
You’ve mastered the basics, and now you’re looking for what’s next. You want to create something for your home that feels less like a small project in a hoop and more like a piece of art—something with presence, texture, and a story to tell.
This is where we shift our thinking from simply stitching to sculpting with fiber. The techniques here bridge that beautiful gap between craft and contemporary decor. They rely on understanding how yarn can create form, how texture can communicate a mood, and how scale can transform a simple knot into a statement.
Many of these stunning pieces are more accessible than they appear. The magic isn’t in some secret, complex skill, but in a new approach to your materials. It’s about seeing yarn not just as thread, but as a line to draw with, a color to paint with, and a medium to build with. Choose an idea that speaks to you and begin there.
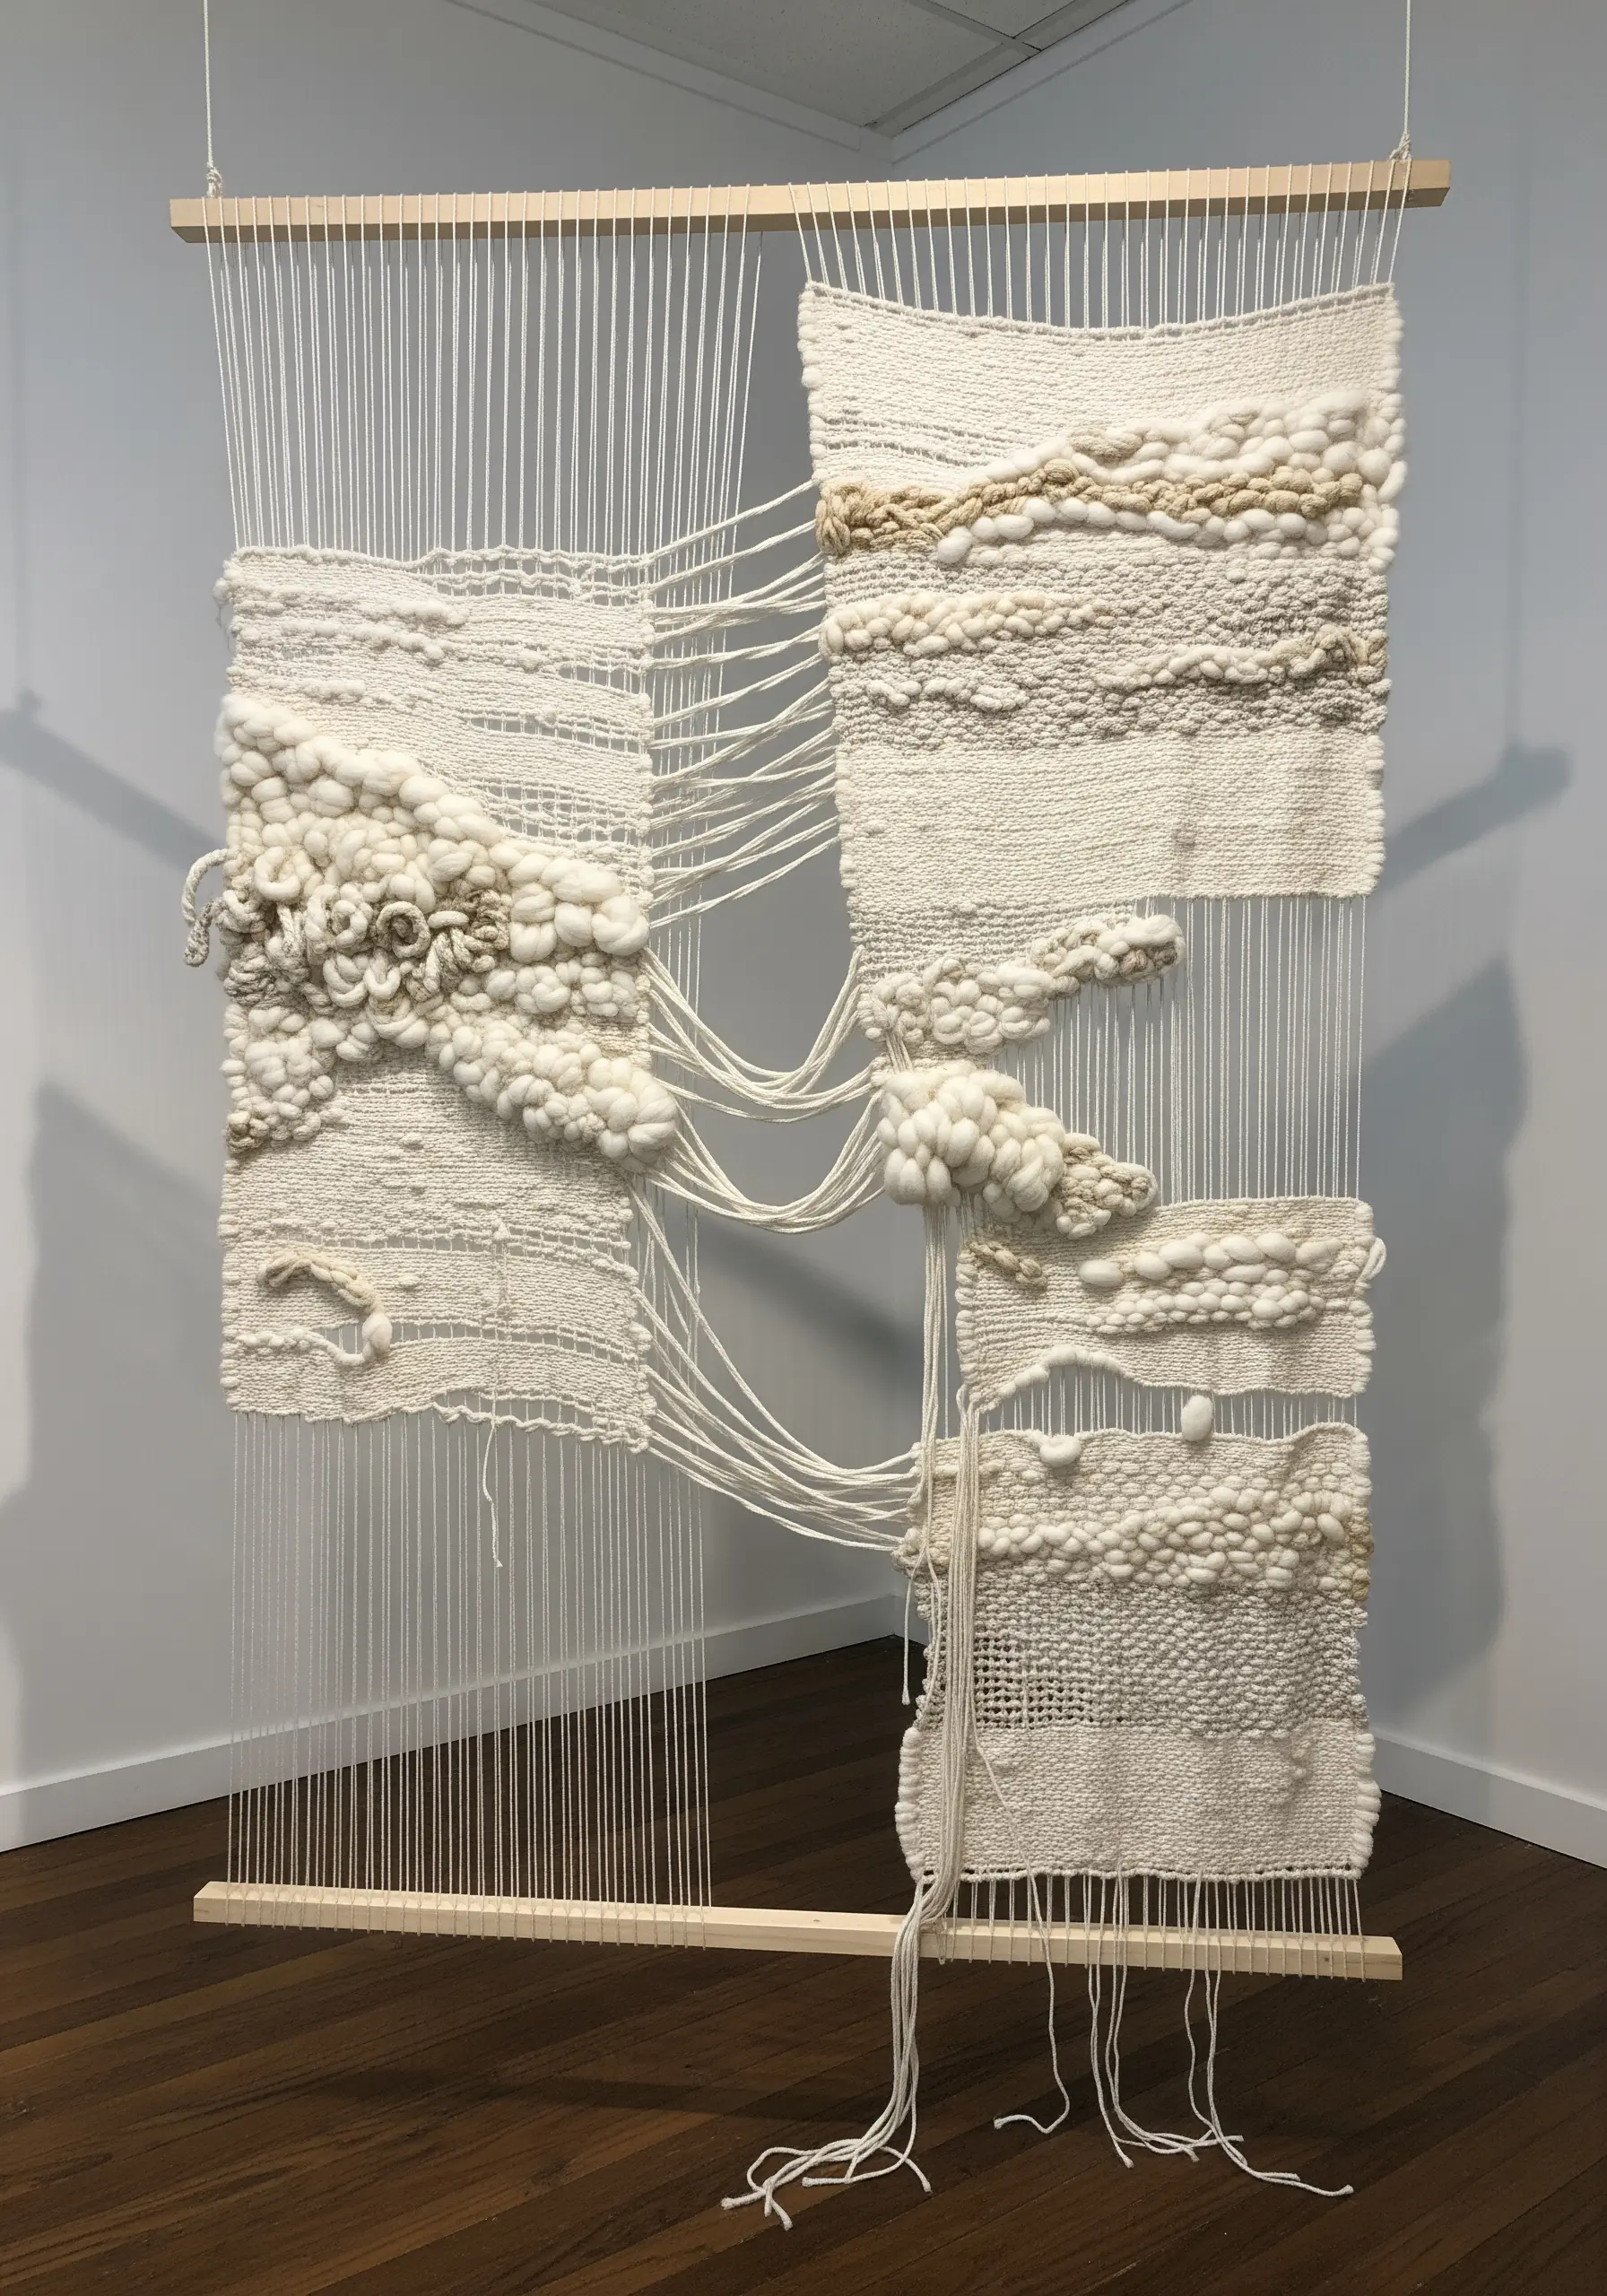
1. Weave Architectural Balance with Mixed Textures
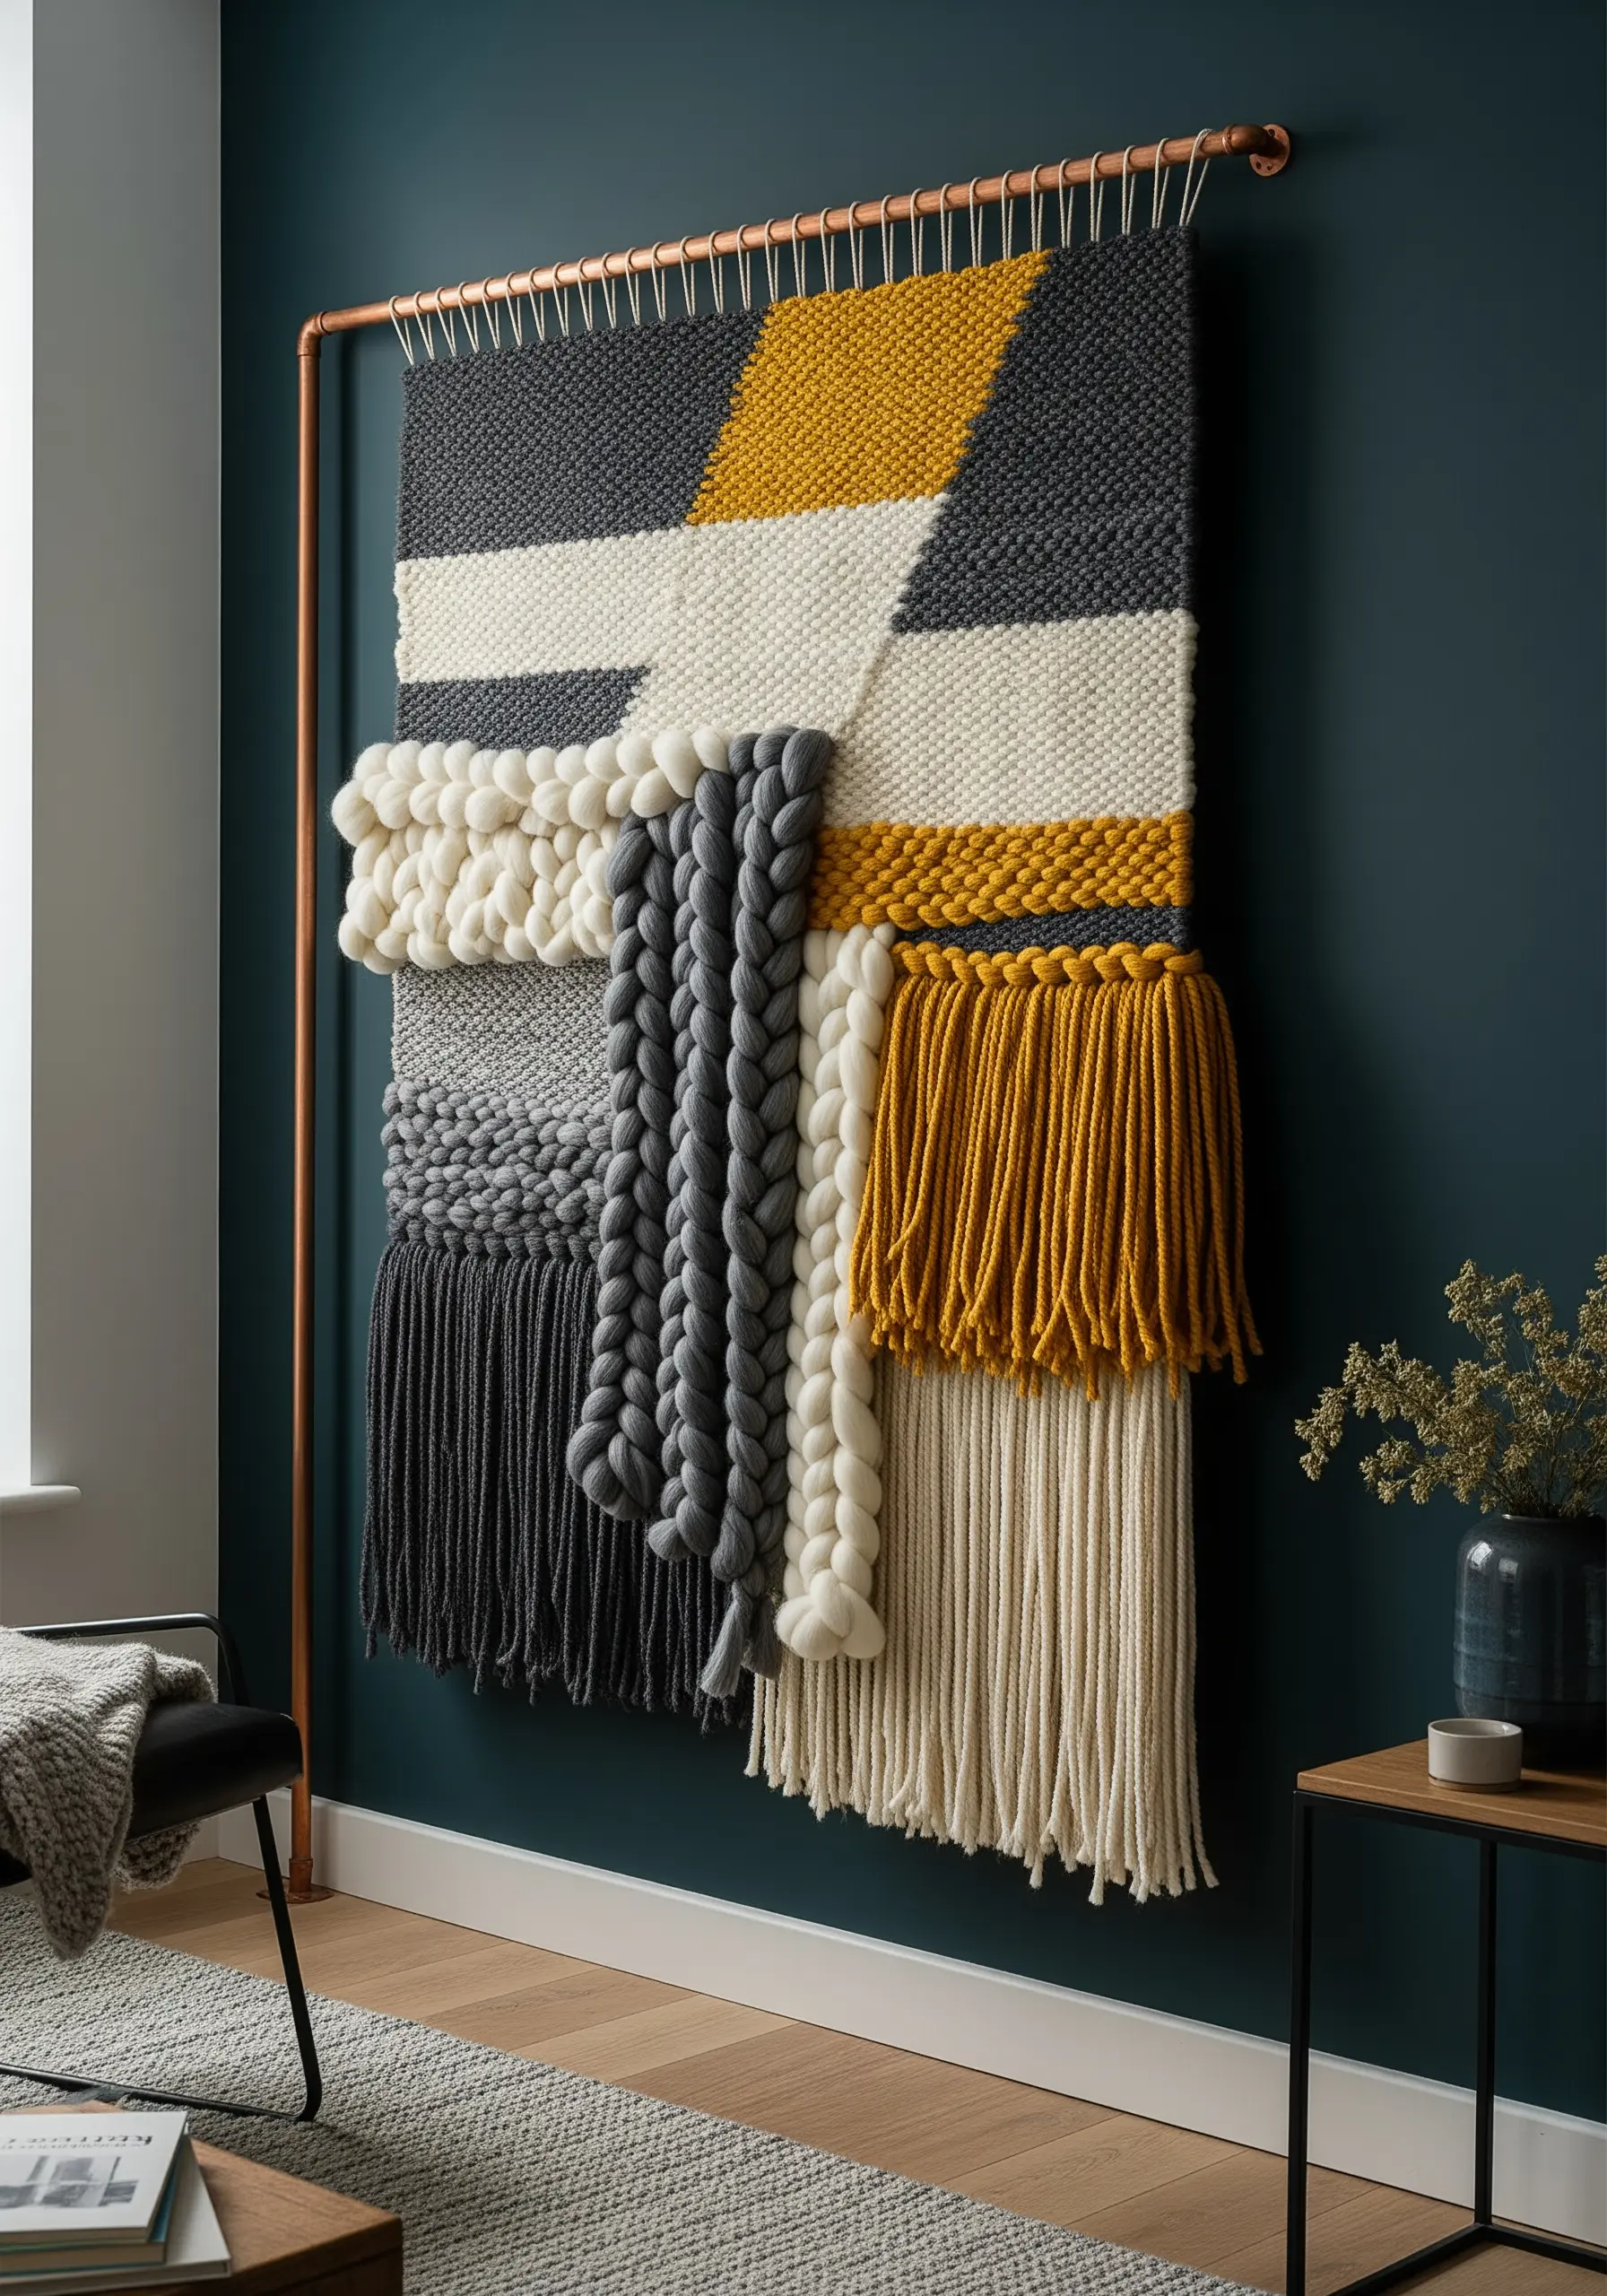
Create a focal point by combining multiple weaving techniques into one cohesive, geometric piece.
Use plain weave for flat color blocks, then introduce chunky braids, soumak stitches for raised lines, and Rya knots for thick fringe.
This method allows you to build a visual hierarchy, guiding the eye through different tactile zones.
For a contemporary finish, hang your weaving from an industrial-style copper or brass pipe instead of traditional driftwood; it elevates the piece from a craft project to one of the most stunning modern yarn wall art designs.
2. Create Rhythm with a Macrame Triptych

Instead of one massive macrame project, break the design into a series of three narrower, identical panels.
This triptych approach creates a calming sense of rhythm and order, perfect for minimalist or Scandinavian-inspired interiors.
The key to a professional finish is maintaining consistent tension in your knots across all three panels, so they hang uniformly.
Display them with slight spacing on a simple black dowel to emphasize their clean, graphic quality, creating minimalist thread art ideas with maximum impact.
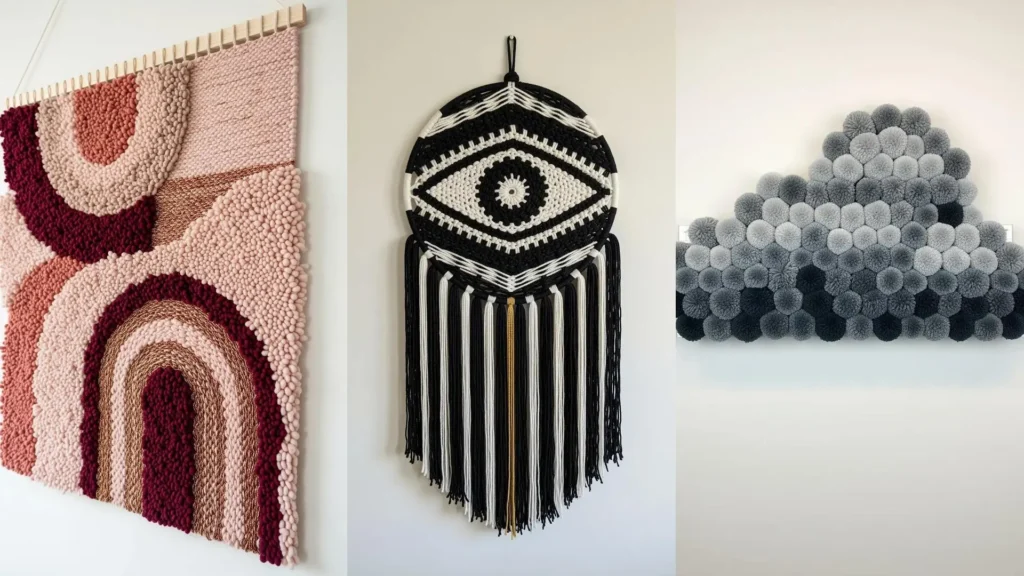
3. Paint a Landscape with Punch Needle Gradients
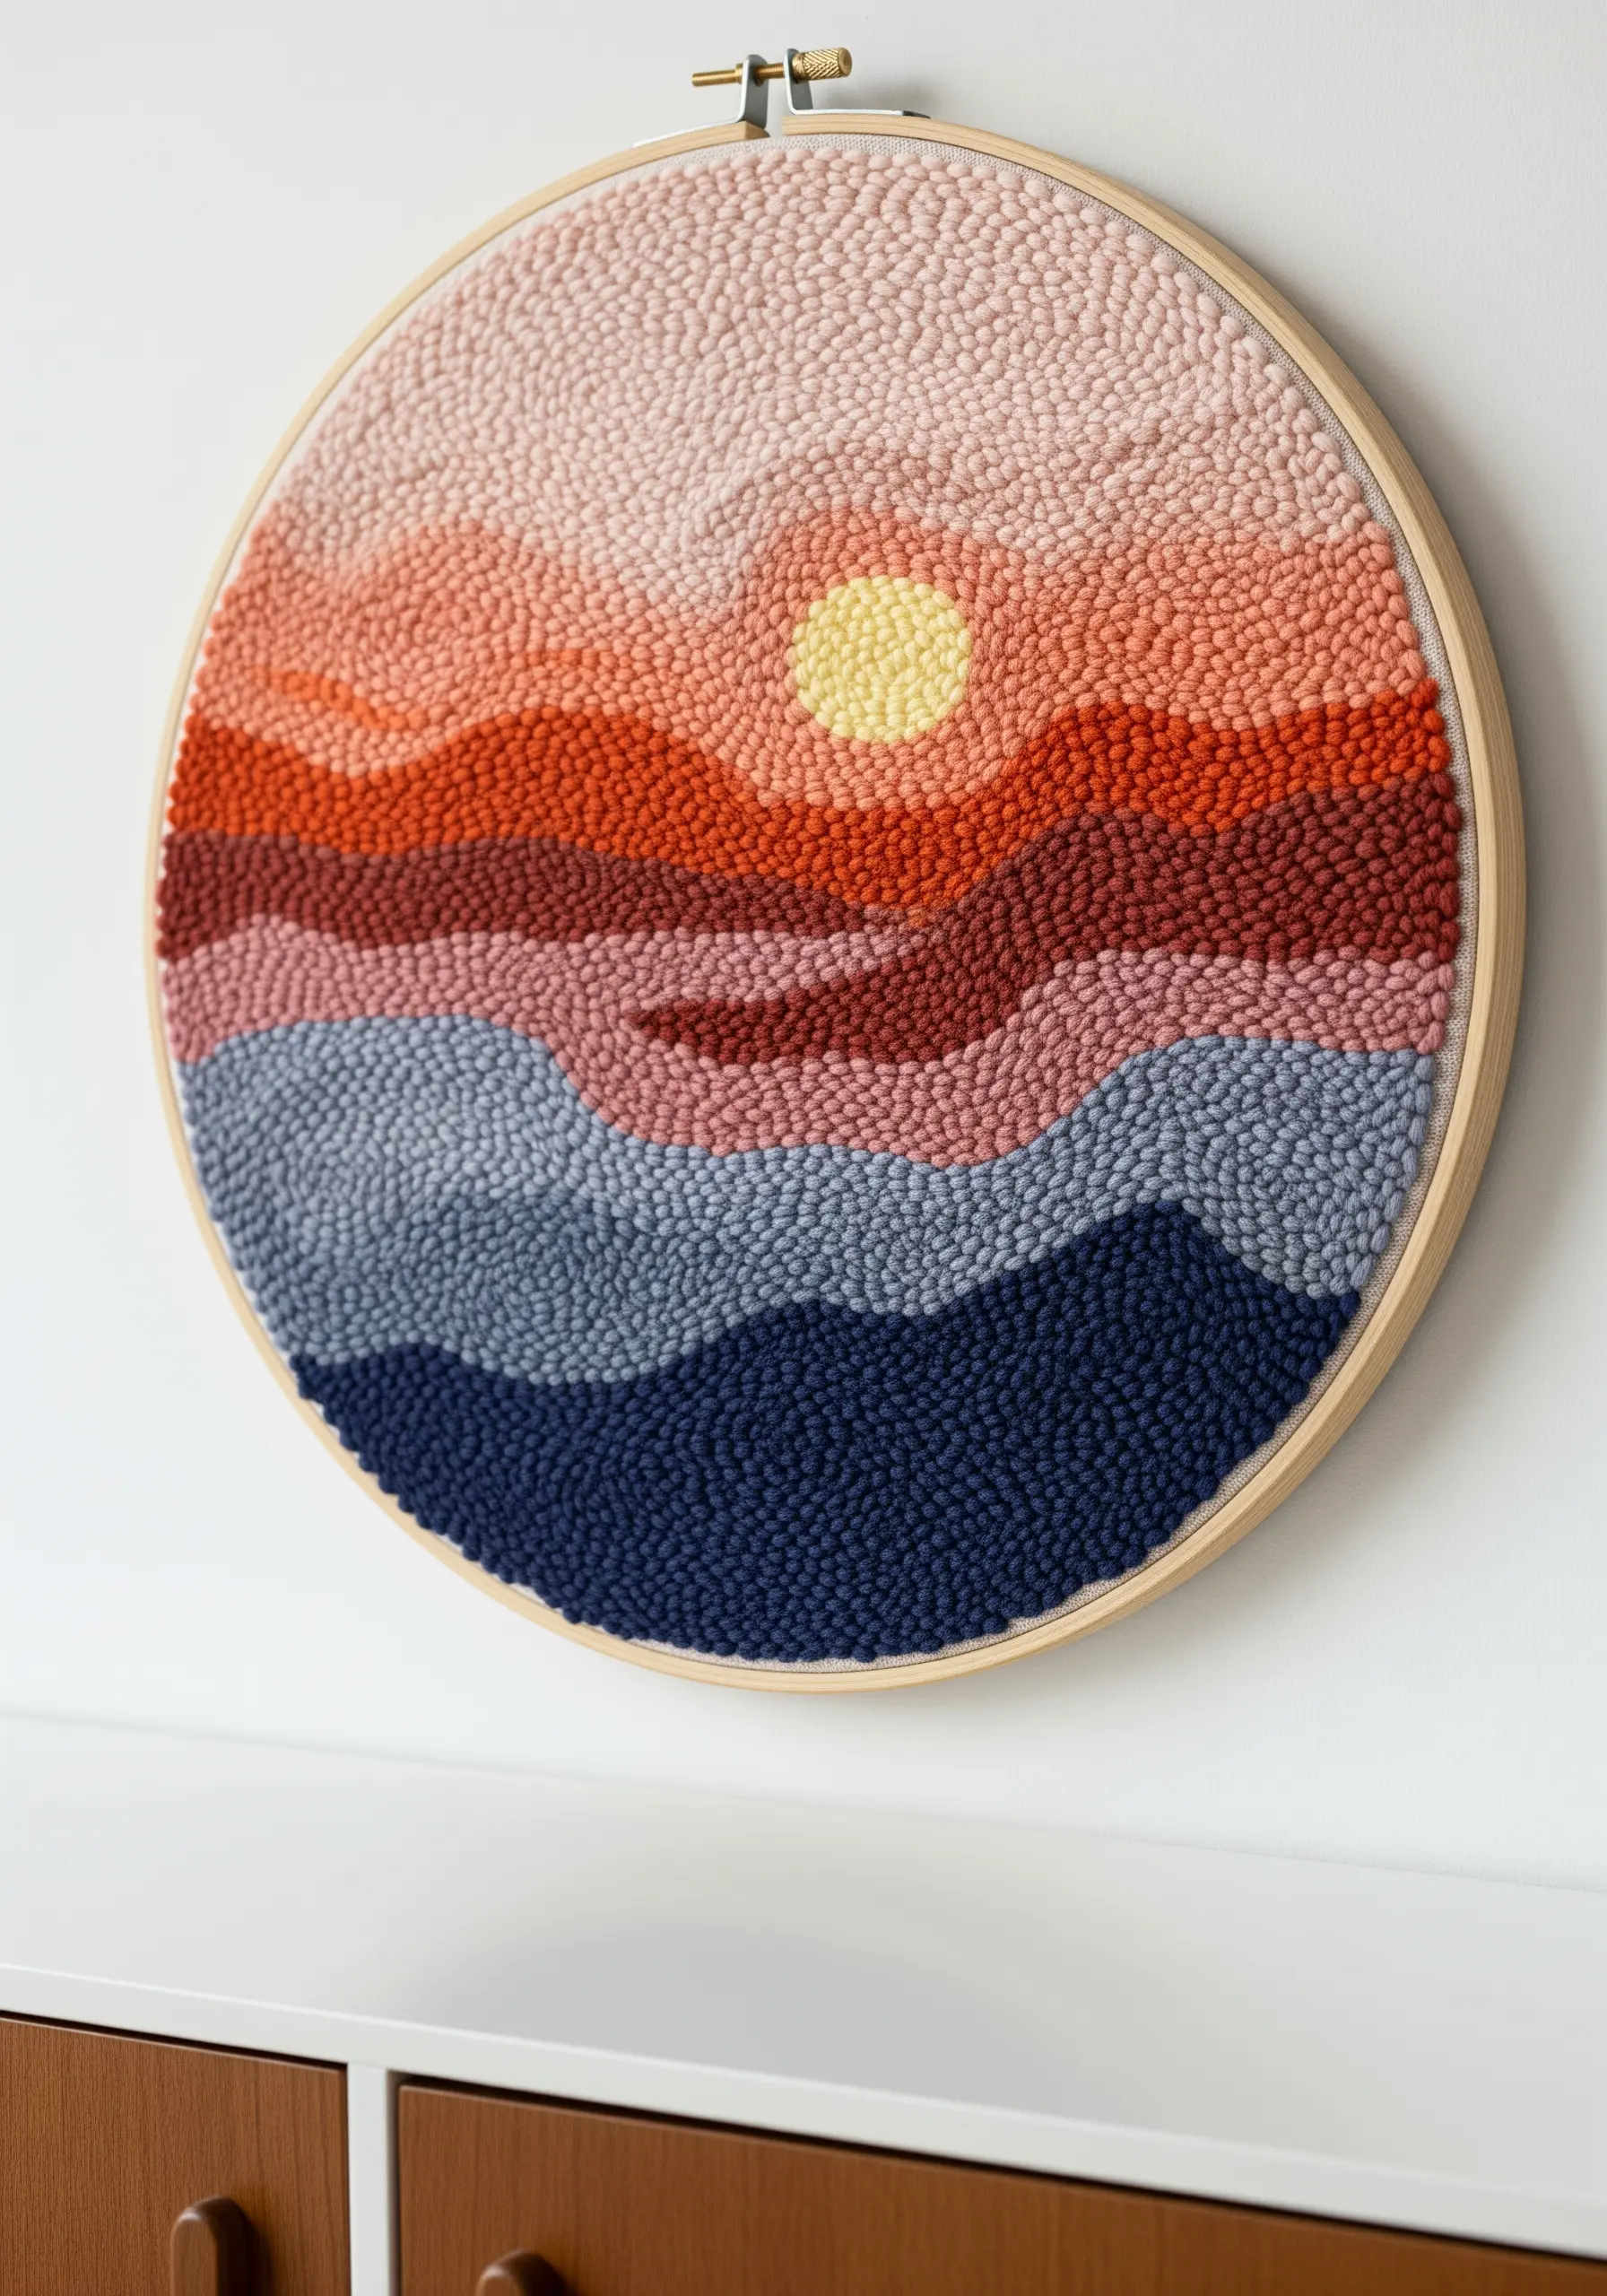
Use a punch needle and a curated palette of yarns to essentially paint with fiber.
To create the soft, rolling hills of a landscape, select three to five shades within the same color family (e.g., pale pink to deep rust).
Work in wavy, organic lines, changing colors to create a smooth gradient that mimics the light of a sunset.
This technique turns simple loops into a rich, textured tapestry, resulting in an art piece that looks almost painted.
4. Achieve Bold Graphics with Sculptural Tufting
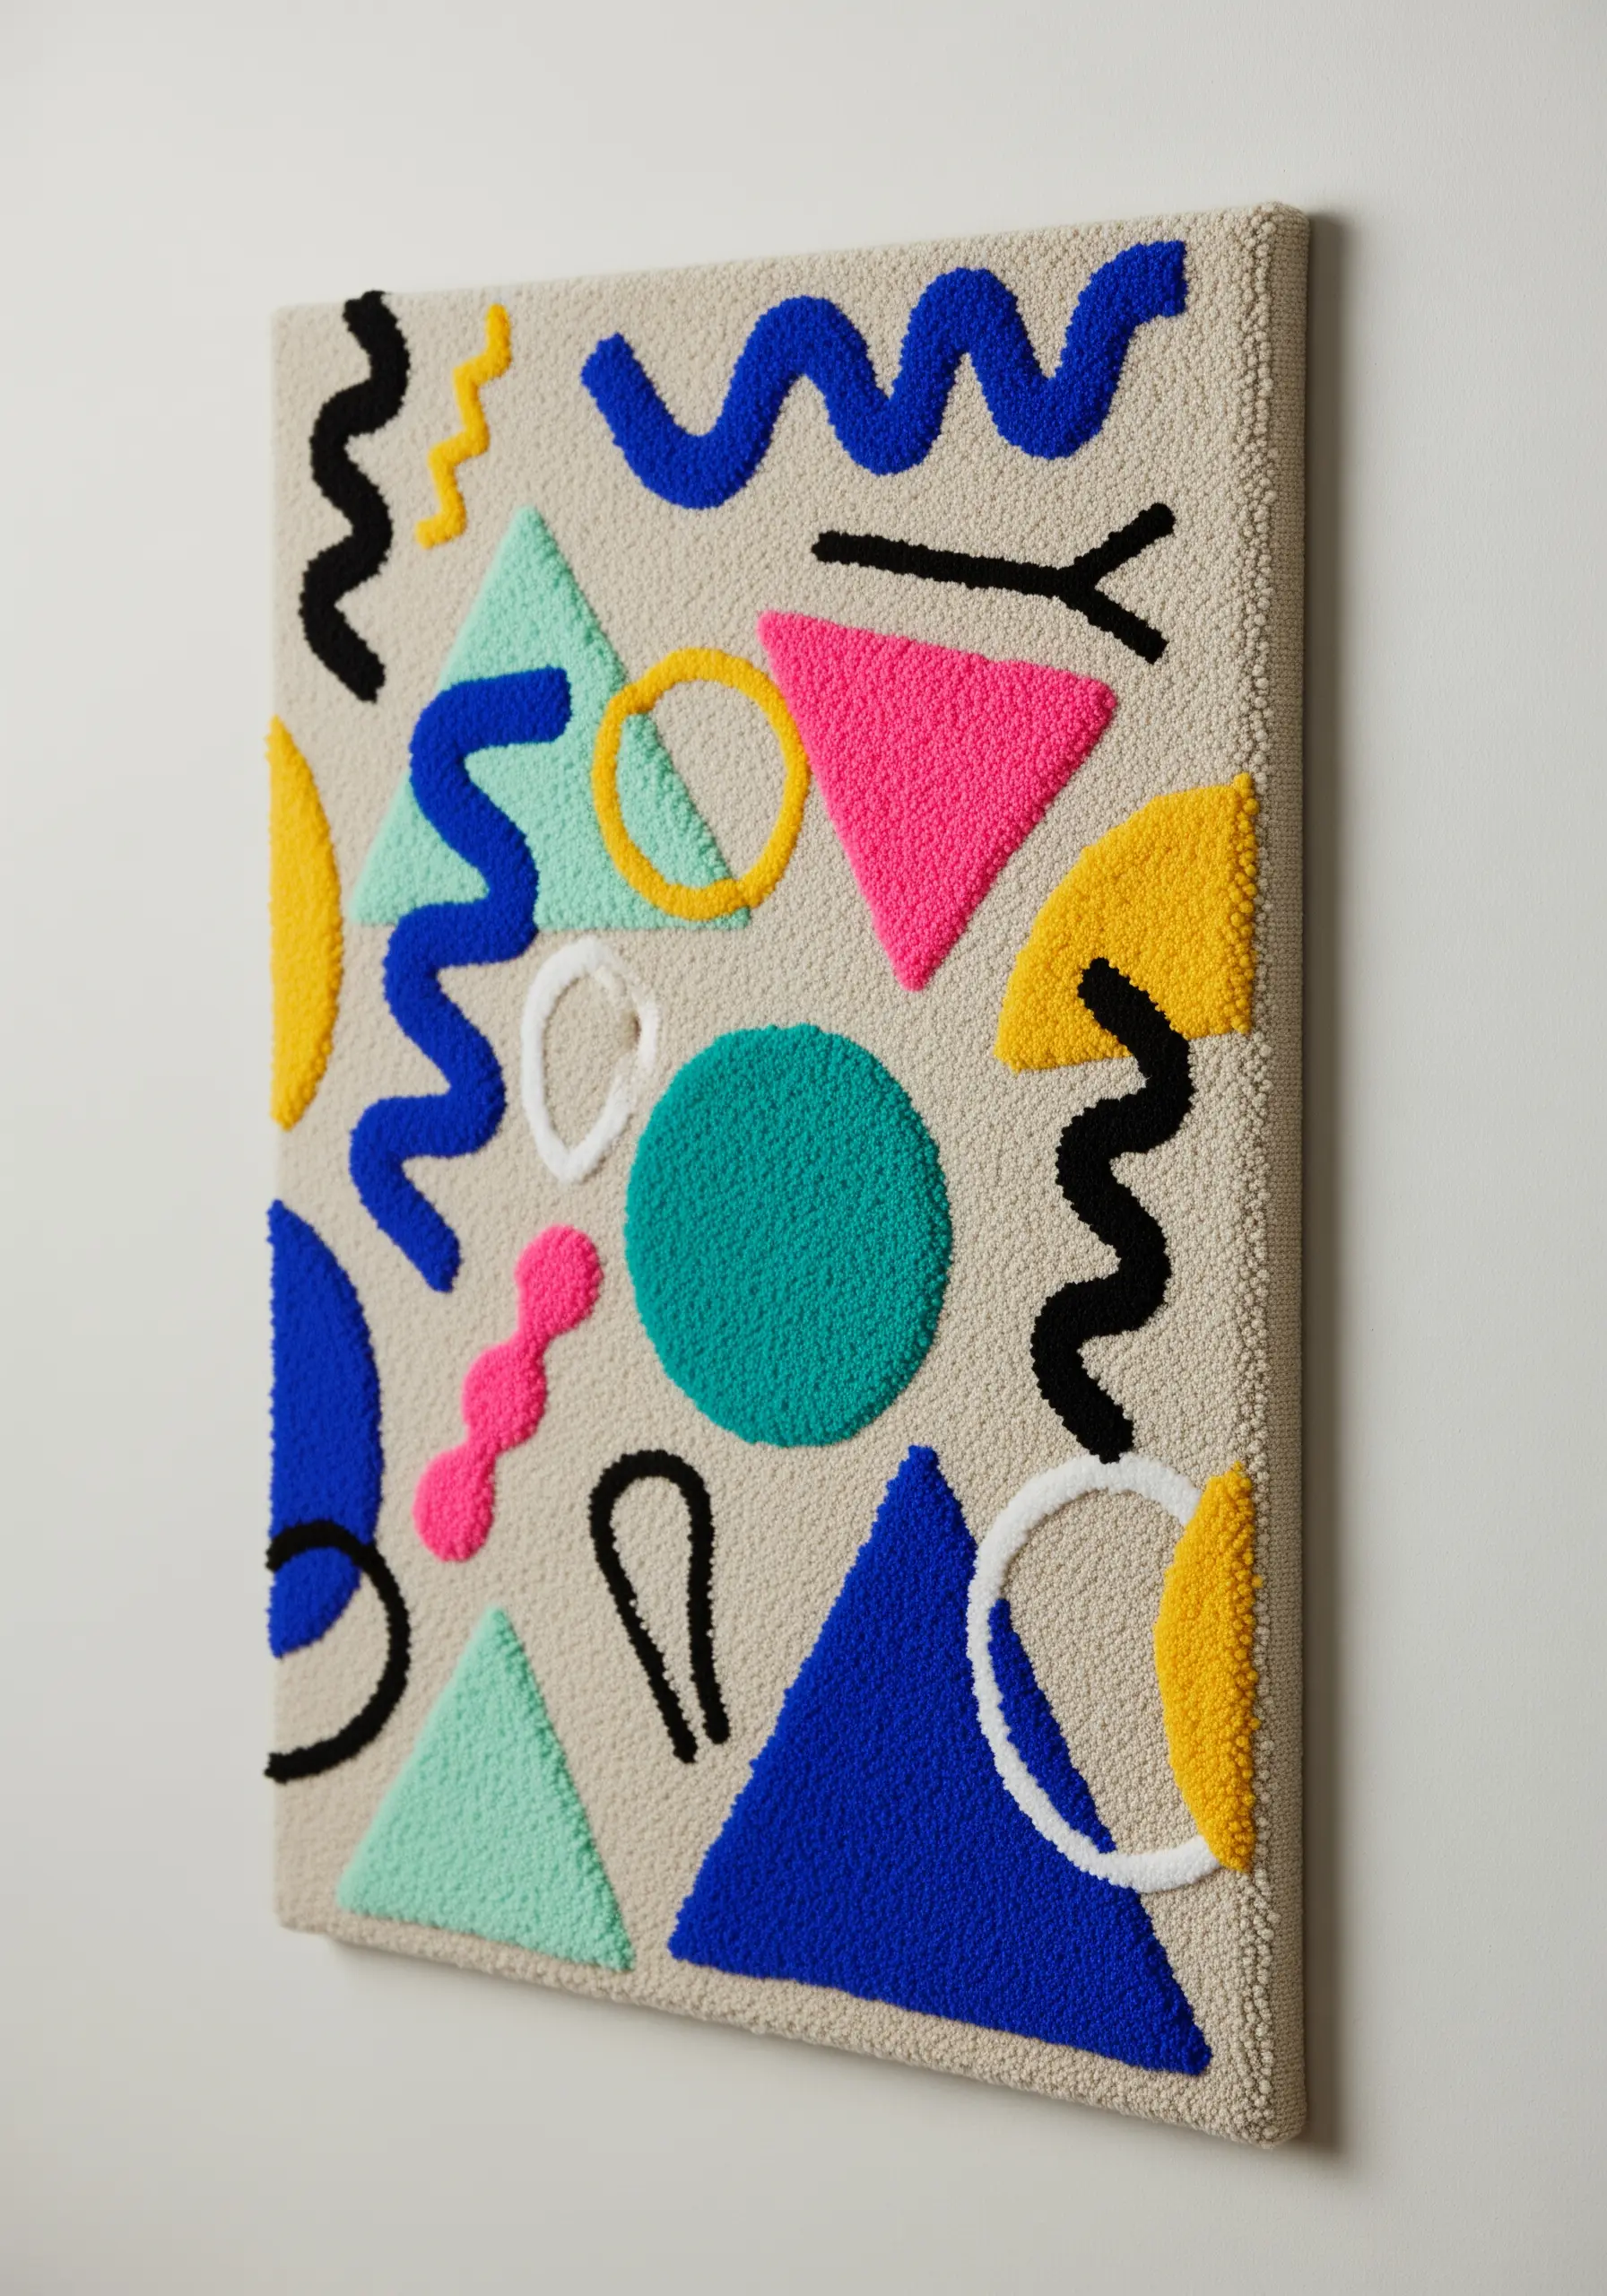
For vibrant, retro-inspired art, use a tufting gun to create high-pile, graphic shapes that pop against a flat background.
To achieve those crisp, clean edges, outline each shape with your tufting gun first, then fill in the centers.
This technique allows you to play with abstract forms and bold color combinations with a satisfyingly plush texture.
The contrast between the raised, cut-pile shapes and the neutral looped background is what gives the piece its dynamic, three-dimensional energy, perfect for maximalist aesthetics.
5. Go Beyond the Knot with Mixed-Media Macra-Weaving
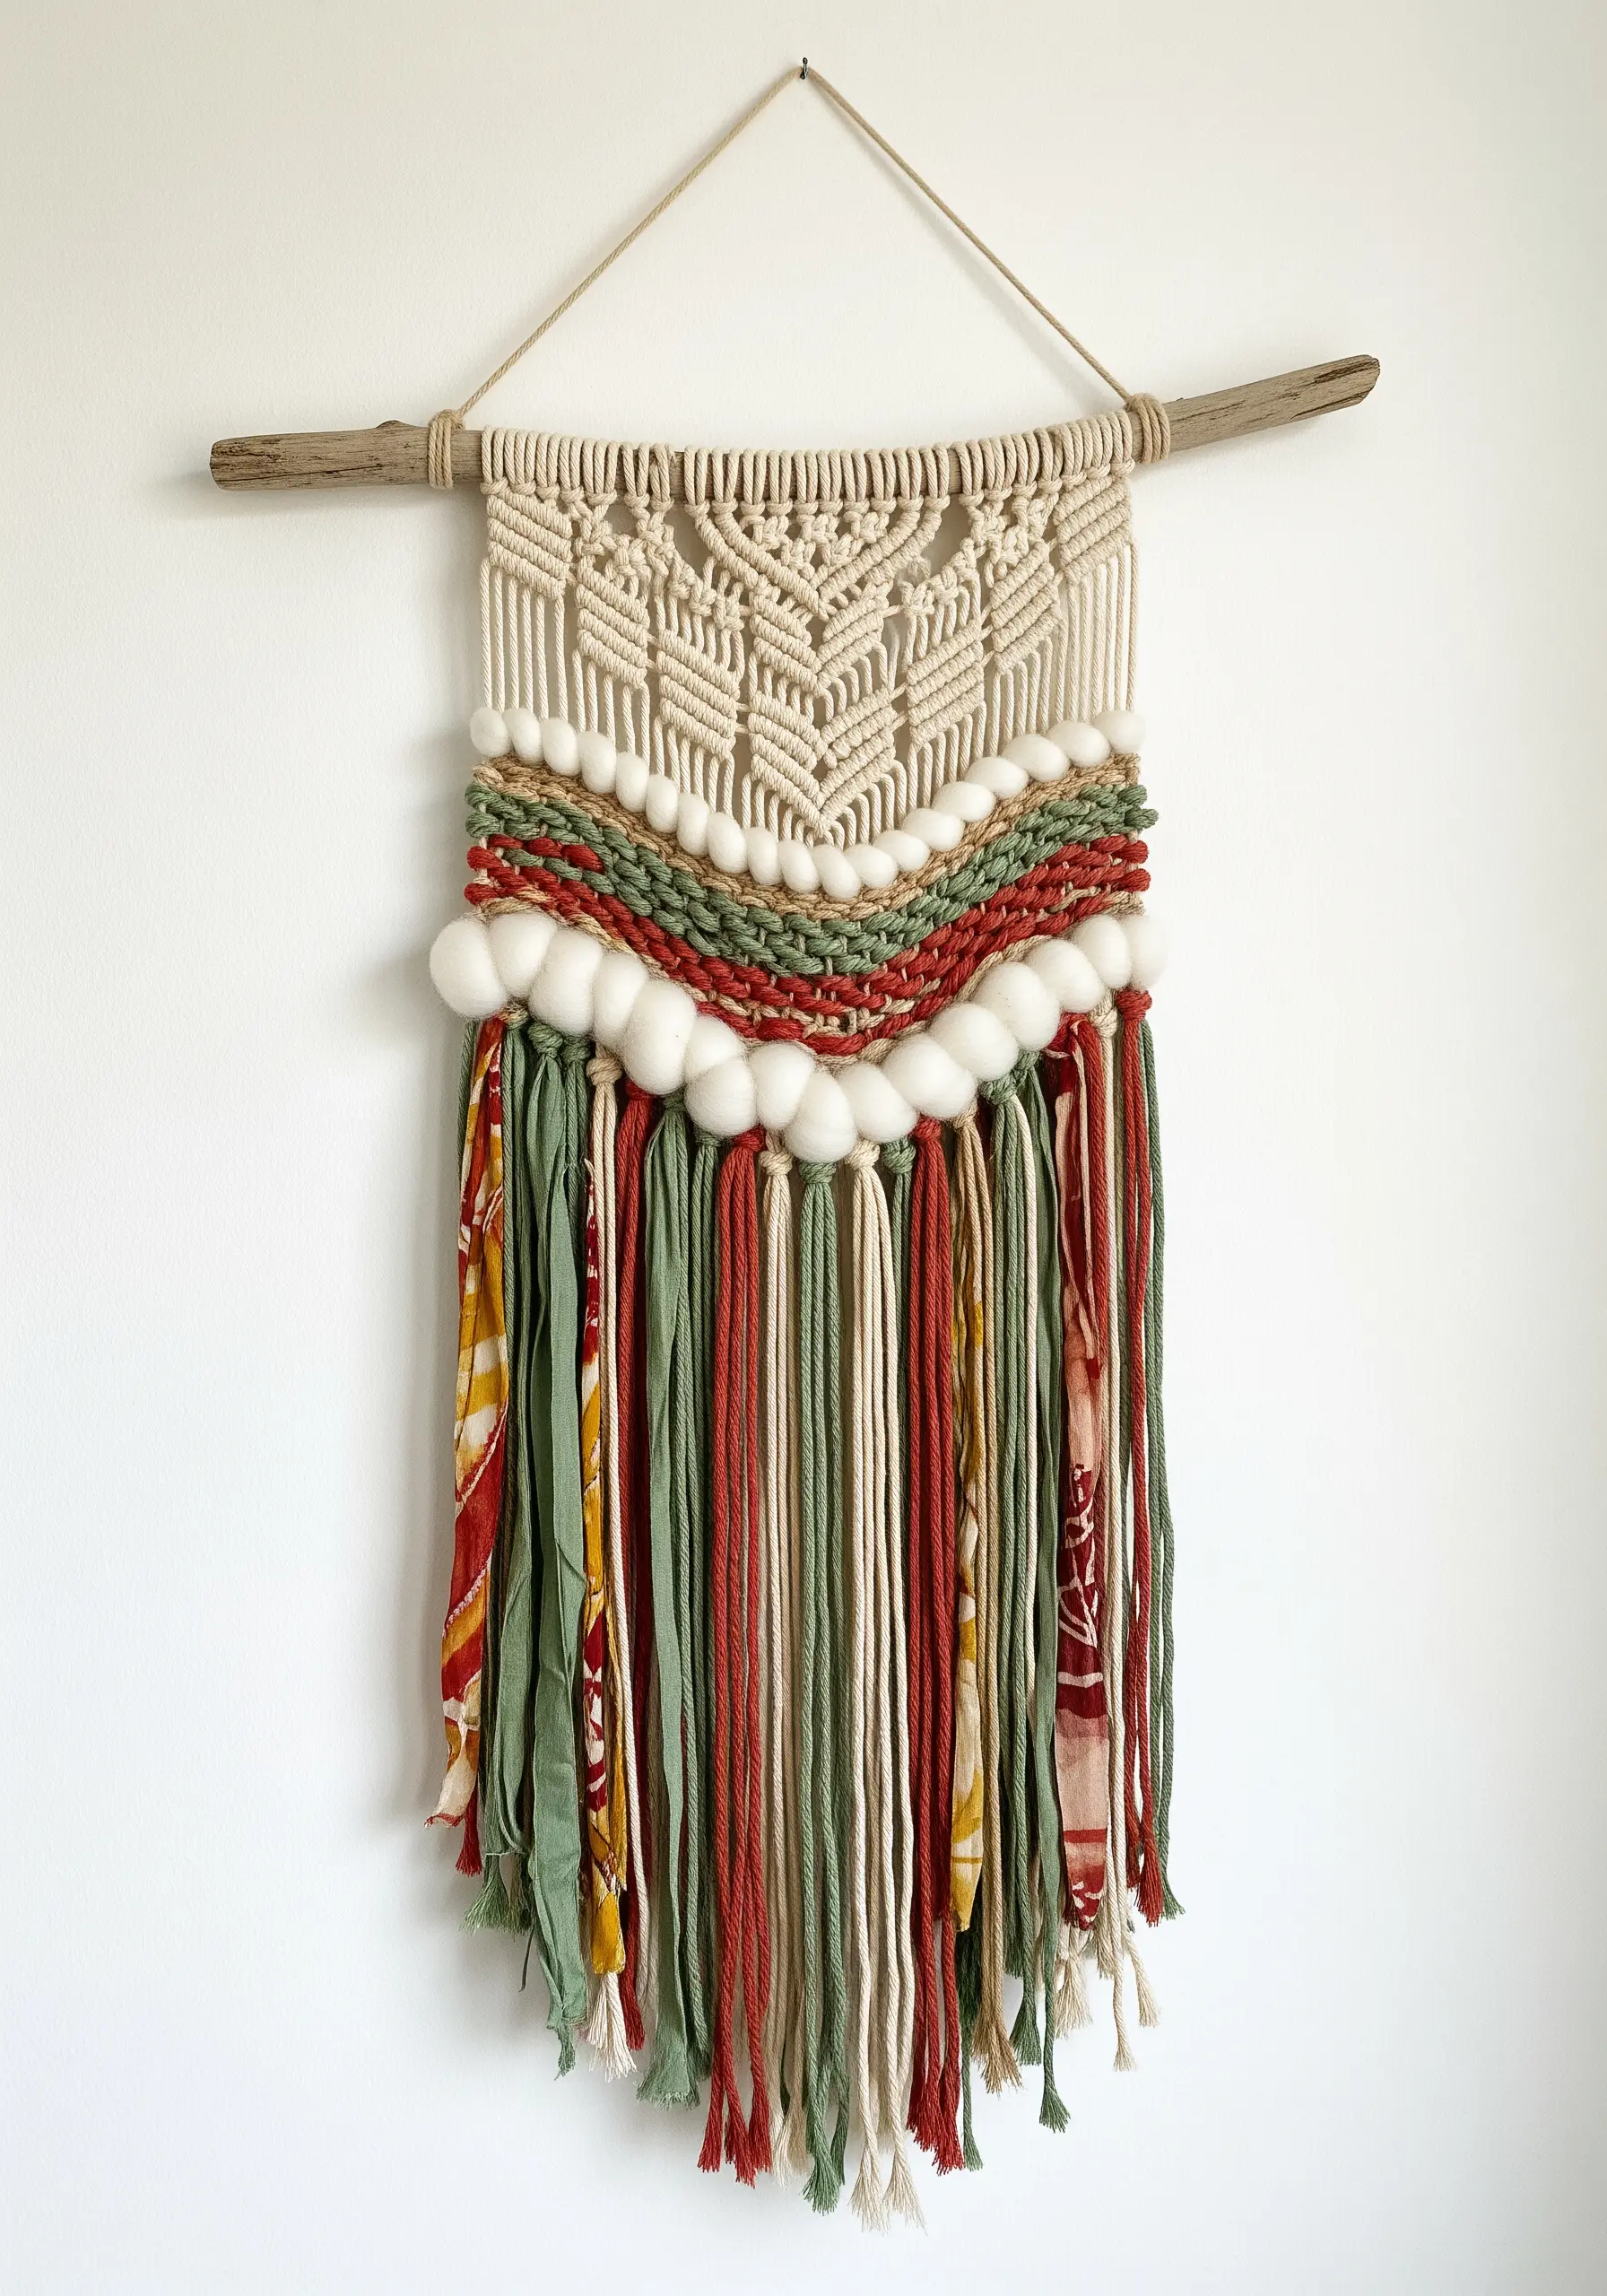
Elevate a standard macrame wall hanging by incorporating unexpected materials into your design.
Intersperse your knotting with sections of woven elements, like strips of recycled silk, chunky wool roving, or contrasting yarn weights.
This hybrid “macra-weave” technique adds depth, color, and a wonderfully free-spirited, bohemian texture that standard macrame cord alone cannot achieve.
It’s one of the best mixed fiber art techniques that push creative boundaries.
6. Construct a Mobile with Yarn-Wrapped Forms
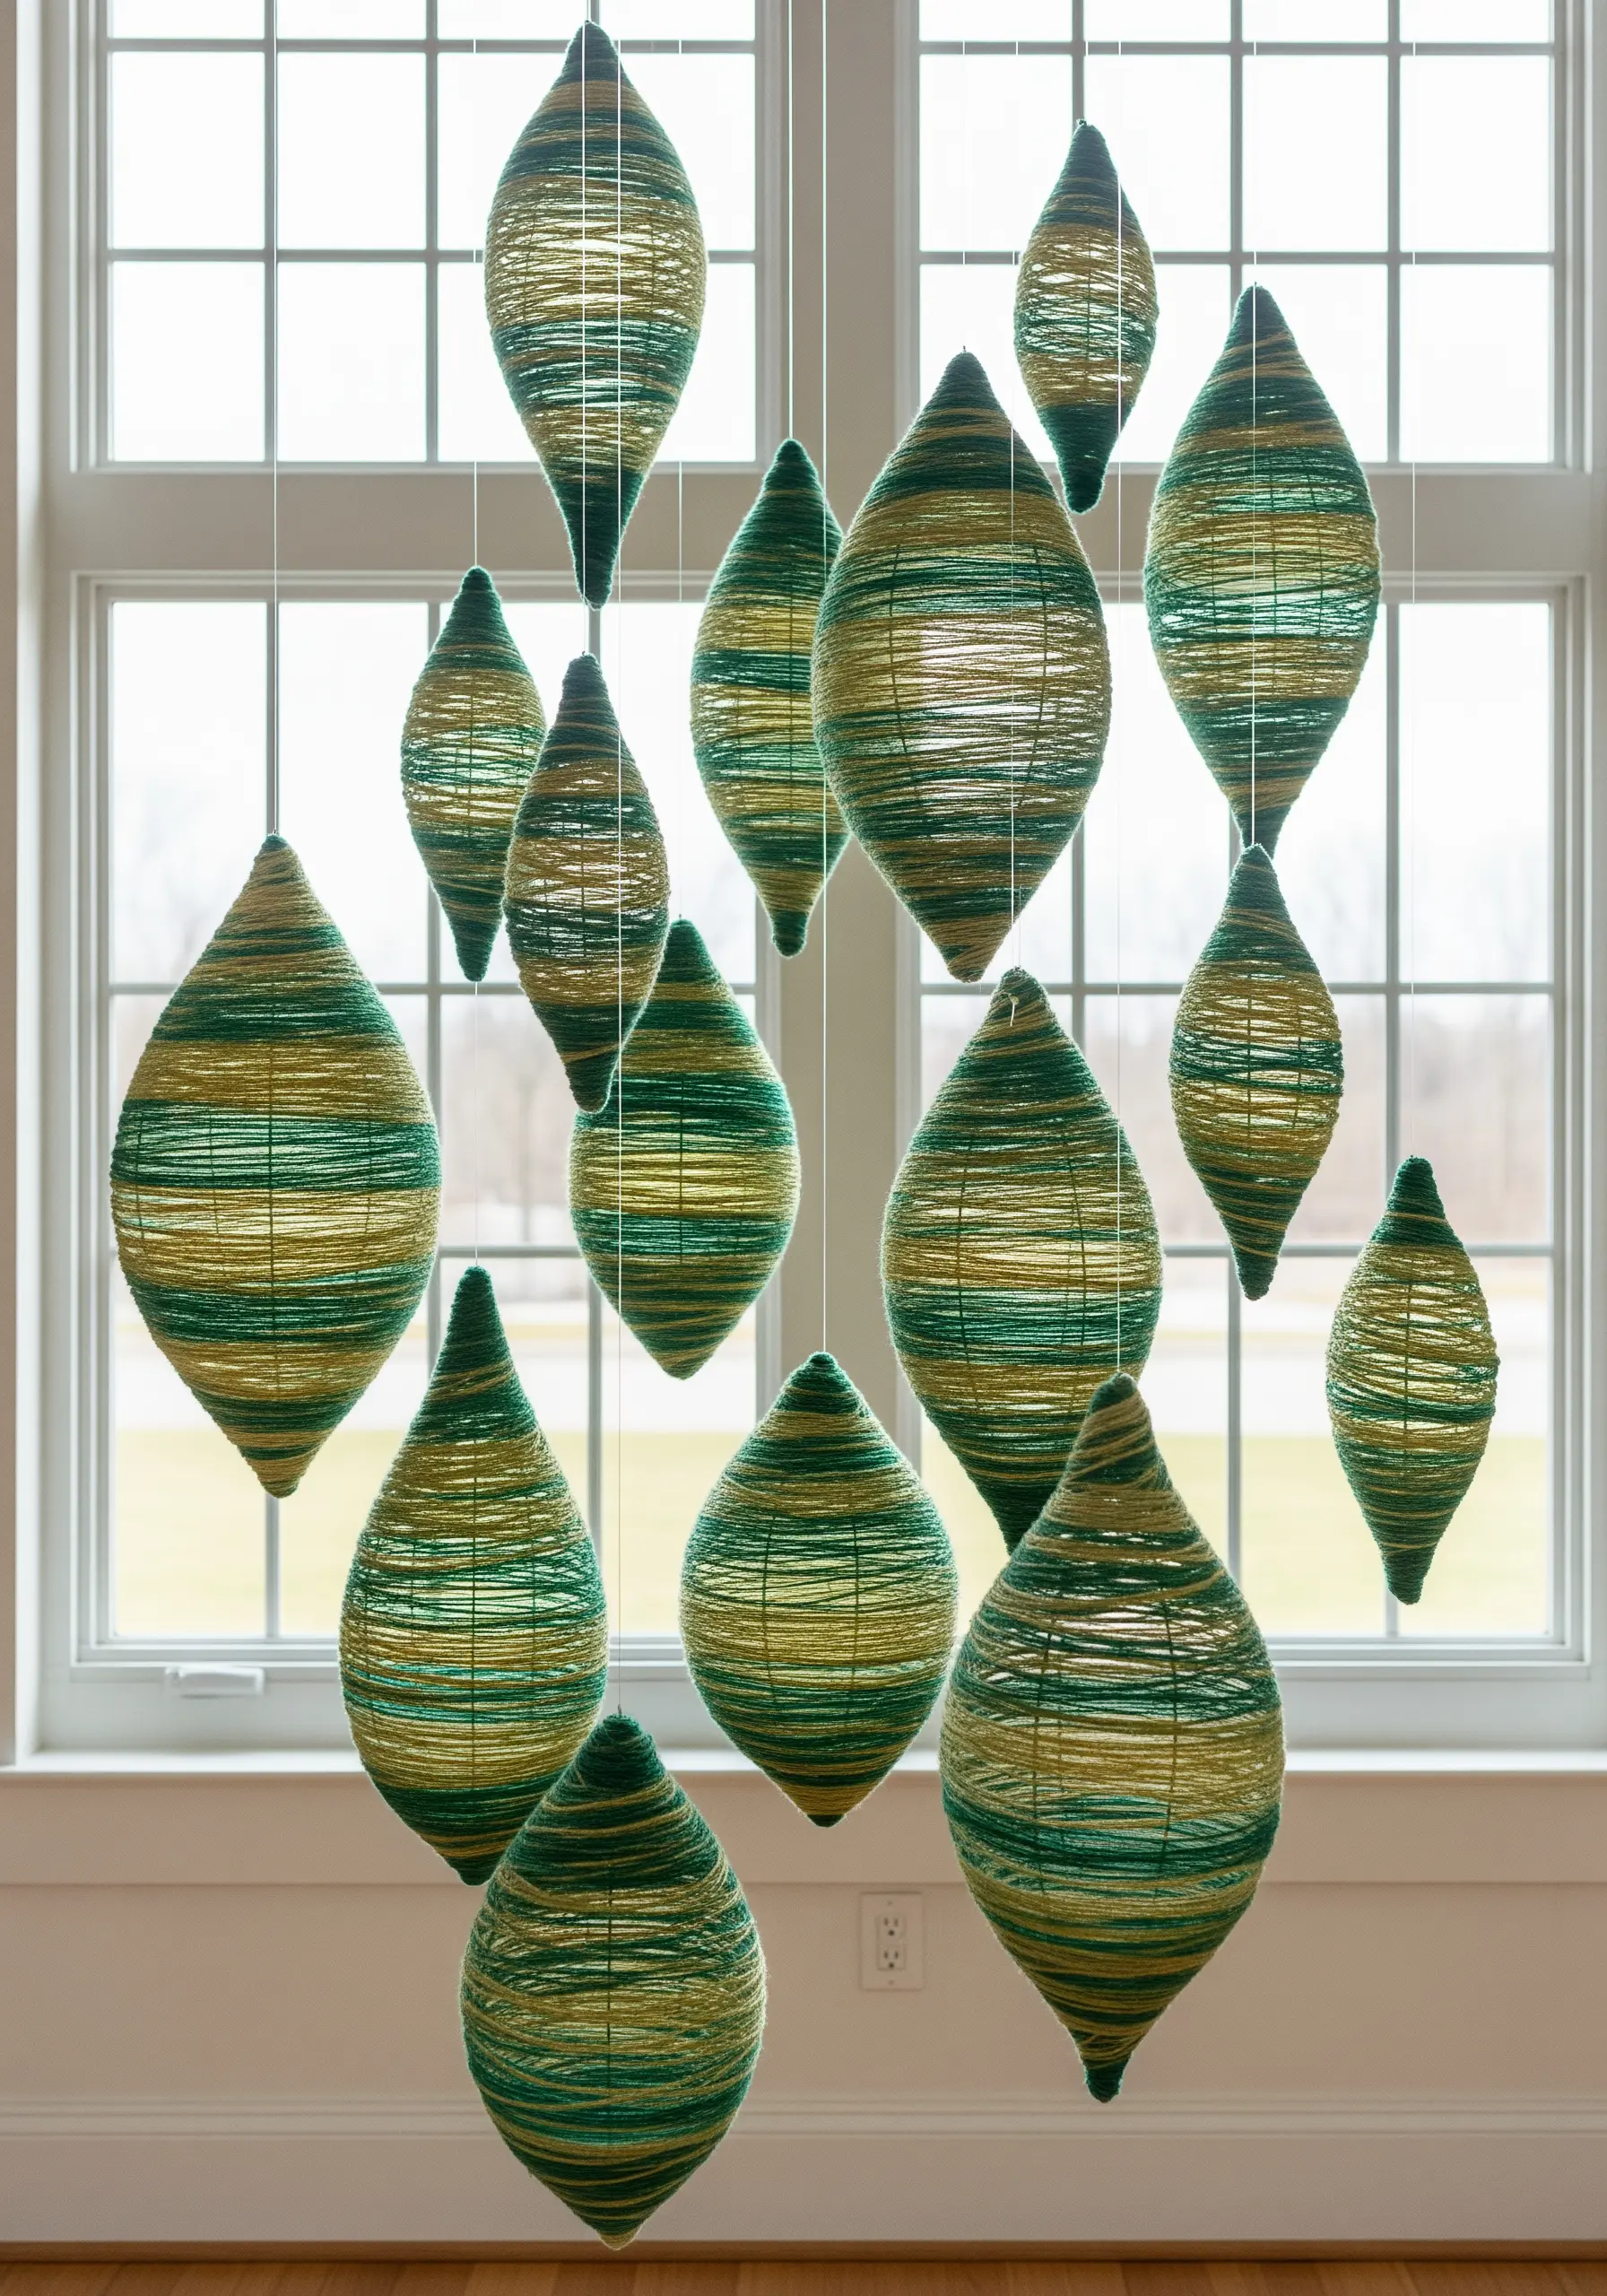
Transform simple structures into sophisticated sculptures through the meticulous process of yarn wrapping.
Create lightweight forms using wire or inflated balloons covered in papier-mâché.
Once dry, wrap the forms tightly with yarn, alternating colors to create clean, graphic stripes.
Suspend multiple forms at varying heights to create a kinetic mobile, turning simple fibers into a dynamic fiber art installation.
7. Make a Statement with Minimalist Cord Sculpture
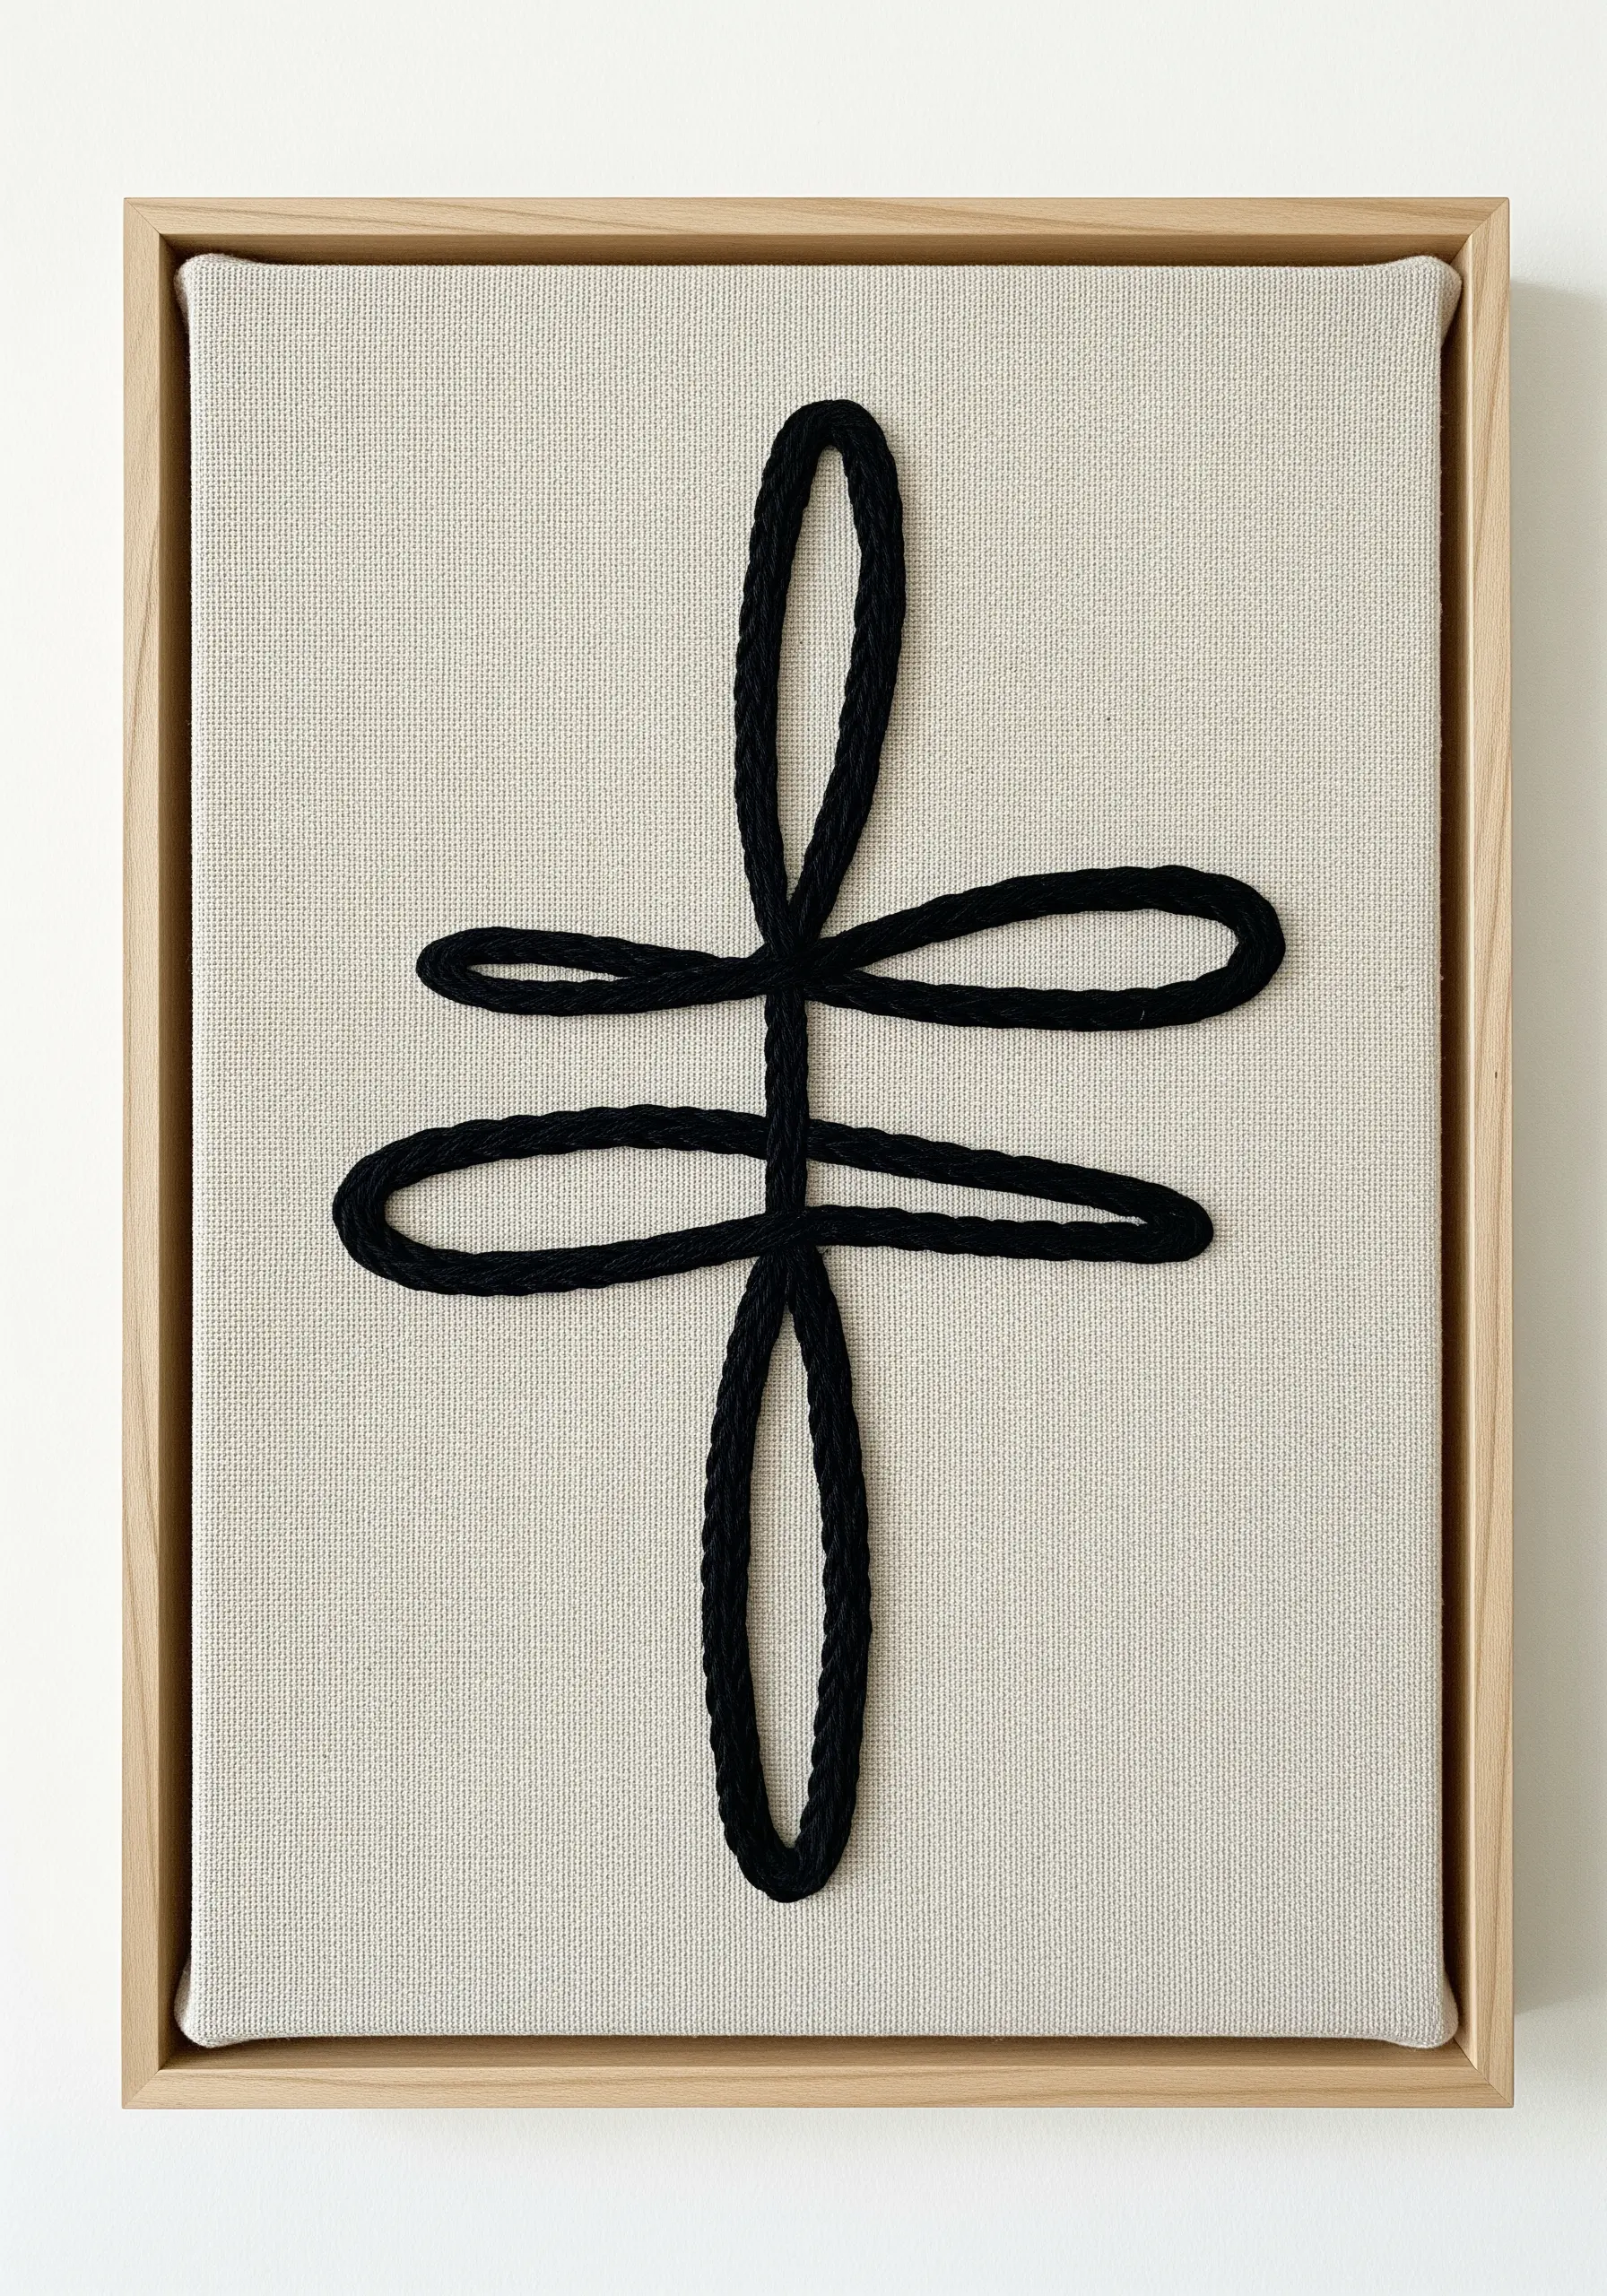
Explore the power of a single line by using thick, sculptural cord on a clean canvas.
Choose a braided or twisted rope and arrange it in a continuous, abstract loop on a stretched linen canvas.
Secure the cord from behind or with discreet couching stitches in a matching thread to maintain the illusion of a single, fluid gesture.
This technique creates sophisticated, mesmerizing wall art that balances the softness of fiber with the clarity of a line drawing.
8. Assemble Micro-Creations into a Grand Chandelier

Create a large-scale, intricate piece by thinking in modular components.
Instead of tackling one giant project, craft multiple small crochet mandalas or macrame medallions.
Arrange and attach these mini-creations to a multi-tiered metal frame, like an old lampshade or custom-made rings.
This approach makes a complex design feel achievable and results in a stunning, heirloom-quality chandelier, perfect for DIY inspiration at home.
9. Create Visual Interest with Texture Blocking
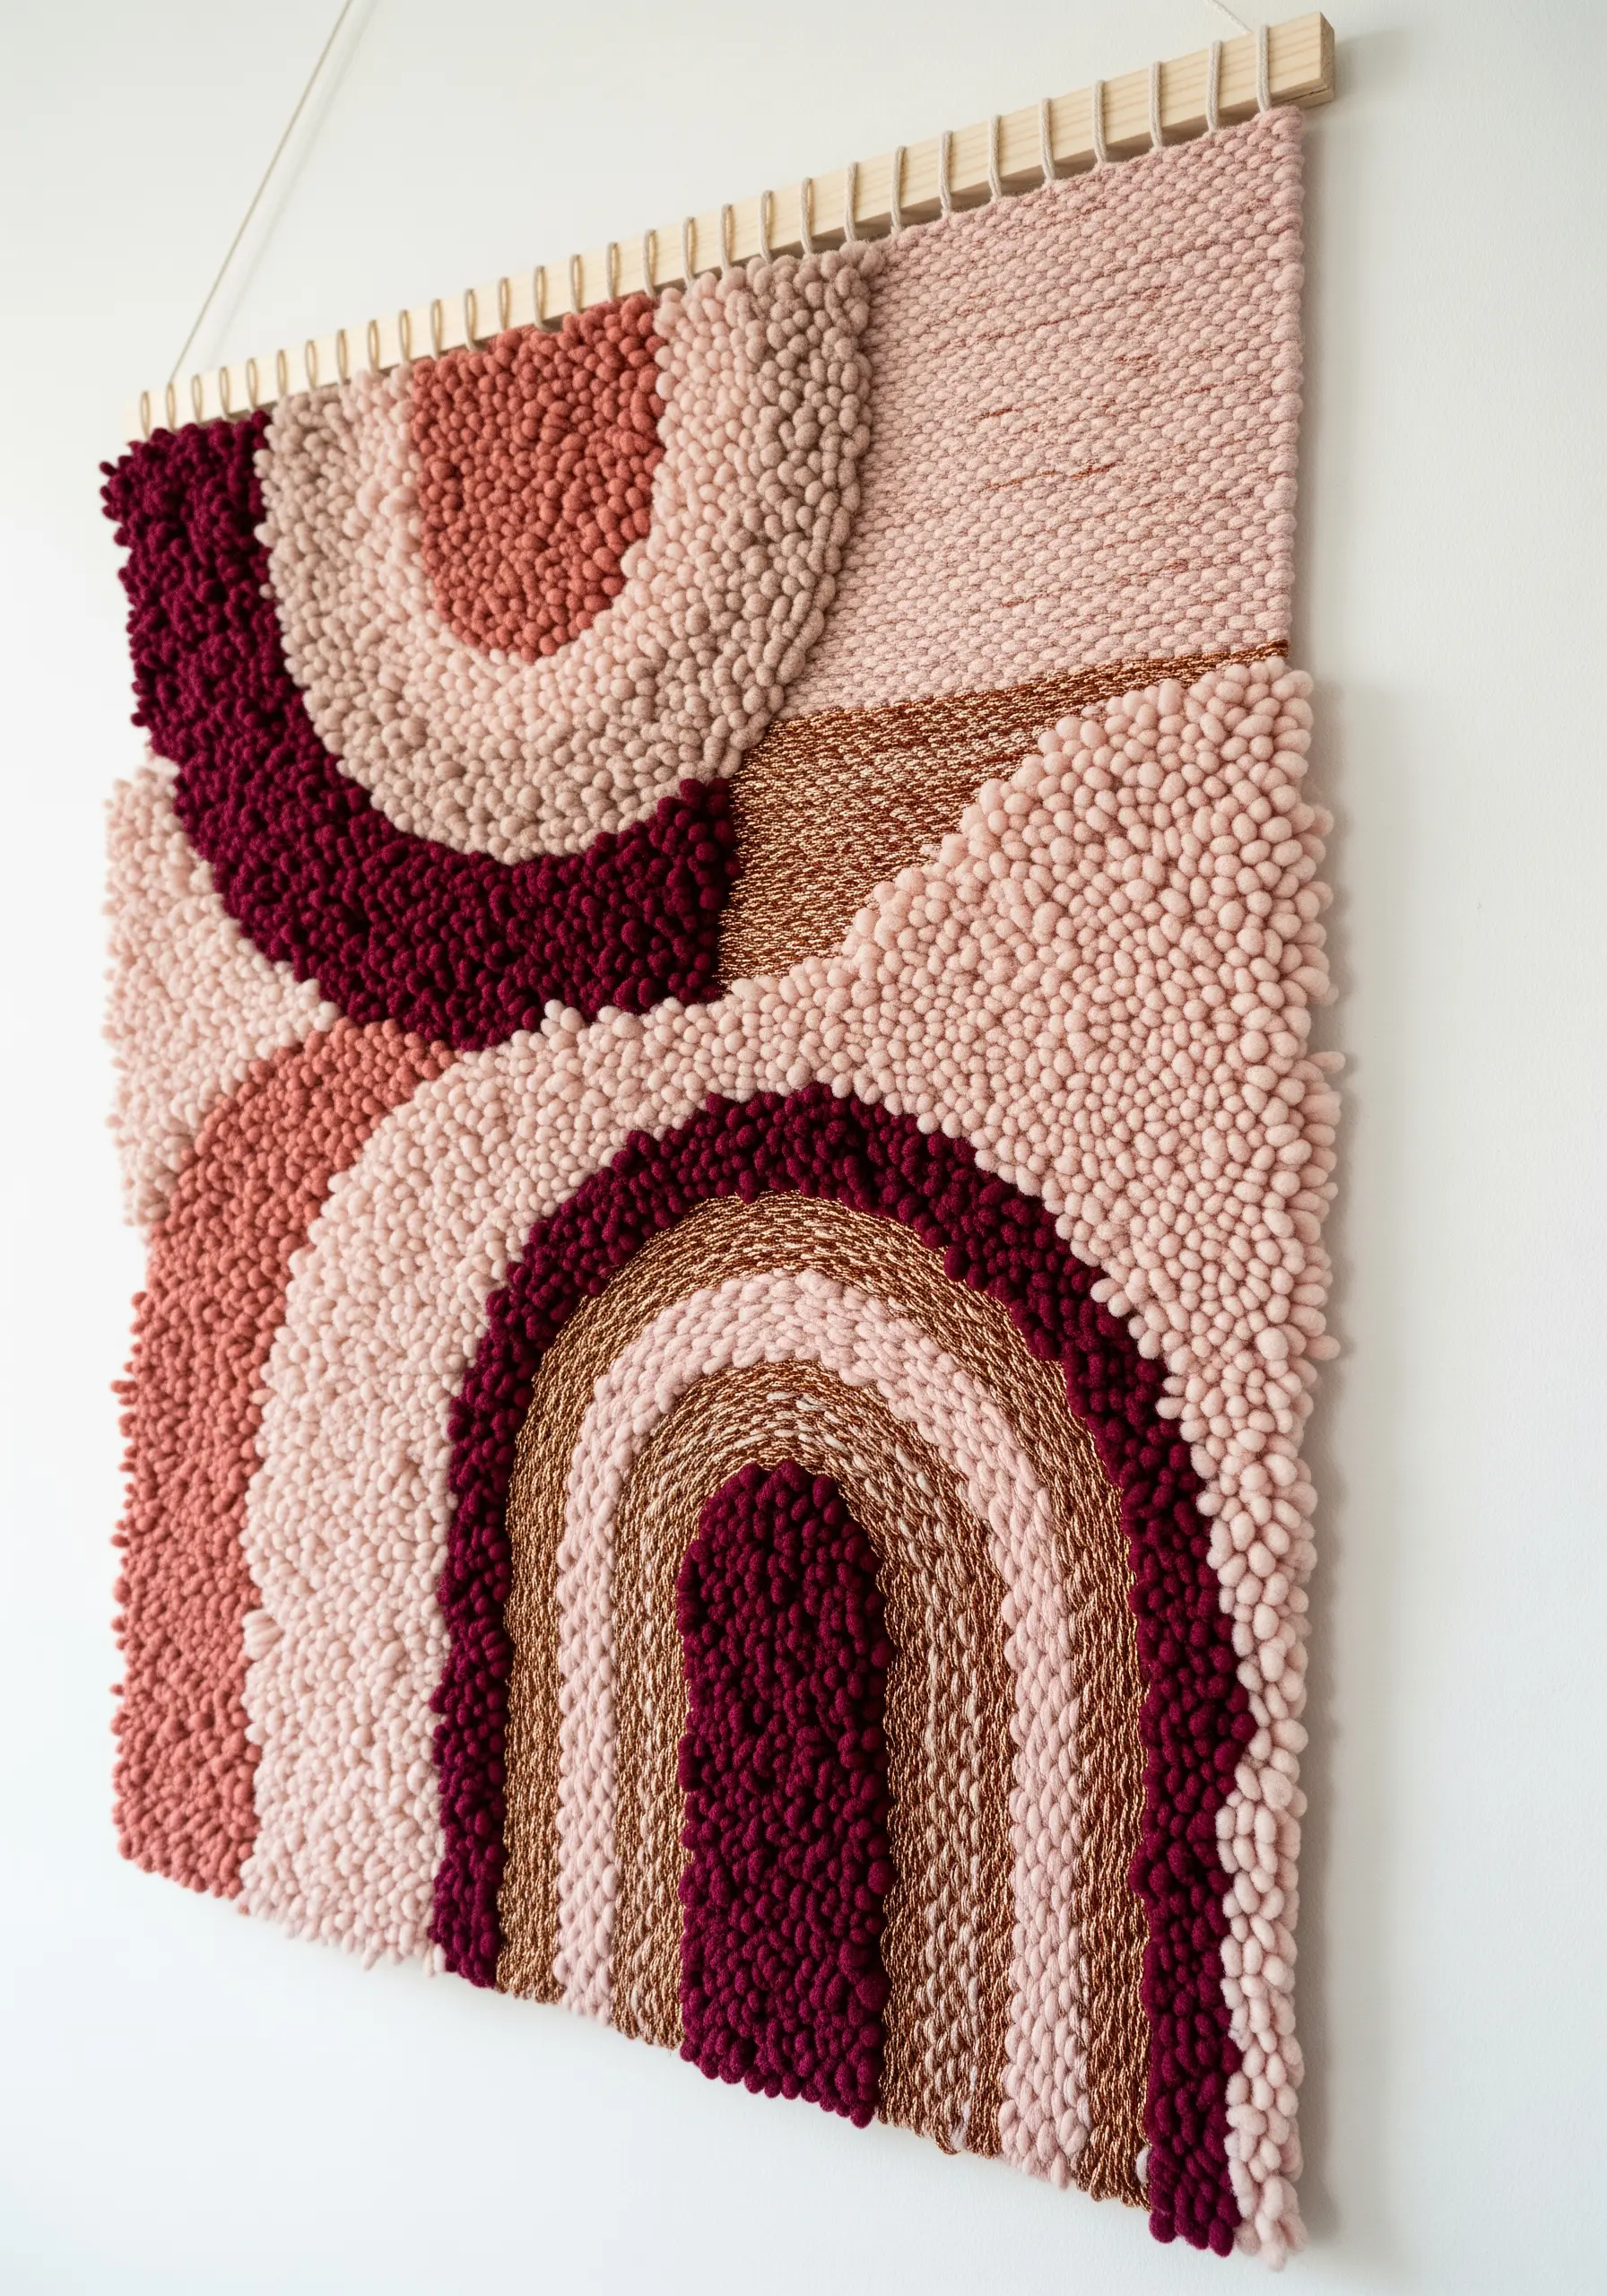
Move beyond simple color blocking by assigning a unique texture to each colored section of your design.
In one area, use short, dense punch needle loops. In another, use a flatter woven stitch or introduce a metallic thread for a surprising bit of shine.
This technique adds a sophisticated, tactile dimension, encouraging viewers to look closer.
These raised, sculptural embroidery effects make the entire piece more dynamic and engaging.
10. Craft Graphic Symbols with High-Contrast Macrame

Use macrame knots as pixels to build a bold, graphic image.
This technique requires careful planning and the use of two highly contrasting colors, like black and white, to define a clear shape, such as an eye or another powerful symbol.
Work your knots meticulously, switching colors precisely to create the outlines and fills.
Adding a single, unexpected accent color, like a strand of gold, draws the eye and provides a modern, artistic finish to these symbolic pieces.
11. Render Painterly Scenes with Needle Felting
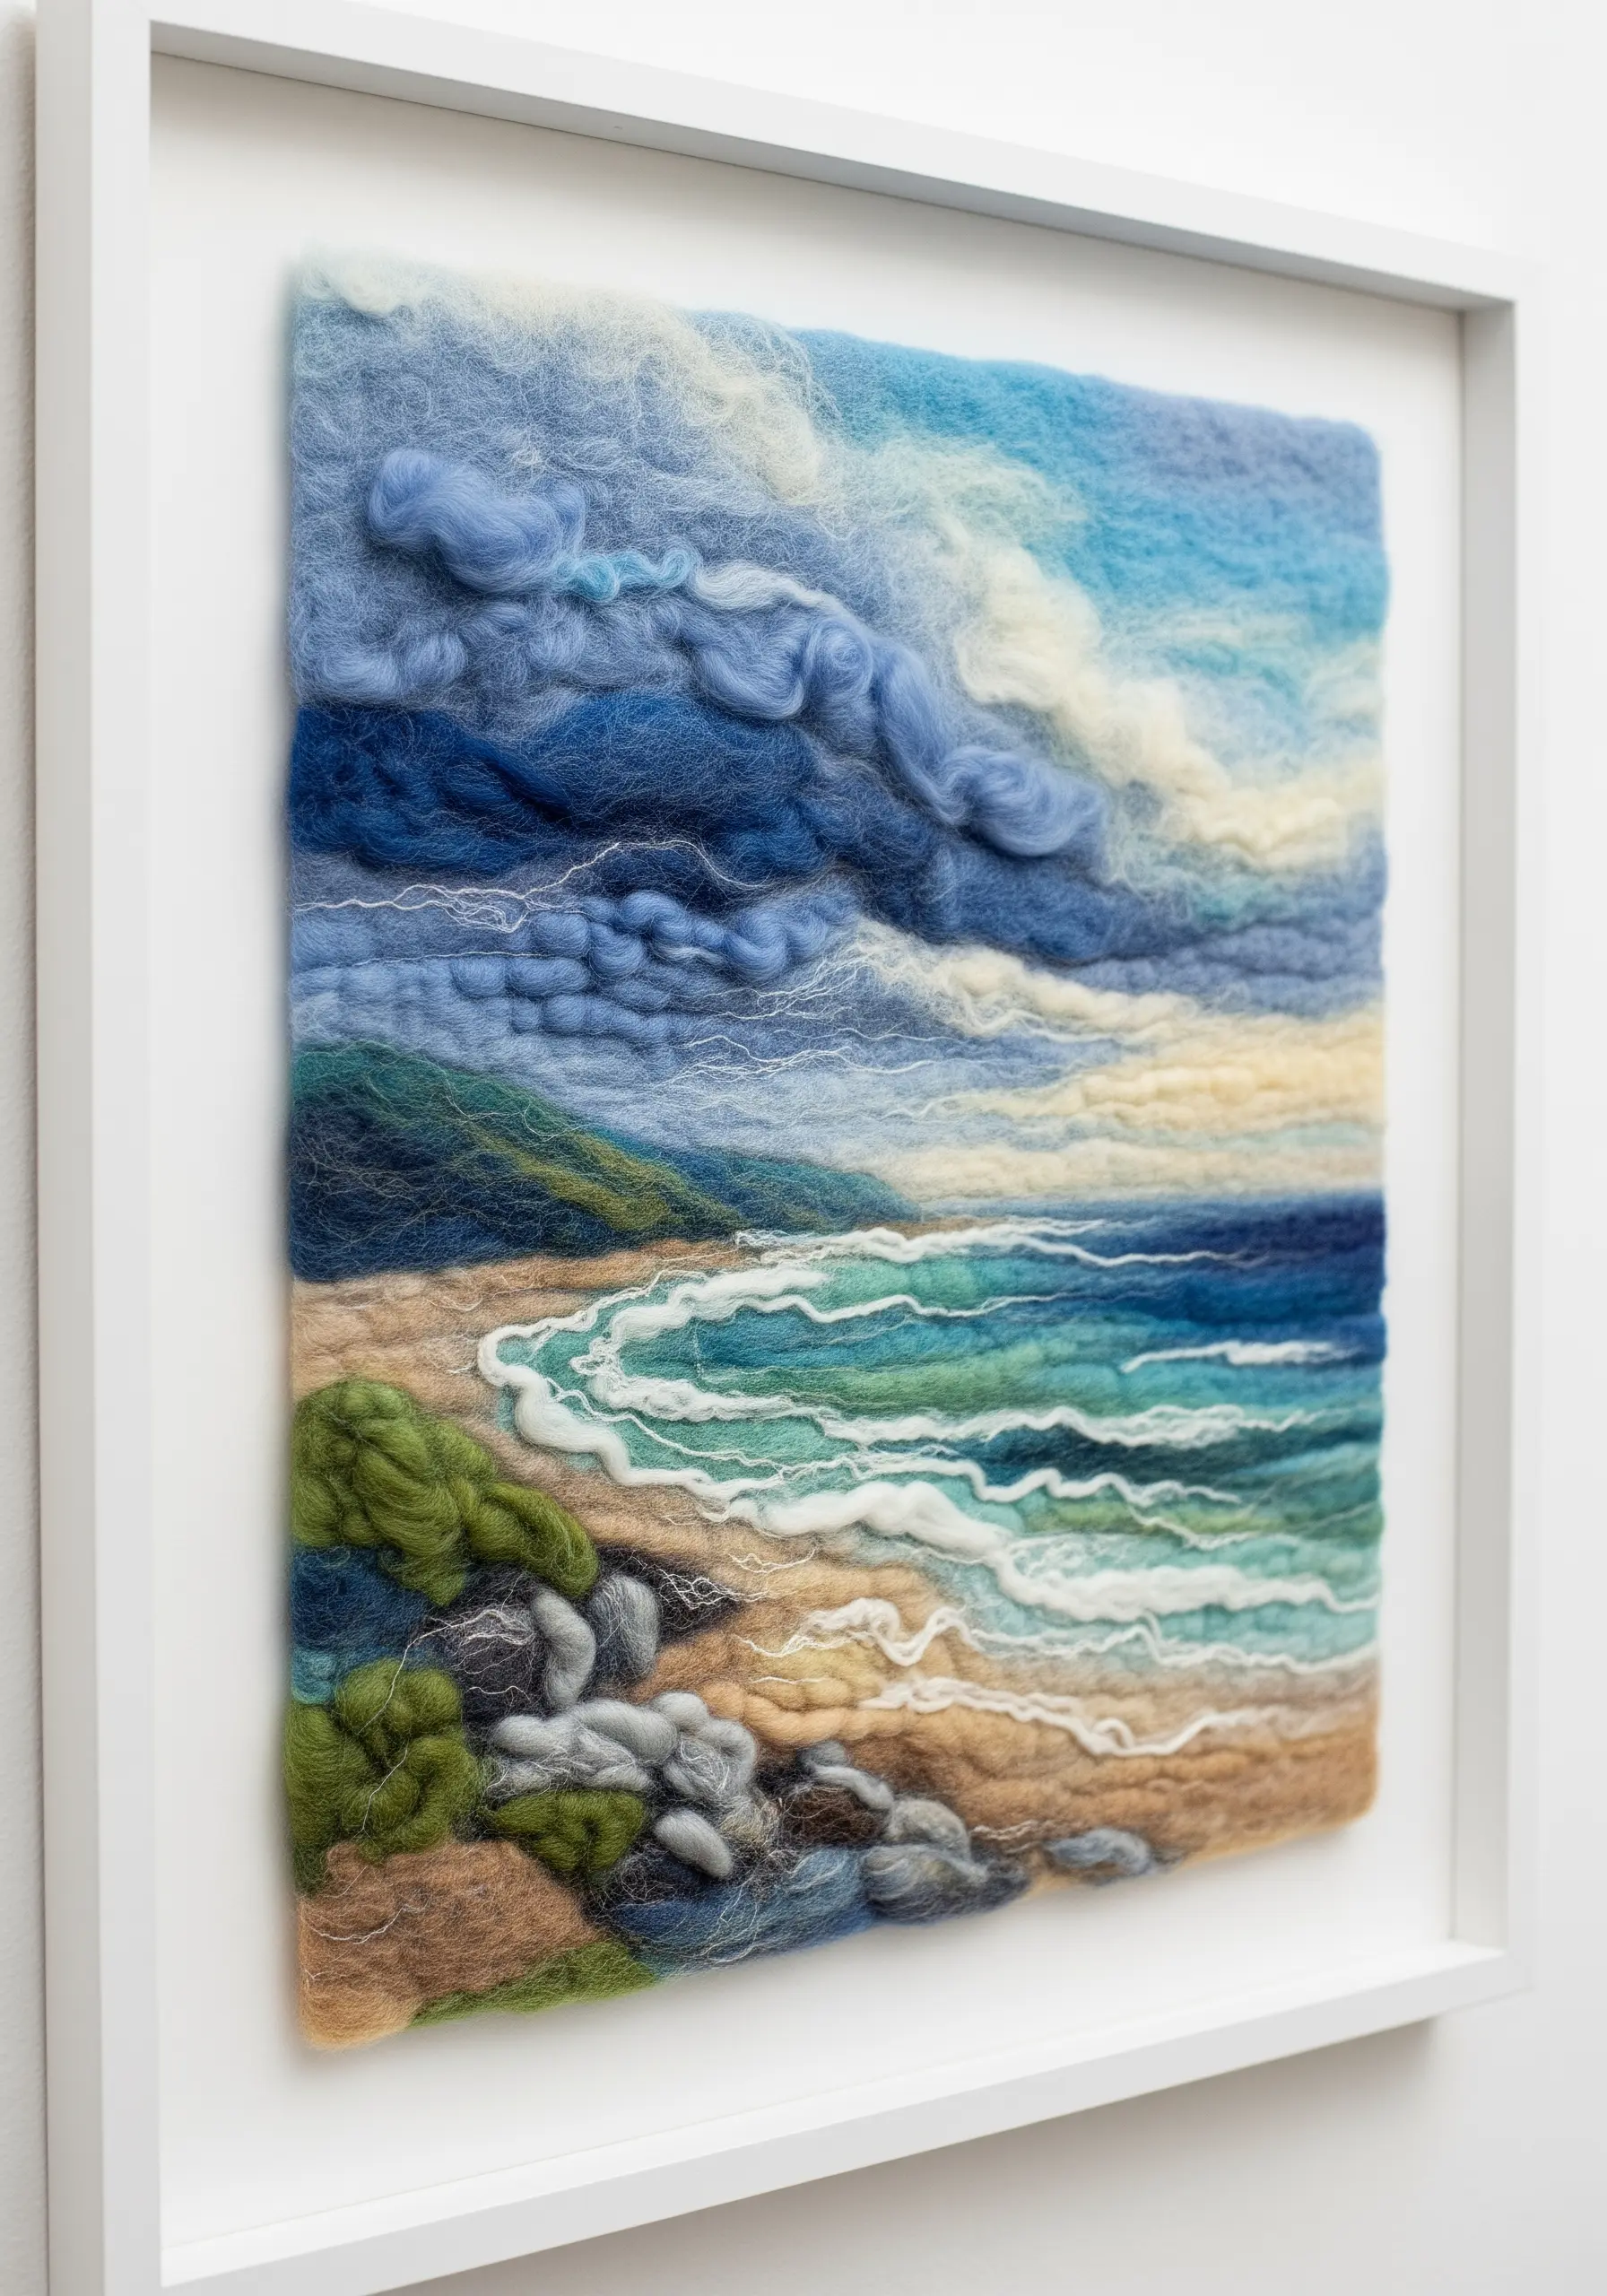
Use wool roving like paint and a felting needle like a brush to create soft, atmospheric landscapes.
Start by laying down a base color on your felt or fabric background.
Then, add small, wispy layers of different colored wool, using the needle to poke and blend them together seamlessly.
This method is incredibly forgiving and allows you to build up rich, painterly detail, perfect for capturing the soft edges of clouds and waves and turning them into threaded landscapes.
12. Explore Asymmetry in a Modern Dreamcatcher
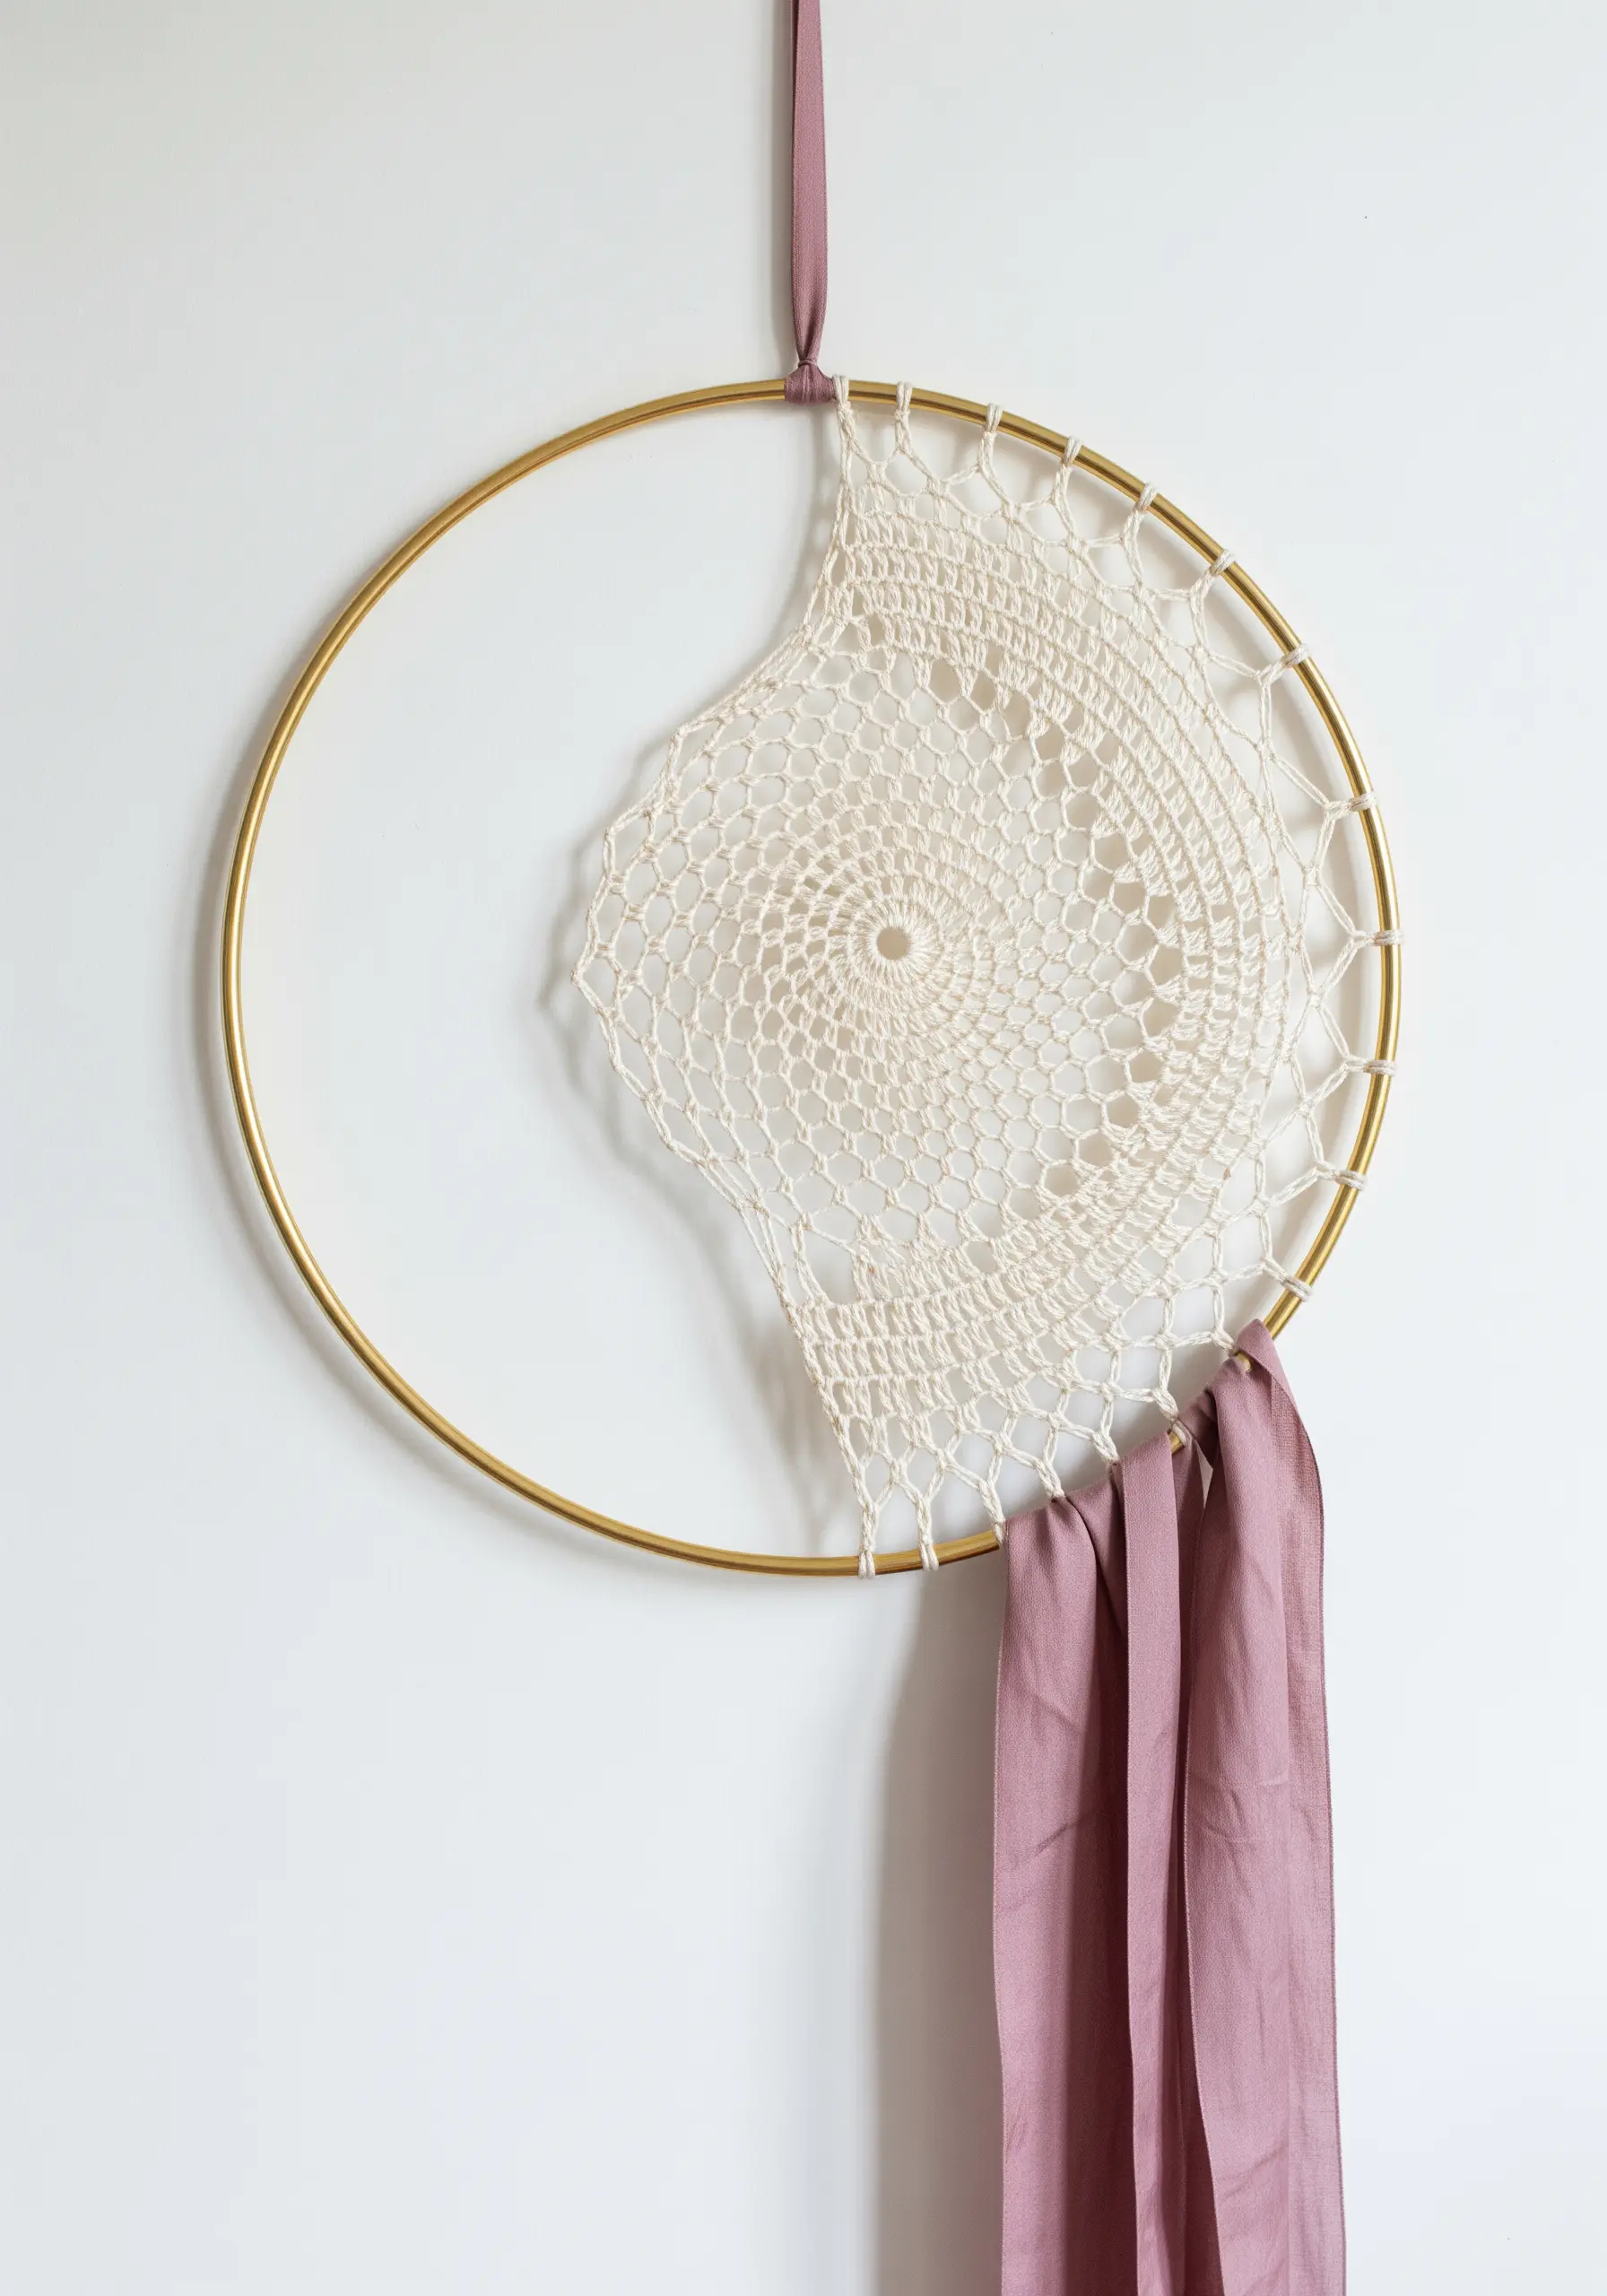
Reimagine the traditional dreamcatcher by deconstructing its form and embracing negative space.
Instead of a full, centered web, attach a section of a vintage doily or a piece of open-weave crochet to one side of a metal hoop.
This asymmetrical placement feels modern and intentional.
Finish the piece with a simple drape of silk ribbon instead of feathers to maintain a sophisticated, minimalist aesthetic and achieve luxury minimal art.
13. Add Sculptural Depth with Extreme Knitting
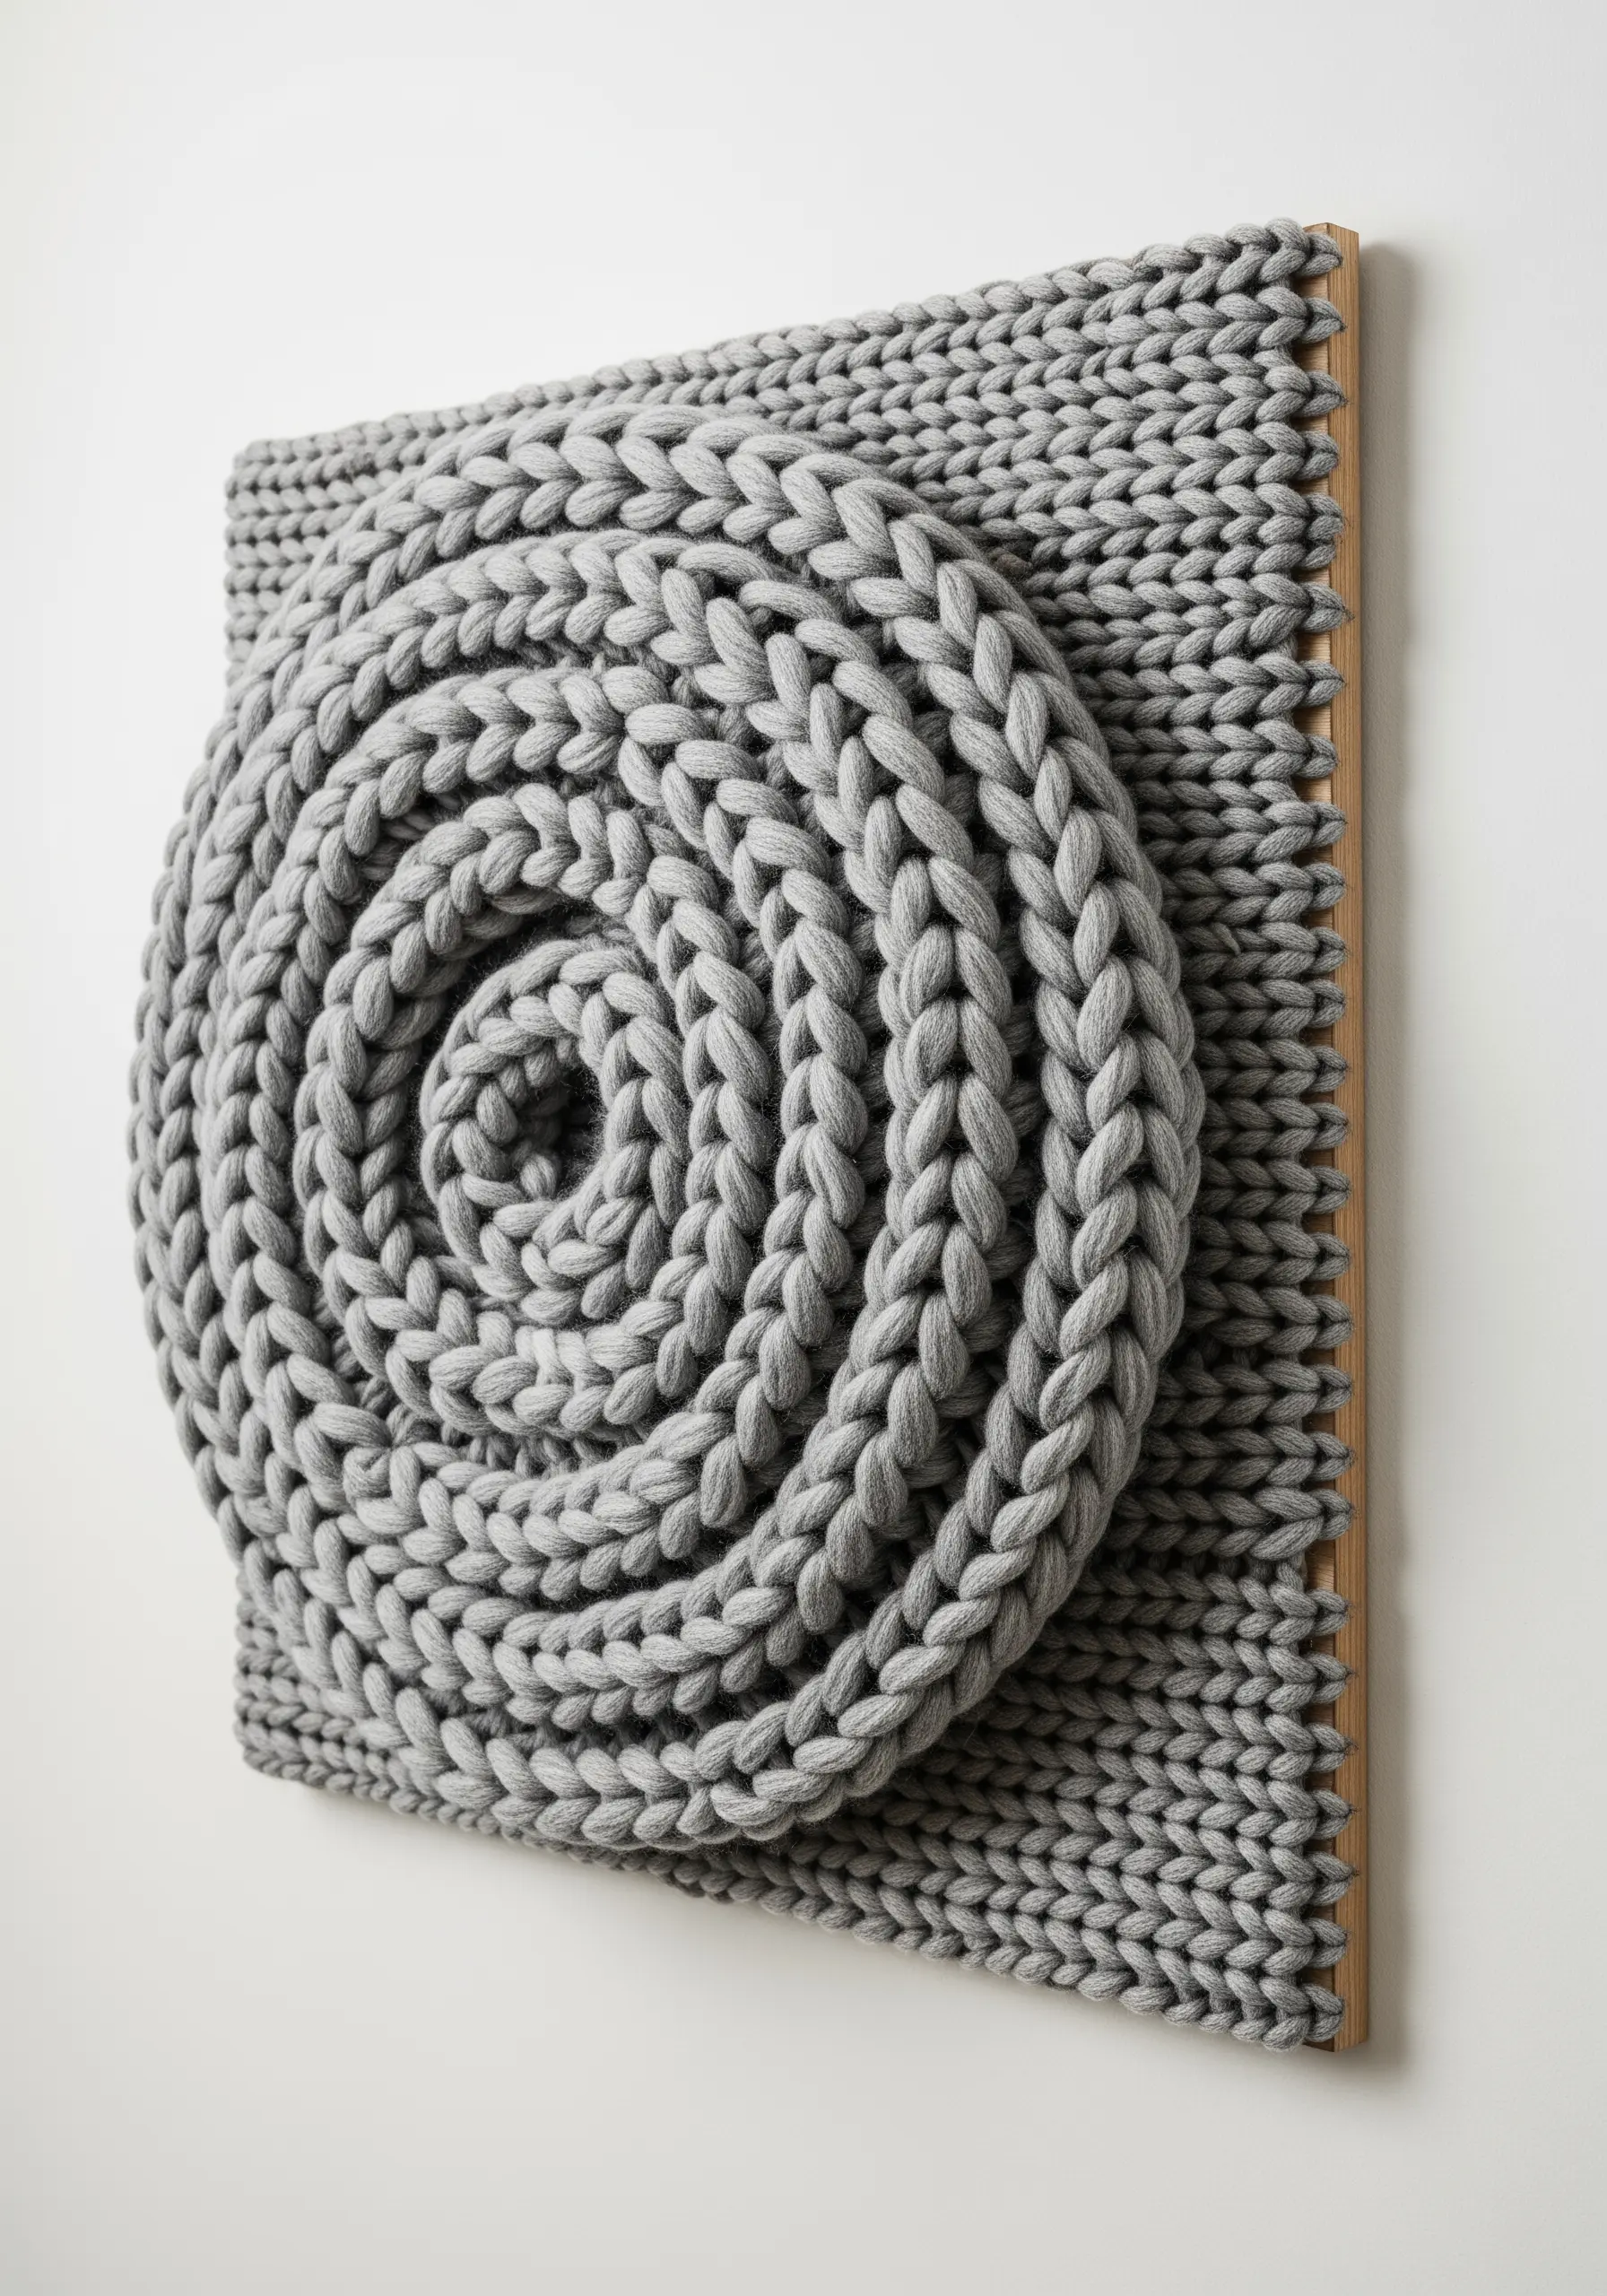
Use jumbo yarn and oversized needles—or even your arms—to knit a simple, highly textured panel.
The true artistry comes in the presentation: instead of hanging it flat, mount the knitted piece on a canvas or wood backing and arrange it in a three-dimensional form, like a coil or spiral.
This transforms a basic knit stitch into a dramatic, sculptural statement, creating one of those 3D wall decor pieces that pops.
14. Tell a Story with a Tactile Texture Sampler
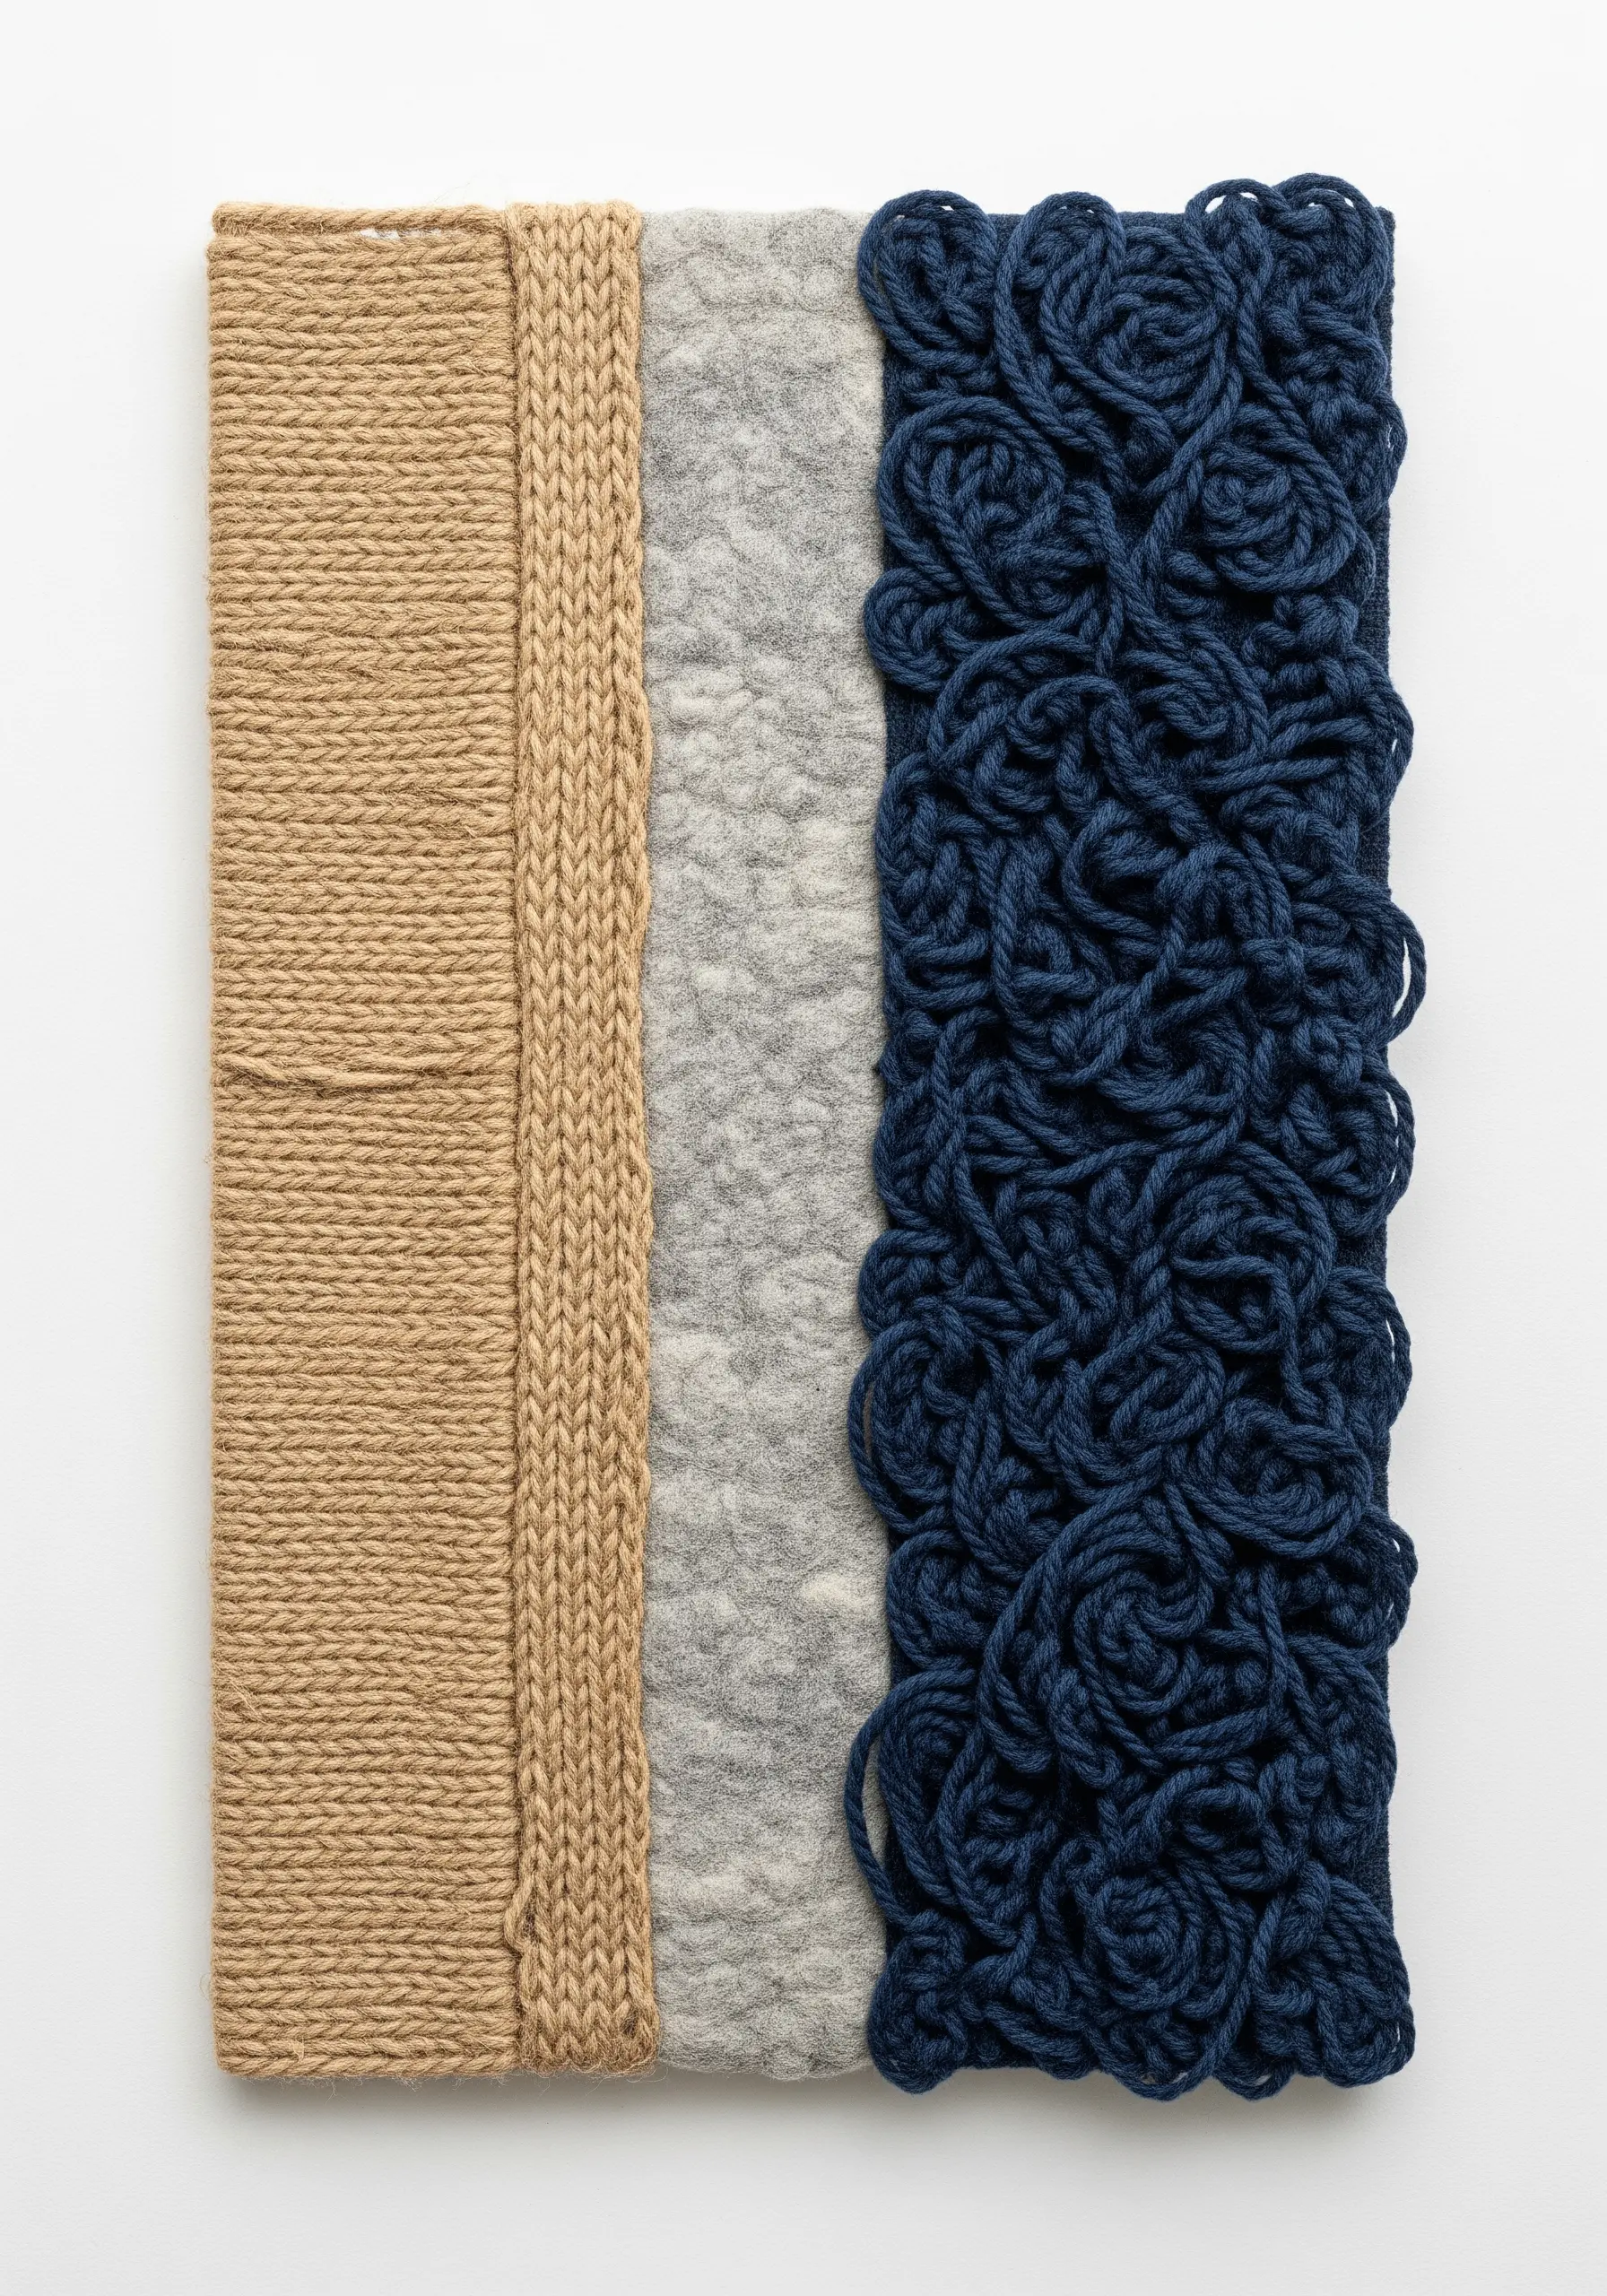
Create a piece that is a study in texture by combining different yarn techniques into a single, cohesive panel.
Divide your canvas into distinct sections, dedicating each one to a different finish: a smooth stockinette stitch, a panel of matted wool felt, and a section of chaotic, tangled loops.
Placing these textures side-by-side highlights their unique qualities and creates a rich, tactile experience, making it one of the most inviting ideas for cozy home decor.
15. Achieve Minimalist Impact with Giant Roving Braids
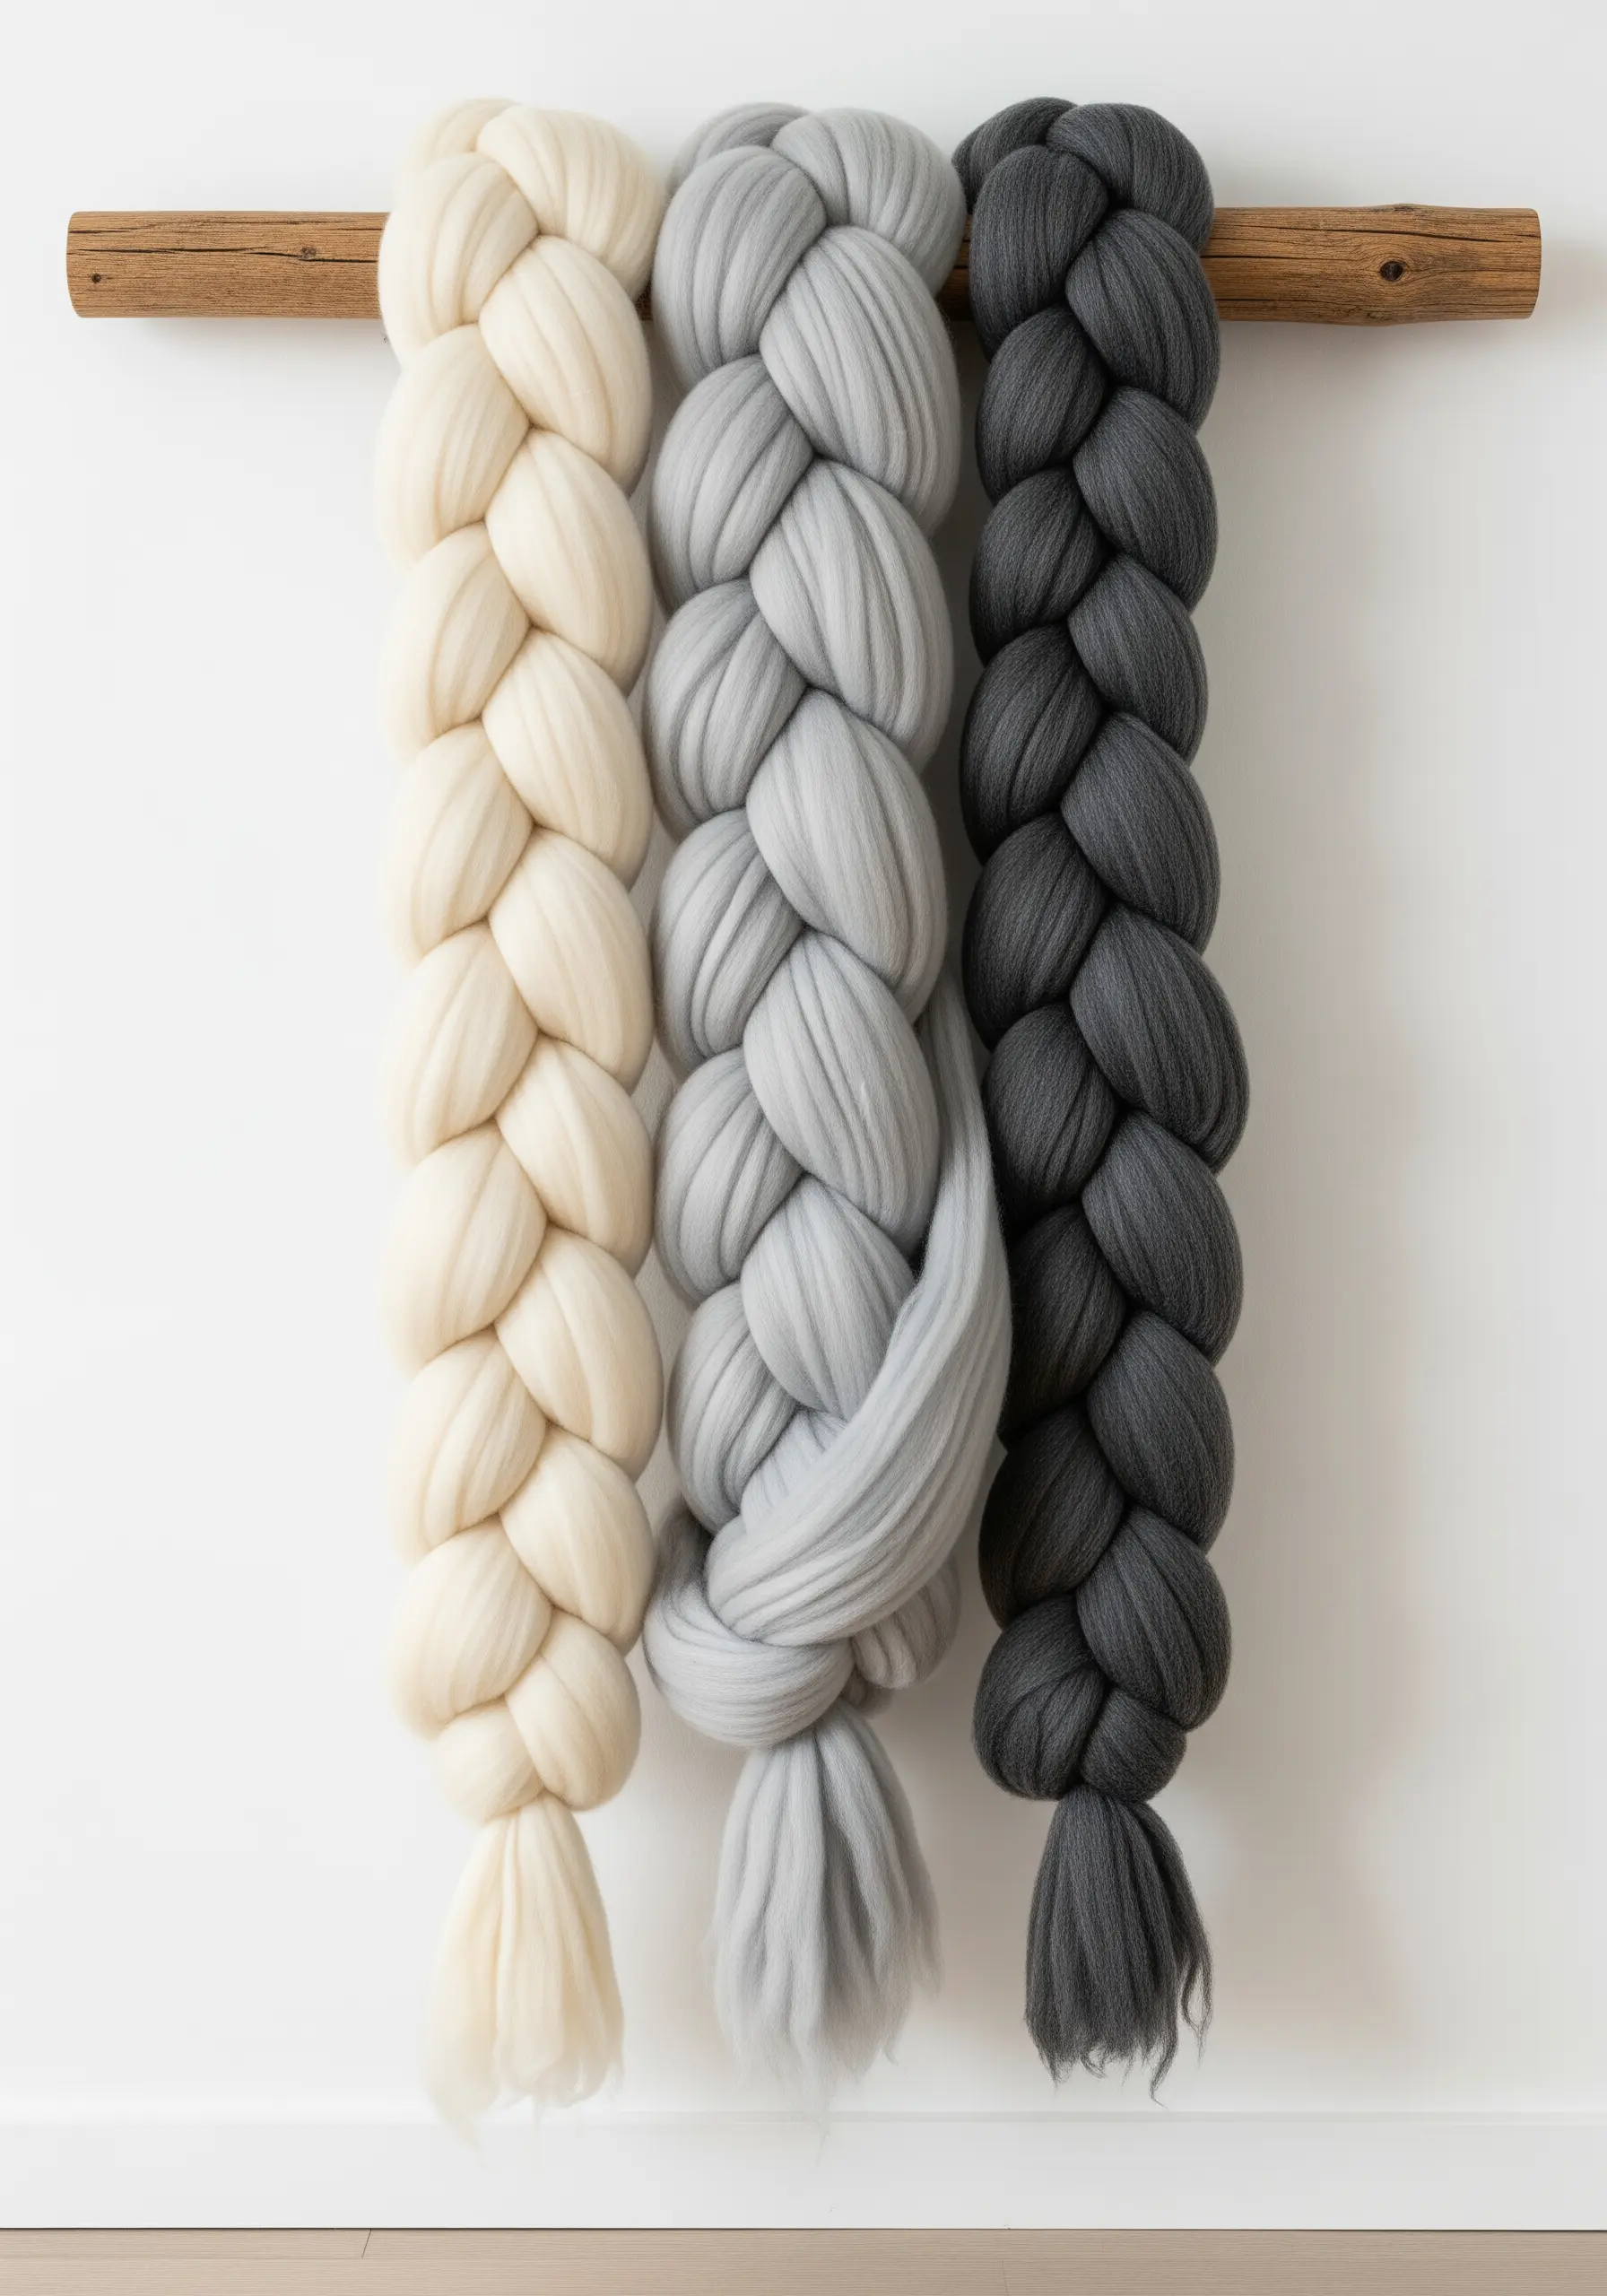
Let the material itself be the masterpiece.
This technique requires no complex skills, only beautiful, high-quality material.
Source thick, unspun merino wool roving and create several large, simple braids.
Hang them from a rustic piece of driftwood or a clean copper dowel.
The oversized scale and inherent softness of the wool create an incredibly impactful piece of art with minimal effort, resulting in one of those projects that look expensive but aren’t.
16. Design a Modular Gallery with Punch Needle Tiles

For a large-scale impact that feels manageable, break down a single geometric design into multiple smaller frames.
This modular approach, inspired by quilting, allows you to create a dynamic gallery wall that can be rearranged to suit your space.
Use a consistent color palette across all the tiles to ensure they feel cohesive, and focus on clean lines for a sharp, graphic look.
It’s a brilliant way to create inspiring art projects for a creative gallery wall.
17. Create Painterly Effects with Dip-Dyed Cord
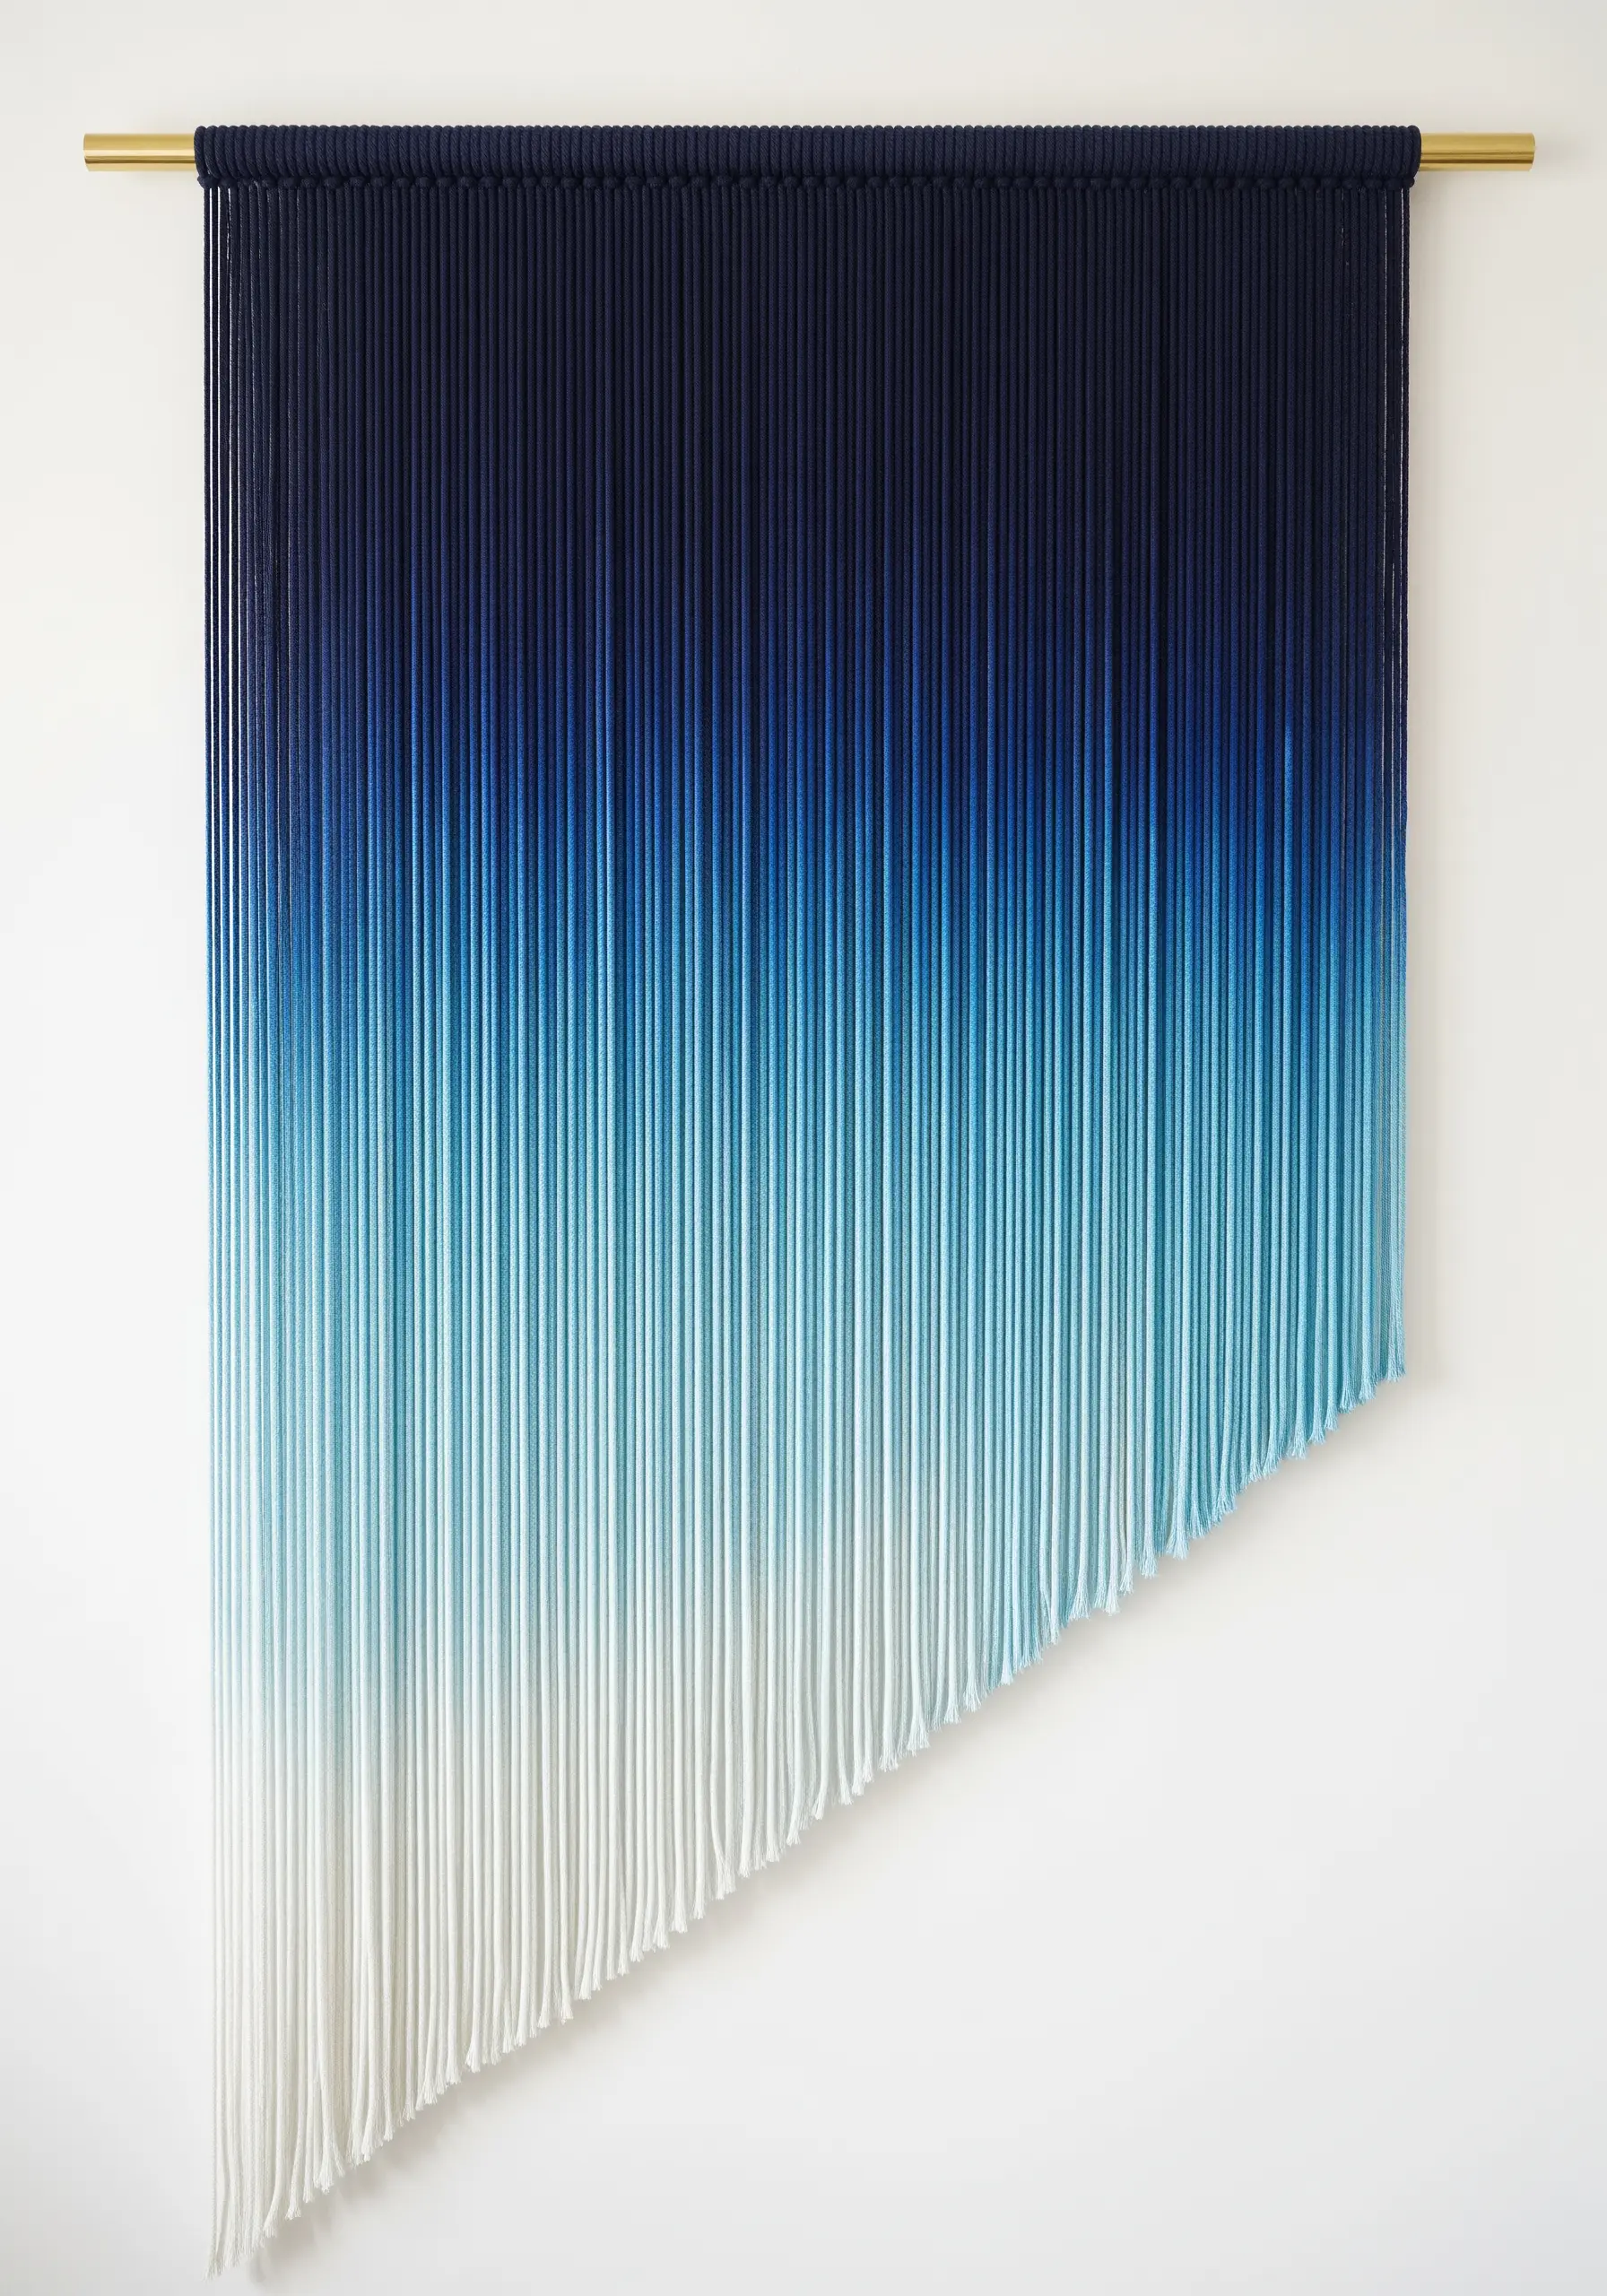
Add color to your fiber art after it’s constructed to achieve a seamless, watercolor-like effect.
Once your macrame or yarn hanging is complete, prepare a bath of fabric dye.
Dip the piece in stages—holding the top portion in for the longest time and gradually lifting it out—to create a beautiful ombre fade.
An asymmetrical cut to the fringe enhances the modern, artistic feel of these gentle gradient designs.
18. Channel Art Deco Style with Graphic Crochet

Use tapestry or mosaic crochet techniques to render sharp, repeating geometric patterns reminiscent of the Art Deco era.
The key to this style is a high-contrast color palette—think black, cream, and a touch of metallic gold—to make the designs pop.
To ensure precision, plan your pattern on graph paper before you begin, treating each square as a single stitch.
This is a perfect example of geometric embroidered wall decor that feels both vintage and modern.
19. Build a Wall Sculpture with Coiled Rope
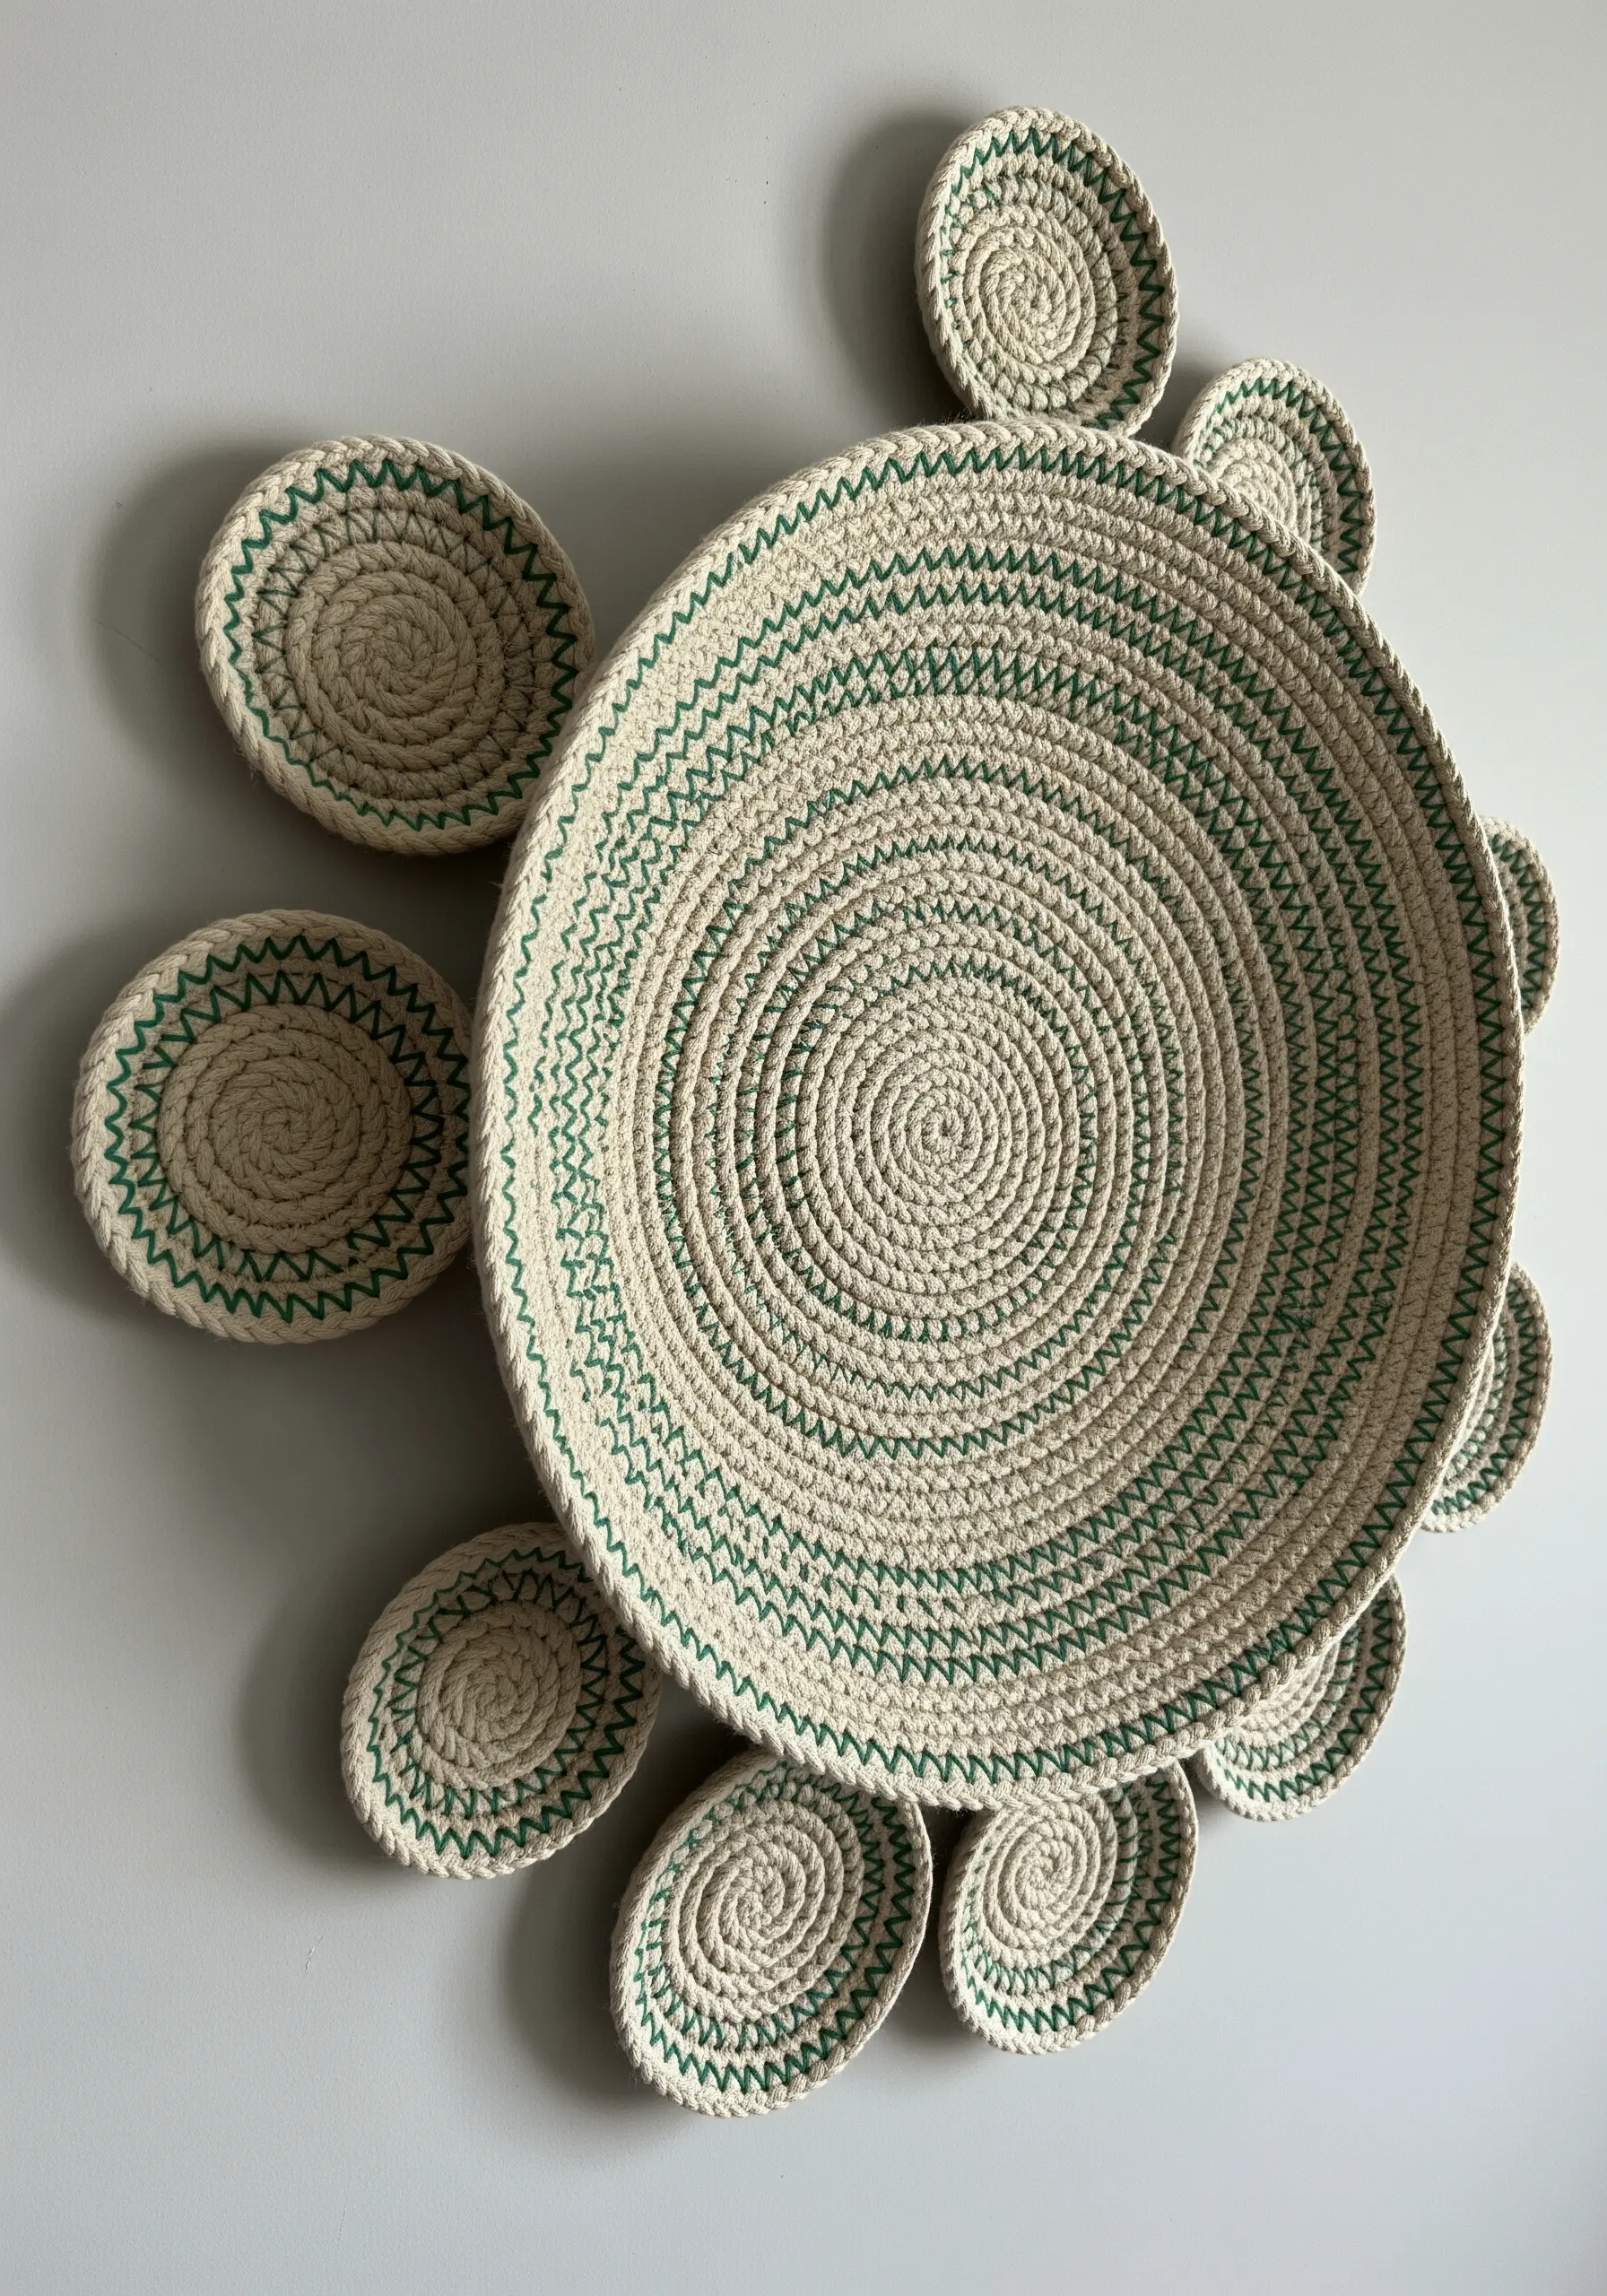
Master the simple technique of coiling rope and stitching it together with a contrasting thread.
While this is often used for baskets, you can adapt it for wall art by creating flat discs and shallow bowls of varying sizes.
Arrange these individual pieces on a wall in an organic, overlapping cluster to create a large-scale sculptural installation.
It’s a wonderful way to use tiny artistic crafts to build something monumental.
20. Craft Dimensional Typography with Knitted I-Cord
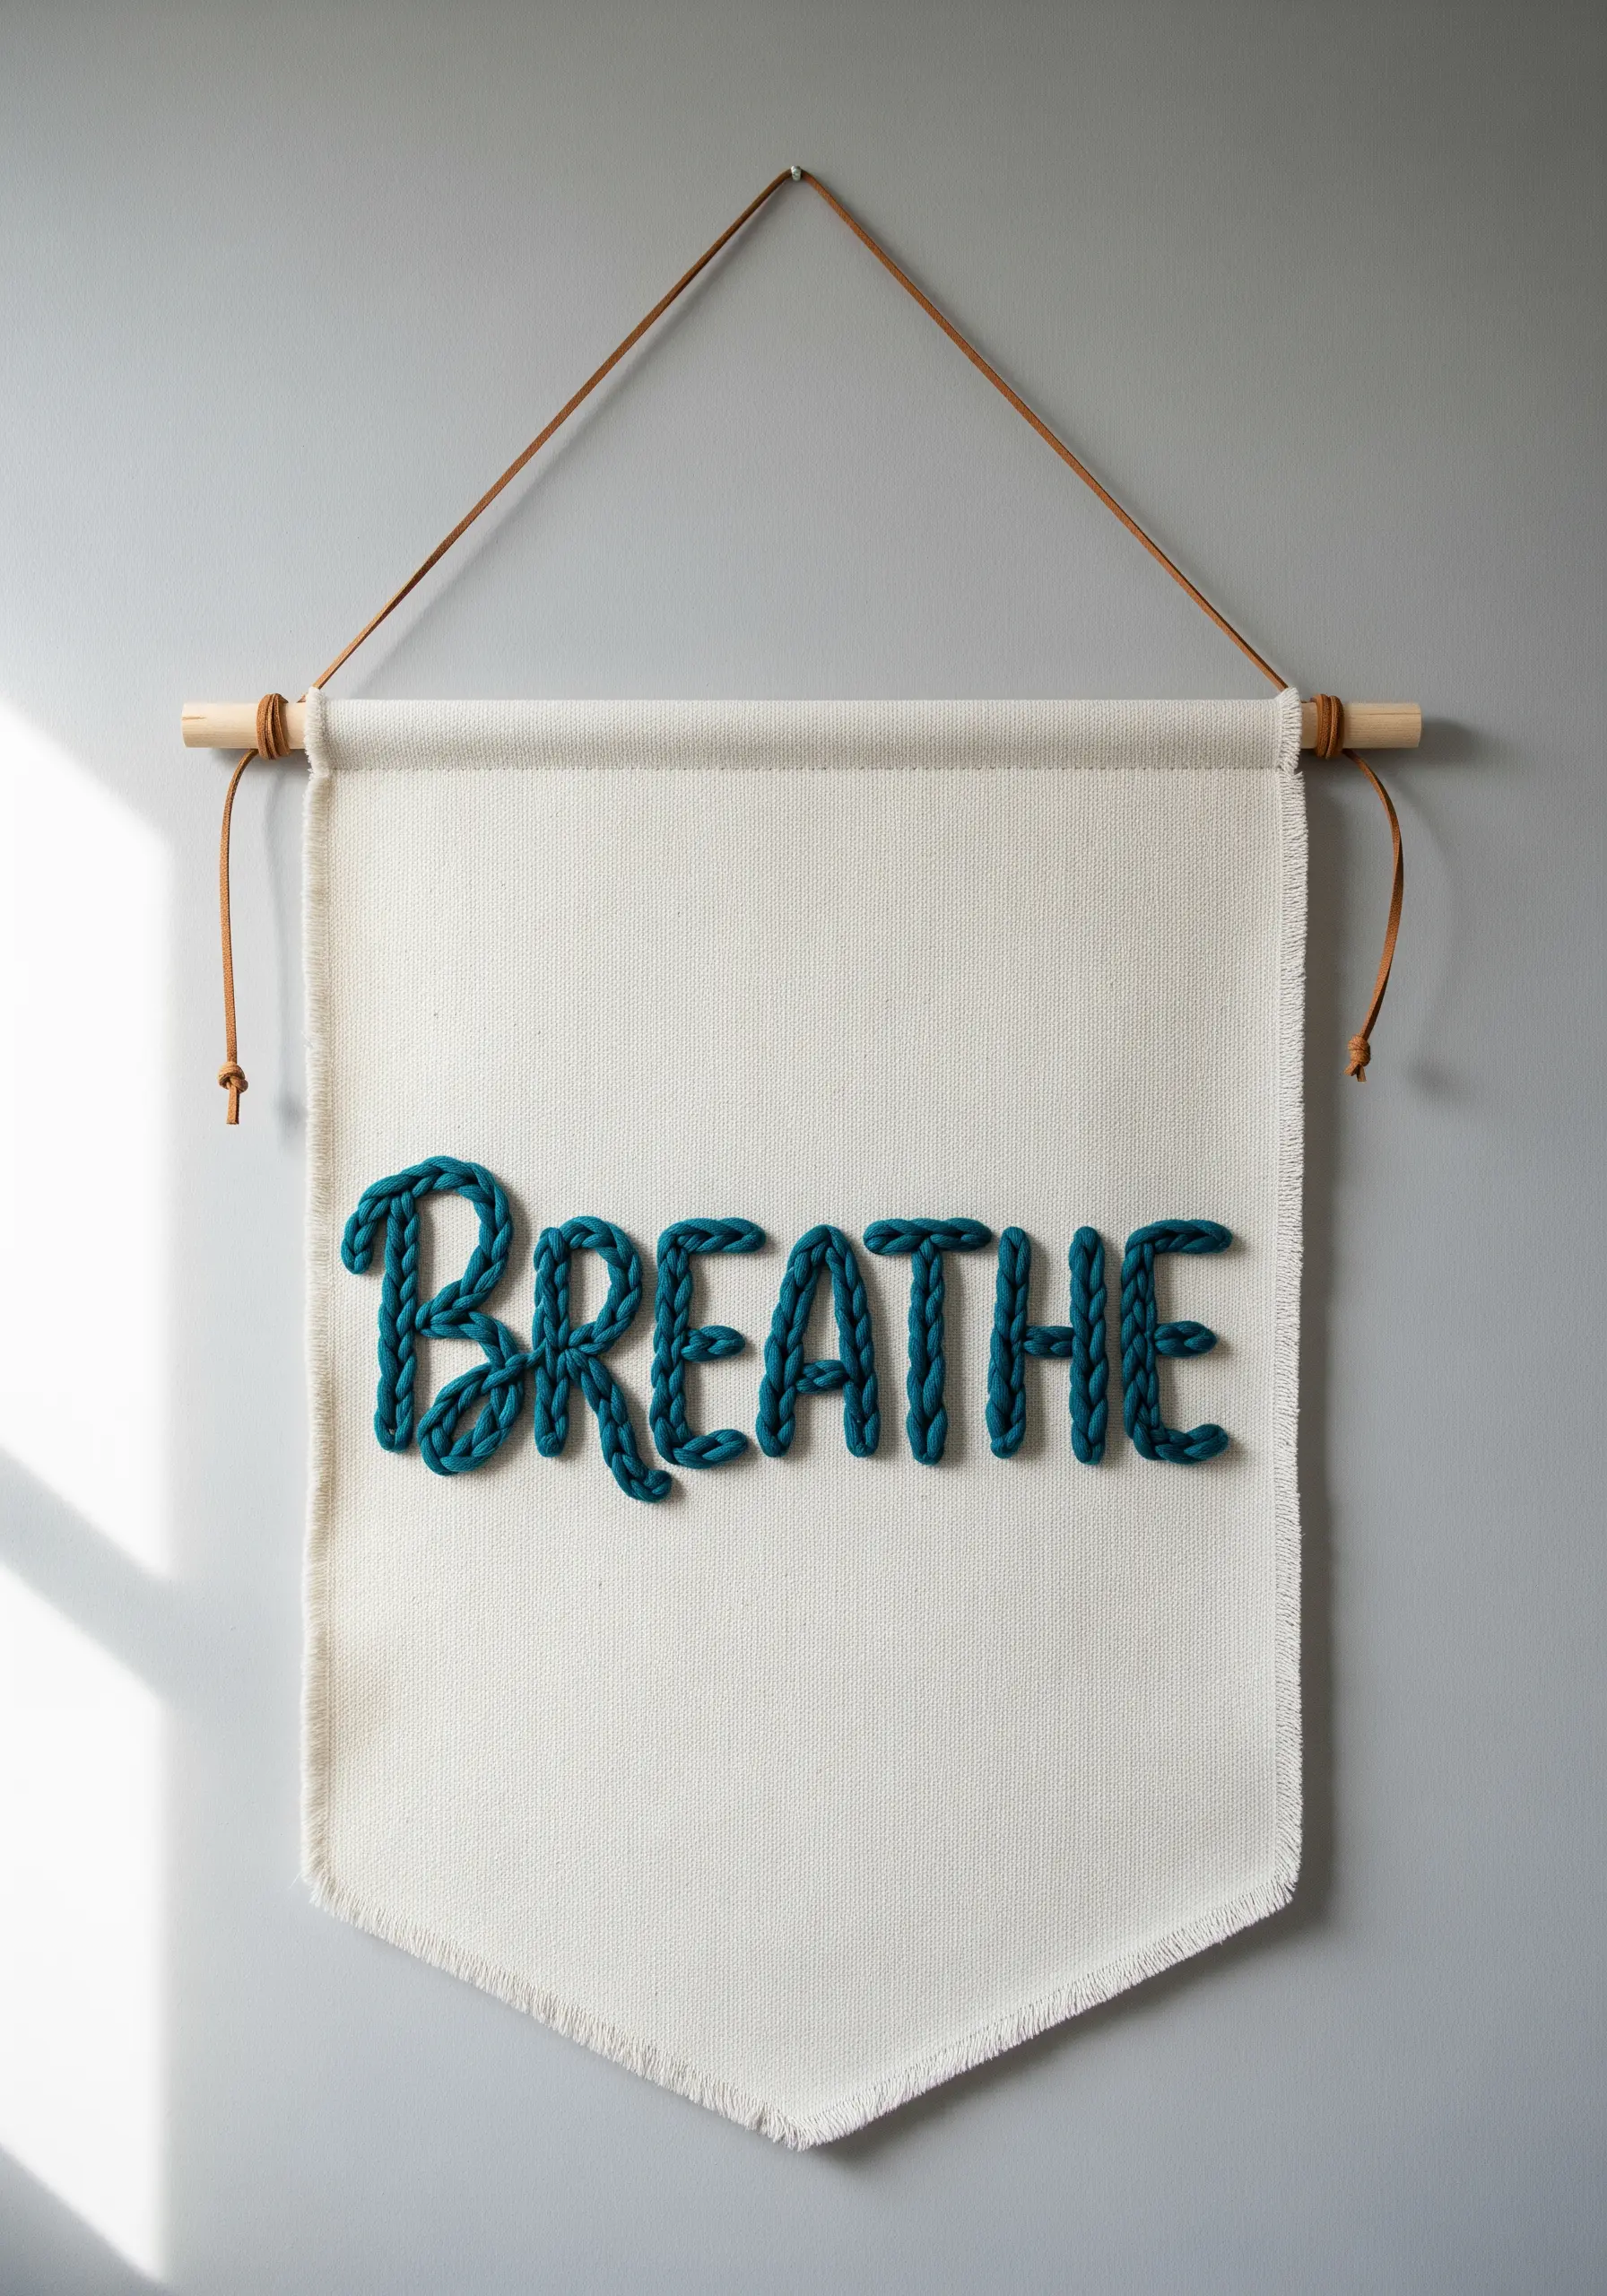
Give your favorite word or quote a soft, three-dimensional presence.
First, create a long, thin tube of knitting known as an i-cord using double-pointed needles or a simple hand-crank tool.
Once you have a sufficient length, you can easily bend and shape the flexible cord into letters.
Stitch your word onto a simple canvas banner for clean, modern, and tactile thread-based typography.
21. Explore Deconstruction in Abstract Weaving
Challenge the traditional rectangular format of weaving by intentionally leaving parts of the loom empty.
Create several separate “islands” of weaving, allowing the vertical warp threads to remain exposed between them.
This deconstructed approach highlights the structure of the piece itself and creates an ethereal, delicate feeling.
It’s a sophisticated way to create abstract thread designs using negative space.
22. Use Pom-Poms for Gradient Pointillist Art
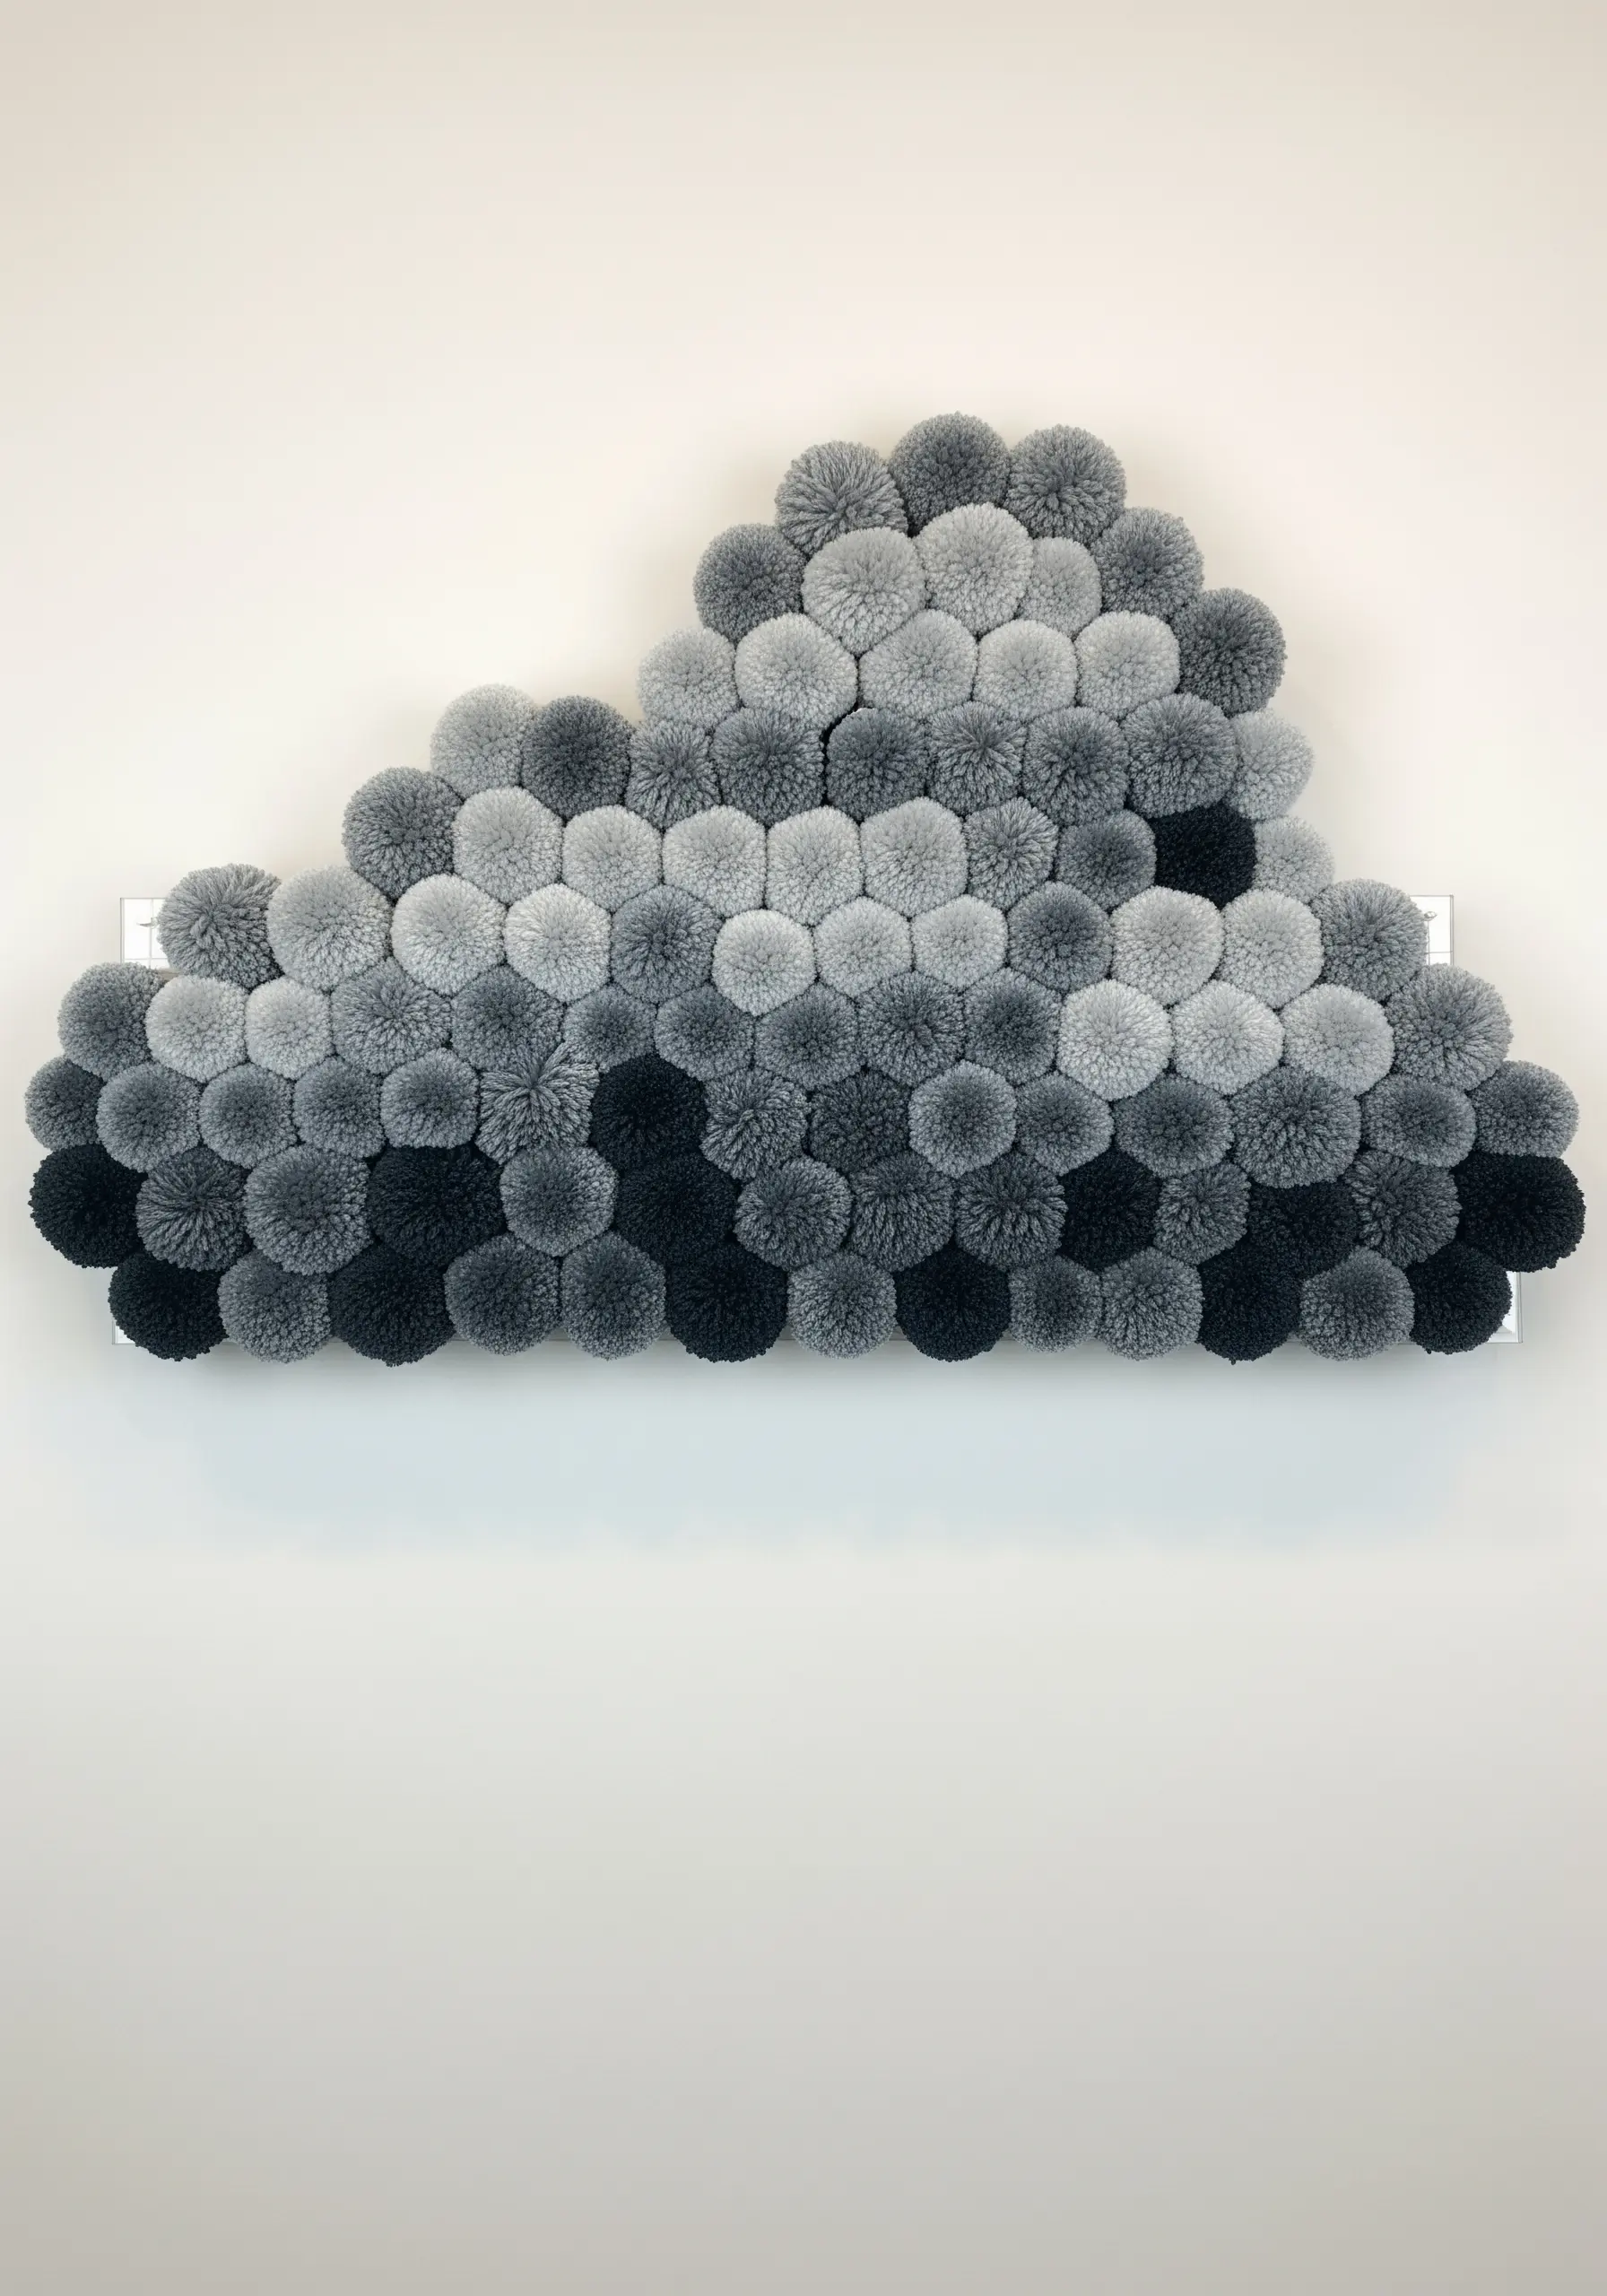
Think of pom-poms as soft, fluffy pixels to build a larger image.
Create a large number of pom-poms in a gradient of shades, from dark to light.
Arrange and attach them closely together on a rigid backing, like foam board or wire mesh, to form a shape like a cloud or a simple geometric form.
The result is a surprisingly cohesive image with a unique, touchable texture—one of the most playful DIY art pieces you can make.
23. Reframe Knitwear as Textile Wall Art
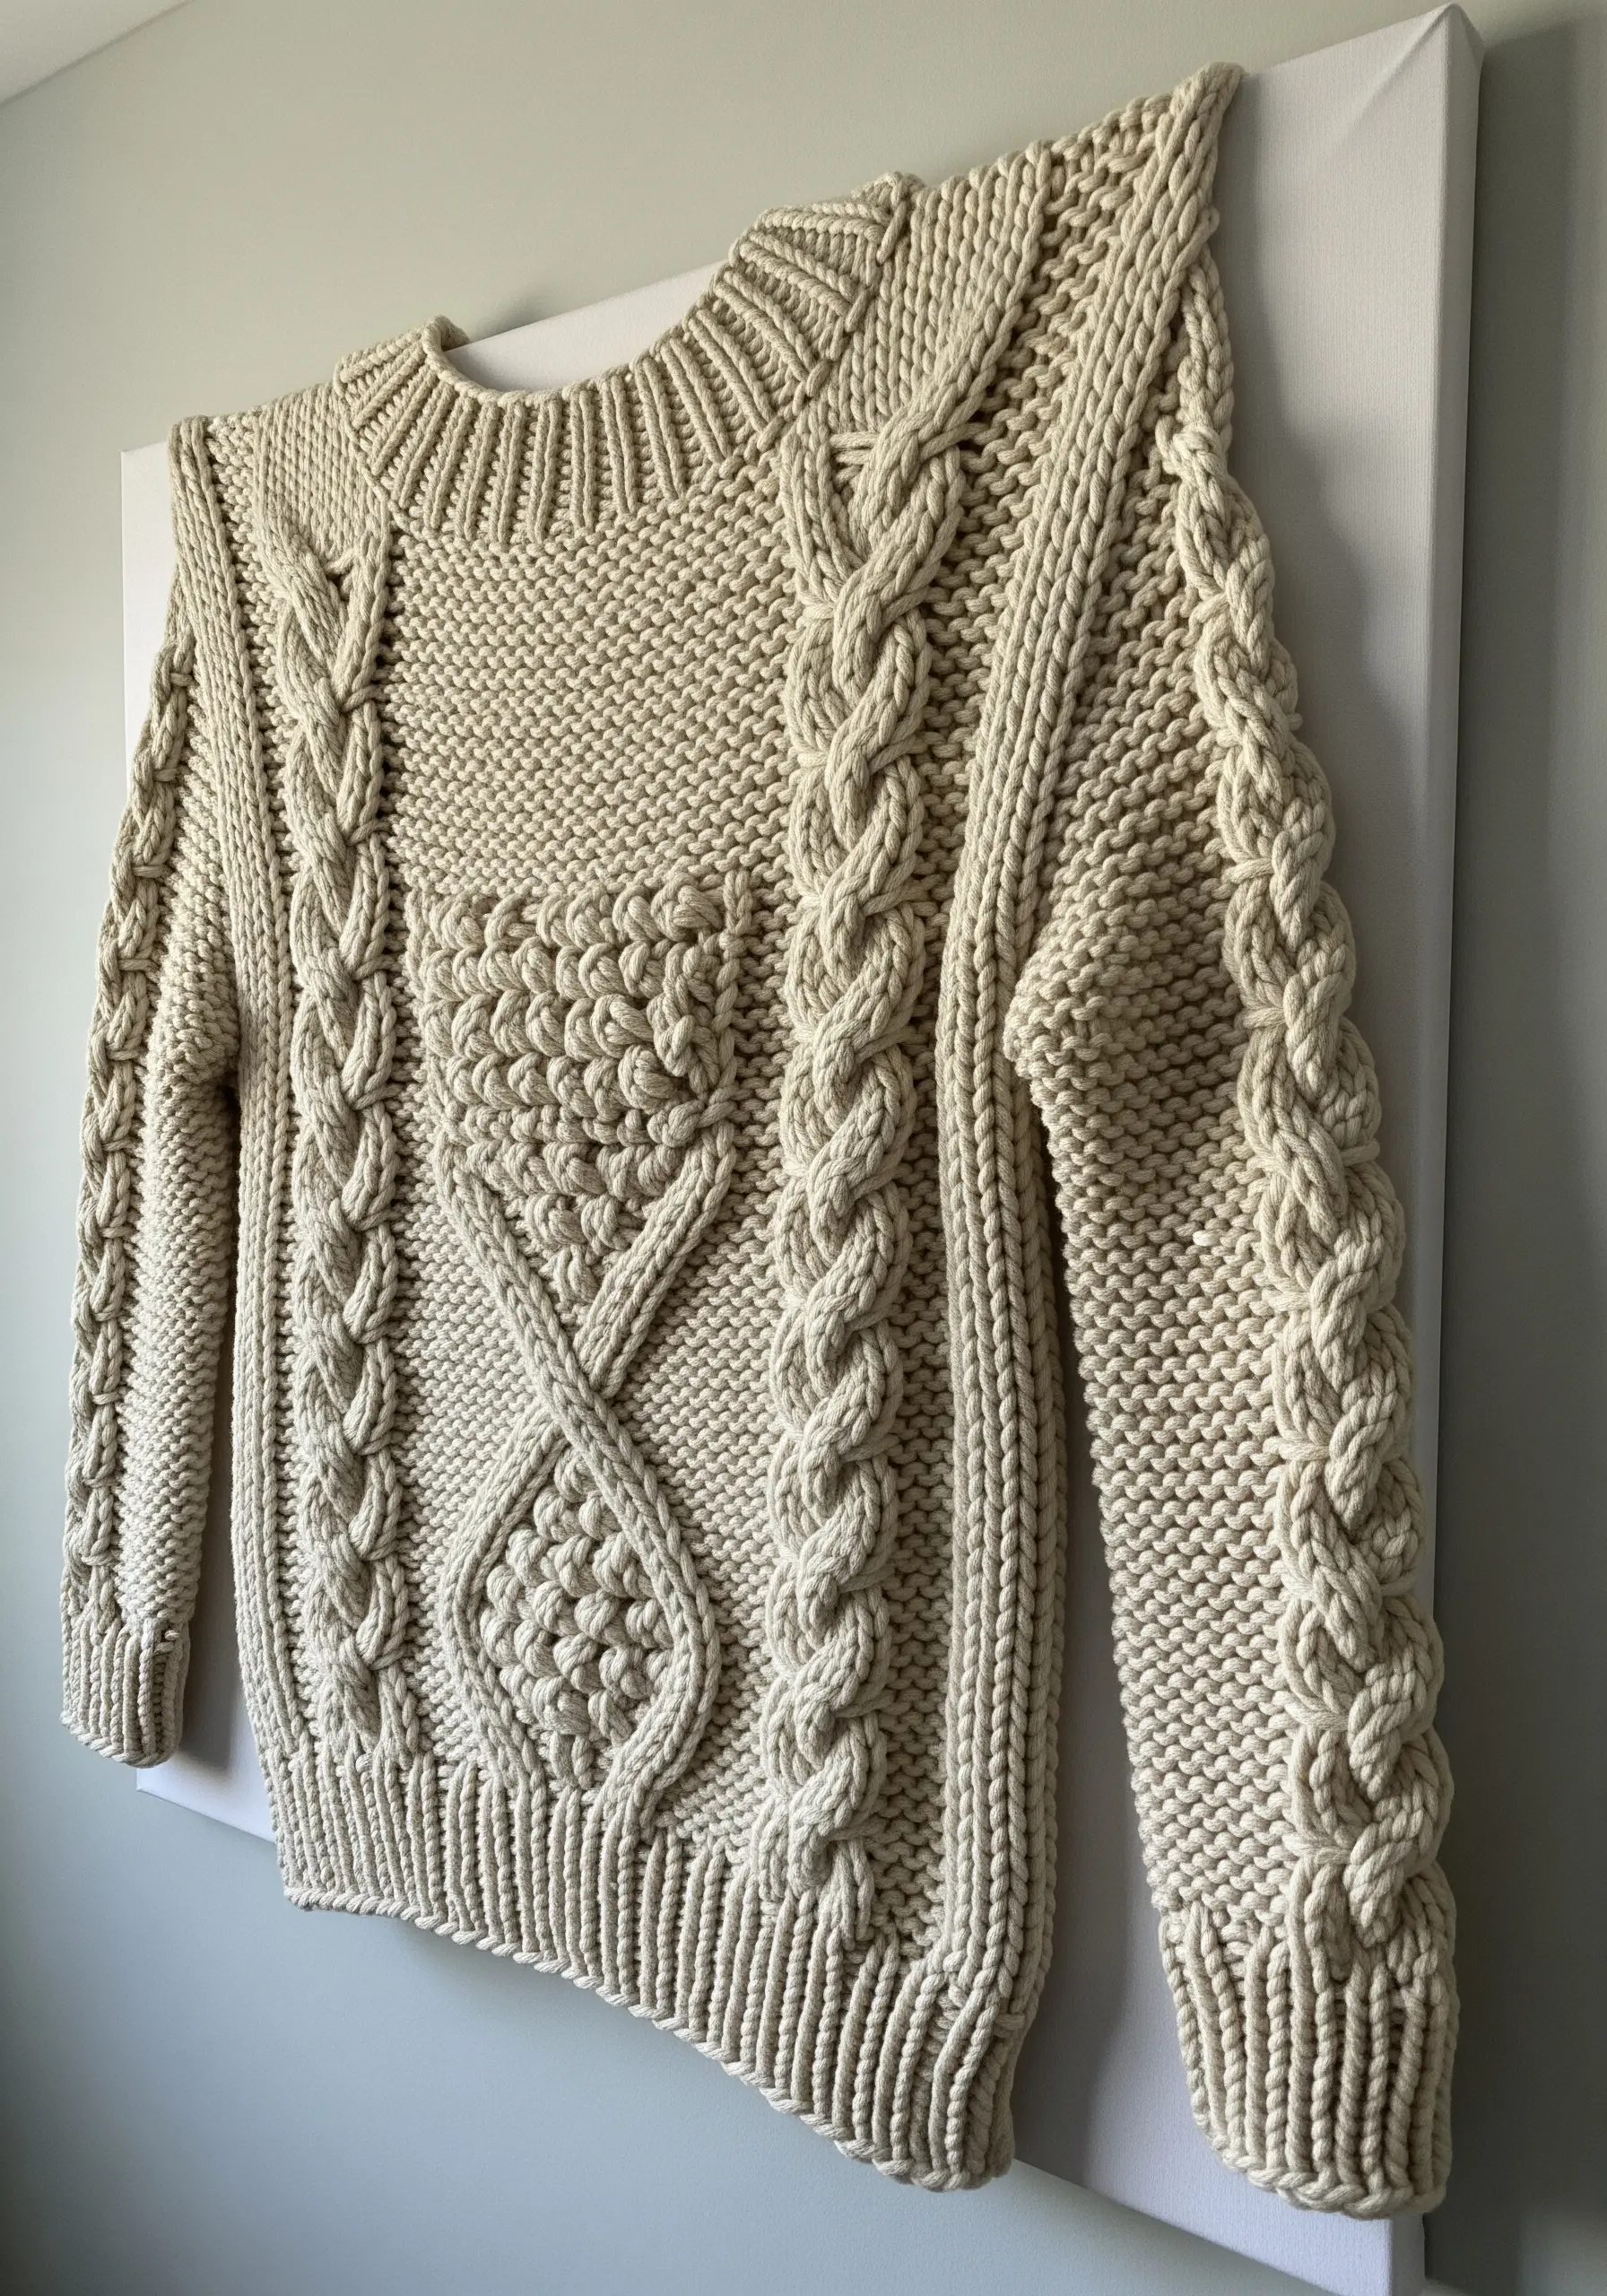
Celebrate the artistry of a beautifully crafted garment by turning it into a permanent piece of decor.
A hand-knitted sweater with intricate cables and stitches is a work of art in itself.
Carefully stretch and mount the piece onto a blank canvas, treating it as you would a painting.
This technique honors the skill and time invested in the craft and creates a unique, textural focal point, turning it into one of those framed art pieces that double as conversation starters.
24. Build a Rainbow with Layers of Texture
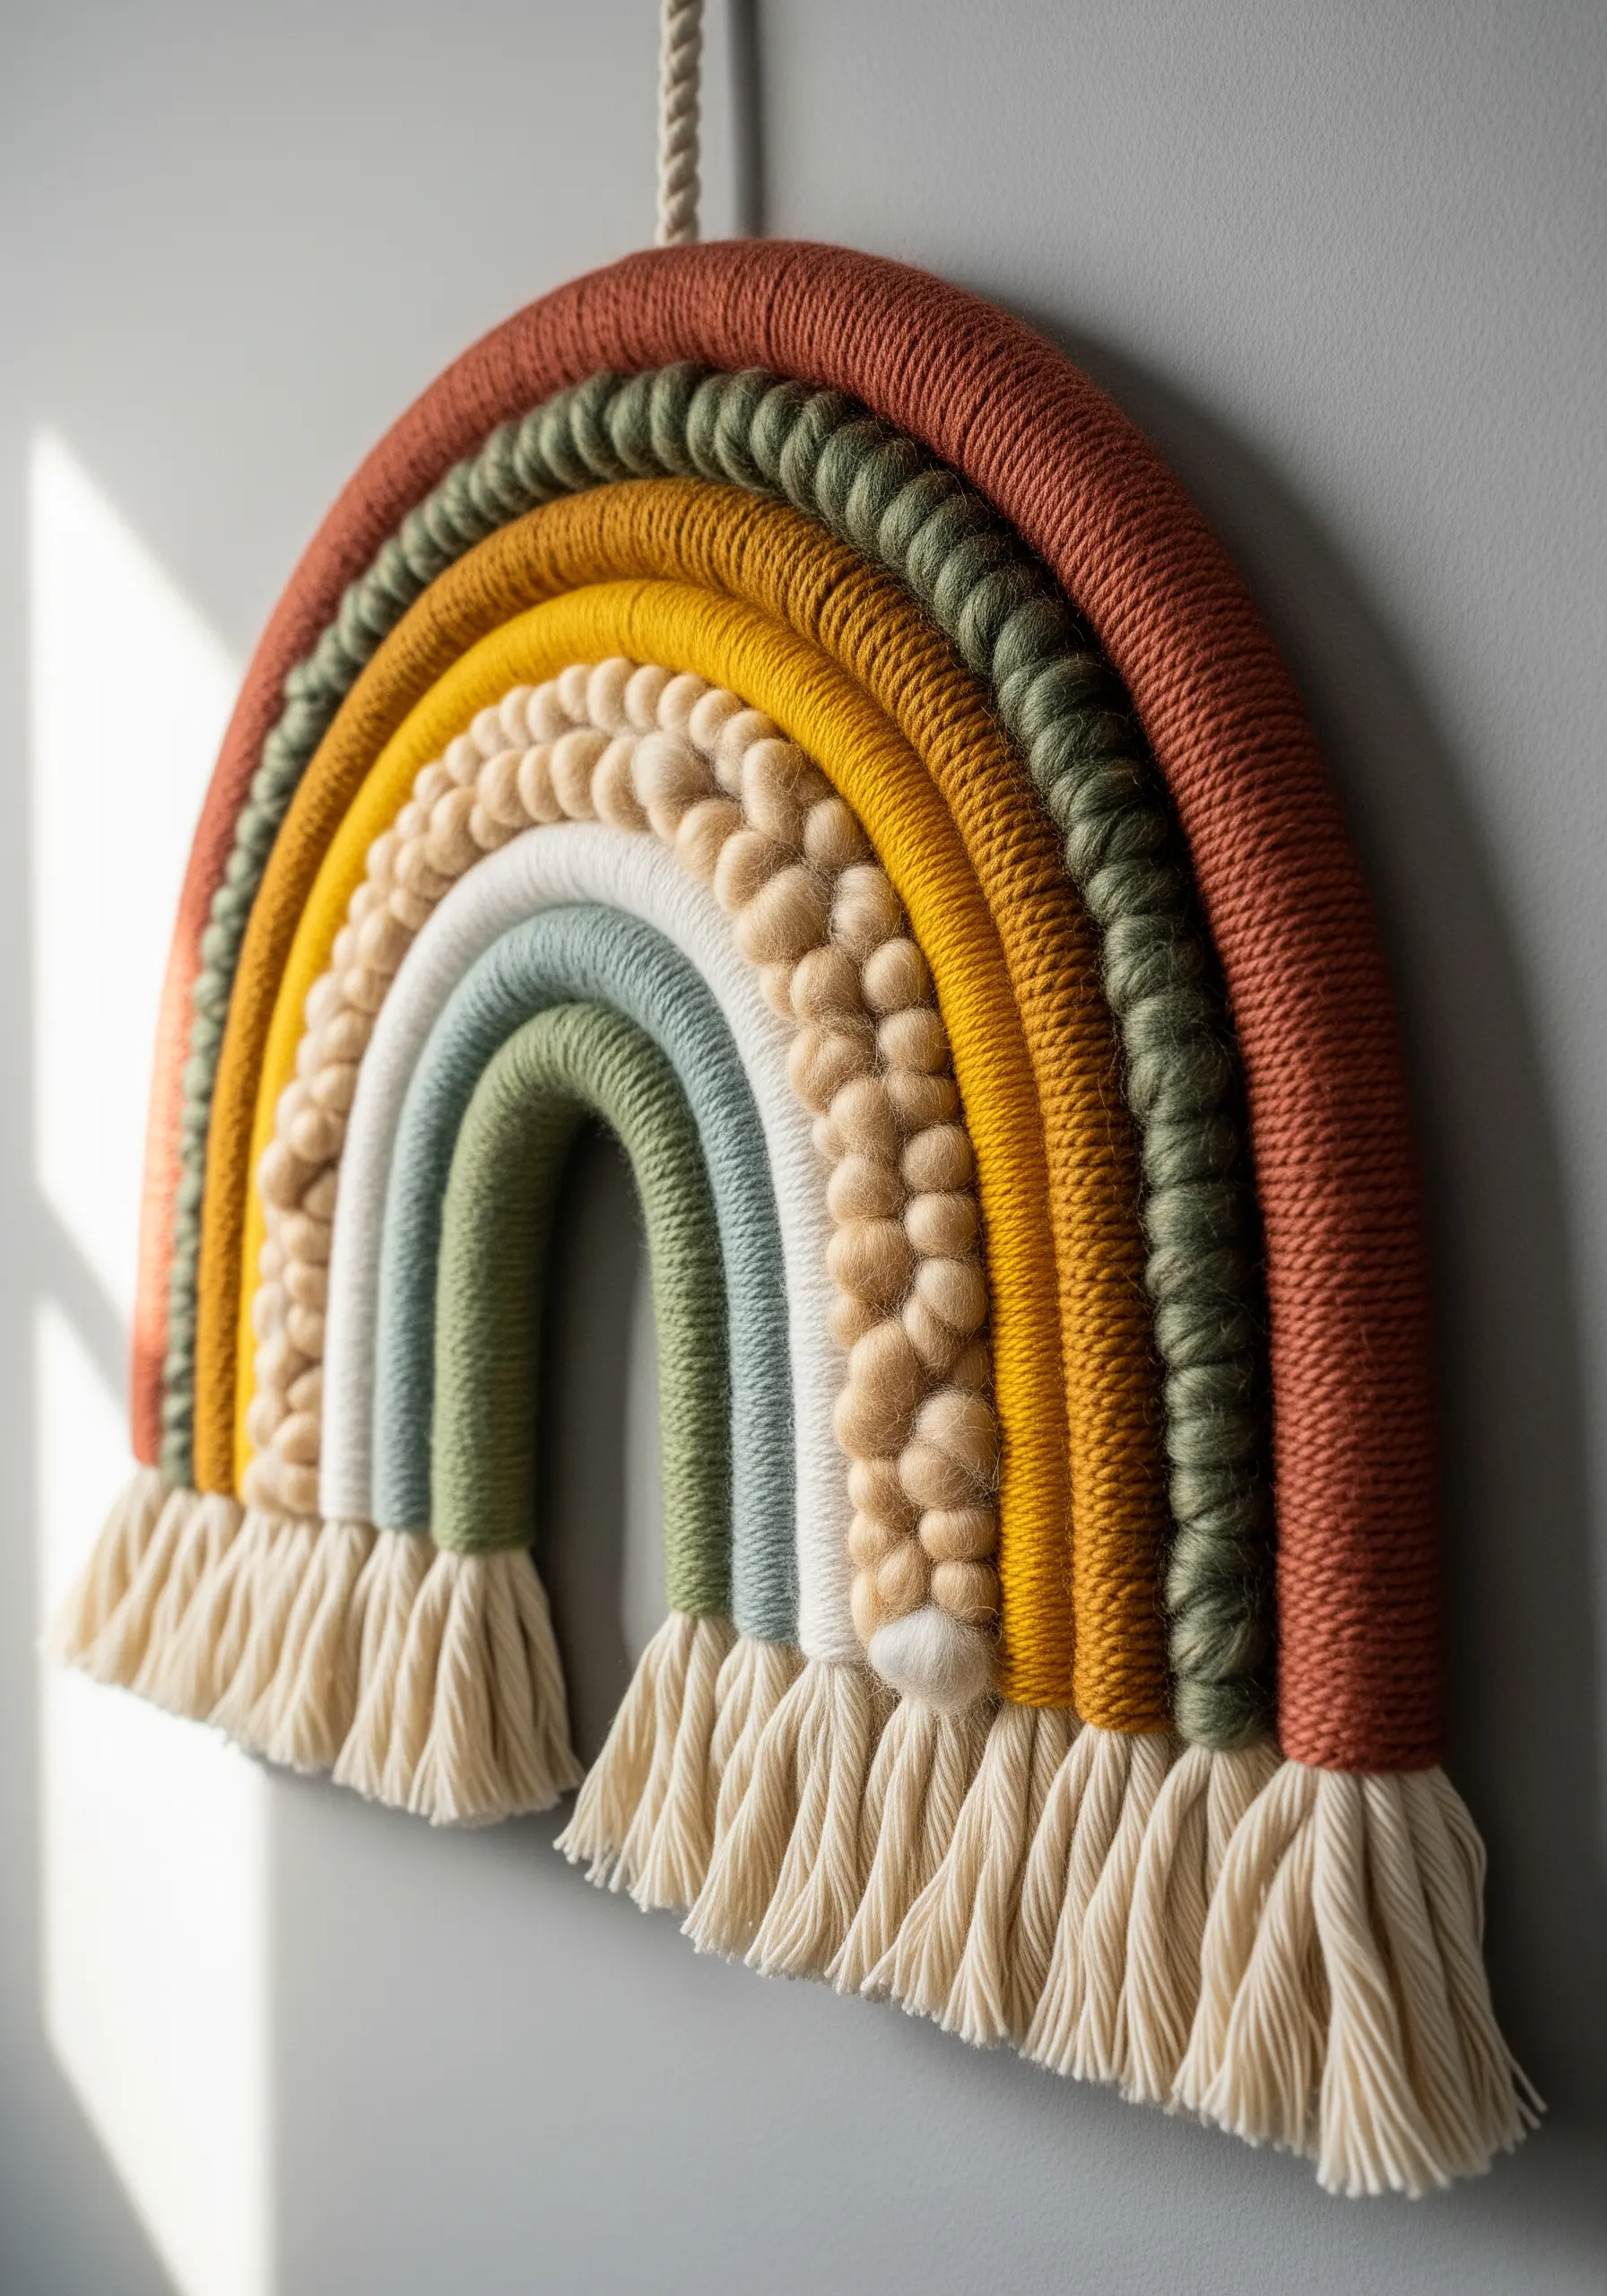
Elevate the classic rainbow motif by giving each colored arch its own distinct personality.
Instead of using the same yarn for each stripe, assign a different texture to each color.
Use a smoothly wrapped cord for one arch, fluffy boucle yarn for another, and chunky French knots or bobbles for the next.
This approach transforms a simple shape into a sophisticated, tactile experience, making it one of those yarn wall art ideas that blend color, texture, and personality.
25. Weave Organic Movement with Sculptural Braids

When working with a neutral or monochrome palette, texture becomes your most powerful tool.
Create visual interest not with color, but with form.
Weave thick, dimensional braids directly into your warp threads, or use soumak stitch to create raised, flowing lines that undulate across the piece.
This technique gives a flat weaving a dynamic sense of movement and depth, creating organic texture designs that add life to any room.
26. Modernize String Art with an Acrylic Grid

Give traditional string art a contemporary update by swapping the wood-and-nails base for a clear acrylic panel.
Drill a grid of clean, uniform holes into the acrylic sheet.
Weave a bold, colored cord through the grid to create sharp, geometric patterns that appear to float in mid-air.
The transparency of the backing removes visual clutter and makes the yarn the true hero of the piece, turning simple stitches into dreamy wall gallery pieces.
27. Map Organic Contours with Punch Needle
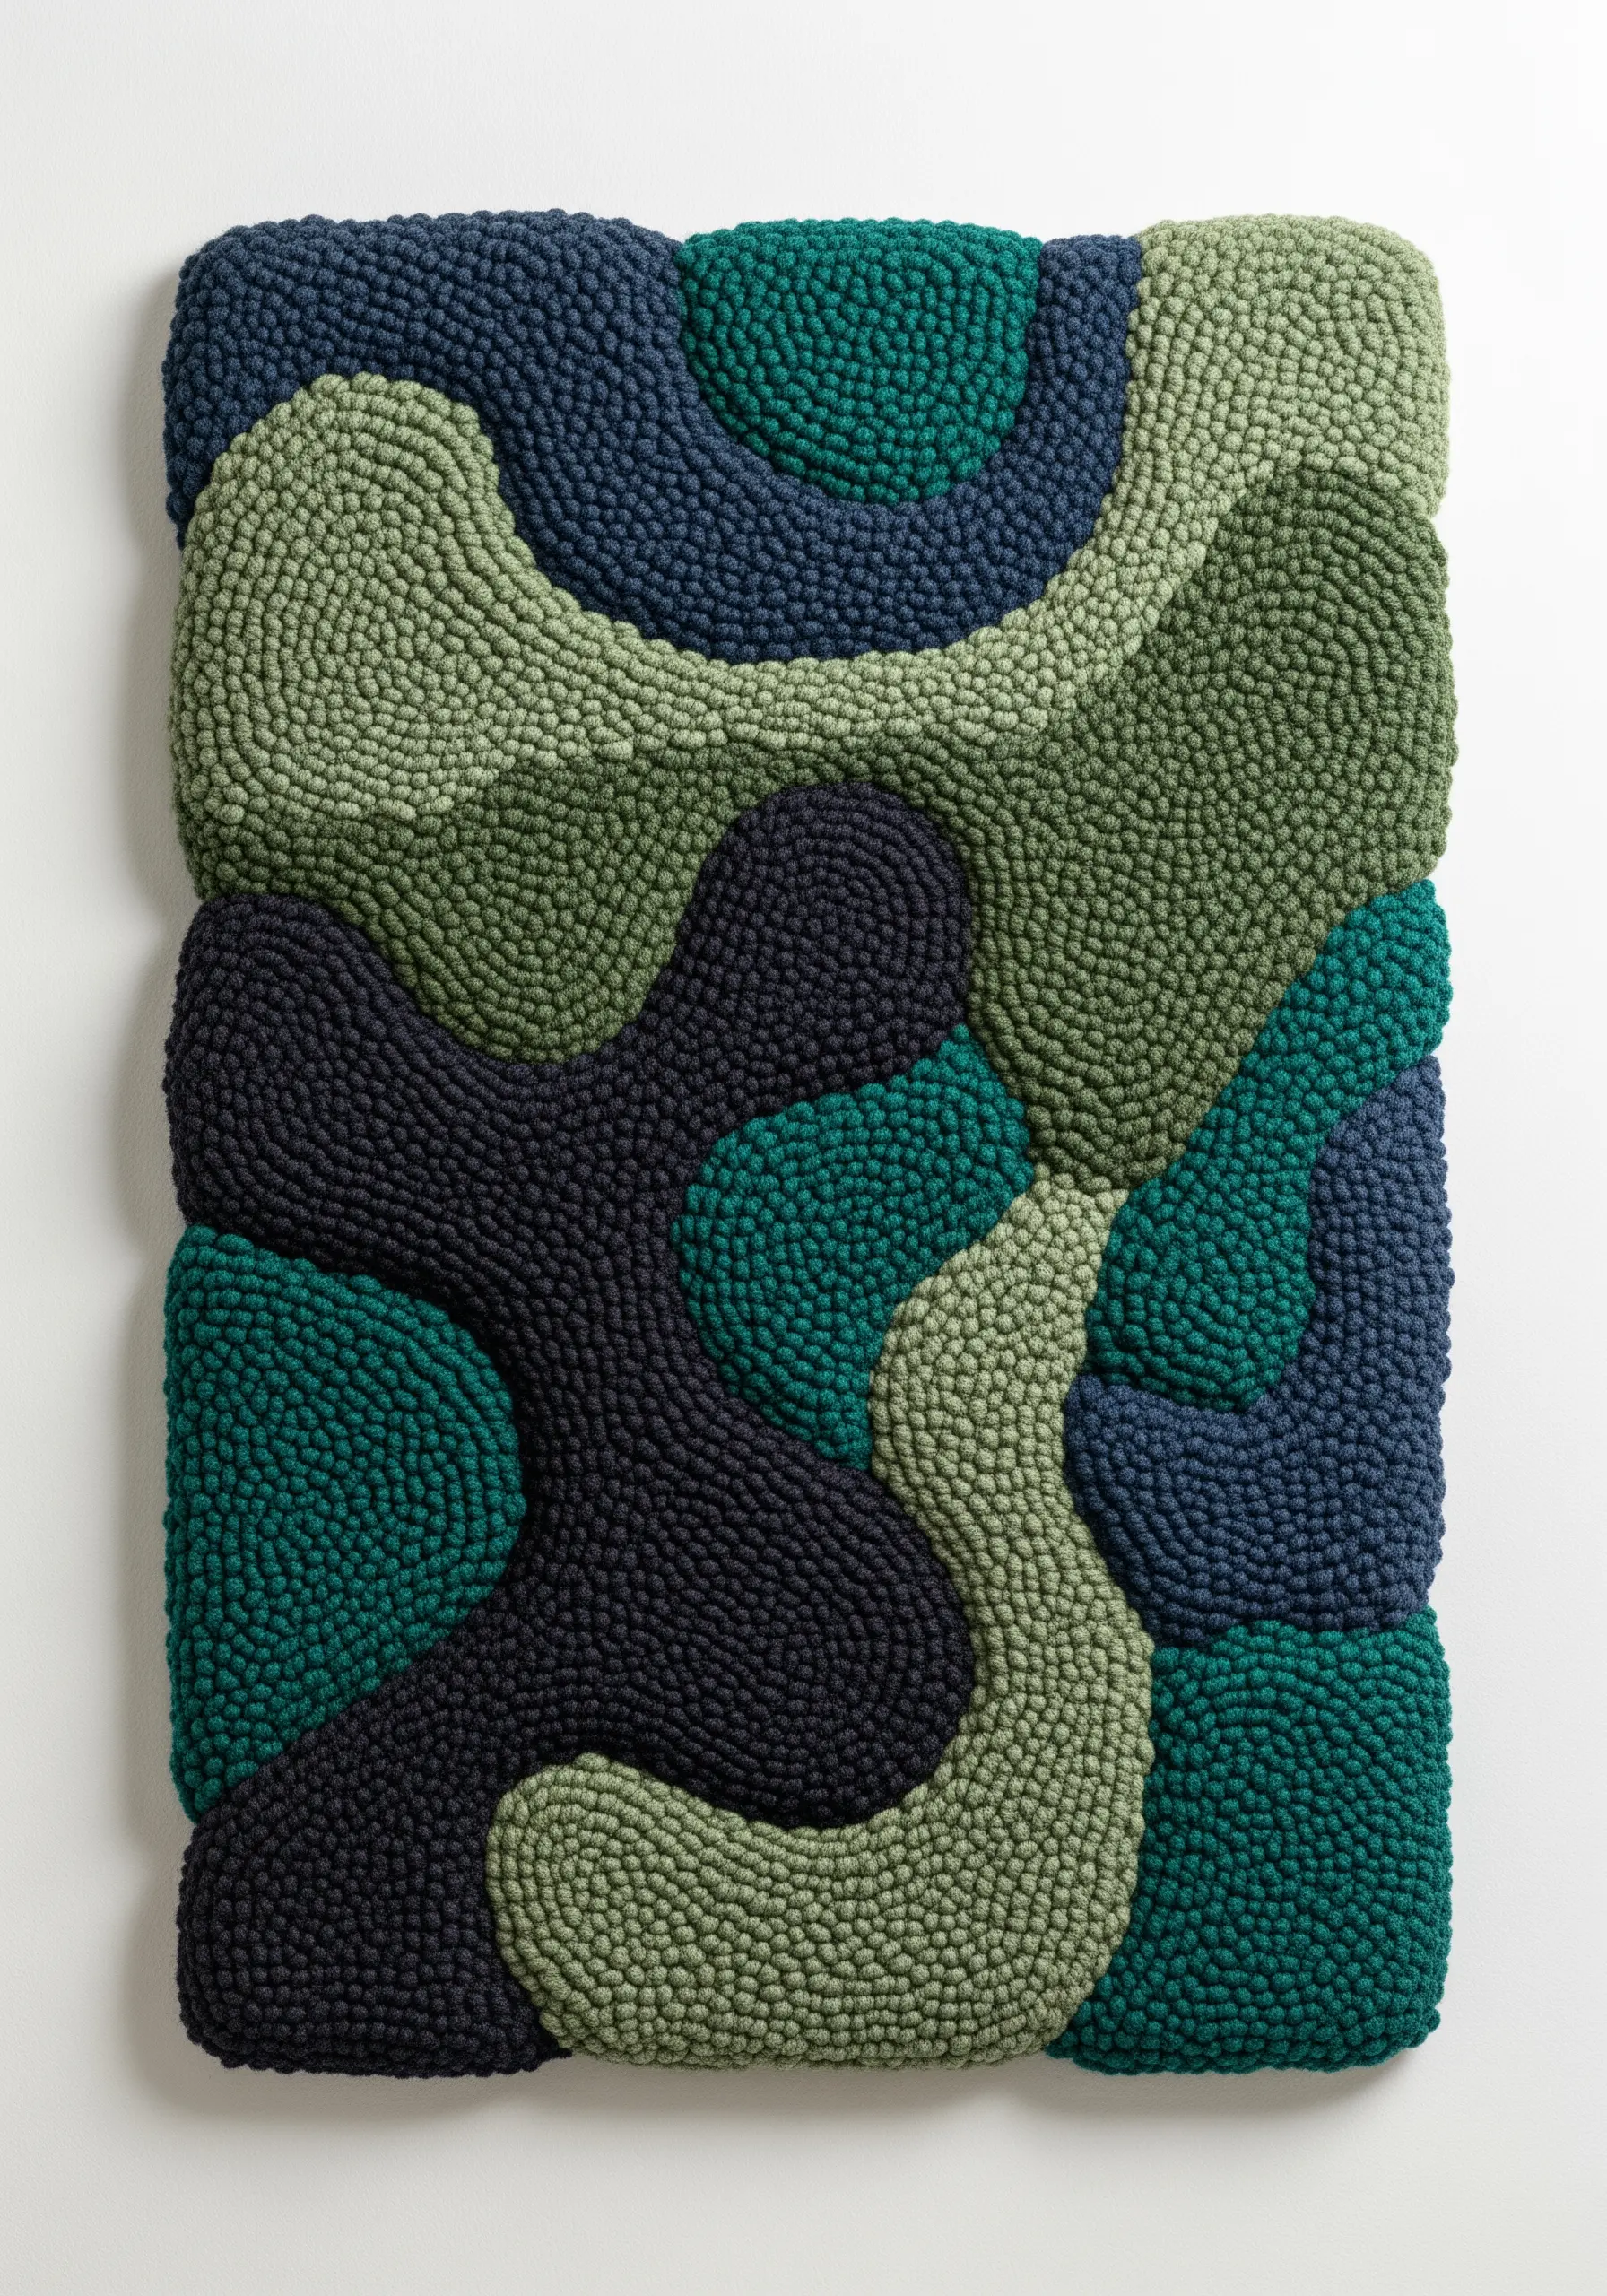
Use your punch needle to create art that feels soft, fluid, and organic.
Draw curved, interlocking shapes on your monk’s cloth before you begin, like a topographic map or amoebic forms.
Carefully punch along these guide lines to establish clean borders between your color fields.
The resulting piece, with its uniform loop texture and soft contours, feels both disciplined and natural, making it a perfect project for beginner crafters who love organic textures.


