

You have the threads, the fabric, and the desire to create something beautiful for your bedroom. But perhaps you feel stuck, repeating the same stitches, or your finished pieces don’t quite capture the warmth you envisioned. It’s not about learning a hundred new stitches; it’s about learning how to use a few with intention.
Think of your needle not just as a tool, but as a way to control texture, light, and emotion. A simple shift—from a flat satin stitch to a raised knot, or from a six-strand floss to a single, delicate thread—can transform a simple motif into a piece of art that feels personal and alive.
Let’s explore how these small, deliberate choices can elevate your work. Together, we’ll turn your bedroom textiles into a quiet gallery of handcrafted warmth, one thoughtful stitch at a time.
1. Stitch a Wildflower Meadow Headboard
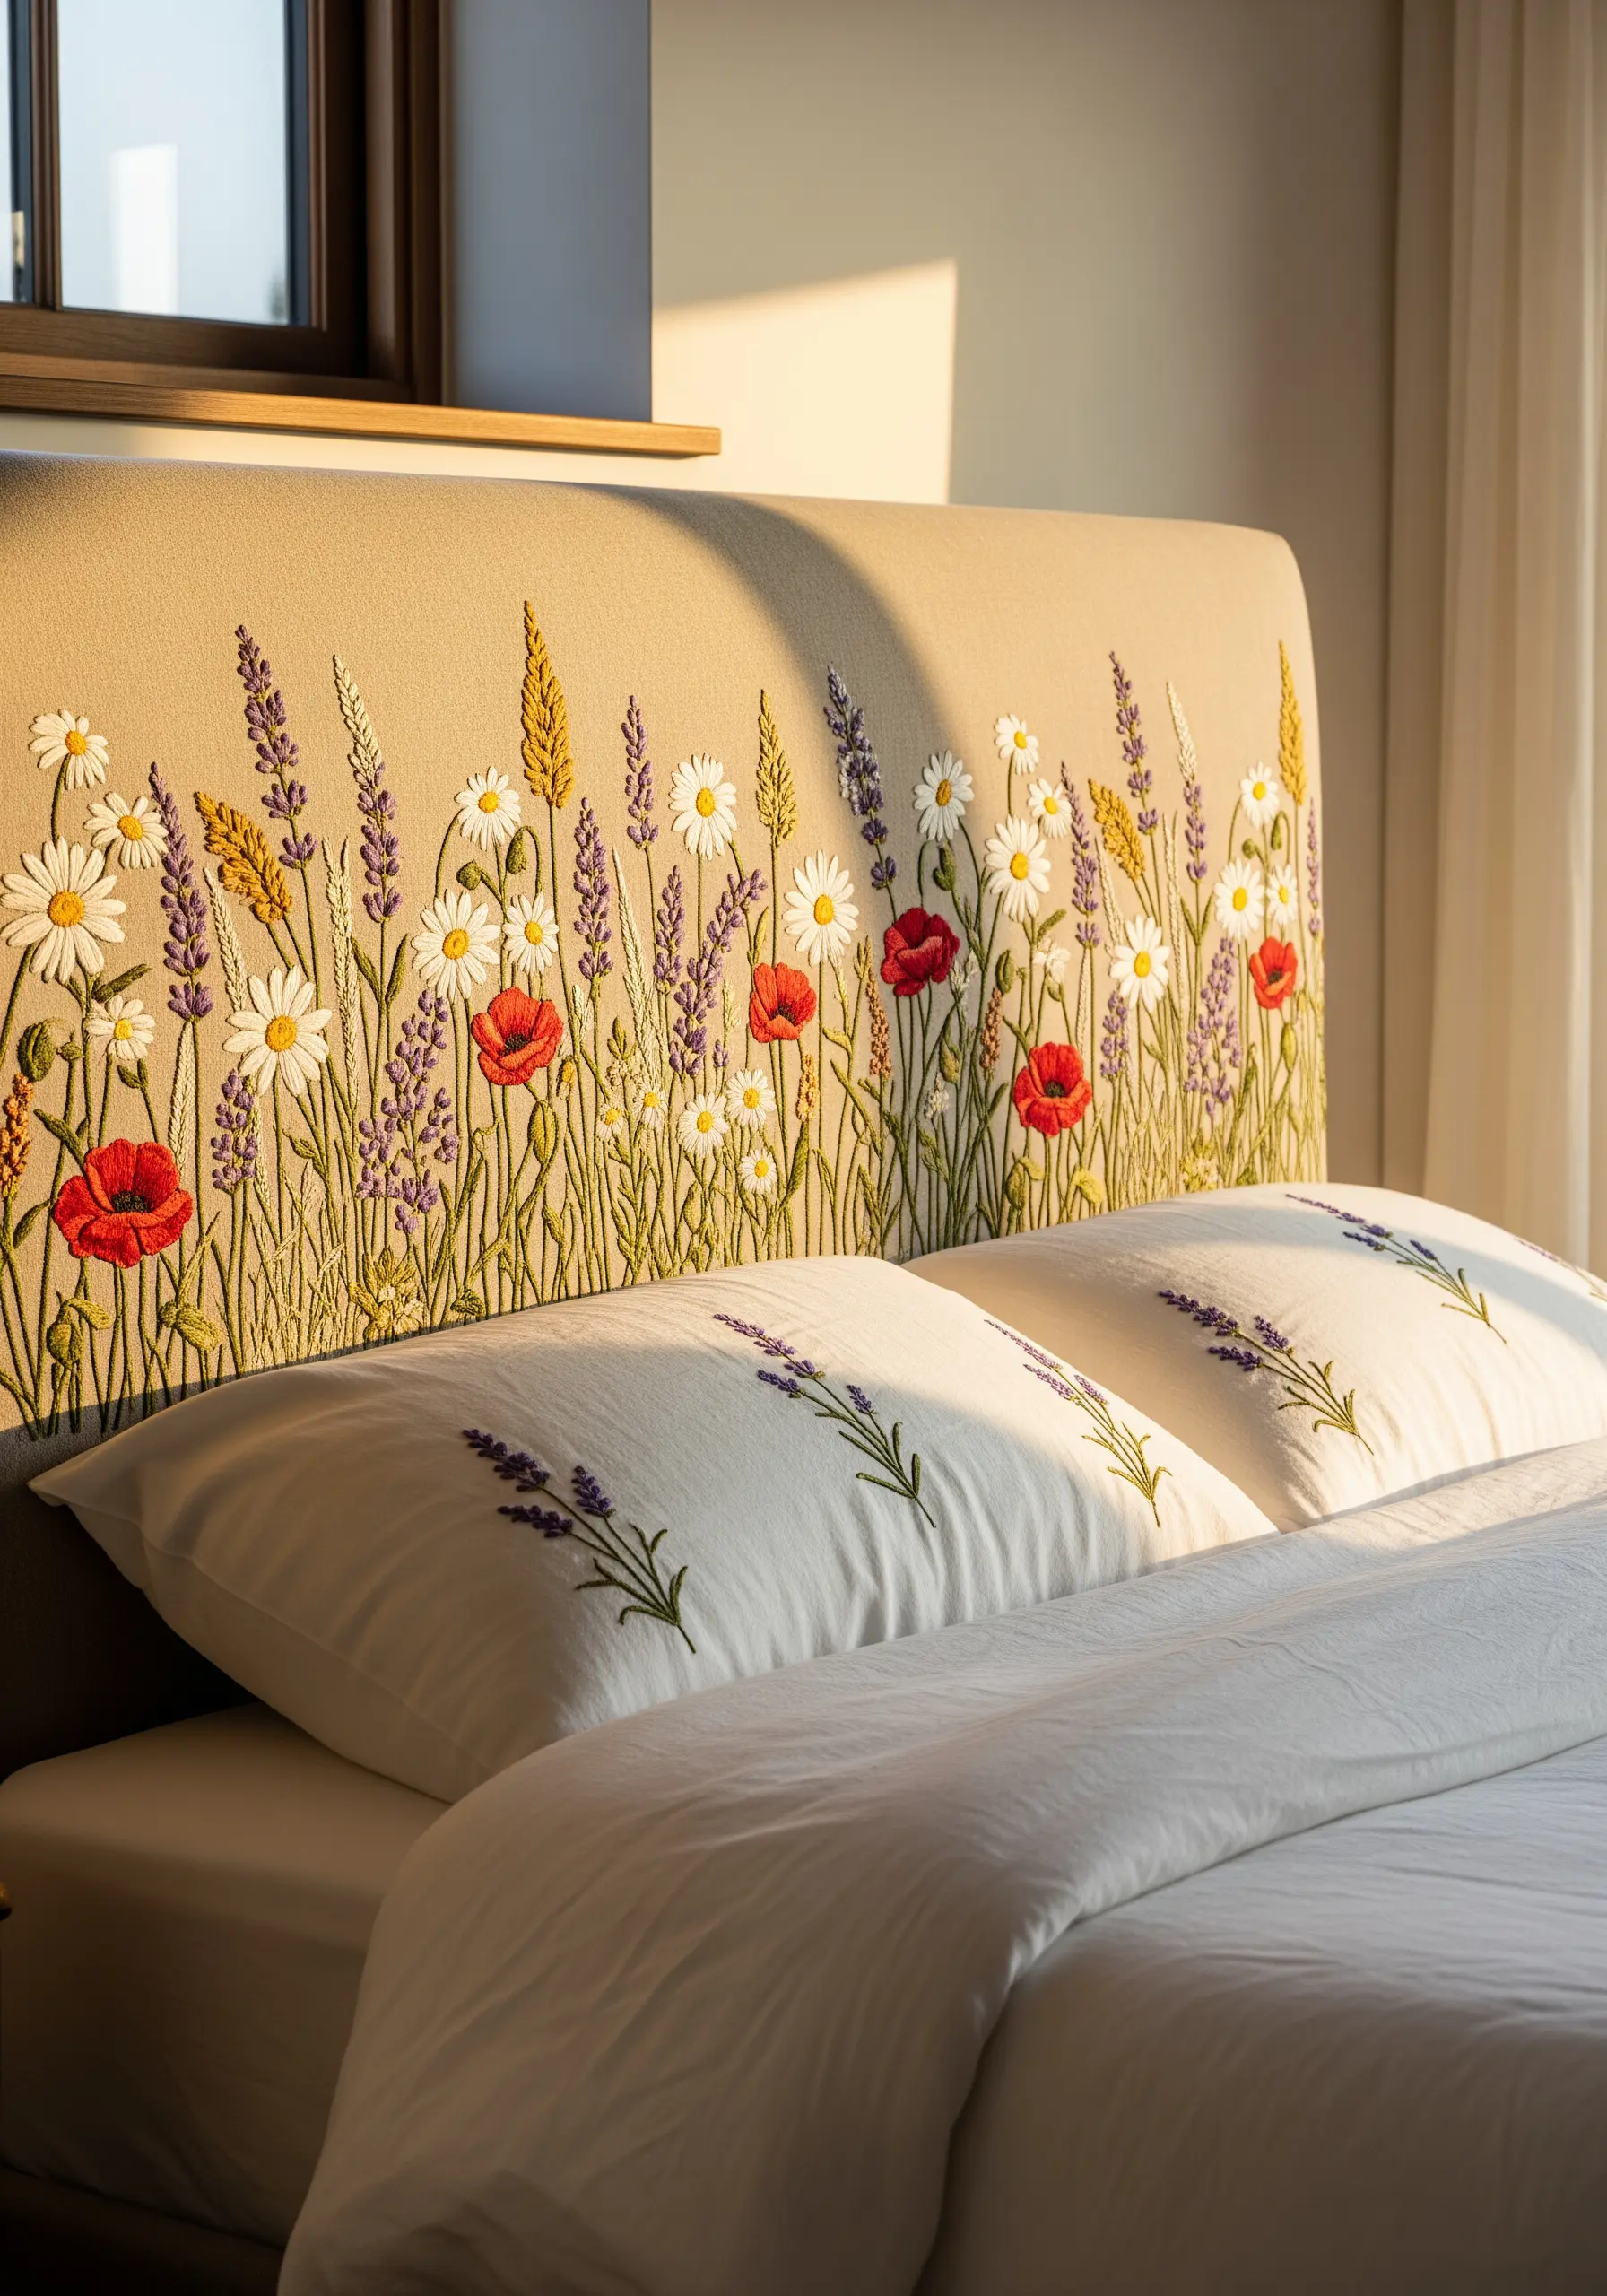
Transform an upholstered headboard into a permanent art piece by stitching directly onto the fabric.
Use a sturdy, curved upholstery needle to navigate the dense material and padding without having to remove the fabric cover.
Choose thicker threads like pearl cotton or tapestry wool; they provide better coverage and durability than standard six-strand floss, ensuring your design feels substantial, not sparse.
Create depth by layering taller stems (stem stitch) behind shorter flowers (satin stitch and French knots), giving your meadow a natural, un-manicured feel that draws you in.
This is one of the most impactful embroidered headboard designs because it integrates artistry directly into your room’s architecture.
2. Embroider a Celestial Map on Plush Fabric
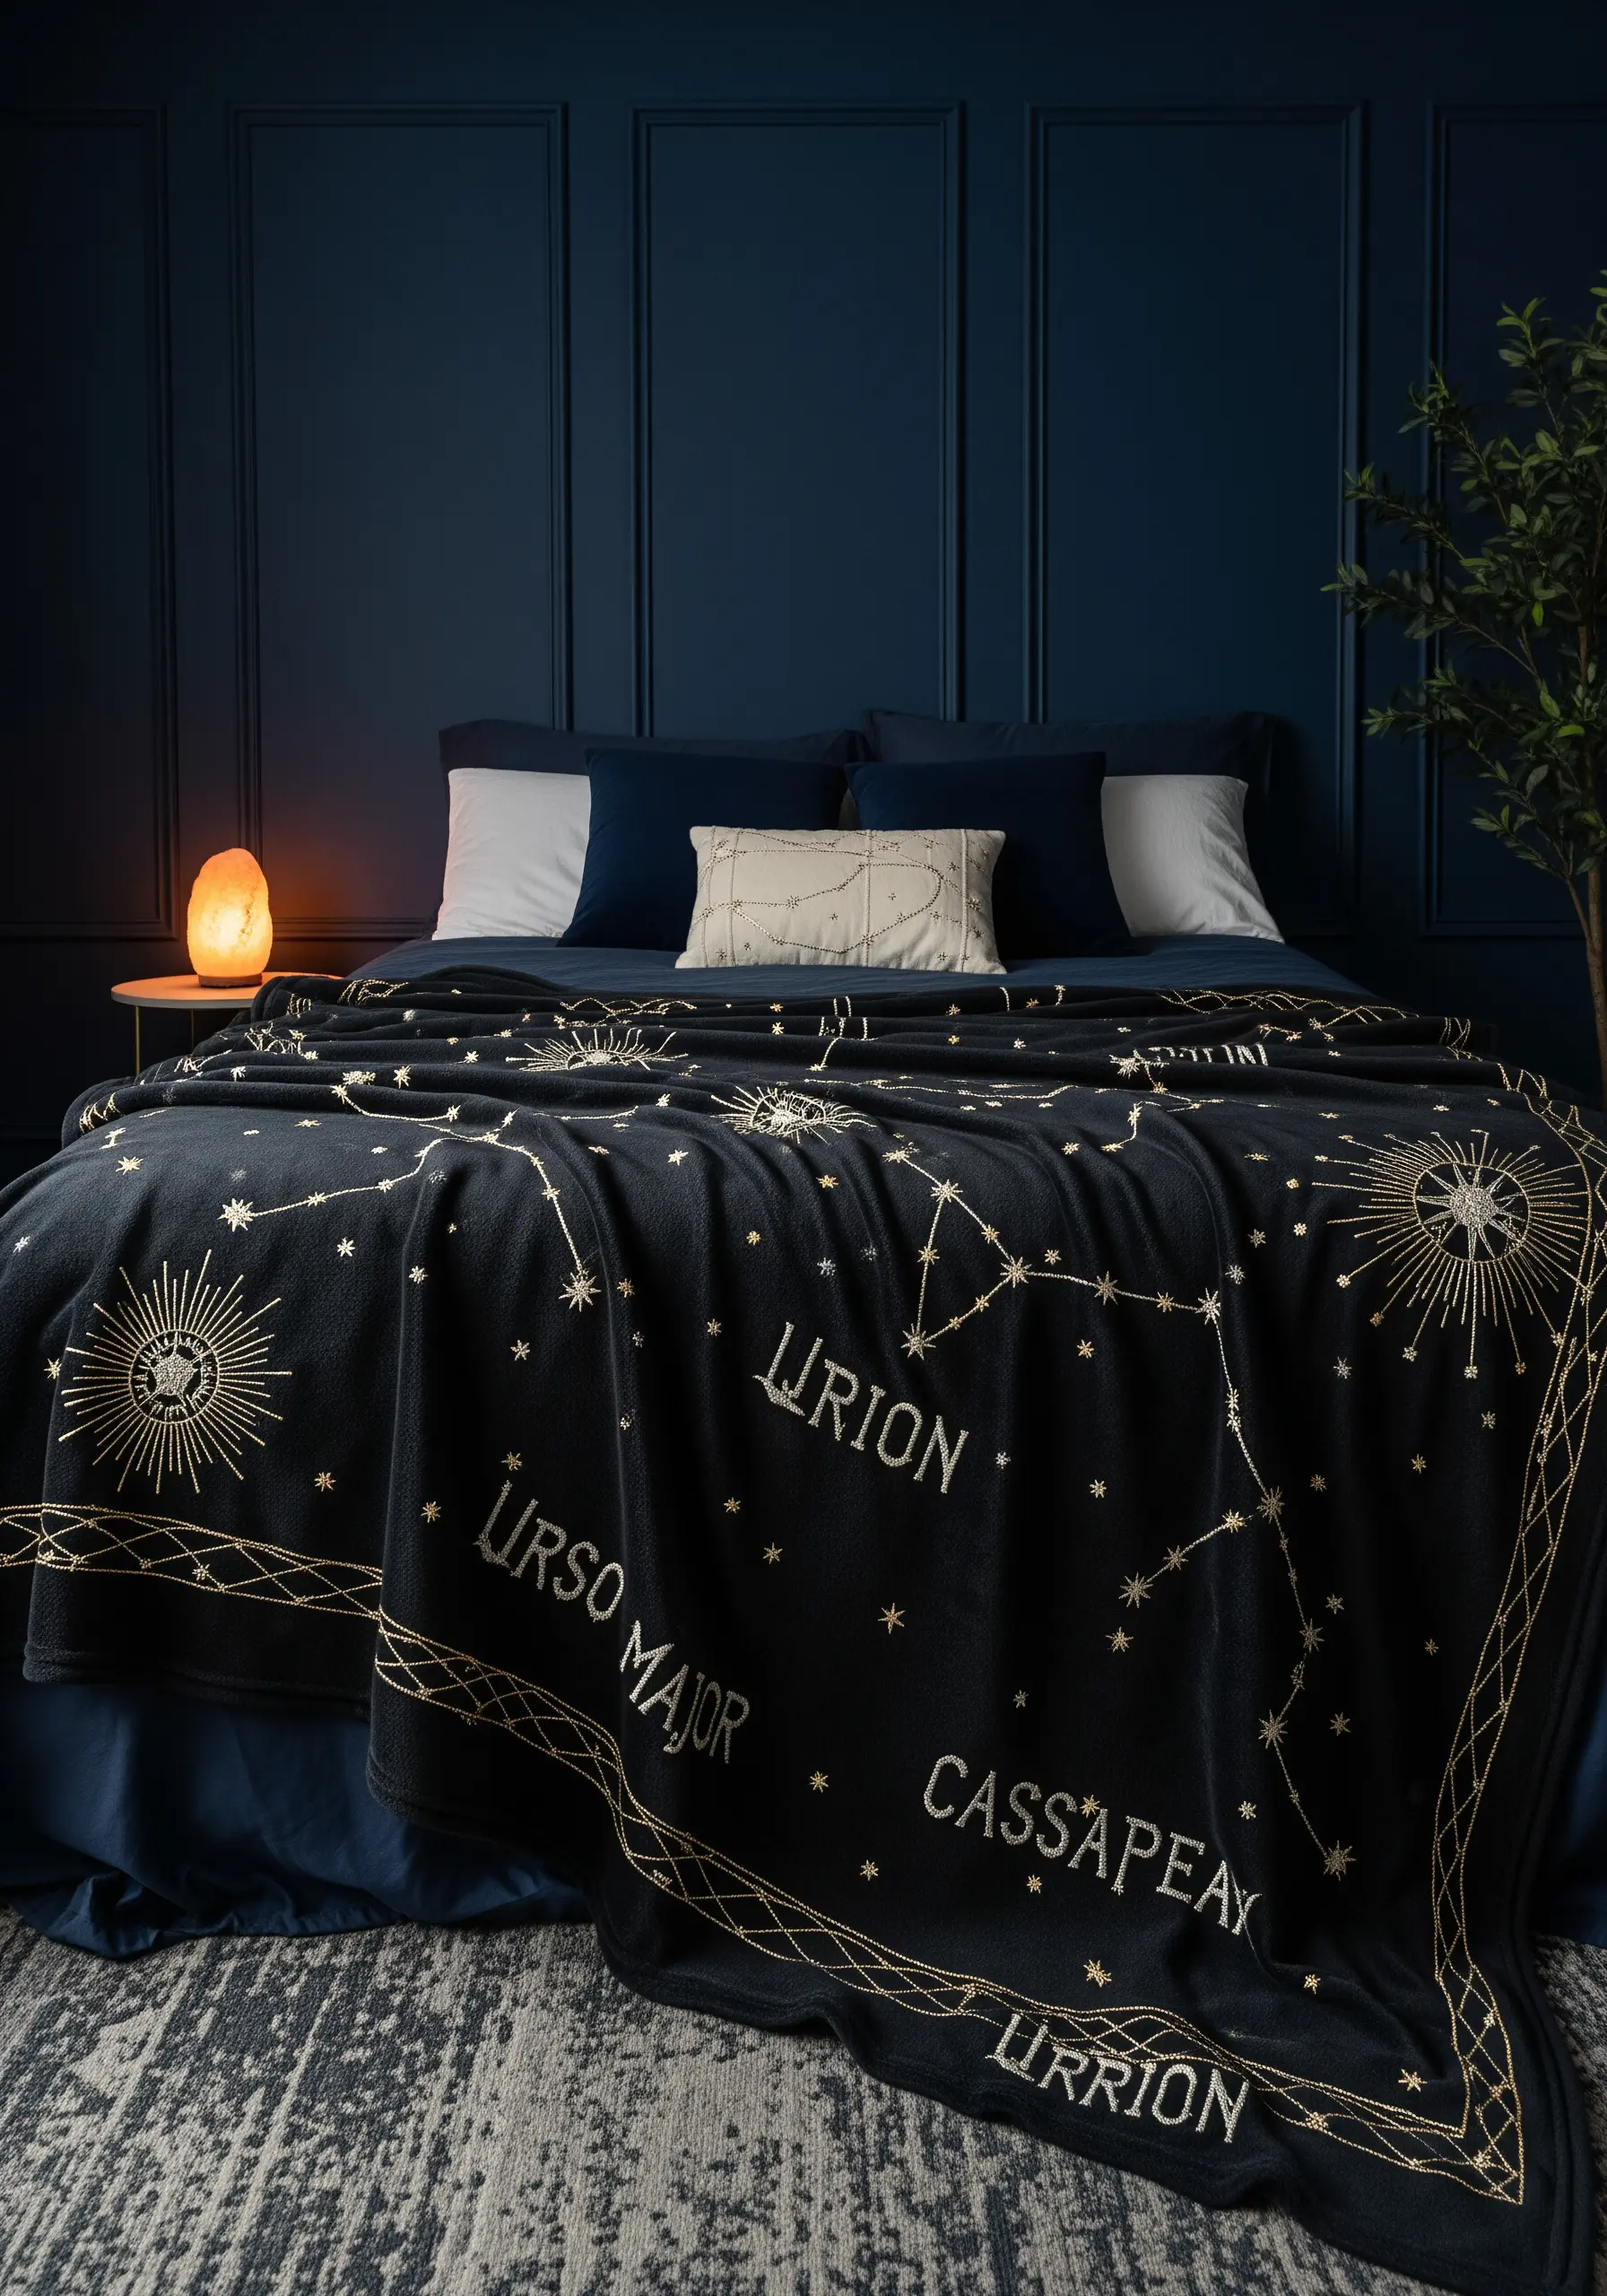
When embroidering on dark, plush fabrics like velvet or fleece, use a single strand of metallic thread for sharp, radiant lines that won’t sink into the pile.
To prevent puckering, reduce your thread tension slightly and use a water-soluble stabilizer on top of the fabric—it provides a smooth surface for your stitches and dissolves completely afterward.
A simple backstitch or whipped backstitch gives your constellations a clean, continuous line that mimics astronomical charts.
For the starbursts, use straight stitches radiating from a central point, varying their lengths to create a dynamic twinkling effect.
3. Create a Forest Landscape Wall Tapestry
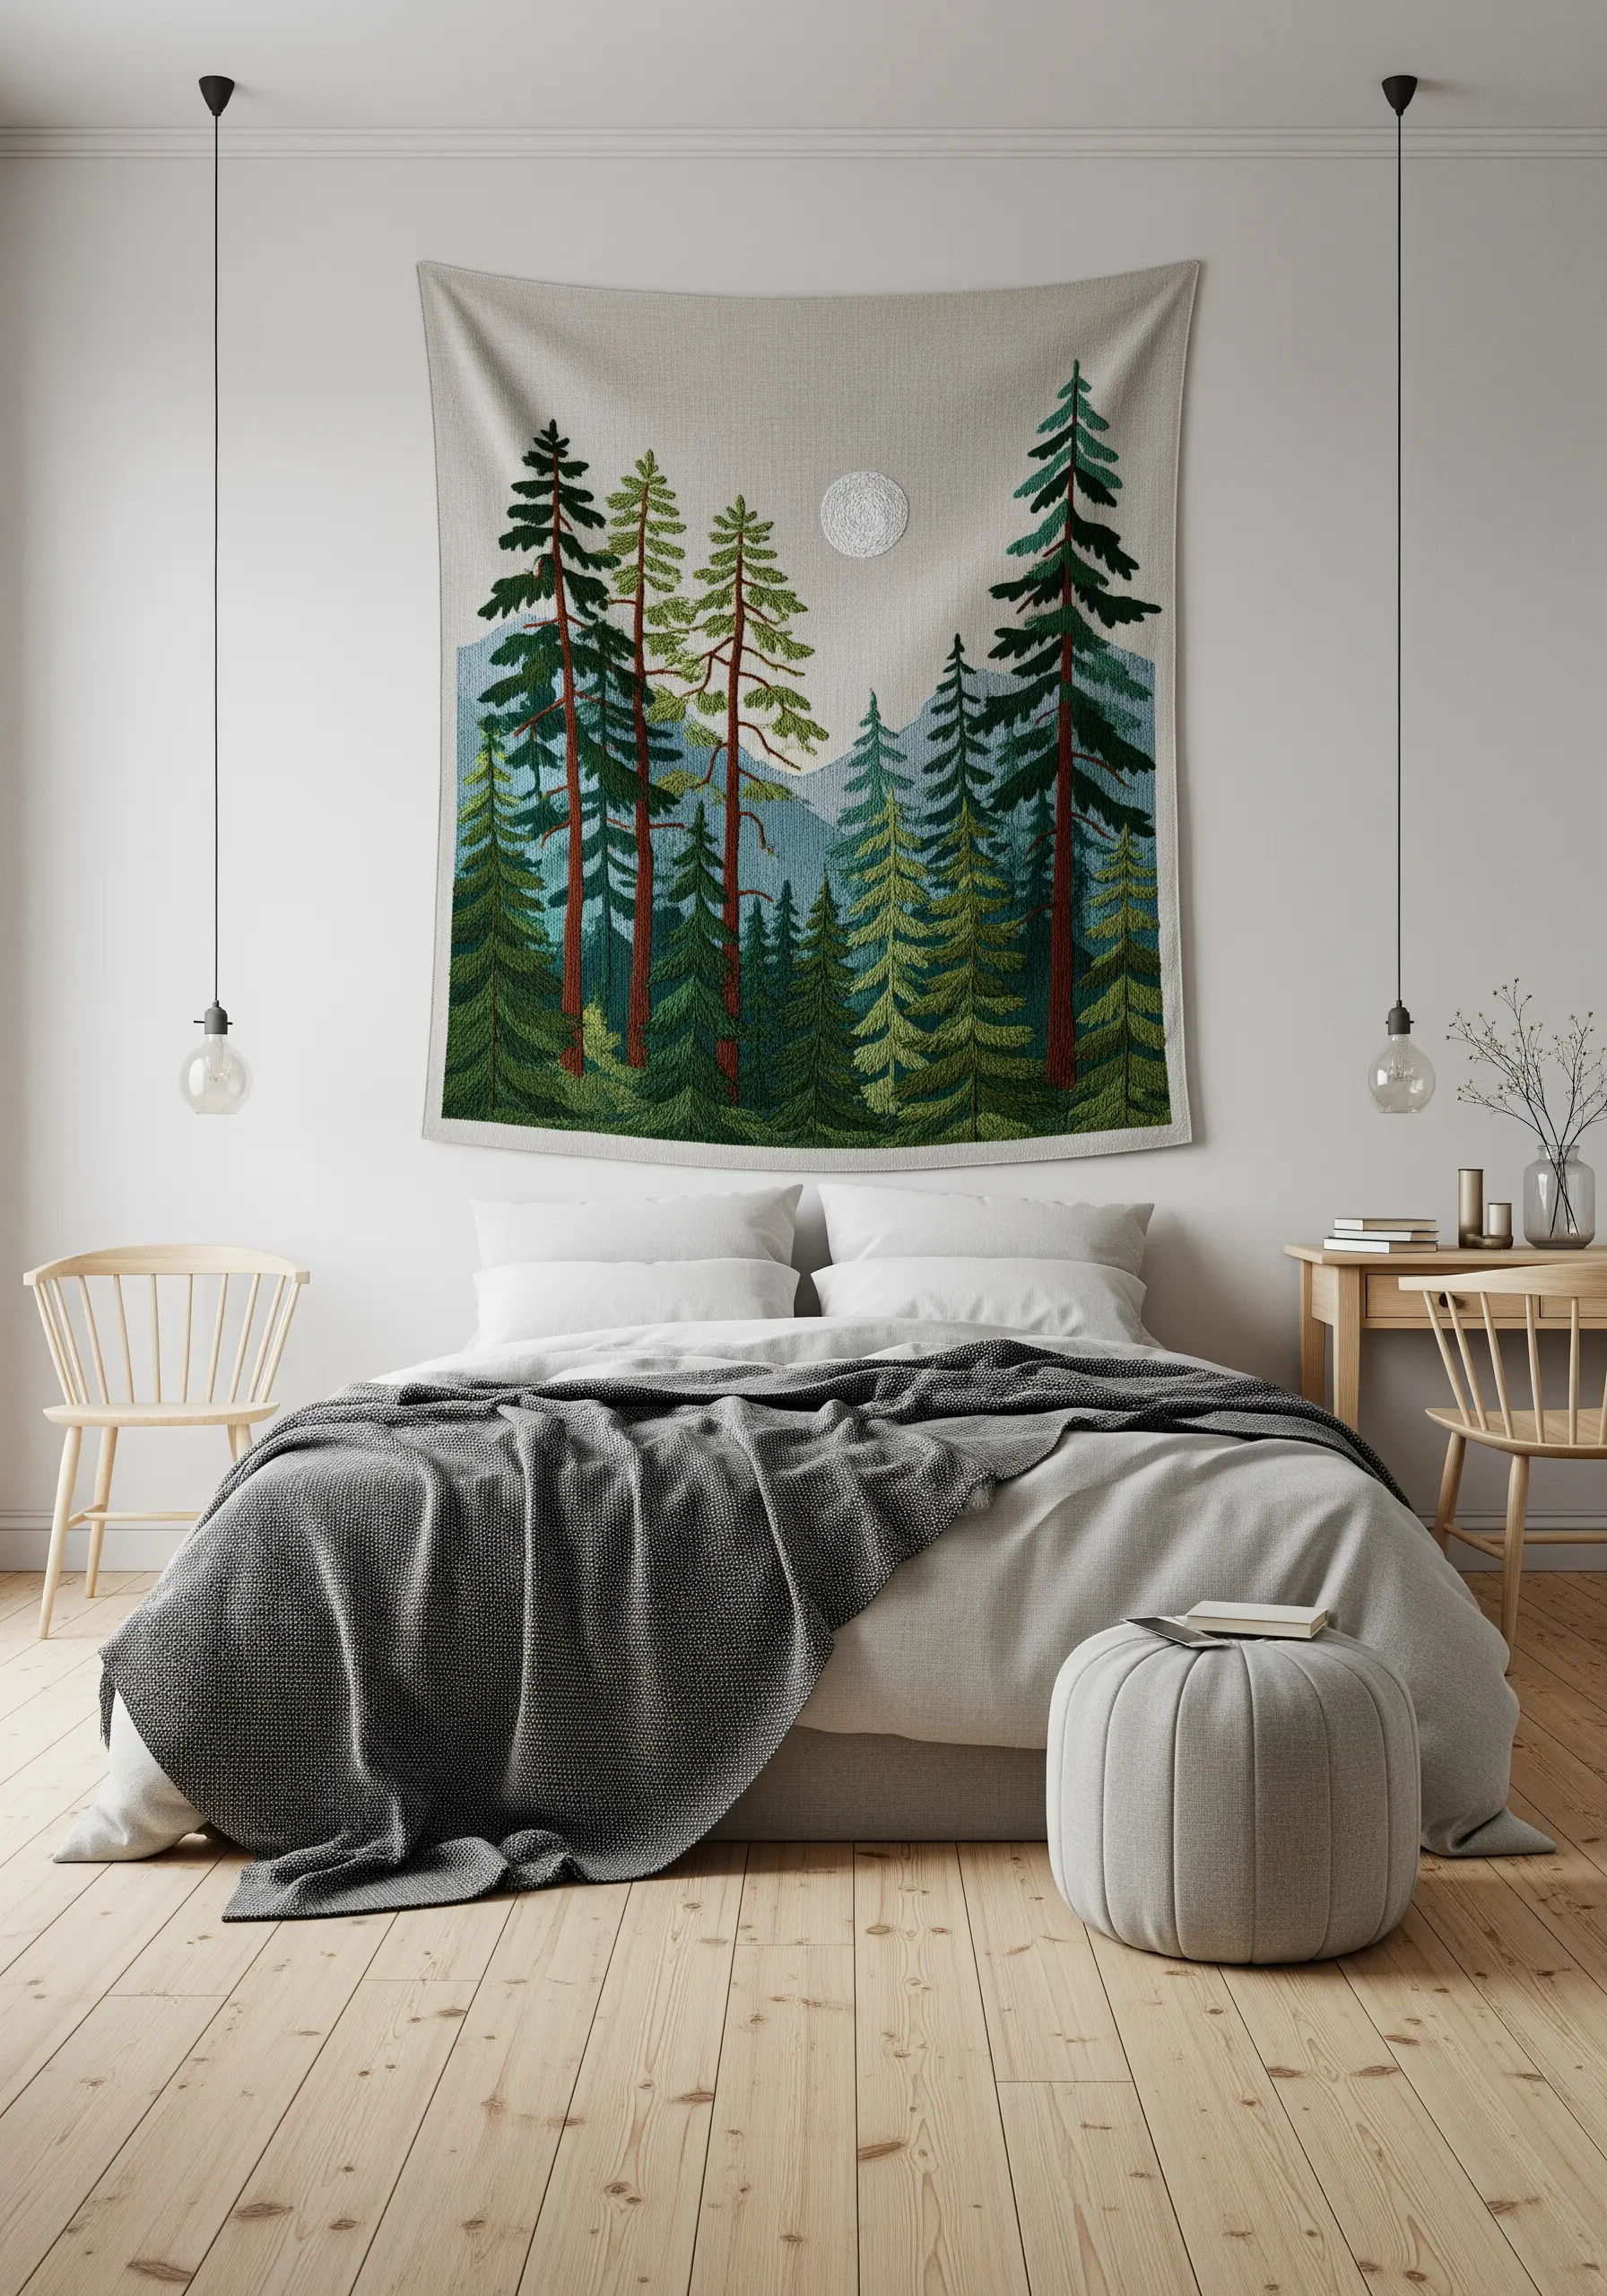
To create perspective in an embroidered landscape, manipulate the weight of your thread.
Use all six strands of floss for the foreground trees to give them presence and texture, then taper to three or four strands for the mid-ground, and finally one or two strands for distant mountains.
This subtle shift in thread thickness tricks the eye into seeing depth, making your scene feel immersive rather than flat.
Work the foliage with vertical satin stitches or seed stitches to mimic the texture of pine needles, keeping the direction consistent to unify the piece.
These large-scale modern embroidered tapestry designs can define an entire room’s atmosphere.
4. Fill Folk Art Motifs with Flawless Satin Stitch
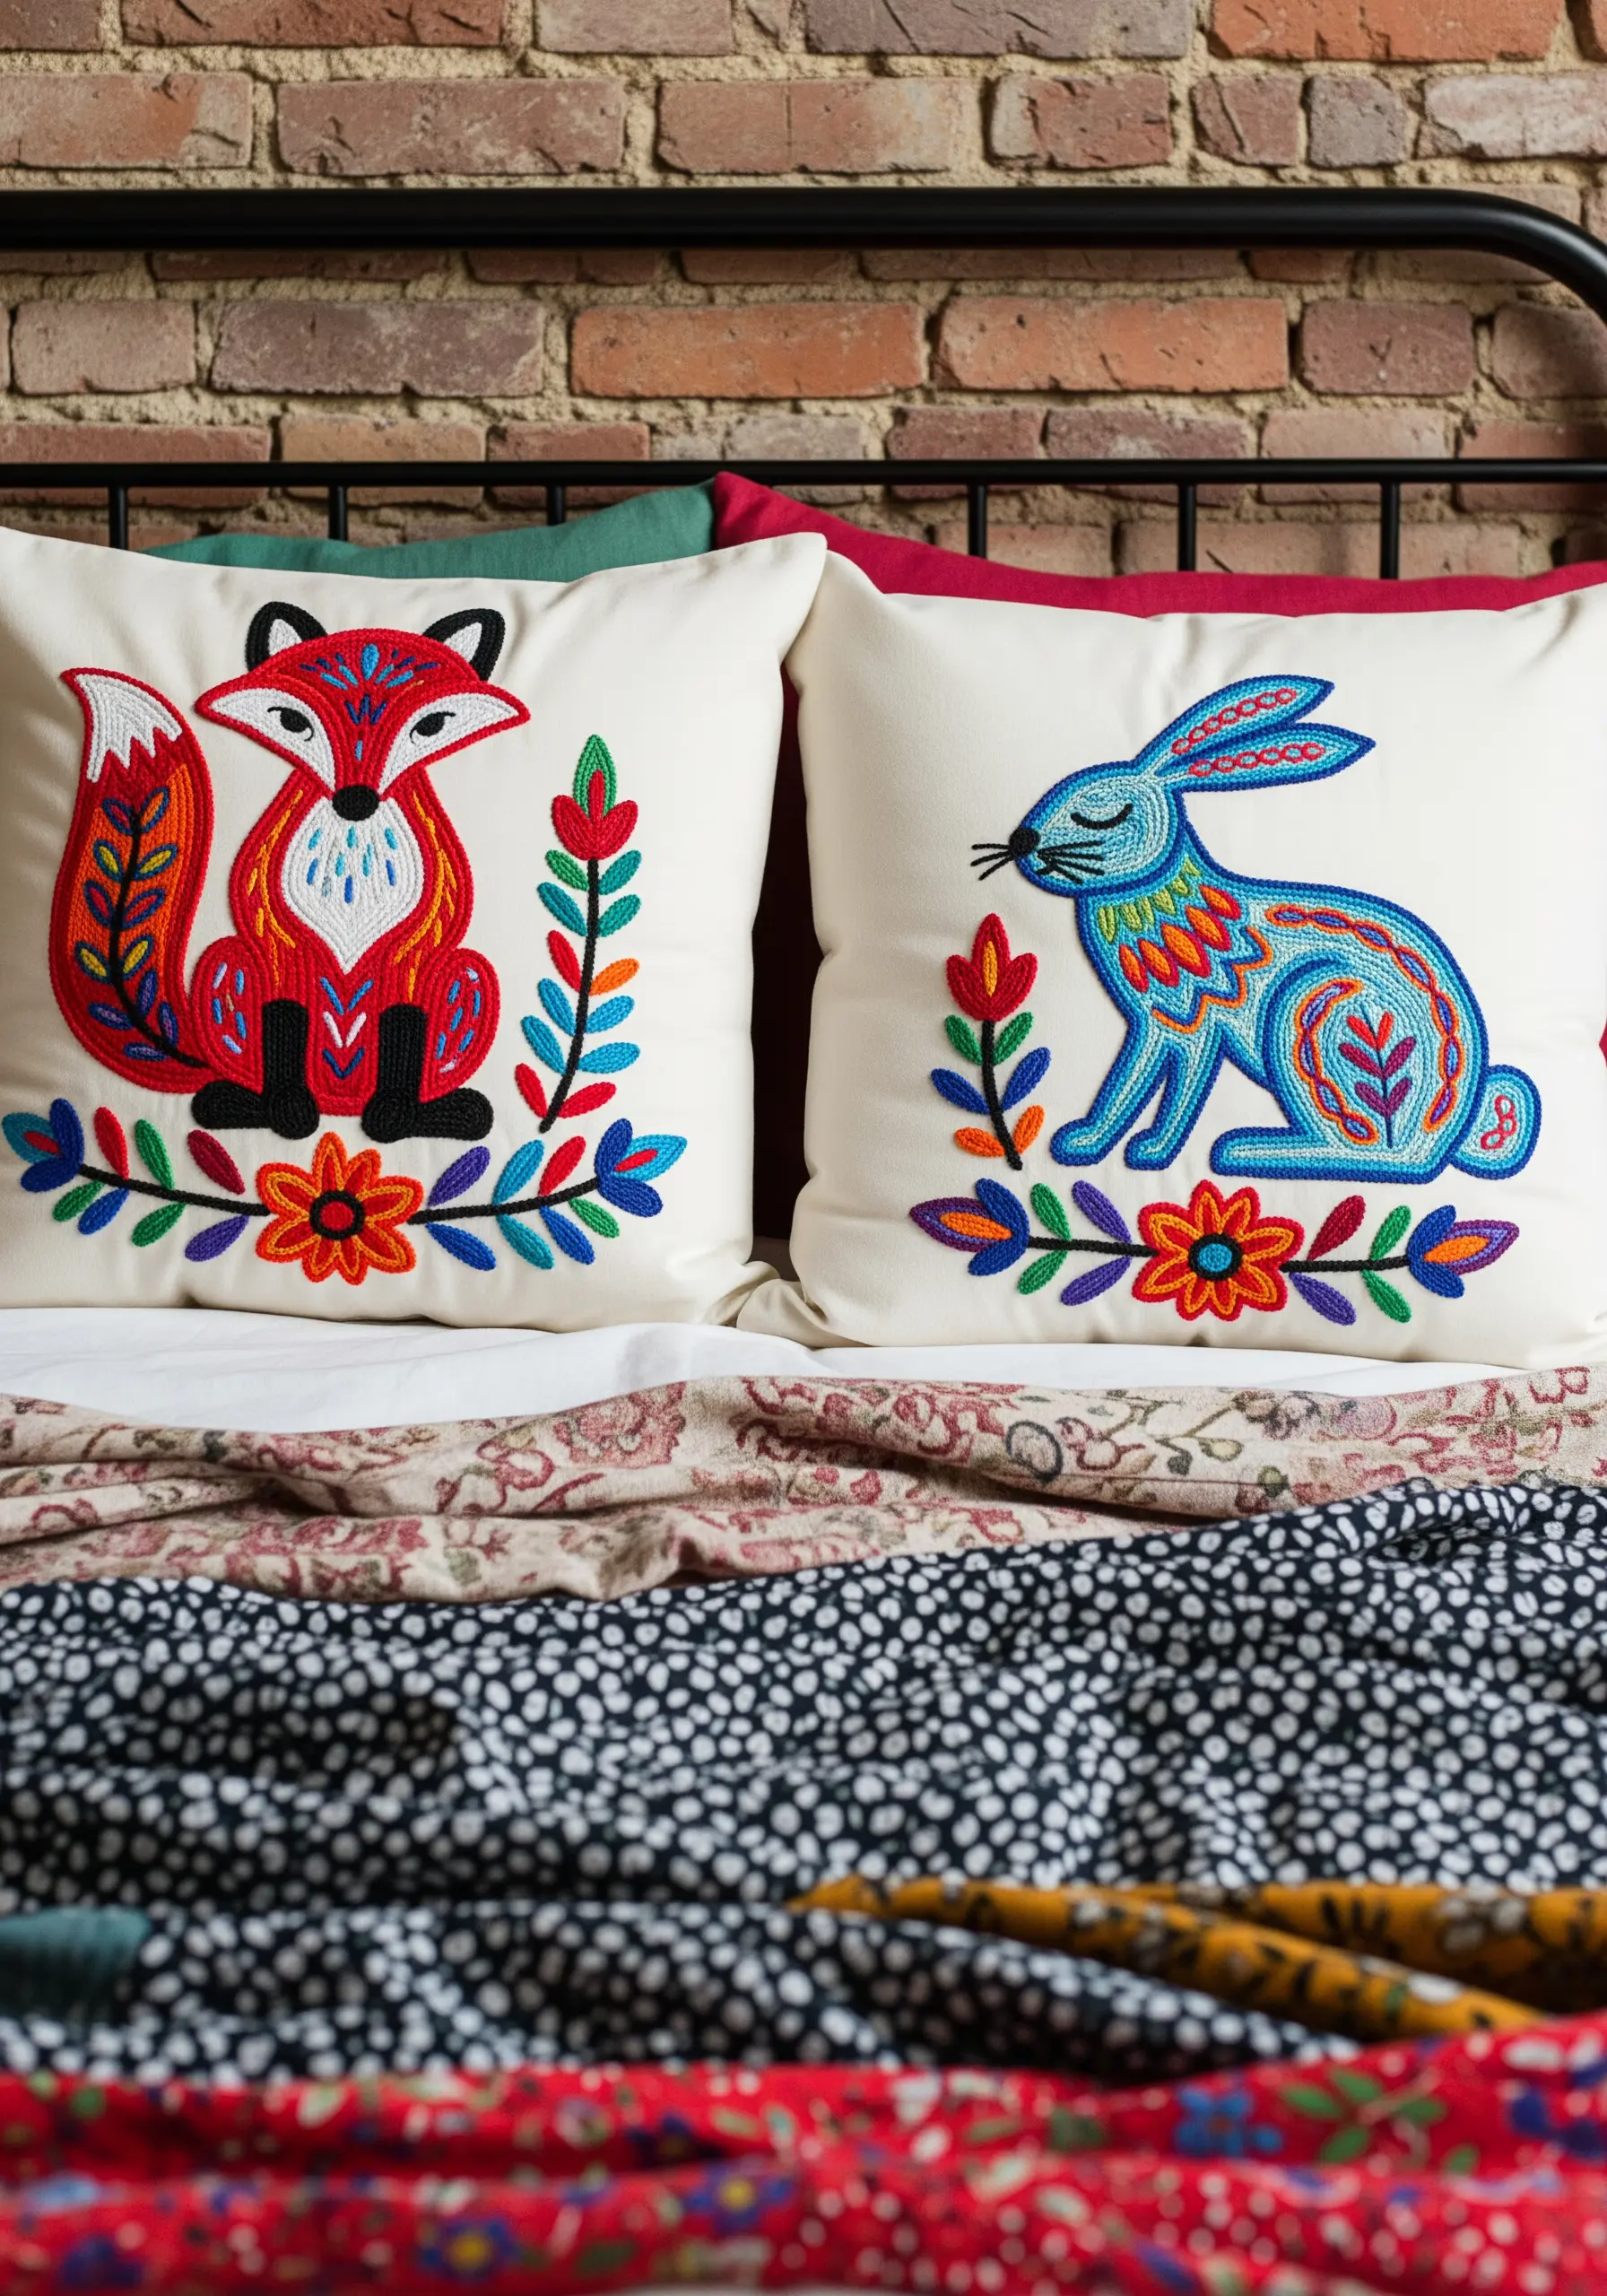
The key to perfectly smooth, dense satin stitch is preparing the outline first.
Before filling a shape, trace its entire perimeter with a tight split stitch; this creates a slightly raised, firm edge for your satin stitches to rest against, preventing gaps and unevenness.
When filling, ensure your stitches lay perfectly parallel to one another without overlapping. A laying tool or the eye of a spare needle can help guide each stitch into place.
These bold, graphic pillow cushion embroidery patterns look sharpest when every filled section is flawlessly executed.
5. Add a Sunrise Motif to Sheer Curtains
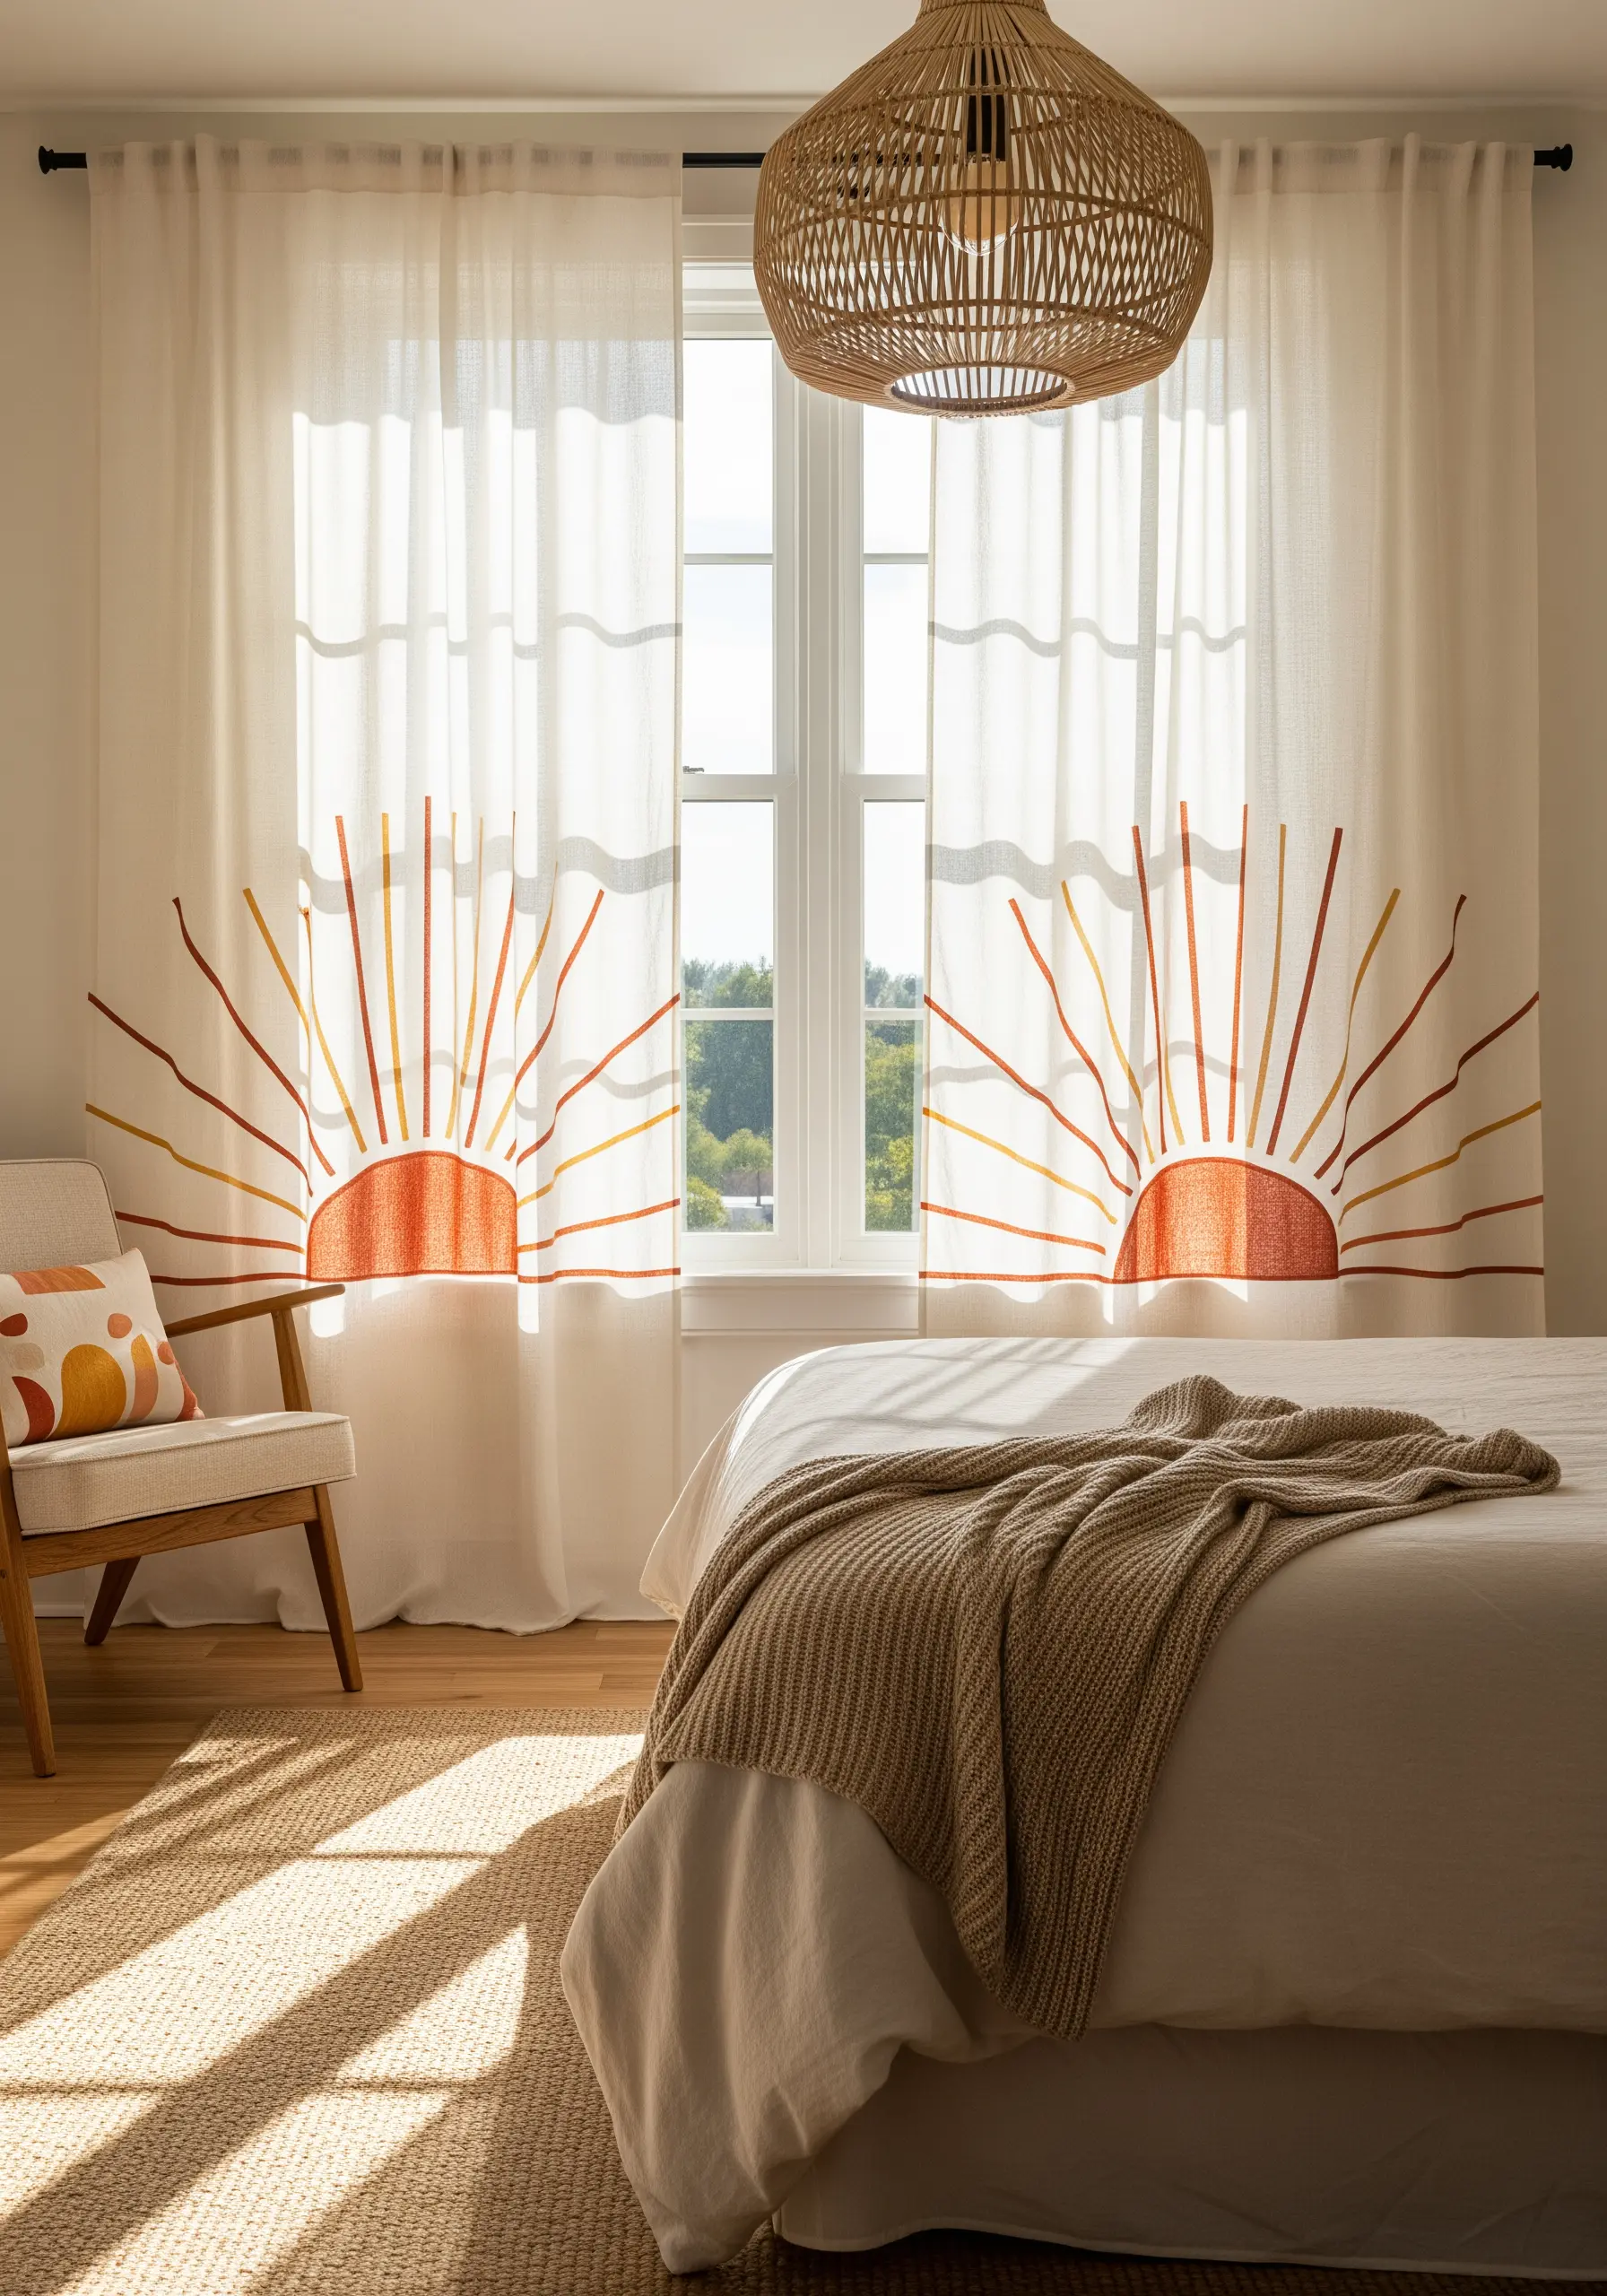
Embroidering on lightweight linen or cotton voile requires a delicate touch to avoid distorting the fabric’s drape.
Use a fine, sharp needle (size 9 or 10) and limit your floss to two or three strands to keep the embroidery from becoming too heavy.
For the sun’s rays, a simple running stitch or stem stitch provides clean, graphic lines without puckering the sheer material.
Fill the semi-circle with long, straight satin stitches, and use a tear-away stabilizer on the back for support during stitching, which you can gently remove once finished.
Explore more embroidered curtain & blind ideas to let light filter through your handiwork.
6. Elevate Bed Linens with a Classic Monogram
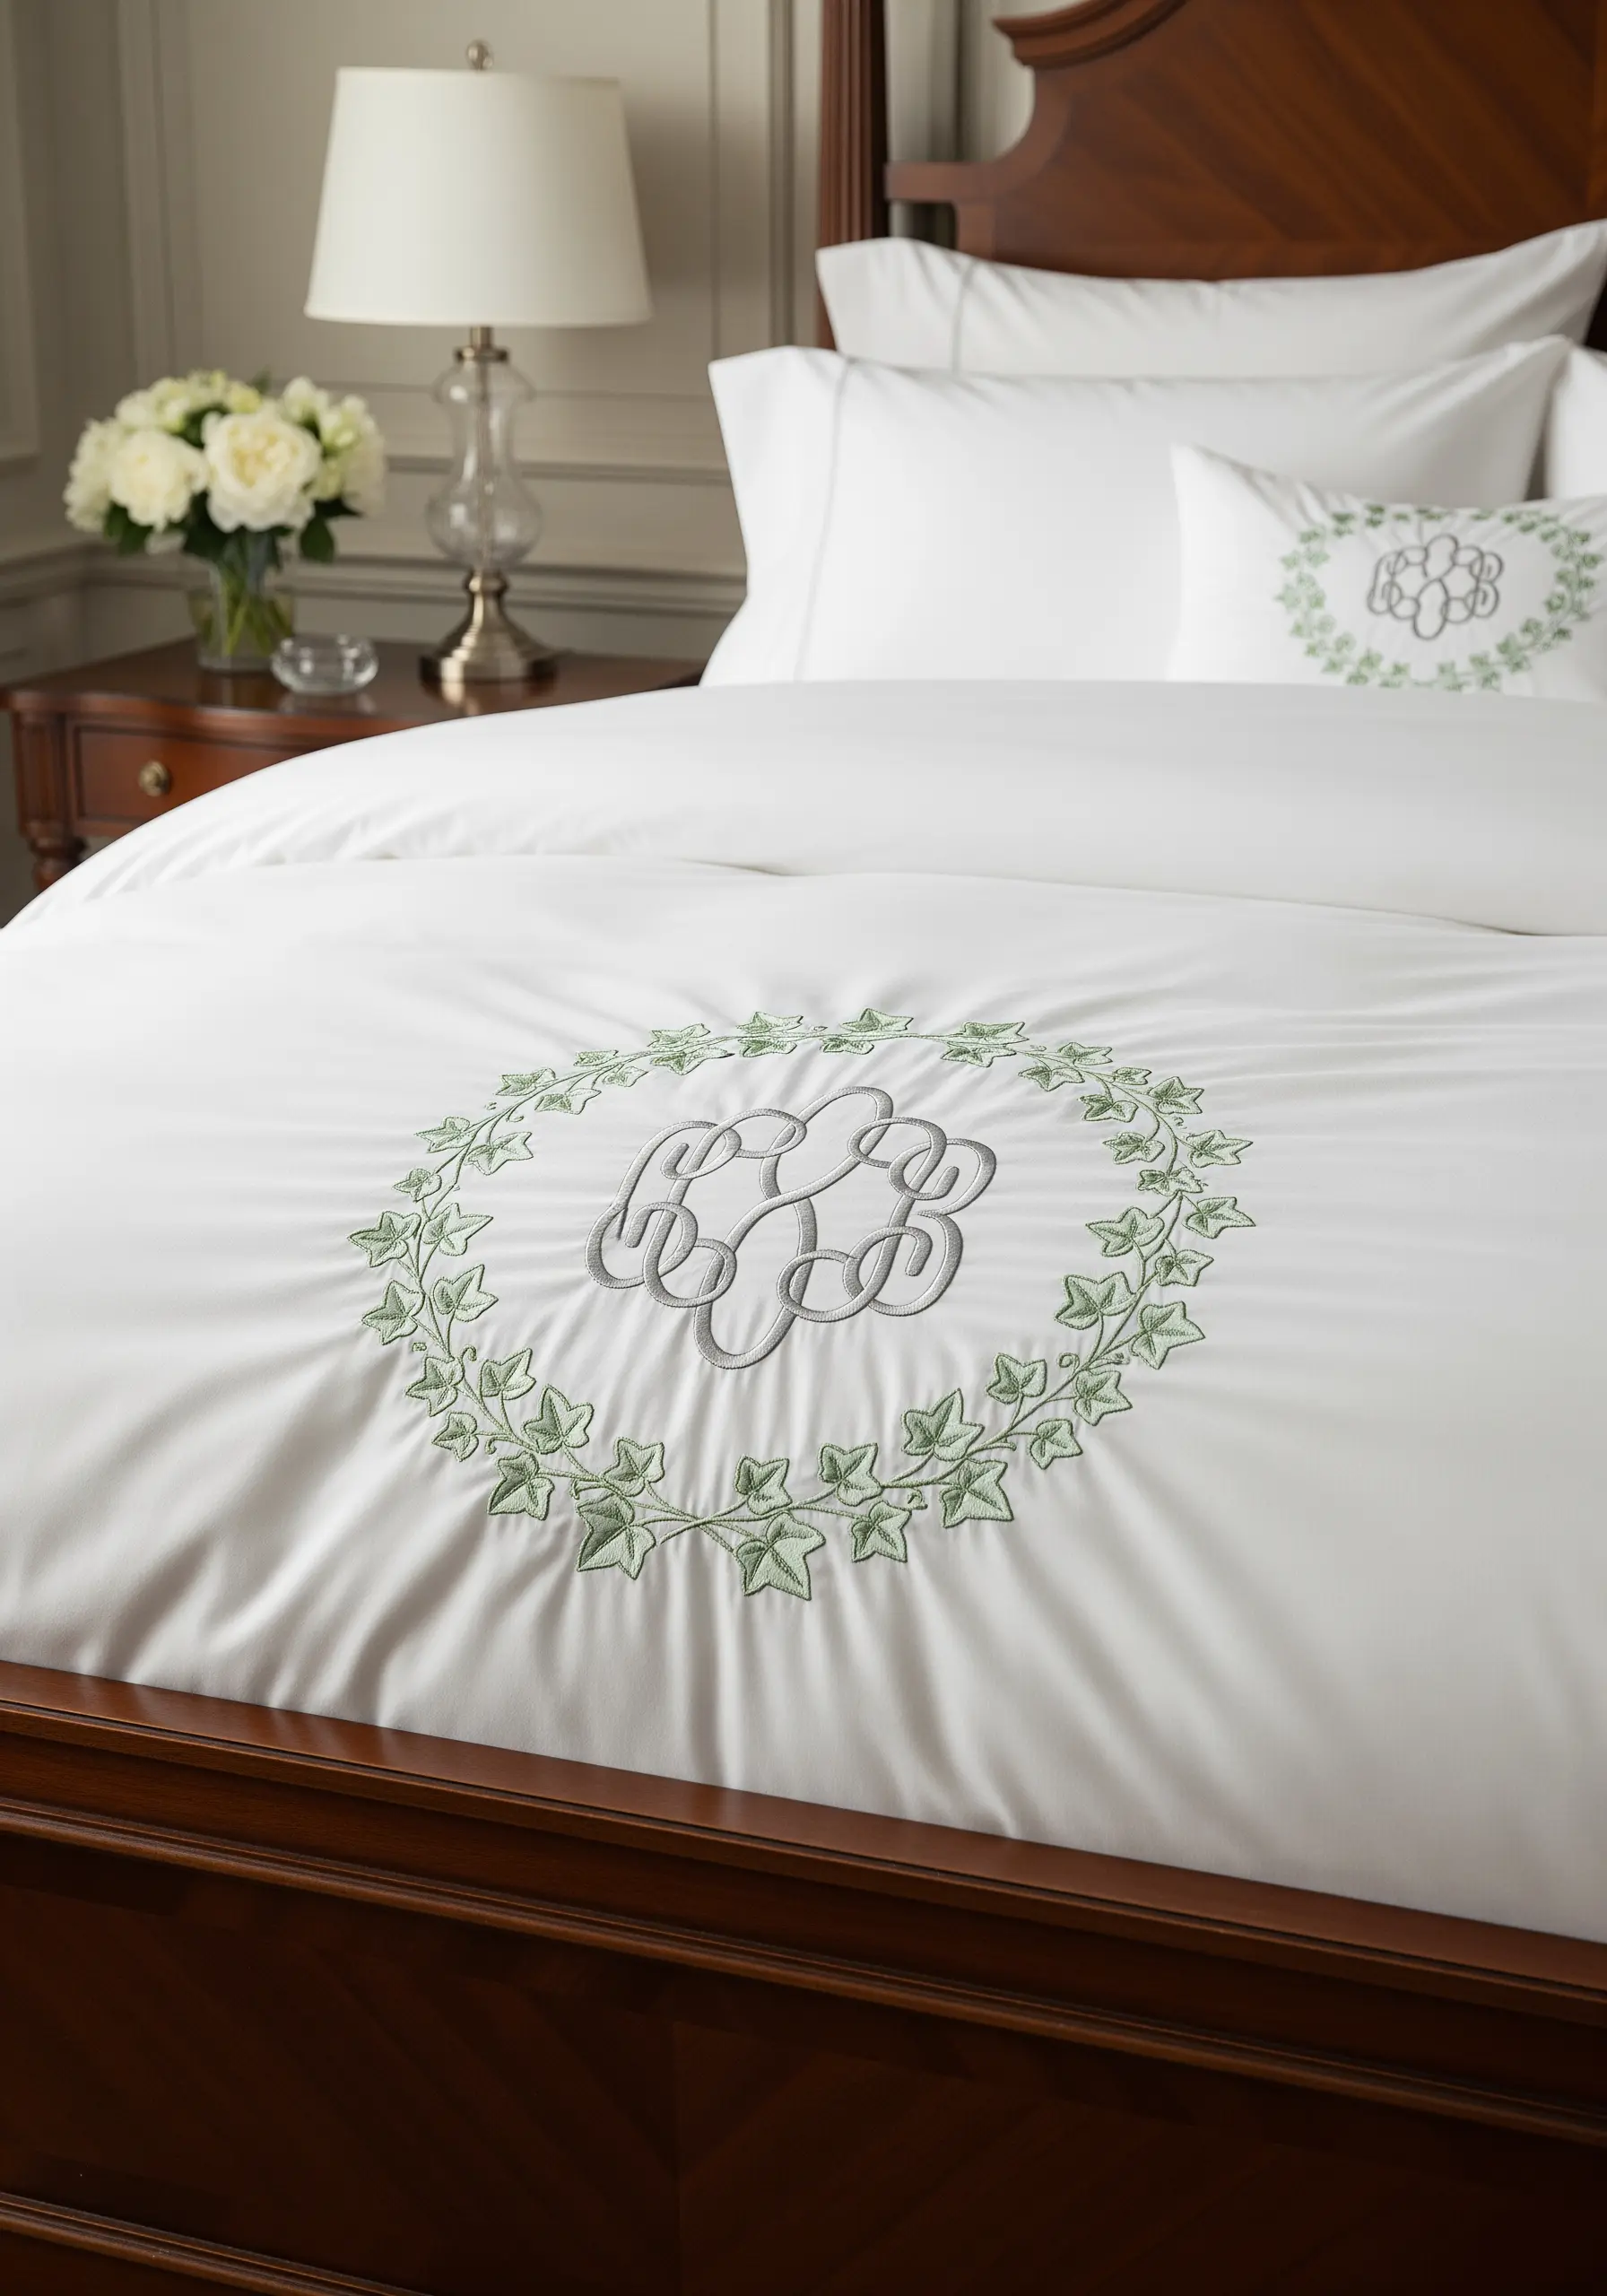
A well-stitched monogram brings a timeless, bespoke quality to any bedroom.
For a subtle, textural look, use a thread color that is only one or two shades different from your fabric—this tone-on-tone effect feels luxurious and integrated.
To give the monogram a raised, three-dimensional profile, first fill the letter shapes with a base of seed stitches, then cover them with a smooth, tight satin stitch.
This technique, known as padded satin stitch, lifts the design from the fabric surface, making your personalized name monogram a tactile focal point.
7. Embellish a Lampshade with Botanical Silhouettes
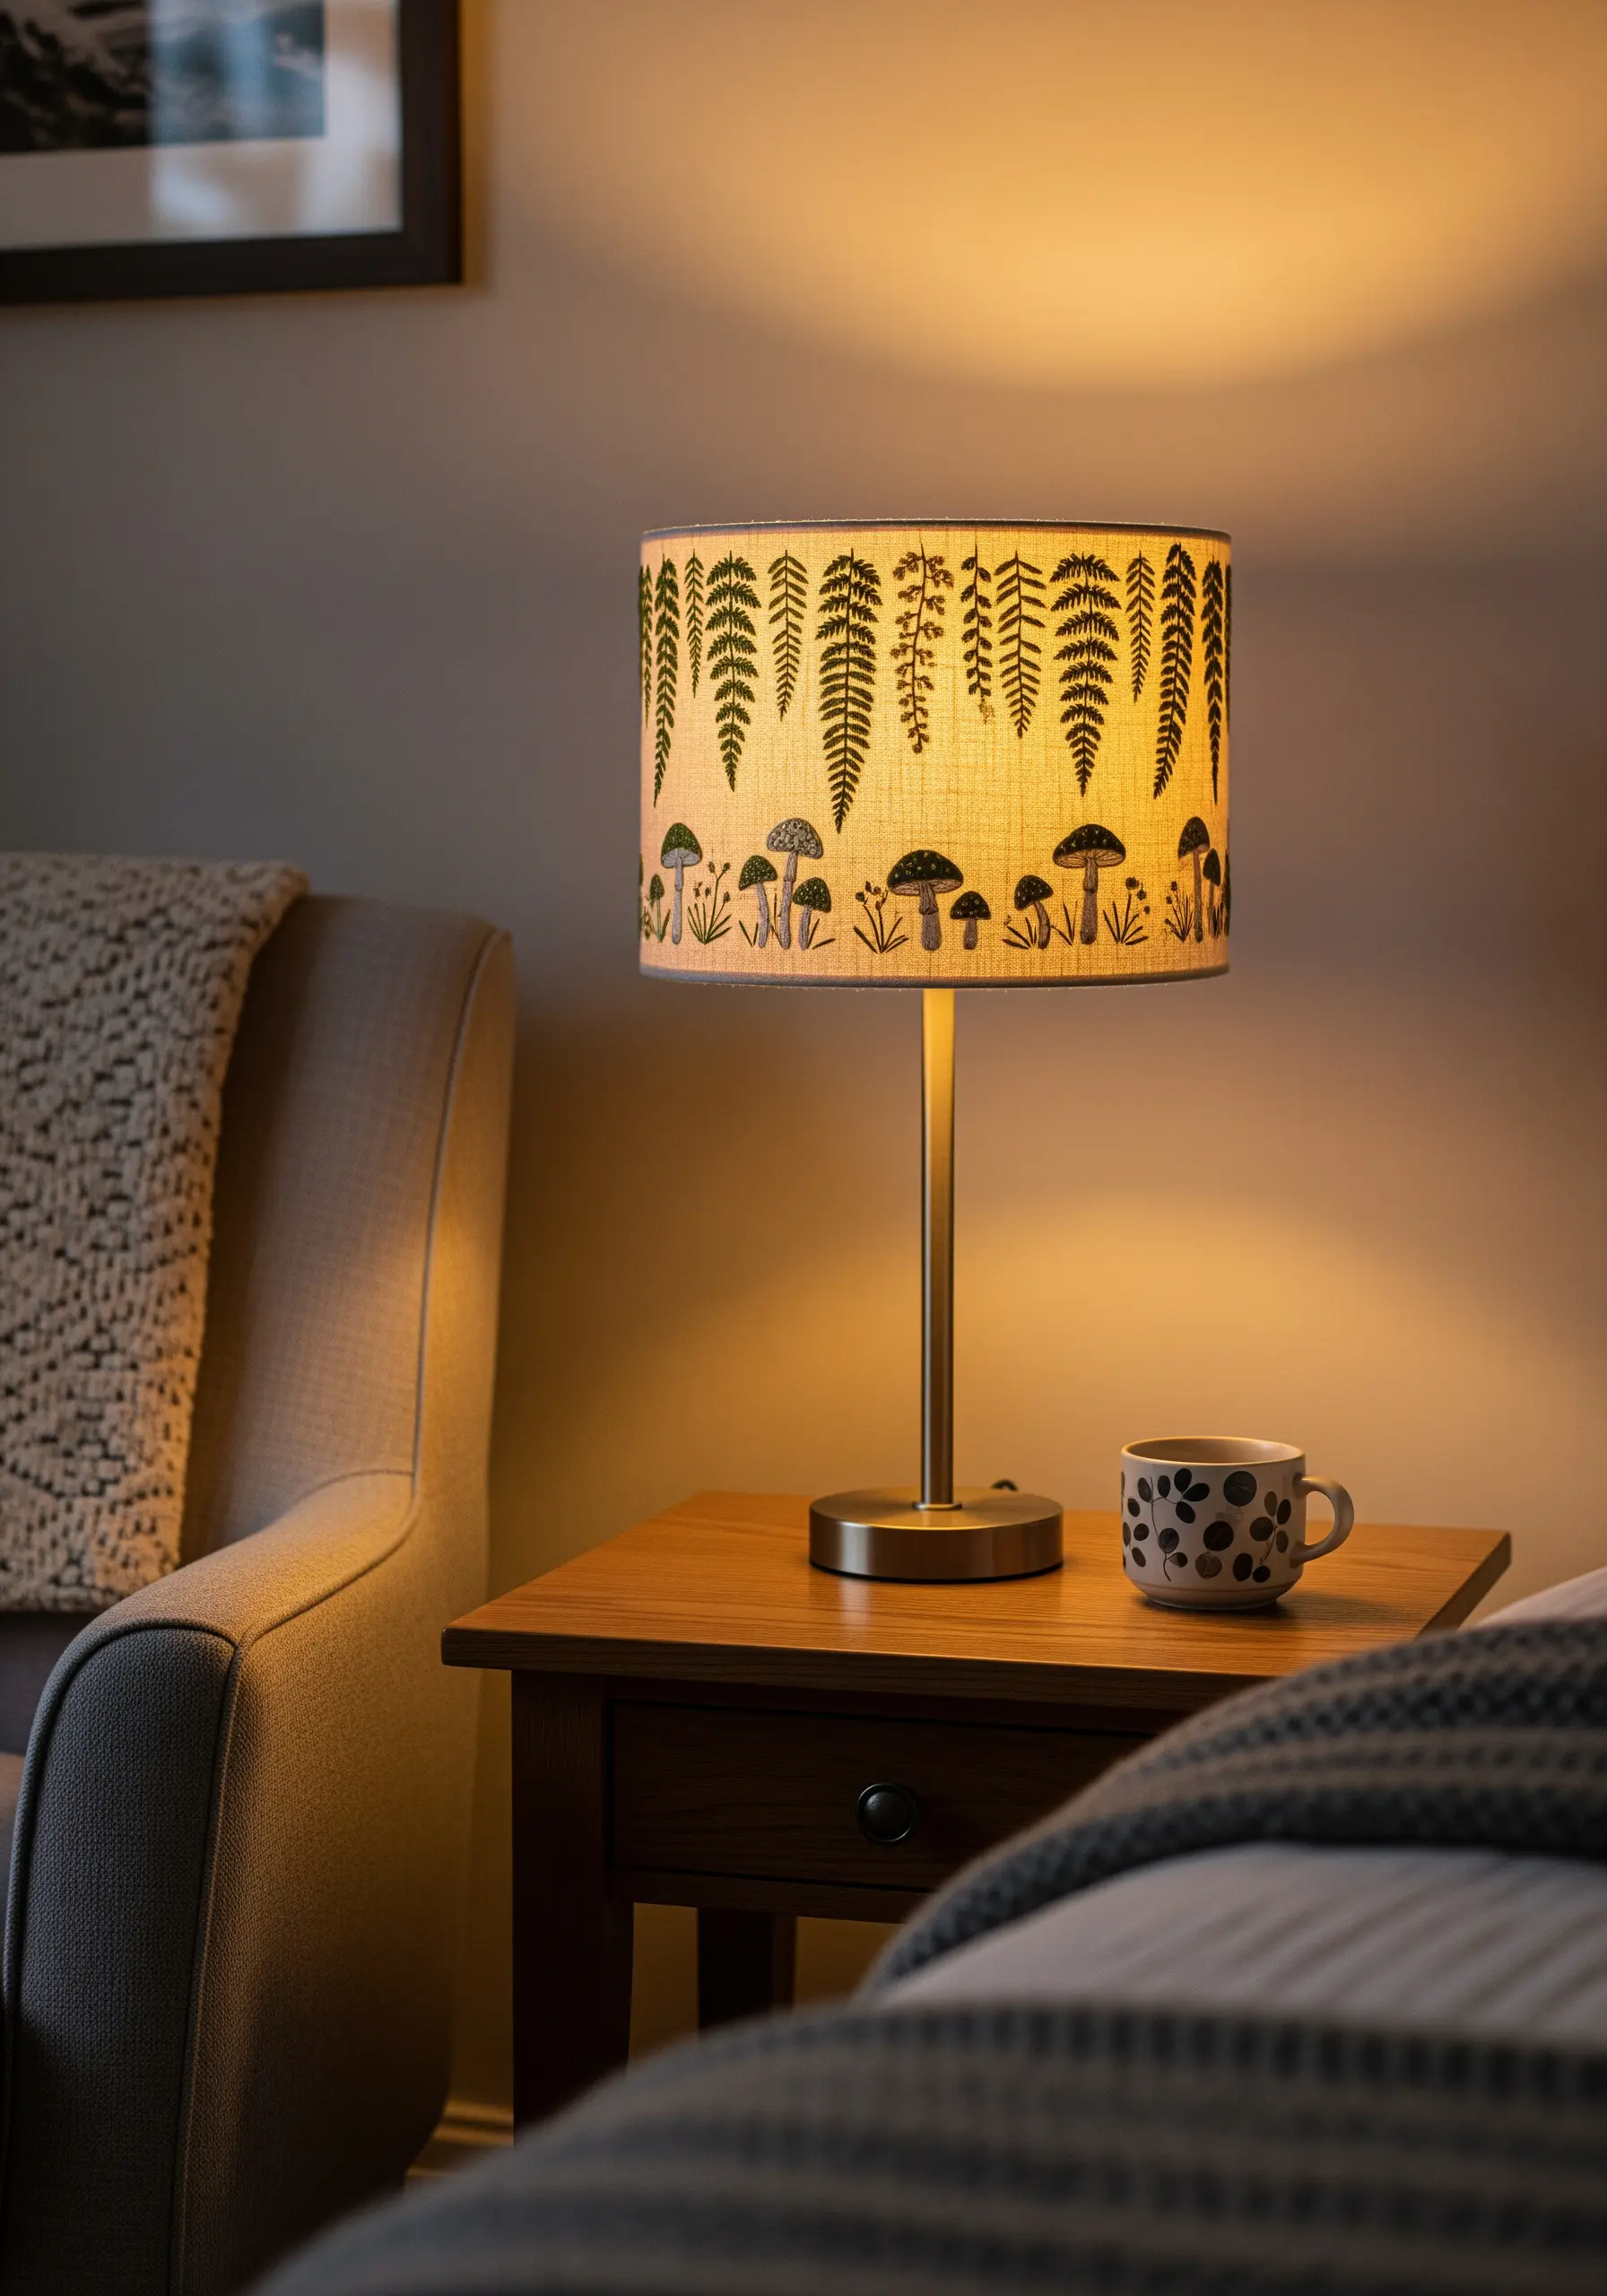
You can stitch directly onto a fabric lampshade to cast beautifully patterned shadows when lit.
Choose a simple, graphic design and use a dark thread on a light-colored linen or cotton shade for maximum contrast and clarity.
A simple backstitch is ideal for creating clean, continuous outlines of ferns, mushrooms, and leaves.
Since you can’t use a hoop, work carefully to maintain even tension with each stitch, holding the shade firmly in your lap.
These forest floor botanical stitch ideas create a warm, narrative glow in a cozy corner.
8. Master Floral Gradients with Thread Painting
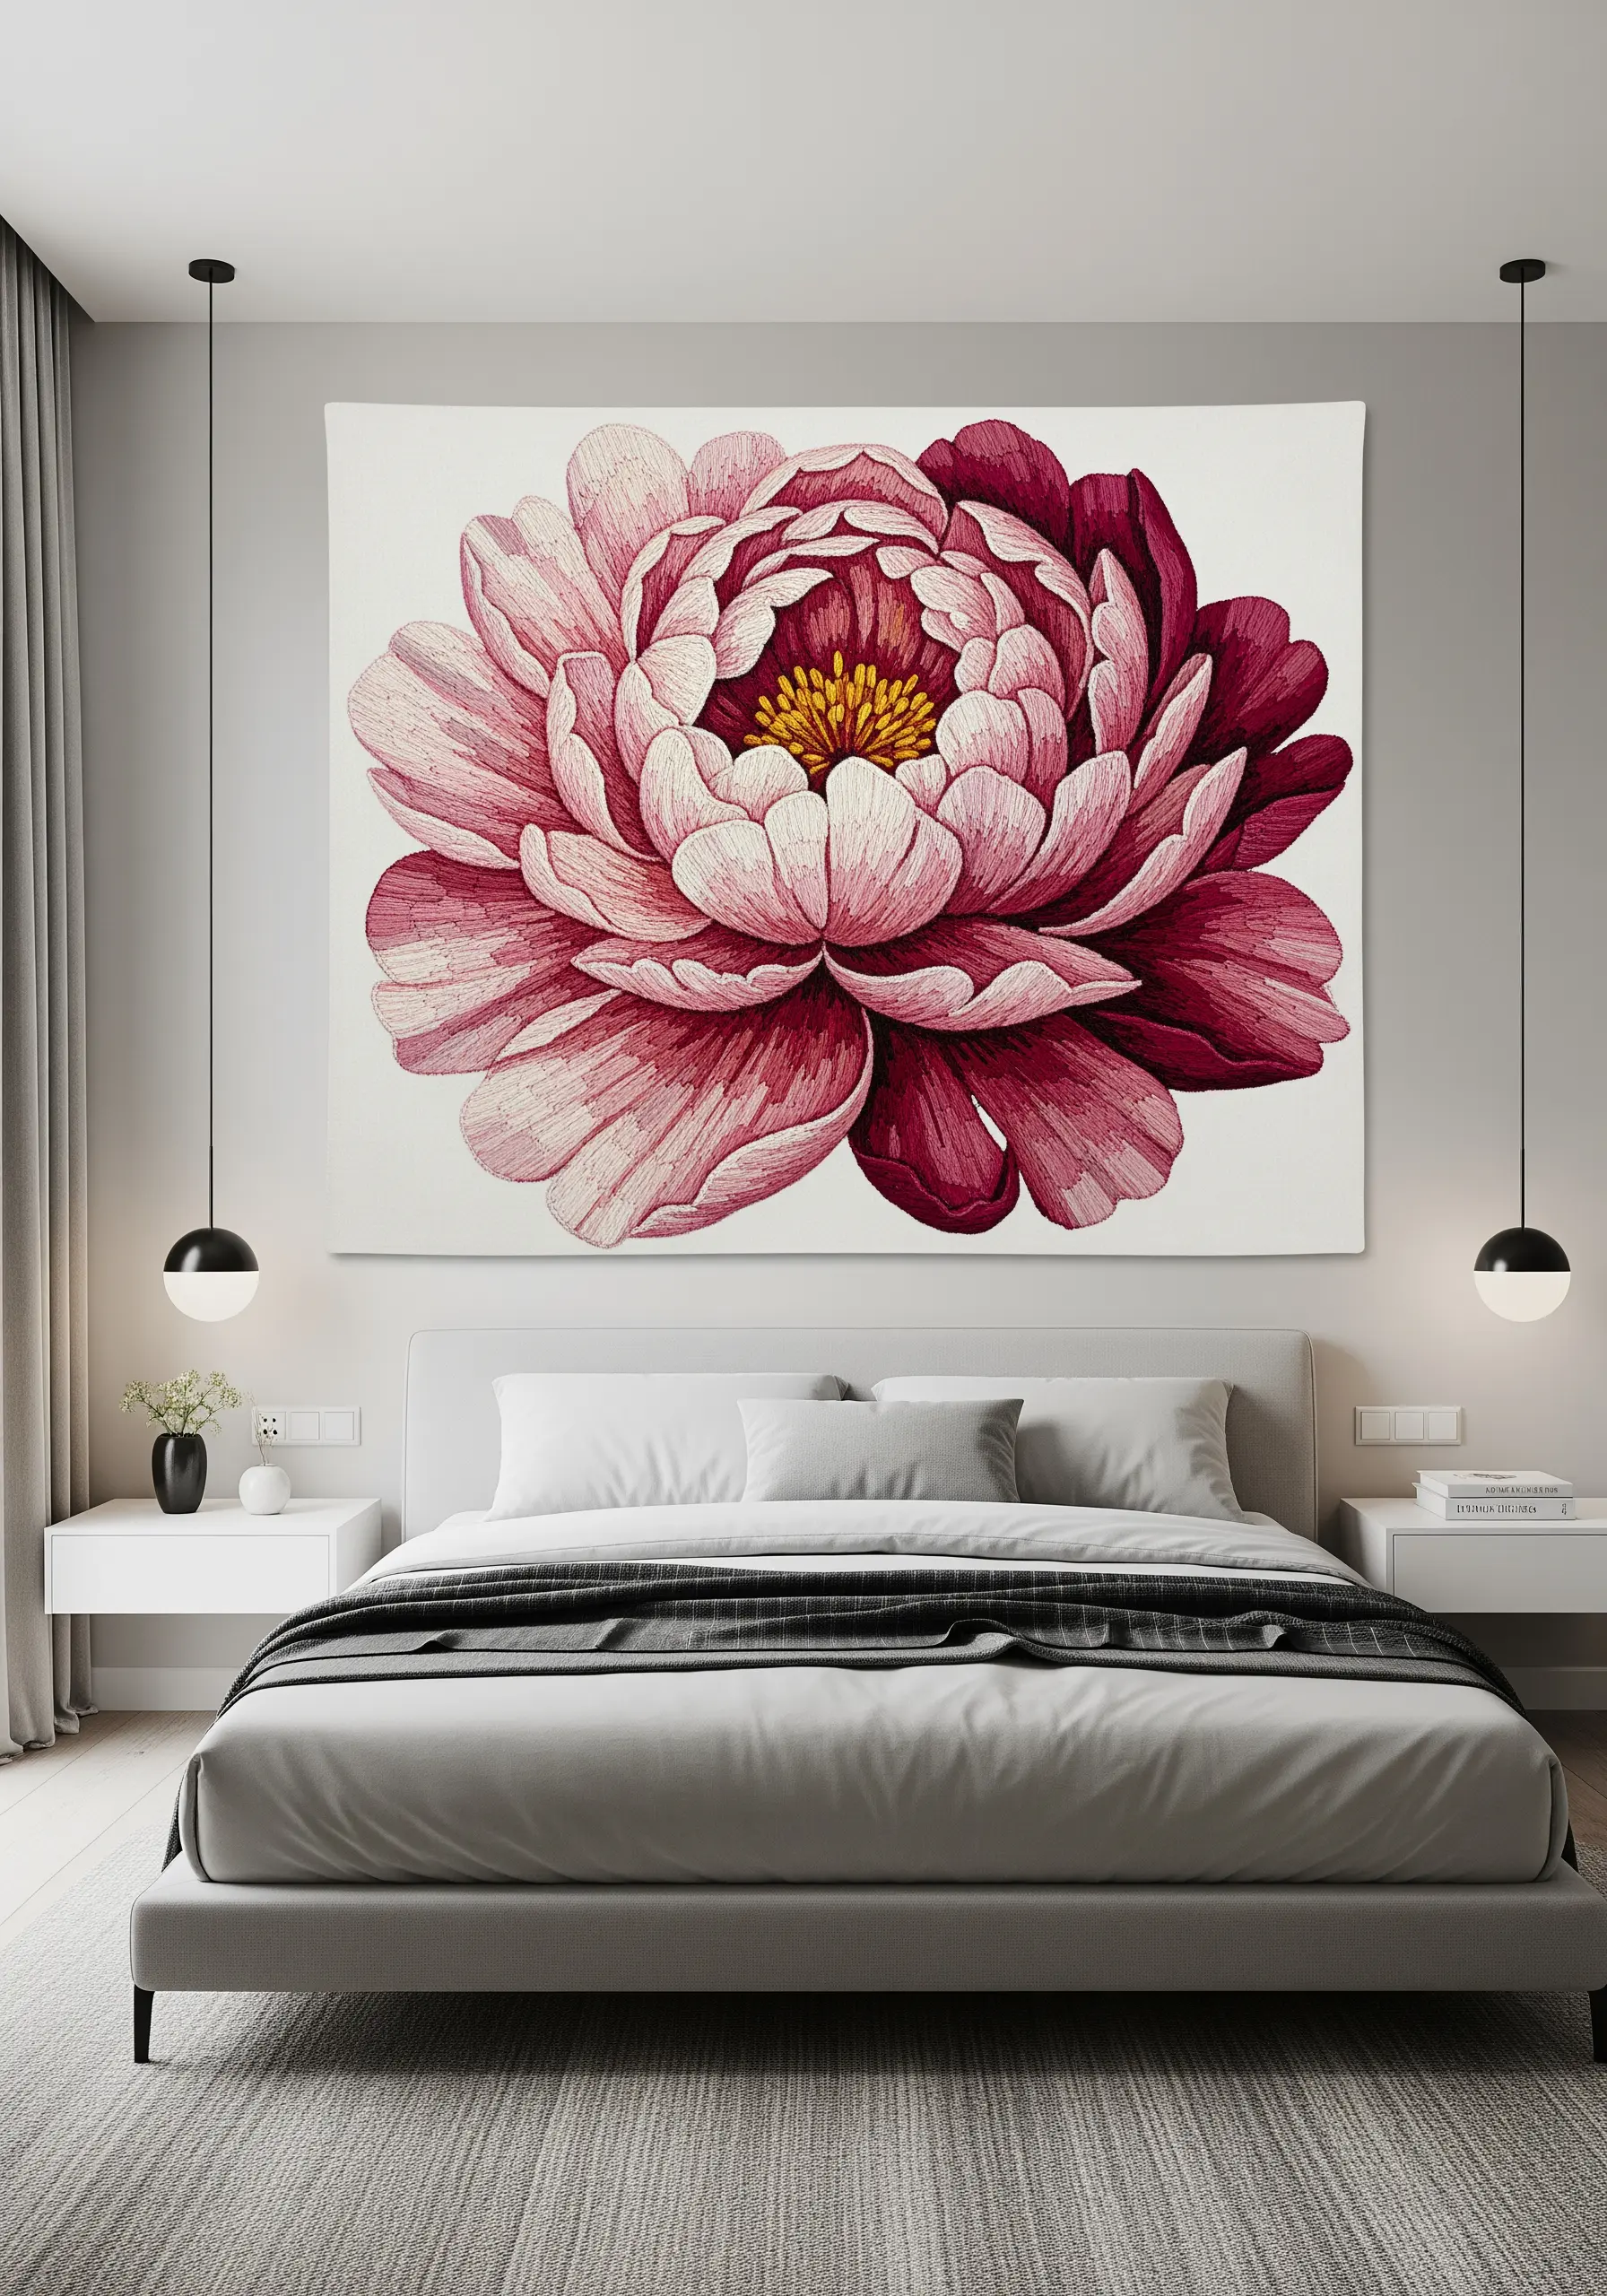
Create photorealistic petals by using the long-and-short stitch technique, often called needle or thread painting.
Select four to five shades of the same color, from darkest to lightest. Begin with the darkest shade at the petal’s edge, making long and short stitches that follow the natural curve of the petal.
Blend the next shade by bringing your needle up through the stitches of the previous color, interlocking them seamlessly.
This method eliminates harsh lines and creates the soft, painterly gradients that make peony embroidery ideas look so lifelike and dramatic.
9. Arrange an Entomological Hoop Gallery

Curate a collection of small, related motifs to create a gallery wall with more impact than a single large piece.
Choose a single theme, like insects, and stitch each one in a separate hoop. Use the same neutral fabric background and simple wooden hoops to create visual consistency.
Focus on precision: use a single strand of floss for delicate details like antennae, legs, and wing veins. A few metallic or iridescent threads can add a realistic sheen to beetle shells or dragonfly wings.
Grouped together, these inspiring hoop art projects tell a compelling visual story.
10. Add Narrative Stitches to a Patchwork Quilt
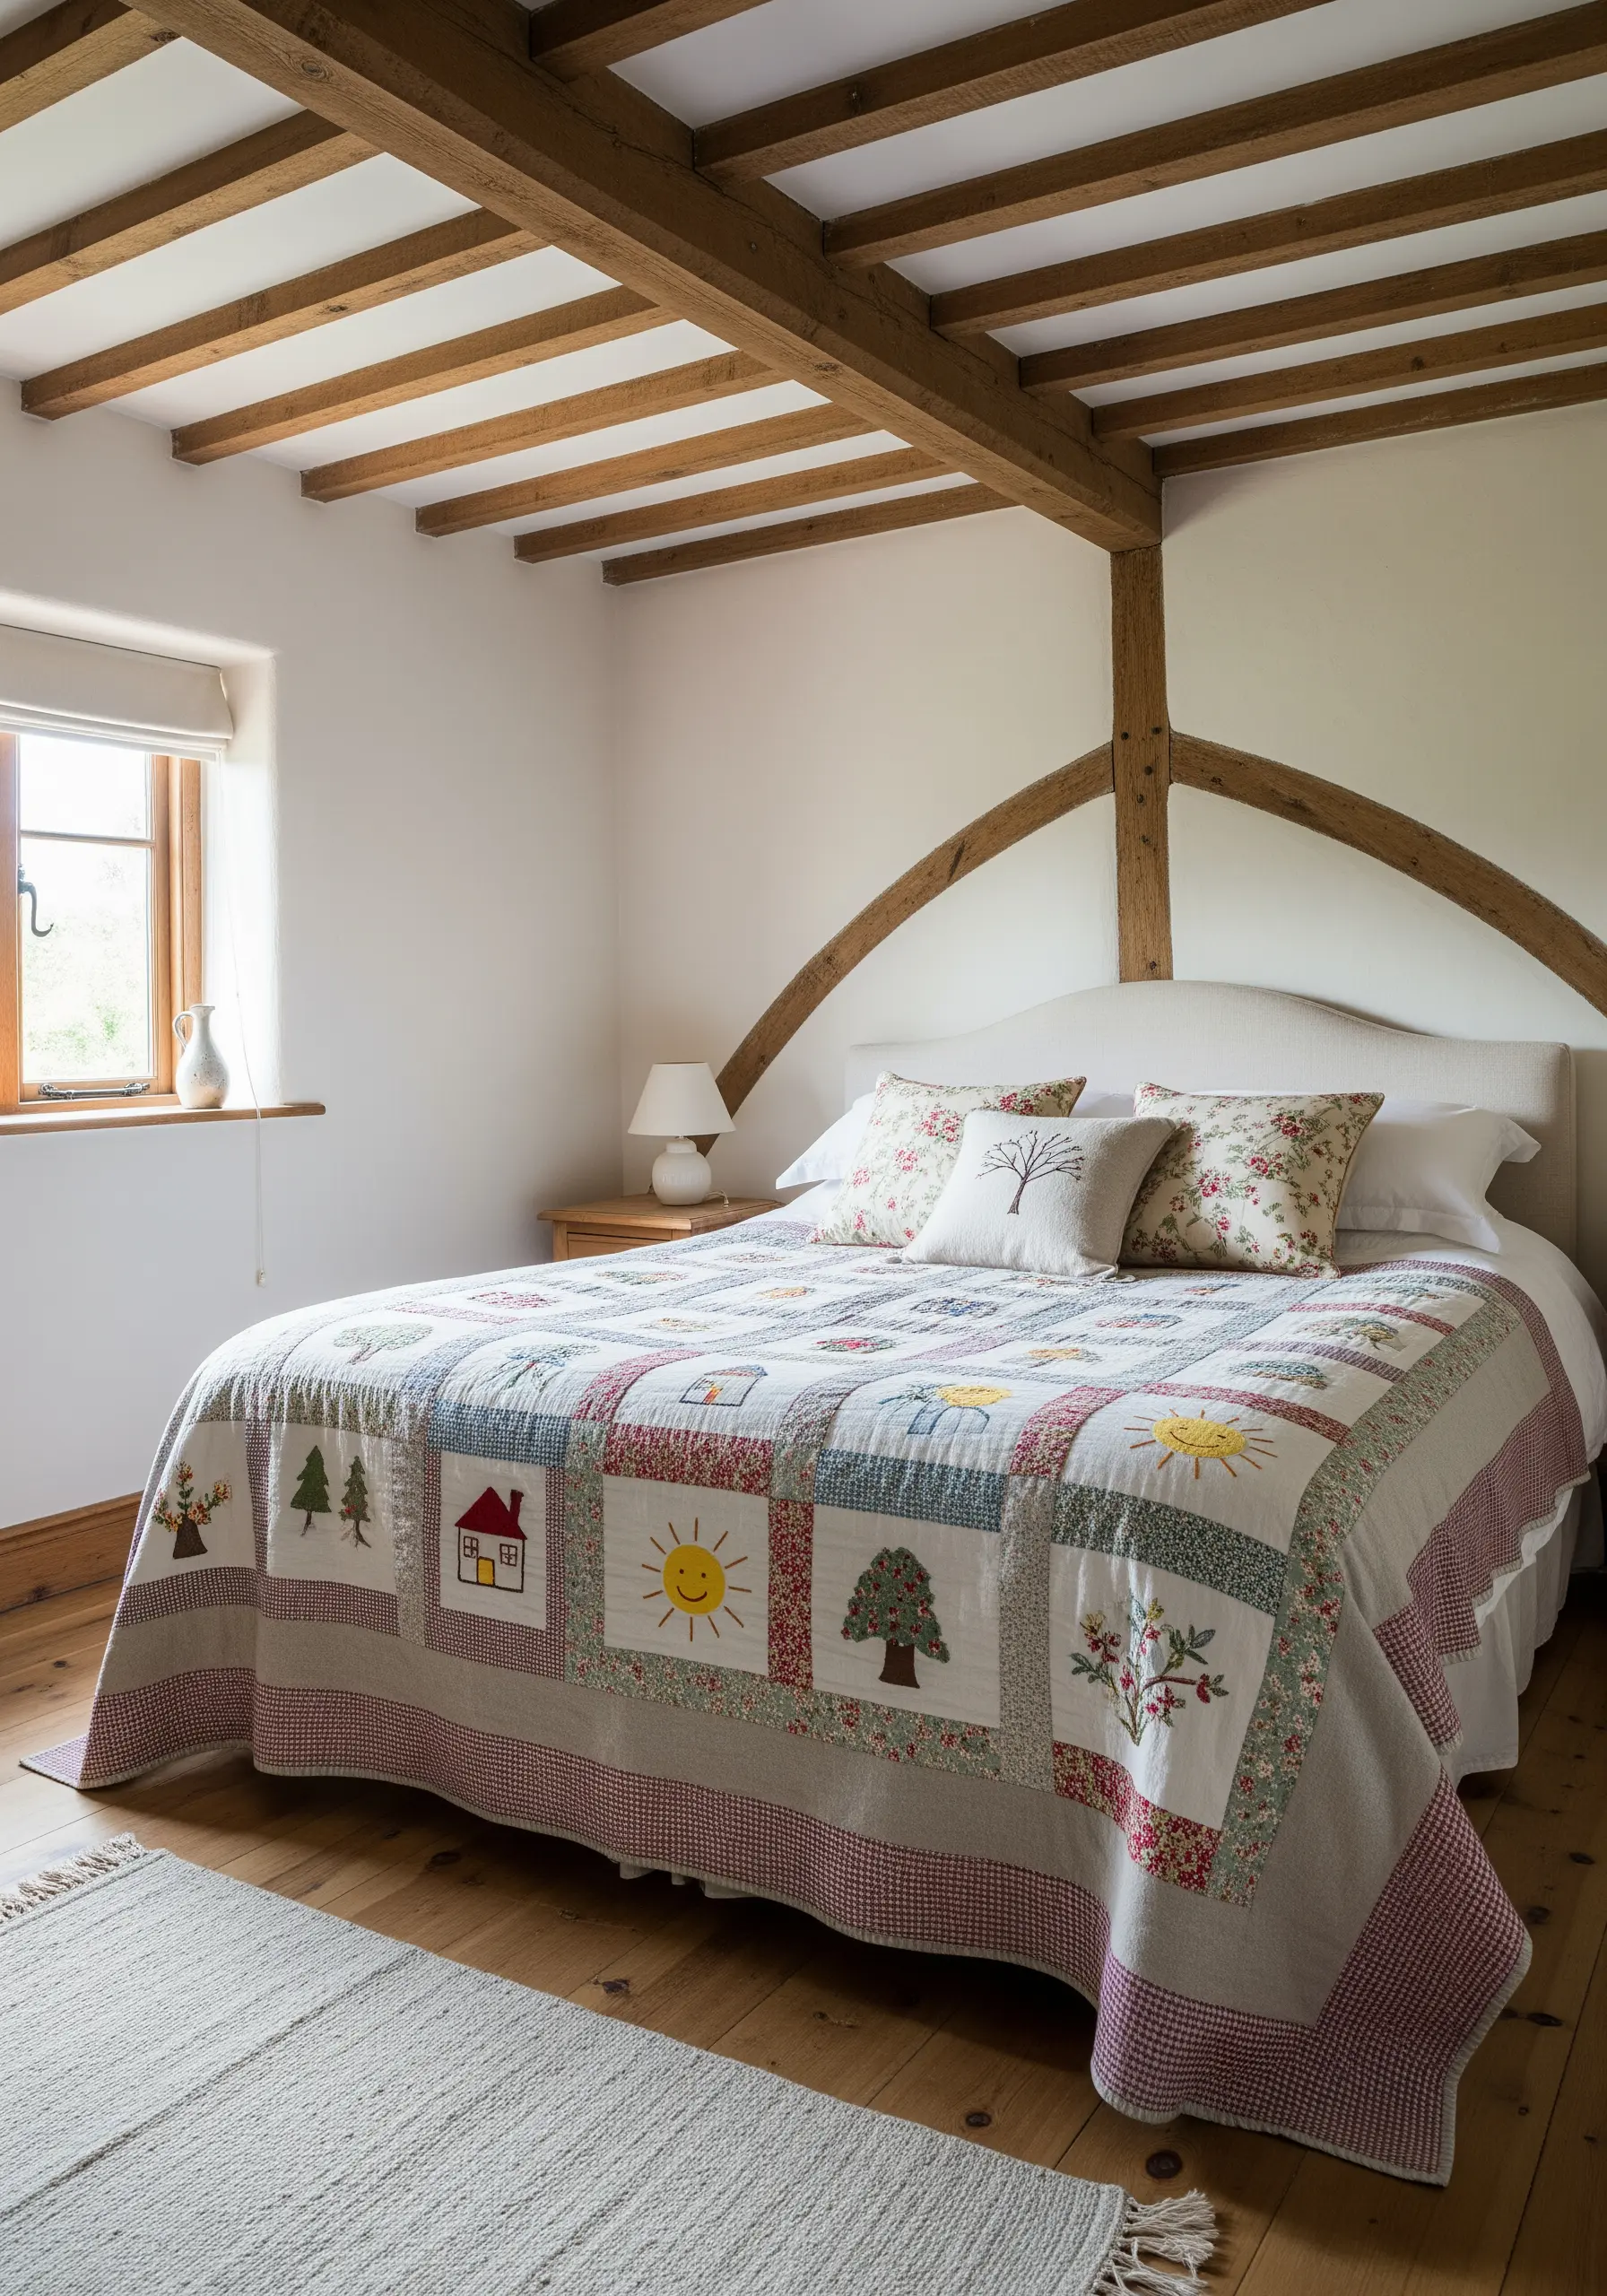
Integrate simple, illustrative embroidery into a patchwork quilt to connect the different fabric squares with a gentle narrative.
Choose motifs that feel personal and nostalgic—a simple house, a sun, a tree—and stitch them using basic outlines like backstitch or stem stitch.
The goal isn’t complex detail but charming simplicity that enhances the handmade feel without overwhelming the patchwork design.
This approach transforms a blanket into a story, making rustic vintage embroidery feel both personal and timeless.
11. Apply Sculptural Lines with Couching
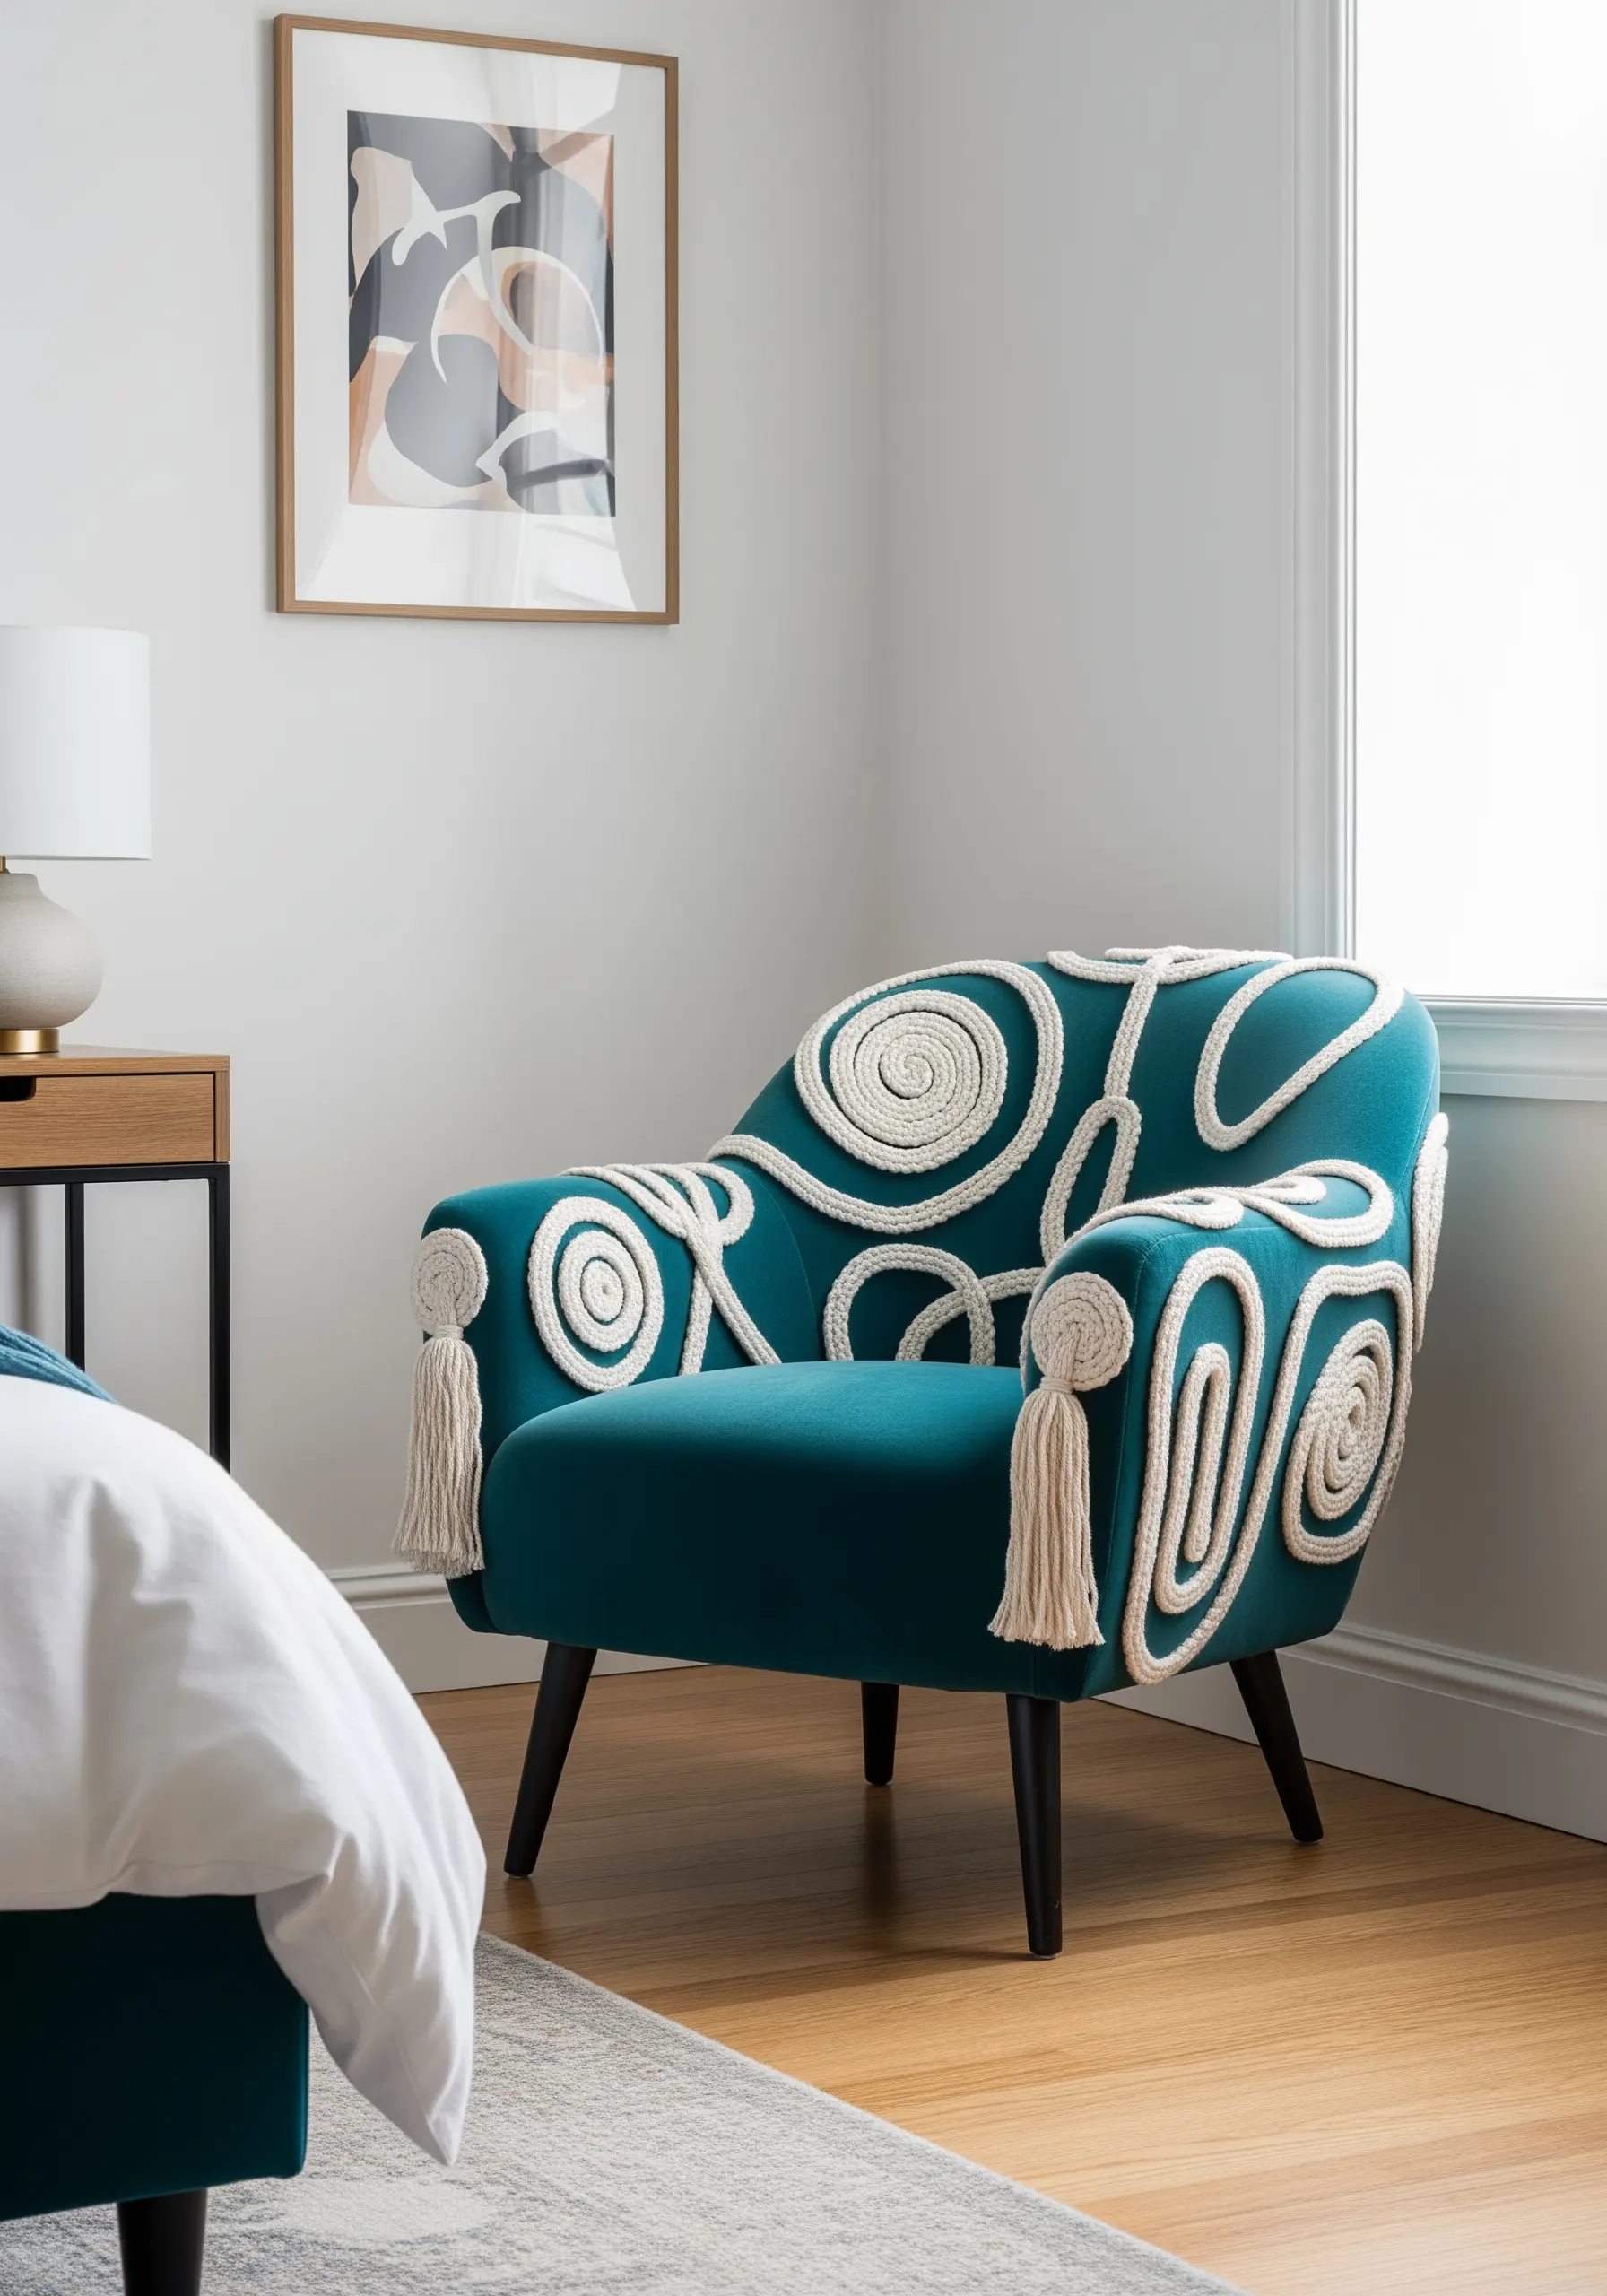
For bold, textural lines that stand off the fabric surface, use the couching technique.
Lay a thick material—like cotton rope, yarn, or cord—along your design line on the fabric.
Then, using a standard embroidery needle and a matching or contrasting floss, make small, perpendicular tacking stitches over the cord to anchor it in place.
This method is perfect for adding graphic, swirling patterns to furniture or large cushions, allowing you to create raised sculptural embroidery effects with dramatic impact.
12. Drape a Bed Canopy with Trailing Vines
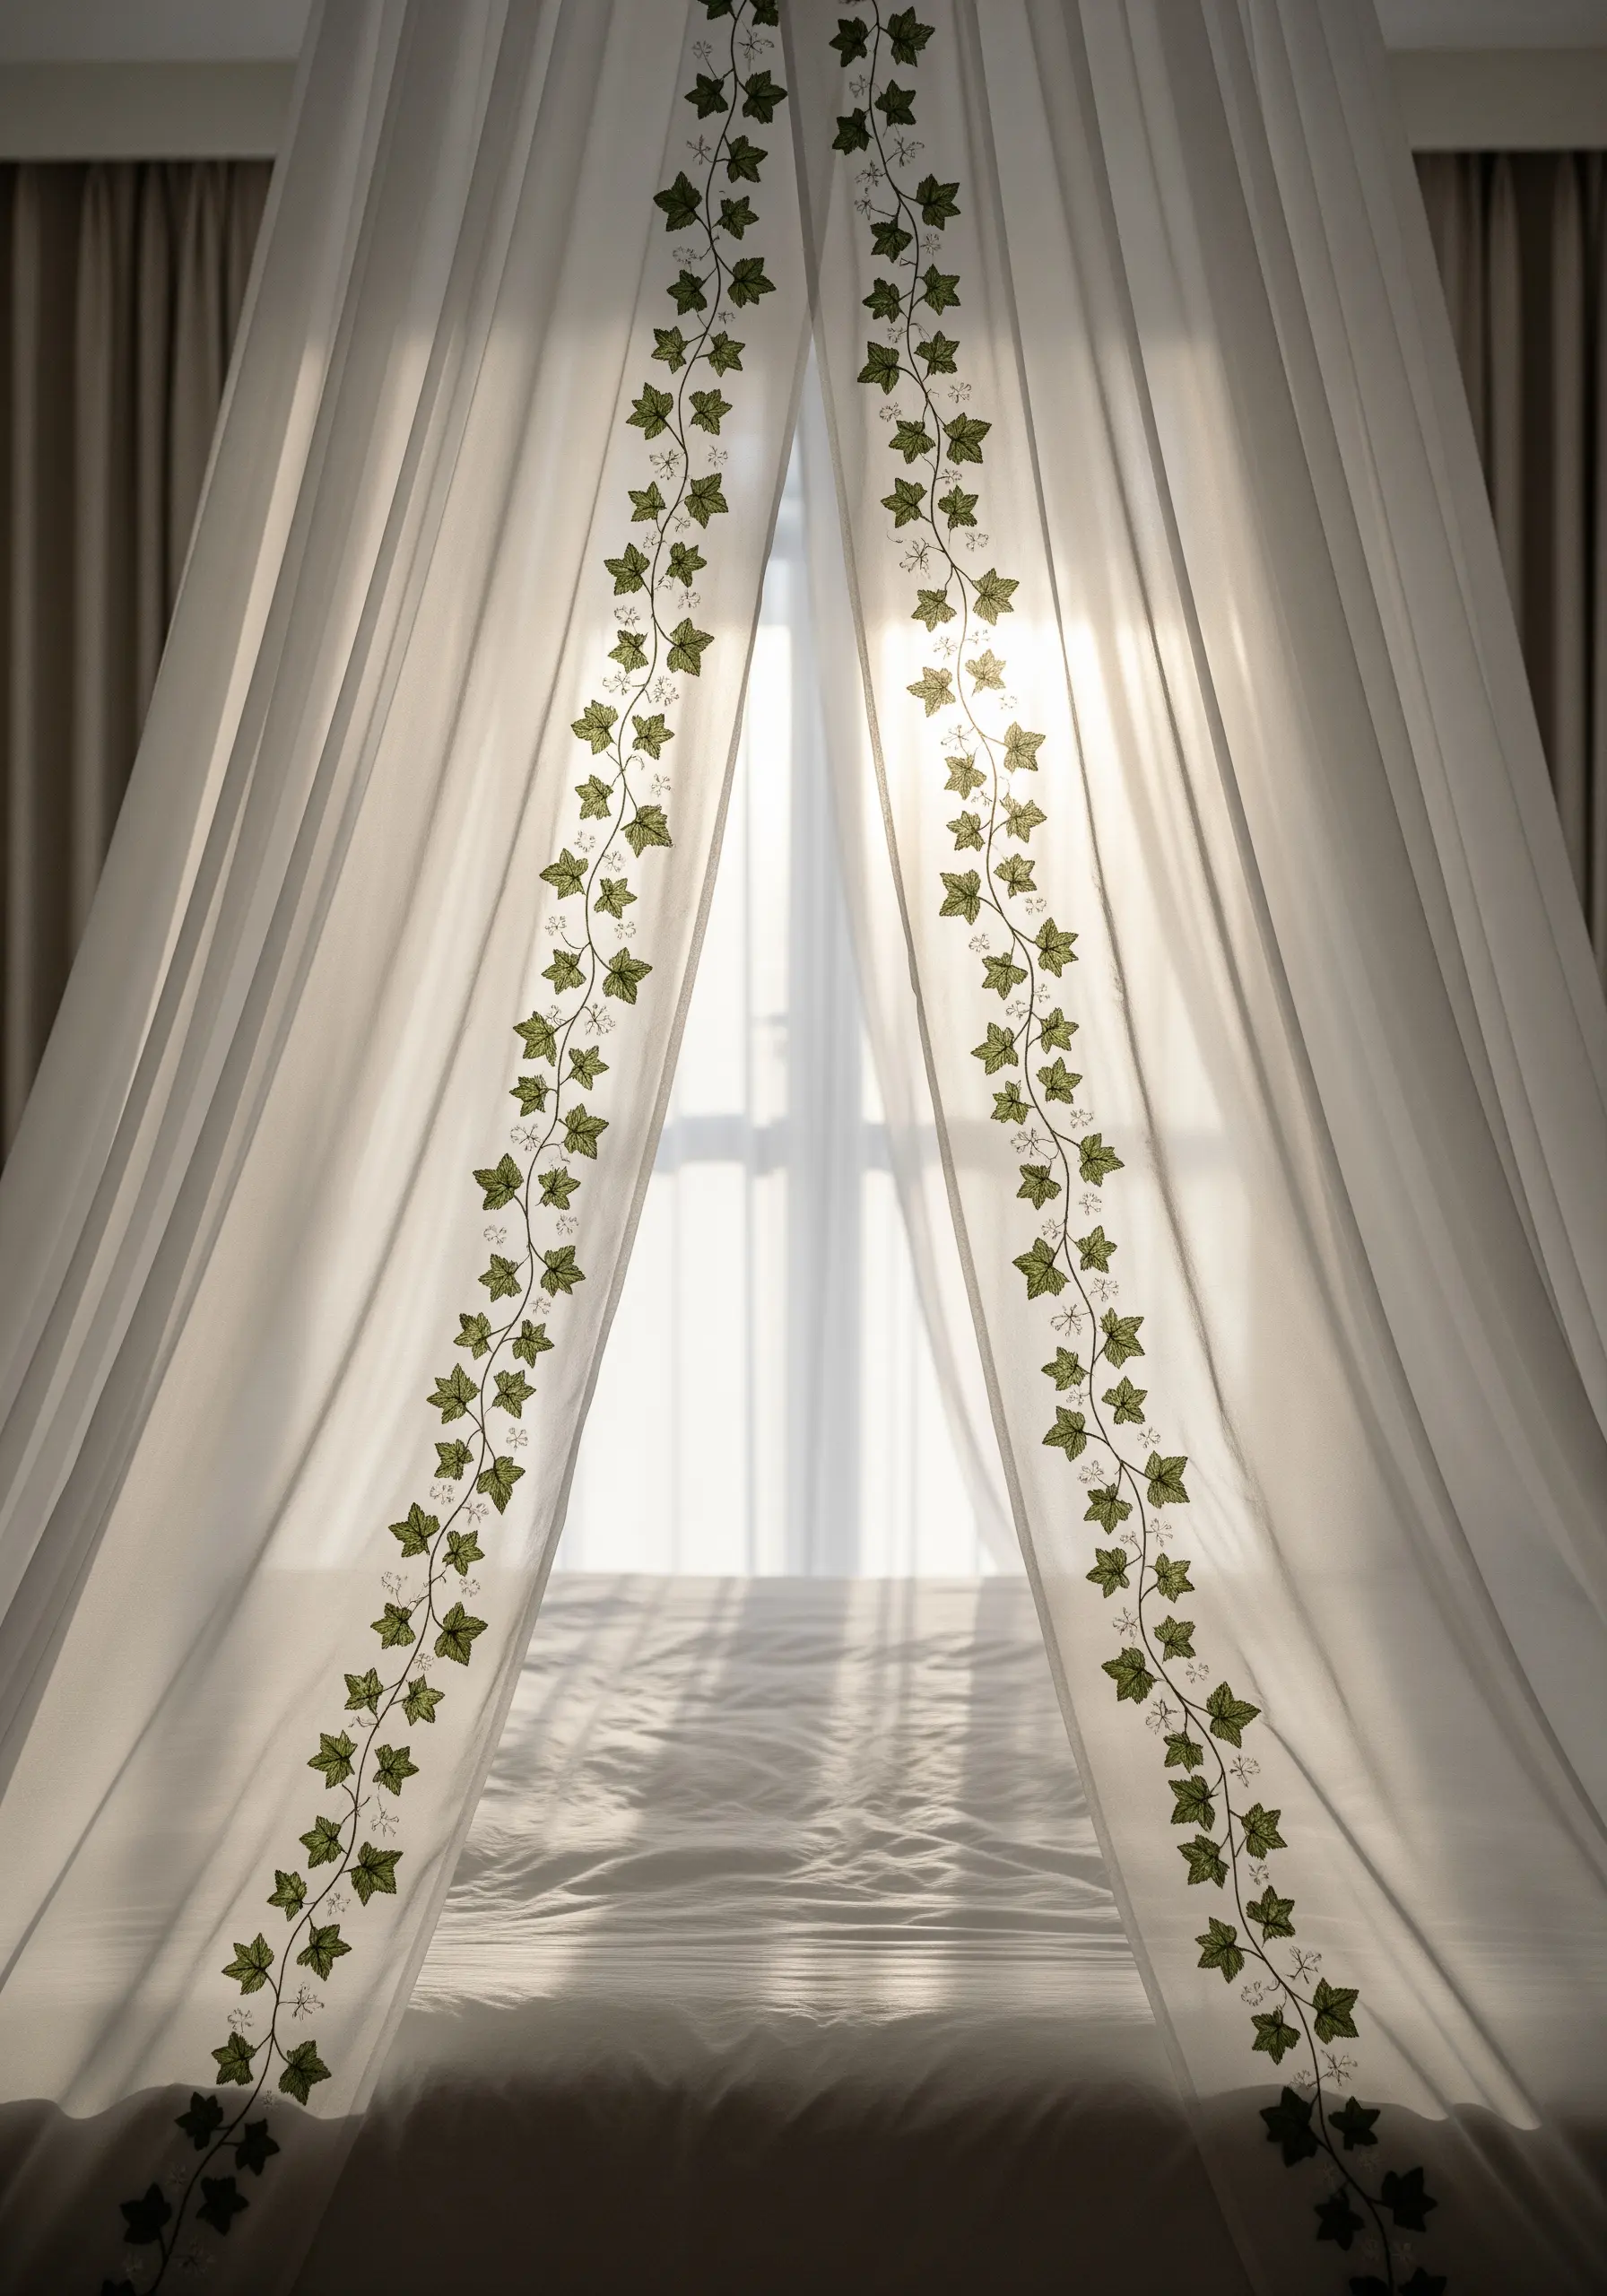
To embroider on ethereal fabrics like tulle or chiffon for a bed canopy, the key is to choose lightweight stitches that won’t cause sagging.
Use a fine stem stitch for the winding vines. For the foliage, opt for open, airy stitches like the detached chain stitch (lazy daisy) or fly stitch.
These stitches secure to the fabric with minimal tension and create the shape of a leaf with just a few threads.
Pairing these delicate leaf embroidery stitches with a lightweight, two-strand floss preserves the fabric’s floaty, dreamlike quality.
13. Juxtapose Matte and Metallic Threads
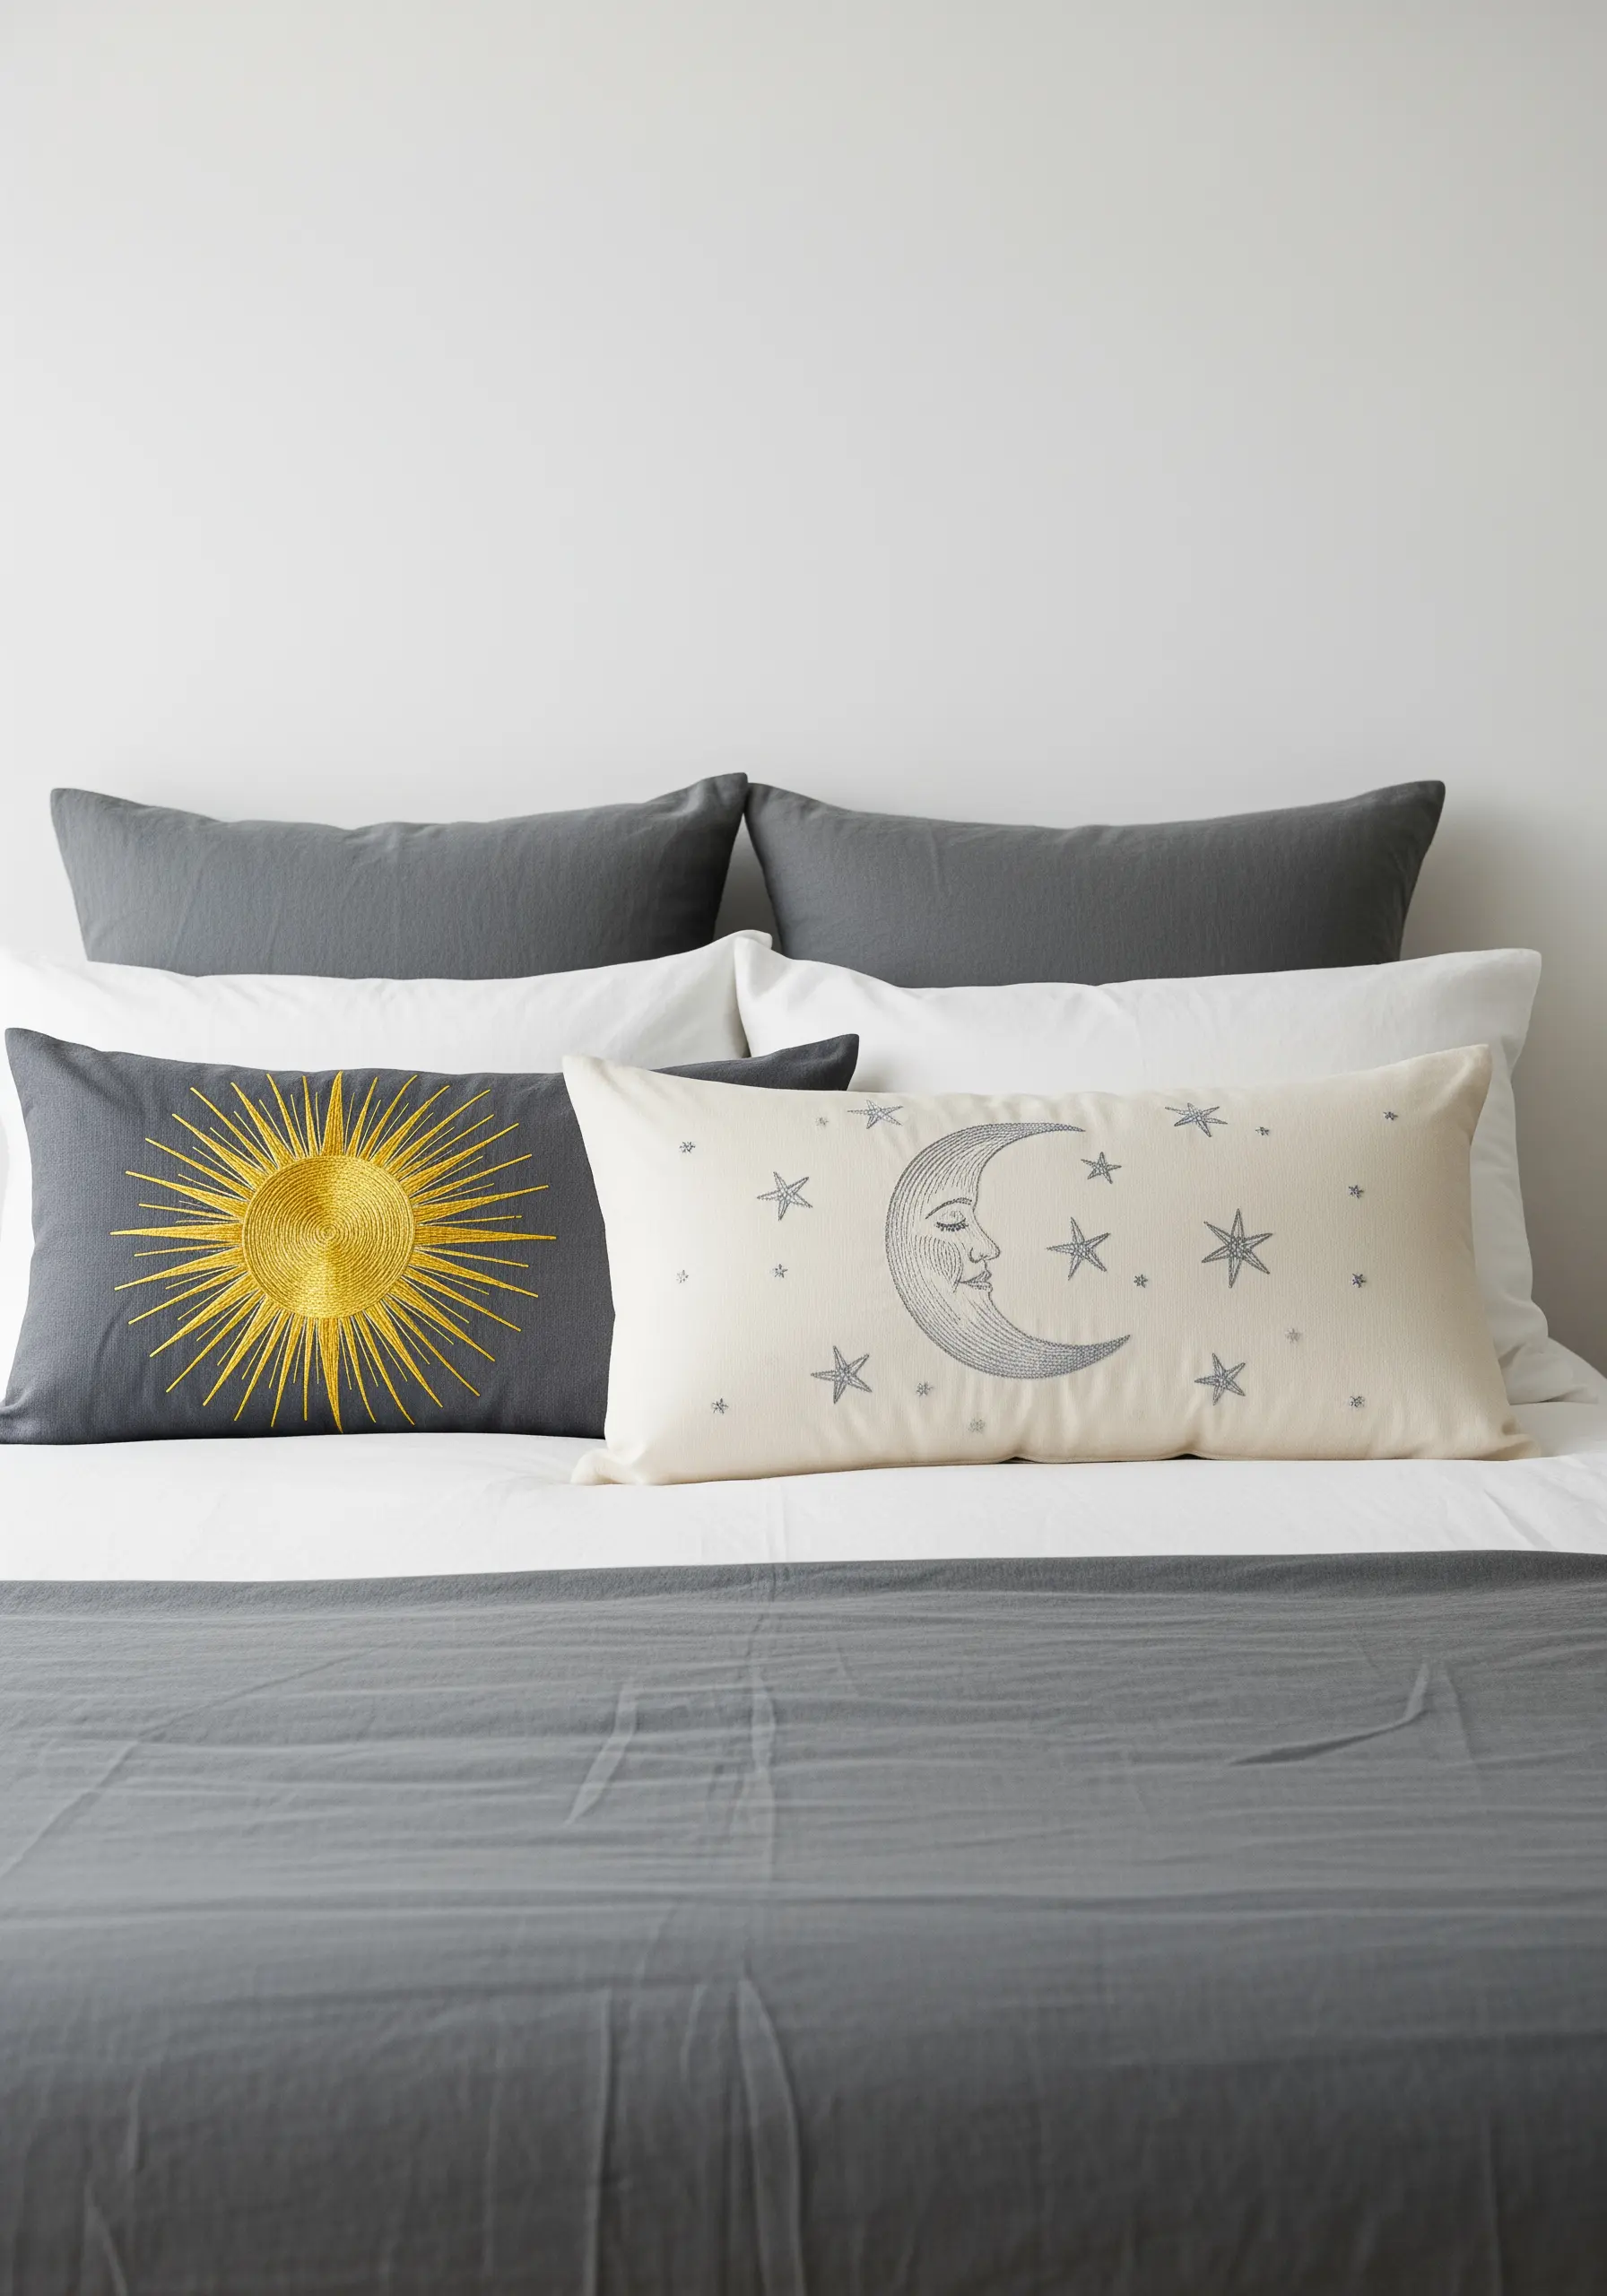
Create visual and textural contrast by pairing different types of thread in one design.
On lumbar pillows, use a high-sheen metallic thread for a sun motif to capture and reflect light, making it the undeniable focal point.
For the adjacent moon and stars, switch to a soft, matte cotton floss. This contrast makes the metallic elements appear even more brilliant and the matte elements softer and quieter.
This thoughtful material choice adds a layer of sophistication to celestial or night-blooming floral stitch themes.
14. Design a Serene Birch Tree Room Divider
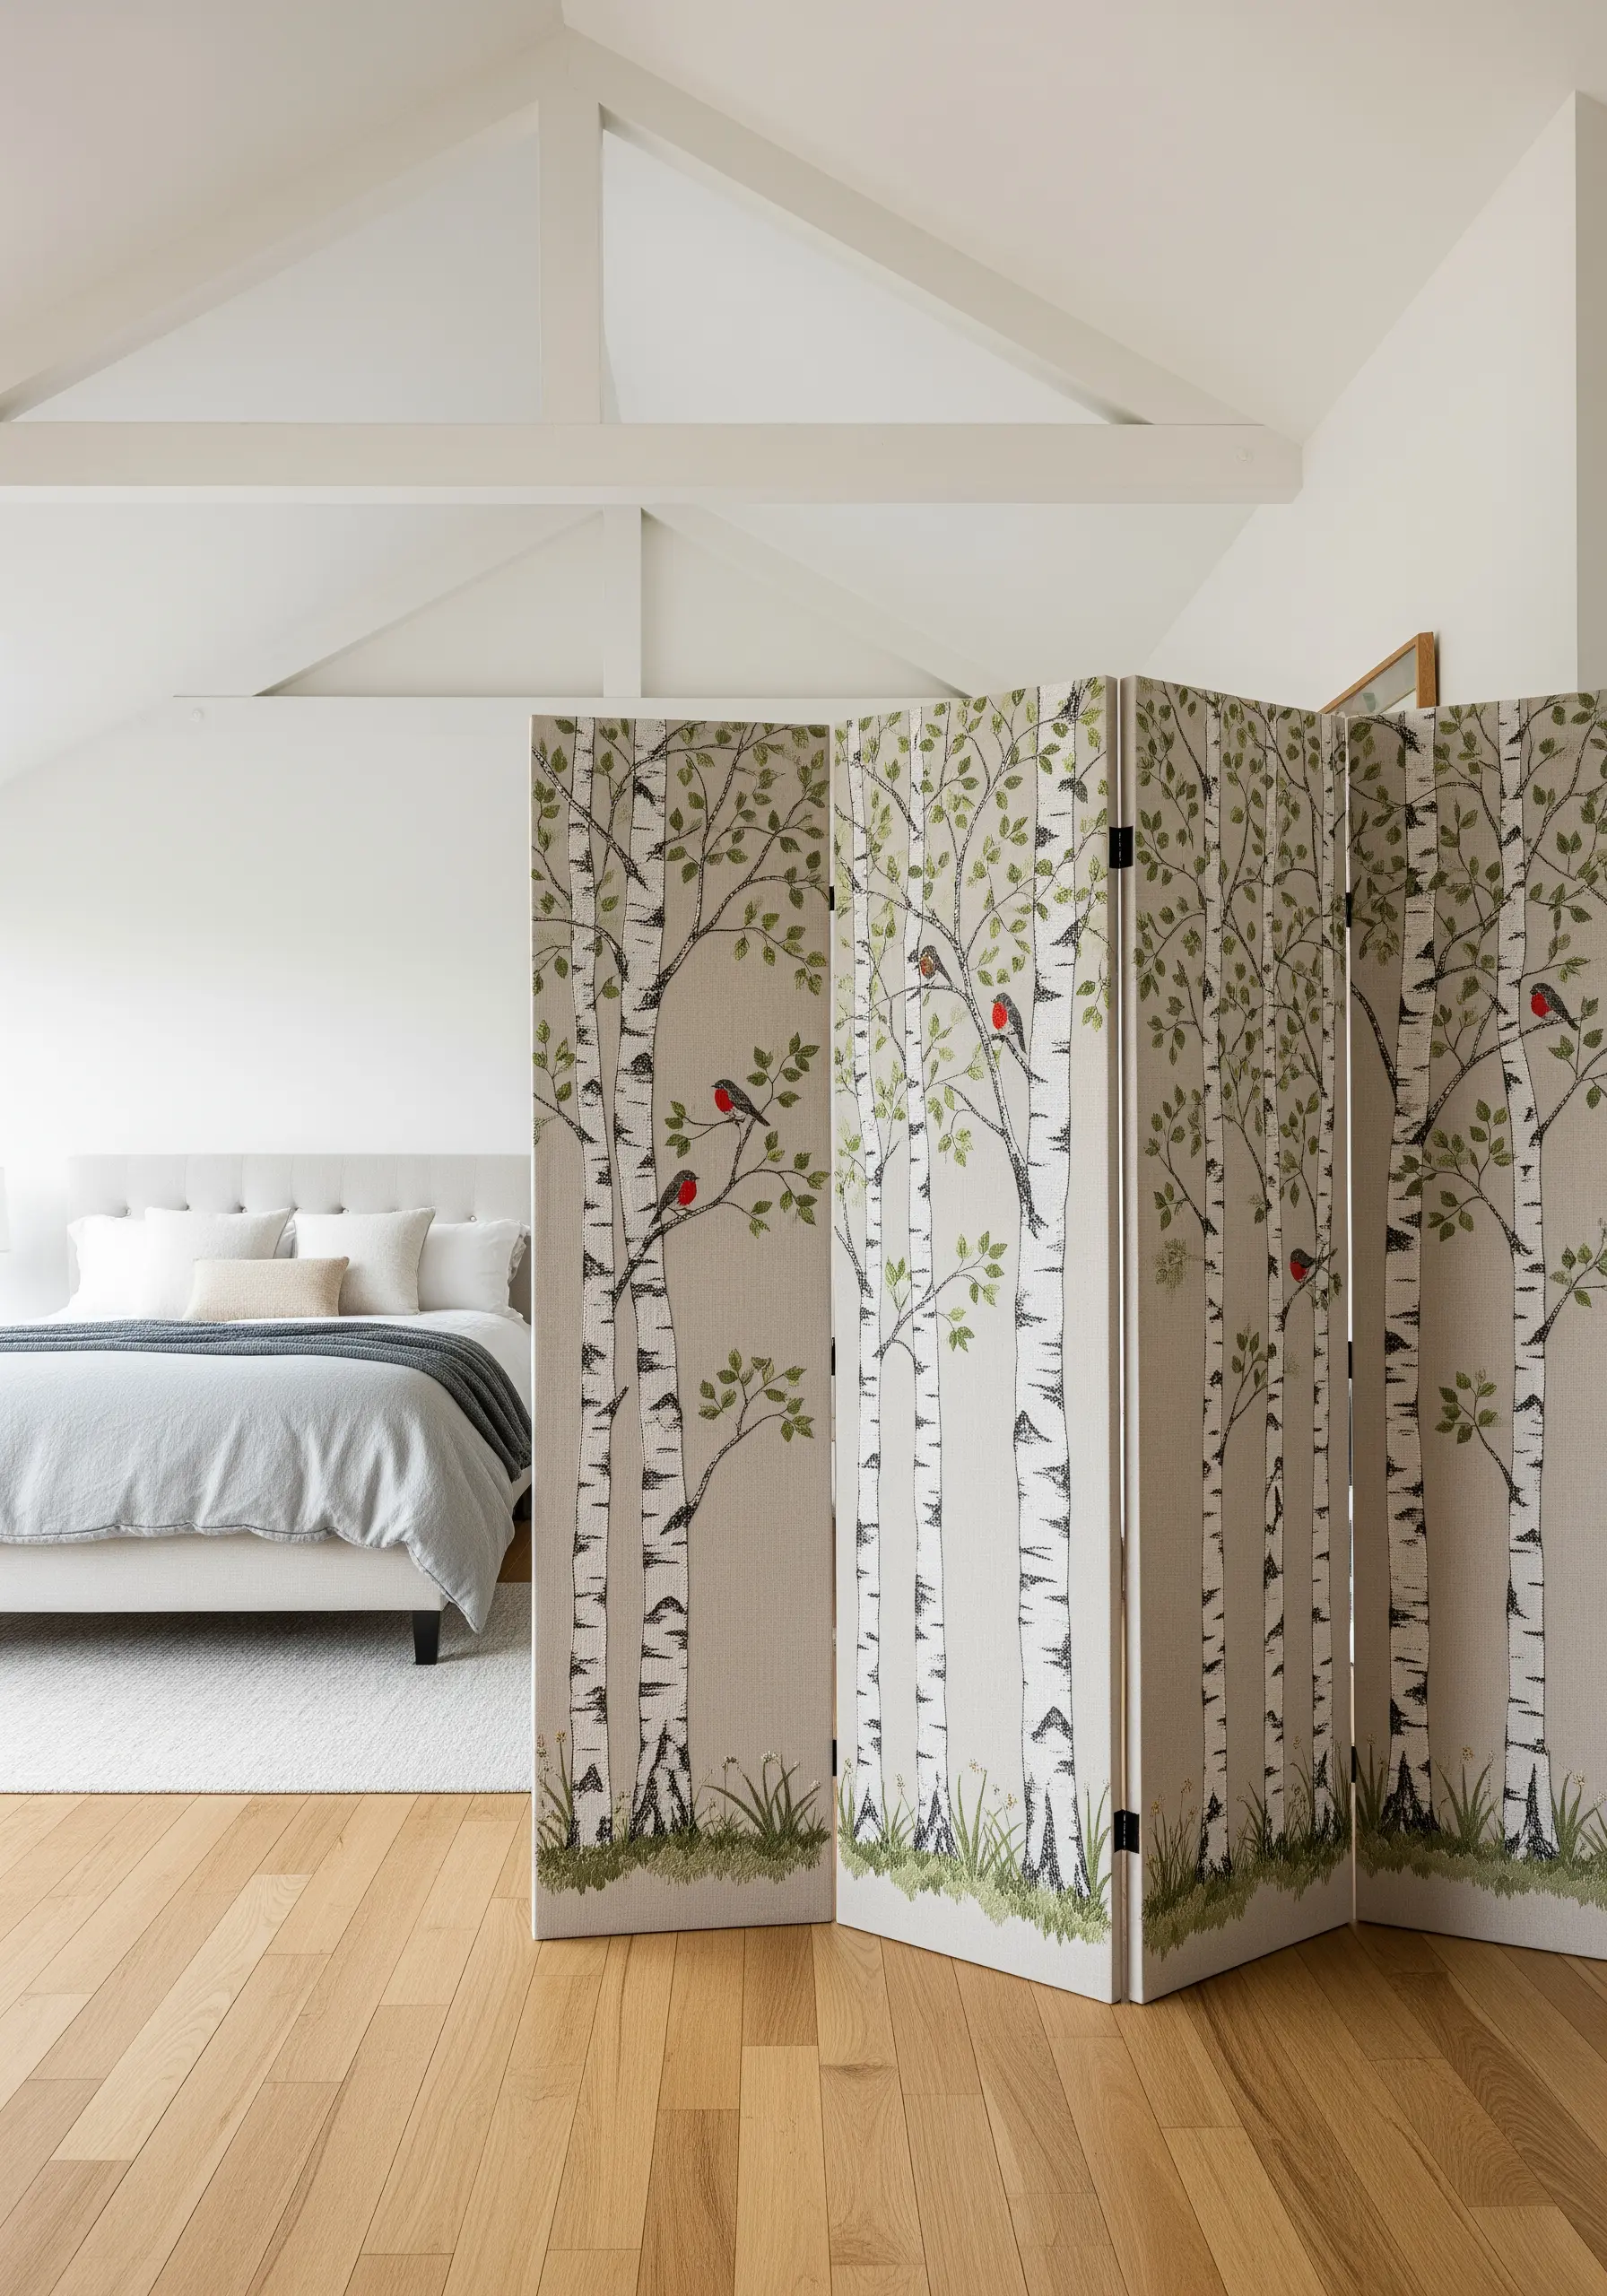
When working on a large, functional piece like a room divider, simplify your stitch vocabulary to maintain a clean, graphic aesthetic.
Use a vertical satin stitch for the birch tree trunks, intentionally leaving small gaps to mimic the texture of bark. A few horizontal straight stitches in a dark color create the characteristic markings.
For leaves, use clusters of simple seed stitches in varied shades of green to create a dappled, airy canopy.
This combination of simple stitches allows you to cover a large area with texture and detail without overcomplicating the process. It’s a great way to render realistic leaf vein details on a grand scale.
15. Add a Playful Motif to a Reading Nook Cushion
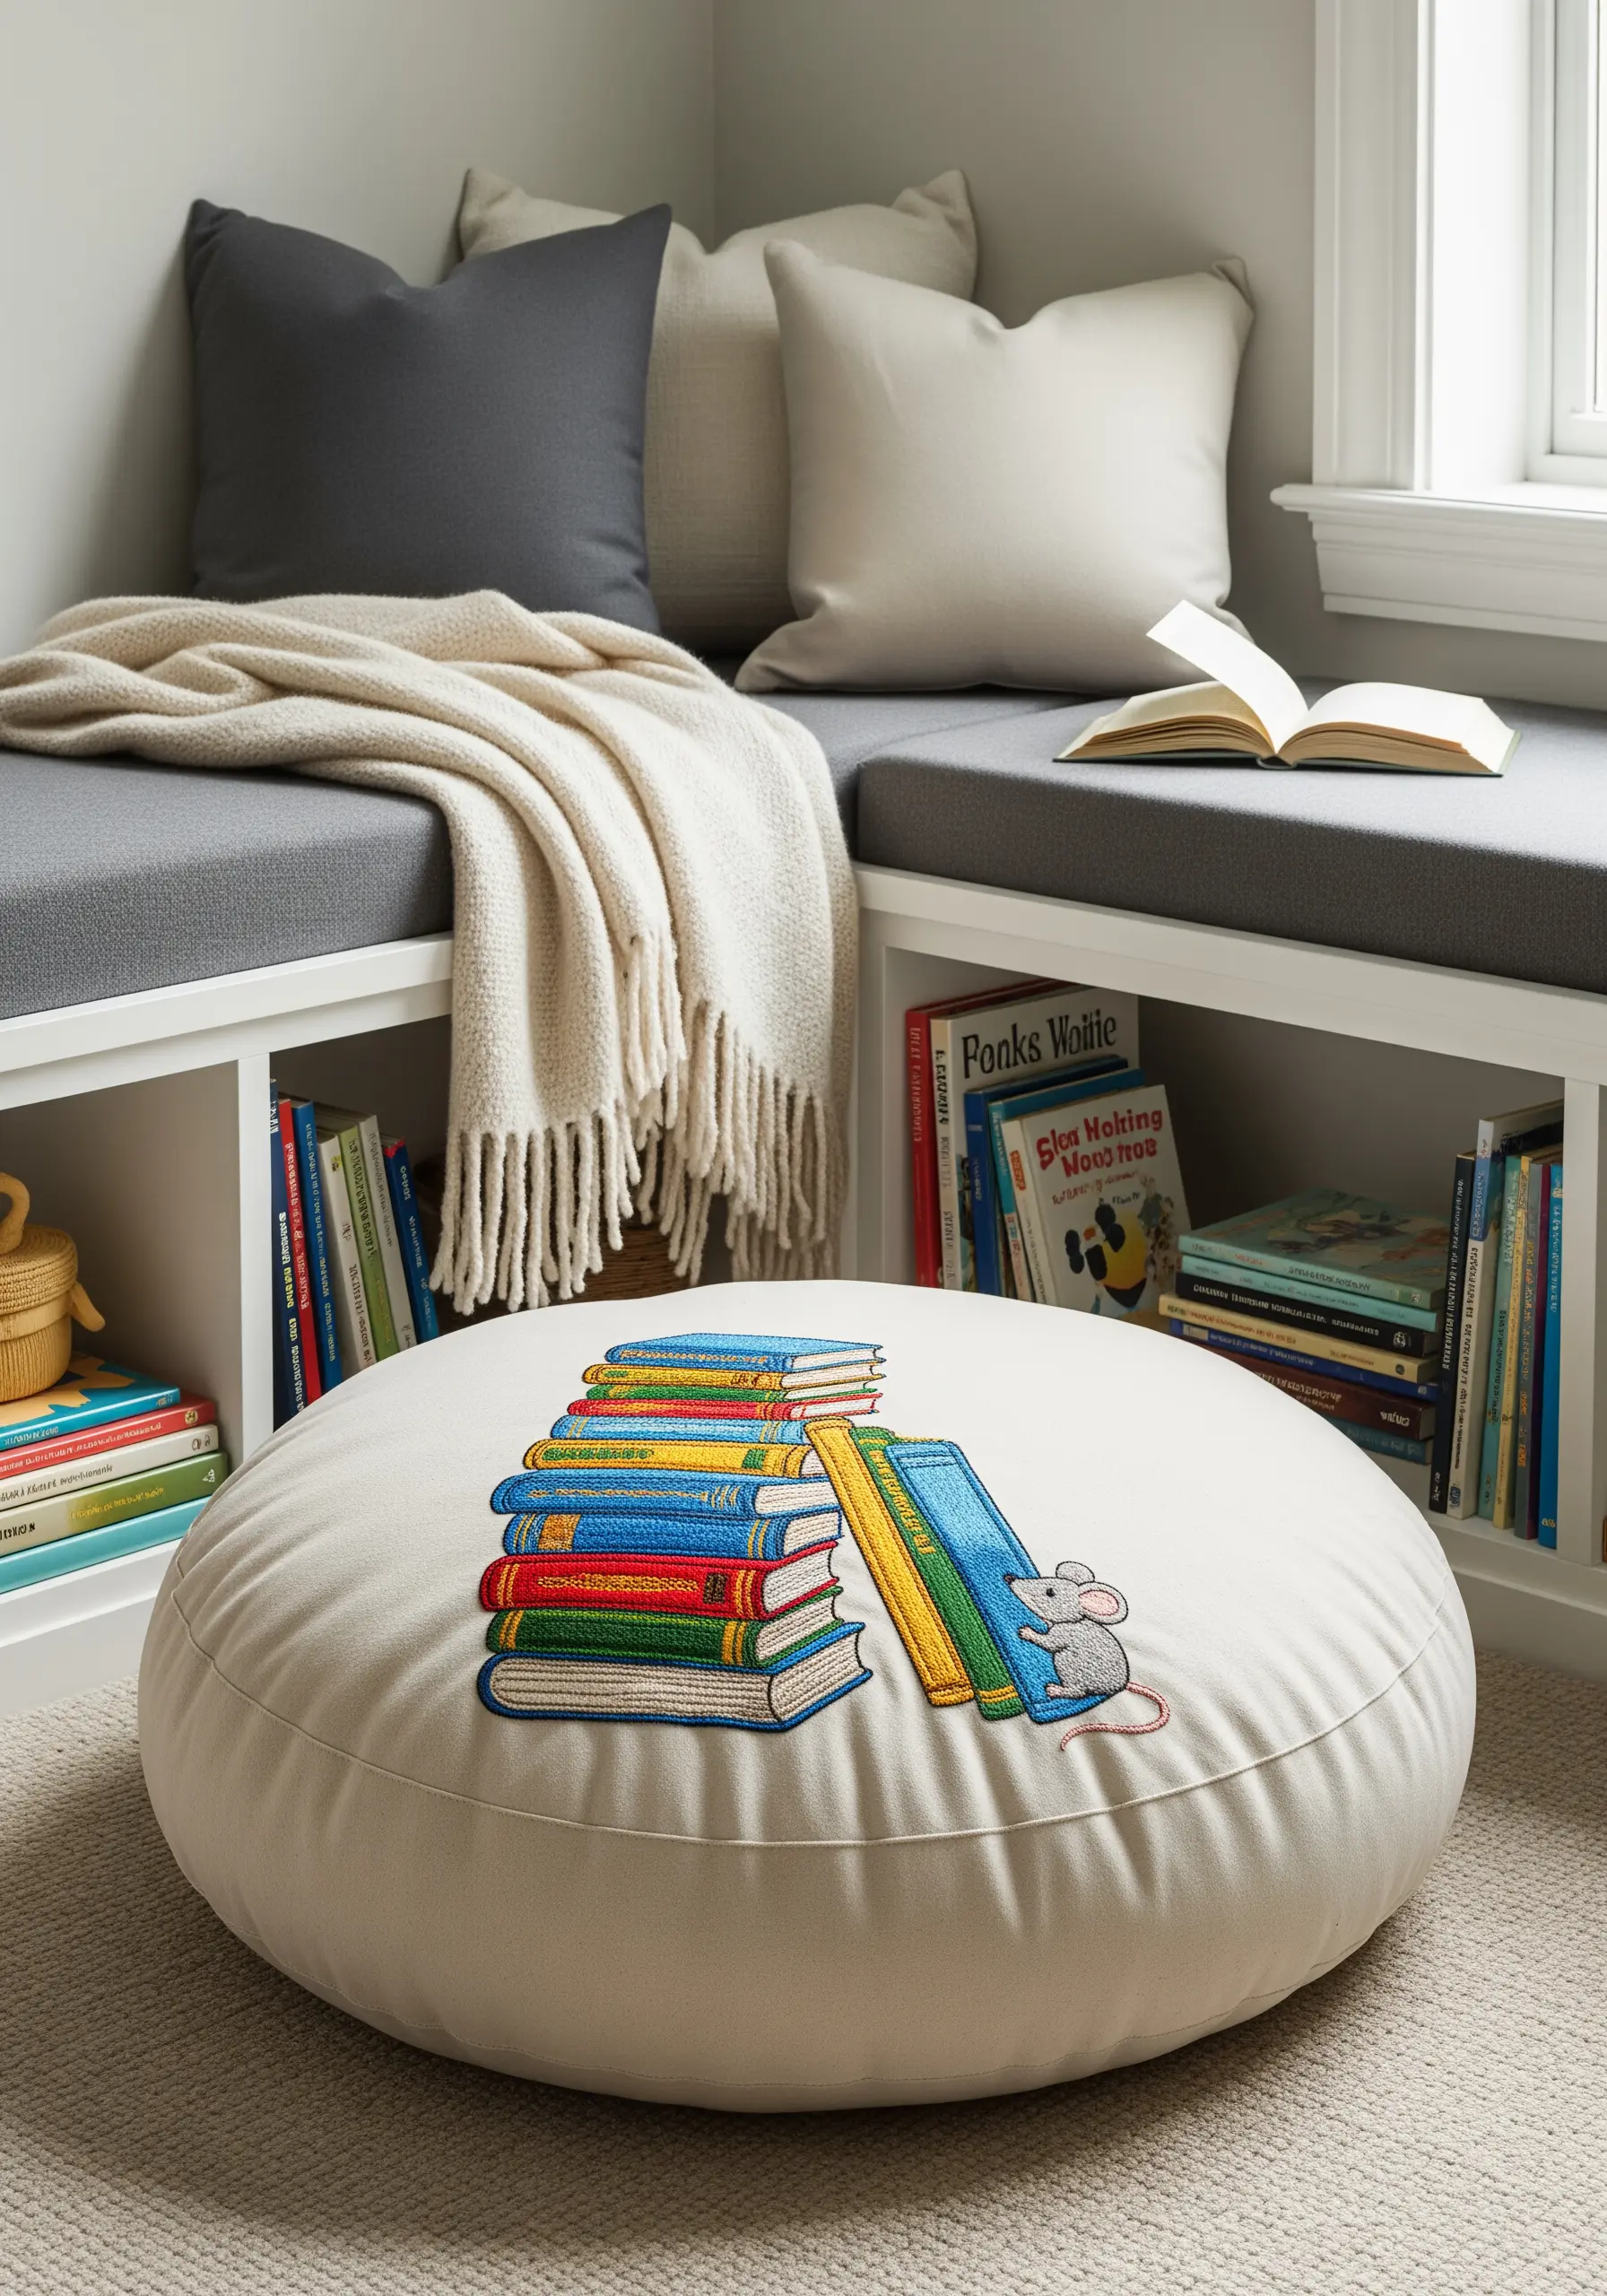
For items that will see frequent use, like a floor cushion, durability is as important as design.
Choose a heavyweight canvas or cotton duck fabric that can withstand wear. Outline your design with a tight, two-strand backstitch for crisp, clear lines that won’t blur over time.
Fill the shapes with a dense satin stitch, ensuring your stitches are short and tight to minimize the risk of snagging.
A well-executed outline is the foundation for embroidery that looks sharp and lasts, whether it’s on a cushion or in DIY cozy embroidery bookmarks.
16. Craft an Heirloom Table Runner with Geometric Stitches
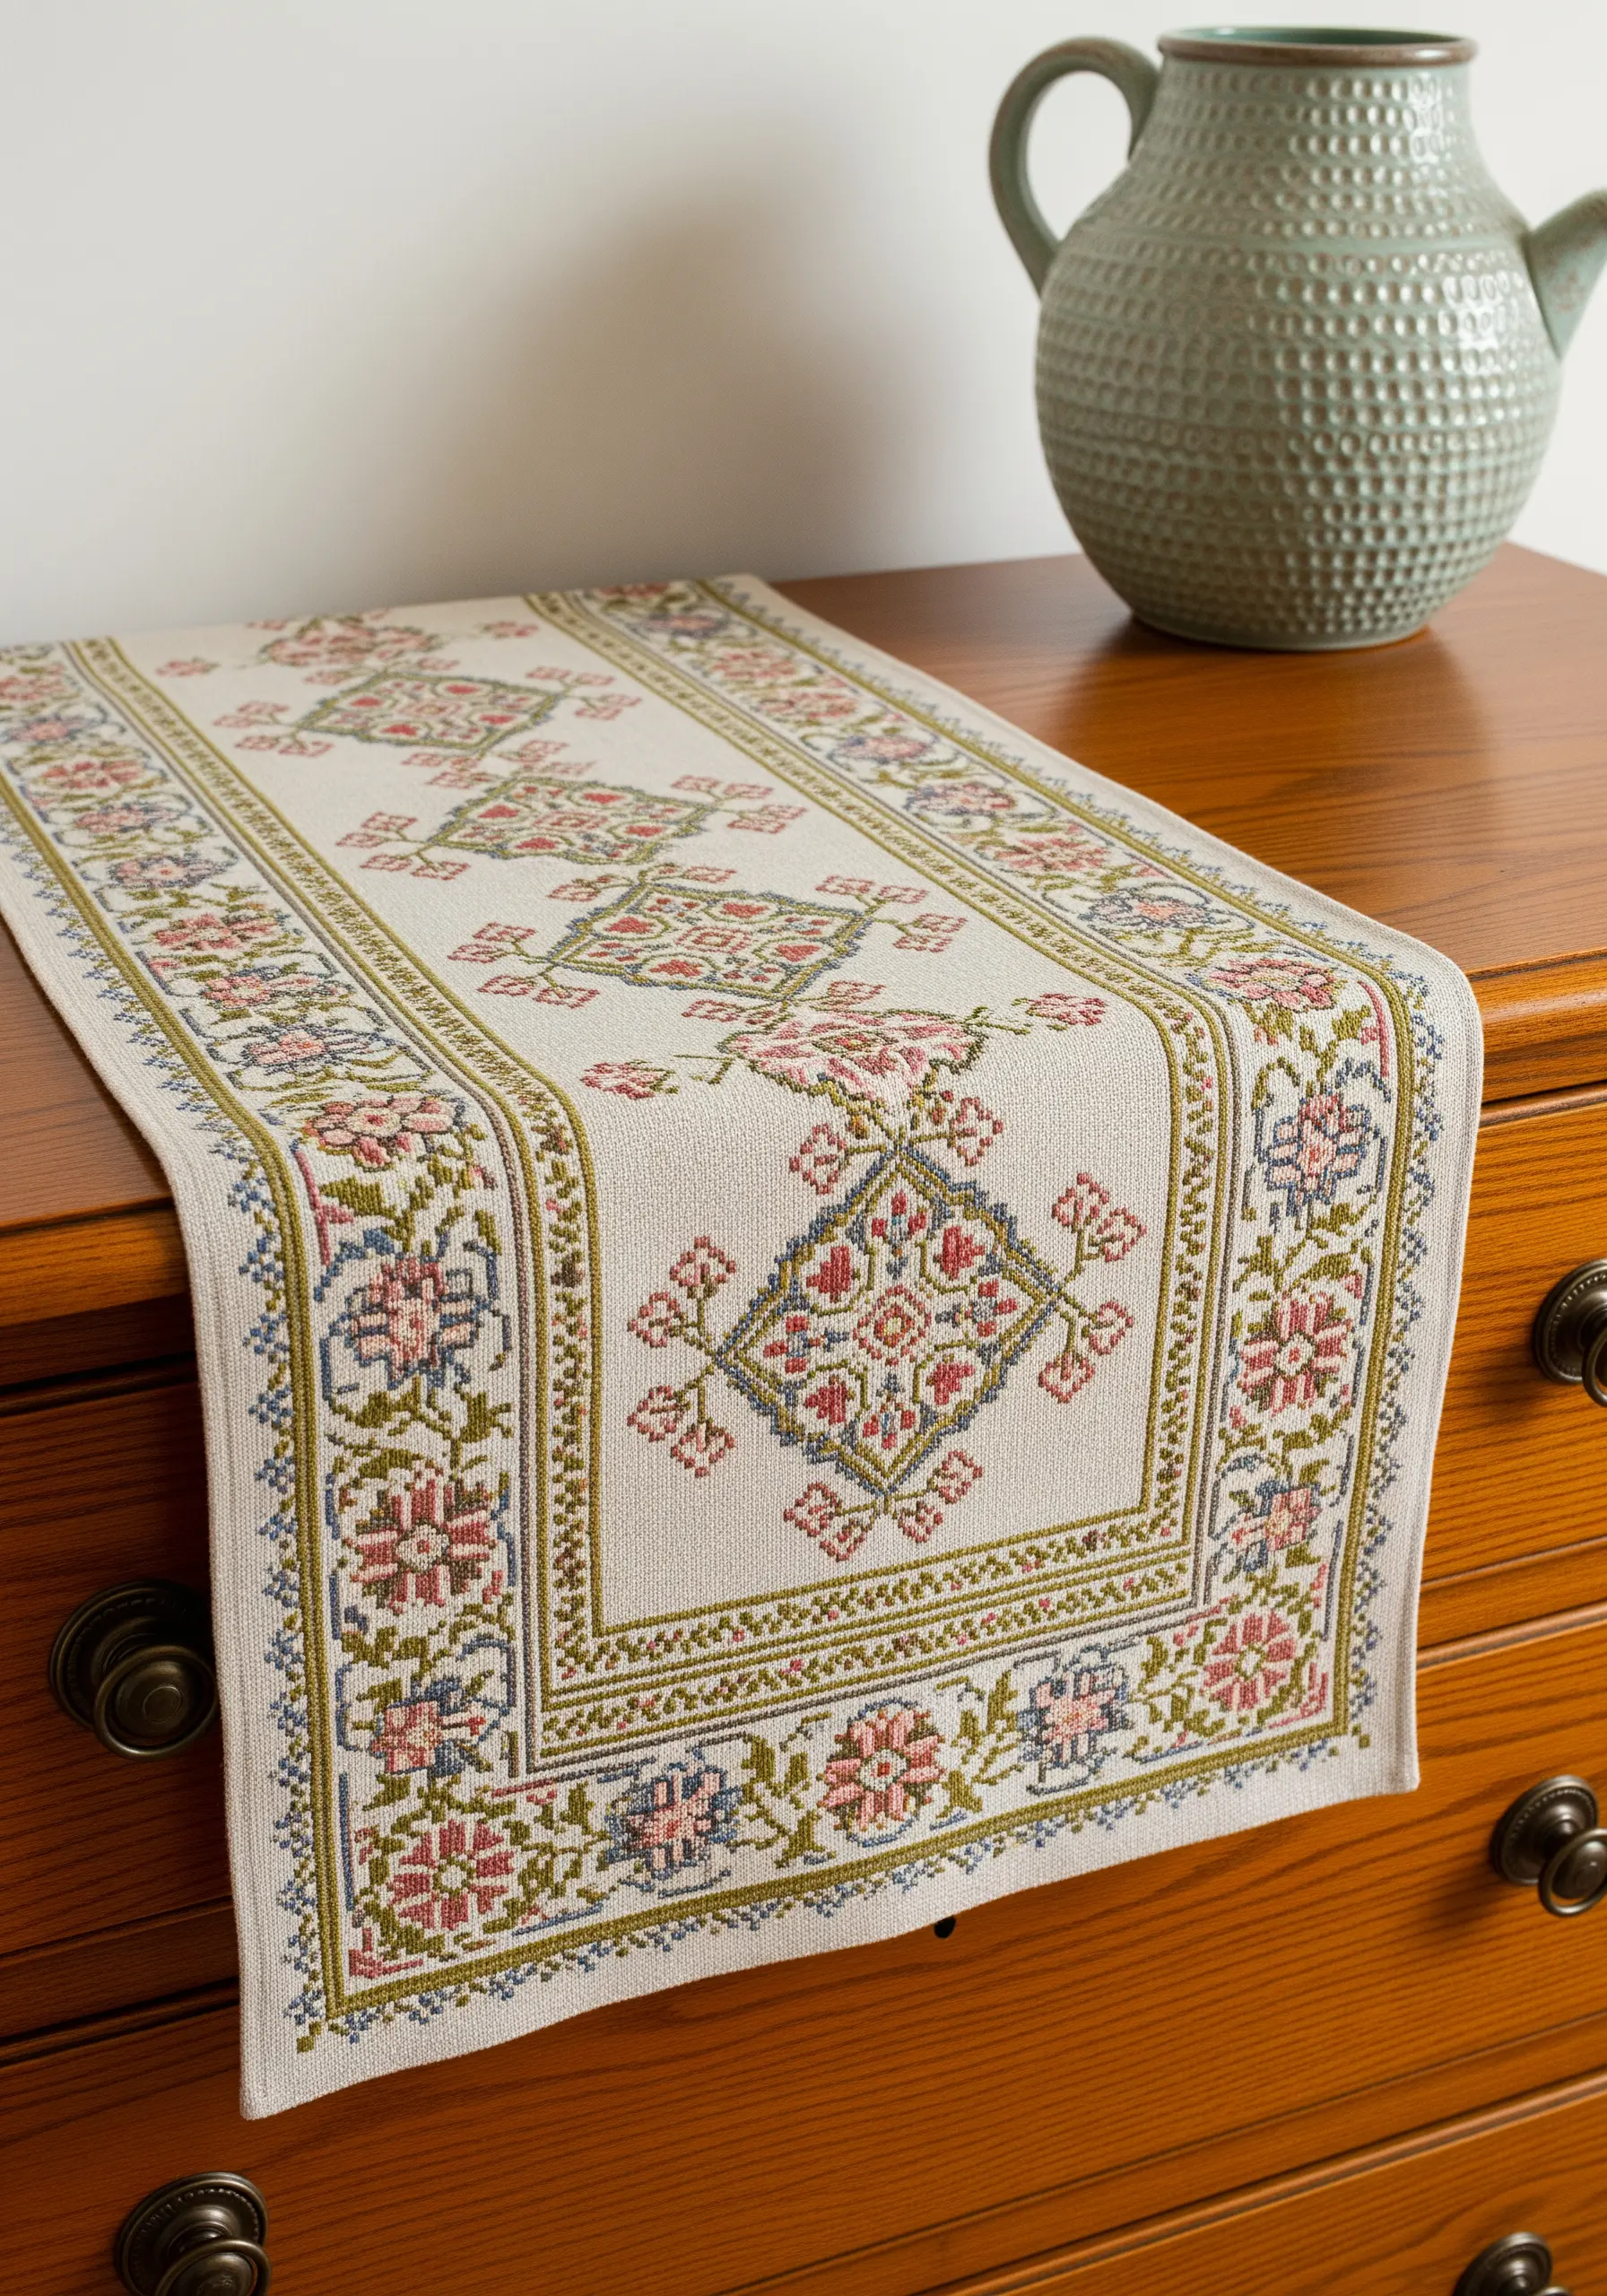
For intricate, geometric patterns with a traditional feel, switch to counted-thread embroidery on evenweave fabric like linen or Aida cloth.
This technique, where stitches are counted over a specific number of fabric threads, ensures perfect symmetry and precision in your design.
Use classic stitches like cross-stitch for filled areas and blackwork stitches (like a double running stitch) for delicate, repeating outlines.
This methodical approach is perfect for creating intricate borders and central medallions on table linen embroidery motifs that feel timeless.
17. Stitch a Whimsical Window Valance
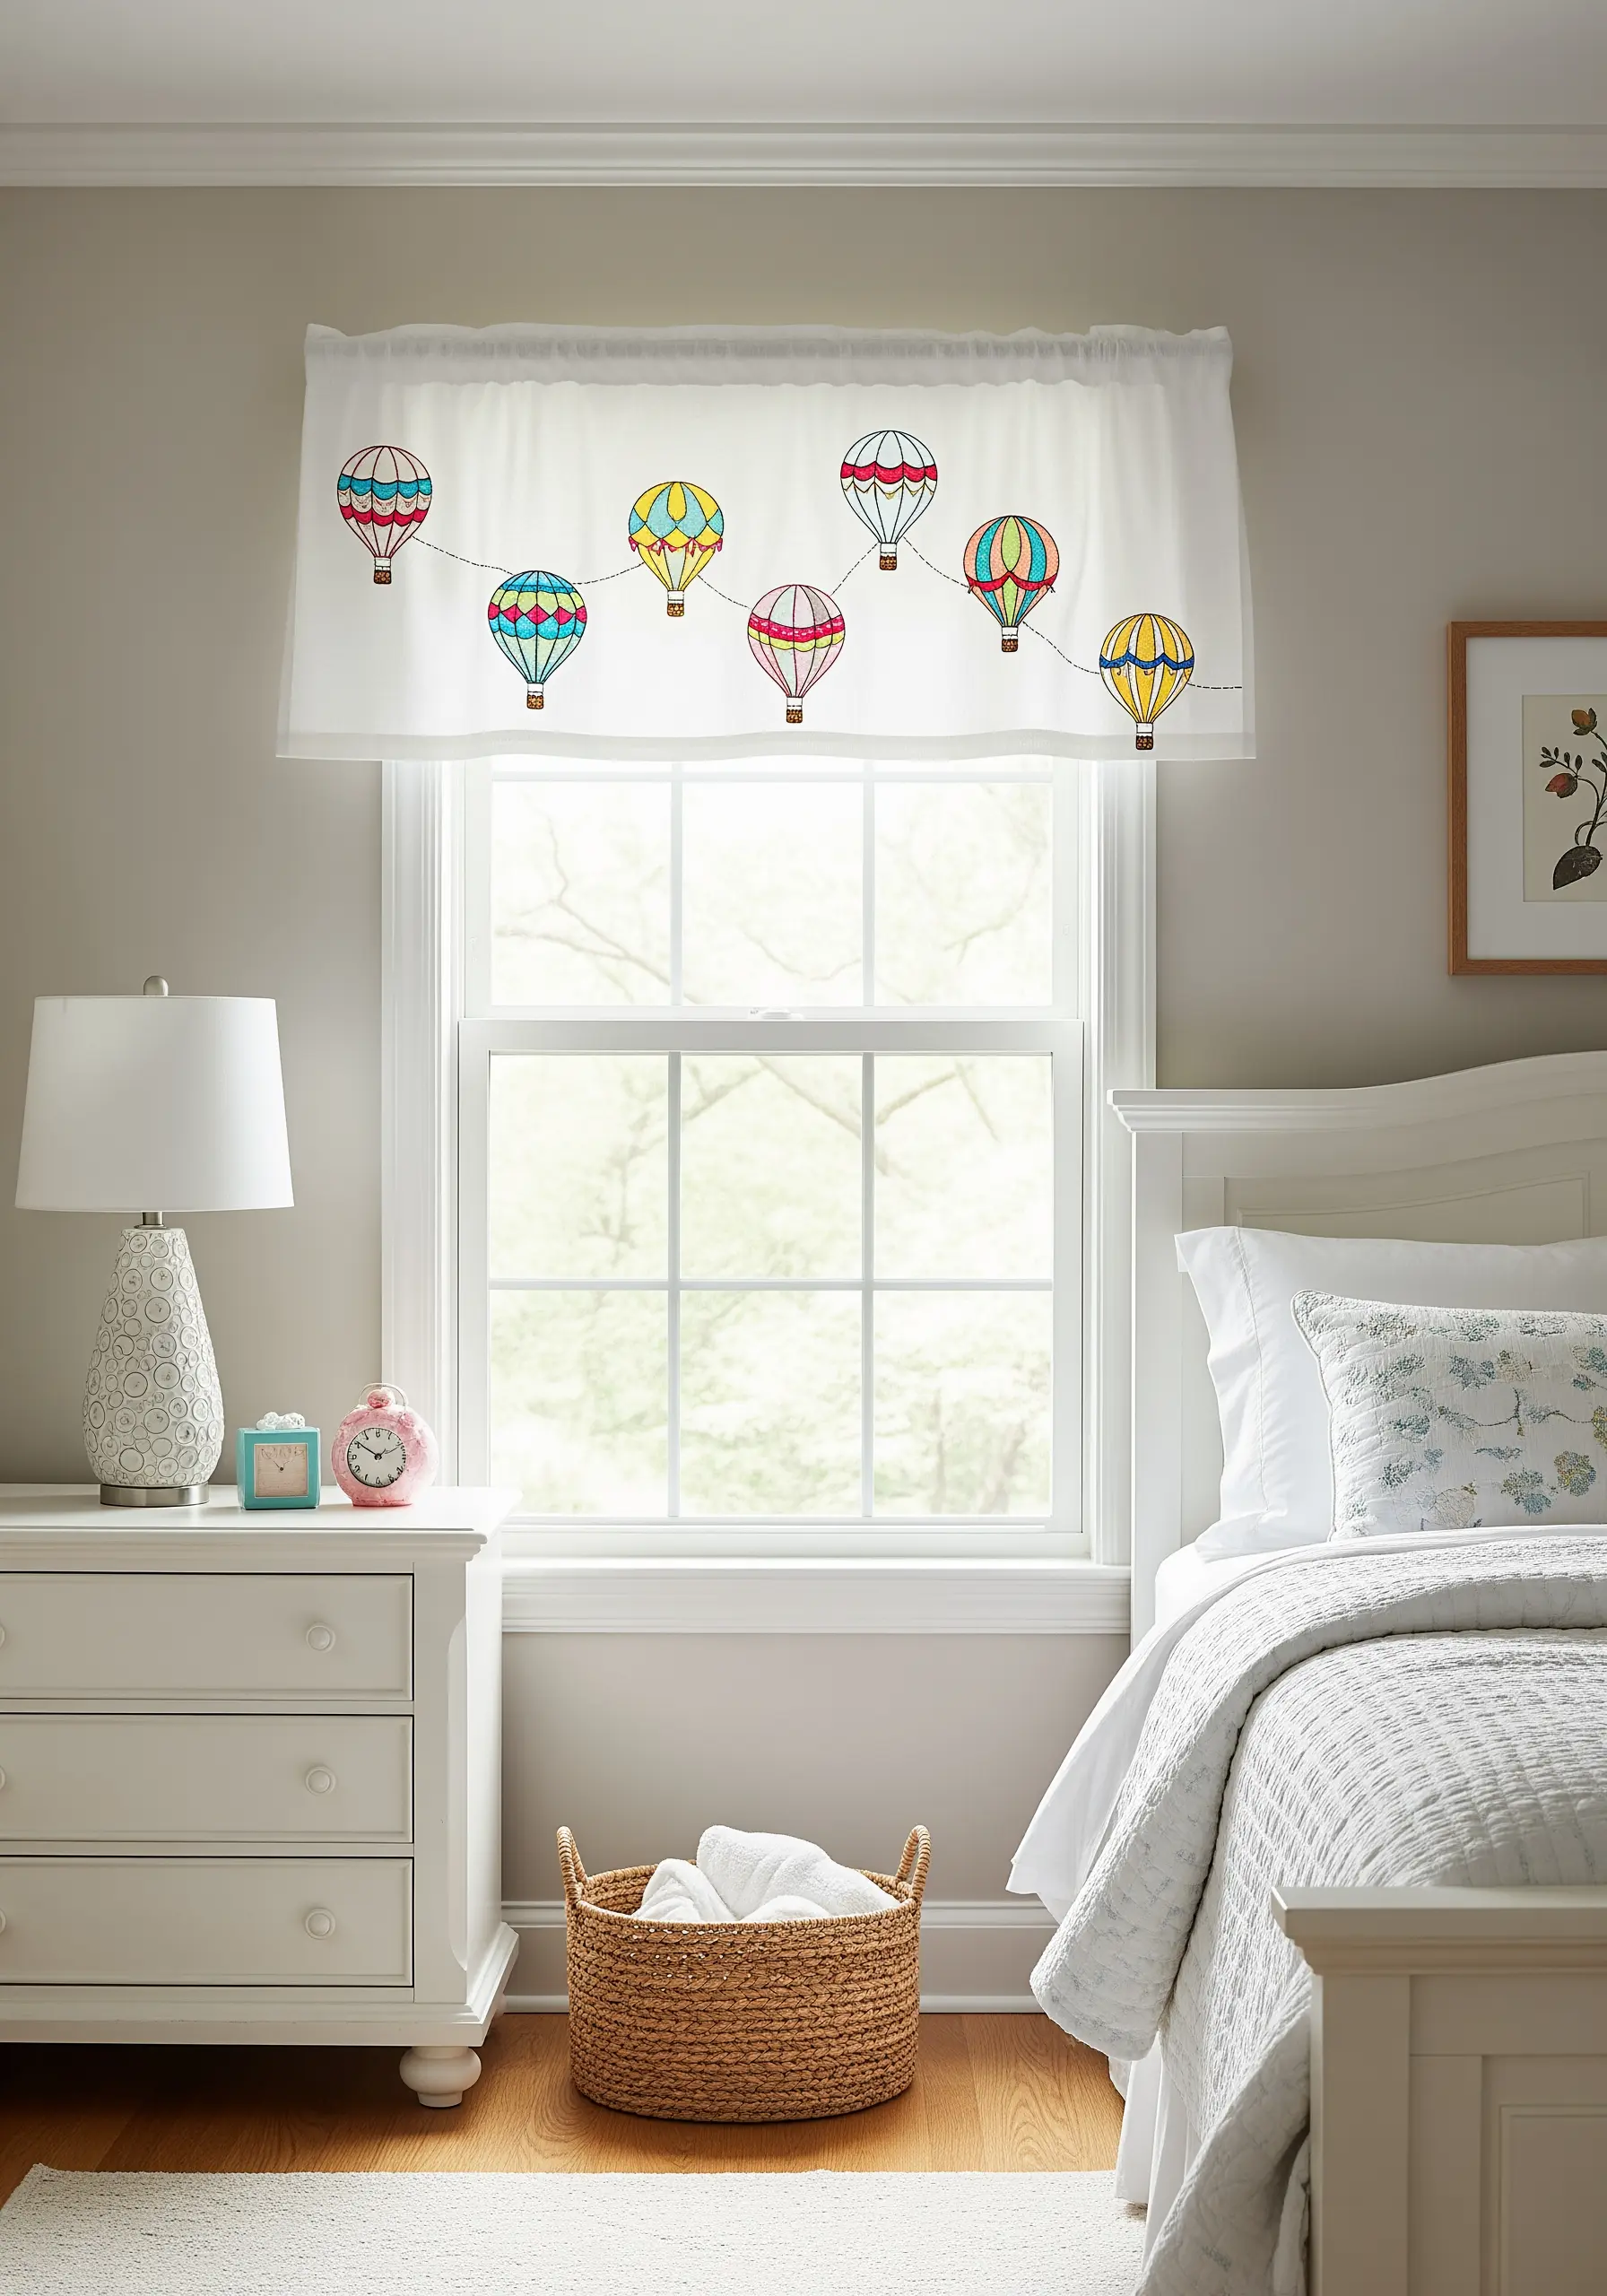
To create a light, illustrative feel on a window valance, think of your thread as ink.
Use a single strand of black or dark grey floss to outline your motifs, like hot air balloons, with a simple backstitch. This gives the design a clean, hand-drawn quality.
Fill in the colors using a light touch—a sparse seed stitch or open satin stitch adds a wash of color without making the fabric heavy or stiff.
This technique is perfect for whimsical floral embroidery ideas and other playful themes in a child’s bedroom.
18. Capture Autumnal Textures with Dimensional Stitches
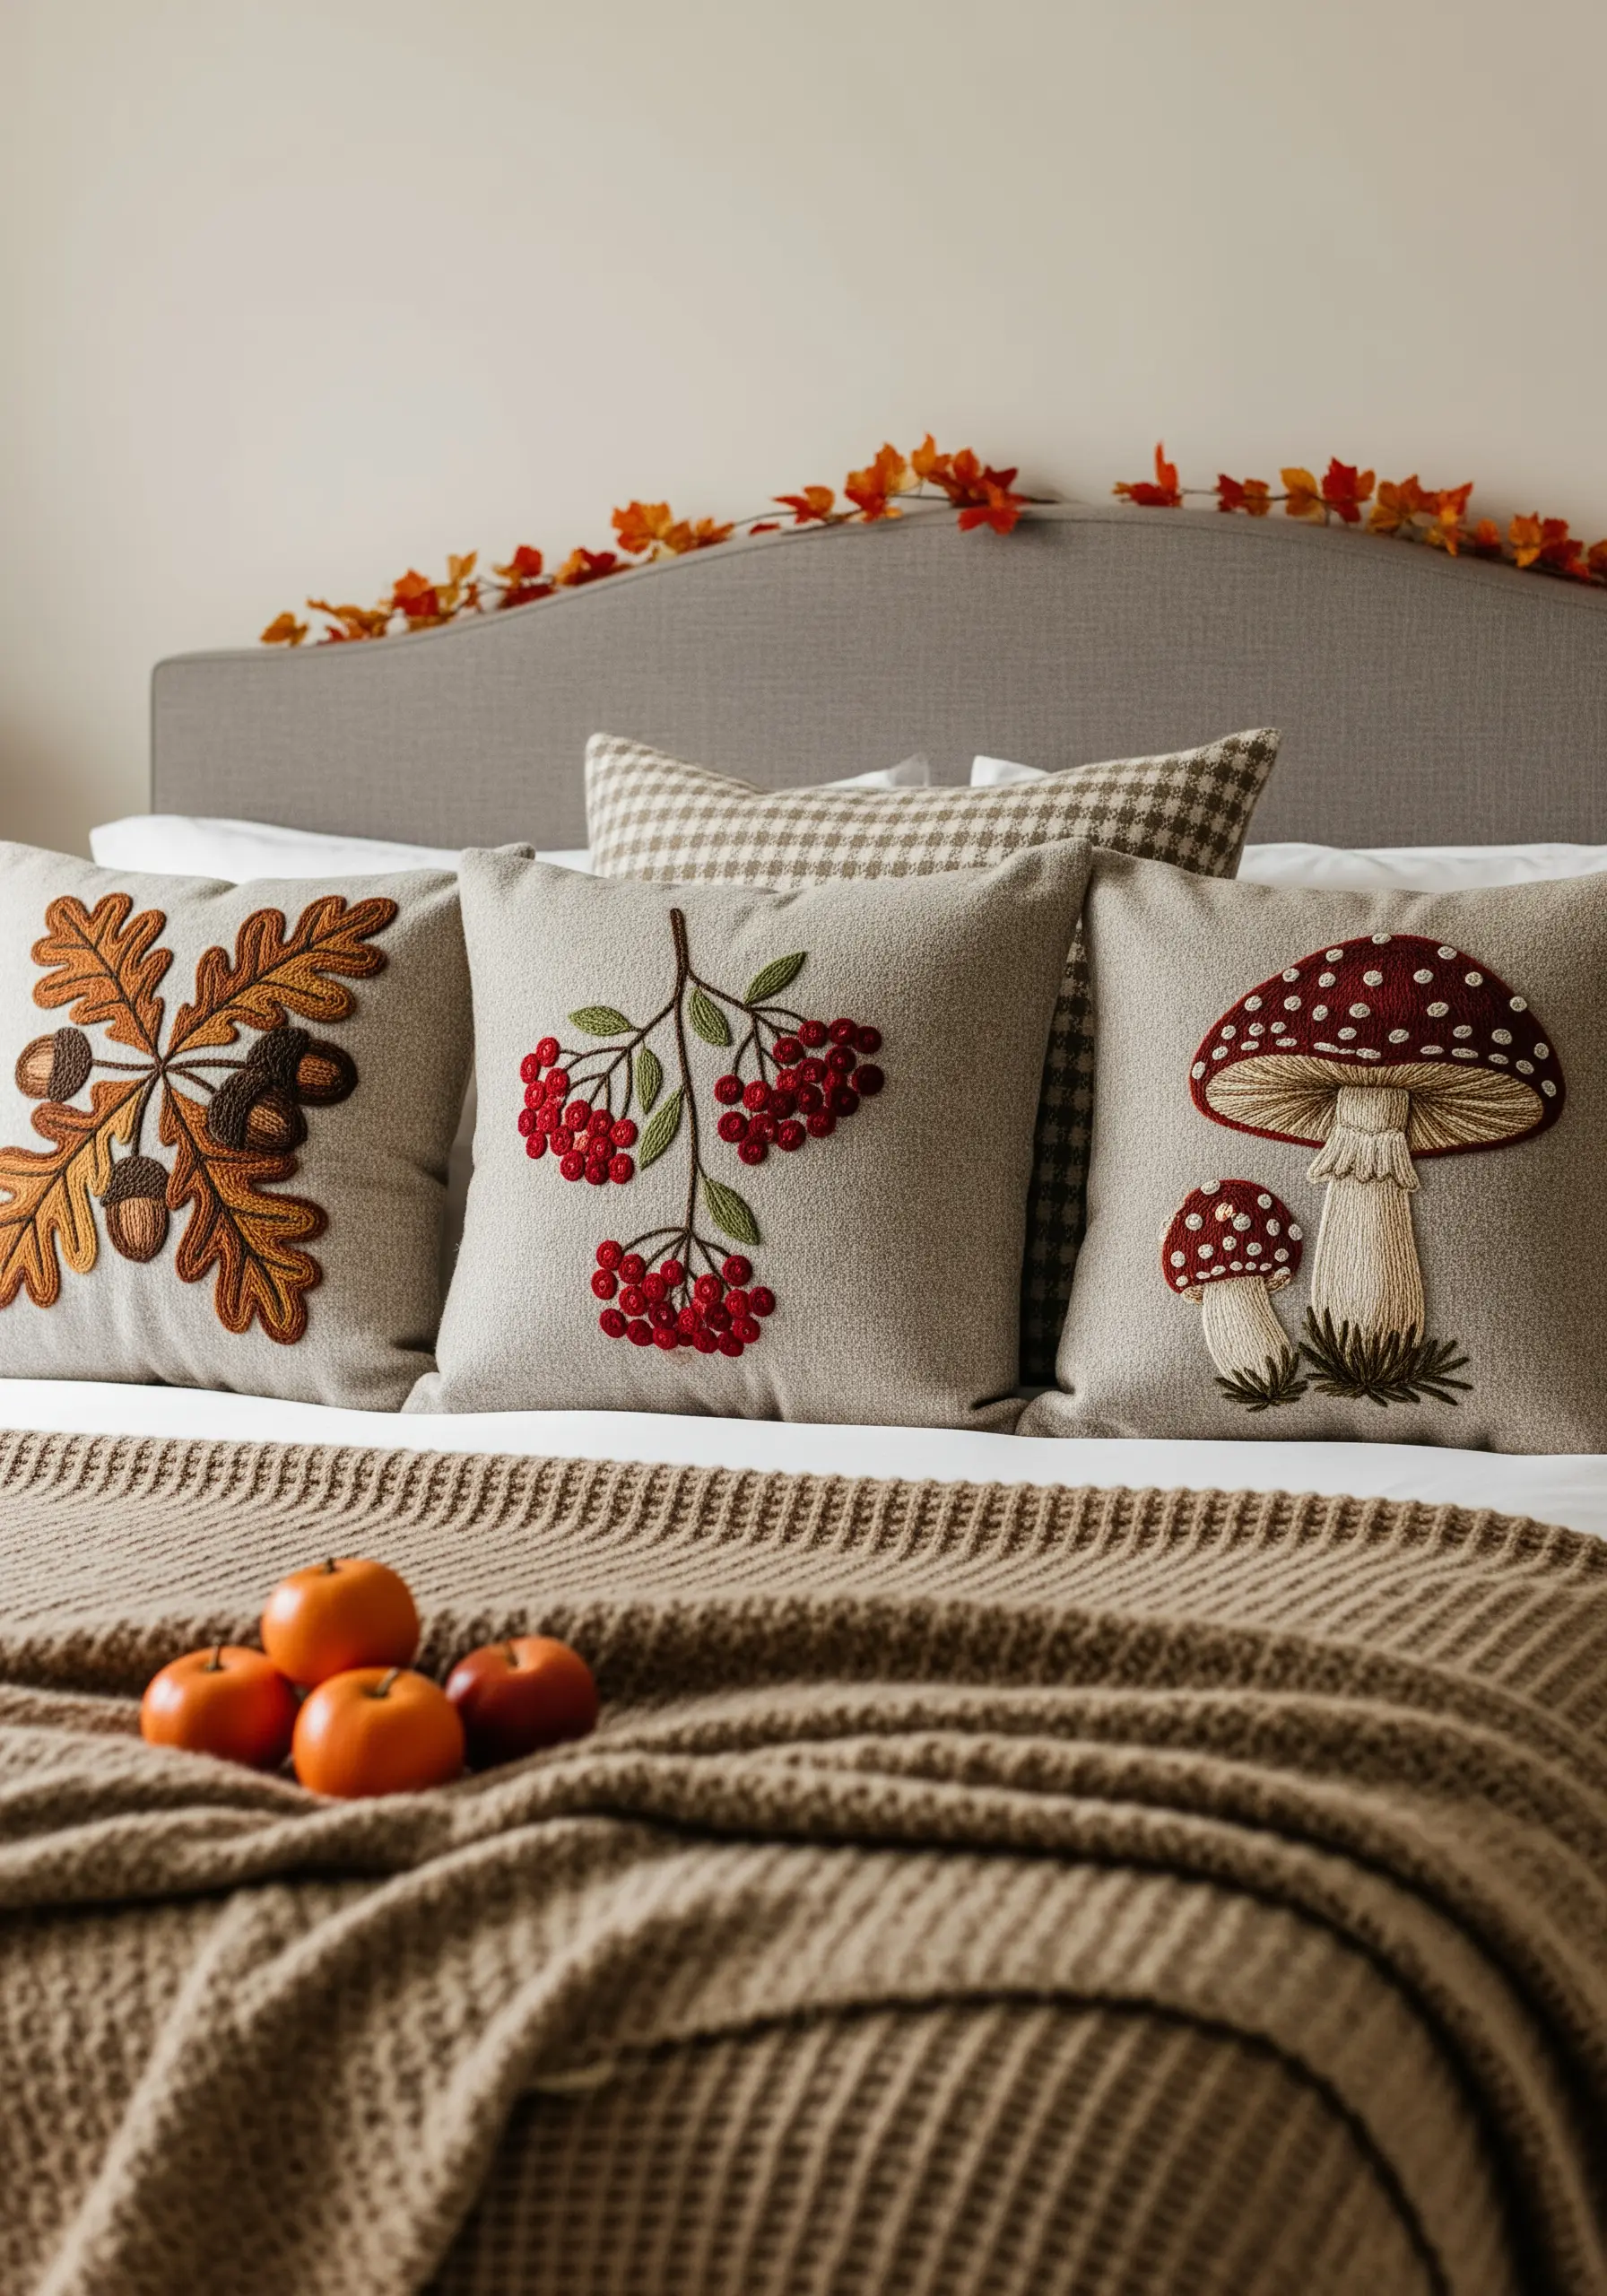
Move beyond flat stitches to capture the rich textures of nature.
Use clusters of French knots or bullion knots to create the bumpy, dimensional surface of berries. This adds a tactile quality that satin stitch can’t replicate.
For the mushroom cap, blend shades of beige and brown using a long-and-short stitch to create a smooth, rounded gradient.
Combining dimensional and flat stitches within the same piece creates a dynamic composition, perfect for earth-inspired embroidery designs that celebrate texture.
19. Create Plush Motifs with Punch Needle
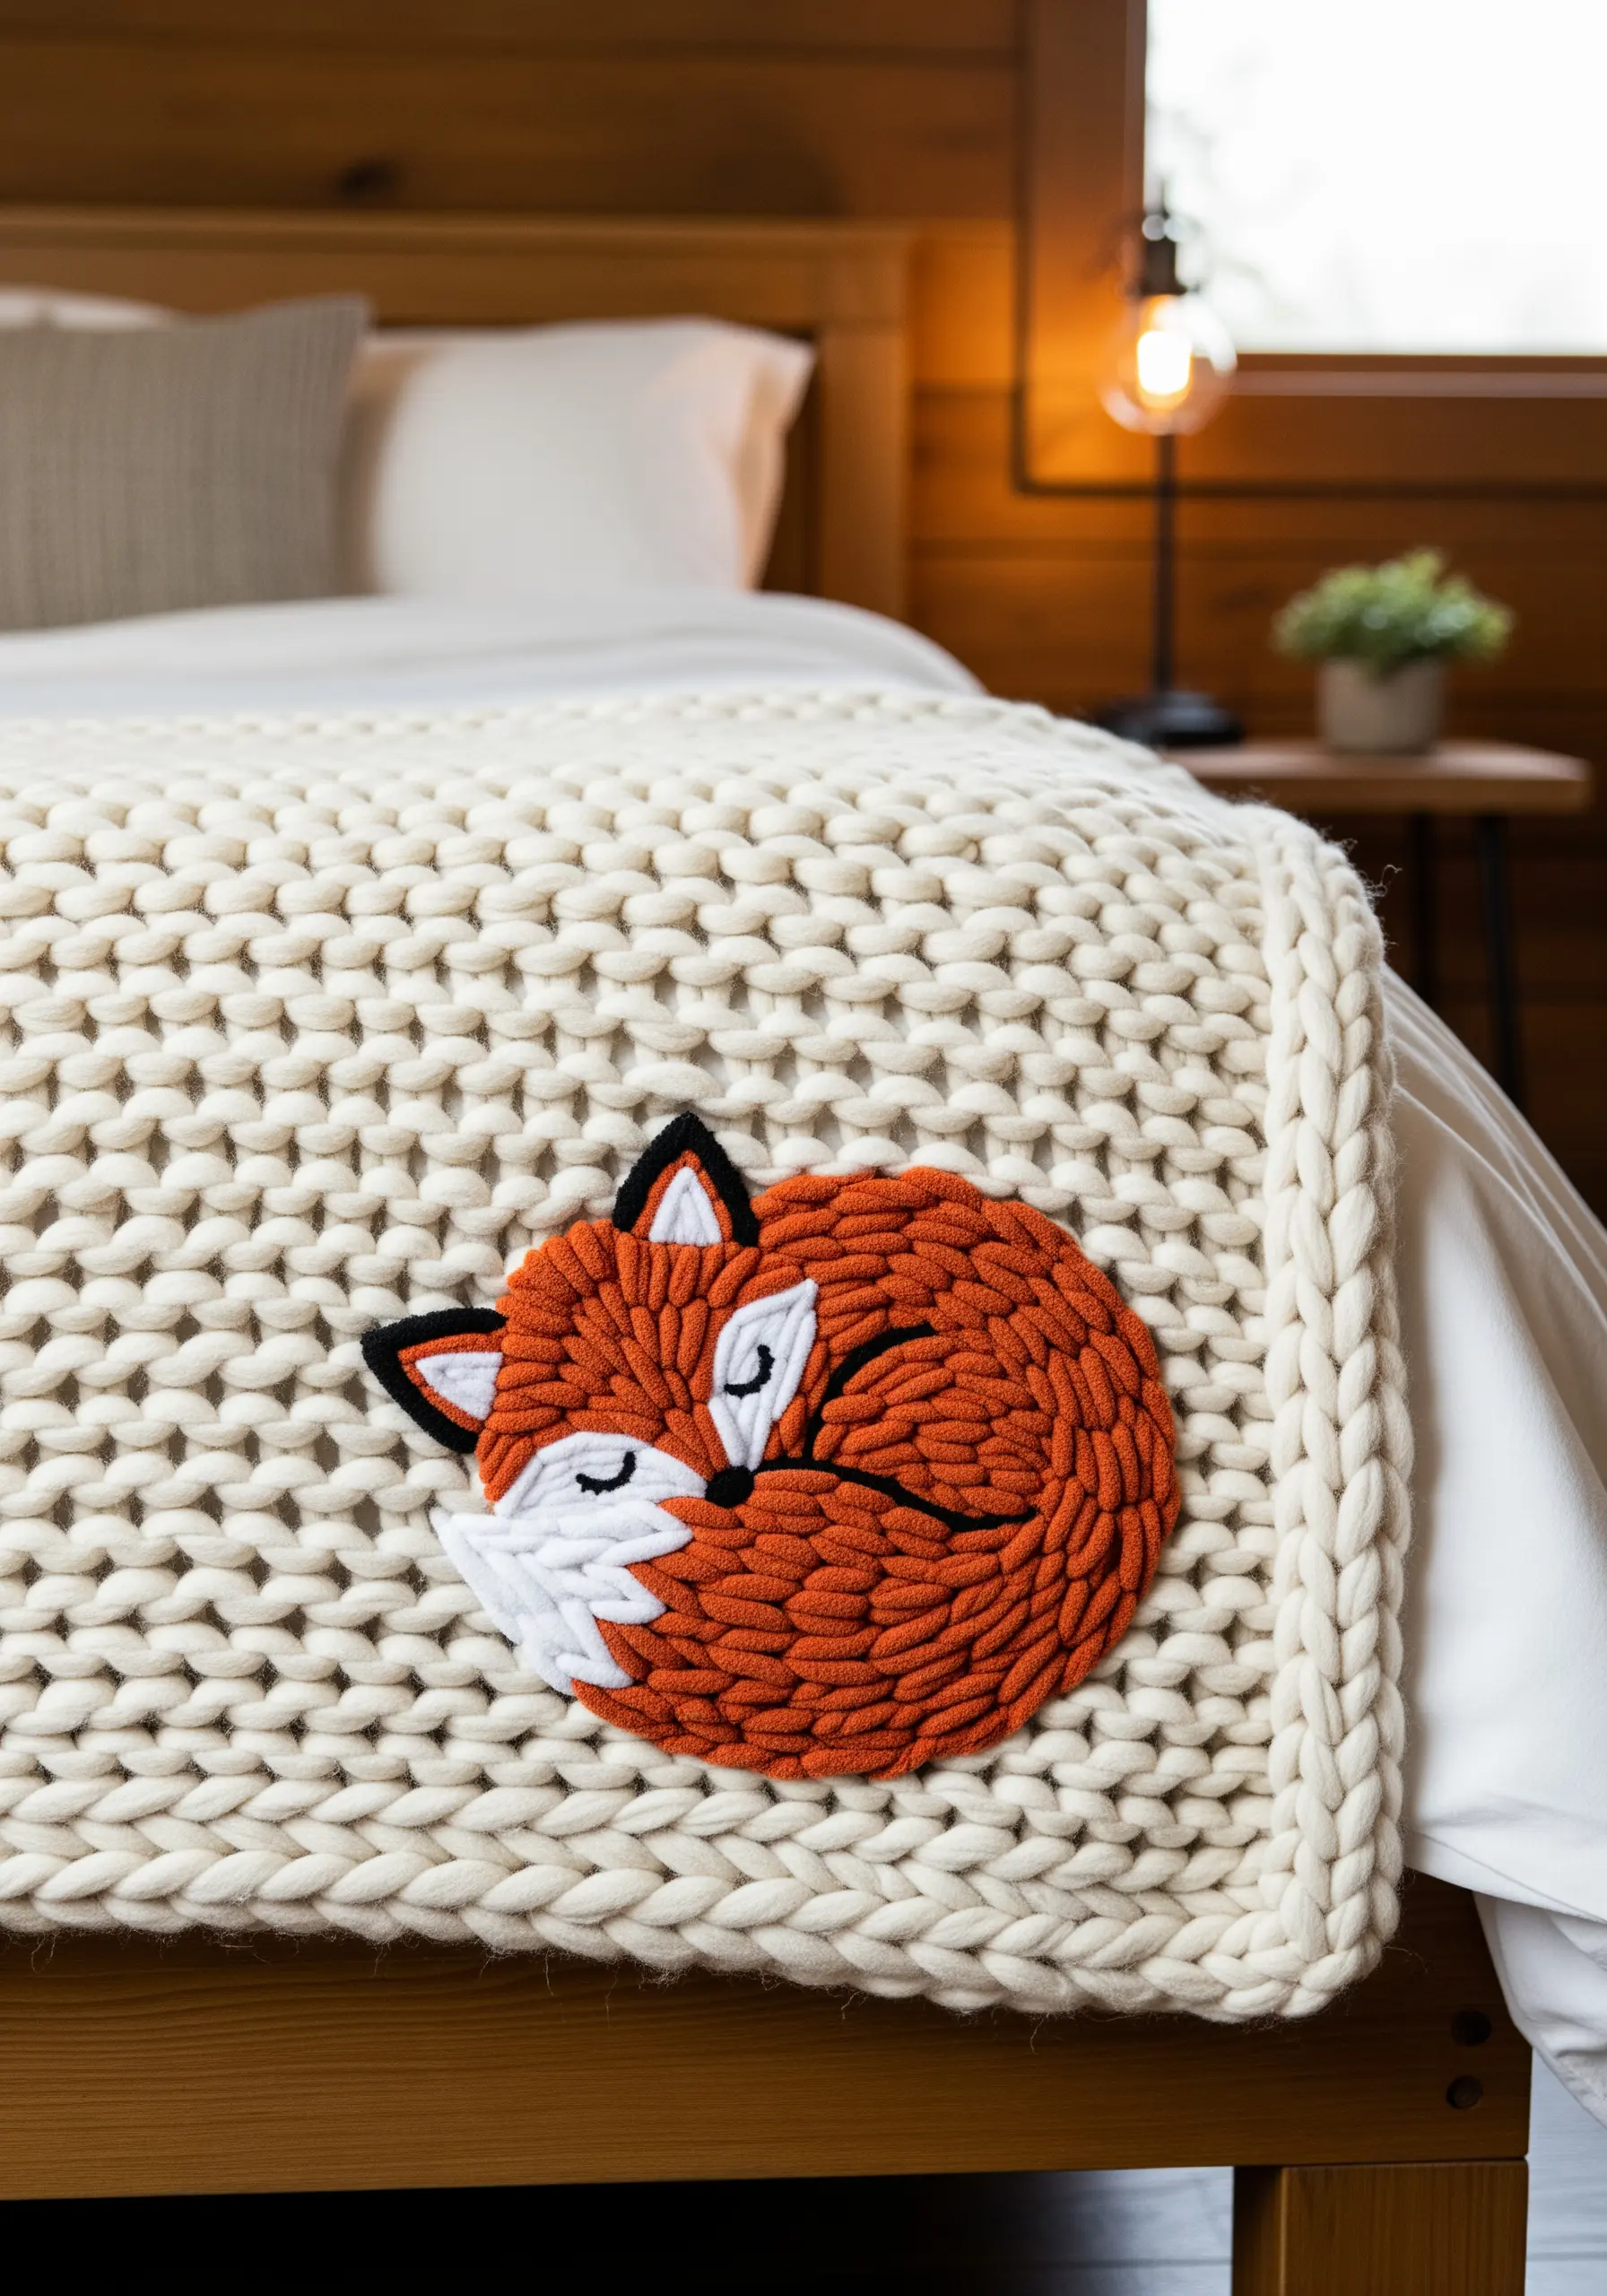
For an ultra-cozy, high-texture effect on a chunky knit blanket, try punch needle embroidery.
This technique uses a special tool to create loops of yarn on the fabric’s surface, resulting in a plush, carpet-like finish that is incredibly tactile.
It’s much faster for filling large areas than traditional embroidery and is perfect for adding soft, graphic motifs to textiles that need to feel exceptionally warm and inviting.
It’s an ideal method for creating adorable forest animal embroidery with a soft, huggable texture.


