

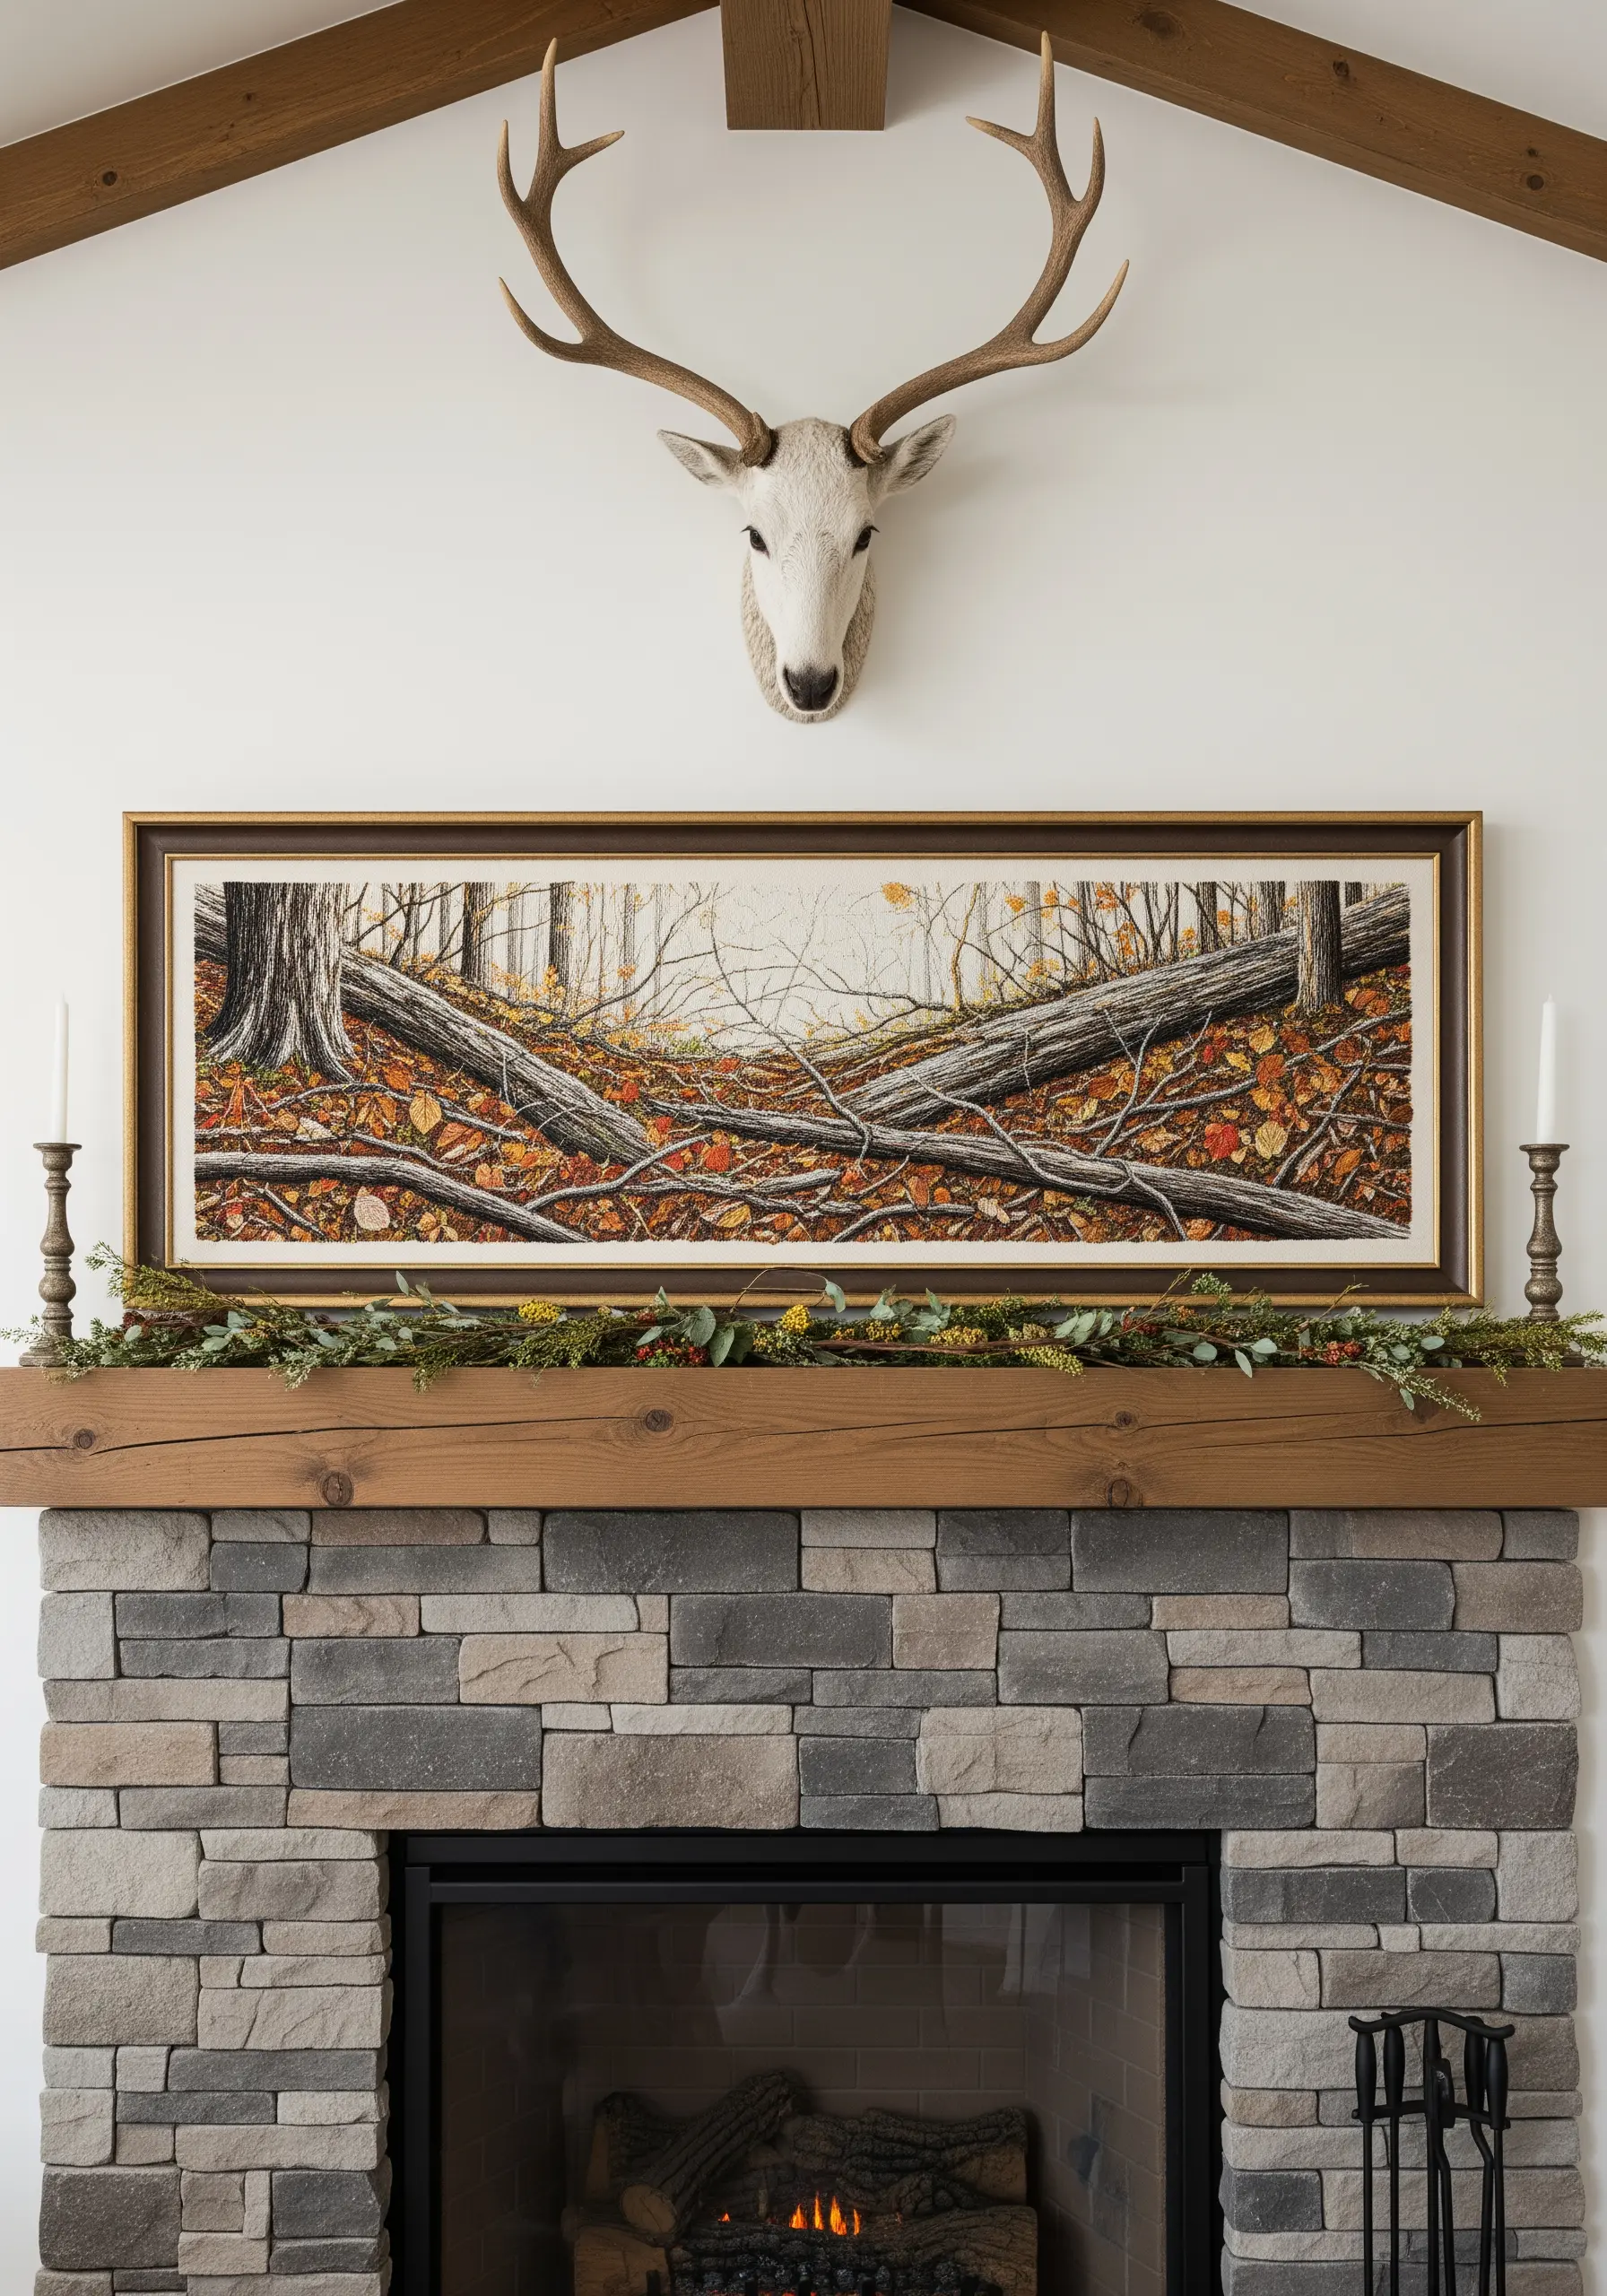
Have you ever looked at a piece of embroidery and felt that it was more than just stitches—that it held a certain quiet power? You know your way around a needle and thread, but you’re ready to create work that feels less like a hobby and more like art.
The secret isn’t in mastering hundreds of complex stitches. It’s in learning to see. Nature is the ultimate teacher of texture, color, and form. The subtle gradient on a leaf, the rough texture of bark, the smooth, cool surface of a river stone—these are your true guides.
In these examples, you won’t just find patterns to copy. You’ll find techniques that teach you how to translate the world around you into thread. It’s time to move beyond following instructions and start designing with intention, observation, and confidence. Let’s begin.
1. Capturing Crystalline Structures in Thread

To build the texture of a geode, use French knots for the crystalline core, varying the tightness and number of wraps to mimic a druzy surface.
For the outer bands, lay long, straight stitches using metallic or silk threads to capture the mineral sheen against a dark fabric background.
This contrast between matte, textured knots and lustrous straight stitches is what gives the piece its geological realism.
The high-contrast combination of color and finish makes for compelling texture-rich thread art ideas that command attention.
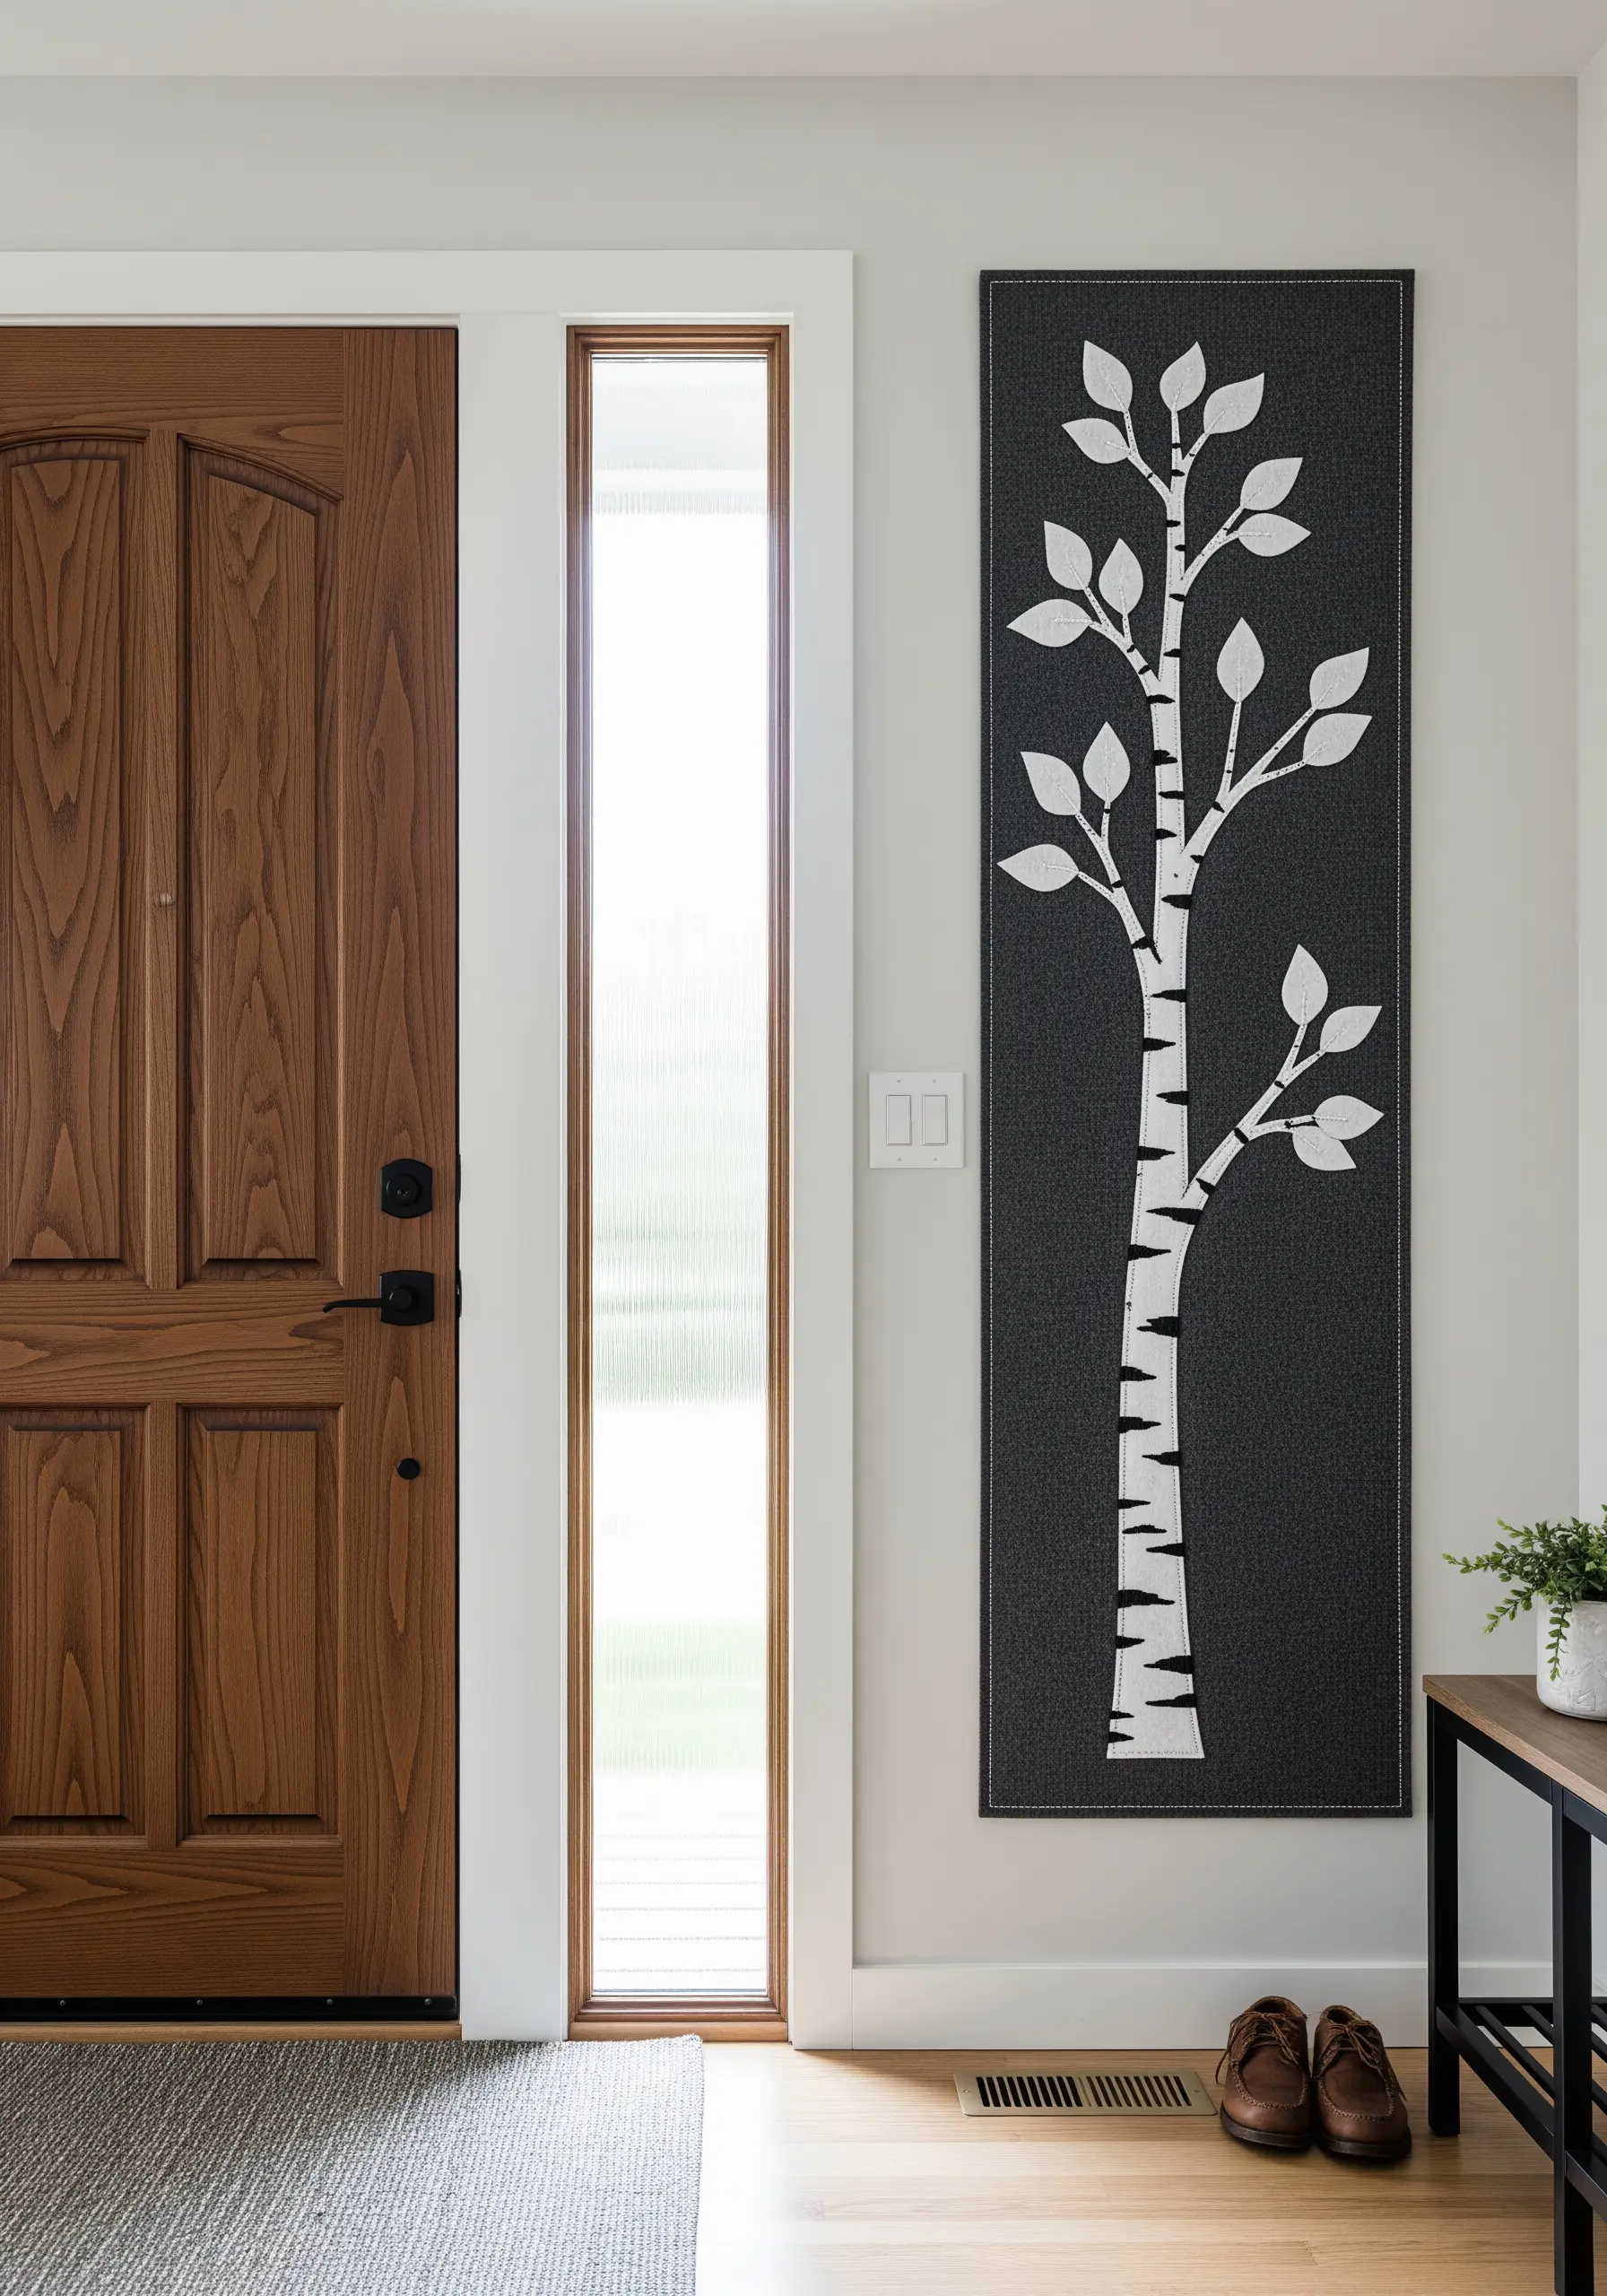
2. Minimalist Birch Forest with Bold Linework

This design’s power comes from its confident use of negative space and strong, graphic lines.
Opt for a thick black thread, like Perle cotton #5, to ensure the tree trunks make a bold statement against the neutral fabric.
Use a clean backstitch for the outlines and add the characteristic bark marks with simple straight stitches.
The key to a natural look is varying the length and placement of these marks—perfect uniformity will make the trees look artificial.
This approach is perfect for creating striking embroidered textile wall hangings with minimal effort.
3. The Art of the Botanical Triptych

When creating a set of artworks, visual consistency is paramount for a polished, professional look.
To stitch realistic fern fronds, use the fishbone stitch with a single strand of thread, which cleverly creates both the central vein and angled leaflets in one fluid motion.
By using the exact same fabric, thread color, and frame style for all three pieces, you establish a strong visual rhythm.
This transforms individual embroideries into a cohesive gallery display, offering a lesson in both stitching and curation.
You can explore many fern & foliage stitch variations to add lush texture to your nature art.
4. Abstract Studies with Variegated Thread
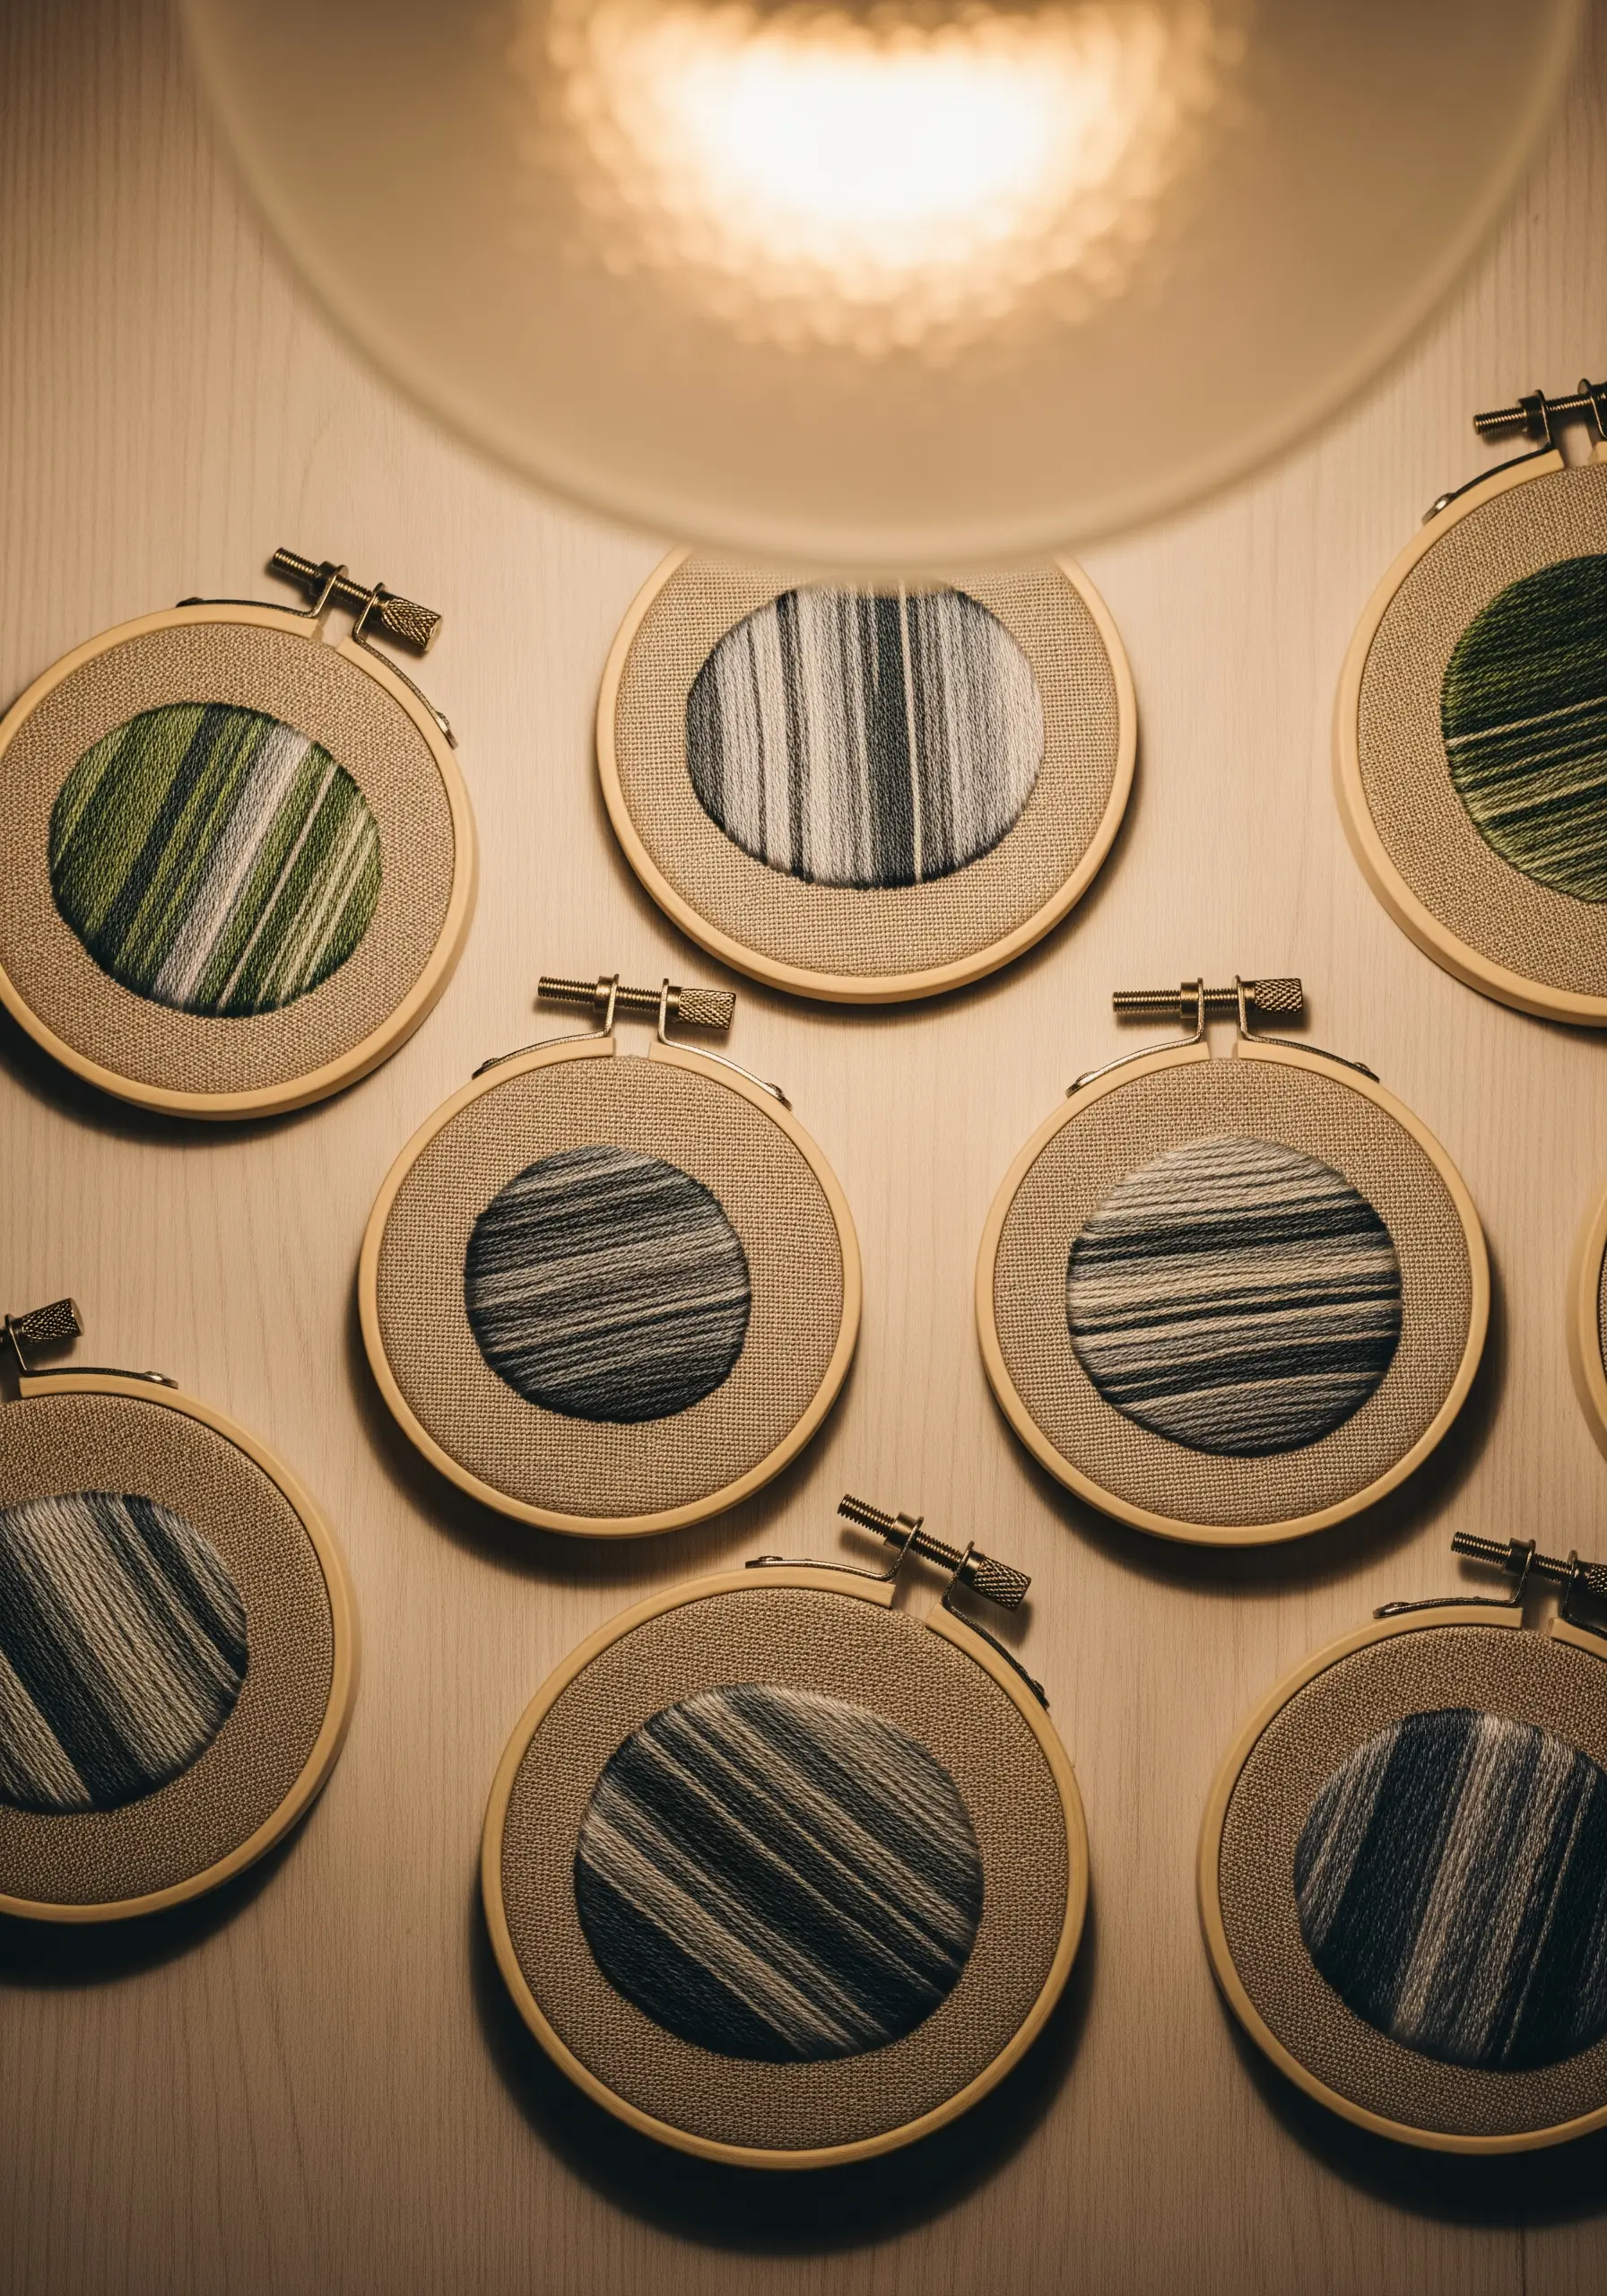
Allow variegated thread to become your design partner in creating these abstract pieces inspired by stone and wood.
Simply fill a circular area with dense satin stitches, laying them either horizontally, vertically, or diagonally.
Resist the urge to control the color placement; the magic lies in the thread’s unpredictable shifts, which create organic stripes and gradients automatically.
Create a full collection using threads from a similar color family to explore abstract layered thread collage ideas with effortless cohesion.
5. Sculptural Forms with Coiled Yarn
Move beyond flat stitching and build dimensional art with a yarn coiling technique.
Start by wrapping thick yarn or textile rope around a central point, securing it to a sturdy backing fabric with small, discreet stitches as you spiral outwards.
The visual interest comes from alternating the thickness and texture of your yarns, creating a surface that mimics the rings of a tree or layers of sediment.
This method transforms simple fibers into a powerful focal point, showcasing gorgeous mixed-fiber textures that invite touch.
6. Achieving Luminous Leaf Gradients
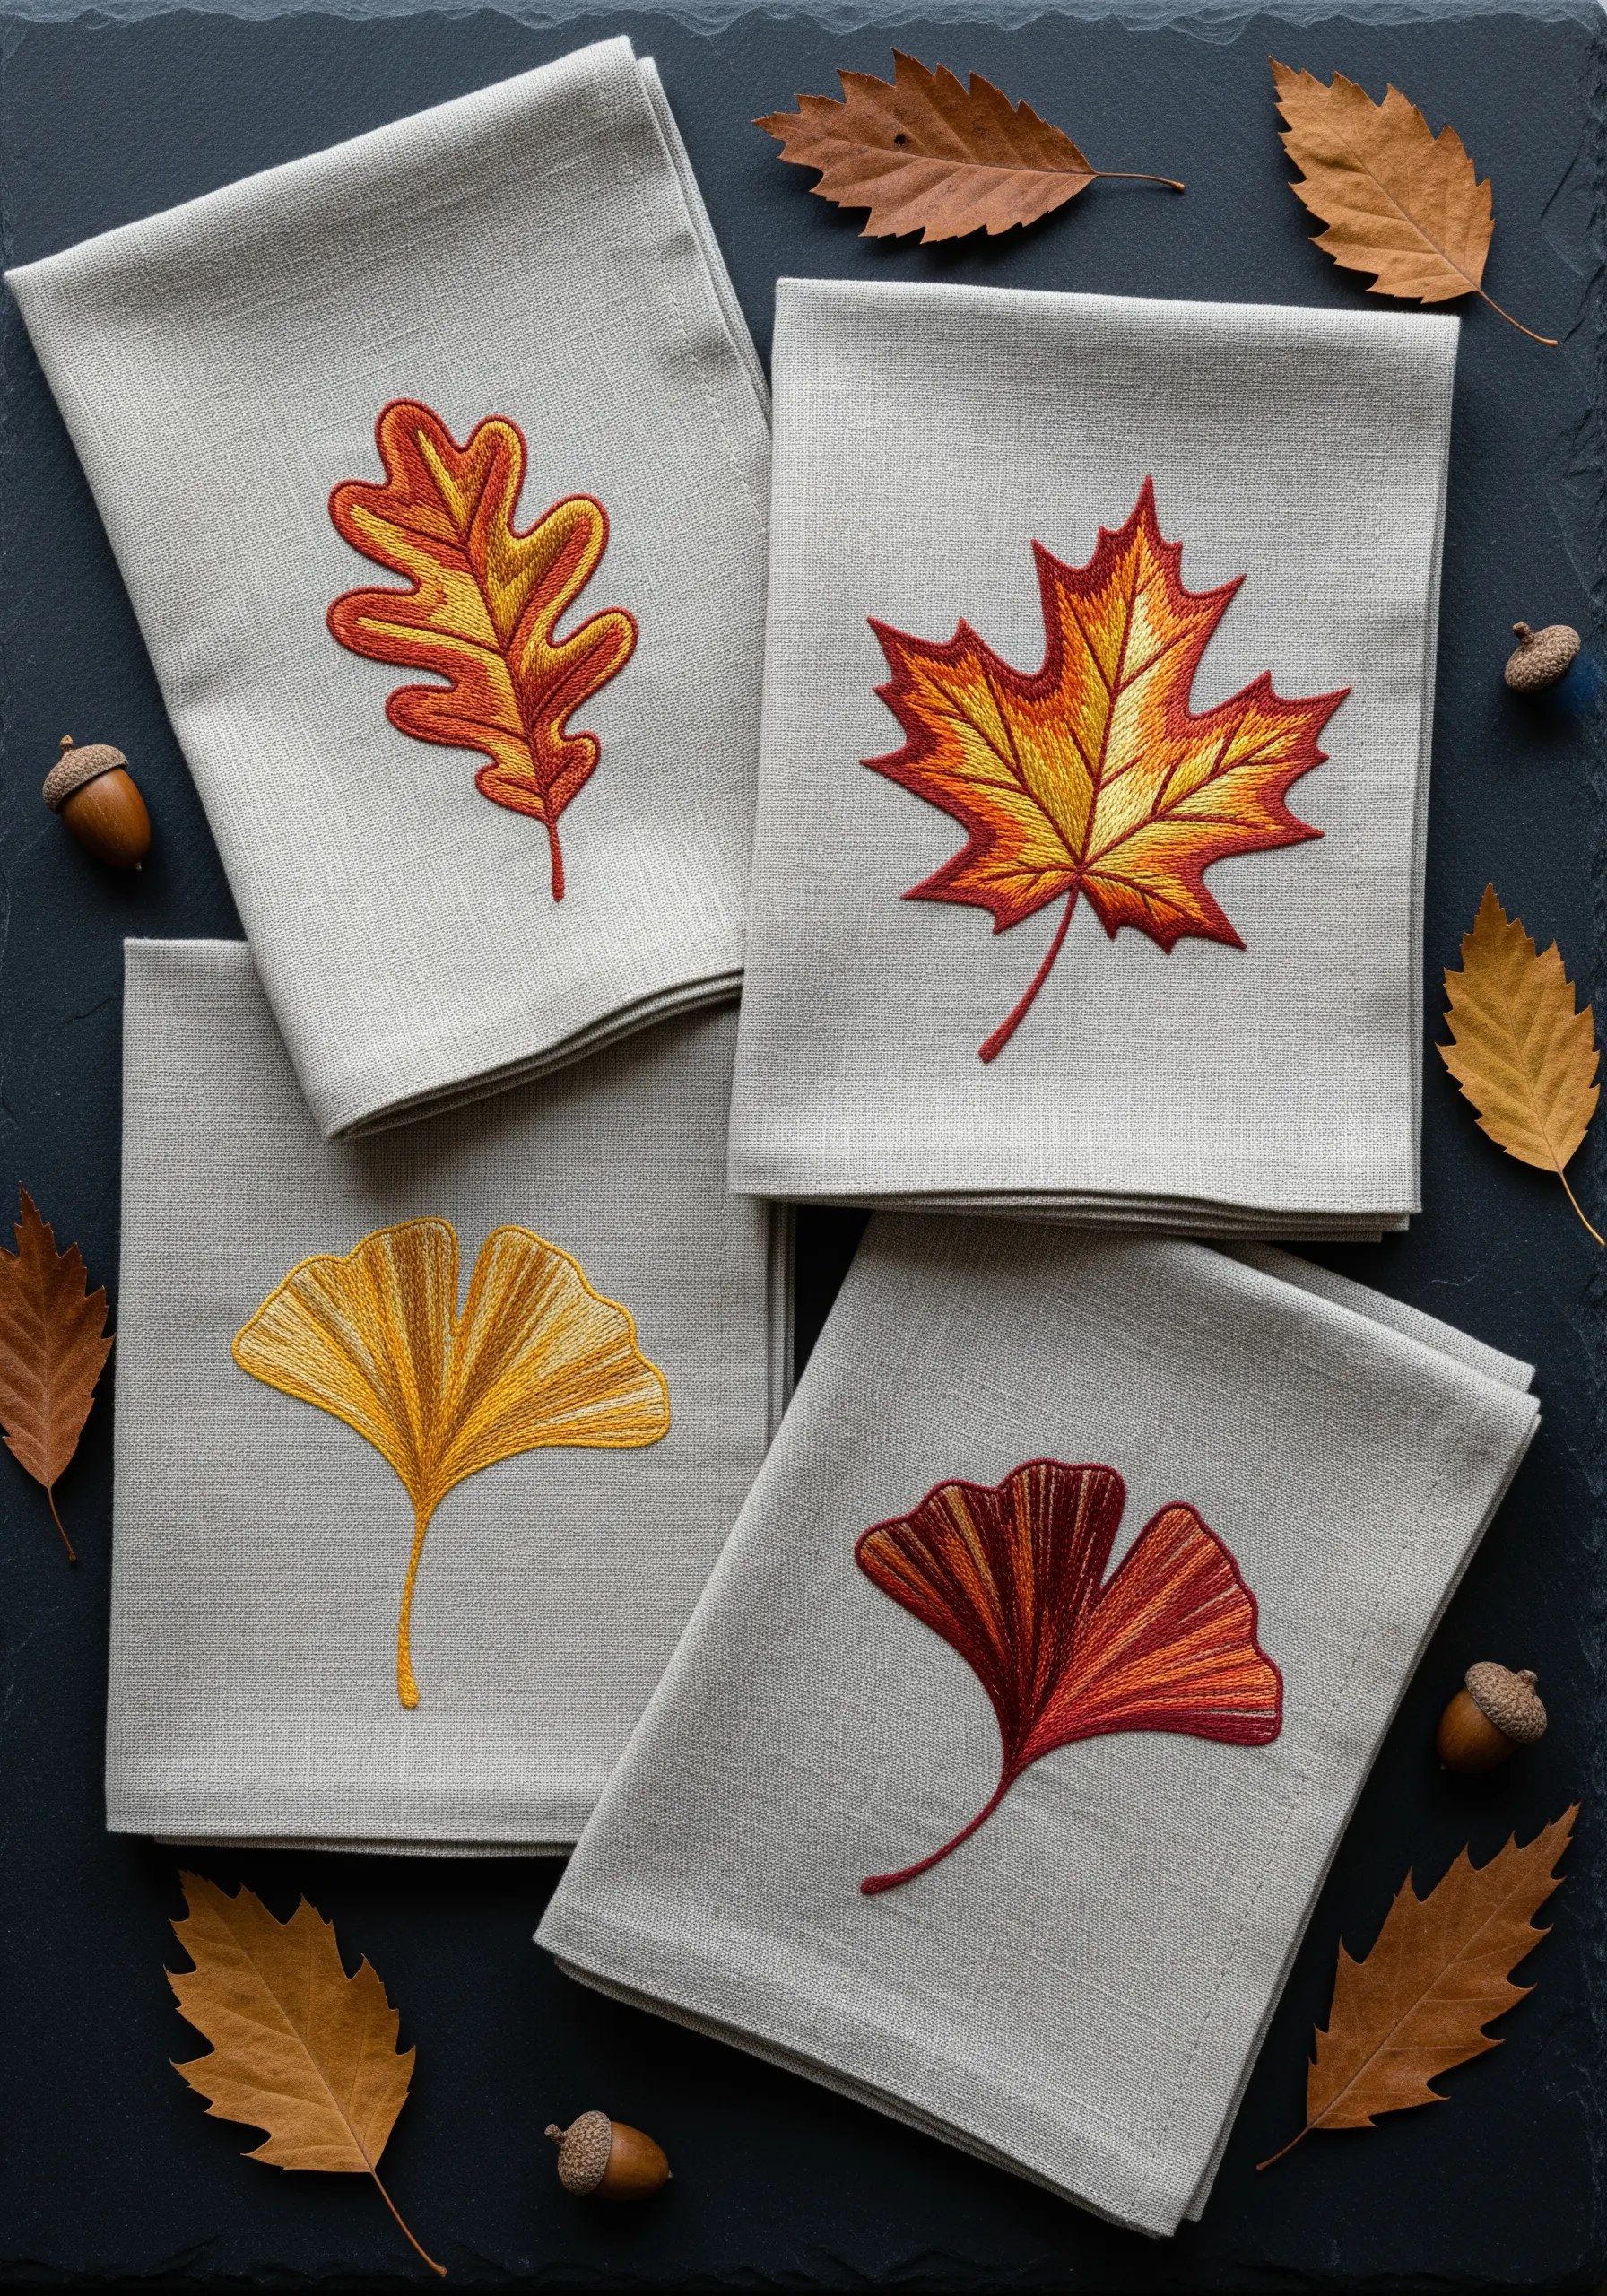
To give your autumn leaves a believable, sun-kissed glow, the long-and-short stitch is your best tool.
Select three to four adjacent shades of thread and blend them seamlessly to create a soft gradient.
Ensure your stitches follow the natural direction of the leaf’s veins; this small detail enhances the realism dramatically.
This thread painting method adds a level of depth and light that a flat satin stitch cannot, turning simple motifs into miniature works of art.
It’s one of the most effective hand-embroidered flower stitches as well.
7. Ethereal Veins on Sheer Fabric

Stitching on a transparent fabric like organza or tulle allows your work to interact with light in a truly magical way.
Use a single strand of white or metallic thread to trace the delicate structure of a skeleton leaf with a simple backstitch.
The see-through background makes the stitches appear to float in mid-air, creating a design that is both minimal and incredibly impactful.
These delicate, light-catching accents are perfect examples of stitched details that make plain walls pop with quiet grace.
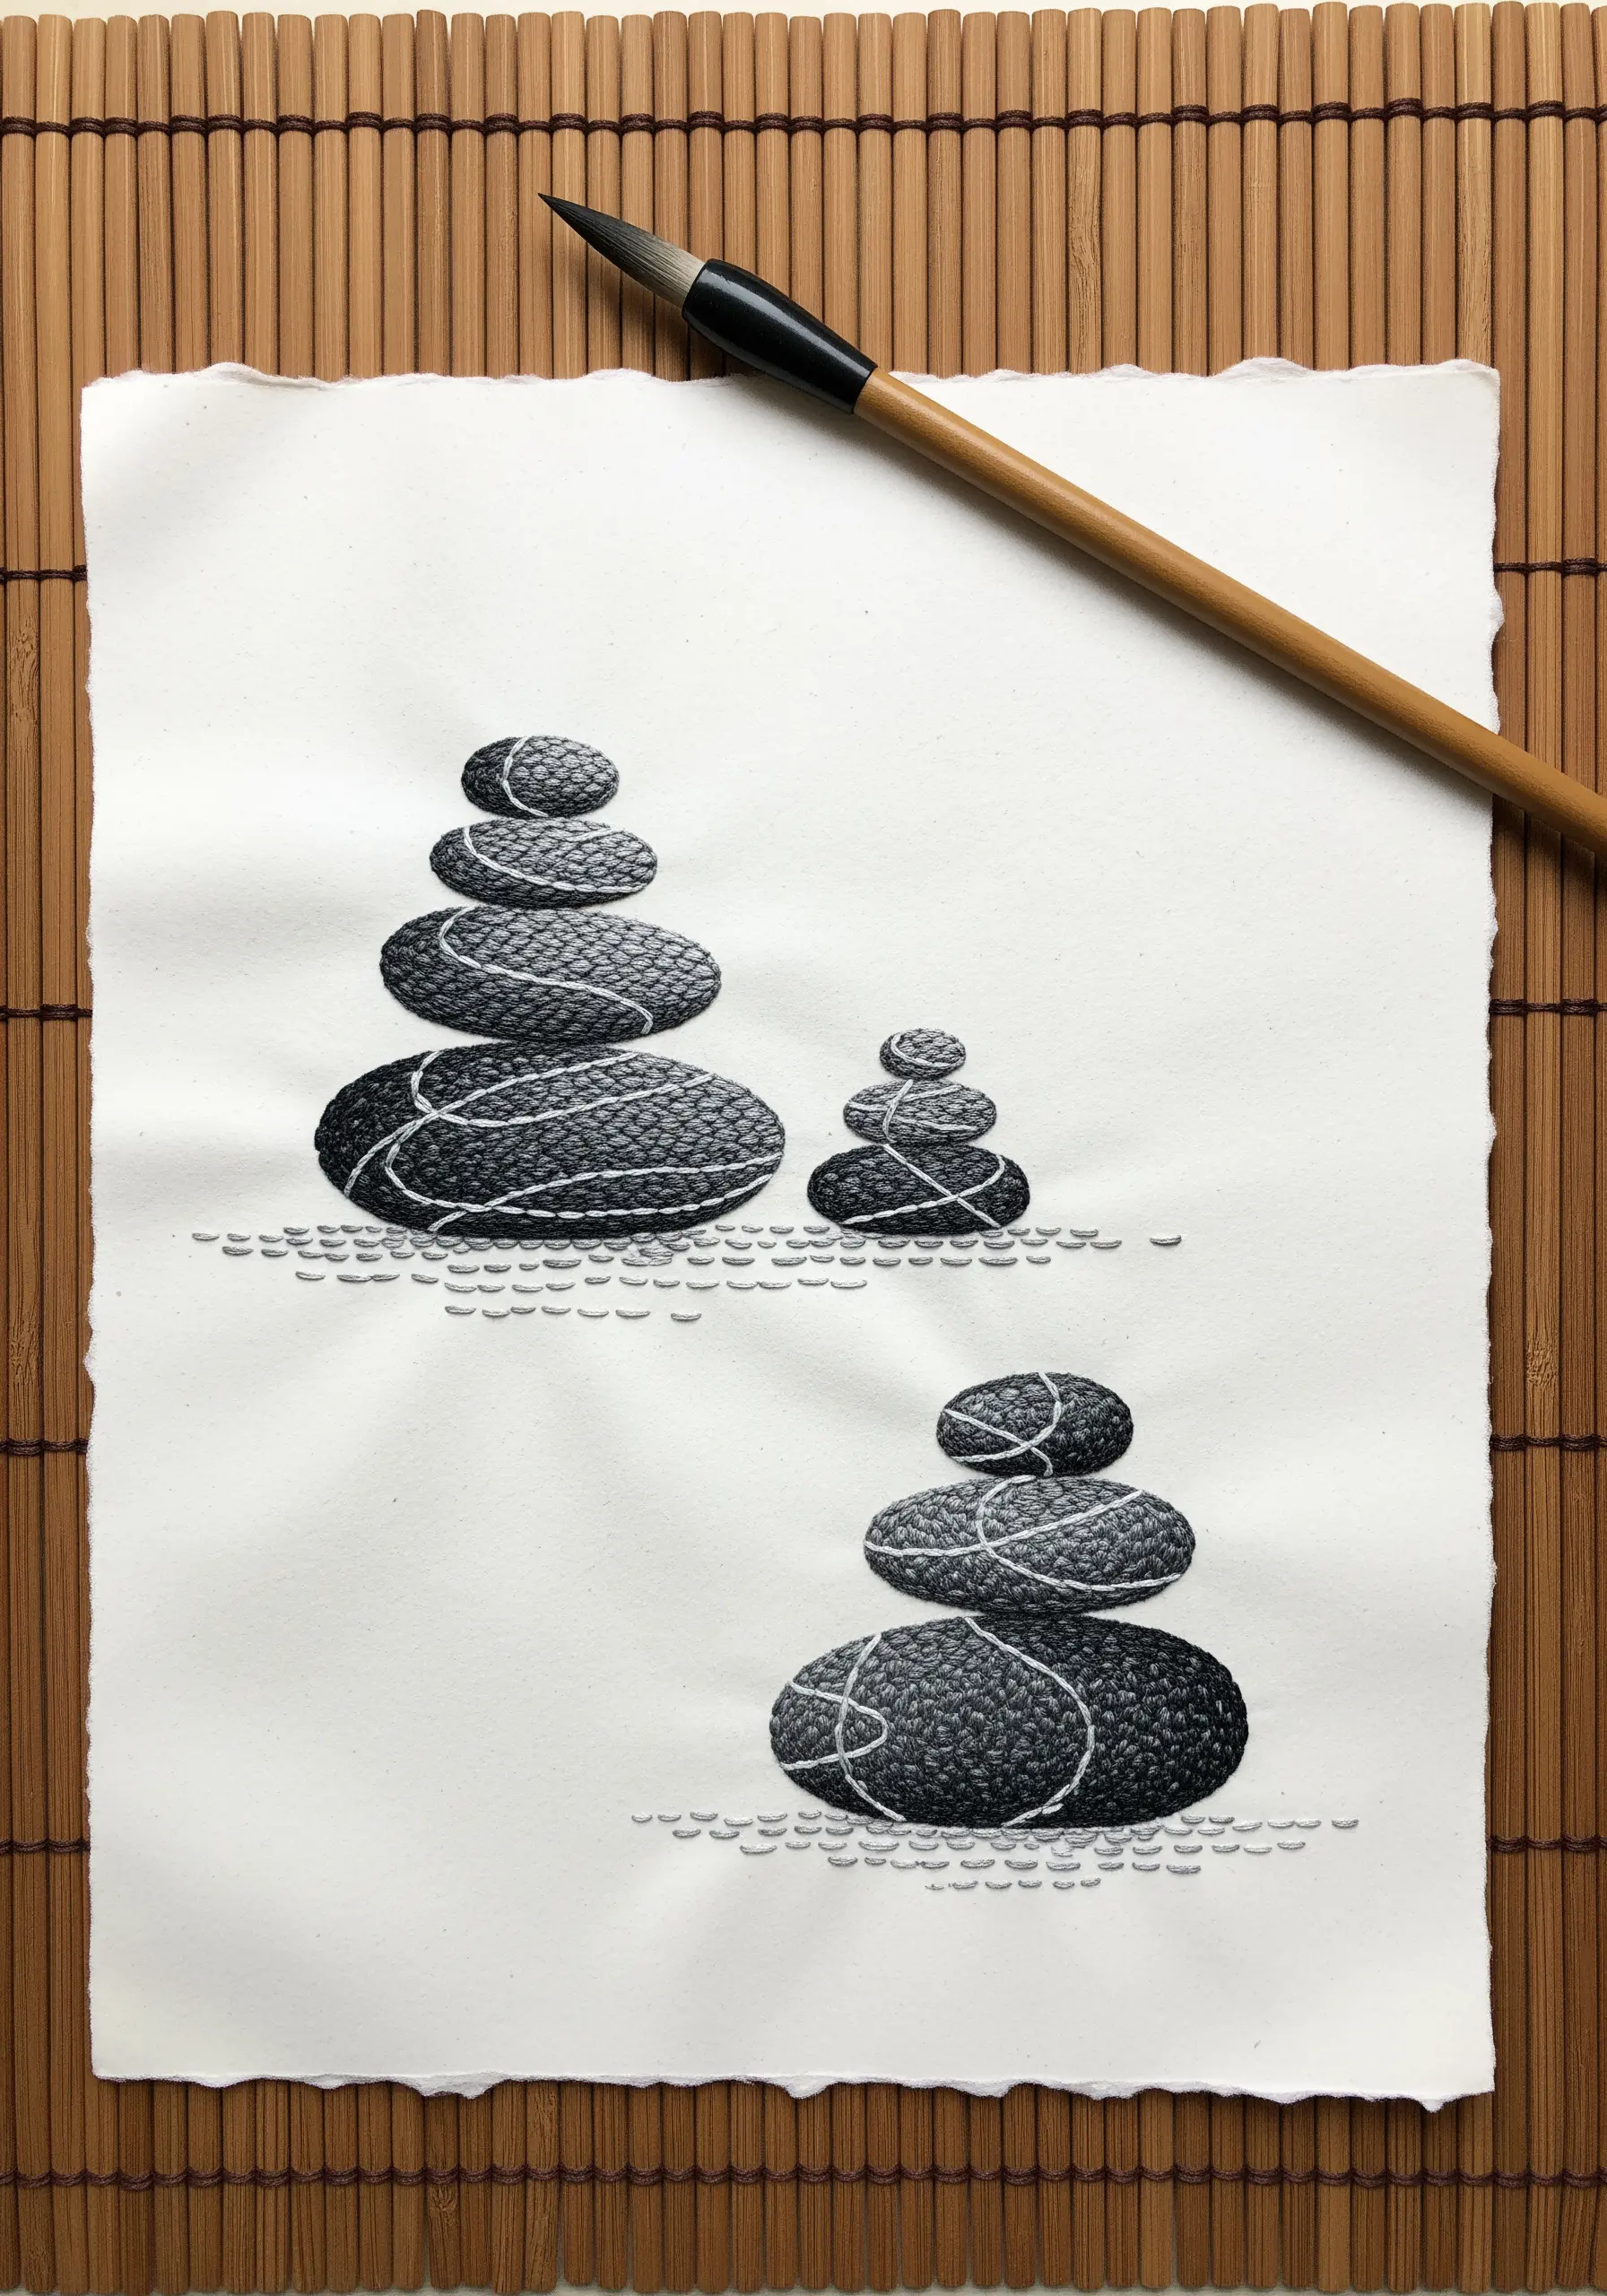
8. Building a Pebbled Surface with Knots

To create a dense, highly tactile surface that resembles river stones, rely on the French knot.
Work with three to six strands of thread and vary the number of wraps around your needle to create knots of slightly different sizes, which adds to the natural feel.
Pack the knots tightly together, allowing them to overlap to completely cover the background fabric.
This method transforms a flat surface into a rich, three-dimensional landscape, making it one of the most satisfying nature texture embroidery projects you can try.
9. Sculpting Tree Bark with Directional Stitches
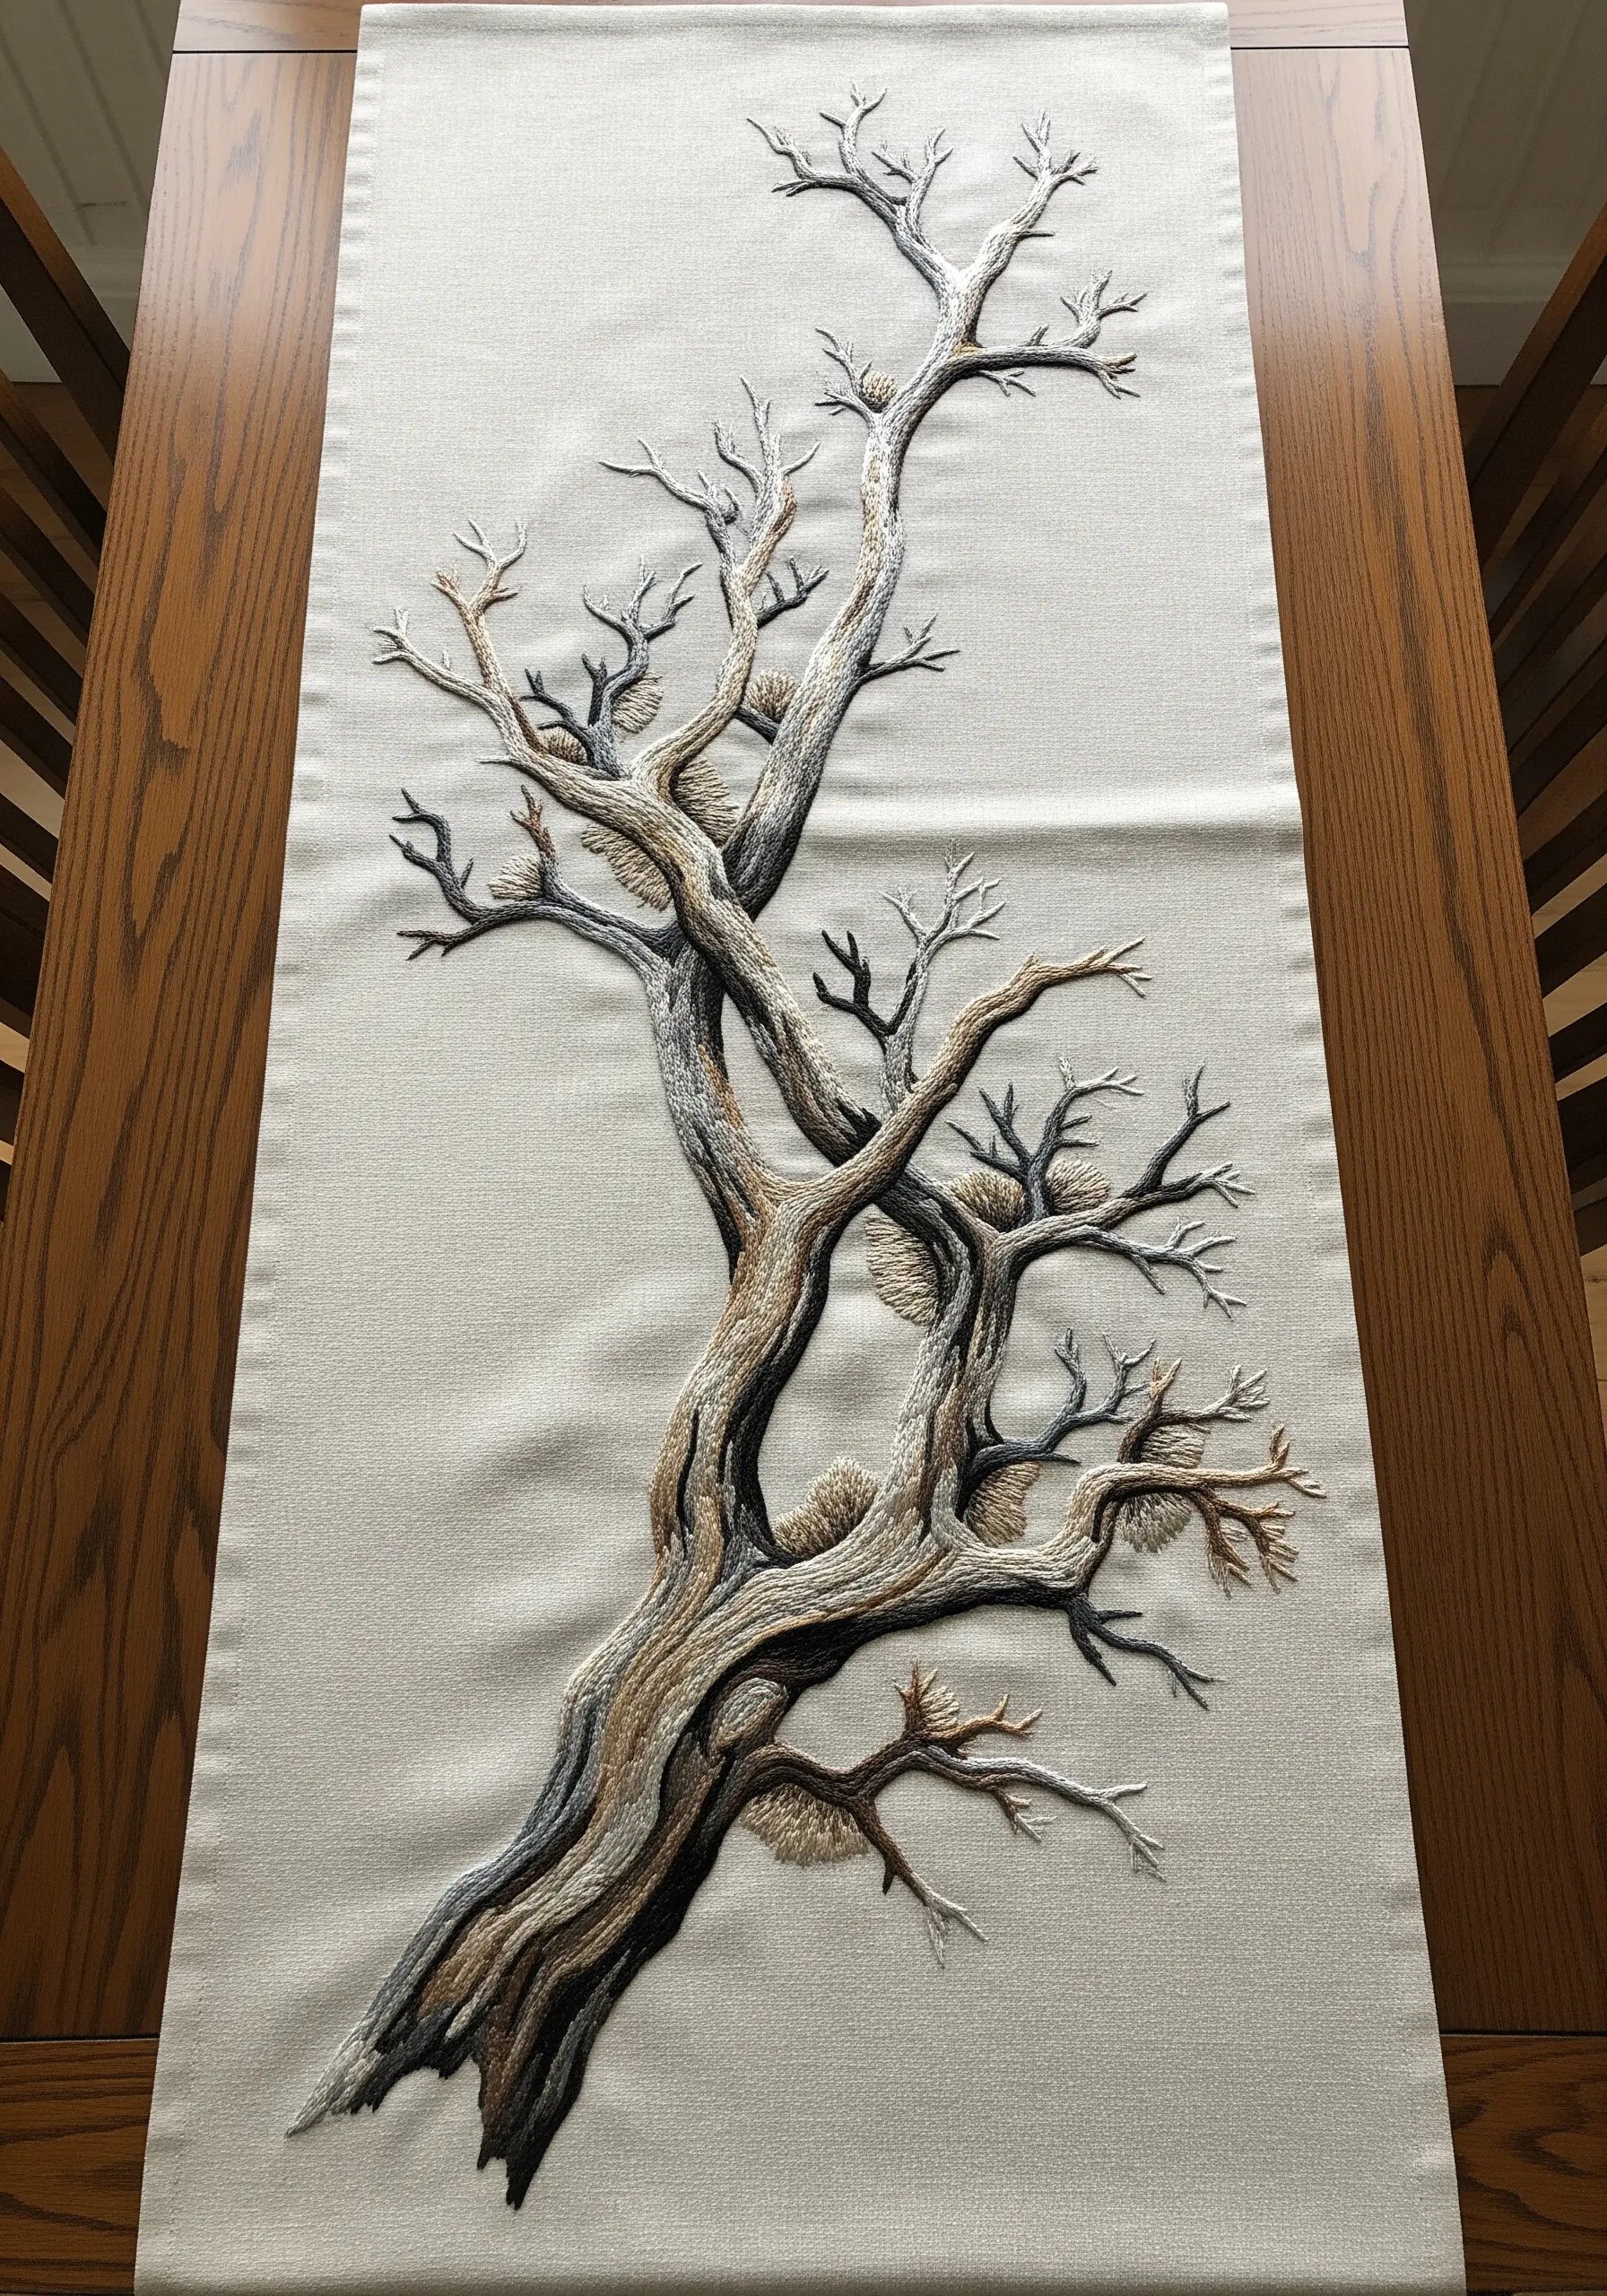
To capture the aged, gnarled character of a tree trunk, the direction of your stitches is everything.
Use a mix of long-and-short stitch and stem stitch, carefully angling them to follow the trunk’s natural curves and contours.
Incorporate several shades of brown, grey, and black, using the darkest threads in the crevices to create shadow and the lightest on the raised areas for highlights.
This approach to shading turns a simple outline into a three-dimensional form, perfect for creative embroidery ideas inspired by tree bark and leaves.
10. Curating a Forest Floor Collection
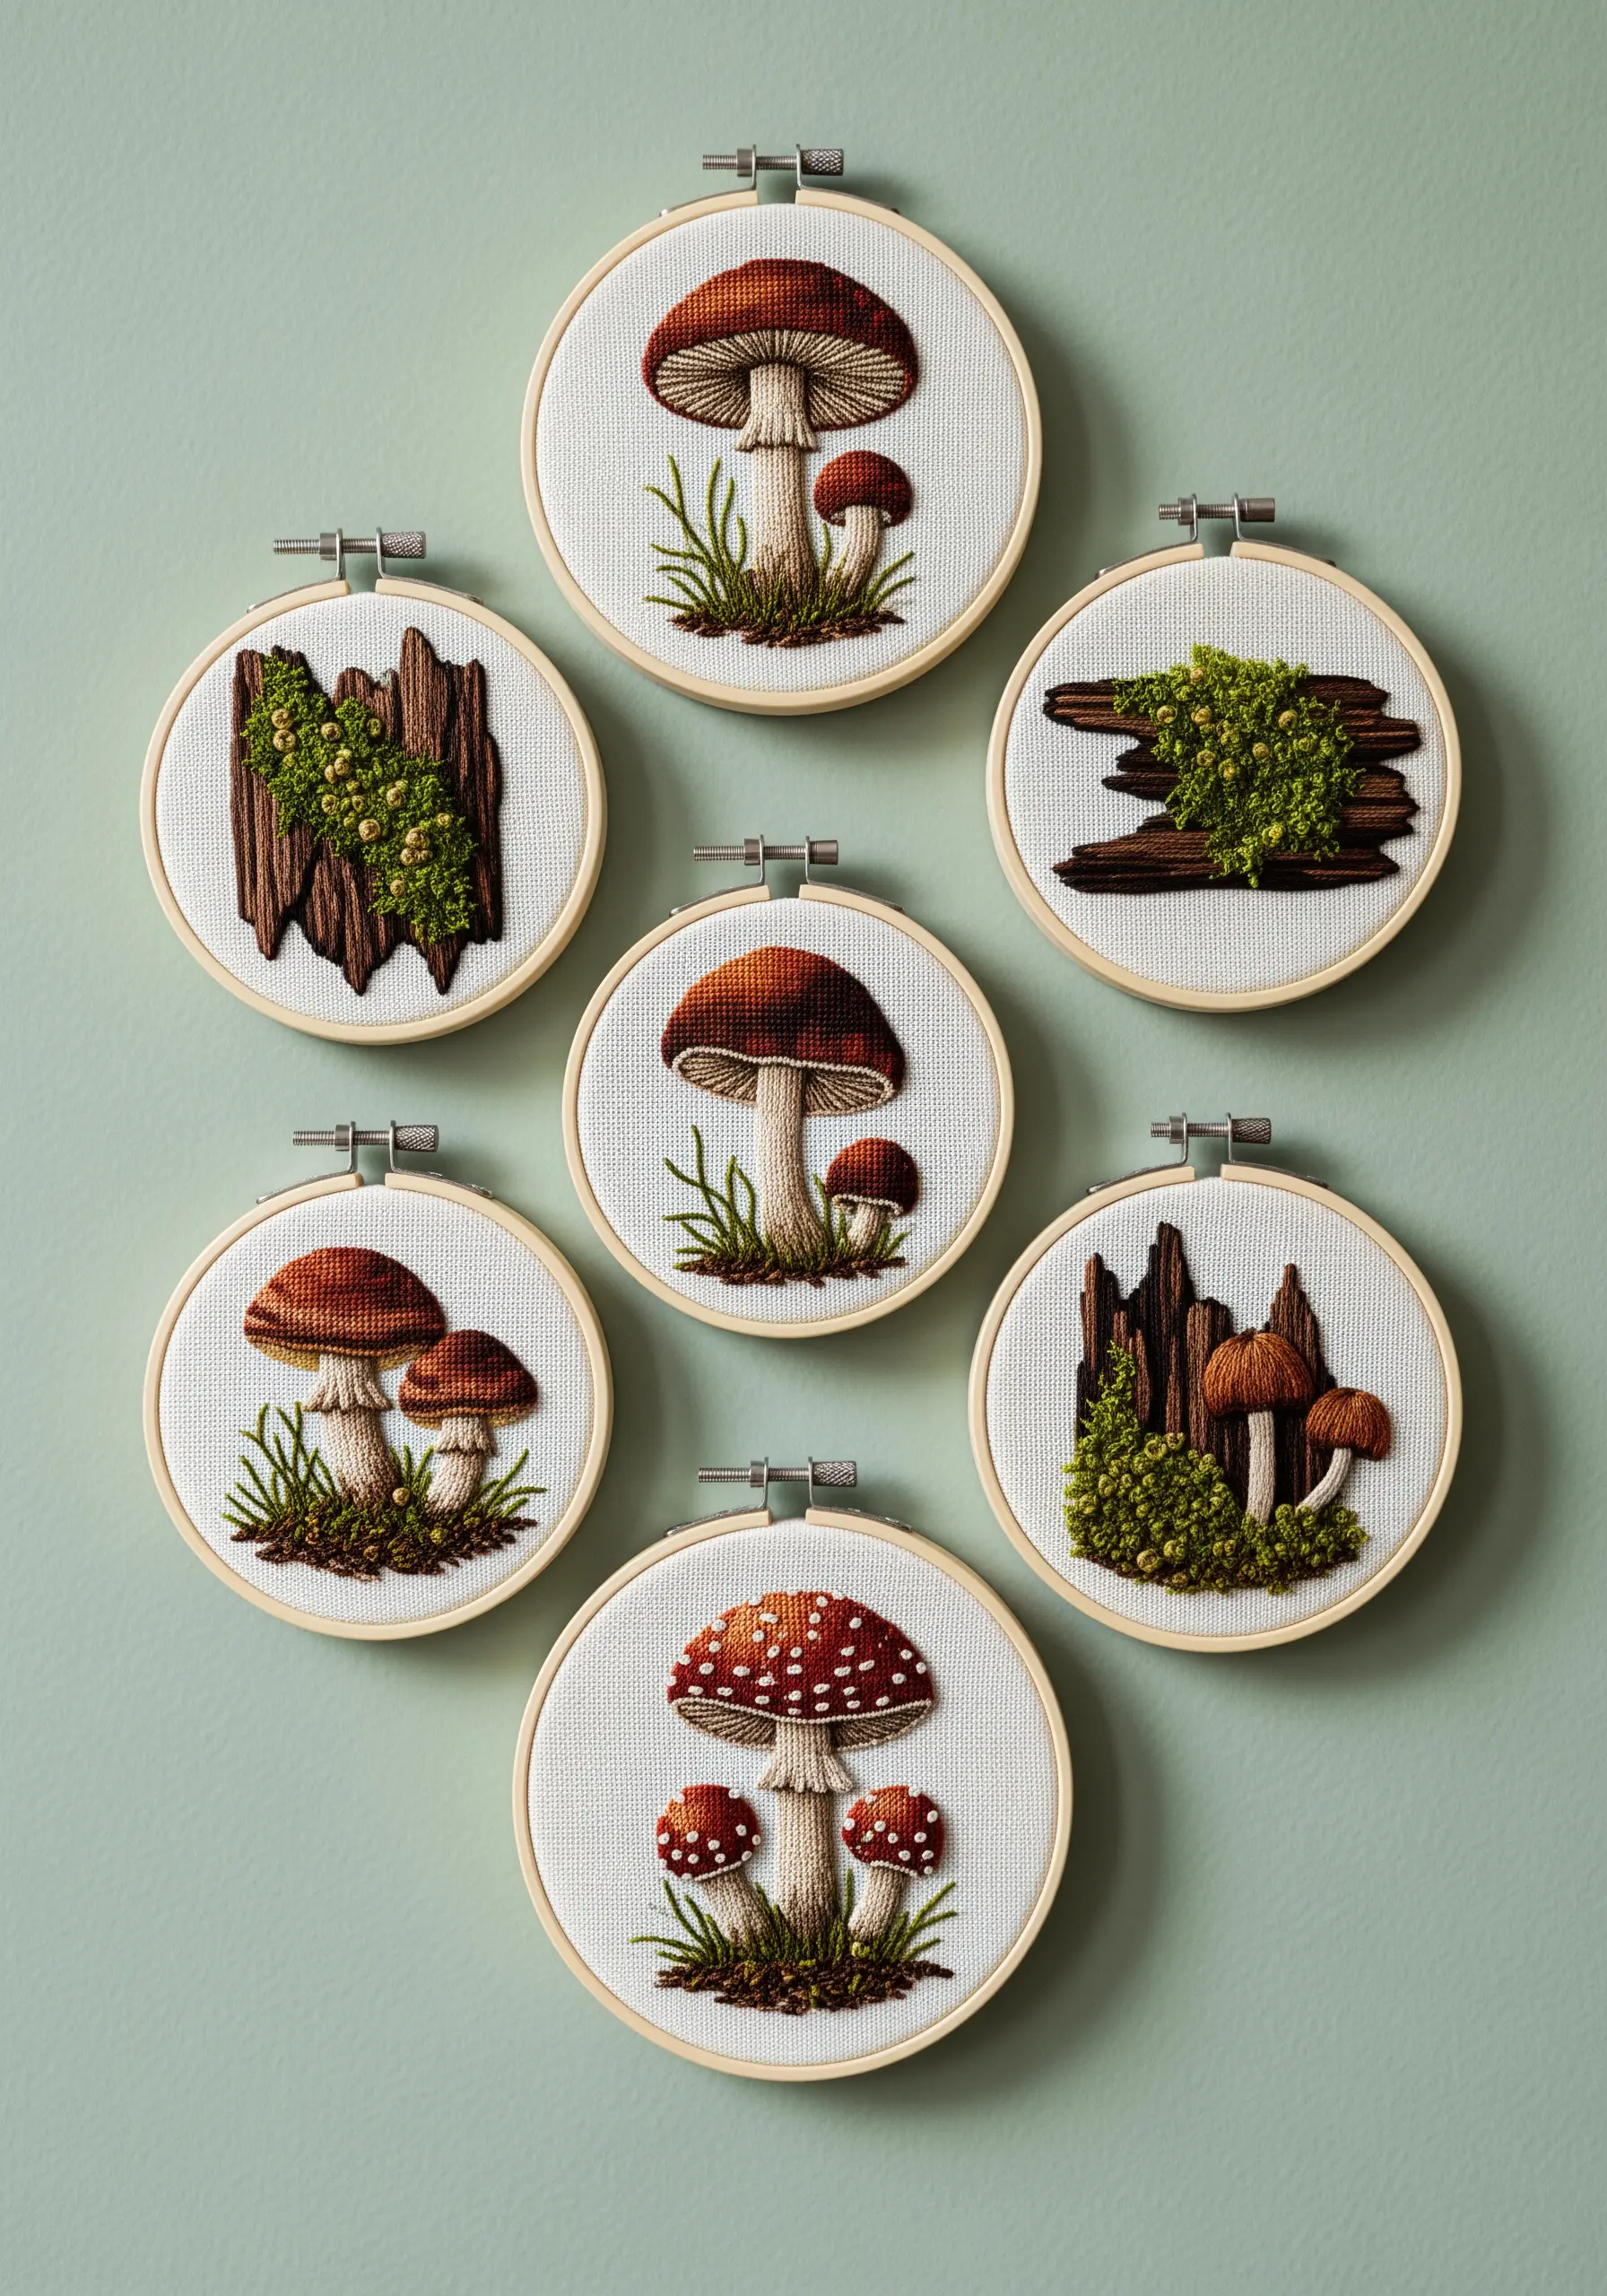
Tell a cohesive story by creating a collection of small hoops, each a tiny window into a woodland scene.
For a convincing moss effect, use dense clusters of French knots in varied shades of green.
To give mushroom caps a plump, rounded form, use a padded satin stitch—simply add a layer of underlying stitches or felt before your final satin stitch layer.
Grouping these different textures together creates a dynamic display inspired by realistic mushroom & forest floor embroidery projects.
11. Capturing Agate’s Flow with Thread

To mimic the fluid lines of an agate stone or flowing water, use parallel rows of a smooth line stitch like split stitch or stem stitch.
Create visual rhythm by varying the thickness of your lines—use a single strand for delicate veins and up to six strands for bold, defining bands.
For a contrasting texture, such as the frothy edge of a wave, introduce a row of French knots or bullion knots to create a raised, turbulent effect.
This is a beautiful technique for creating abstract thread waves & swirls that feel alive.
12. High-Contrast Botanicals with Appliqué
For a crisp, modern aesthetic, combine fabric appliqué with minimal stitch work.
Start by cutting your tree and leaf shapes from a light-colored fabric and fusing them onto a dark background using an iron-on adhesive for clean, sharp edges.
Then, add defining details, like the bark lines and outlines, with a simple backstitch in a high-contrast thread.
This mixed-media technique is ideal for creating large, graphic embroidered wall hangings that make a powerful statement.
13. A Patchwork of Stitches within a Leaf
Transform a simple leaf silhouette into a sampler of your skills by dividing it into irregular sections.
Fill each segment with a different textural stitch: seed stitch, satin stitch, French knots, or a woven stitch like the basket weave.
This patchwork approach not only adds immense visual interest but also serves as a creative way to practice and showcase a variety of techniques within a single, cohesive motif.
It’s a wonderful method for designing unique hand embroidery leaf patterns for journal covers or patches.
14. Weaving Thread Over Sculptural Surfaces
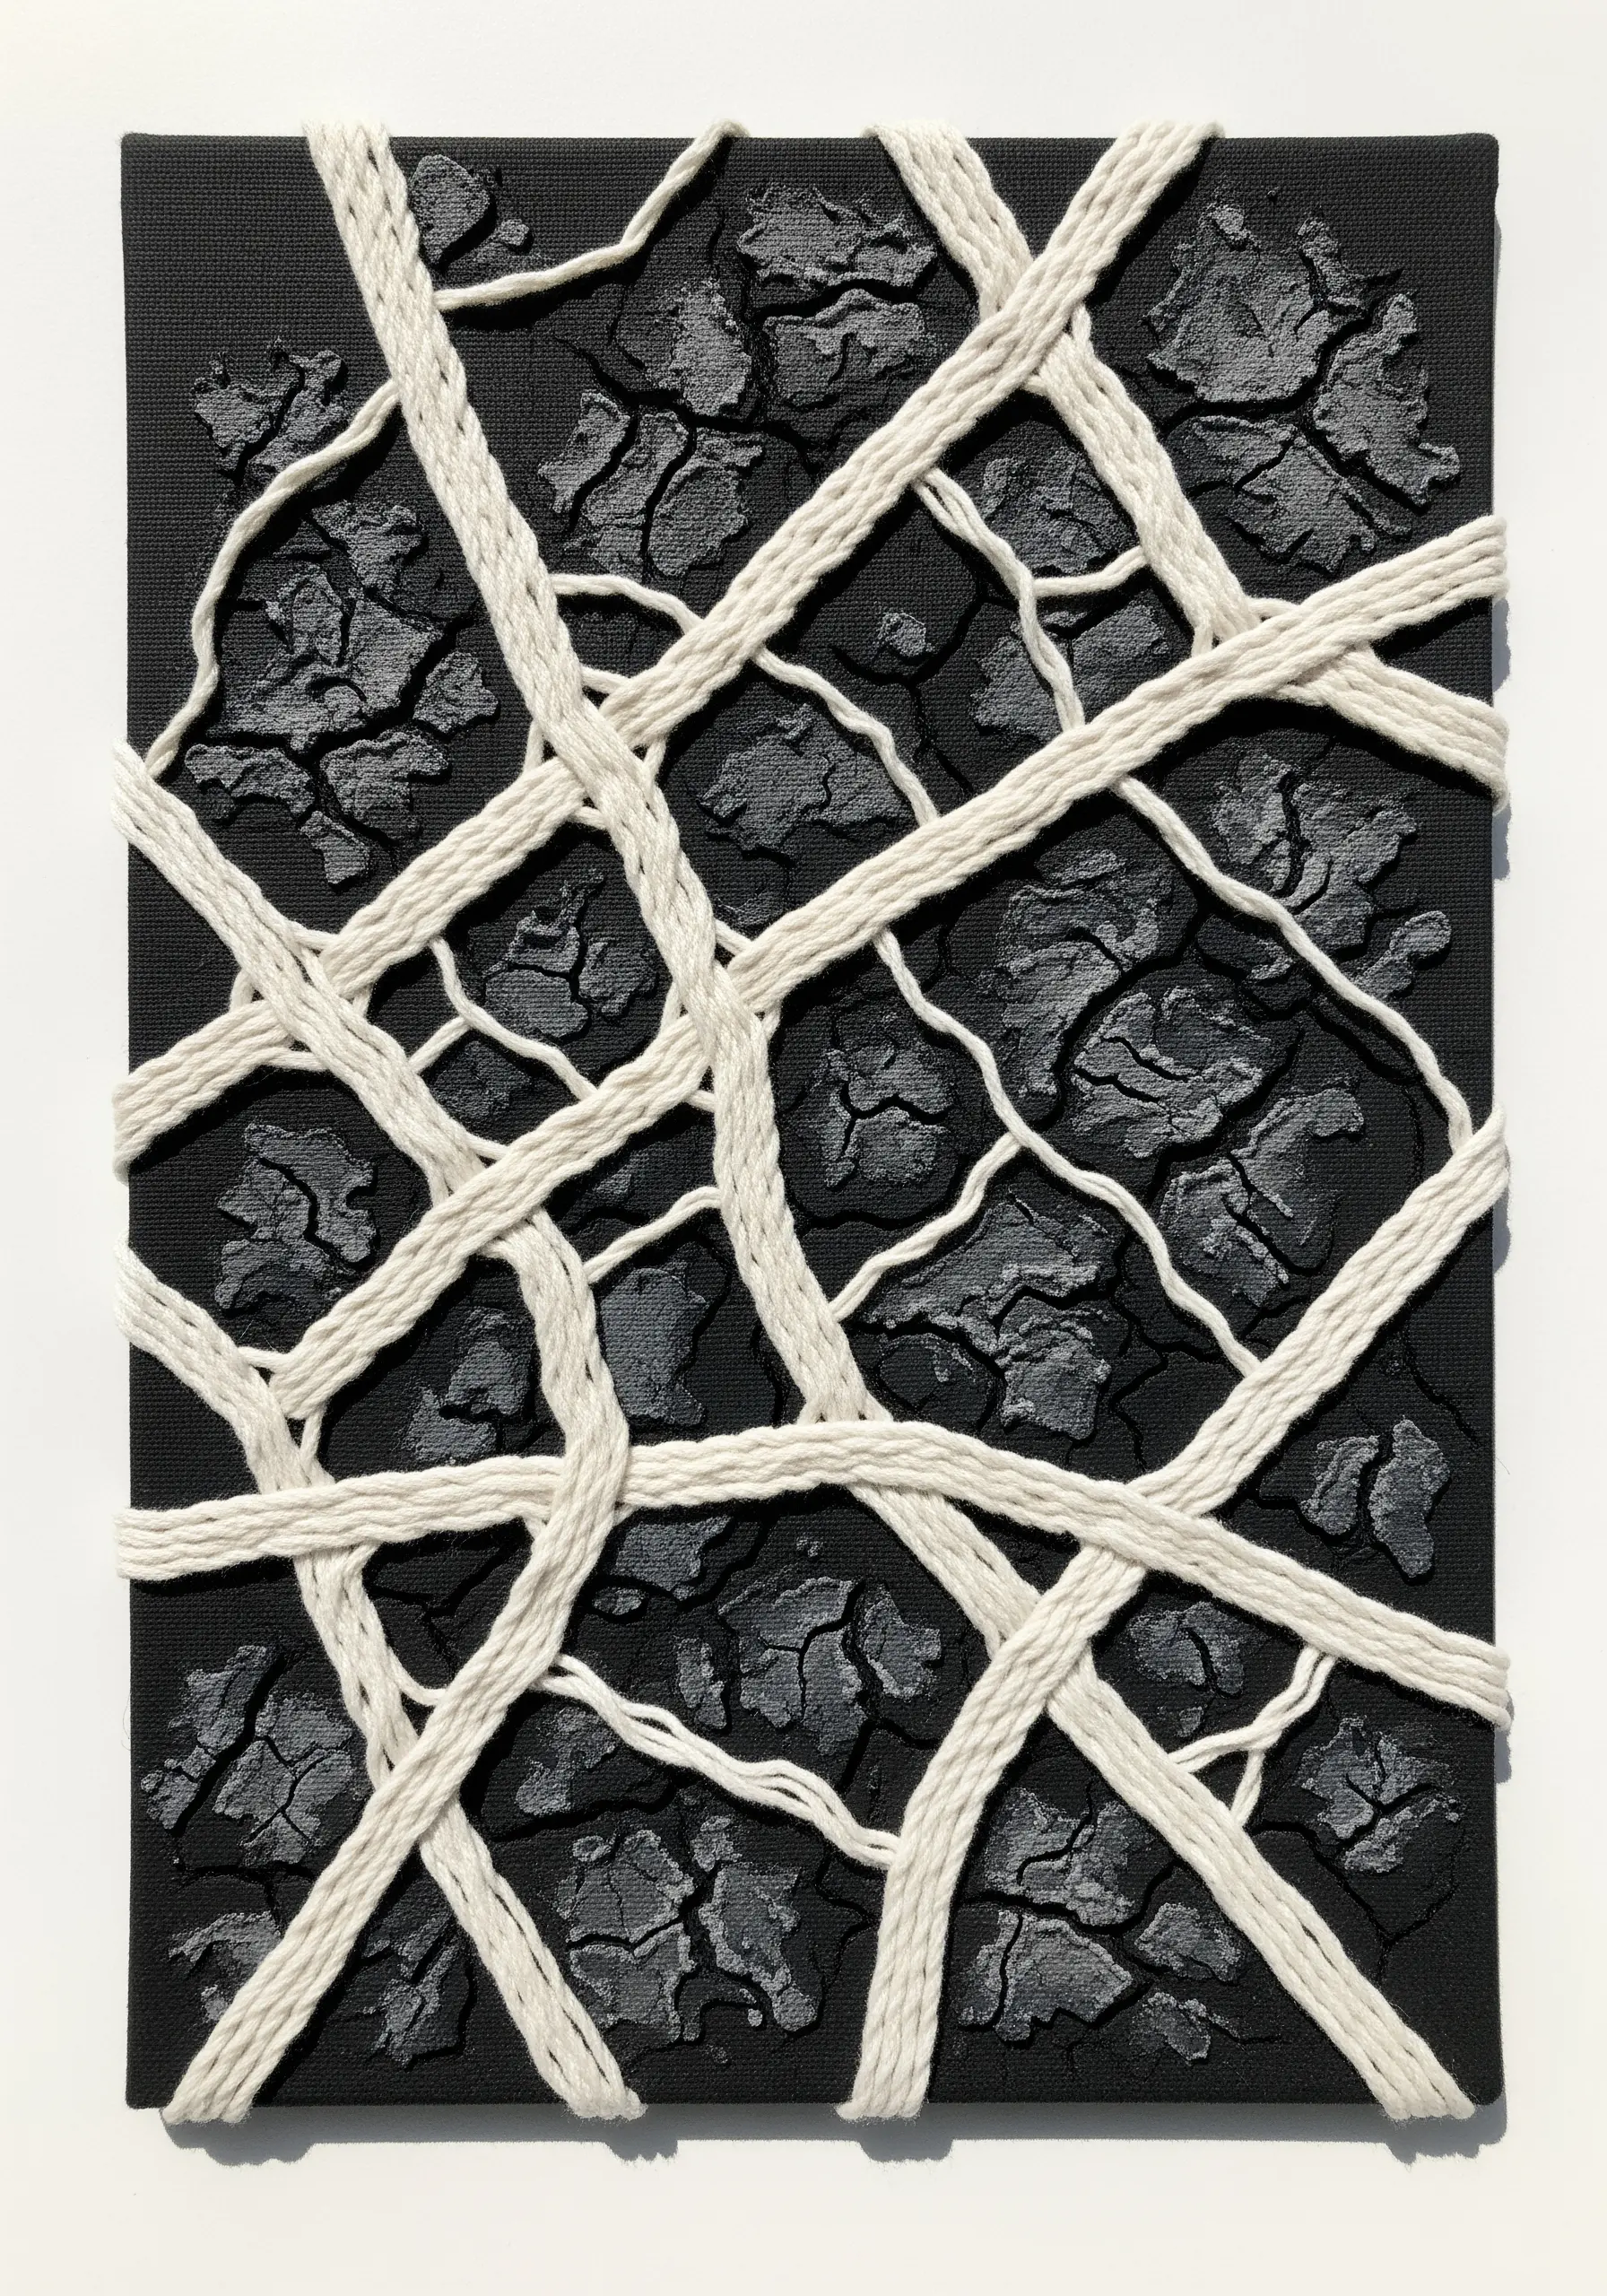
Push the boundaries of embroidery by working on a dimensional, non-fabric base.
Prepare a canvas with a thick layer of texture paste, allowing it to dry and crack to create an interesting foundation.
Then, weave or wrap thick yarn across the canvas, using the raised, cracked surface as a natural anchor for your fibers.
This tactile contrast between the hard, painted base and the soft yarn results in powerful mixed-media contemporary embroidery designs.
15. Sculpting Realistic Moss and Stone

The key to this design’s realism is the dramatic contrast in texture between the rocks and the moss.
For the smooth, rounded stones, use a classic satin stitch, angling your threads to follow each rock’s curve to create subtle highlights.
For the lush moss, employ the Turkey work stitch: create dense loops of thread and then snip them to form a plush, velvety pile.
This pairing of flat and fuzzy textures is perfect for recreating moss & fern embroidery textures you’d find in nature.
16. Creating Depth with Atmospheric Perspective
To give your embroidered landscapes a convincing sense of distance, apply the rules of atmospheric perspective.
Stitch foreground elements, like the fallen logs and leaves, using thicker threads and vibrant, saturated colors to make them feel closer.
For the trees and details in the background, switch to finer, single-strand threads and more muted, paler colors.
This intentional shift in thread weight and color intensity will trick the viewer’s eye into perceiving depth, much like you see in string art landscape scenes.
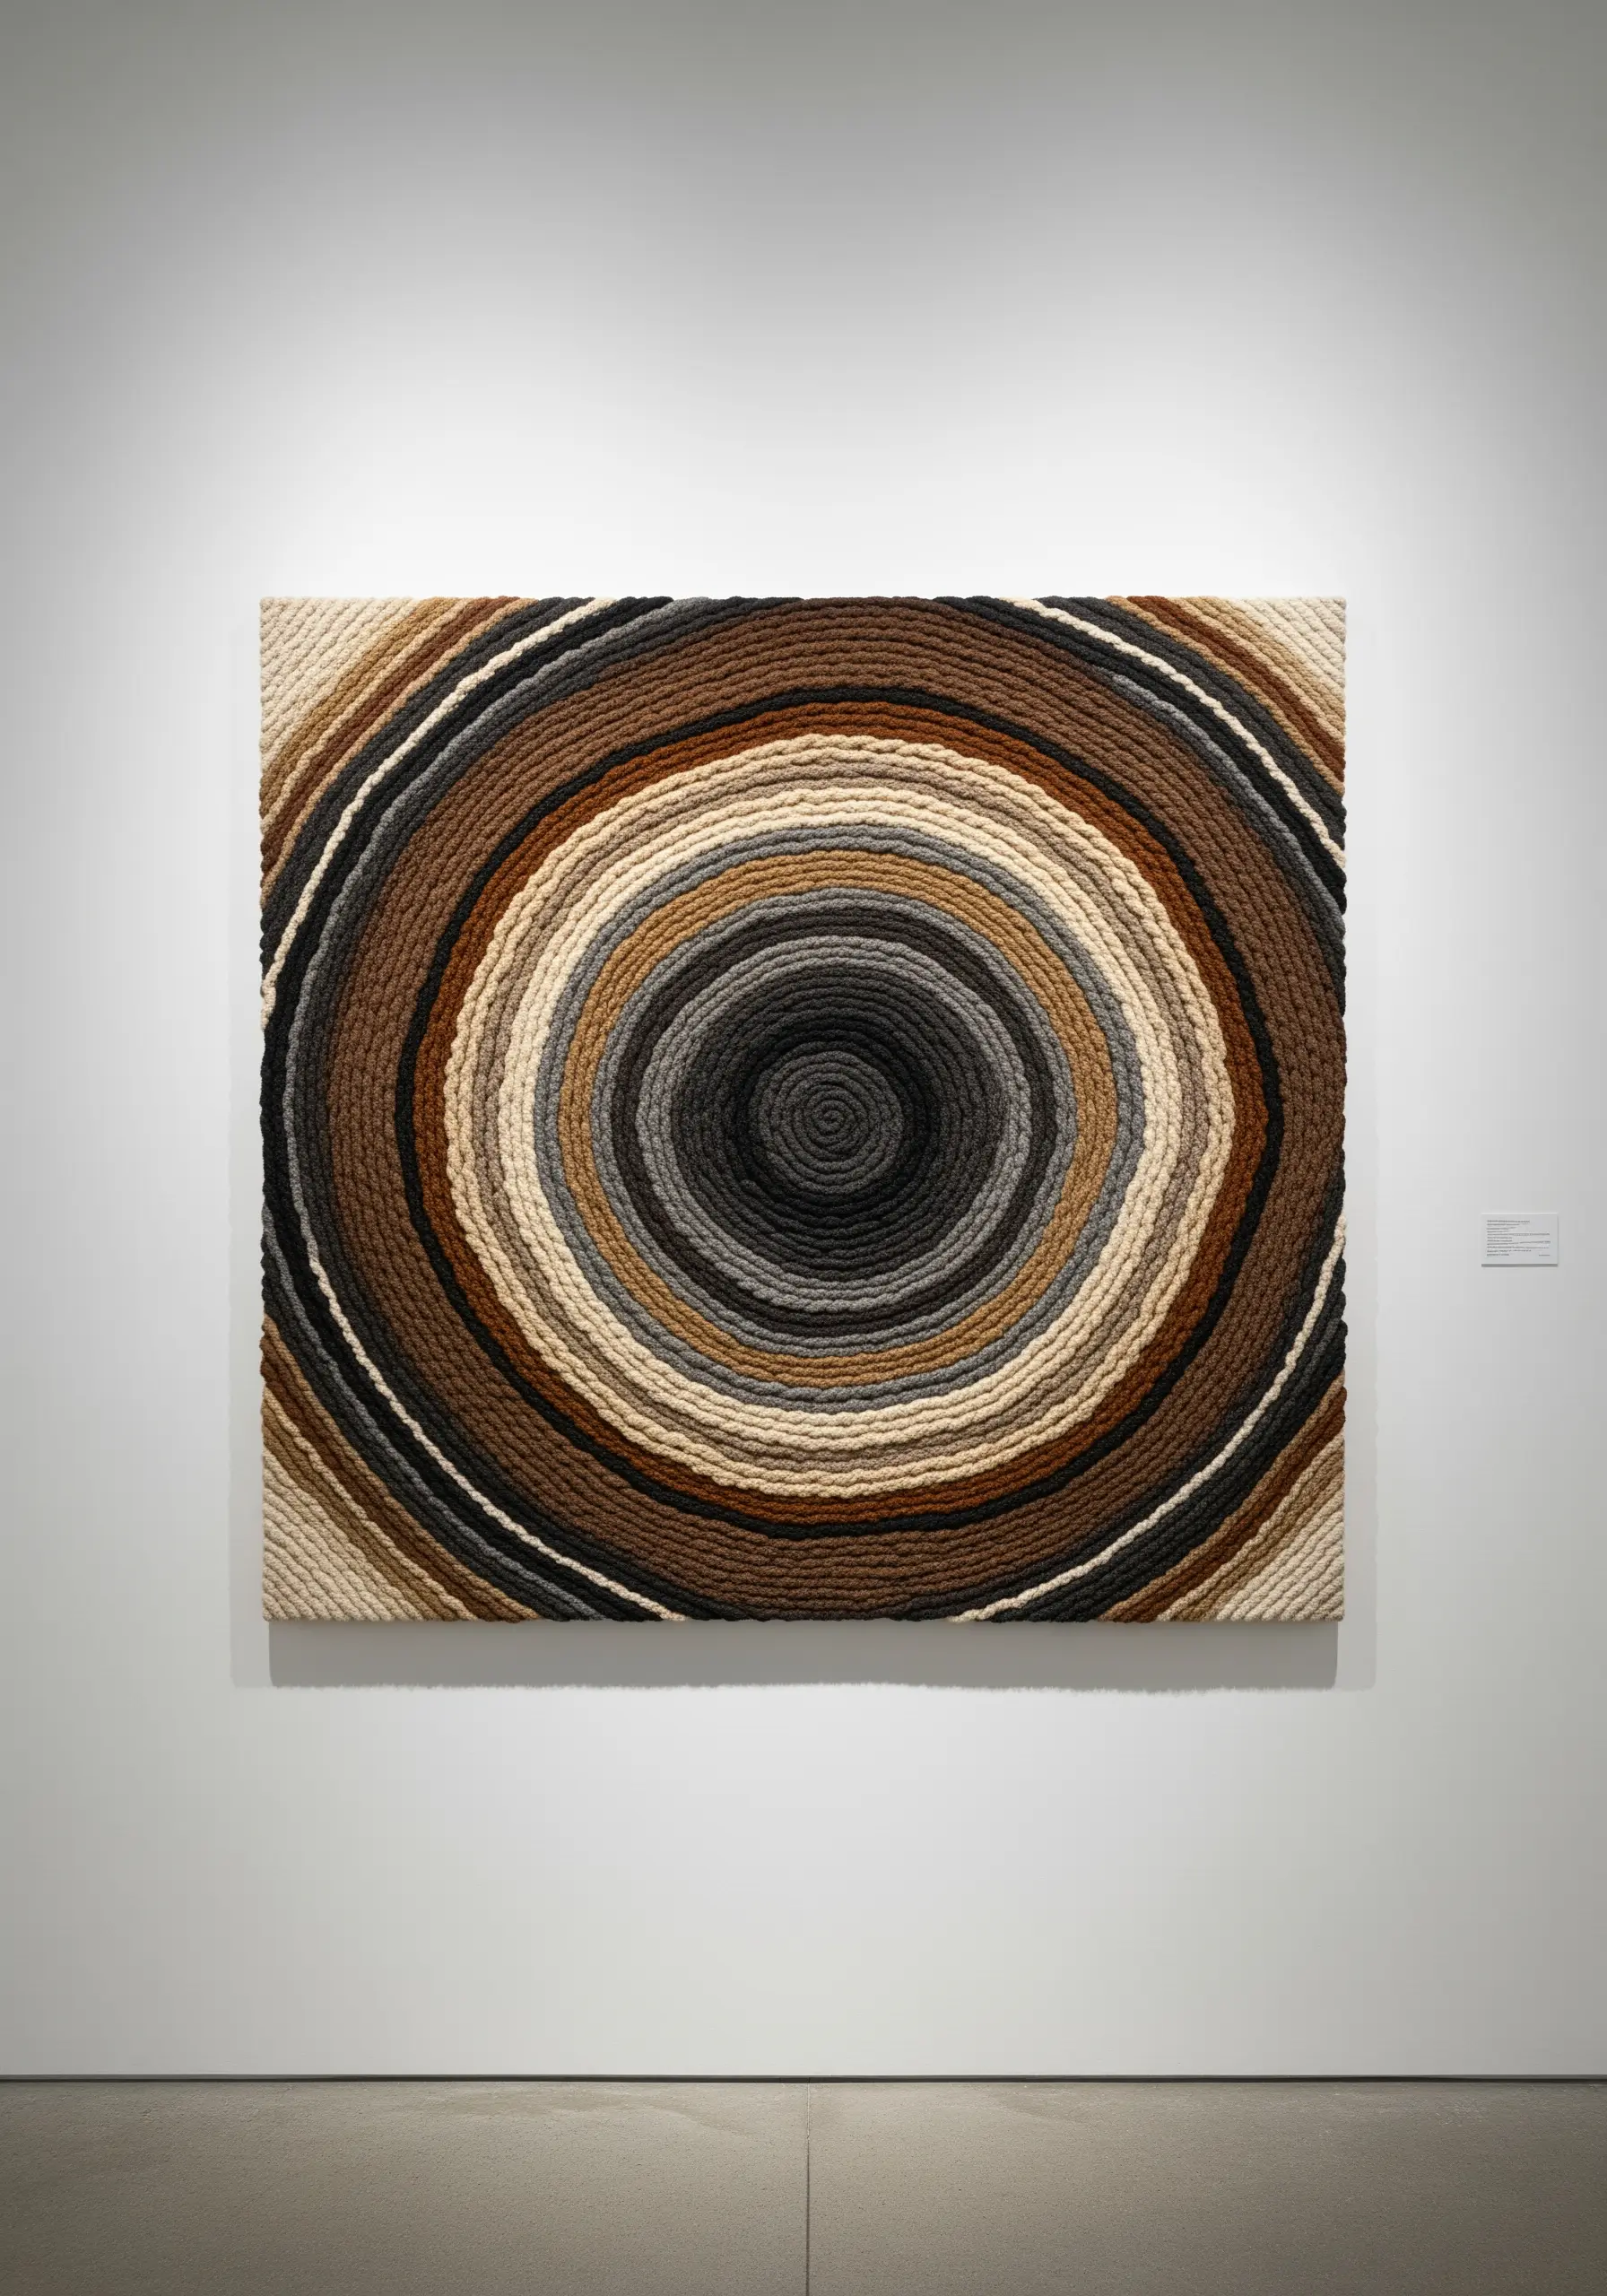
17. Meditative Contours of Wood Grain

Recreate the organic, flowing patterns of wood grain through the simple, meditative process of contour stitching.
Using a basic backstitch or stem stitch, follow free-form, concentric paths that mimic the rings of a tree.
Embrace imperfection—the most natural-looking results come from lines that wander and form irregular shapes.
Using a variegated thread in earthy tones will enhance the effect, adding effortless color variation to these beautiful embroidery ideas inspired by the subtle textures of nature.
18. Crafting 3D Leaves with Padded Satin Stitch

To make your botanical embroidery literally stand out, use a padding technique beneath your satin stitch.
Before you lay your final, smooth layer of colored thread, fill the entire shape with a base of small seed stitches or a piece of felt cut to size.
Stitching over this raised foundation gives the leaf a plump, three-dimensional form that catches the light, creating natural highlights and shadows.
This is one of the most impactful leaf embroidery stitches that turn ordinary tote bags into botanical art.
19. Achieving Graphic Precision on Paper
Embroidering on a sturdy, high-gsm paper provides a crisp definition that is difficult to achieve on fabric.
To prevent tearing, pre-pierce your stitching holes with a needle before passing the thread through.
For the stone texture, use tiny seed stitches, and for the bold white lines, use couching—tacking down a thicker thread with smaller, discreet stitches.
This method preserves the integrity of the paper and is a fantastic way to create unique paper art projects that turn simple stitches into stunning decor.
20. Expanding Designs with Mixed-Media Embellishments
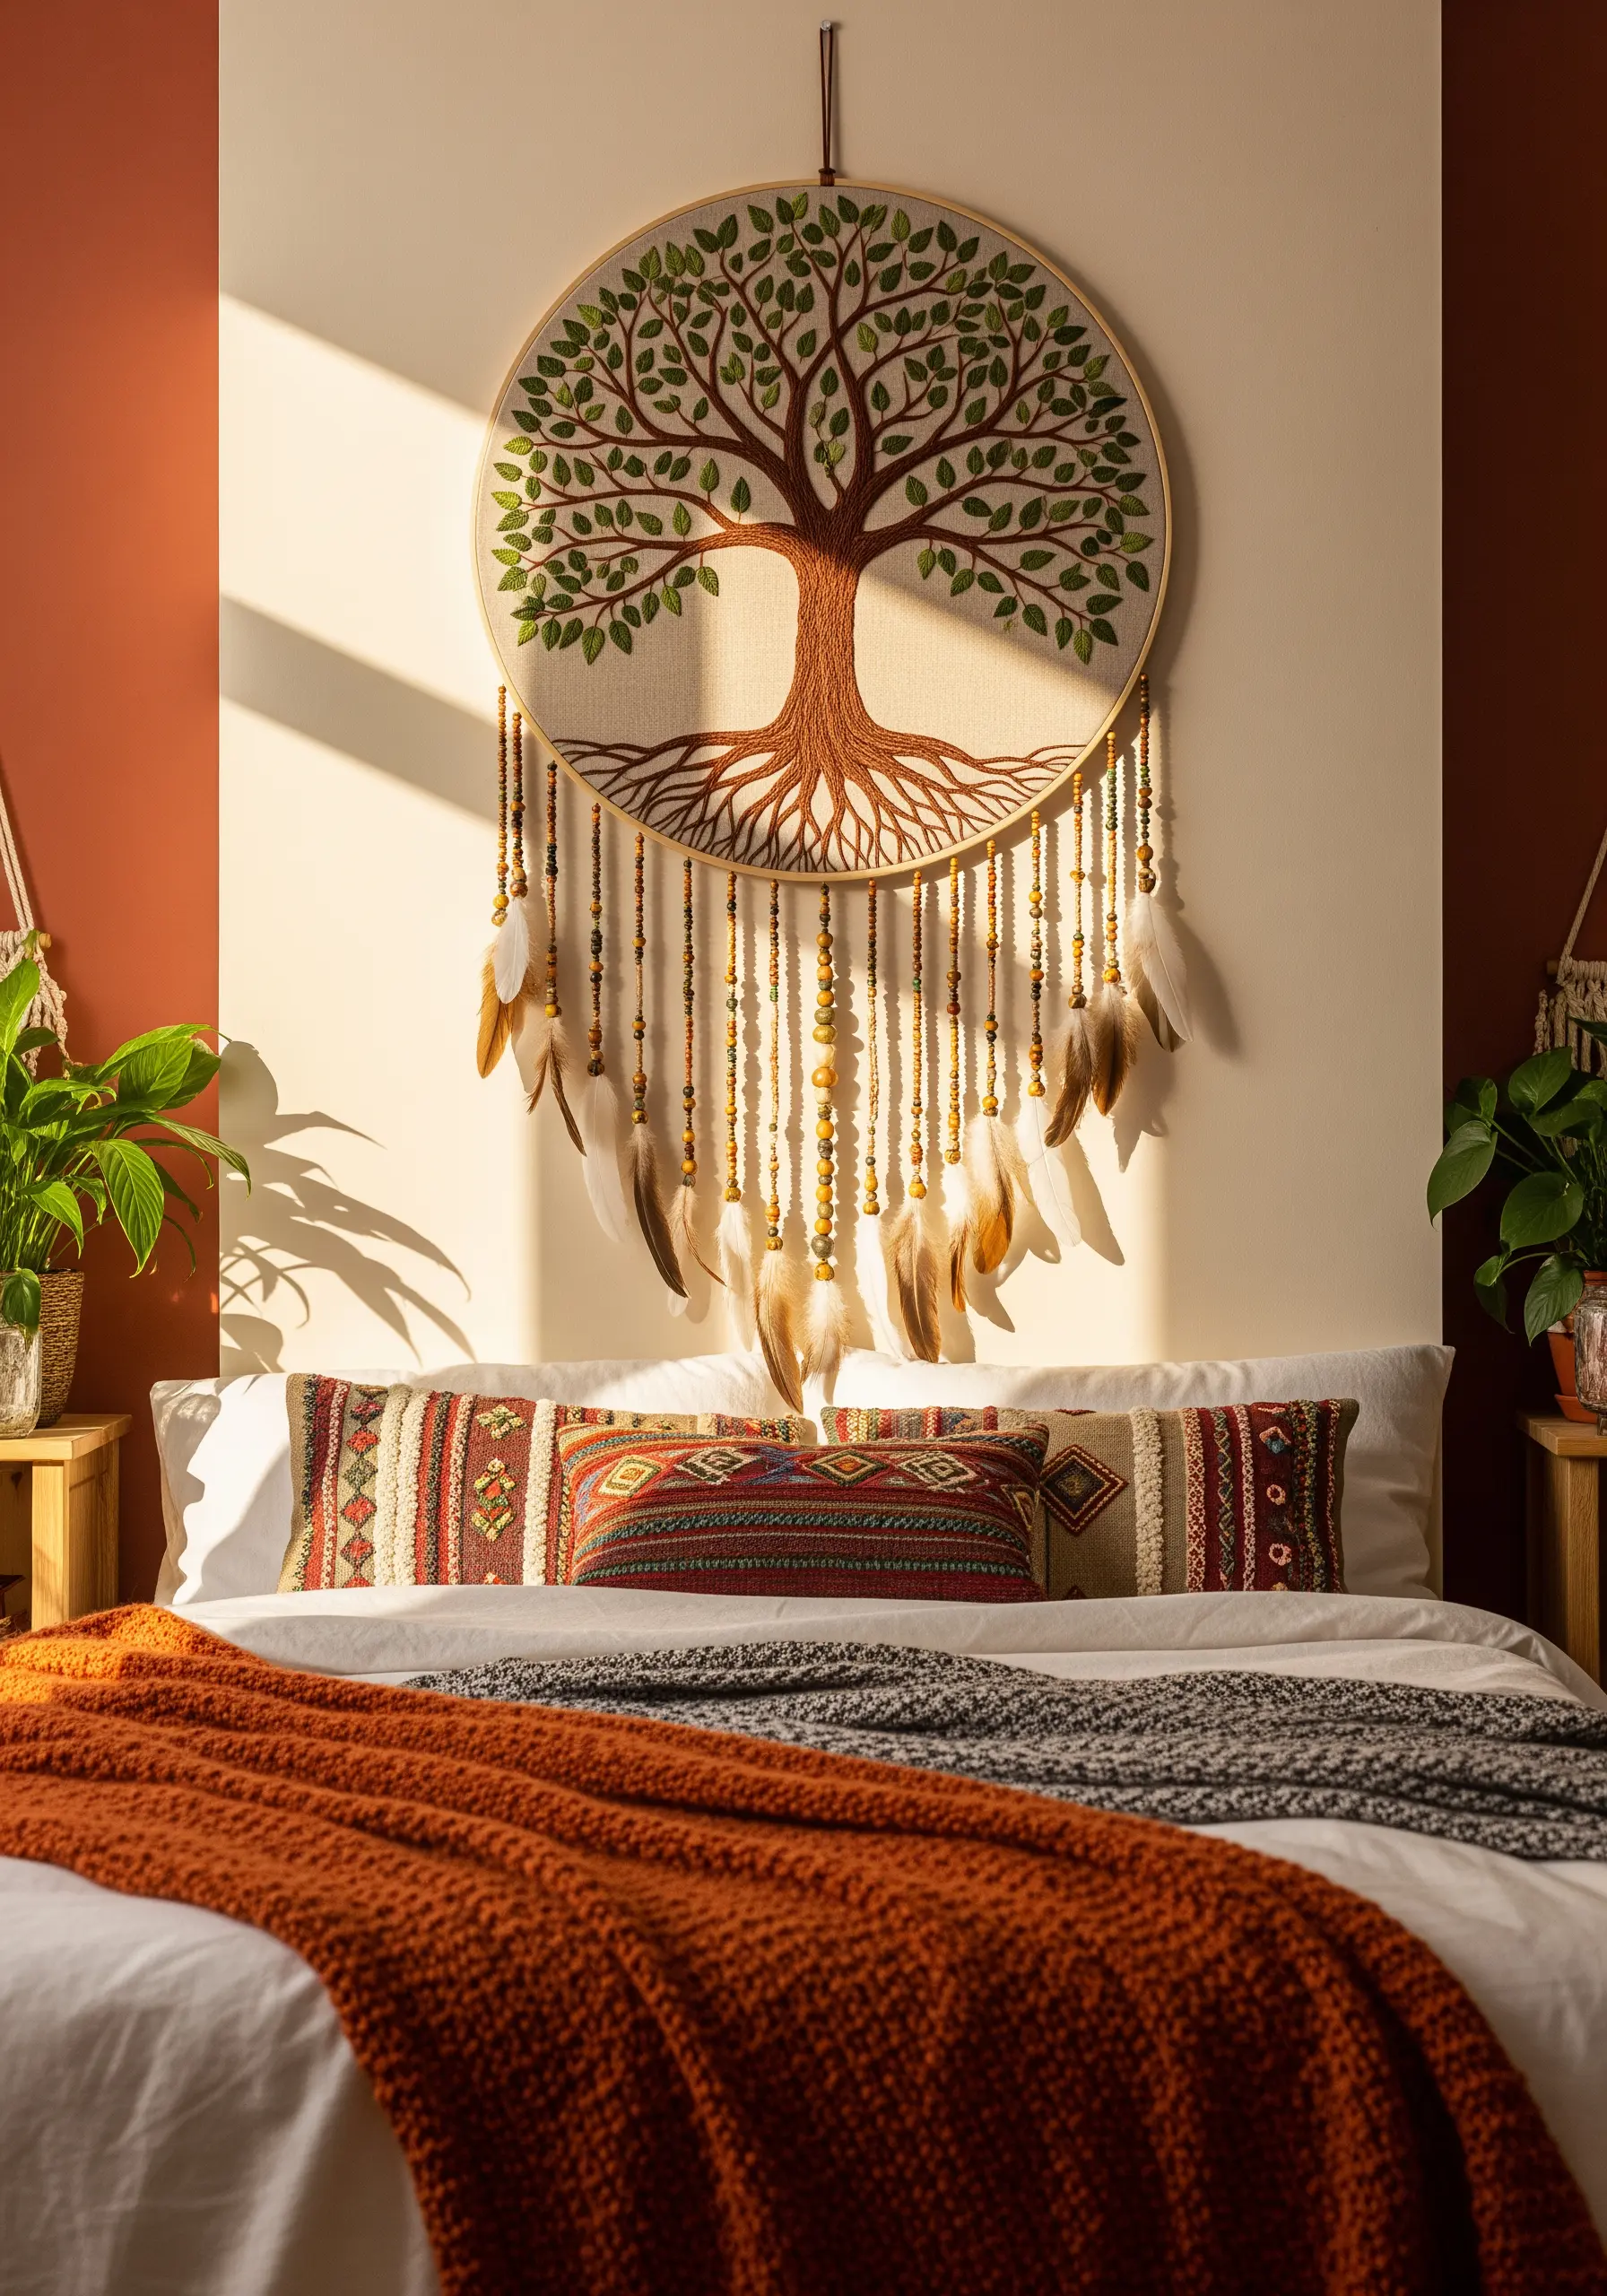
Take your embroidery beyond the confines of the hoop by adding dimensional, hanging elements.
Once the stitched portion of your Tree of Life is complete, attach strands of beads, small charms, and feathers that drape below the hoop.
This technique adds movement, texture, and a tactile quality, transforming a static piece into a dynamic wall hanging.
It’s the perfect finishing touch for boho embroidery patterns, giving them an authentic, free-spirited feel.
21. Hyper-Realistic Bark with Layered Textures

To achieve this level of realism, you must build texture in layers, just as it grows in nature.
Begin with a base of long, vertical stitches in foundational colors. Then, add the rough, raised ridges using dimensional stitches like bullion knots or chunky French knots.
Finally, define the deep cracks and crevices with fine, dark split stitches to add shadow and depth.
This masterful layering is one of the most advanced ways to capture nature’s textures in thread.
22. Minimalist Botanicals for Elegant Table Linens

For home décor items like placemats and napkins, a ‘less is more’ approach often yields the most elegant results.
Choose a simple, graceful motif like a single eucalyptus stem and stitch it with a fine thread using just two or three strands.
A delicate stem stitch for the branches and a smooth satin stitch for the leaves is all that’s needed.
This refined touch aligns perfectly with modern minimalist table linen embroidery ideas, adding a hint of handmade luxury.
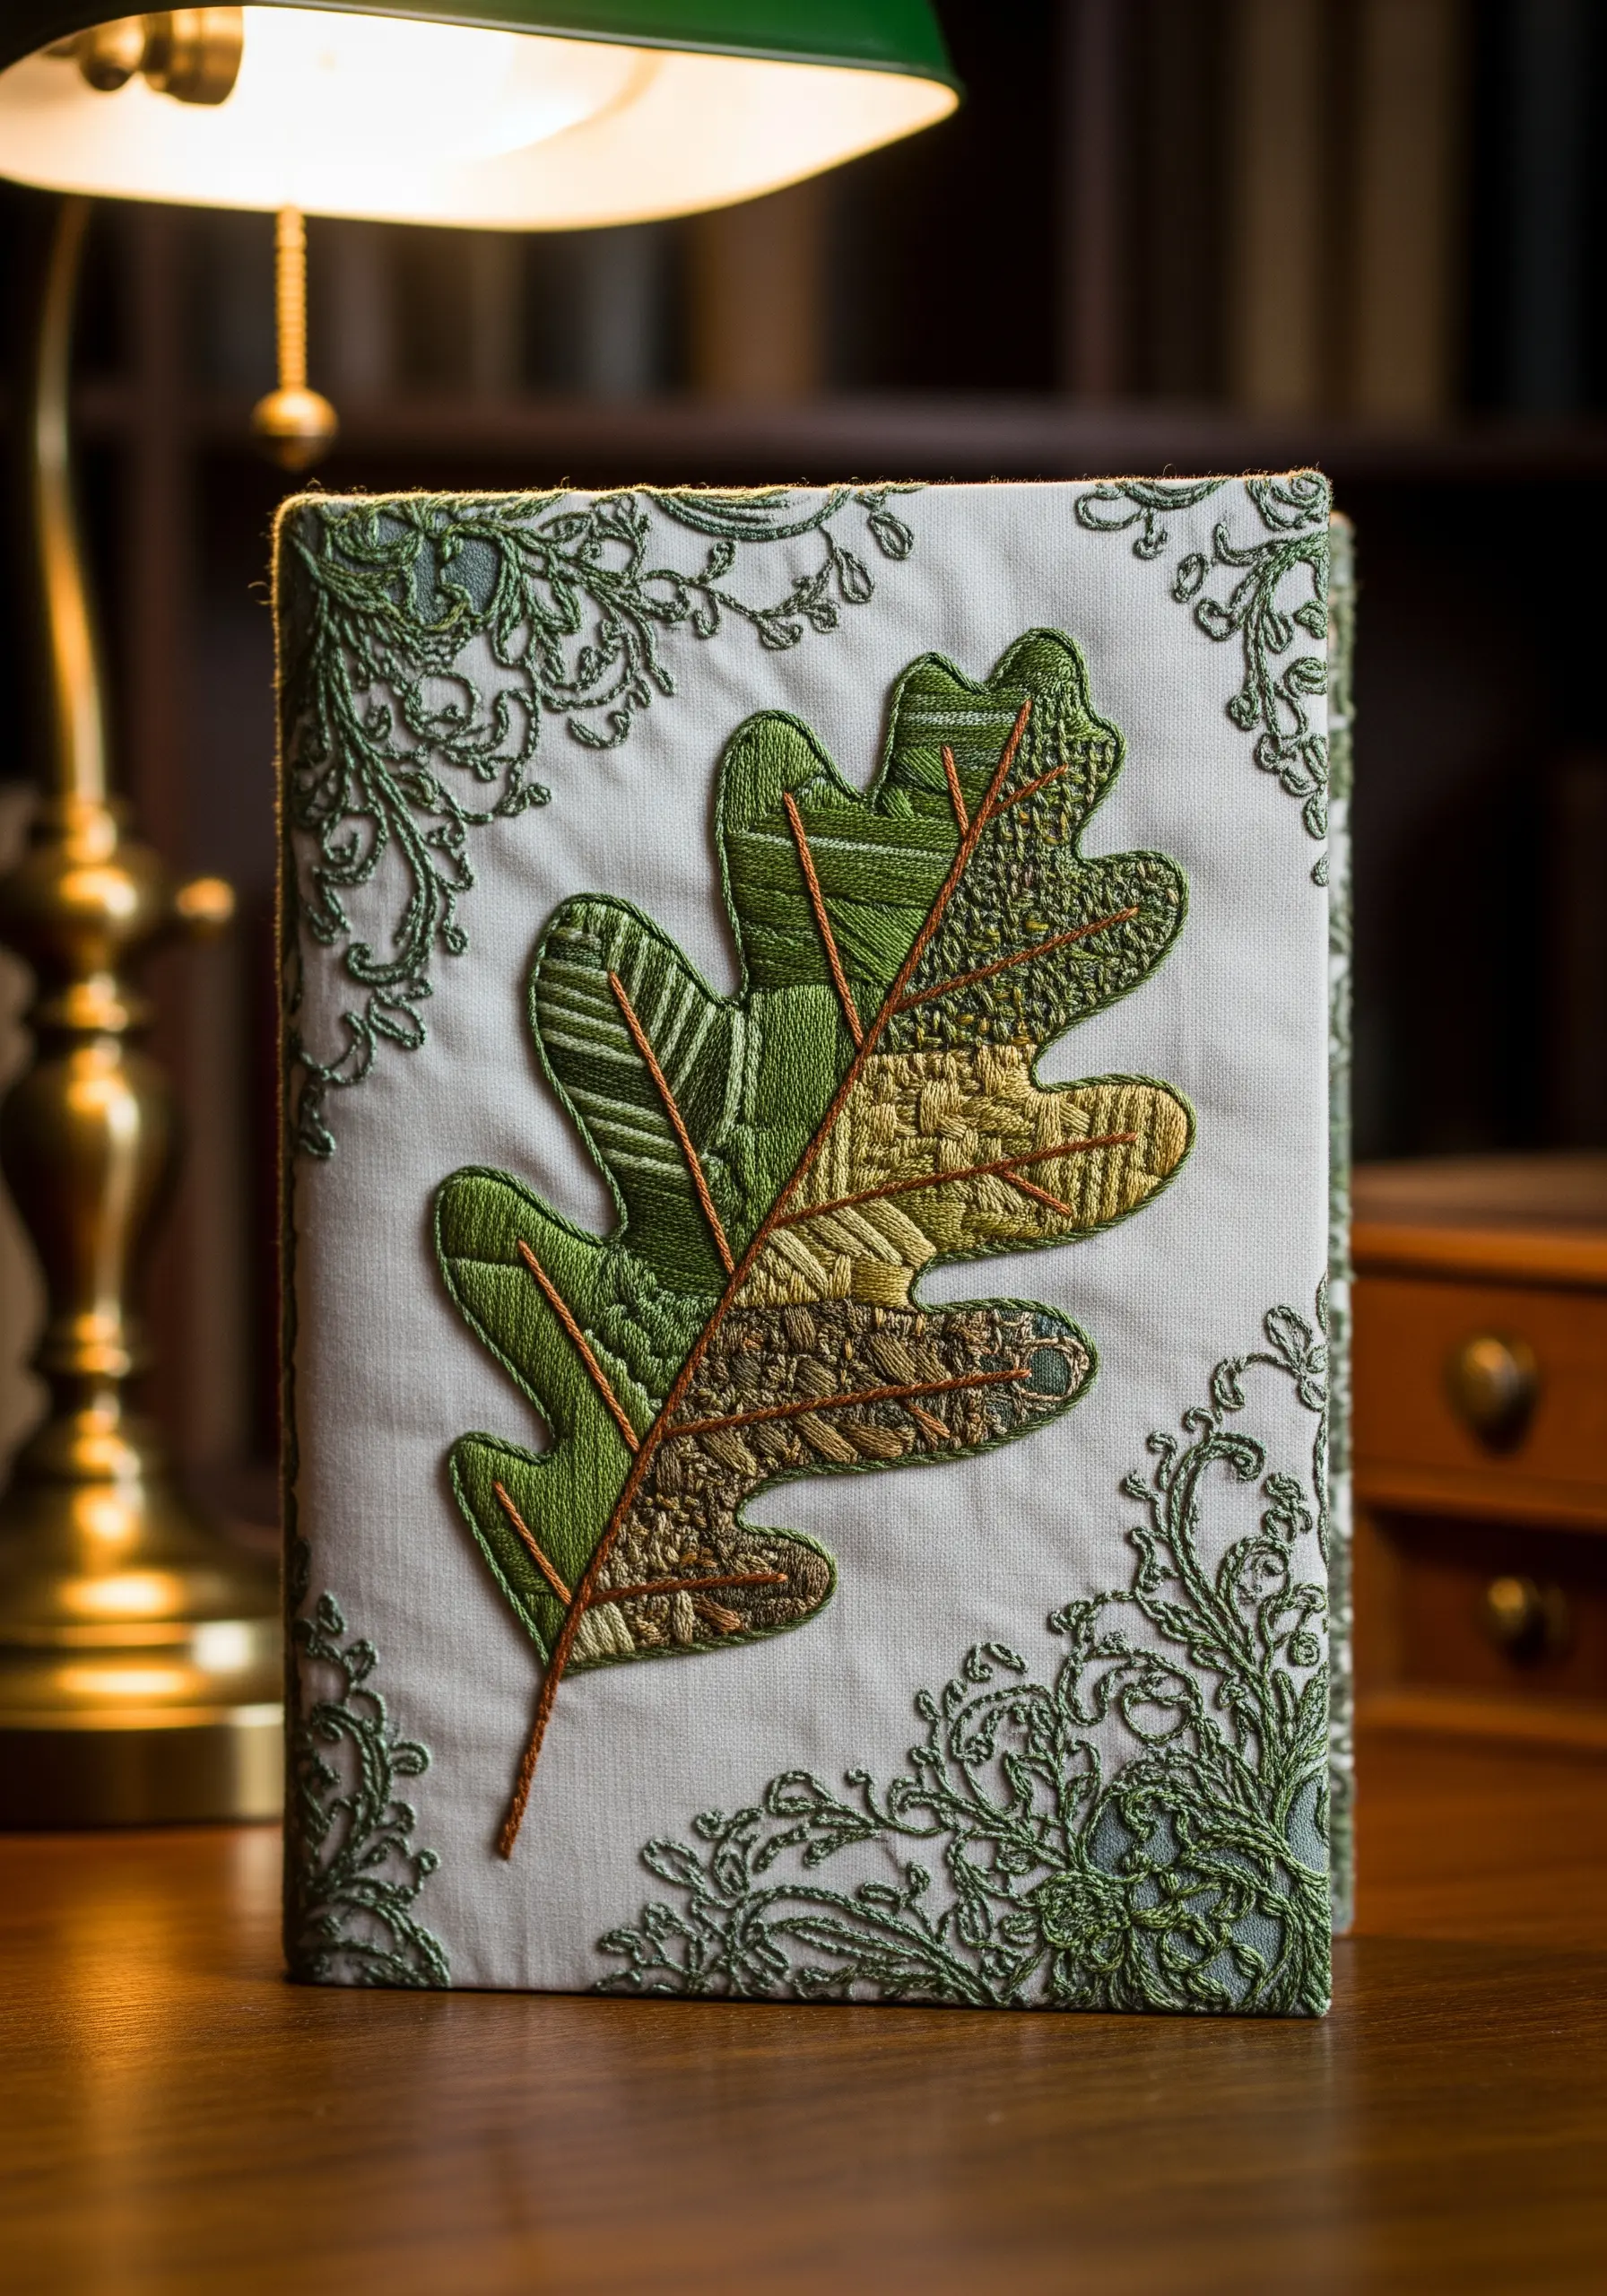
23. Mastering the Art of Thread Painting
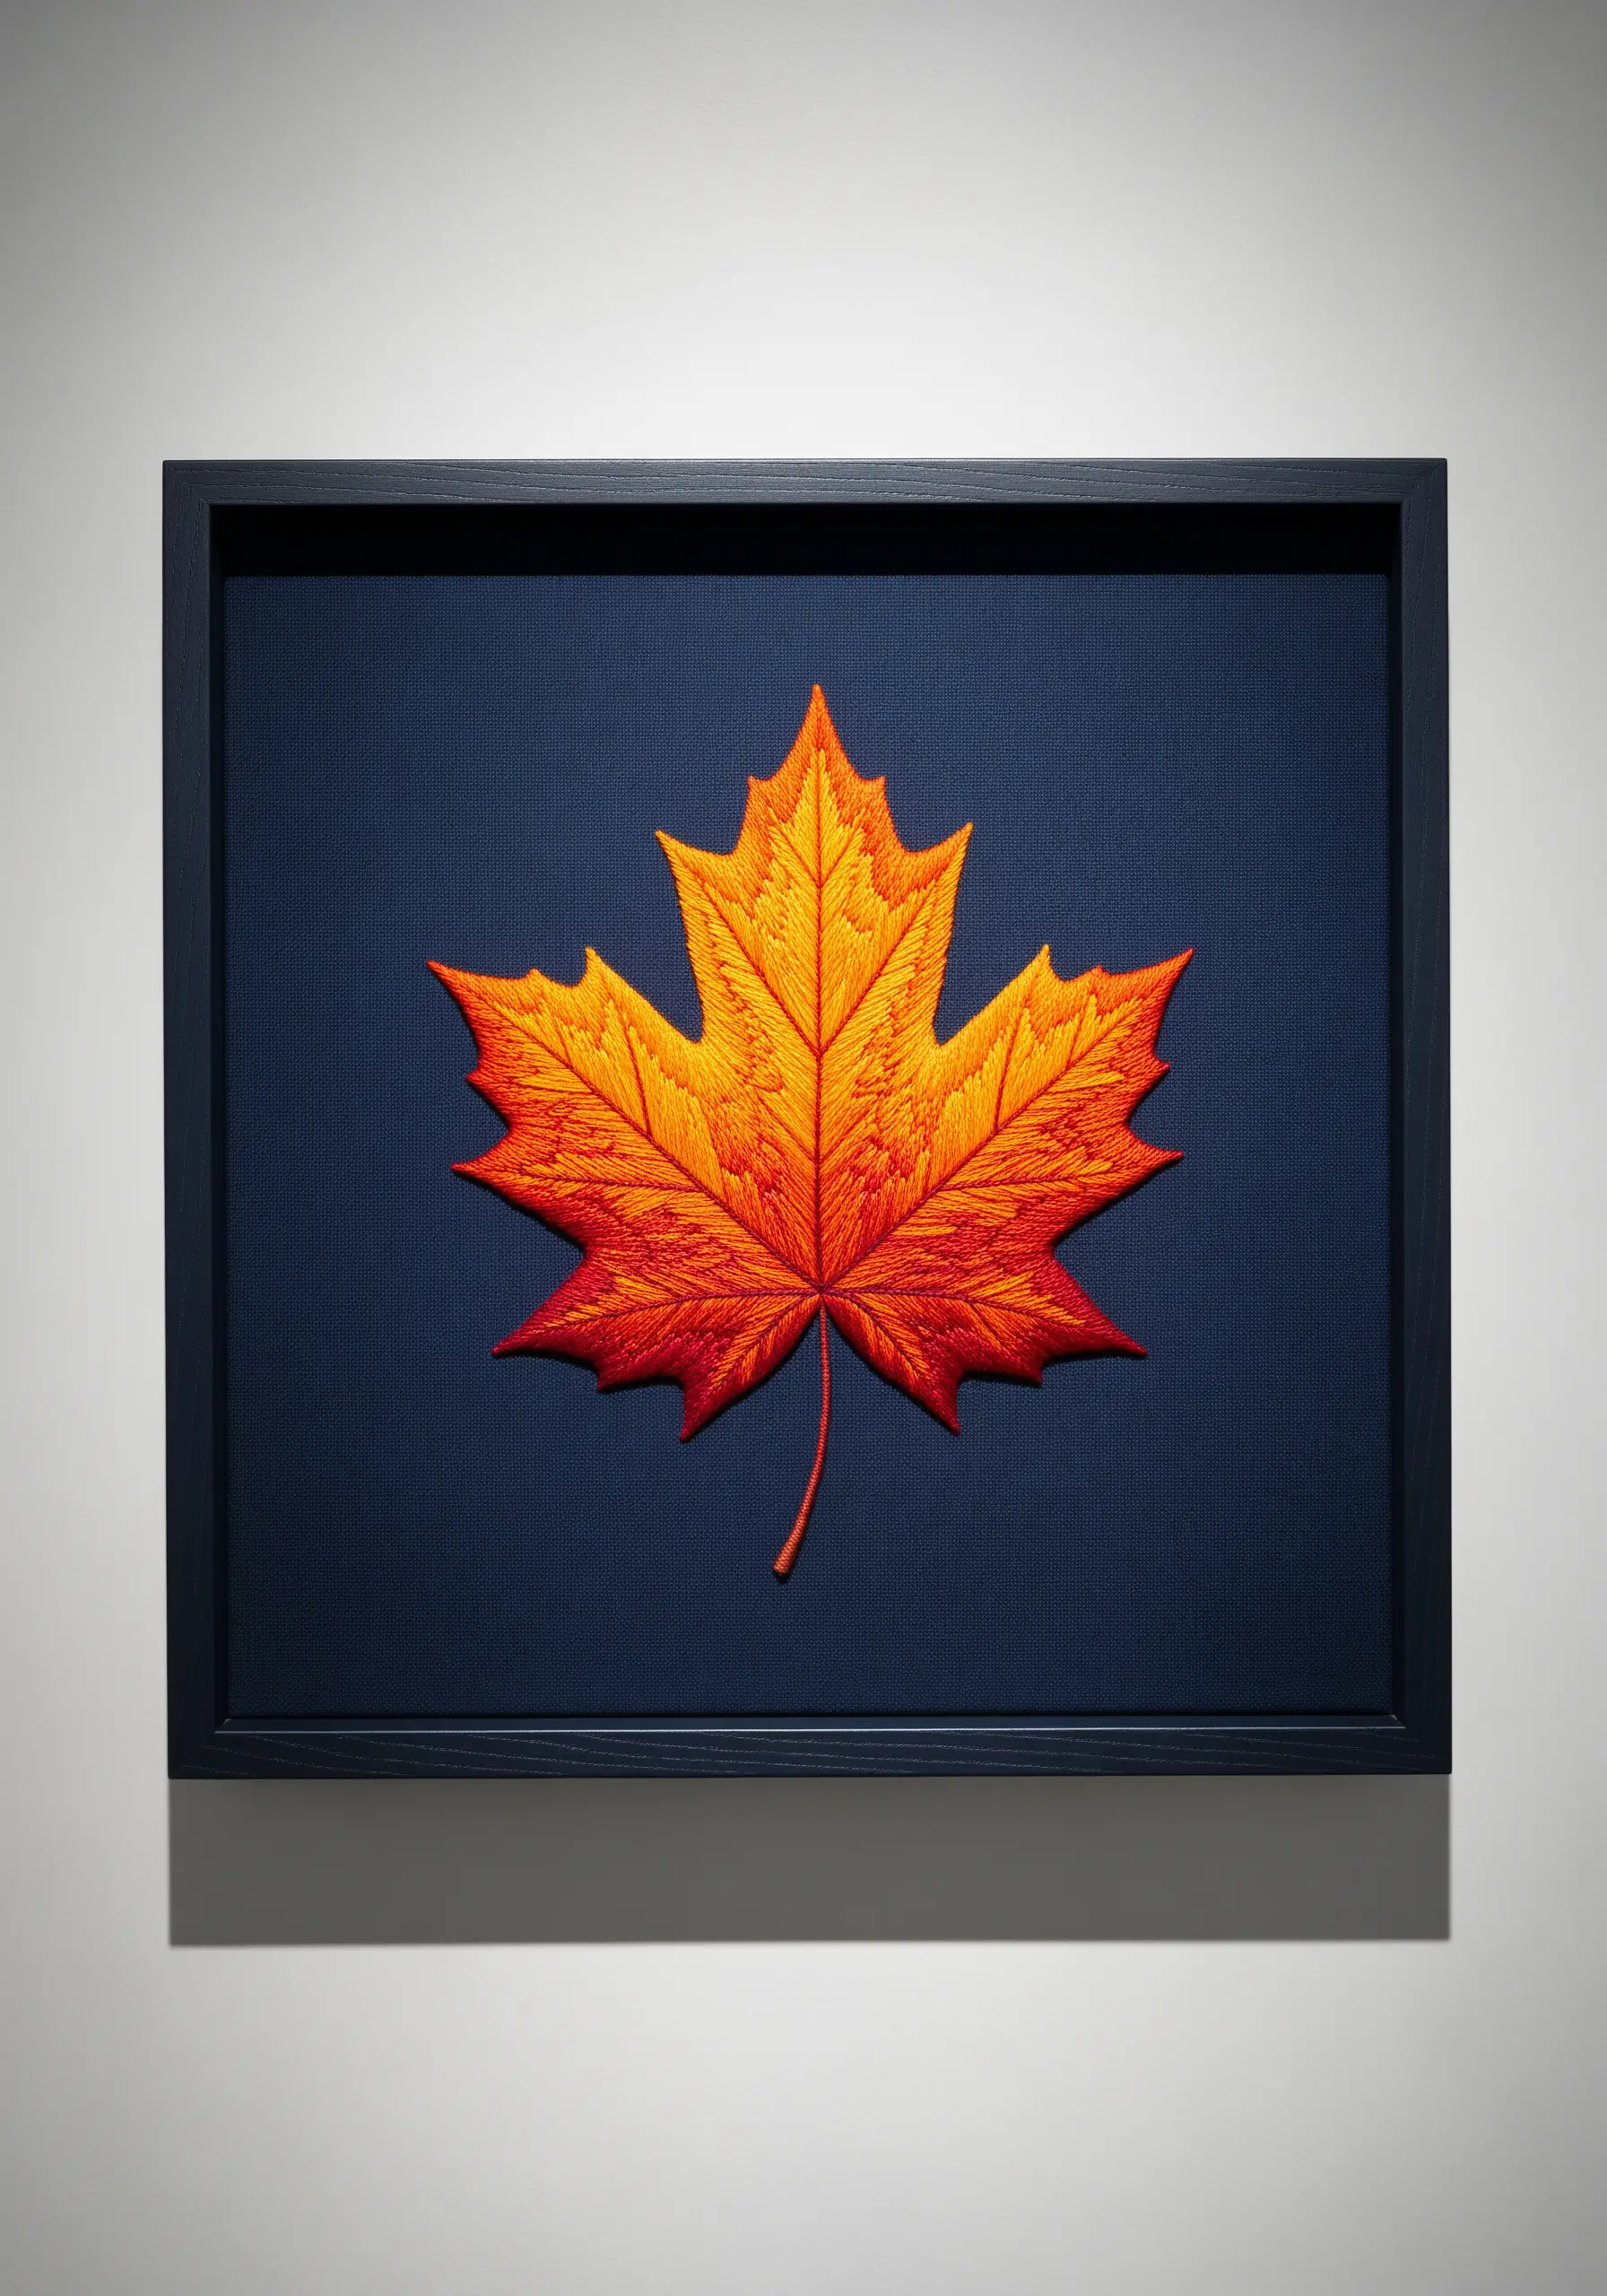
This leaf’s stunning realism is achieved through thread painting, a technique that uses the long-and-short stitch to create seamless color blends.
Working with just a single strand of thread, you can smoothly transition from one color to the next, just like mixing paint on a palette.
Angle your stitches to follow the natural direction of the leaf’s veins to enhance the illusion of depth and form.
This skill-intensive method is perfect for ambitious DIY framed embroidery art projects that look like they belong in a gallery.
24. Mapping Complex Shapes with Fill Stitches
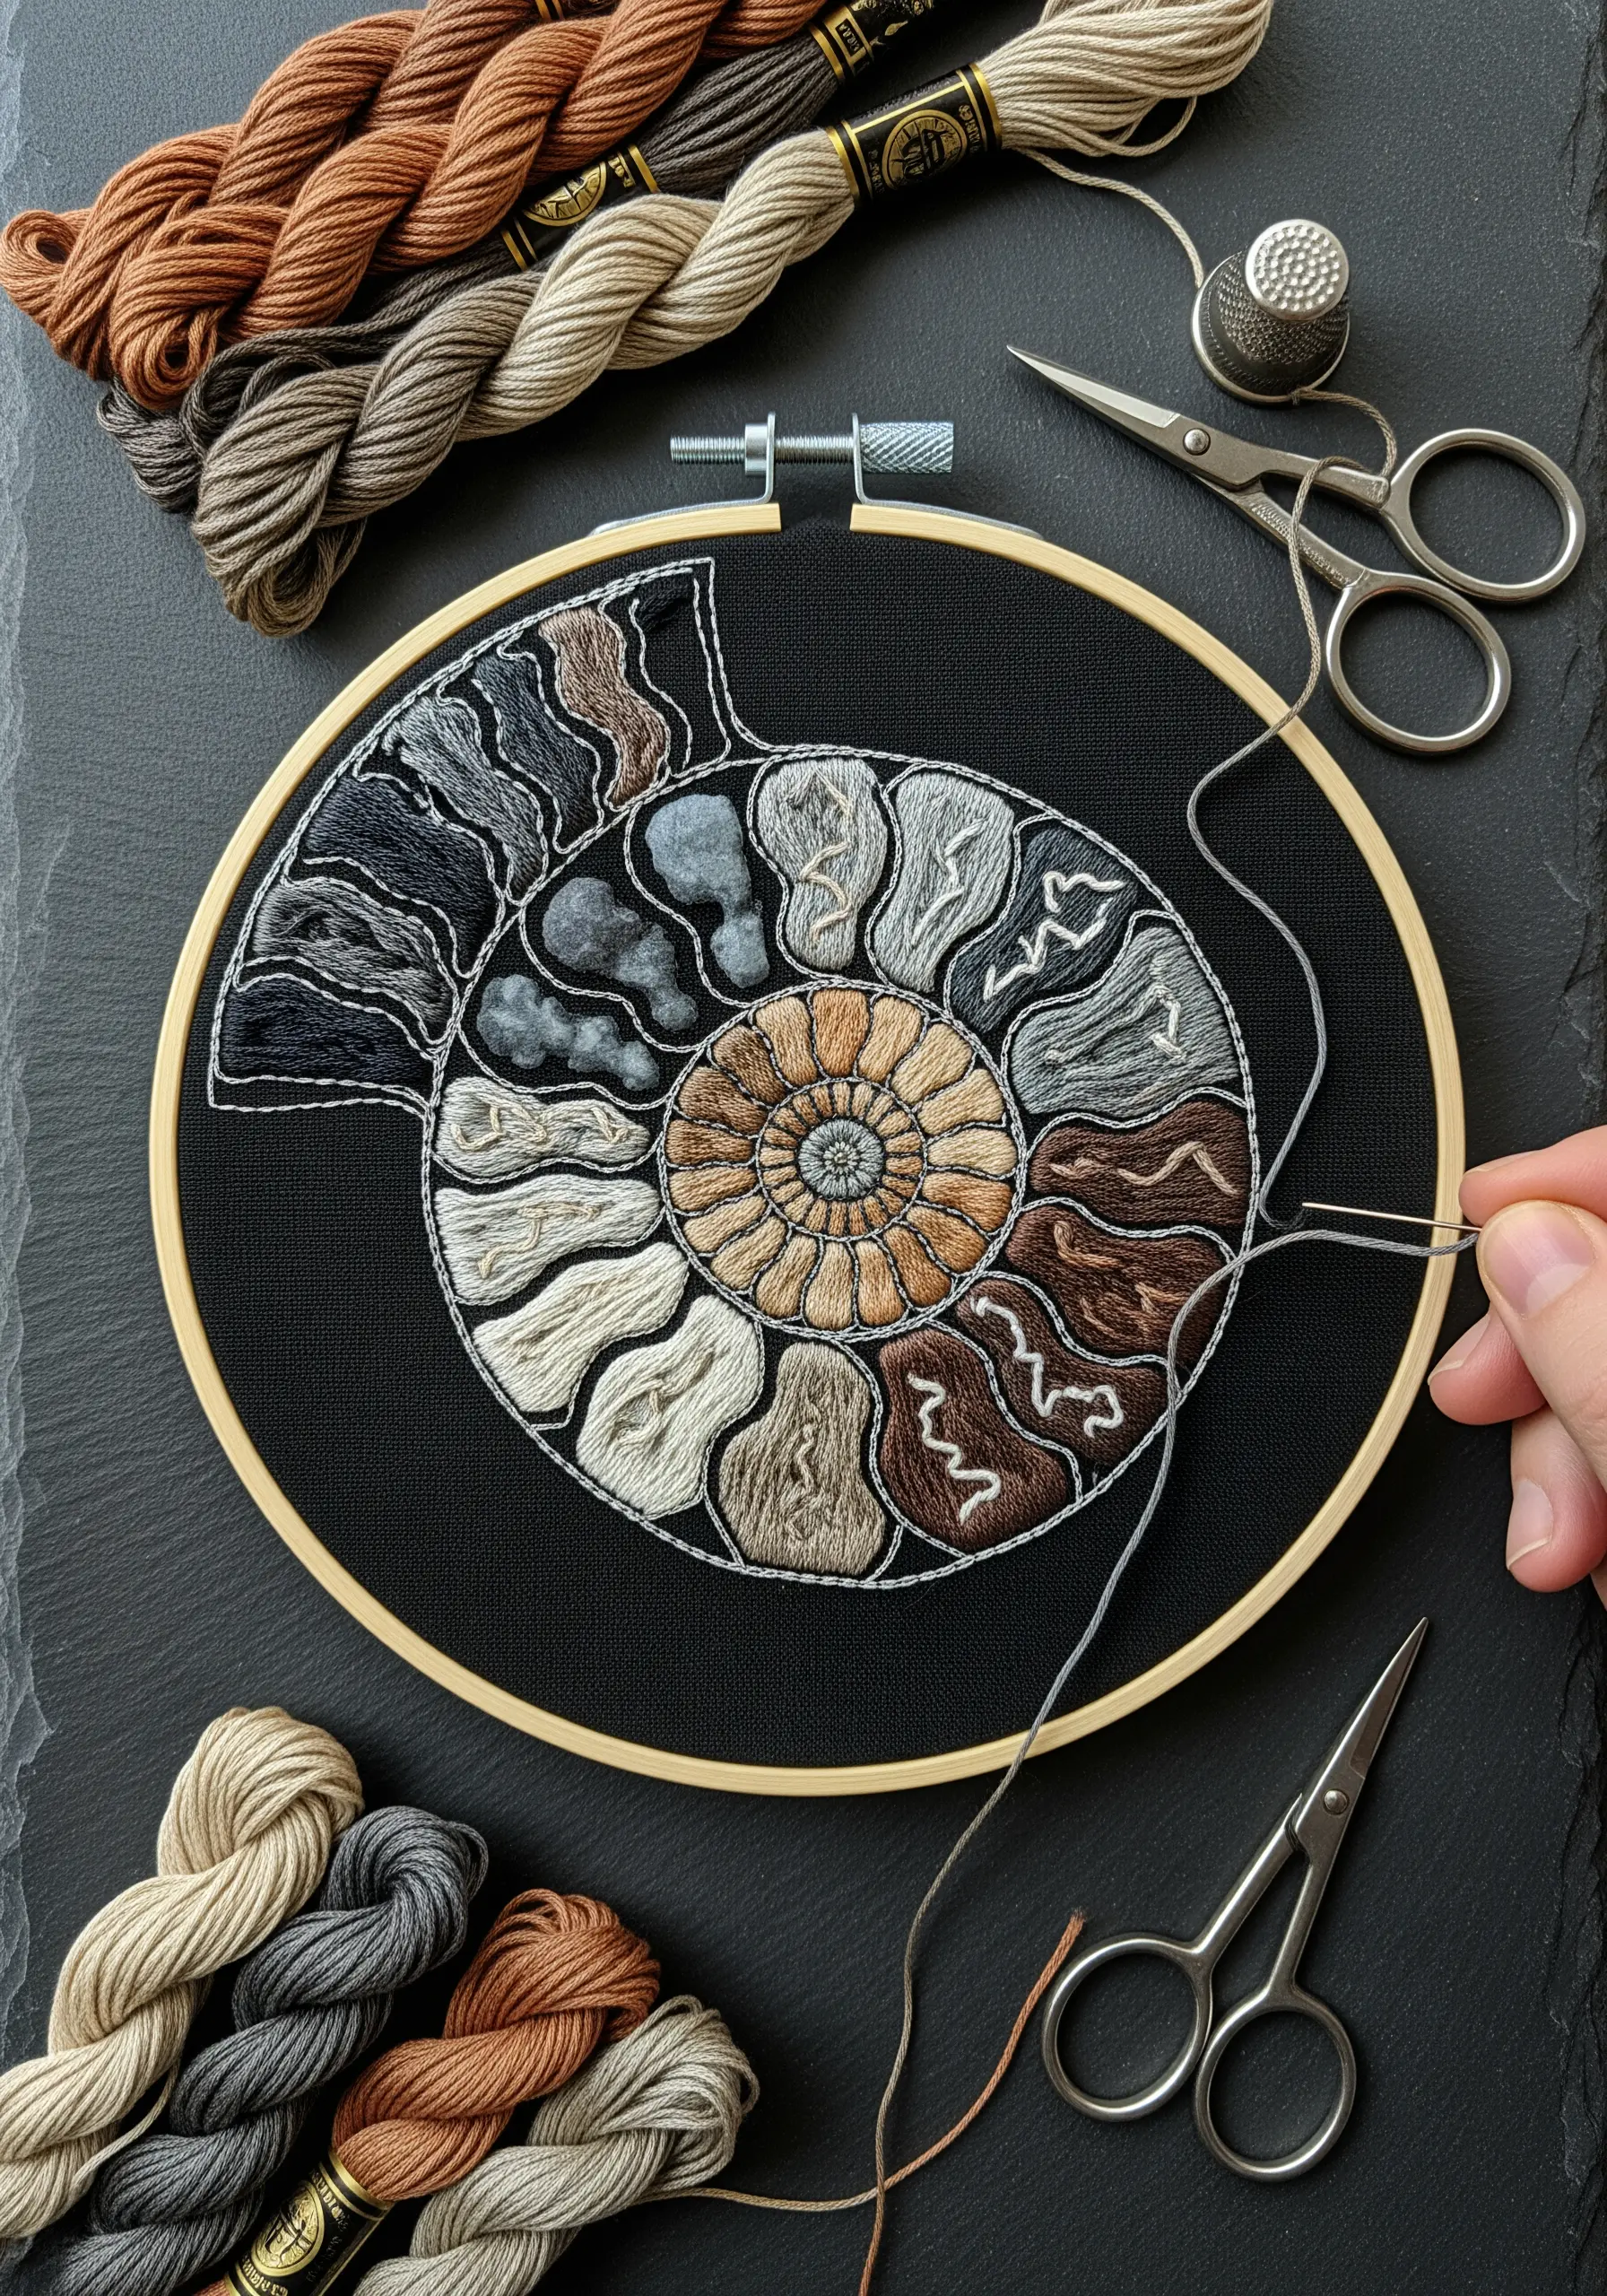
When tackling a design with many distinct segments, like this ammonite fossil, treat each section as its own mini-project.
Fill each shape with satin stitch, but deliberately change the direction of your stitches from one section to the next.
This simple trick creates subtle shifts in how the light reflects off the thread, adding texture and definition.
Outline each segment with a clean backstitch to make the forms pop, creating timeless earth-tone patterns that are both graphic and organic.
25. Recreating Pussy Willows with 3D Stitches
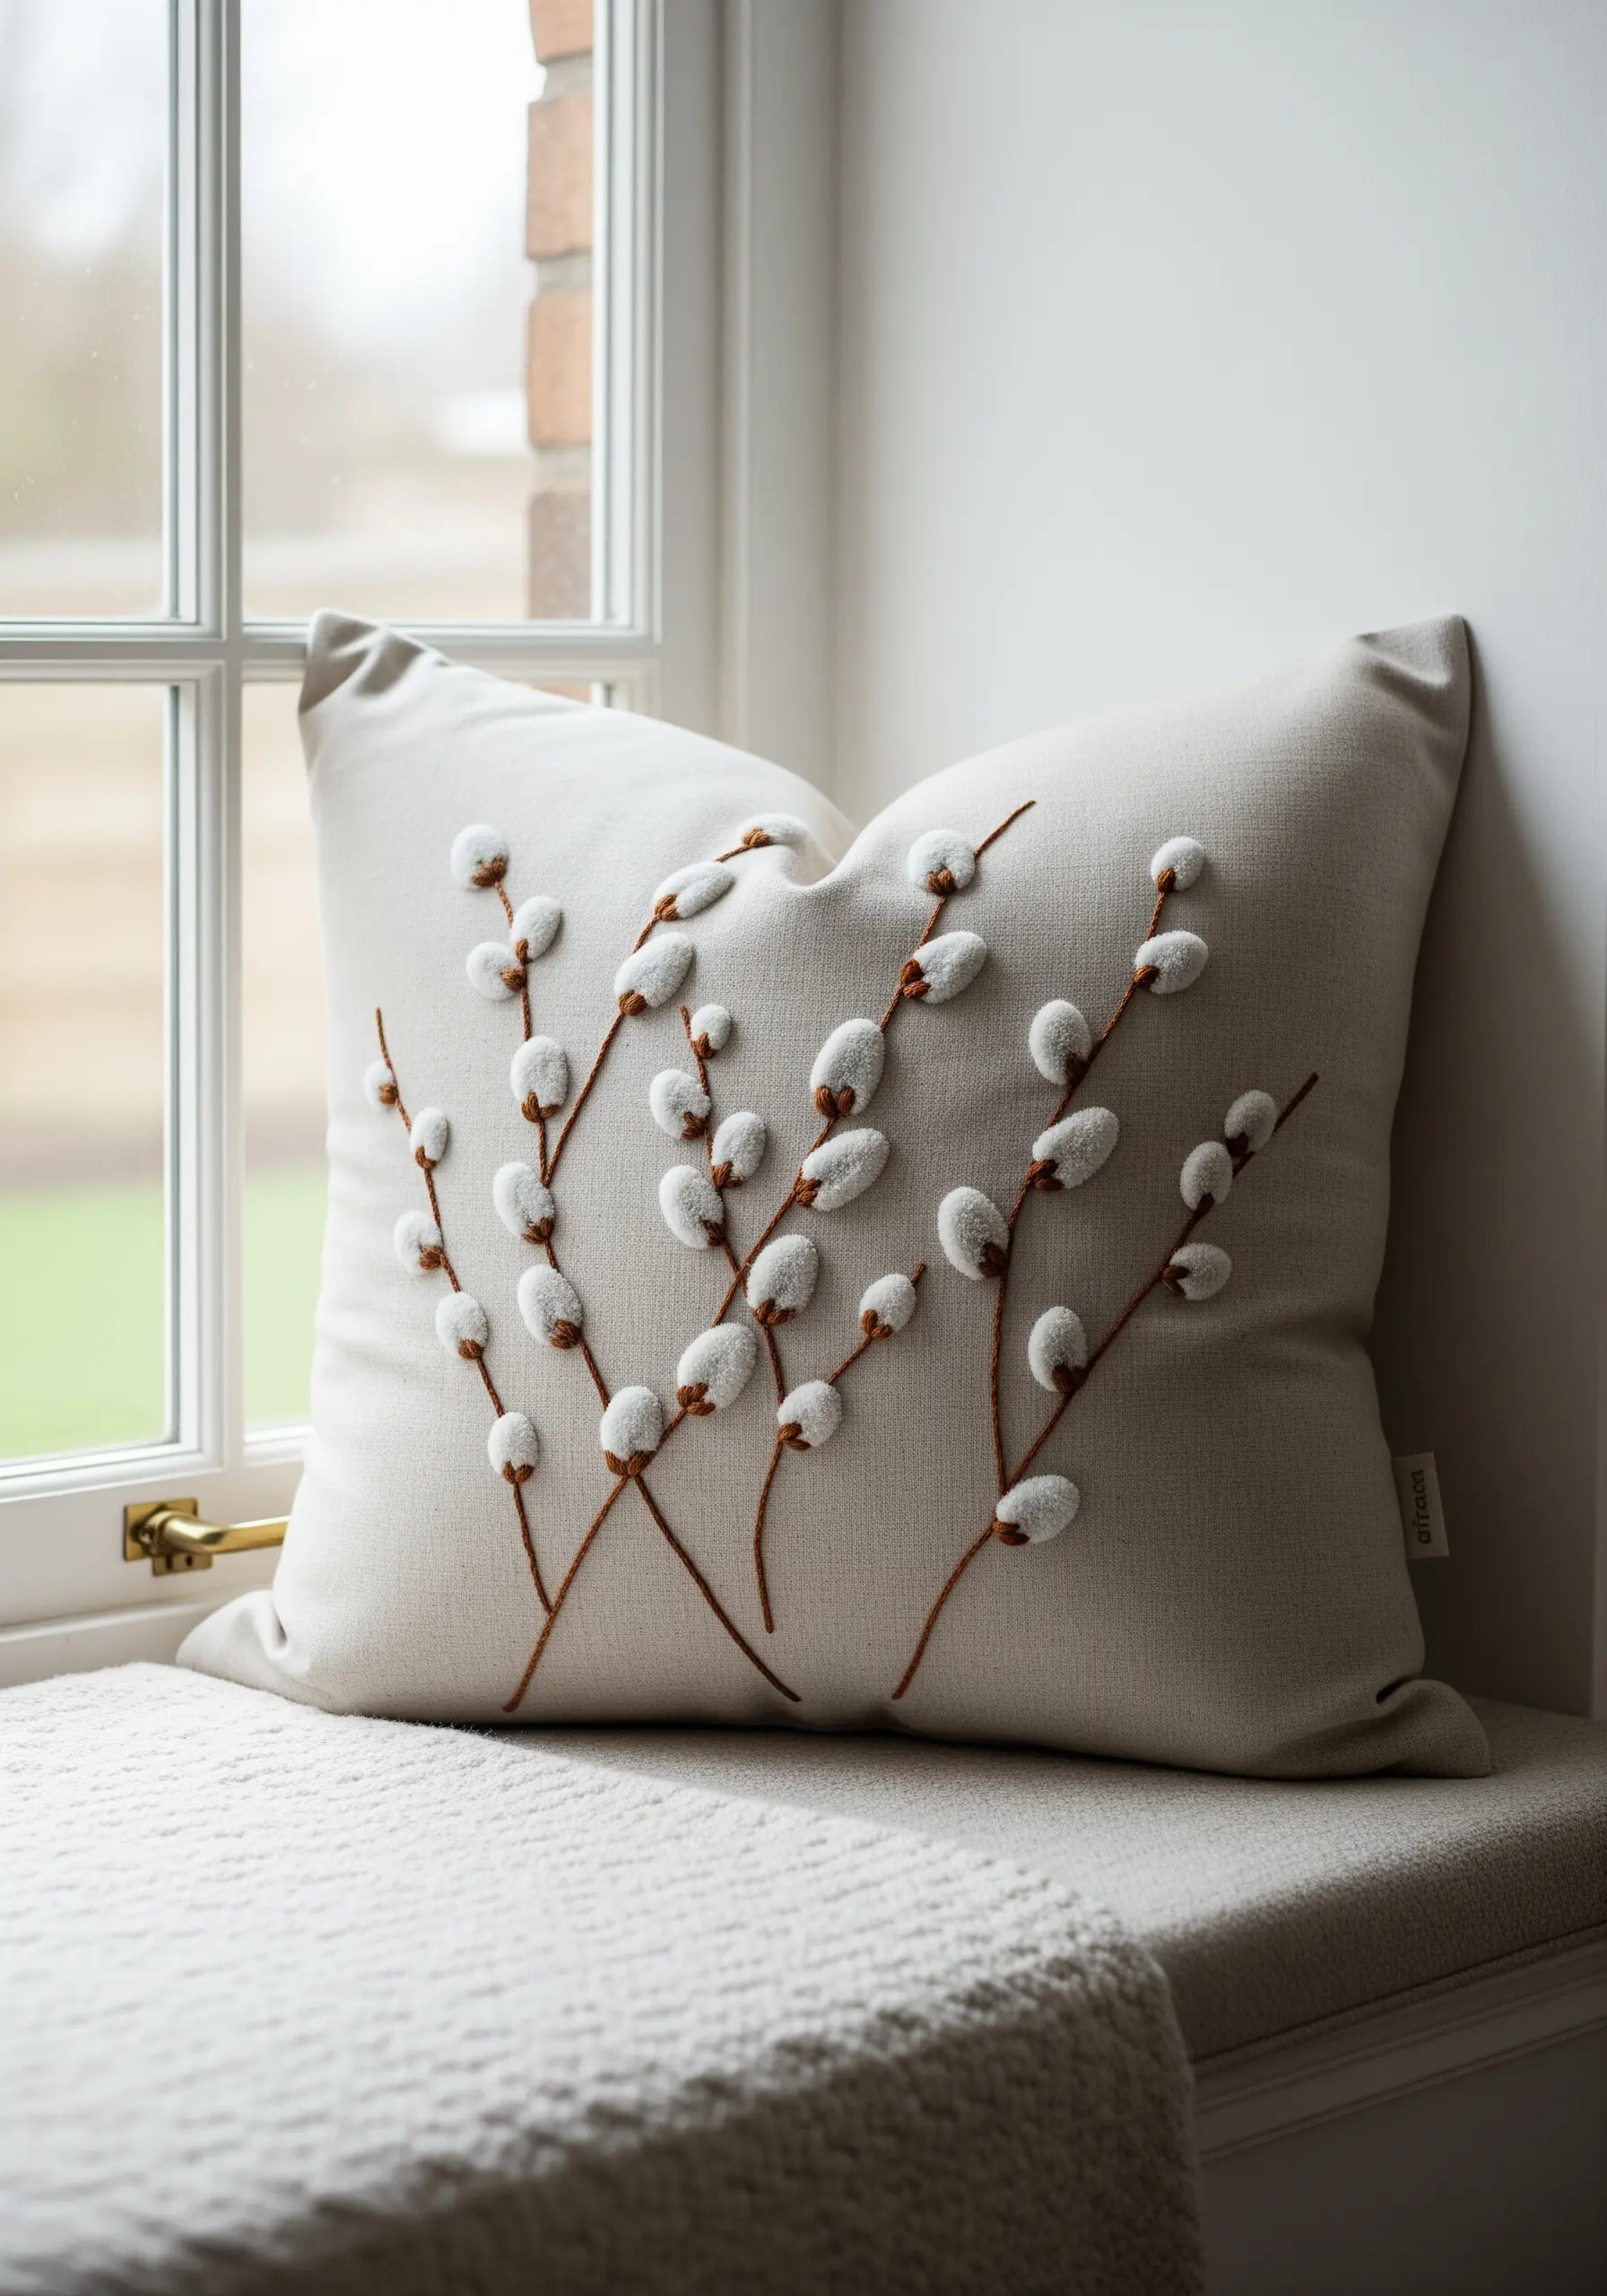
To capture the signature soft buds of the pussy willow, you need a stitch that creates a raised, plush texture.
Turkey work is an excellent choice; you can leave the loops uncut for a chenille-like feel or snip them for a fluffier, velvety finish.
Paired with a simple stem stitch for the delicate brown branches, this textural contrast is what brings the design to life.
It is a perfect example of how to use cozy neutral decor ideas to add warmth to your space.
26. Backlighting Embroidery for a Stained-Glass Glow

Transform your embroidery into a luminous art installation by stitching on a sheer, stable fabric such as organza.
When the finished piece is hung in front of a window or an artificial light source, the light passes through the transparent ground fabric and illuminates the threads themselves.
This technique creates a breathtaking stained-glass effect, making the colors of your thread appear to glow from within.
This is a stunning application for large-scale embroidery tapestries in modern interiors.
27. Minimalist Design with Couching and Appliqué

You can create a sophisticated and balanced composition with just two core techniques: couching and appliqué.
The clean, curved lines are made by couching—laying down a thick cord and tacking it into place with tiny, near-invisible stitches.
The solid black shapes are fabric appliqué, attached with a simple whip stitch around the edges.
This combination of line and form creates beautiful, meditative art, and is a hallmark of minimalist embroidery projects.
28. Integrating Embroidery with Apparel Construction
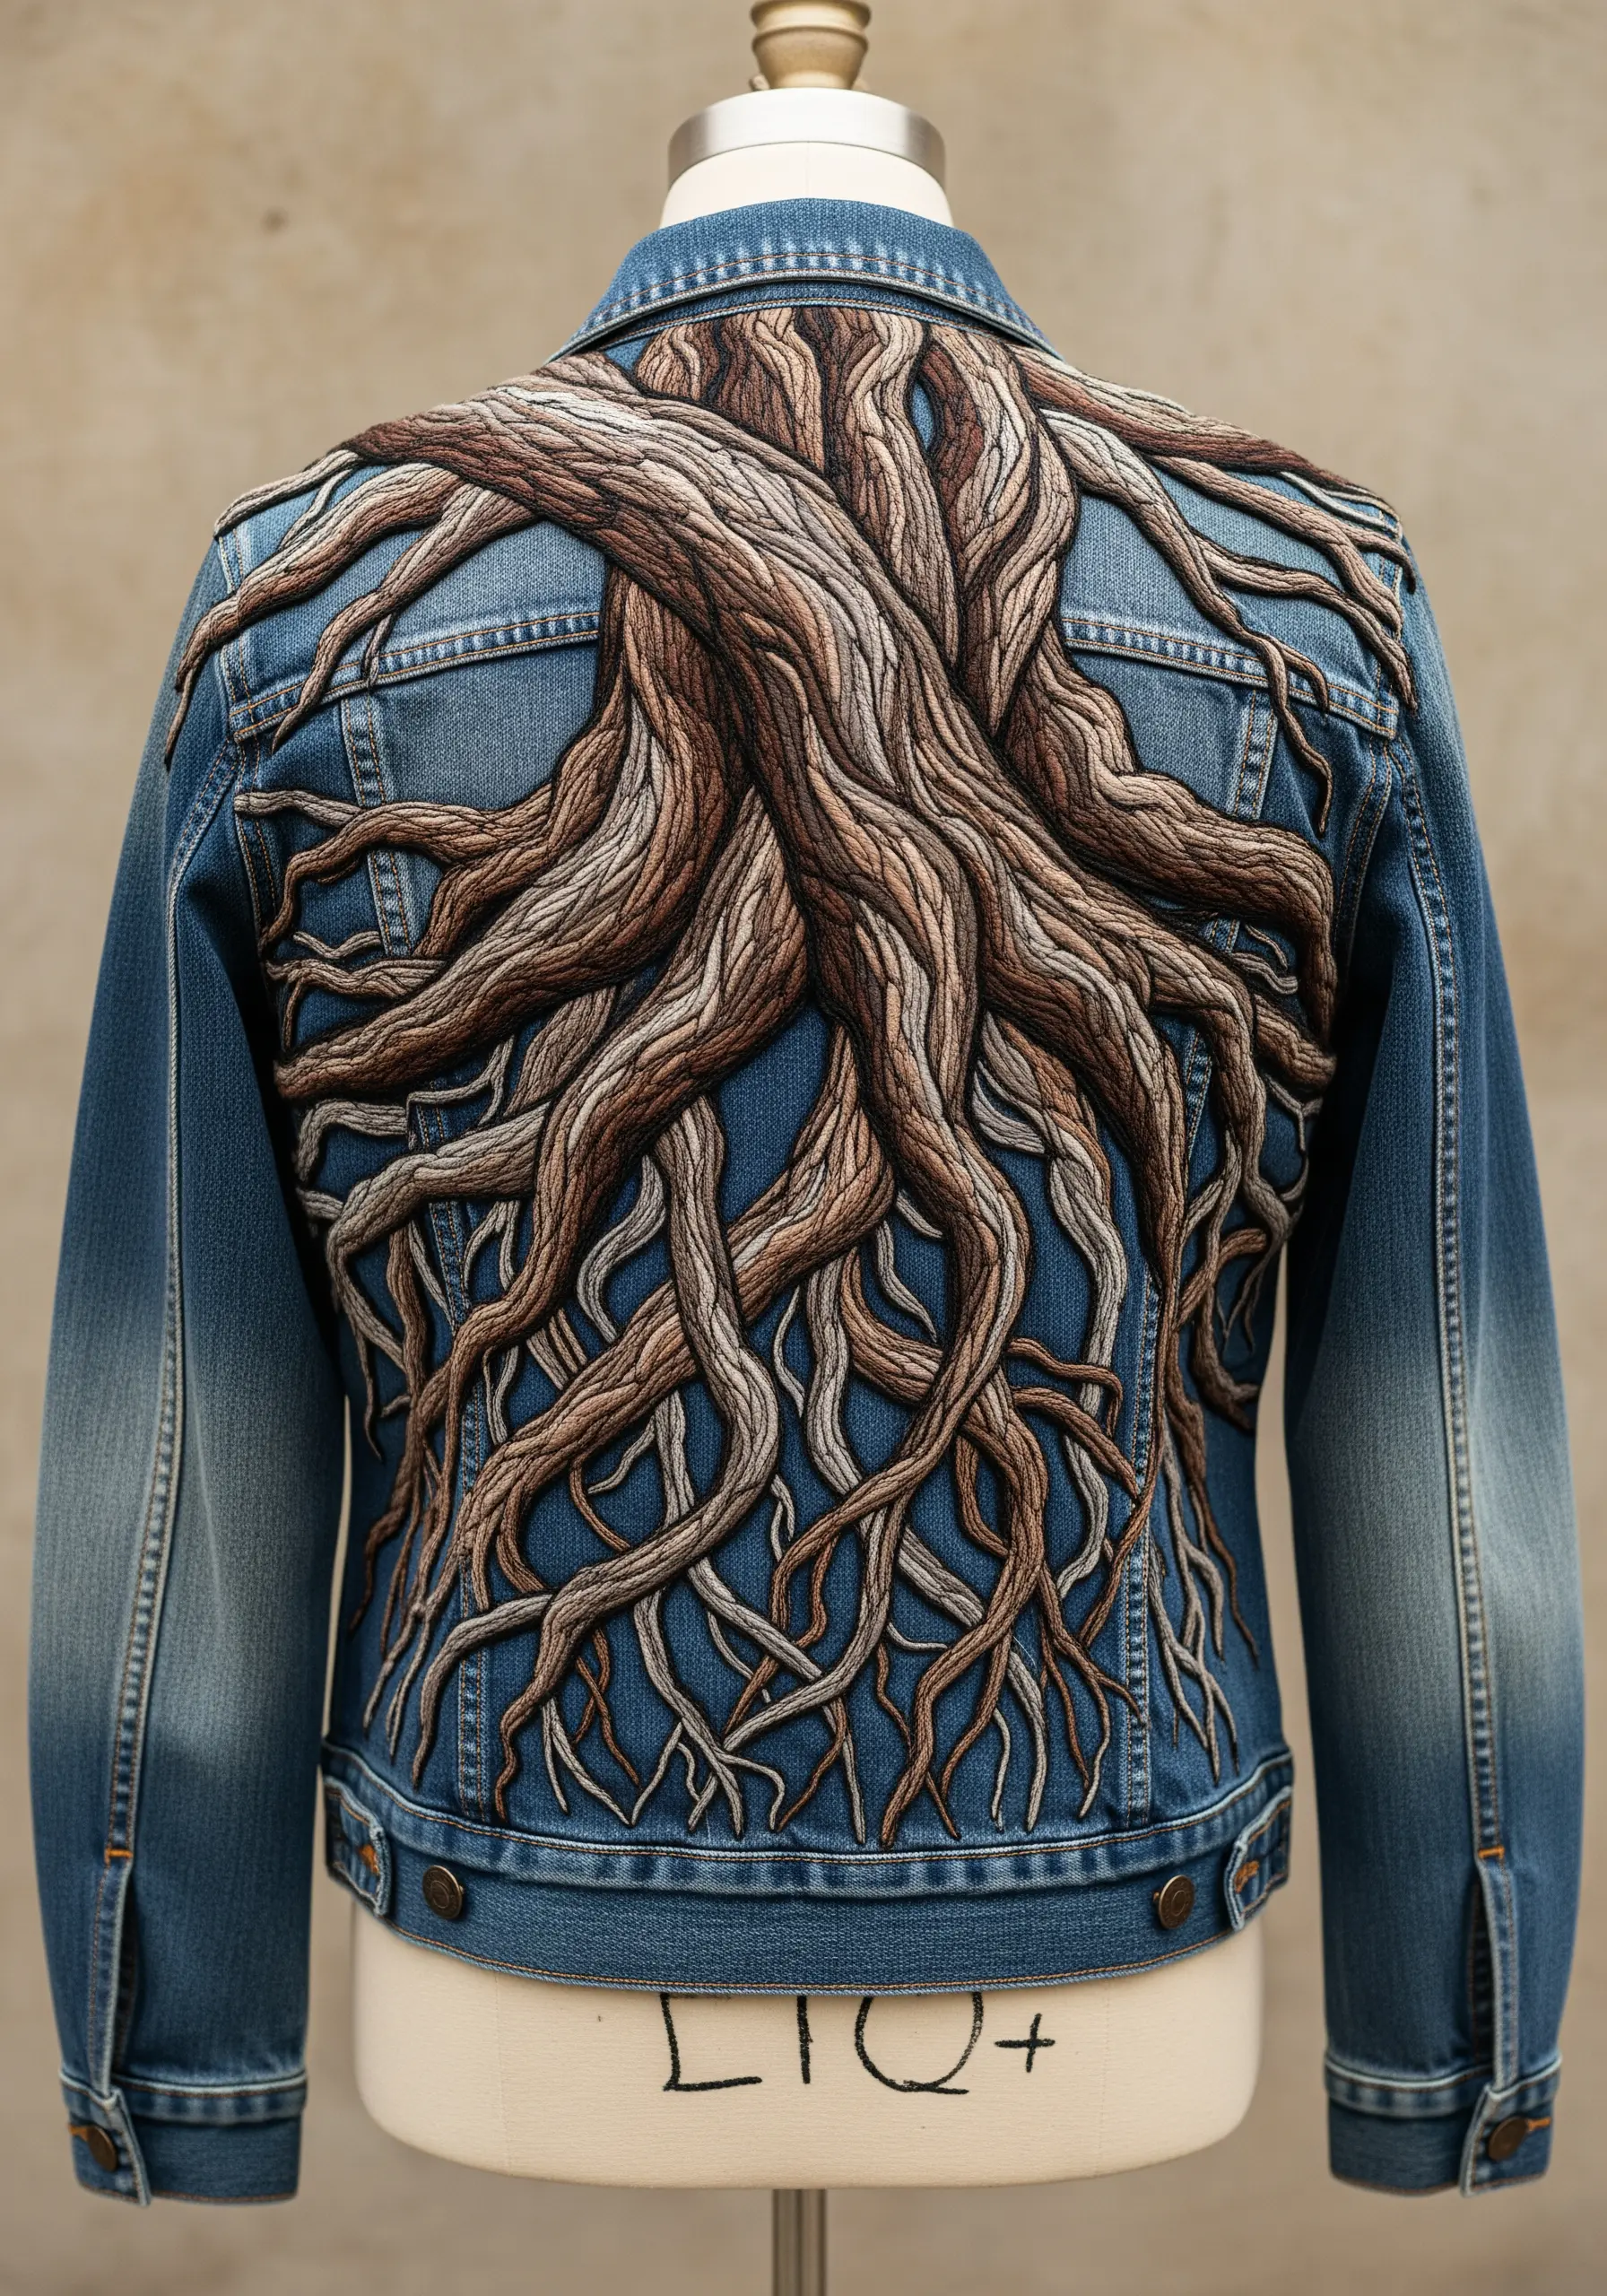
When you embroider on clothing, treat the garment’s seams and panels as a framework for your design.
Here, the tree roots flow organically from the jacket’s yoke, following the existing lines of construction, which makes the design feel fully integrated.
Always use a stabilizer on the reverse side to prevent the denim from puckering under the tension of dense stitching.
This is the secret to professional-looking vintage-inspired denim jacket embroidery motifs that last.


