

If you’ve ever felt that your wall art is missing something—a certain depth or tactile presence—the answer might not be in a new stitch, but in a new perspective on your materials.
It’s time to think beyond the single strand of floss and embrace the world of yarn. Its inherent weight, texture, and sculptural potential can transform a flat surface into a dynamic, three-dimensional landscape. This isn’t about abandoning embroidery; it’s about expanding your definition of what thread can do.
These projects are designed to guide you through layering, coiling, wrapping, and knotting. They are invitations to explore how different fibers interact and how simple changes in technique can create stunning visual depth. You’ll learn to see your walls not just as a place for decoration, but as a canvas for textile art that you can not only see, but truly feel.
1. Blend Weaving with Sculptural Roving
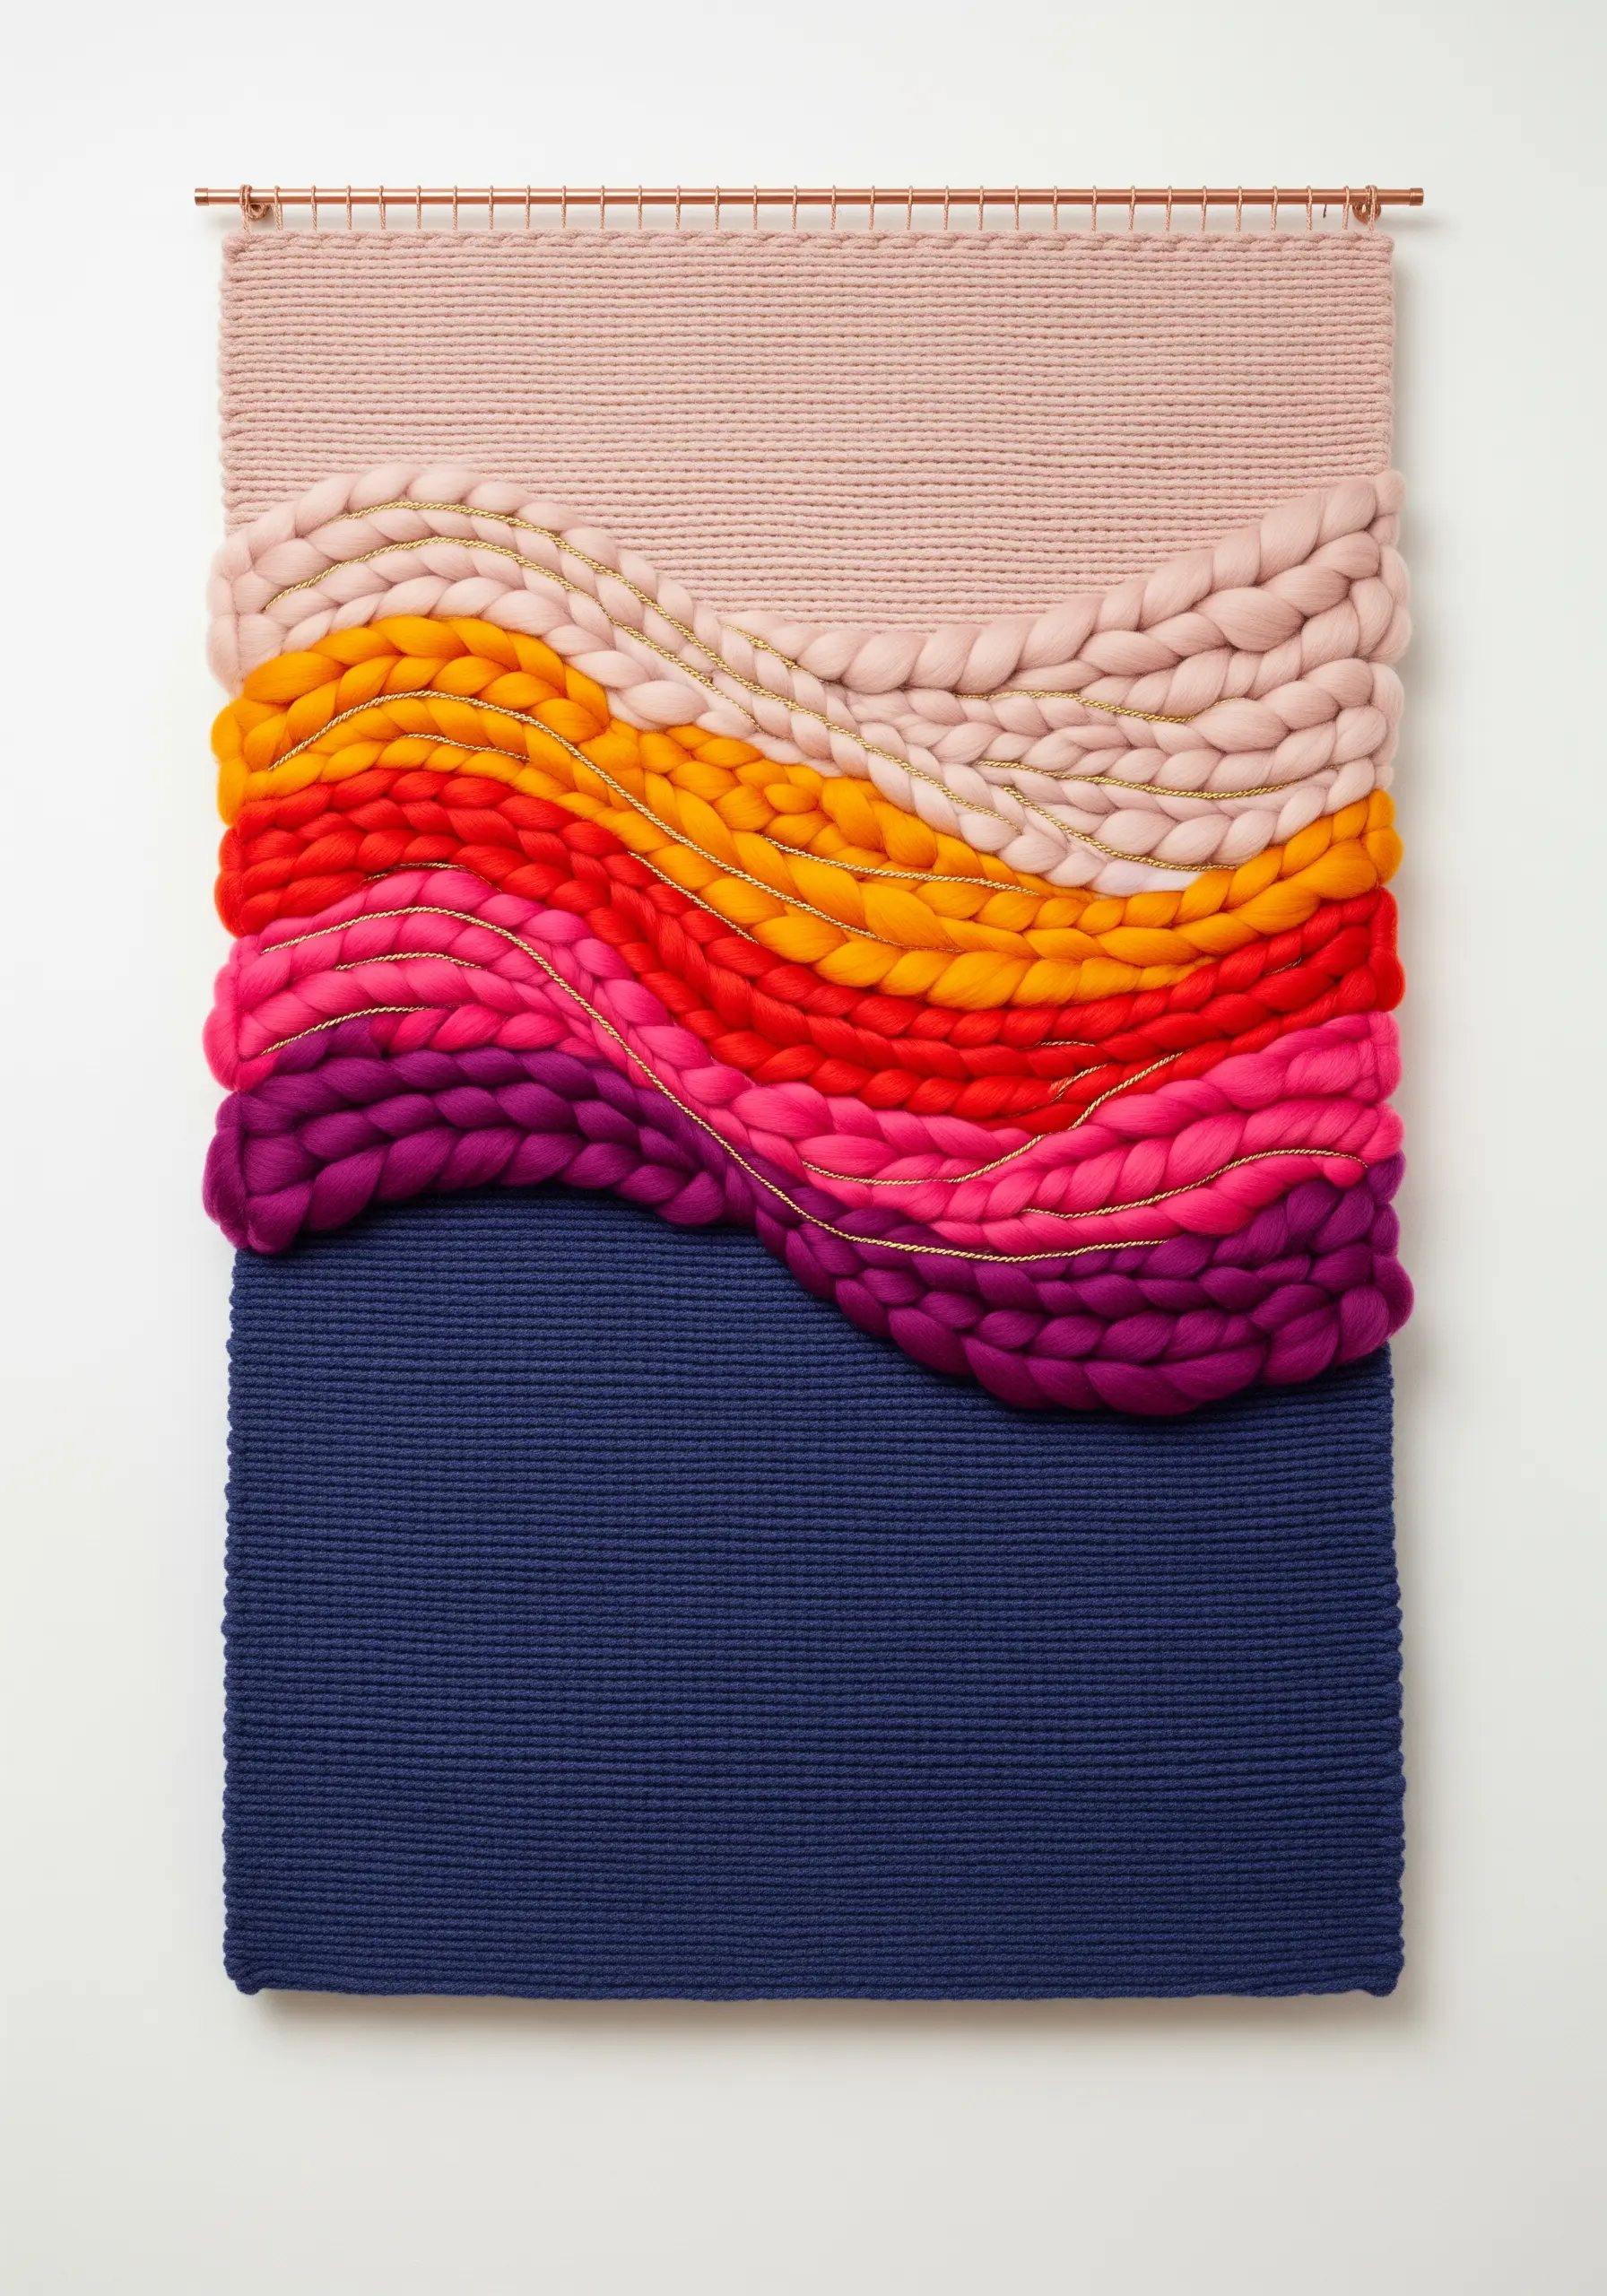
To achieve this deep textural contrast, combine flat tabby weaving for your background with thick, unspun wool roving for the foreground elements.
Instead of weaving the roving through the warp threads, use a soumak stitch or simply couch it onto the surface, allowing it to sit on top in voluminous, soft waves.
This technique preserves the roving’s loft and creates a clear separation between the smooth, tight weave and the sculptural yarn.
A fine metallic thread, stitched along the curves after weaving, adds a delicate highlight that defines the form without competing with the texture.
2. Master the Art of Concentric Coiling
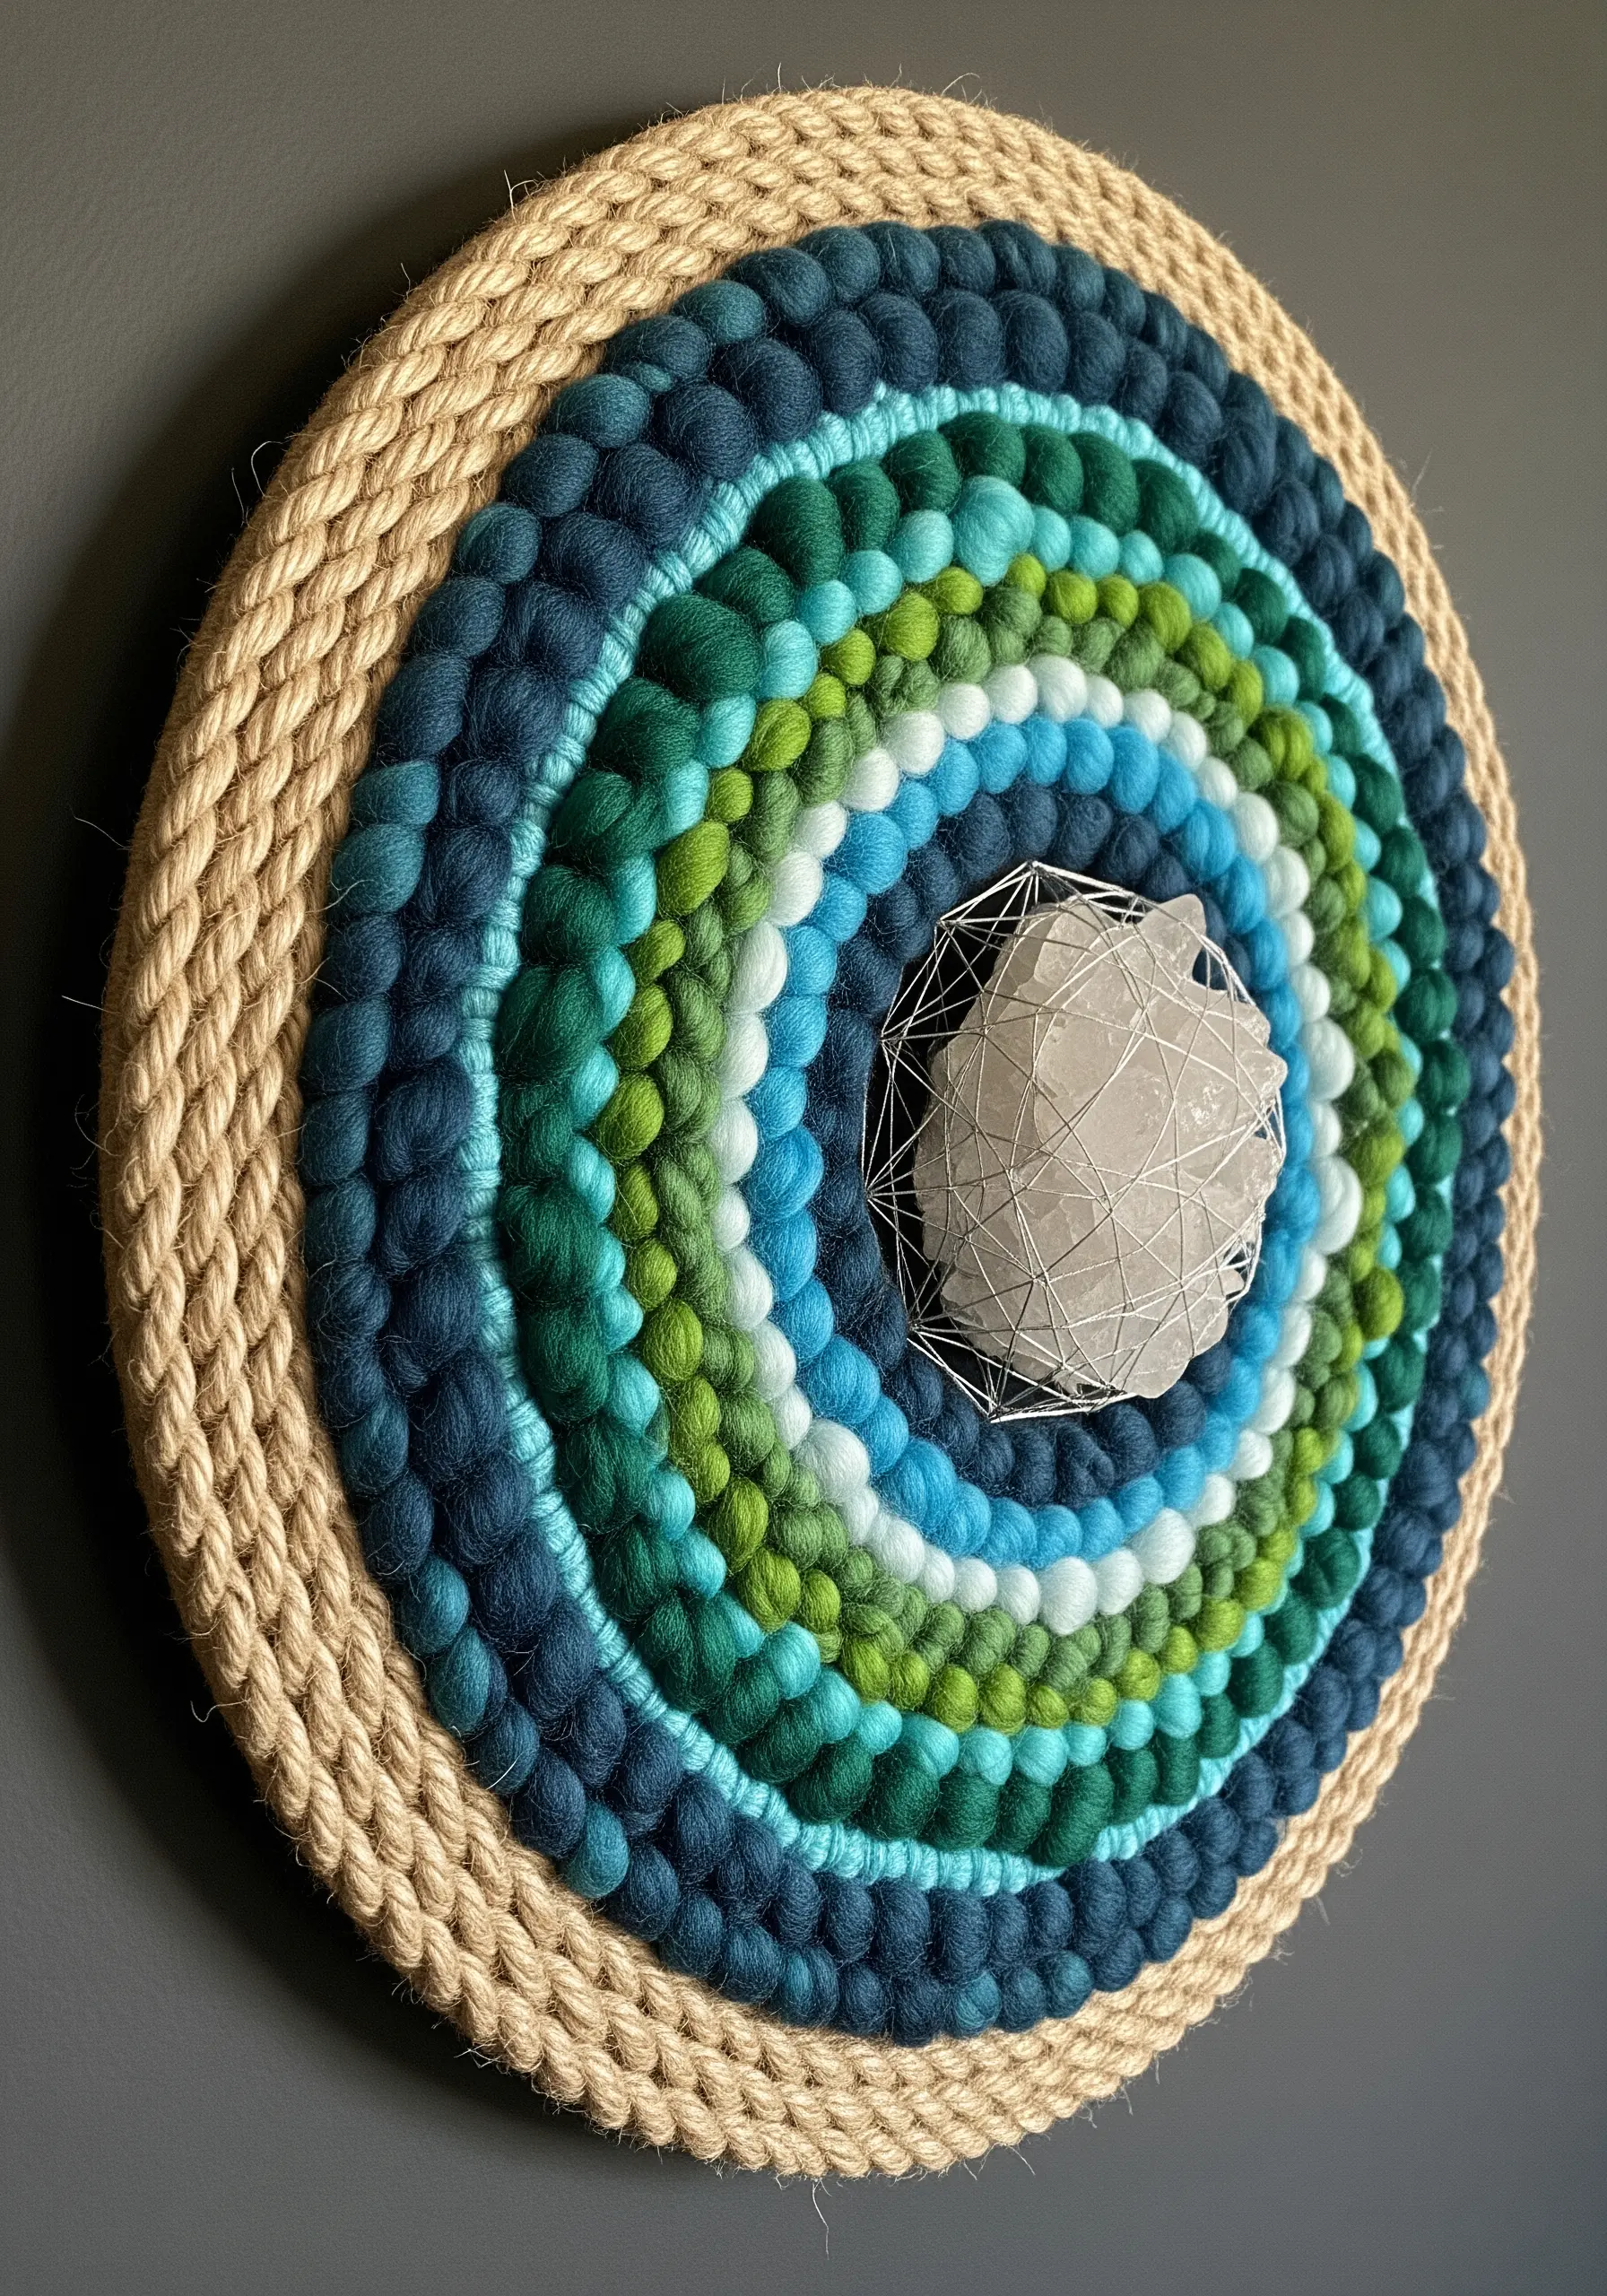
Build hypnotic, circular designs by coiling yarn around a sturdy base, like a flat wreath form or a custom-cut wooden circle.
Secure the yarn with a strong adhesive as you work, pressing each new coil tightly against the last to ensure there are no gaps.
Varying the thickness of the yarn—from chunky wool to thinner cotton cord—creates a subtle rhythm and visual interest within the concentric rings.
Frame the piece with a contrasting material like thick jute rope to add a rustic, defined edge that contains the energy of the spirals.
3. Construct Modular Macrame Panels
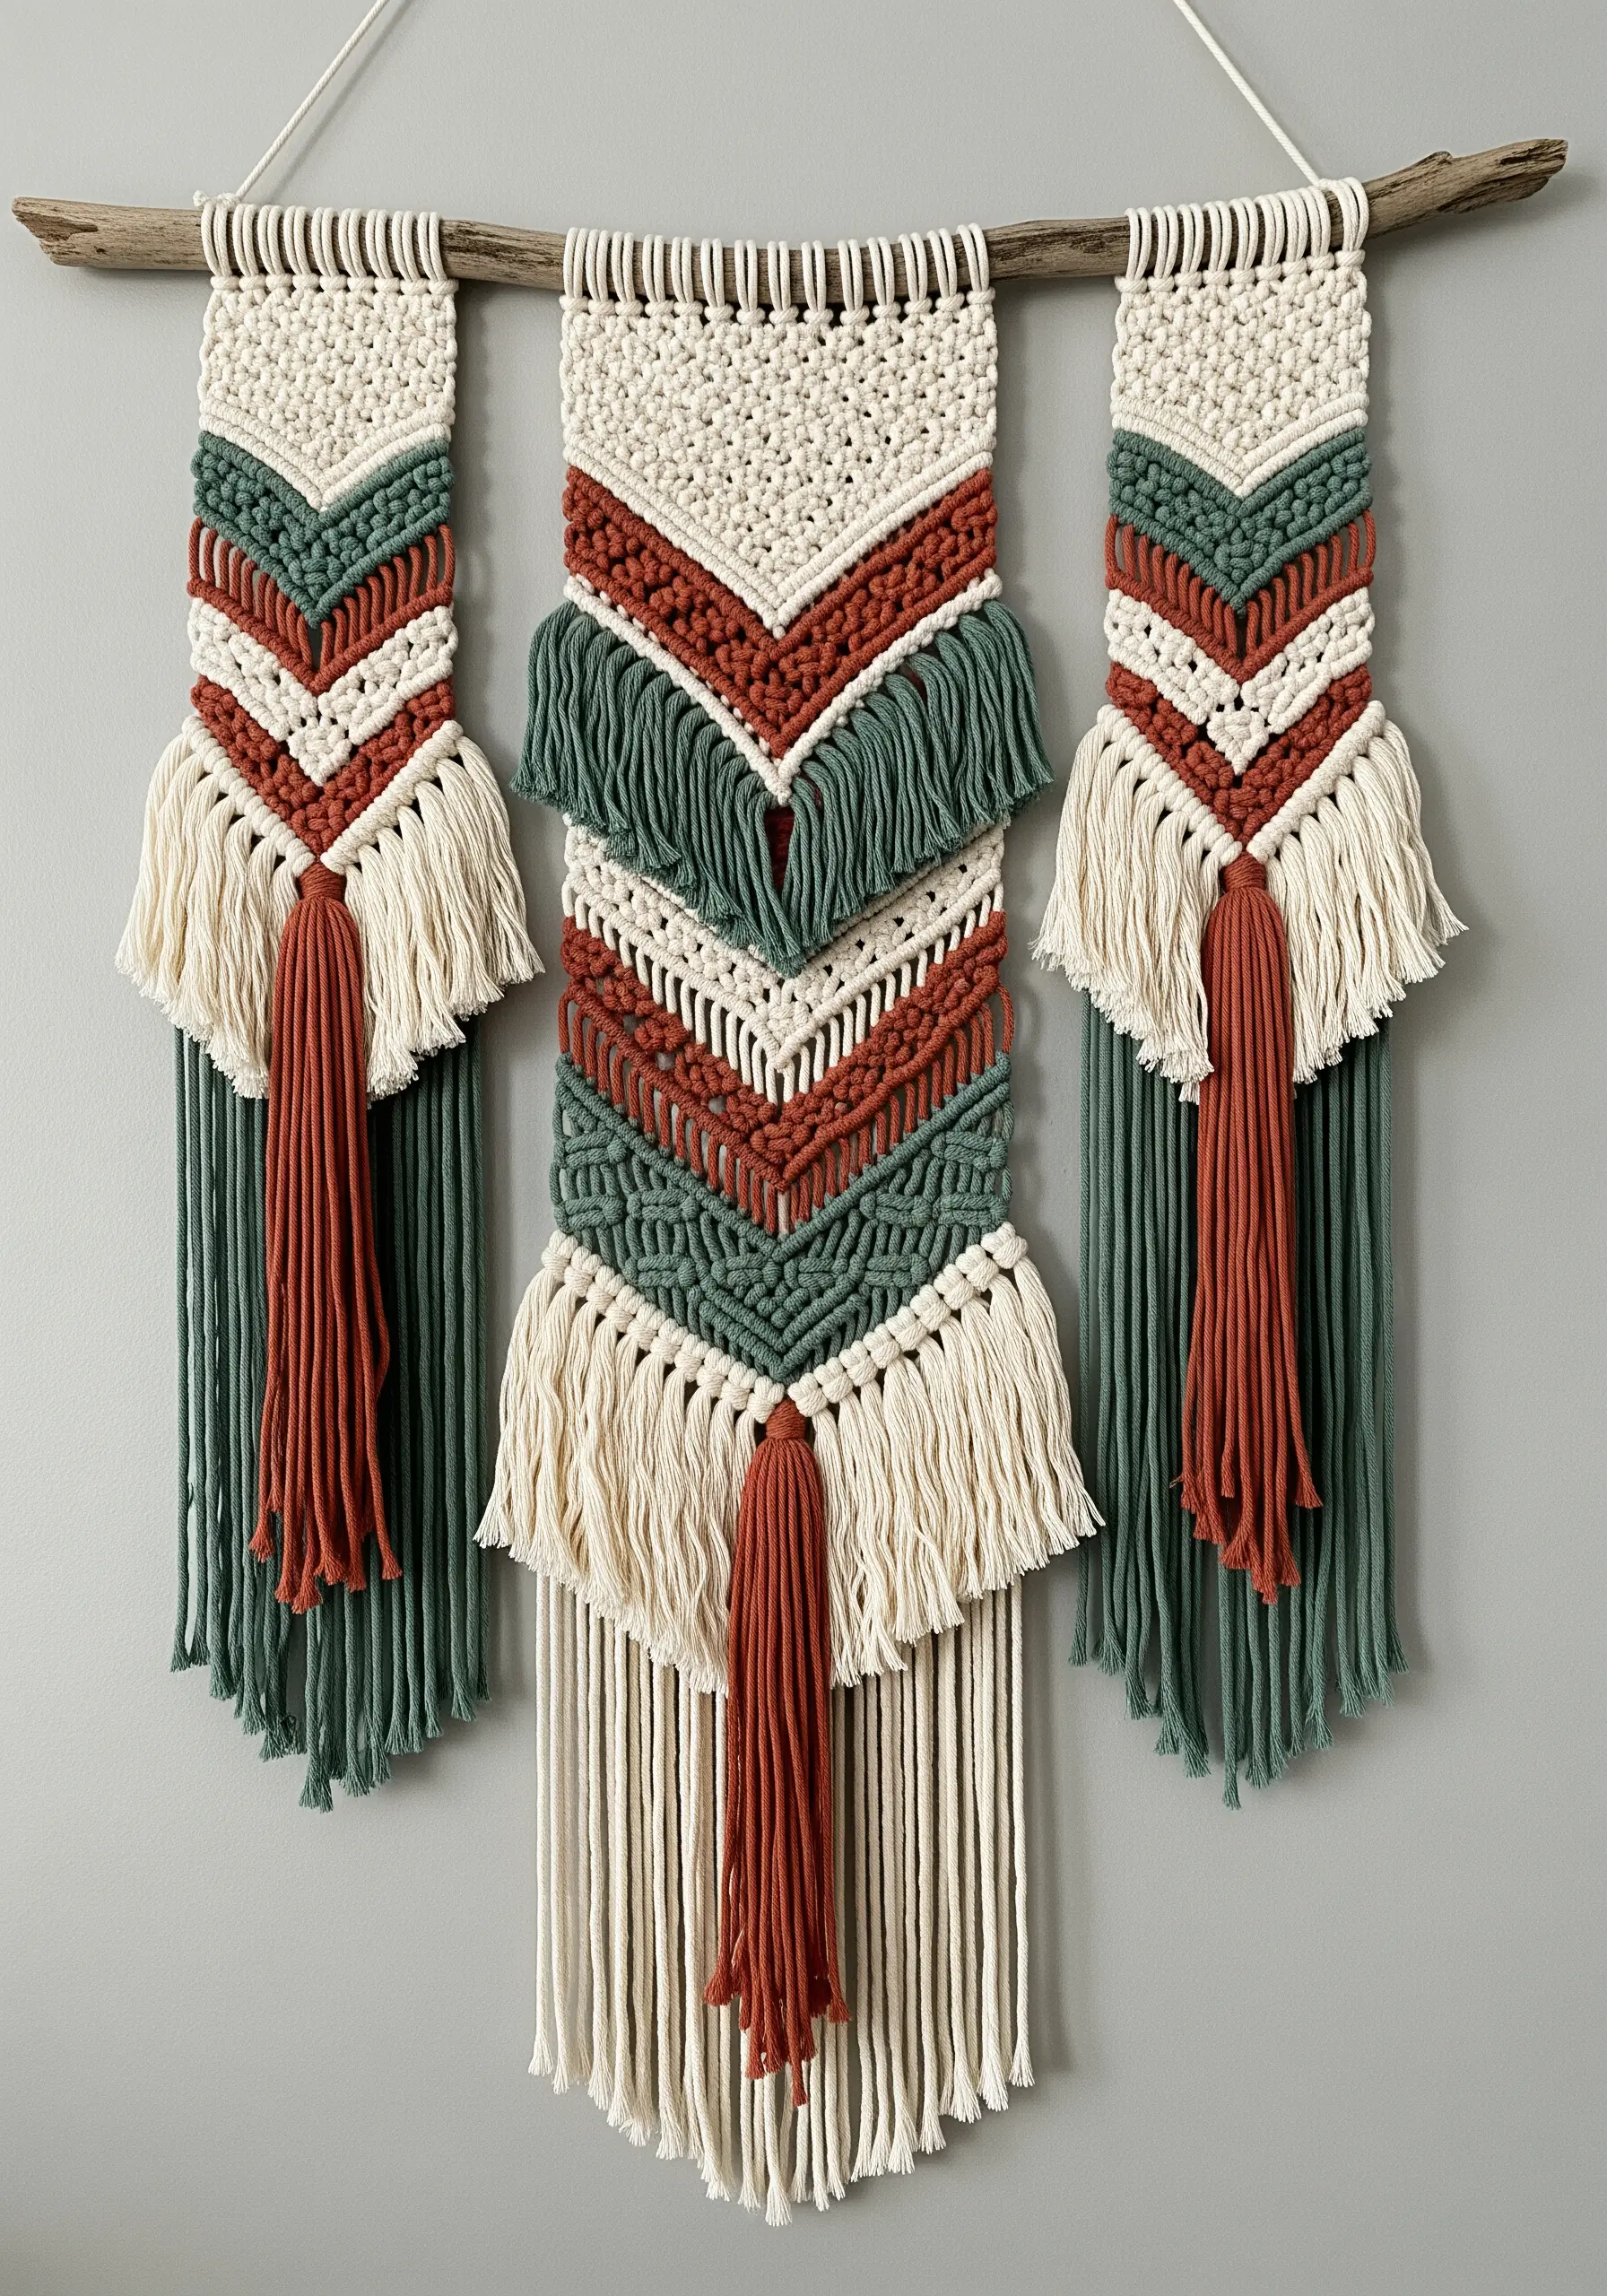
Instead of tackling one massive piece, design your wall art as a collection of smaller, coordinated panels.
This modular approach makes the knotting process more manageable and creates a strong, geometric rhythm when the panels are hung together.
Focus on layering different knots to build texture; use rows of square knots for a flat base and add raised diagonal half-hitch knots for chevron patterns that pop.
Unbrushed fringe adds a clean, linear finish that balances the intricate knot work above it.
4. Sculpt with Felting over Wire Armatures

Move your fiber art into three dimensions by building forms around a simple wire armature.
Create a basic cage or skeleton from a pliable but sturdy wire, shaping it into your desired organic form.
Using a felting needle, systematically build up layers of wool roving around and through the wire structure, compacting the wool until it forms a solid, sculptural pod.
This technique allows you to create hollow, lightweight objects with complex curves that would be impossible with stitching alone.
5. Layer Asymmetrical Knit Panels

Create a modern, architectural piece by layering multiple, smaller knitted panels instead of creating one large tapestry.
Assign a different stitch to each colored panel to give it a unique surface quality—a dense seed stitch, a simple garter stitch, or a smooth stockinette.
Mount each knitted piece onto a thin, rigid backing like foam board before arranging them.
This ensures clean edges and allows you to create a dynamic, overlapping composition that plays with depth and shadow.
6. Create Landscapes with Mixed Fiber Techniques
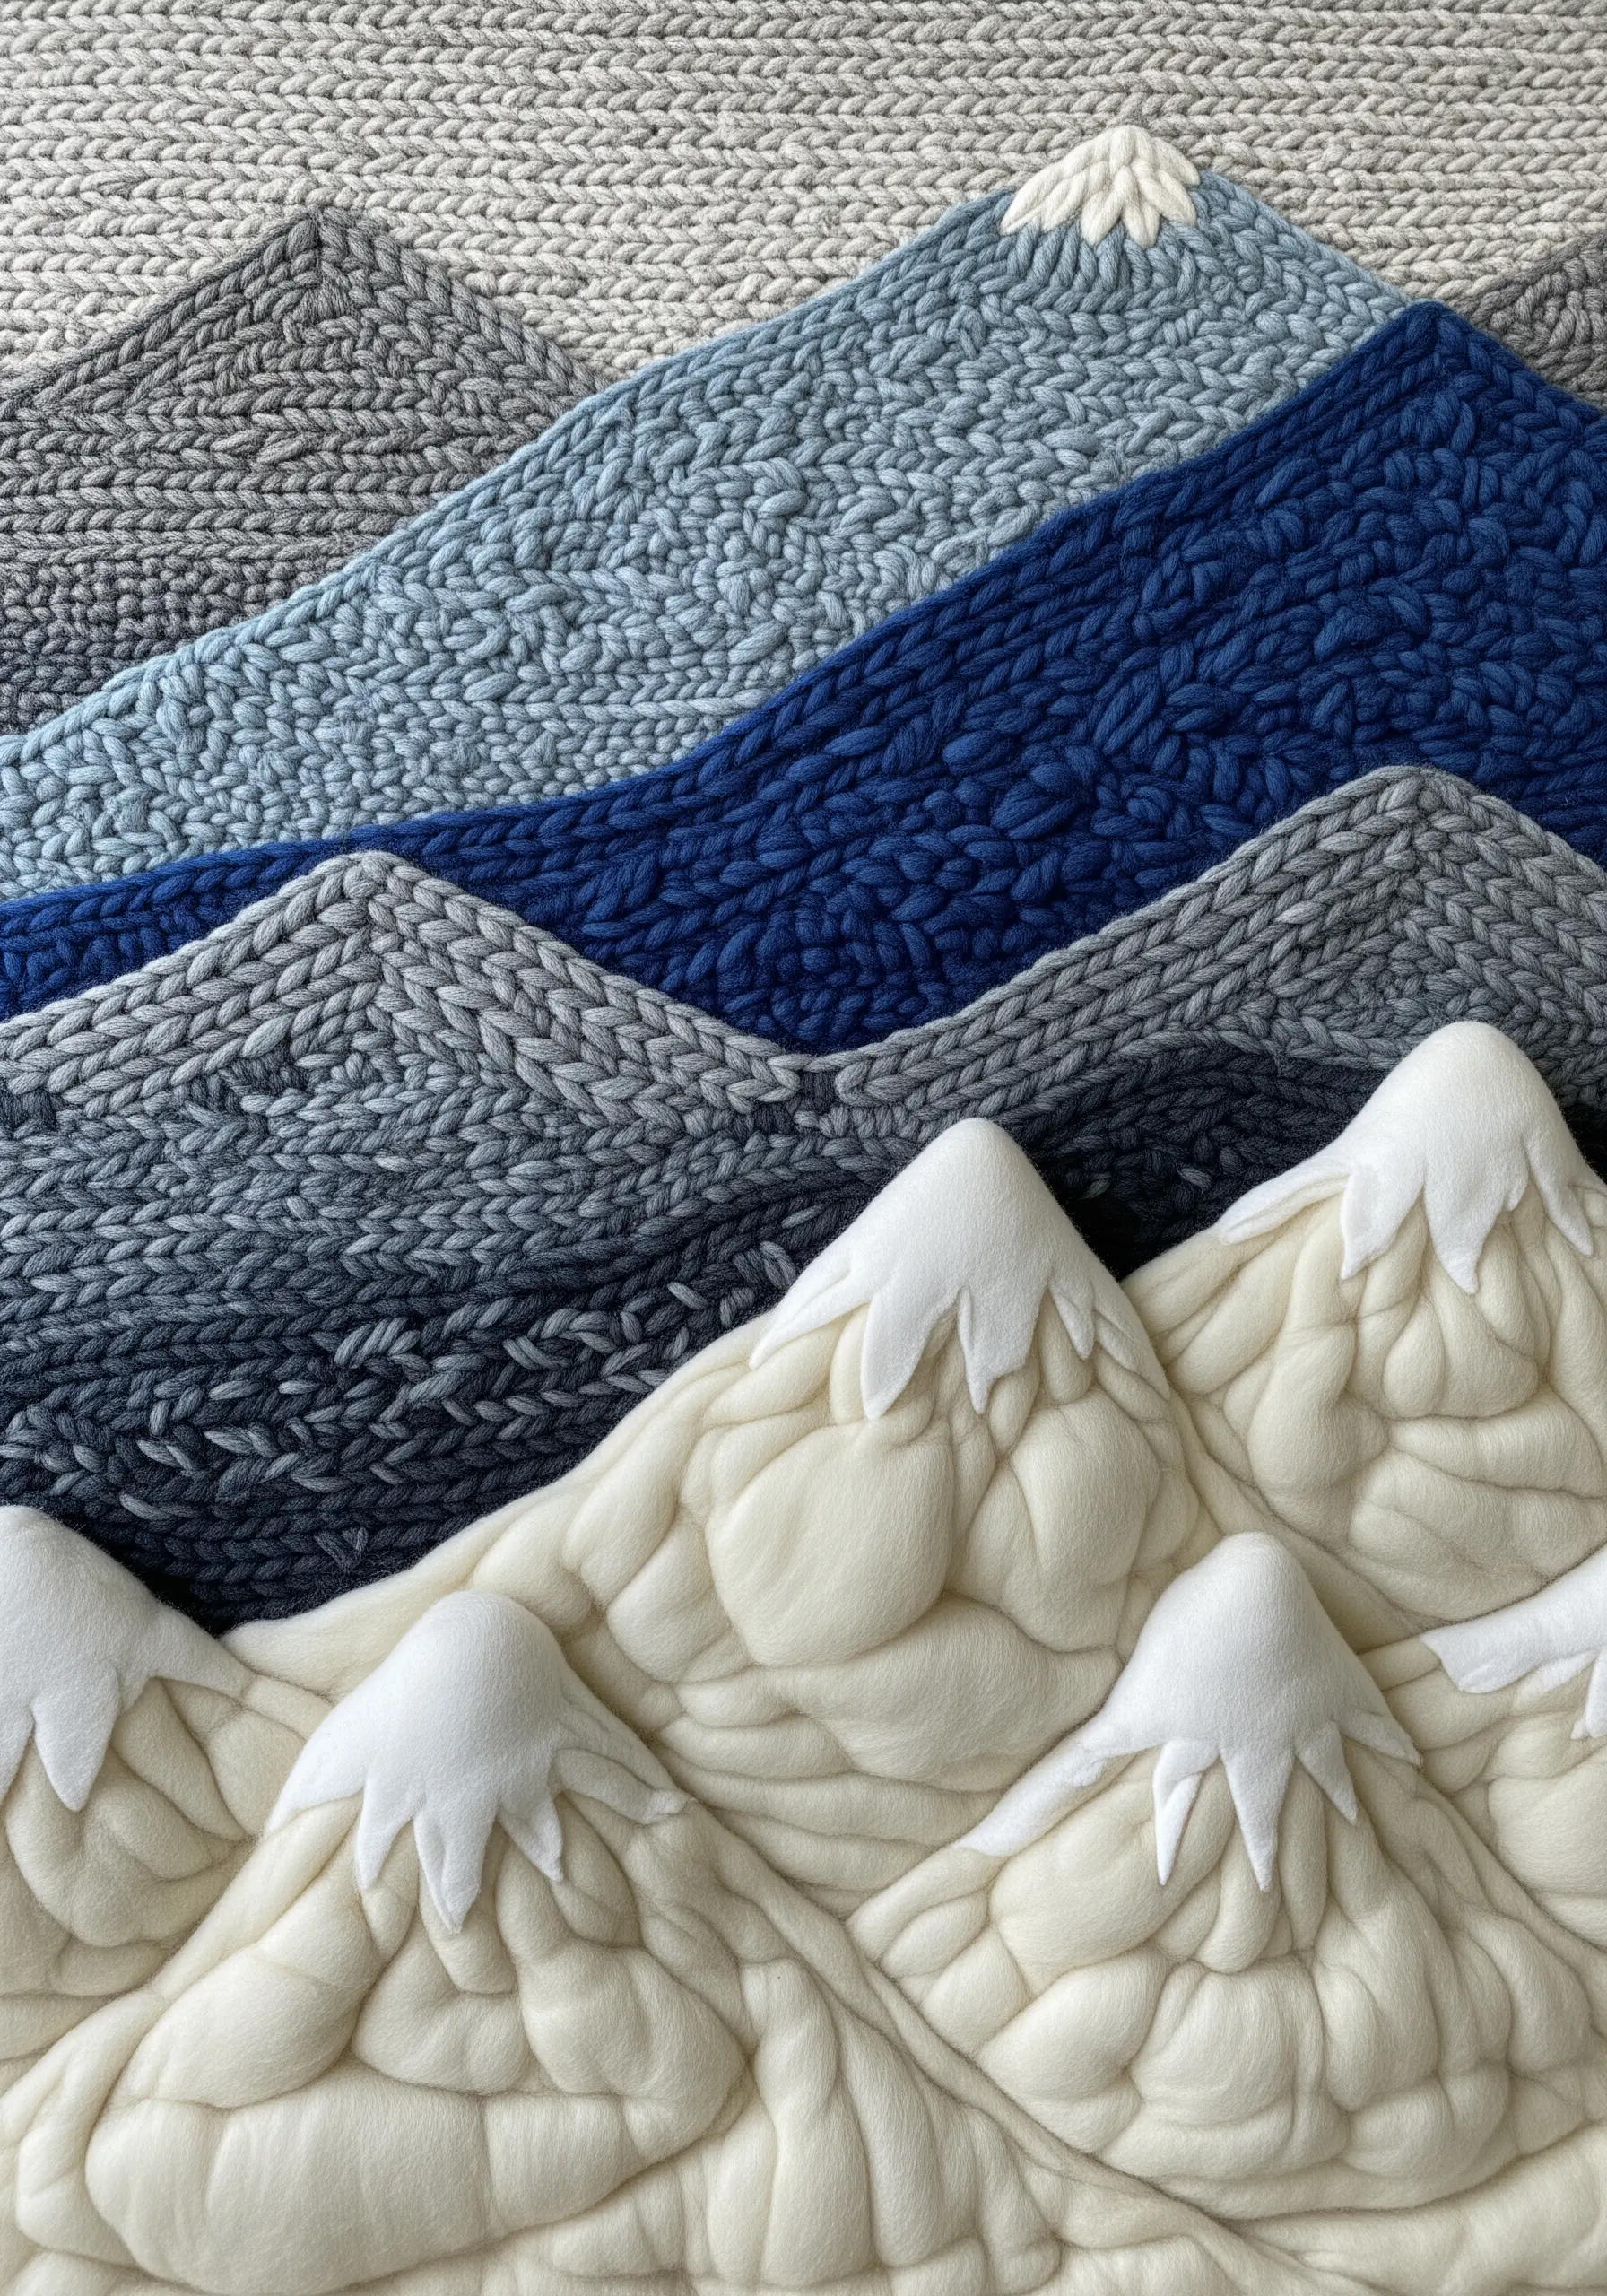
To build a sense of atmospheric perspective in a landscape, you must combine different textile techniques that suggest distance and proximity.
Use flat, textured knitting—like basketweave or moss stitch—in muted tones for the distant mountains to make them recede.
For the foreground, create soft, sculptural forms with needle felting over padded shapes, which brings them forward and gives them a tangible, almost cloud-like volume.
This deliberate contrast between flat and voluminous textures is what creates the illusion of a deep, layered vista.
7. Design a Multi-Texture Rainbow Arch

Elevate the classic yarn rainbow by giving each color arc its own distinct texture, turning a simple shape into a tactile journey.
Form the arcs with a stiff rope base, then experiment with different surface treatments for each one.
Create dense pom-poms for a plush, fluffy band, make a long four-strand braid for a chunky, woven feel, or wrap two colors together for a candy-stripe effect.
This approach to playful yarn wall art crafts makes the final piece far more engaging and visually complex.
8. Compose a Monochrome Texture Study

When you limit your palette to a single color, texture becomes the star of the show.
Use a stretched canvas as a neutral foundation for a composition of different fiber techniques.
Create individual textural elements—a tightly coiled rope medallion, a small patch of chunky garter stitch, a neatly wrapped tassel—and arrange them in a balanced, asymmetrical layout.
This focused approach highlights the subtle interplay of light and shadow across different surfaces, creating a sophisticated and minimalist embroidery decor piece.
9. Stitch Dimensional Waves with Varied Yarns
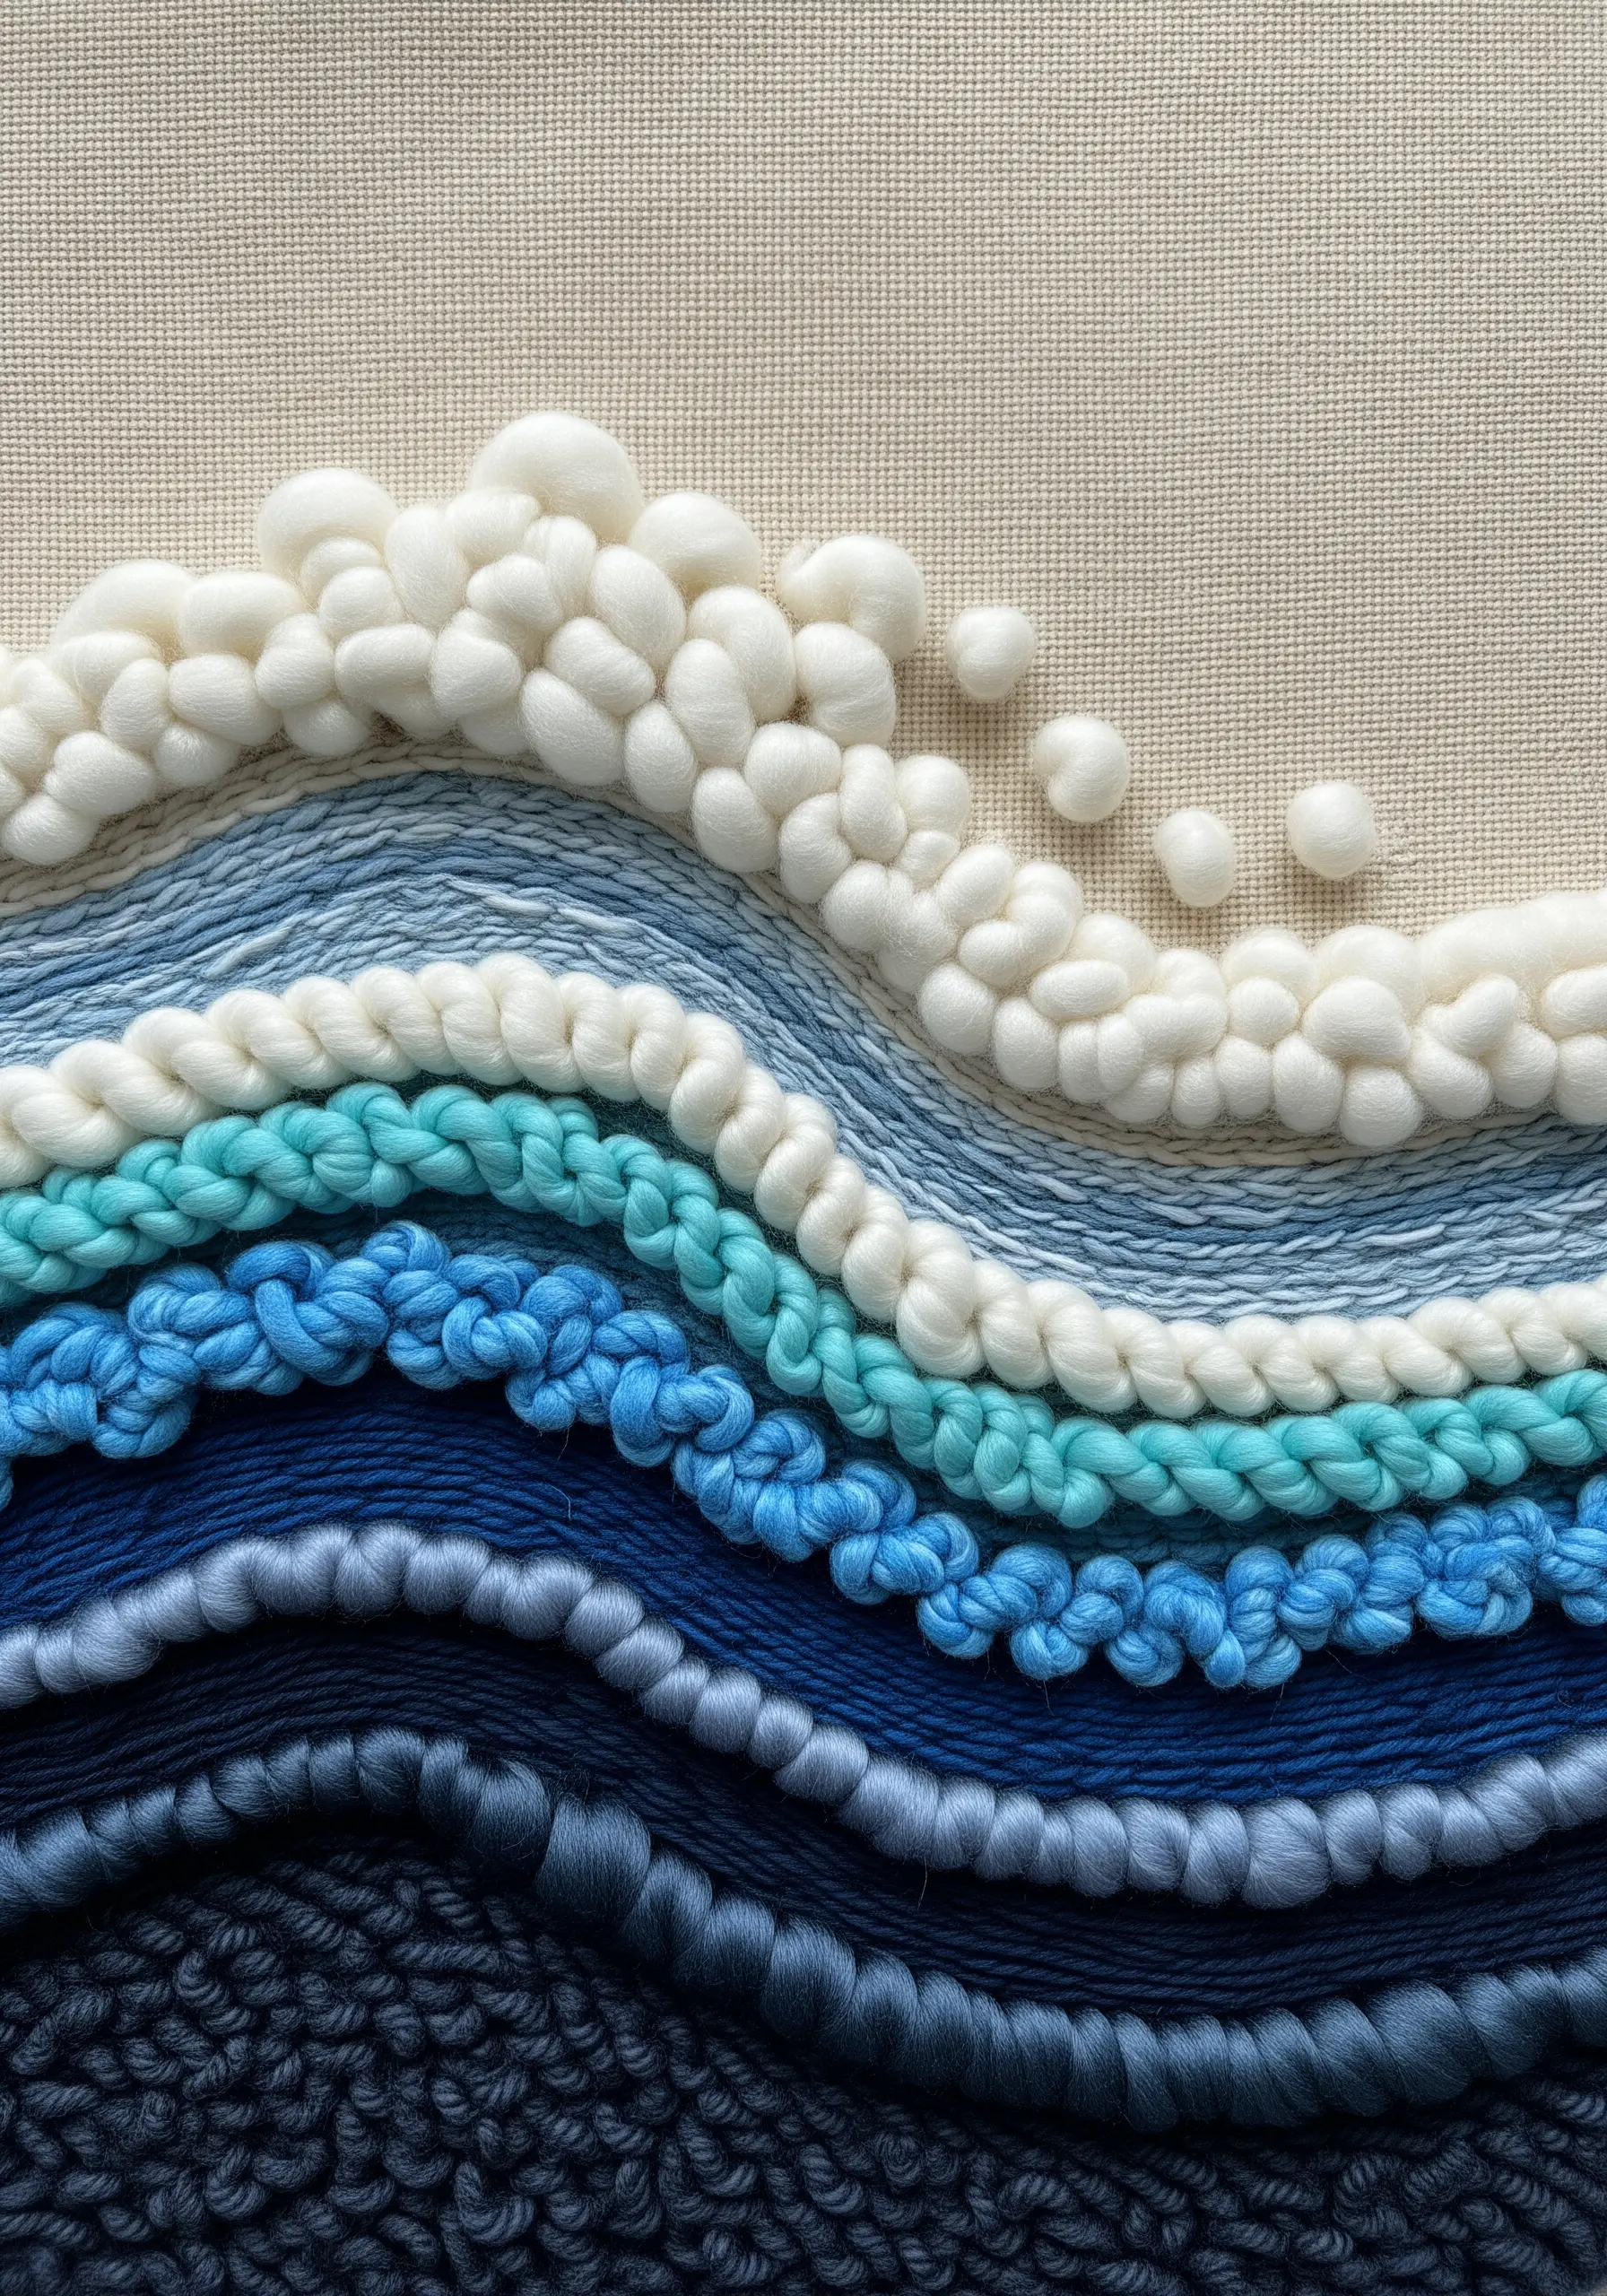
To capture the dynamic movement of water, your choice of yarn and stitch is everything.
Use chunky, un-plied wool roving to create the seafoam, couching it down in loose, irregular loops to mimic the aeration of breaking waves.
For the deeper, smoother sections of water, switch to a thinner, tightly plied yarn and work in dense rows of chain stitch or French knots.
This intentional gradient in both color and texture is what creates a convincing illusion of depth and motion.
10. Layer Felt Appliqué for Graphic Dimension
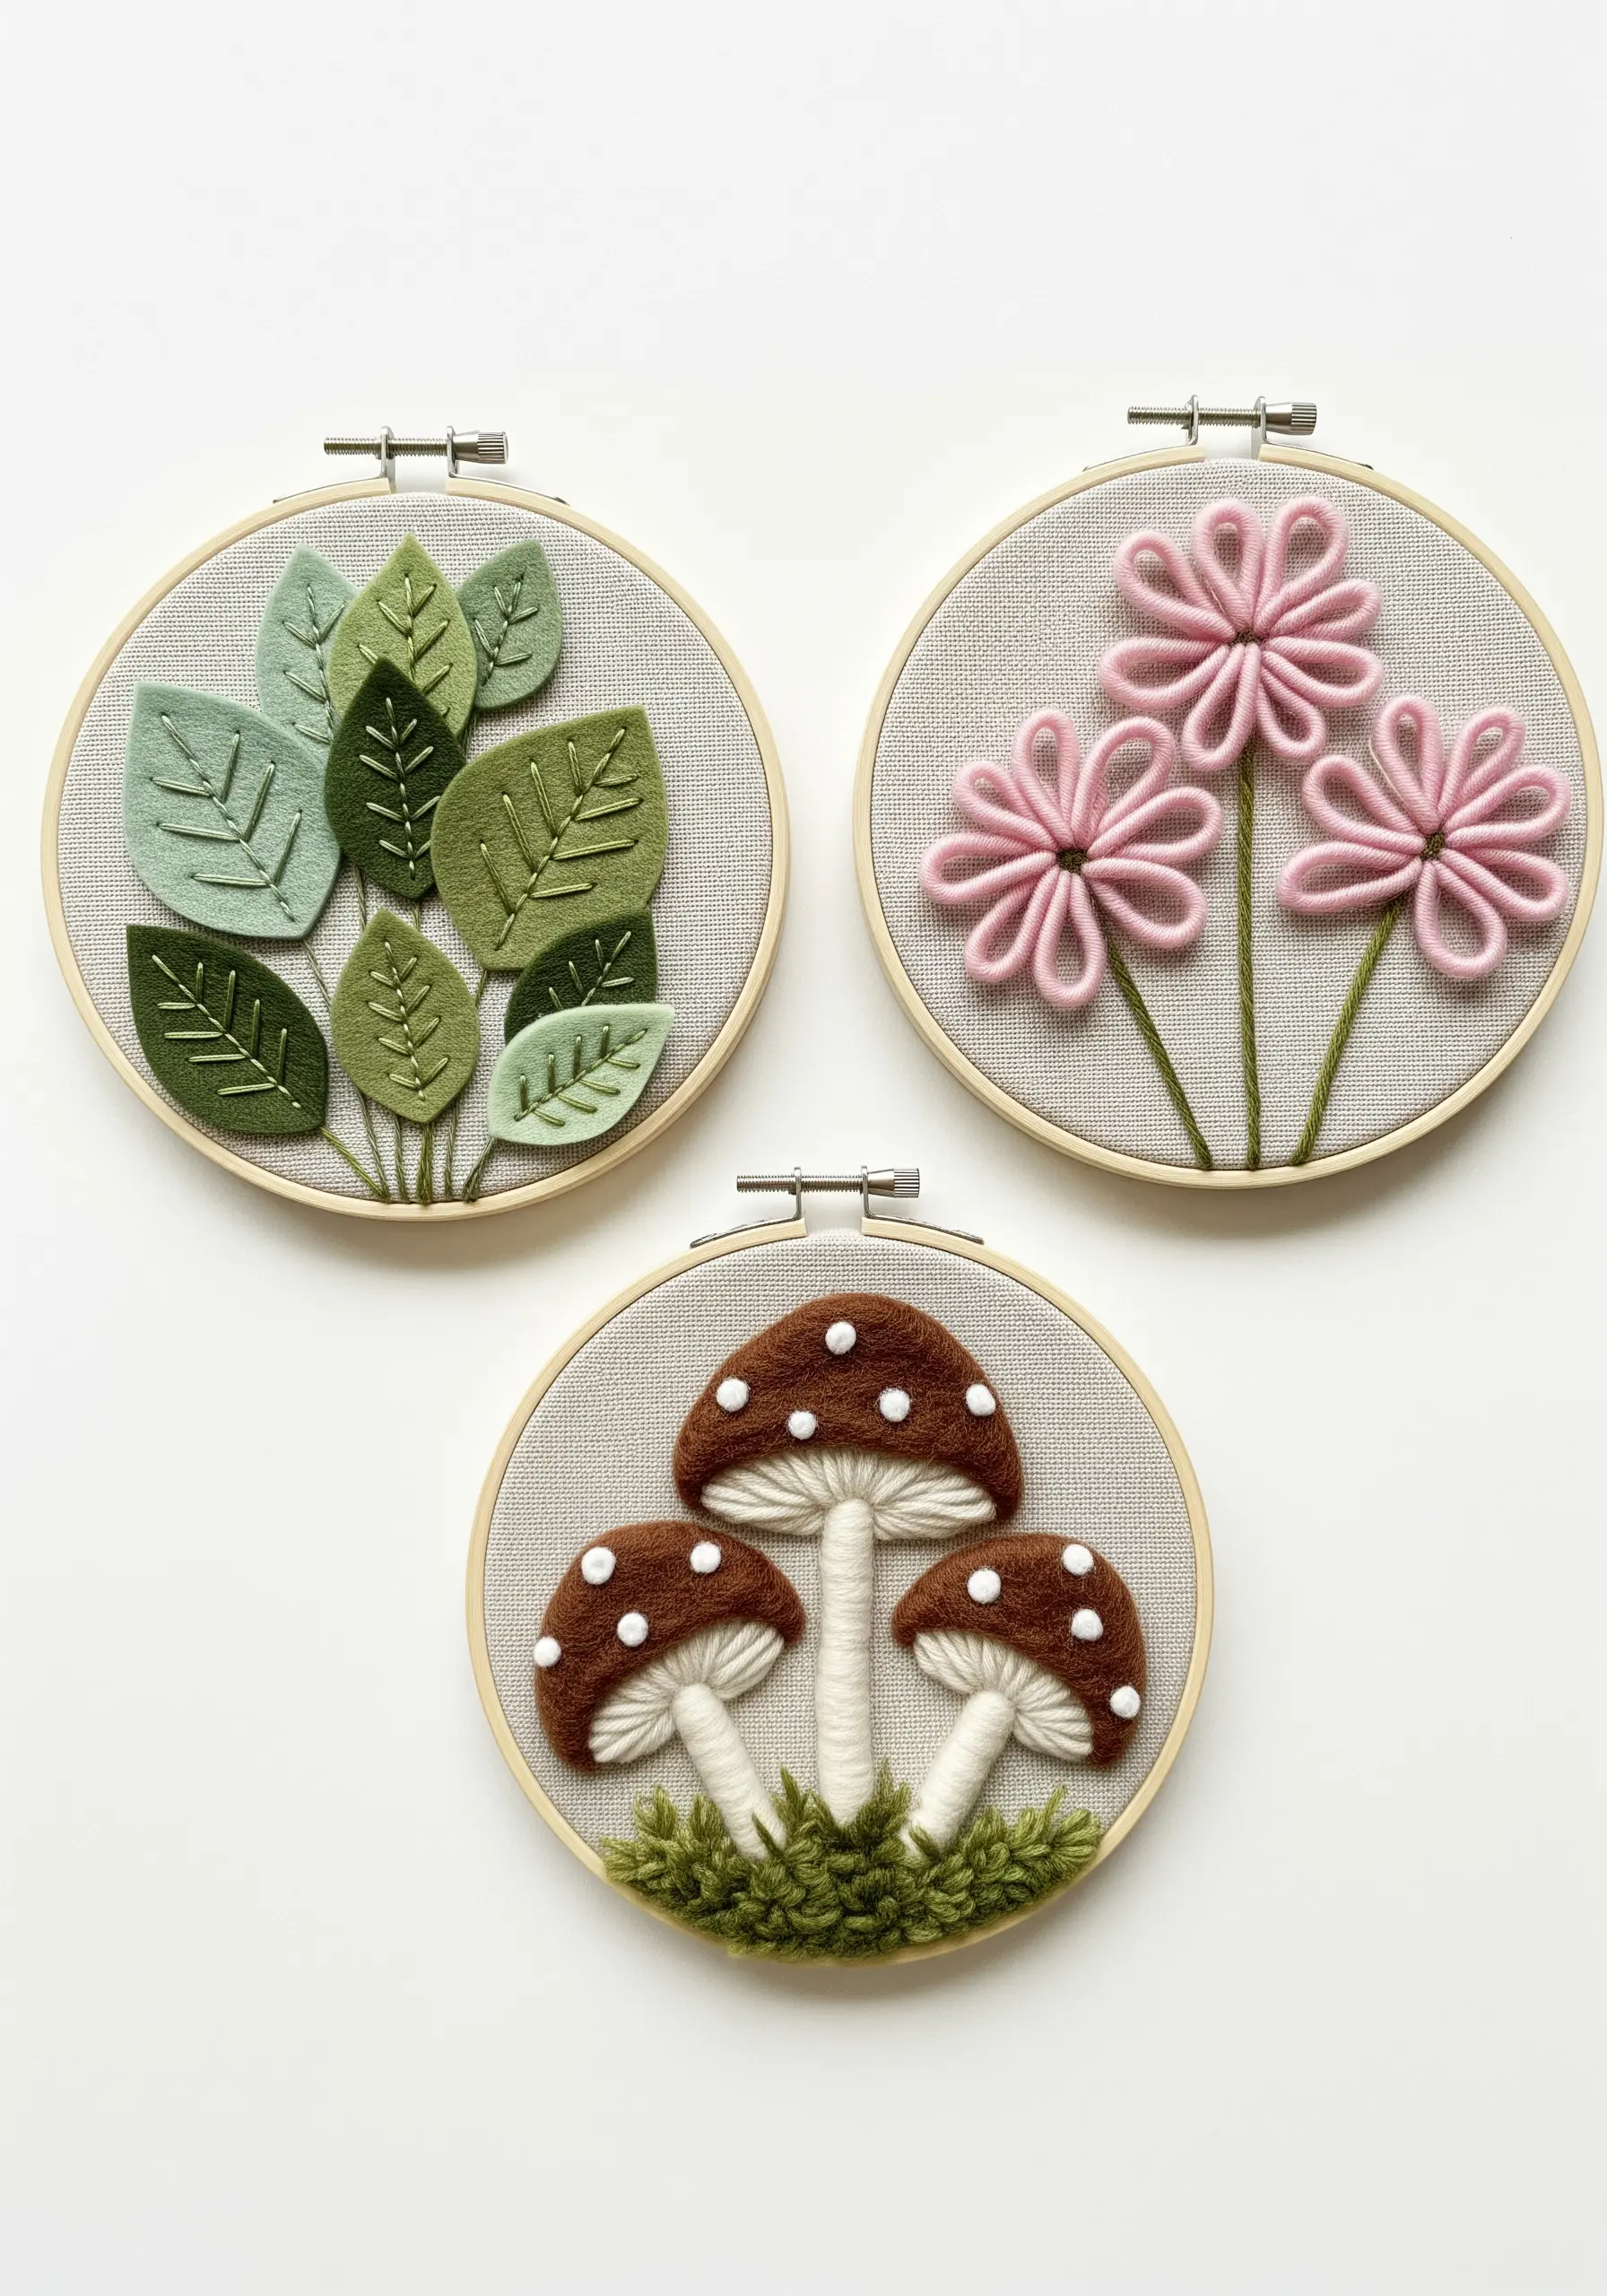
For clean, bold shapes with a soft dimensionality, use felt appliqué as your foundation.
Cut your primary shapes from wool-blend felt and tack them onto your background fabric with a few small, hidden stitches.
This technique provides perfect color blocking and a raised surface without the time and thread required for satin stitch.
Then, add finer details like leaf veins or flower stamens with simple embroidery stitches directly on top of the felt, creating a beautiful layered effect.
11. Contrast Density in Geometric Compositions
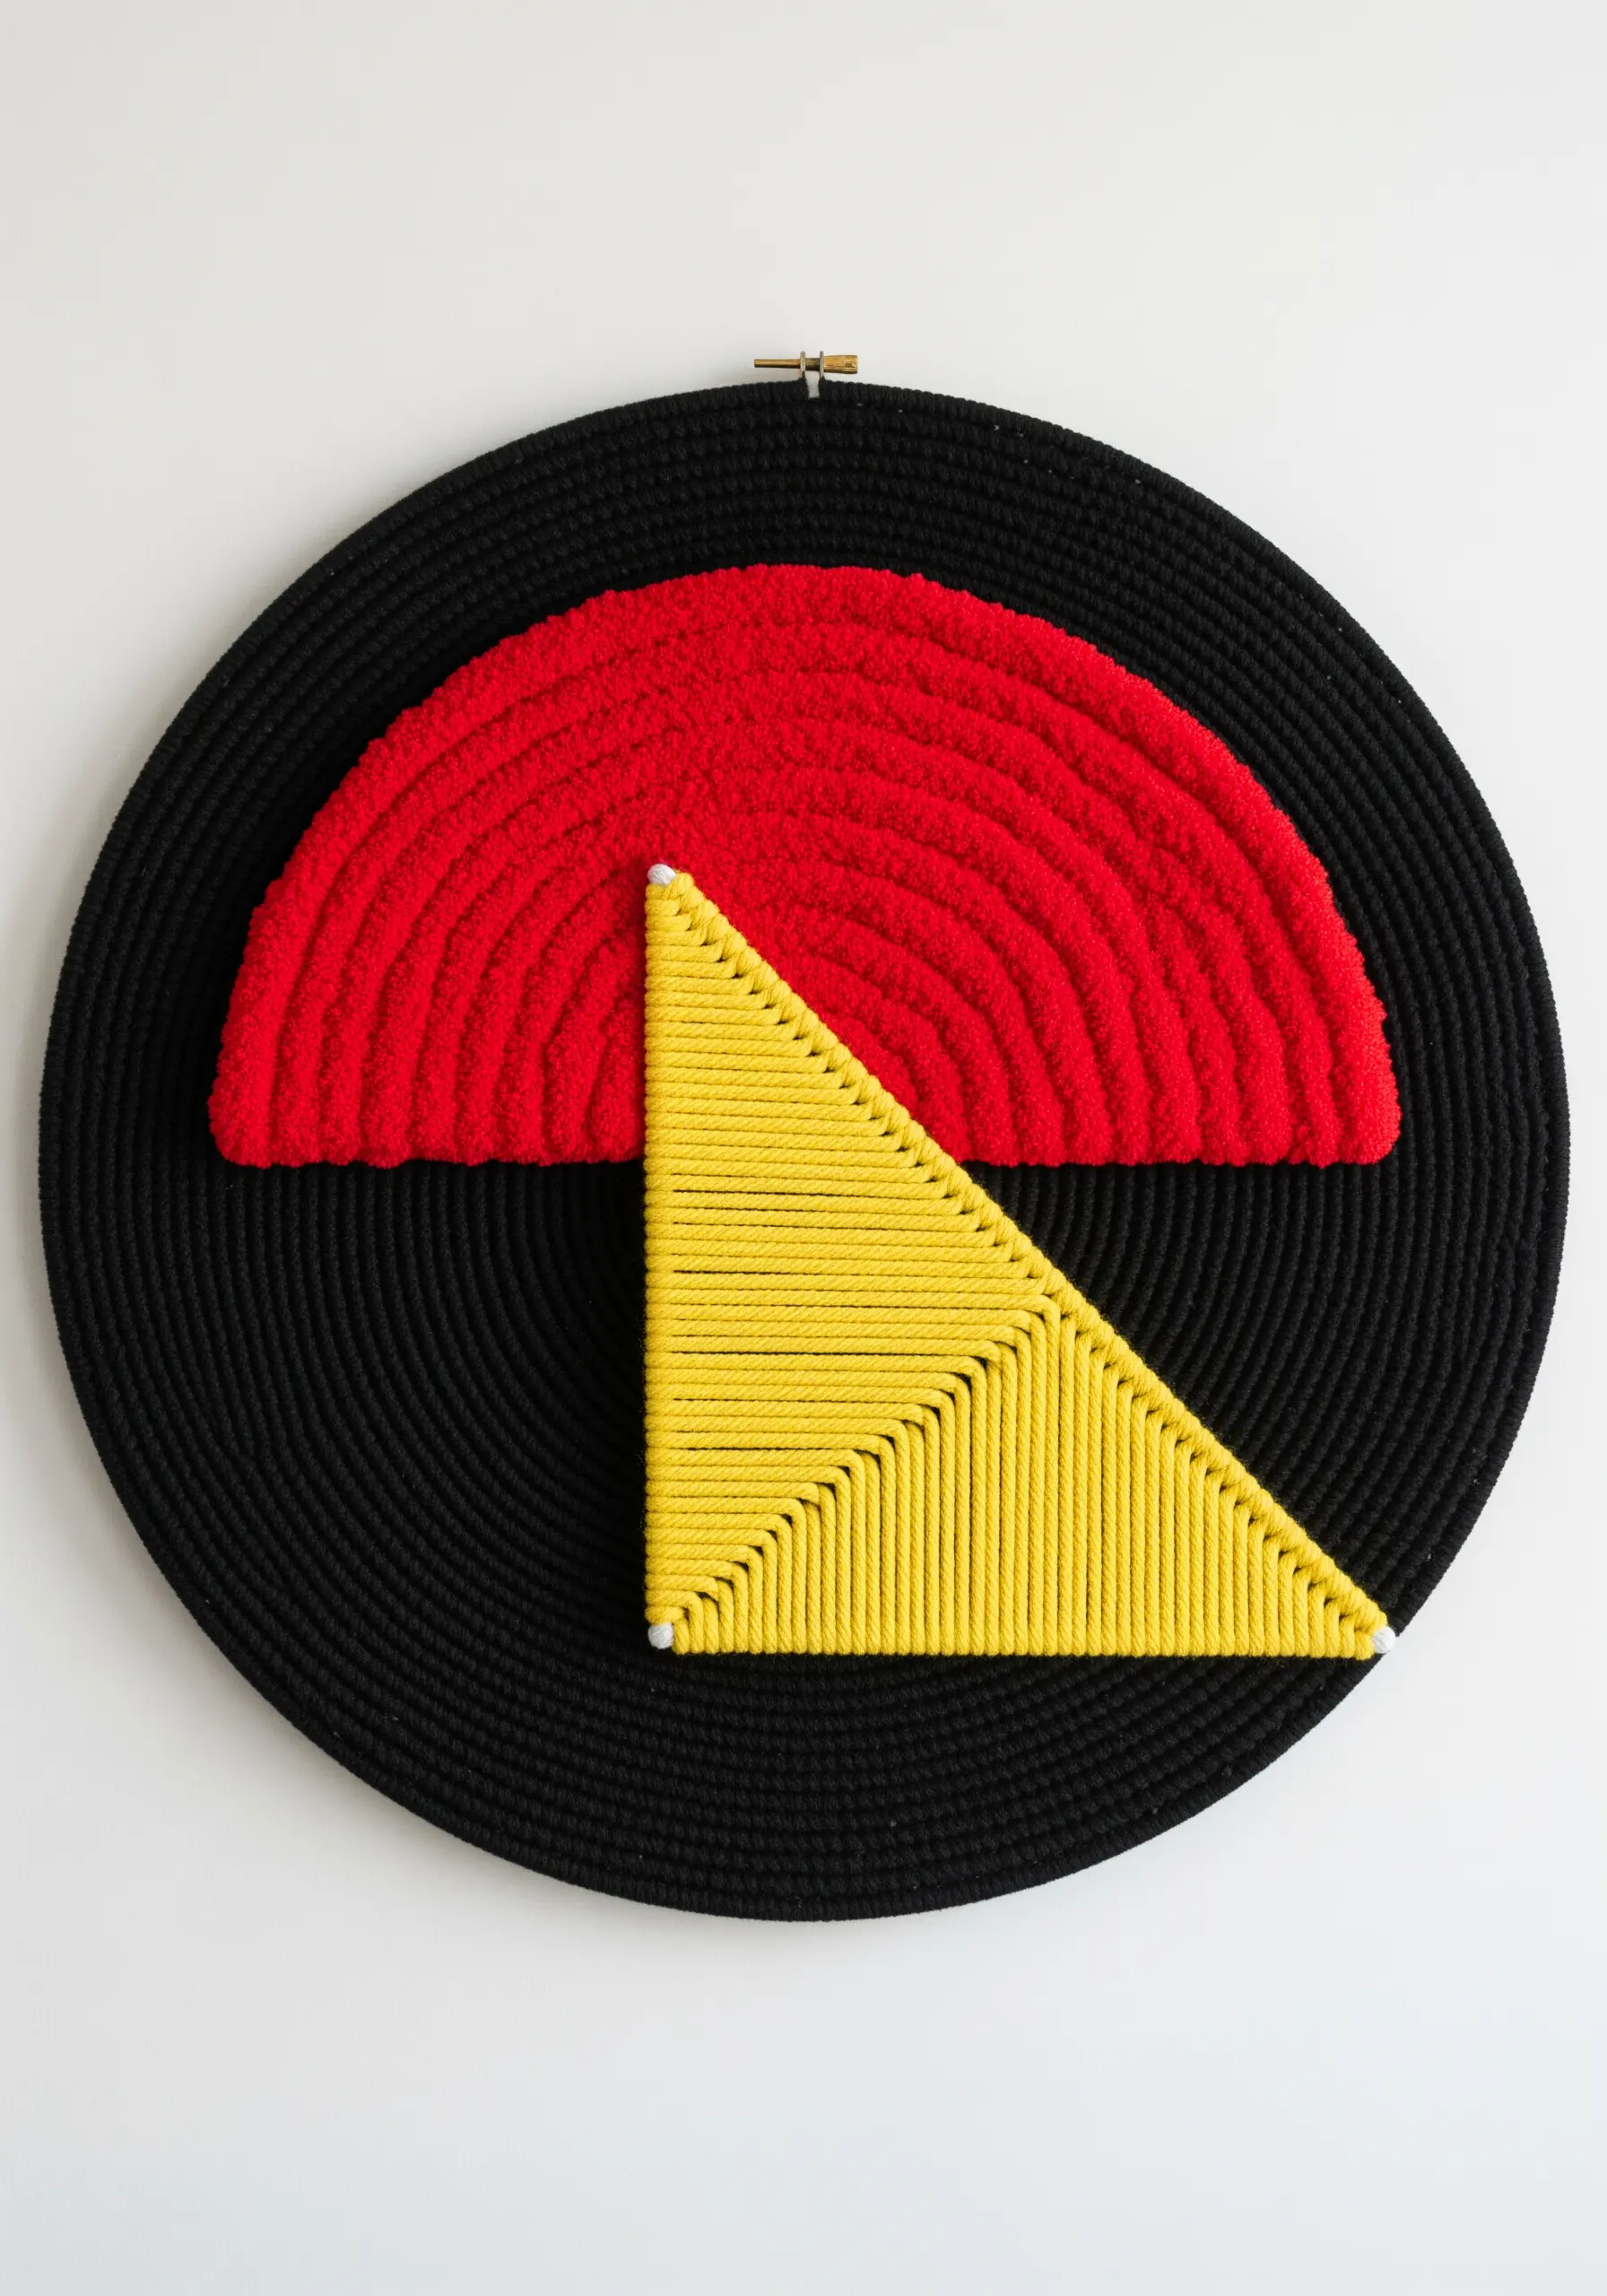
Create powerful visual tension by pairing radically different textures within a minimalist, geometric design.
Fill one shape with a dense, plush pile using a punch needle or by filling the area with turkey work knots and trimming them short.
For the contrasting shape, create a flat, graphic fill by wrapping yarn tightly and precisely around a wire frame or between two points.
The extreme difference between the soft, light-absorbing pile and the hard, linear sheen of the wrapped yarn makes both textures more impactful.
12. Sculpt with Layers of Textured Fringe
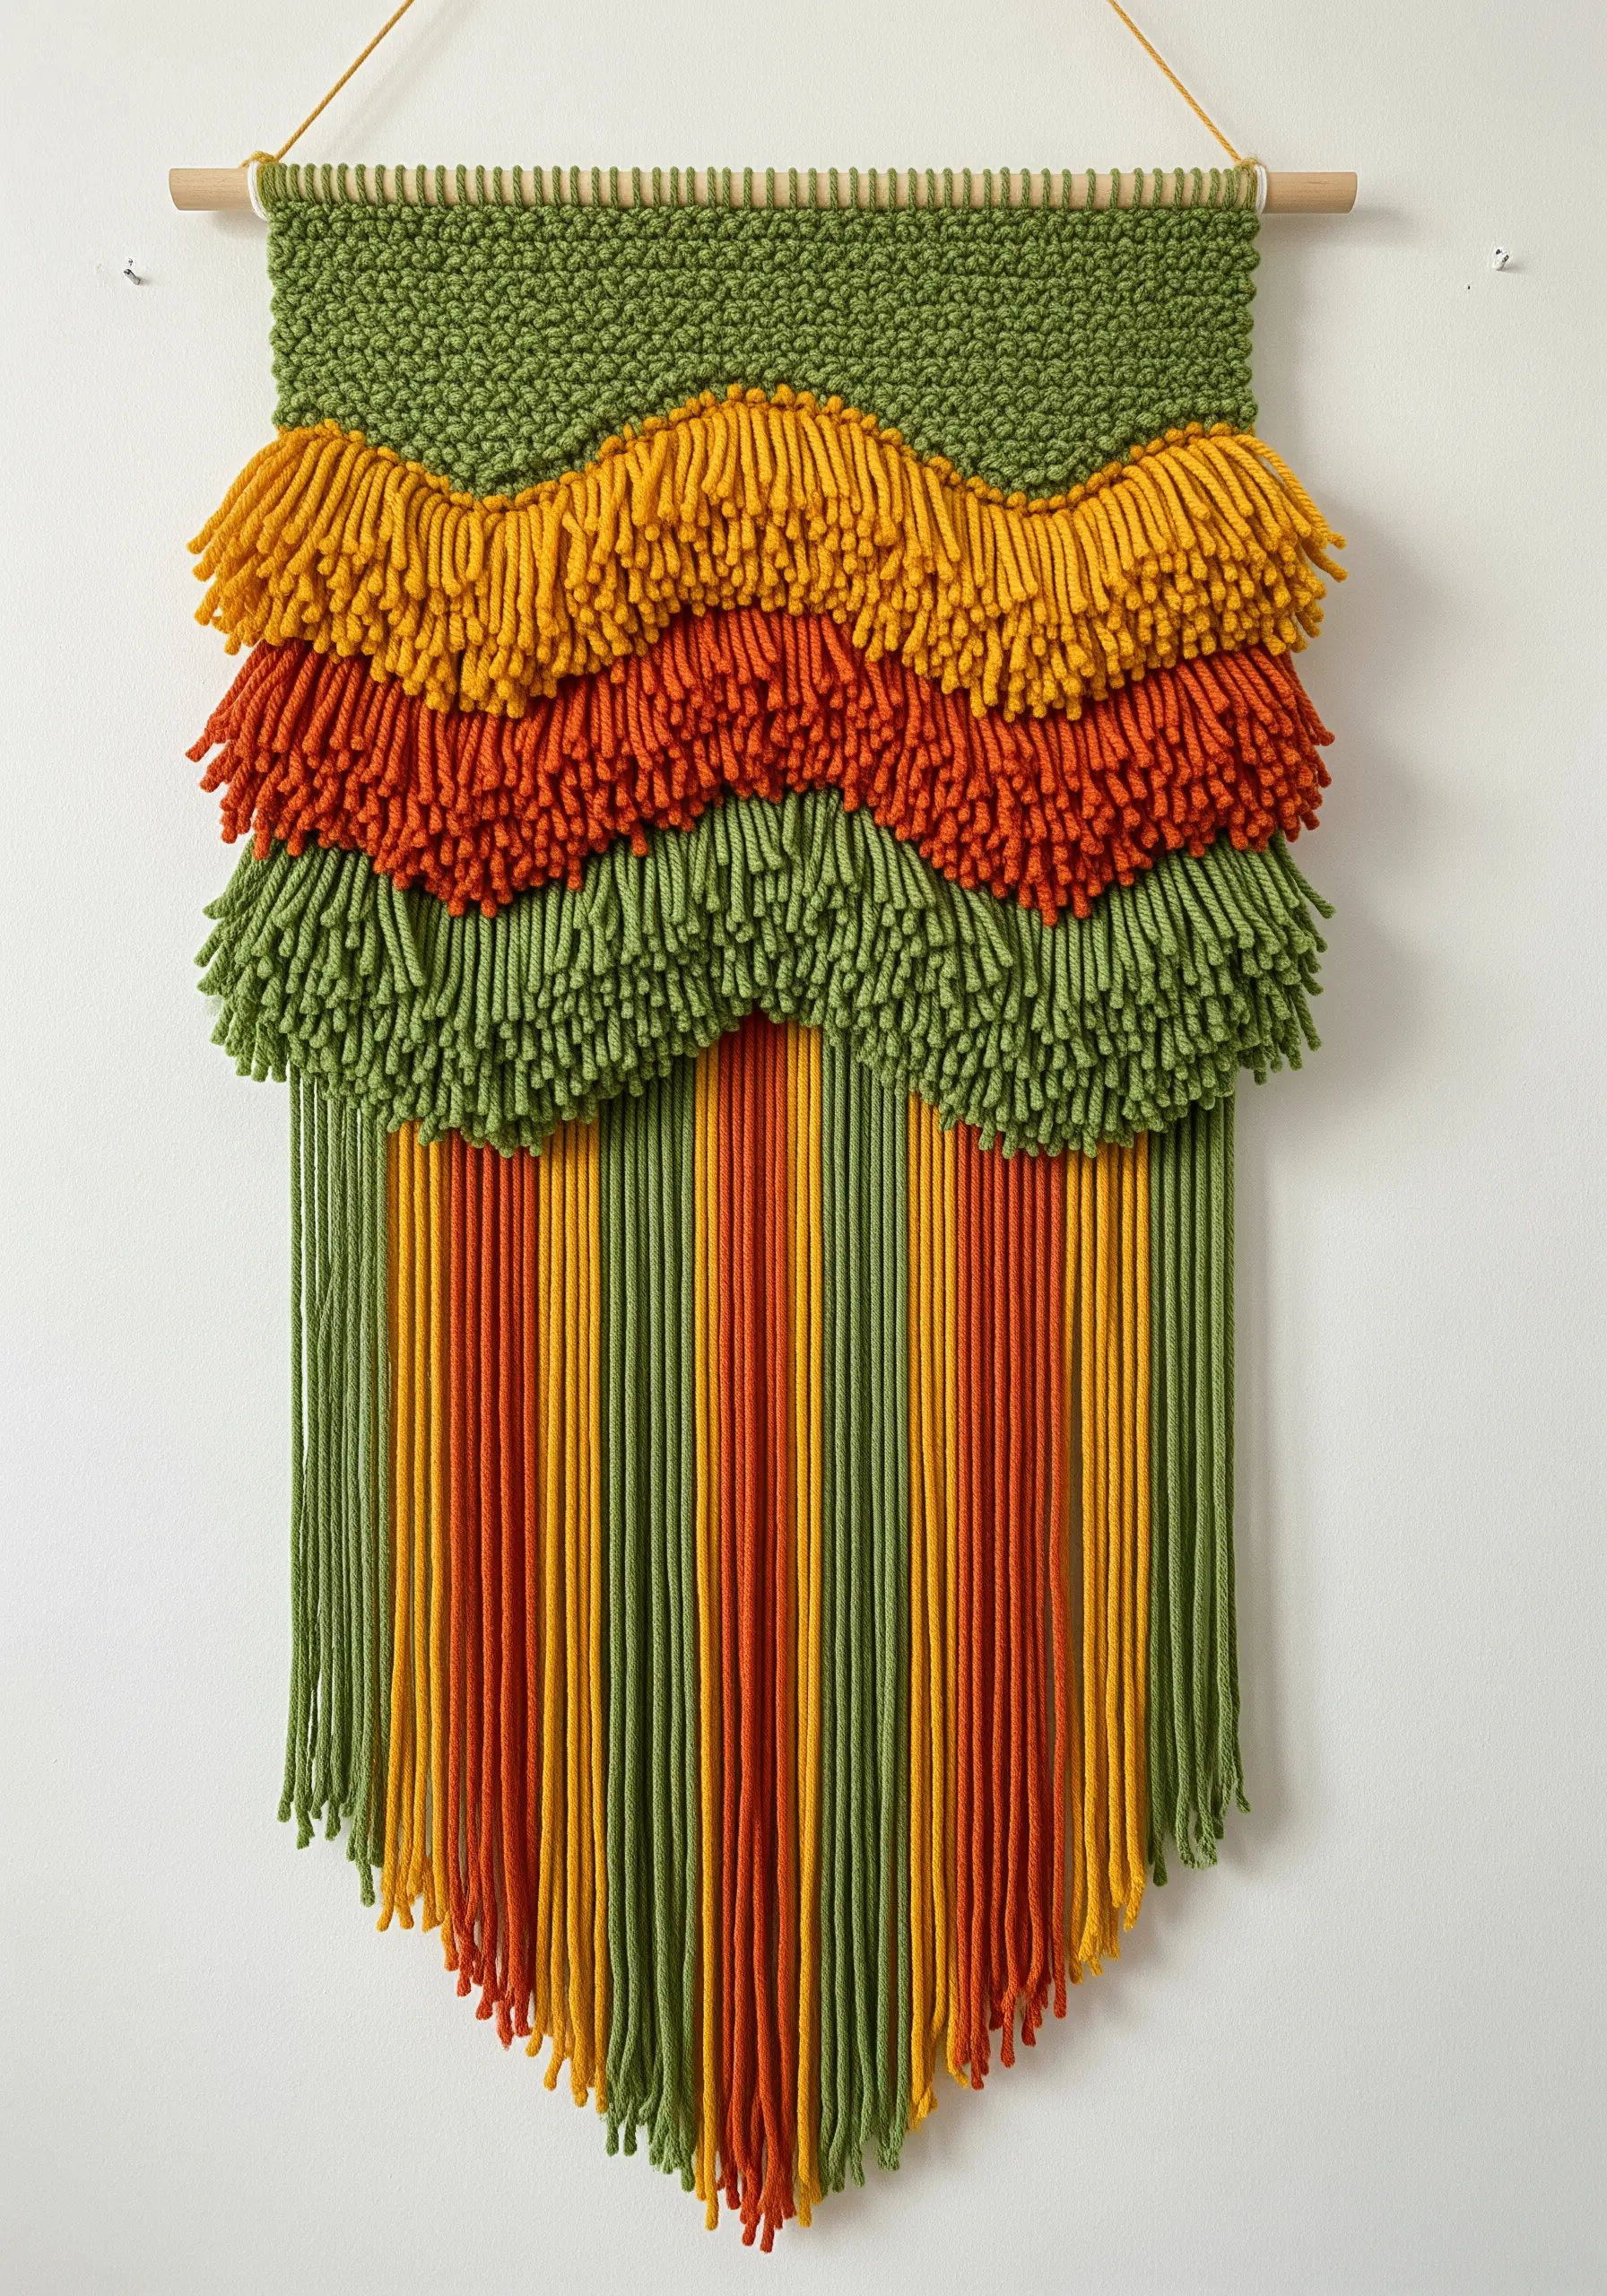
This deep, wavy shag is created by building up dense rows of Rya knots on a woven or mesh base.
To achieve the scalloped, layered effect, you must meticulously plan the length of your yarn for each knot, making the knots in the center of a row longer than those at the edges.
This creates a graceful curve in each layer of fringe.
Layering these sculpted rows in different colors adds another level of dimension, allowing you to create patterns that flow both in color and in physical form.
13. Model Surfaces with Felting and Coiling
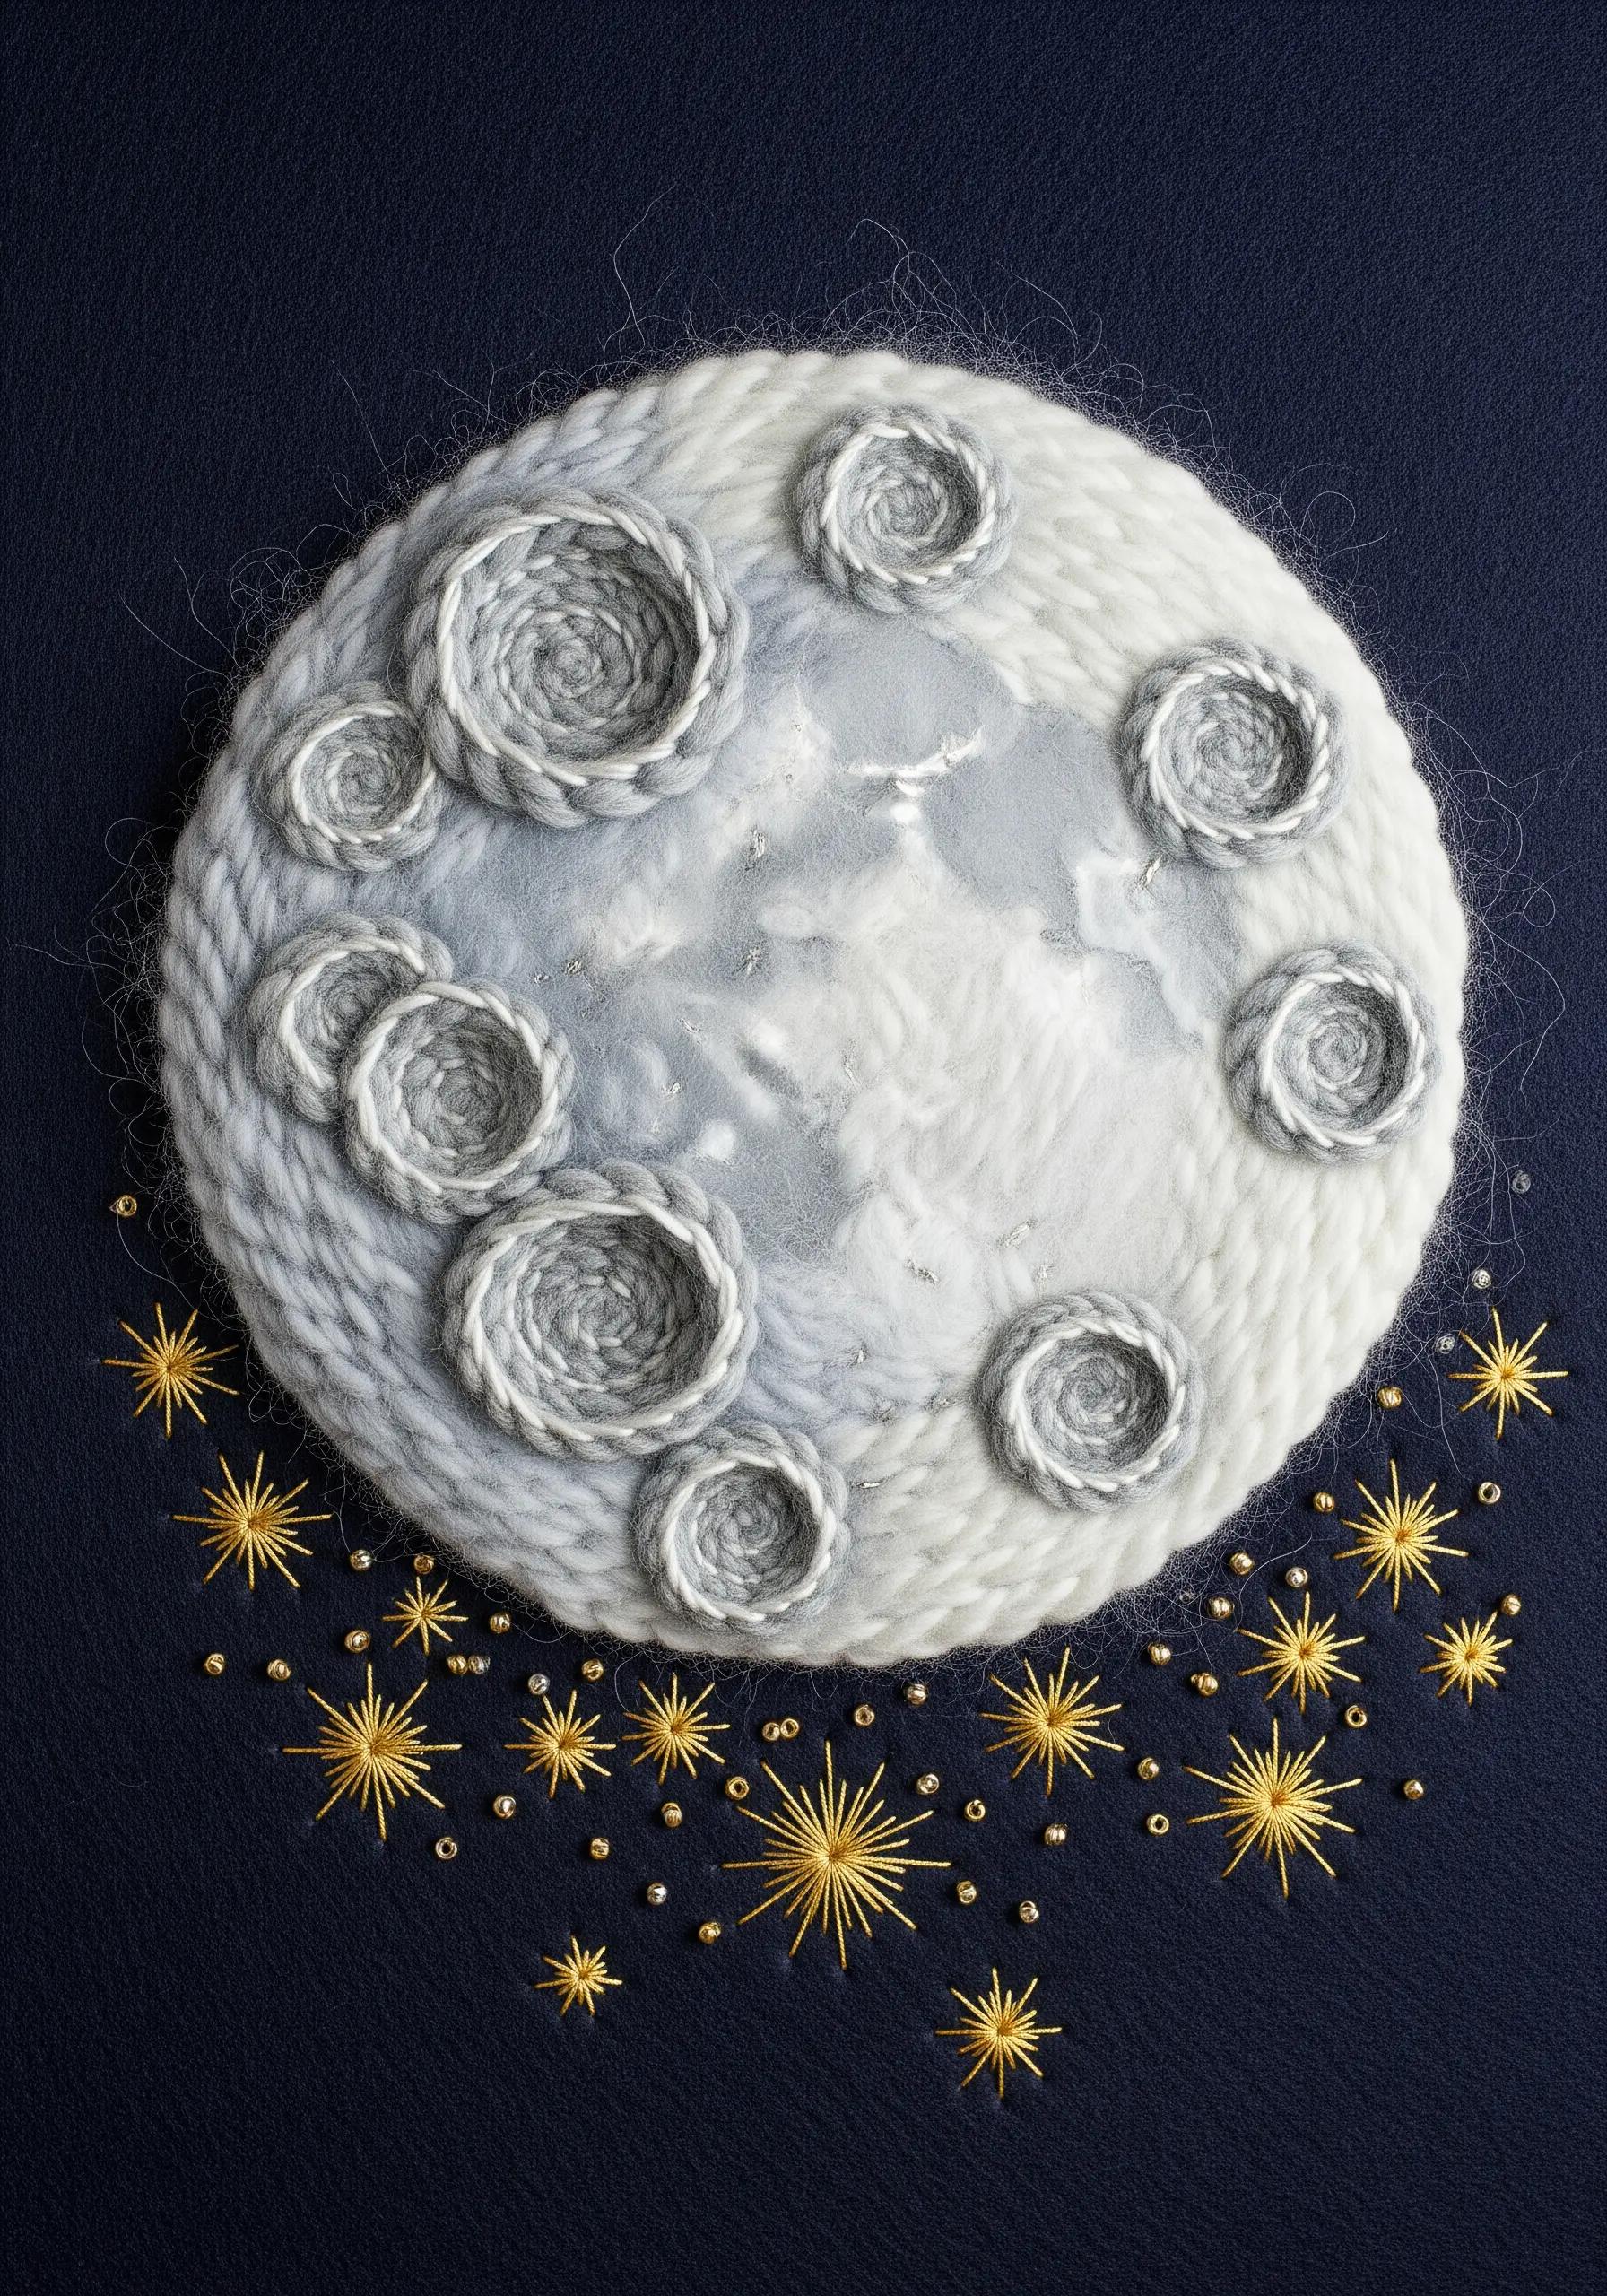
To create a realistic celestial body, start with a painterly base of needle-felted wool, blending shades of grey and white roving to suggest shadows and highlights.
Define key features like craters not by stitching, but by couching down pre-coiled lengths of yarn to create raised circular ridges.
This contrast between the soft, atmospheric felting and the hard, linear coils adds incredible dimension.
Finish with a scatter of metallic starburst stitches and beads to place your creation in a sparkling cosmos.
14. Create Sculptural Lines by Wrapping and Knotting
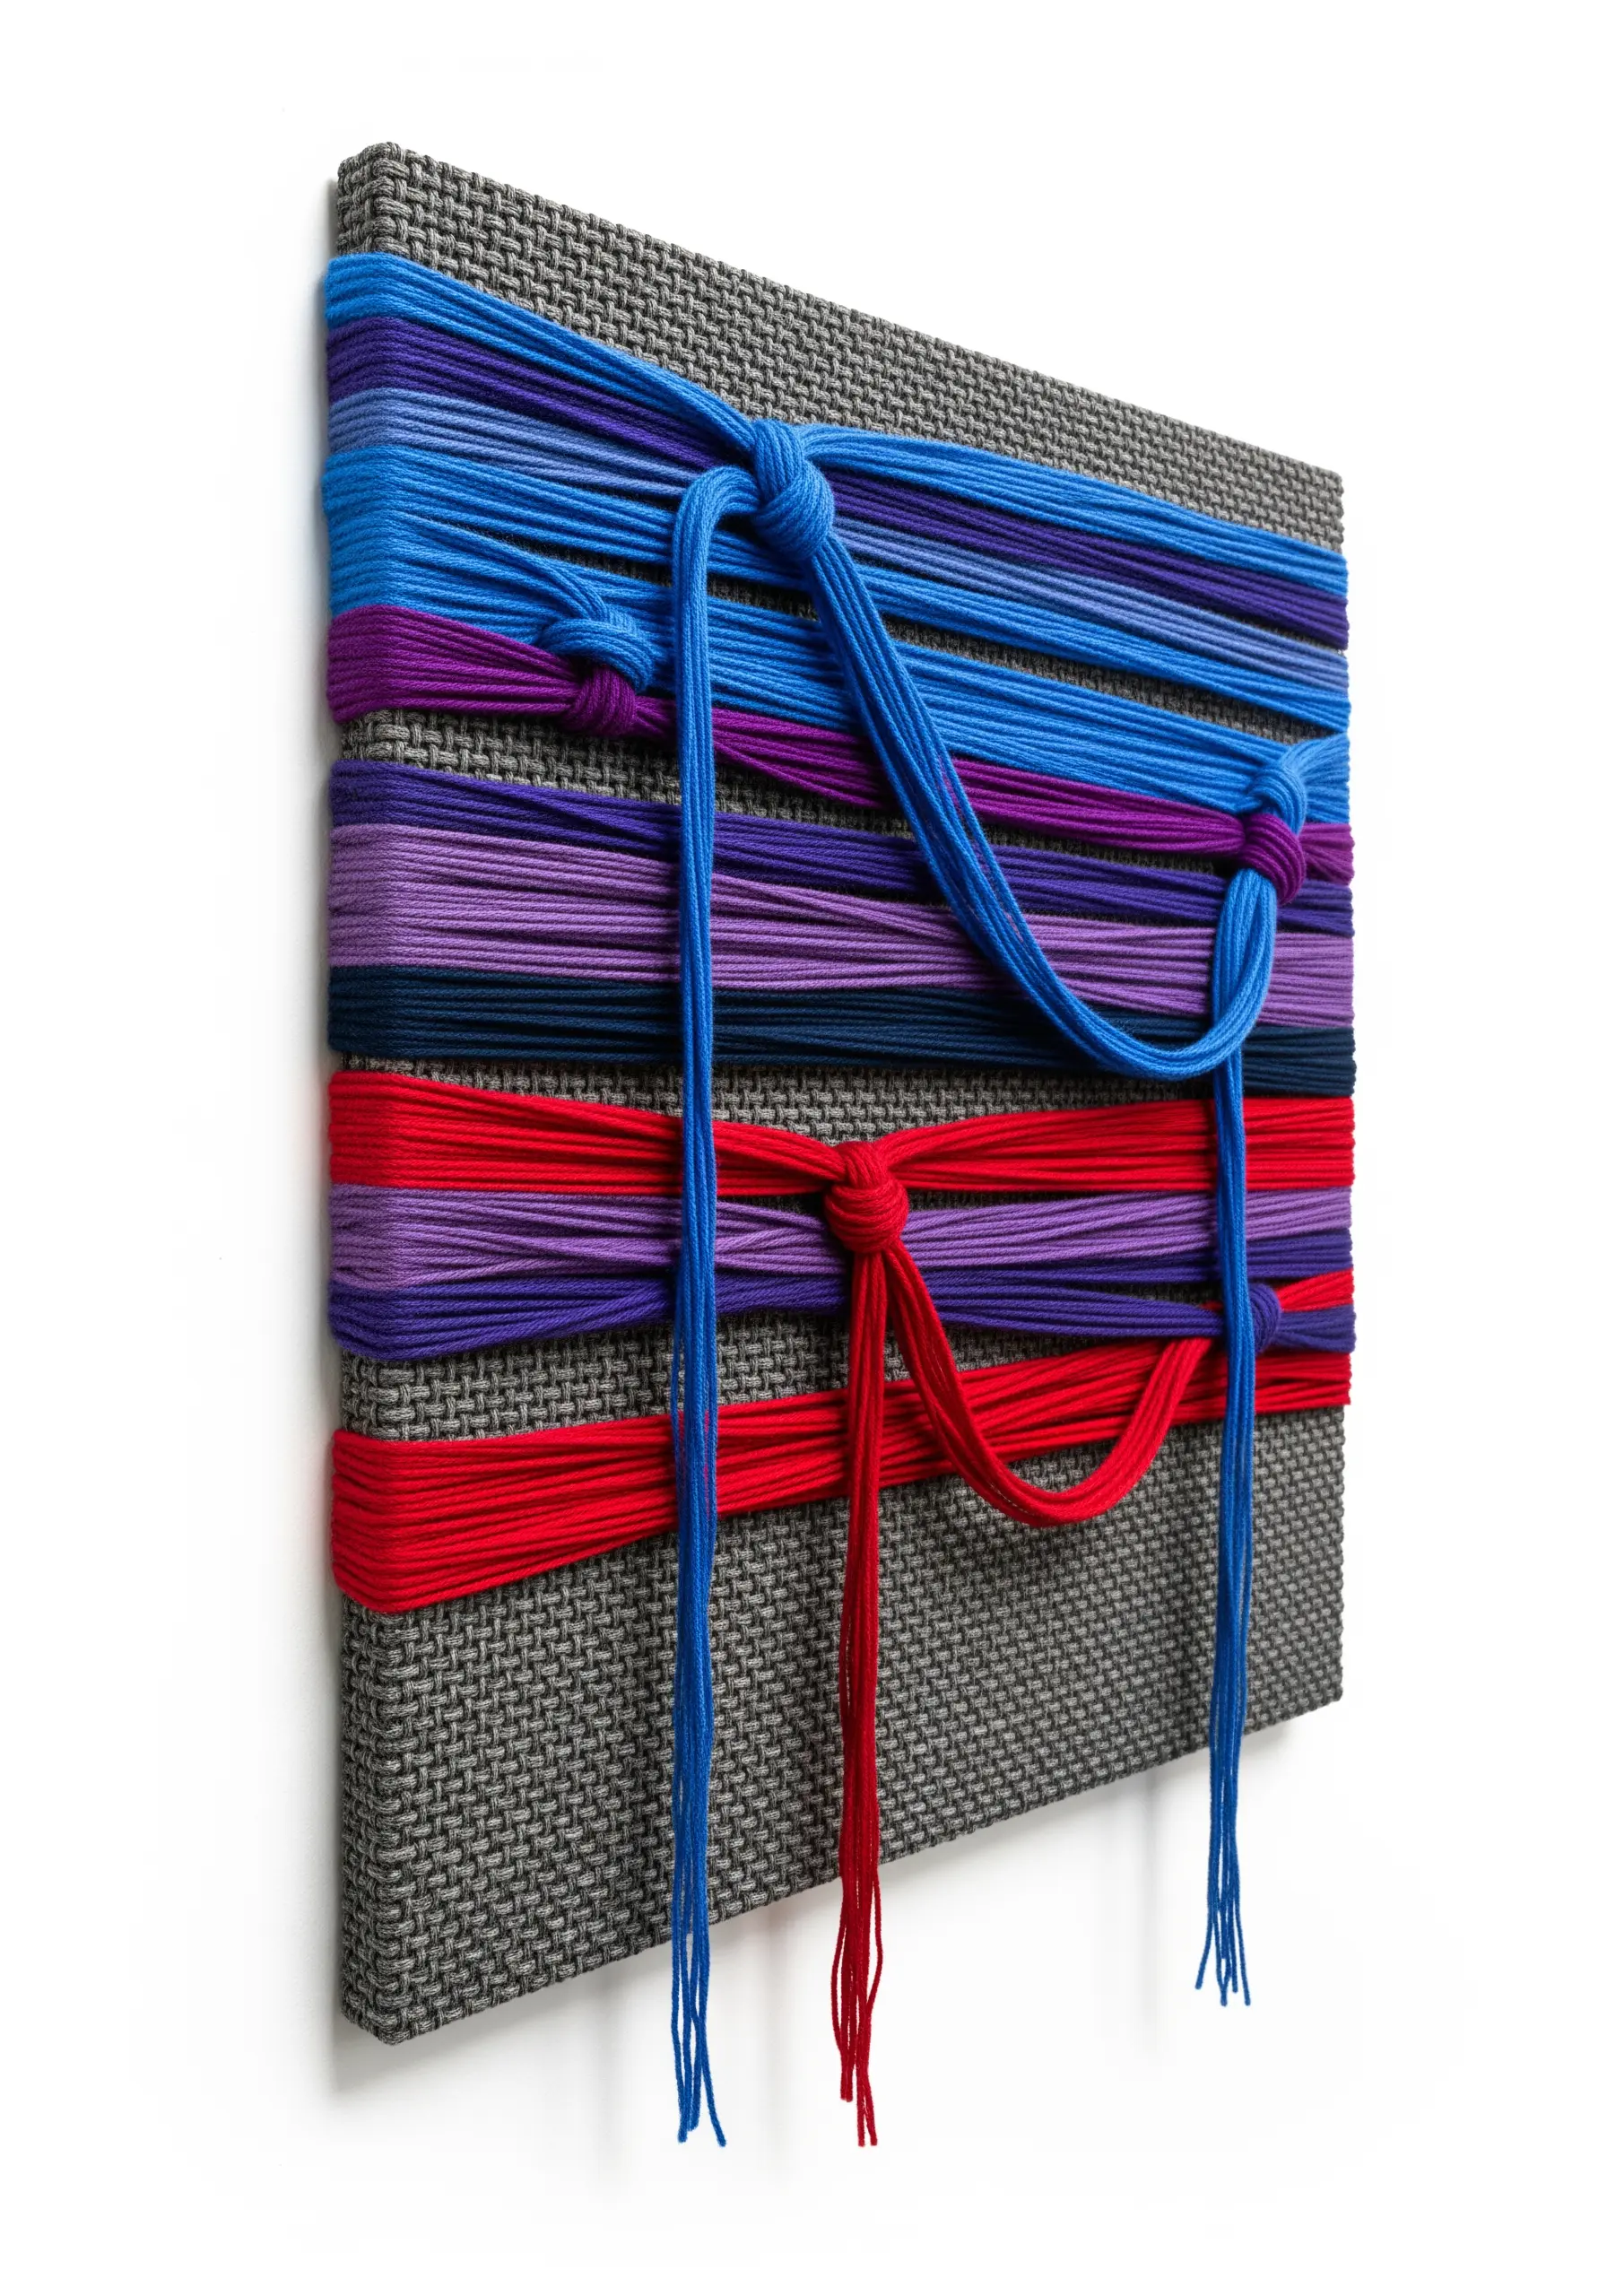
Use a stretched canvas as a simple frame loom to explore line and tension.
Wrap your yarn or cord in tight, clean bands of color across the canvas, treating it like a three-dimensional sketchbook.
To introduce sculpture, selectively gather a few of the wrapped strands and cinch them together with a simple knot.
This action pulls the lines away from the flat surface, creating dimensional curves, shadows, and a dynamic focal point in an otherwise minimalist composition.
15. Build Raised Forms with Padded Appliqué
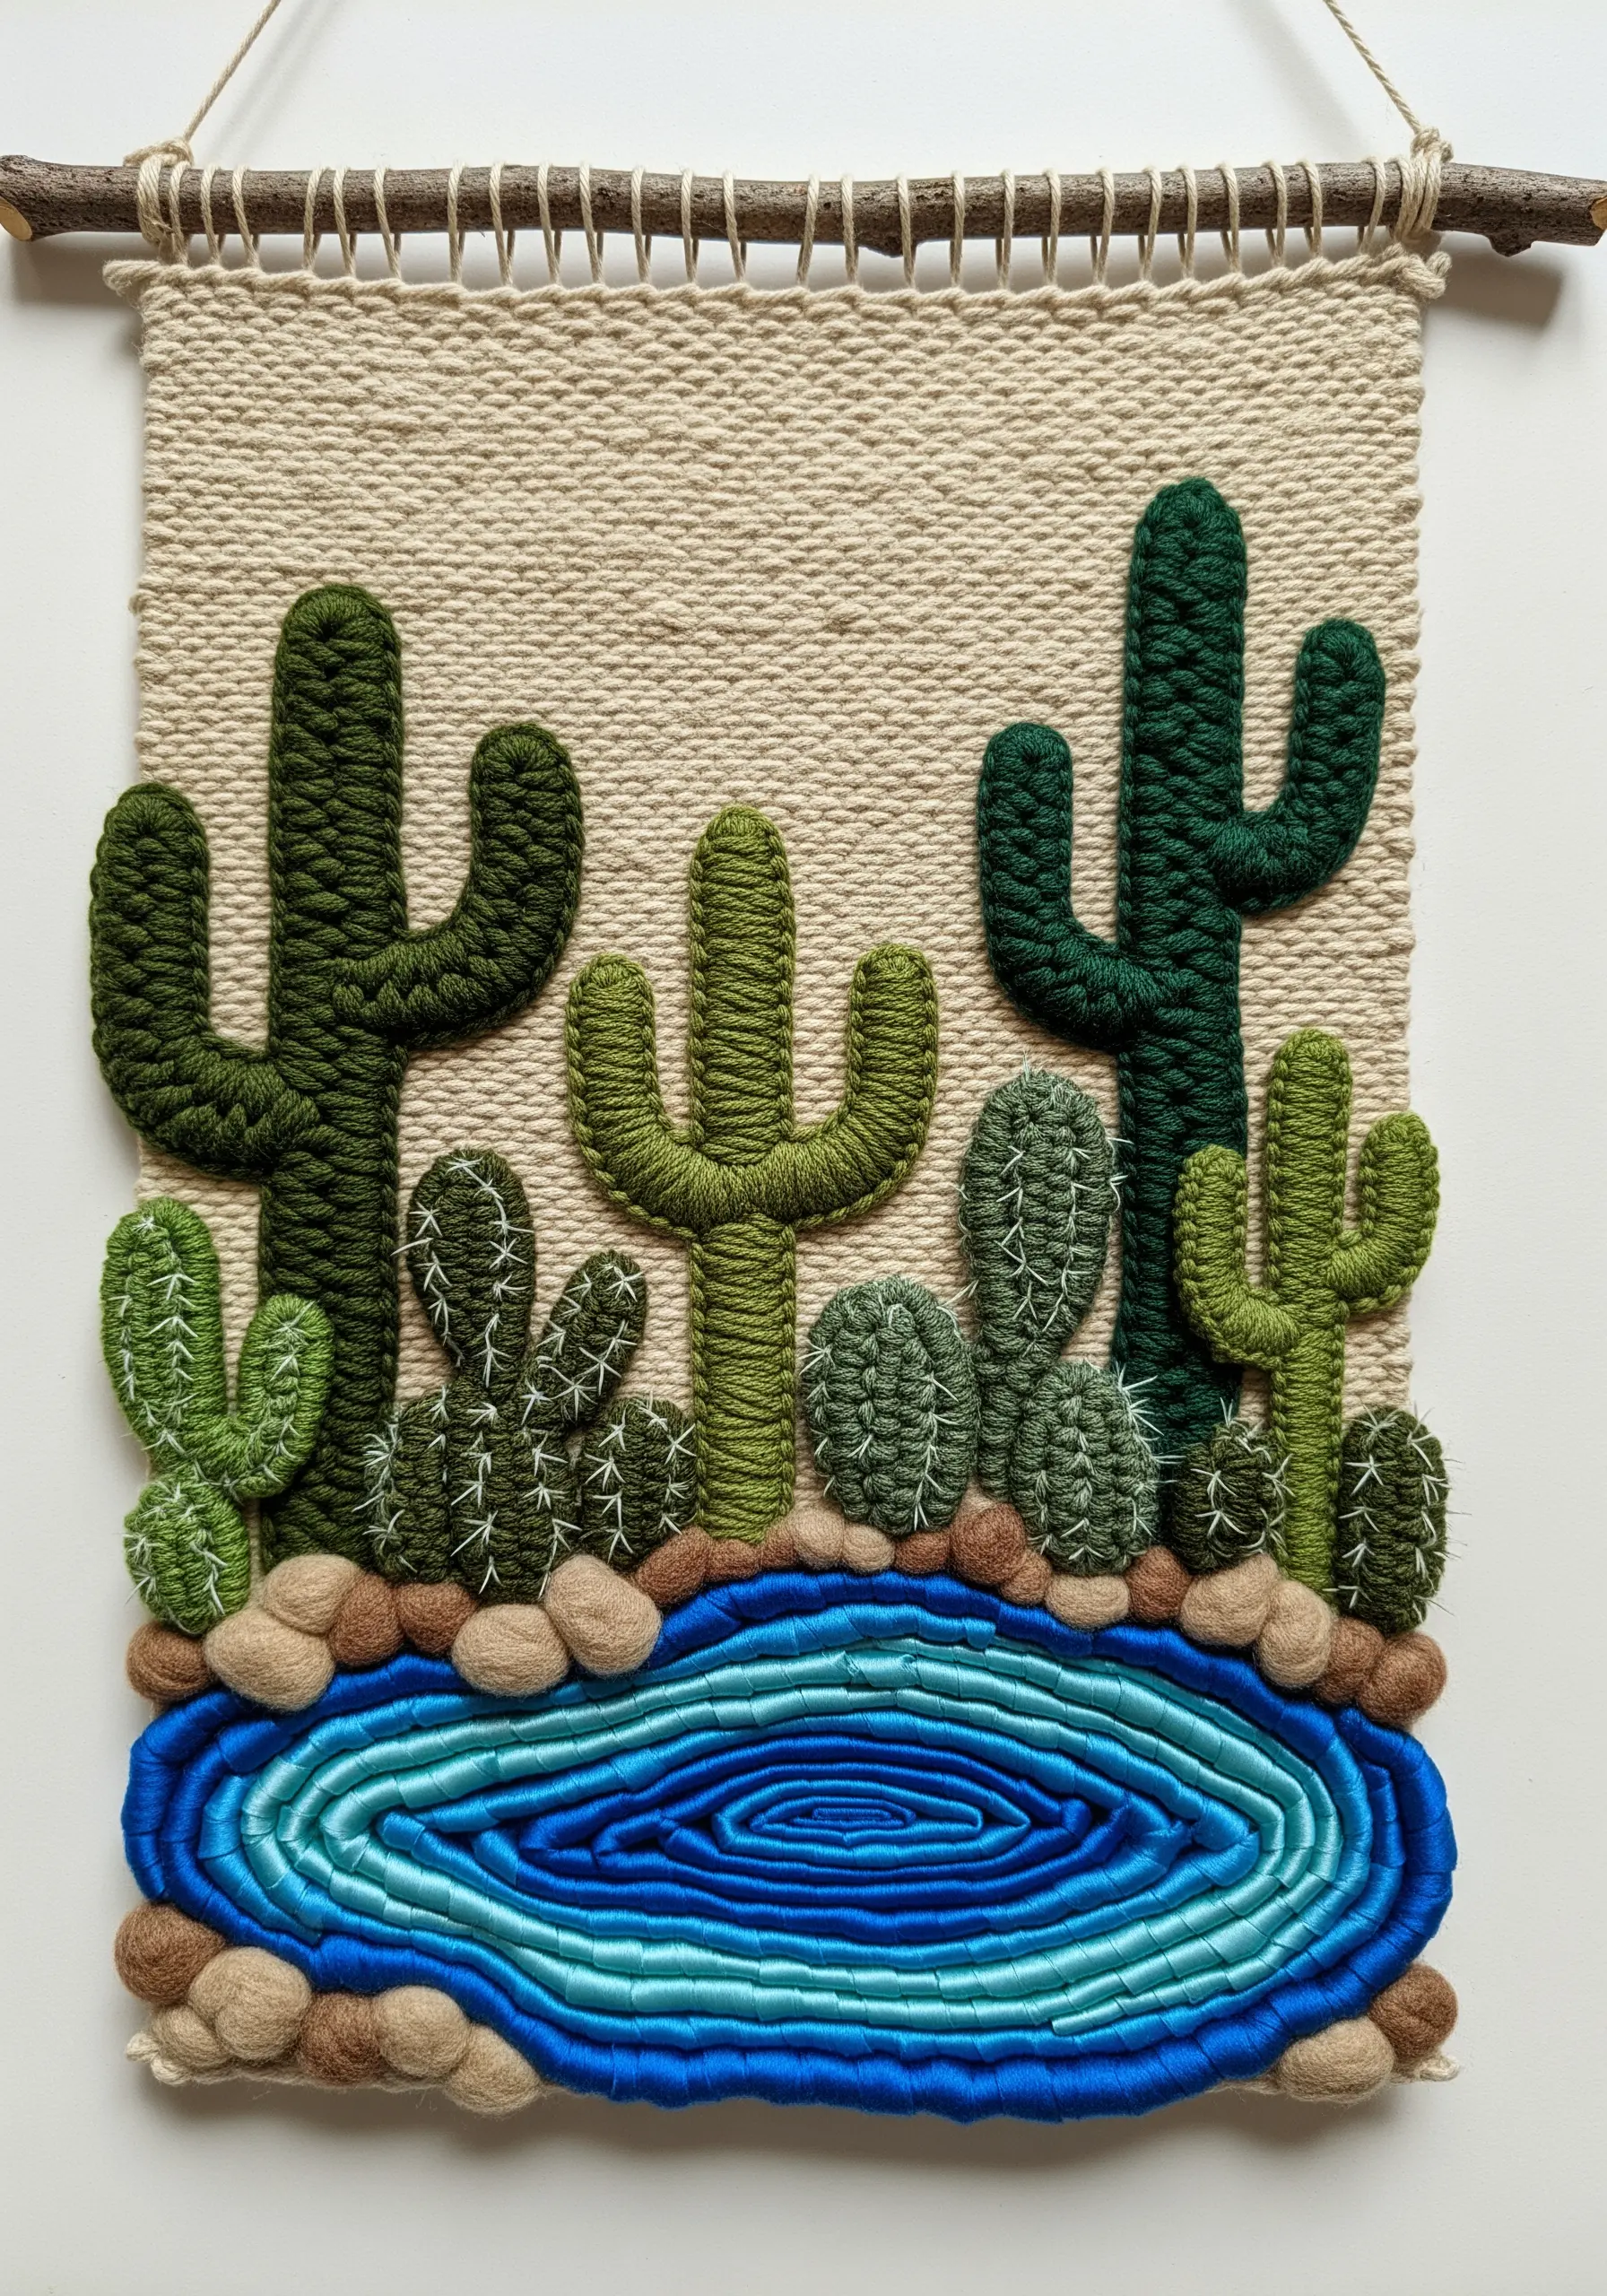
To make certain elements of your design physically stand out, employ stumpwork and padding techniques.
Create your cactus shapes by first cutting a base from felt or thick batting, then stitching it to your woven background.
Completely cover this padded base with dense vertical satin stitches or French knots to create a solid, raised object.
This technique, paired with other flat textures like the coiled yarn oasis, is one of the most effective ways to create true 3D yarn wall art creations inspired by nature.
16. Achieve Architectural Form with Wrapped Cord
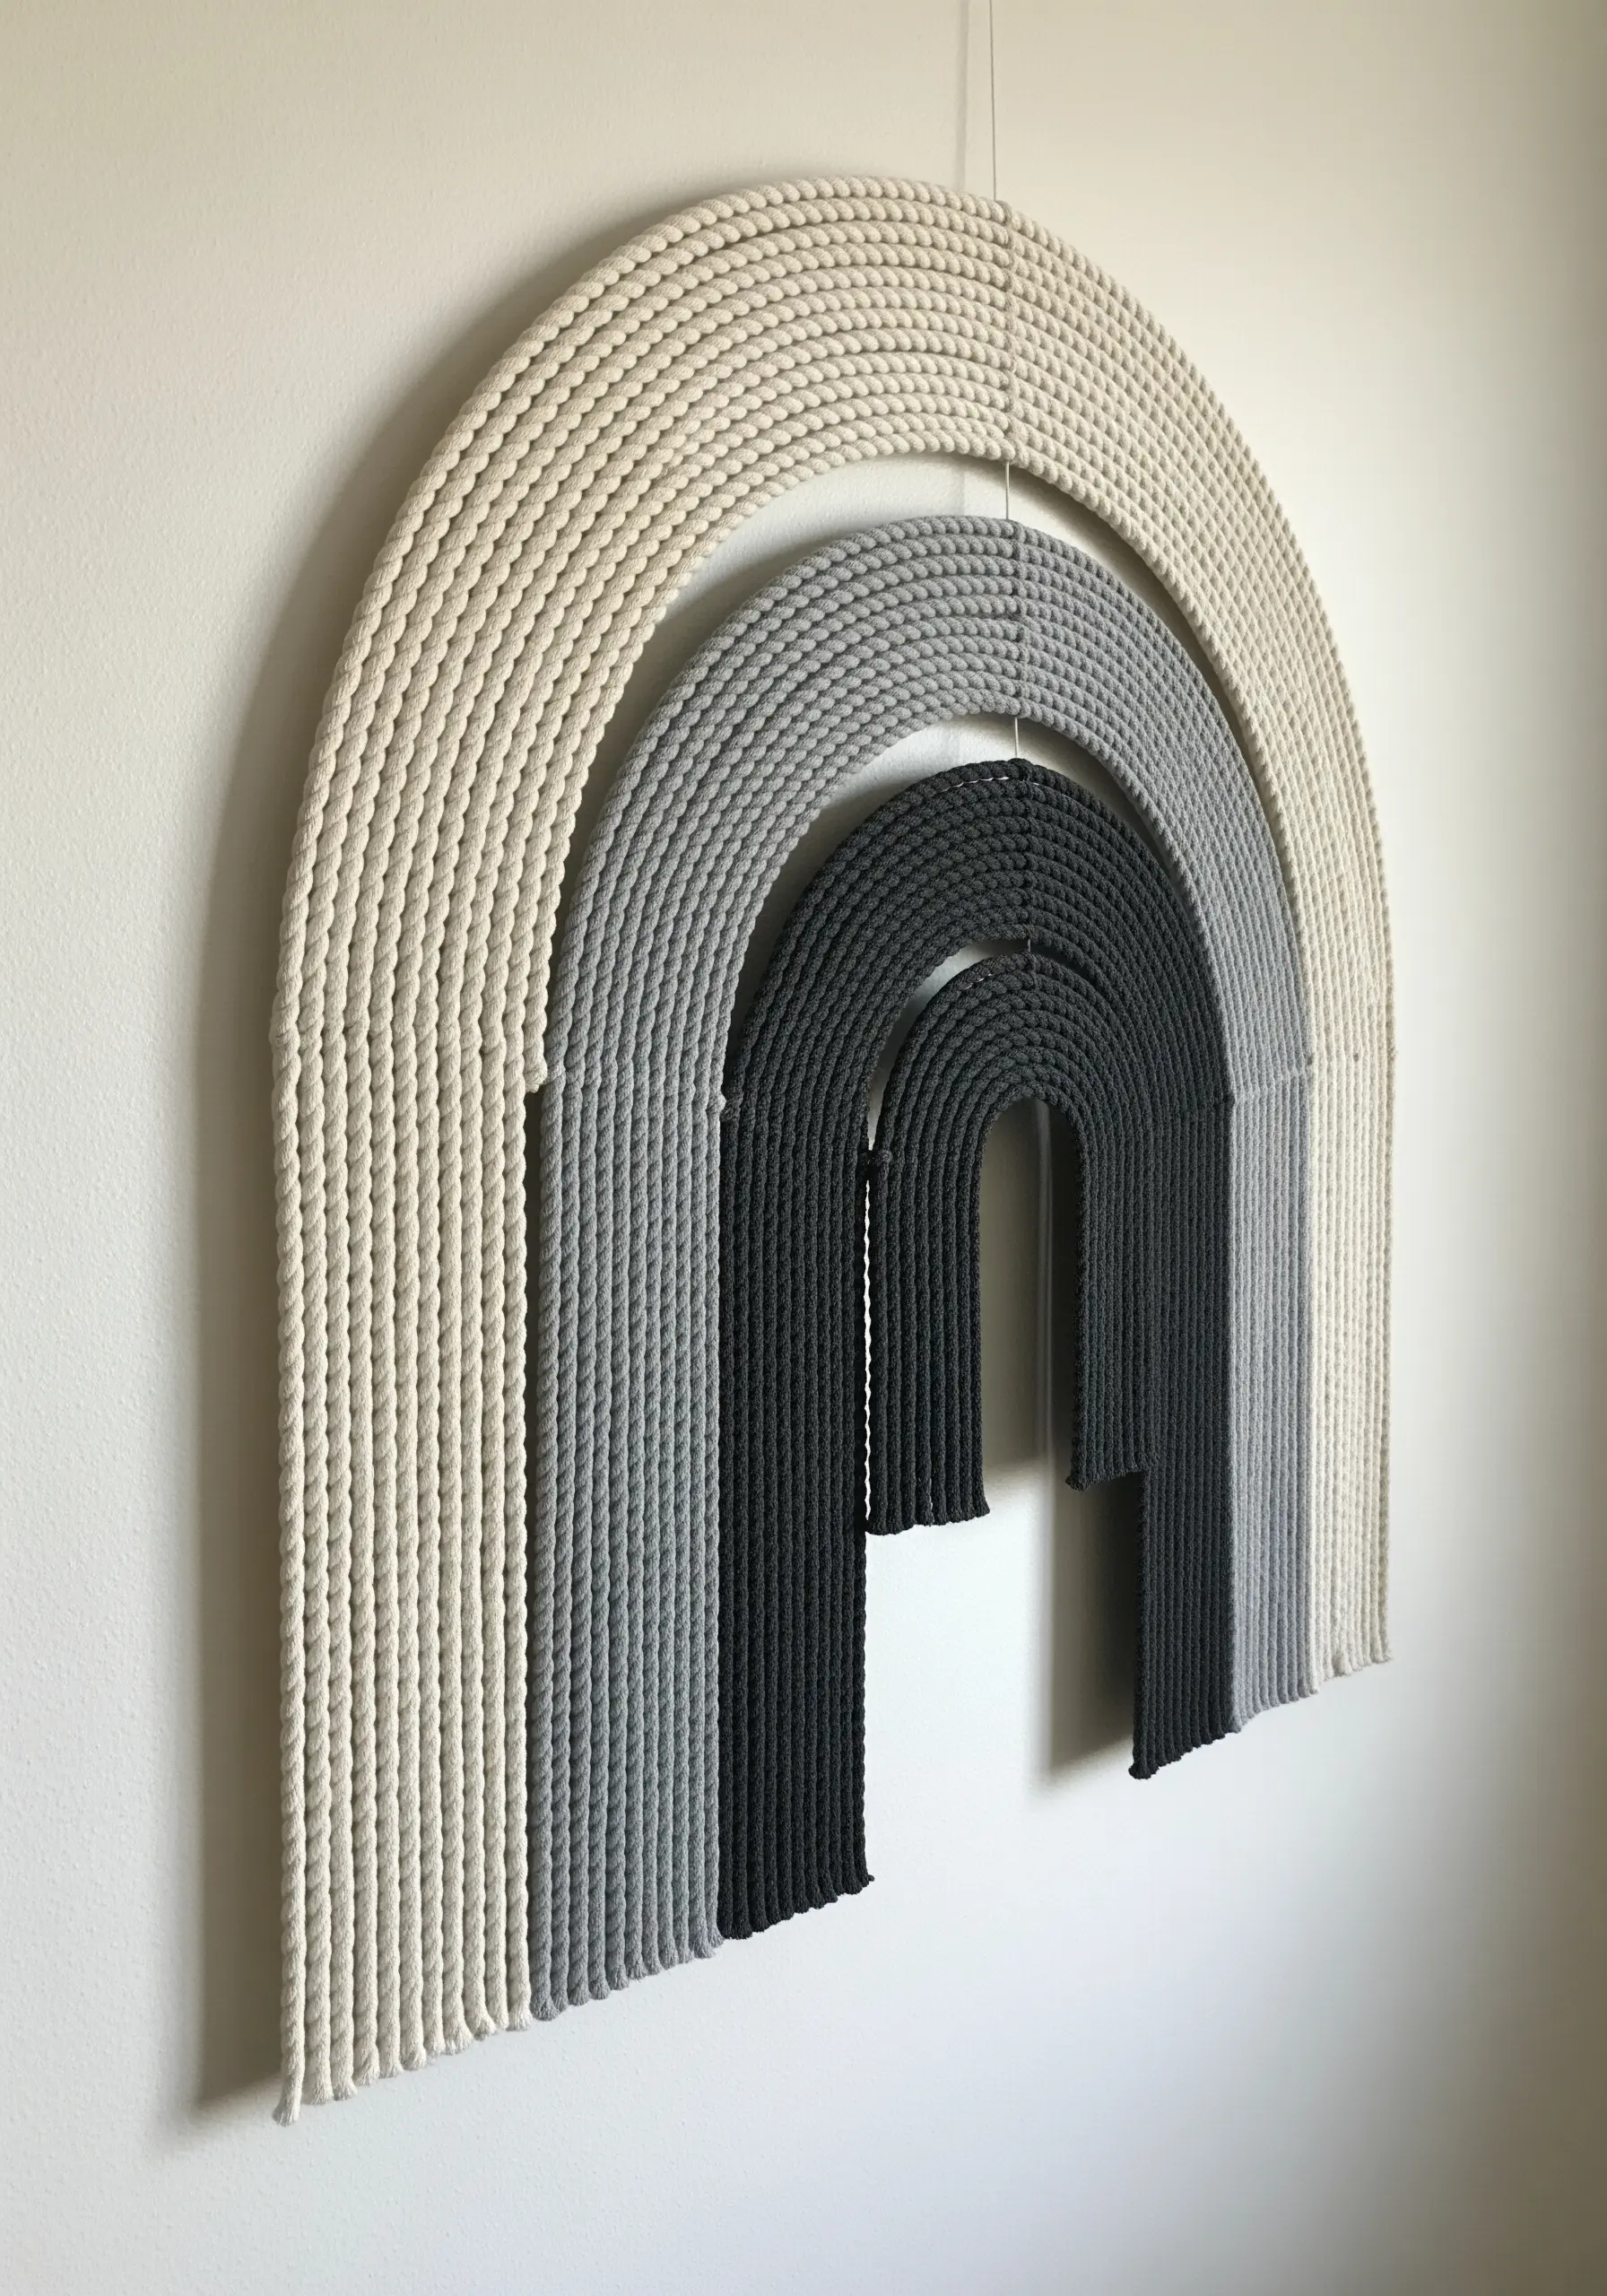
This powerful piece derives its impact from its clean, architectural form and precise execution.
Create the concentric arches using a very stiff, shapeable material like thick rope or heavy-gauge wire.
The key to a professional finish is the wrapping: ensure your yarn is applied with even tension and that each wrap lies perfectly flush against the last.
By suspending the inner arches, you introduce negative space that enhances the sense of depth and turns a simple rainbow shape into a modern sculpture.
17. Cultivate a Coral Reef with Freeform Crochet
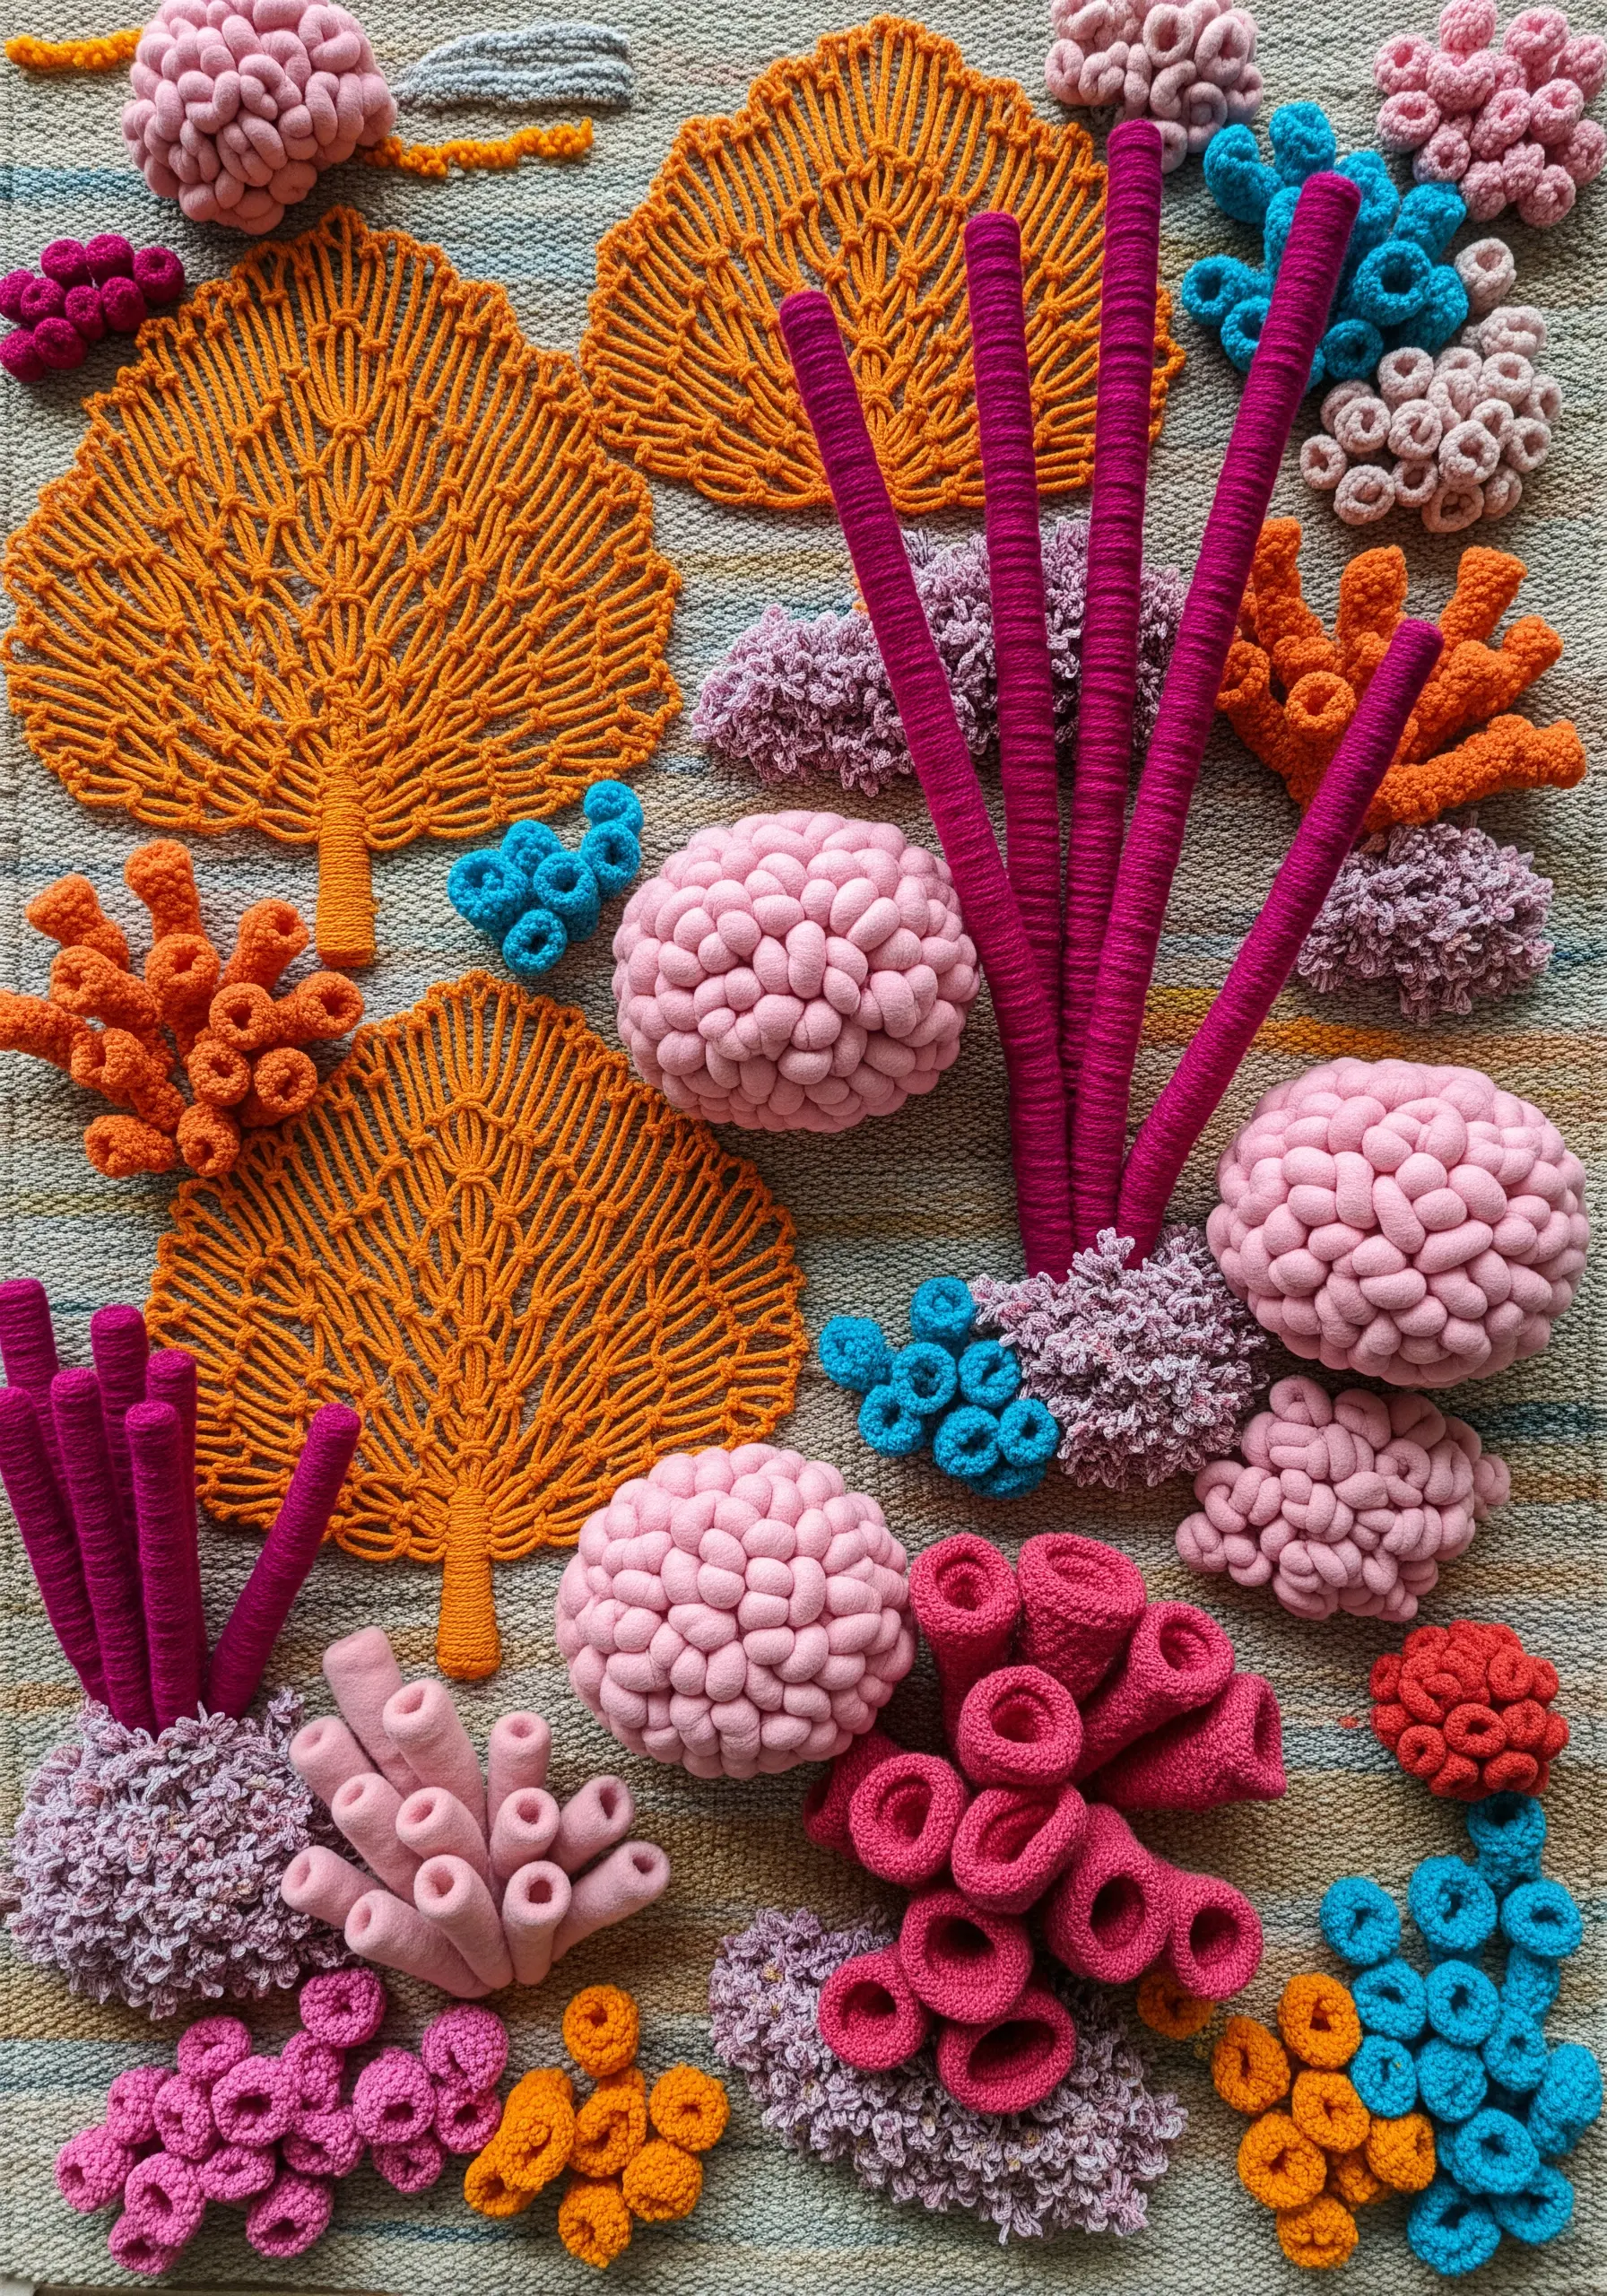
This incredible depth is achieved by creating a collection of individual, freeform crochet and knit elements, then composing them on a single background.
Use hyperbolic crochet (increasing stitches in every row) to create the ruffled, organic shapes of coral fans, and experiment with bobble stitches or French knots for brain coral textures.
Once you have a diverse library of small, tactile forms, arrange and stitch them onto a felt or canvas base, layering them to build up a rich, vibrant, and dimensional ecosystem.


