
Have you ever finished a project and felt that something was missing? That elusive element that separates ‘handmade’ from ‘handmade luxury’? It’s not about complexity or skill—it’s about intention.
The secret lies in small, perfectly executed details. A single, well-placed motif can redefine an entire garment, turning a simple t-shirt, a denim jacket, or a shirt cuff into a personal statement. It’s a quiet conversation between thread and fabric, and it speaks volumes.
Here, you’ll find more than just patterns. You’ll discover the techniques behind the polish: how to make a satin stitch gleam, how to give a leaf texture, how to choose a color that whispers instead of shouts. This is your guide to stitching with purpose and transforming your summer wardrobe, one thoughtful motif at a time.
1. Collar Corner Detail: The Olive Sprig
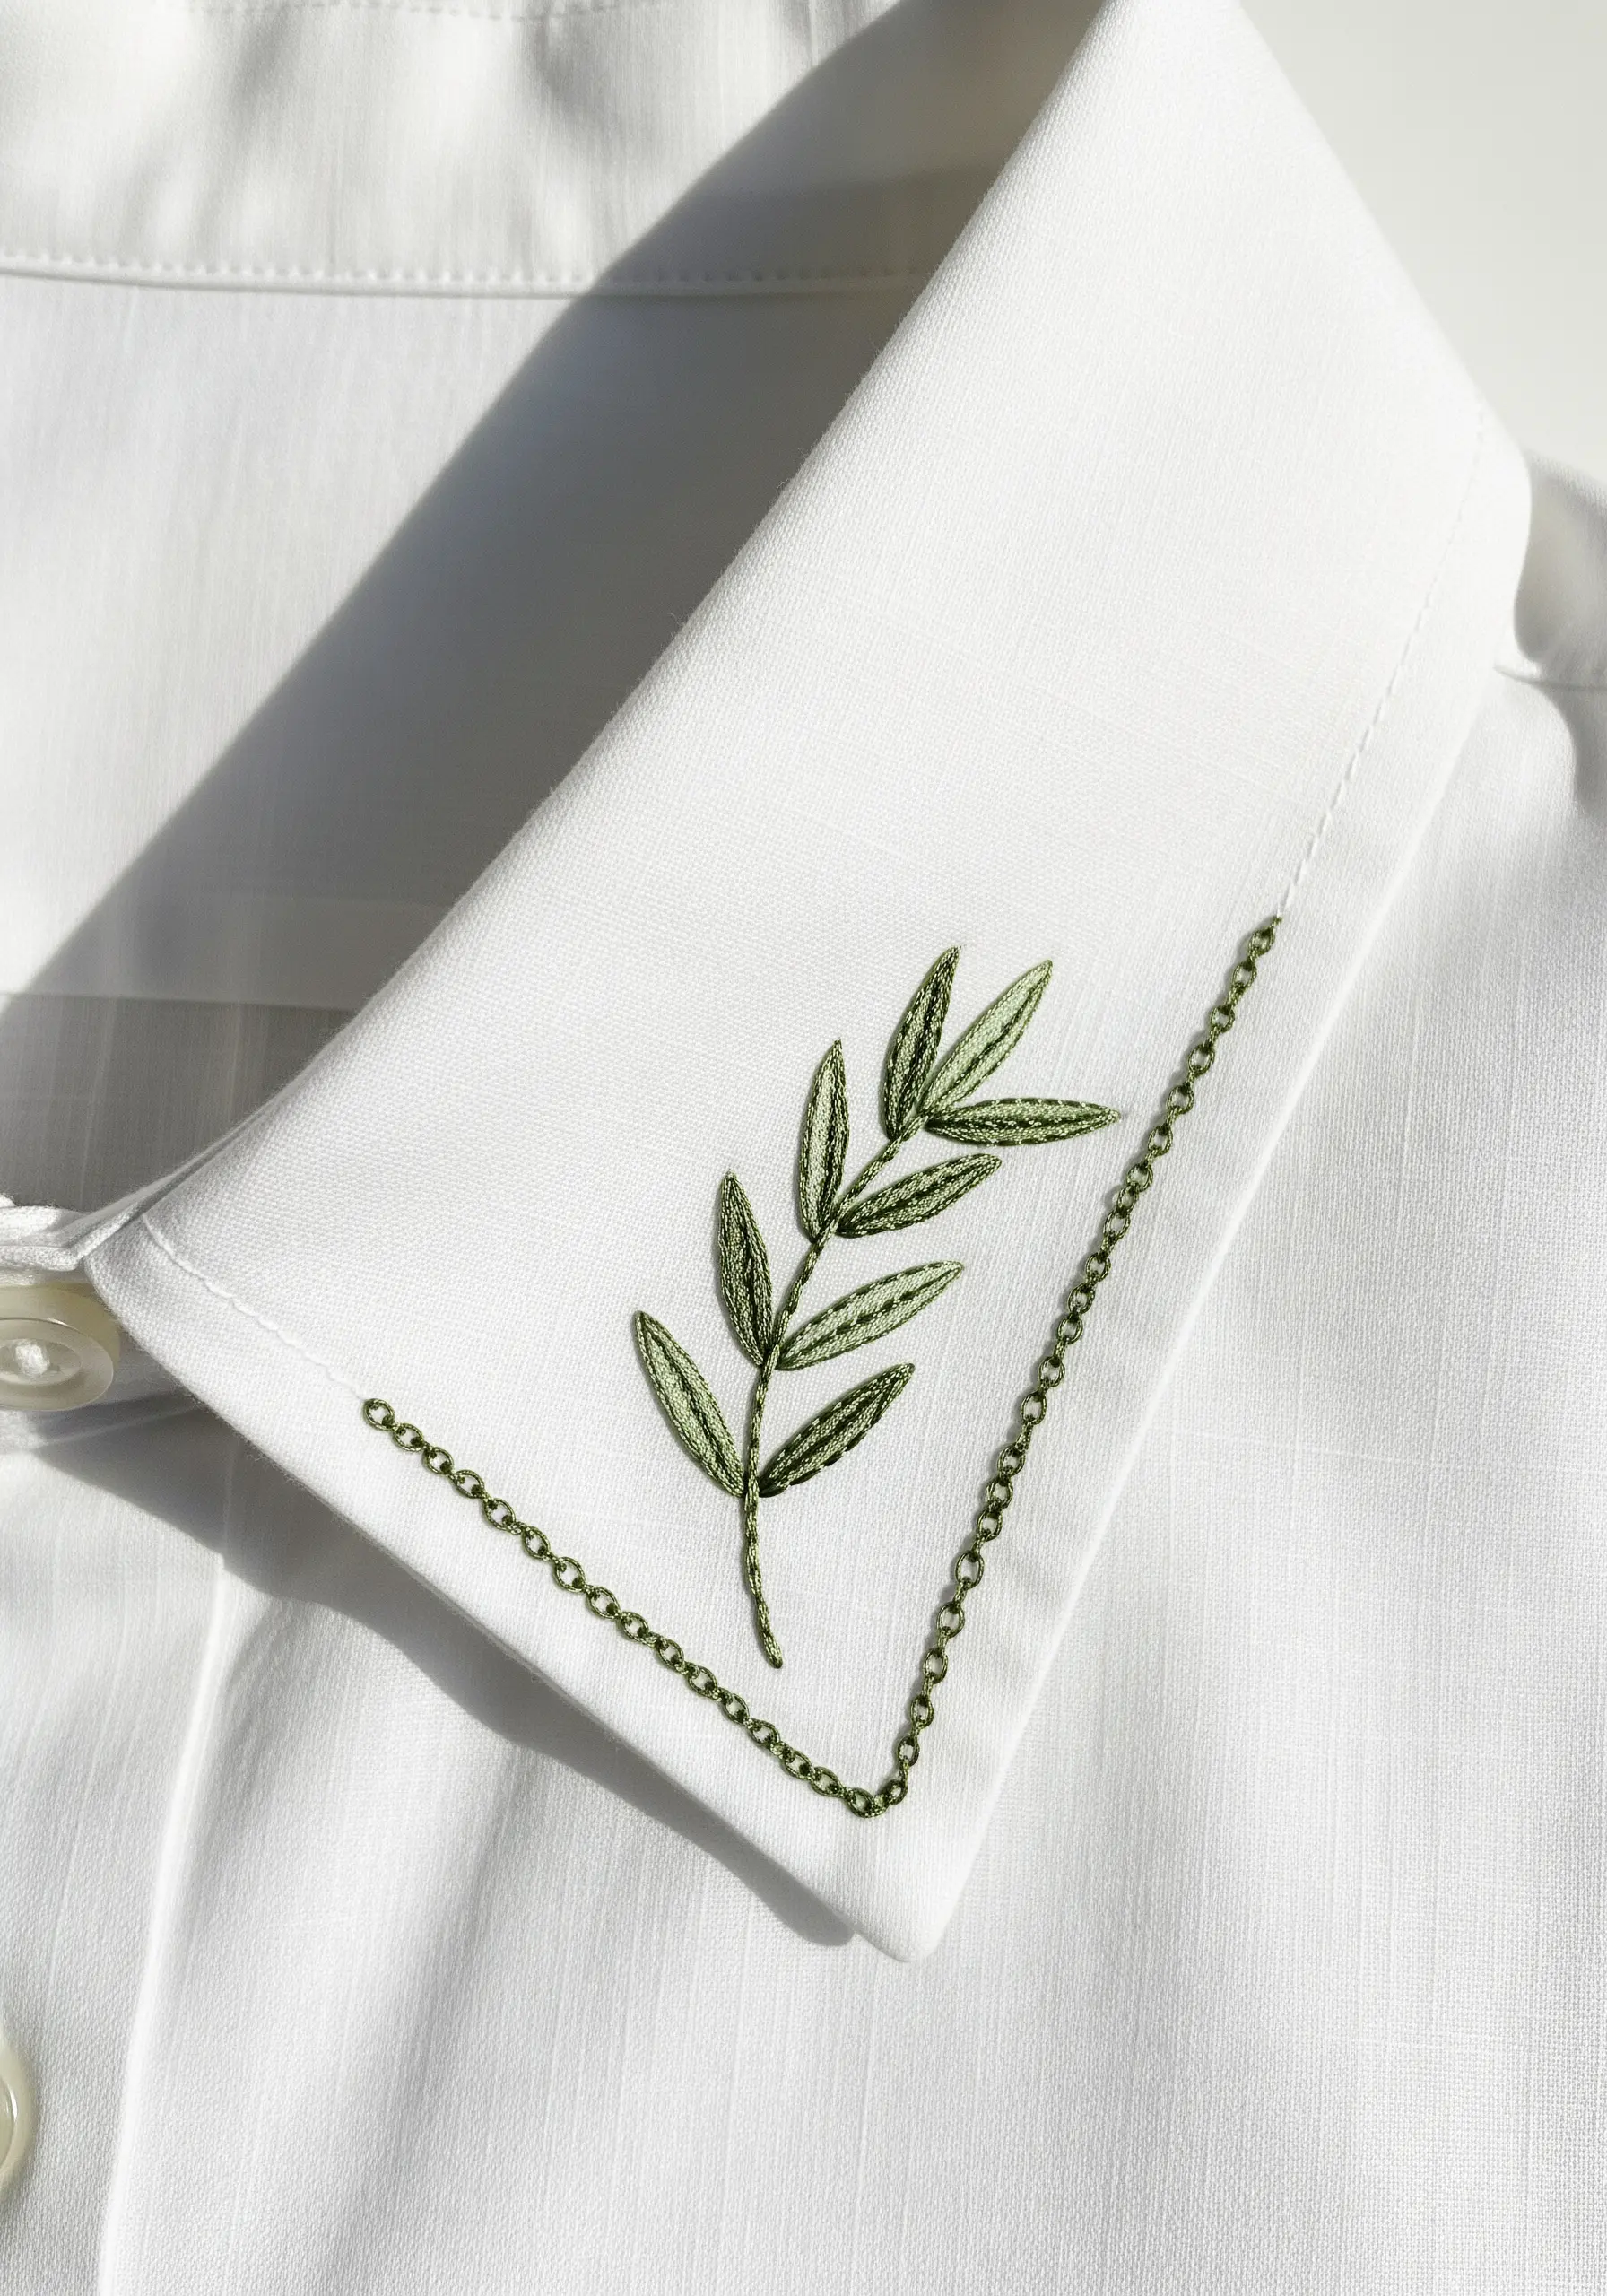
Create an elegant frame on a collar tip by pairing a central motif with a simple border.
For the olive leaves, use an open fishbone stitch—instead of filling the shape completely, leave space between the stitches to create a light, sketched texture.
Outline the sprig with a delicate backstitch using a single strand of floss.
Frame the design with a neat chain stitch, keeping your tension perfectly even for a line that looks as refined as a drawn border.
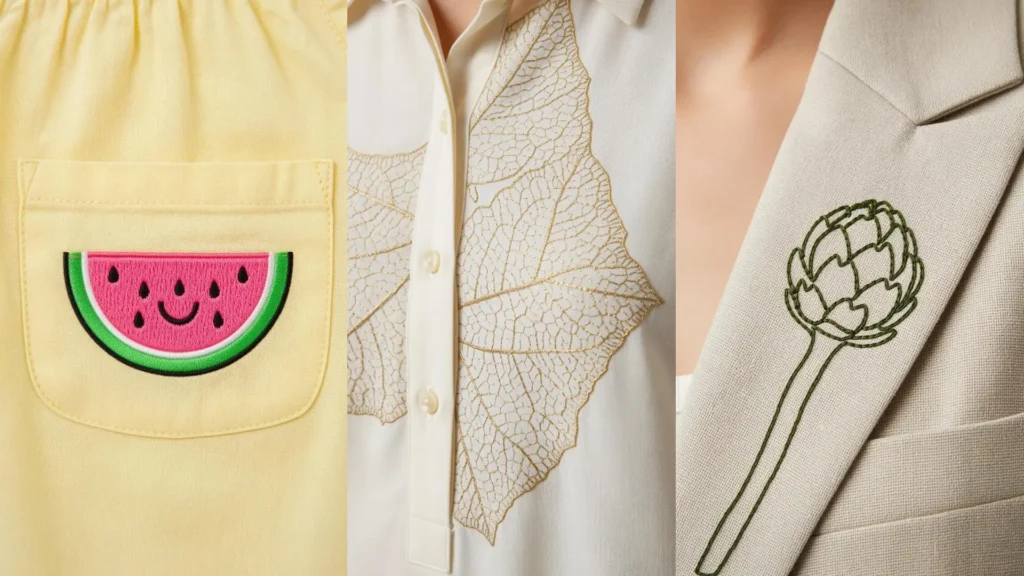
2. Pocket Pop: Hyper-Realistic Cherries

To achieve the glossy, rounded look of these cherries, a flawless satin stitch is key.
First, create a split-stitch outline around the entire shape. This creates a raised, firm edge that will guide your satin stitches and prevent them from looking uneven.
Fill the shape with directional satin stitches, following the curve of the fruit.
For the highlight, use a single strand of white floss to add one or two small straight stitches. This tiny detail creates the illusion of light and dimension.
3. Cuff Accent: Zesty Lemon Slice
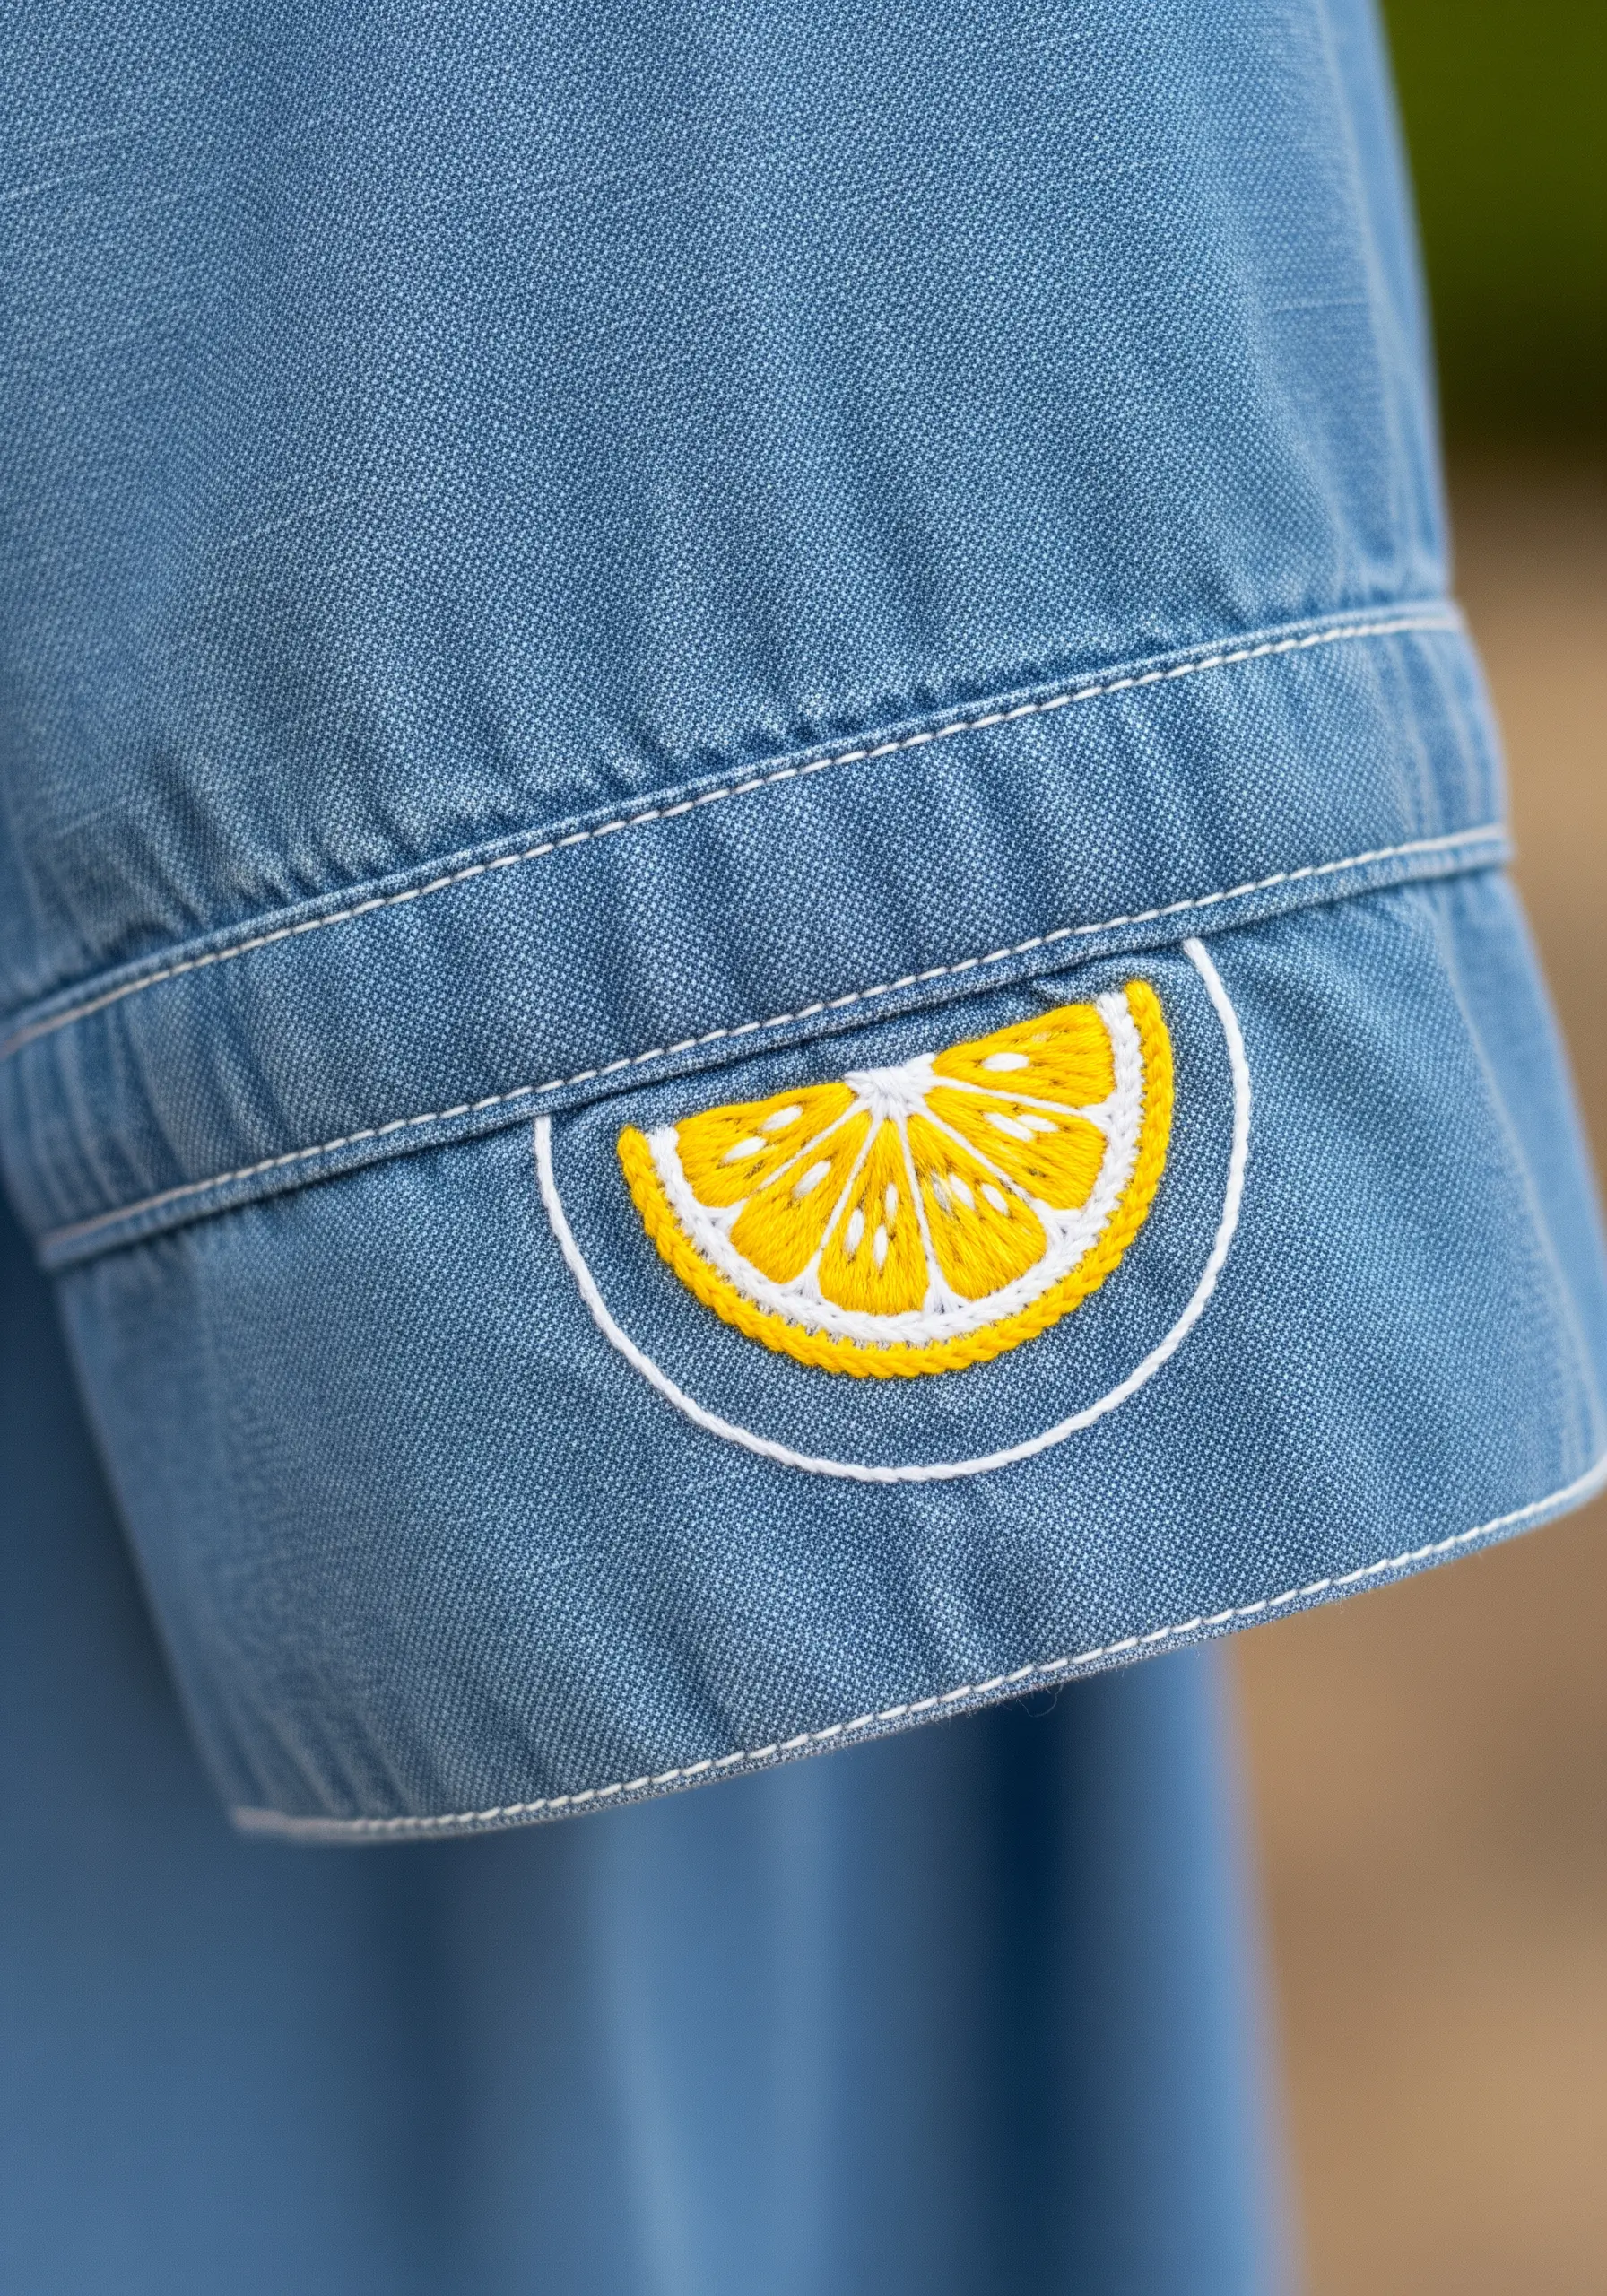
The success of this lemon slice lies in its precise segmentation.
Use a single strand of white thread and a simple backstitch to create the lines separating each segment before you begin filling.
Fill the pulp sections with a light yellow satin stitch, angling your stitches toward the center of the fruit to create realistic texture.
Use a slightly darker, more saturated yellow for the rind to create a subtle, professional contrast that defines the shape.
4. Denim Detail: Graphic Monstera Leaf

When embroidering on a heavy fabric like denim, your choice of outline stitch makes all the difference.
Instead of a simple backstitch that can get lost in the texture, use a chain stitch.
This stitch creates a thicker, more prominent line that holds its own against the denim weave.
Use at least three strands of six-strand embroidery floss to give the design enough weight and visual impact to feel intentional.
5. The Strawberry Button: A 3D Embellishment

Elevate your embroidery from a surface decoration to a functional, sculptural element.
To create this 3D strawberry, use a technique called padded satin stitch. Cut a small piece of felt in the shape of the berry, tack it to the fabric, and then cover it with dense satin stitches.
The padding underneath gives the fruit a raised, realistic volume.
Add tiny white French knots for seeds and detached chain stitches (lazy daisies) for the green topper.
6. Linen Accent: Aromatic Lavender Sprigs

To capture the texture of lavender blossoms, use bullion knots or a dense cluster of French knots.
Using a variegated purple thread will automatically create subtle shifts in color, giving the flowers a natural, sun-kissed appearance without any extra effort.
For the stems, a simple stem stitch works perfectly. Allow the stems to overlap for an organic, freshly-gathered look.
This delicate technique is perfect for upgrading home textiles and is one of our favorite minimalist table linen embroidery ideas.
7. Gilded Ginkgo: Metallic Thread on Black

Stitching with metallic thread can be challenging, but the result is unmatched elegance.
Work with a short length of thread—no more than 12 inches—to minimize twisting and fraying.
Use a needle with a larger eye to reduce friction on the thread.
For a smooth, painterly fill, use a long-and-short stitch. This technique allows you to blend stitches seamlessly, creating a solid, lustrous surface that glows against dark fabric.
8. Graphic Pear: Minimalist Line Art

This modern design uses negative space as a key element.
First, create the outline of the pear using a crisp backstitch.
Then, instead of a traditional fill, use long vertical straight stitches, leaving space between them. This technique is sometimes called voiding, and it creates a light, graphic effect.
The key to a polished look is ensuring your vertical stitches are perfectly parallel and evenly spaced.
9. Strap Detail: The Delicate Fern Frond
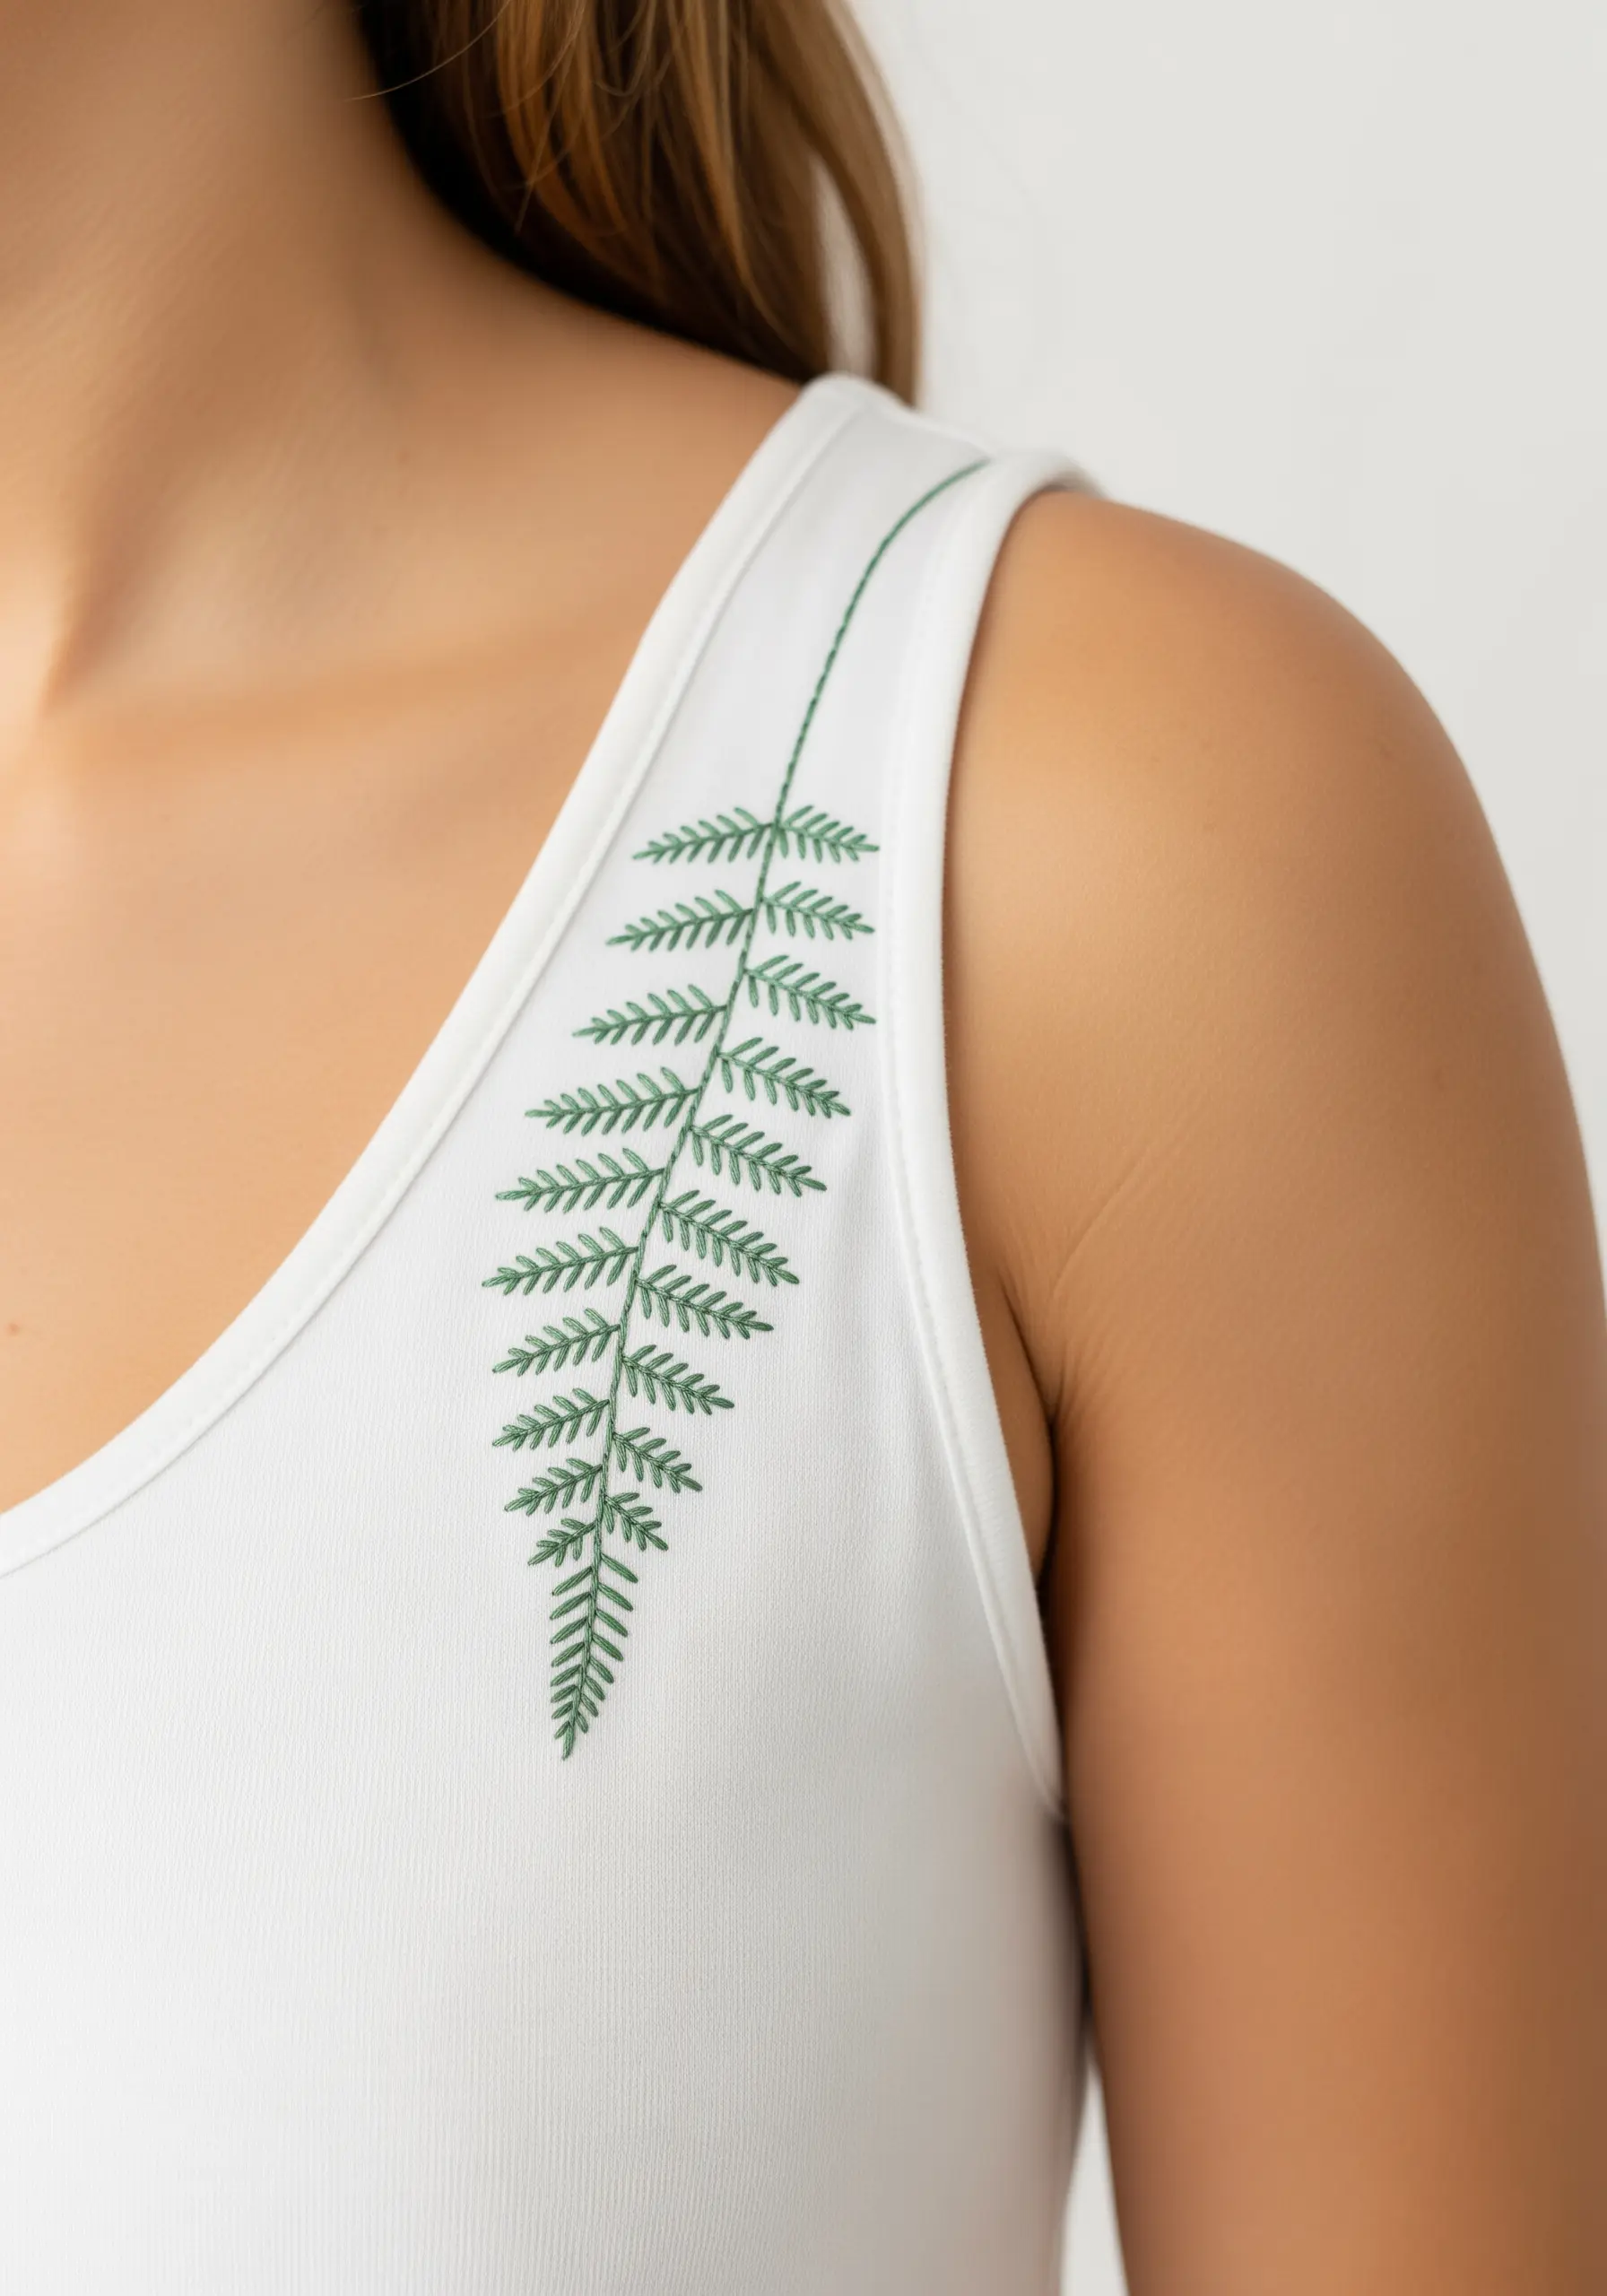
Integrate your embroidery into the garment by following its existing lines, like a strap or a seam.
This placement feels thoughtful and intentional.
For the fern, use a central stem stitch for the main stalk.
Create the individual leaflets using a fly stitch—it perfectly mimics the shape of a fern frond with a single, efficient motion.
10. Cuff Contrast: Playful Banana Motif
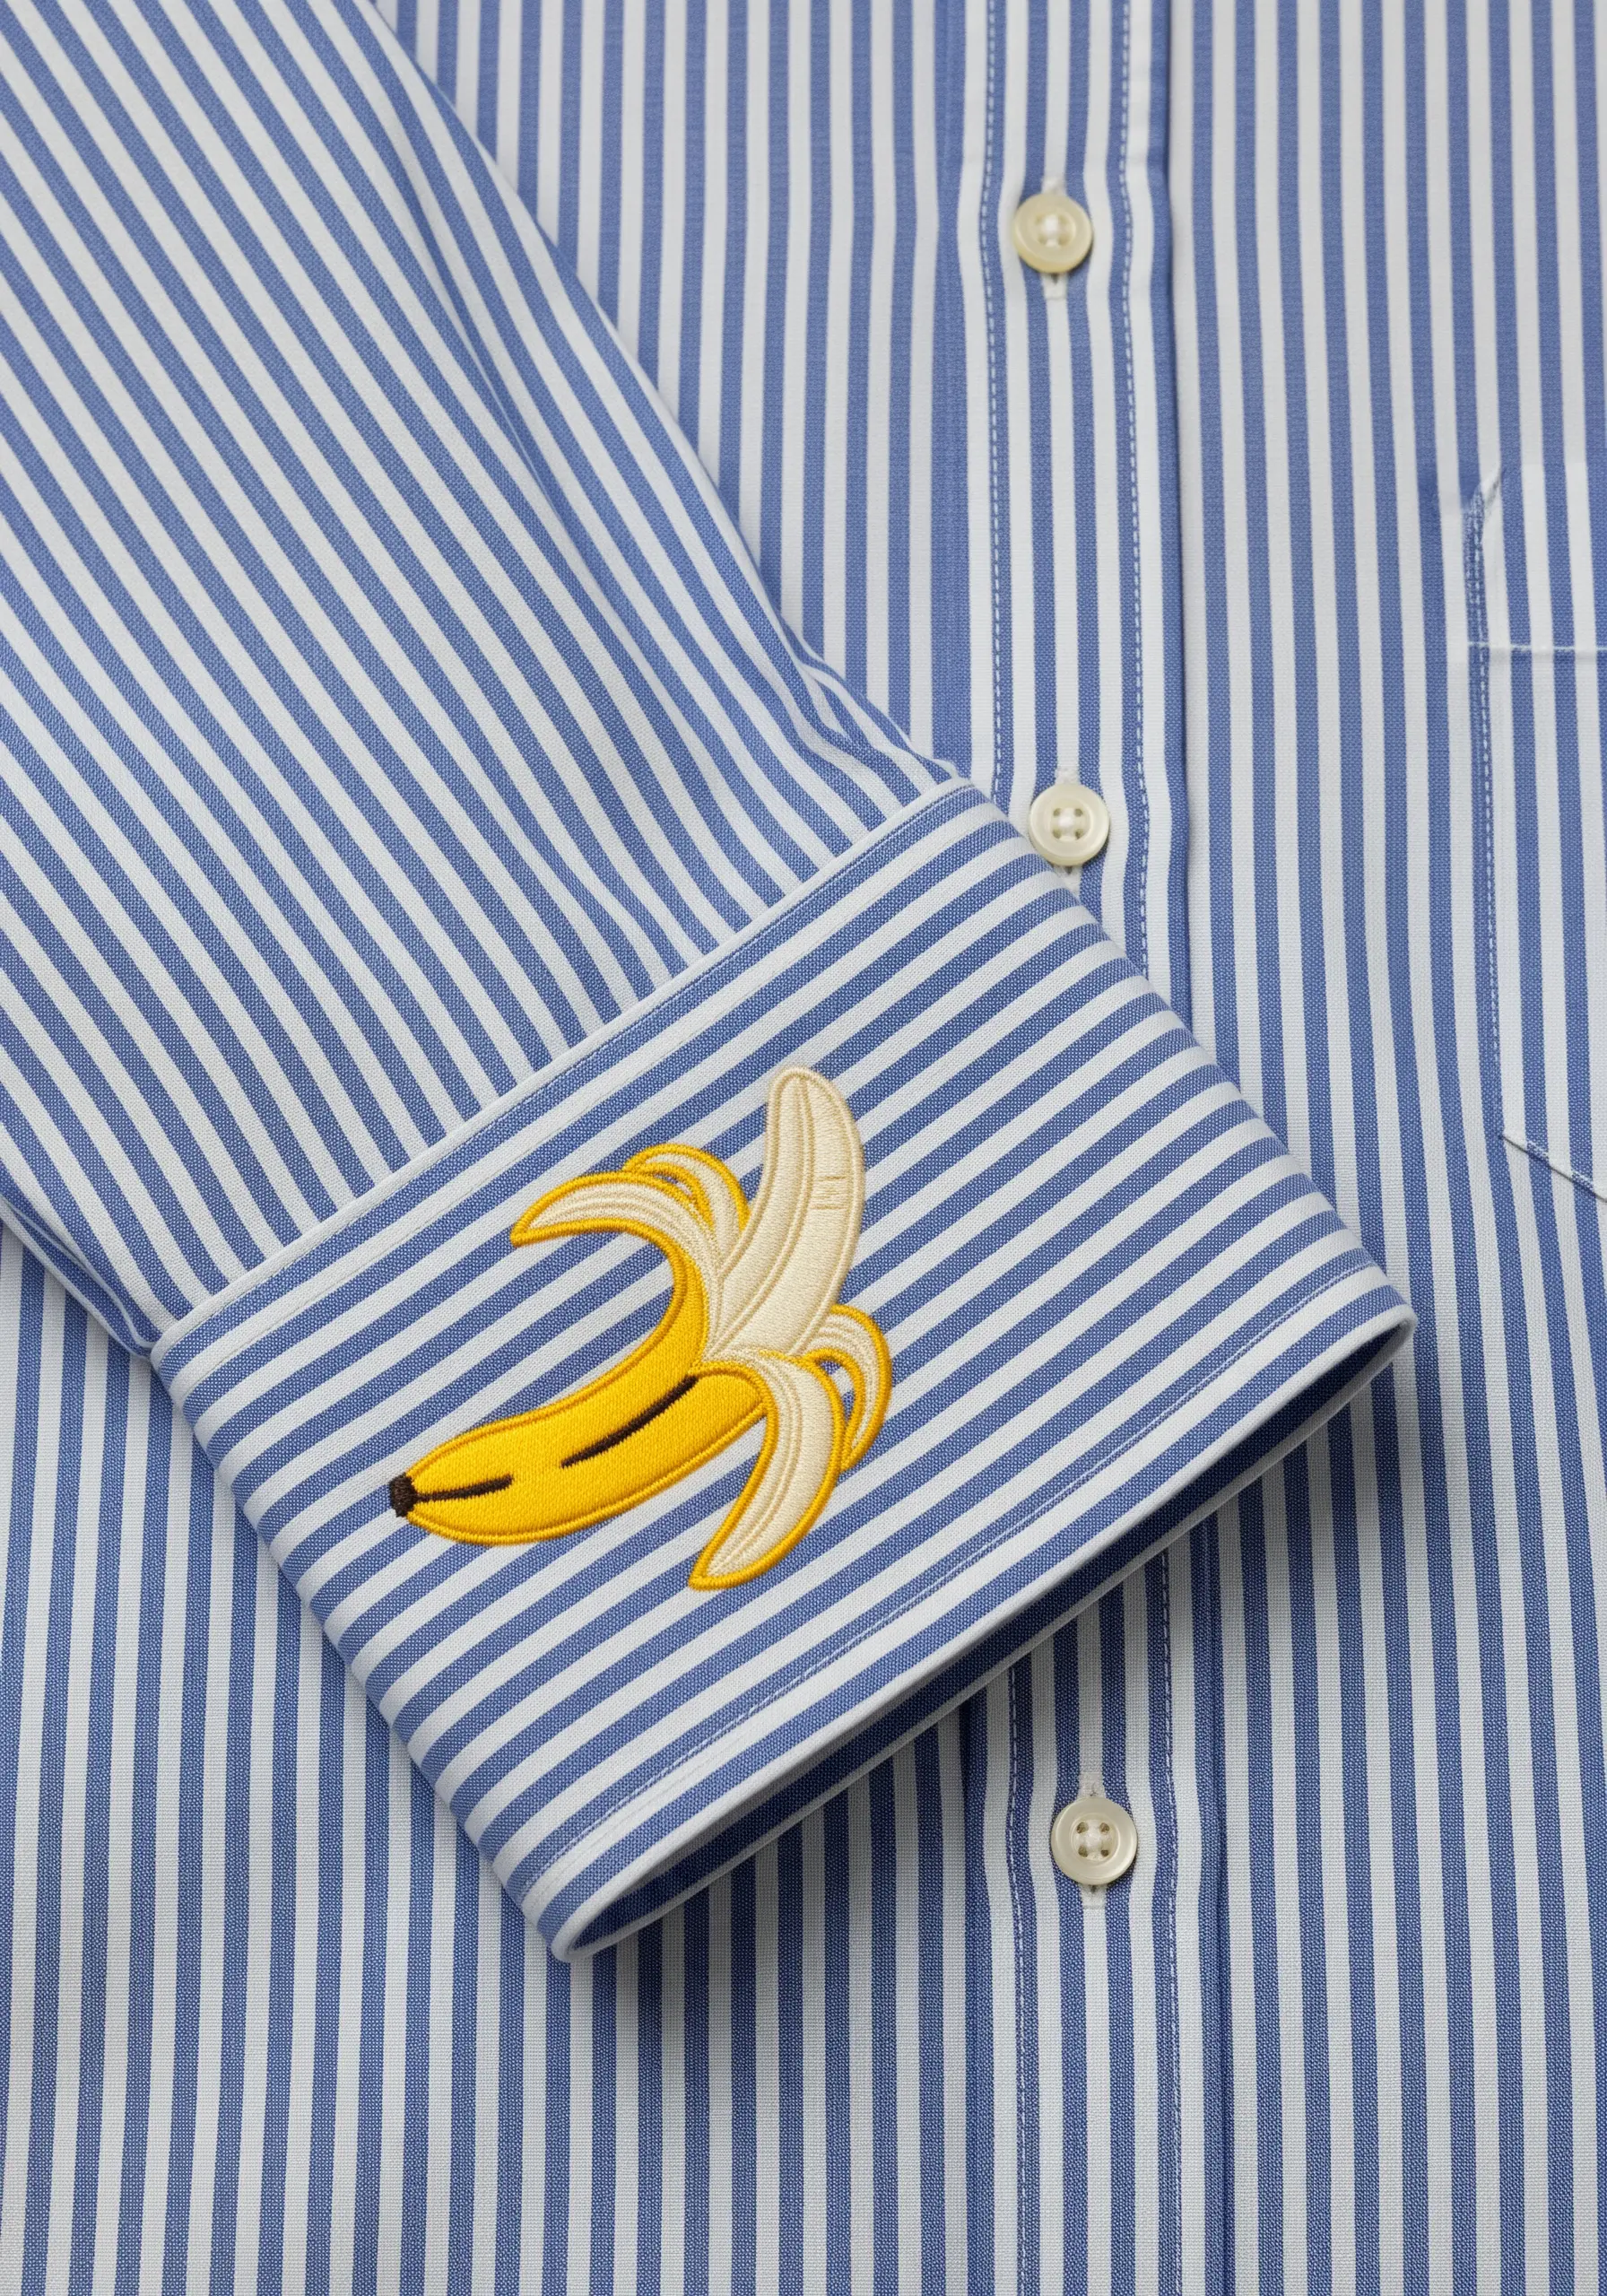
To ensure your embroidery stands out on a patterned fabric, you need a strong outline.
Use a thick satin stitch border to create a clean separation between your motif and the background stripes.
Create dimension within the banana by using two shades of yellow for the peel—a brighter tone for the outside and a paler one for the inside.
A slightly off-white thread for the fruit itself adds a final touch of realism.
11. Lapel Art: The Architectural Artichoke
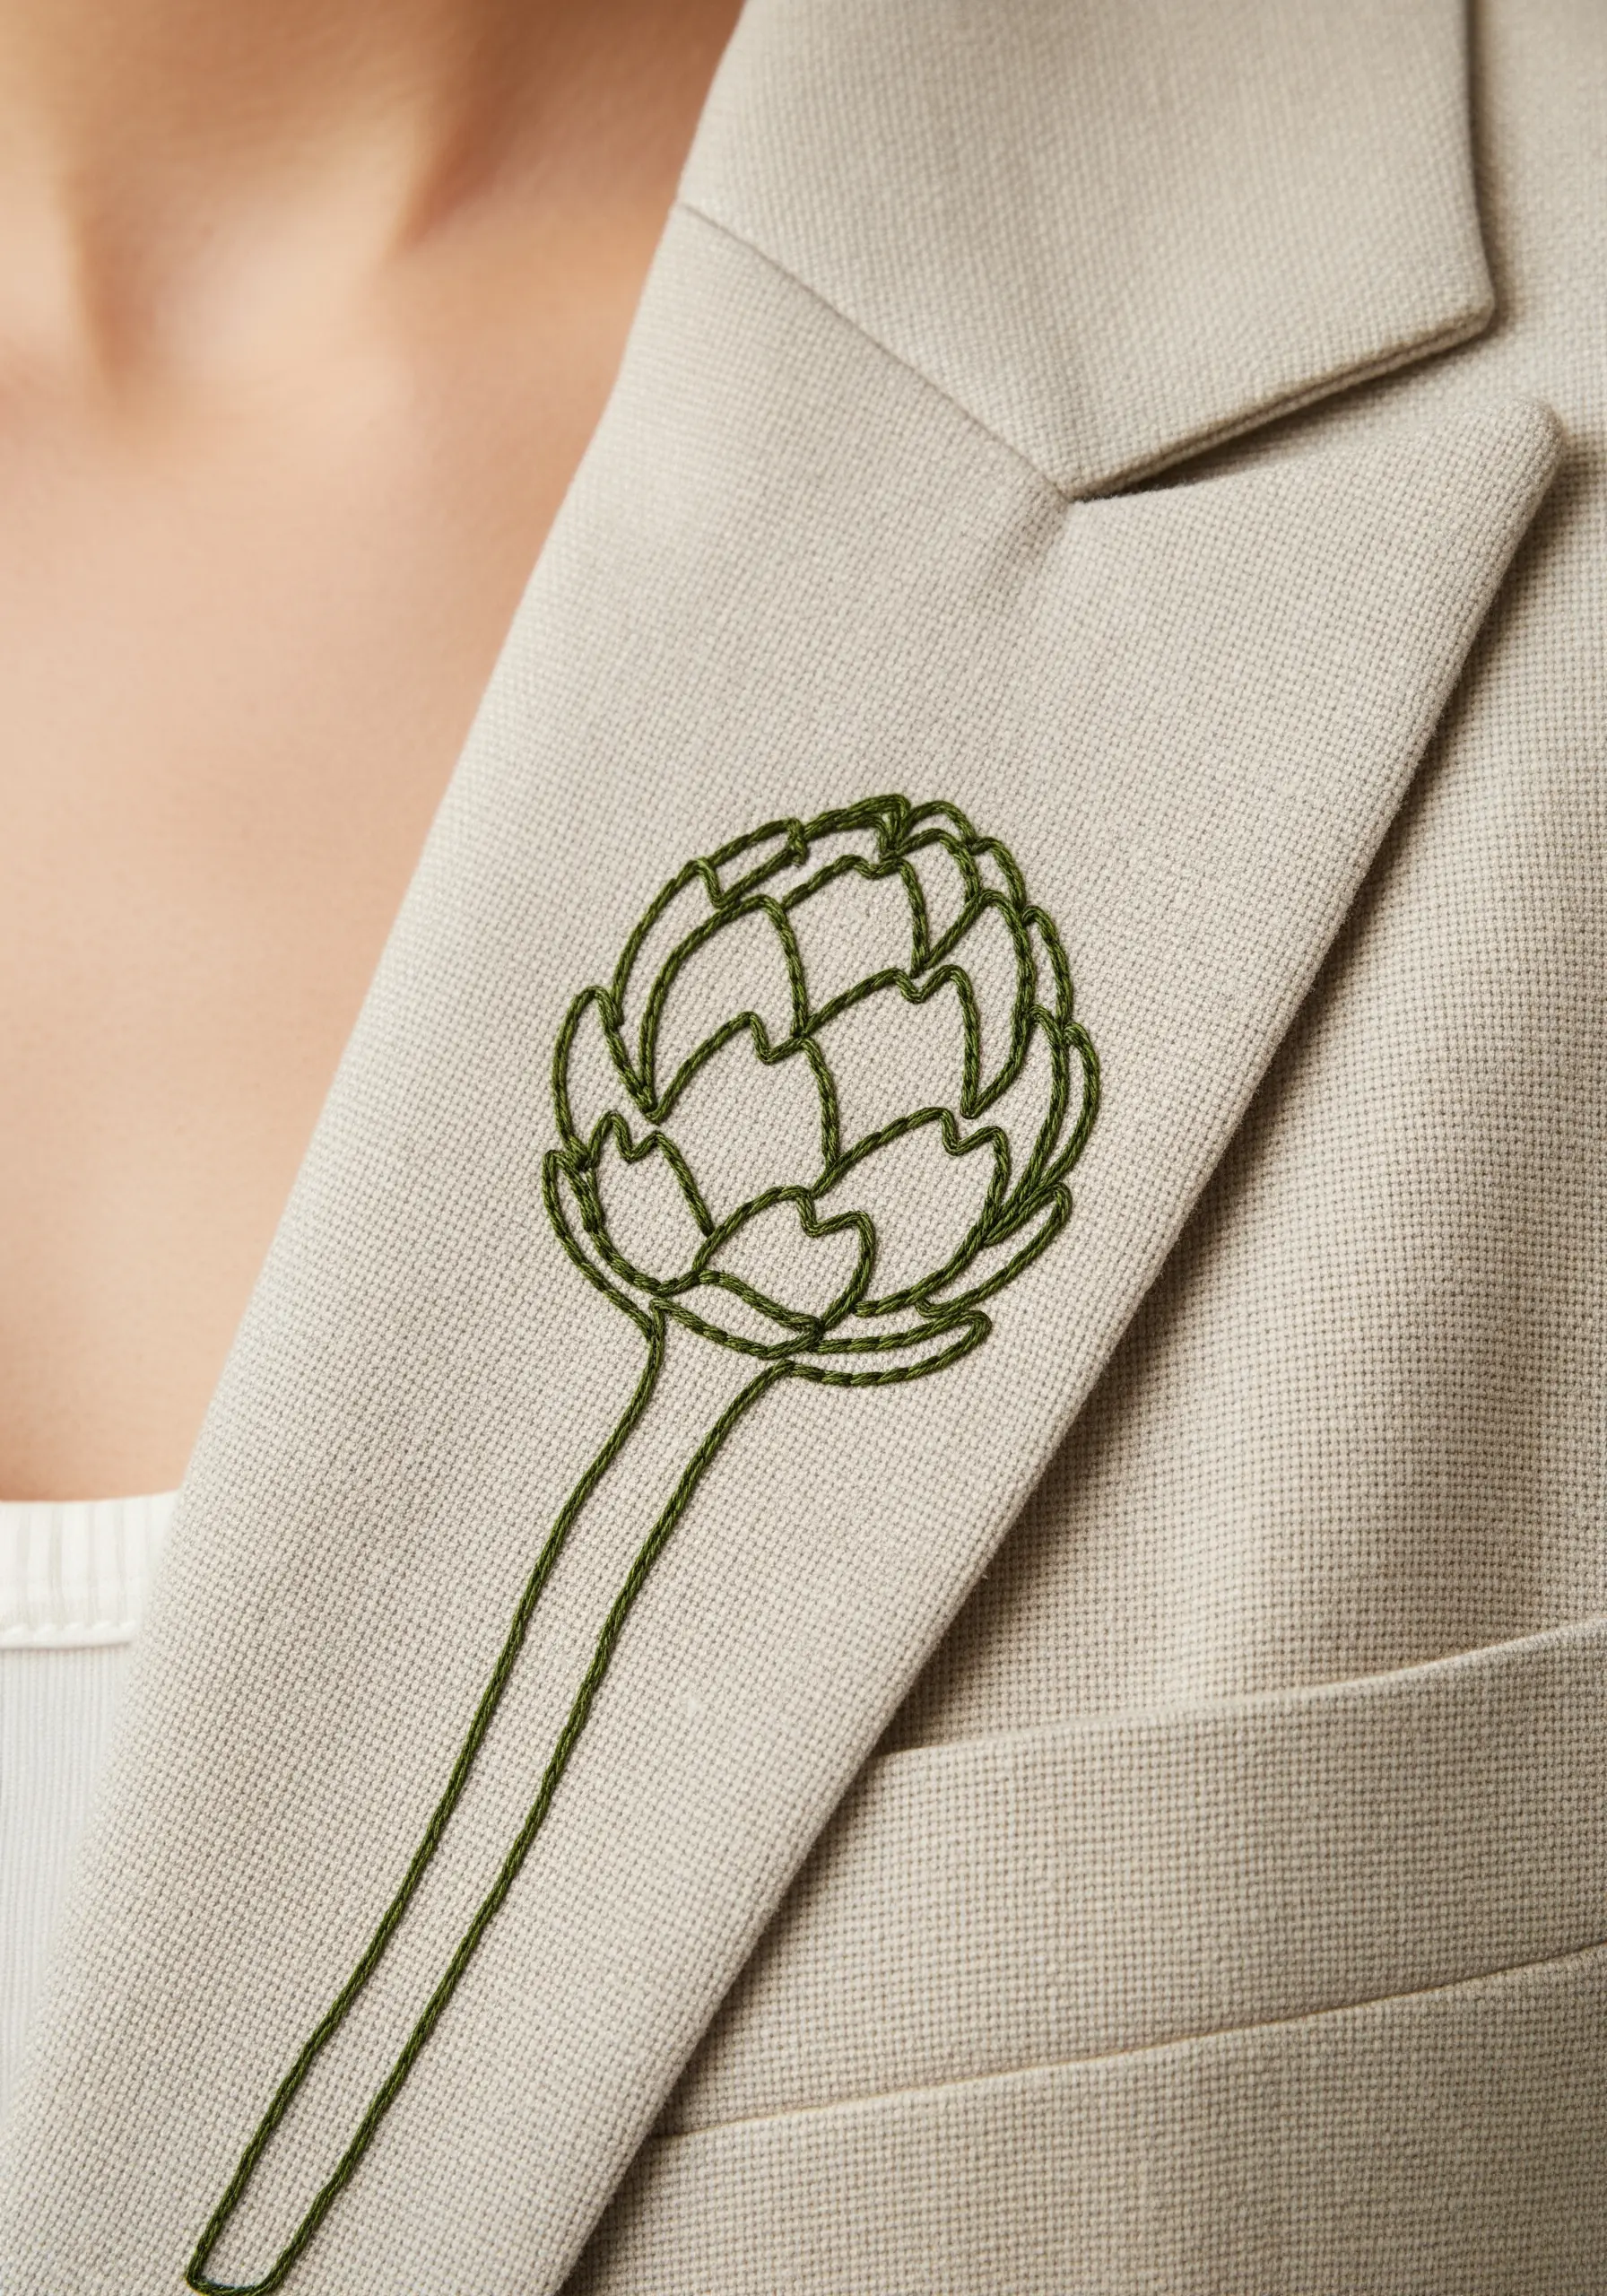
A single, clean line drawing can turn a tailored piece into wearable art.
For a smooth, cord-like outline, use a whipped backstitch. First, you create a standard backstitch line, then you whip a second thread around it without piercing the fabric.
This technique gives the line more substance and a perfectly smooth finish, which is ideal for a sophisticated accent on a blazer lapel.
12. Textured Fig: A Study in French Knots

This design is a masterclass in creating rich, engaging texture.
Bring the interior of the fig to life with a dense cluster of French knots using several shades of red, pink, and gold.
This mimics the natural, seedy texture of the fruit beautifully.
Contain the beautiful chaos of the knots with a clean, sharp satin stitch border around the rind. This contrast between texture and smoothness is what makes the design so successful.
13. Espadrille Embellishment: Blueberry Clusters

To give these blueberries a plump, three-dimensional form, use a padded satin stitch.
Lay down a few small straight stitches as a base layer within the berry’s shape. Then, cover this padding with your final satin stitches.
The extra volume makes the berries pop off the fabric.
Tiny white French knots for highlights and fishbone stitch for the leaves provide contrasting textures that complete the look.
14. Bold Backpiece: Abstract Foliage

For a large-scale design on the back of a jacket, you need techniques that make an impact.
Use a thick chain stitch for the main outlines to create a bold, rope-like texture.
For the smaller interior details, fill the spaces with satin stitch dots or dashes.
This contrast between a heavy line and a dotted fill creates a modern, graphic style that is both fast to stitch and visually striking.
15. Hatband Herbology: Simple Rosemary

This elegant rosemary sprig proves that the simplest stitches are often the most effective.
The entire design is created with just two stitches: a stem stitch for the central branch and straight stitches for the leaves.
The key to a natural look is to vary the angle and length of your straight stitches, avoiding perfect symmetry.
This is a quick, beautiful, and durable way to customize summer accessories.
16. Pocket Pattern: Geometric Pineapple
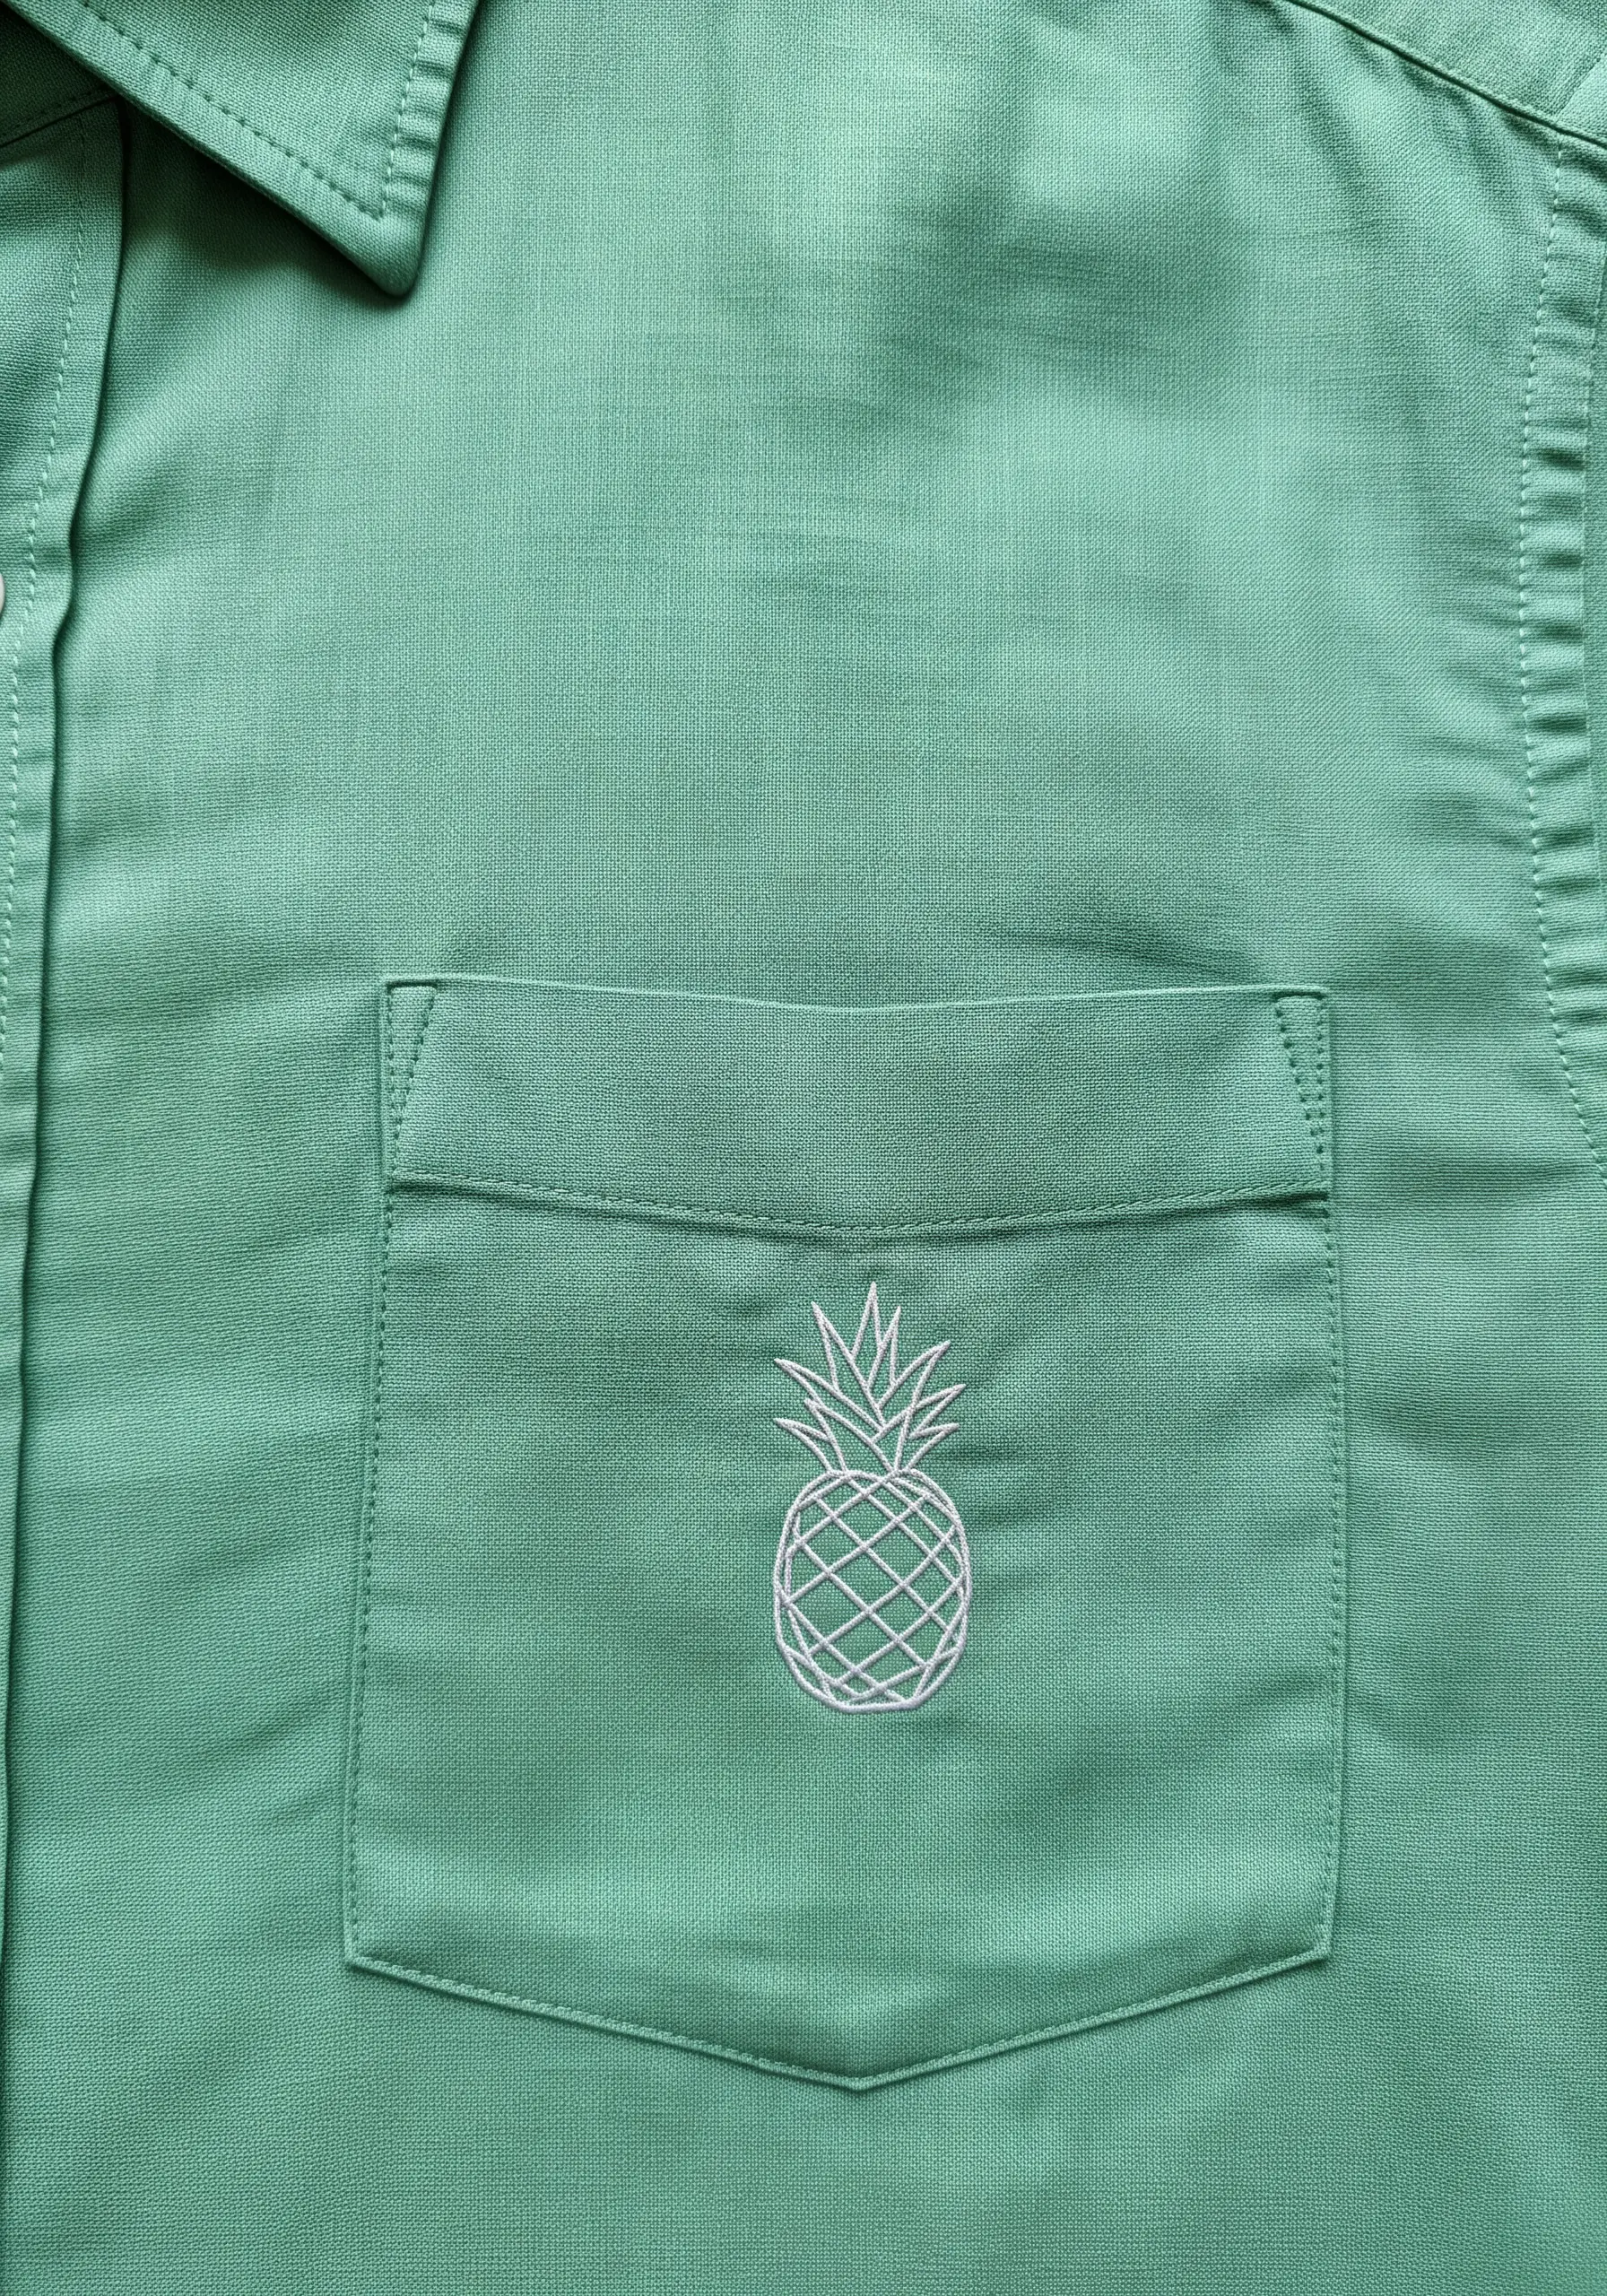
This design translates a pineapple into a clean, modern, geometric pattern.
Use a simple backstitch with two strands of floss for the entire motif.
Precision is everything here. Use a water-soluble stabilizer printed with your pattern to act as a perfect guide for your stitches.
This ensures your lines are straight and your cross-hatching is symmetrical, resulting in a crisp, professional finish.
17. Tonal Texture: Abstract Grape Cluster
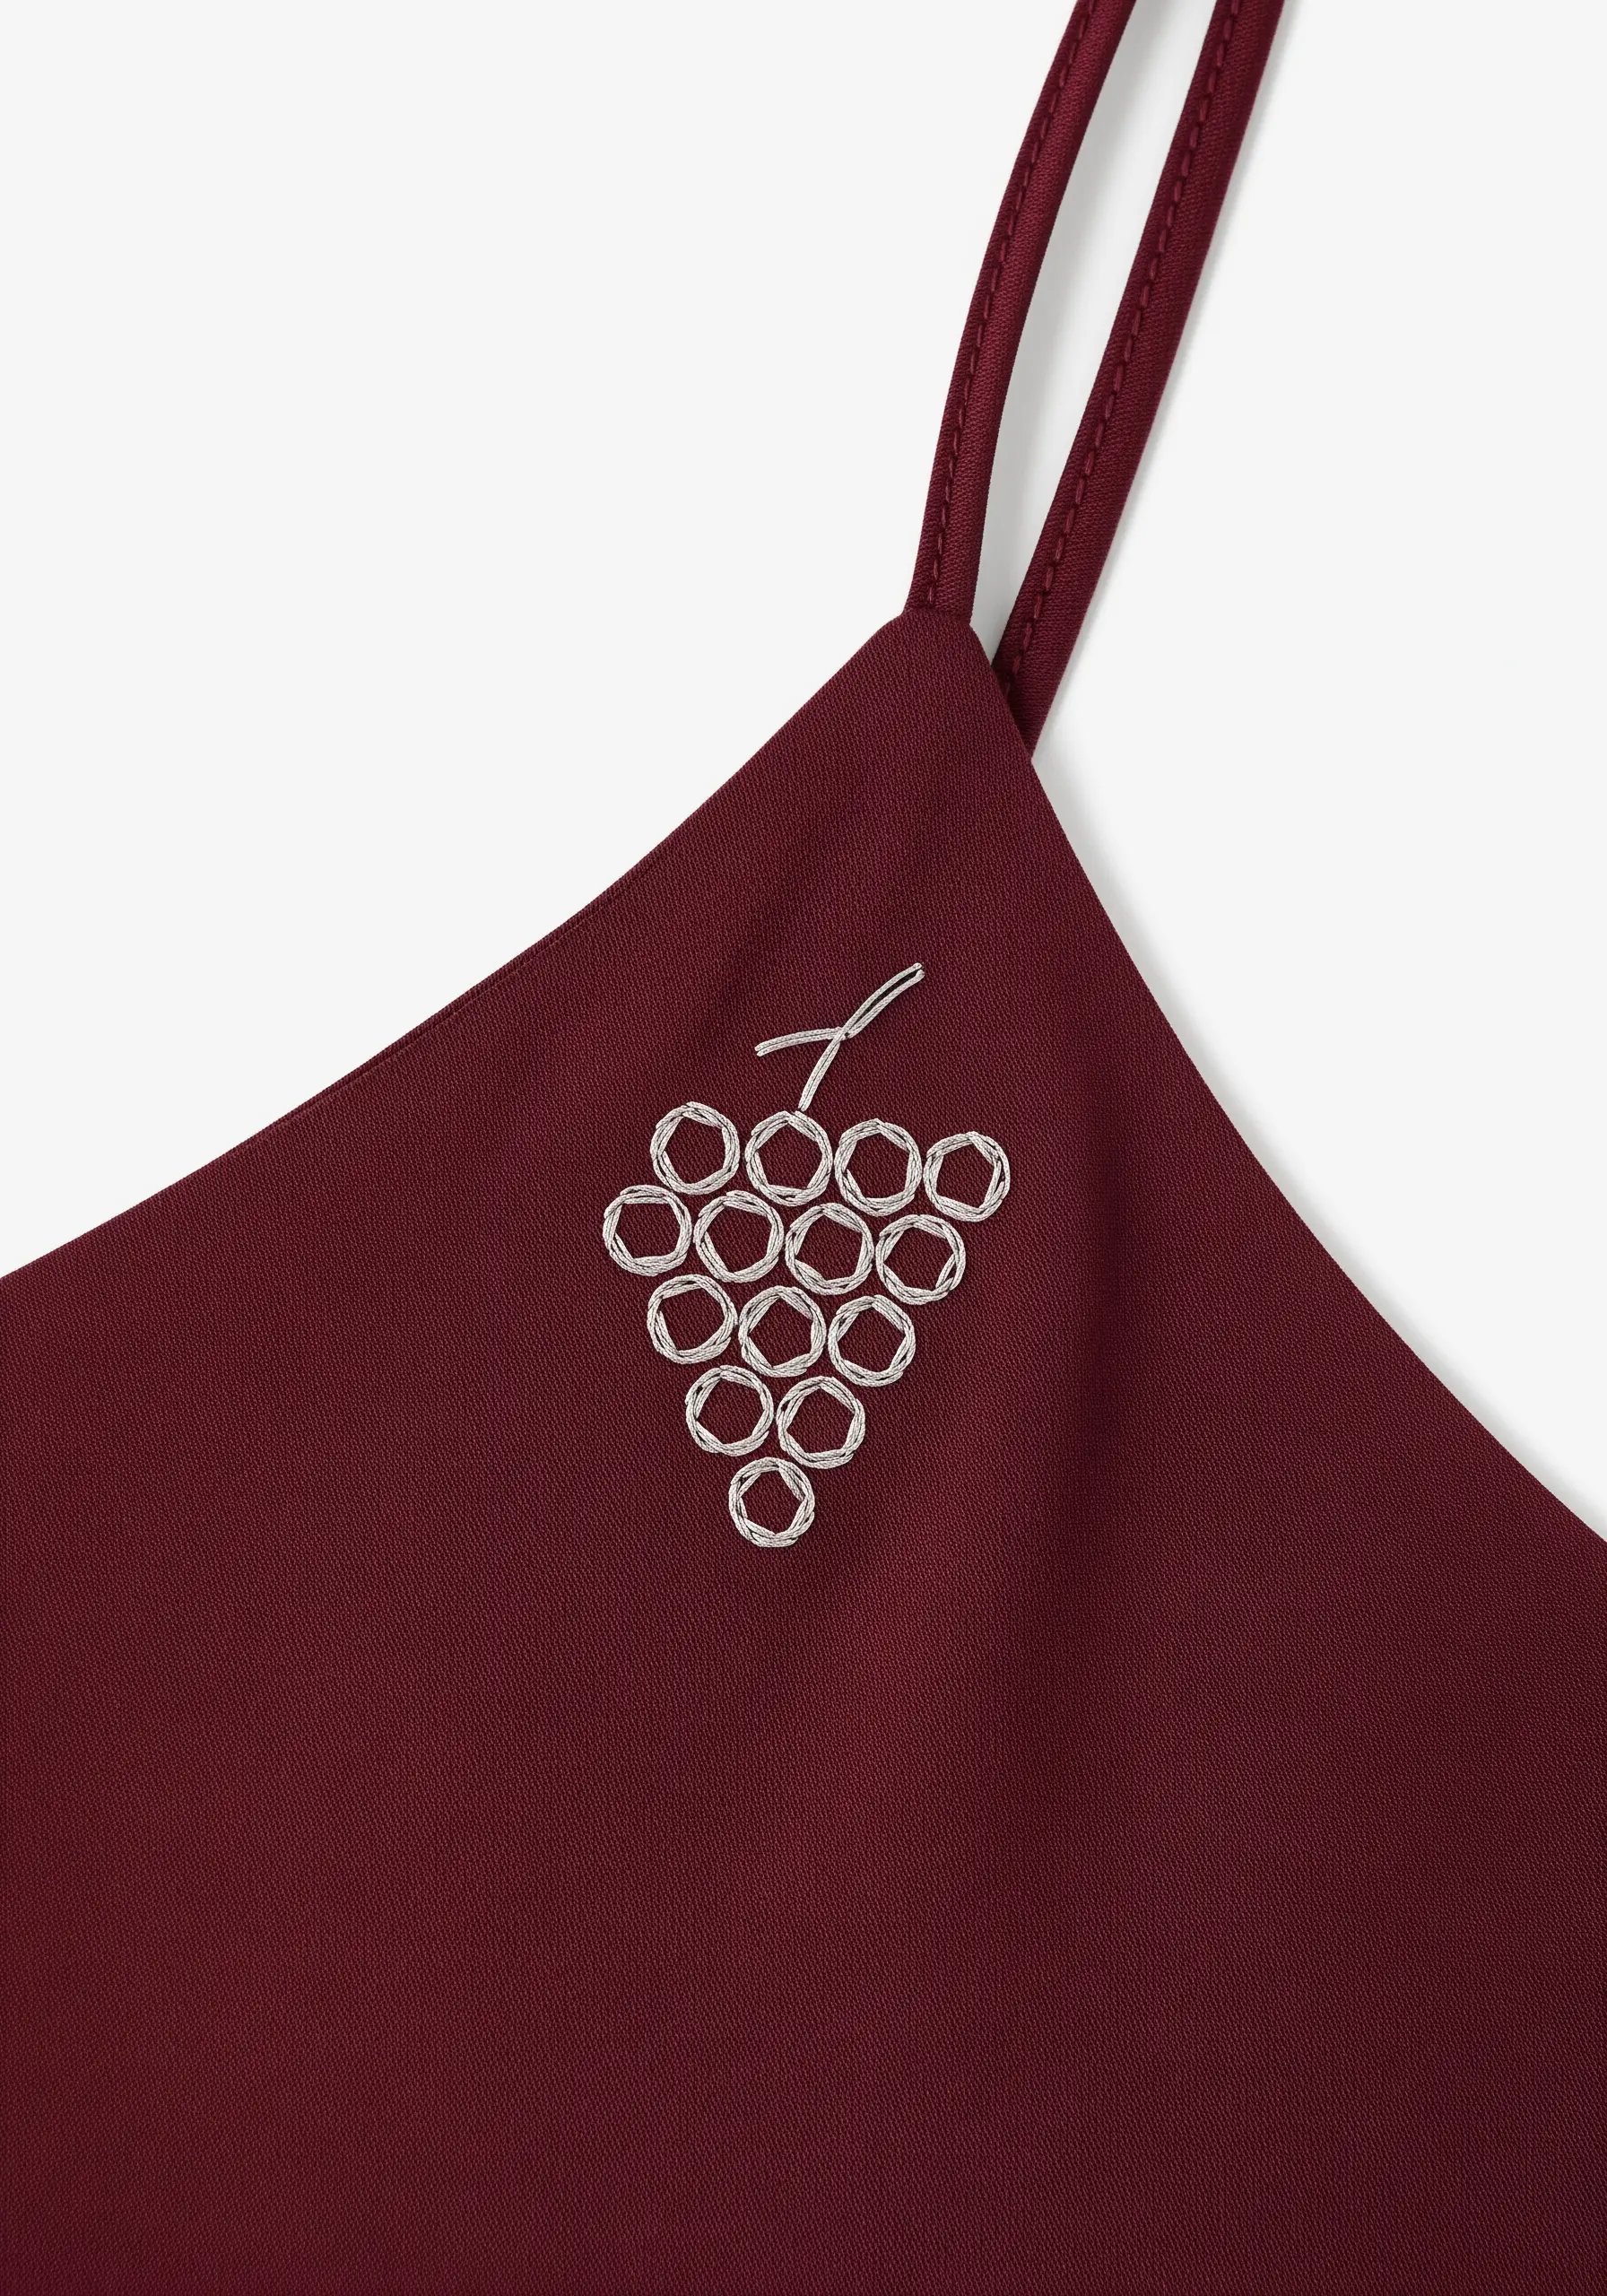
Create a sophisticated, subtle design by using a thread color that is only a few shades lighter than your fabric.
This tonal approach feels luxurious and modern.
The grapes are represented abstractly with detached chain stitches (lazy daisies) arranged in a cluster.
This minimalist technique proves that you don’t need bold colors or complex fills to create a beautiful and impactful design.
18. Tie-Strap Citrus: The Perfect Orange

Move beyond satin stitch and give your citrus a more realistic texture with a basket weave stitch.
This stitch creates a woven, slightly dimpled surface that beautifully mimics the look of an orange peel.
To ensure the motif is clearly defined, especially on a narrow strap, outline the entire shape with a crisp backstitch in a contrasting color.
This small step gives the piece a clean, professional edge.
19. Open Fishbone Stitch for Airy Leaves

Instead of filling your leaves with dense satin stitch, try this lighter alternative.
The open fishbone stitch uses the same angled technique, but you intentionally leave space between each stitch.
This creates a skeletal, delicate look that allows the background fabric to become part of the design itself.
It’s an excellent choice for dark fabrics where a lighter thread can create a striking, high-contrast effect.
20. Hemline Accent: Pomegranate Repeat
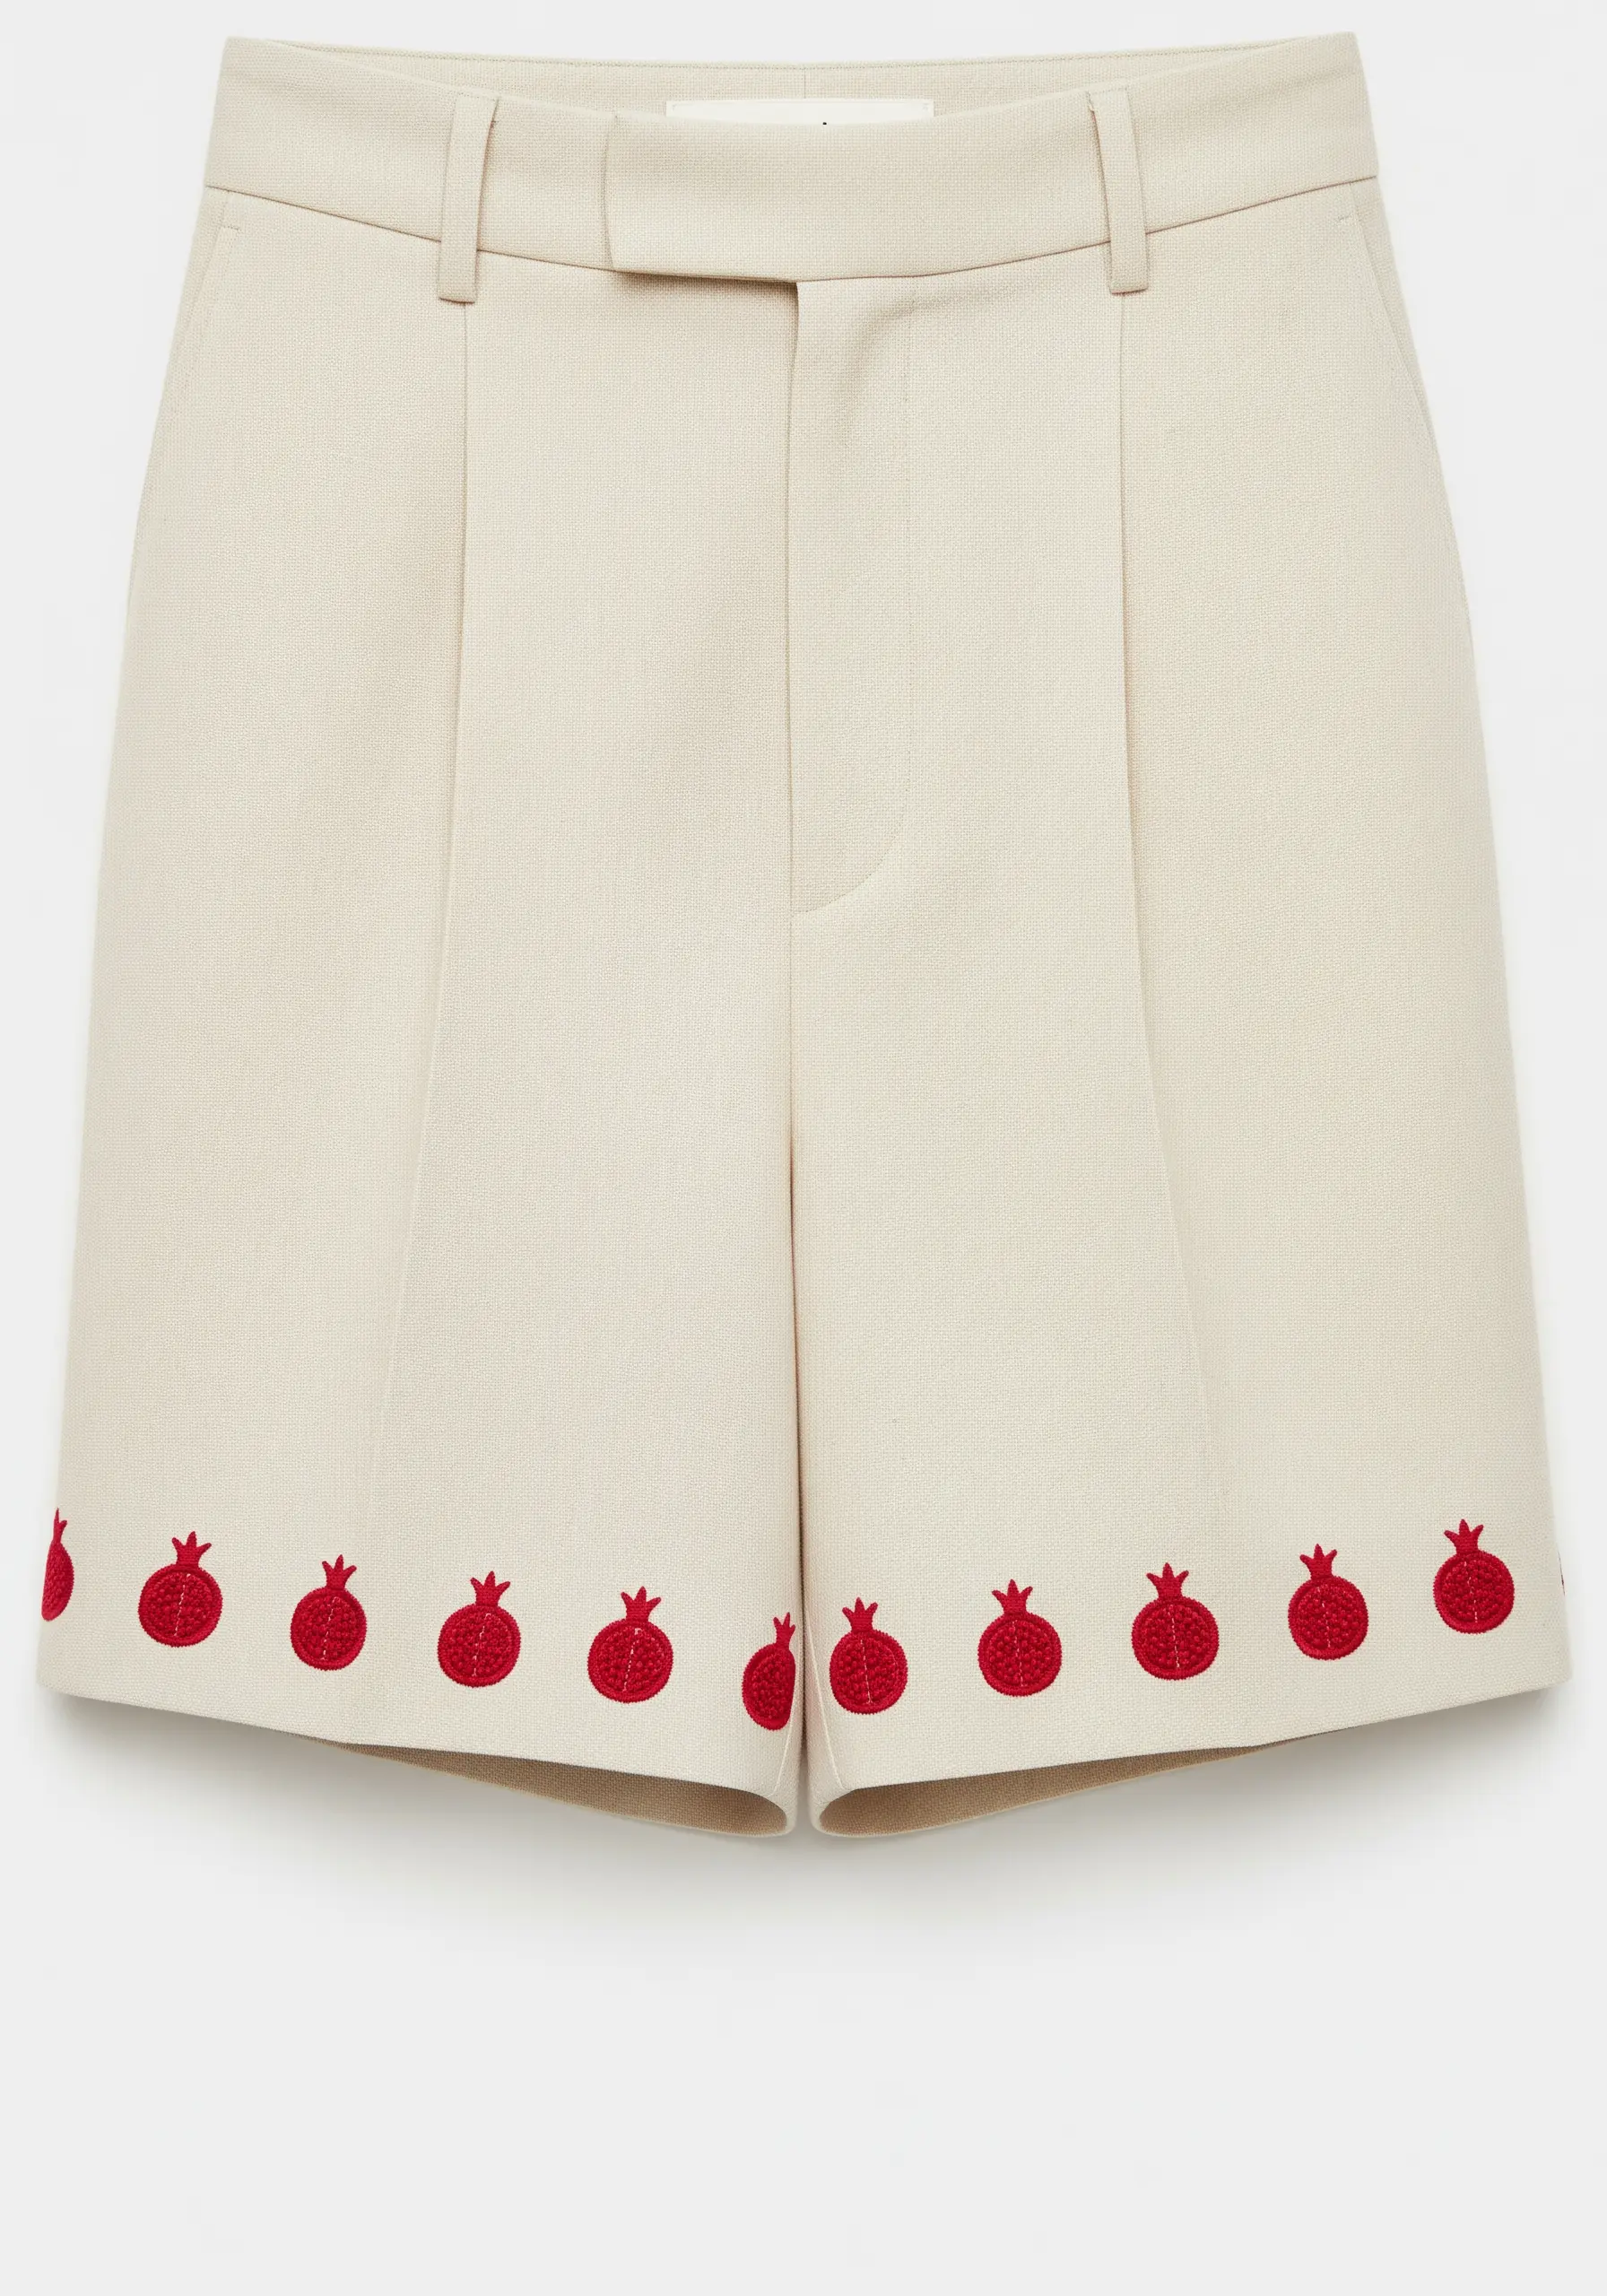
Adding a repeating motif along a hemline instantly gives a garment a custom, high-fashion feel.
To ensure your pattern is perfectly spaced and consistent, create a small stencil from cardstock or use a heat-erasable pen to mark out the placement before you begin stitching.
A simple satin stitch fill in a bold, contrasting color is all you need to create a playful and rhythmic border.
21. Playful Pocket: A Slice of Summer
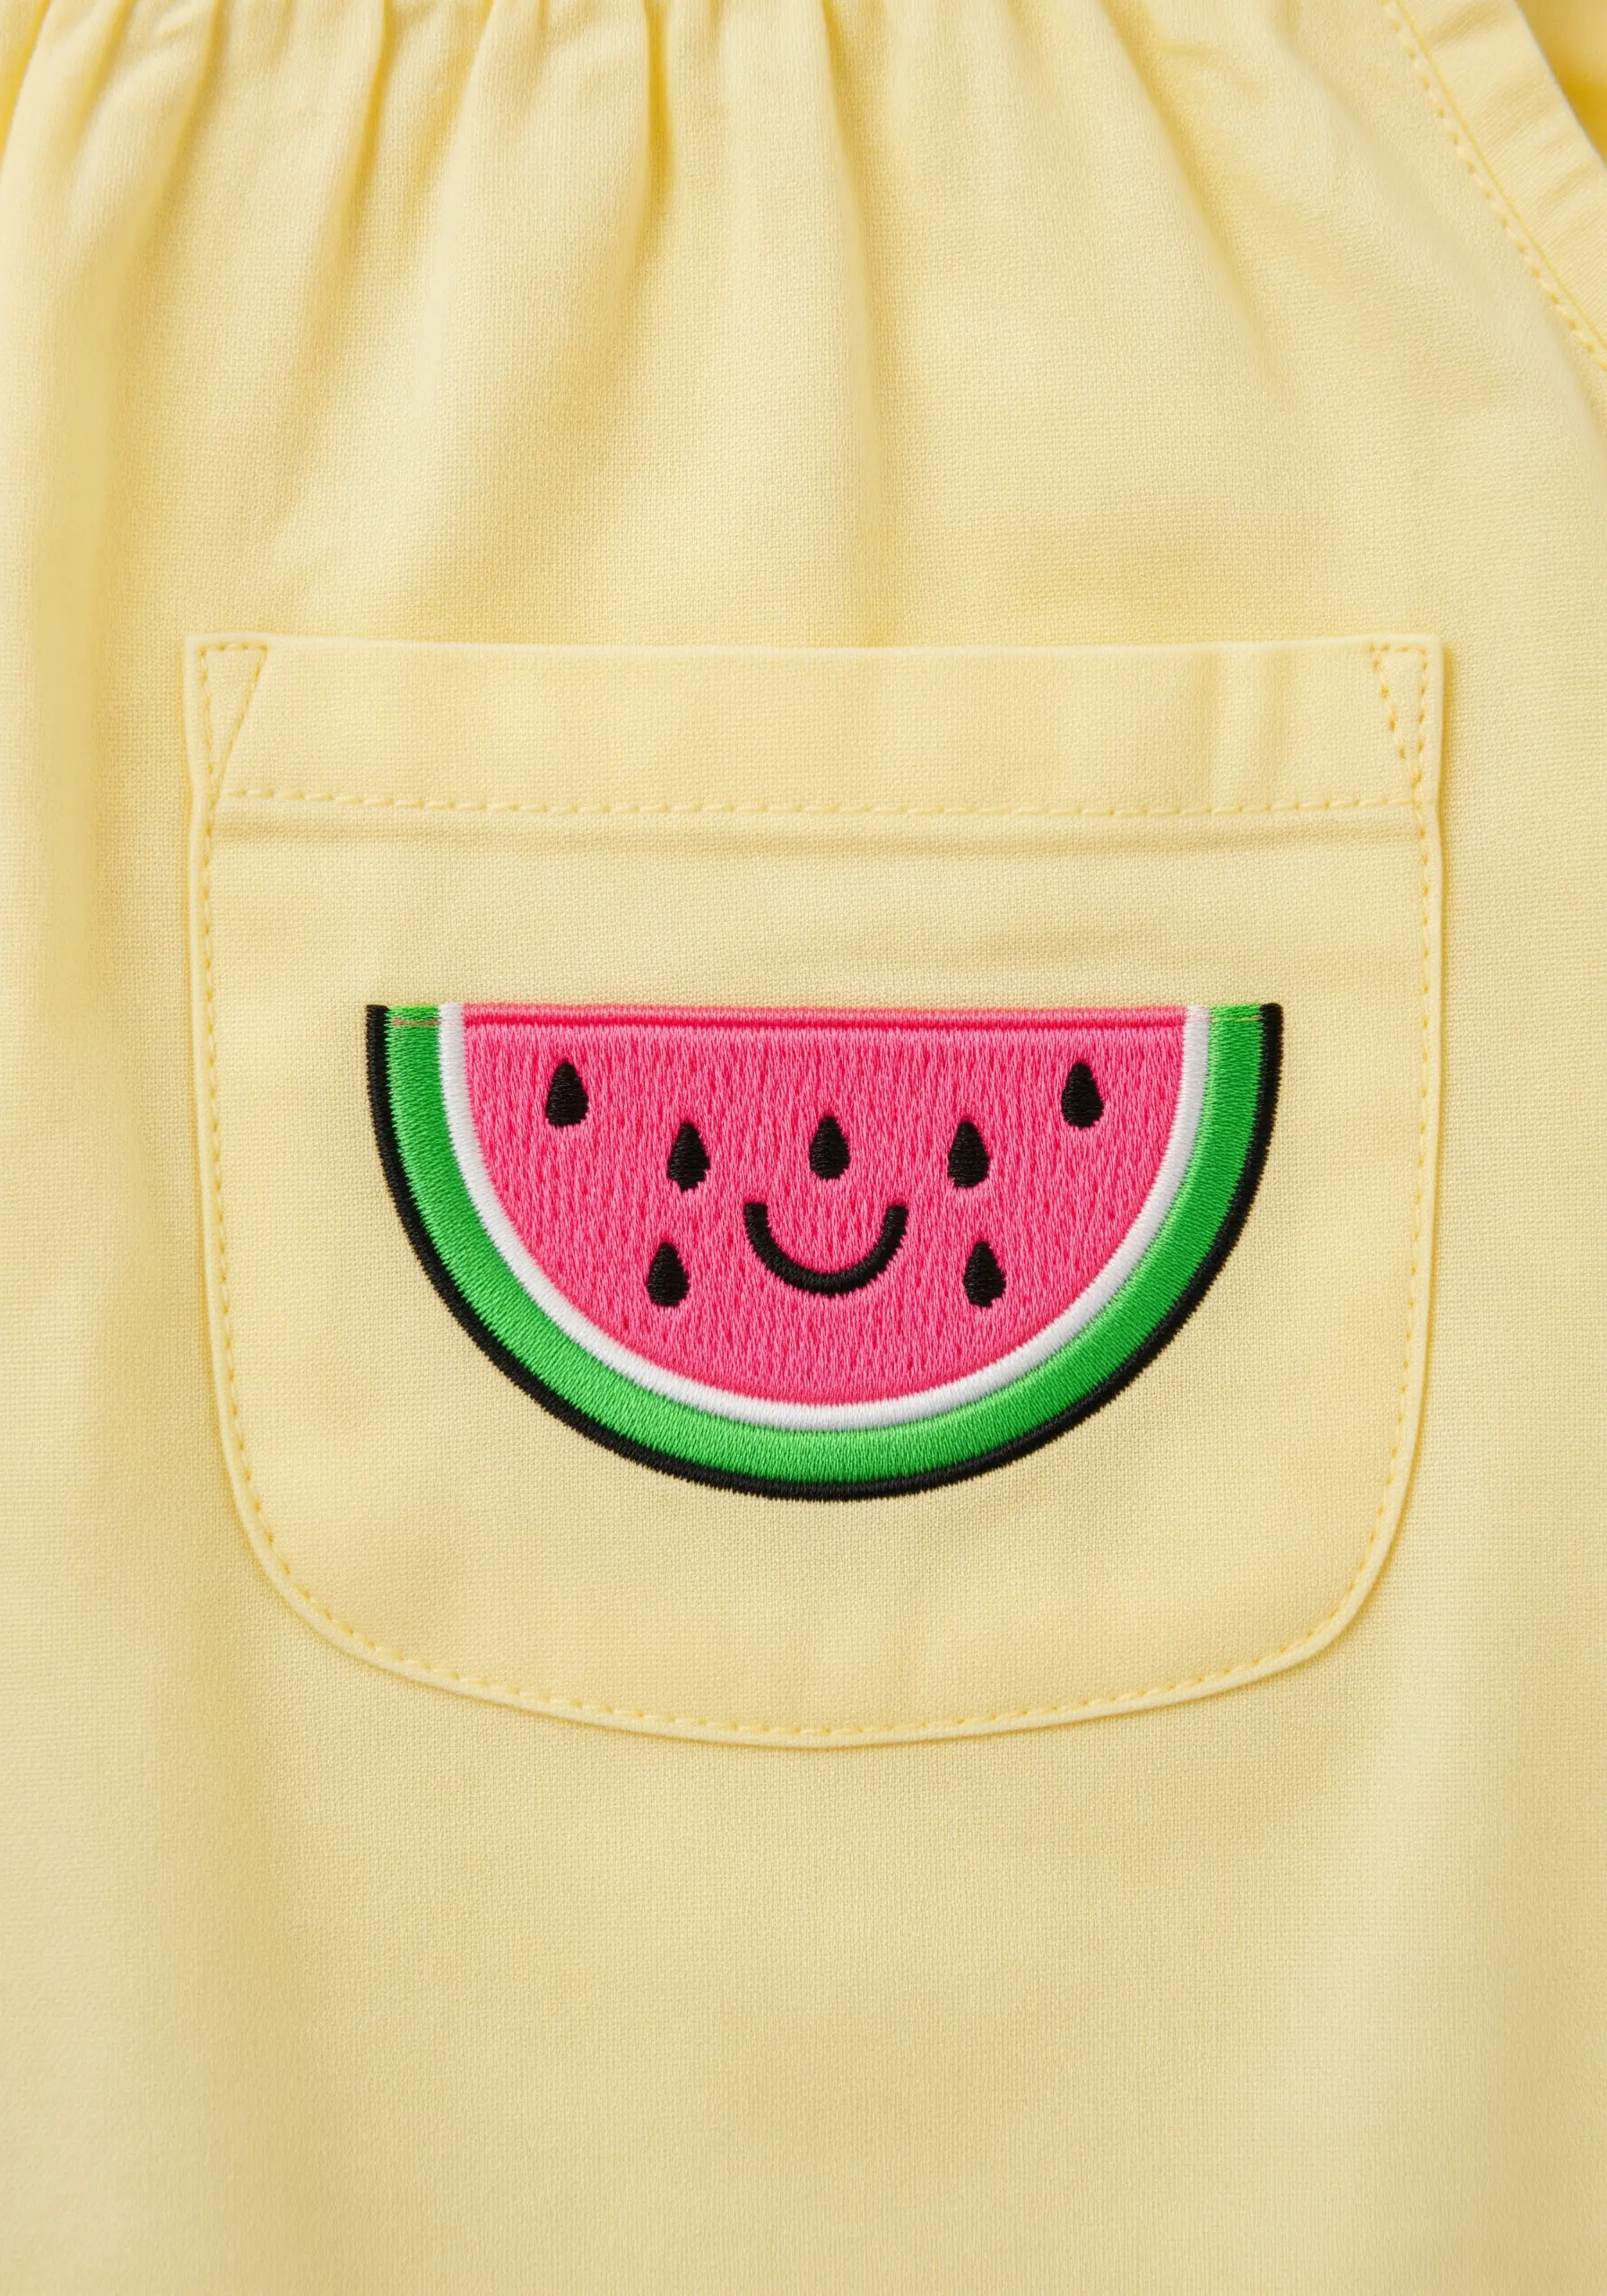
The charm of this watermelon slice comes from its crisp, graphic quality.
Achieve this by first filling the pink and green areas with a dense, smooth satin stitch.
The secret to the clean finish is to add the black backstitch outline *after* the fill is complete. This technique, called outlining, covers any minor imperfections in your satin stitch edges and makes the colors pop.
22. The Gossamer Leaf: Delicate Veining

This ethereal, lace-like effect is created using free-motion machine embroidery on a water-soluble stabilizer, where the fabric is washed away leaving only the thread.
To achieve a similar look by hand, stitch your leaf vein pattern onto a sheer fabric like organza or tulle using a backstitch.
Carefully trim around the embroidered shape and then appliqué it onto your garment for a stunning, layered effect.
23. Filled vs. Outline: The Avocado Duo
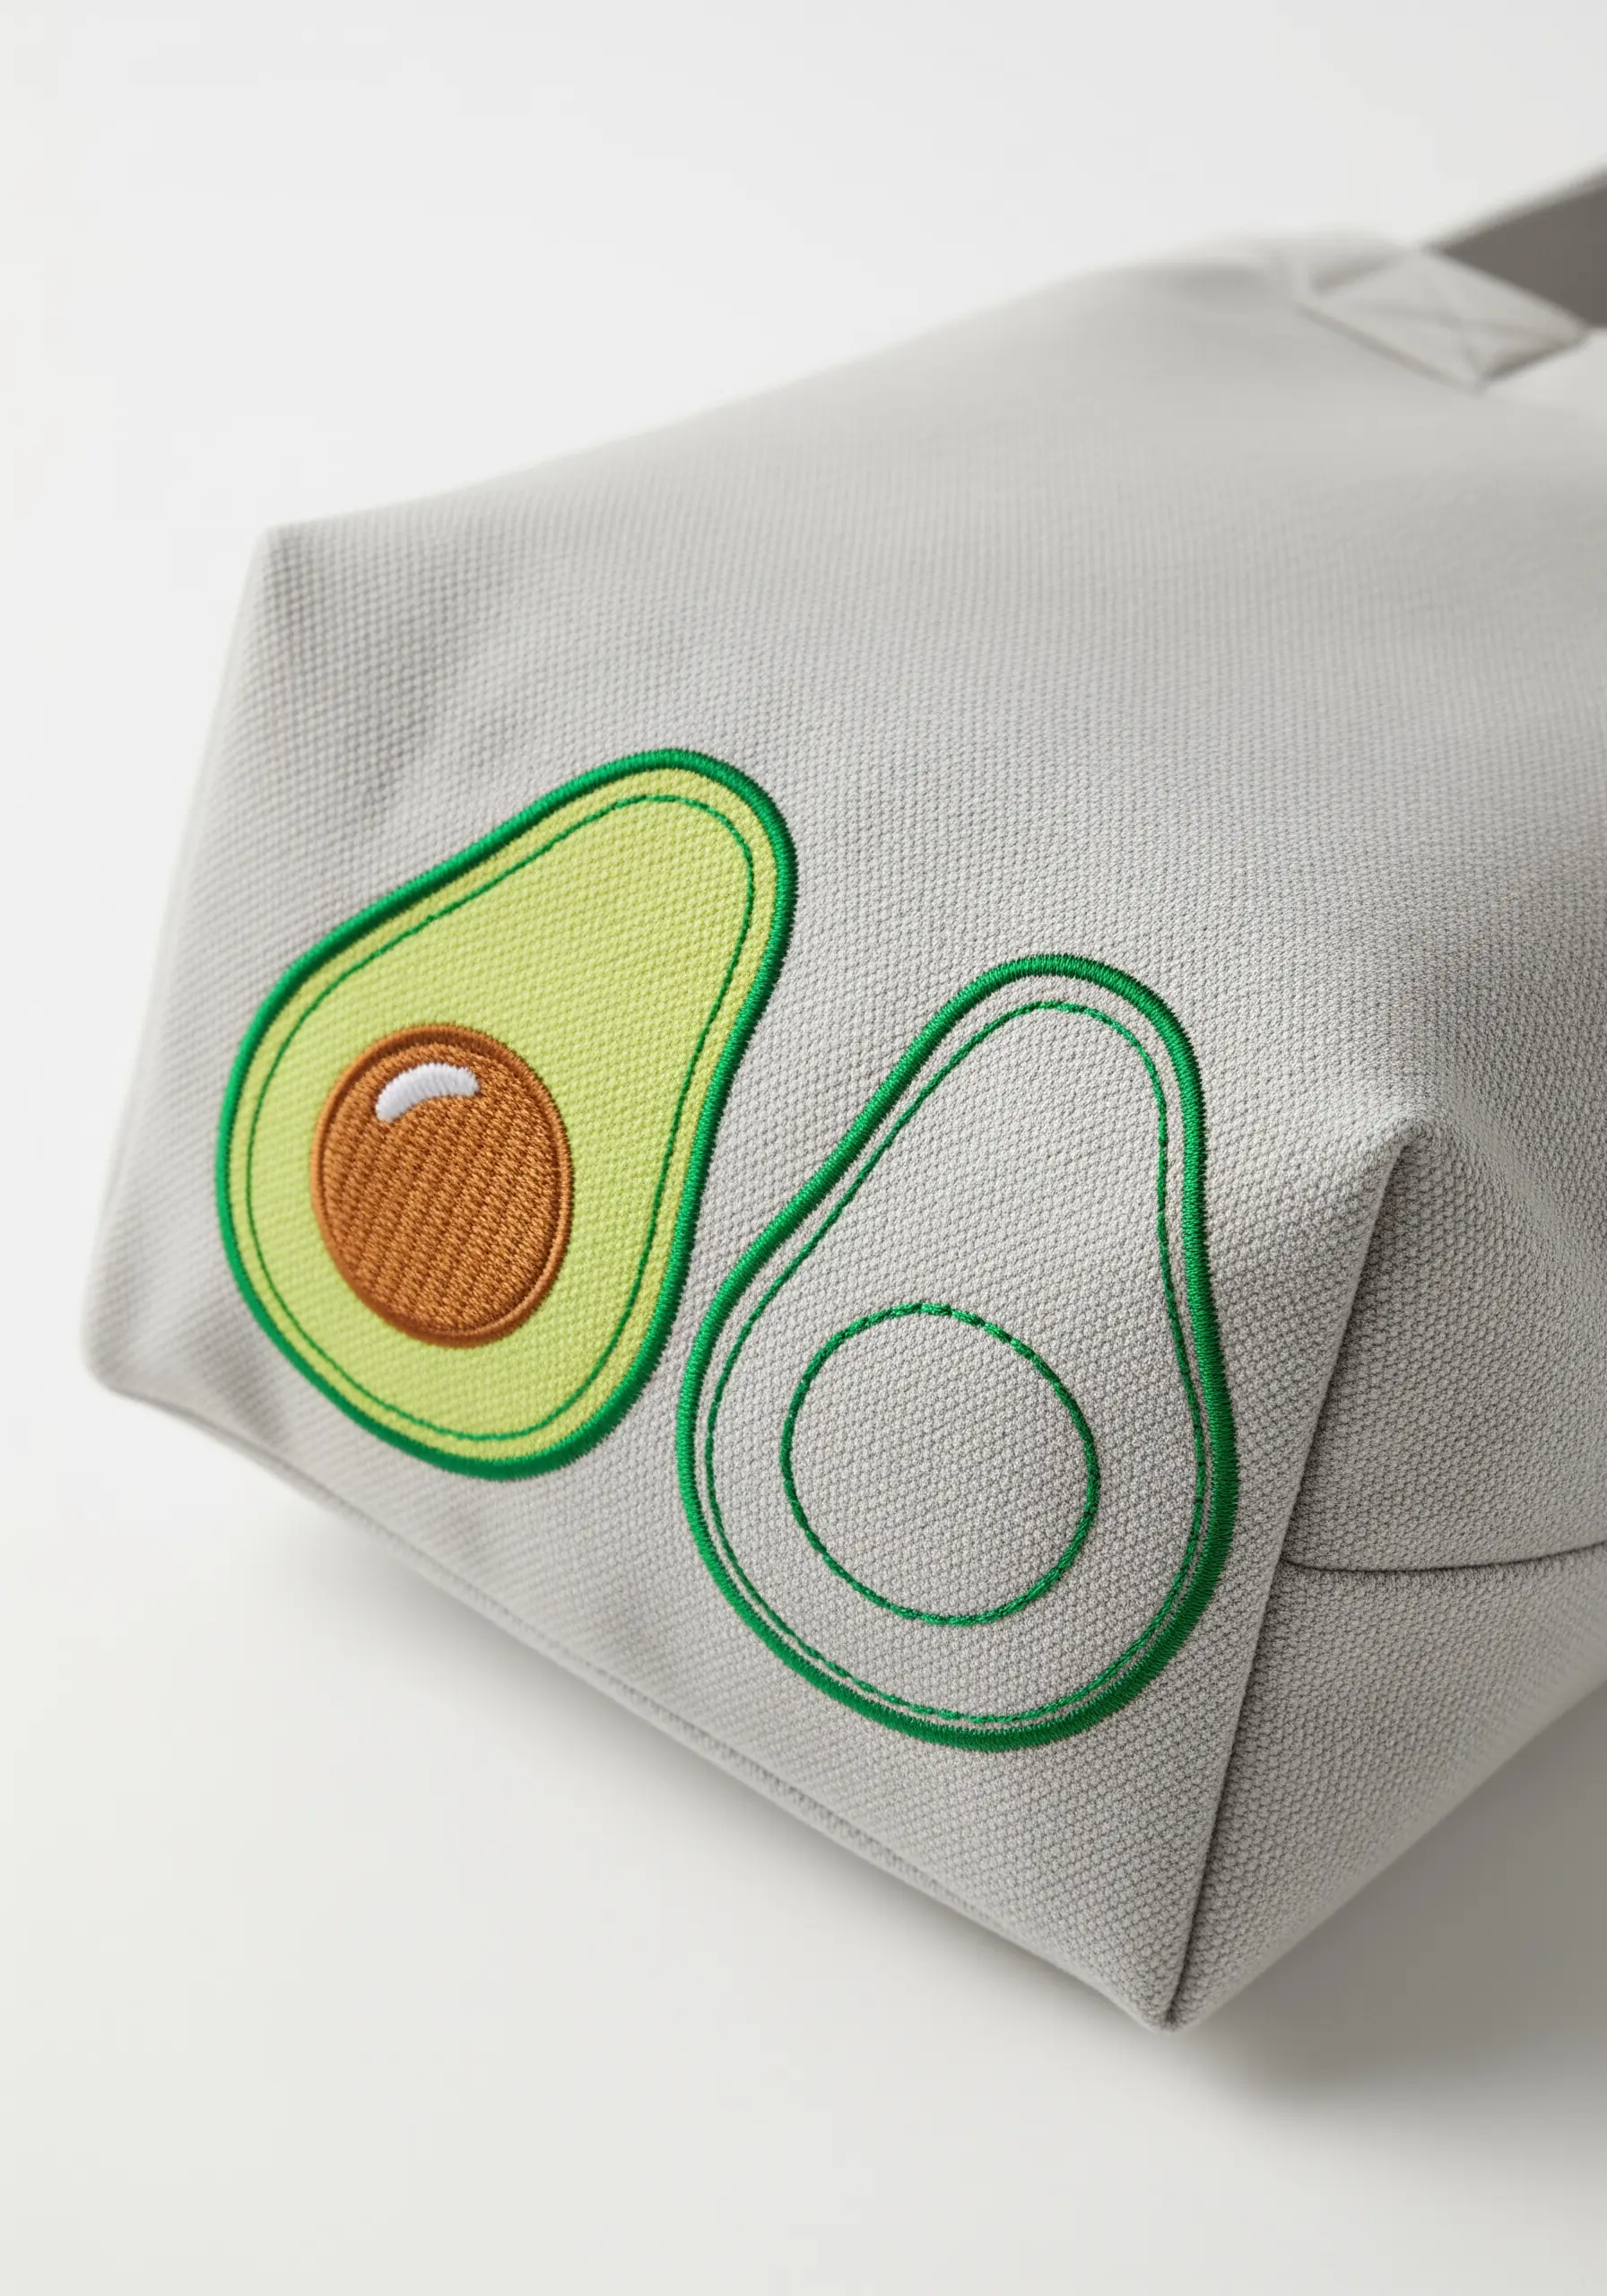
Create a dynamic composition by pairing a filled motif with its simple outline.
This technique adds visual interest and a modern, deconstructed aesthetic to your design.
Use a smooth satin stitch for the filled version and a clean, crisp backstitch for the outline.
This pairing is a clever way to fill a larger space on a tote bag or jacket without the design feeling heavy or cluttered.
24. Micro-Floral: The Solitary Daisy

Never underestimate the power of a single, tiny motif. Often, less is more.
This simple daisy is composed of detached chain stitches (lazy daisies) for the petals and one French knot for the center.
The high contrast between the white and yellow thread and the dark navy background is what makes this tiny embroidered accent so impactful.
Its slightly off-center placement feels considered and chic.
25. Dimensional Berries: Raised Stitch Technique

To create these wonderfully tactile raspberries, use a collection of bullion knots or tightly packed French knots.
Build the stitches in a circular pattern, even layering them slightly, to achieve a raised, 3D effect.
Using two similar shades of red or a variegated floss will add instant depth and realism.
Contrast the bumpy texture of the berries with smooth, flat fishbone stitch leaves.
26. Detailed Kiwi: A Study in Radiating Stitches

Capturing the intricate detail of a kiwi slice is all about working from the inside out.
Start with a few white French knots for the core, then add short, radiating straight stitches in black for the seeds.
Finally, fill the green flesh with a satin stitch that follows the curve of the fruit.
This methodical approach ensures all the delicate details are preserved and results in a stunningly realistic motif.
27. Unexpected Texture: Chain Stitch Fill

For a fresh alternative to the classic satin stitch, try filling a shape with rows of chain stitch.
This technique creates a unique, looped texture that resembles knitting and adds a playful, tactile quality to your work.
To keep your rows neat and contained, complete a backstitch outline of the shape before you begin filling it.
This is perfect for simple shapes that you want to give a little extra personality.
28. Collar Points: Scattered Pomegranate Seeds
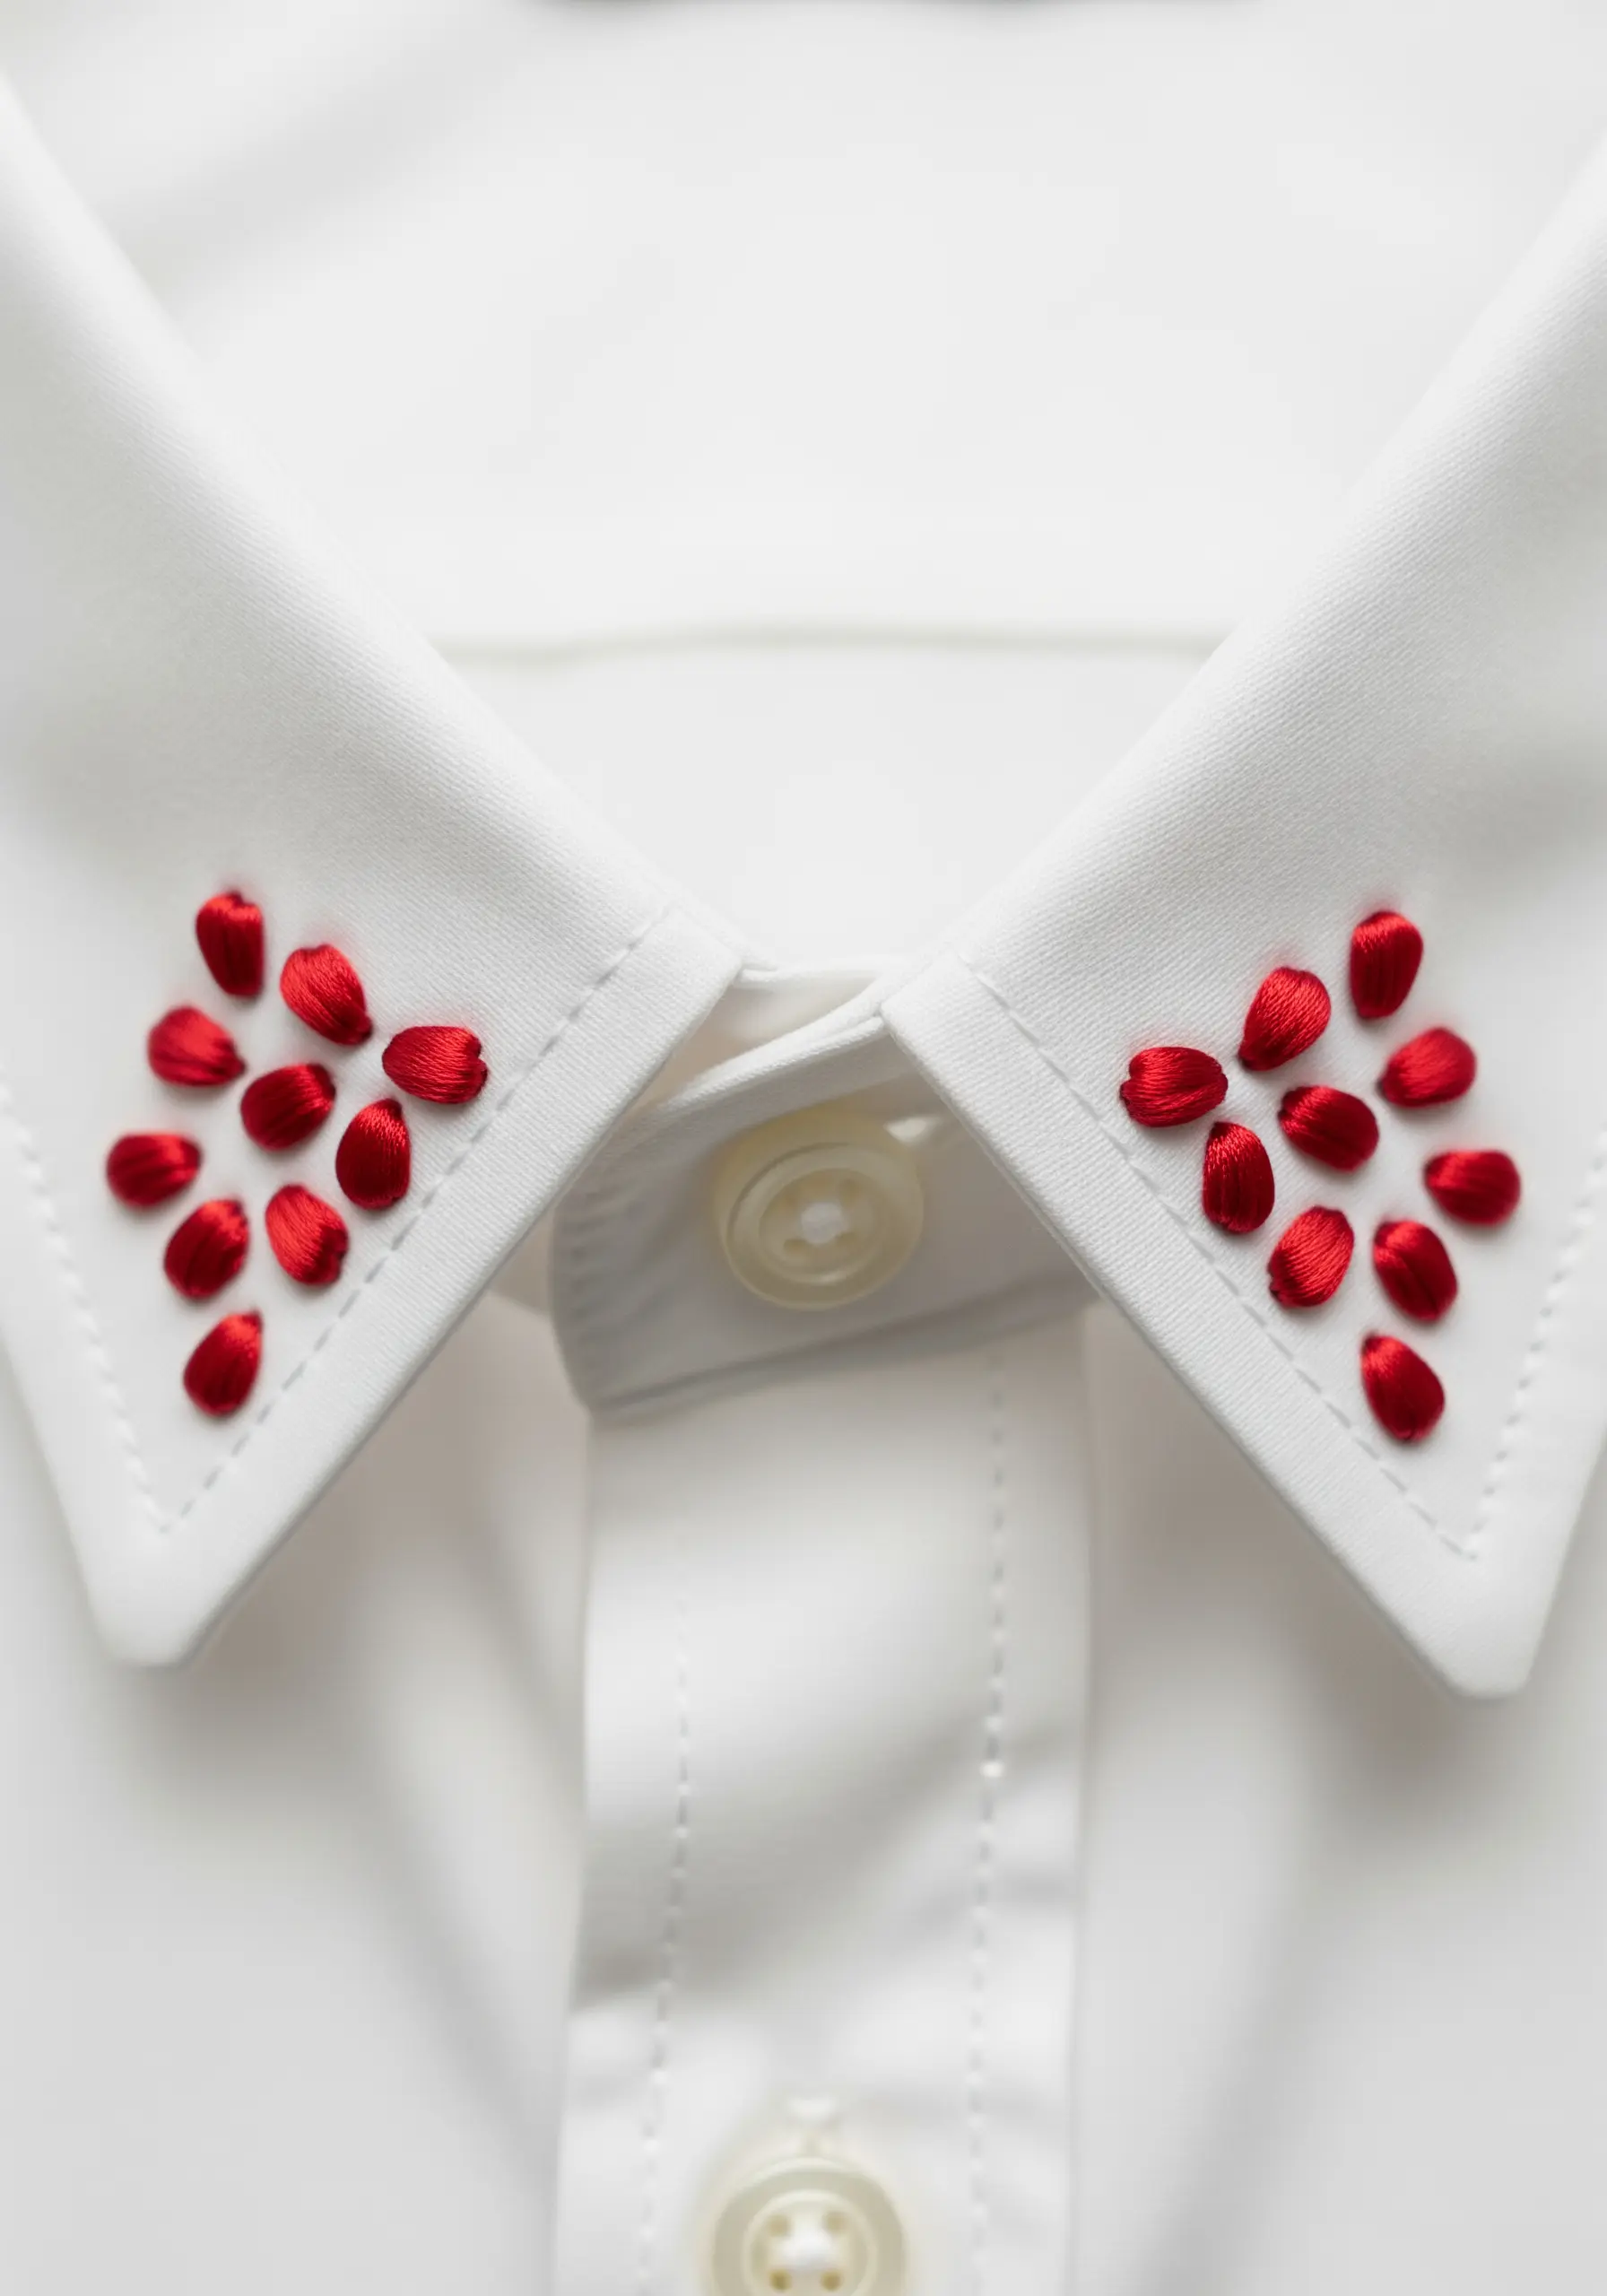
This elegant design uses individual satin stitches, shaped like seeds, to create a sophisticated pattern on collar tips.
The key is the organic, asymmetrical arrangement. Avoid placing them in a perfect grid; instead, scatter them in a small cluster.
Slightly vary the angle of each stitch to enhance the natural, scattered feel.
It’s a minimalist way to add a burst of color and personality to a formal shirt.
29. Delicate Florets: Queen Anne’s Lace

To capture the airy, delicate nature of Queen Anne’s Lace, you need a light touch.
Use a single strand of white floss to create tiny, dispersed French knots for the flower head. Wrap the thread only once or twice around your needle to keep the knots small.
A thin stem stitch for the stalks completes the illusion.
This is one of the most beautiful minimal embroidery patterns that look harder than they are, relying on simplicity for its elegance.
30. Climbing Ivy: A Sleeve Transformed
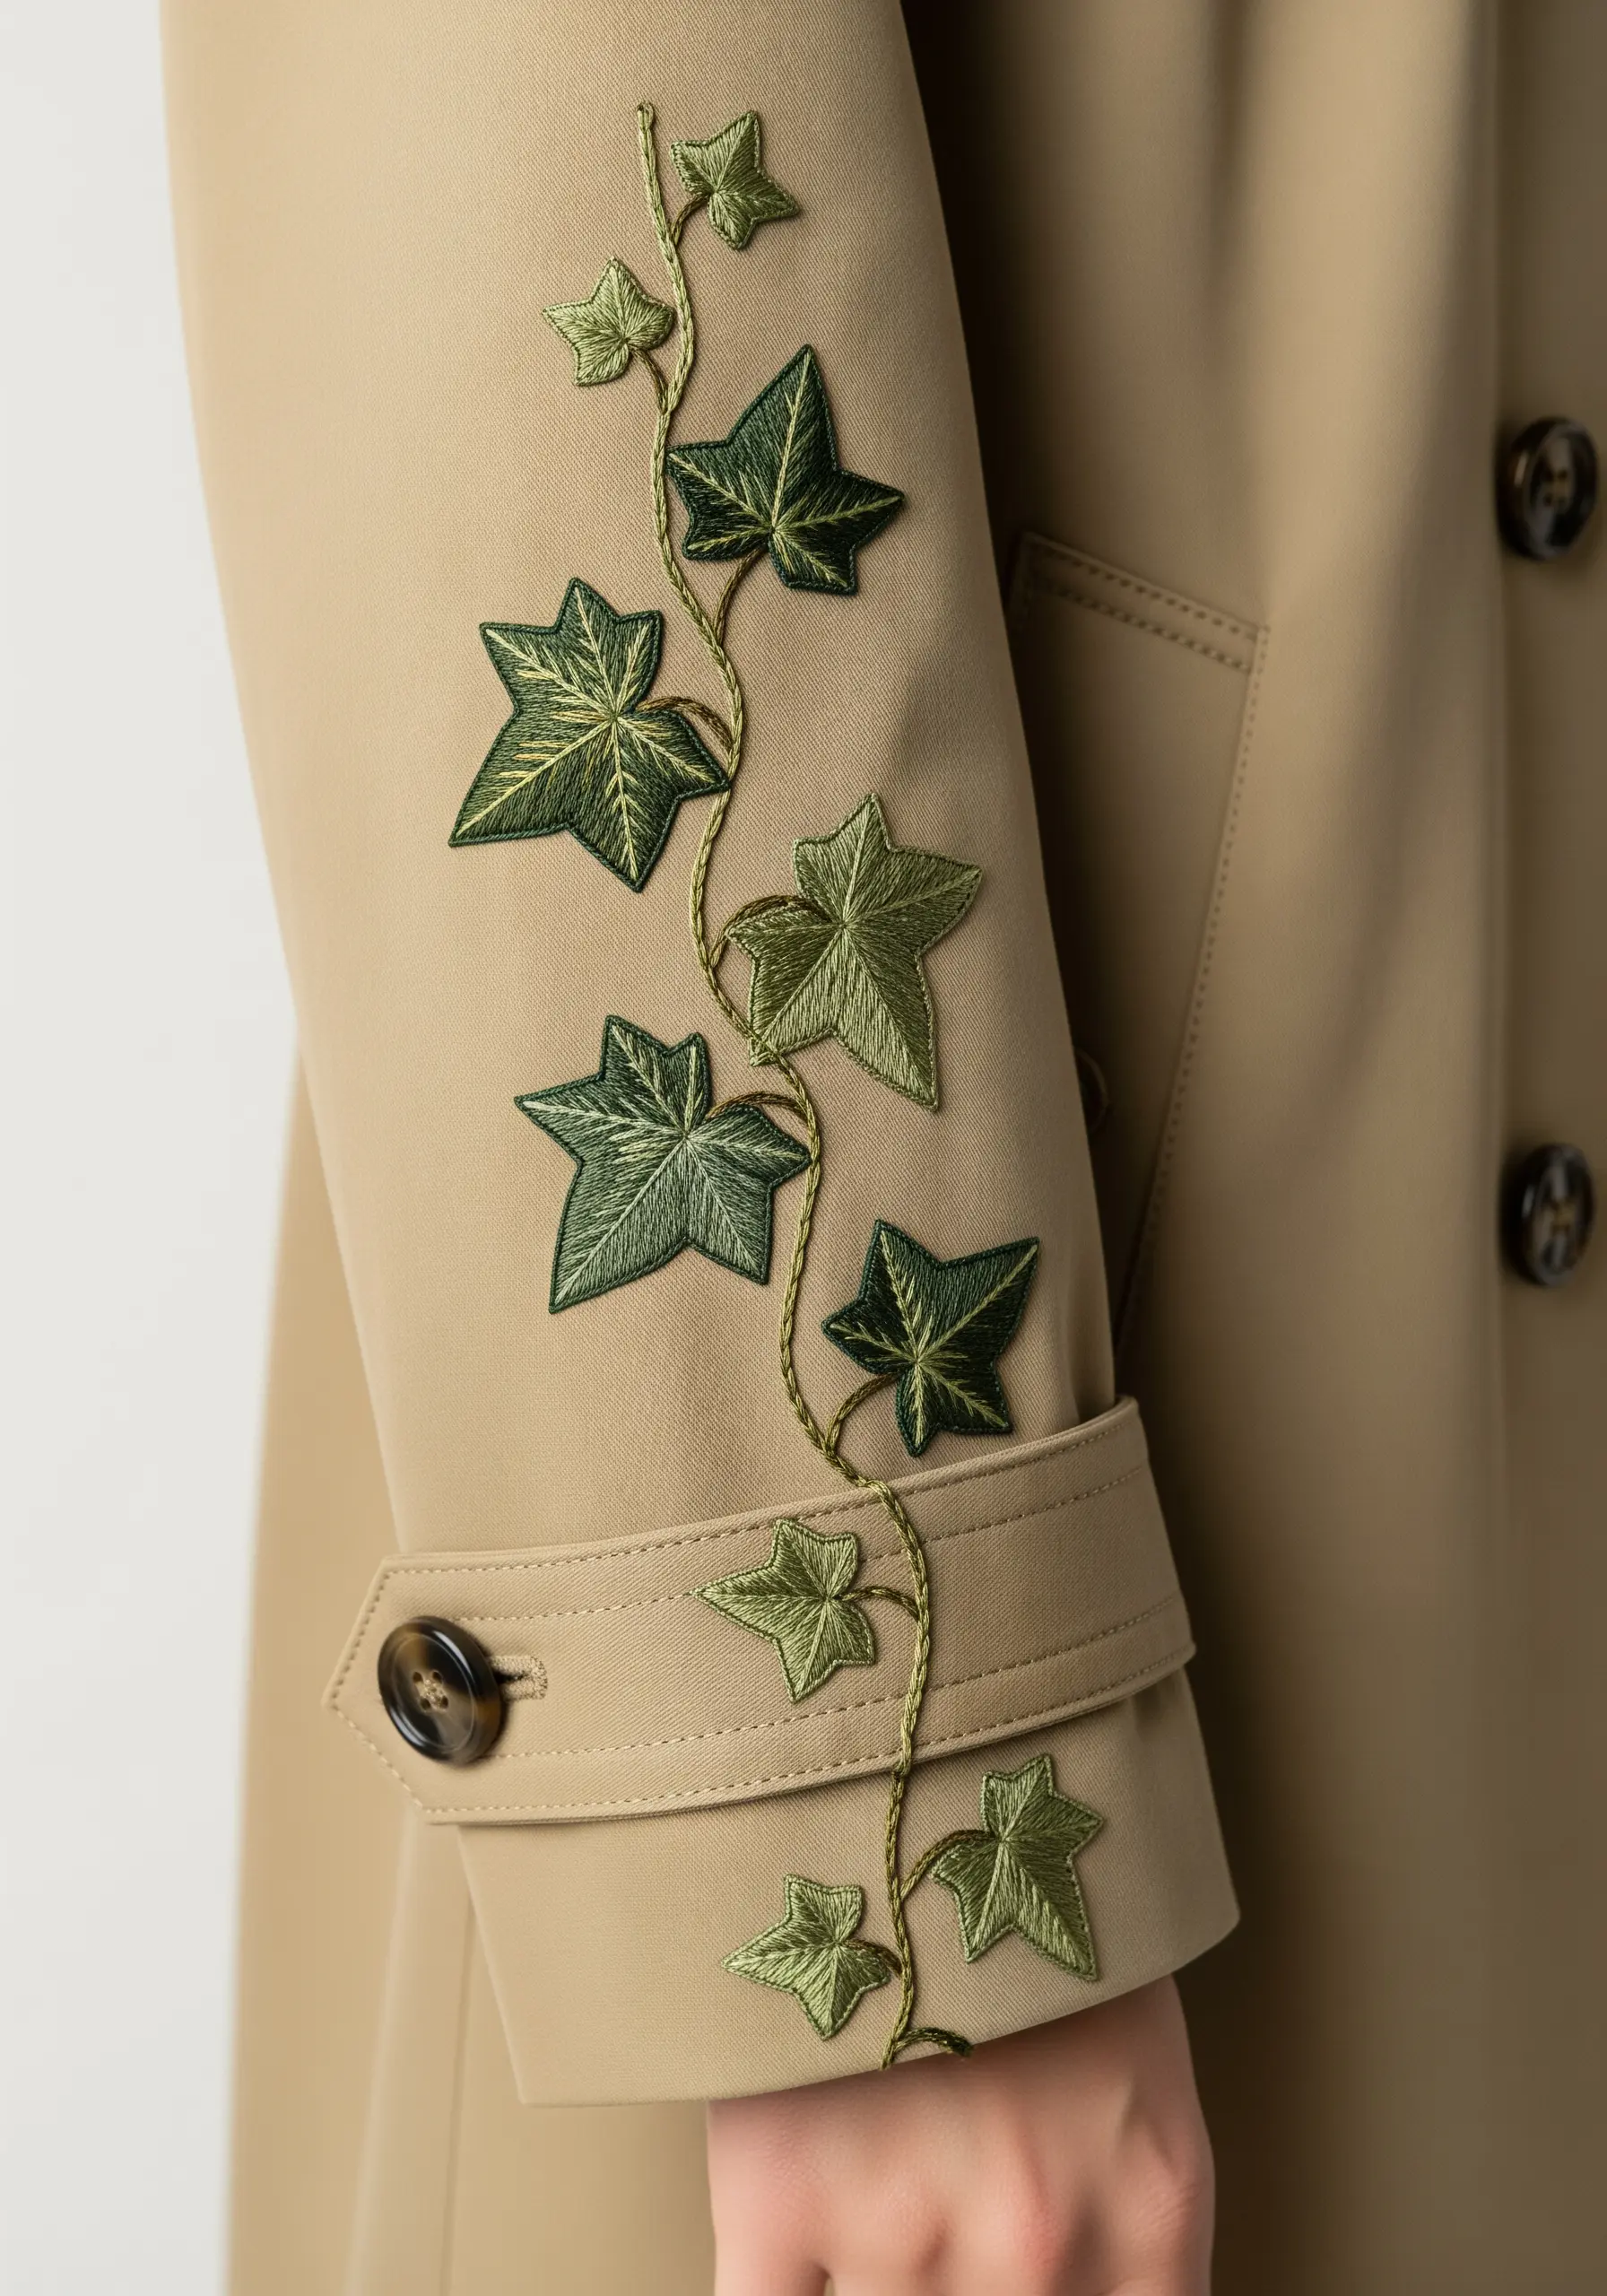
Allow your embroidery to interact with the construction of the garment for a truly bespoke feel.
This ivy vine feels alive as it climbs the sleeve, turning a classic trench coat into a piece of art.
Use a long-and-short stitch to blend two or three shades of green within each leaf. This creates a subtle gradient that gives the foliage realistic depth and dimension.
A twisted stem stitch for the vine adds texture that mimics a real woody stem.


