

I know you’re looking for a way to make your embroidery feel more intentional, more polished, and more *you*. It’s not about mastering dozens of complicated stitches or spending weeks on a single project. It’s about understanding how small choices—in texture, color, and composition—can transform a simple line into a work of art.
Think of minimalism not as a lack of detail, but as the art of making every single stitch count. It’s about the quiet confidence of a perfectly smooth satin stitch, the playful rhythm of a repeating motif, or the emotional weight of a single, fluid line. This is where your embroidery evolves from a hobby into a personal creative practice.
These ideas are your permission slip to start small and create something beautiful *right now*. Each one is a quick win designed to build your skills and, more importantly, your confidence. Let’s pick up a needle and create something that feels clean, modern, and completely authentic.
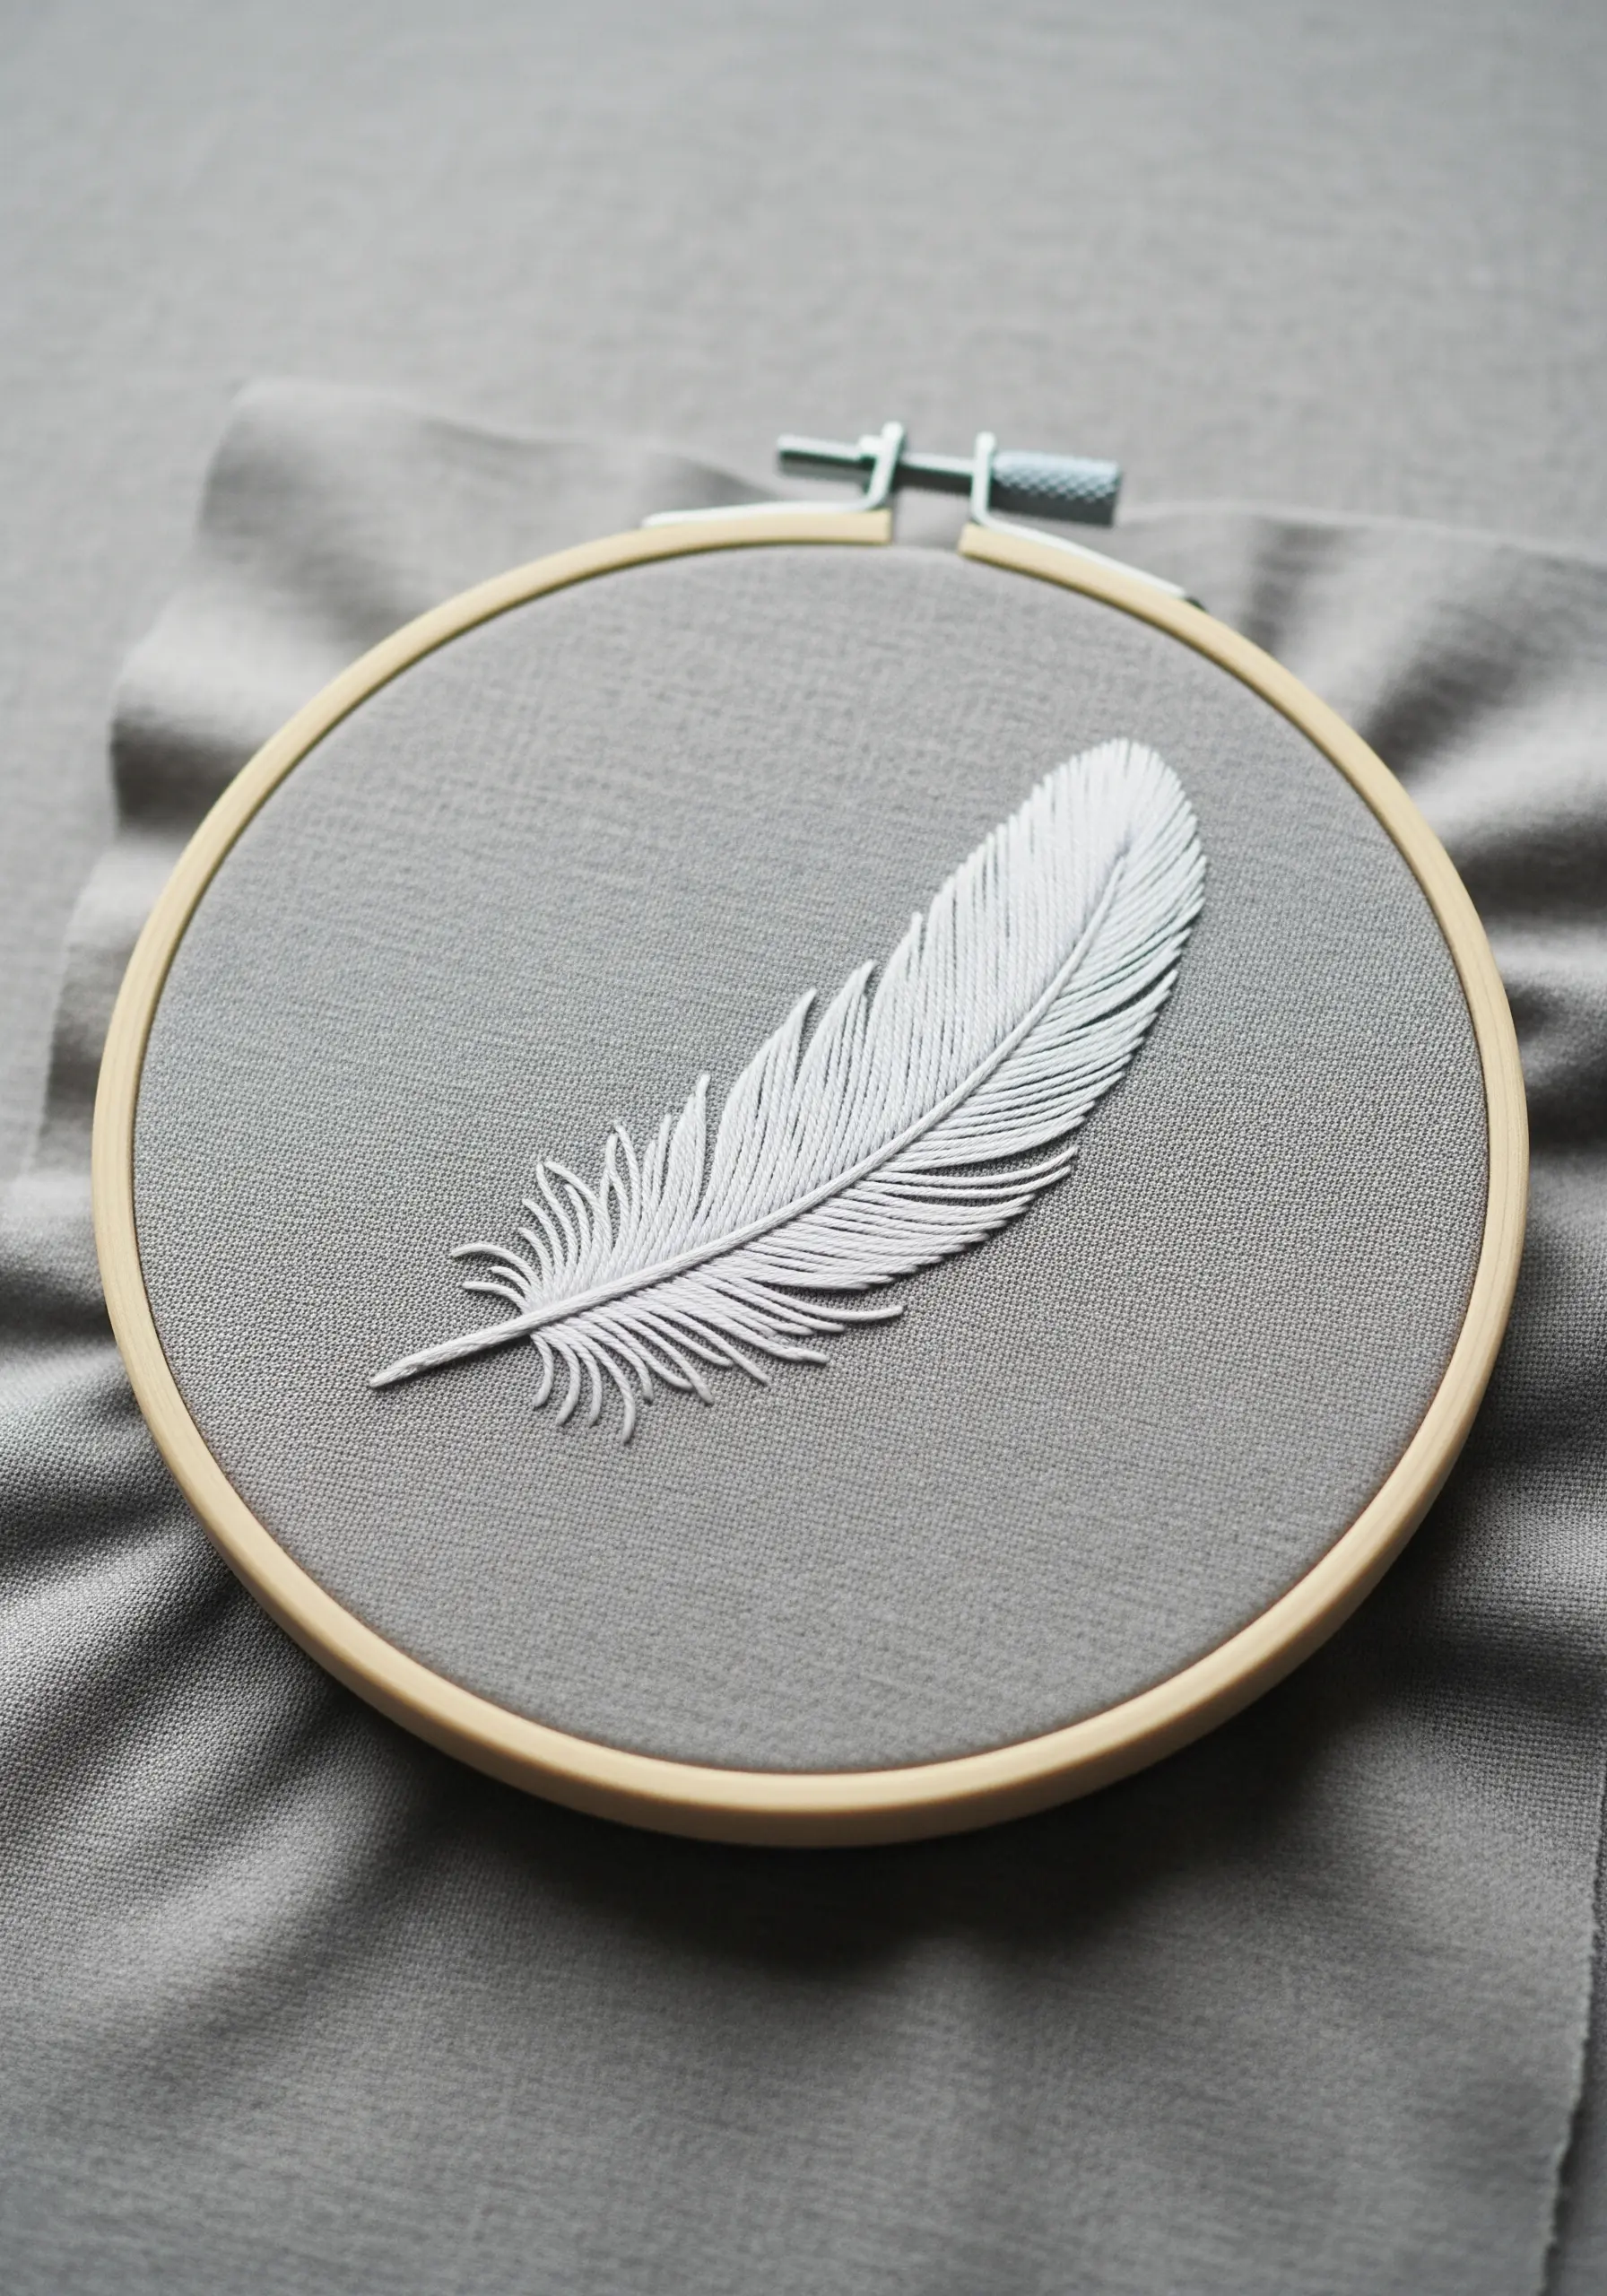
1. Master the Radiating Satin Stitch
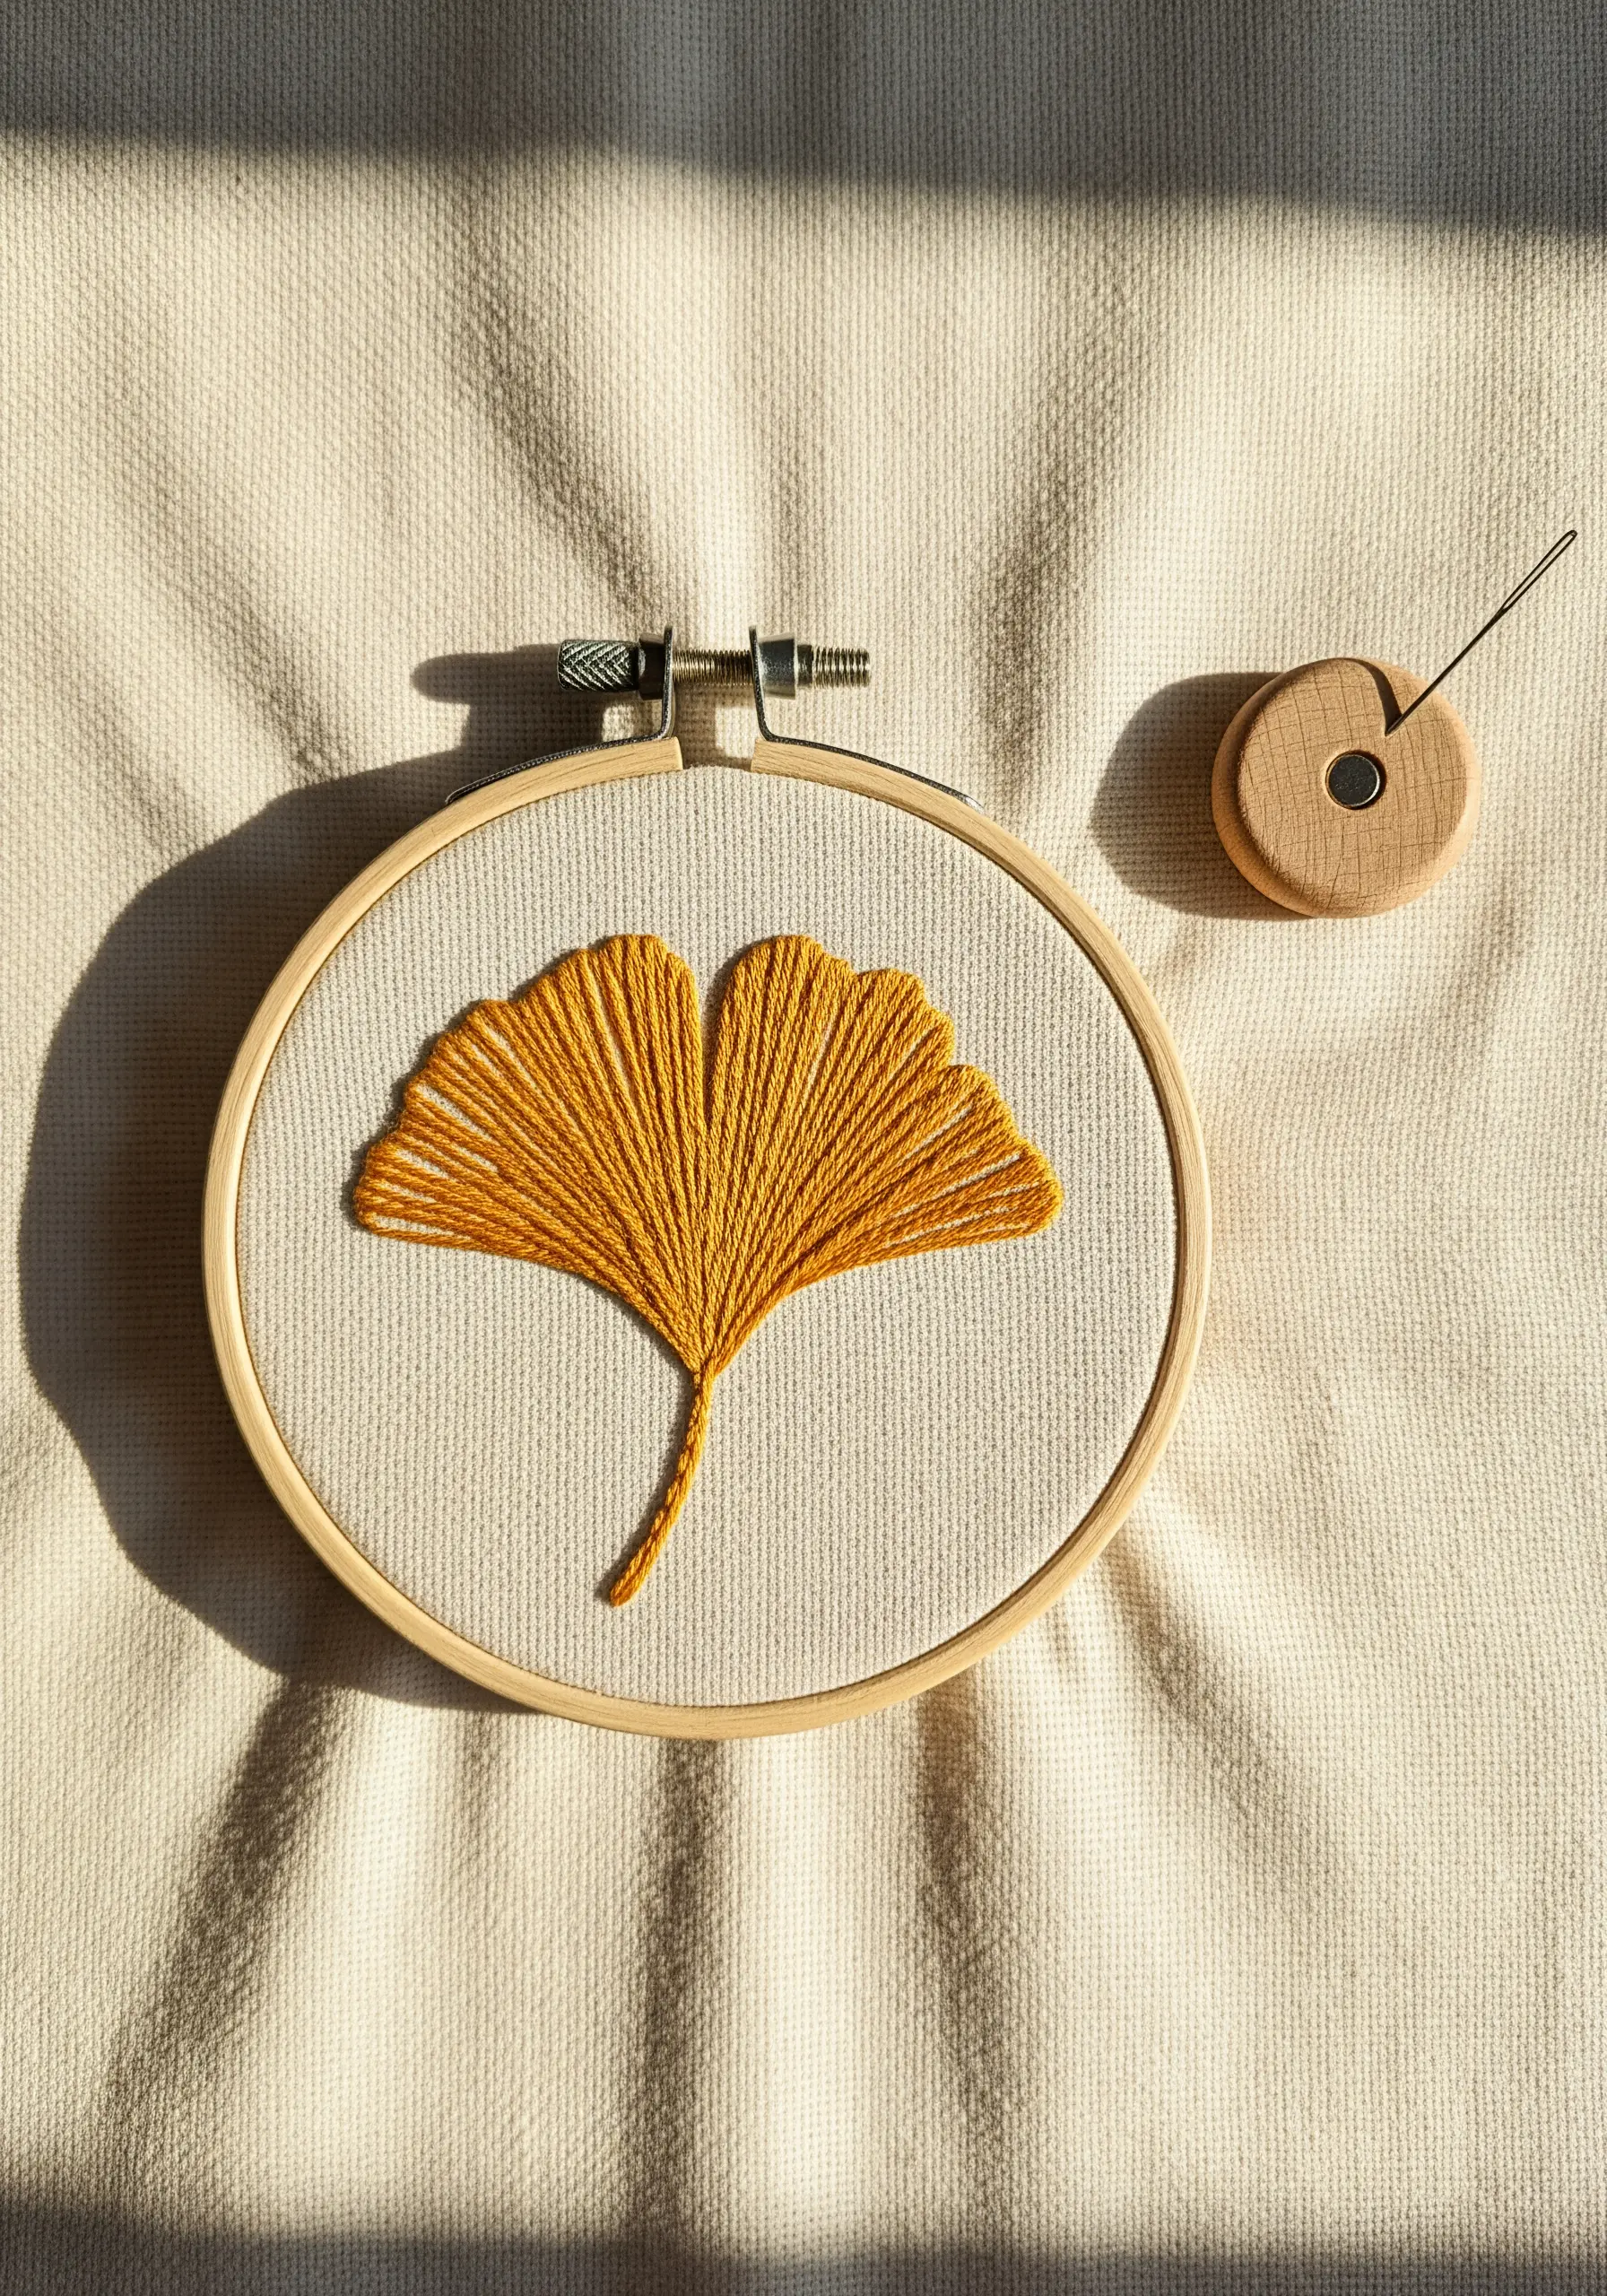
Create the elegant fan shape of a ginkgo leaf by mastering a radiating satin stitch, also known as a fishbone stitch variation.
Start by making a single straight stitch from the base to the center top of the leaf to act as a guideline.
Then, angle your subsequent stitches from the outer edge inward, meeting just beside that central line.
This technique creates flawless texture and flow, mimicking the natural veins of the leaf without adding any complex outlines.
Use three to four strands of floss on a medium-weight cotton or linen for a smooth, matte finish that feels both modern and organic.
2. Build Texture with Layered Couching

Achieve this dense, corded texture by layering rows of couching stitches instead of using a traditional satin stitch.
To do this, lay down a single long strand of thread along your arch shape, then use a second, thinner thread to tack it down with tiny, evenly spaced stitches.
By placing these couched rows right next to each other, you build a raised, rope-like effect that has incredible visual weight and a satisfyingly tactile finish.
This method also prevents the puckering that can occur with wide satin stitches, making it perfect for creating bold, abstract shapes on non-stretch fabrics.
These earth-tone patterns are ideal for creating a warm, Japandi-inspired aesthetic.
3. Create Contrast with Negative Space
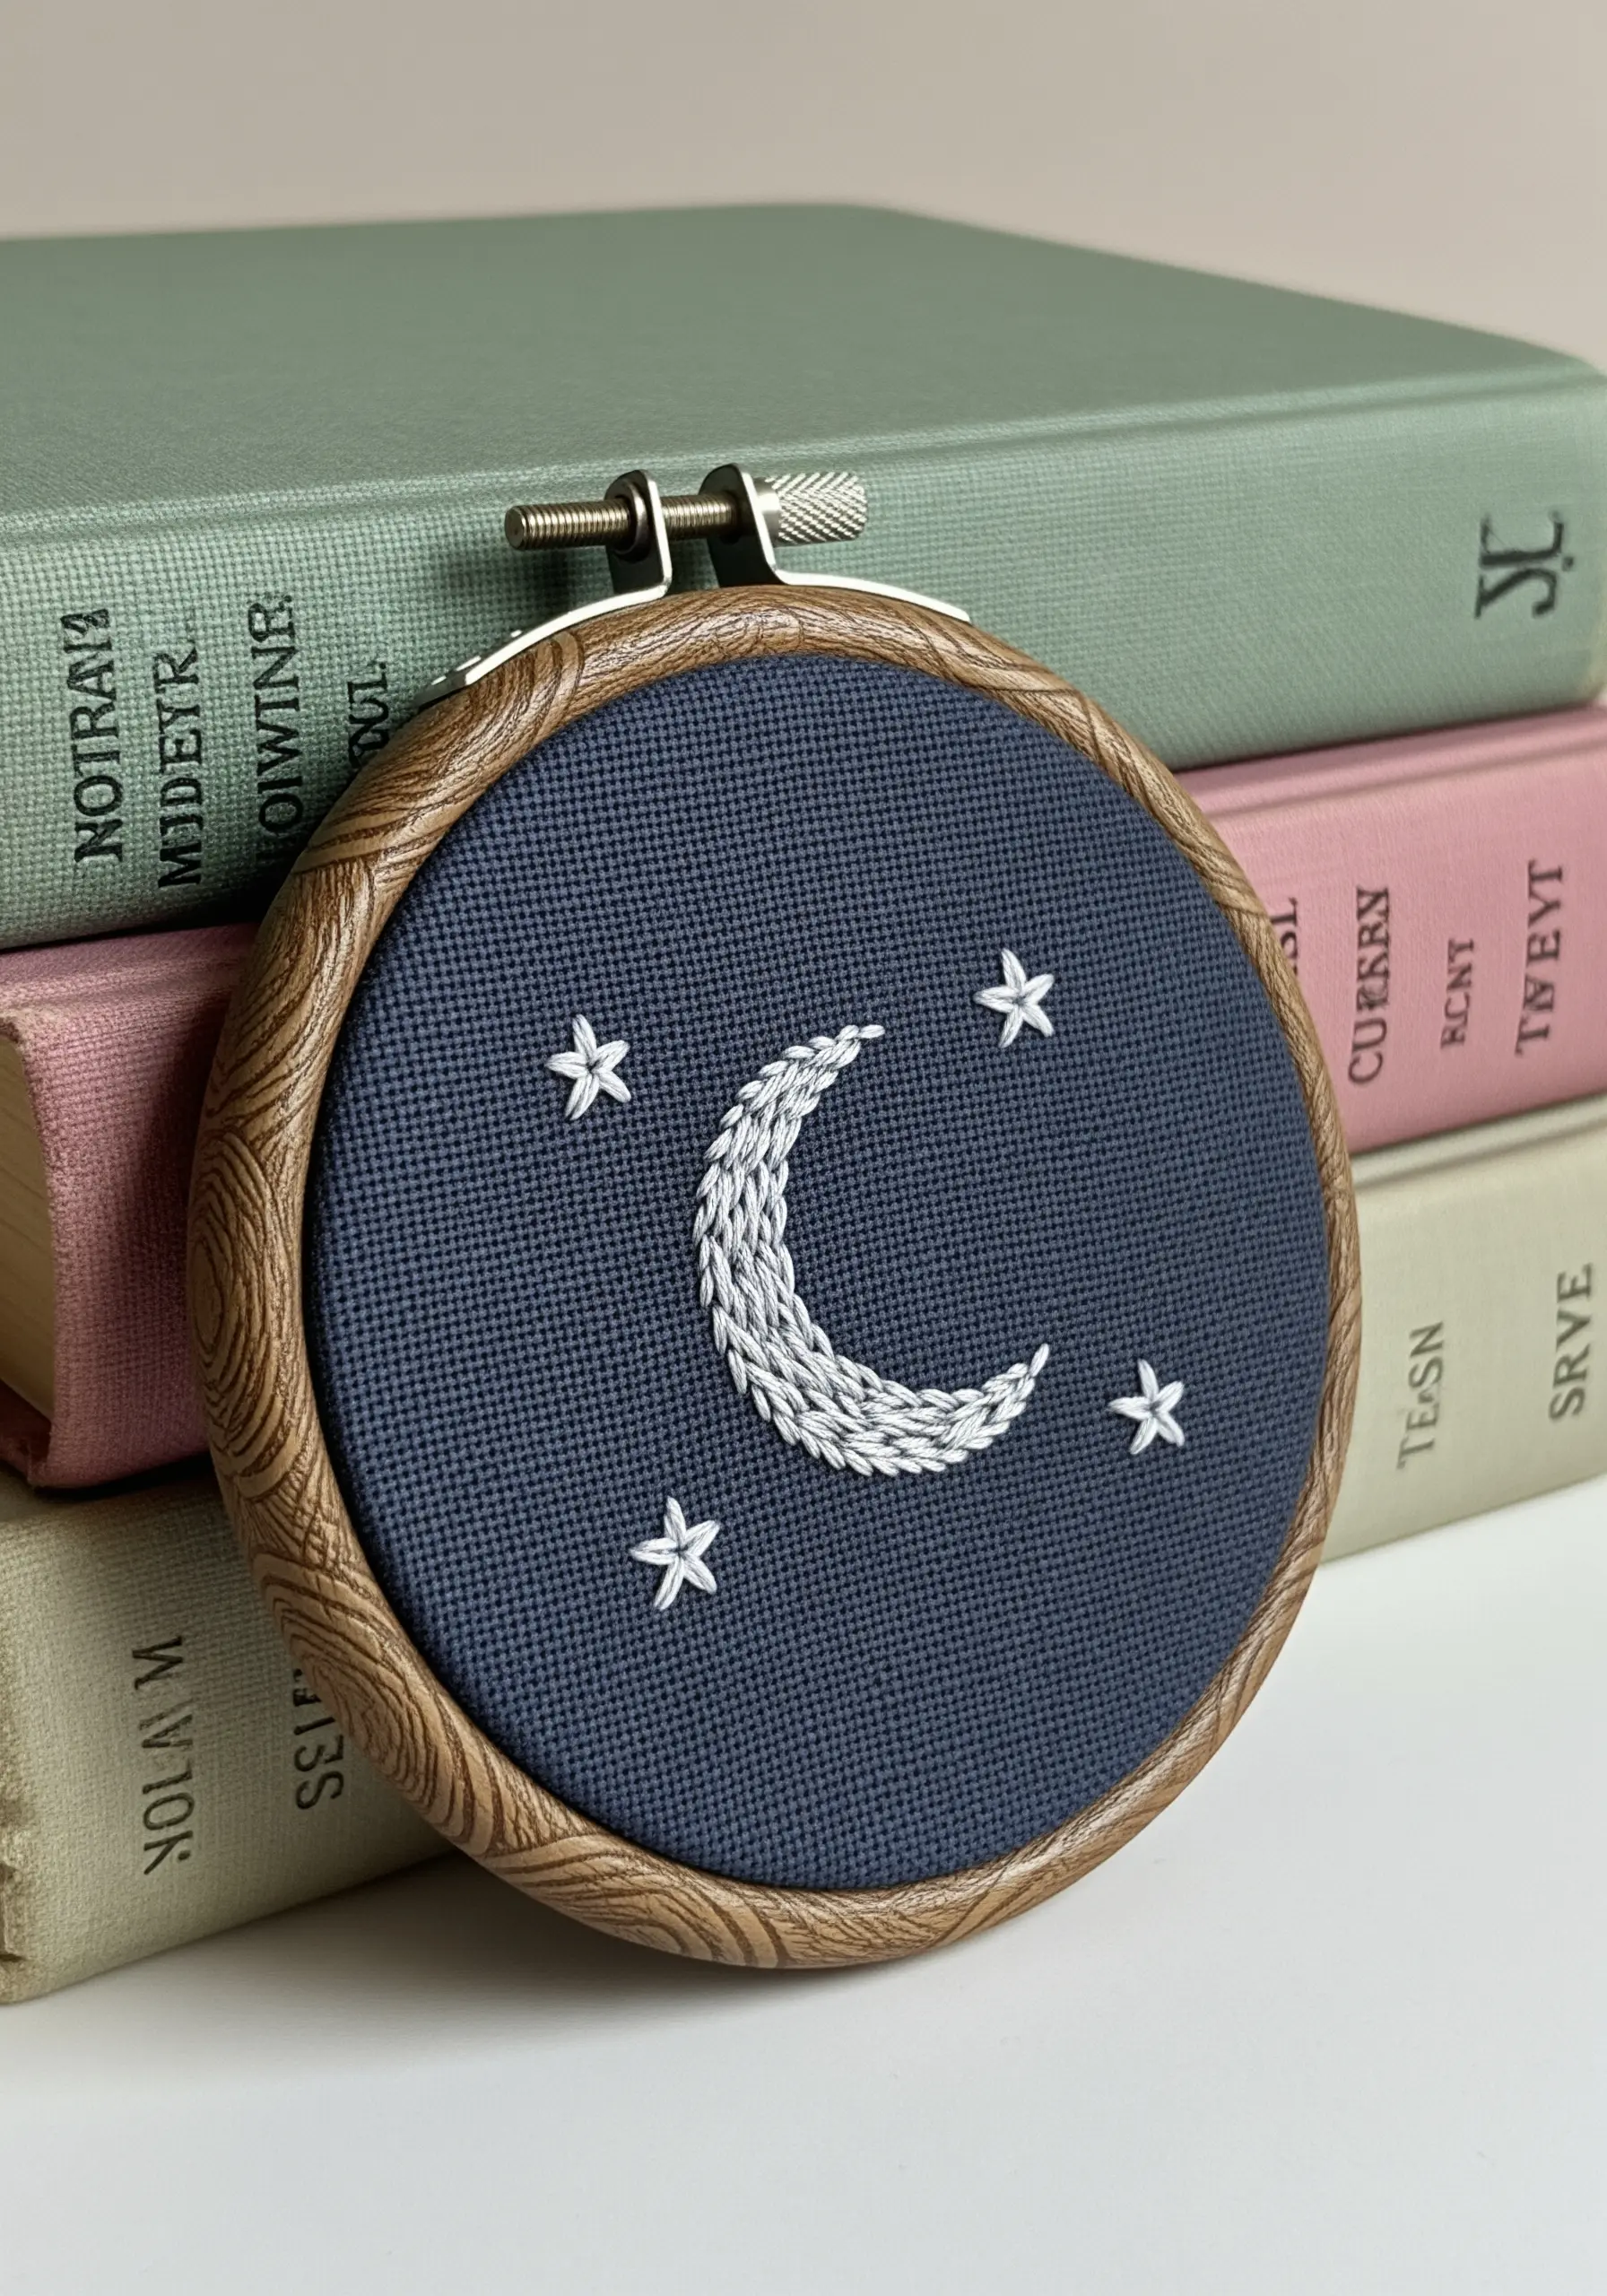
Let your fabric do the work by choosing a dark, tightly woven material that makes simple stitches pop.
Instead of filling the entire moon, use a series of short, slightly curved straight stitches or seed stitches to suggest its crescent shape and texture.
This creates a delicate, shimmering effect that feels more sophisticated than a solid block of color.
For the stars, use just one or two strands of thread to make them appear finer and more distant, enhancing the sense of depth against the deep navy background.
Consider exploring other designs using dark fabric & metallic threads for an even more dramatic result.
4. Define Shapes with Whipped Backstitch
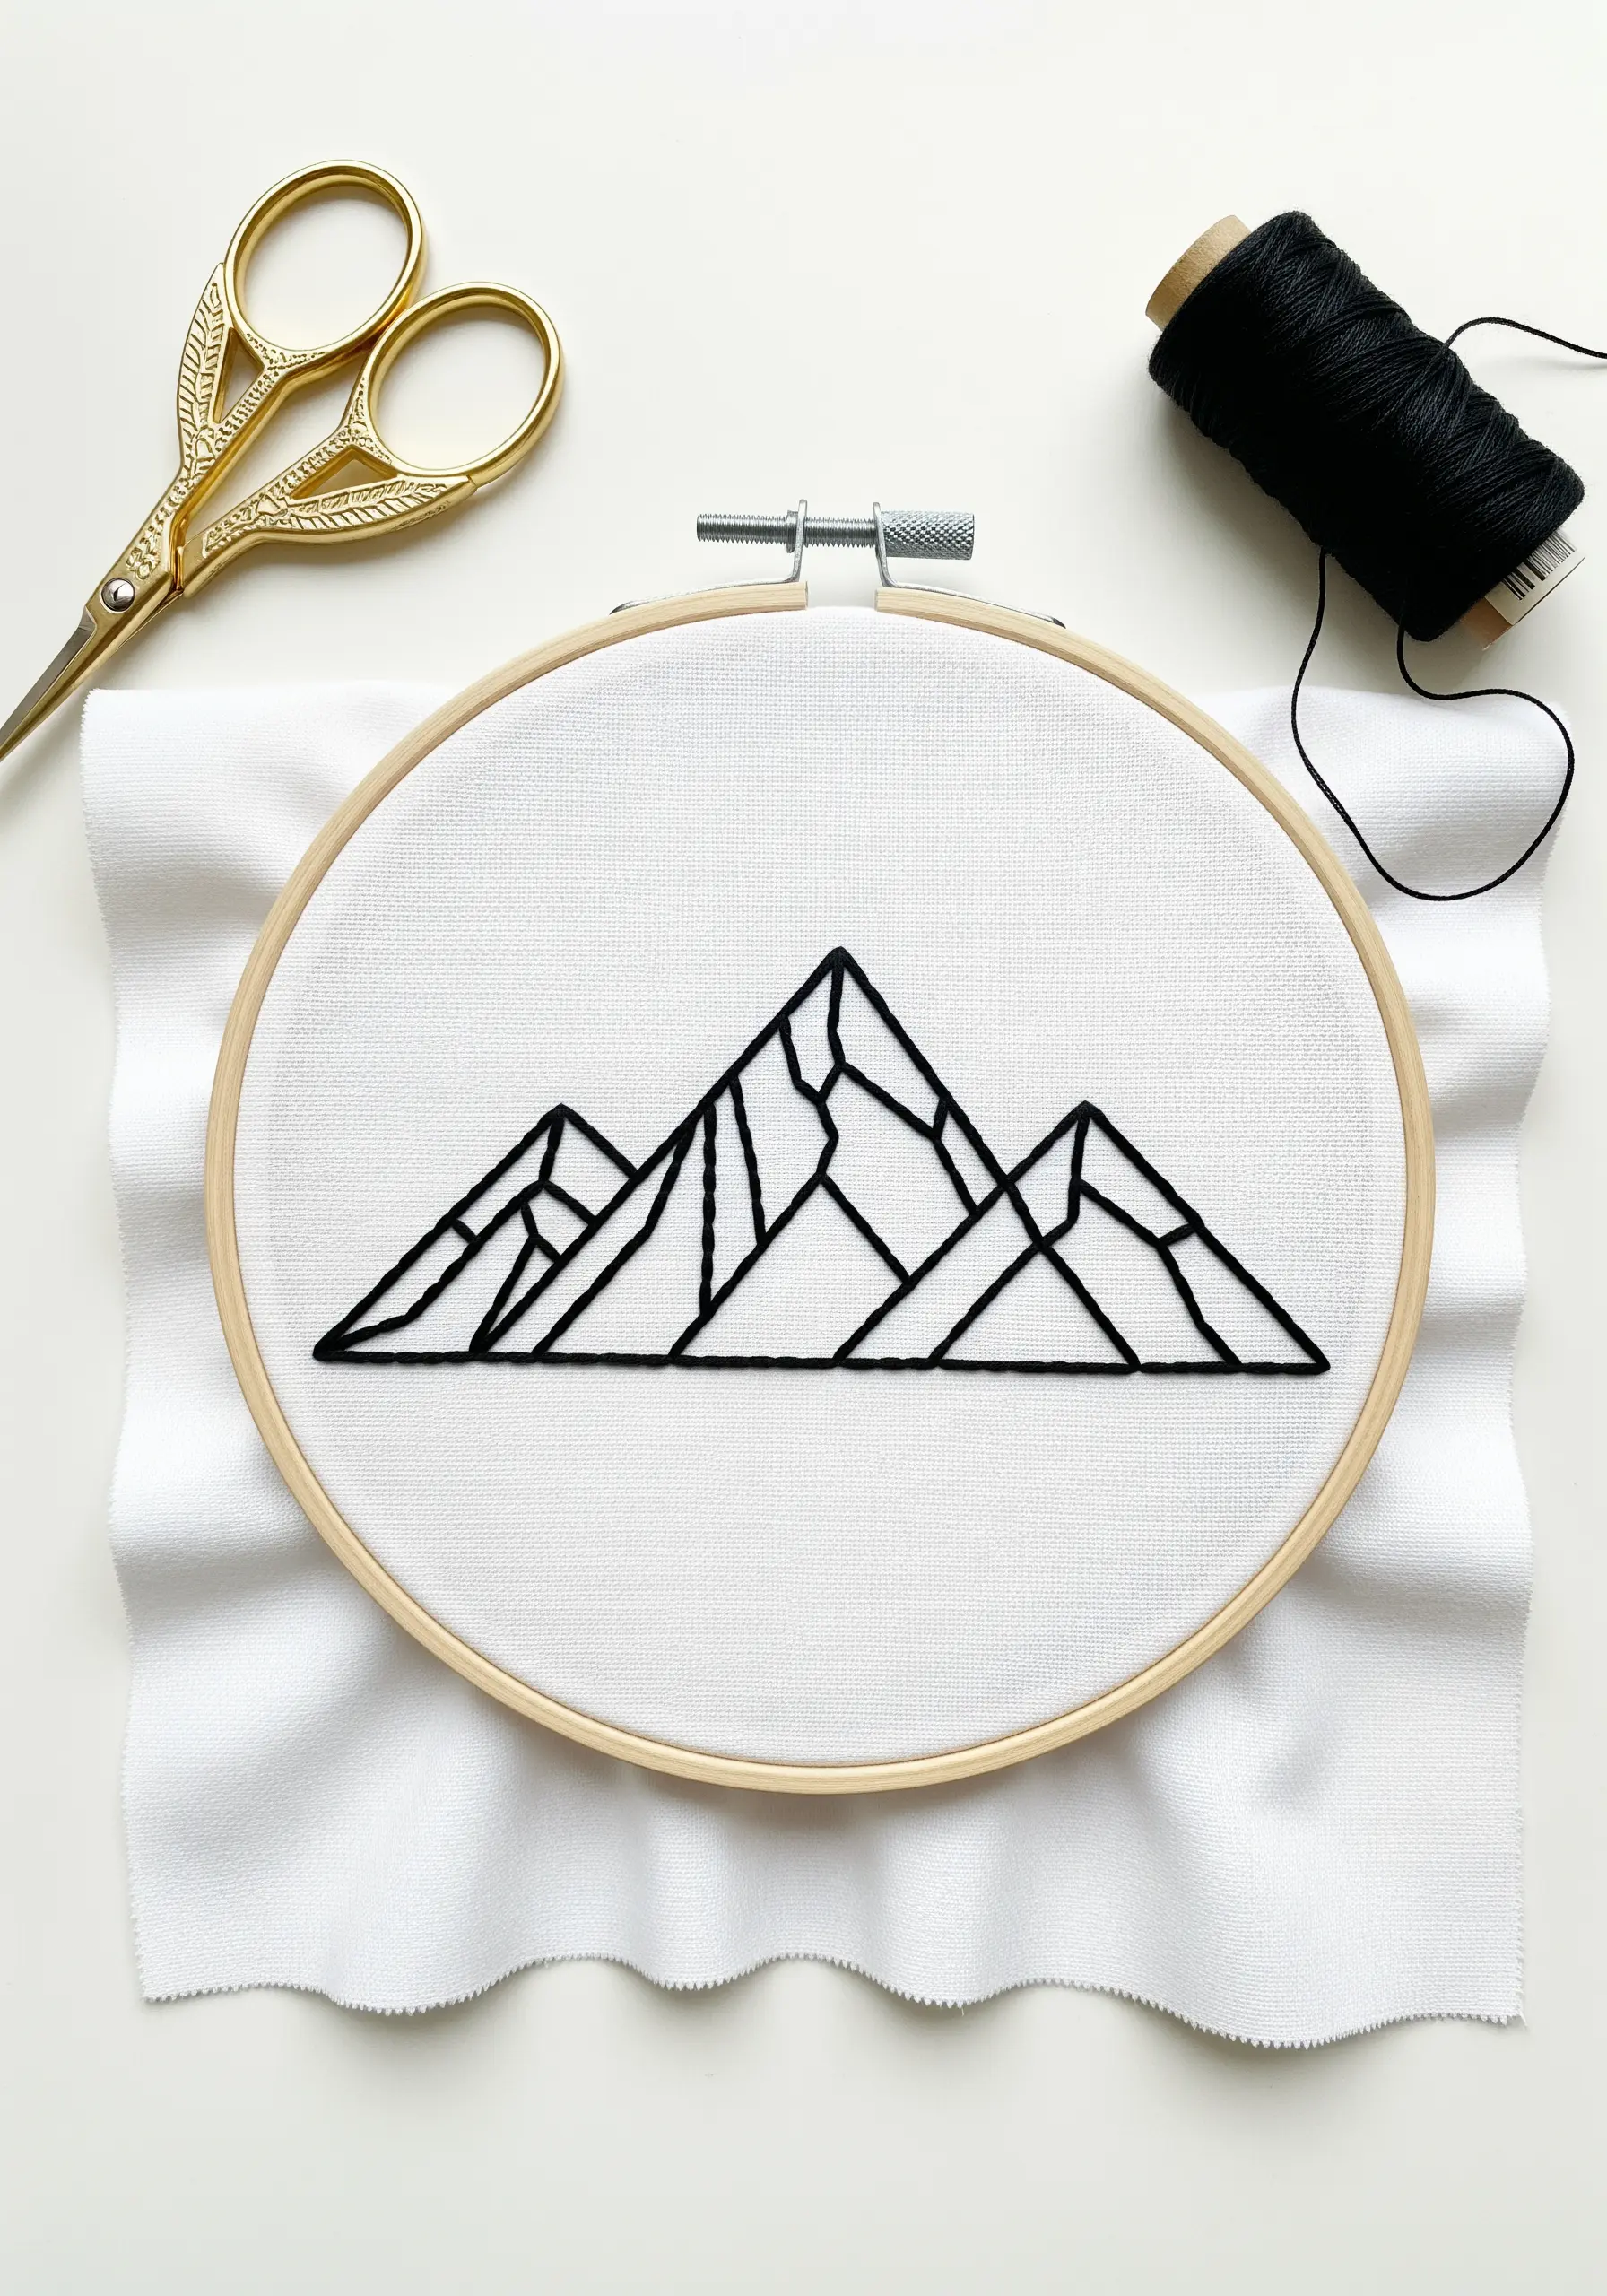
For crisp, geometric designs like this mountain range, elevate a simple backstitch by whipping it.
First, complete your entire outline using a standard backstitch with three or four strands of floss.
Then, using the same thread, slide your needle under each backstitch without piercing the fabric, wrapping the outline to create a smooth, solid, and slightly raised line.
This technique eliminates the segmented look of a plain backstitch, giving your work a clean, graphic quality that is essential for minimalist line art nature embroidery.
5. Add Personality with Apparel Embellishment

Transform everyday denim with a tiny, well-placed motif.
When stitching on thick fabric like denim, always use a sharp needle and a thimble to protect your fingers.
Combine a padded satin stitch for the bee’s body with delicate detached chain stitches for the wings to create varied textures.
A simple running stitch for the flight path adds a touch of playful movement, turning a simple pocket into a unique focal point.
Explore more tiny embroidery ideas to personalize your denim jacket and make every piece your own.
6. Capture Emotion in a Single Line

Embrace the elegance of single-line art to create expressive portraits with minimal effort.
The key to success is using a single, continuous strand of thread and a smooth stitch like the stem stitch or split stitch.
This ensures your line has a consistent thickness and fluid feel, mimicking an ink drawing.
Before you begin, trace your pattern lightly onto the fabric and practice the path your needle will take to avoid any awkward joins or unnecessary knots.
These abstract face line embroidery designs are perfect for modern wall art.
7. Build Dimension with French Knots

Give your lavender sprigs a realistic, three-dimensional texture by using French knots instead of satin stitches for the blossoms.
Vary the number of wraps around your needle (one, two, or three times) to create knots of different sizes, mimicking the natural variation in a lavender flower.
Cluster the larger knots at the base of each floret and taper to smaller ones at the tip for a more organic shape.
Combining these textured knots with simple straight stitches for the stems creates a beautiful contrast that brings the bouquet to life.
Try these delicate lavender stitch ideas for a truly serene project.
8. Explore Meditative Texture with Seed Stitch
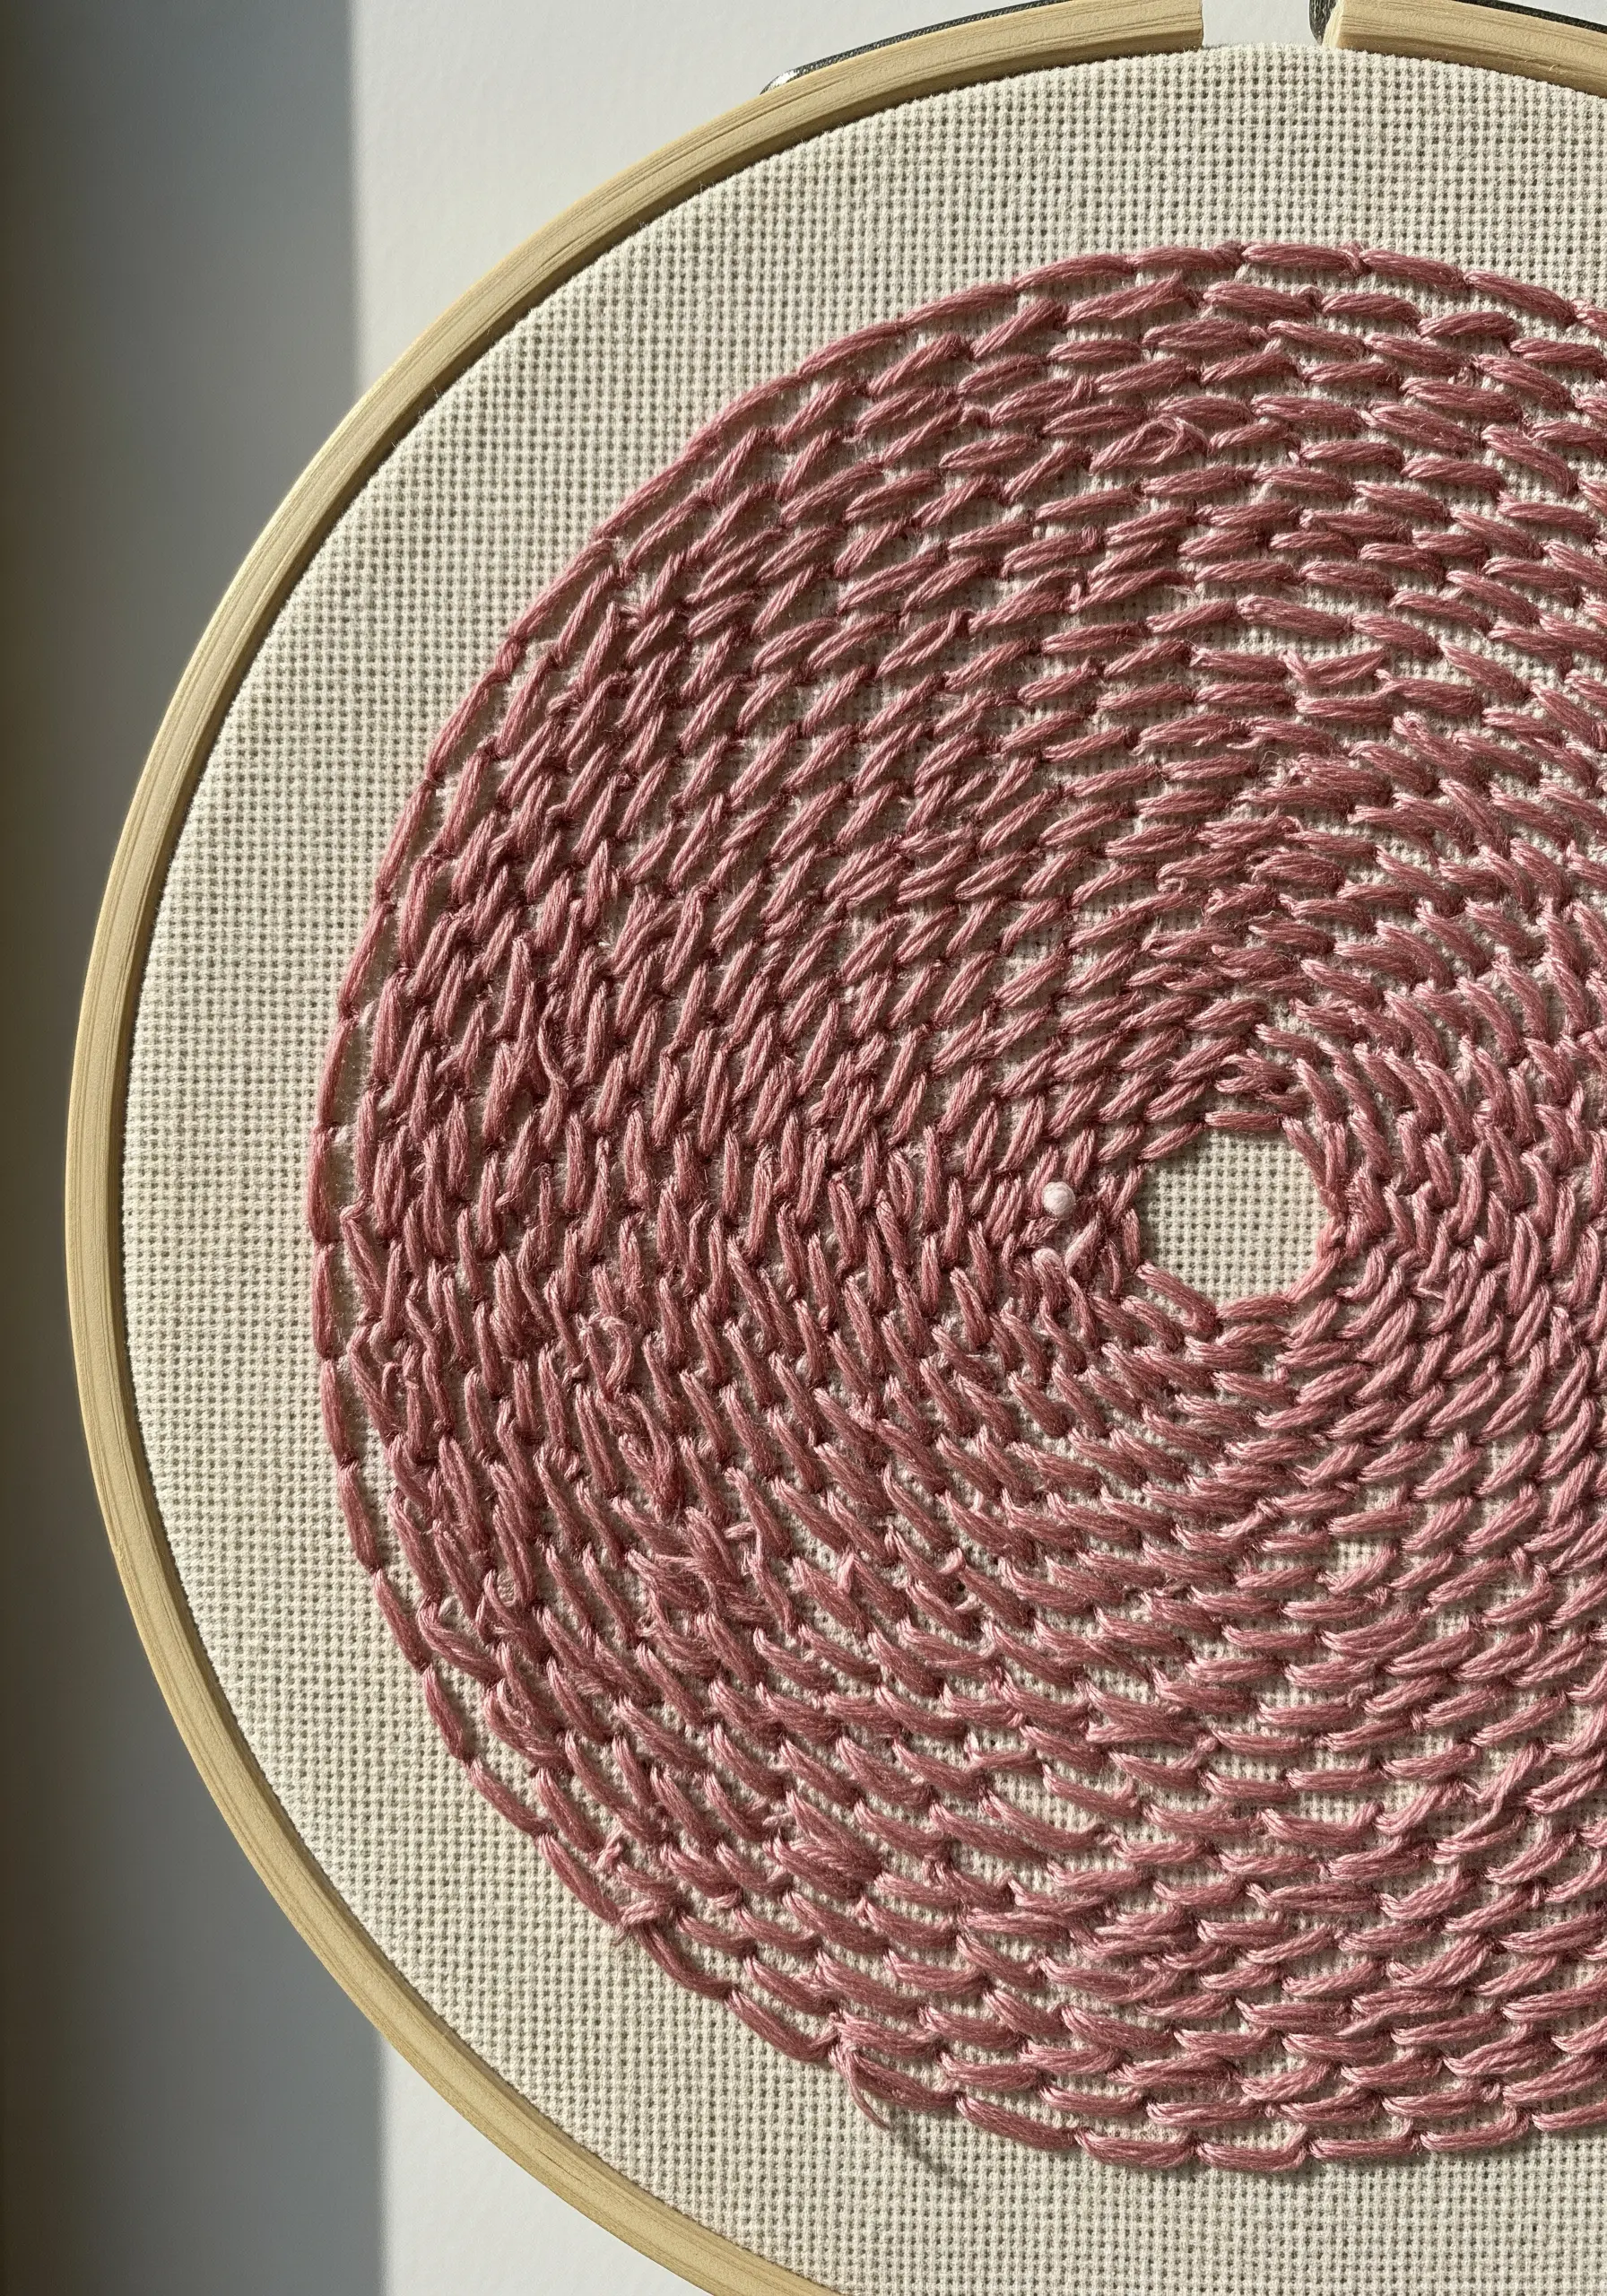
Fill a large area with a rich, organic texture using one of the simplest stitches: the seed stitch.
This technique involves making small, straight stitches in random directions to fill a shape, creating a subtle, woven effect.
To achieve this spiraling composition, draw your circle and then stitch concentrically, moving from the outside in.
The beauty of this stitch is its imperfection; slight variations in stitch length and angle add to its handmade charm, making it a perfect choice for abstract, mesmerizing wall art.
9. Frame Your Stitches as Modern Art
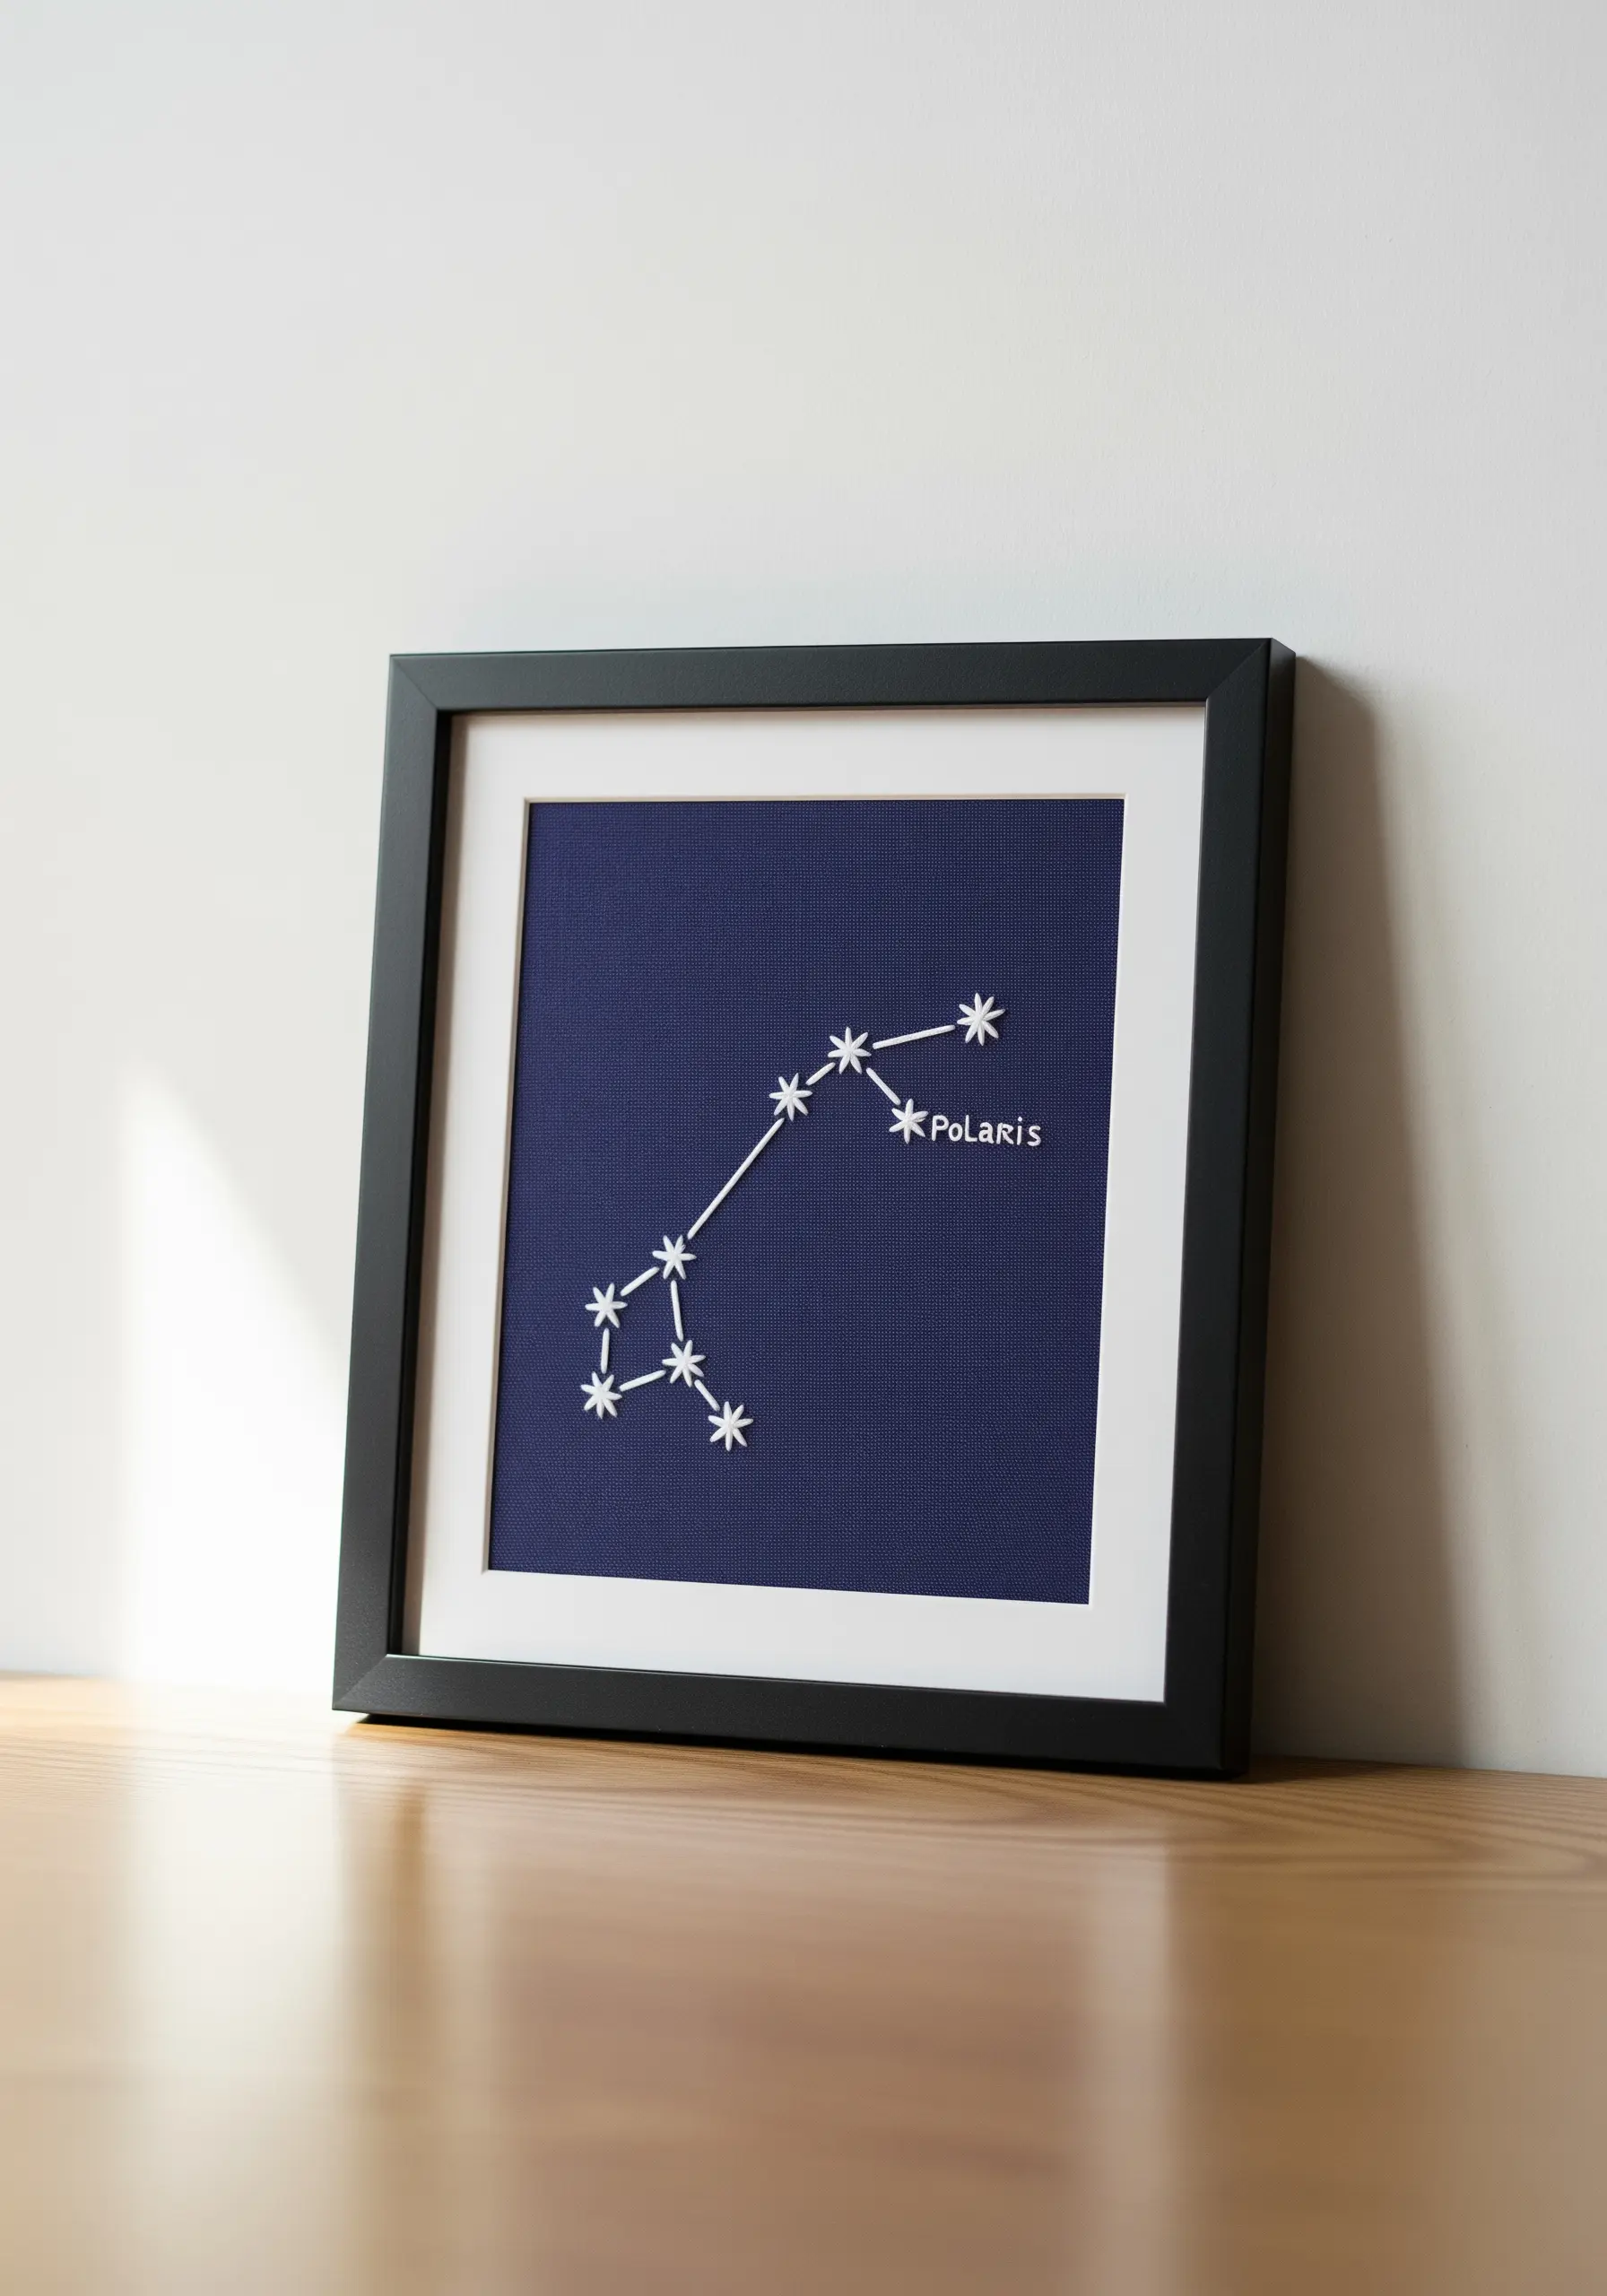
Take your minimalist embroidery off the hoop and onto the wall by mounting it in a contemporary frame.
Stitch your design on a piece of fabric several inches larger than your frame’s mat opening.
After stitching, press the piece carefully from the back and wrap it securely around a piece of acid-free mat board, taping the edges on the reverse.
This professional finish elevates simple star constellations or quotes into polished works of art, perfect for gifting or displaying in your home.
You can find more inspiration in these framed embroidery ideas.
10. Create Harmony with Interlocking Shapes
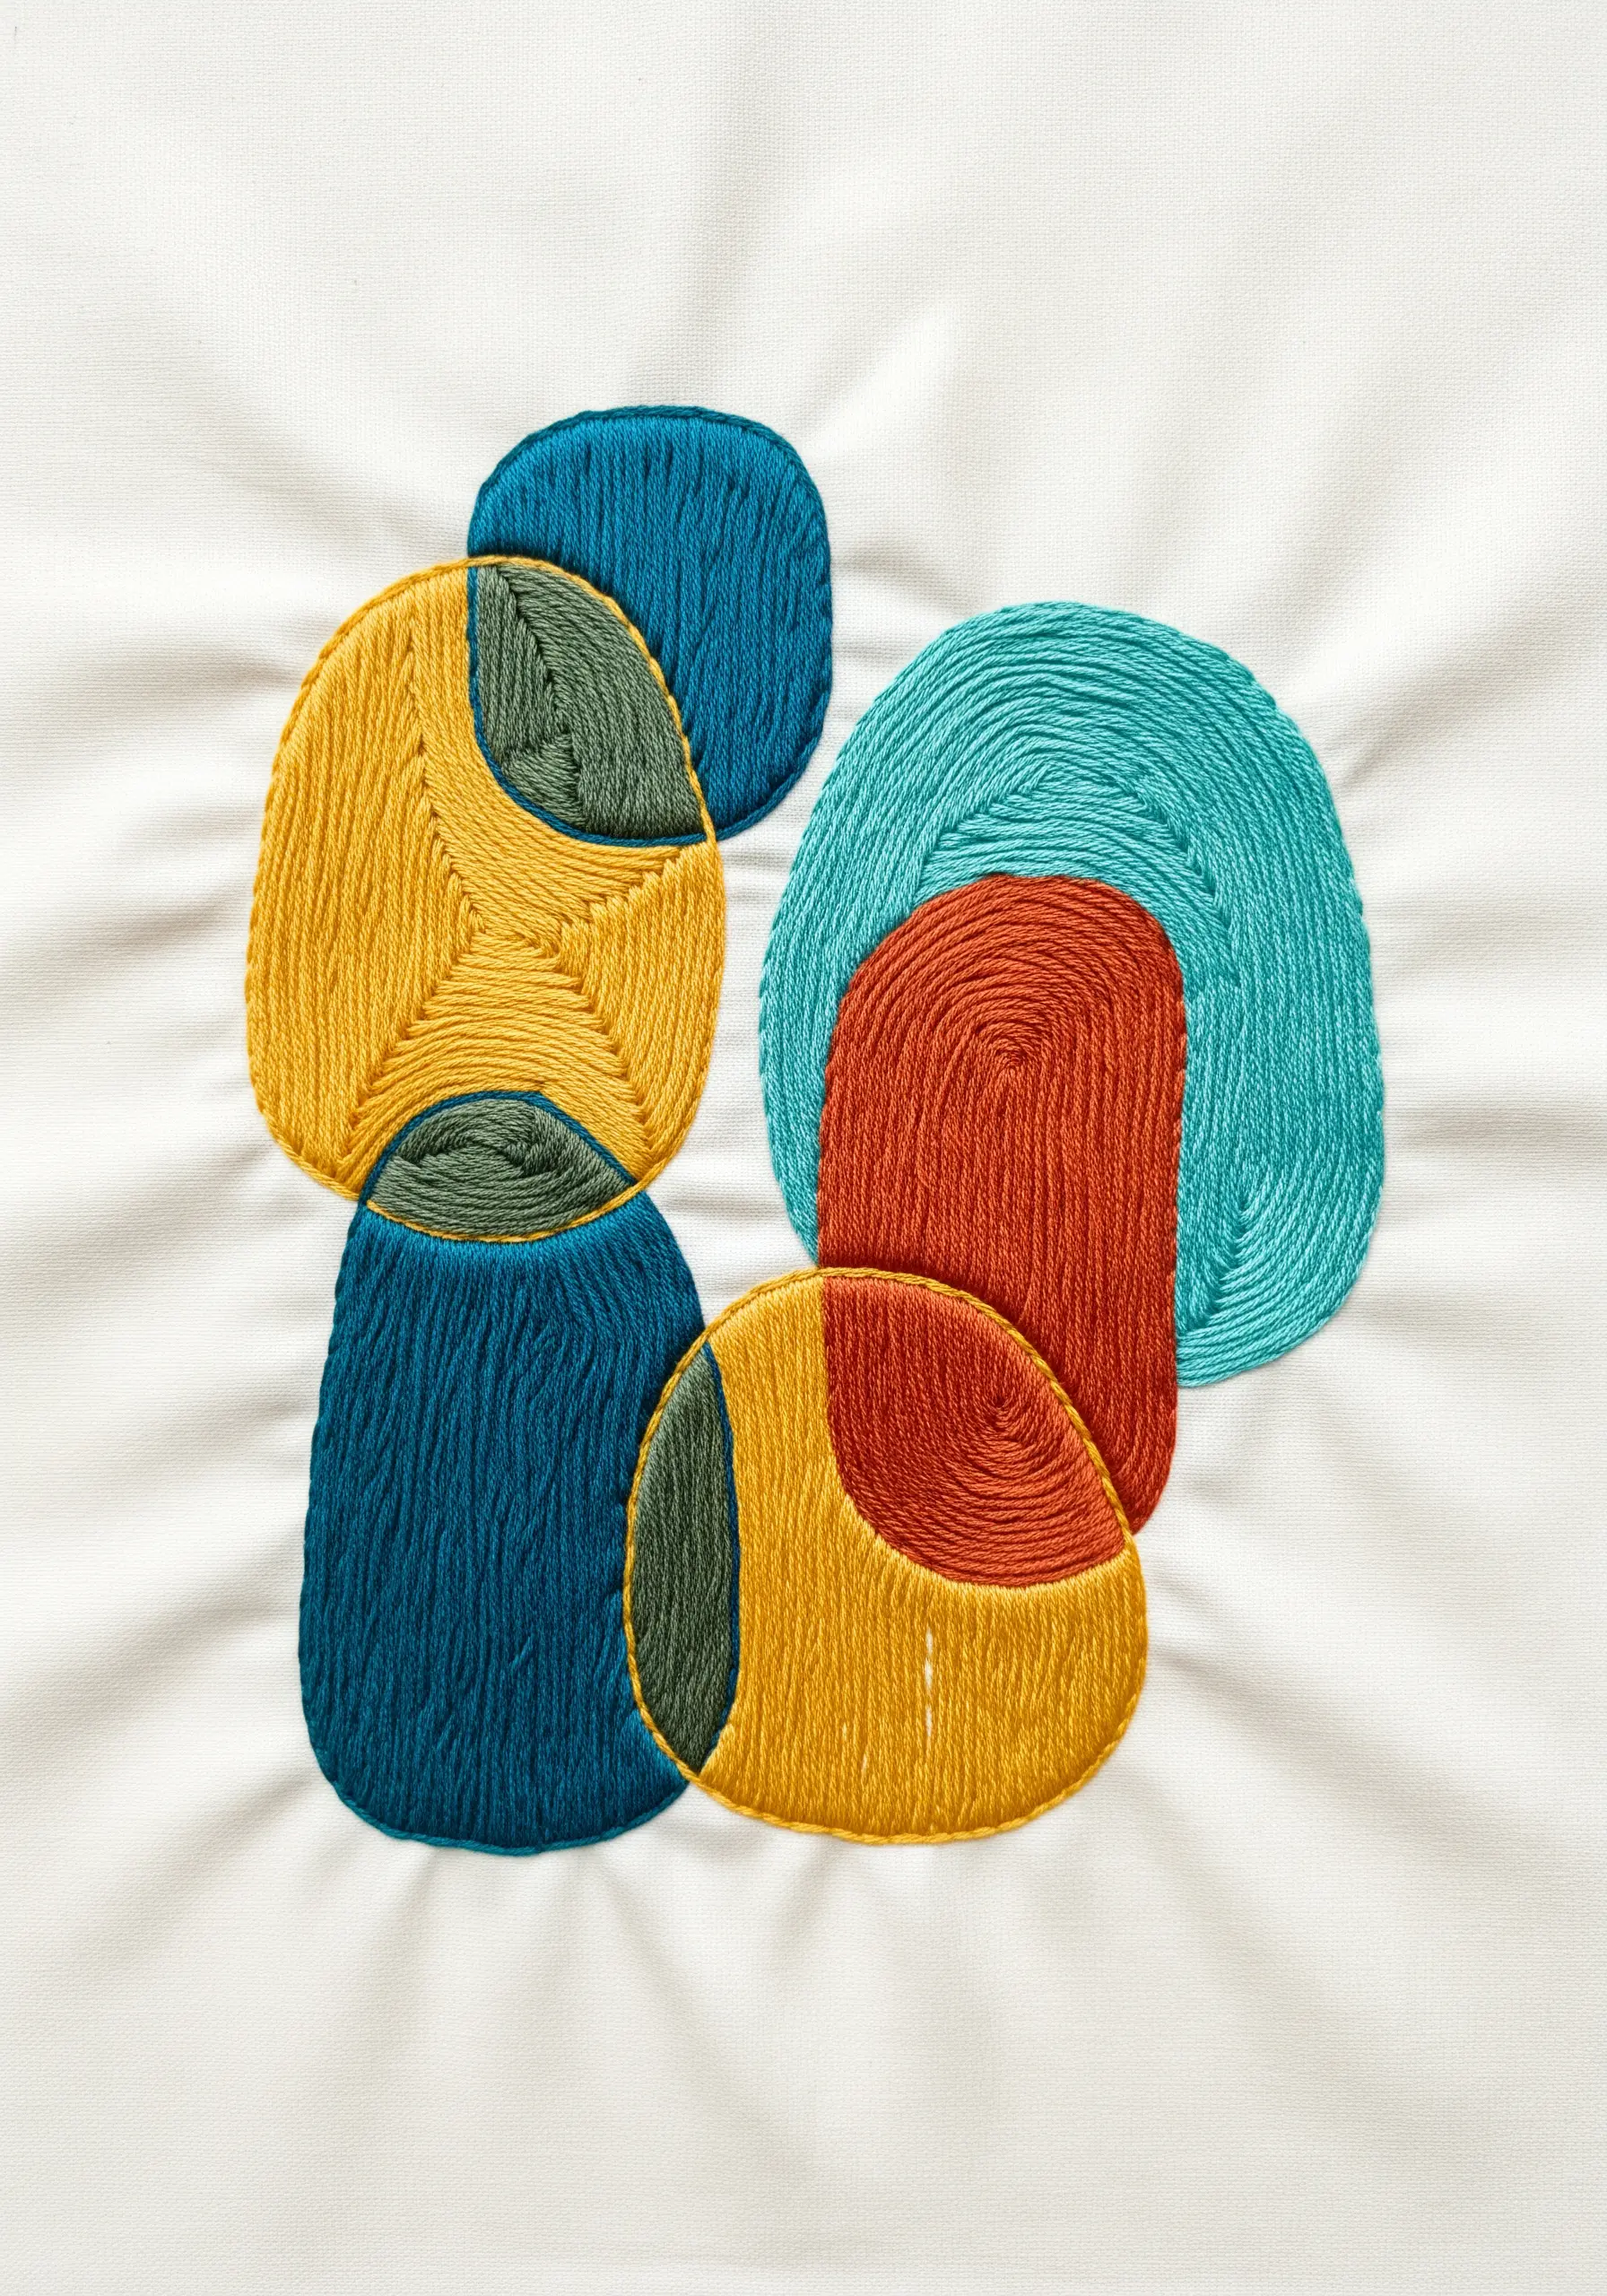
Play with composition by stitching abstract, pebble-like shapes that overlap and interact.
Use a dense satin stitch and vary the stitch direction in each section to create subtle shifts in how the light reflects off the thread.
This adds depth and interest without complicating your color palette.
Choose a cohesive set of three to four colors to ensure the final piece feels balanced and intentional, not chaotic.
This technique is perfect for creating abstract color-blend stitch ideas that look like modern graphic illustrations.
11. Add Detail with Tiny Stitch Variations
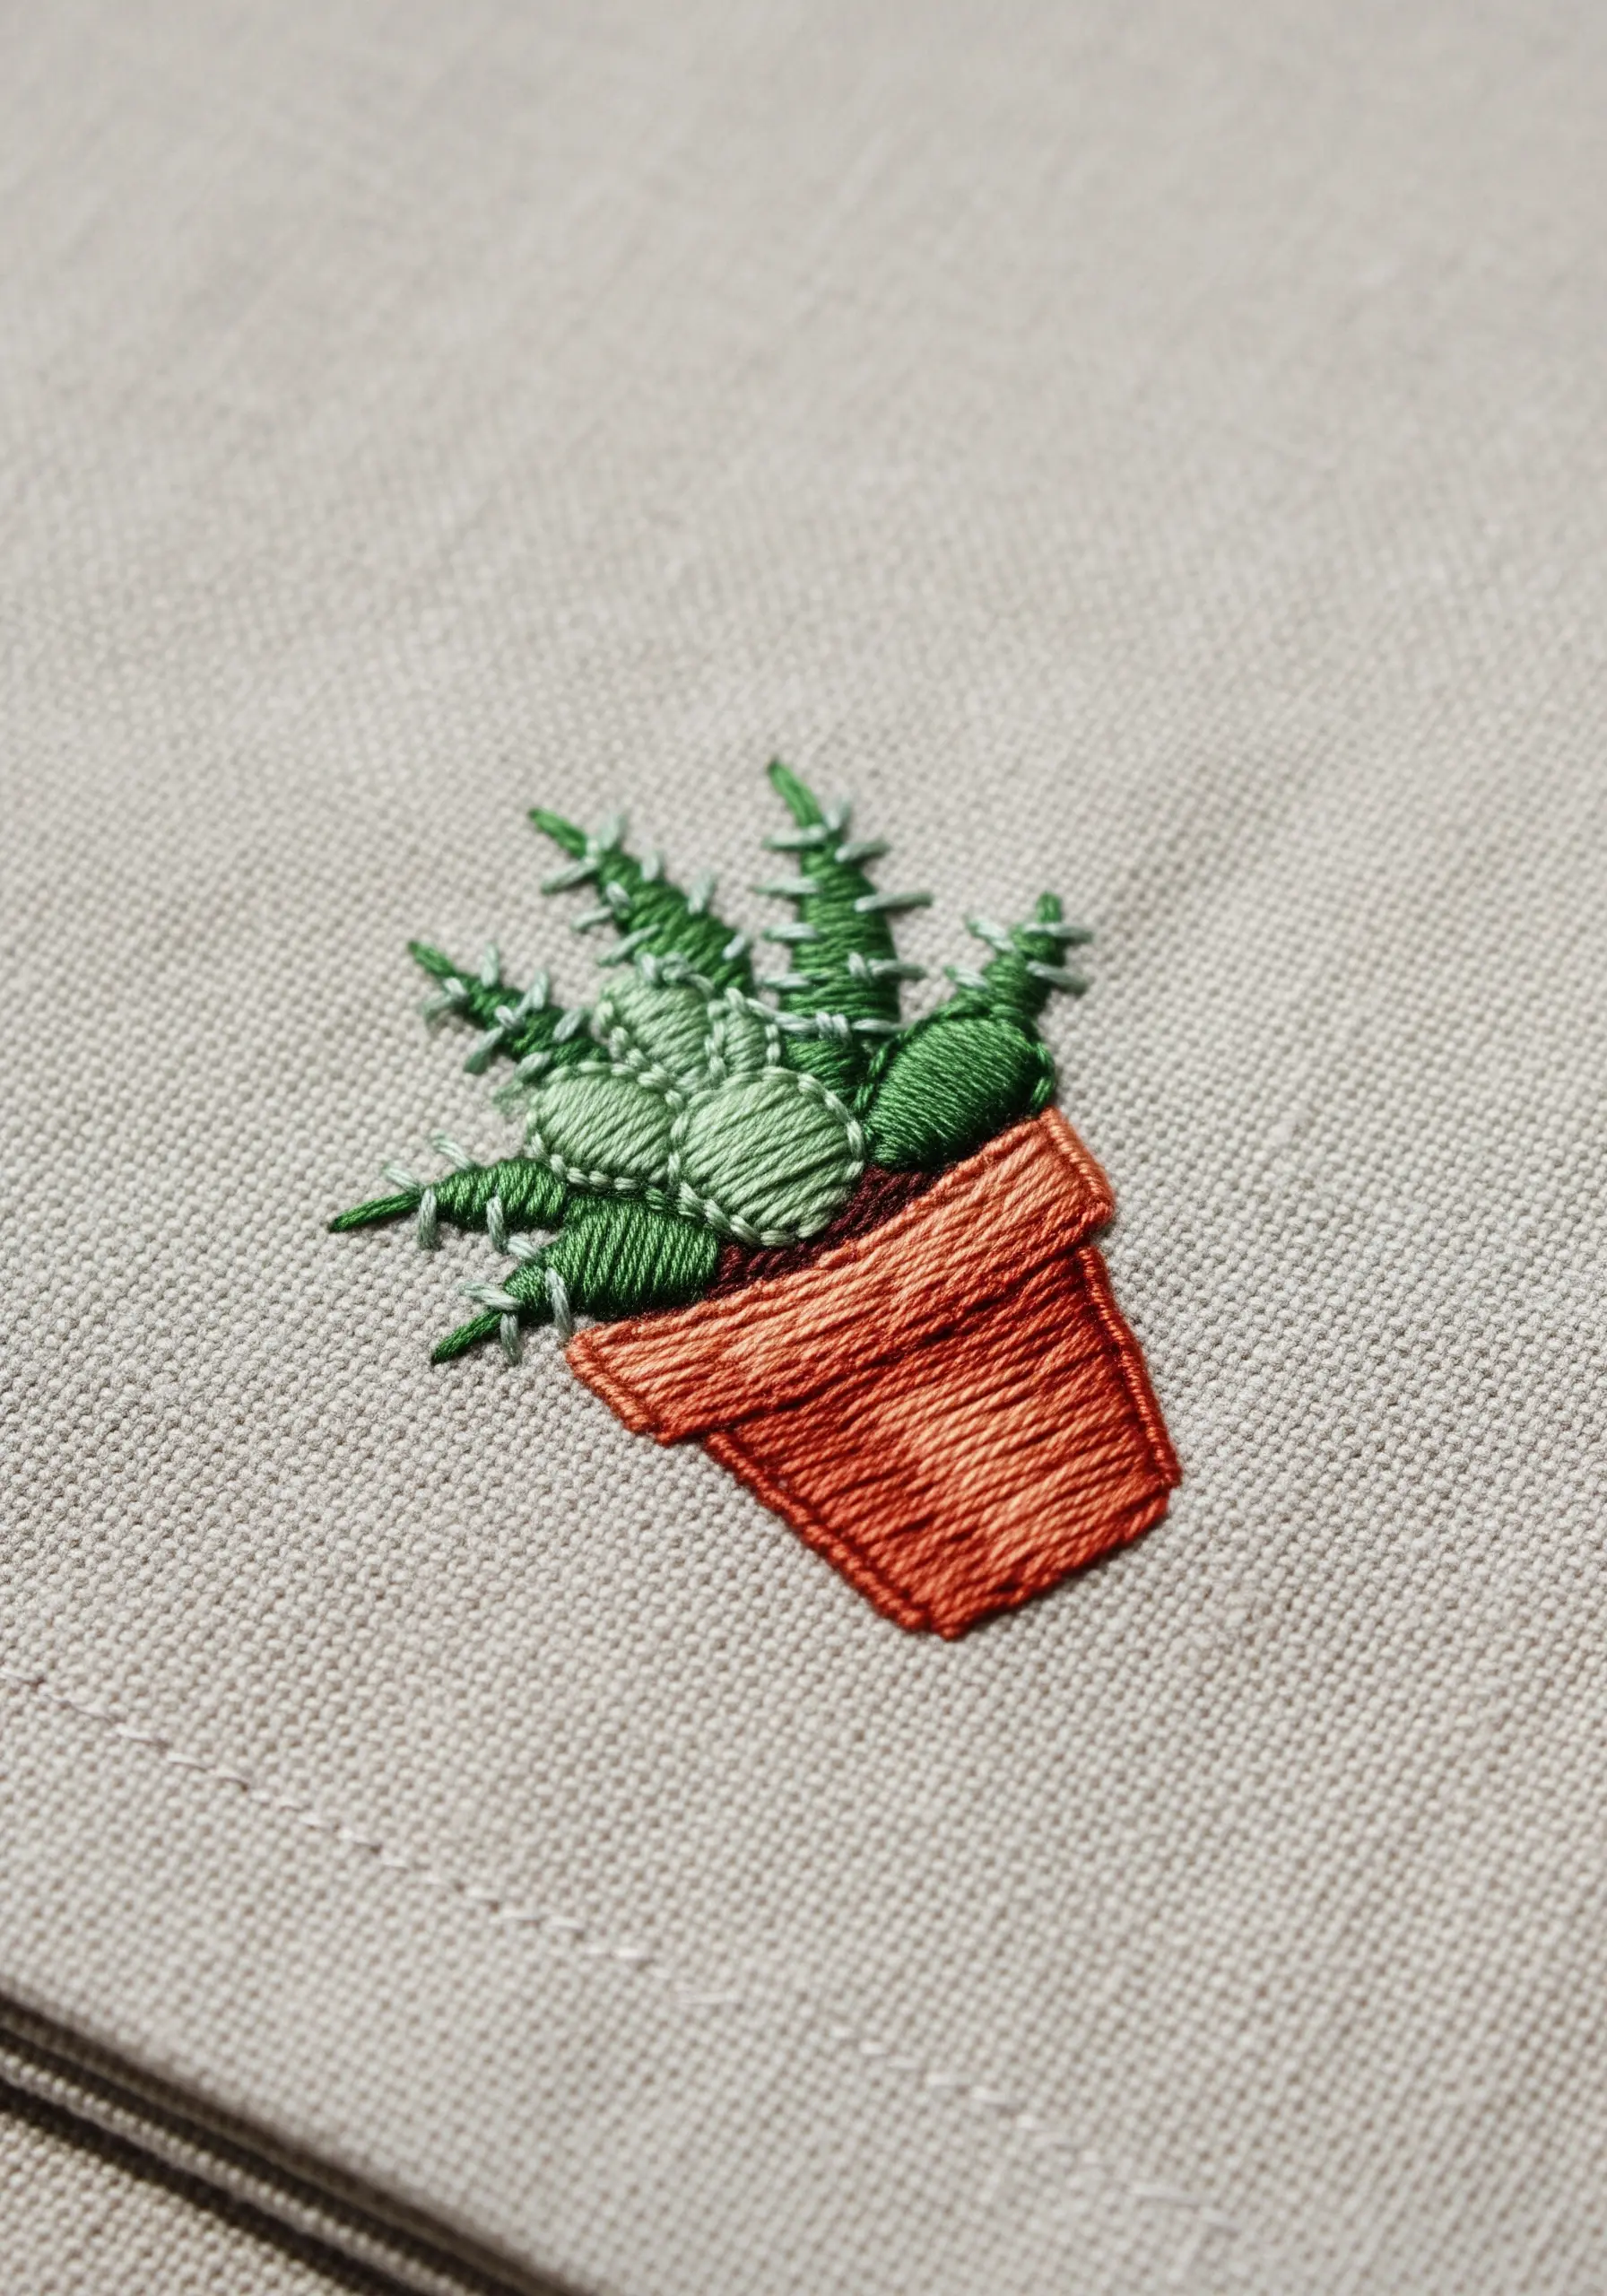
For a tiny motif like this succulent, a few different stitches are all you need to create surprising detail.
Use a fishbone stitch for the broader leaves to create a central vein, and switch to simple straight stitches for the spikier, upright leaves.
A row of tiny French knots can suggest the texture of soil or small pebbles in the pot.
Working on this small scale on linen or cotton napkins elevates everyday items, and it’s a great way to use up leftover thread from larger projects.
These houseplant embroidery motifs are perfect for adding a touch of green to your textiles.
12. Capture Movement with Graduated Color

Create a sense of motion in a simple wave design by using a gradient of color.
Select three to four shades of blue, from dark to light, and assign each shade to a specific line in the wave.
Use a smooth, clean stitch like a stem stitch or split stitch to ensure each line is fluid and defined.
Placing the darkest color at the bottom and the lightest at the crest of the wave mimics how light hits water, giving your simple design a dynamic and realistic feel.
This is a core technique in any ocean-inspired hoop embroidery.
13. Perfect the Padded Satin Stitch Monogram

To give your monograms a luxurious, raised appearance, use a padded satin stitch.
First, outline your letter with a split stitch. Then, fill the inside of the letter with rows of small, straight seed stitches.
Finally, cover the entire shape with smooth, vertical satin stitches, going just beyond your split stitch outline for a perfectly crisp edge.
This underlying padding gives the letter a three-dimensional quality that looks incredibly professional on handkerchiefs, towels, and other gifts.
These minimal monogram styles always feel timeless and elegant.
14. Achieve a Chunky Texture with Chain Stitch
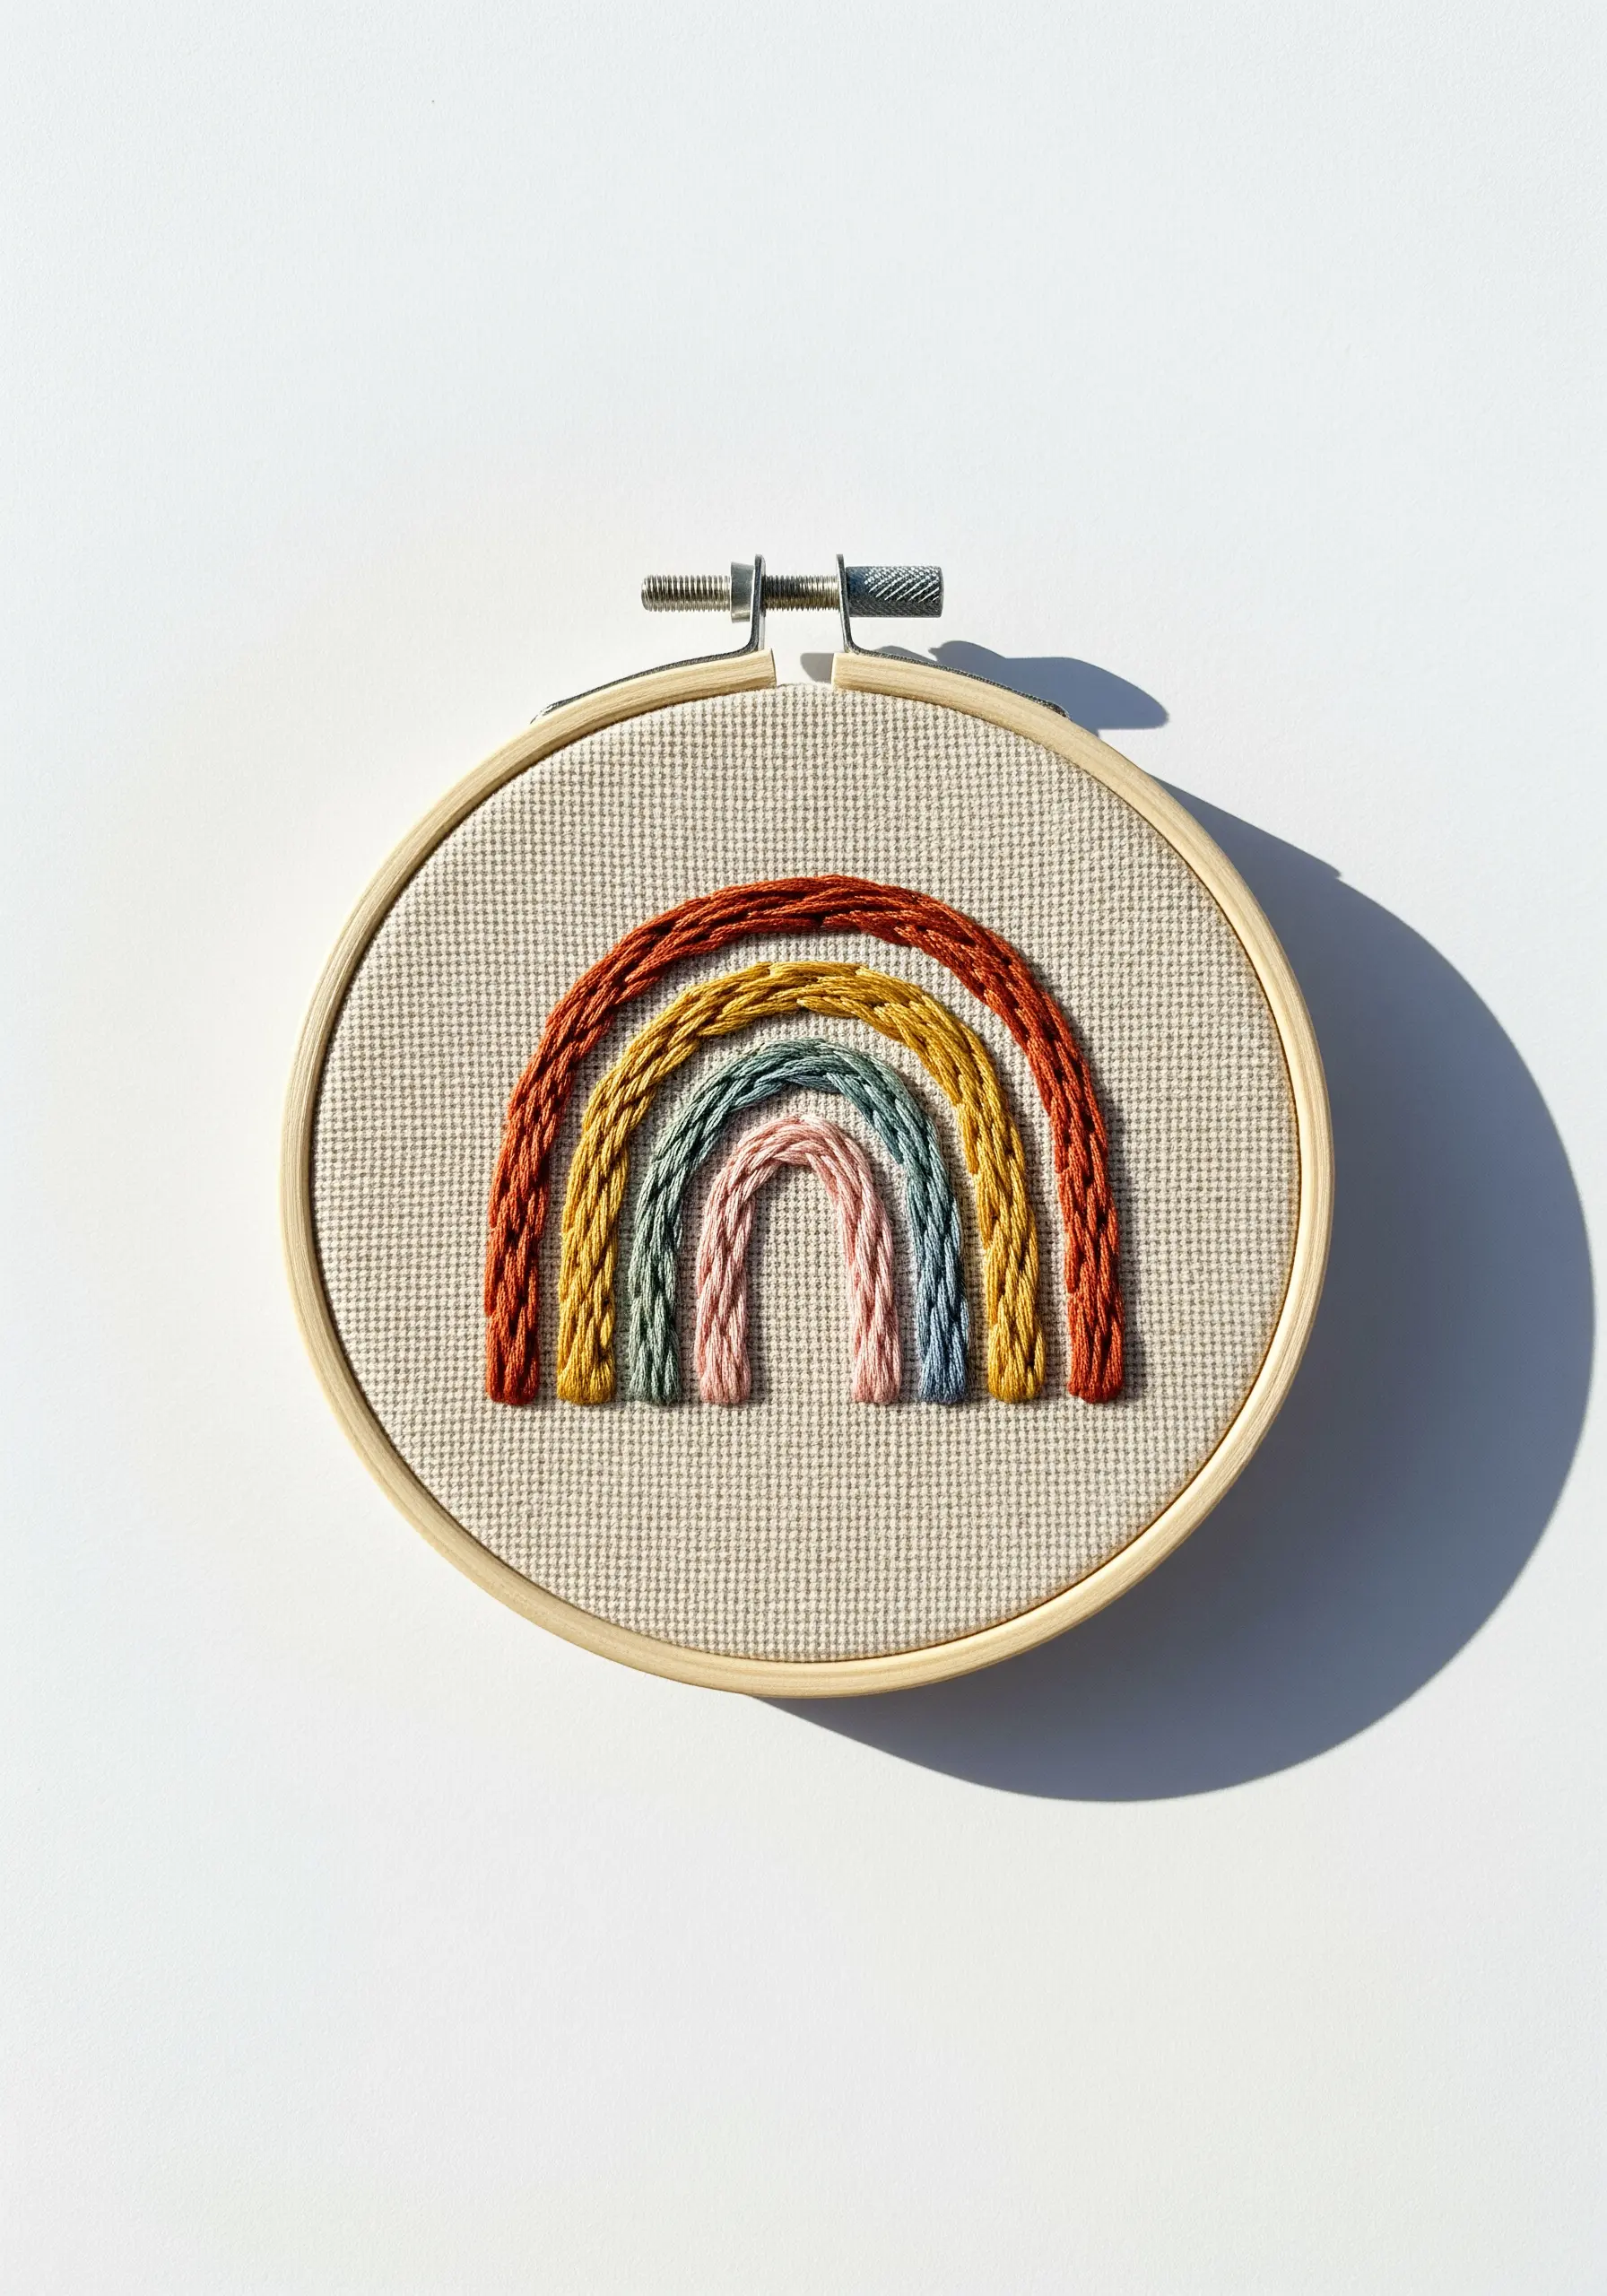
For a bold, textured rainbow, use a chain stitch fill instead of a satin stitch.
Work each colored arc in rows of chain stitch, placing them tightly together so no fabric shows through.
This stitch naturally creates a braided, rope-like texture that adds a playful, tactile quality to the design.
It is also much faster for filling shapes than satin stitch, making it one of those cozy DIY ideas you can finish in a single afternoon.
Using a matte, six-strand cotton floss enhances the chunky, soft appearance.
15. Use Variegated Thread for Instant Shading

Create the illusion of light and shadow with zero effort by using a single variegated thread.
This type of thread has multiple shades of the same color dyed along its length, so the color shifts naturally as you stitch.
Use a simple backstitch or stem stitch for the outline, and the thread will do all the work, adding depth and a subtle shimmer to your design.
It’s an ideal choice for minimalist line art embroidery patterns like this coffee cup, where you want a hint of dimension without changing floss.
16. Create Sculptural Knots with a Woven Wheel

The woven wheel stitch, or rose stitch, is the perfect way to create highly textured, three-dimensional dots.
Start by making a small star shape with an odd number of straight stitches (five is ideal).
Then, bring your needle up near the center and weave it over and under the spokes without piercing the fabric until the spokes are completely covered.
These sculptural knots add a surprising pop of texture and are perfect for abstract compositions, flower centers, or playful polka dots.
They are among the most unexpected embroidery techniques for creative fabric crafts.
17. Achieve Realism with Thread Painting
Even a minimalist design can benefit from the softness of thread painting.
Use the long and short stitch to create the feather, blending just two or three shades of grey or white for a subtle, realistic gradient.
Keep your stitches flowing in the natural direction of the feather’s barbs, angling them out from the central stem.
Use a single strand of floss for the finest details at the feather’s edge to give it a soft, delicate finish.
This is a great entry point to contemporary thread painting techniques.
18. Craft a Modern Patch with Appliqué
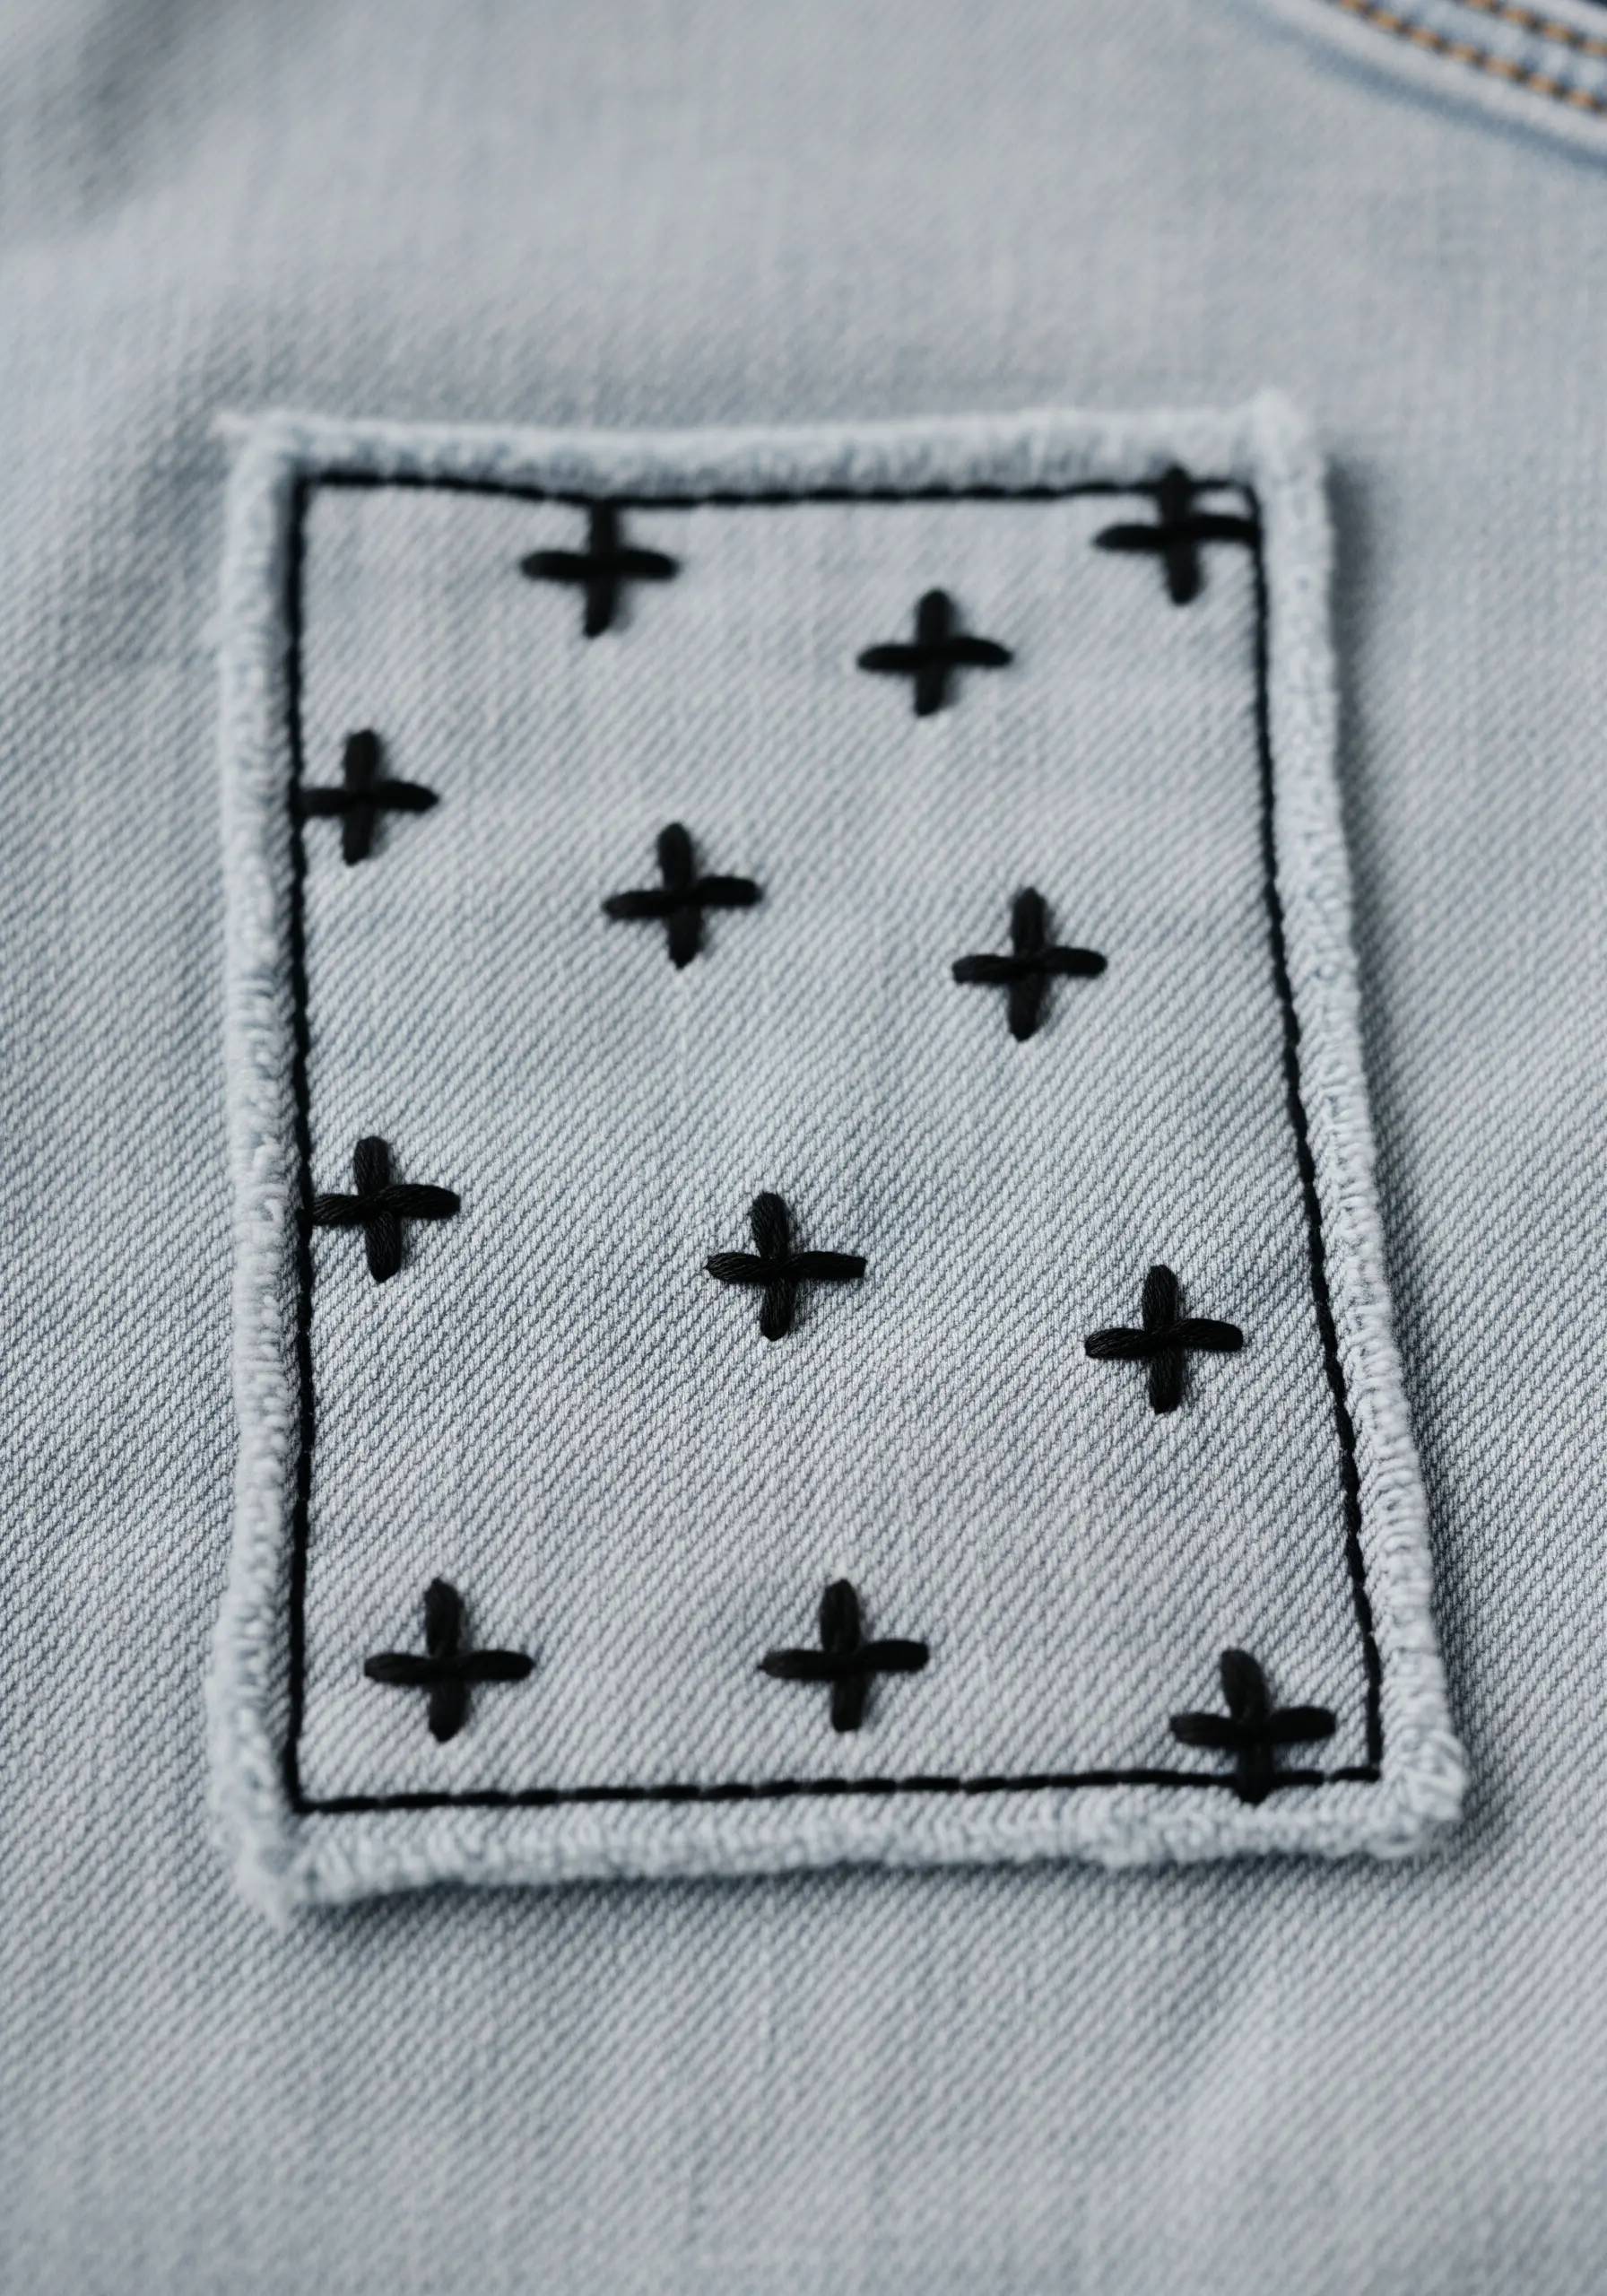
Create a custom patch by stitching your design on a separate piece of fabric first.
Use a contrasting fabric scrap, like this light denim, and stitch a simple repeating pattern, such as these cross stitches.
Once finished, carefully trim the fabric, leaving a small border.
Tuck the raw edge under and use a whip stitch or a tight running stitch around the border to secure it to your garment, creating a clean, modern appliqué.
This is one of many upcycled fabric wall art projects using embroidery to give old clothes a new life.
19. Play with Asymmetry in Radial Designs

Give a classic sunburst a modern twist by varying the length of the rays.
Instead of making each straight stitch identical, create a more dynamic rhythm by alternating long and short stitches around the central point.
This simple adjustment turns a predictable motif into something more energetic and visually interesting.
Use a full six strands of cotton floss to ensure the rays are bold and graphic, providing a strong contrast against the plain background fabric.
These abstract thread burst techniques are perfect for hoop art.
20. Vary Stitch Direction for Realistic Leaves
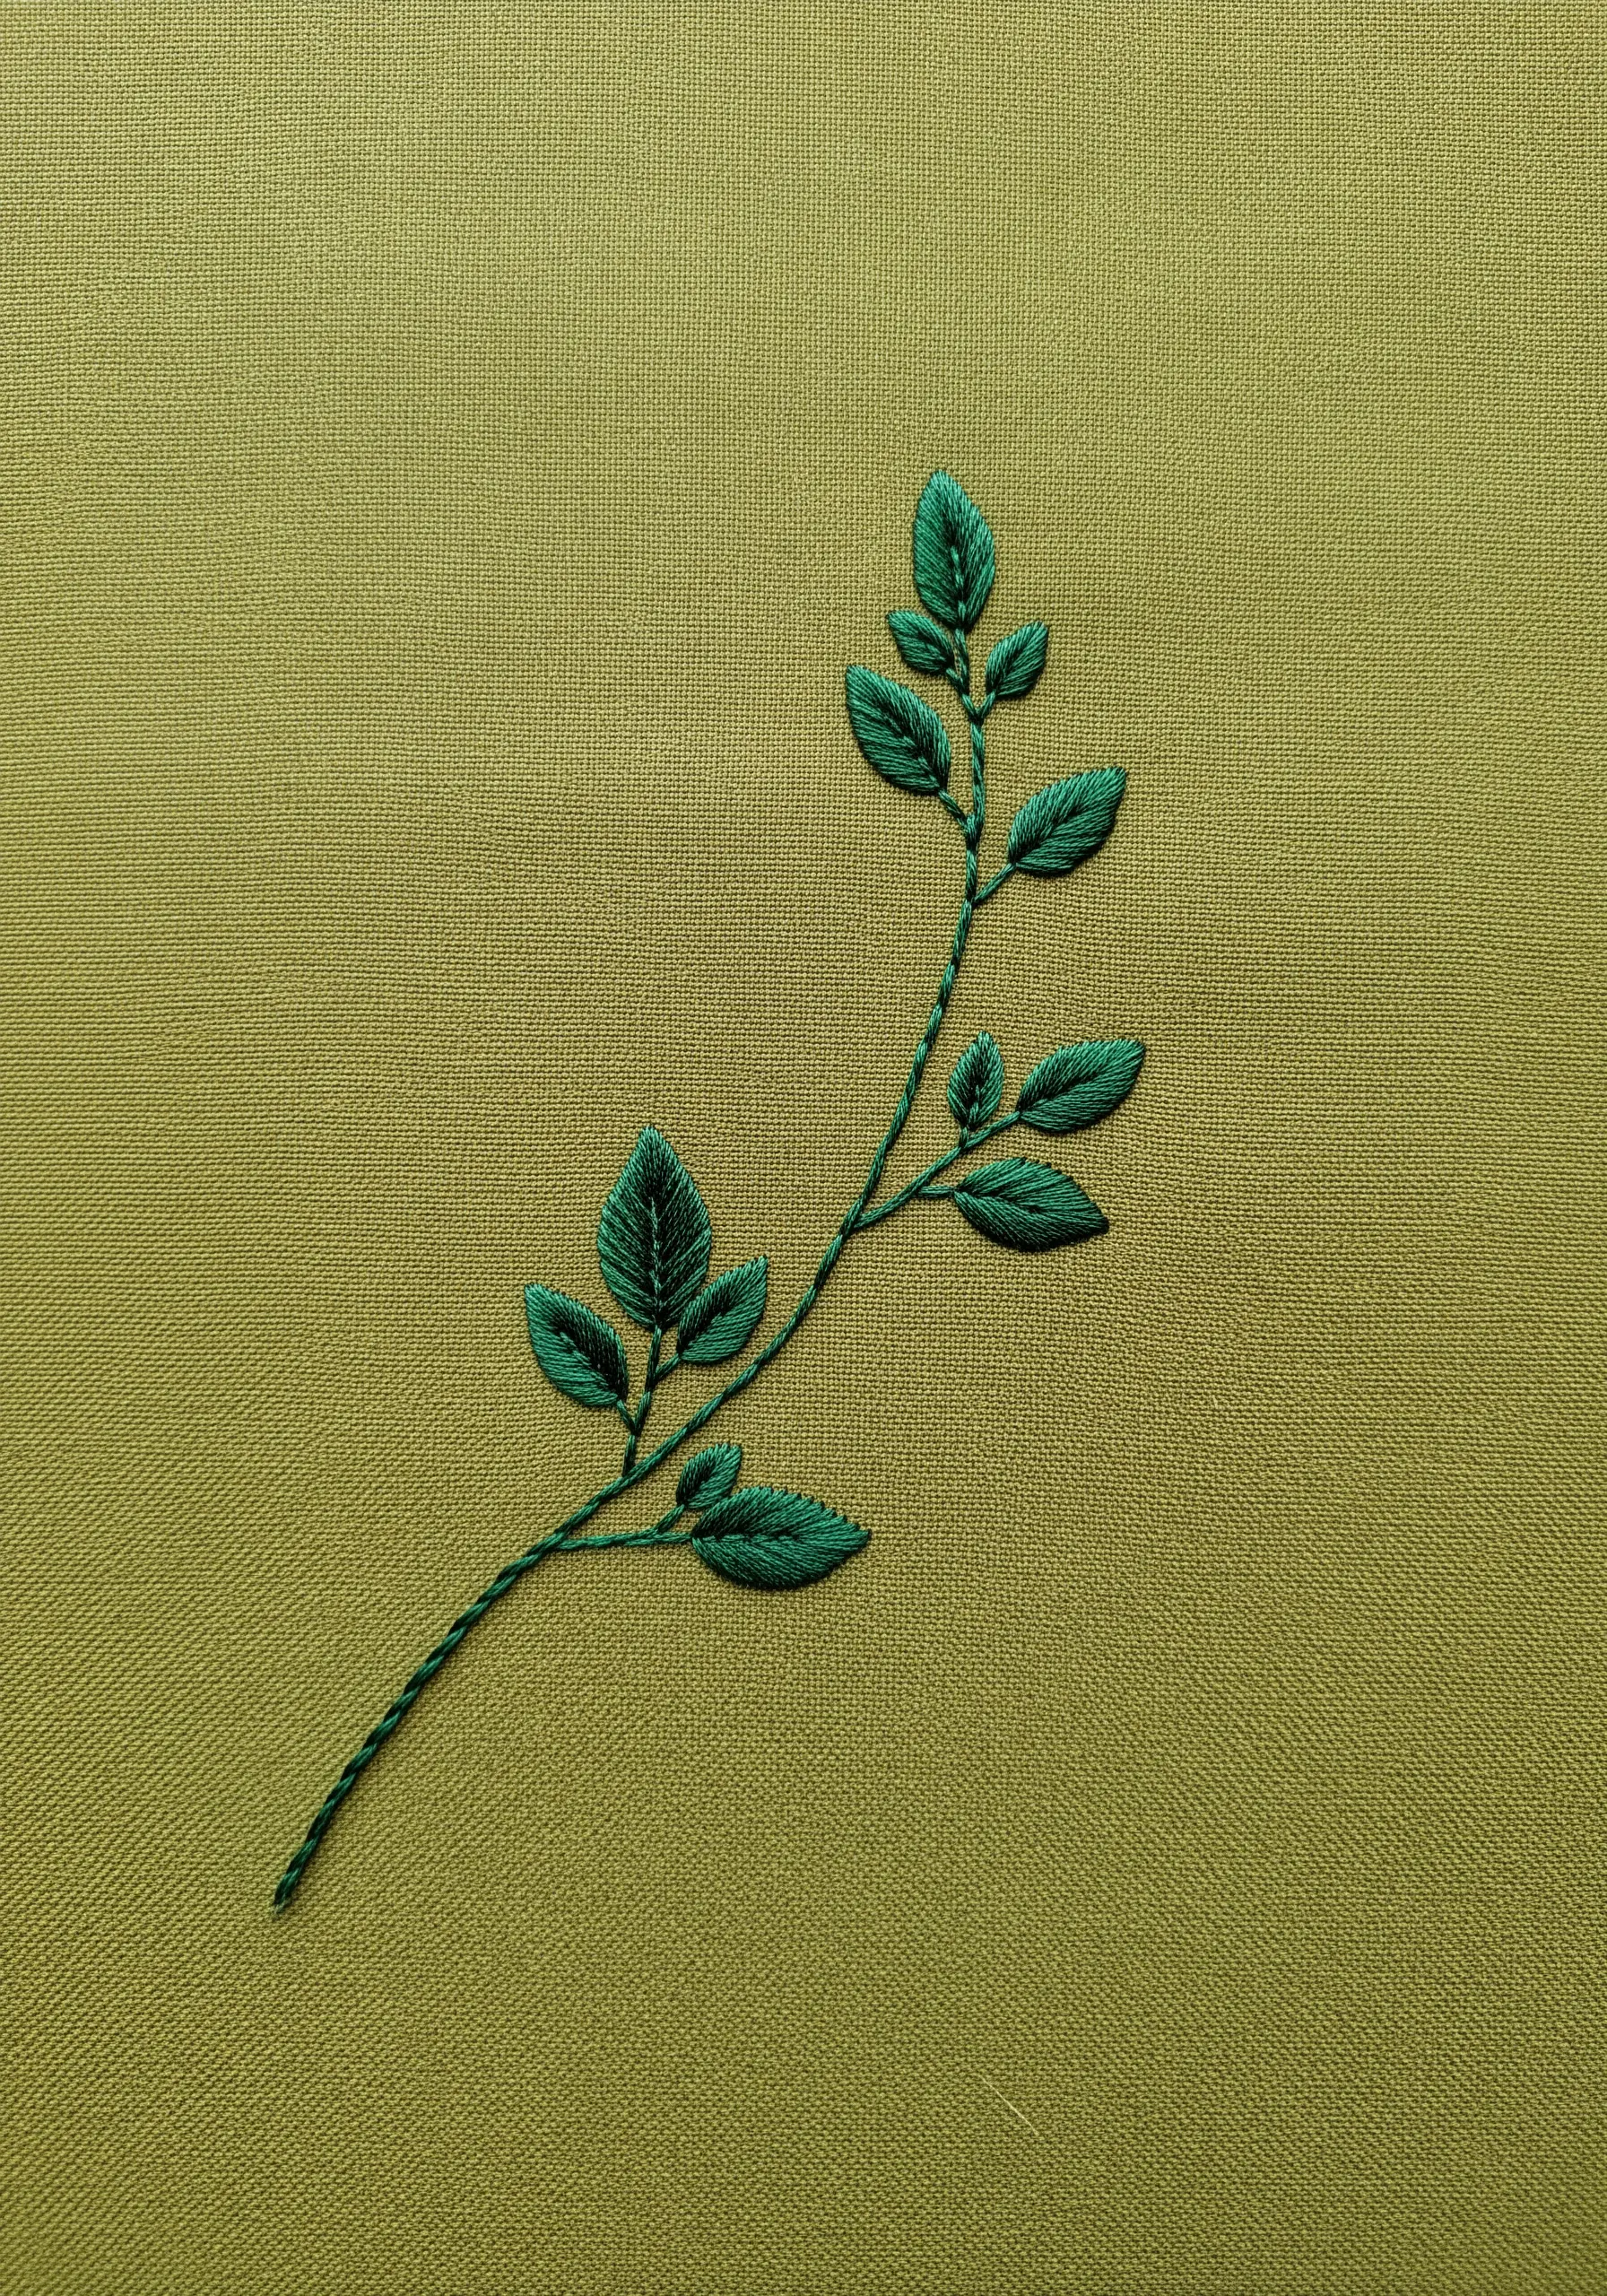
To make simple leaves look more realistic, pay close attention to the direction of your satin stitches.
Instead of stitching straight across, angle the stitches on the left and right halves of each leaf so they meet at a slight ‘V’ along an imaginary center line.
This mimics the natural vein of a leaf and creates a subtle play of light on the thread.
For a clean look, combine these filled leaves with a simple, thin stem stitch for the branches, letting the leaves remain the focus.
These are the kinds of leaf embroidery stitches that turn ordinary tote bags into botanical art.
21. Imply Form with Open Outlines
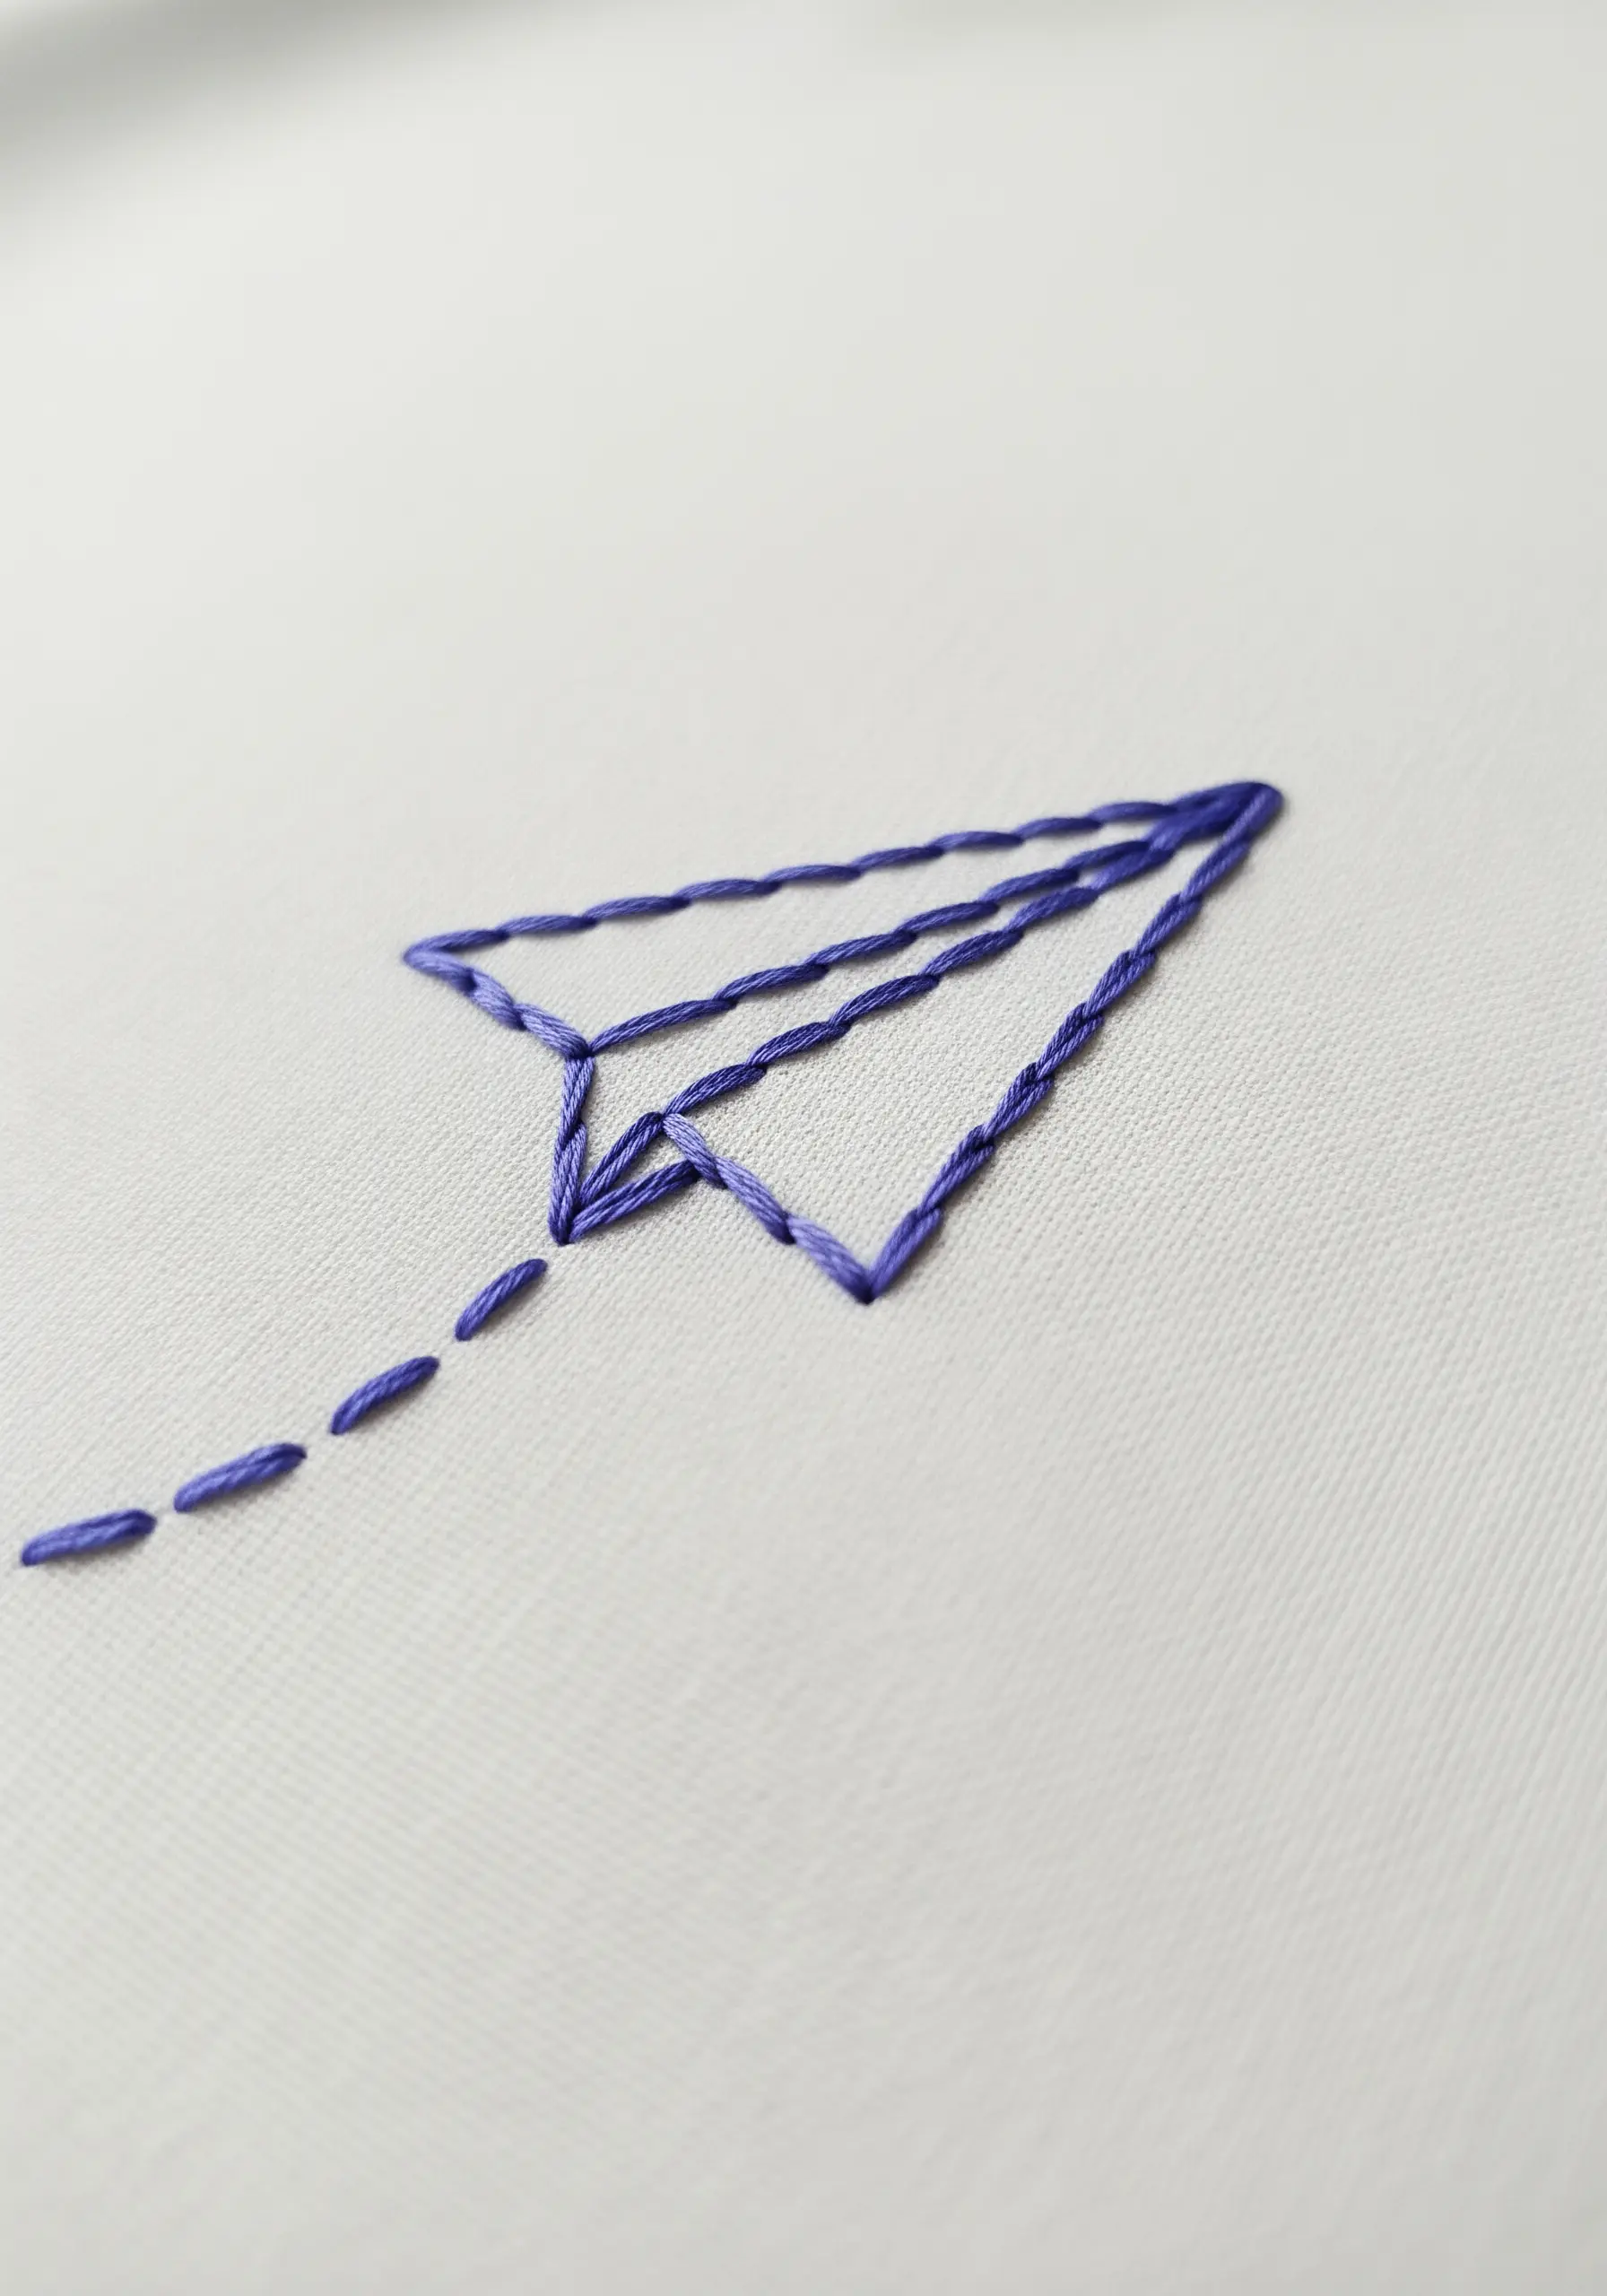
You don’t need to fill a shape to give it substance. An open, airy outline can be just as effective.
For this paper plane, use a simple backstitch for the main outline.
Then, add a few internal lines to suggest the folds and creases of the paper, giving the two-dimensional shape a sense of three-dimensional form.
A trailing dashed line (running stitch) adds a sense of movement and whimsy, completing the story with just a few carefully placed stitches.
This approach is perfect for minimal travel-themed embroidery ideas.
22. Use Color Blending for Photorealism

Achieve a stunningly realistic, textured mushroom cap with careful color blending.
Using single strands of floss in three or four related shades of brown and tan, fill the cap with long and short stitch.
Work in curved rows, following the rounded shape of the cap, and scatter your stitches to blend the colors seamlessly where they meet.
Contrast this detailed texture with a smoother, vertical satin stitch for the stem to create a clear distinction between the two surfaces.
It’s an advanced technique that produces embroidery designs that turn everyday nature into stunning art.
23. Create Clean Lines with Appliqué Strips
For perfectly straight, bold stripes of color, turn to fabric appliqué instead of thread.
Cut thin strips of cotton fabric and use a fusible adhesive to temporarily secure them to your base fabric.
Then, stitch along the edges of each strip with a simple, matching running stitch to permanently attach them and add a subtle, handmade detail.
This method is faster than filling large areas with satin stitch and guarantees a crisp, clean edge every time, perfect for creating modern, minimal border designs.
24. Make Details Pop with French Knots

For a tiny motif like these cherries, the texture is everything.
Fill each cherry with a cluster of tightly packed French knots using a vibrant red thread. This creates a rounded, three-dimensional effect that looks much more interesting than a flat satin stitch.
Use two or three strands for the knots to give them volume, but switch to a single strand for the delicate green stems to keep the design balanced.
It’s one of the best minimal fruit & plant motifs that make summer clothing look handmade luxury.
25. Elevate Outlines with Metallic Thread
Create a striking, high-contrast design by pairing metallic thread with dark fabric.
To make the metallic floss easier to work with, use shorter lengths of thread (about 12 inches) and a thread conditioner to prevent tangling and fraying.
A split stitch or chain stitch works beautifully for outlines, as it allows the metallic fibers to lie flat and catch the light evenly.
This combination of simple line work and luxe material feels both modern and timeless.
You can use this technique for all kinds of metallic thread wall art projects.
26. Explore Rhythm with Repeating Motifs
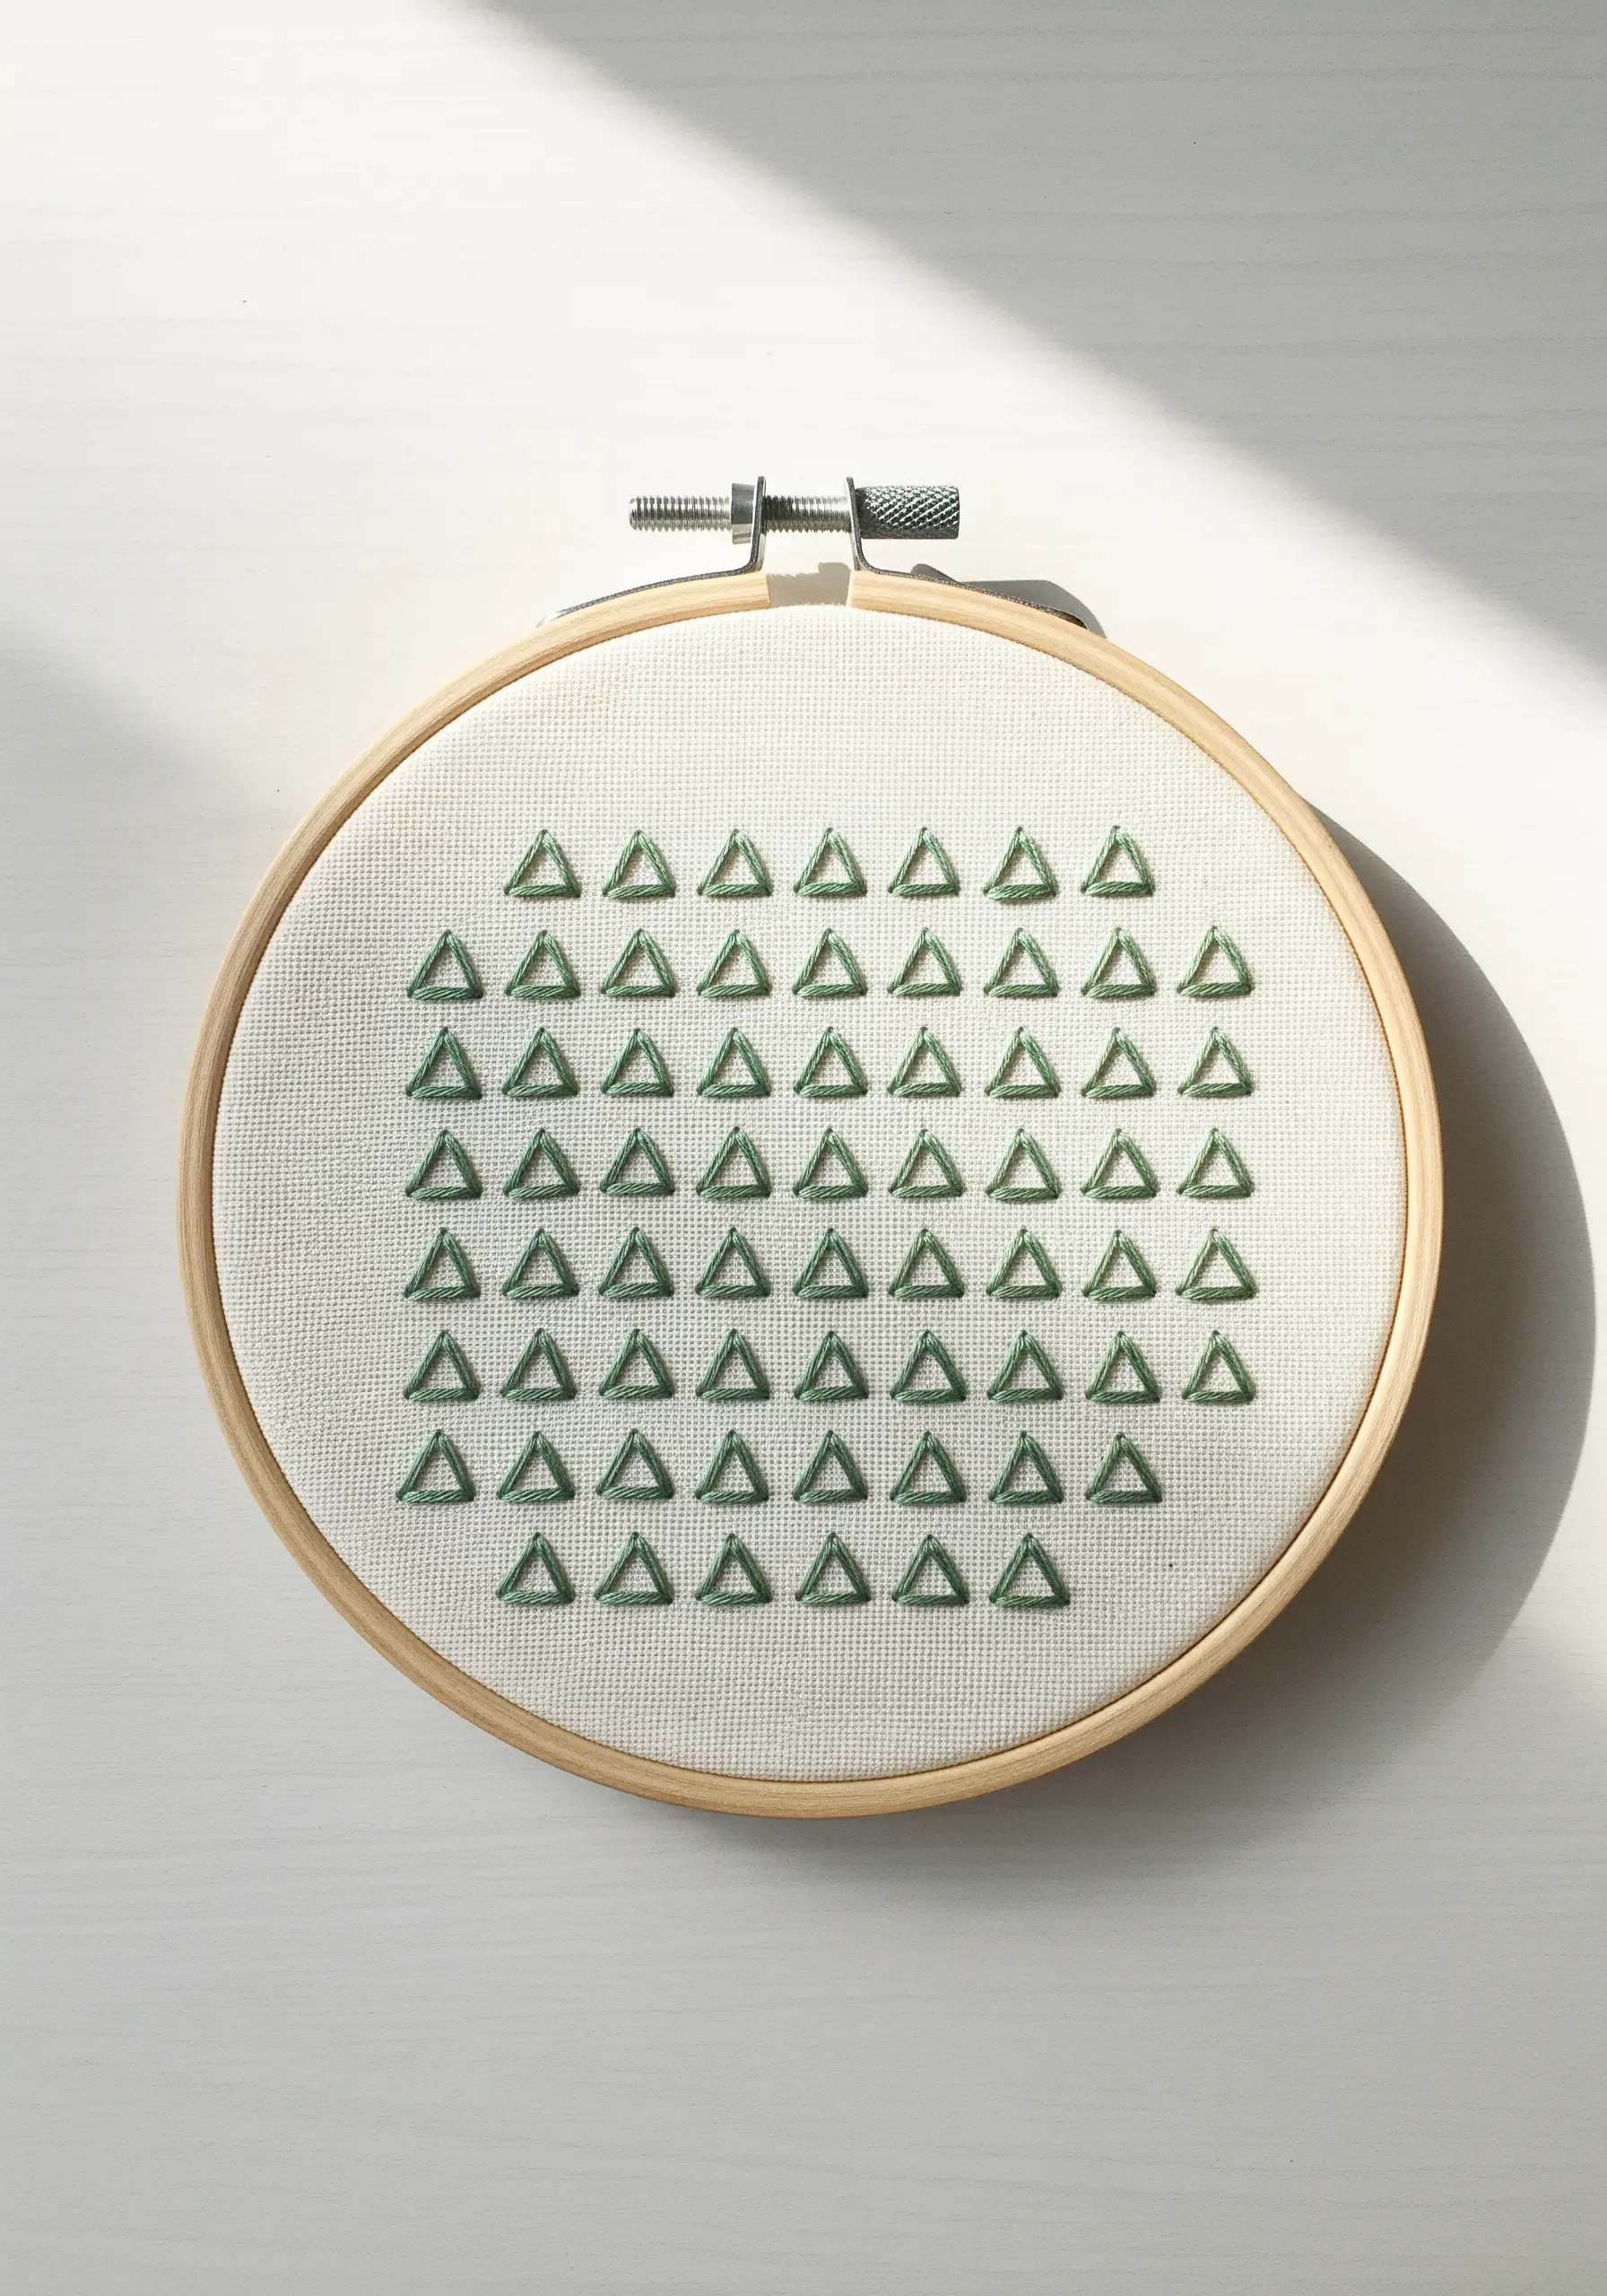
Create a calming, geometric pattern by repeating a single, simple shape.
Stitch a grid of small triangles using just three straight stitches for each one. The key to a polished look is consistency in the size and spacing of your motifs.
Use a water-soluble marker to draw a light grid on your fabric before you start stitching to ensure perfect alignment.
This meditative process results in a sophisticated, patterned textile that looks complex but is incredibly simple to execute, making it ideal for minimalist embroidery projects for calm and cozy interiors.
27. Isolate a Motif for Maximum Impact

Make a tiny design feel important by giving it plenty of negative space.
By placing a single, small motif like this planet on an otherwise empty expanse of dark fabric, you draw the viewer’s eye directly to it.
Use a circular satin stitch for the planet, working in a spiral from the outside in to create a smooth, rounded shape.
A single, delicate backstitch for the ring provides just enough detail to complete the image, proving that a design doesn’t need to be large to be impactful.
These tiny, secret embroidery ideas add a personal touch to any fabric item.
28. Juxtapose Textures for Abstract Art

Create a compelling abstract piece by combining different stitch textures within a single composition.
Here, a smooth, vertical satin stitch contrasts beautifully with a block of horizontal satin stitch and a tightly woven satin stitch in the oval.
This juxtaposition of direction and density creates visual interest and depth, even with a limited color palette.
Define your shapes with a pencil first, then fill each one with a distinct texture to create a piece that feels like a fabric collage embroidery.
29. Create Delicate Detail with Detached Stitches
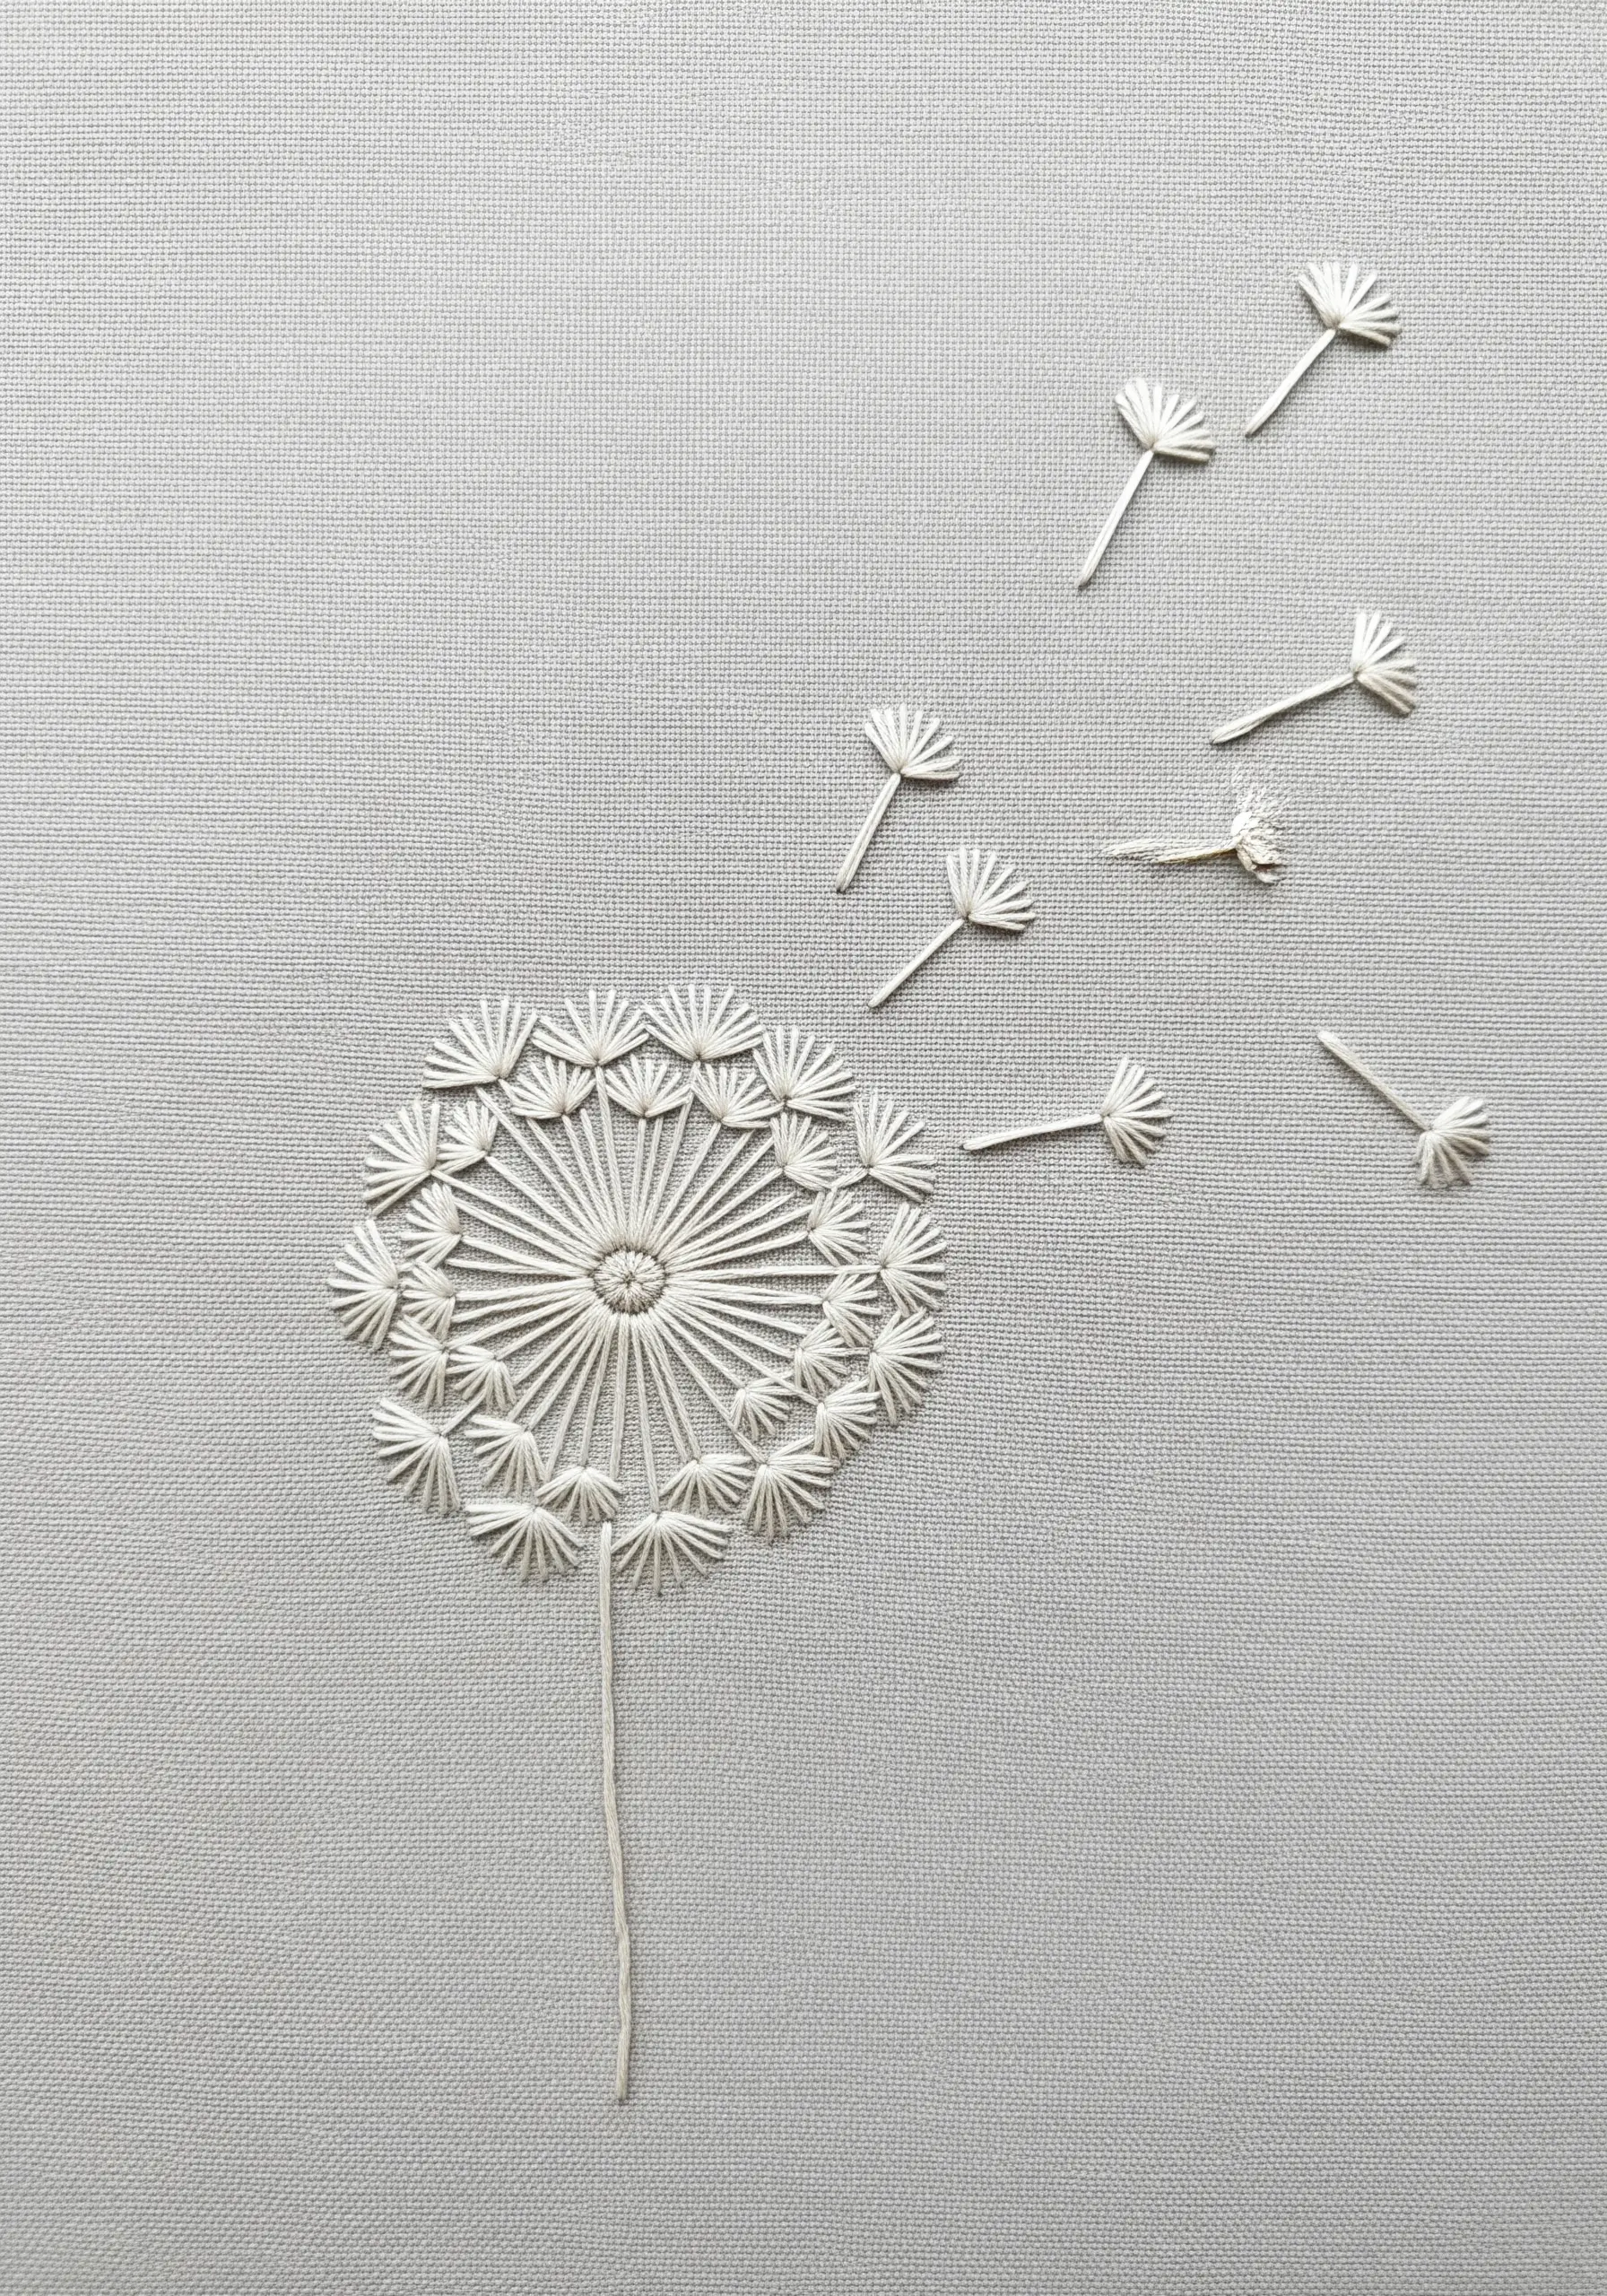
To capture the airy, weightless quality of a dandelion, use detached and semi-detached stitches.
The central seed head is made of radiating straight stitches, while the floating seeds are created with a combination of a single straight stitch for the stem and a detached chain stitch fanned out at the top.
By leaving some threads slightly looser or raised from the fabric, you create a delicate, three-dimensional effect that mimics the way dandelion seeds float on the wind.
This technique is perfect for tone-on-tone embroidery techniques, where texture is the main focus.
30. Perfect the Filled Backstitch Outline

For a clean, solid, and slightly raised silhouette, outline your shape with backstitch and then fill it in completely.
This technique is perfect for tote bags and other heavy-use items, as it’s more durable than a satin stitch and won’t snag easily.
Use three or four strands of floss to create a bold outline, then fill the shape with horizontal or vertical straight stitches, ensuring your needle goes down just inside the outline for a crisp edge.
It’s an excellent method for tiny embroidery motifs that transform plain tote bags into chic accessories.


