
You have the thread, the fabric, and the desire to create something beautiful, but perhaps you feel your work is missing that final touch of refinement. You see clean, intentional designs and wonder how to translate that clarity into your own stitching.
Minimalism in embroidery isn’t about doing less; it’s about making every single stitch matter. It’s found in the confident curve of a single line, the perfect tension of a satin stitch, and the quiet power of negative space. It’s an art of precision, texture, and restraint.
Here, you’ll find more than just patterns. You’ll discover the specific techniques that create that polished, modern aesthetic you admire. Think of this as a conversation about how to choose the right stitch for the right effect, how to handle your thread with intention, and how to turn simple shapes into sophisticated art. Let’s begin.
1. Sculpting with a Single Line
To achieve this sculptural effect, move beyond standard six-strand floss and use a thicker thread like a Perle cotton or even a fine yarn.
Instead of struggling to make a thick thread conform to tight curves with a traditional stitch, lay it on the fabric and secure it with a couching stitch—small, separate tacking stitches made with a finer, matching thread.
This preserves the continuous, fluid line that defines these abstract face line embroidery designs.
The tension here is key; let the negative space breathe, allowing the single line to carry all the artistic weight.
2. Architectural Satin Stitch Landscapes
For the crisp, graphic edges essential to this style, always outline each shape with a split stitch before filling it with satin stitch.
This simple preparation acts as a raised barrier, preventing the satin stitches from slipping and ensuring your geometric forms have sharp, clean definition.
Create subtle depth by varying the direction of your satin stitches in adjacent shapes—one section vertical, the next horizontal.
This manipulates how light hits the thread, creating texture and dimension even within a monochrome palette.
3. Raised Geometry with Corded Stitches
Create this powerful 3D effect by first laying down a foundation of thick cord, such as cotton piping cord, in your desired shape.
Then, using a standard embroidery needle and floss, completely wrap the cord with satin stitches, passing your needle under the cord and back through the fabric.
This technique, known as padded satin stitch, turns a flat line into a sculptural element.
Mounting the design on high-contrast black fabric makes the raised white forms appear to float, enhancing the minimalist aesthetic.
4. The Breathing Outline for Modern Botanicals
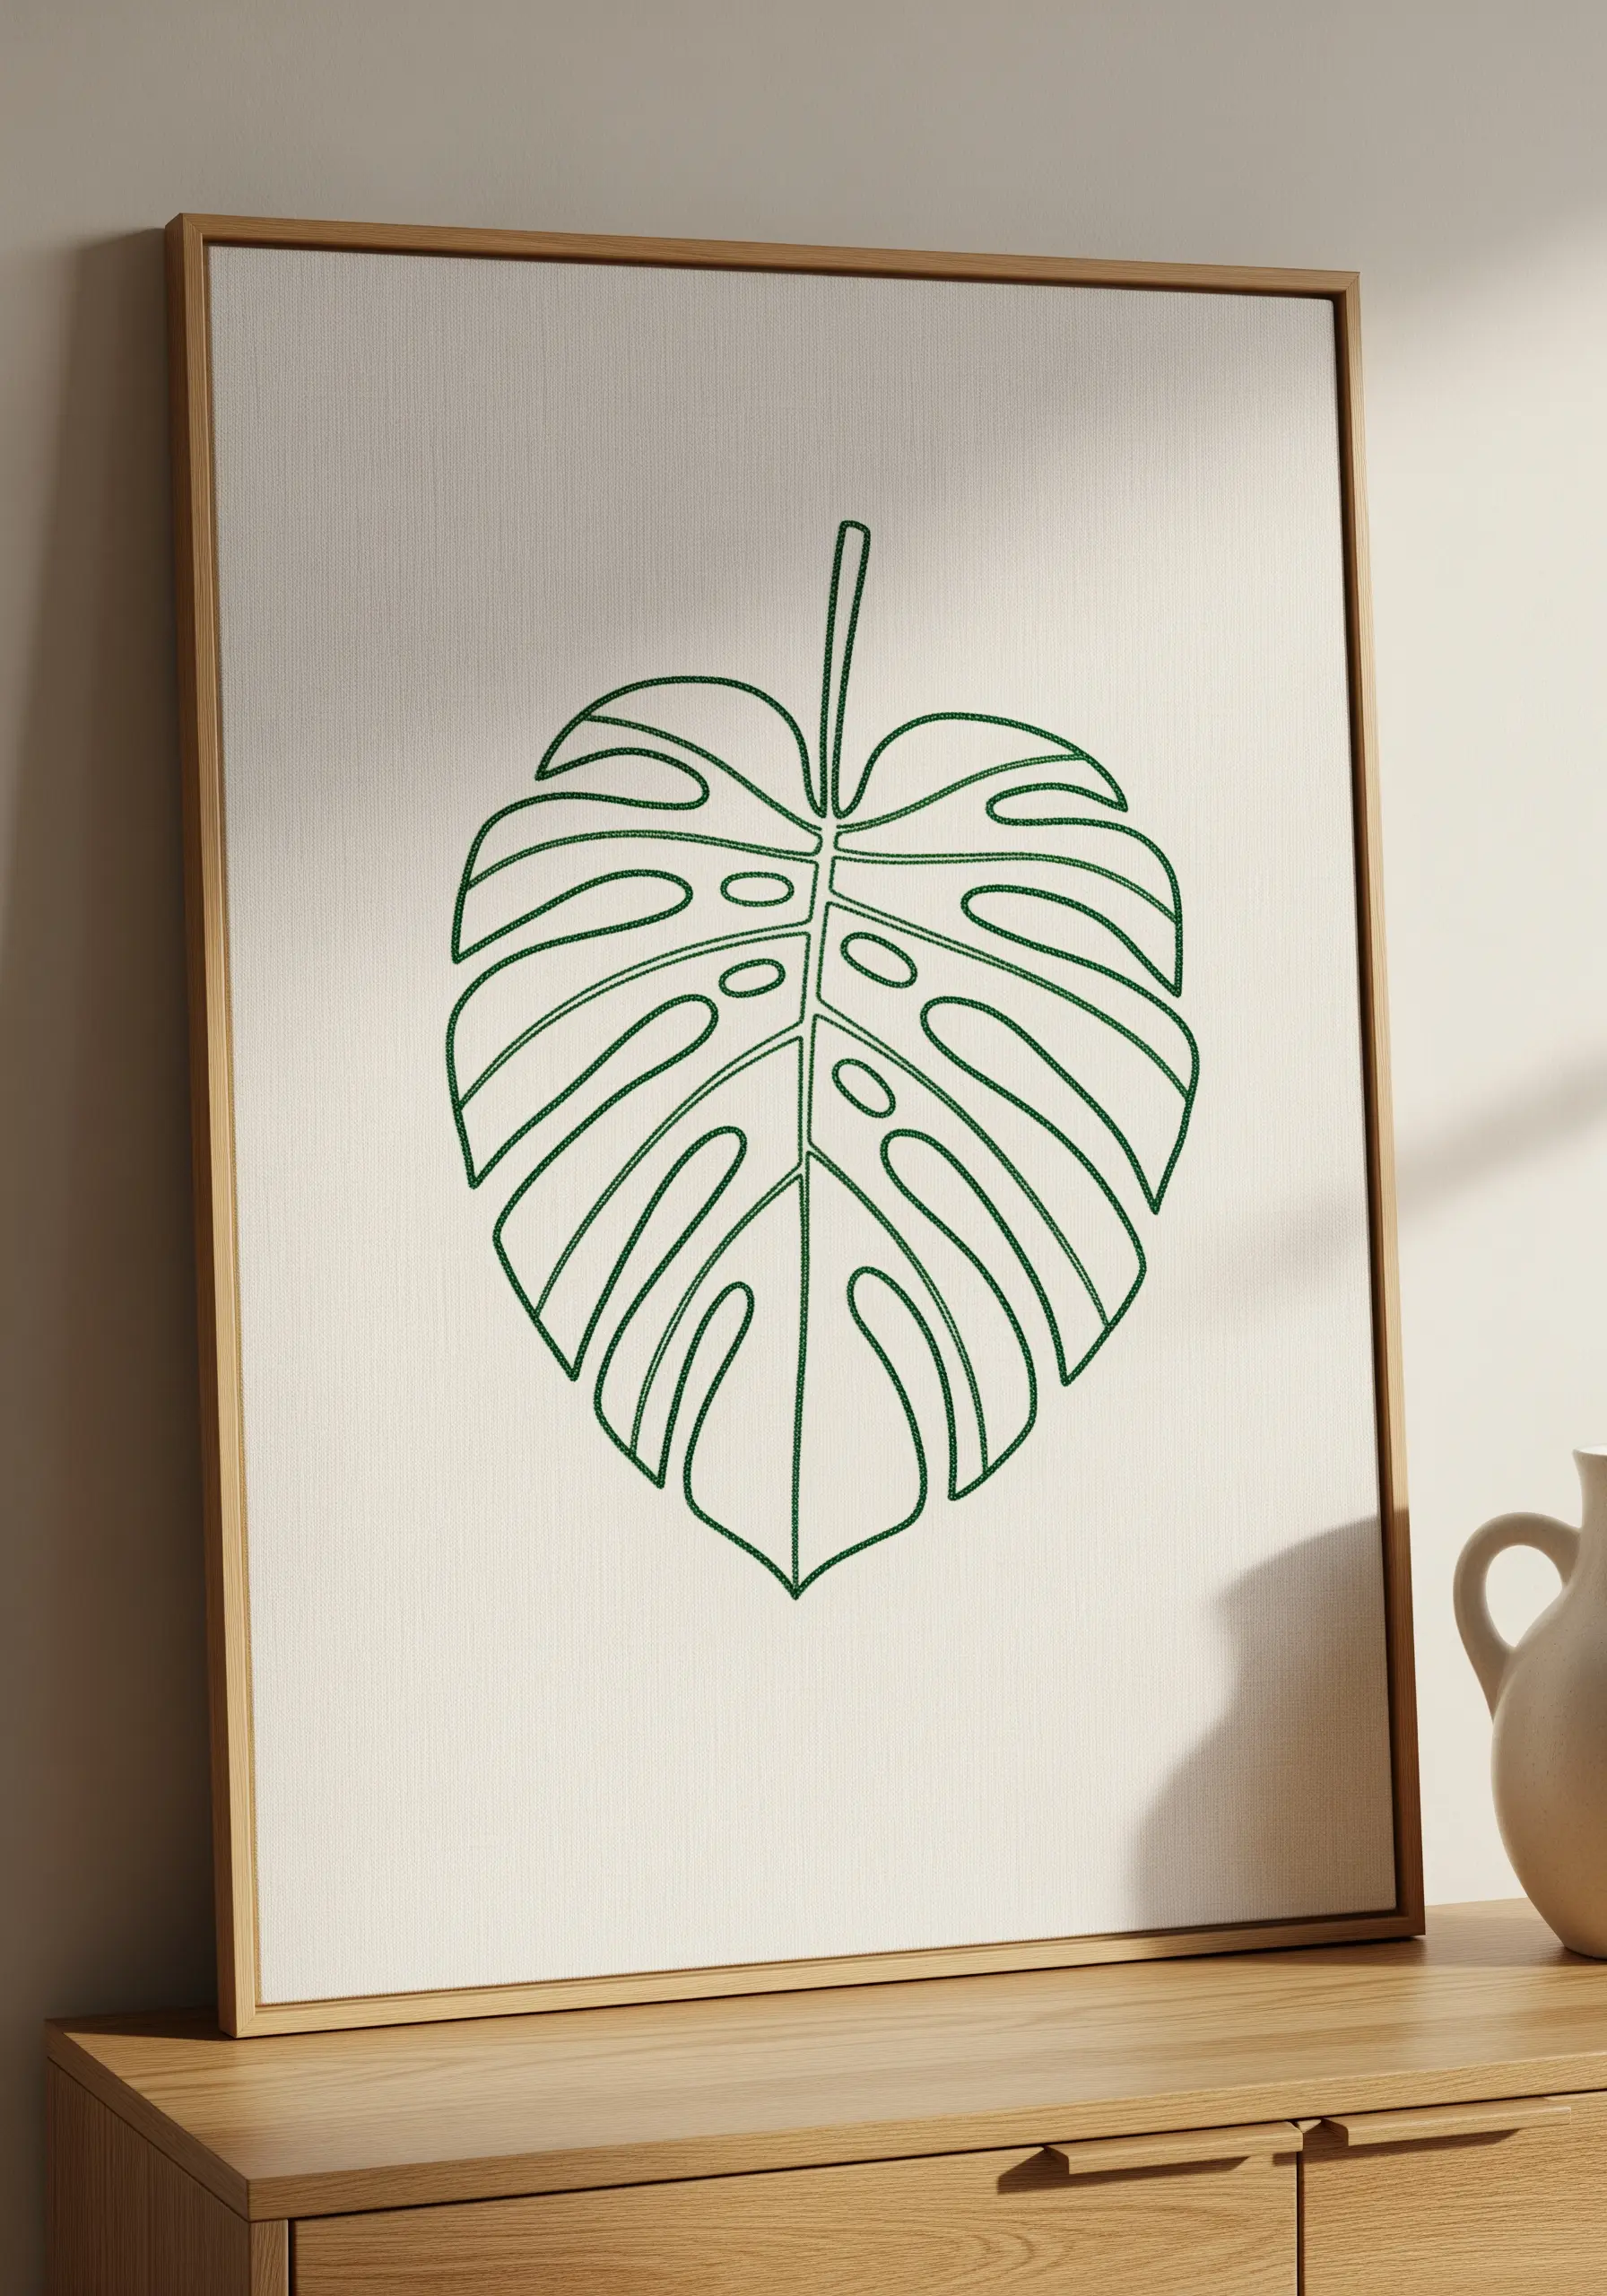
Instead of filling in the leaf, use a double outline to emphasize its form and celebrate negative space.
Stitch both the inner and outer contours of the design using a precise backstitch or stem stitch with two strands of floss.
This technique transforms the empty fabric inside the leaf into an intentional part of the composition.
It feels lighter and more modern than a solid-filled motif, making it perfect for clean, modern floral embroidery ideas that complement airy interiors.
5. Meditative Texture with Concentric Chain Stitch

Build this mesmerizing, tactile surface using a continuous spiral of chain stitches worked from the center outwards.
The key to a uniform, woven appearance is impeccable stitch consistency—keep every single chain stitch the same length and tension.
Use a thicker thread, such as Perle cotton No. 5 or even sashiko thread, to achieve that satisfyingly plush and raised texture.
This method turns a simple stitch into a complex-looking, meditative pattern.
6. Blueprint Precision with Backstitch
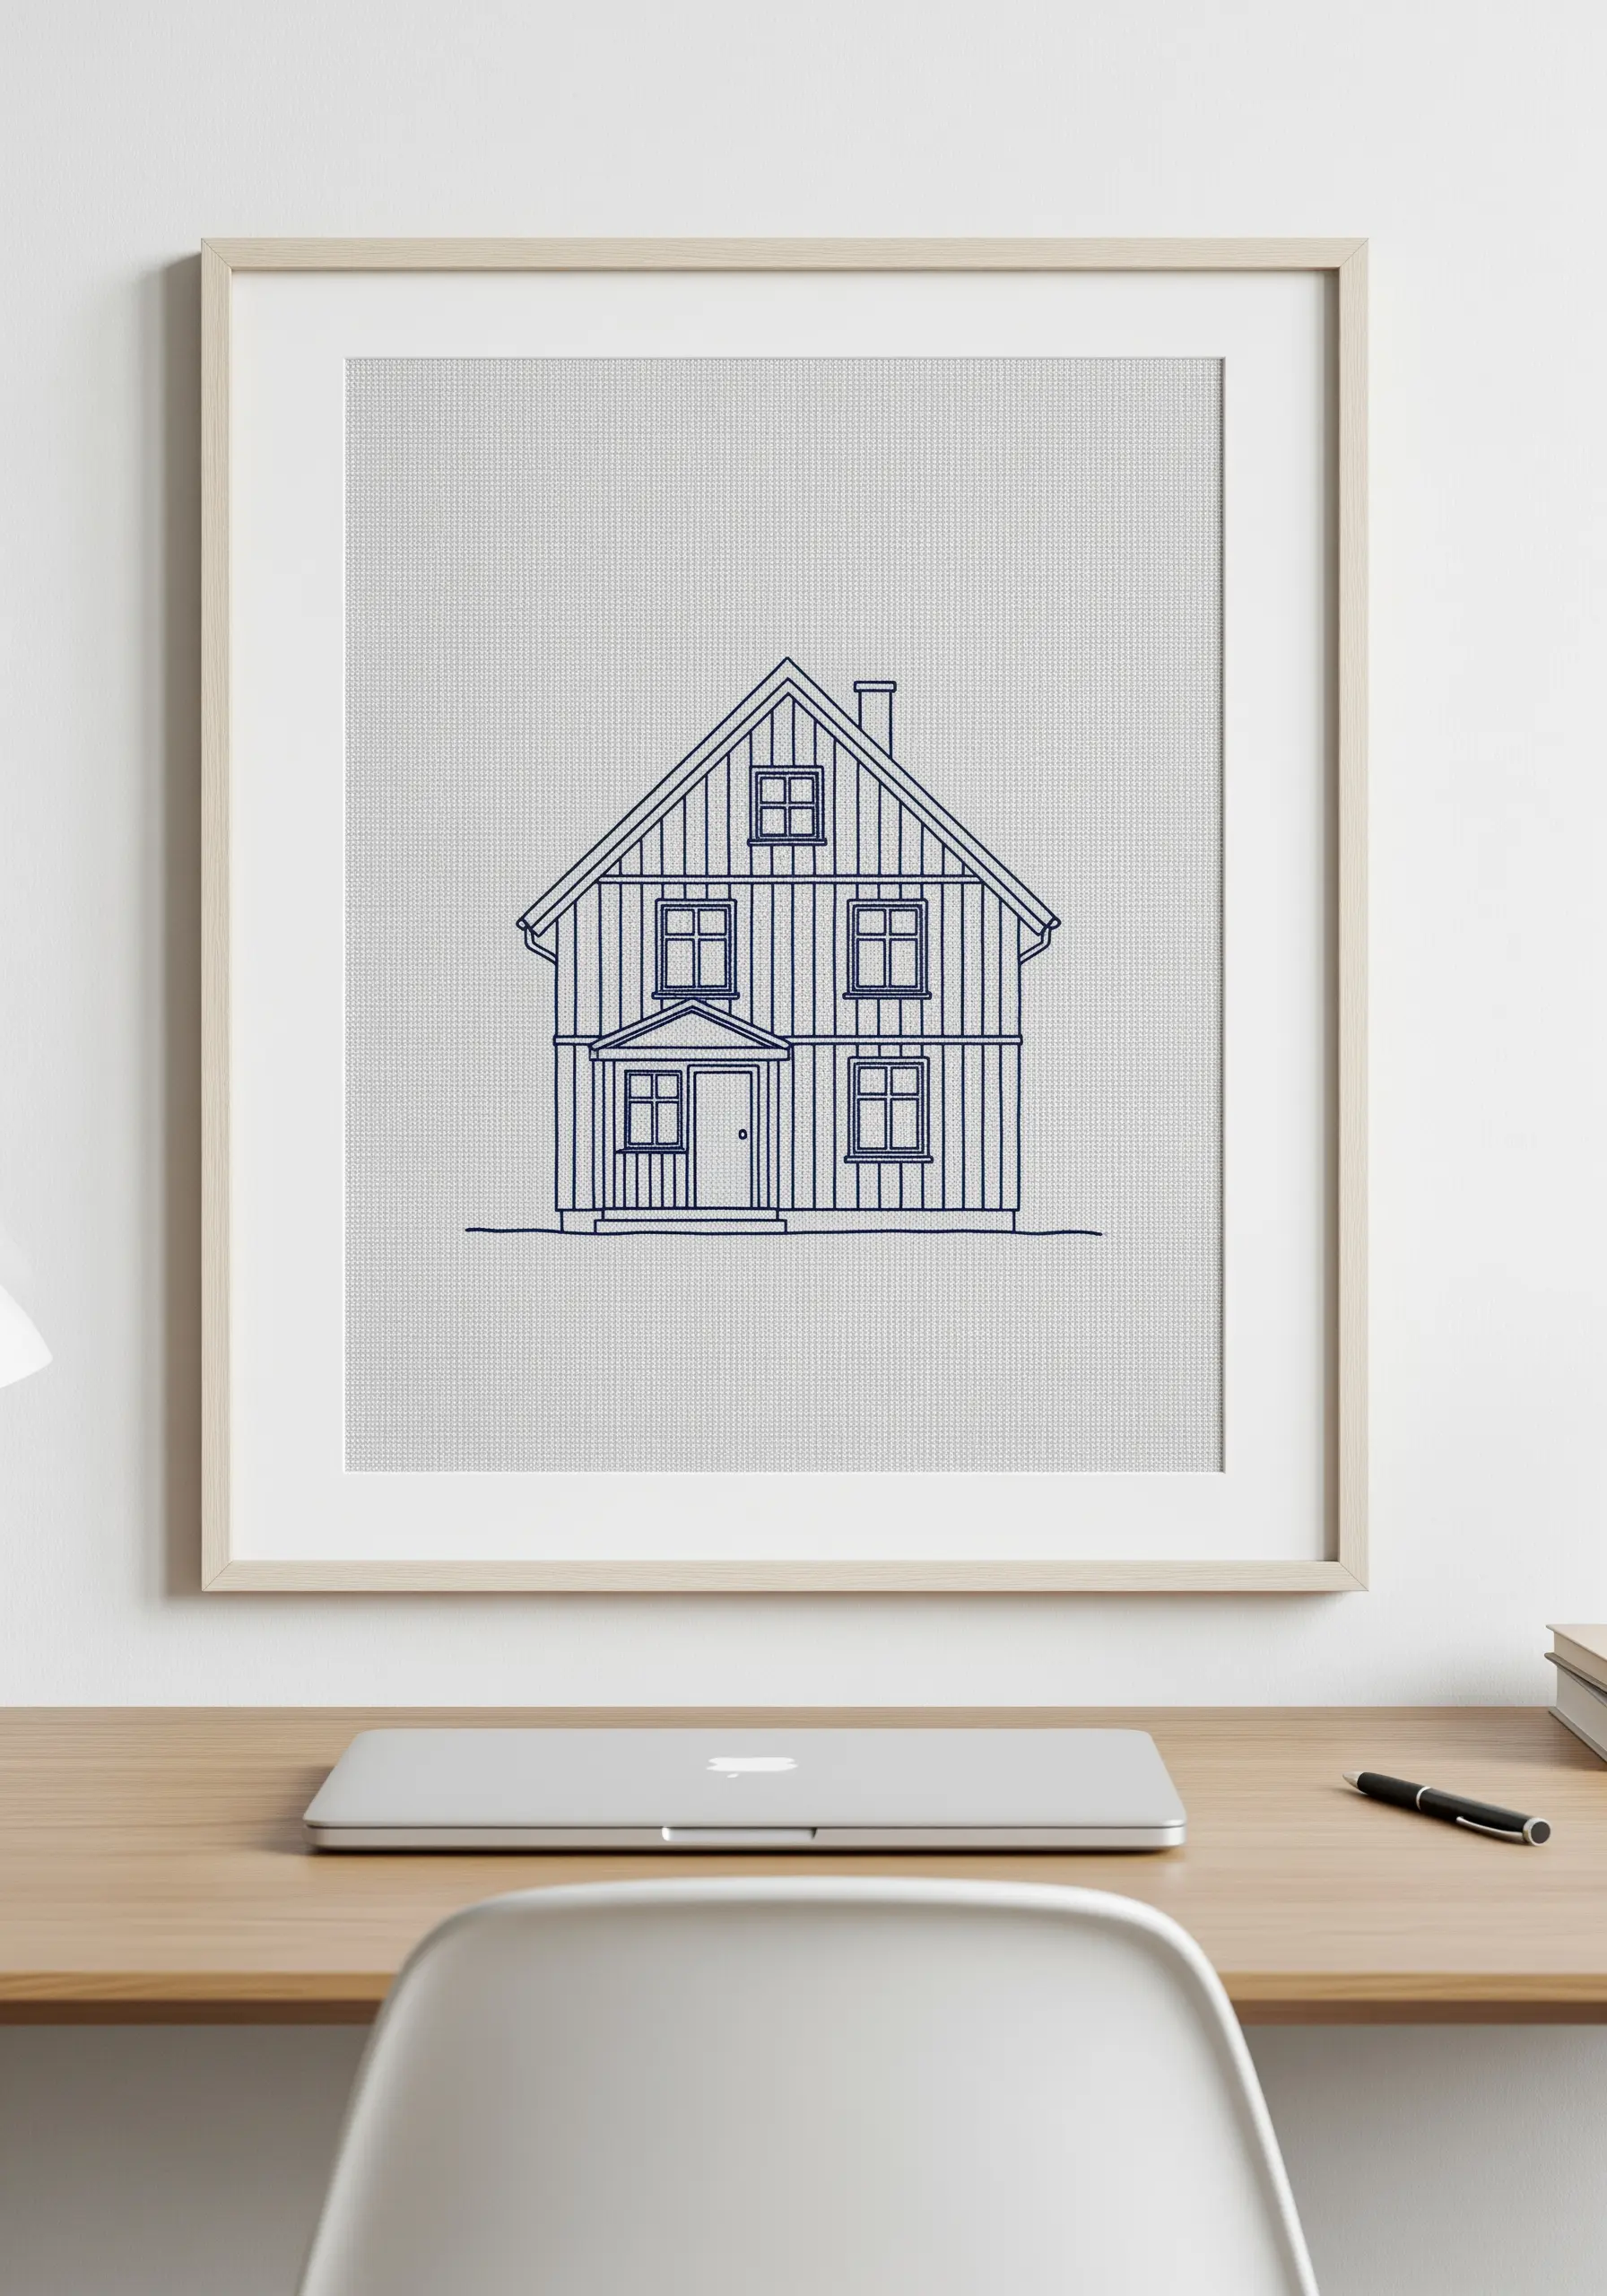
To achieve the clean, architectural lines of a blueprint, precision is everything. Use a single strand of floss and a sharp needle.
Choose an even-weave fabric like linen or Aida cloth, which allows you to use the fabric’s grid to keep your lines perfectly straight and your corners sharp.
Transfer your design using a fine-tipped, water-soluble marker to ensure every windowpane and roofline is flawlessly executed.
This meticulous approach transforms a simple backstitch into a work of technical art.
7. Dynamic Grids on Hand-Dyed Fabric
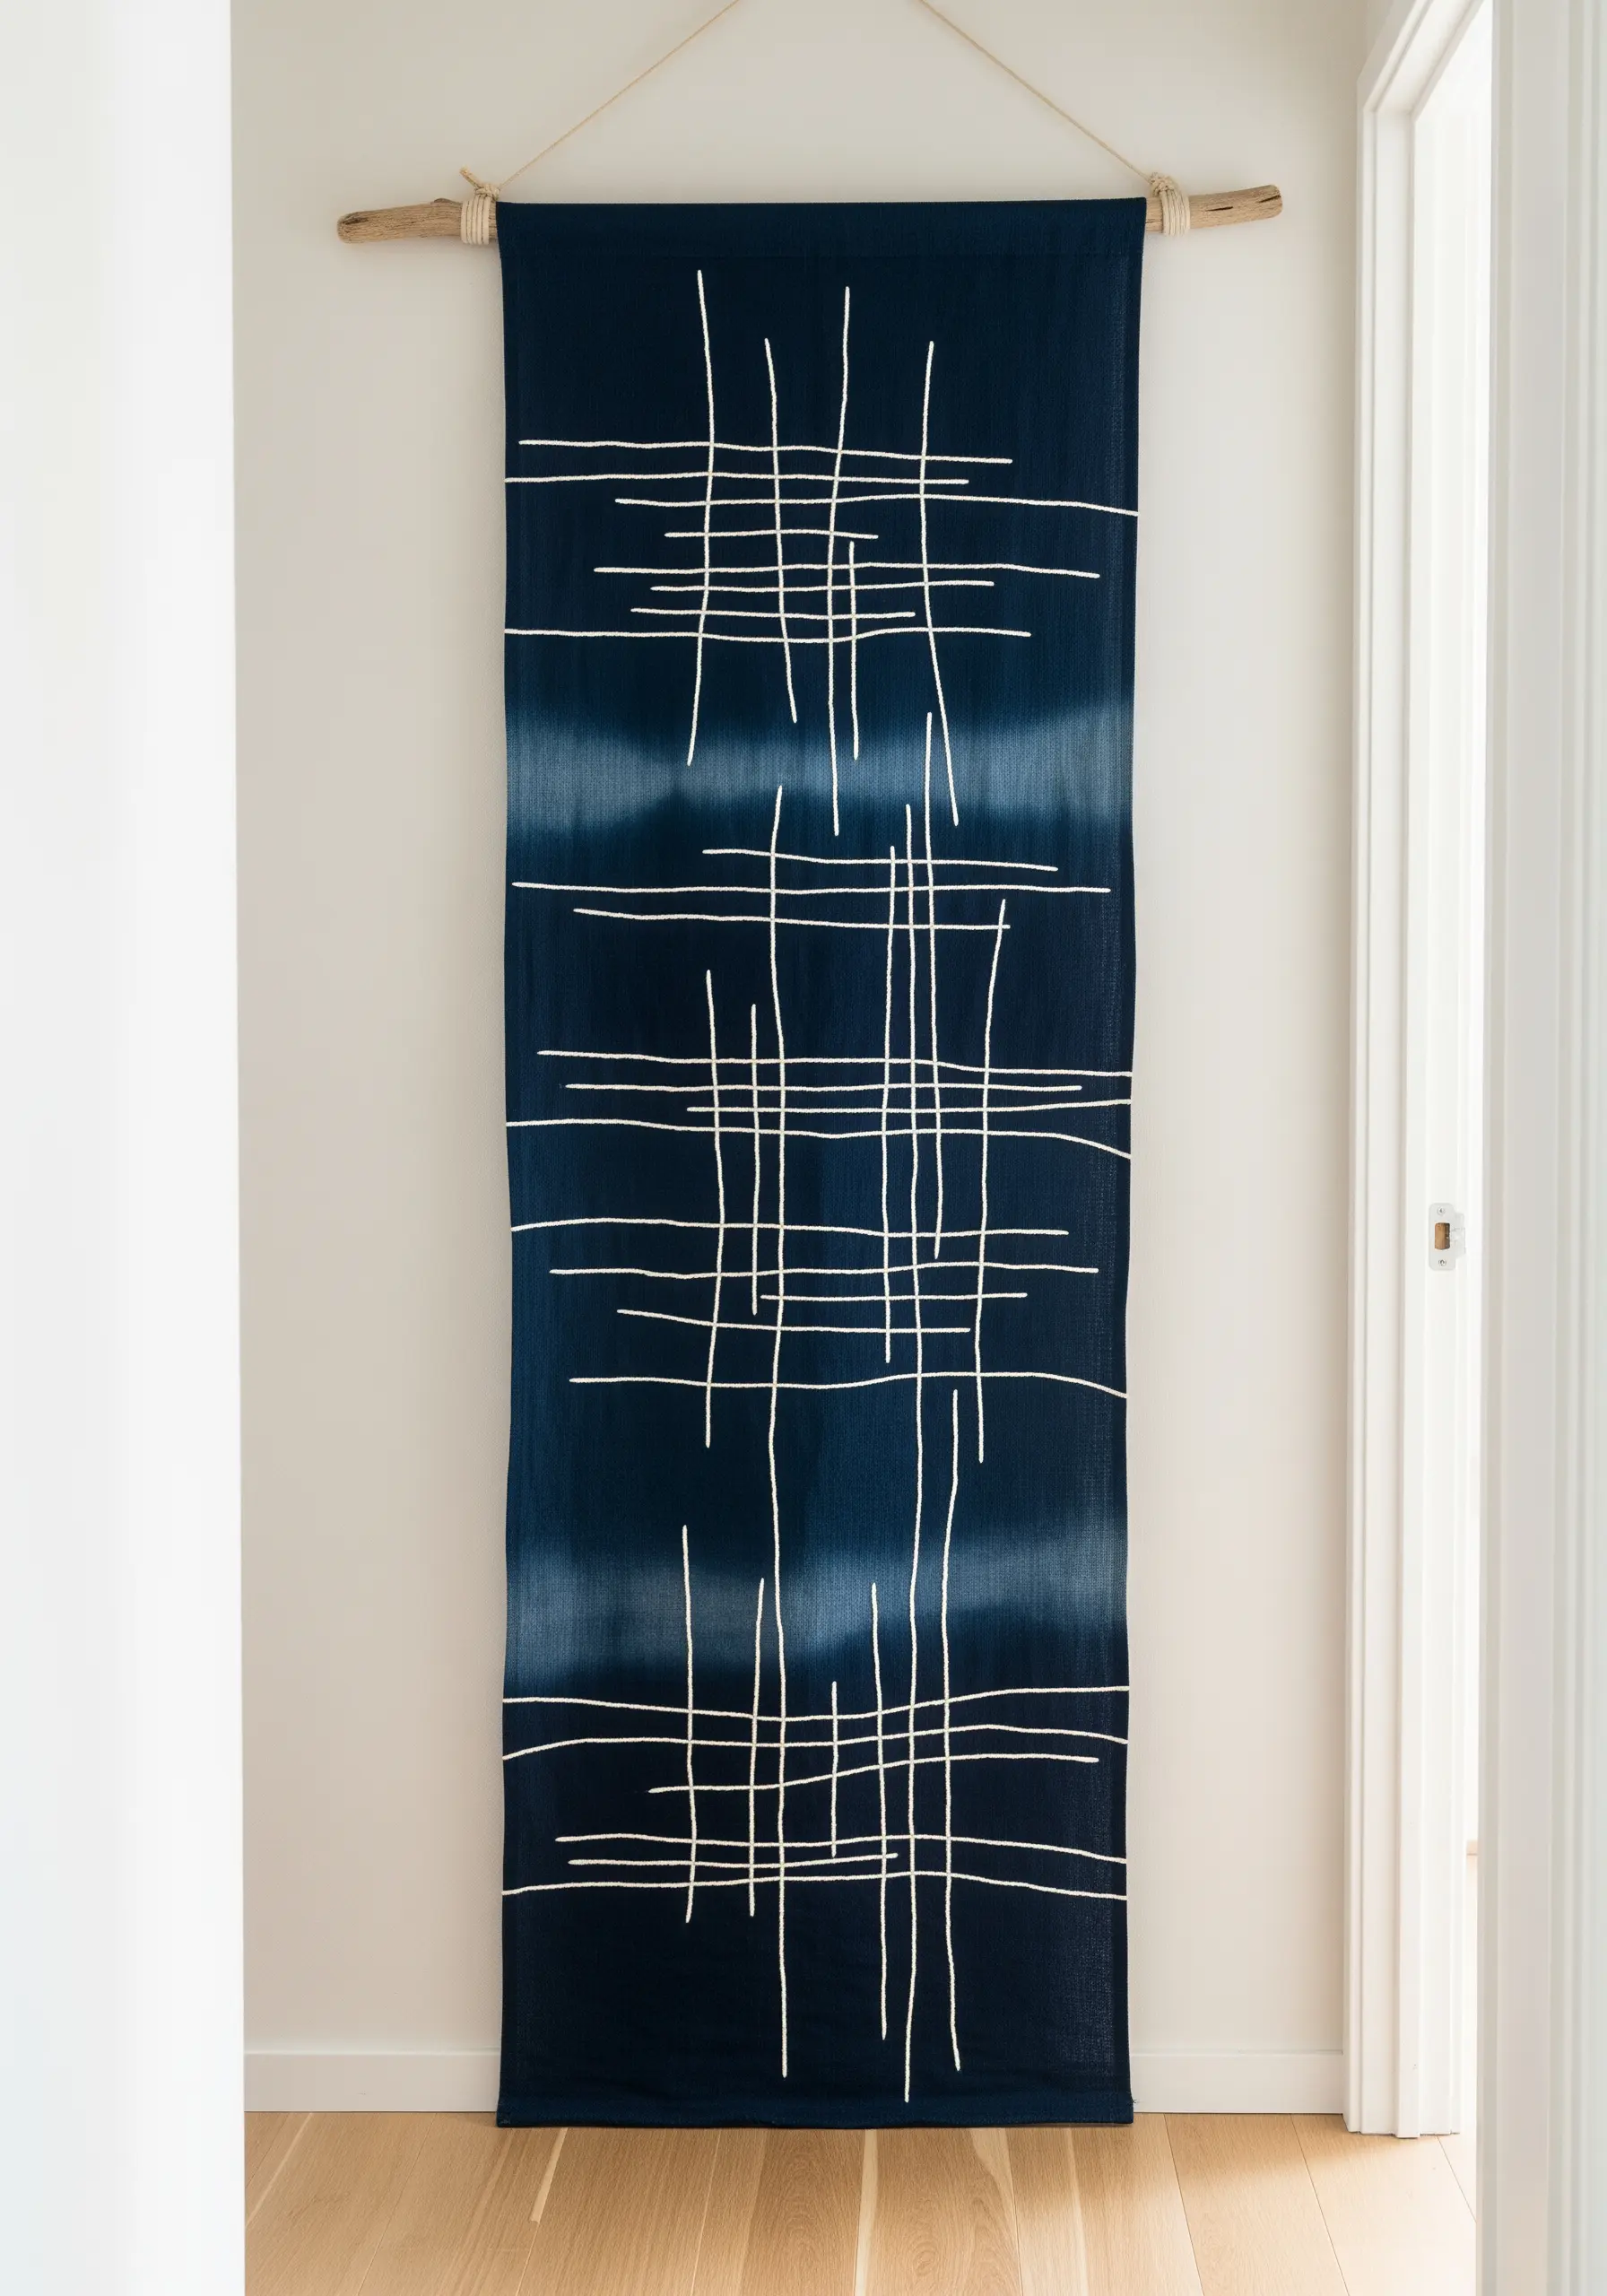
The beauty of this design lies in the interplay between organic and geometric elements.
Start with a piece of fabric that has its own character, like shibori-dyed indigo or a subtly watercolored linen.
Then, impose a structured grid over it using a simple running stitch with a high-contrast thread.
Don’t strive for perfect uniformity in your grid; allowing for slight variations in line spacing and stitch length honors the handmade process and adds visual energy.
8. Celestial Glow with Metallic Threads
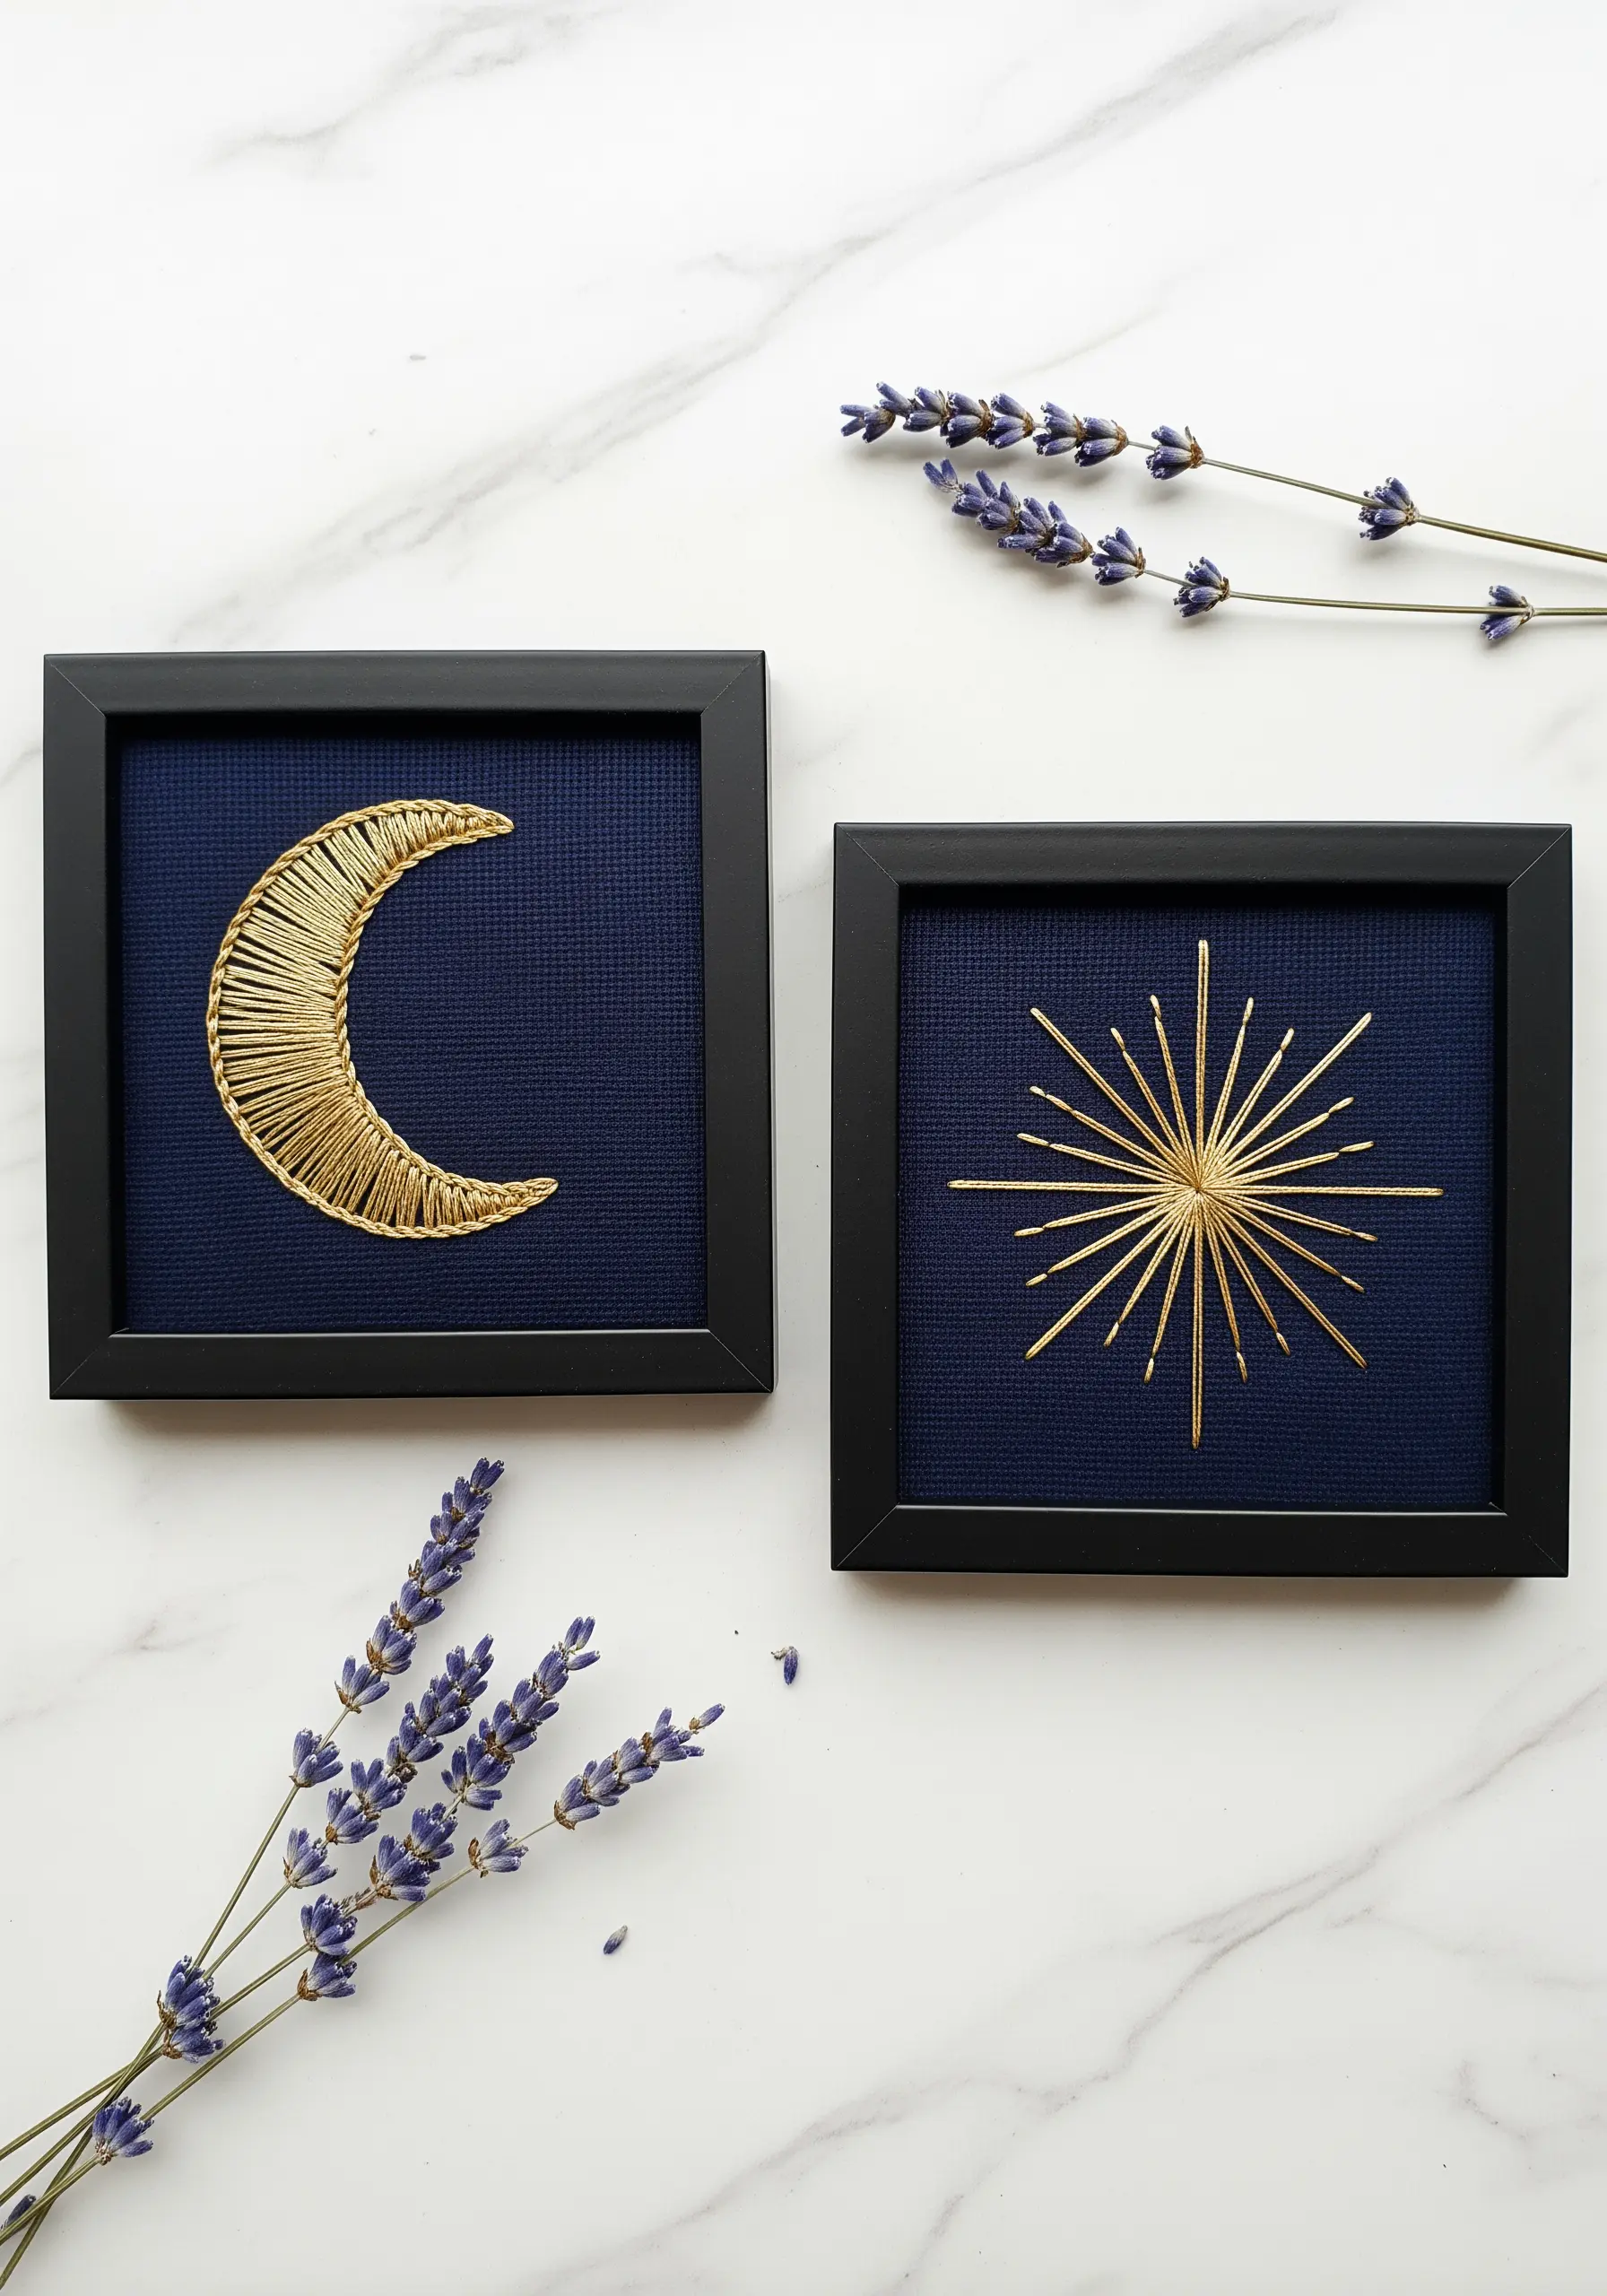
Working with metallic thread requires a specific technique to prevent fraying and tangling. Always use short lengths—no longer than 12-14 inches.
For the smooth, curved surface of the moon, use a satin stitch, ensuring your stitches lie flat and parallel to create a solid, light-reflecting surface.
For the sunburst, a series of simple straight stitches pulled taut from a central point creates the sharp, graphic rays.
Stitching on dark, matte fabric like navy blue linen makes the metallics appear even more luminous.
9. Visualizing Sound with Thread
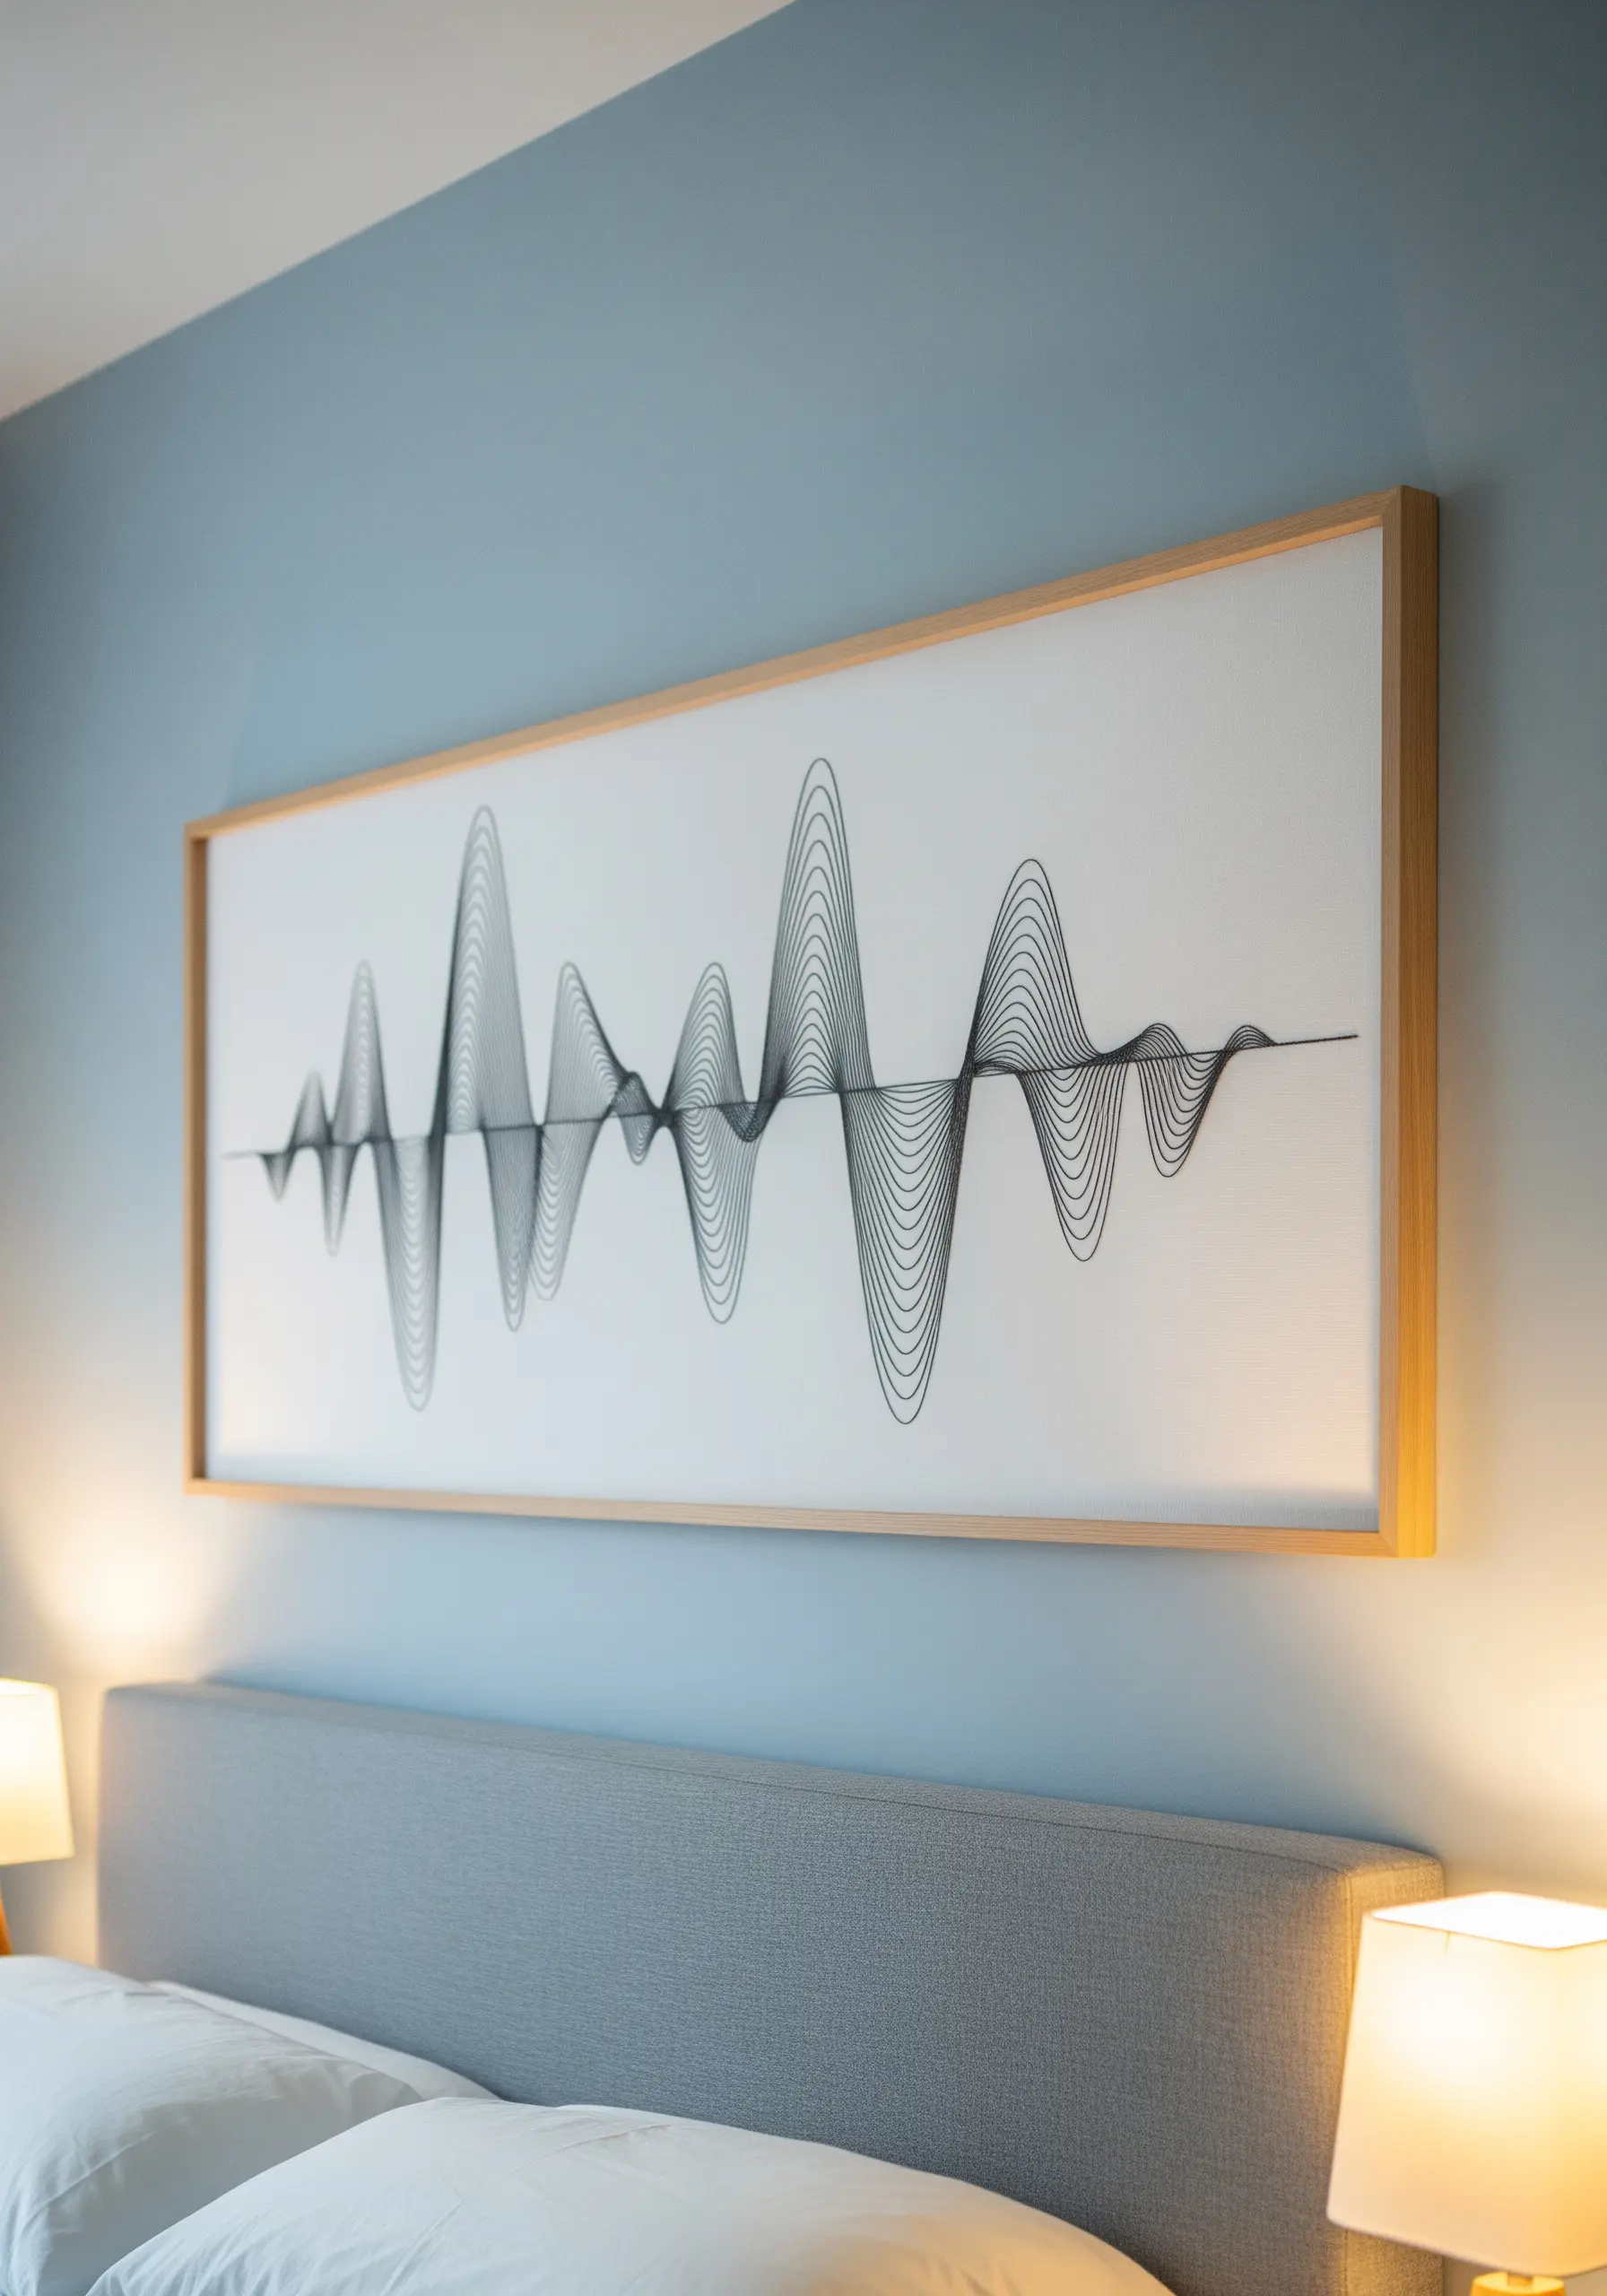
Capture the essence of a favorite song or a loved one’s voice by translating a soundwave into thread.
For a project of this scale, consider stitching on a stretched artist’s canvas instead of fabric in a hoop. The rigid surface is ideal for maintaining tension over long, straight lines.
Use a single, continuous strand of black Perle cotton and couch it down with a fine, invisible thread to create the flowing peaks and valleys of the soundwave.
This personalizes the minimalist aesthetic in a deeply meaningful way.
10. Typography as Art: The Power of Padded Satin Stitch
To make embroidered letters look crisp and professional, you need to give them dimension.
First, outline your letters precisely with a split stitch. Next, fill the interior of the letters with a base of small seed stitches—this is the padding.
Finally, cover the padding with smooth satin stitches, working perpendicular to the stroke of the letter.
This technique elevates simple text into a tactile art piece, making your embroidered quote wall hangings look exceptionally polished.
11. Seamless Color Blending with Thread Painting

Create a soft, painterly gradient by using the long-and-short stitch, the foundation of thread painting.
Select four or five adjacent shades in your chosen color family. Using only a single strand of floss, work in rows of staggered stitches, introducing the next color gradually.
Your needle should split the stitches of the previous row, which seamlessly blends the tones and eliminates any harsh lines.
This technique allows for incredible subtlety and is perfect for abstract color studies.
12. Graphic Tension with Straight Line Art
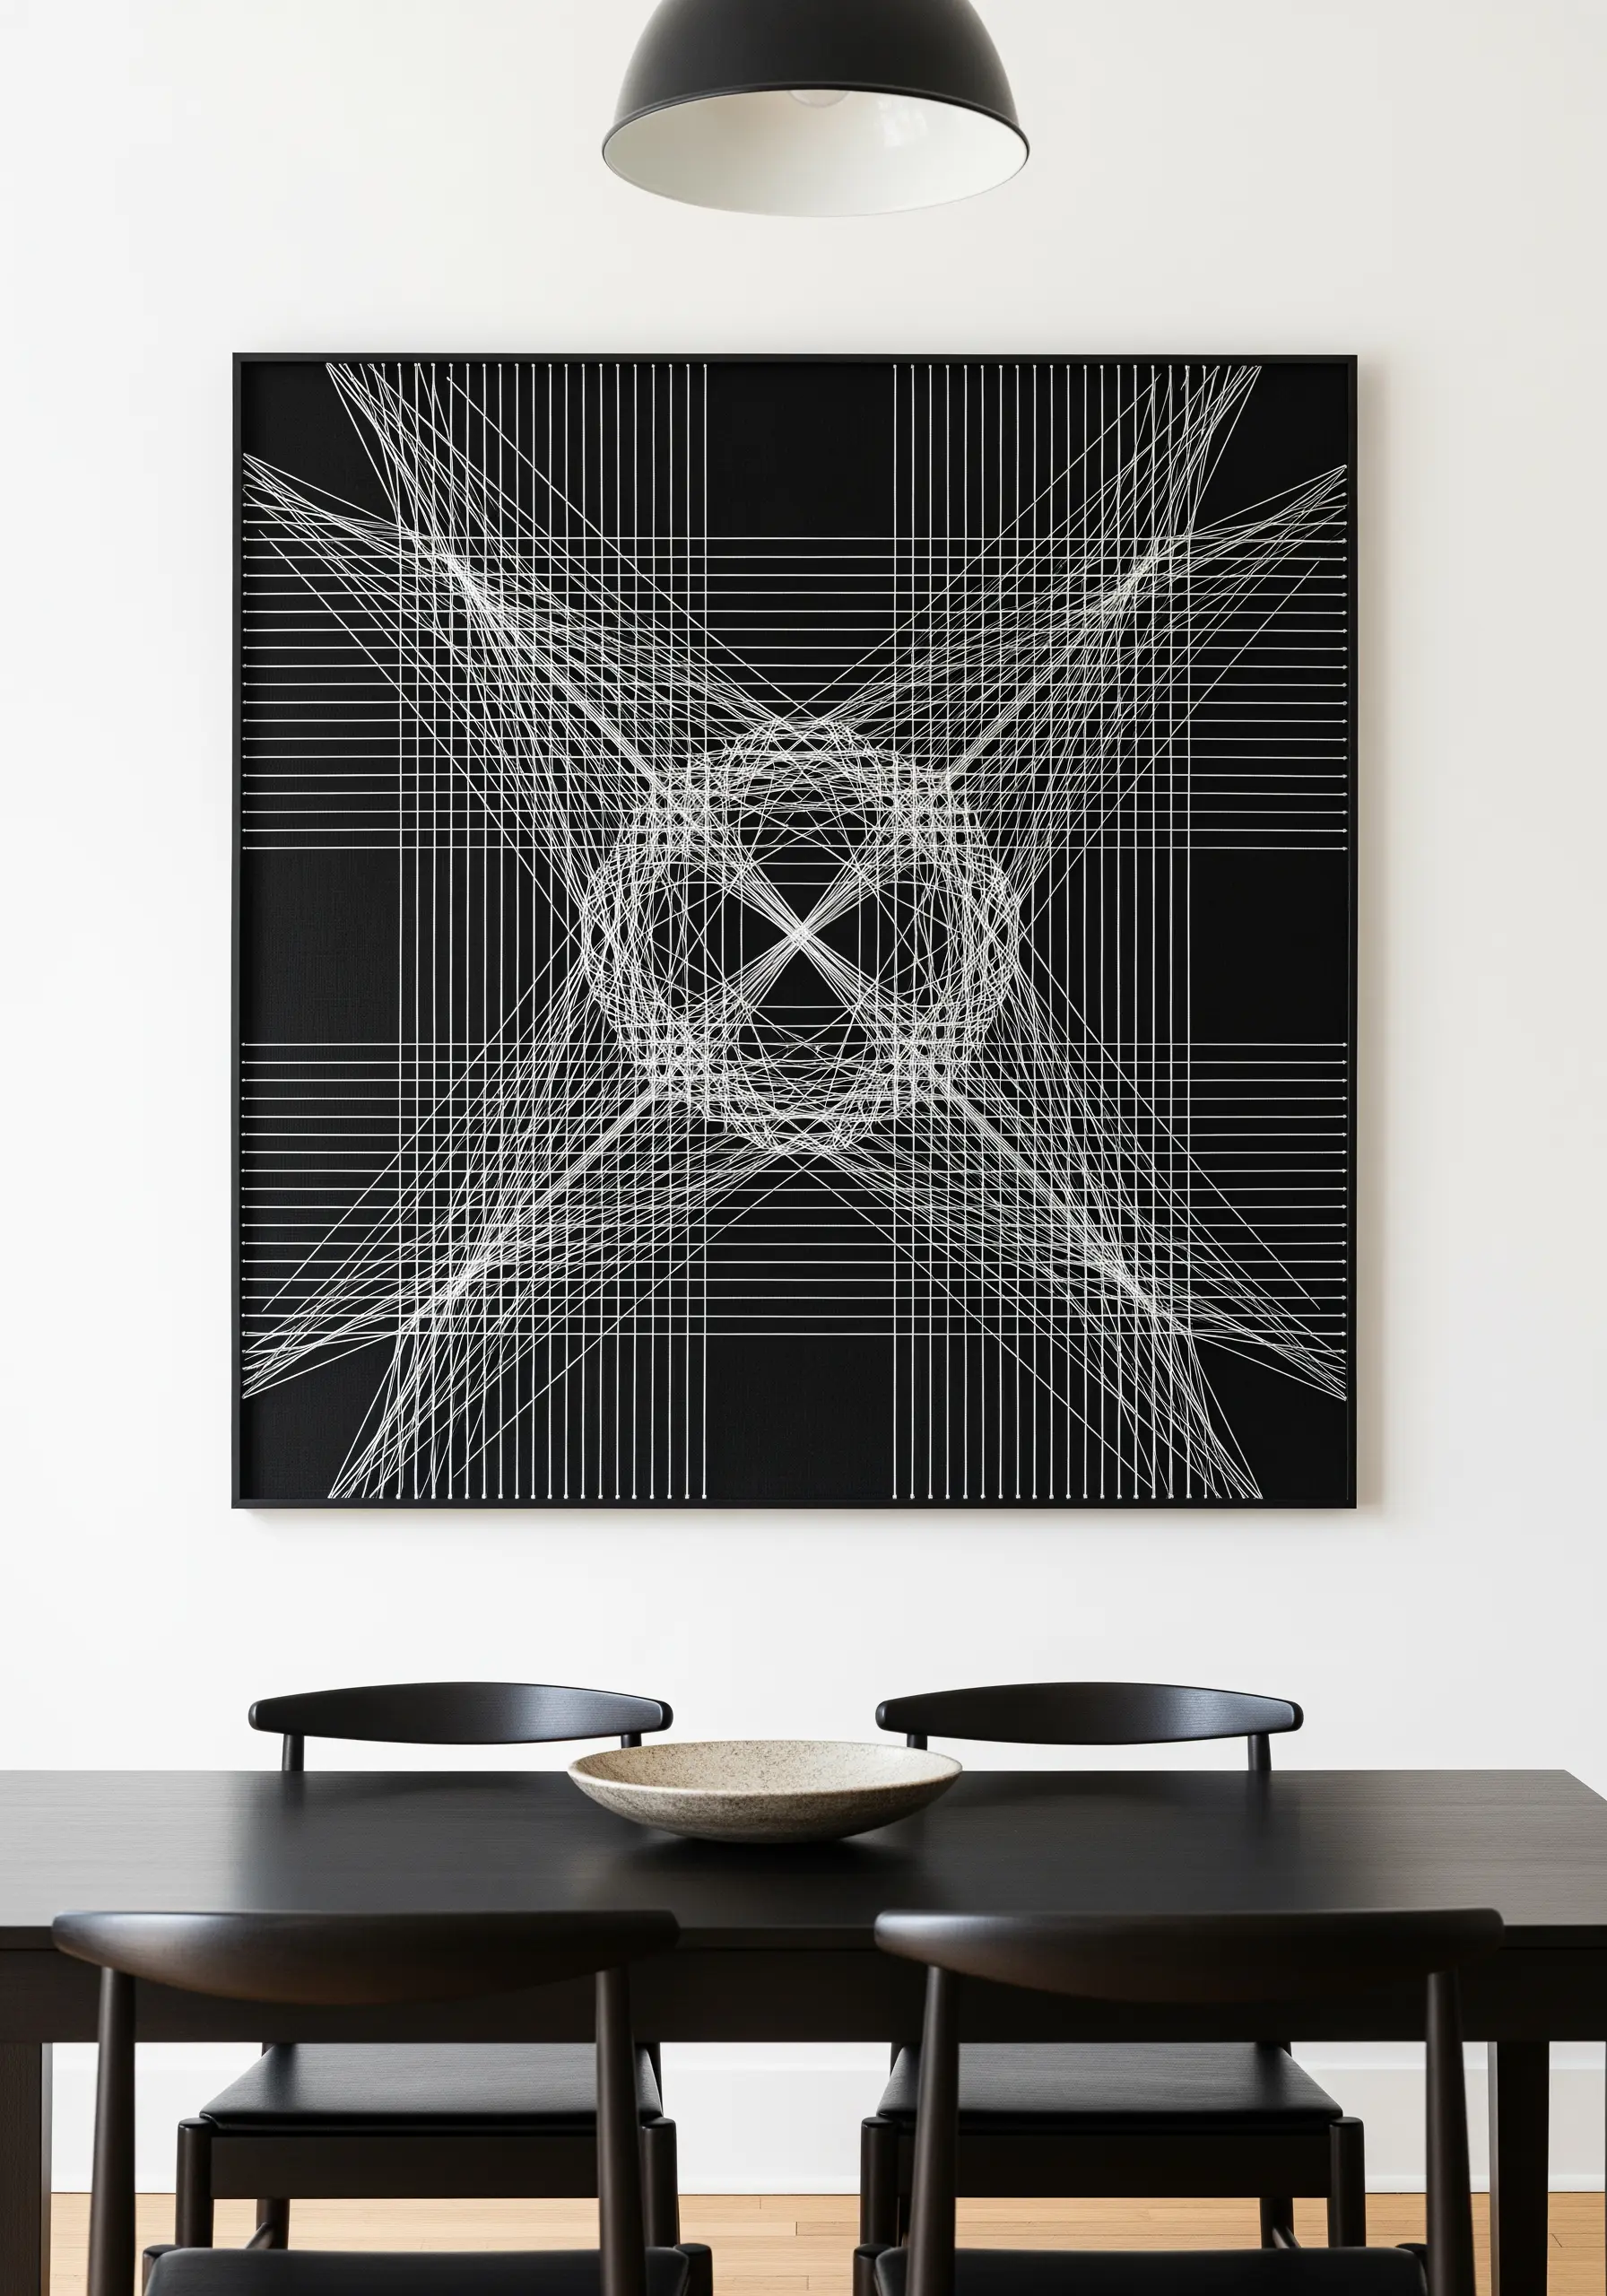
This style, reminiscent of string art, relies on mathematical precision for its impact.
Start by drawing a perfect grid on your fabric with a removable marker, marking every point where the thread will enter or exit.
Use a single, strong thread like a Perle cotton and pull each long straight stitch taut to prevent sagging.
The magic happens as the lines overlap, creating moiré patterns and complex geometric shapes from a series of simple, direct stitches.
13. Stitching the Stars with Textural Details
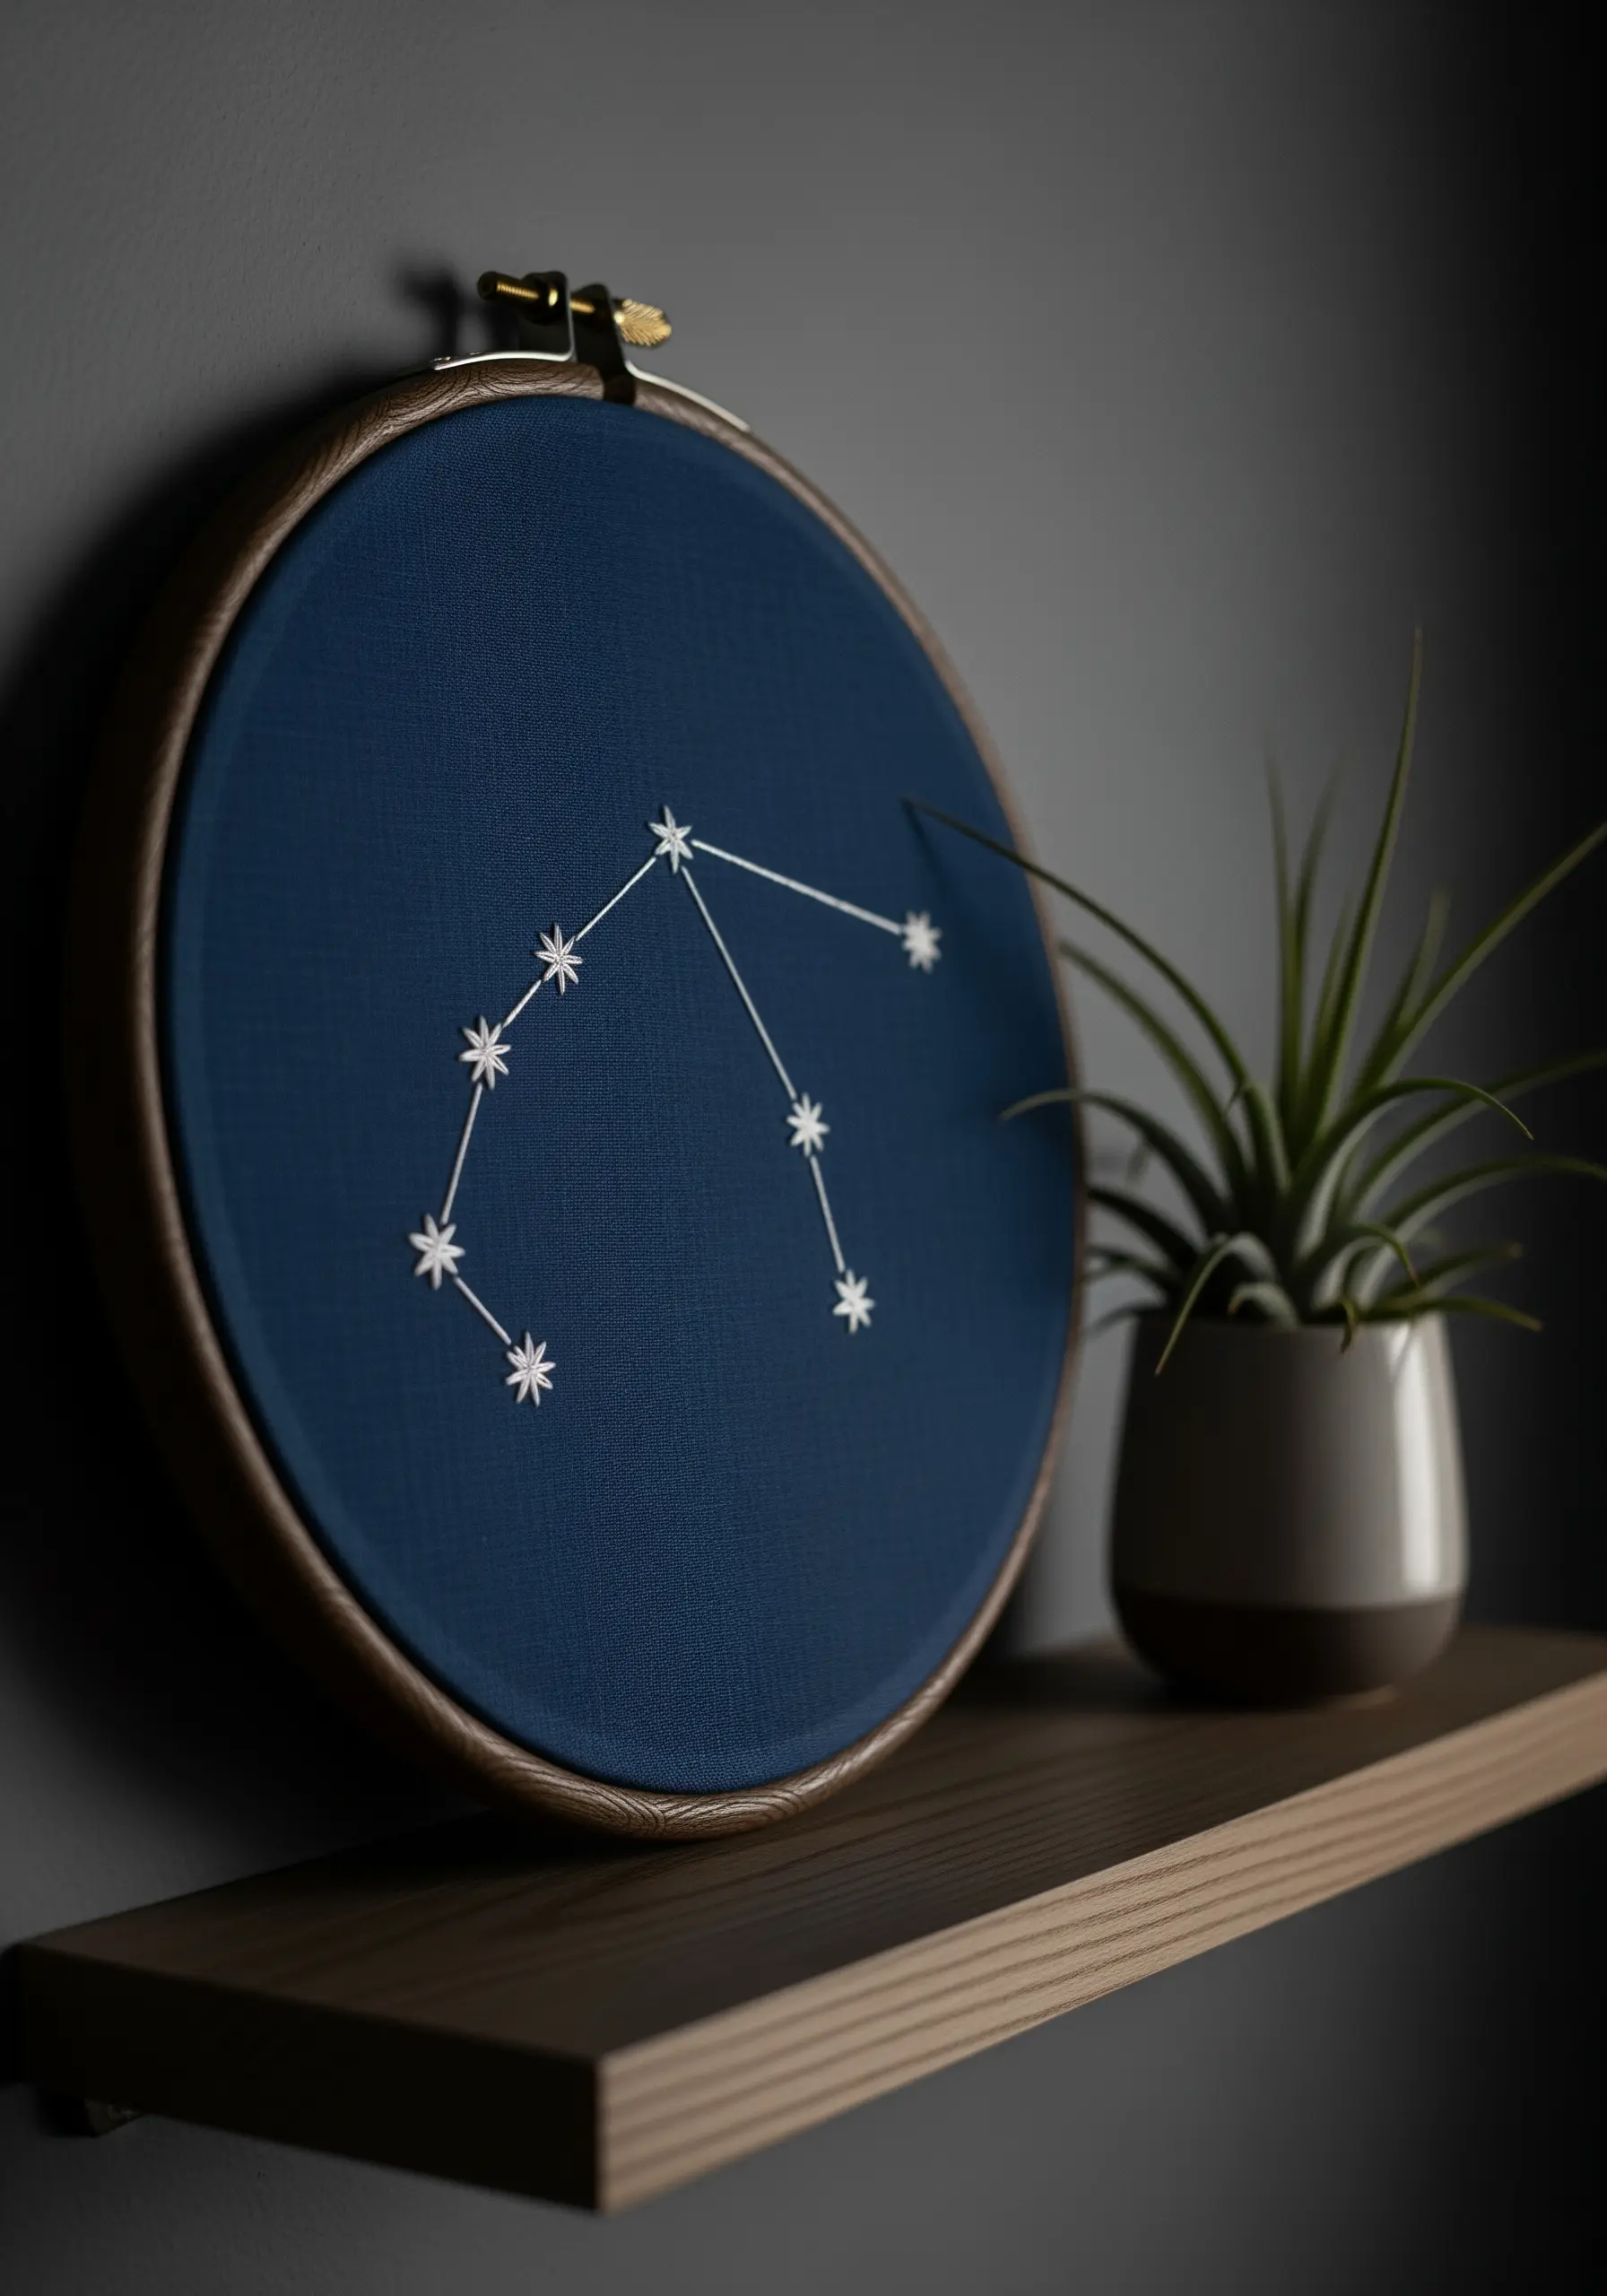
To give your constellations life, differentiate the stars with varied stitches.
Use tiny French knots (wrapping the needle only once) for distant stars and small, bright star stitches (three intersecting straight stitches) for the more prominent ones.
Connect them with a delicate, single-strand backstitch. Using a silver metallic or glow-in-the-dark thread on a deep navy fabric adds a layer of celestial magic, making these perfect for tiny night sky embroidery designs.
14. Elevating Decor with Continuous Line Embroidery
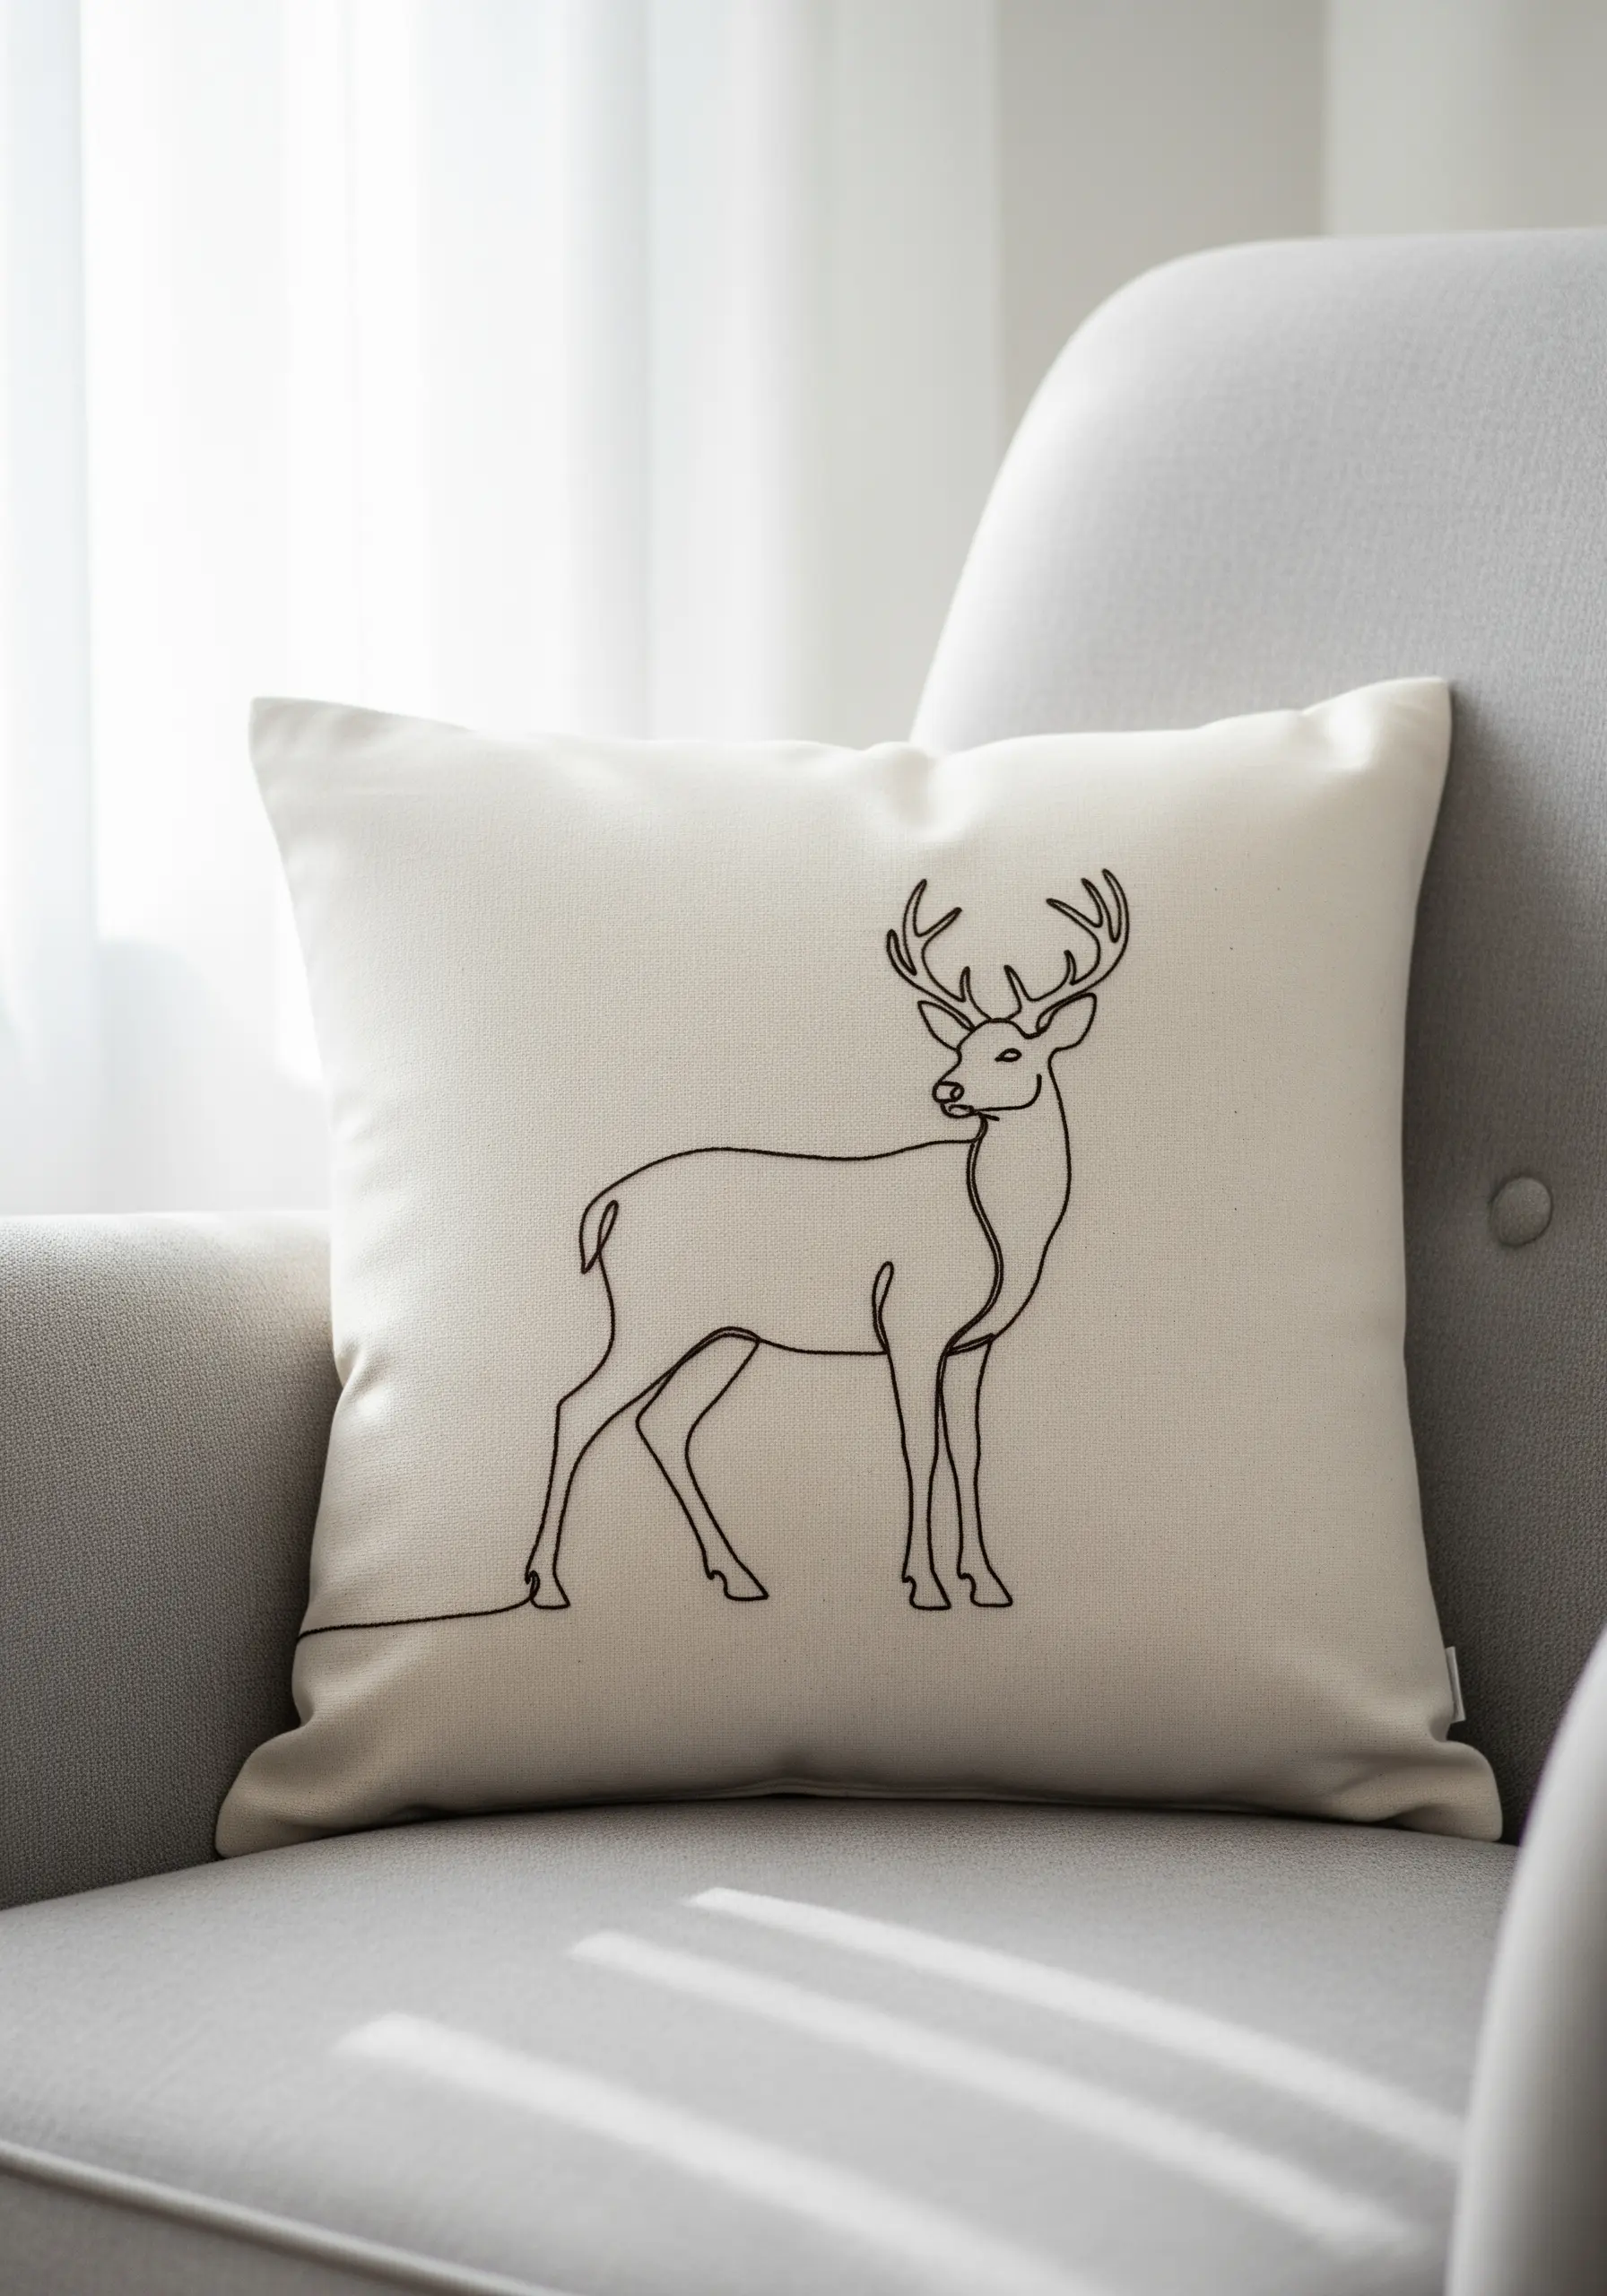
When embroidering on functional home decor like a pillow, choose a stitch that is both beautiful and durable.
A stem stitch, worked with three or four strands of floss, creates a lovely, rope-like texture that stands up to wear.
To transfer a fluid, single-line design, trace it onto lightweight tissue paper, baste the paper to your fabric, and stitch directly through it.
Once finished, you can gently tear the paper away, leaving a perfect outline. This is a great way to bring minimalist line art animal designs into your home.
15. Composing with Stitch Direction and Density
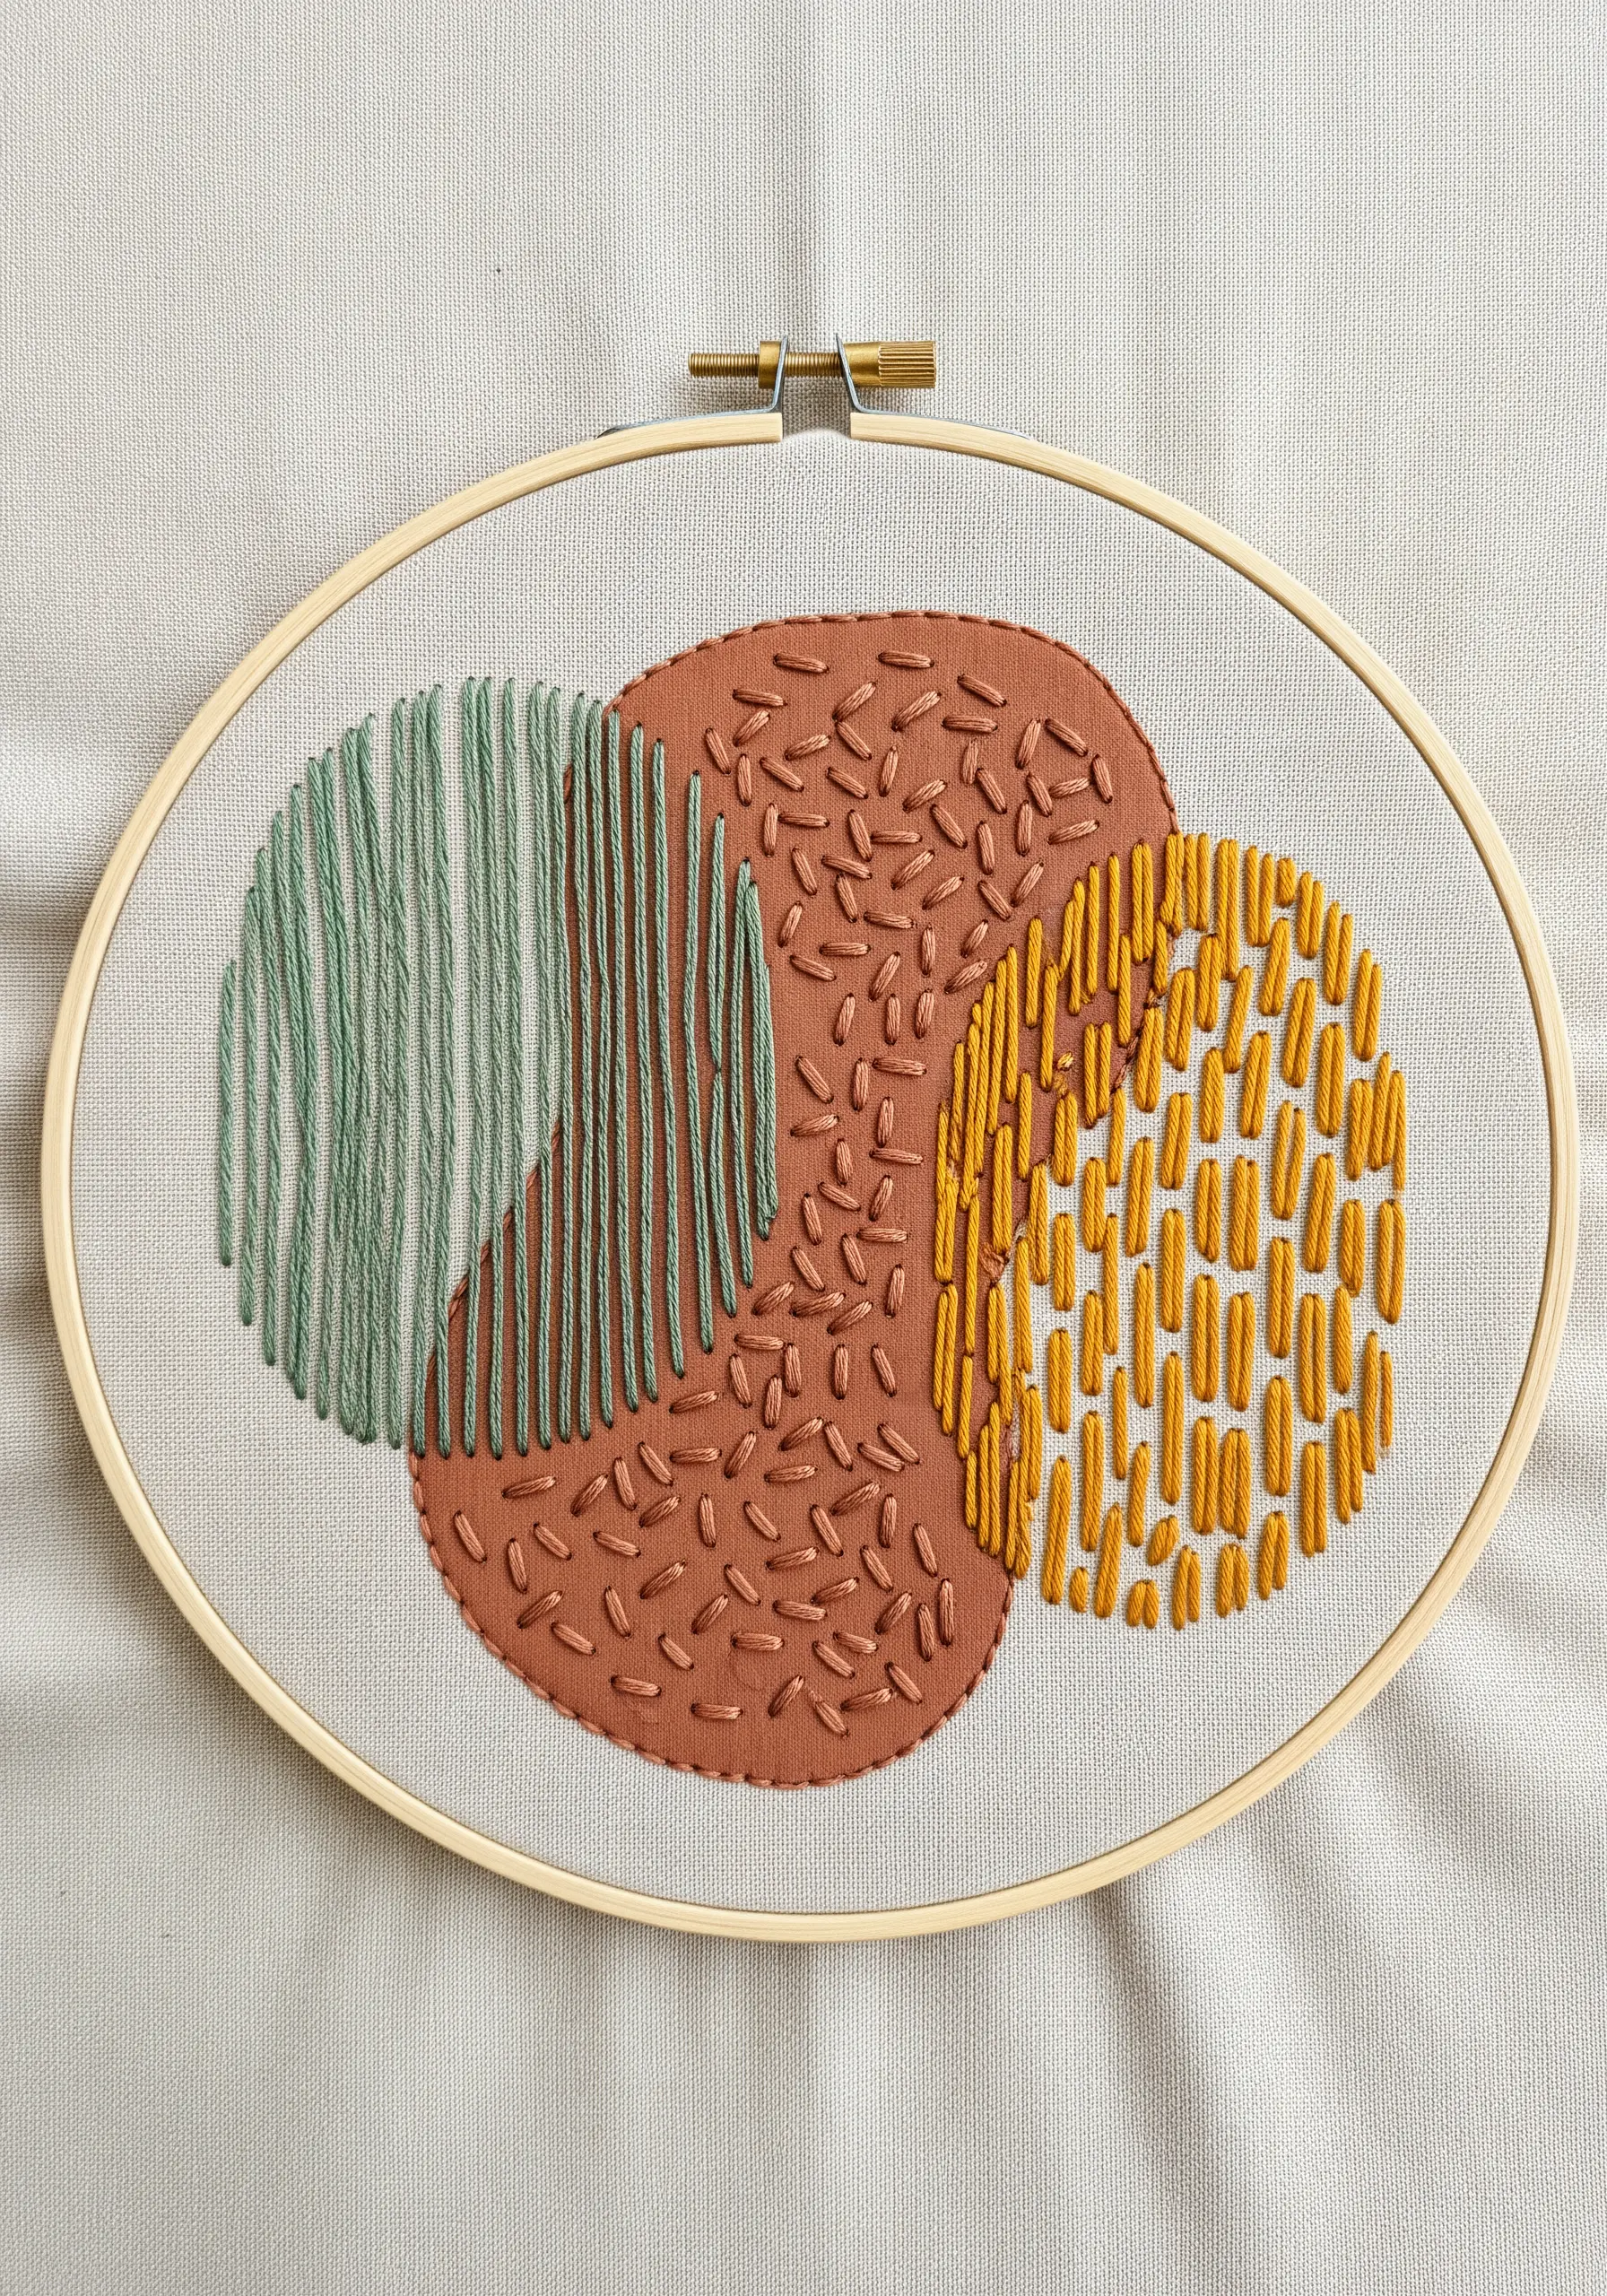
Transform simple stitches into a sophisticated abstract composition by focusing on direction and density.
Within a unified color palette, fill distinct shapes with varied stitch patterns. Use tightly packed vertical straight stitches in one area, sparsely scattered seed stitches in another, and dense horizontal stitches in a third.
This approach creates visual interest and tactile contrast, proving that you don’t need complex stitches to make compelling abstract thread embroidery ideas.
16. Dimensional Arcs with a Raised Braid Stitch
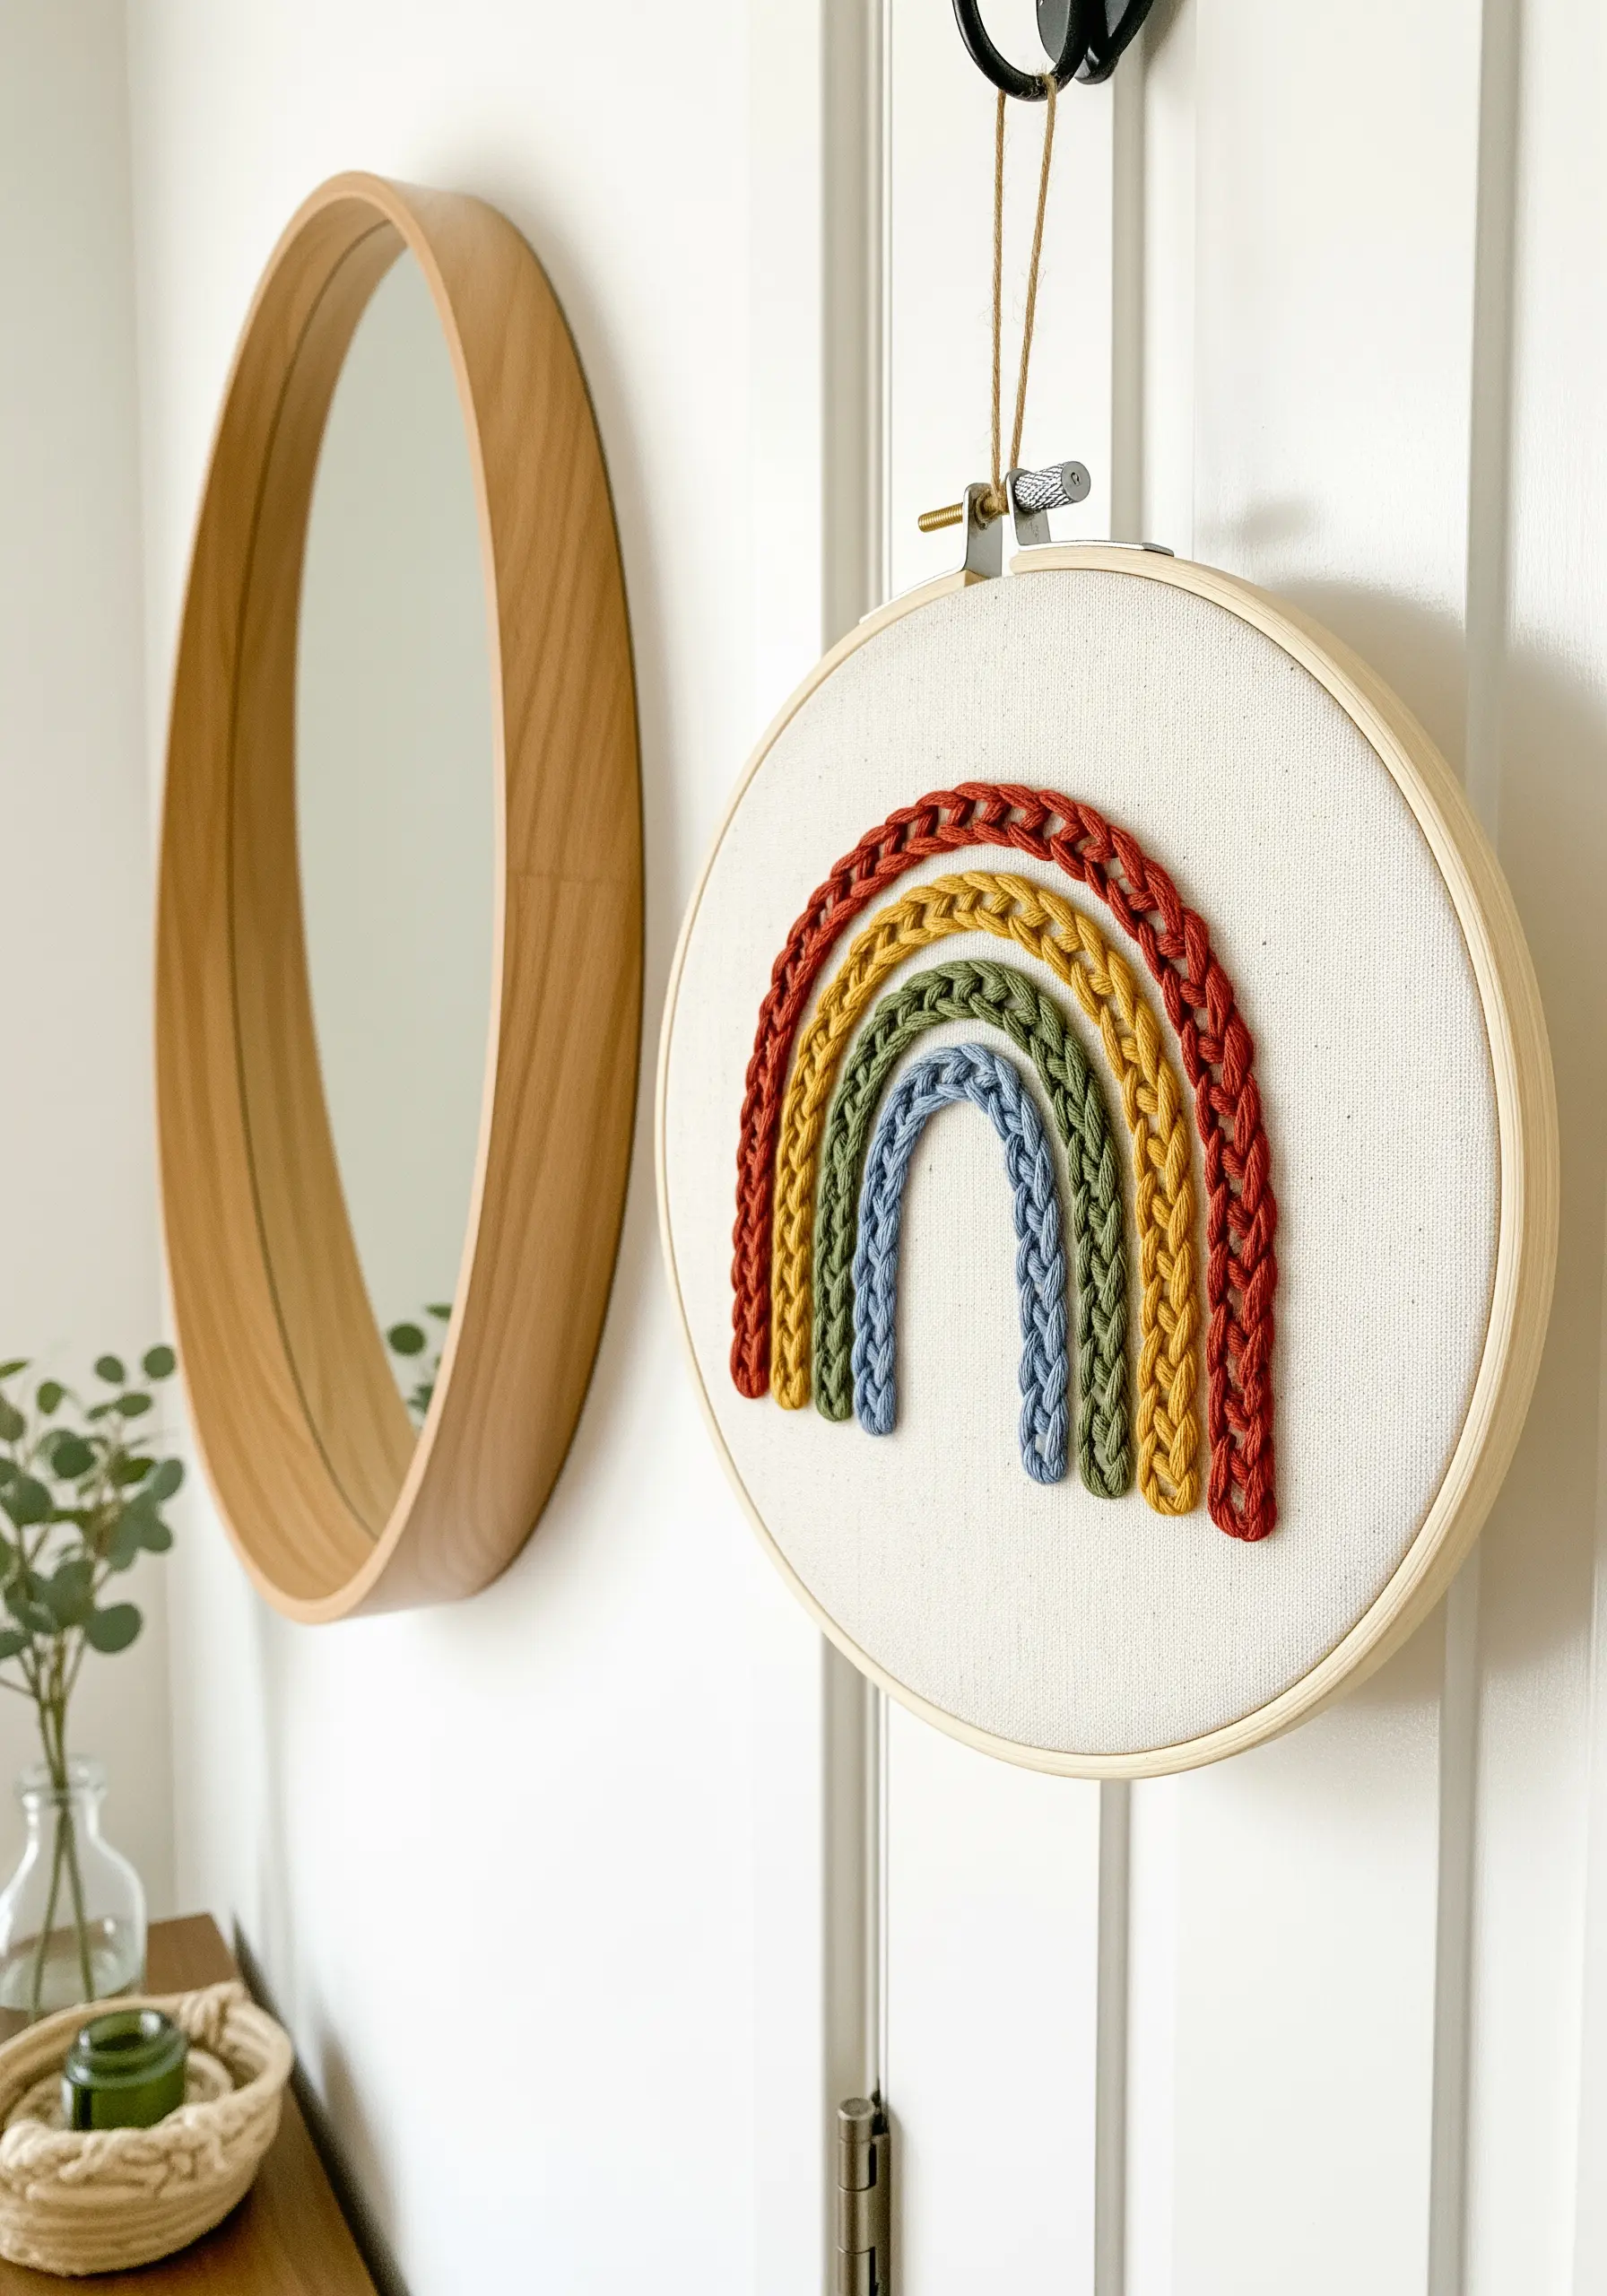
This highly textural, braided rainbow is created with a raised chain stitch band.
Unlike a standard chain stitch, this variation is worked over a foundation of several long straight stitches, creating a detached, padded braid that sits on top of the fabric.
Use all six strands of embroidery floss, or even a sport-weight yarn, to maximize the plush, 3D effect.
The result is a piece that invites touch and adds playful, sculptural depth to your wall.
17. Modern Patterning with Woven Stitches
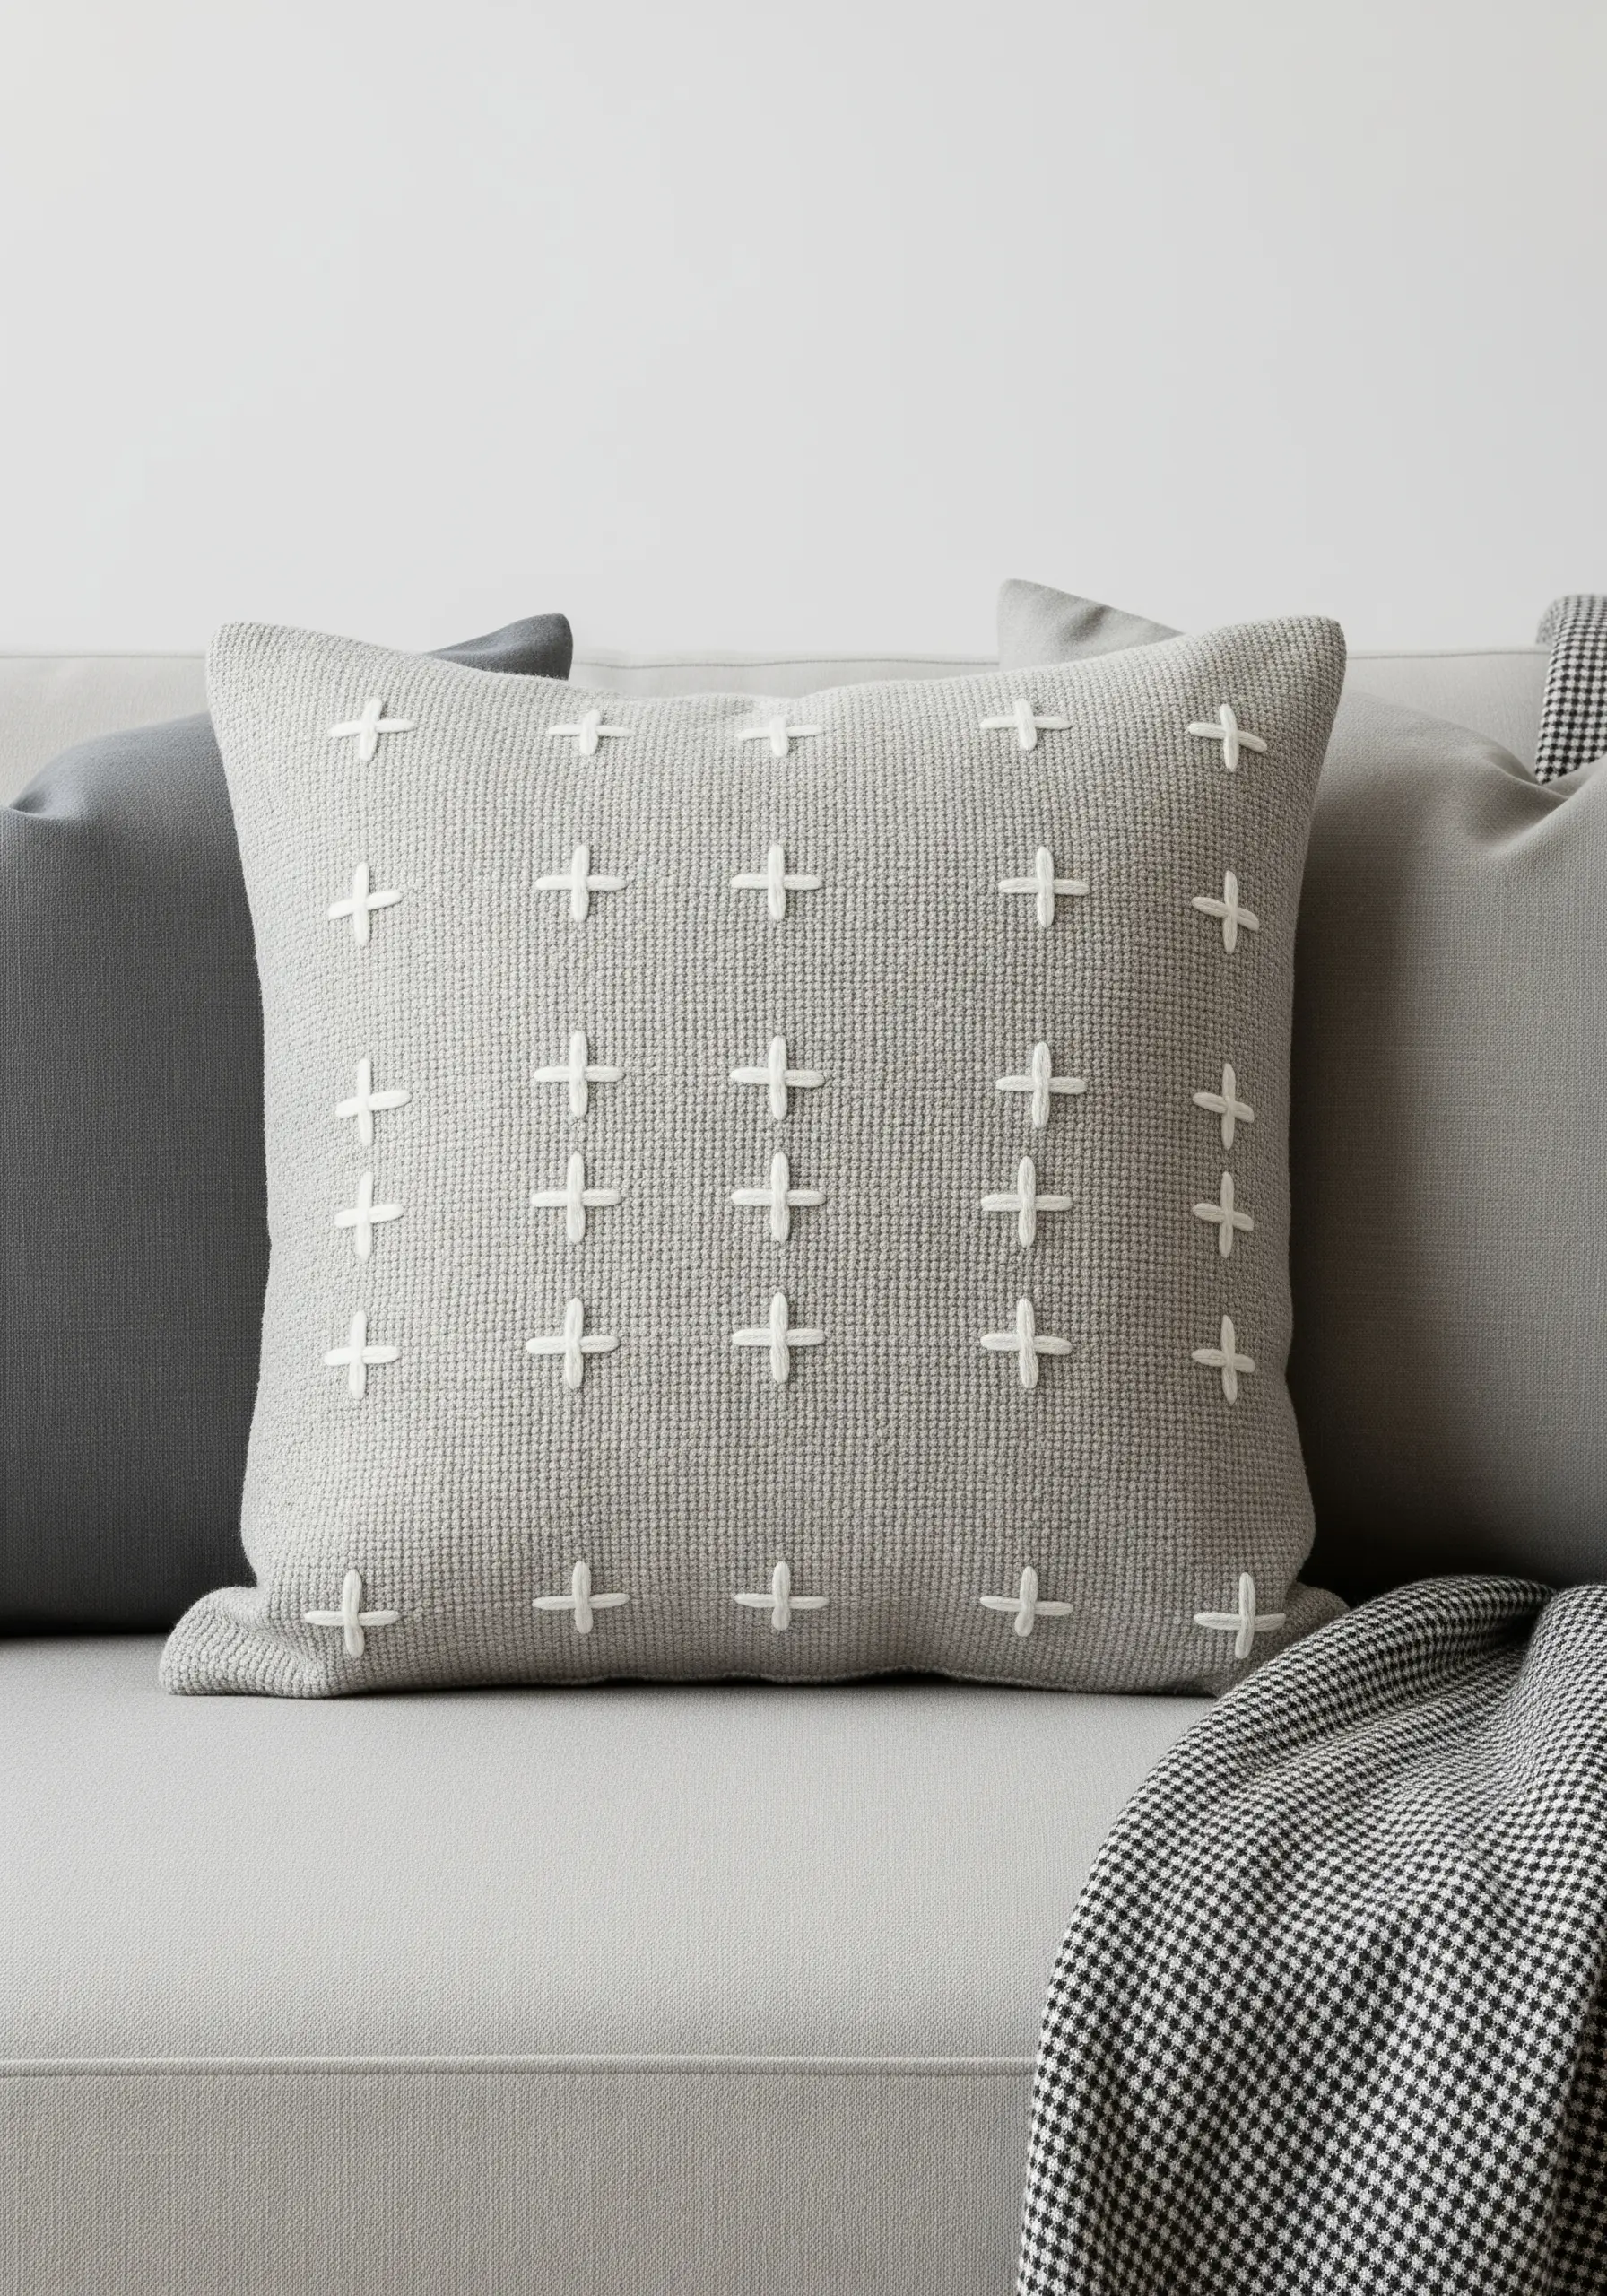
Elevate a simple grid of plus signs by replacing basic stitches with a woven bar stitch.
First, create the vertical bar with three or five parallel straight stitches. Then, take a blunt tapestry needle and weave your horizontal thread over and under these foundation stitches without piercing the fabric.
This creates a small, raised bar with a beautiful woven texture that adds a subtle, sophisticated detail to home textiles like cushions and throws.
18. Large-Scale Art with Couching and Rope
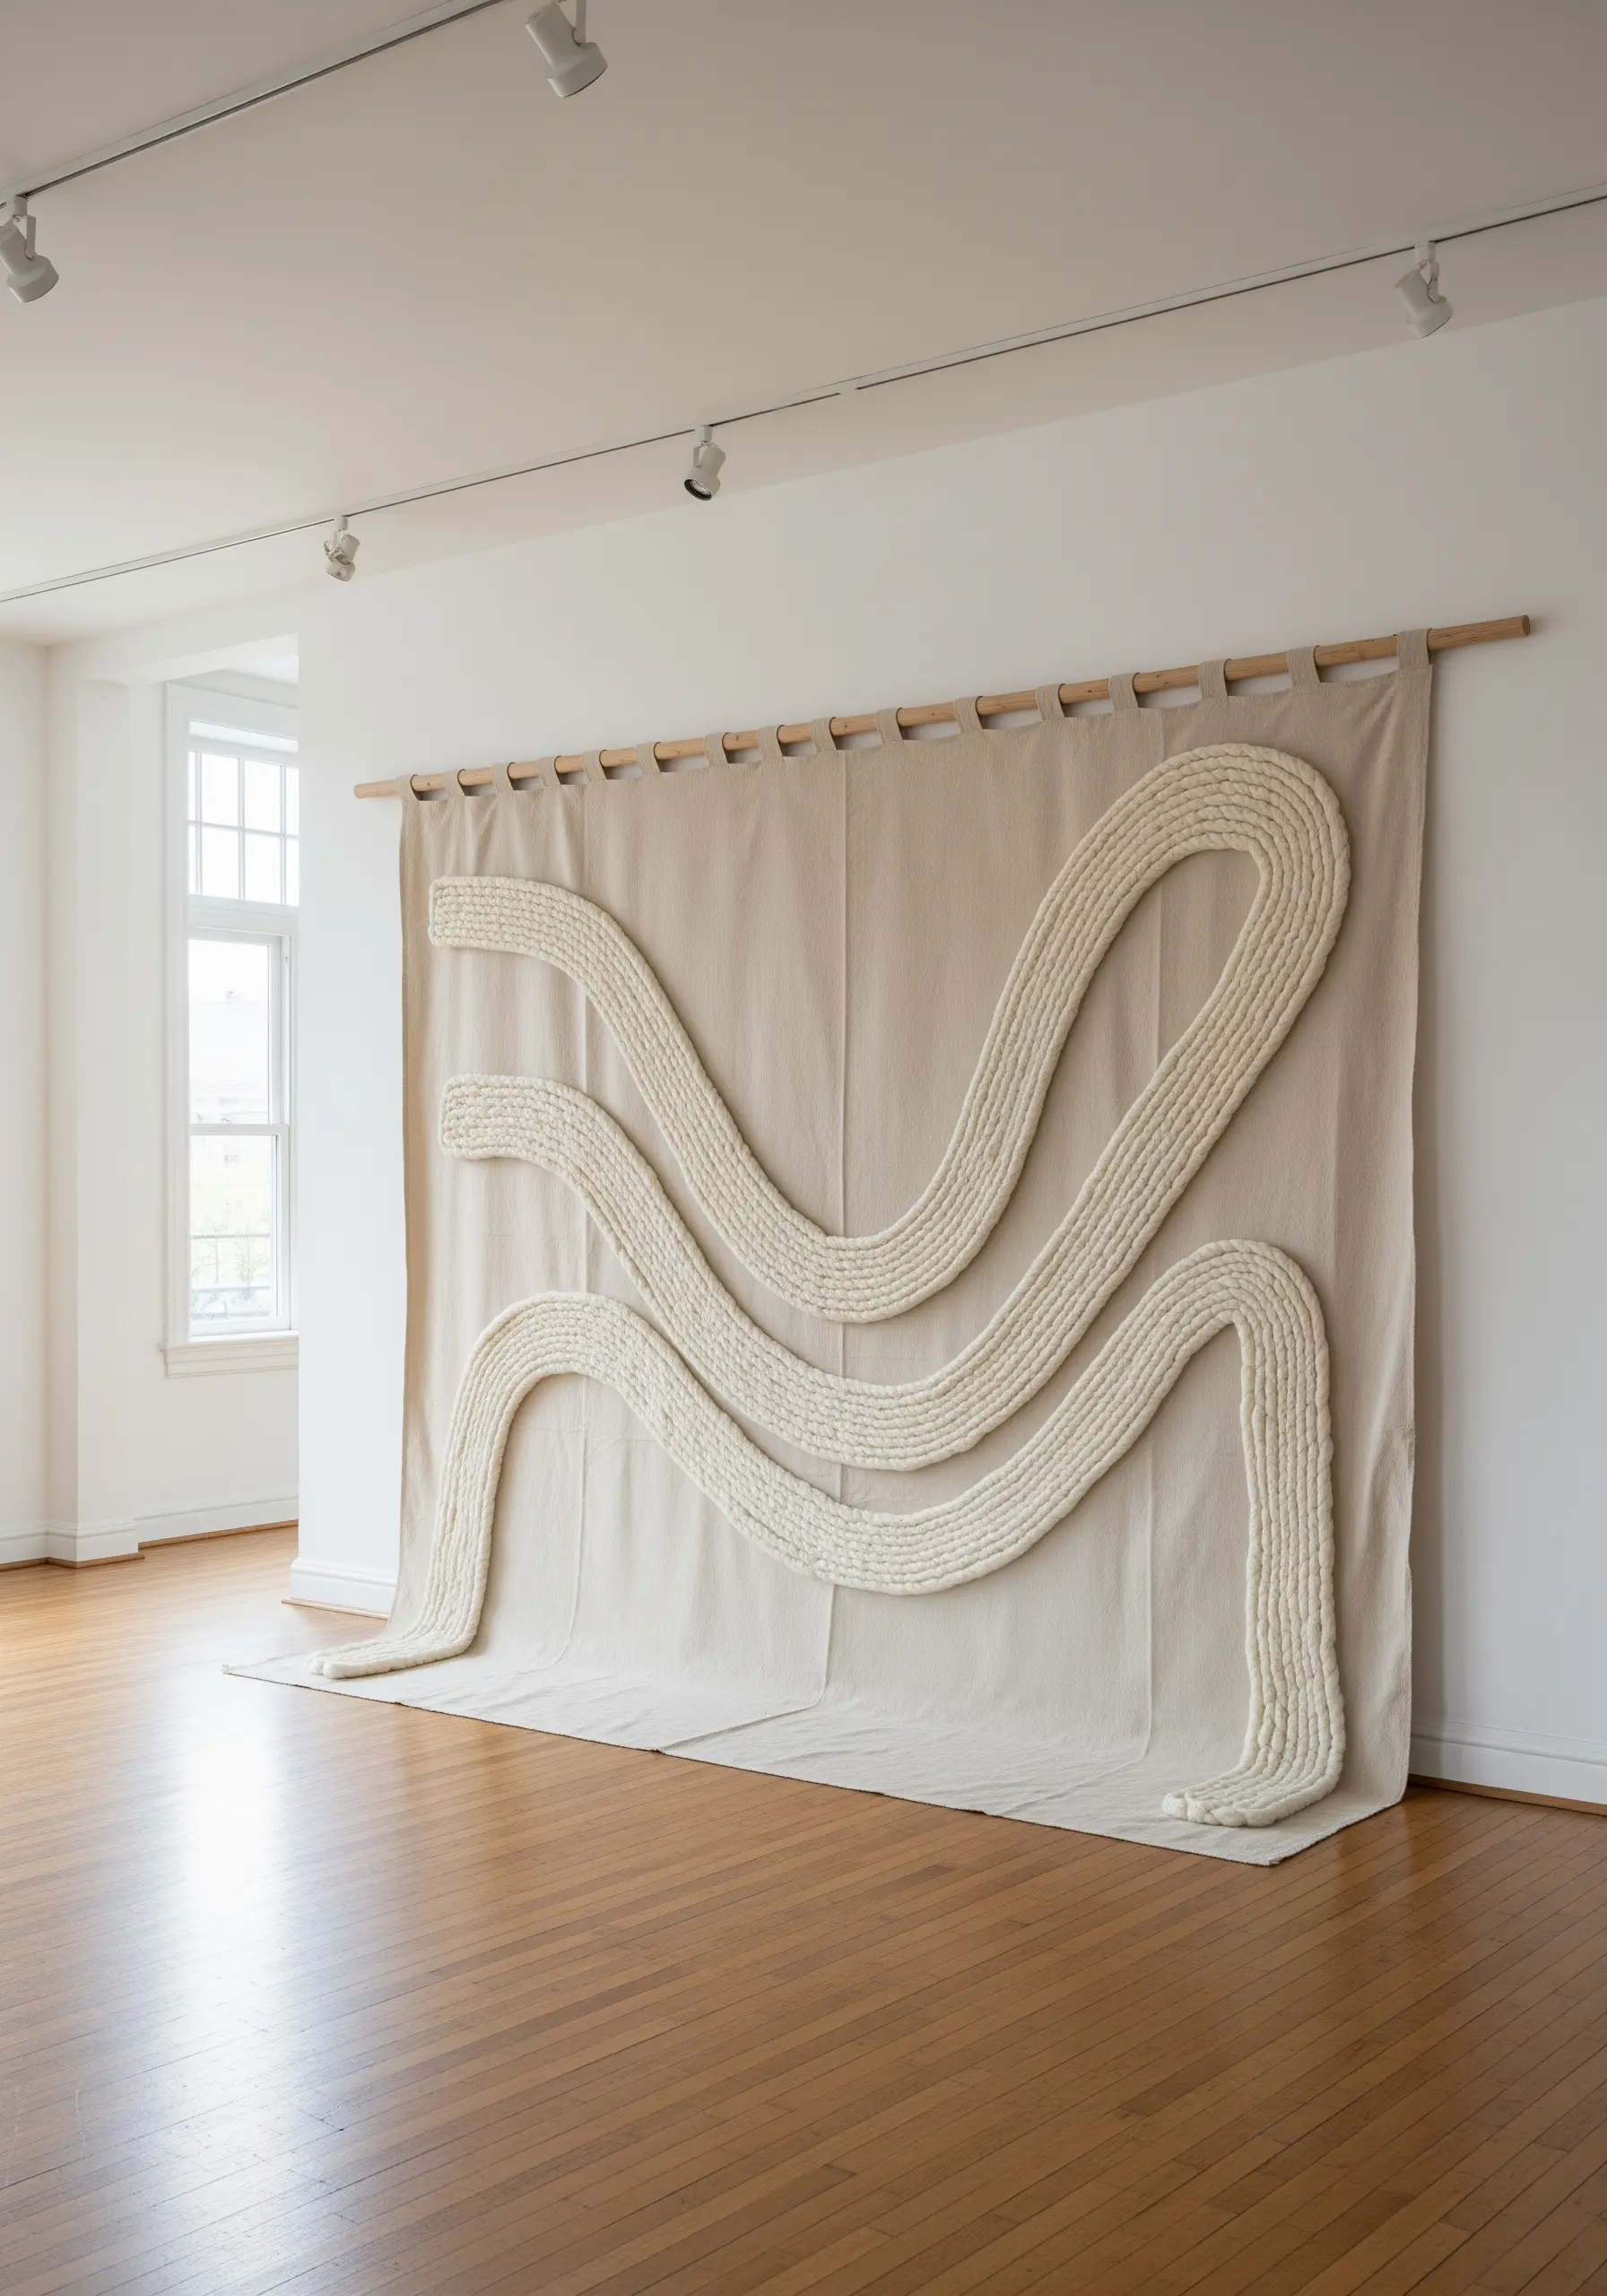
To work on a monumental scale, think beyond the needle and thread and embrace couching.
This technique allows you to attach thick materials like cotton rope, chunky yarn, or even electrical wire to a large fabric panel.
Simply lay your primary material on the surface and use a second, finer thread to tack it down with small, evenly spaced, and almost invisible stitches.
It’s the secret to creating dramatic, large-scale fiber art installations that command attention.
19. Organic Movement with Variegated Threads
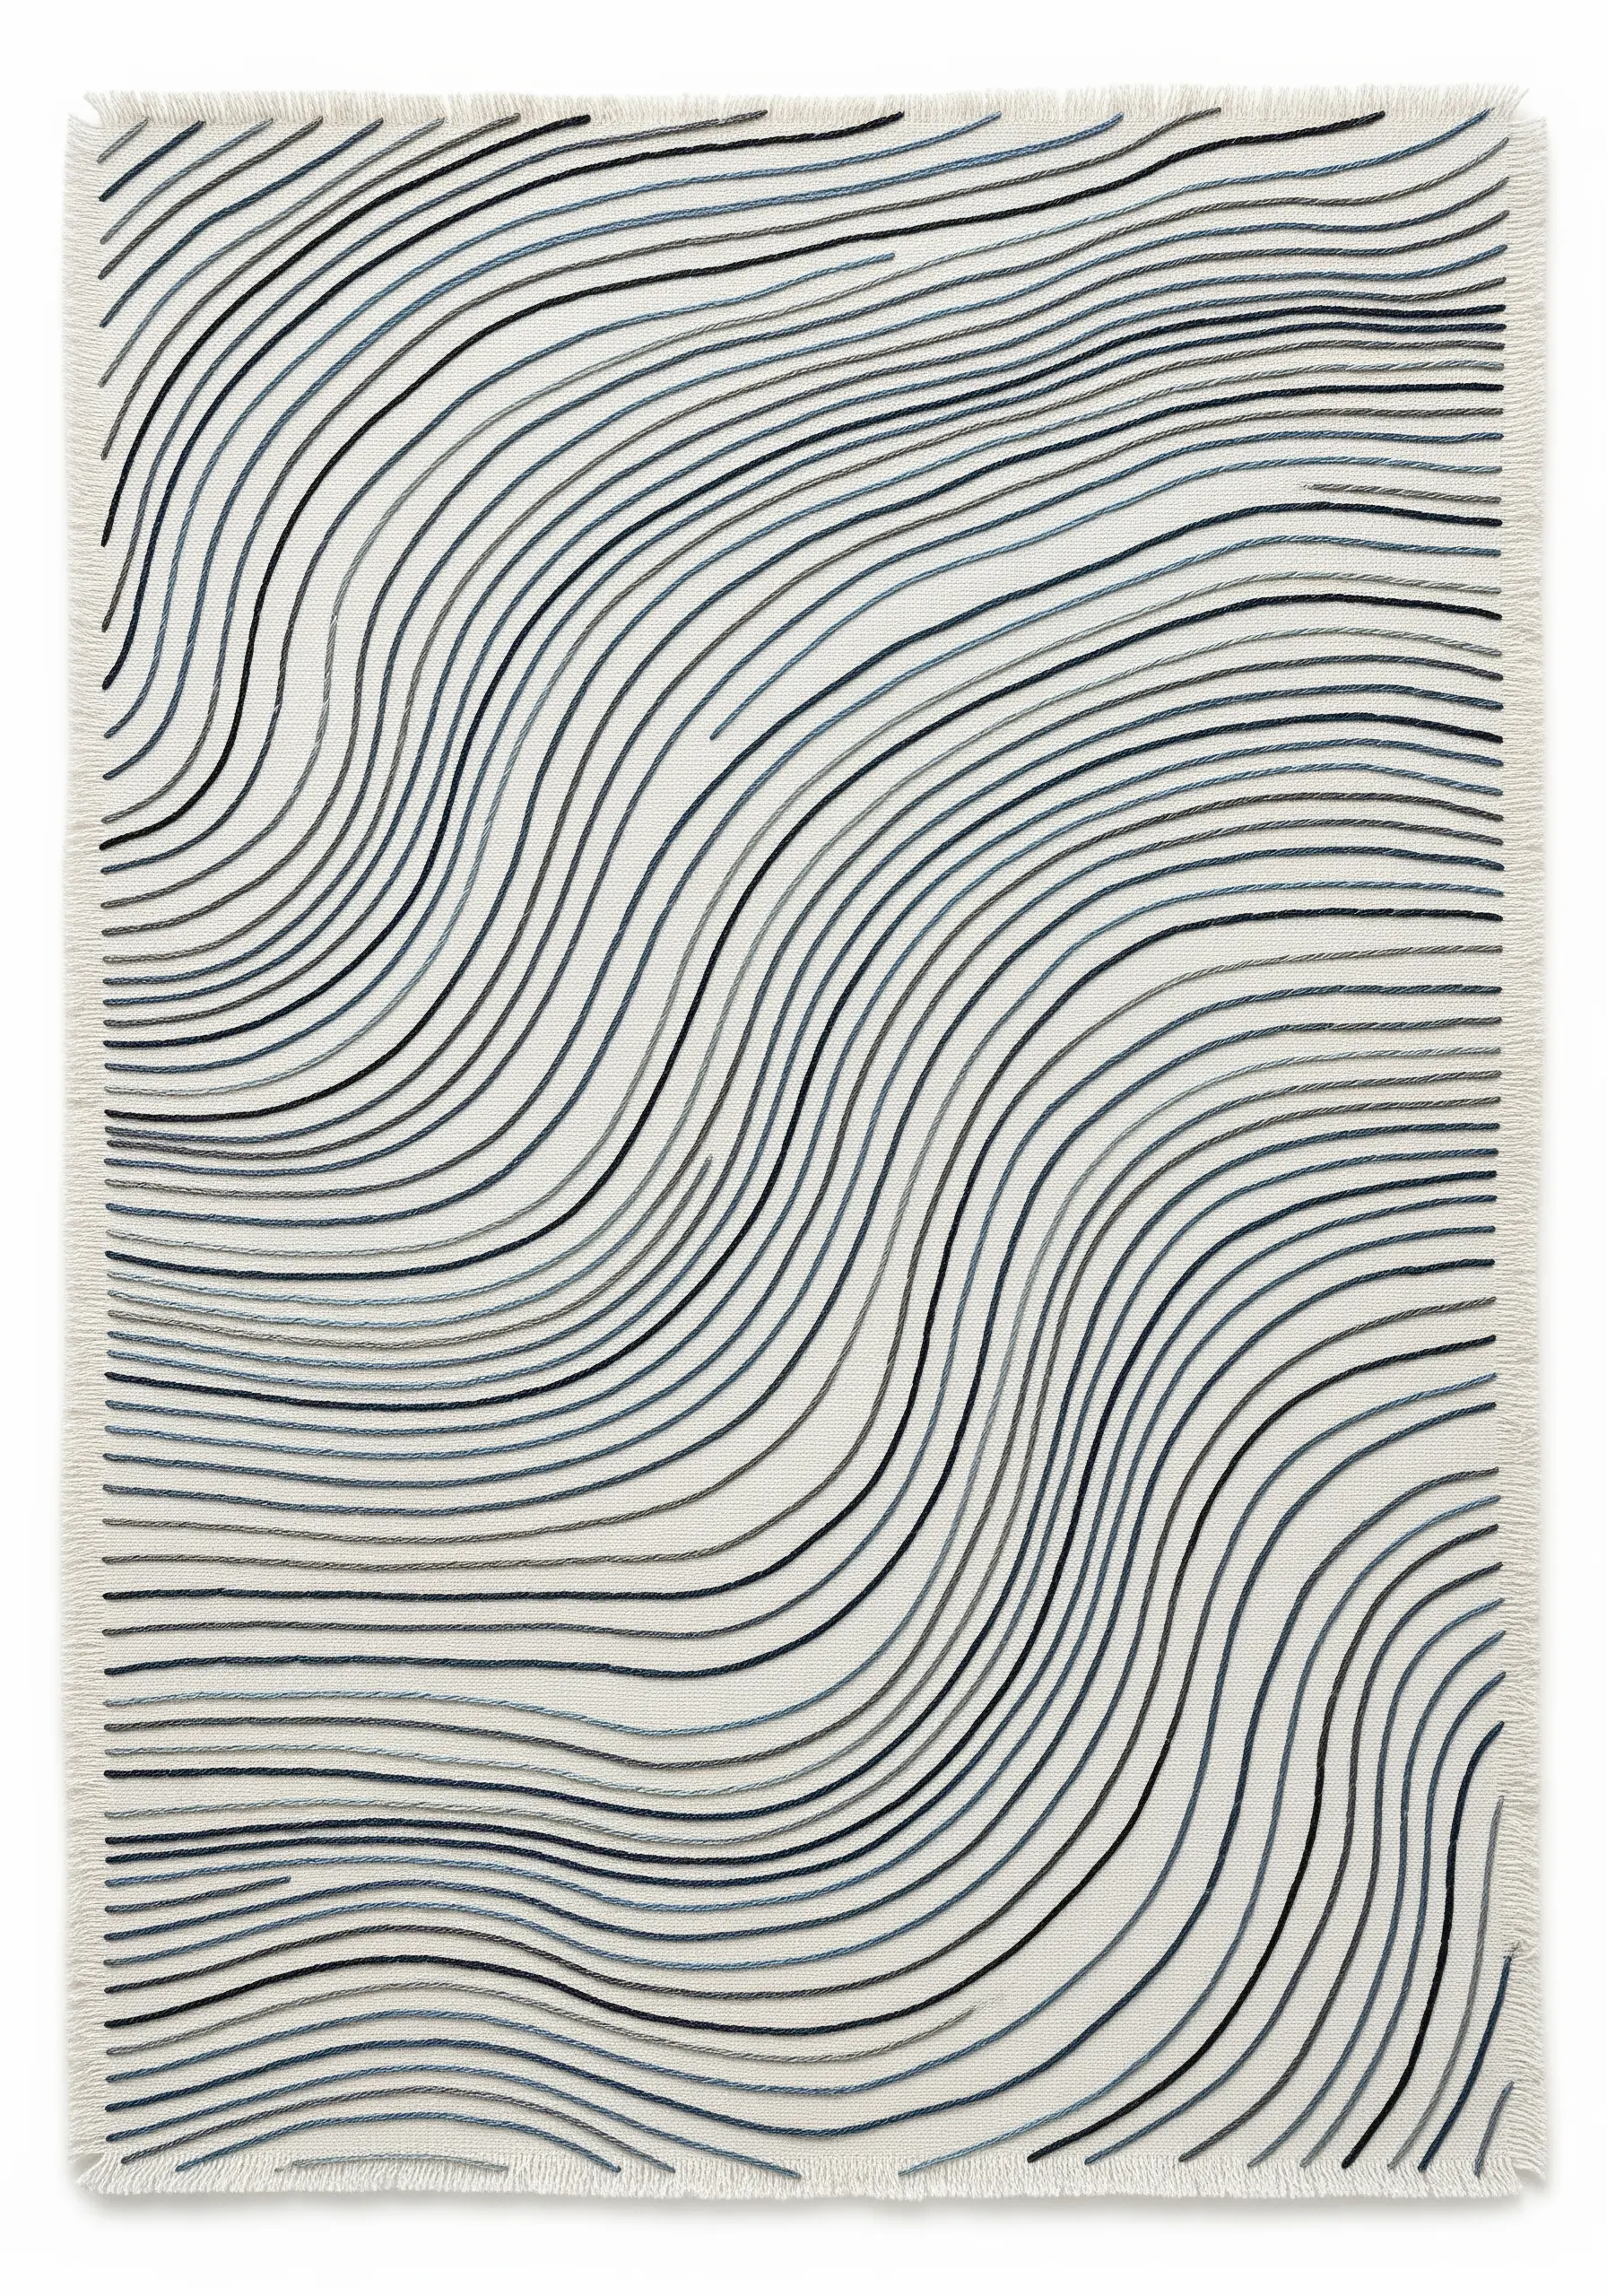
To capture the natural, flowing lines of wood grain or water, let your thread do the creative work.
Use a high-quality variegated floss, which features multiple shades dyed along a single strand.
When you use this thread for continuous stitches like the backstitch or running stitch, the colors will shift and blend organically as you work.
This creates subtle, complex color transitions with minimal effort, adding depth and a sense of natural movement to your design.
20. Delicate Engineering with Straight Stitches
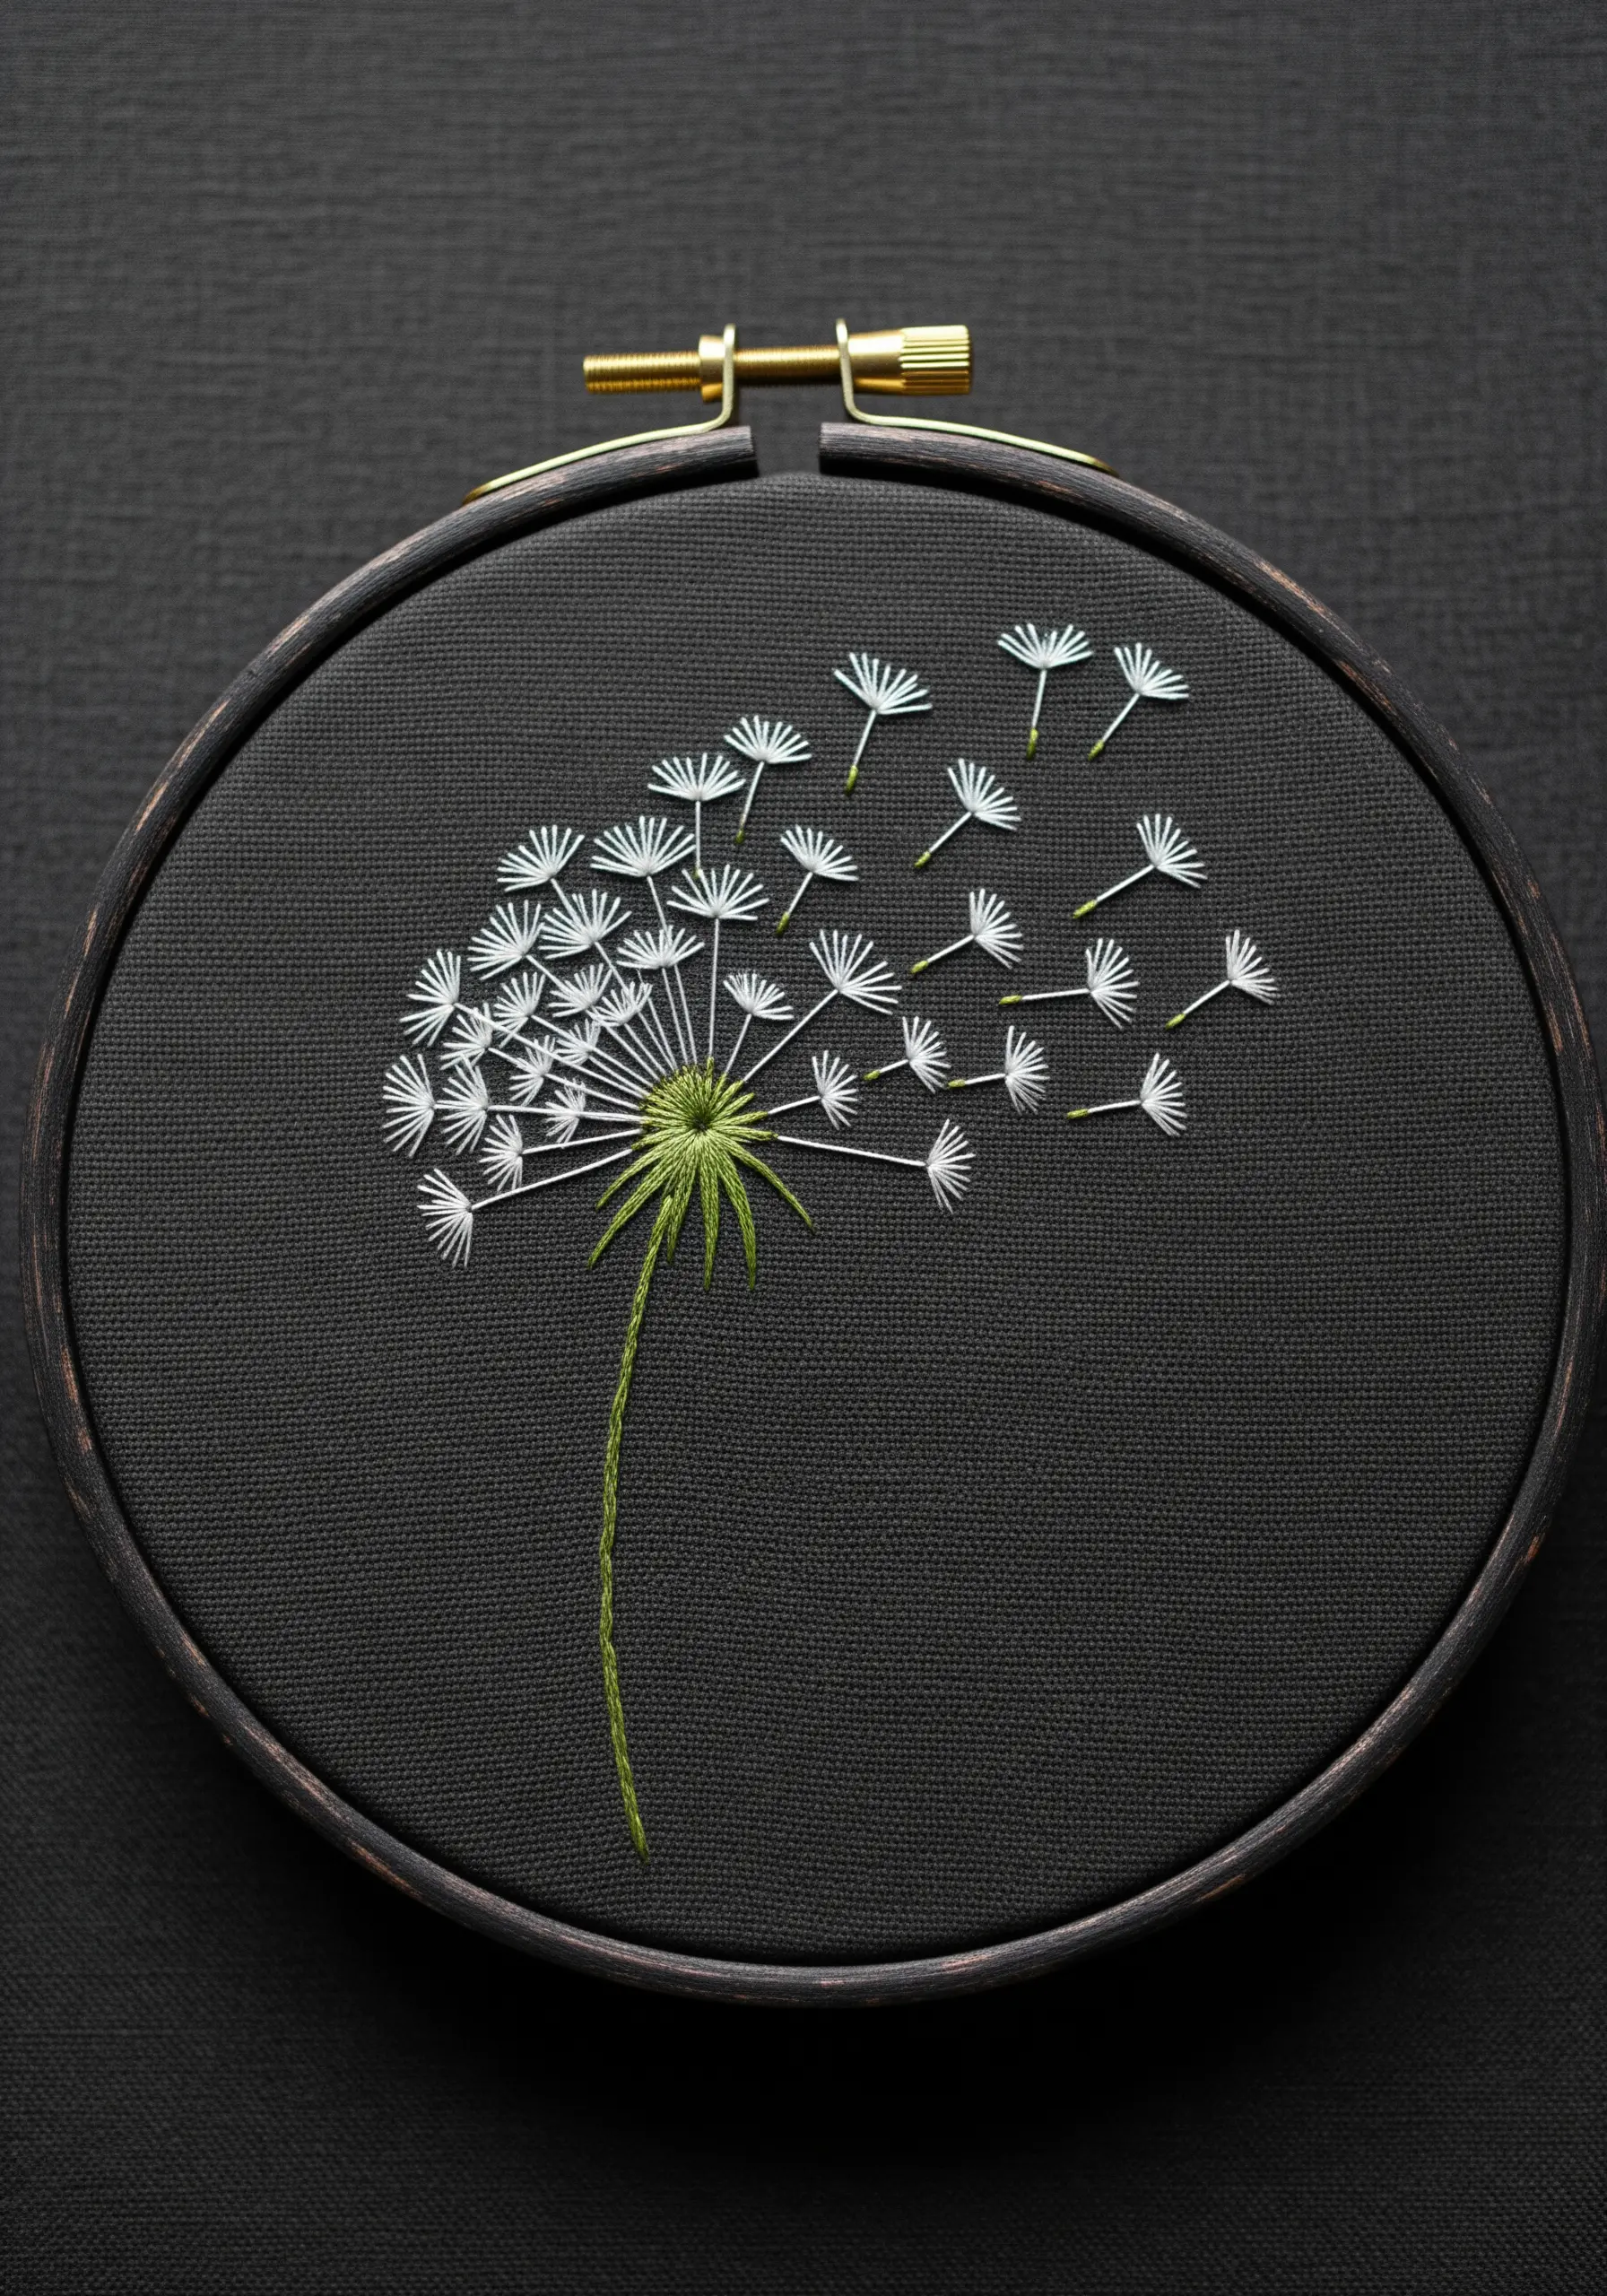
This ethereal dandelion design is a masterclass in the humble straight stitch. Its success depends entirely on precision and variation.
Use a single strand of white floss for the delicate parachute-like pappus and a slightly heavier green thread for the seed and stem.
Create a sense of movement by varying the length and angle of each individual stitch, clustering them tightly at the base and scattering them as they float away.
The careful placement is what transforms simple lines into a moment of captured motion.
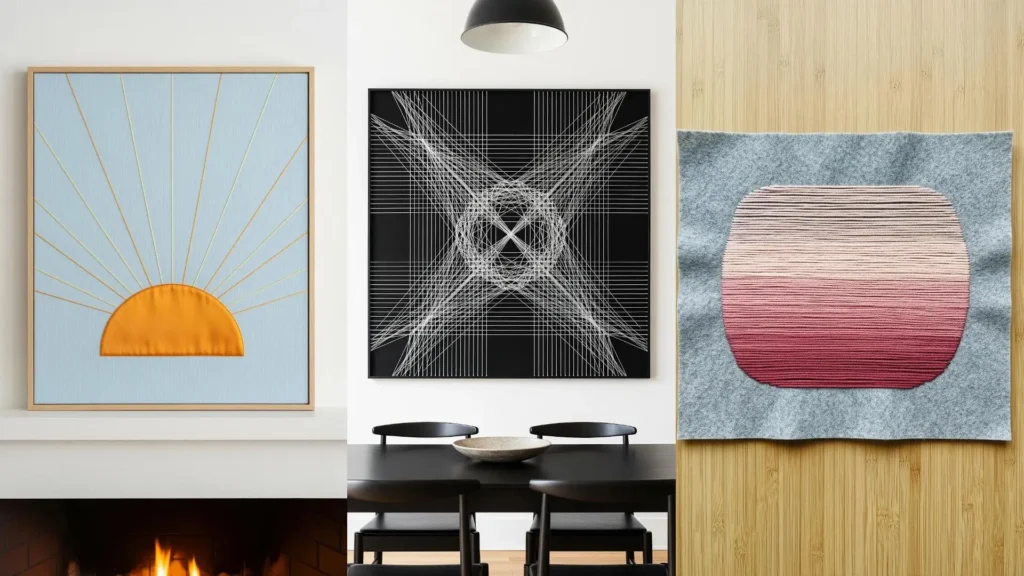
21. Radiating Light with Thread and Satin Stitch

This graphic sunrise gains its power from the contrast in texture and direction.
For the sun, use a high-sheen thread like silk or rayon and fill the semi-circle with a perfectly smooth, horizontal satin stitch to create a solid block of lustrous color.
For the rays, switch to a matte cotton floss and use long, taut straight stitches that radiate from the sun’s edge.
This combination of textures—one reflective and solid, the other linear and matte—creates a dynamic and visually striking piece.
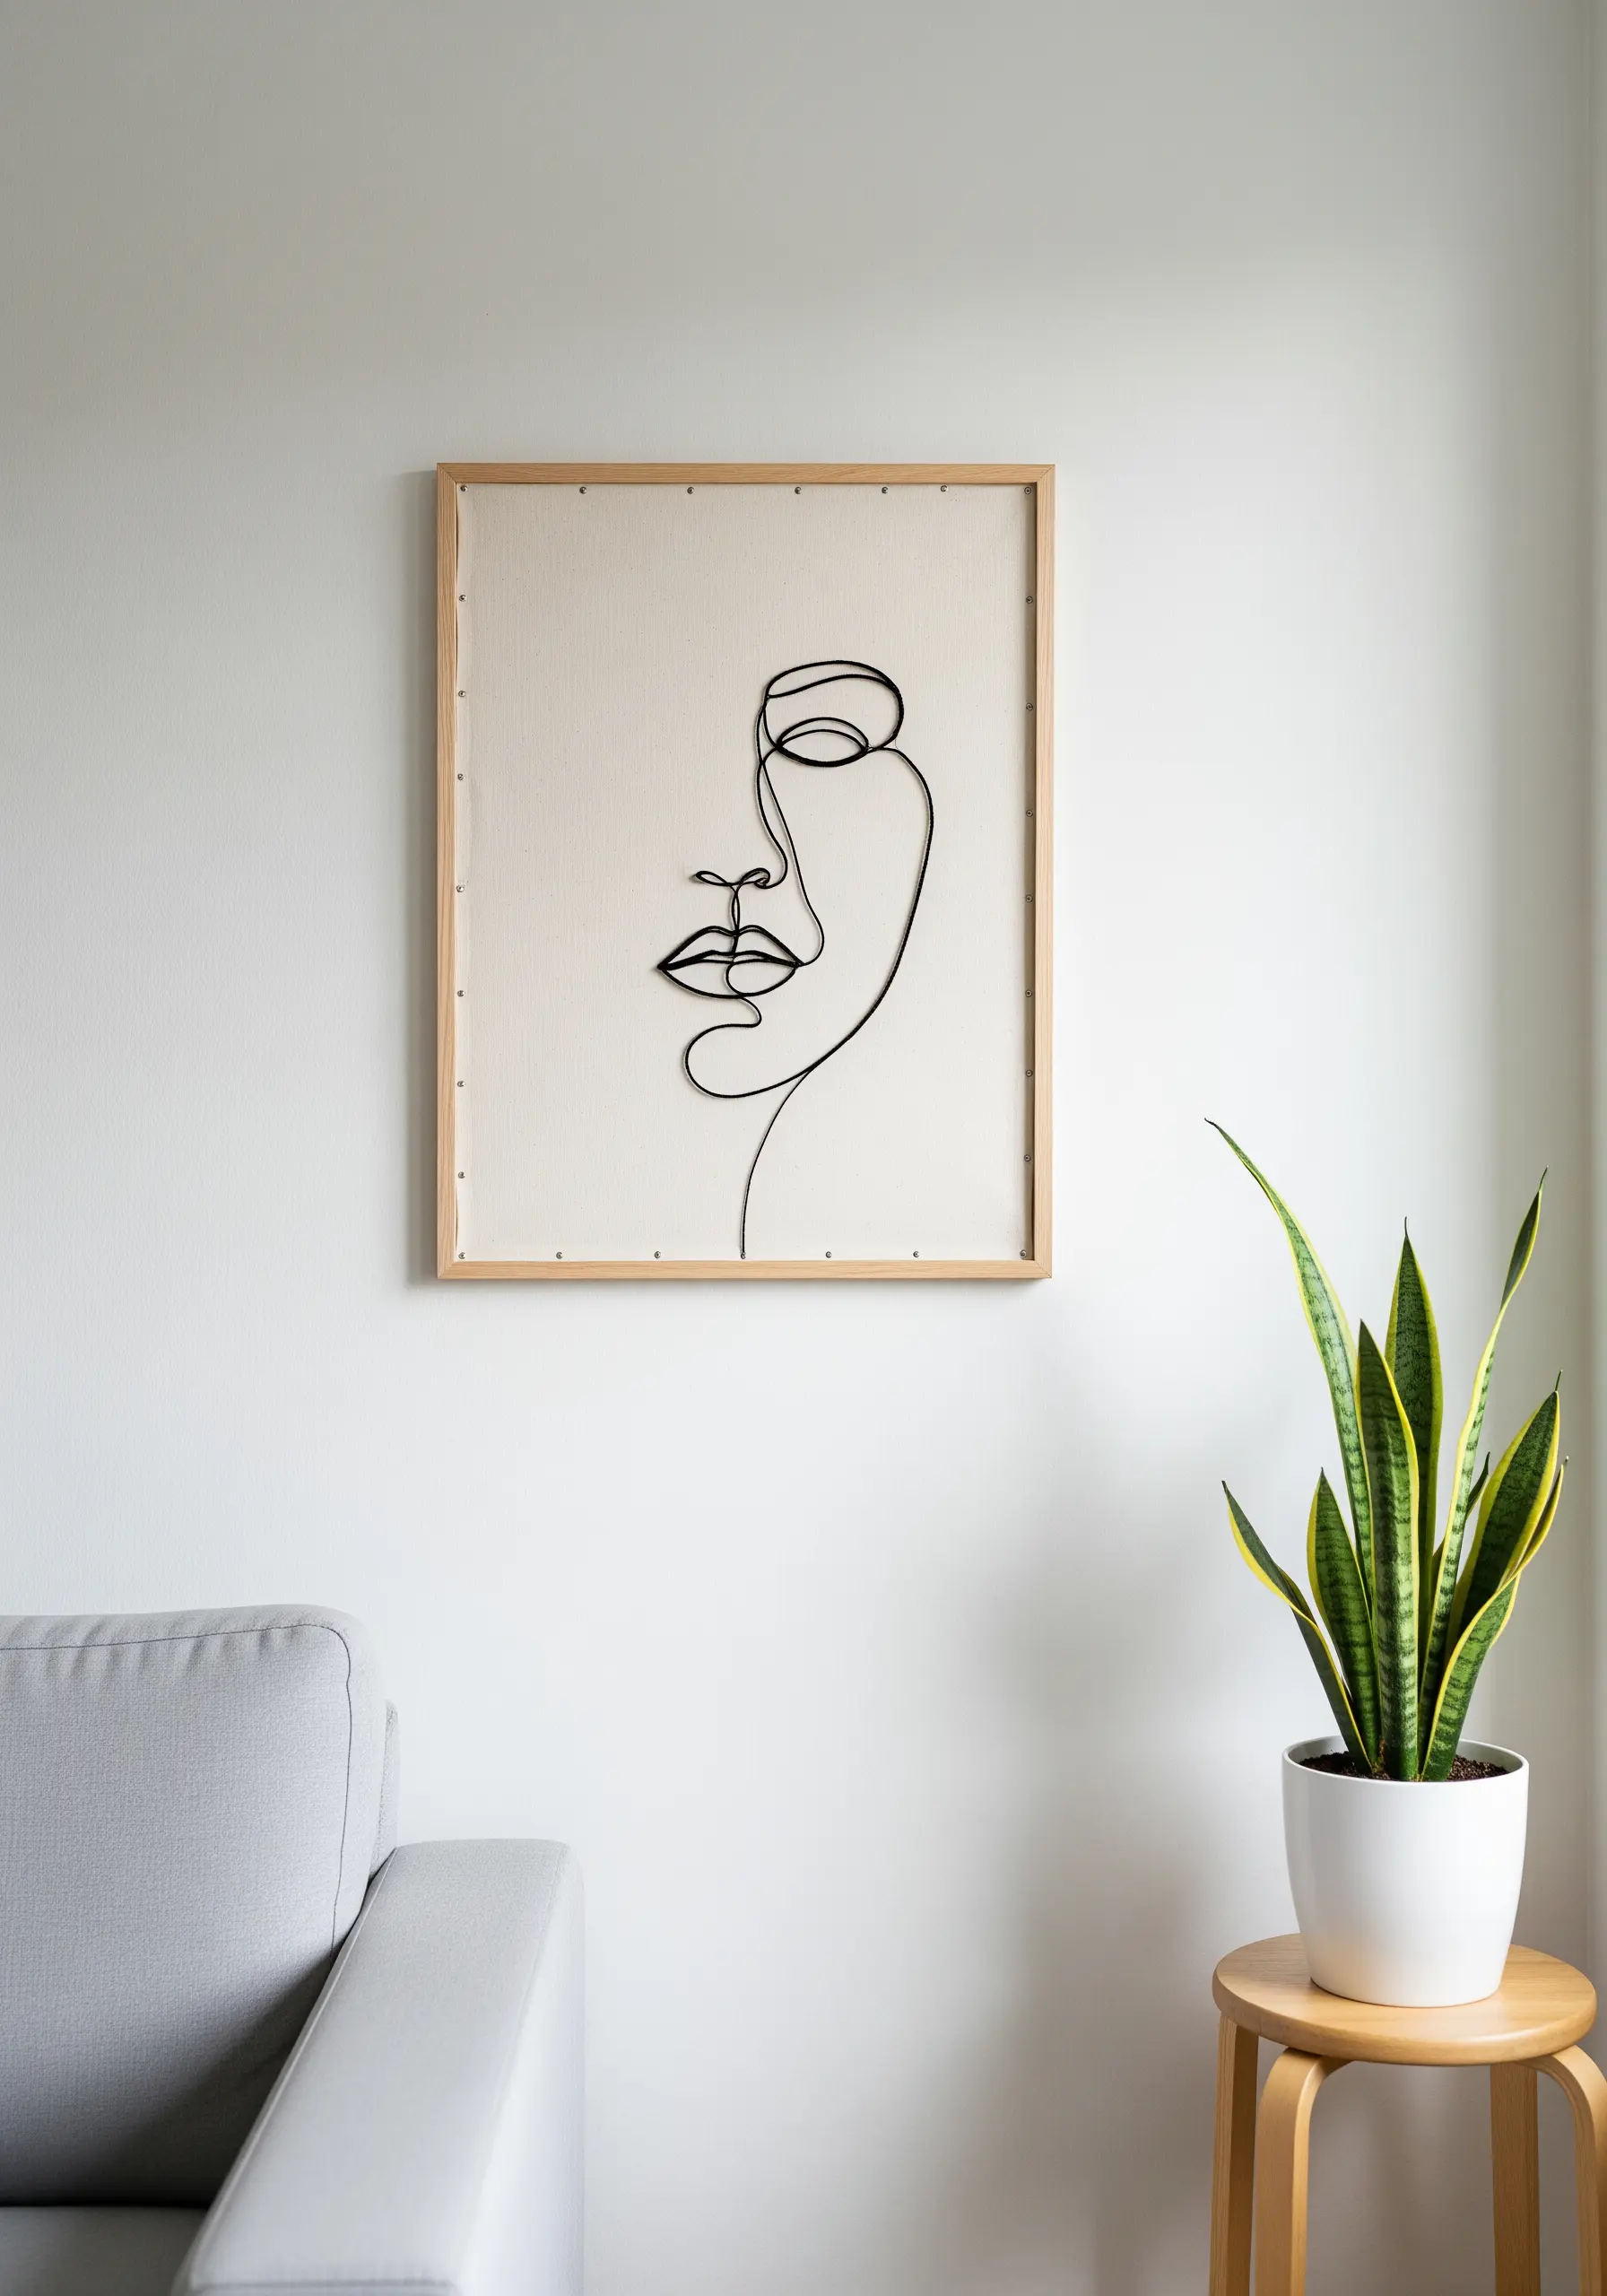
22. Iconic Art Reimagined with 3D Outlines

To give this classic line art a modern, sculptural feel, use a technique that raises the line off the fabric surface.
A whipped backstitch is perfect for this. First, create a standard backstitch outline. Then, using the same thread and a blunt needle, loop the thread around each backstitch without piercing the fabric.
This covers the backstitch, creating a smooth, solid, and slightly raised line that has more presence and weight than a simple outline, turning it into one of the most elegant minimal DIY embroidery pieces.
23. Geometric Repetition for Functional Art
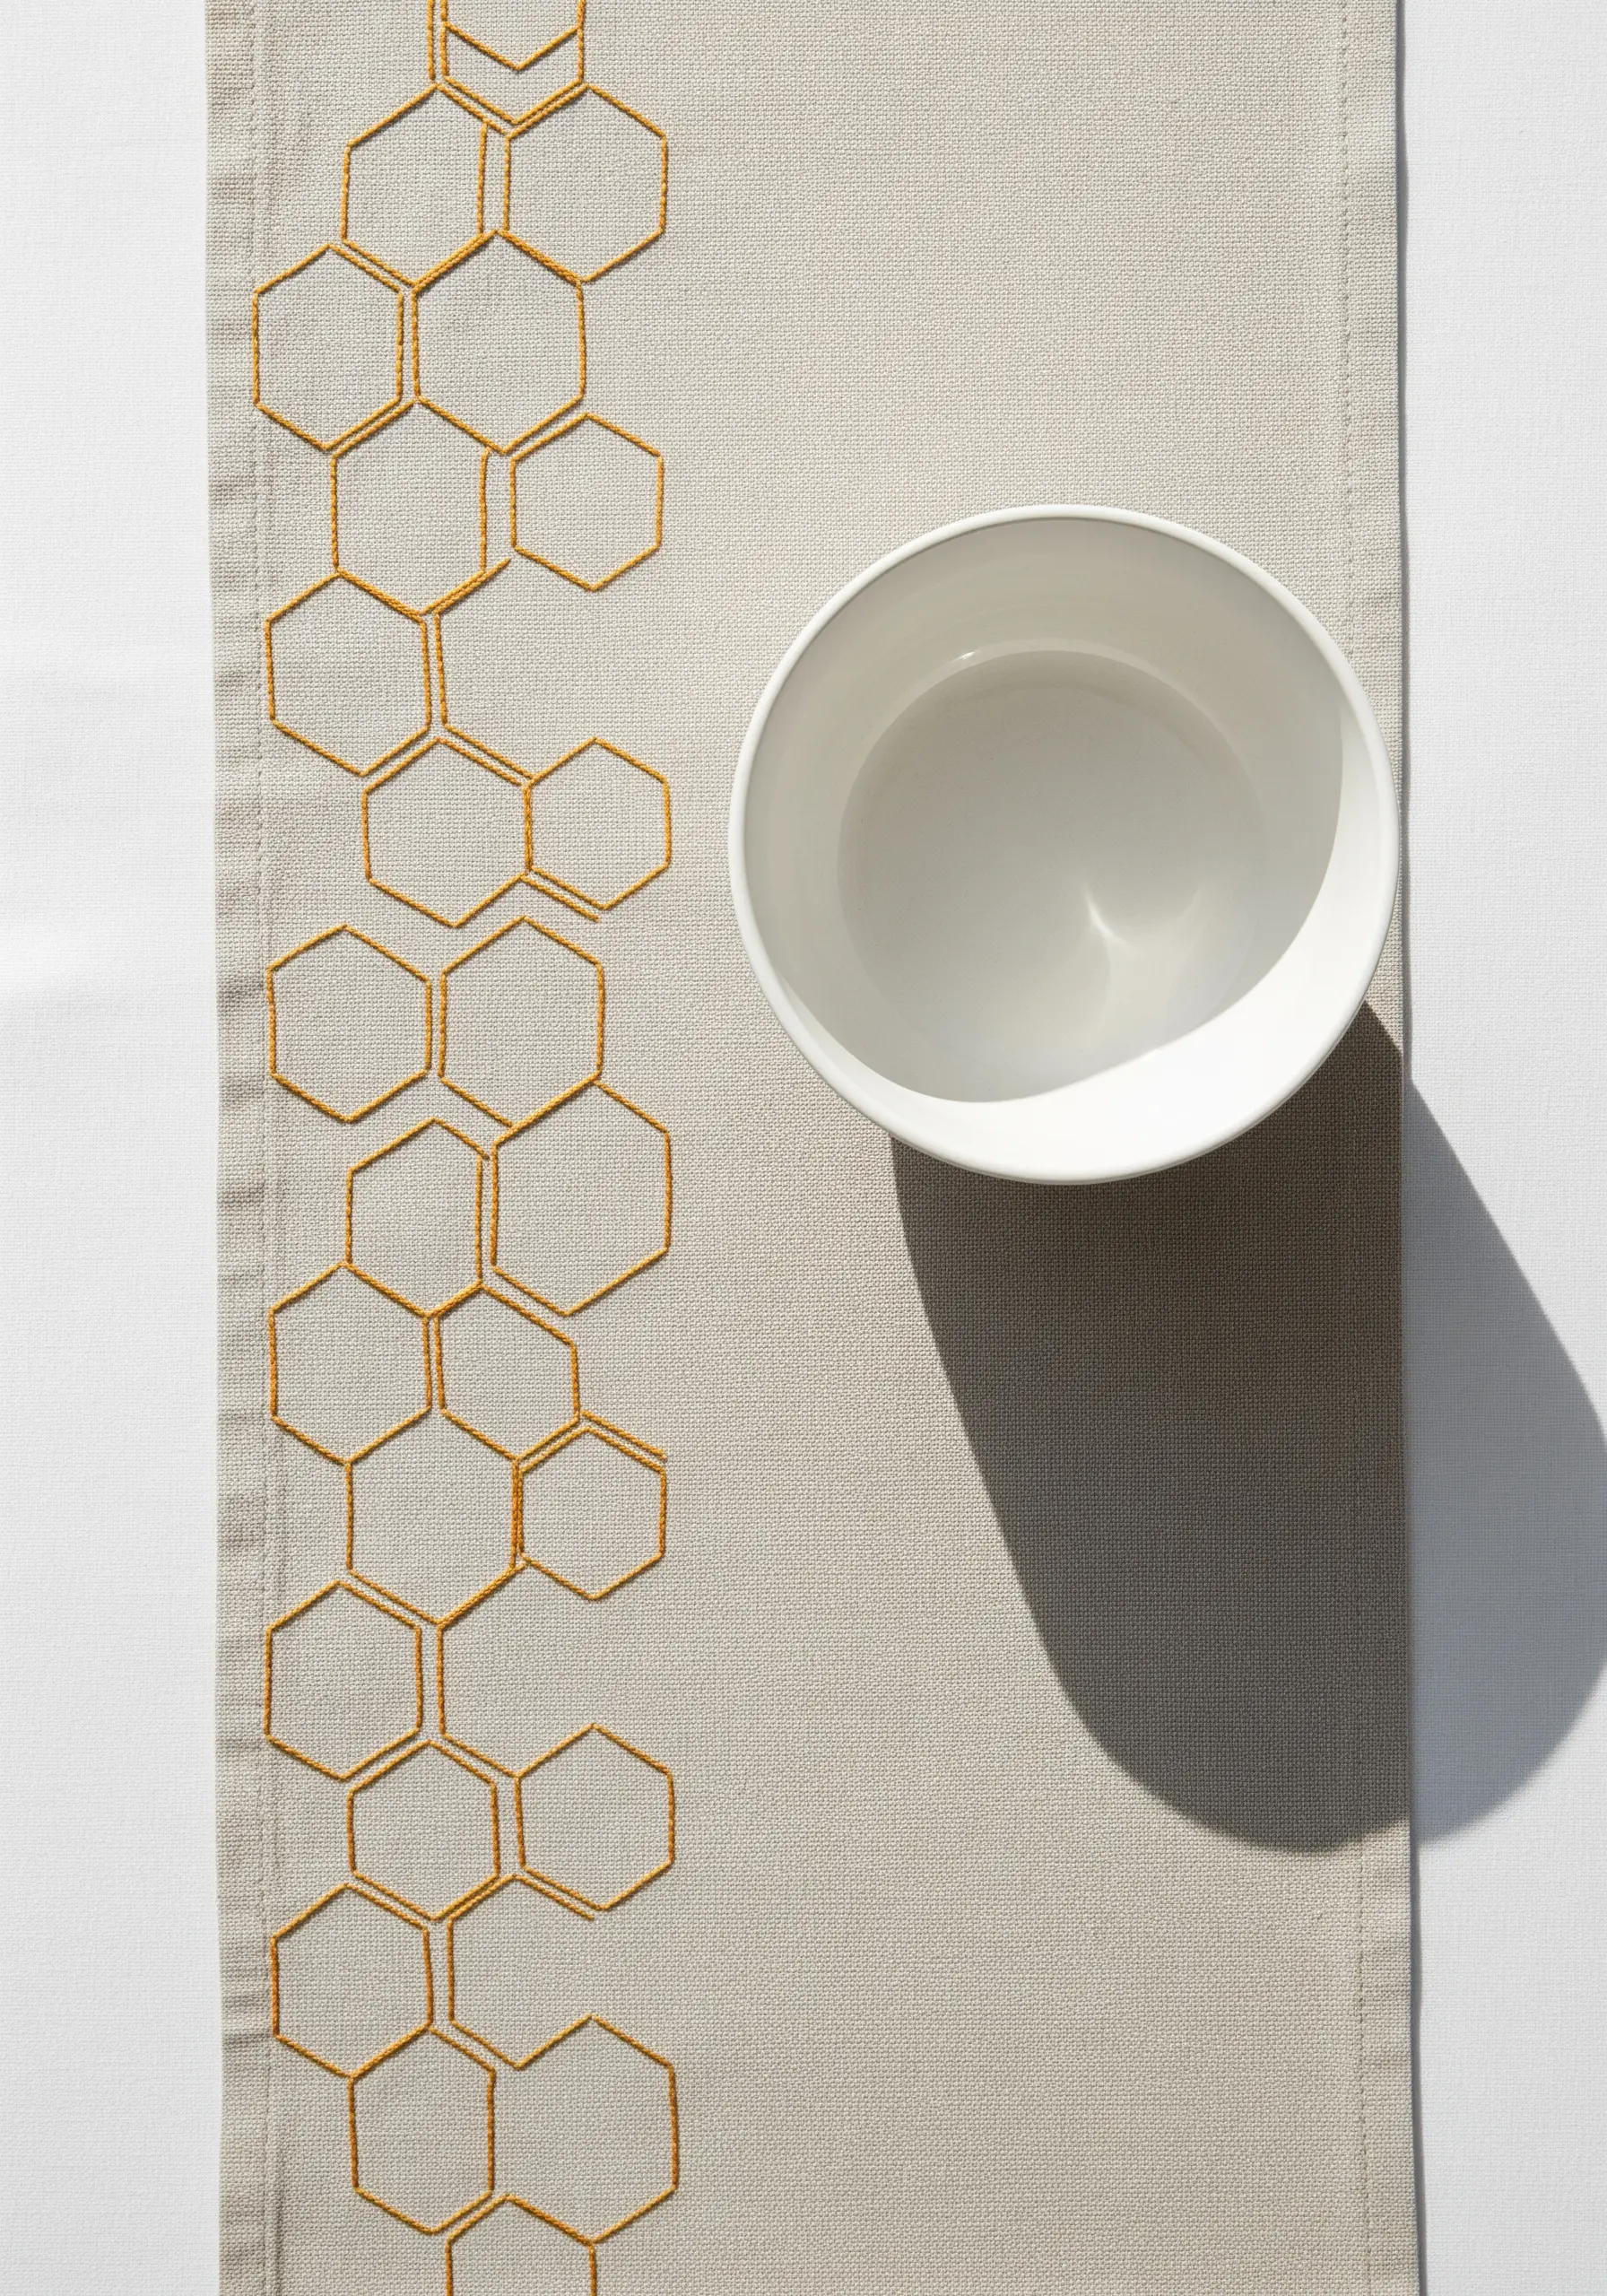
When embroidering functional items like this table runner, durability is as important as aesthetics.
A simple backstitch or stem stitch in a contrasting color is an excellent choice for creating this clean honeycomb pattern.
Use a high-quality, colorfast cotton floss that can withstand washing. To ensure perfect geometric shapes, use a water-soluble canvas grid or a heat-erasable pen to mark your pattern before you begin stitching.
This attention to detail ensures your functional art remains beautiful through use.
24. Hyper-Realistic Texture with Single-Strand Shading
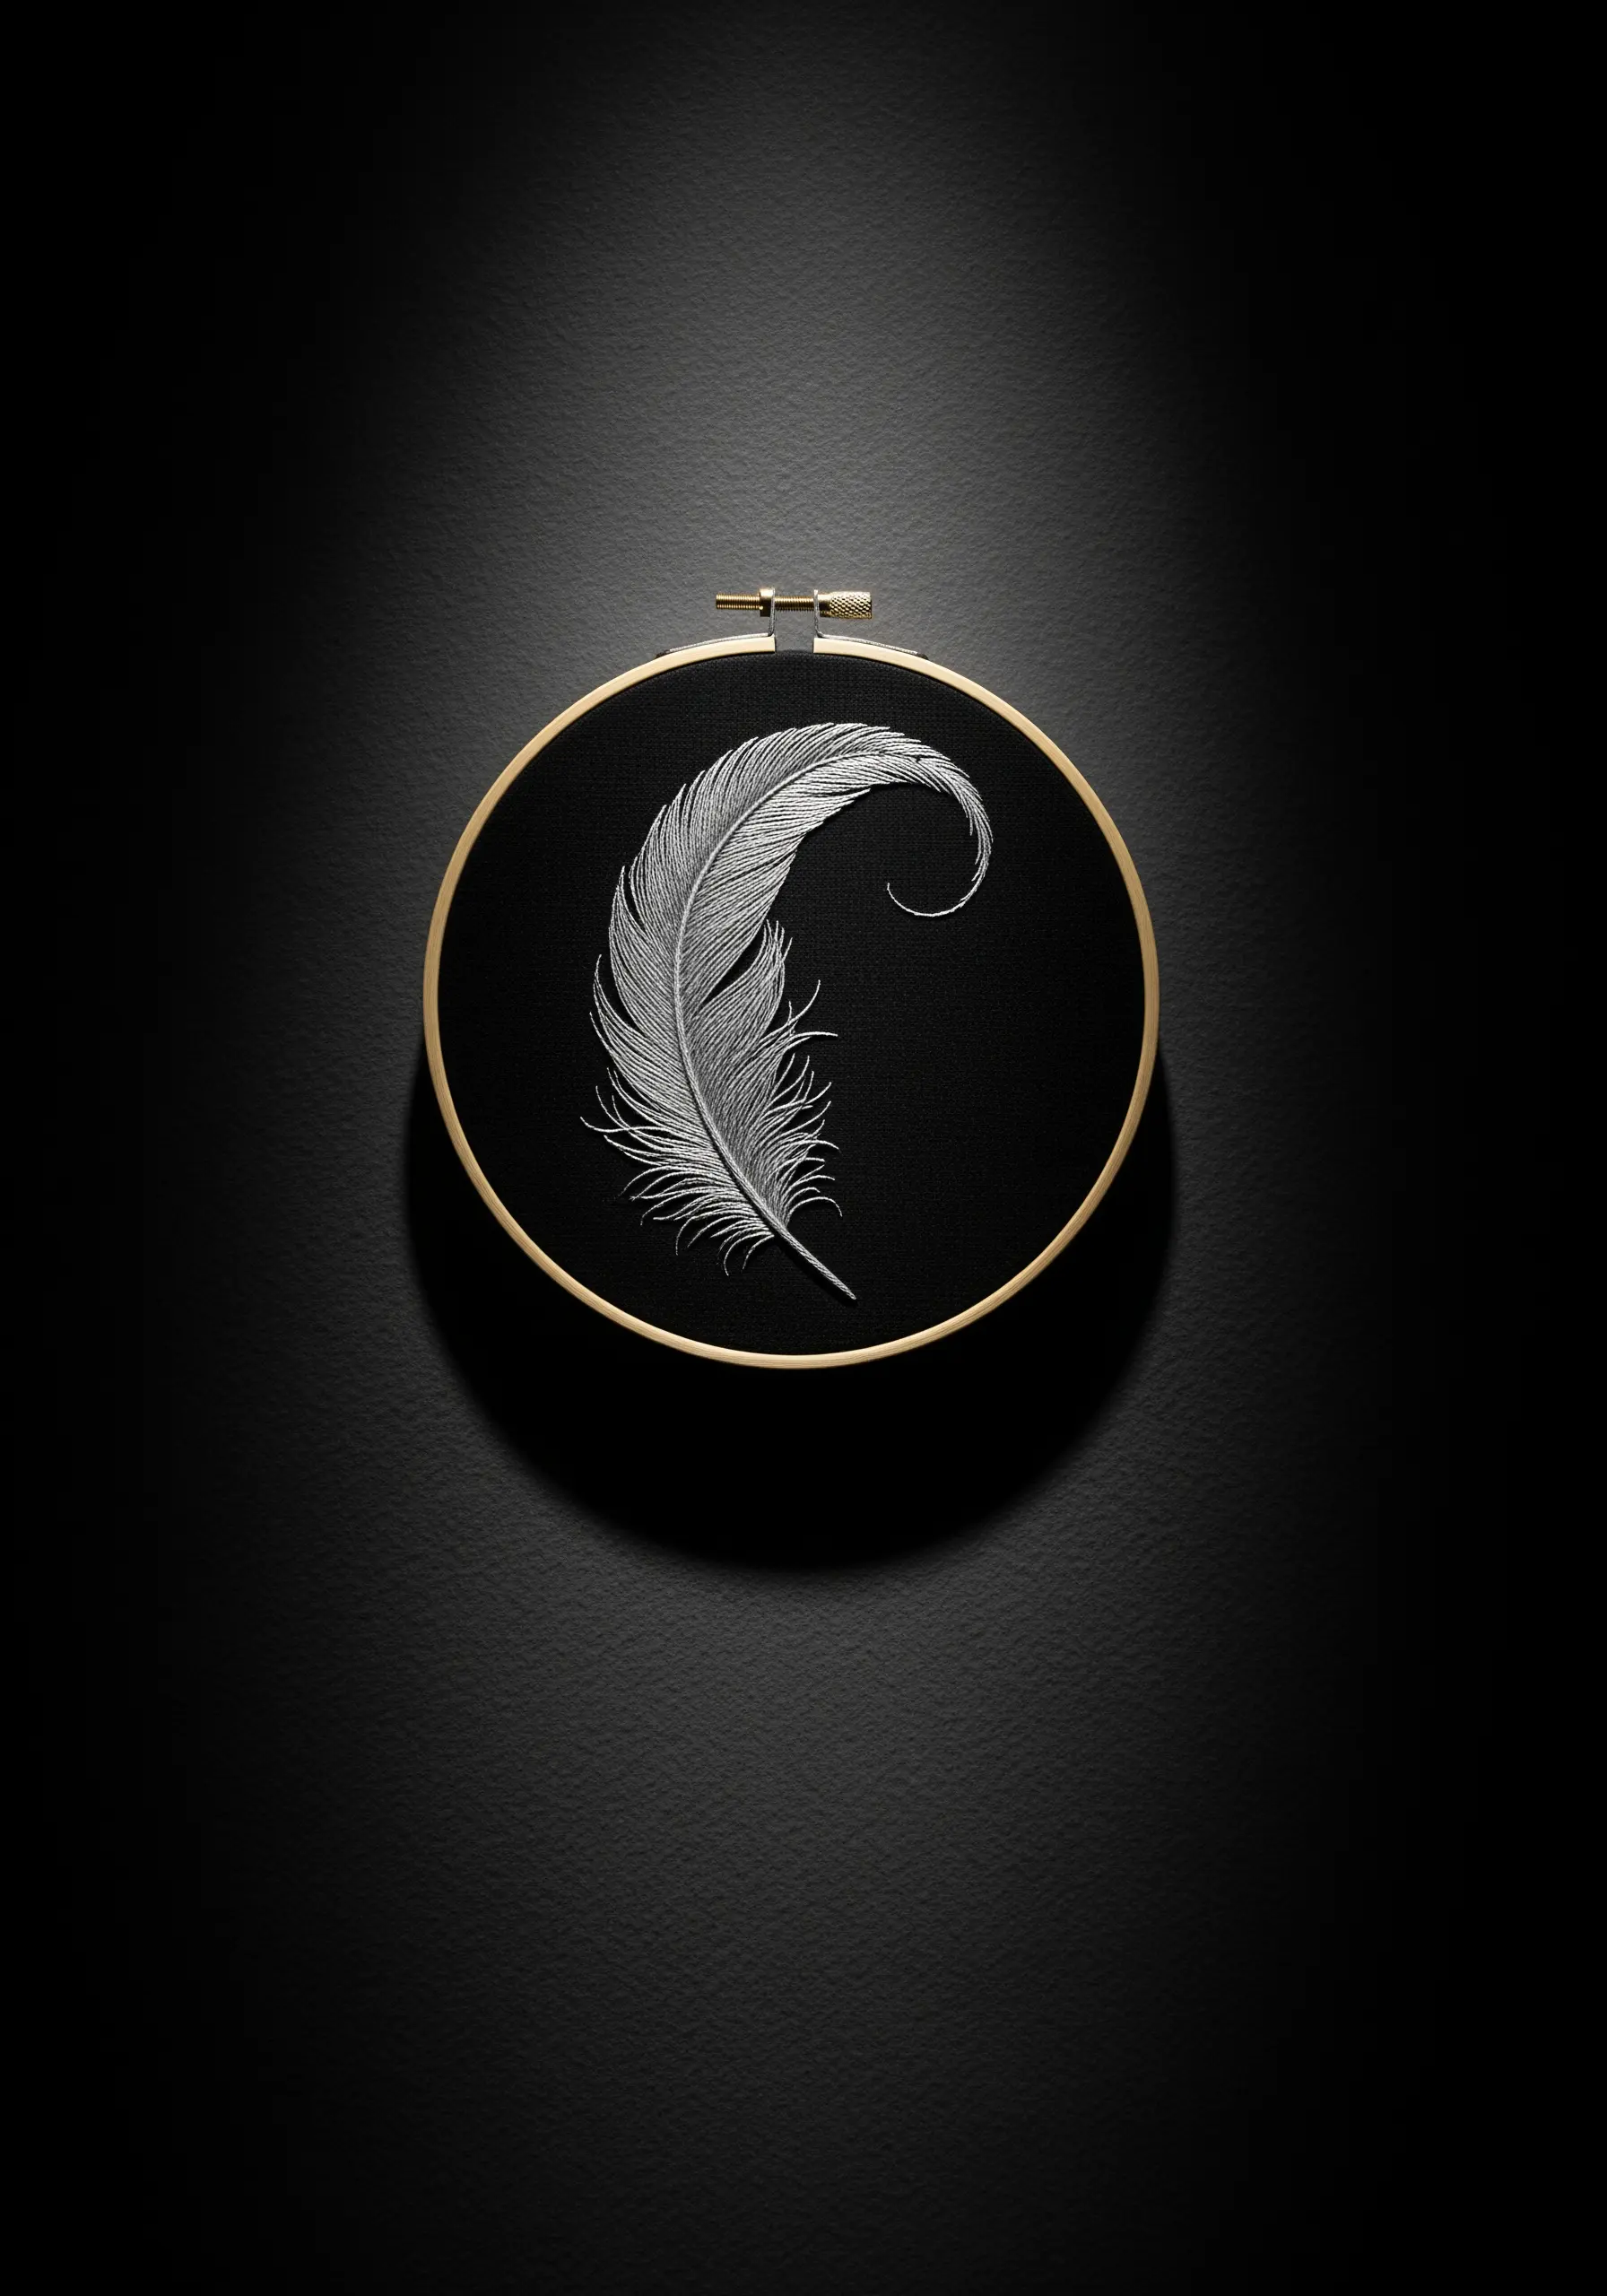
The breathtaking realism of this feather is achieved through meticulous thread painting with a single strand of floss.
Using multiple shades of white, cream, and silver-grey, lay your long-and-short stitches in the natural direction of the feather’s barbs, sweeping out from the central quill.
By subtly blending these tones and allowing for tiny gaps and overlaps, you mimic the way light and shadow play across a real feather.
This is one of the most effective ways to capture nature’s textures in thread.


