
Have you ever found yourself admiring a piece of fiber art, wondering what secret technique gives it that final, polished touch? Often, the answer isn’t a complex new stitch but a thoughtful decision to step outside the bounds of a single material.
The most expressive textile work happens when you allow different fibers to speak to one another. It’s in the contrast between chunky, soft-spun yarn and fine, shimmering silk thread; between the crisp, flat edge of fabric appliqué and the plush, sculptural form of wool roving. This is where your embroidery finds its voice and moves from craft to art.
Think of this collection not just as inspiration, but as a direct invitation to experiment. You don’t need new, expensive tools—just the confidence to mix the materials you already have. By pairing different weights, textures, and forms, you can add incredible depth, emotion, and sophistication to every piece you create.
1. Build Textural Contrast with Varied Yarn Weights
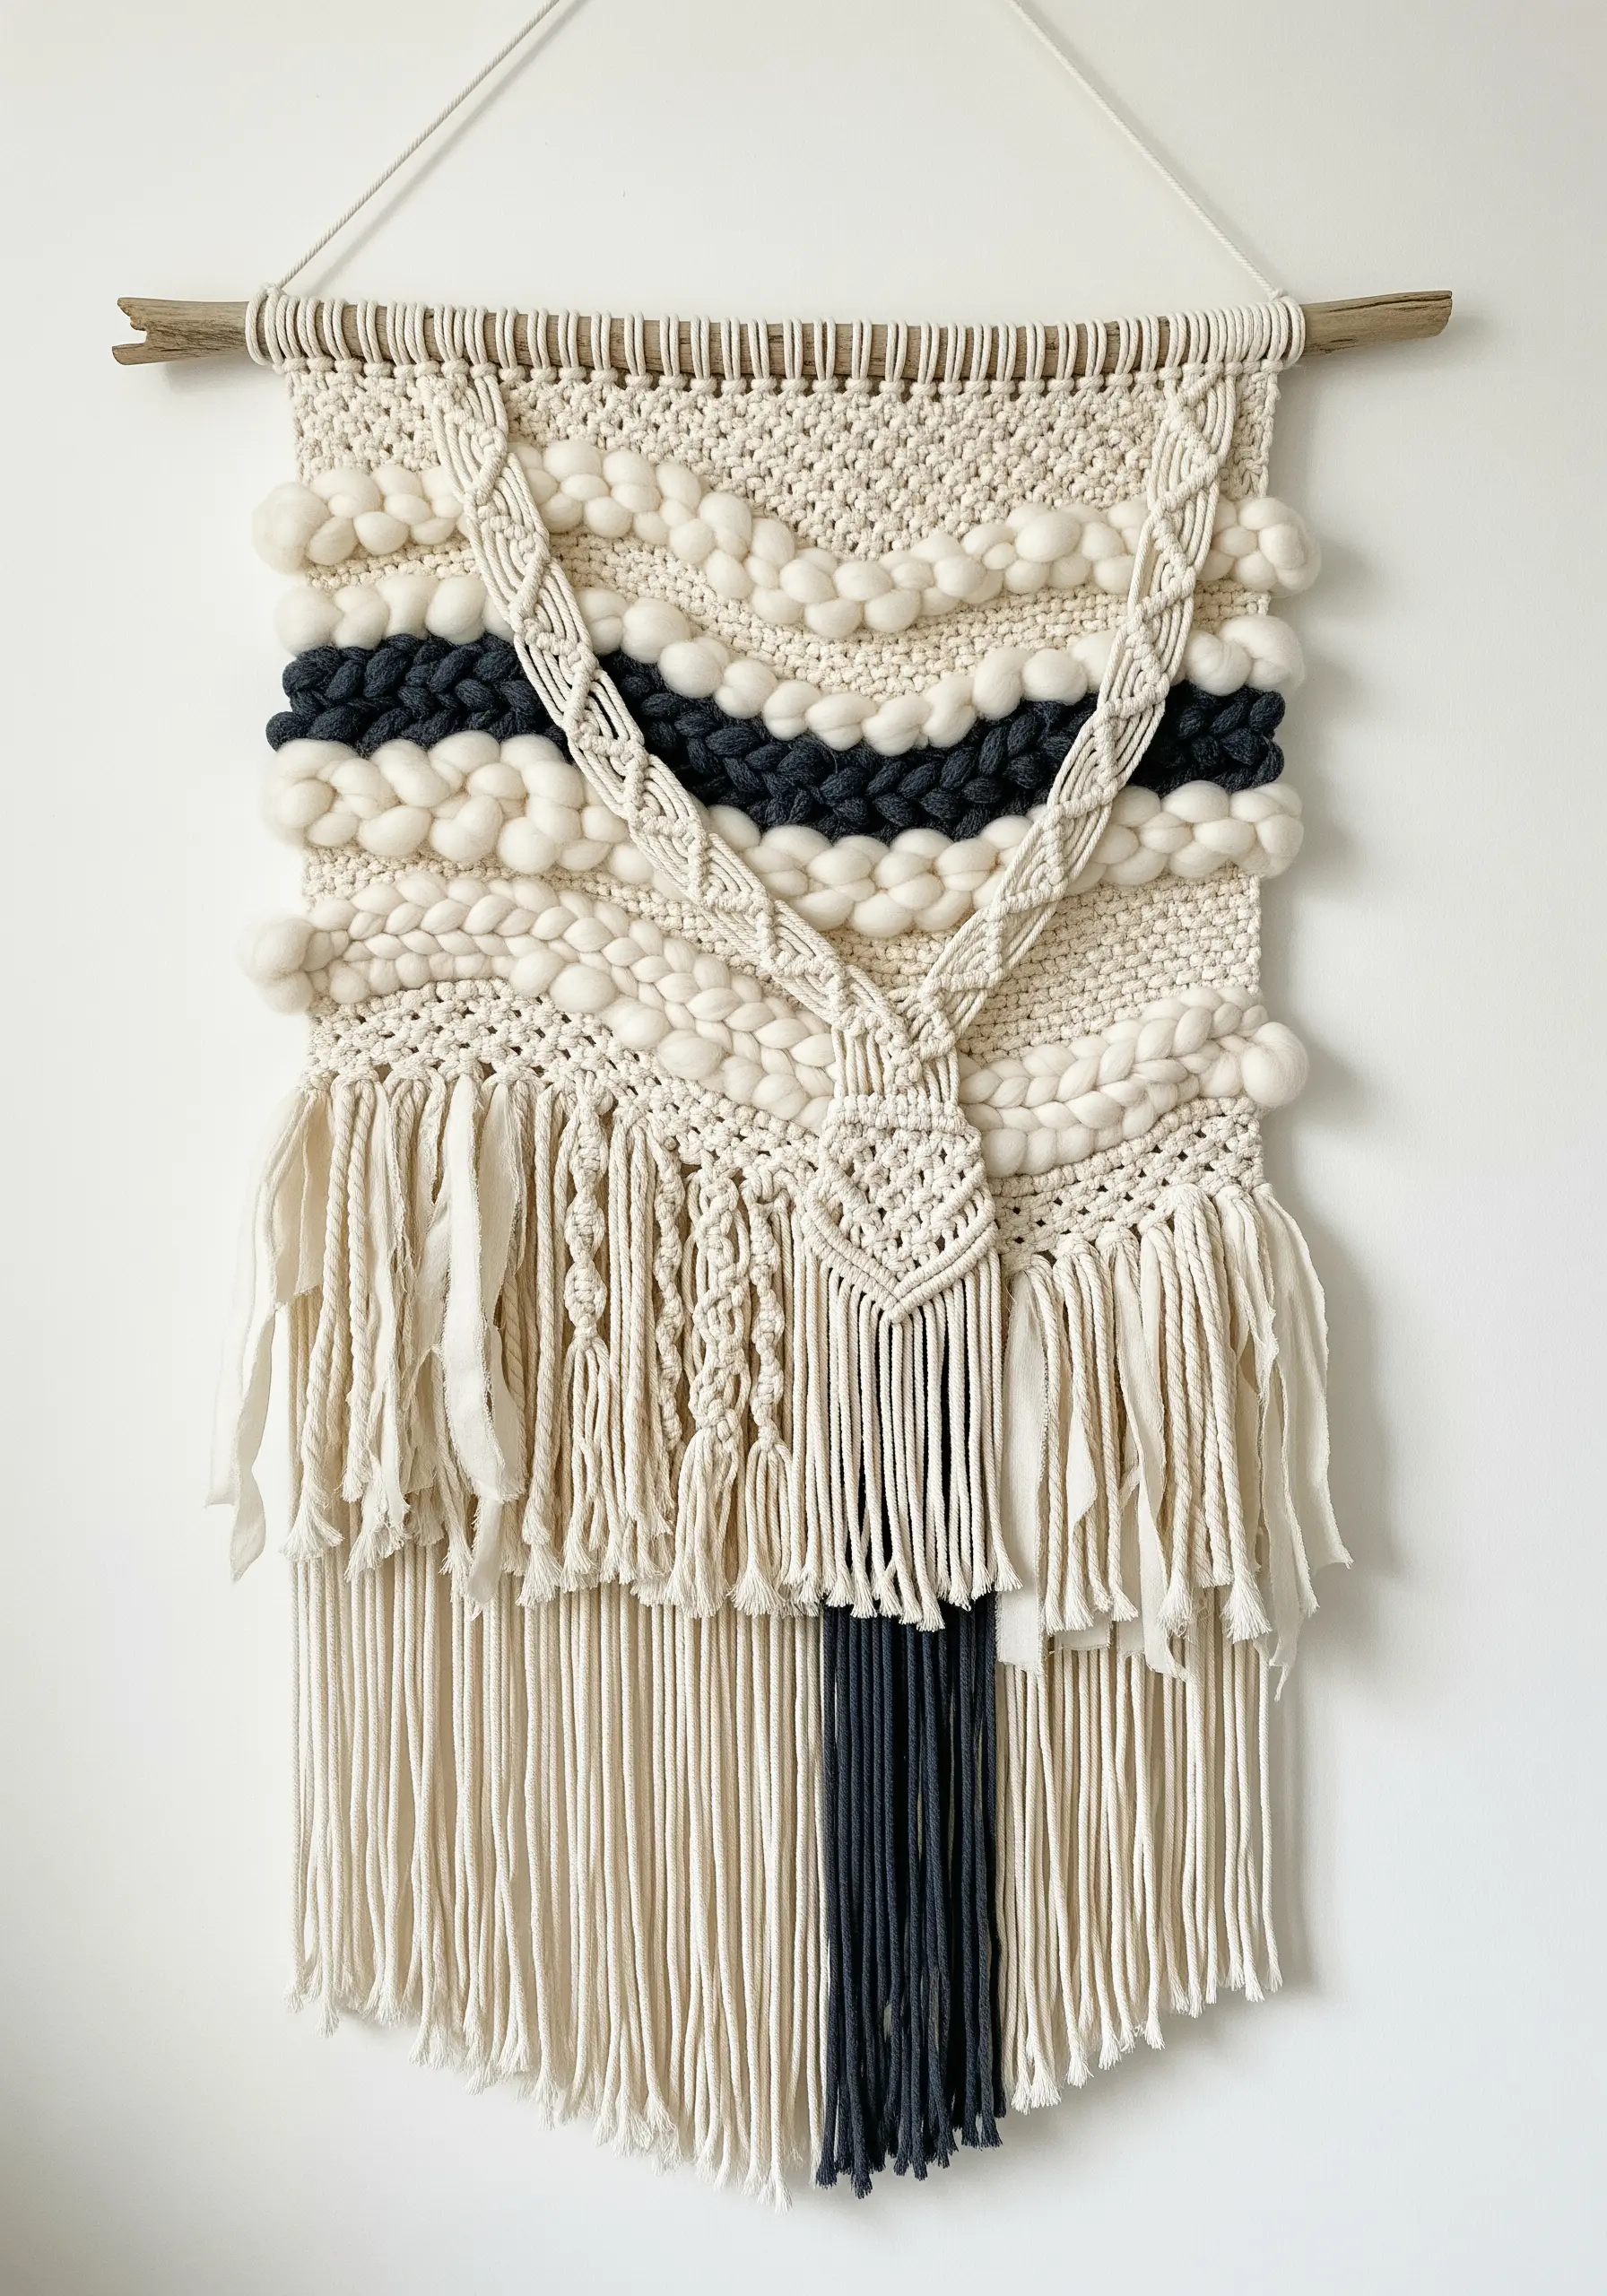
When weaving a wall hanging, the key to a professional finish is textural variety.
Start with a simple plain weave base, then introduce sections of chunky, unspun wool roving to create soft, cloud-like forms.
Contrast these plush areas with a tightly compacted stitch, like the soumak, which creates a raised, braided effect.
Finally, add a focal point using a different discipline entirely, such as a delicate macrame braid.
This dramatic shift in fiber thickness—from bulky roving to fine cord—creates a sophisticated rhythm and depth that draws the eye.
2. Guide the Eye by Couching Sculptural Fibers
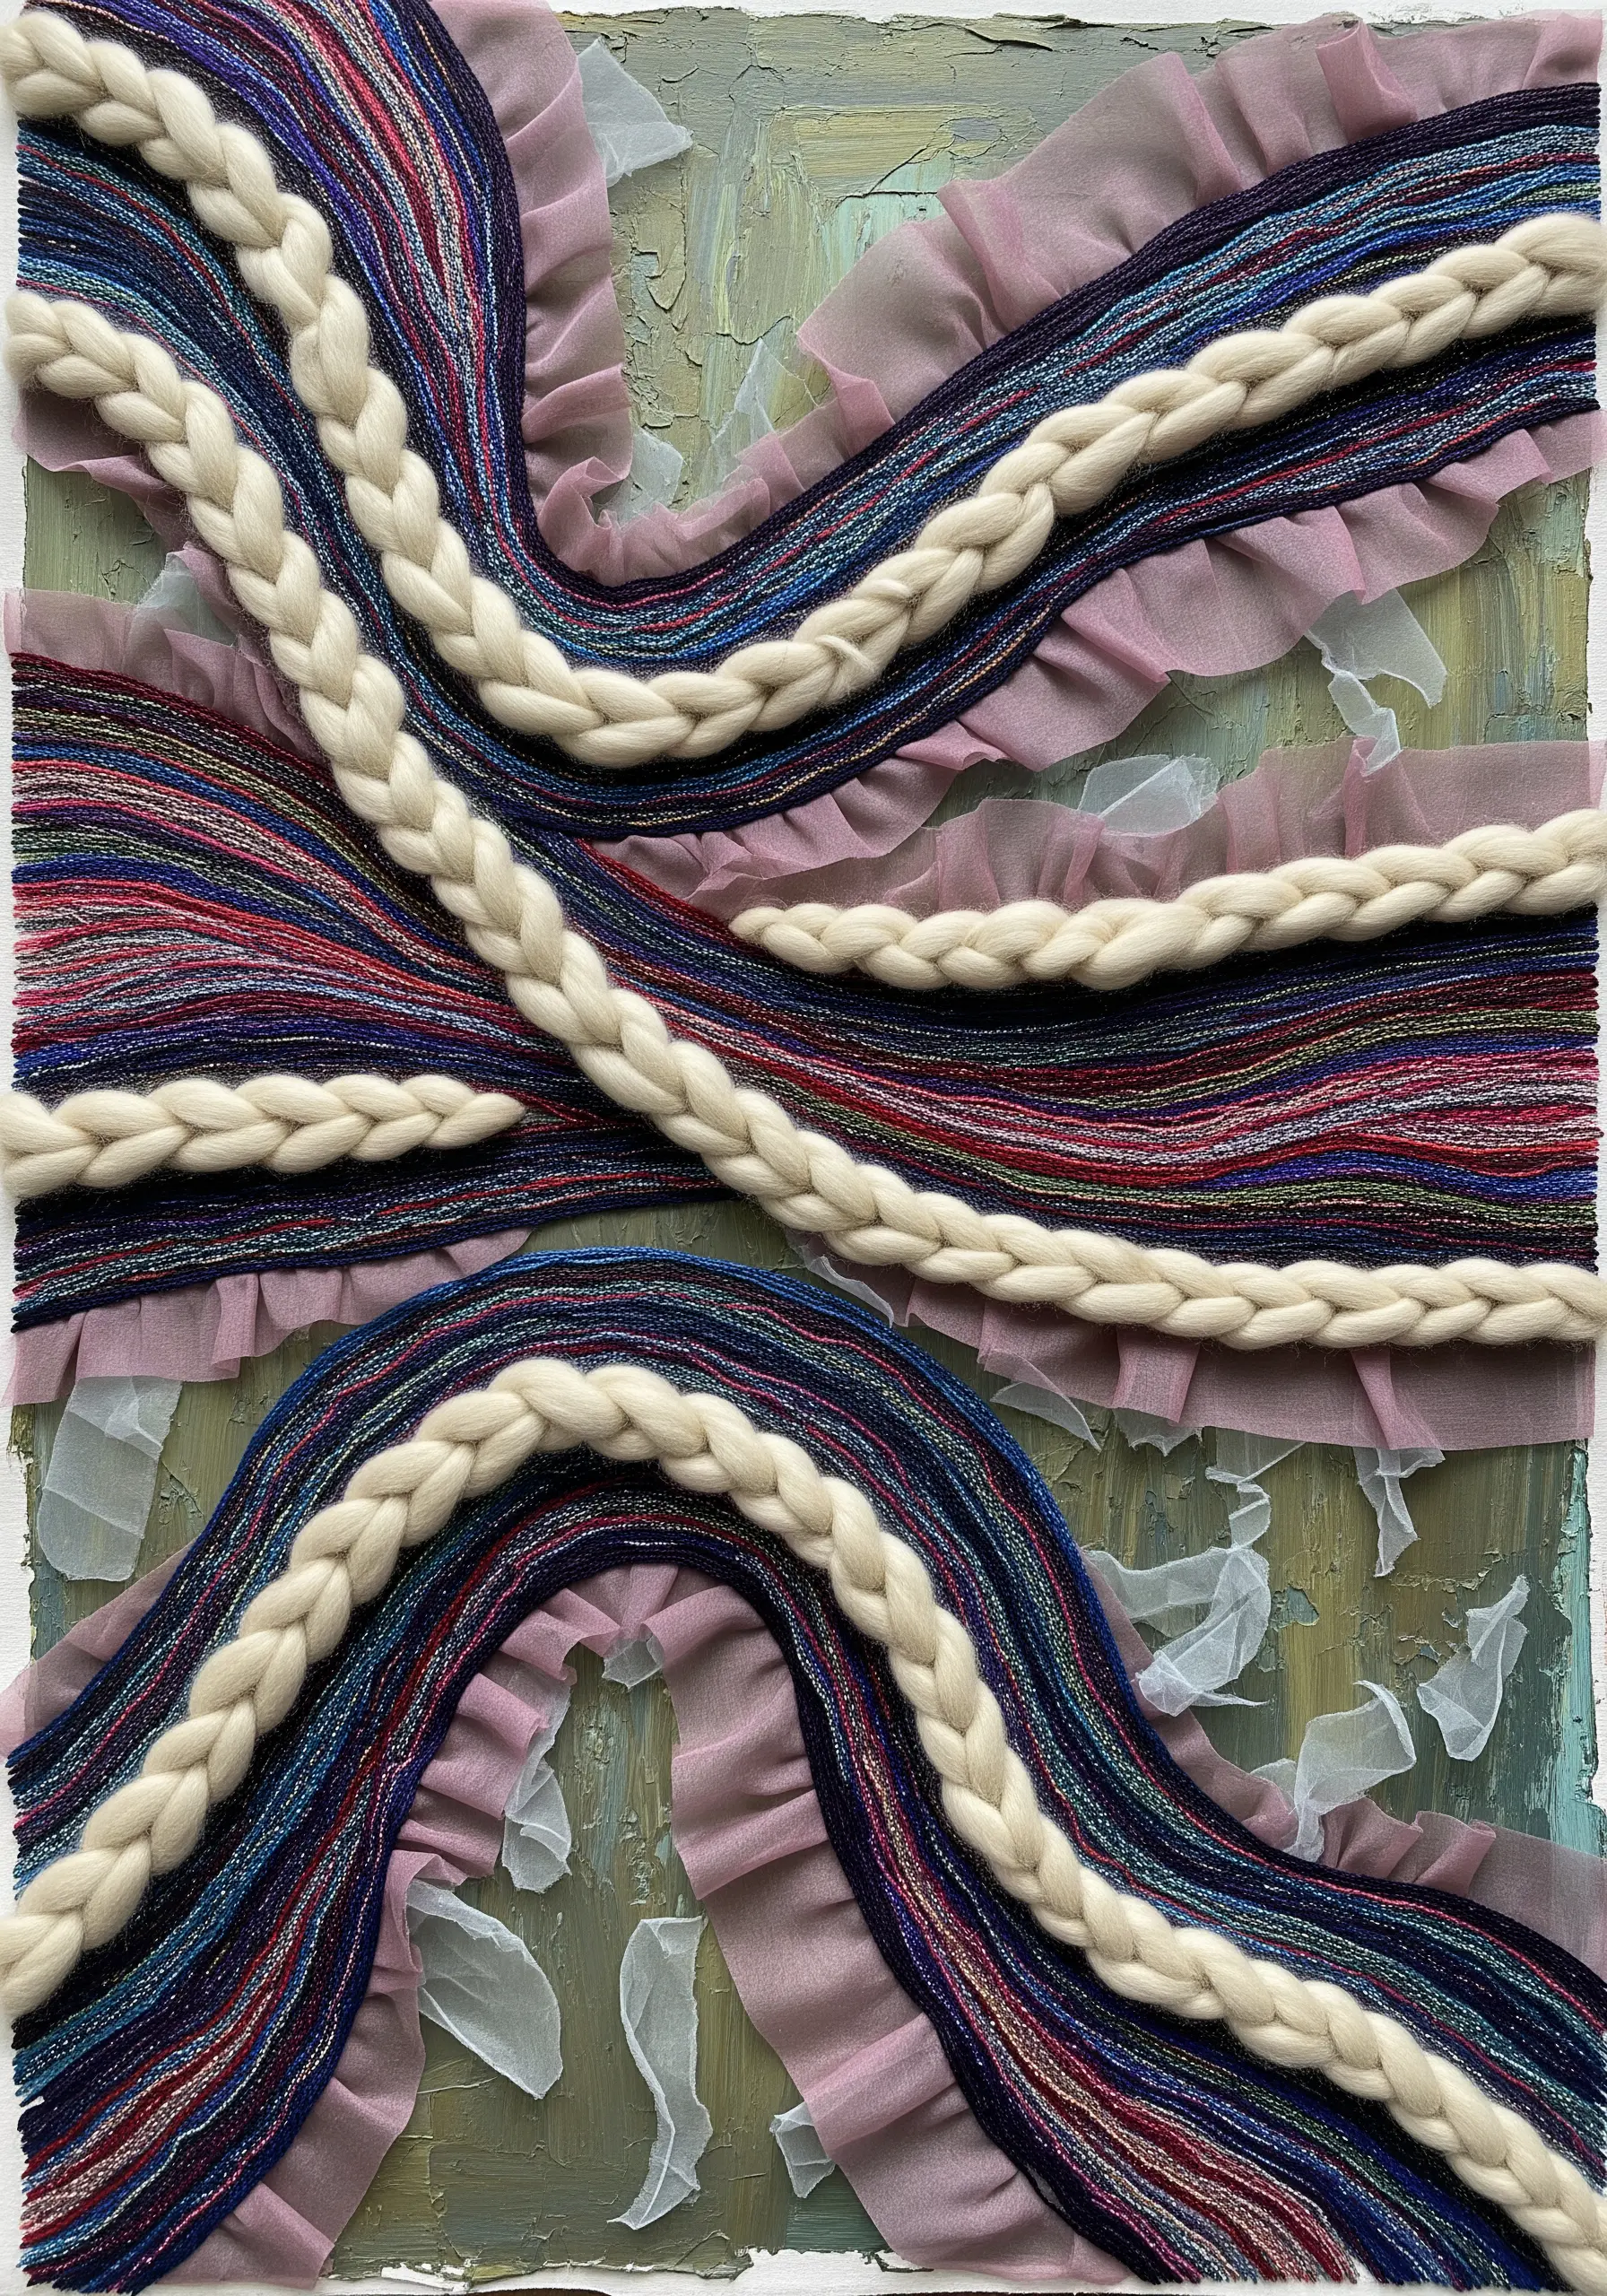
To add bold, dimensional lines to your work without piercing the fiber, use the couching technique.
Create thick, soft braids from wool yarn, then lay them on your fabric surface in a flowing design.
Using a thinner, strong thread, make small, discreet stitches over the braid to tack it securely to the background fabric.
This allows the braid to sit entirely on top of the surface, preserving its loft and creating a sculptural effect.
Juxtapose these heavy lines with a delicate material, like sheer ruffled fabric, to amplify the contrast in weight and texture.
3. Add Narrative with Hand-Stitched Appliqué Patches
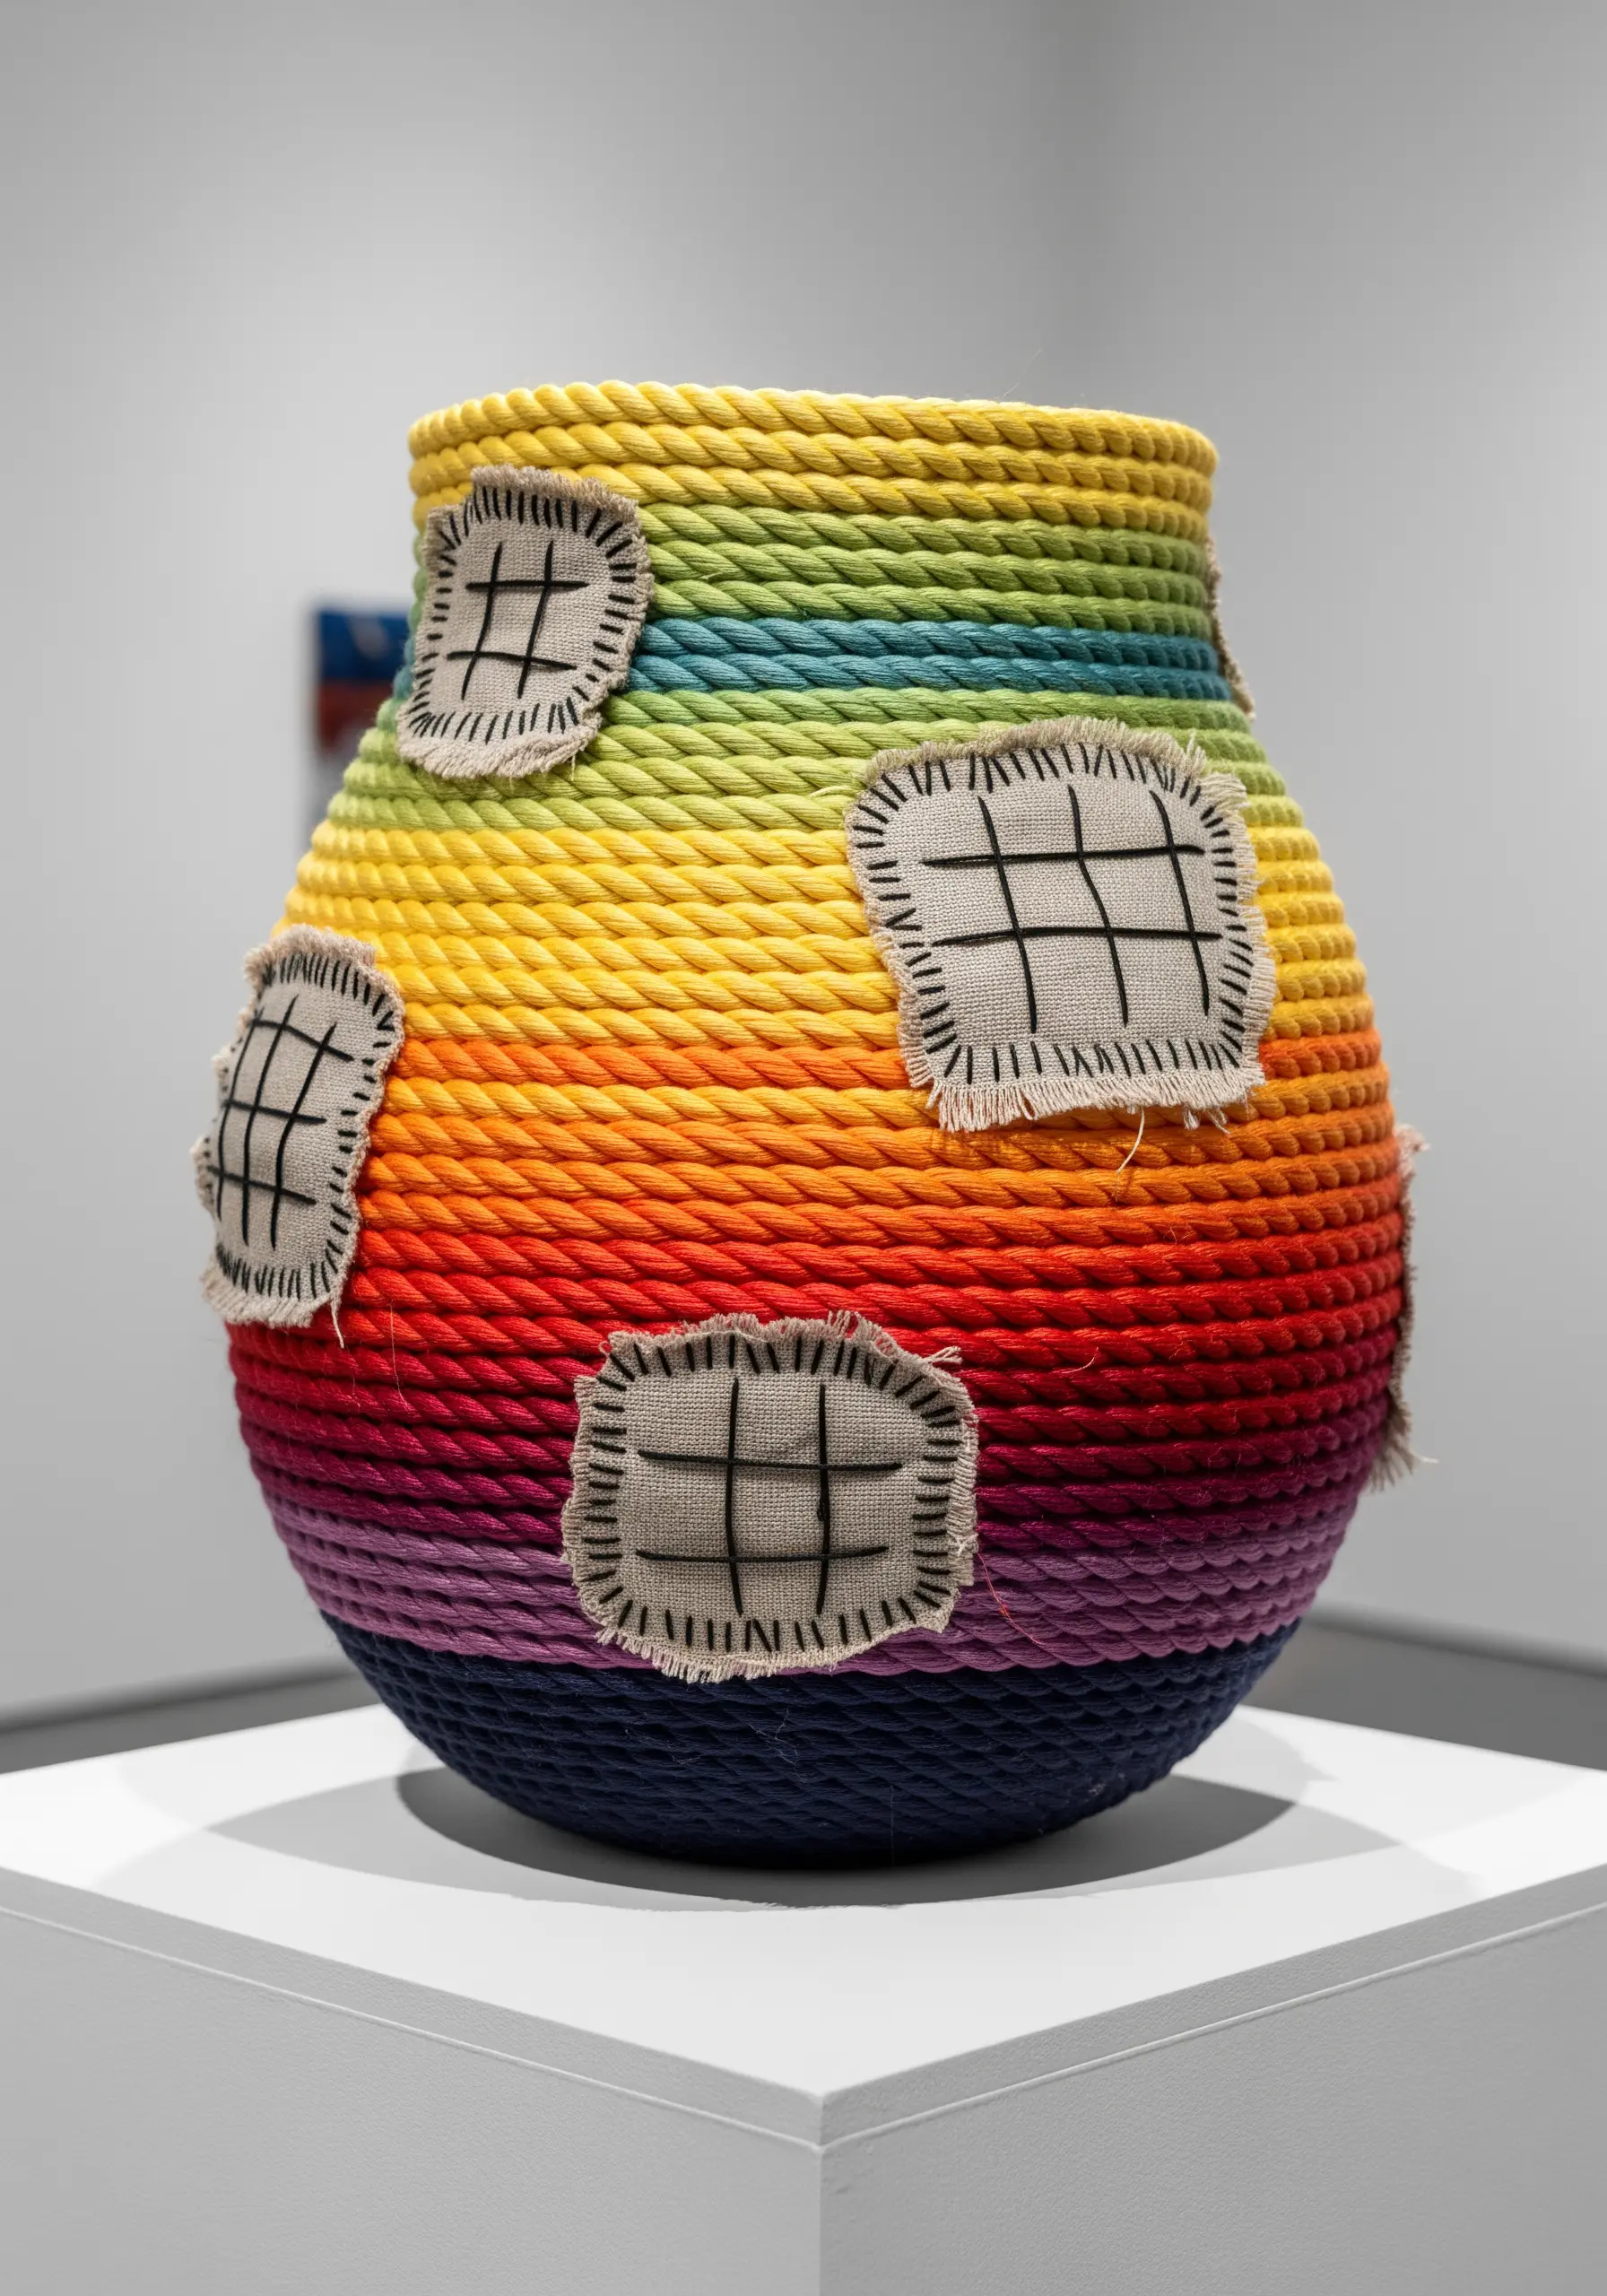
Transform a simple object, like a plain vase or basket, by wrapping it tightly with colorful yarn or rope, securing the coils with craft glue.
This technique creates a uniform, textured canvas for further embellishment.
To add a layer of story and rustic charm, create small appliqué patches from a contrasting material like burlap or linen.
Stitch a simple motif onto each patch *before* you attach it.
Then, use a visible, slightly imperfect running stitch to sew the patches onto the coiled surface, celebrating the piece’s handmade character.
4. Create Dimensional Tree Bark with Couched Yarn
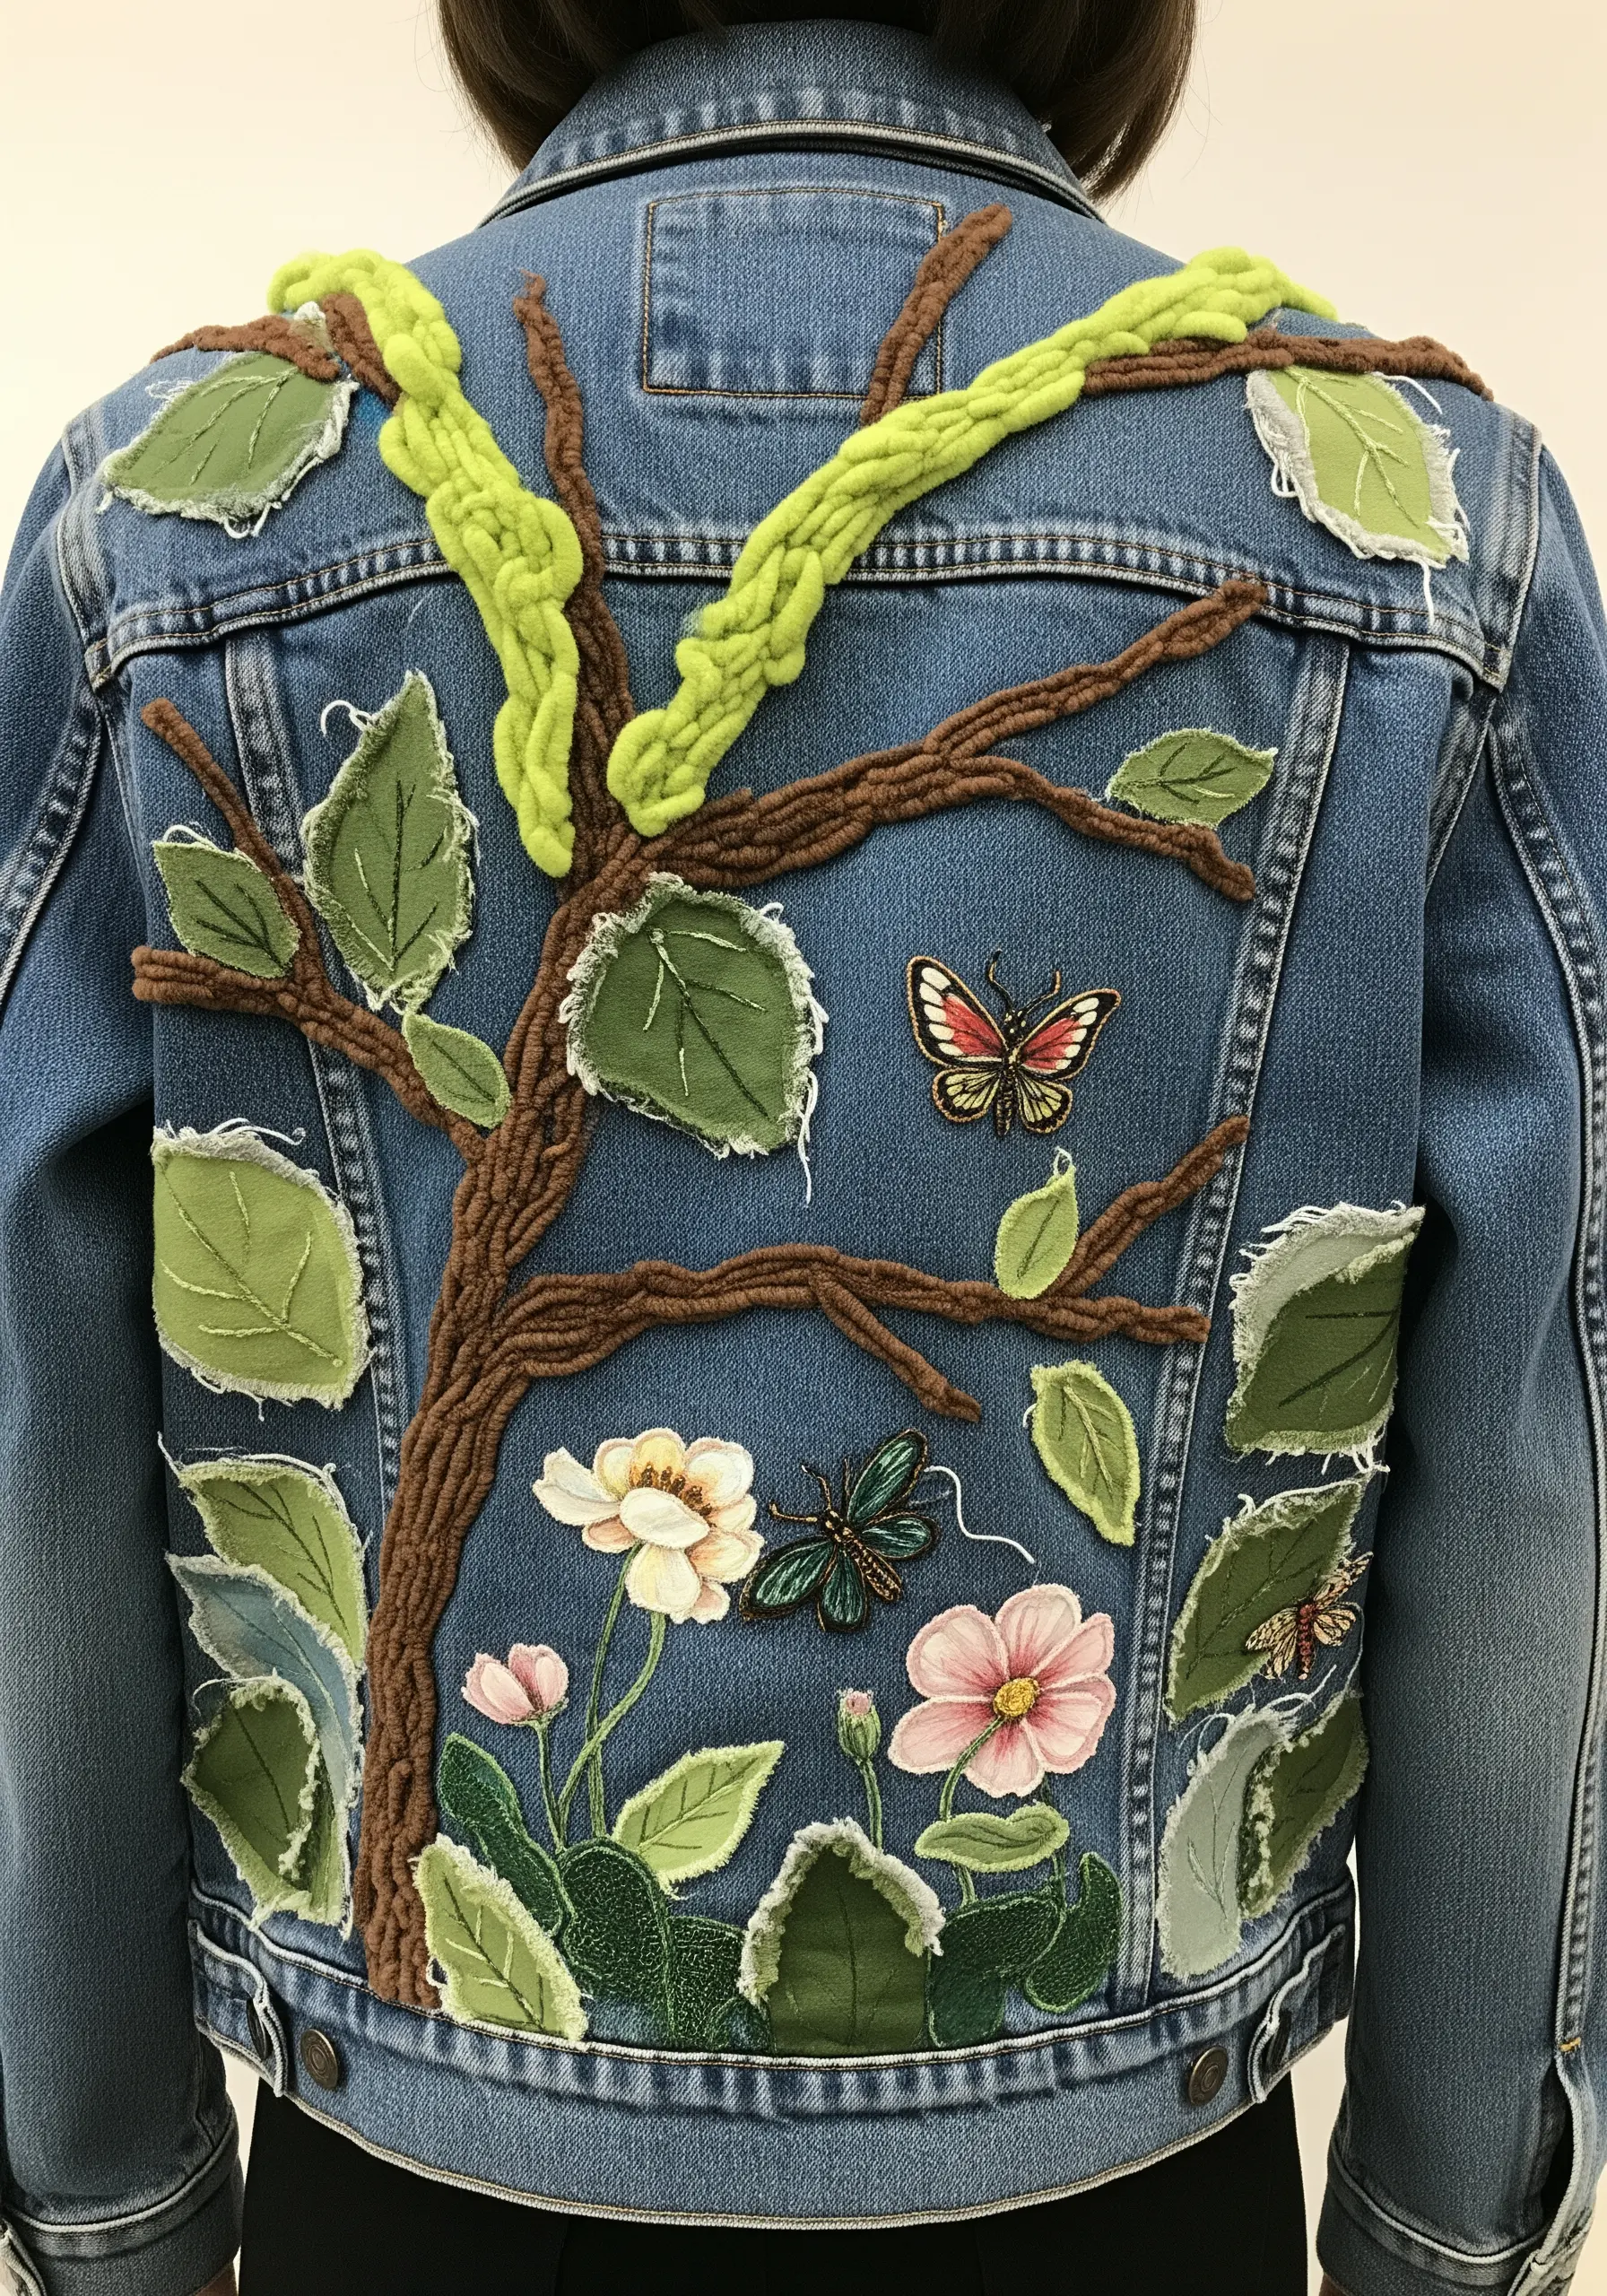
Instead of the painstaking work of filling thick tree branches with satin stitch, achieve a more realistic and faster result with couched yarn.
Choose a bulky, textured yarn—like wool or chenille—and lay it along your design lines on the denim.
Using a matching color of standard embroidery floss, tack the yarn down with small, evenly spaced stitches that sink into the yarn’s texture.
For the leaves, use frayed-edge fabric appliqué secured with a single stitch down the middle, creating a natural feel that contrasts beautifully with the solid, sculptural branches.
5. Evoke Natural Textures with Torn Fabric Edges
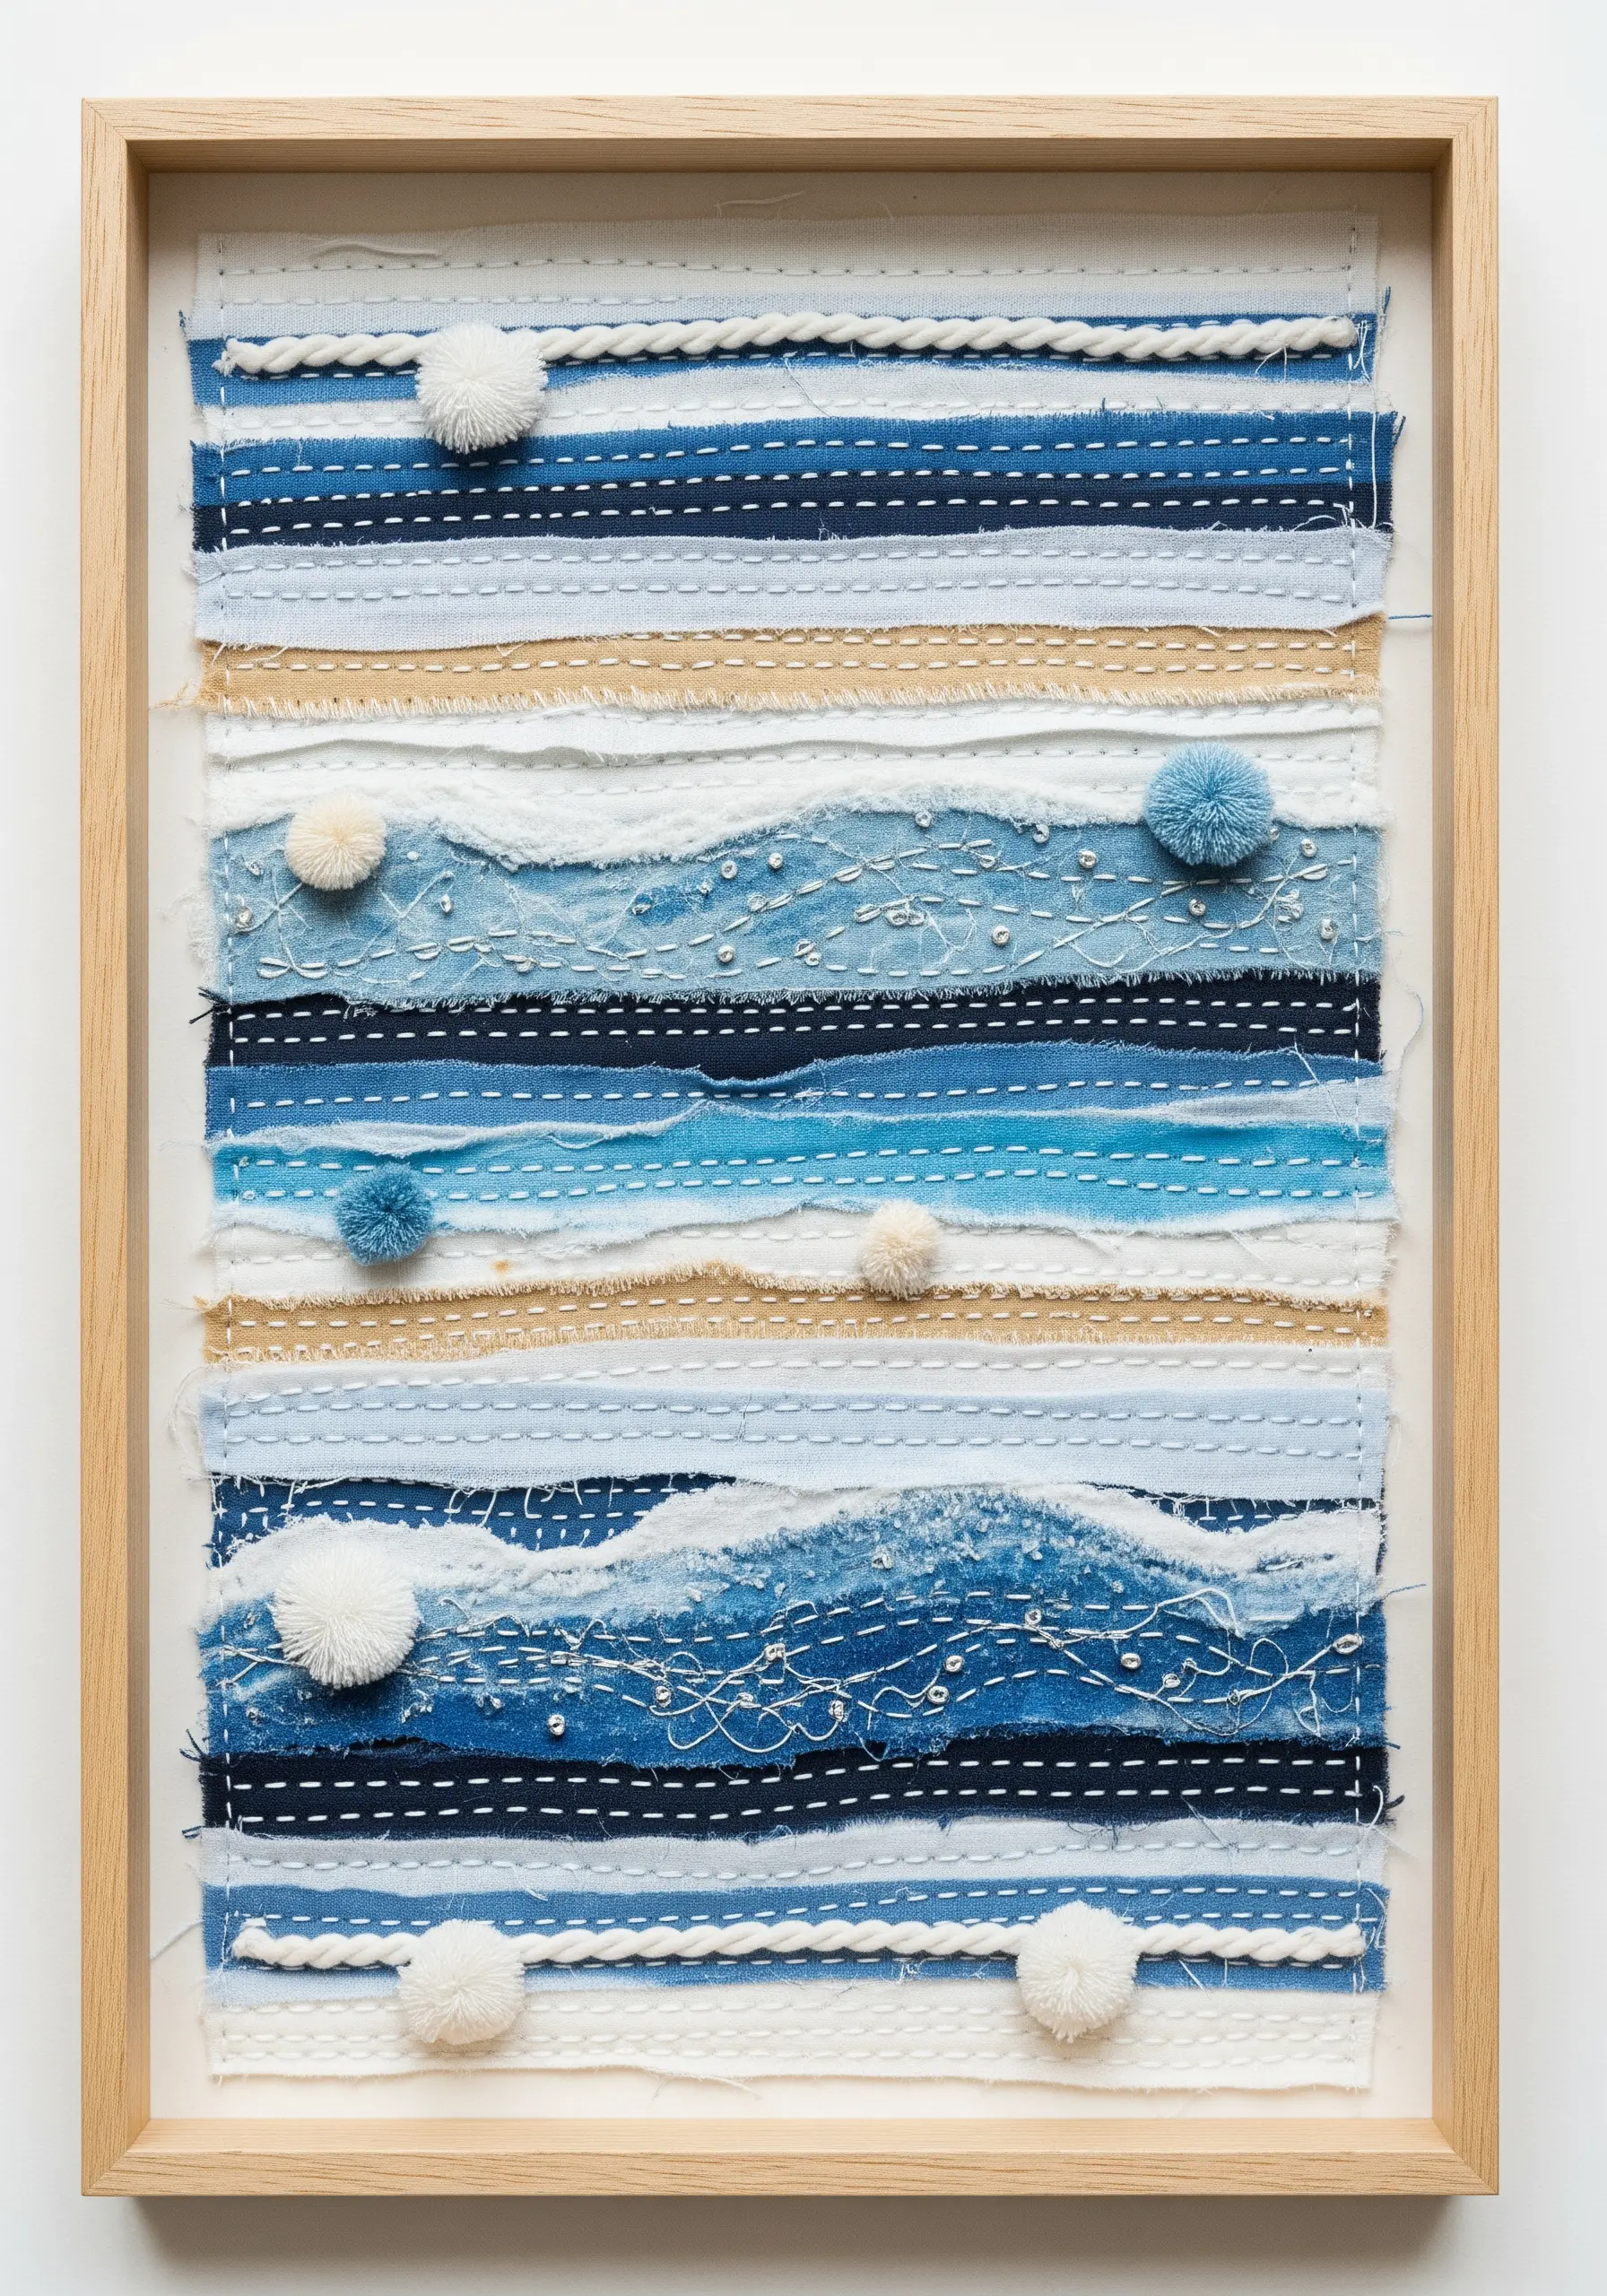
To create an abstract piece that feels organic and full of movement, work with torn strips of fabric instead of neatly cut pieces.
Layer different fabrics like denim, cotton, and linen, allowing the frayed, uneven edges to become a key design element.
These torn edges naturally suggest the texture of sea foam, clouds, or weathered terrain.
Secure the layers with simple, visible running stitches, and add small textural accents like yarn pom-poms or beads to act as grounding focal points within the composition.
6. Build Depth by Merging Weaving and Fabric Collage
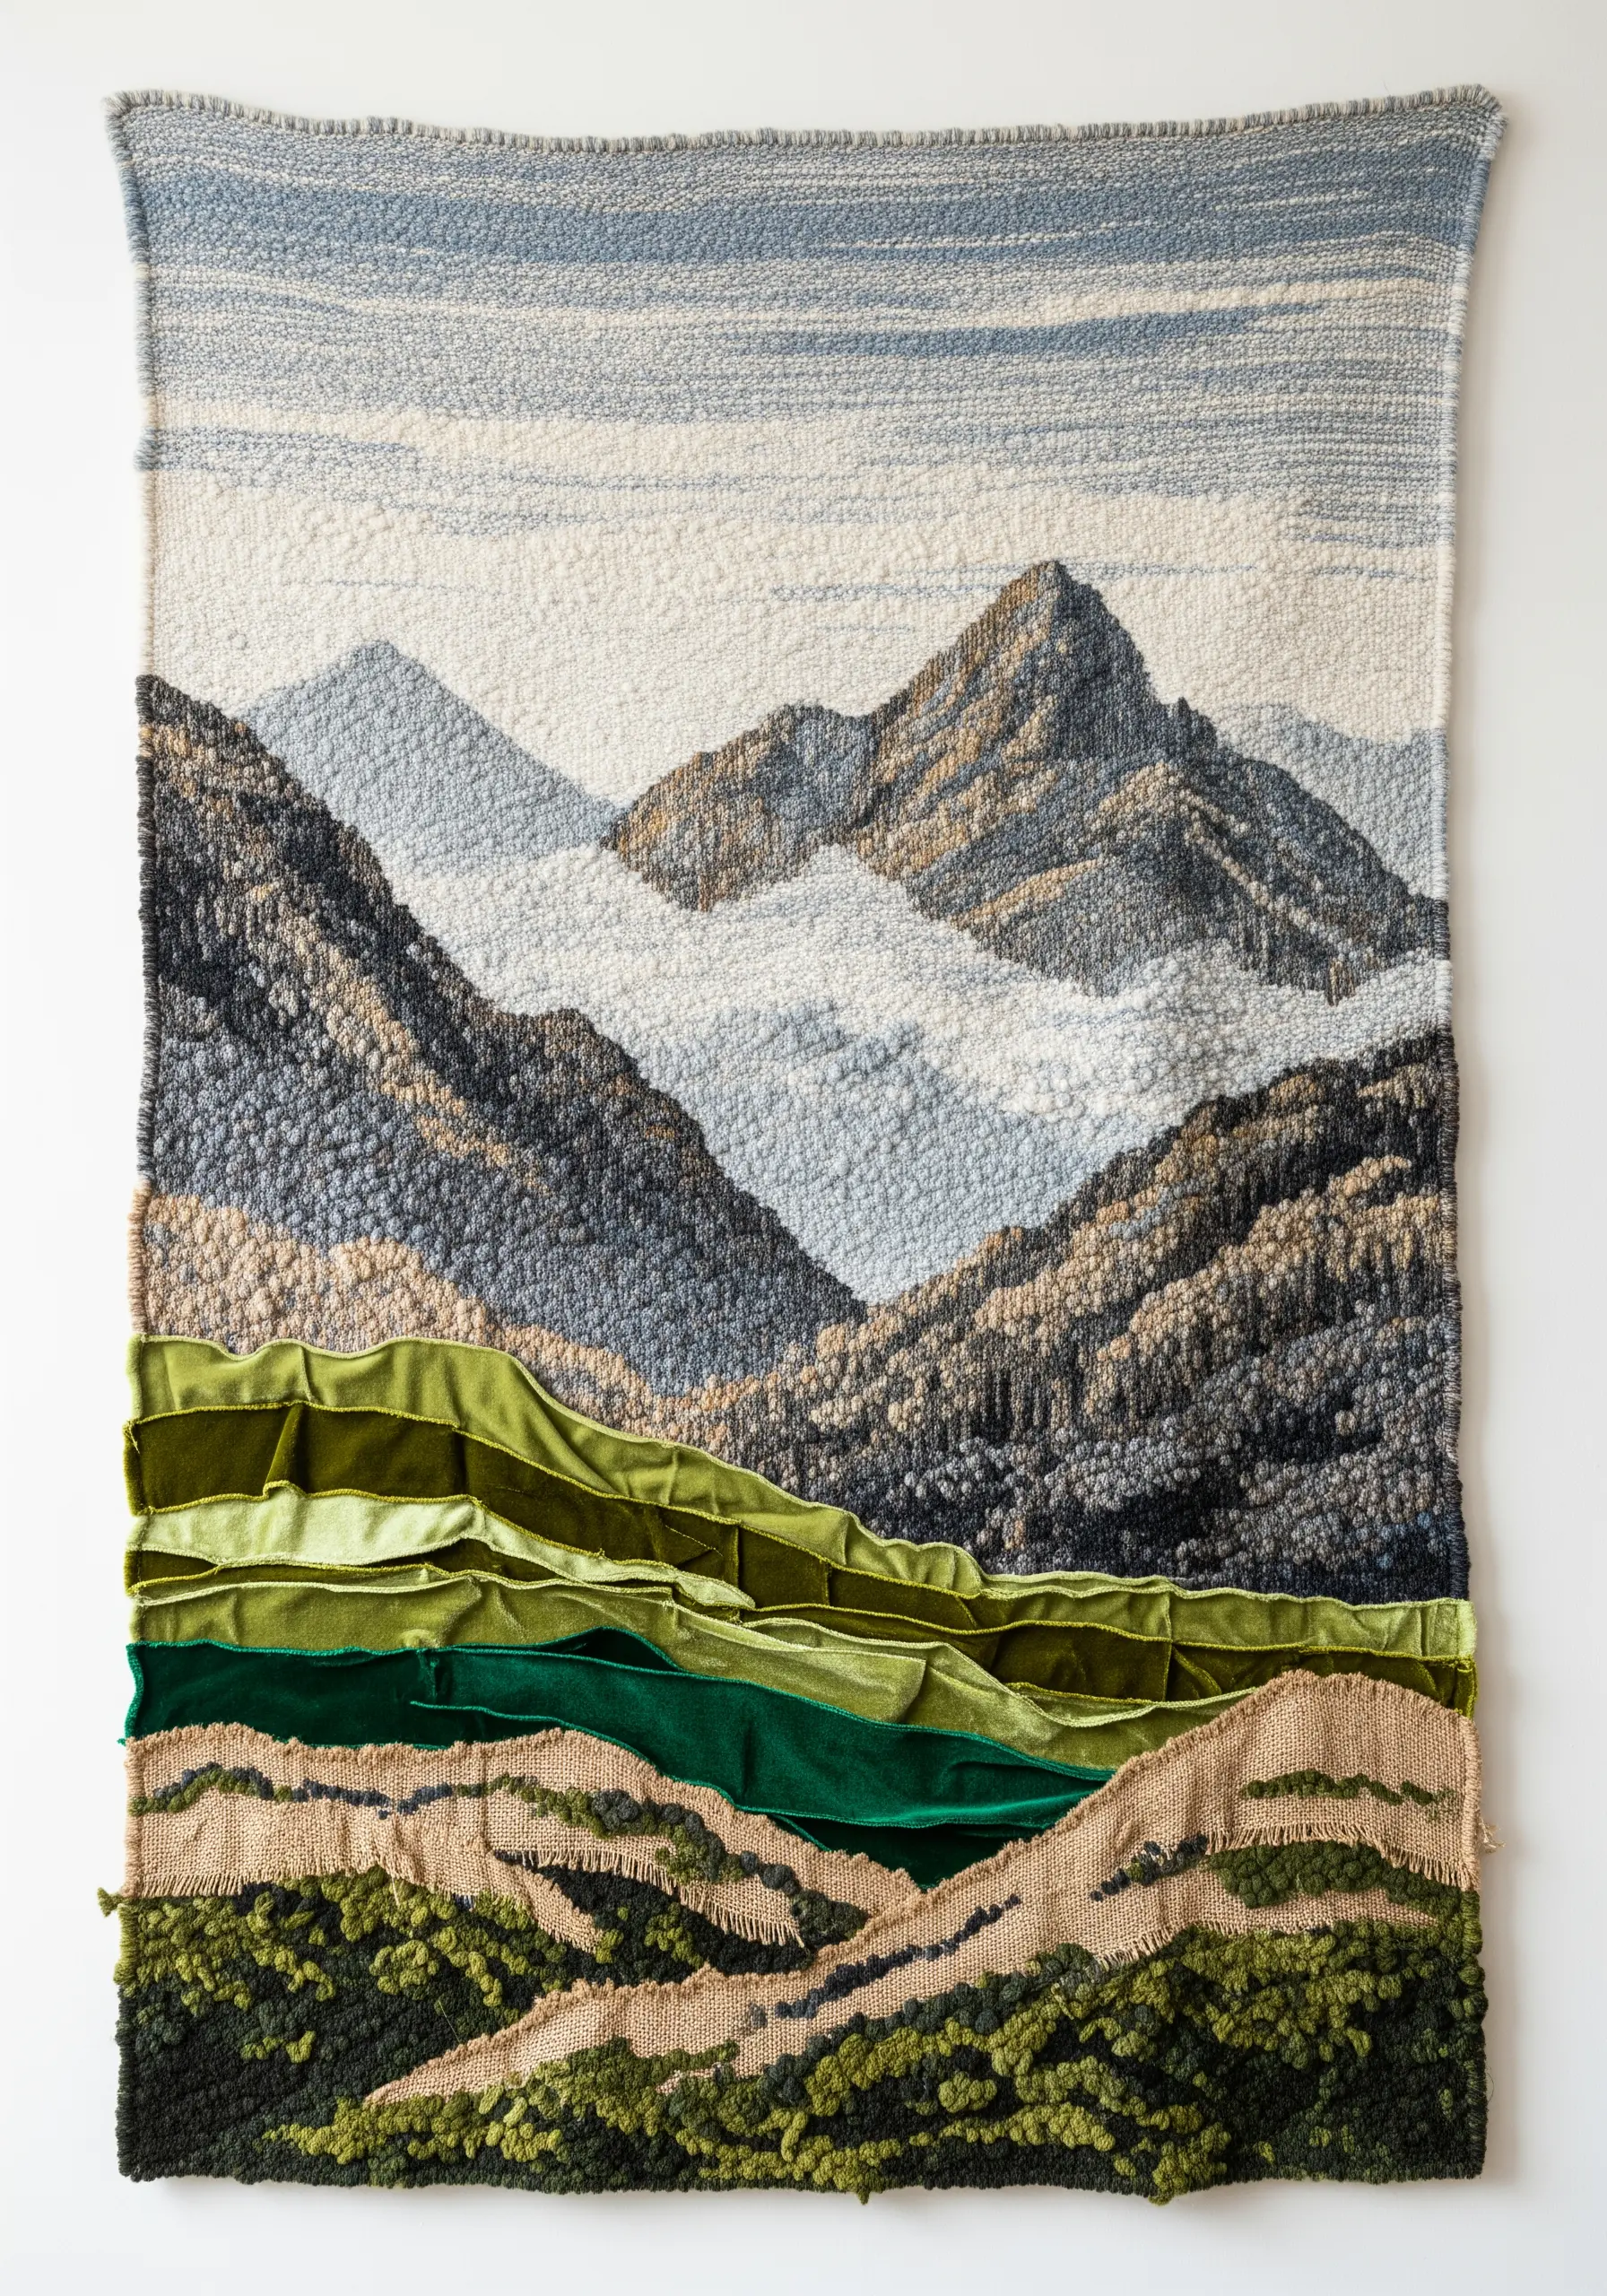
Create a powerful sense of perspective in a landscape tapestry by combining two different techniques for the background and foreground.
Use traditional weaving for the distant elements, like the sky and mountains, using subtle color blending and textured stitches like French knots to suggest detail from afar.
For the foreground, switch to dimensional fabric collage techniques.
Layer, fold, and gather fabrics like velvet and burlap, stitching them onto the woven base to create high-relief textures that physically advance toward the viewer.
This shift in materiality immediately establishes a clear and dynamic sense of depth.
7. Balance 3D Forms with Flat Embroidered Elements
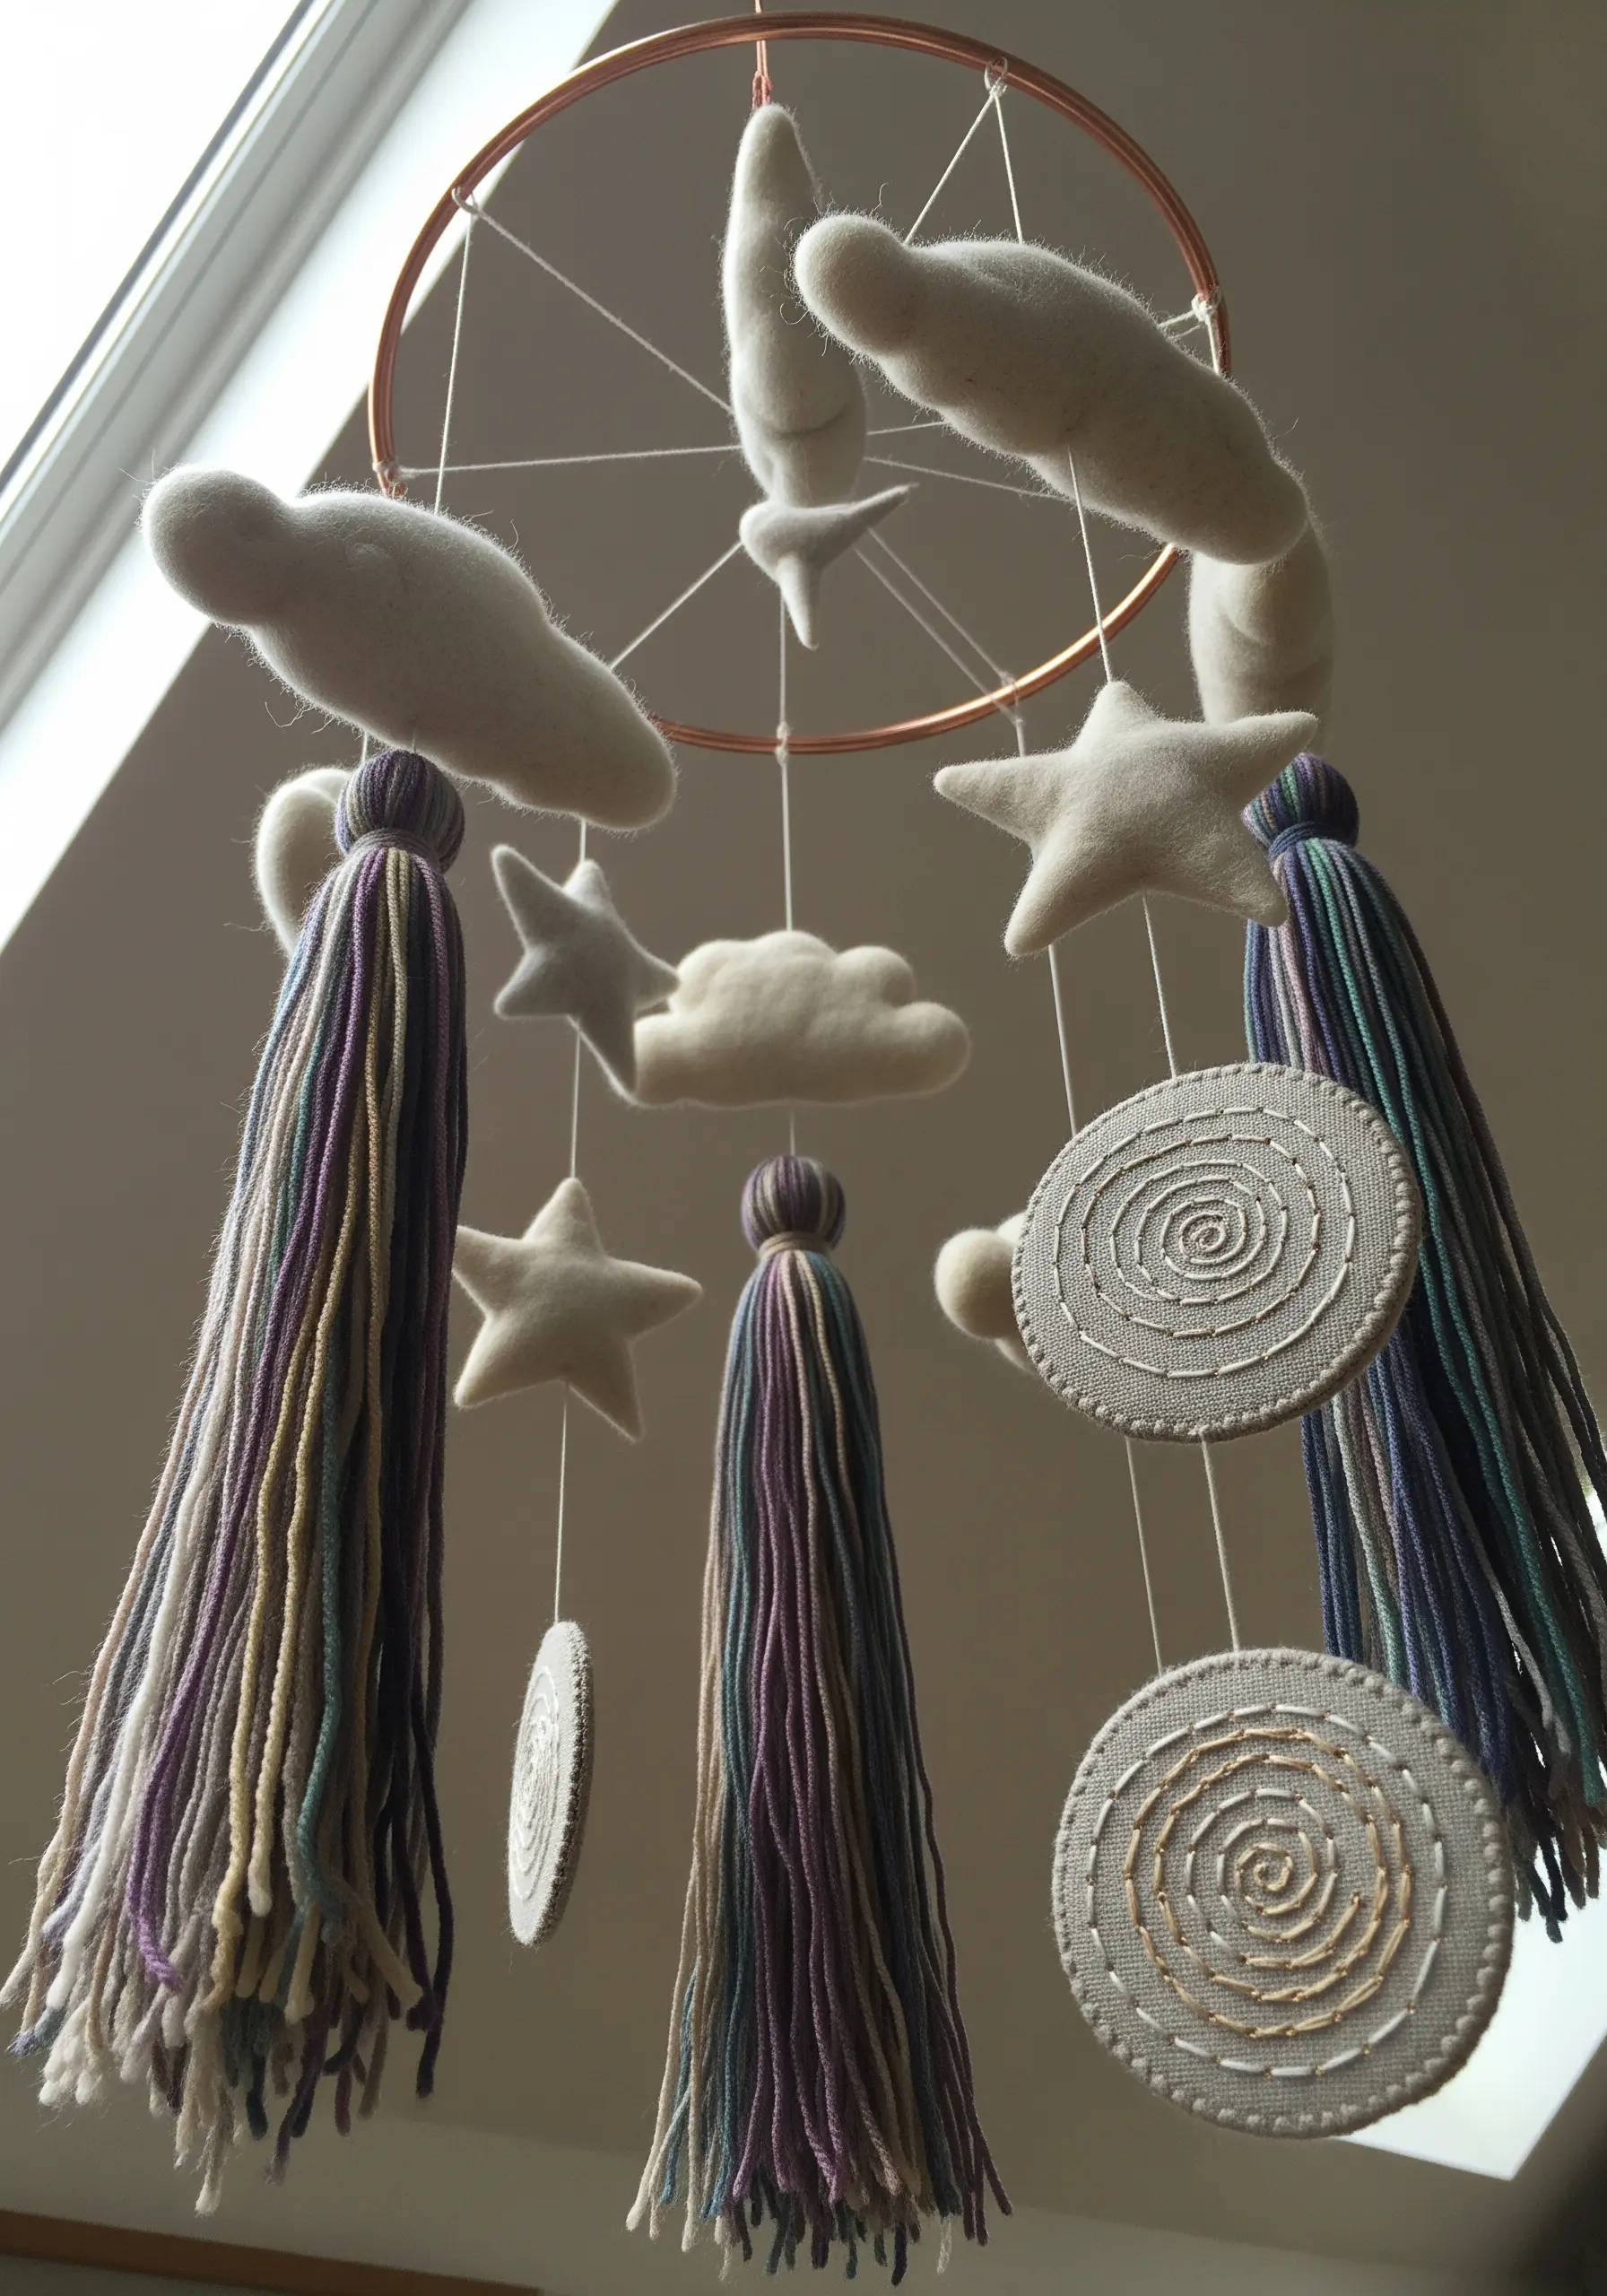
When designing a hanging mobile, create visual interest and balance by mixing dimensional forms with flat, detailed surfaces.
Craft soft, sculptural shapes like clouds and stars using needle-felted wool, which provides volume without much weight.
Contrast these 3D objects with flat, circular medallions.
Create these by stretching fabric over a small disc (cardboard works well) and embellishing it with clean, graphic embroidery, like a simple backstitched spiral.
The interplay between the soft, diffuse shapes and the crisp, linear stitching makes the entire piece more engaging.
8. Integrate Punch Needle Panels for High-Loft Texture
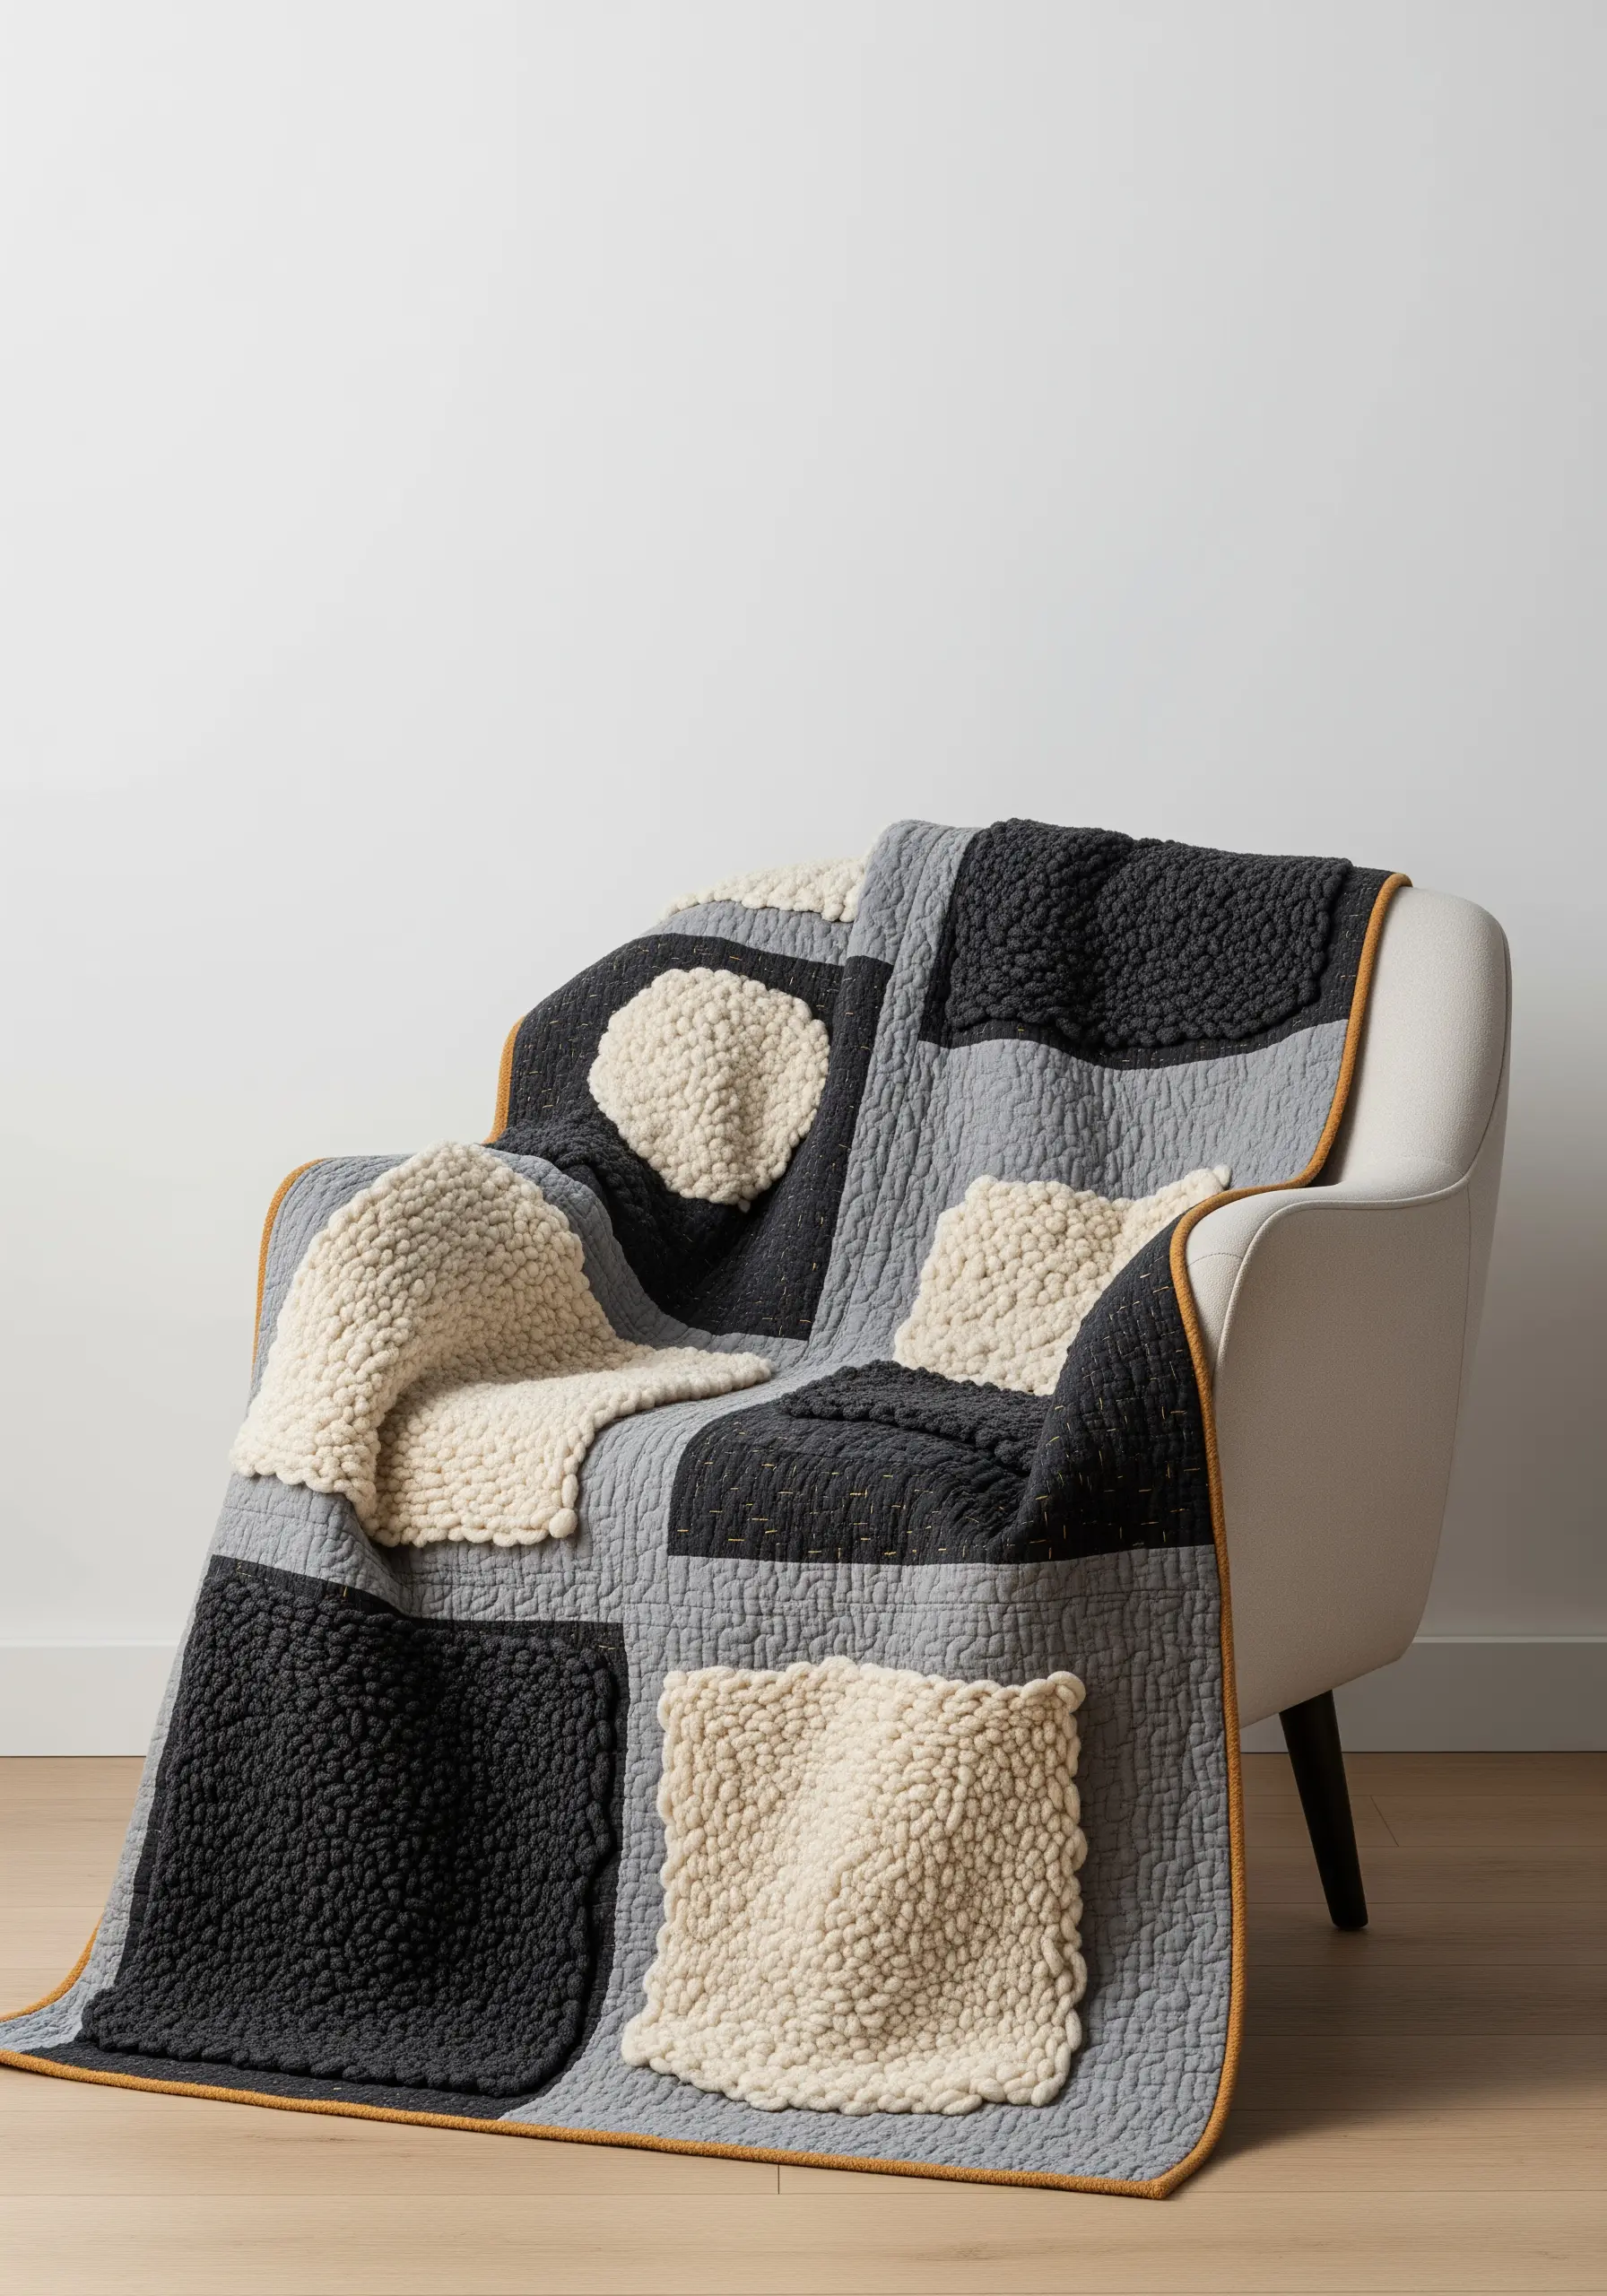
Introduce a dramatic and inviting texture to a traditional quilt by replacing some of the standard fabric squares with punch needle panels.
Using a punch needle and chunky wool yarn on monk’s cloth, create high-pile, plush blocks that stand in relief against the flat surface of the quilt.
This technique adds not only visual dimension but also a wonderful tactile quality.
To ensure the texture is the main focus, keep the surrounding patchwork simple, using solid colors that complement the yarn.
The result is a sophisticated, modern take on a classic craft.
9. Create Realistic Leaf Veins with Directional Thread Painting
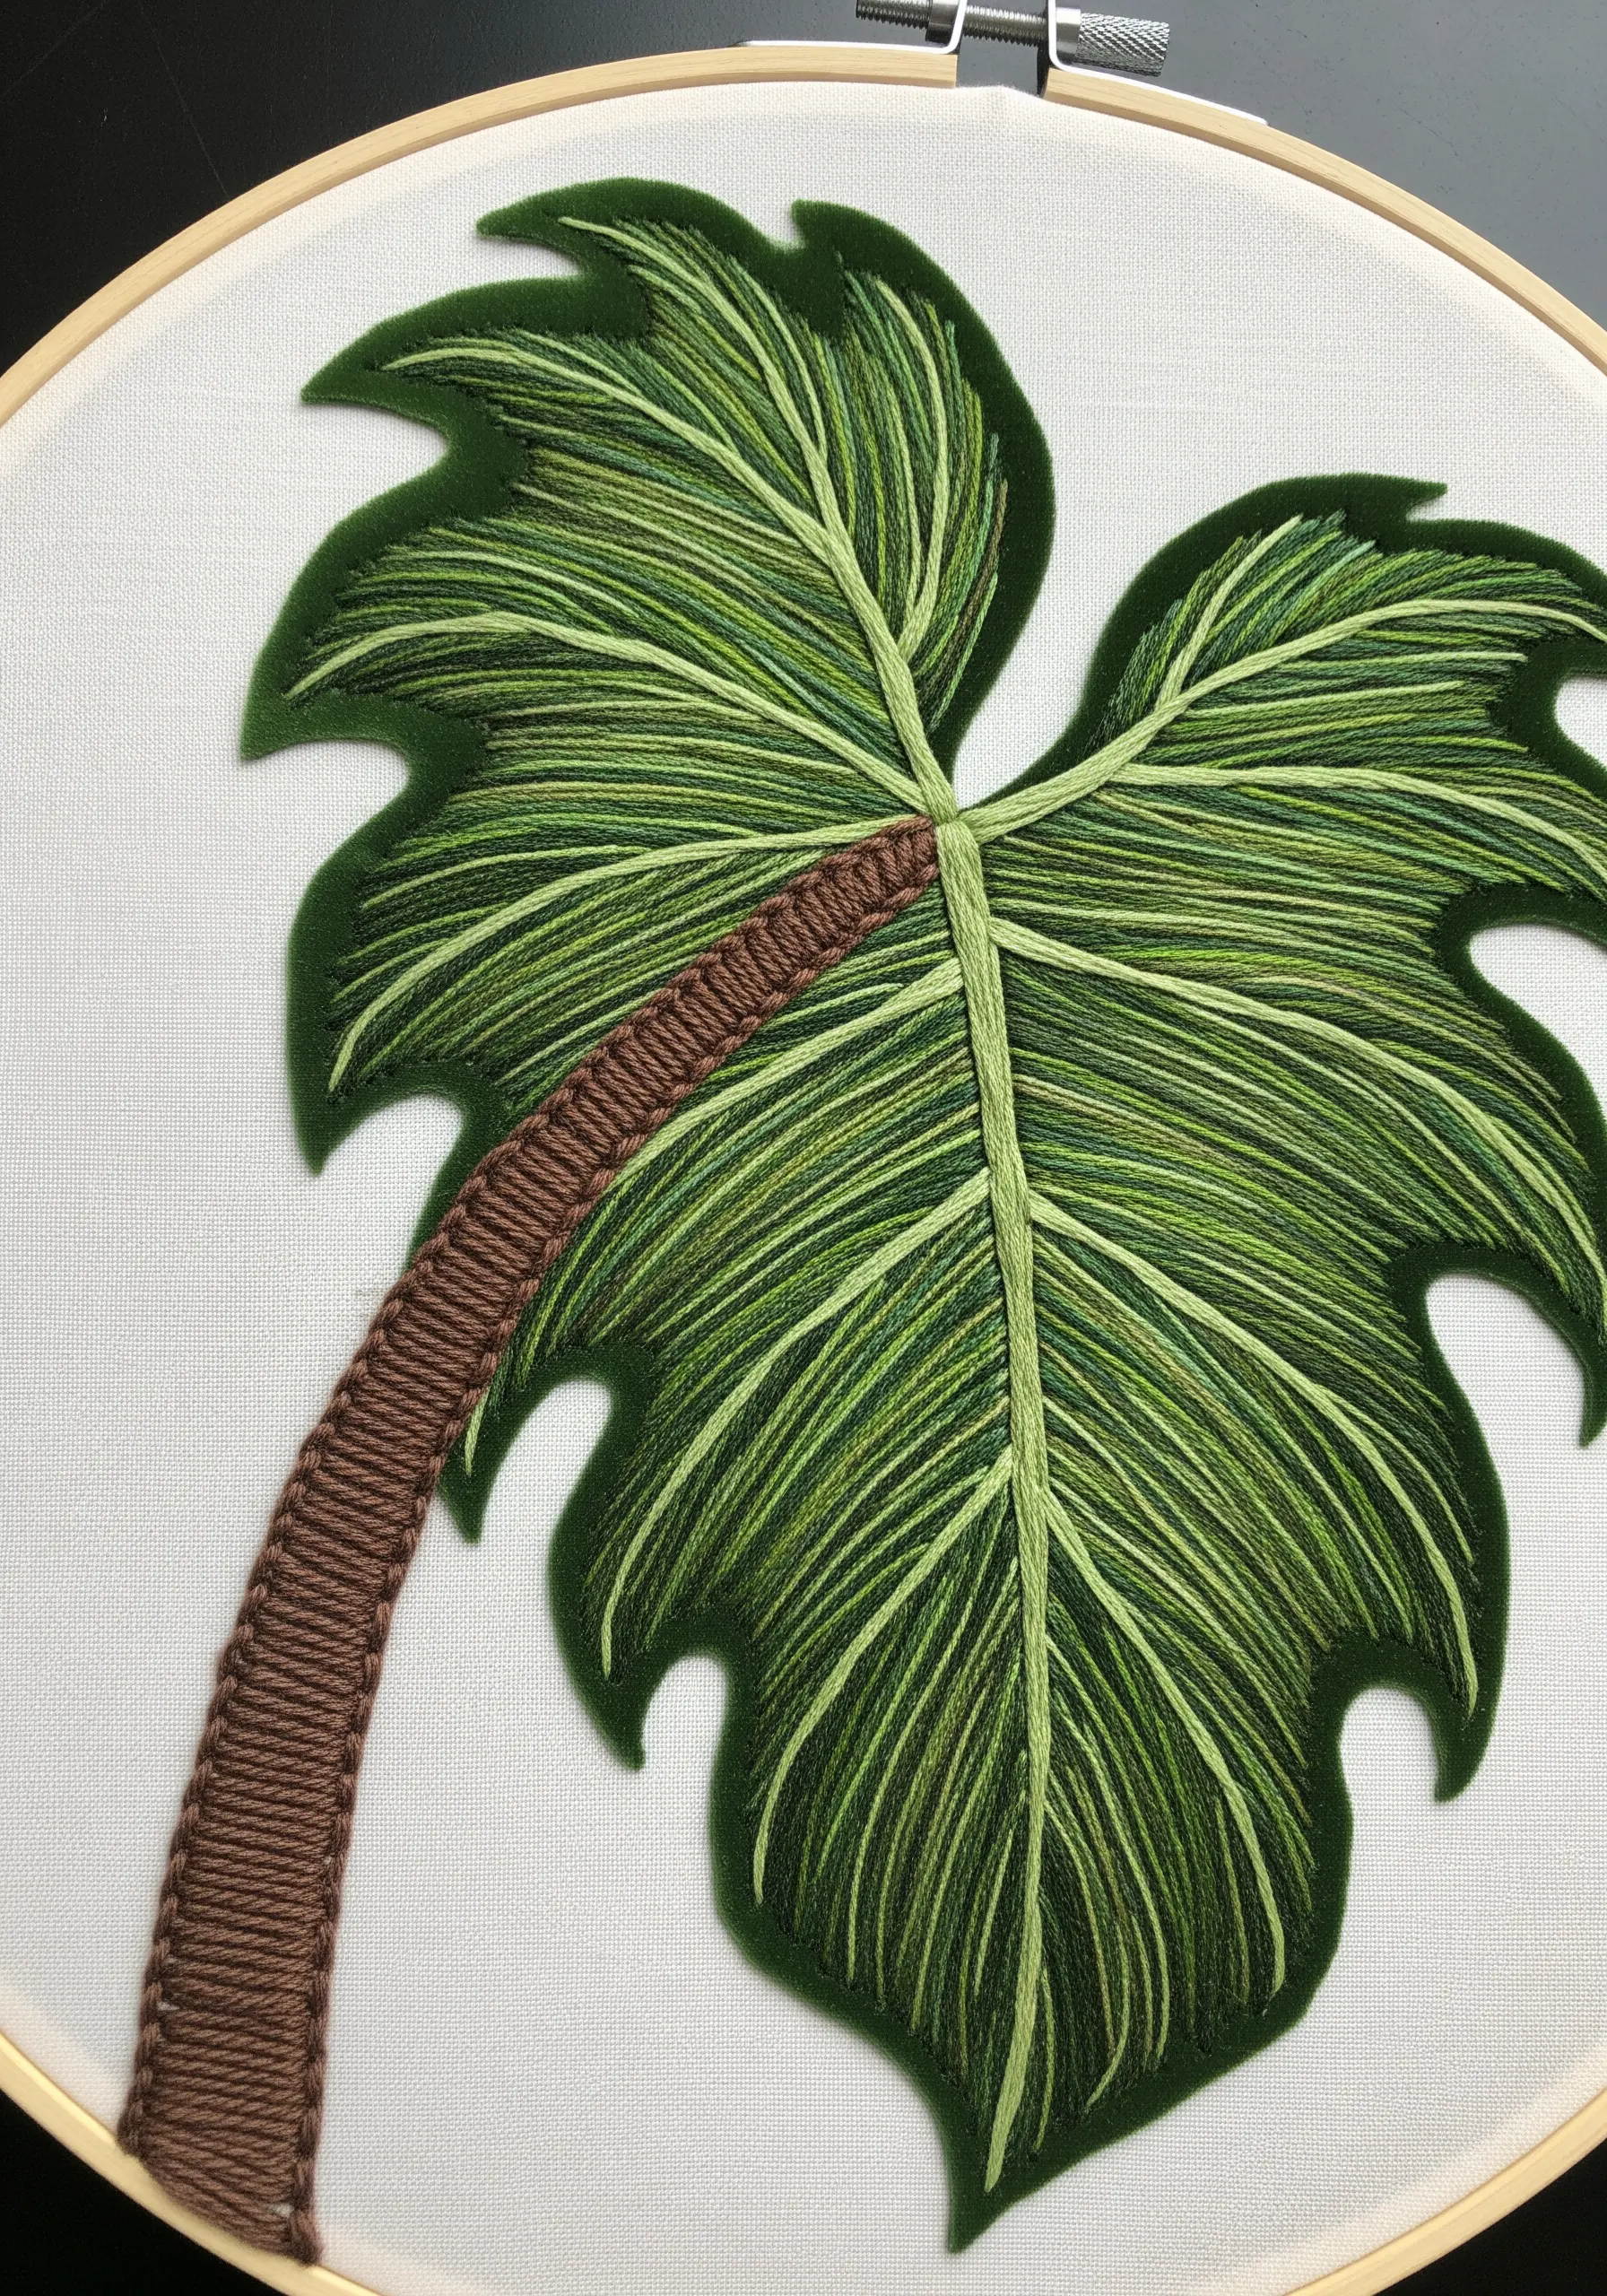
To achieve hyperrealistic botanical embroidery, the direction of your stitches is just as important as the color.
Use long-and-short stitch, also known as thread painting, and carefully angle your stitches to follow the natural growth pattern of the leaf’s veins, radiating out from the center.
Blend several shades of green to create subtle highlights and shadows that suggest light falling on the leaf.
For the stem, create a raised effect by wrapping thread around a core of thicker yarn (a padded satin stitch), making it pop off the fabric.
10. Create Depth with a Sheer Tulle Overlay
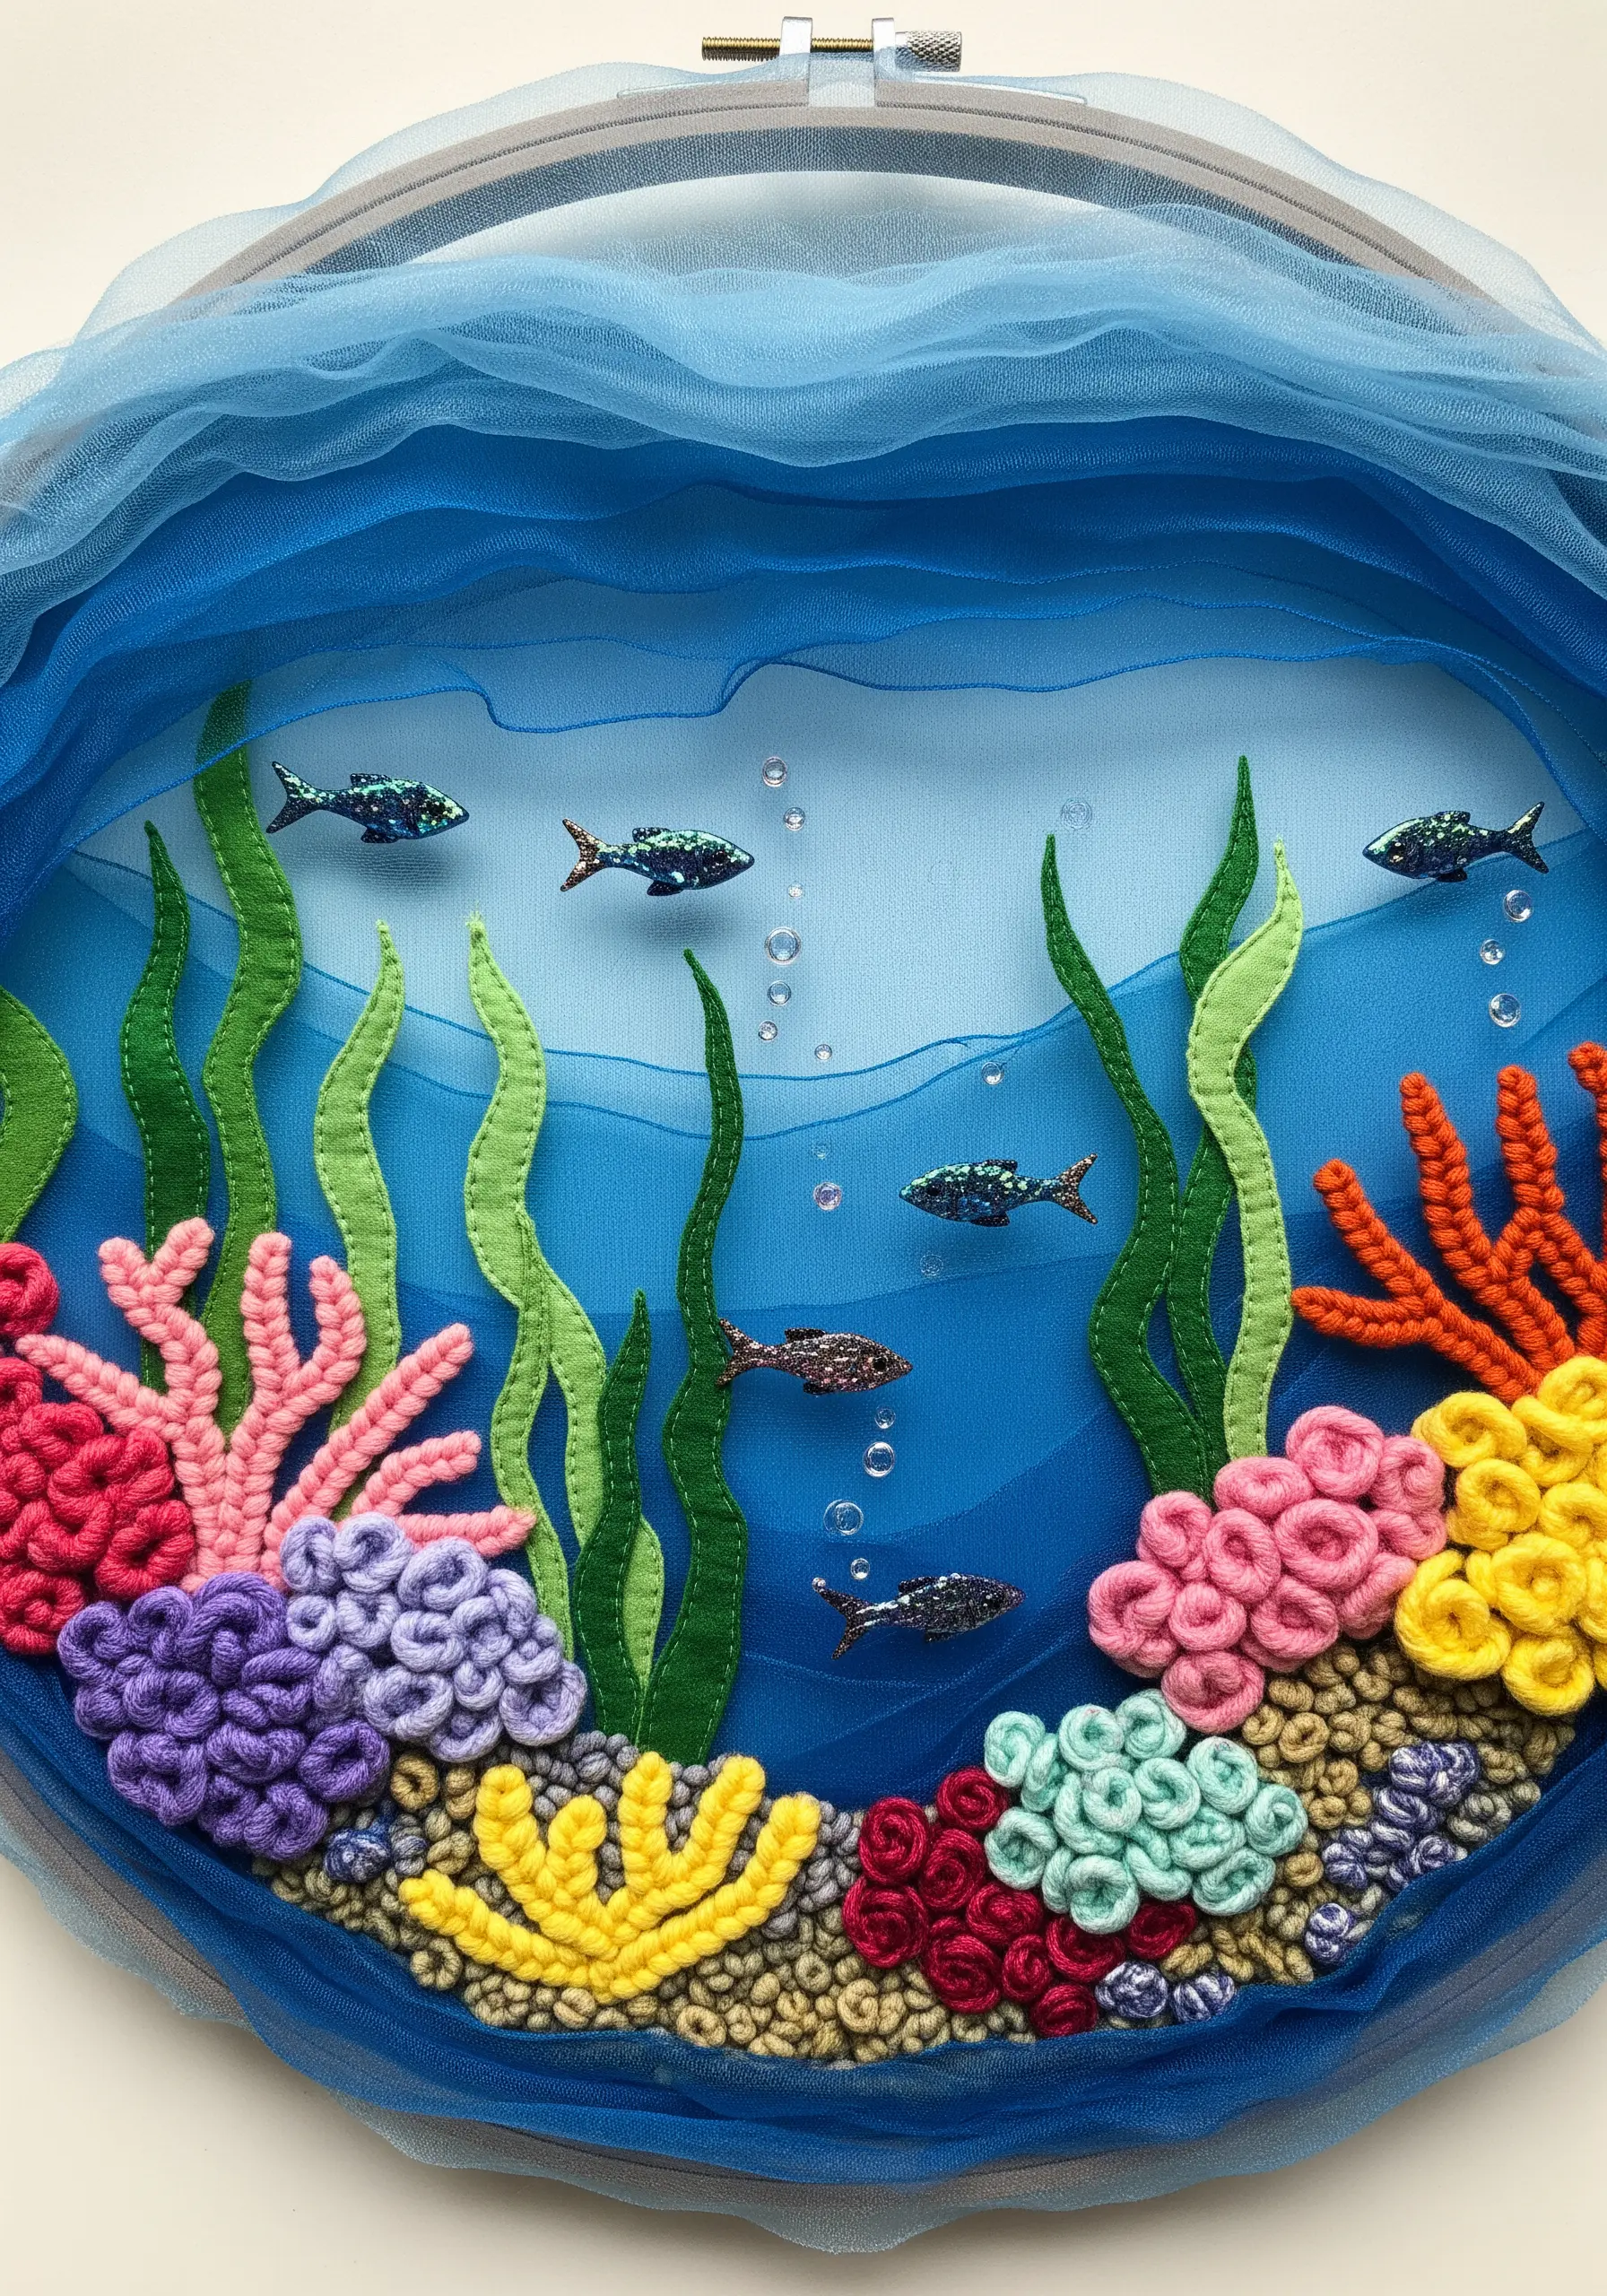
To give your underwater scenes a magical, submerged quality, incorporate a layer of sheer fabric.
First, complete most of your embroidery on the base fabric, using textured stitches like bullion knots and French knots for coral and appliquéing felt for seaweed.
Then, stretch a layer of light blue or seafoam green tulle over the entire hoop before locking it in place.
This simple addition instantly creates a sense of looking through water.
For a final touch, add a few details *on top* of the tulle—like sequined fish or beaded air bubbles—to enhance the illusion of depth.
11. Construct Large-Scale Forms with a Wire Armature
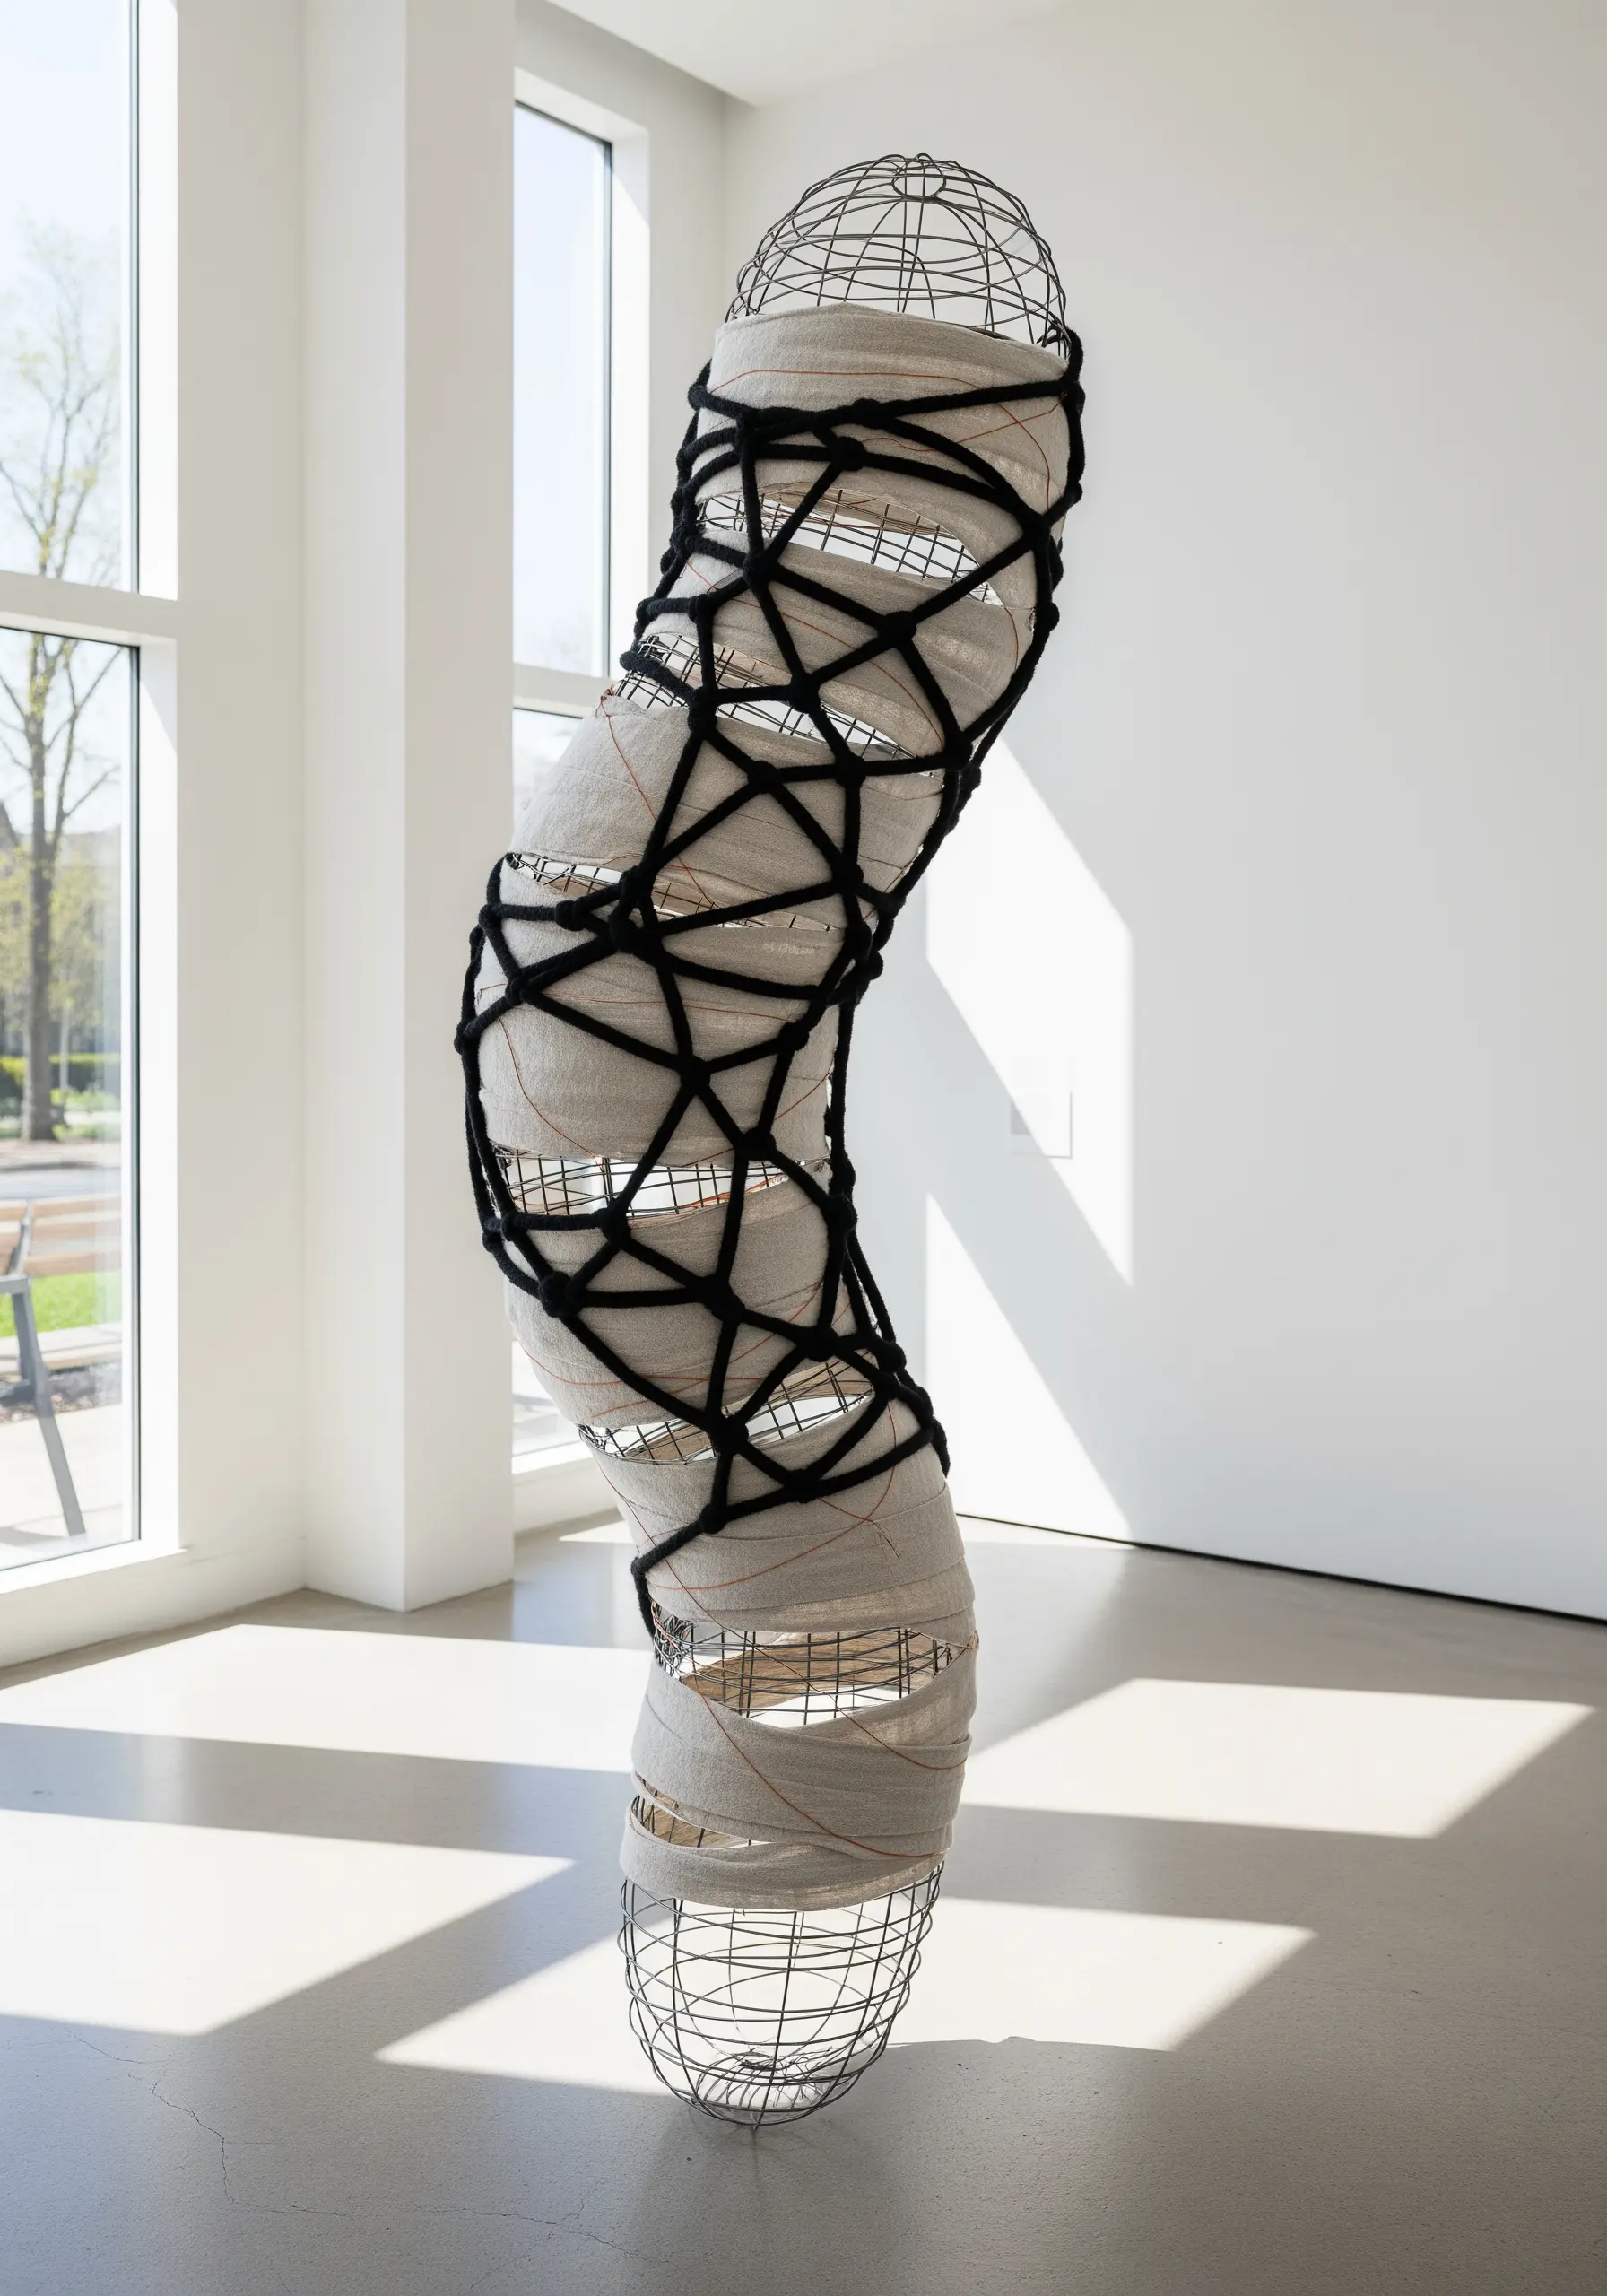
To create large, three-dimensional fiber sculptures without the immense weight and material cost, begin with a lightweight armature.
Shape pliable wire mesh (like chicken wire or craft wire) into your desired organic form.
Next, wrap the wire structure completely with strips of a neutral fabric, like cotton or muslin. This creates a solid surface, hides the wire, and provides a base for your final layer.
Finally, wrap the form with a contrasting, thick yarn to define the contours and add a graphic, linear pattern.
12. Weave on a Stretched Canvas Frame
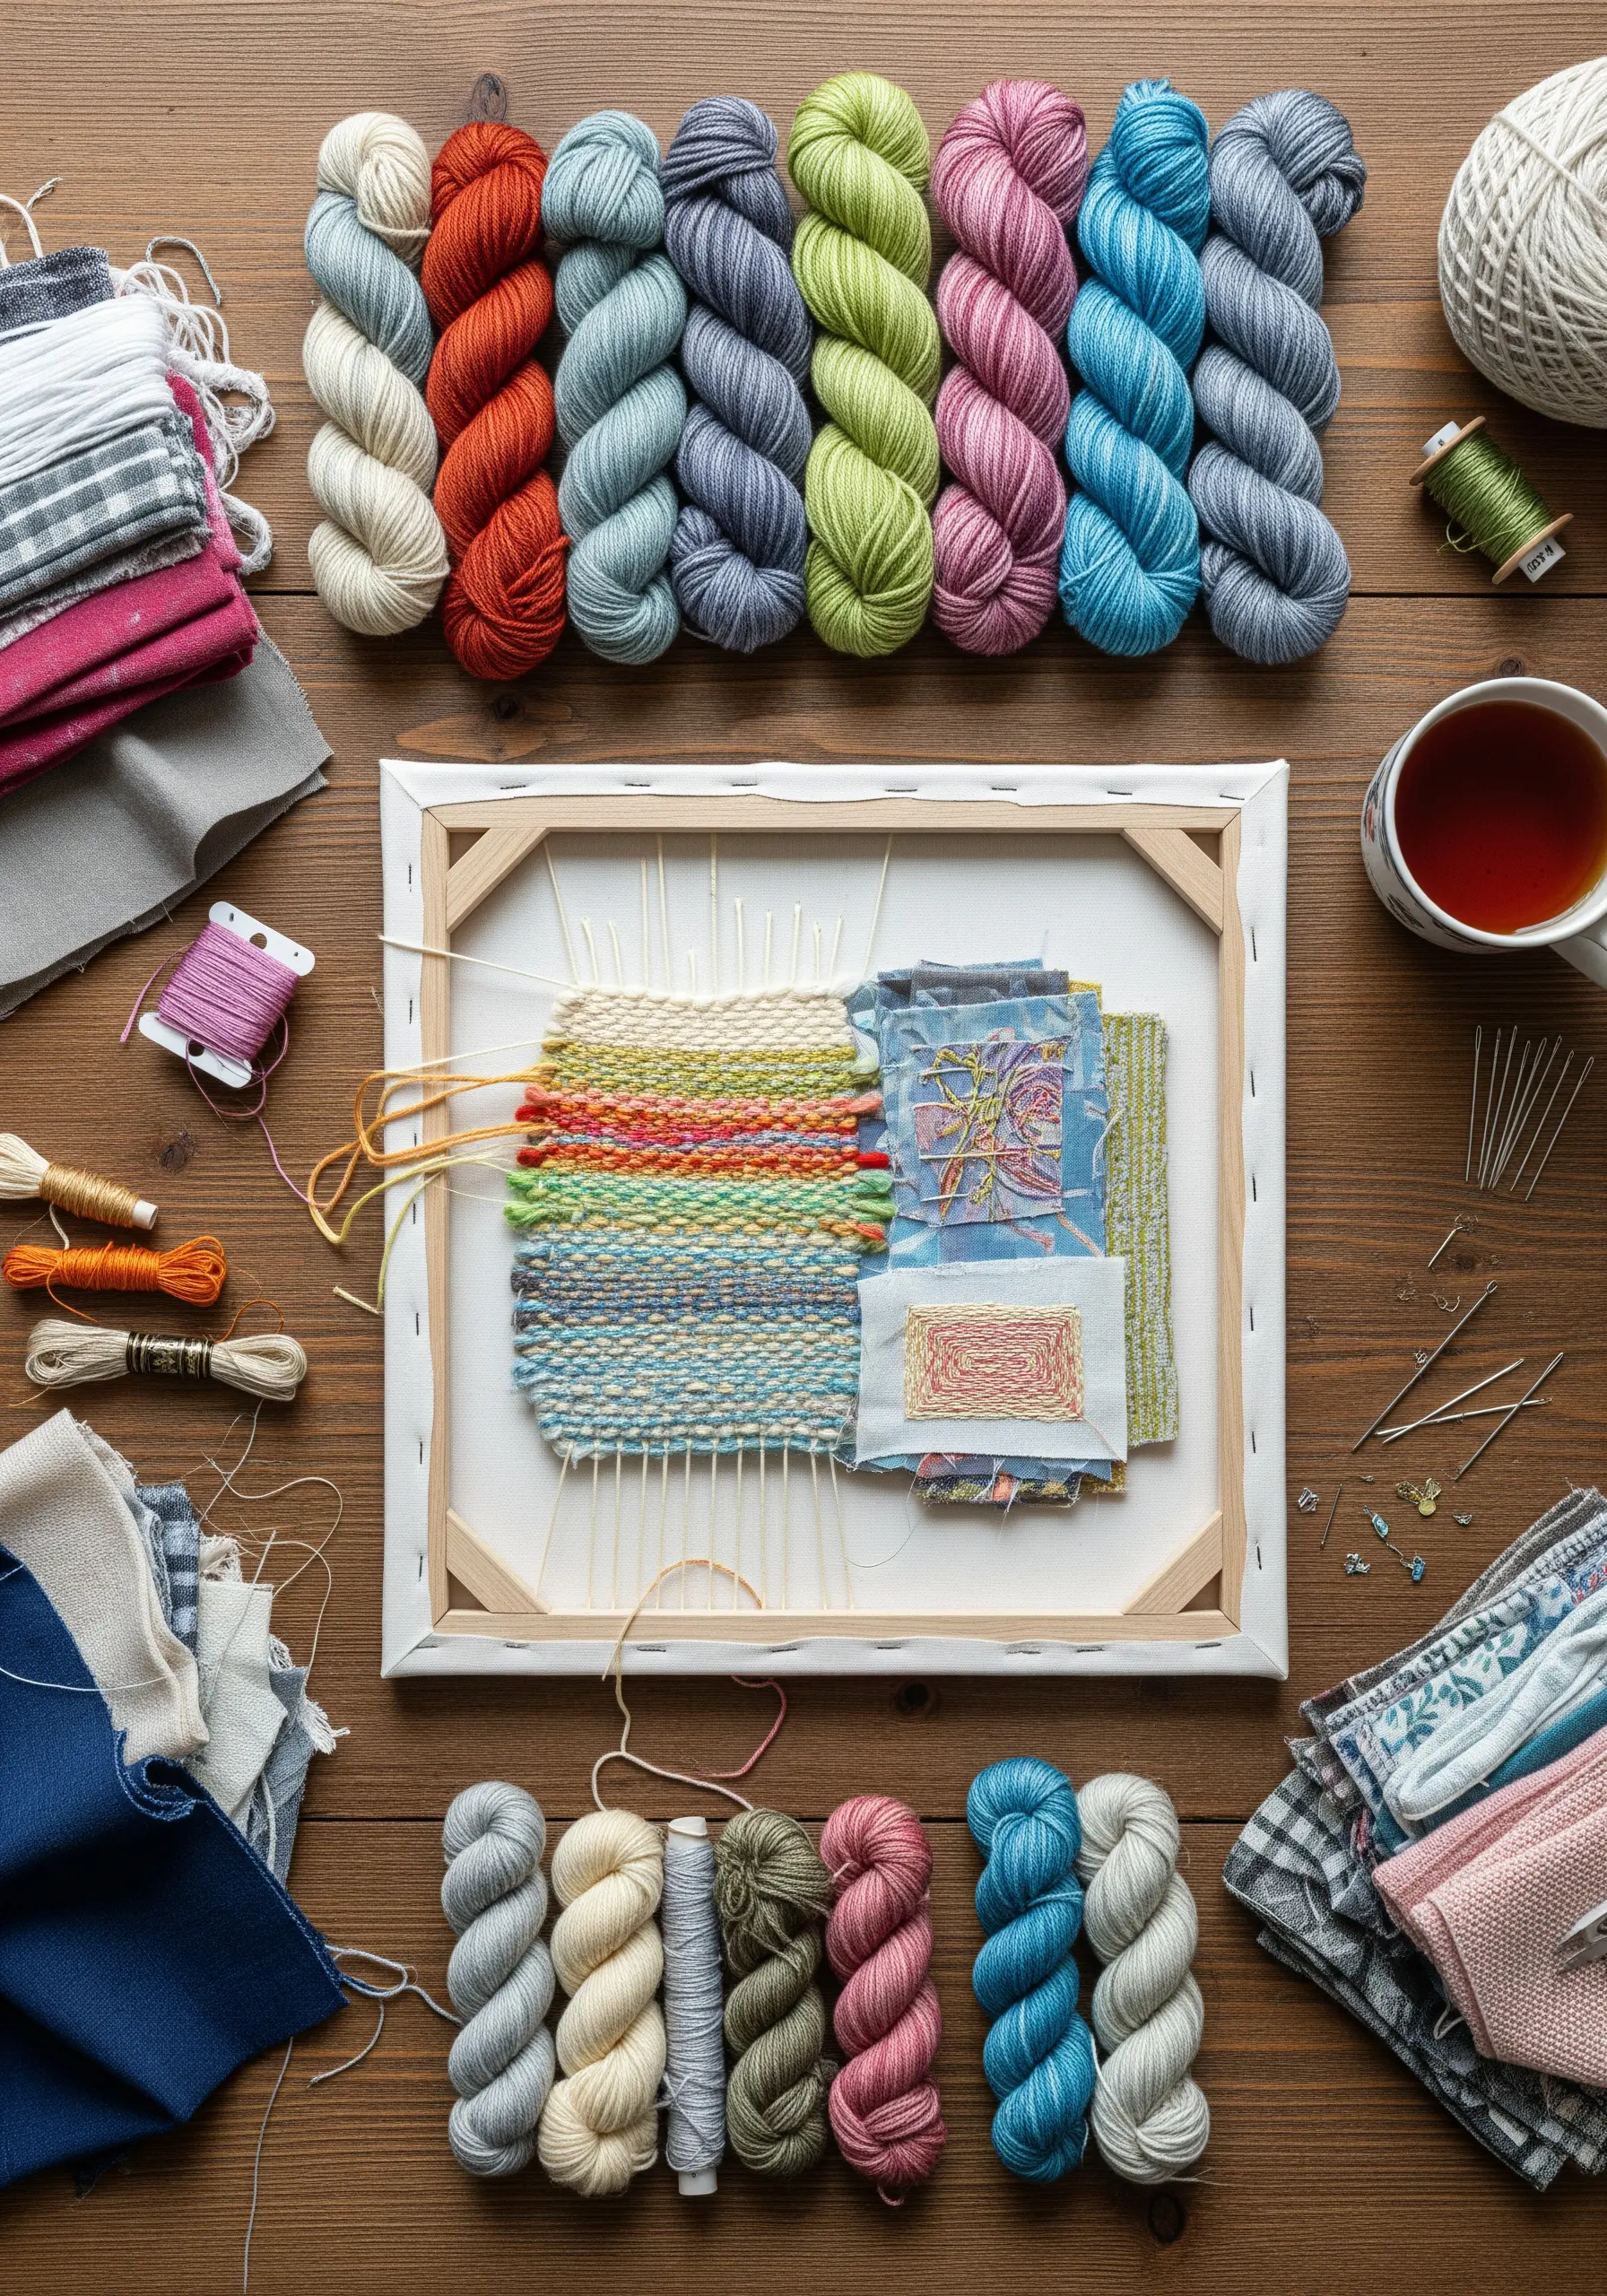
You don’t need a specialized loom to experiment with weaving. A simple wooden canvas stretcher frame from an art supply store is an excellent starting point.
Carefully hammer small nails or tacks at even intervals across the top and bottom bars of the frame.
You can now warp your loom by winding a strong thread vertically between the nails, creating a taut grid.
This DIY loom is perfect for creating small tapestries, experimenting with yarn textures, or making mixed-media textile collages.
13. Add Graphic Impact by Couching Knitted Chains
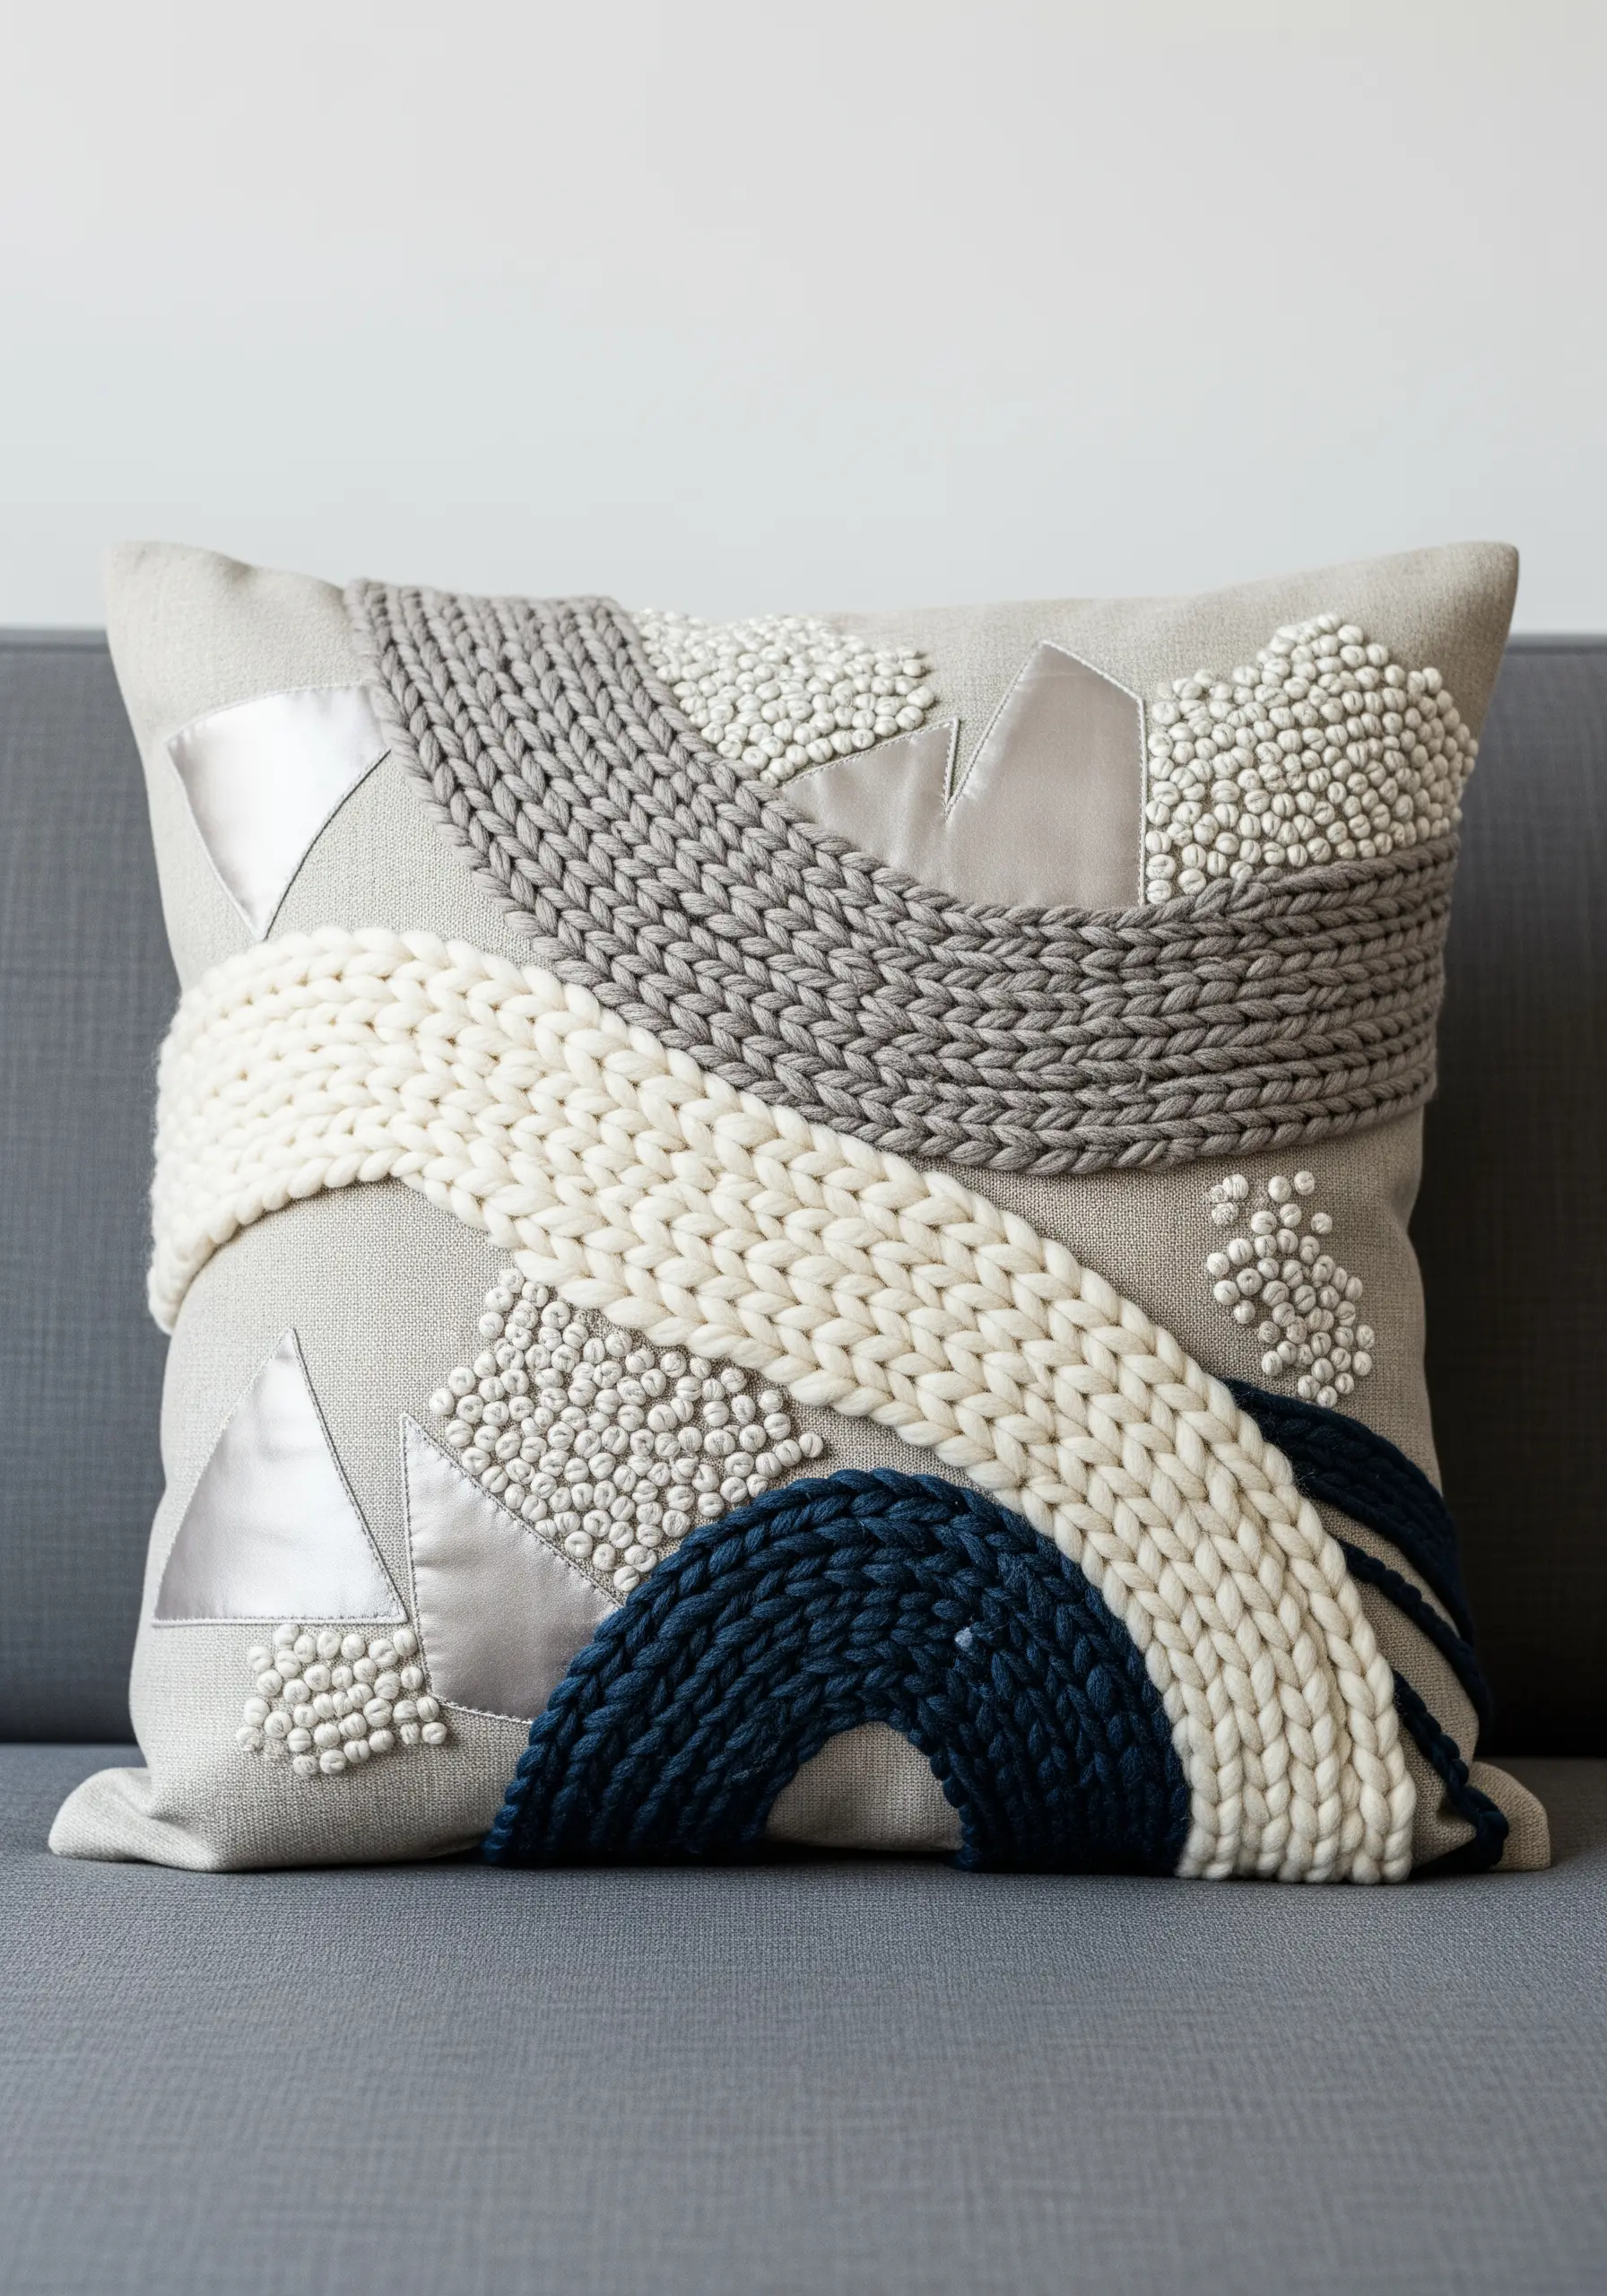
For a quick and impactful way to add bold, textural lines to seasonal pillow embroidery, use pre-knitted yarn.
Using chunky yarn, create a long cord with a French knitting tool or a simple finger-knitting technique.
Arrange this highly textured, pliable cord into sweeping curves or geometric shapes on your pillow cover.
Secure it by couching—tacking it down with a matching, thinner thread.
Intersperse the bold lines with delicate clusters of beads or French knots for a sophisticated contrast in scale and texture.
14. Assemble a Larger Work from Embroidered Modules
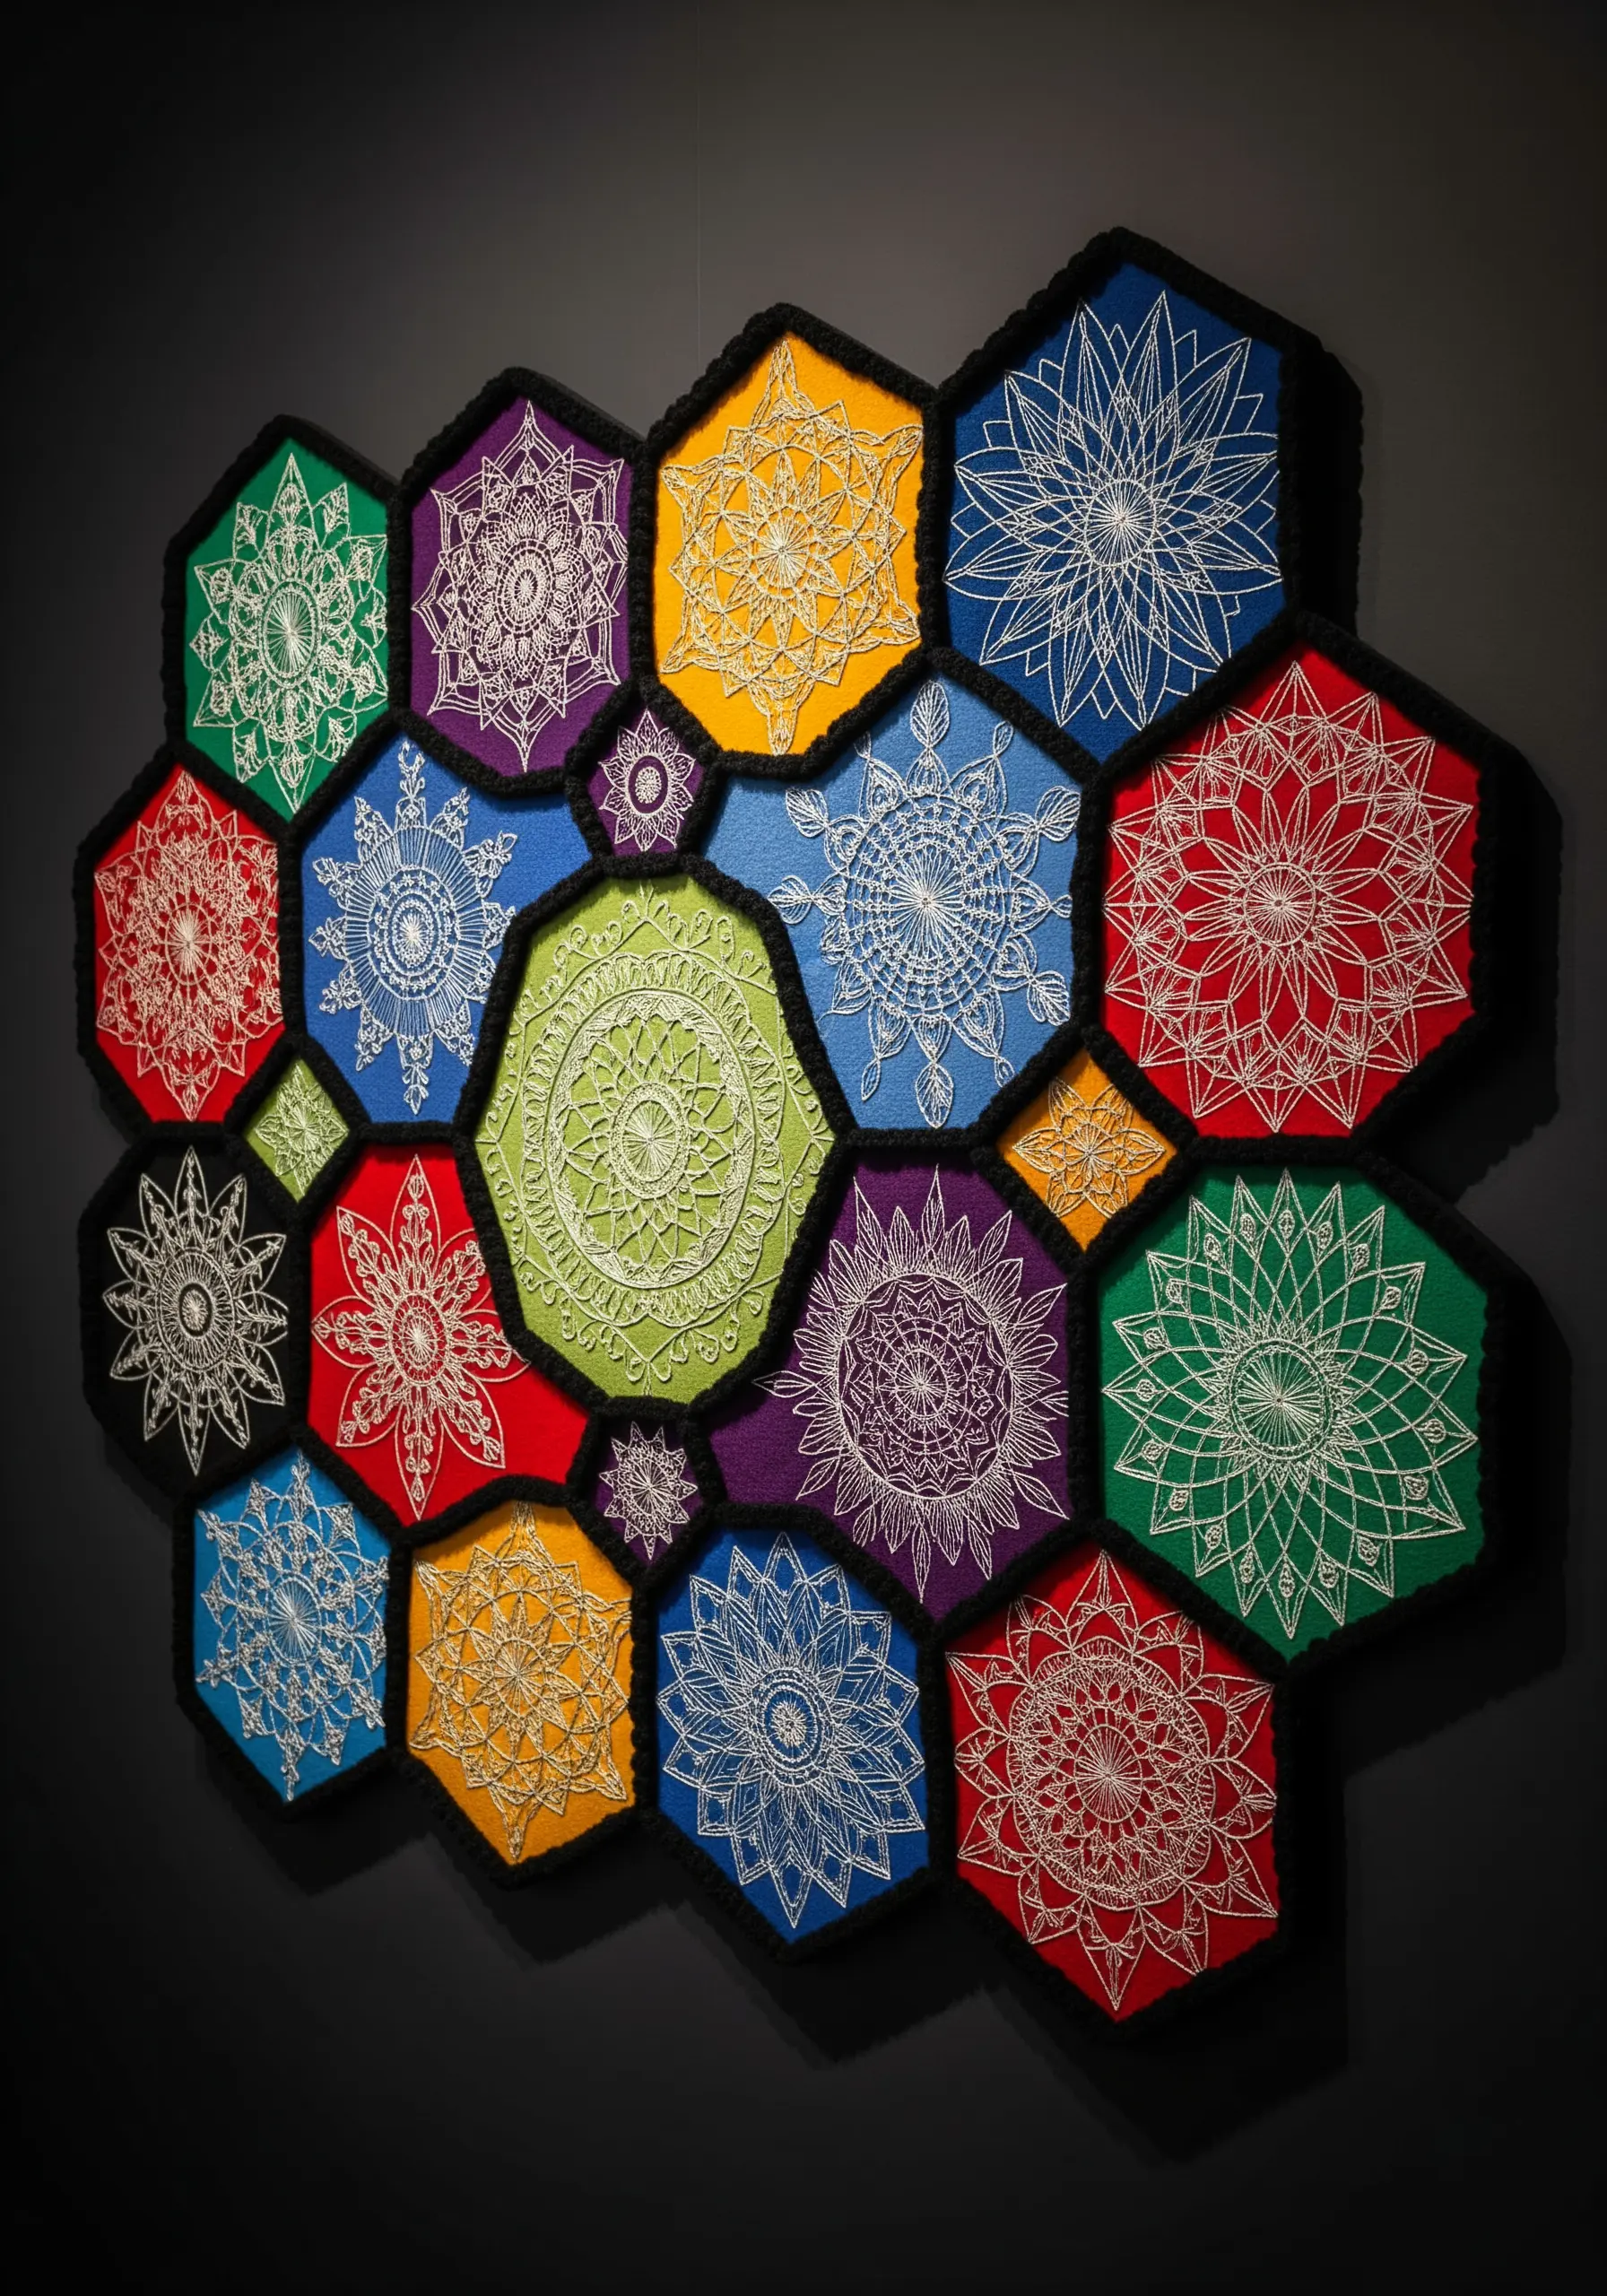
Tackling a large or highly detailed project can feel overwhelming.
Break it down into manageable parts by creating your design on smaller, individual fabric pieces, or modules.
Embroider each hexagon (or square, or circle) separately, perfecting one small composition at a time.
Once all modules are complete, arrange them and join them with a decorative stitch.
Using a crocheted border or a visible whipstitch turns the seams into an intentional part of the final design, transforming smaller efforts into an impressive, cohesive artwork.
15. Soften Your Fringe with Torn Fabric Strips

Give your woven wall hangings a softer, more bohemian feel by incorporating fabric into the fringe.
Alongside your standard yarn tassels, add thin strips of torn fabric like muslin, cotton voile, or raw silk.
Simply tear the fabric into ribbons and attach them to the warp threads using a Rya or Larks Head knot, just as you would with yarn.
The fabric introduces a different weight and texture, creating a gentler drape and a more organic, less uniform finish than a fringe made of yarn alone.
16. Unify a Triptych with a Continuous Thread
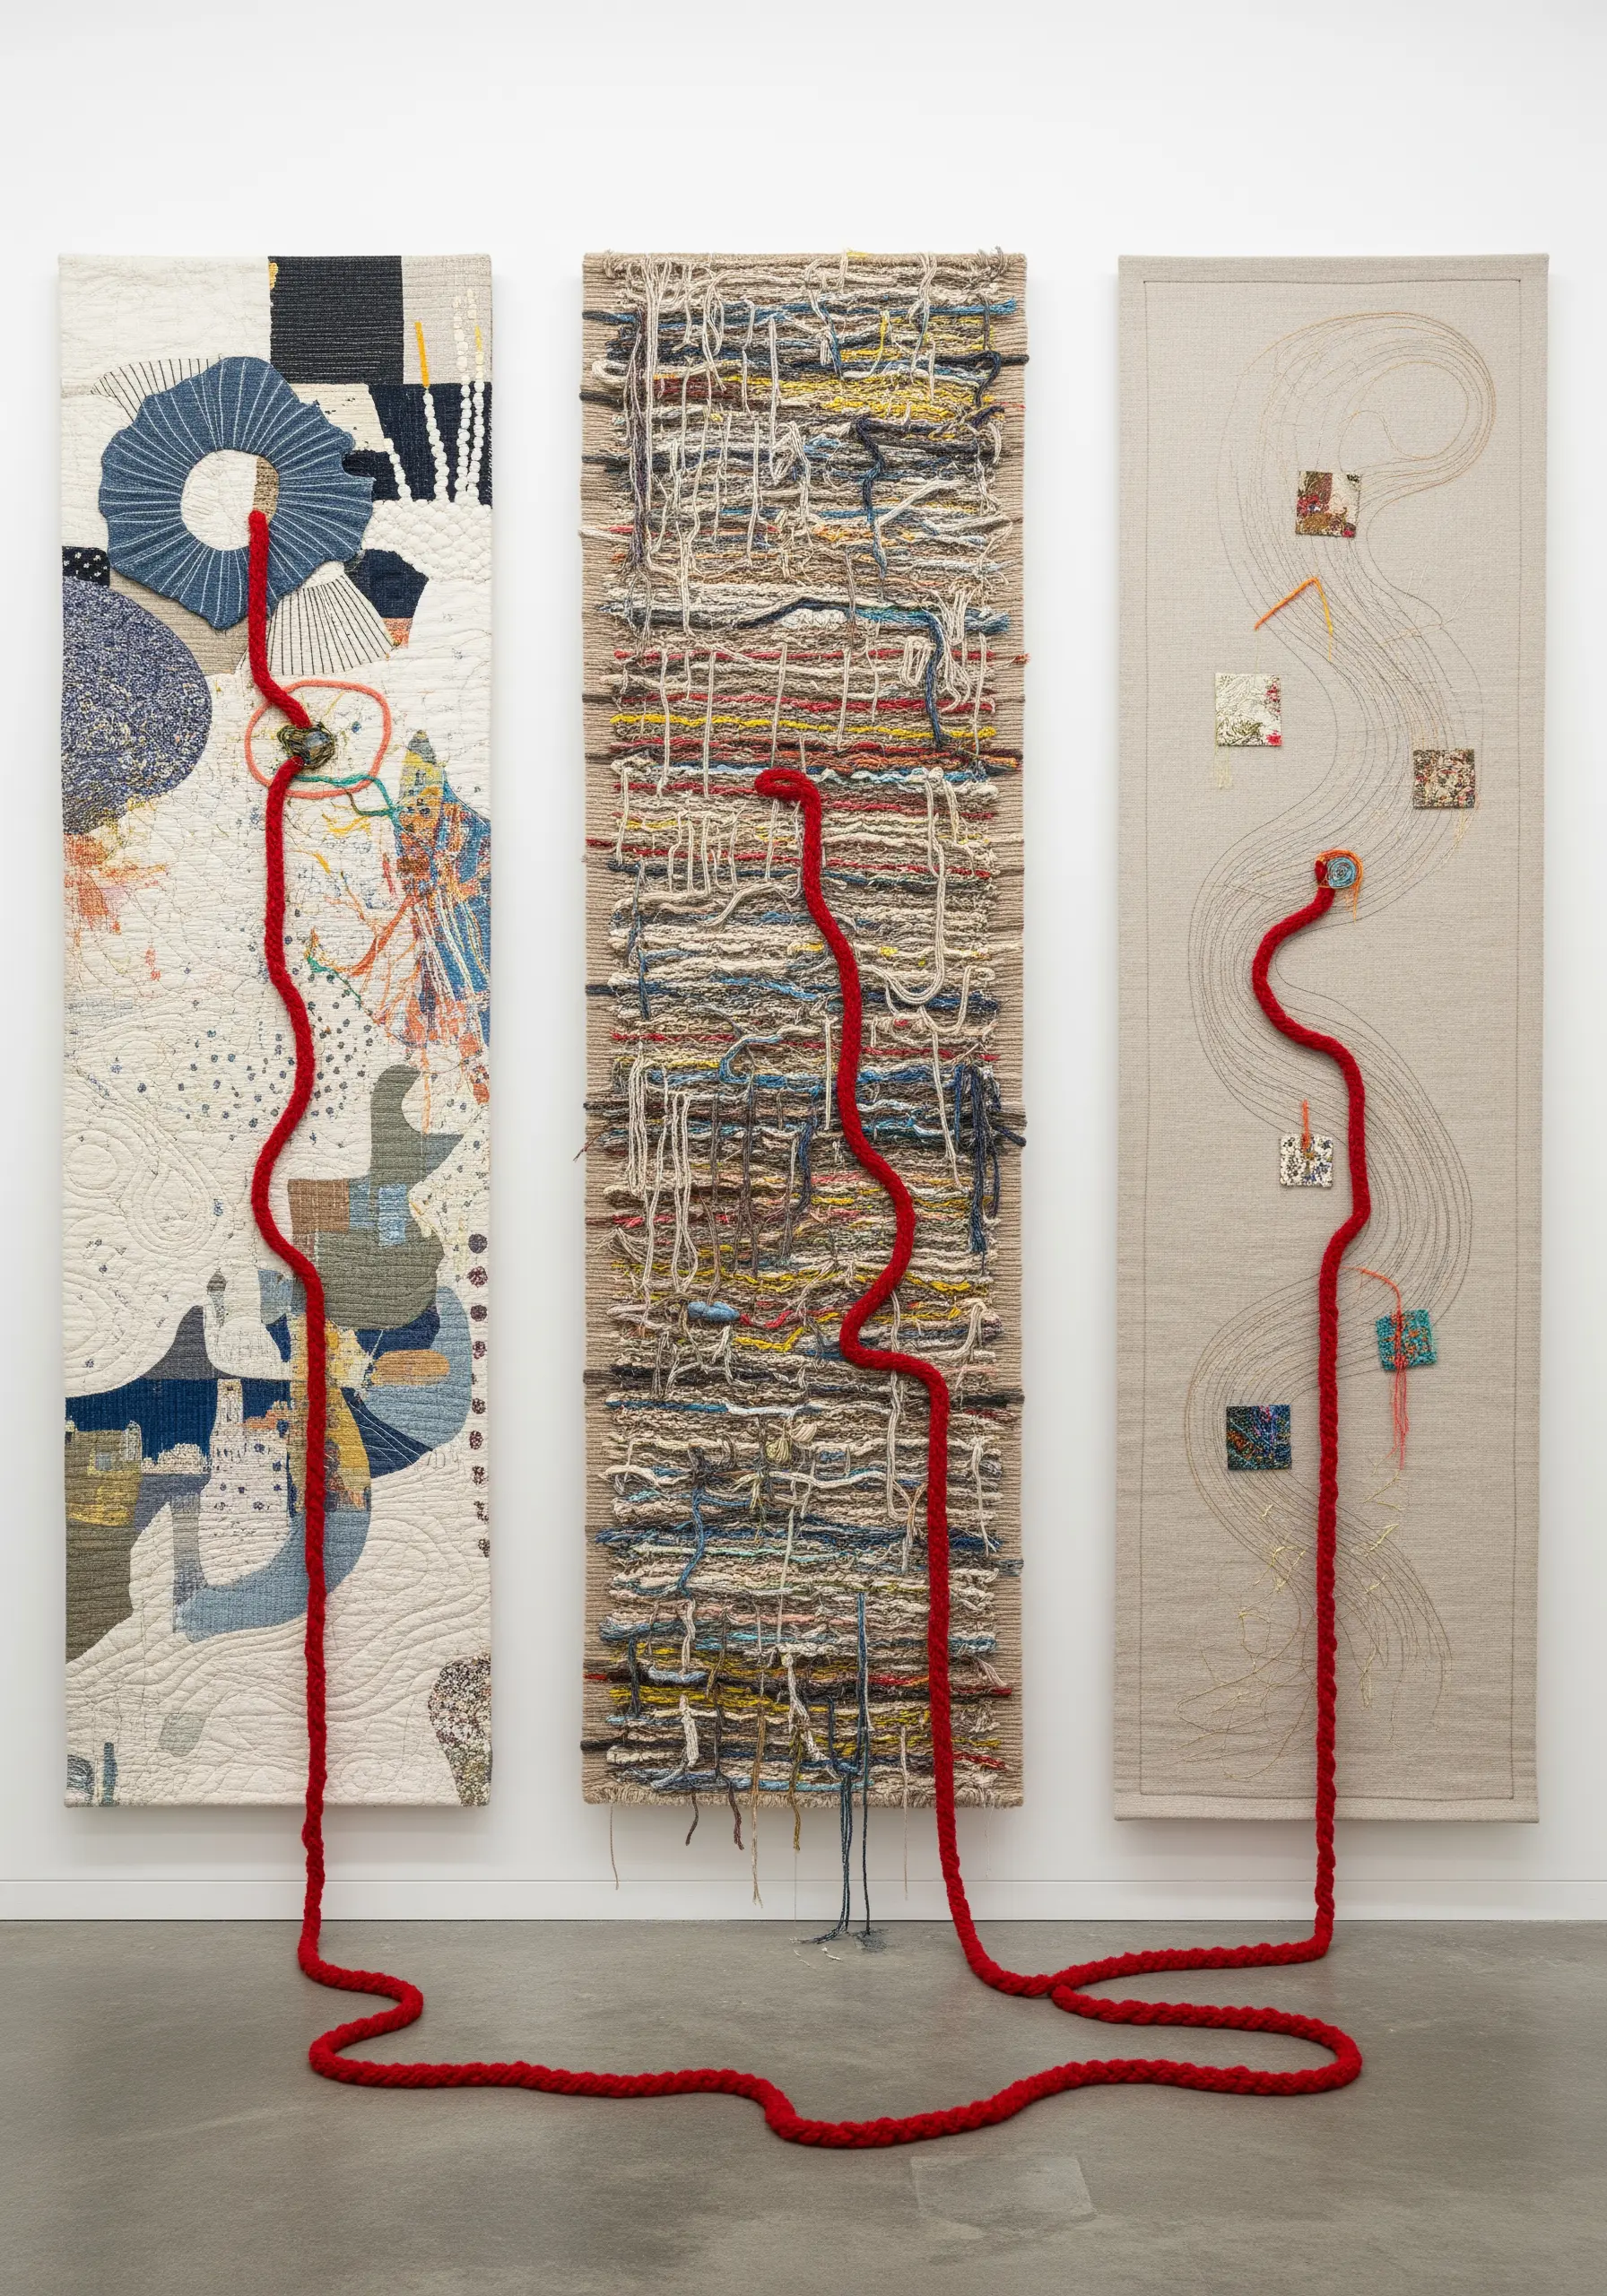
When creating a multi-panel artwork, you can forge a powerful visual and conceptual link between the pieces using a single, continuous fiber.
Design your individual panels, then choreograph the path of a bold, sculptural element—like this thick red cord—that travels across, through, and between them.
This technique physically connects the separate parts, guiding the viewer’s eye and suggesting a single narrative flowing through the entire installation.
It transforms a collection of artworks into one cohesive, dynamic statement piece.
17. Weave Asymmetrically for a Modern Hoop Hanging
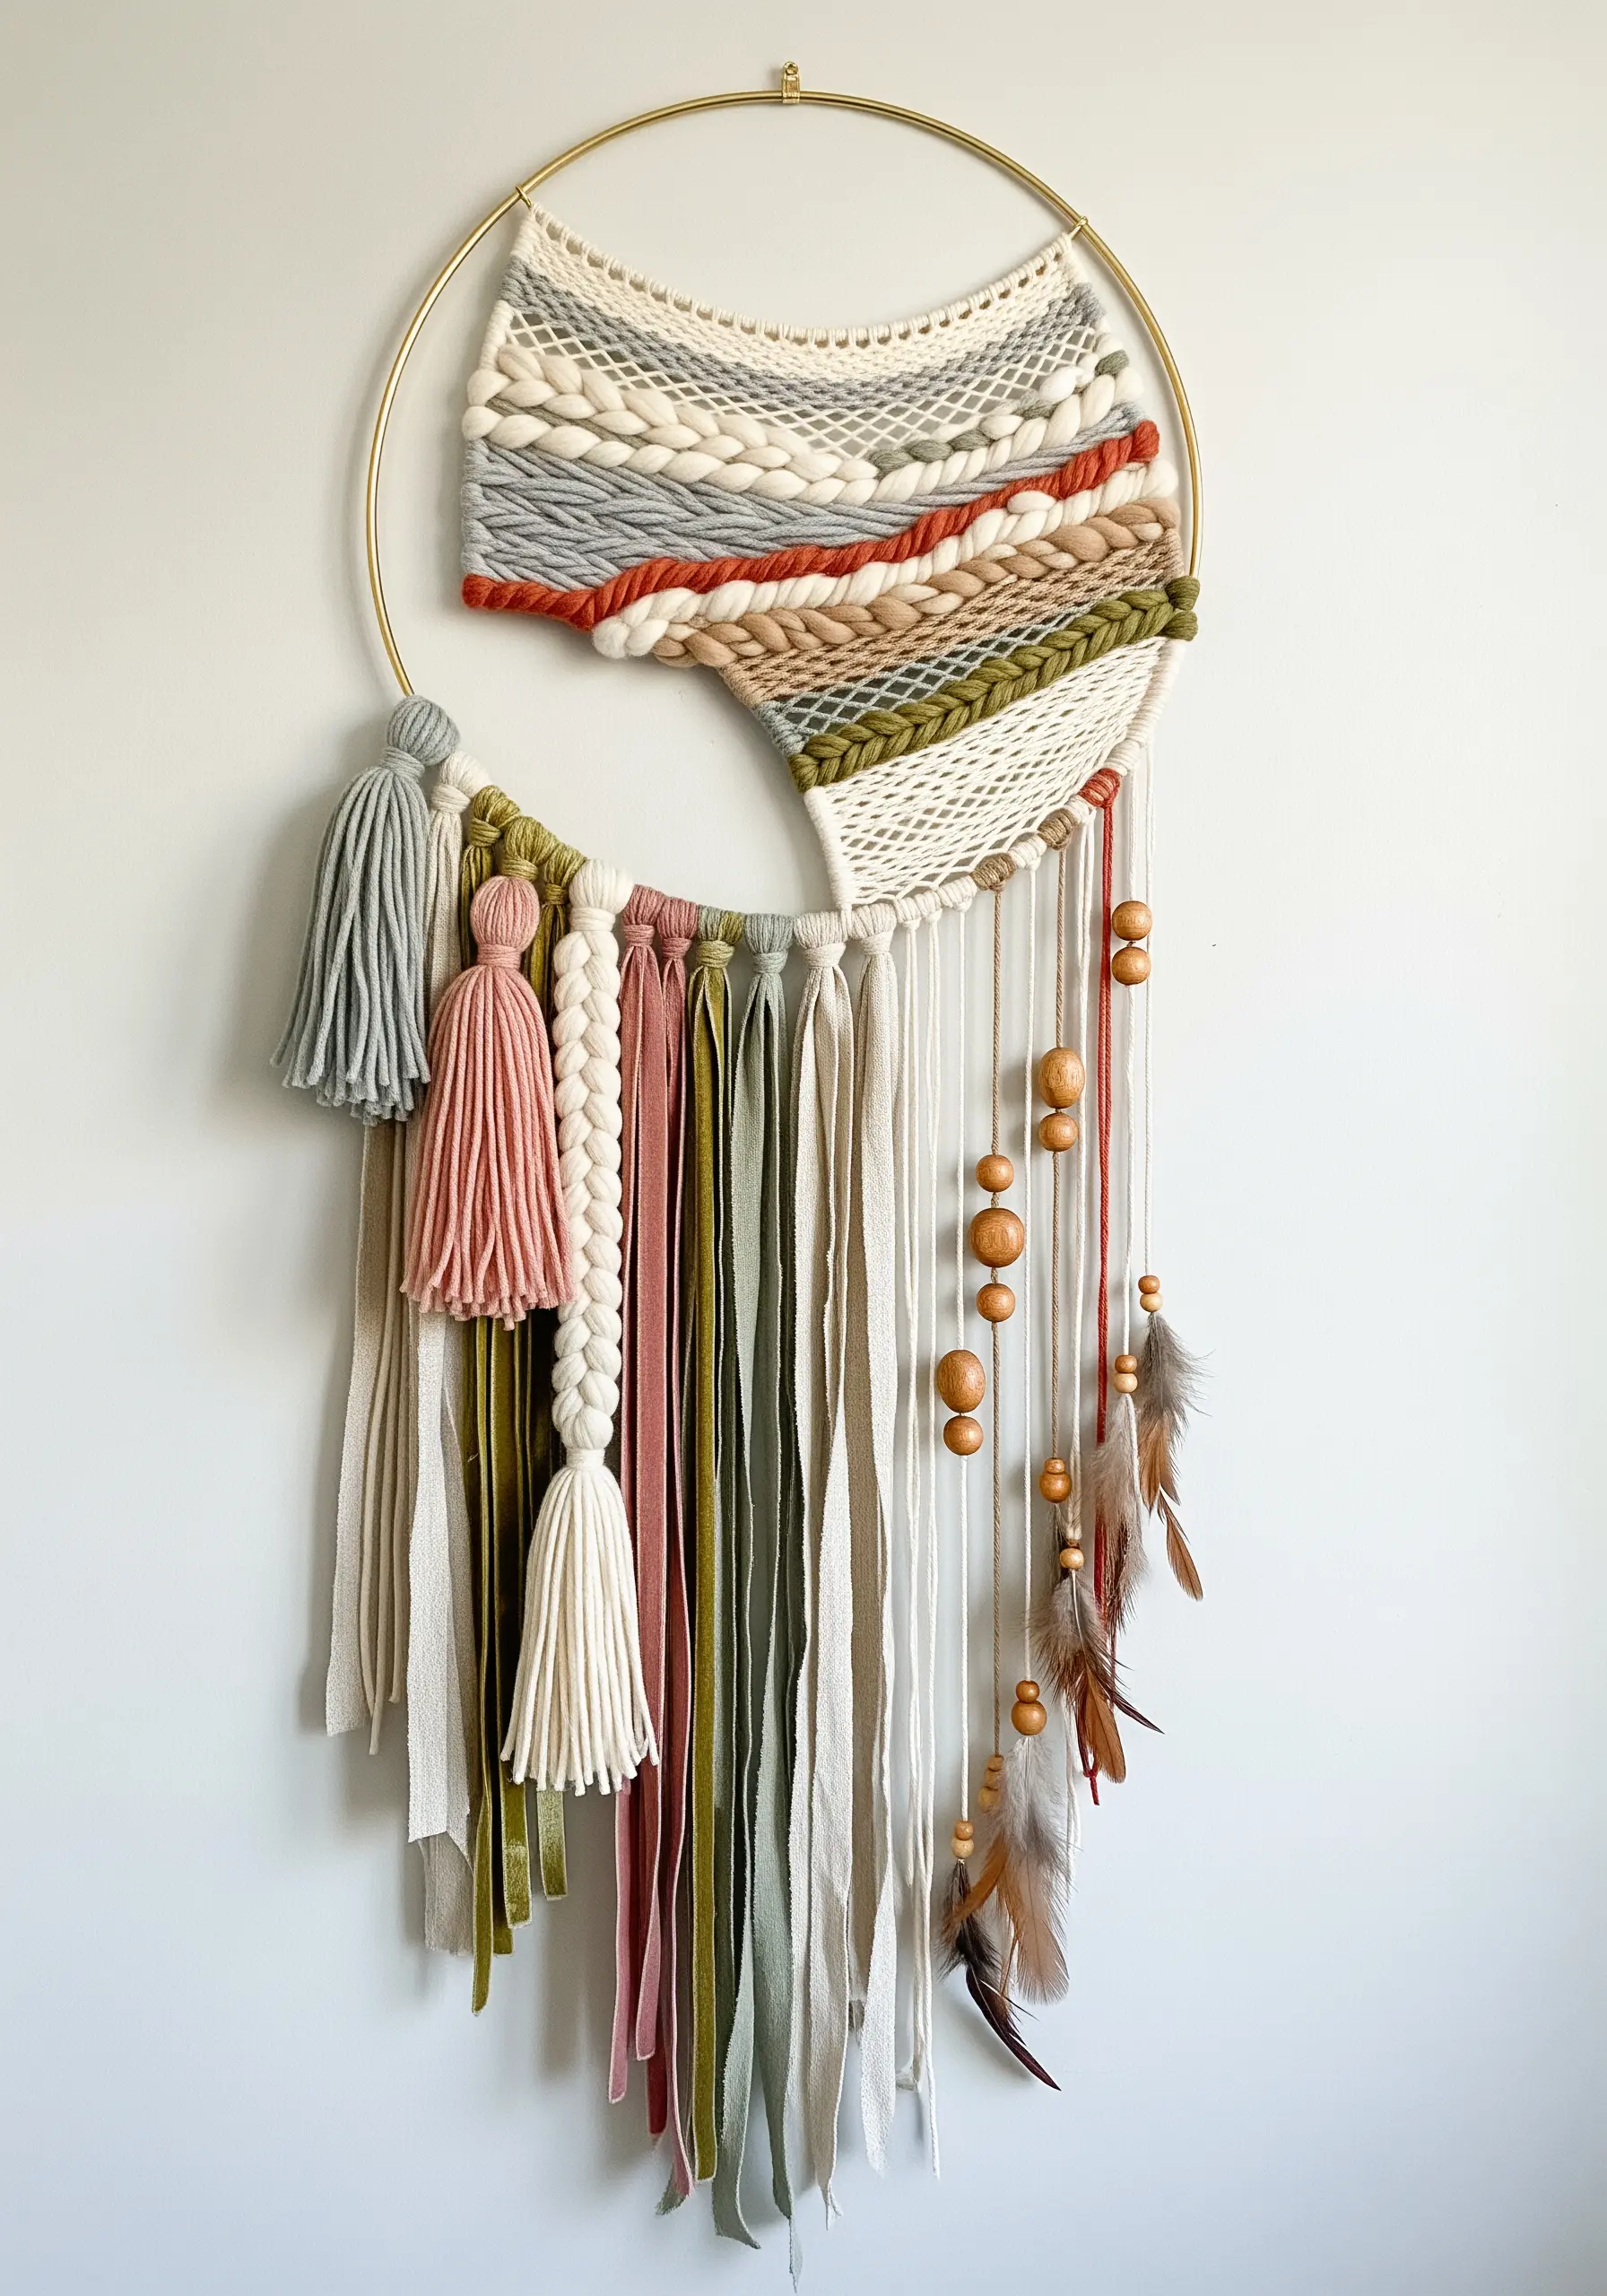
Reimagine the traditional dreamcatcher with a modern, minimalist approach that emphasizes negative space.
Instead of warping the entire metal or wooden hoop, warp only a section of it—an upper quadrant or one side.
Create a small, dense weaving within this section, varying your colors and textures.
This asymmetrical design leaves much of the hoop elegantly bare, creating an airy frame for a cascade of mixed-fiber tassels, ribbons, and natural elements like beads and feathers.
18. Define and Unify with a Raised Yarn Border
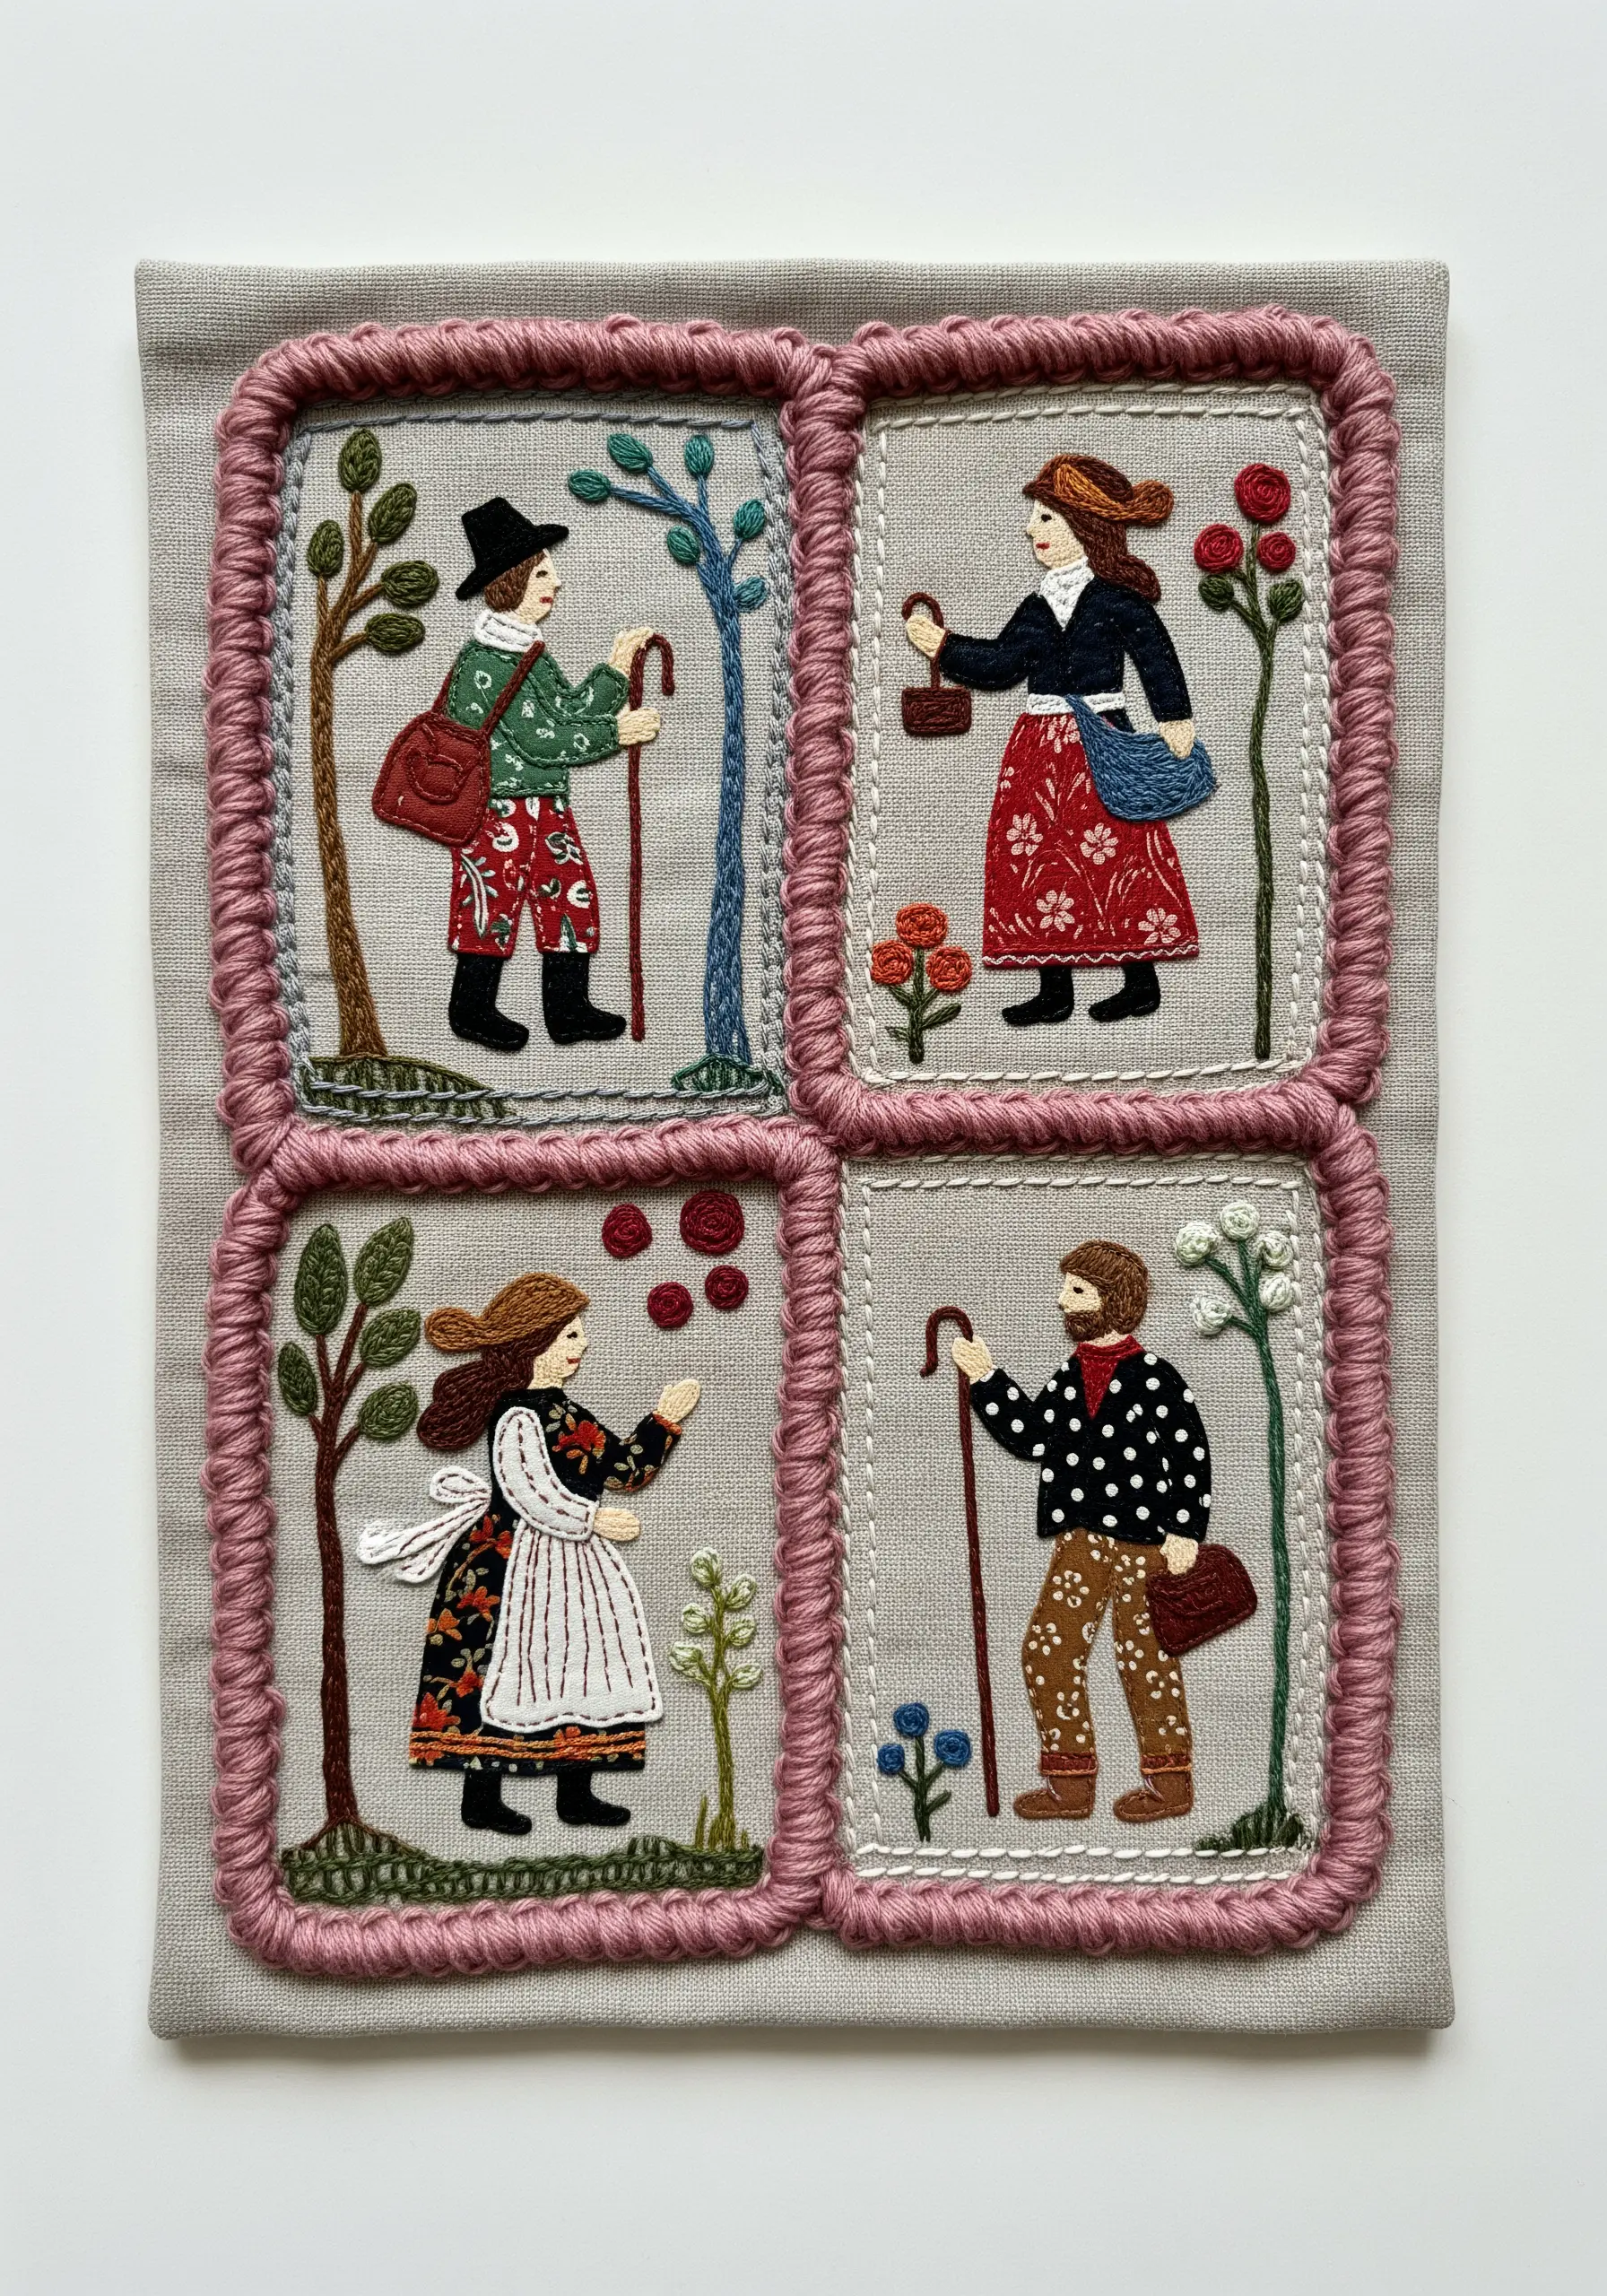
To present a collection of small embroidered scenes as a single, cohesive piece, use a consistent framing technique to tie them together.
After completing each small embroidery, couch a thick, plush yarn around its perimeter.
This creates a soft, raised border that gives each panel definition and a finished look.
Using the same yarn for all four panels visually unifies them, transforming a simple grid of designs into a sophisticated, intentional composition with tactile appeal.
19. Incorporate Fabric Appliqué for Effortless Color
When you want to include intricate patterns or solid blocks of color in your design, fabric appliqué is a brilliant time-saver.
Instead of filling a shape with satin stitch, cut the shape from a scrap of printed or colored fabric.
Secure the fabric piece to your background with a neat satin stitch border, a simple running stitch, or fabric glue for a no-sew option.
This technique not only adds color and pattern quickly but also introduces a lovely, layered quality, turning your embroidery into a creative collage of textures.
20. Sculpt Sea Foam with Needle-Felting
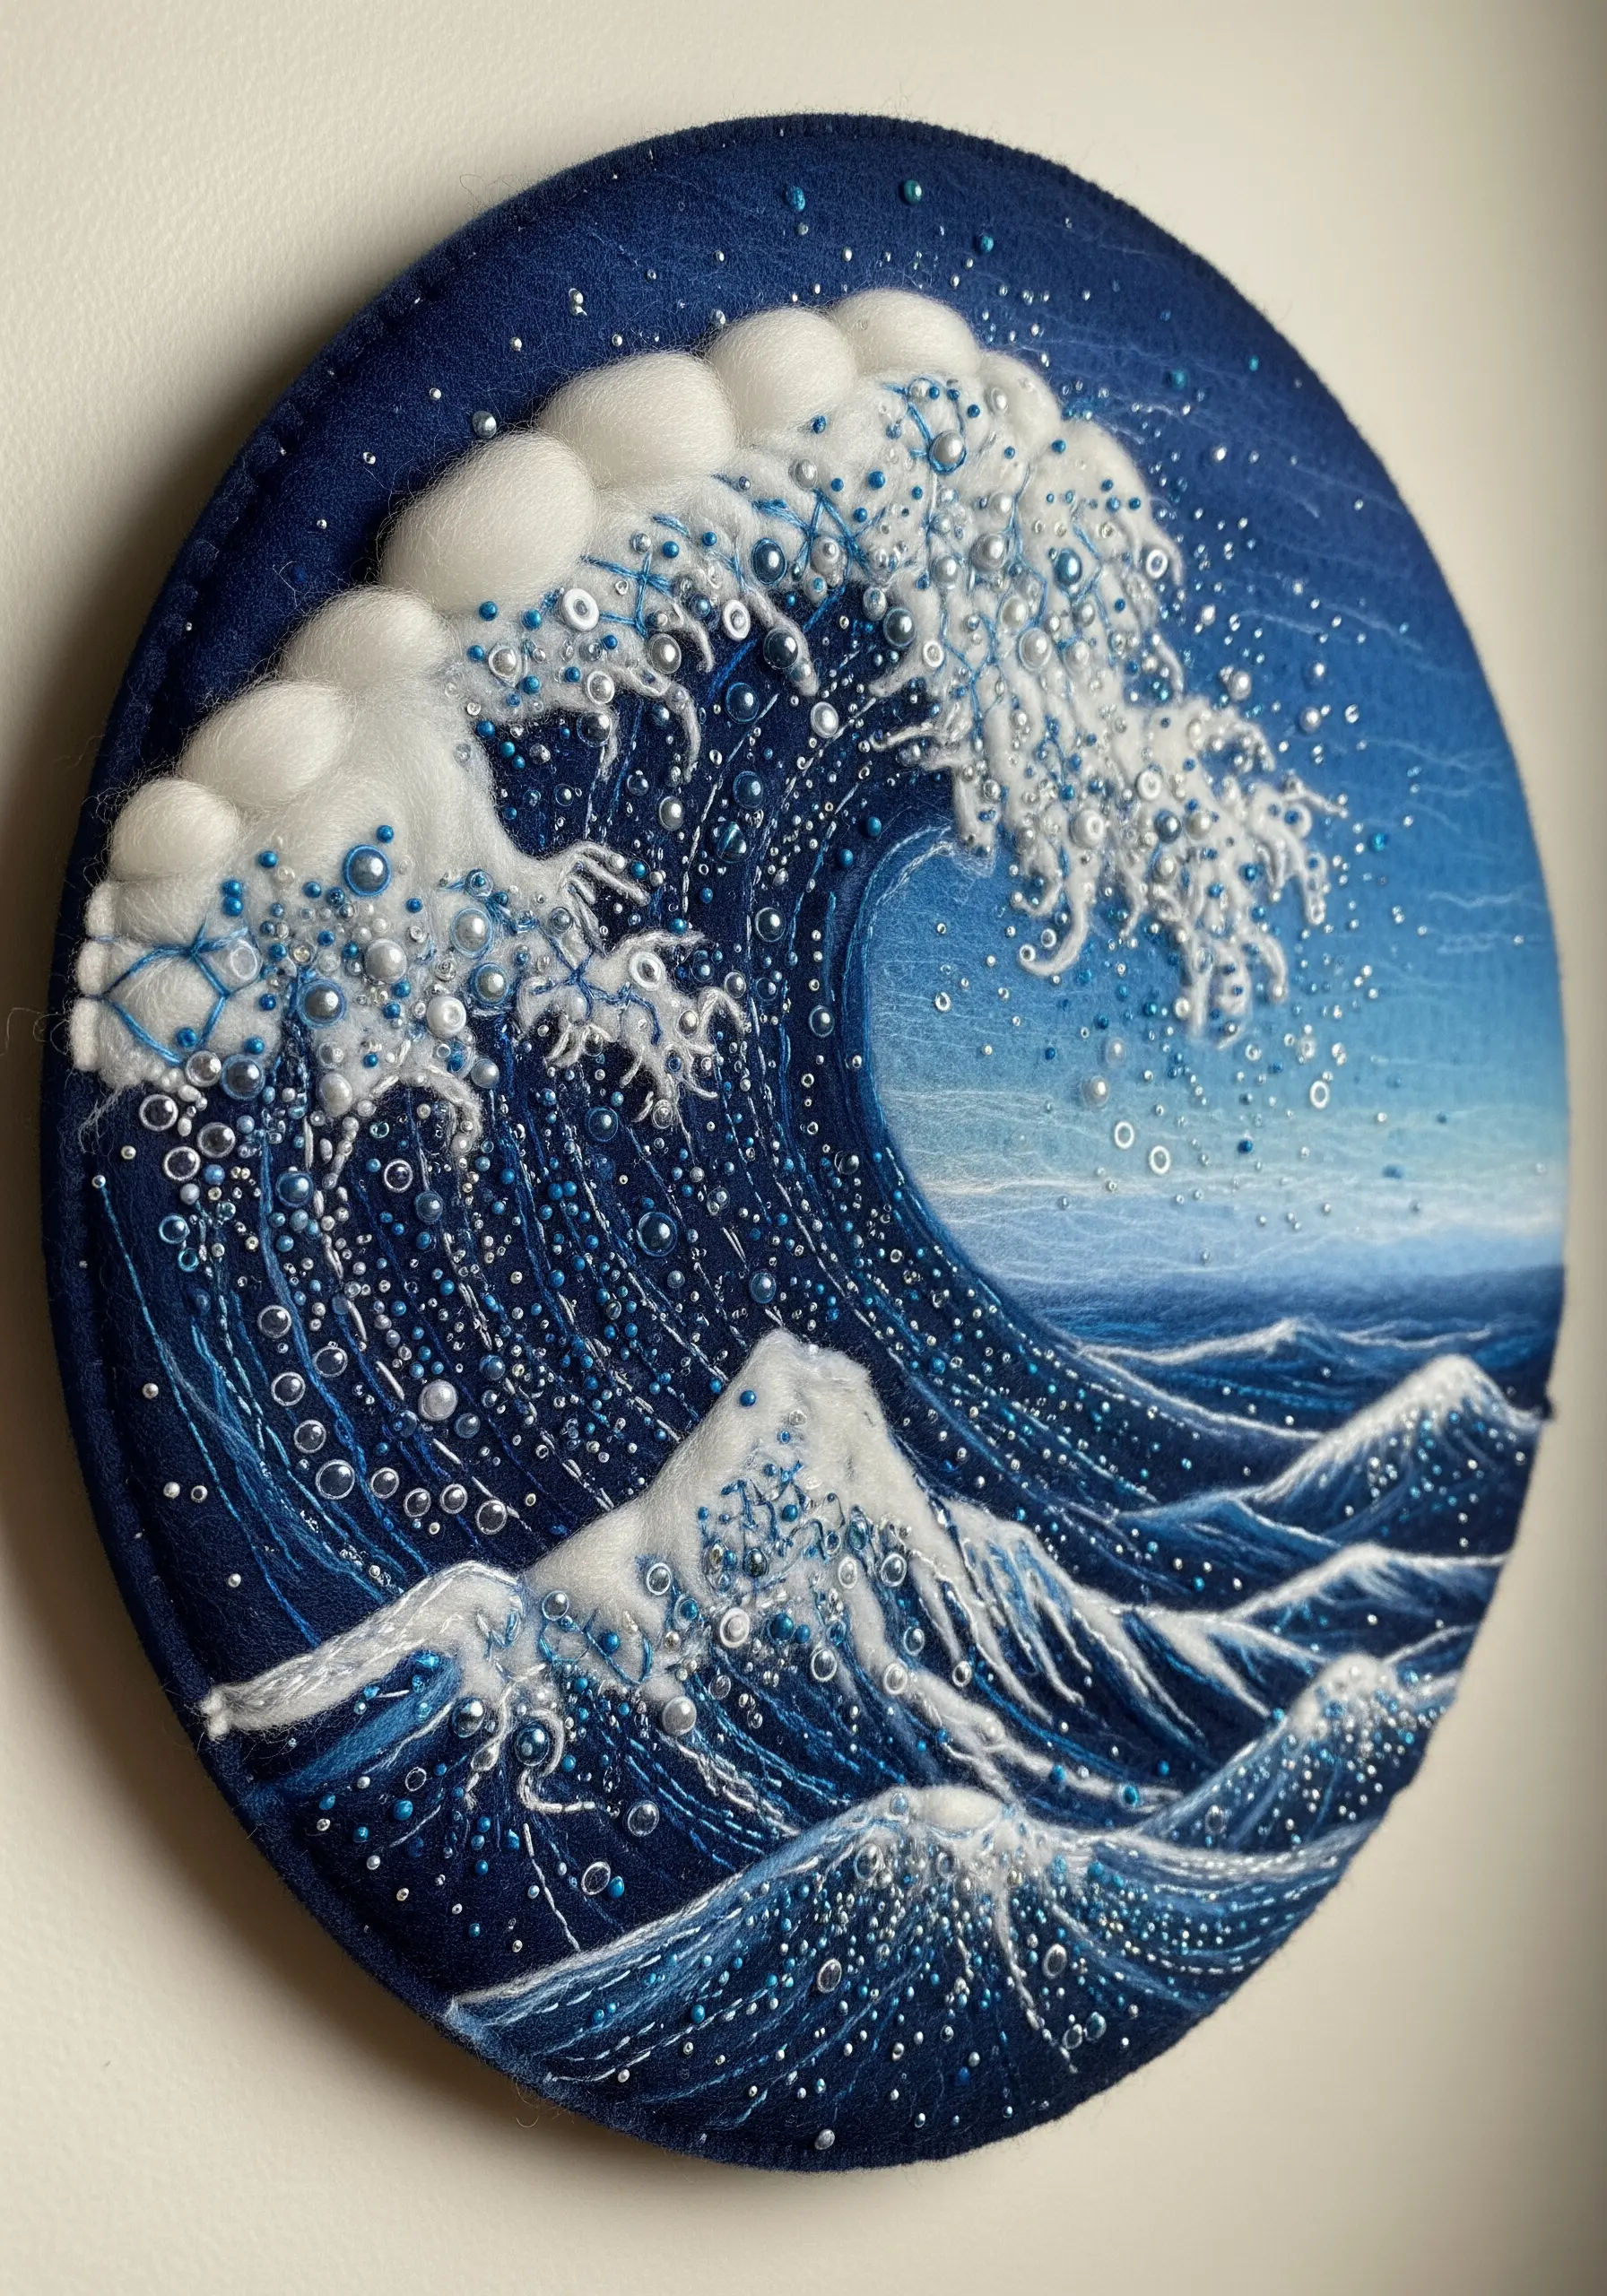
To capture the light, airy texture of sea foam, which is difficult to replicate with thread alone, turn to wool roving.
Apply small tufts of white or off-white wool directly to your background fabric using a felting needle.
This technique allows you to build up soft, three-dimensional forms that perfectly mimic the frothy crest of a wave.
Contrast this ethereal softness with the sparkle of tiny seed beads and the smooth, directional satin stitches of the water for a dynamic and hyperrealistic effect.
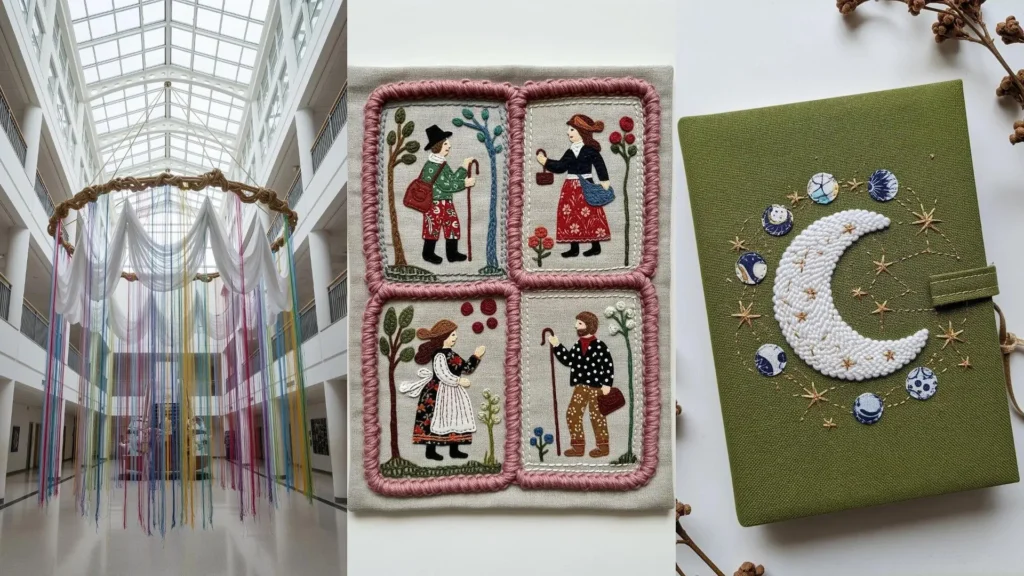
21. Use Architecture as Your Canvas for a Fiber Installation
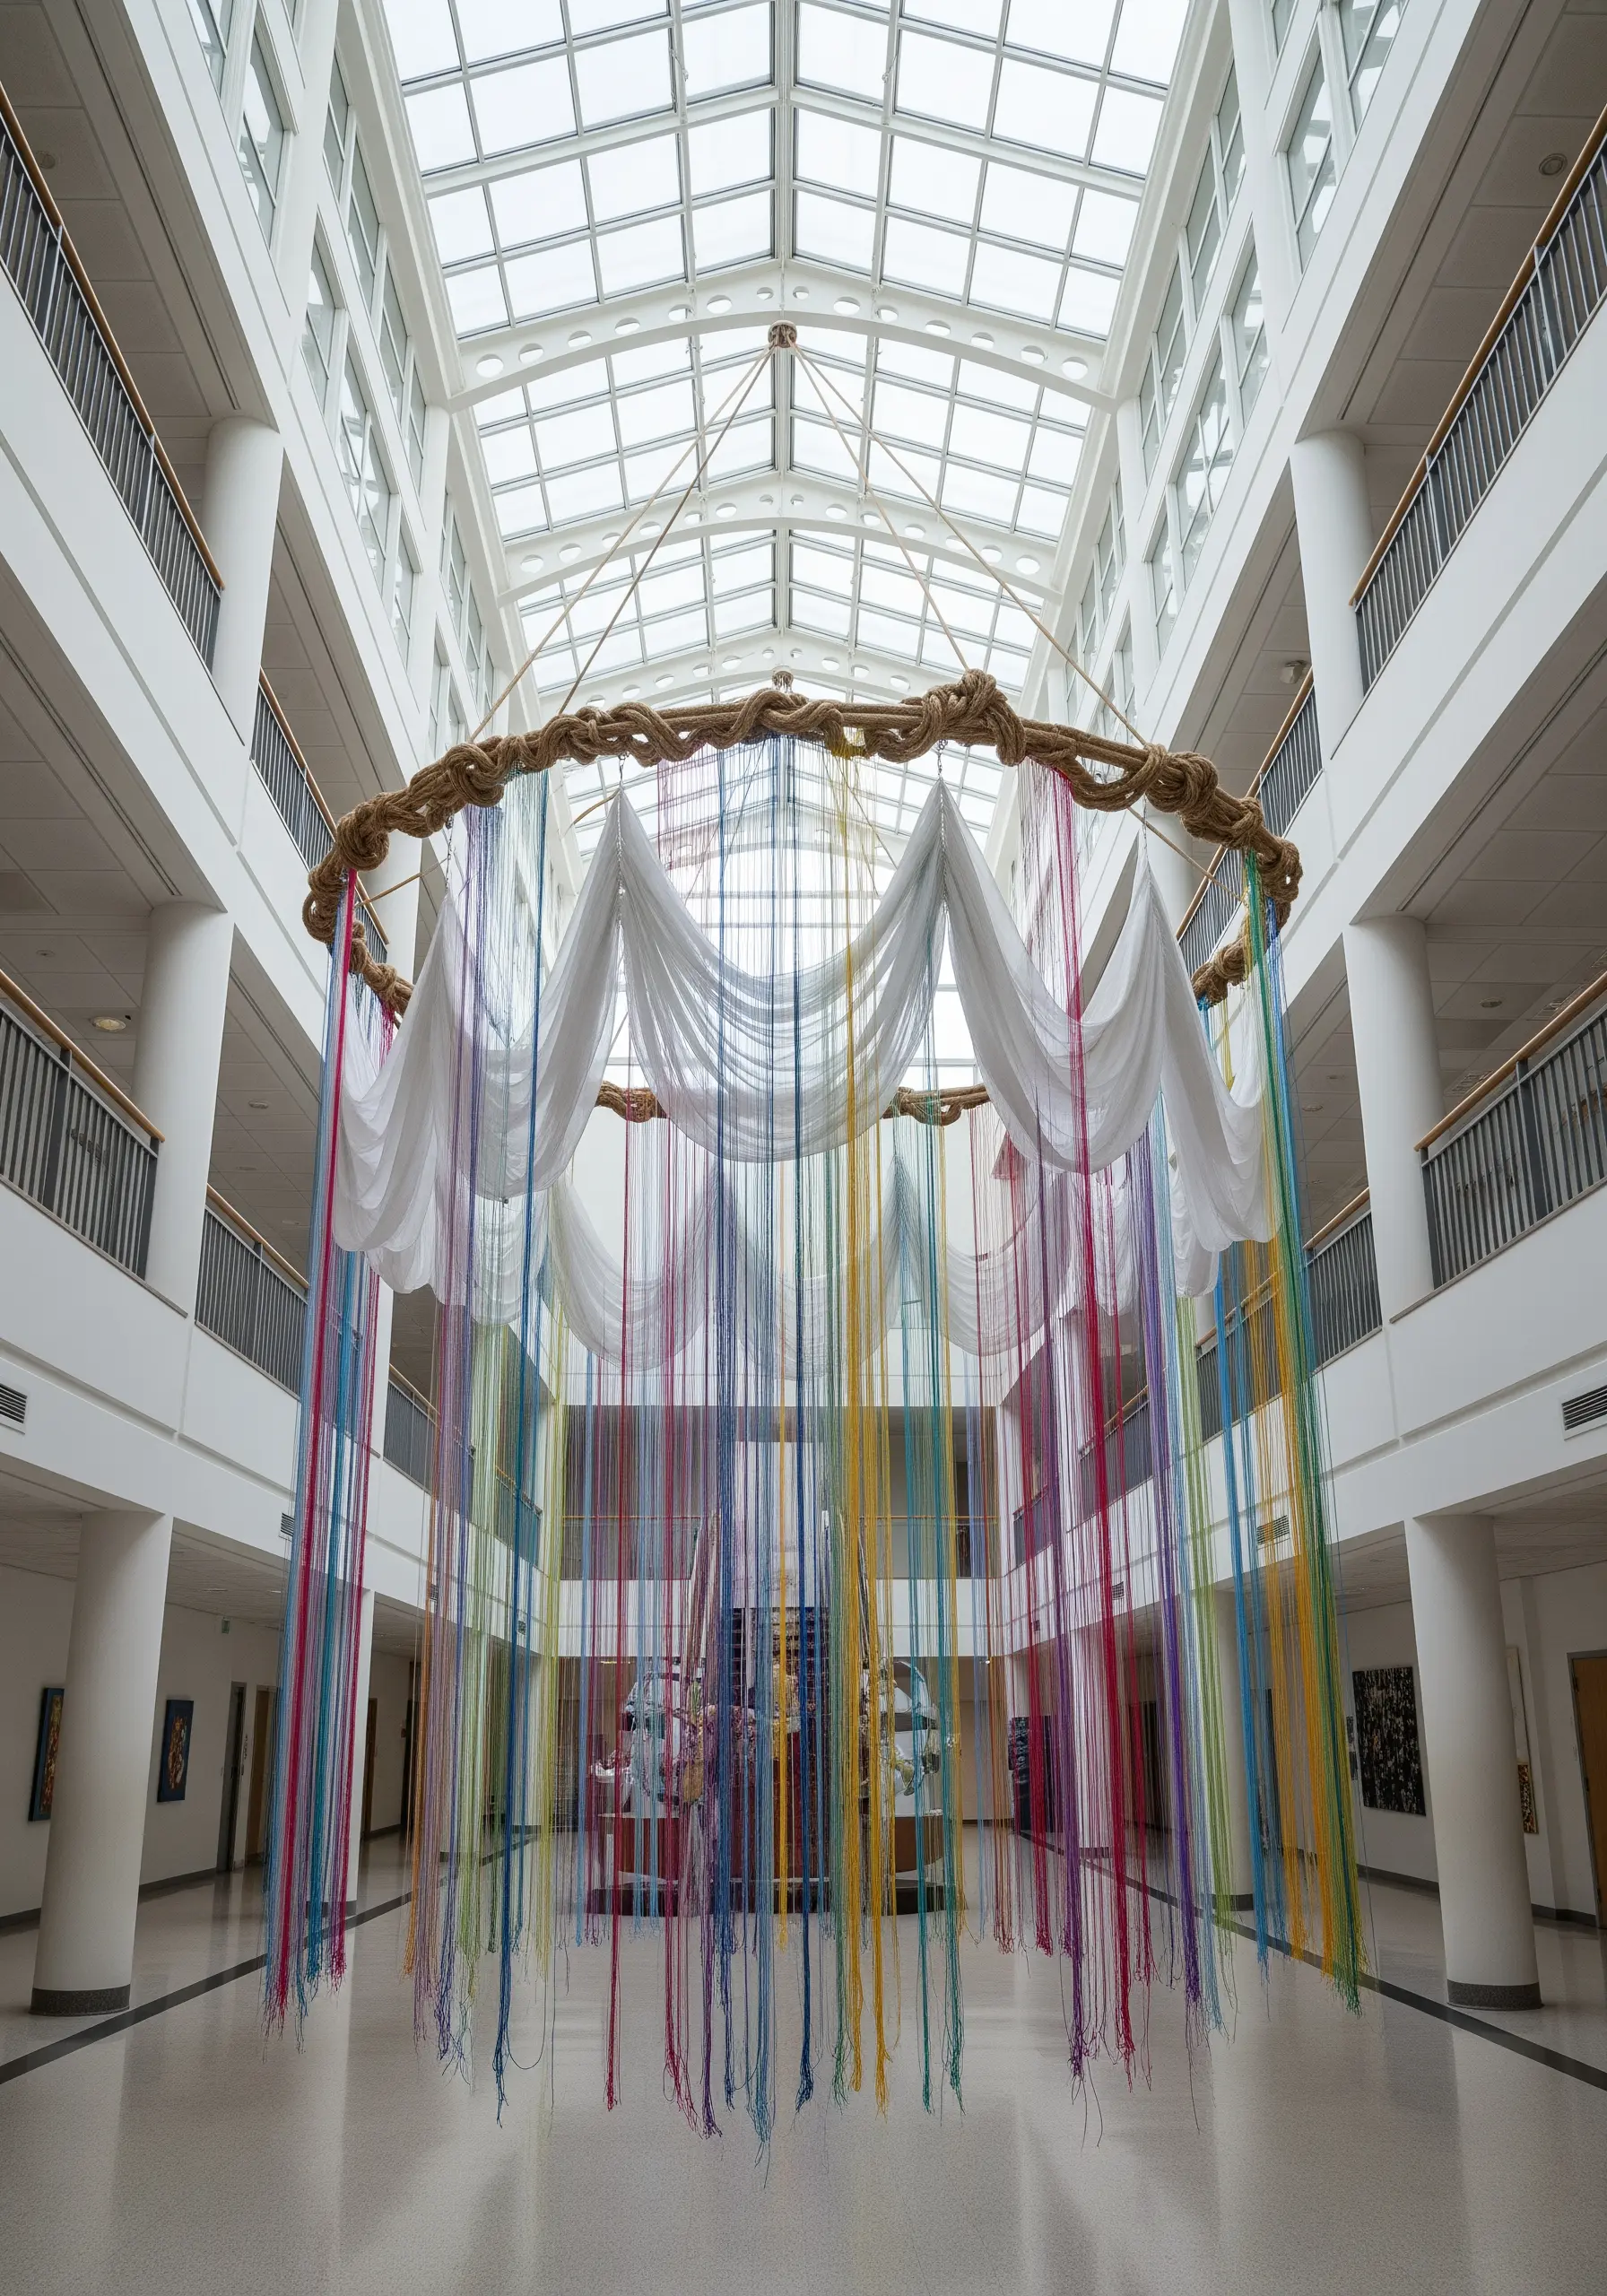
Elevate your fiber art by taking it beyond the frame and into three-dimensional space.
Instead of a hoop or canvas, use the architecture of a room as your structure.
Suspend a large hoop or frame from a high ceiling and drape long, cascading strands of colorful yarn and bolts of sheer fabric from it.
By allowing gravity to shape the materials, you create an immersive installation that interacts with light, air, and the viewer’s movement.
This transforms everyday materials into a breathtaking dazzling fiber art installation.
22. Create a Minimalist Study of Pure Texture
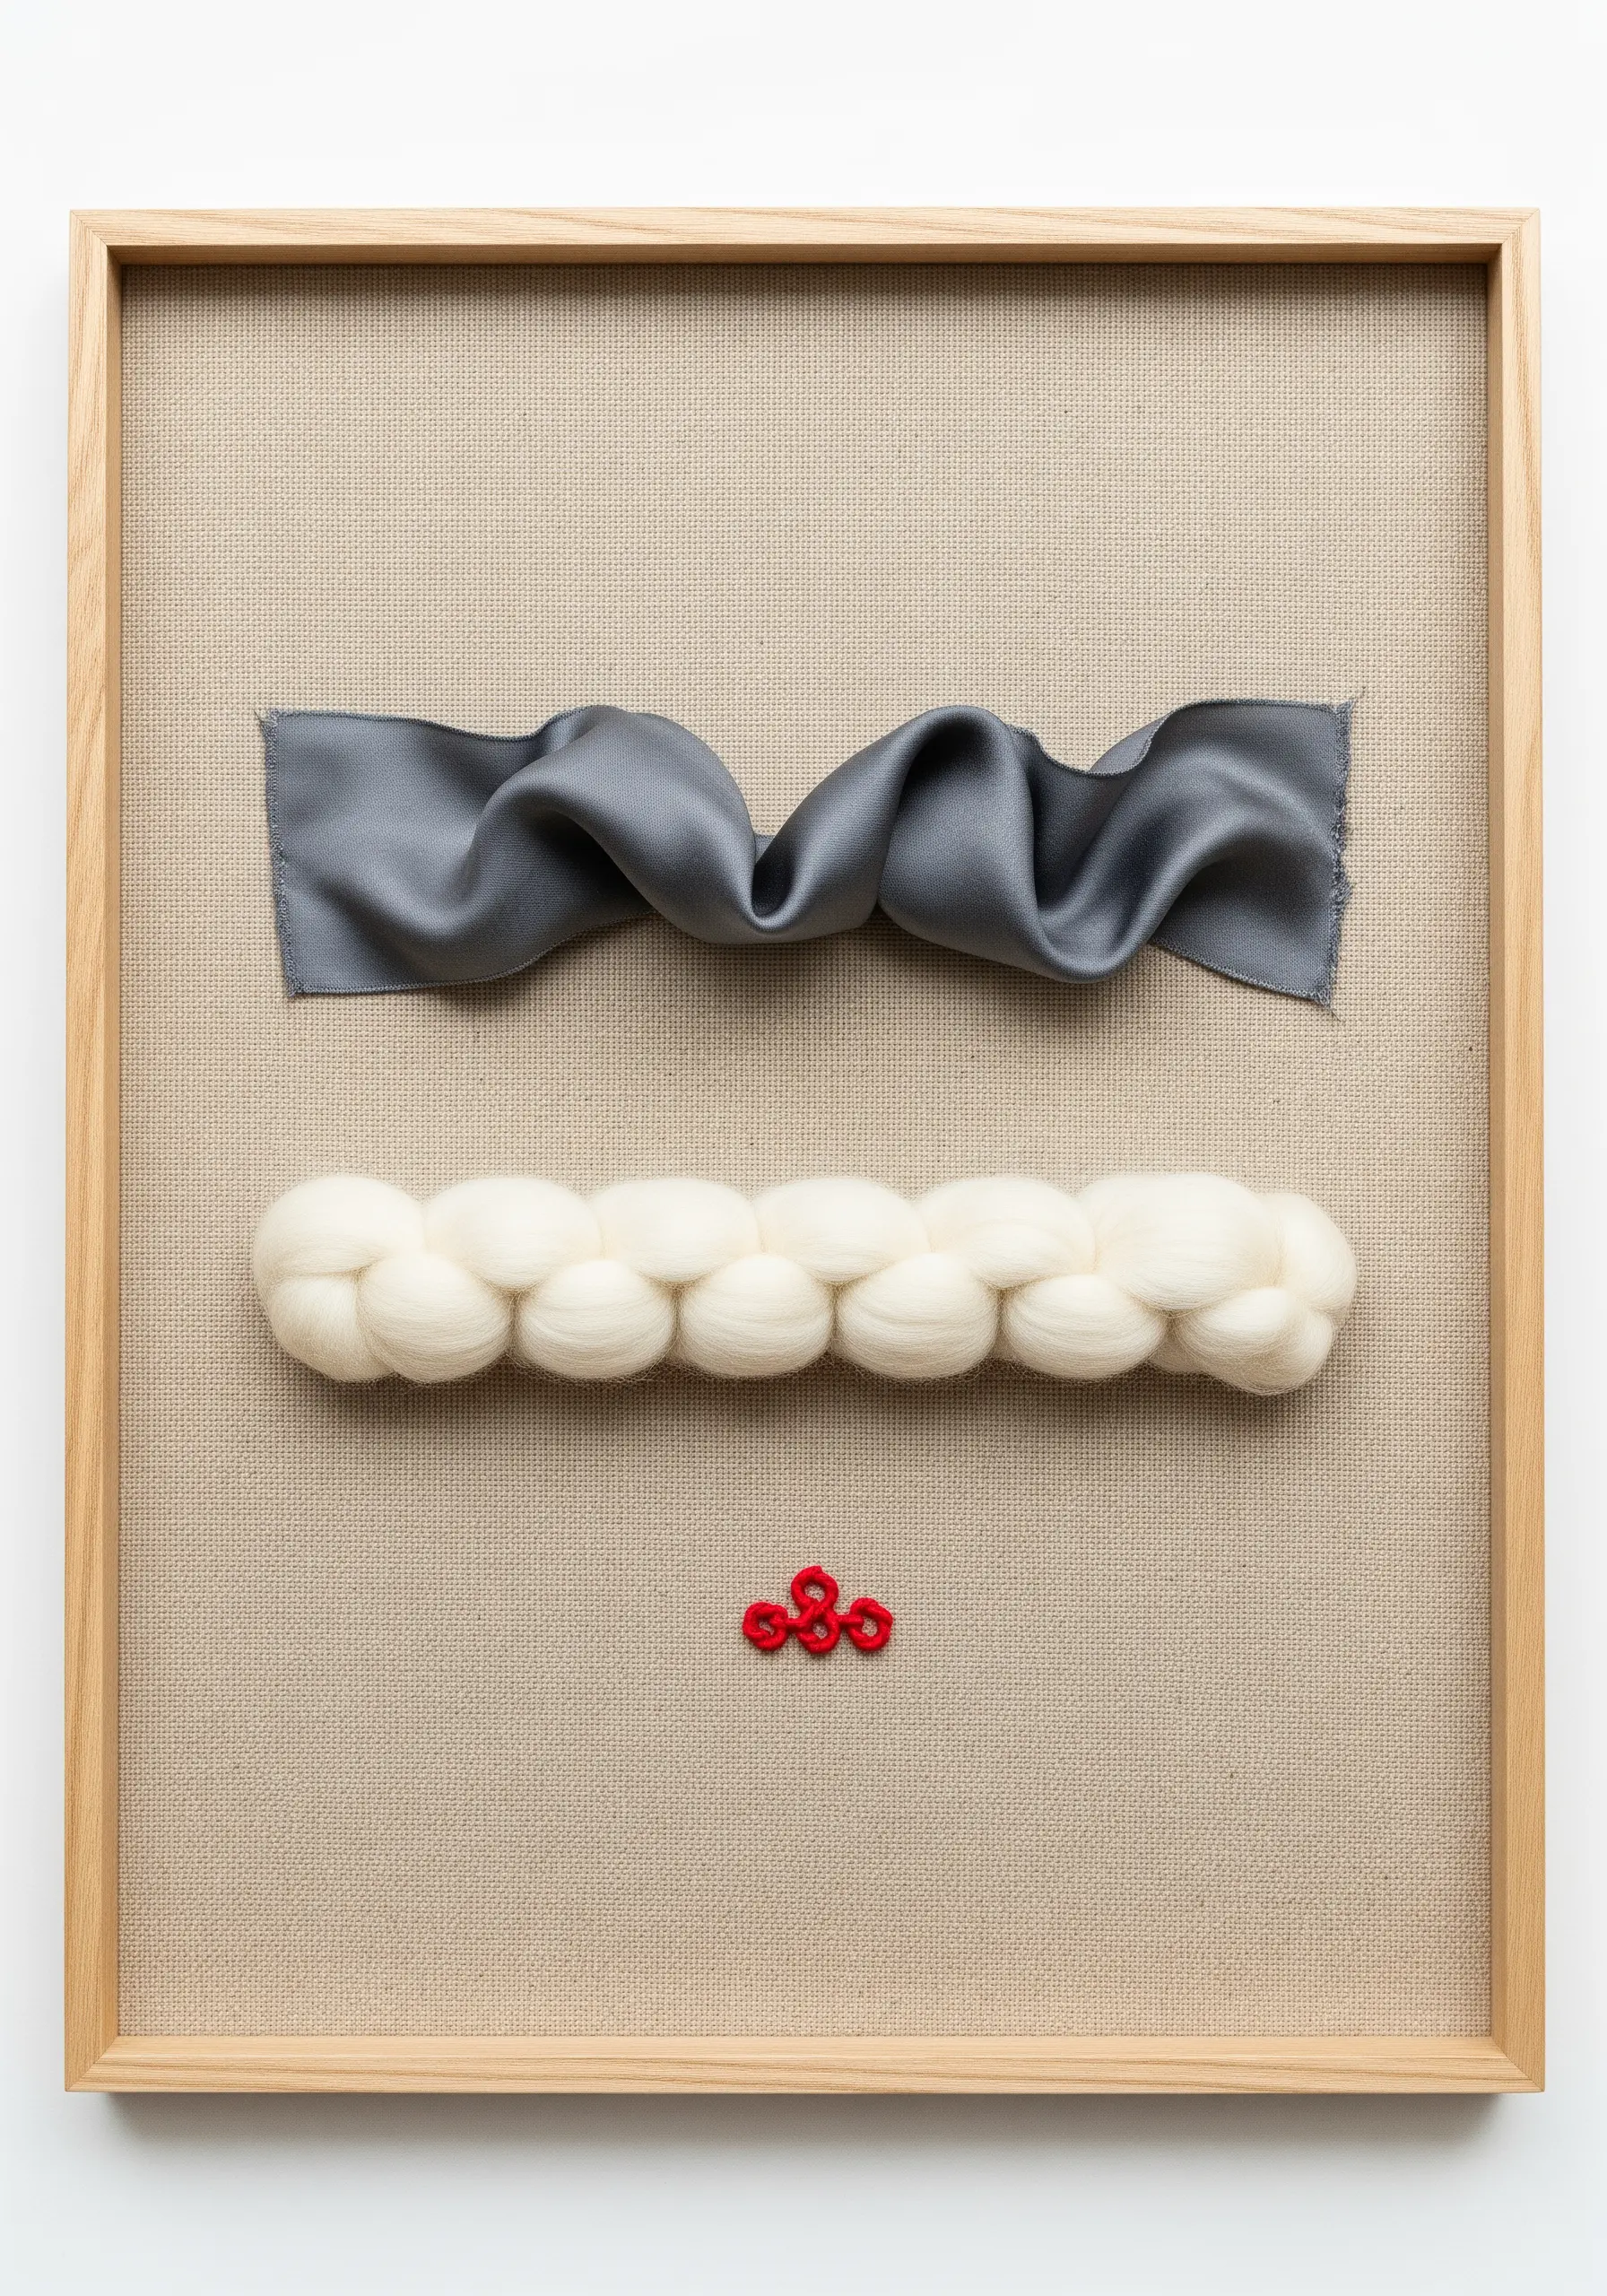
Sometimes the most powerful statement comes from simplicity.
Challenge yourself to create a composition that focuses exclusively on the inherent beauty of your materials.
On a neutral background like a linen canvas, arrange just three distinct textural elements.
Consider the contrast between the liquid drape of a silk ribbon, the rustic bulk of a wool braid, and the precise, graphic mark of a few small stitches.
By isolating these elements in a clean, minimalist layout, you highlight their unique qualities and create a sophisticated meditation on texture.
23. Blend 2D Collage with 3D Yarn Sculpting
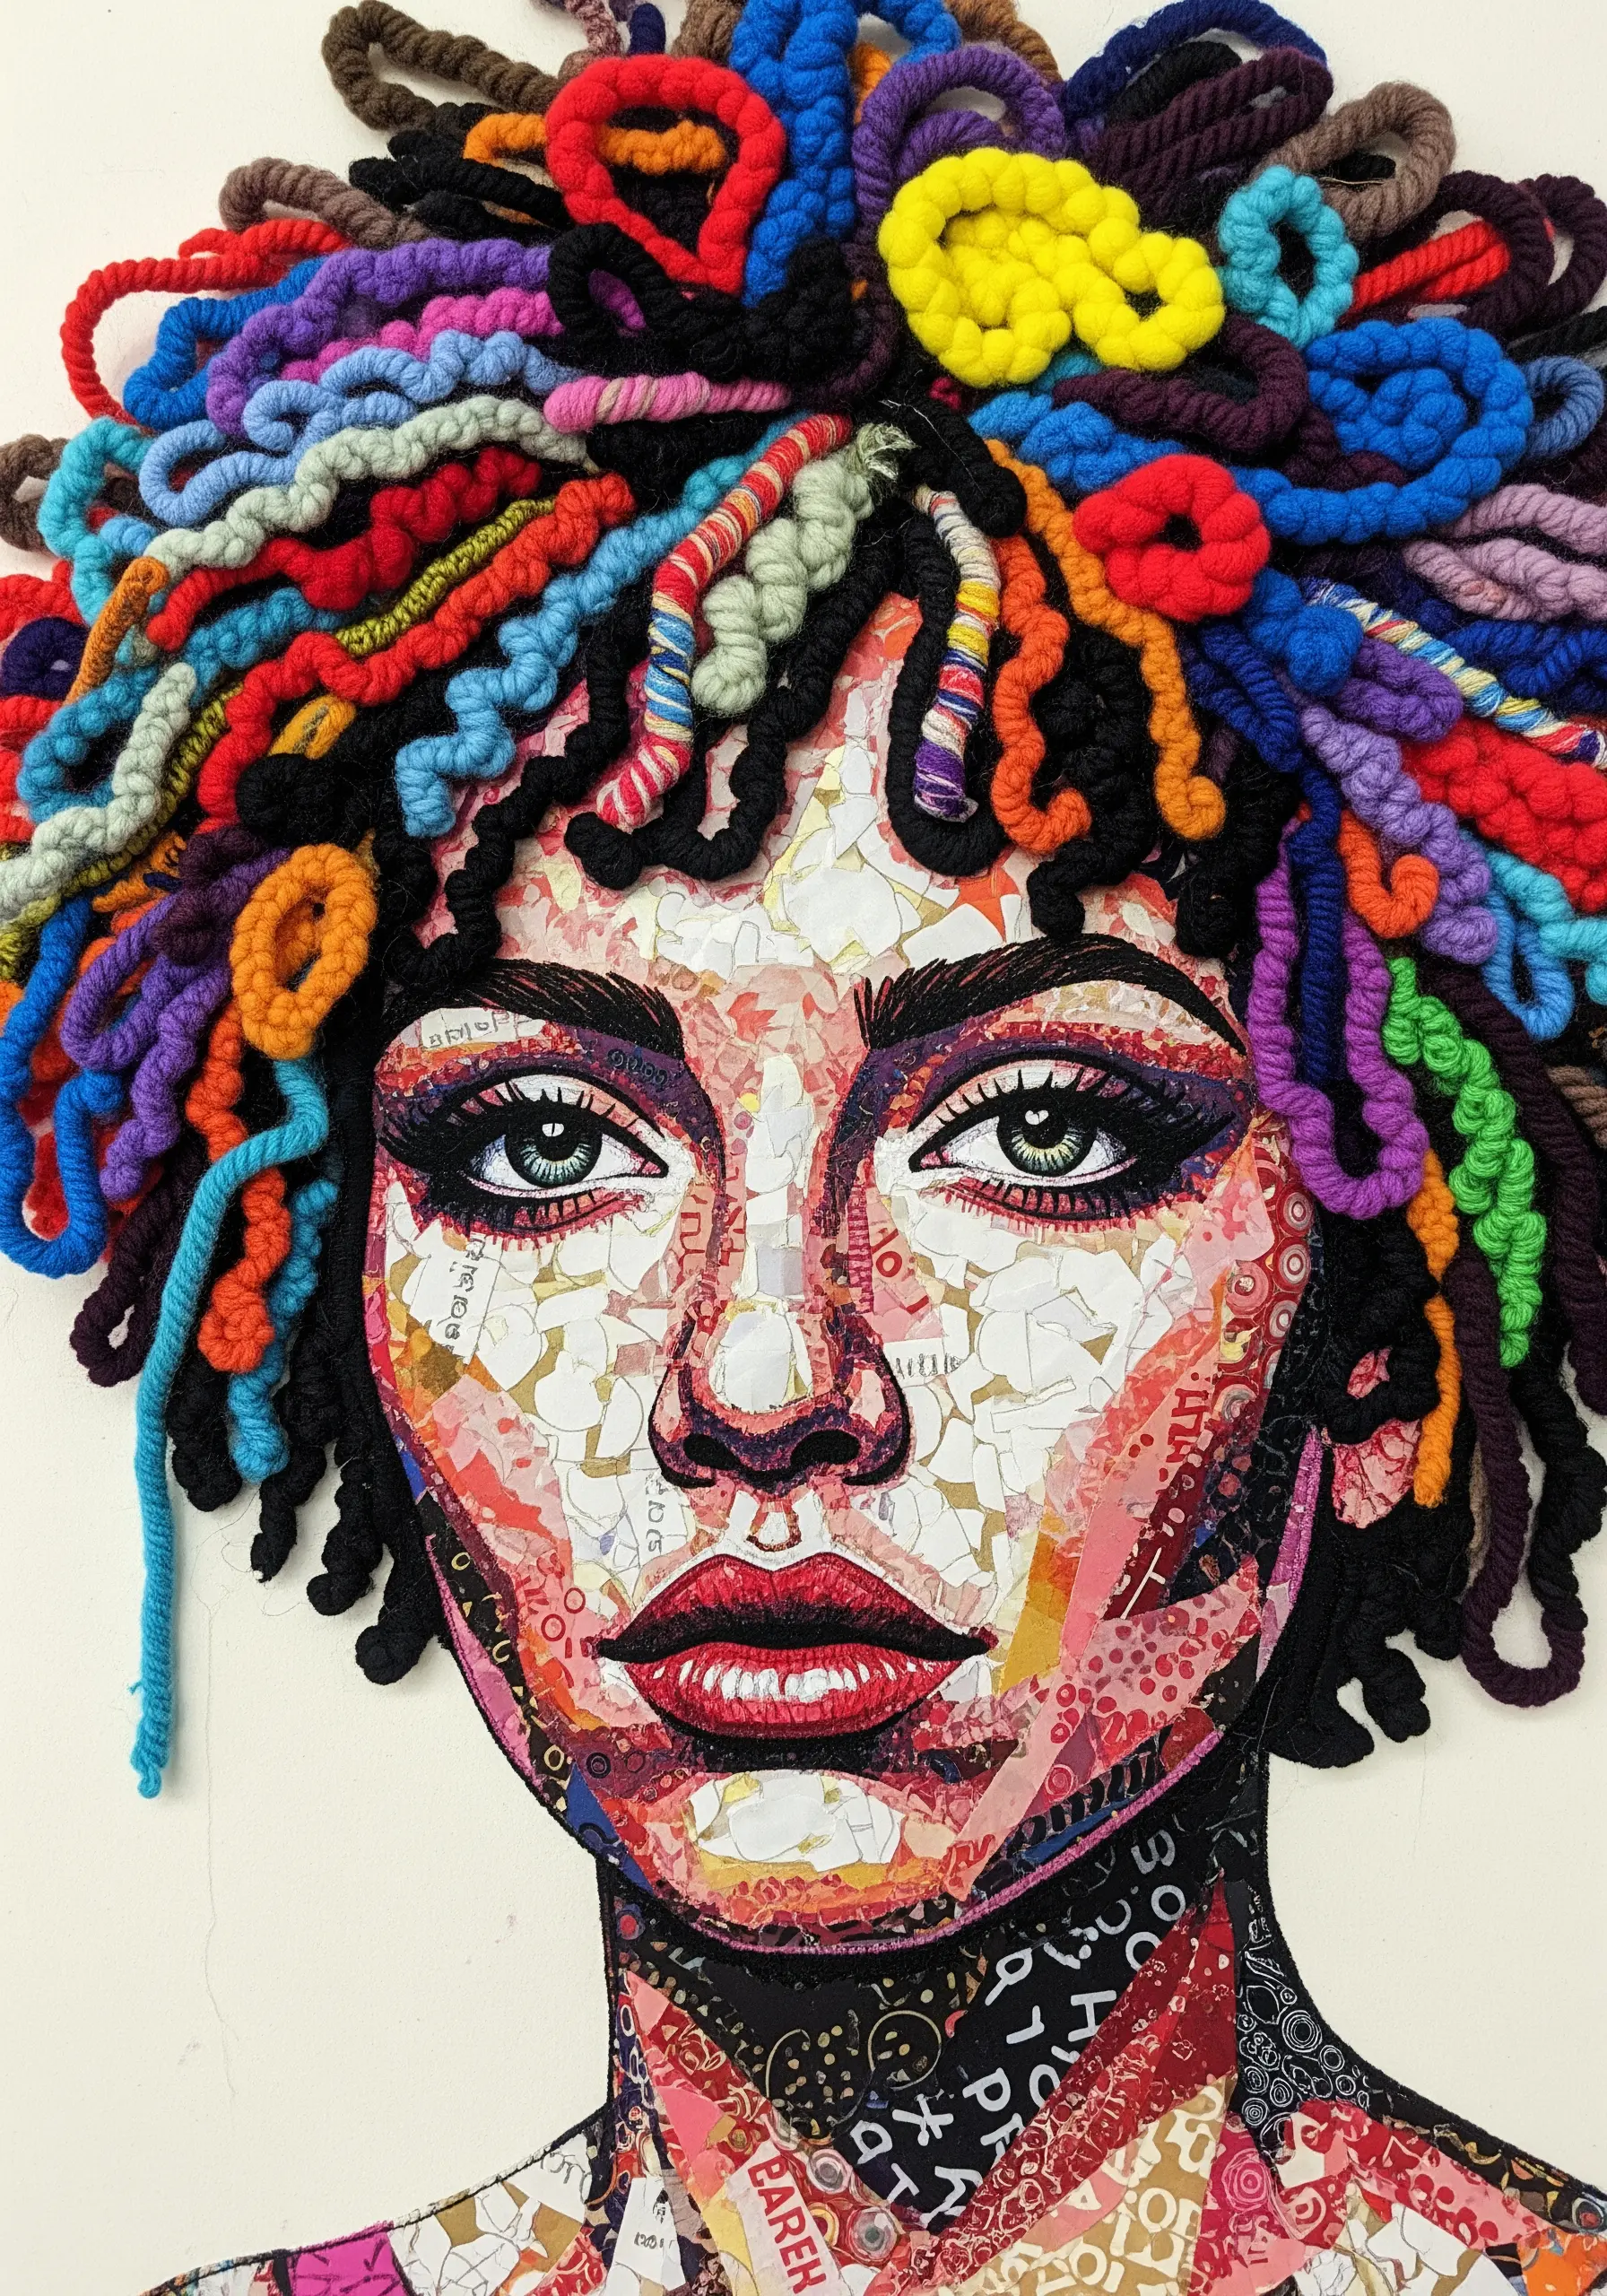
Create a portrait that leaps off the page by combining flat and dimensional media.
Use paper collage to build the facial features, layering torn paper to create nuanced shading and form—a technique that provides texture without bulk.
Then, for a feature like hair, switch to a fully three-dimensional material.
Arrange, coil, and secure chunky, colorful yarns to create sculptural locks with real volume and depth.
This dramatic juxtaposition of flat paper and high-relief fiber creates a dynamic, tactile piece that begs to be seen up close.
24. Embroider in the Round with Temari Balls
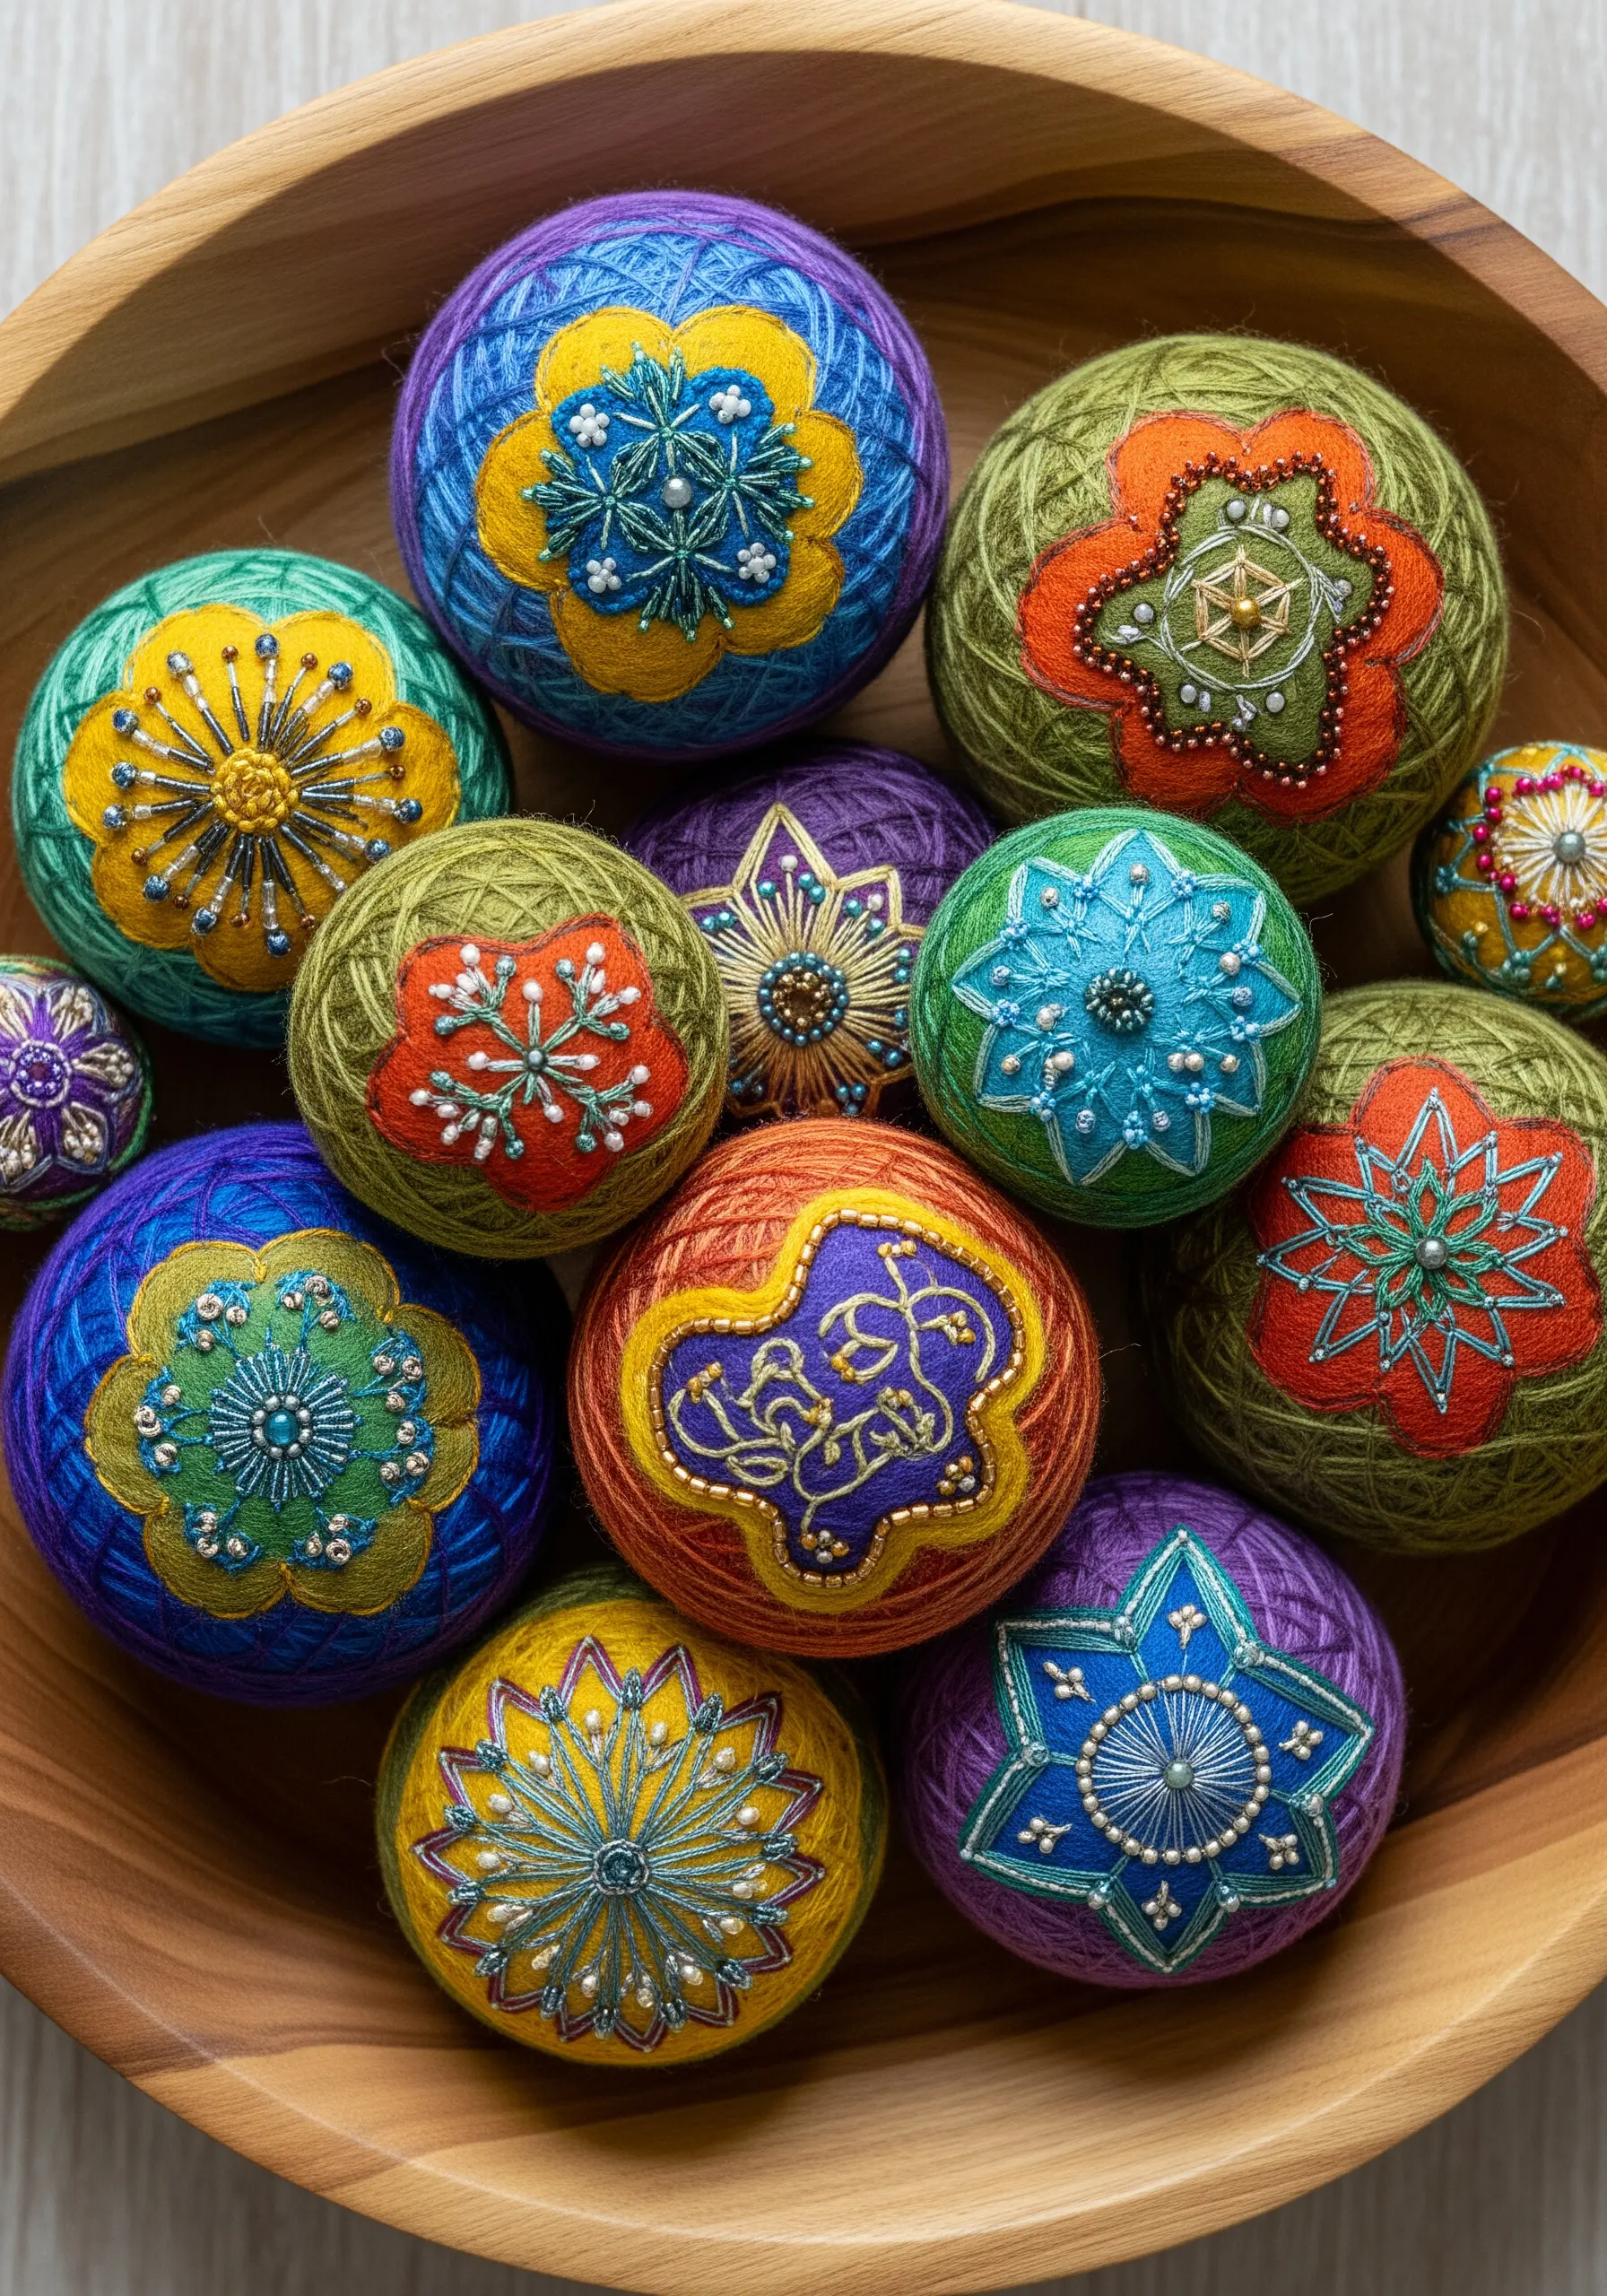
Explore a new dimension of embroidery with the traditional Japanese art of Temari.
The process begins by creating a perfectly round and dense base, typically by wrapping a core with layers of yarn and then a final layer of sewing thread.
Using pins and guide threads, you divide the sphere into precise geometric sections—like an orange.
These guides become the framework for building intricate, symmetrical patterns with embroidery floss, metallic threads, and beads.
It is a meditative practice that results in a beautiful, handheld work of art.
25. Contrast Crisp Appliqué with Soft Needle Felting
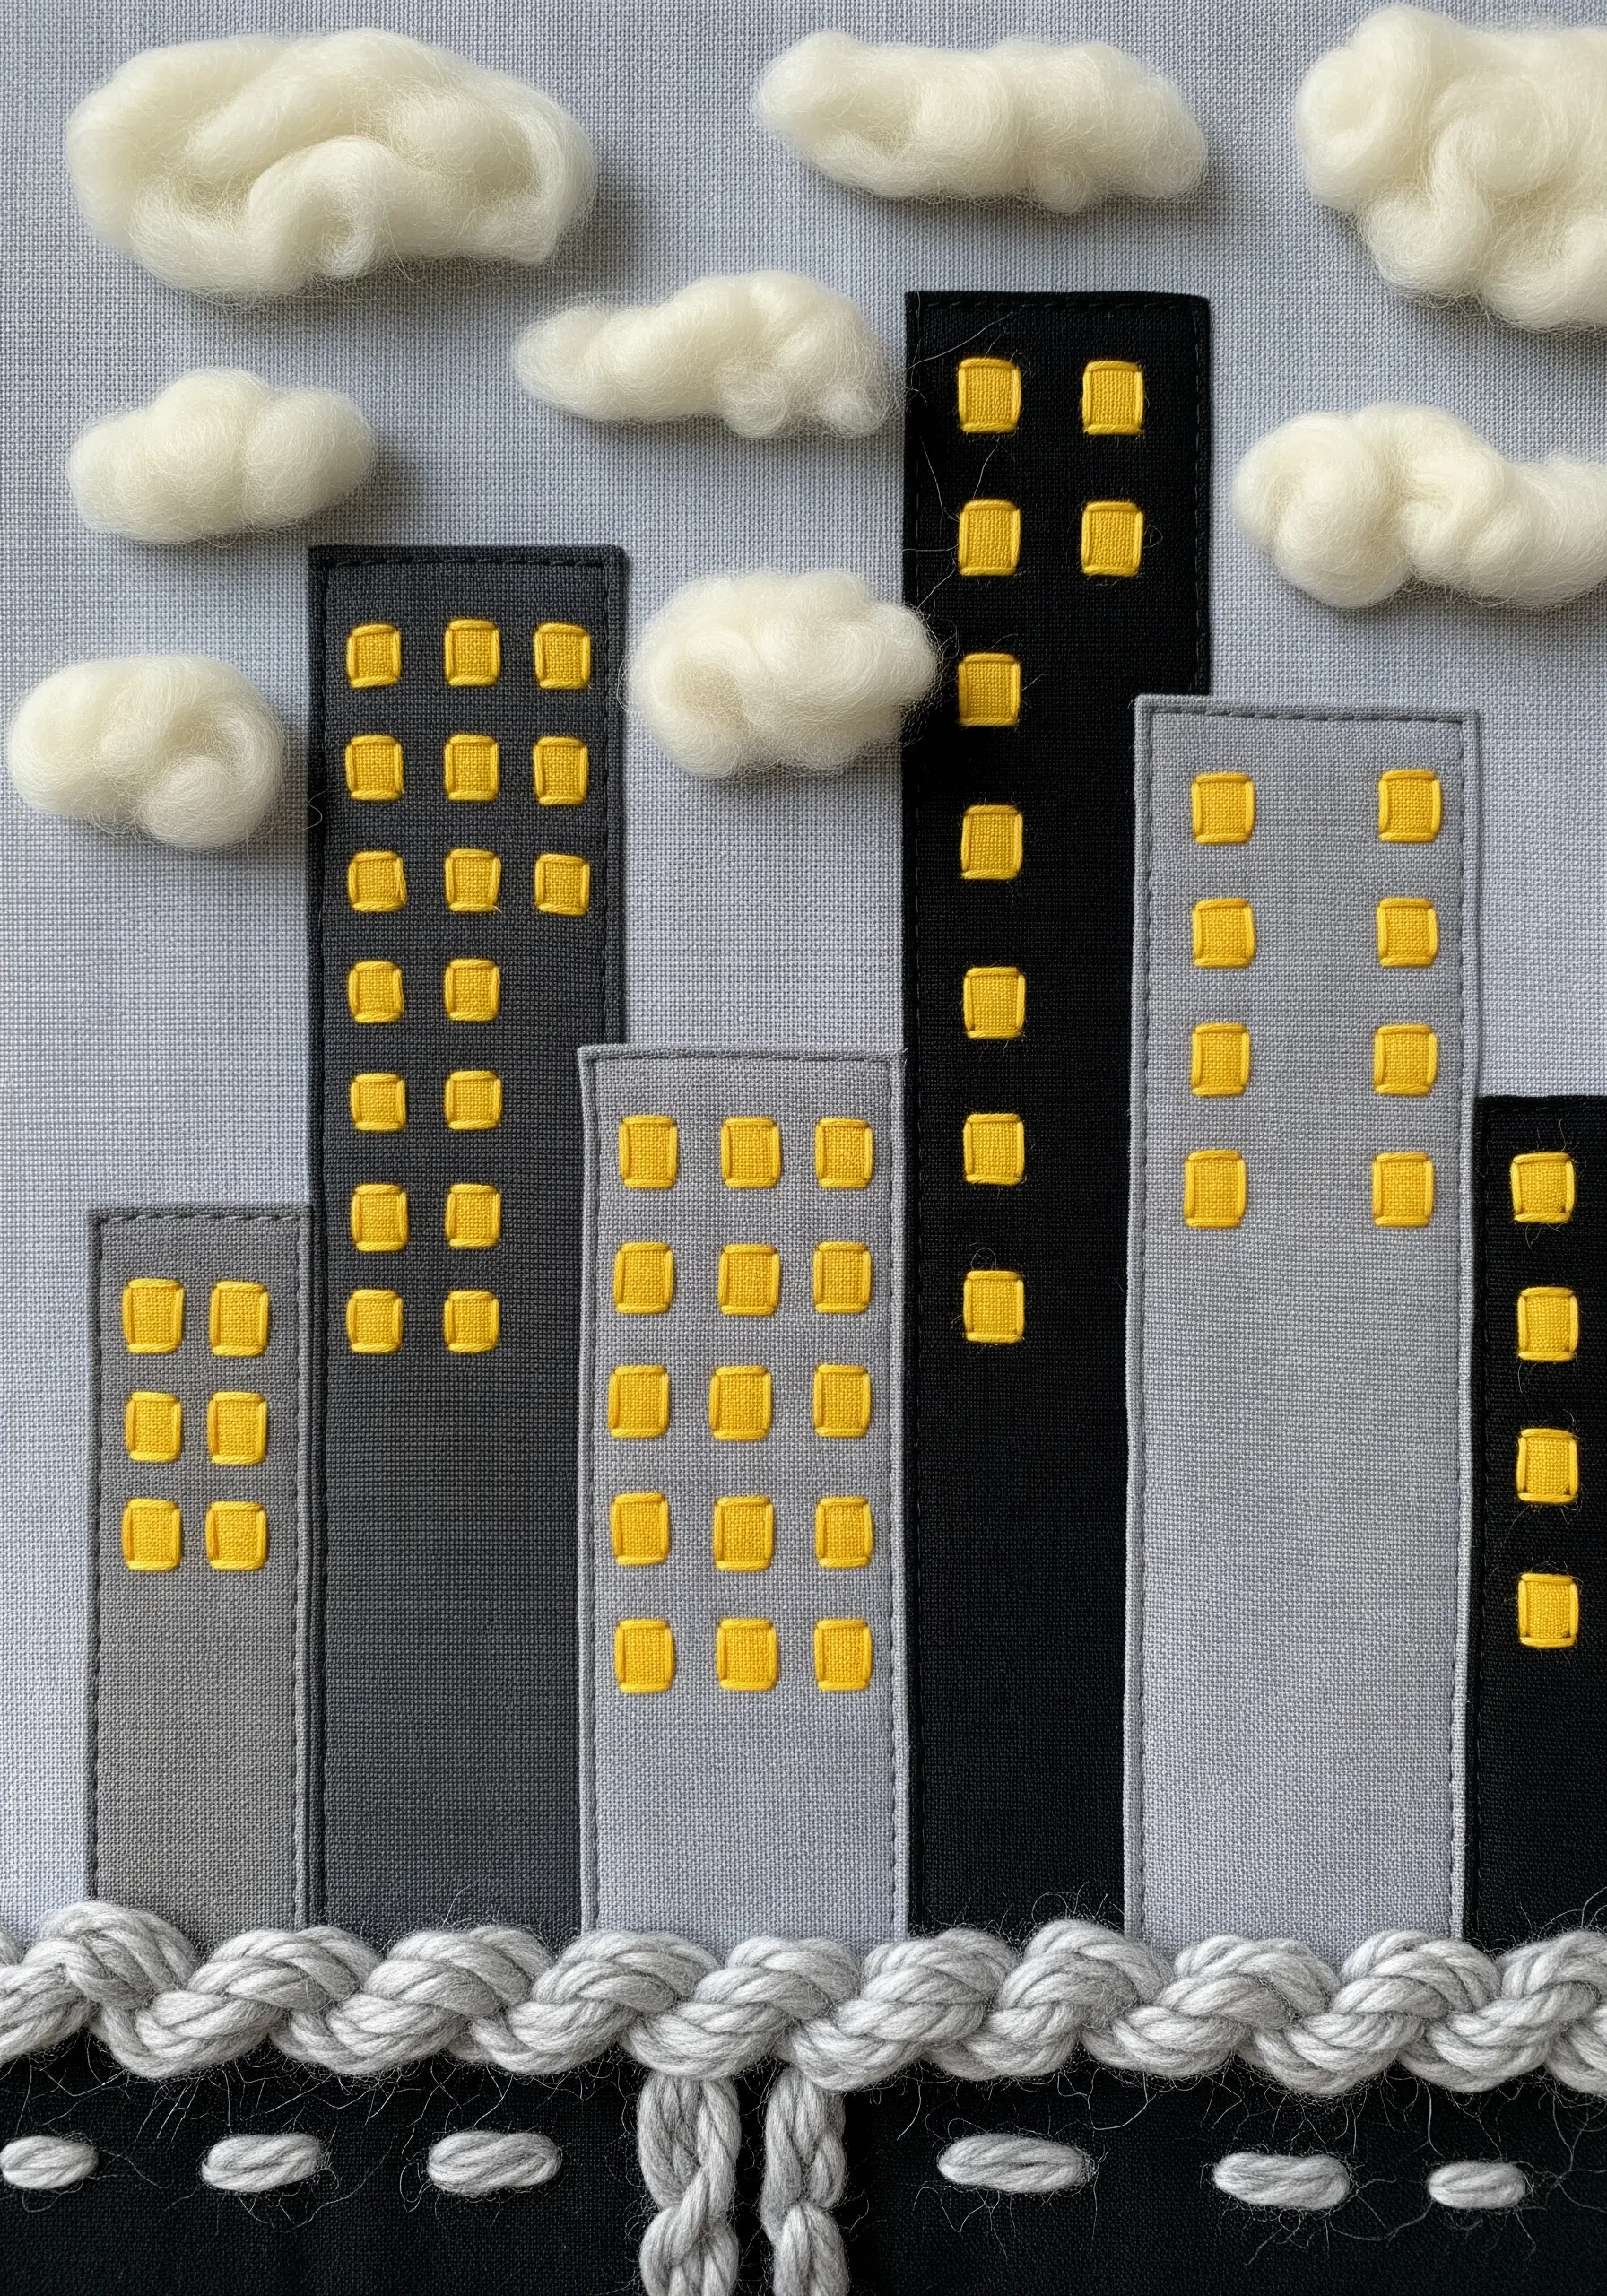
To create a compelling scene that includes both architecture and nature, choose materials that enhance their inherent characteristics.
For the sharp, clean lines of buildings, use fabric appliqué, which can be cut precisely and secured with a neat edge stitch.
For organic, diffuse elements like clouds, use needle-felting.
Applying soft tufts of wool roving with a felting needle allows you to build up gentle, blended shapes with no hard edges.
This purposeful contrast between hard-edged fabric and soft, sculptural wool makes the entire composition more dynamic and visually interesting, creating a modern thread landscape.


