

Perhaps you’ve mastered the satin stitch and your French knots are finally perfect, but you feel a creative plateau approaching. You’re ready for your work to say more, to feel more uniquely *yours*. It’s time to look beyond the thread.
Mixed media isn’t about complicating your process; it’s about expanding your creative language. It’s the intentional layering of texture and meaning, combining the familiar comfort of thread with the expressive potential of paint, paper, botanicals, and even photographs.
Here, you will find techniques that invite you to play, to experiment, and to see your needle and thread as a tool that can connect different worlds. Each idea is a starting point for art that is not just seen, but deeply felt—tactile, personal, and unlike any other.
1. Embroider on a Watercolor Wash

Begin by applying a soft watercolor wash to heavy, cold-press watercolor paper (at least 140 lb/300 gsm to prevent buckling).
Let the paper dry completely before you begin stitching; a damp surface will tear.
Use a sharp, sturdy needle to pierce the paper, creating your design with simple stitches like the running stitch or backstitch, which place minimal stress on the paper fibers.
This method creates an atmospheric background, allowing the clean lines of your thread—especially a metallic or silk one—to stand out with beautiful contrast.
Try adding tiny beads at the intersections of your stitches for a touch of refined sparkle.
2. Stitch into a Photograph

Transform a personal photograph by having it professionally printed onto canvas or fabric-backed paper.
Choose a high-contrast image, as the thread will have the most impact when highlighting specific details against a simpler background.
Use satin stitch to fill in areas with vibrant, solid color, creating a surreal focal point that draws the eye.
This technique adds a layer of tactile memory to a visual one, turning a flat image into a dimensional story.
Frame the final piece without glass to preserve the texture and let the threadwork shine.
3. Create a Stitched Collage Journal
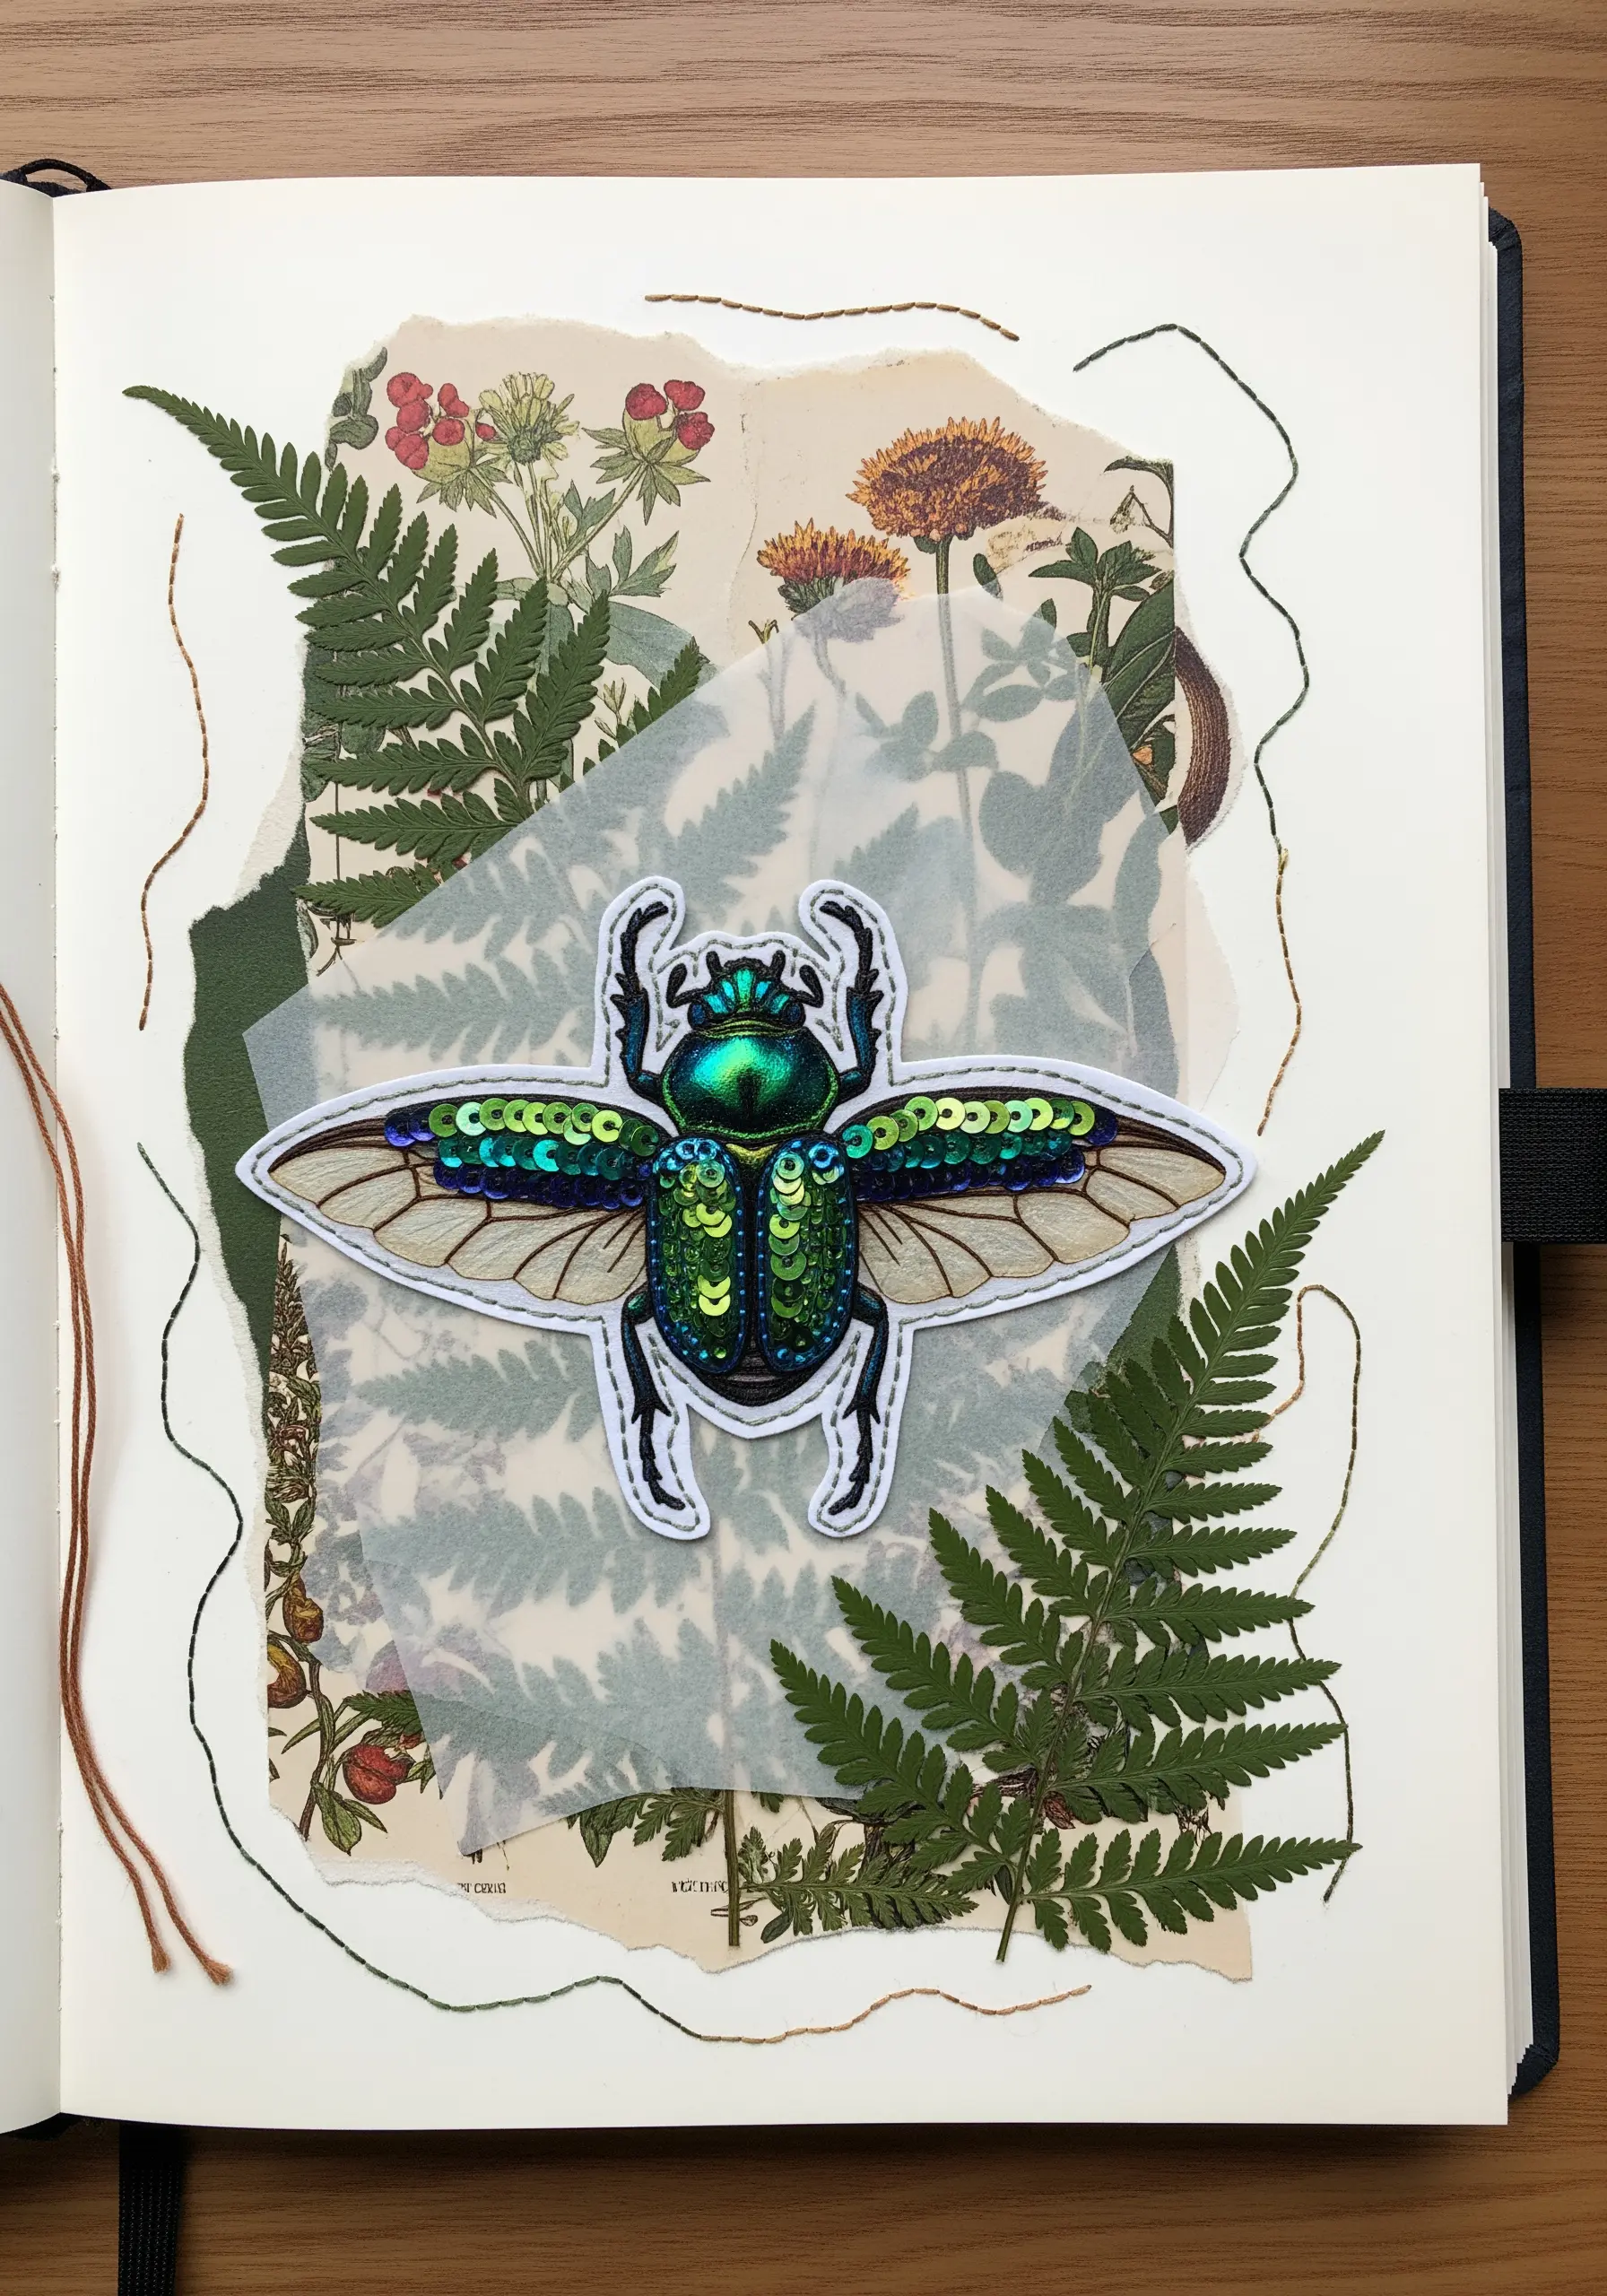
Elevate your art journaling by creating a mixed-media collage base before you stitch.
Layer torn papers, pressed botanicals, and delicate fabrics, securing them with a light application of archival glue.
Once your collage is set, use simple, organic stitches like a wandering stem stitch or running stitch to unify the different elements and add a sense of movement.
The embroidery acts as a final drawing layer, connecting disparate textures and images into a cohesive, personal narrative.
Don’t stitch through bulky items; instead, let your thread meander around them to create definition.
4. Sculpt with High-Relief Textures
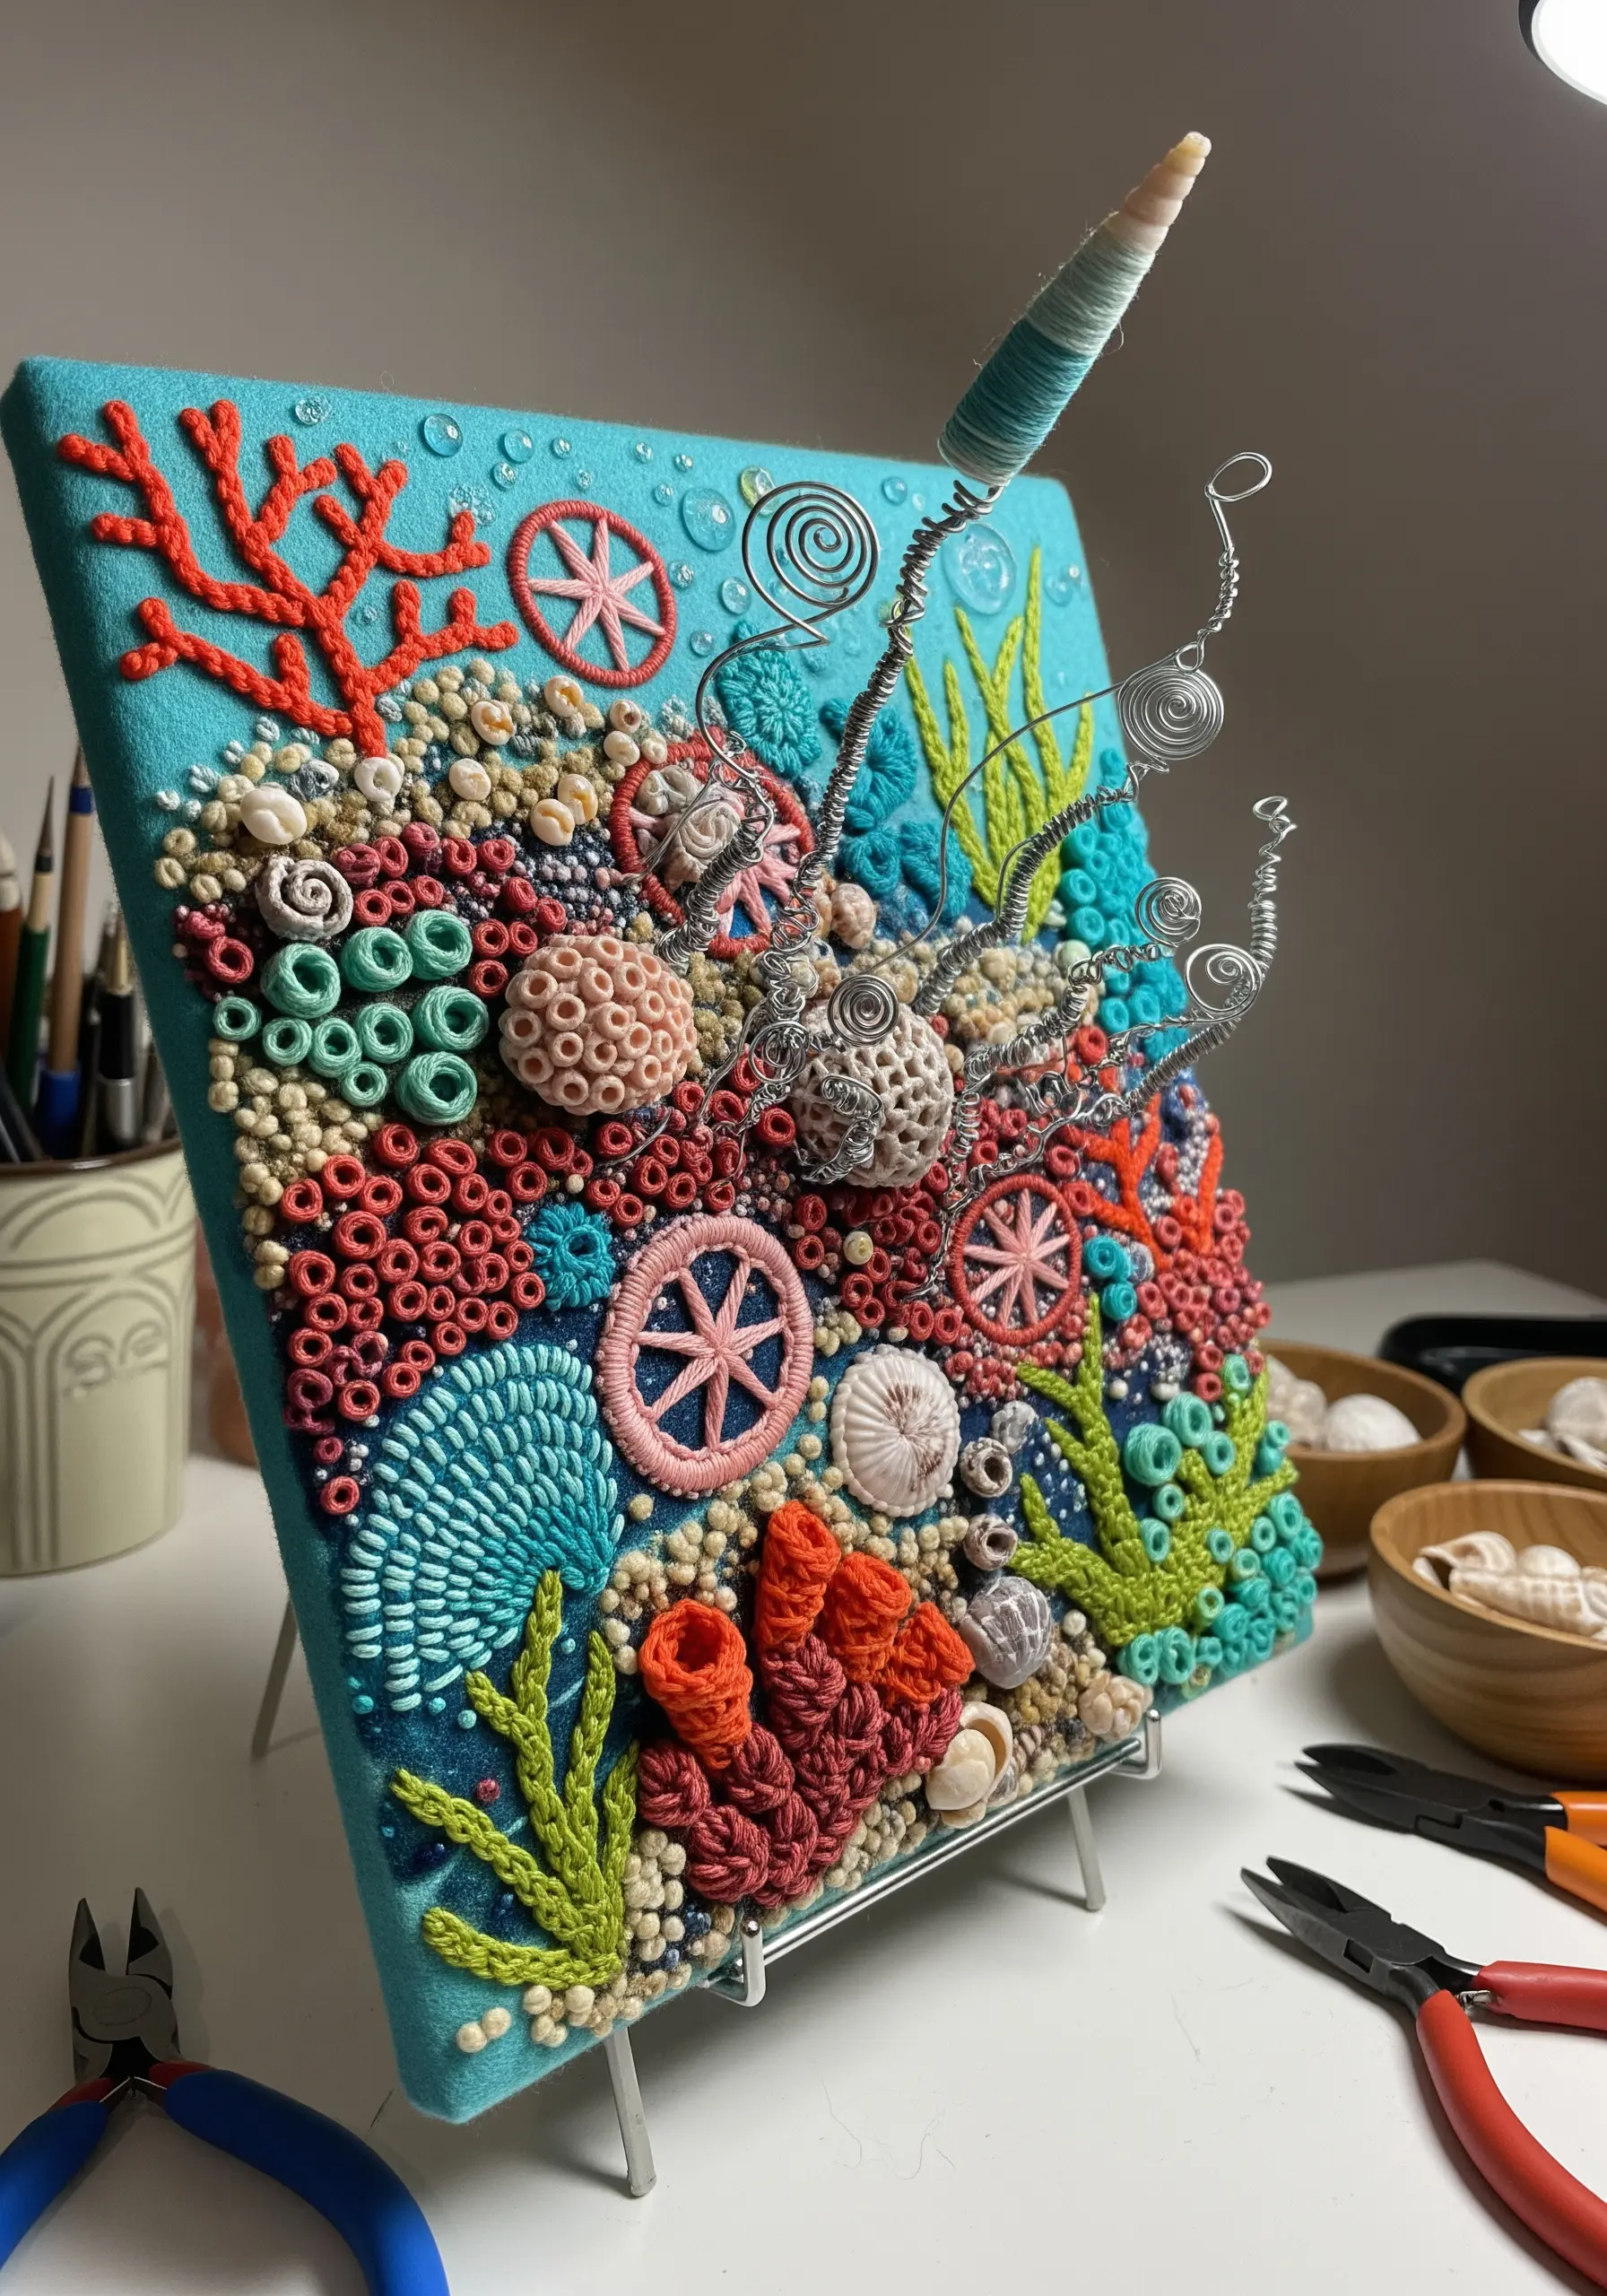
Move beyond flat stitches and build a truly three-dimensional surface by combining traditional embroidery with sculptural elements.
Use dense clusters of French knots for a pebbled effect, couch thick yarn for bold outlines, and integrate beads, wire, or real seashells directly into your design.
This technique is about creating a rich, tactile landscape that invites touch.
Work on a tightly stretched, heavy-duty fabric like canvas or felt mounted on a frame to support the weight of the embellishments.
Varying the height and texture of your elements is key to achieving dynamic, sculptural embroidery effects.
5. Weave and Stitch Painted Paper
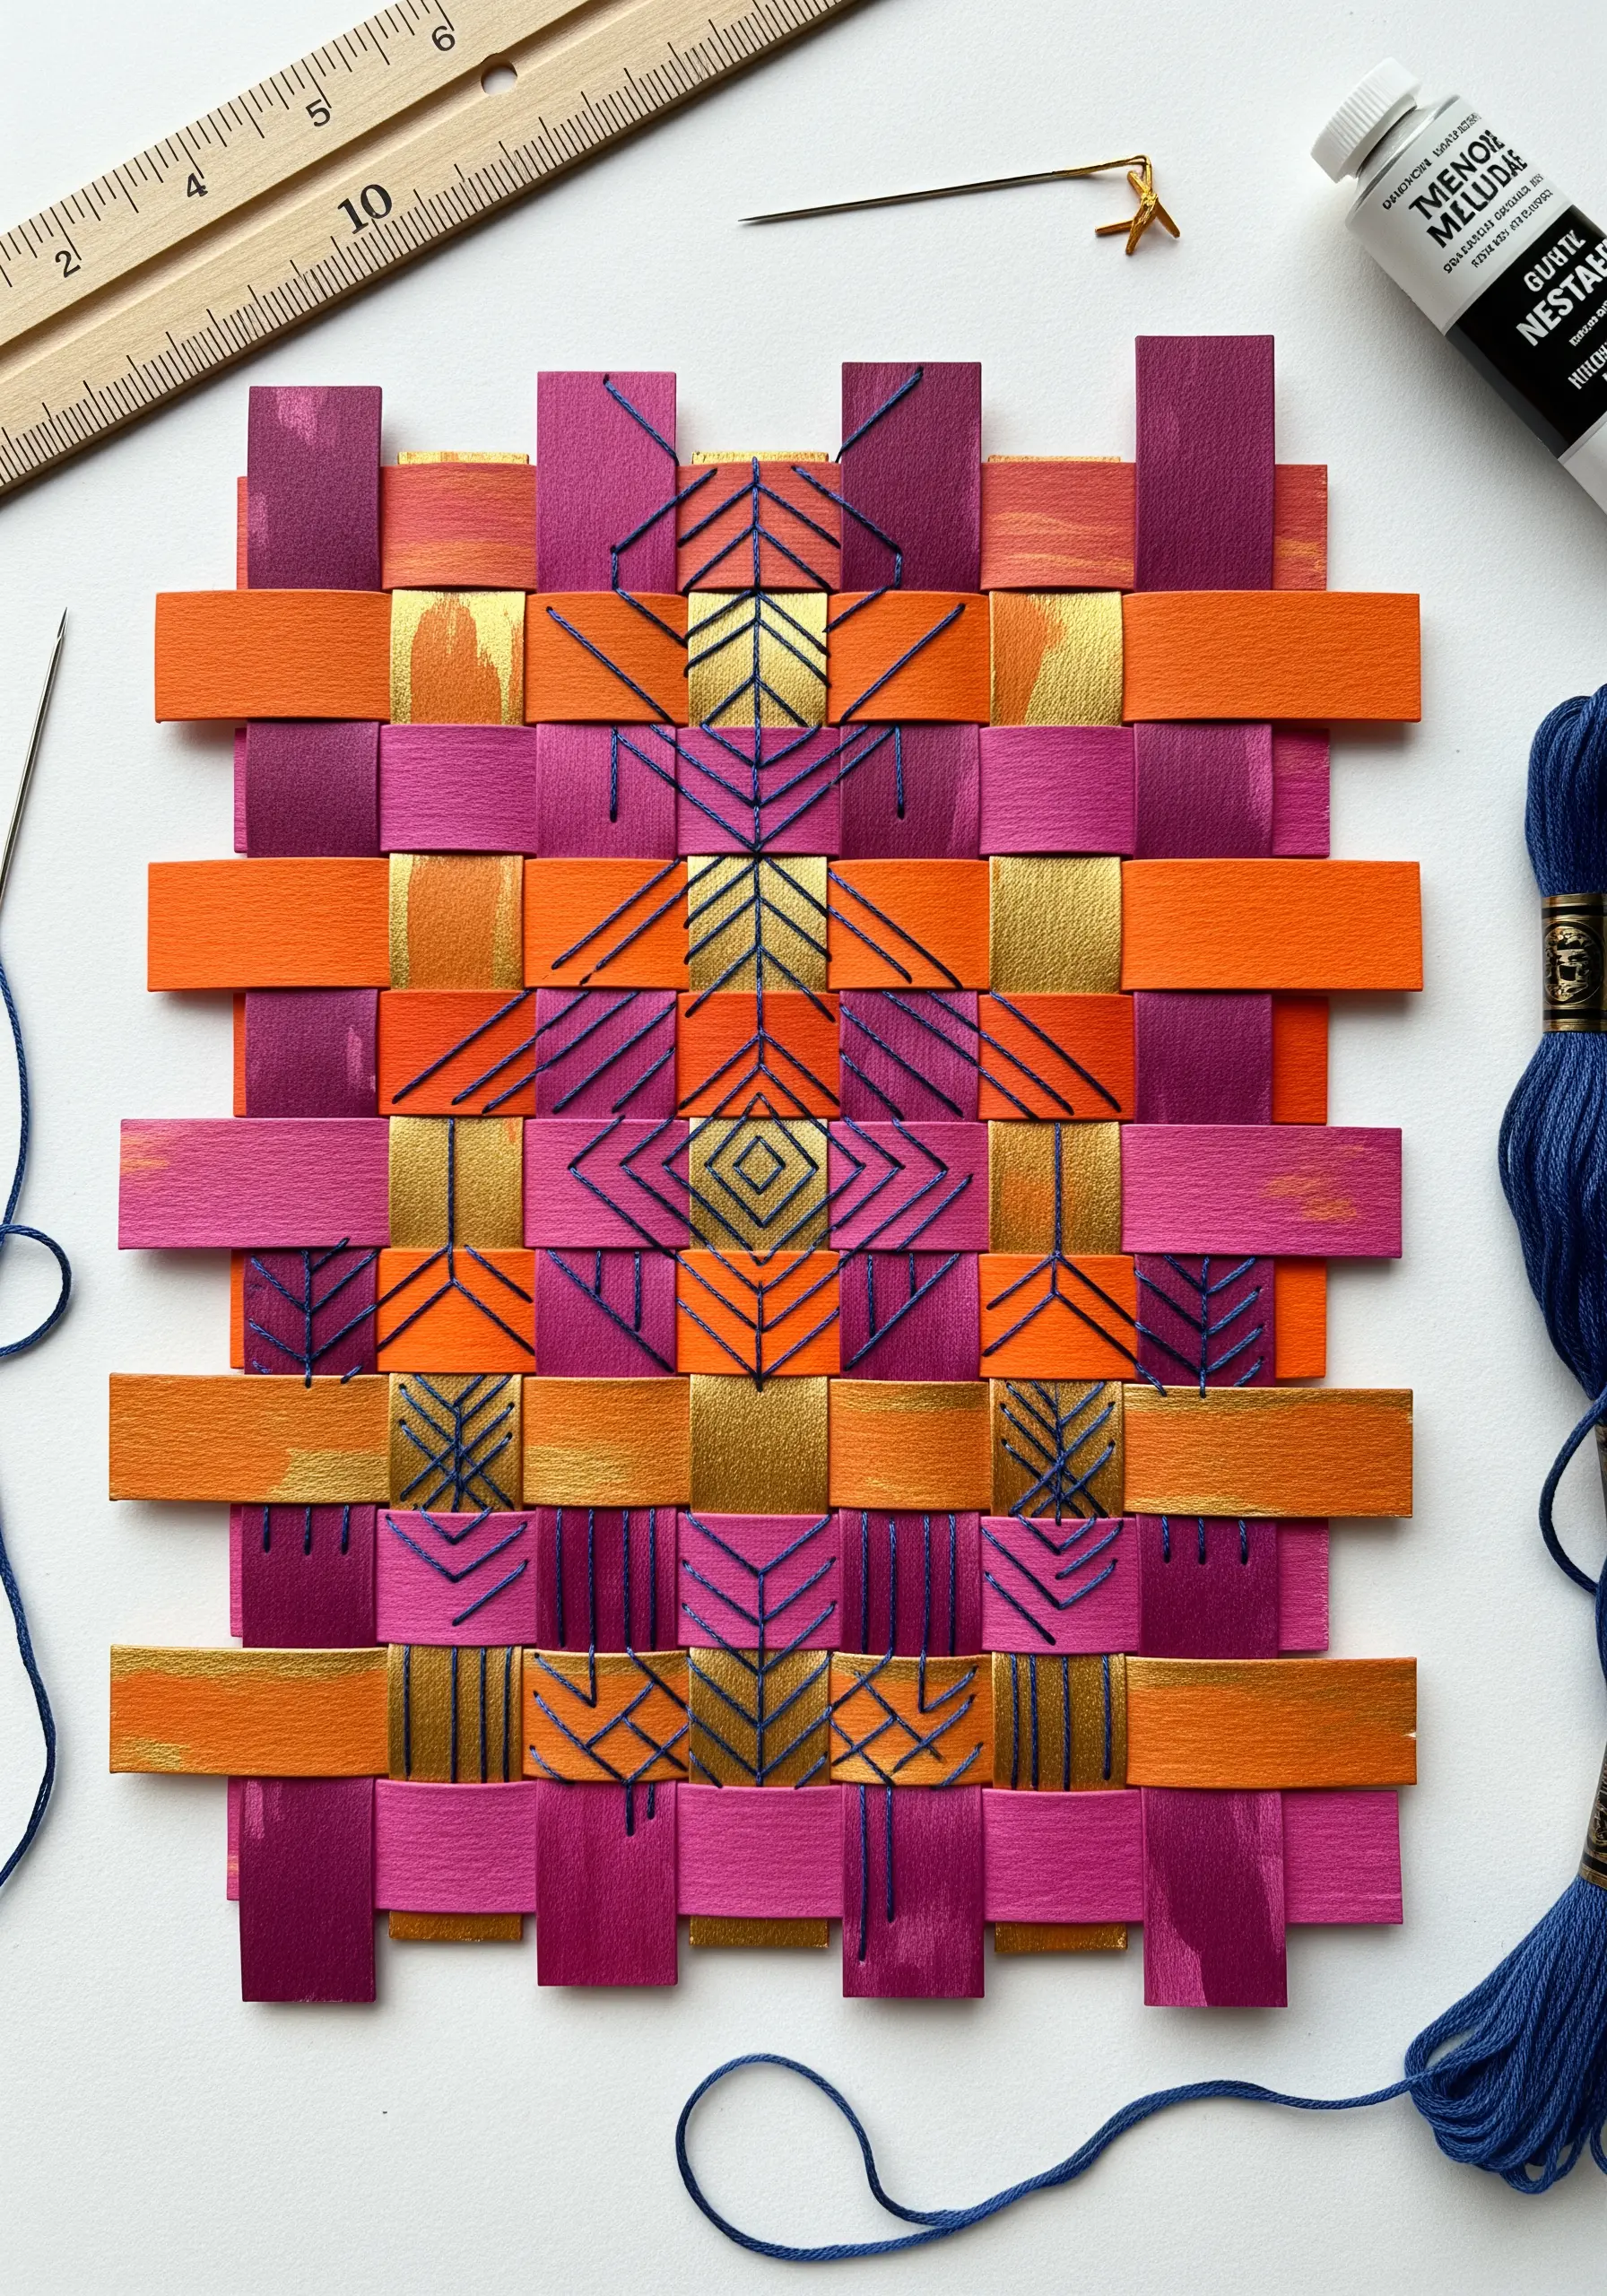
Combine paper weaving with embroidery for a graphic, structured piece of art.
Start by painting strips of heavy cardstock with acrylics, adding metallic accents for a touch of light.
Once dry, weave the strips into a tight grid and secure the edges on the back.
Use the woven grid as your canvas, stitching geometric patterns directly onto the paper with a strong needle and contrasting thread.
The rigid surface creates exceptionally clean lines and angles, perfect for minimalist and abstract designs.
6. Embellish a Cyanotype Print

Use the magic of cyanotype printing to create a stunning, deep blue background for your embroidery.
Expose light-sensitive fabric with plants, flowers, or other objects to create ghostly white silhouettes, then rinse and dry.
Use a fine, single strand of white or silver thread to delicately outline the botanical shapes or add intricate details like leaf veins and petal textures.
The embroidery appears to illuminate the print from within, adding precision and focus to the ethereal, photographic base.
7. Add Thread and Gold Leaf to a Painting

Integrate fiber into a painted portrait to create breathtaking texture and dimension.
After painting your subject on canvas, use various weights of yarn and thread to form the hair, couching them down with a finer, matching thread to create flow and movement.
For a final touch of luxury, apply gold leaf to the background using adhesive size.
This combination of paint, fiber, and metal creates a powerful piece of art that blends classical portraiture with contemporary textile techniques.
8. Create a Beaded Mosaic on Fabric

Use beads not just as accents, but as the primary medium for filling shapes, similar to painting with dots.
Begin with a fabric collage of velvets and cottons to create a rich, tactile base.
Outline your shapes with a single row of beads, then fill the interior with dense, concentric circles or straight lines of color.
This technique creates a heavy, jewel-like textile that captures light beautifully.
Use a strong beading needle and Nymo thread for durability, ensuring your stitches are small and tight to secure the beads flat against the fabric.
9. Stitch Over a Gel Plate Monoprint
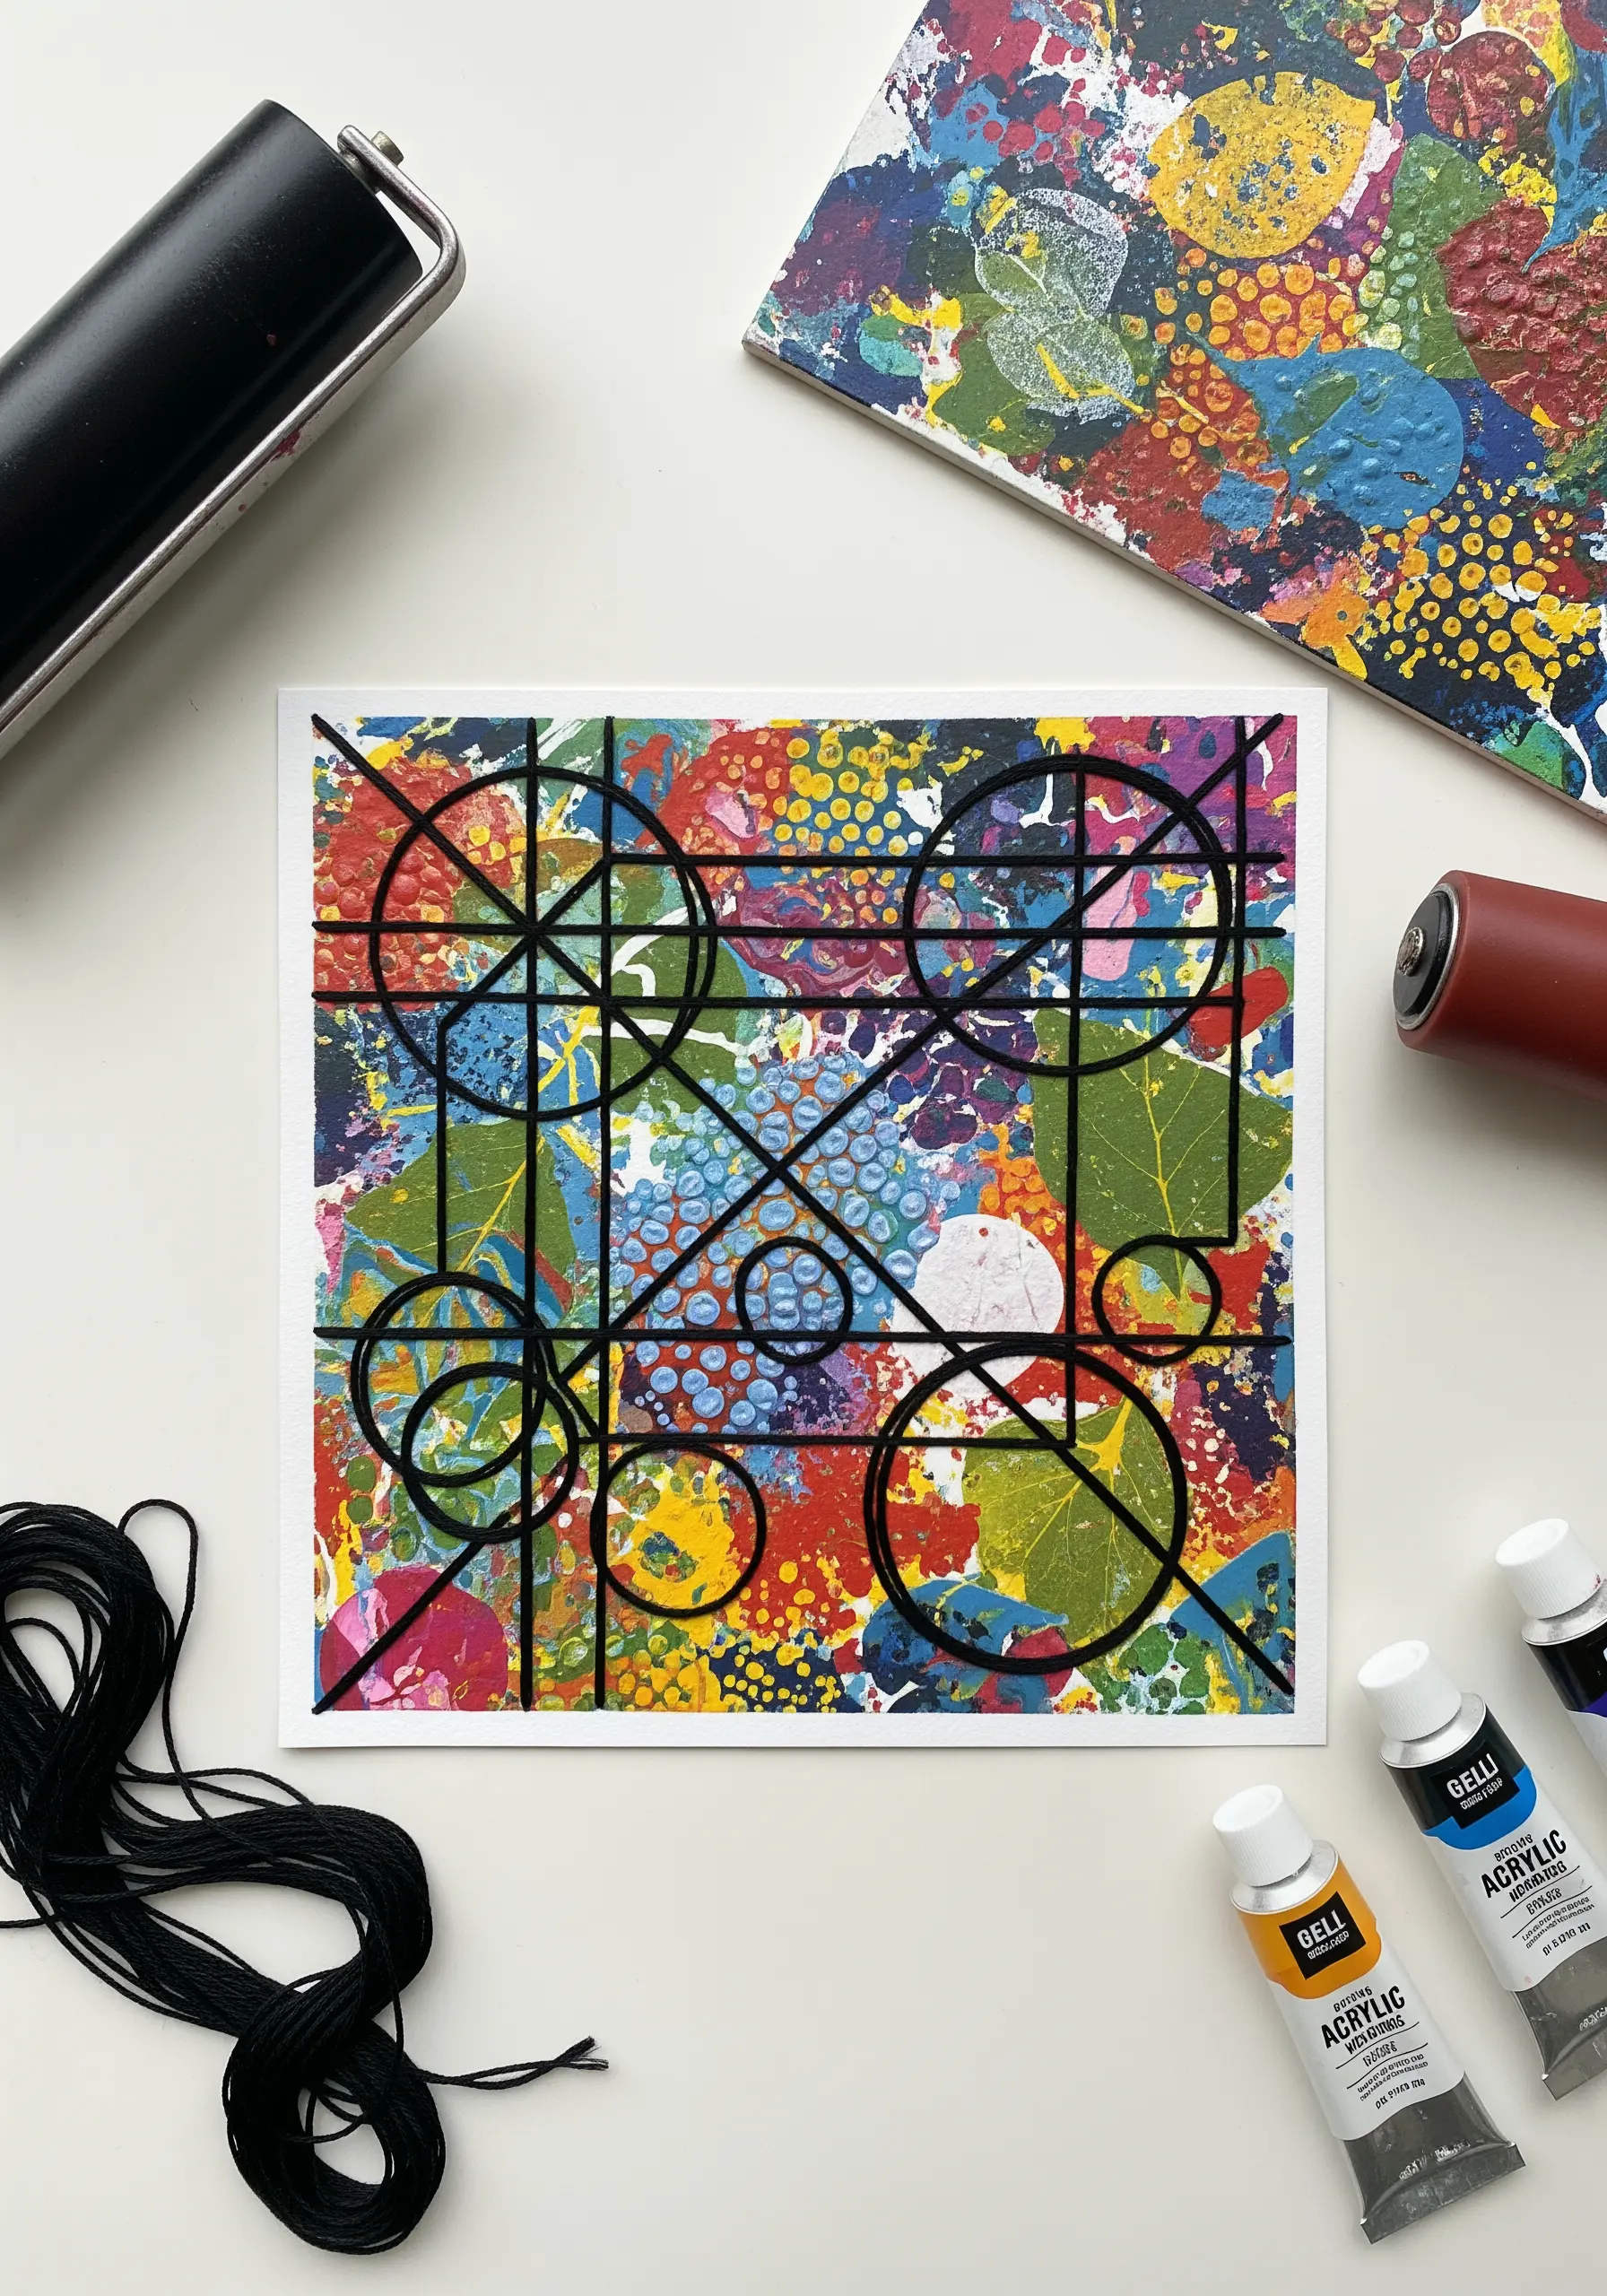
Create a one-of-a-kind background using a gel printing plate and acrylic paints.
Press leaves, bubble wrap, or other textured items onto the plate to create layered, abstract patterns on heavy paper or fabric.
Once the print is dry, impose a structured, graphic design over the chaotic background using a bold, dark thread.
The stark contrast between the organic, colorful print and the precise, geometric stitches results in a visually dynamic and modern composition.
10. Integrate Buttons into Floral Designs
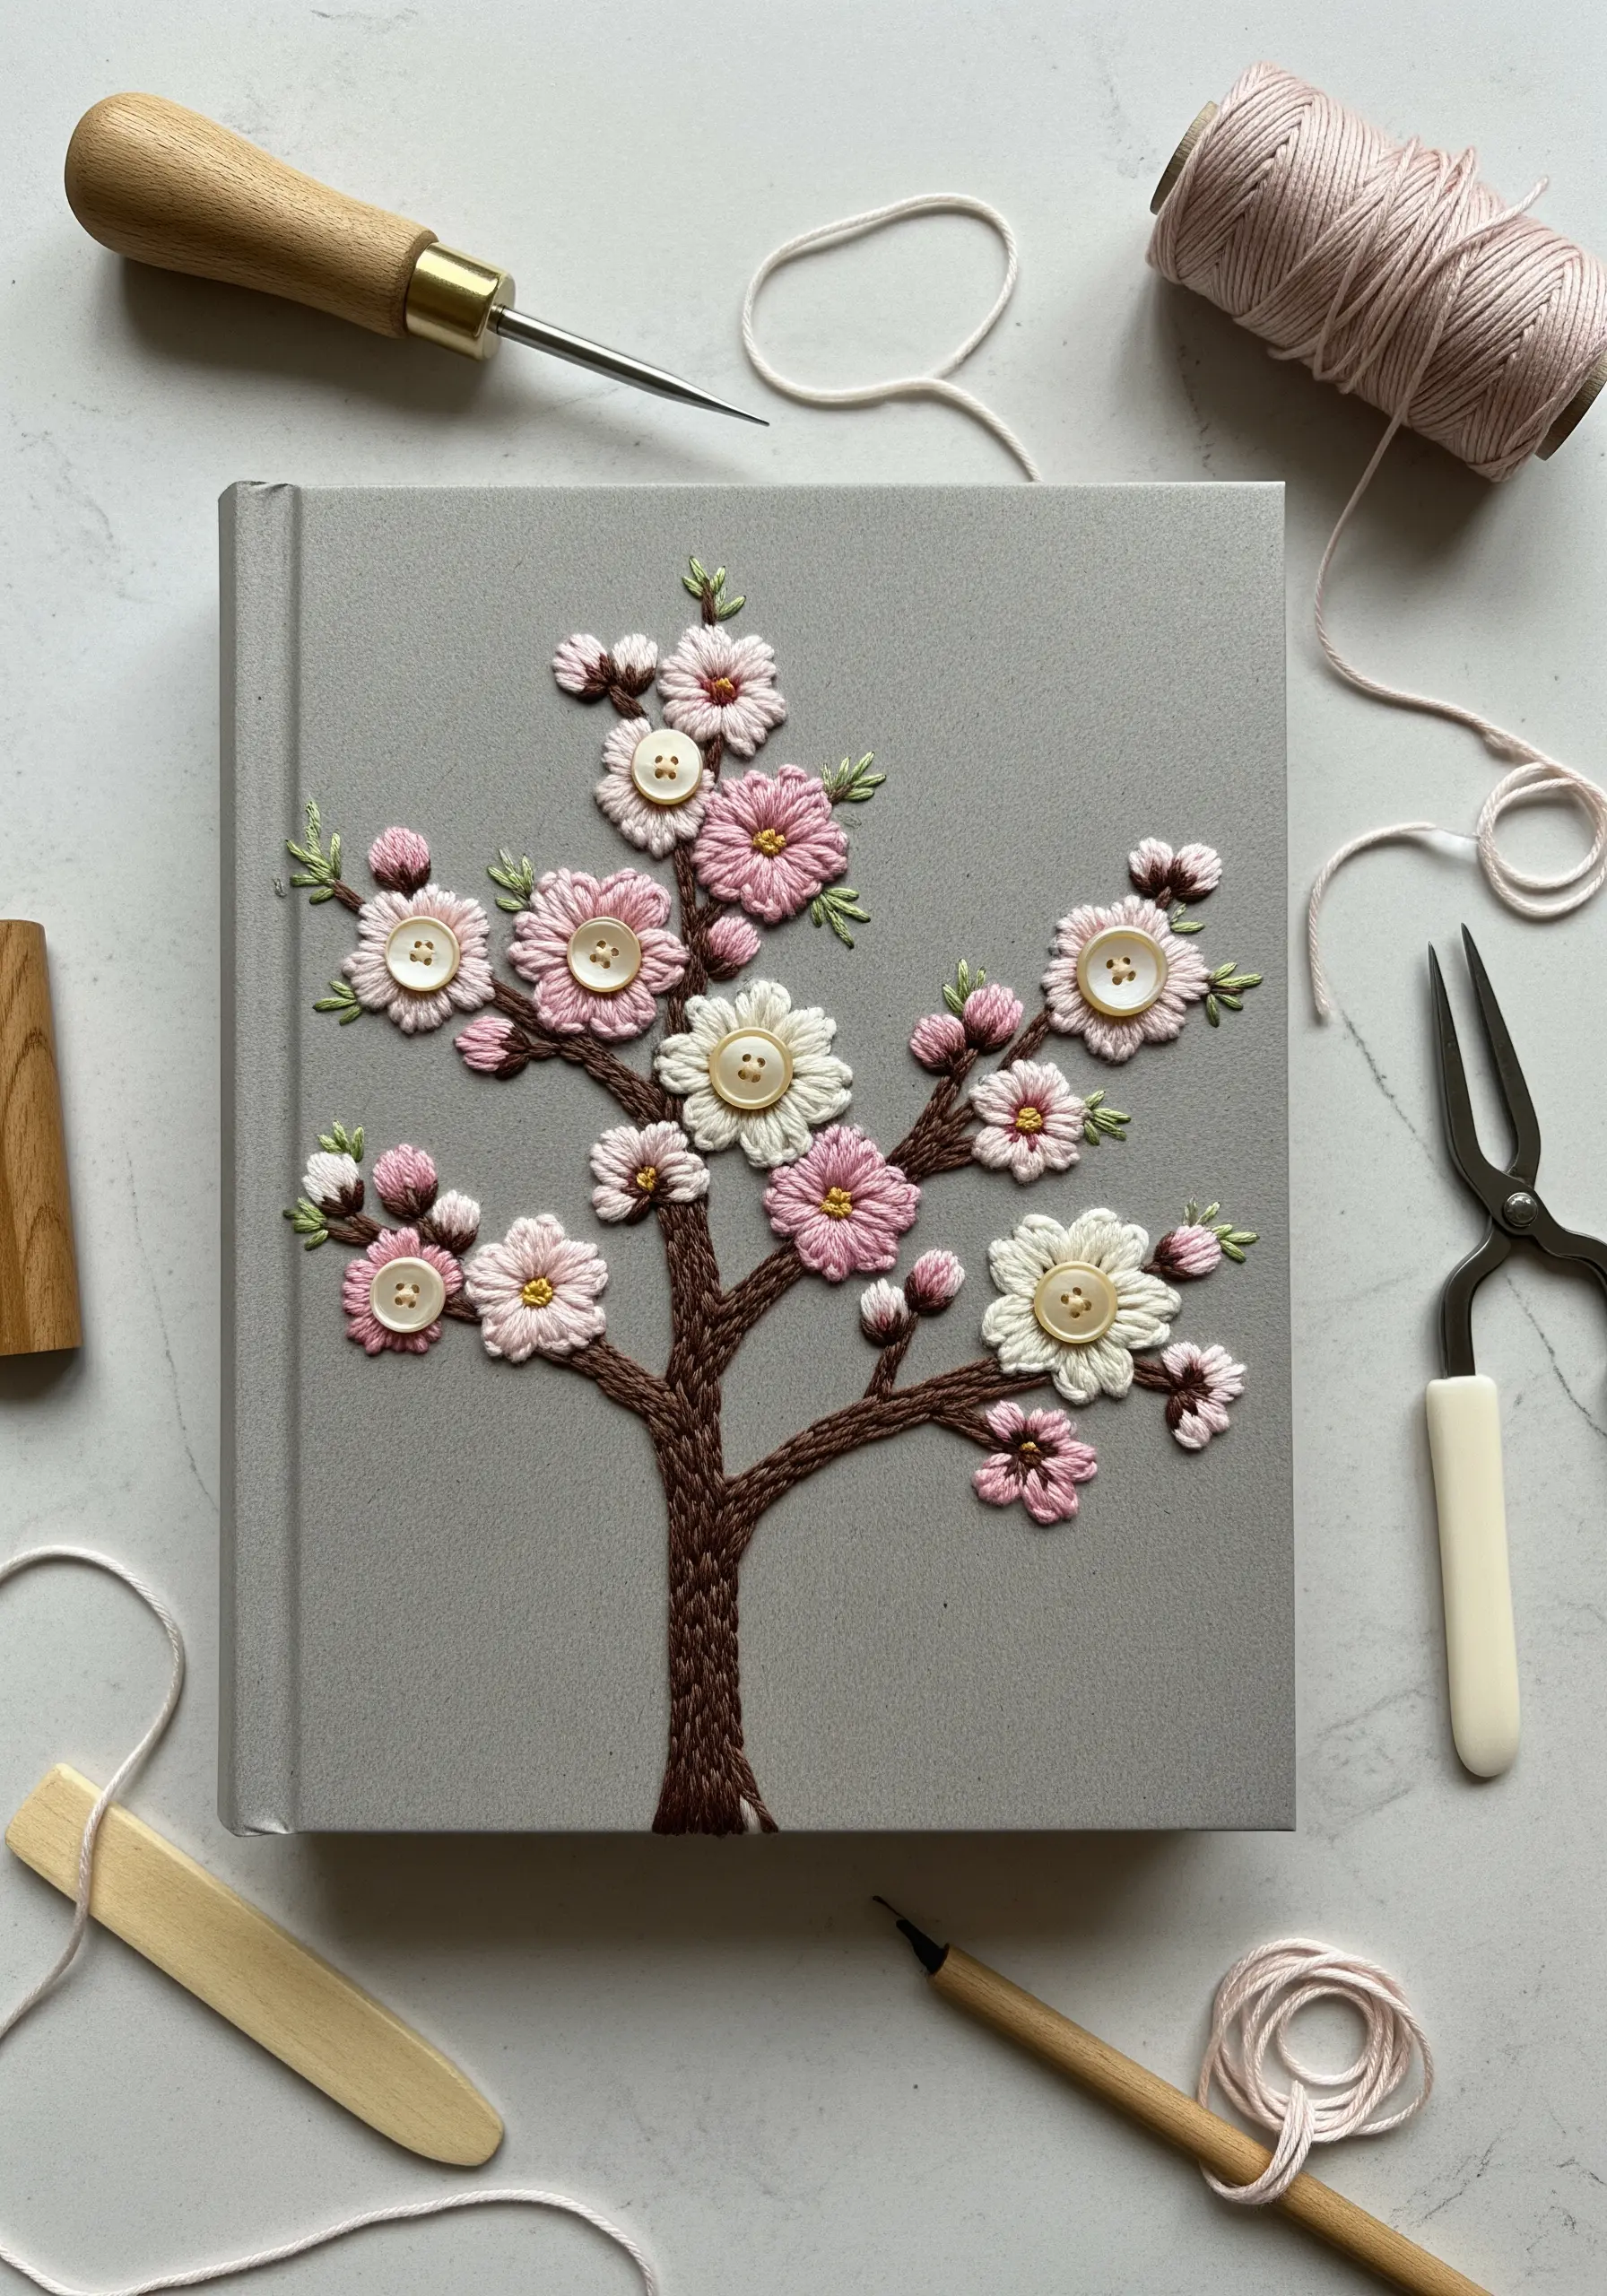
Use vintage or modern buttons as structural and decorative elements in your embroidery.
Position a button as the center of a flower and surround it with detached chain stitches (lazy daisies) or satin-stitched petals.
This technique adds instant dimension and a touch of nostalgic charm to your work.
It is especially effective on sturdy surfaces like book covers, felt, or denim, where the weight of the button is well-supported.
Choose buttons that complement your color palette to ensure the piece feels cohesive and intentional.
11. Explore Thread Wrapping and String Art

Move beyond stitching through a surface by wrapping thread around a pre-drilled or laser-cut base.
Materials like cork, acrylic, or thin wood provide a rigid canvas for creating crisp, geometric string art.
The technique relies on thread tension and layering to build color gradients and intricate patterns.
This method removes the need for a hoop and allows you to create durable, unconventional art objects perfect for display.
12. Layer Embroidery on Sheer Tulle
Create an illusion of floating motifs by embroidering on multiple layers of tulle or organza.
Stretch your primary layer of sheer fabric in a hoop, then add smaller, floating pieces of tulle on top, stitching your design through all layers.
This creates a beautiful sense of depth and dimension, as if the embroidered elements are suspended in air.
Use a water-soluble or tear-away stabilizer behind your work to prevent puckering and provide support for your stitches.
13. Add Thread Details to Stamped Art

Combine the precision of rubber stamping with the delicate texture of hand embroidery for a refined, illustrative effect.
Use archival ink to stamp your designs onto high-quality cardstock.
Instead of filling the entire image, select one or two key features to embellish with a few careful stitches.
A single strand of iridescent thread on a dragonfly’s wing or a pop of red on a sentiment adds a surprising and elegant focal point, transforming a simple stamped card into a miniature work of art.
14. Embroider Directly onto Wood

Juxtapose the softness of thread with the hardness of wood for a stunning, modern piece.
First, transfer your design onto a thin sheet of plywood or balsa wood.
Using a micro drill bit, carefully drill holes along your pattern lines, ensuring they are evenly spaced.
Thread your needle through the pre-drilled holes to create your design; straight stitches and geometric patterns work exceptionally well.
The natural grain of the wood becomes an integral part of the final artwork, adding warmth and organic texture.
15. Create Pathways on Tie-Dyed Fabric

Use the organic patterns of tie-dye or shibori as a map for your stitching.
Instead of imposing a new design, use a simple running stitch in a contrasting color to trace the edges of the dye patterns.
This technique highlights the beauty of the dyeing process and adds a layer of mindful, meditative stitching.
The result is a piece that feels both spontaneous and intentional, celebrating the interplay between controlled stitching and unpredictable color bleeds.
16. Build Sculptural Layers with Paper and Thread
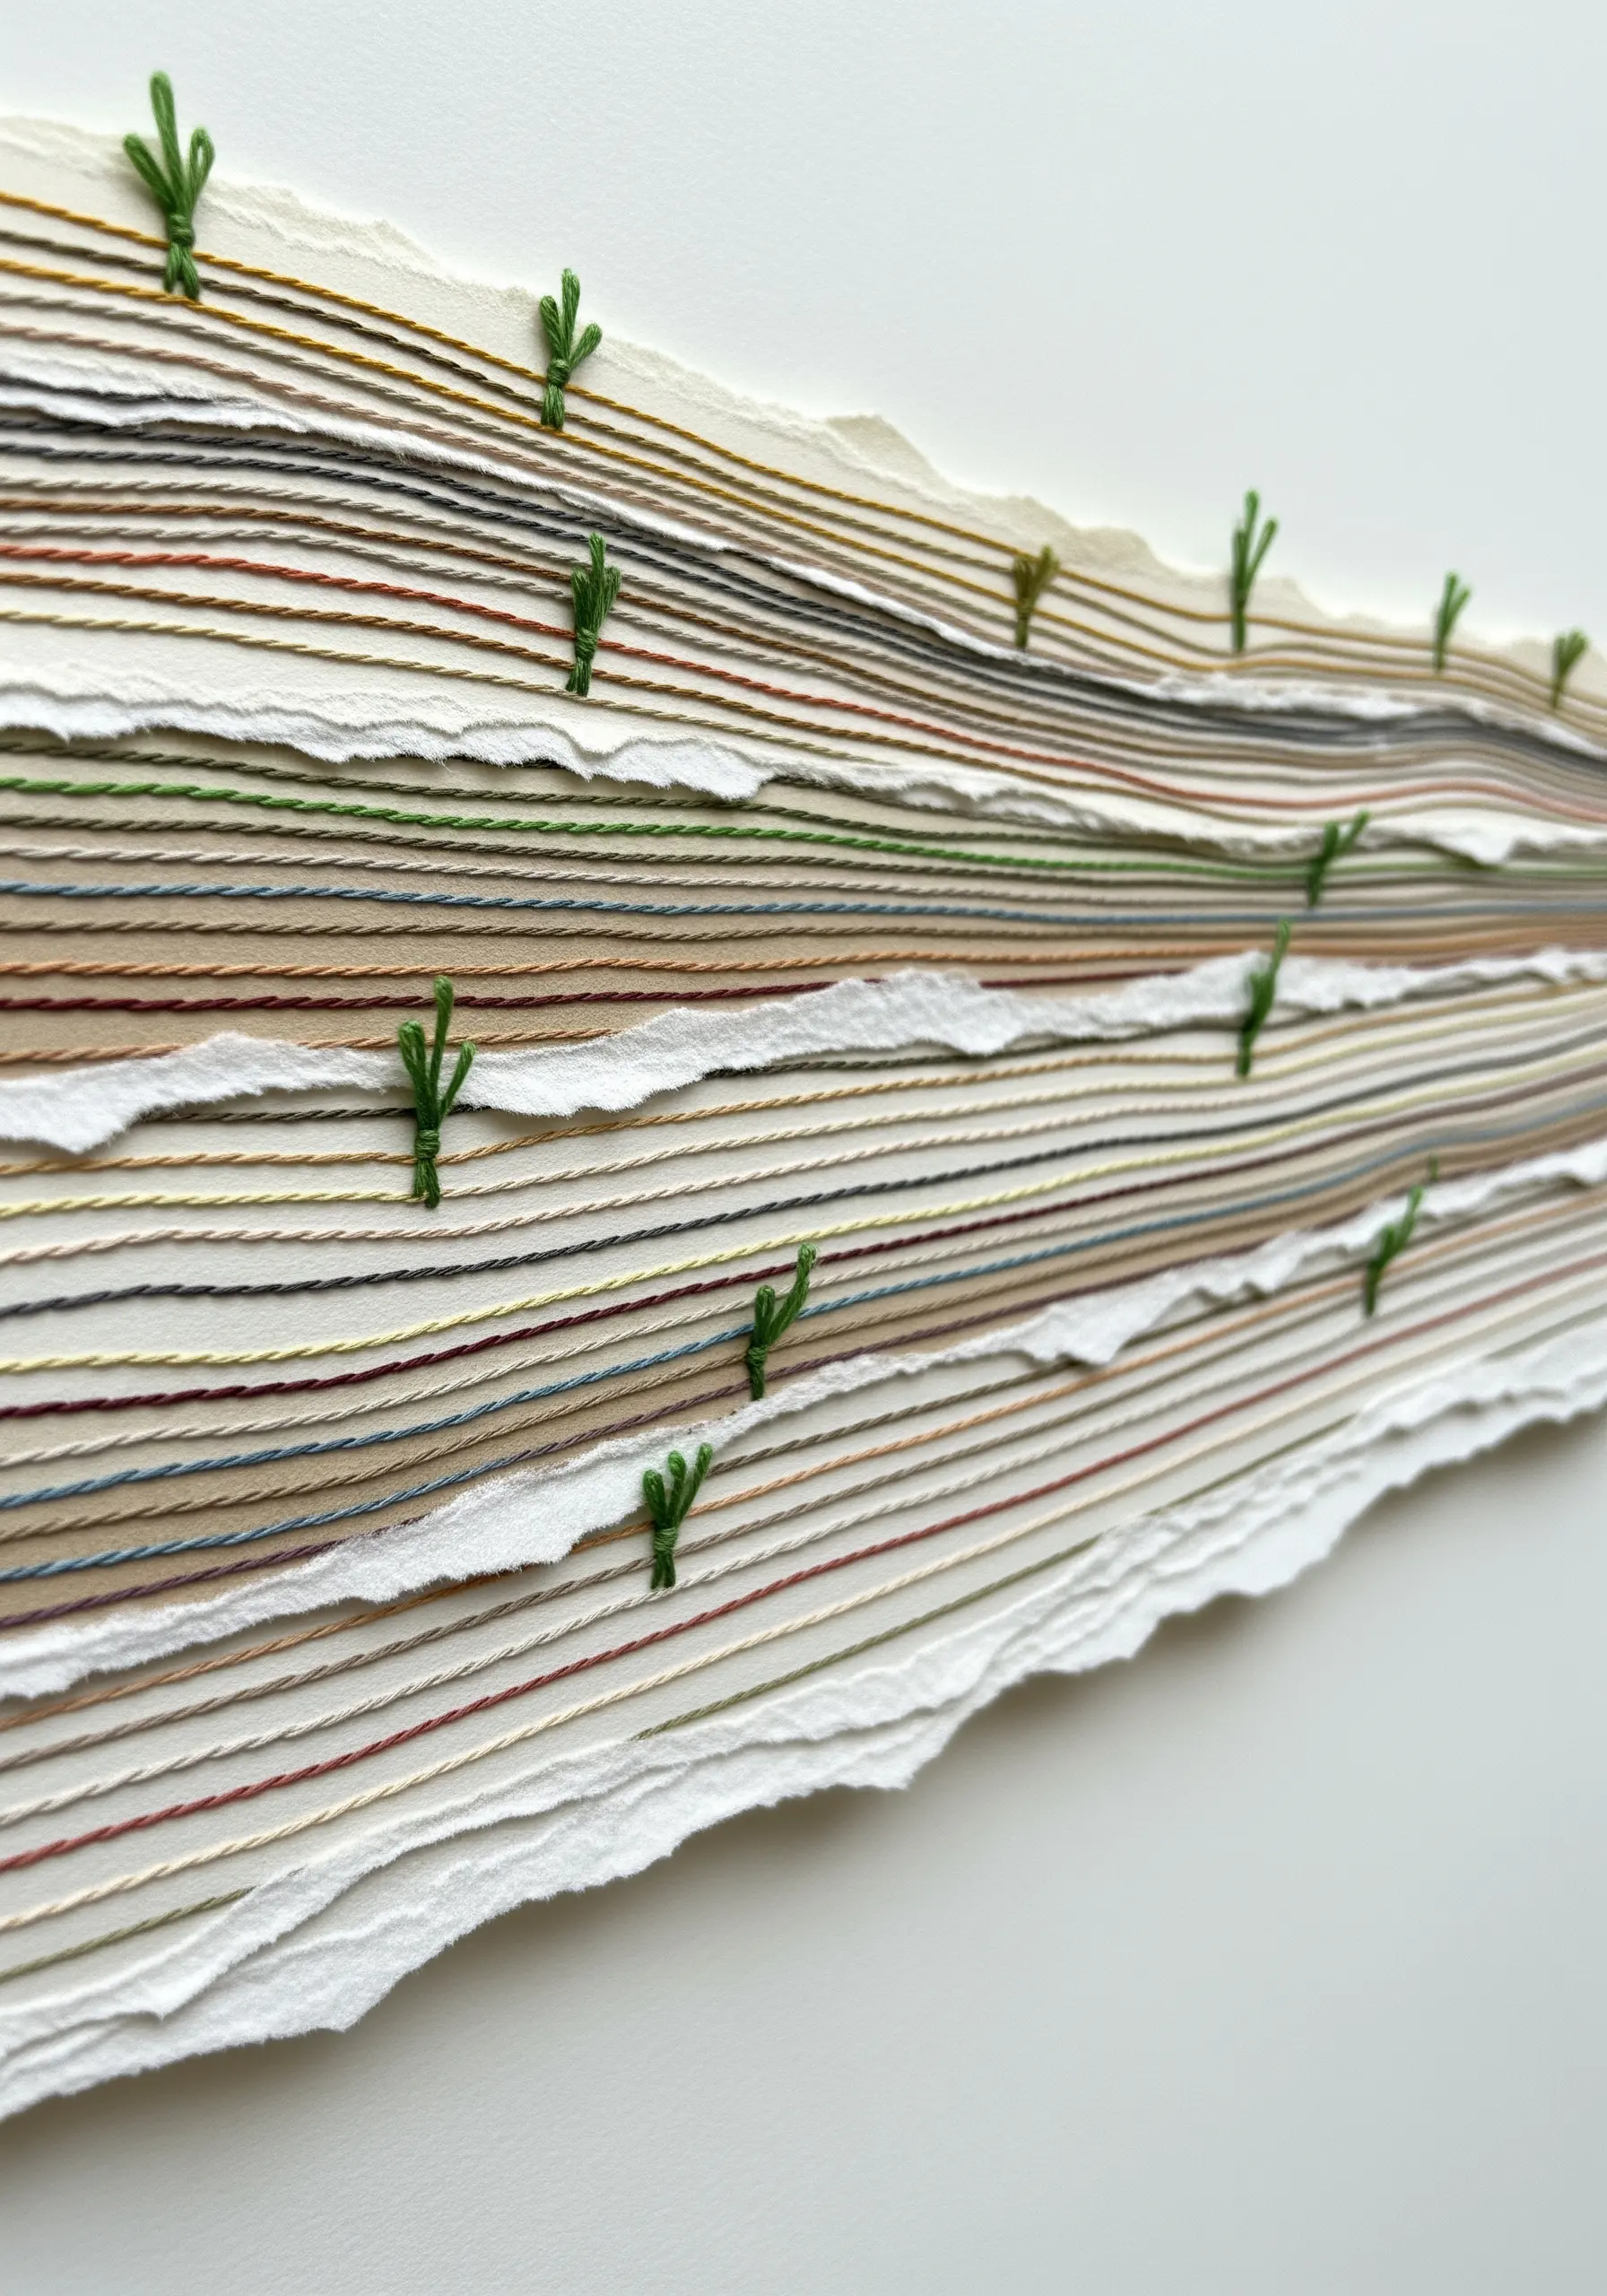
Construct a 3D textile landscape using layered paper and precisely stitched lines.
Cut or tear strips of high-quality, textured paper and stitch rows of thread across each one.
Assemble the strips with small spacers (like foam board) between each layer to create visible depth and shadow.
Add tiny vertical stitches, like the small cacti here, to connect layers and add points of interest.
This transforms simple materials into a sophisticated, sculptural piece that explores line and form.
17. Embed Thread into Impasto Paint
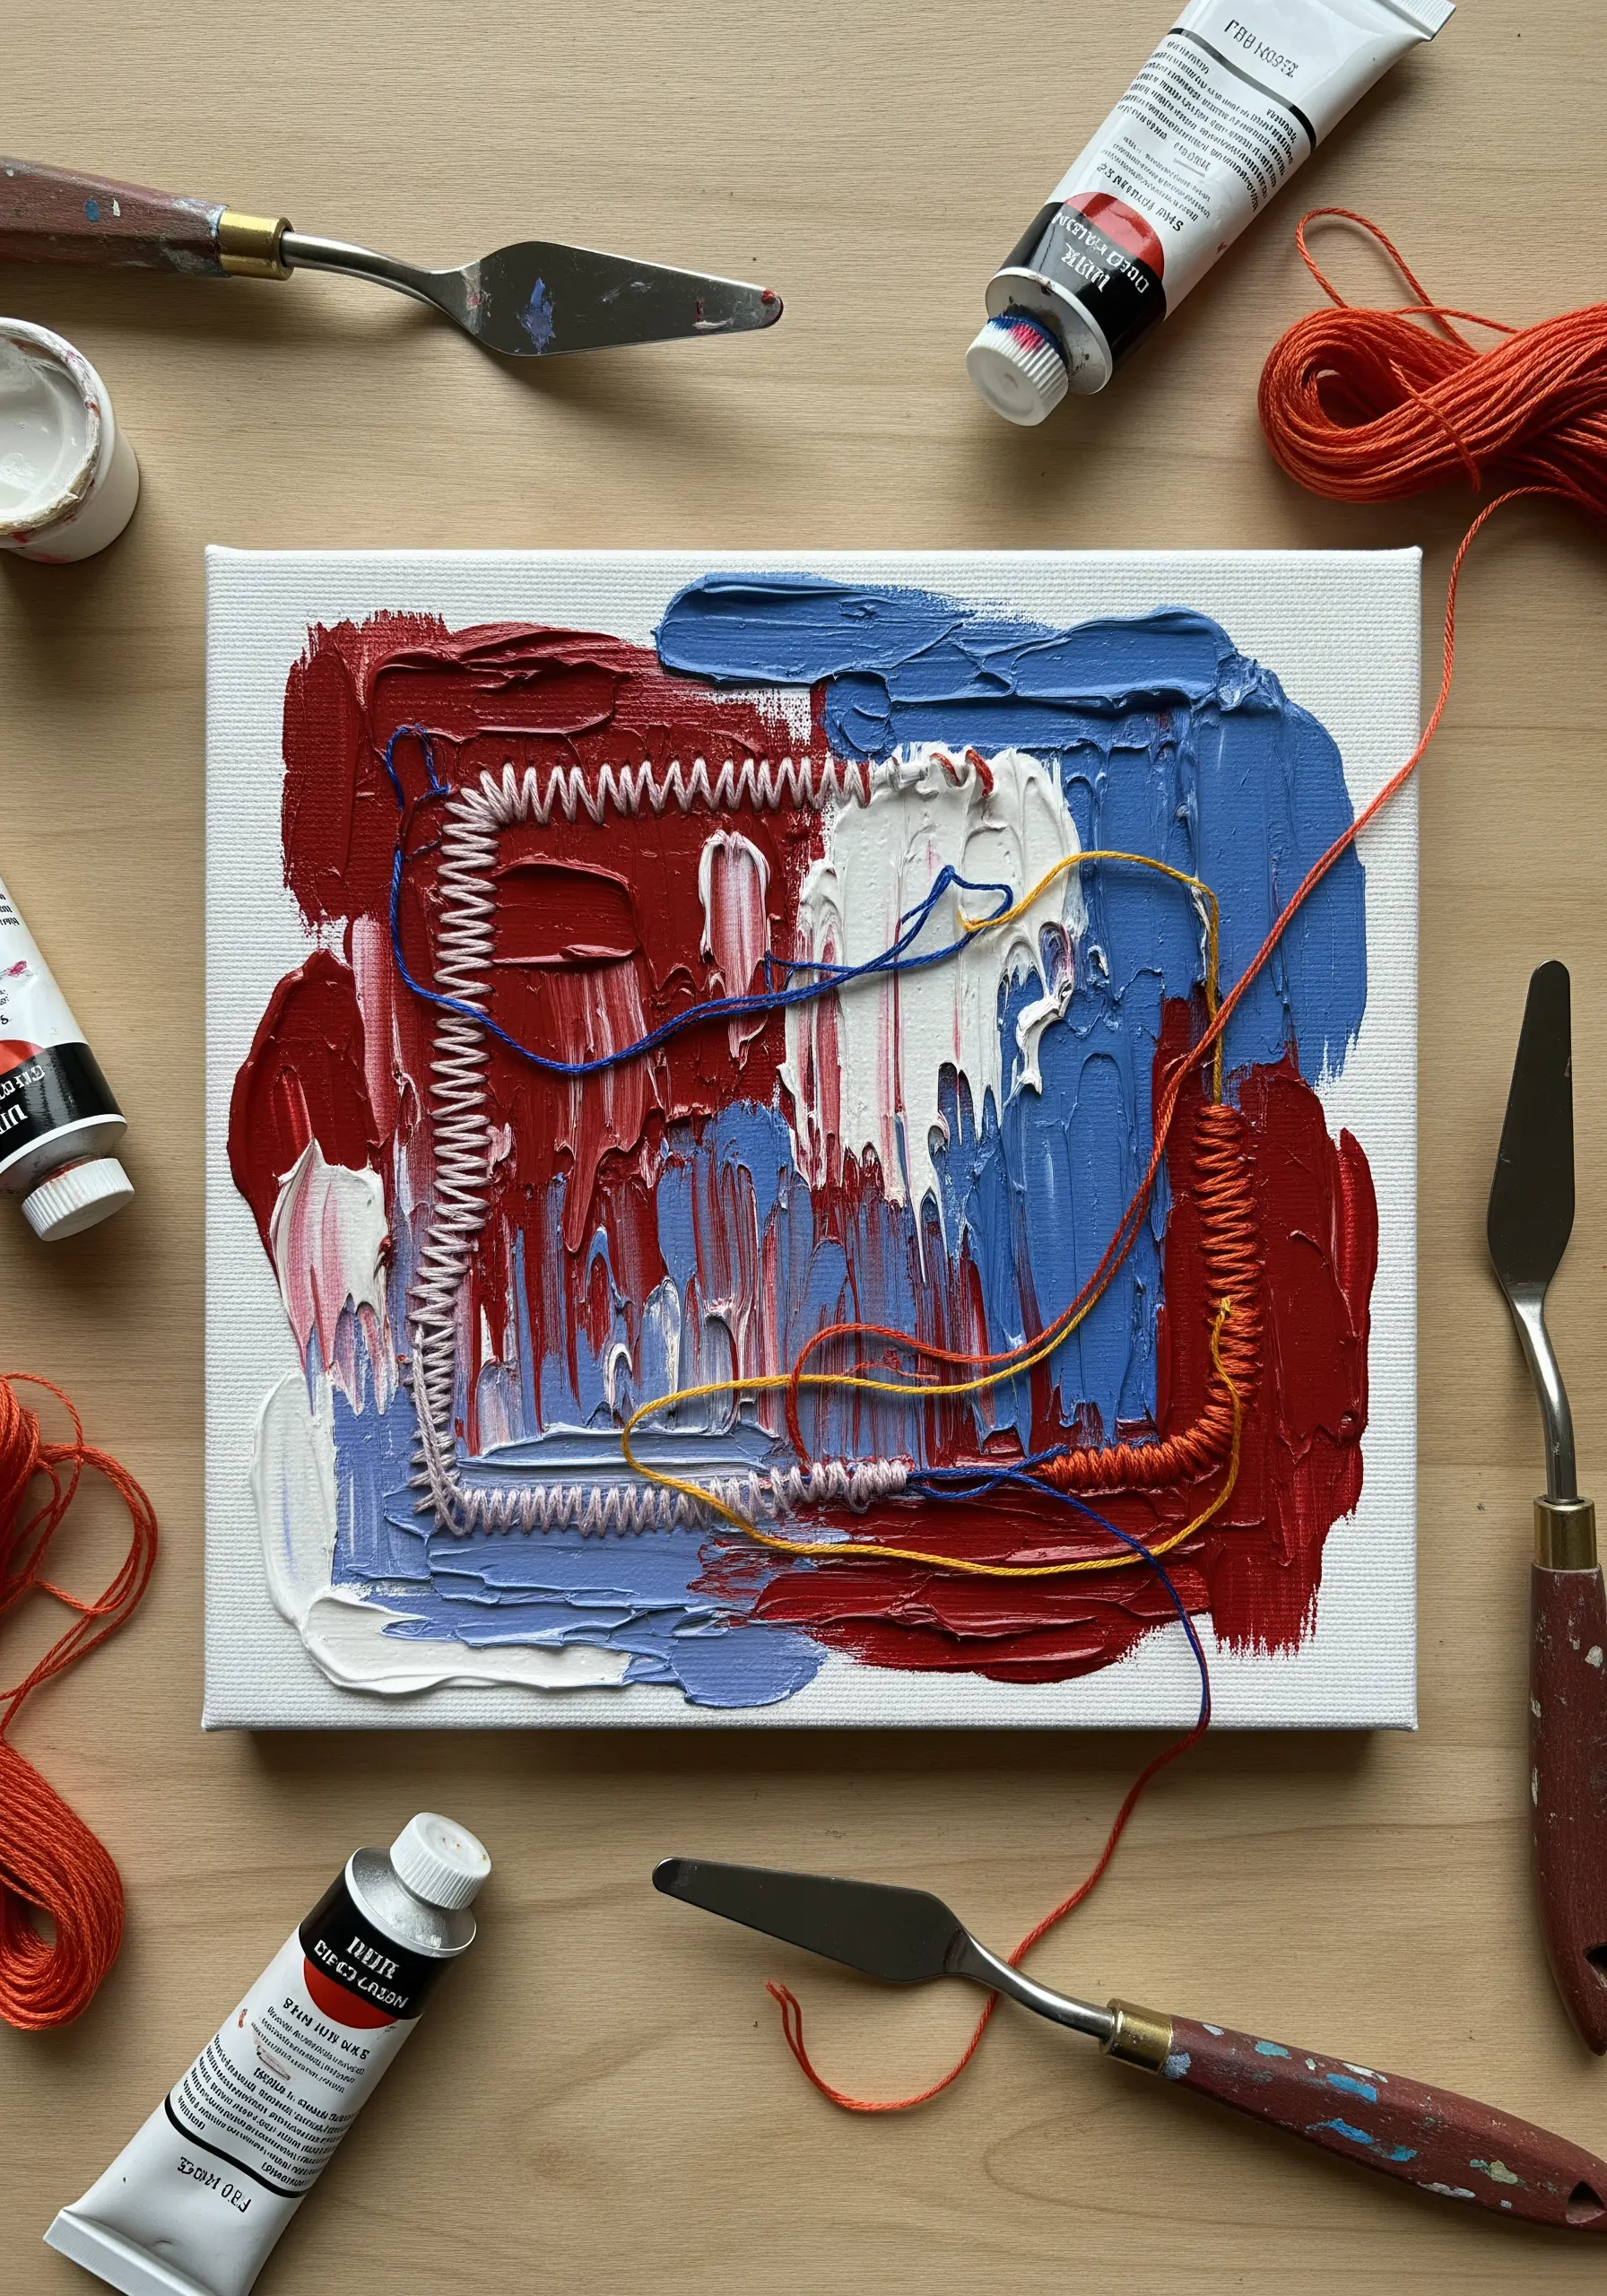
Merge painting and embroidery by pressing thread directly into thick, wet paint.
Apply heavy body acrylic paint to a canvas with a palette knife, creating bold, textural strokes—this is the impasto technique.
While the paint is still wet, lay down your thread, gently pressing it into the surface to create lines, shapes, and movement.
Once fully dry, you can add further embroidered details by stitching through the canvas, creating a piece with deeply integrated layers of texture.
18. Construct Scenes with Felt Appliqué
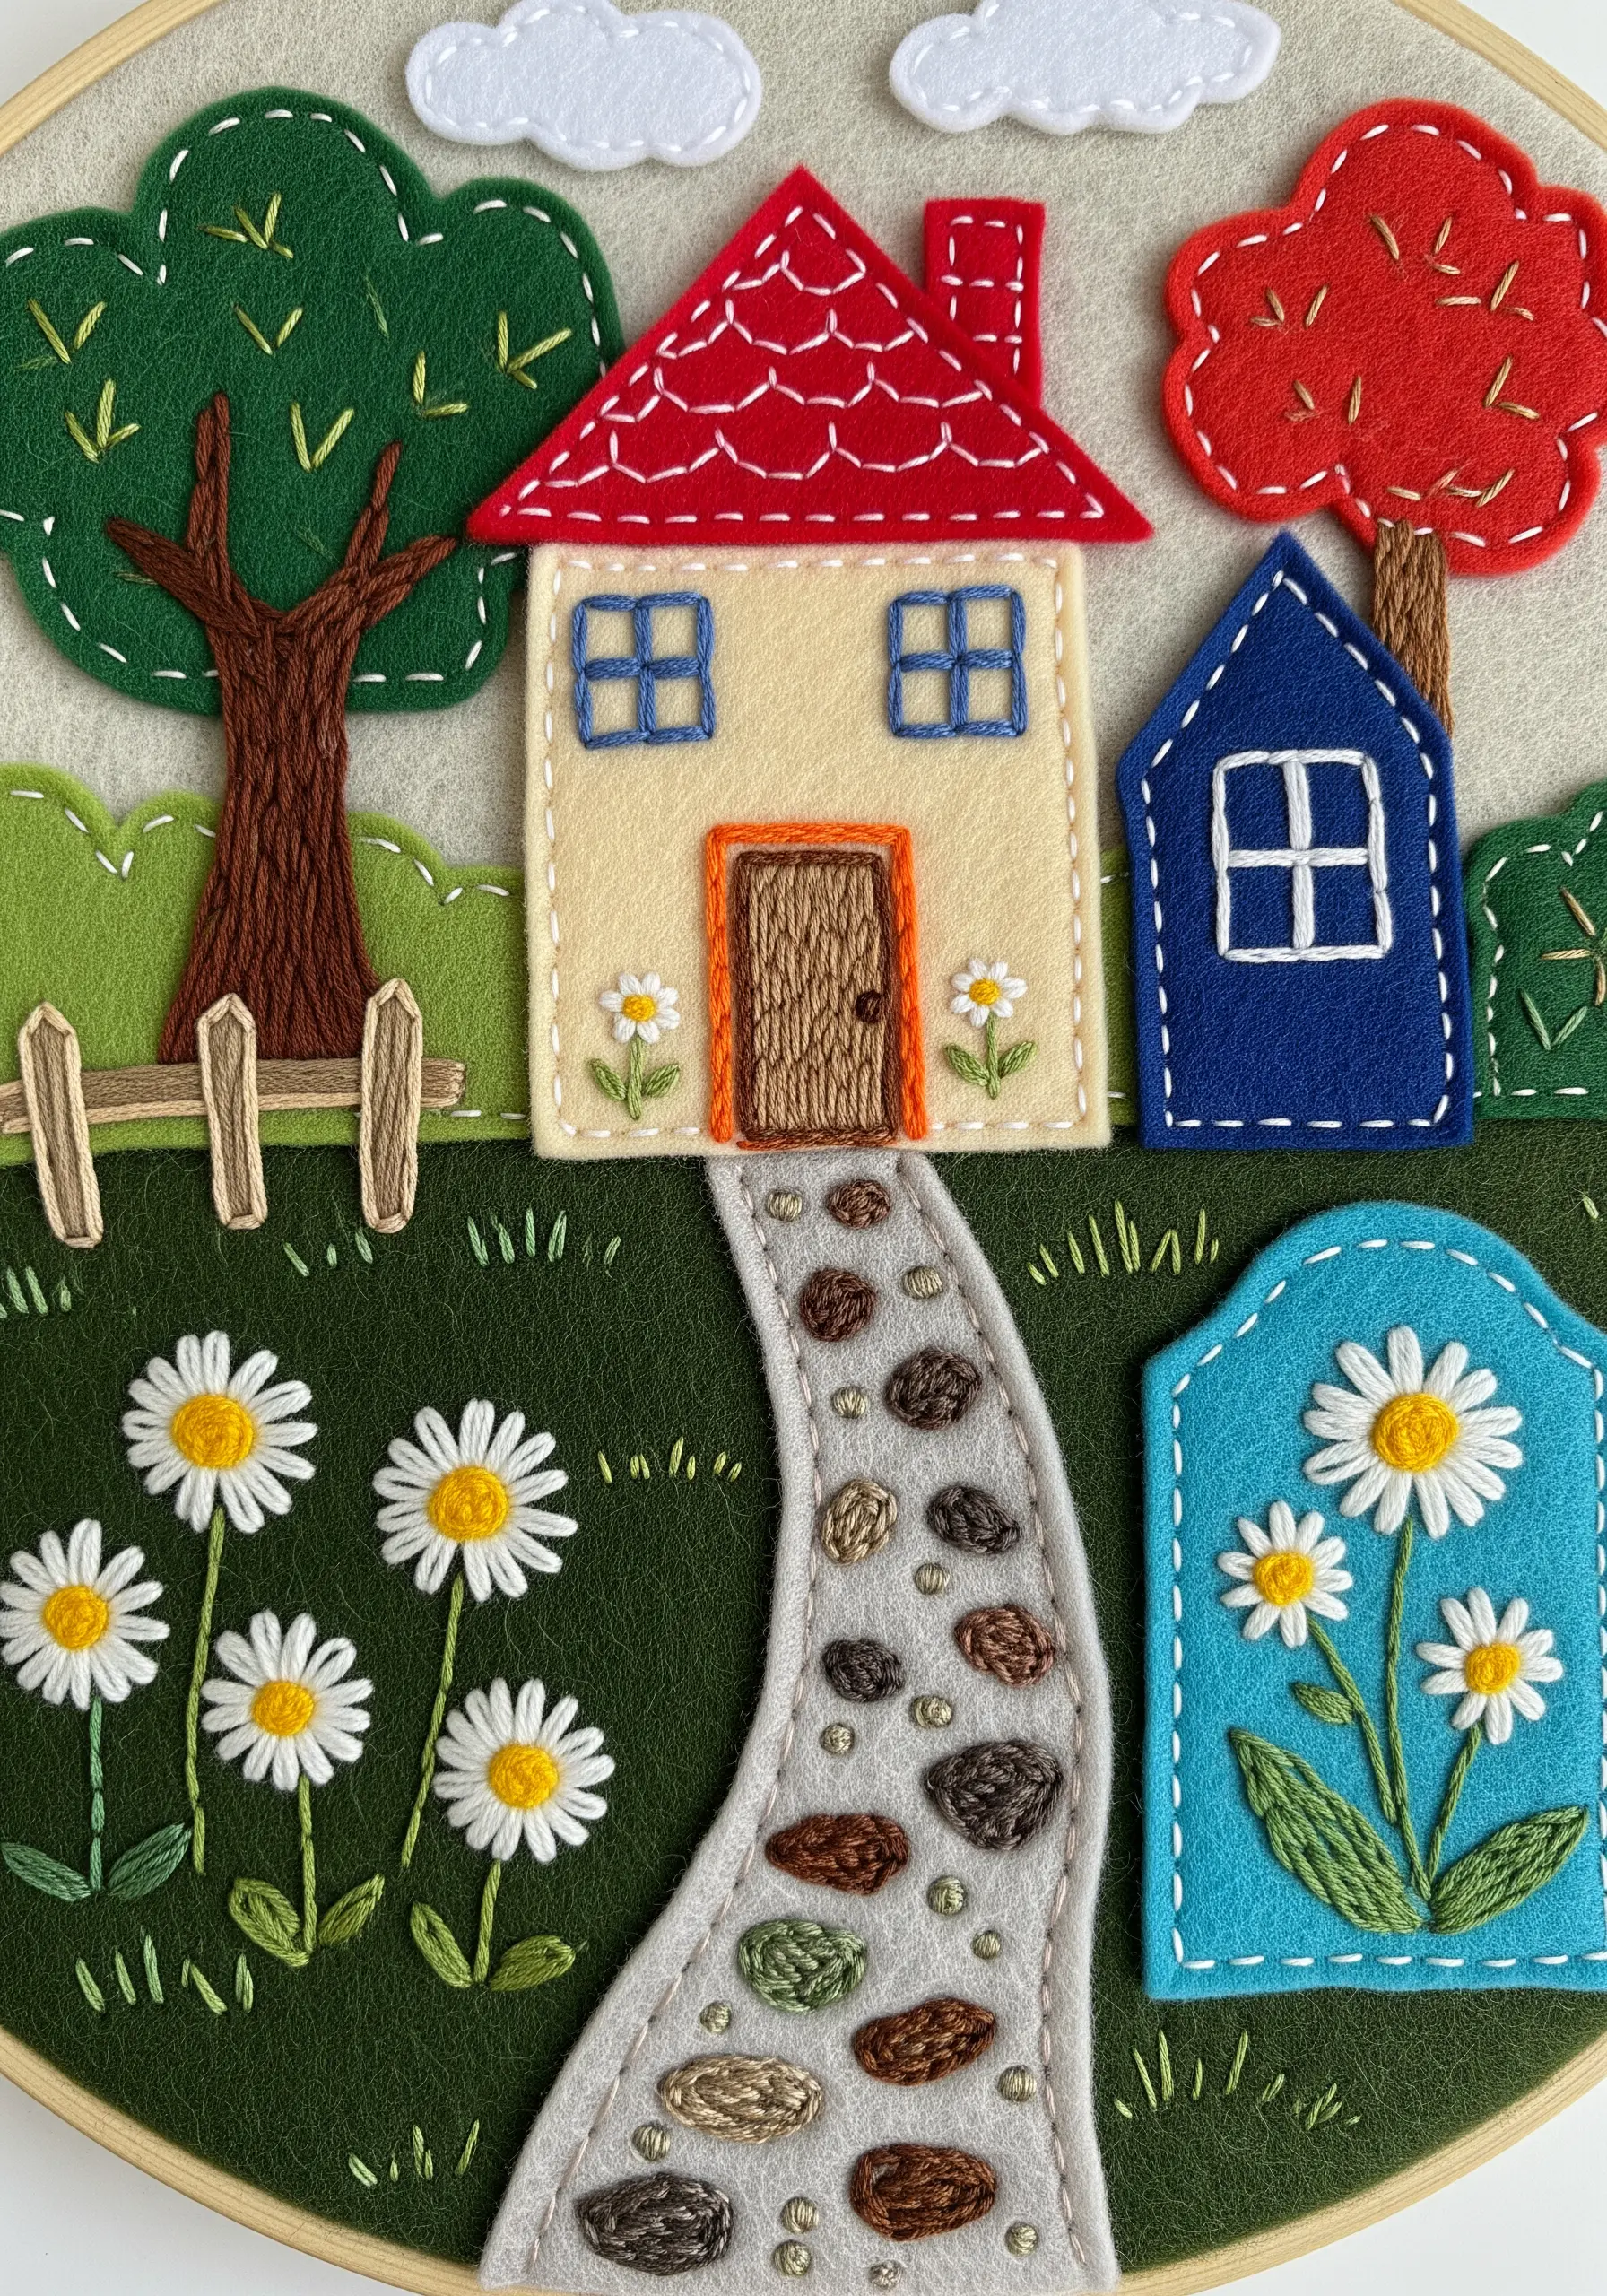
Use felt as a base for building colorful, layered scenes with a charming, illustrative quality.
Cut shapes from different colors of felt and arrange them on a background piece, securing them with appliqué stitches like the blanket stitch or a simple running stitch.
Embroidery is then used to add all the fine details—windows on a house, veins on a leaf, or pebbles on a path.
This method is wonderfully forgiving and allows you to create bold, graphic compositions with satisfying texture.
19. Chart a Design with Cross-Stitch on Paper

Use graph paper not just for planning, but as the final canvas for your cross-stitch art.
The printed grid provides a perfect, ready-made guide for creating flawless, even stitches.
This technique is excellent for pixel-art-inspired designs and for achieving a clean, graphic aesthetic where the background grid is part of the charm.
Use a needle with a sharp point to cleanly pierce the paper and choose a thread weight that fills the squares without tearing them.
20. Stitch Over Eco-Printed Botanicals

Eco-printing uses the natural pigments in leaves and flowers to create subtle, organic prints on fabric.
Enhance these delicate, earth-toned imprints by embroidering over them with a complementary thread, like a warm copper metallic.
Use your stitches to trace the outlines of the leaves, add details to the veins, or create abstract patterns that echo the botanical shapes.
This honors the natural source of the design, creating a piece that feels deeply connected to the earth.
21. Illustrate with Thread on a Drawing
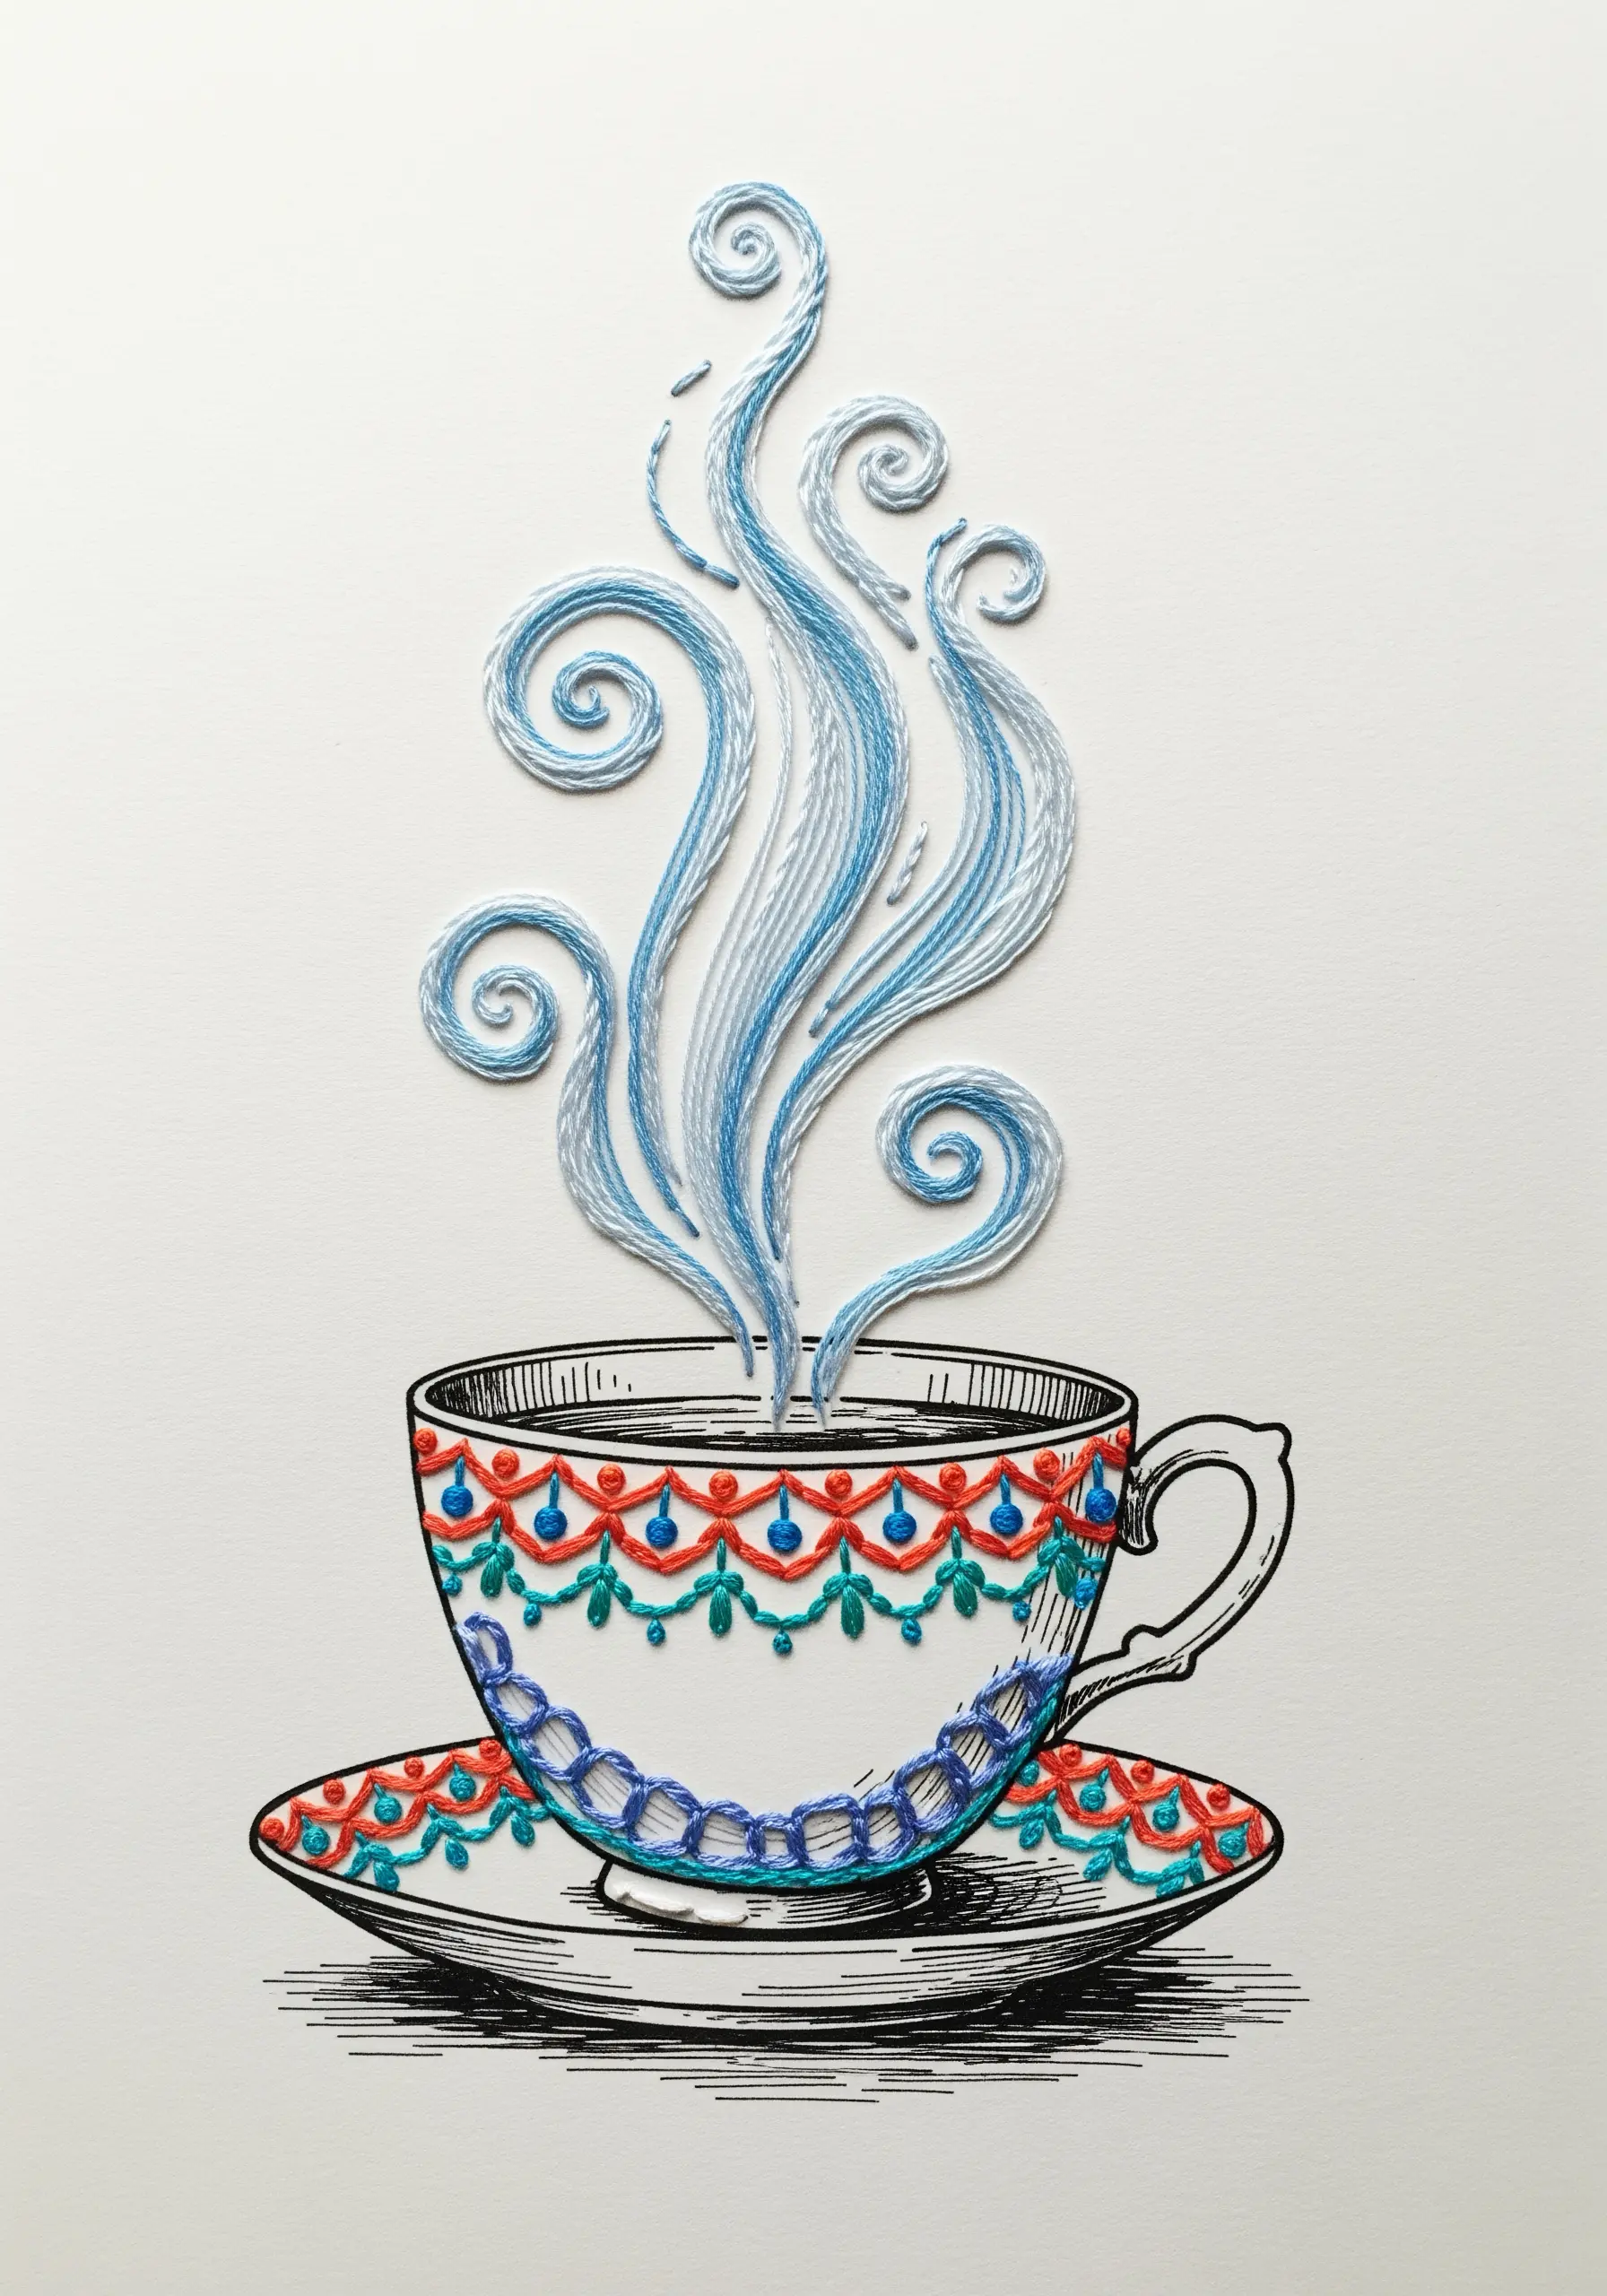
Combine your love for drawing and embroidery by stitching directly into a printed illustration.
Print a line drawing onto sturdy paper or printable fabric, then select key areas to bring to life with thread.
You can use satin stitch to fill in shapes with color, backstitch to reinforce lines, or, as shown here, use thread to create an element—like steam—that flows off the page.
This technique adds a dynamic, tactile dimension to a flat drawing, blending two art forms seamlessly.
22. Layer Sheer Fabric Over Patterned Paper
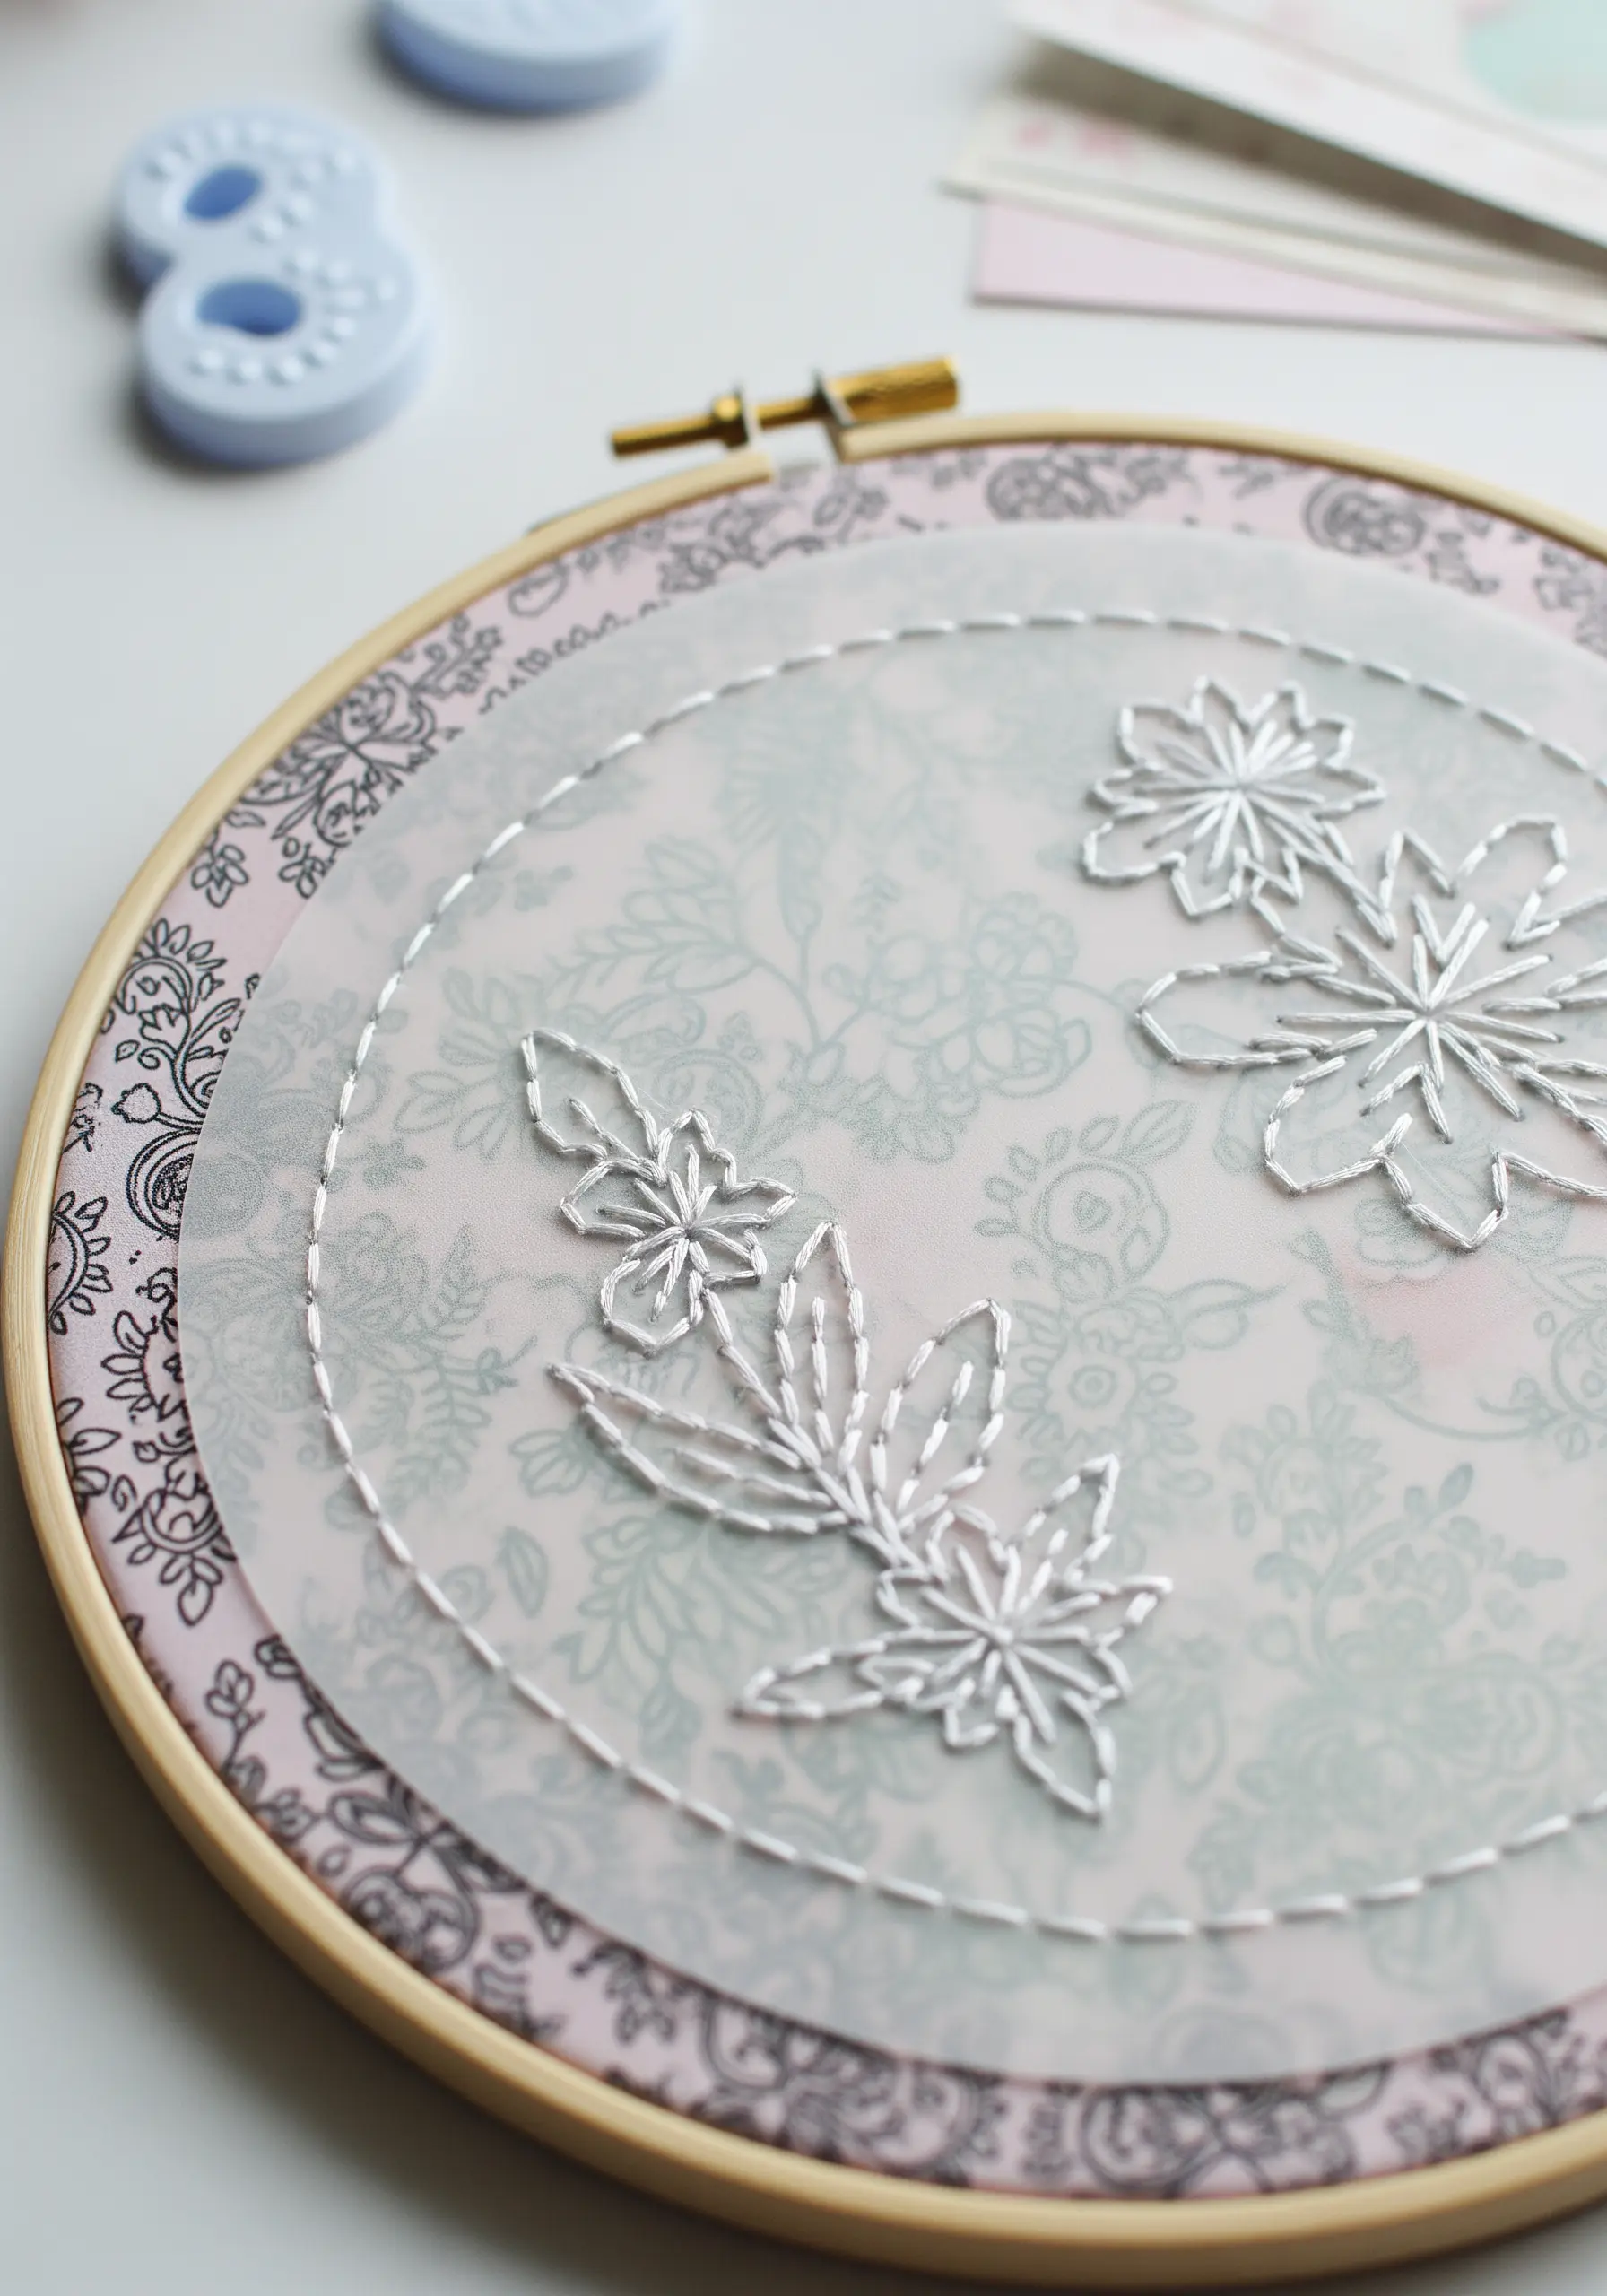
Create a soft, dreamy effect by layering translucent fabric over a beautiful piece of paper.
Choose a patterned scrapbook paper or decorative textile and place it at the back of your hoop.
Stretch a piece of vellum or organza over the top, creating a muted, frosted version of the pattern beneath.
Embroider your design onto the sheer top layer.
Your stitches will appear sharp and defined, seeming to float above the soft-focus background for a truly elegant finish.


