

When you pick up a needle and thread, you’re holding endless potential. But sometimes, there’s a frustrating gap between the beautiful image in your mind and the finished piece in your hoop. You might wonder how to make your stitches look less like a hobby and more like art—intentional, polished, and uniquely yours.
The secret isn’t in mastering hundreds of complex stitches or buying expensive supplies. It lies in the small, deliberate choices you make: the direction you lay your thread, the number of strands you use, the way you balance color with empty space.
These eighteen ideas are more than just patterns; they are invitations to refine your technique. Think of them as gentle guidance on how to use minimalism and nature’s own designs to create embroidery that feels both modern and timeless. It’s time to stitch with quiet confidence and create work that truly resonates.
1. Define Landscapes with Minimalist Line Art
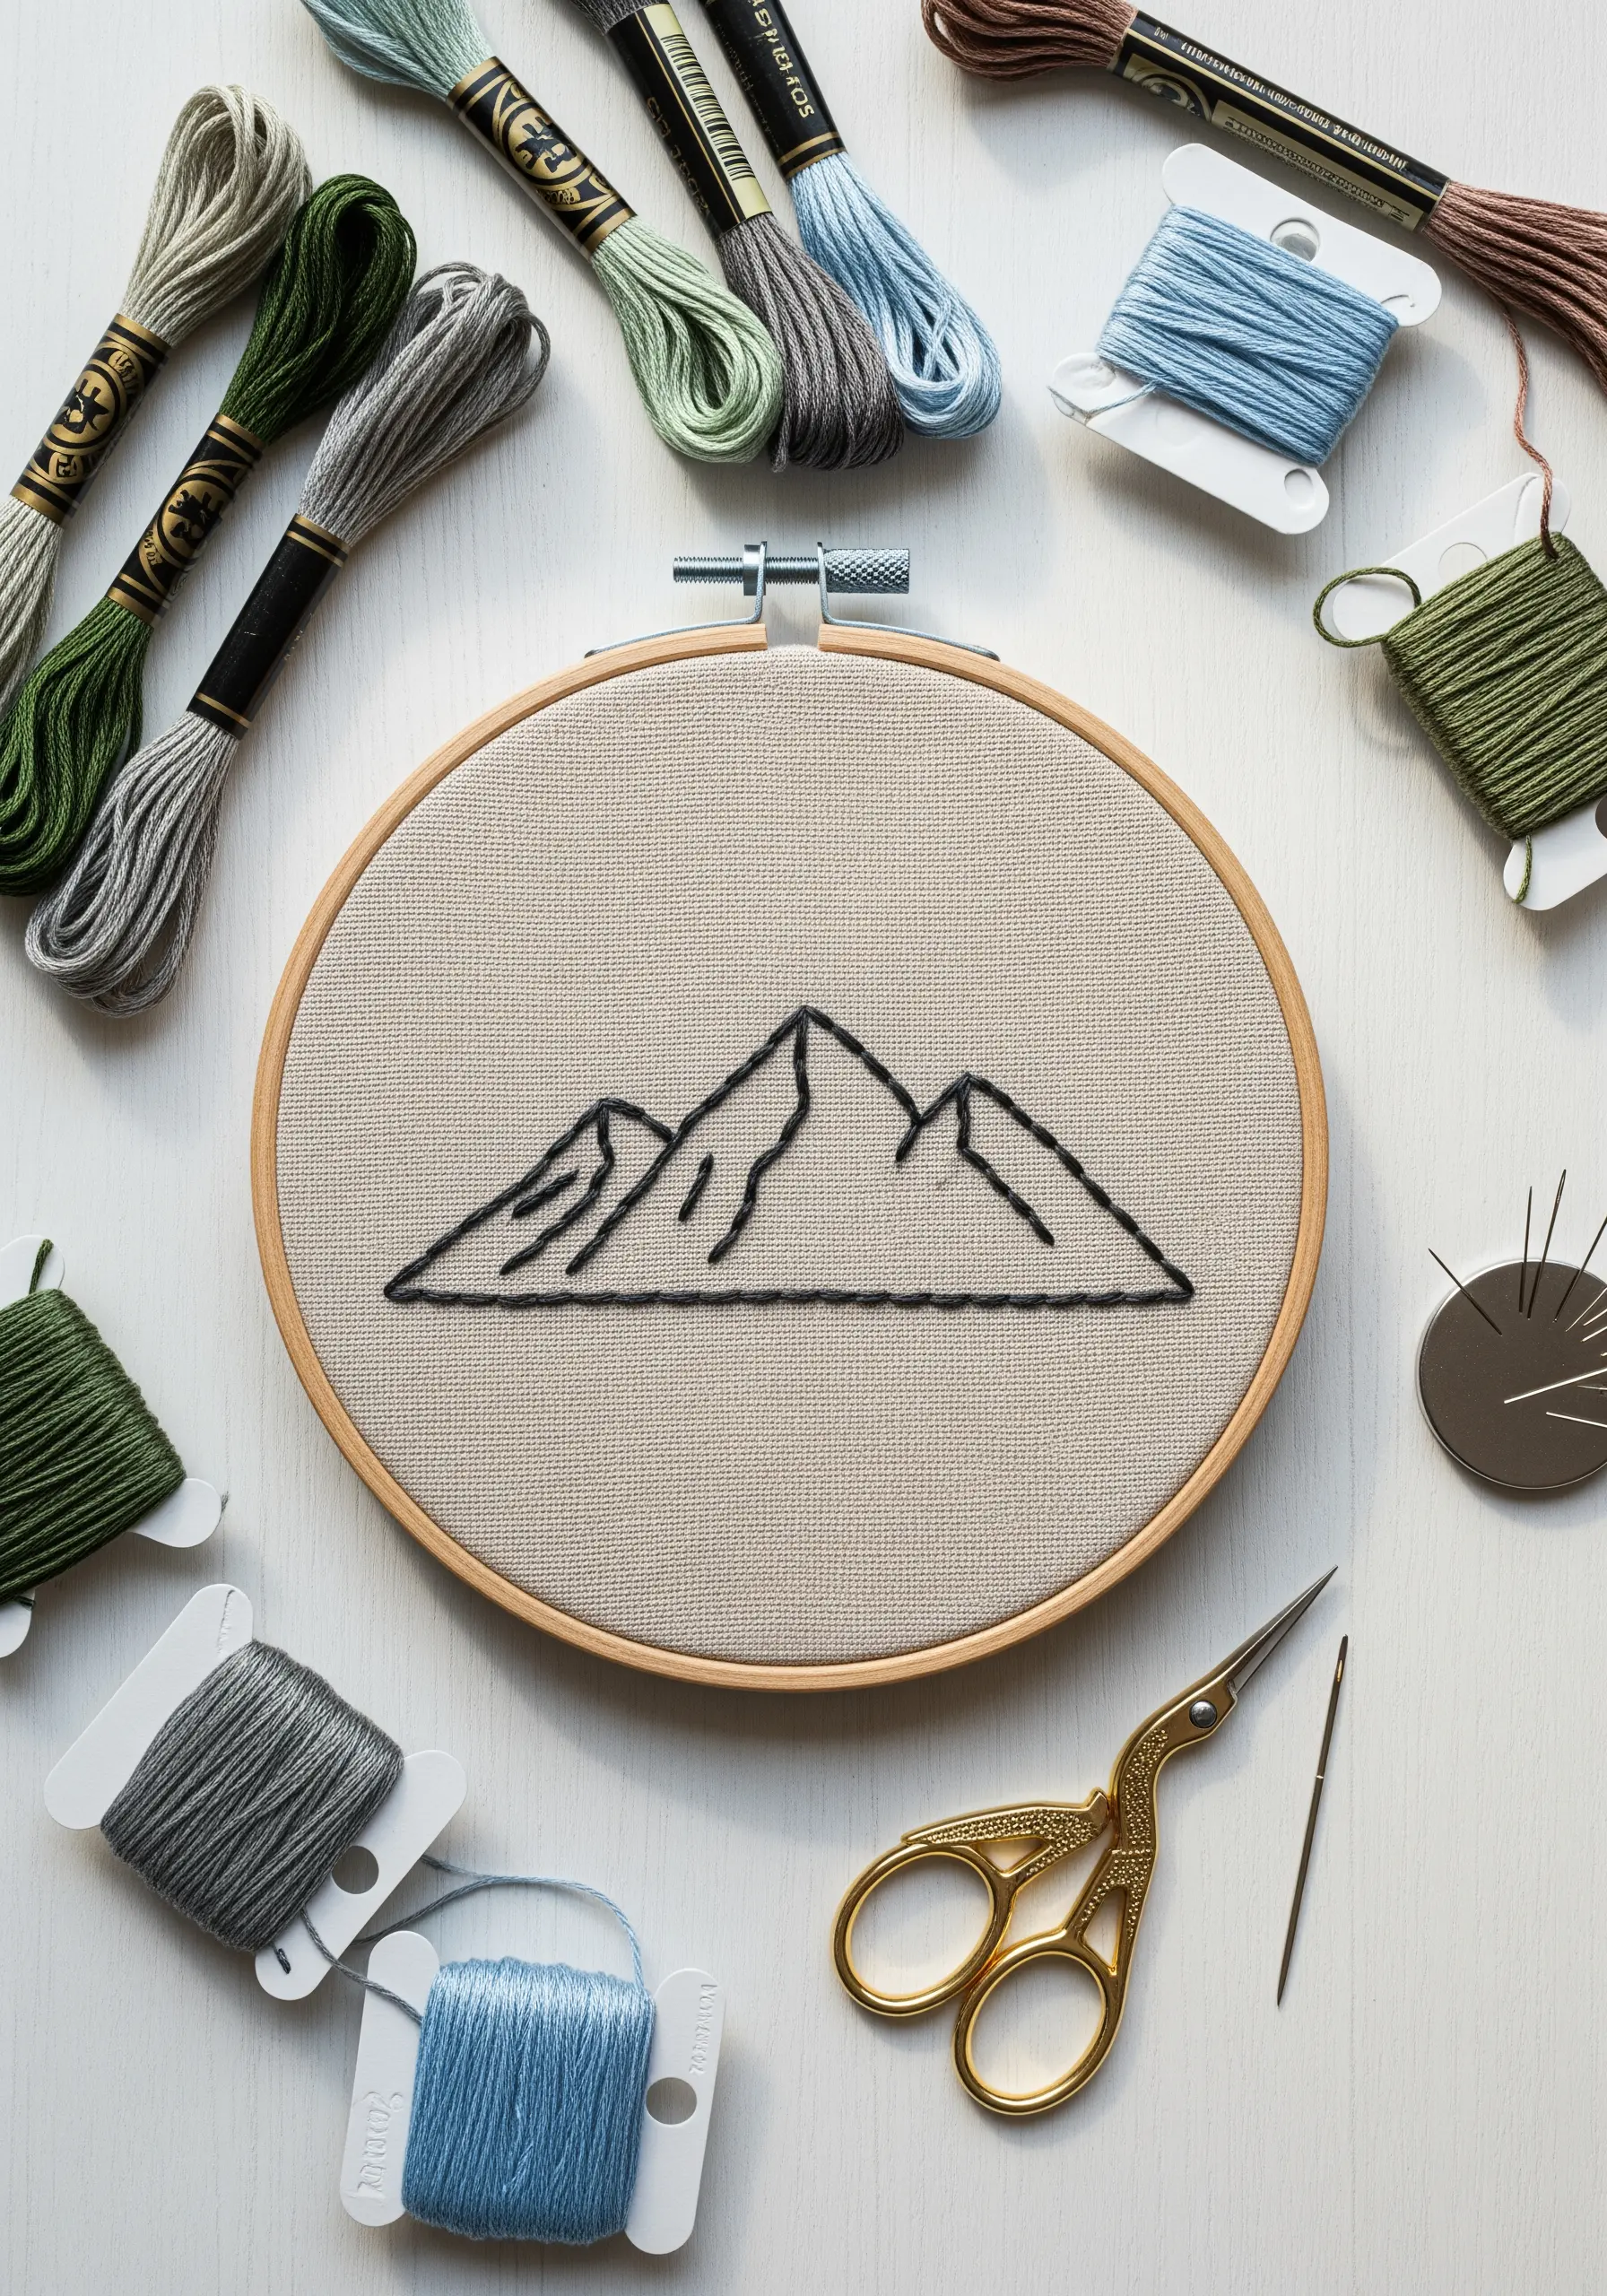
Transform a simple outline into a statement piece by focusing entirely on the quality of your line.
Use a full six strands of cotton floss with a backstitch to create a bold, graphic line that stands out against a neutral linen or canvas fabric.
For a more delicate, hand-sketched effect, switch to just two strands and use a stem stitch, which creates a subtly twisted, rope-like line with a smoother curve.
This technique proves that a design doesn’t need complexity to have a powerful impact; its strength lies in precision and the texture of the thread against the fabric.
2. Master Directional Fill for Organic Realism
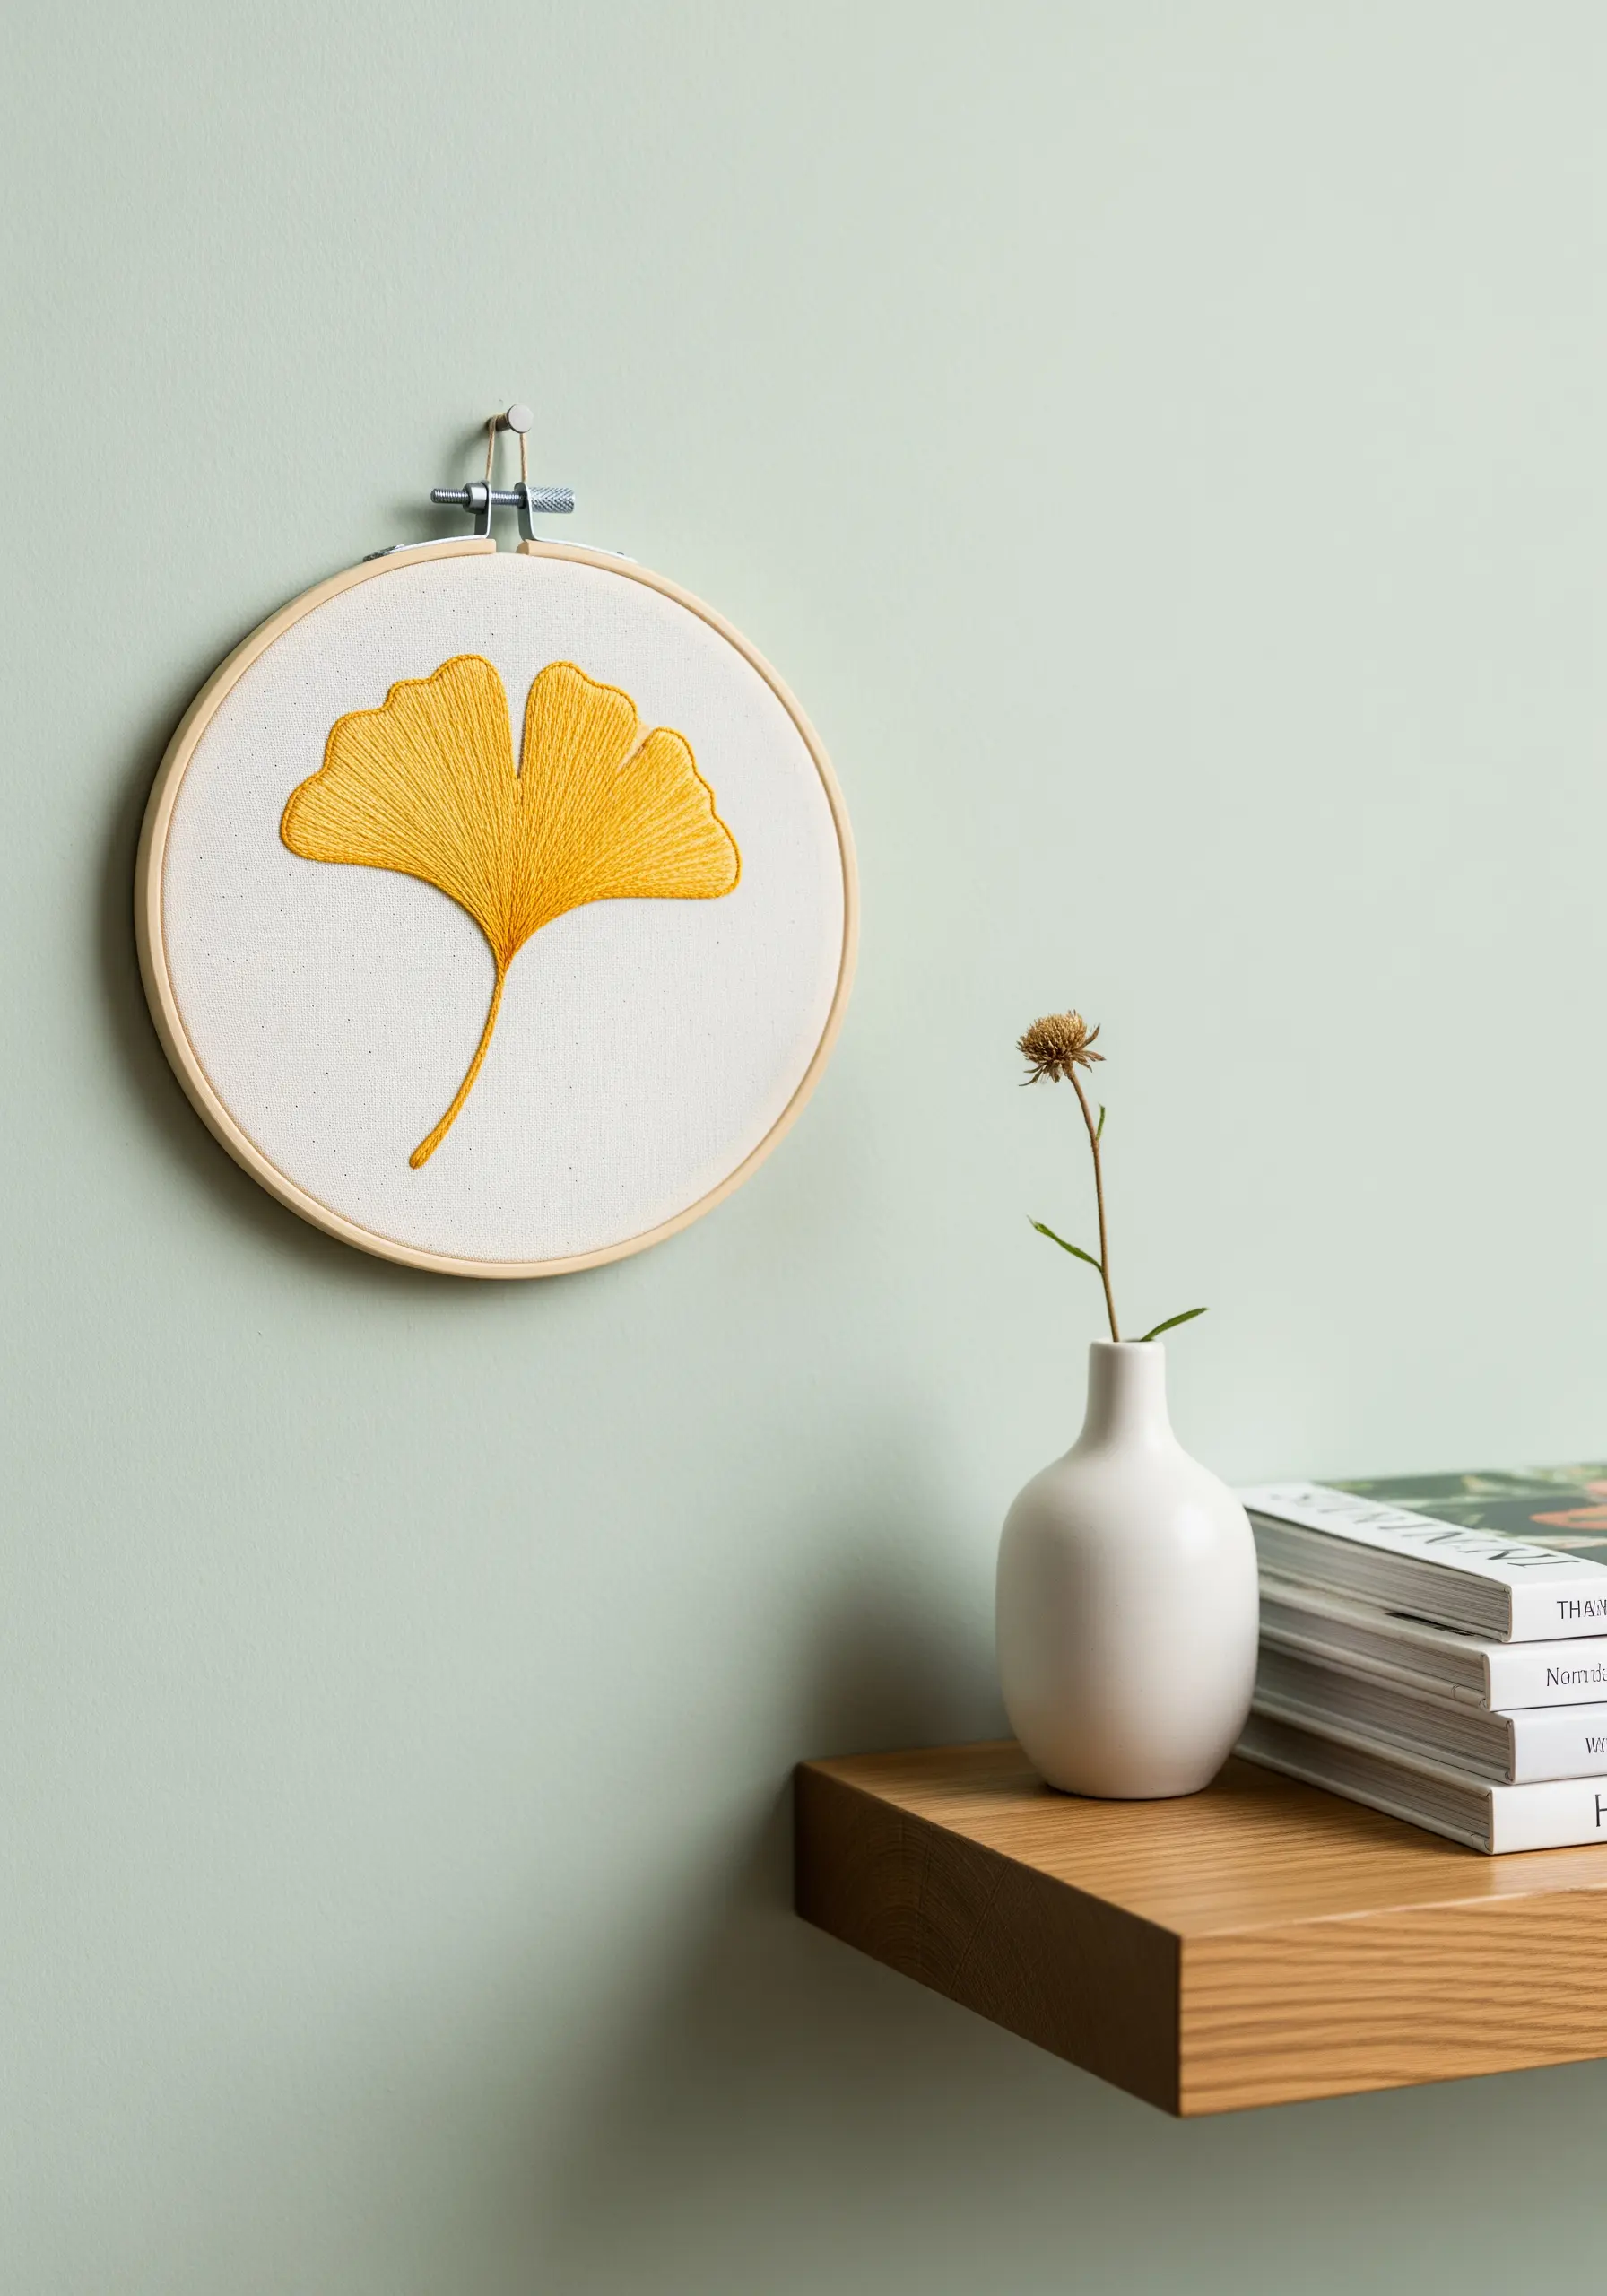
Give botanical motifs like this ginkgo leaf a sense of life and movement by mastering directional fill.
Instead of a standard satin stitch, use a long-and-short stitch, angling your stitches to follow the natural direction of the leaf’s veins as they fan out from the stem.
Sketch faint guide lines onto your fabric first to ensure your stitches flow cohesively from the base to the outer edge.
This small adjustment makes the flat shape feel three-dimensional and organic, proving that the direction of your stitches is just as important as the color you choose.
3. Combine Stitches for Botanical Texture on Totes
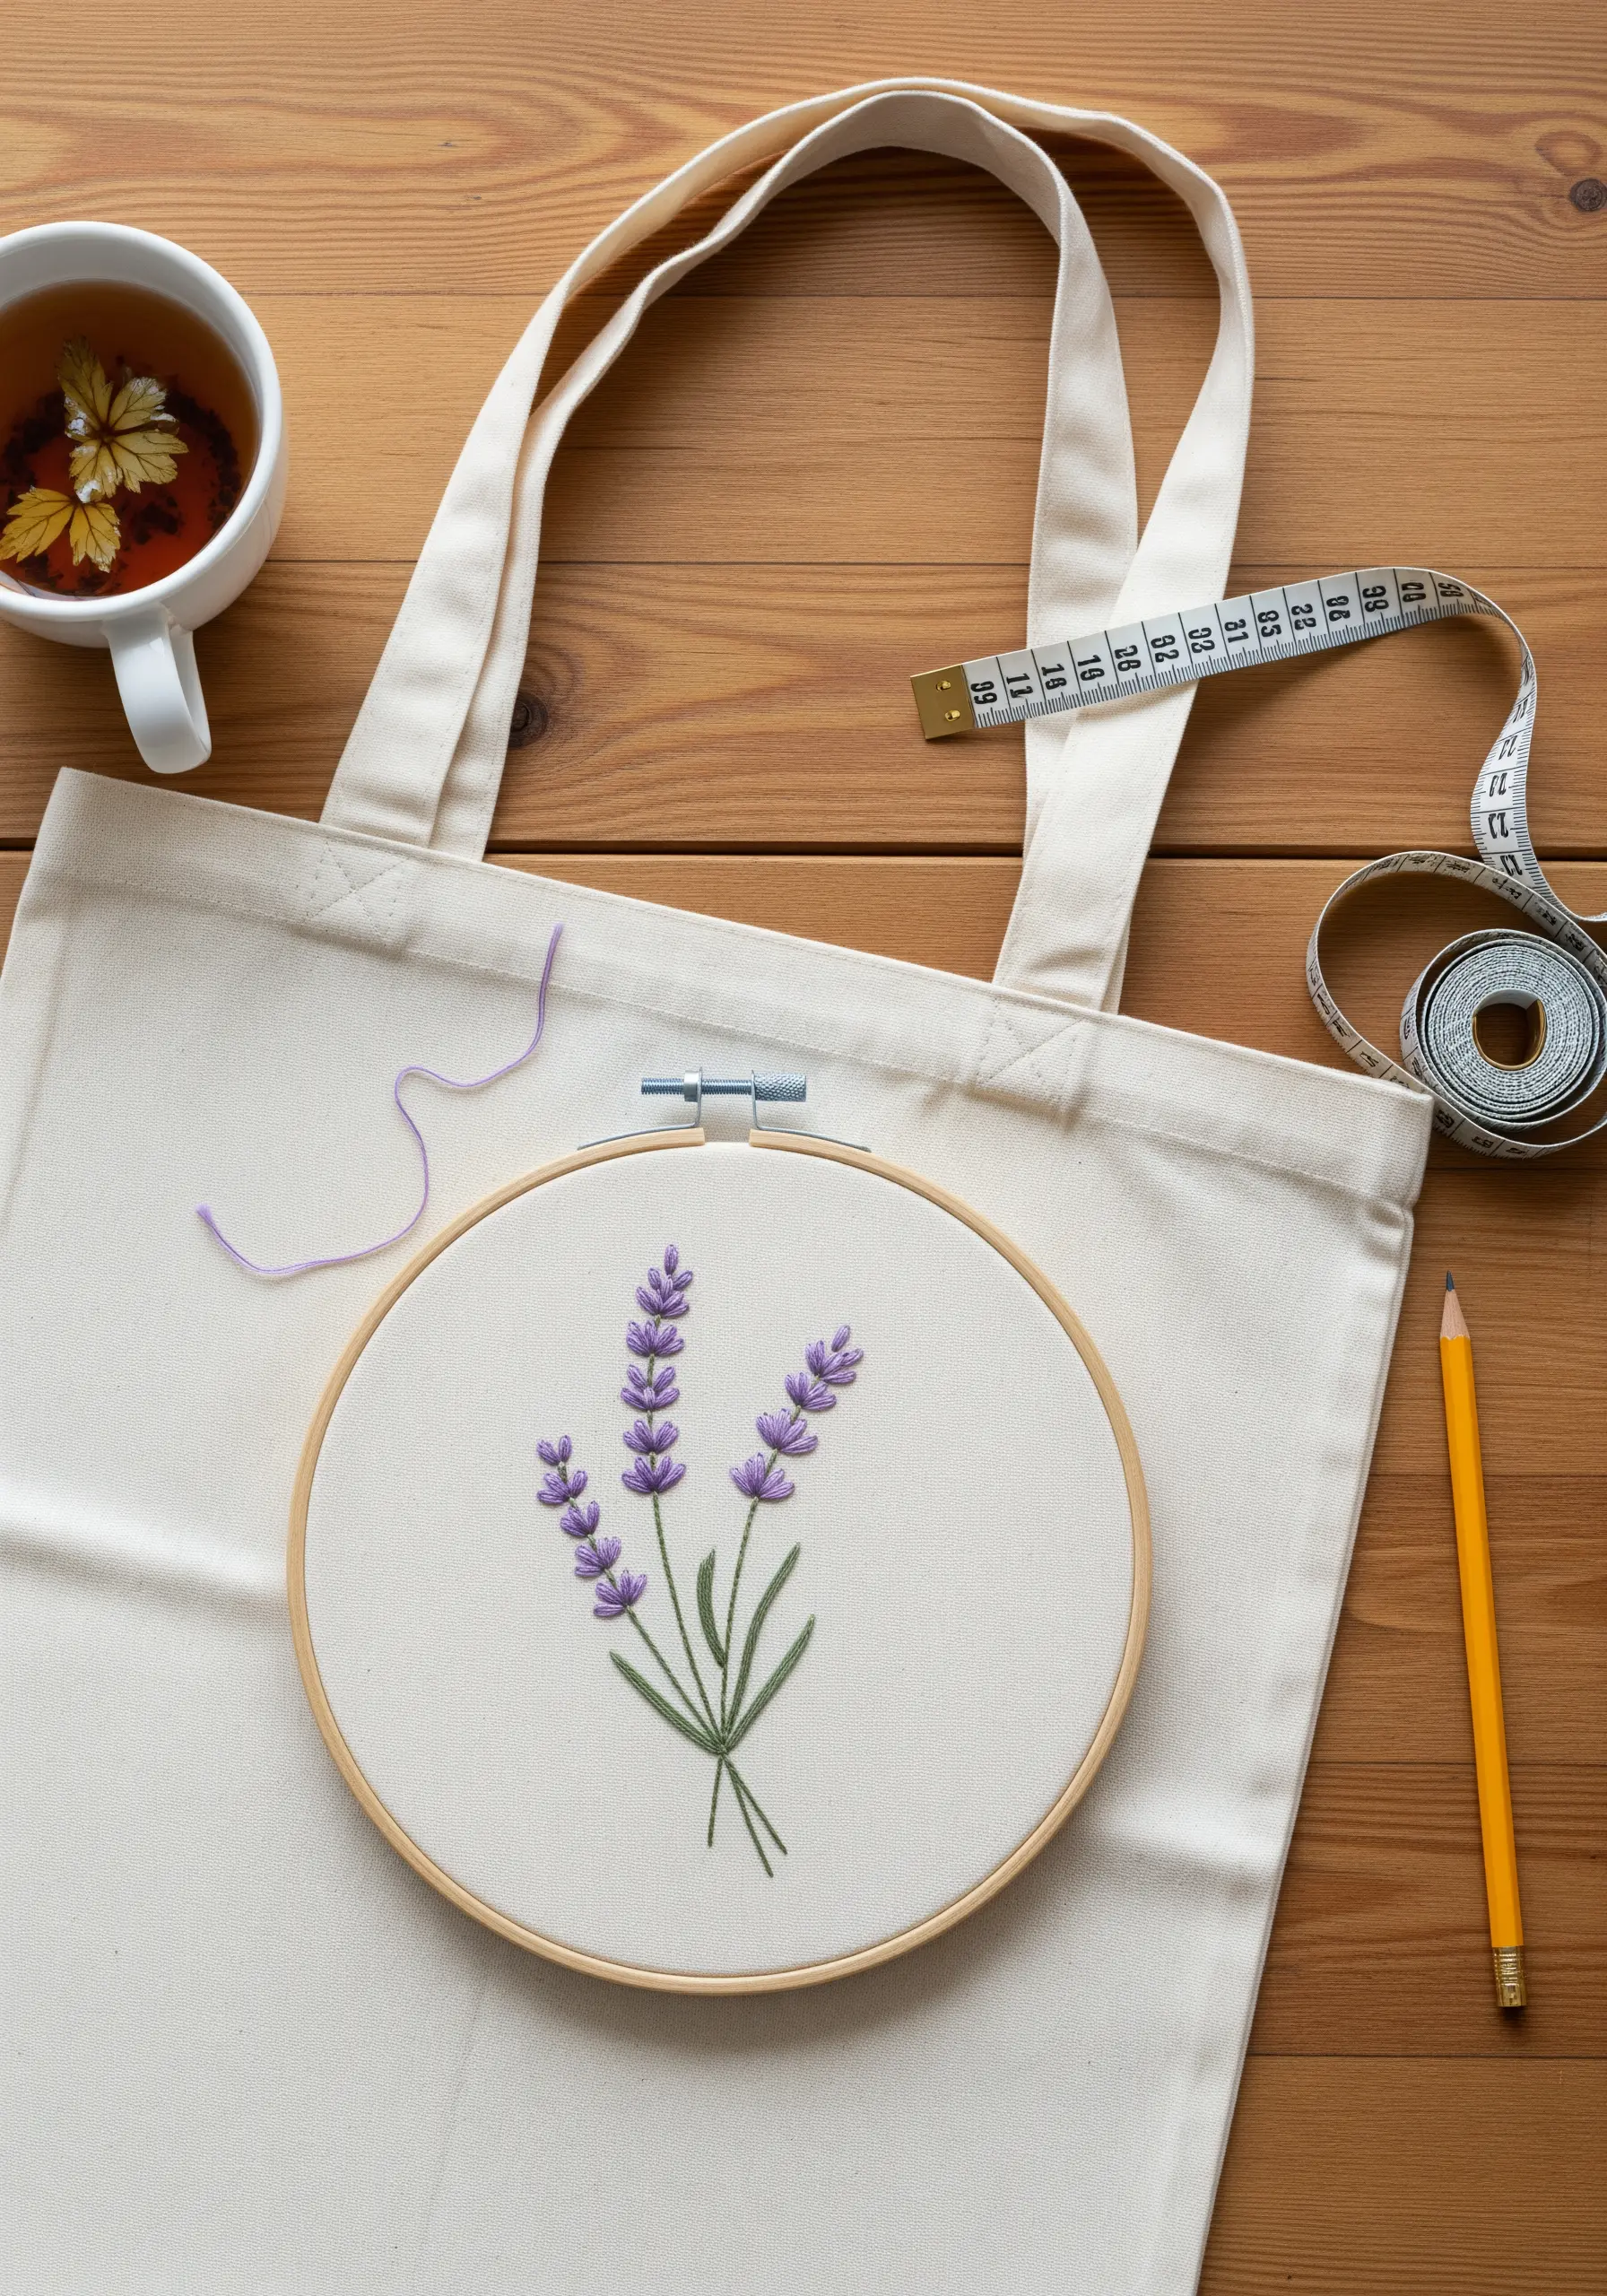
Elevate a simple floral design on a functional item like a tote bag by combining different stitches to create varied textures.
Use French knots for the lavender buds, wrapping the thread twice for tighter knots and three times for fuller, more prominent ones.
Pair them with a clean stem stitch for the green stalks. This contrast between the smooth lines of the stems and the clustered dots of the buds adds depth and visual interest.
Always use a medium-weight stabilizer inside the bag to prevent the fabric from puckering and ensure your stitches remain tight and secure with daily use.
4. Create Cohesive Sets with Single-Color Motifs
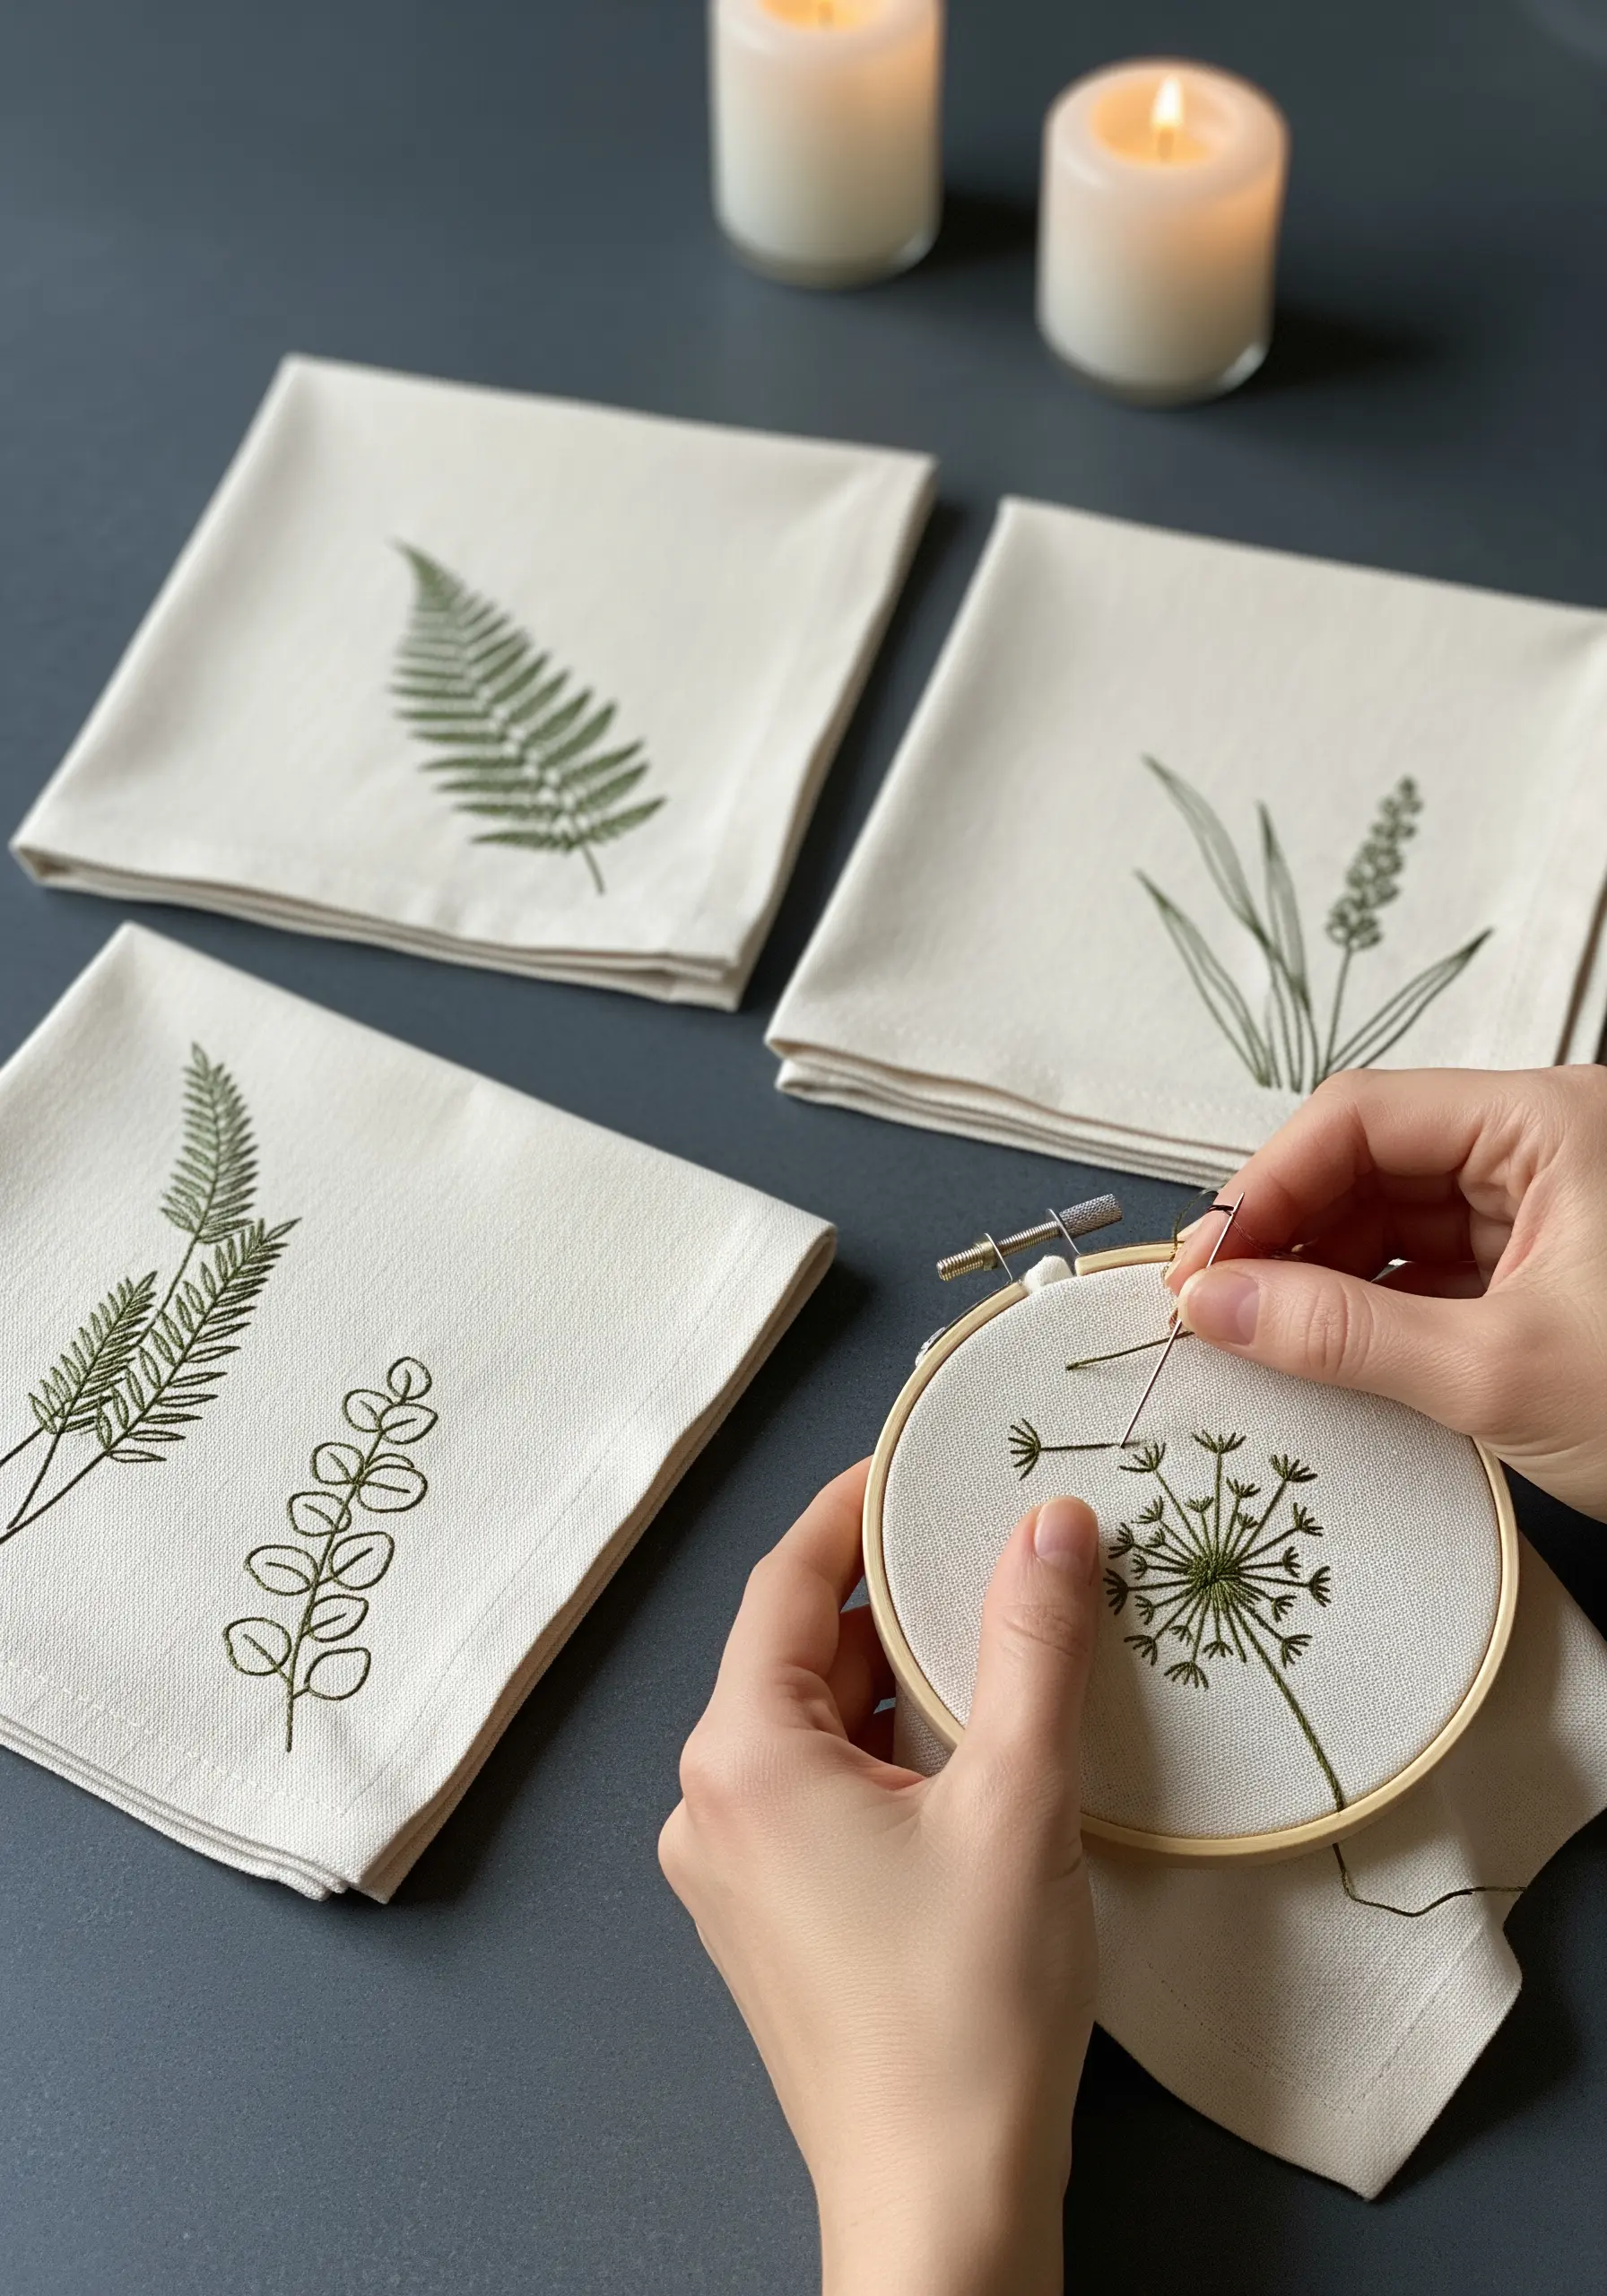
Design an elegant, unified set of table linens or napkins by limiting your palette to a single color.
Choose different minimalist botanical motifs—a fern, a dandelion, a sprig of leaves—but render them all in the same shade of green or grey thread.
Use a fine, two-strand backstitch or split stitch to achieve crisp, delicate lines that feel refined and won’t overpower the functional object.
This restrained approach creates a sophisticated, cohesive collection where the focus is on the clean forms and the subtle beauty of the stitch work itself.
5. Stitch the Stars on a Deep Navy Canvas
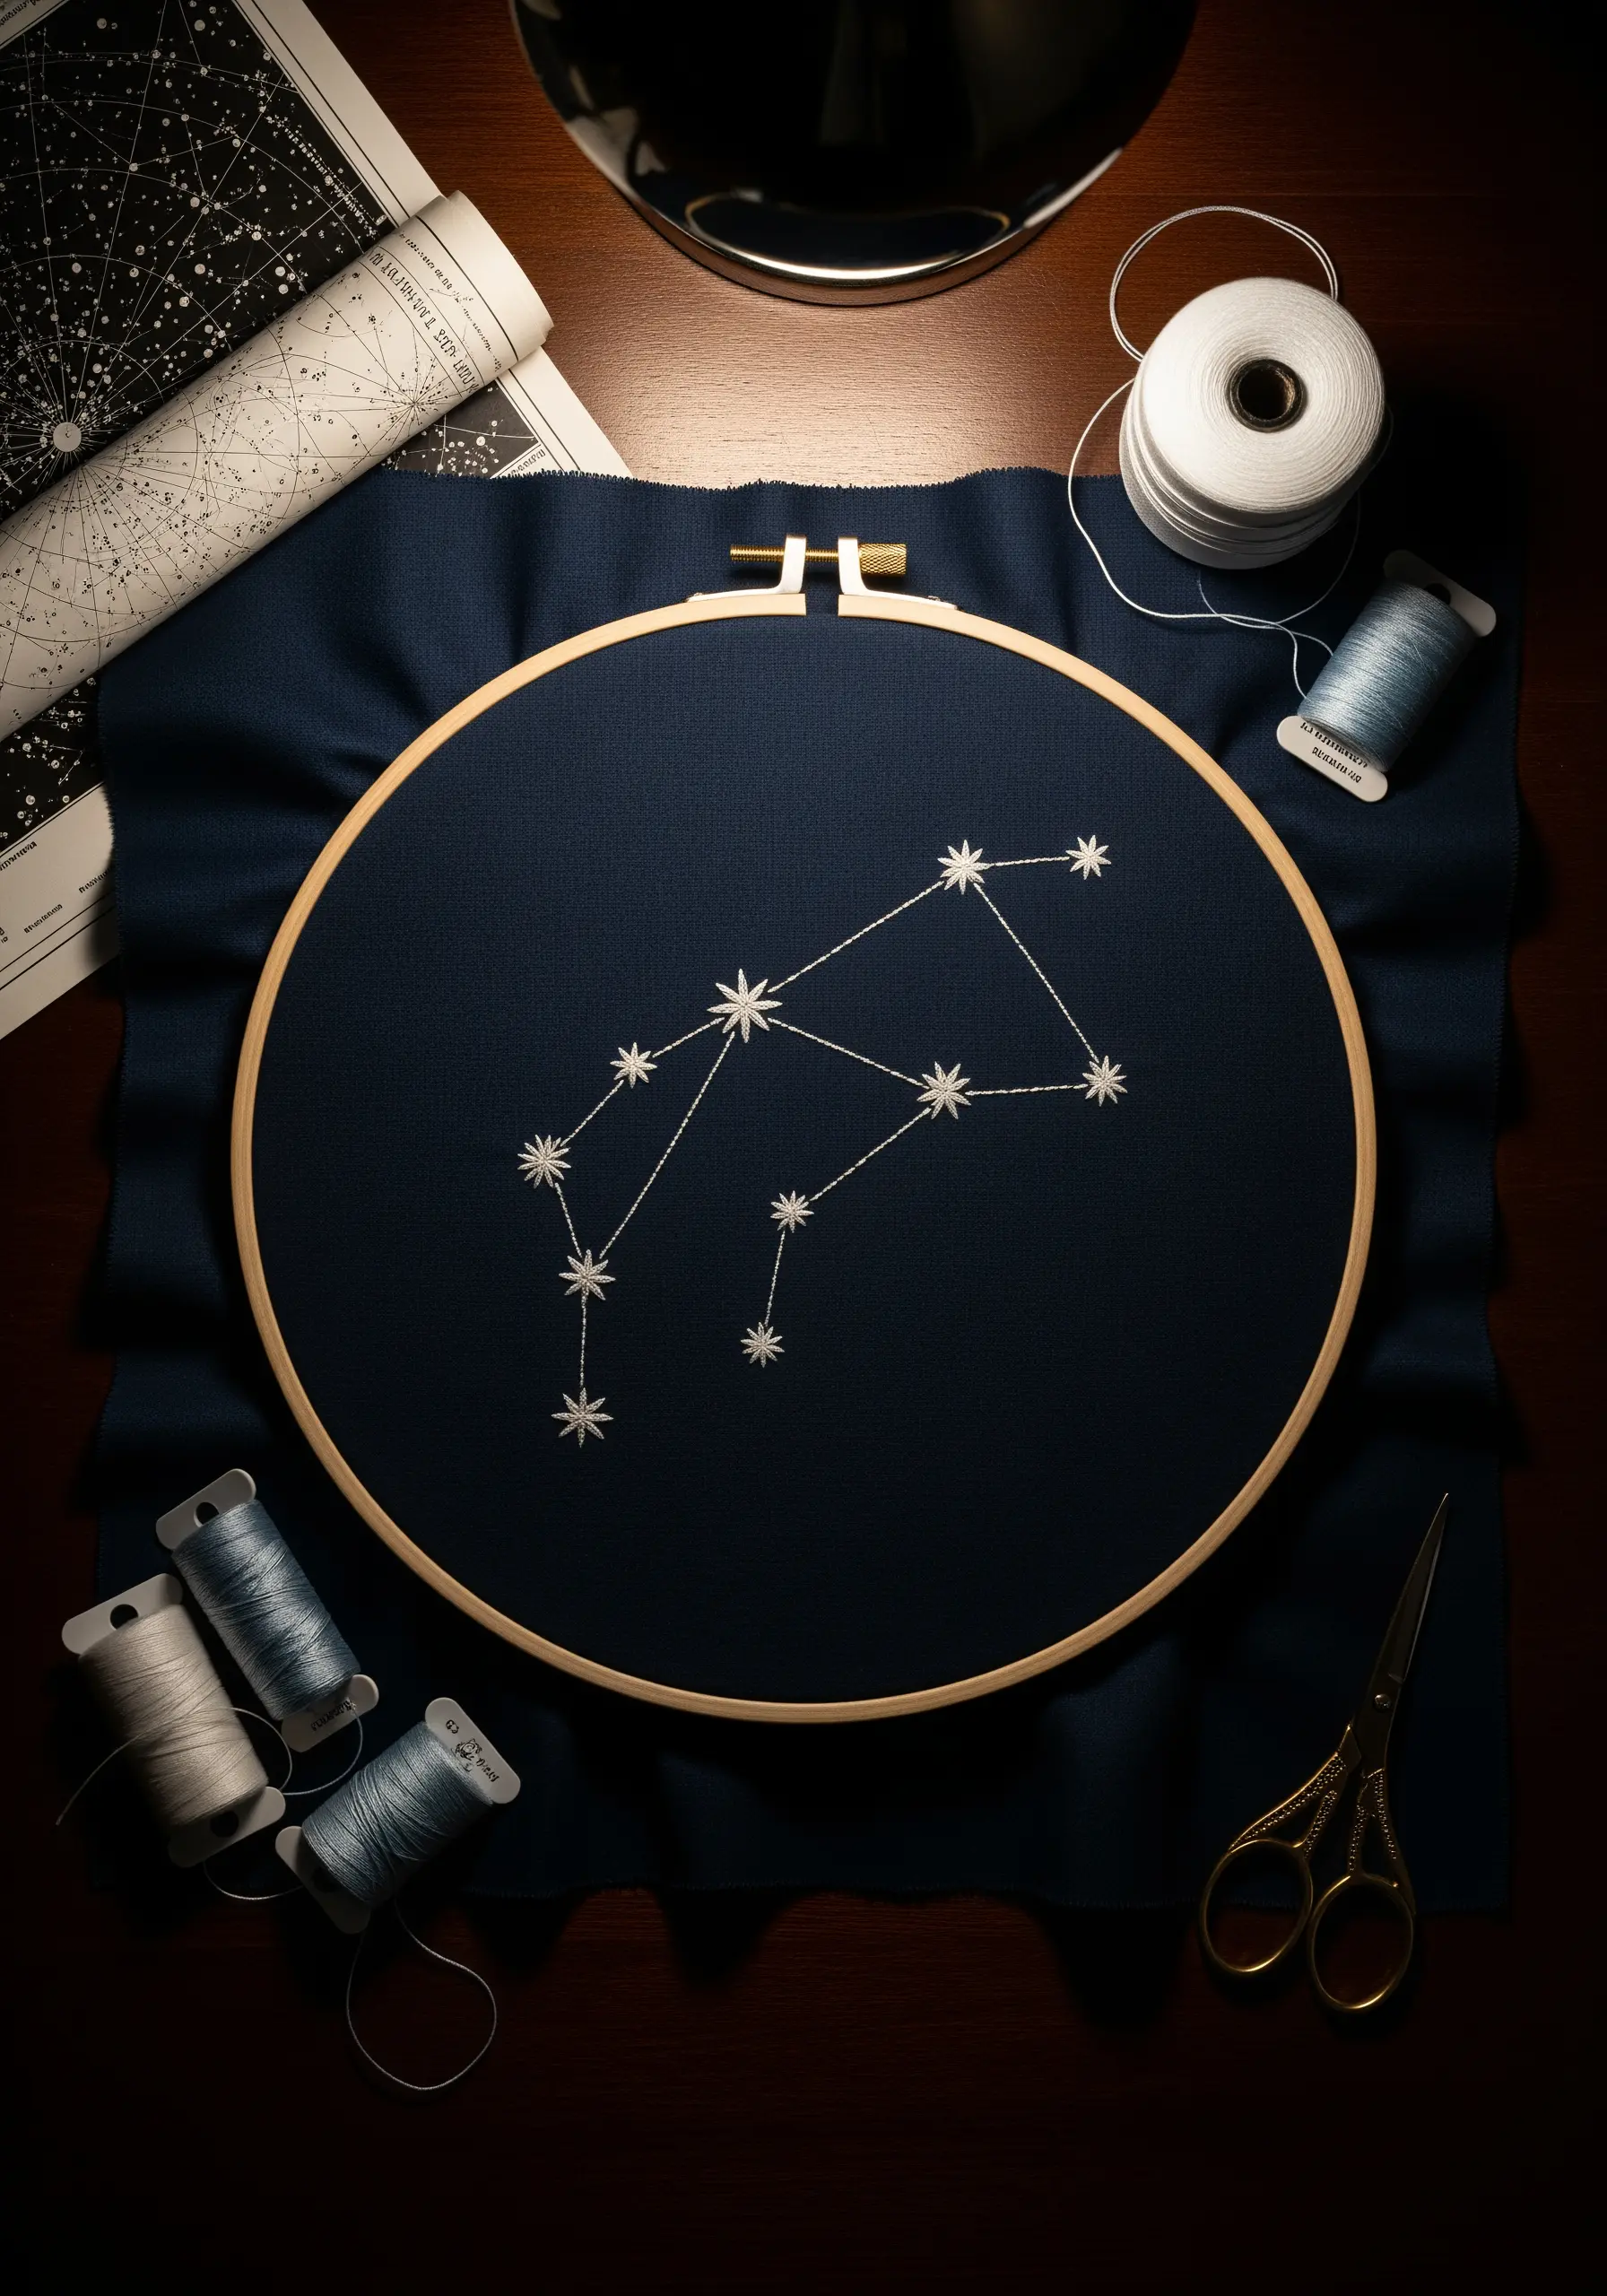
Capture the night sky by using a deep navy or black fabric as your canvas. The high contrast makes simple stitches appear to glow.
Vary the size of your stars by creating French knots with one, two, or three wraps of thread. This creates a sense of depth and distance.
Use a single strand of white or silver metallic thread for the connecting lines, pulling each straight stitch taut for a crisp, geometric effect.
The negative space of the dark fabric is the most important part of the composition, making each stitch feel intentional and luminous.
6. Anchor Large Designs on Denim with Stabilizer
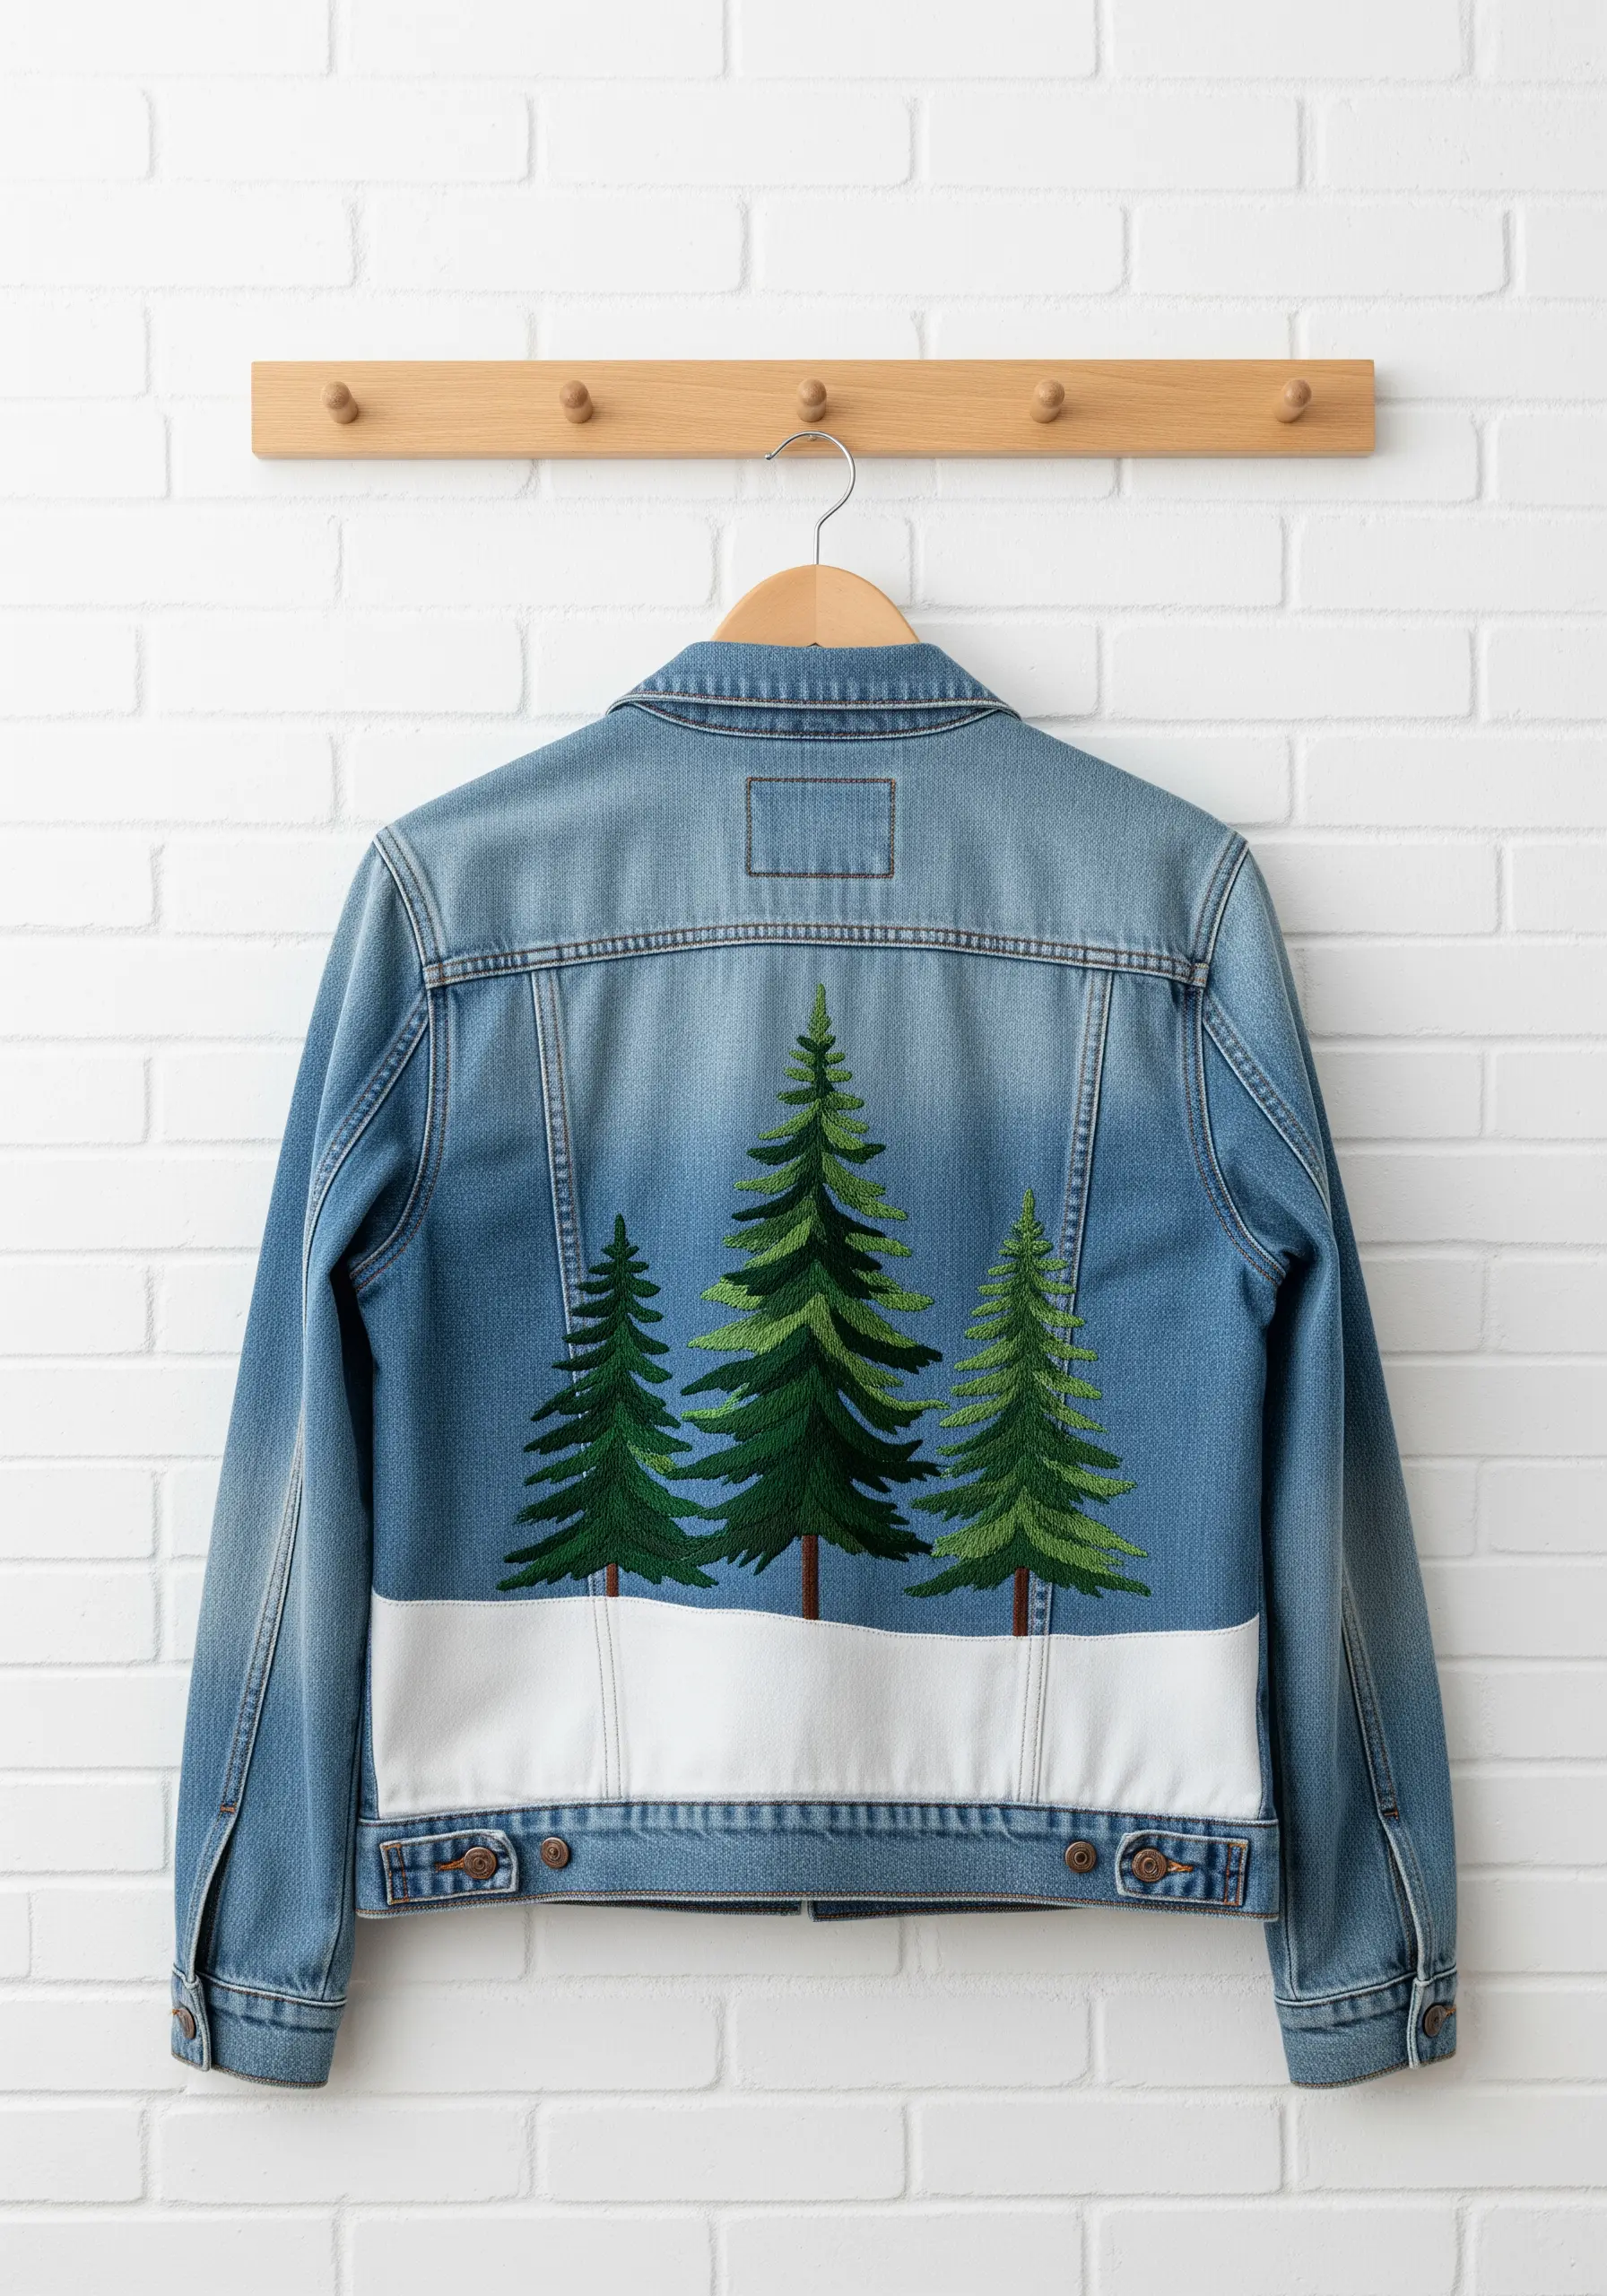
When working on a large-scale piece for a denim jacket, proper preparation is everything.
Iron a cut-away stabilizer to the inside of the jacket before you begin stitching. This prevents the denim from stretching and distorting under the tension of dense fill stitches.
Break up large satin-stitched areas into smaller sections to avoid long, snag-prone threads. For the trees, stitch each block of branches separately, angling the stitches slightly differently to create texture and the illusion of layers.
This technical foresight ensures your finished embroidery is durable and professional, ready to withstand wear.
7. Add a Touch of Whimsy with Pocket Embroidery
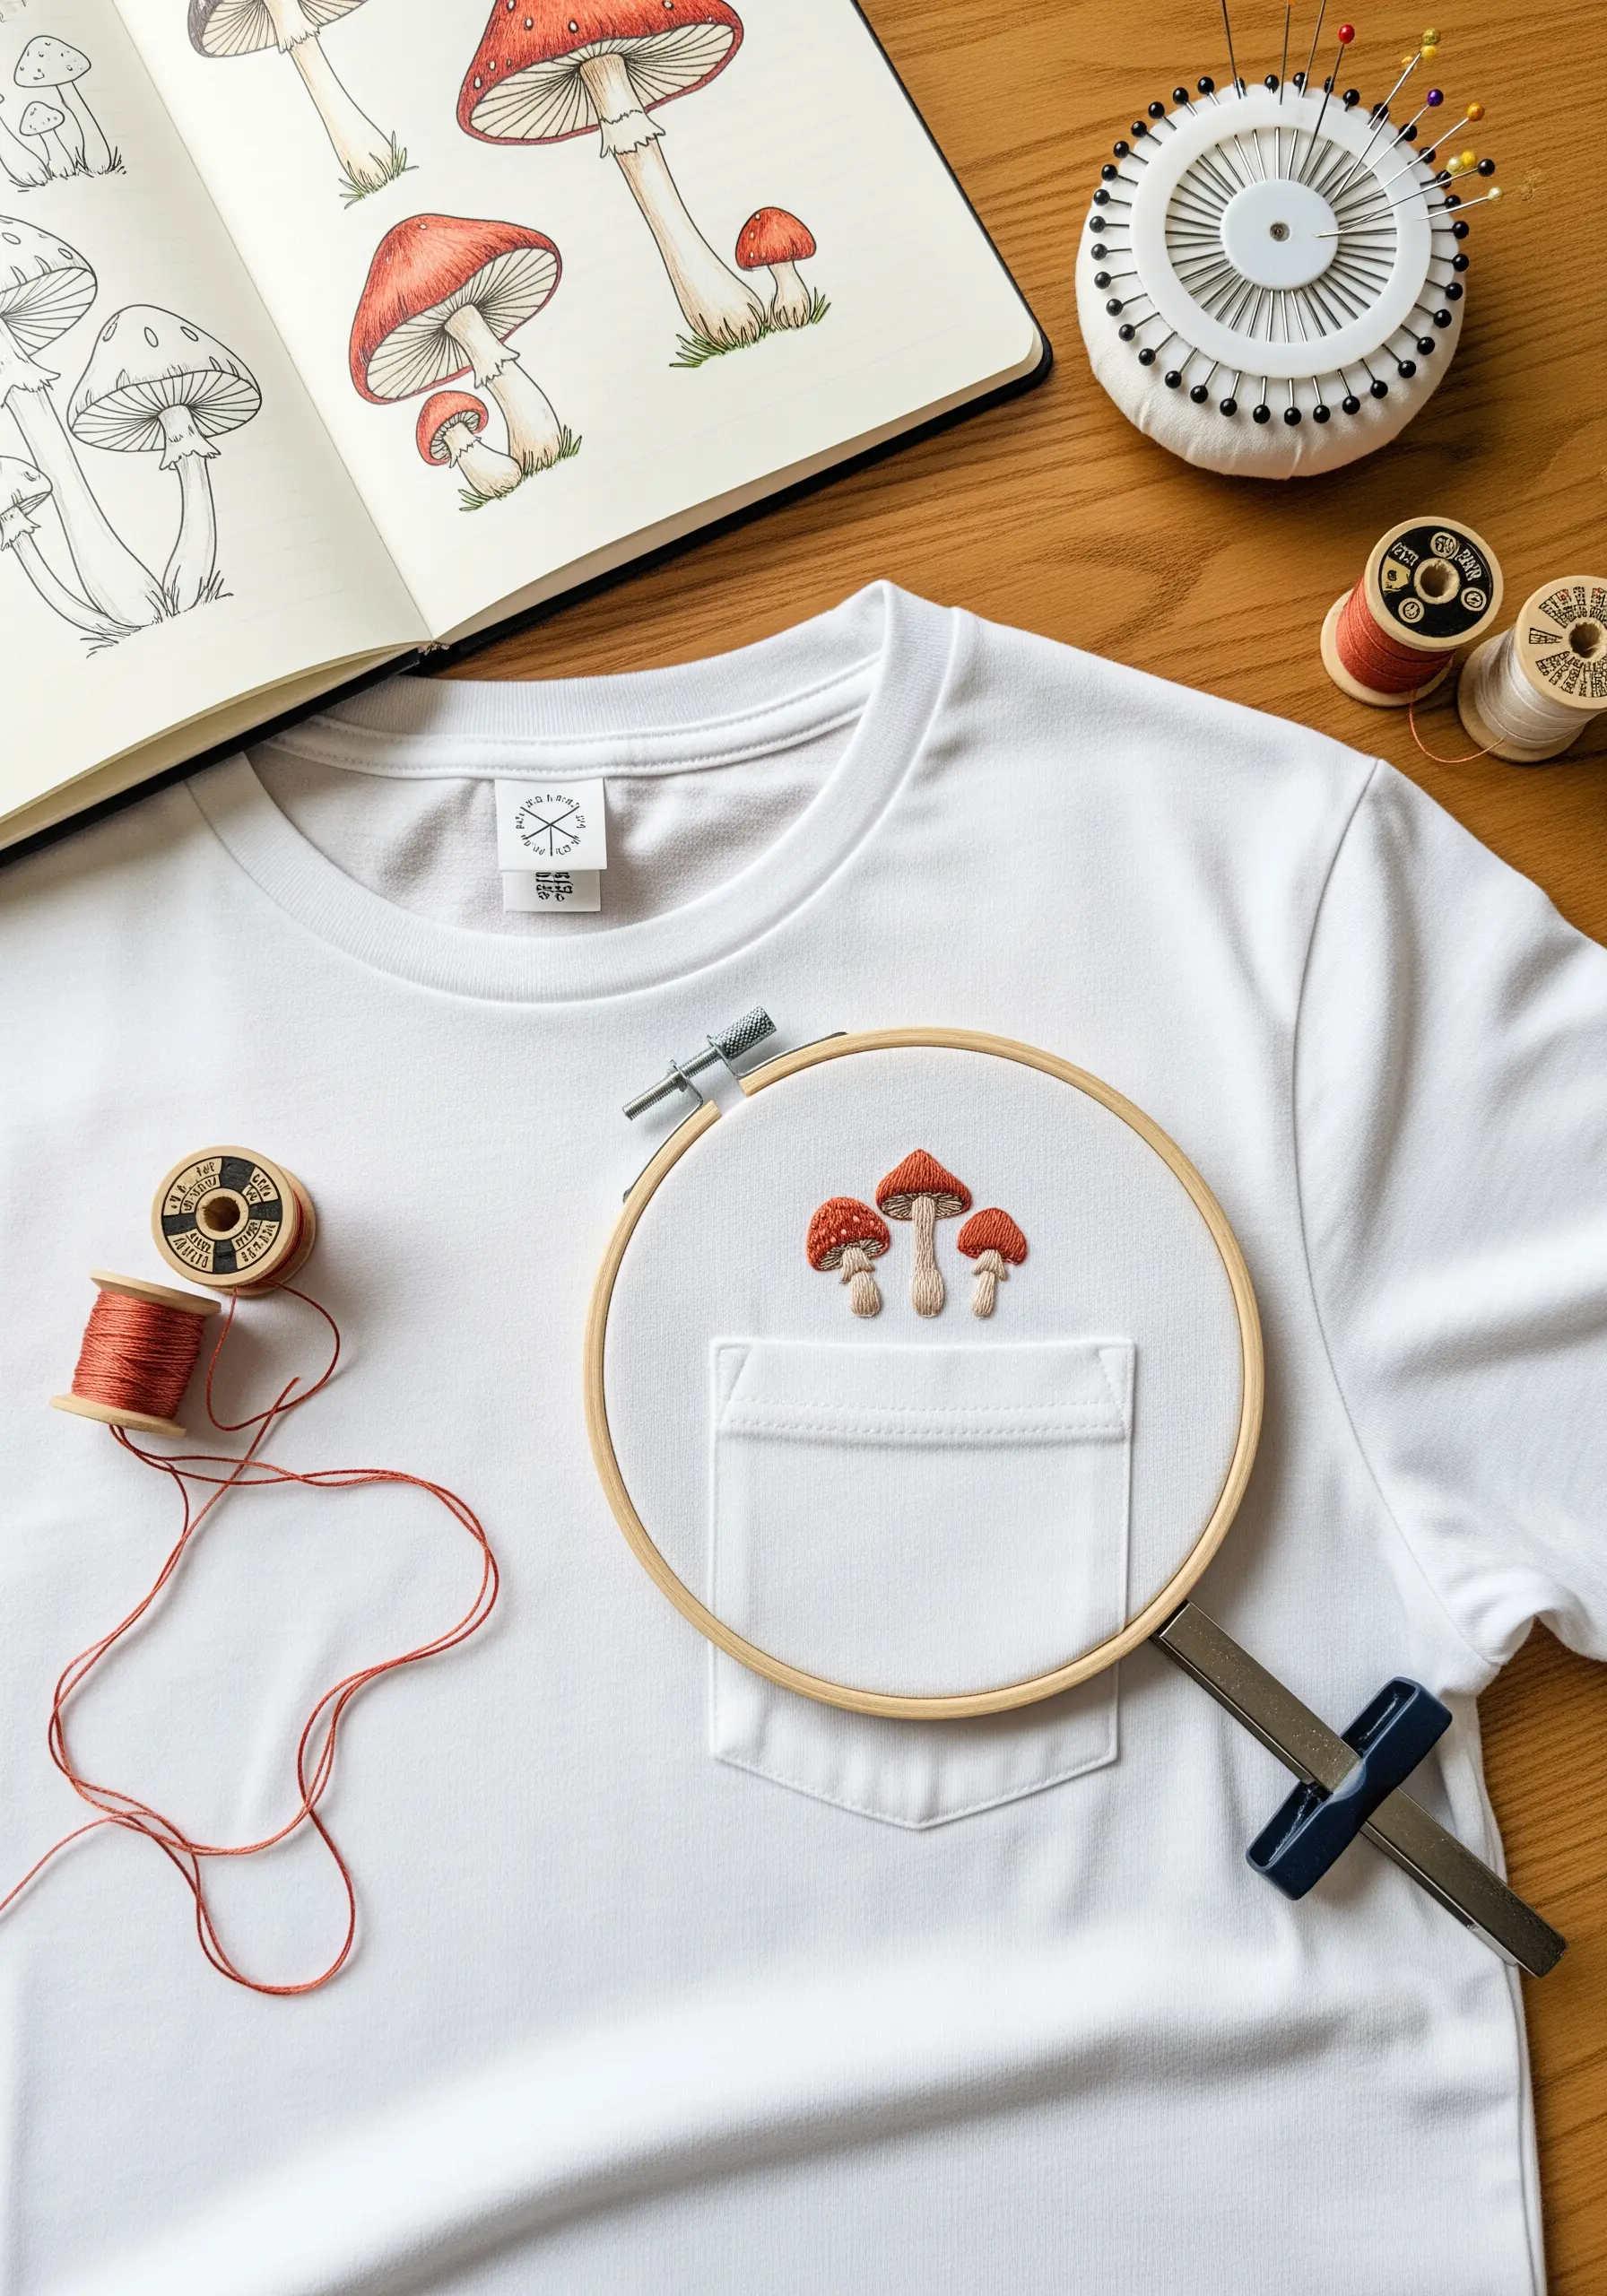
A tiny motif stitched on or just above a t-shirt pocket adds a subtle, personalized detail that elevates a basic garment.
For the mushroom caps, use a two-color long-and-short stitch to create a soft gradient, giving the small shapes a surprising amount of dimension.
Because t-shirt fabric is a knit, always use a stabilizer on the back to prevent puckering. A stick-and-stitch stabilizer is perfect here, as it provides a pattern guide and support in one.
The key is placement—tucking a small design into an unexpected corner makes it feel like a delightful discovery.
8. Achieve Understated Luxury with Tone-on-Tone Stitching
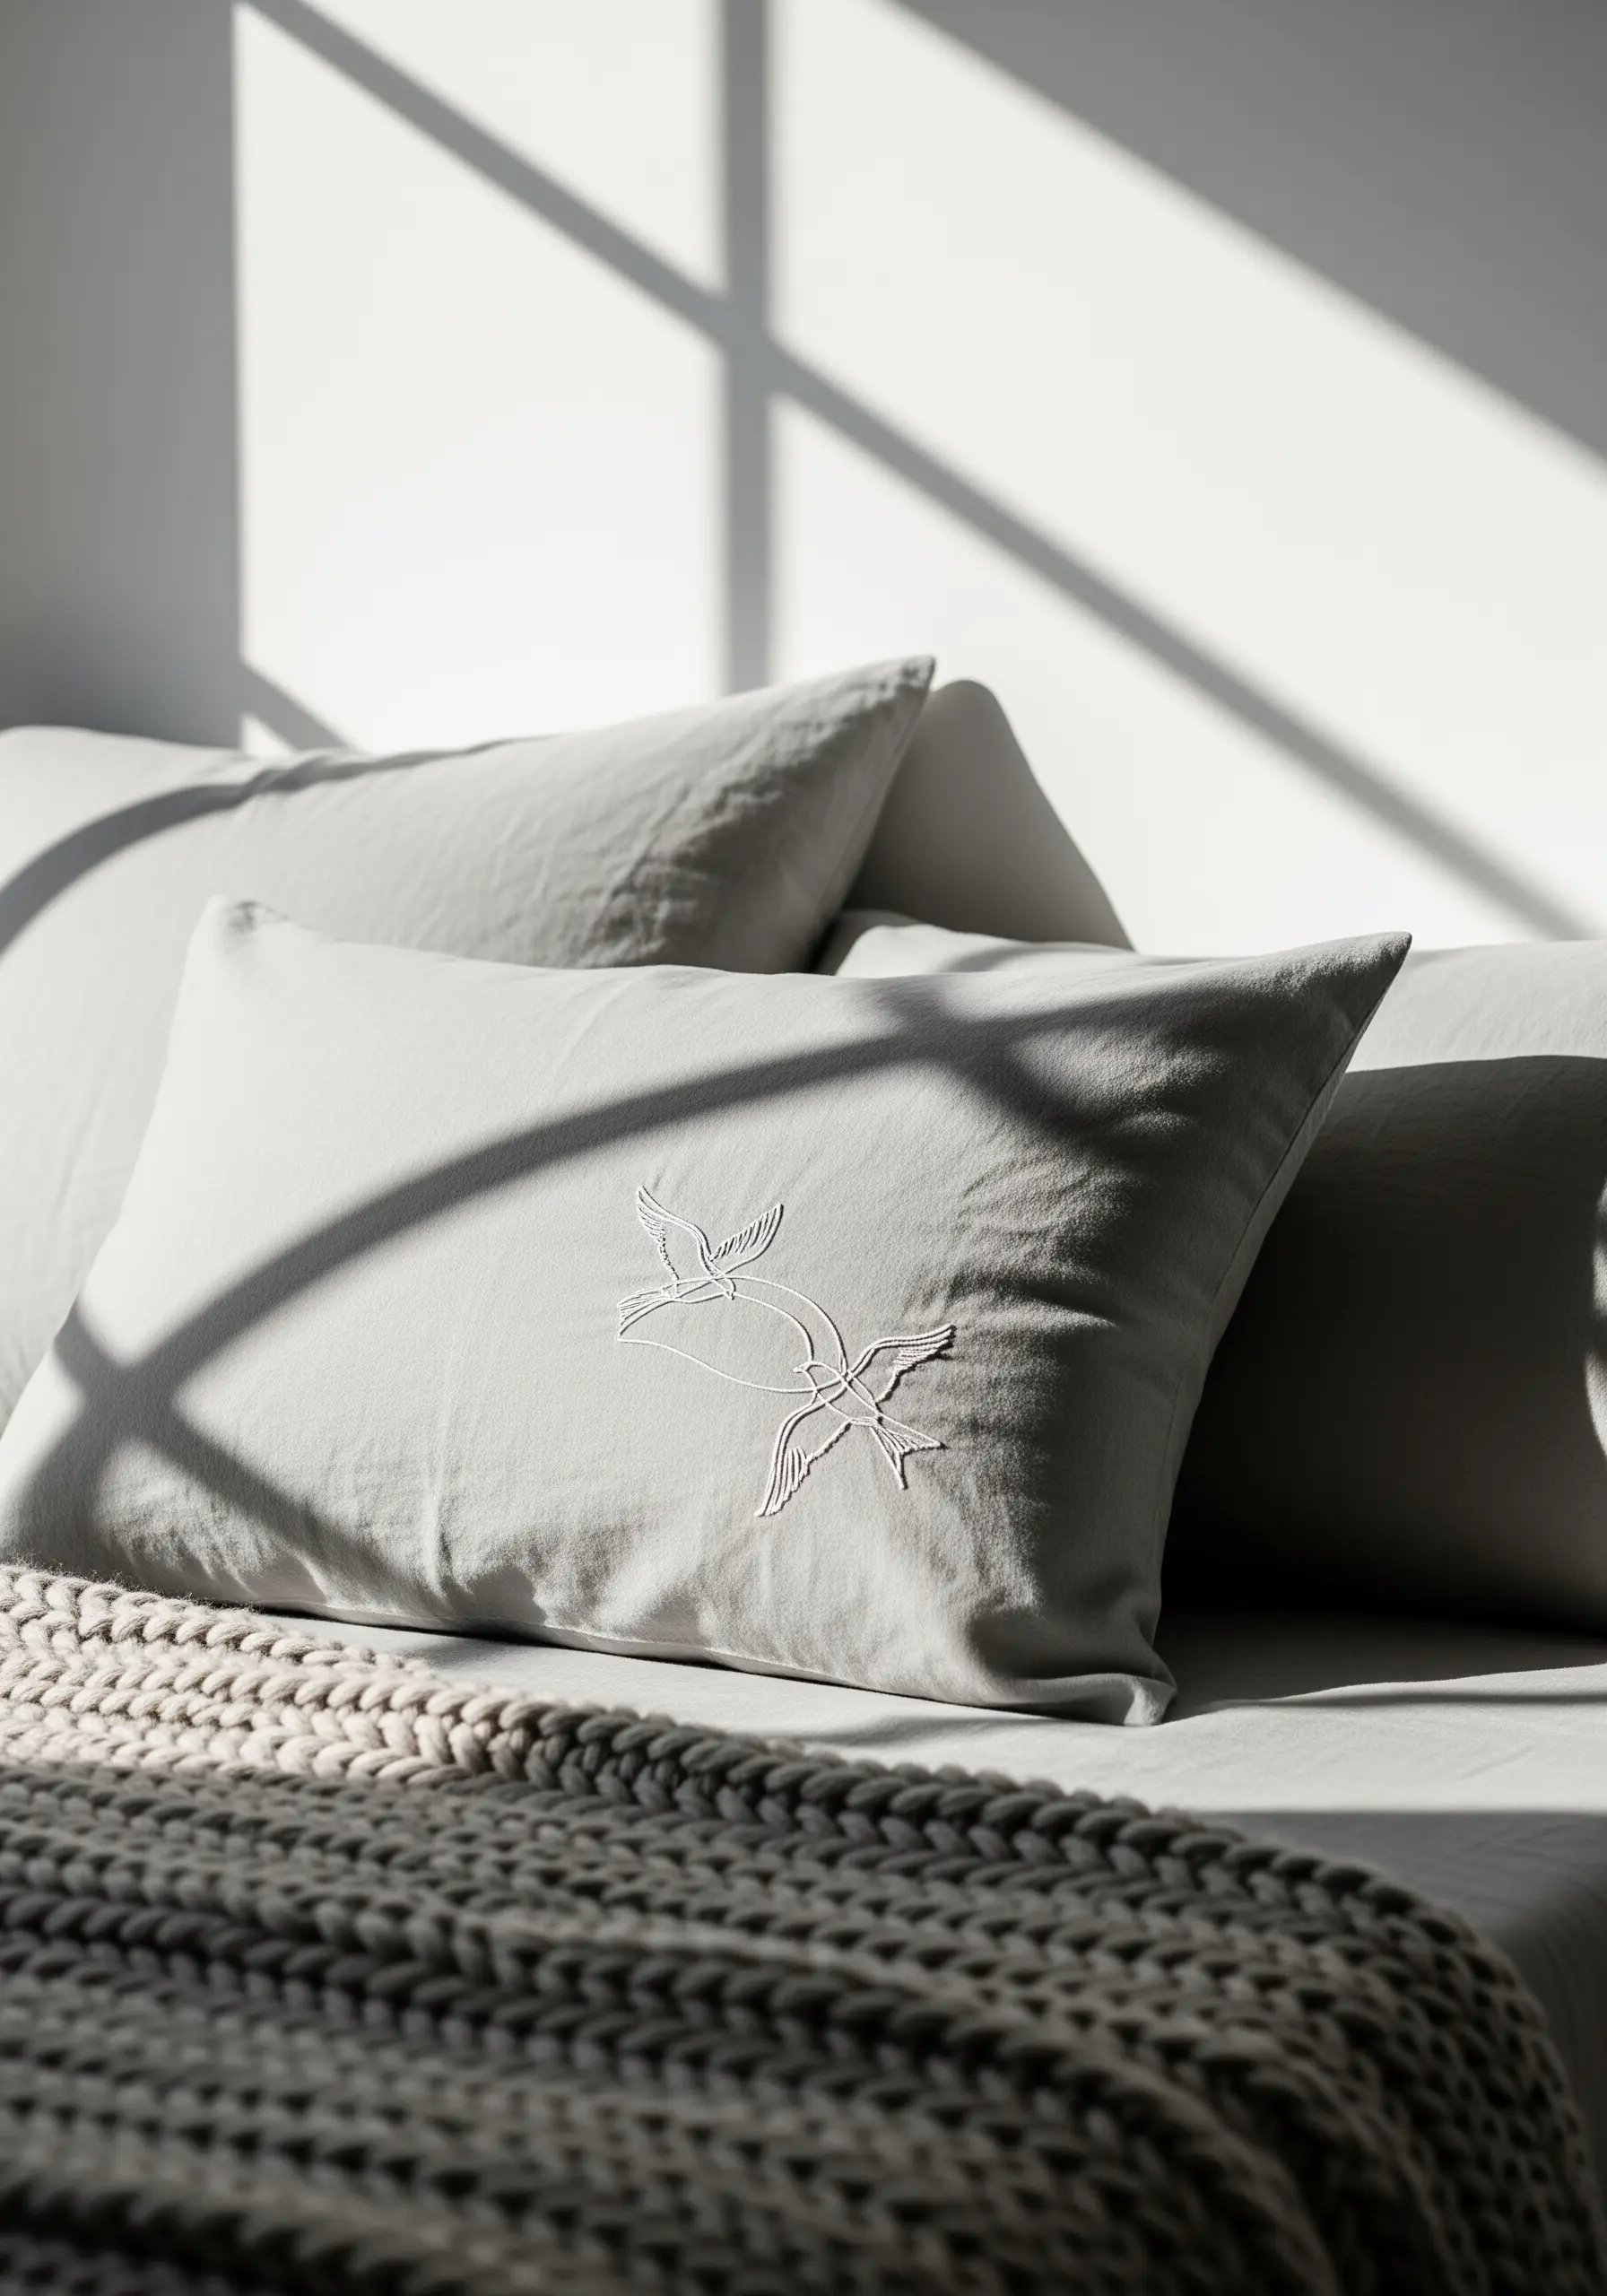
Create a high-end, minimalist aesthetic by using a thread color that is only a few shades lighter or darker than your fabric.
This tone-on-tone embroidery technique emphasizes texture over color, allowing the subtle sheen of the thread and the shadow of the stitches to form the design.
On linen pillowcases or bedding, a simple outline of a bird or botanical in a slightly lighter cream thread feels both calming and incredibly sophisticated.
It’s a quiet statement that relies on the tactile quality of the stitches, adding a layer of texture that invites touch.
9. Explore Geometric Fills and Negative Space
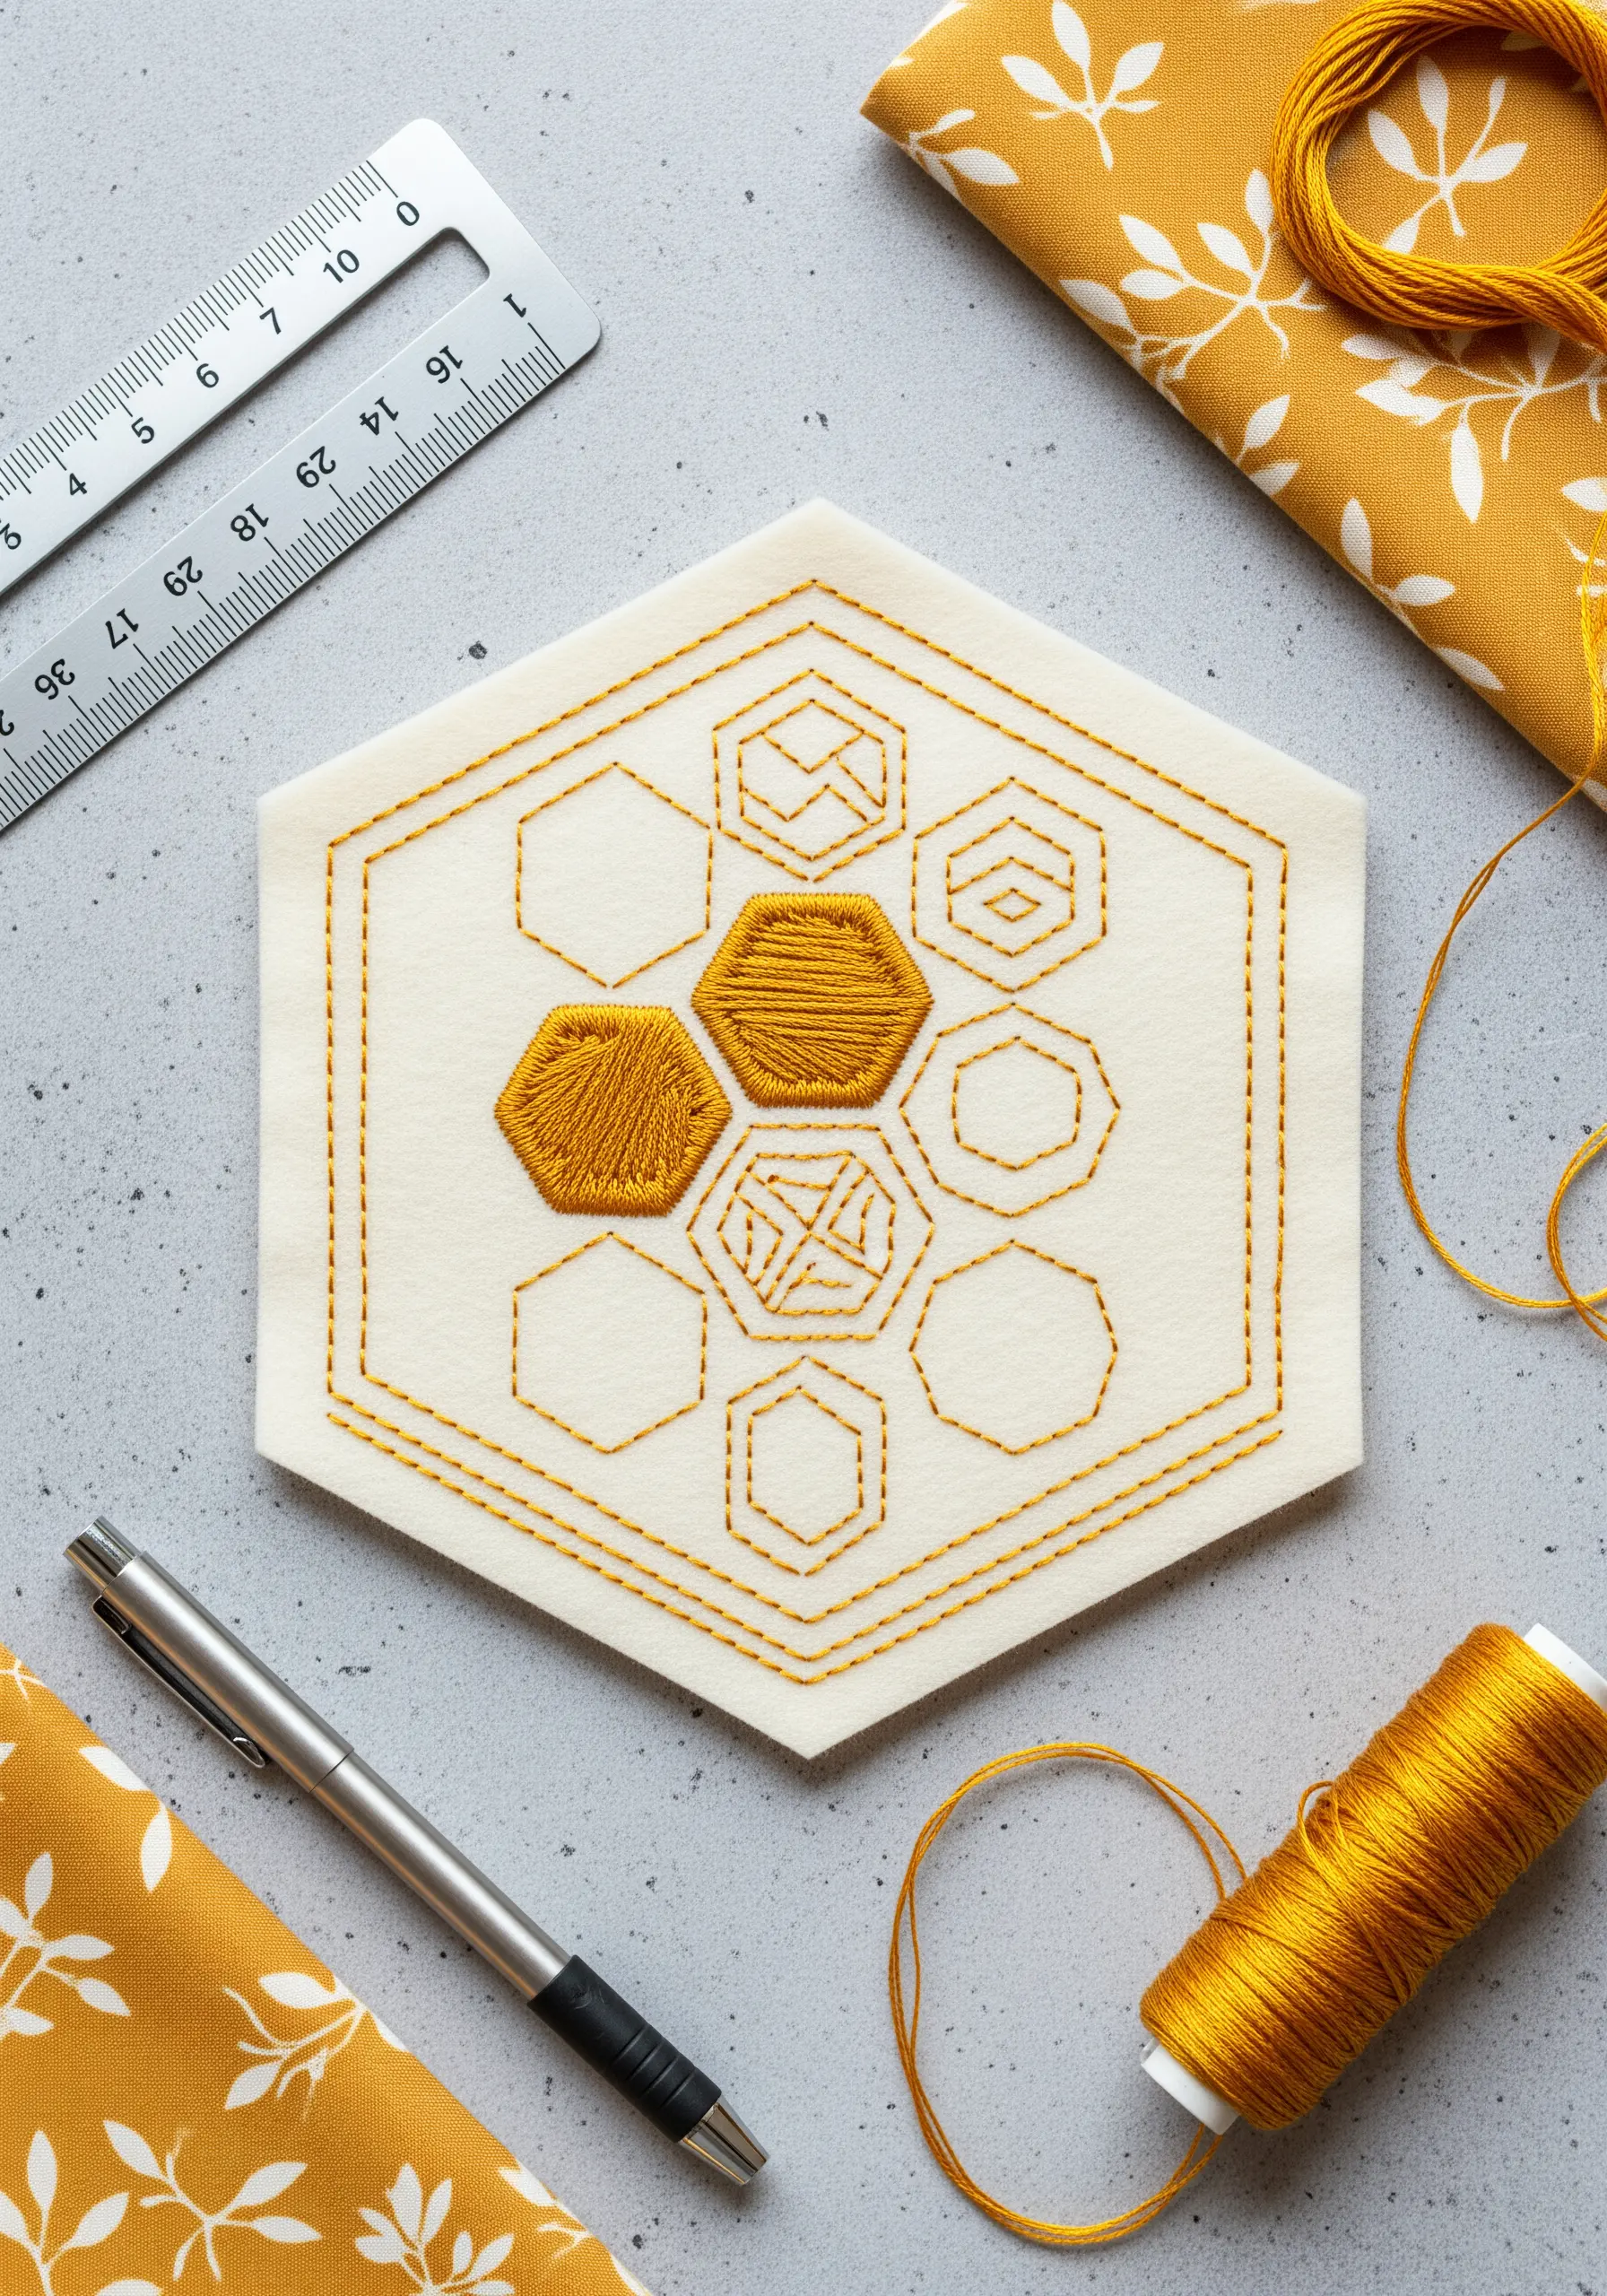
Move beyond organic shapes and explore the clean satisfaction of geometric embroidery.
Use a backstitch or stem stitch for your outlines to ensure they are crisp and uniform. For the filled-in honeycombs, a tidy satin stitch provides a dense, smooth texture that contrasts beautifully with the empty shapes.
Let the negative space do some of the work. By leaving some shapes as simple outlines, you create balance and prevent the design from feeling too heavy.
This approach combines the precision of line work with the textural impact of fill stitches, resulting in a balanced, modern composition.
10. Create Dynamic Motion with Layered Line Work
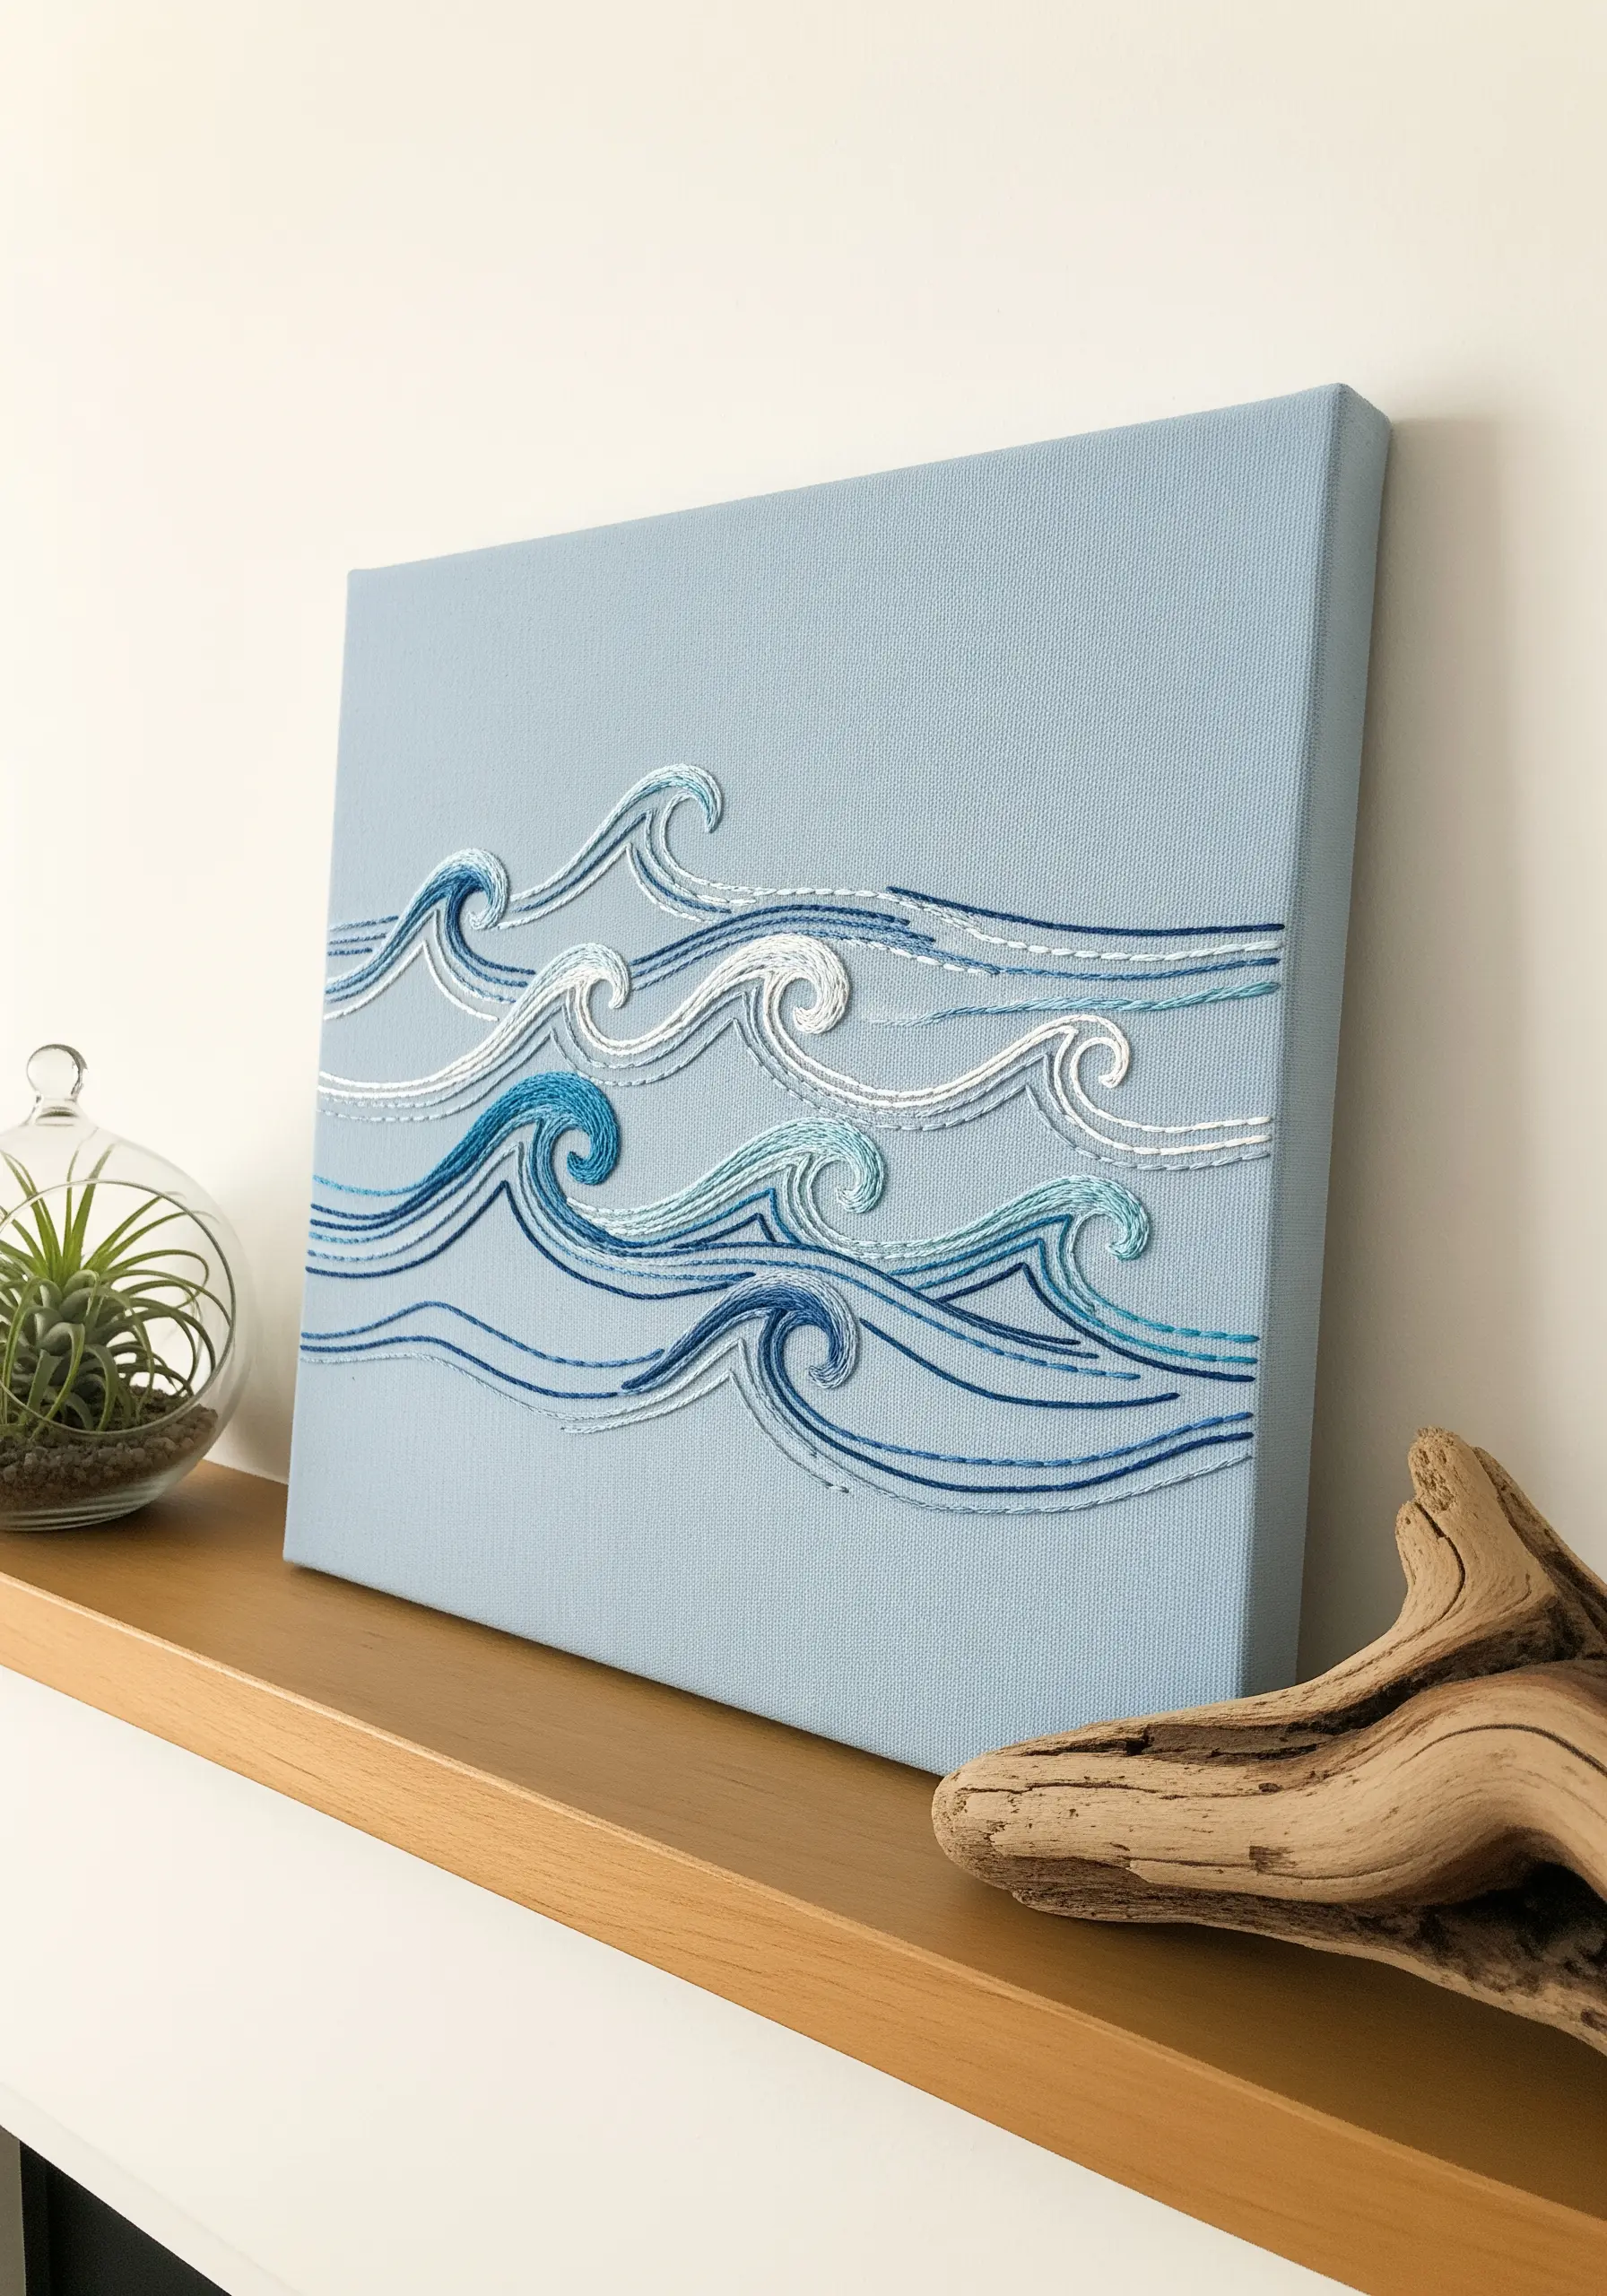
Capture the energy of ocean waves by layering lines of varying colors and stitch types.
Use a whipped backstitch for the main wave crests; this creates a perfectly smooth, uninterrupted line that mimics the flow of water.
Incorporate thinner, single-strand backstitches in lighter and darker shades of blue and white to suggest foam and shadow, adding depth and movement.
Stitch directly onto a stretched canvas for a ready-to-hang piece of minimal, ocean-inspired embroidery that feels both structured and fluid.
11. Use Felt for Crisp, No-Fray Edges
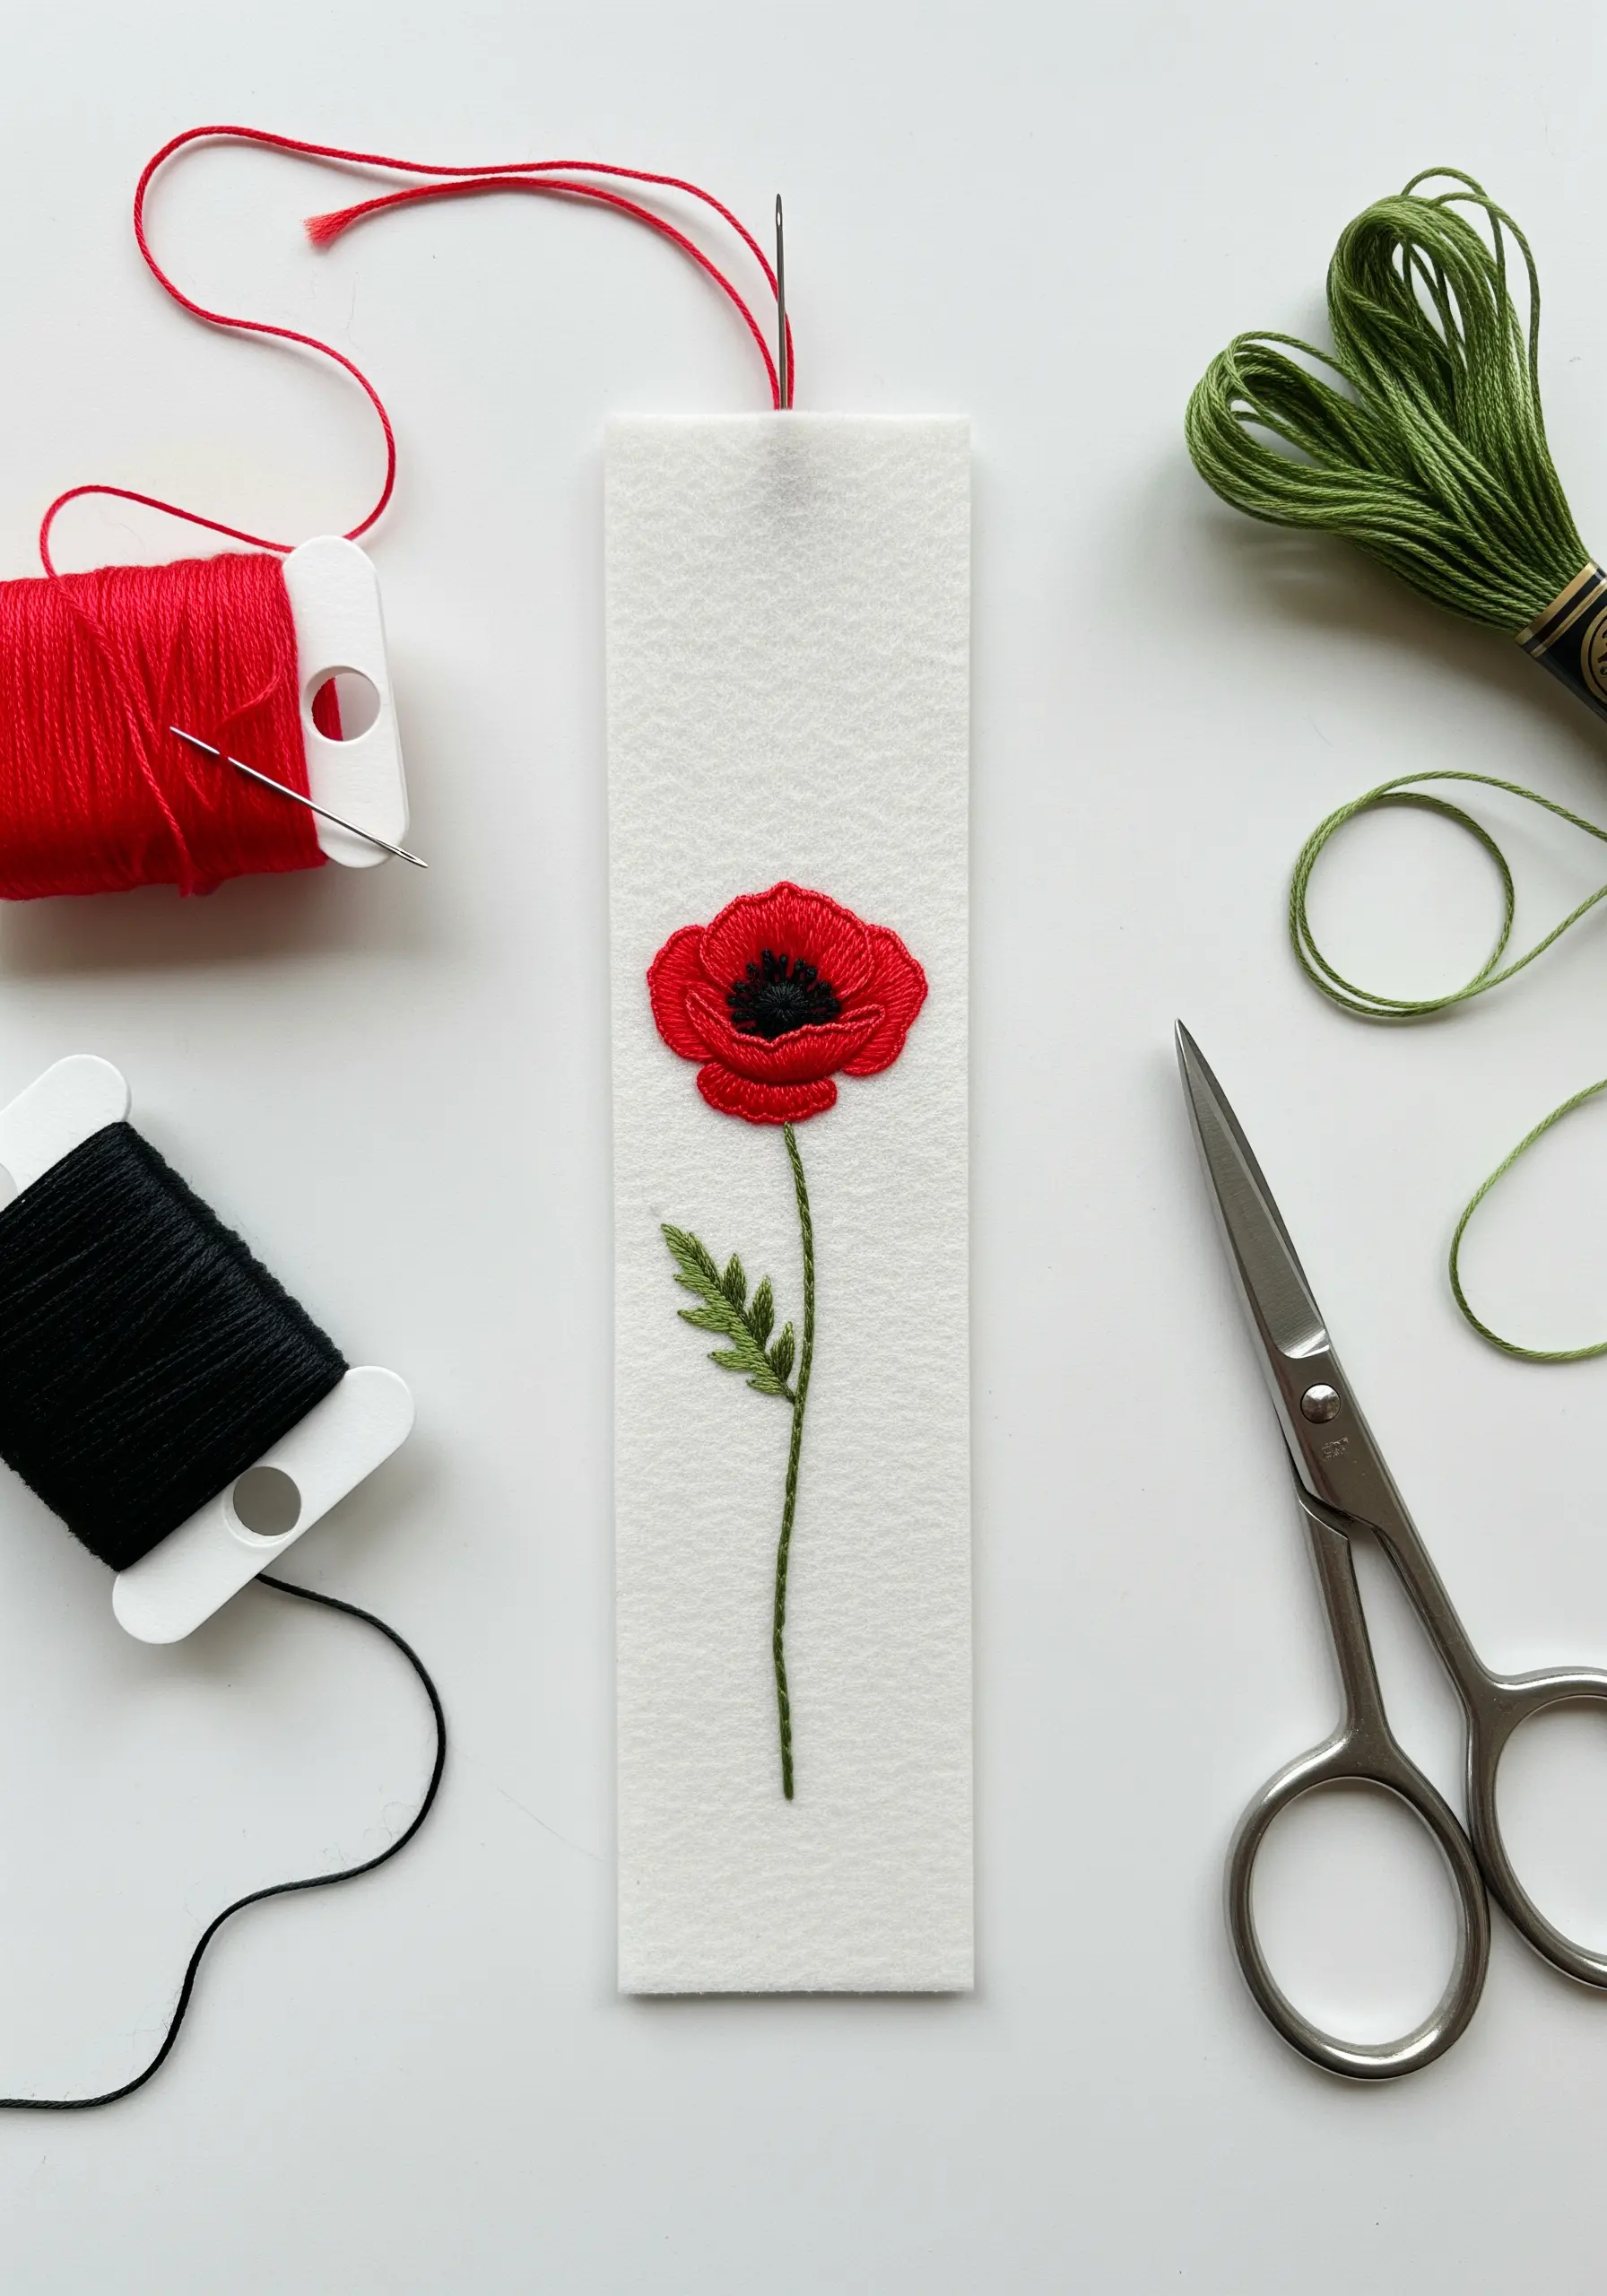
For small projects like bookmarks or patches, choose high-quality wool-blend felt as your base fabric.
Felt’s pressed fibers mean it won’t fray at the edges, so you can cut it to your desired shape after stitching without needing to hem or finish it.
To create the poppy’s soft petals, use a long-and-short stitch to blend the red and black threads seamlessly, creating a gradient effect that gives the flower realistic depth.
The stable, non-woven nature of felt makes it an incredibly forgiving fabric for beginners practicing dense fill stitches.
12. Add a Secret Detail to a Shirt Cuff
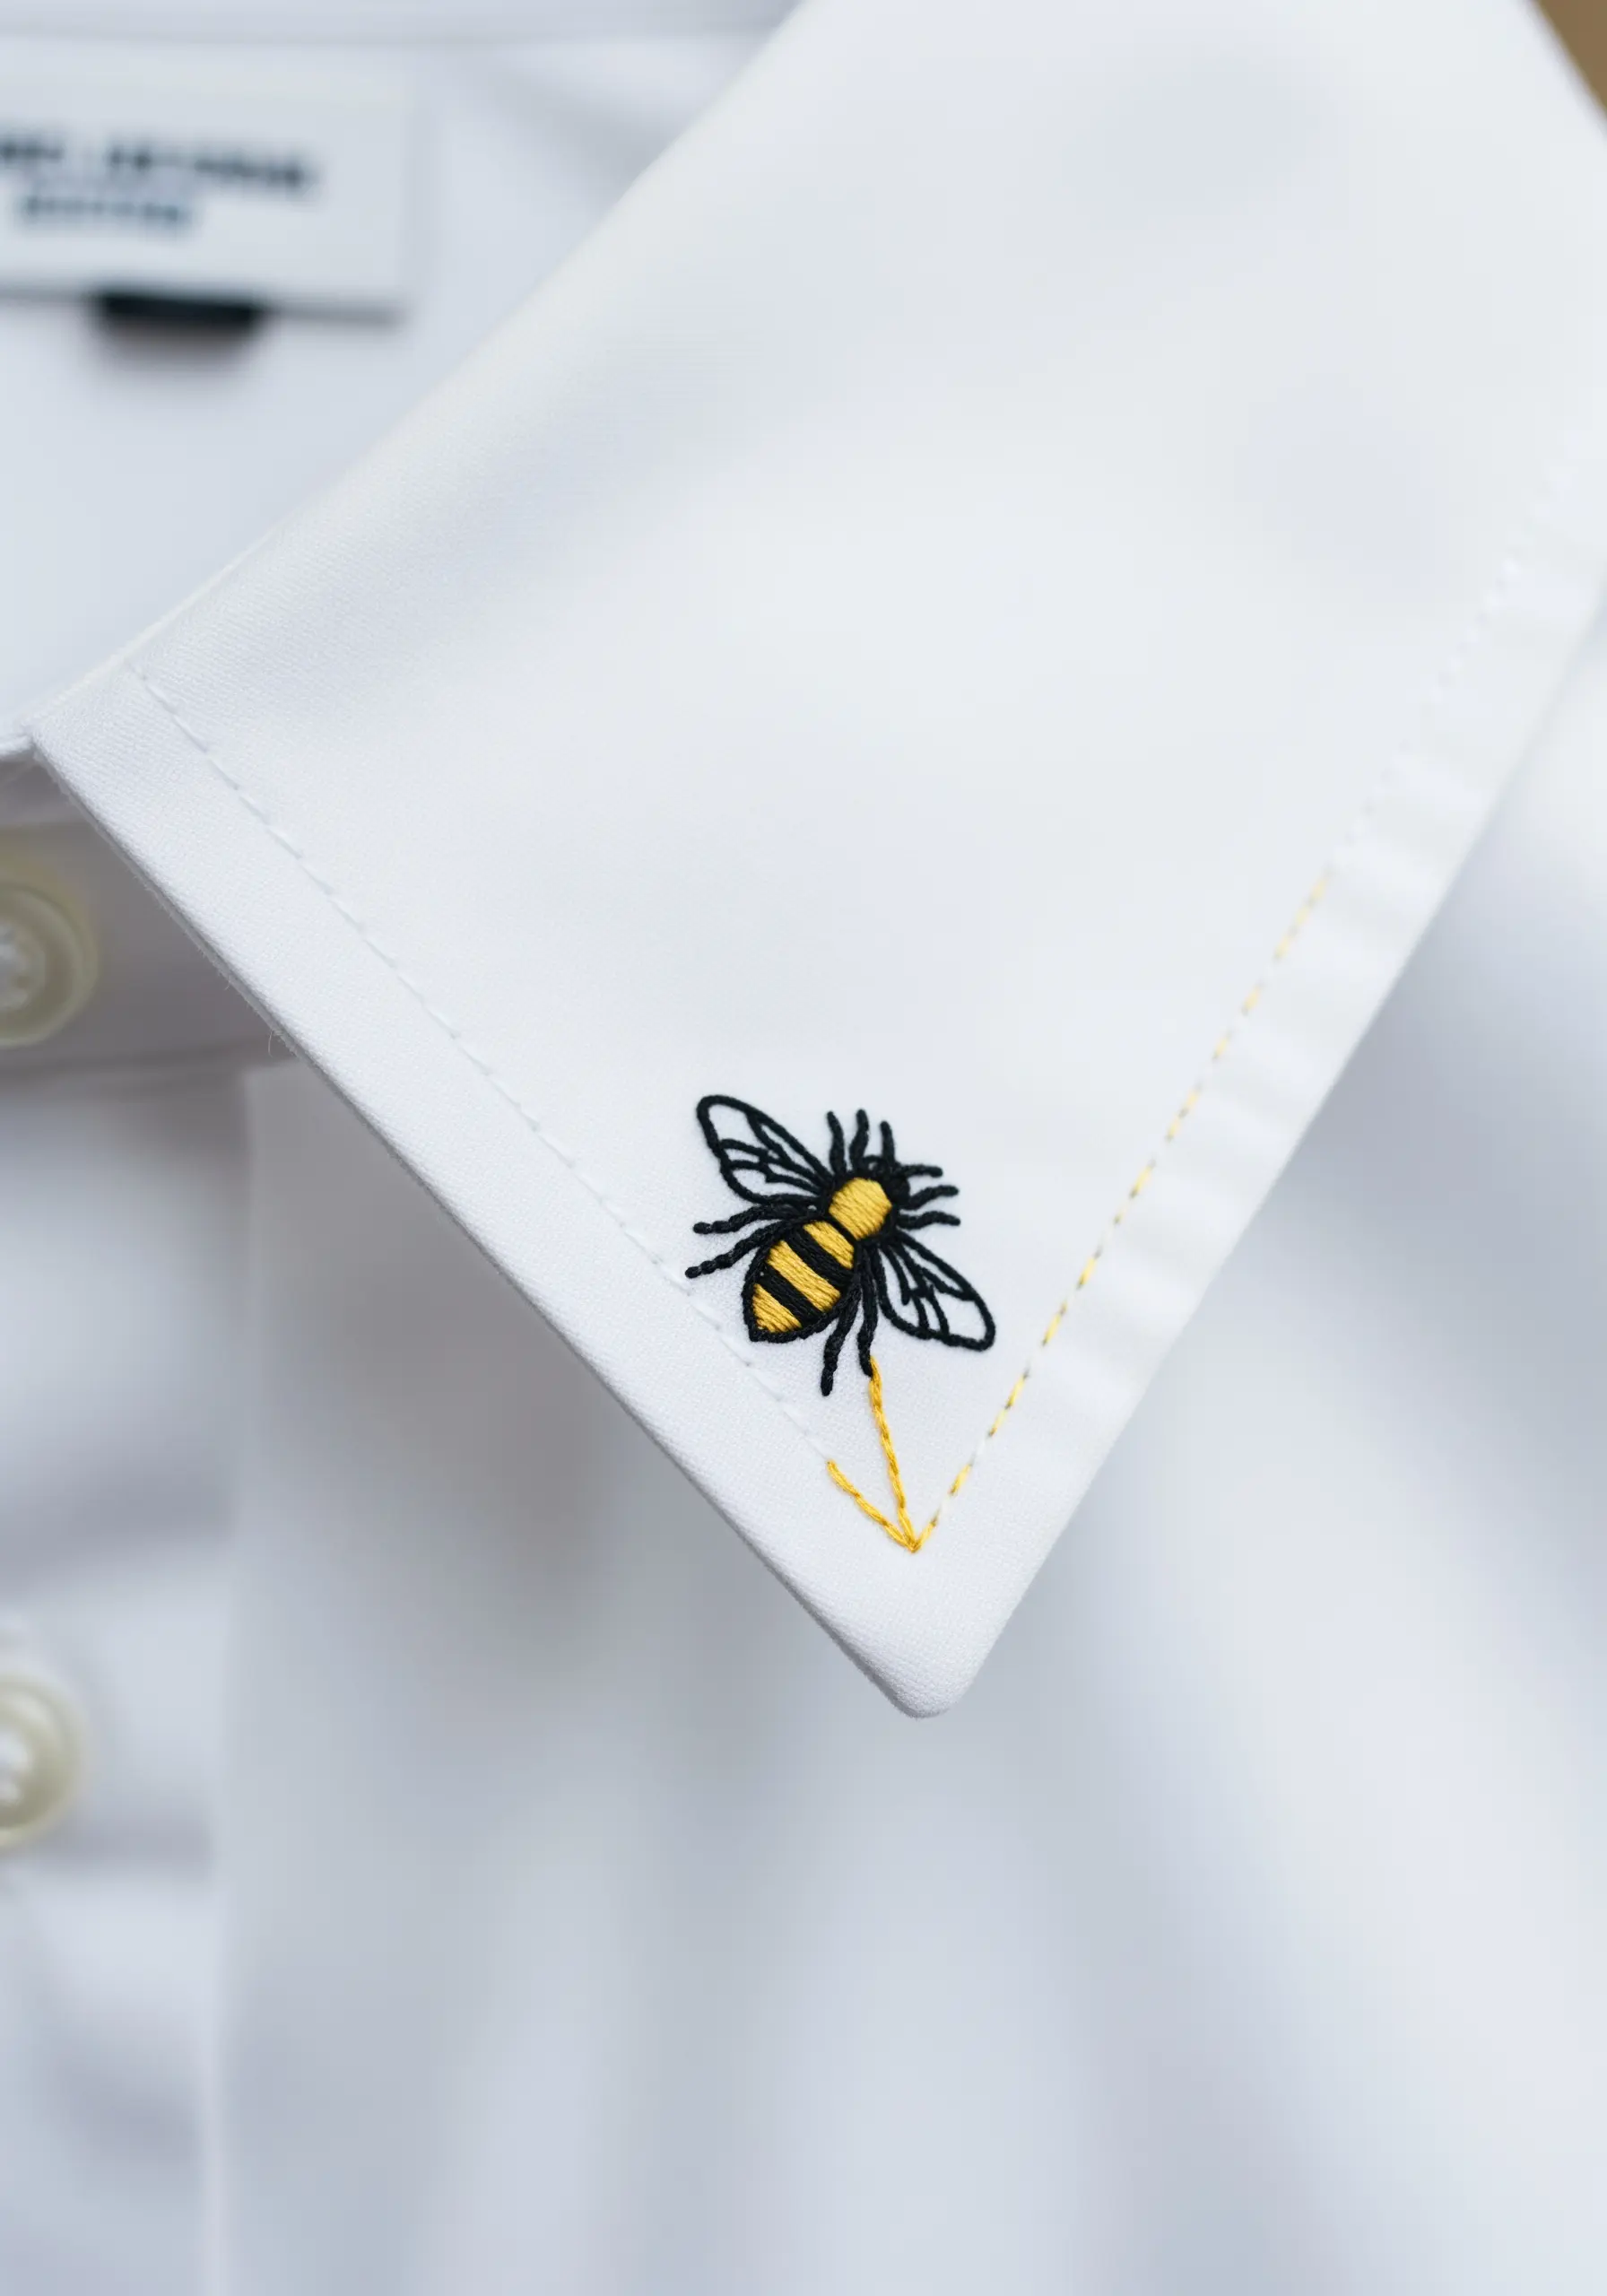
Elevate a classic white shirt by adding a tiny, unexpected embroidered motif to the corner of a cuff.
This placement turns a simple garment into a bespoke piece with a hidden personality. For a bee, use a sharp split stitch for the black outlines to keep the lines crisp and defined.
Fill the stripes with a tiny, two-strand satin stitch. The key is to work at a small scale with precision, using a single strand for the most delicate details like antennae.
This is a perfect way to practice fine detail work, and it adds an immense amount of character with just a few stitches.
13. Tell a Story with a Themed Hoop Set
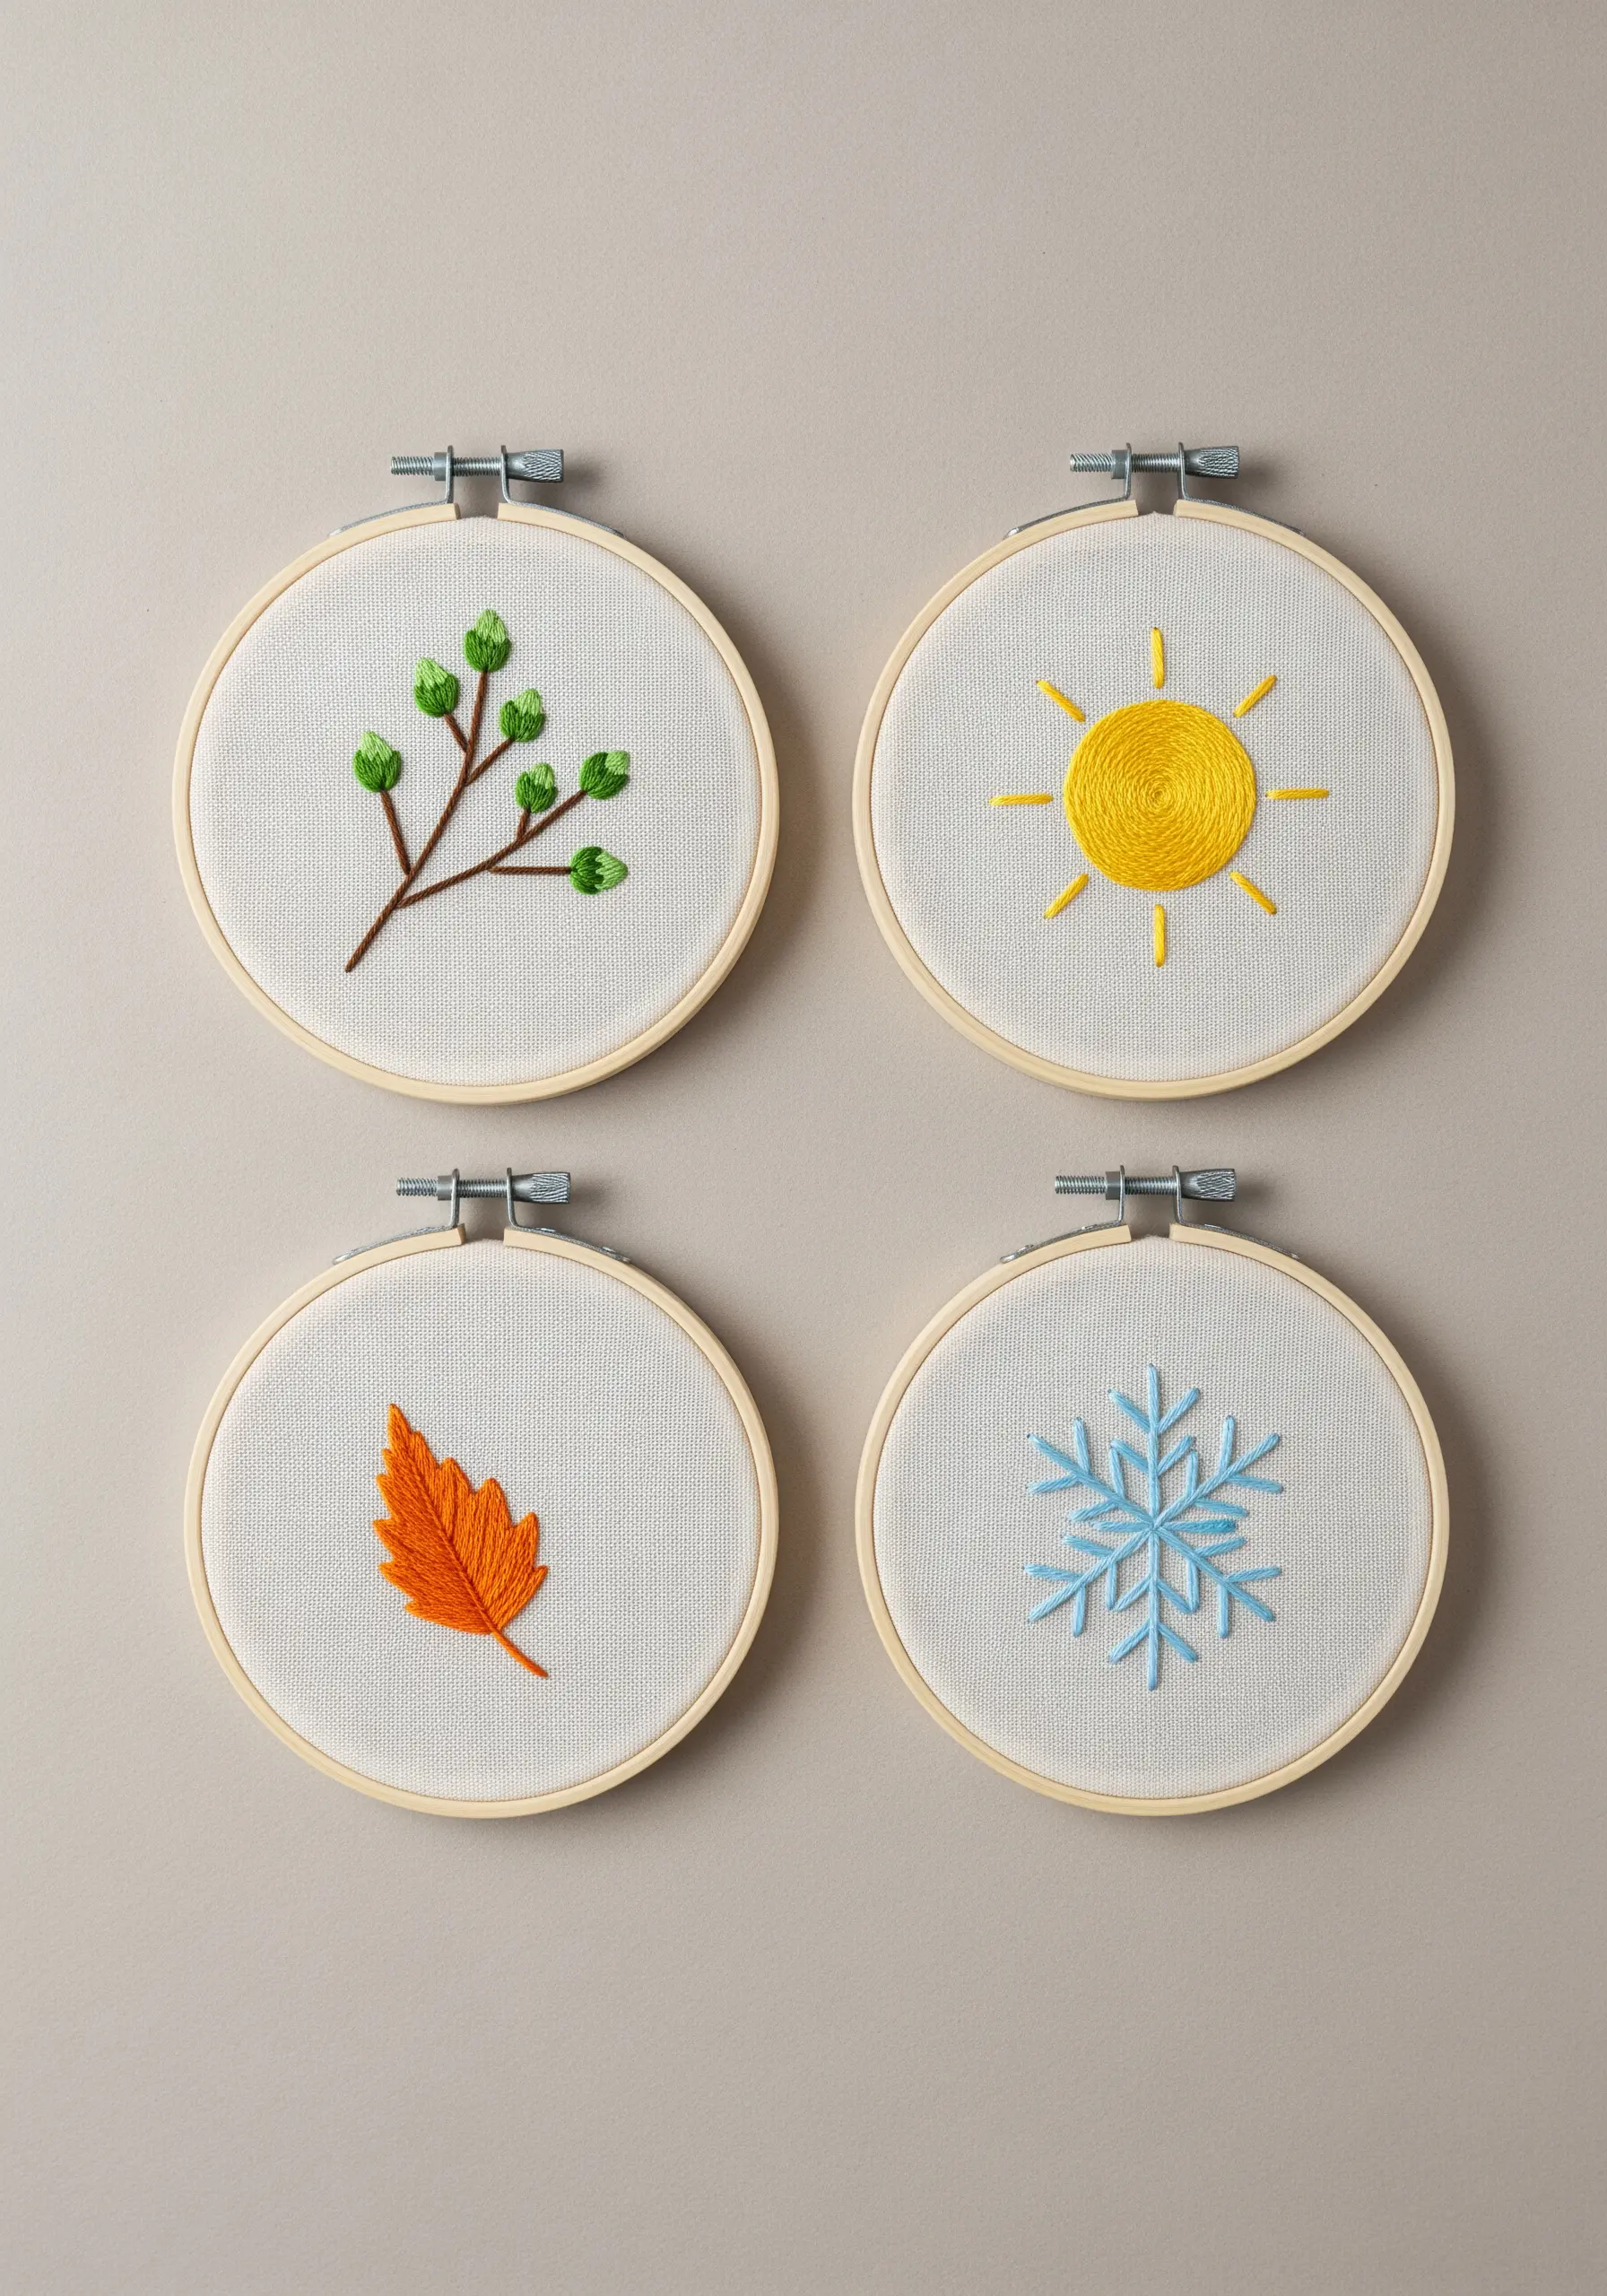
Create a cohesive wall art installation by stitching a series of small, themed hoops.
Choose a concept like the four seasons and represent each with a simple, iconic motif: budding leaves for spring, a bold sun for summer, a falling leaf for autumn, and a snowflake for winter.
Tie the set together by using a consistent fabric and a limited, harmonious color palette across all four designs.
This hooped wall collage approach is more impactful than a single piece, turning simple stitches into a minimalist narrative.
14. Achieve a Textured Effect with Seed Stitching
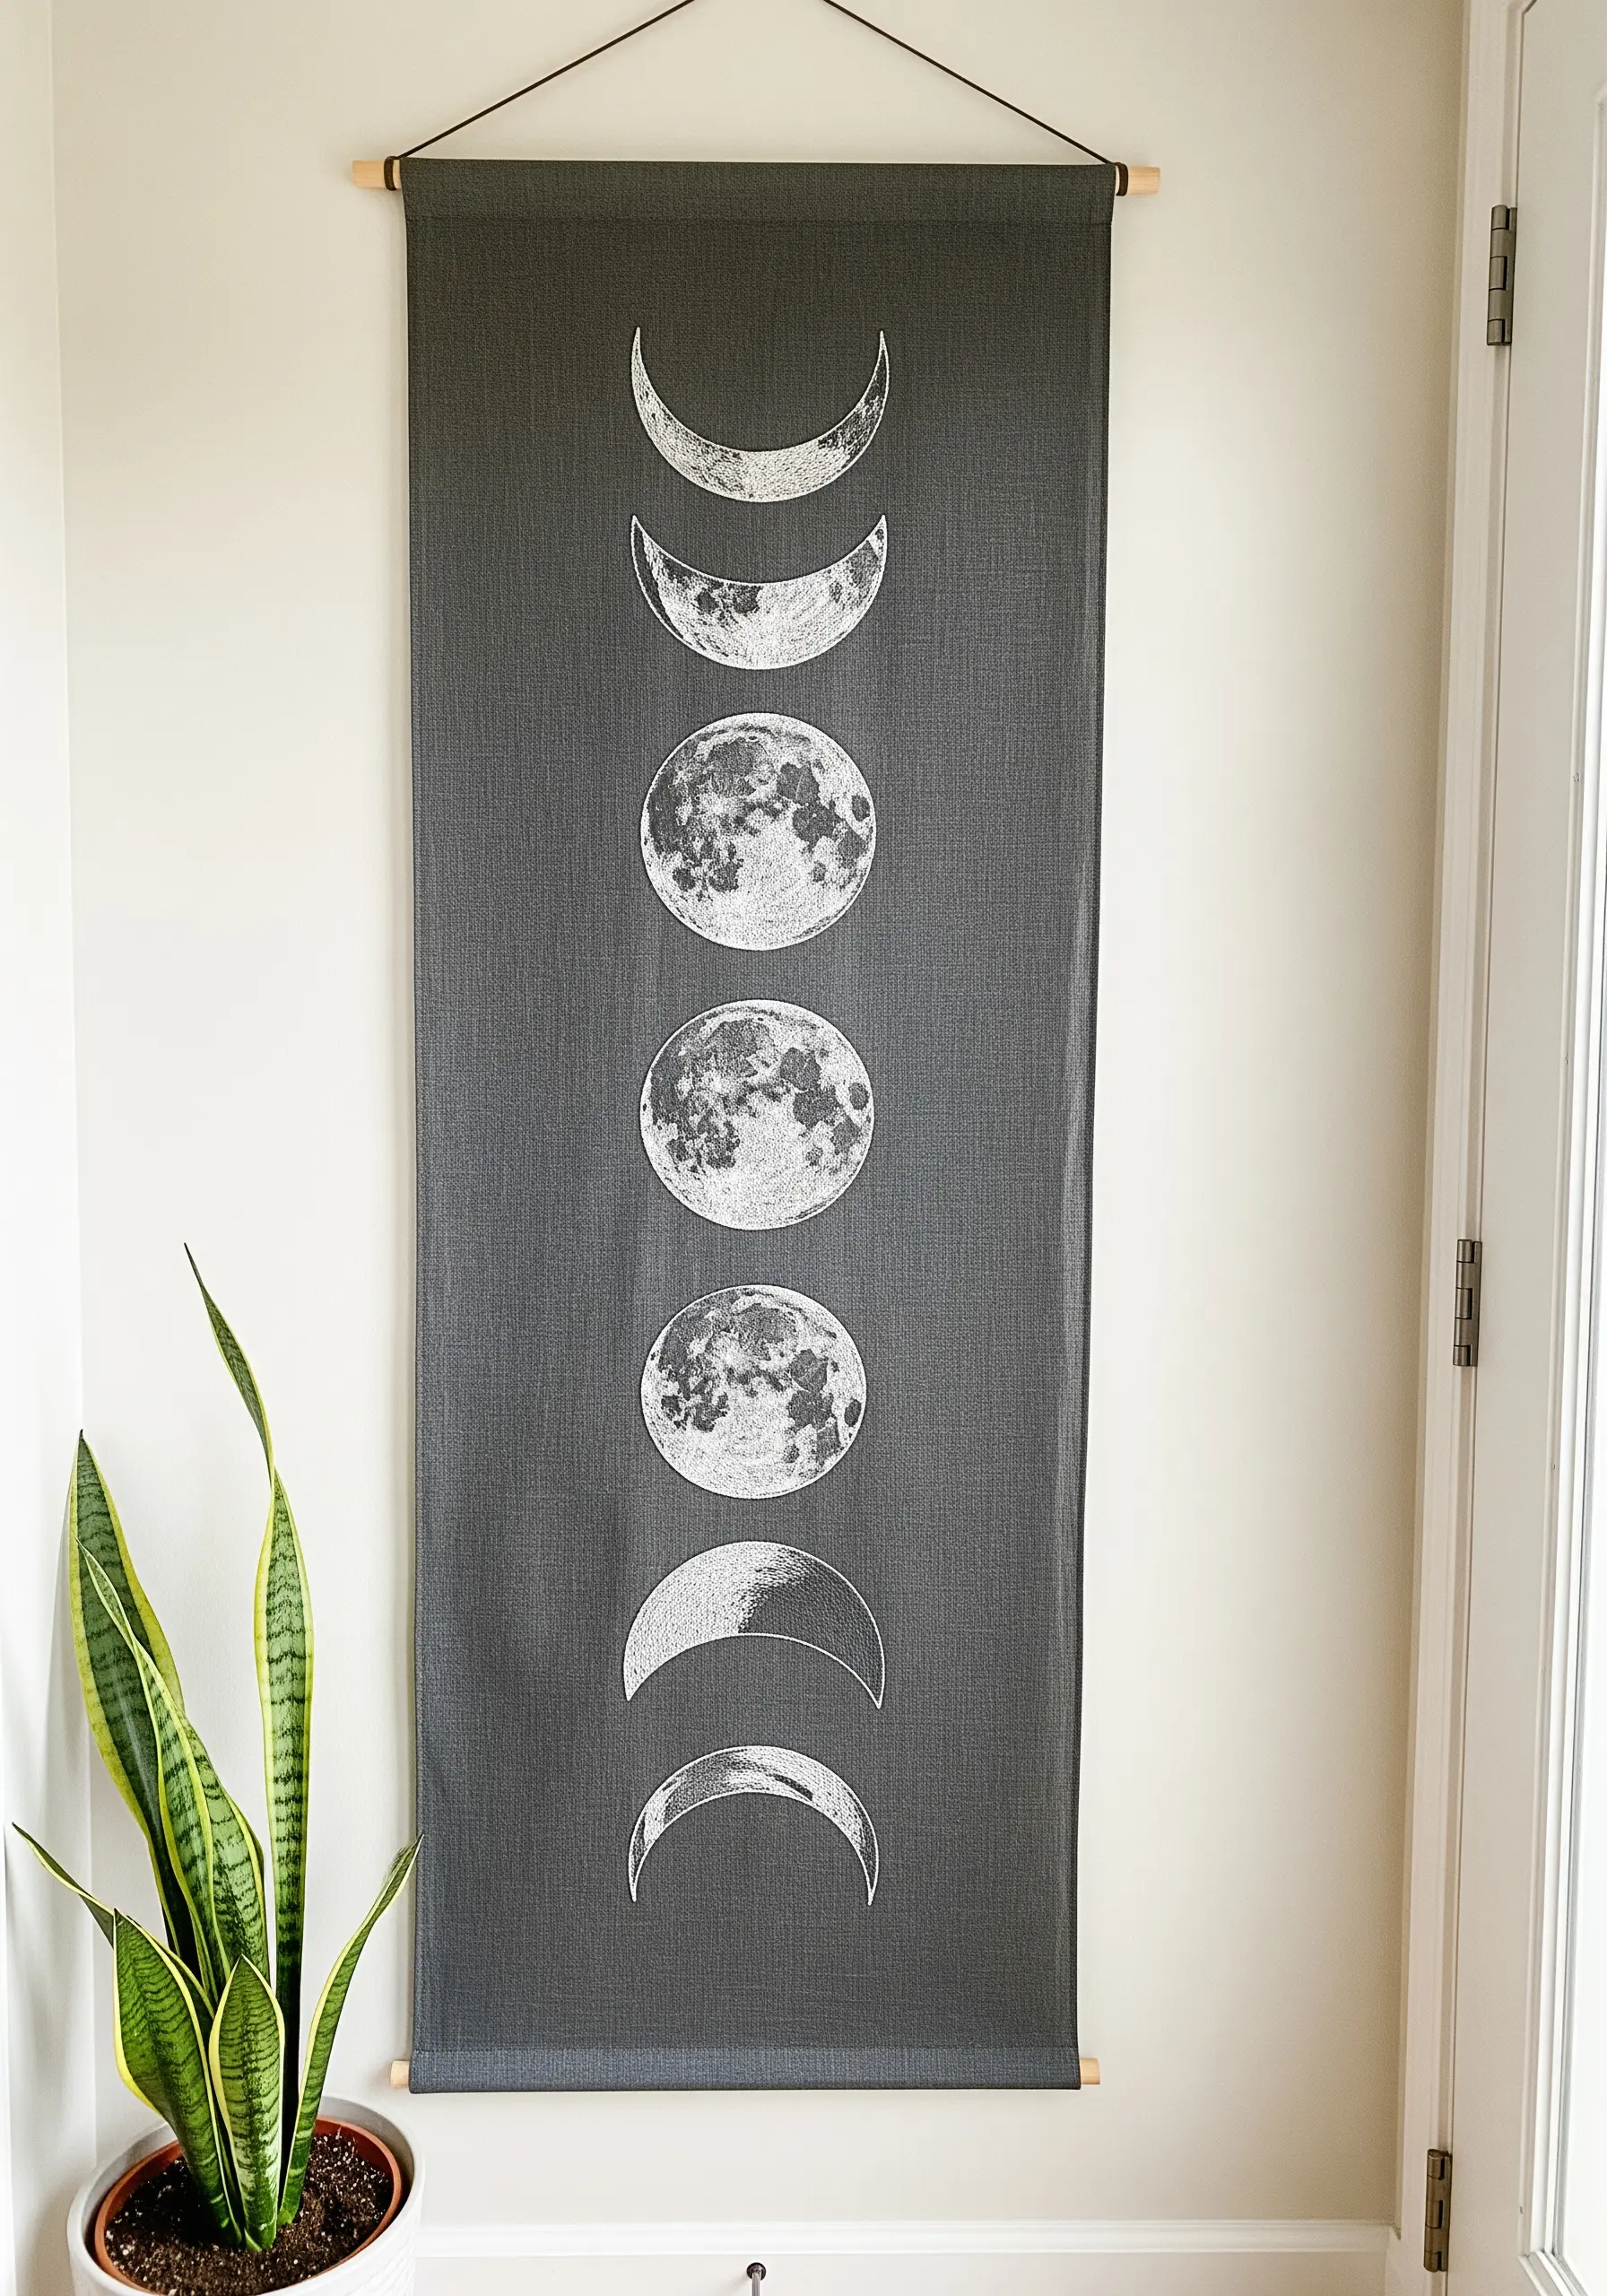
To create the cratered, textural surface of the moon for a large wall hanging, move beyond flat fills.
Fill the entire shape with thousands of tiny, randomly placed straight stitches, known as seed stitches. Use a mix of white, light grey, and silver threads to create subtle variations in tone and shadow.
This pointillist-style technique is meditative and forgiving, as there are no perfect lines to follow. The final effect is a rich, tactile surface that catches the light beautifully.
Finish the piece by attaching it to wooden dowels at the top and bottom for a clean, modern tapestry look.
15. Sculpt with Thread Using Padded Satin Stitch
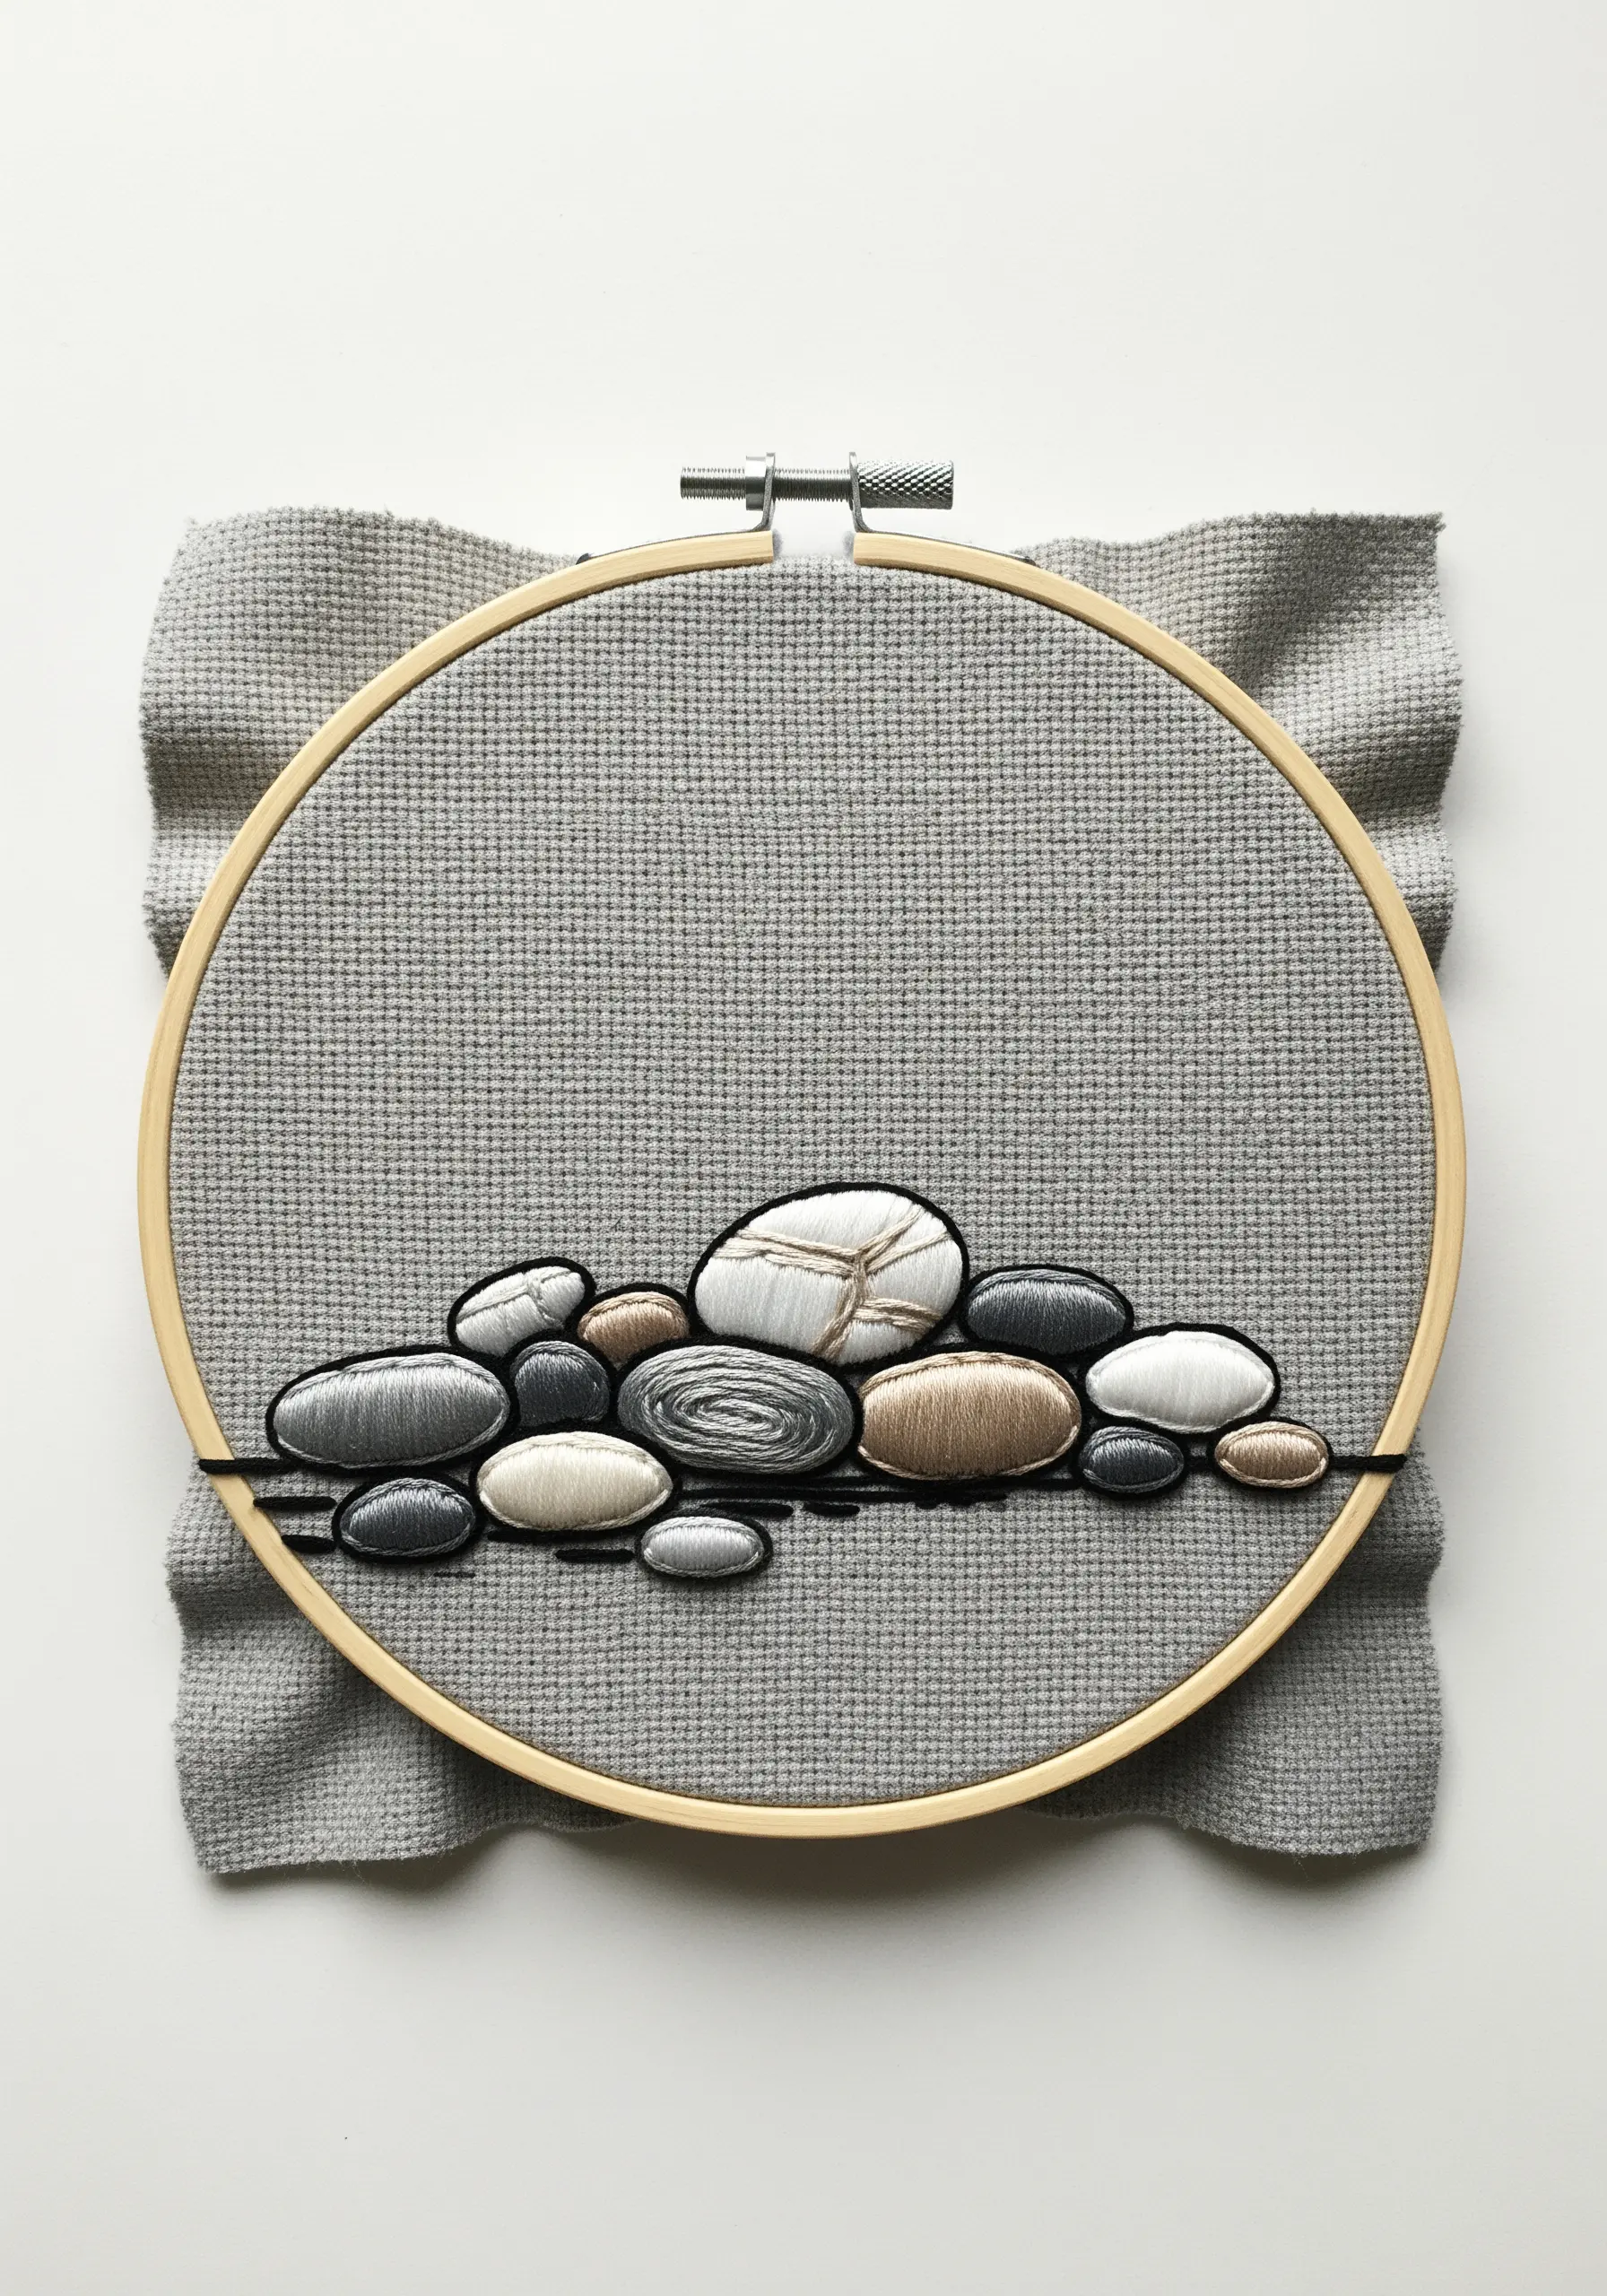
Give simple shapes a raised, three-dimensional quality by using a padded satin stitch.
First, fill the interior of each stone shape with a base layer of straight stitches or seed stitches. Then, cover this padding with your final satin stitch, worked in the opposite direction.
This underlying layer lifts the top stitches, creating a smooth, rounded, and highly tactile surface that mimics real pebbles.
Vary the direction of the final satin stitch on each stone to enhance the sense of form and catch the light in different ways, adding to the realism of your composition.
16. Embroider on Knits with a Stabilizer and Open Stitches
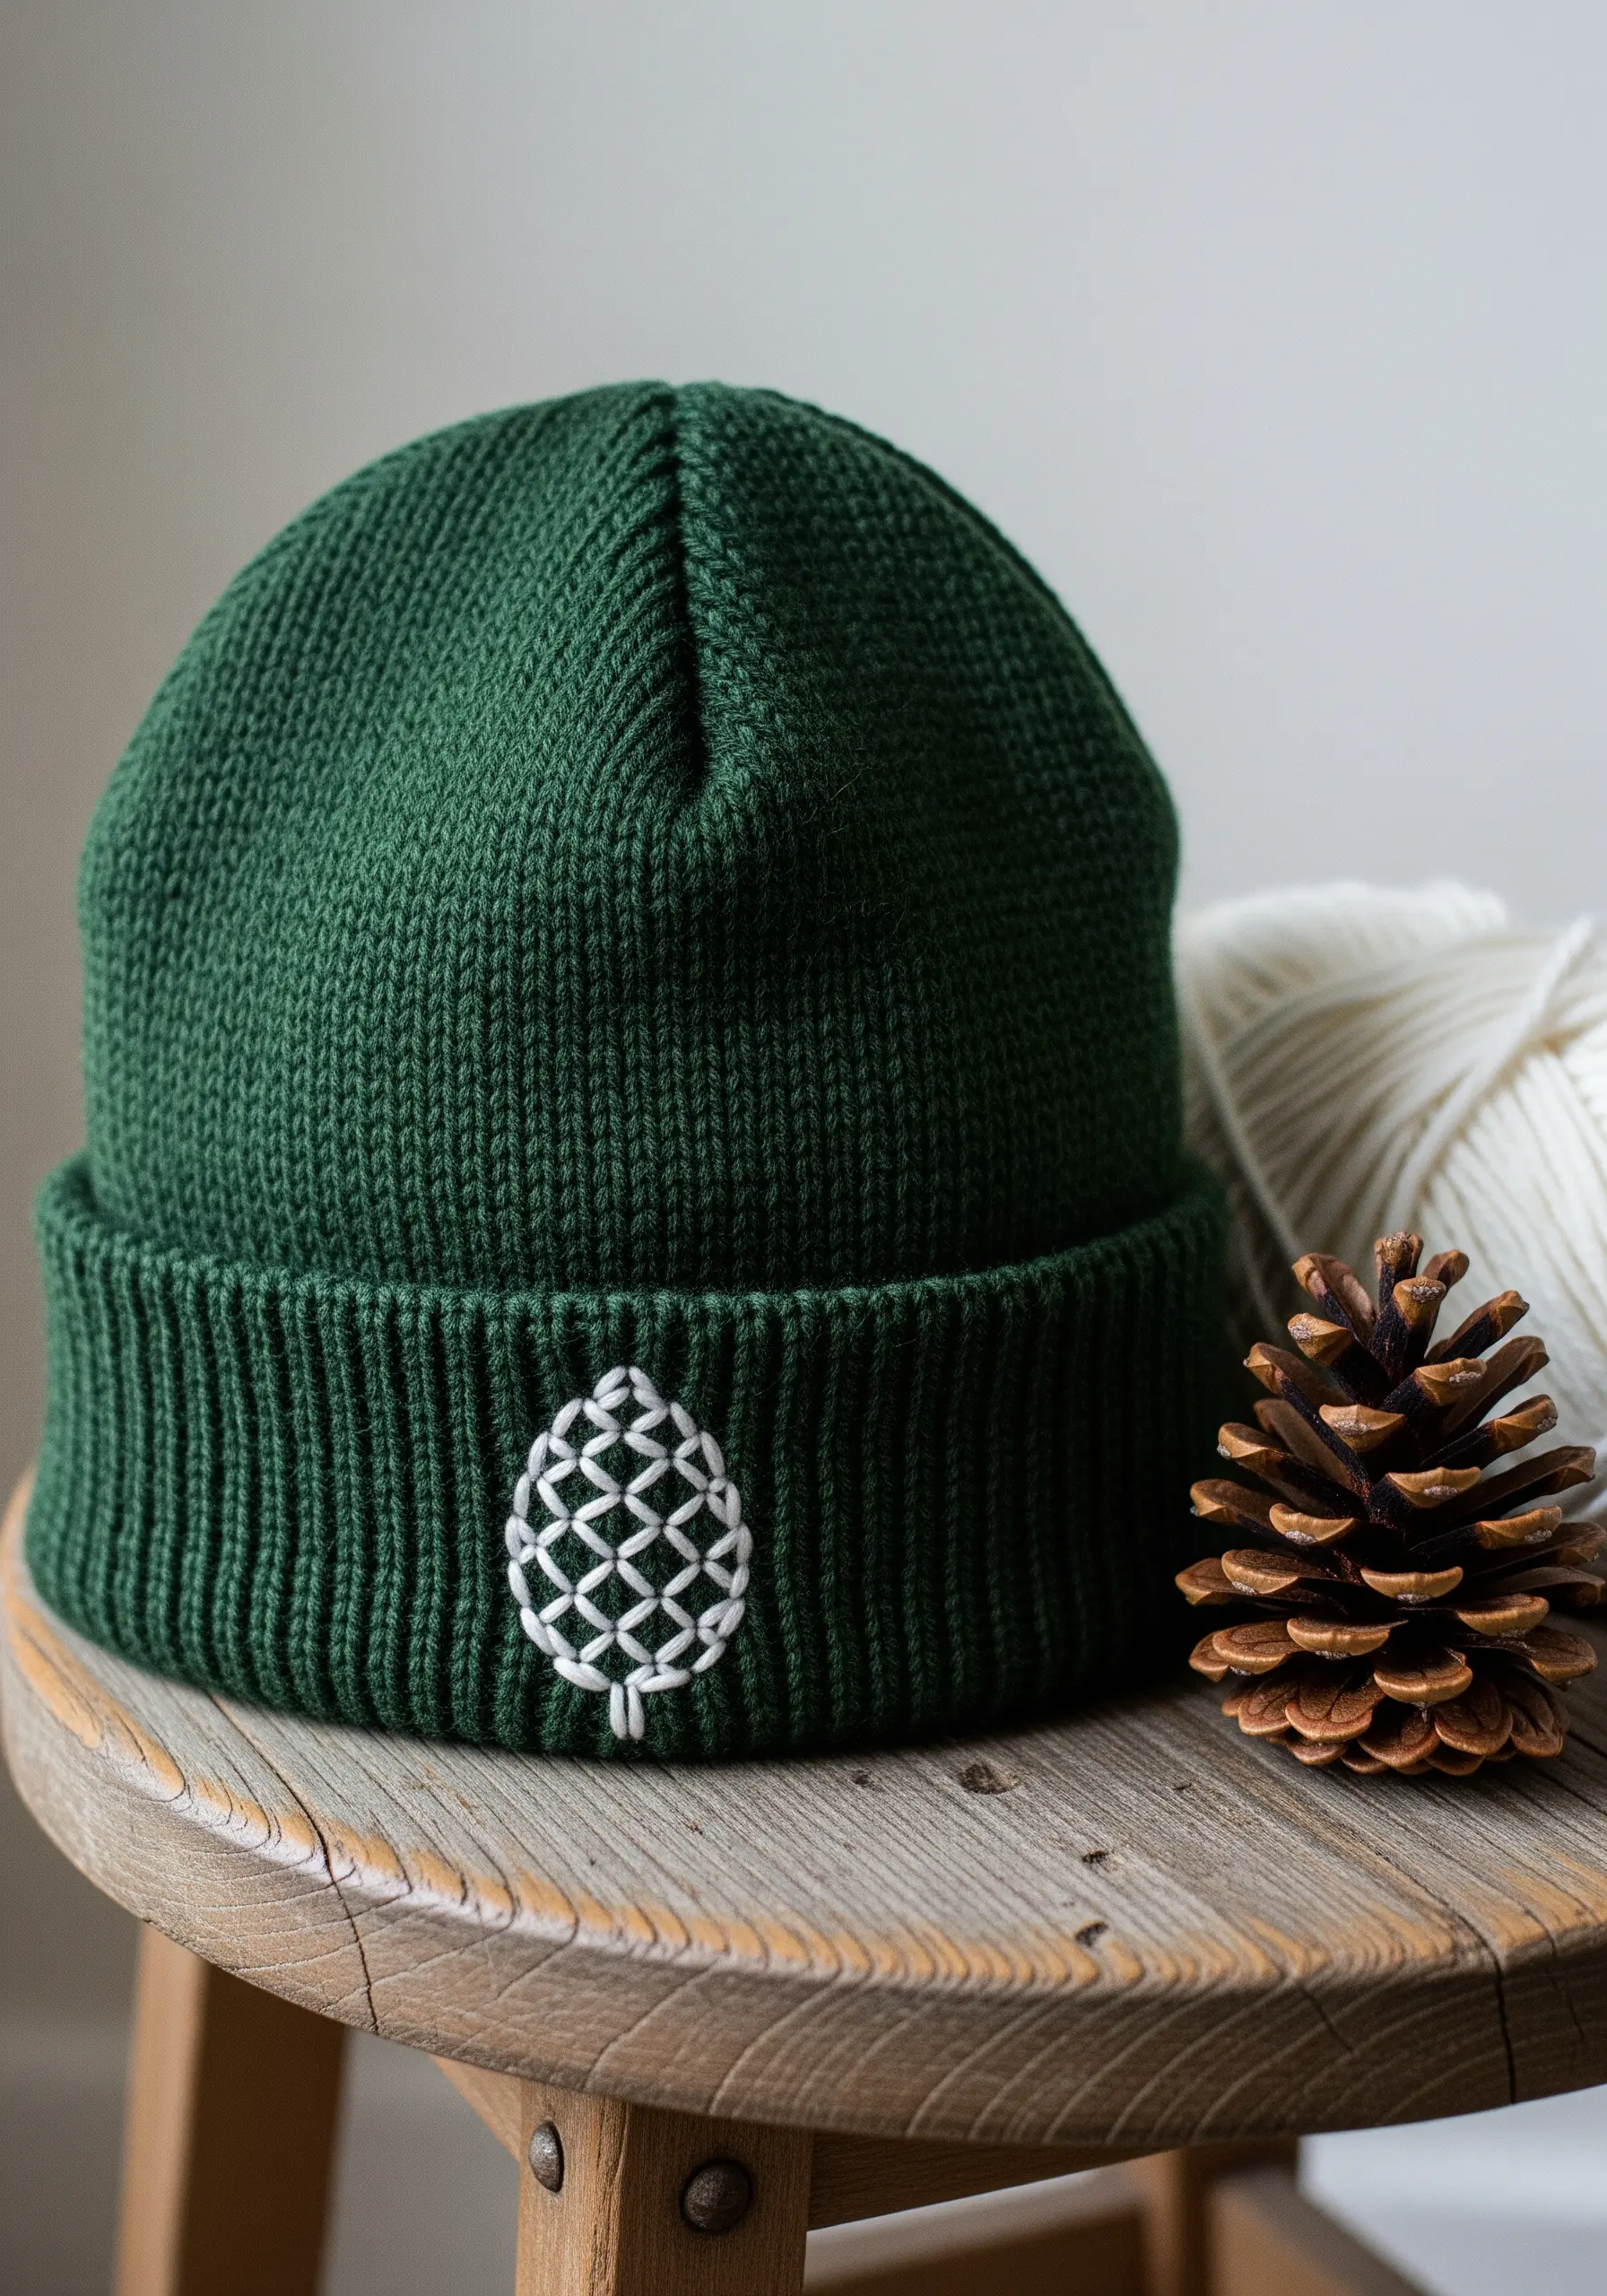
Embroidering on stretchy knit fabric like a beanie requires a special approach to avoid distorting the garment.
Always use a cut-away stabilizer on the inside to provide a firm, non-stretch foundation for your stitches. This is the most crucial step.
Choose a design with open, linear stitches rather than dense fills. The lattice-work pattern of this pinecone is perfect, as it allows the knit fabric some room to breathe and move naturally.
Using a thicker thread, like a pearl cotton or all six strands of floss, ensures the design stands out against the ribbed texture of the knit.
17. Paint Abstract Landscapes with Thread
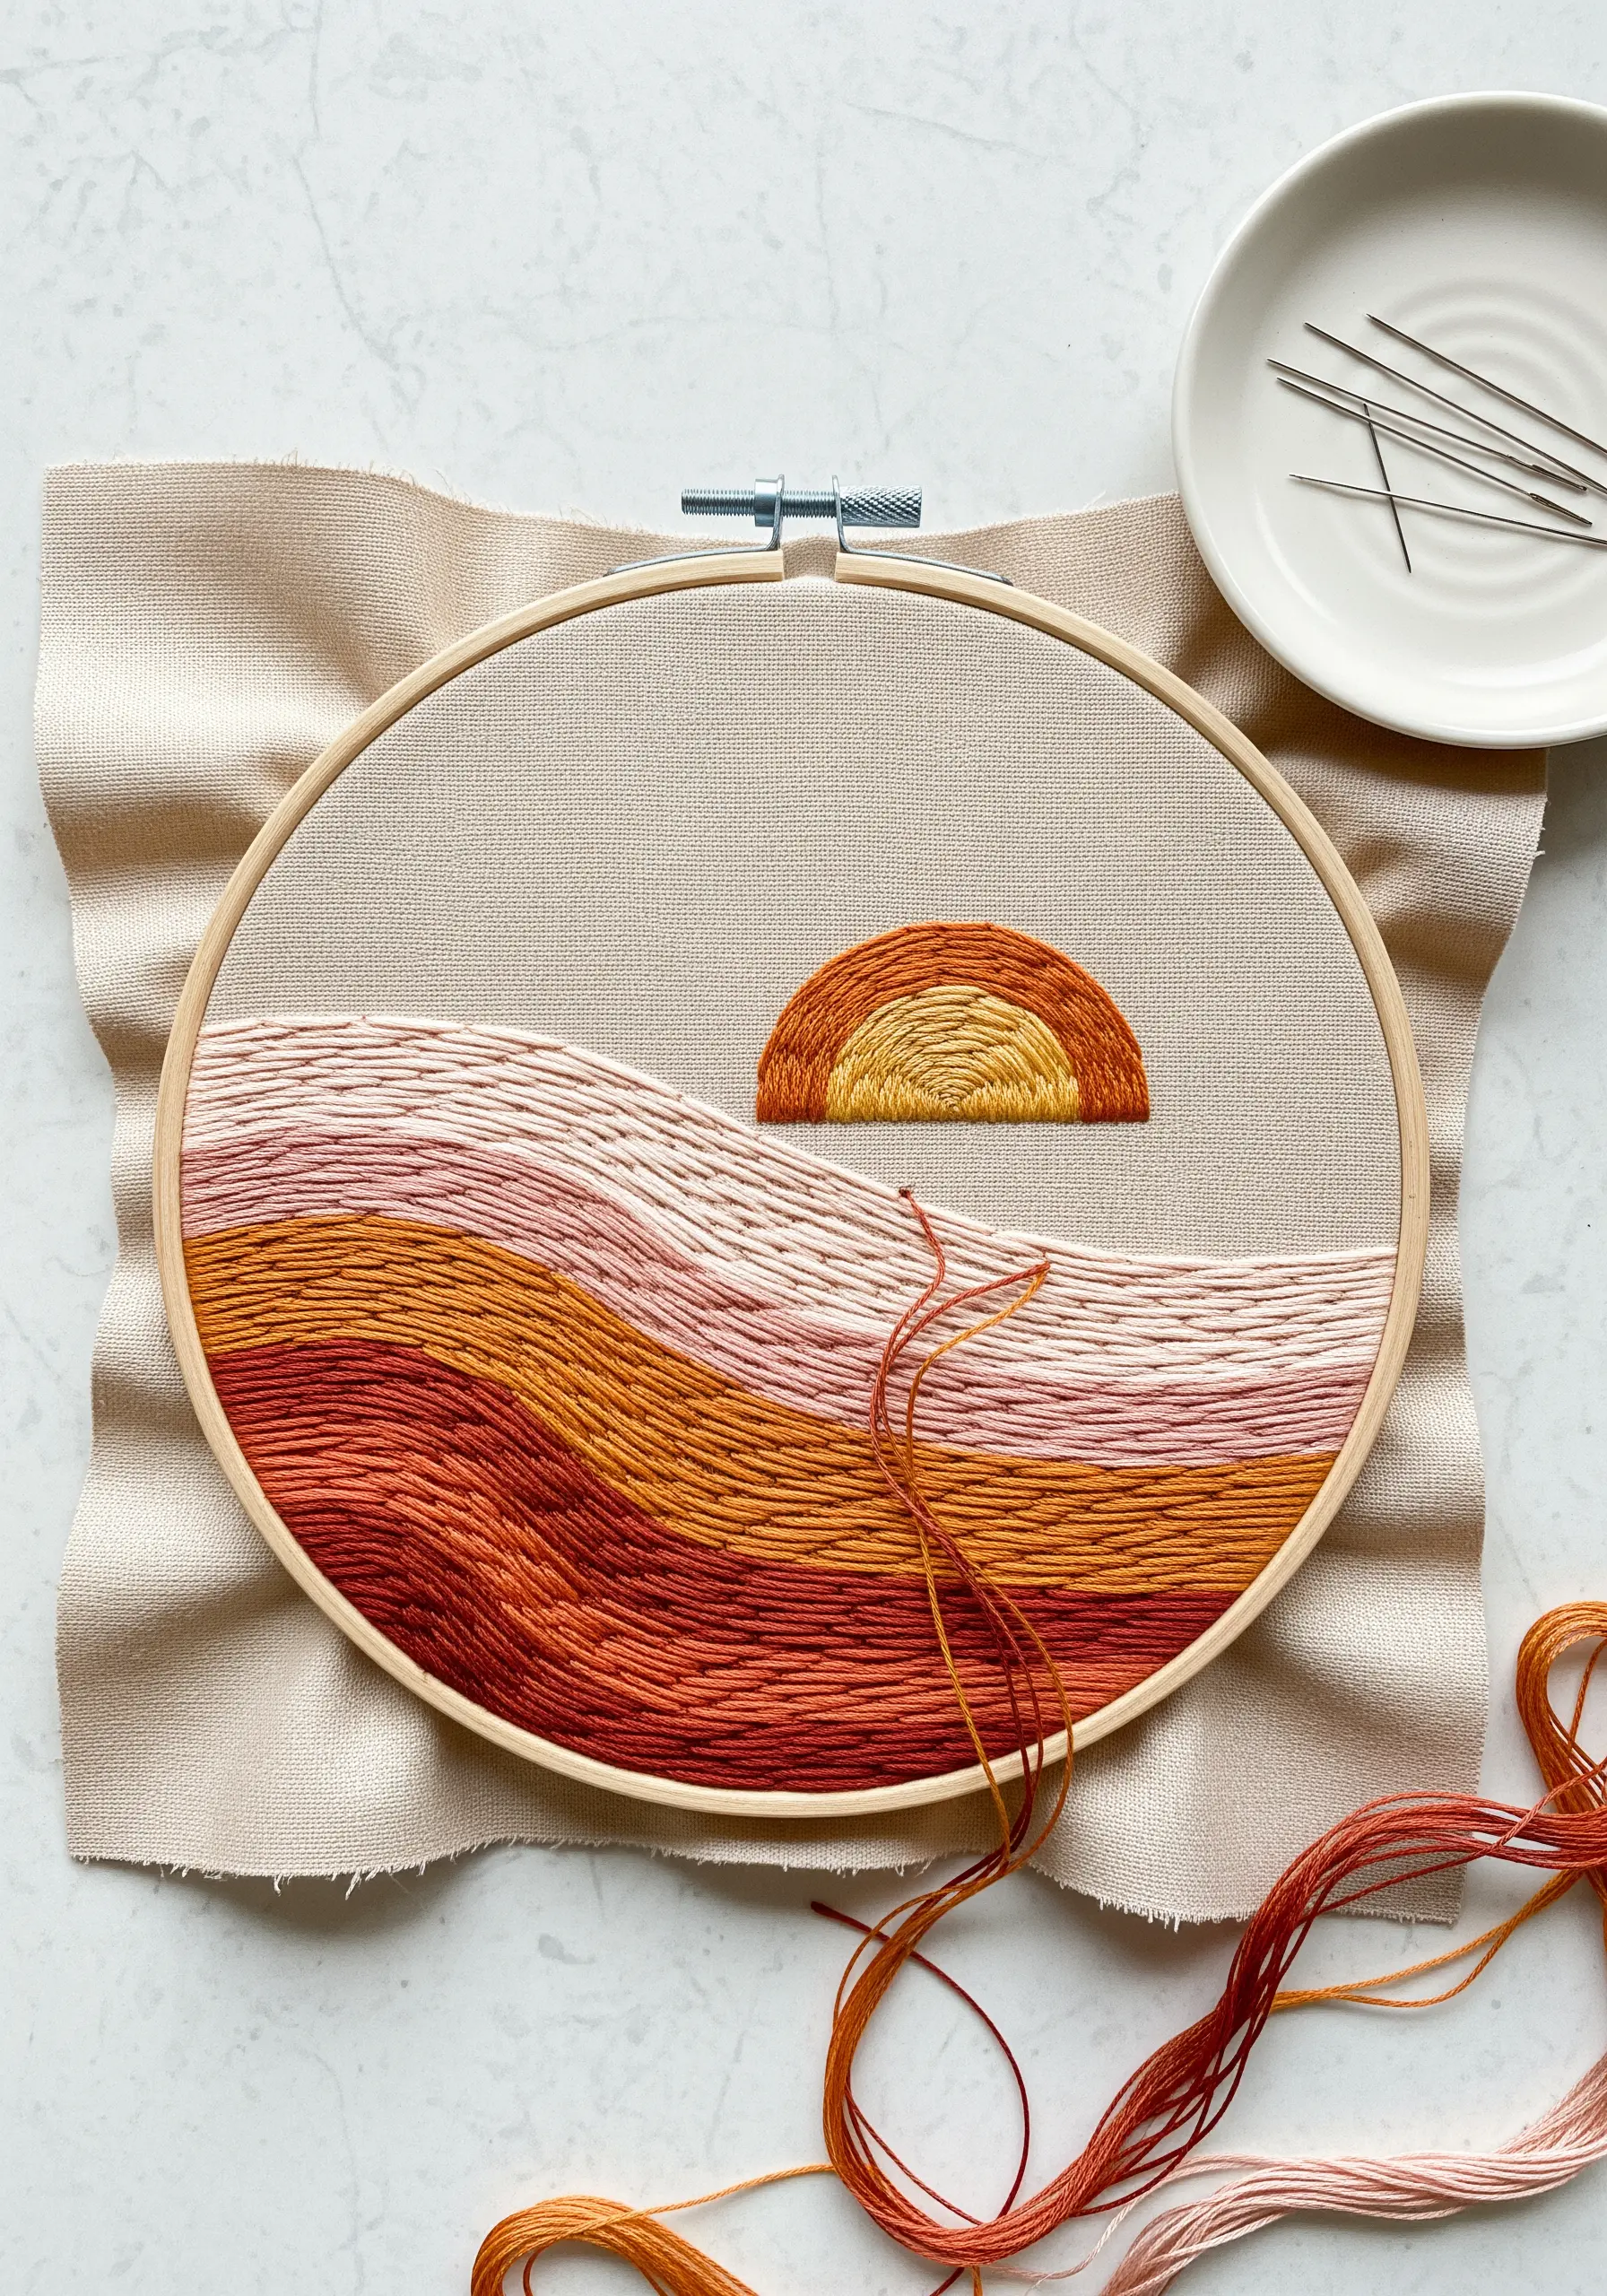
Create an evocative, abstract thread landscape by focusing on color and texture rather than precise representation.
Use a warm, earthy palette and fill horizontal bands with long, slightly wavy satin stitches, allowing the colors to blend and overlap organically.
Vary the number of strands you use—four or five for the foreground, two or three for the background—to create a subtle sense of atmospheric perspective.
The beauty of this style is its imperfection. Let the texture of the thread and the flow of the colors create a feeling rather than a literal scene.
18. Create Delicate Blossoms with Lazy Daisy Stitches
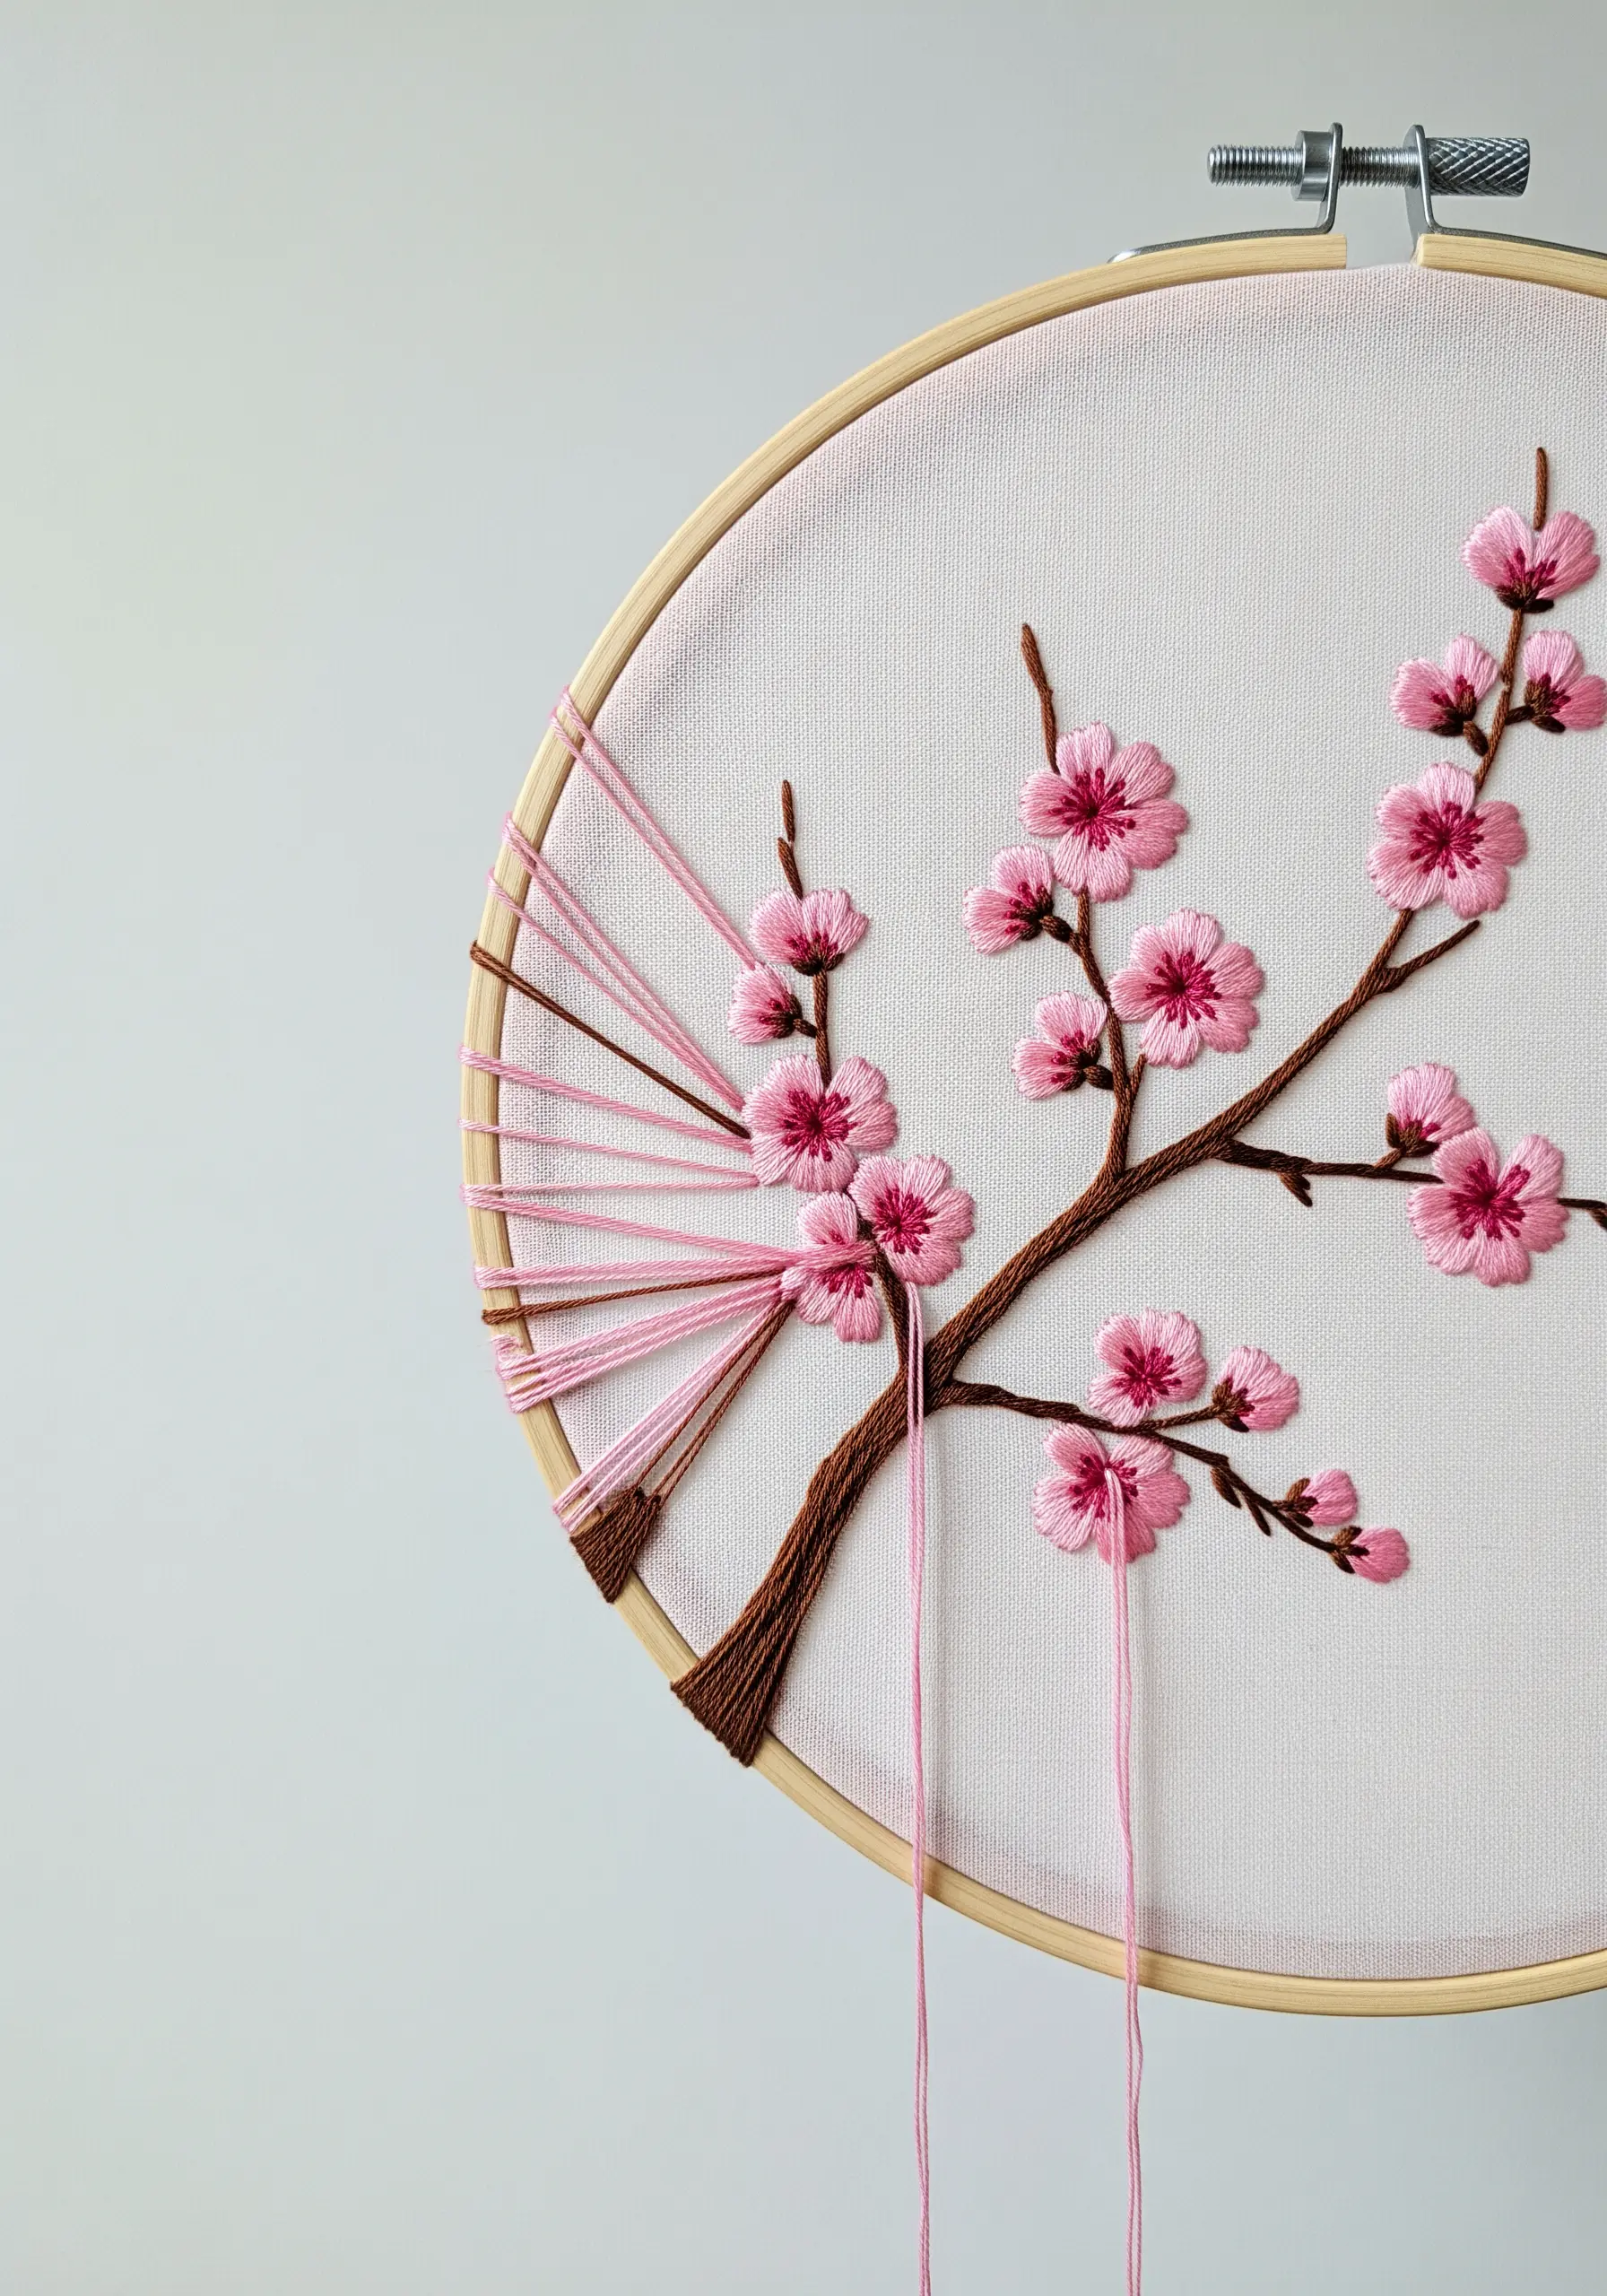
For small, delicate flower petals like cherry blossoms, the detached chain stitch—often called a lazy daisy stitch—is the perfect choice.
Work five or six of these looped stitches in a circle to form each bloom, leaving a small space in the center for a contrasting French knot.
This stitch is naturally raised, giving the petals a three-dimensional quality that makes them pop from the fabric.
The artistic choice to wrap thread across the hoop adds a deconstructed, modern layer to the traditional floral motif, turning the process itself into part of the final piece.


