
You have a love for houseplants and a needle in your hand, but you feel a gap between the patterns you follow and the art you want to create. Your stitches are neat, but you know your work could have more life, more intention.
The secret isn’t in mastering hundreds of complex stitches. It’s in the subtle choices you make with the stitches you already know. It’s about the direction of a single satin stitch, the texture you choose for a pot, or the way you blend two shades of green to capture the light on a leaf.
Here, you’ll find 24 practical ways to make those choices confidently. These aren’t just ideas; they are specific, actionable techniques that will elevate your work immediately. You will learn to see your thread and fabric not just as materials, but as tools for shaping light, creating texture, and breathing life into your botanical designs.
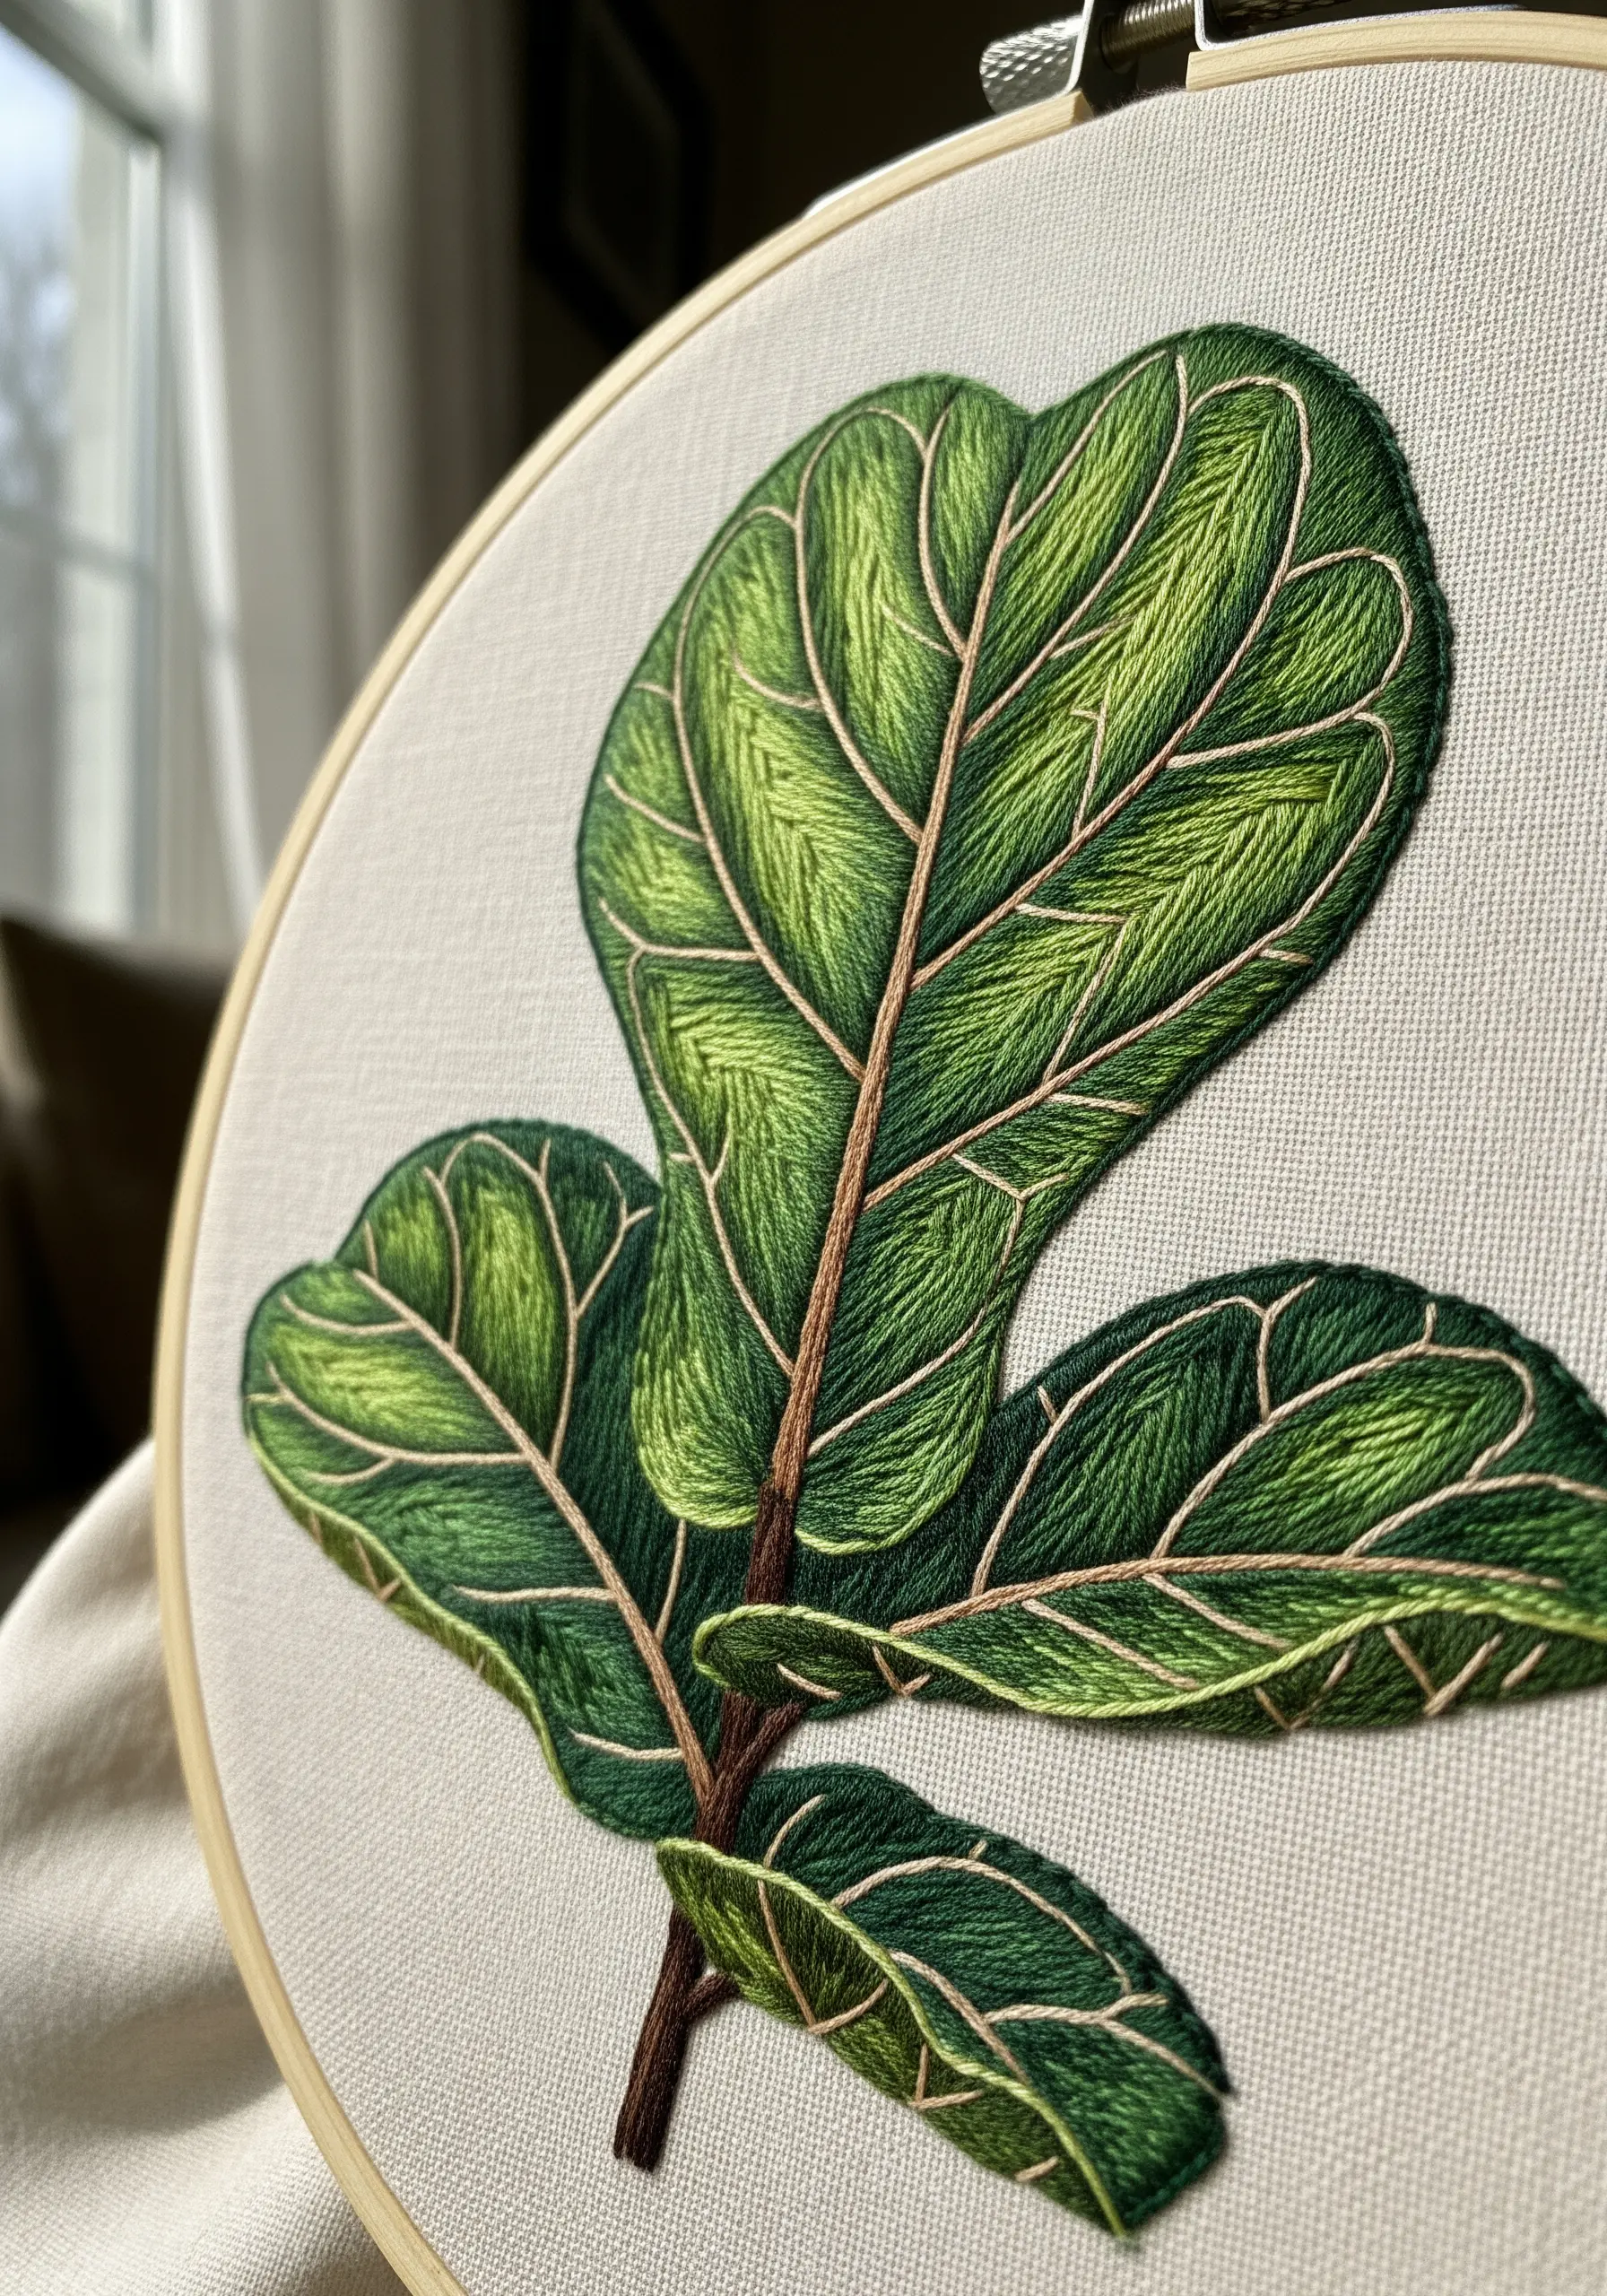
1. Master Light and Shadow with Directional Satin Stitch
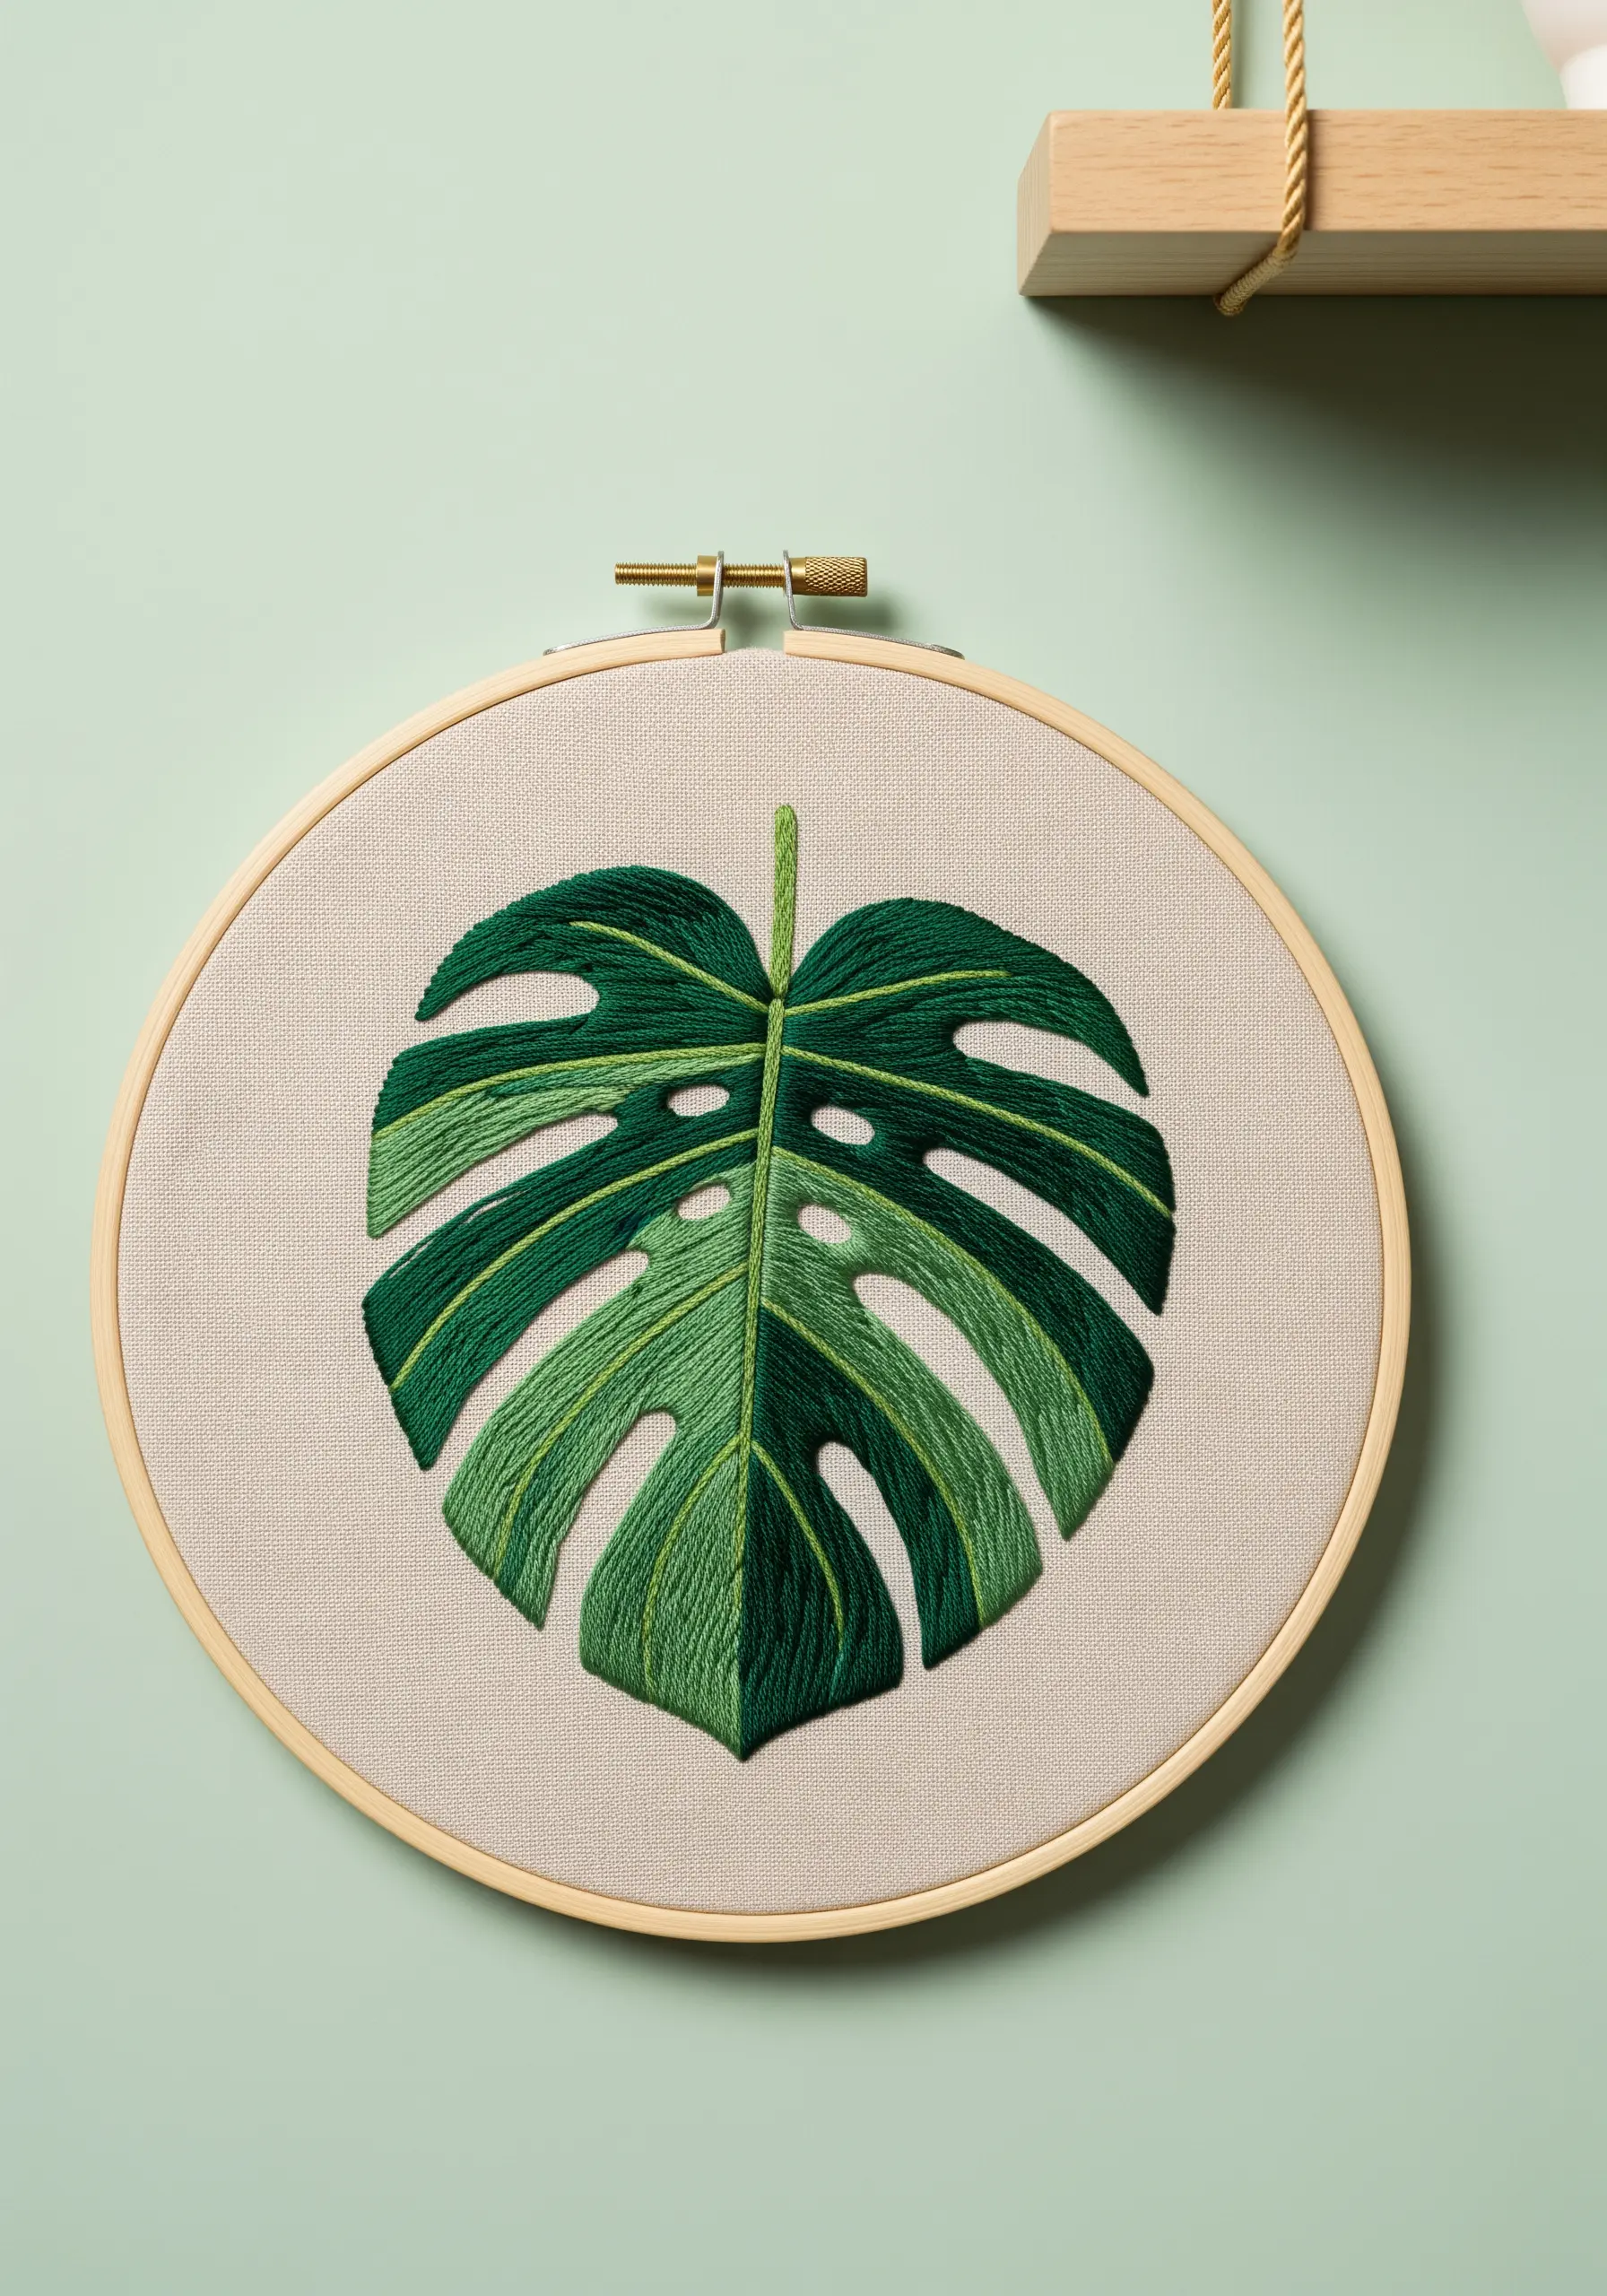
To give your Monstera leaf a dynamic, realistic feel, divide it in half with a central line of split stitches.
Fill one side with a dark green and the other with a lighter shade, using long-and-short satin stitches.
Angle your stitches outward from the center vein toward the edge of the leaf; this simple directional change mimics the way light hits a real leaf, creating instant depth and form.
For the iconic leaf holes, simply outline them with a single backstitch before you begin filling, then work your satin stitches right up to that edge for a clean finish.
2. Use Negative Space and Textural Fill for a Graphic Look
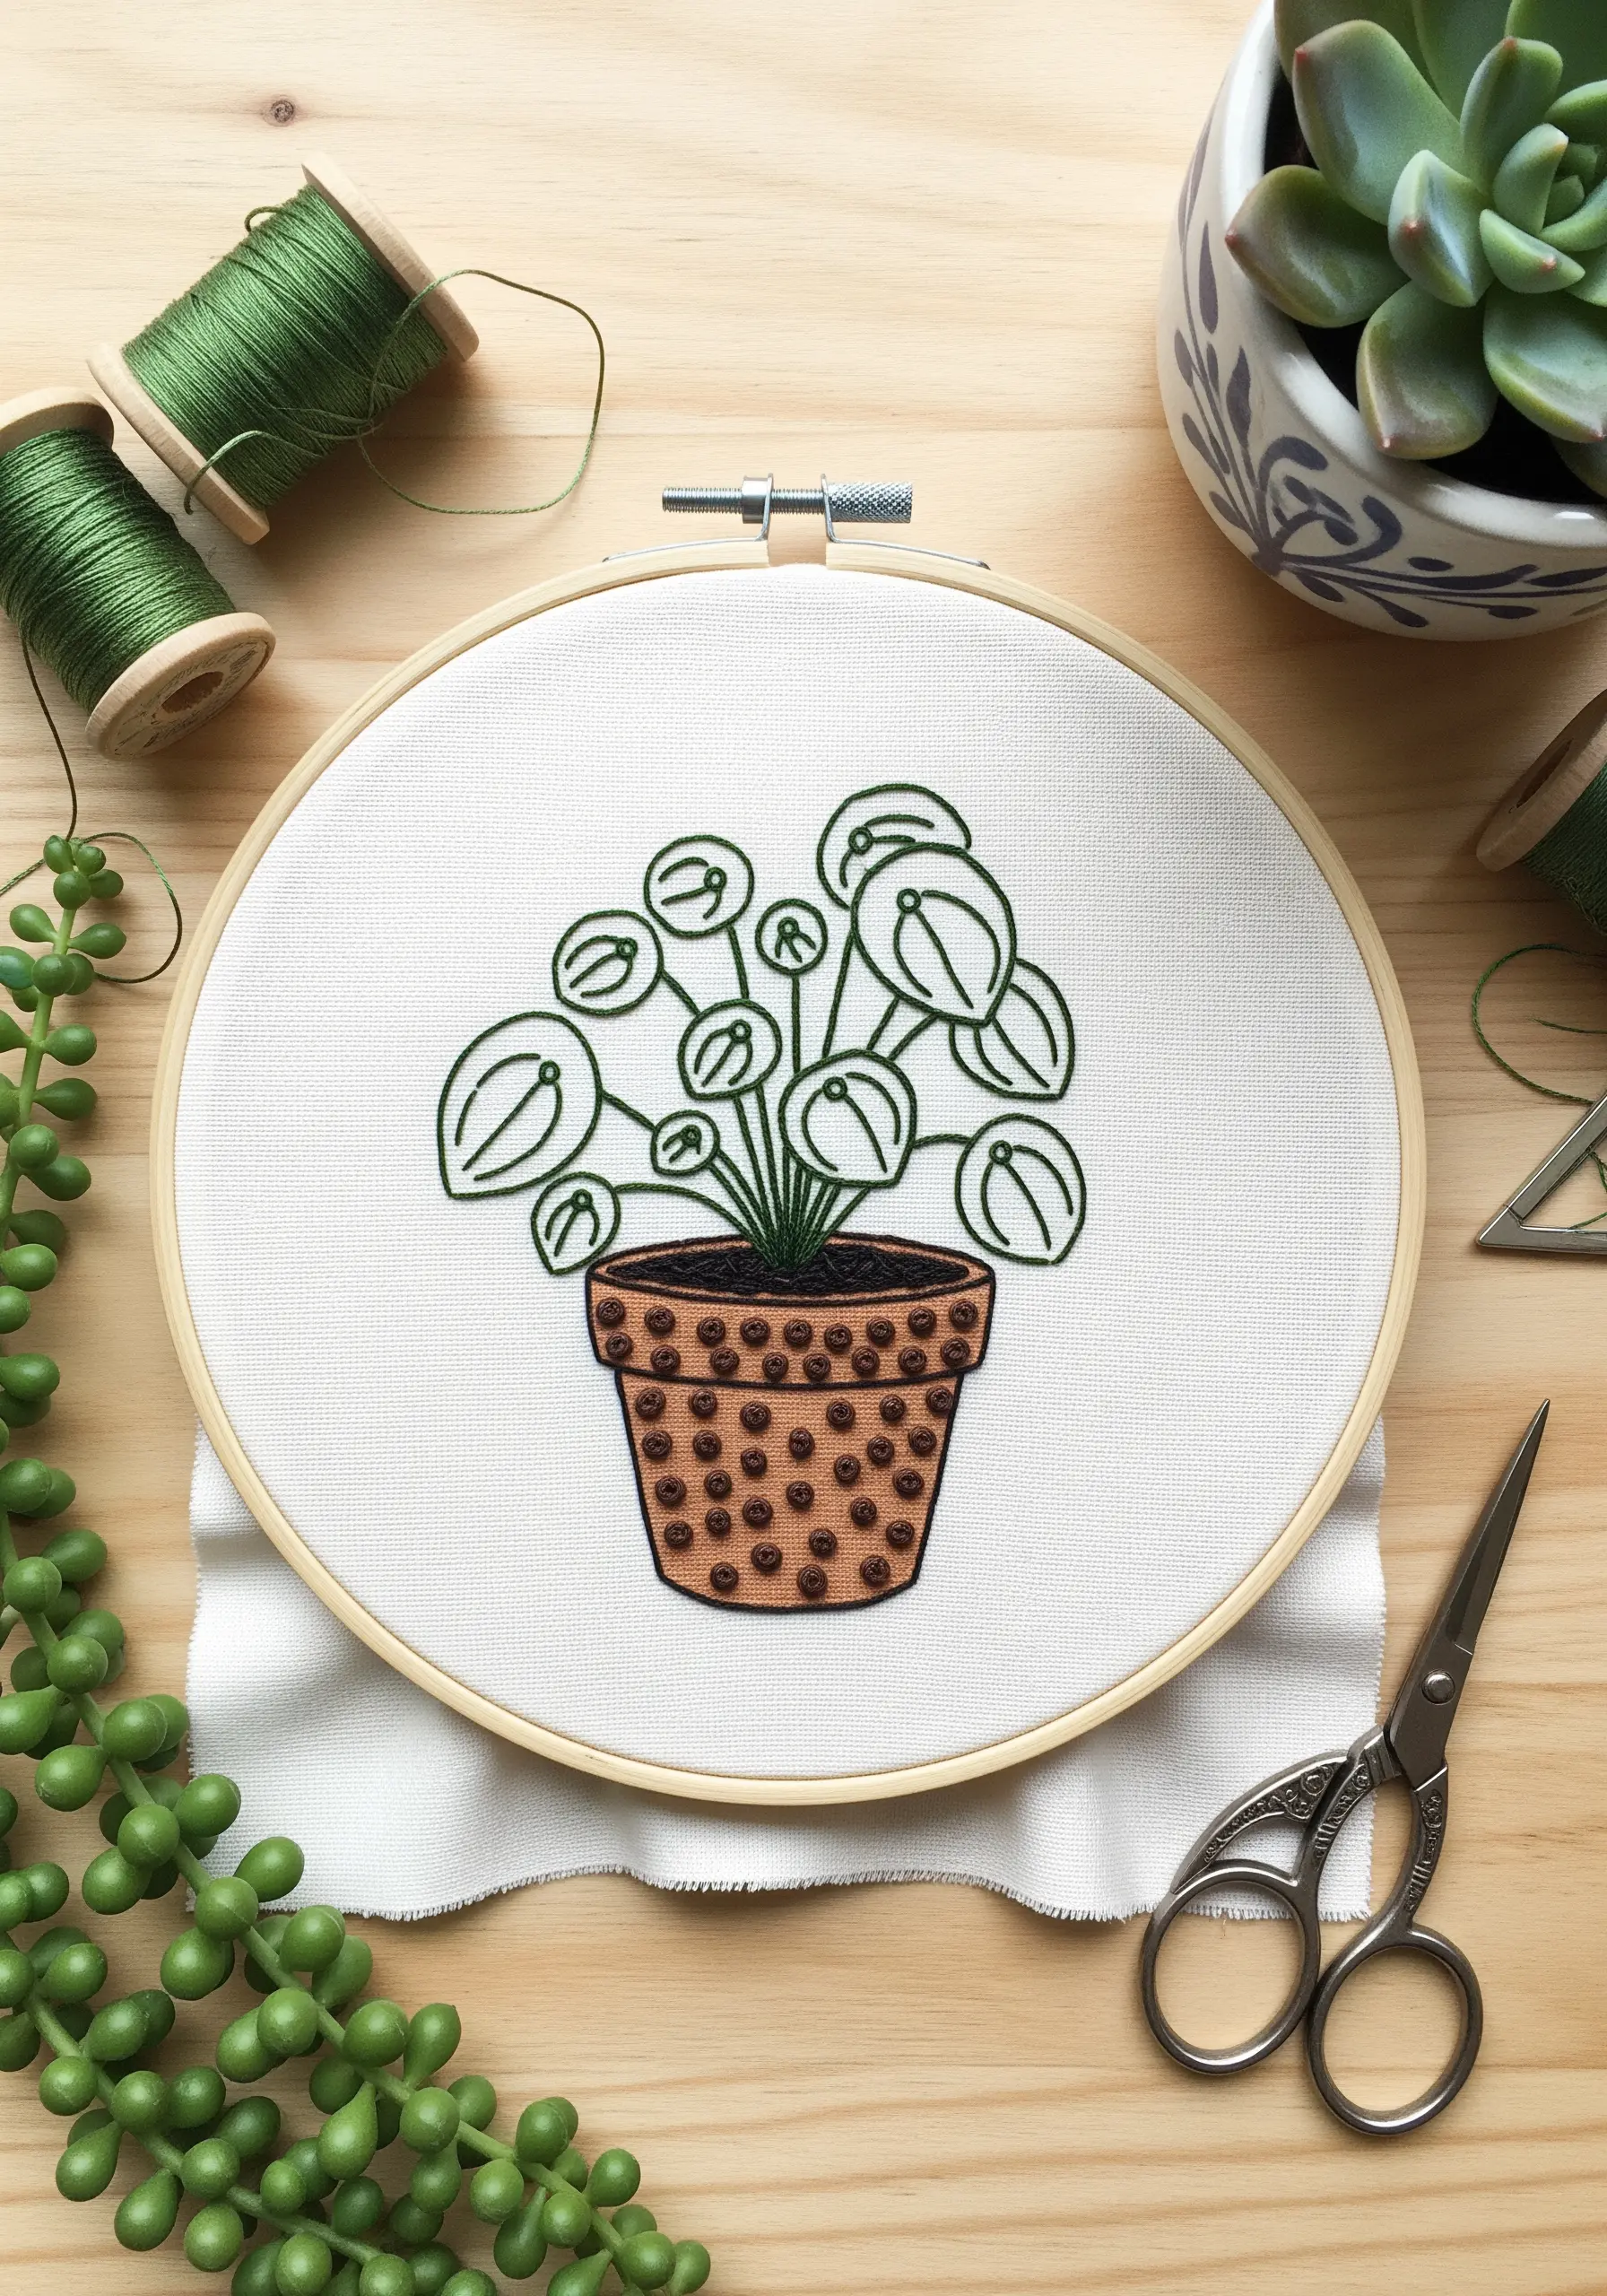
Capture the playful shape of a Pilea plant by focusing on its outlines, leaving the leaves unfilled.
Use a two-strand backstitch for the leaf outlines and a whipped backstitch for the stems to create smooth, defined lines that stand out.
For the terracotta pot, create a tactile contrast by filling the area with tightly packed French knots in two shades of brown.
This combination of open, linear leaves and a dense, textural base makes the entire composition feel modern and balanced.
3. Create Dramatic Contrast on Dark Fabric
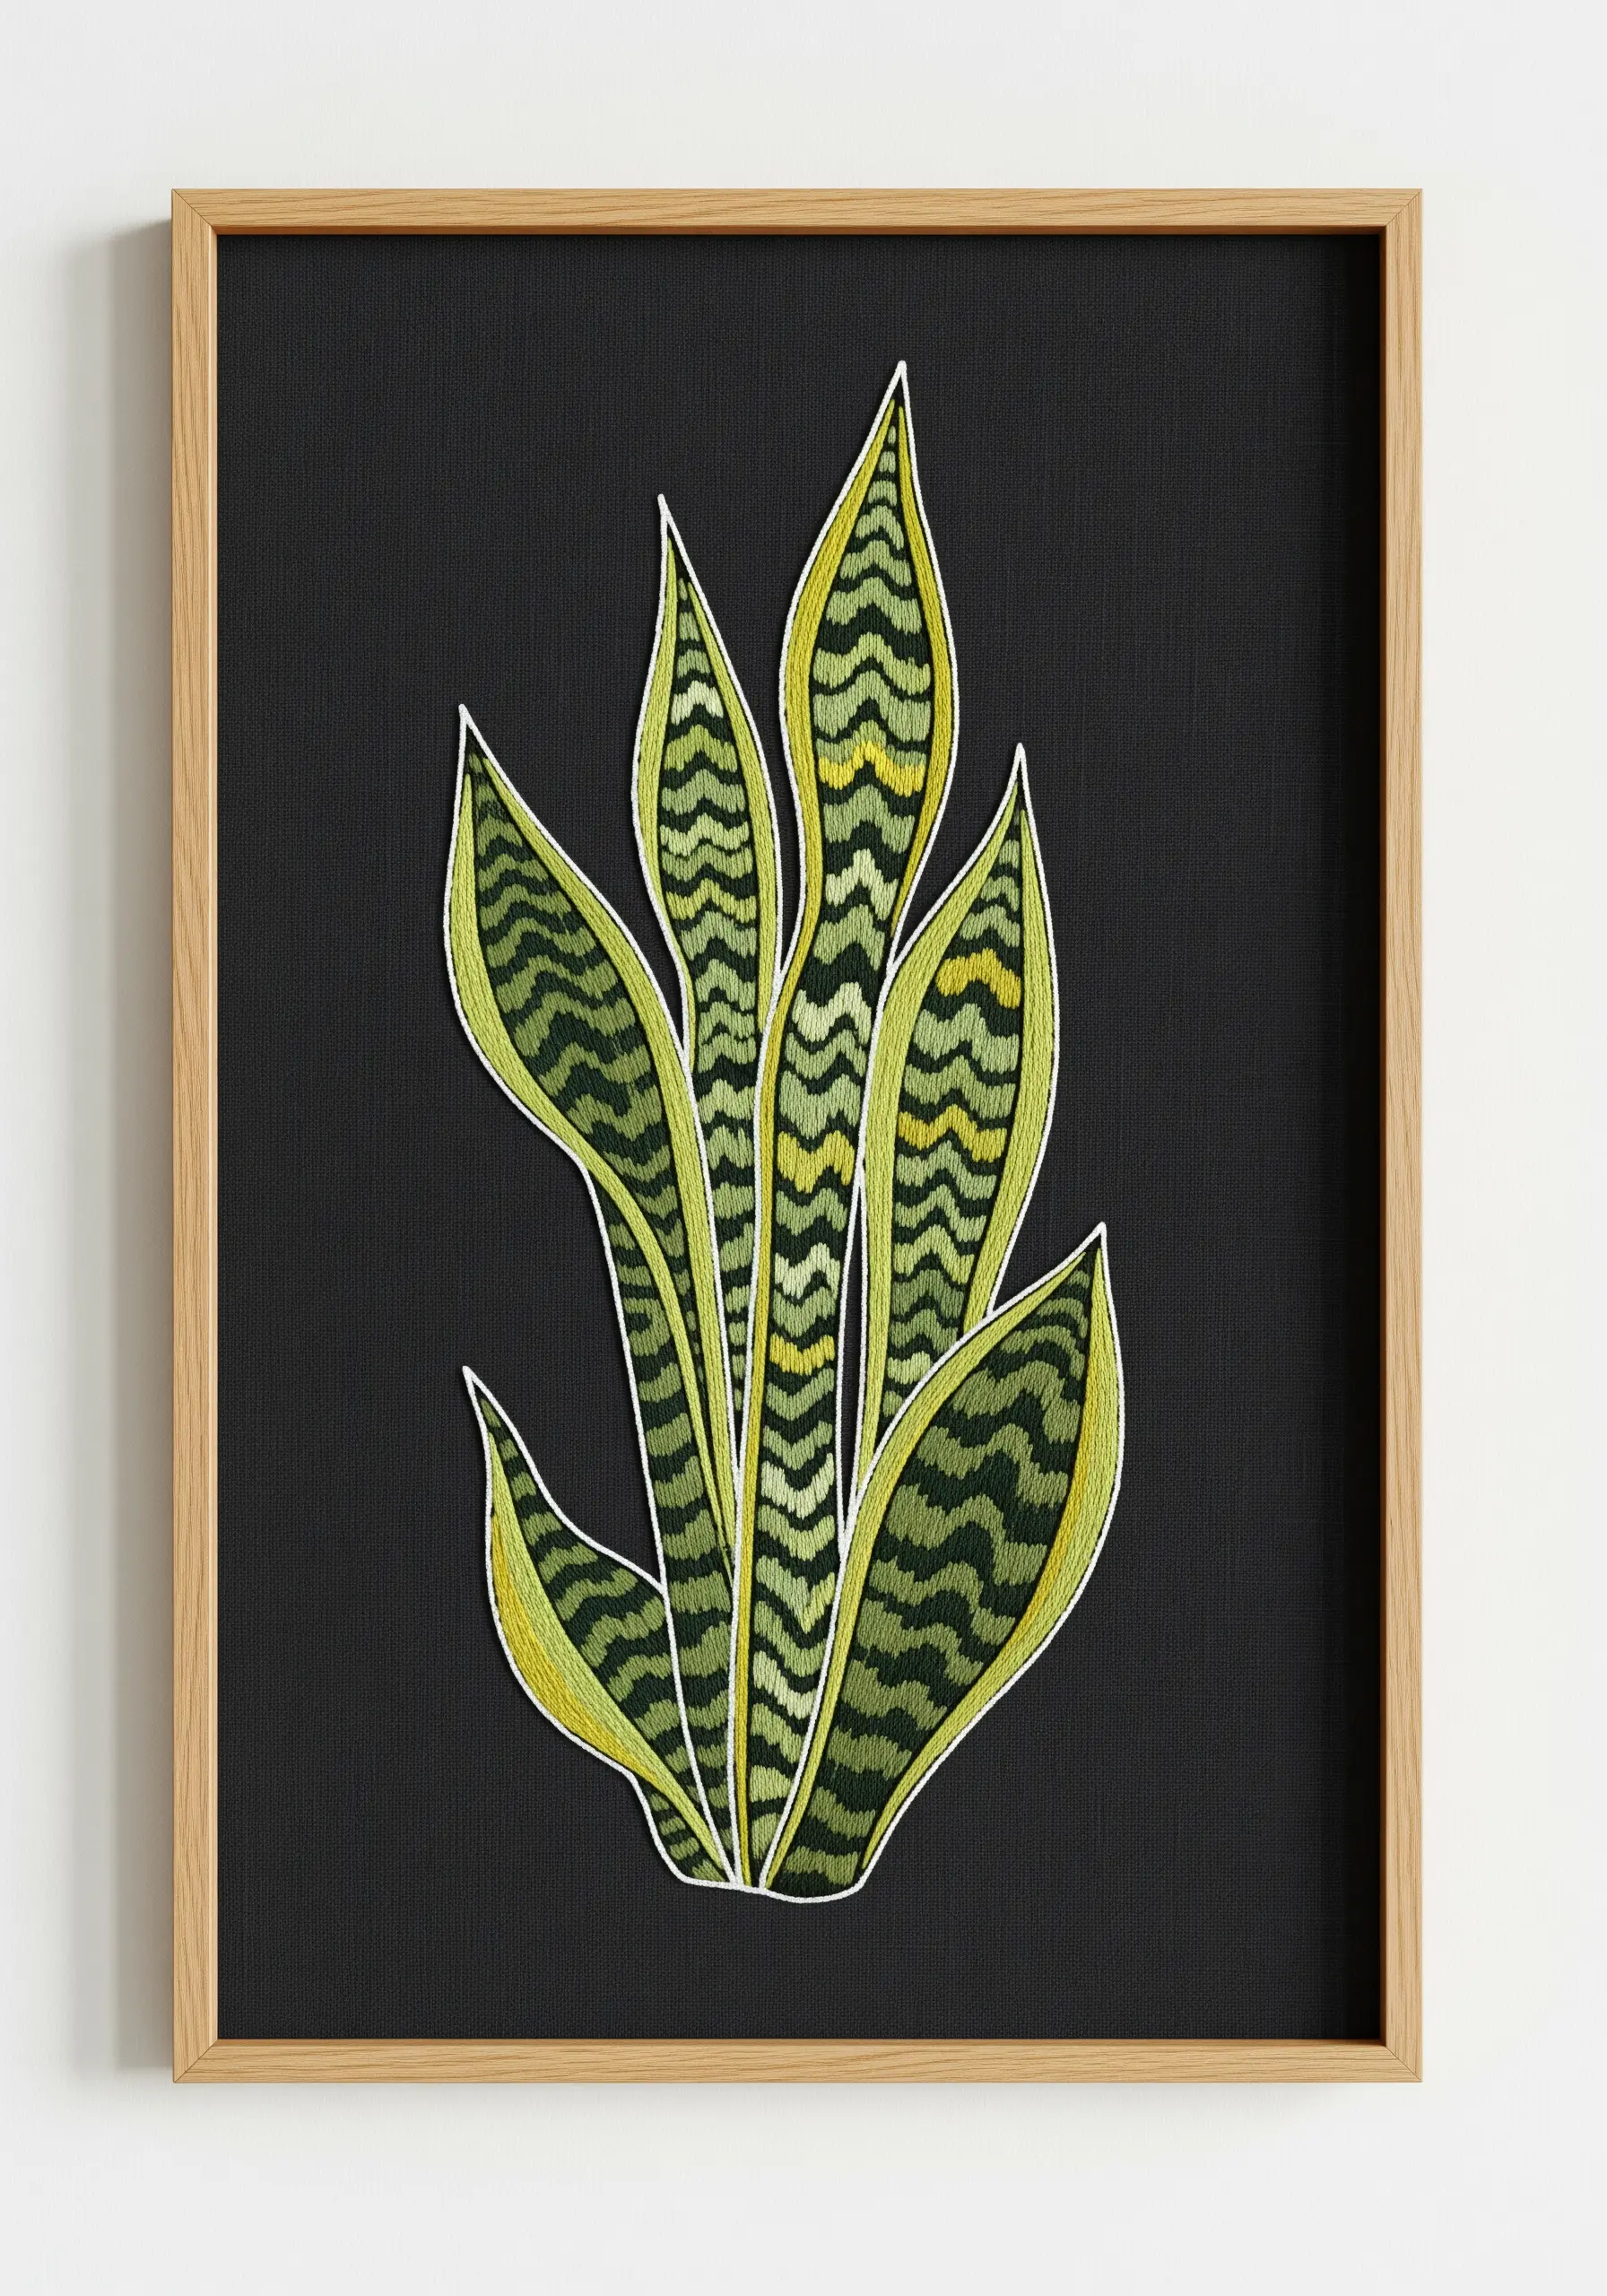
Make the vibrant patterns of a snake plant pop by stitching it on black or charcoal linen.
First, outline the entire plant with a single strand of white thread using a stem stitch; this acts as a barrier and makes your colors appear brighter.
Fill the variegated sections with a split backstitch for the dark green wavy lines and a simple satin stitch for the lime green areas.
The dark background absorbs light, forcing the viewer’s eye to focus on the thread’s color and texture, creating a bold, gallery-worthy piece.
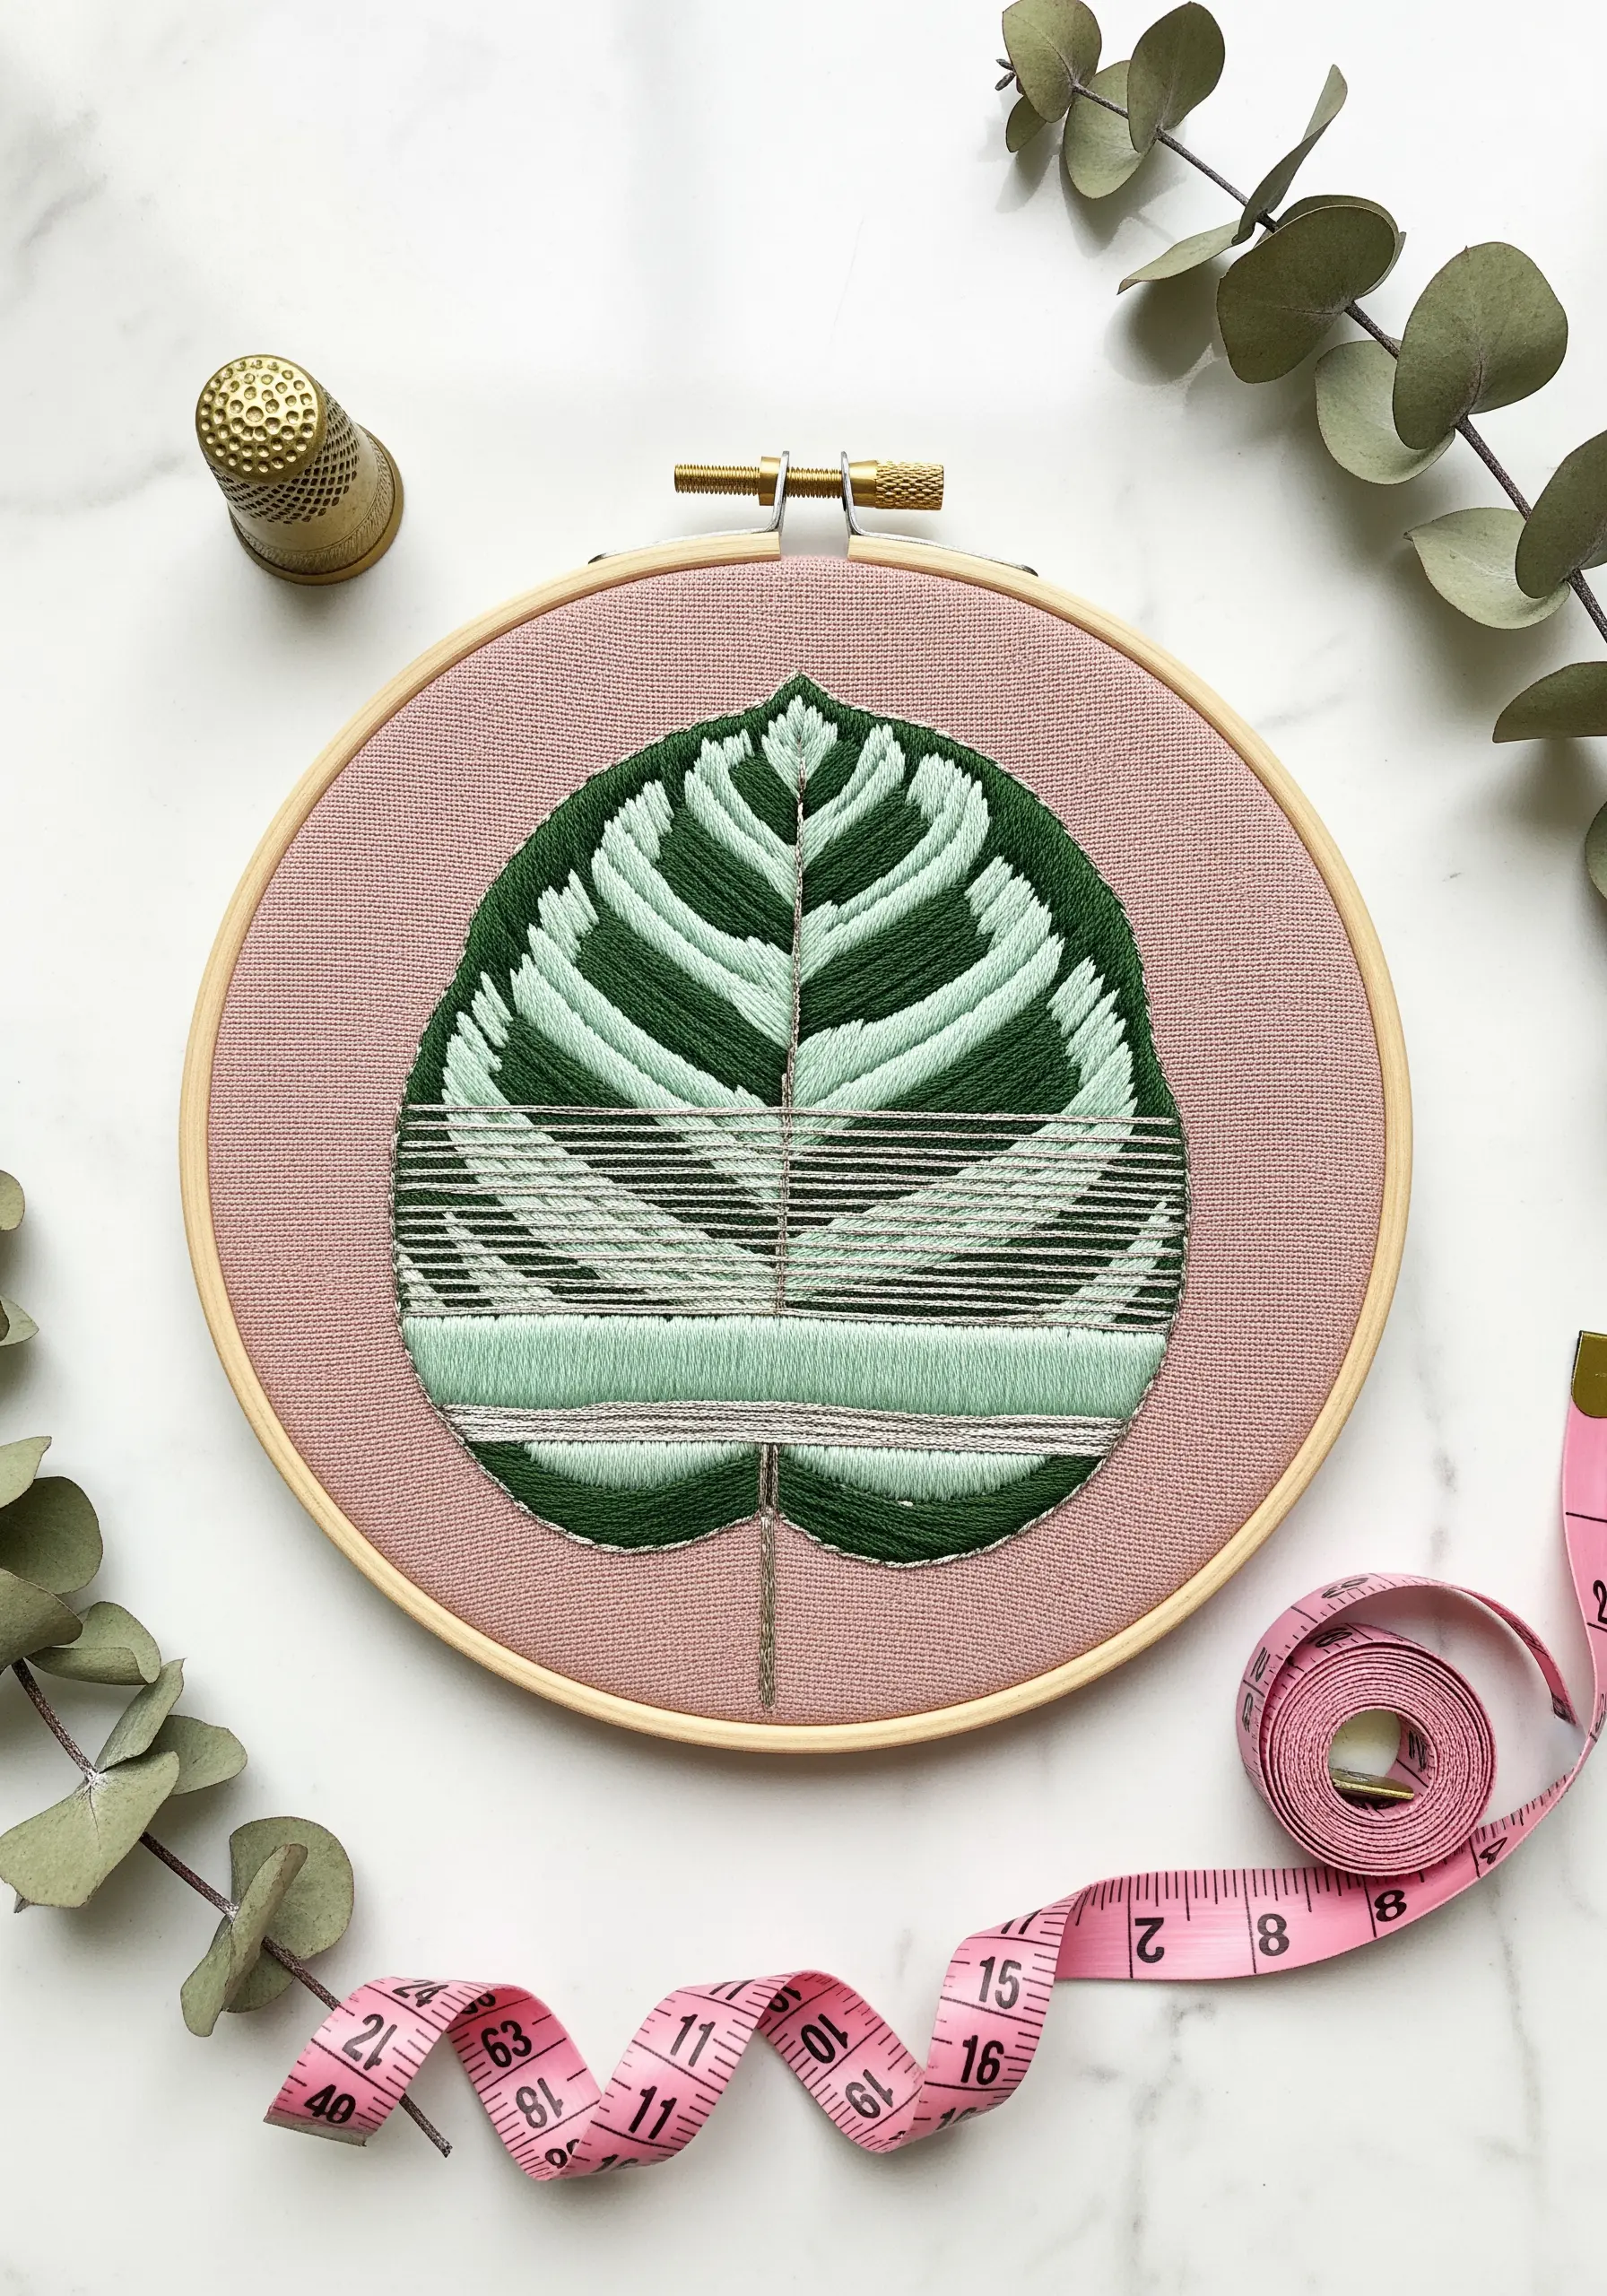
4. Achieve Realistic Blending with Thread Painting
For a lush Fiddle Leaf Fig, thread painting is the key to capturing its subtle color variations.
Use a single strand of floss in three or four shades of green, from deep forest to a brighter spring green.
Work in long-and-short stitches, allowing your stitches to overlap and interlock naturally to create a soft gradient effect.
Instead of stitching veins on top, try stitching them first with a lighter thread, then carefully fill around them. This integrates the veins into the leaf for a more organic look.
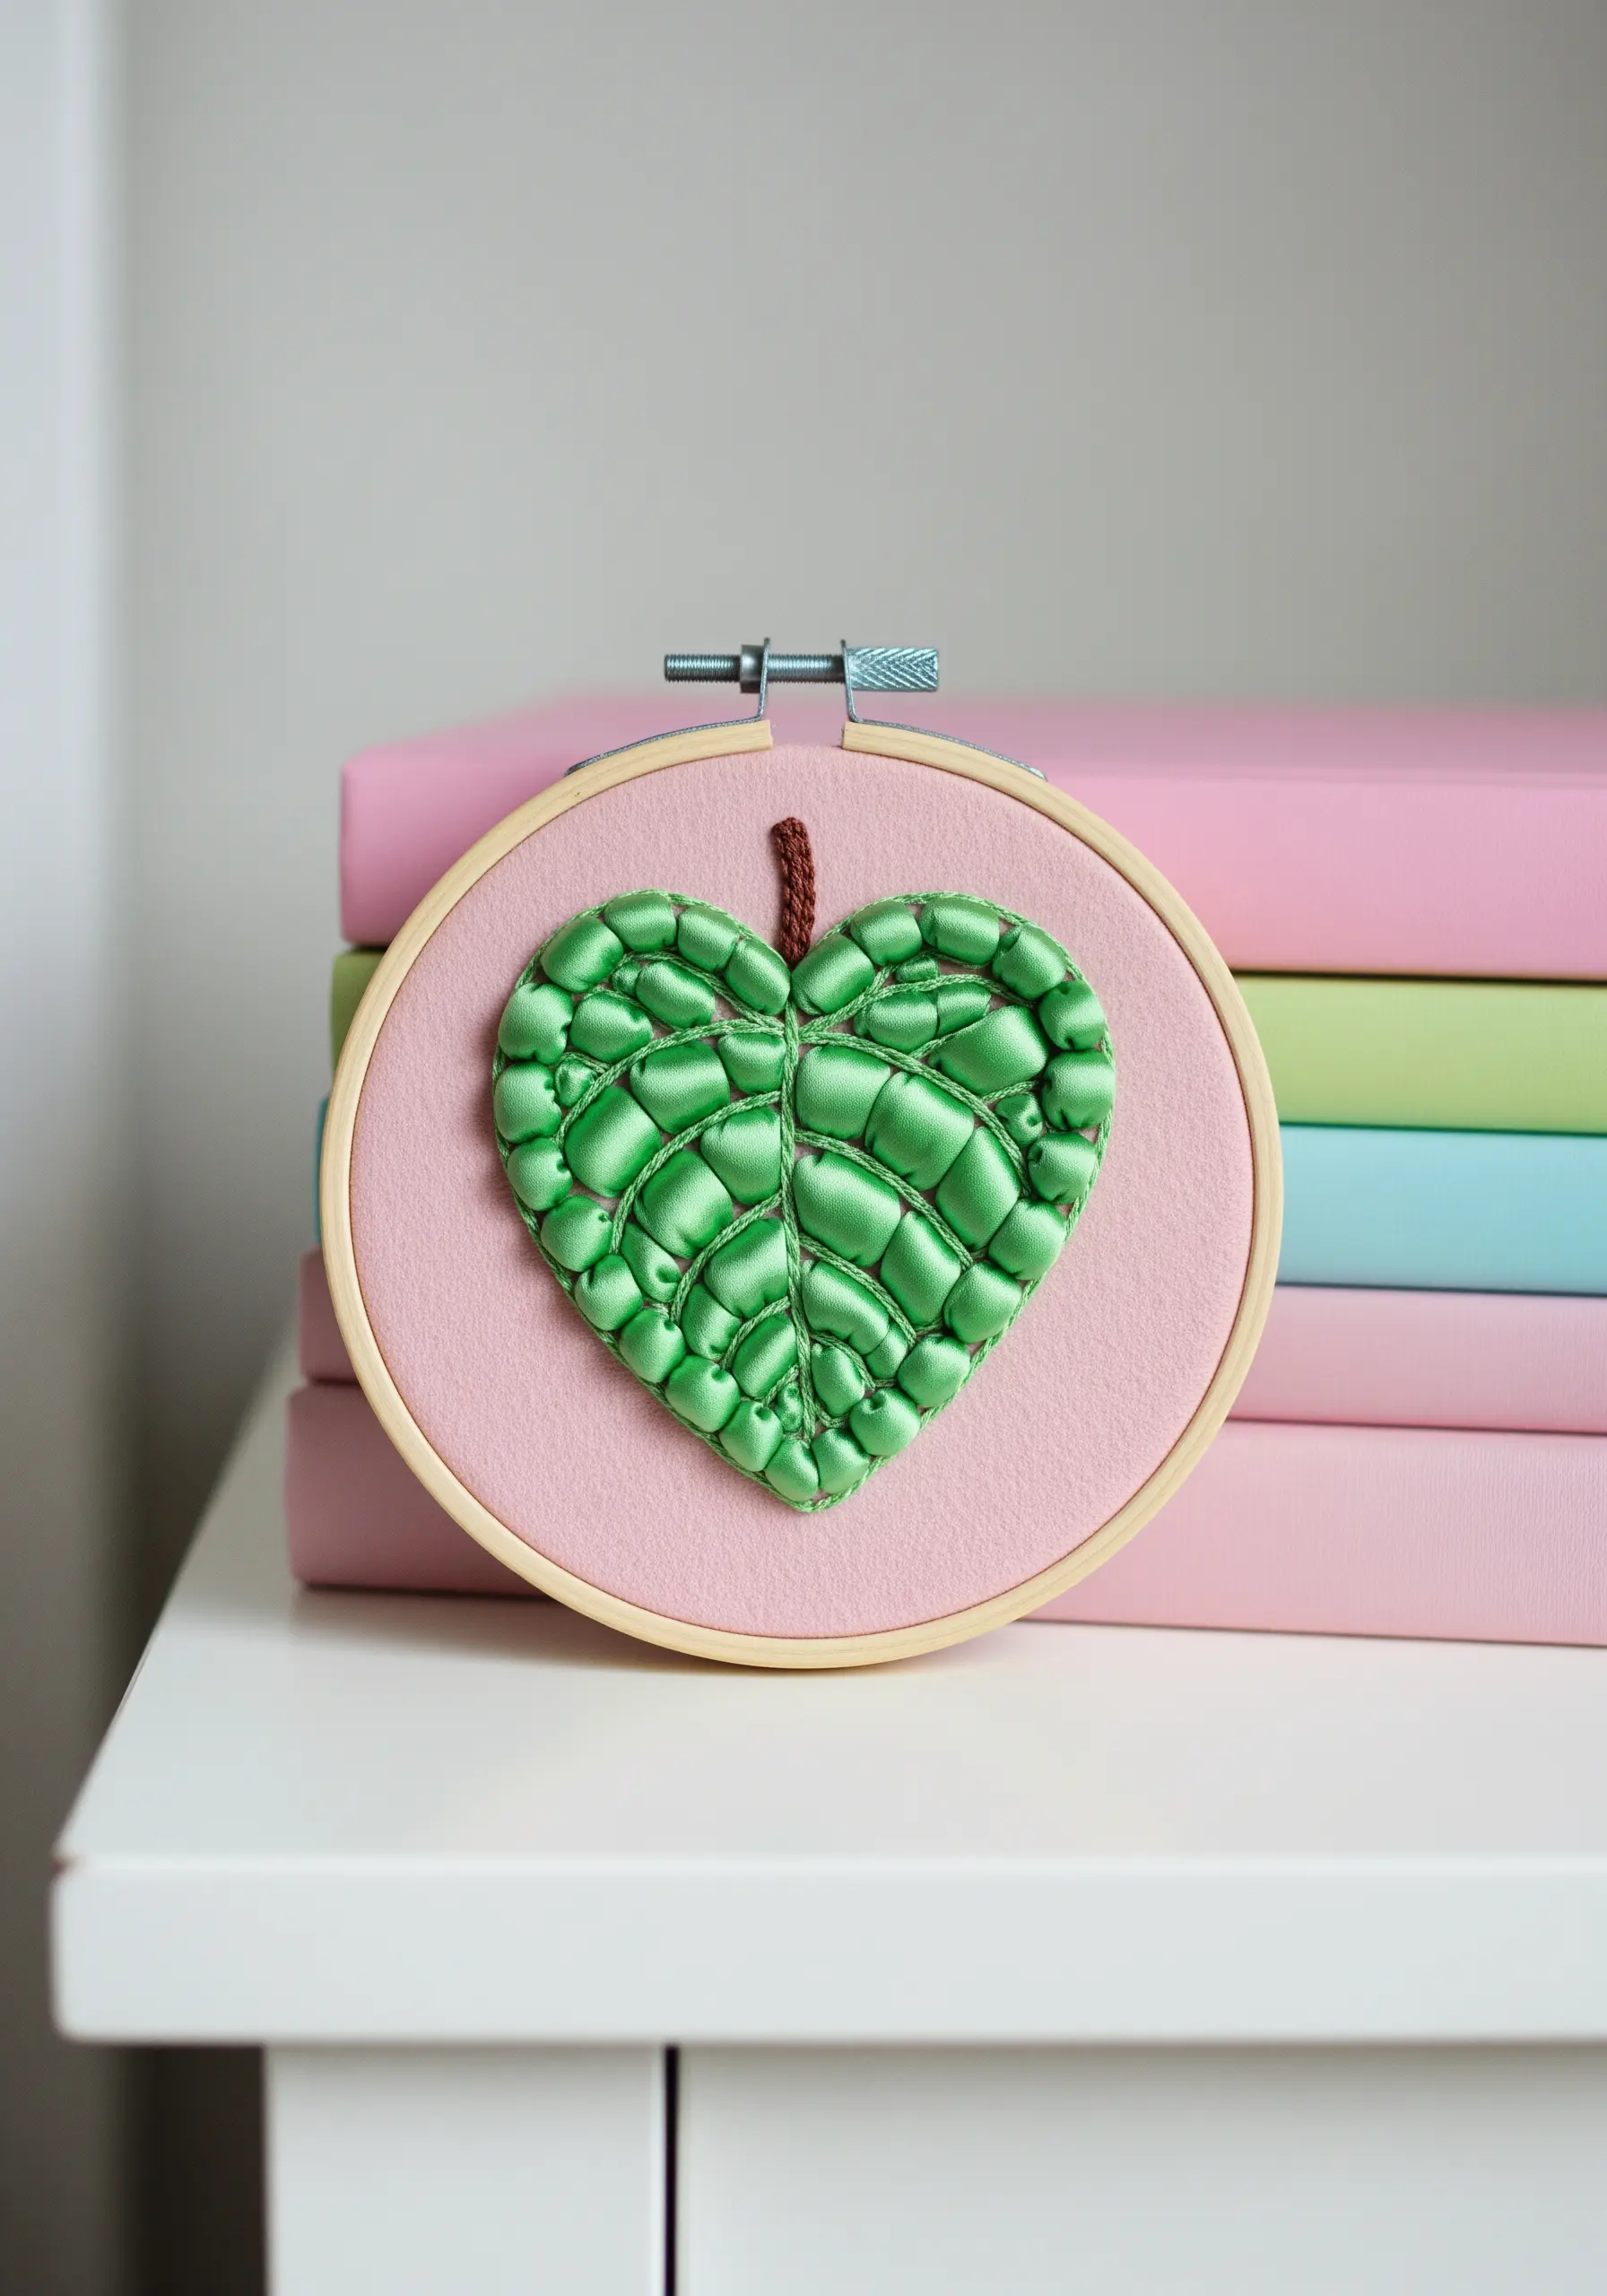
5. Build 3D Texture with Padded Knots
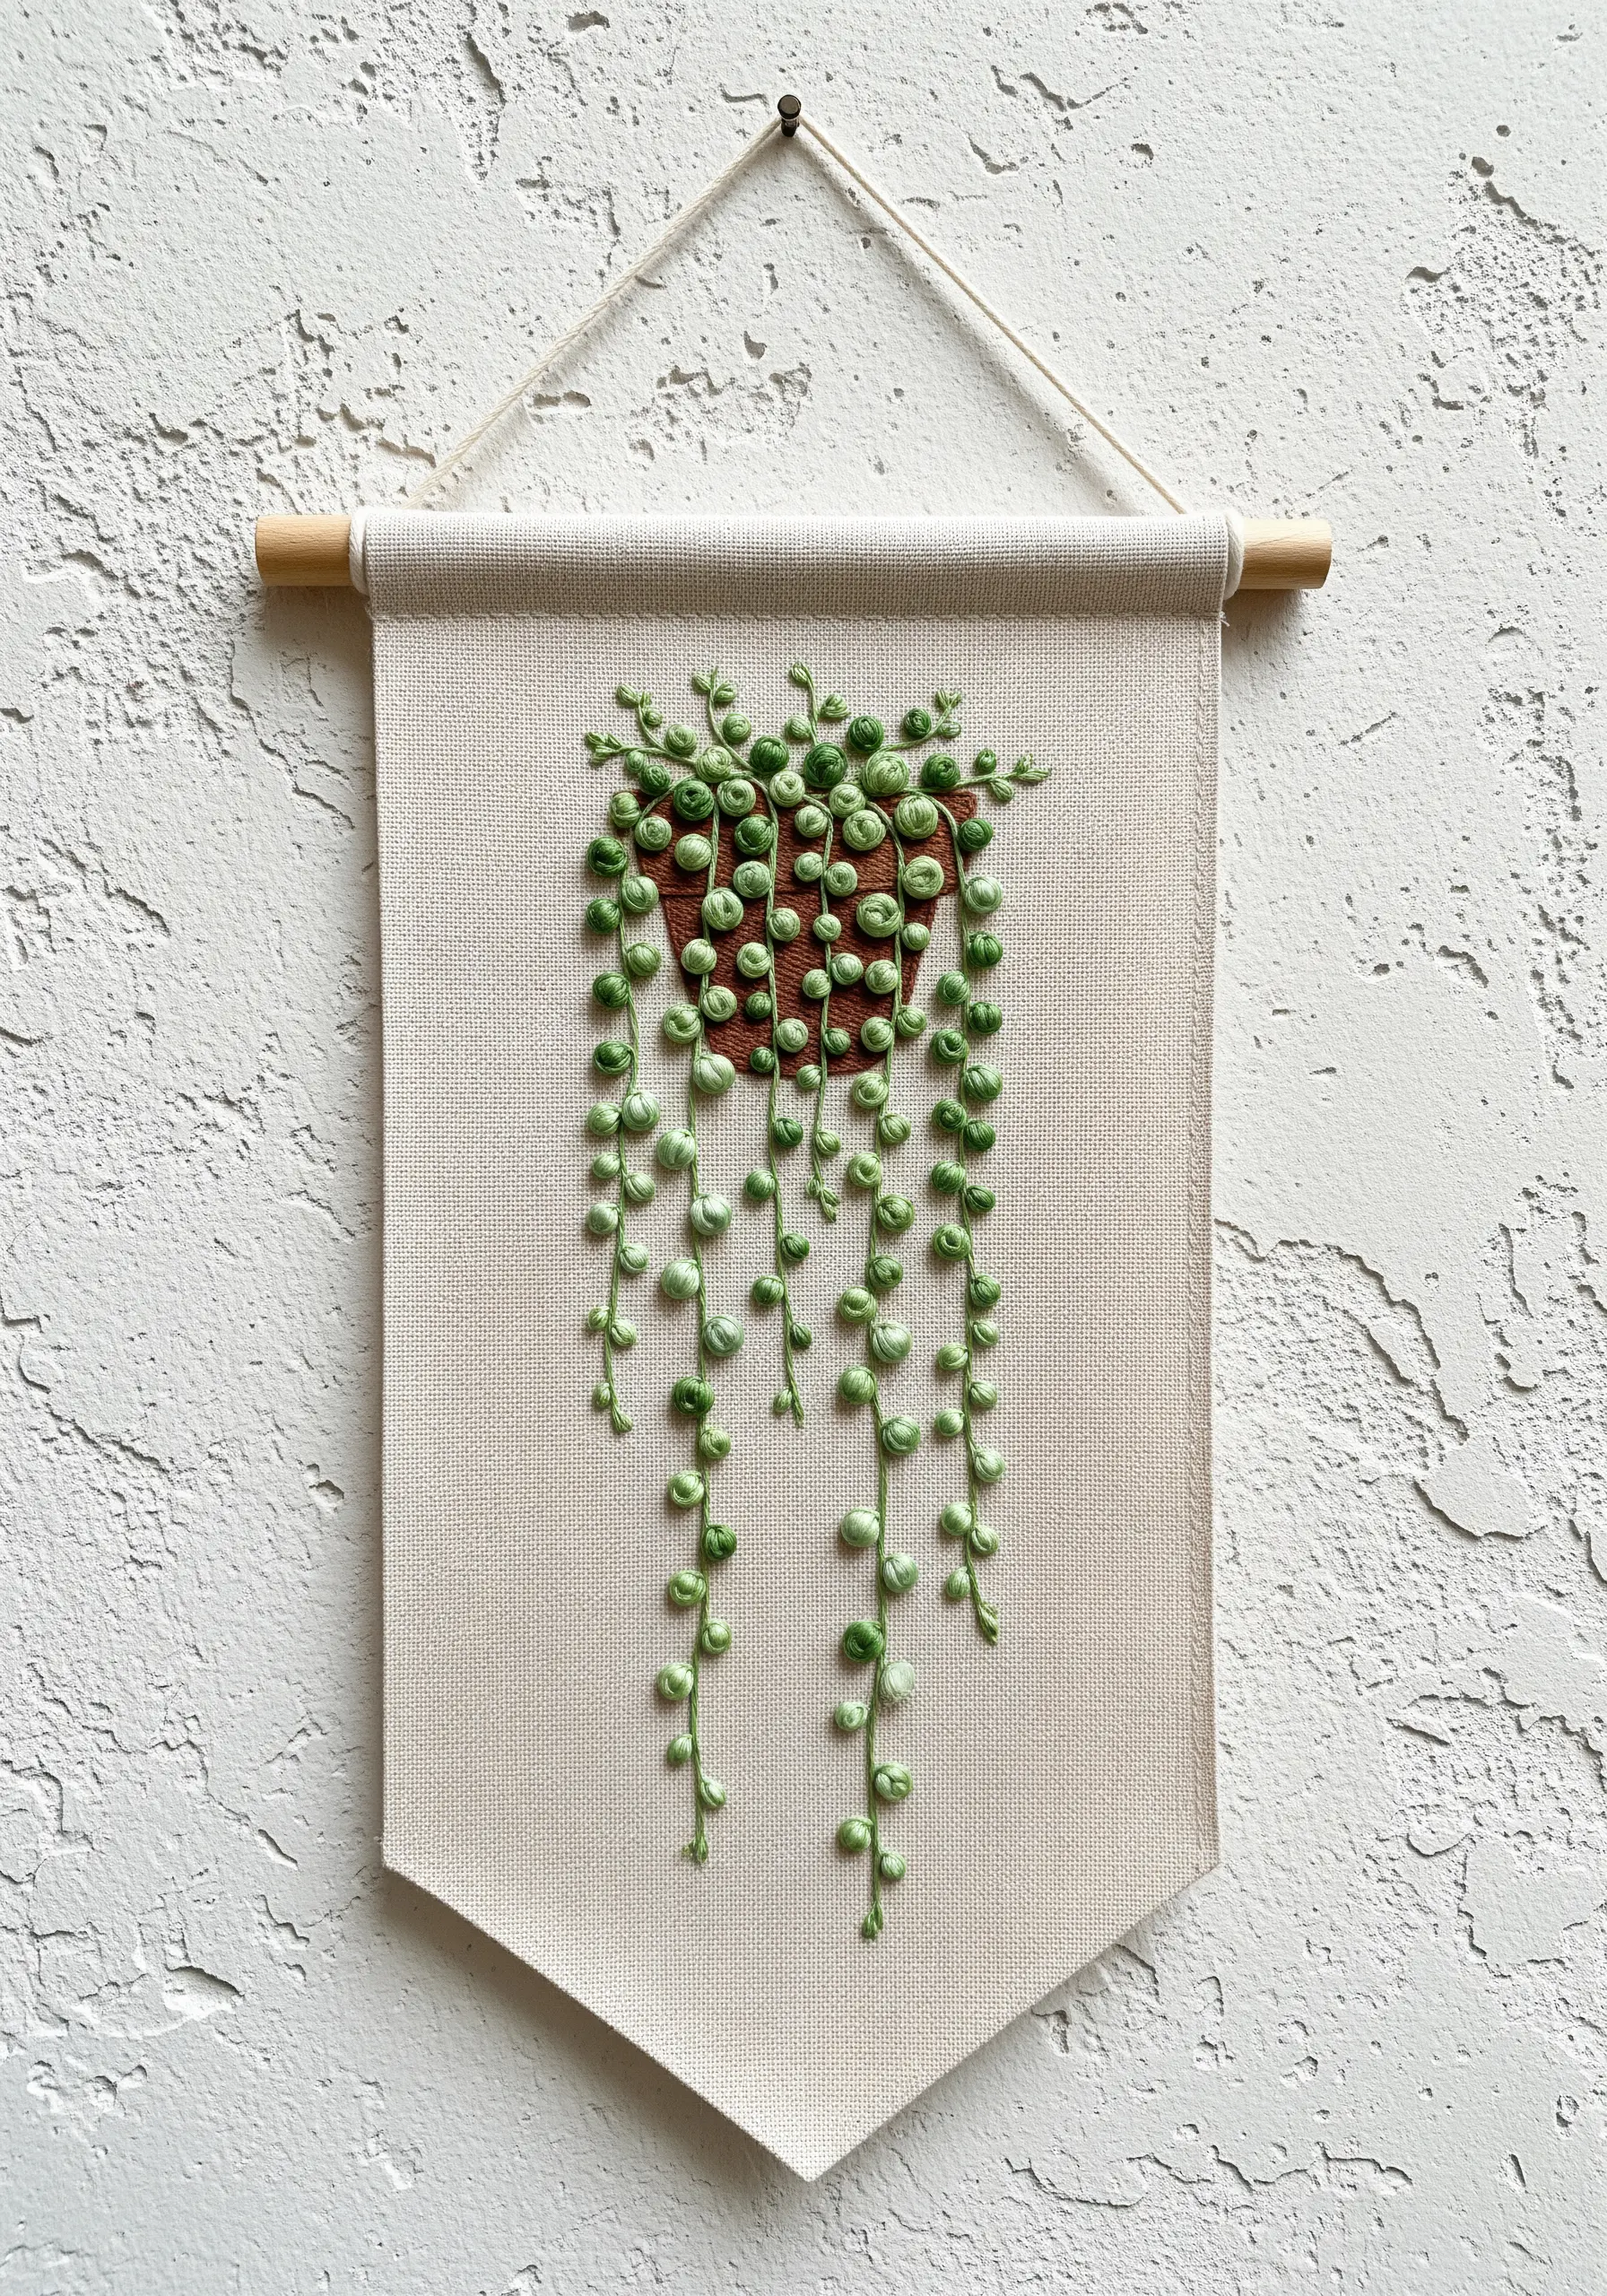
To give your String of Pearls a plump, three-dimensional form, move beyond simple satin stitch.
Use bullion knots for each pearl, varying the number of wraps around the needle to create different sizes for a more natural look.
If bullion knots feel intimidating, you can achieve a similar effect by layering several French knots on top of each other.
Use a variegated green thread or switch between two or three shades to give the trailing stems a sense of movement and life.
6. Combine Solid Fill with Geometric Spacing
Capture the graphic beauty of a Calathea leaf by playing with stitch density and negative space.
Use a smooth, tight satin stitch for the dark green feather-like markings along the central vein.
For the lighter striped sections, use single, long straight stitches spaced about 2mm apart instead of a full fill.
This technique creates a delicate, almost skeletal effect that highlights the leaf’s intricate pattern without overwhelming the design. It’s an elegant solution that also saves thread and time.
7. Elevate Decor with High-Sheen Threads on Velvet

To make an embroidered cushion feel truly luxurious, choose your materials with intention.
Stitching on a rich fabric like velvet instantly adds depth, as the pile of the fabric interacts with the light.
Use a rayon or silk floss instead of cotton for the Prayer Plant leaves; these threads have a high sheen that mimics the gloss of machine embroidery.
The combination of a plush surface and lustrous thread creates a dynamic, high-contrast piece that feels opulent and professionally finished.
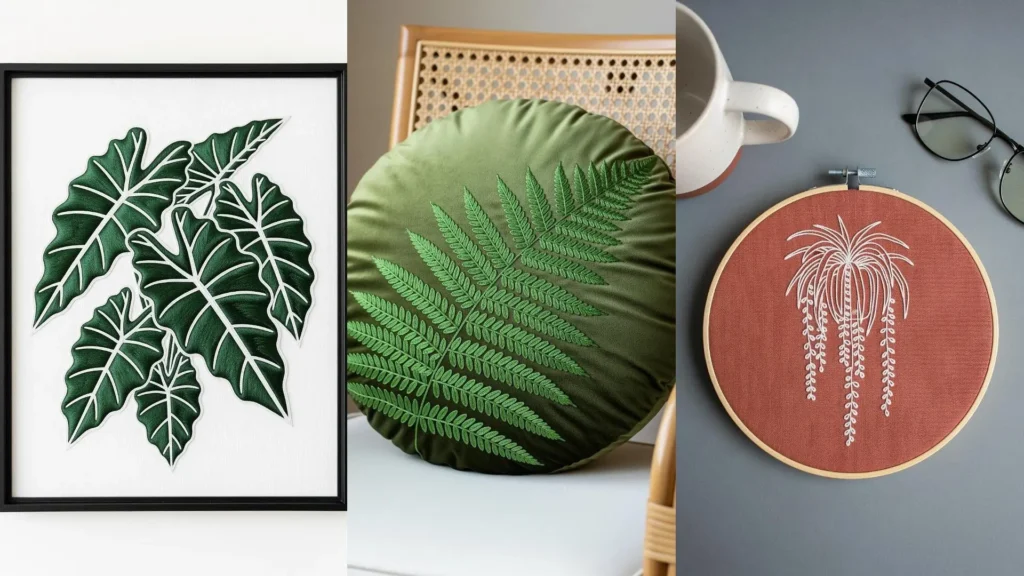
8. Embrace Simplicity with Monochrome Line Art
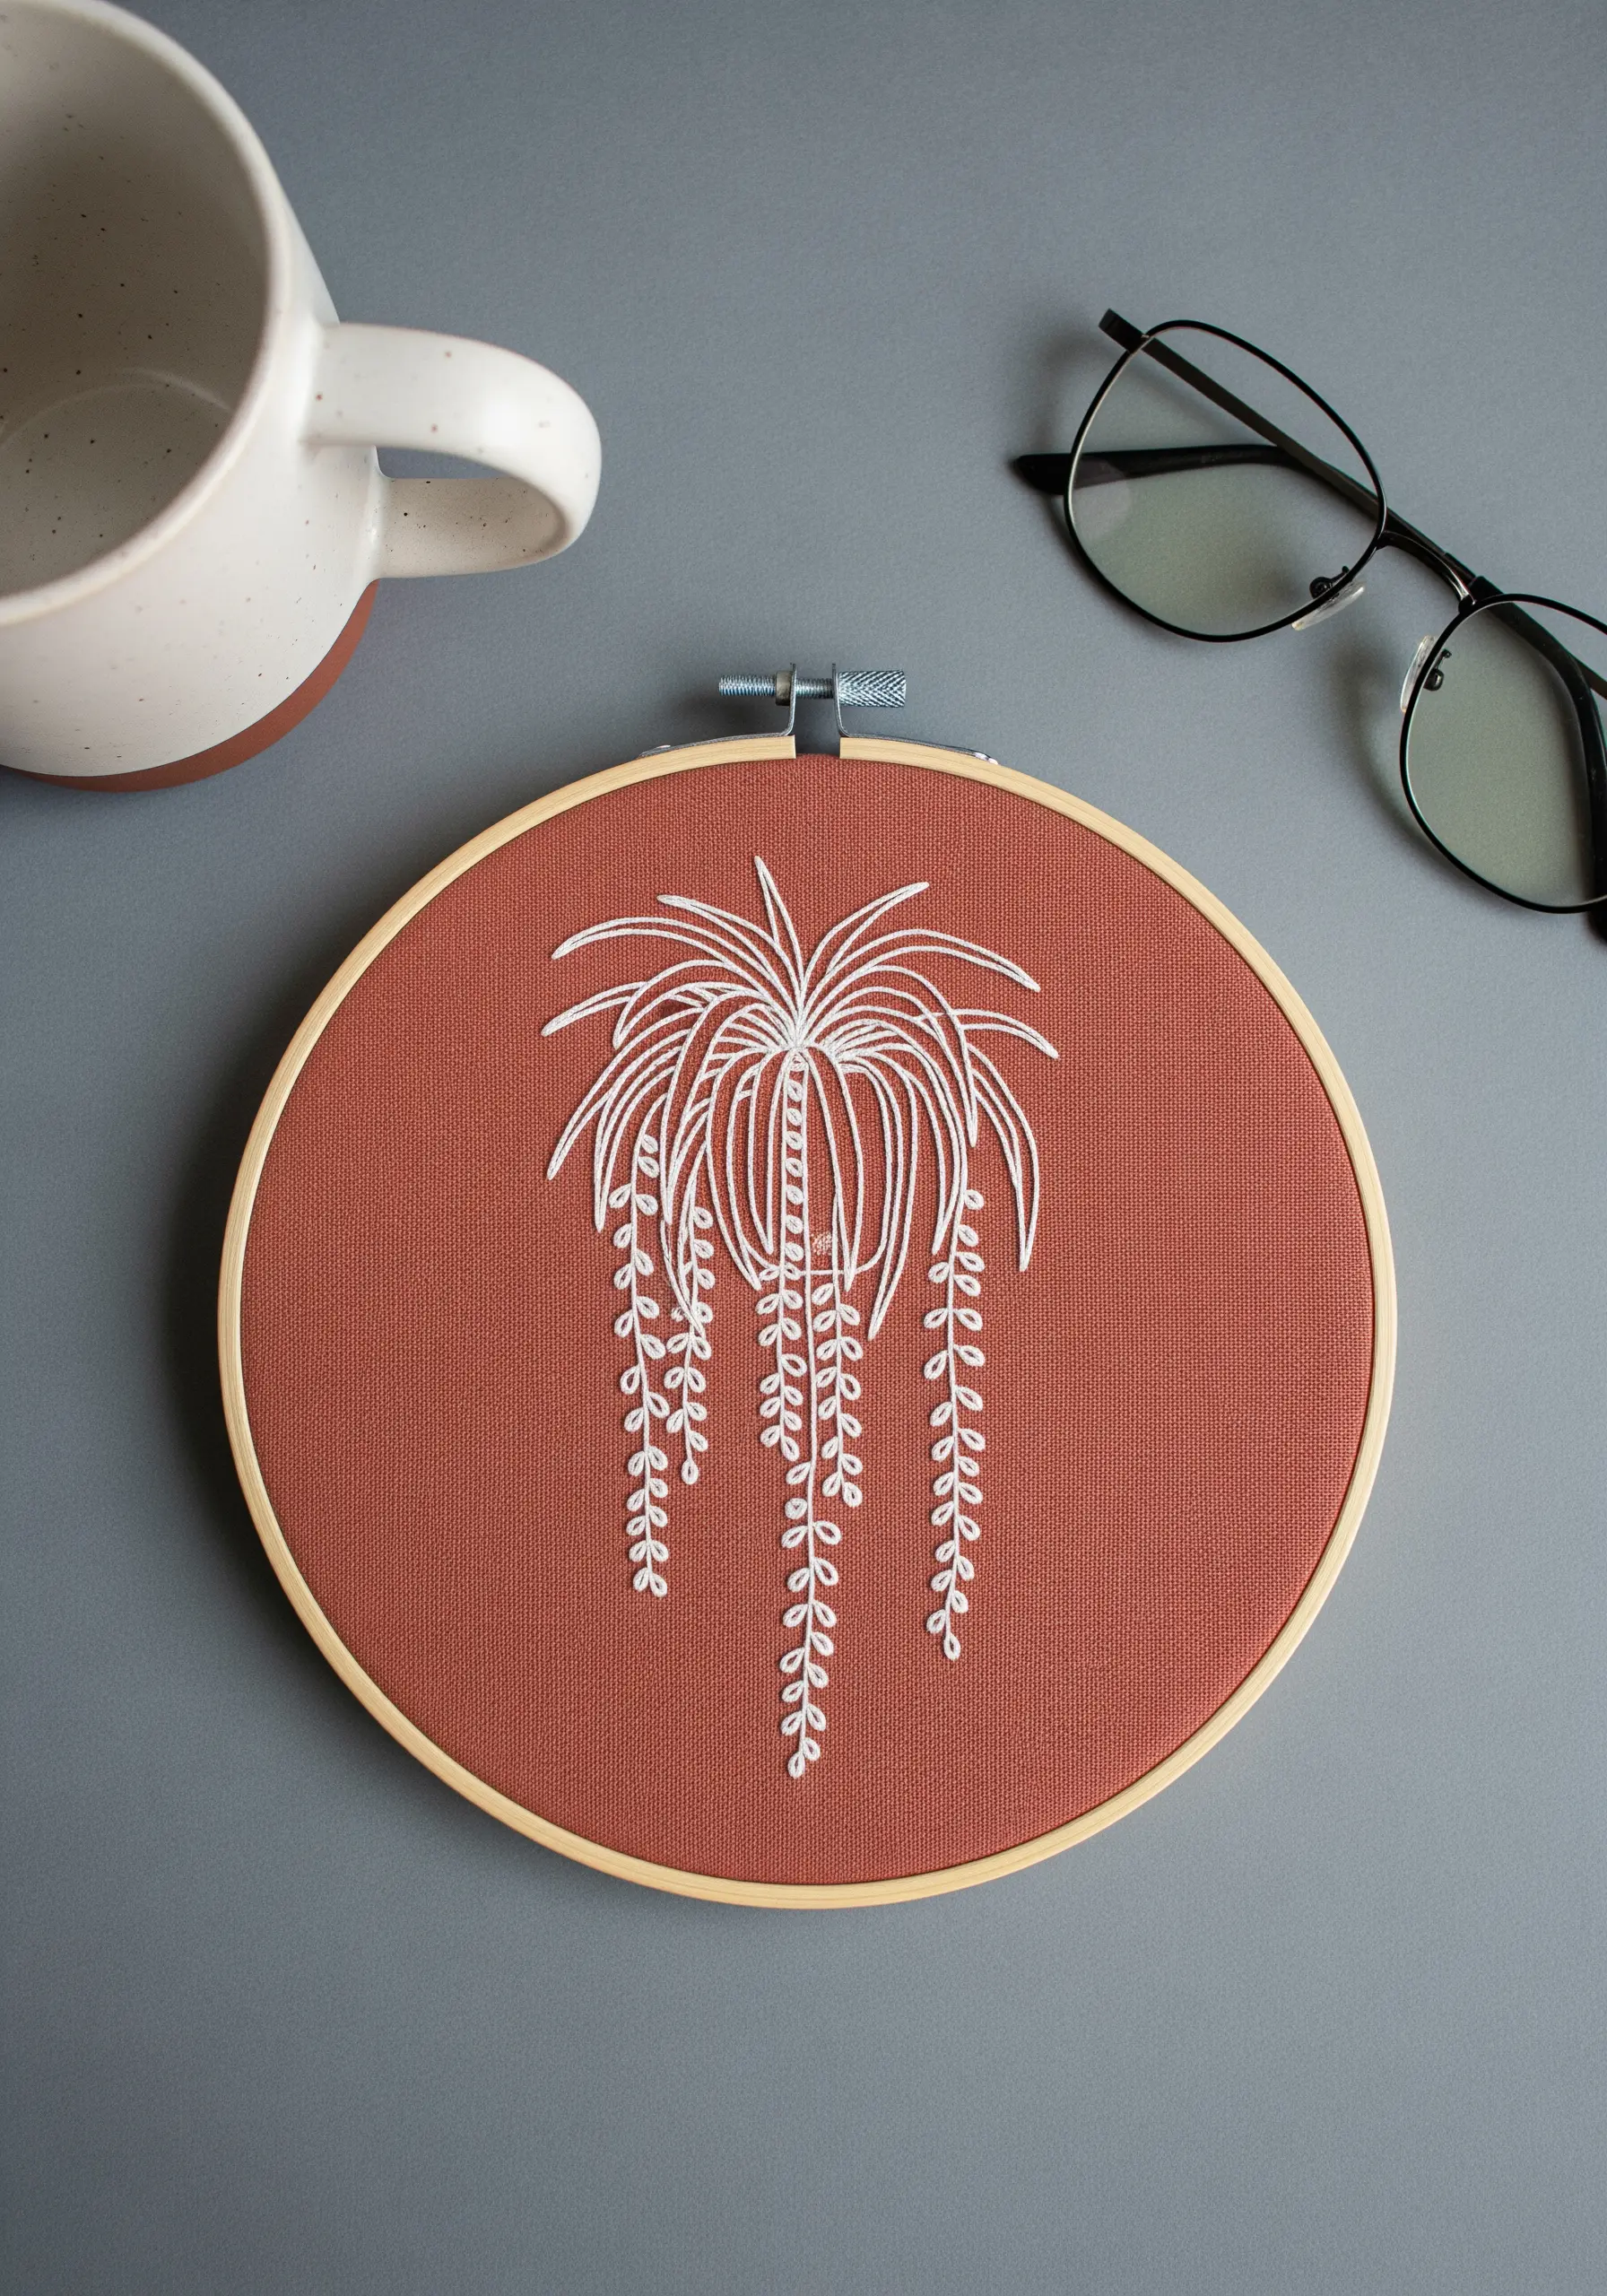
Sometimes, the most impactful design is the simplest. Let the fabric do the talking by choosing a rich, earthy color like terracotta or ochre.
Stitch your trailing plant using only white thread in a simple backstitch or stem stitch.
This high-contrast, monochrome approach turns the plant into a modern, graphic icon.
It emphasizes the form and movement of the plant’s silhouette, creating a piece of minimalist stitched art that feels both calm and confident.
9. Curate a Collection with Varied Textures
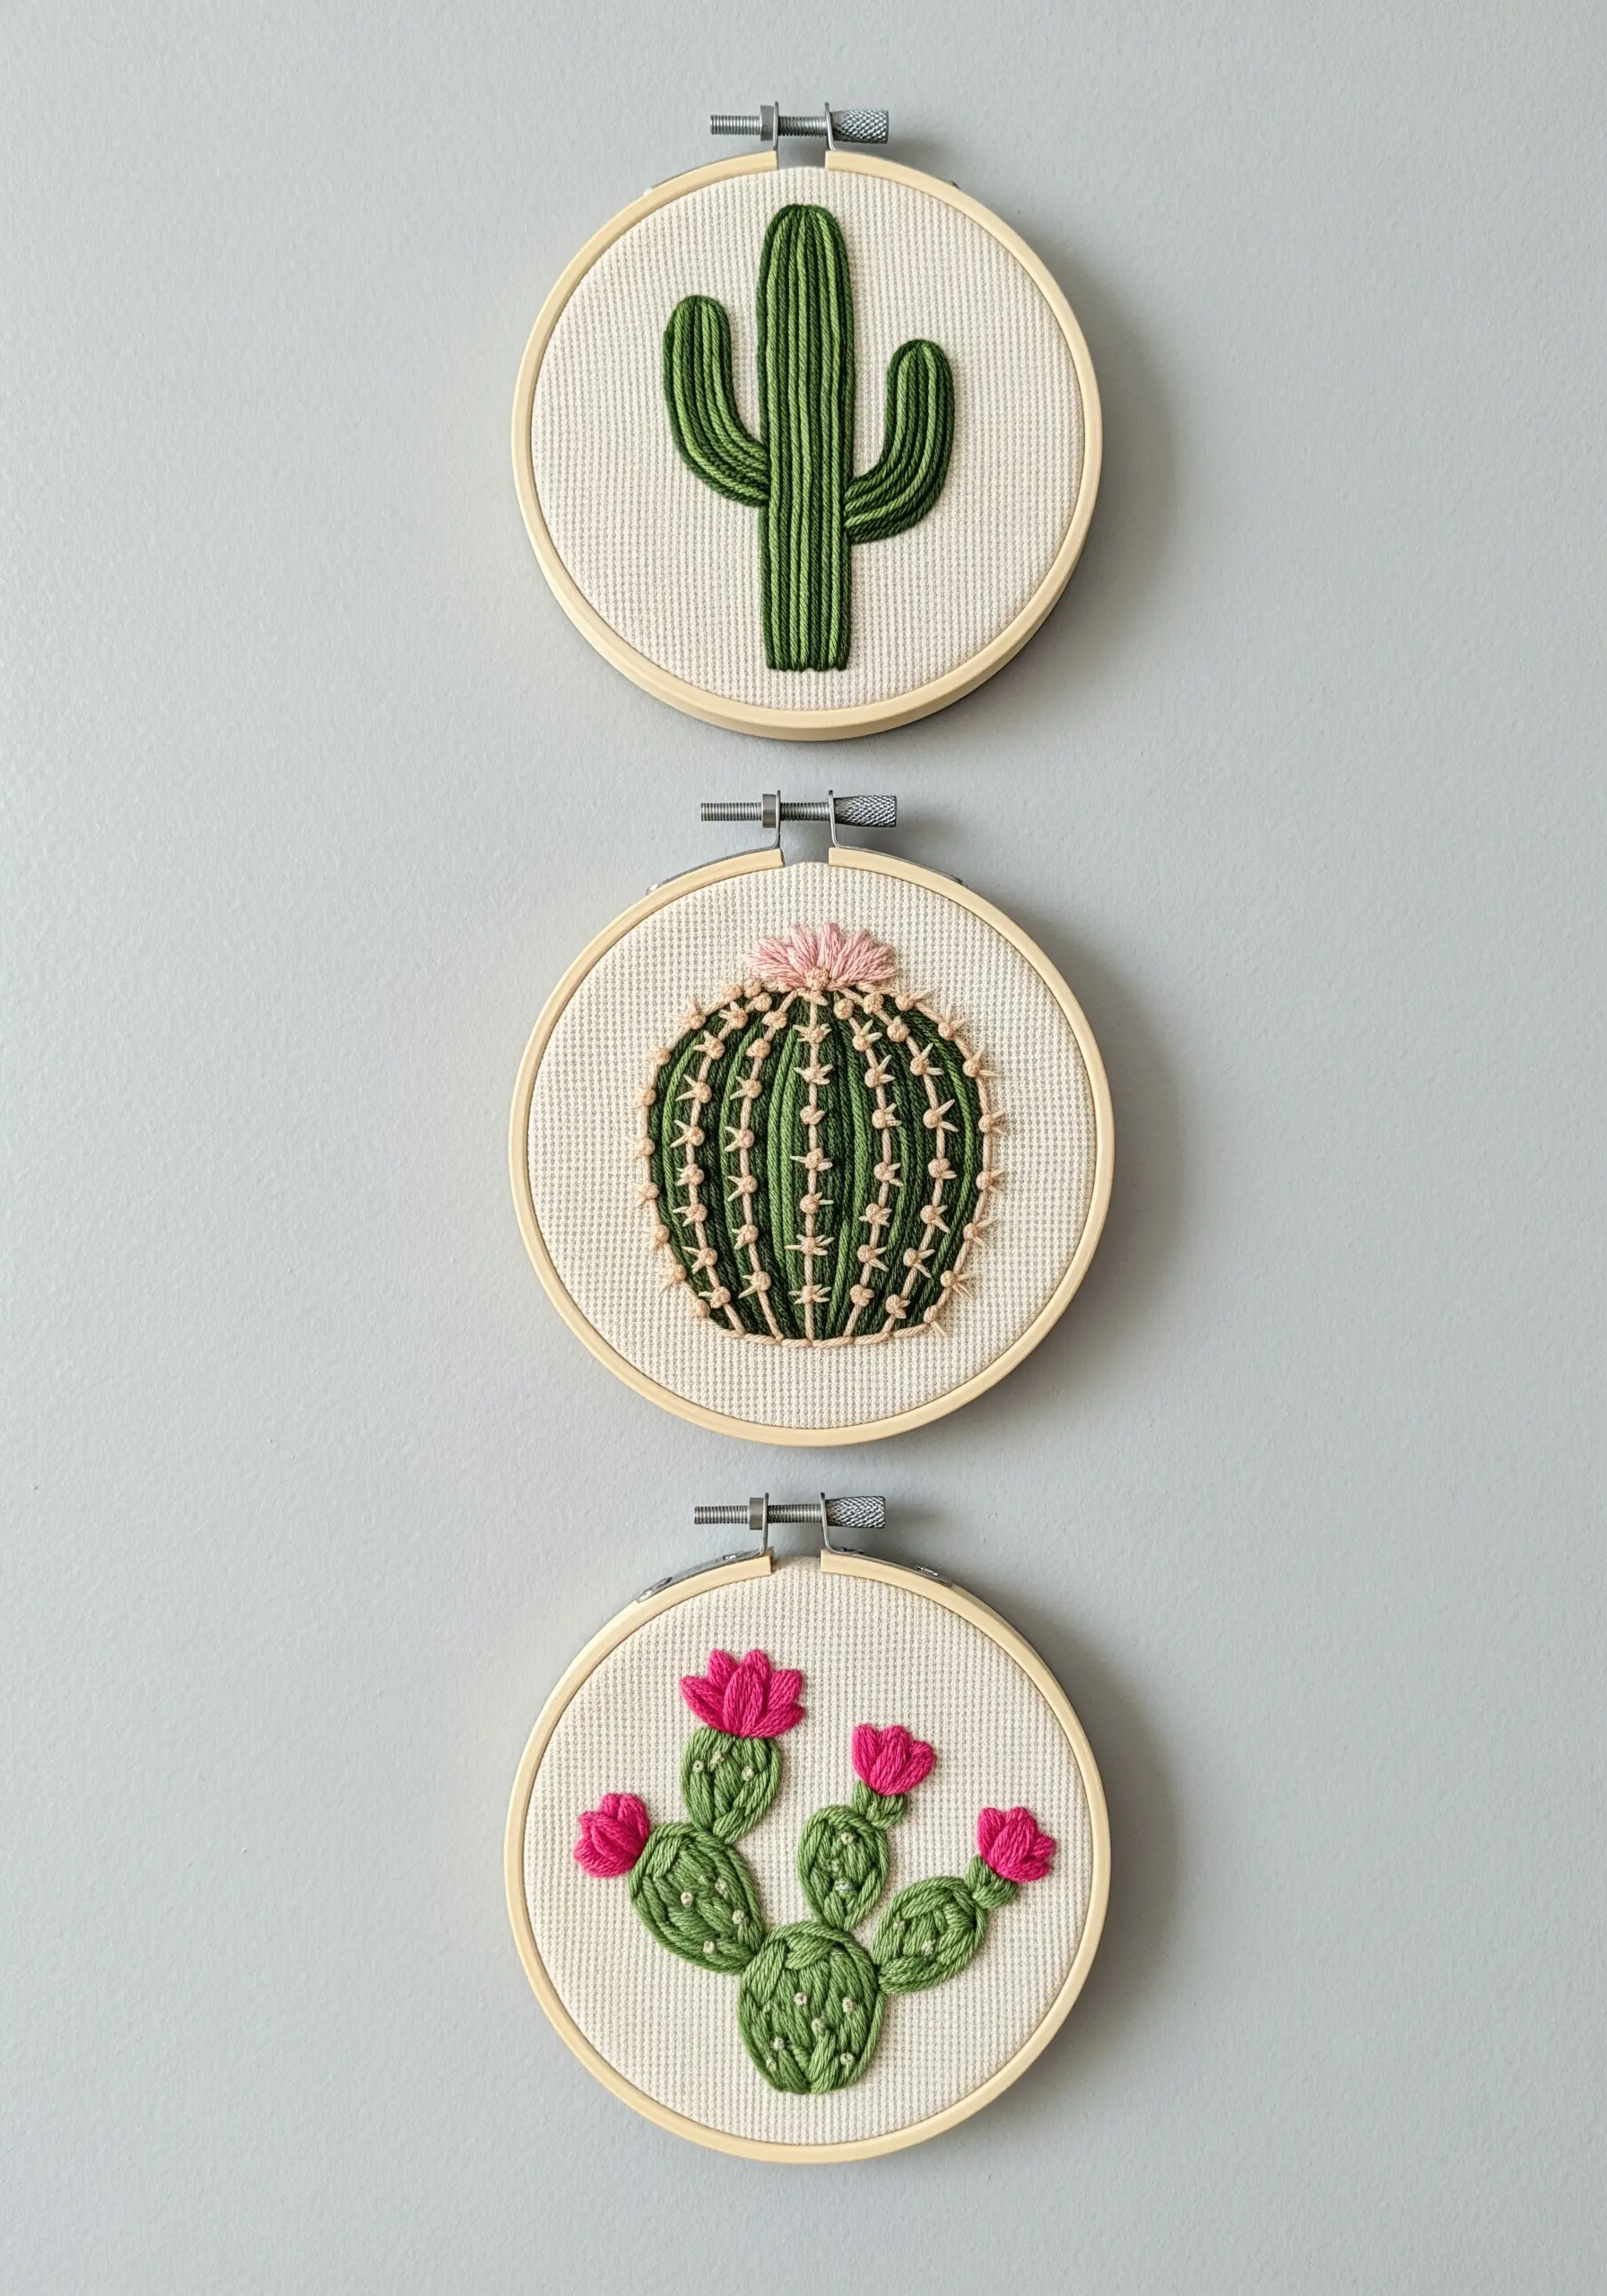
When creating a set of small hoops, think like a curator by assigning a unique texture to each cactus.
For the tall saguaro, use vertical satin stitches to emphasize its height. For the round barrel cactus, use detached chain stitches arranged in rows to suggest its spiky ribs.
Create the prickly pear pads with a seed stitch fill, and use woven wheel stitches for vibrant, dimensional flowers.
Displaying them together transforms simple motifs into a cohesive, tactile story.
10. Capture Variegation with Irregular Color Blocking
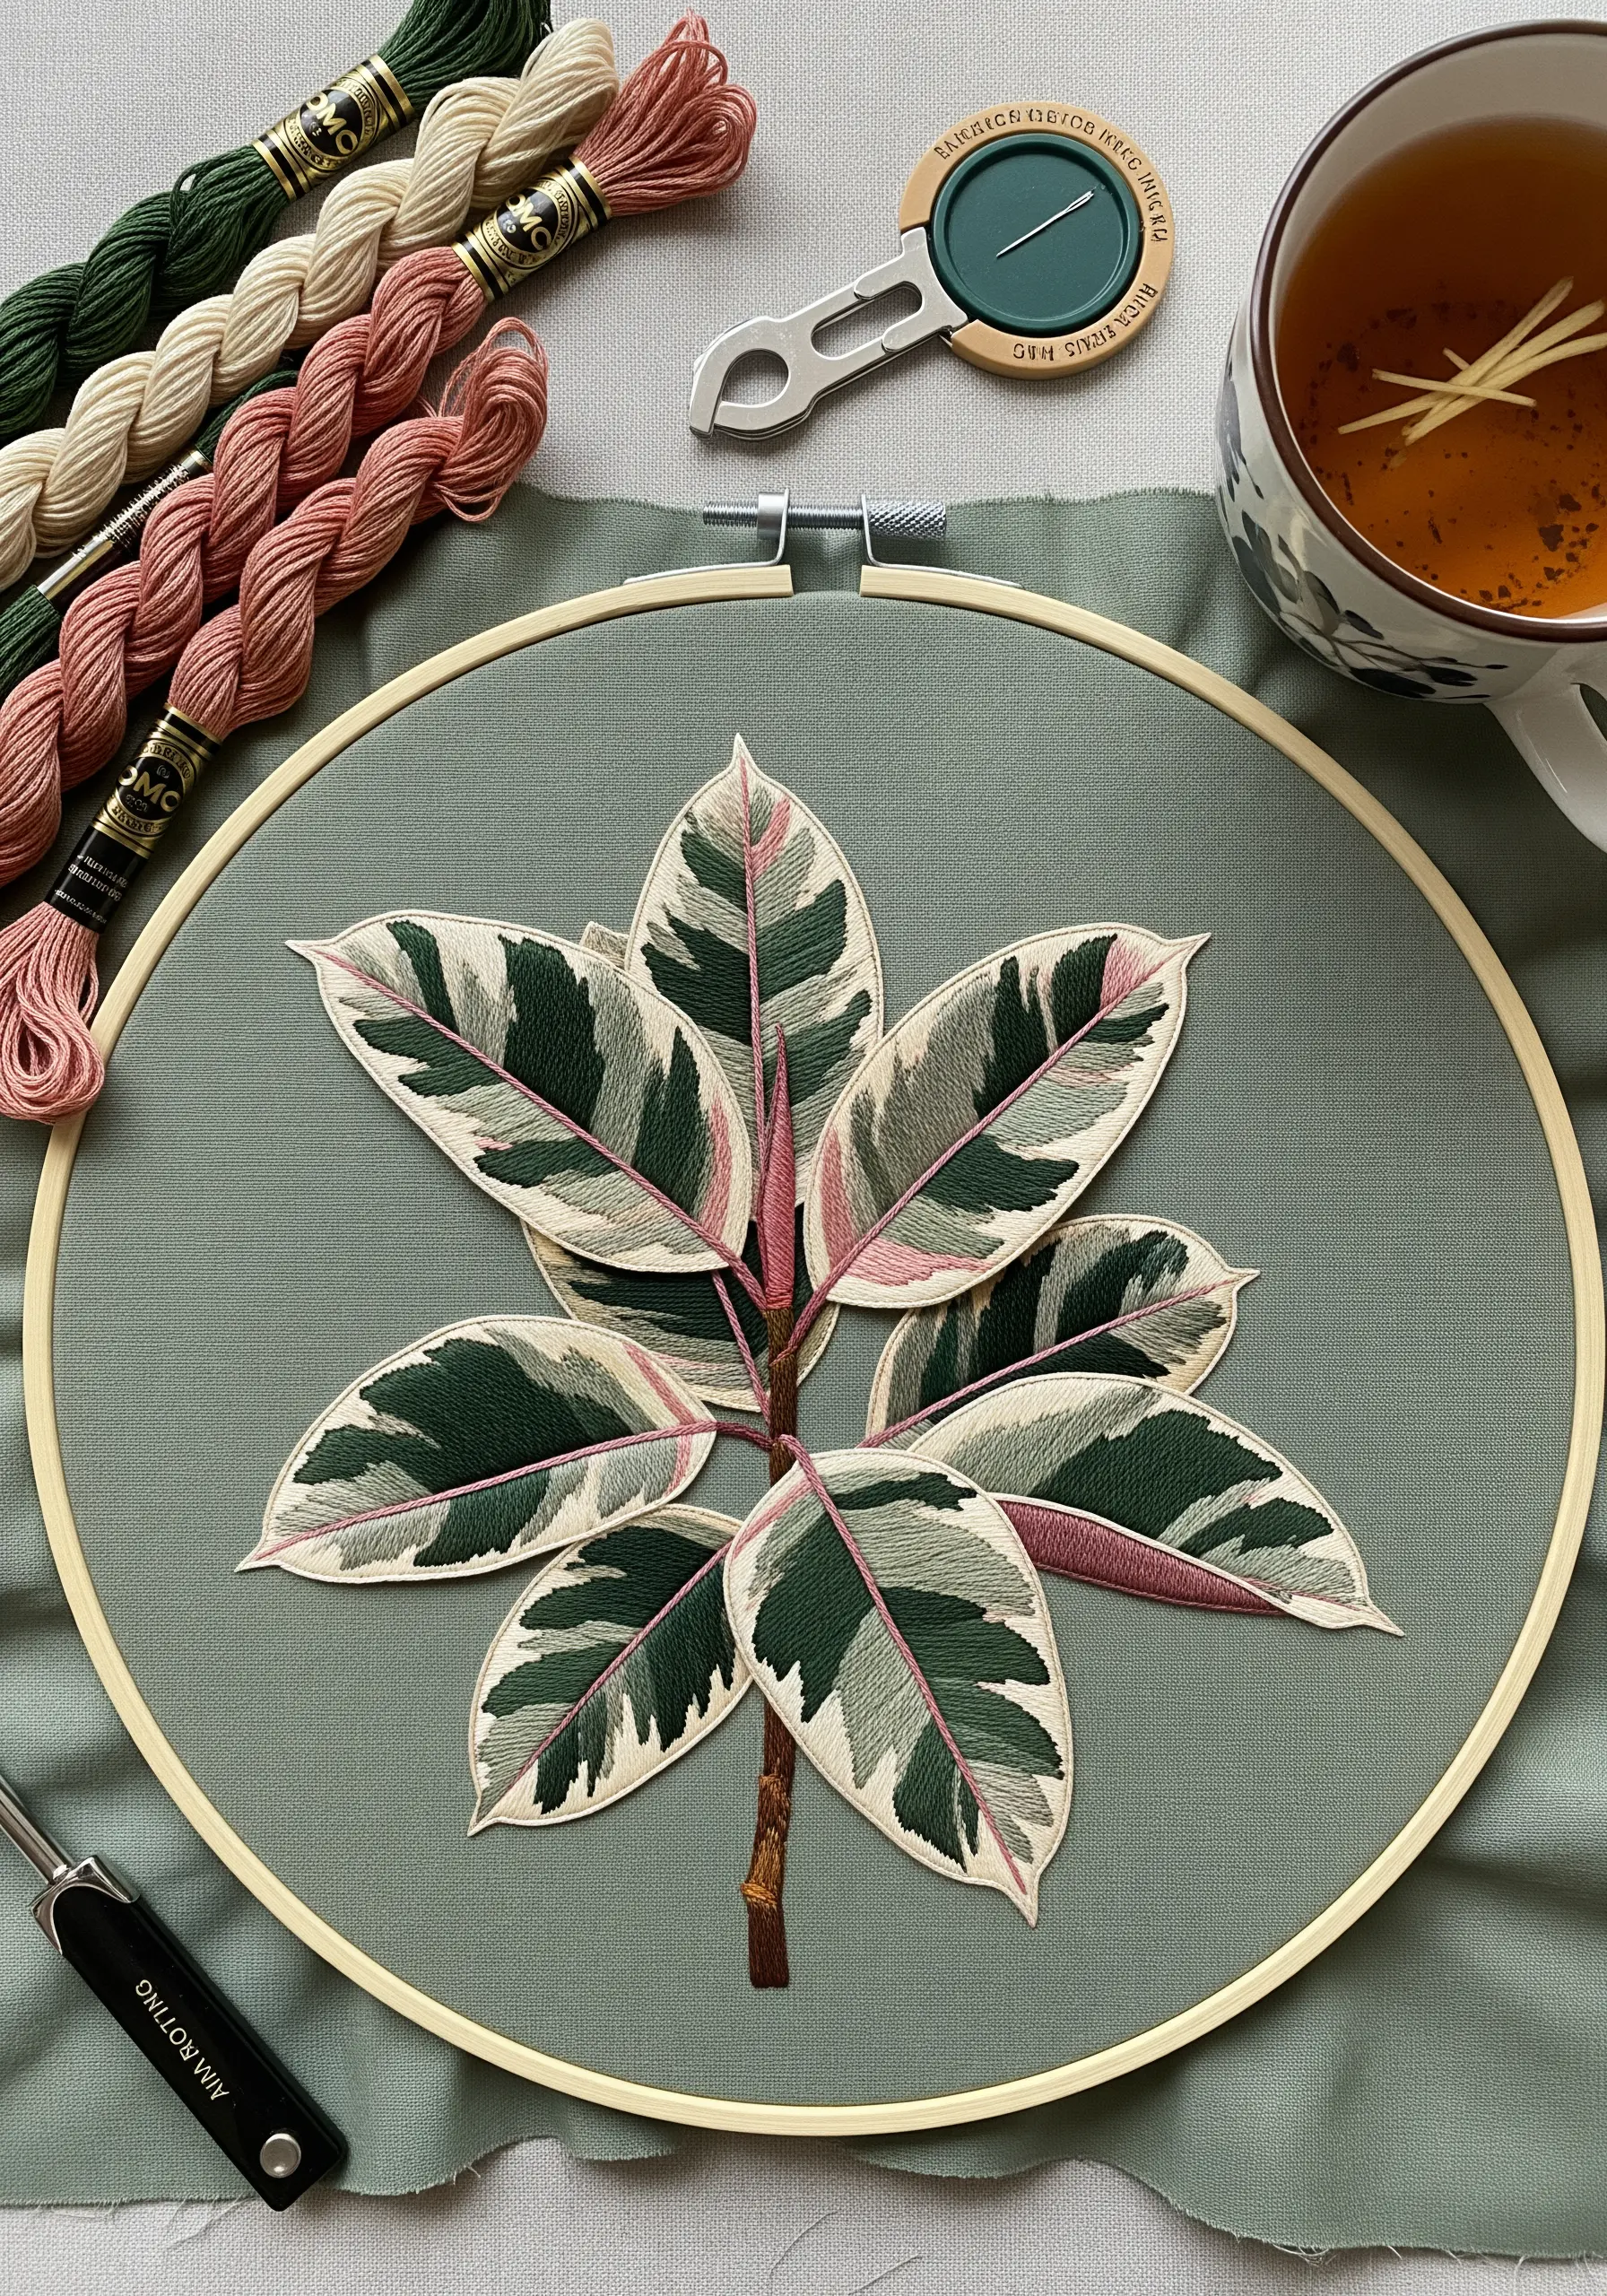
The beauty of a variegated rubber plant is its unpredictable pattern. Recreate this by abandoning perfect symmetry.
Lightly sketch irregular patches of color on your fabric before you begin.
Use a single strand of thread and the long-and-short stitch to fill each section with pink, cream, and green, allowing the edges of the colors to blend softly.
A crisp split-stitch outline in a neutral color will contain the complex interior, making the variegation the star of the show.
11. Achieve Subtle Elegance with Tone-on-Tone Stitching
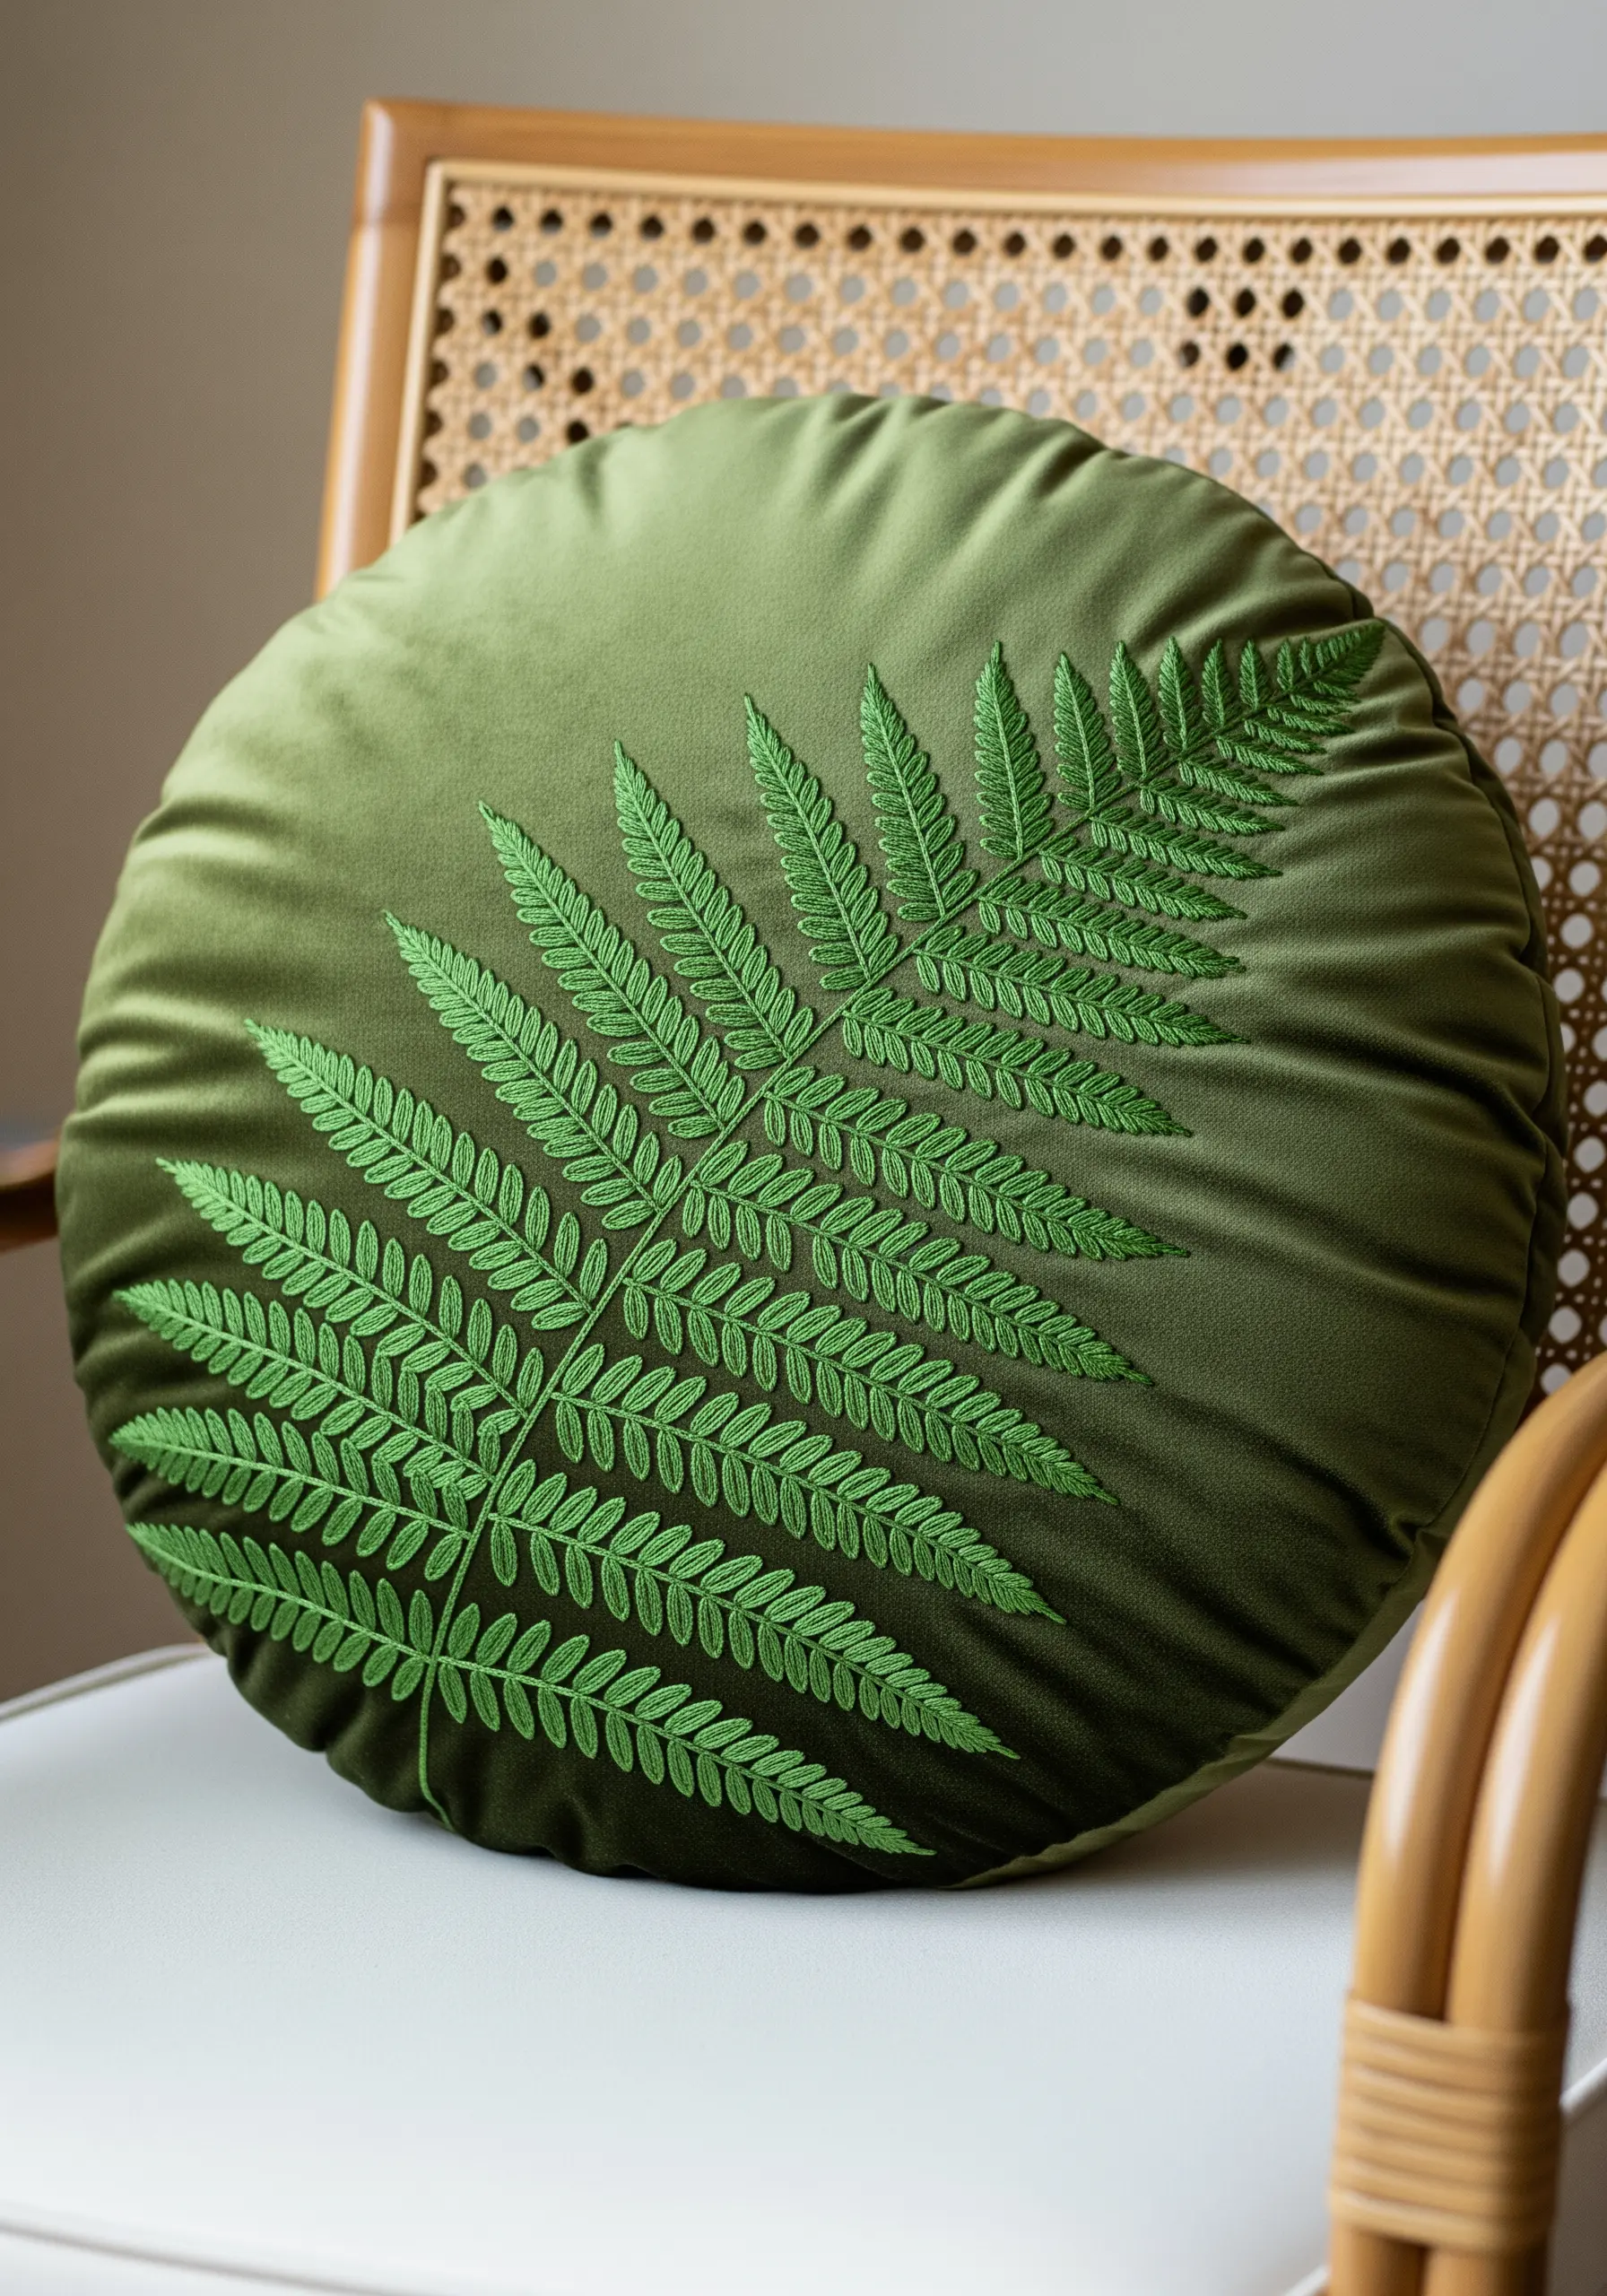
For a sophisticated take on botanical decor, embroider a design using thread that is only a few shades different from your fabric.
On this olive velvet cushion, a slightly brighter green makes the fern motif whisper rather than shout.
Use a fishbone stitch for the individual fern leaves; this single stitch creates the central stem and angled leaf in one fluid motion.
This tone-on-tone technique creates a textured, embossed effect that looks incredibly high-end and integrates seamlessly into your decor.
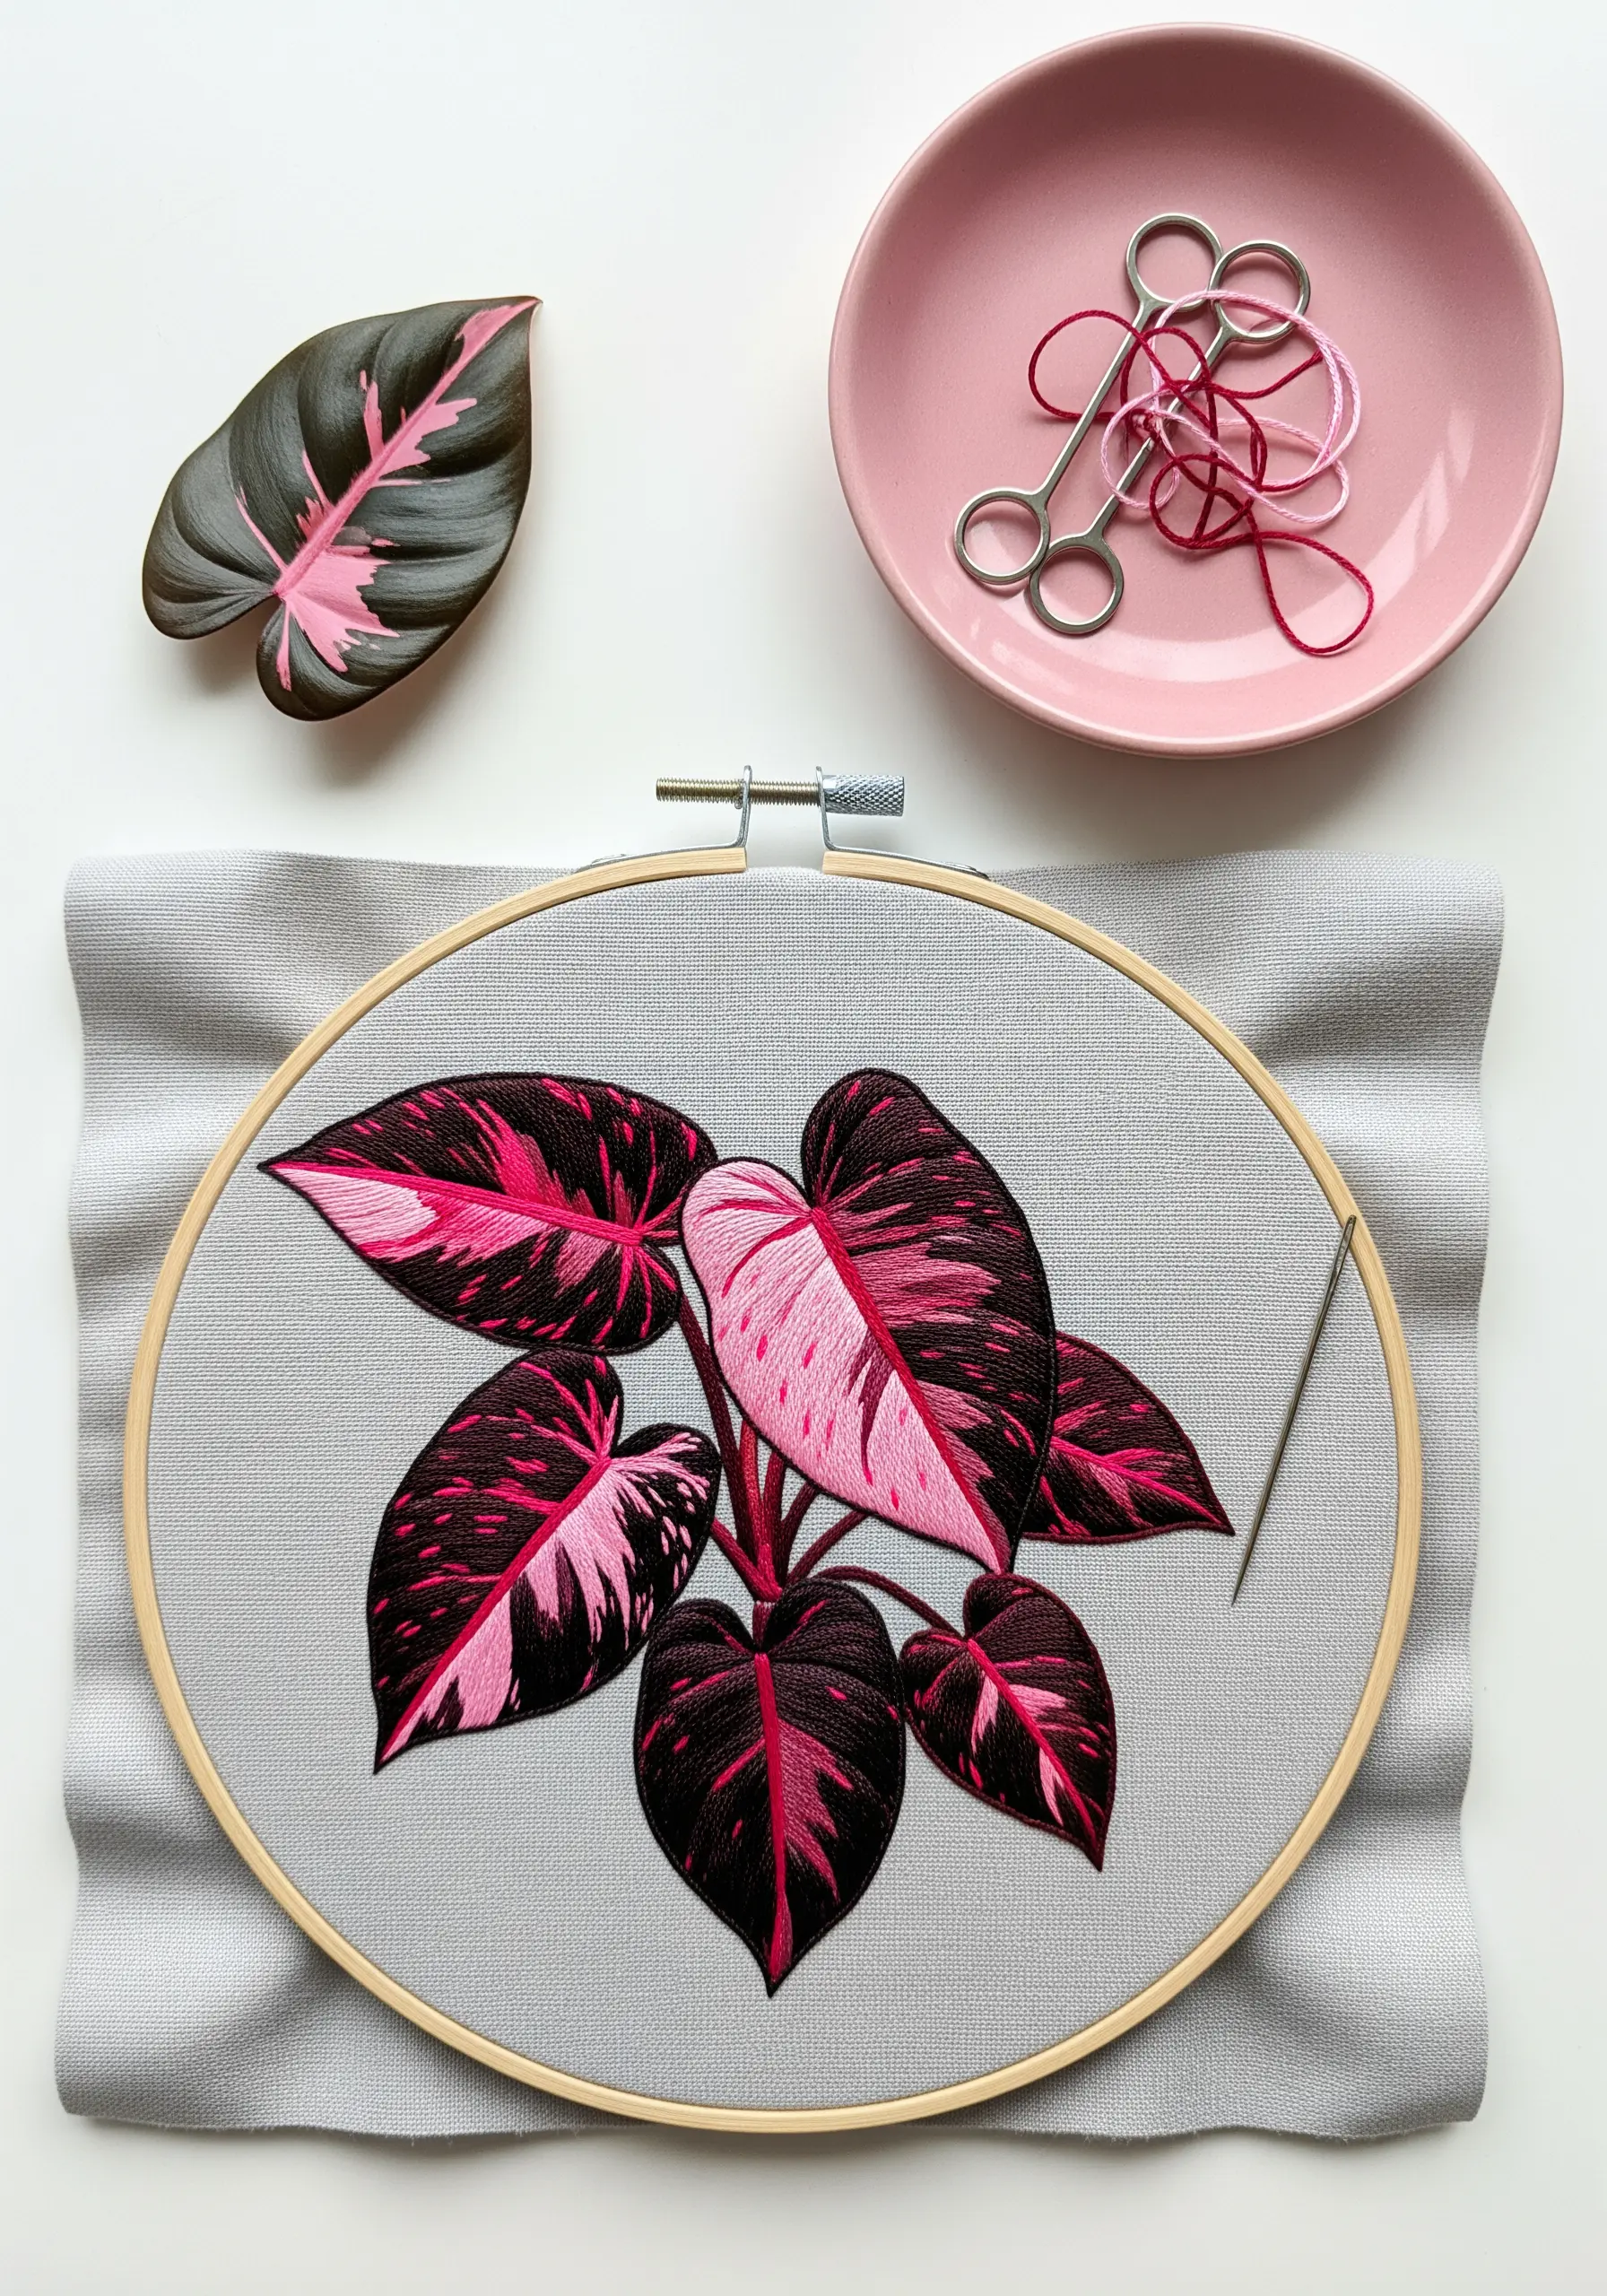
12. Define Form with Contrasting Veins and Outlines
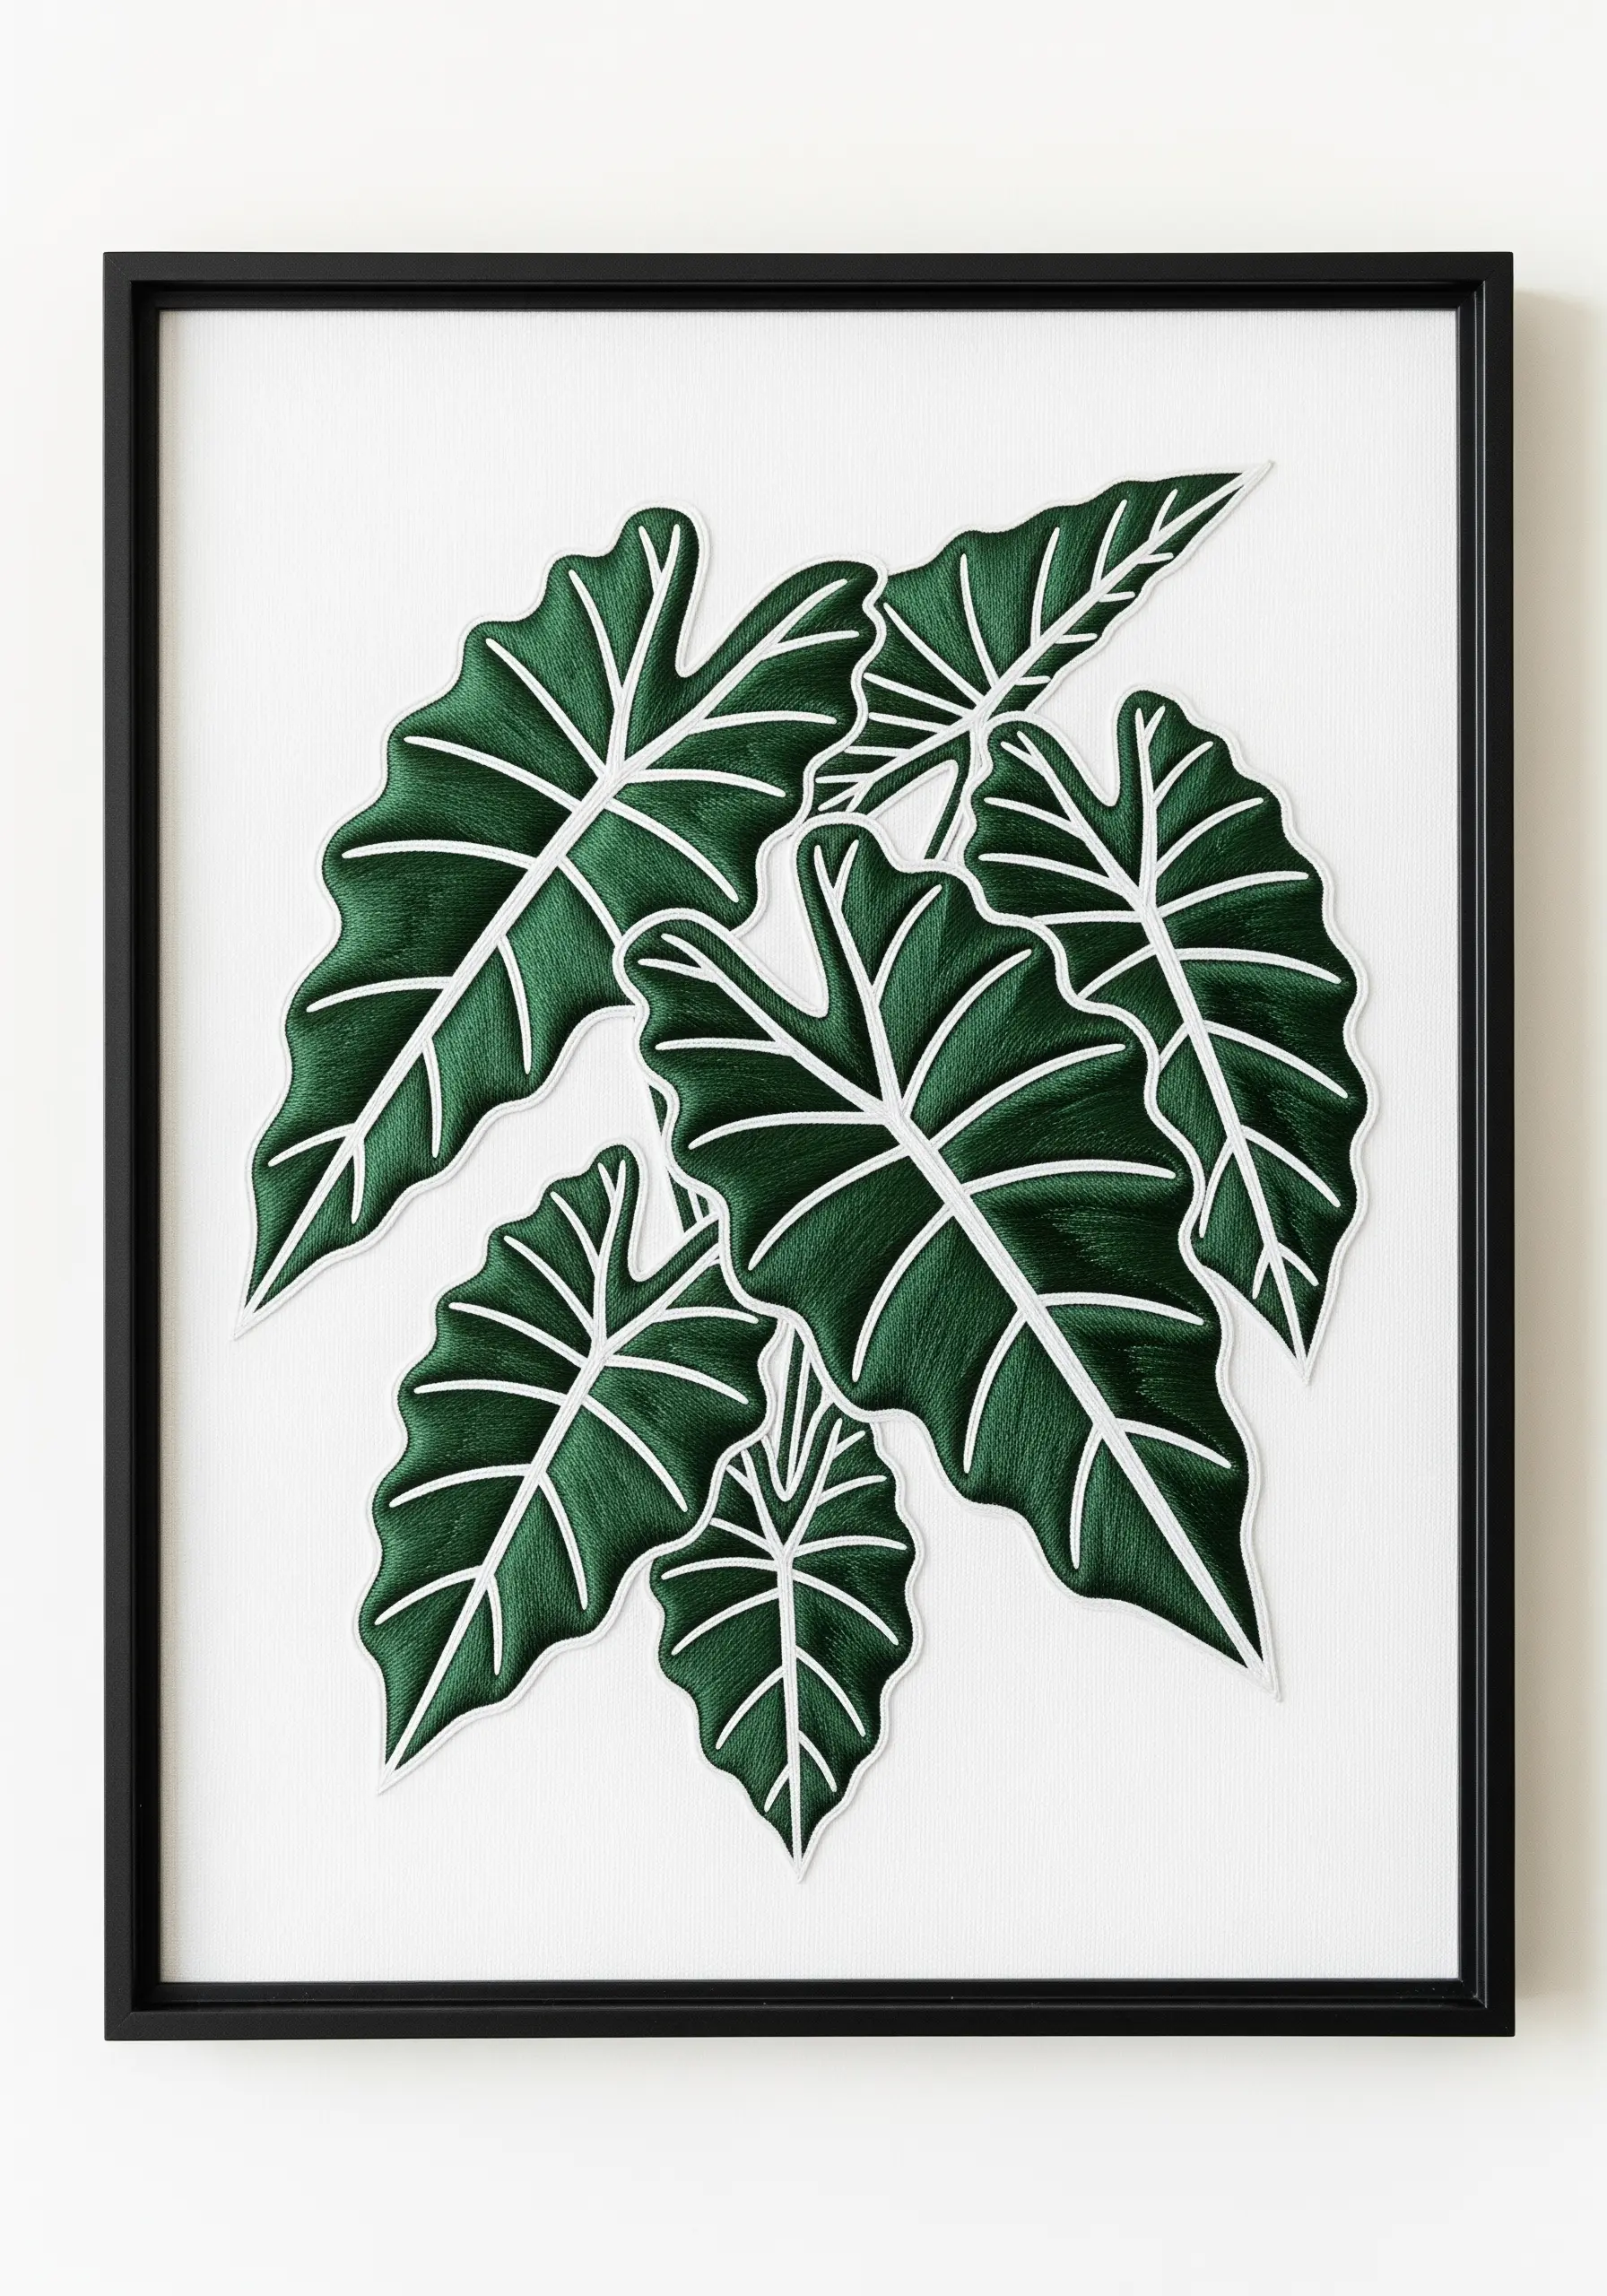
Make the dramatic leaves of an Alocasia plant the focal point by emphasizing their structure.
Fill the body of the leaves with a deep green satin stitch, ensuring all your stitches lie in the same direction for a smooth, cohesive sheen.
Then, come back with a contrasting white or silver thread and use a stem stitch to lay the veins and outline directly on top of the fill.
This method creates sharp, graphic lines that define the shape and make the entire composition feel bold and clean.
13. Introduce Luster and Volume with Silk Ribbon
To create a leaf that has a unique sheen and puffy texture, swap your embroidery floss for silk ribbon.
Use a wide-eyed chenille needle and simple straight stitches, allowing the ribbon to twist slightly as you pull it through the fabric to create dimension.
For the central vein, you can couch a piece of ribbon down with a matching color of regular floss.
The way silk ribbon catches the light provides a luxurious, almost wet-look finish that cotton thread can’t replicate.
14. Create Natural Movement on Functional Linens
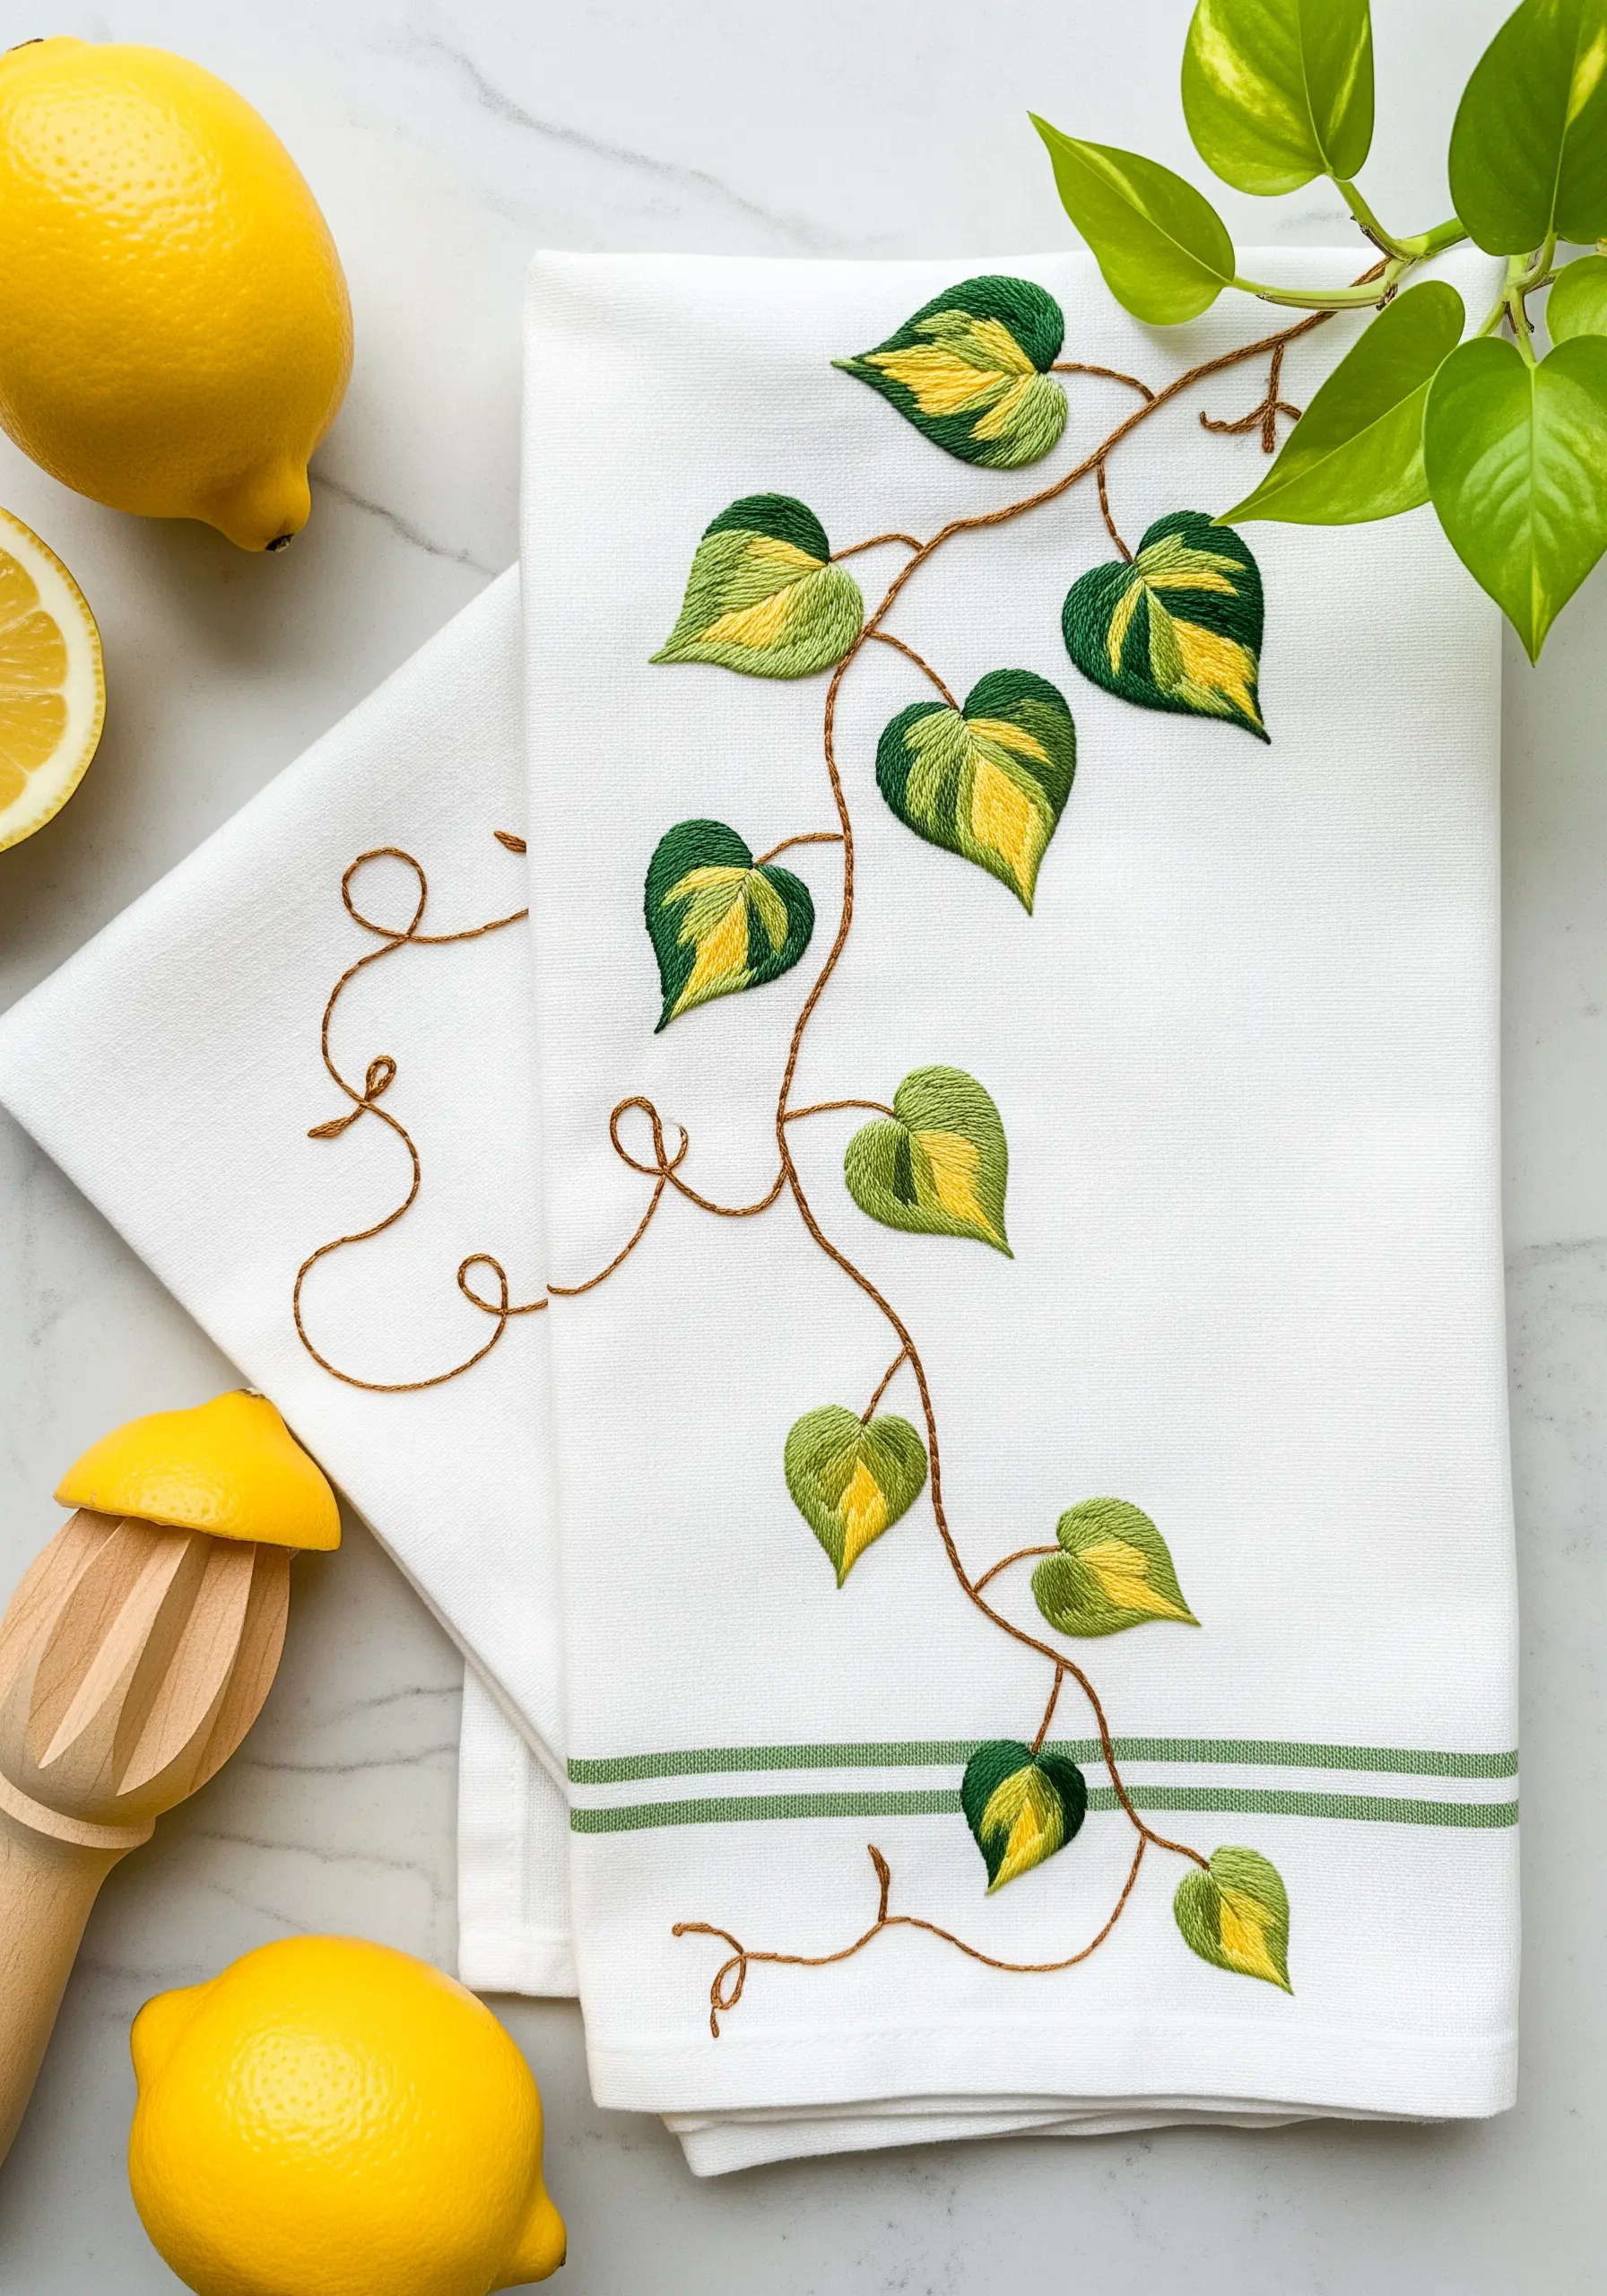
When embroidering on items like tea towels, design with movement in mind. A trailing Pothos vine is perfect for this.
Use a gentle, curving stem stitch for the main vine to give it a natural, flowing line.
For the variegated leaves, use a split satin stitch. Work the yellow and green sections separately but allow their edges to meet imperfectly, just as they do in nature.
Let the vine wander organically across the fabric, even leaving a few playful, unfinished tendrils at the end.
15. Blend Stitching and Fabric with Appliqué
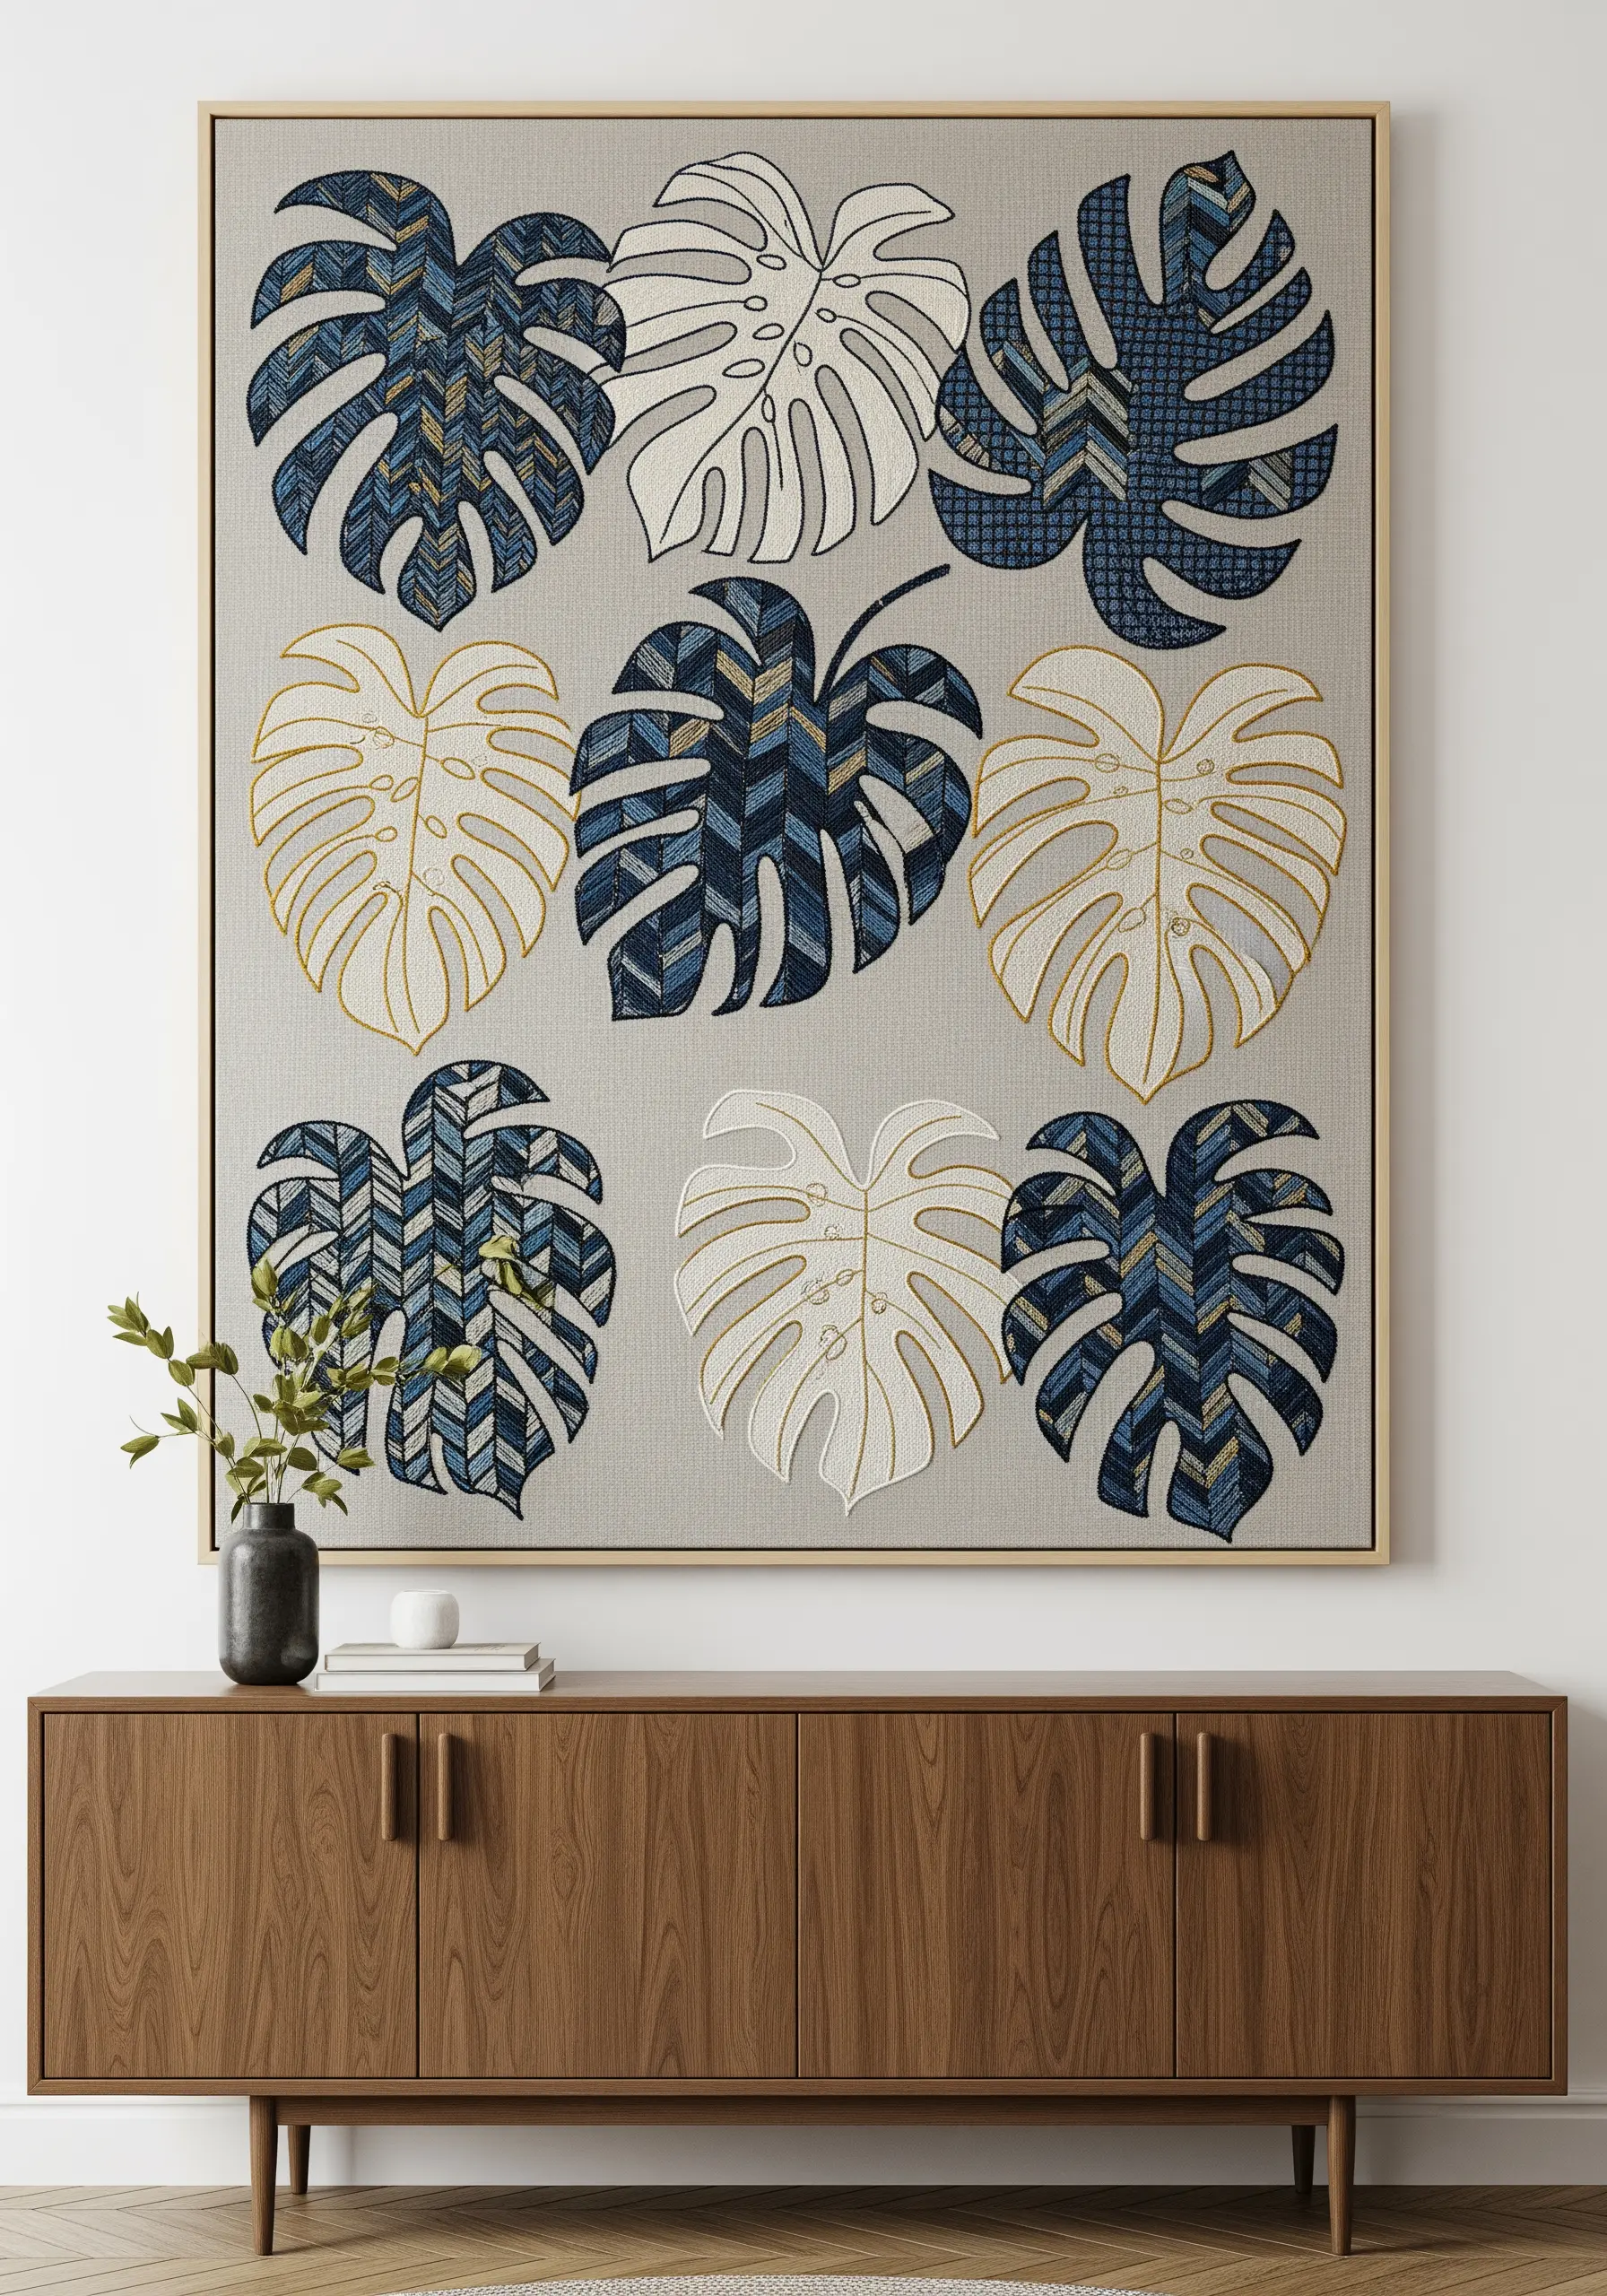
Create a large-scale piece of wall art by combining embroidery with fabric appliqué for a modern, quilt-like effect.
Cut your Monstera leaf shapes from various patterned fabrics, attach them to your base cloth, and then embroider the details.
Use a chain stitch or a thick backstitch in a contrasting color like gold or white to outline each leaf and add the veins.
This mixed-media approach allows you to introduce complex patterns and textures quickly, reserving your stitching for the defining details.
16. Tell a Story in Miniature with Tiny Stitches
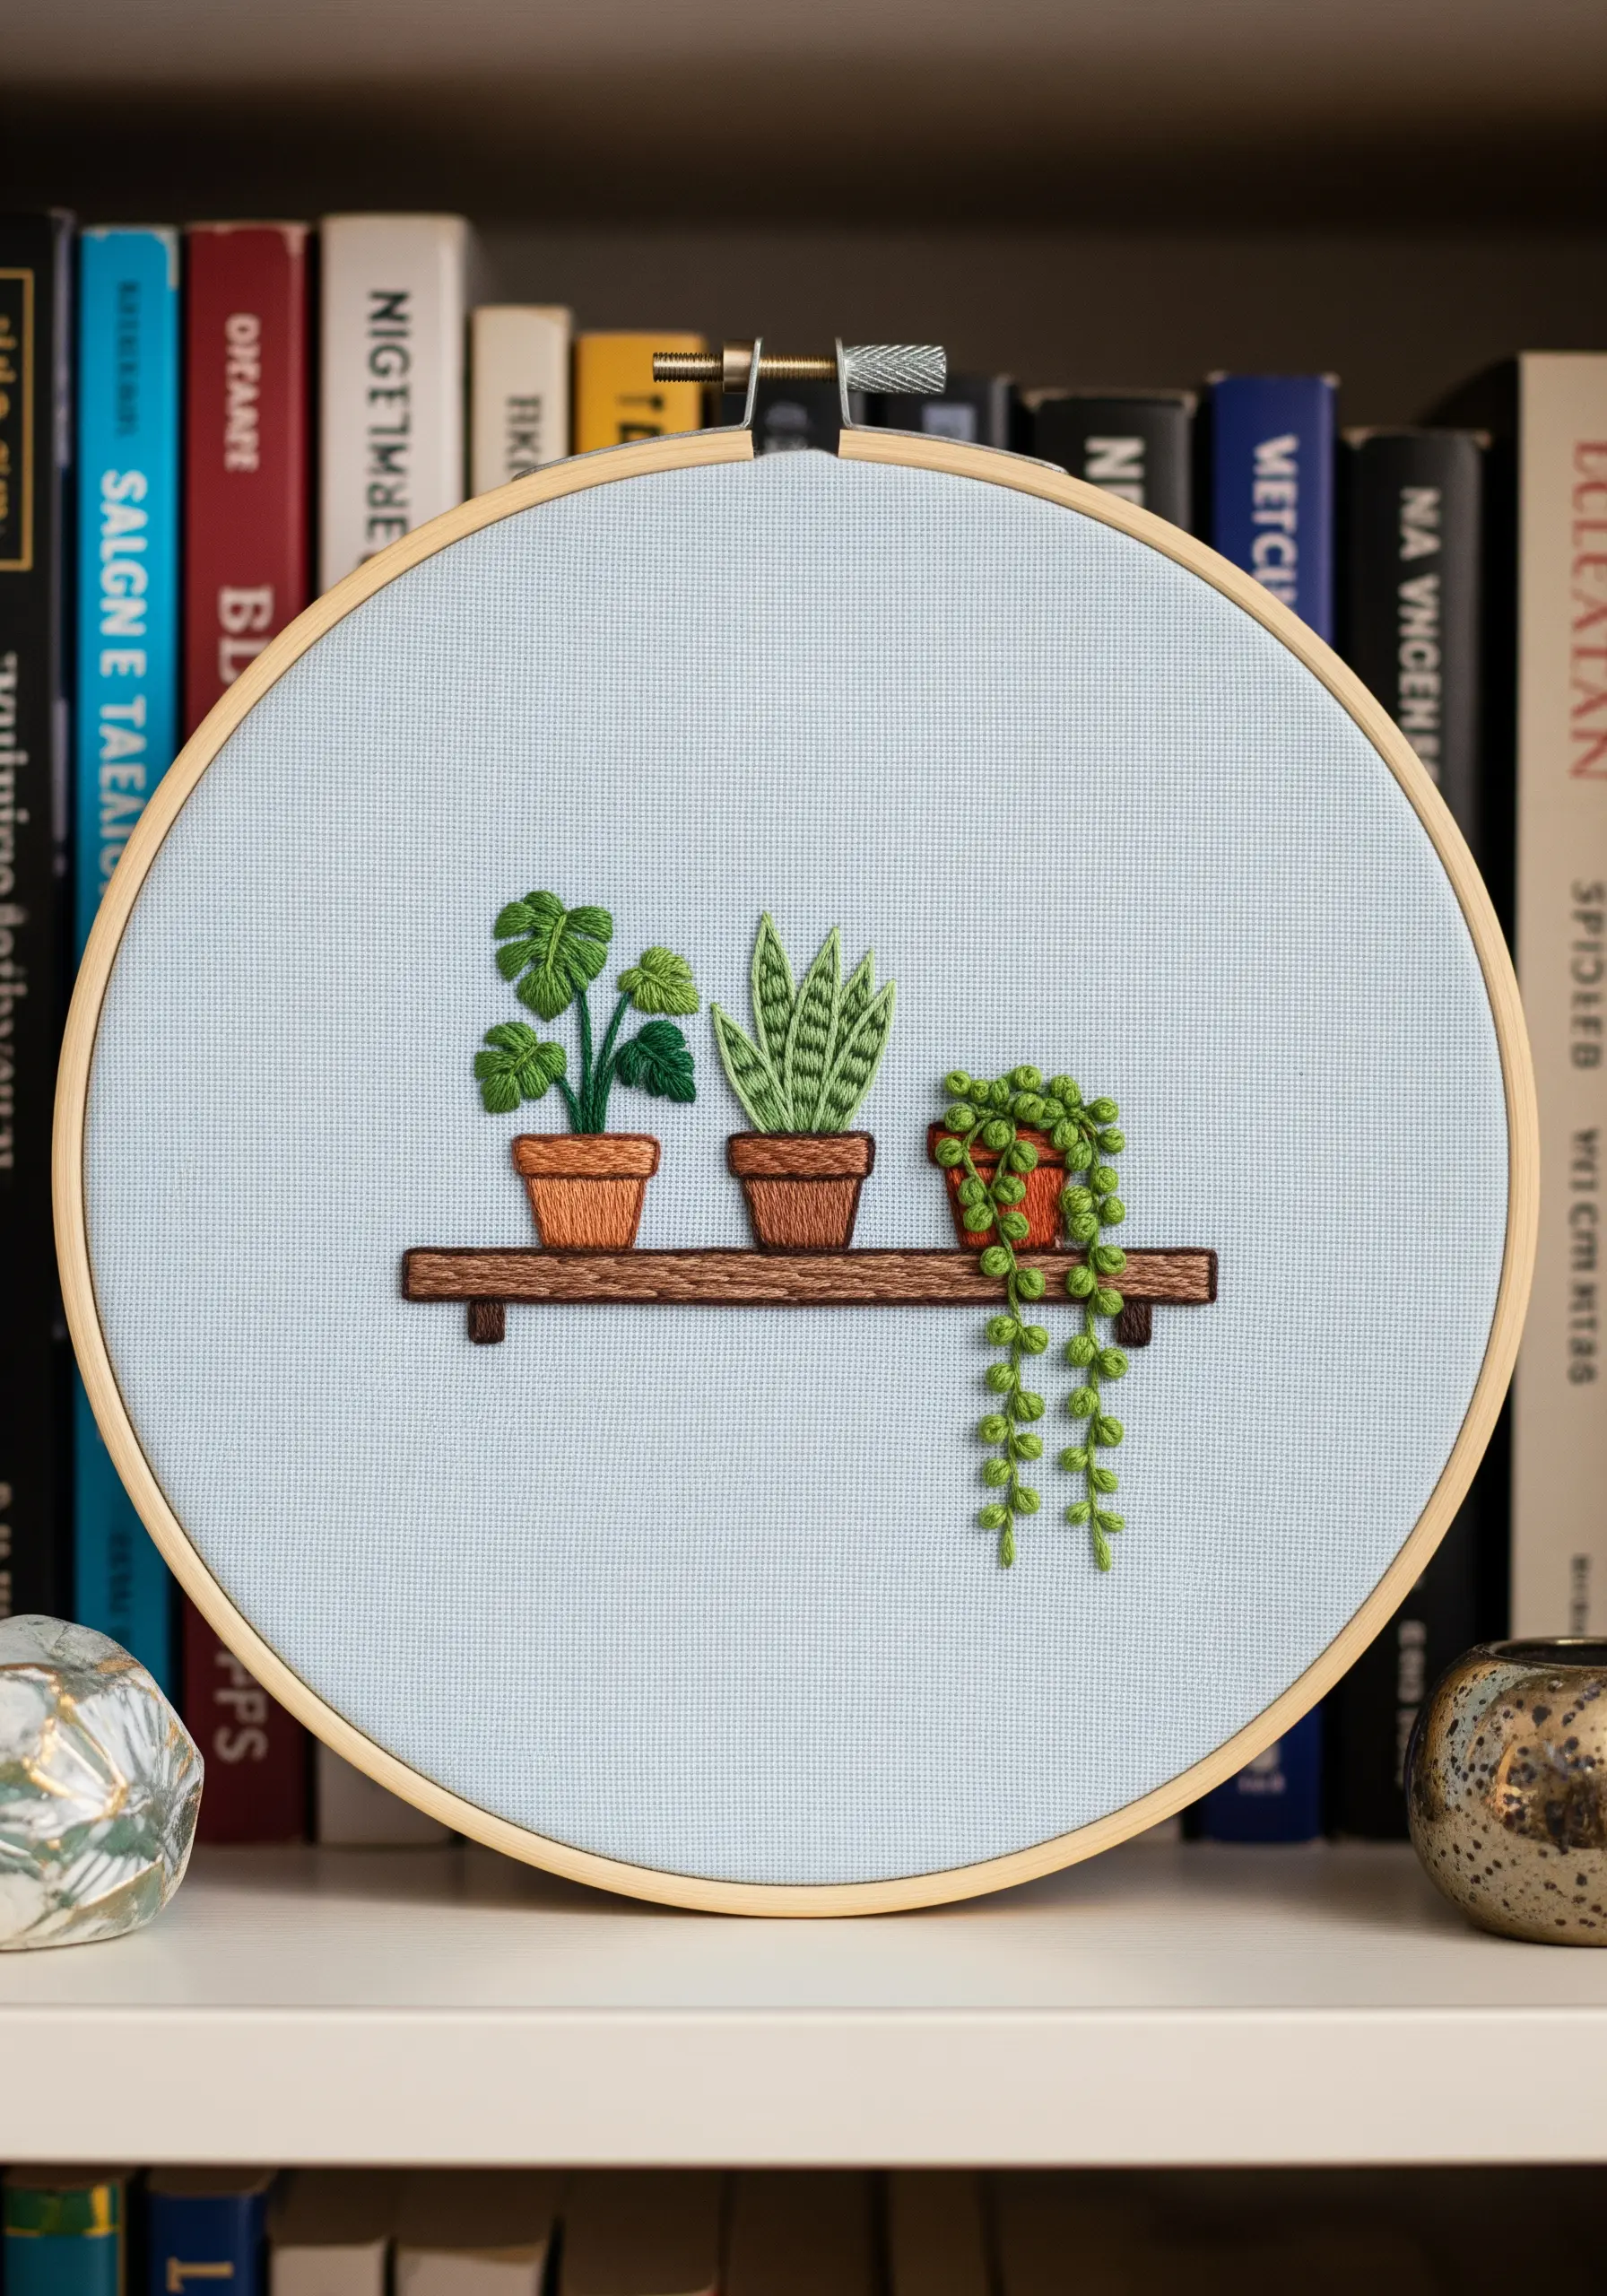
For a detailed miniature scene, precision comes from using fewer strands of thread.
Use a single strand of floss for the finest details, like the stripes on the snake plant or the texture of the terracotta pots.
A row of long stitches in two shades of brown creates a convincing wood grain effect for the shelf.
For the tiny String of Pearls, single French knots or seed stitches are all you need to suggest the plant’s form without adding bulk.
17. Make Bold Colors Pop with a Muted Background
To ensure the shocking pink of a Philodendron Pink Princess is the absolute star, stitch it on a neutral, cool-toned fabric like grey or slate blue.
Use long-and-short stitch to create the dramatic splashes of pink, filling these areas first to keep the color pure and vibrant.
Then, fill the remaining dark green and black areas around the pink. This technique prevents the darker threads from muddying your brights.
The understated background makes the high-contrast foliage feel even more electric and alive.
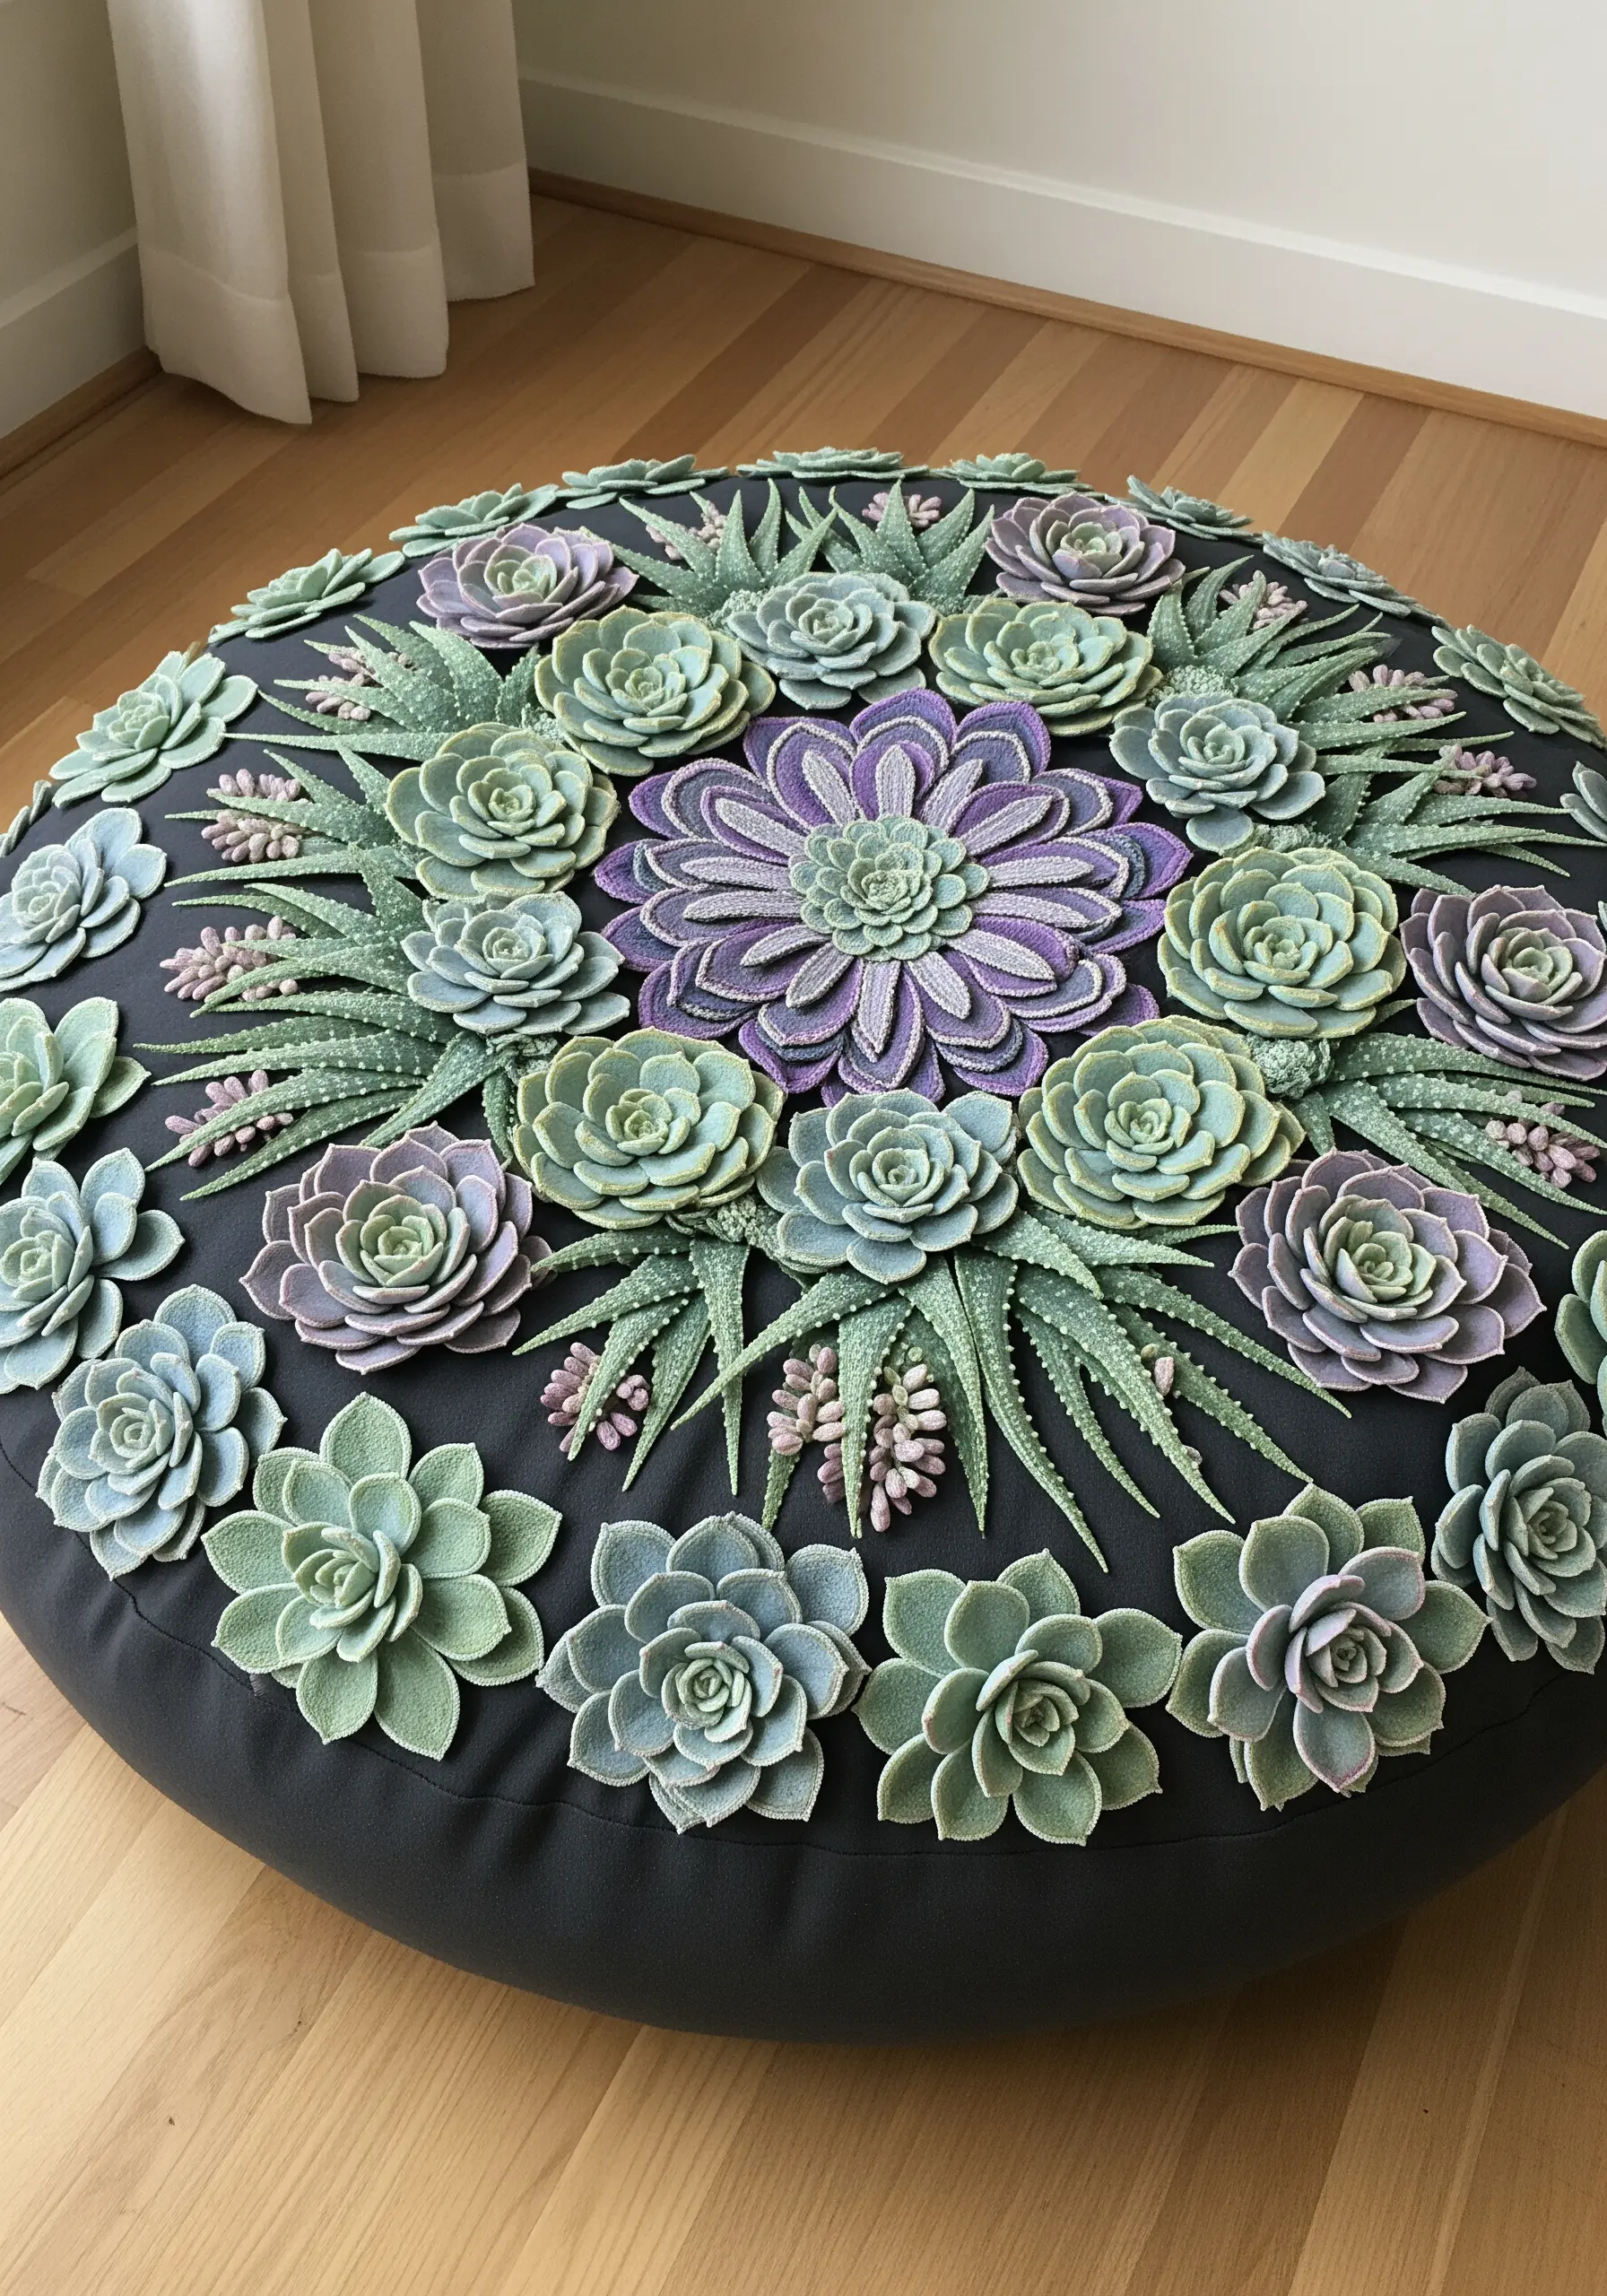
18. Sculpt Dimensional Succulents with Woven Wheels
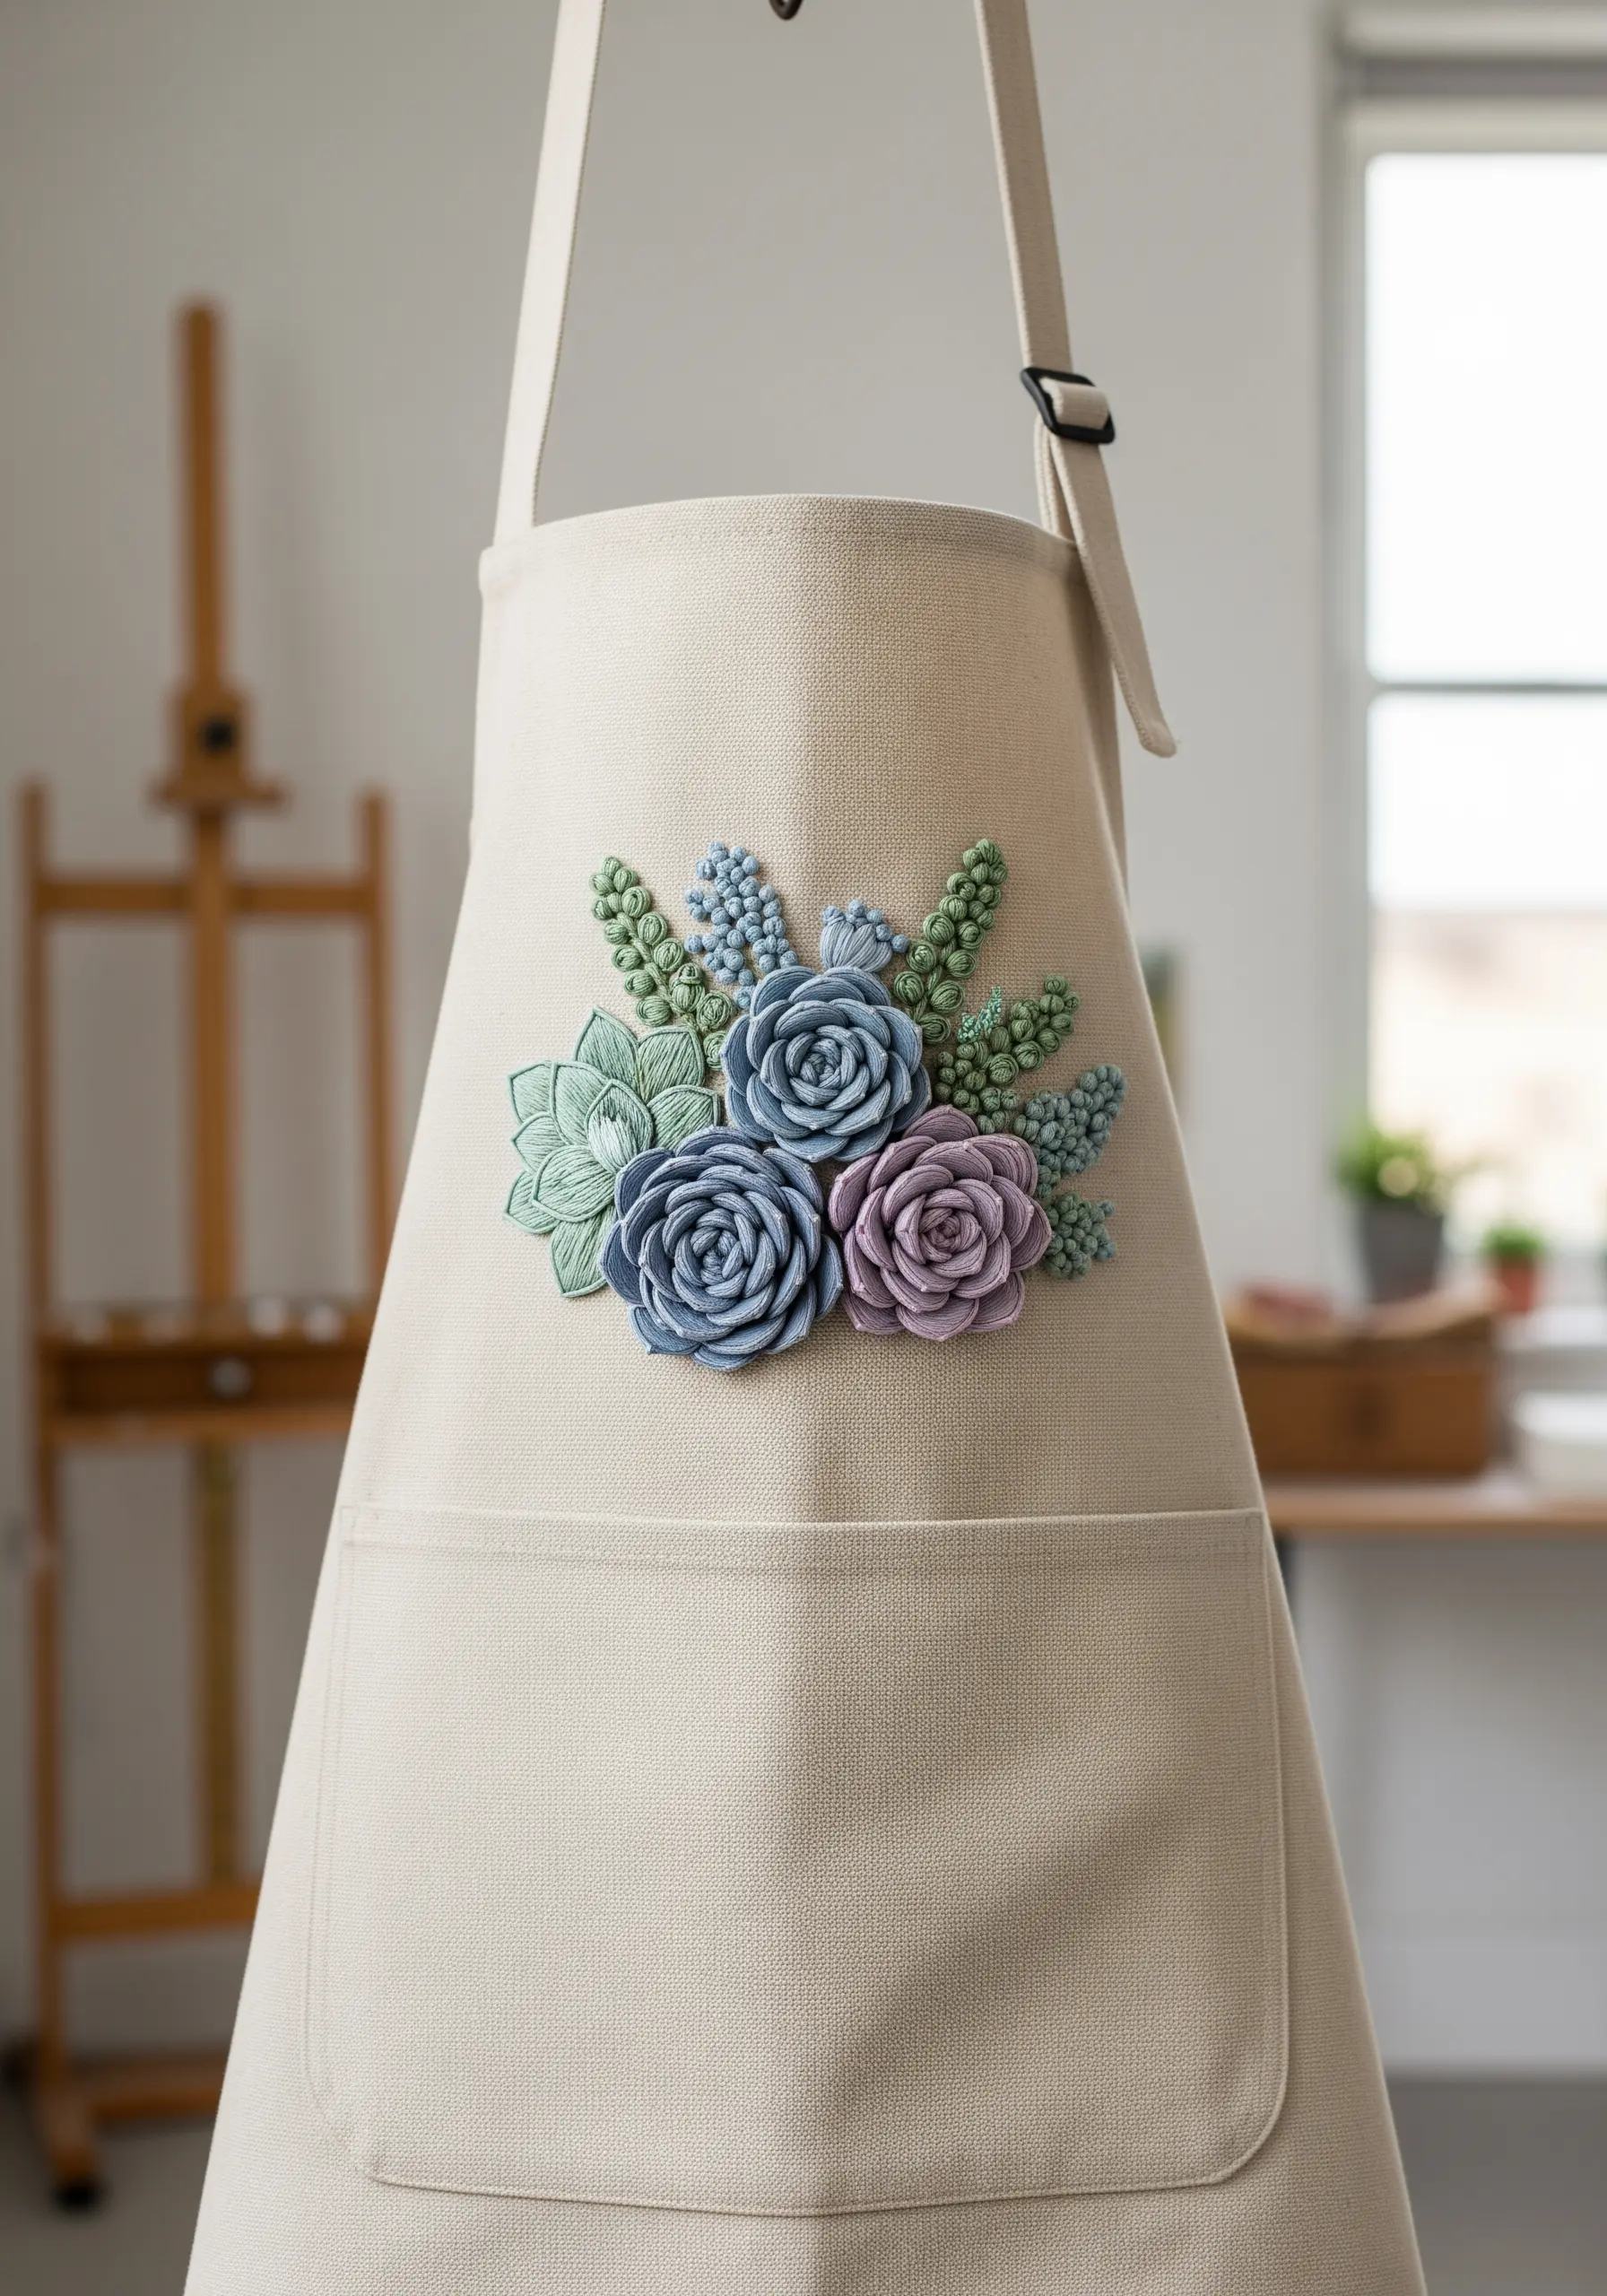
Create lush, 3D succulents on an apron or jacket using dimensional stitches that rise off the fabric.
The woven wheel stitch (or woven spider wheel) is perfect for creating layered, rose-like succulents. Simply create a star of straight stitches and weave your thread over and under them until the shape is filled.
Combine these with bullion knots for elongated leaves and French knots for dense, bumpy textures.
Using a thicker thread, such as #8 pearl cotton, will help you build volume more quickly.
19. Create Floating Botanicals on Transparent Fabric
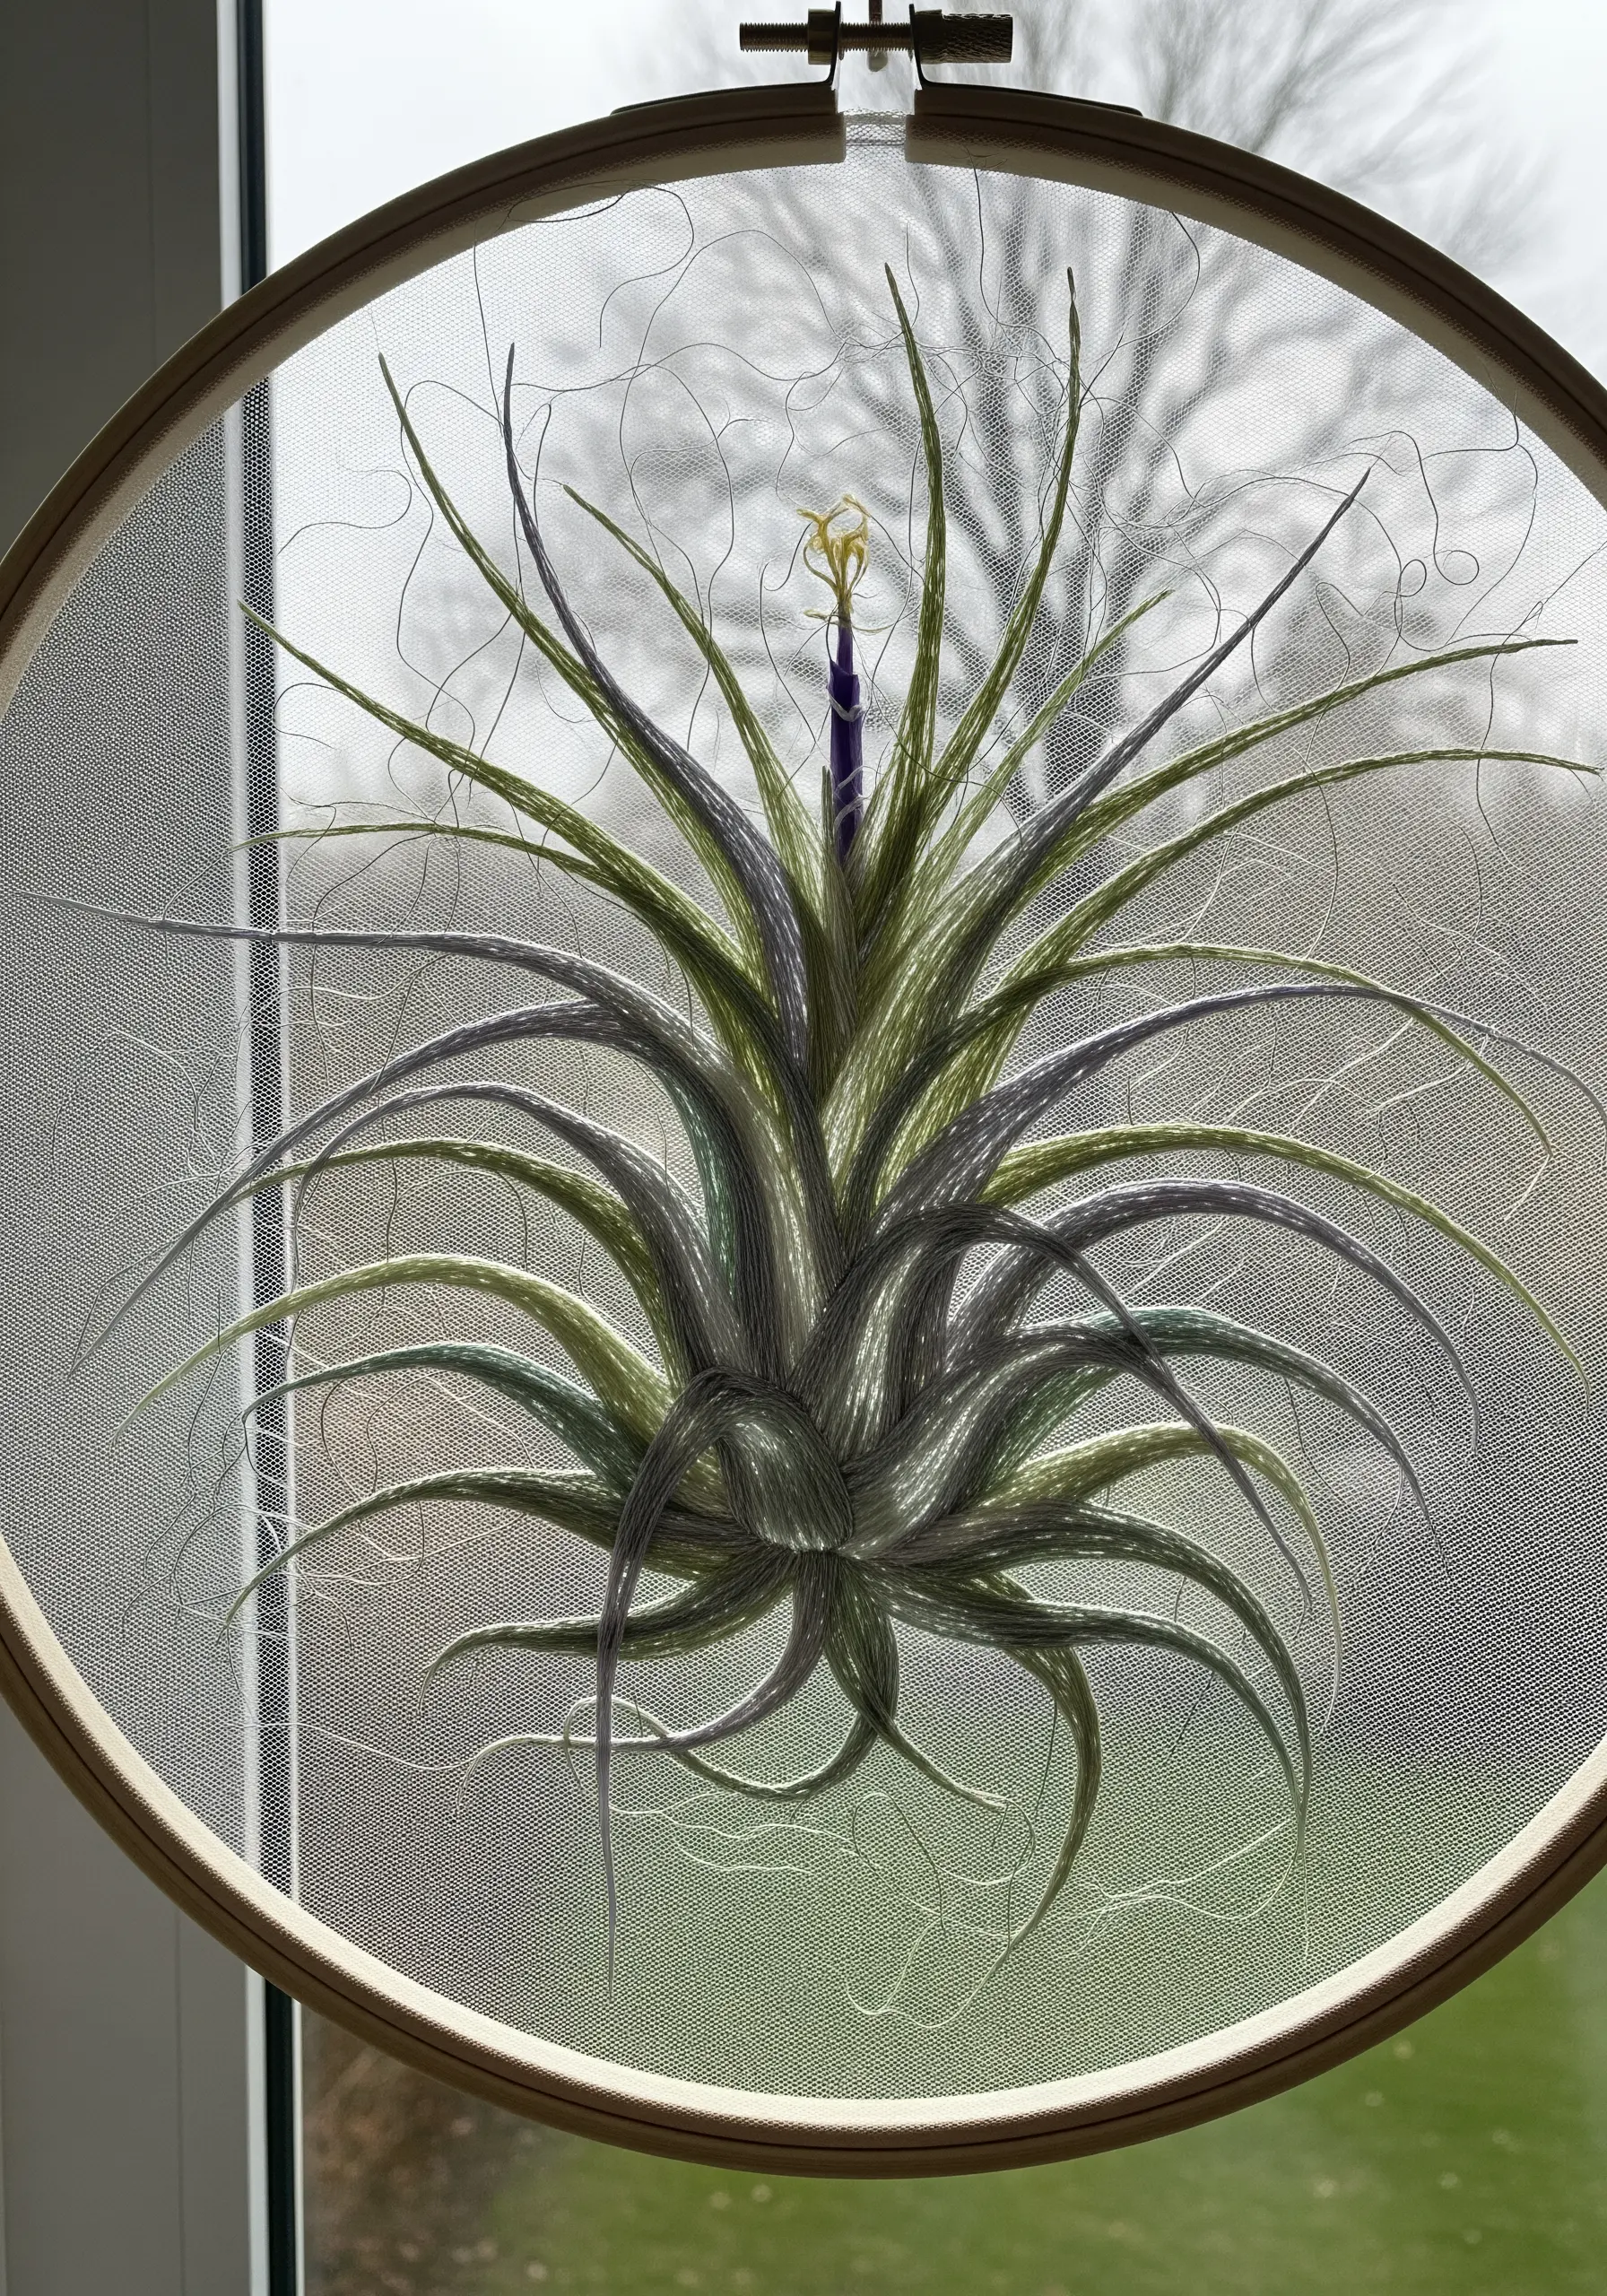
Stitch an air plant on sheer organza or tulle to create a magical, floating effect.
You must keep the back of your work exceptionally neat, as it will be visible. Secure your threads by weaving them under existing stitches instead of using knots.
Use long, graceful straight stitches for the leaves, radiating from a central point. A variegated or space-dyed thread works beautifully here, creating subtle color shifts with ease.
When hung in a window, the light will shine through the fabric, isolating the stitched plant as a delicate sculpture.
20. Frame Your Flora with Geometric Line Work
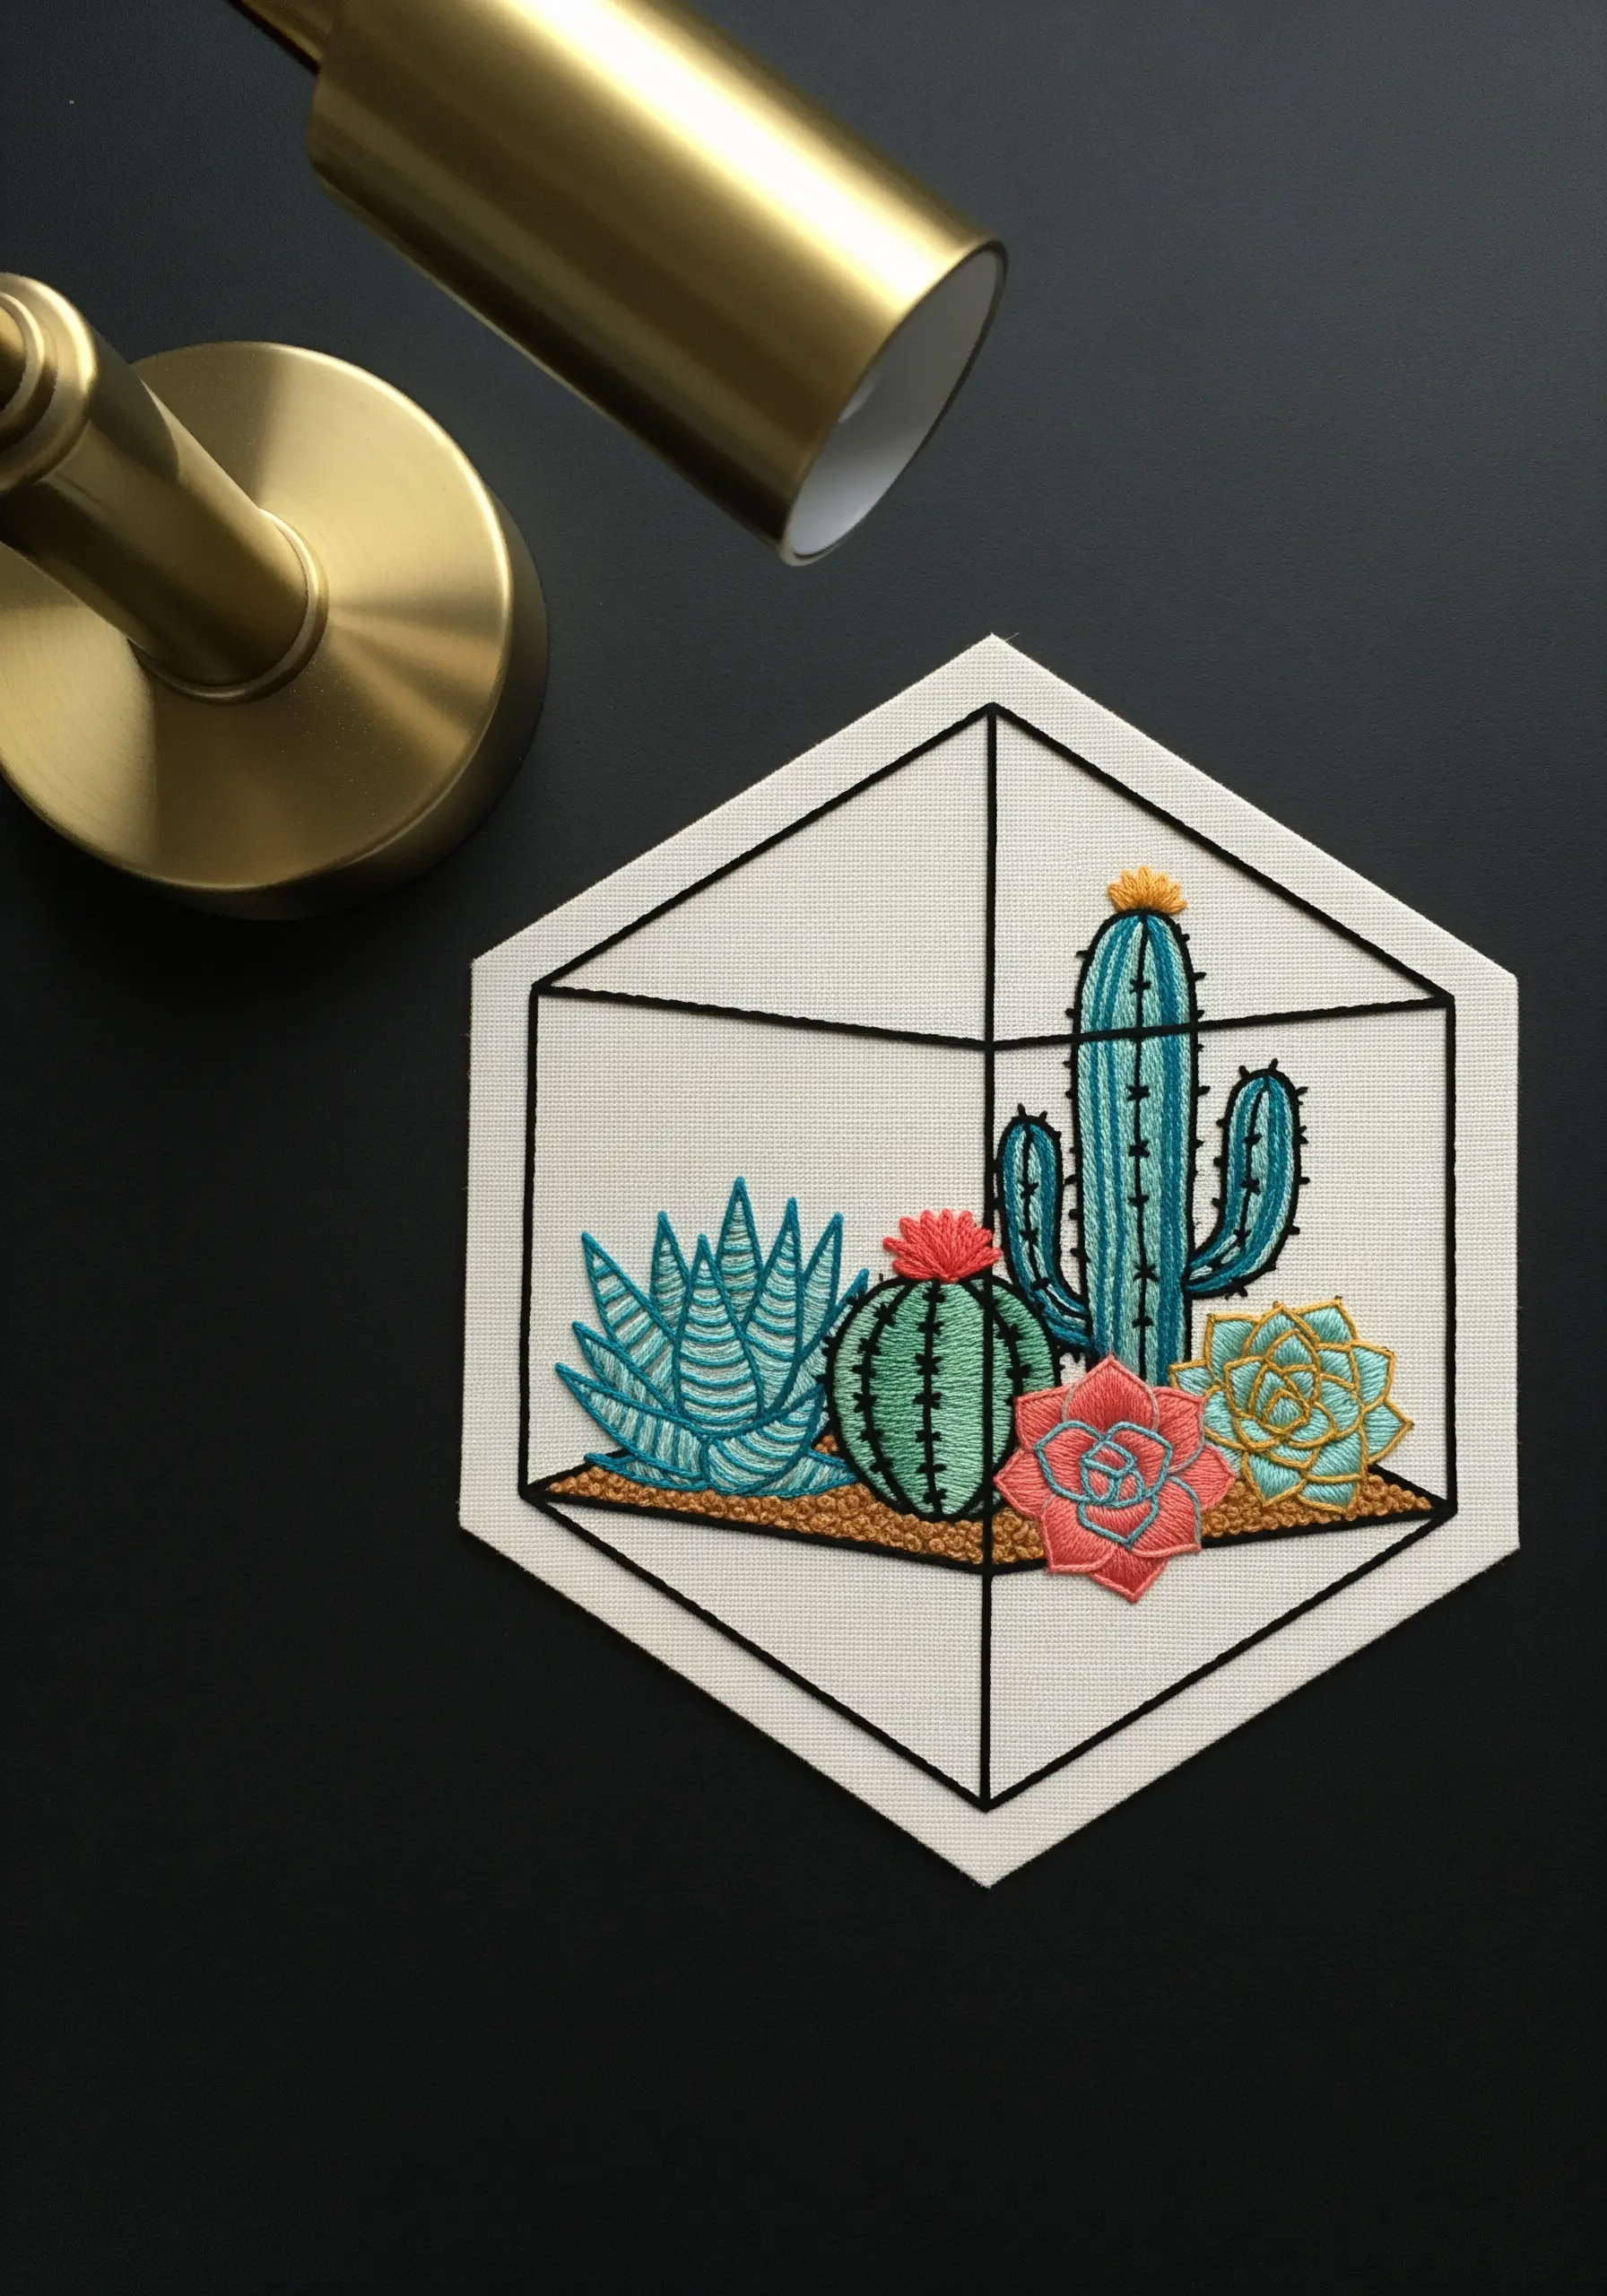
Juxtapose the organic shapes of succulents with a crisp, geometric terrarium frame.
Use a simple black backstitch to create the clean lines of the container. This acts as a window, drawing the eye inward.
Inside the frame, use a riot of color and texture: satin stitch for the cactus, French knots for the succulent centers, and long-and-short stitch for blended colors.
This contrast between the rigid, simple frame and the soft, detailed plants is what gives the design its modern, architectural appeal.
21. Go Maximalist with Large-Scale Stumpwork
For a truly show-stopping piece like a floor cushion, explore the world of stumpwork, or raised embroidery.
Each succulent petal or leaf is created individually on a spare piece of fabric, often stitched over a thin wire for structure.
Once complete, the shapes are cut out and appliquéd onto the base fabric, creating an incredibly dense and realistic 3D succulent garden.
For a simpler approach, you can build up layers of felt padding on the cushion and cover them with satin stitch to mimic this sculptural effect.
22. Use Stitch Direction to Mimic Natural Growth
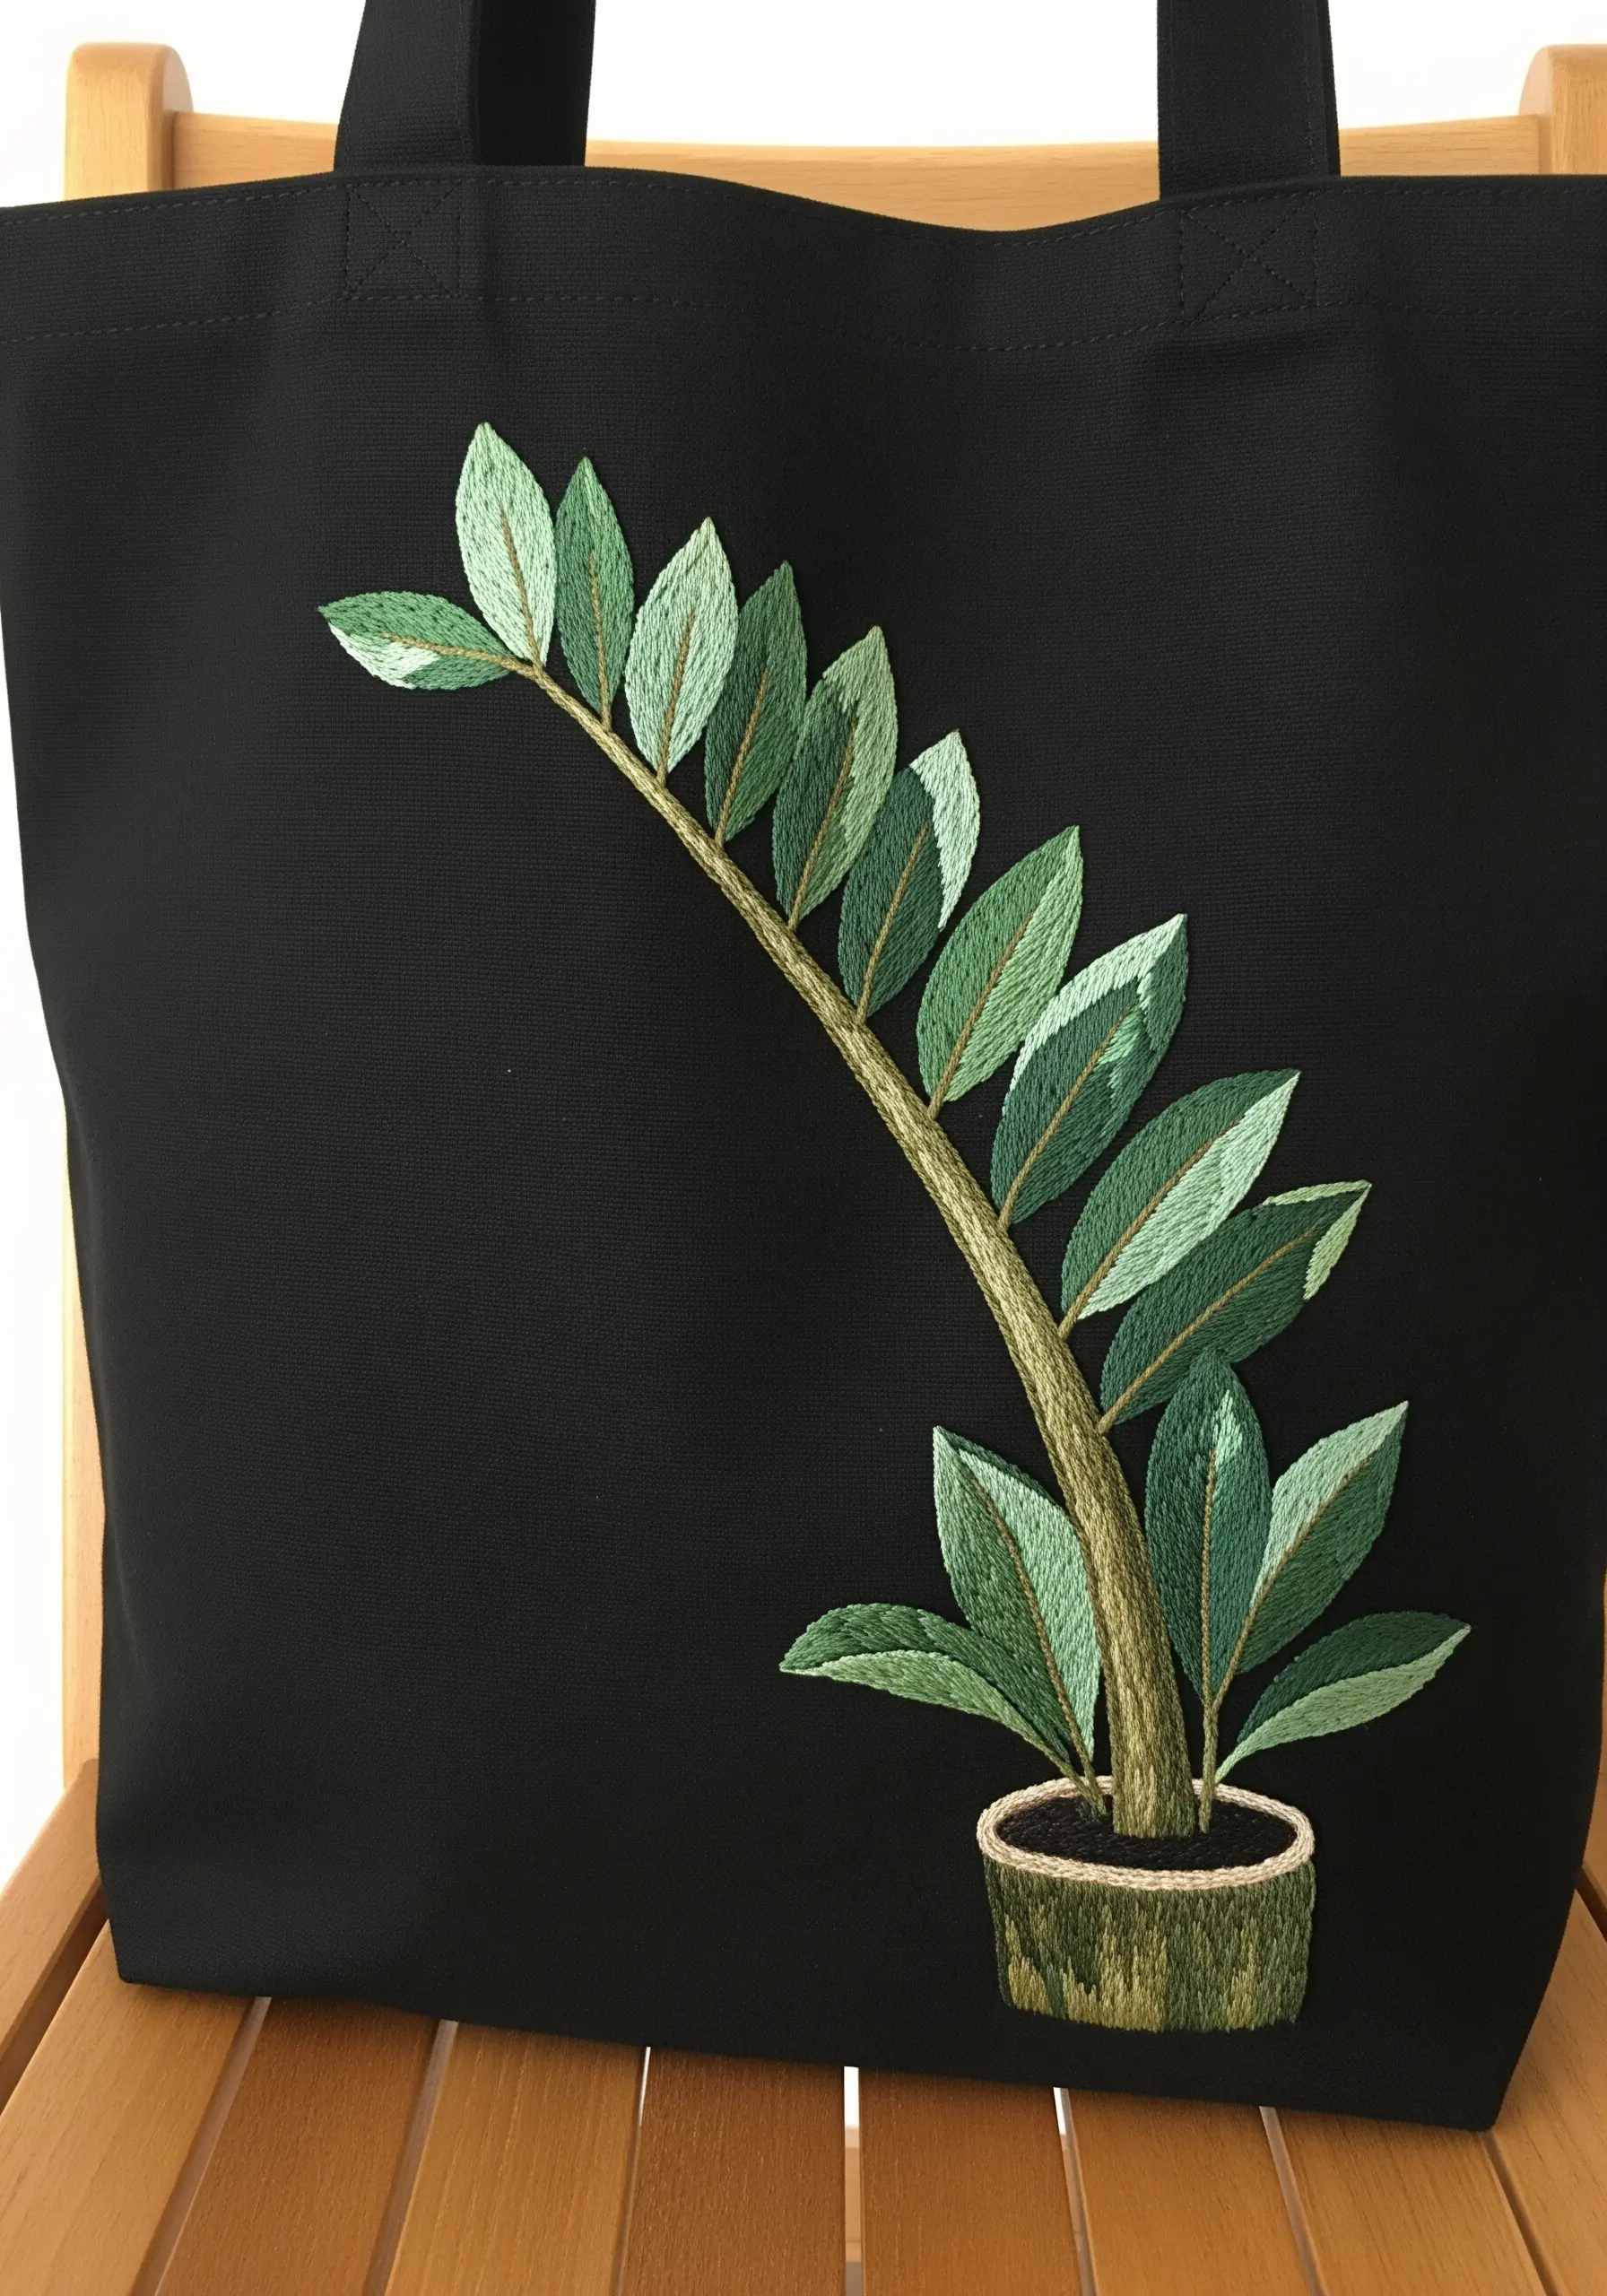
To make your embroidered ZZ plant look less flat and more alive, pay close attention to the direction of your stitches.
For the thick central stem, use vertical satin stitches to give it a sense of strength and height.
When filling the leaves, angle your stitches diagonally, radiating out from the center vein toward the edges. This mimics the leaf’s natural structure and creates a subtle sheen.
This intentional use of stitch direction is a simple trick that adds a surprising amount of realism to your botanical art.
23. Personalize Your Decor with a Botanical Monogram
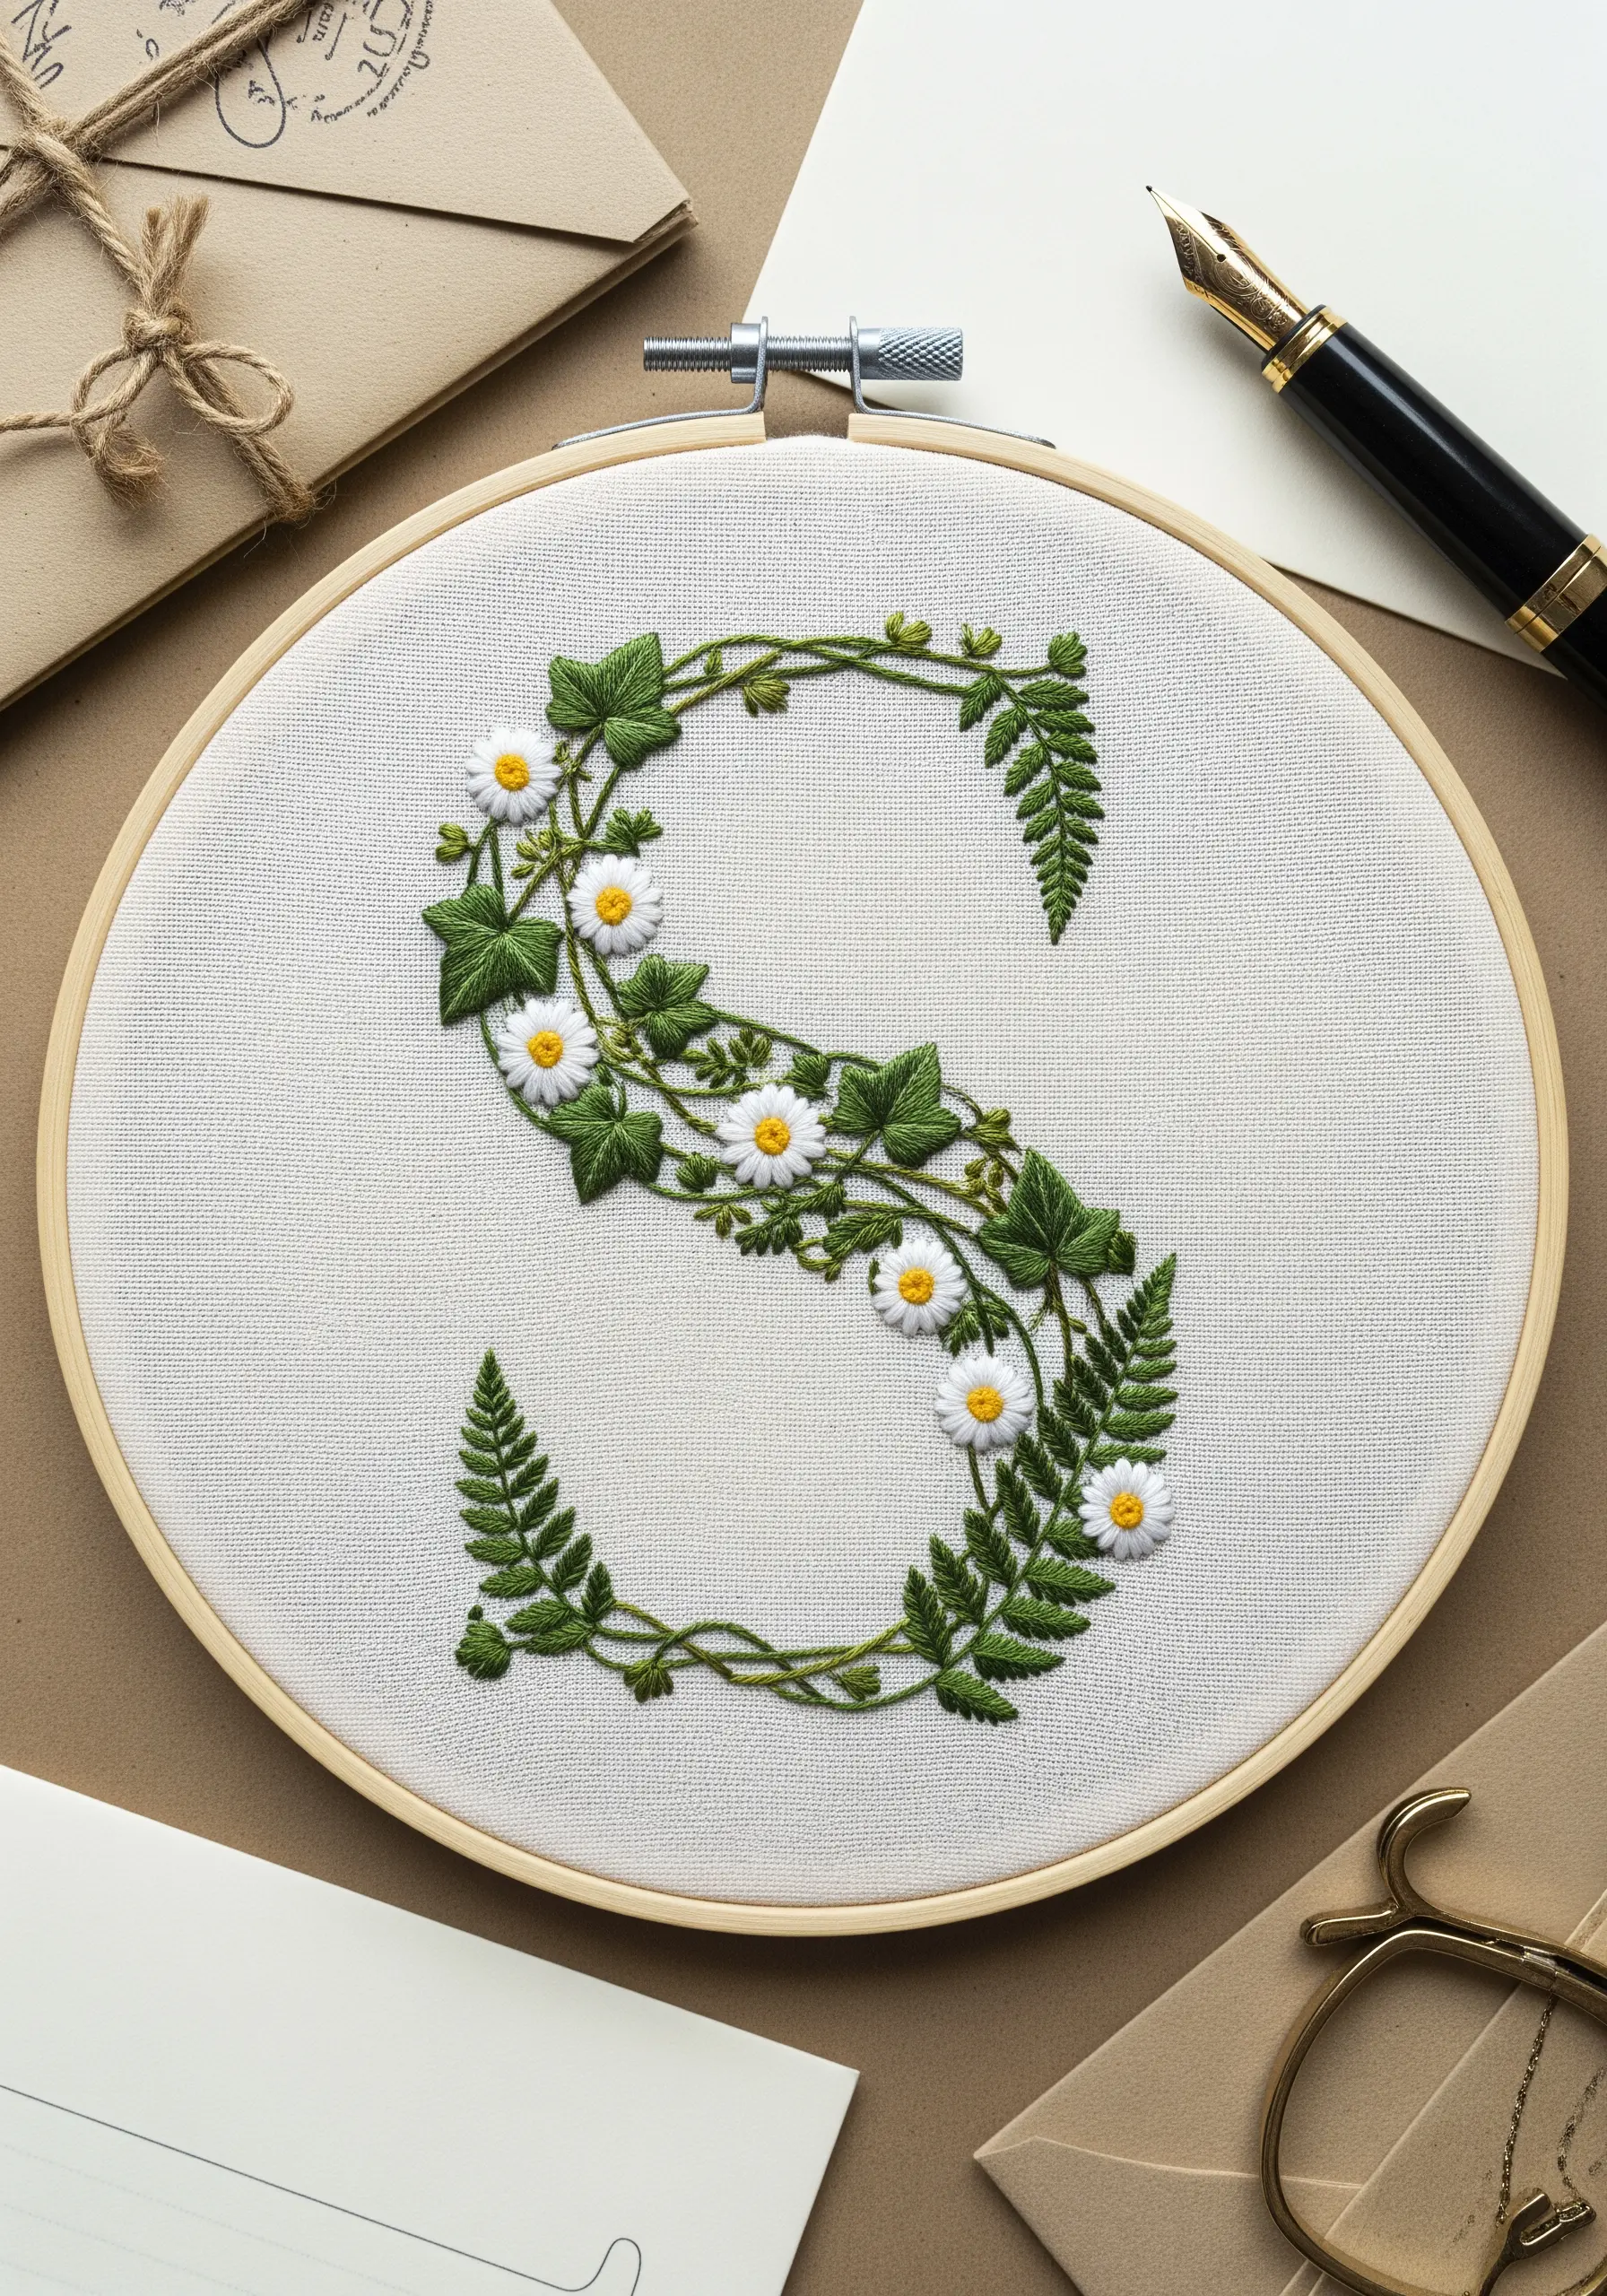
Transform a simple initial into a lush piece of art by constructing it from leaves, vines, and flowers.
First, draw your letter and then trace intertwining vines along its shape using a twisted chain stitch for a rope-like texture.
Build upon this framework by adding different types of foliage: use fishbone stitch for fern fronds, detached chain stitches (lazy daisies) for ivy leaves, and small woven wheels for tiny blossoms.
This technique allows for endless personalization and turns a simple monogram into a meaningful, natural composition.
24. Create Texture with Geometric Fill Stitches
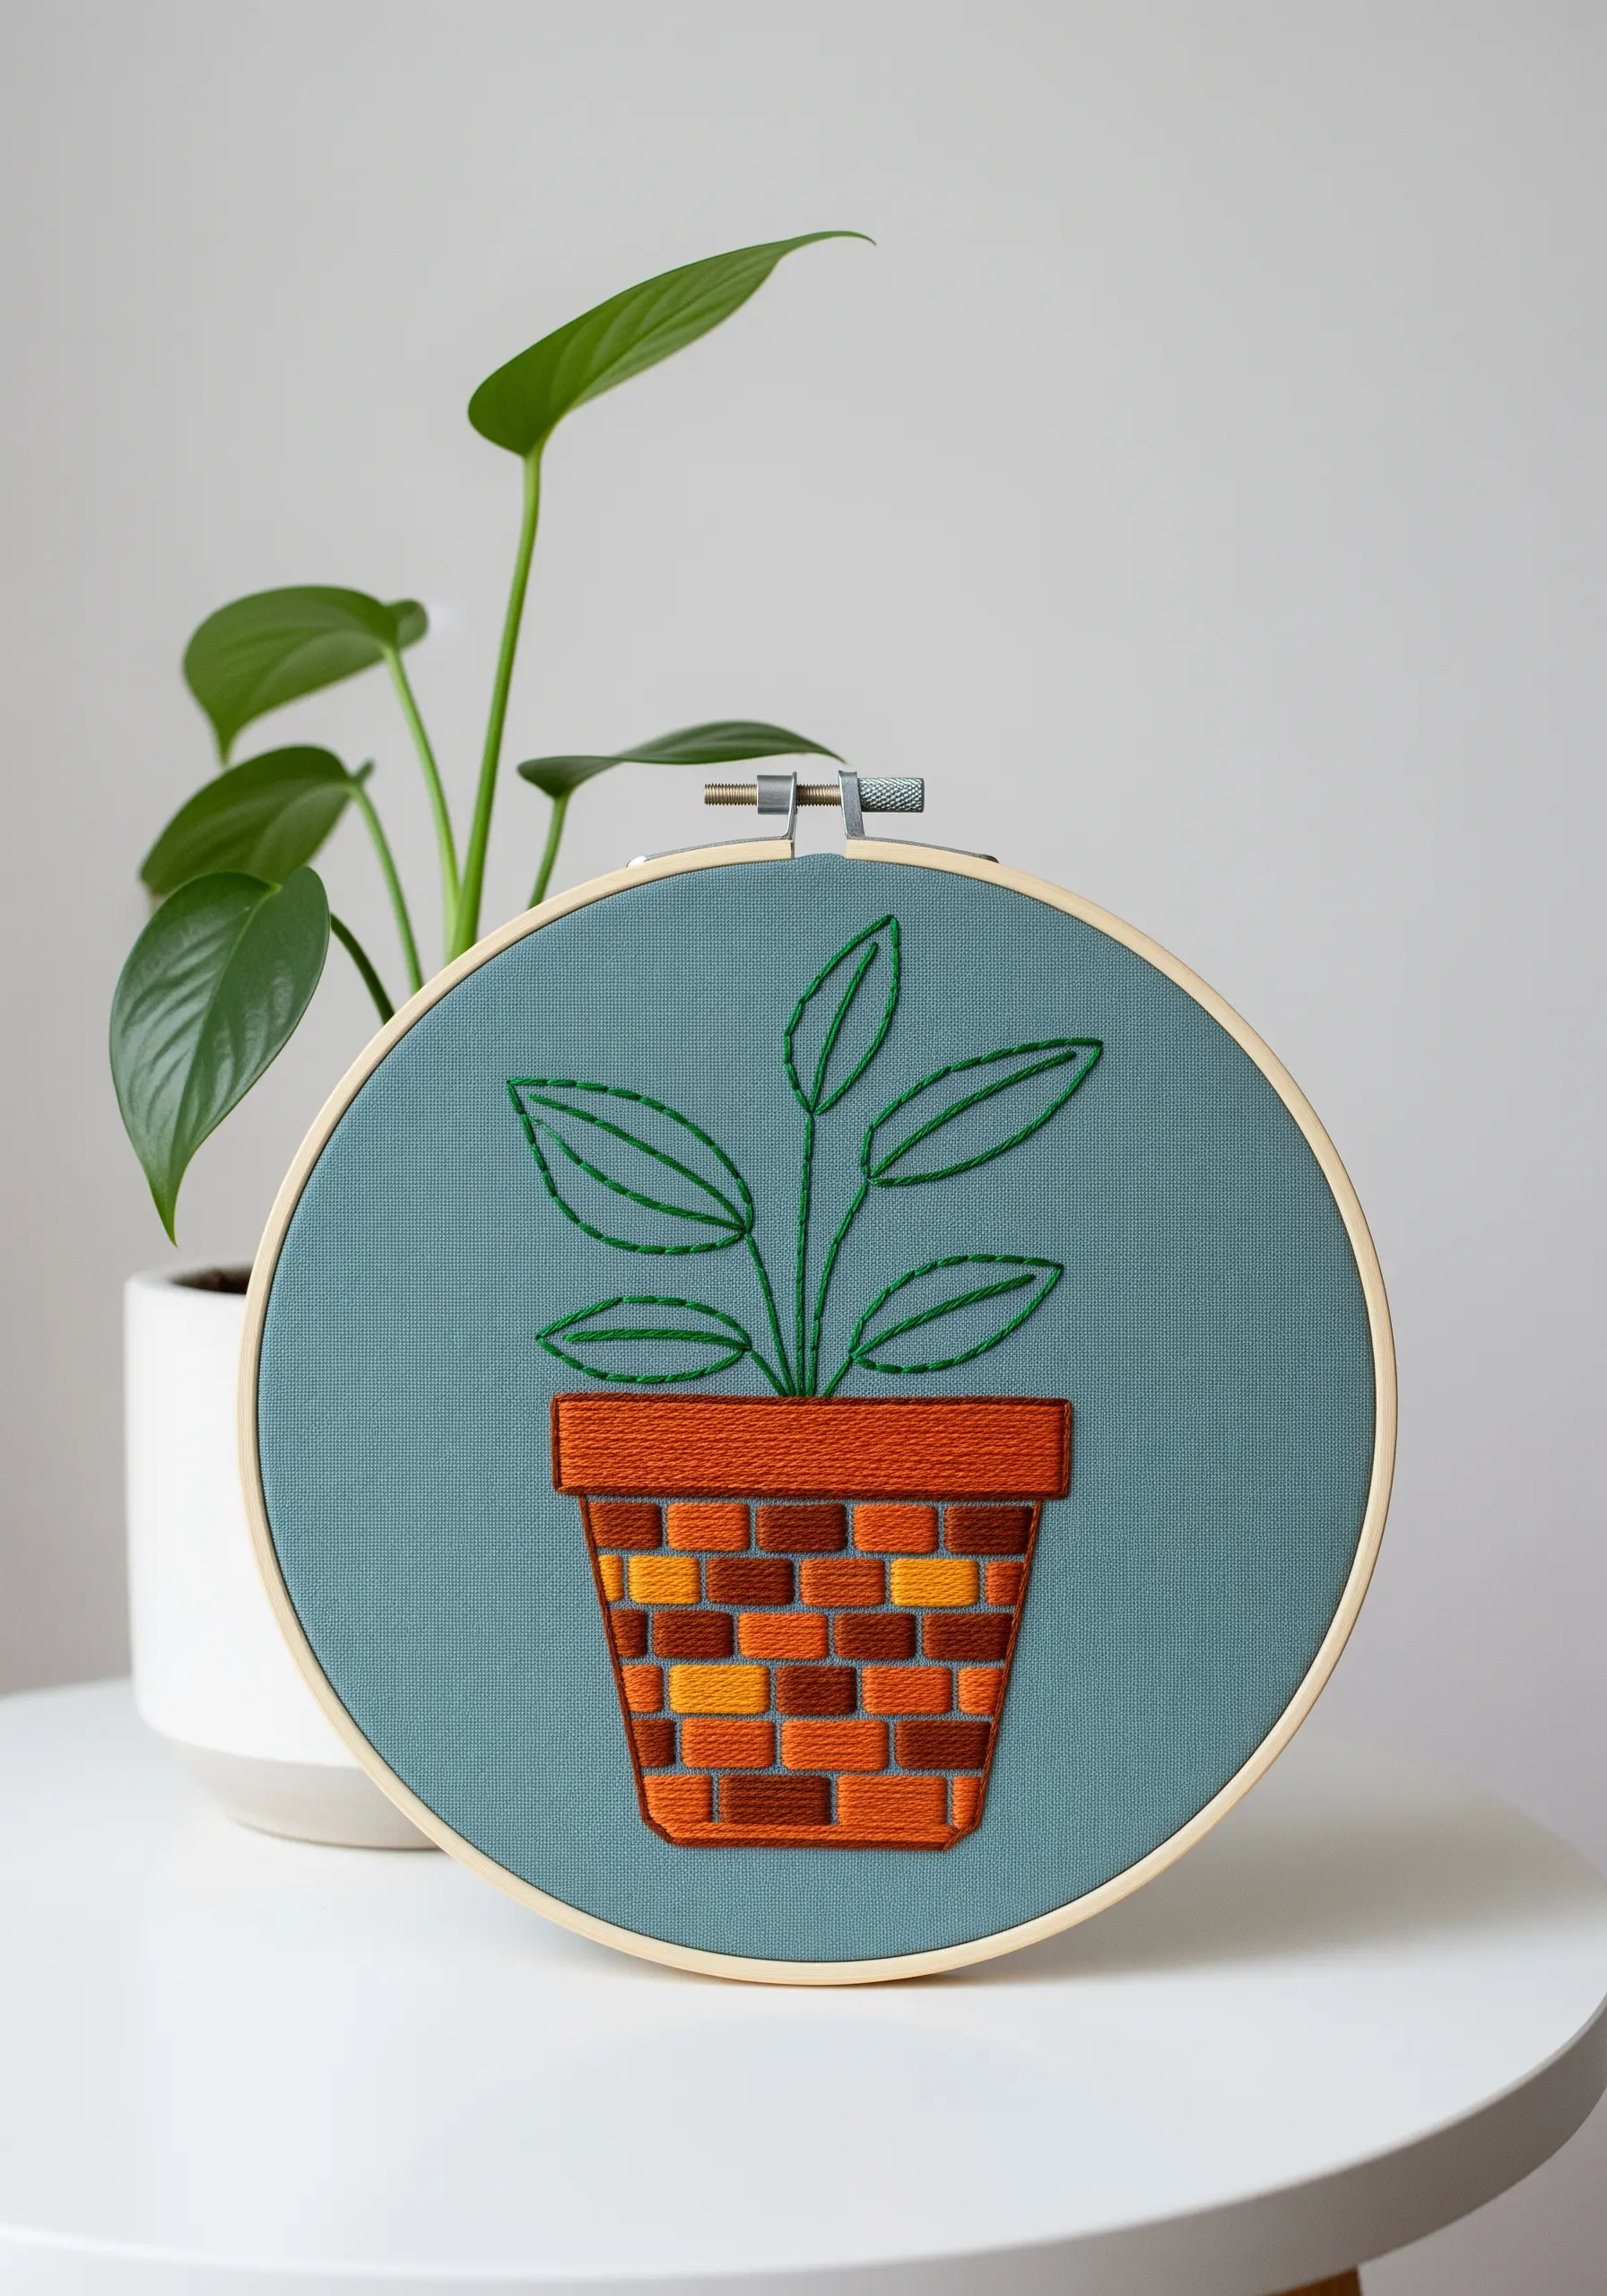
Give a simple plant illustration a modern twist by focusing on the texture of the pot.
Instead of a basic satin stitch, fill the pot with a basketweave stitch or a simple brick stitch. This immediately adds a graphic, tactile quality to the piece.
Keep the plant itself minimal with a clean backstitch or stem stitch outline, leaving the leaves unfilled.
This contrast between the detailed, geometric pot and the simple, airy plant creates a balanced design that feels fresh and contemporary.


