
When you look at a plain linen napkin or a simple cotton tablecloth, I want you to see more than just fabric. See it as a canvas, a quiet space waiting for a single, intentional mark that can transform its entire character.
Minimalist embroidery isn’t about filling space; it’s about activating it. It’s the art of knowing that one perfectly executed line, a cluster of textural knots, or a subtle shift in color can carry more weight than a thousand complex stitches. It’s about making every single stitch count.
In the ideas that follow, we’ll move beyond just patterns. We will explore how a change in thread weight can add drama, how a simple stitch can become an architectural element, and how texture can tell a story. Let’s refine your stitching so that it speaks with quiet confidence, turning everyday textiles into personal, cherished art.
1. Render Abstract Faces with a Single, Fluid Line

To achieve that effortless, continuous line for abstract portraiture, use a whipped backstitch.
First, lay down a standard backstitch, keeping your stitches small and even around tight curves.
Then, using the same thread (or a contrasting one for depth), whip the needle under each backstitch without piercing the fabric.
This technique smooths the jagged edges of a standard backstitch, creating a single, raised line that mimics the confident stroke of an ink pen.
Using 4-6 strands of cotton floss will give the line enough weight to stand out, transforming a simple napkin into a piece of gallery-style hoop art.
2. Create Bold Texture with Couched Cord

For a design with dramatic, sculptural texture, move beyond floss and try couching.
This technique involves laying a thicker material, like a braided cotton cord or chunky yarn, onto your fabric and securing it with small, perpendicular stitches.
Use a single strand of matching embroidery floss for your couching stitches to make them nearly invisible, allowing the cord’s texture to dominate.
Place your securing stitches about a quarter-inch apart on straightaways and closer together on curves to maintain the shape.
This method adds dimension and a tactile quality that standard embroidery cannot, perfect for a statement table runner.
3. Achieve Organic Scatter with Seed Stitch

To create a delicate, organic texture that feels both random and intentional, use the seed stitch.
Work tiny, straight stitches in varying directions, scattering them across the designated area like scattered grain.
For a subtle, tone-on-tone effect, choose a thread just a shade lighter or darker than your fabric.
The key to a sophisticated look is inconsistency in stitch direction but consistency in stitch length.
This approach transforms a simple placemat into a canvas of subtle movement and light, adding interest without overwhelming the minimalist aesthetic.
4. Frame Your Table with Geometric Running Stitch

Transform a plain tablecloth with a clean, architectural border inspired by Japanese Sashiko.
Use a simple running stitch, focusing meticulously on uniform stitch length and spacing.
To ensure perfect geometry, use a water-soluble marker and a quilting ruler to draw your grid before you begin stitching.
Choose a thread with a slight sheen, like perle cotton, in a contrasting color like charcoal or navy to make the graphic pattern pop against white linen.
This technique is meditative and impactful, proving that the simplest stitch can create the most profound elegance.
5. Sculpt Raised Botanicals with Padded Satin Stitch

Give your embroidered leaves a three-dimensional, lifelike quality using padded satin stitch.
First, create a base of small, underlying stitches (like split or chain stitches) within the shape of the leaf to build up volume.
Then, work your satin stitches over this padding, perpendicular to the direction of the underlying stitches.
This technique, borrowed from stumpwork, lifts the design off the fabric, creating soft shadows and a tactile feel.
It’s one of the best ways to capture nature’s textures, turning a flat motif into a soft sculpture.
6. Add a Touch of Luster with Metallic Fill

Introduce a moment of unexpected luxury to dark linen with a dense metallic fill.
To achieve a solid, shimmering effect, use a satin stitch, ensuring your stitches are laid close together without overlapping.
Metallic threads can be challenging; work with shorter lengths (about 12 inches) and a thread conditioner to prevent fraying and tangling.
A simple, geometric shape like a half-circle allows the material to be the focus, creating a powerful contrast between the matte linen and the reflective thread.
This is modern minimalism at its best—a single, impactful detail that elevates the entire piece.
7. Weave Dimension with a Whipped Grid

Elevate a simple grid pattern by adding a layer of texture through whipping.
Start by stitching a basic grid using a backstitch or stem stitch in a medium-grey thread.
Next, take a slightly lighter or darker thread and weave it over and under the intersecting grid lines without piercing the fabric.
This creates a subtle, woven effect that adds dimension and visual interest.
The result is a sophisticated, architectural border that feels more complex and tactile than a simple stitched line.
8. Reimagine the Cross Stitch as a Modern Accent

Take the traditional cross stitch out of its sampler context and use it as a modern, graphic element.
Instead of creating a picture, scatter individual cross stitches across your fabric in a random or loosely organized pattern.
Use a thicker thread, such as all six strands of floss or a fine perle cotton, to give each stitch more presence and a slightly plush texture.
This deconstructed approach turns a humble stitch into a minimalist statement, adding a playful yet sophisticated rhythm to a simple tablecloth.
9. Build Topographic Texture with Knotted Stitches

Create a dense, pebbled surface by clustering French knots or colonial knots together.
By varying the number of times you wrap the thread around the needle, you can control the size of each knot, adding subtle variation to the texture.
Use two or three complementary neutral shades—like ivory, dove grey, and charcoal—and arrange them in organic drifts to create a sense of movement and depth.
This is a perfect example of how to create high-texture fabric collage effects using only thread, ideal for a table runner that invites touch.
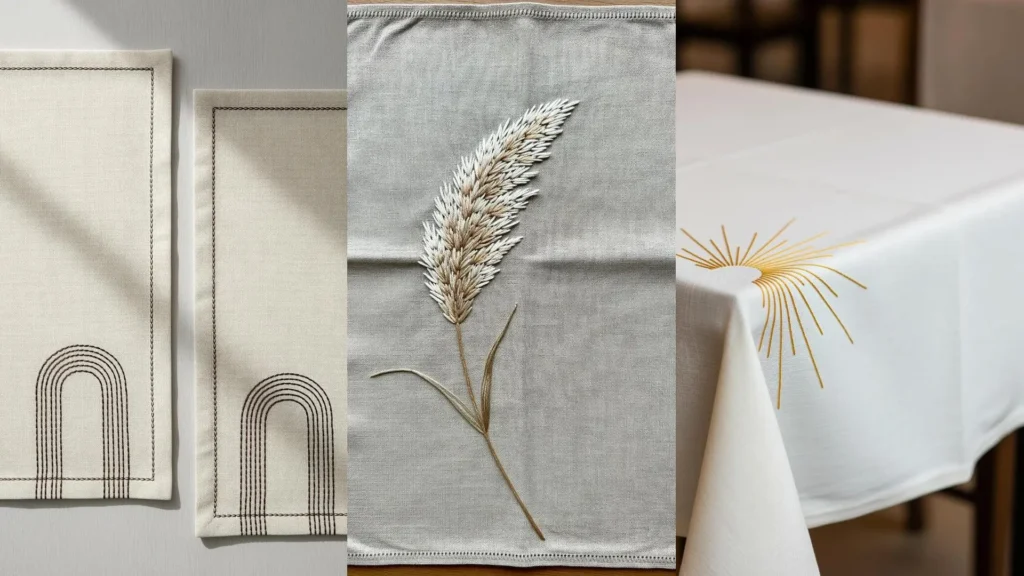
10. Imply Form with Minimalist Arch Motifs

Suggest architectural shapes using the power of negative space and simple repetition.
Stitch a series of concentric arches using a basic backstitch or stem stitch.
The key to this design’s success is precise spacing; use a compass and a water-soluble pen to draw your guidelines perfectly before you begin.
By leaving the interior of the arches empty, you create a design that is light and modern, allowing the texture of the linen to be part of the composition.
A dark brown or black thread on cream linen creates a classic, high-contrast look that feels both timeless and contemporary.
11. Master Smooth Fills for Celestial Motifs

To achieve a perfectly smooth, solid fill for celestial shapes like moons and circles, preparation is key.
First, outline your shape with a split stitch. This creates a slightly raised, firm edge for your satin stitches to rest against, preventing gaps and ensuring a crisp silhouette.
Then, fill the shape with satin stitches, laying them closely side-by-side. For a circle, keep all stitches parallel; for a crescent, angle them slightly to follow the curve.
This two-step process is the secret to a professional, polished finish on any minimal sky-moon design.
12. Embrace Rustic Charm with a Simple Dash Border

Create a warm, handcrafted border with a simple, elongated running stitch, sometimes called a saddle stitch.
Instead of aiming for tiny, uniform stitches, intentionally make them longer and slightly thicker for a more rustic, visible effect.
Use a contrasting thread in a warm, earthy tone like terracotta or rust to pop against a neutral cream or oatmeal linen.
This stitch is beautifully imperfect and works quickly, adding a touch of cozy, wabi-sabi elegance to the edge of a tablecloth.
At the corners, arrange three stitches into a small starburst or arrow for a thoughtful finishing detail.
13. Stitch Delicate Constellations on Sheer Fabric

Embroidering on sheer or lightweight fabrics requires a delicate touch to avoid puckering.
Use a fine needle and a single strand of metallic or silk thread to keep the design light.
Create abstract starbursts by stitching several straight stitches radiating from a central point, then connect them with long, intersecting lines.
Stabilize the fabric in your hoop with a layer of water-soluble stabilizer on top, which will support the stitches and prevent distortion before being gently washed away.
The final effect is ethereal, with the design appearing to float on the translucent surface.
14. Capture Botanical Grace with Fine Line Work

To replicate the delicate structure of a ginkgo leaf, focus on the elegance of line.
Use a fine-weight thread (only two strands of floss) and a stem stitch for the main stem to give it a smooth, rounded appearance.
For the fanned veins of the leaf, switch to single straight stitches, radiating them out from the stem’s end point.
This technique mimics botanical illustration, emphasizing form and structure over color or fill. It’s a perfect way to practice your botanical line art embroidery on functional items like placemats.
15. Map the Stars with Knots and Lines

Embroider a personal constellation on a napkin for a subtle, meaningful detail.
Use tiny French knots to represent the stars, wrapping the thread just once or twice around the needle to keep them delicate and sharp.
Connect the knots with a single, fine backstitch or a simple straight stitch to form the constellation’s shape.
Choose a bright white or silver metallic thread on a muted, earthy fabric like taupe or olive green to make the stars pop.
This idea transforms a simple napkin into a conversation piece and is perfect for adding subtle star motifs to your table setting.
16. Create a Radiant Sunburst with Straight Stitches

Embellish the corner of a tablecloth with a graphic sunburst motif that radiates energy and warmth.
This design is composed entirely of straight stitches of varying lengths, all originating from a single point just off the edge.
To achieve a clean, sharp look, use a ruler and a disappearing ink pen to mark the lines before you stitch.
A gold metallic thread will catch the light beautifully against crisp white linen, adding a touch of celebratory glamour without feeling overly decorative.
This technique is a brilliant way to use negative space, as the unstitched area becomes the sun itself.
17. Construct Geometric Mosaics with Appliqué

Combine fabric and thread to create a bold, textural table runner that mimics geometric tilework.
Cut small, rectangular pieces of fabric in a monochromatic palette (ivory, grey, charcoal) and arrange them in a repeating pattern.
Secure each piece using an iron-on adhesive like Heat’n Bond Lite, then finish the edges with a tight, clean satin stitch border.
This not only secures the appliqué permanently but also frames each shape, giving the design a clean, graphic definition.
This is one of the most effective and beginner-friendly fabric collage embroidery methods for creating large-scale, impactful designs.
18. Paint with Thread for Realistic Textures

To capture the feathery softness of pampas grass, use the long-and-short stitch technique, also known as thread painting.
Work with single strands of floss in several closely related neutral shades—ivory, sand, taupe, and a hint of dusty rose.
Fill the shape with stitches of varying lengths, blending the colors organically to create soft gradients and the illusion of depth and movement.
This approach transforms your needle into a paintbrush, allowing you to create nature texture embroidery projects that feel amazingly real and full of life.
For the stem, a simple whipped backstitch in a darker brown will provide a solid, contrasting line.
19. Define Form with Angular Line Art

Create a modern, origami-inspired motif using crisp, clean lines and sharp angles.
A simple backstitch is the perfect choice for this style, as it creates a solid, unbroken line ideal for geometric designs.
Use 3-4 strands of black floss on a stark white fabric to maximize the graphic contrast.
To ensure your angles are sharp, make sure to end a stitch precisely at each corner before starting the next line.
This technique is all about precision, turning a simple line into a stylized and sophisticated piece of art.


