

The magic of stitching a mandala isn’t just in the finished piece, but in the quiet rhythm of the process itself. It’s a moment of focus, a calming repetition where each stitch becomes a small meditation. Your hands know the way, but you’re looking for that next step—the shift that transforms a pleasant pastime into a true art form.
That transformation doesn’t require complex new skills or expensive materials. It lives in the small, intentional choices you make: the weight of your thread, the direction of a stitch, the subtle harmony between two colors. It’s about learning to see your work with an artist’s eye and understanding *why* certain techniques create a more polished, expressive result.
Consider these ideas not as a set of rules, but as gentle invitations. They are starting points for you to explore texture, master a cleaner line, and play with color in a more confident way. Here, you’ll find the techniques to elevate your work, helping you create mandalas that are not only calming to stitch, but breathtaking to behold.
1. Create Depth with Layered Thread Wrapping
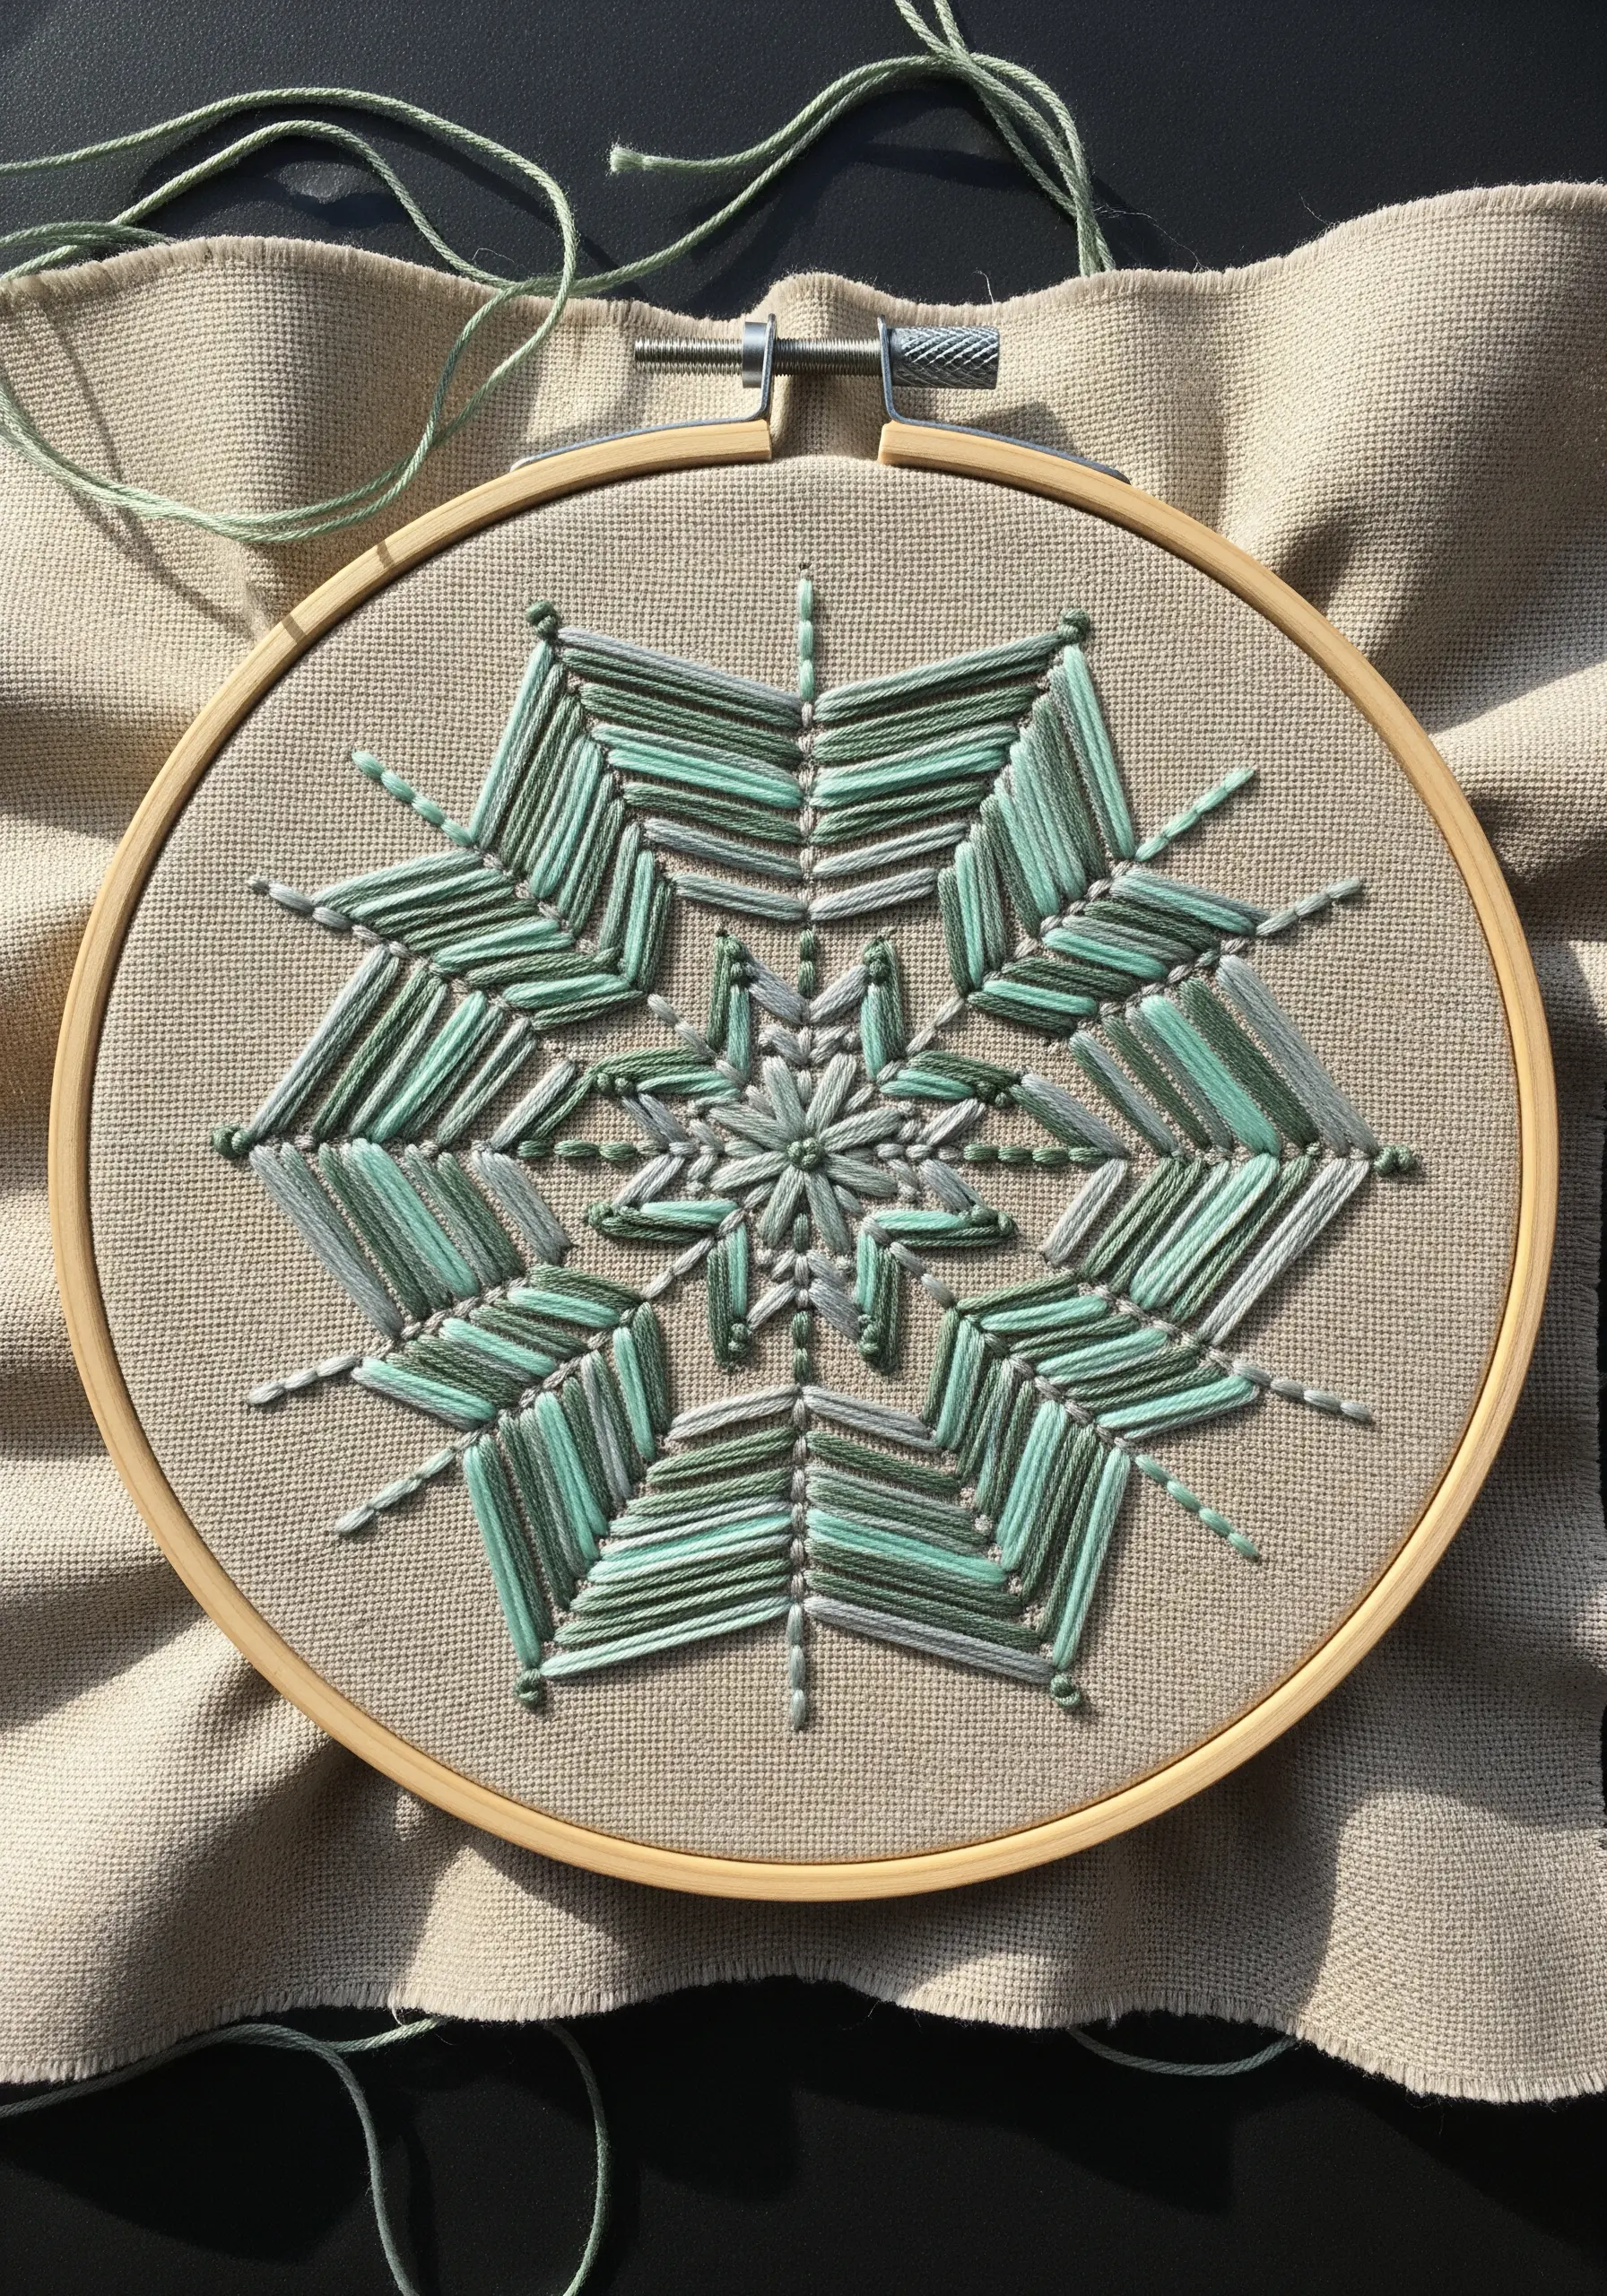
This string-art-inspired technique relies on wrapping thread between anchor points to build layers of color and texture.
Start by stitching a simple star or geometric shape using backstitch to serve as your anchor points.
Instead of filling the shape, wrap your floss between these points, overlapping the threads to build density.
Using a variegated thread here creates subtle, automatic color shifts, giving the finished piece a gentle gradient without changing your floss.
The key is maintaining consistent tension so the wrapped threads lie flat and don’t sag.
2. Master Fine Lines with Metallic Threads
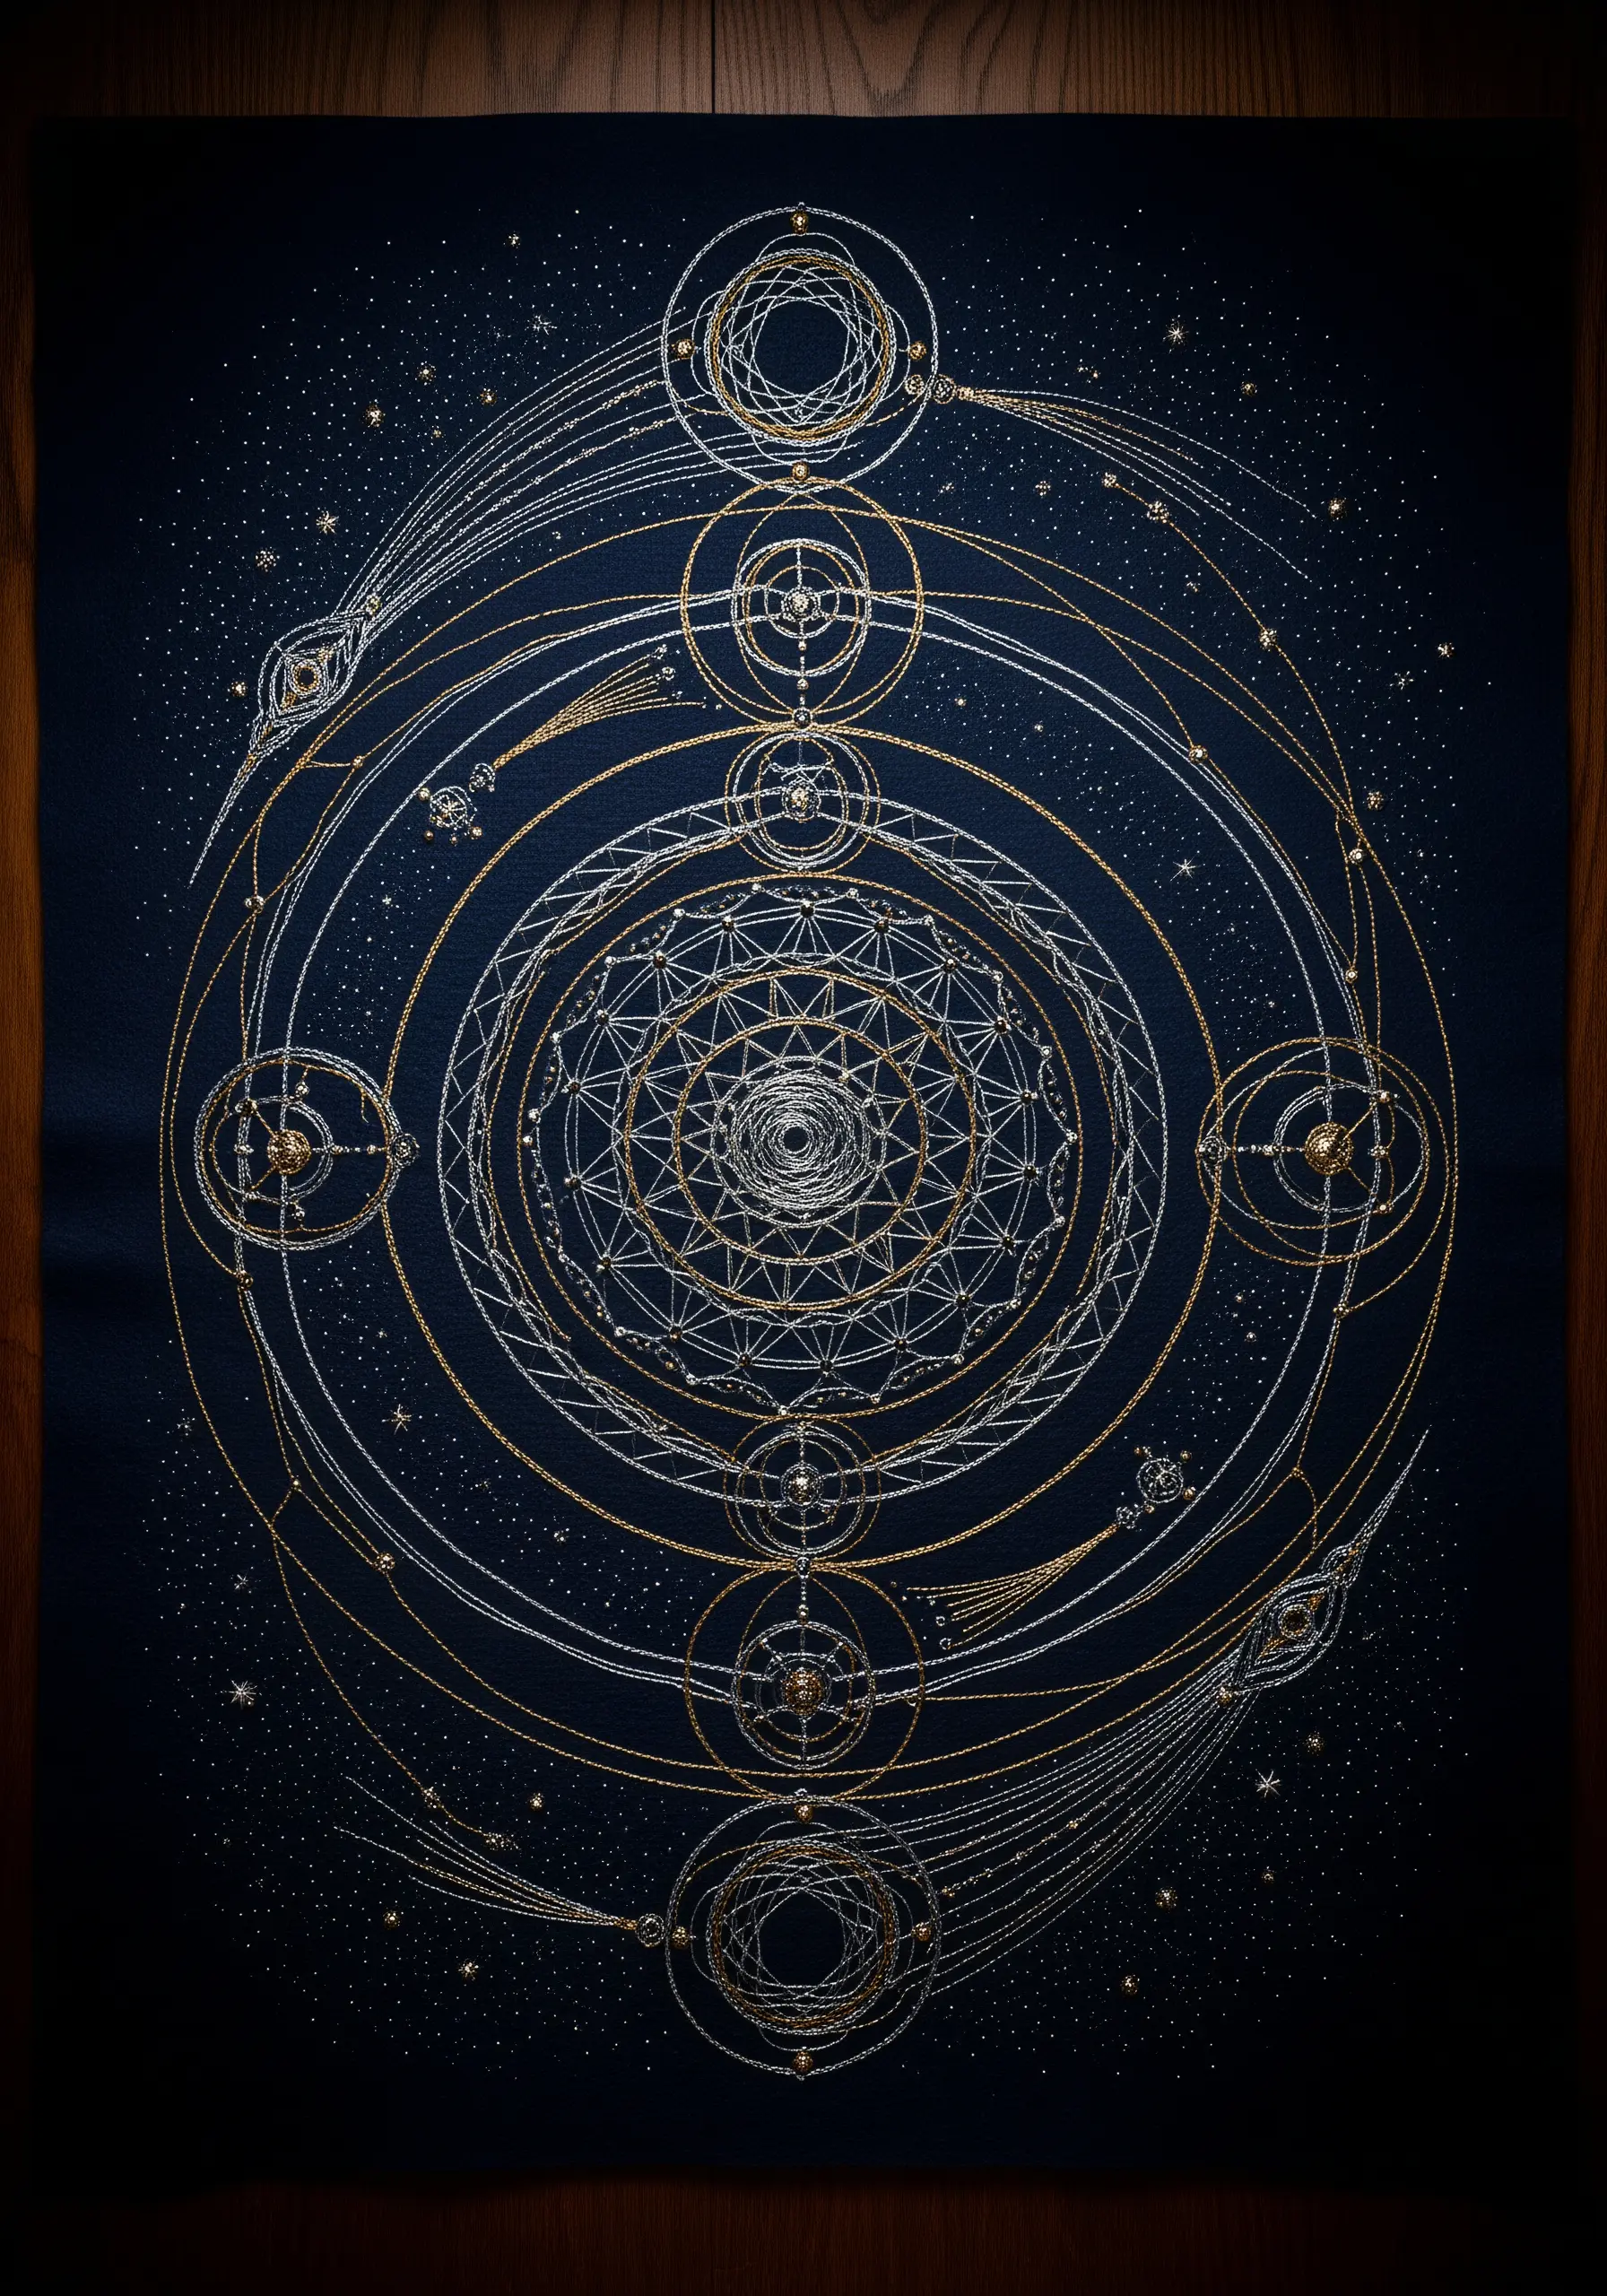
To achieve the precision of a celestial map, work with single strands of metallic thread on a dark, high-contrast fabric like navy or black cotton sateen.
For perfectly smooth curves and circles, use a couching stitch: lay down your metallic thread on the design line and tack it in place with a second, thinner thread in a matching color.
This method prevents the metallic thread from snagging or twisting, which often happens with standard stitches.
For the scattered ‘stars,’ use single French knots or tiny seed beads to add sparkle that complements the fine linework without overwhelming it.
3. Build a Landscape of Monochromatic Texture
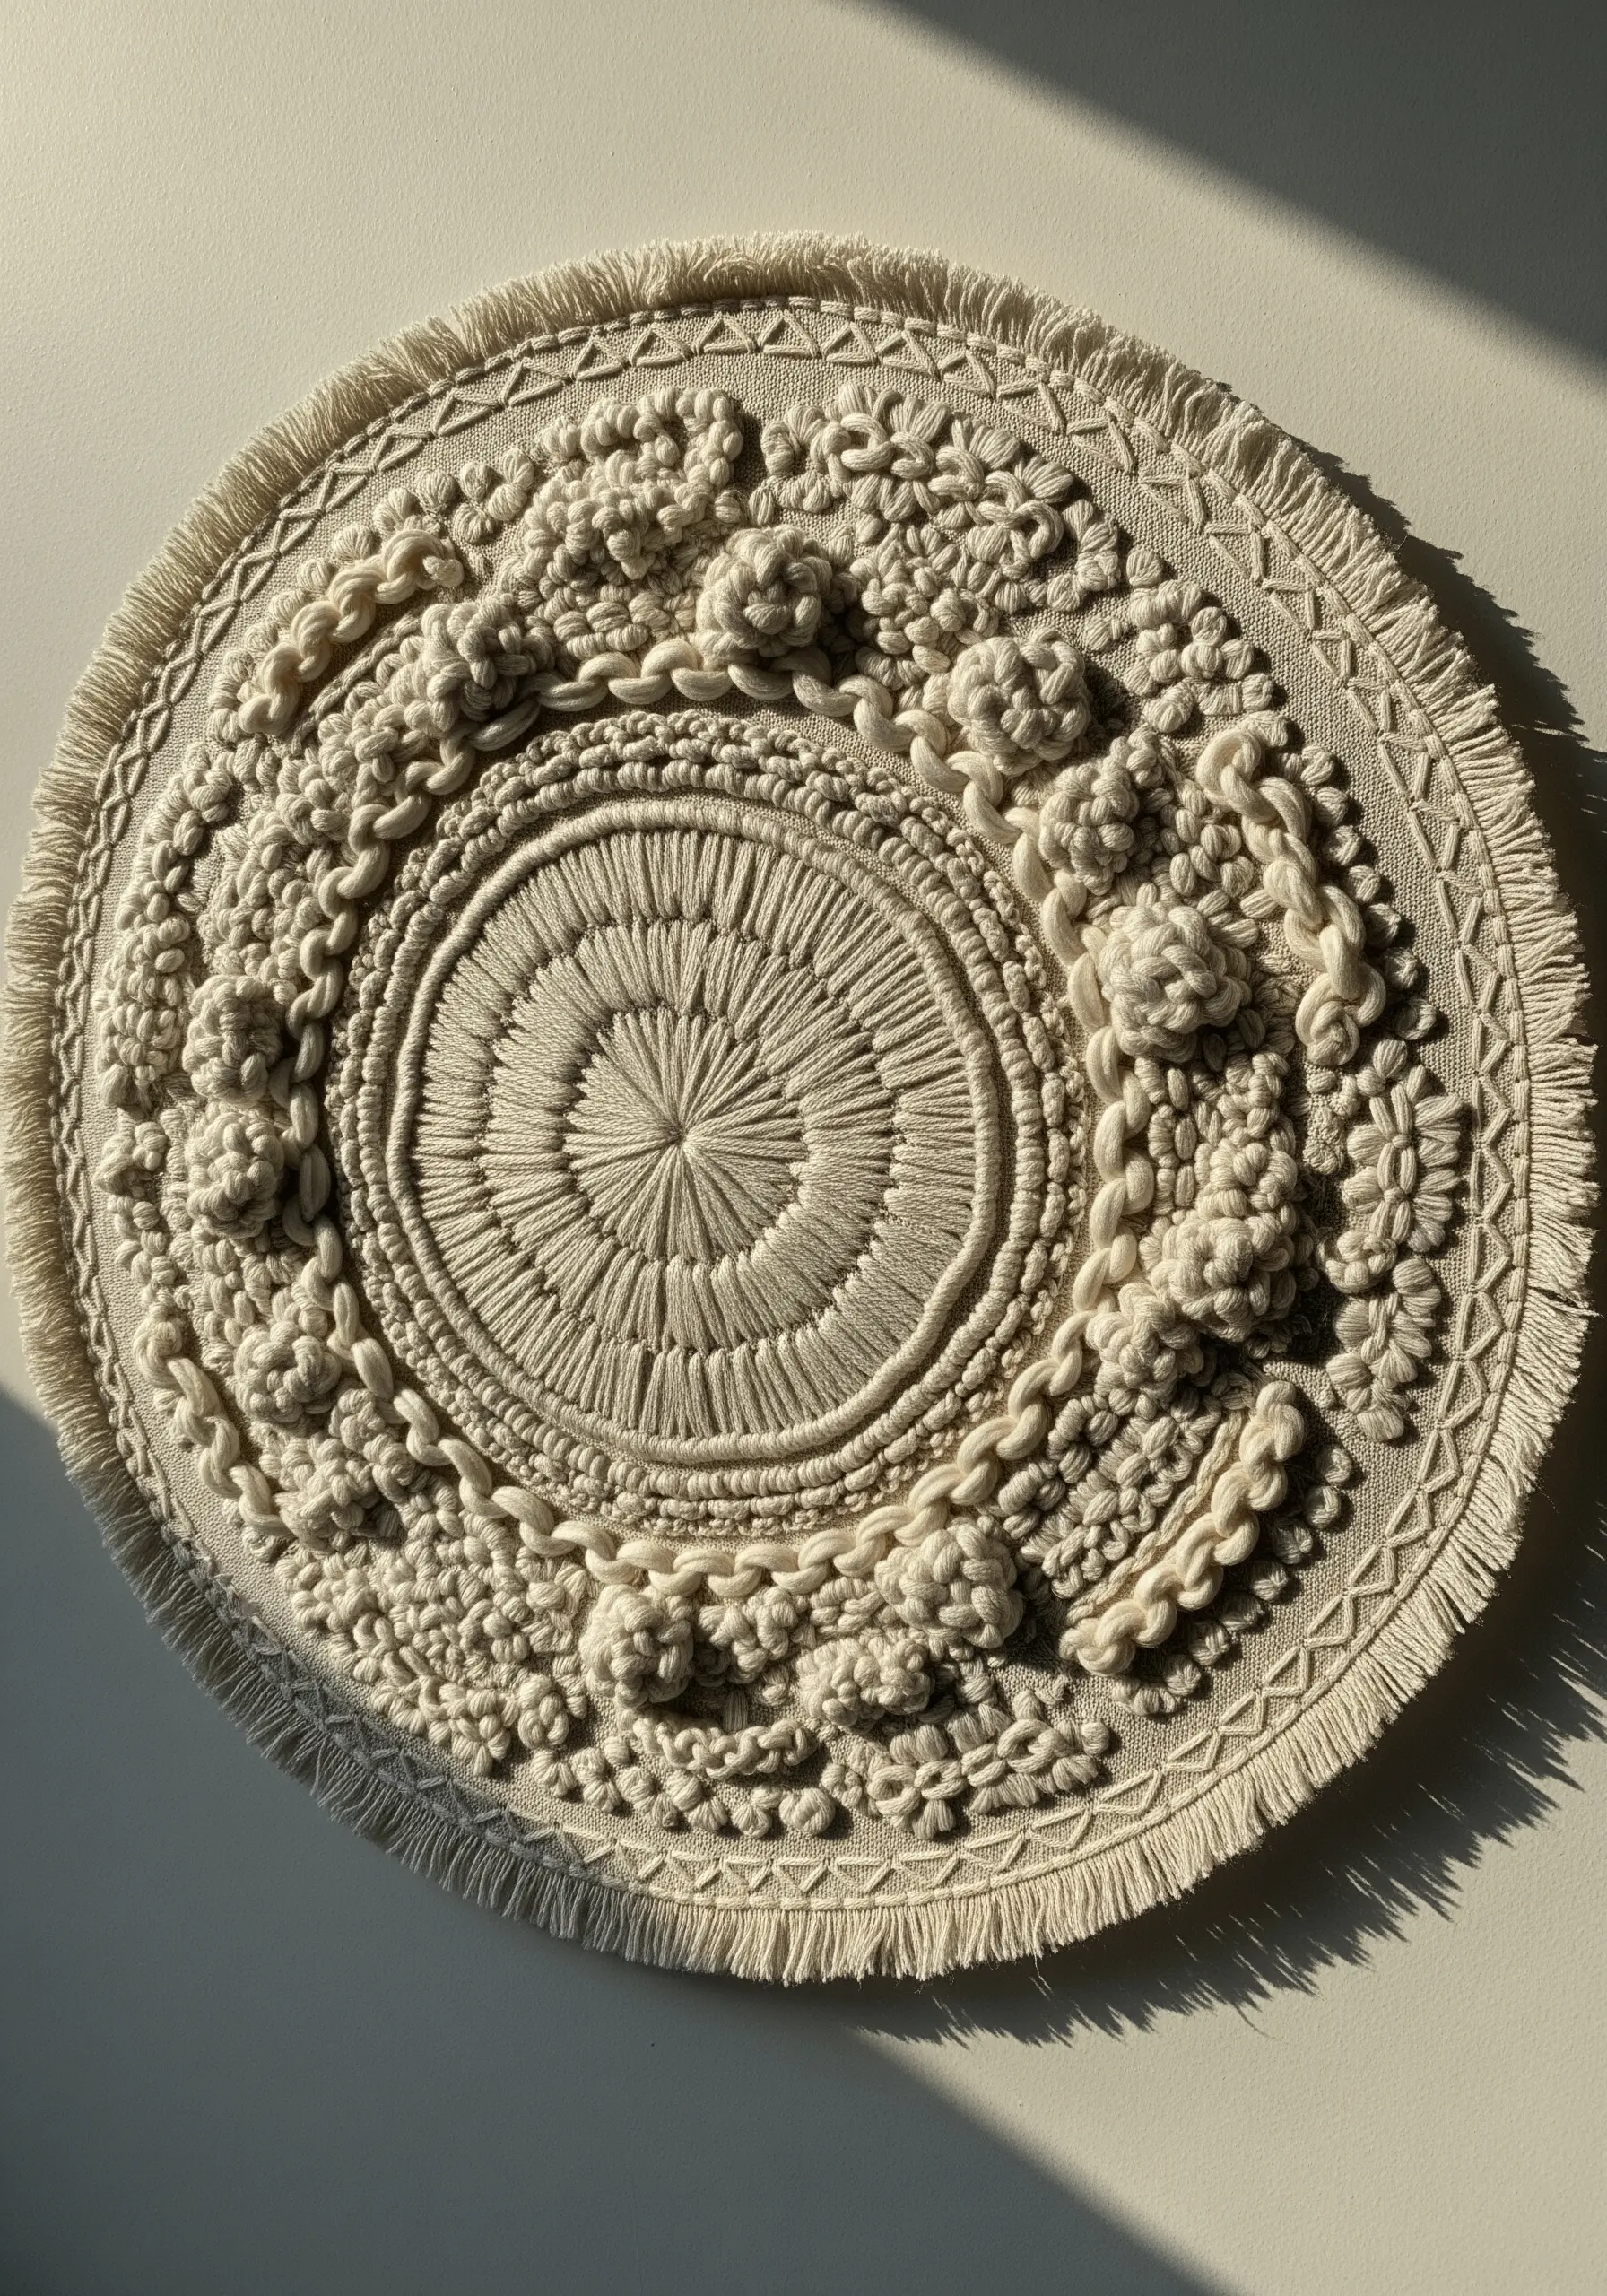
Create a powerful tactile experience by focusing entirely on texture, not color.
Work with a single shade, like ivory or white, and combine high-relief stitches to build a dimensional surface.
Use dense clusters of French knots for a pebbled feel, add woven picot stitches for floral-like shapes, and create ridges with padded satin stitch or raised chain stitch bands.
Varying the weight of your thread—from a single strand to all six—will also enhance the textural contrast, making your monochrome design feel incredibly rich and complex.
4. Achieve Blended Petals with Fishbone Stitch
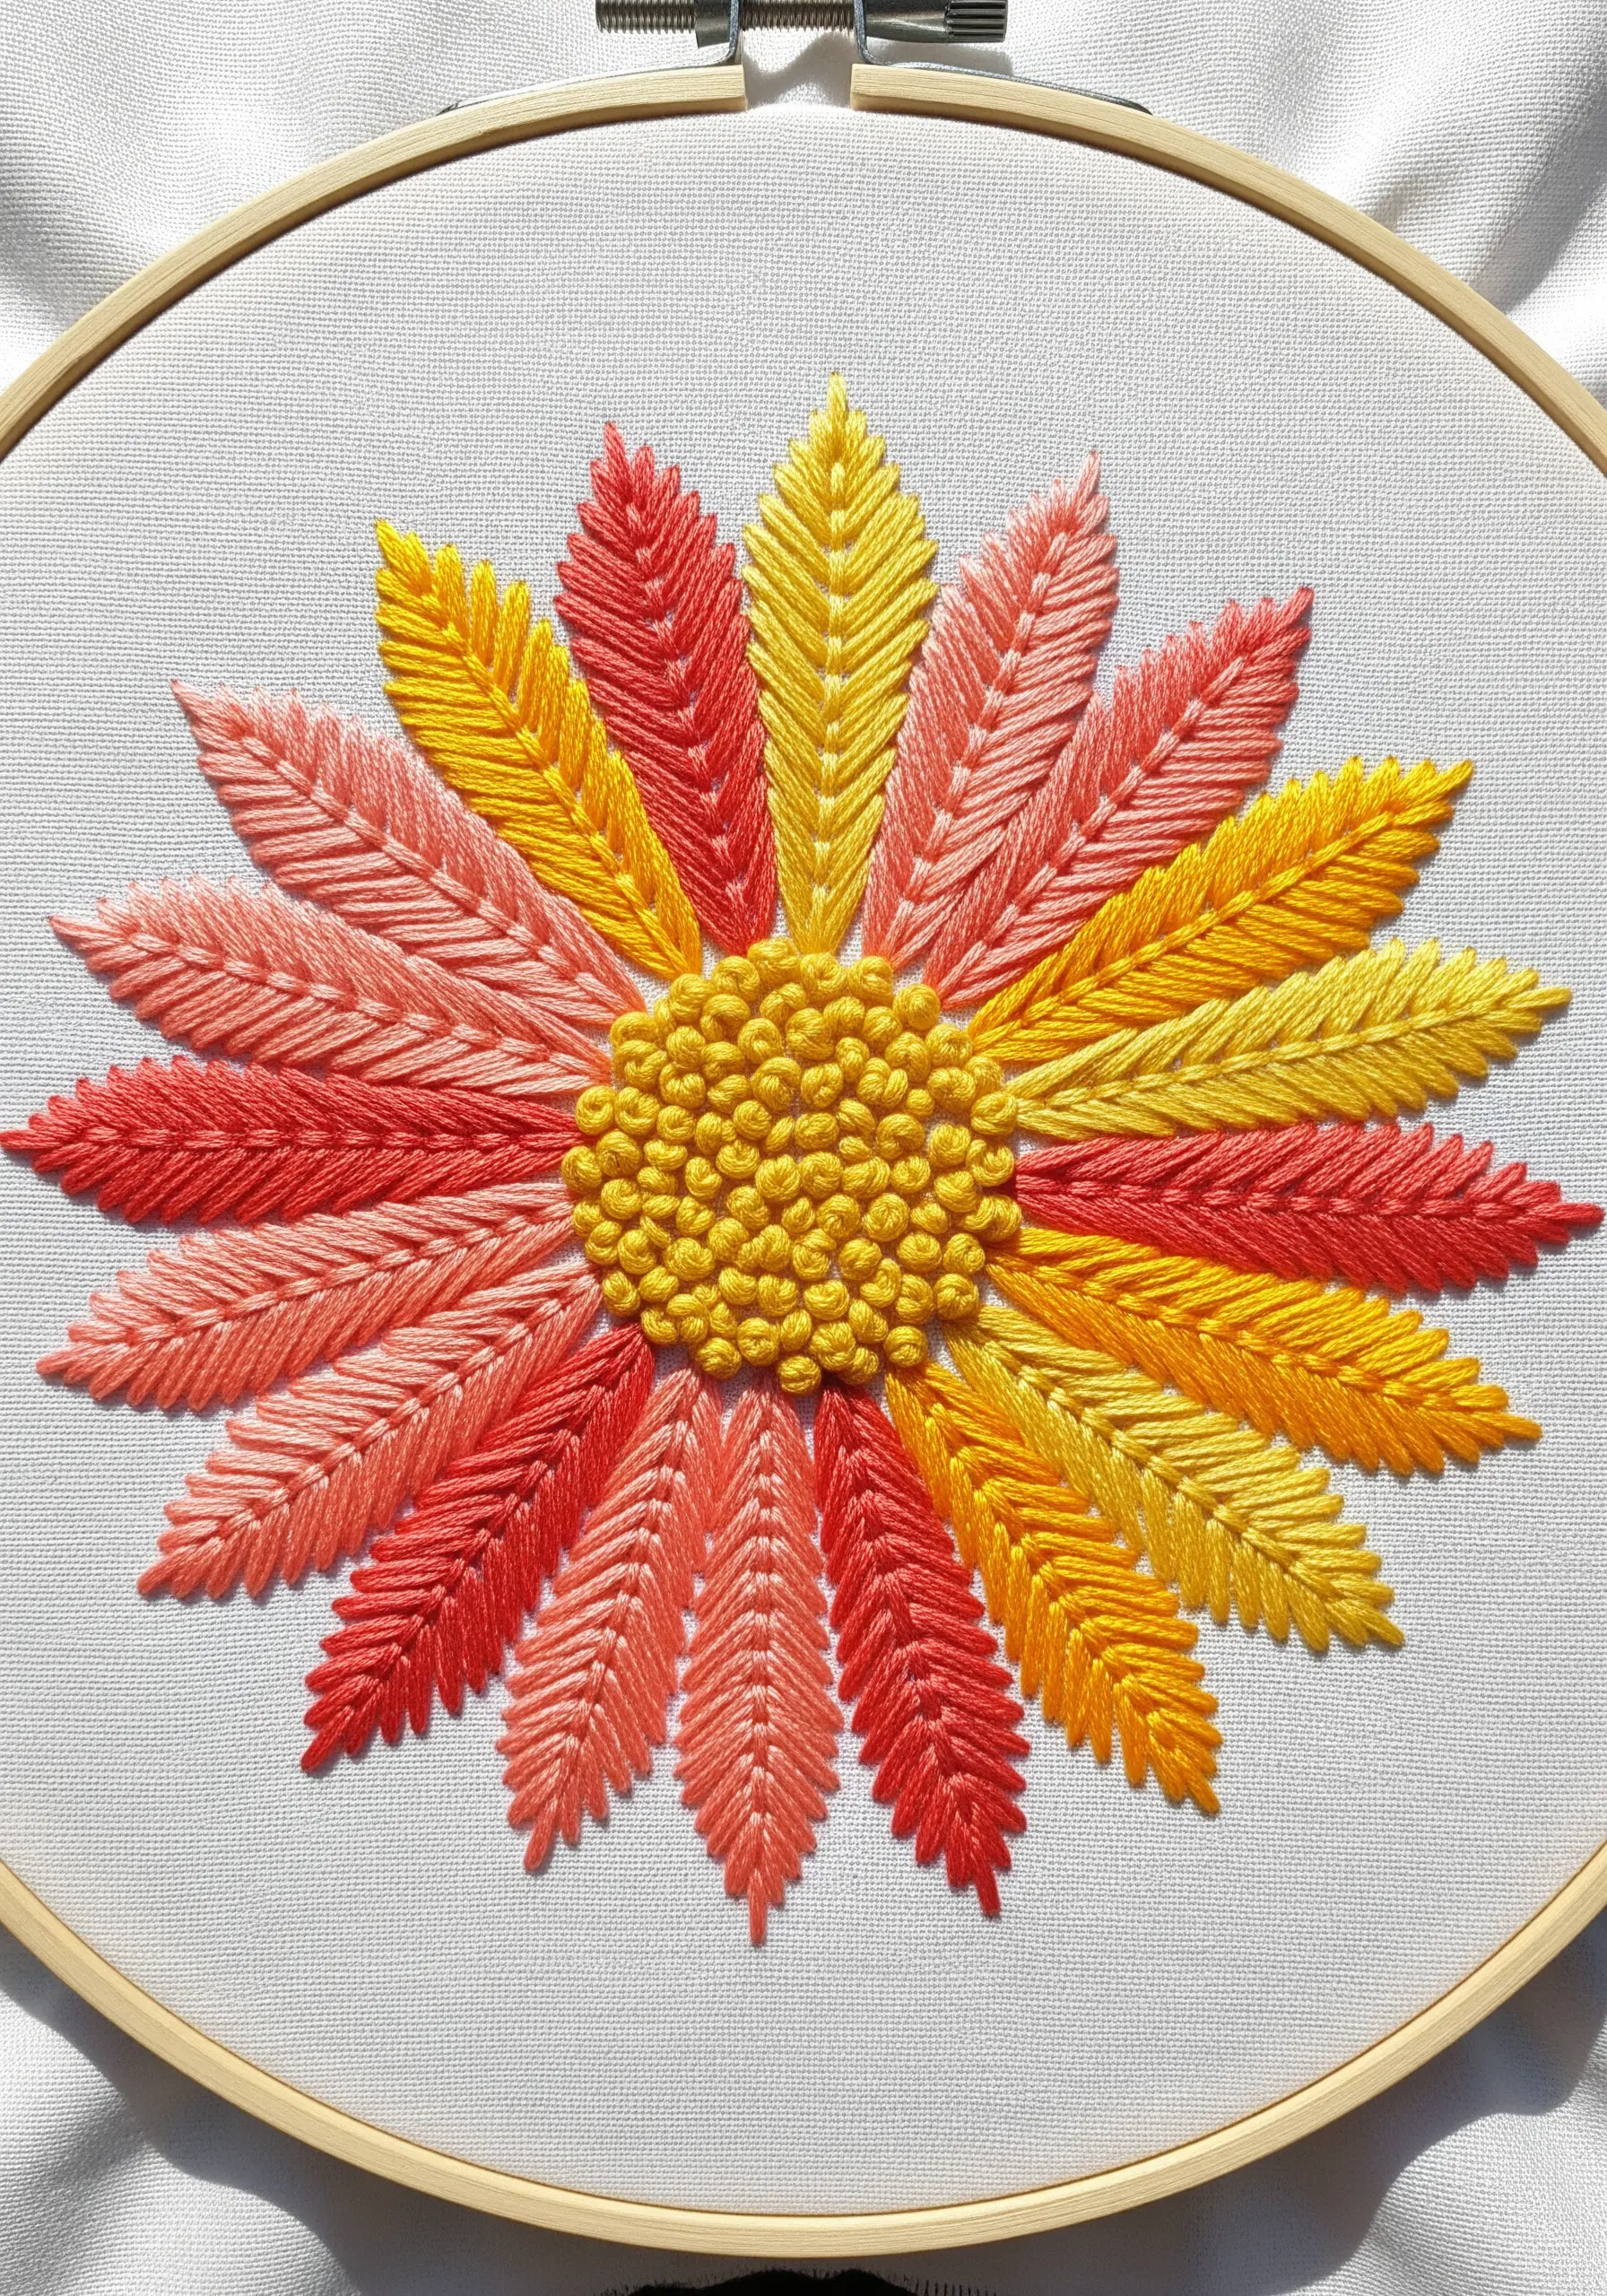
For petals that feel both structured and naturally shaded, the fishbone stitch is your best choice.
It creates a central vein while allowing you to fill the shape with smooth, angled stitches that mimic natural growth.
To create a warm gradient, stitch one-third of each petal in one color, the next third in another, and finish the tip with a third shade.
Unlike traditional satin stitch, this technique blends the colors organically at the edges where the stitches meet, creating a soft transition.
A center filled with dense French knots provides a contrasting texture that makes the smooth petals pop.
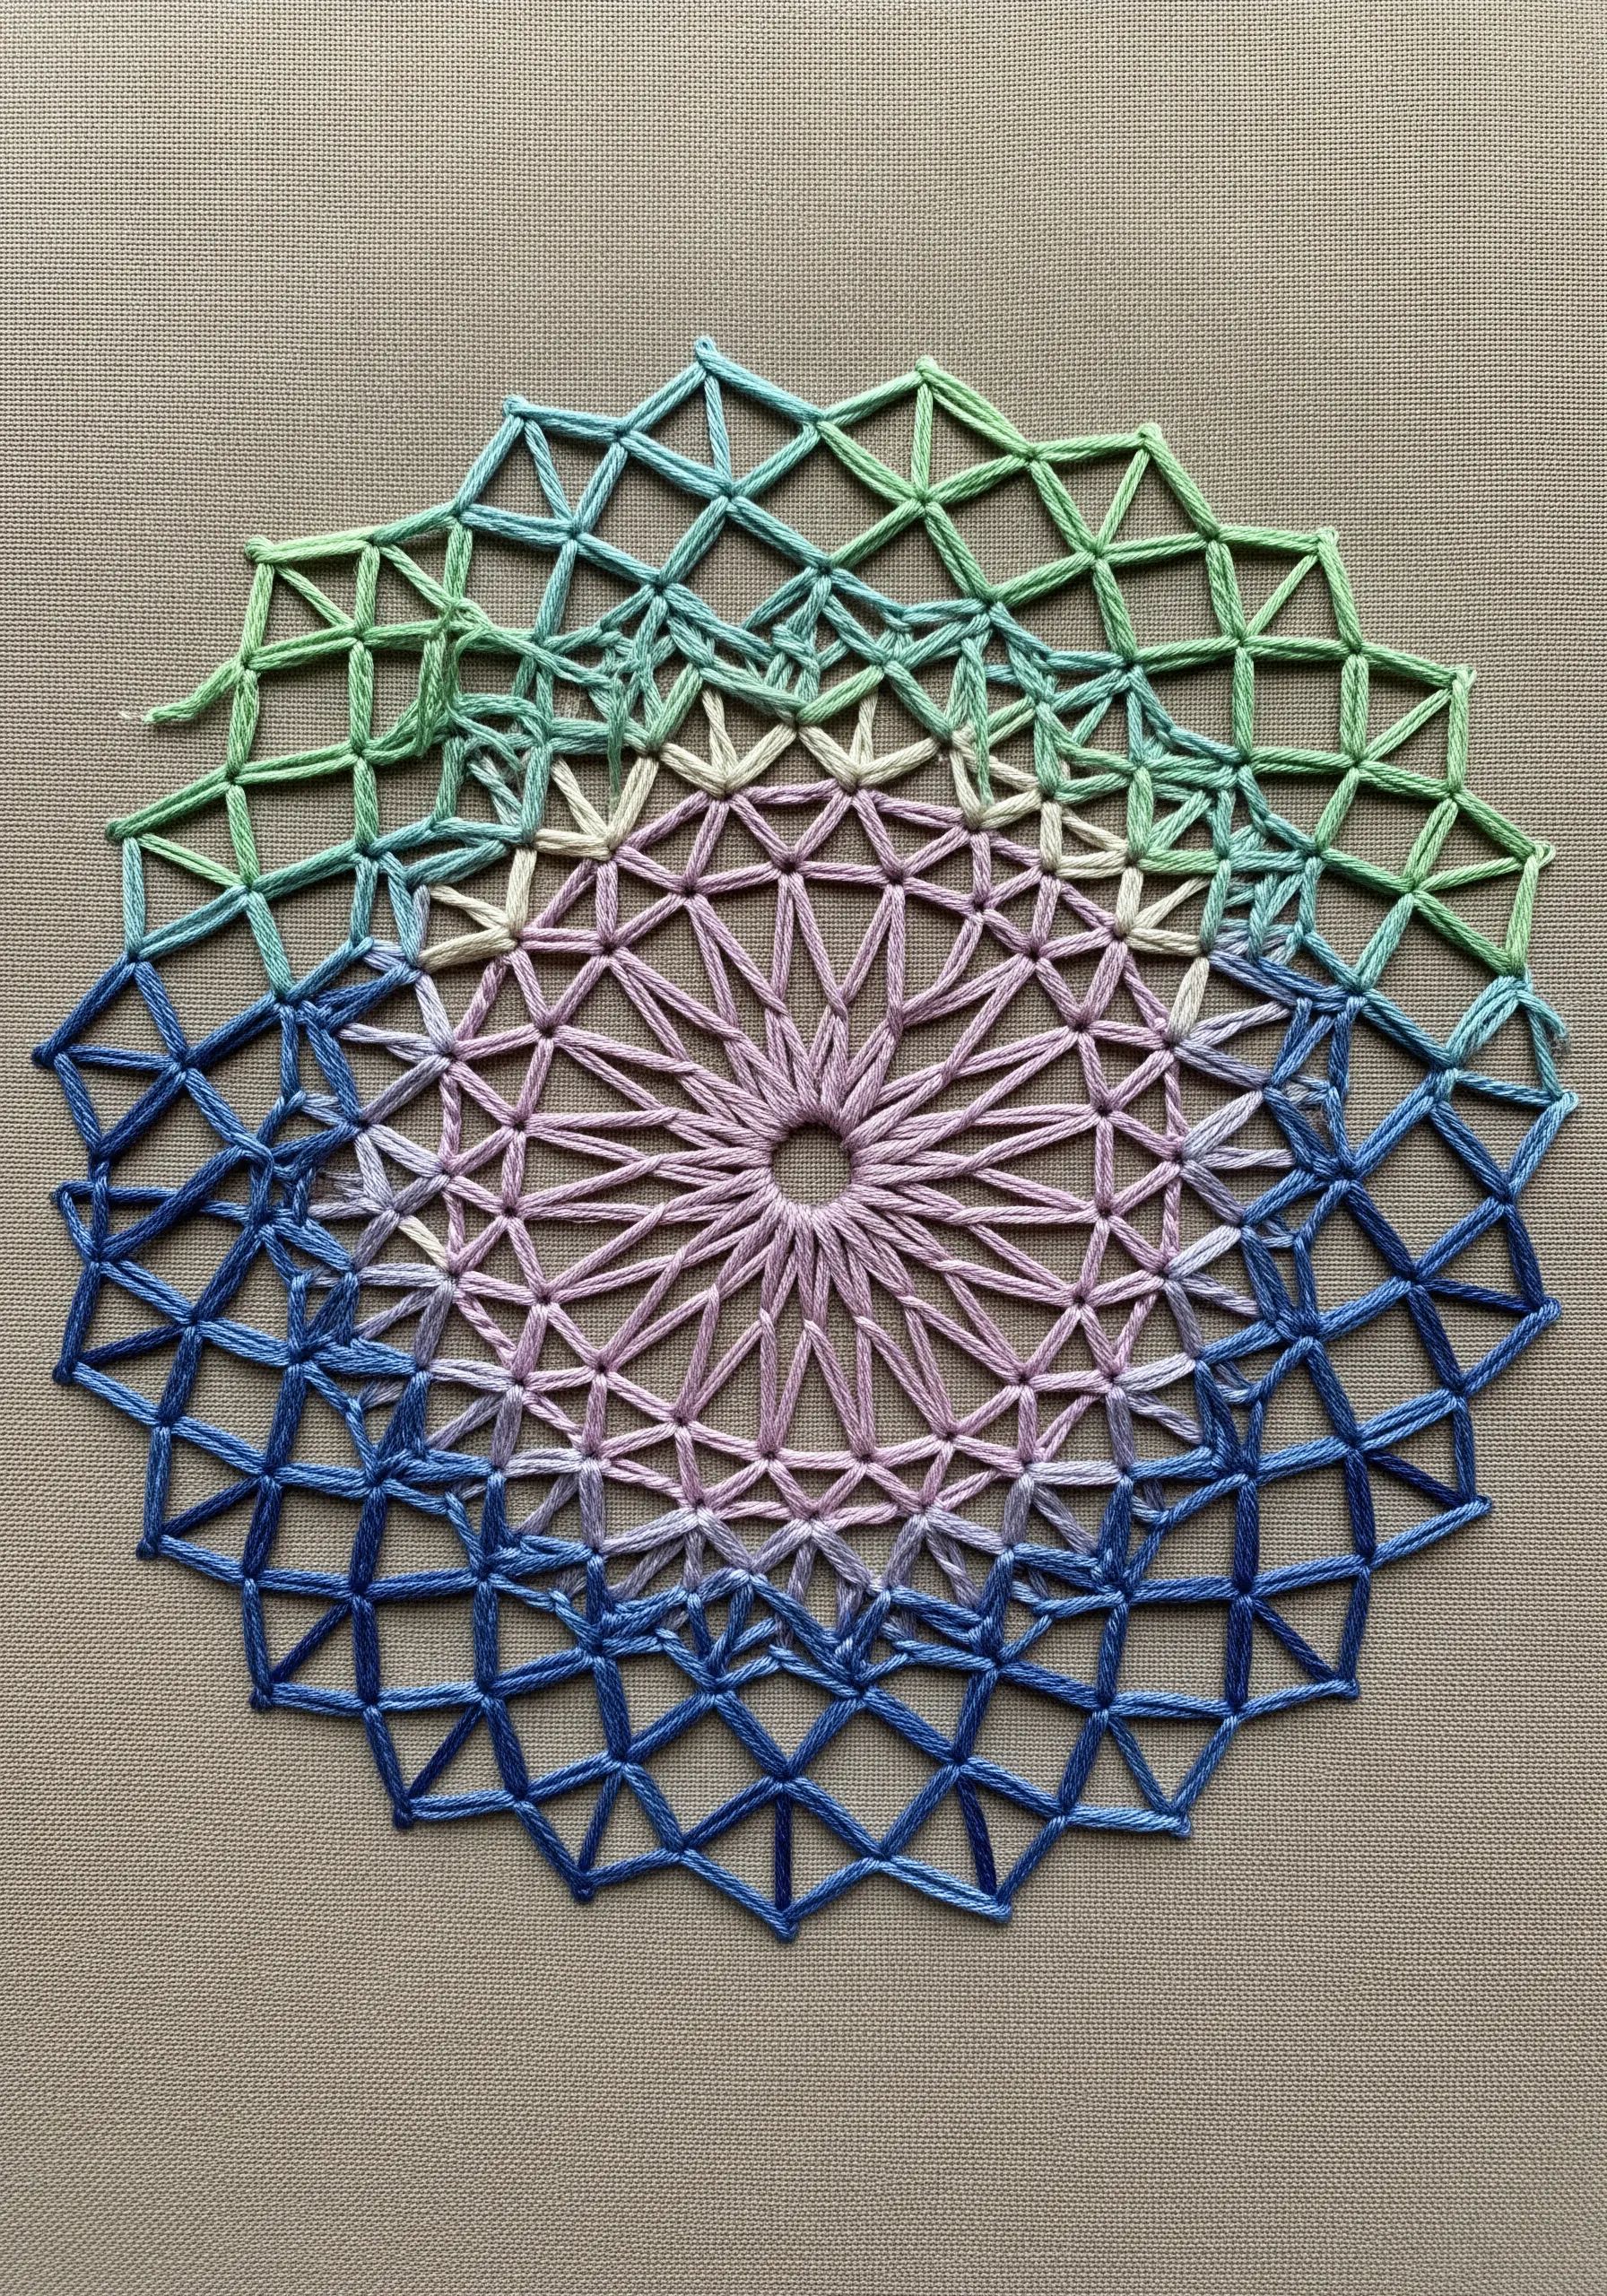
5. Capture Fluid Motion with Parallel Lines
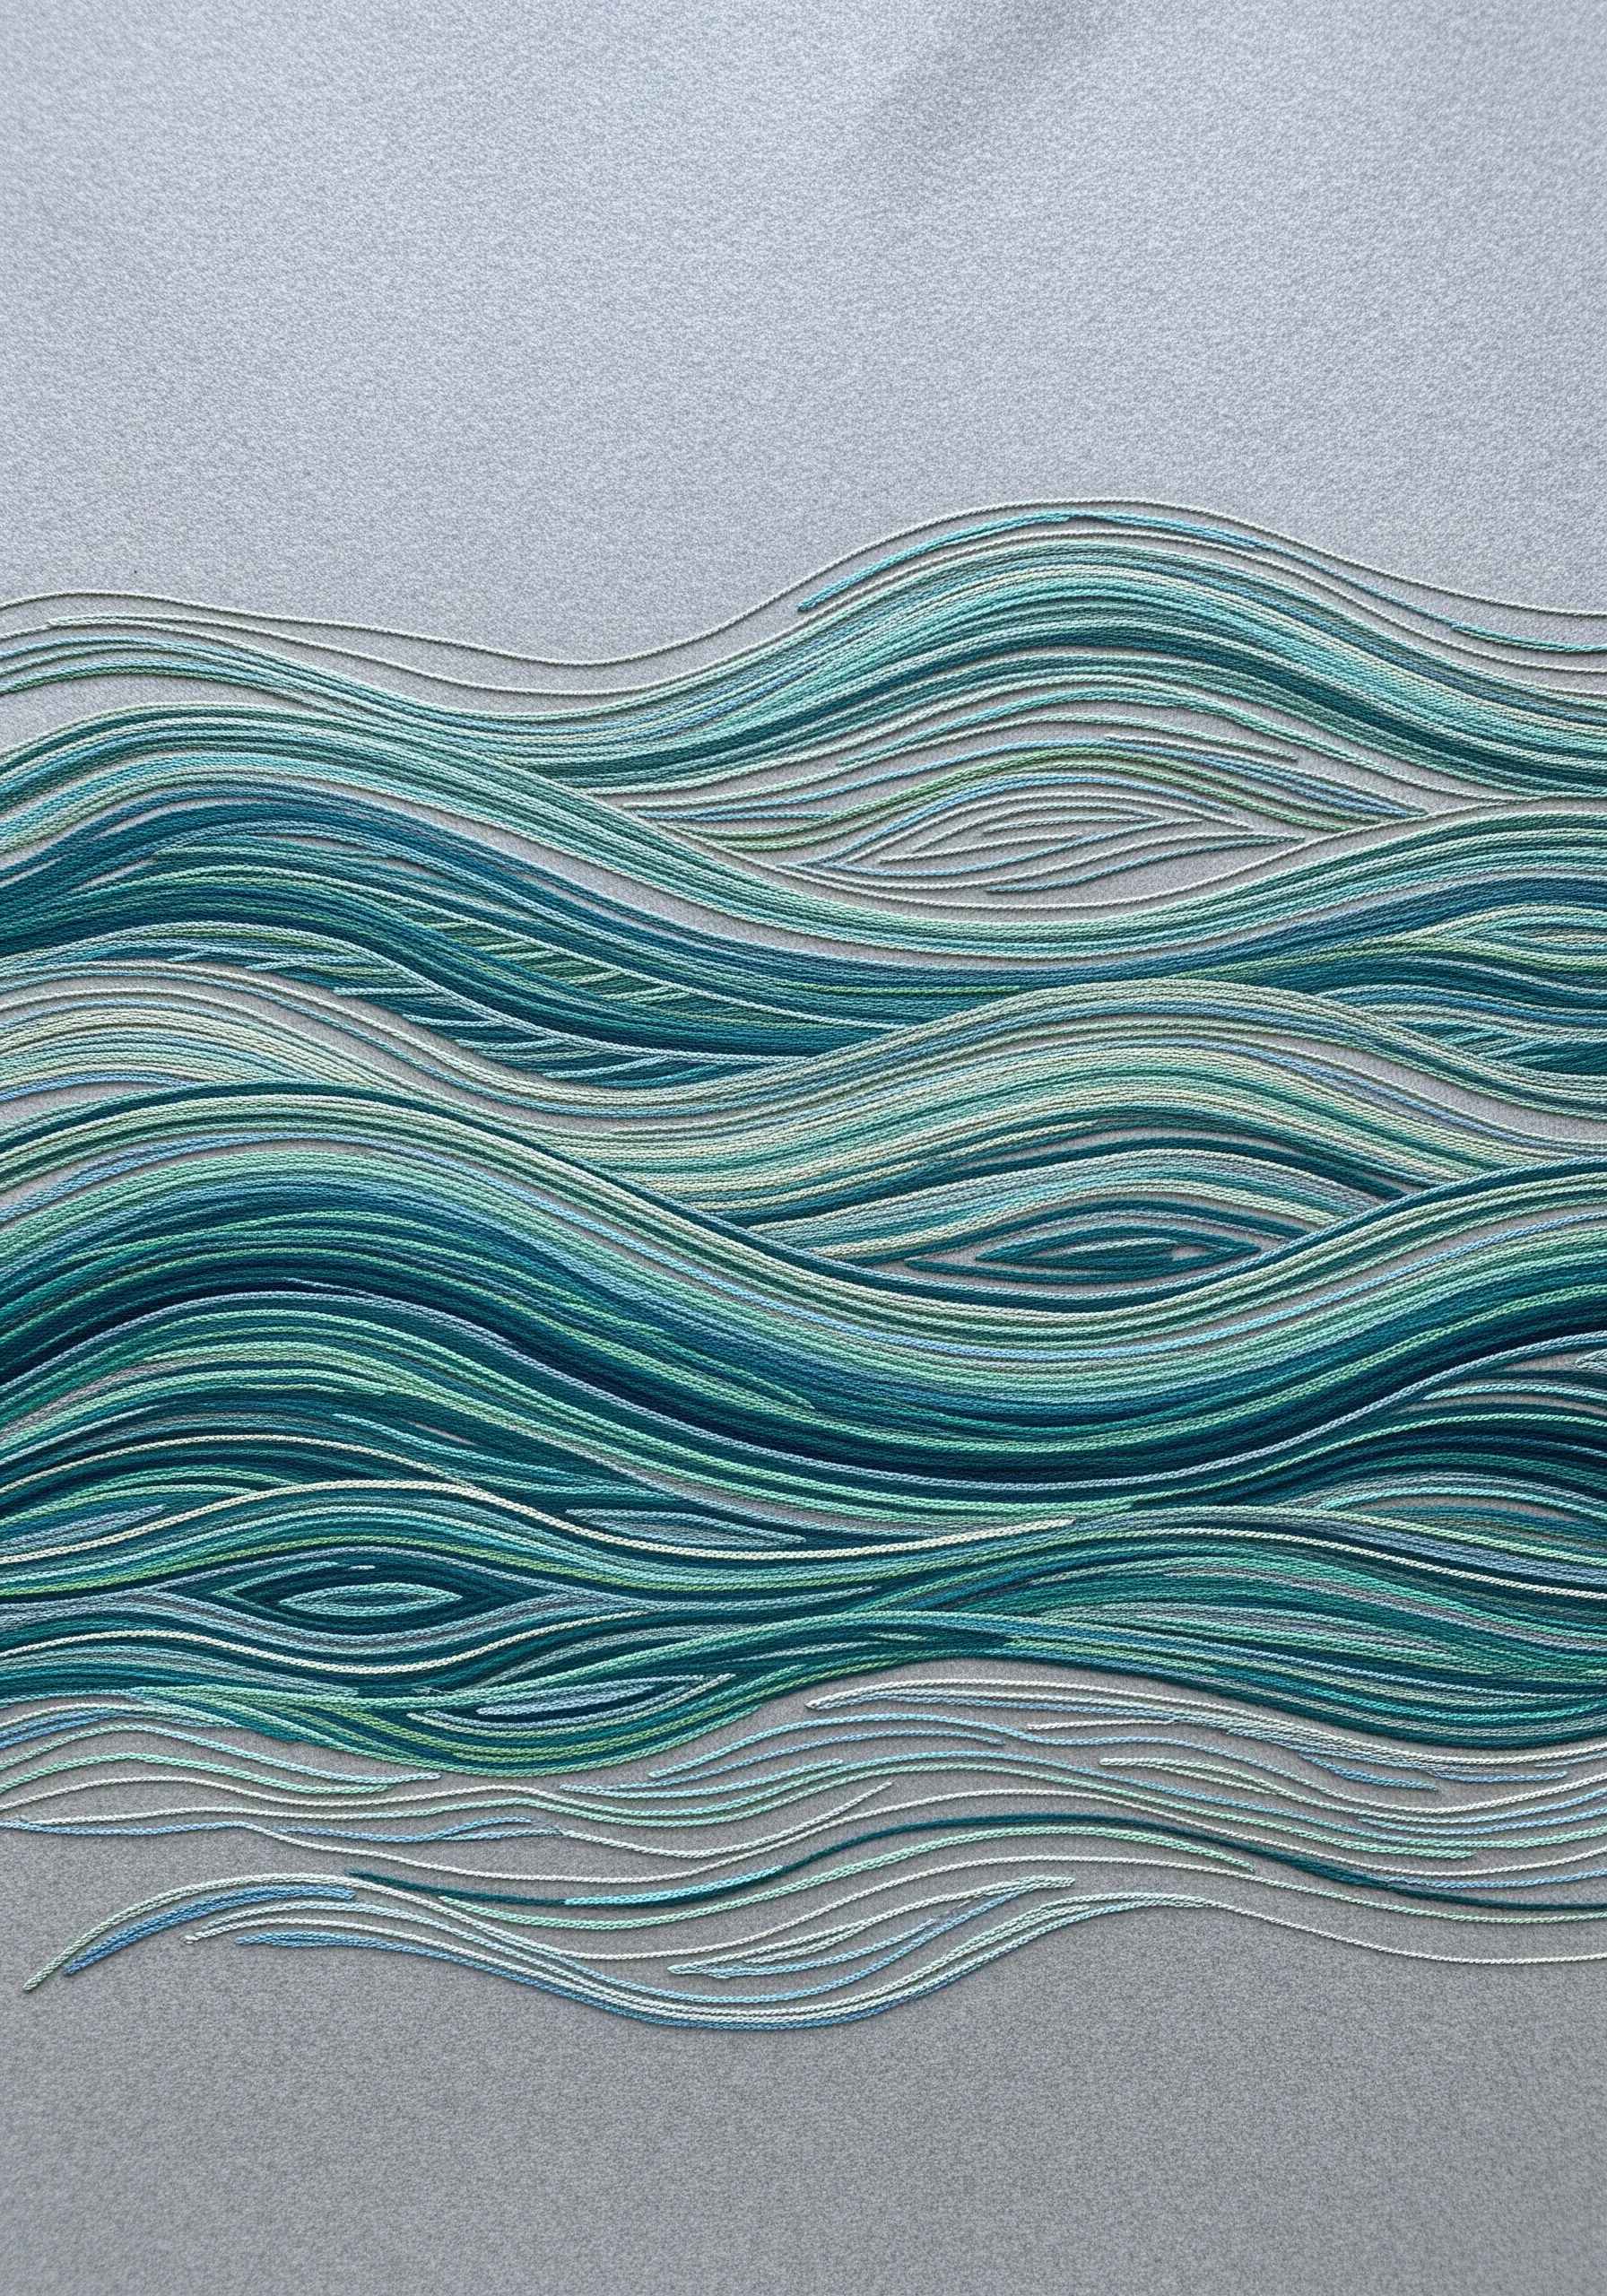
Evoke the calming rhythm of water or wind by filling your space with clean, parallel lines of thread.
Instead of filling a shape with satin stitch, trace its contours with rows of stem stitch, split stitch, or even a simple backstitch.
Choose an analogous color palette—like various shades of teal, blue, and green—and allow the colors to flow into one another organically.
This technique is incredibly meditative as you follow the lines across the fabric, creating a design that feels both minimal and full of serene movement.
6. Use Tension to Create Graphic String Art

This minimalist approach uses thread like a pencil, drawing sharp, geometric lines across an open space.
The key to this style is precision: carefully mark your anchor points on the fabric before you begin.
Use a single, strong strand of thread and maintain a firm, even tension as you wrap it between the points.
Stitching on a high-contrast fabric, like white thread on black canvas, emphasizes the crisp geometry of the design, turning negative space into an essential part of the artwork.
7. Incorporate Chunky Fibers for Bold Texture
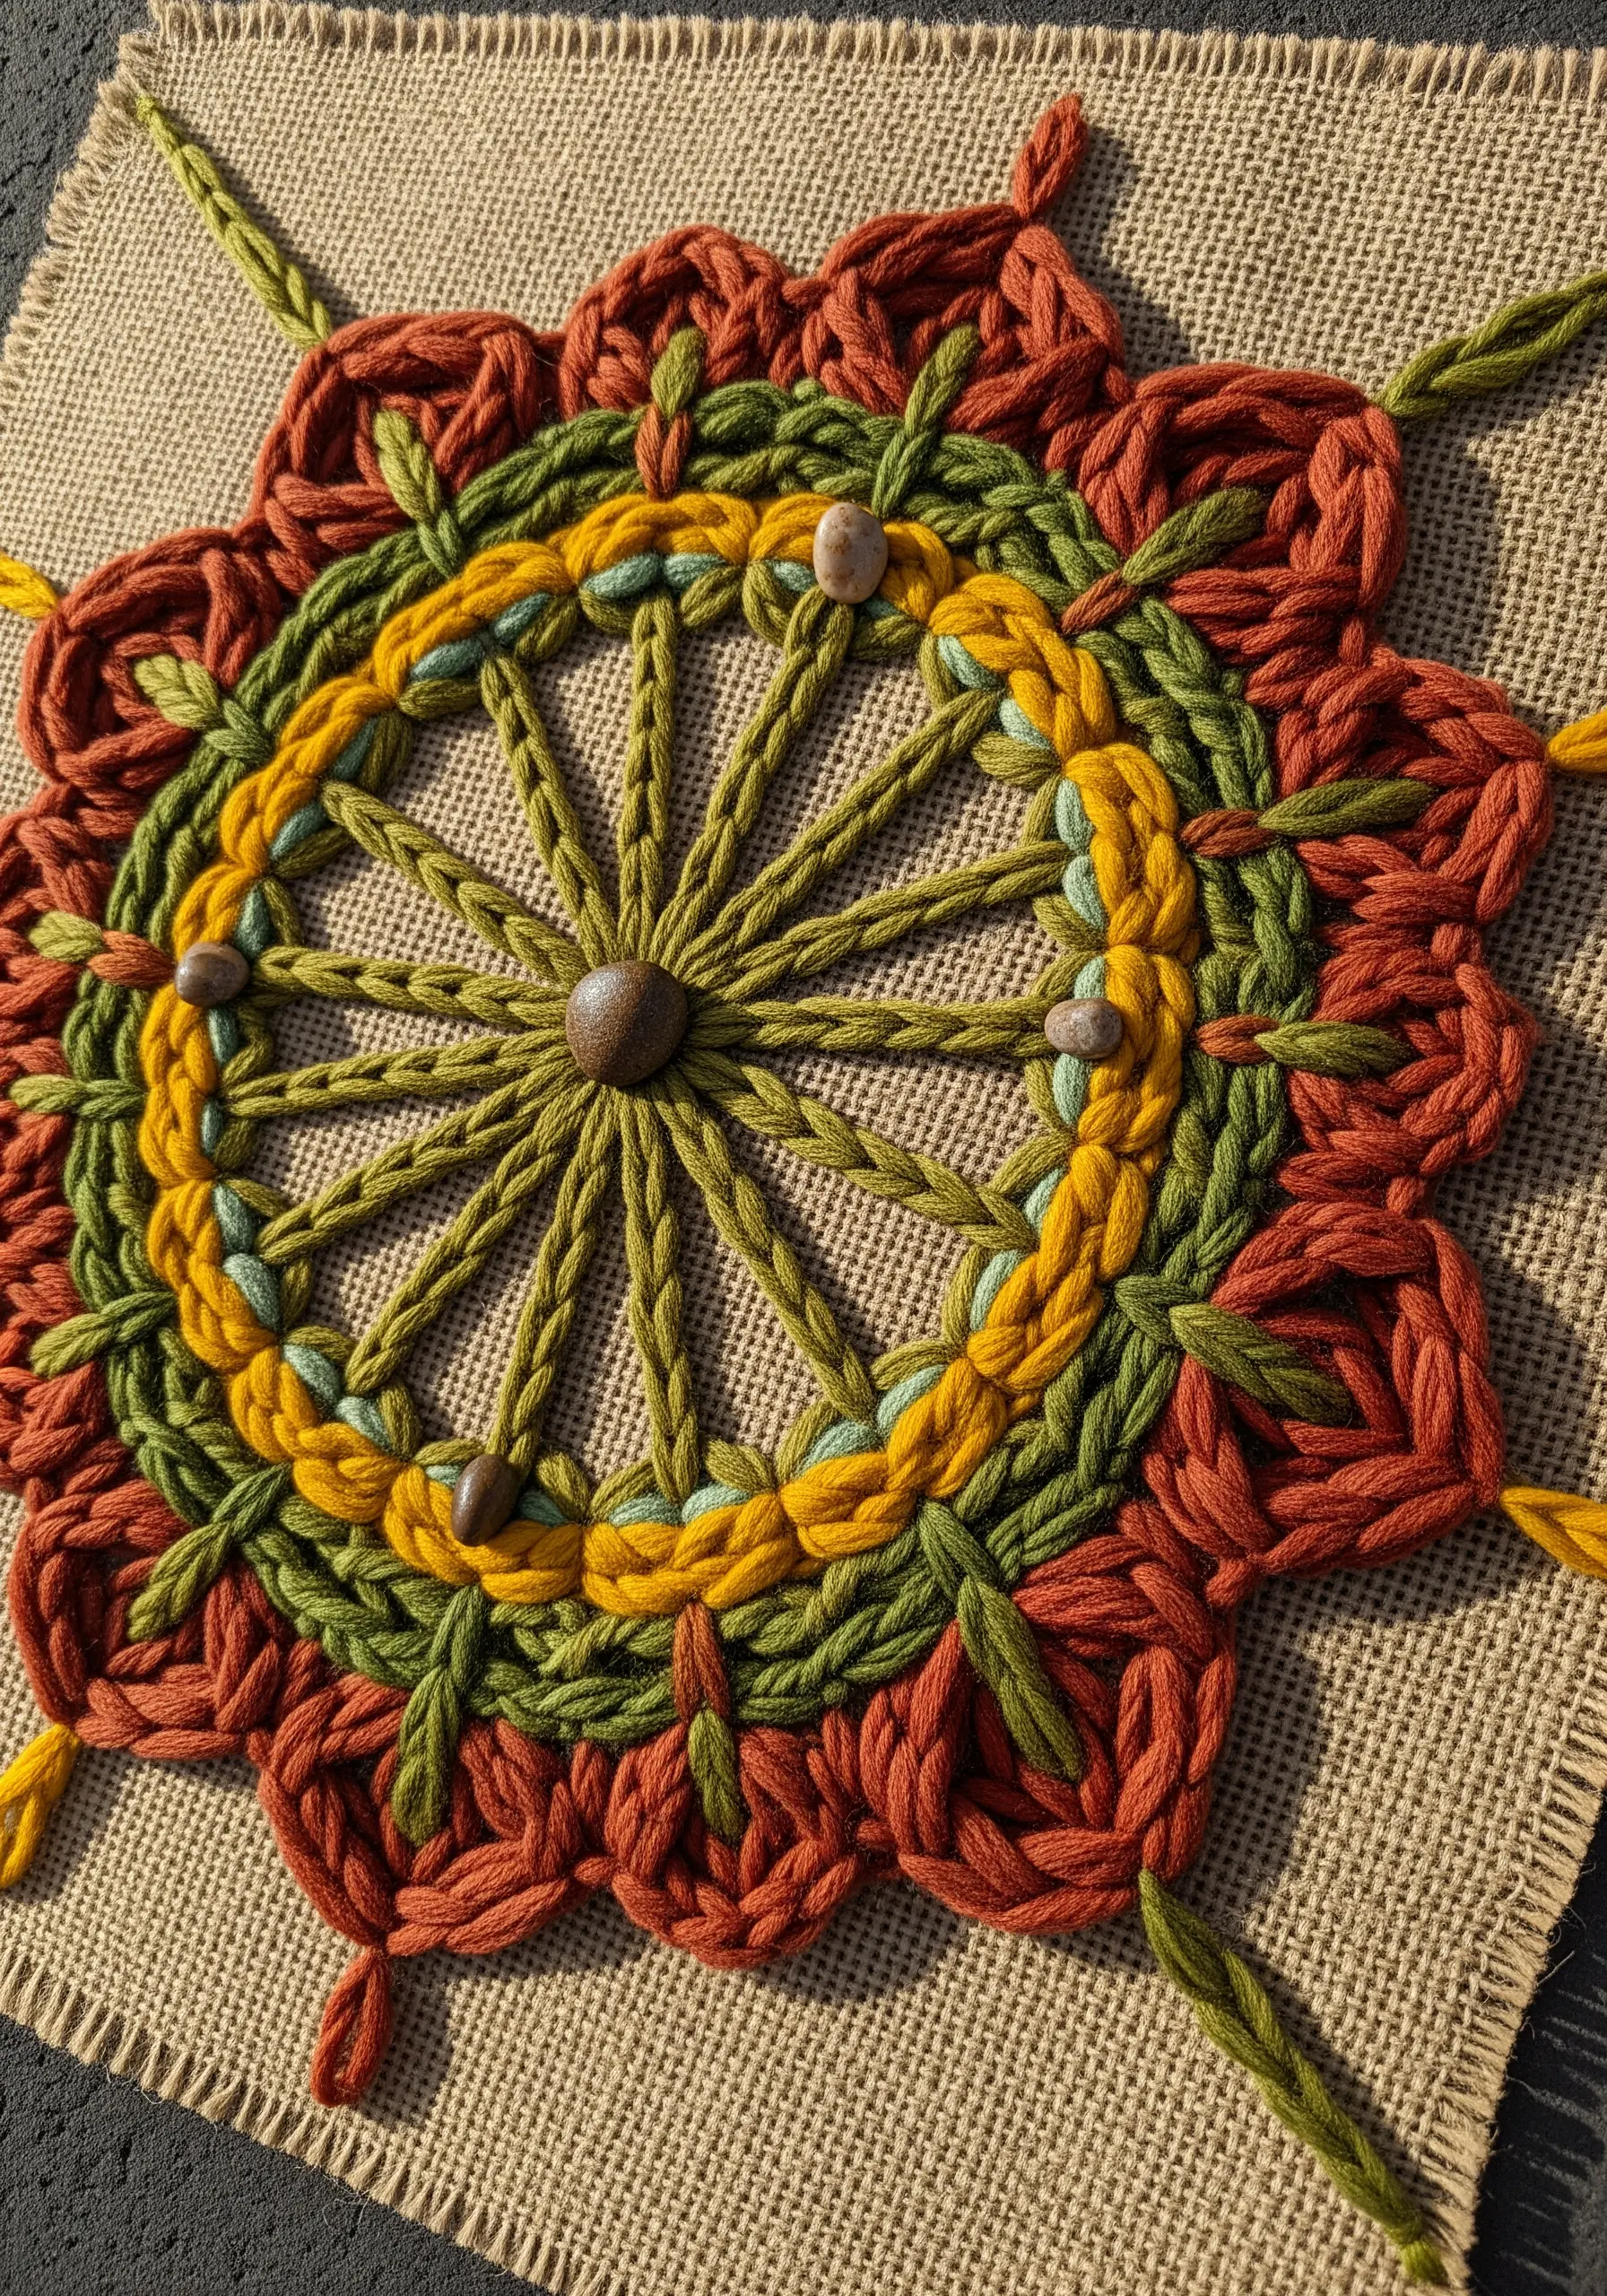
Move beyond standard embroidery floss and introduce thick, tactile materials like wool yarn or macramé cord into your mandala.
Use a large-eyed needle to couch these heavy fibers onto a sturdy base like burlap or canvas, creating bold outlines and textured fills.
Stitches like chain stitch or blanket stitch, when worked in yarn, become incredibly dimensional.
Combine these soft textures with hard elements like wooden beads or smooth river stones to create a rustic, multi-sensory piece that invites touch.
8. Master Clean Circles with Chain Stitch
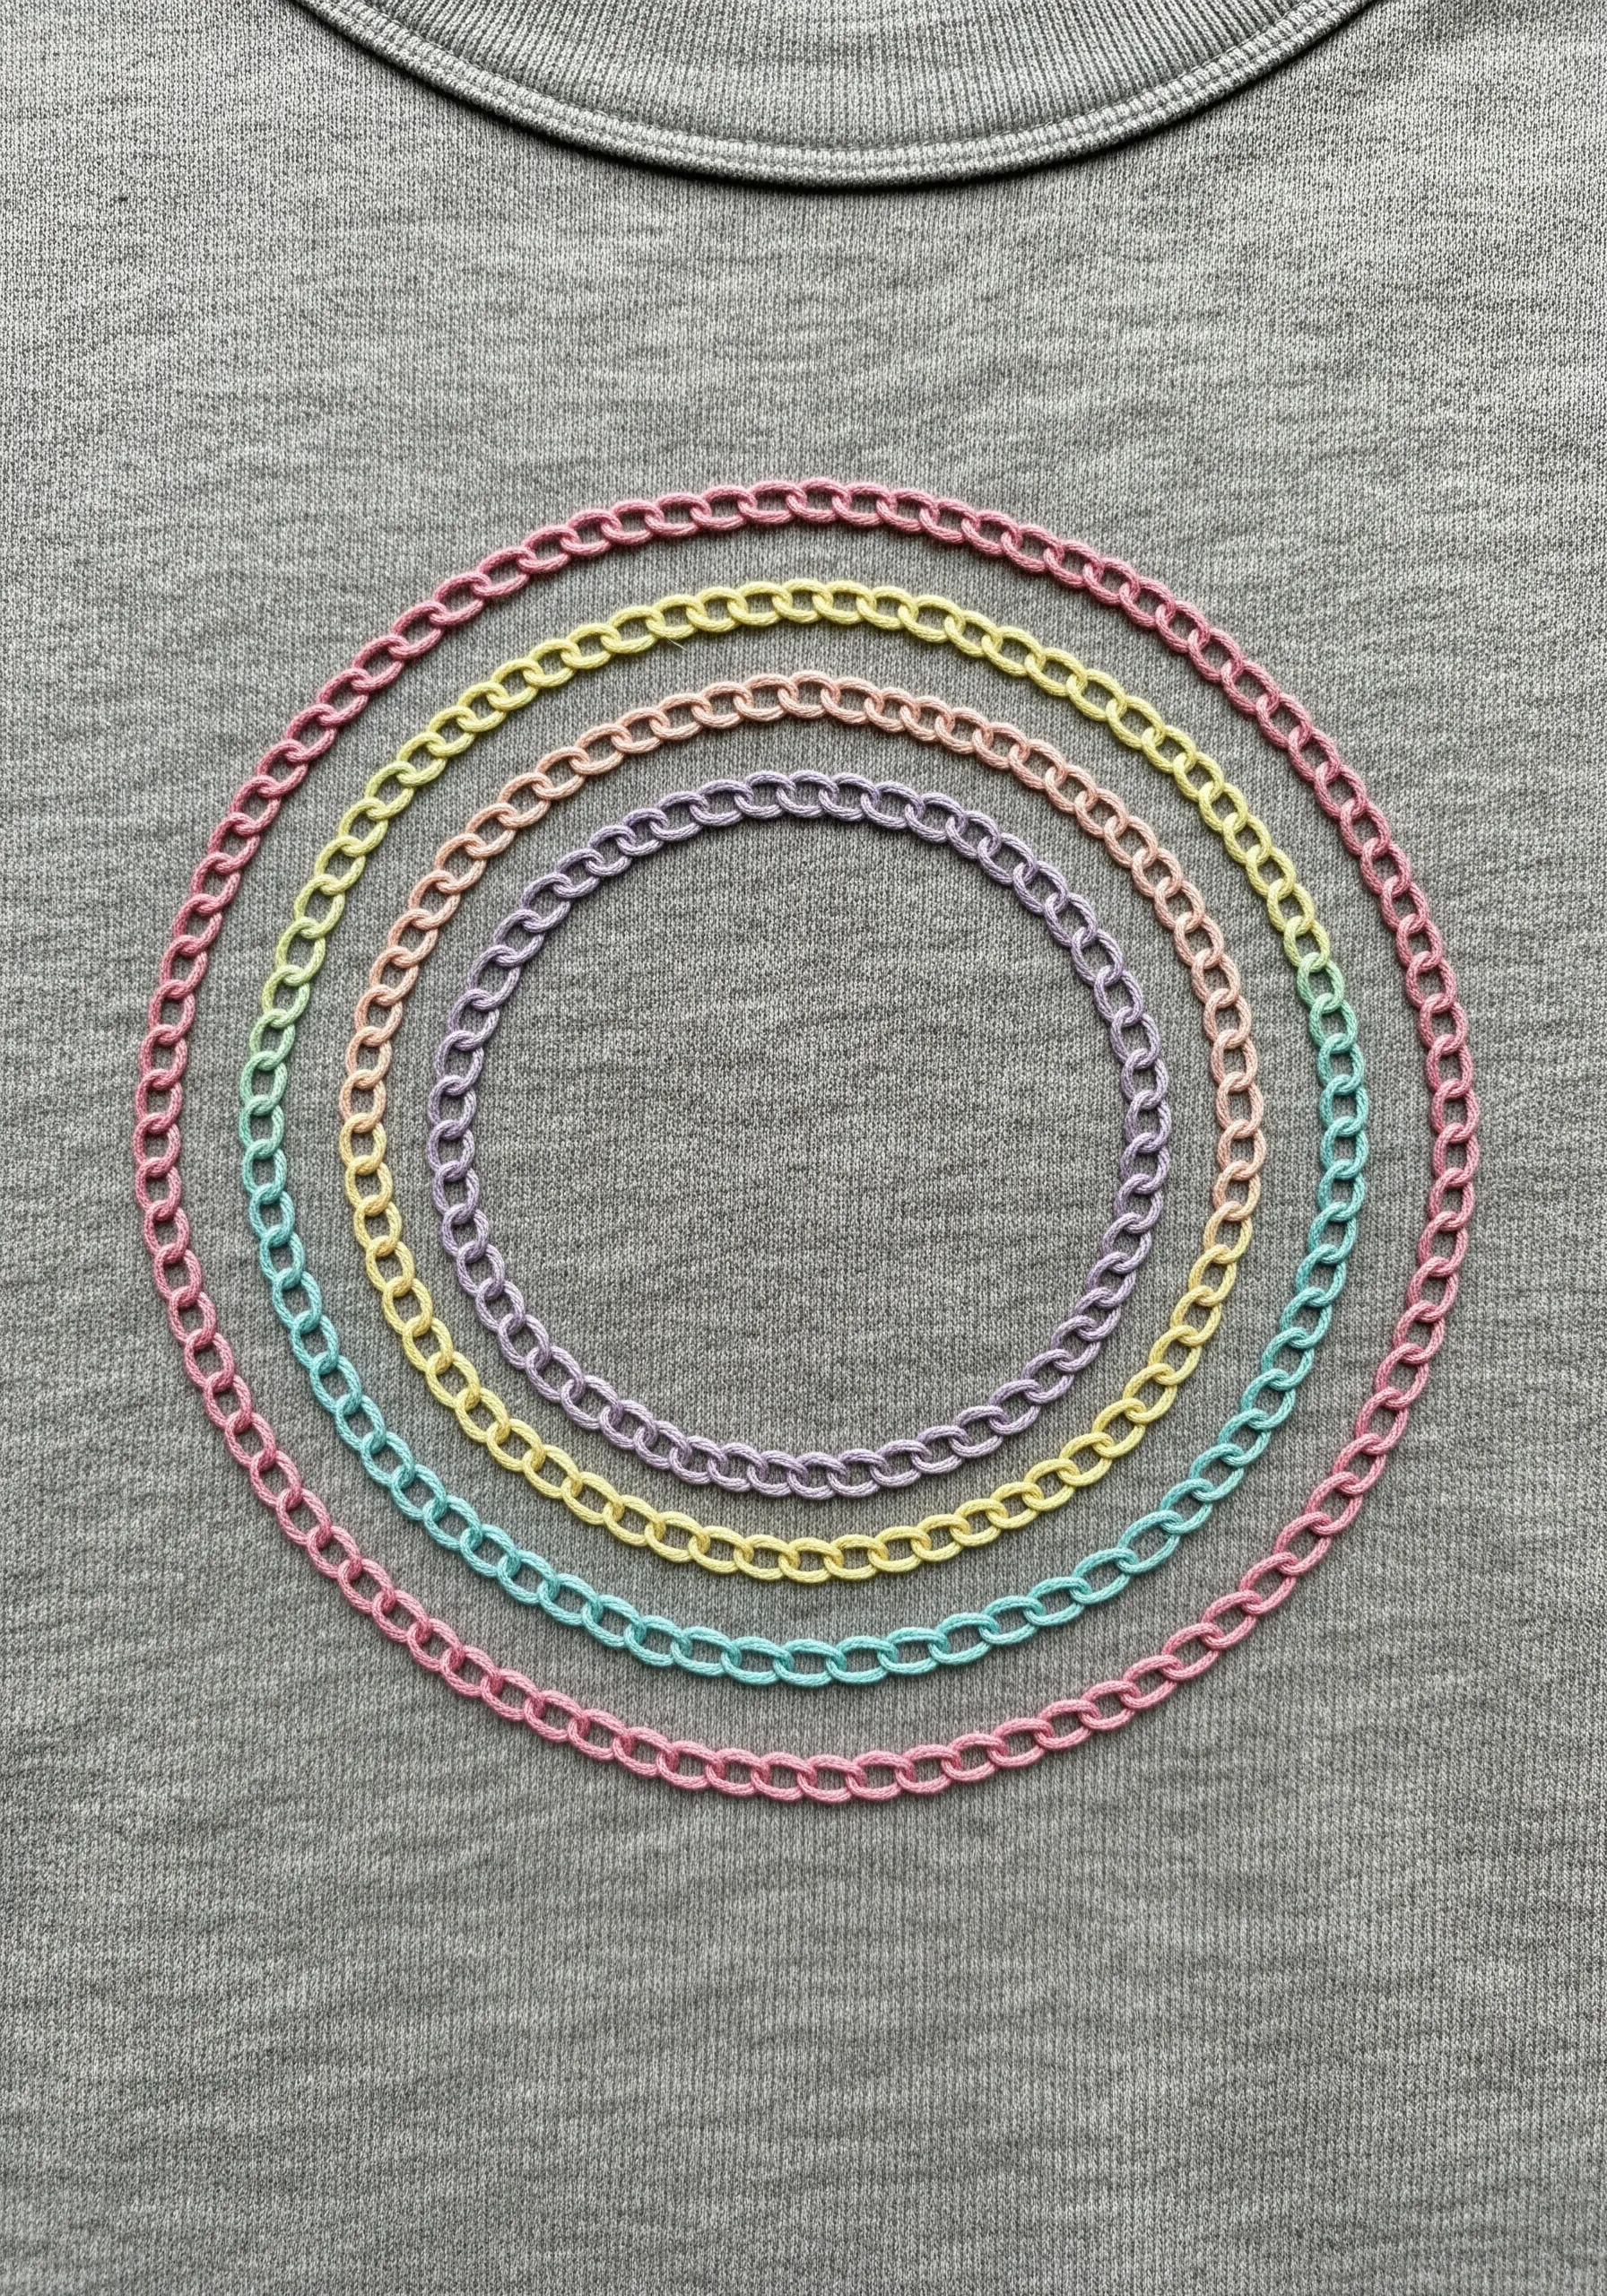
When embroidering on knit fabrics like a sweatshirt, a clean line is essential.
The chain stitch is perfect for creating smooth, consistent curves that resemble a delicate chain.
Always use a stabilizer on the back of stretchy fabric; it provides a solid foundation and prevents the material from puckering or warping as you stitch.
A simple design of concentric circles in a soft pastel palette turns a basic garment into a piece of custom, wearable art.
9. Stitch a Radiant Burst of Energy
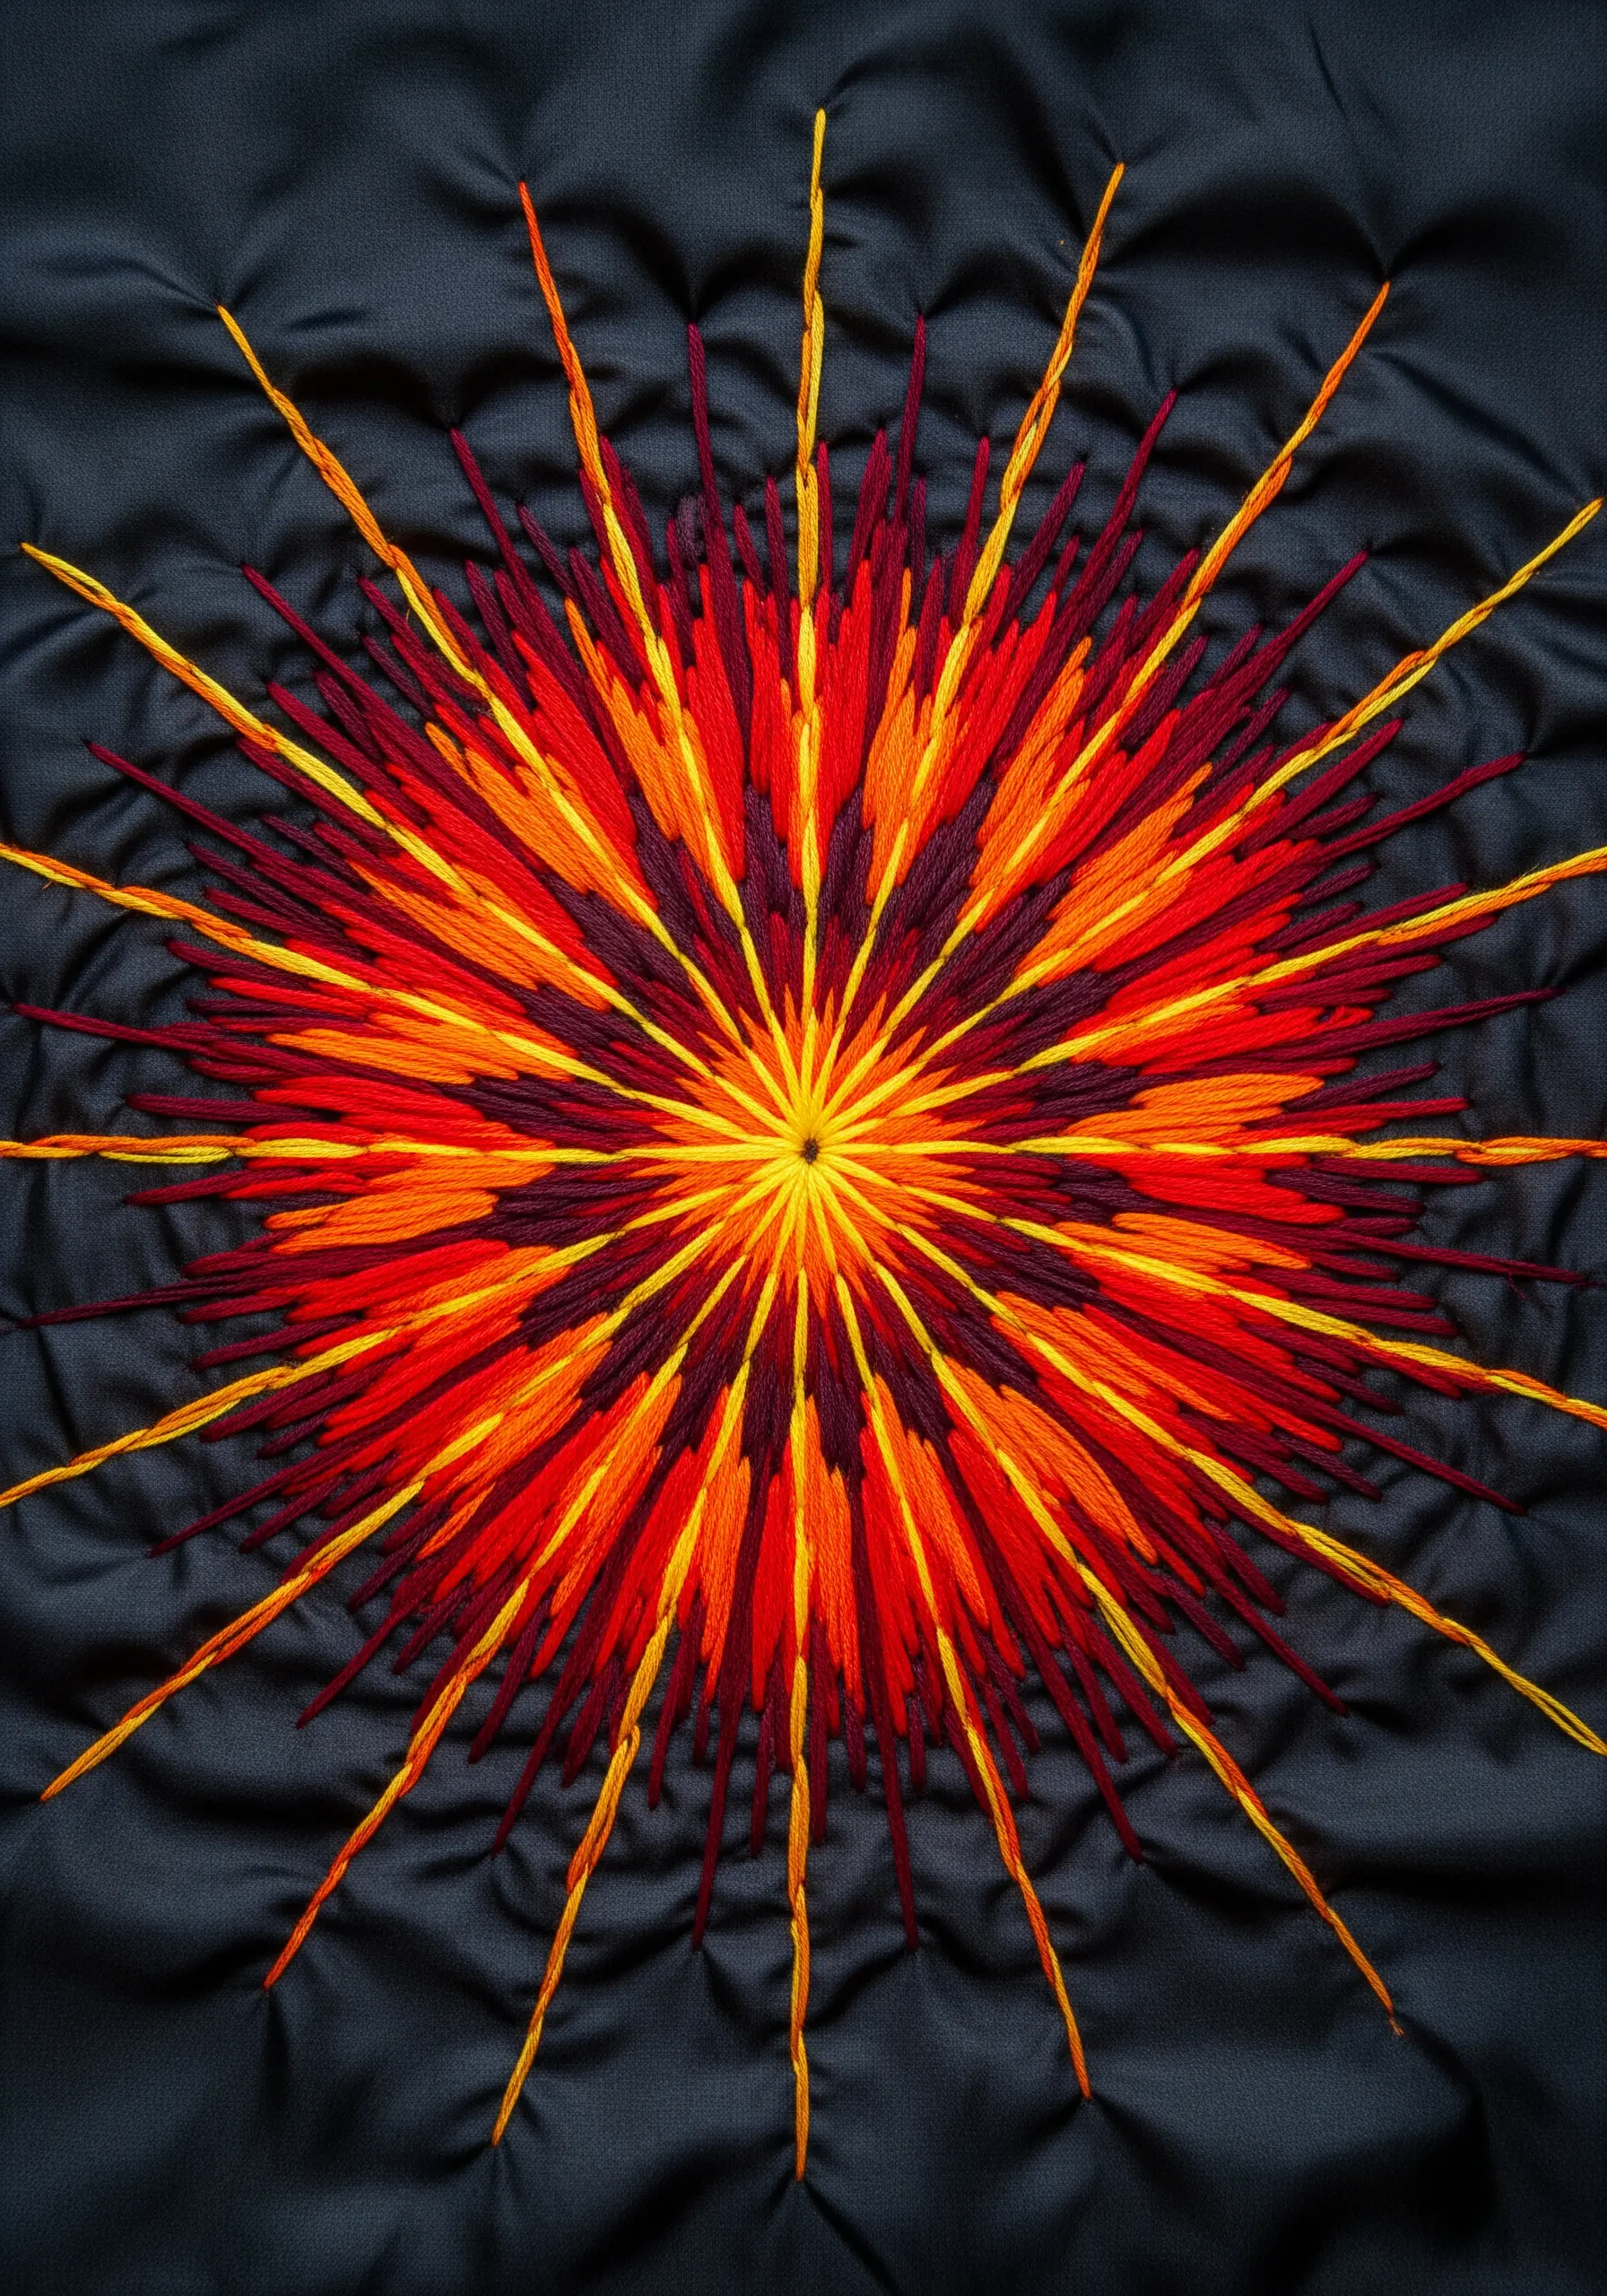
Create a dynamic explosion of color by layering straight stitches of varying lengths and shades, all radiating from a central point.
Start with the lightest color (like yellow) at the core, then work your way out through progressively darker, warmer tones like orange, red, and deep burgundy.
Allow the stitches to overlap slightly; this creates a sense of depth and movement.
Working on a dark, gathered fabric adds another layer of texture, making the fiery colors appear even more vibrant and intense.
10. Deconstruct the Mandala for a Modern Feel
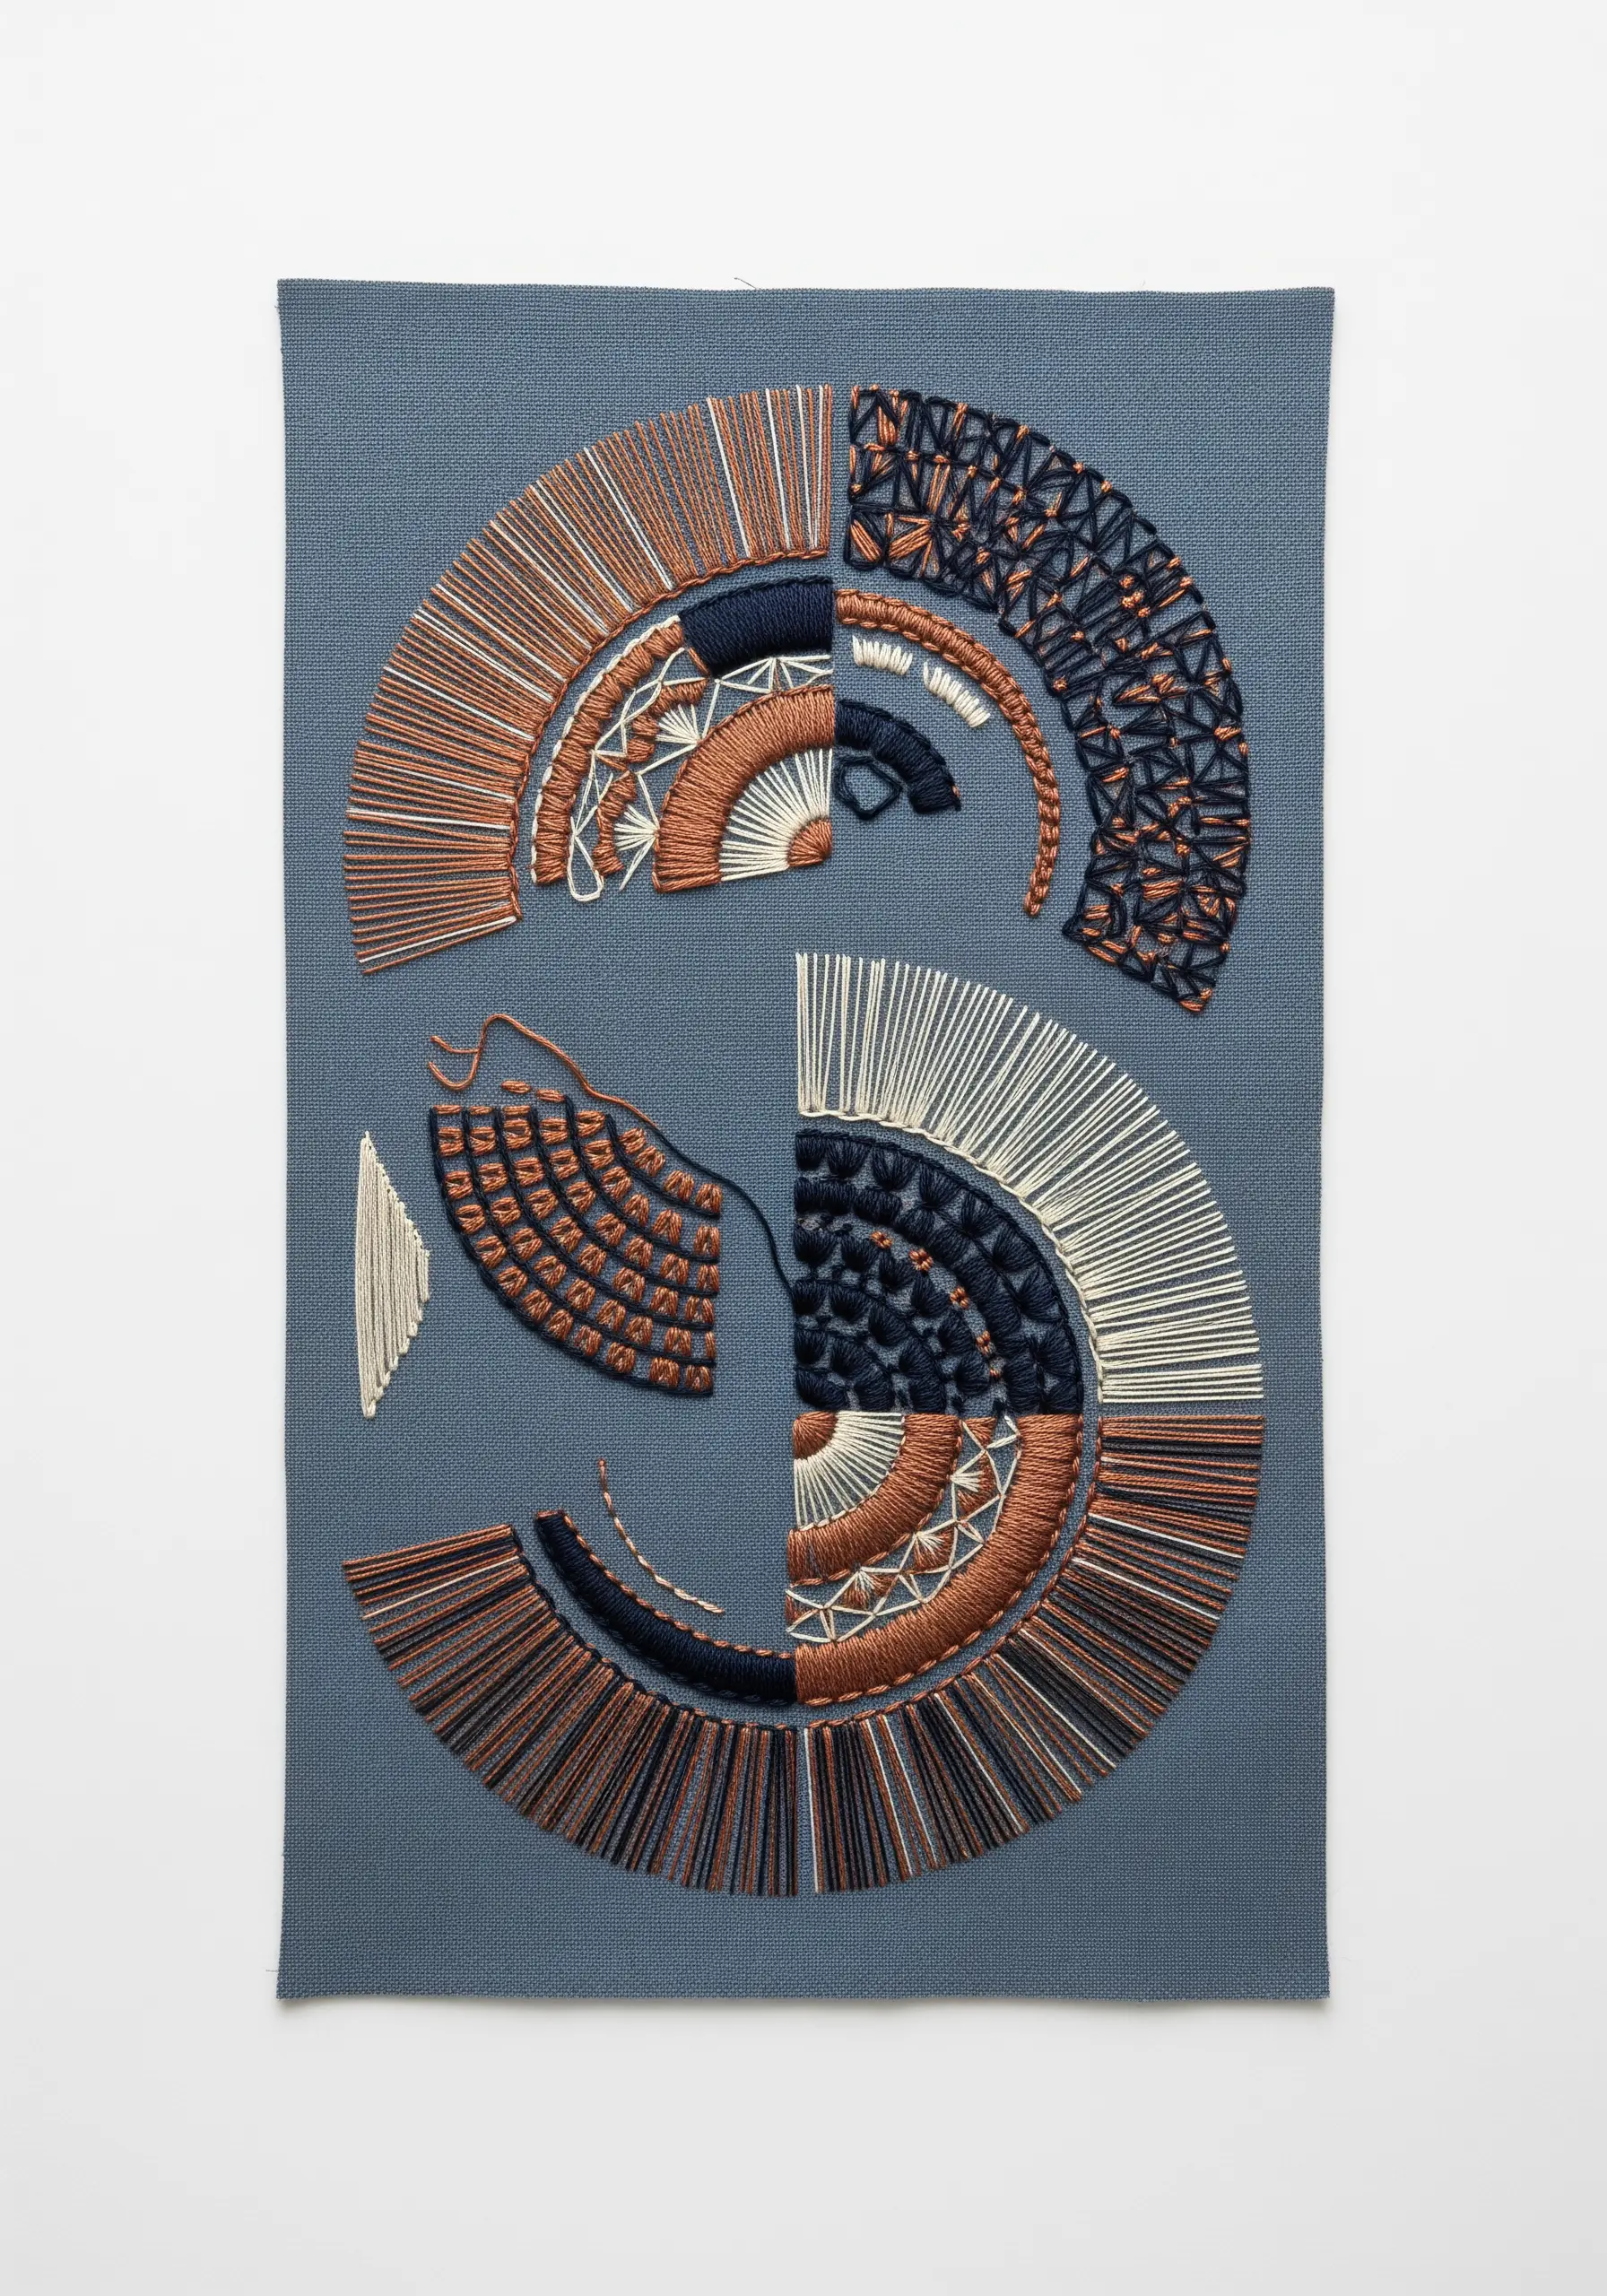
Break free from perfect symmetry by creating a fragmented or asymmetrical mandala.
Instead of a full circle, explore semi-circles, arcs, or even S-shaped compositions that suggest the form of a mandala without completing it.
This approach allows you to play with different stitch textures—like smooth satin stitch next to graphic gridwork—in a more dynamic, unexpected way.
This turns your embroidery into a piece of abstract framed embroidery, perfect for a contemporary space.
11. Integrate Beads for Texture and Sheen

Incorporate non-thread elements to introduce a different kind of texture and light reflection.
You can create incredibly clean, shimmering lines by stitching down rows of tiny seed beads, which is often easier than achieving a perfectly smooth line with metallic floss.
To create the focal point, use padded satin stitch for the ‘stones’ by building up a base of small straight stitches before covering them with a final smooth layer.
This technique gives them a raised, three-dimensional quality that contrasts beautifully with the flat, delicate beads.
12. Embroider on Sheer Fabric for an Ethereal Look
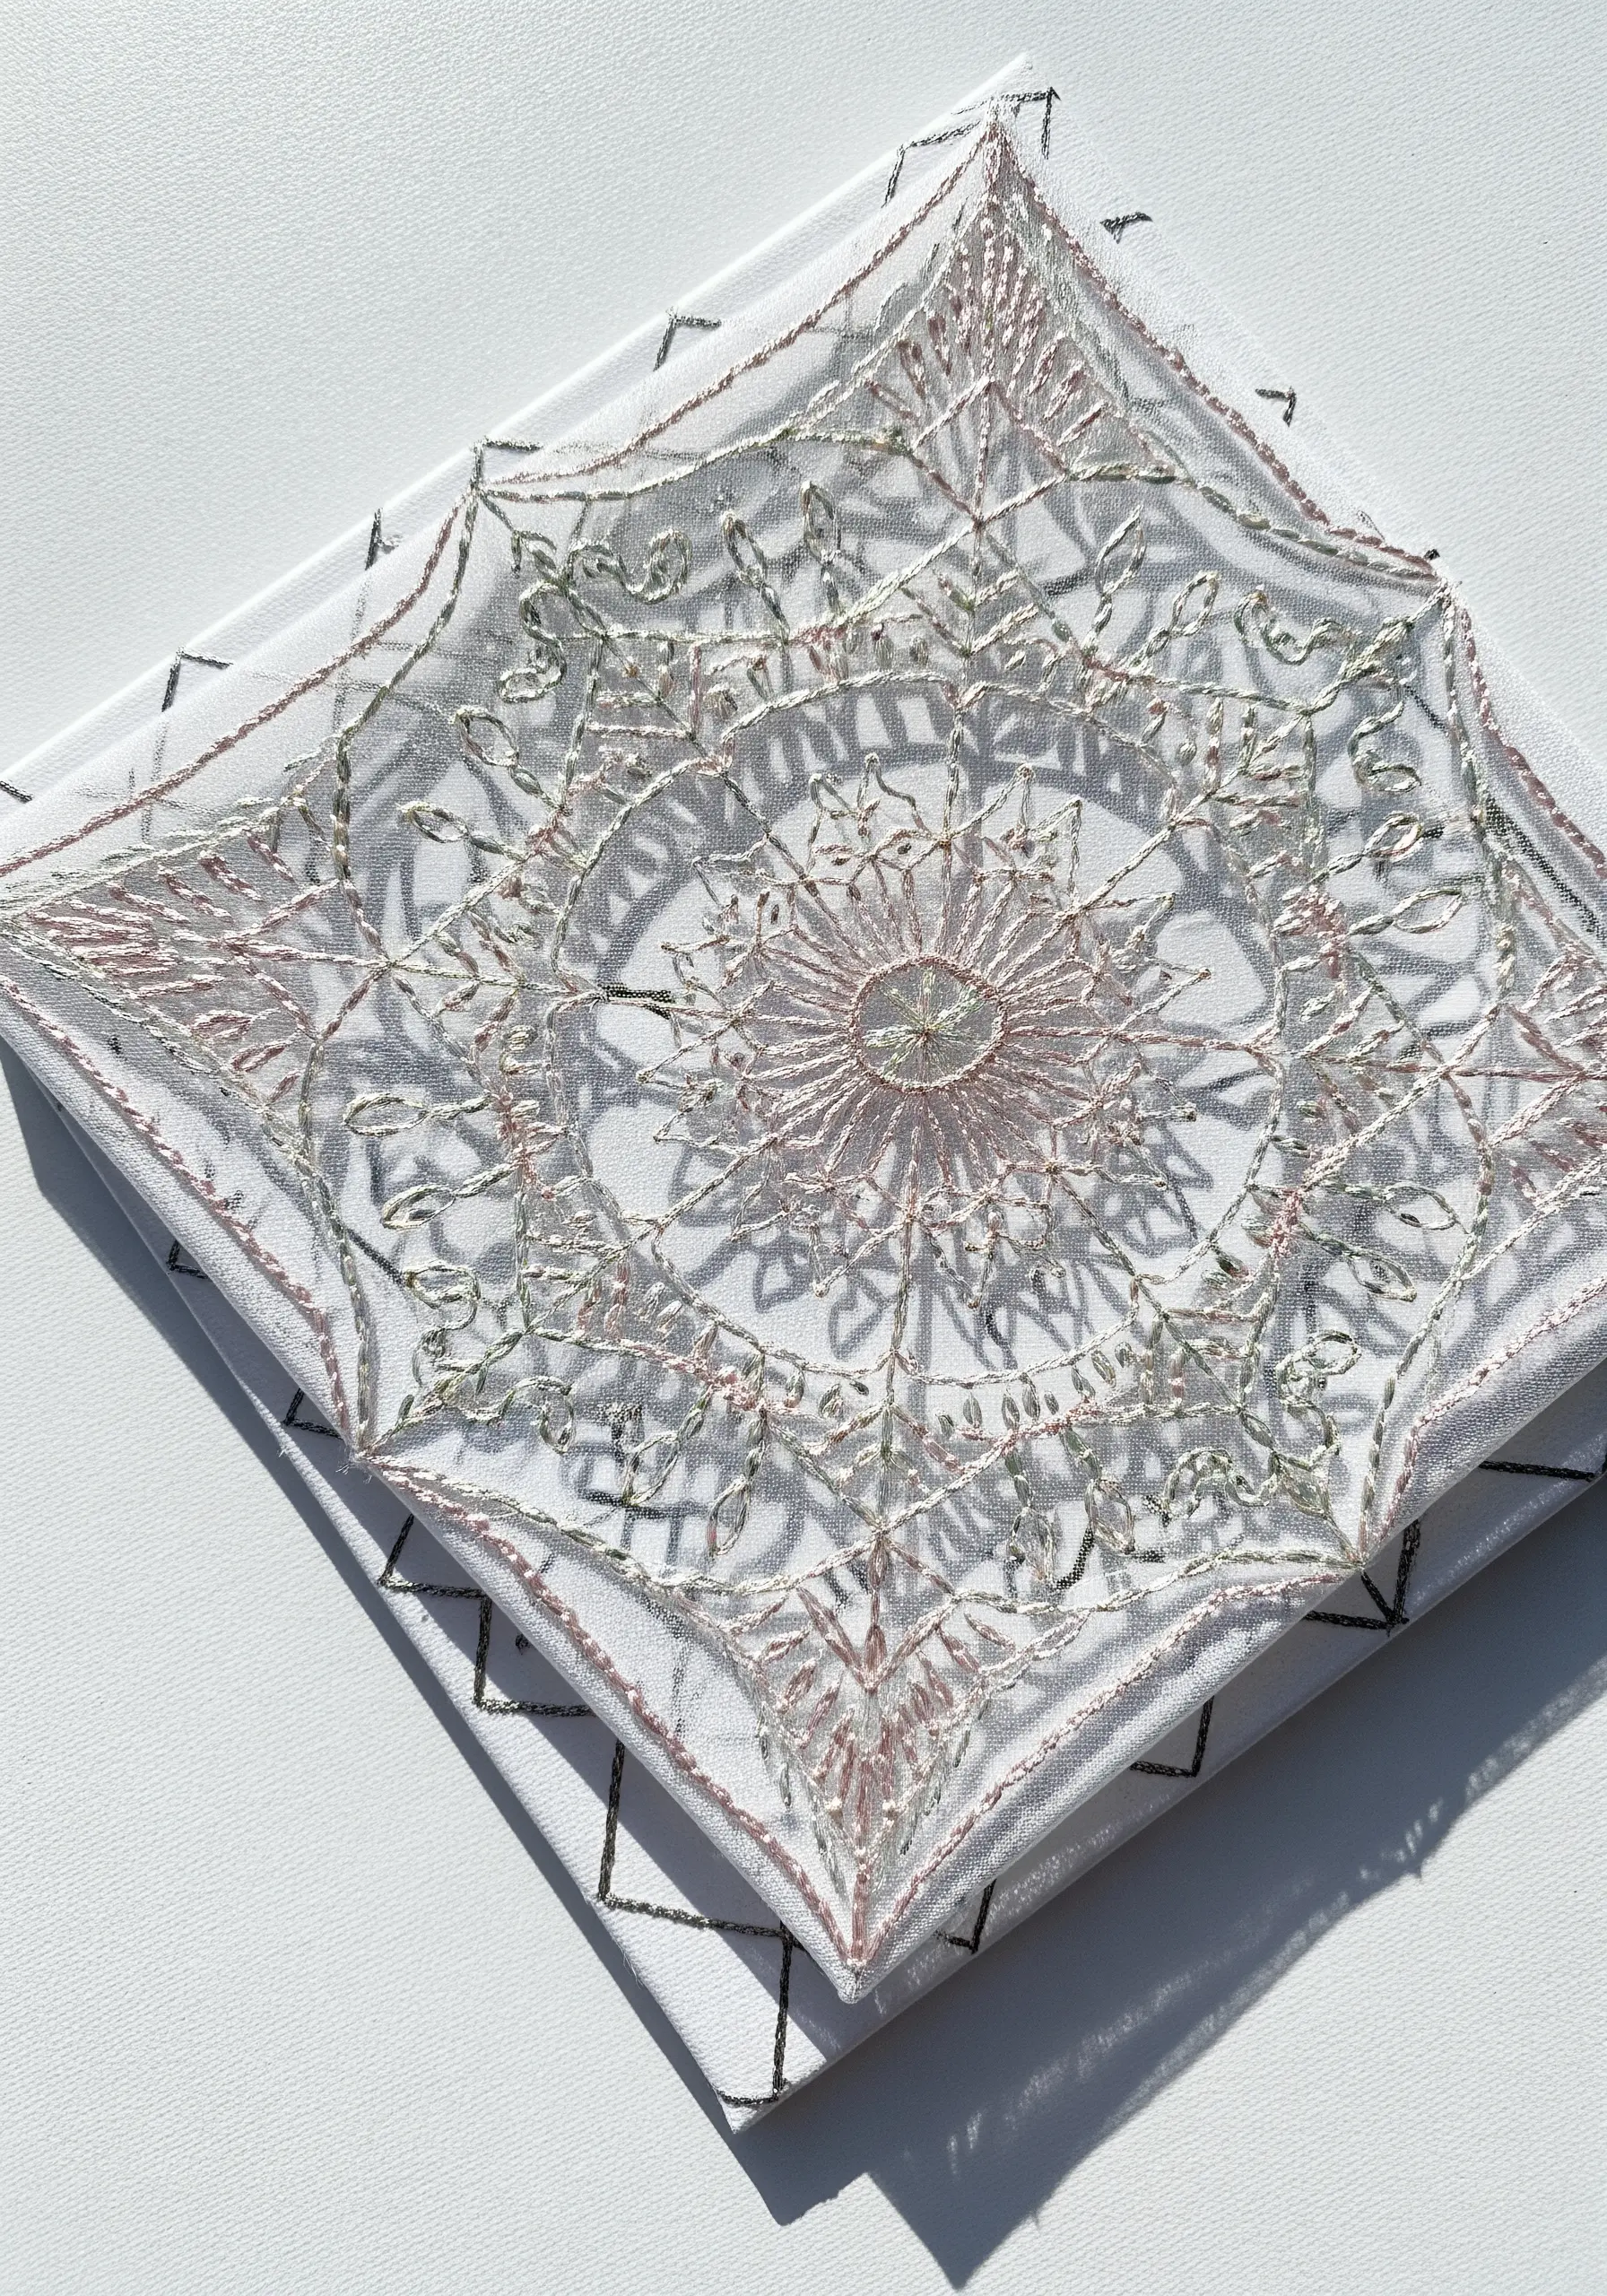
Stitching on a transparent fabric like organza or tulle creates a magical, floating effect.
To prevent puckering, always use a stabilizer. A water-soluble stabilizer is ideal, as it will wash away completely, leaving only your stitches behind.
Use fewer strands of floss—one or two is often enough—and simple stitches like backstitch or stem stitch to maintain the fabric’s delicate, airy quality.
When displayed, the light will pass through the fabric, highlighting the thread work as if it were suspended in air.
13. Weave a Textural Forest Floor Mandala
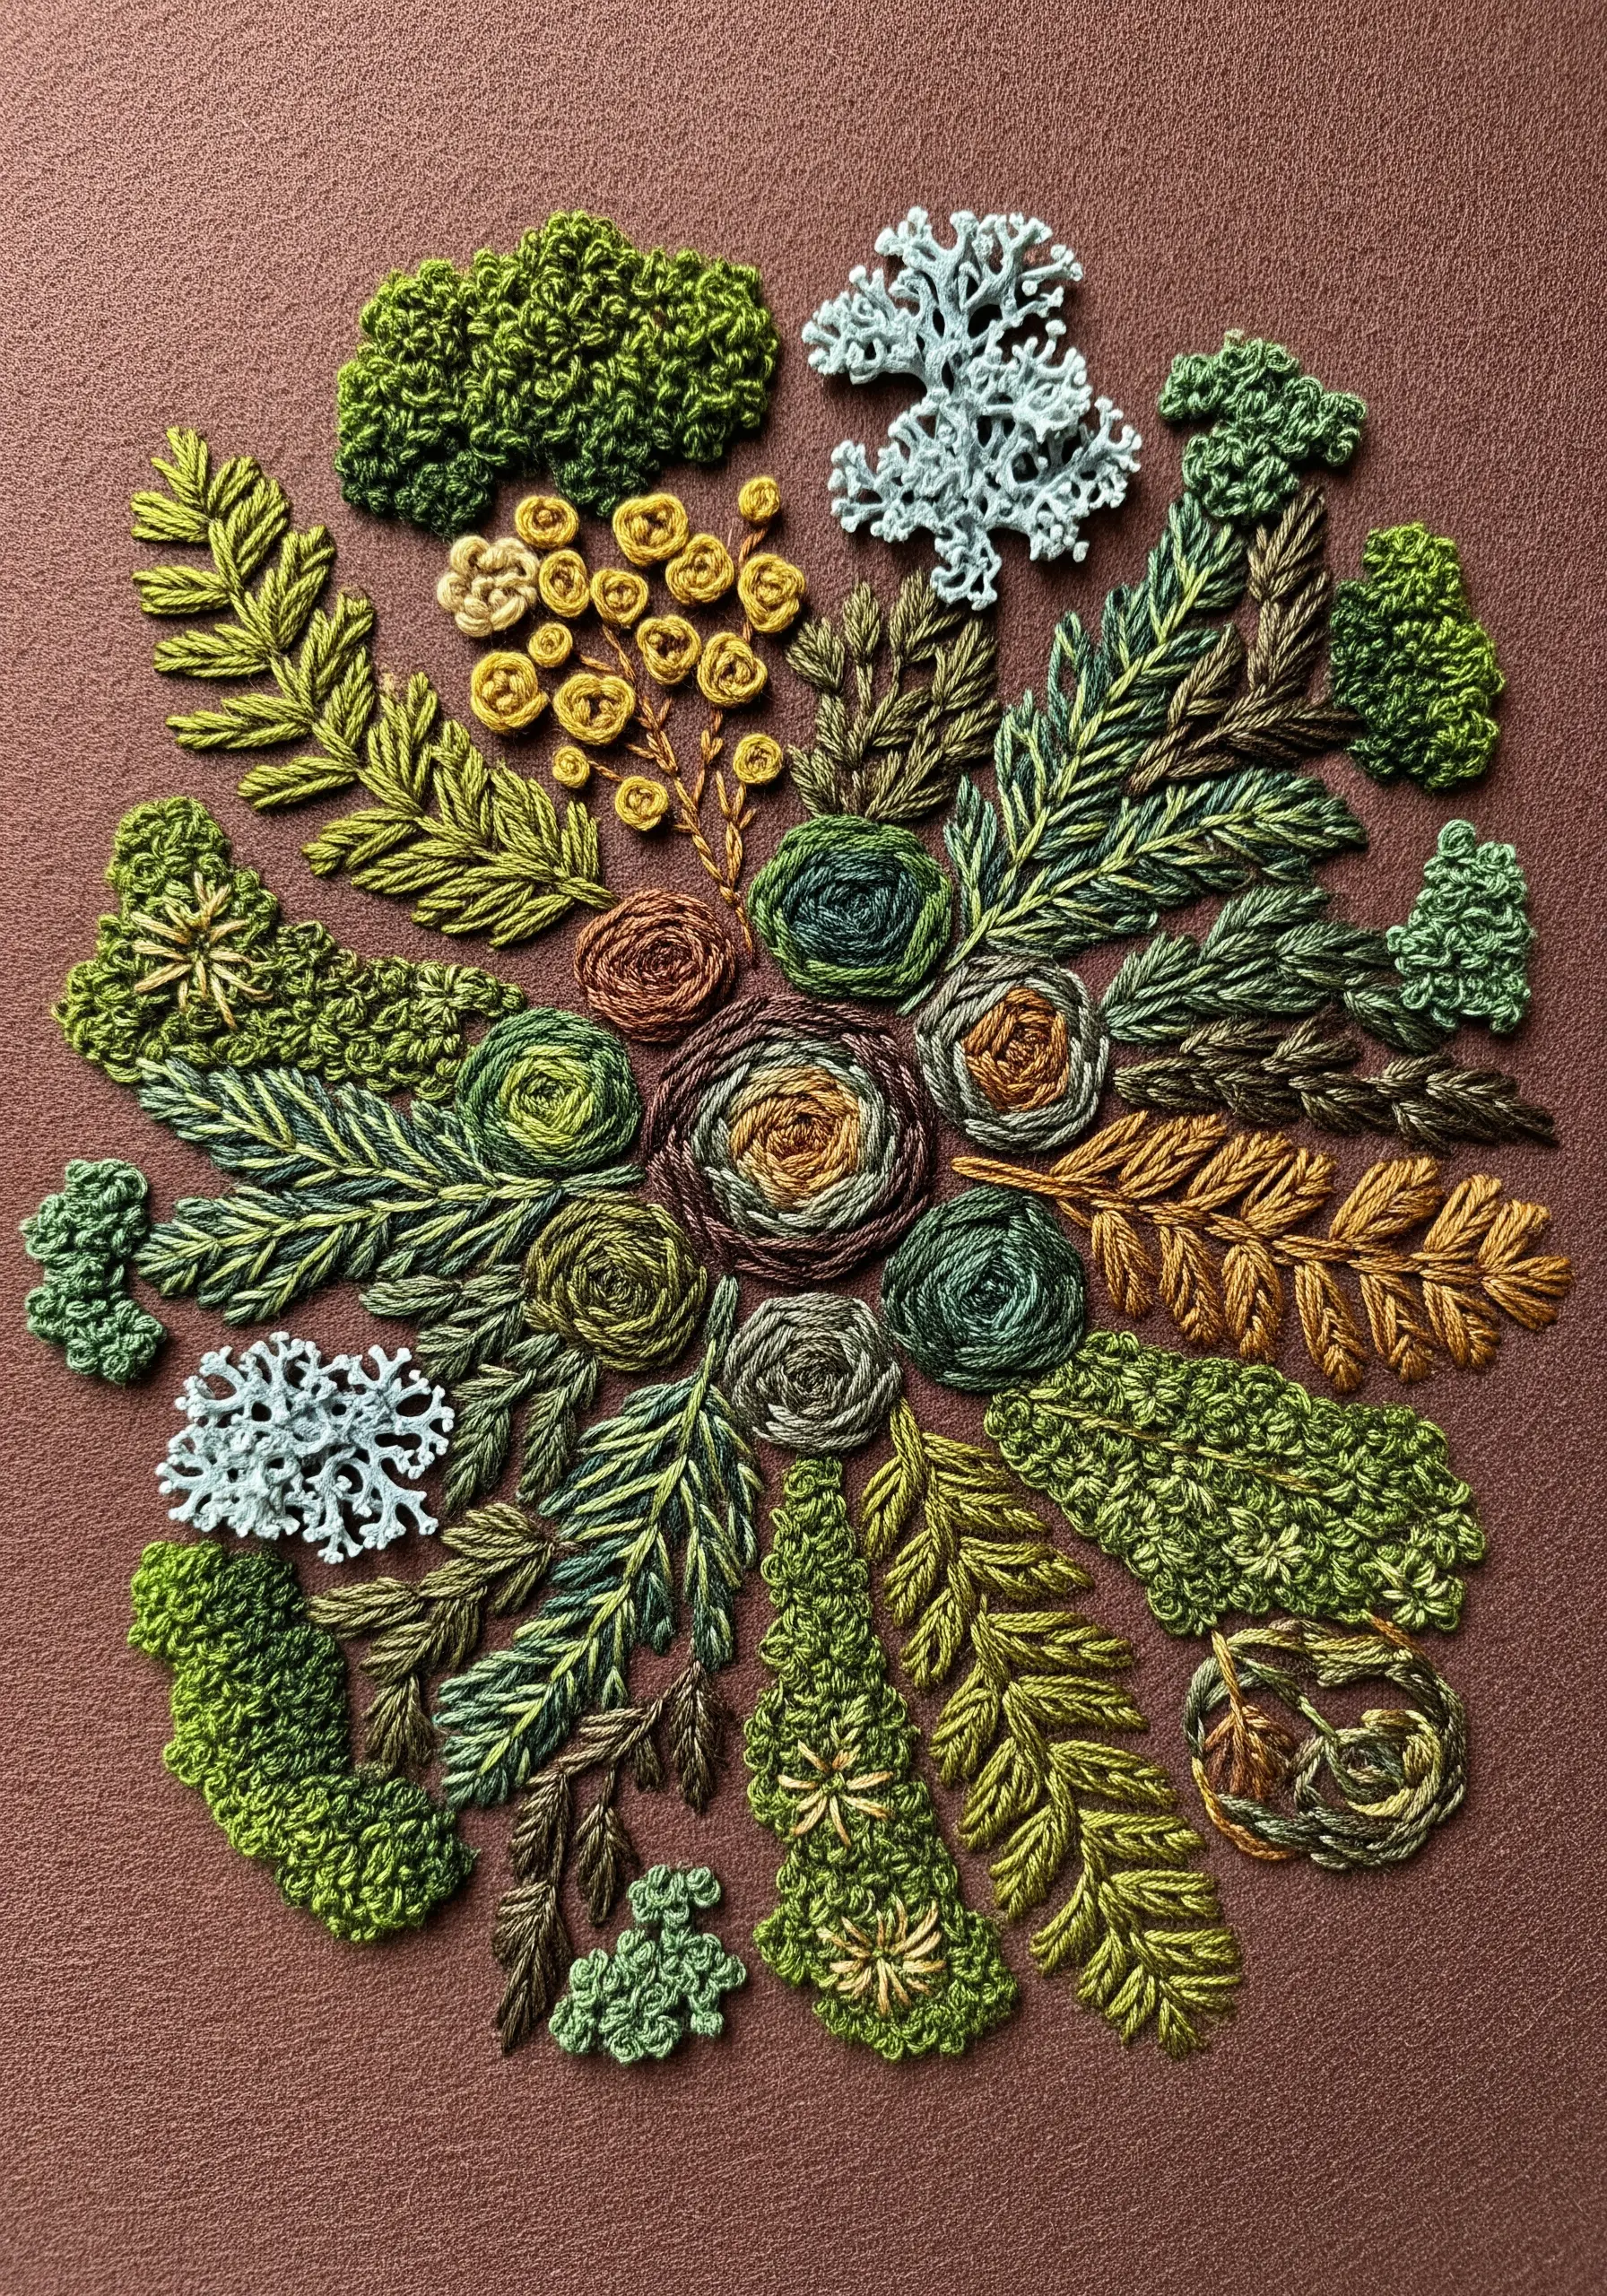
Move beyond traditional floral motifs and capture the rich, varied textures of a forest floor.
This organic approach to the mandala form relies on building clusters of nature-inspired stitches.
Use dense French knots for mossy patches, turkey work for a shaggy texture, and woven wheel stitches for small rosettes.
Varying shades of green, brown, and ochre, combined with stitches like fishbone for leaves, create a tactile composition that feels like a miniature ecosystem.
14. Create a Stained-Glass Effect with Bold Outlines
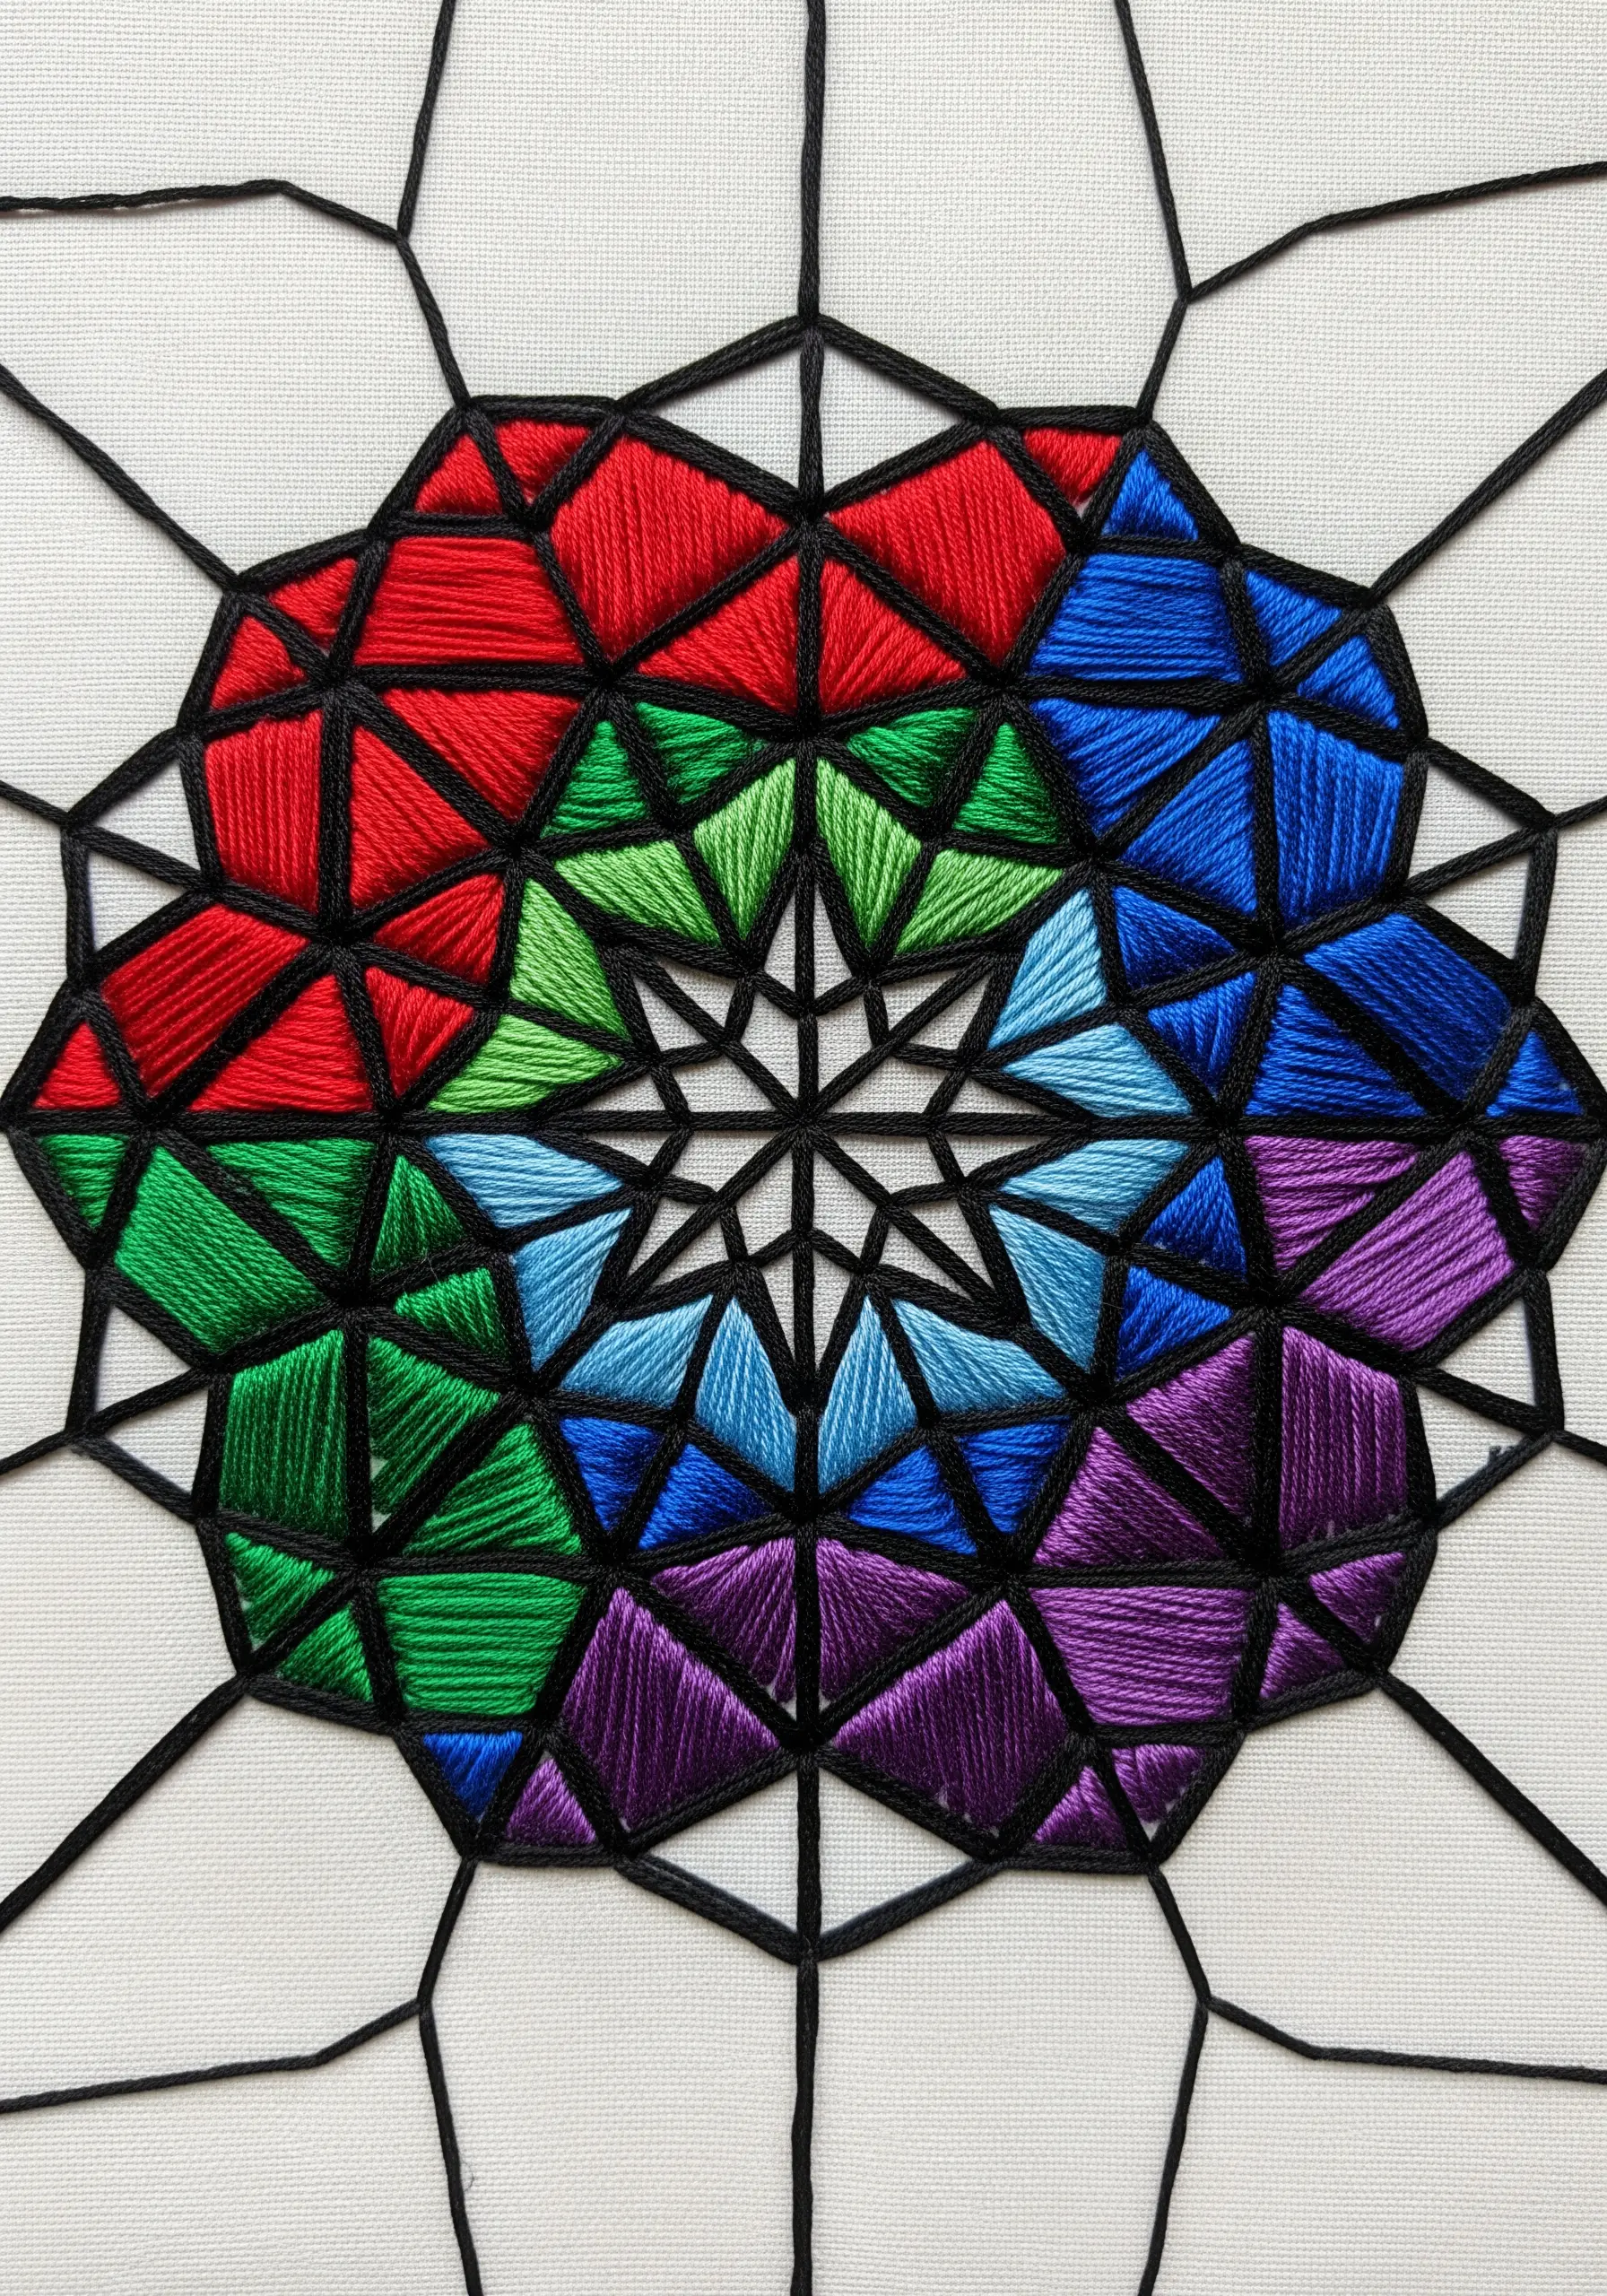
To achieve a crisp, graphic look reminiscent of stained glass, the outline is everything.
First, stitch all the dividing lines of your geometric pattern using a thick, bold black thread. A whipped backstitch or a heavy stem stitch works perfectly for this.
Once the framework is in place, fill each segment with vibrant, dense satin stitch.
The black outlines will contain the colors, making each one pop and creating a clean, dramatic contrast that defines the entire piece.
15. Add Subtle Sparkle with Strategically Placed Beads
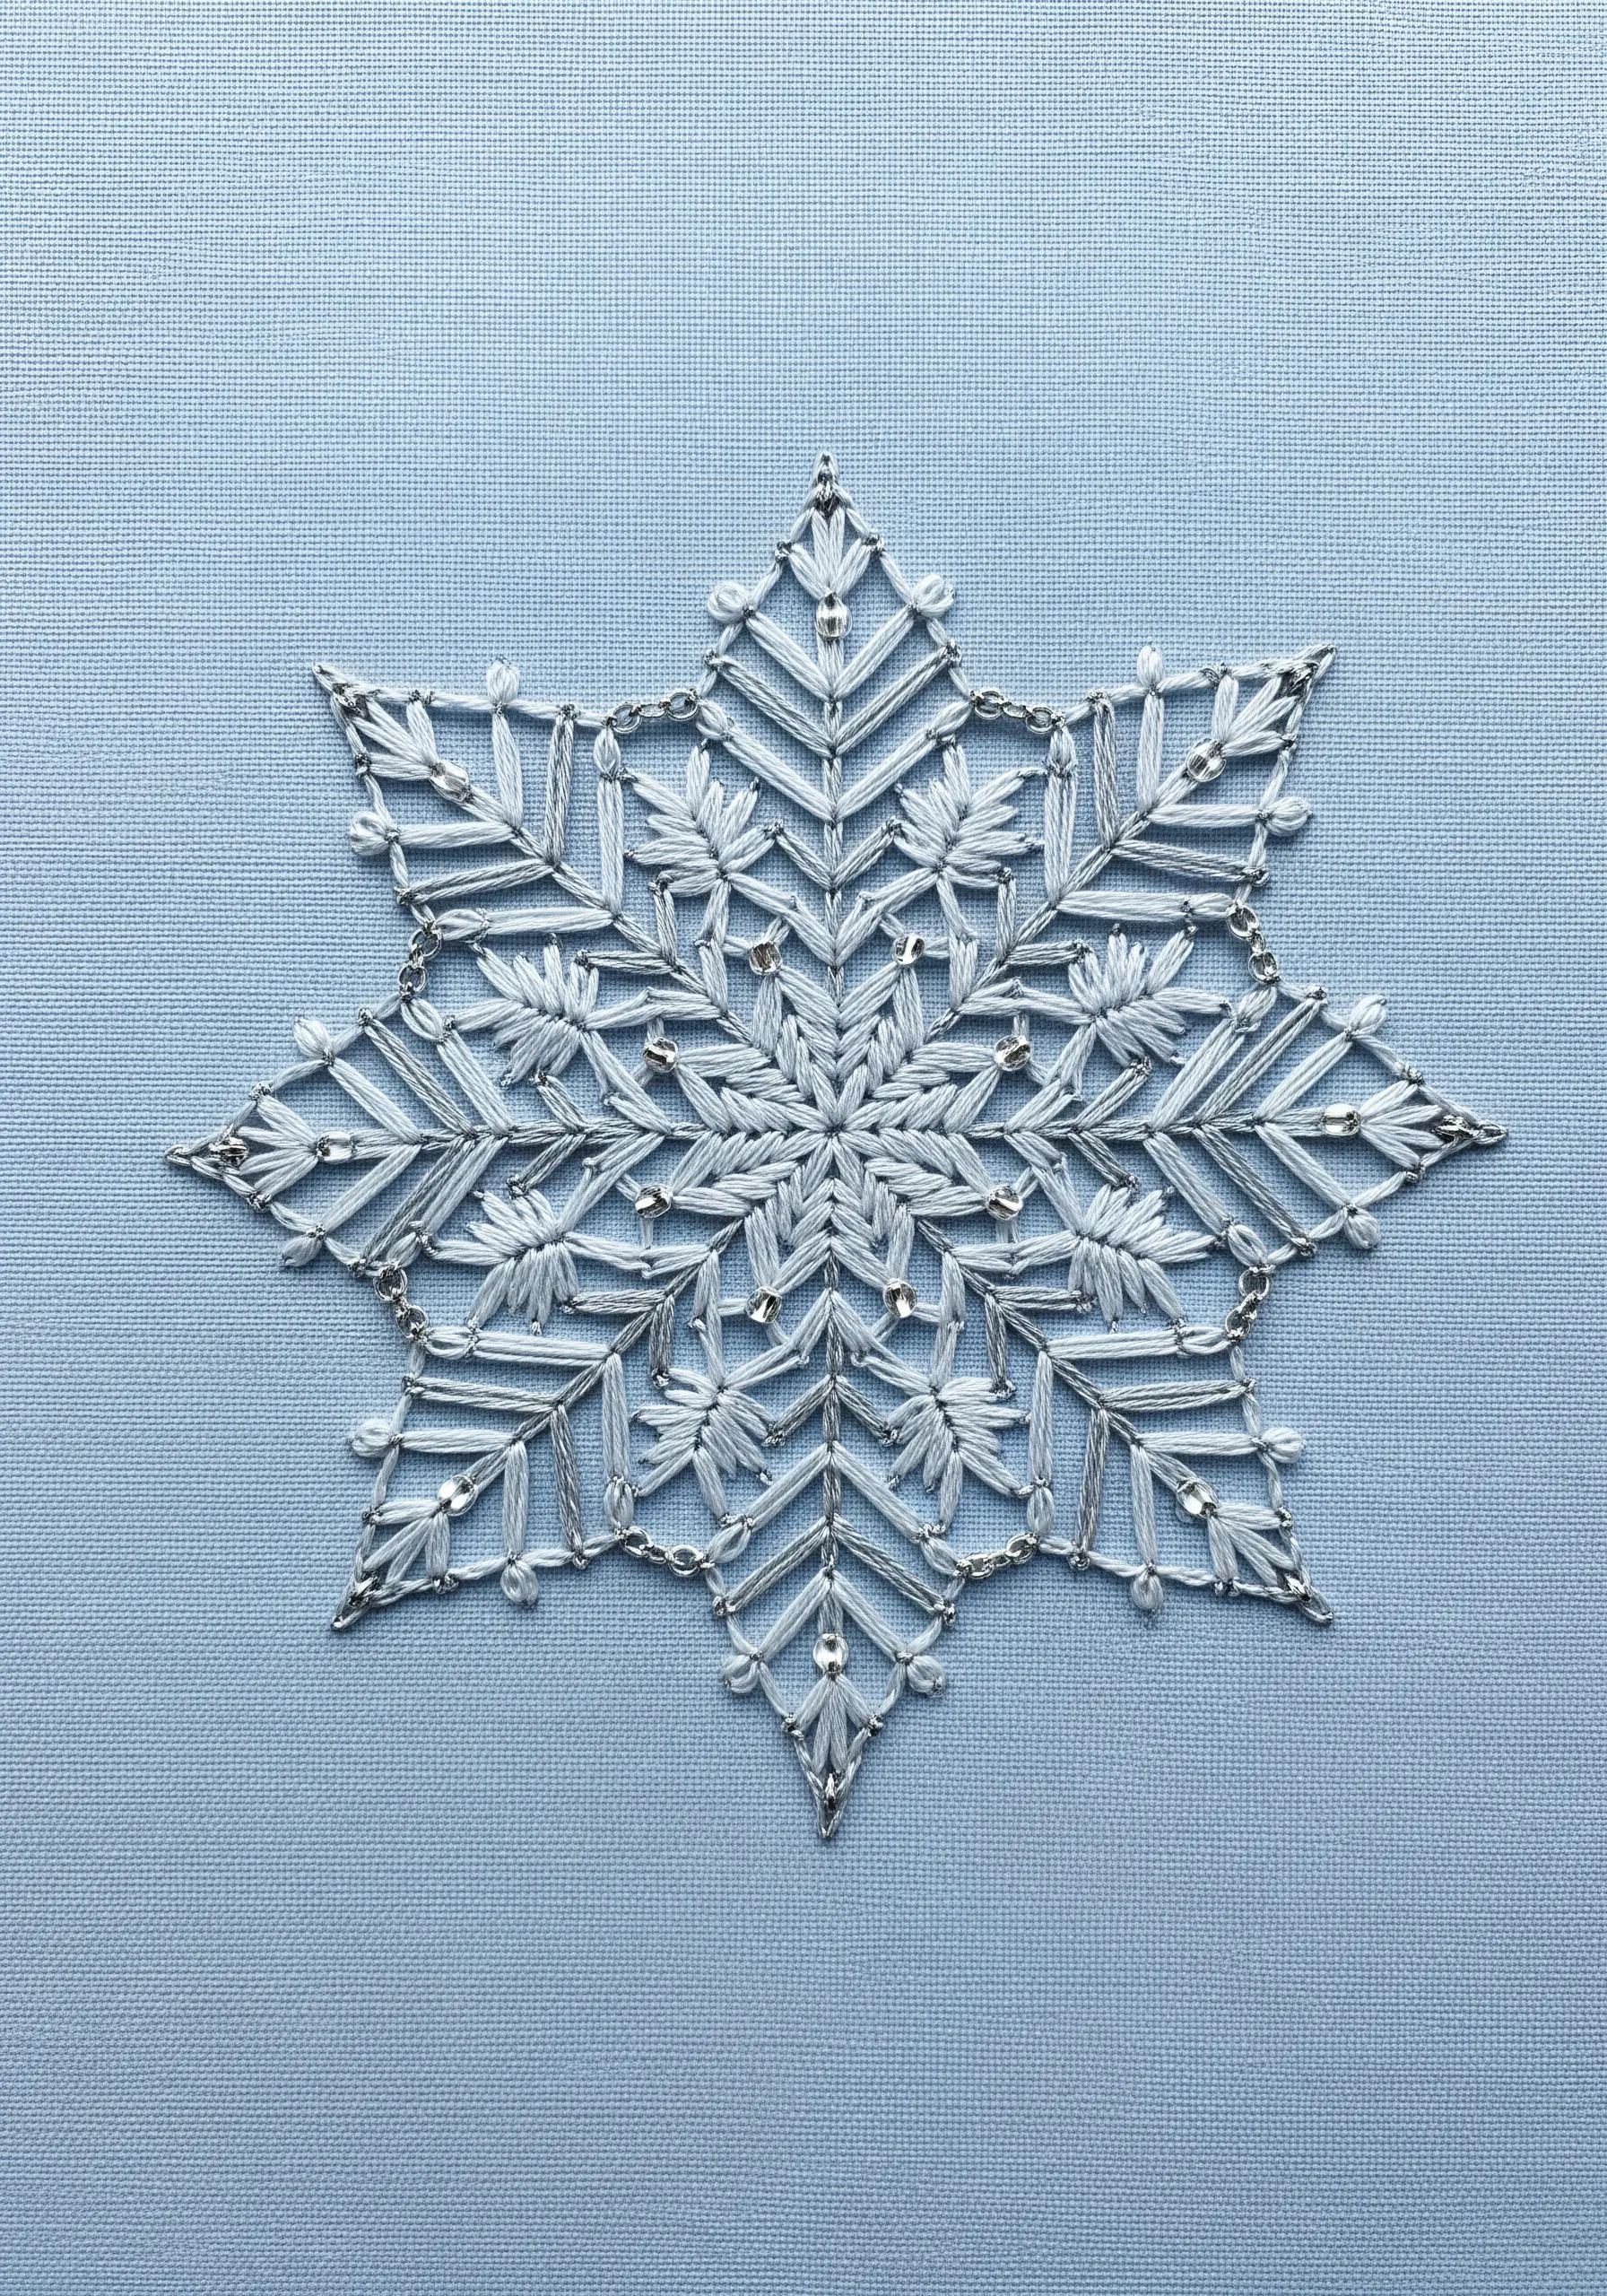
Elevate a delicate design by adding just a touch of sparkle.
Instead of overwhelming your work with embellishments, place tiny silver or crystal beads at the intersections of your stitch work or at the points of a star.
Secure each bead with a tiny stitch using a thread that matches either the bead or the fabric.
This technique adds a subtle glint of light that catches the eye and enhances the intricacy of the embroidery without distracting from the delicate thread work itself.
16. Weave Your Mandala on a Hoop Loom

Combine embroidery with weaving by turning your hoop into a simple loom.
First, create the ‘warp’ threads by stitching long straight stitches across the hoop like spokes on a wheel.
Then, use a tapestry needle to weave your ‘weft’ thread (yarn works beautifully here) over and under the warp threads, working from the center outwards.
This method allows you to create bands of solid color and texture, offering a bold and rhythmic alternative to traditional stitching for DIY yarn wall art pieces.
17. Explore Stitching on Unconventional Surfaces Like Paper

Take your embroidery off the fabric and onto a surface like heavy watercolor paper or handmade paper.
To avoid tearing, you must pre-punch the stitching holes along your design lines with a pin or a sharp awl.
Use a sturdy thread, like a full six strands of cotton floss or perle cotton, and a simple backstitch or stem stitch to create clean, graphic lines.
The texture of the paper itself becomes part of the final piece, offering a crisp, modern backdrop for your thread work in these paper art embroidery ideas.
18. Layer Petals for a Dense, Vibrant Bloom
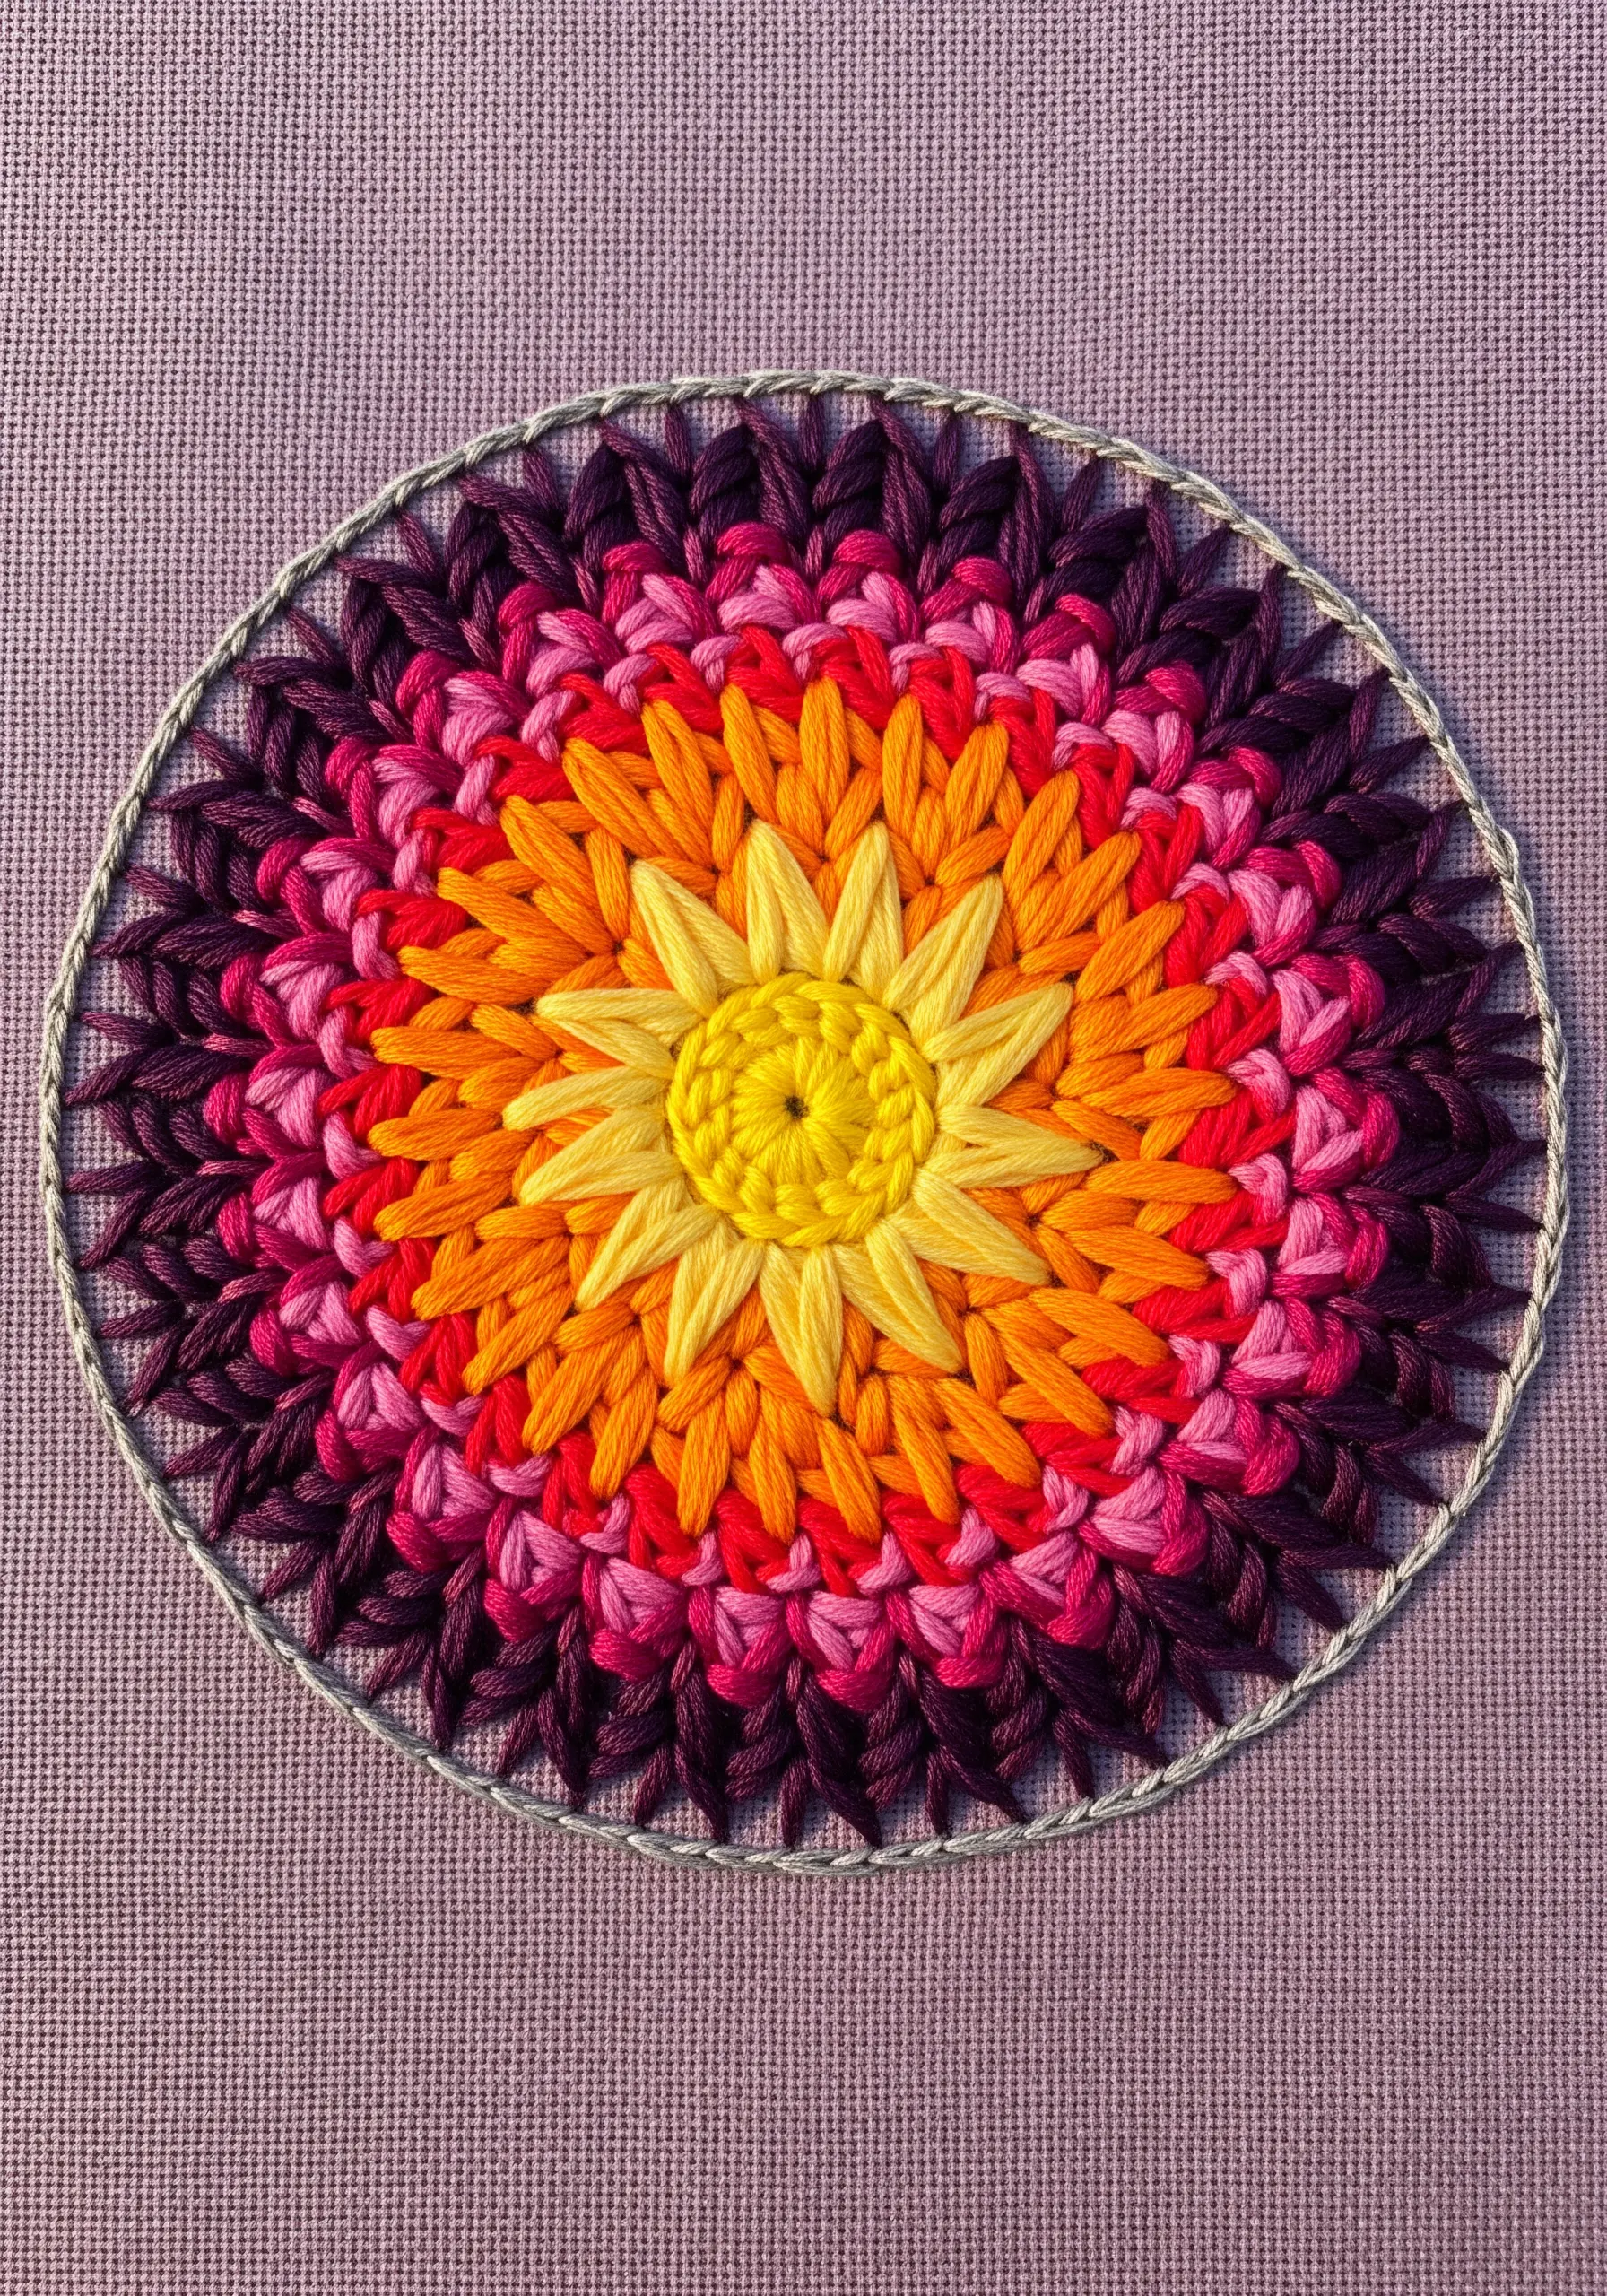
Create an intensely saturated floral mandala by densely layering simple stitches.
Work in concentric circles, starting from the outside and moving in. Use rows of detached chain stitches (lazy daisies) or short, straight satin stitches for the petals.
By tightly packing the stitches and overlapping each new row on top of the previous one, you build a thick, plush texture.
Transitioning through a vibrant, sunset-like color palette from dark purples to bright yellow enhances the feeling of a flower in full, radiant bloom.
19. Frame Your Motif with Delicate Openwork
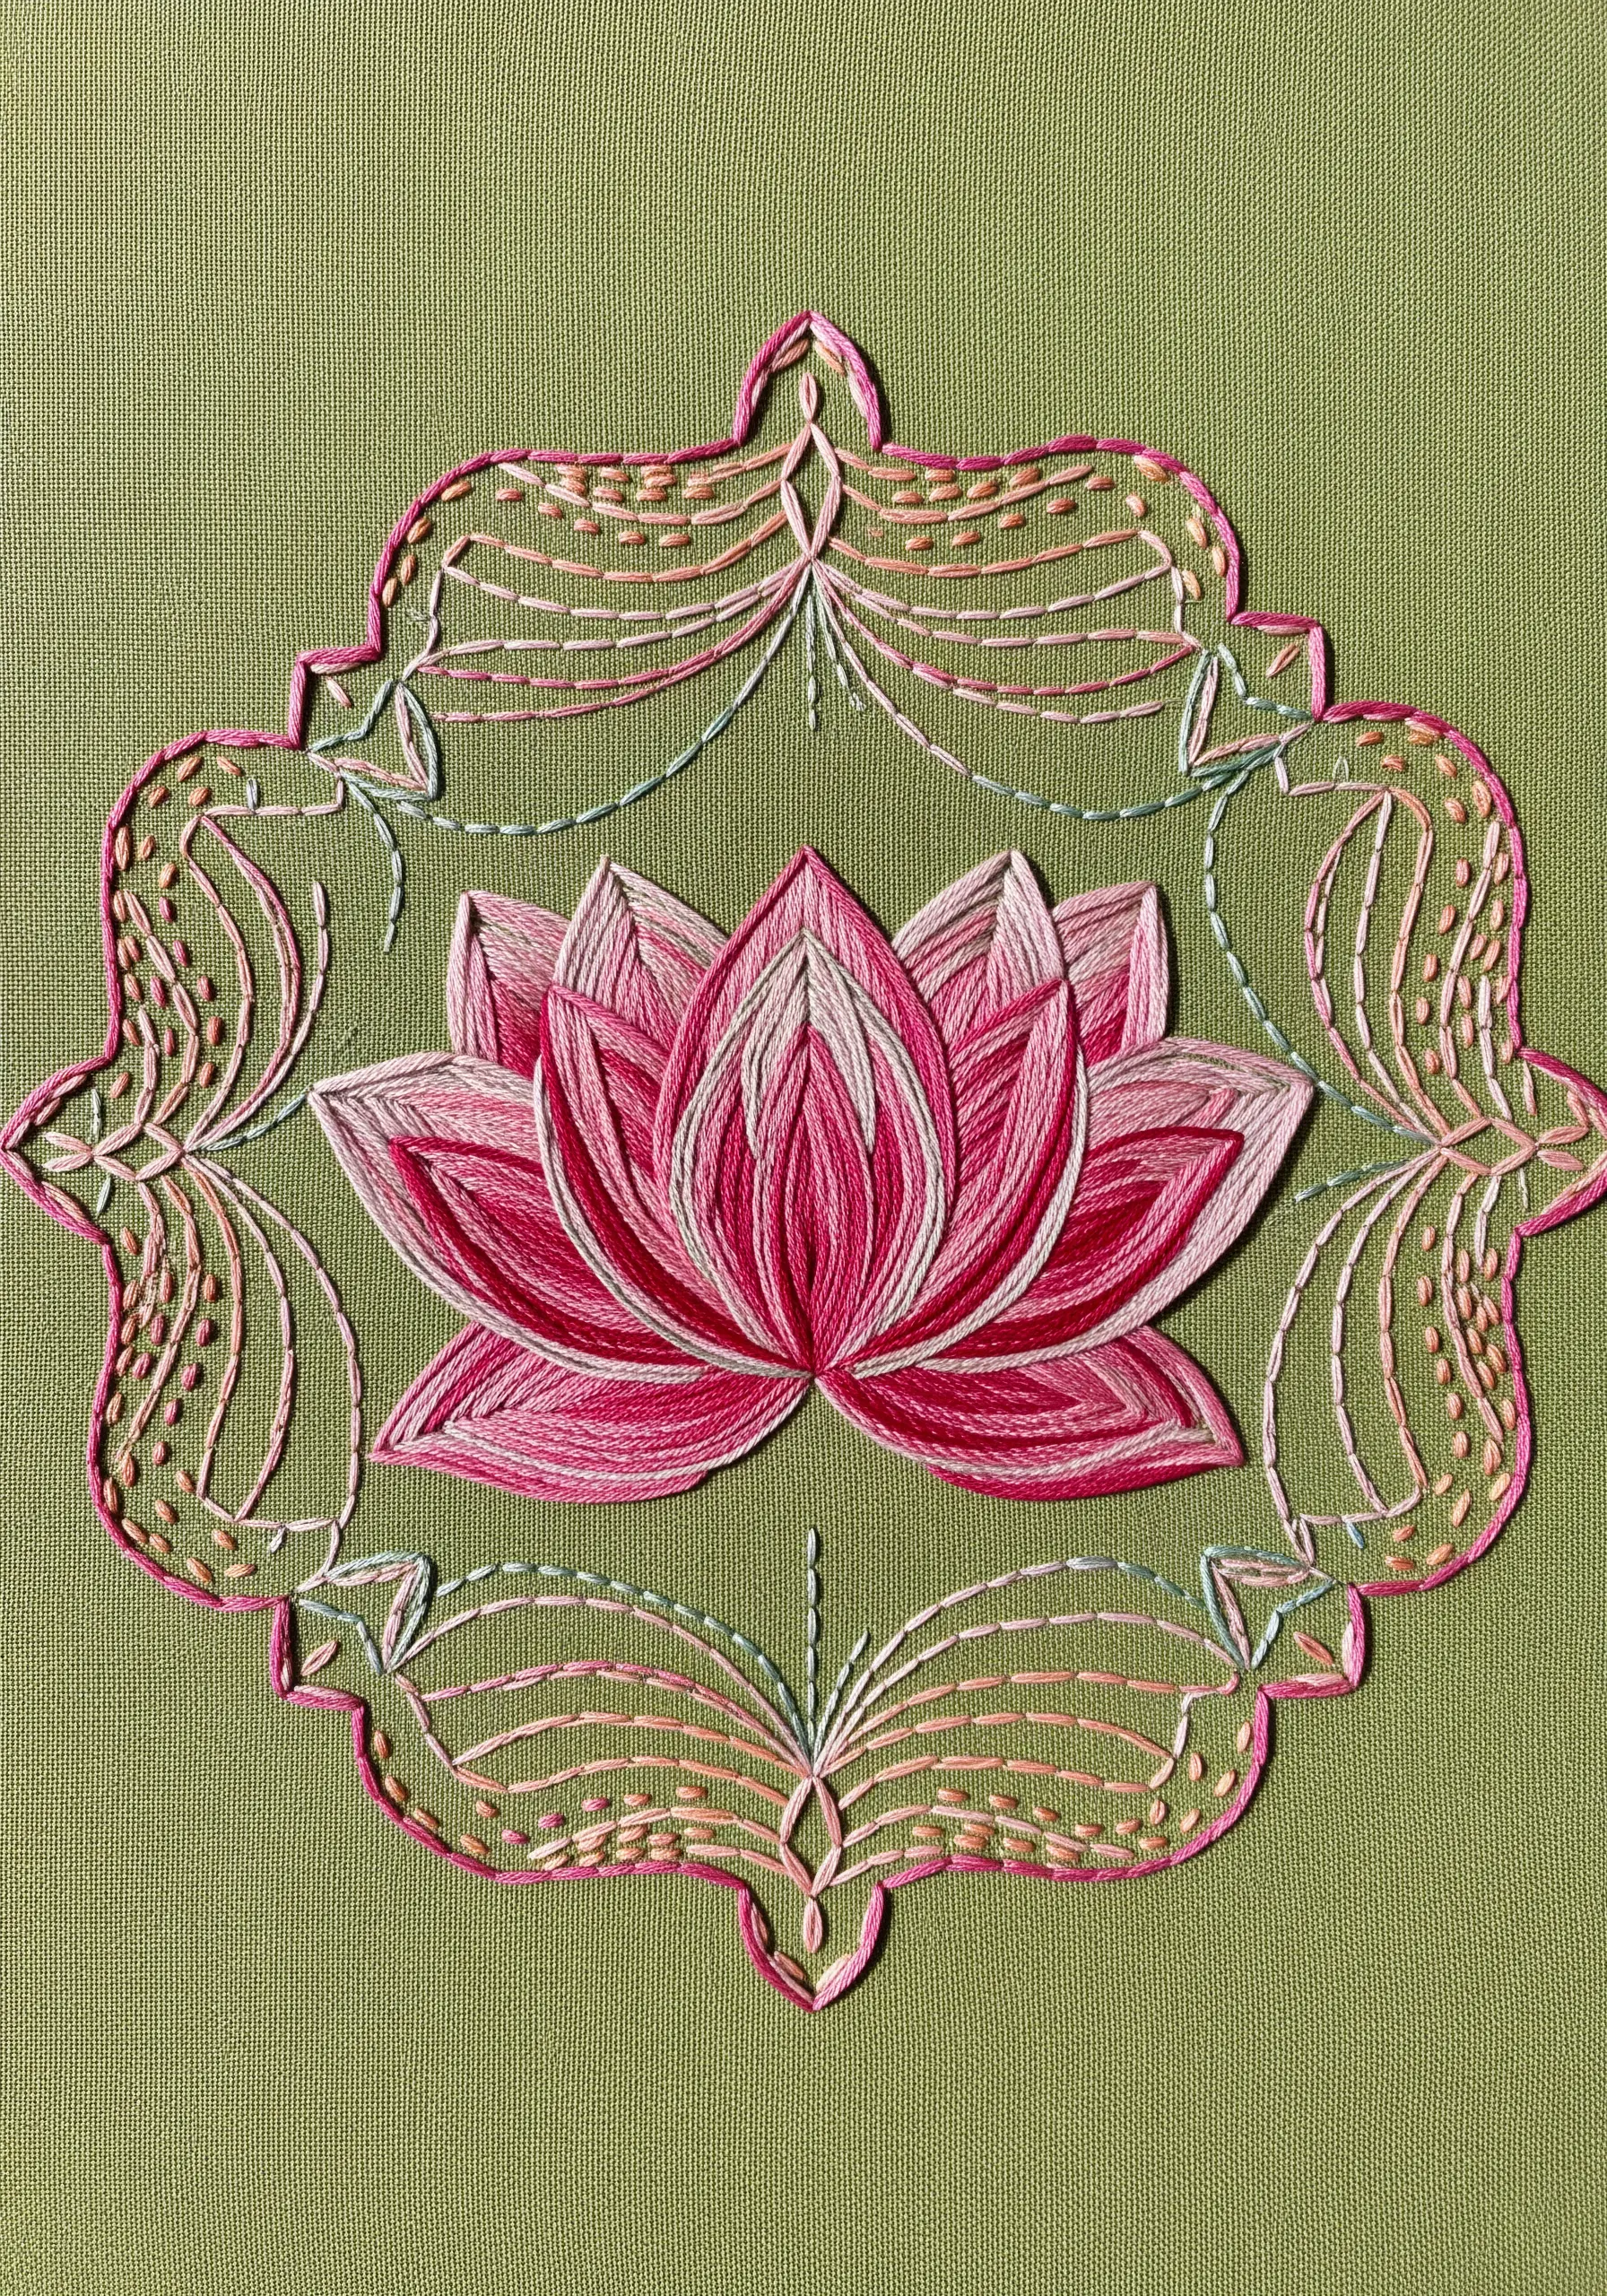
Draw the eye to your central motif by surrounding it with a delicate, decorative frame.
Instead of filling the background, use light, open stitches like fly stitch, seed stitch, or simple straight stitches to create an airy, lace-like border.
This use of negative space makes the central element—like this lotus rendered in smooth satin stitch—feel more significant and focused.
It’s a sophisticated composition technique that adds elegance without adding density.
20. Embrace Art Deco with Geometric Precision
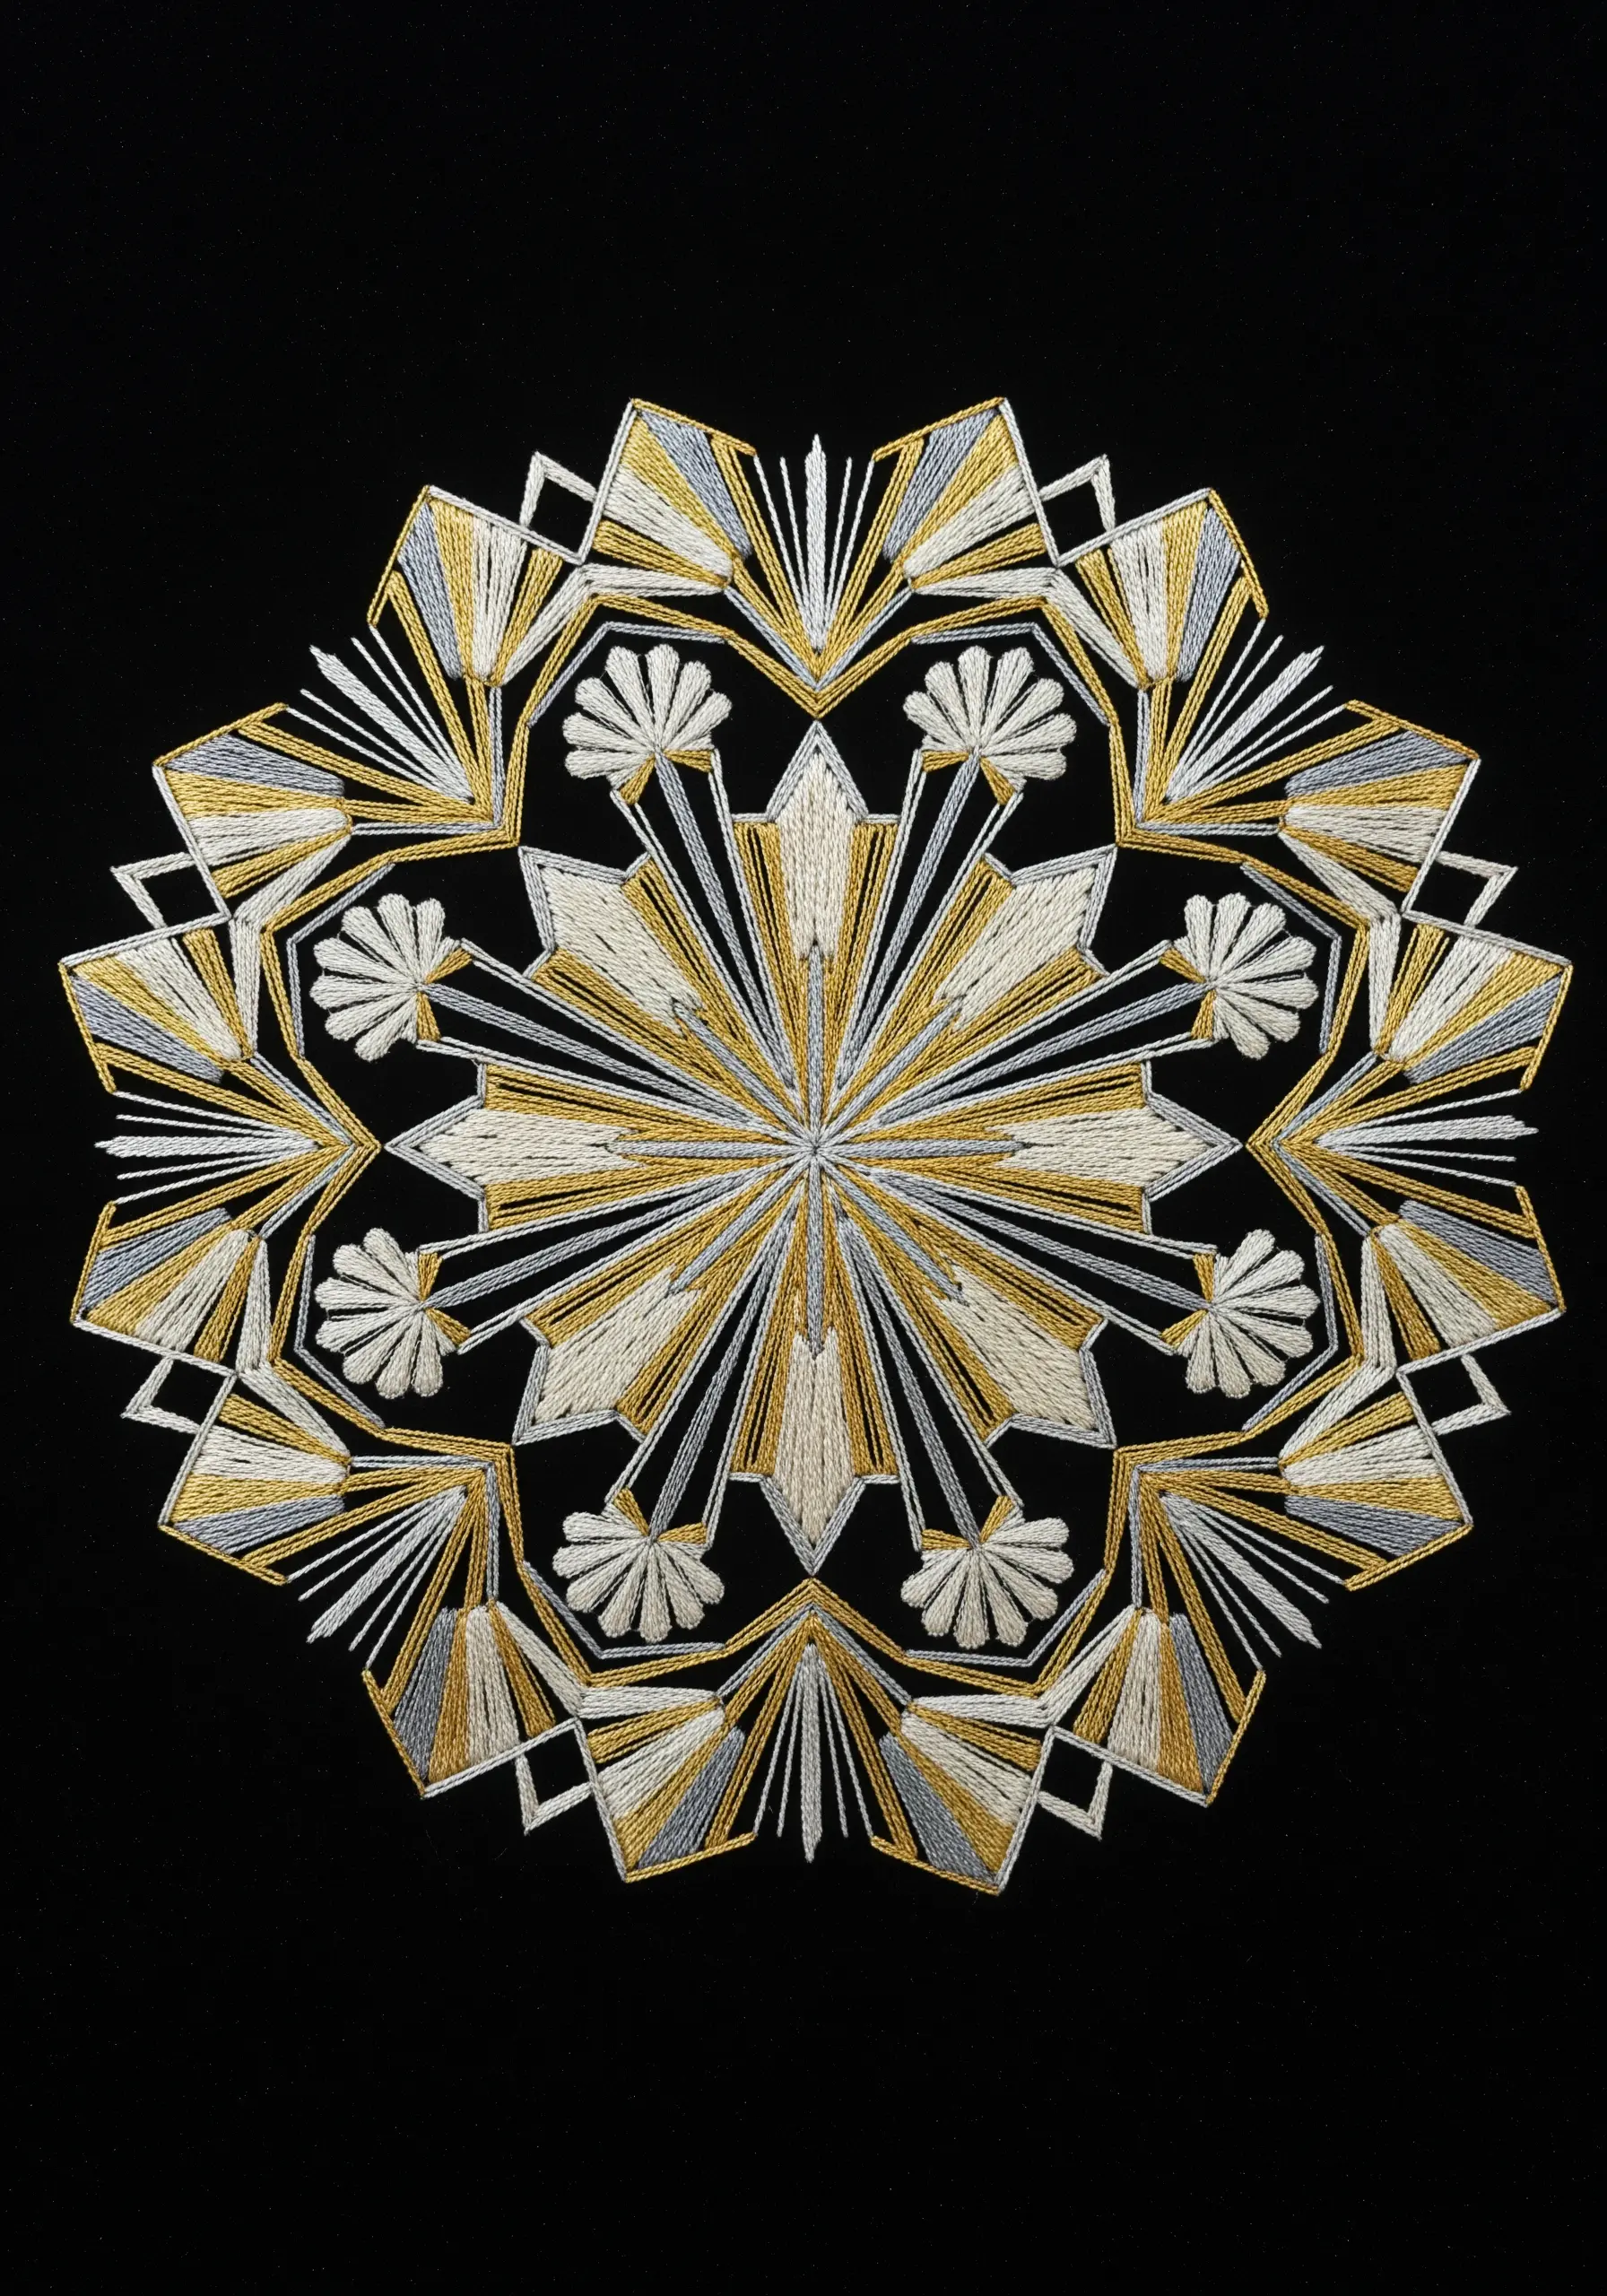
Capture the glamour of the Art Deco era by focusing on strong geometric shapes, symmetry, and a touch of metallic shine.
Use blocks of satin stitch to create bold, defined shapes and radiating straight stitches to mimic sunburst motifs.
A limited palette of gold, silver, and white against a black background is classic for this style.
The key is precision: keep your satin stitches perfectly parallel and your lines sharp to achieve that clean, architectural feel.
21. Create a Seamless Gradient in a Geometric Pattern
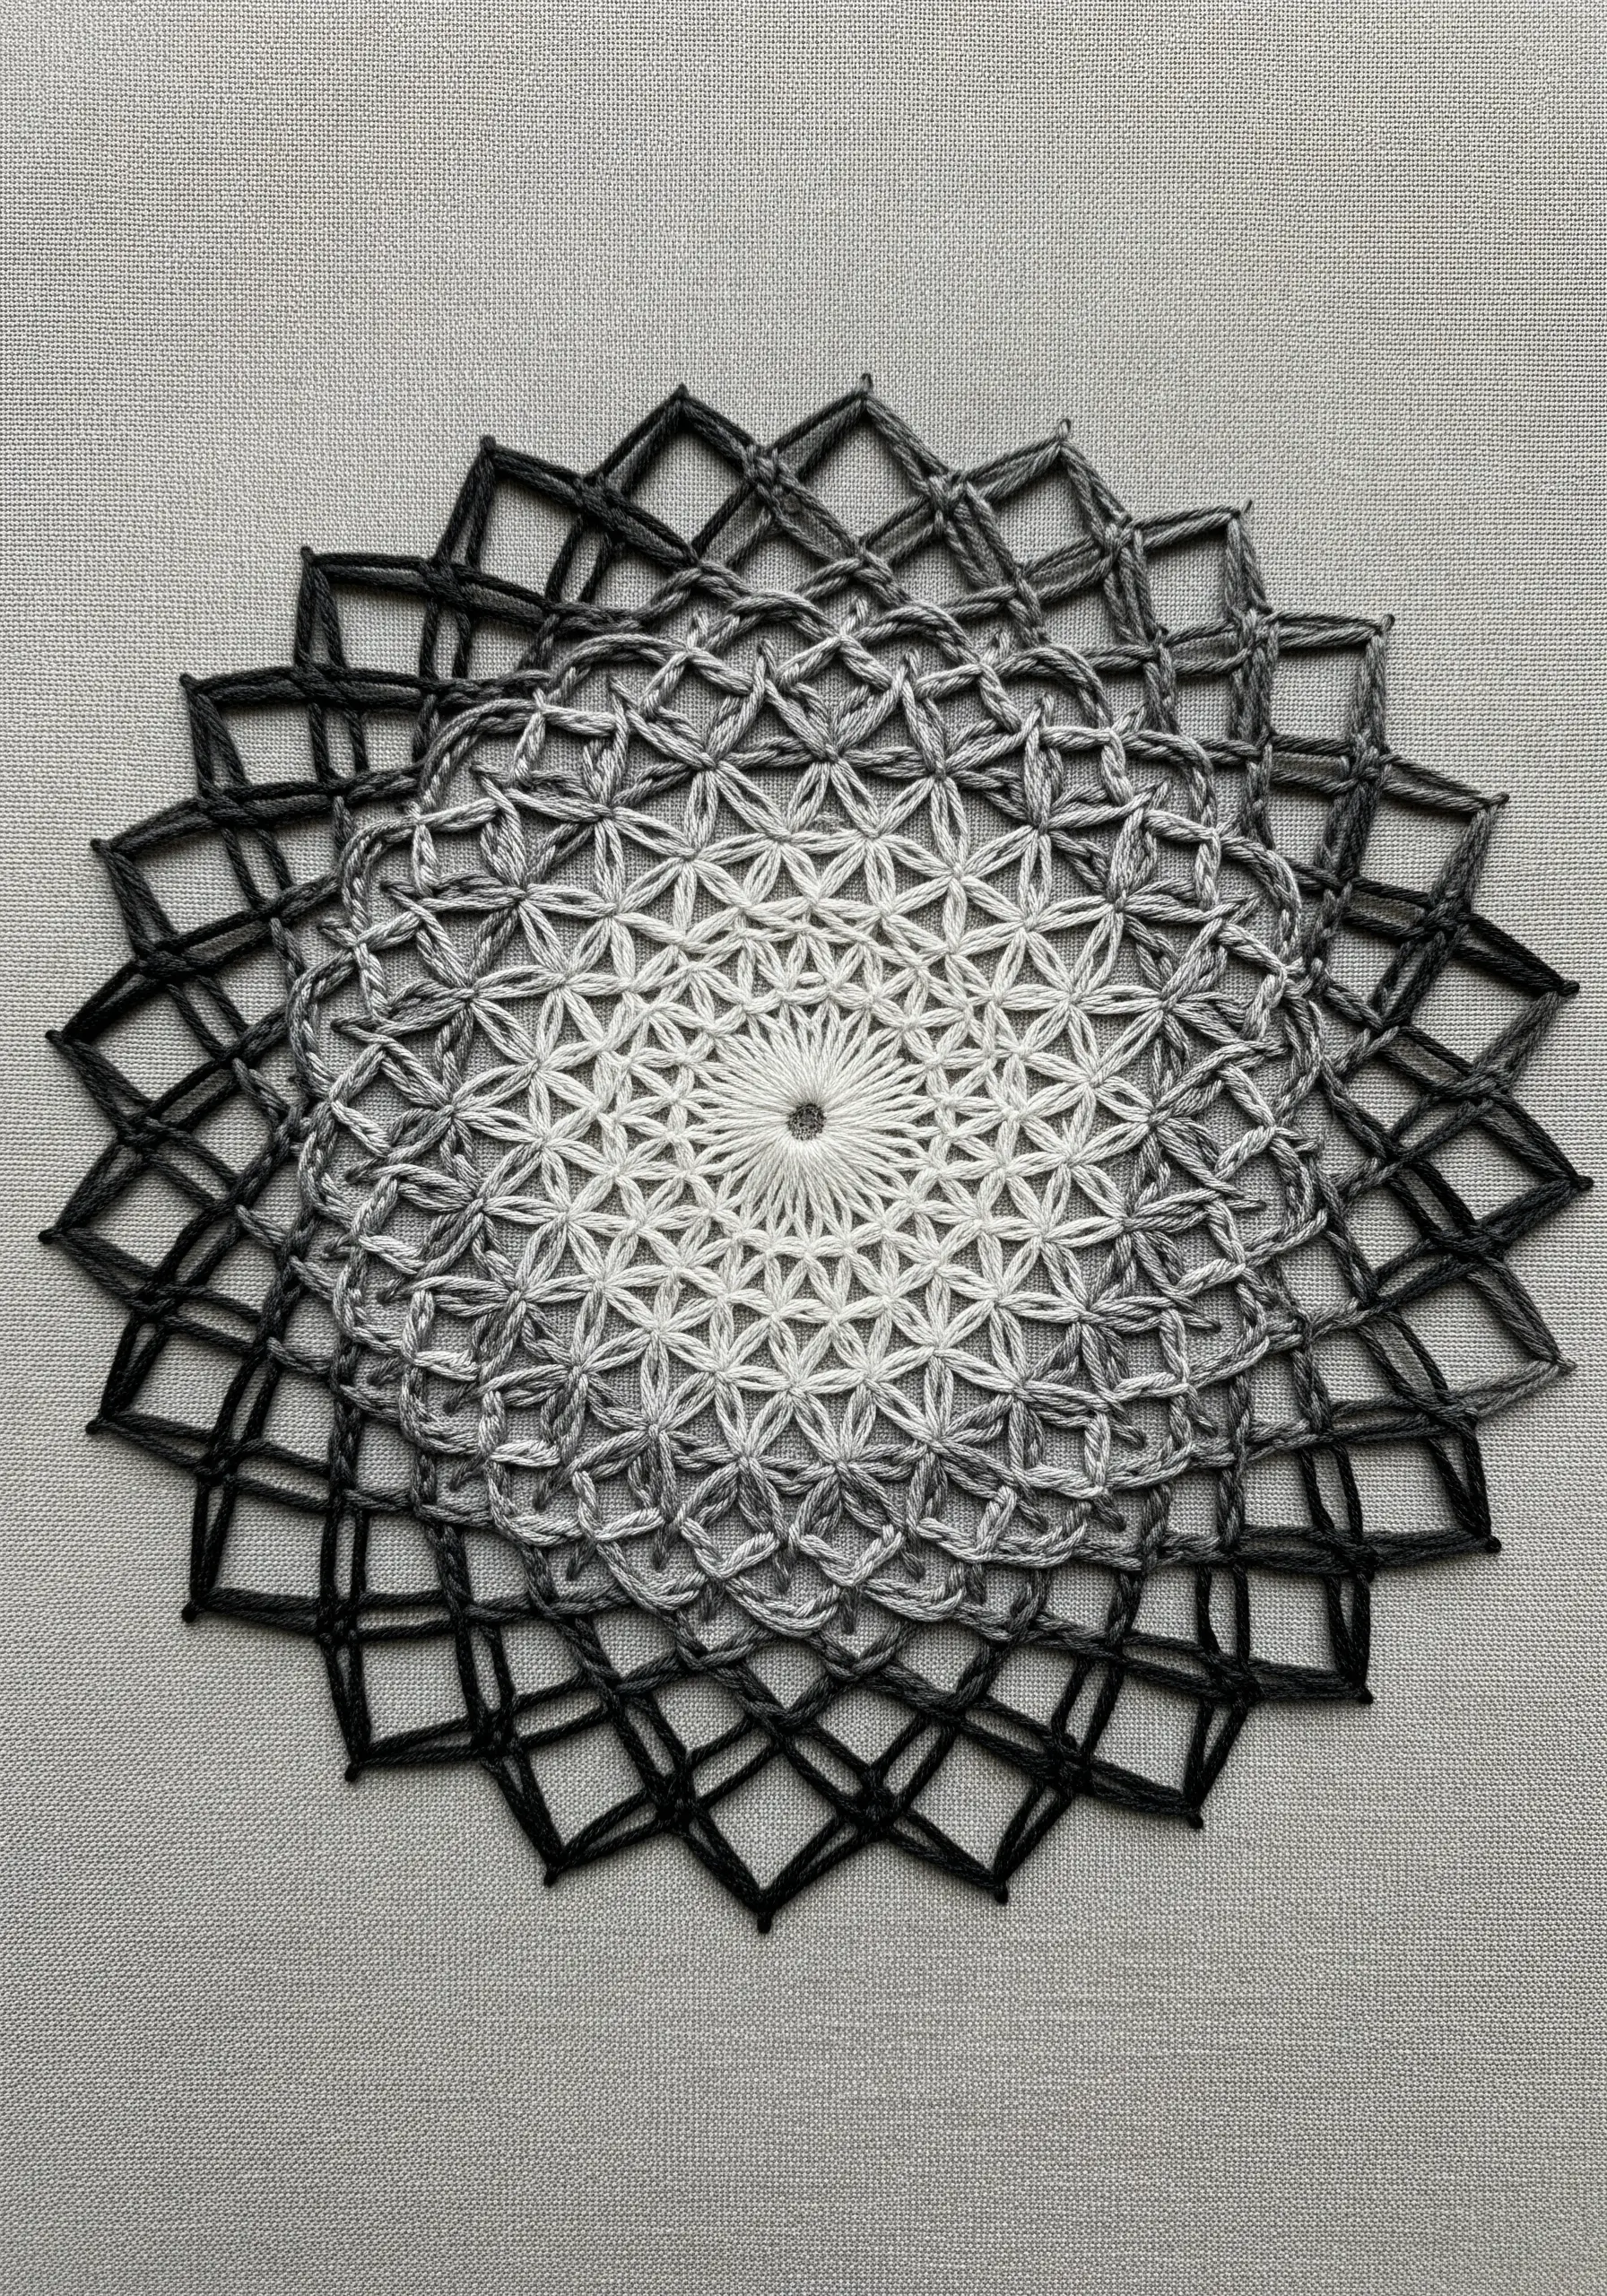
Achieve a smooth ombré effect by methodically blending your threads.
To transition from white to black, start with six strands of white thread. For the next section, use five strands of white and one of black. Continue adjusting the ratio (4/2, 3/3, 2/4, 1/5) until you are stitching with six strands of black.
This painstaking process creates a flawless, gradual shift in color that looks stunning in repeating geometric patterns like the Flower of Life.
The subtle changes in tone give the entire piece a sense of depth and luminosity.
22. Use Couching for Flawless Sacred Geometry
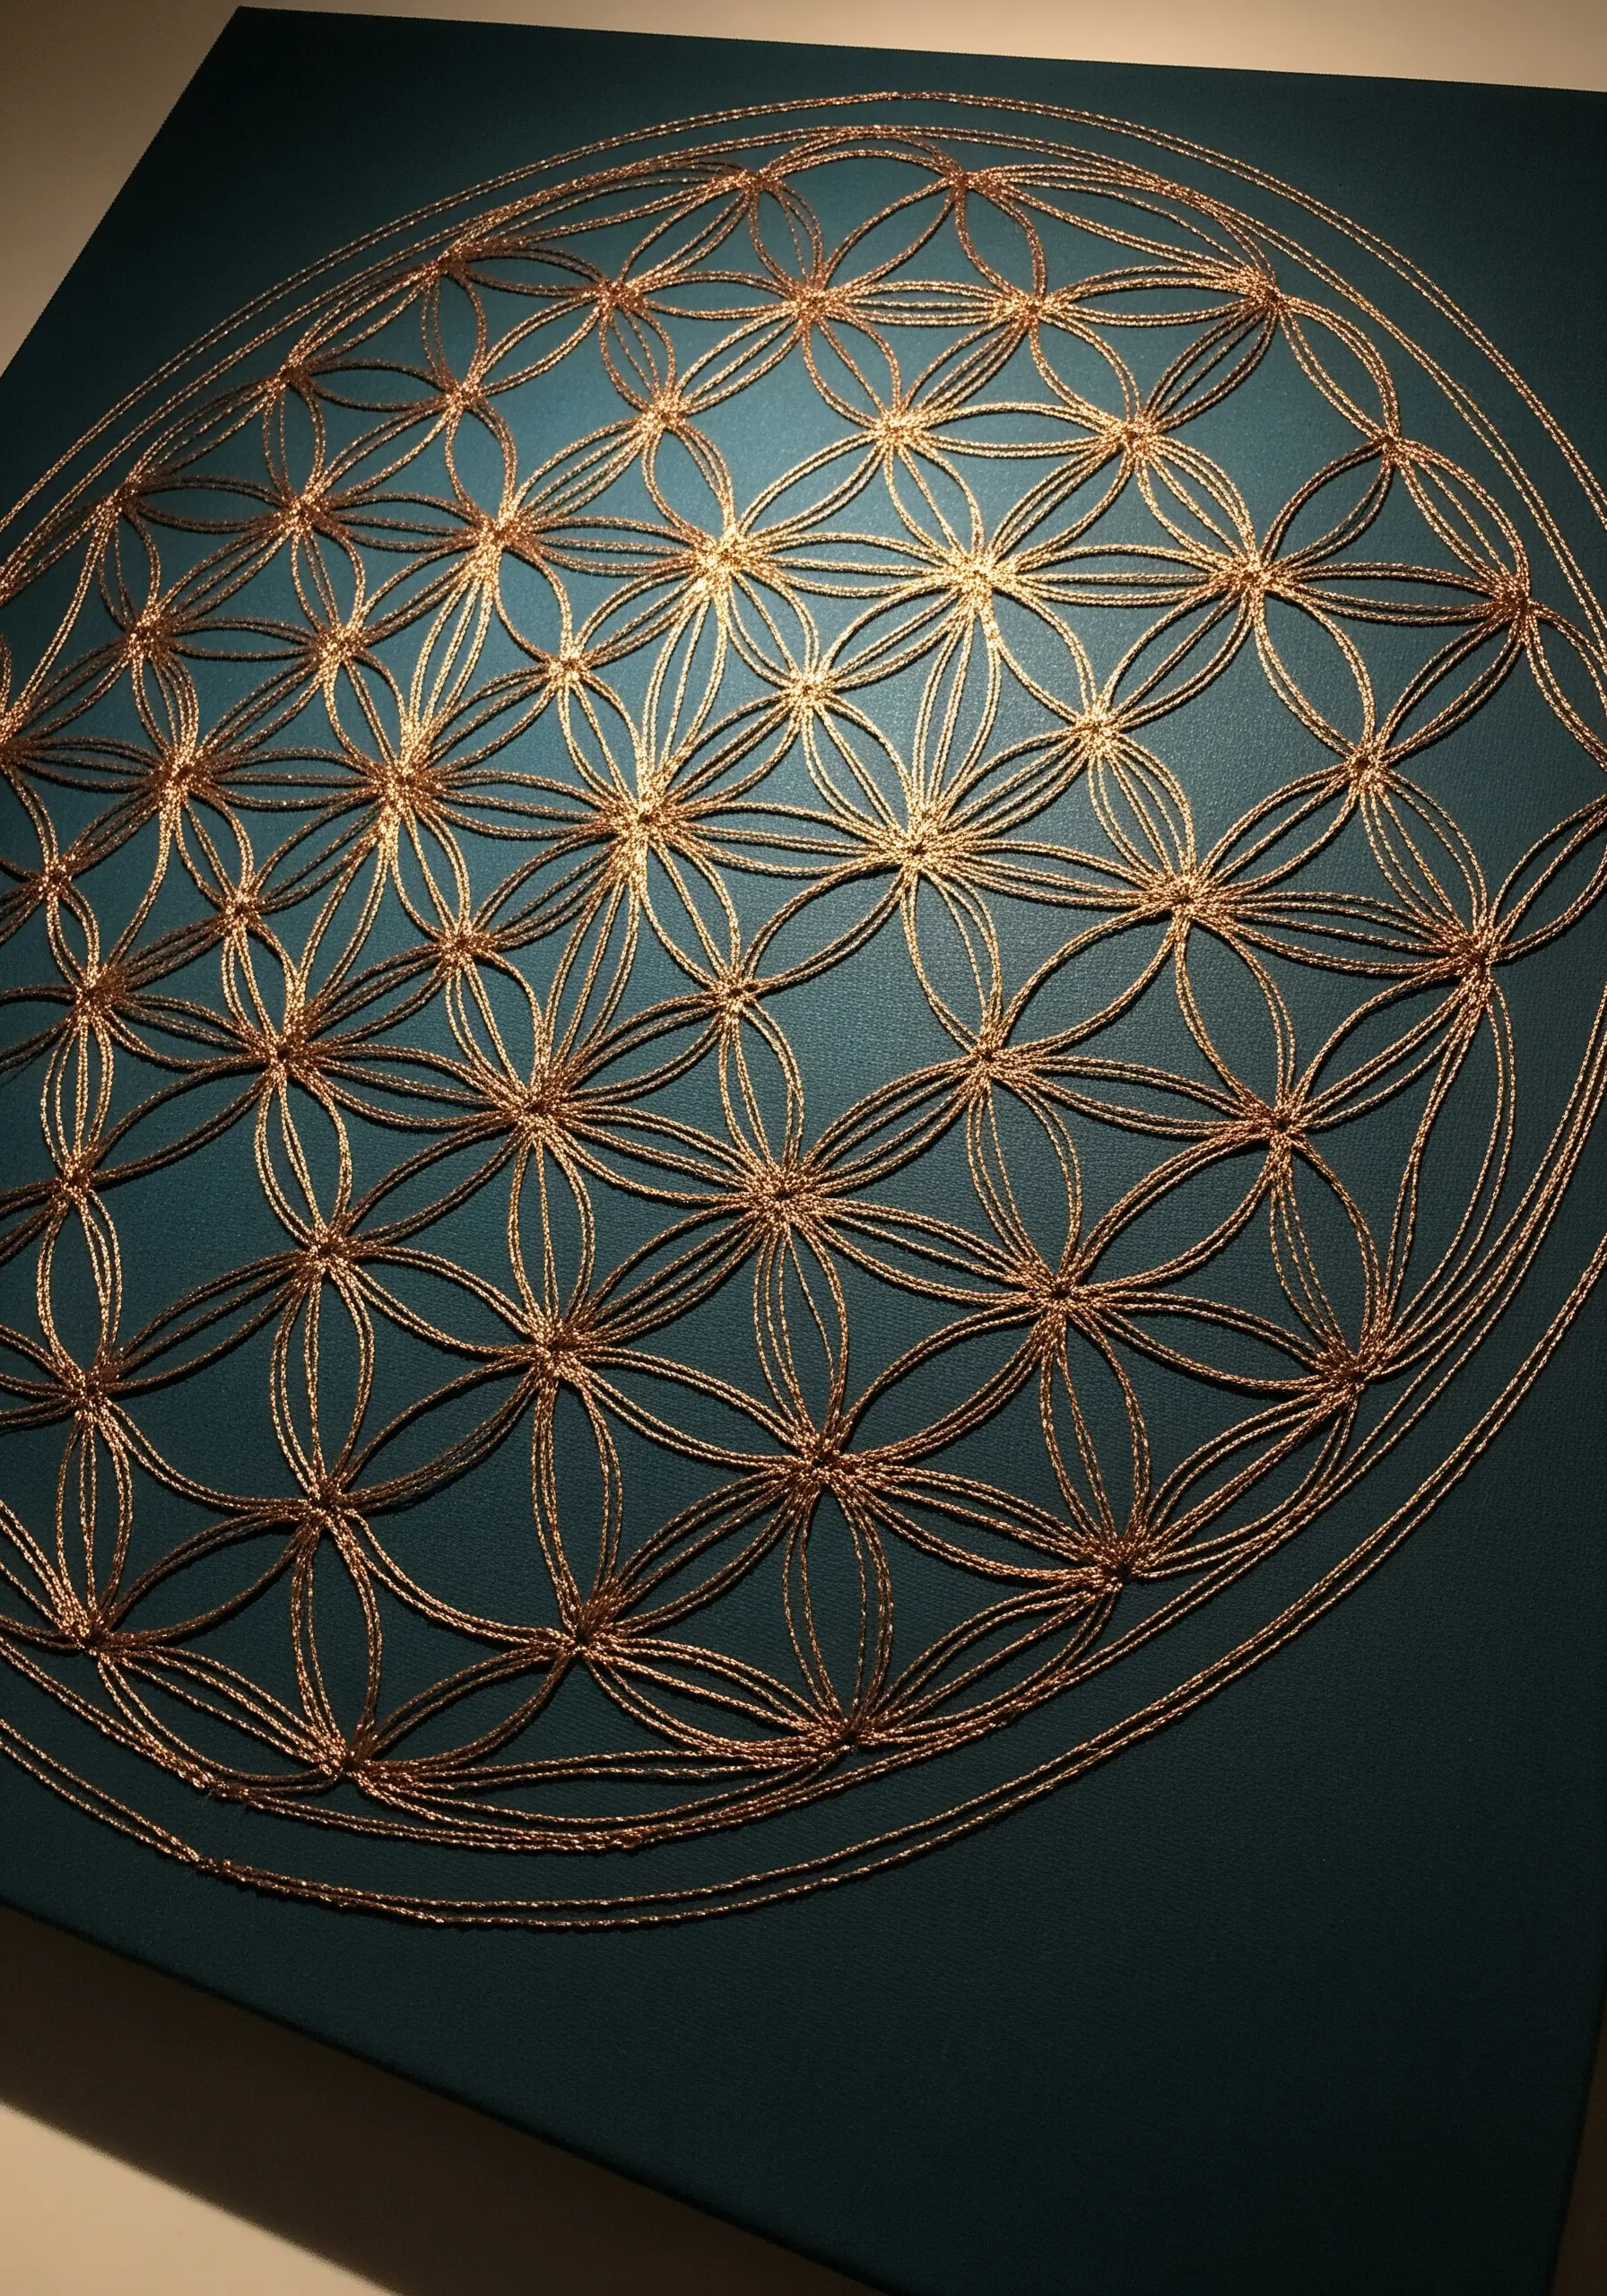
For patterns that rely on perfect, continuous lines, like the Flower of Life, the couching stitch is your most reliable technique.
Lay down a thick metallic cord or perle cotton thread along your design lines.
Then, using a second, finer thread, make small, evenly spaced tacking stitches to hold the main cord in place.
This method allows you to create perfectly smooth curves and sharp intersections without any of the lumps or twists that can occur with other outline stitches, resulting in a polished, professional finish.
23. Paint with Thread Using French Knots
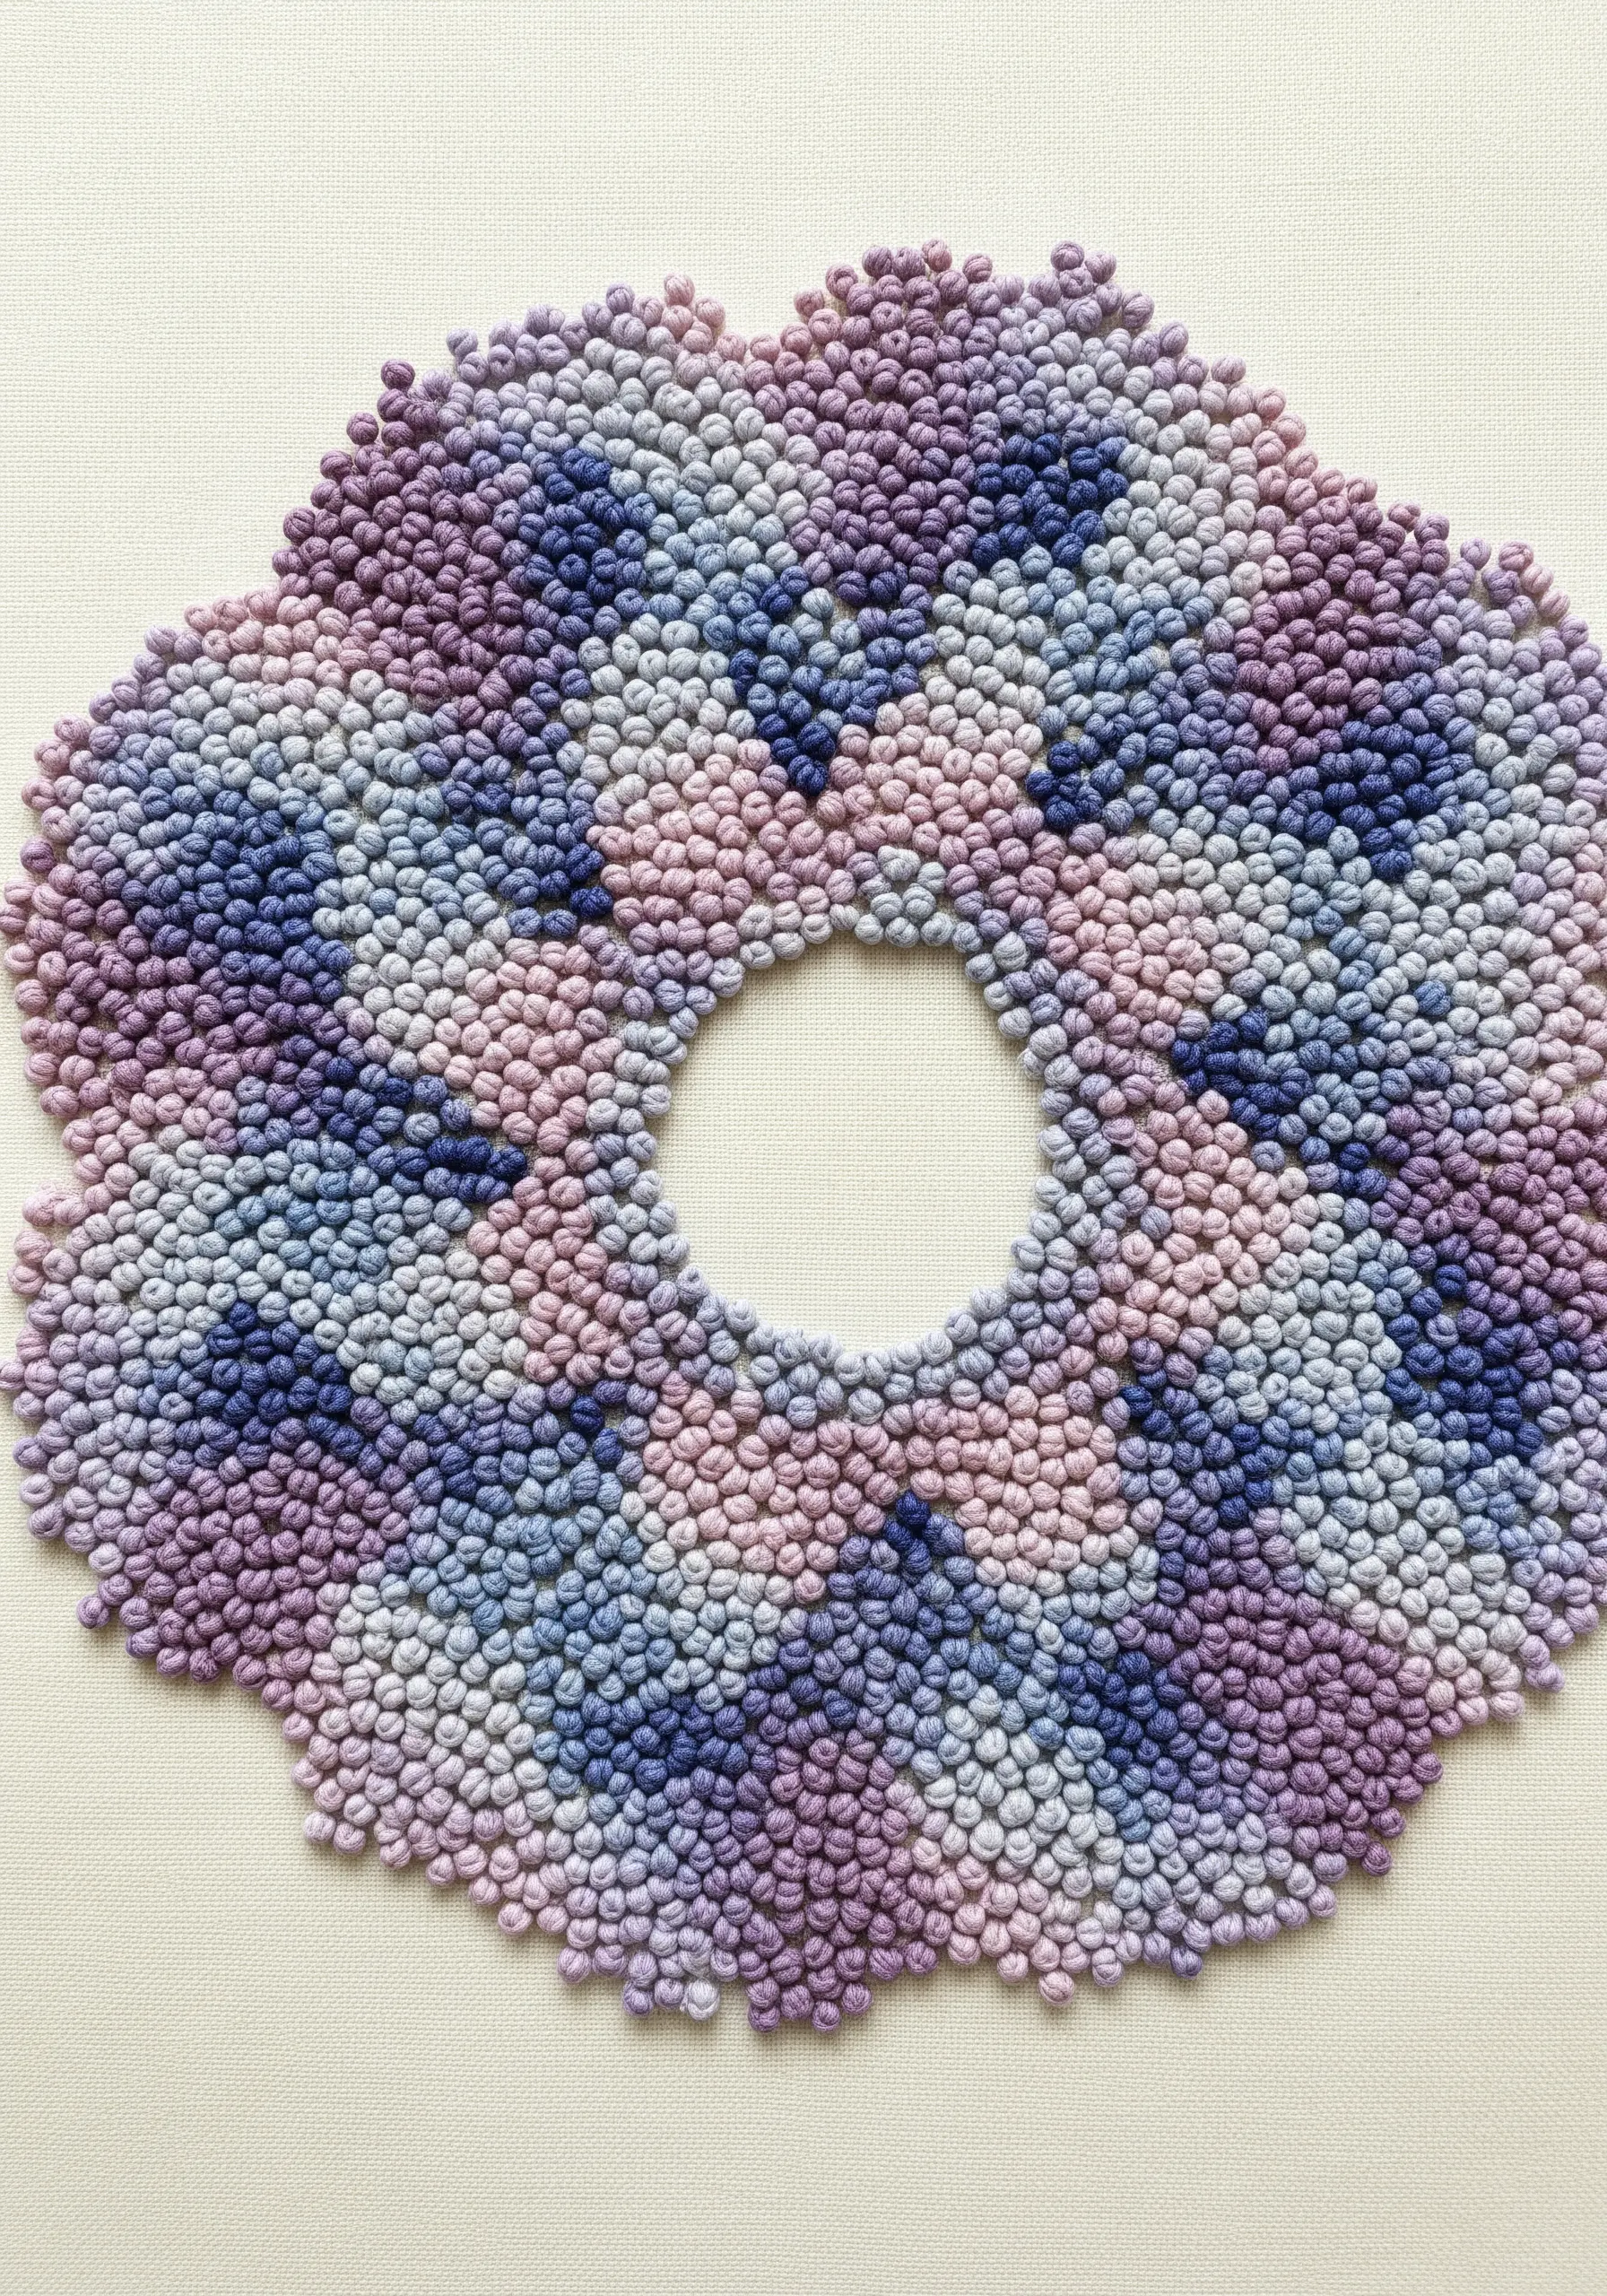
Think of your needle as a paintbrush and your floss as dabs of paint to create a pointillist-style mandala.
Instead of lines or shapes, fill your entire design with dense French knots.
You can create soft, blended fields of color by clustering different shades together, just as a painter would.
This technique is incredibly forgiving and meditative, and it produces a wonderfully plush, tactile surface. Varying the number of wraps on your needle will also create knots of different sizes for added texture.
24. Design a Mixed-Media Abstract Landscape
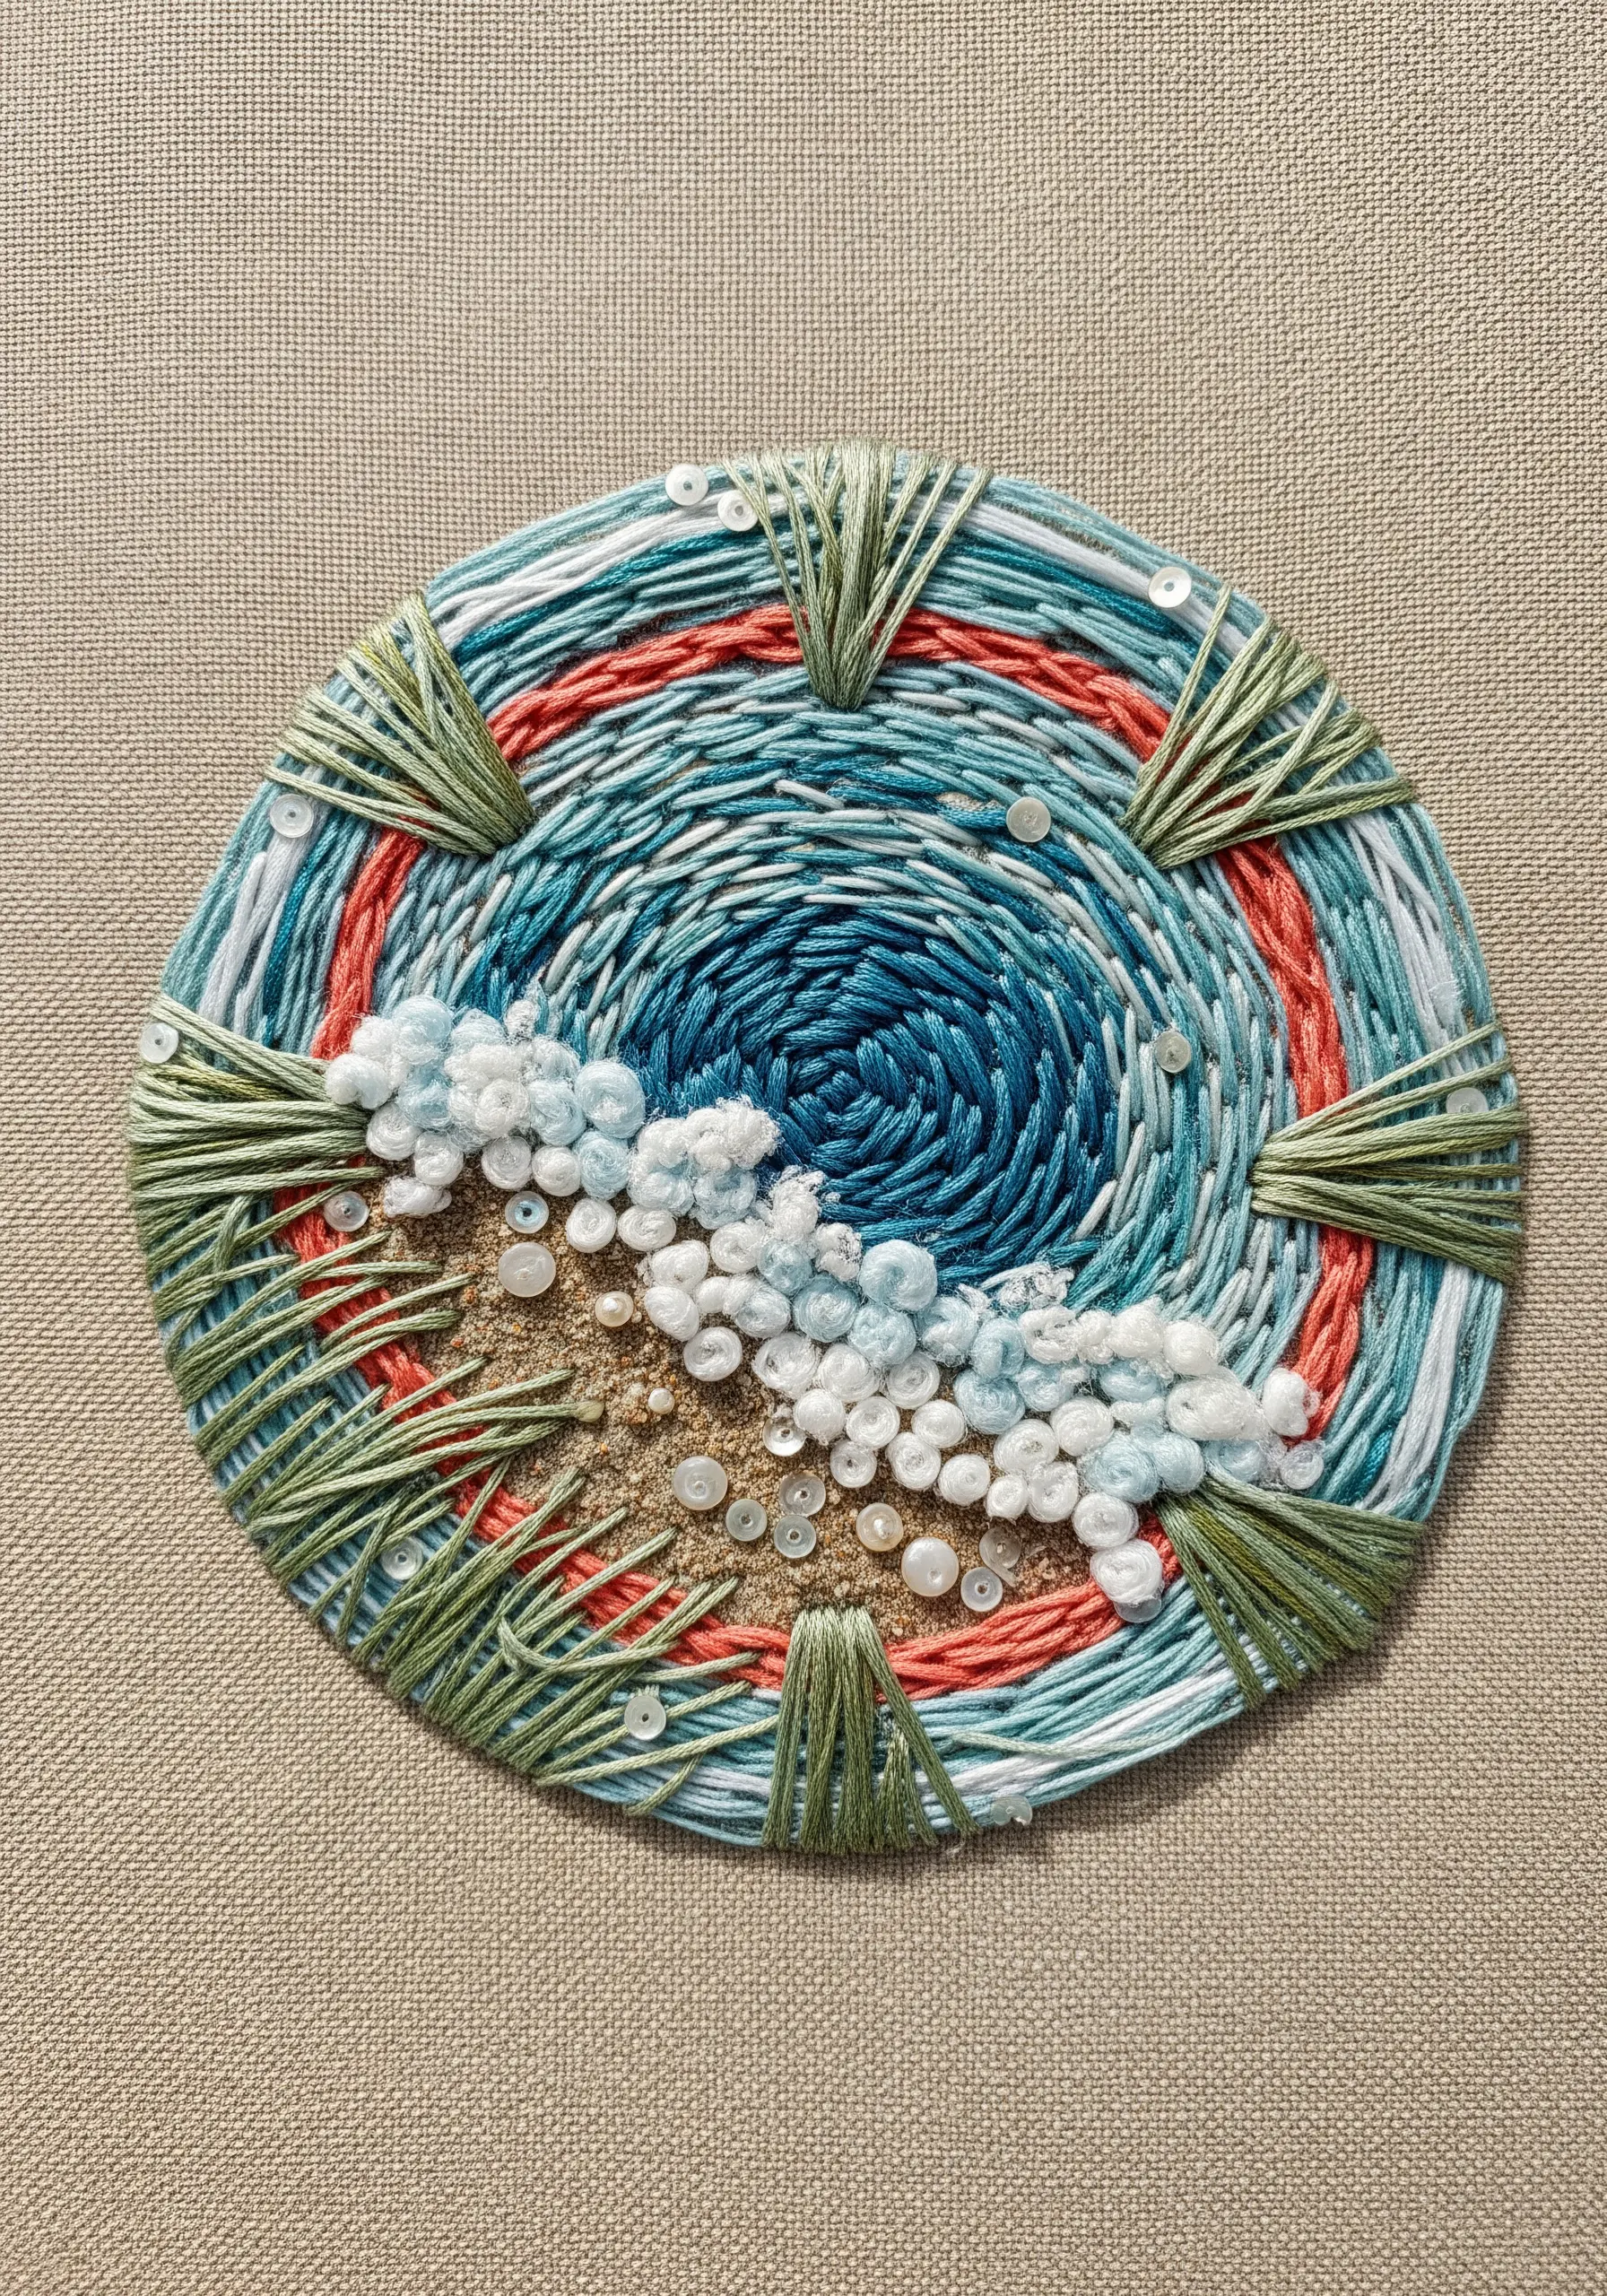
Your mandala doesn’t have to be purely geometric; it can represent an abstract idea, like a seascape.
Create a swirling ocean by couching down variegated blue yarn. Use clusters of white and iridescent beads to suggest crashing seafoam.
You can even incorporate real sand, held in place with a clear craft glue, for an unexpected textural element.
This mixed-media approach turns the traditional mandala into a small, narrative world.
25. Let Variegated Thread Do the Color Work
Create a complex color story with minimal effort by choosing a high-quality variegated thread.
In a repeating geometric pattern, a single strand of floss that shifts from green to blue to purple will create a beautiful, organic gradient without you ever having to change your thread.
The color changes will pool in different areas depending on the length of your stitches, resulting in a unique and effortless watercolor effect.
It’s the perfect way to achieve a vibrant look while maintaining a meditative stitching rhythm.
26. Create an Ethereal Burst with Fly Stitches
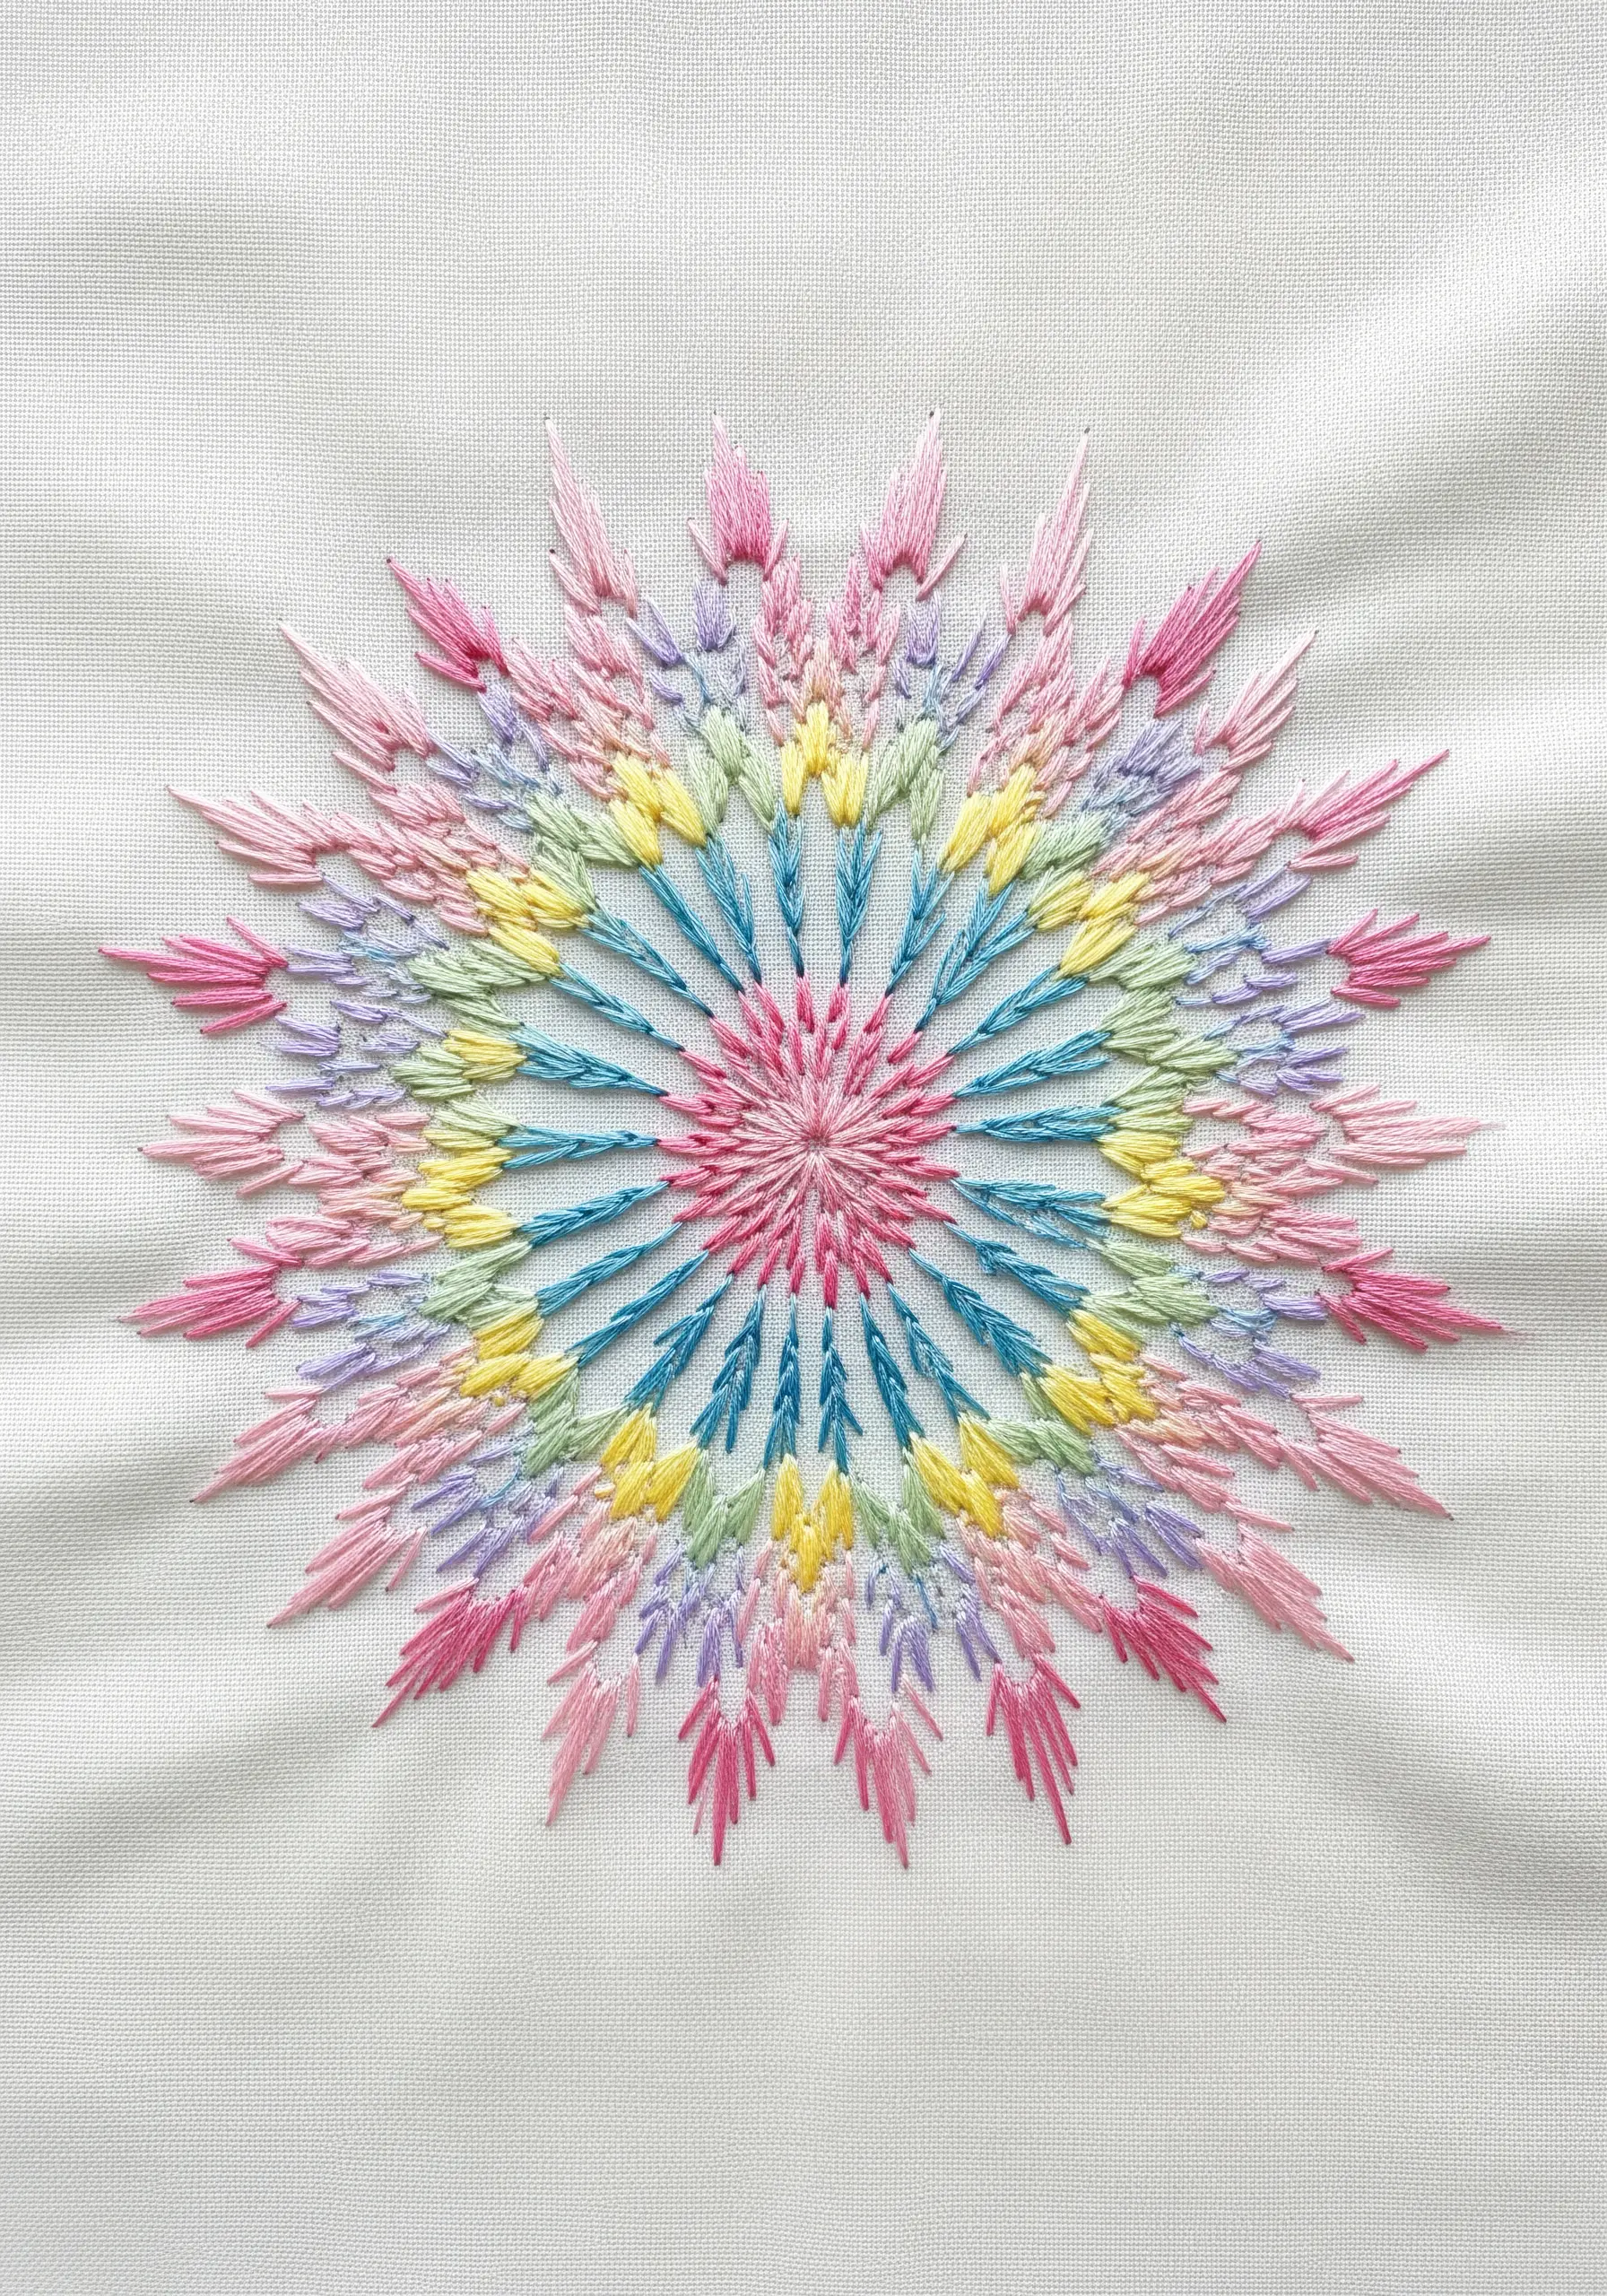
For a lighter, more delicate starburst effect, use radiating lines of fly stitch or feather stitch.
Unlike dense satin stitch, these open, airy stitches create a sense of softness and movement.
Stitch them in a radial pattern, varying the lengths to create a dynamic, explosive shape.
Using a dreamy pastel palette on a simple white background enhances the design’s ethereal, almost crystalline quality.
27. Adapt Mandala Principles to Chunky Knits
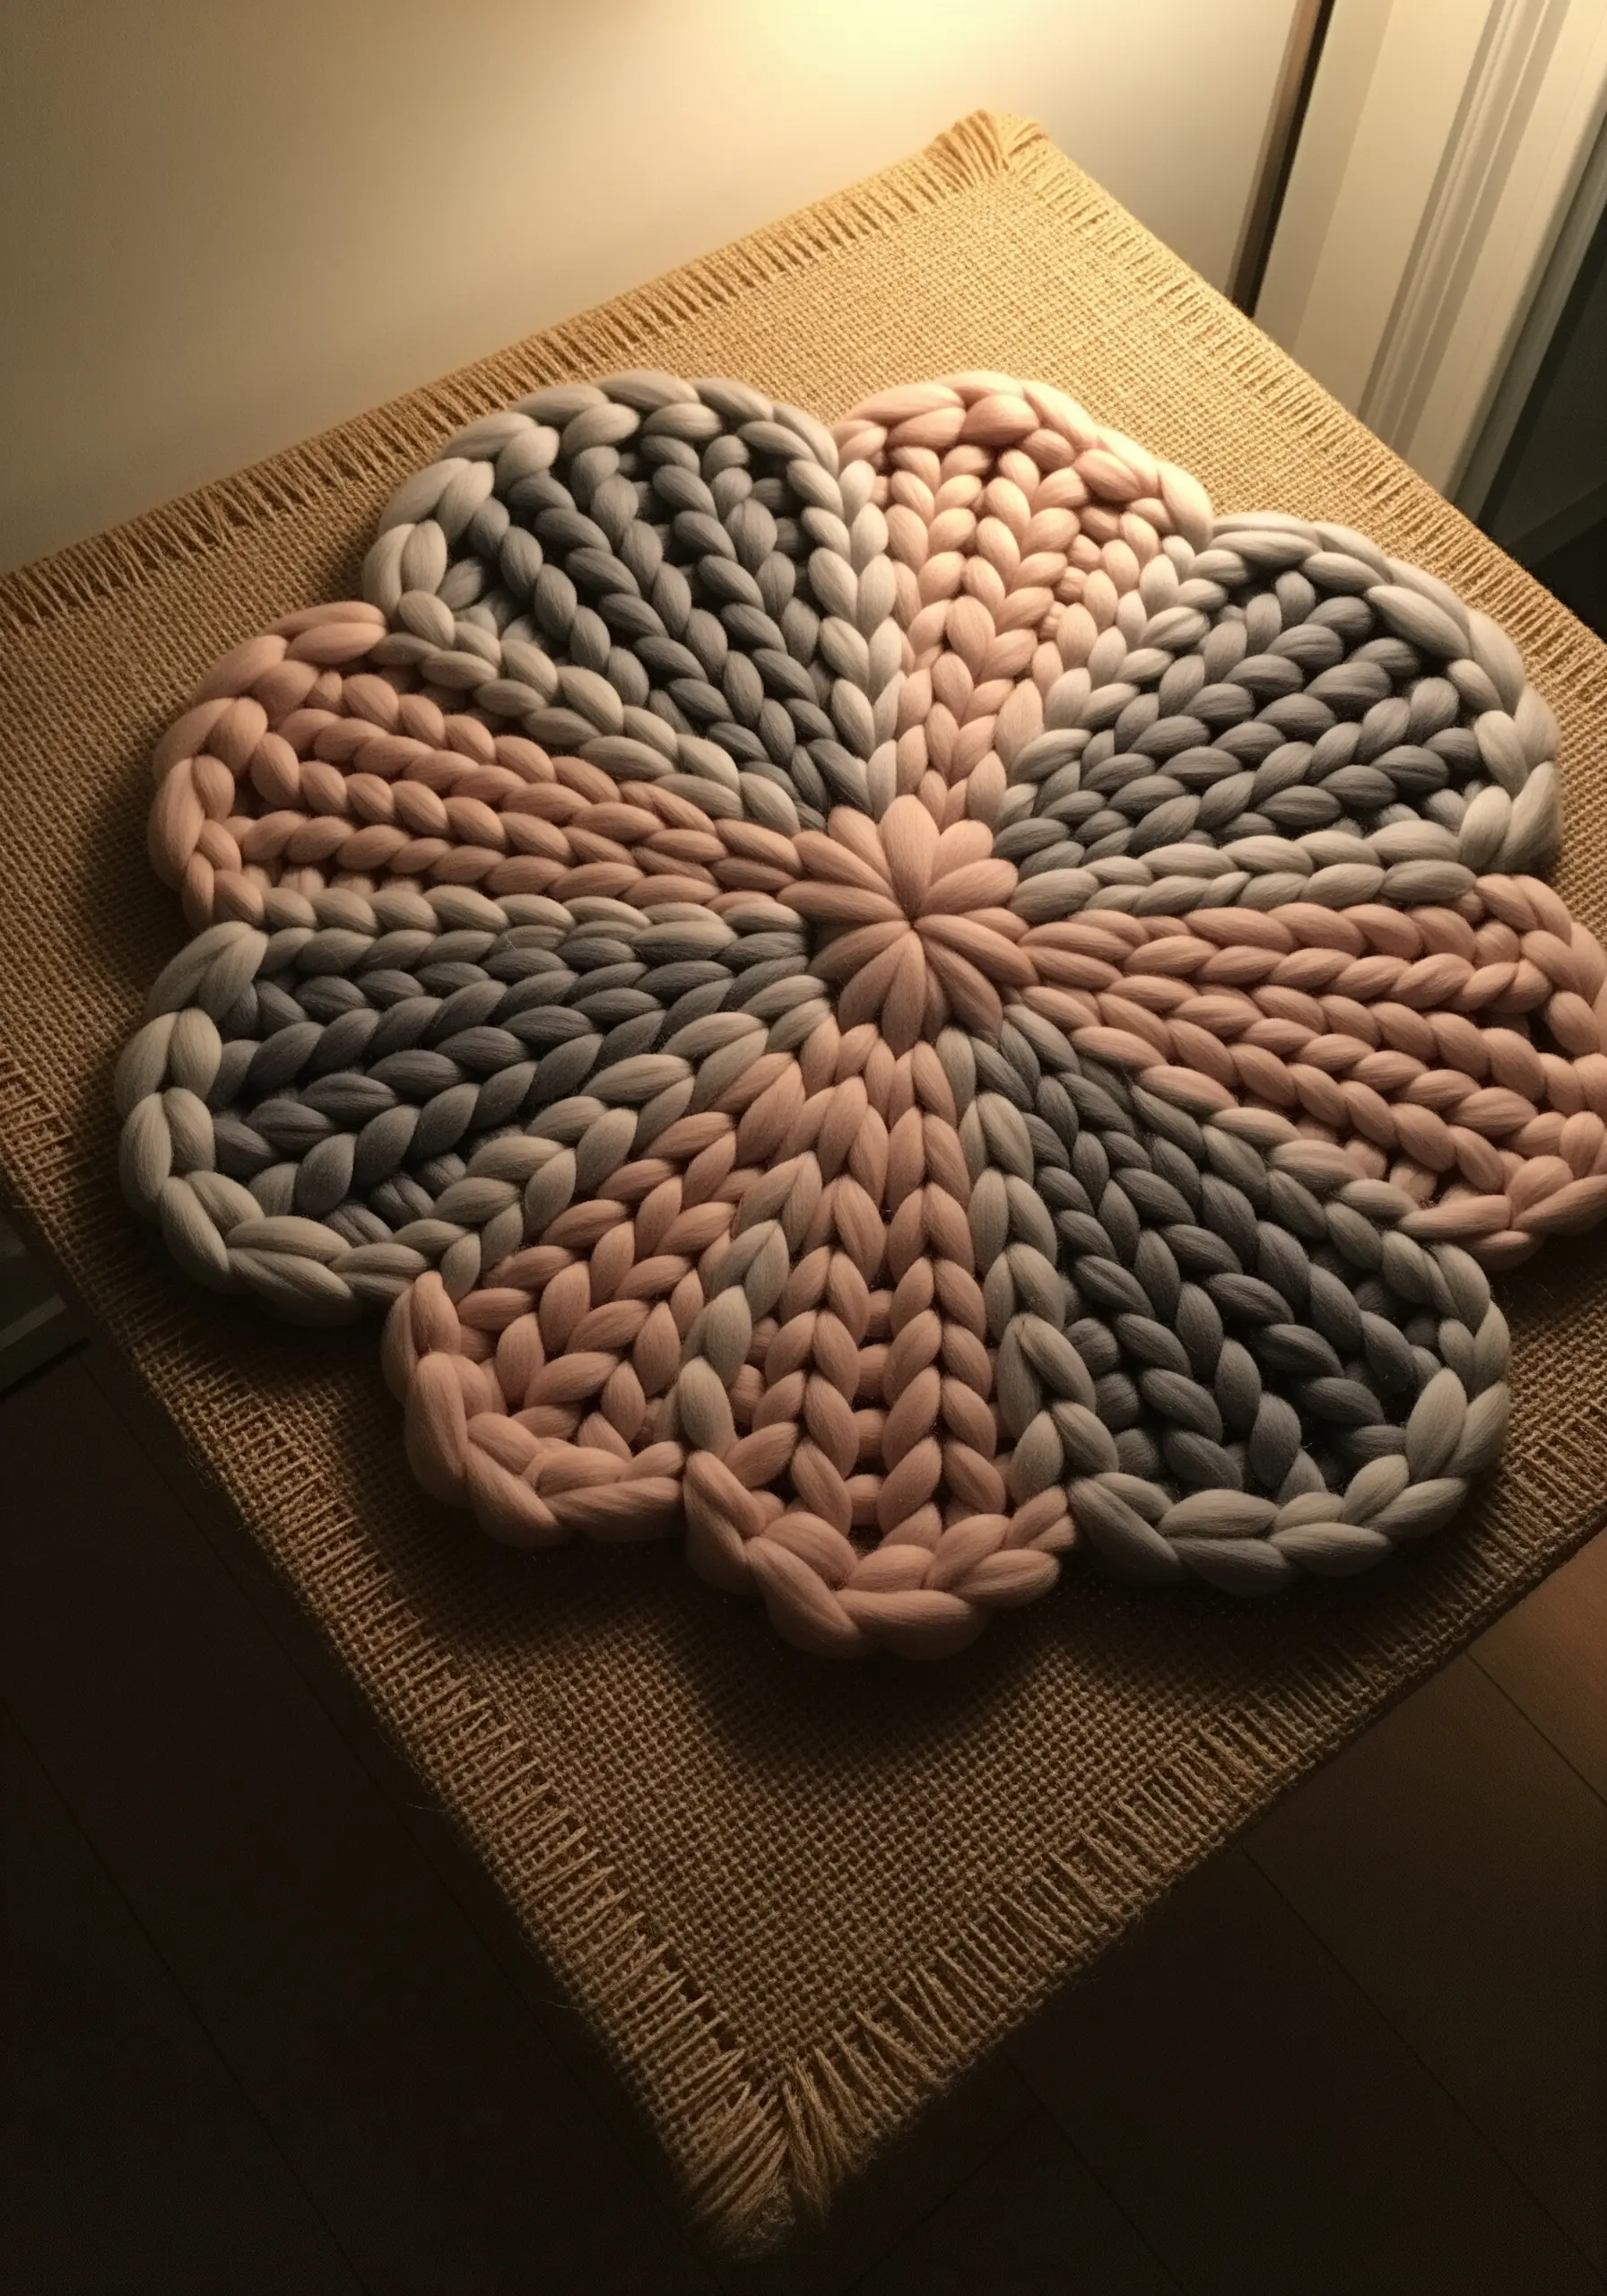
The meditative practice of creating a mandala isn’t limited to a needle and thread.
You can achieve the same rhythmic, circular construction with large-scale fibers and finger or arm knitting techniques.
By working in the round, you can create a plush, tactile mat or wall hanging that follows the same principles of radial symmetry.
This is a wonderful way to create a functional piece of art that embodies the calming spirit of the mandala on a much grander scale.
28. Stitch a Swirling Galaxy with Couching and Knots
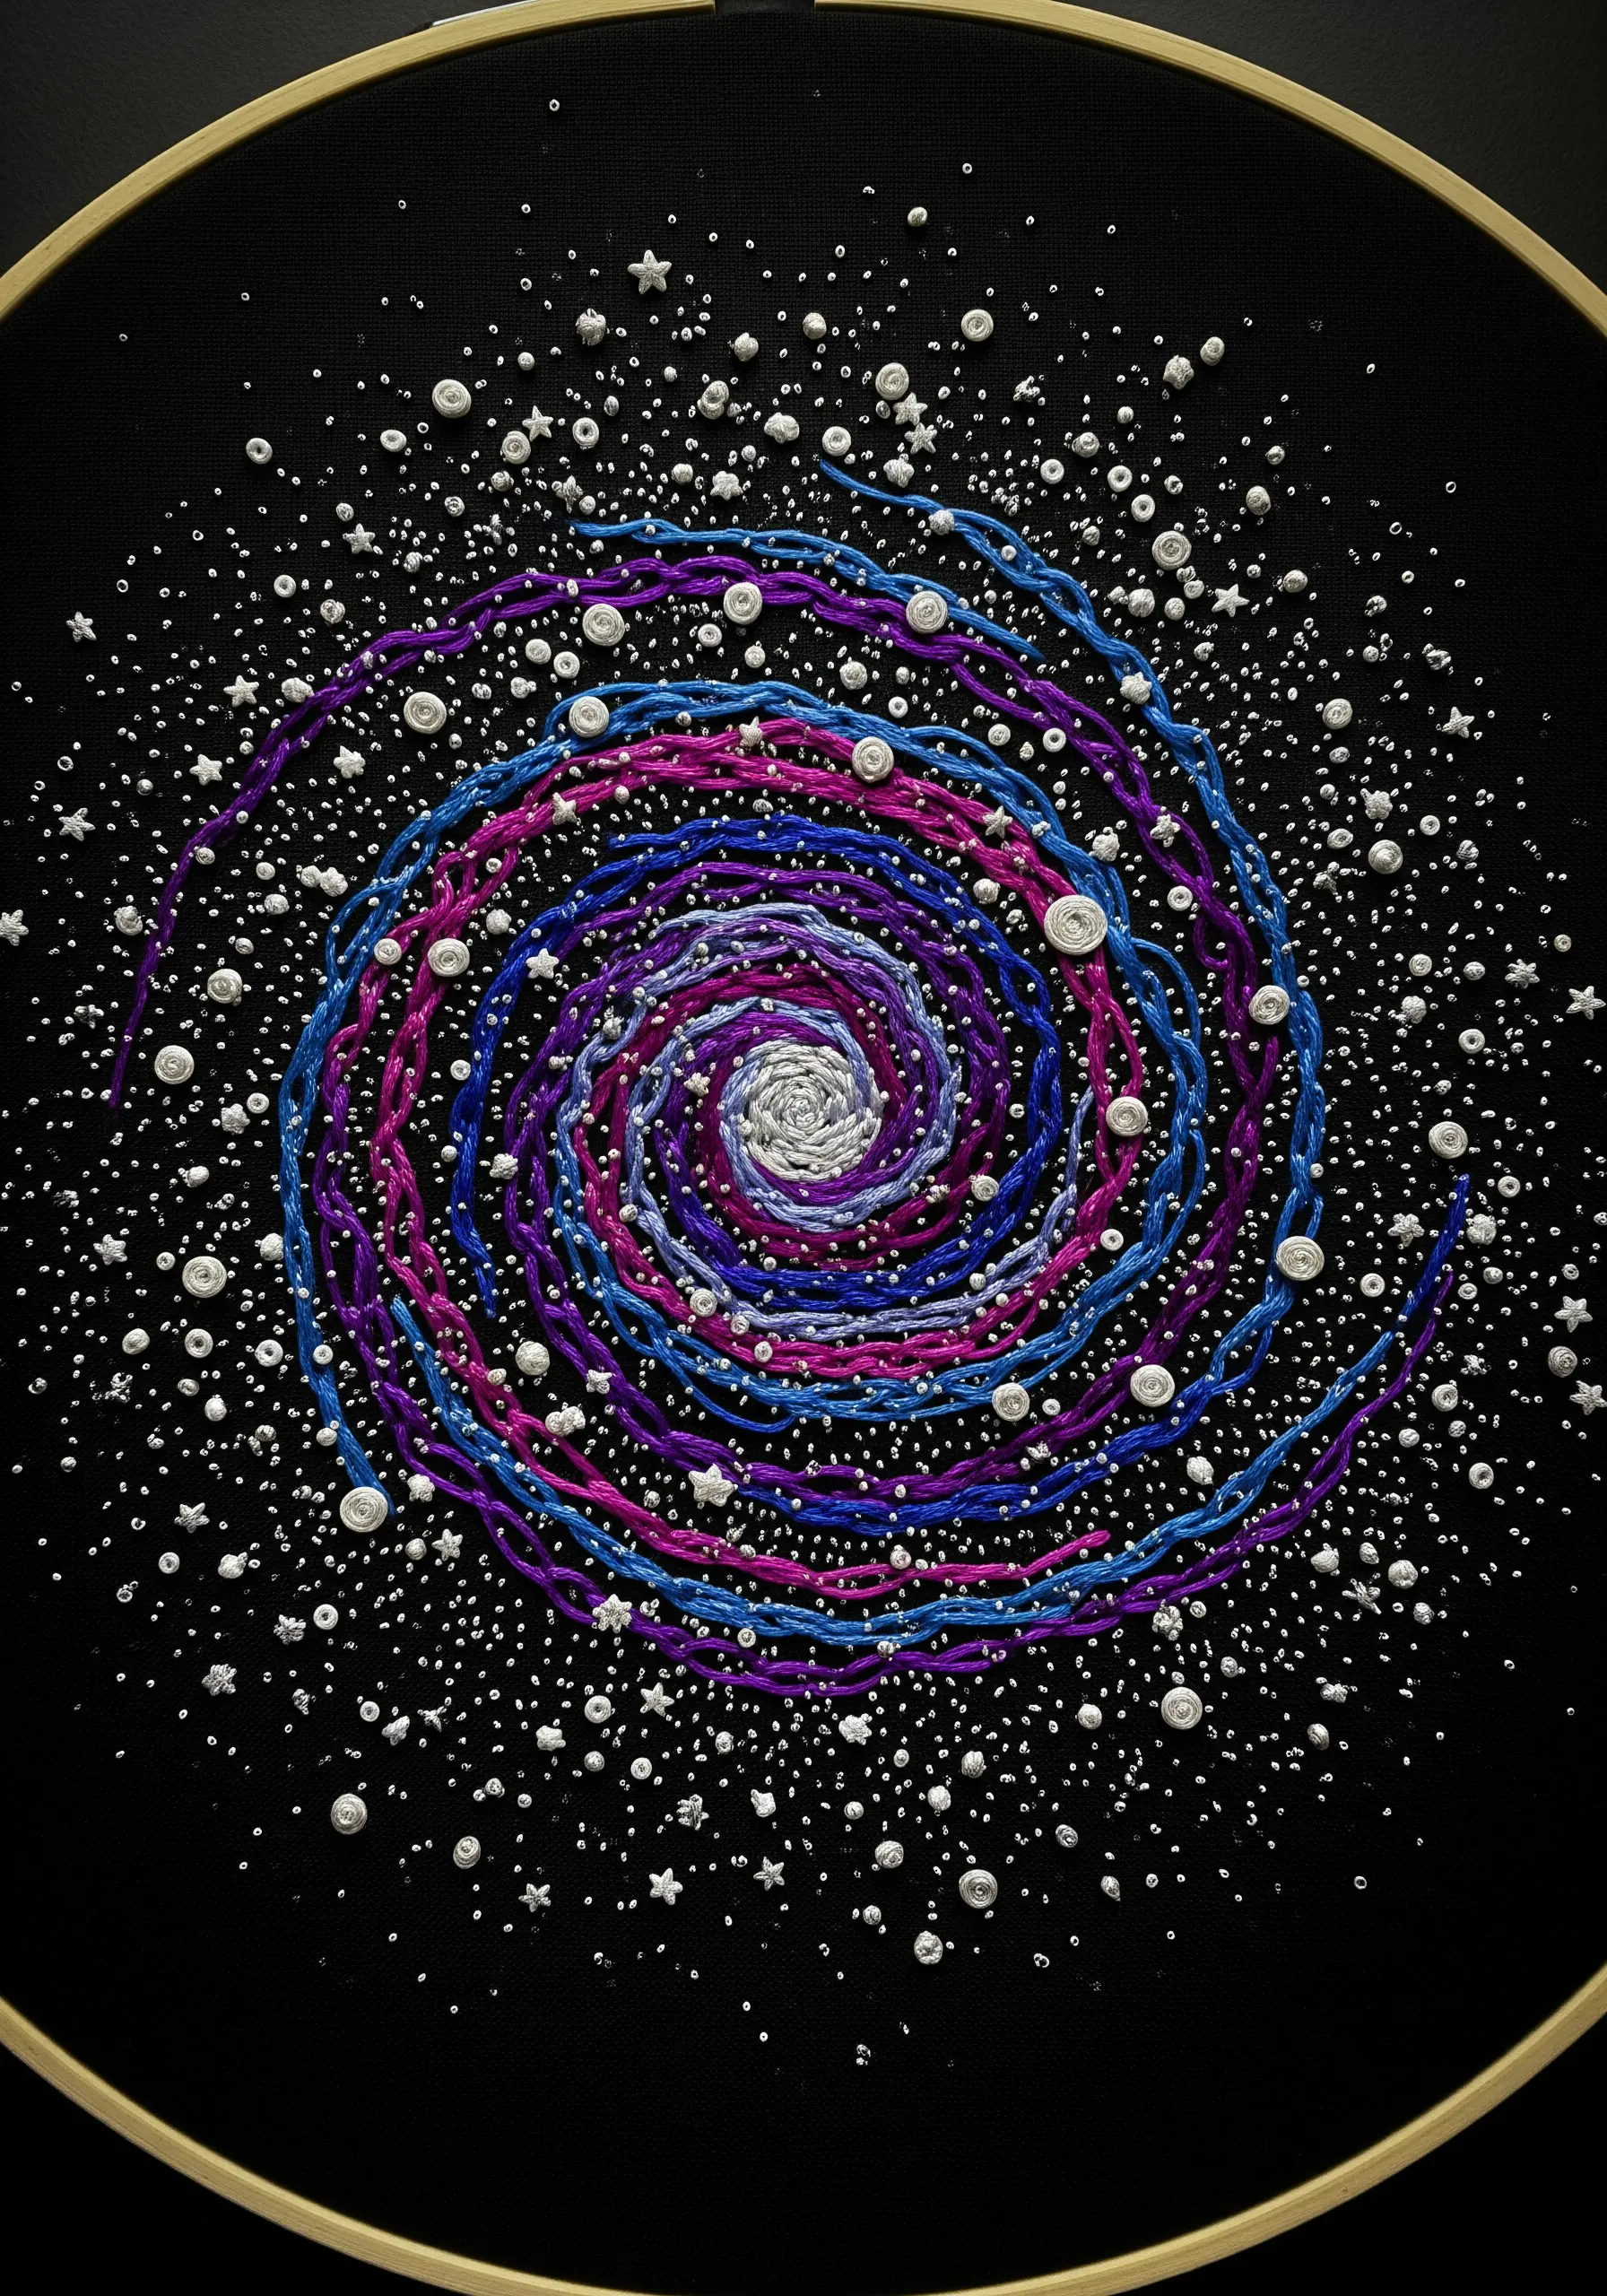
Capture the dynamic energy of a spiral galaxy on dark fabric.
Use a couching stitch with a thick, variegated thread in cosmic colors to create the smooth, swirling arms of the galaxy.
Then, fill the surrounding space with a dense scattering of French knots and tiny star stitches using white, silver, and metallic threads.
Varying the size of the knots (by changing the number of wraps) will create the illusion of stars at different distances, adding depth to your celestial scene.
29. Command Attention with Bold, Graphic Lines
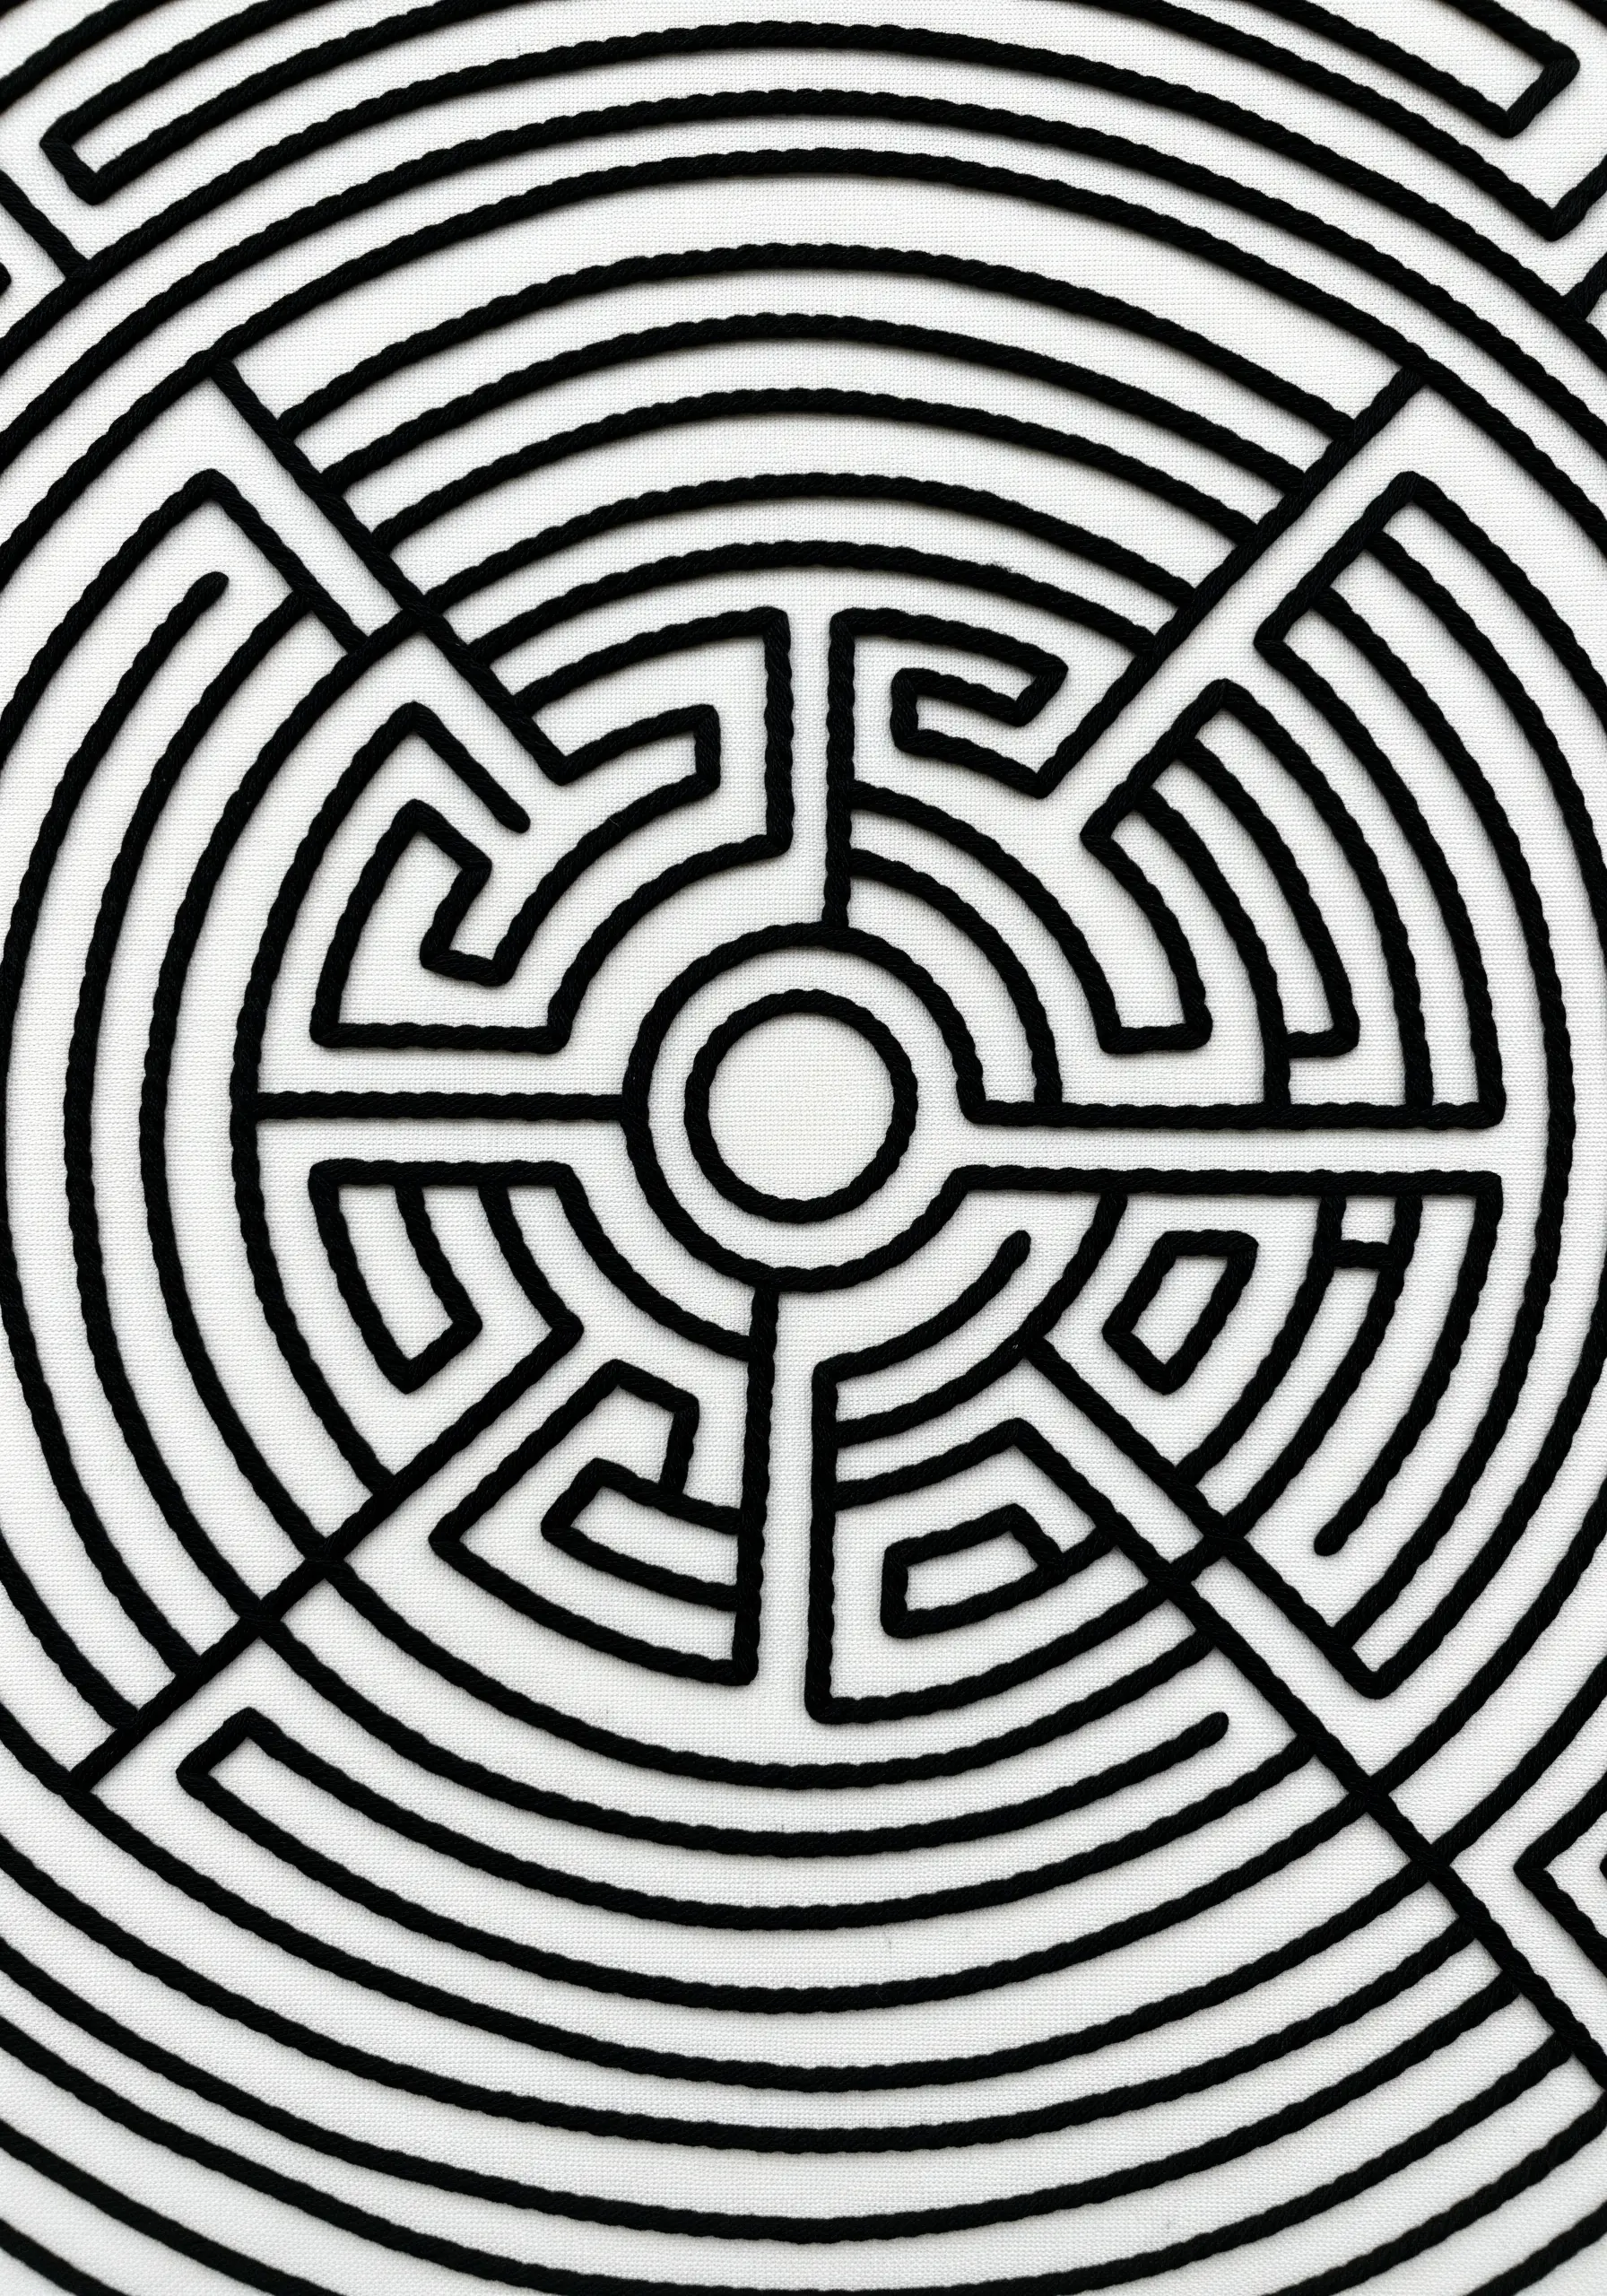
Sometimes, the most powerful design is the most simple.
A labyrinth or maze pattern in a single, bold color against a stark background has an incredible graphic impact.
To achieve a perfectly uniform, cord-like line, use a whipped backstitch or a heavy, two-ply stem stitch.
The precision of the lines and the stark use of negative space create a modern, hypnotic piece that is both meditative to stitch and to gaze upon.
30. Design an Asymmetrical Autumnal Mandala
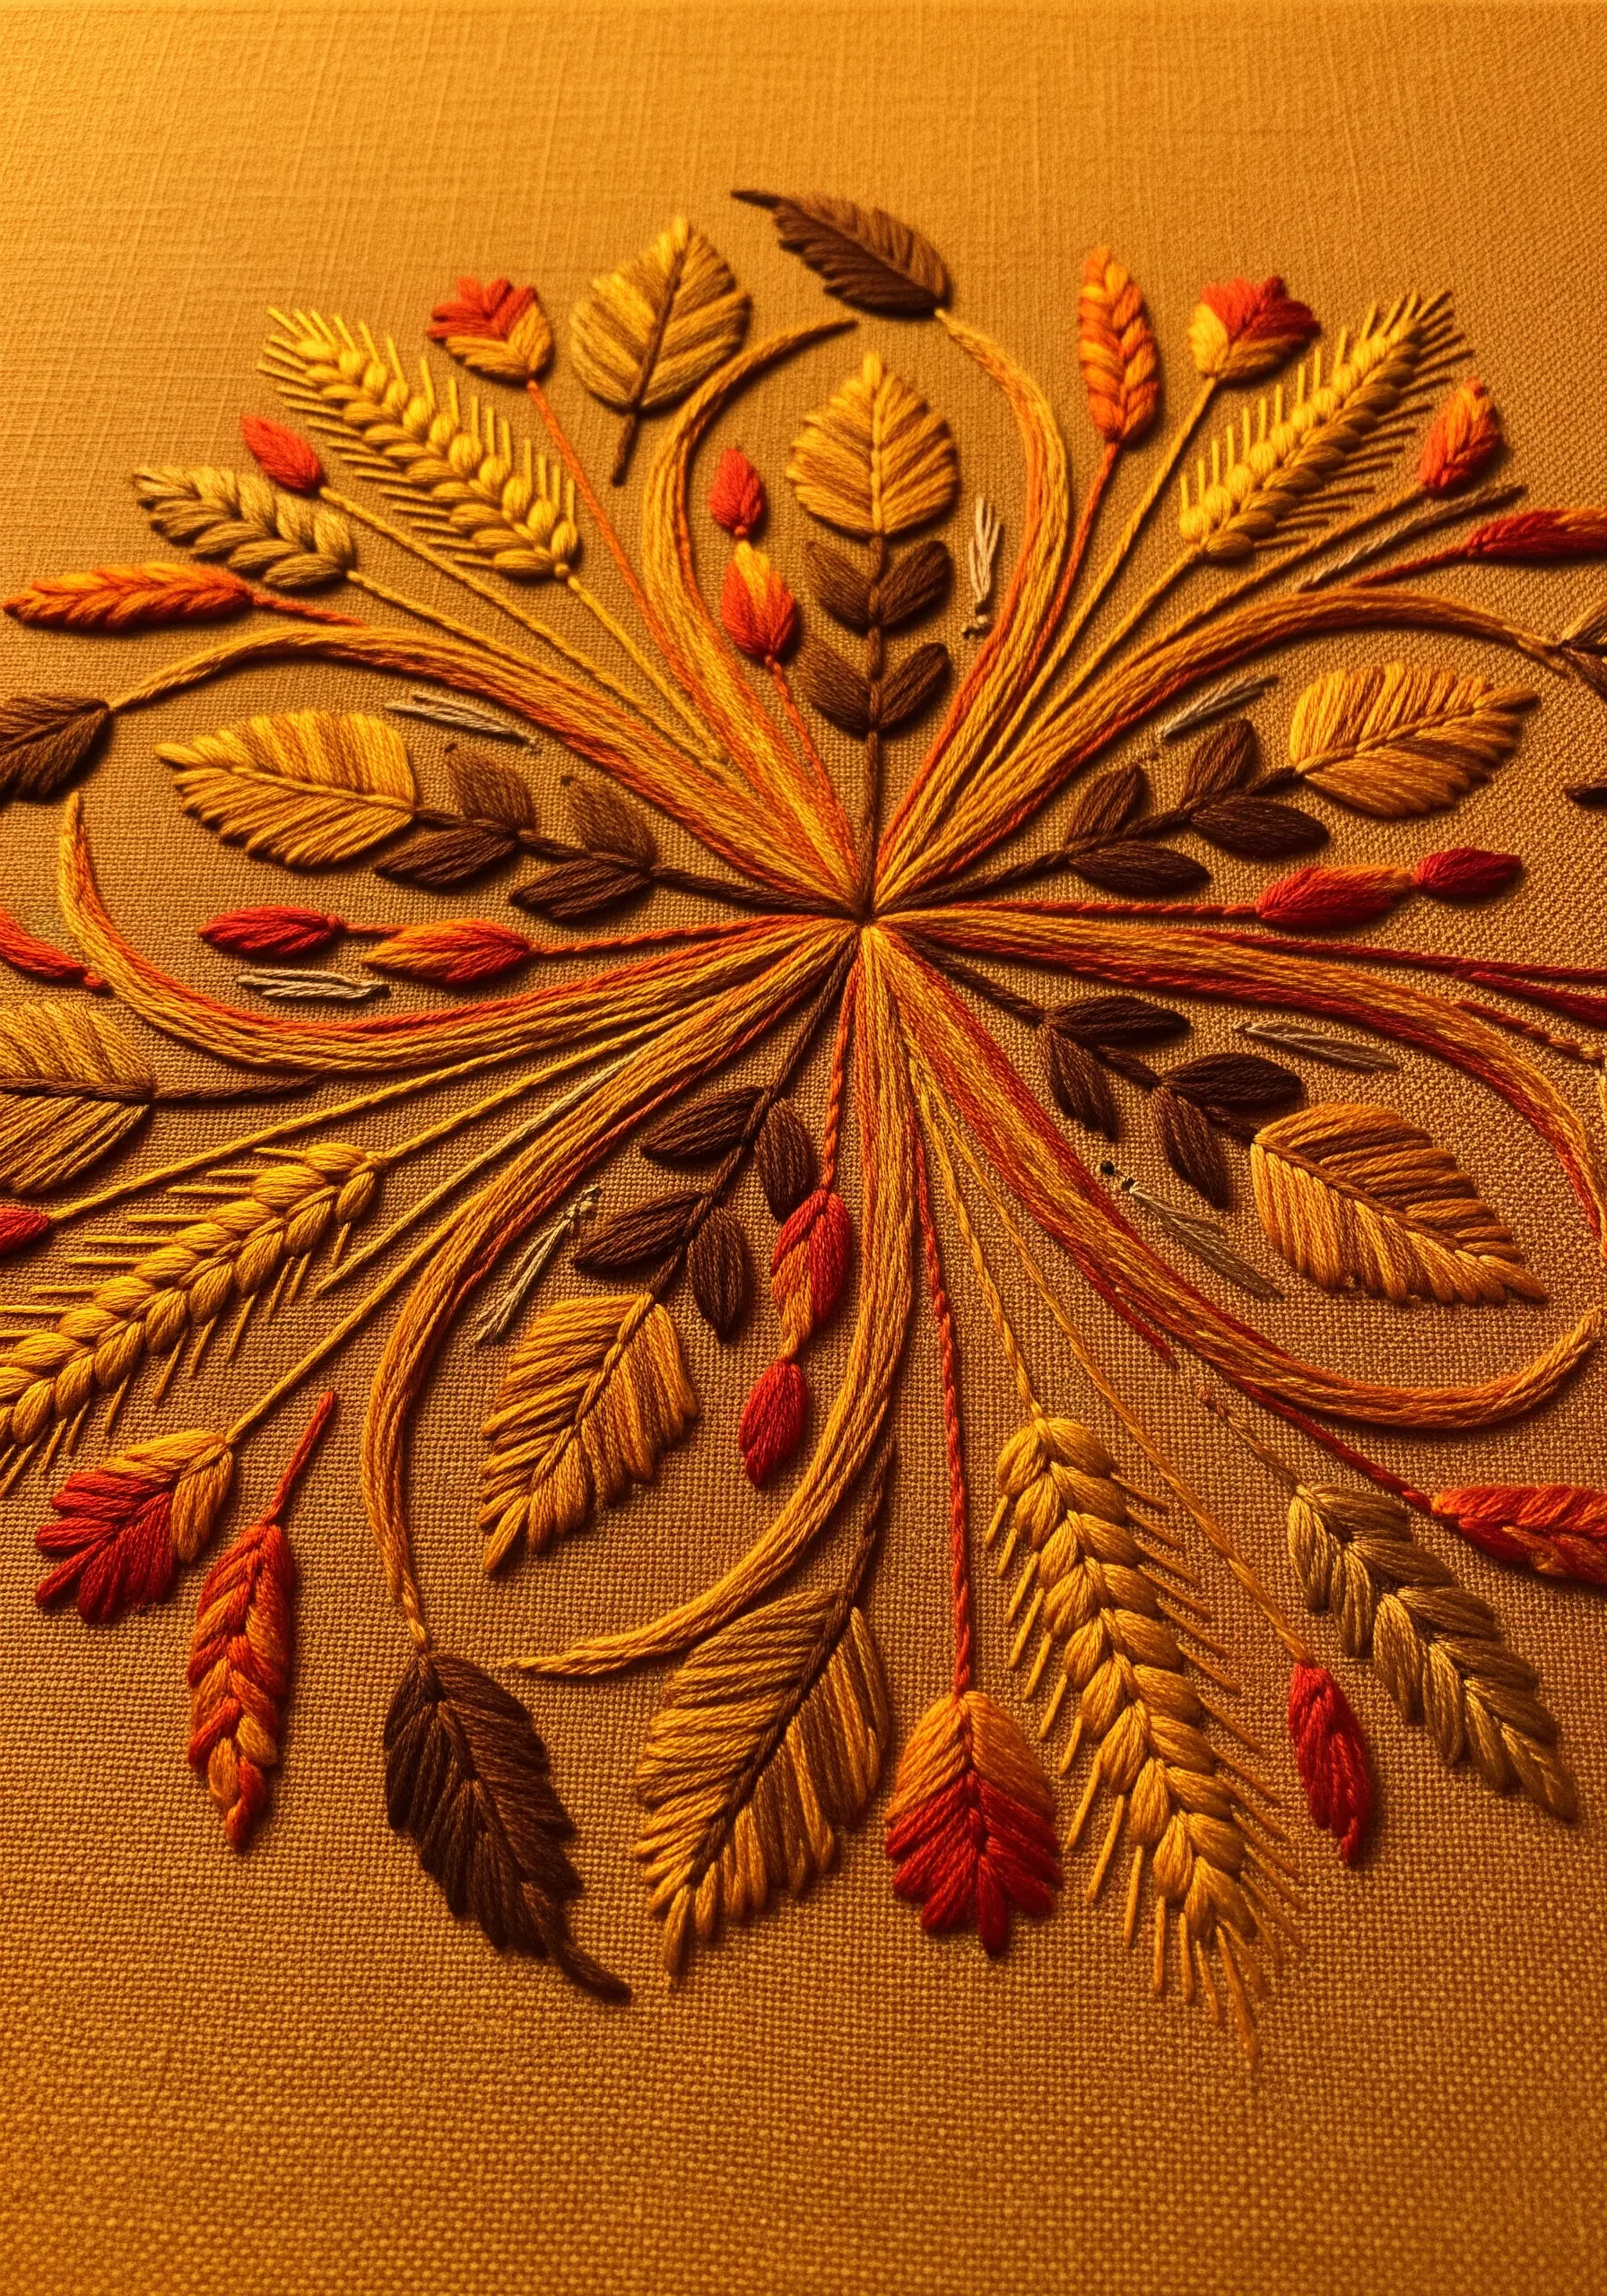
Embrace the beauty of imperfection by creating a mandala with organic, flowing asymmetry.
Start with a central point, but allow your radiating elements—like satin-stitched leaves and wheat stalks—to curve and overlap naturally.
Use a warm, autumnal palette of golds, oranges, and deep browns to unify the composition.
This approach breaks free from rigid symmetry, resulting in a piece that feels more like a dynamic botanical illustration than a static geometric pattern, perfect for lovers of organic embroidery designs.
31. Create Hypnotic Ripples with Echo Stitching
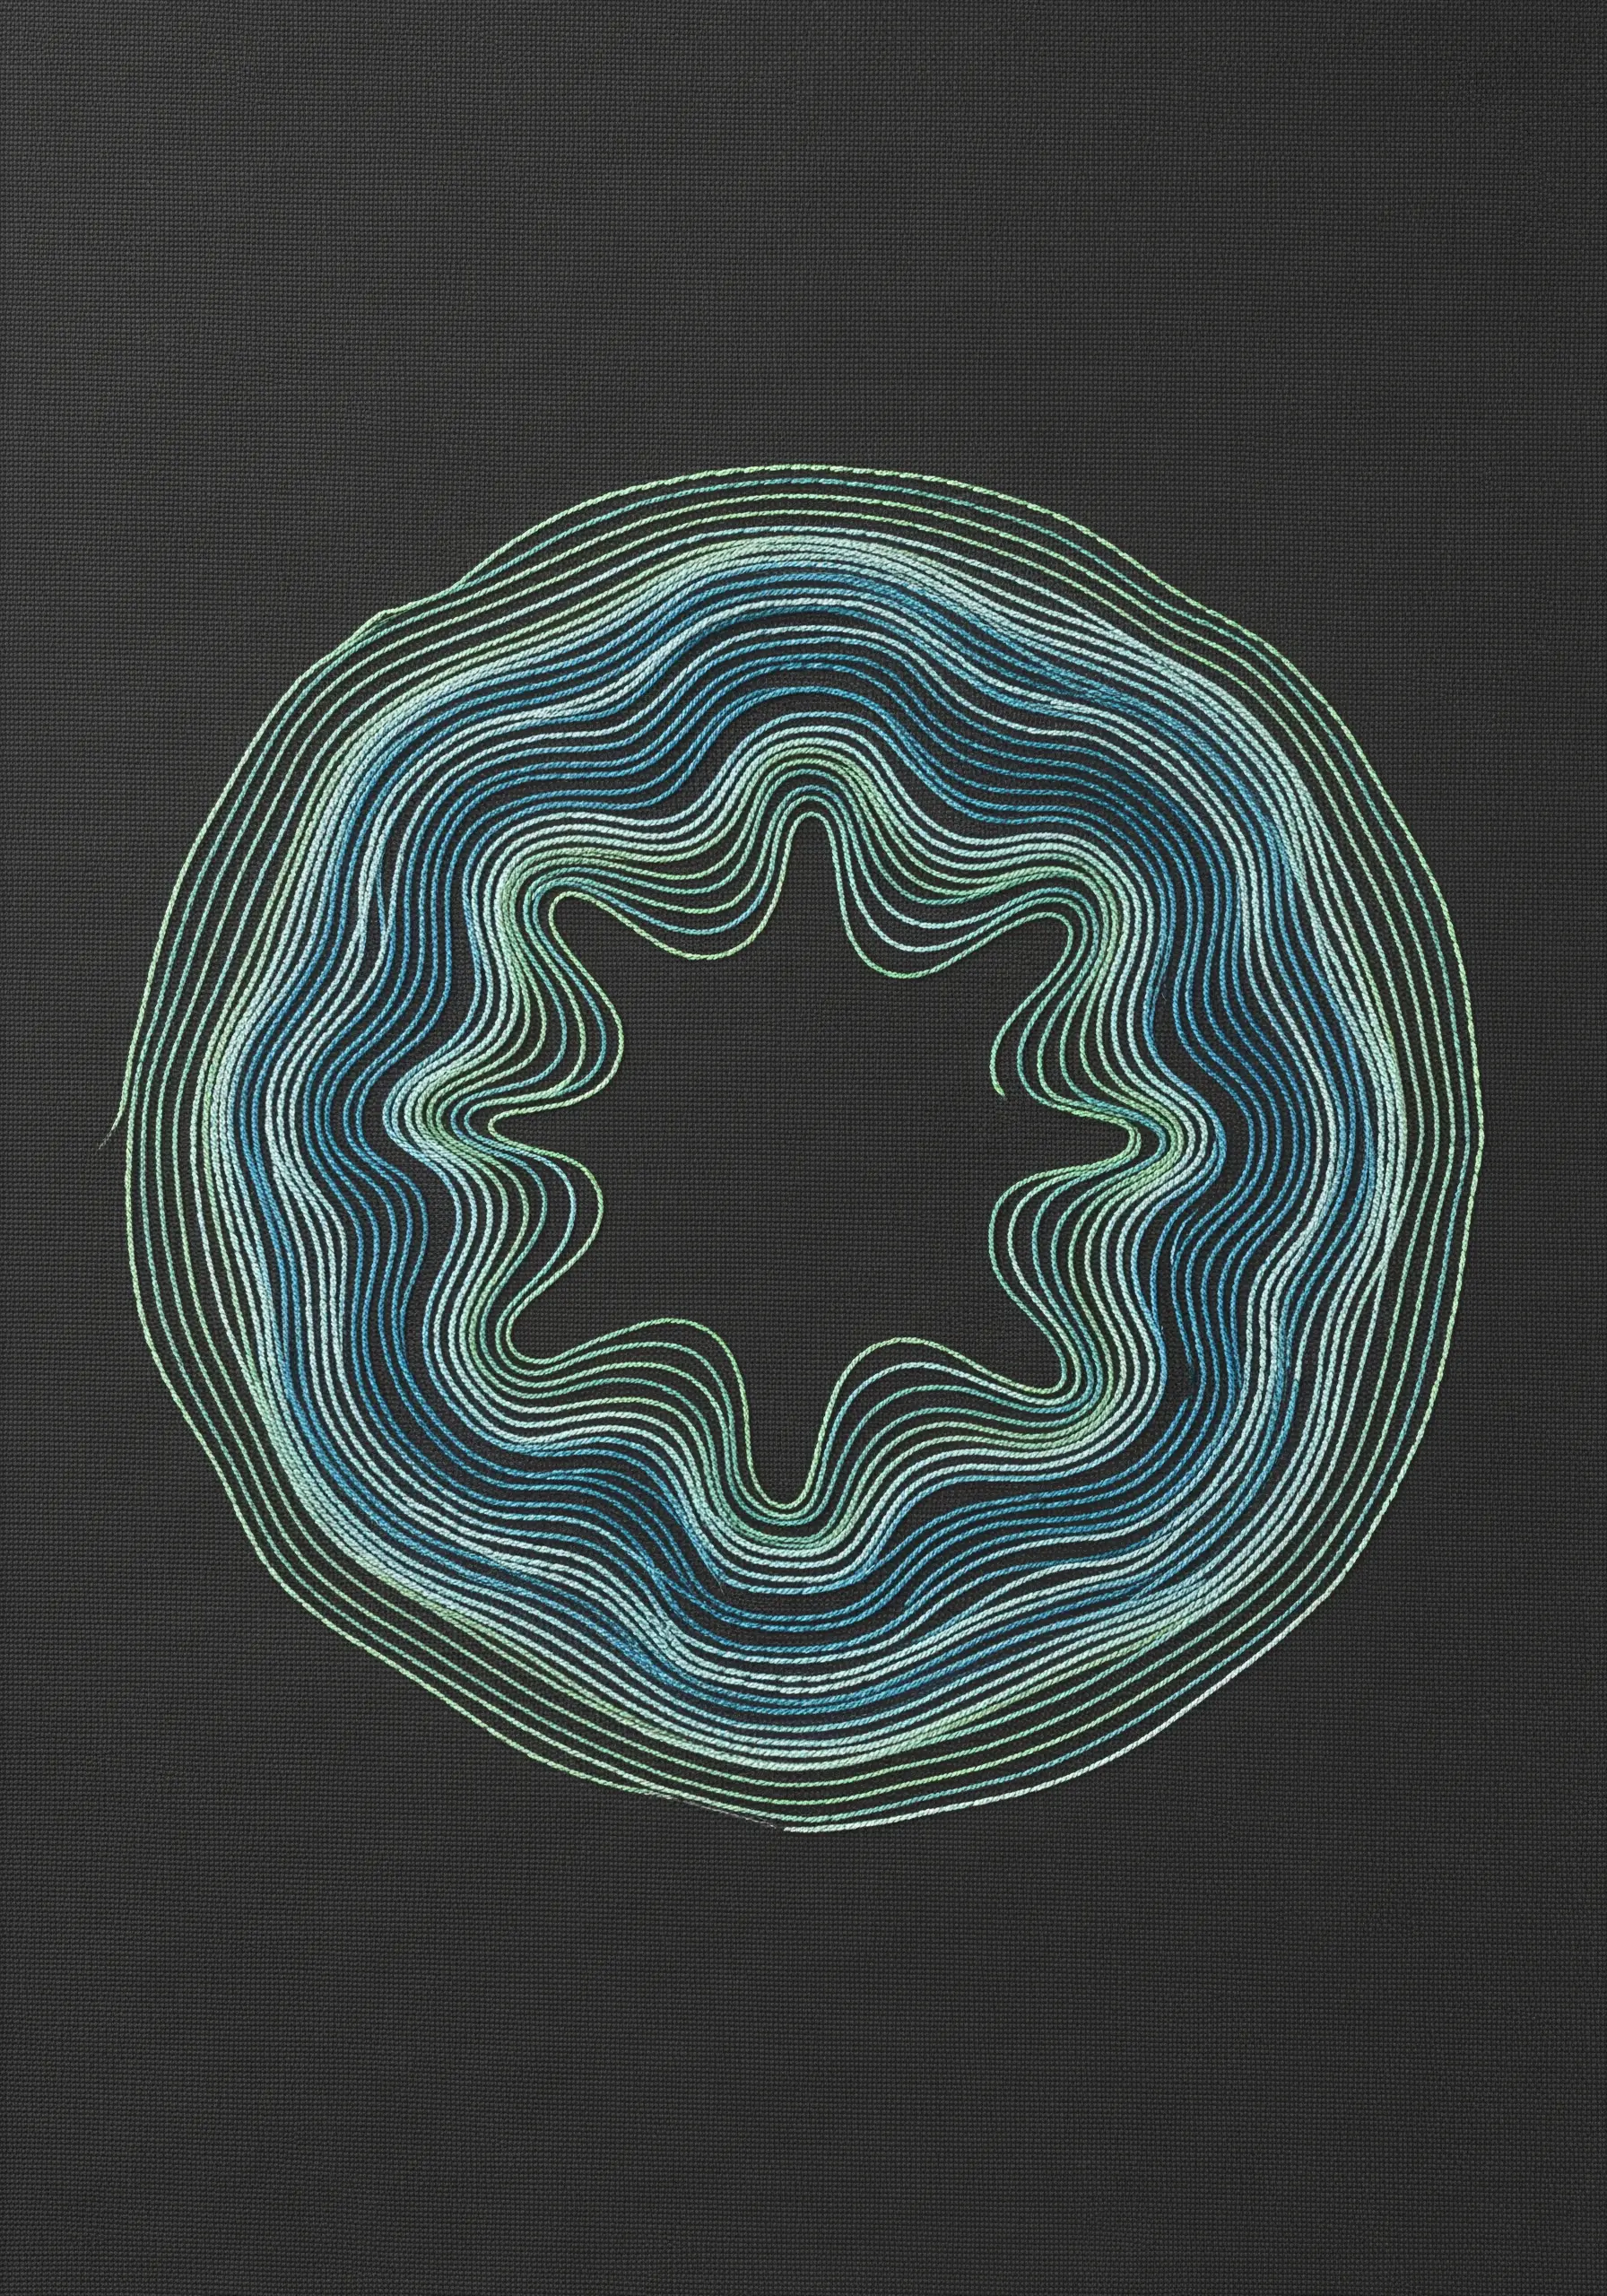
This technique creates a mesmerizing visual effect with just one simple stitch.
Start by lightly drawing a simple shape in the center of your fabric, like a star or a scalloped circle.
Then, using a simple backstitch, stitch concentric lines that echo this initial shape, working your way outwards.
Don’t worry about keeping the distance between the lines perfect; slight variations will add to the organic, hand-drawn quality.
Using a cool, analogous color palette enhances the hypnotic, water-like ripple effect.


