
Let’s set color aside for a moment and explore the power of a single black thread. This isn’t about limitation; it’s about focus. When you remove the distraction of color, you are forced to see your work in a new way—through the lens of line, texture, form, and negative space.
Each design here is more than just a pattern; it’s a lesson in technique. You’ll learn how the direction of a stitch can mimic shadow, how varying your thread’s thickness can create depth, and how the space you *don’t* stitch can become the most powerful part of your composition.
This is where your embroidery develops a signature style—one that is intentional, polished, and quietly confident. Forget trends. It’s time to master the fundamentals that will make every piece you create feel like a small work of art.
1. Master Geometric Tension and Texture

Create a dynamic composition by contrasting three distinct textures: solid fill, clean outline, and patterned detail.
For the solid shapes, use a satin stitch, ensuring your threads lay flat and parallel for a smooth, light-catching surface.
Use a crisp backstitch for the open circles to create sharp, defined lines that contrast with the filled areas.
Introduce a third texture with seed stitch—tiny, randomly placed straight stitches—to add a subtle graininess that breaks up the solid black and draws the eye.
This technique turns a simple geometric layout into a sophisticated study of light and texture, all with a single color.
2. Elevate Line Art with a Bold, Sculptural Outline

Transform a simple line drawing into a statement piece by giving your outline weight and dimension.
Instead of a standard backstitch, use a thicker thread like a #5 perle cotton, or couch a fine cord to the surface for a truly raised effect.
This method gives the lines a clean, graphic quality that stands out, making the negative space just as important as the stitched lines.
Choose a smooth, high-contrast fabric like a crisp white cotton twill to ensure your bold linework remains the undisputed focus of the piece.
3. Create Architectural Depth with Directional Stitches
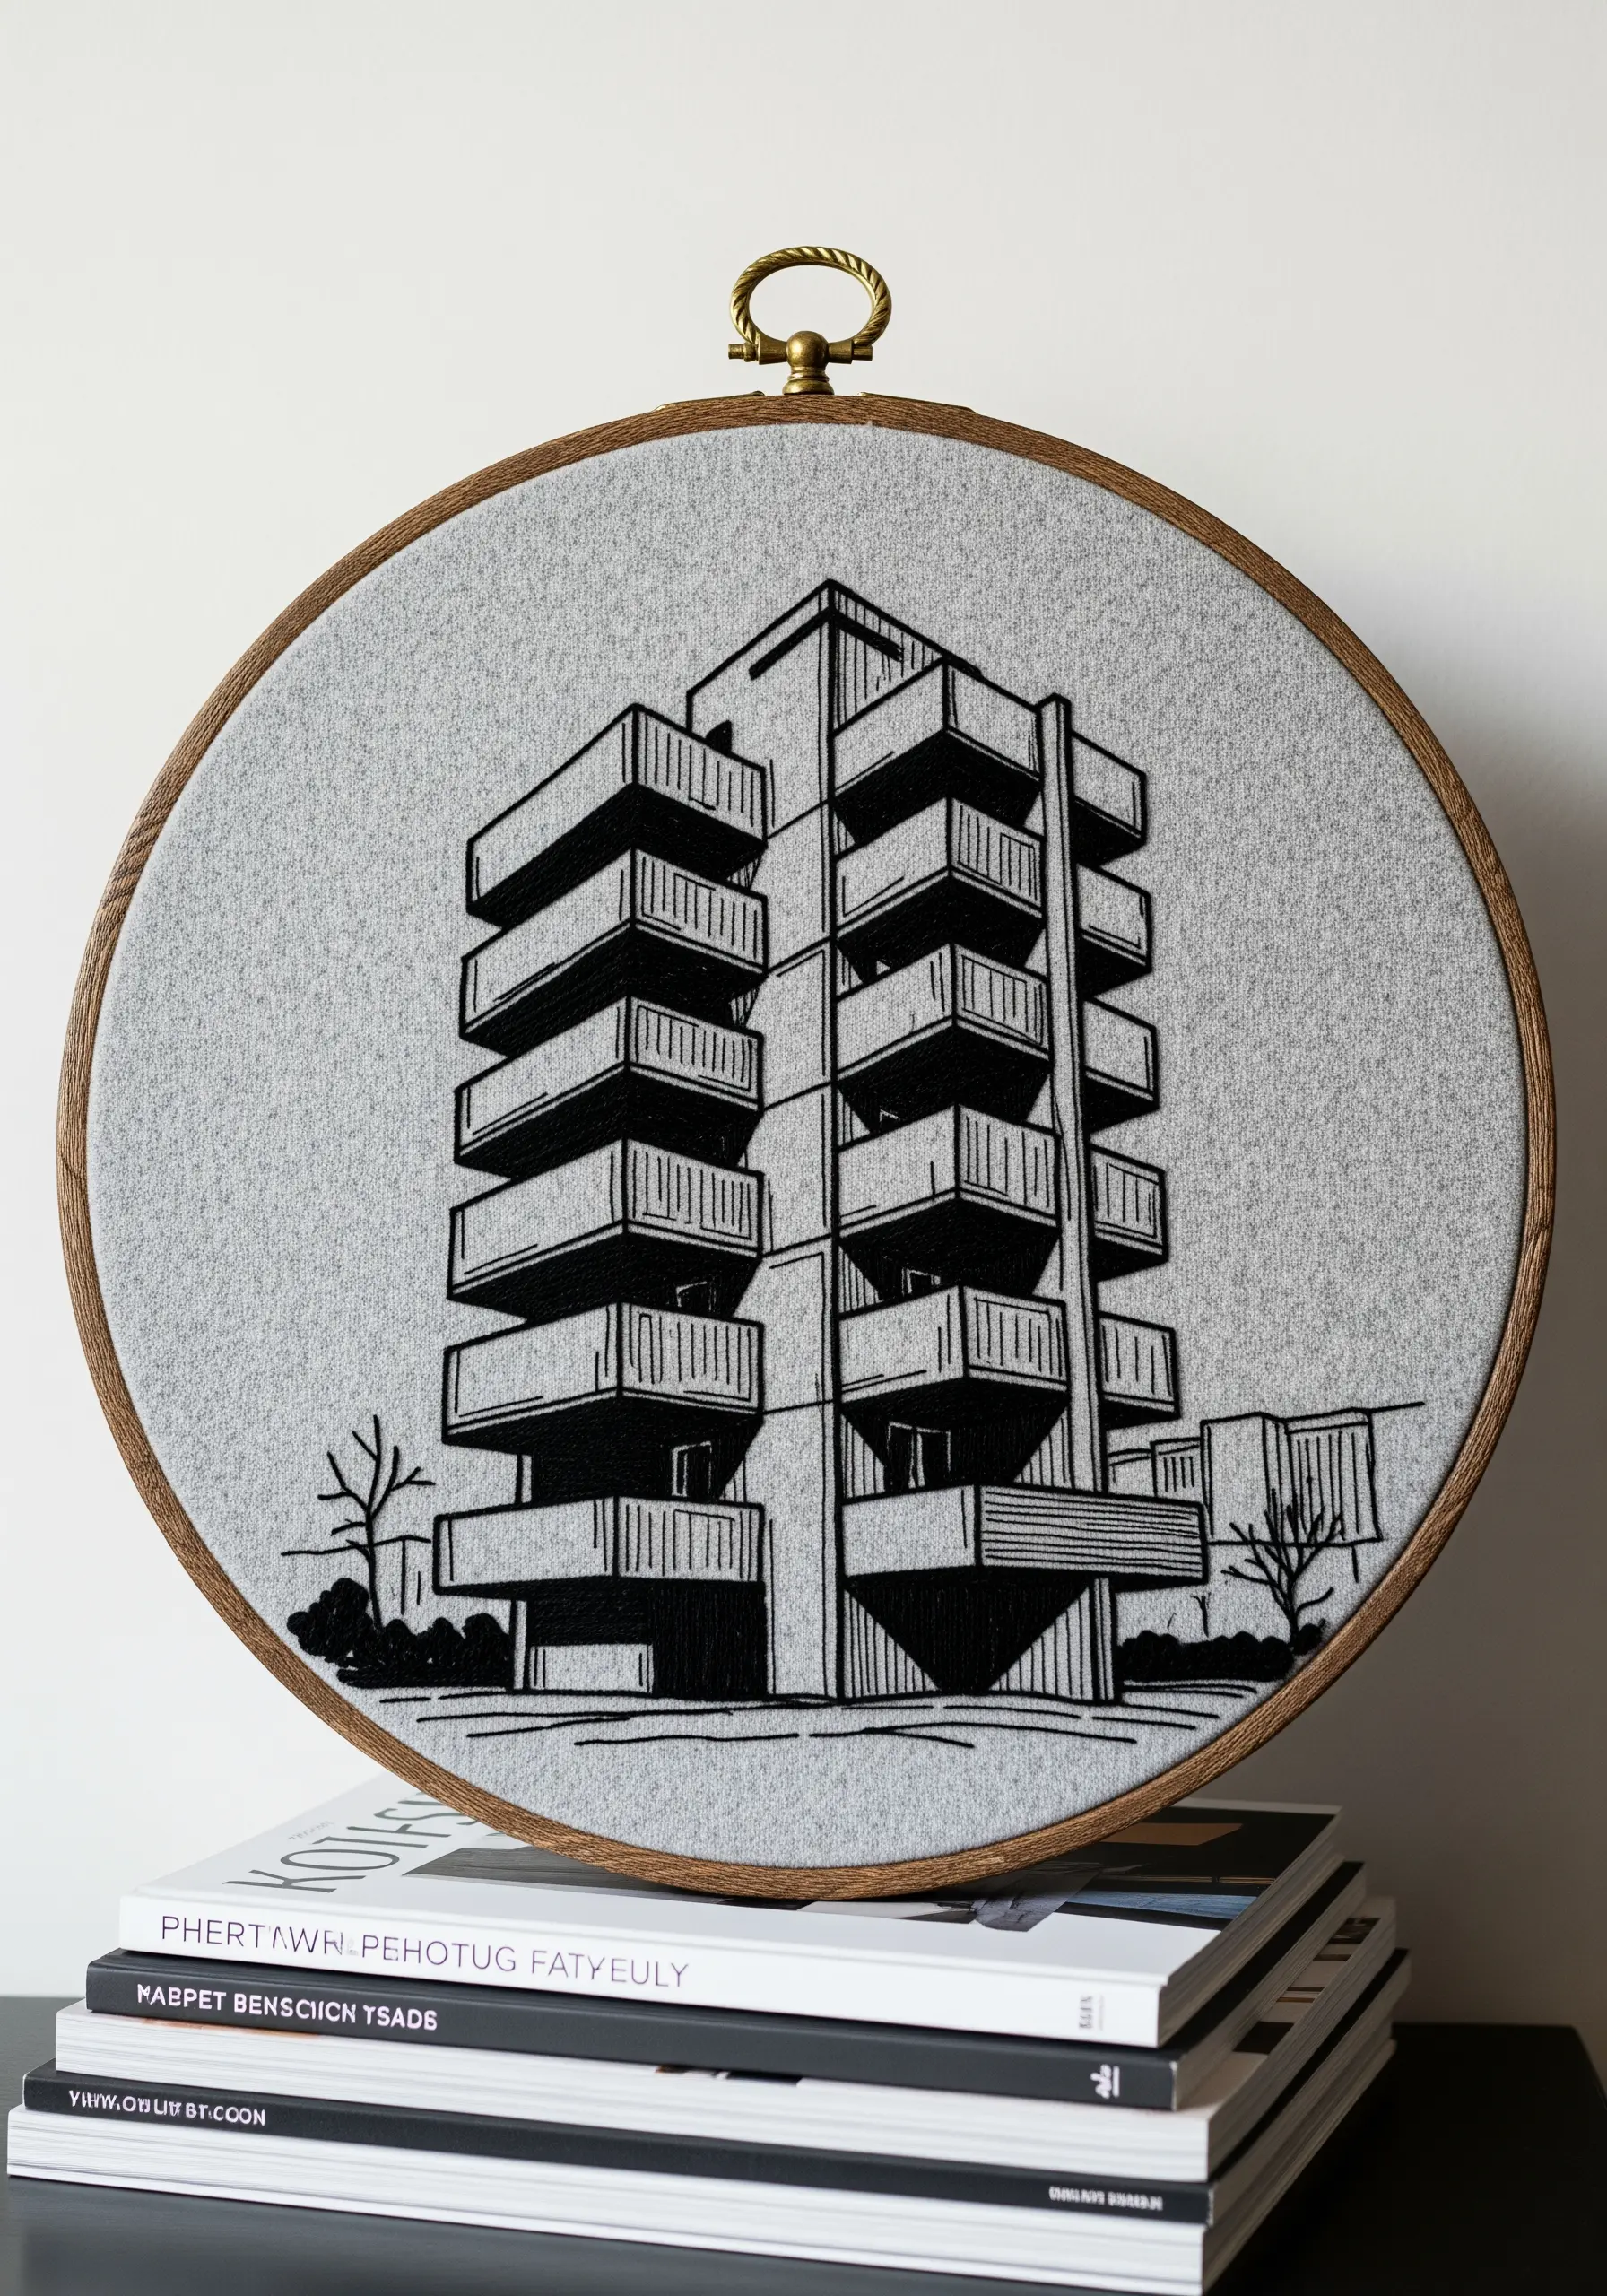
When working with a single color, stitch direction is your most powerful tool for creating dimension and shadow.
Map out the planes of your subject—like the sides of a building—and assign a different stitch direction to each one.
Fill recessed areas with vertical satin stitches and forward-facing surfaces with horizontal ones; this subtle shift in thread direction will catch the light differently, mimicking shadow.
Choosing a mid-tone fabric, like this heather grey, gives you a neutral canvas where the black thread can create both highlights and lowlights, enhancing the illusion of depth.
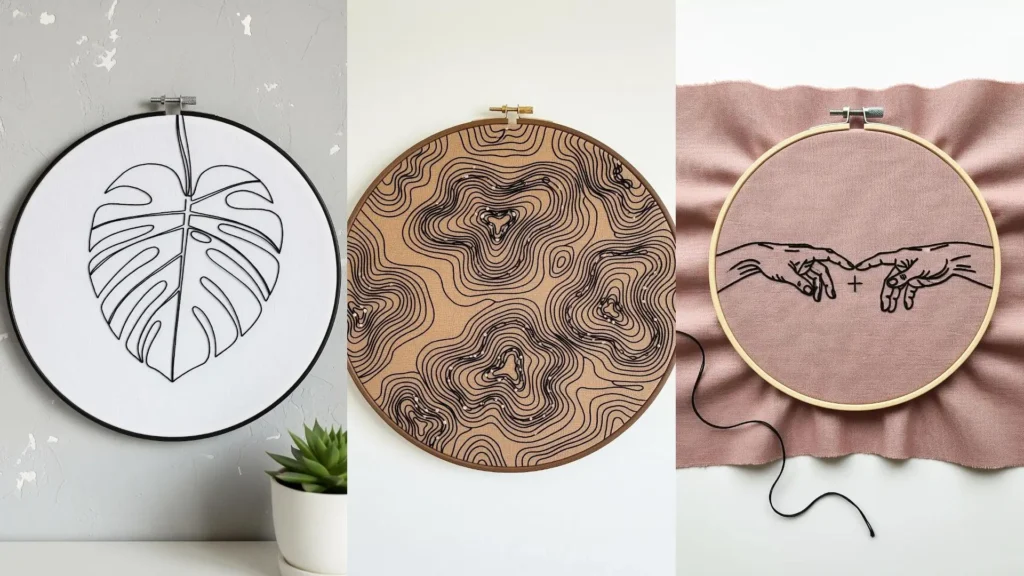
4. Achieve Fluidity in Continuous Line Portraits
For single-line drawings, a smooth, uninterrupted stitch is crucial to maintaining the design’s fluid energy.
Use a stem stitch or a whipped backstitch, as both stitches are designed to create seamless curves without the jagged edges a simple backstitch can produce.
Work with two strands of floss for a line that is delicate yet defined, allowing the artwork’s form to take center stage.
Introduce a tiny, contrasting detail, like these white French knot stars, to add a point of interest and highlight the elegance of the primary black outline.
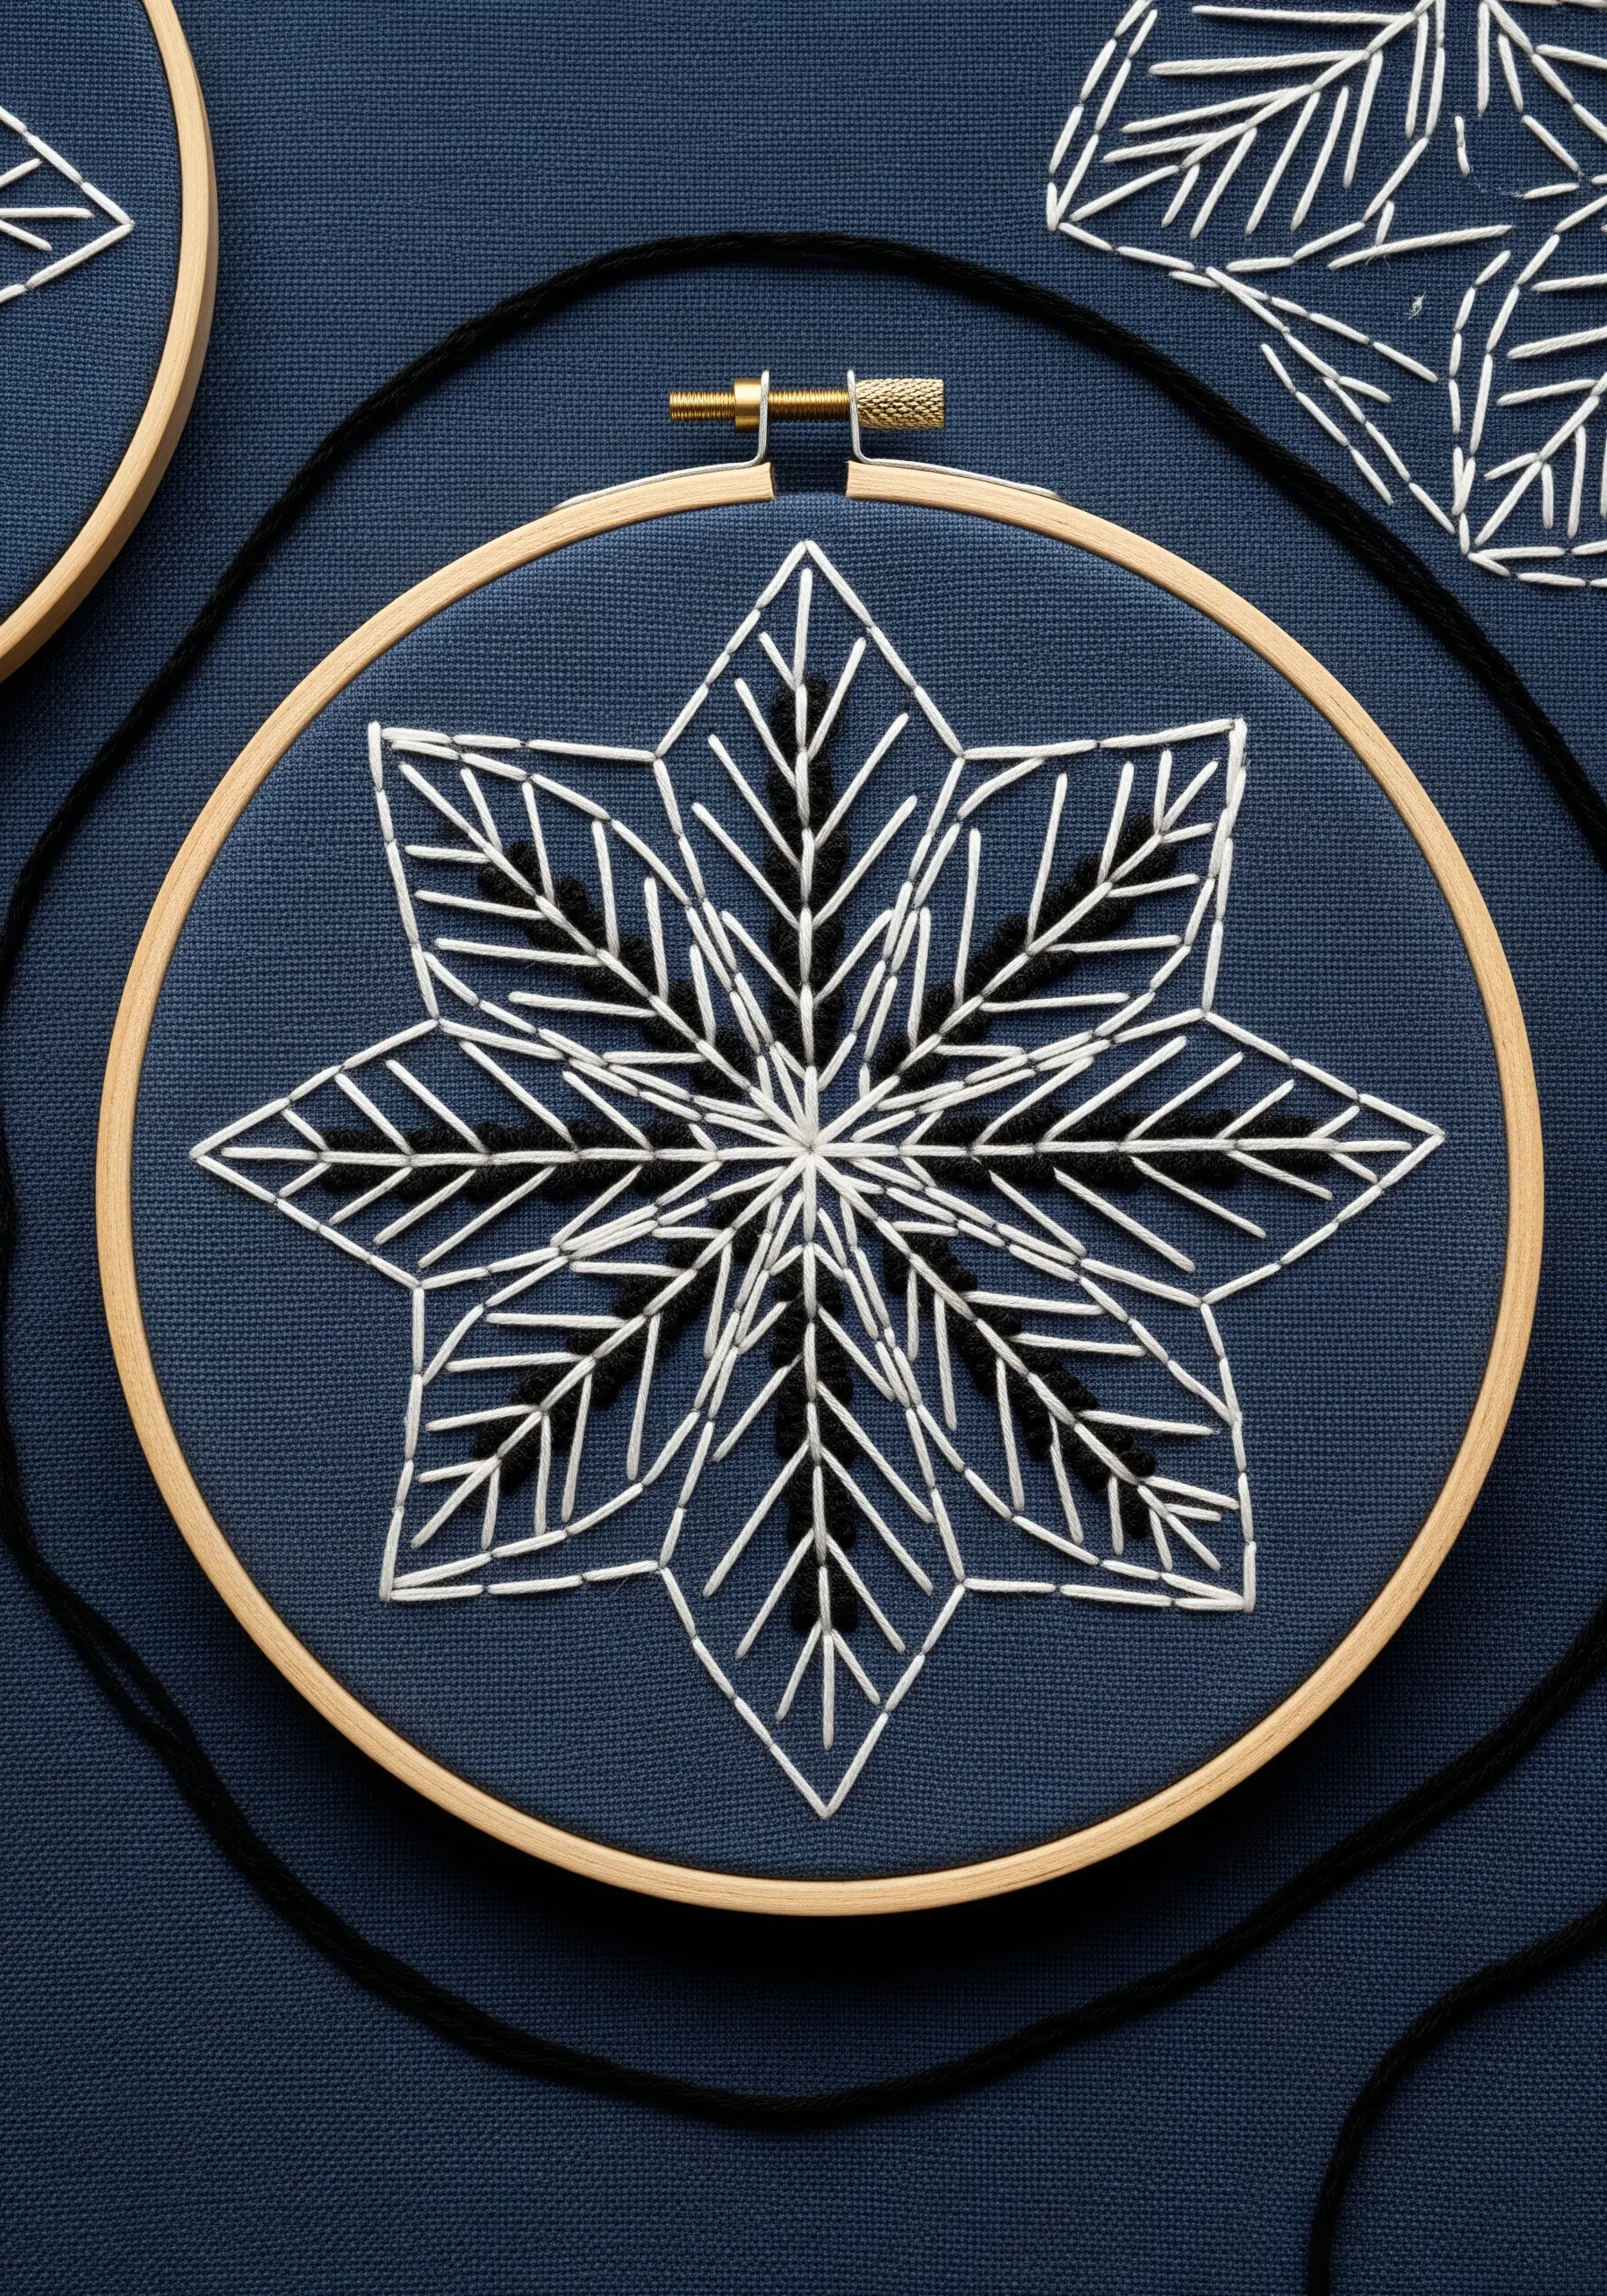
5. Stitch Celestial Maps with Varied Weight and Precision
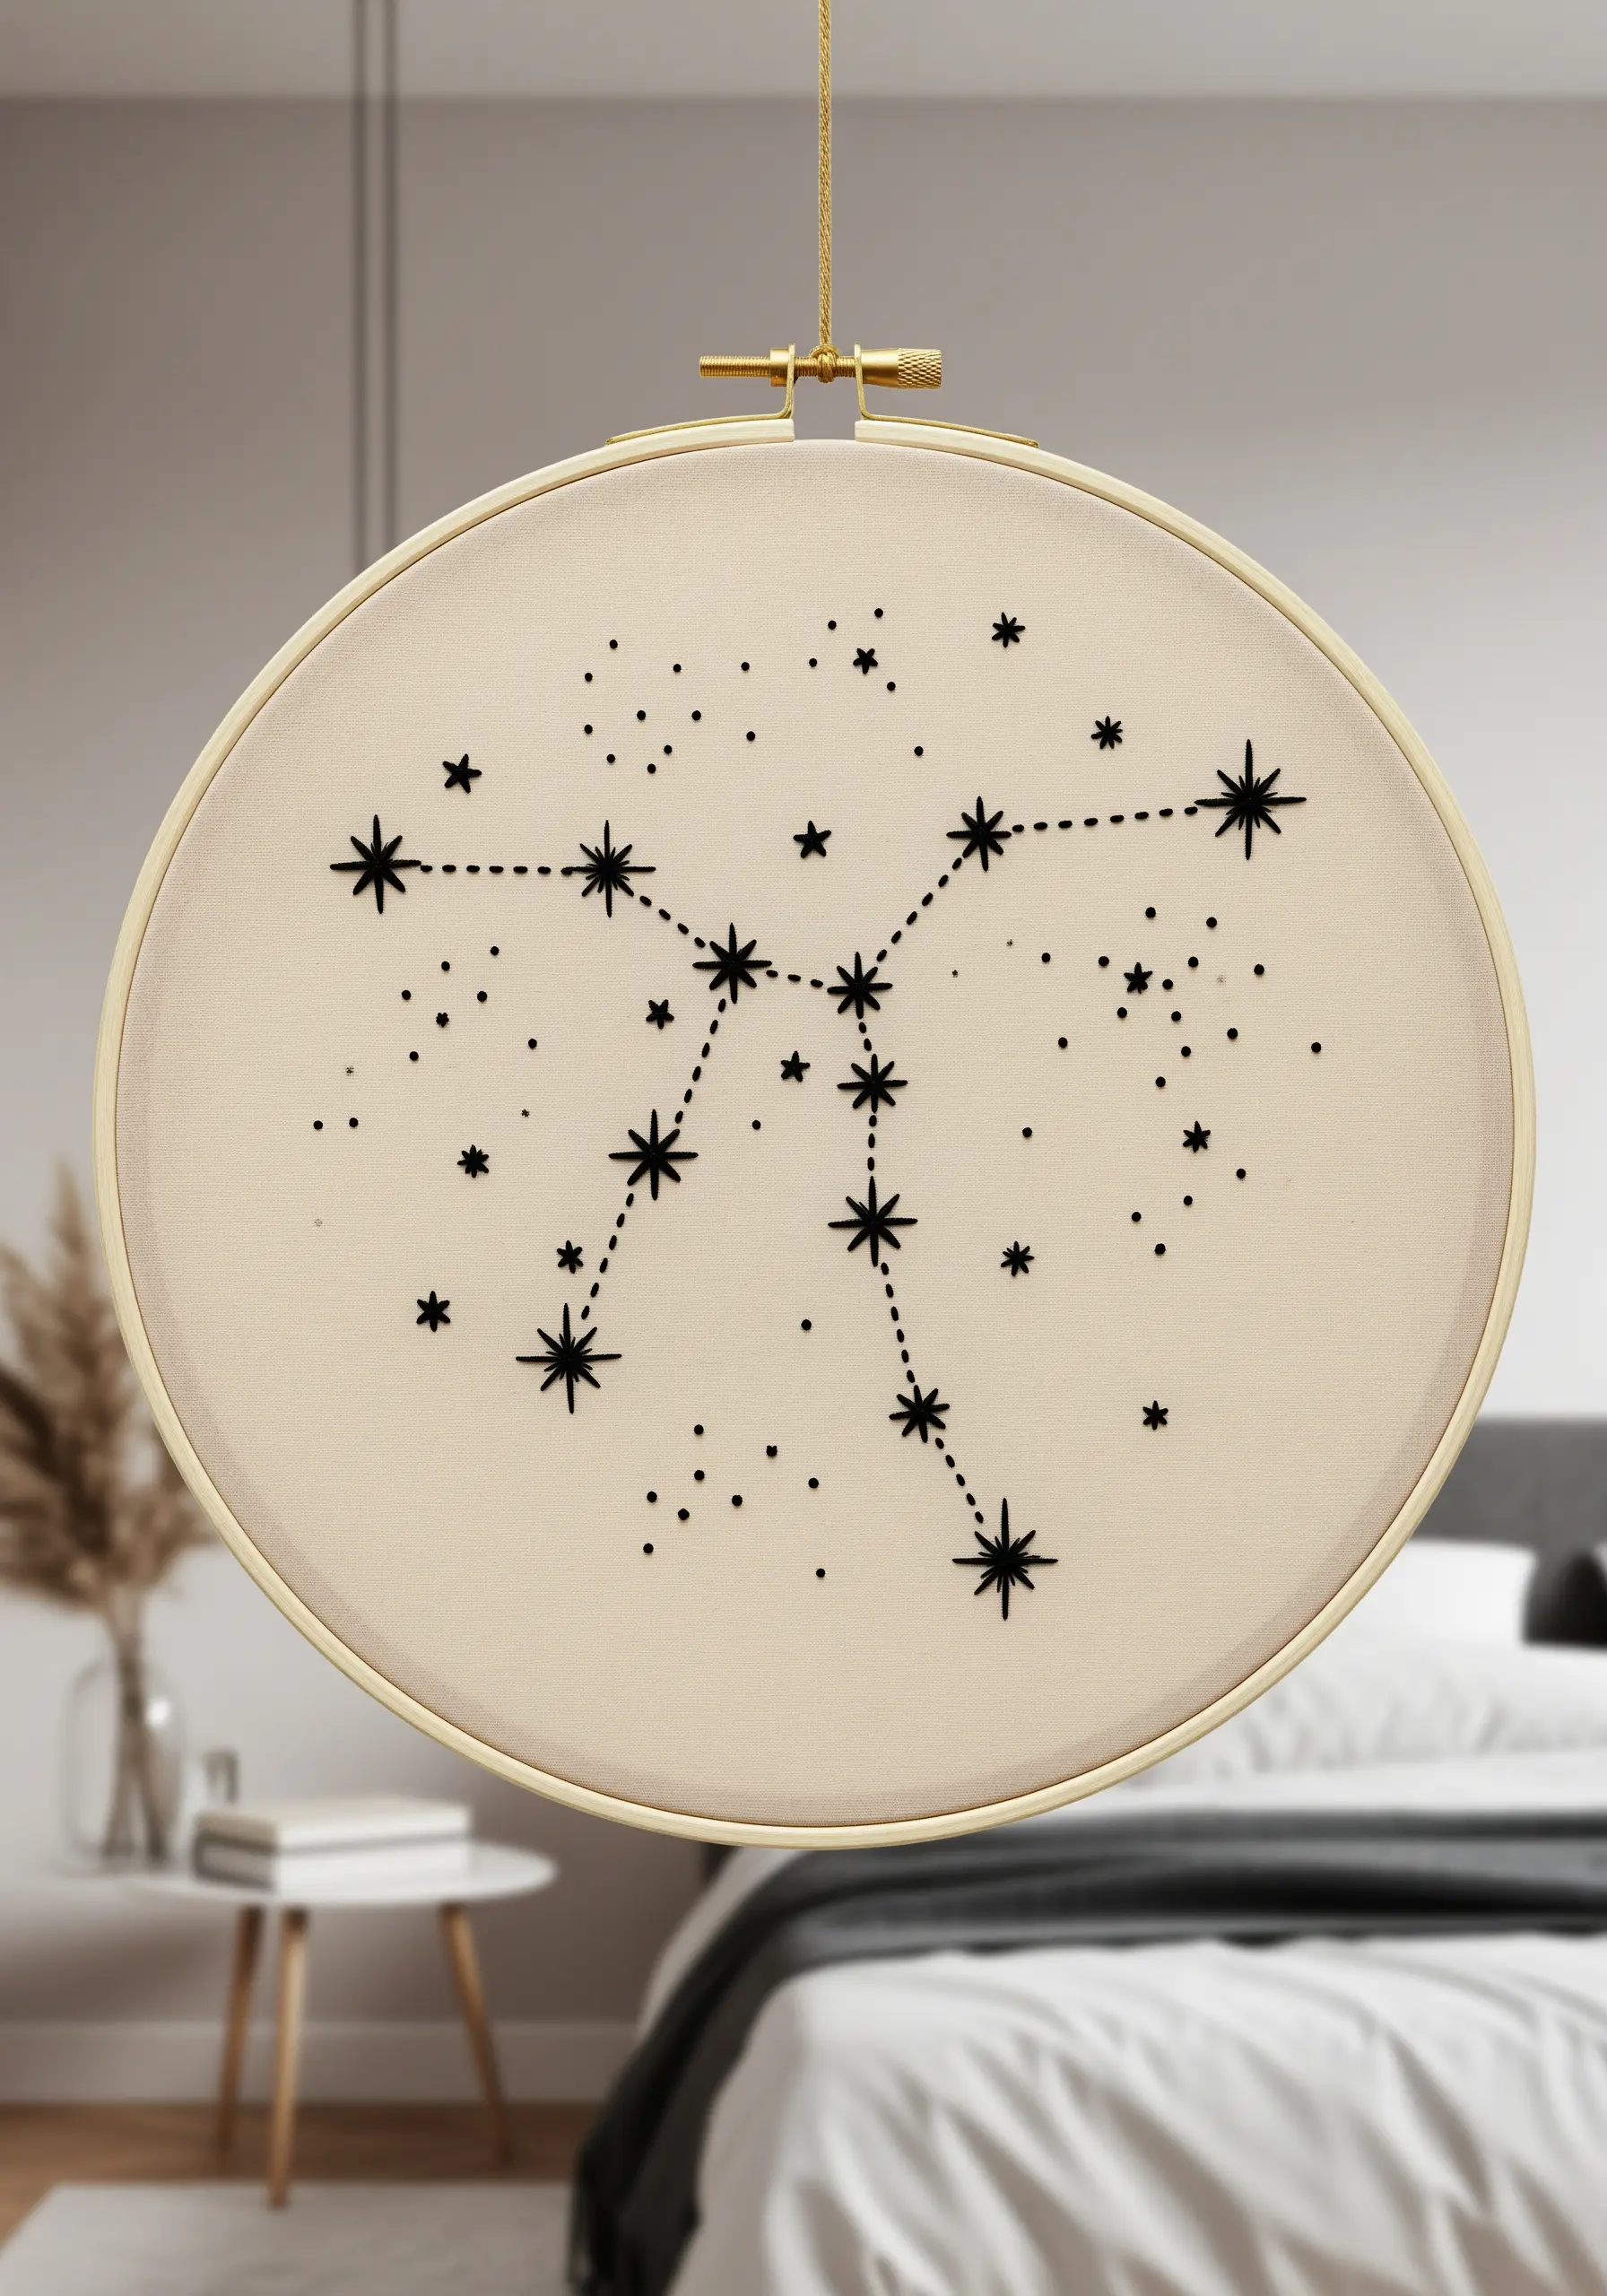
Create a dynamic constellation by varying the visual weight of your stitches to represent different star magnitudes.
Use single, tiny French knots for distant stars and small, multi-spoked straight stitches (star stitches) for the brighter focal points.
Connect the stars with a taut, single-strand backstitch to ensure the connecting lines are crisp and delicate, not bulky.
This careful variation in stitch type and scale turns a simple star map into a piece of tiny night sky embroidery with visual hierarchy and rhythm.
6. Carve Mountain Textures with Long-and-Short Stitch
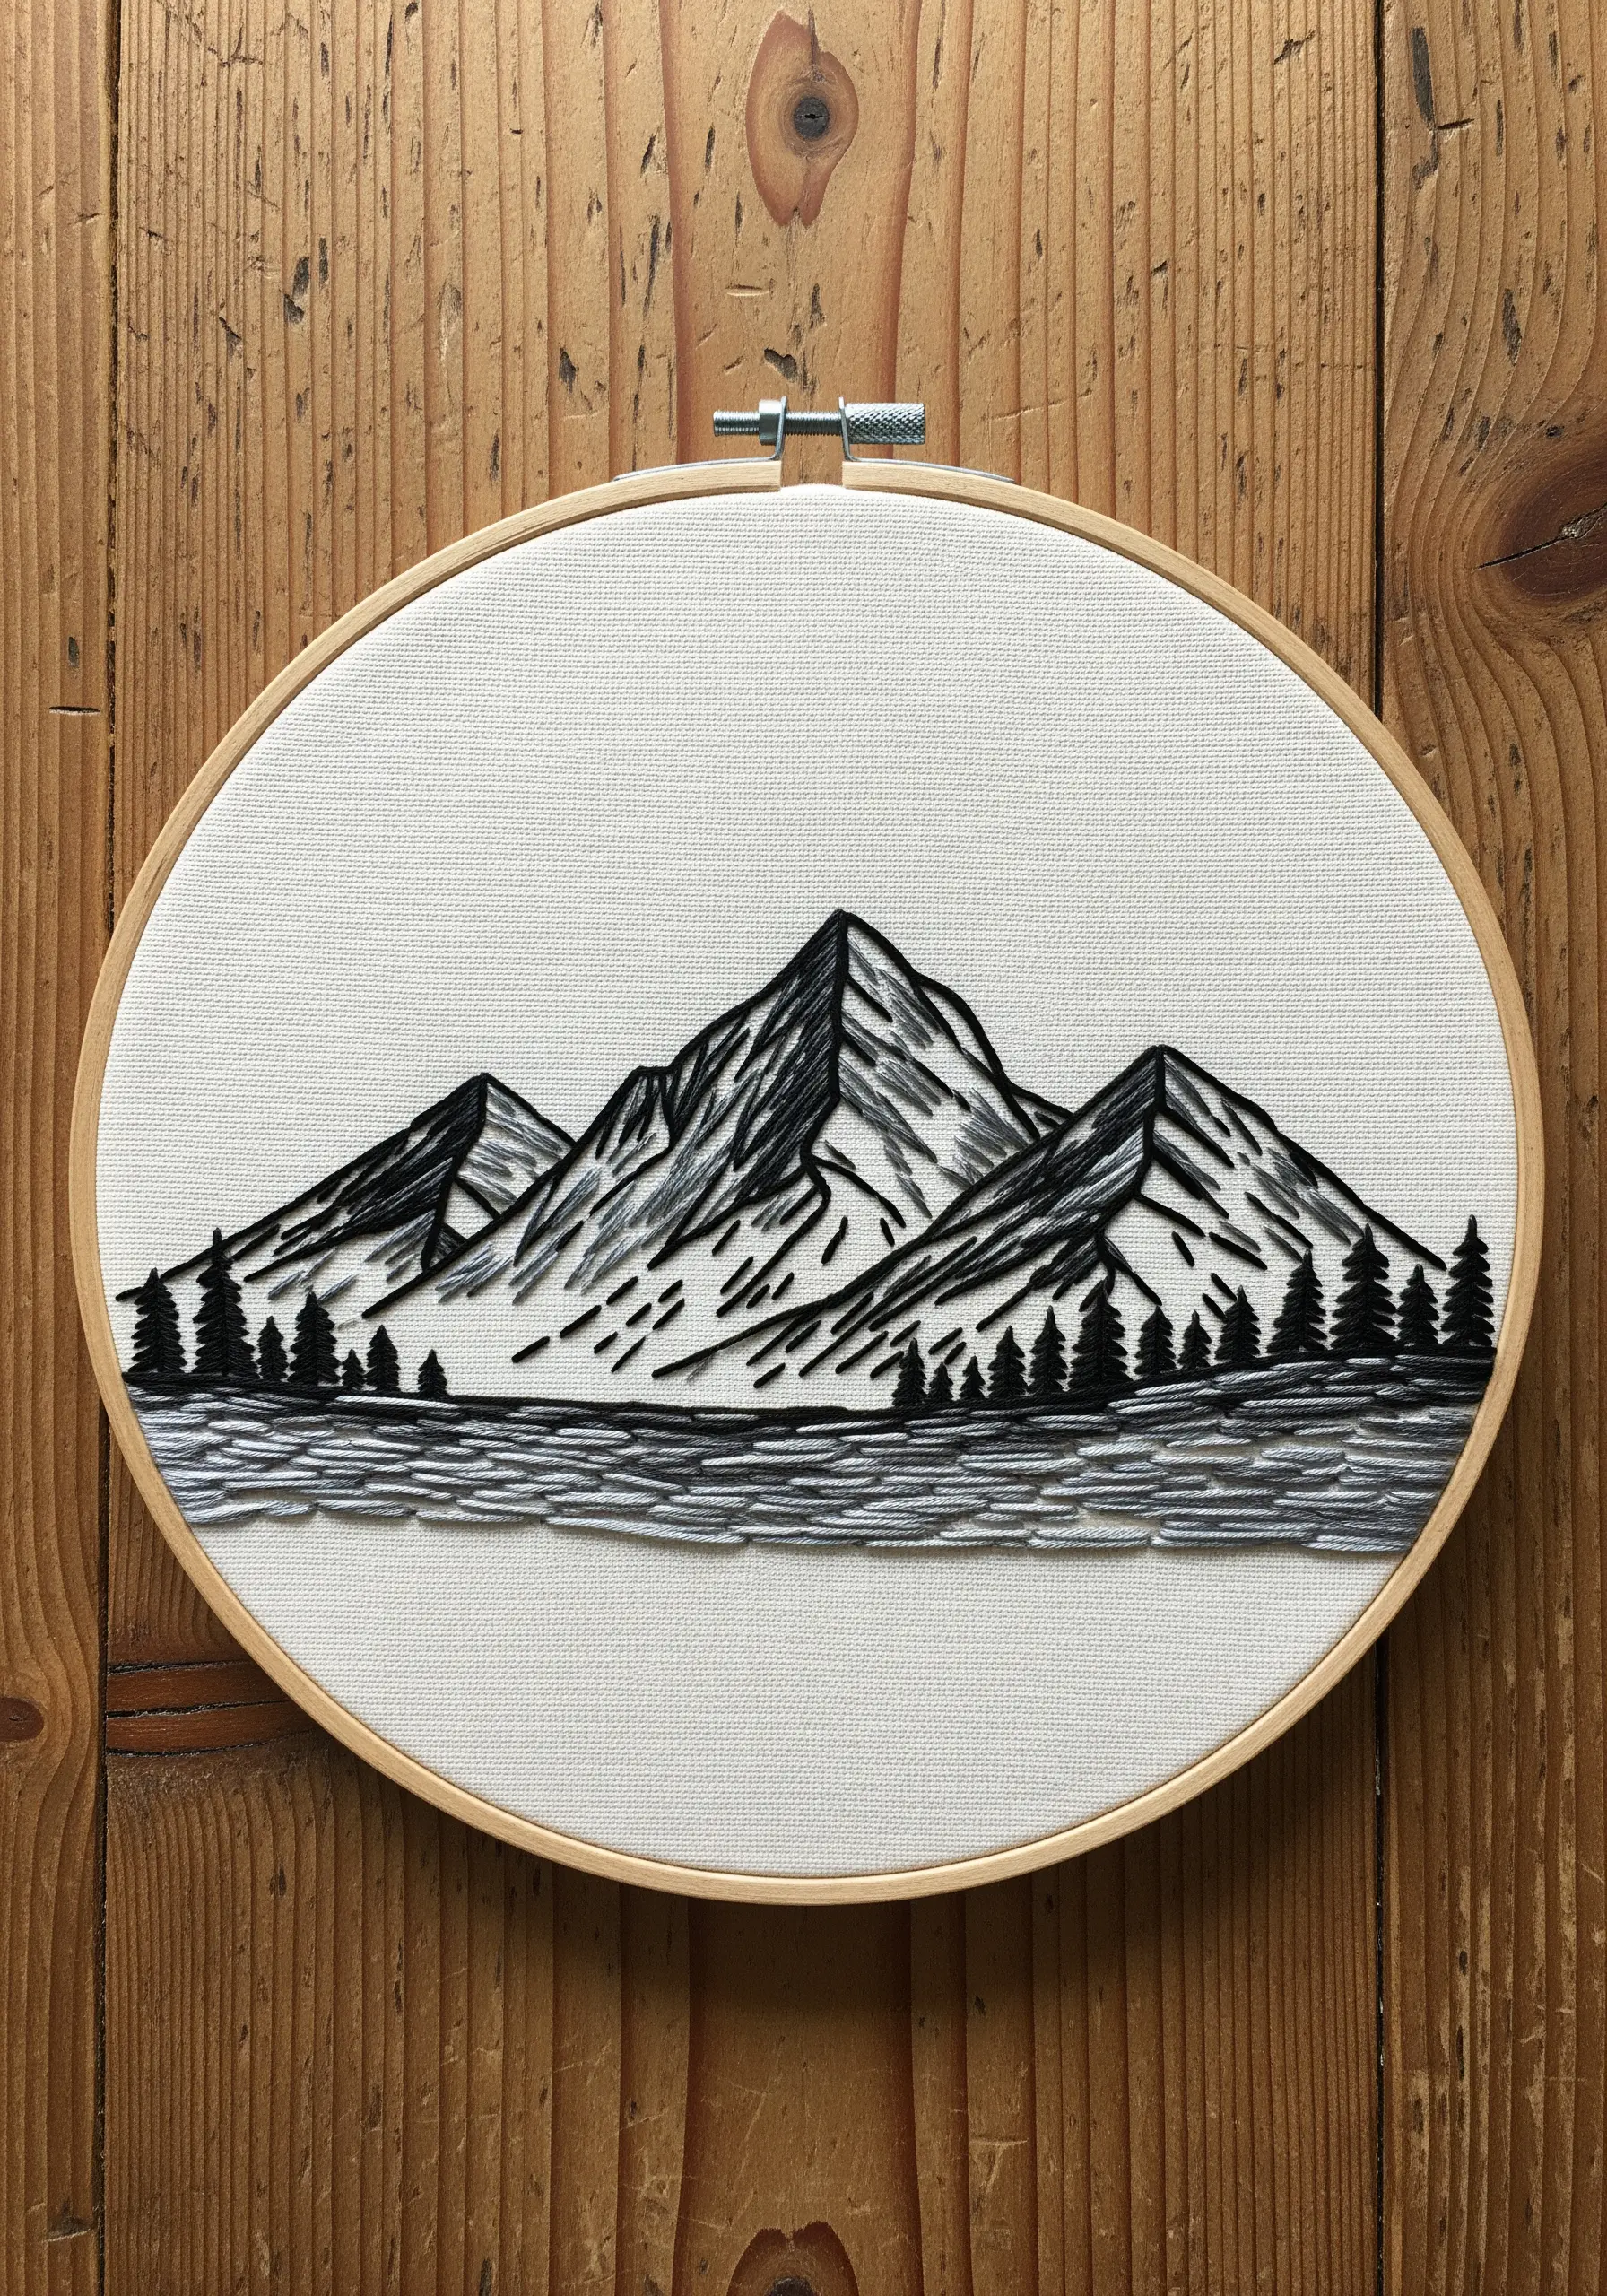
Capture the rugged texture of a mountain range by using long-and-short stitch to create rocky, uneven shading.
Instead of uniform satin stitches, stagger your stitch lengths and angles to follow the natural crags and shadows of the peaks, creating a more organic and less uniform fill.
Contrast the chaotic energy of the mountains with uniform, horizontal satin stitches for the water in the foreground.
This juxtaposition of stitch styles—organic versus orderly—creates a powerful sense of landscape and reflection, making your nature-inspired embroidery projects feel more alive.
7. Give Lettering a Raised, Three-Dimensional Finish
To make your embroidered text look truly professional, use a padded satin stitch for a raised, dimensional effect.
First, outline your letters with a foundation of split stitches. Then, work your satin stitches over this raised base.
This simple preliminary step lifts the satin stitch away from the fabric, creating soft shadows and a beautiful, tactile finish that makes the word pop.
Always stitch across the narrowest part of the letterform to ensure the satin stitches are short, tight, and less likely to snag.
8. Stabilize Stitches on Heavy Fabrics like Denim
When embroidering on thick, stretchy, or heavy-weave fabrics like denim, a stabilizer is your best friend.
Apply a cut-away or iron-on stabilizer to the back of the fabric before you begin stitching. This prevents the fabric from puckering or warping under the tension of your stitches.
For a clean, graphic design, use a simple backstitch with 3-4 strands of floss; it’s sturdy enough to hold its own against the denim’s texture.
This preparation ensures your aesthetic embroidery ideas look crisp and intentional, not homemade.
9. Play with Sheen and Matte for Tonal Texture
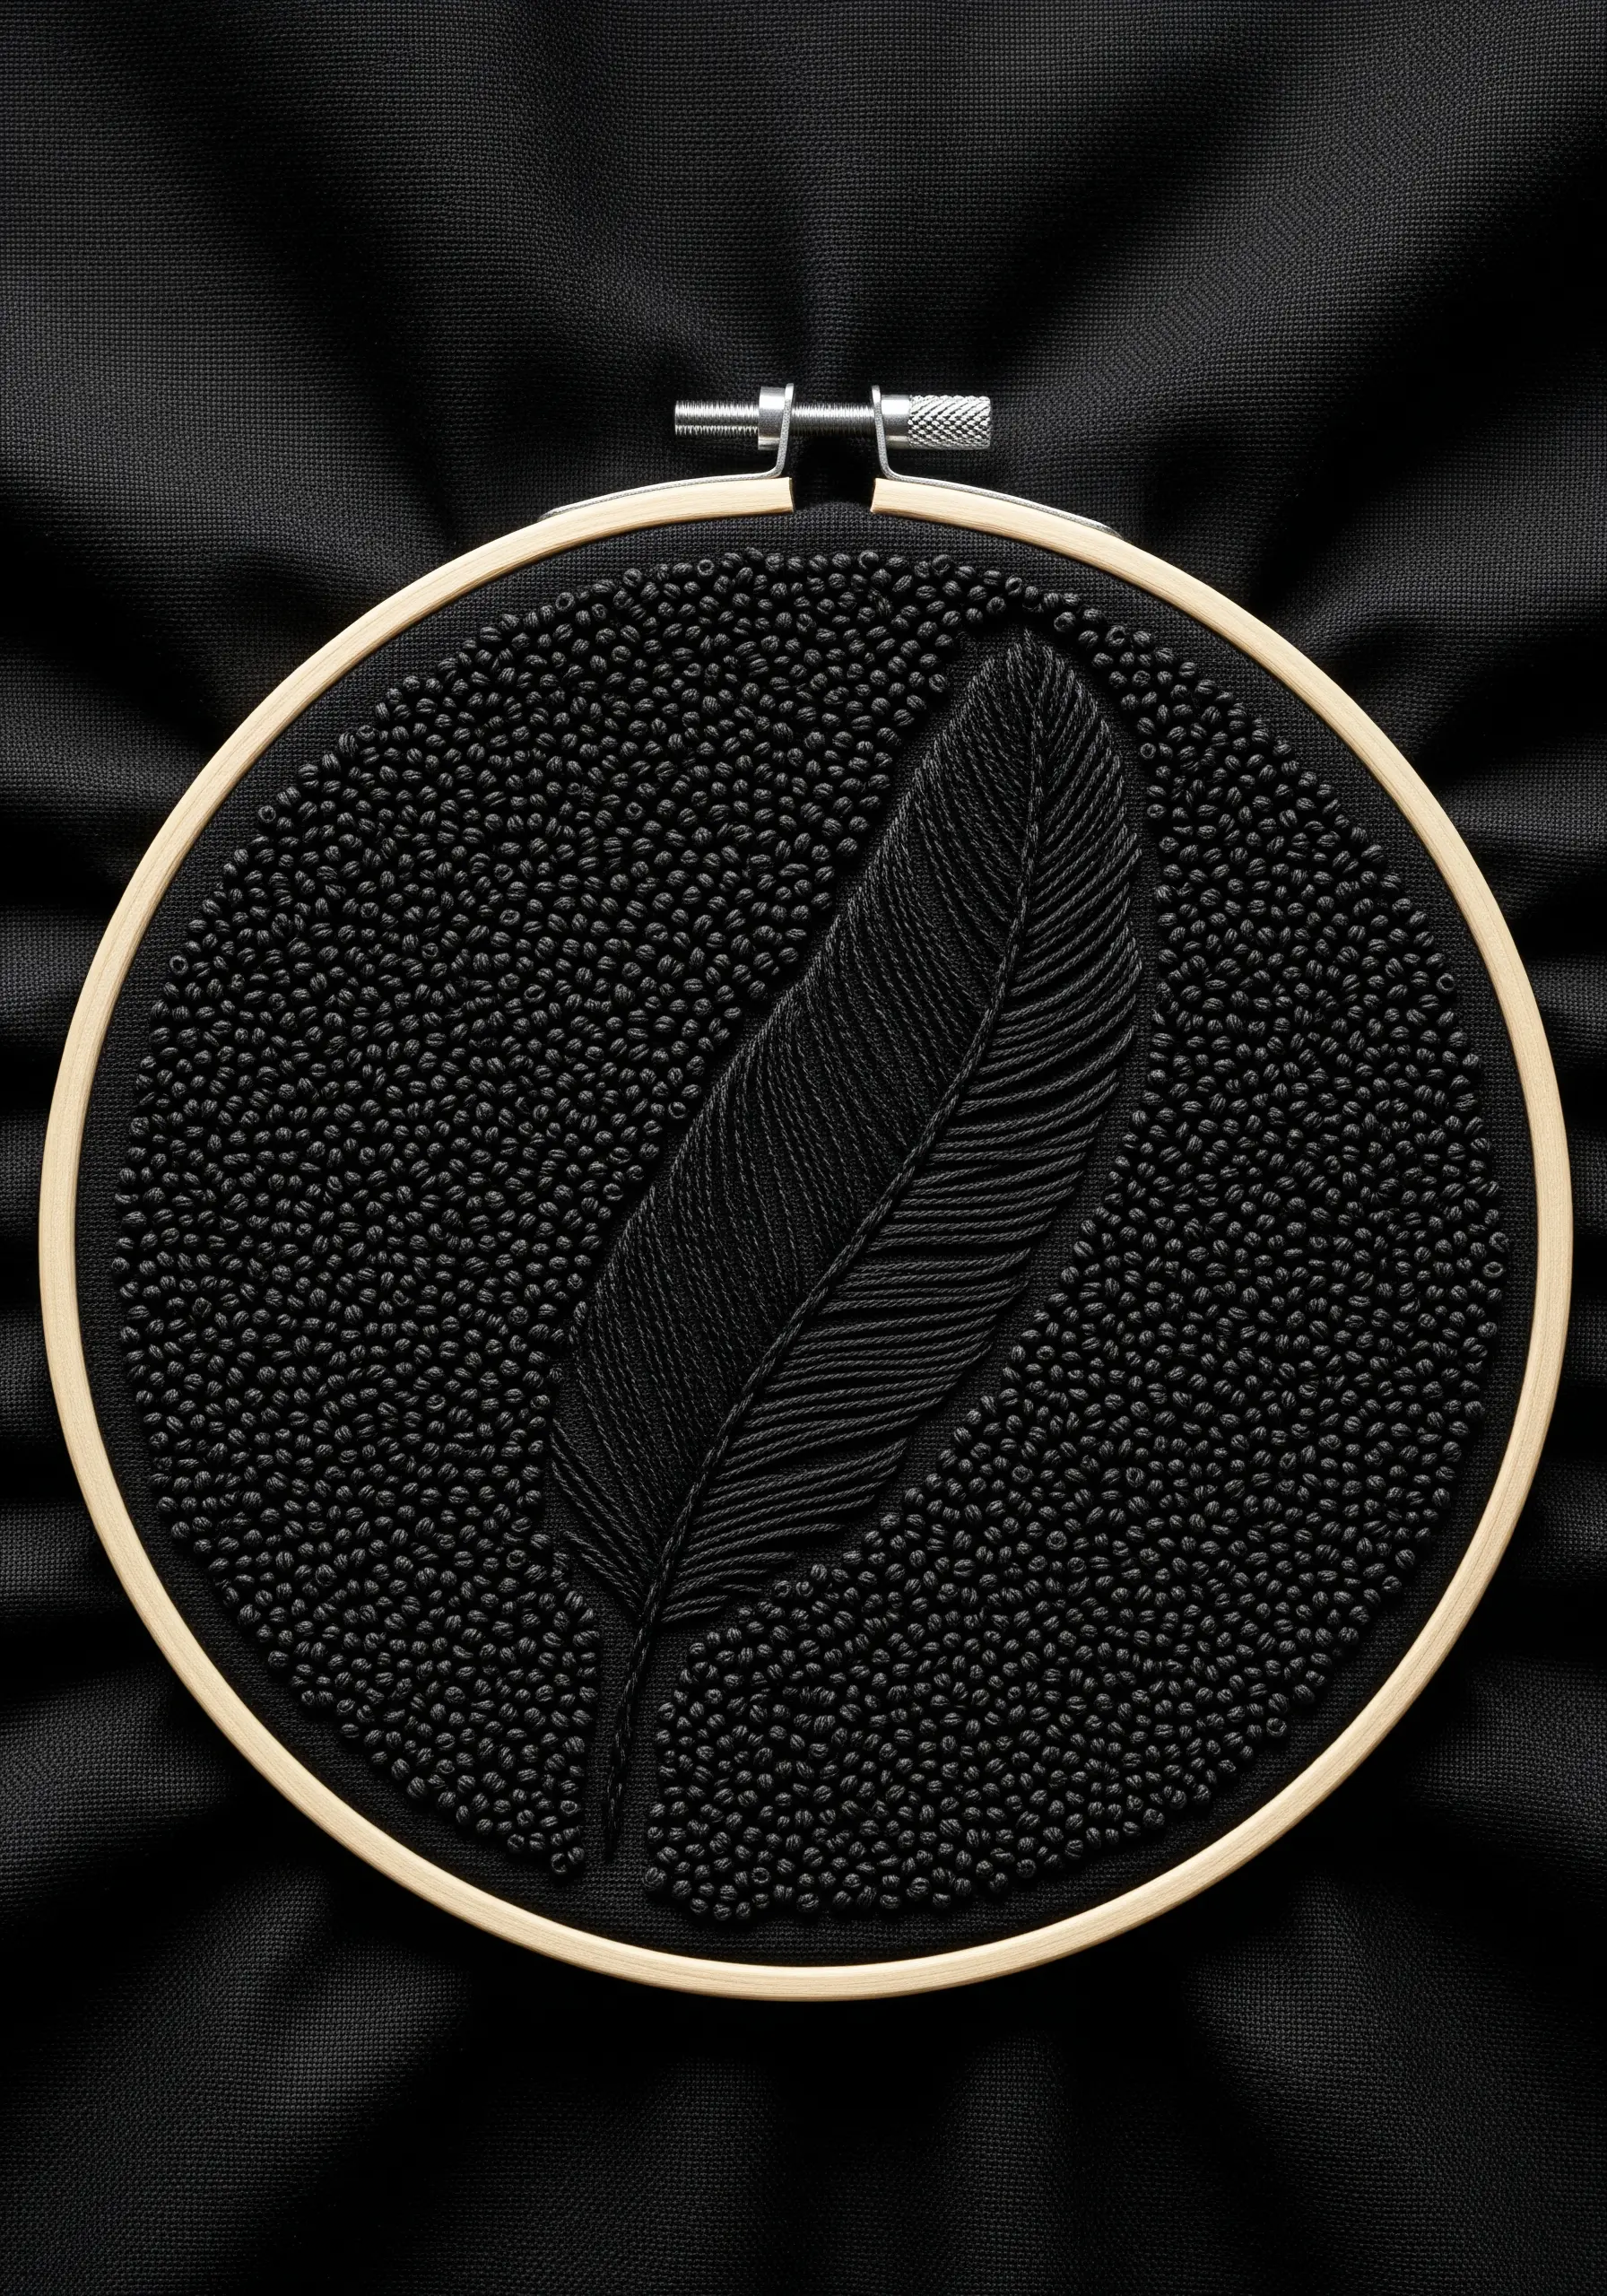
Create a subtle yet stunning black-on-black effect by pairing threads with different finishes.
For the background, use a matte cotton floss to stitch dense French knots; their texture will absorb light, creating a deep, velvety void.
For the central feather motif, switch to a thread with a slight sheen, like silk or satin floss. Its smooth surface will reflect light, causing it to emerge elegantly from the matte background.
This sophisticated use of texture-on-texture proves that monochrome doesn’t have to mean monotone.
10. Design with Negative Space in Mind
In this geometric design, the unstitched fabric is just as important as the thread.
Use simple backstitch and straight stitches to outline your shapes, but intentionally leave areas of the background fabric exposed within the motif.
This technique, known as voiding, creates a delicate, almost skeletal effect that feels light and modern.
The high contrast between the dark fabric and the light thread amplifies the impact, turning simple lines into a complex and visually engaging pattern.
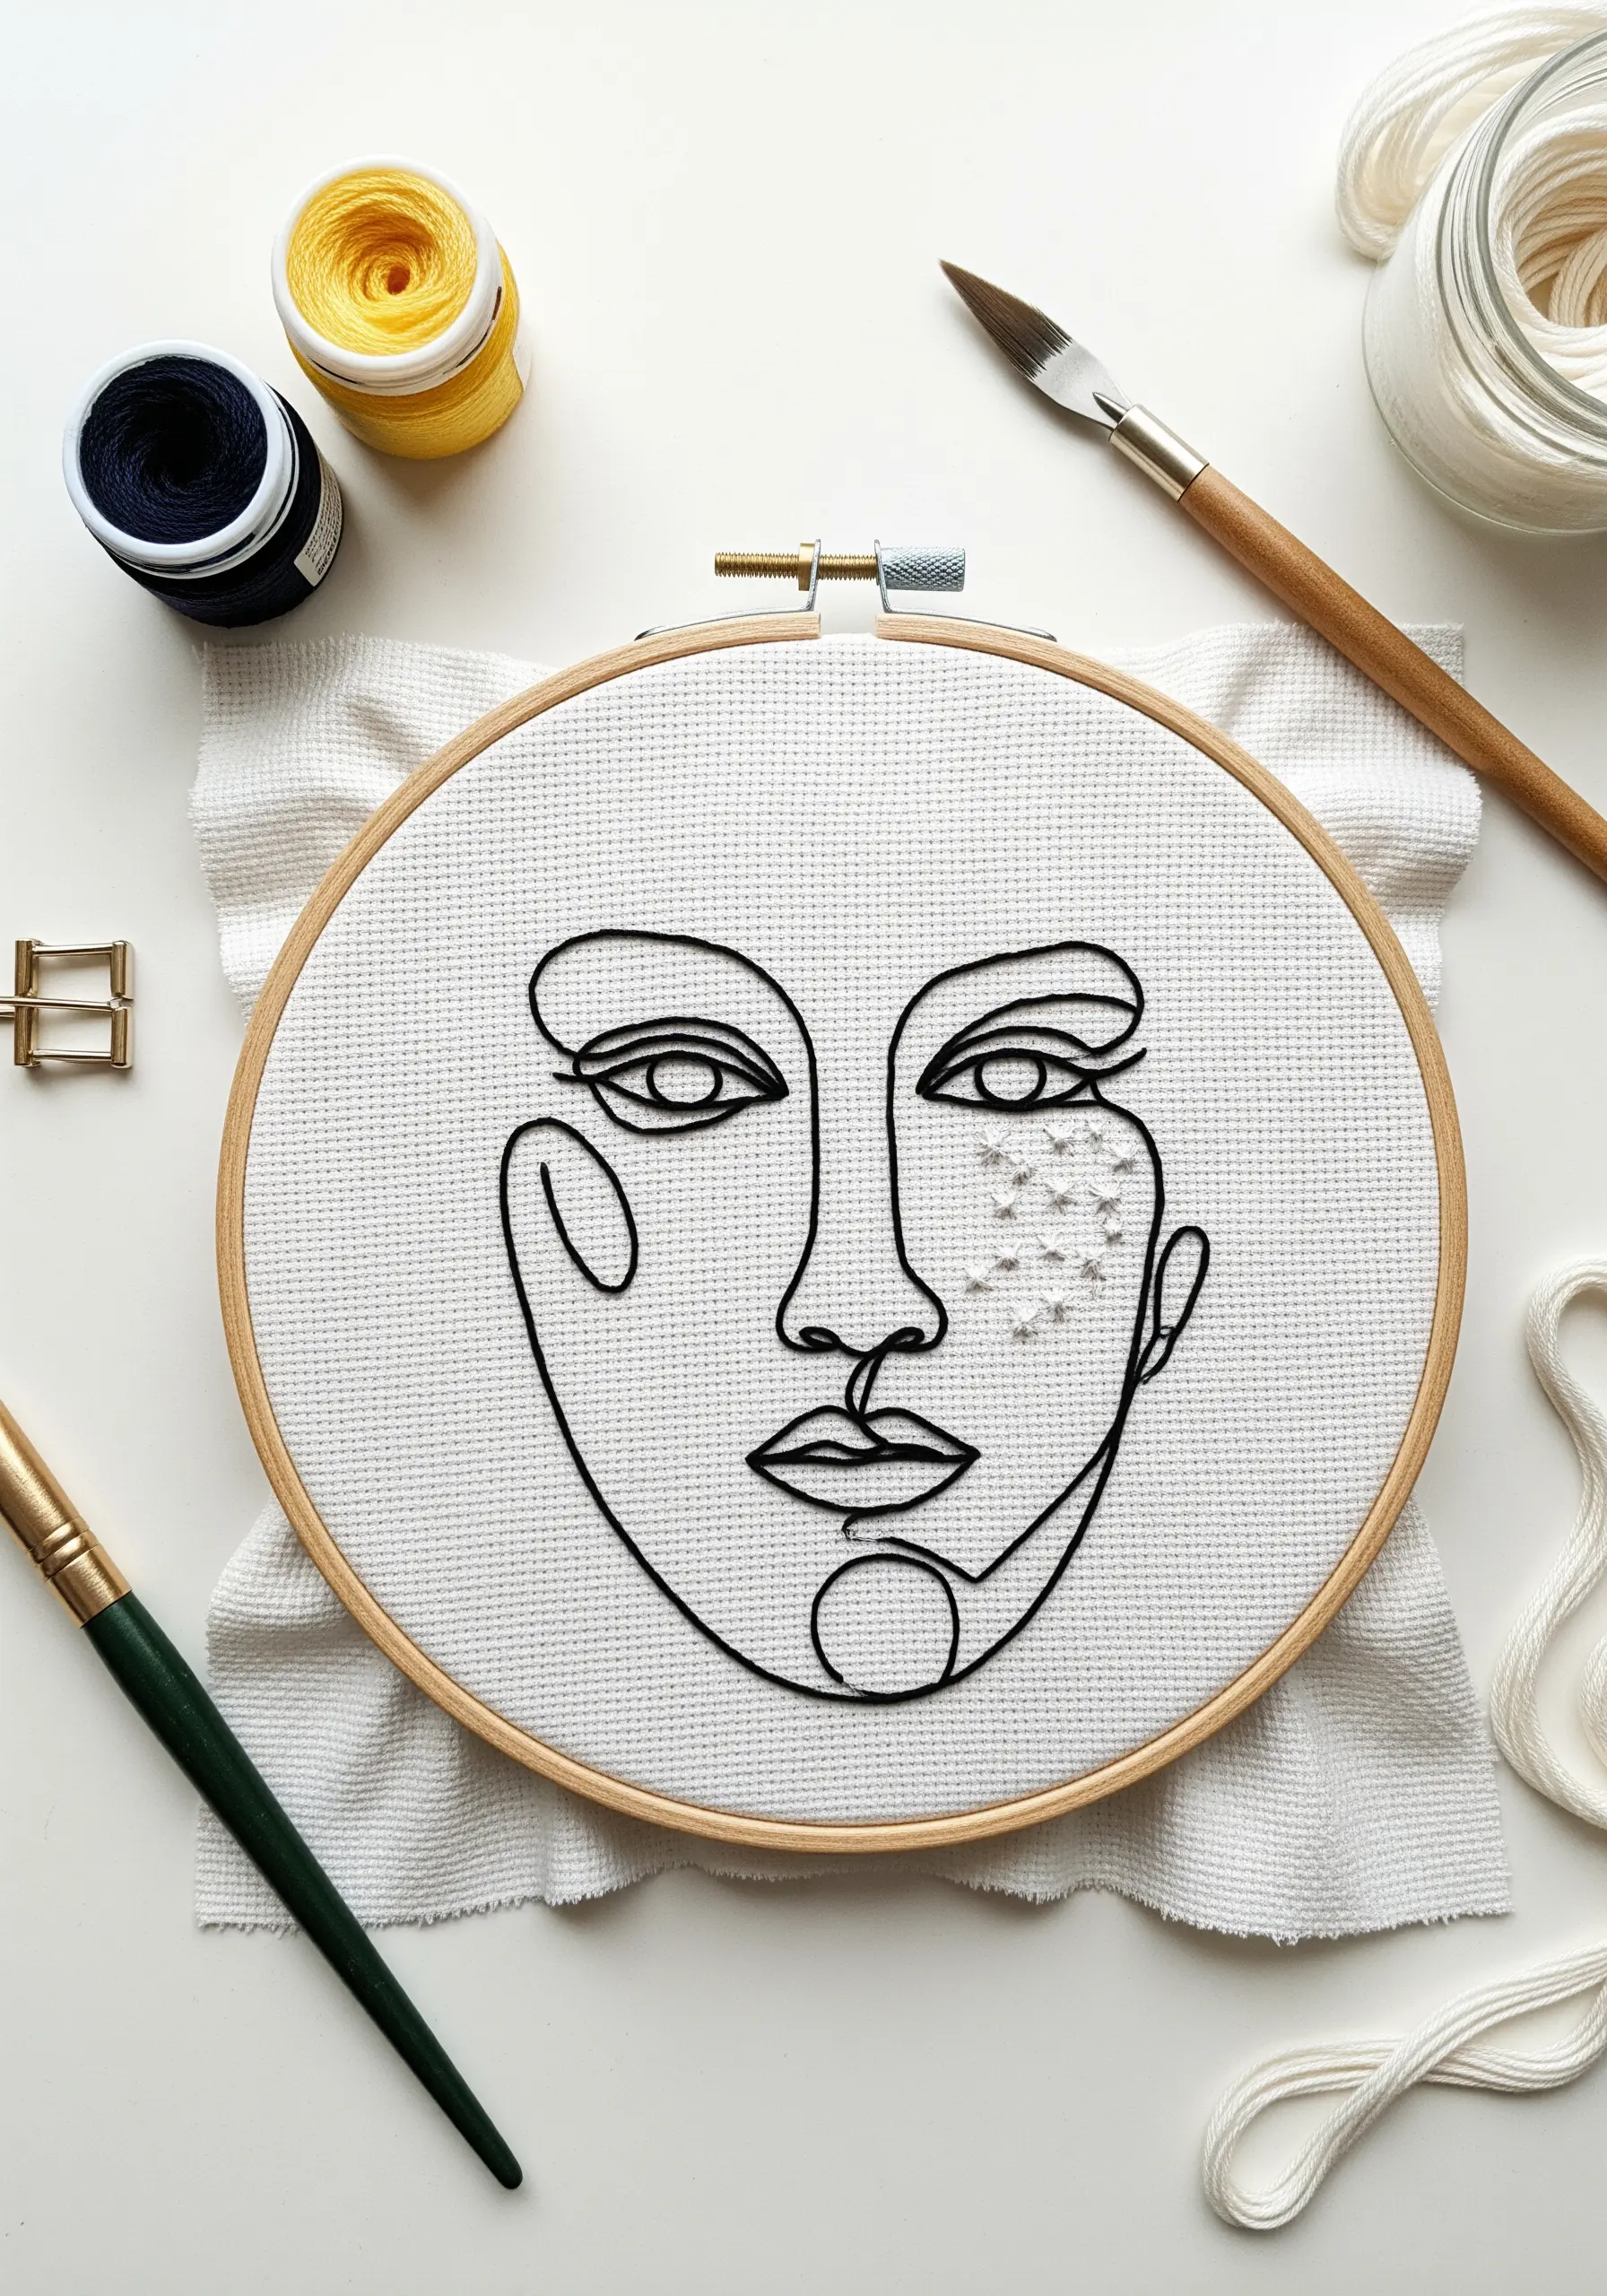
11. Refine Your Outlines with a Precise Split Stitch

For delicate motifs, the quality of your outline is everything. A split stitch provides more precision and solidity than a standard backstitch.
By piercing the thread of the previous stitch, you create a continuous, chain-like line that has no gaps, resulting in a smoother, more refined curve.
Use only two strands of floss for a line that is present but not overpowering, perfectly suited for minimalist stitch designs where every detail matters.
This technique is perfect for capturing the gentle contours of sleeping animals or subtle botanical illustrations.
12. Capture Painterly Motion with Abstract Satin Stitch
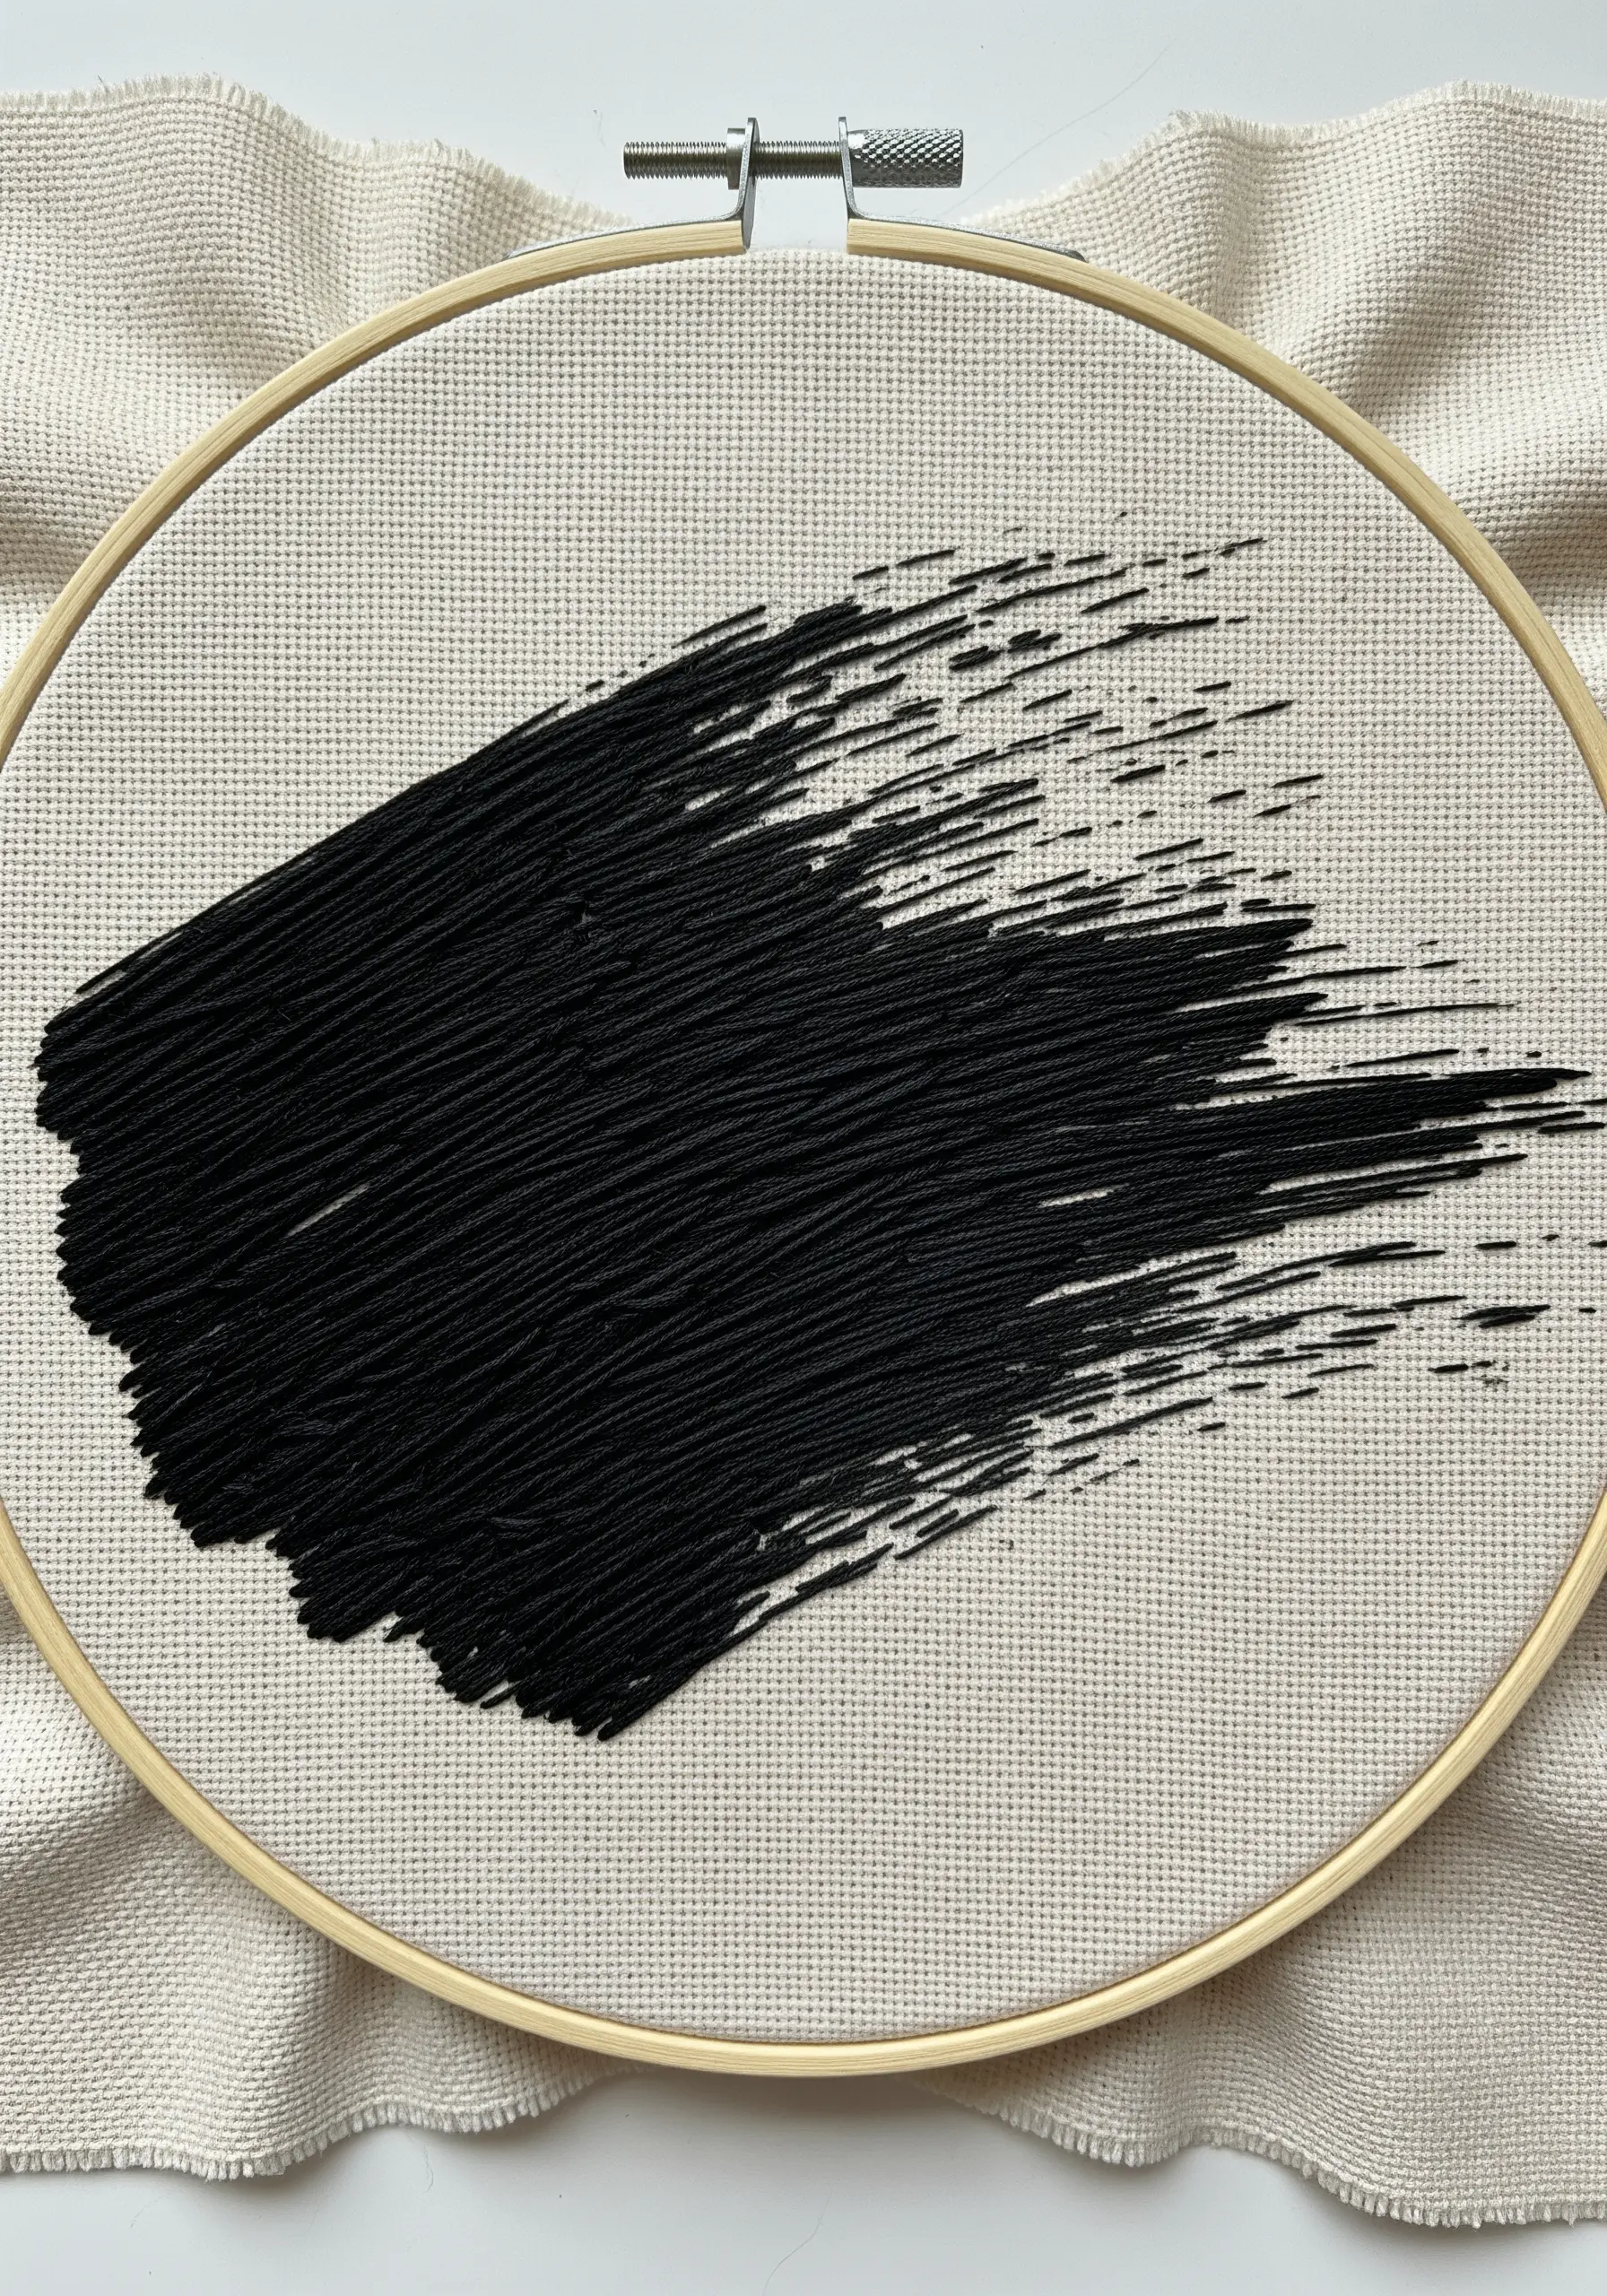
Recreate the energetic drag of a paintbrush by abandoning perfectly uniform stitches.
Lay down a dense field of satin stitches, but intentionally vary their lengths and angles, especially at the edges of the shape.
Let the stitches trail off unevenly to mimic the bristles of a dry brush losing paint. This technique is about embracing imperfection to create a sense of movement and raw energy.
It’s one of the most effective abstract hoop art concepts for turning thread into a gesture.
13. Add Bold, Graphic Texture with Couching
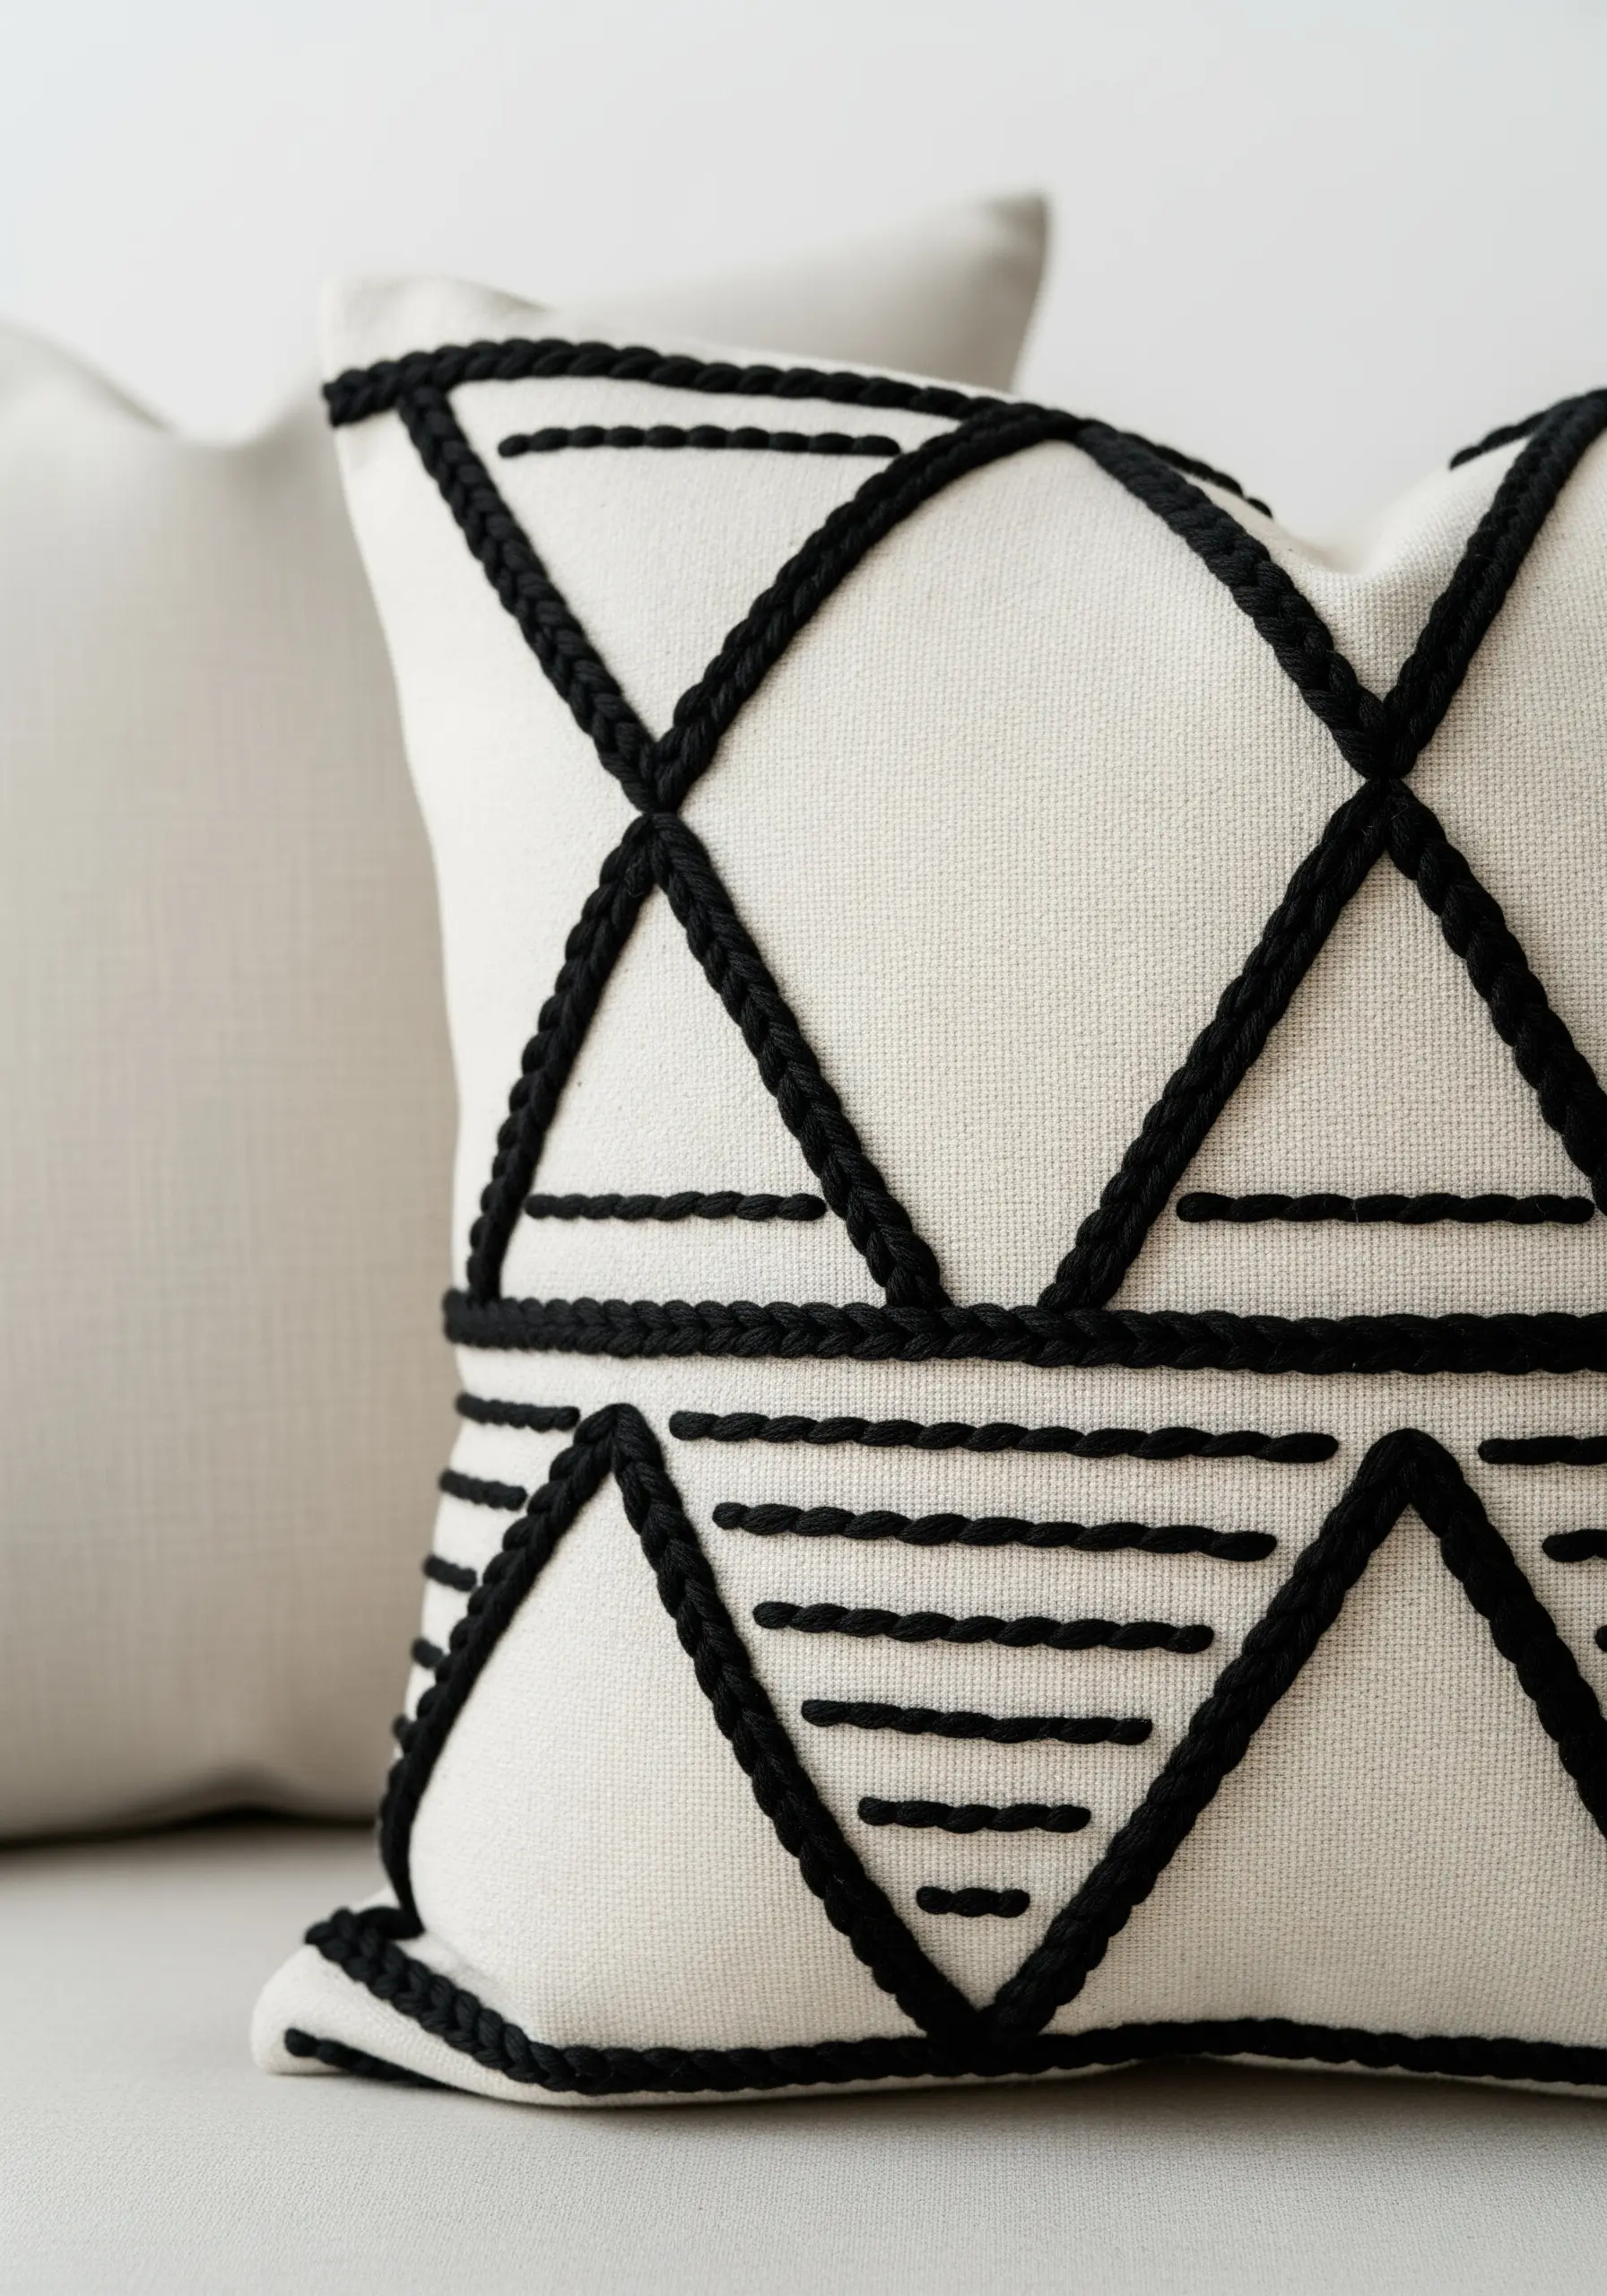
For home décor items that need to be both beautiful and durable, couching is the perfect technique for adding bold lines.
Instead of trying to stitch with a very thick yarn, lay the yarn on the surface of the fabric and use a standard, thinner embroidery floss to tack it down with small, perpendicular stitches.
This method allows you to create thick, graphic patterns that are securely attached and have a wonderful, raised texture.
It’s an ideal approach for geometric patterns on pillows, blankets, or any high-use textile.
14. Preserve Detail with a Precise Pattern Transfer

When recreating detailed illustrations with fine lines, your pattern transfer is the most critical step.
Use a water-soluble stabilizer that you can print on directly, or trace your design with an ultra-fine, heat-erasable pen.
A precise guide allows you to focus on stitching clean, accurate lines without guessing. For hands or faces, even a millimeter of deviation can alter the expression.
This focus on a perfect foundation is what separates amateur work from polished, minimalist line art embroidery patterns that feel gallery-ready.
15. Weave Organic Rhythm with Topographical Lines
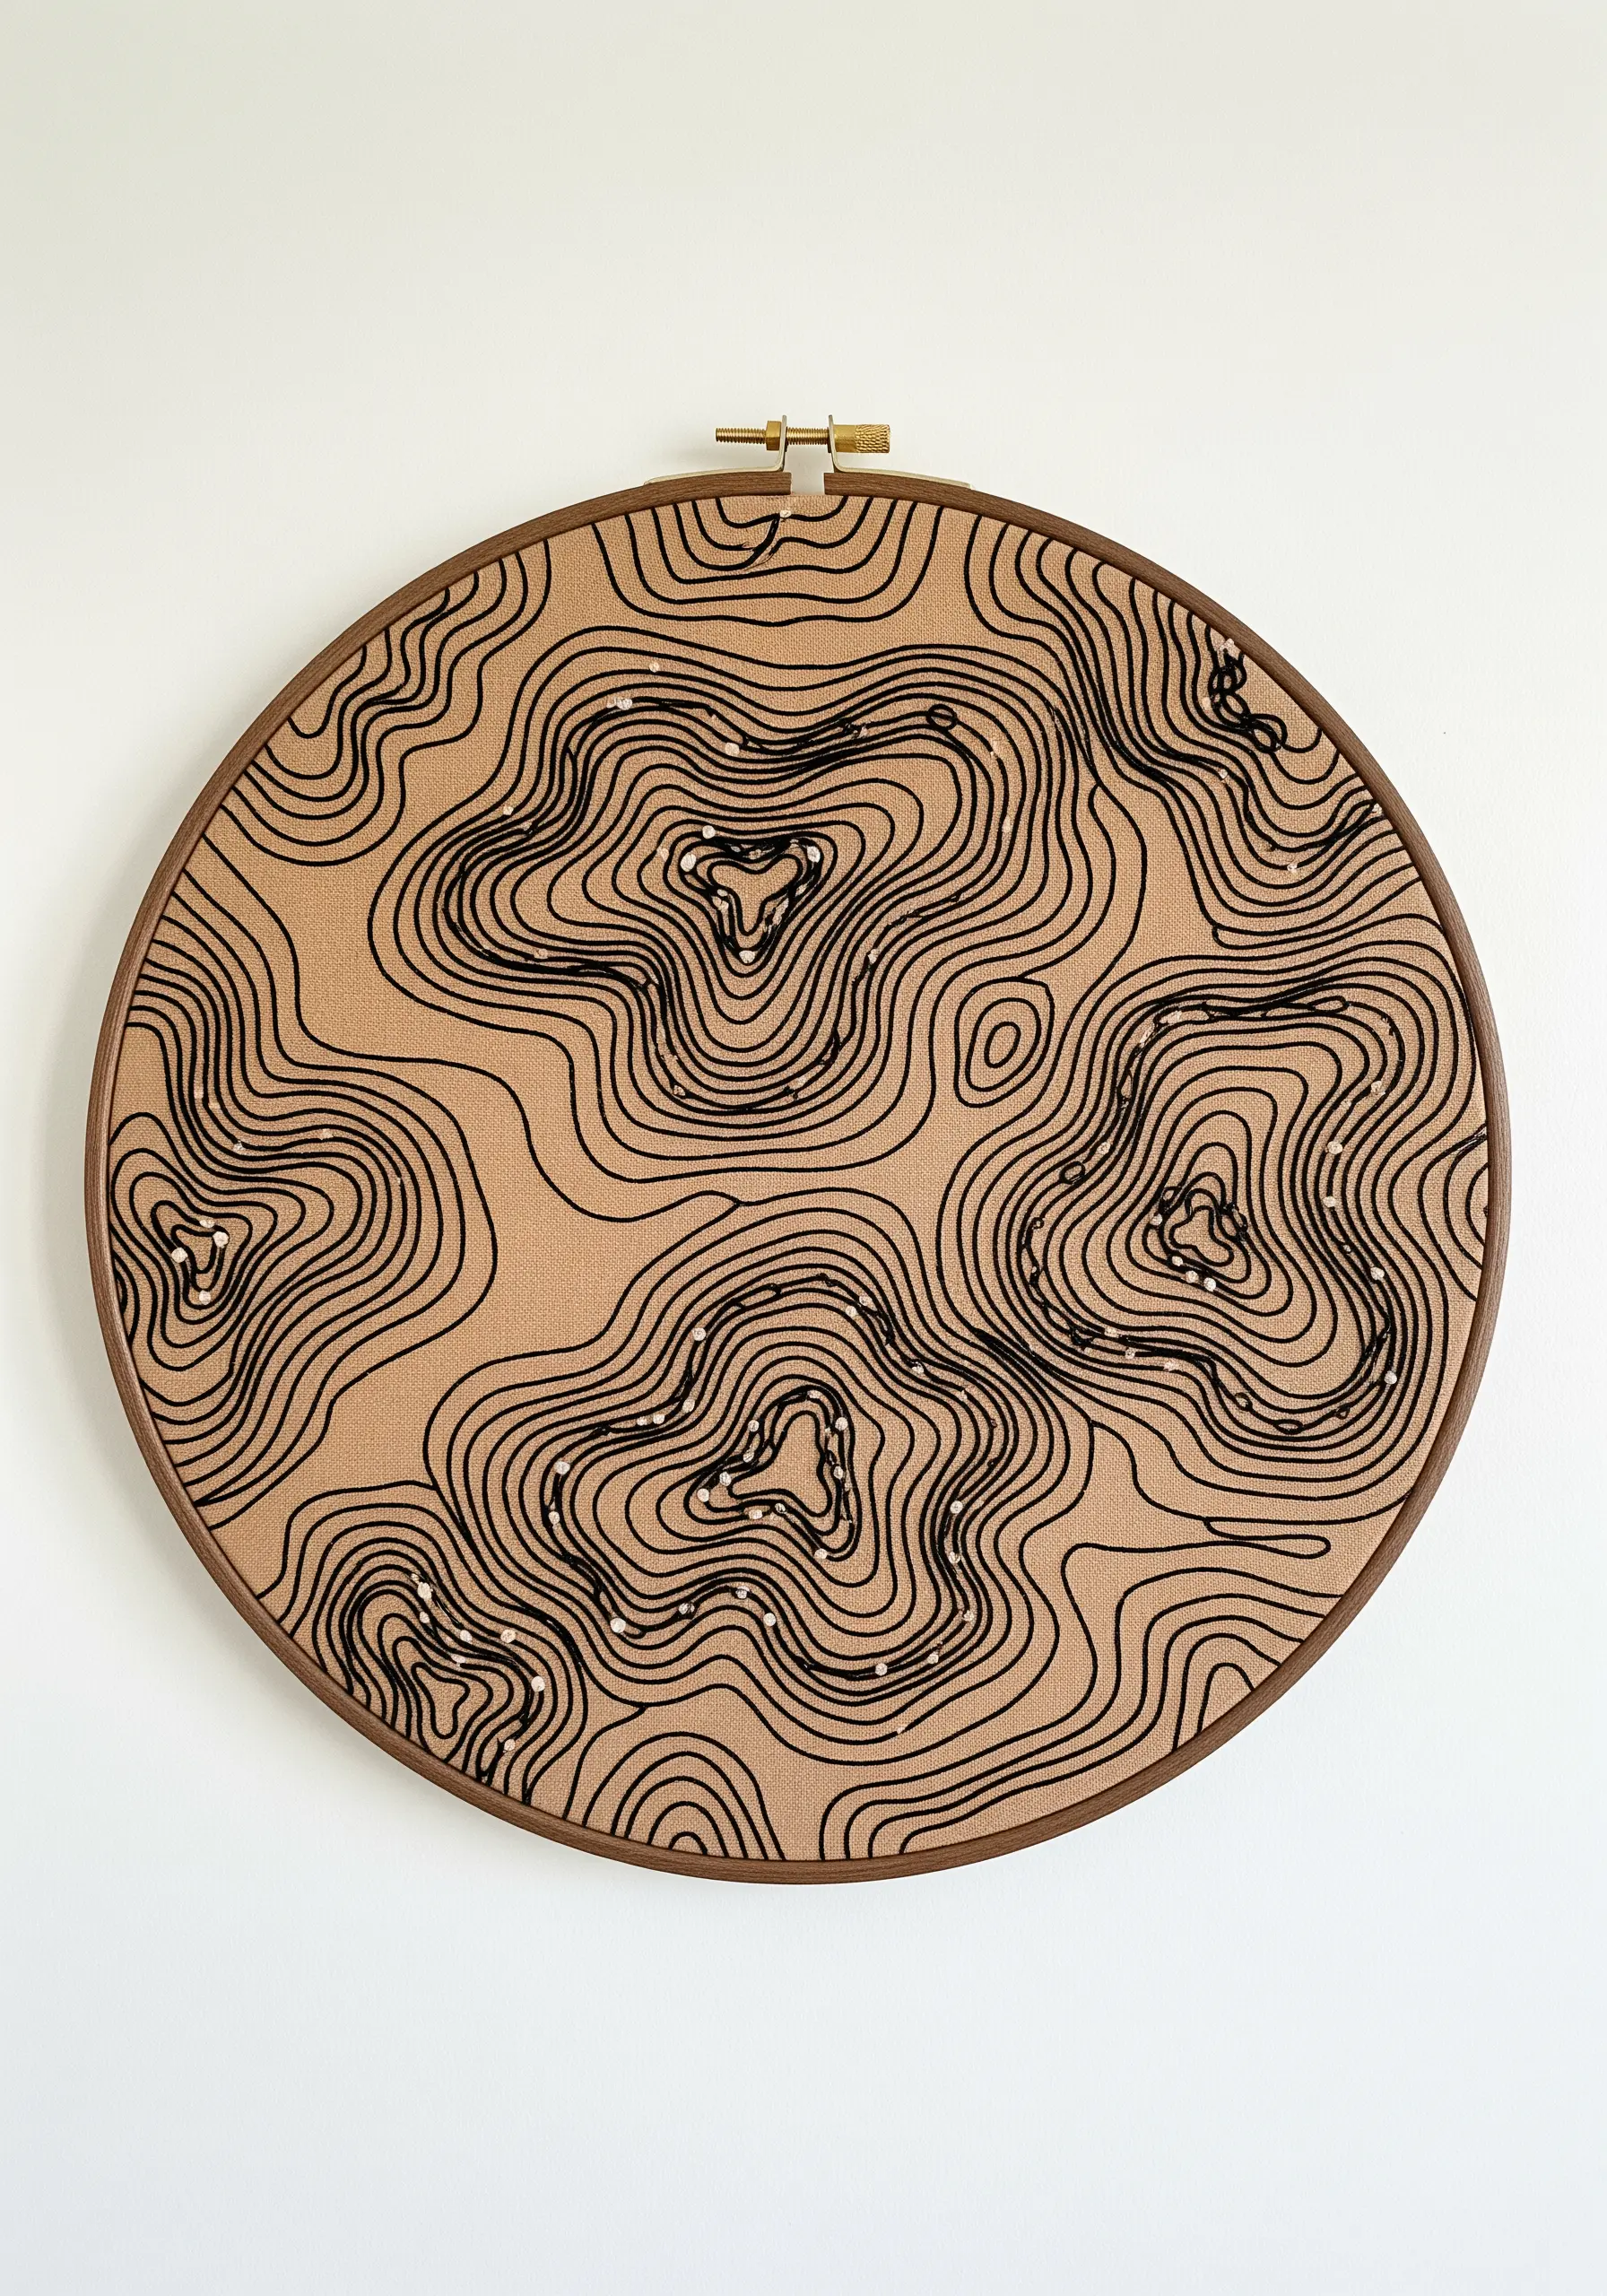
Capture the feeling of a landscape by stitching organic, flowing lines that mimic a topographical map.
Use a whipped backstitch to ensure your long, curving lines are perfectly smooth and consistent in thickness.
Introduce tiny seed beads or French knots in a contrasting finish—like a pearlescent white or silver—to add subtle points of light and texture without disrupting the monochrome palette.
These abstract thread embroidery ideas translate the patterns of nature into a sophisticated, rhythmic design.
16. Build Dramatic Tension with Radiating Straight Stitches

Create a powerful sense of impact and motion using only straight stitches that radiate from a central point.
To achieve the sharp, shattered-glass effect, your lines must be perfectly straight. The key is to maintain high, even tension on every single stitch.
Use a ruler and a disappearing ink pen to draw your guidelines directly on the fabric before you start. This ensures your composition is balanced and your angles are precise.
This design is a masterclass in how precise placement can turn the simplest stitch into a dramatic work of modern geometric thread art.
17. Balance Solid Fills and Delicate Lines on Accessories

For items that will be used and seen up close, like a tote bag, balance is key.
Combine solid satin-stitched leaves with a delicate, single-strand stem. This contrast in visual weight creates a design that is both bold and refined.
When filling shapes with satin stitch on a functional item, keep your stitches under half an inch long to minimize the risk of snagging.
A few scattered French knots or seed stitches add a final touch of detail, elevating your simple tote into a piece of wearable botanical art.
18. Achieve Graphic Precision with a Soluble Stabilizer

For designs that demand absolute precision, like a soundwave or complex geometric pattern, stitching freehand is not an option.
Print your digital design directly onto a sheet of sticky, water-soluble stabilizer. Adhere it to your fabric, stitch directly through it, and then dissolve it in water when you’re done.
This method guarantees that every line, peak, and valley is perfectly replicated, resulting in a flawless, professional finish.
It’s the ultimate technique for translating digital precision into the tactile world of thread art.


