

Embroidery is more than just thread on fabric—it’s a way to translate the world around you into a language of texture and color. But how do you move beyond flat, simple stitches to create work that feels truly alive and dimensional?
The secret isn’t in owning more supplies or learning dozens of complex techniques. It’s in learning to see, and then choosing the right stitch, thread, and approach to capture the essence of a texture—the rough bark of a tree, the soft density of moss, or the delicate structure of a feather.
Here, you won’t find generic patterns. Instead, you’ll discover specific, thoughtful methods for building realistic natural textures. You’ll learn how to combine stitches, layer materials, and think sculpturally, giving you the confidence to turn any natural wonder into a piece of tactile art.
1. Render Birch Bark with Layered Fiber
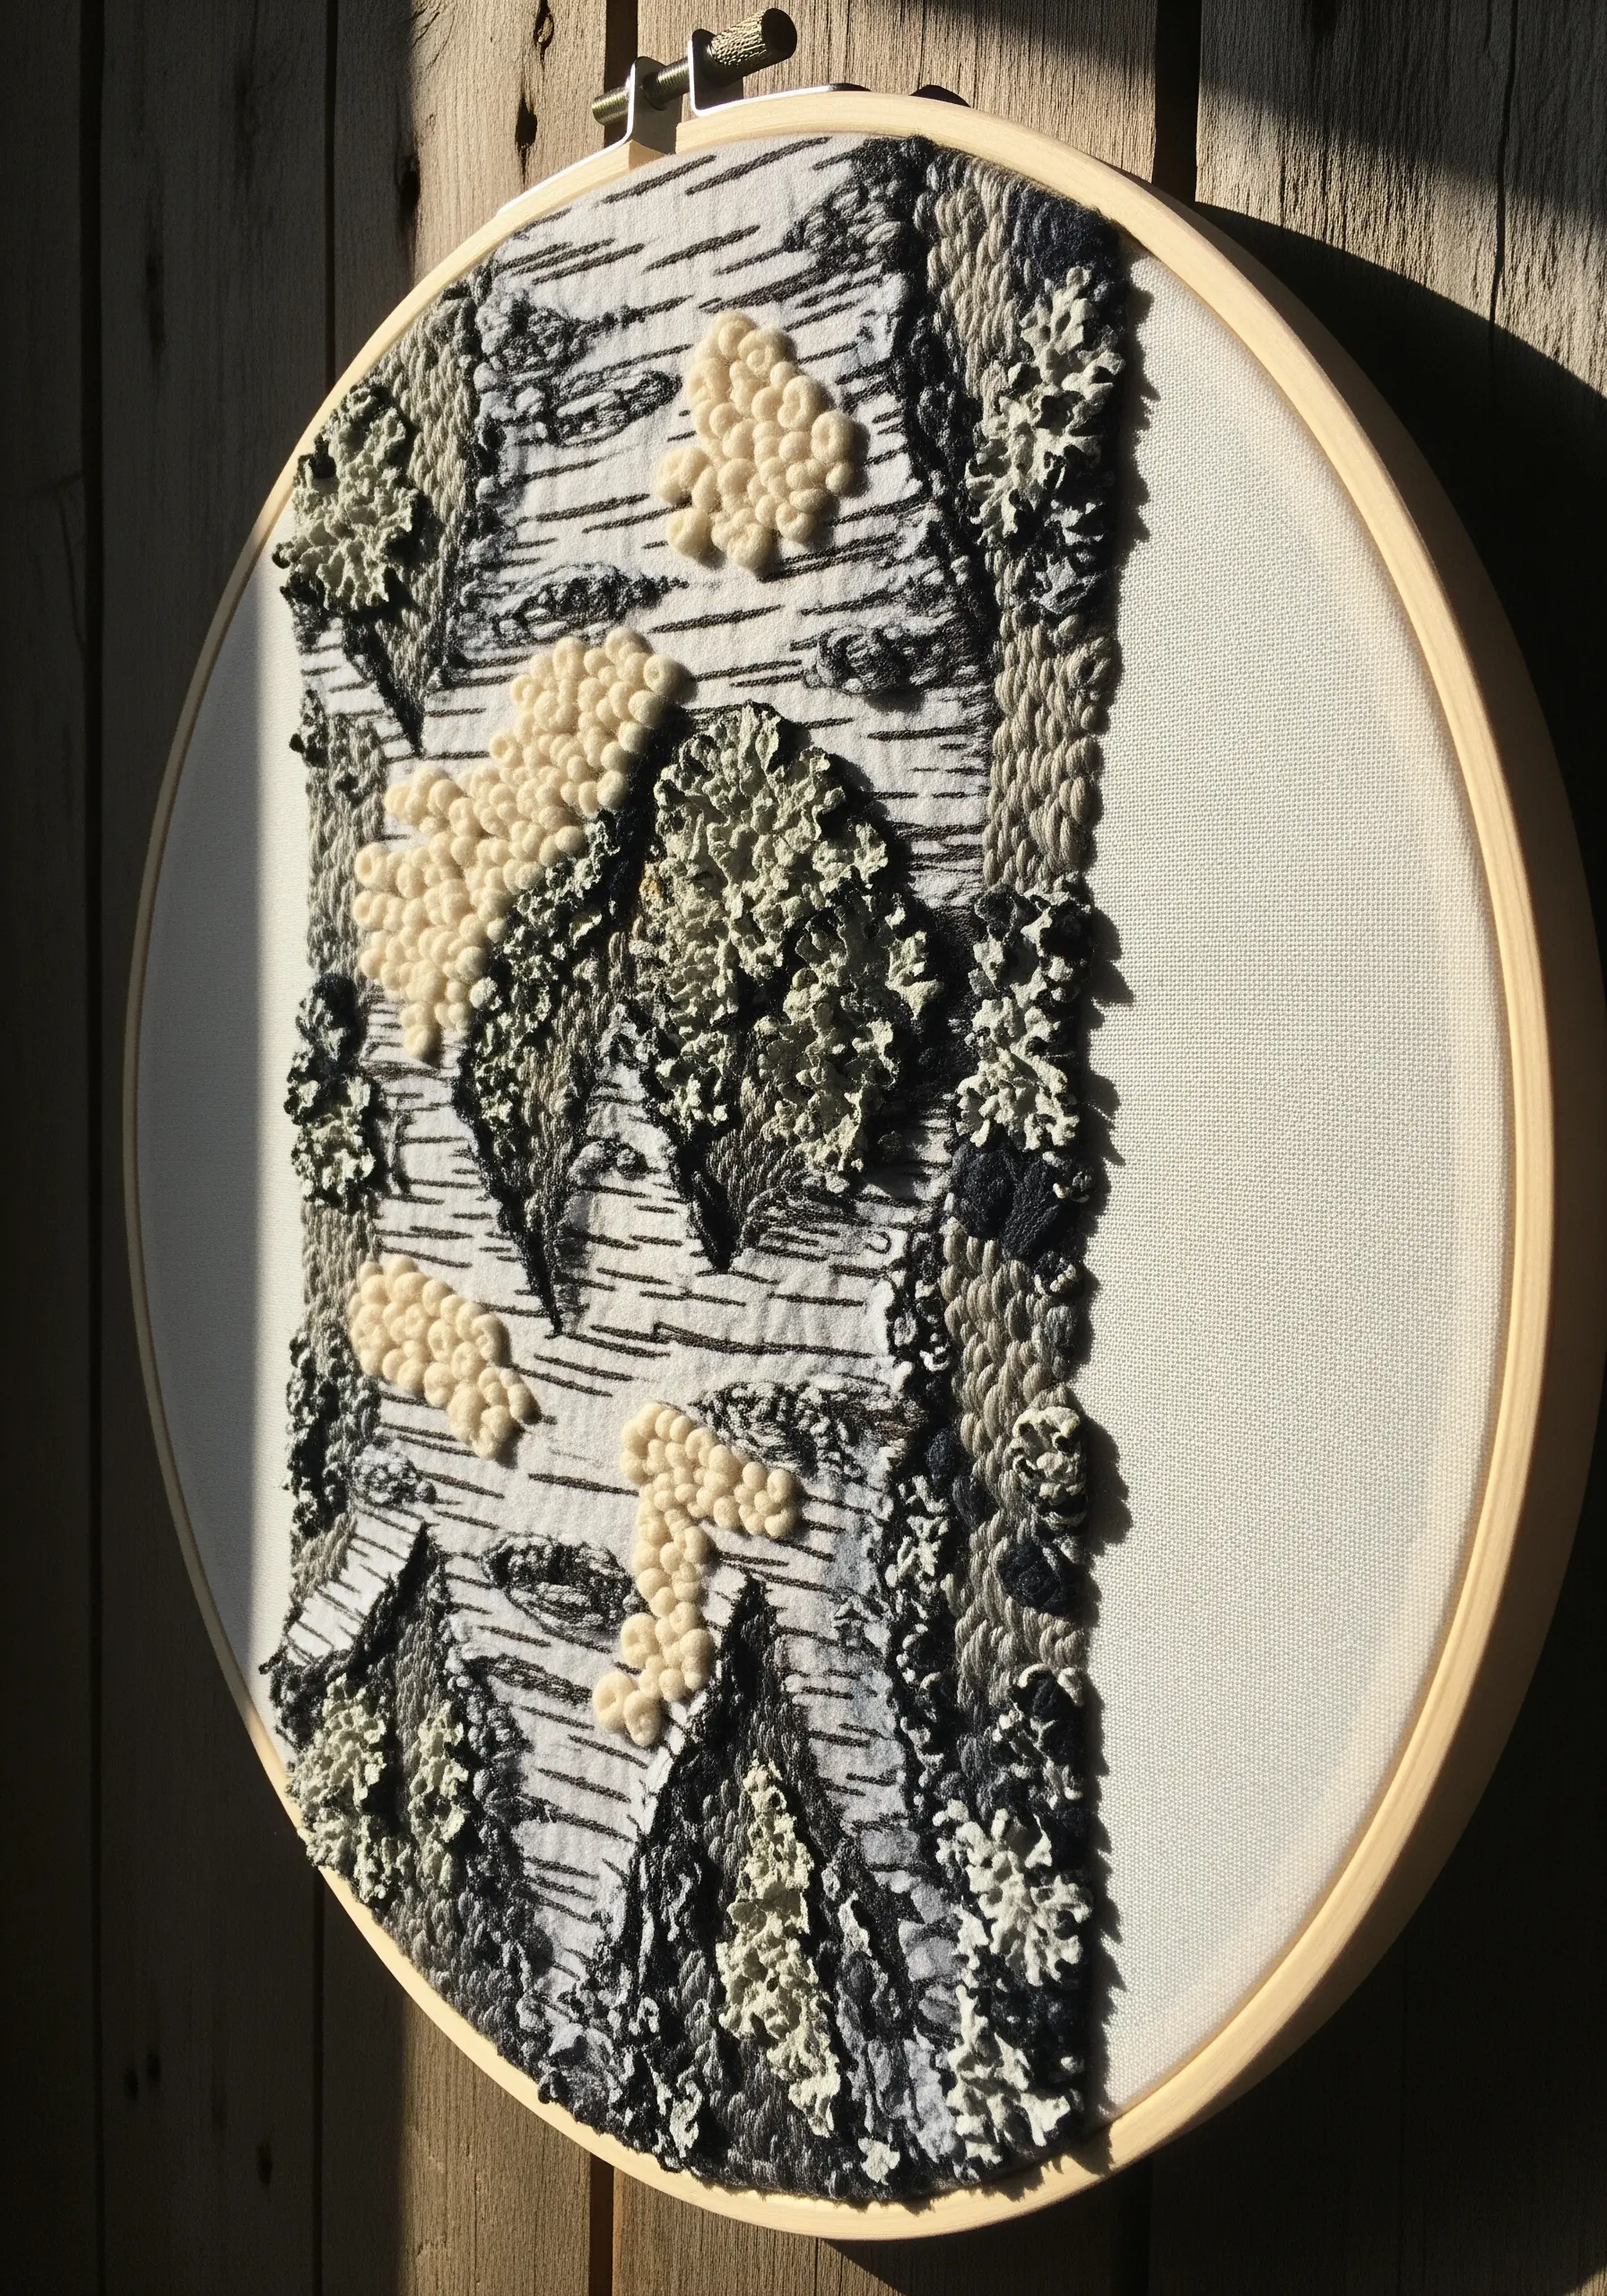
To capture the texture of birch bark, combine fine black straight stitches on a white linen background for the distinctive horizontal lines.
For the lichen, use chunky French knots and turkey work loops with variegated grey and off-white wool yarn.
This contrast between delicate line work and high-texture knots creates a believable and tactile surface that invites touch.
Using a thicker yarn for the knots provides instant volume, making the texture pop without excessive stitching.
2. Sculpt Mossy Stones with Appliqué and Knots
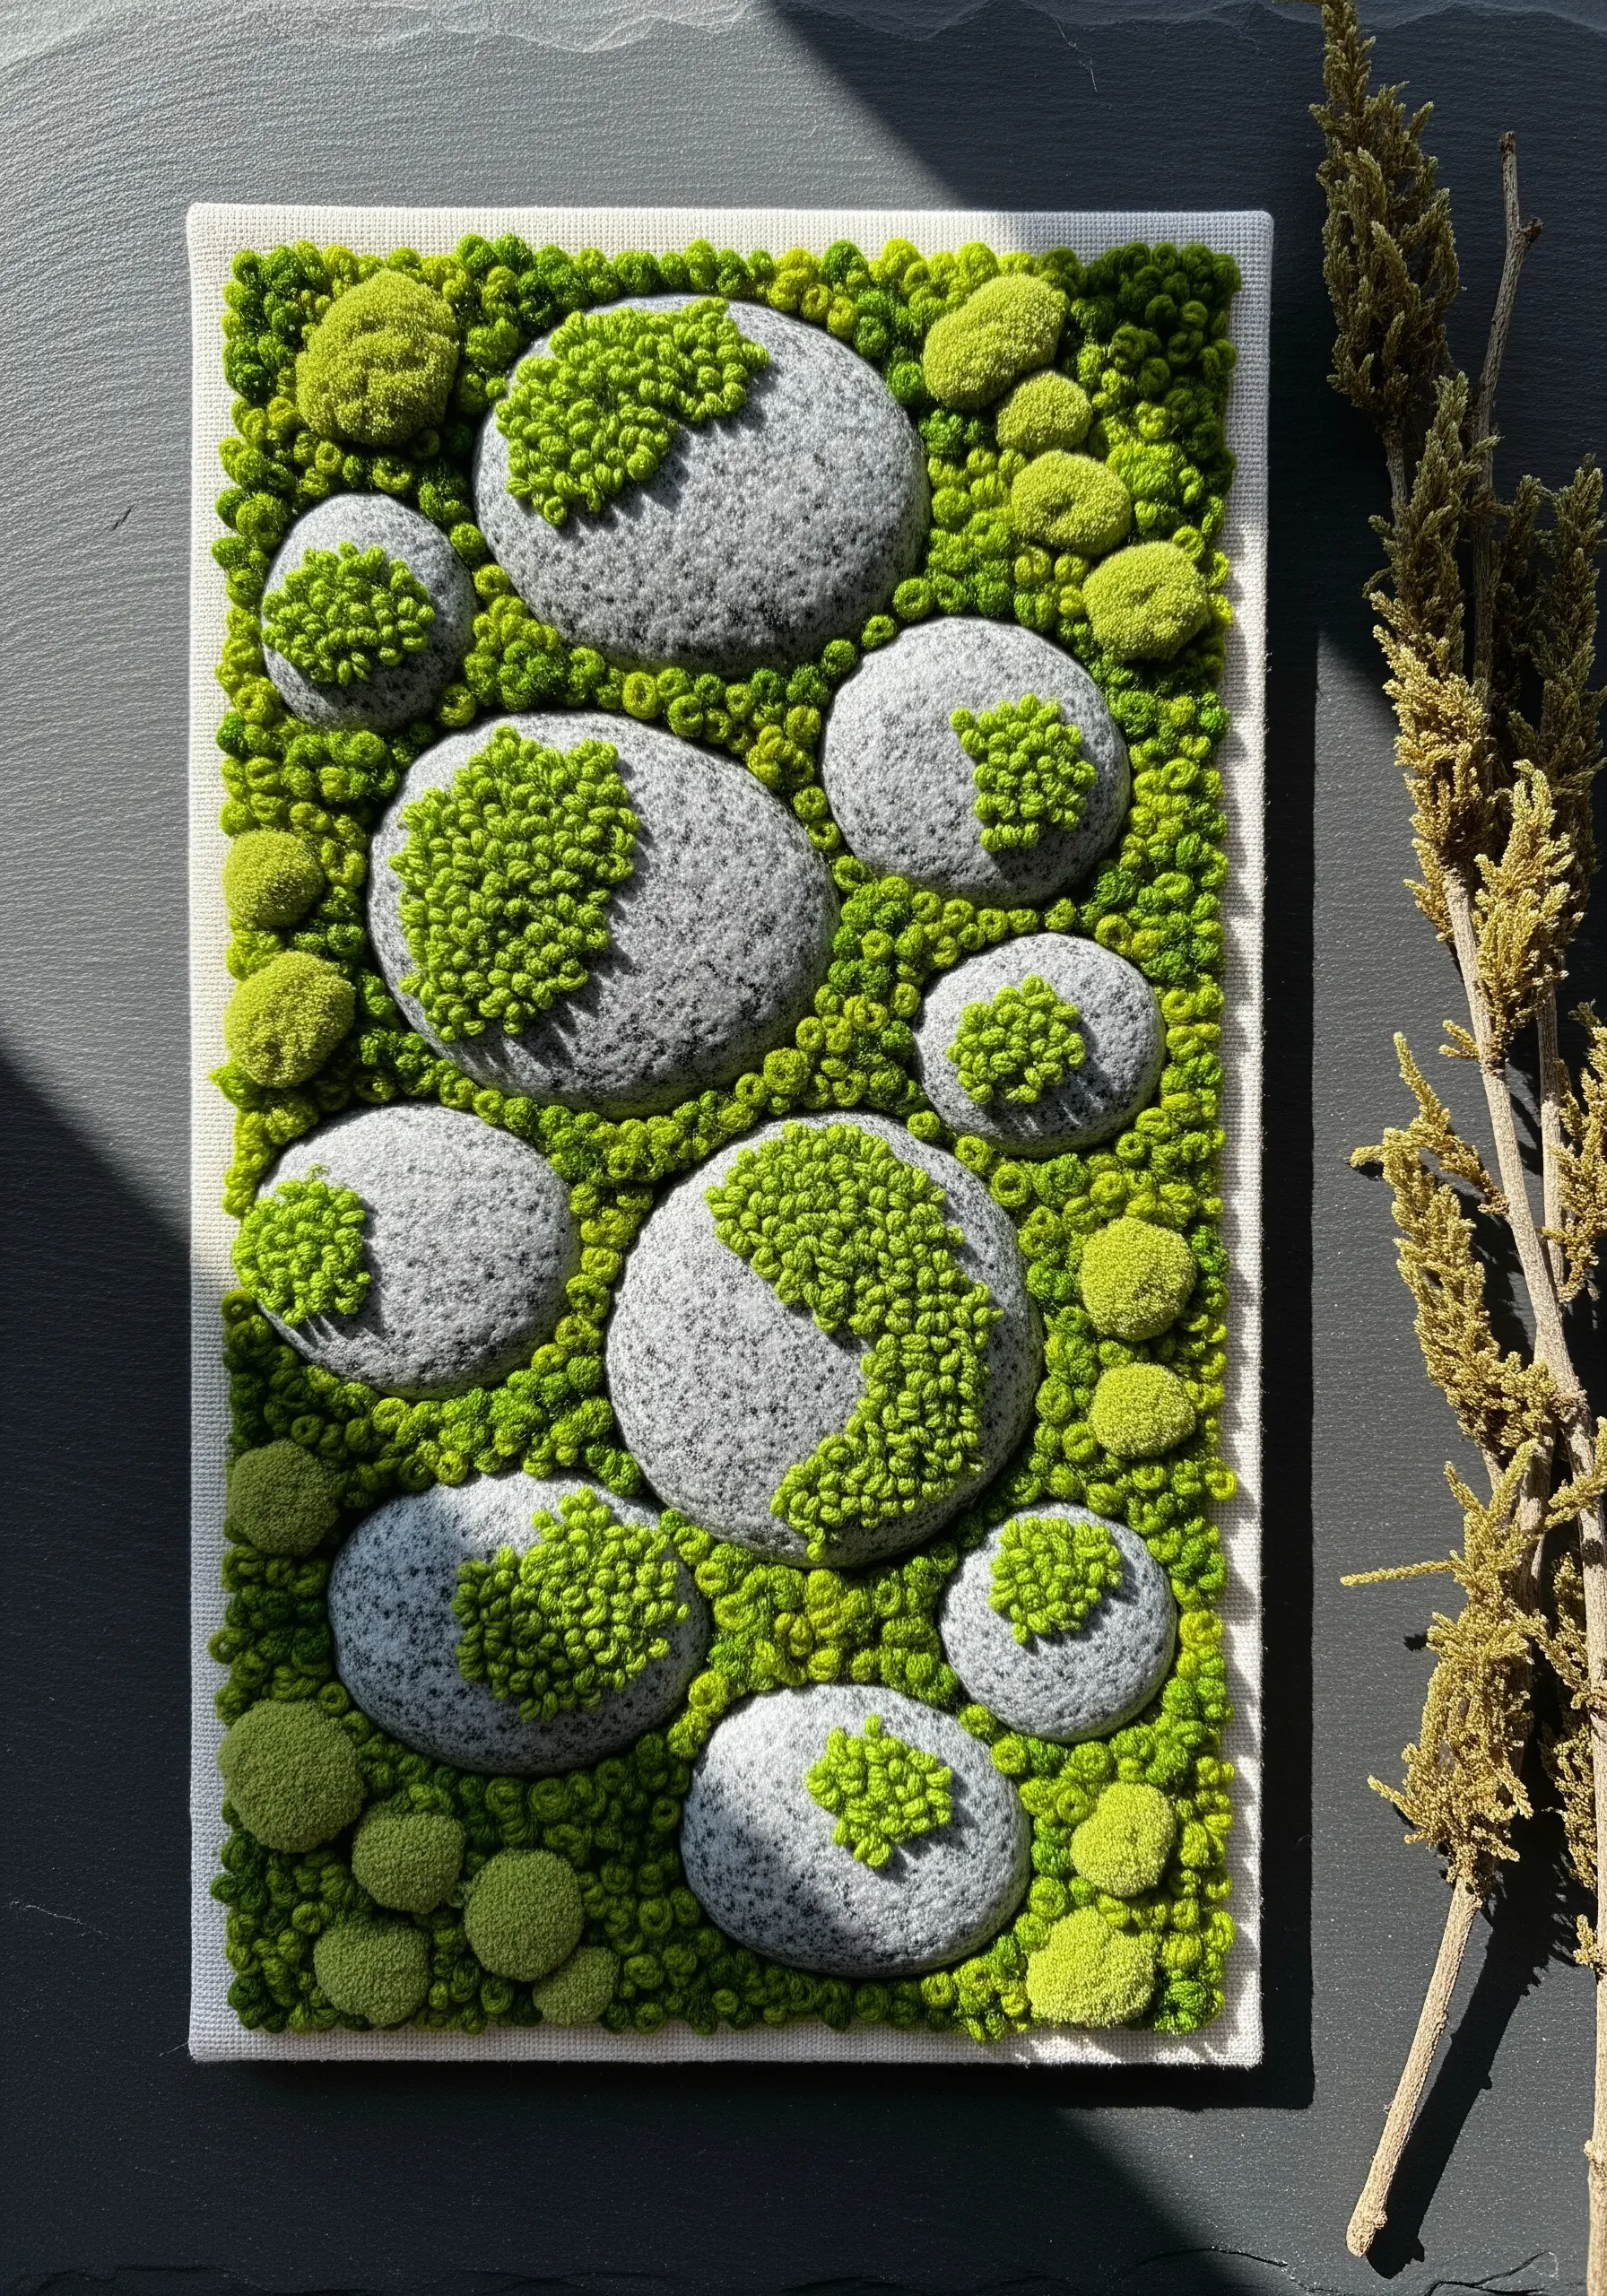
Create the smooth, rounded form of stones by using felt appliqué as your base.
Cut ovals from thick grey felt and attach them to your background fabric, leaving space between them.
Then, surround and cover parts of the felt with dense clusters of French knots in several shades of chartreuse and forest green.
This technique gives you immediate height and dimension, allowing the embroidered moss to look like it’s genuinely growing over a solid surface.
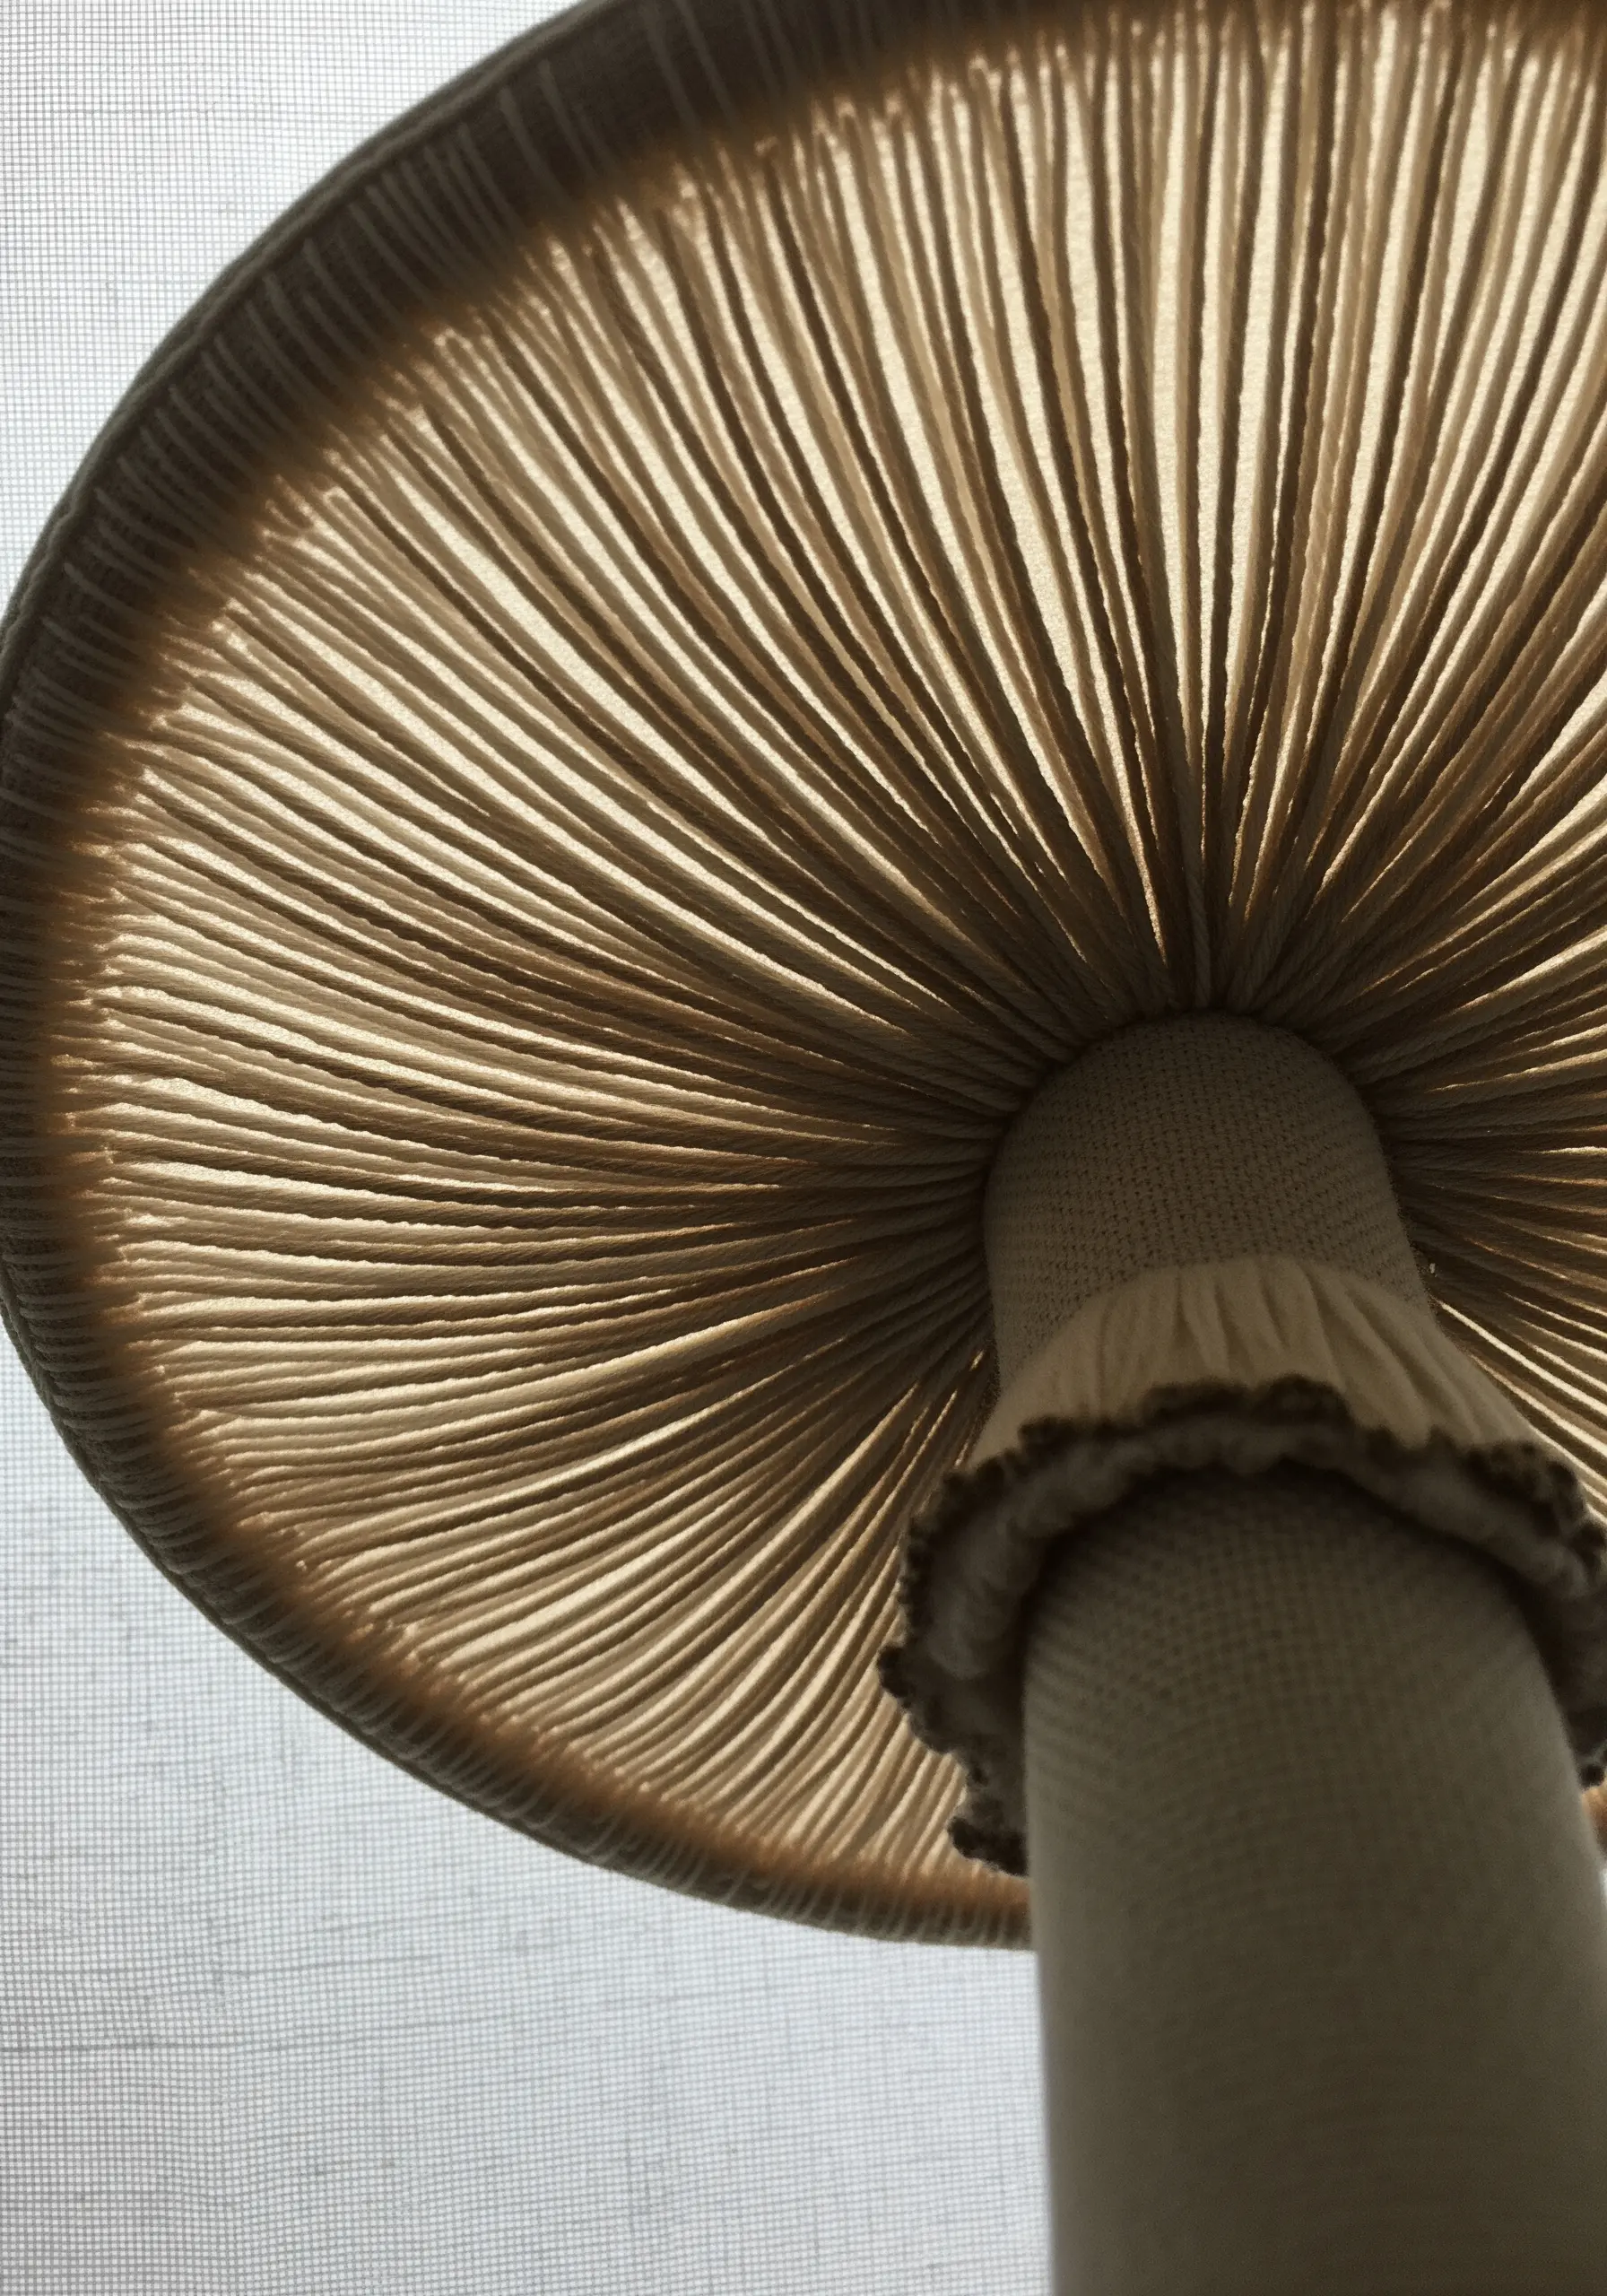
3. Build Realistic Fungus with Padded Satin Stitch
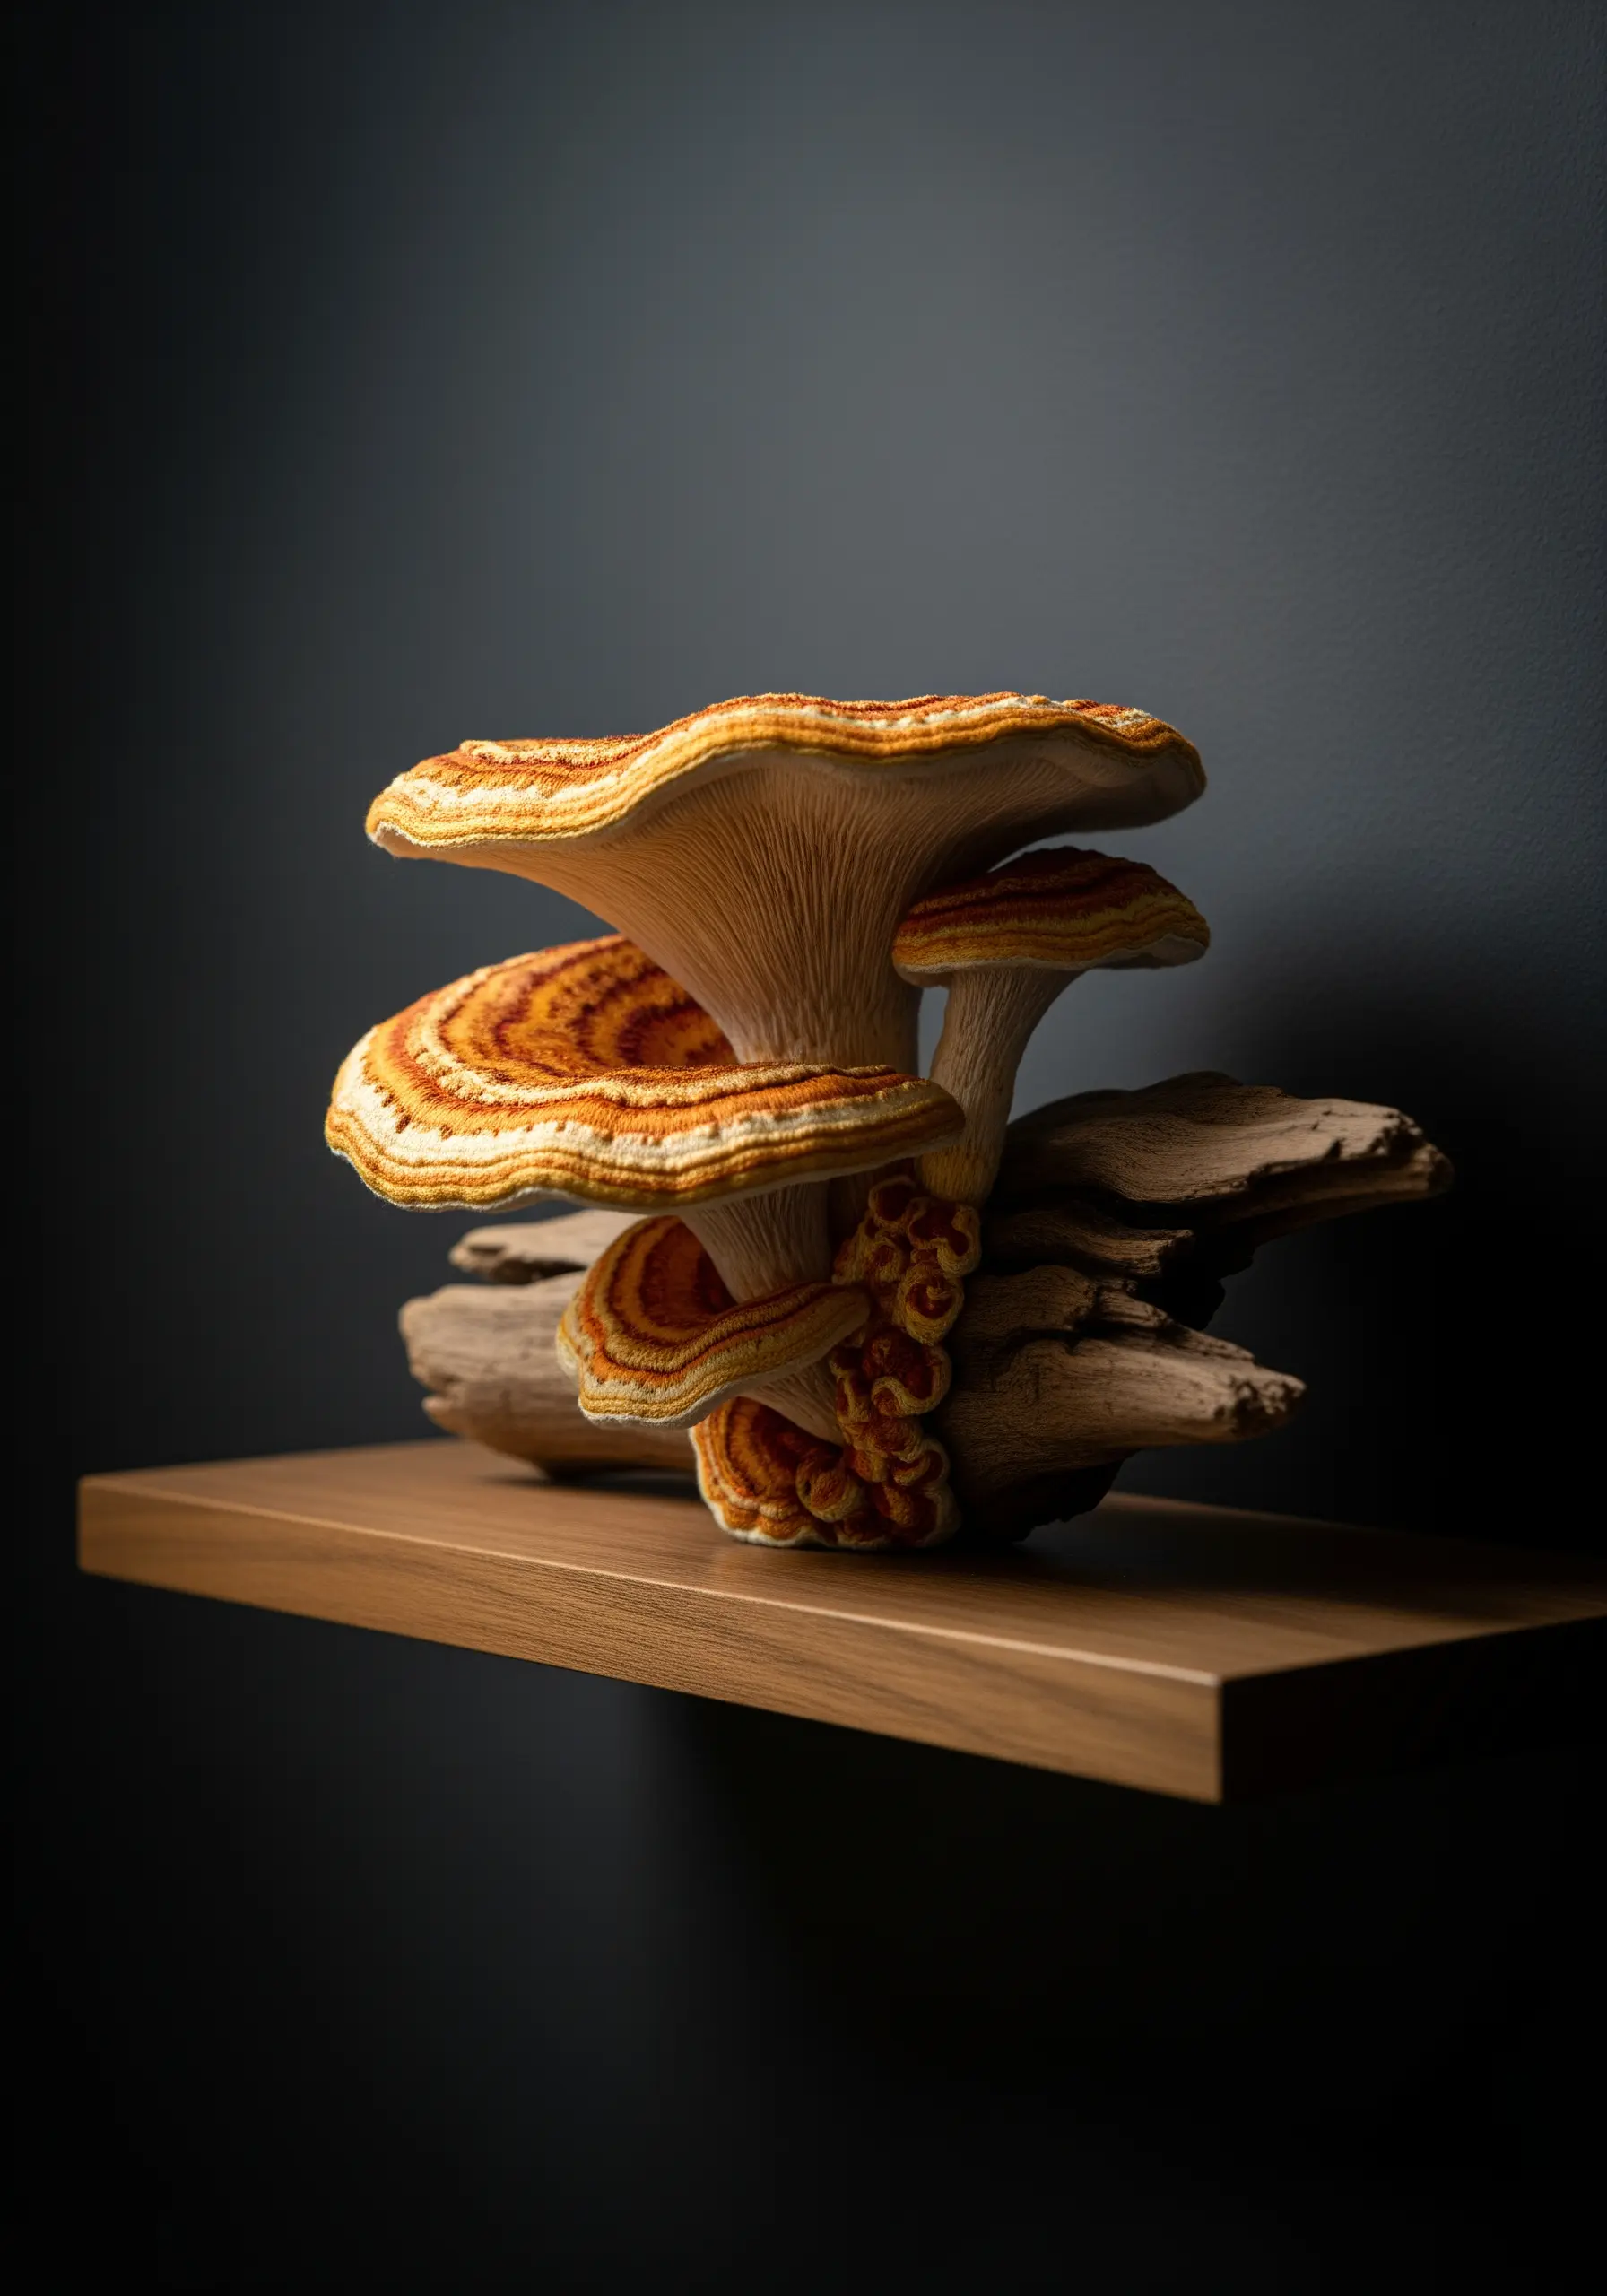
Achieve the undulating form of shelf fungus by using padded satin stitch over layers of felt or sacrificial stitches.
Work in a gradient of color, using long-and-short stitch with single strands of floss in ochre, orange, and cream to create soft, natural transitions.
For the delicate gills underneath, use tightly packed, radiating straight stitches in a pale beige.
This sculptural approach makes the piece feel like it’s growing directly from the surface.
4. Couch Yarn for Flowing Water Ripples
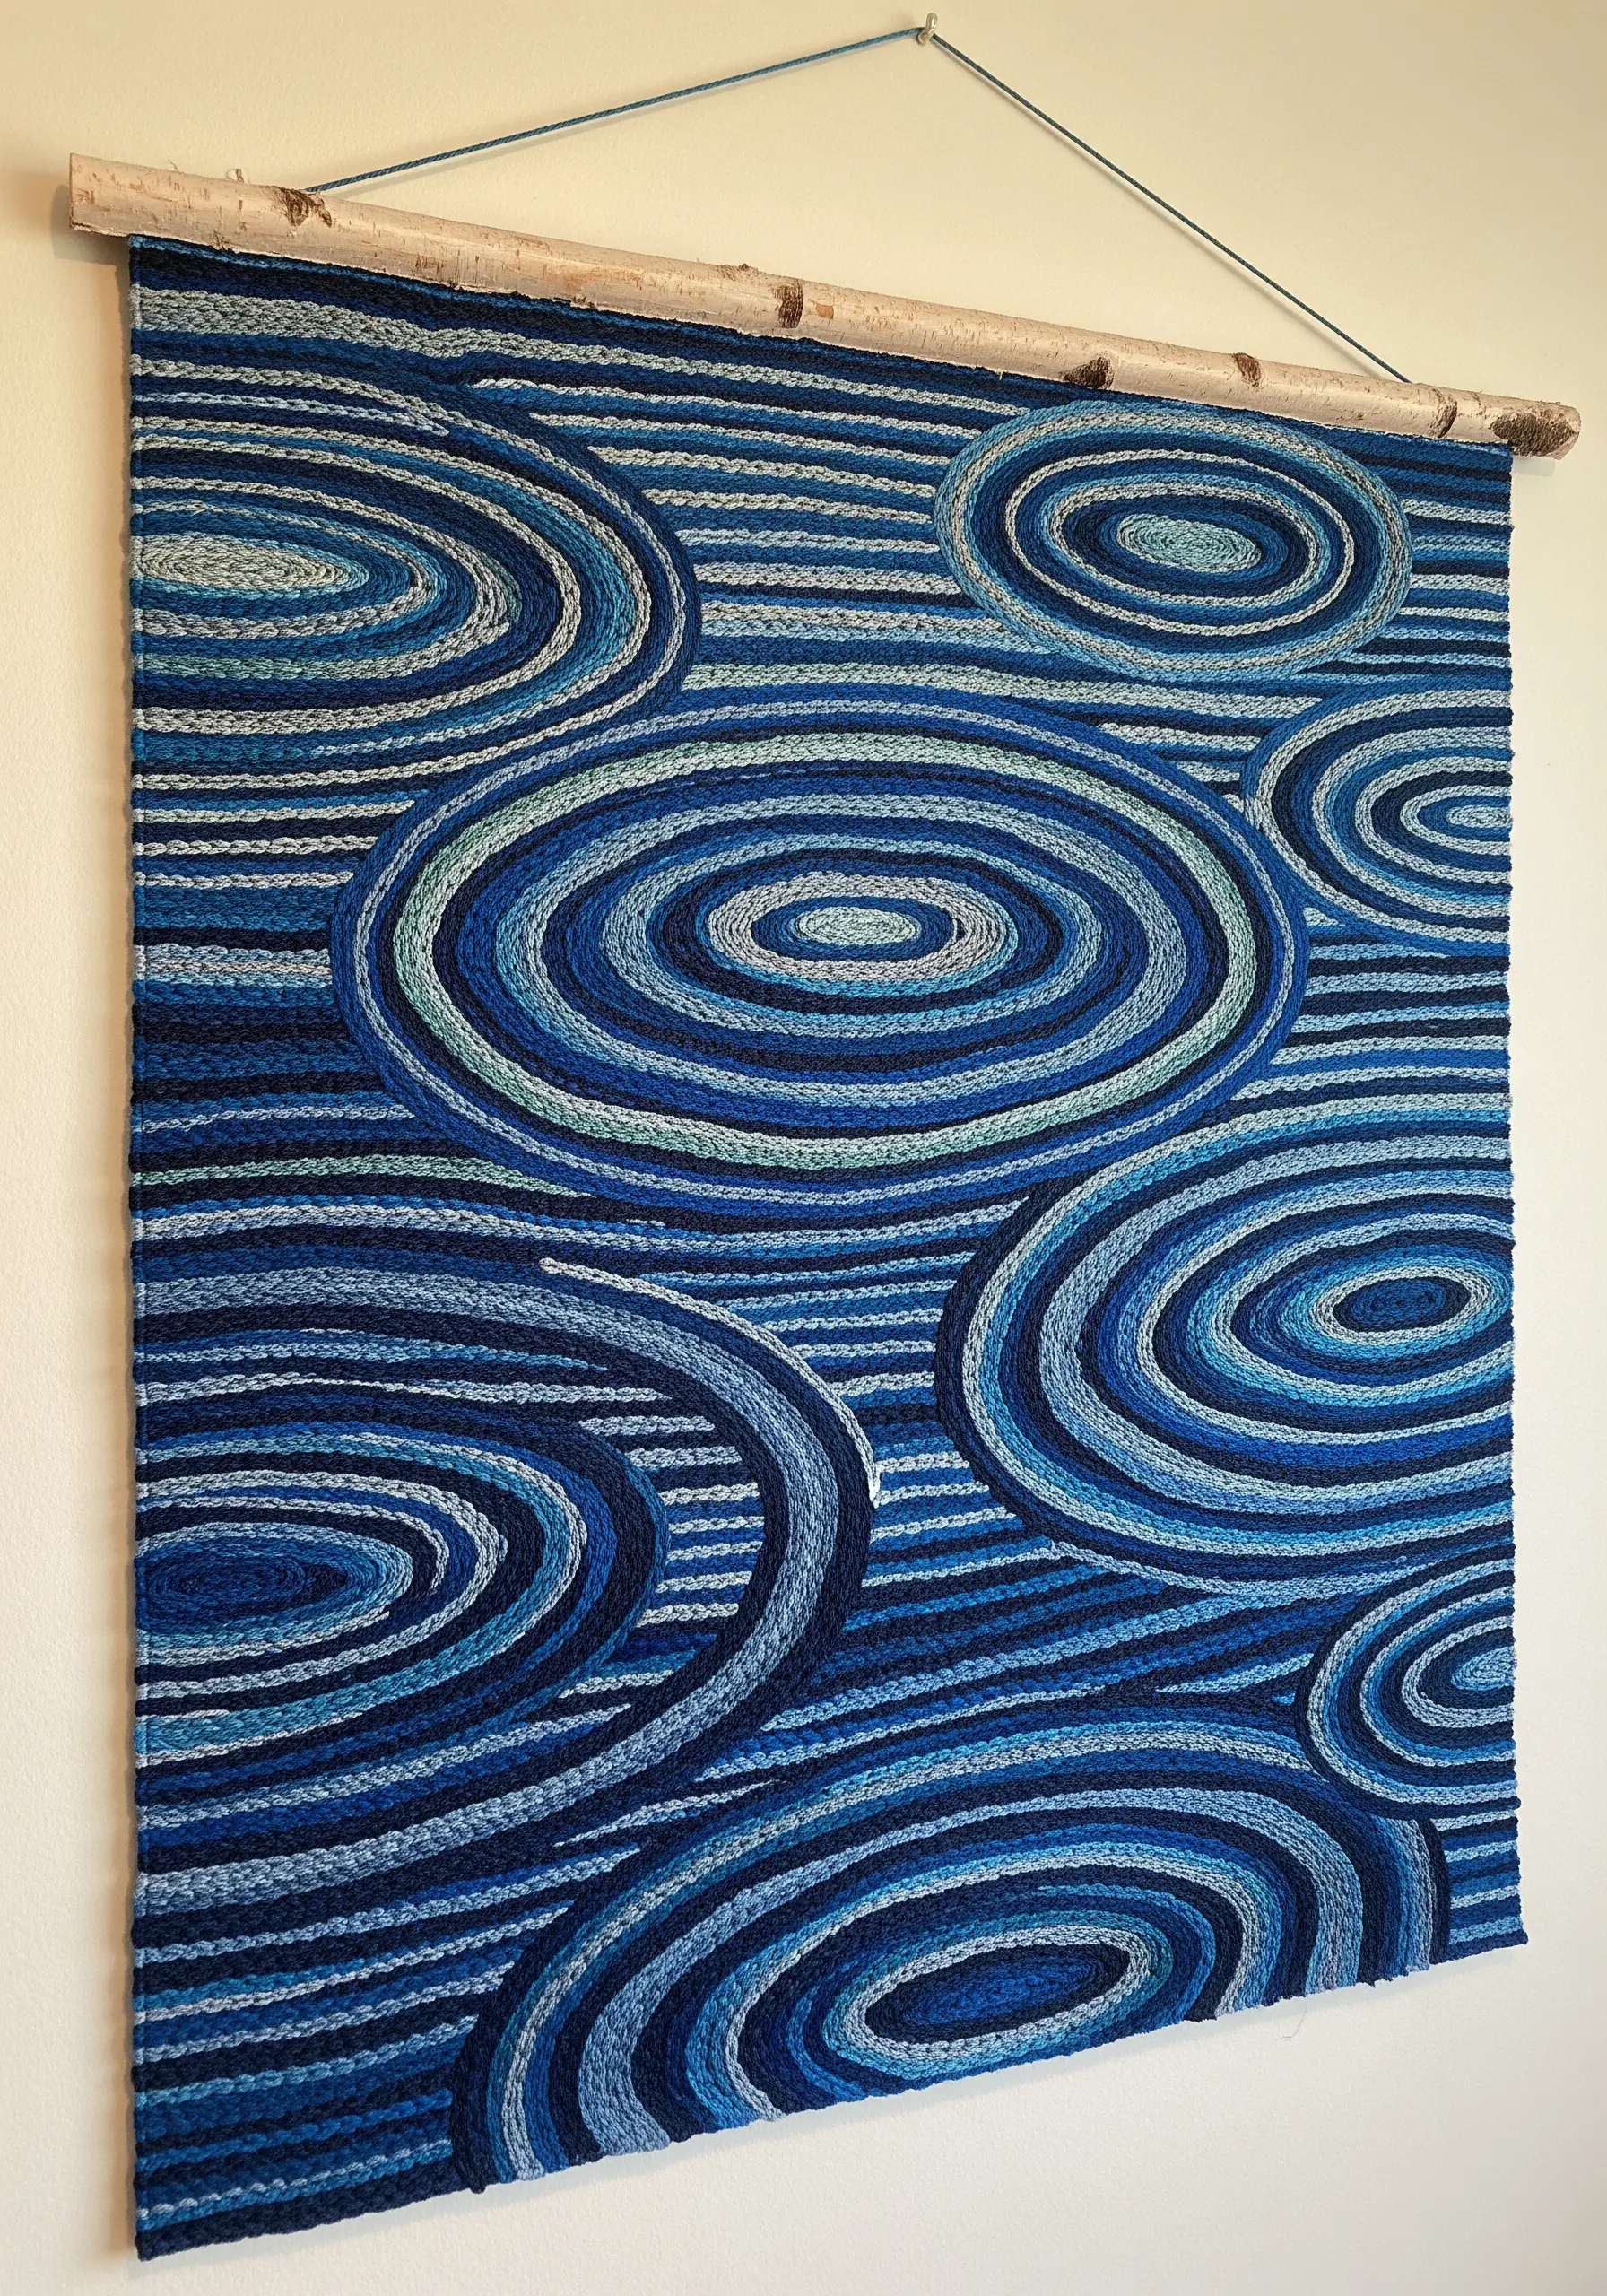
Instead of trying to fill large areas with satin stitch, define water ripples using couching.
Lay down thick variegated blue yarn or multiple strands of floss in concentric ovals and tack them in place with a thinner, contrasting thread.
This method creates clean, graphic lines, adds a lovely raised texture, and is much faster than traditional fill stitches.
The slight irregularity in the couched yarn mimics the organic movement of water perfectly.
5. Combine Beads and Thread for a Crystalline Geode
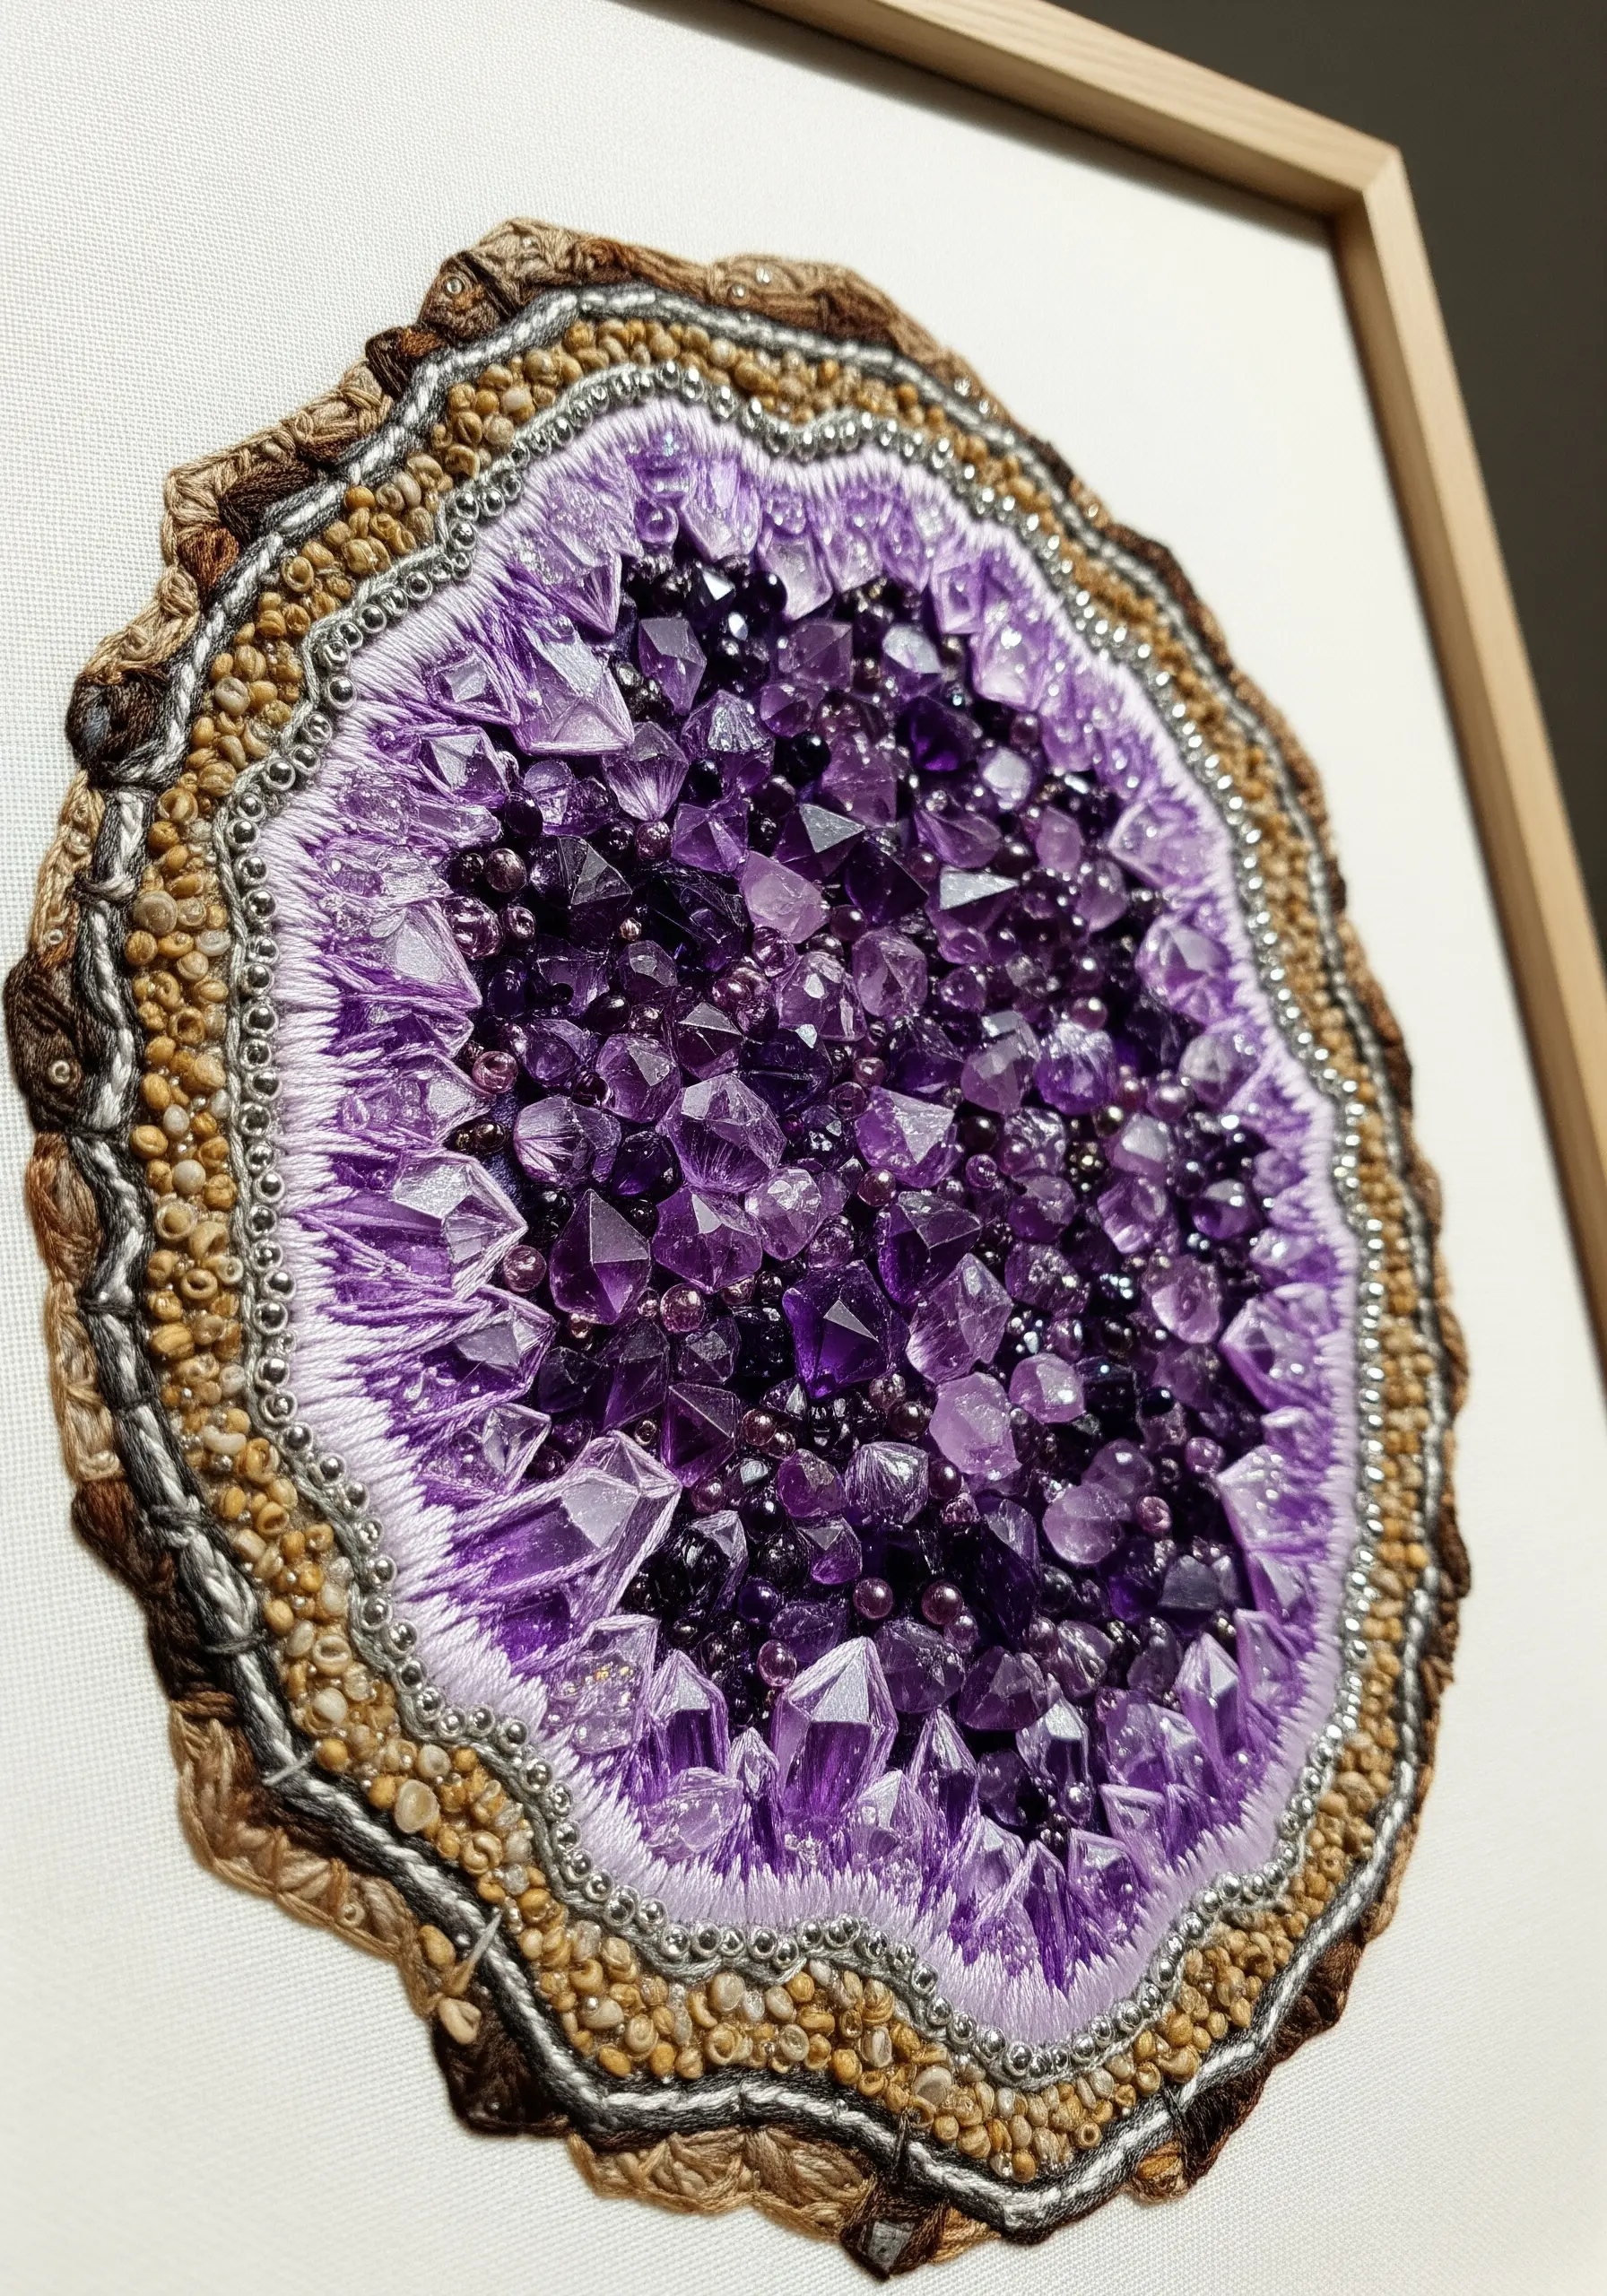
Translate the complex texture of a geode through mixed-media embroidery.
Use rows of brown and beige French knots for the rough outer crust, followed by a smooth border of silver-lined backstitch.
Fill the center with a base of satin stitch in shades of amethyst, then sew on faceted beads and crystals of various sizes to catch the light.
This blend of soft thread and hard, reflective surfaces is what gives the piece its geological authenticity.
6. Create Parched Earth with Padded Satin Stitch
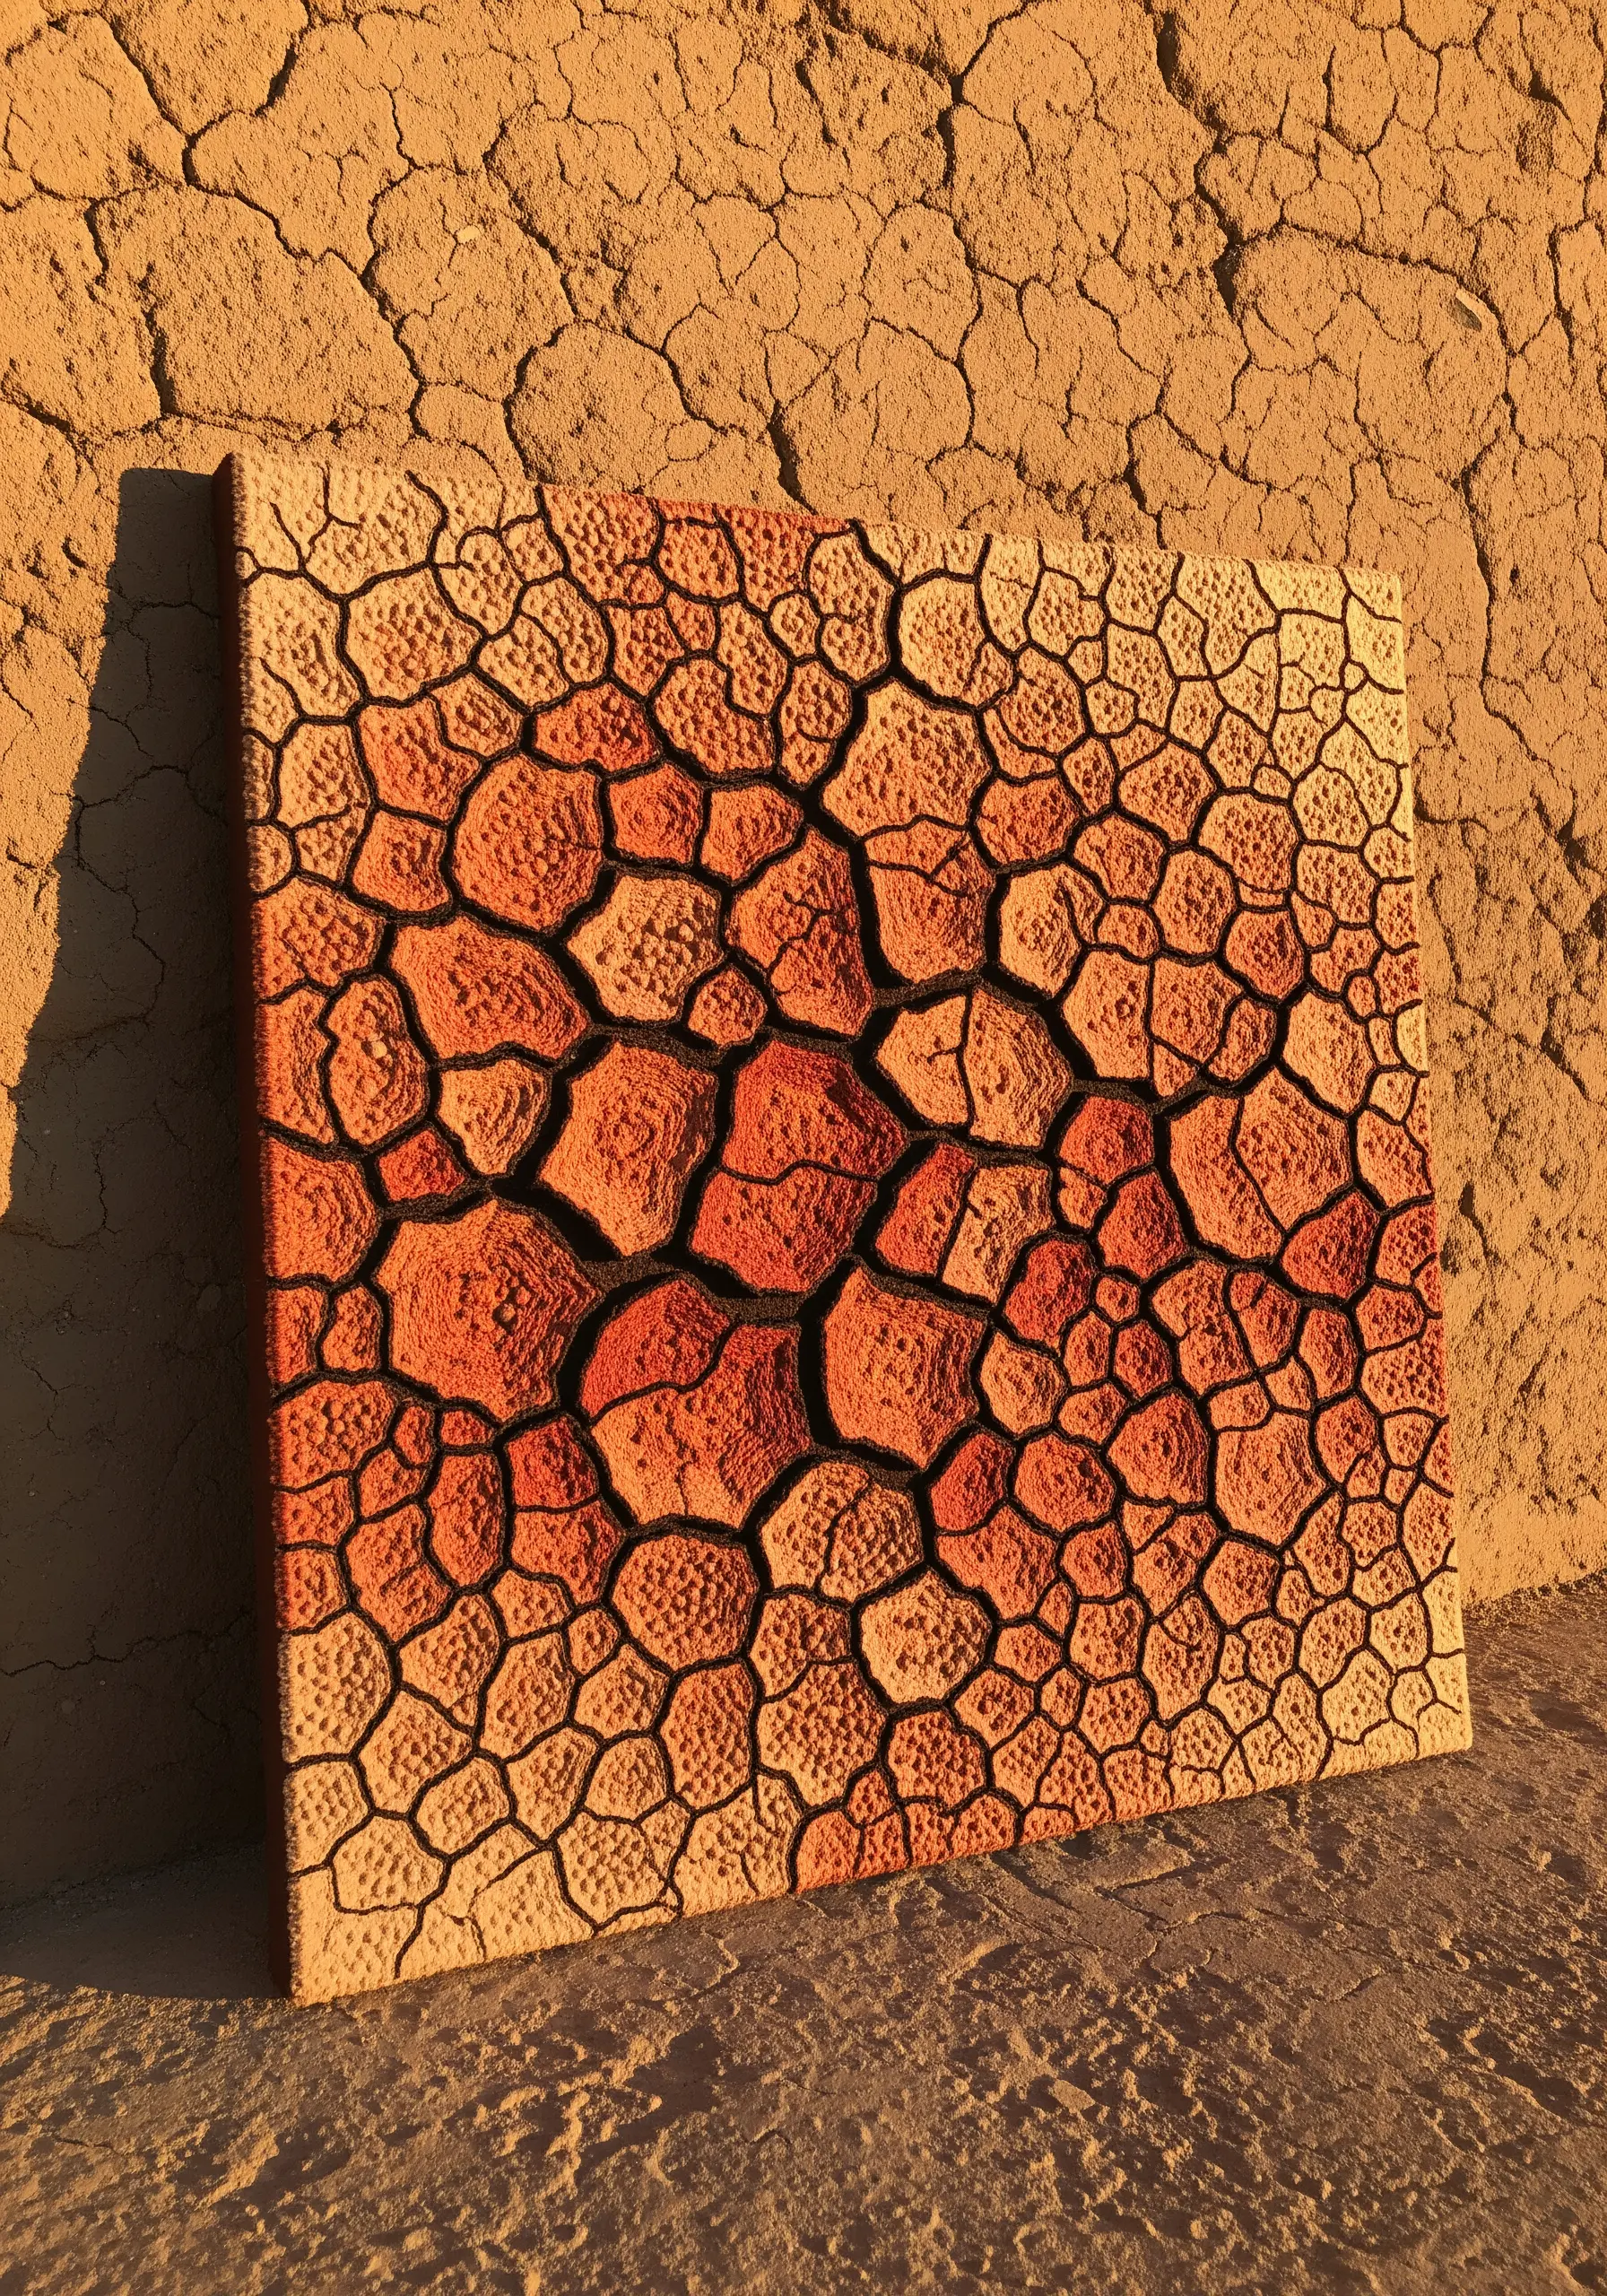
To mimic the texture of cracked desert earth, use raised or padded satin stitch for each segment.
Draw your crackle pattern onto the fabric, then fill each shape with a layer of felt before covering it with directional satin stitch.
Use a gradient of terracotta, rust, and sand-colored threads to enhance the sun-baked effect.
The unstitched fabric between the padded shapes becomes the deep, shadowy cracks, creating incredible depth.
7. Stitch Delicate Hoarfrost with Feather Stitch
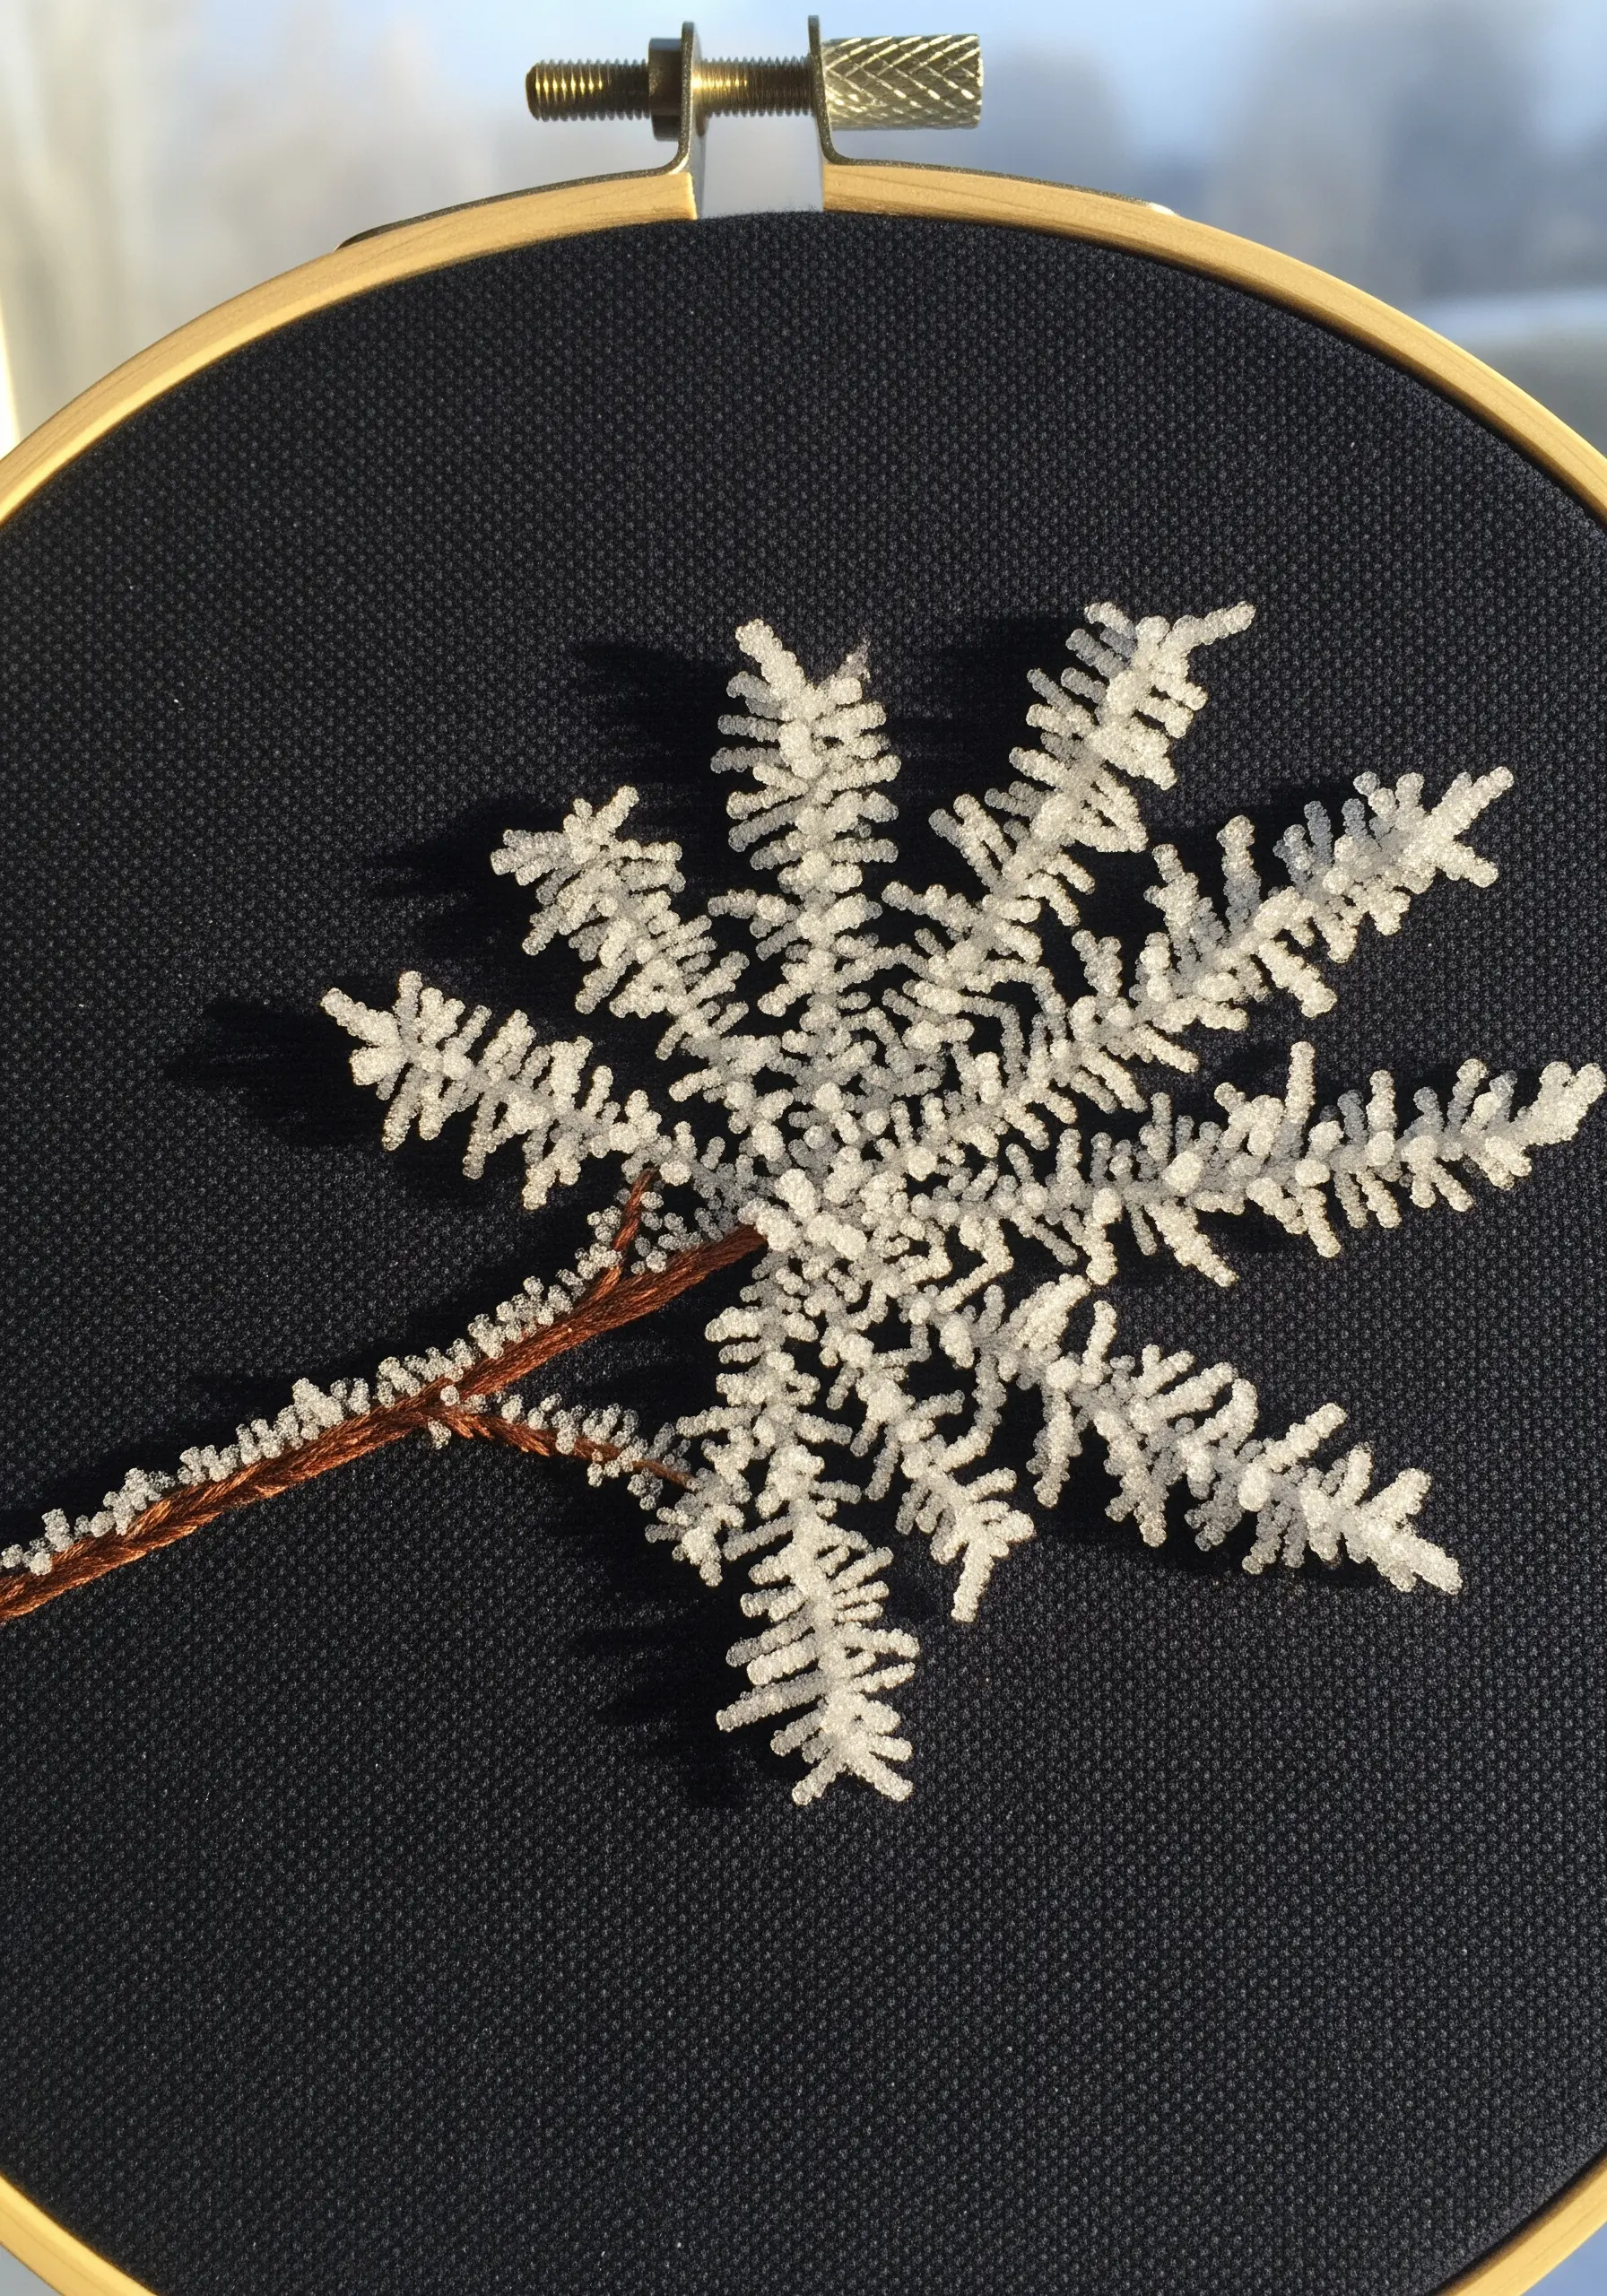
Capture the crystalline structure of frost using the feather stitch or detached chain stitches worked in a fine, fuzzy thread.
A white mohair or specialty textured floss on a dark background creates a stark, beautiful contrast that emphasizes the delicate texture.
Work the stitches outwards from a central stem, keeping them light and airy to mimic the way ice crystals form in nature.
The key is to avoid dense packing, allowing the background fabric to show through.
8. Construct a Freestanding Bird’s Nest

Create a sculptural bird’s nest by working on a water-soluble stabilizer instead of fabric.
Coil and couch various natural-toned threads like linen, jute, and raffia into a nest shape over a bowl or form.
Once you have a sturdy, interwoven structure, dissolve the stabilizer to release a freestanding, three-dimensional nest.
You can then add satin-stitched eggs or other small elements inside for a truly unique piece.
9. Layer Beads and Knots for a Sandy Shoreline
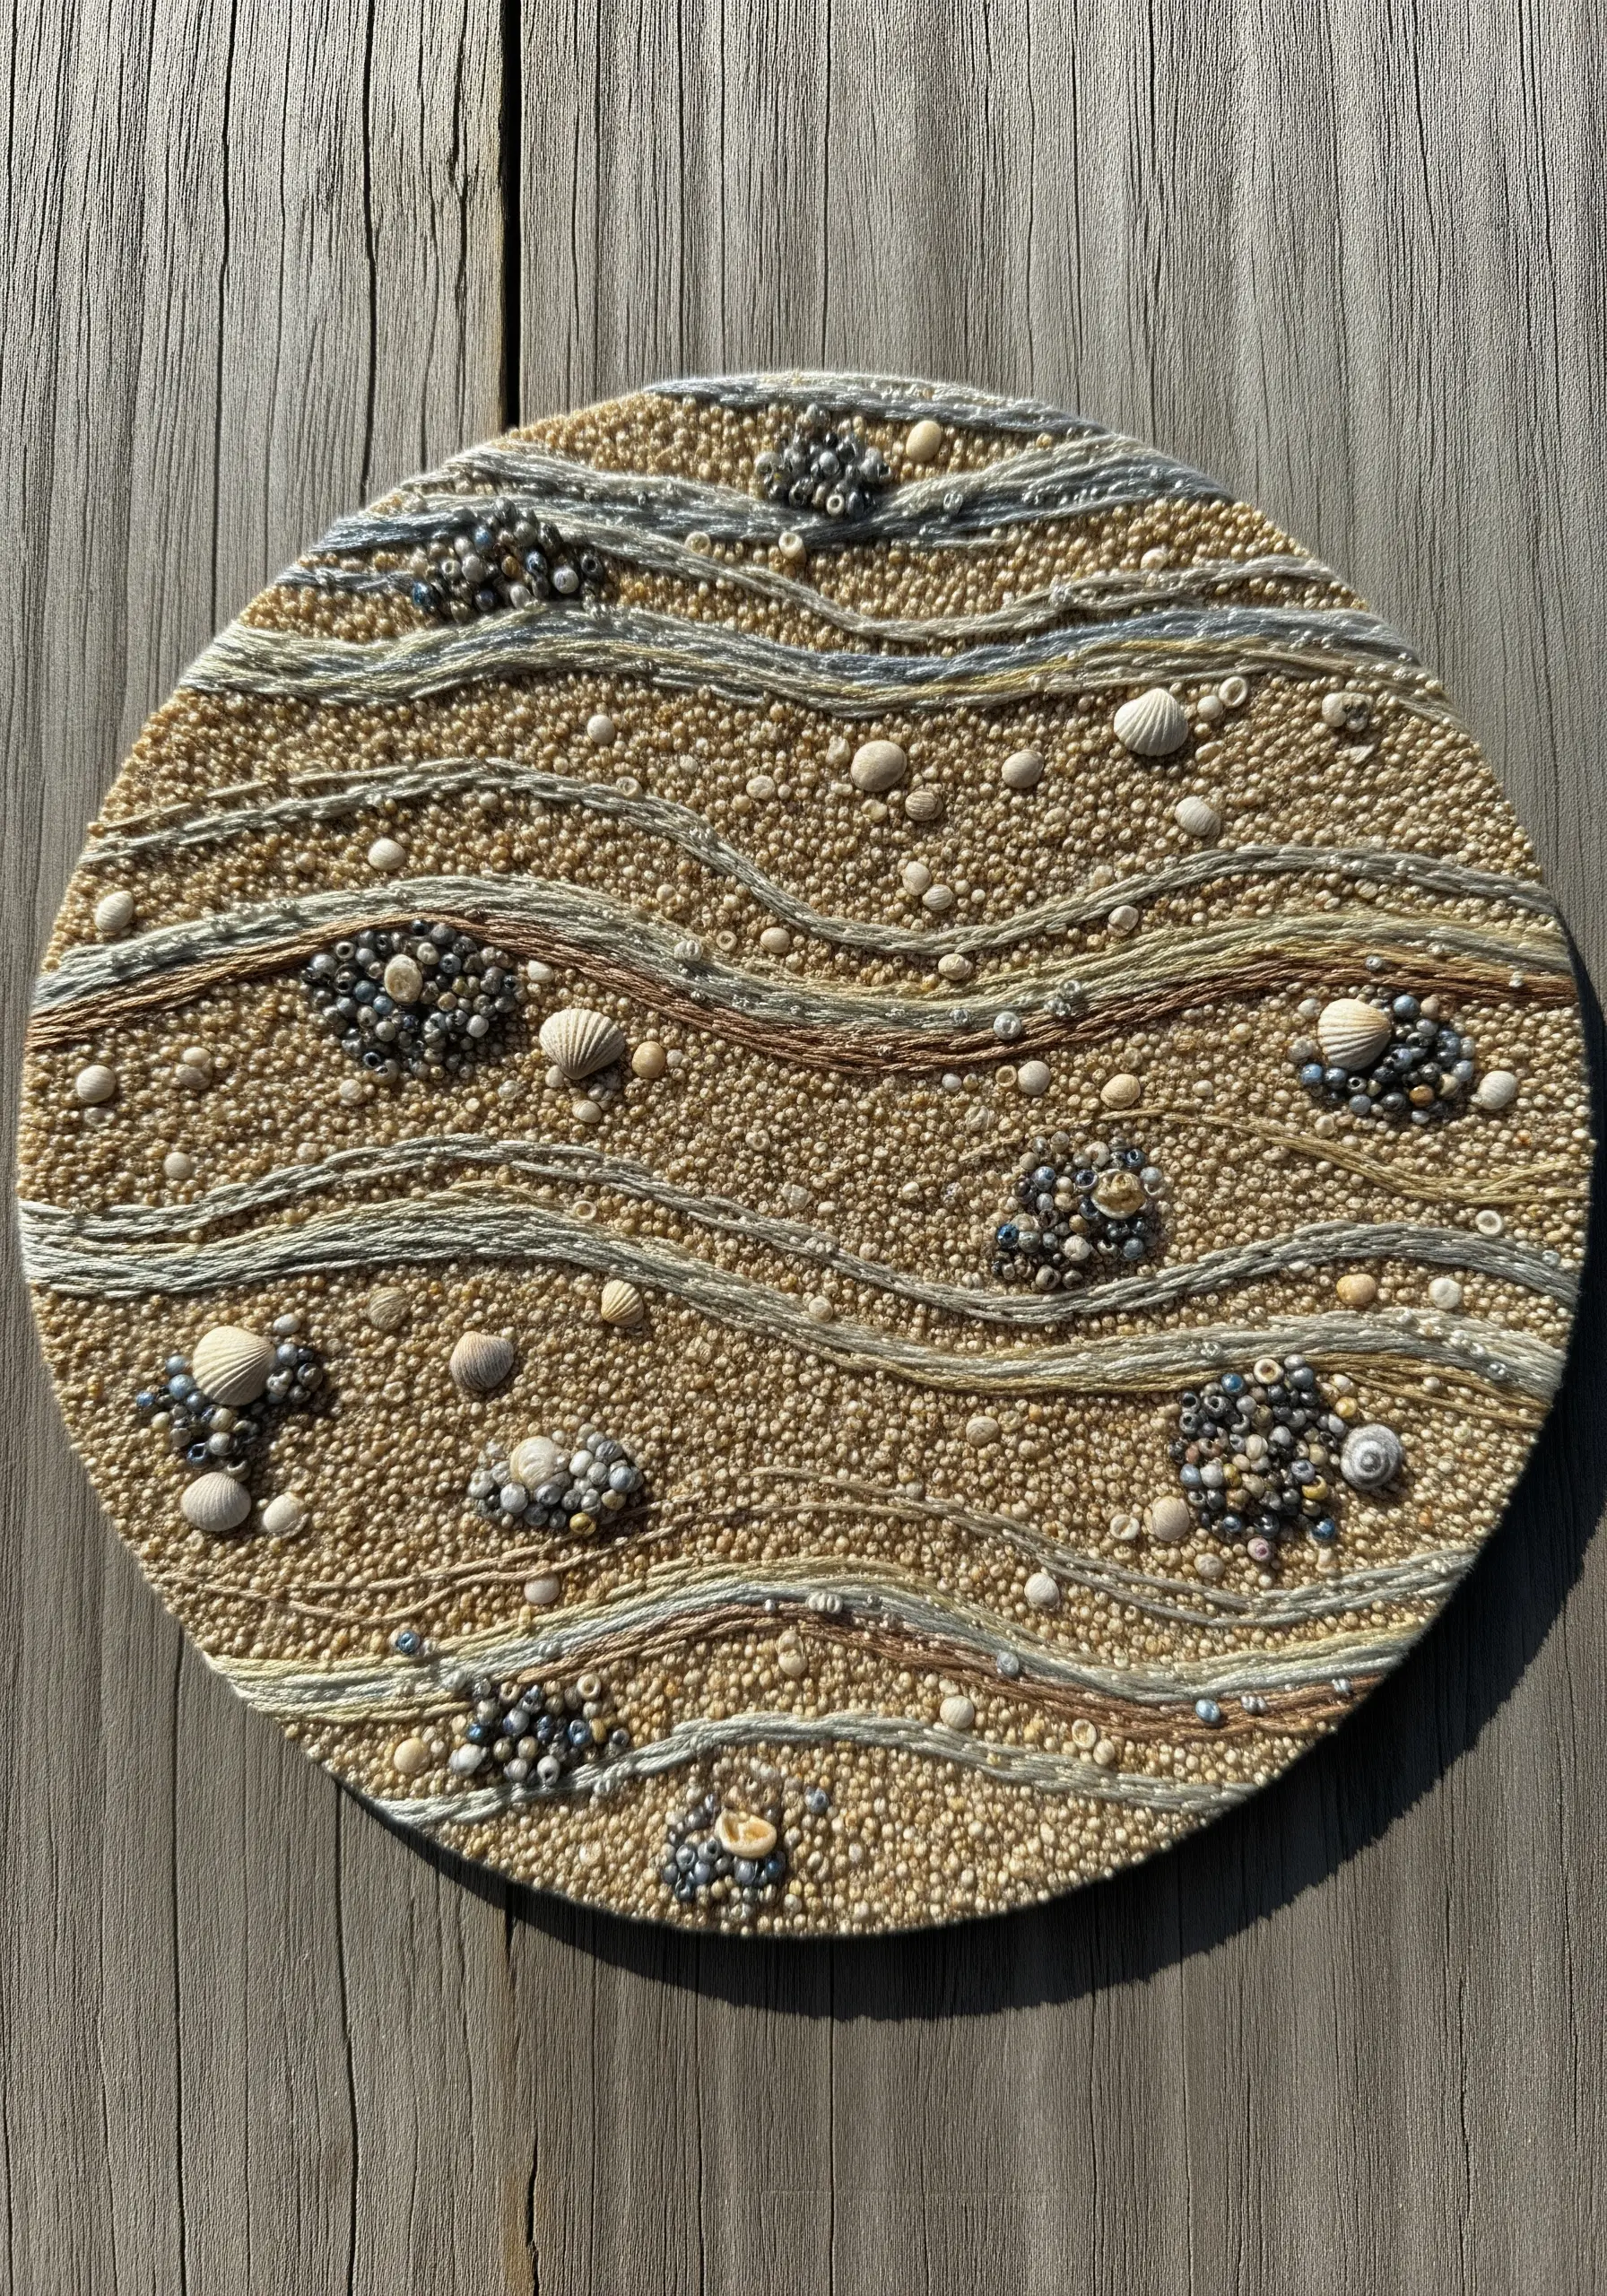
Build the texture of a pebbled beach by layering different elements.
Start with a dense background of seed stitches in a sandy beige to represent fine grains of sand.
Next, add clusters of French knots and sew on various seed beads and tiny shells to create pockets of pebbles and debris.
Finally, couch lines of variegated blue and white thread to represent the gentle waves washing ashore.
10. Appliqué Fabric for Realistic Autumn Leaves
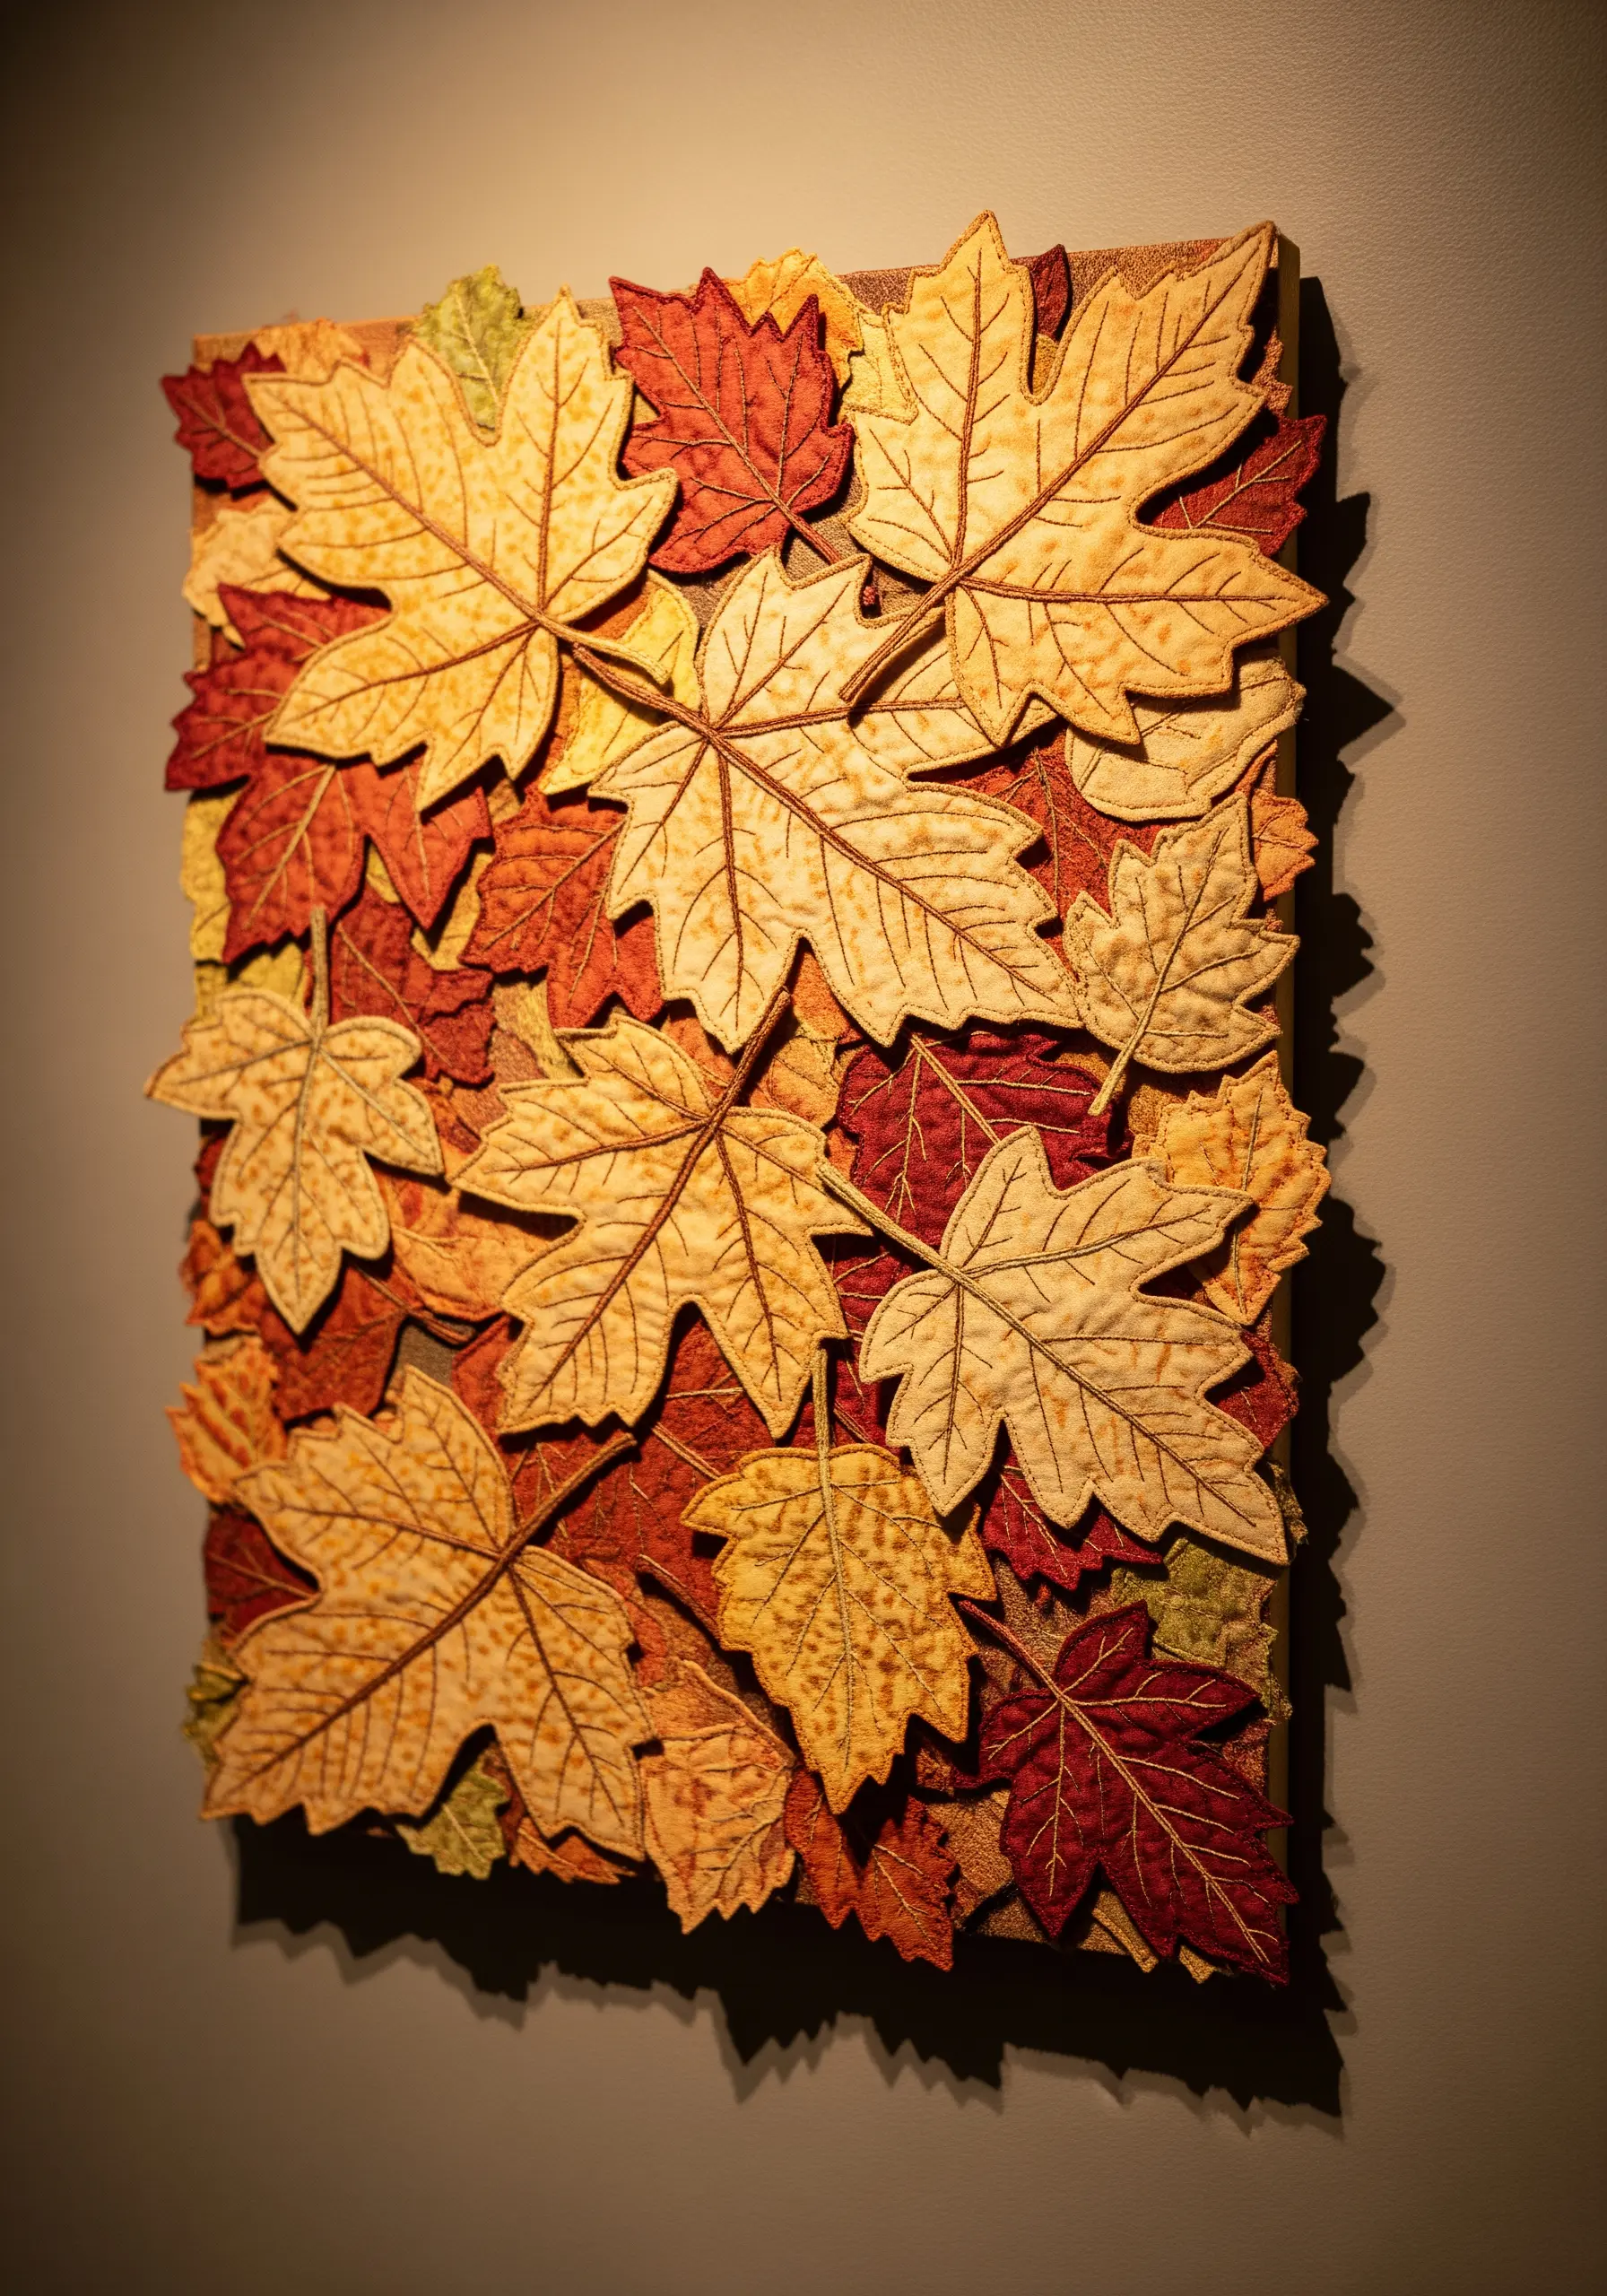
Achieve rich color and texture for fall leaves by combining fabric appliqué with simple stitch work.
Cut leaf shapes from various cotton prints, linens, and felts in autumnal shades.
Layer them on your base fabric and use a simple backstitch or running stitch in a contrasting thread to add the veins.
This method allows you to build a dense, layered composition quickly and is an excellent way to use beautiful fabric scraps.
11. Mimic Wood Grain with Blended Straight Stitches
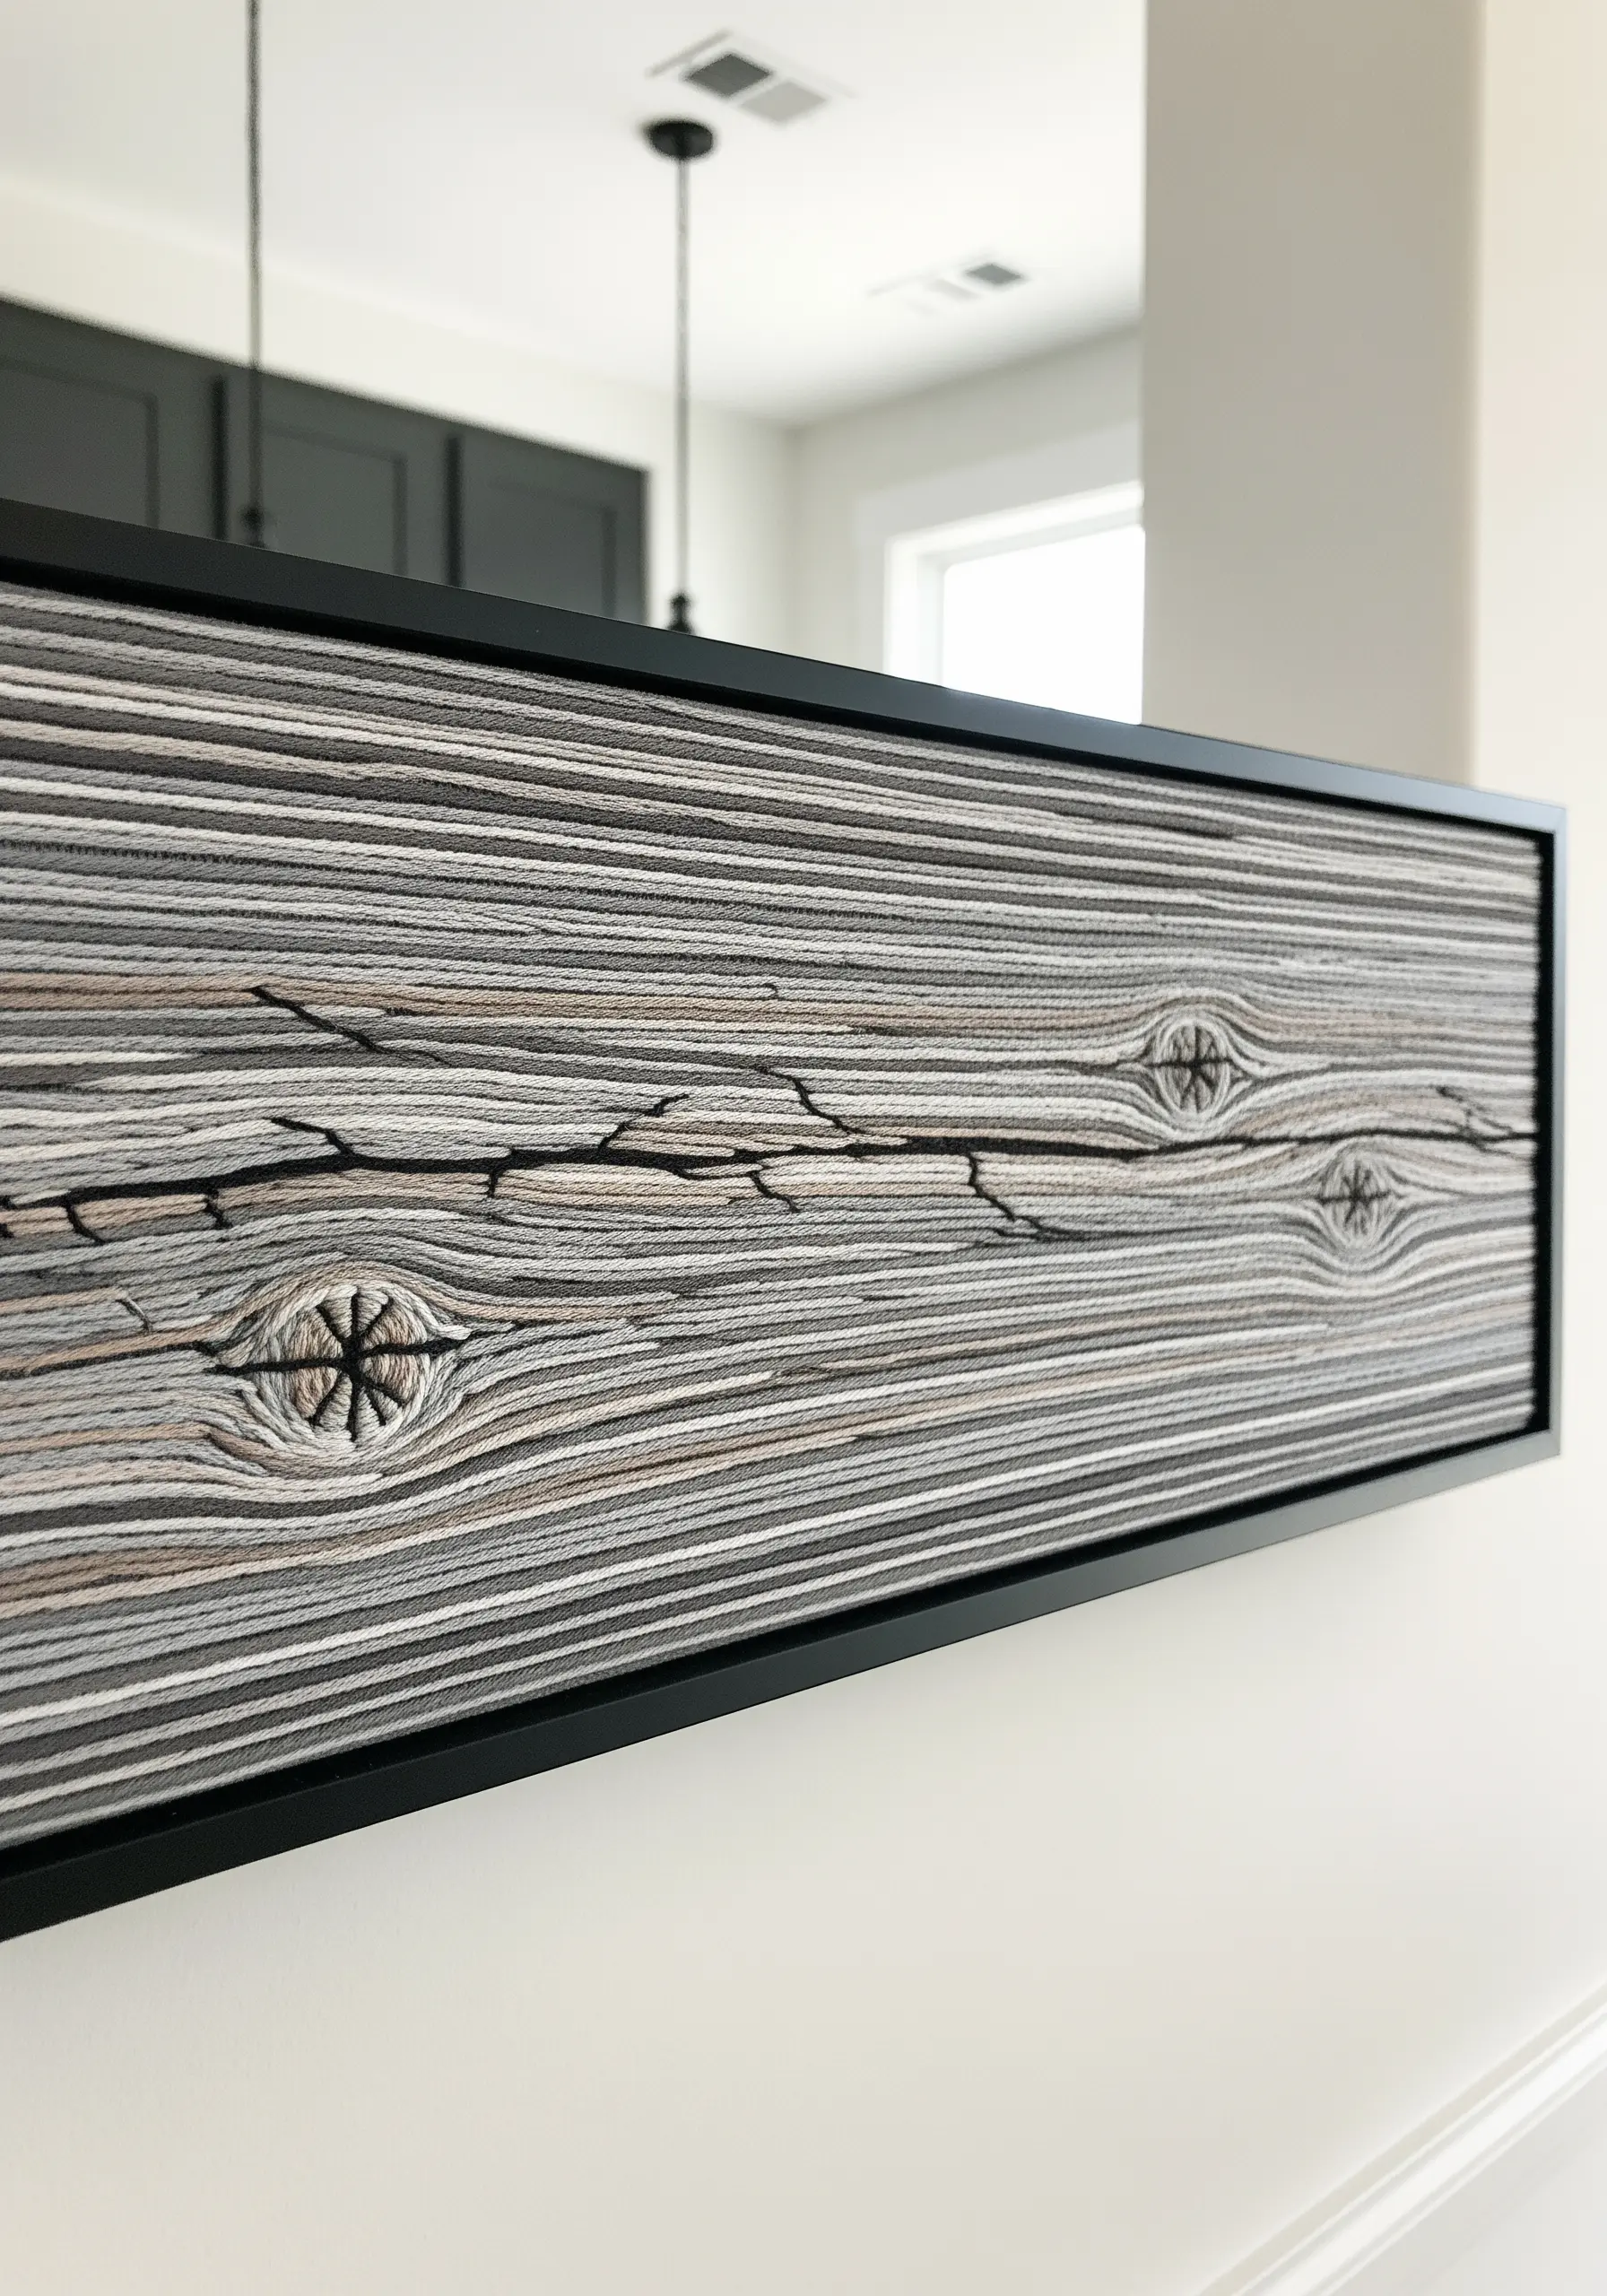
Replicate the subtle texture of wood grain with long, parallel straight stitches.
Use a blend of three to four similar neutral tones—like grey, taupe, and cream—stitching with single strands to create soft, natural variations.
For the wood knots, use a radial satin stitch or a tight spiral of stem stitches in a darker shade.
Ensure your stitches follow a gentle, organic wave to avoid a perfectly straight, unnatural look.
12. Capture Tree Rings with Spiraled Couching

Illustrate the history of a tree by couching a thick cord or yarn in a continuous spiral.
Start from the center and work your way out, tacking the cord down with a finer thread.
Switching between shades of brown yarn as you expand the spiral creates the distinct growth rings.
Frame the piece with a jagged border of turkey work and French knots to simulate rough bark and moss.
13. Add Resin for a Liquid Honey Effect
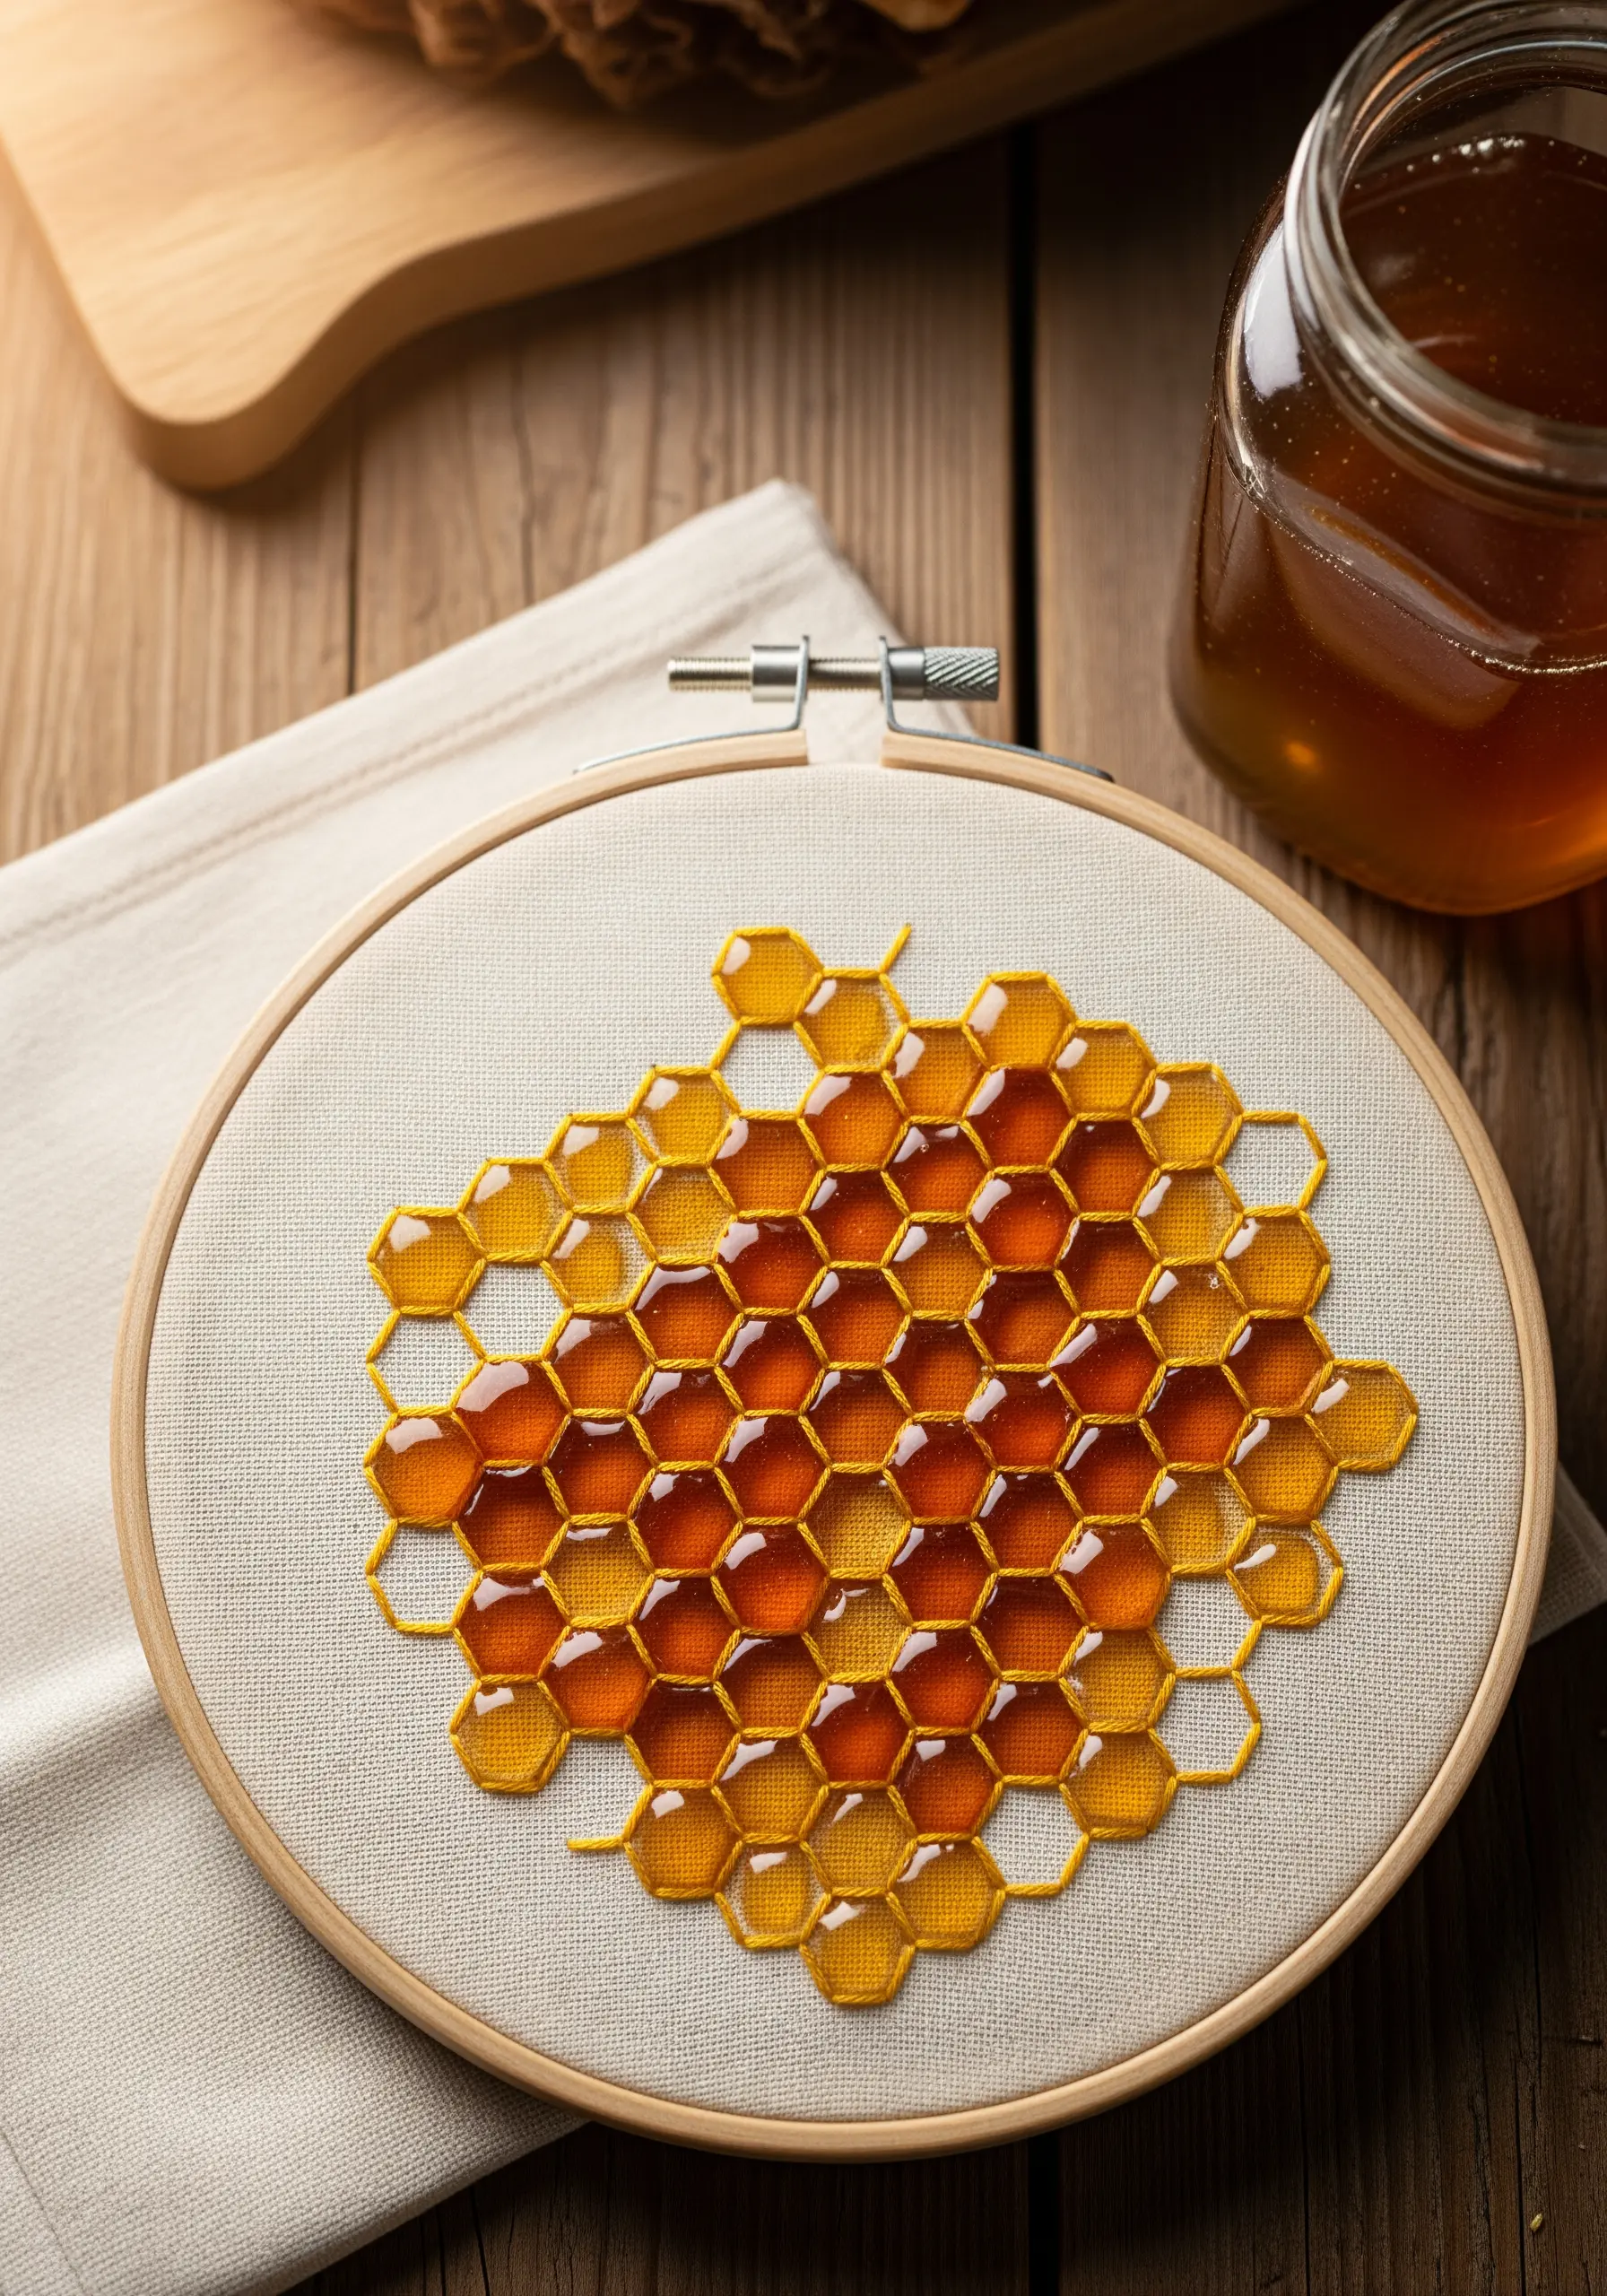
To create the glossy, transparent look of honey, combine traditional stitching with a modern material.
First, outline your honeycomb pattern on light-colored linen using a simple backstitch in a golden yellow thread.
Once the stitching is complete, carefully fill individual cells with a clear, dimensional medium like UV resin or glossy fabric paint.
This mixed-media approach gives you an unparalleled level of realism and liquid shine.
14. Sculpt Lichen with Dimensional Beading
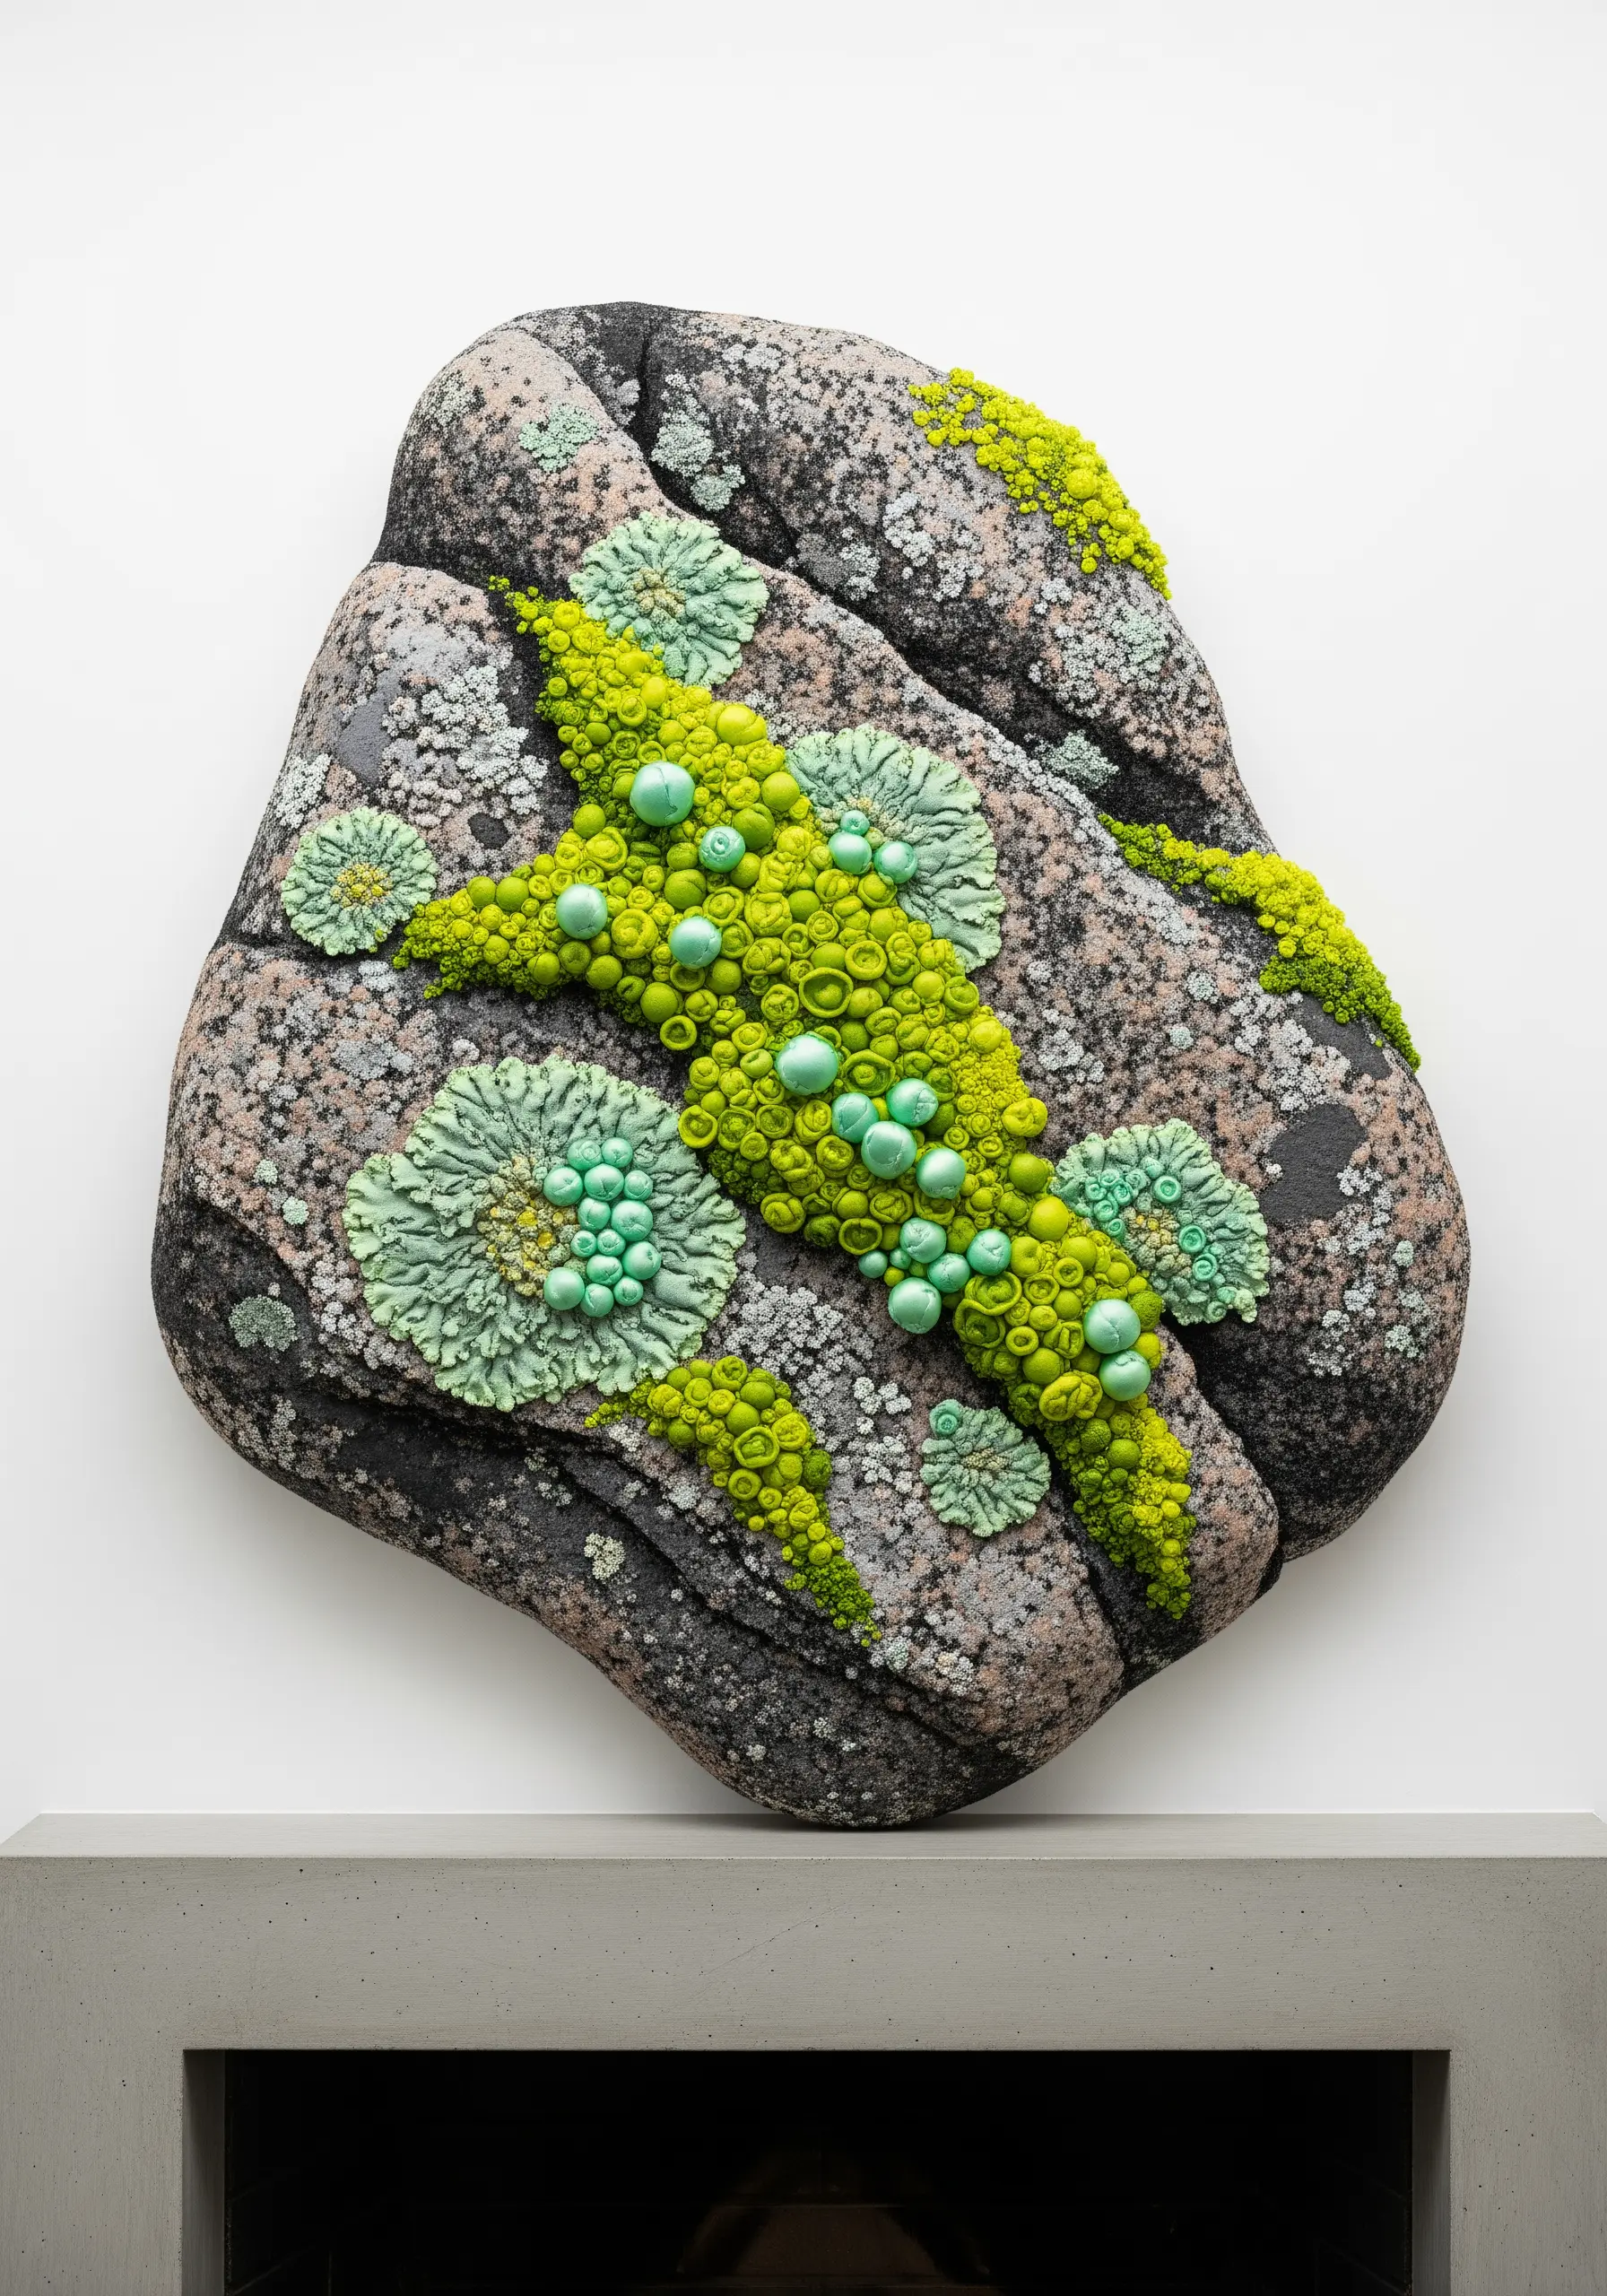
Recreate the complex, vibrant texture of rock lichen using sculptural beading techniques.
On a base of grey felt or densely stitched fabric, build up clusters of seed beads in brilliant greens and teals.
Vary the size, shape, and finish of your beads—mixing matte, shiny, and bugle beads—to create an organic, multi-faceted surface.
This method provides a rich, tactile quality that thread alone cannot achieve.
15. Define Form with Directional Straight Stitch
You don’t always need complex stitches for realistic texture; sometimes, direction is everything.
To create the delicate gills of a mushroom, use hundreds of tightly packed, radiating straight stitches.
The uniform direction and density of the stitches create a texture defined by light and shadow.
This minimalist approach is incredibly effective, relying on precision and thread tension to build form.
16. Paint a Feather with Long-and-Short Stitch
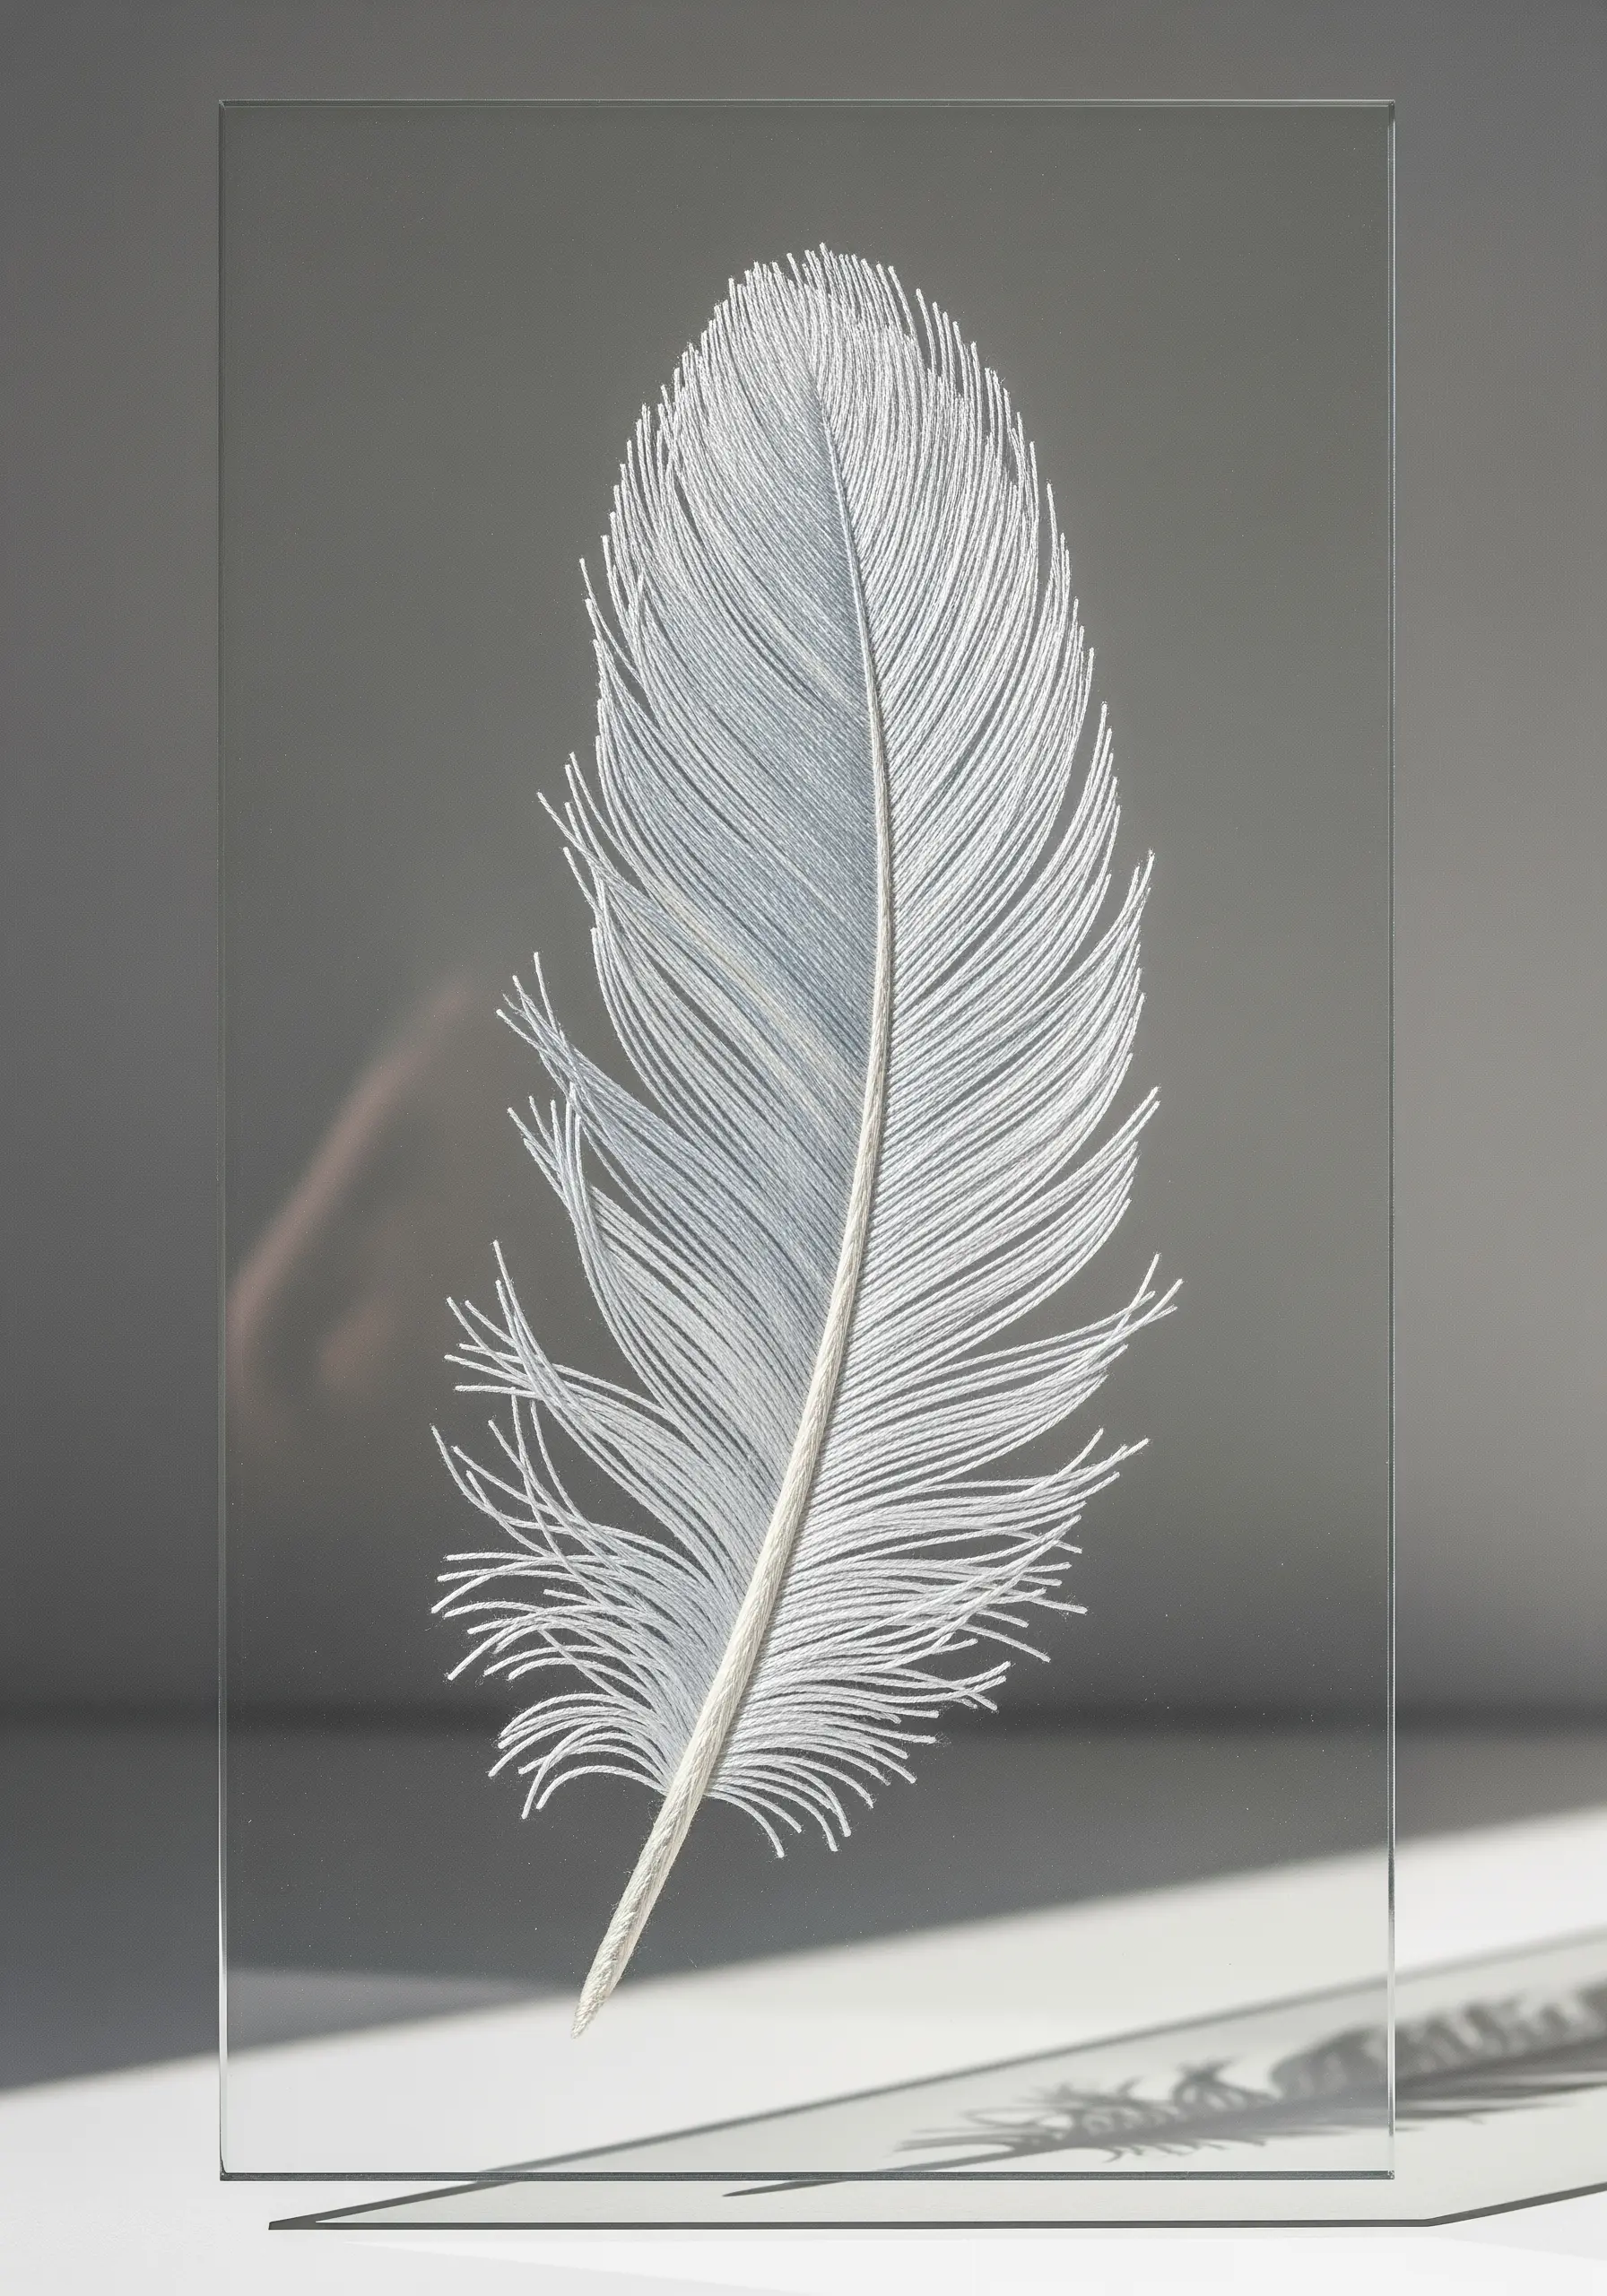
Achieve the weightless quality of a feather with disciplined long-and-short stitch, also known as thread painting.
Use a single strand of white or pale grey floss and work long, angled stitches outward from a central shaft.
Blend your stitches seamlessly to create a soft, continuous surface without harsh lines.
Stitching on a transparent or dark surface, like this glass panel, enhances the feather’s delicate, ethereal quality, making it a perfect minimal wall piece.
17. Weave Sea Foam with Chunky Yarn Knots
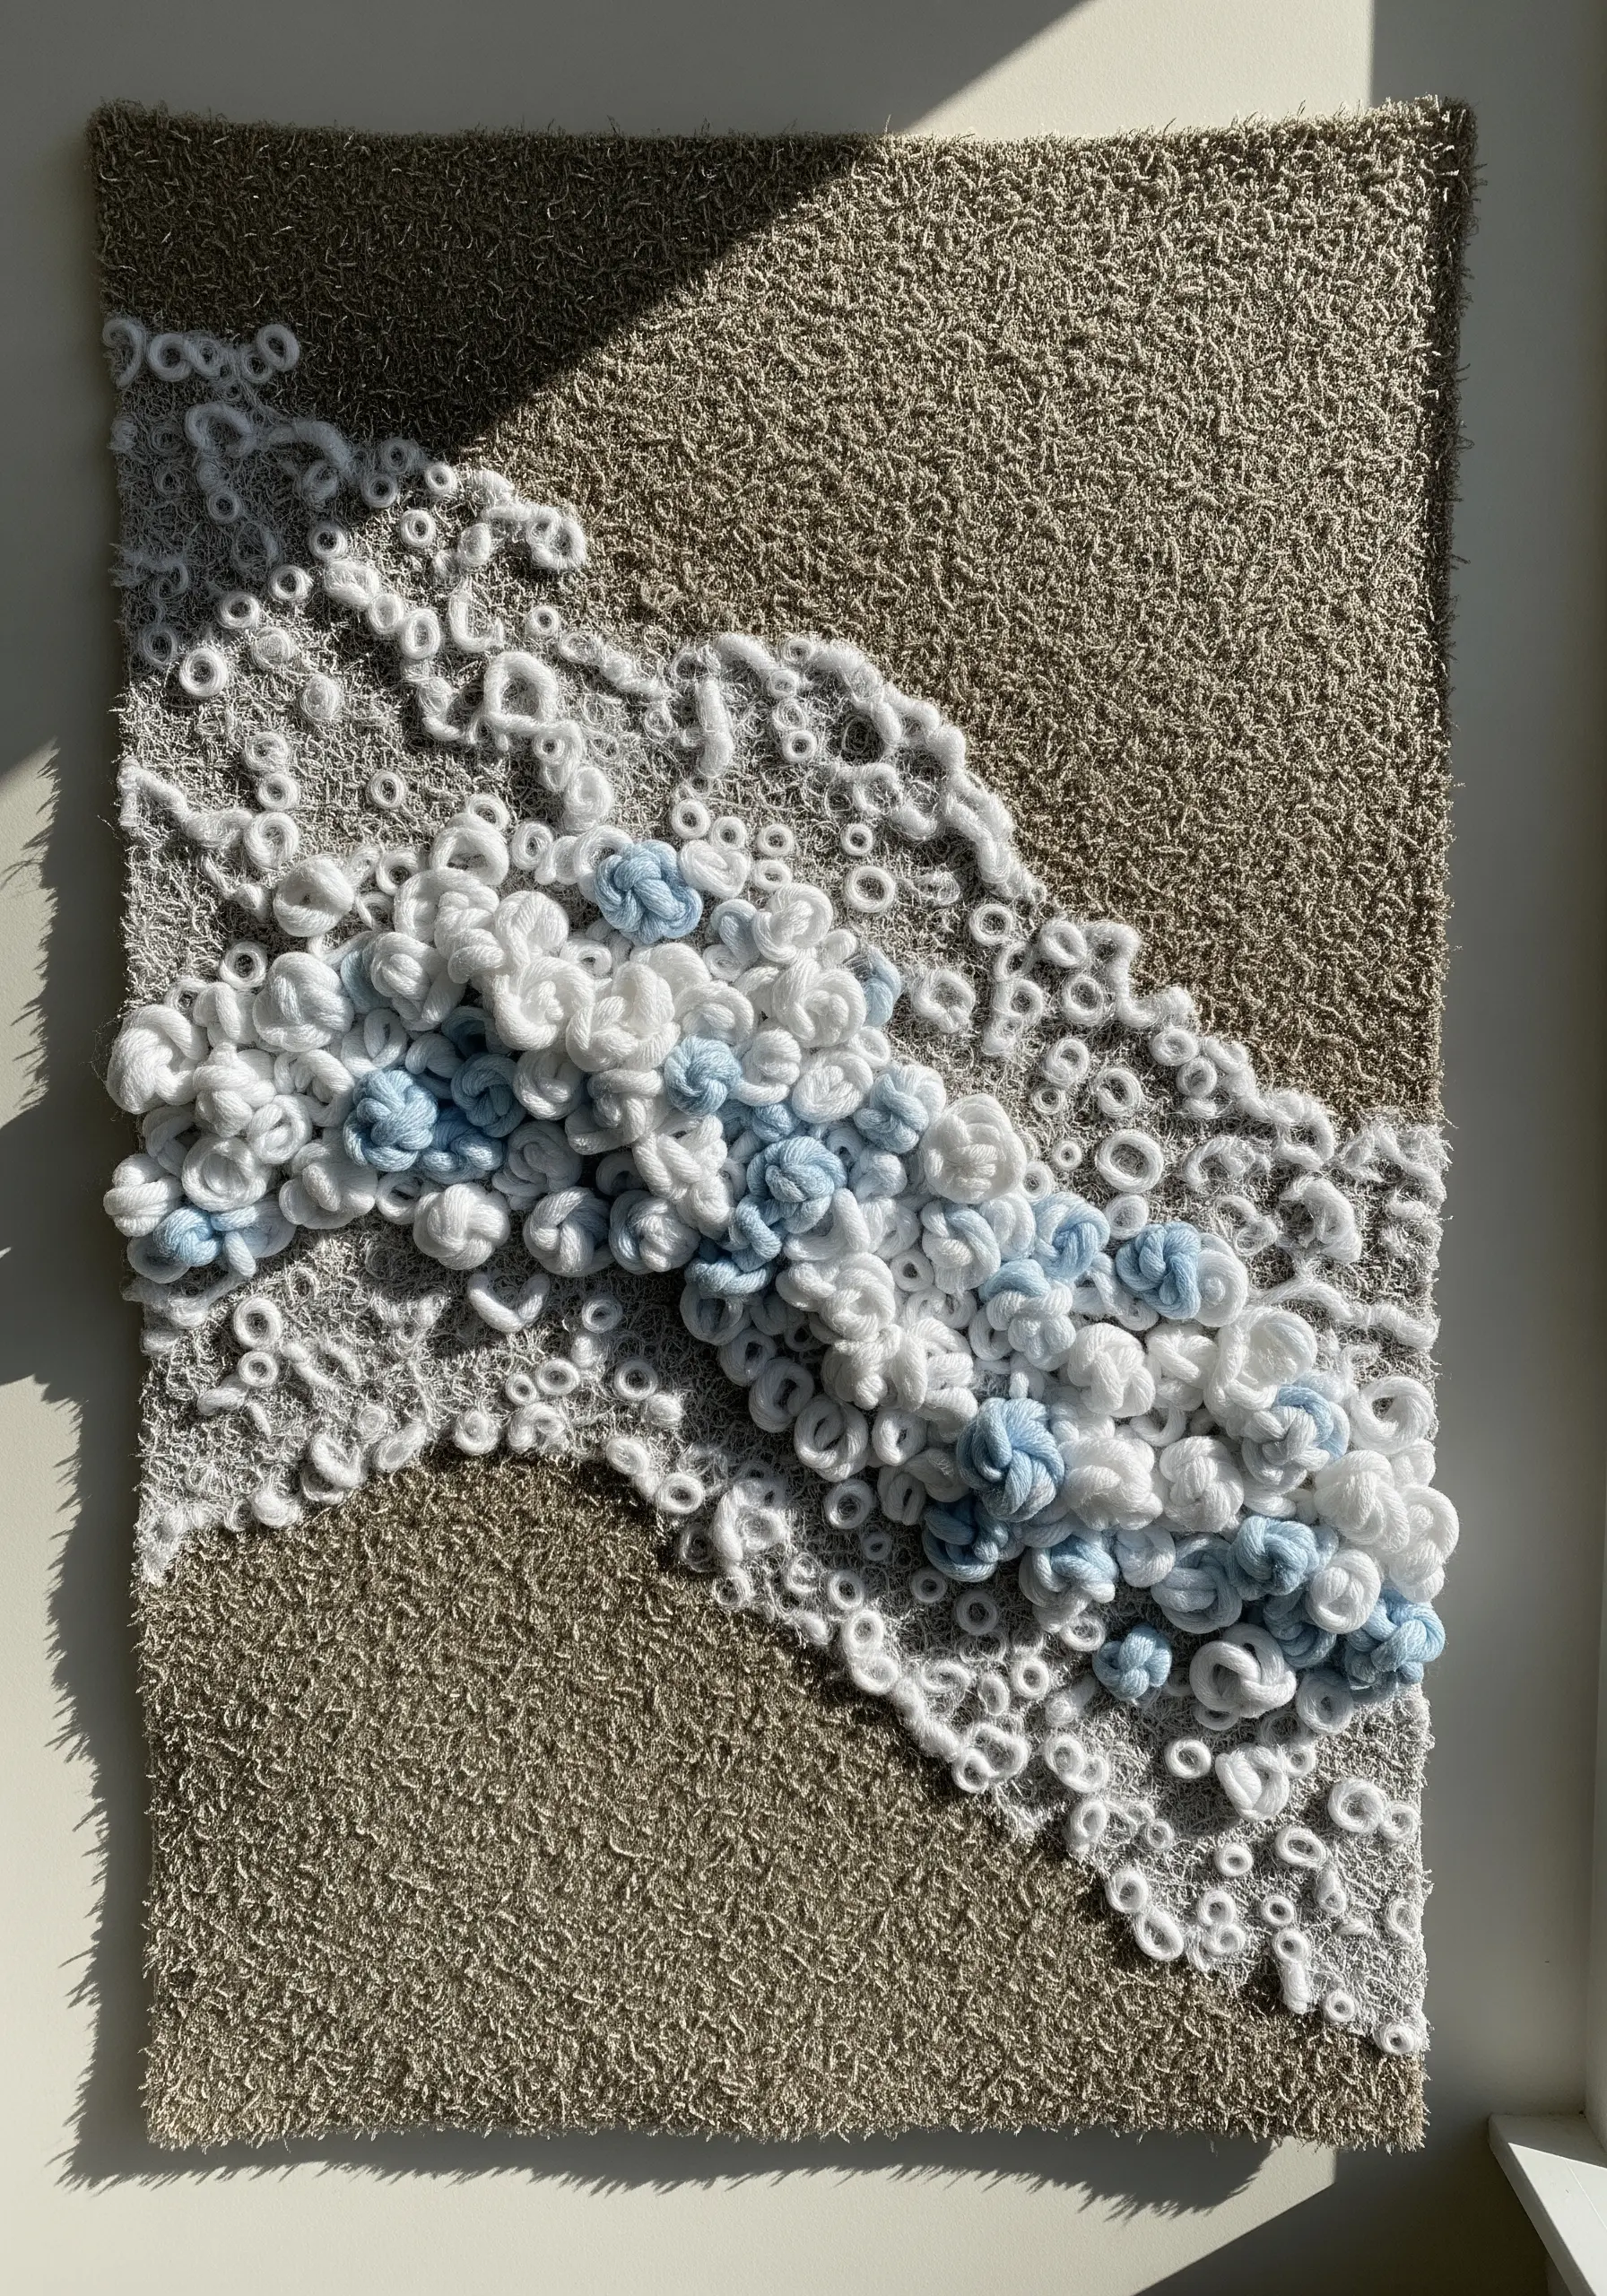
Capture the frothy, chaotic texture of sea foam by working with chunky, soft yarn.
Create a dense background with needle punching or tight French knots for the wet sand.
For the foam, use a combination of high-pile techniques like bullion knots, cast-on stitches, and turkey work loops.
The extreme difference in height and texture between the flat sand and the voluminous foam creates a powerful, tactile seascape.
18. Create Depth in a Field with Layering

To give a landscape like a wheat field a sense of depth, vary the detail and density of your stitches.
In the foreground, stitch fully detailed wheat stalks with fishbone stitch heads and distinct leaves.
For the middle and background, simplify the motifs into suggestive vertical lines and smaller, less-defined shapes.
Using slightly lighter and less saturated colors for the background elements will further enhance the illusion of distance.
19. Embellish Branches with Beaded Ice
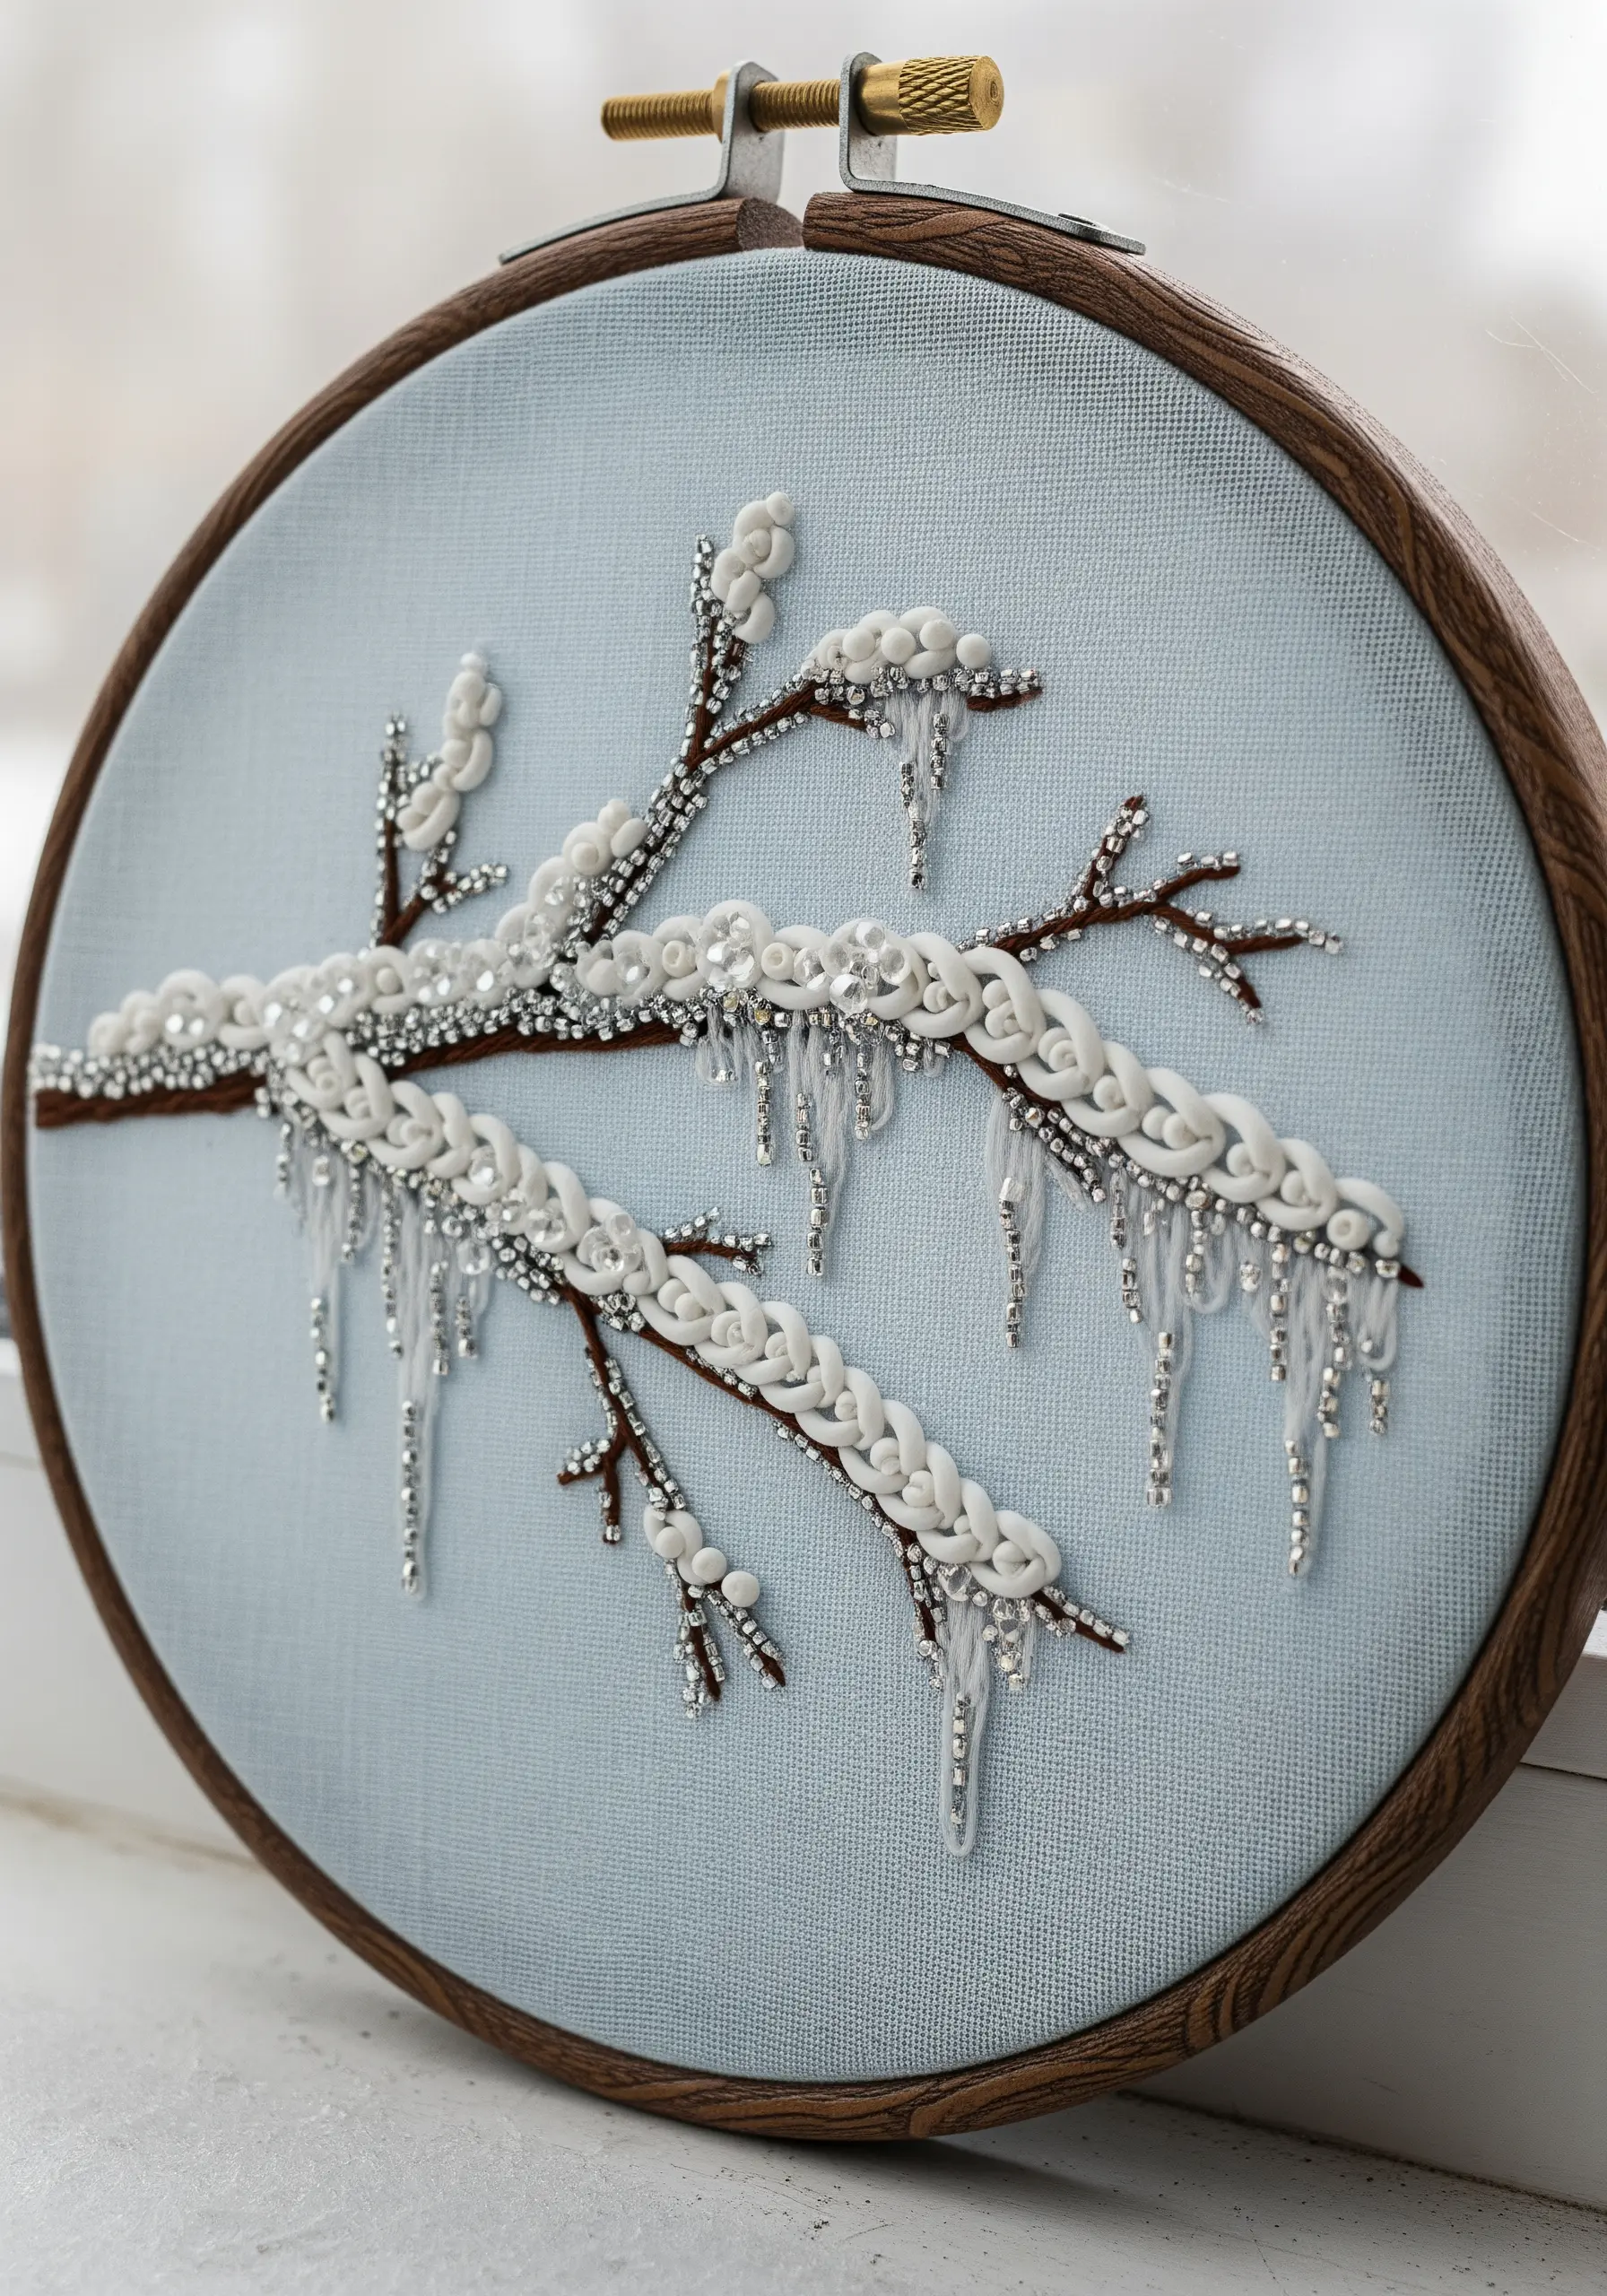
Mimic the glistening effect of ice by combining soft stitches with hard, reflective beads.
Use a brown stem stitch for the branches, then add thick accumulations of snow with white bullion knots or woven picot stitches.
For the icicles, create hanging fringes with clear and silver seed beads.
This combination catches the light beautifully, giving your piece a magical, frozen sparkle that thread alone cannot replicate.
20. Outline Agate Contours with Split Stitch
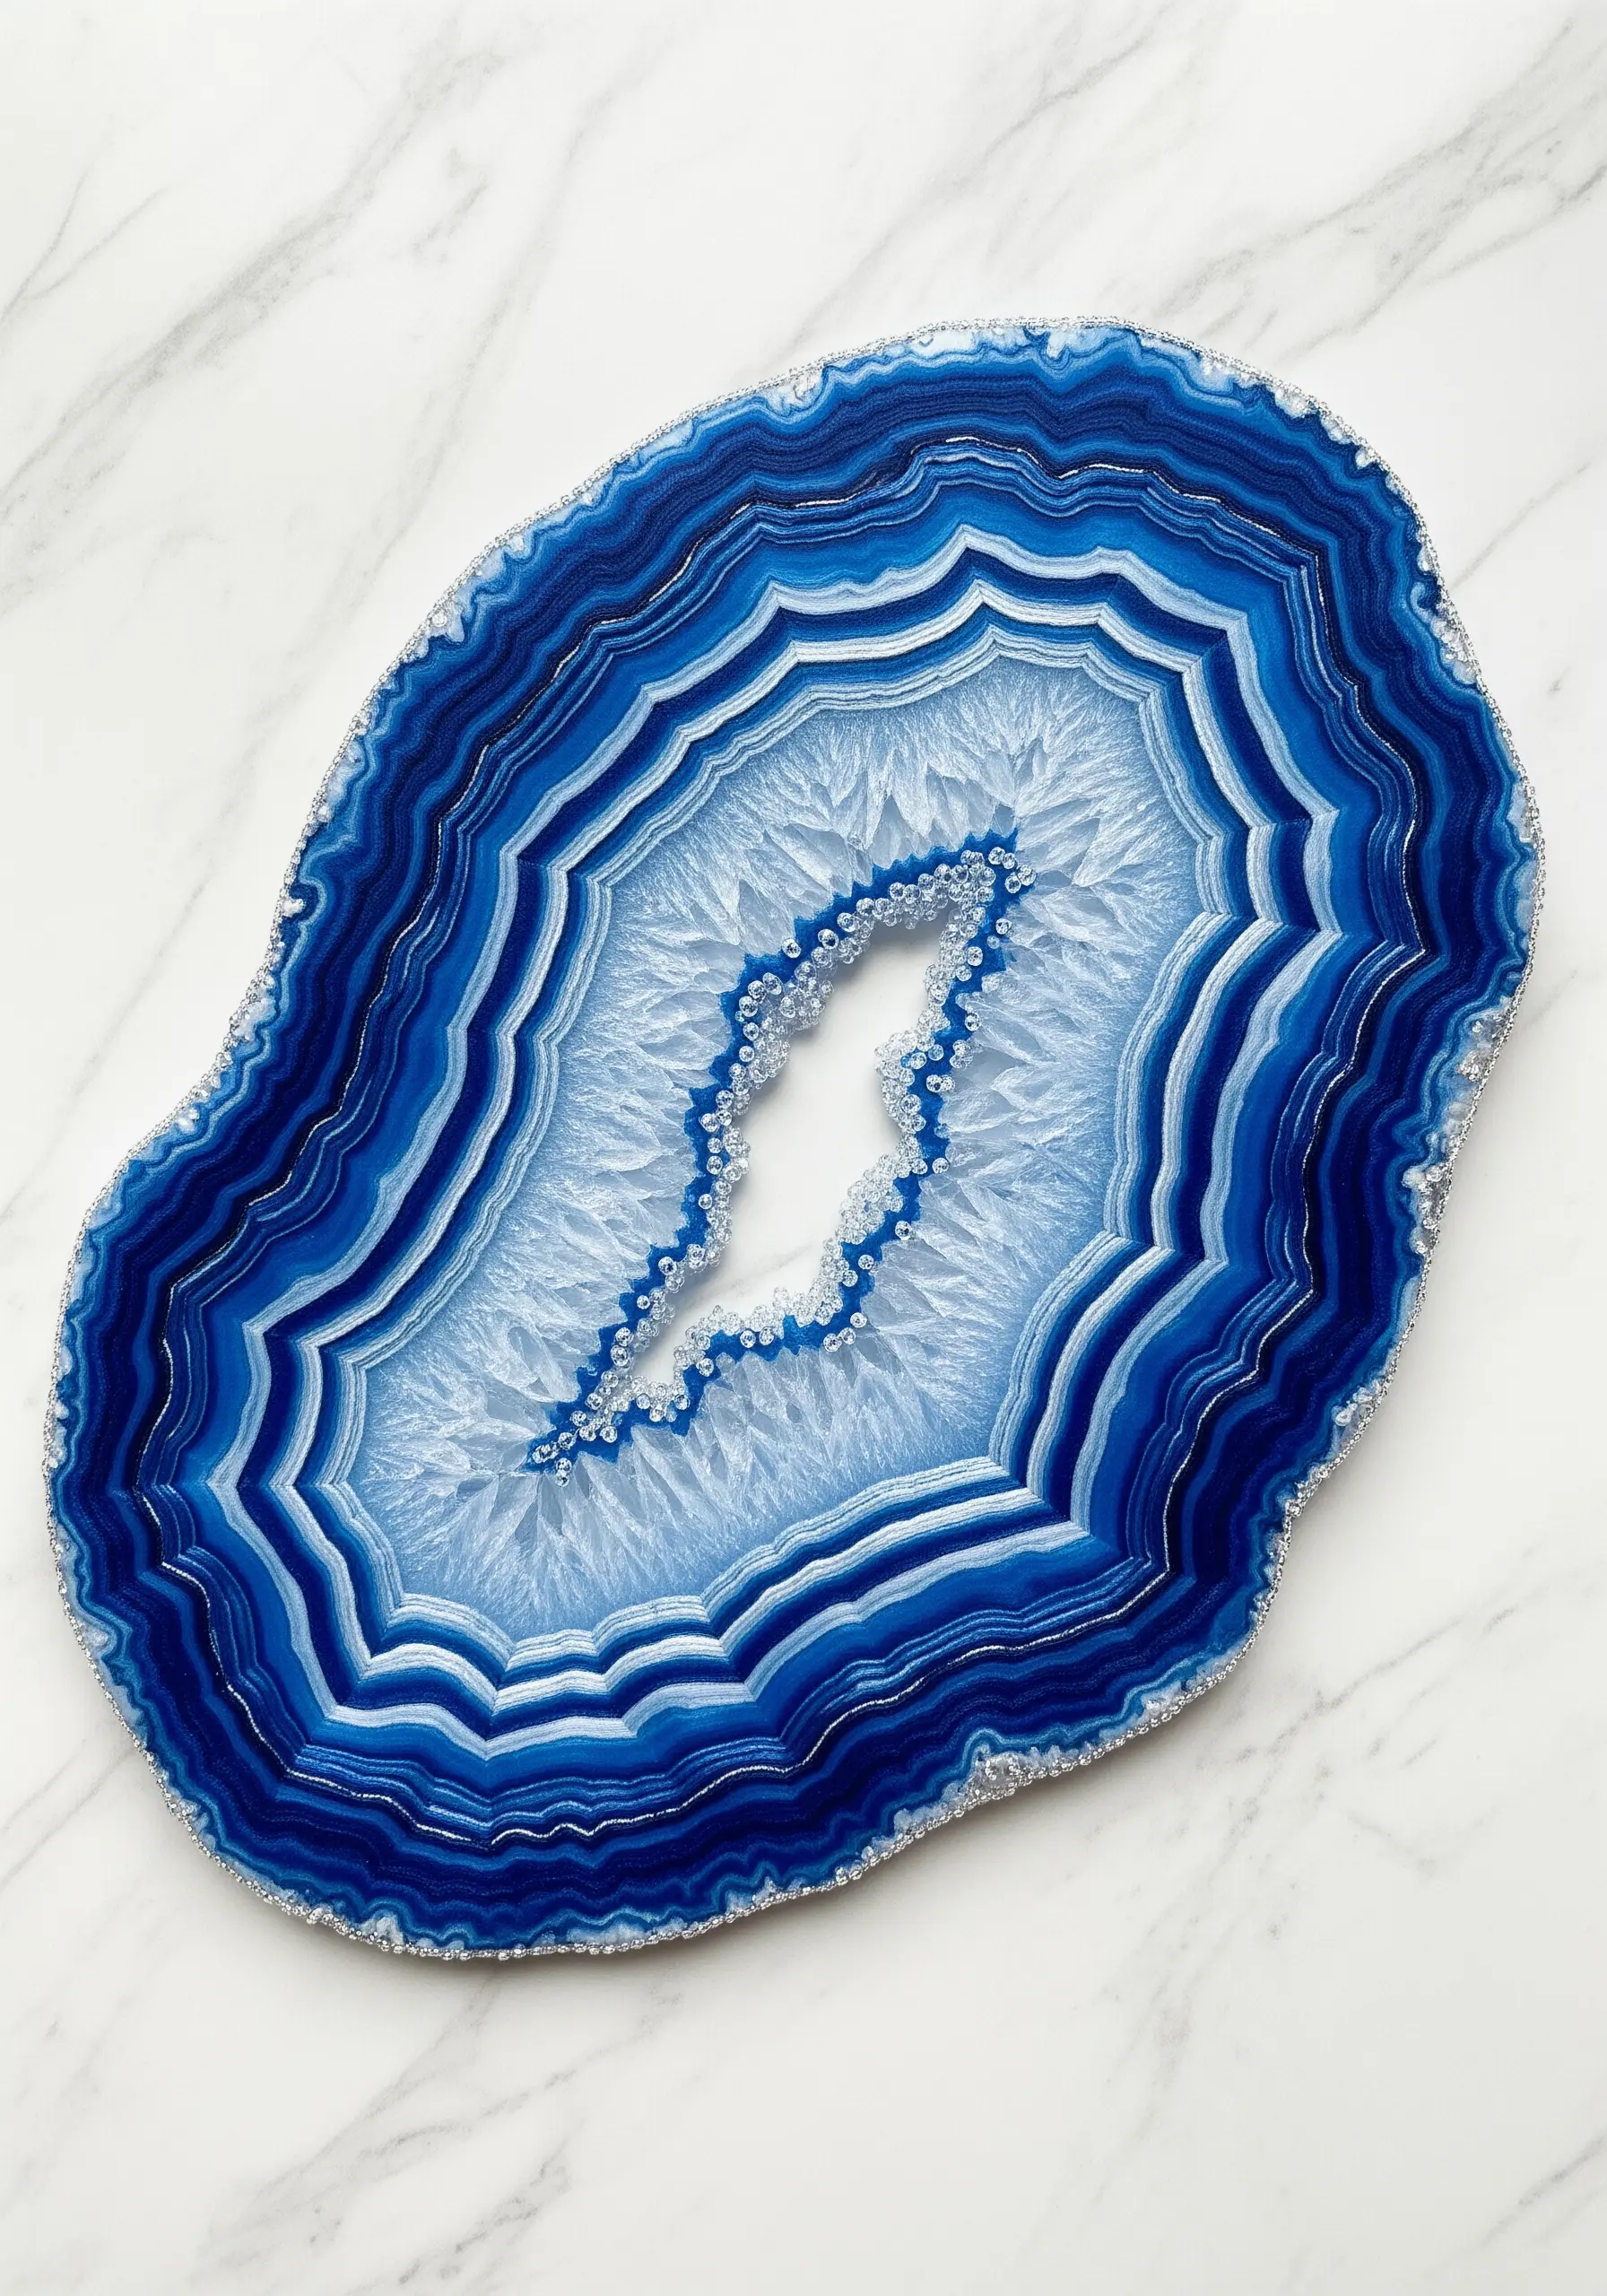
Replicate the fine, flowing bands of an agate slice with precise contour lines.
Use a single strand of floss and a neat split stitch to create smooth, concentric shapes that never cross.
The key to a realistic effect is a sophisticated color gradient, moving through multiple shades of a single color family.
For the crystalline center, fill the space with a dense field of French knots or tiny seed beads in a contrasting, sparkling thread.
21. Layer Scales for a Dimensional Pine Cone
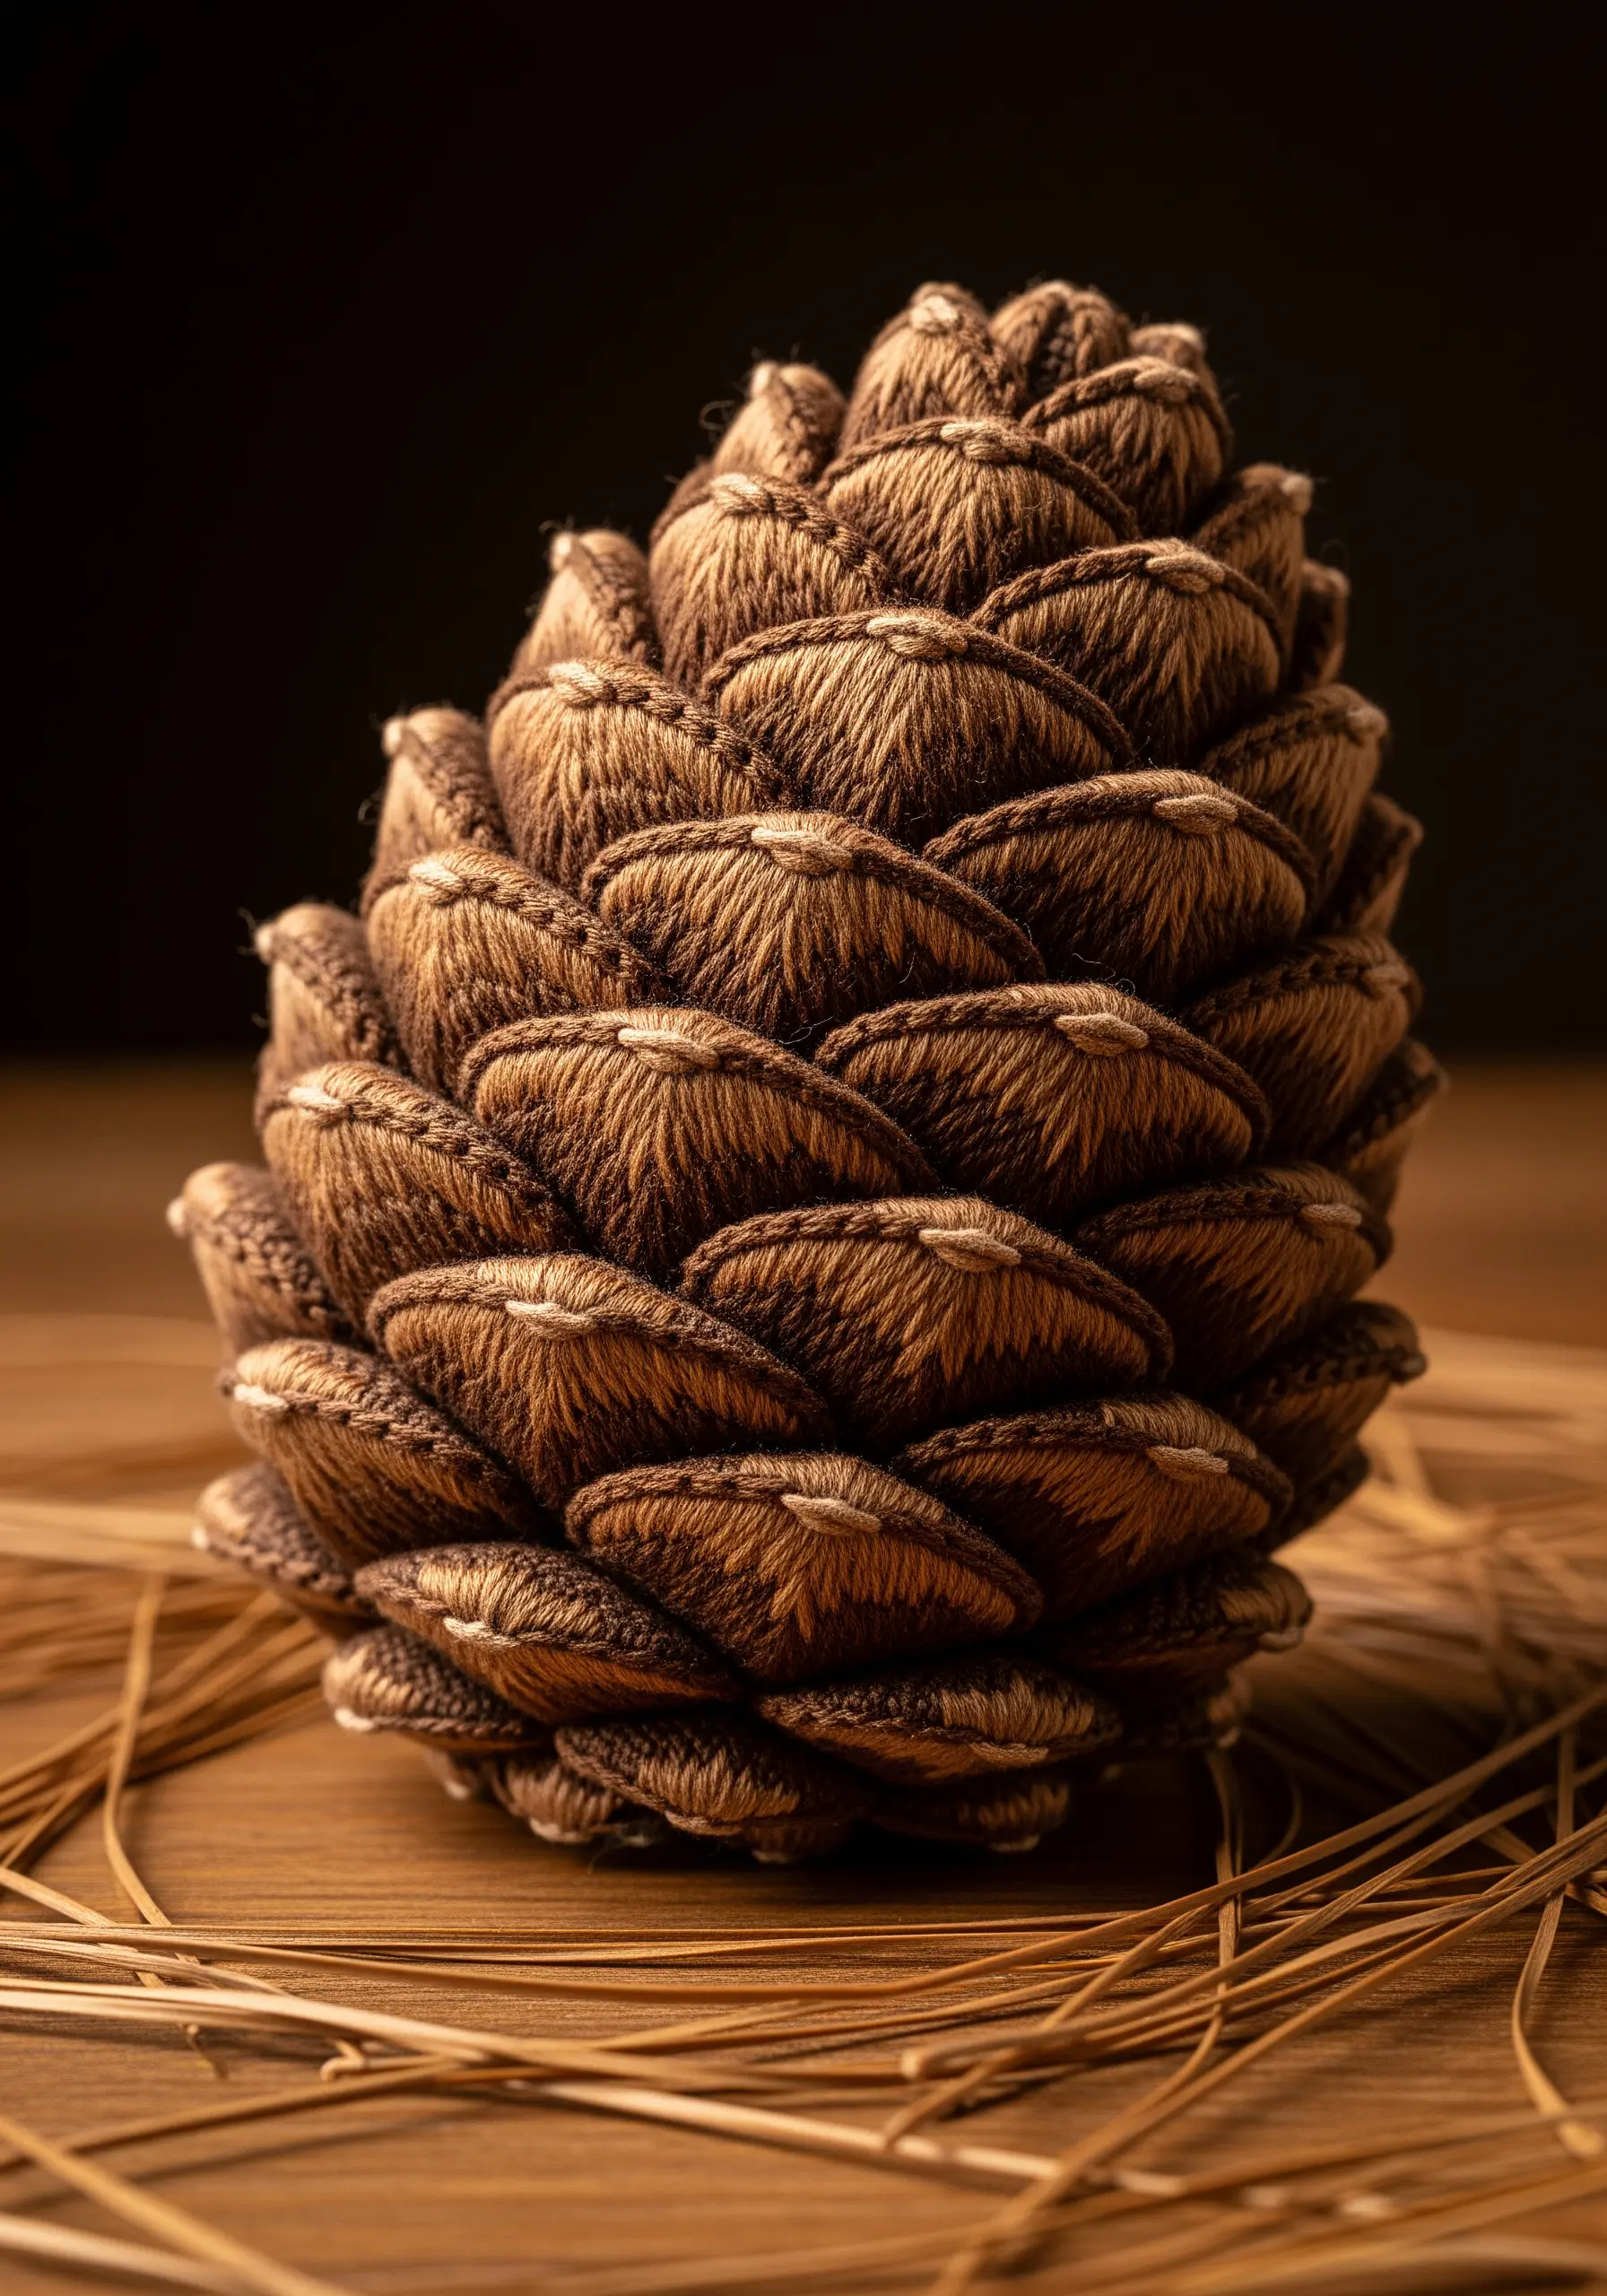
Build a realistic, three-dimensional pine cone by stitching each scale as a separate, overlapping element.
Work in rows from the bottom up, using a padded satin stitch for each scale.
This layering technique ensures that each scale appears to sit on top of the one below it, creating natural depth.
Use a satin-finish brown thread and add a single highlight stitch in a lighter color at the tip of each scale to define its shape.


