
Embroidery is more than just a series of stitches; it’s a quiet language of texture, color, and line. Often, the difference between a project you like and one you truly love comes down to small, intentional choices—the kind that feel professional, polished, and uniquely yours.
You don’t need a dozen complex stitches or an entire rainbow of threads to elevate your work. Instead, I want to show you how subtle adjustments—like changing the direction of a stitch, choosing a specific thread weight for an outline, or combining two simple textures—can transform your embroidery from simple to stunning.
Think of these mini patterns not as rigid rules, but as gentle guidance. They are invitations to slow down, to notice the details, and to build your confidence one thoughtful stitch at a time. Let’s begin.
1. Render Lavender with Textured Knots
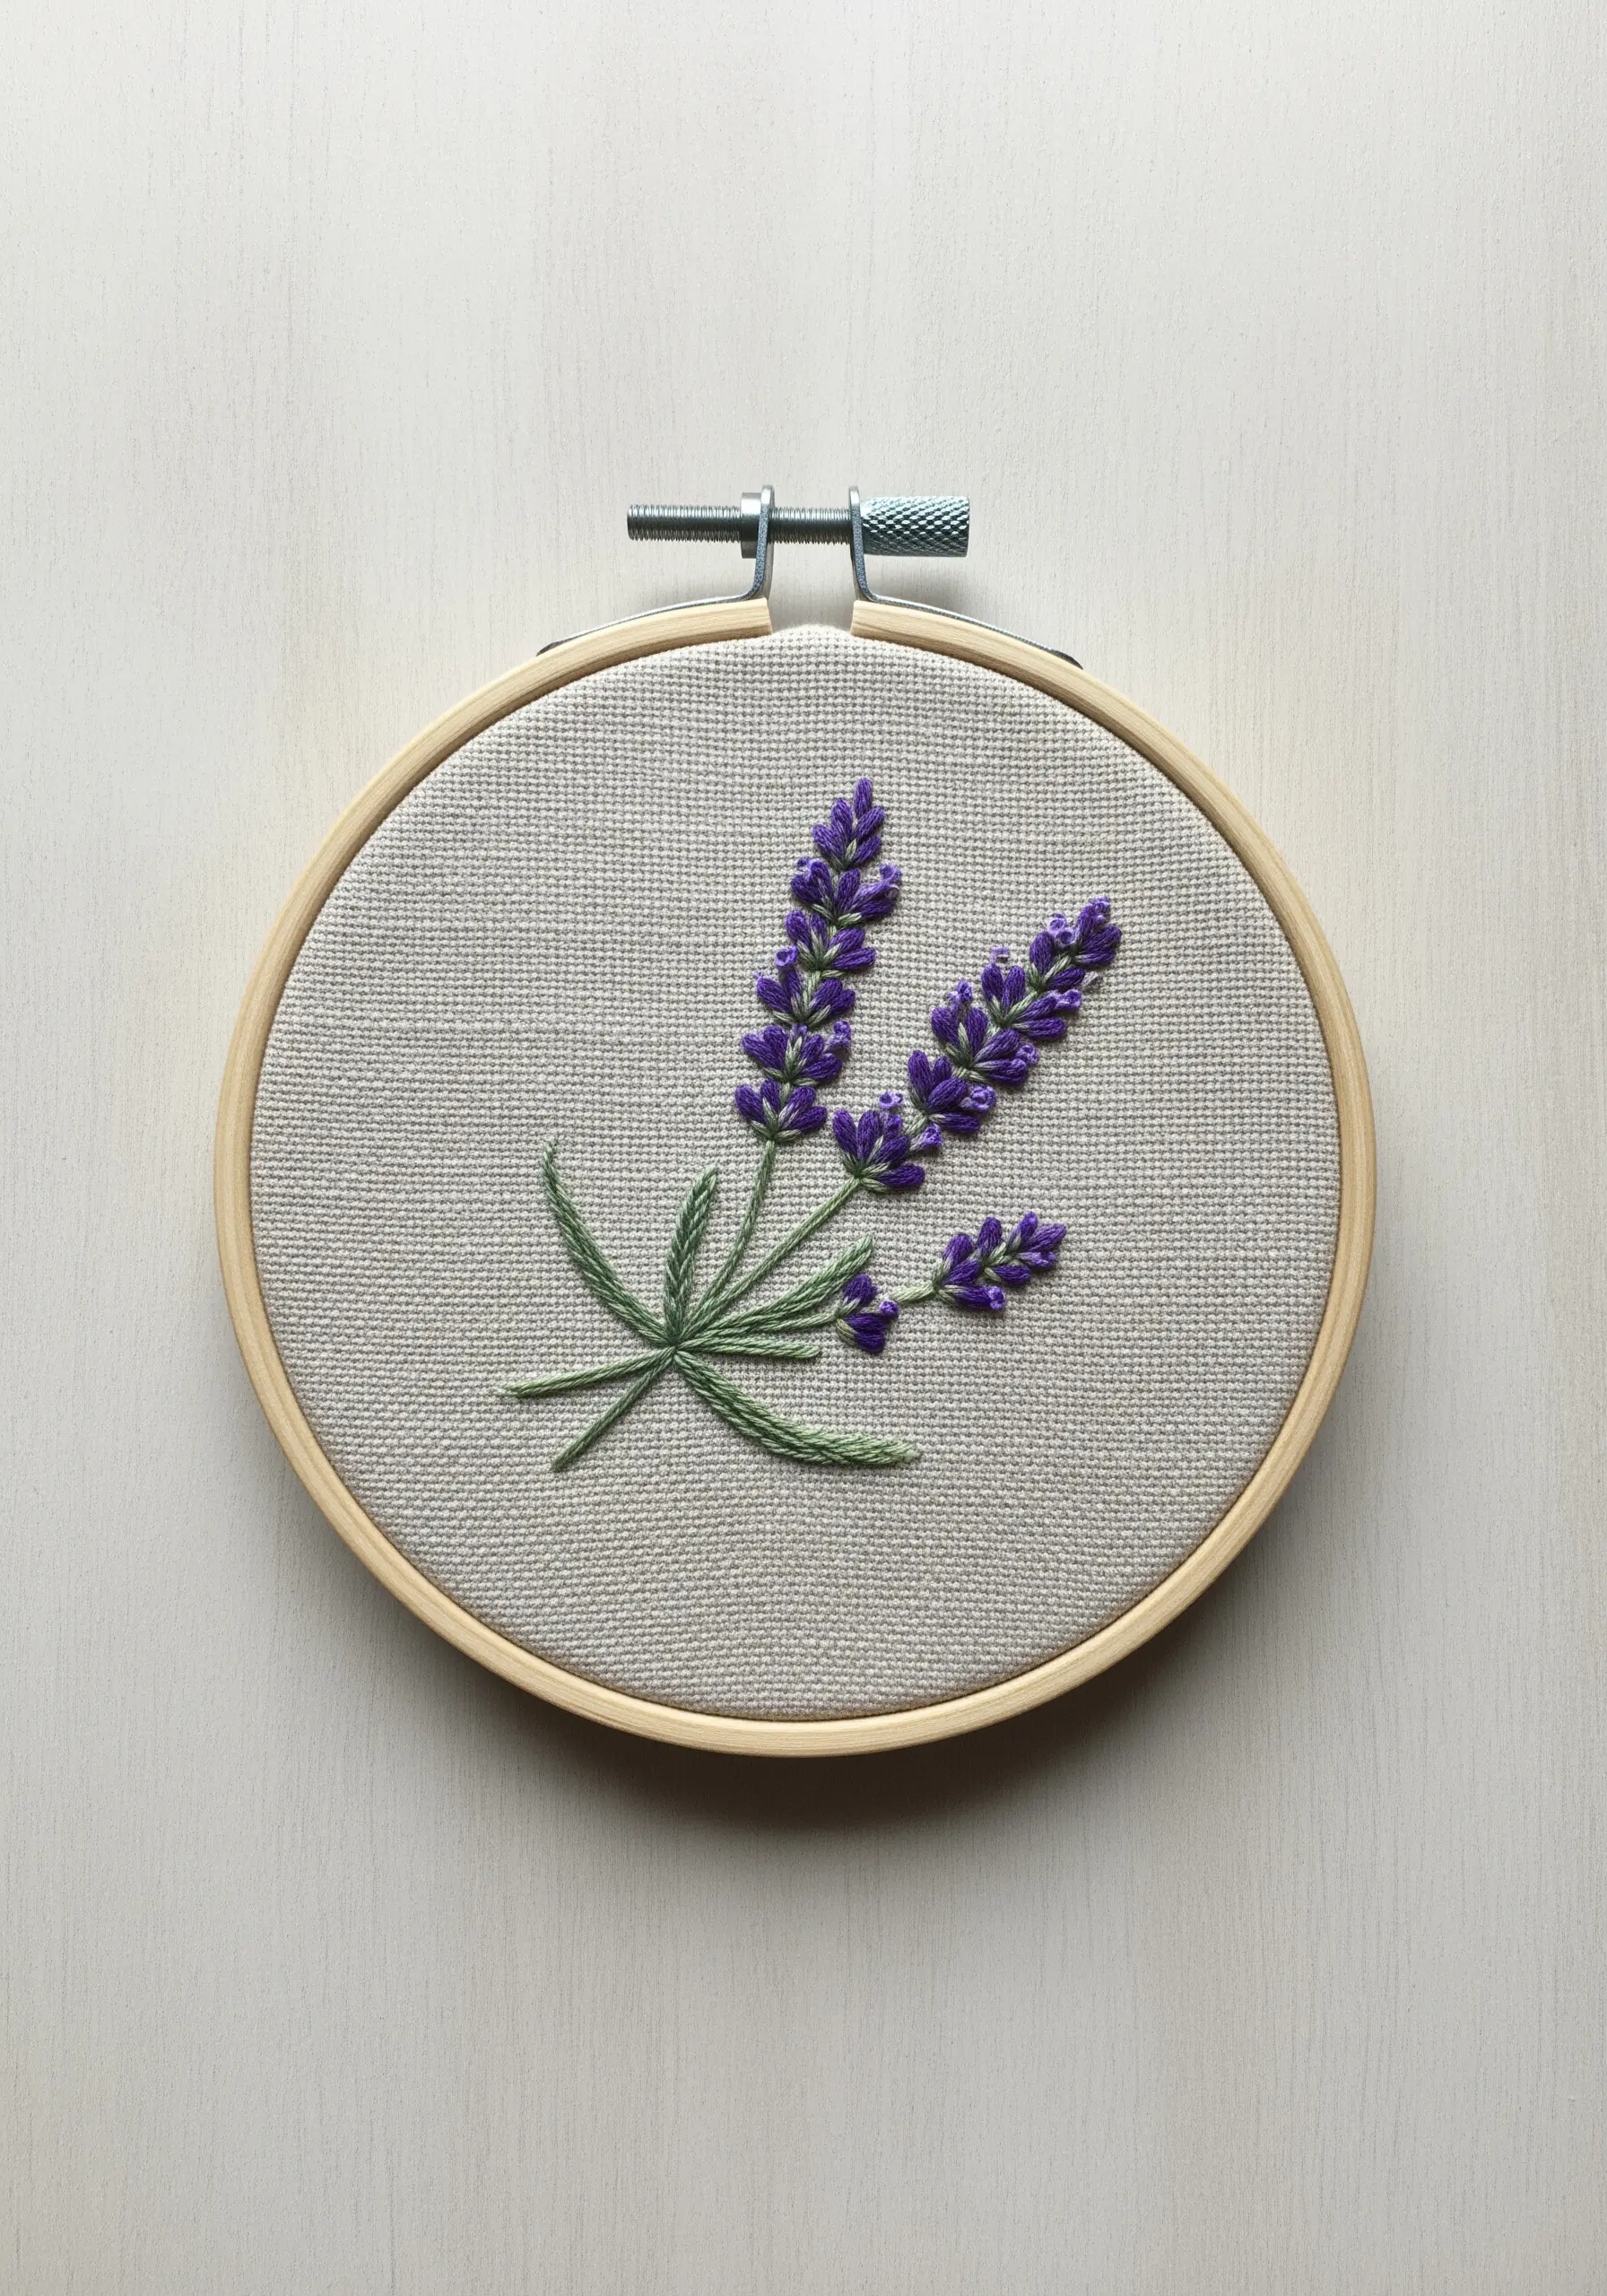
Create the delicate lavender florets using a combination of French knots and single detached chain stitches (lazy daisies).
Vary the tightness and the number of thread wraps for your French knots to give each bud a unique, organic shape—some tighter, some looser.
For the stems, use a simple stem stitch with two or three strands of green floss to create a smooth, slightly raised line.
This mix of stitches adds a delightful textural contrast that elevates a simple botanical motif into a more tactile piece of art.
2. Define Peaks with a Whipped Backstitch
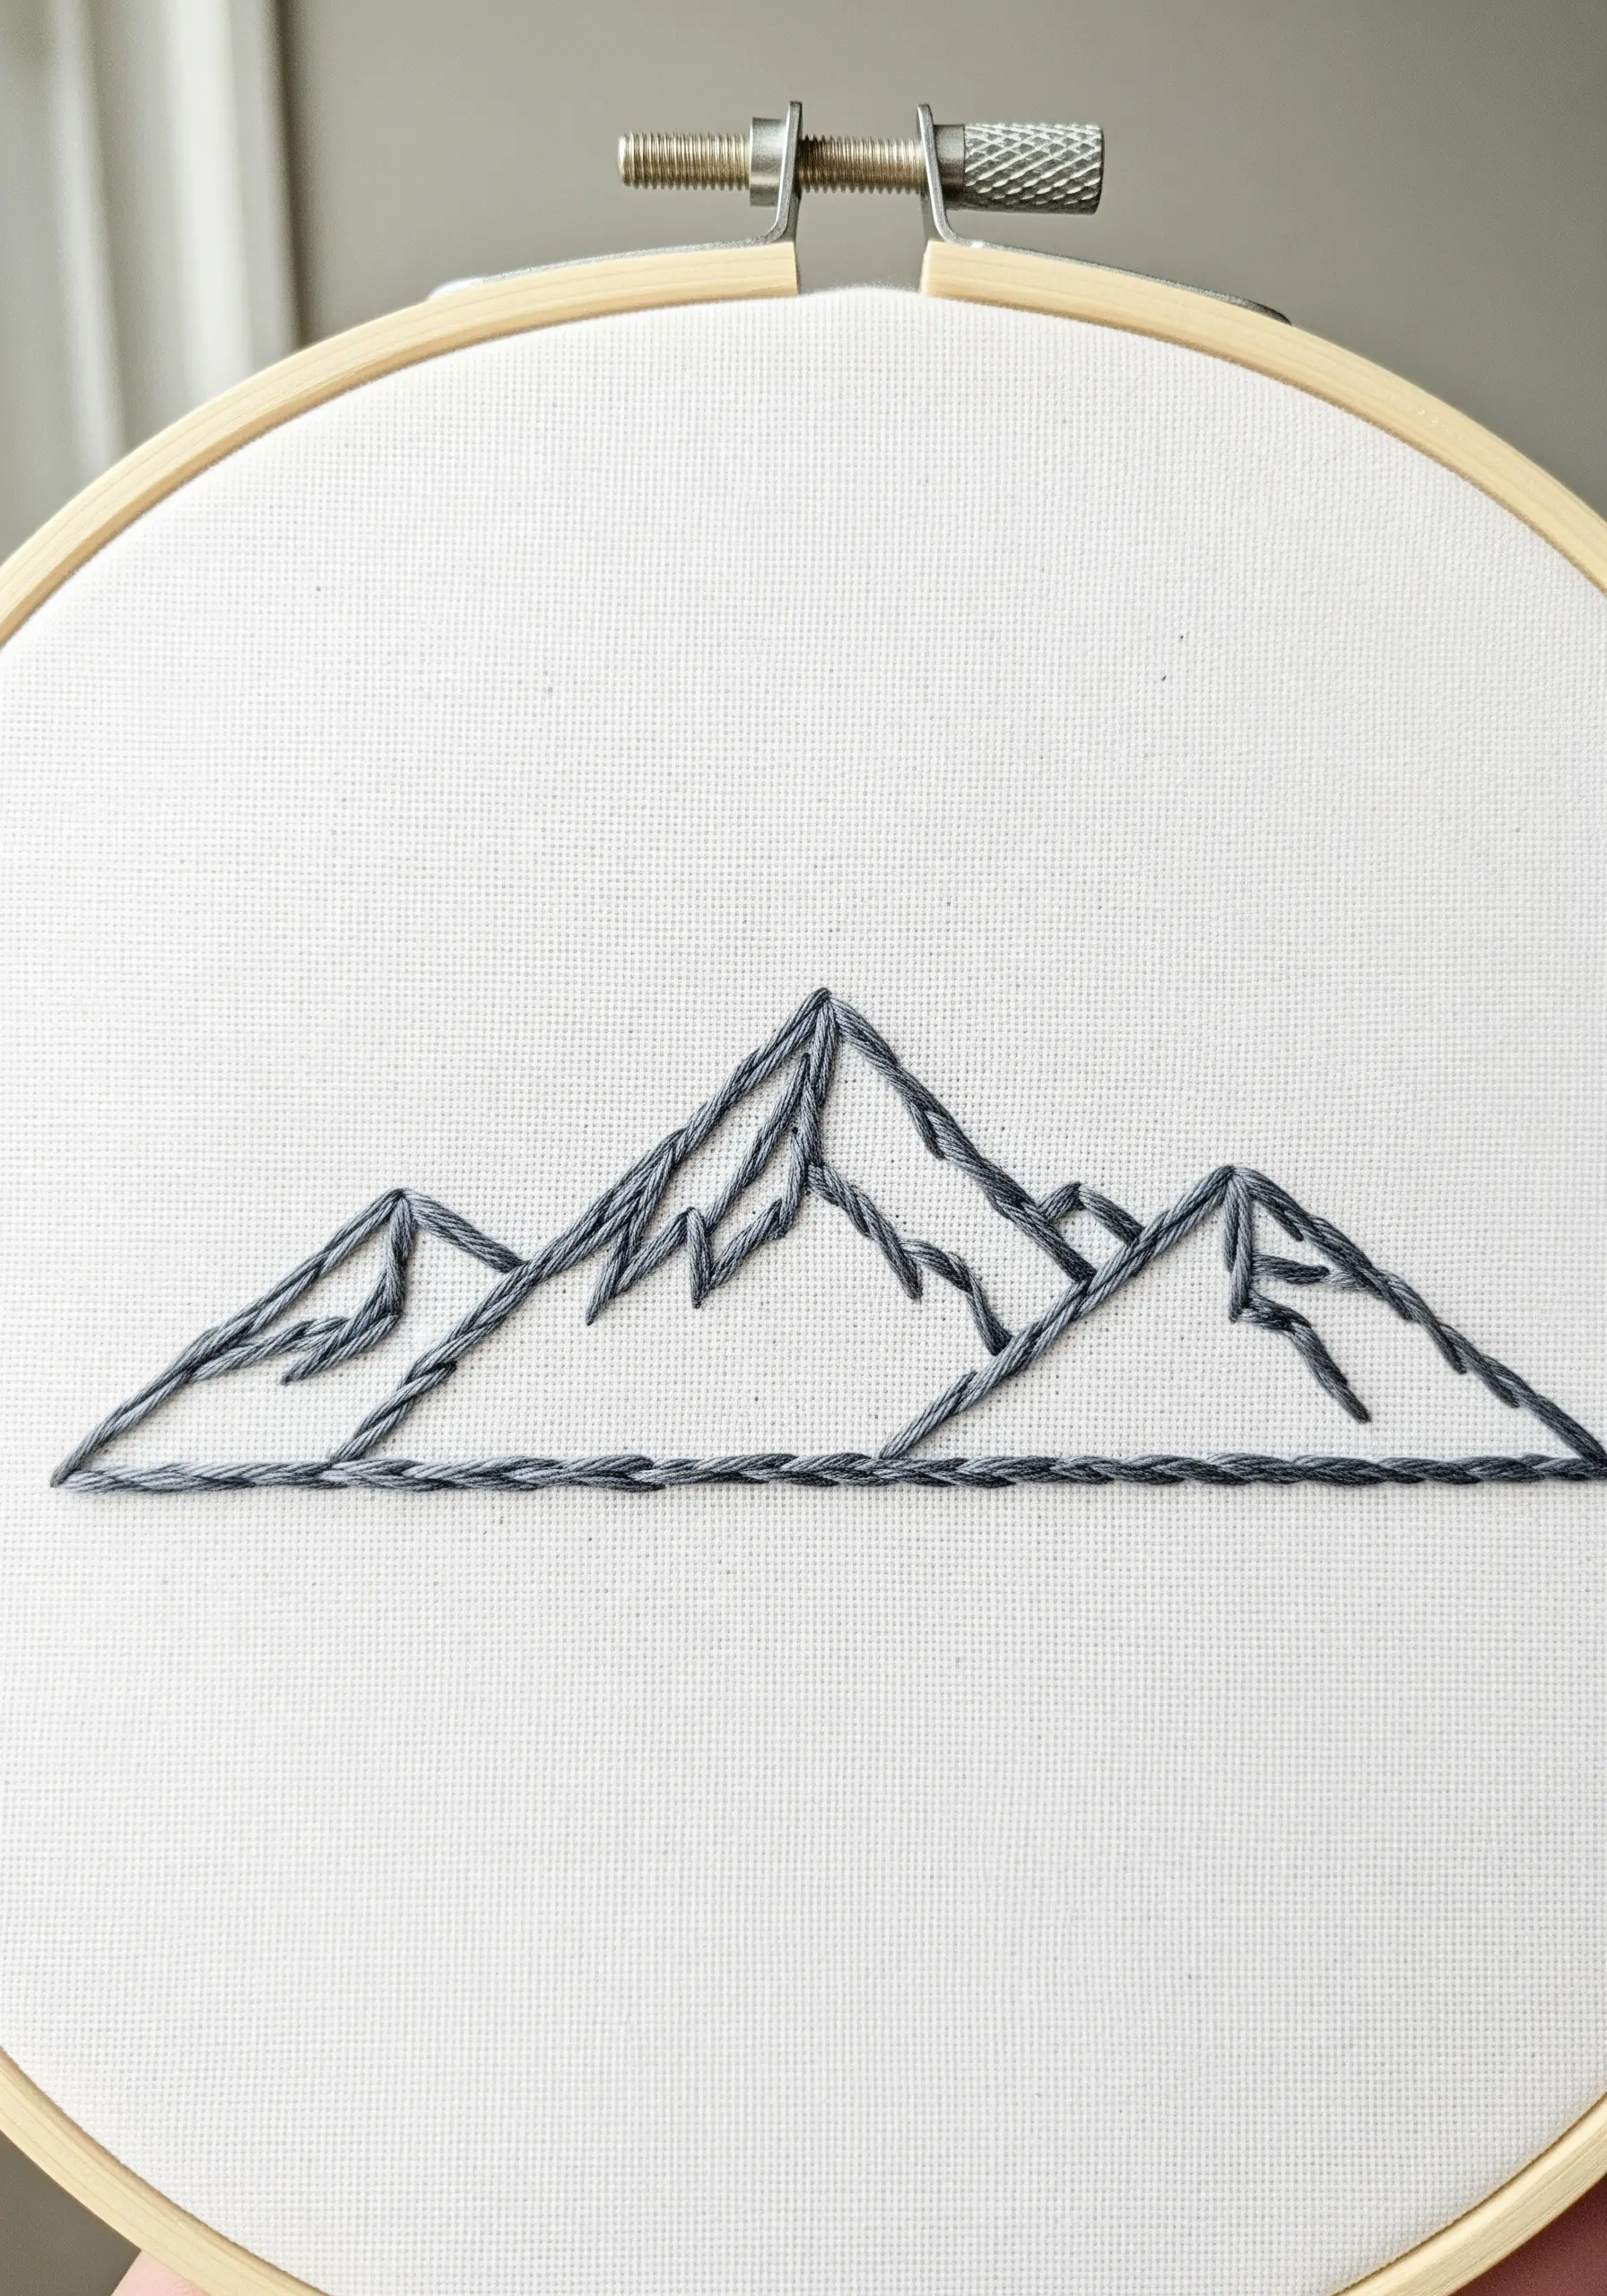
For a crisp, uninterrupted mountain outline, start with a standard backstitch.
Then, elevate it by whipping the line: use a second thread of the same color to loop around each backstitch without piercing the fabric.
This technique smooths over the segmented look of a basic backstitch, creating a solid, rope-like line that gives your mountain landscape a clean, graphic, and professional finish.
Use fewer strands for distant peaks to create a subtle sense of atmospheric depth.
3. Create a Fluffy Bee with Long-and-Short Stitch
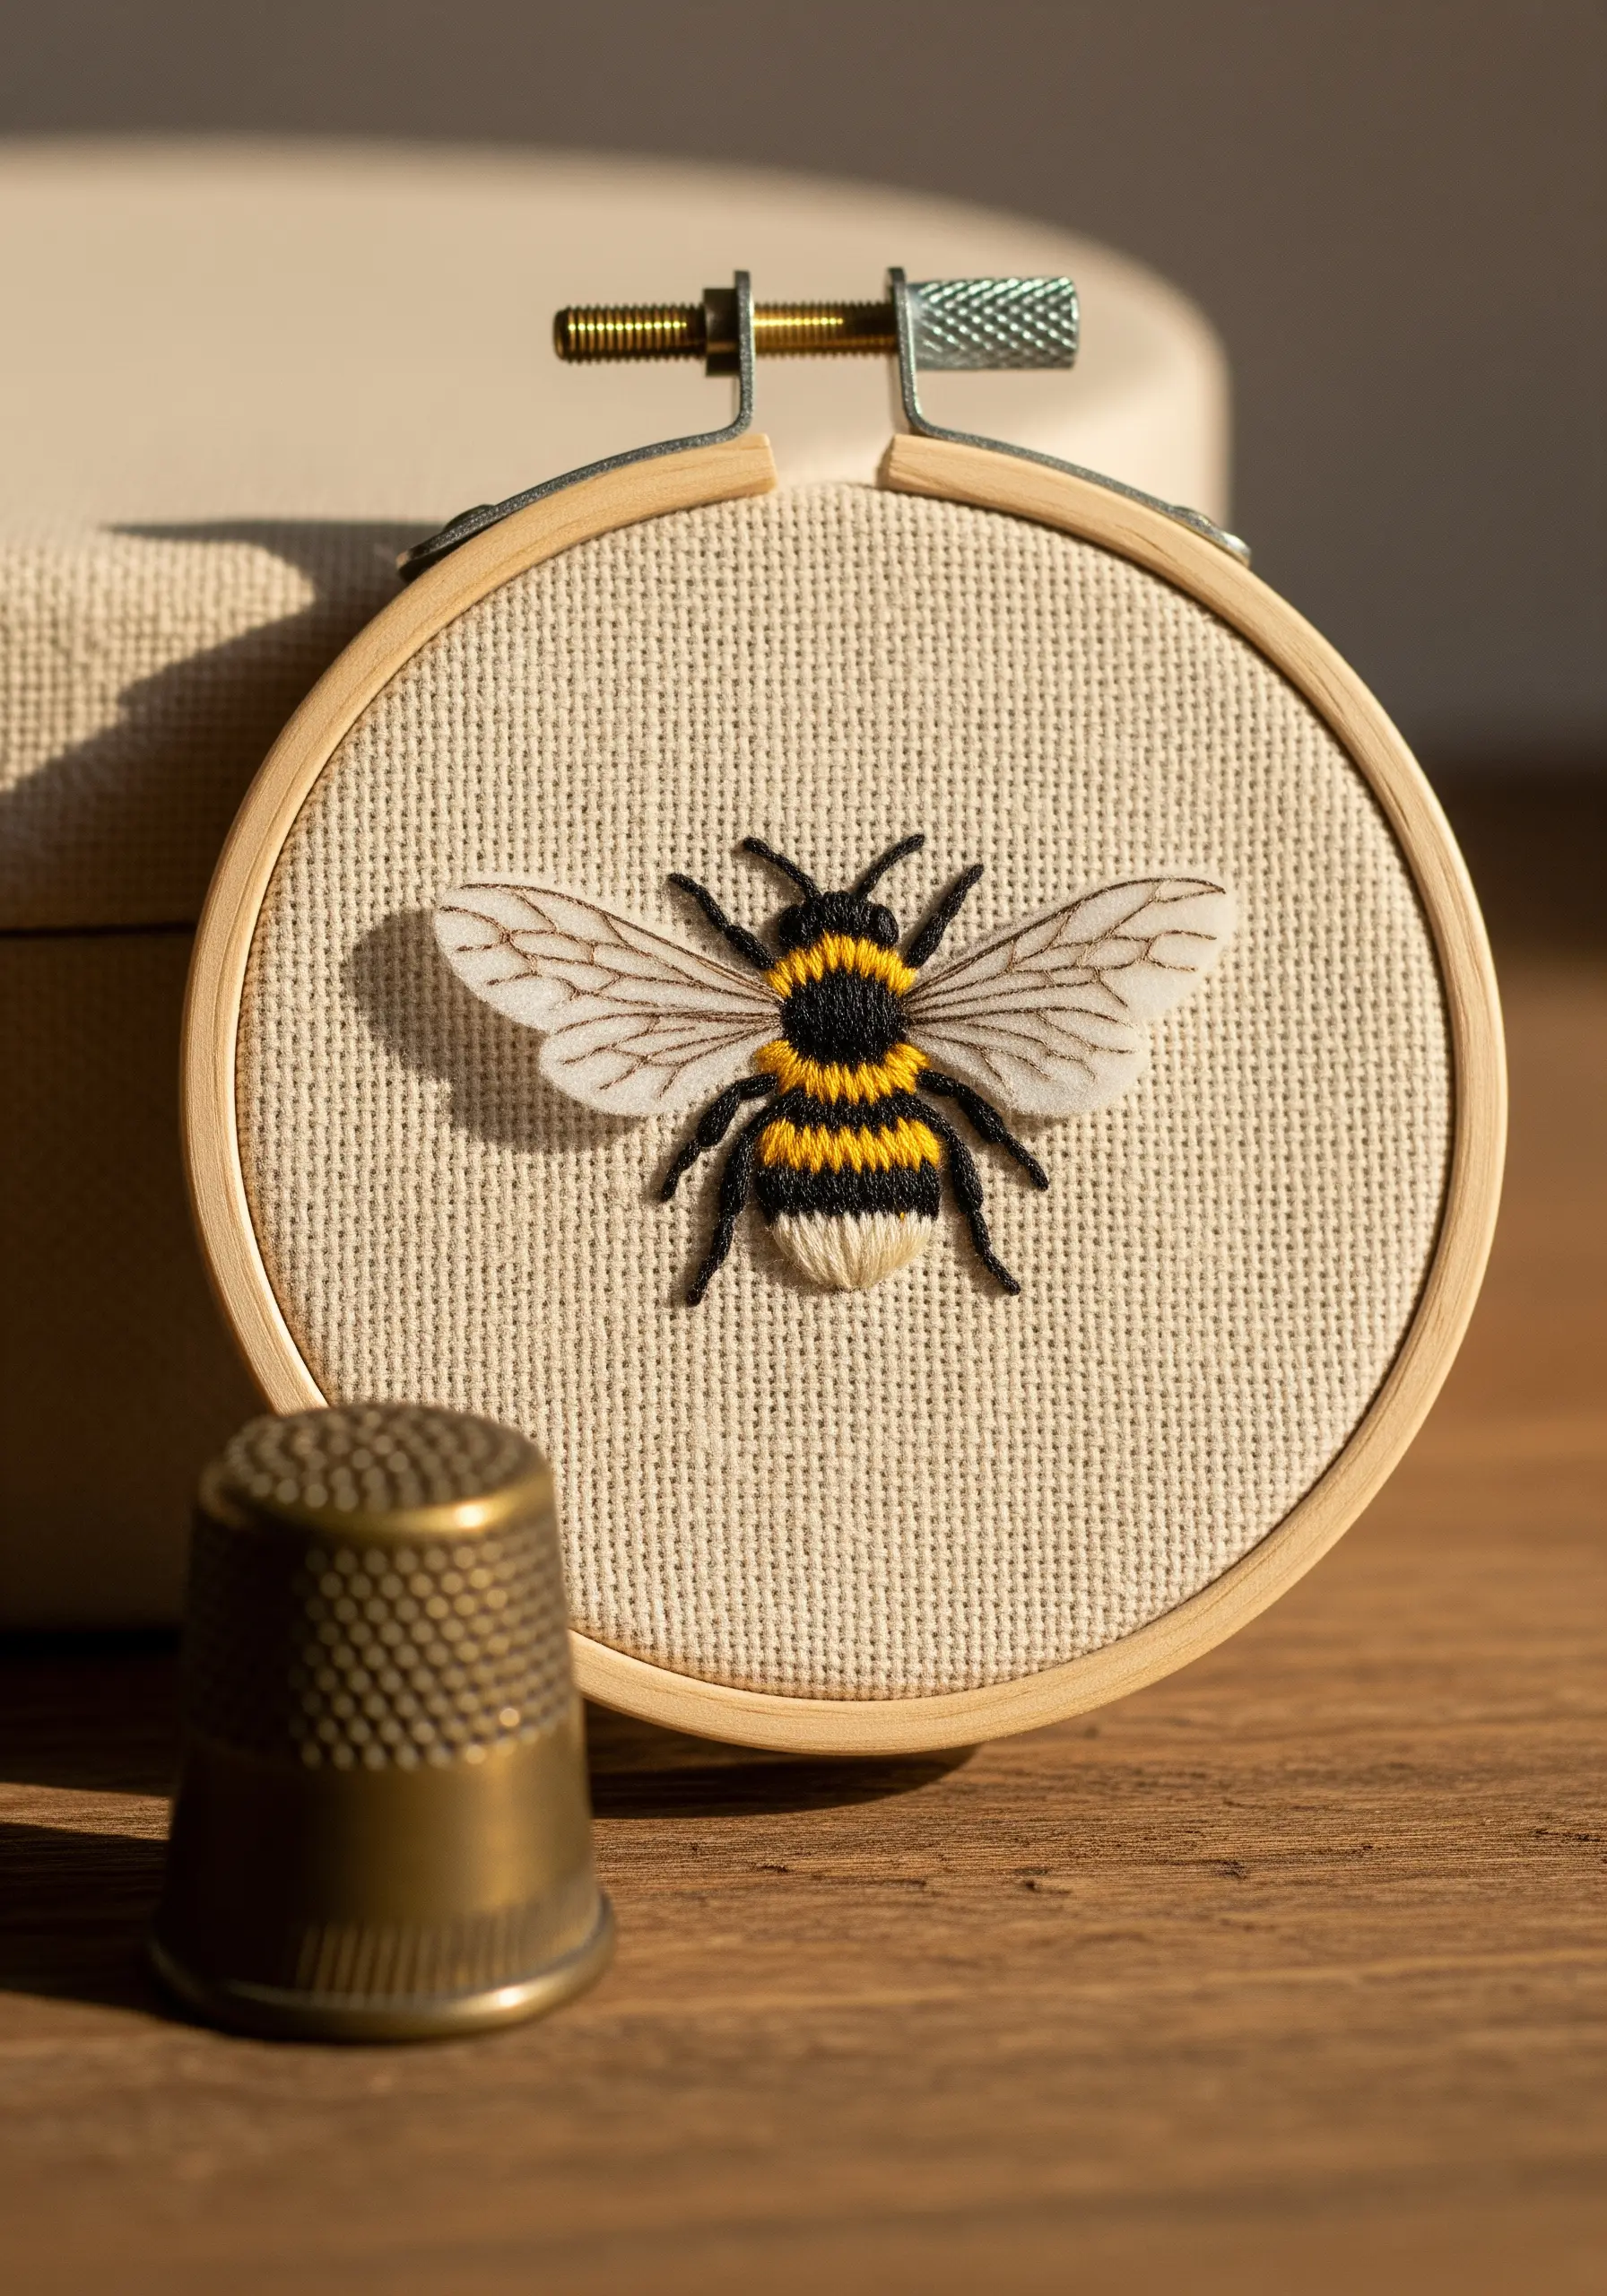
To give the bee’s body a soft, fuzzy appearance, use the long-and-short stitch instead of a flat satin stitch.
Work in rows, staggering the stitch lengths to seamlessly blend the yellow and black sections.
For the delicate, translucent wings, use a single strand of grey or off-white thread and outline them with a split stitch, then fill with sparse straight stitches to suggest veining.
This combination of techniques creates a surprisingly realistic, soft texture that brings the tiny creature to life.
4. Achieve Geometric Precision with a Split Stitch Outline

When stitching geometric shapes, sharp lines and clean corners are essential.
Use a split stitch for your outlines; its interlocking nature creates a solid, stable line that prevents distortion and helps you pivot perfectly at each corner.
Fill the interior with a contrasting stitch like a simple running stitch or chain stitch, using the split stitch border as a precise guide.
This two-step approach is the secret to flawlessly crisp geometric embroidery.
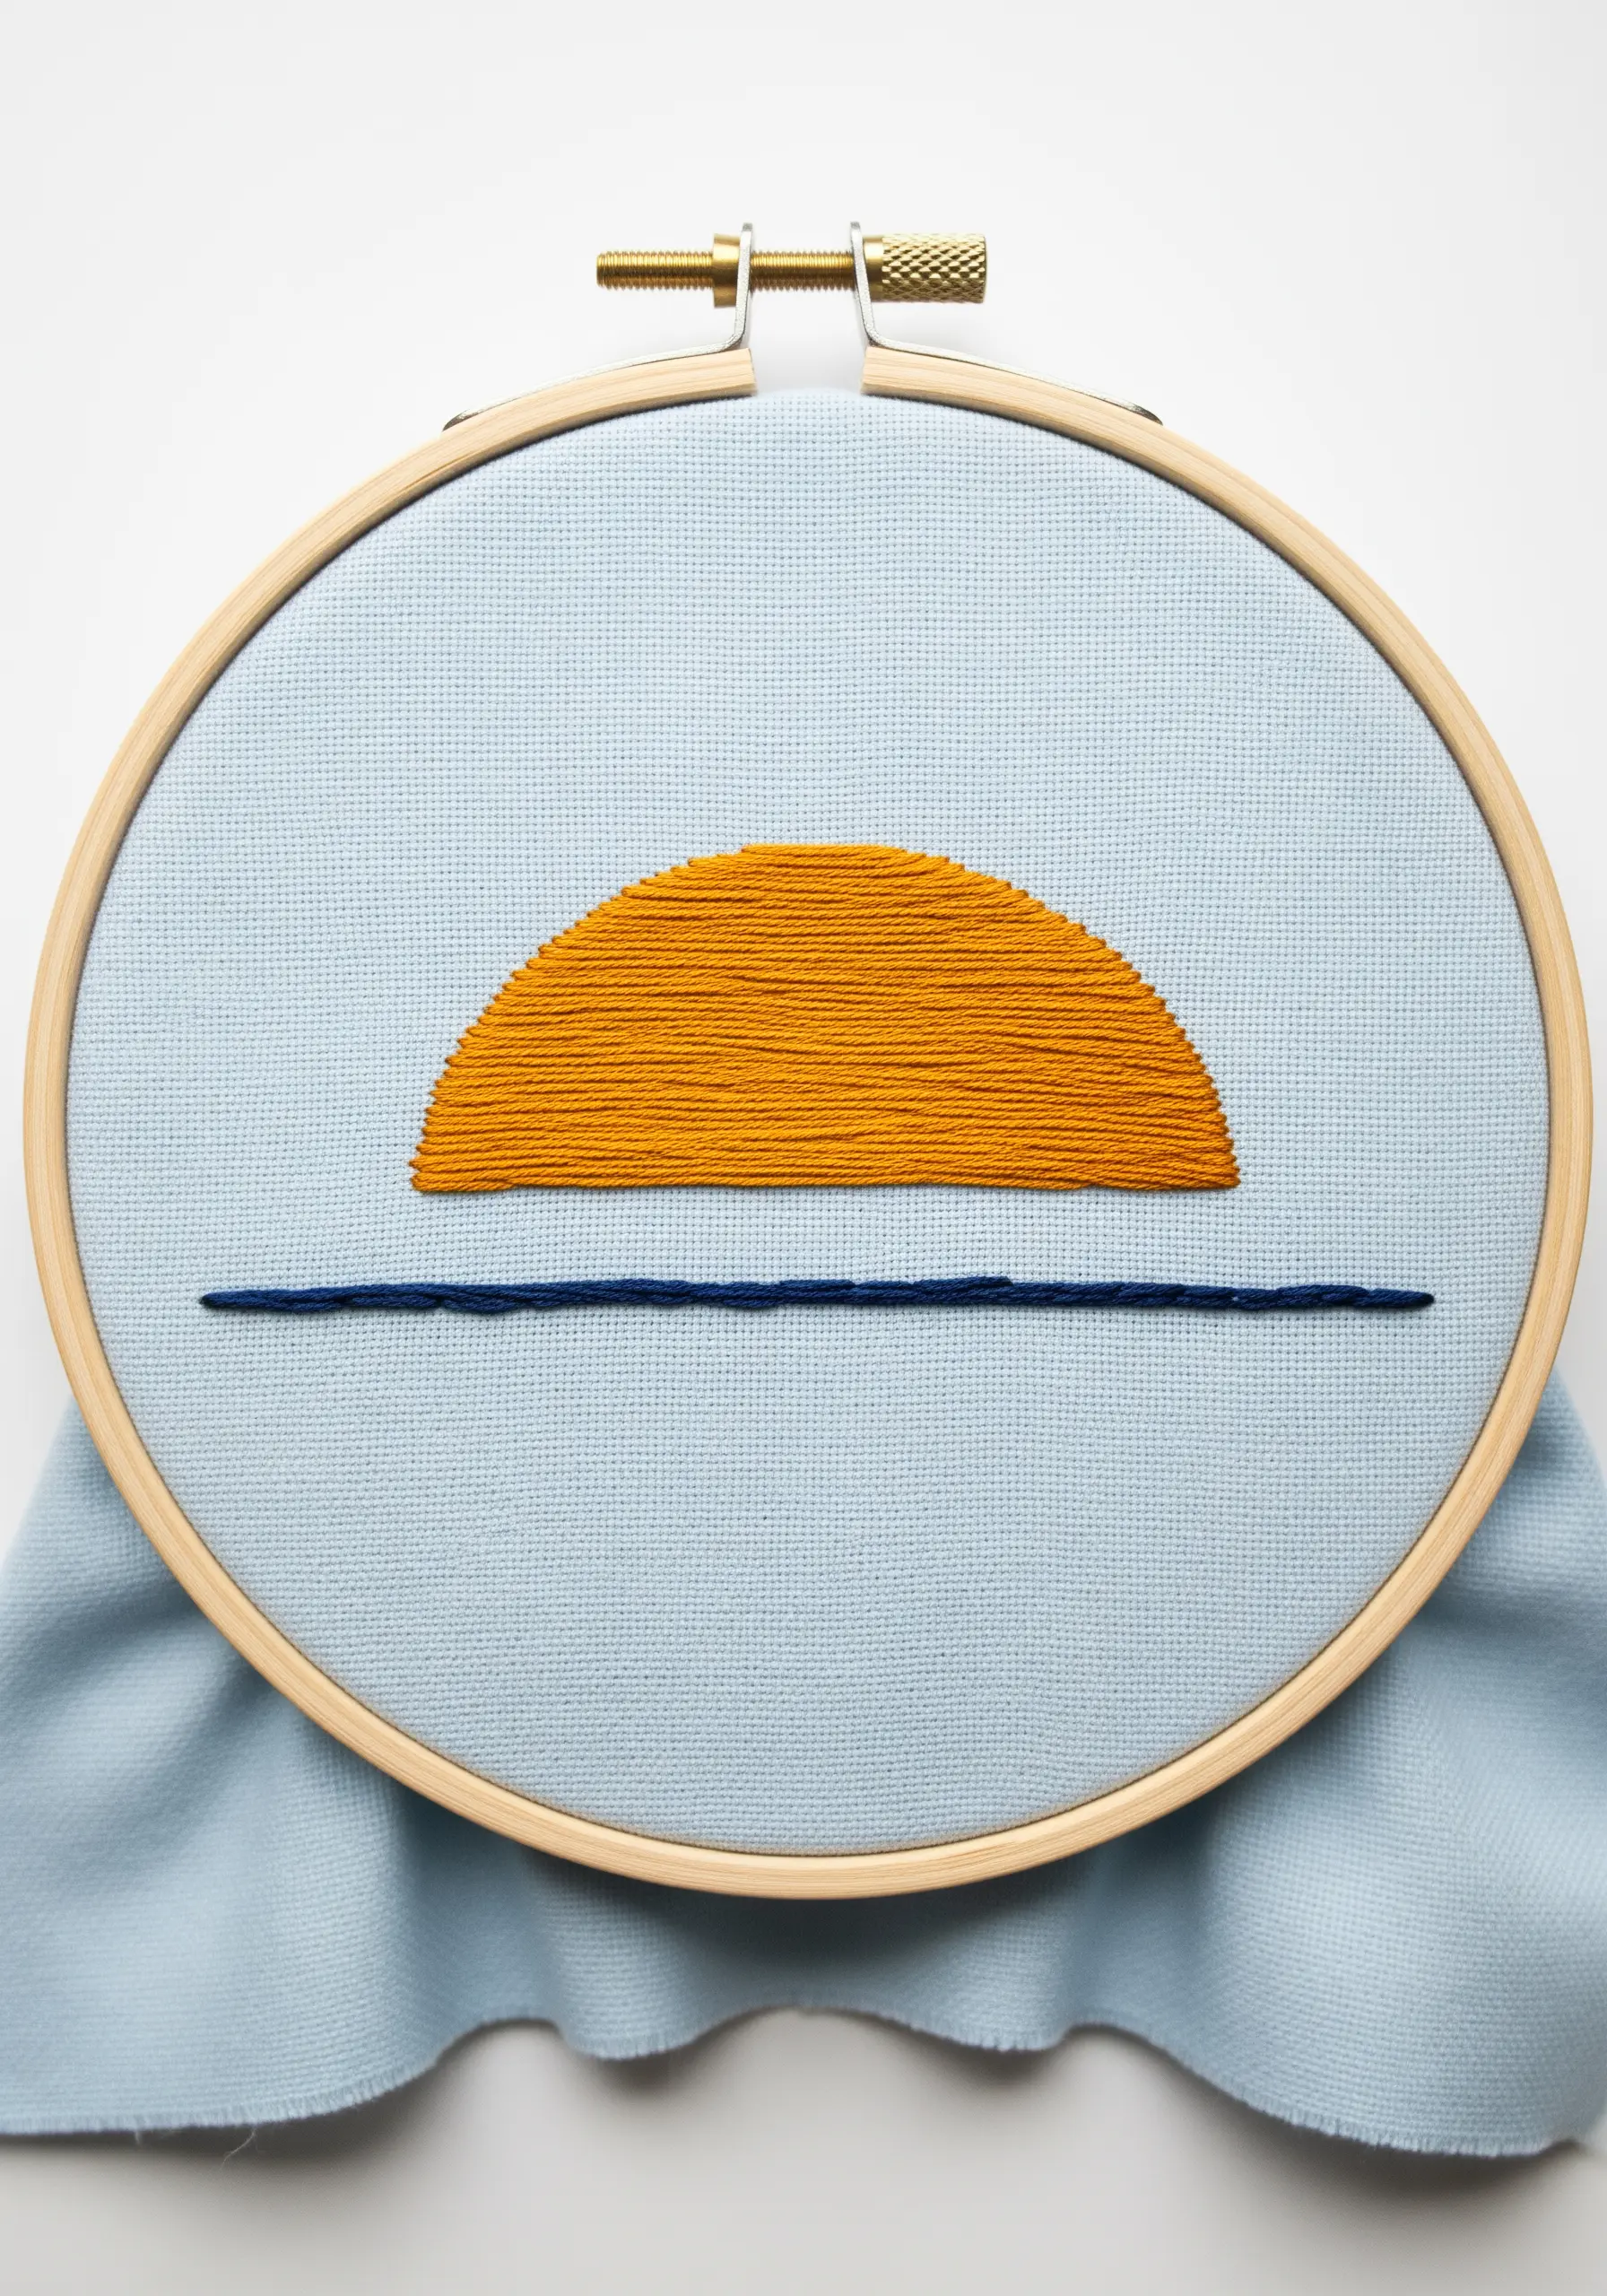
5. Craft a Luminous Moon with Directional Satin Stitch
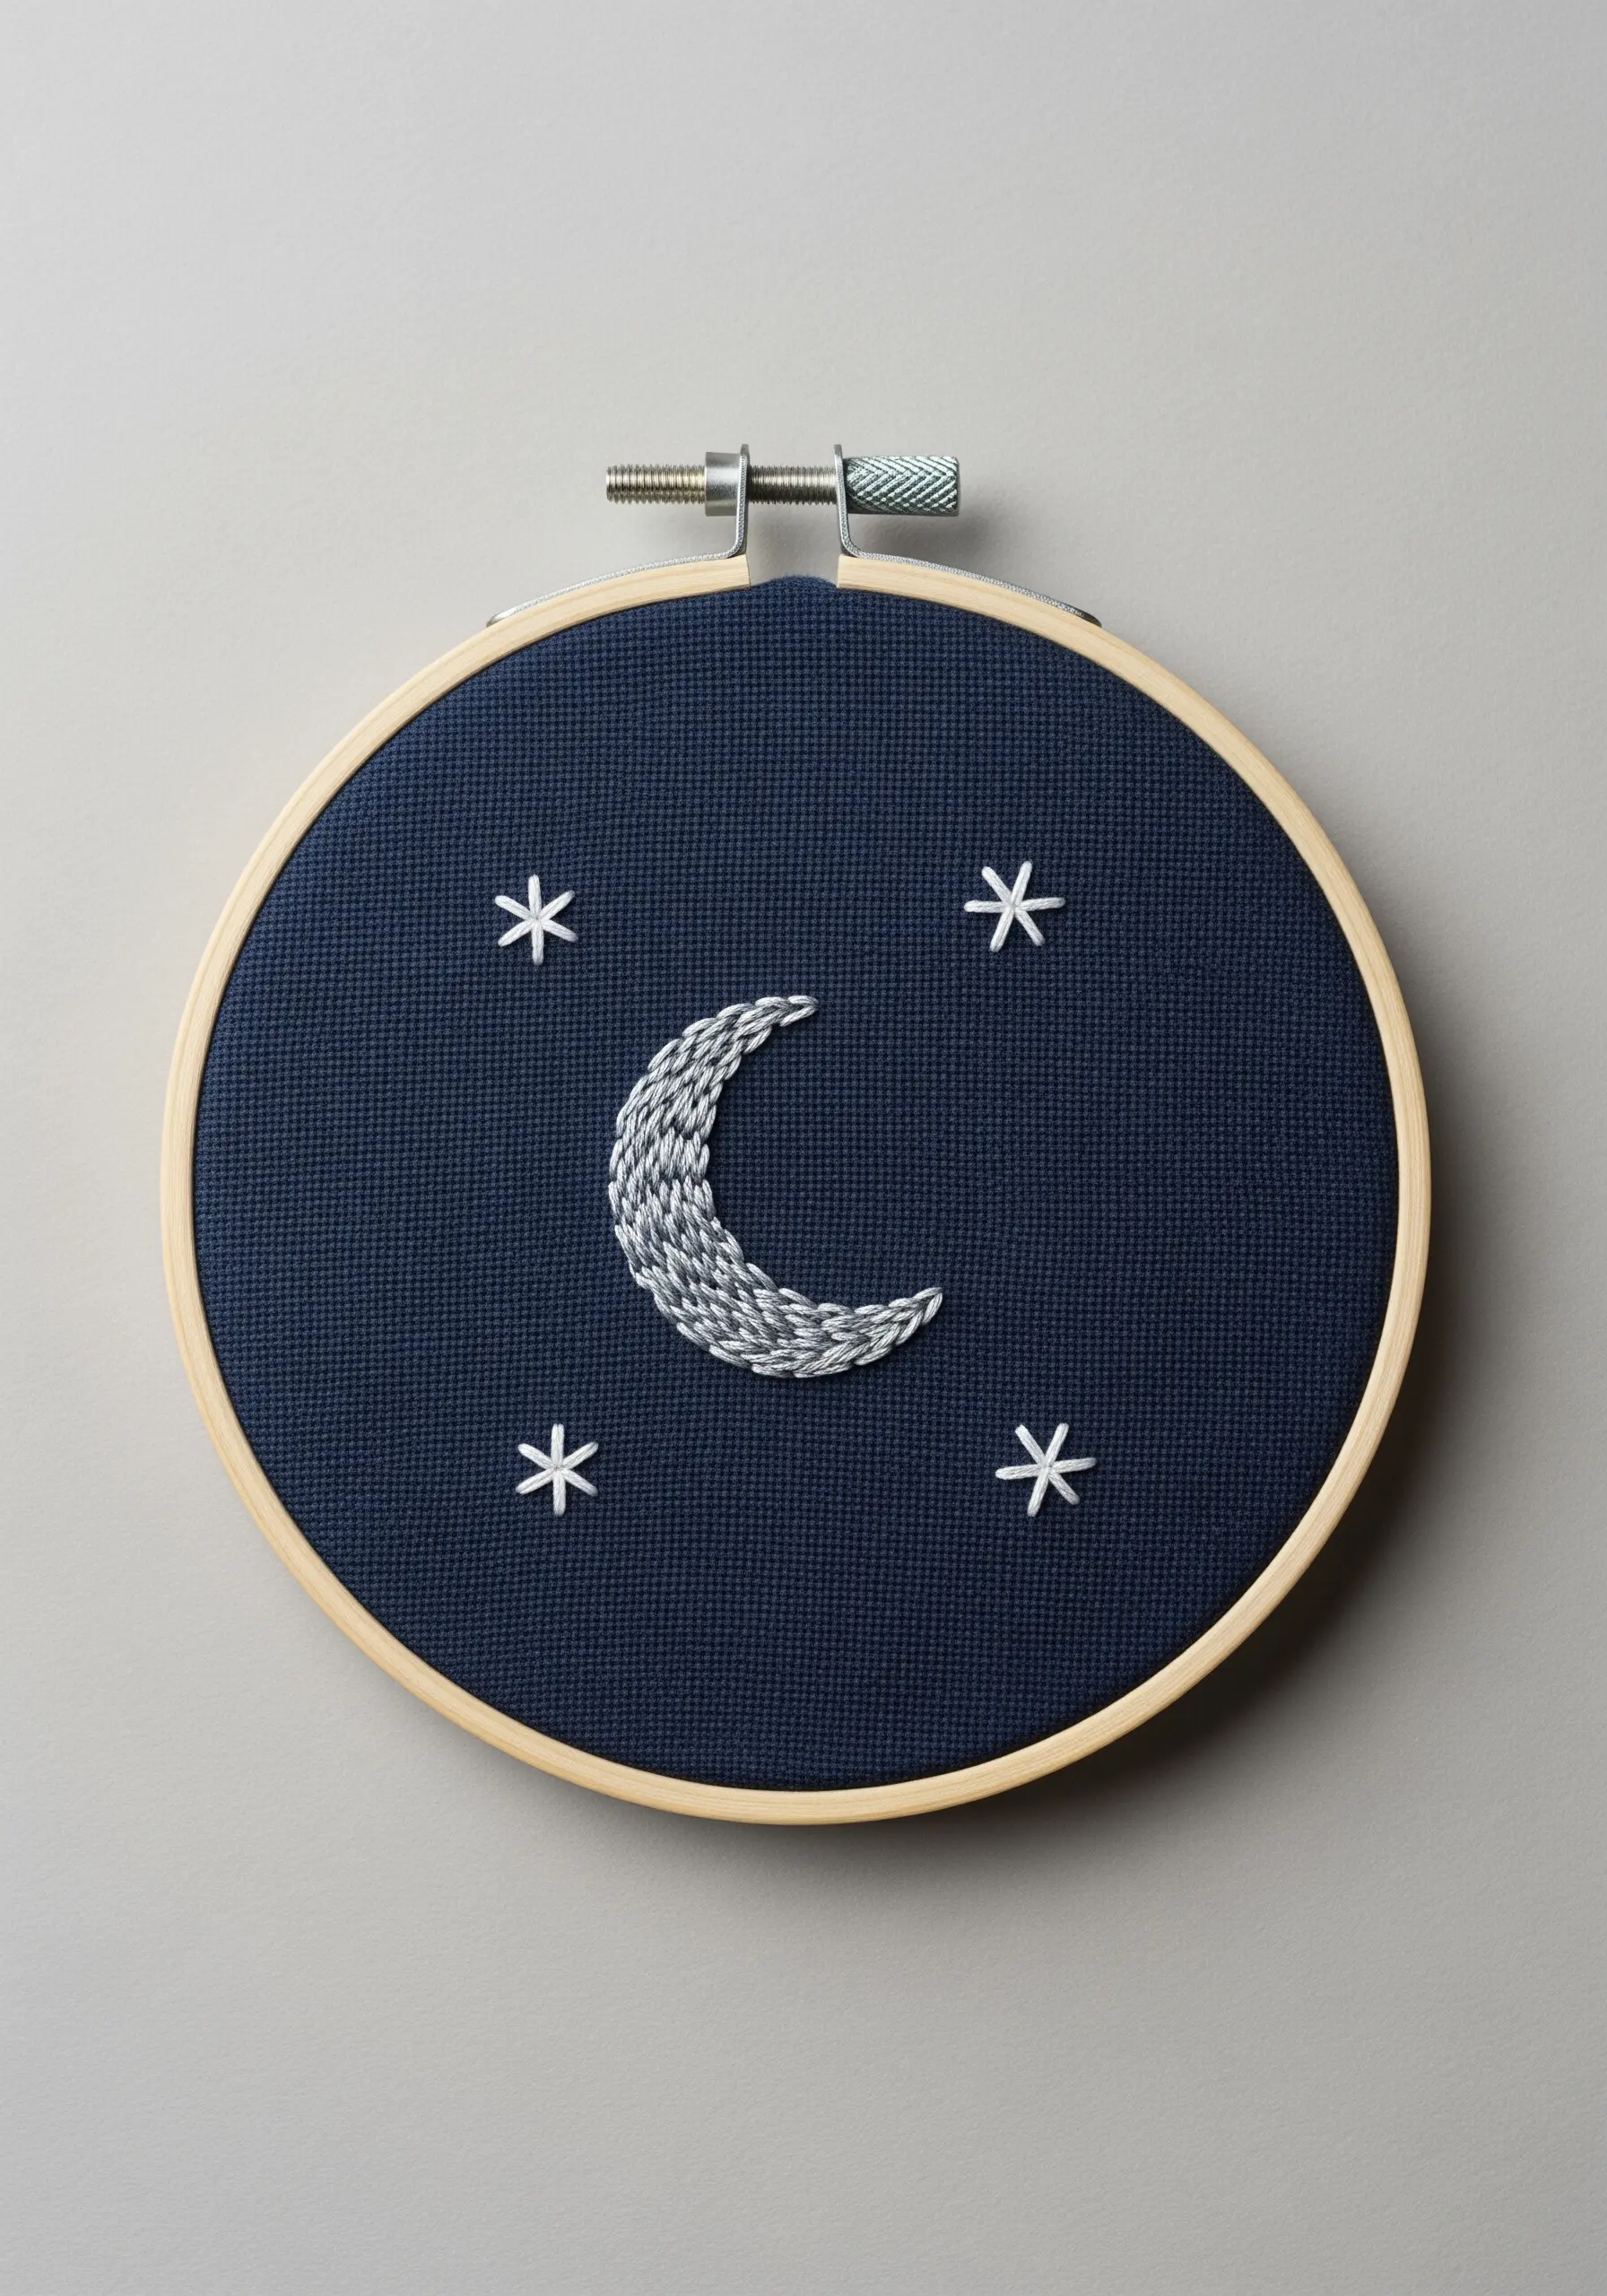
Instead of filling the crescent moon randomly, use directional satin stitch to create the illusion of light and shadow.
Angle your stitches to follow the curve of the moon, which adds a subtle, elegant sheen.
Using a variegated grey or silver metallic thread enhances this effect, giving the surface a shimmering, cratered texture.
For the stars, a simple five-point star made with straight stitches provides a sharp, graphic contrast to the moon’s soft glow.
These minimal sky moon designs look especially striking on dark Aida or linen fabric.
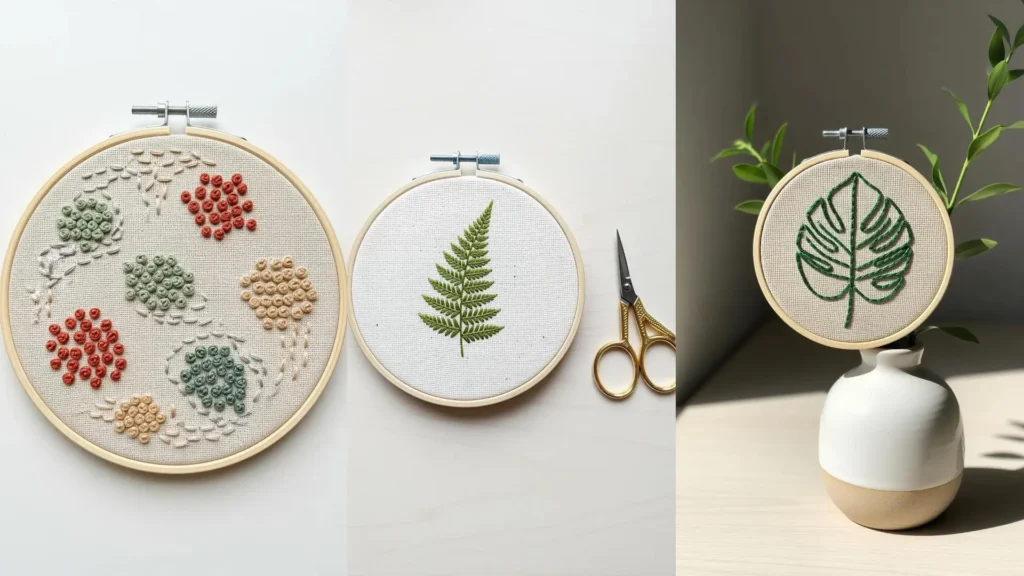
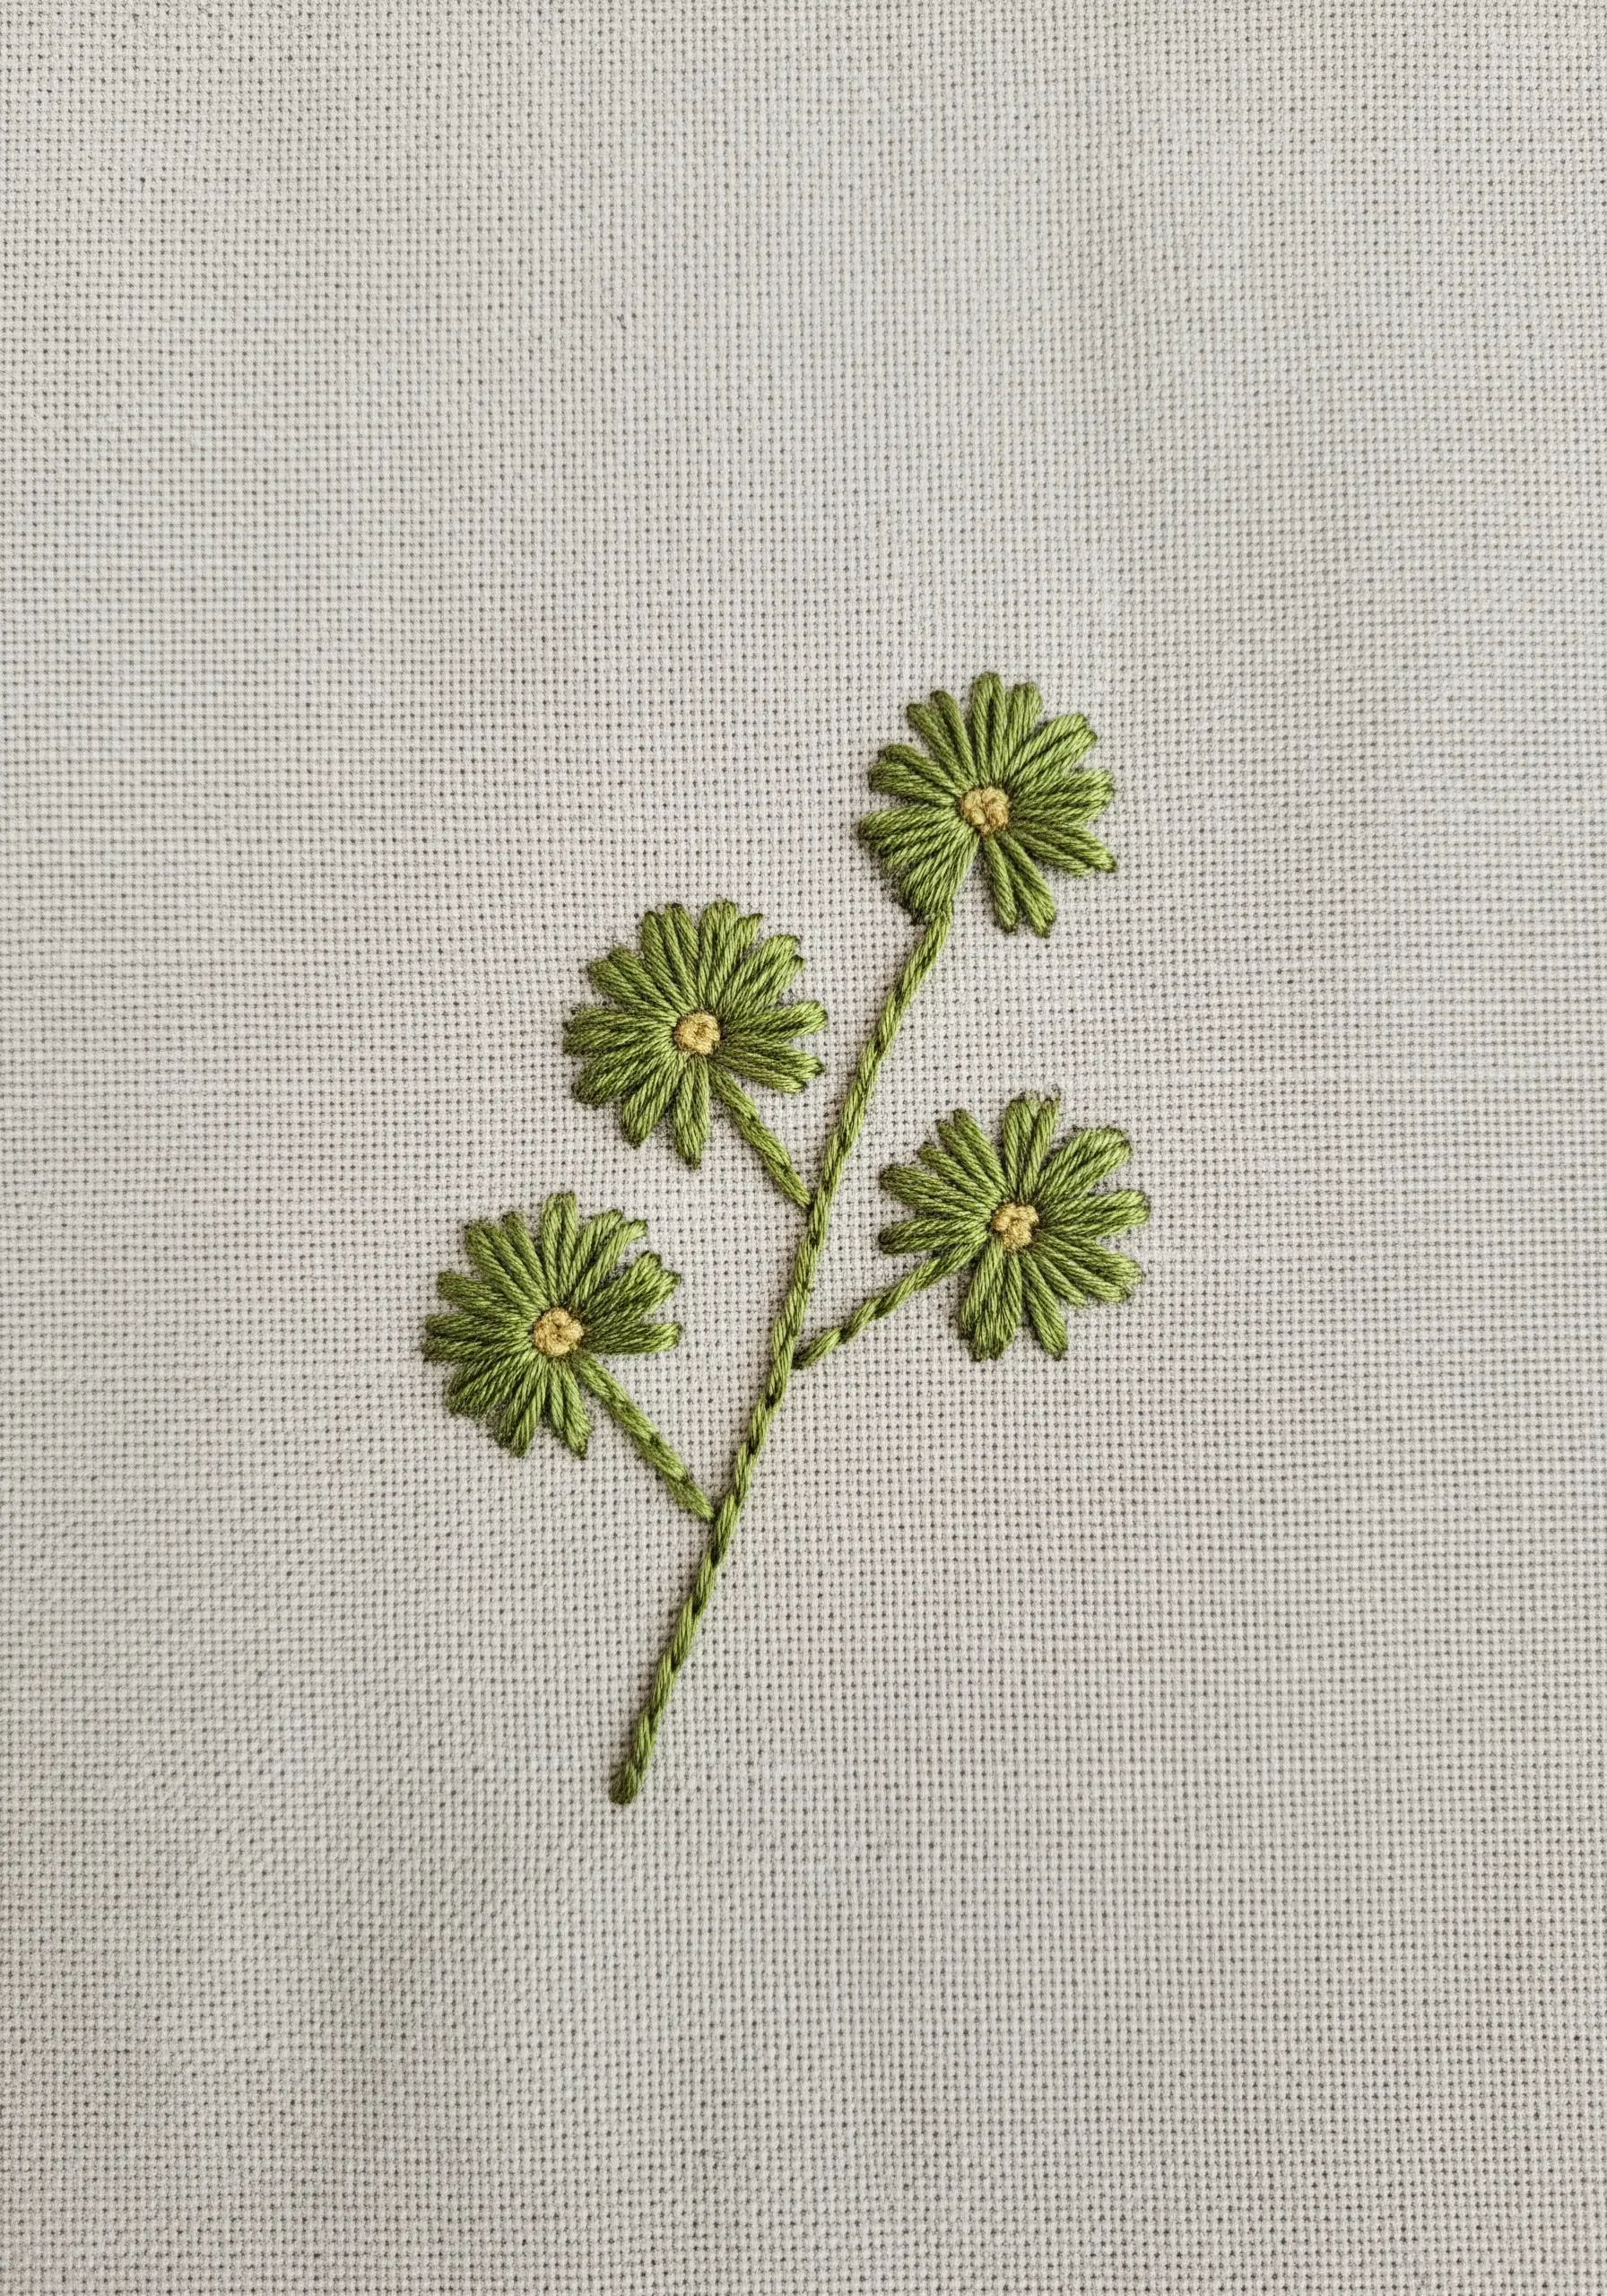
6. Stitch a Dandelion with Radiating Straight Stitches
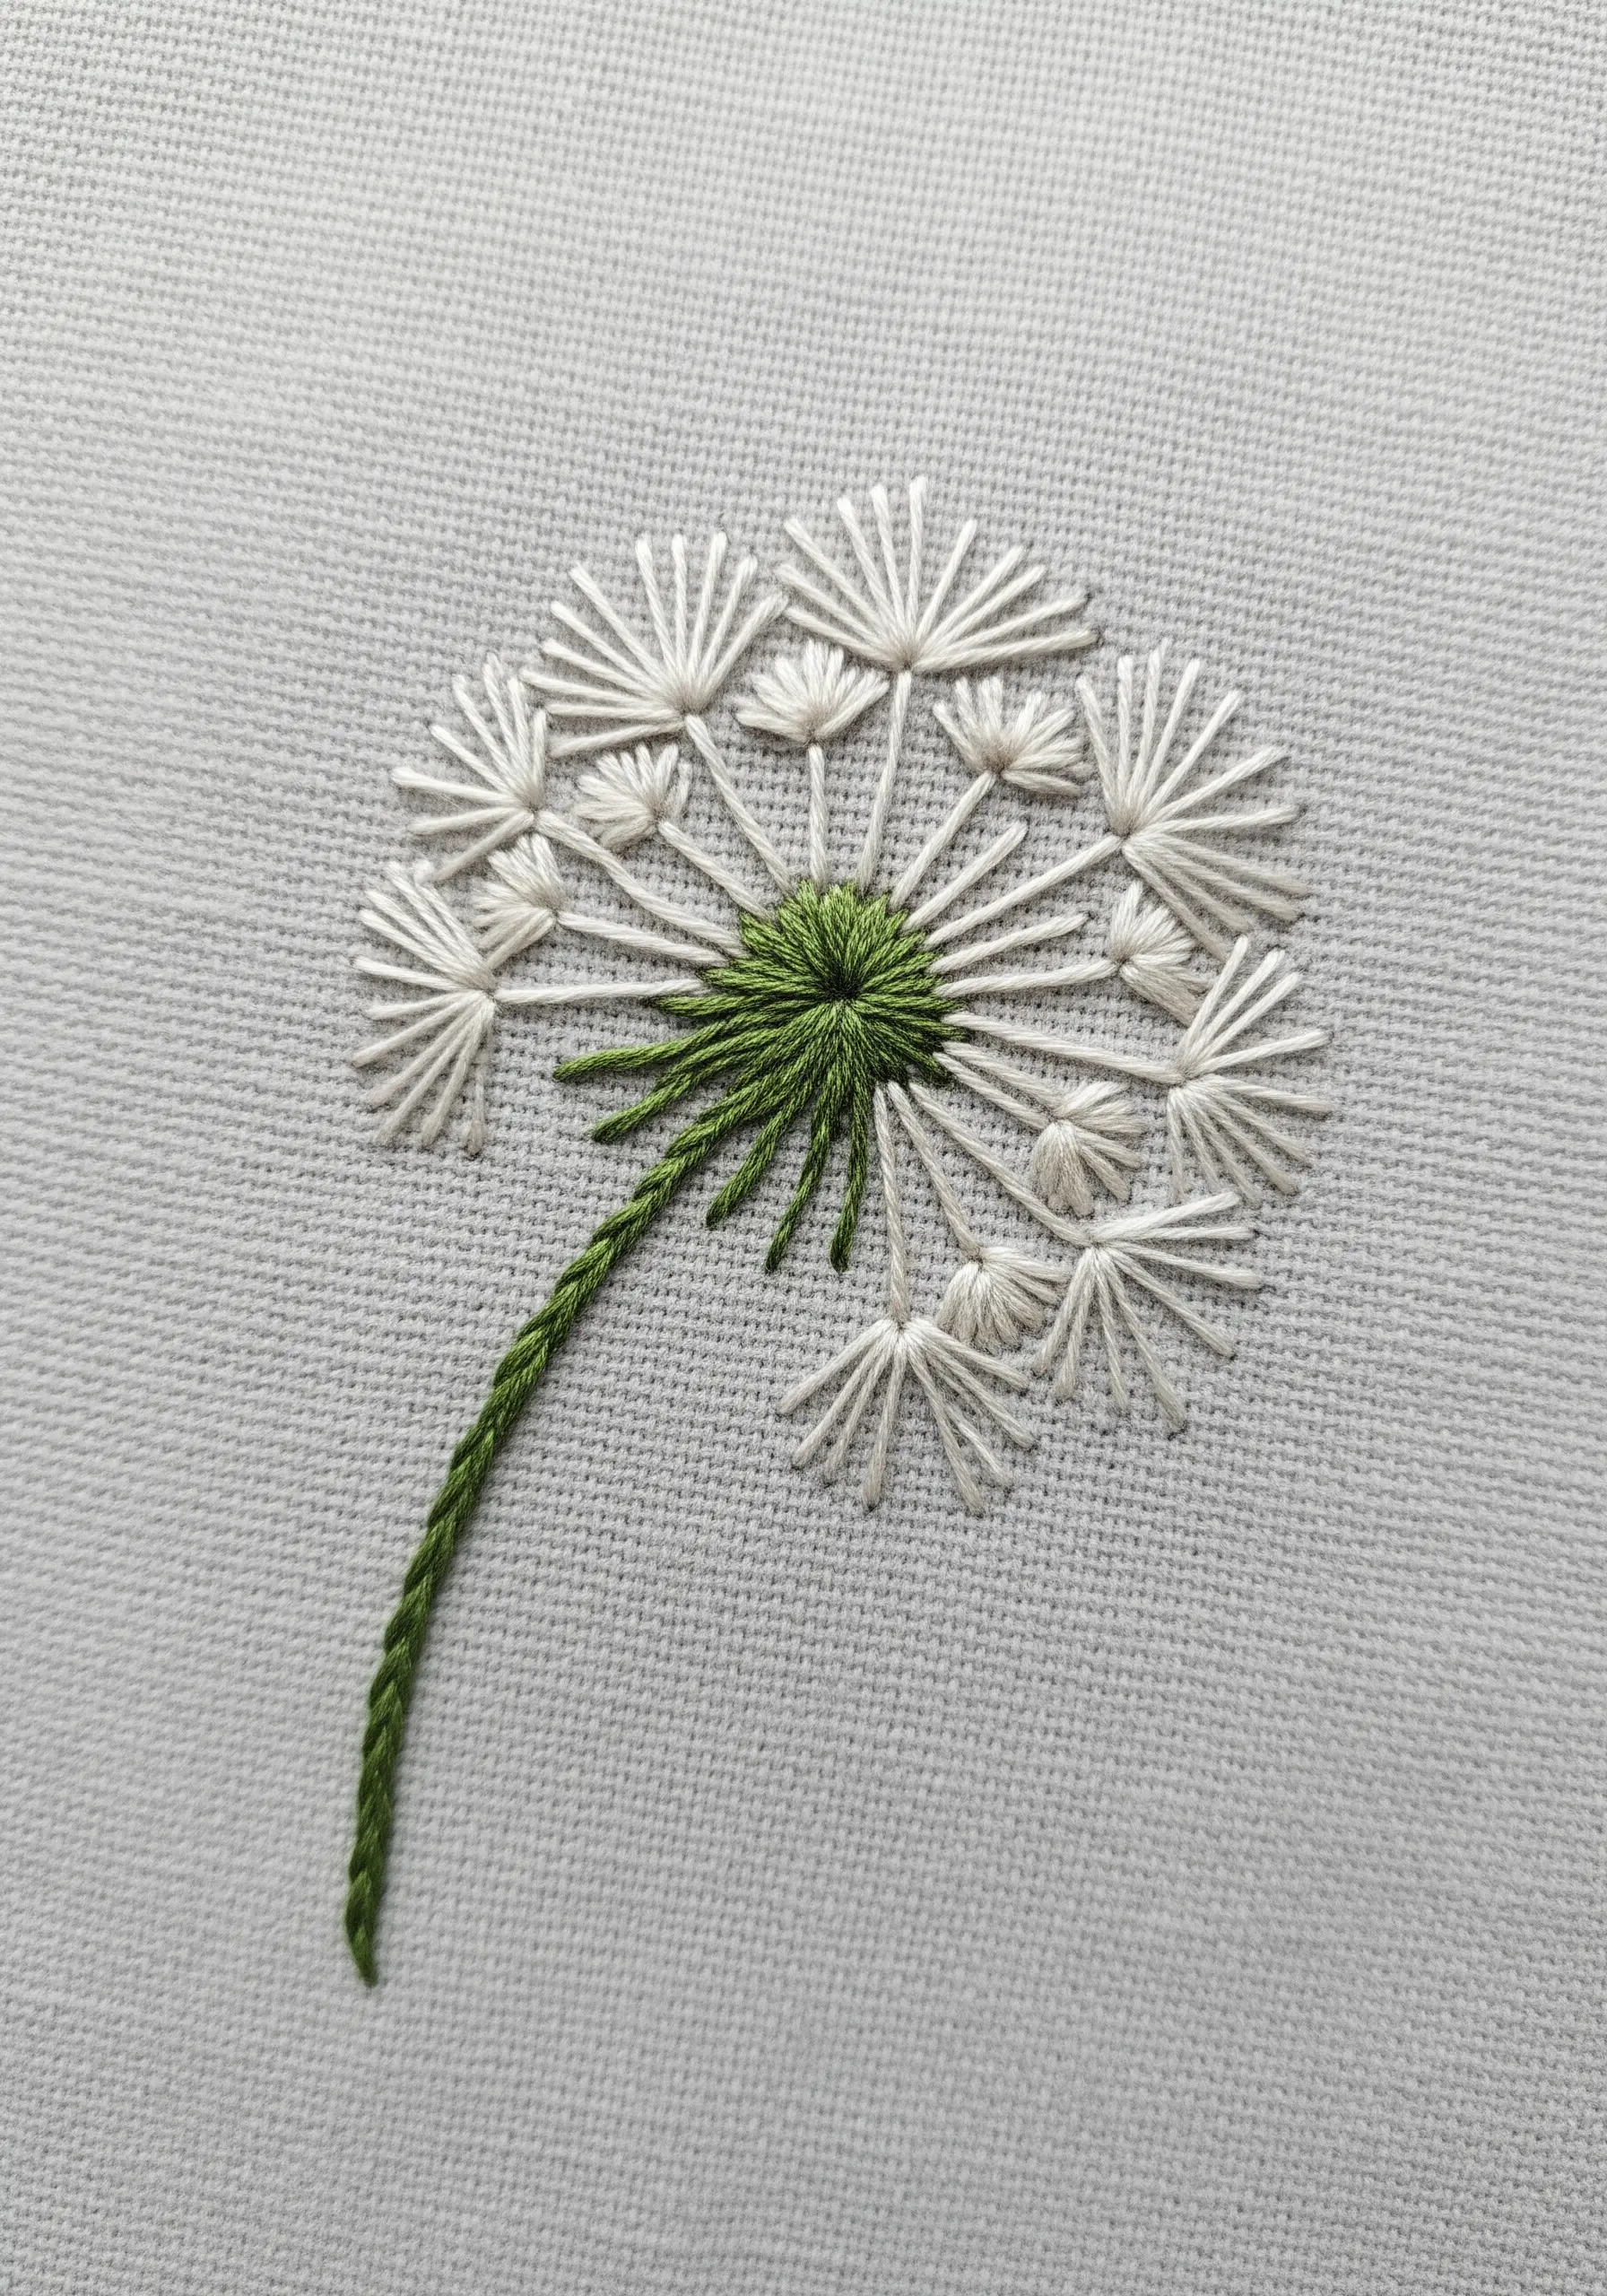
The key to a delicate dandelion puff is stitch placement and tension.
Create the fluffy seed head with groups of straight stitches radiating from a central point, like spokes on a wheel.
Maintain even, light tension to prevent the fabric from puckering under the force of so many stitches converging.
Anchor the design with a cluster of tiny green French knots at the core and a clean stem stitch for the stalk.
7. Outline Iconic Leaves with a Smooth Stem Stitch
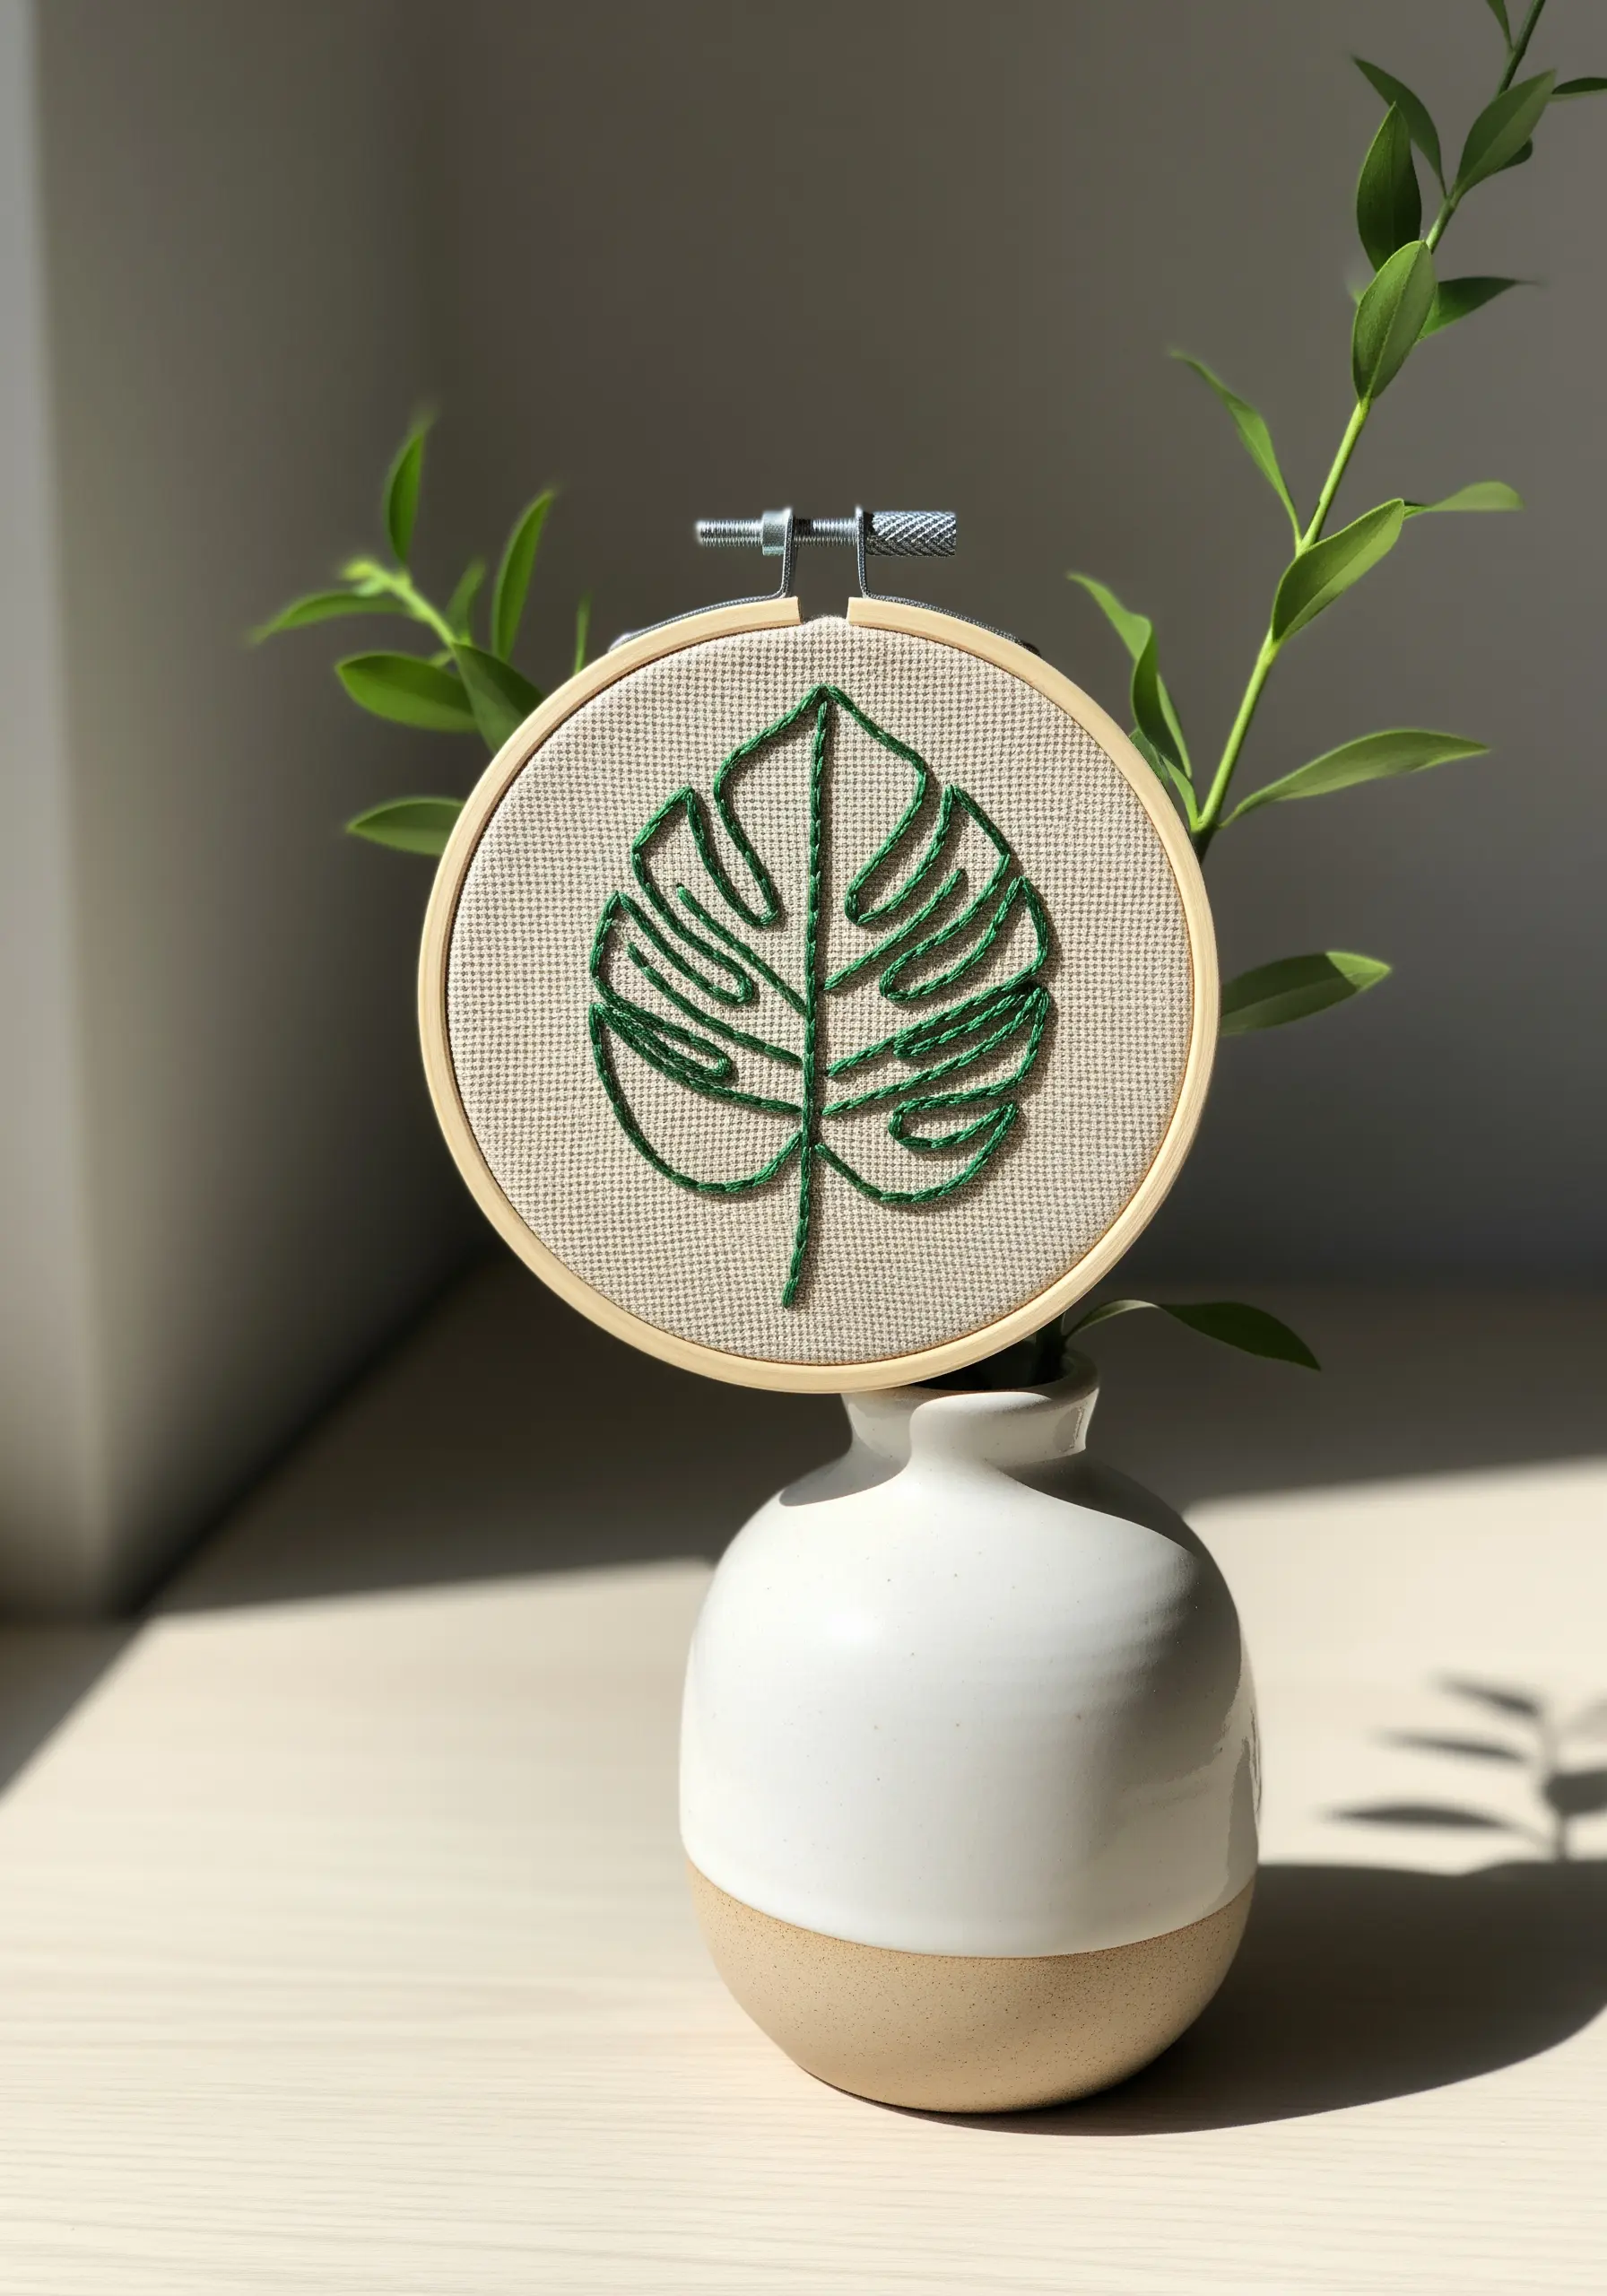
For leaves with iconic, curving shapes like the monstera, a stem stitch is your best choice for a graceful outline.
This stitch creates a slightly twisted, rope-like line that handles curves beautifully without creating sharp, awkward angles.
Use three strands of floss to give the line enough weight to stand on its own as a clean, minimalist botanical statement.
It’s the perfect way to capture the essence of a plant with just a few elegant lines.
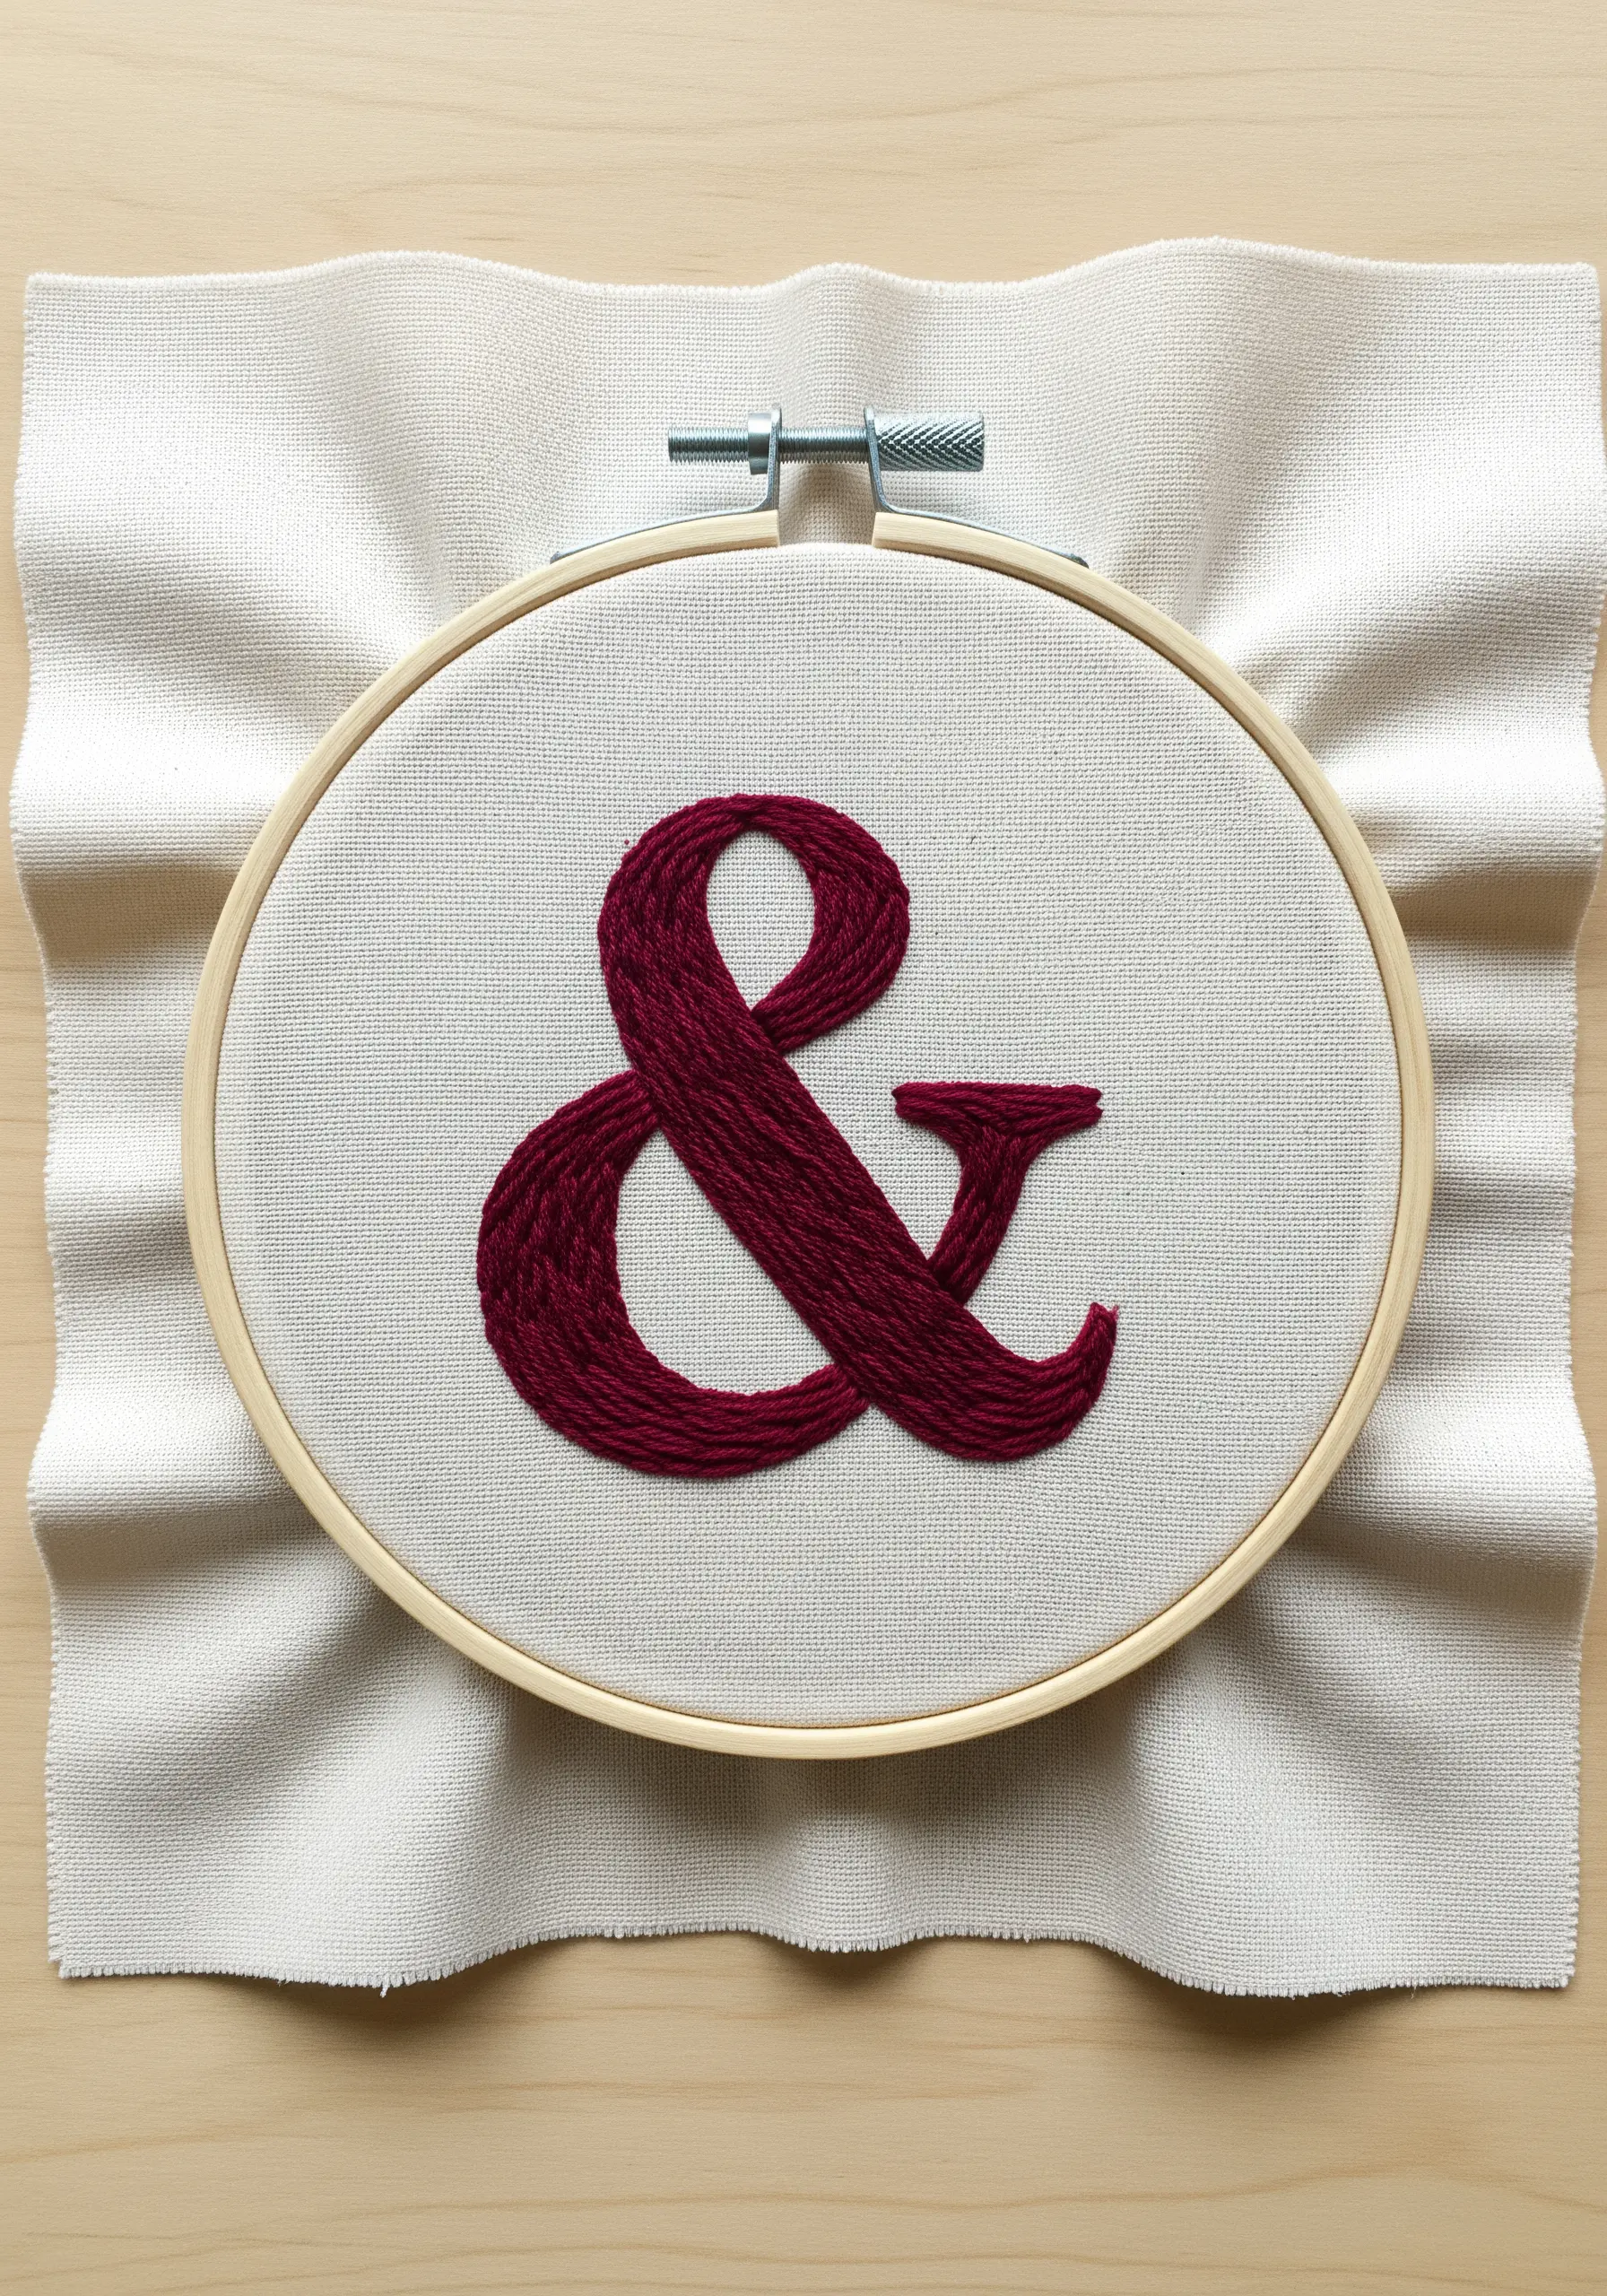
8. Elevate Simple Icons with Variegated Thread
Transform a simple outline, like this coffee cup, into something more dynamic by using a single variegated thread.
The subtle, built-in color shifts add depth and visual interest without any extra effort or color changes on your part.
Stitch the outline with a two-strand backstitch for delicacy and definition.
This is an excellent technique for adding a sophisticated touch to kitchen linens, tote bags, or clothing.
9. Fill Shapes with Textured Laid Work
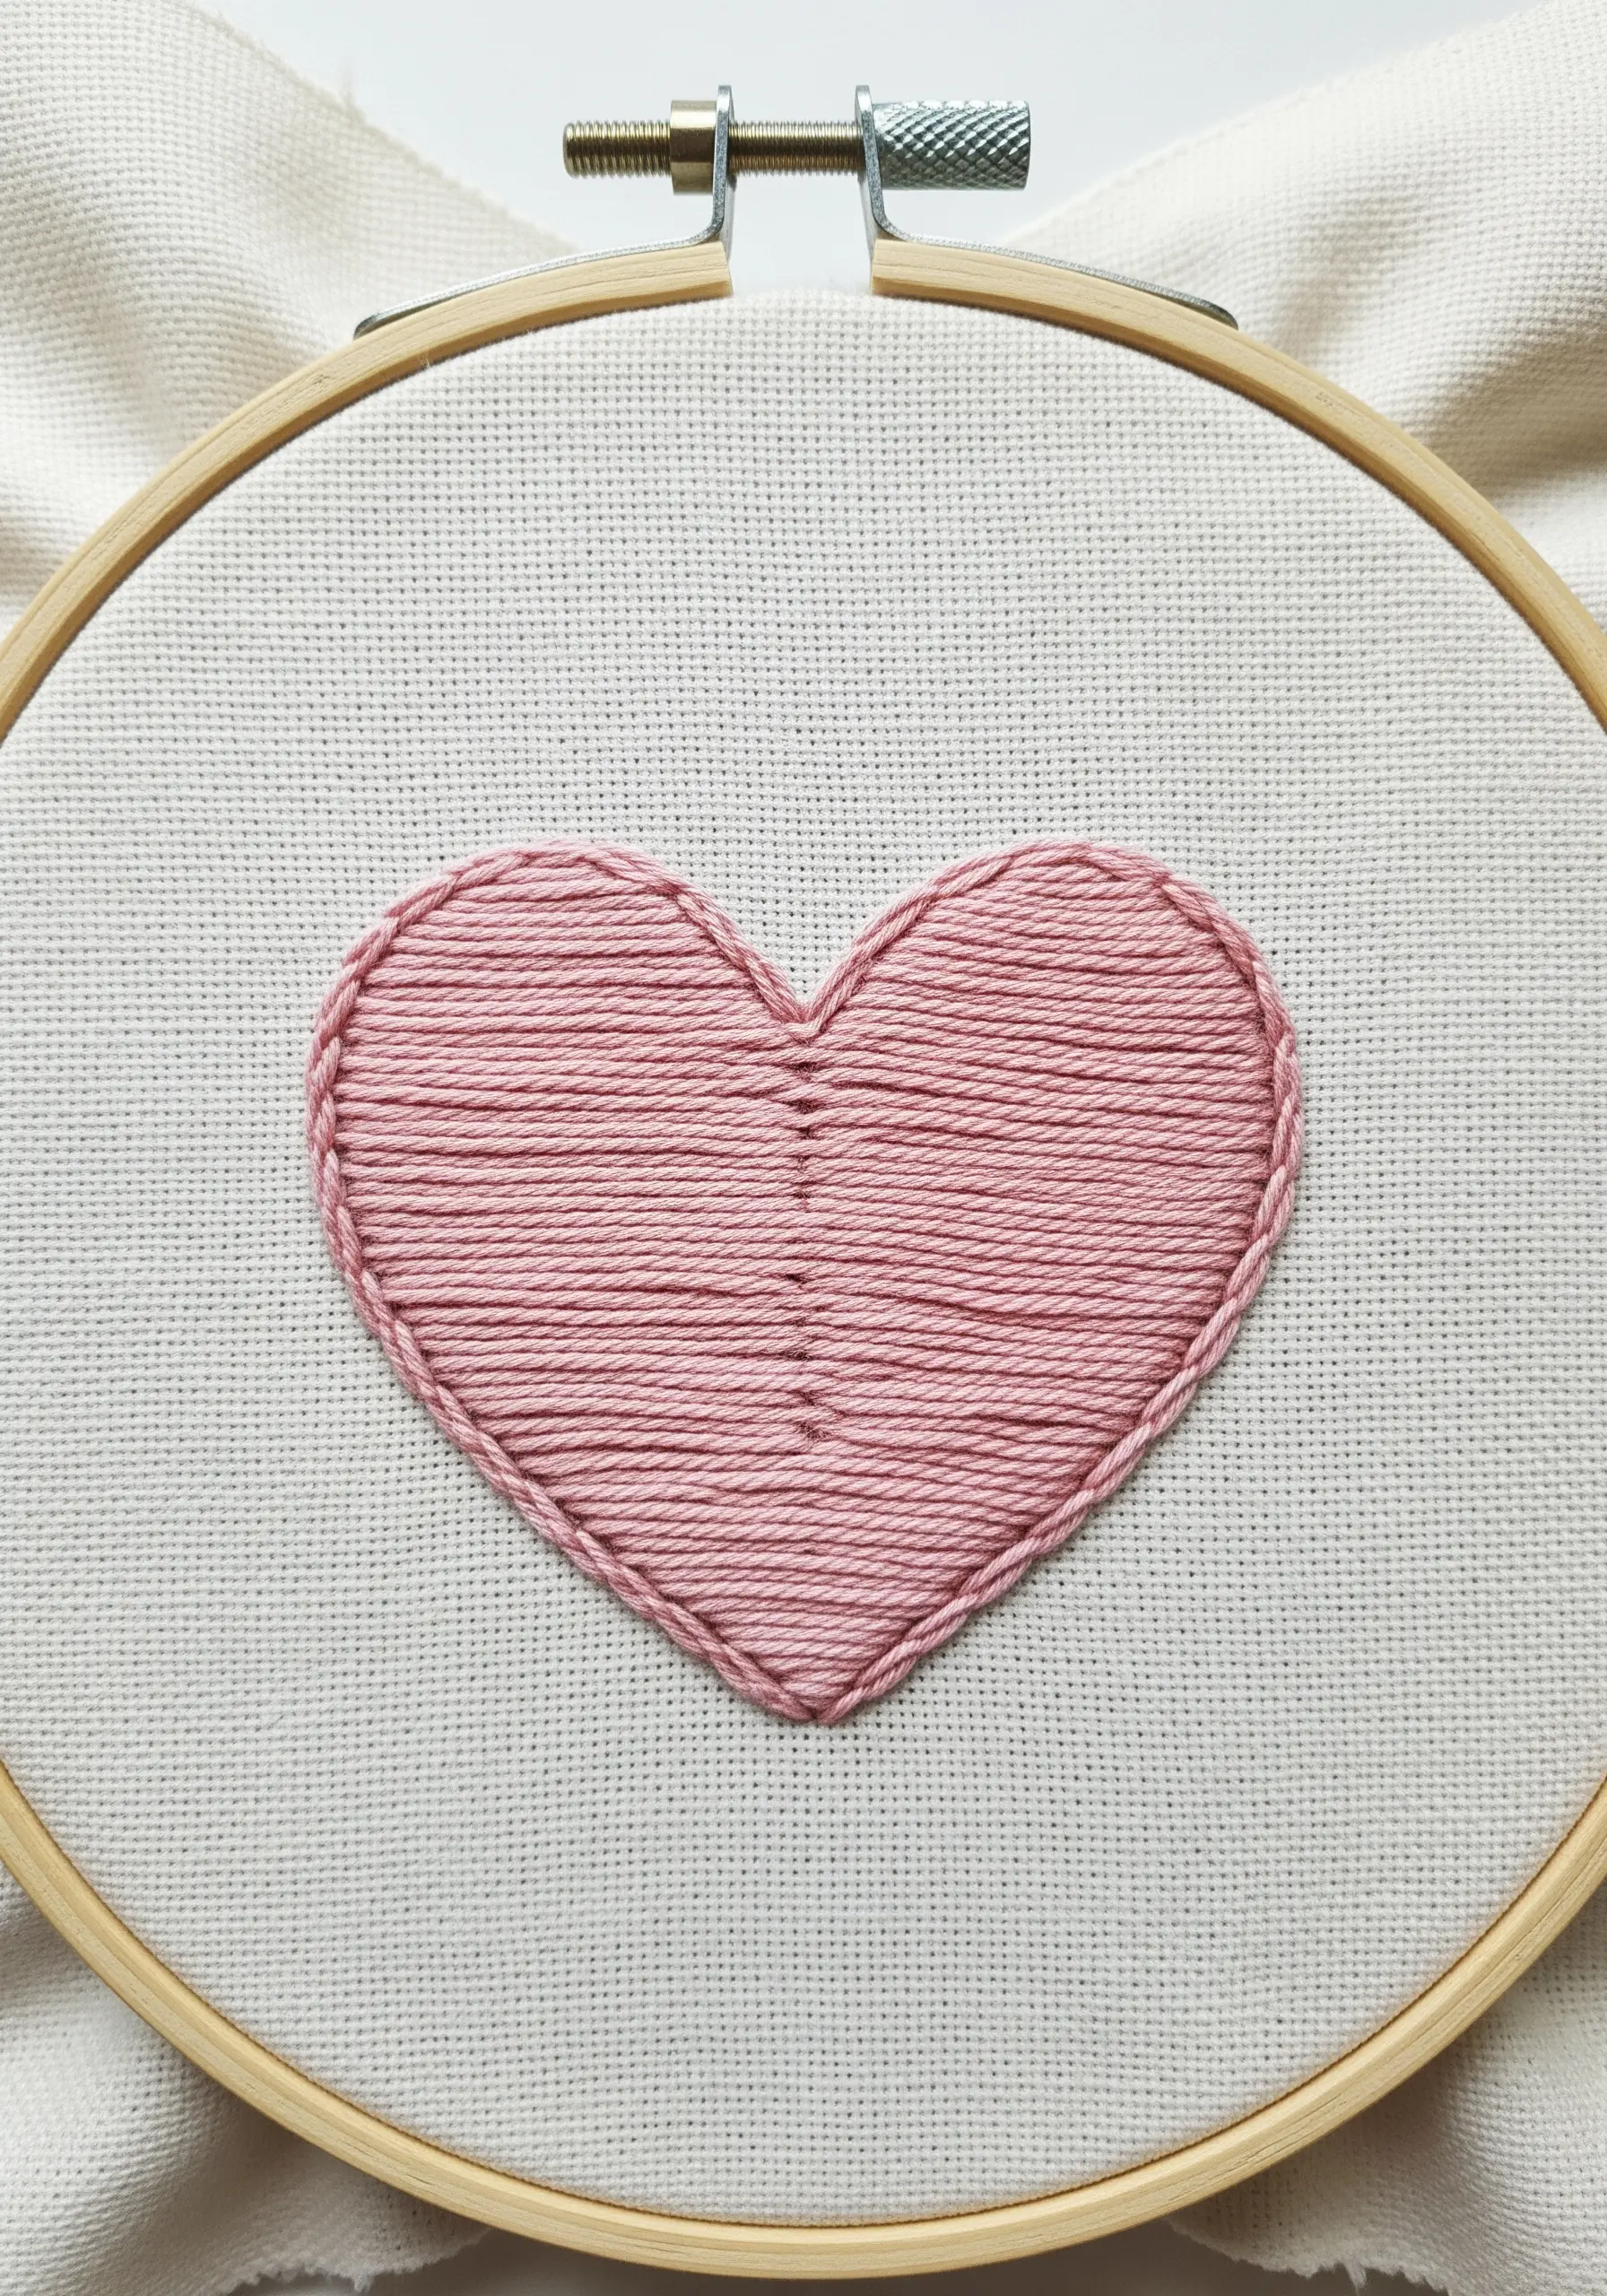
For filling a medium-sized shape like a heart, a standard satin stitch can sometimes pucker or become uneven.
Instead, try laid work: lay down long, parallel straight stitches across the entire shape, then anchor them with tiny perpendicular stitches on top.
This technique uses less thread, lies perfectly flat, and creates a beautiful, woven texture that adds a layer of sophistication to a simple motif.
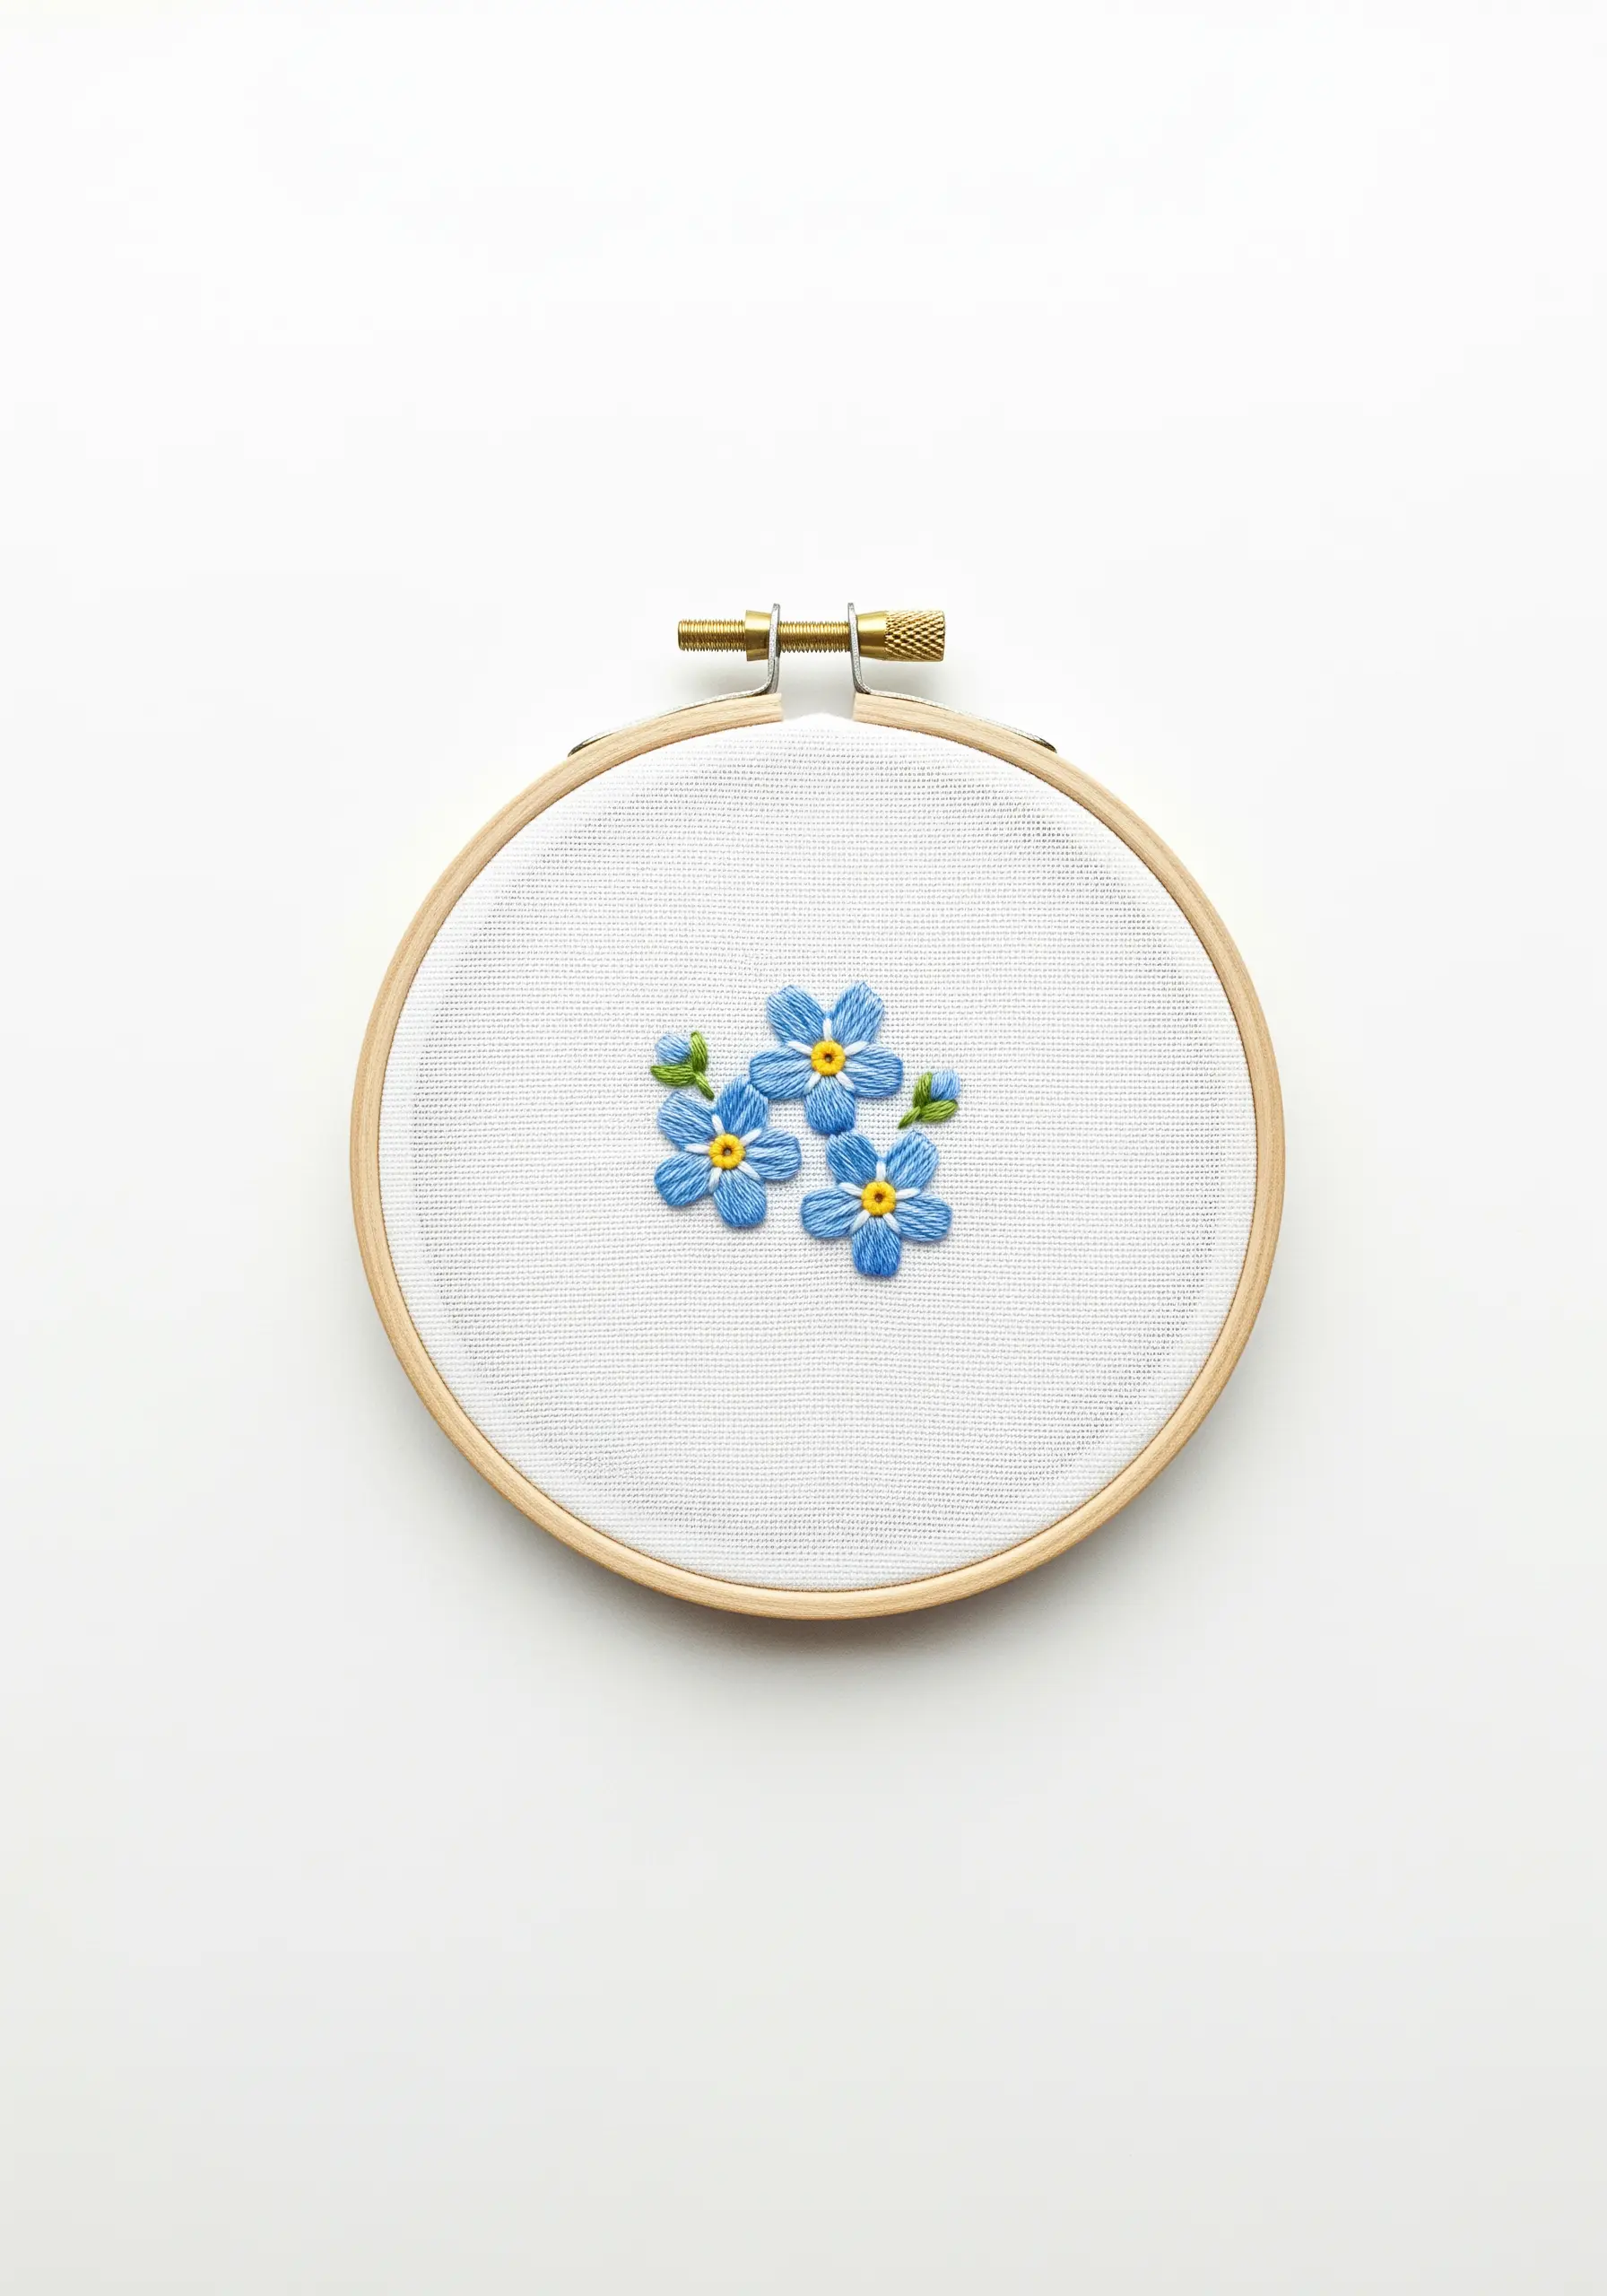
10. Build Delicate Petals with Lazy Daisy Stitches
The lazy daisy stitch, or detached chain stitch, is perfect for creating small, uniform petals.
Stitch five or six loops in a circle, all starting from the center, to form each flower head.
Add a single yellow French knot in the middle for a classic daisy center.
This simple combination allows you to build charming, subtle floral embroidery motifs that are ideal for decorating apparel or creating delicate hoop art.
11. Master Clean Edges in Satin Stitch Blocks
Achieving a crisp edge on a satin-stitched shape is a common challenge for beginners.
The secret is to first outline the entire shape with a split stitch. This creates a slightly raised border that acts as a guide, or a ‘fence,’ for your satin stitches.
Tuck the beginning and end of each satin stitch just under this outline. The result is a perfectly contained shape with a clean, professional edge.
12. Capture Whimsy with a Refined Backstitch
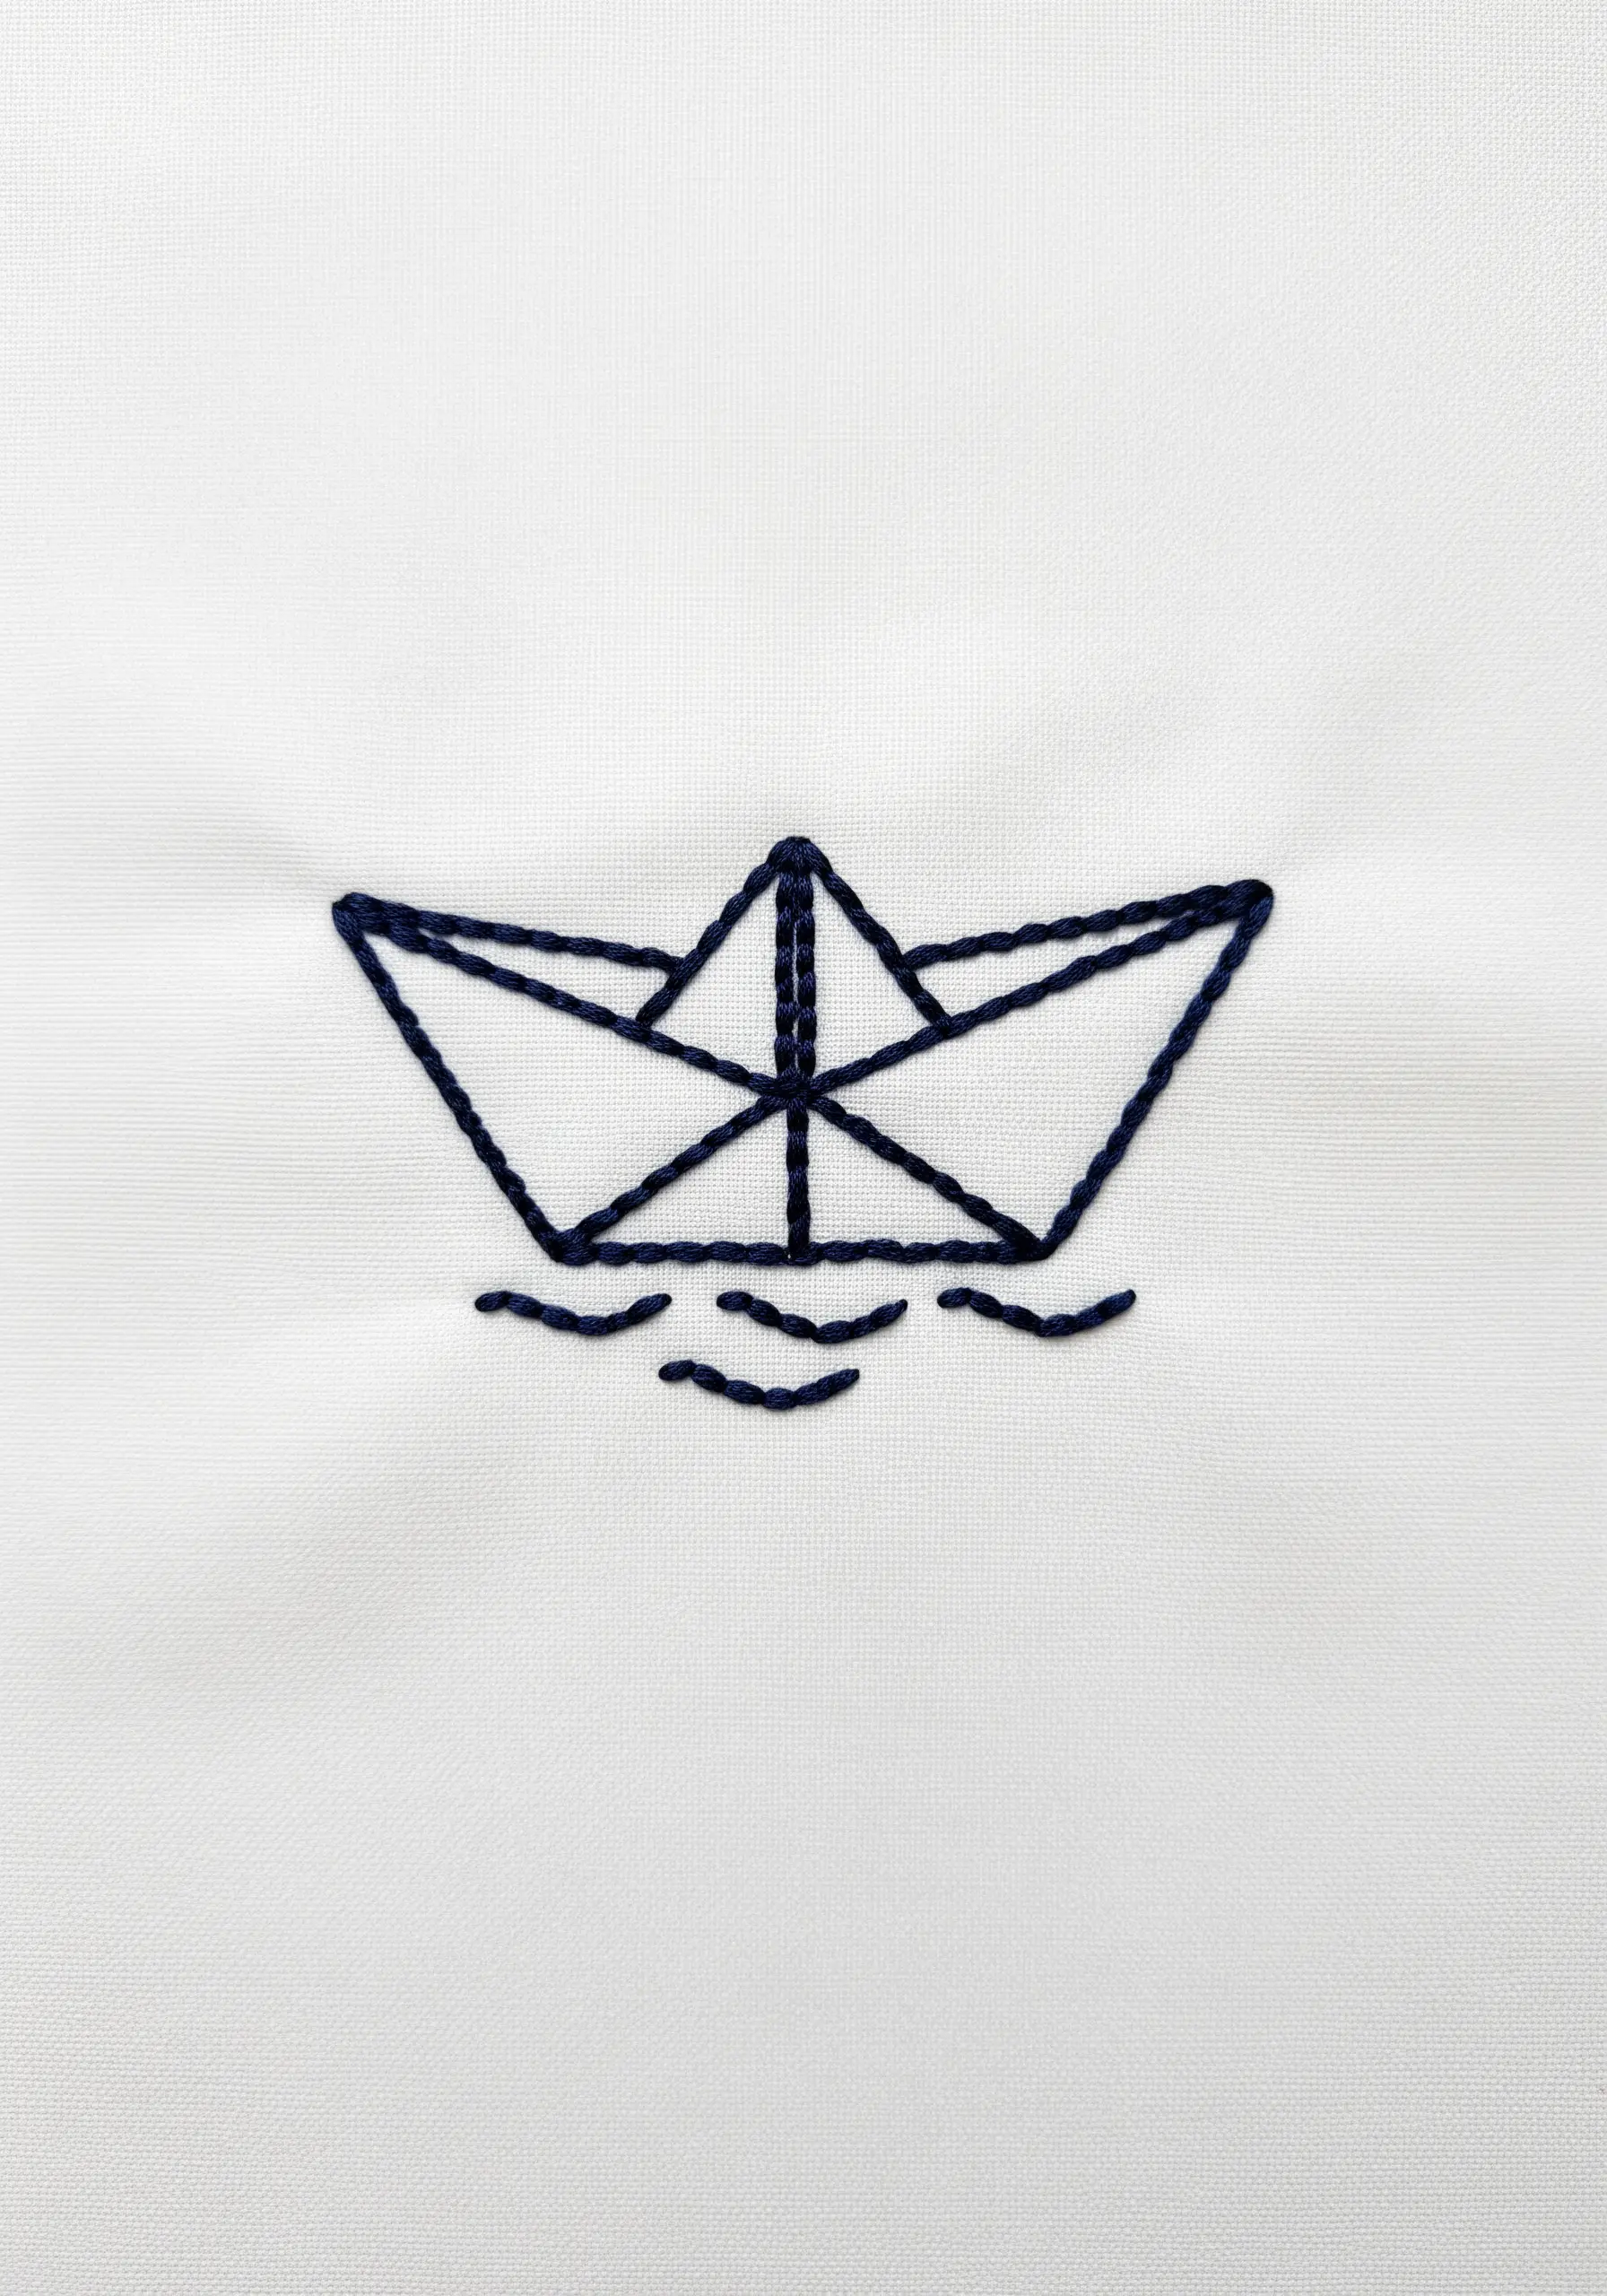
For simple line drawings like this paper boat, the quality of your backstitch makes all the difference.
Focus on keeping your stitch length consistent throughout the design to create a clean, intentional line that looks drawn, not sewn.
Using three strands of floss provides a nice, visible weight without appearing bulky, making it perfect for minimalist thread art on clothing or hoop art.
13. Weave Abstract Patterns Directly in the Hoop
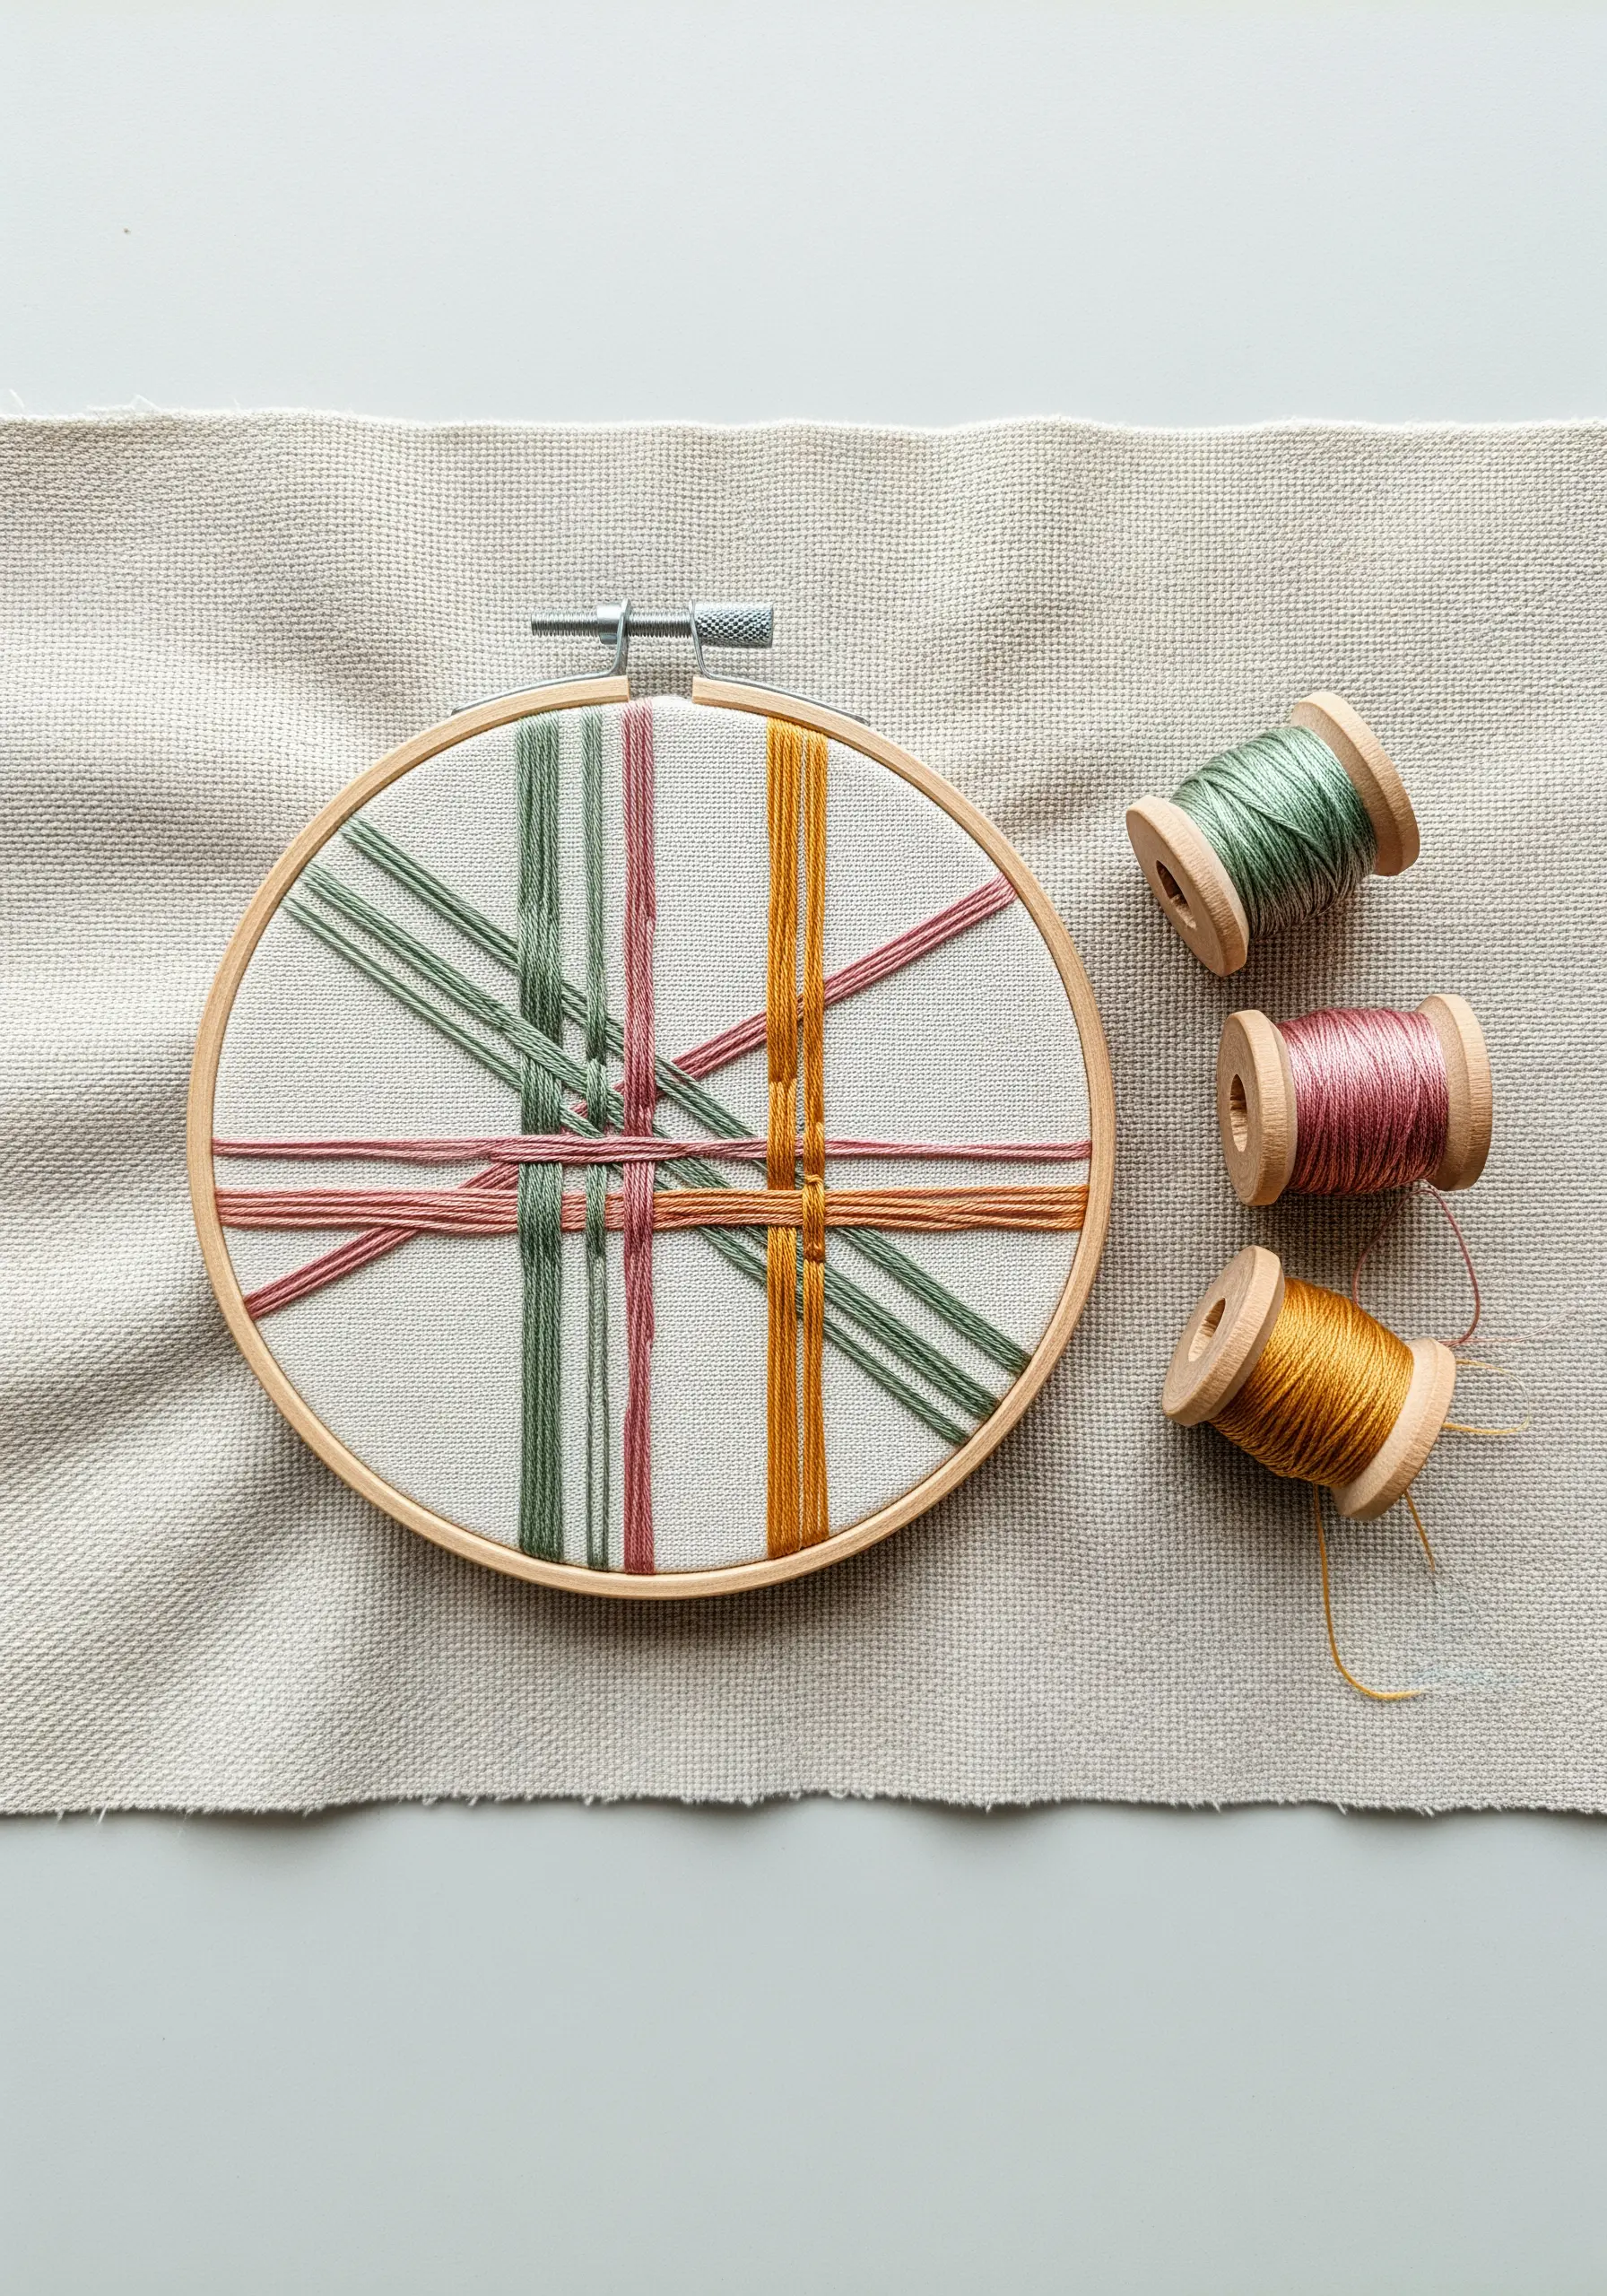
Move beyond traditional stitches and use your hoop as a small loom.
Create a ‘warp’ by stretching long strands of thread vertically across the hoop, then ‘weave’ other colors horizontally over and under the warp threads.
This technique is a fantastic way to play with color interaction and texture, turning leftover floss into a modern, tactile art piece.
There are no rules—simply explore how the colors and lines intersect.
14. Create Bold Icons with a Heavy Stem Stitch
To make a simple icon like this house pop, use all six strands of your embroidery floss.
Pair the heavy thread with a stem stitch instead of a backstitch. The stem stitch creates a thicker, more solid line because the stitches overlap more smoothly.
This combination produces a bold, graphic look with a satisfying texture, perfect for minimalist designs that need to make a statement.
15. Add Dimension to Florals with Color Layering
Give simple lazy daisy flowers more life by adding a touch of dimension.
After stitching the blue petals and yellow French knot centers, add tiny green lazy daisy stitches at the base of each flower to represent sepals (the small leaves beneath the blossom).
This tiny detail grounds the flowers and adds a subtle layer of realism, making the entire composition feel more complete and thoughtful.
16. Evoke Delicacy with an Open Fishbone Stitch
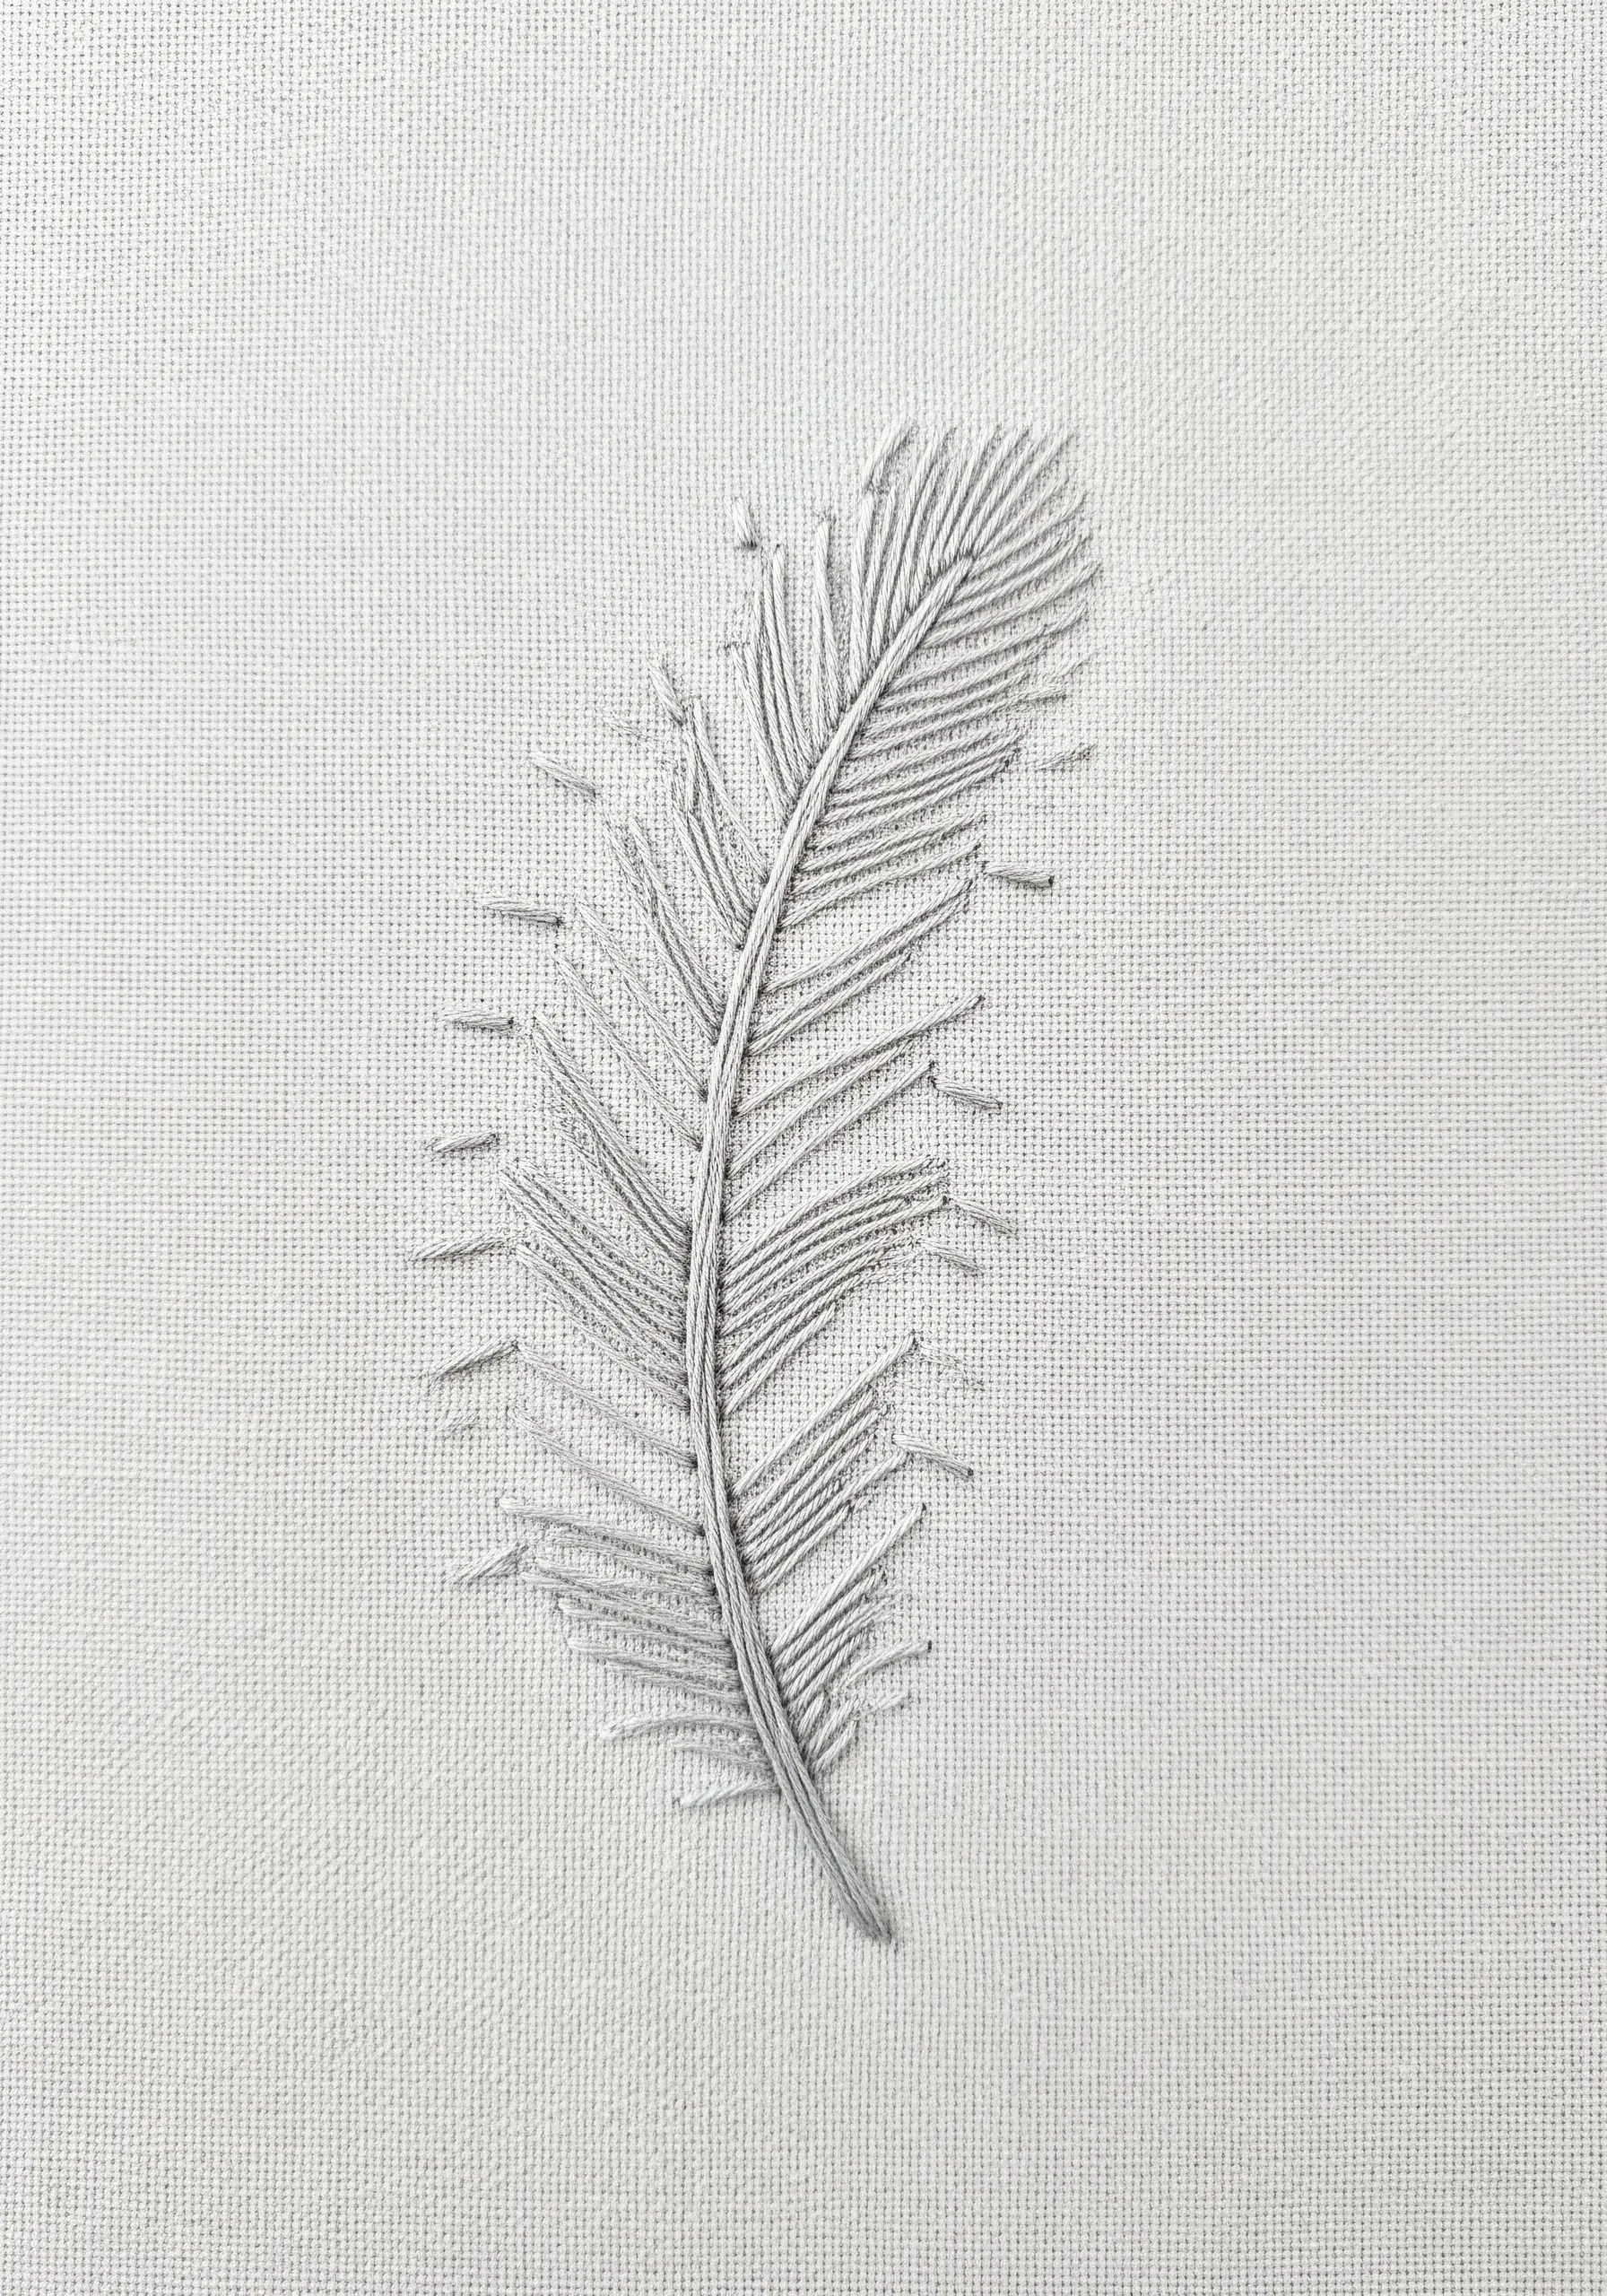
To create the light, airy structure of a feather, use an open fishbone stitch.
First, stitch a central line for the quill using a stem stitch. Then, work angled straight stitches from the outline towards the center, alternating sides, leaving space between them.
This method creates a beautiful herringbone-like texture that mimics the feather’s natural structure without being dense or heavy, making it perfect for delicate subjects.
17. Achieve a Flawless Fill on Curved Typography
Stitching smooth curves with satin stitch can be tricky. The solution is to work in small, manageable sections.
Mentally divide the letter or shape into smaller parts based on the curves. Stitch each section separately, angling your stitches slightly to follow the direction of the curve.
This approach prevents the long, awkward stitches that can occur when trying to fill a complex curve in one go, resulting in a perfectly smooth, contoured finish.
18. Combine Stitches for Maximum Textural Impact

Elevate a simple flower by focusing on textural contrast.
Use clean, flat straight stitches for the petals to create a smooth, ray-like effect.
Then, for the center, create a dense, bumpy cluster of French knots. Varying the number of wraps (one or two) for each knot will create subtle differences in size, adding even more dimension.
This pairing of flat and raised stitches makes the motif far more engaging to the eye and touch.
19. Explore Abstract Forms with Knot Clusters
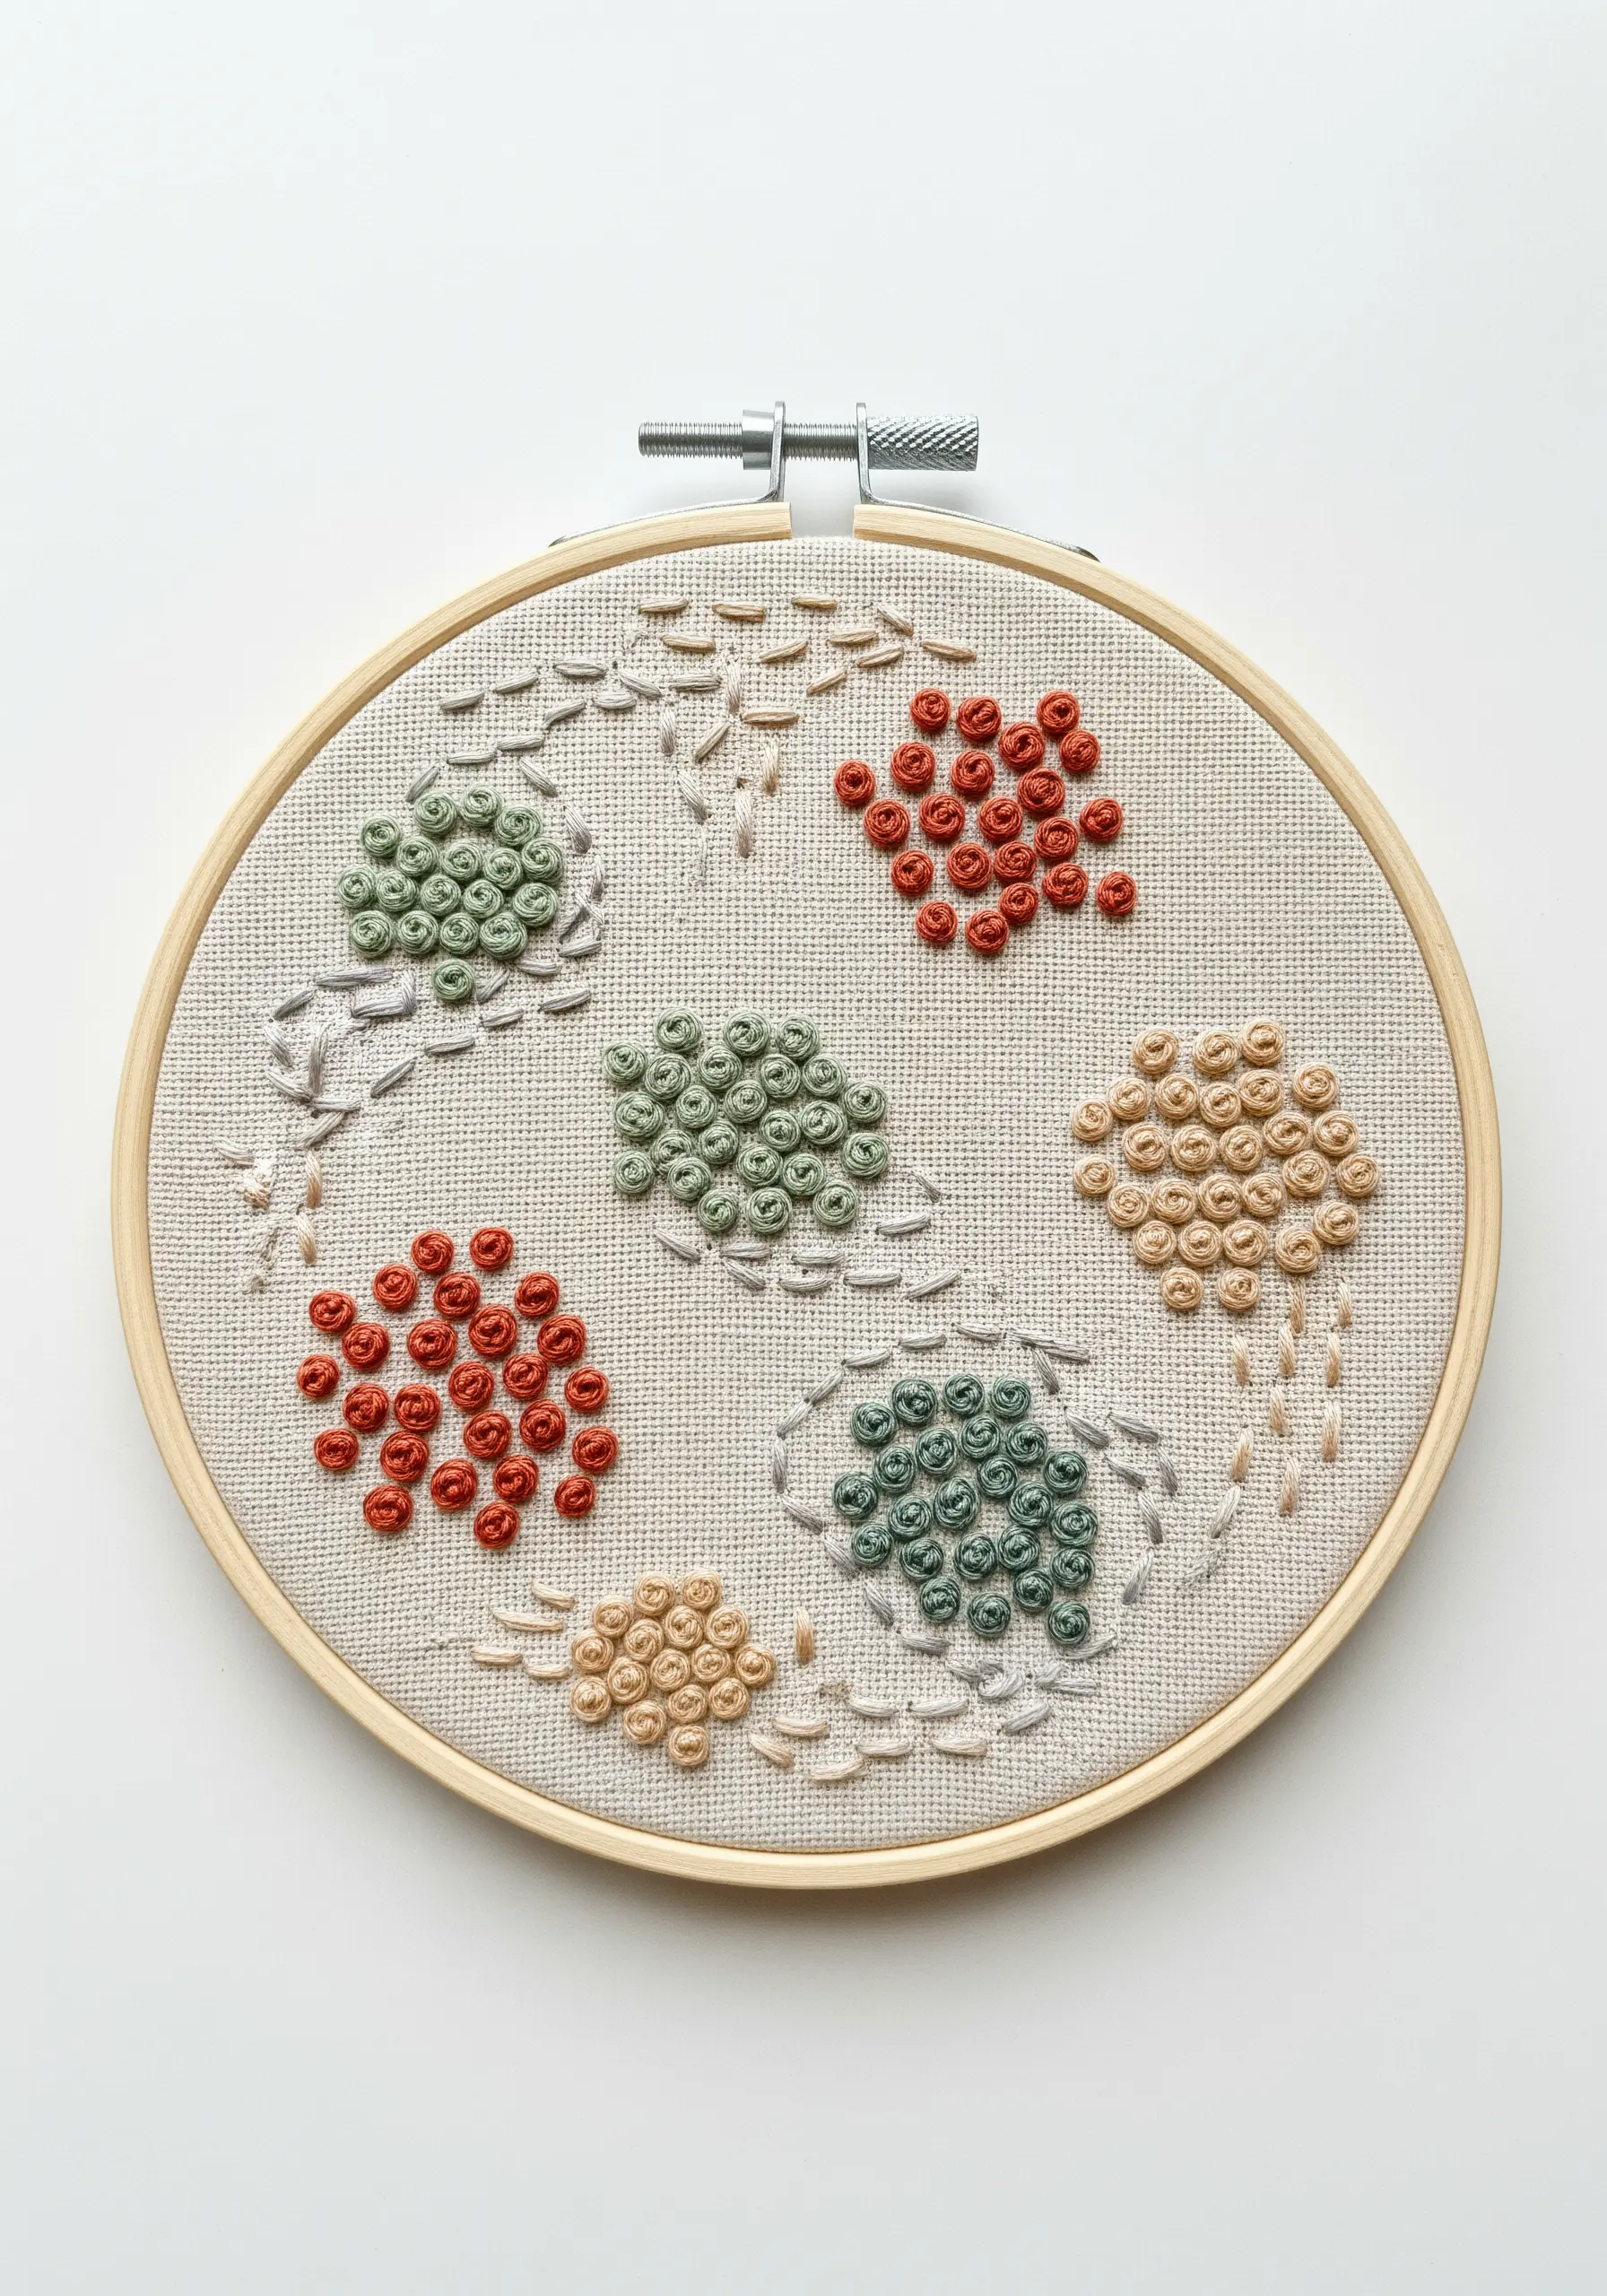
Move away from representative shapes and explore texture itself as the subject of your art.
Using French knots or colonial knots, stitch organic ‘clouds’ of color. Play with the density—packing them tightly in some areas and spacing them out in others.
You can contain these textured masses with a simple running stitch outline or let them float freely.
This is a wonderfully relaxing and meditative stitching exercise that also creates beautiful abstract art.
20. Perfect Your Silhouettes with a Whipped Backstitch
For a flawless, solid silhouette, a simple backstitch can sometimes leave tiny gaps that disrupt the line.
Solve this by whipping your backstitch. After completing the outline, take the same color thread and weave it under and over each stitch without going through the fabric.
This action wraps the original stitches, closing any gaps and creating one continuous, fluid line that makes your line art look exceptionally clean and polished.
21. Mimic Nature with Directional Thread Painting
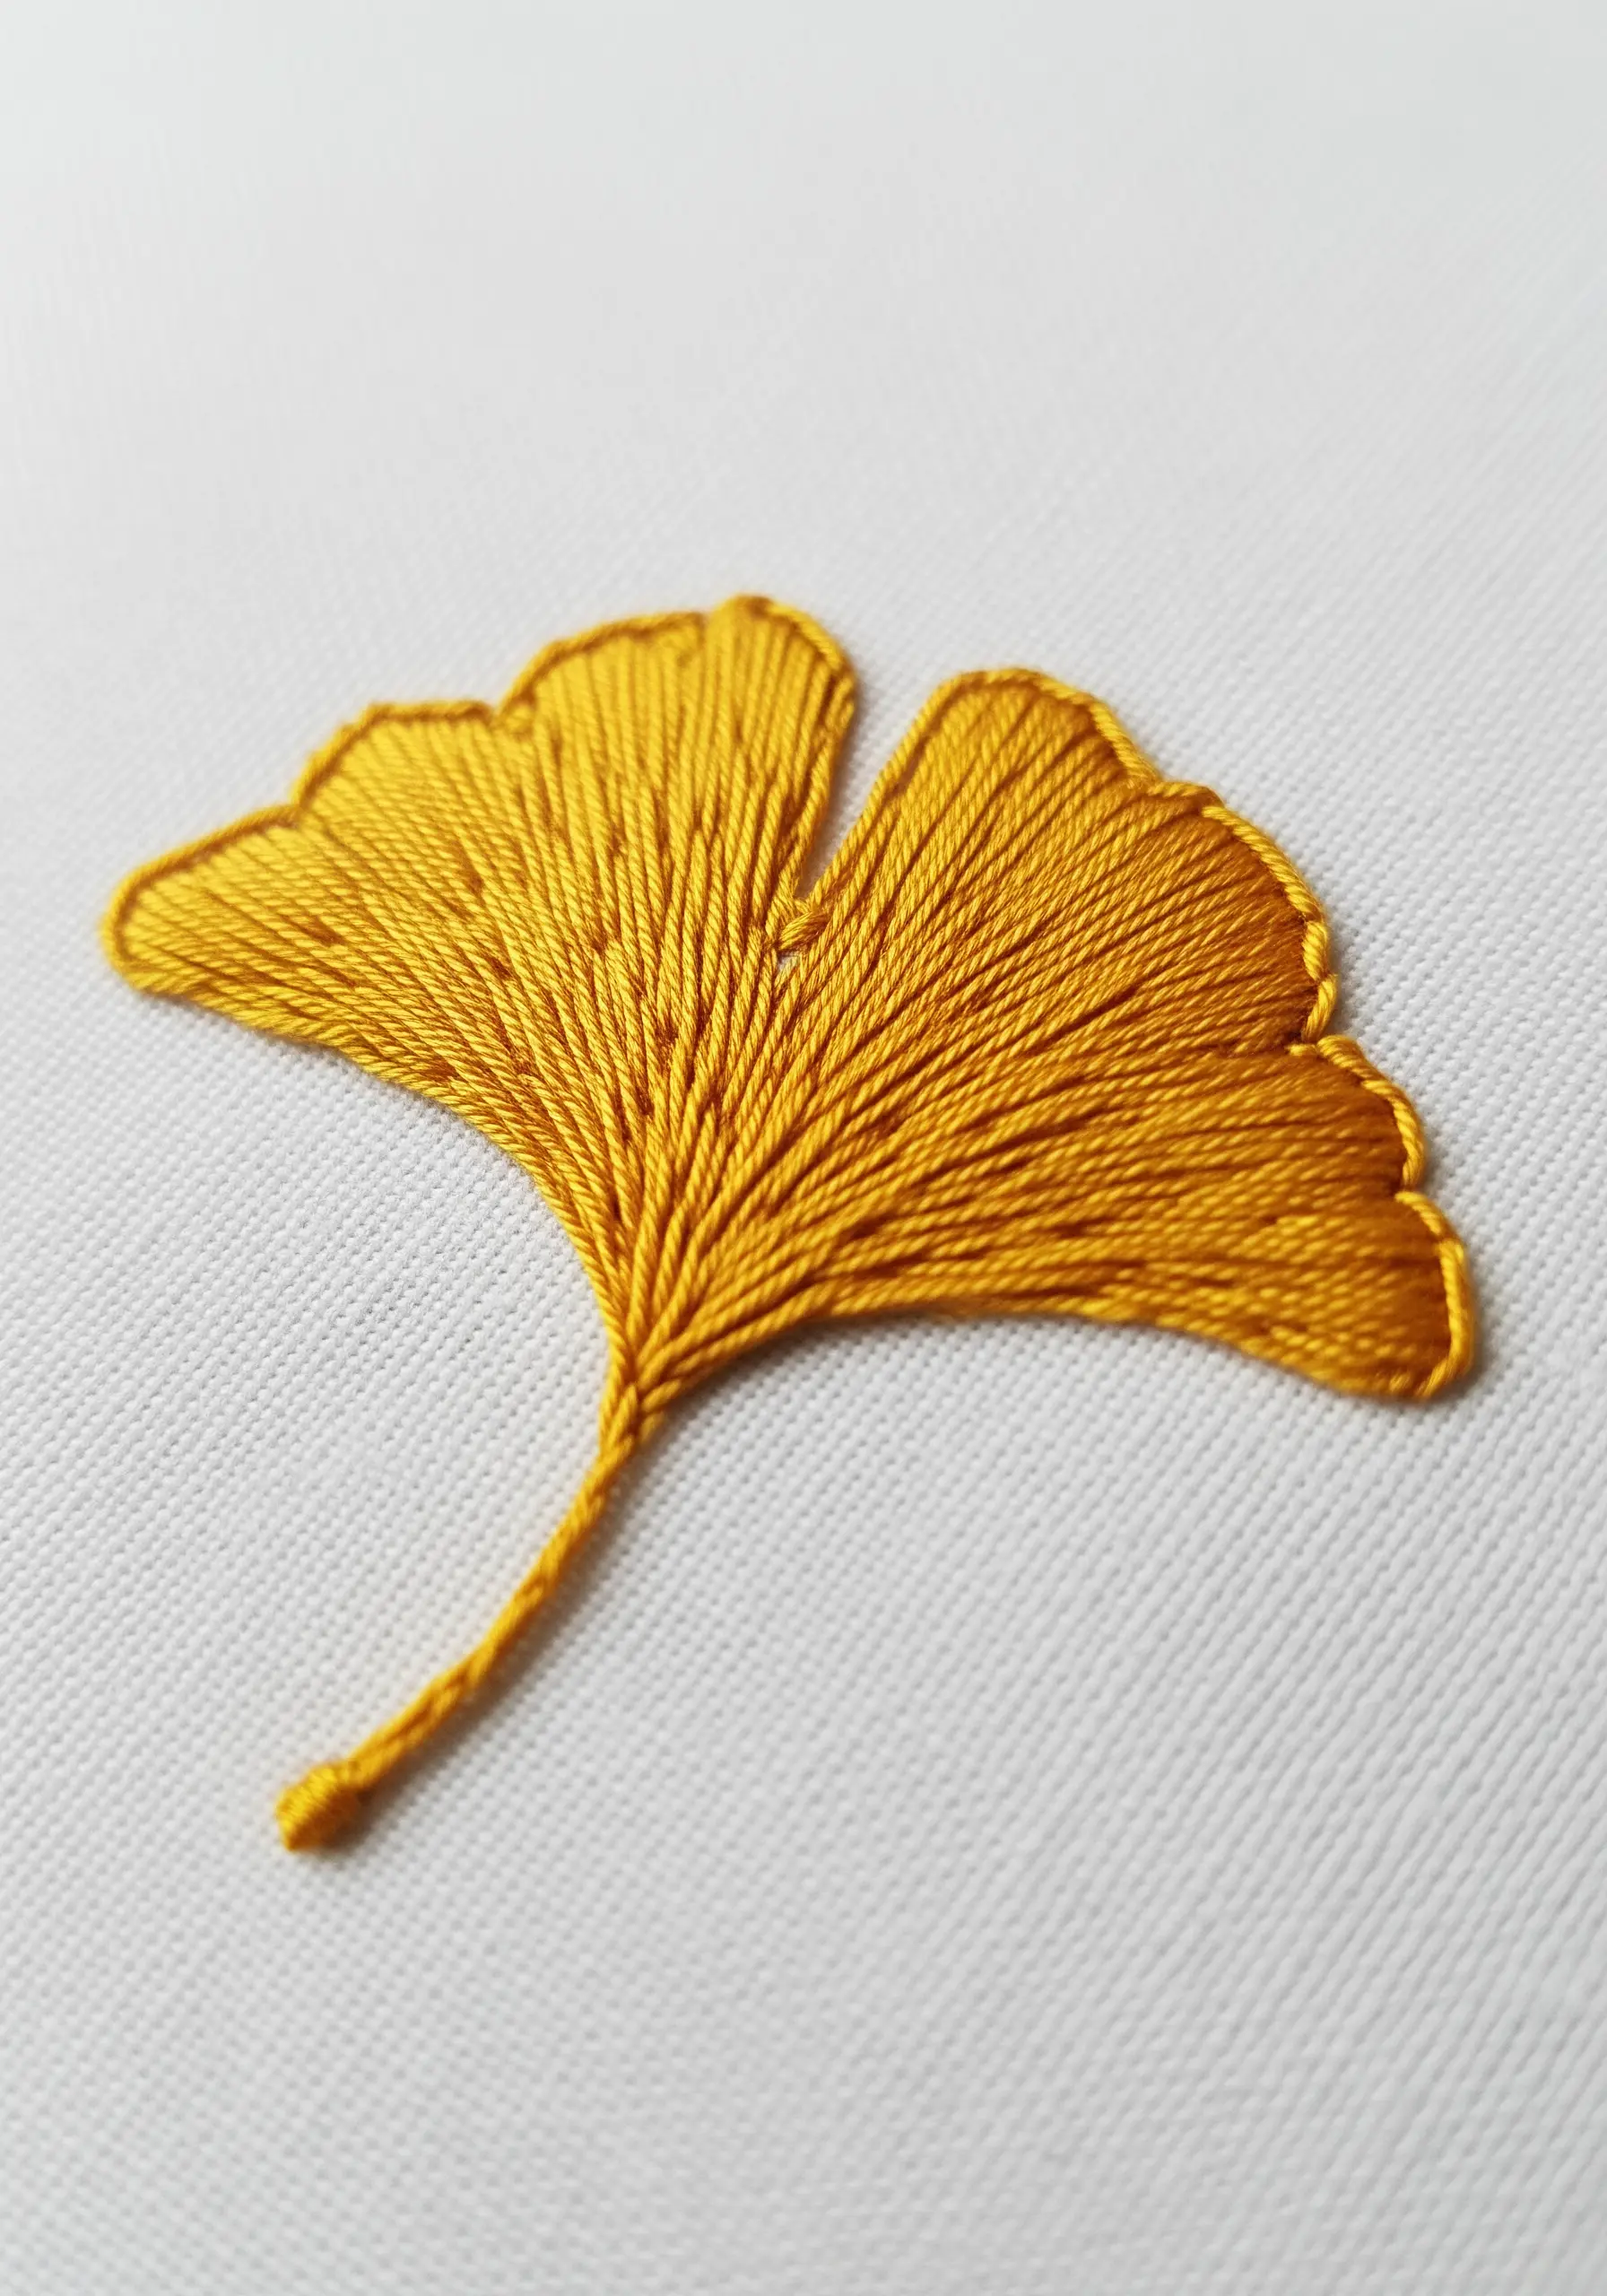
To give this ginkgo leaf its lifelike shape and flow, use a beginner-friendly version of thread painting with long-and-short stitch.
Instead of stitching straight across, angle all your stitches to radiate outwards from the base of the leaf, just as the veins do in nature.
This directional stitching instantly creates movement and realism.
Using a satin floss will also add a beautiful sheen that catches the light, enhancing the leaf’s organic form and making for beautiful leaf embroidery stitches.
22. Create Lush Foliage with Repetitive Stitches
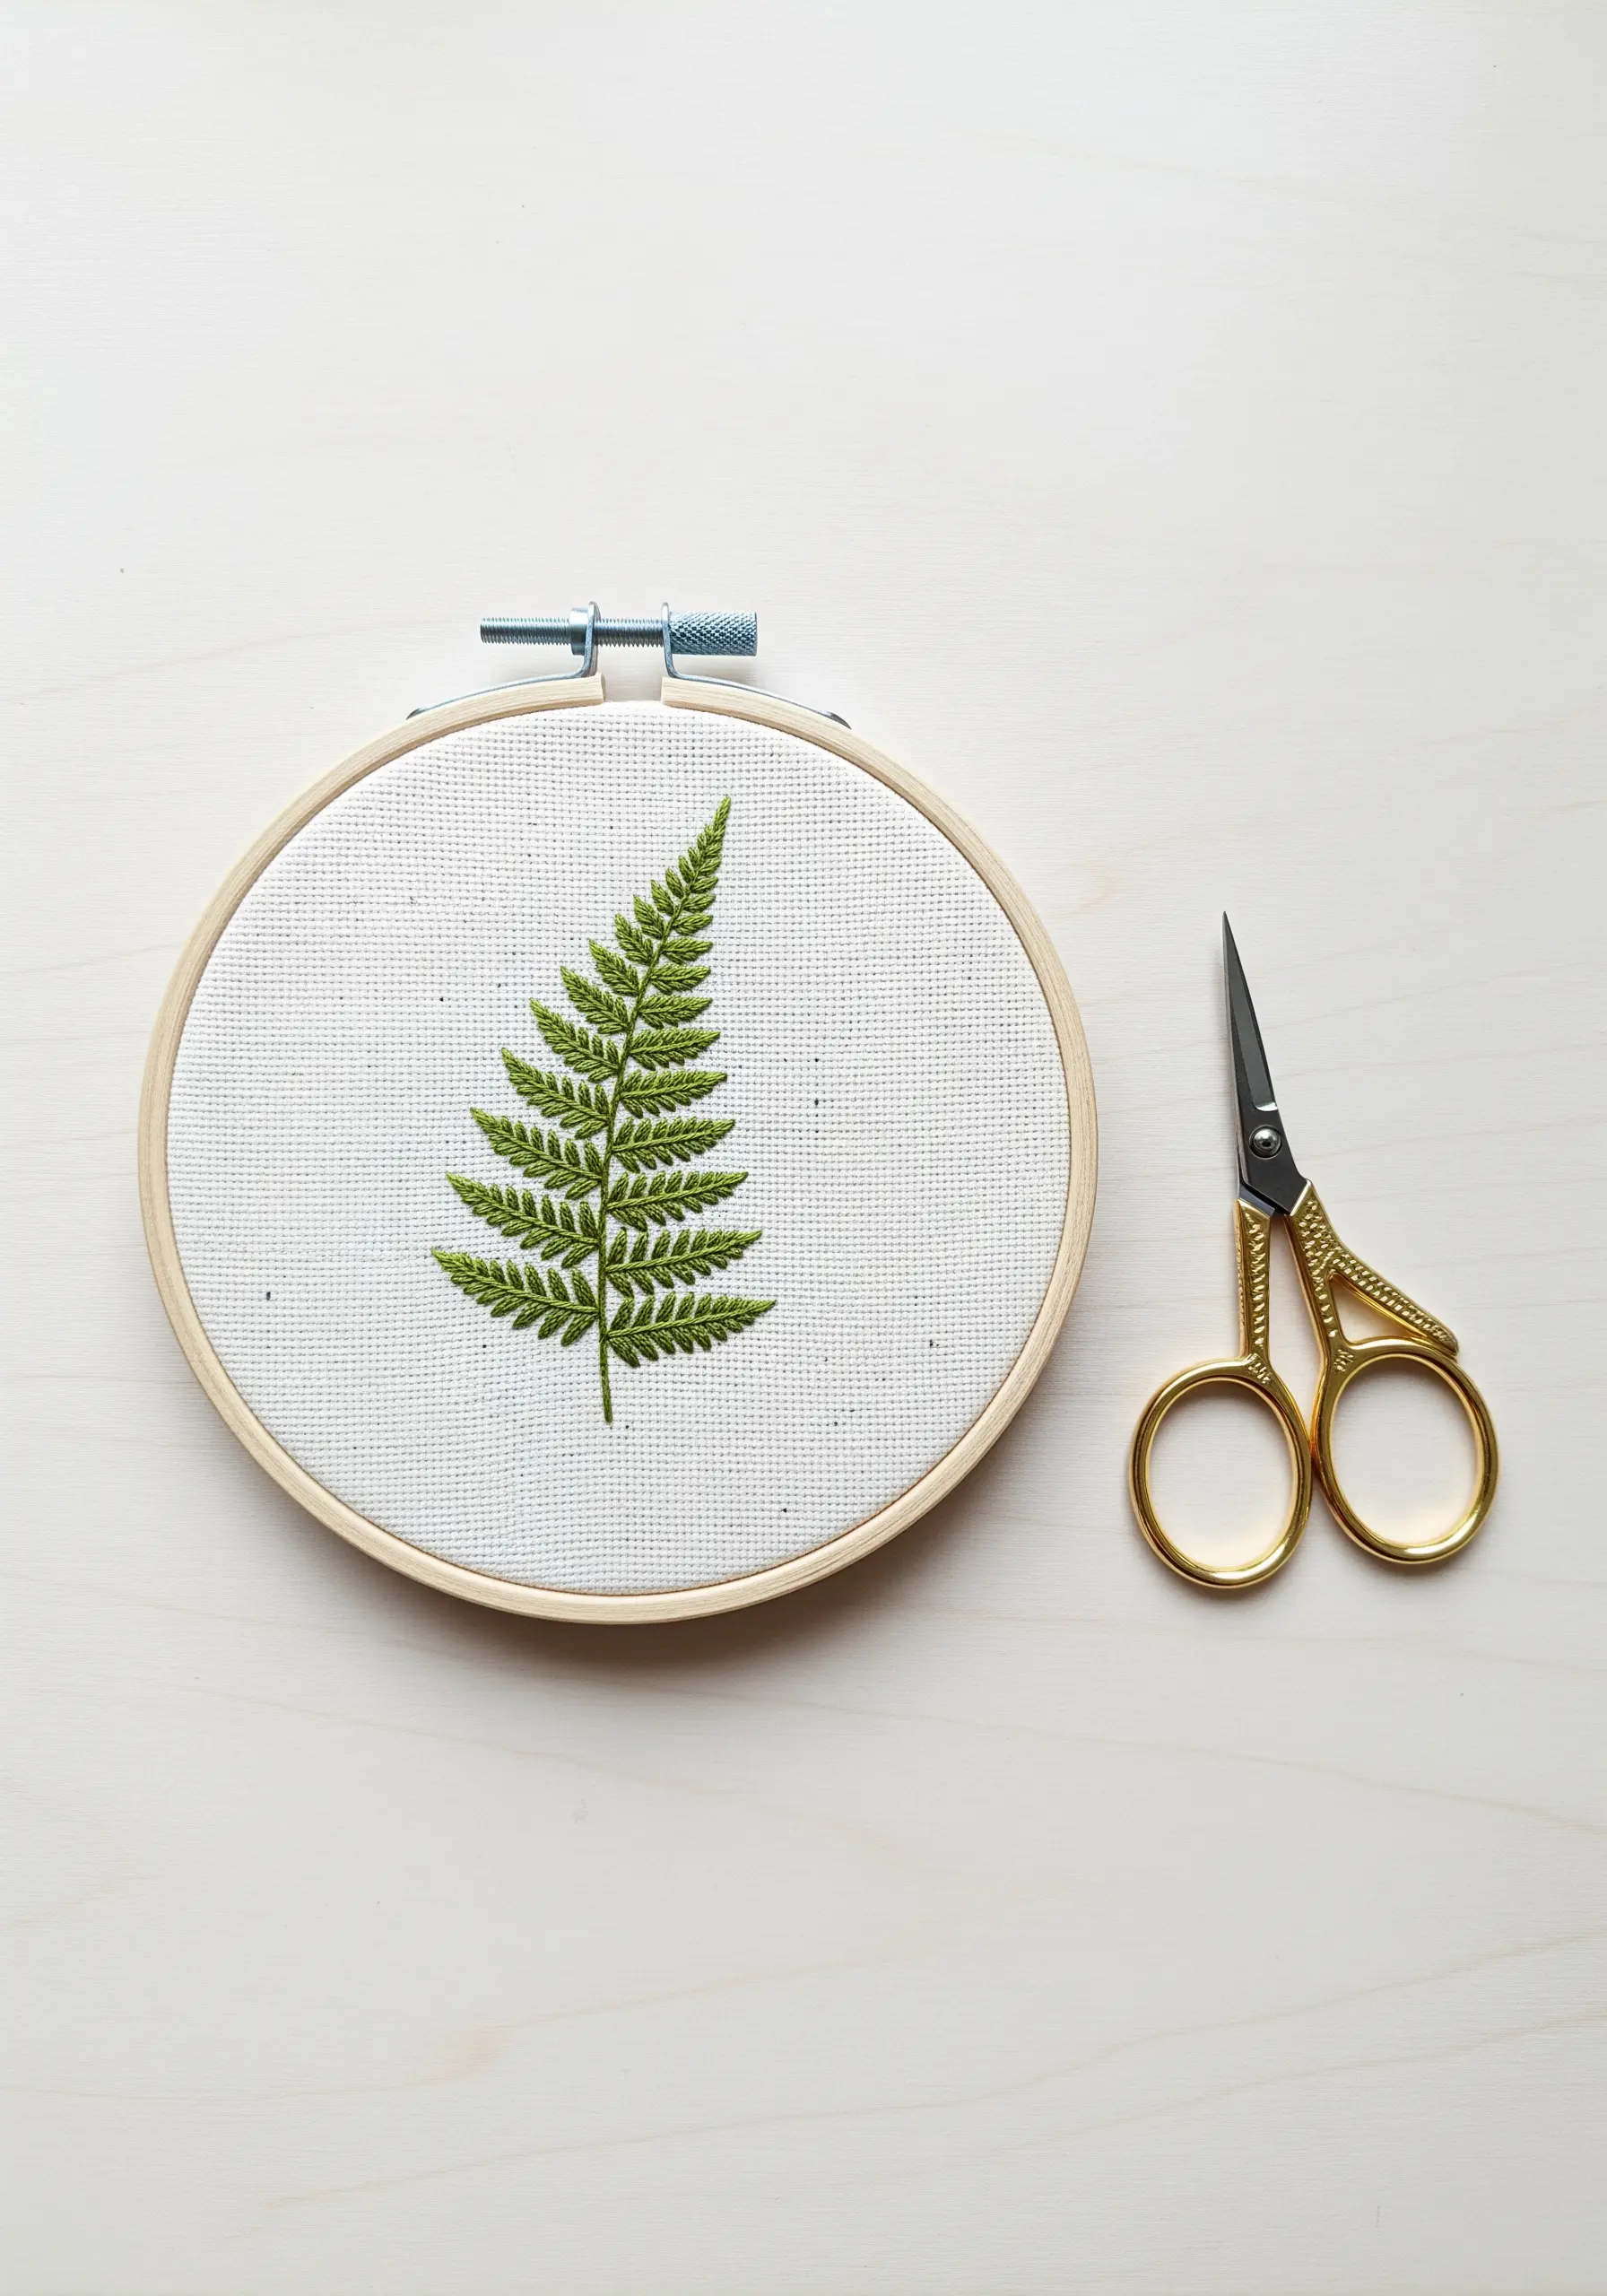
The beauty of a fern lies in its detailed, repetitive structure, which is surprisingly easy to replicate.
First, create the central stem with a stem stitch. Then, work your way up, adding the tiny leaflets on each side with single, angled straight stitches.
The key is to find a meditative rhythm as you stitch. This simple, repetitive process builds into a complex and lush-looking piece of botanical art.
23. Map the Stars with Minimal Stitches
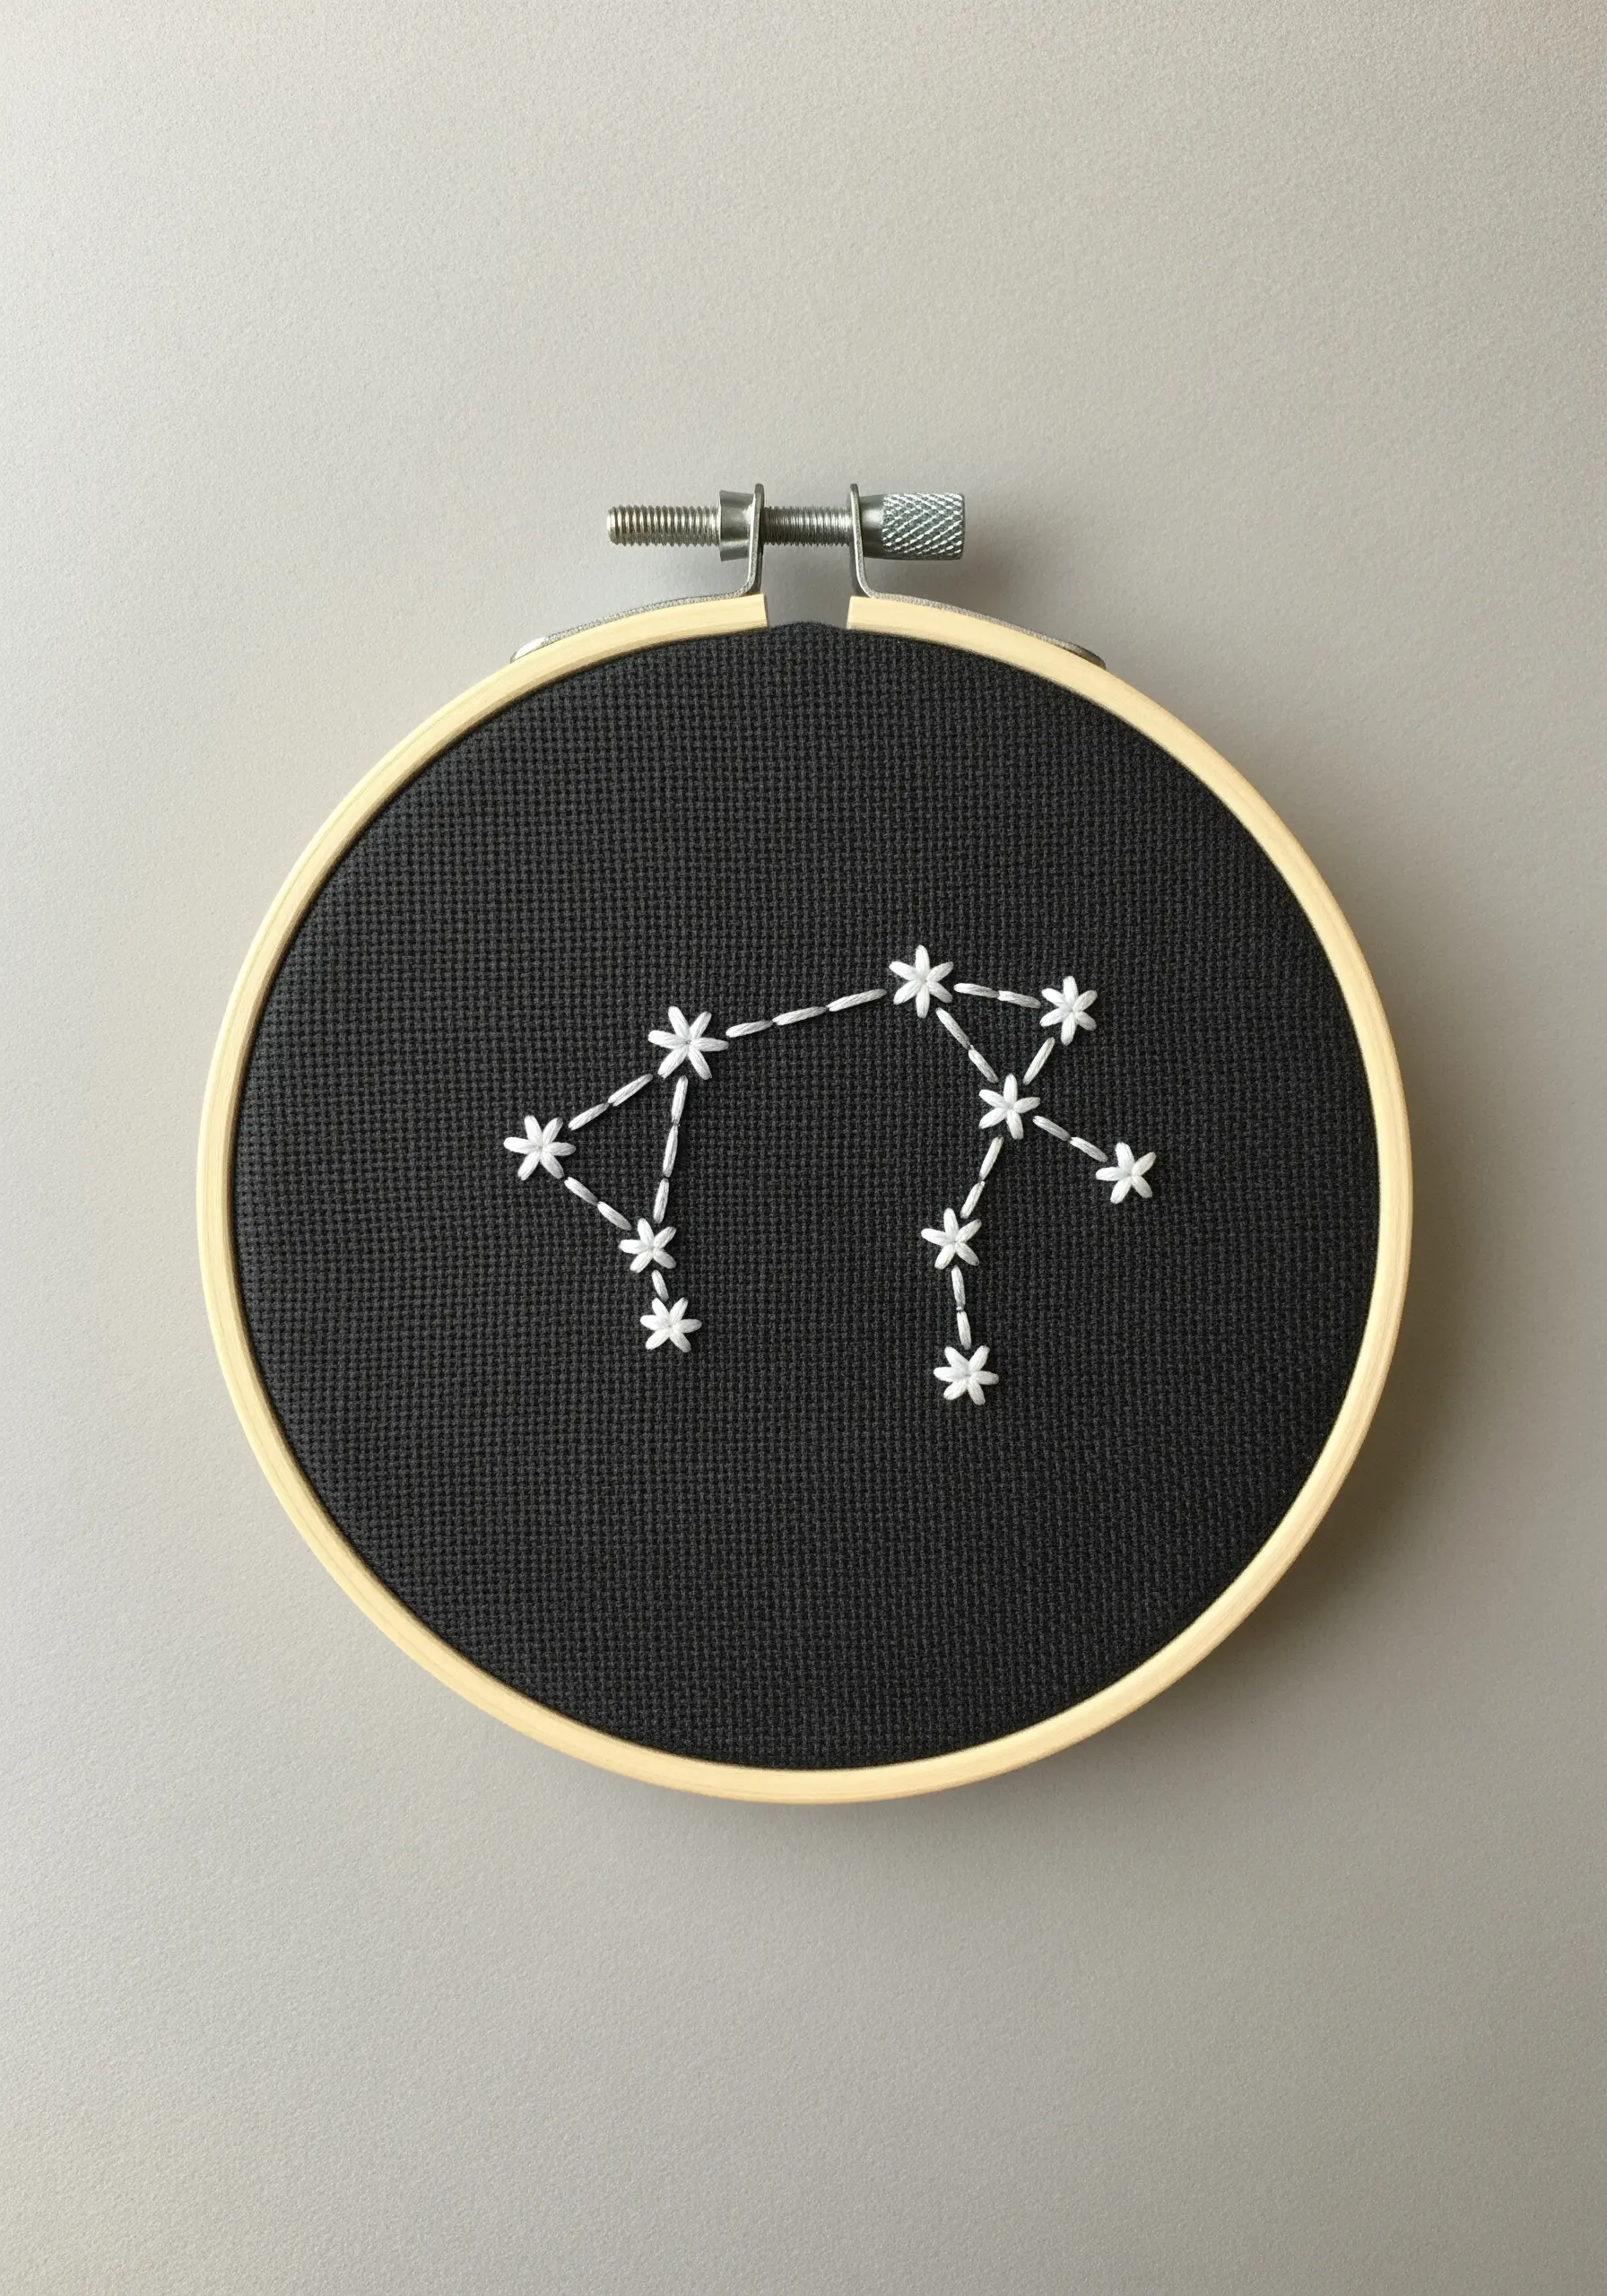
You don’t need complex techniques to create something magical.
For a constellation, use simple straight stitches to form tiny asterisks or stars. Connect them with a clean, single-strand backstitch to trace the constellation’s shape.
The high contrast of white thread on black fabric does most of the aesthetic work for you, creating a striking piece of celestial micro-embroidery.
This project is all about precision and celebrating negative space.


