
A tote bag is more than just a utility item; it’s a blank canvas waiting for a story. Before you begin, I want you to think of each tiny motif not as decoration, but as a quiet, personal signature.
You don’t need complex patterns to make something beautiful. The magic is in the details: the way you angle a satin stitch to catch the light, the choice to use one thread instead of two for a delicate line, or the textural surprise of a single French knot.
These small, intentional choices are what transform a simple design into a piece of art that feels uniquely yours. Let’s explore how to make your stitches speak with confidence and grace, one small pattern at a time.
1. Render Lavender with Botanical Texture
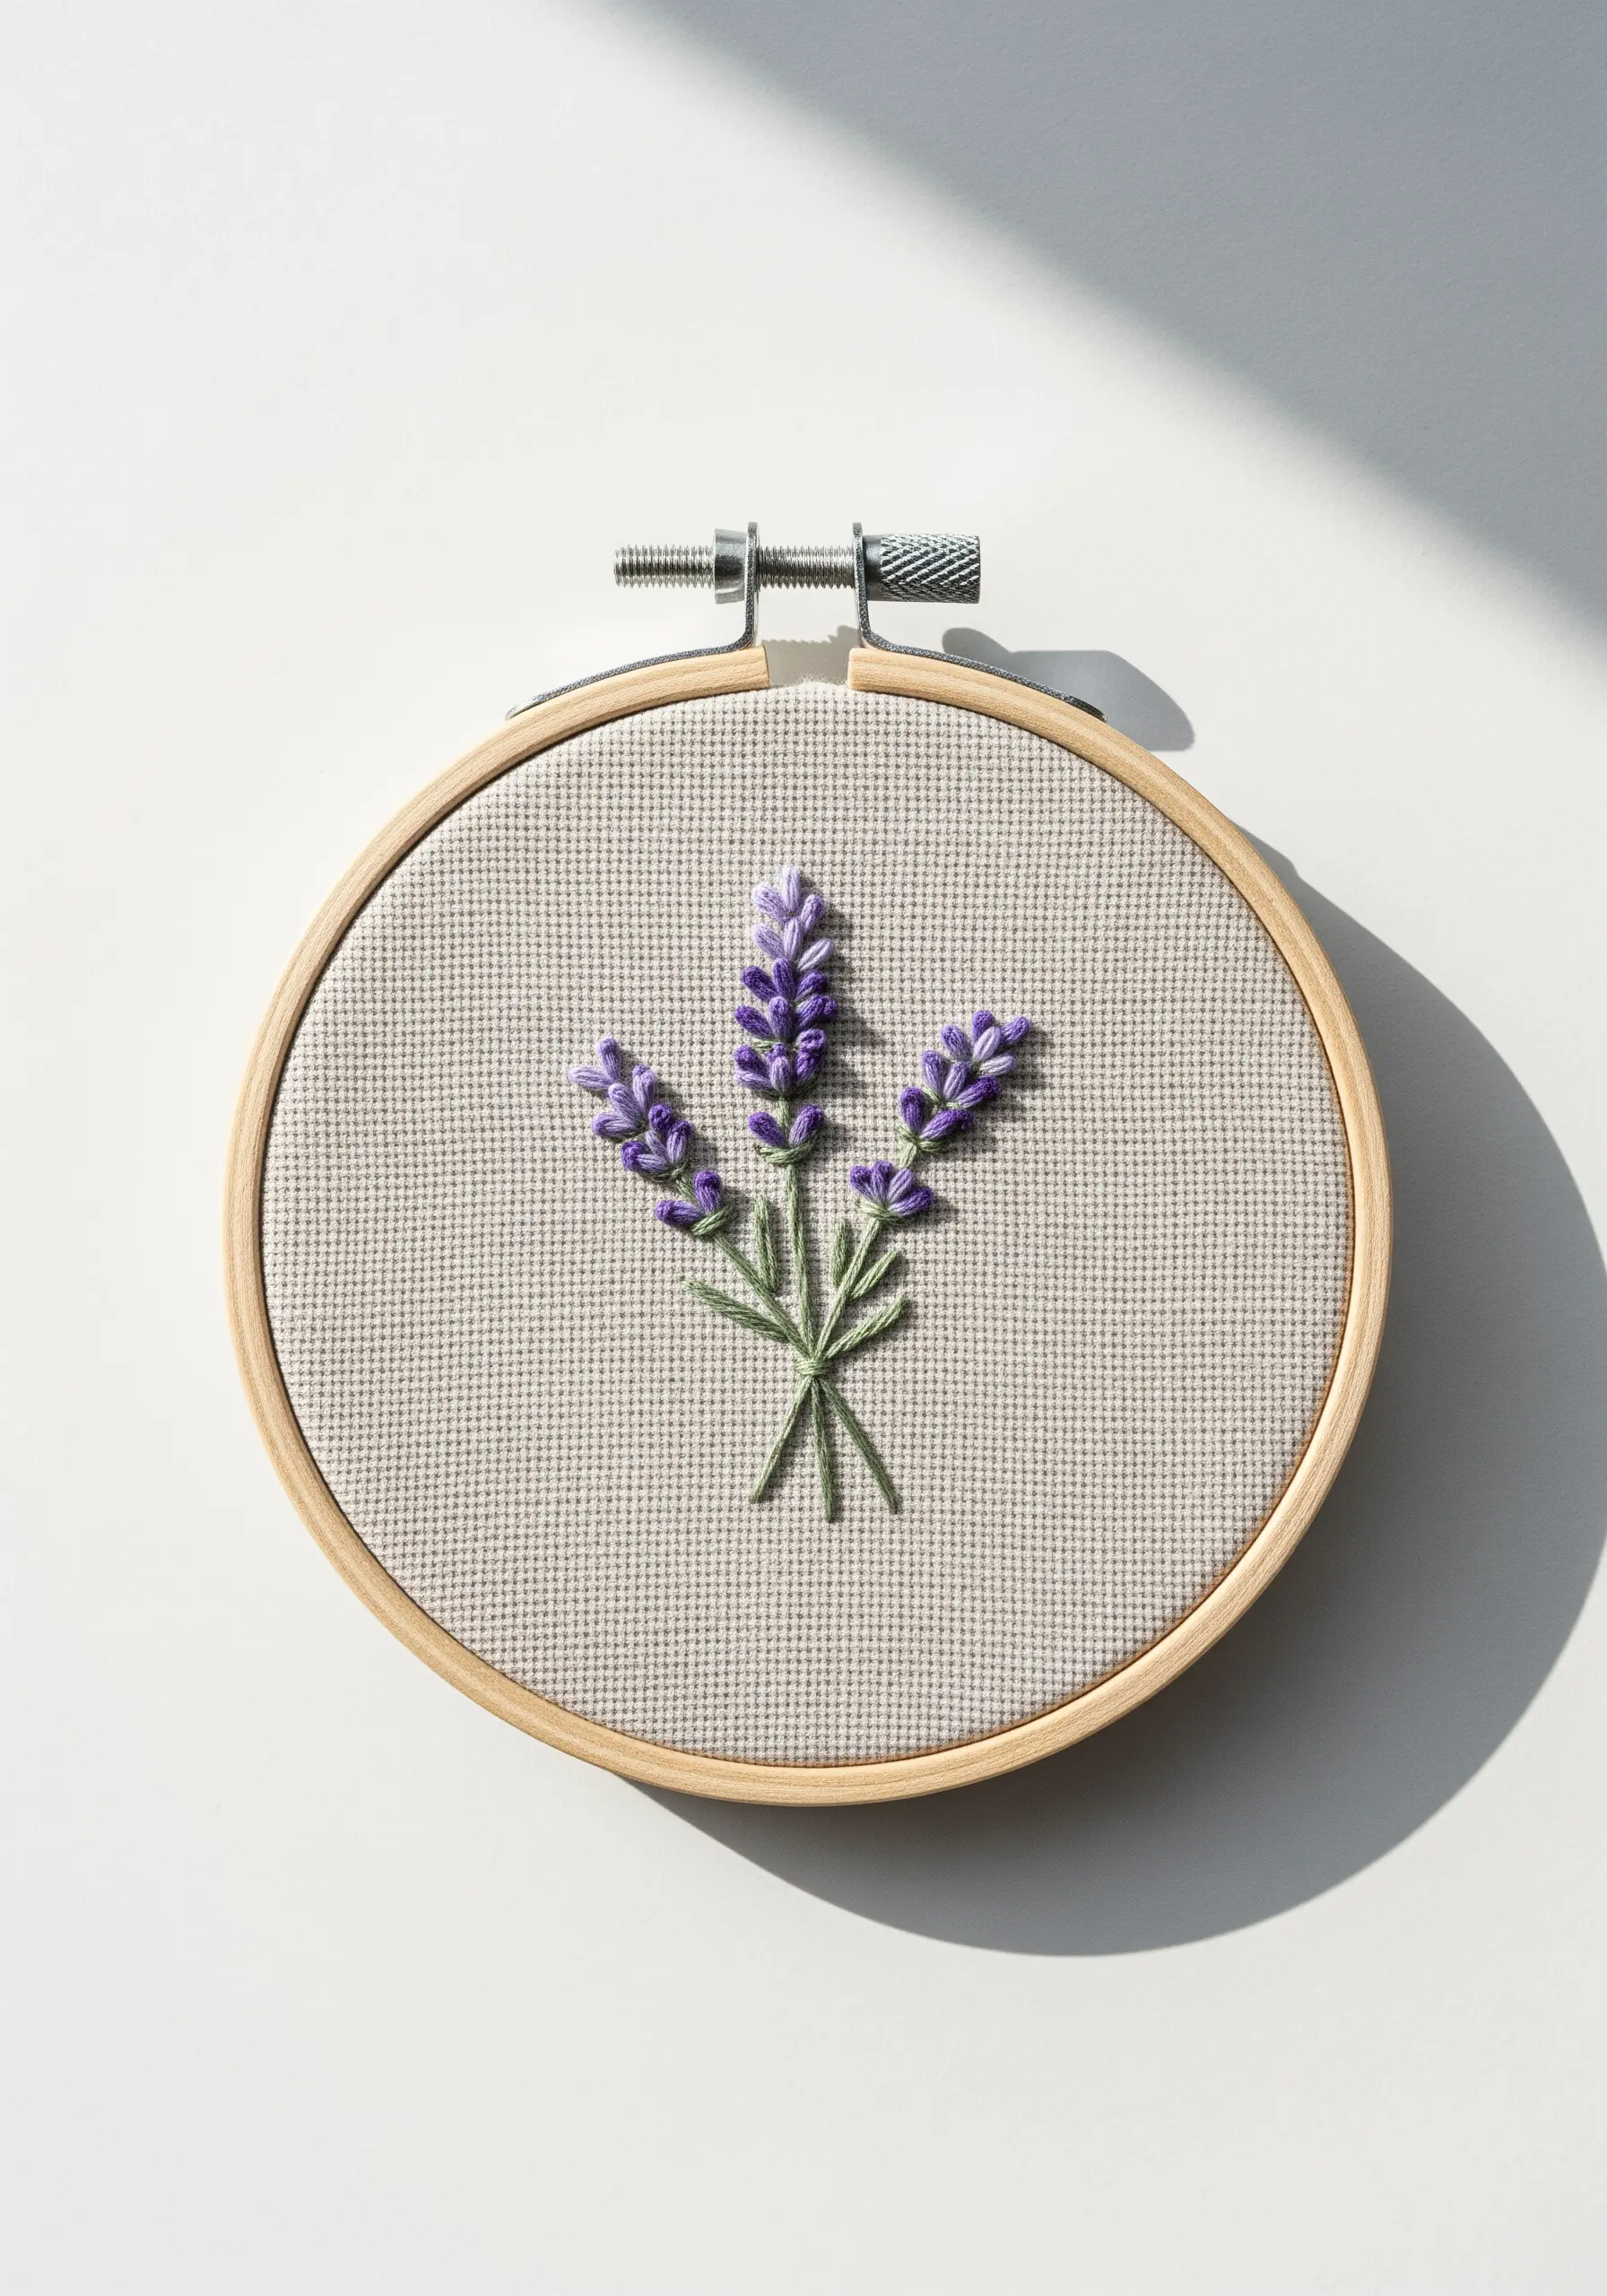
Combine French knots and straight stitches to give your lavender a realistic, dimensional feel.
Use three to four strands of thread for the knots to create plump, textured buds, clustering them tightly at the top and spacing them out as you move down the stalk.
For the stems, a simple backstitch using two strands in a muted green will provide structure without overpowering the delicate flowers.
This mix of stitches creates a design that is both visually and texturally engaging, elevating a simple motif into one of the most delicate lavender stitch ideas you can try.
2. Achieve Crisp Bee Details with Satin Stitch

For a bold, graphic bee, focus on the direction of your satin stitch.
Fill the body with horizontal satin stitches for a smooth, wide appearance, and use vertical stitches for the head to create a subtle contrast.
Use a single strand of black thread for the wings and antennae, stitched in a clean backstitch or split stitch.
This precision ensures the fine lines remain sharp and don’t get lost against the filled body, creating a clean, professional finish on durable canvas.
3. Create a Mountain Patch with a Satin Stitch Border
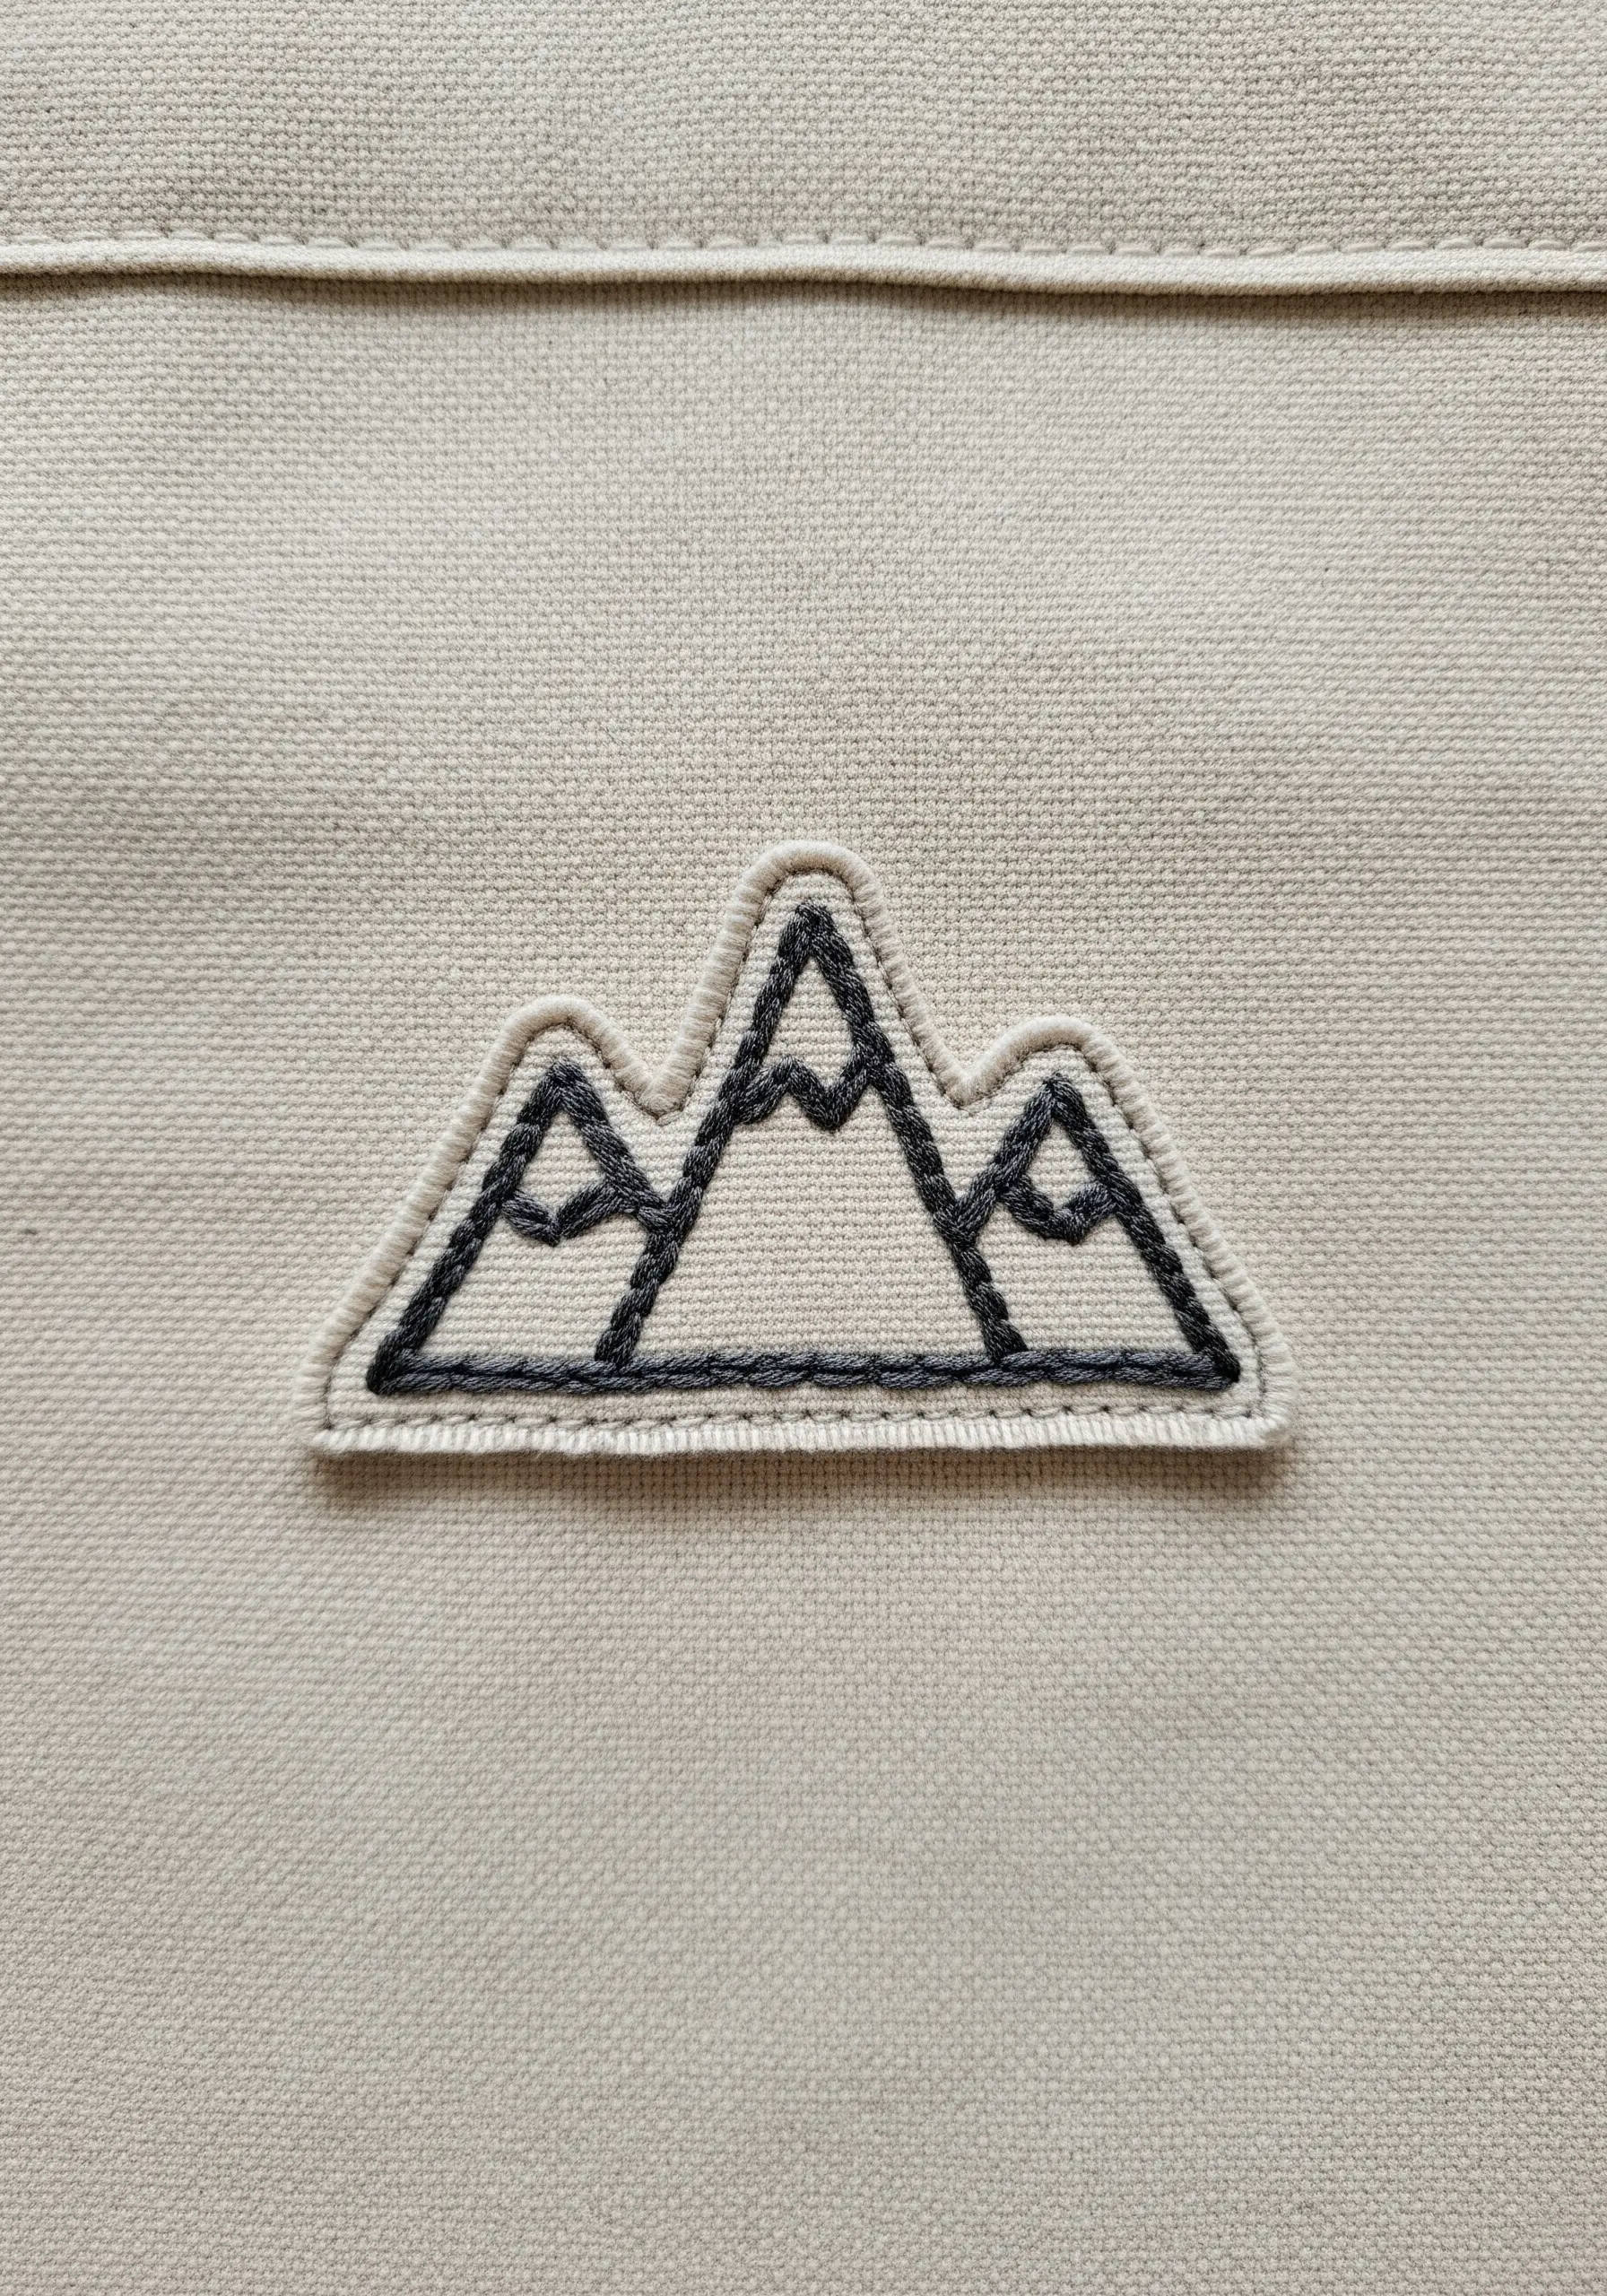
Give your mountain range the clean, contained look of a patch by outlining the entire shape with a dense satin stitch border.
First, stitch your inner line art travel adventure symbols using a simple backstitch.
Then, work a tight satin stitch around the perimeter, ensuring each stitch is perpendicular to the outline.
This technique creates a raised, defined edge that makes the design pop from the fabric, giving it a polished, appliqué-like aesthetic.
4. Sculpt a Coffee Bean with Directional Satin Stitch
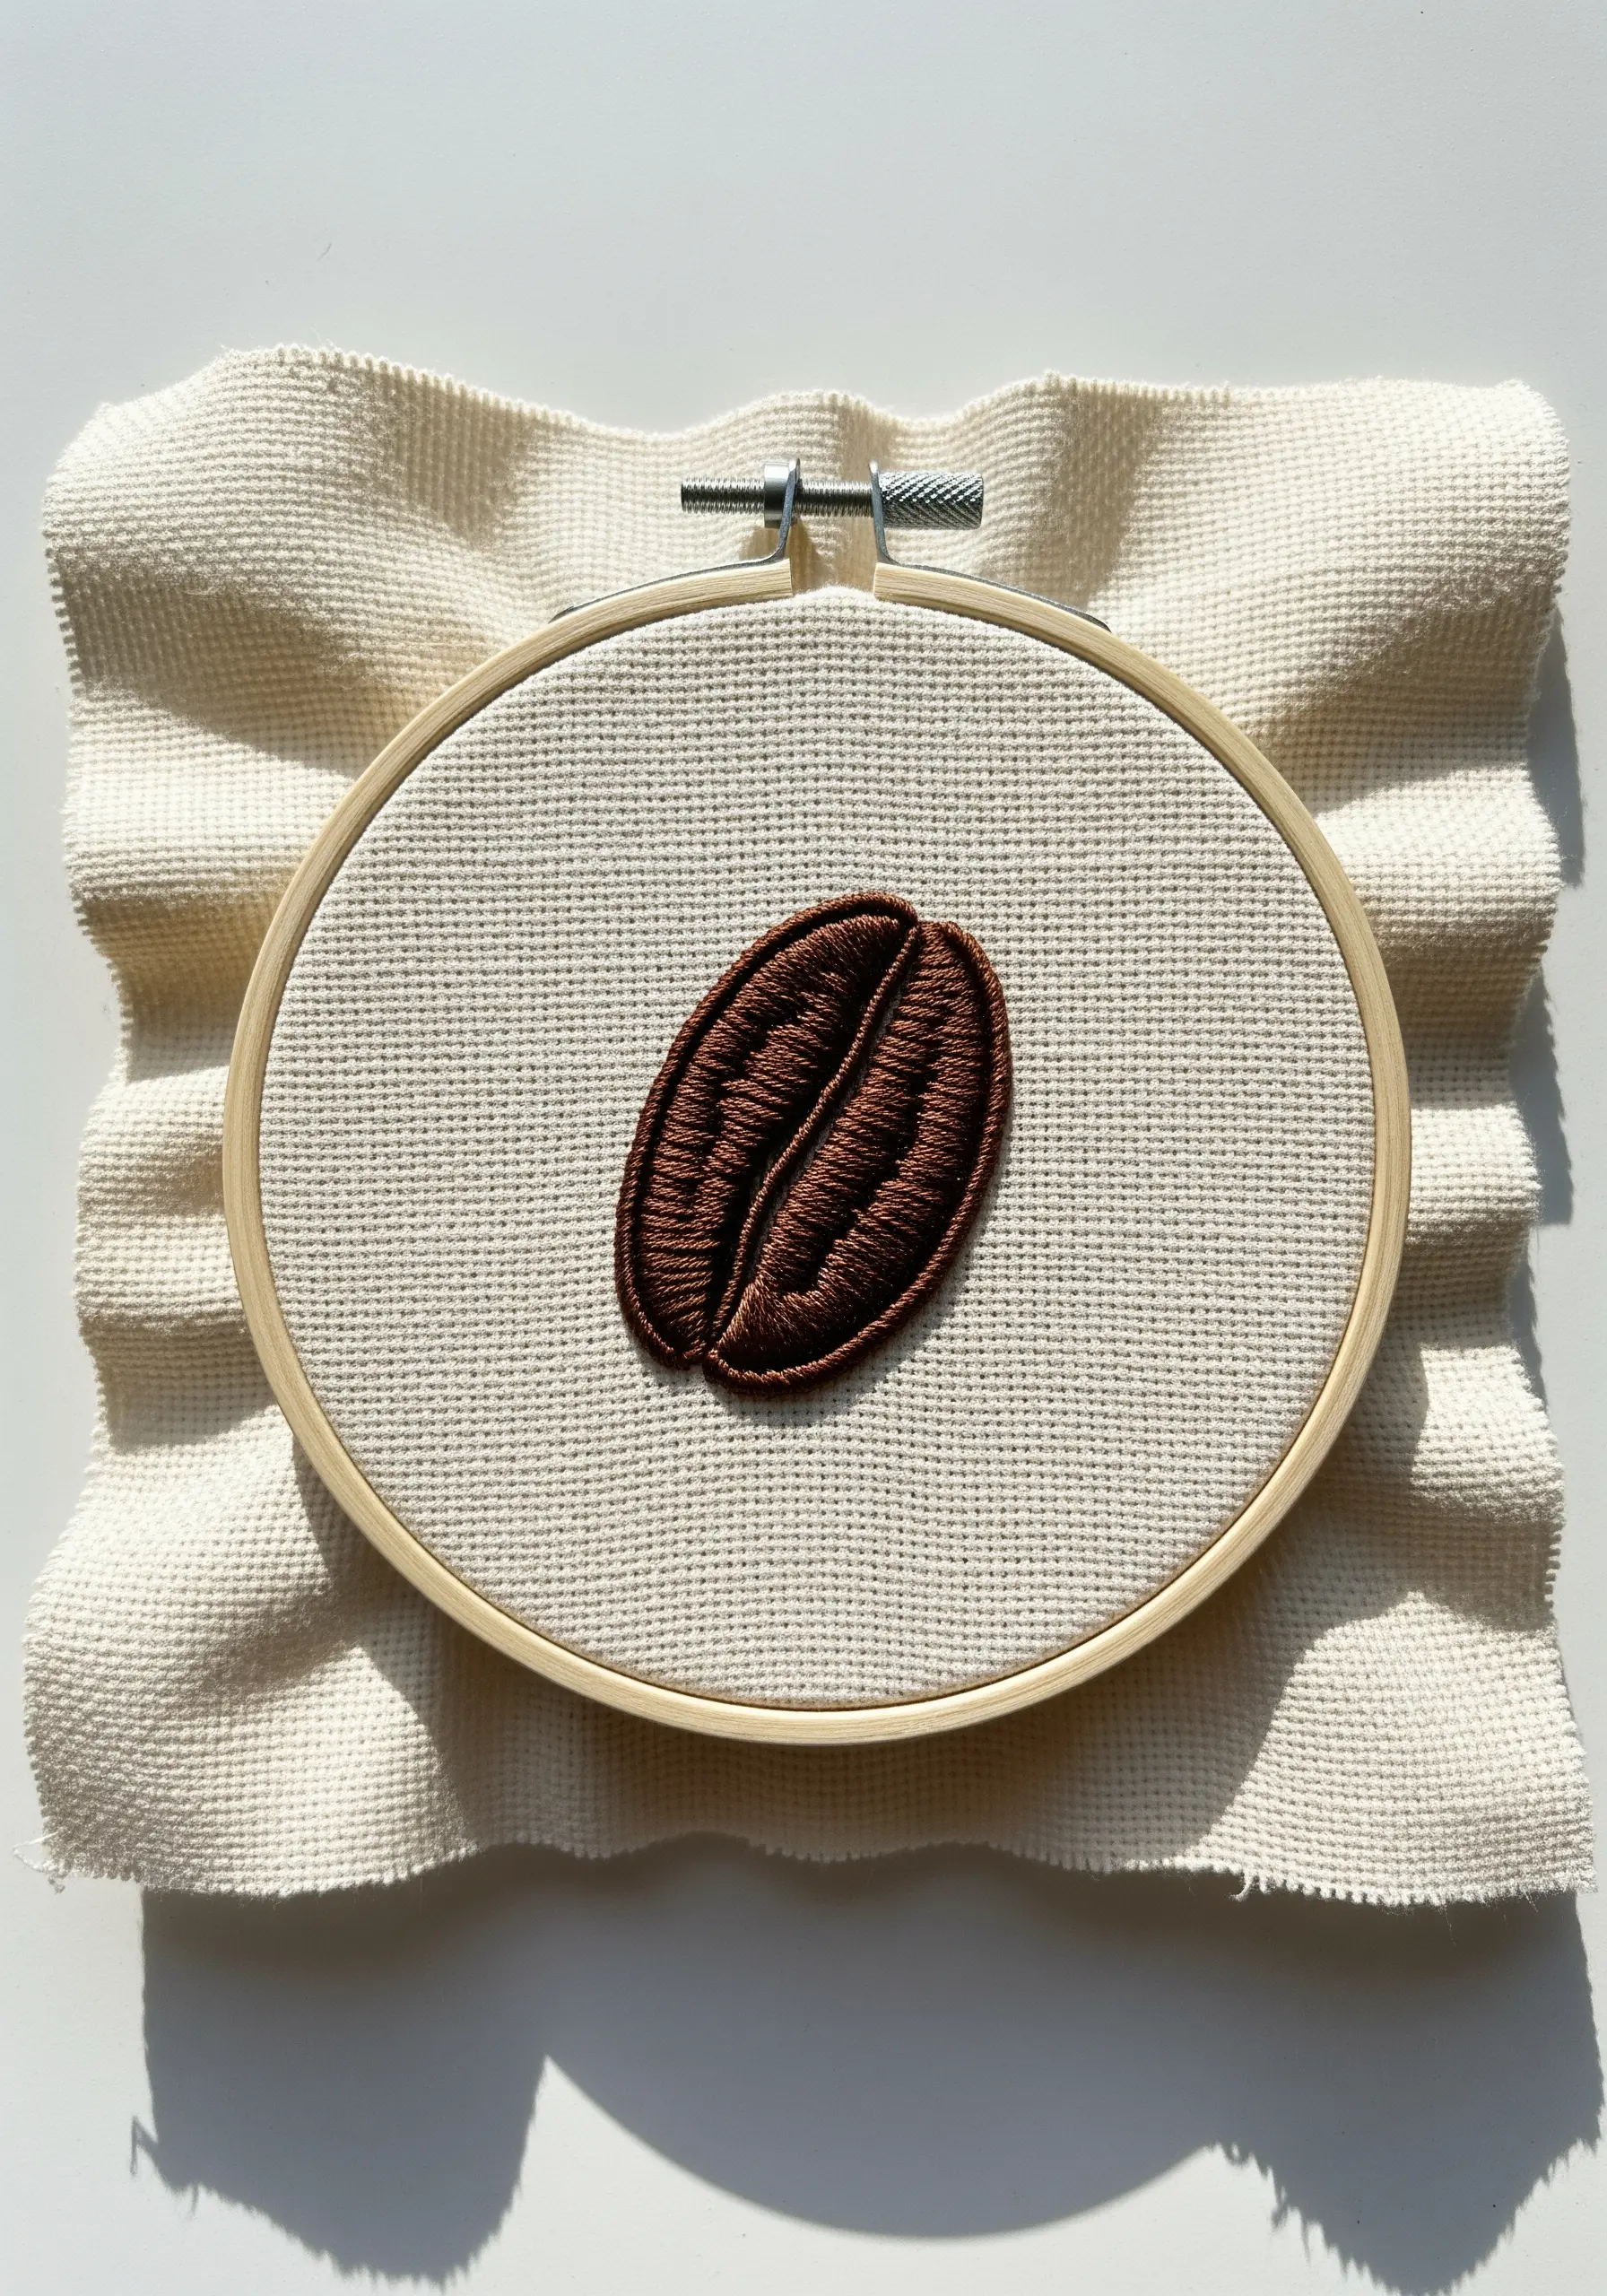
To give a simple oval the dimension of a coffee bean, the direction of your satin stitches is everything.
Instead of stitching straight across, angle your stitches to follow the bean’s natural curve, working from the outer edge toward the central split.
This creates a subtle play of light and shadow on the thread, giving the flat object a rounded, 3D appearance.
It’s a perfect example of how technique, not complexity, elevates modern thread art ideas inspired by everyday objects.
5. Define an Open Book with Contrasting Thread Weights
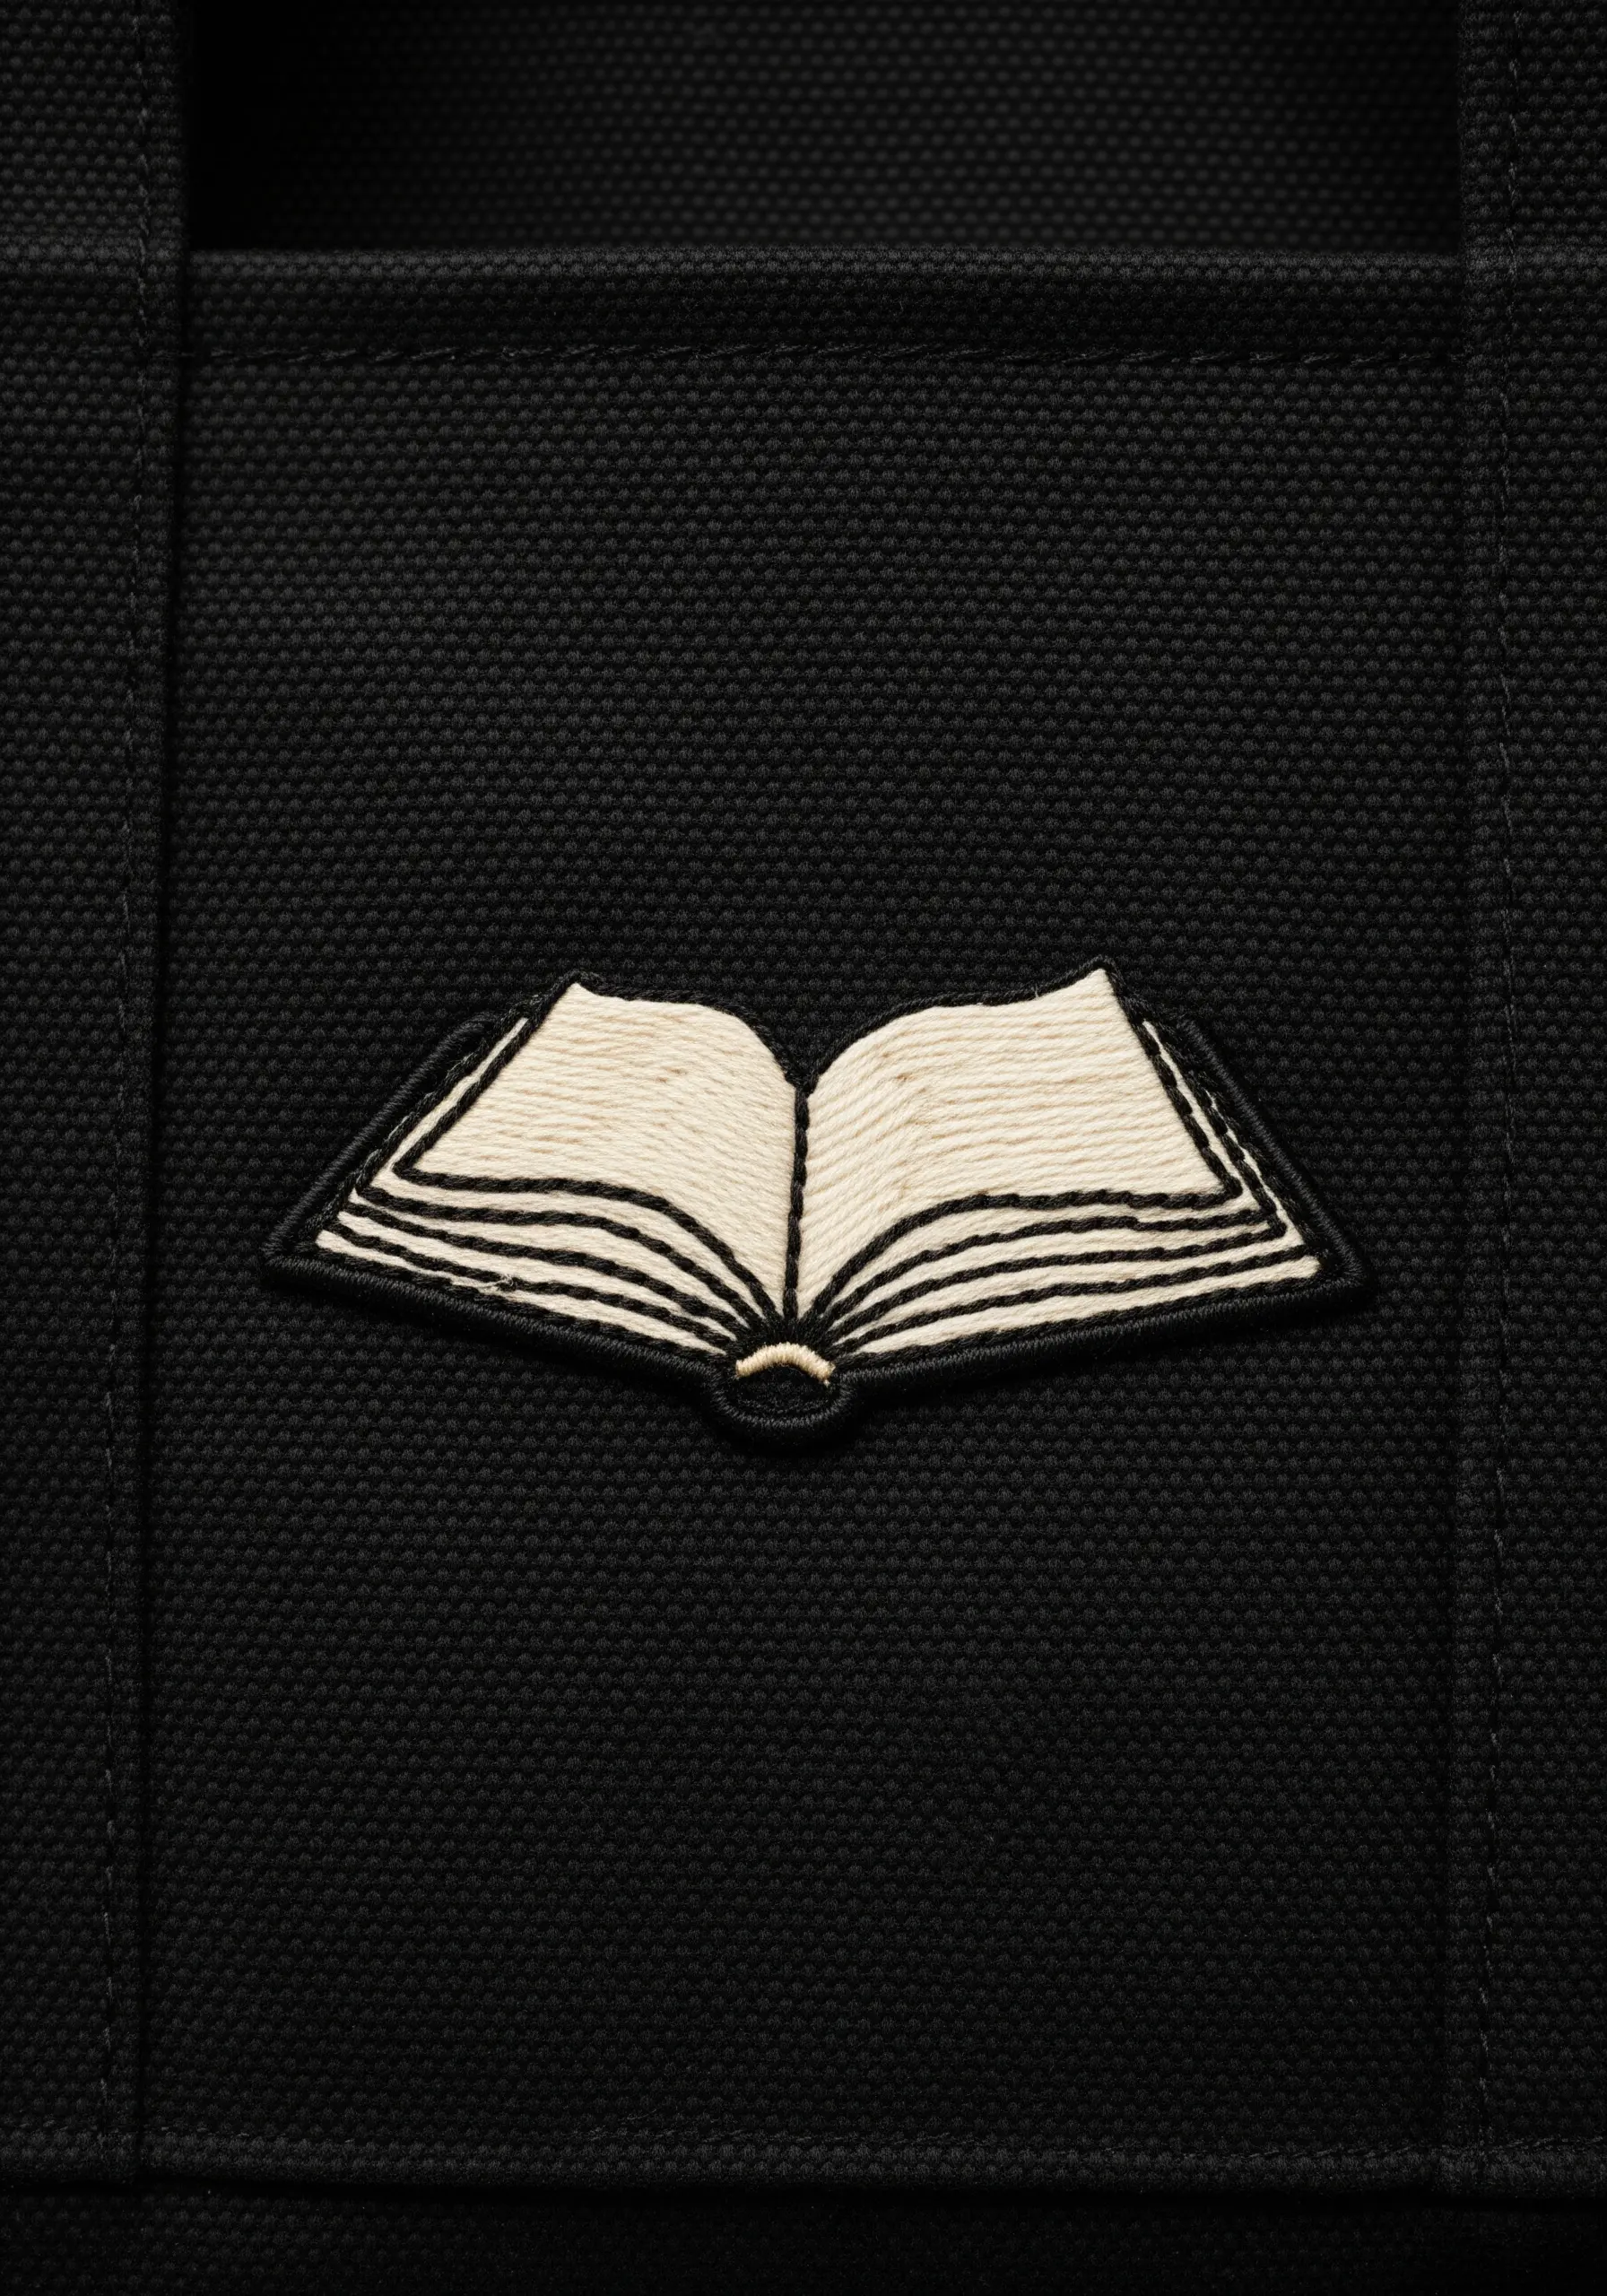
To create depth and clarity in this book motif, vary your thread weight between the outlines and the fill.
Use three strands of black for the main outline of the book to establish a strong, graphic shape.
For the delicate page lines, switch to a single strand of black. This prevents the interior from looking cluttered and creates a sense of perspective.
Fill the pages with an off-white satin stitch using two strands, allowing the fine lines to show through clearly.
6. Add Lunar Texture to a Night Sky

Instead of a flat satin stitch, give your crescent moon a cratered, textured surface.
Use a silvery-gray or metallic thread and fill the moon with tiny, multi-directional straight stitches or seed stitches.
This chaotic fill mimics the moon’s uneven surface and catches the light beautifully, making it far more dynamic than a solid fill.
Scatter a few golden yellow French knots for stars to complete these tiny night sky embroidery designs, creating a simple yet enchanting scene on dark fabric.
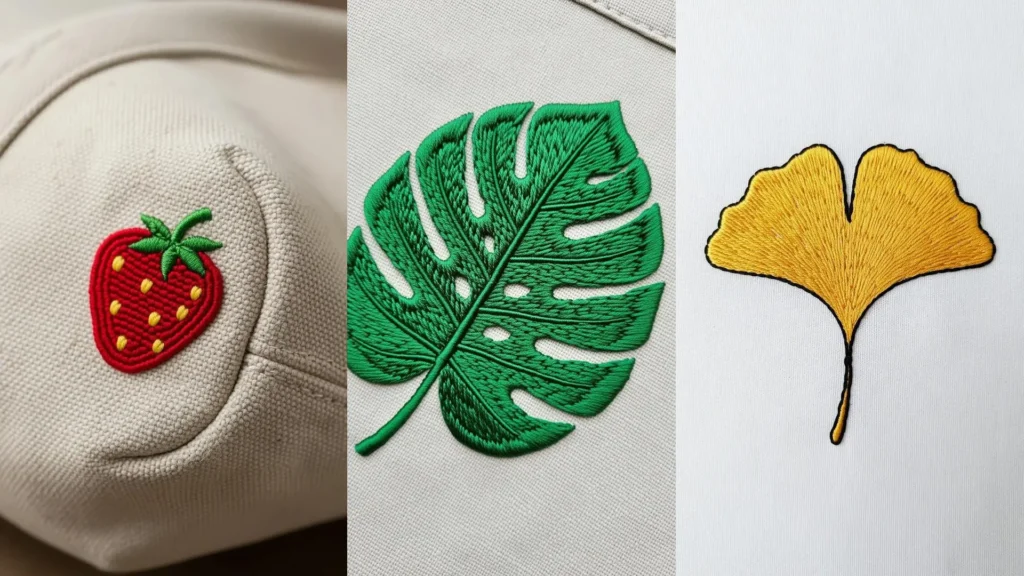
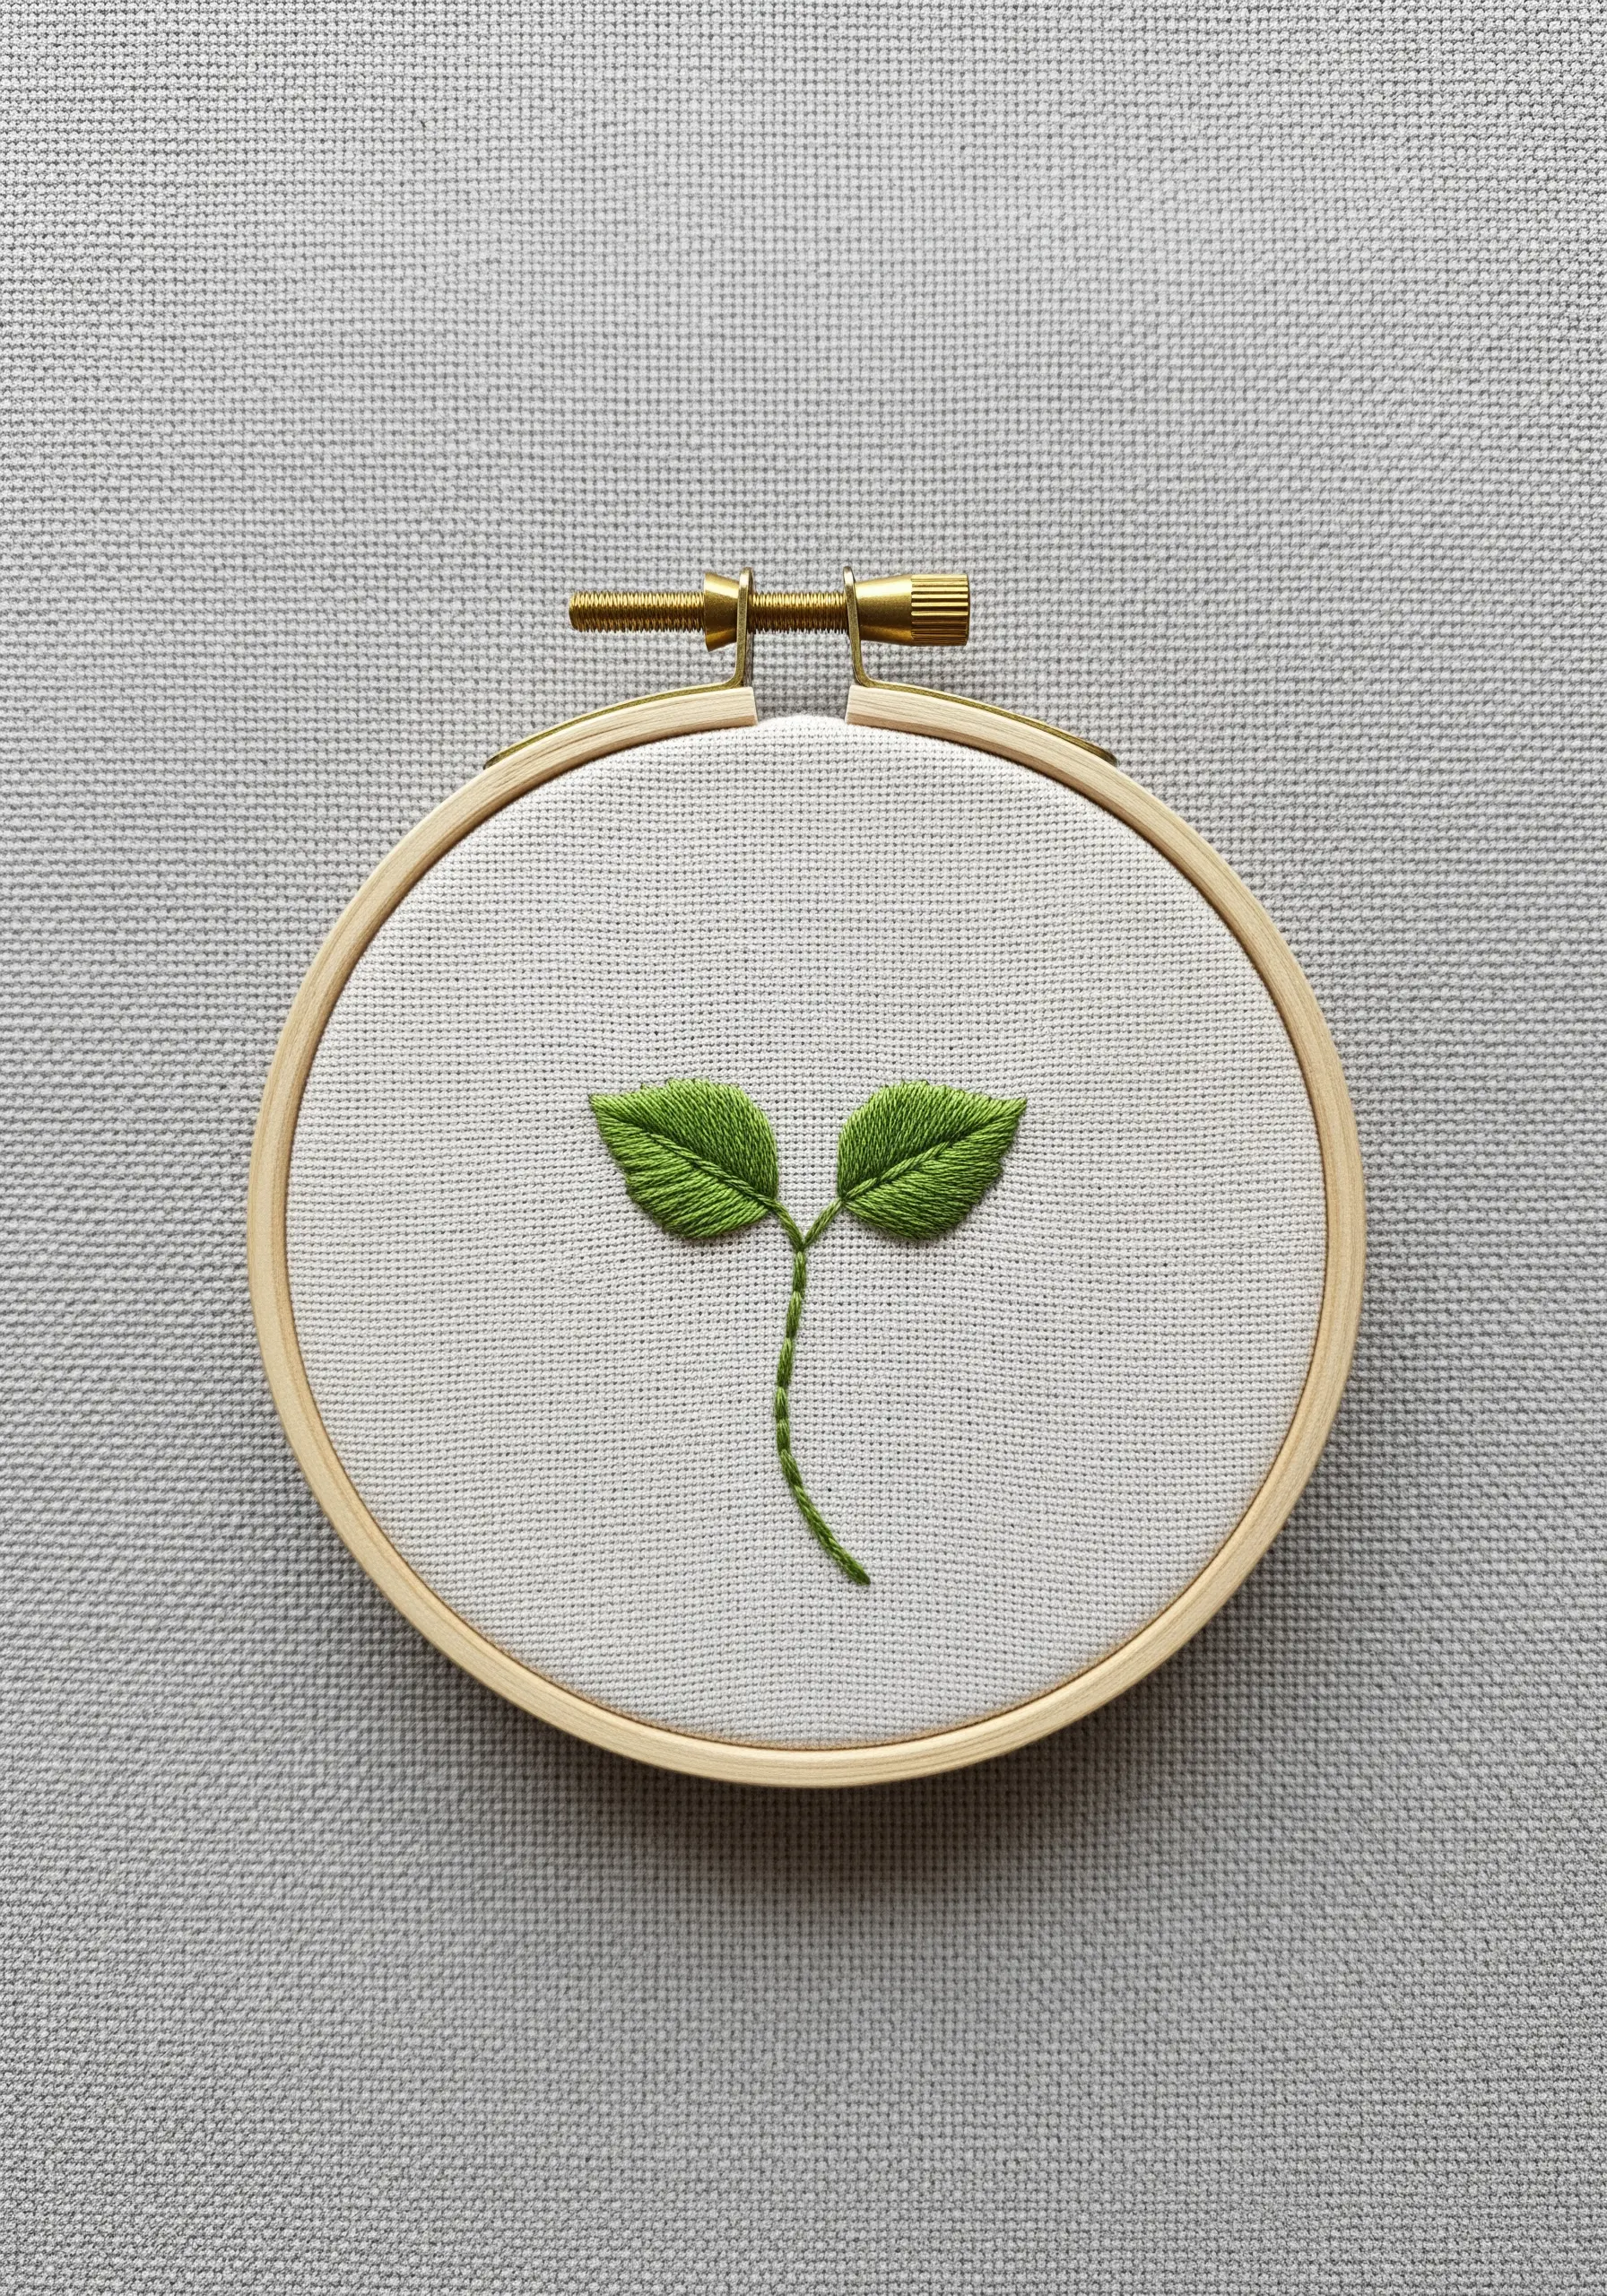
7. Replicate Leaf Veins with Stitch Variation
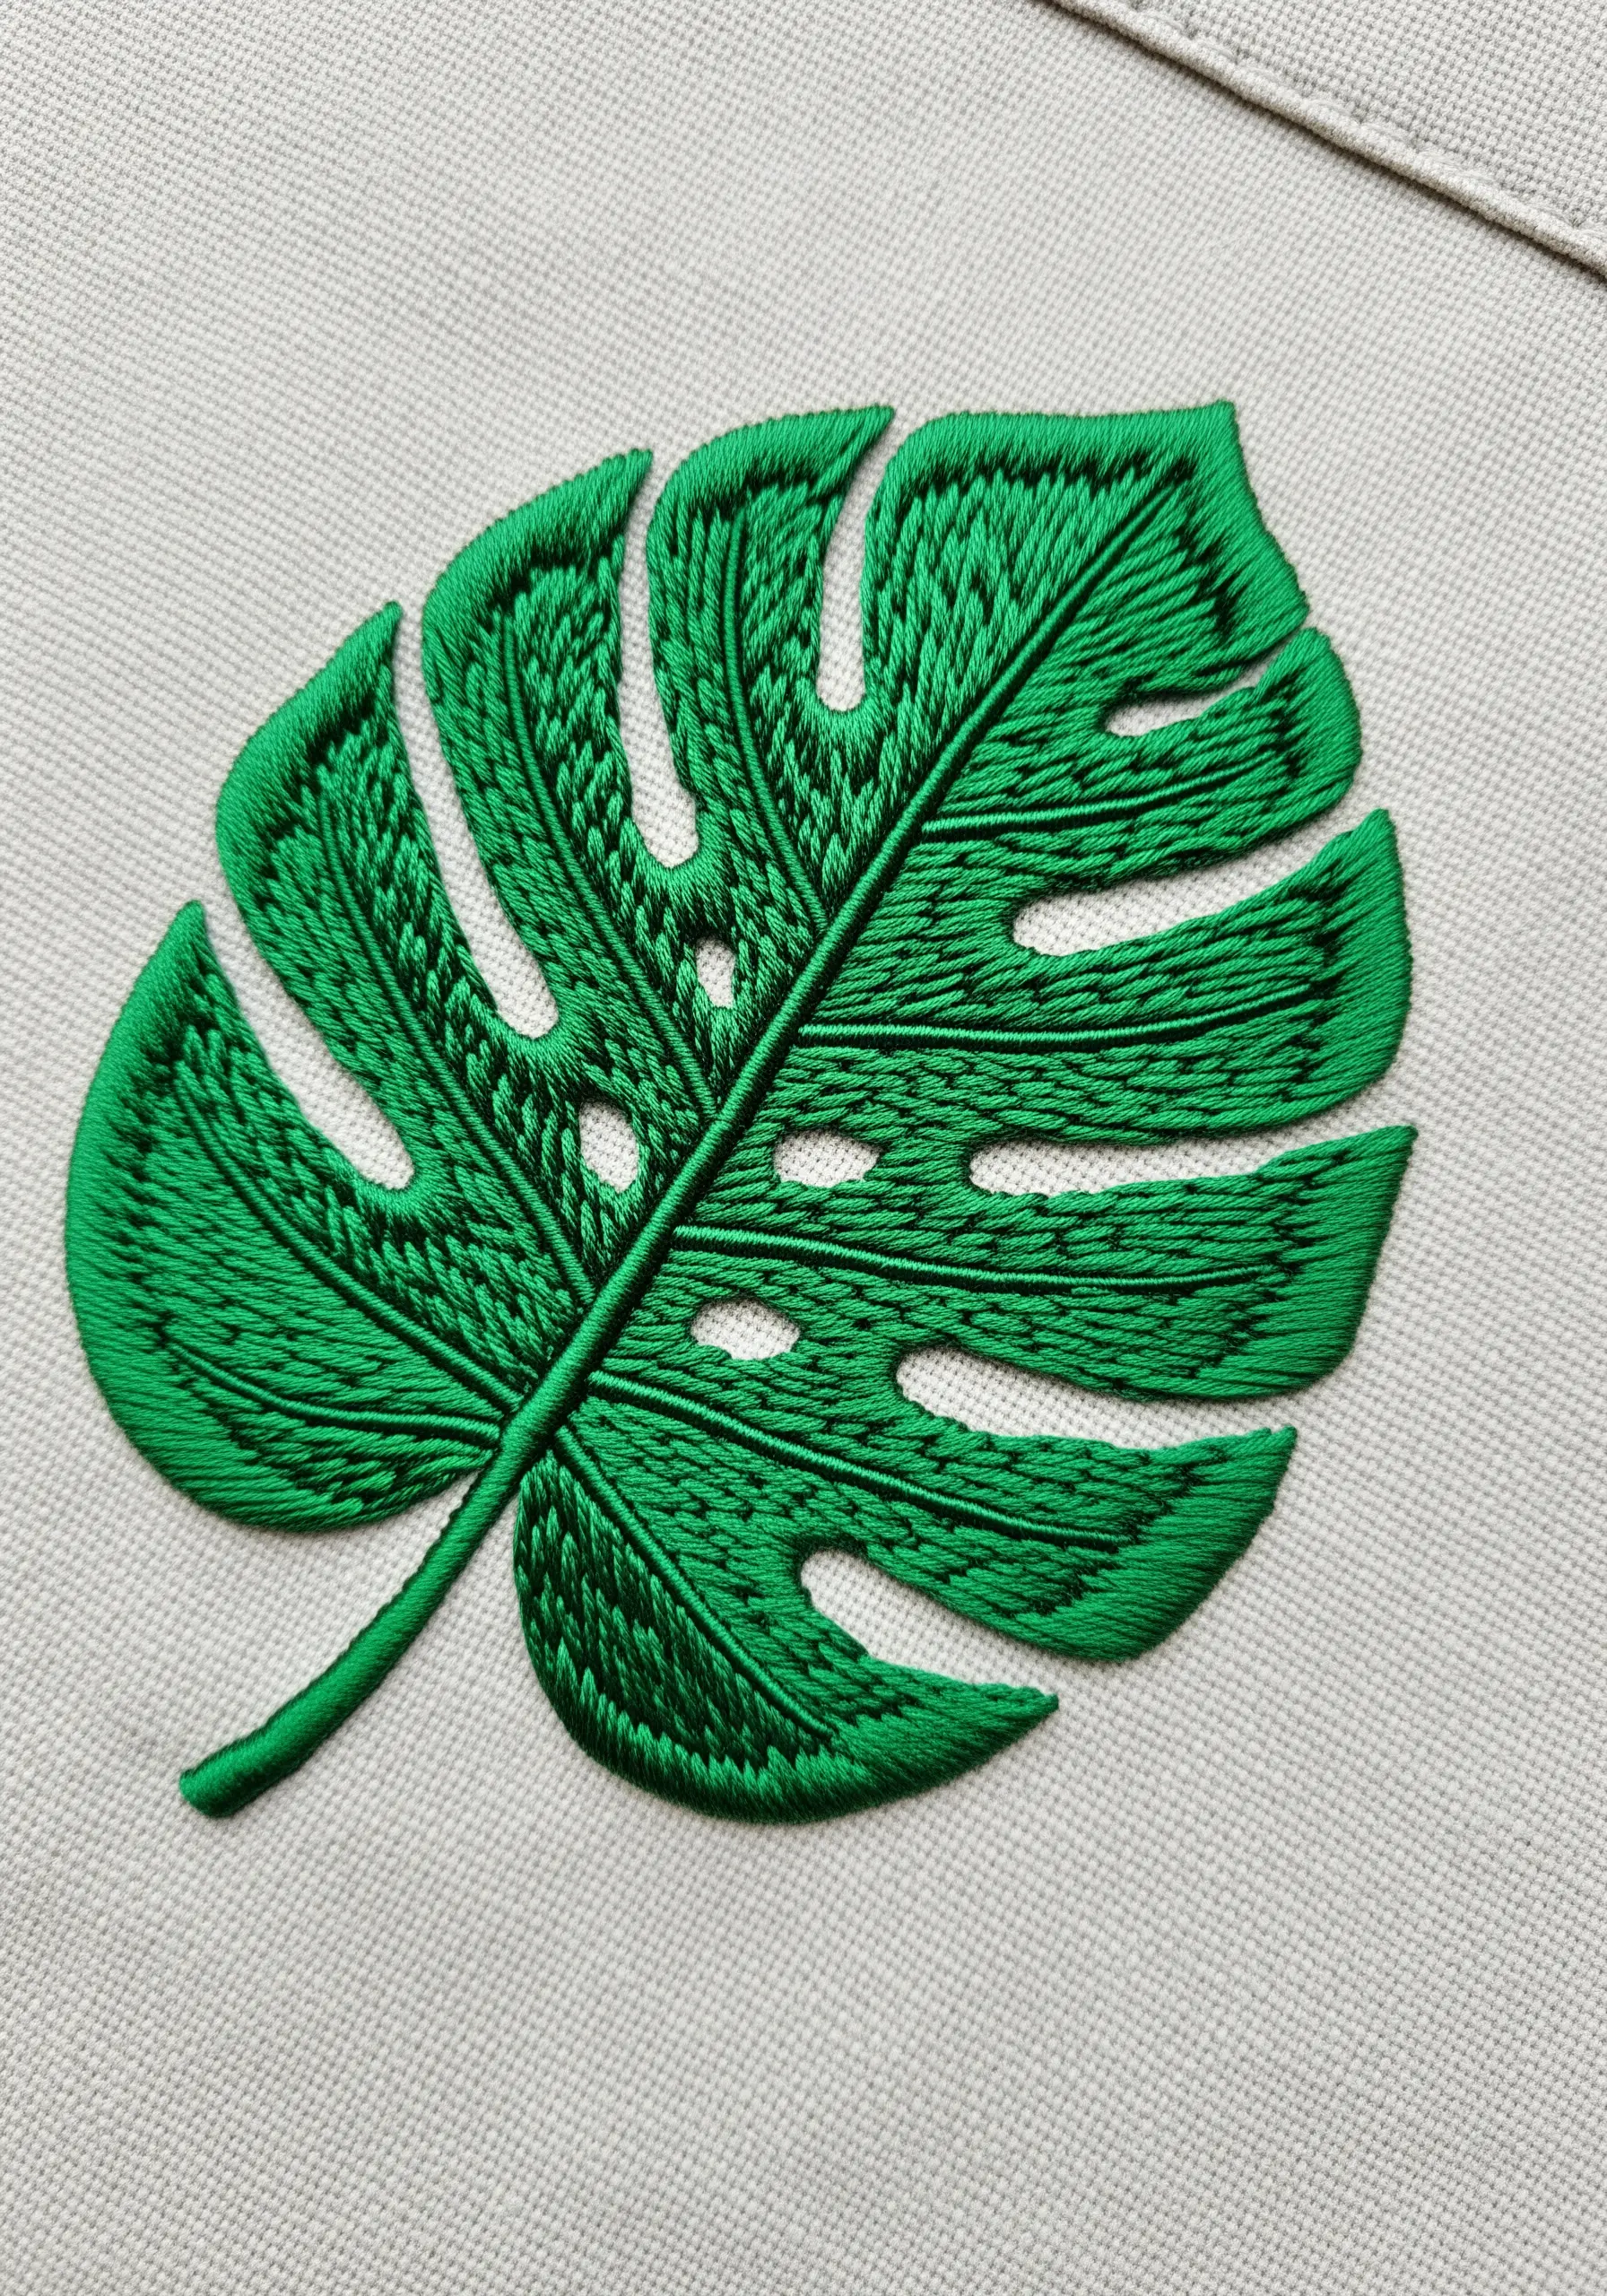
To give a monstera leaf lifelike dimension, use two different stitches for the fill.
Work the main sections of the leaf in a fishbone stitch, which creates a beautiful central vein organically.
For the smaller, textured areas near the center, switch to a tightly packed seed stitch or small French knots.
This textural shift mimics the natural complexity of the leaf and makes the design much more engaging. It’s a simple way to elevate your leaf embroidery stitches from flat to dynamic.
8. Elevate Line Art with a Whipped Backstitch

For single-color line art, a standard backstitch can sometimes look disjointed.
Instead, first lay down a simple backstitch foundation. Then, using the same thread, whip the stitches by passing your needle under each backstitch without piercing the fabric.
This technique transforms the segmented line into a smooth, continuous cord that looks incredibly polished and intentional.
It’s the perfect finishing touch for minimalist line art embroidery patterns on a tote bag.
9. Weave a Strawberry for 3D Texture
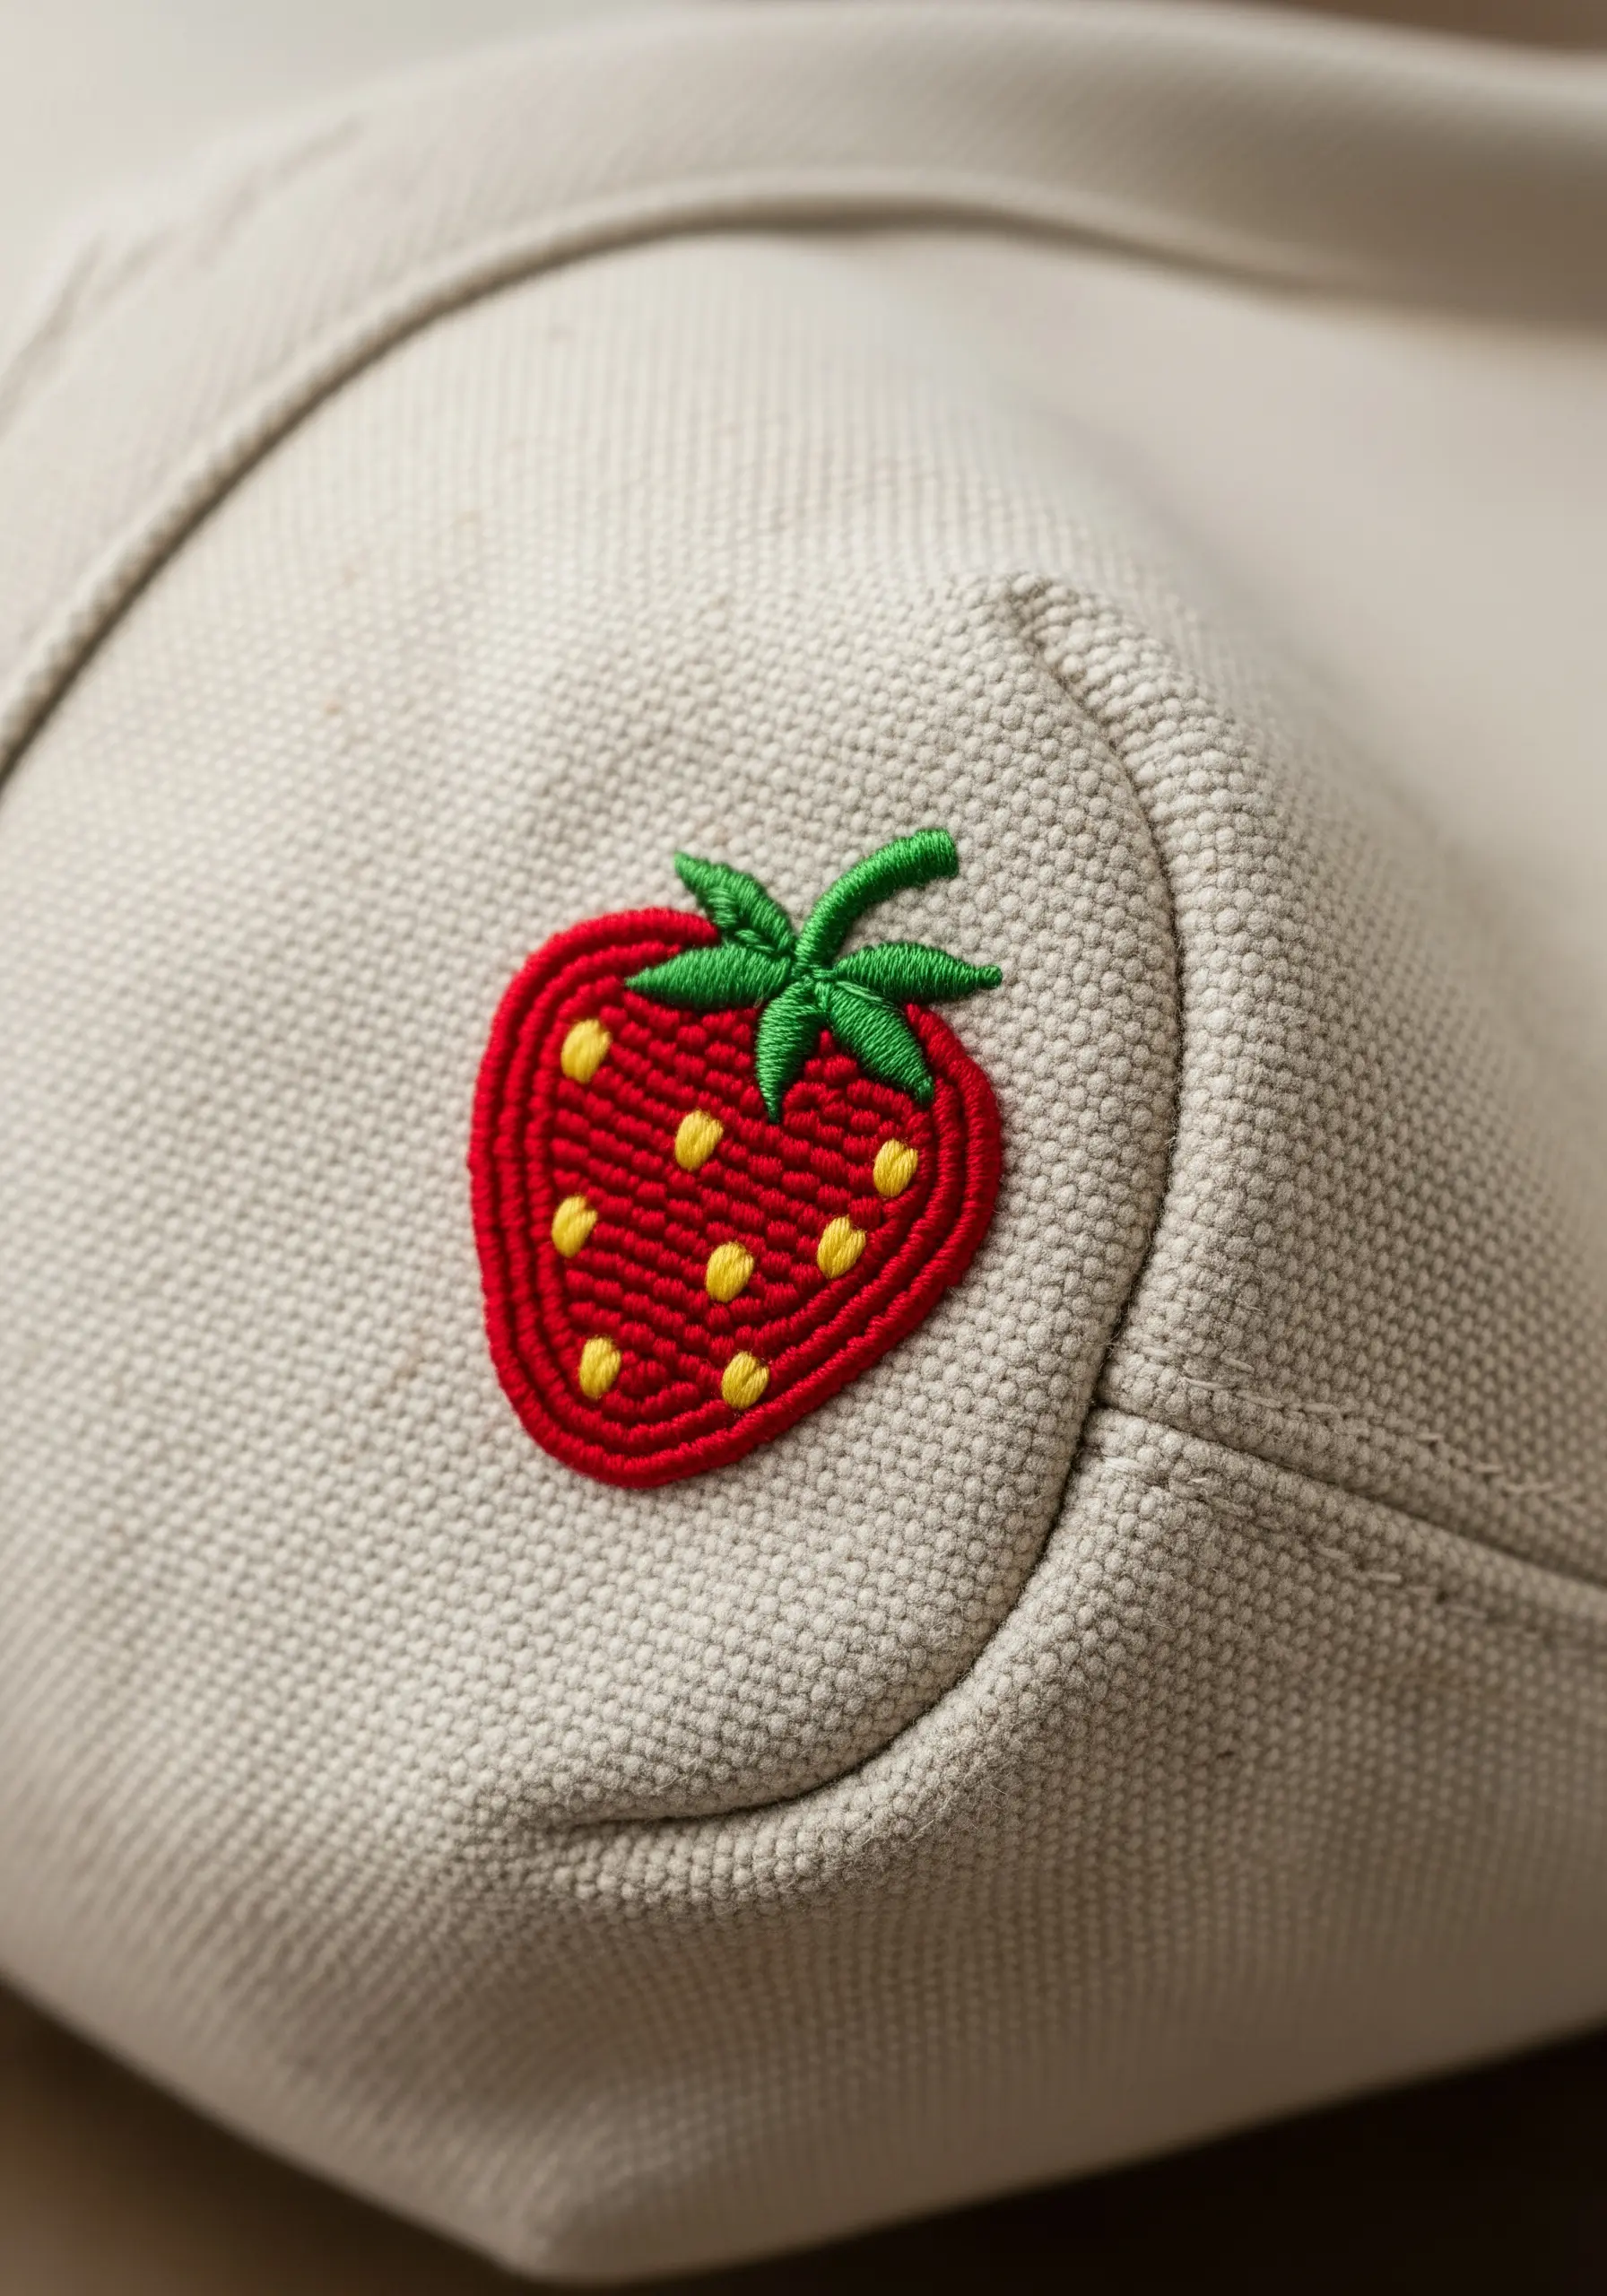
Give a simple strawberry a delightful, raised texture by using a woven wheel stitch for the body.
Create a small foundation of five straight stitches radiating from a central point, like spokes on a wheel.
Then, weave your red thread over and under these spokes until the entire shape is filled, creating a beautiful woven circle.
Add tiny yellow seed stitches on top for the seeds, and your strawberry will have a tactile quality that begs to be touched.
10. Stitch Bold Sun Rays with Stem Stitch

When you want clean, bold lines like the rays of a sun, a simple backstitch can look too thin.
Opt for a stem stitch instead. This stitch creates a slightly raised, rope-like line that has more presence and texture.
Use all six strands of your embroidery floss to maximize the effect, ensuring each ray is a strong, graphic element.
This is one of the easiest tiny stitching ideas that add a pop of color and makes a powerful statement with minimal effort.
11. Create Soft Mushroom Gradients with Long-and-Short Stitch
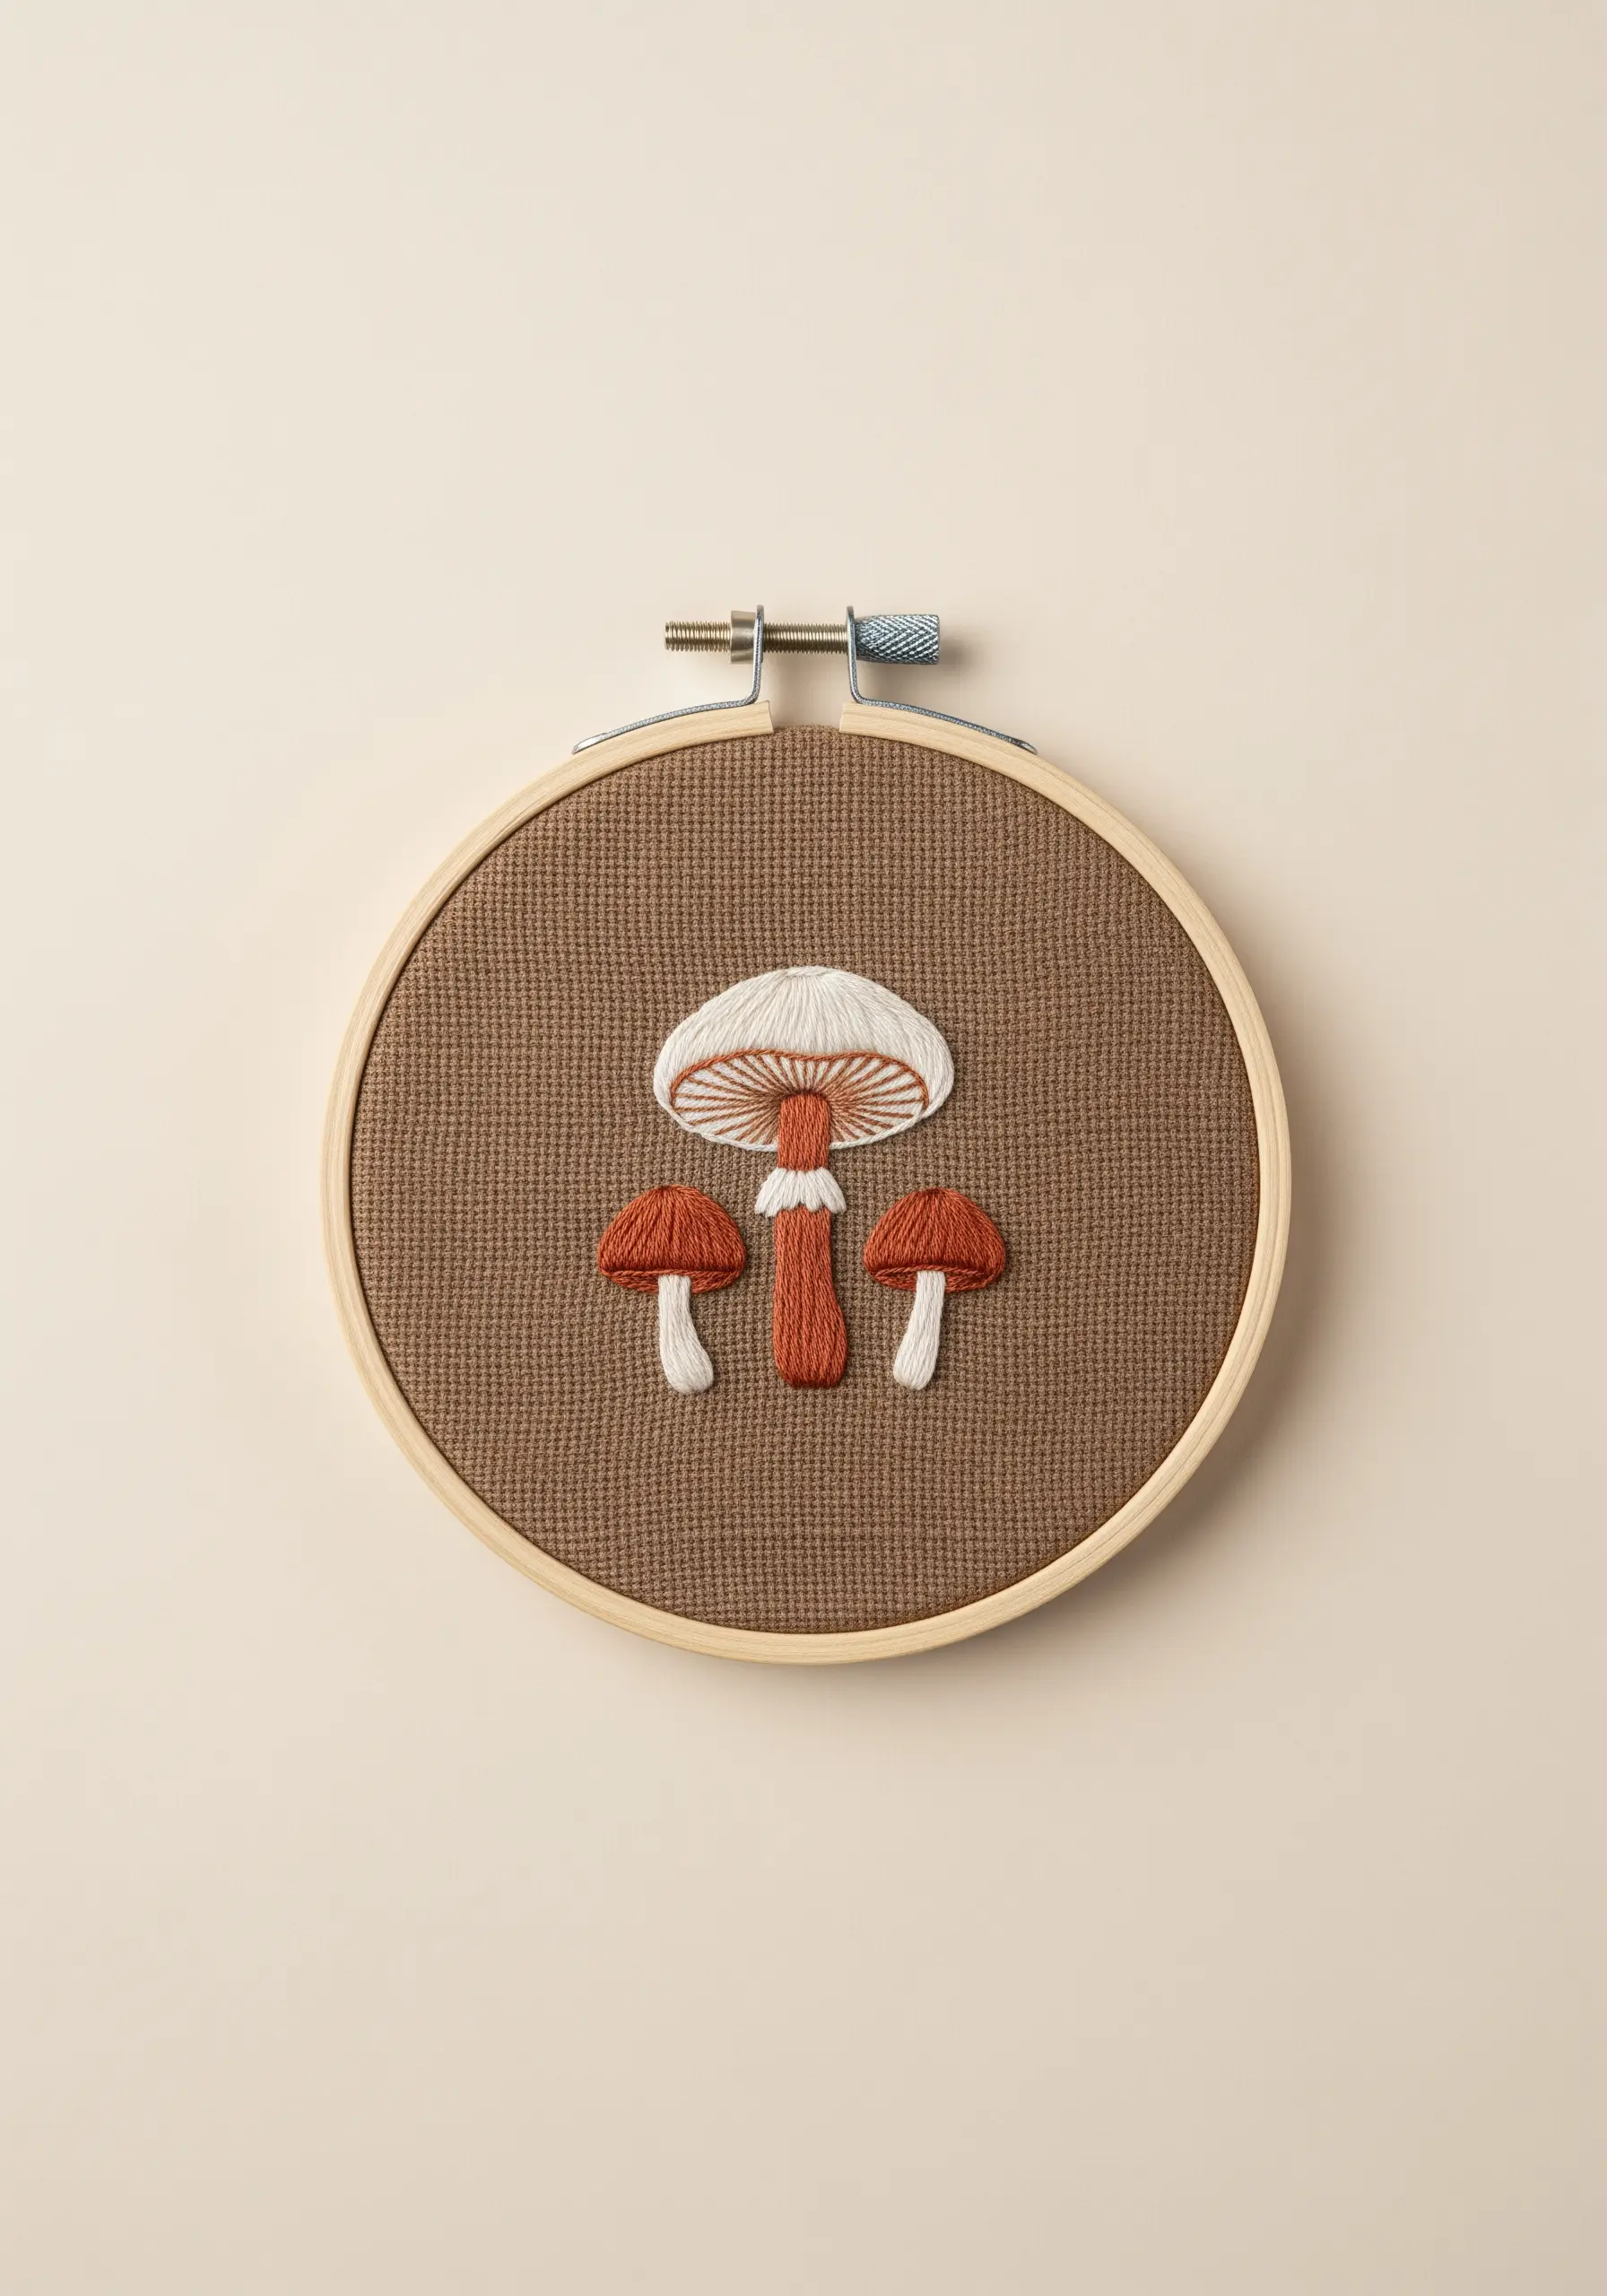
For the delicate gills under a mushroom cap, long-and-short stitch is your best friend.
Instead of a flat satin stitch, use two or three closely related shades of beige and white to create a soft, natural-looking gradient.
Start with the darkest shade at the top and work your way down, blending each new color into the previous row with staggered stitches.
This technique adds incredible depth and realism to realistic mushroom forest floor embroidery projects.
12. Capture a Dandelion’s Delicacy

To embroider something as airy as a dandelion, your stitch choice needs to feel weightless.
Use single-strand white thread for the main seed spokes, radiating from a central point with straight stitches.
For the fluffy tops, create tiny, fluffy turkey stitches or use small, detached chain stitches topped with a French knot.
This combination of fine lines and soft textures perfectly captures the fragile, floating nature of the subject.
13. Perfect the Minimalist Cat Silhouette
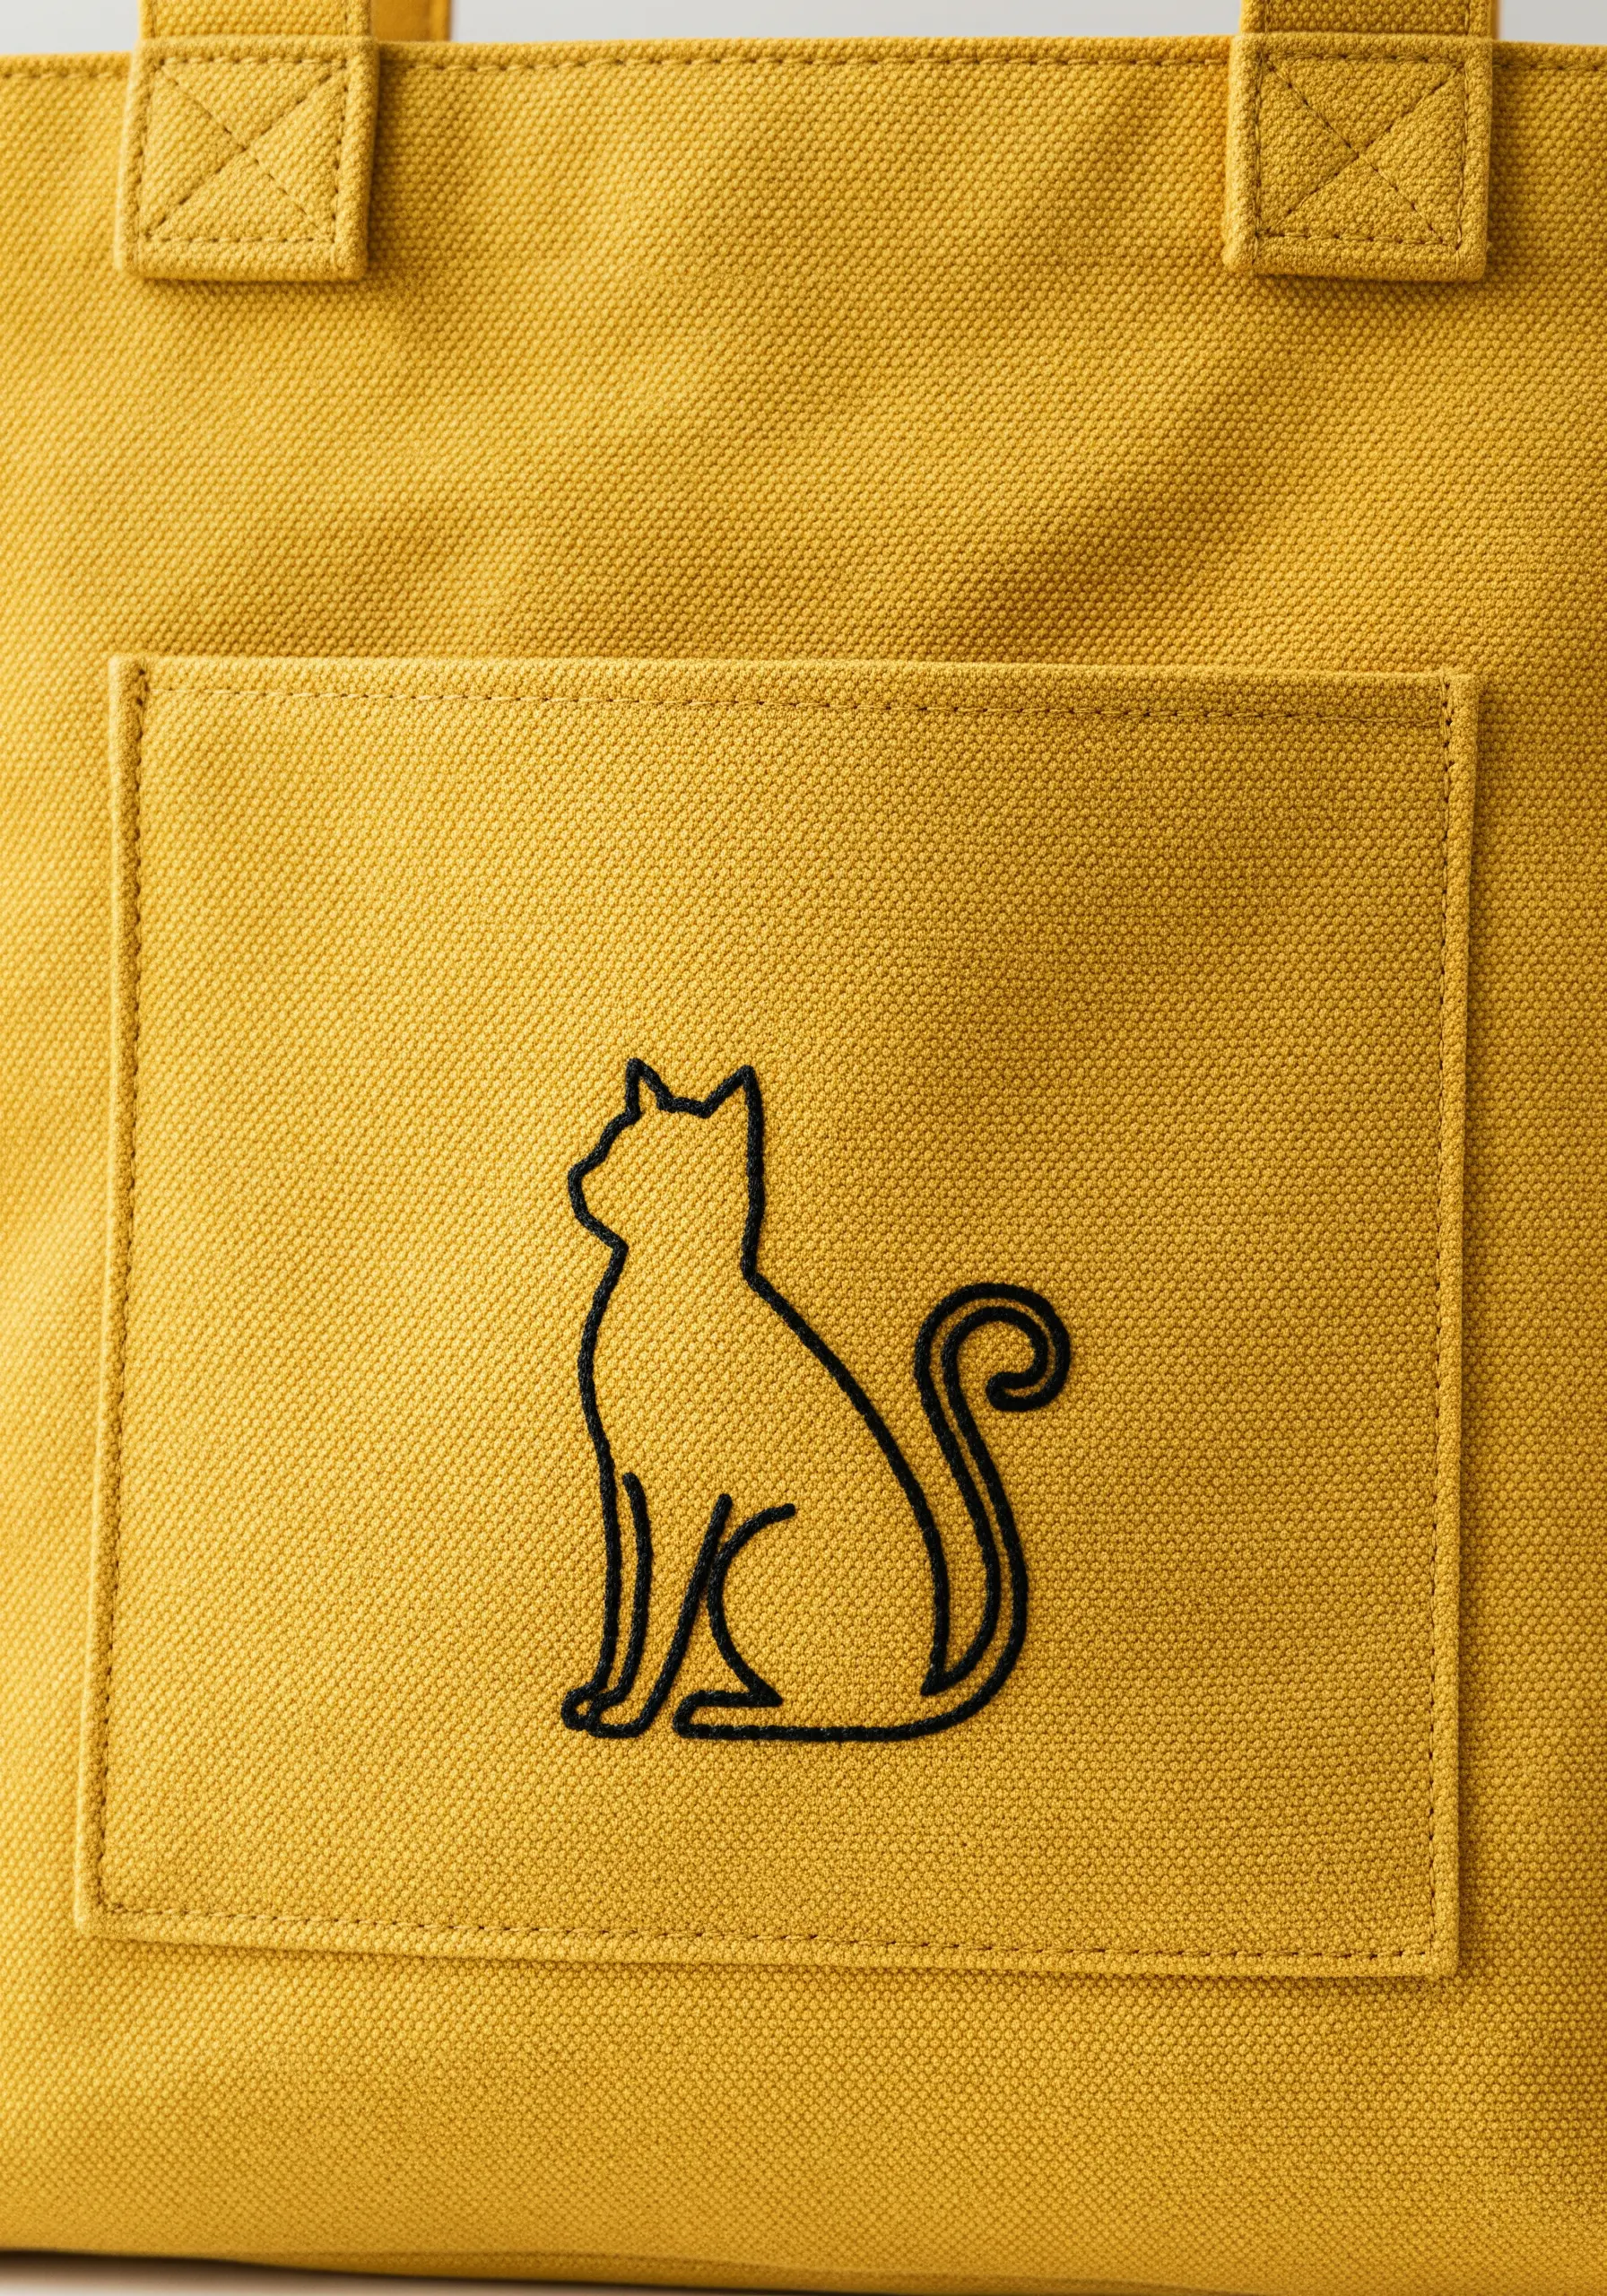
When stitching a clean outline, the key to smooth curves is managing your stitch length.
Use a simple backstitch with two or three strands of black floss.
On the straight sections, like the back, you can use longer stitches. As you approach a curve, like the tail or head, shorten your stitch length significantly.
Shorter stitches allow you to navigate tight corners without creating sharp, angular points, resulting in a fluid and graceful silhouette. It’s a core skill for all minimal pet-themed line art stitches.
14. Add a Pop of Shine with a Single Stitch

The small white highlight on these cherries is what makes them look glossy and dimensional, and it’s incredibly simple to achieve.
After filling the cherry shape with a rich red satin stitch, use a single strand of bright white thread.
Create one or two small, slightly curved straight stitches where the light would naturally hit.
This tiny detail instantly lifts the entire motif, transforming it from a flat circle into a shiny, rounded fruit.
15. Weave a Textured Color-Blocked Patch

Create a stunning, tactile patch using just one stitch: the bullion knot or a tightly coiled French knot.
Draw a simple grid on your fabric and assign a different color to each block.
Fill each square with densely packed knots, ensuring they are all uniform in size and tightness. The result is a design that looks complex and woven.
This is a wonderfully meditative way to play with color theory and create a piece with incredible texture.
16. Make Graphic Shapes Bold with a Thick Outline
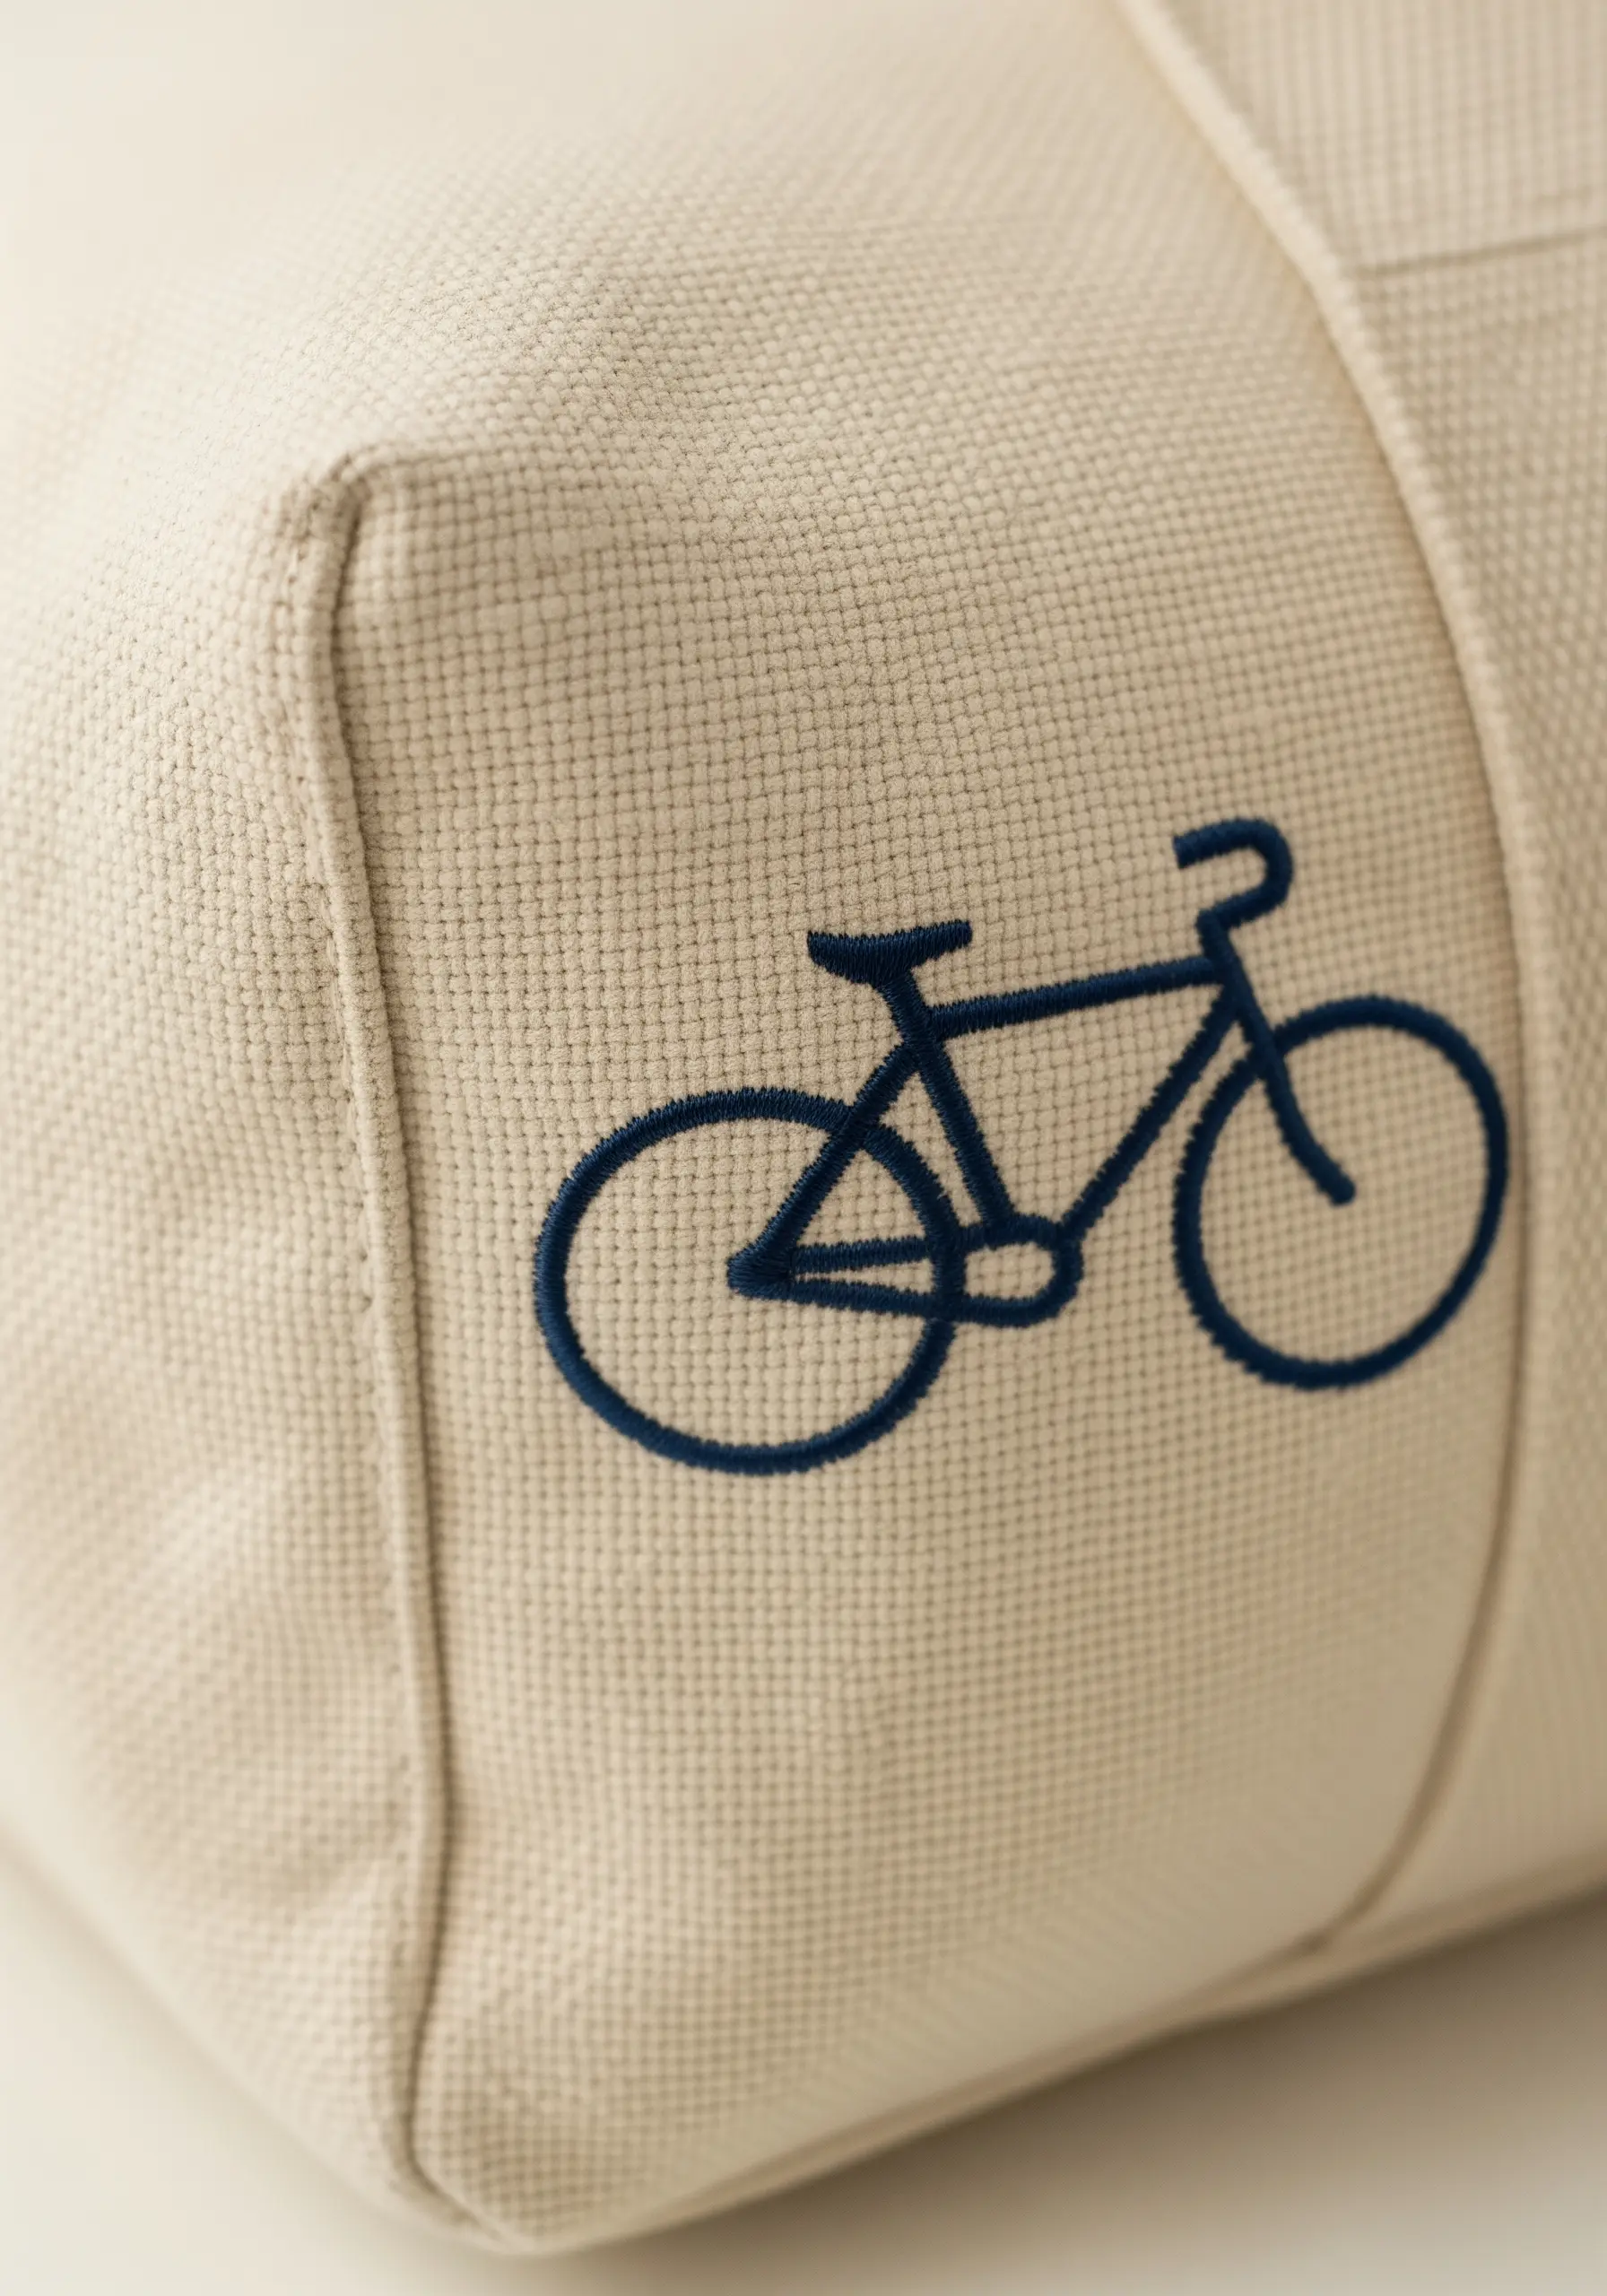
For a minimalist design like this bicycle to have impact, it needs a strong line.
Instead of using just two or three strands of floss, use all six strands. This creates a thick, substantial line that stands out against the canvas fabric.
Use a backstitch or a stem stitch for a continuous, rope-like texture.
This simple adjustment in thread weight is what gives the motif its confident, graphic quality without adding any complex stitches.
17. Build a Fern with Fishbone Stitch

The fishbone stitch is perfect for creating leaves and ferns because it builds the stem and leaflets all in one motion.
Start at the tip of a frond and alternate your stitches from left to right, crossing over the central guideline each time.
This technique creates a beautiful, raised center line that looks just like a natural stem, with the angled stitches forming perfectly shaped leaves.
It is one of the most effective fern foliage stitch variations for achieving a realistic look with a single stitch.
18. Create Motion with a Dashed Line
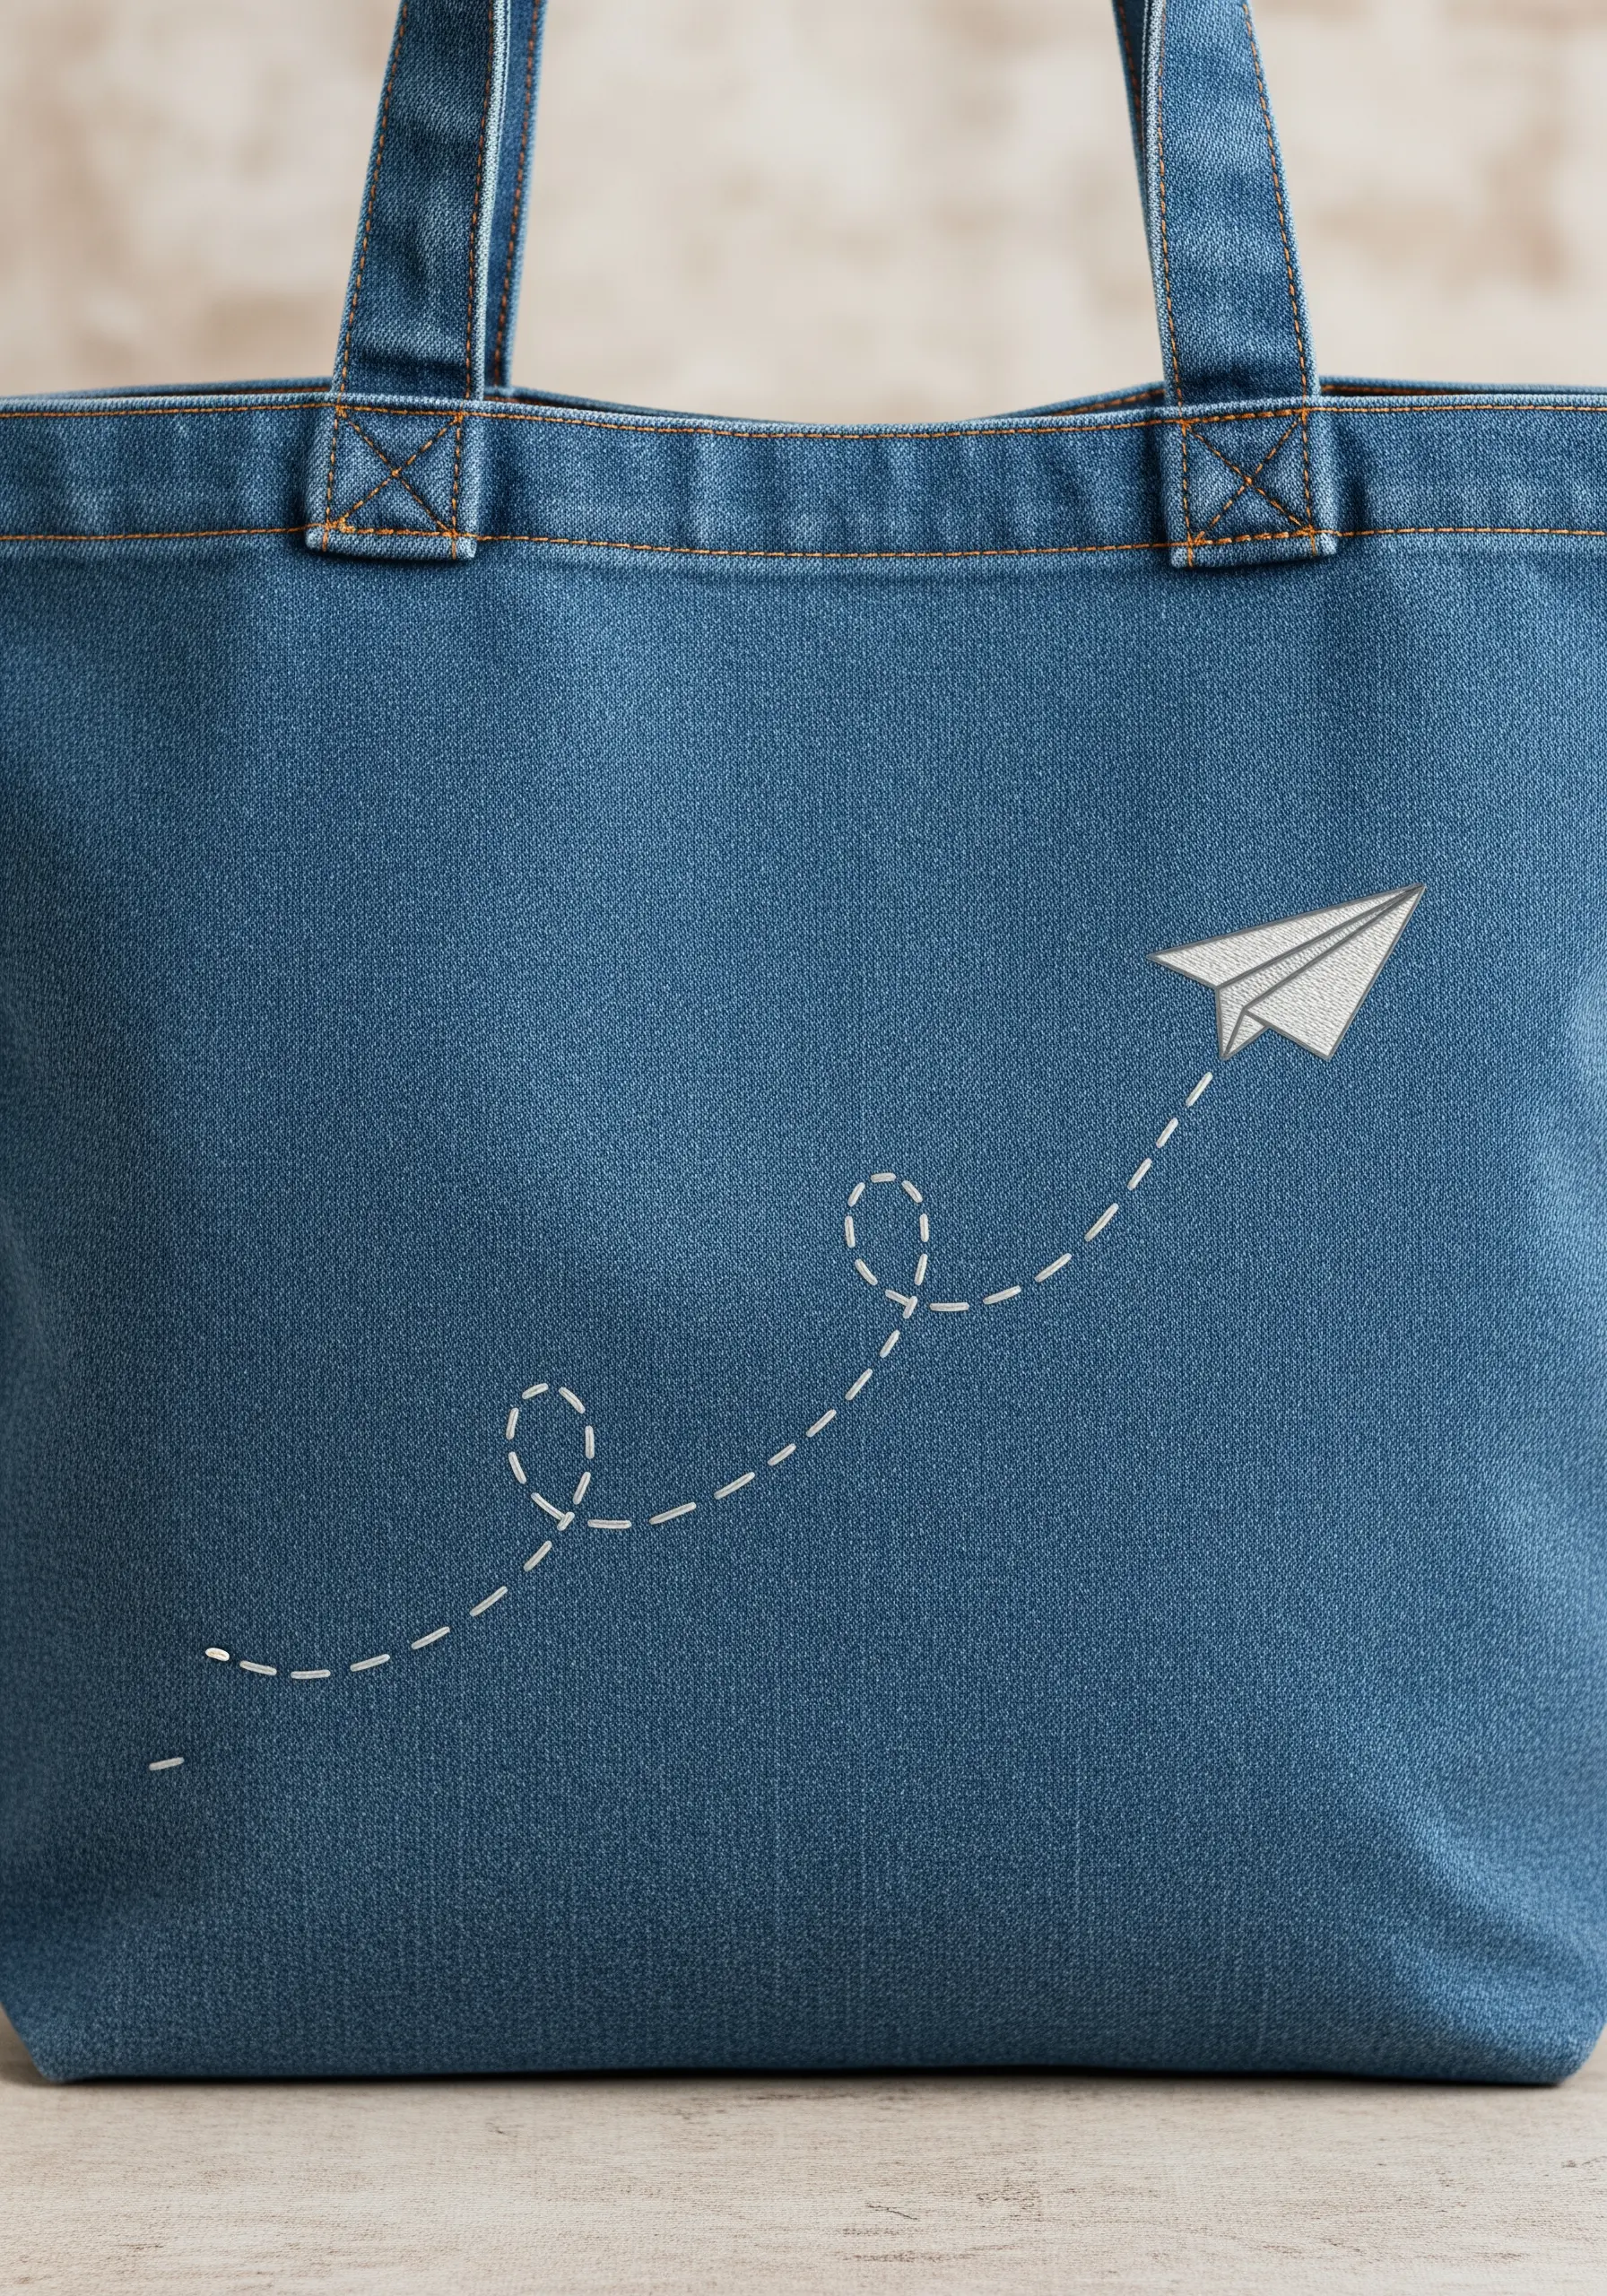
A simple running stitch is the perfect way to imply movement and direction, as seen with this paper airplane’s flight path.
Use a contrasting thread color, like white on denim, to ensure the path is clearly visible.
Keep your stitches and the gaps between them consistent for a clean, rhythmic look. For the loops, shorten your stitch length to create smooth curves.
This technique adds a touch of playful storytelling to your design.
19. Define Citrus Segments with Directional Fill
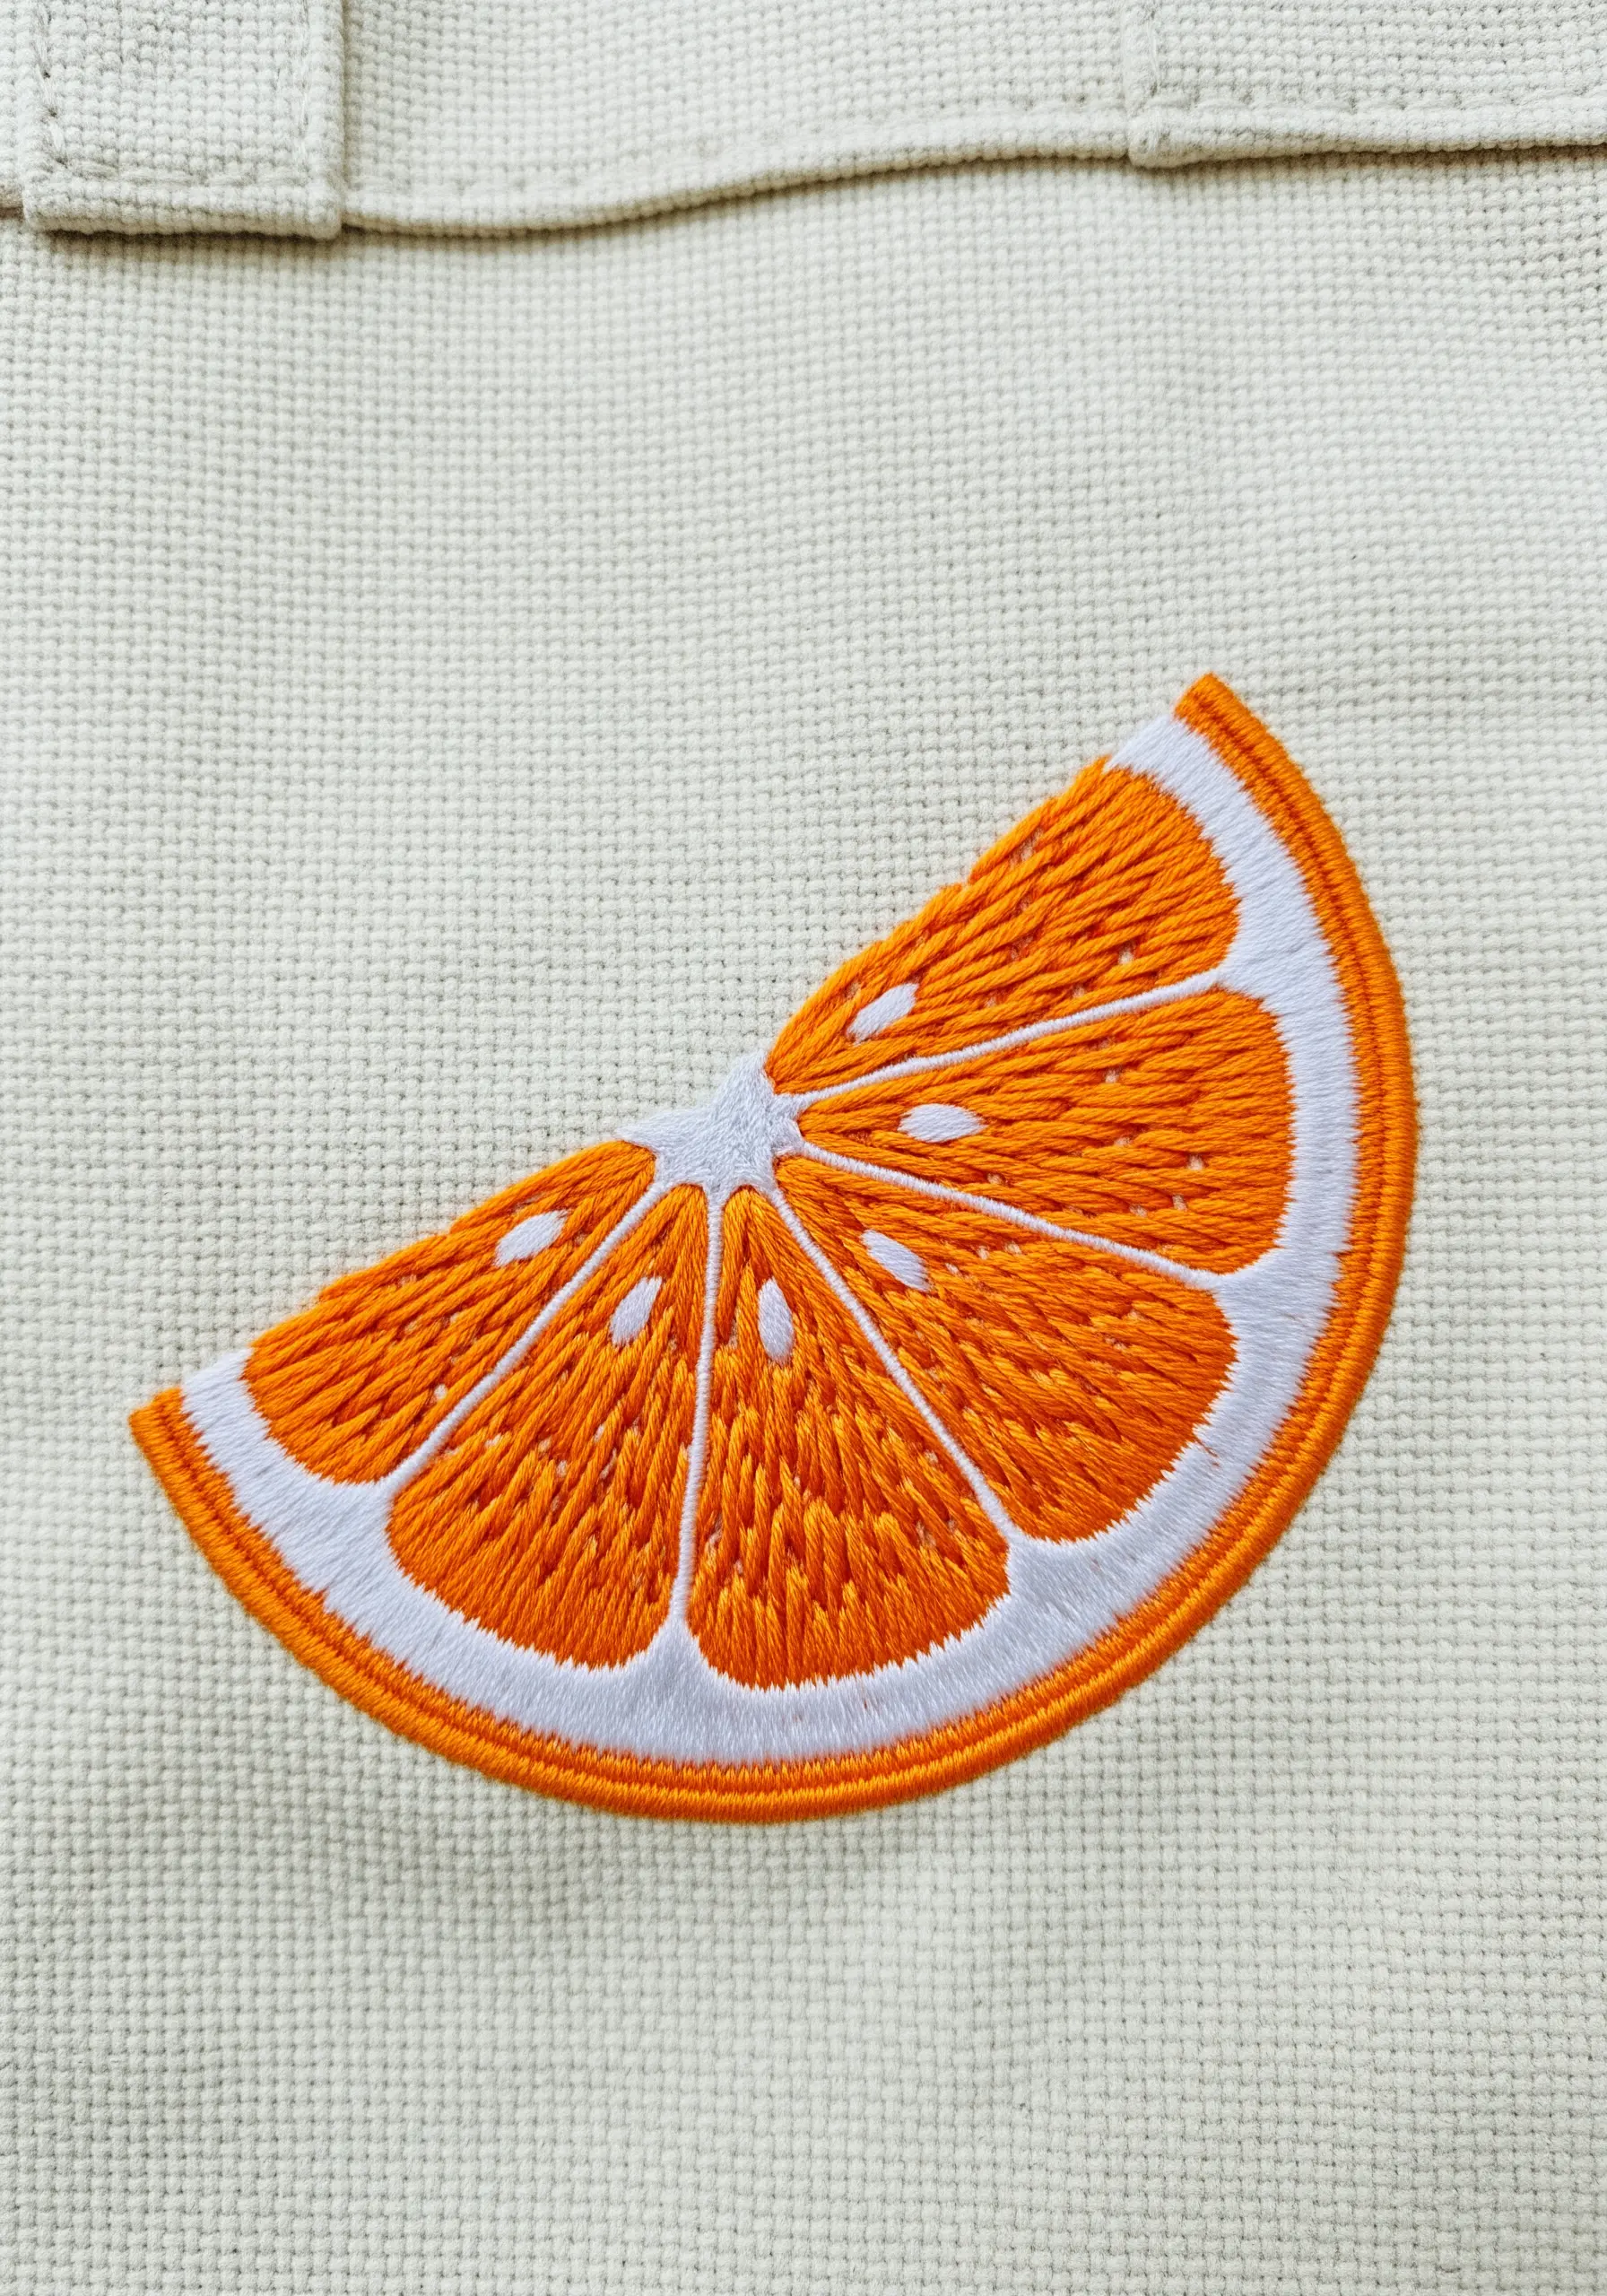
The key to a realistic orange slice is ensuring each segment’s stitches point toward the center.
Outline each segment first with a split stitch. Then, fill it with satin stitches, angling them so they converge at the point of the wedge.
This directional stitching creates the illusion of pulp and membrane, giving the slice a juicy, realistic texture.
It’s a simple adjustment that makes all minimal fruit plant motifs look more professional.
20. Give Tiny Leaves a Central Vein
For very small leaves, the fishbone stitch is the most efficient way to create a defined shape with a built-in central vein.
Even with just a few stitches on each side, the overlapping technique at the center forms a delicate, raised line that mimics a real leaf.
Use two or three strands of green floss to keep the leaves delicate and not overly bulky.
This stitch is essential for any collection of hand embroidery leaf patterns, no matter the size.
21. Layer a Succulent for 3D Form
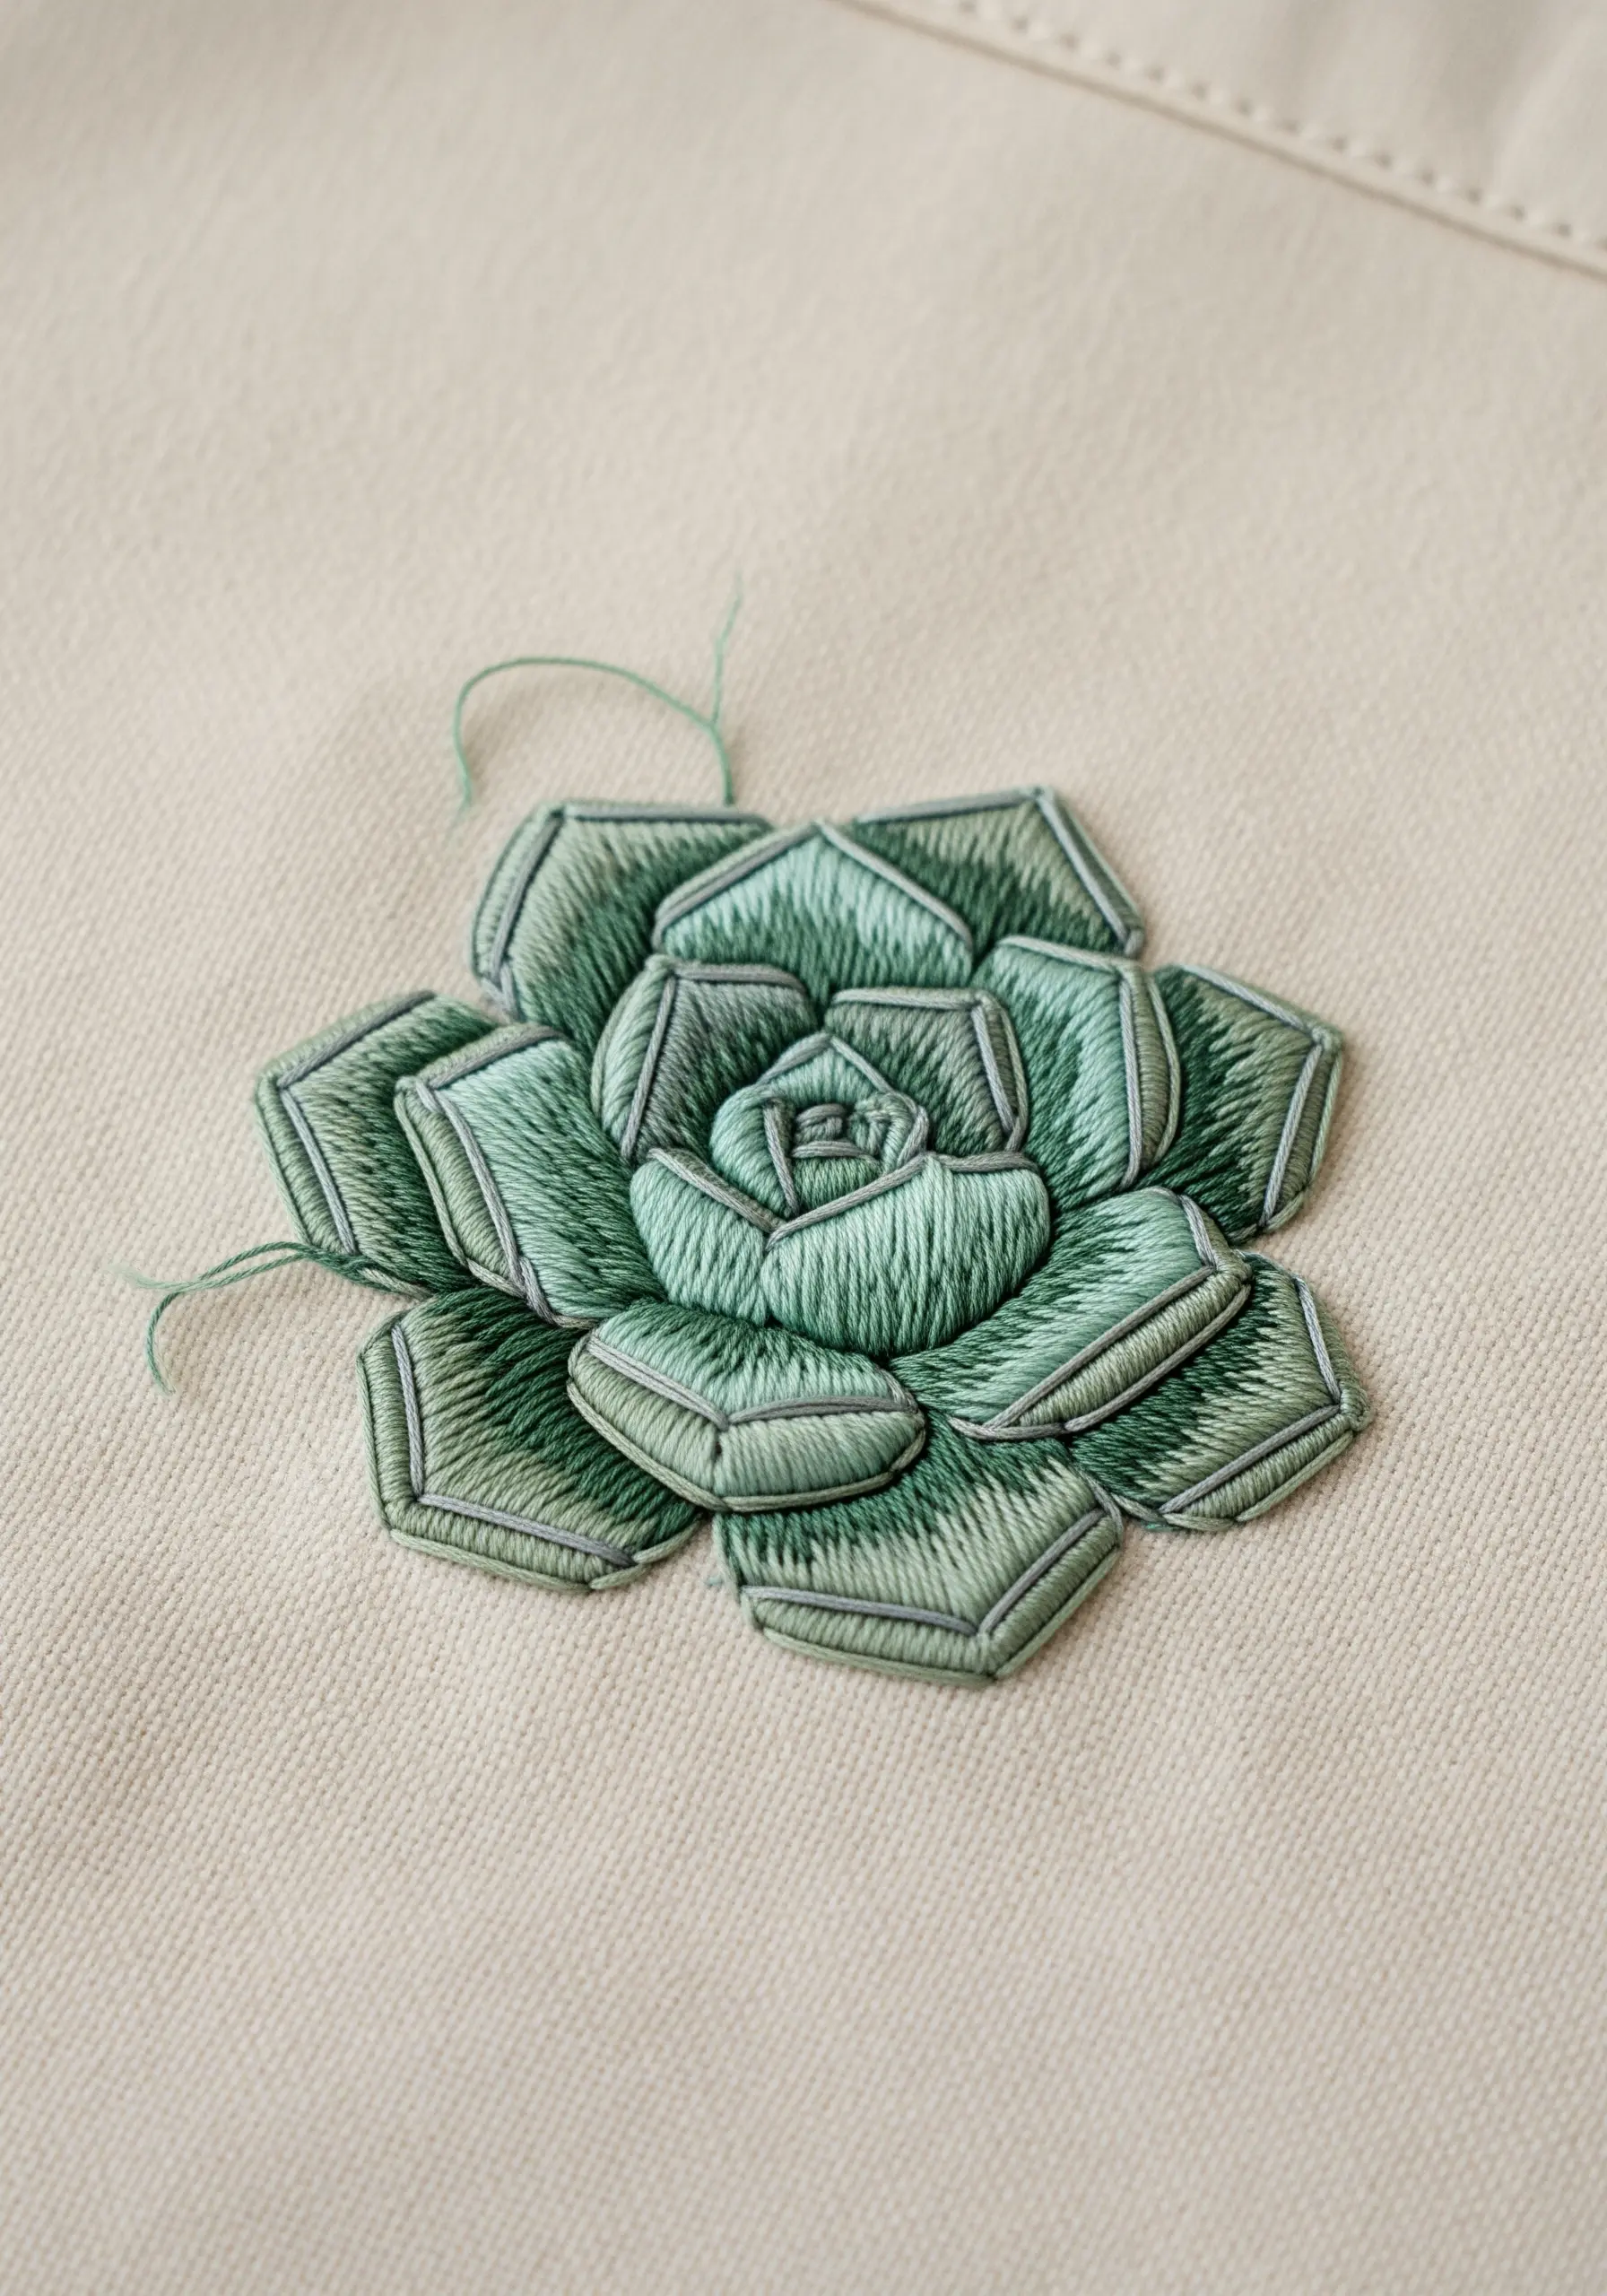
Build a succulent with convincing depth by stitching it in layers, from the outside in.
Start by embroidering the largest, outermost petals first. Then, stitch the next layer of petals on top, slightly overlapping the previous ones.
Continue working your way toward the center, using slightly lighter thread colors for the inner petals to suggest new growth.
This layering technique, combined with a sharp backstitch outline for each petal, creates a stunning, dimensional effect.
22. Achieve Solid Fill with Block Satin Stitch
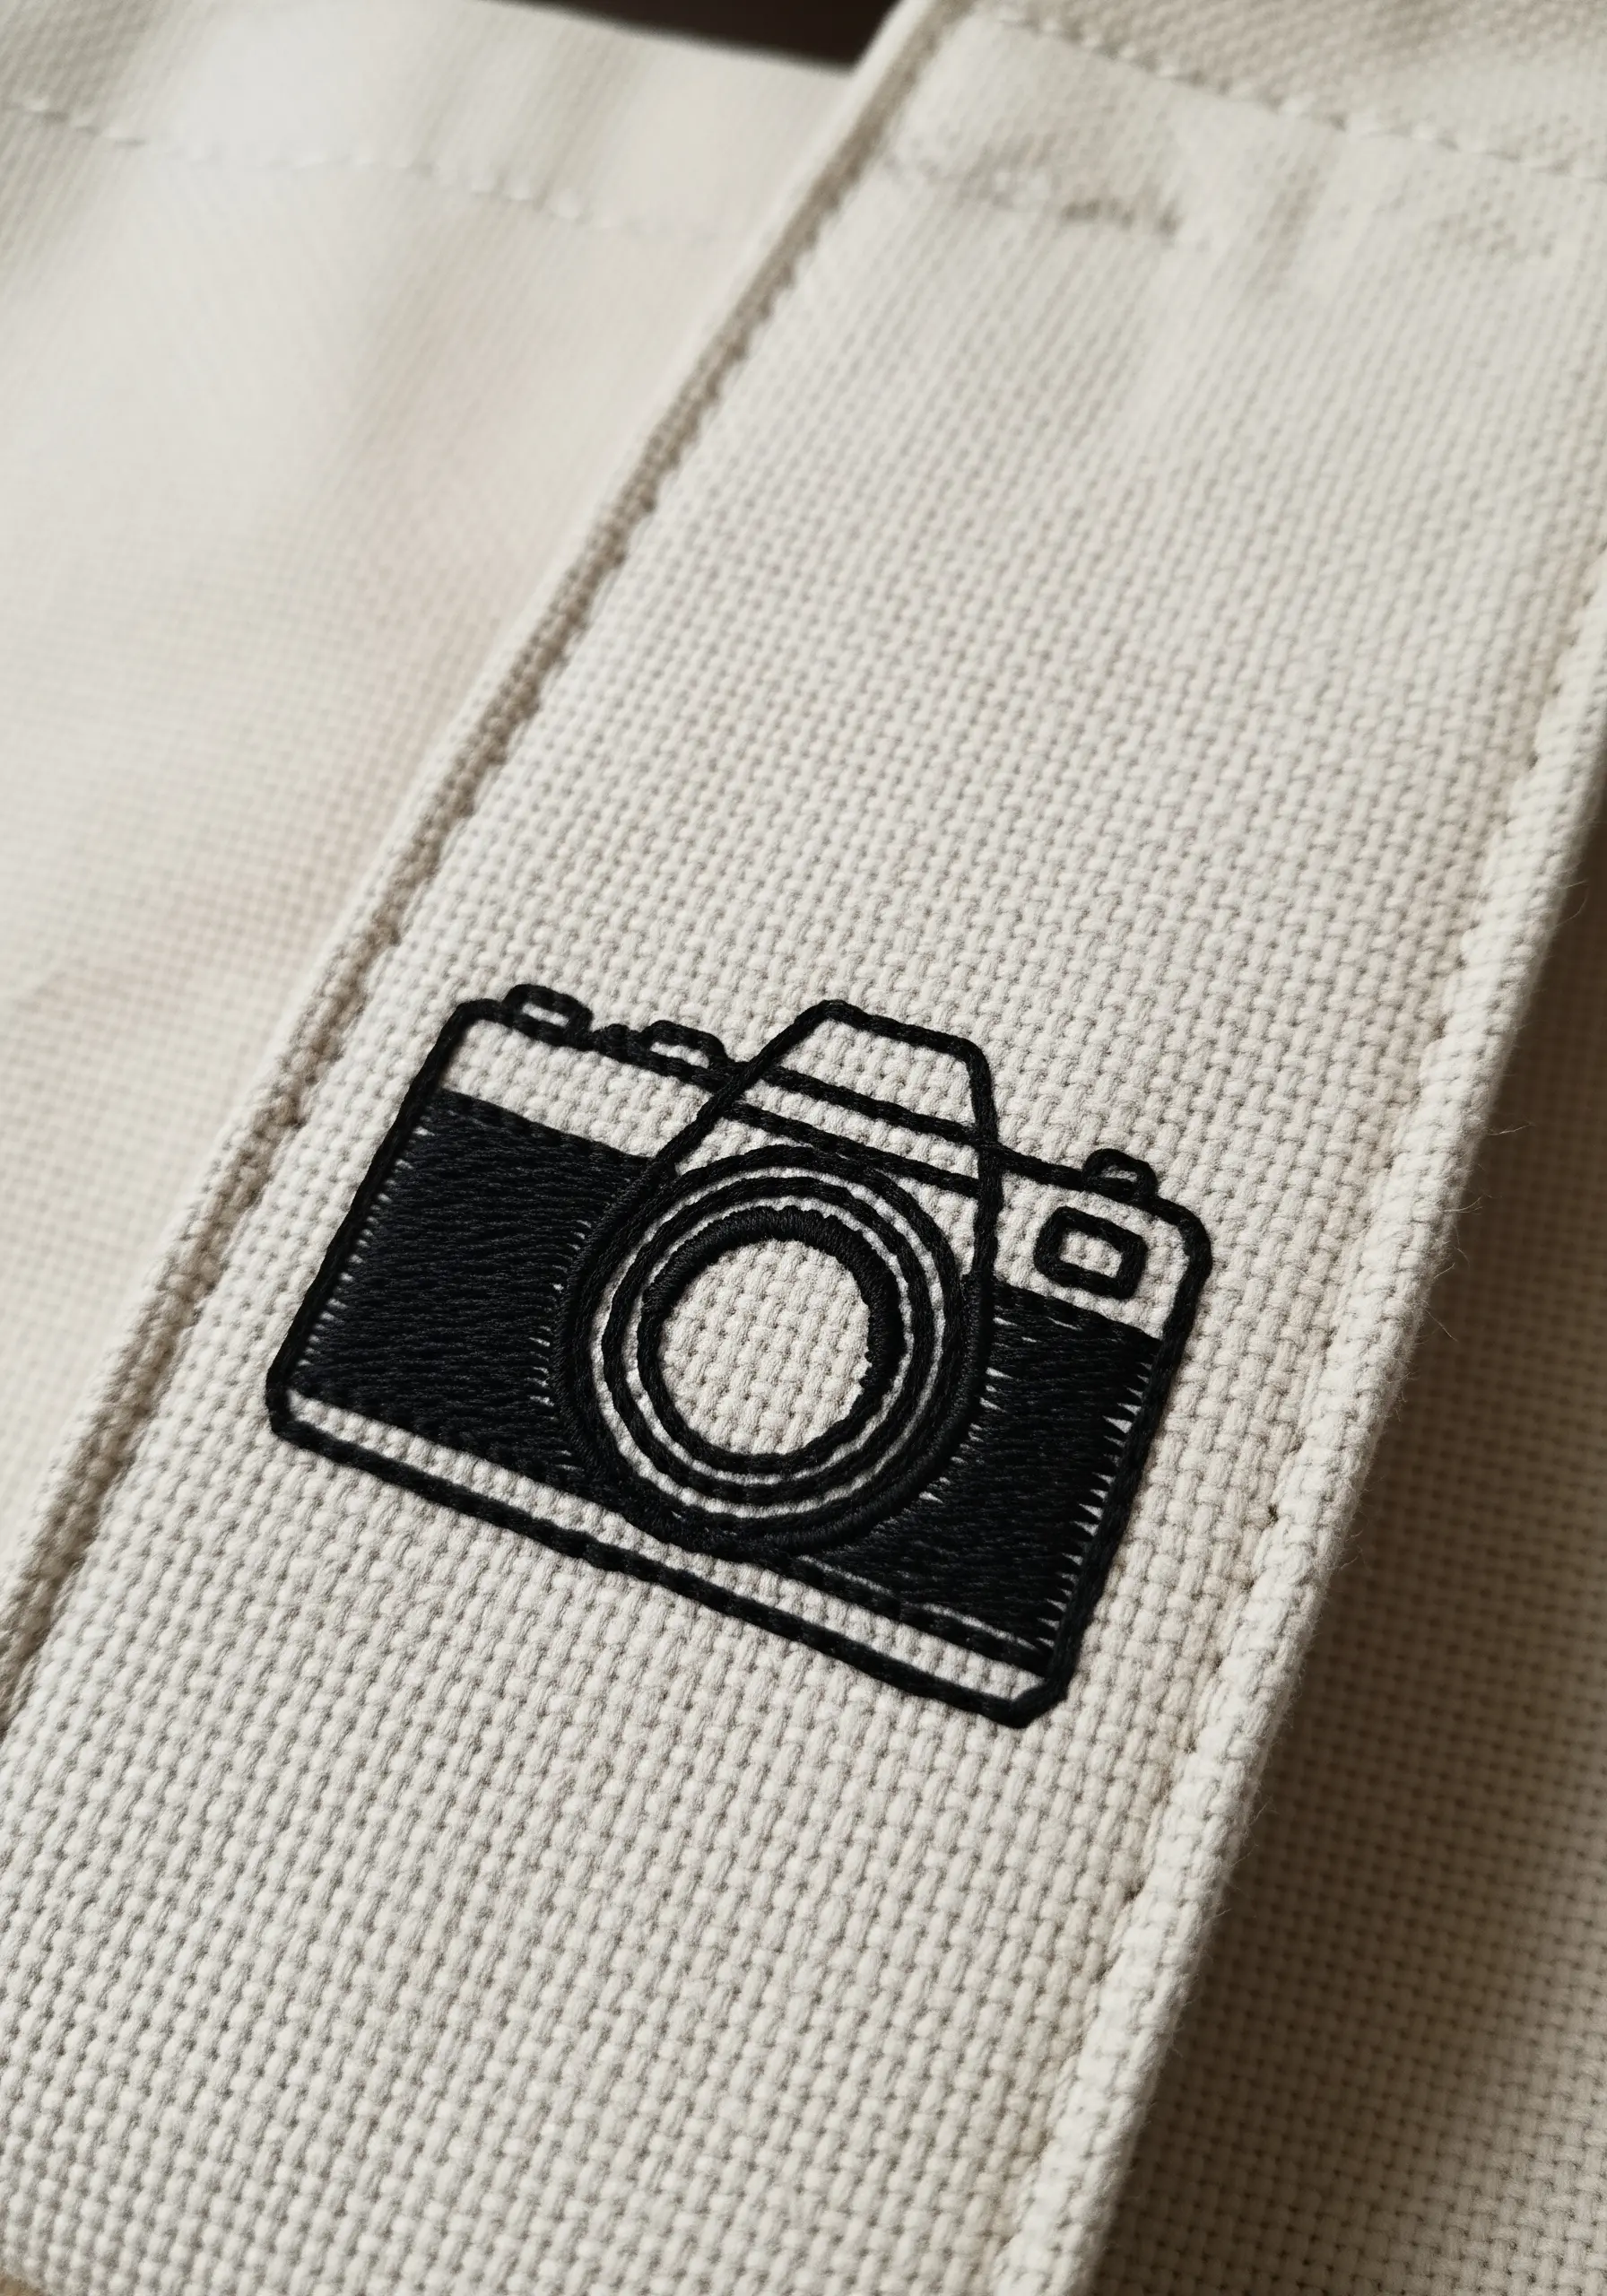
For a clean, solid fill in a geometric shape like a camera, use a satin stitch and work in small, manageable blocks.
Instead of trying to cross the entire width of the camera body with one long stitch, break it into smaller sections.
Ensure your stitches lie flat and parallel to one another, creating a smooth, almost machine-embroidered finish.
Use a crisp backstitch outline to contain the fill and define the camera’s edges for a polished look.
23. Scatter Abstract Knots for a Pop of Texture
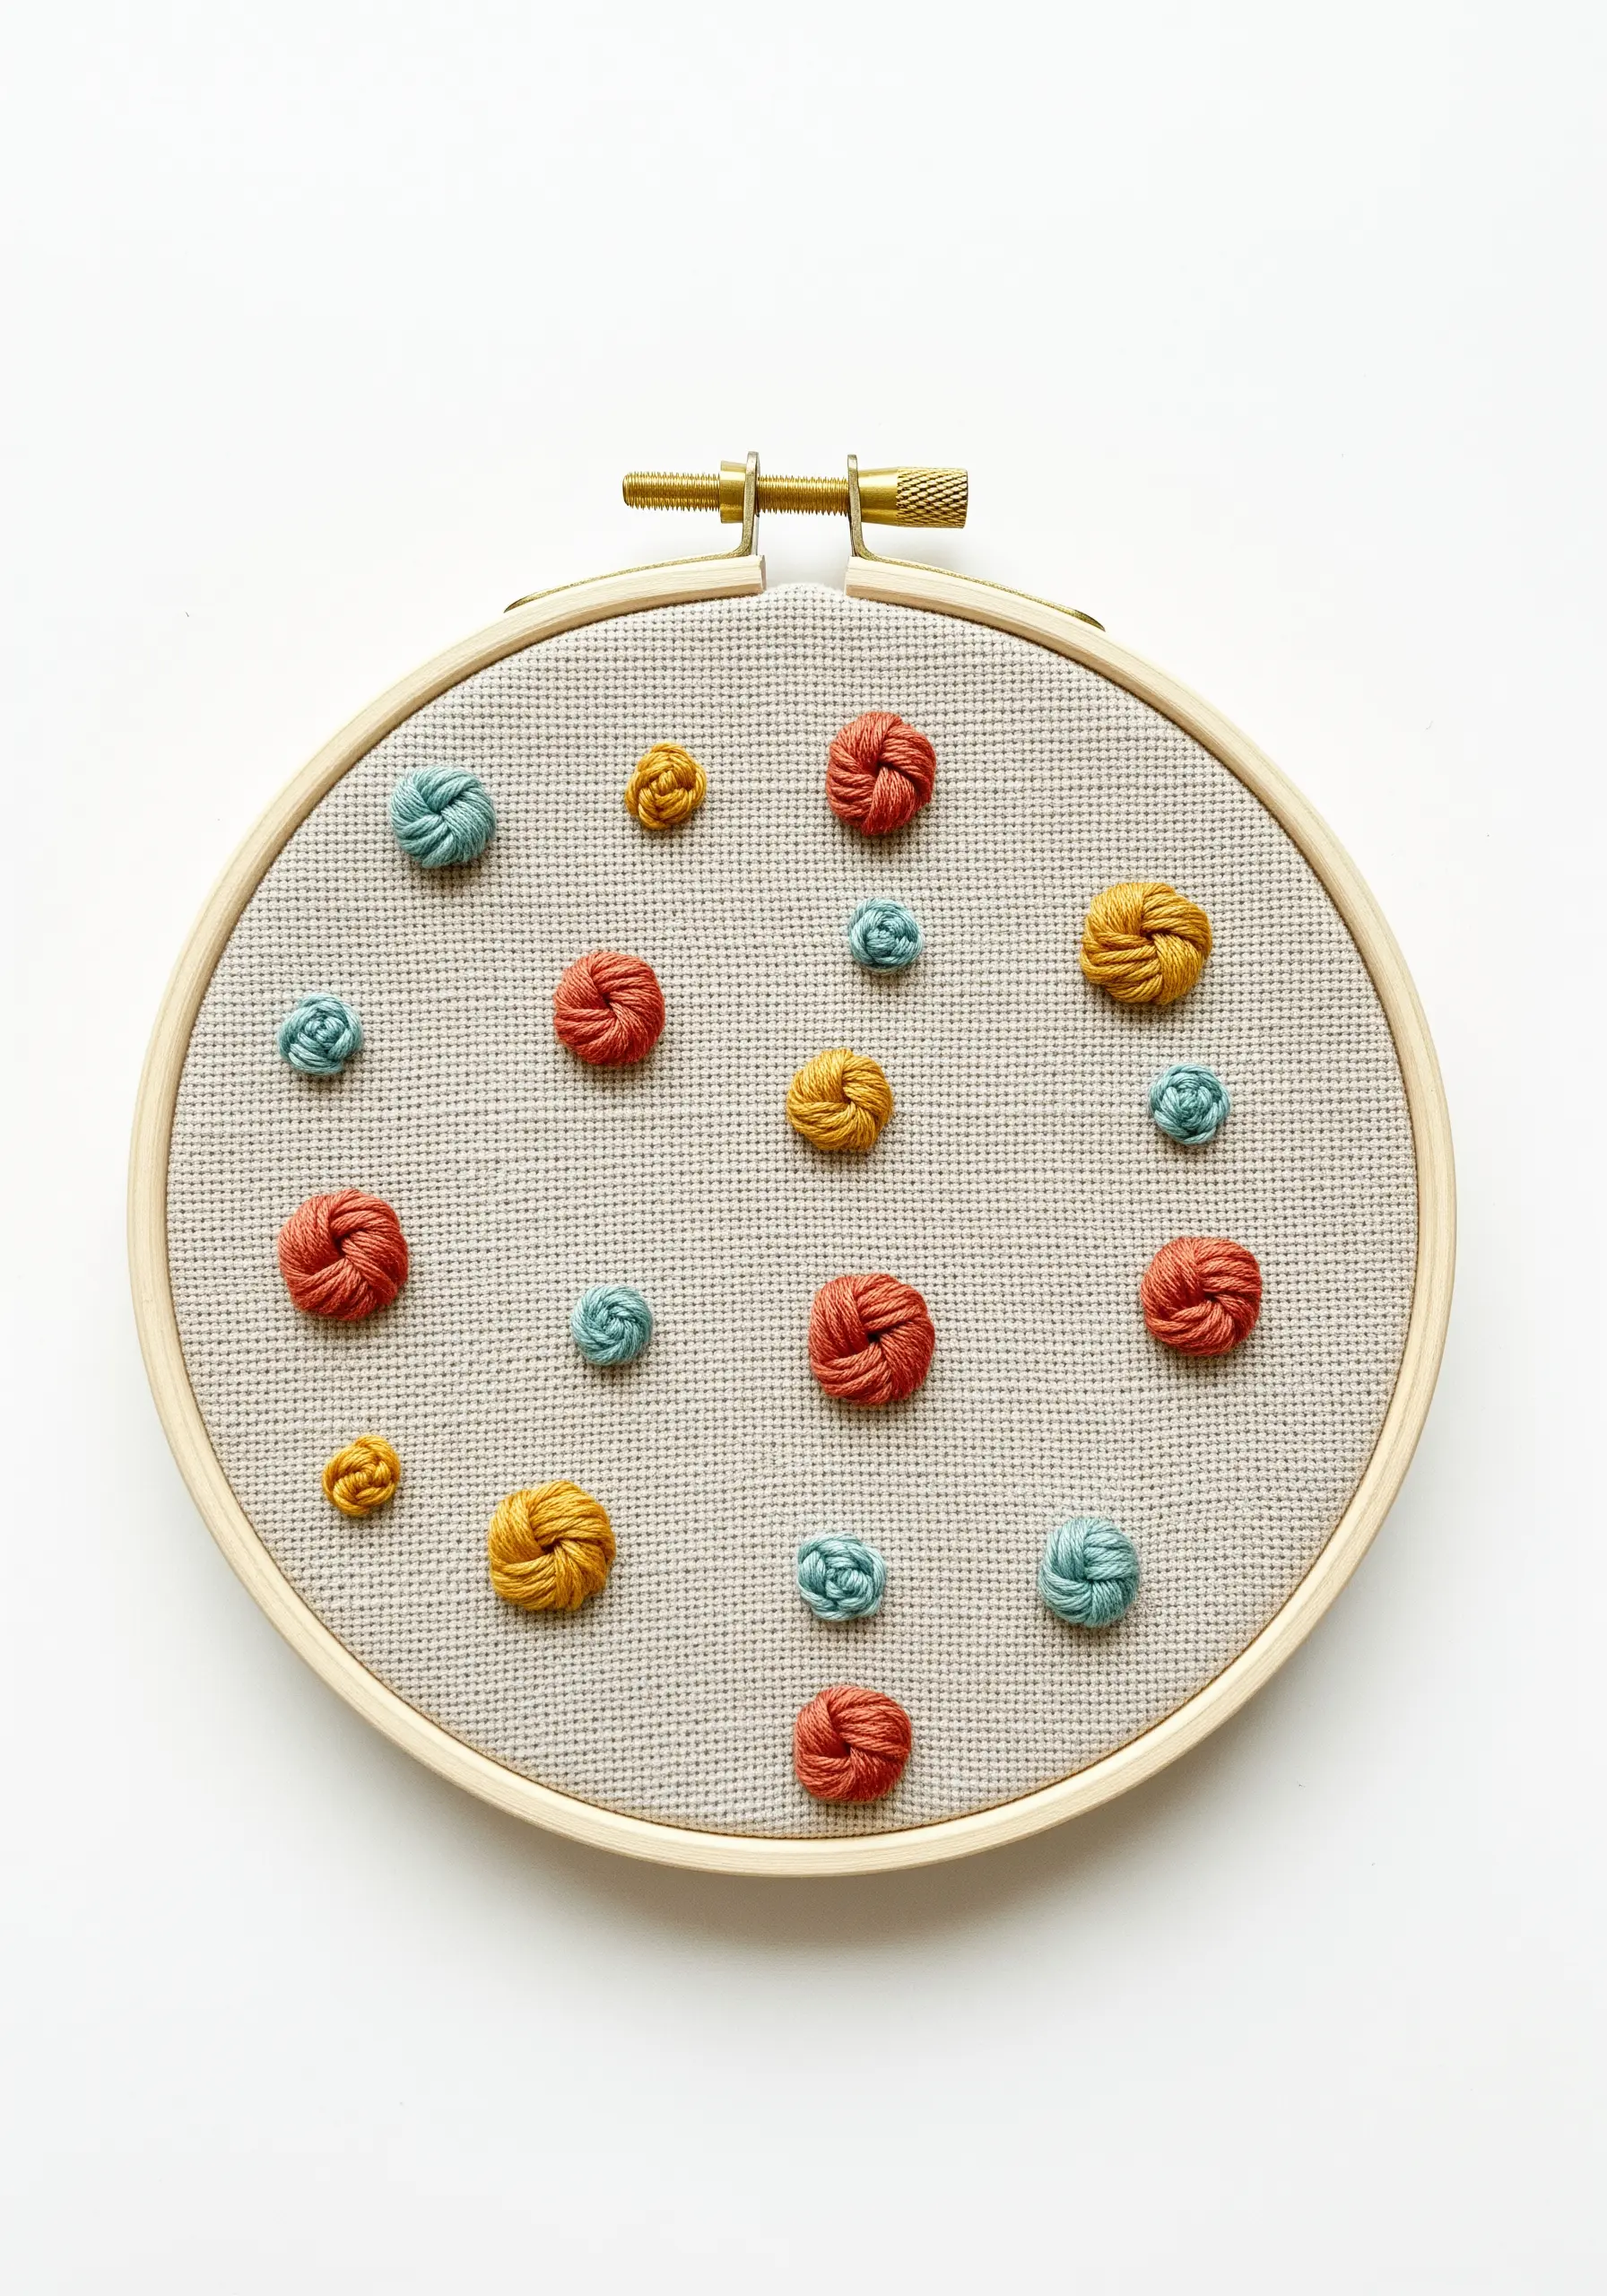
Move beyond figurative designs and create a playful, abstract pattern using just one type of stitch in various sizes.
The Turk’s head knot or a chunky bullion knot is perfect for this. Scatter them across your fabric in a random pattern.
Vary the size of the knots by changing the number of thread strands or the number of wraps around the needle.
This creates a field of texture that is visually interesting and incredibly fun to stitch.
24. Paint with Thread for a Realistic Fox

To capture the soft, blended fur of a sleeping fox, you’ll need to use a technique called thread painting.
Use single strands of several shades of orange, rust, and white. Fill the fox’s body with long-and-short stitches, blending the colors where they meet.
Keep your stitches flowing in the natural direction of fur growth to create a realistic texture and shape.
This approach turns simple fox deer embroidery patterns into miniature works of art.
25. Combine a Sharp Outline with a Smooth Fill

For a design that is both bold and elegant, pair a sharp outline with a perfectly smooth fill.
First, outline the ginkgo leaf using a split stitch with two strands of black thread. This creates a fine, solid line that contains the shape.
Then, fill the leaf with a golden yellow satin stitch, using three strands for good coverage.
Angle your stitches to follow the natural fan shape of the leaf, which adds a subtle, realistic sheen to the finished piece.
26. Build a Wave with Layered Stitches

Create the dynamic movement of a wave by layering different shades of blue and using textural stitches.
Start with the darkest blue at the base, using long horizontal backstitches. As you move up, introduce lighter shades of blue and aqua.
For the frothy crest of the wave, switch to white thread and use a dense cluster of French knots or turkey stitches.
This progression of color and texture makes abstract thread waves swirls feel alive with energy.
27. Craft Elegant Cosmos with Fishbone Stitch Petals

The fishbone stitch is ideal for creating the slightly overlapping, delicate petals of a cosmos flower.
Stitch each petal individually, starting from the outer tip and working your way toward the center. The stitch naturally creates a central line, mimicking a petal’s vein.
Use a contrasting yellow for the center, filling it with a dense cluster of French knots for a realistic, pollen-dusted look.
This is one of the most effective floral embroidery ideas to transform plain tote bags into wearable art.


