
There’s a quiet moment in embroidery when you move past just following a pattern and begin to make choices with intention. It’s the difference between simply filling a space with color and choosing a stitch that creates the perfect texture, or selecting a thread that catches the light just so.
These small ideas are designed for that moment. They look complex, but their beauty lies in simple, clever techniques—a change in stitch direction, a contrast in thread thickness, or a thoughtful use of negative space.
Here, you won’t just learn a new motif. You’ll discover how to make your work look more polished, feel more personal, and carry the quiet confidence of an artist who understands their materials. Let’s begin.
1. Create Energy with Radiant Straight Stitches
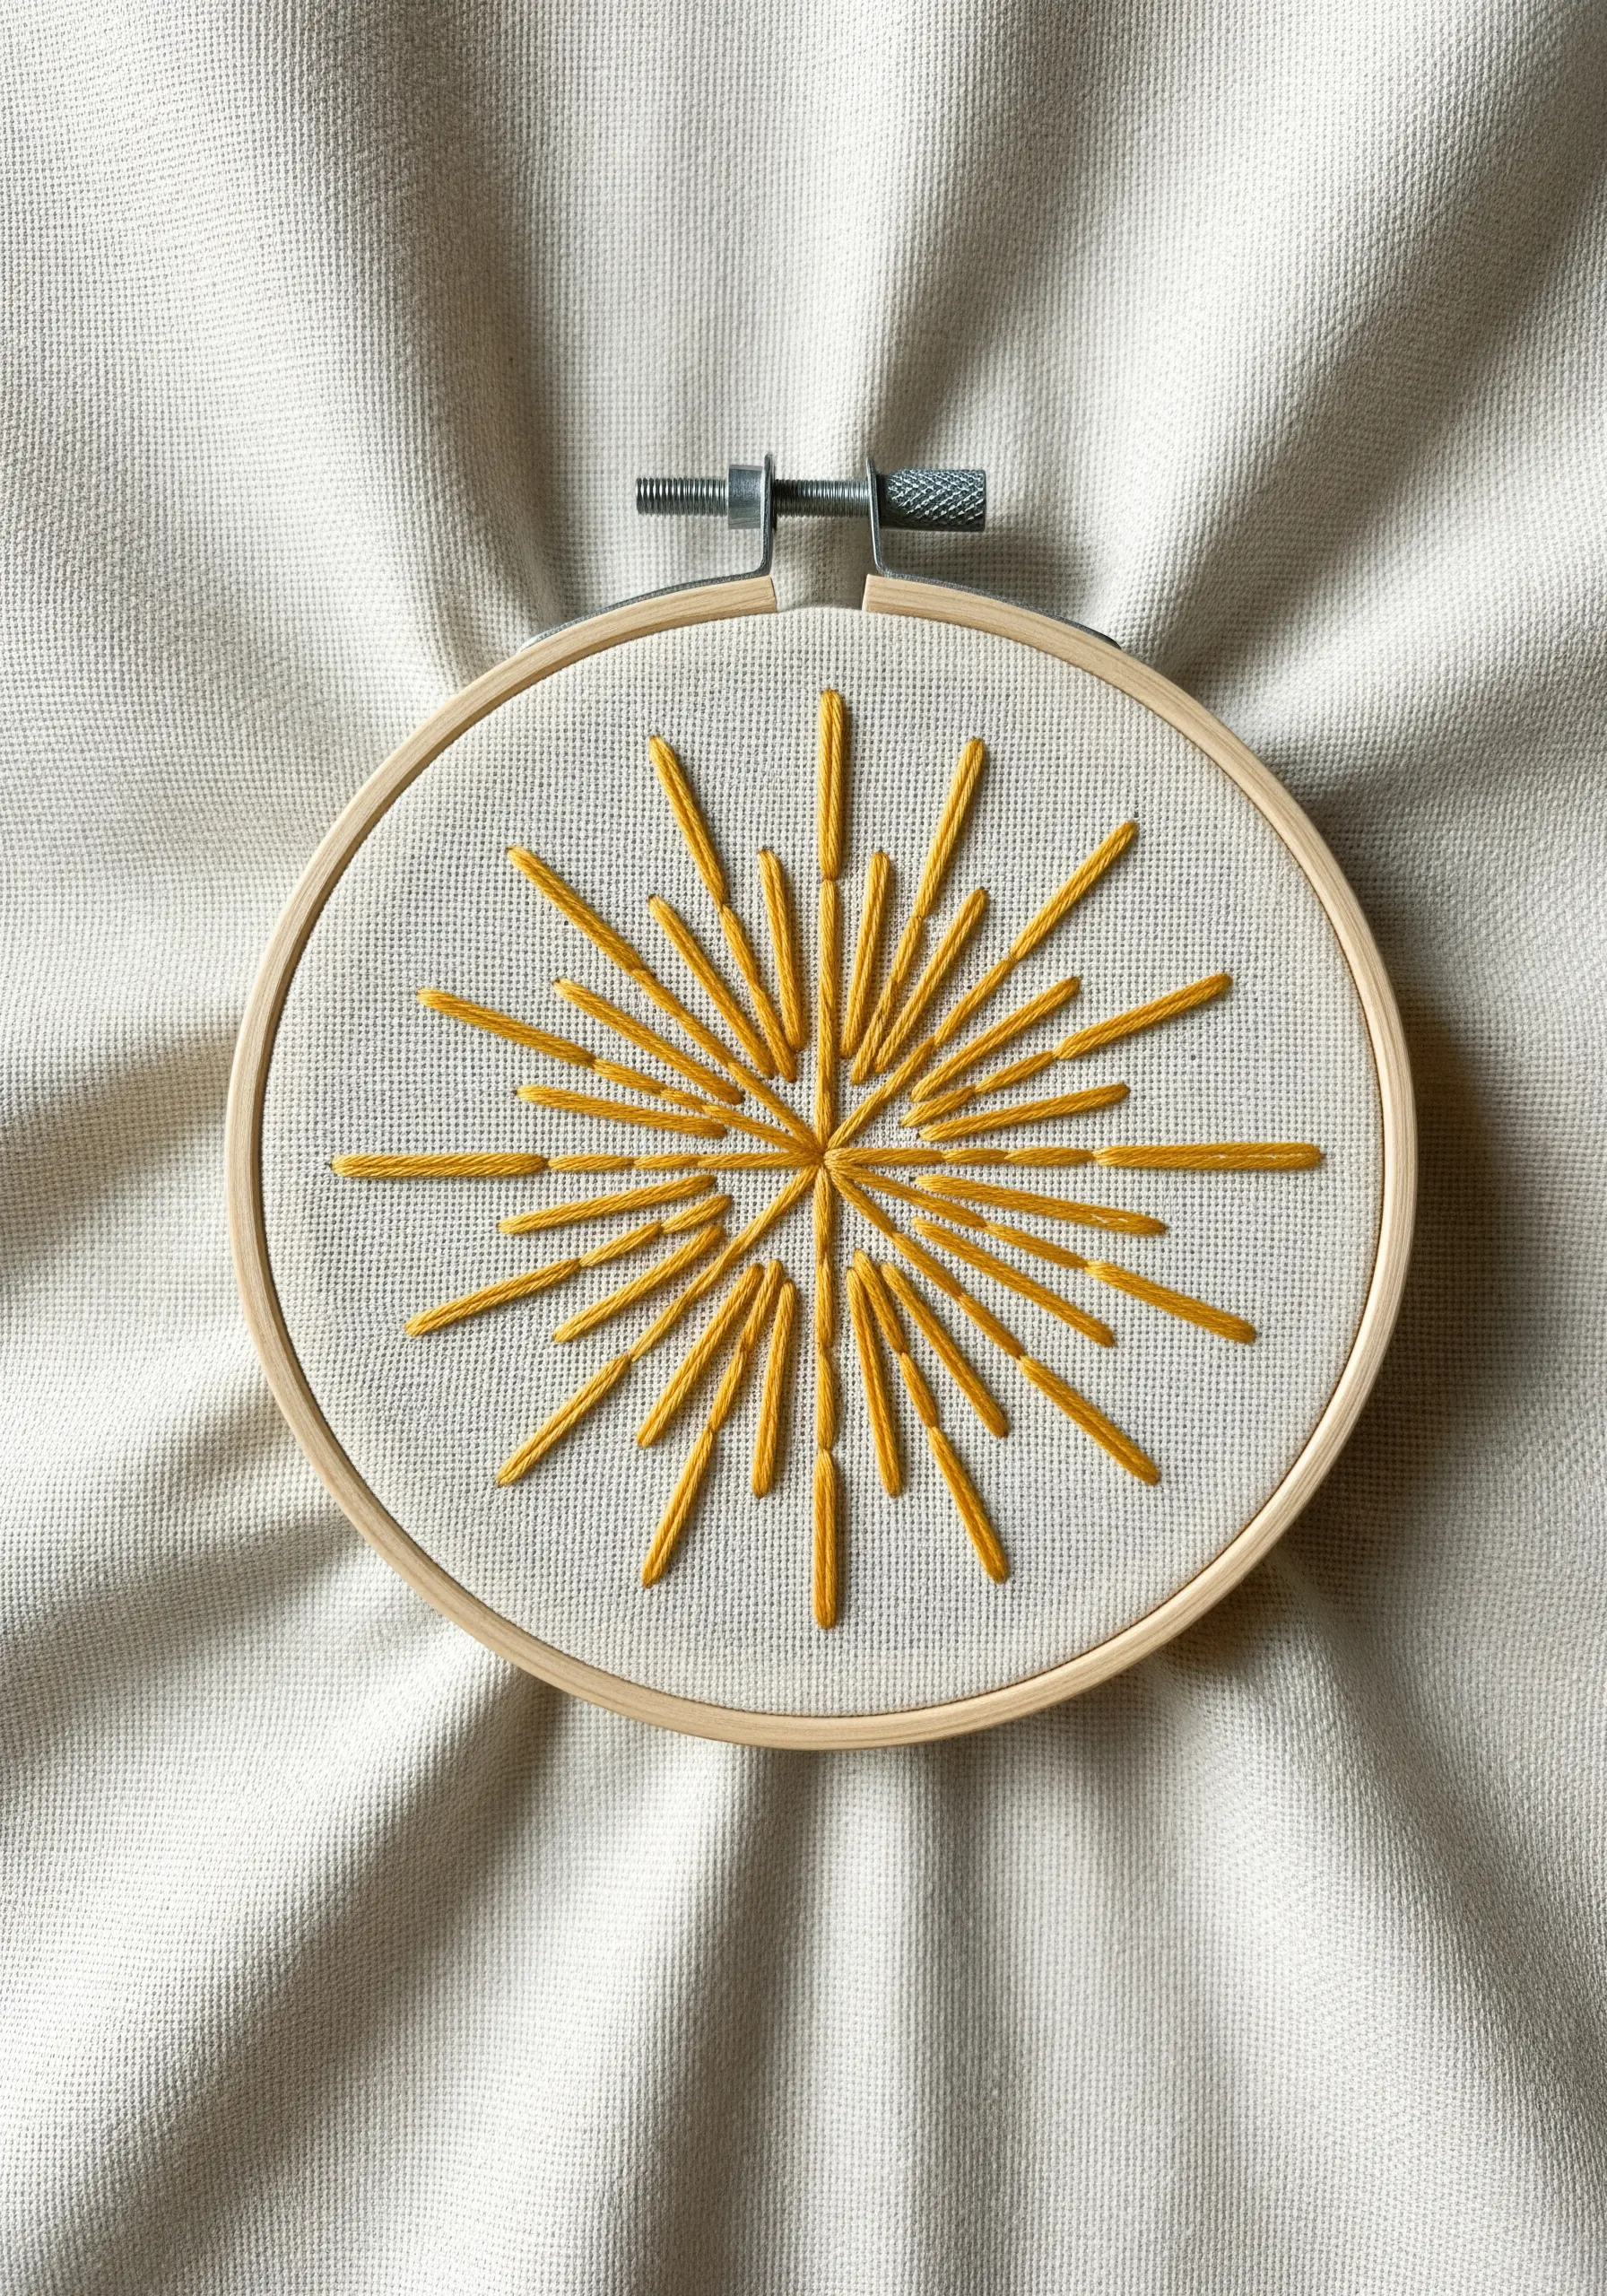
This vibrant sunburst effect relies on one of the most basic stitches: the straight stitch.
The secret to its complex appearance is varying the length of each stitch, creating a sense of dynamic movement and radiant energy from a central point.
Use a full six strands of embroidery floss to give the lines weight and presence against the fabric.
This technique works beautifully for abstract stars, stylized flowers, or simply as a pop of textural energy on a plain background.
2. Build Dimensional Florals with Woven Wheels
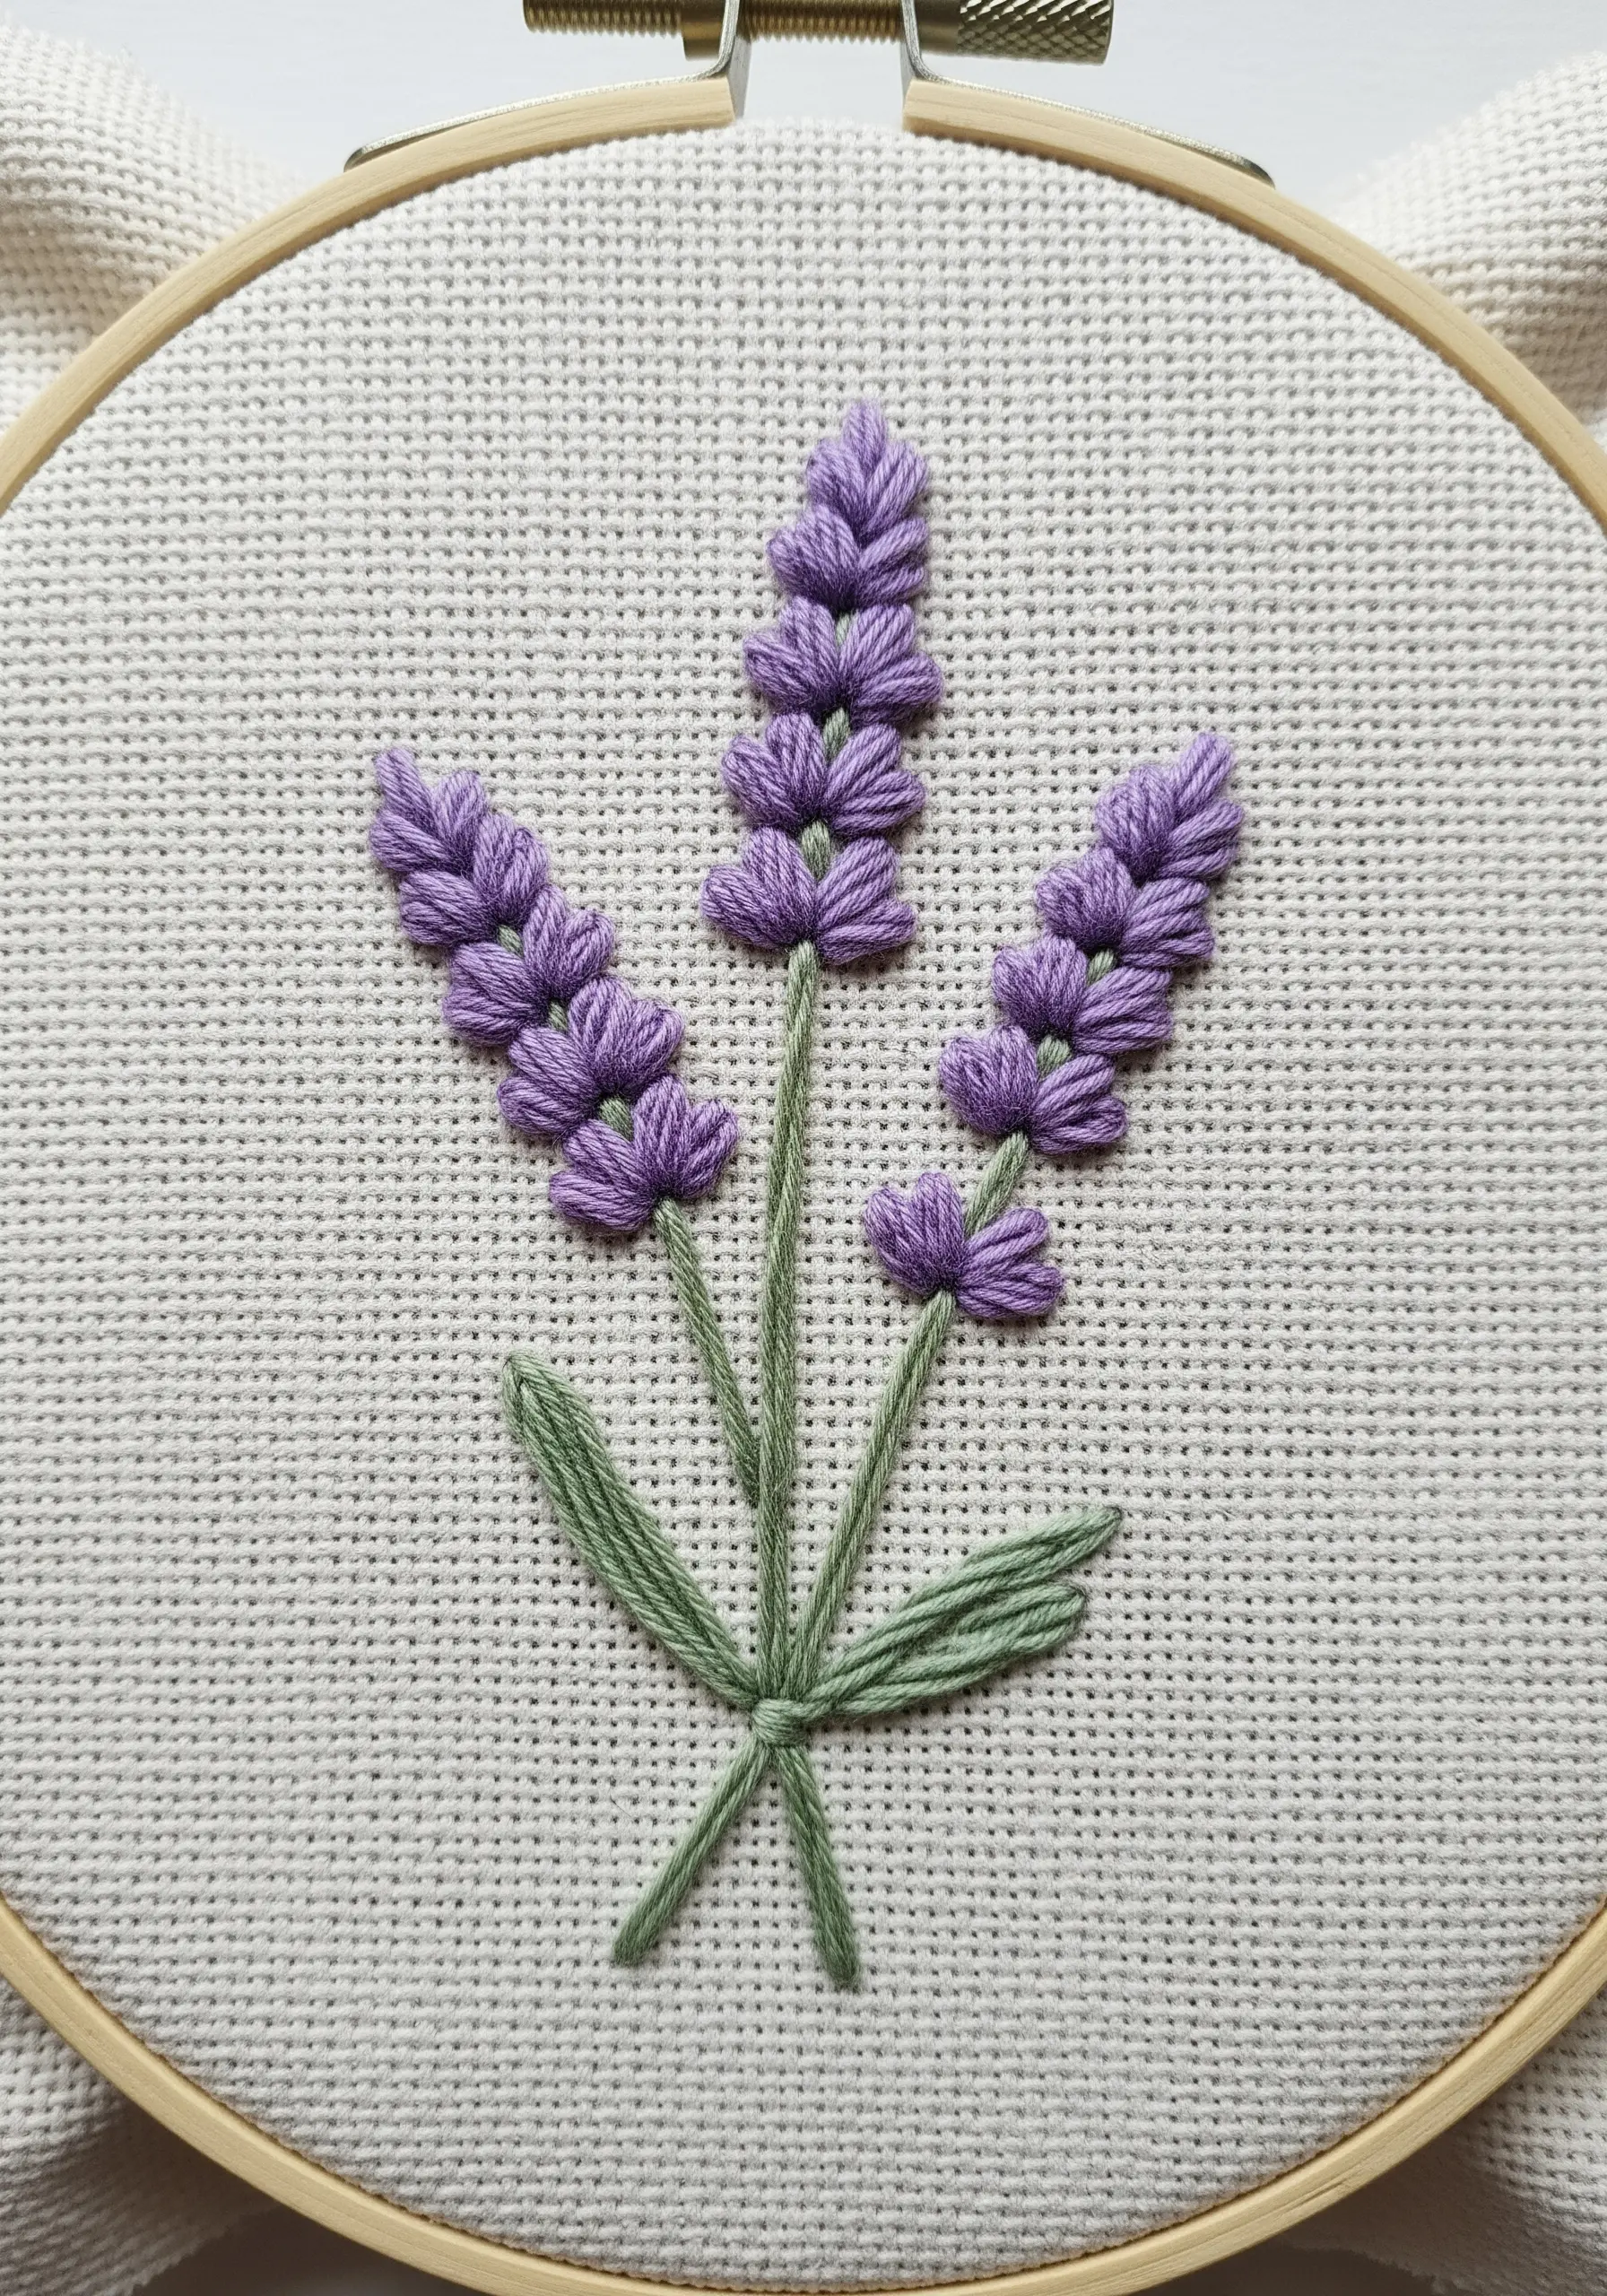
To achieve the plush, three-dimensional texture of lavender blossoms, move beyond simple satin stitches.
Create a small star of straight stitches (five or seven spokes work best) as a base.
Then, weave your thread over and under these spokes to form a raised, circular bud known as a woven wheel stitch.
Combining these textural woven wheel stitches or bullion knots with flat stem stitches for the greenery creates a beautiful contrast that makes the design feel rich and layered.
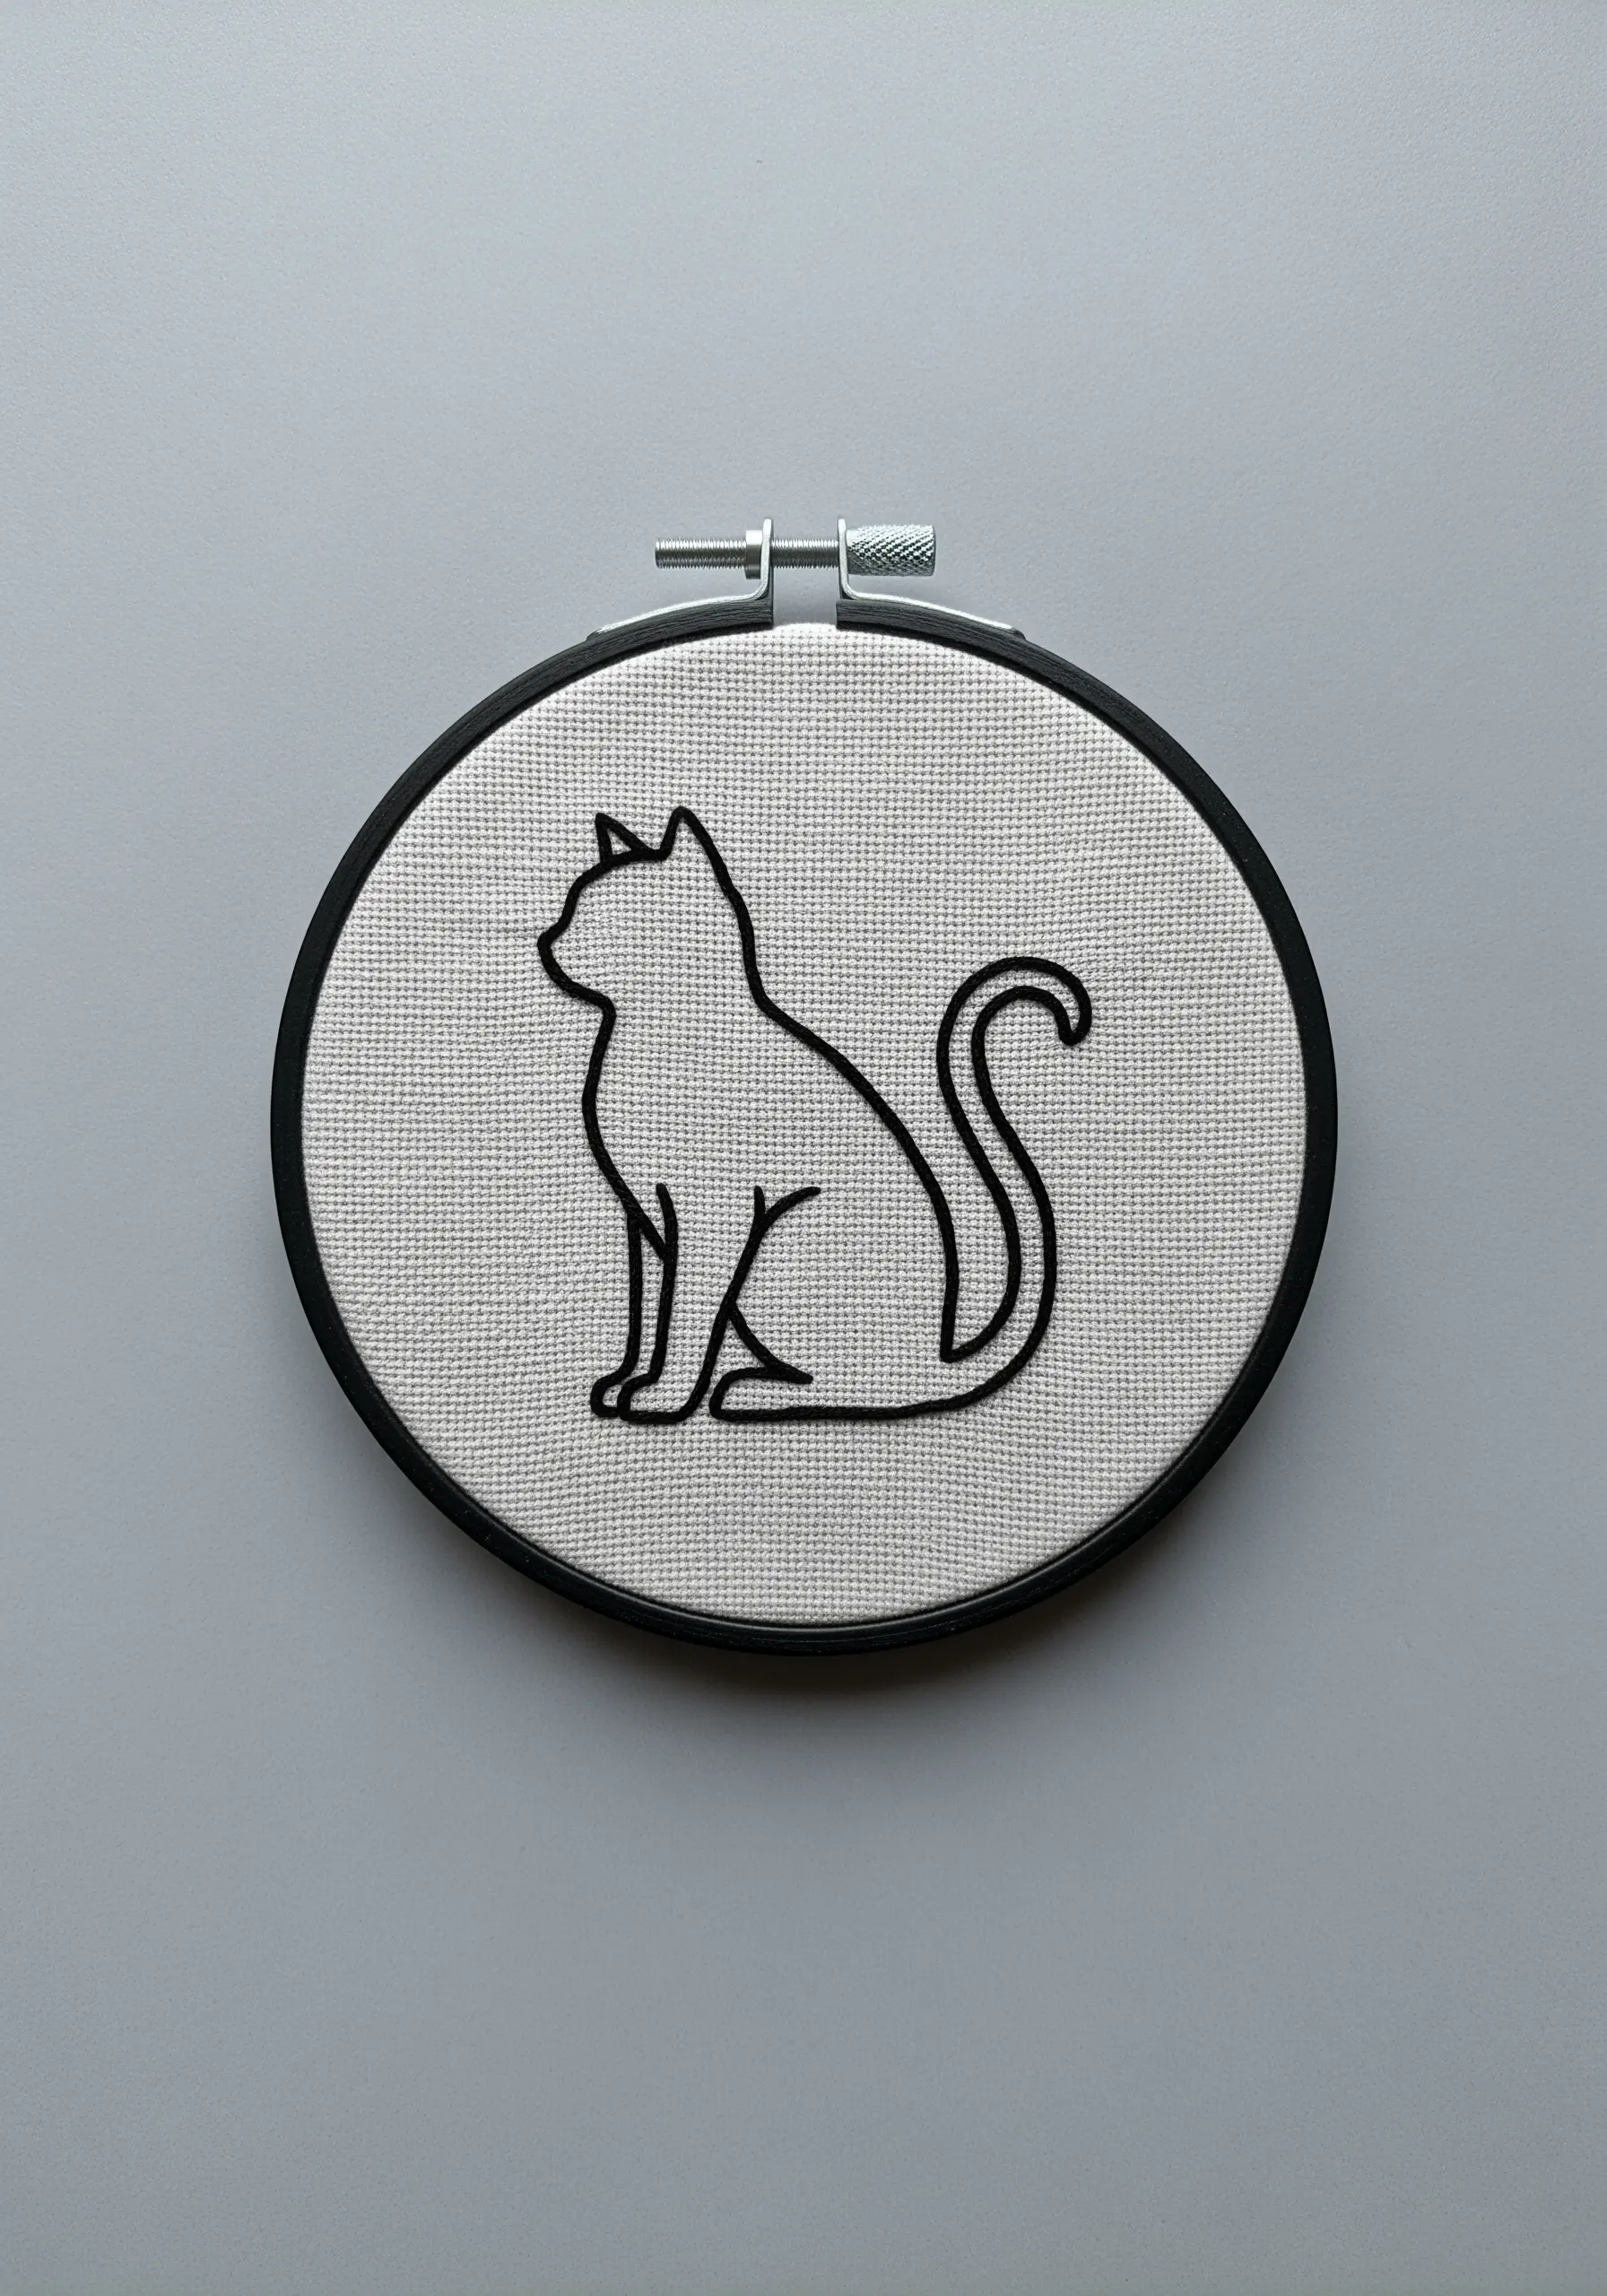
3. Achieve Graphic Impact with Minimalist Outlines
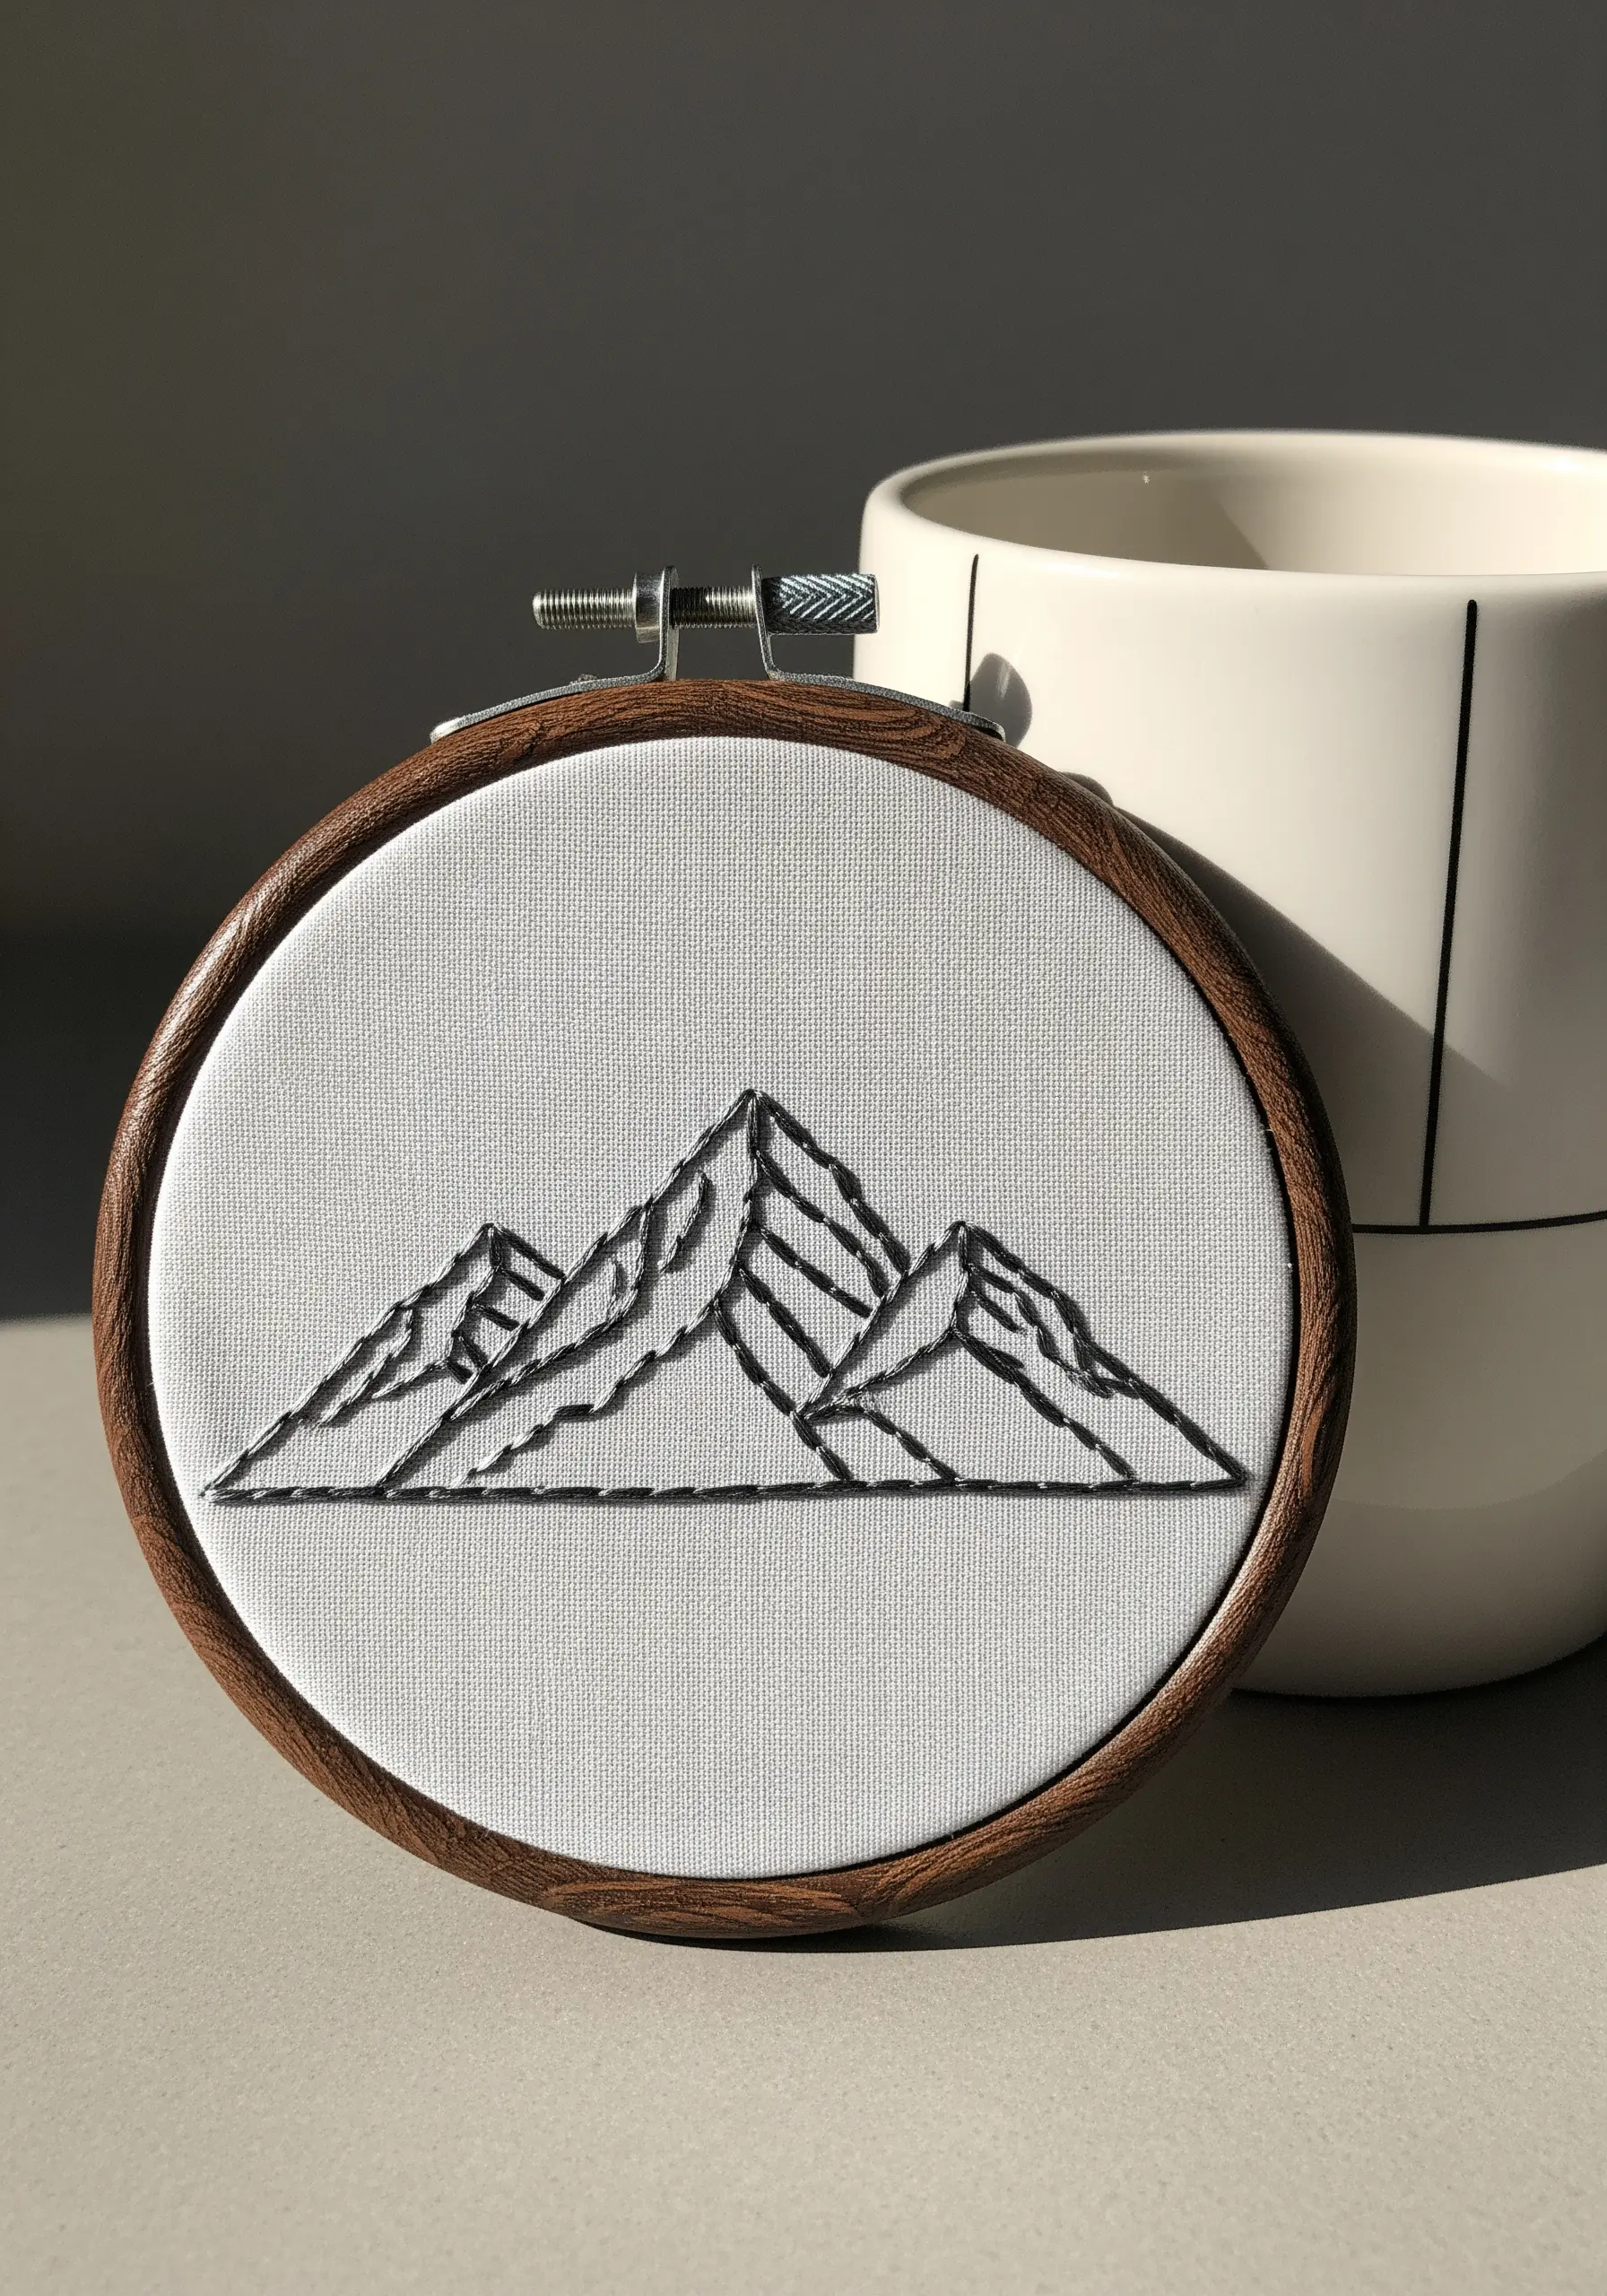
This striking mountain range proves that you don’t need complex fills to create a powerful image.
Use a whipped backstitch—a simple backstitch outline that is then wrapped with thread—to create a solid, cord-like line that stands out.
Sticking to a single dark color on a light, neutral fabric enhances the sharp, clean edges, resulting in a modern, graphic look.
The key here is precision and consistency in your stitch length before wrapping.
4. Capture Movement with Detached Chain Stitches
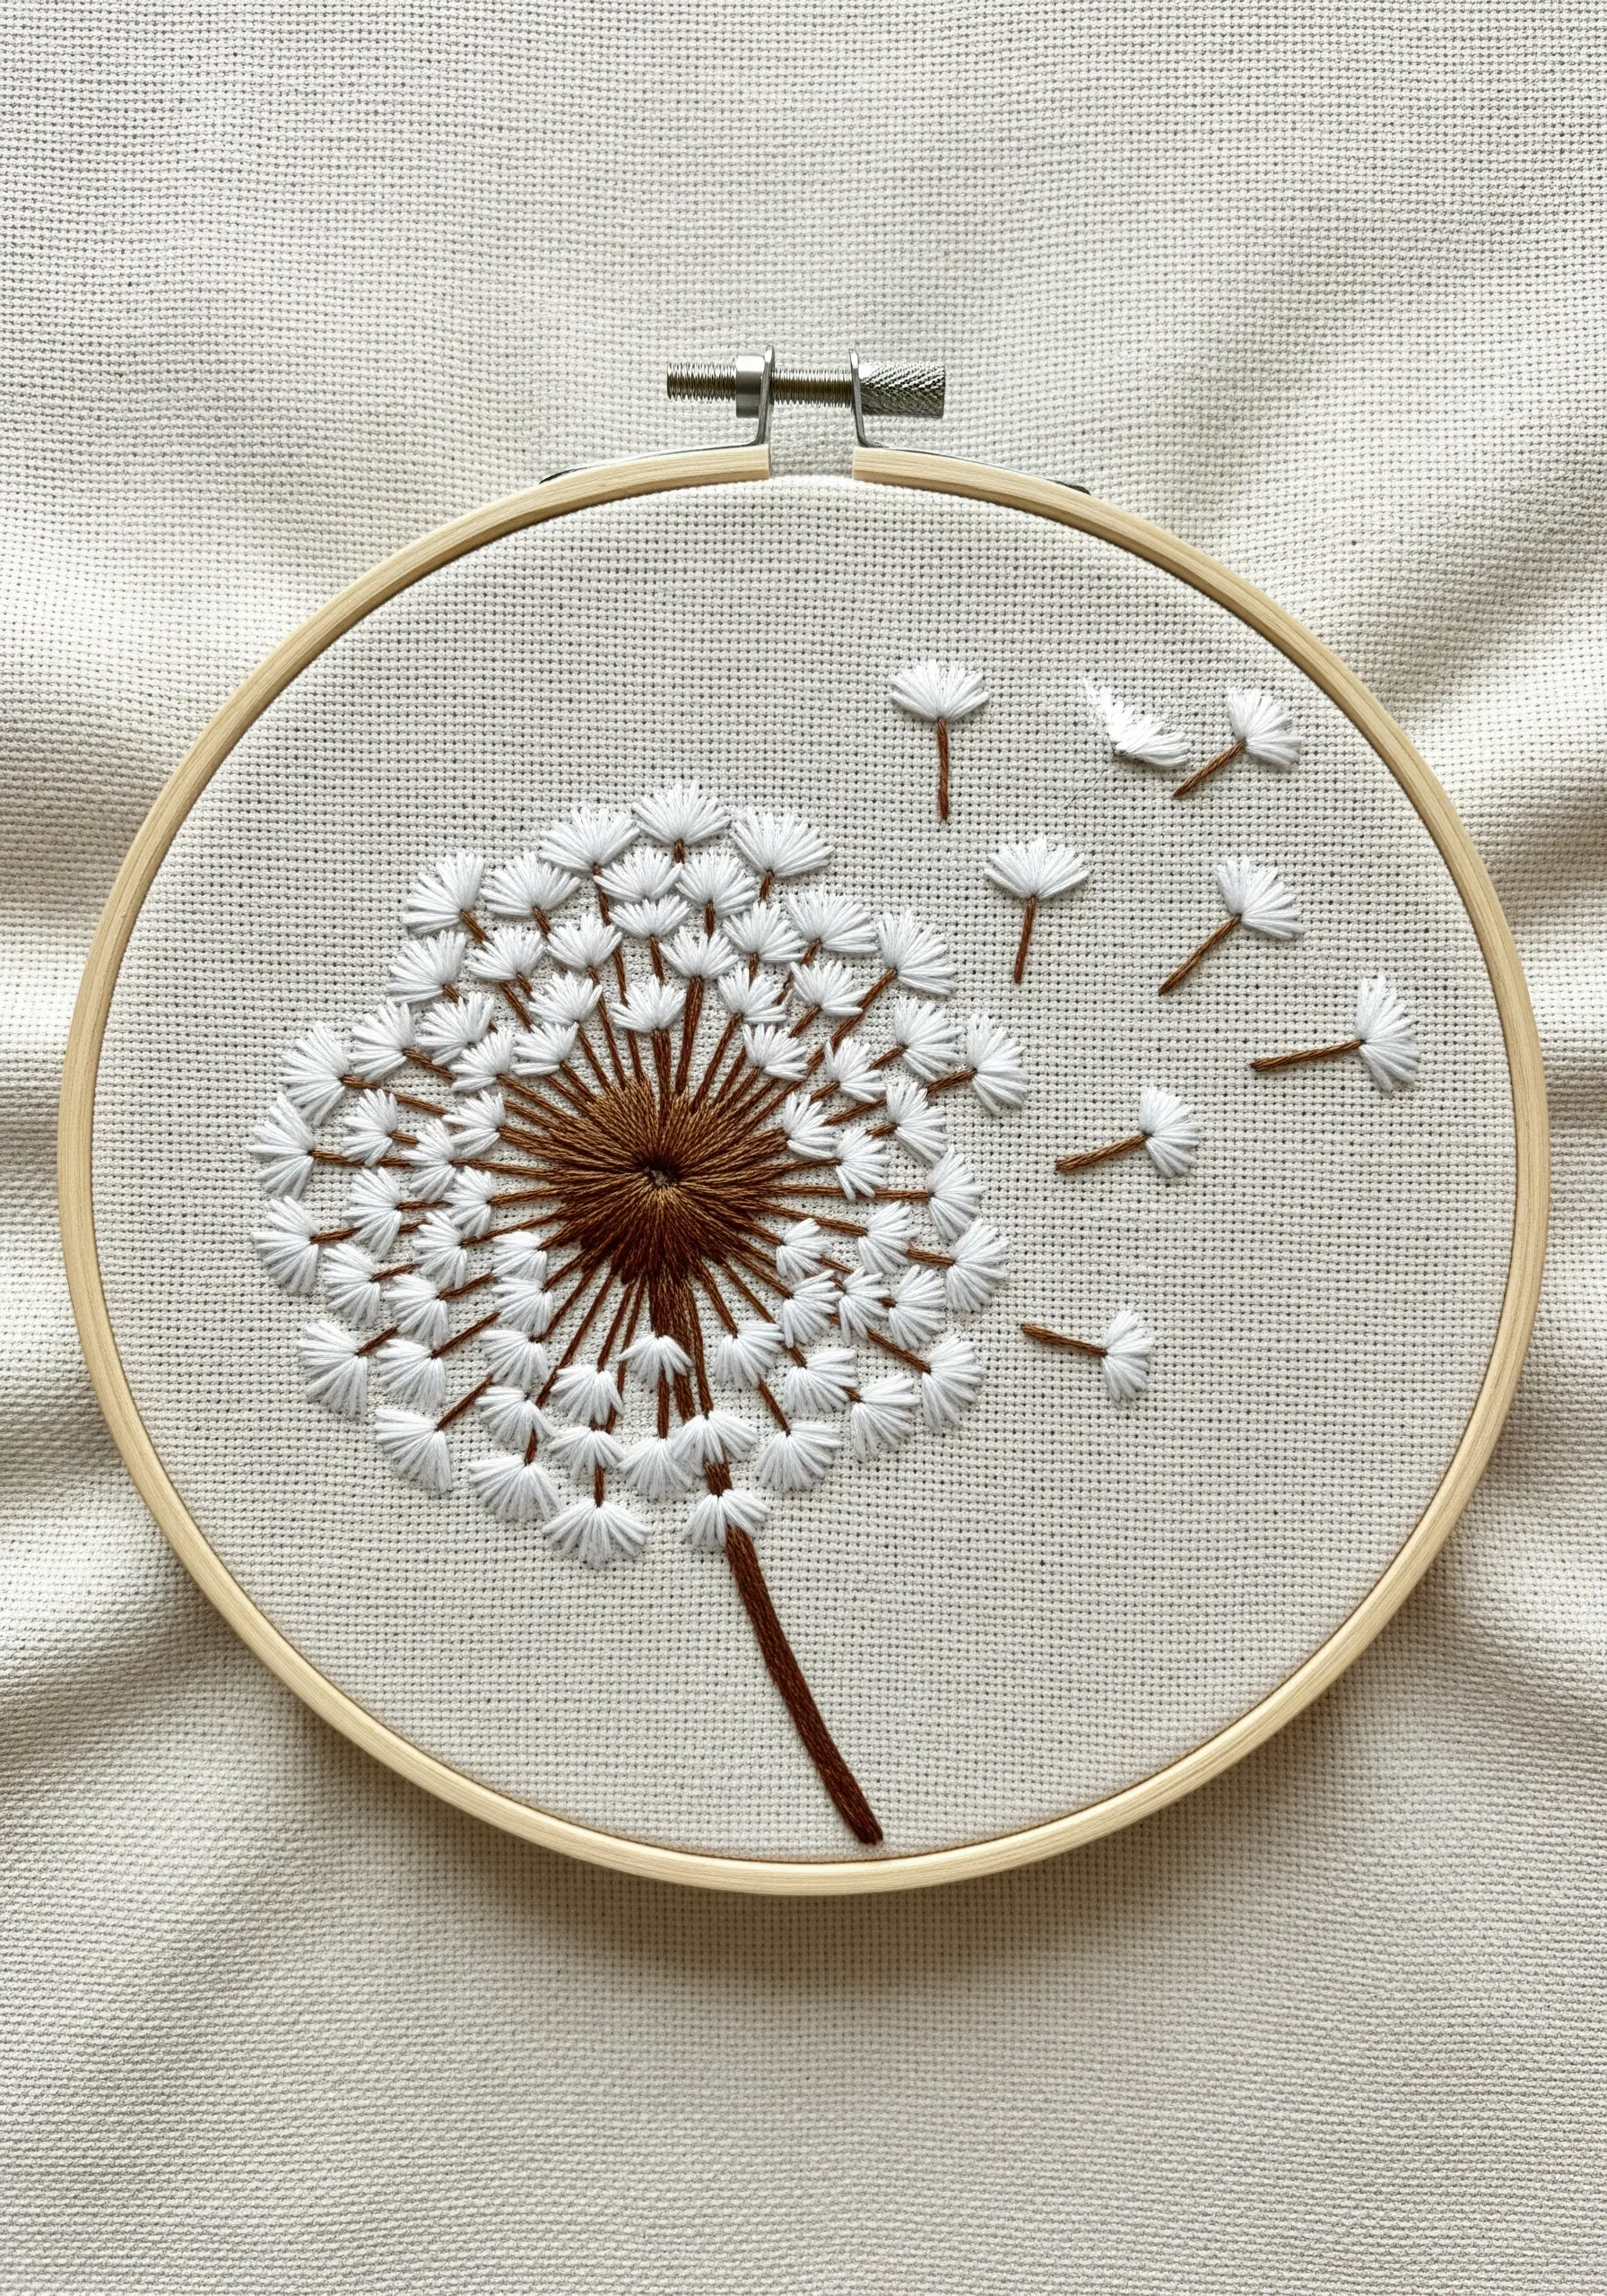
The magic of this dandelion is its illusion of weightlessness, achieved with a smart combination of simple stitches.
Use straight stitches radiating from the center for the dandelion head, and then add detached chain stitches (lazy daisies) for the individual seeds.
By scattering the seeds as if they are floating away, you create a narrative and a sense of lightness and motion that a static design wouldn’t have.
Use only two or three strands of floss for the floating seeds to enhance their delicate appearance.
5. Illuminate Dark Fabric with Celestial Stitches
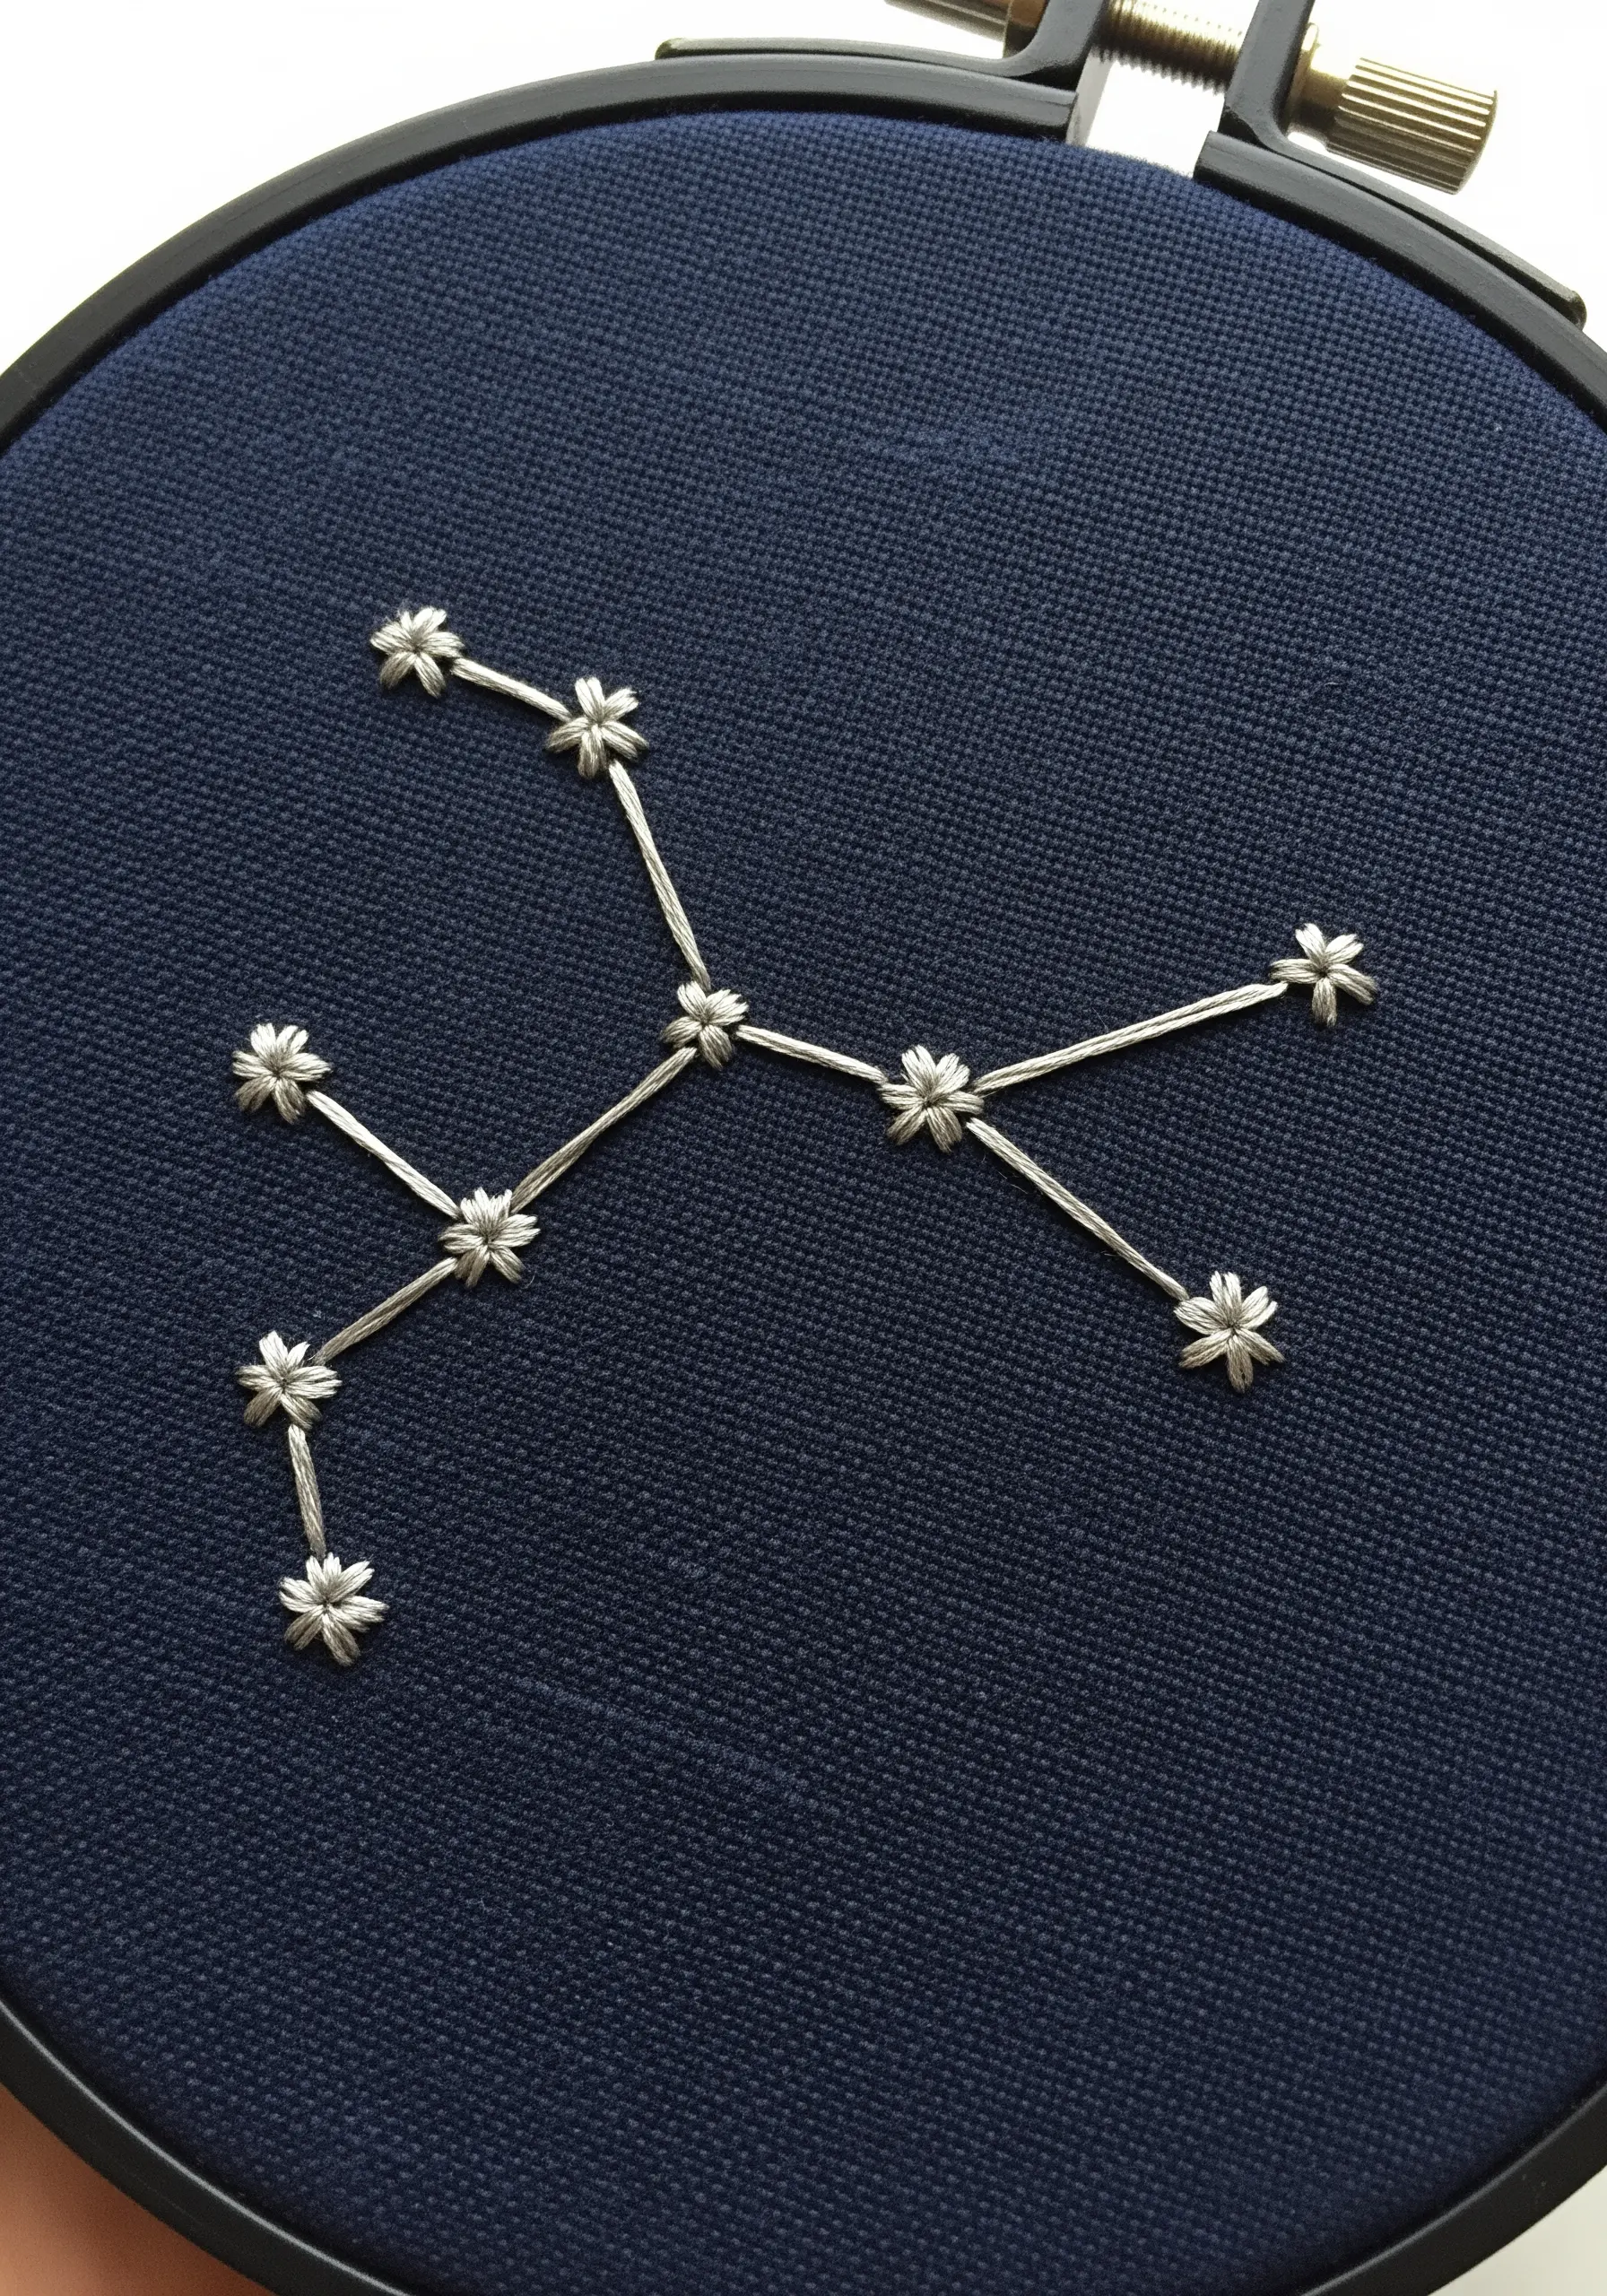
To make stars that truly sparkle, the right thread and fabric combination is essential.
Choose a dark, tightly woven fabric like navy cotton or black linen to create a night-sky backdrop.
Use a metallic or high-sheen white thread to stitch your constellation, employing tiny lazy daisy stitches or star stitches at each point.
The contrast between the shimmering thread and the deep background is what gives this simple design its dramatic, celestial feel. Stitch the stars and see how they catch the light.
6. Elevate Simple Line Art with a Perfect Backstitch
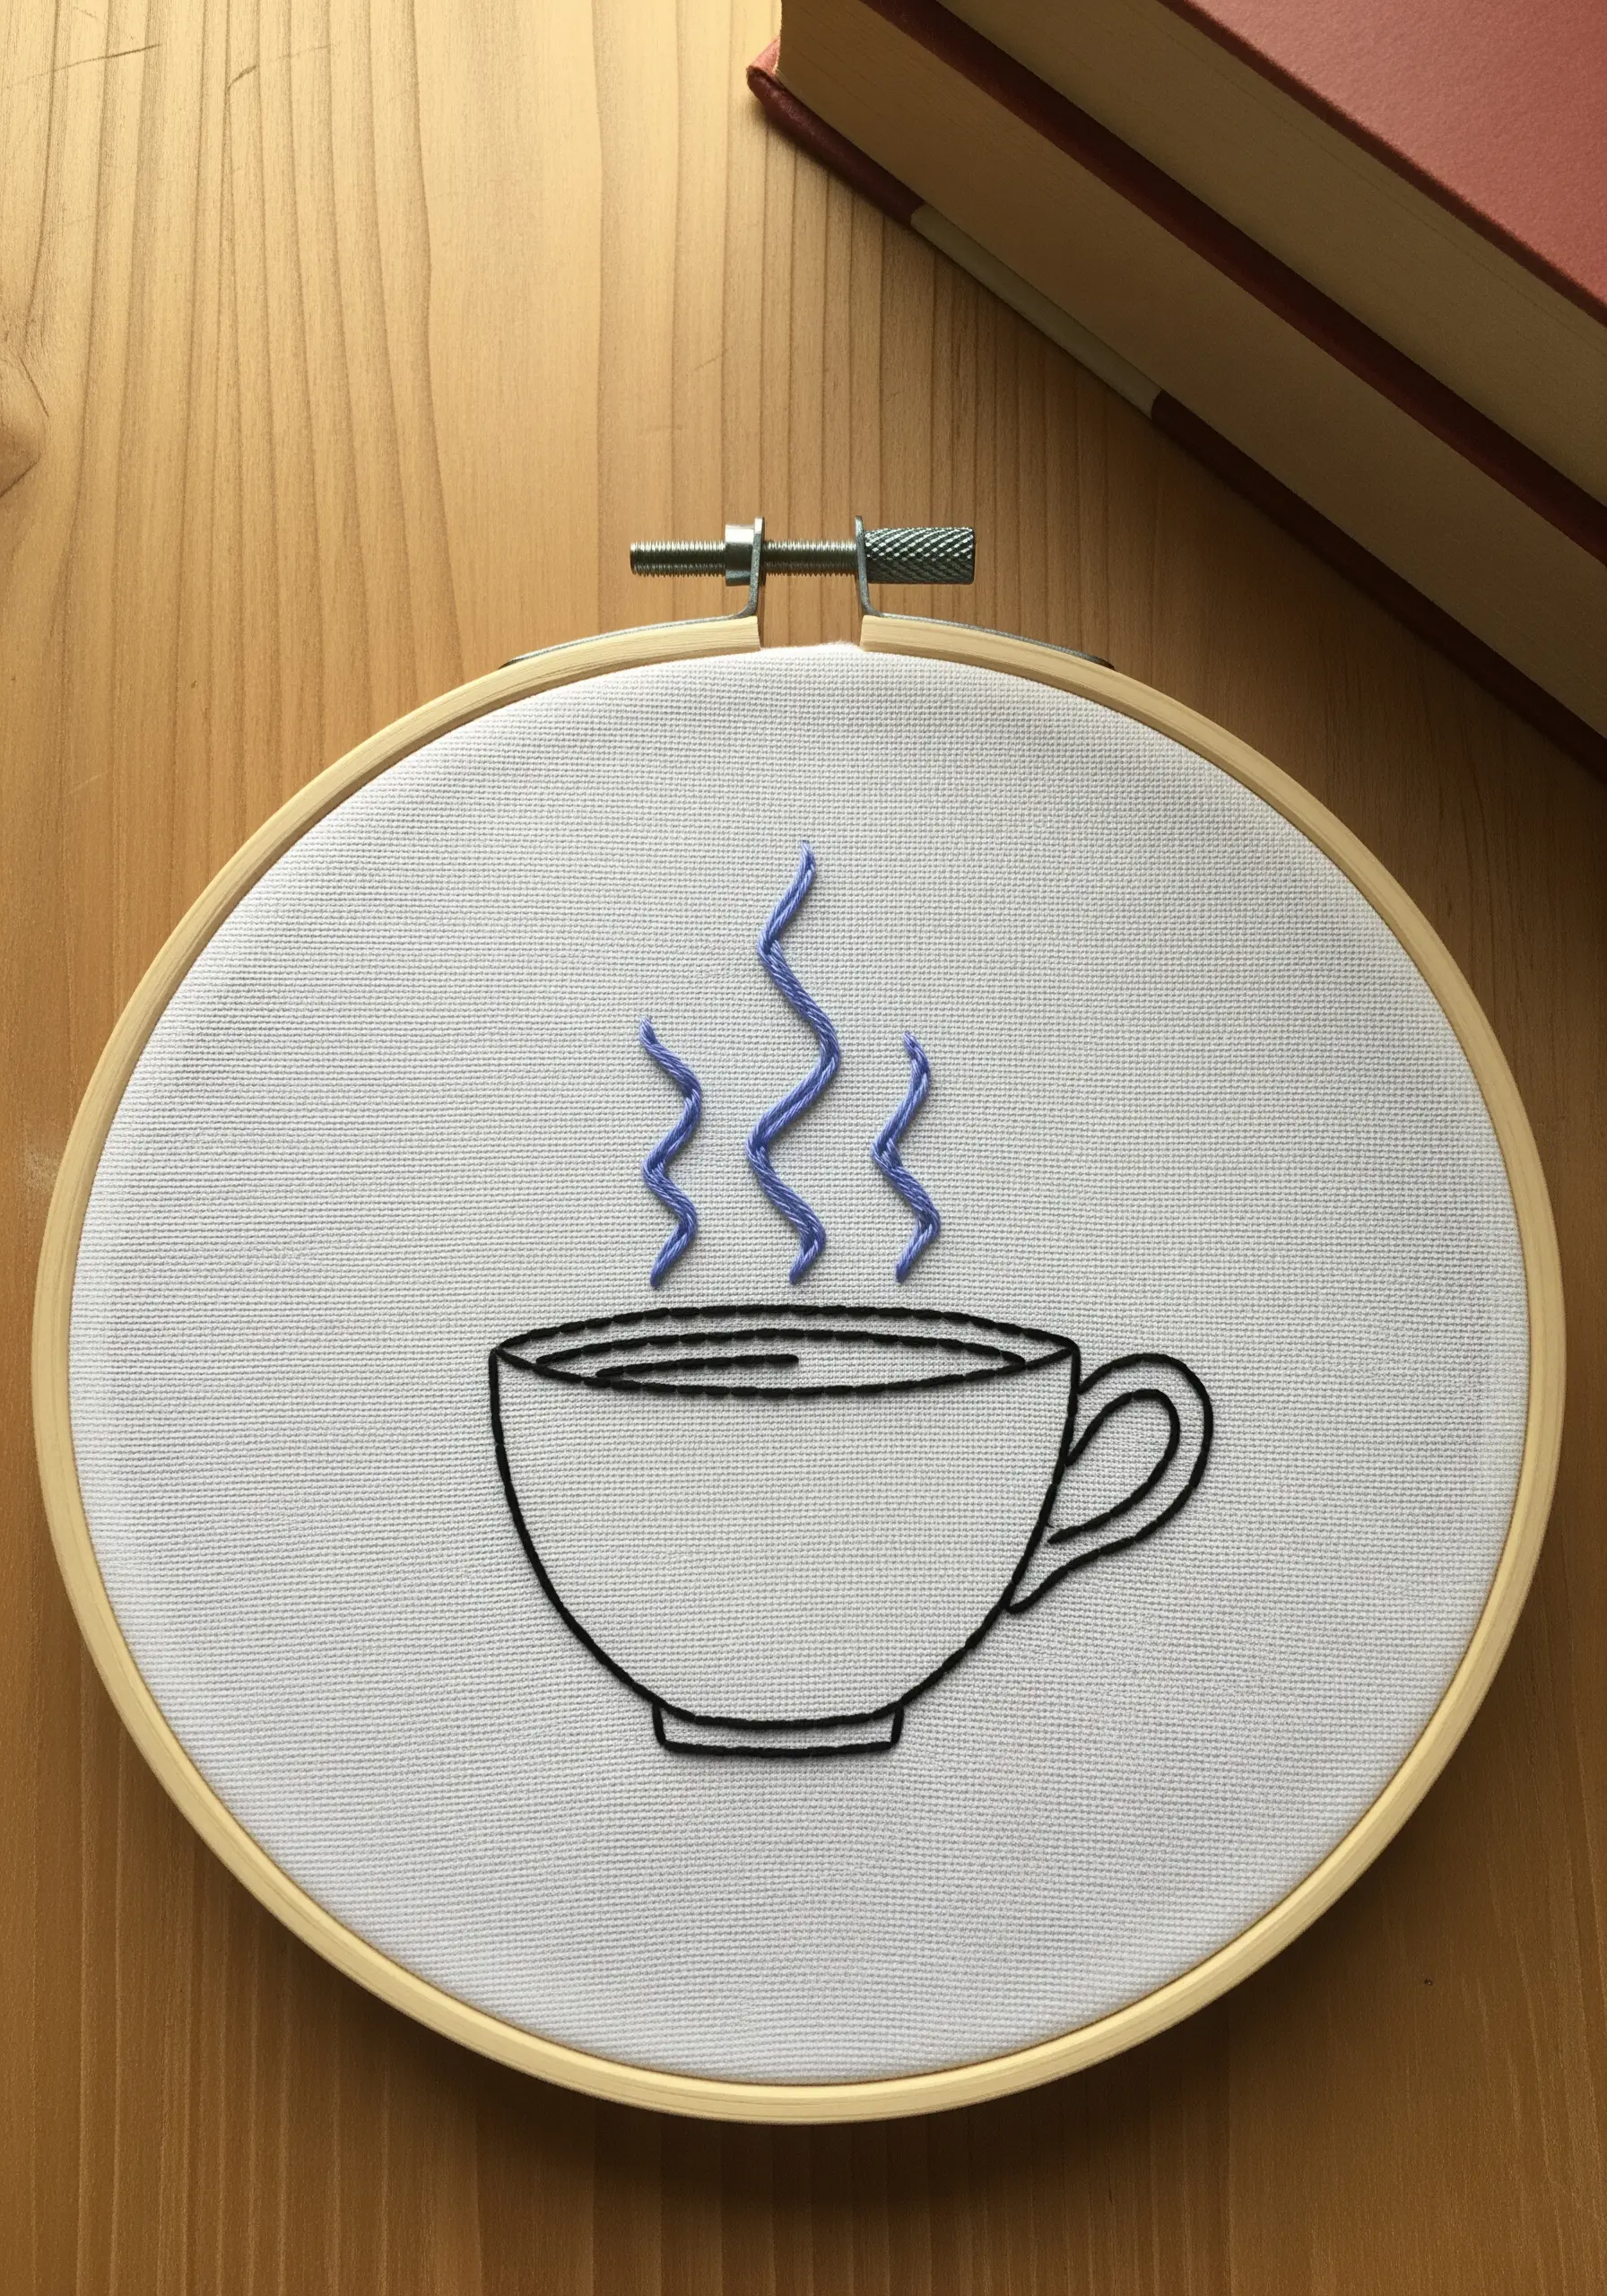
Transform a simple drawing into a polished piece of hoop art by focusing on the quality of your outline.
A consistent, even backstitch is all you need to create this clean and modern coffee cup design.
Pay close attention to keeping your stitch length uniform, especially around curves, to avoid a jagged appearance.
Introducing a second color for a small detail, like the steam, adds a playful touch that elevates the entire piece of modern hoop art.
7. Use Negative Space for Stylized Botanicals
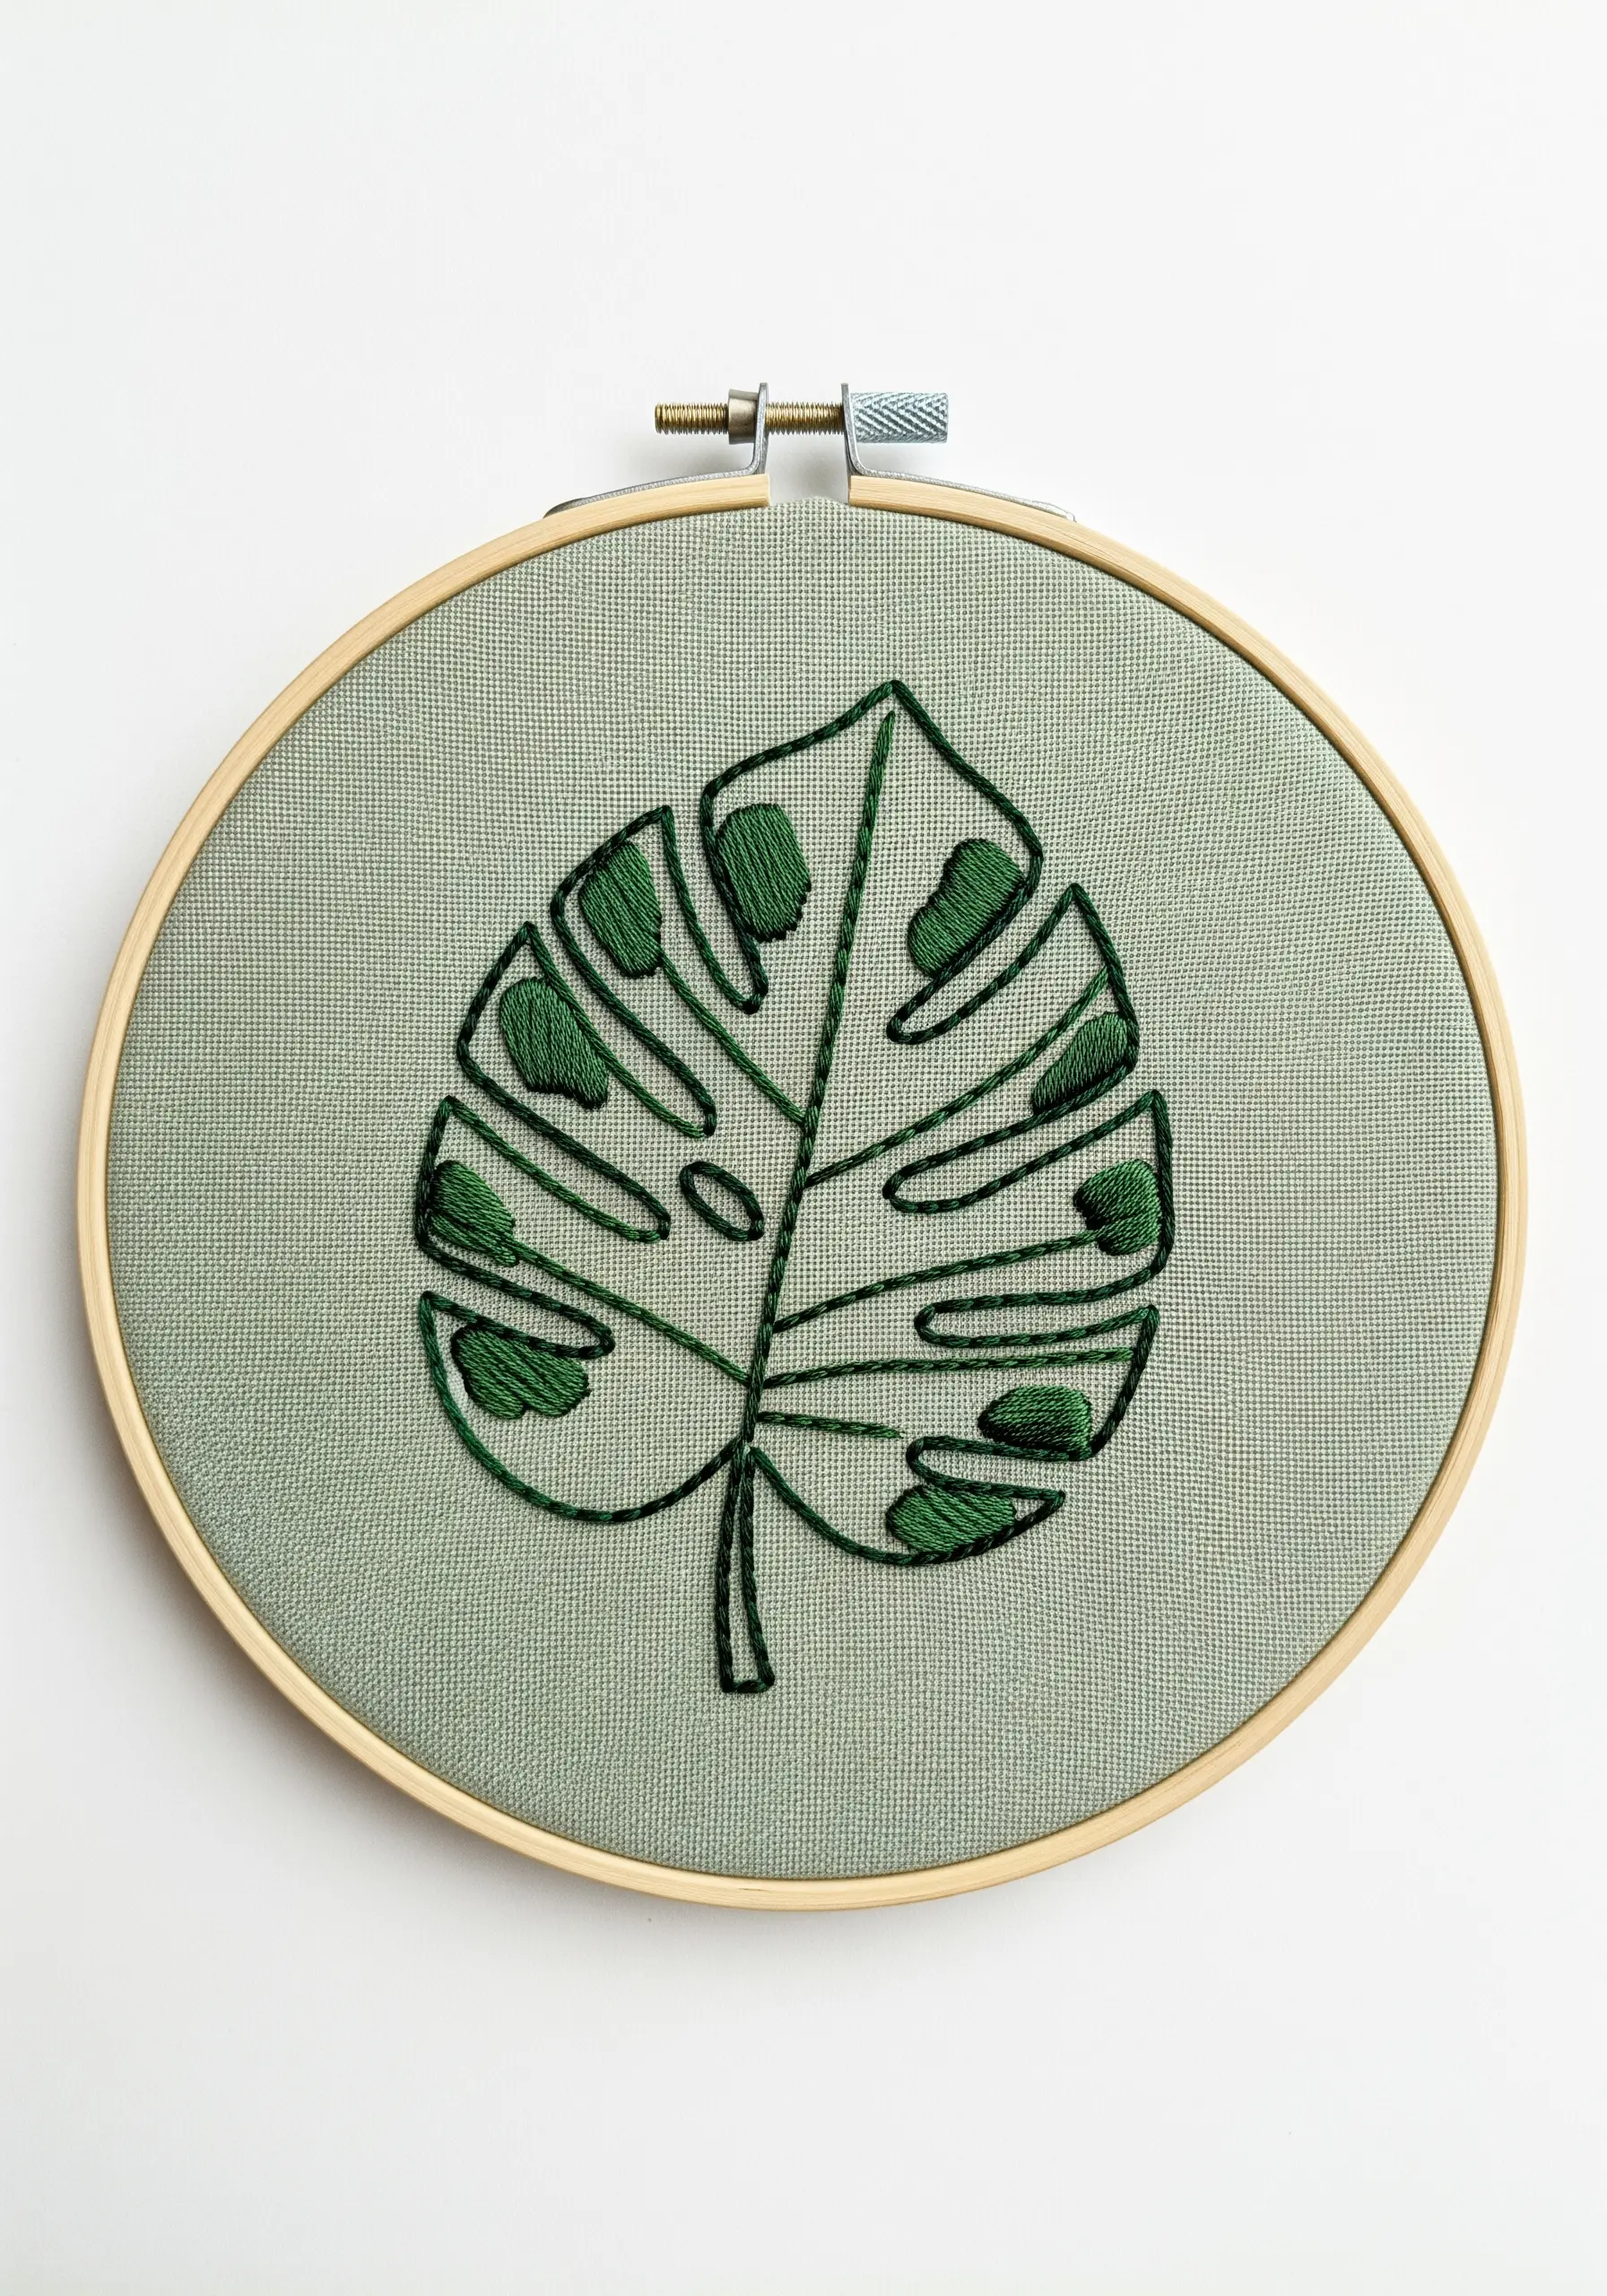
Instead of filling an entire leaf with satin stitch, create a more contemporary look by playing with negative space.
First, outline the entire monstera leaf with a clean backstitch. Then, strategically fill in just a few sections with a smooth satin stitch.
This technique is not only faster but also creates a lighter, more graphic design that feels airy and intentional.
The unfilled space becomes as important as the stitched areas, resulting in sophisticated and modern botanicals.
8. Juxtapose Textures for Tactile Appeal
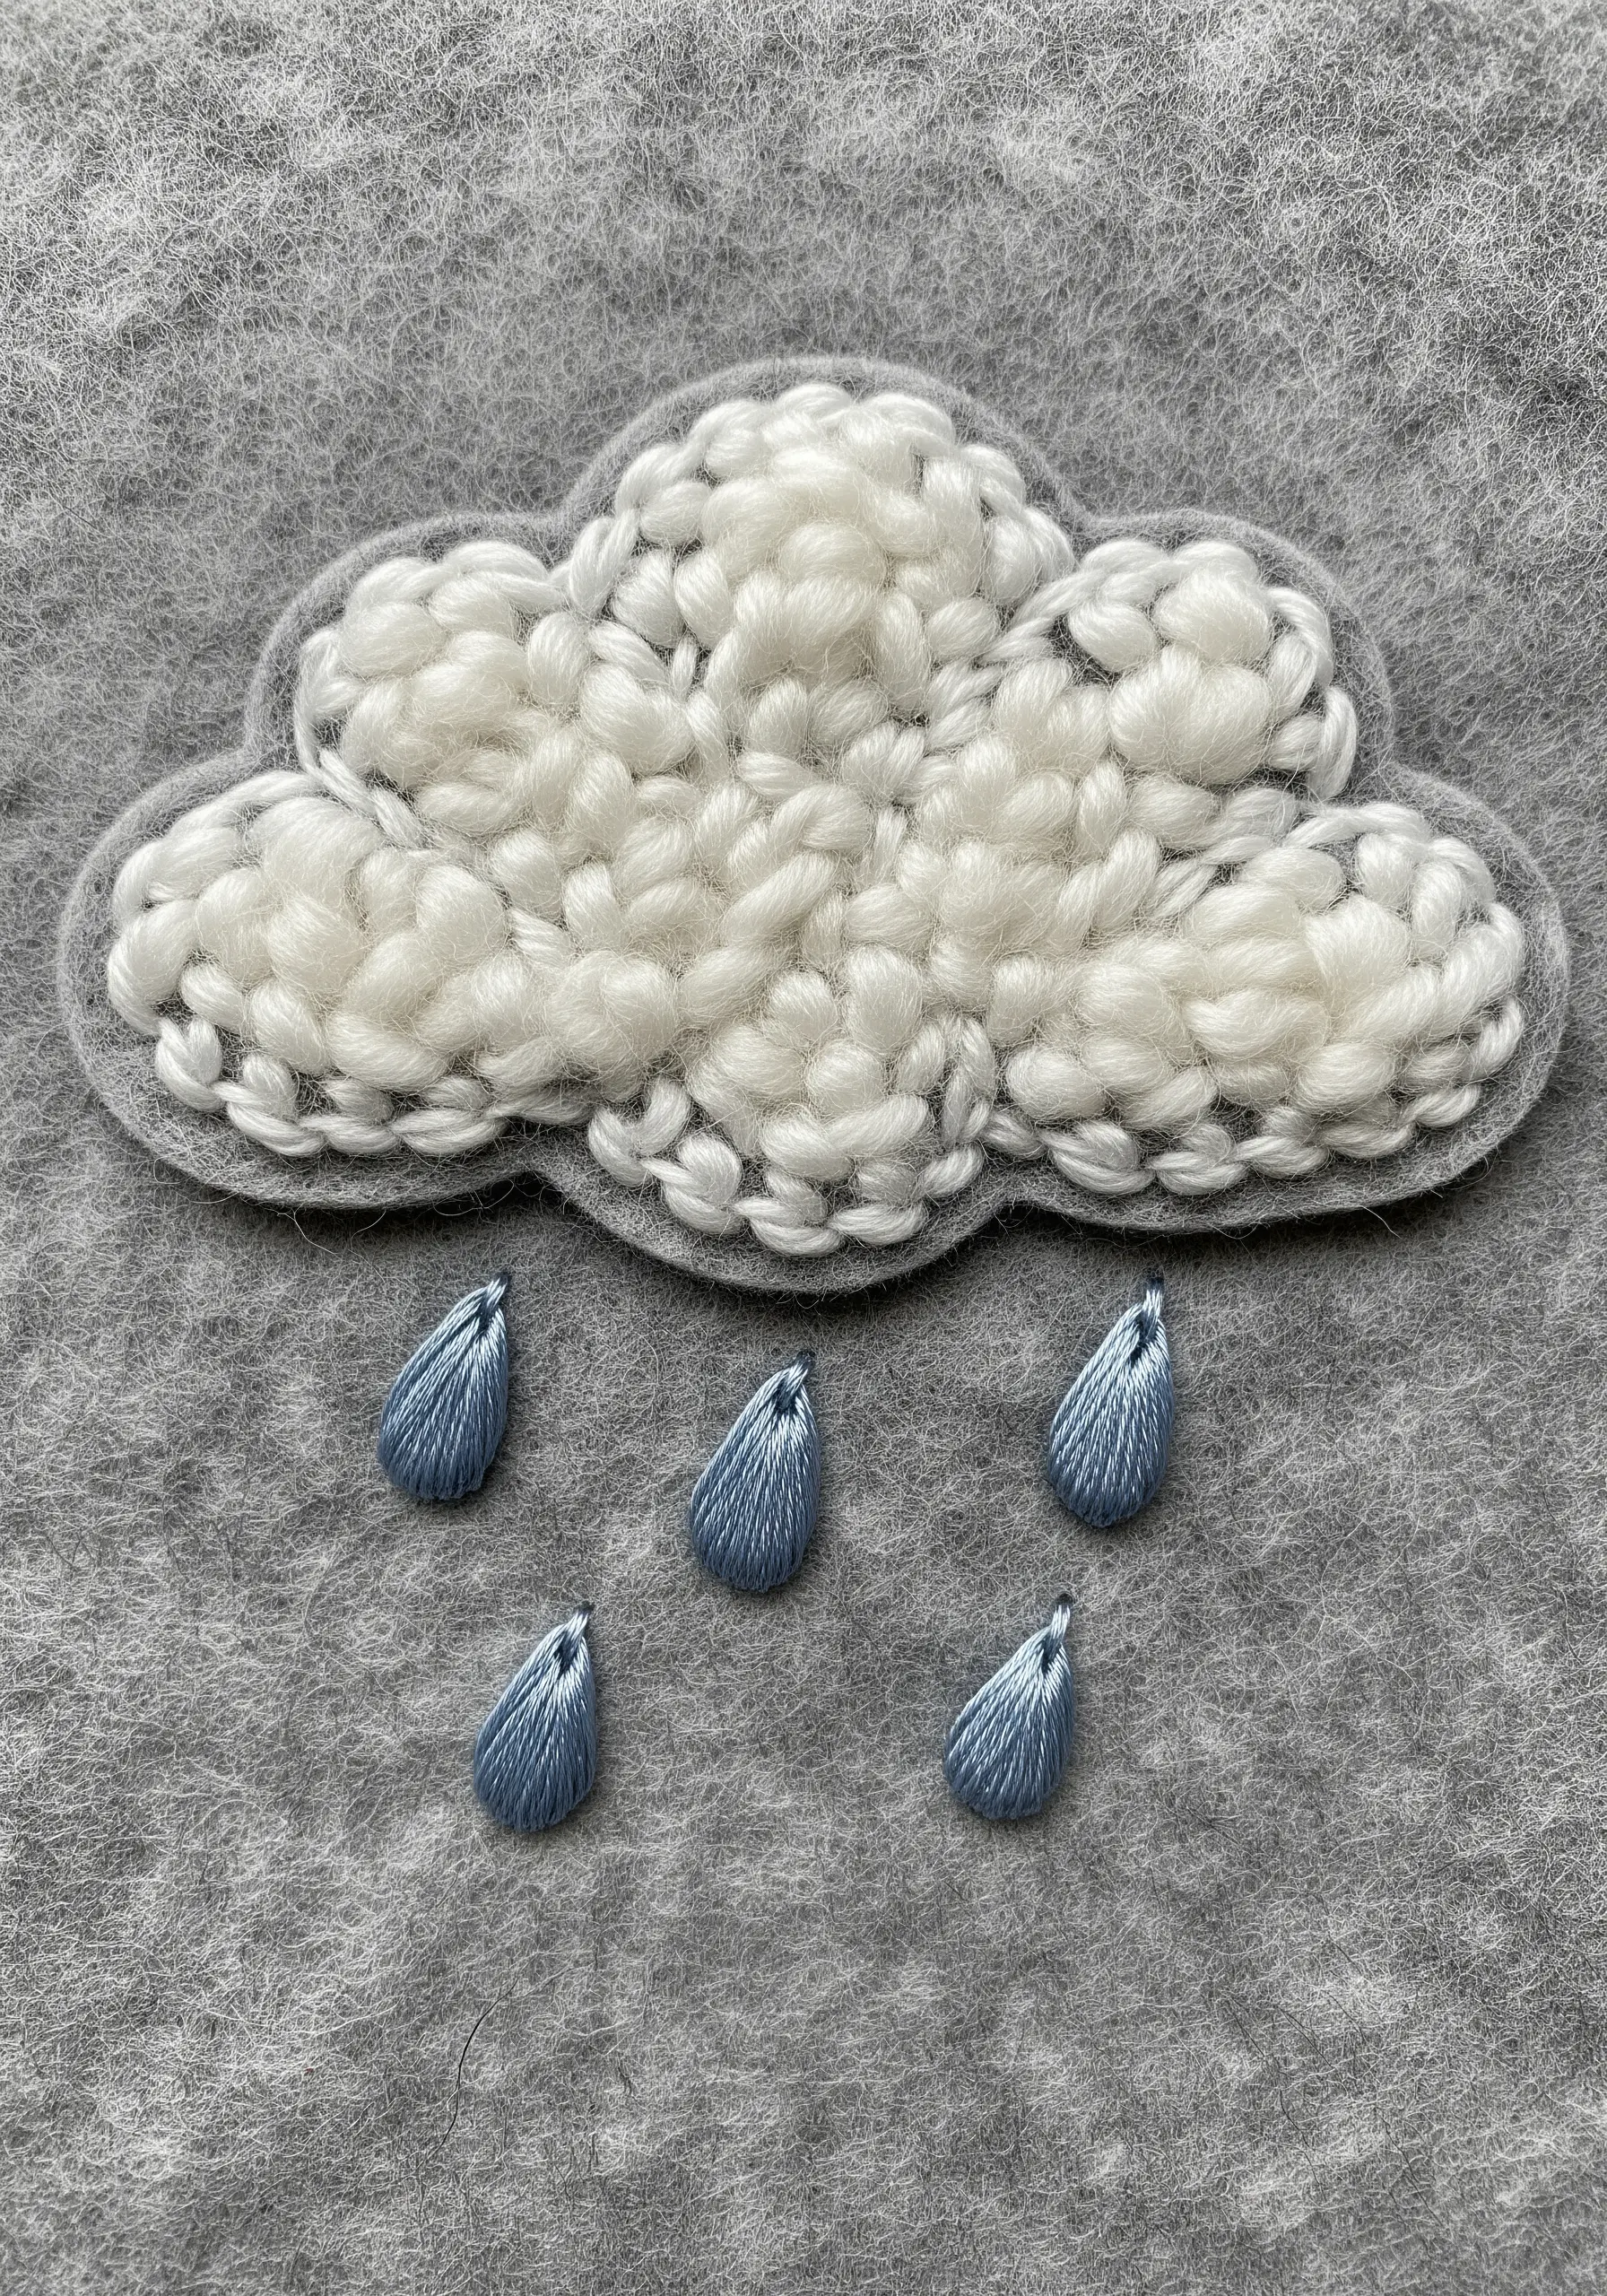
This design’s charm comes from the dramatic contrast between the fluffy cloud and the sleek raindrops.
Achieve the cloud’s texture by using a thick yarn or multiple strands of floss to make dense French knots or small loops.
For the raindrops, switch to a silky, high-sheen thread and create teardrop shapes with smooth satin stitches.
This smart textural play is visually engaging and adds a delightful, touchable quality to your work.
9. Master Precision with a Simple Geometric Pattern

A repeating honeycomb pattern looks intricate, but it’s built from one of the simplest stitches: the backstitch.
The key to success is consistency. Use a fabric marker to lightly draw your guidelines first, ensuring all your hexagons are uniform.
Keep your stitch length even throughout the design to maintain a clean, crisp appearance.
Stitching with a single color on a bold background allows the elegance of the geometric patterns to take center stage.
10. Let Variegated Thread Create Effortless Gradients
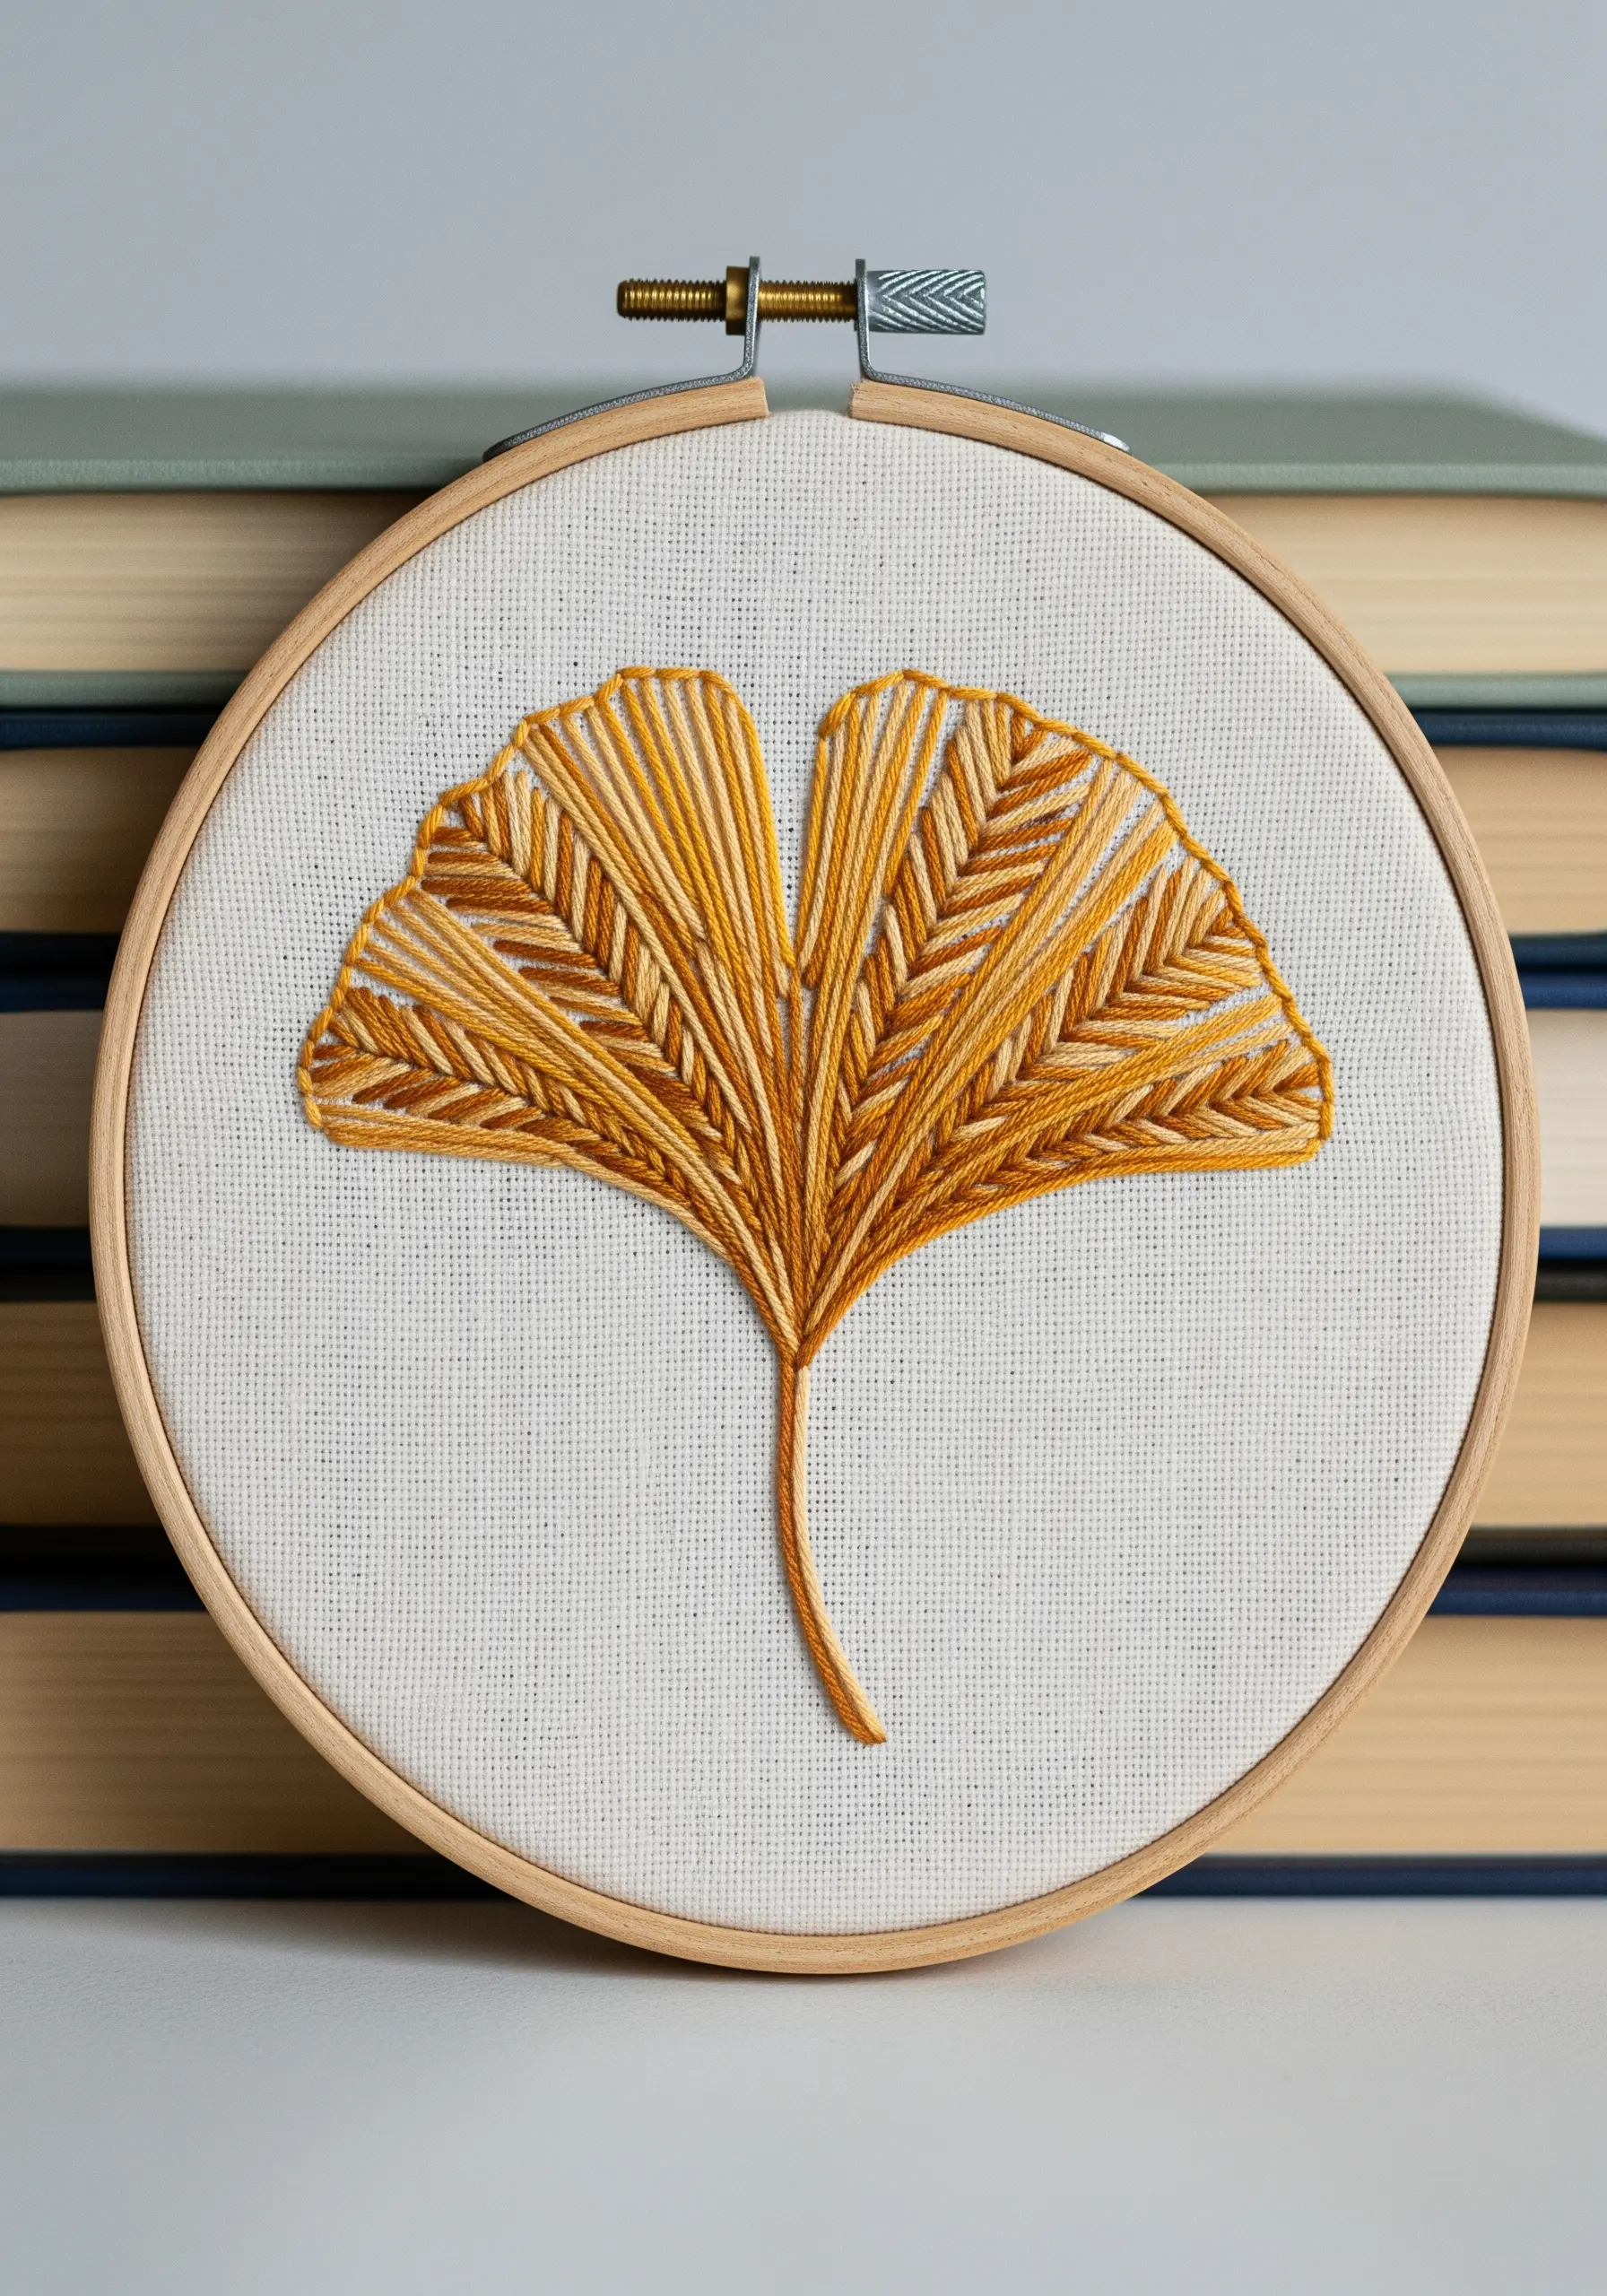
Achieve a beautiful, painterly effect in this ginkgo leaf without the hassle of manually changing colors.
Use a variegated embroidery floss that shifts between shades of yellow, gold, and brown.
Stitch using a fan-like array of straight stitches or a long-and-short stitch, allowing the thread’s natural color changes to create the gradient for you.
This technique automatically adds depth and realism, making the leaf look complex and richly detailed.
11. Create a Textured Fill with French Knots
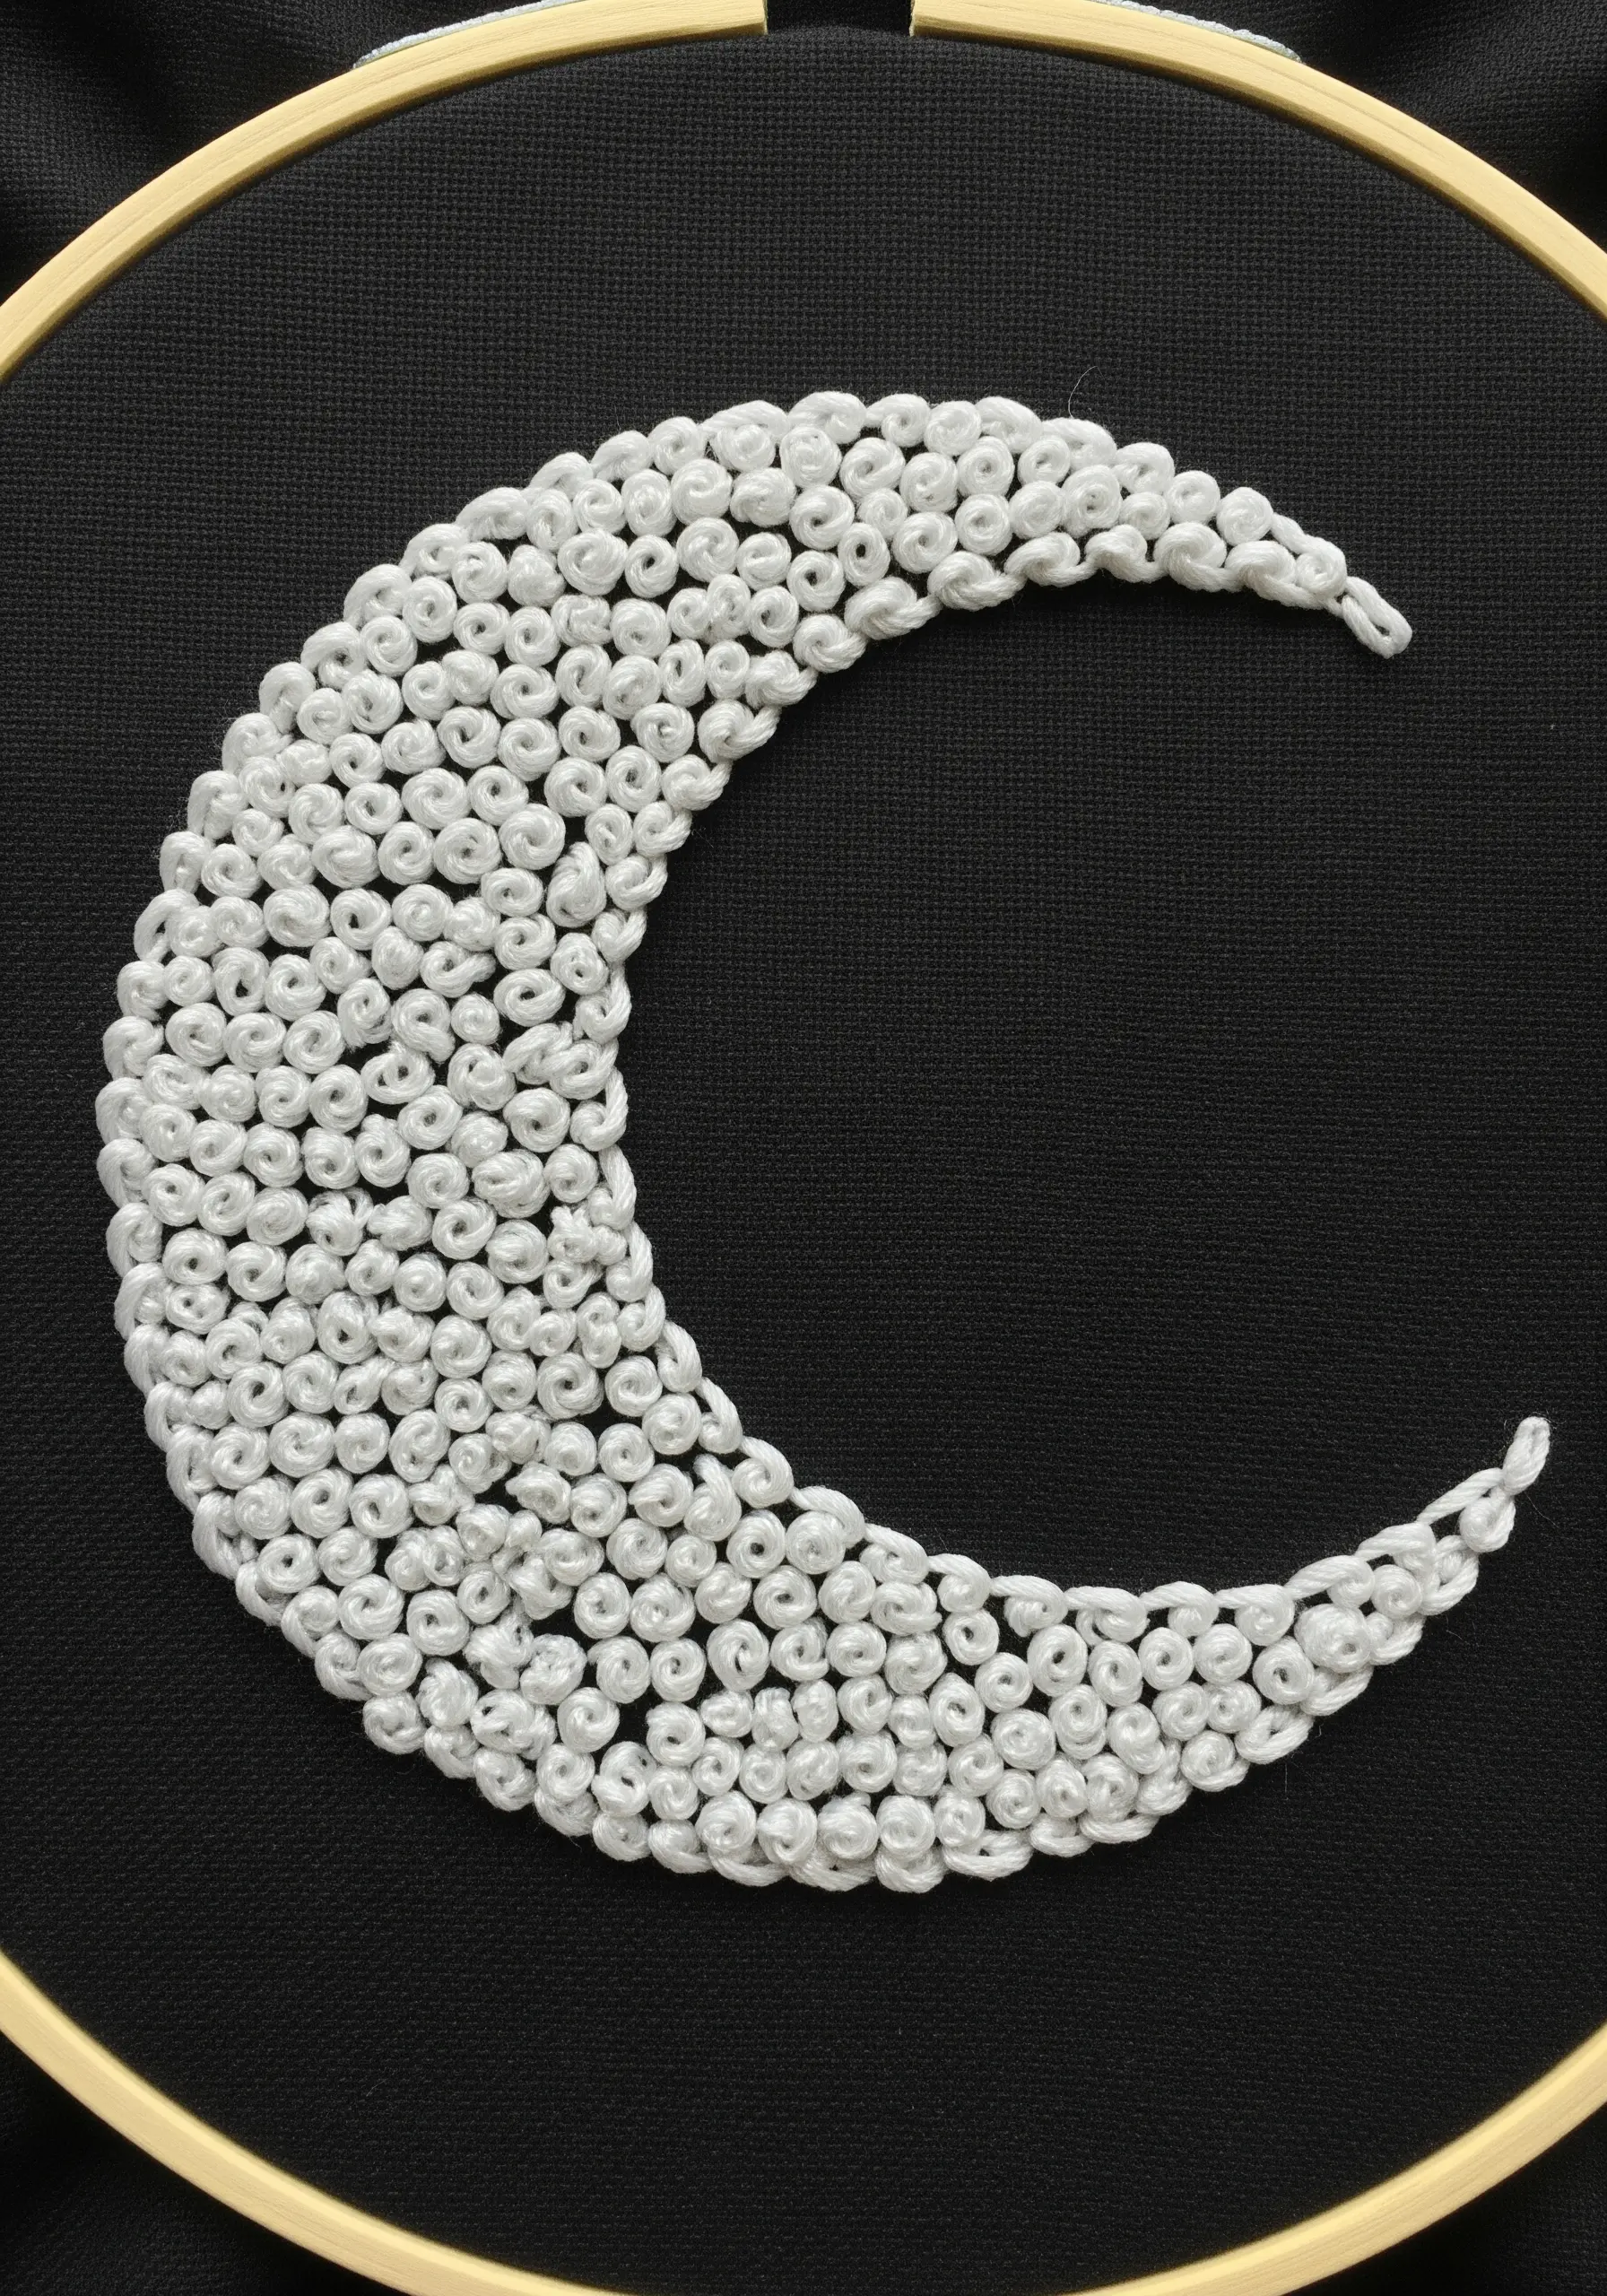
This stunning crescent moon is created with just one stitch, repeated hundreds of times: the French knot.
The technique creates a dense, pebbled texture that is incredibly tactile and visually striking, especially in high-contrast colors.
To ensure even coverage, work in rows and pack your knots closely together. Varying the number of times you wrap the thread around the needle (once or twice) can add subtle variations in size.
It’s a meditative process that yields a highly tactile result.
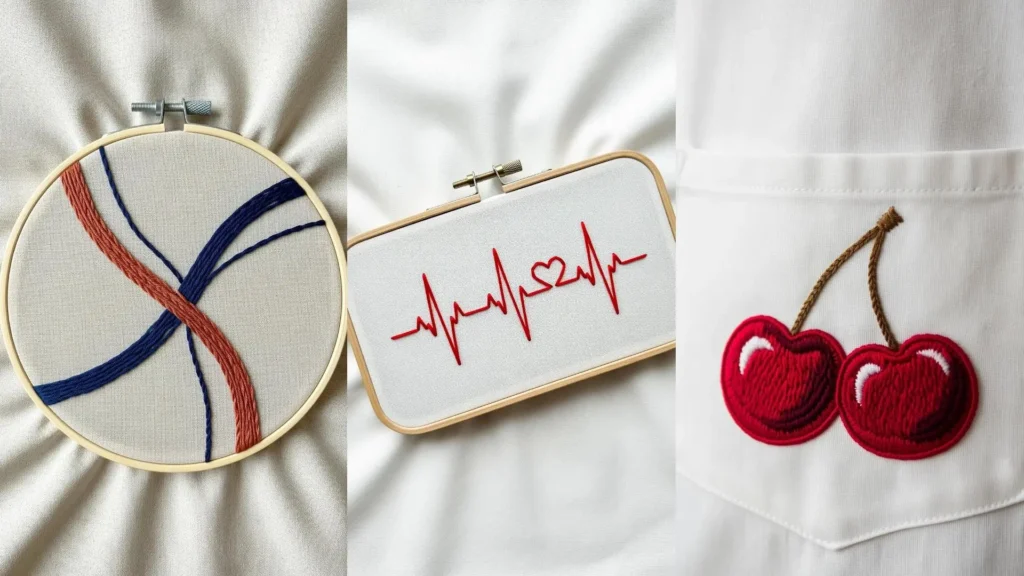
12. Design Dynamic Compositions with Overlapping Lines
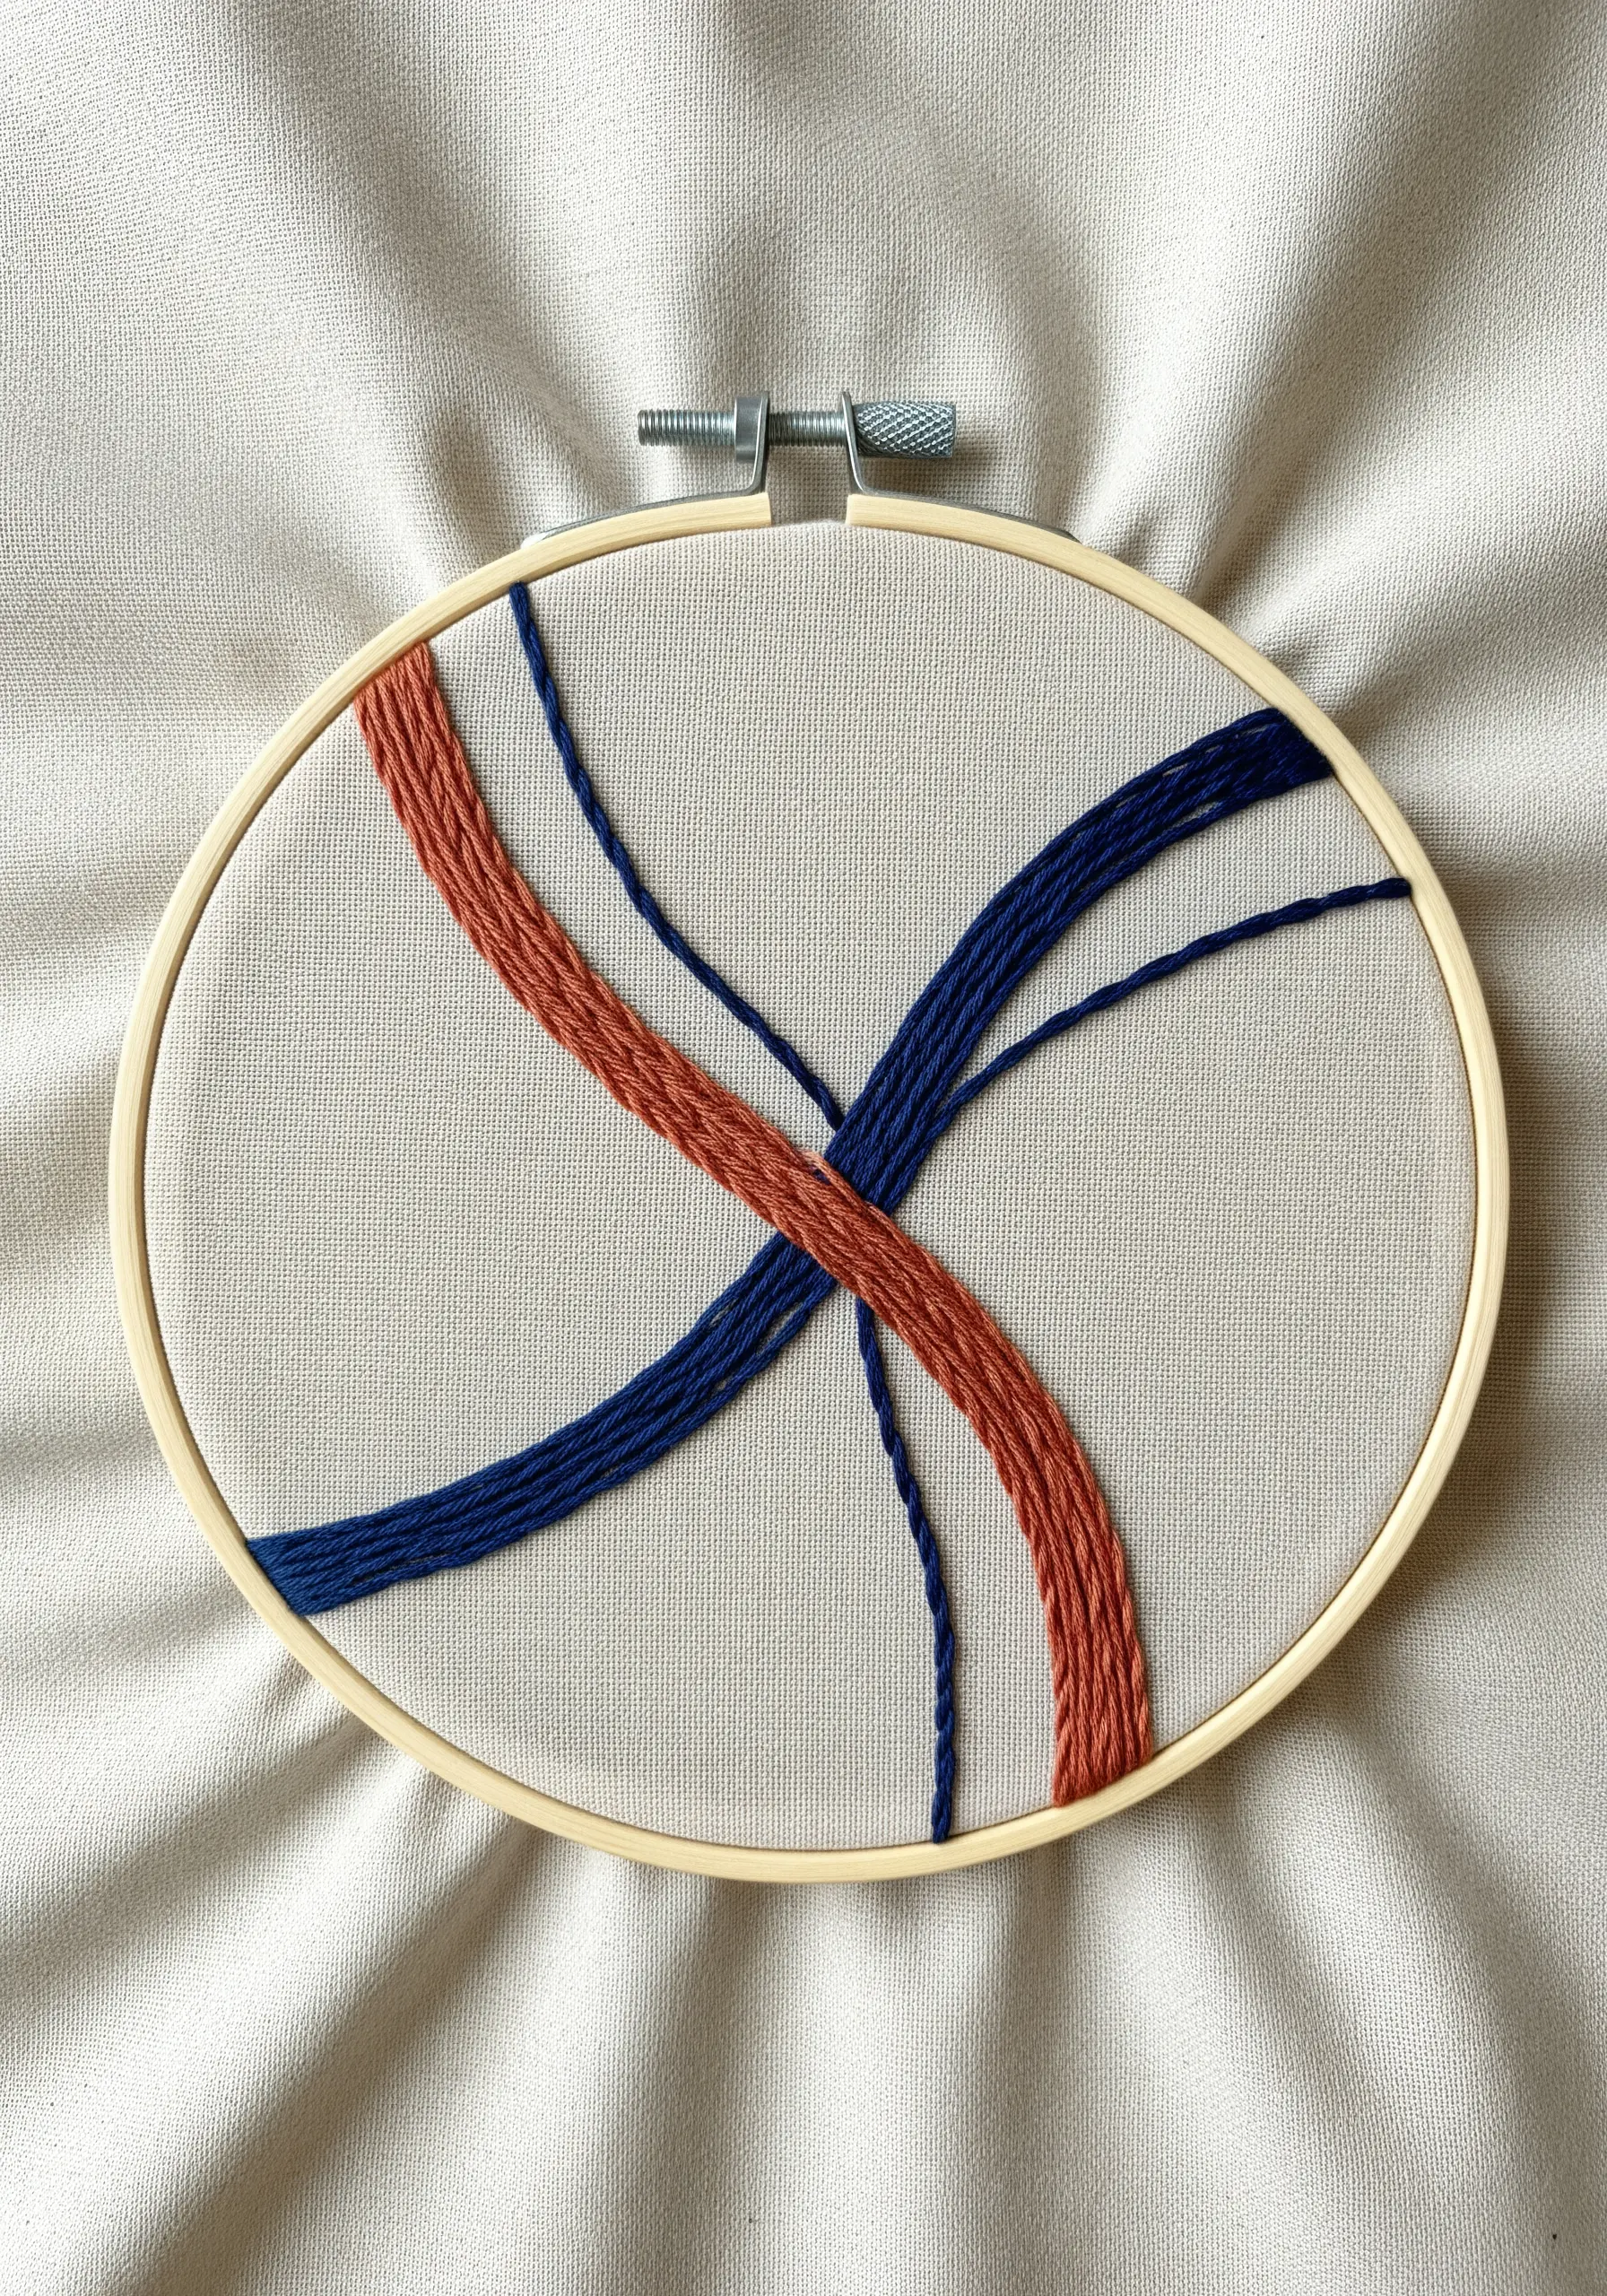
You don’t need a complex image to make compelling art; sometimes, abstract lines are all it takes.
Create visual interest by layering stitches of different colors and thicknesses. Use a full six strands for a wide satin stitch to create the thicker bands.
Then, use a thinner thread (two or three strands) and a simple backstitch for the lines that weave over and under.
This interplay of line weight and color is a simple way to create abstract art with depth and movement.
13. Achieve a Flawless Finish with Directional Satin Stitch
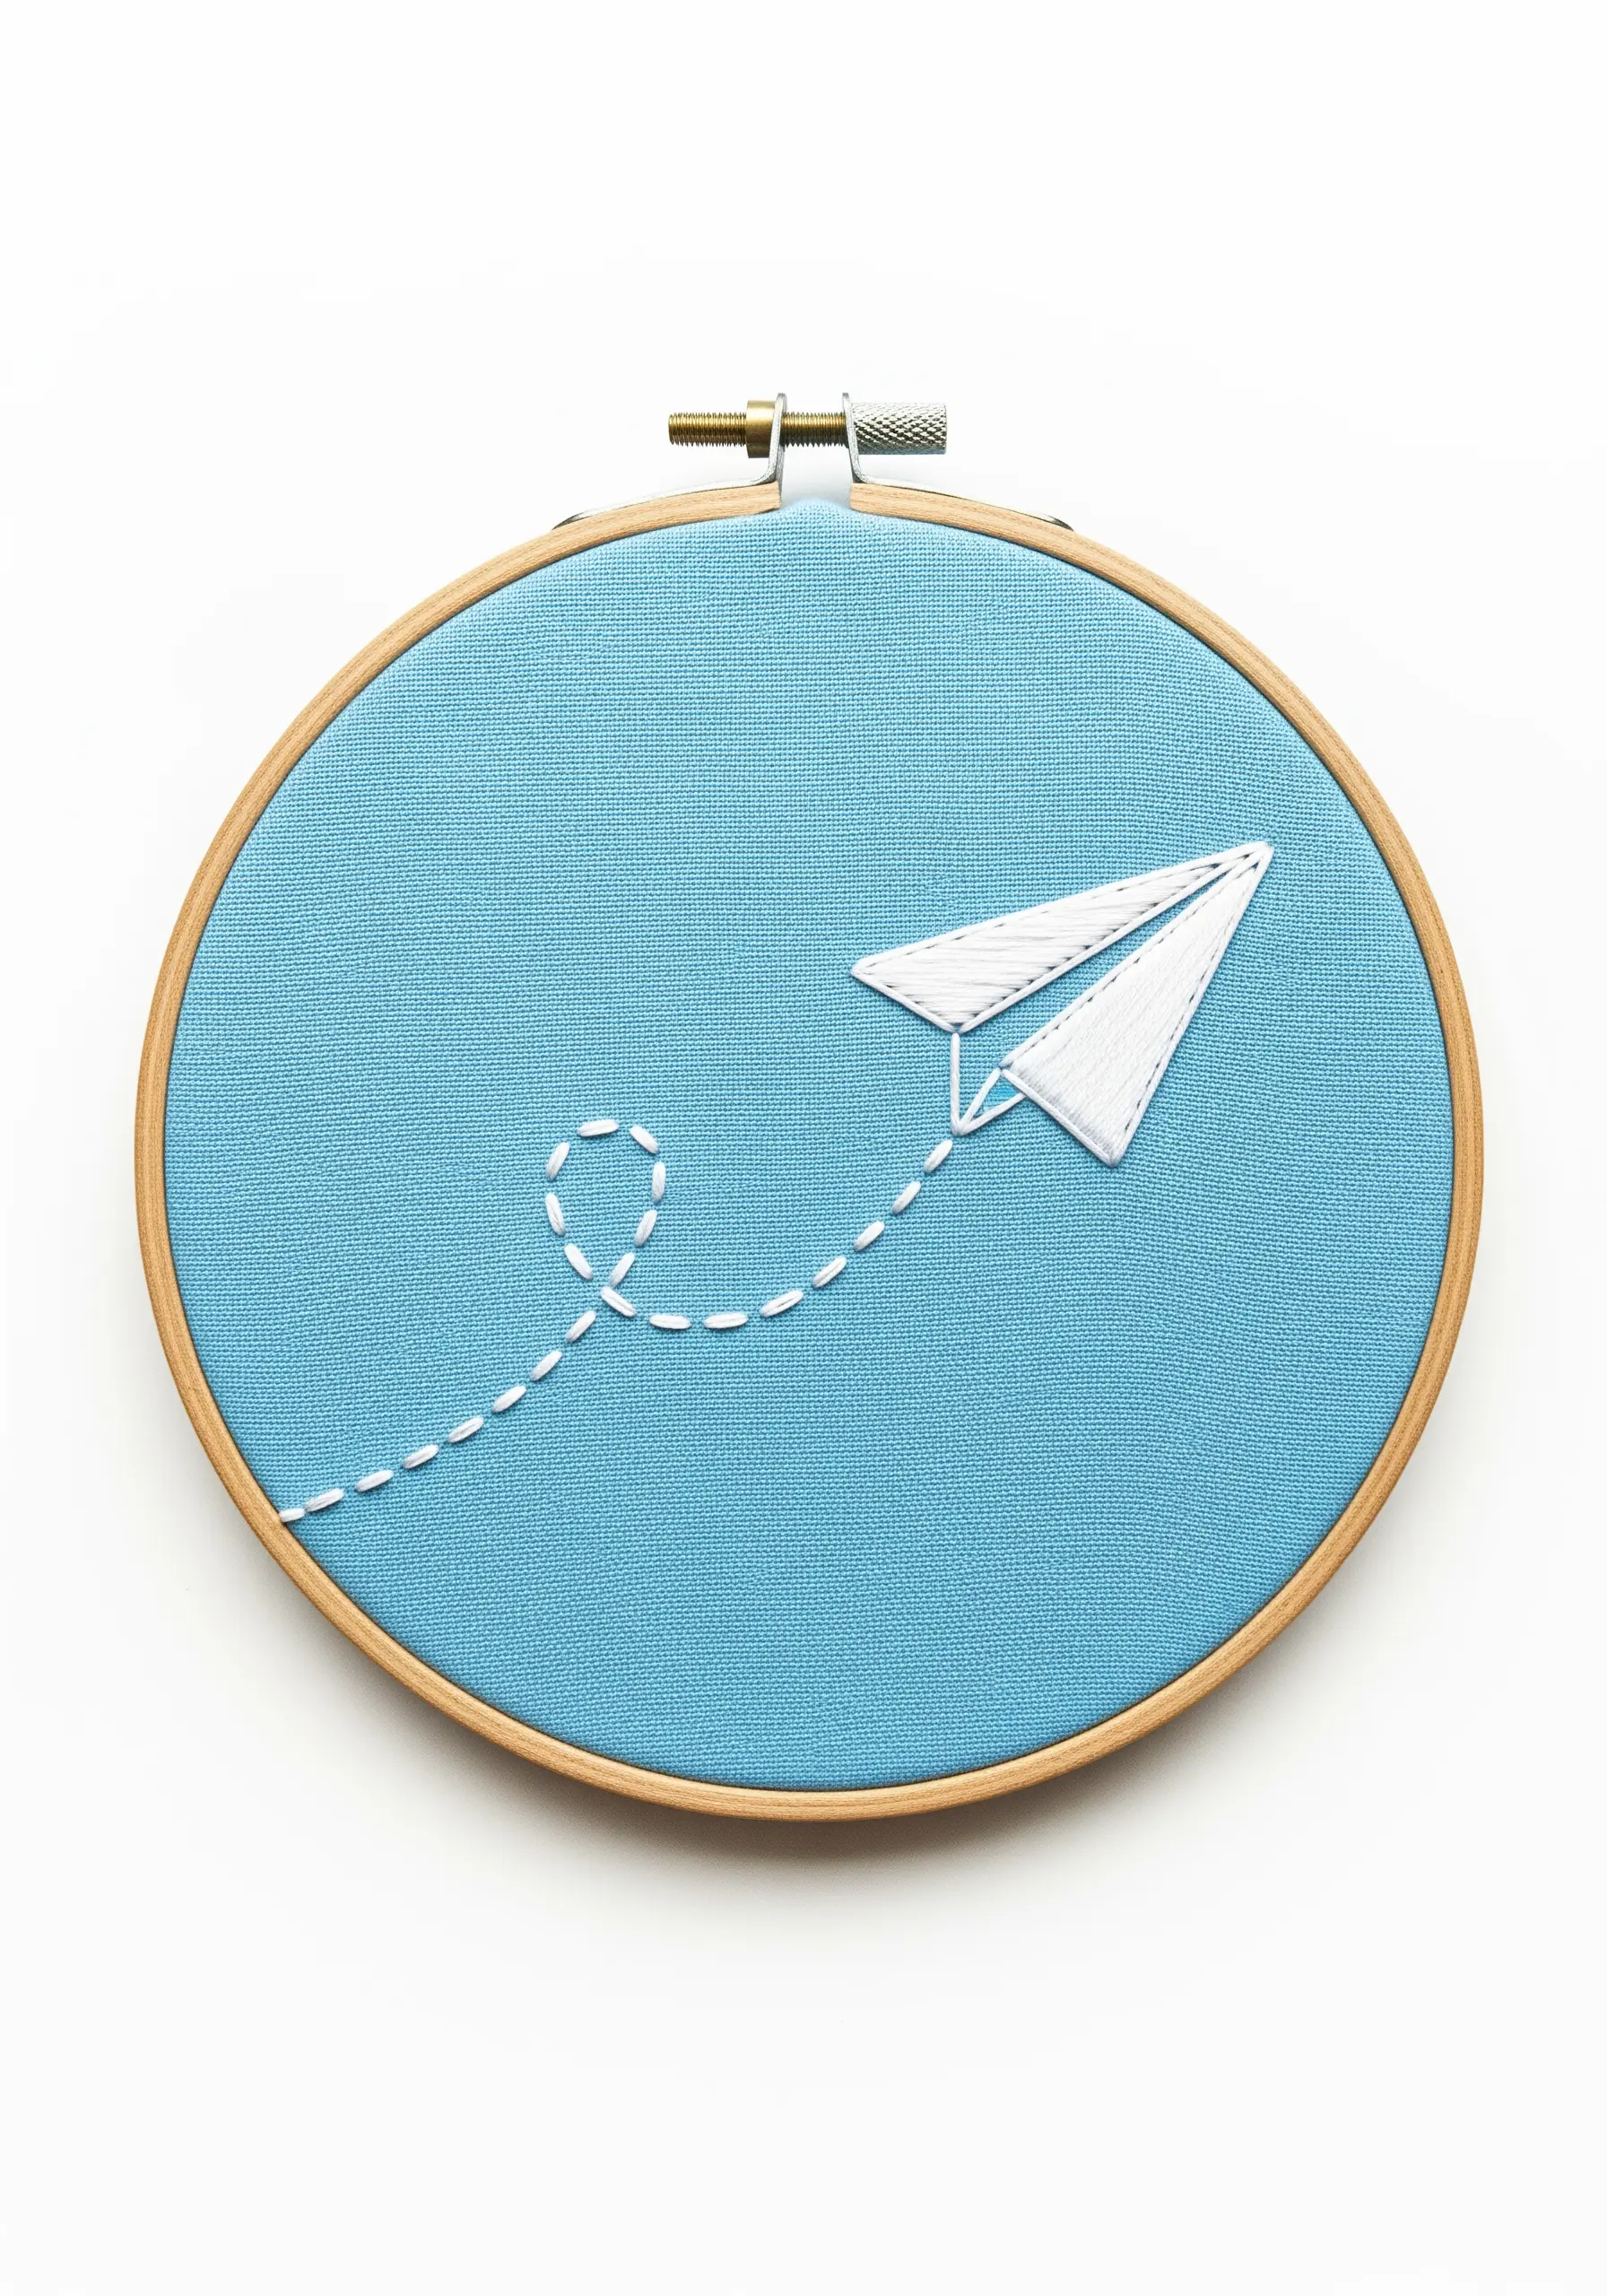
The success of this paper airplane lies in a perfect satin stitch. The goal is a smooth, solid fill that looks almost like a piece of paper.
To achieve this, ensure all your stitches are parallel and lie flat against the fabric. Use a single strand of thread to outline the shape with a backstitch first; this creates a raised edge to guide your satin stitches and results in a crisper finish.
A simple running stitch for the trail adds a whimsical touch and gives the whole piece a polished feel.
14. Embellish Linens with Dainty, Understated Florals

When embroidering on delicate items like napkins or handkerchiefs, less is more.
This charming daisy sprig uses classic, simple stitches: lazy daisies for the petals, a single French knot for each center, and a stem stitch for the branch.
The key to its elegance is using only two or three strands of floss. This keeps the design from feeling bulky and preserves the drape of the fine fabric.
These delicate floral stitches add a touch of handmade luxury without overpowering the item.
15. Master Color Blocking with Dense Vertical Stitches
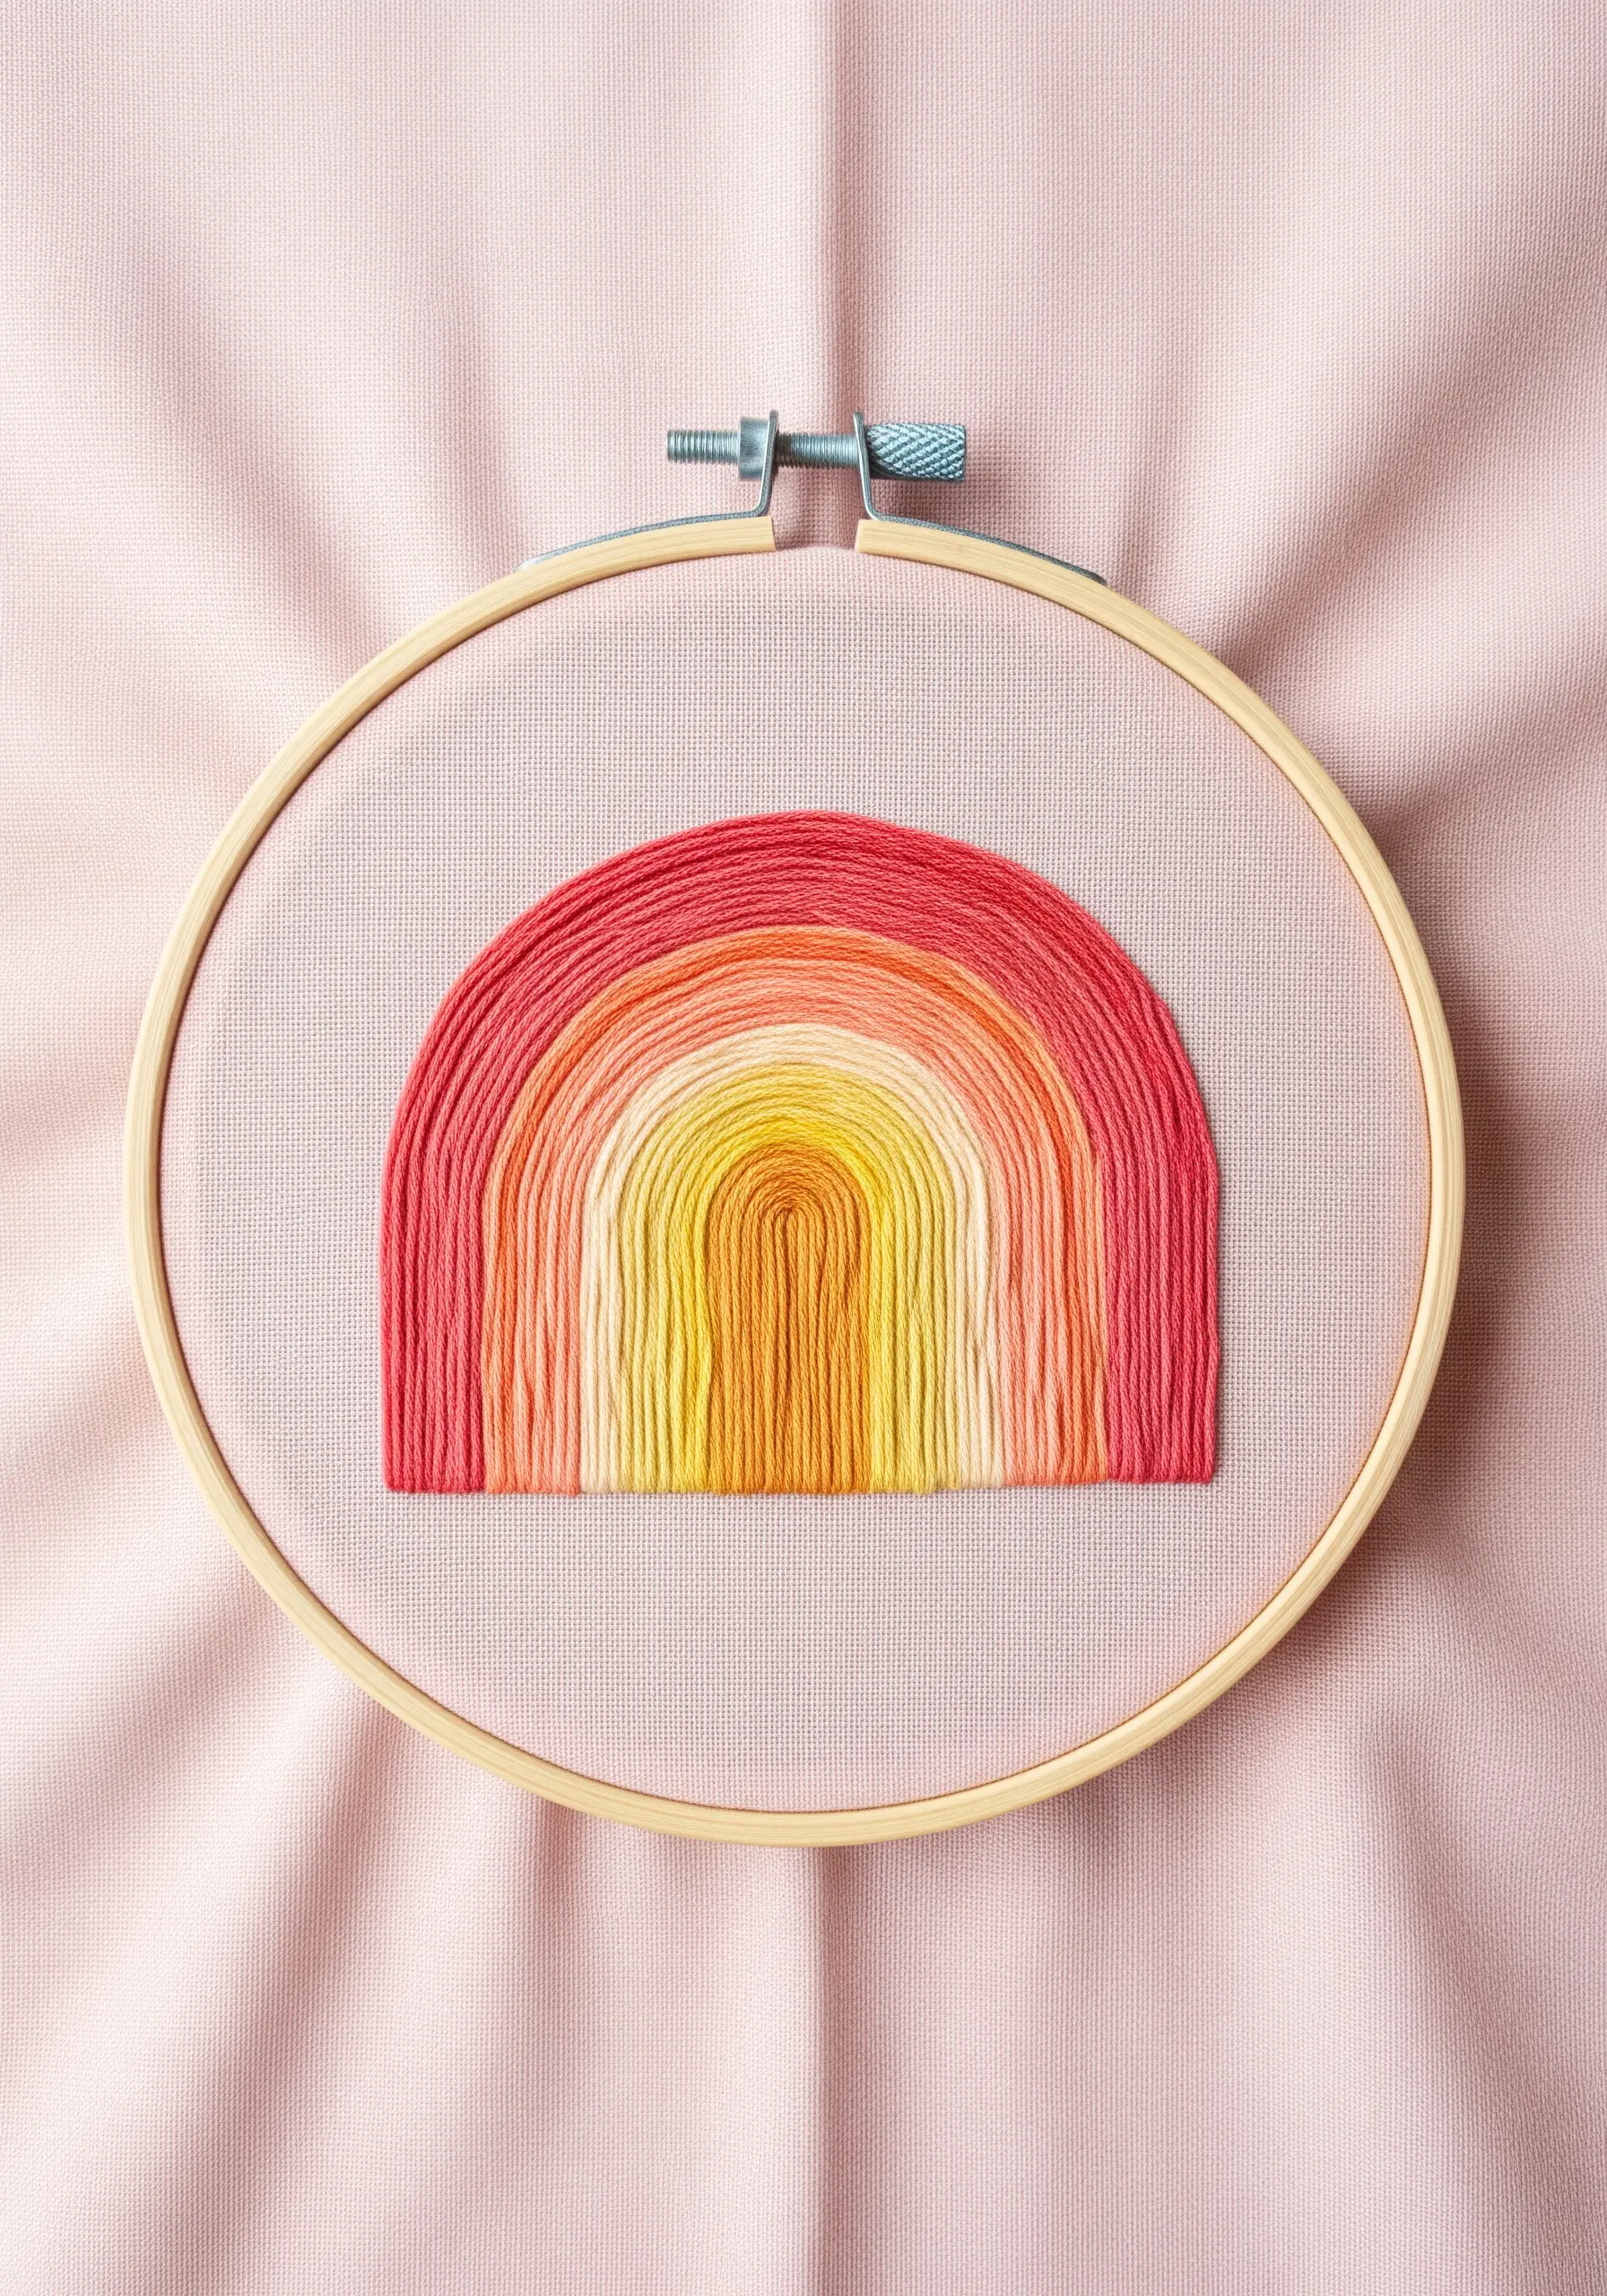
This vibrant rainbow effect is achieved with rows of tightly packed satin stitches, creating solid bands of color.
To keep your lines clean and the shape defined, draw your arch guidelines onto the fabric first.
Work from the inside arch outward, placing each stitch directly next to the last to avoid gaps. Choosing colors from an analogous palette (like reds, oranges, and yellows) creates a harmonious and sophisticated gradient.
16. Add Realism with Contrasting Textural Stitches
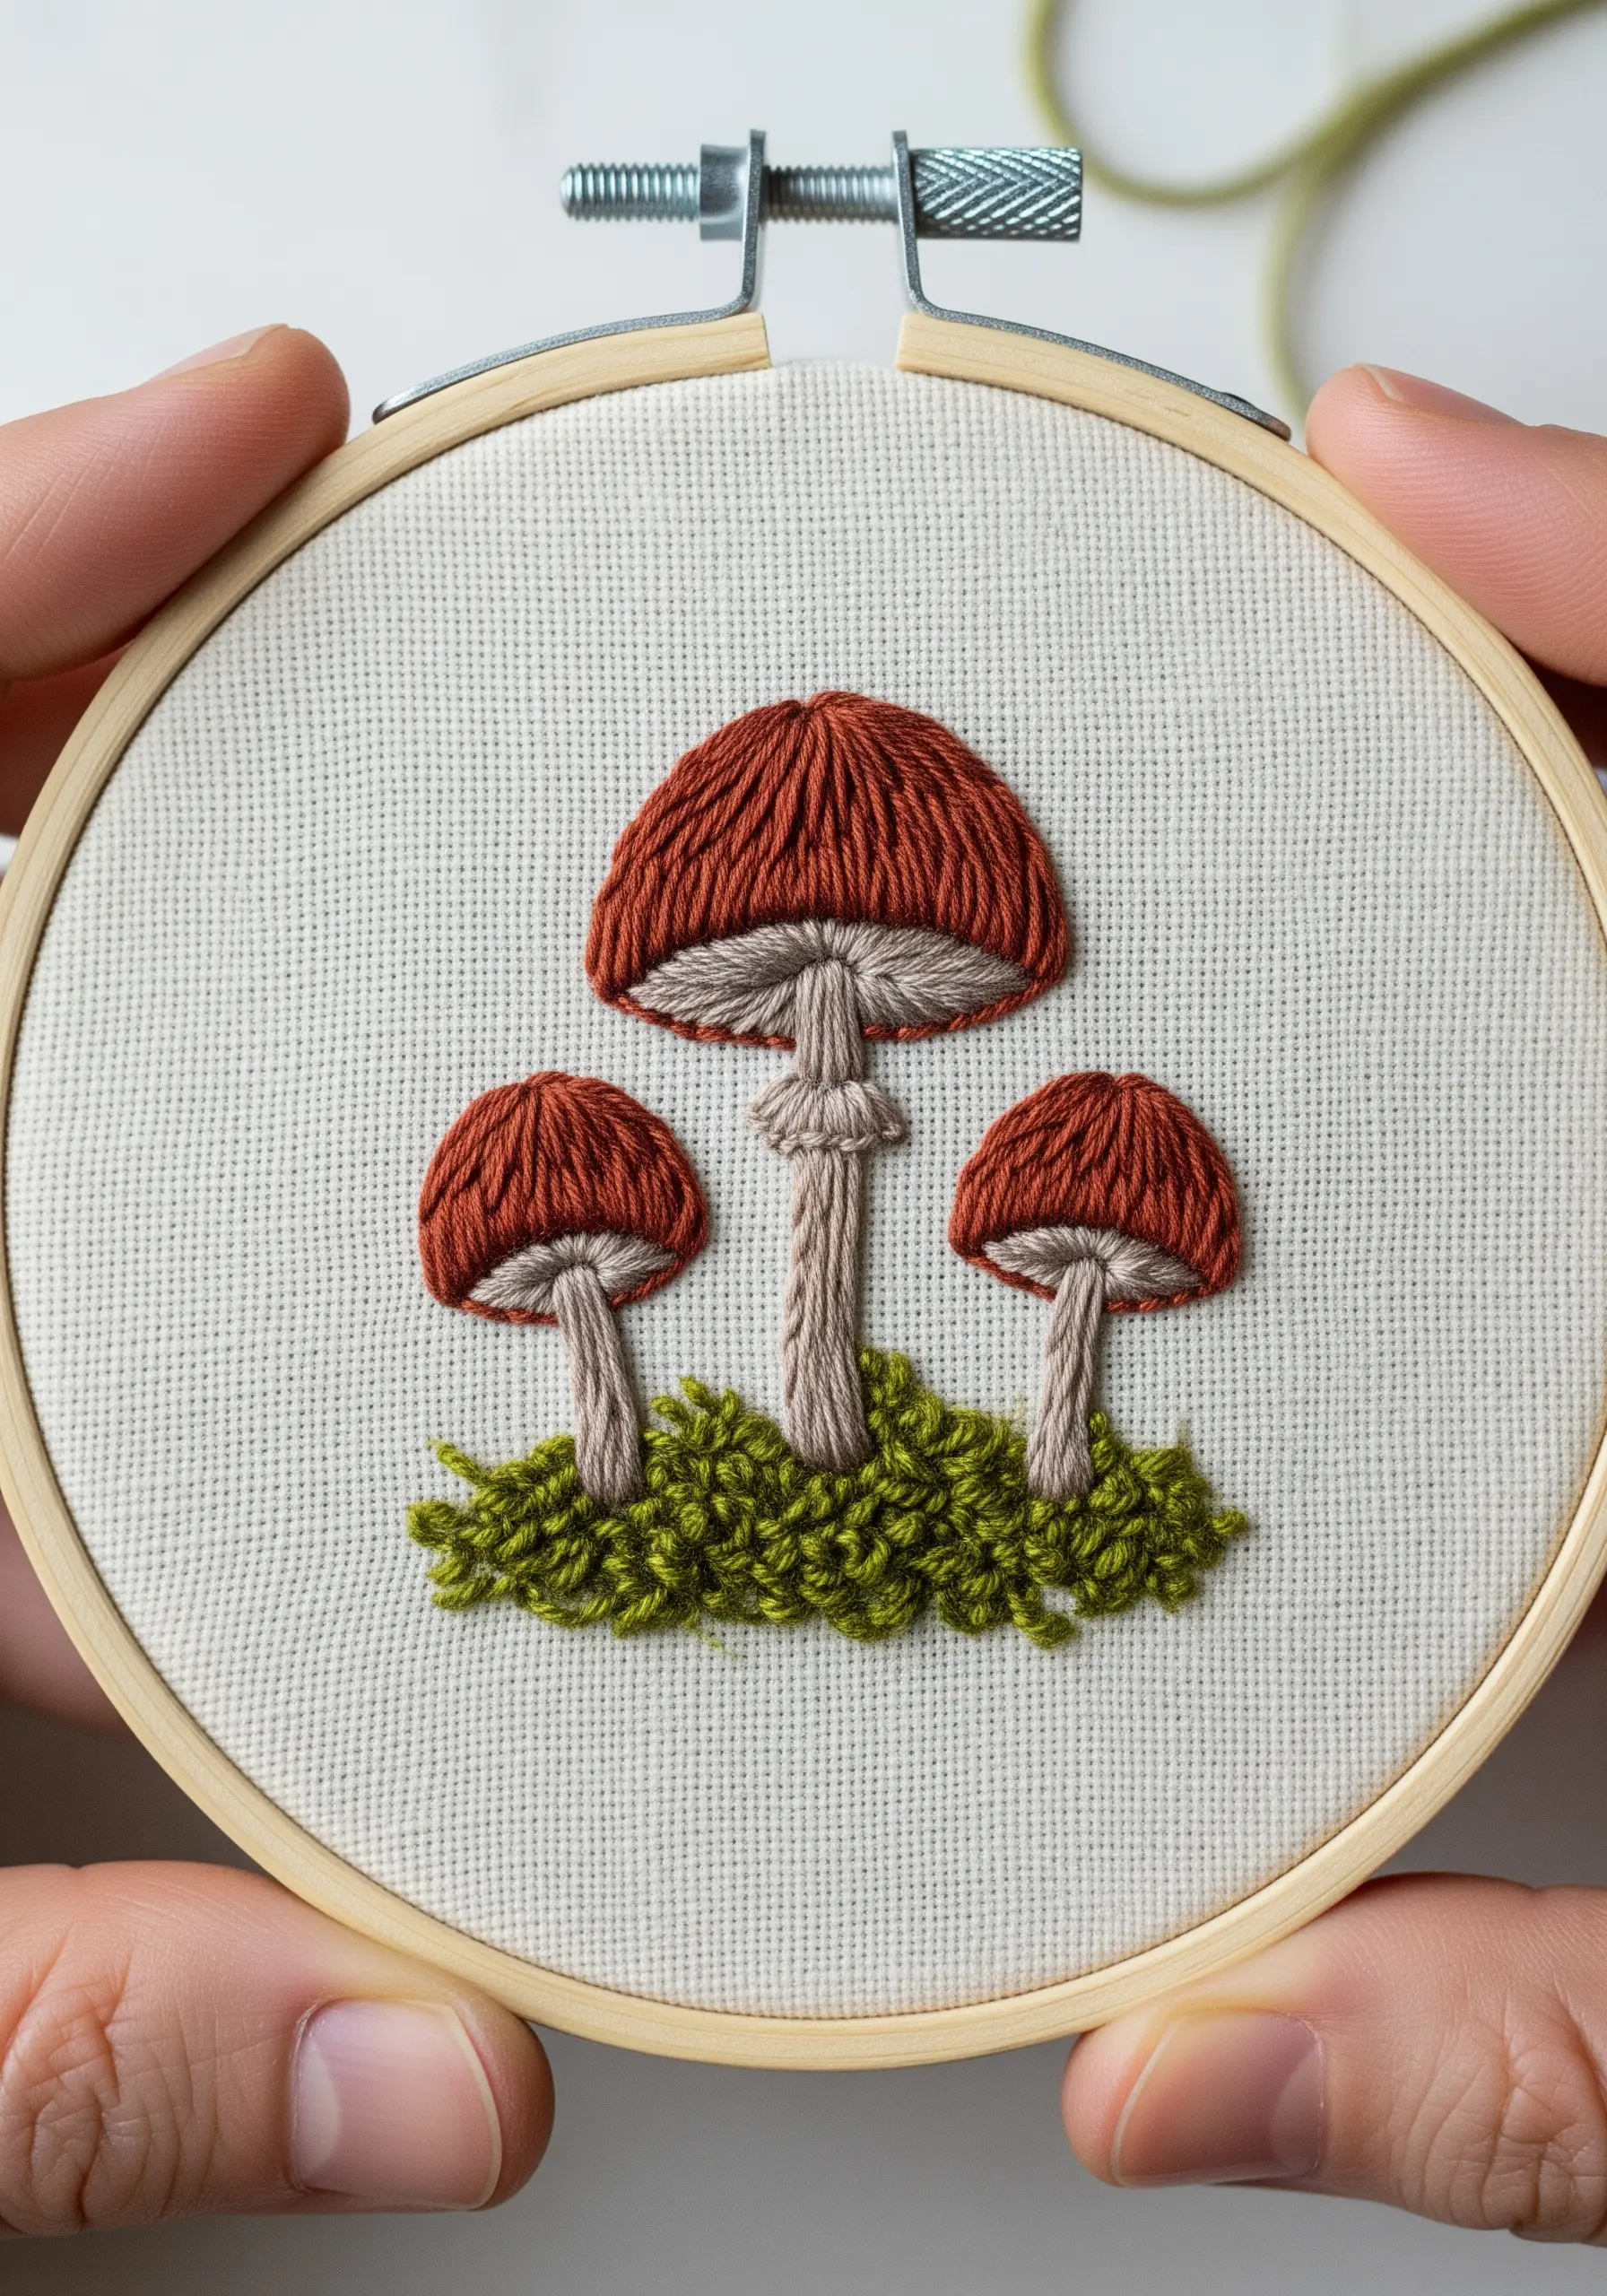
A few different stitches are all it takes to make these mushrooms feel lifelike and dimensional.
Use a smooth, directional satin stitch for the mushroom caps and a lighter color for the gills underneath.
The real magic happens at the base: a cluster of green French knots instantly creates the illusion of soft, uneven moss.
This combination of smooth and rough textures is a simple trick to bring nature scenes to life.
17. Paint with Thread Using Simple Parallel Lines
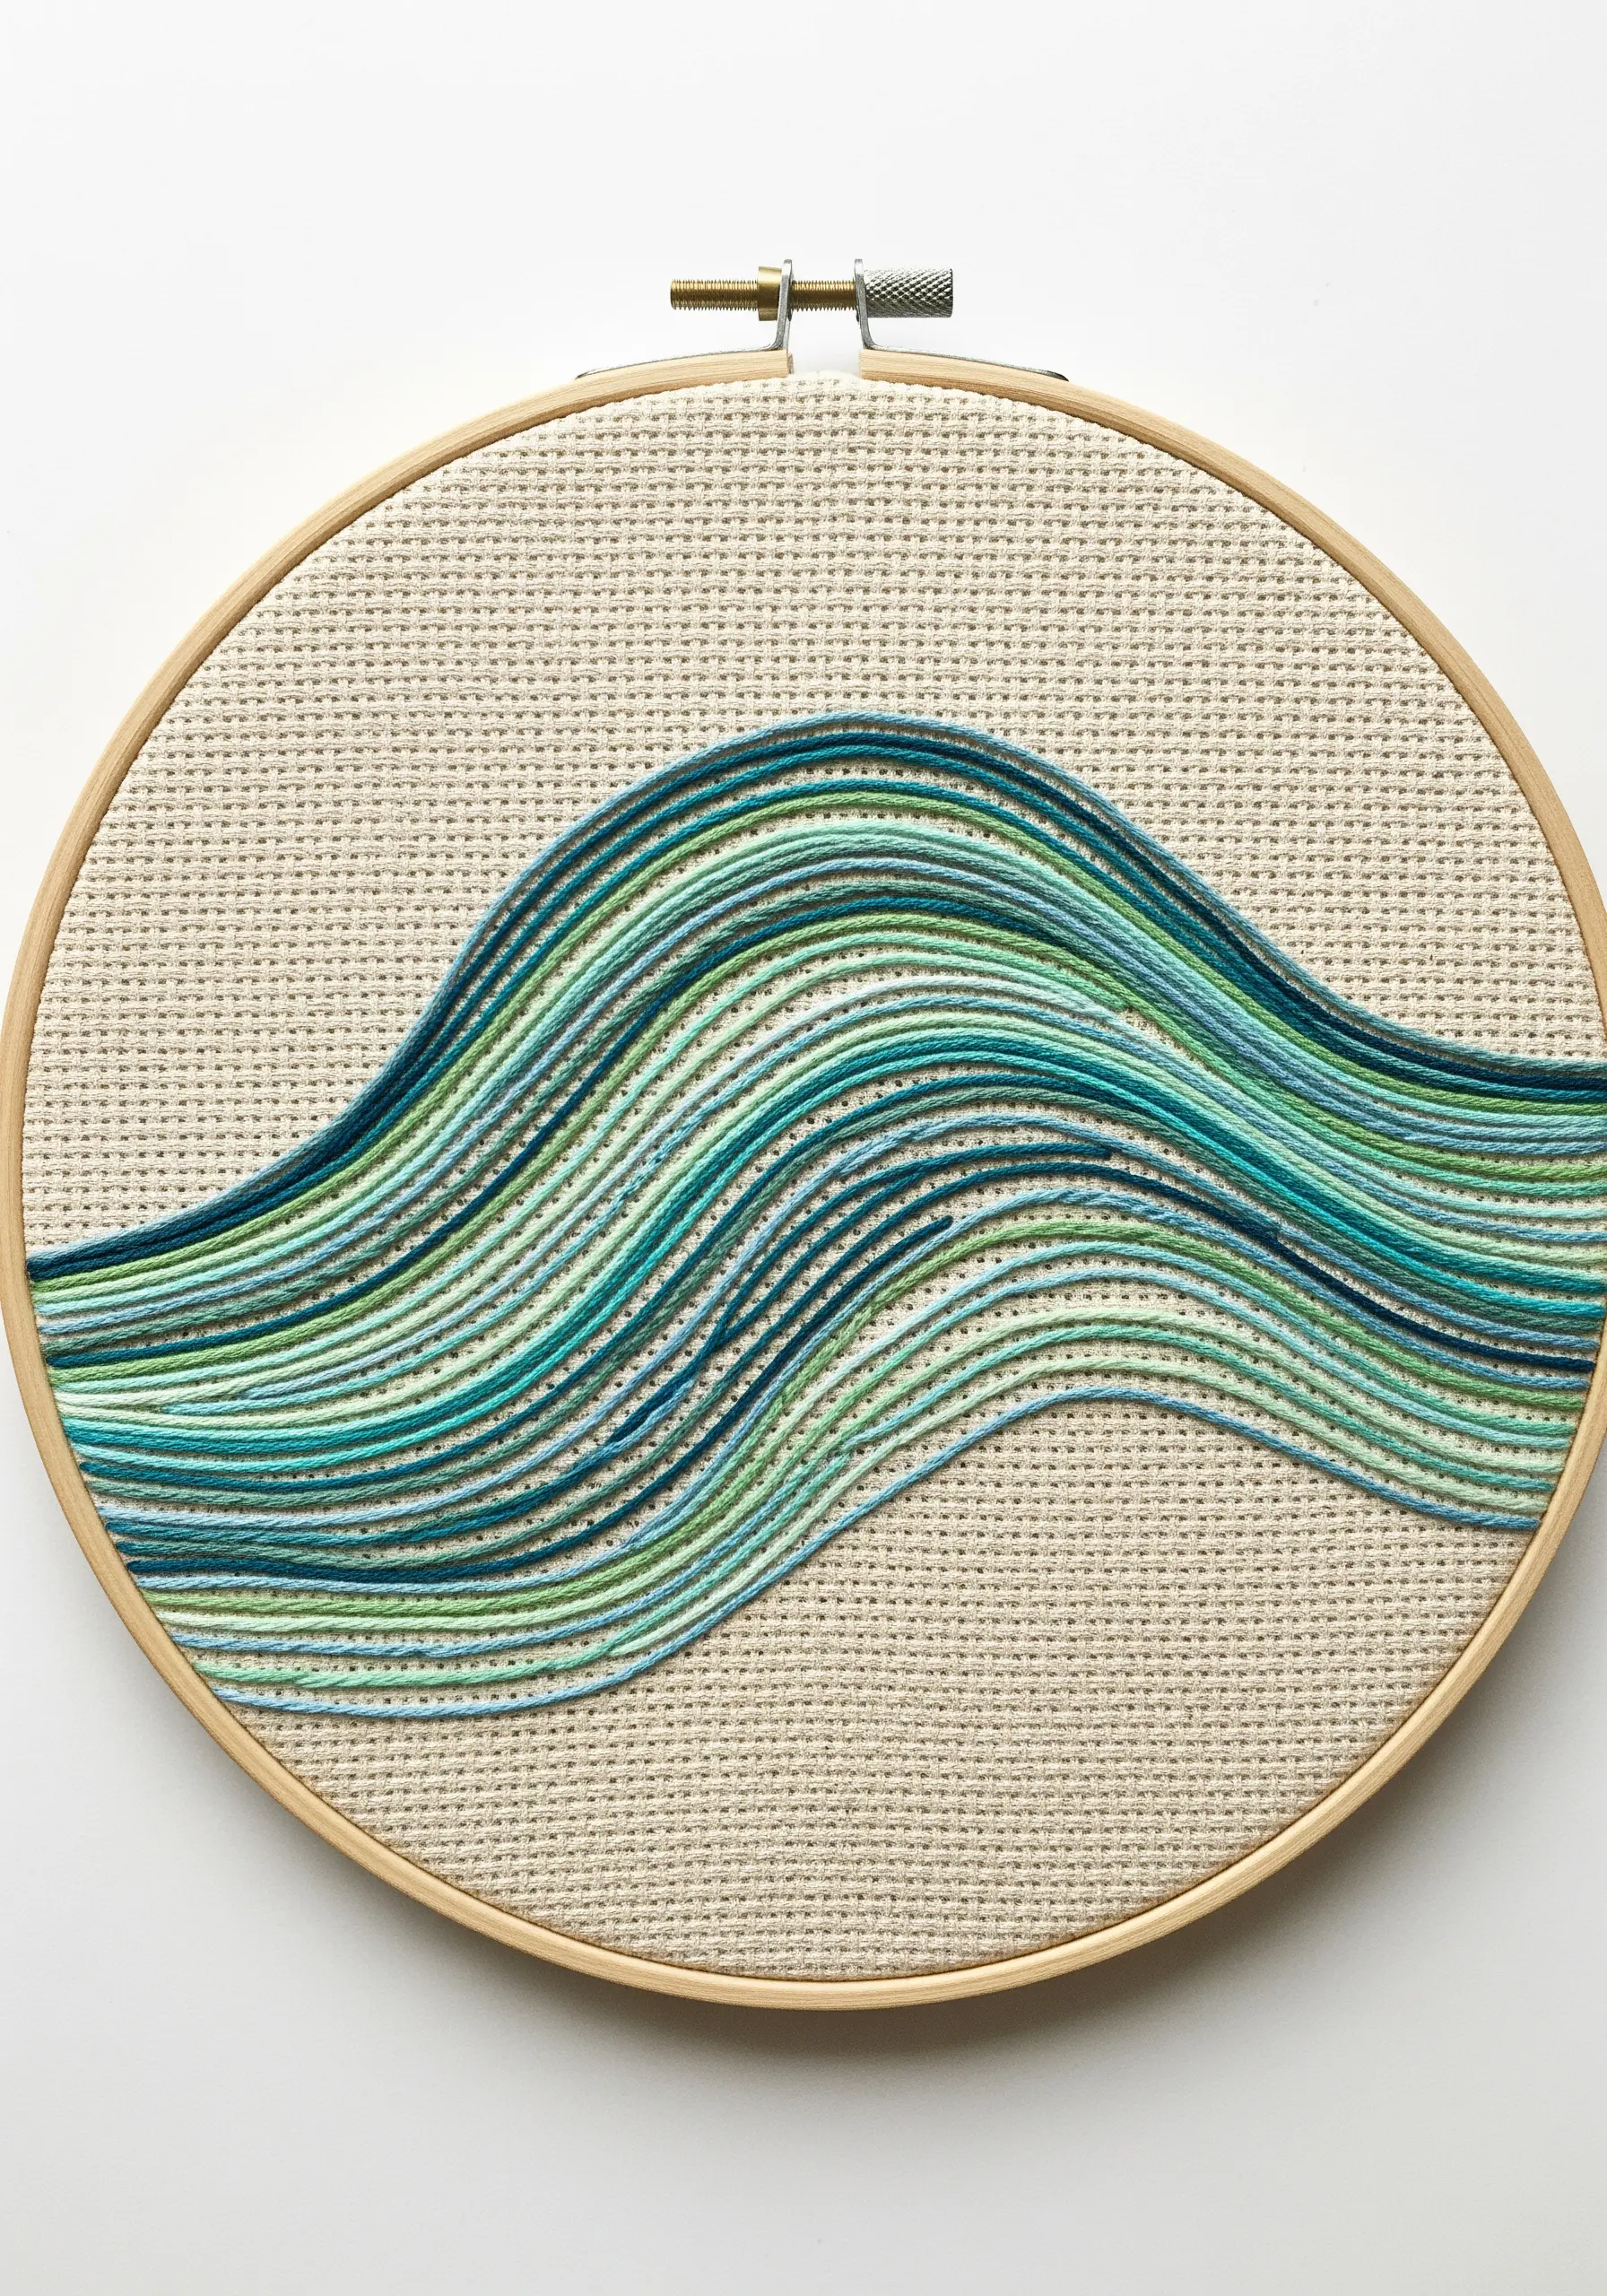
This stunning abstract wave is composed entirely of simple horizontal stitches. Its complexity comes from color choice, not technique.
Select a range of colors within the same family, like various blues and greens, to create a sense of flow and depth.
Stitch in rows, following a gentle wave pattern, and allow the colors to blend and interact. This is an excellent way to use up scrap threads and create a piece with a beautiful, painterly quality from your curated color palette.
18. Perfect Your Outlines with a Whipped Backstitch
If your backstitch outlines sometimes look a bit choppy, the whipped backstitch is the solution you need.
First, create a standard backstitch outline of your shape. Then, take a second length of the same thread and, without piercing the fabric, weave it under each backstitch.
This wrapping motion covers the gaps between stitches, resulting in a smooth, solid, and slightly raised line.
It’s the perfect technique for creating flawlessly elegant outlines with a professional finish.
19. Embellish Apparel with Bold, Graphic Motifs
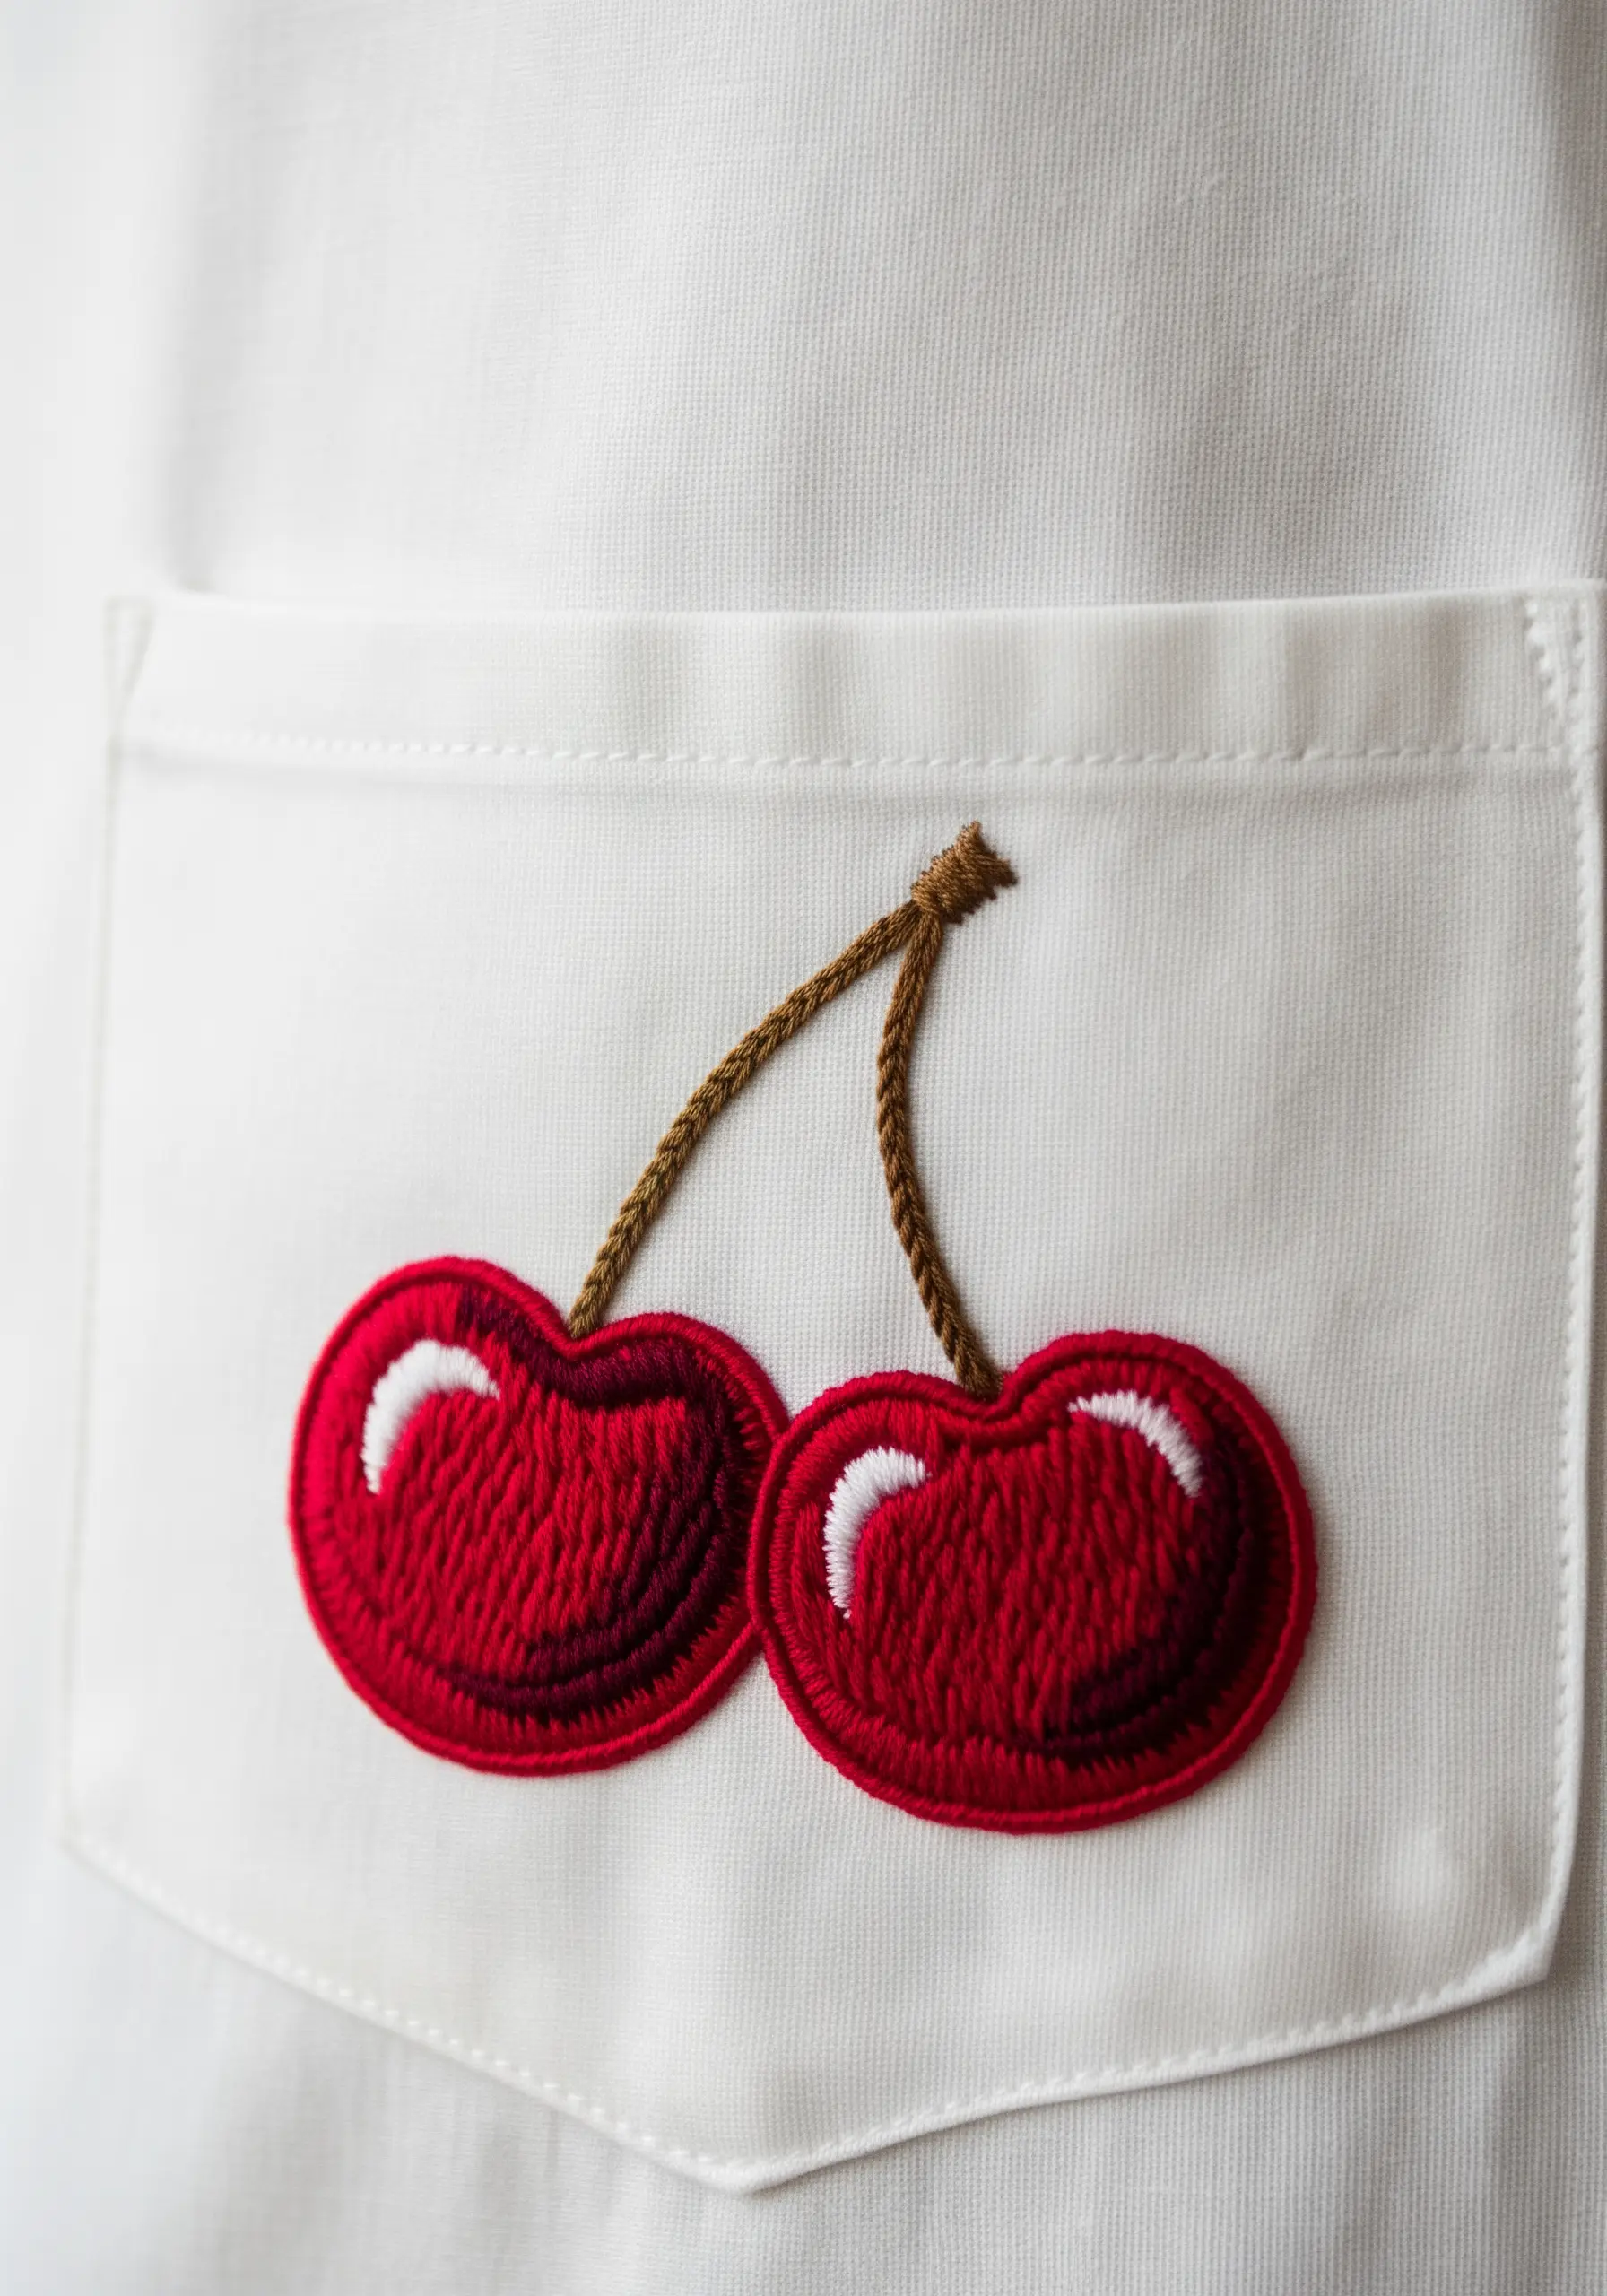
Adding embroidery to clothing requires stitches that are durable and designs that pop.
This cherry motif uses a dense satin stitch for a solid, almost patch-like fill. A crisp backstitch outline in a darker shade adds definition and secures the edges.
The small white satin stitch highlight is the key detail that gives the cherries a glossy, three-dimensional look.
This simple but bold approach is perfect for personalizing clothes on pockets, collars, or denim.
20. Create a Gradient with a Field of French Knots
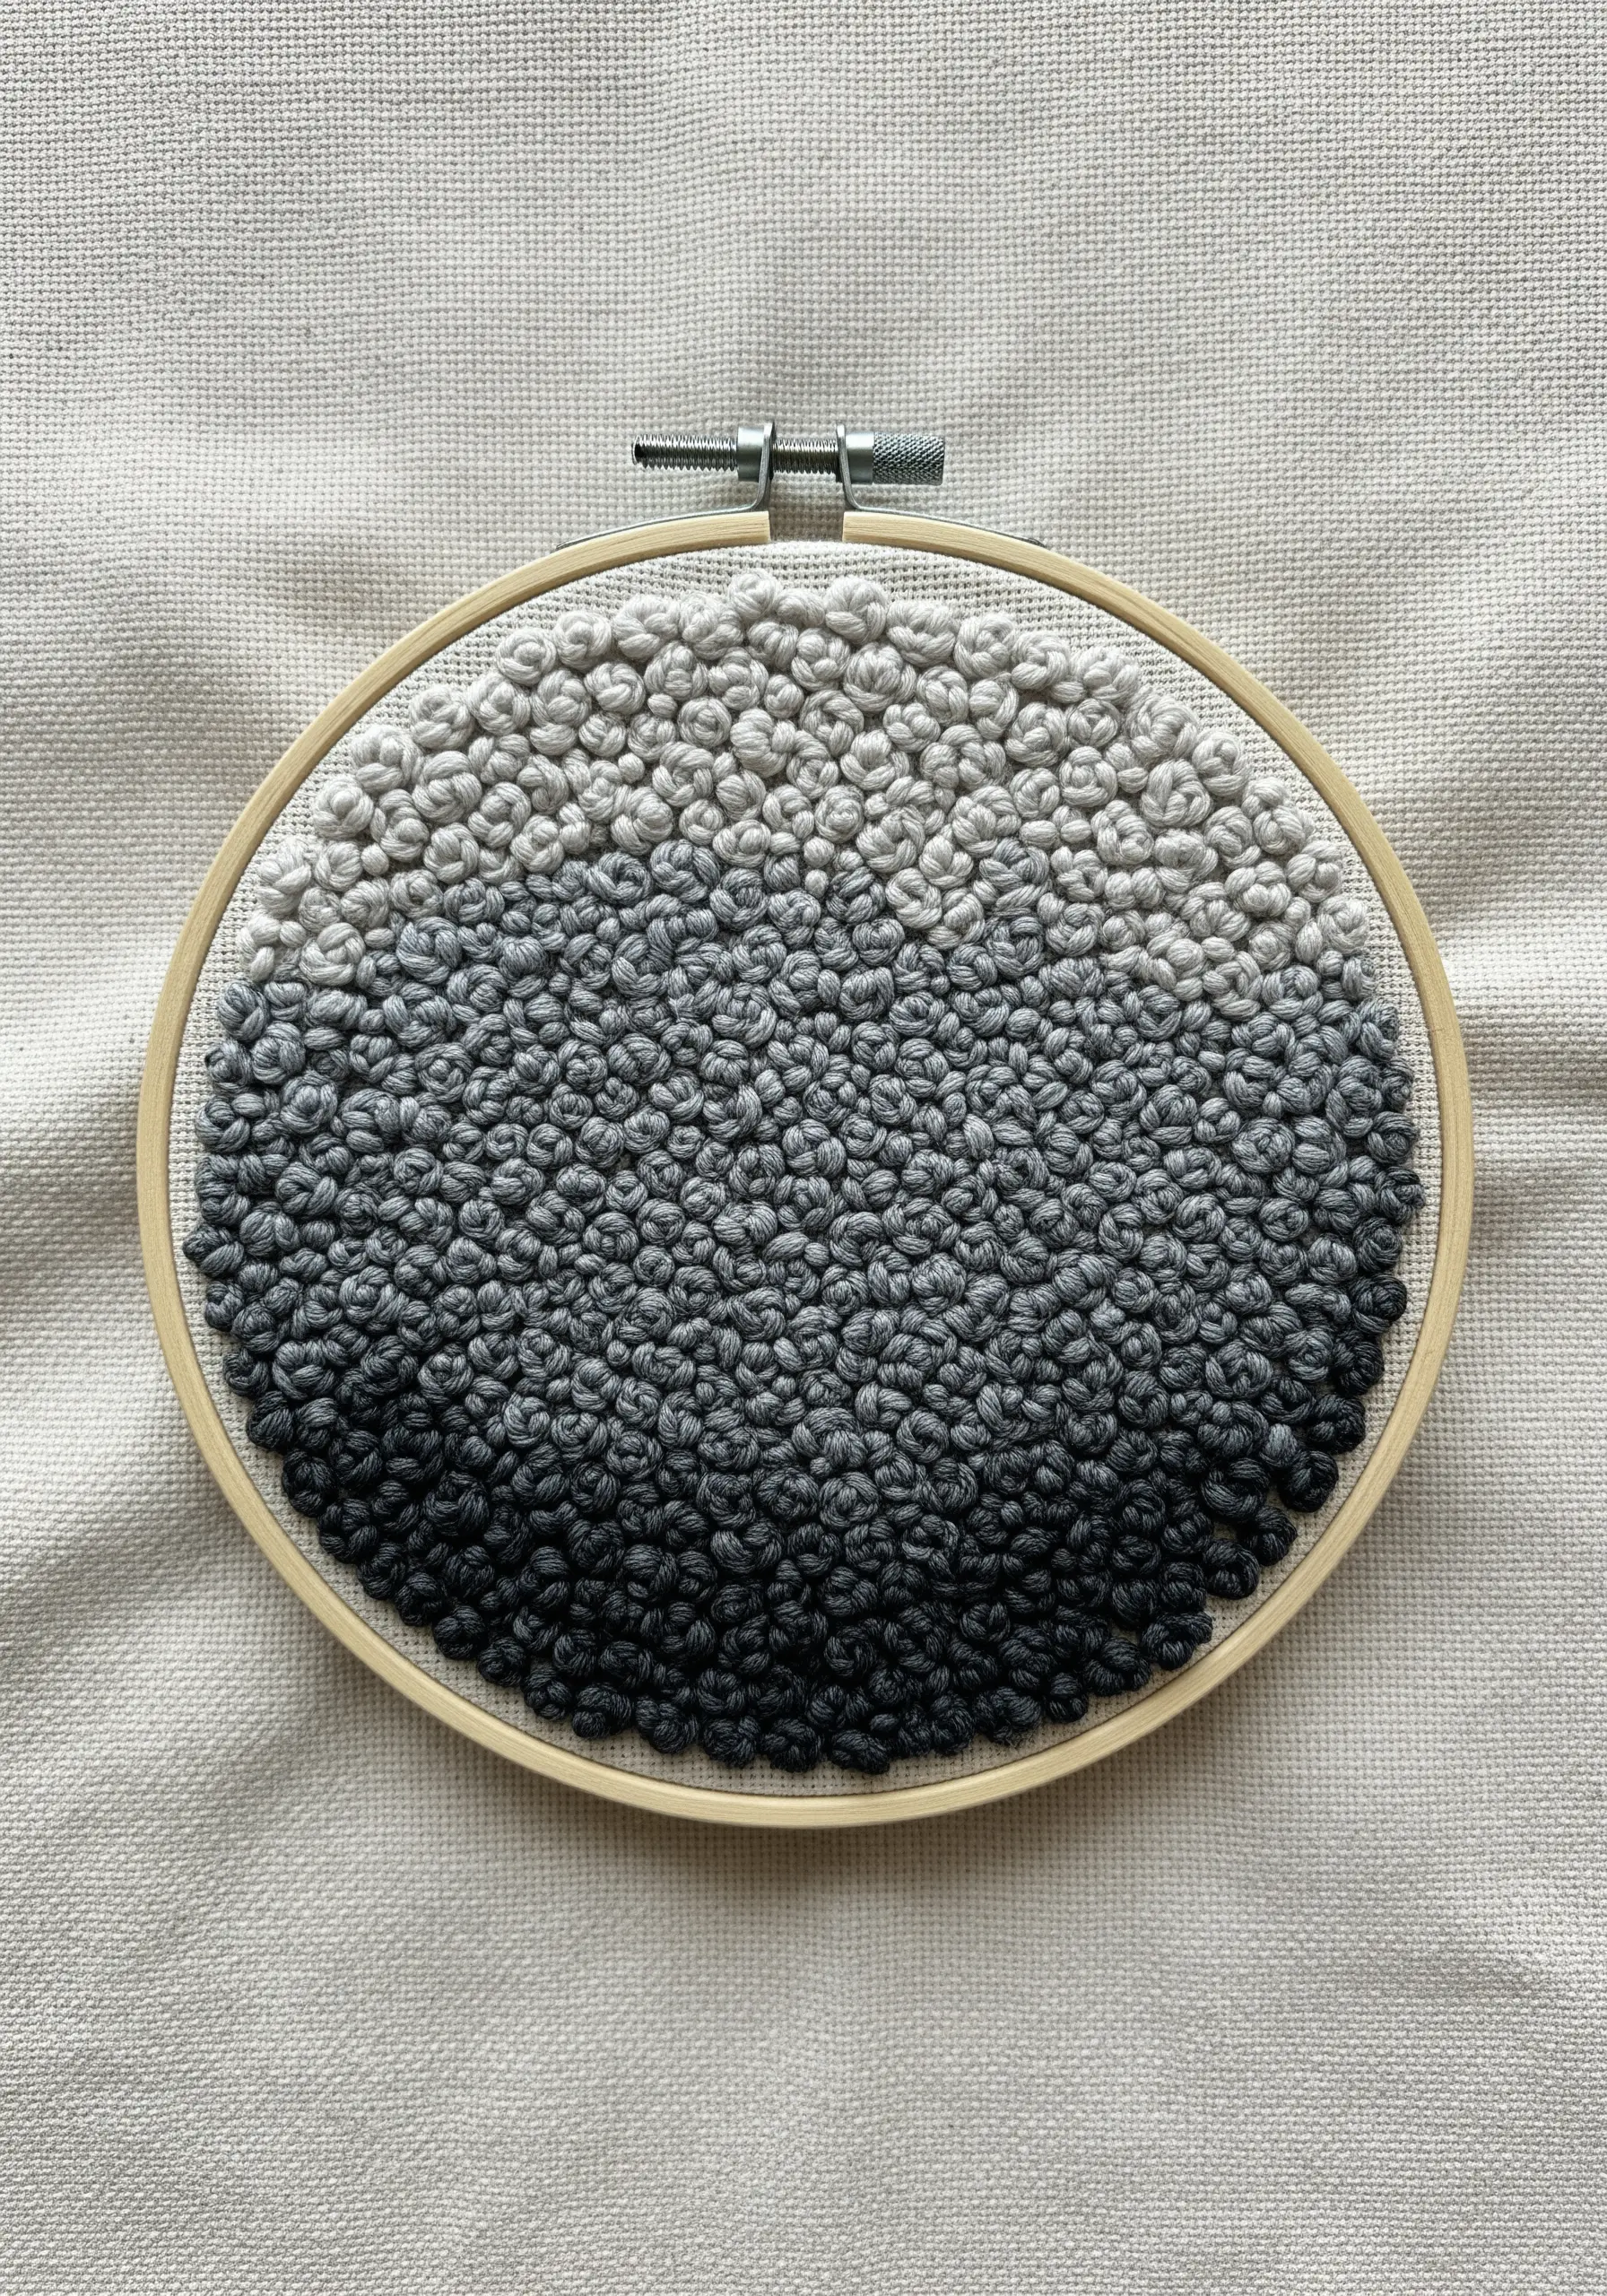
This mesmerizing texture is an exercise in color blending, using French knots like a pointillist painter uses dots.
Start with your darkest thread color at the bottom, densely packing the knots. Gradually introduce the next shade, stitching them amongst the darker knots to create a soft transition.
Continue this process until you reach the lightest color at the top. The result is a tactile, seamless, and stunning gradient created from a single, simple stitch.
21. Achieve Intricate Detail with the Fishbone Stitch
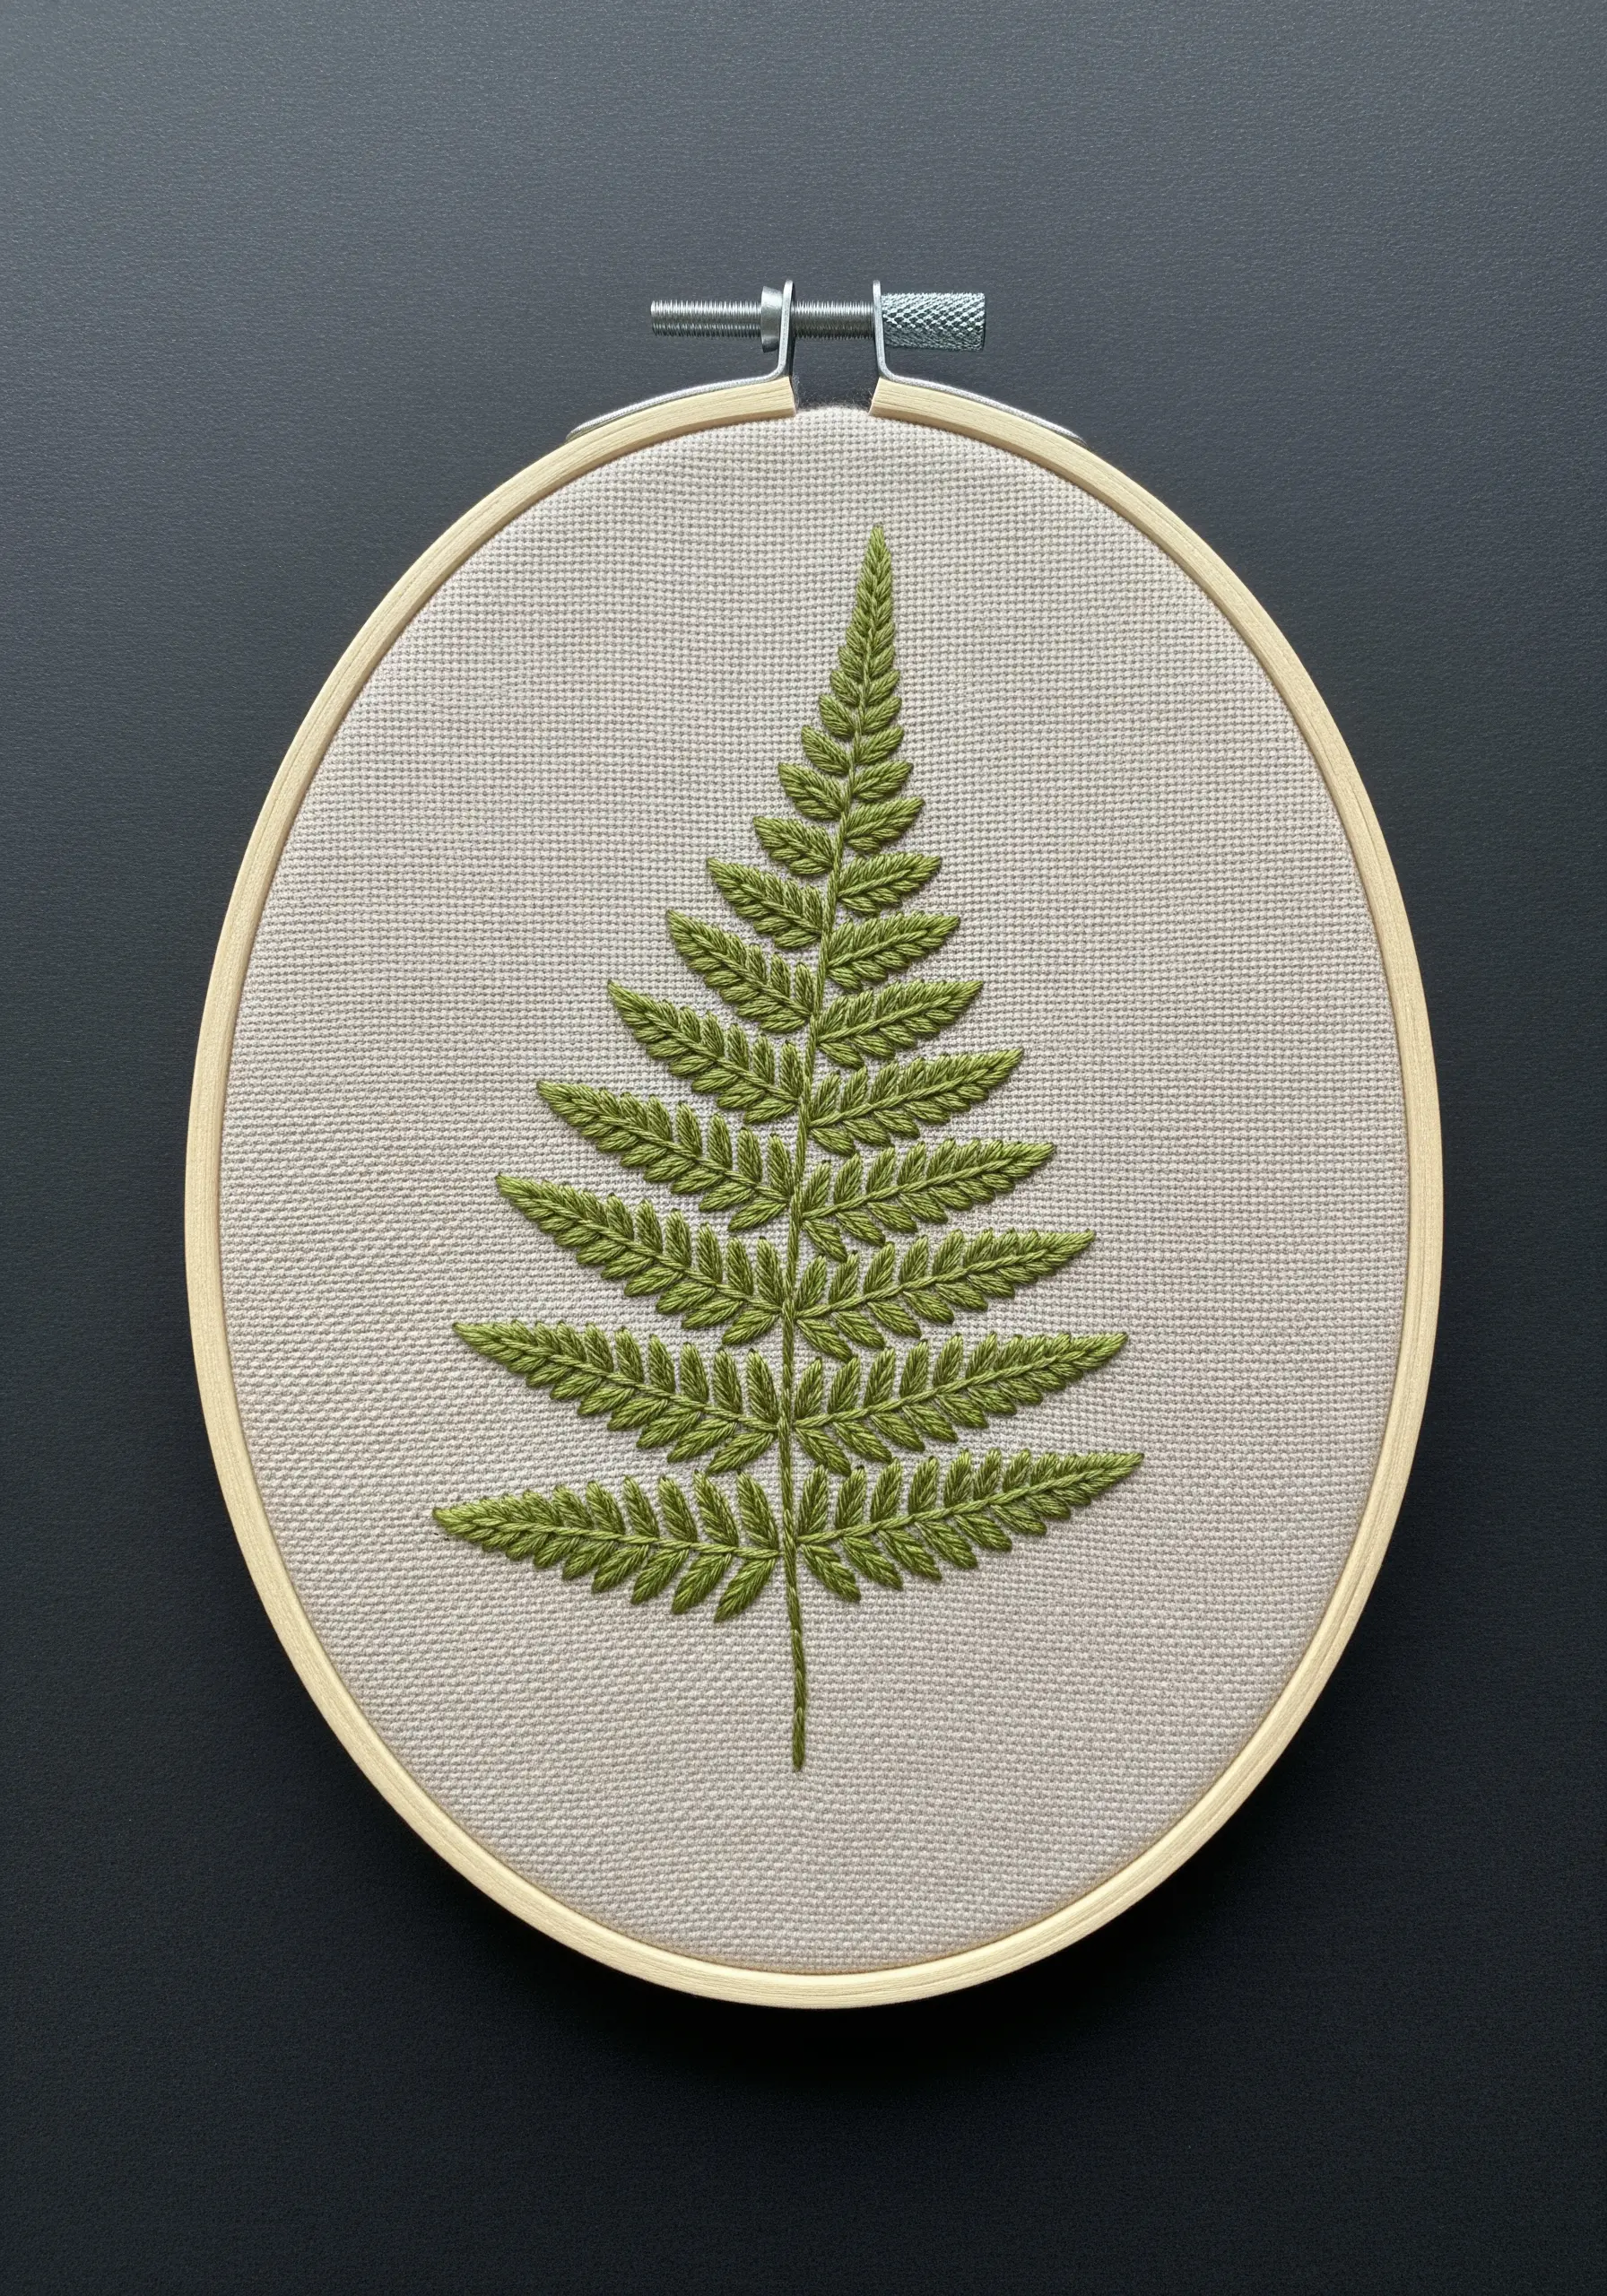
A fern leaf looks incredibly detailed, but you can stitch it with surprising ease using the fishbone stitch.
This stitch creates the central vein and the angled leaflets all in one fluid motion, resulting in a perfectly symmetrical and textured leaf.
Simply work your way down the central line, alternating angled stitches from left to right. The repetition is meditative, and the result is one of the most elegant and intricate-looking botanicals you can make.
22. Define Shapes with a Mix of Outline Stitches
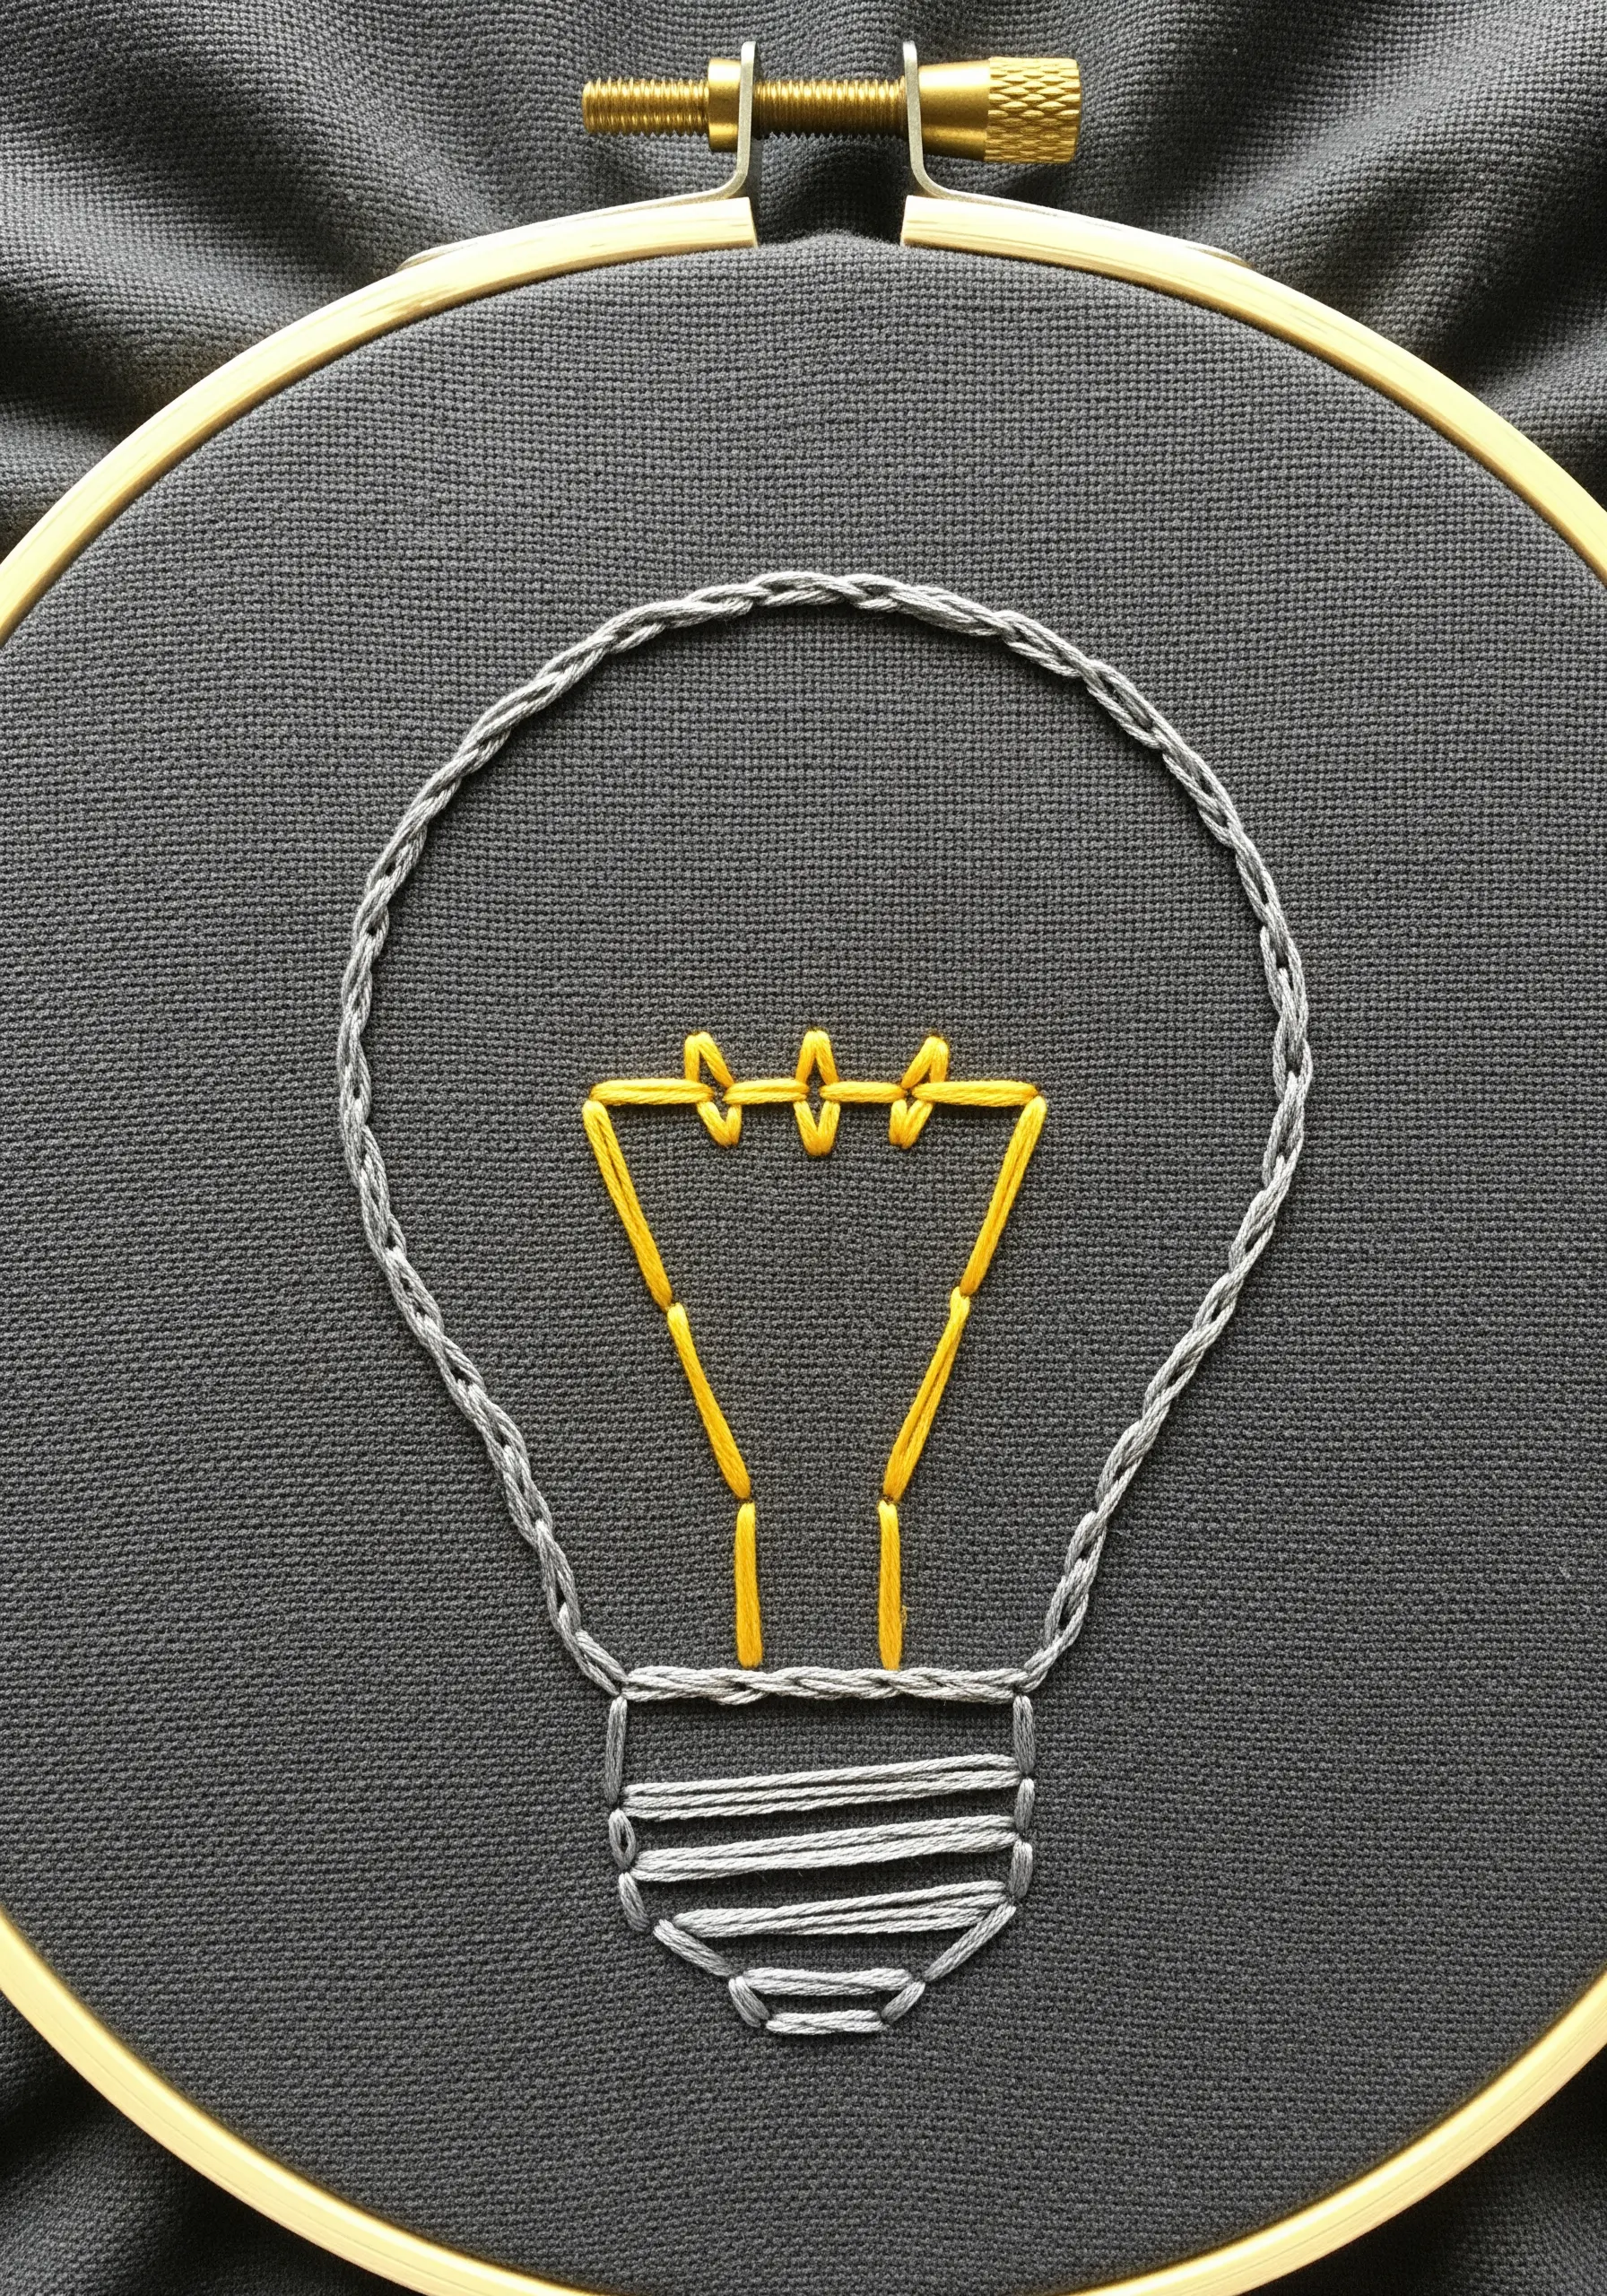
Add visual interest to simple line art by using different types of stitches to represent different textures.
For the outer glass of this lightbulb, use a whipped chain stitch to create a thick, rounded, cord-like line.
For the delicate filament inside, switch to a simple, thin backstitch using fewer strands of floss.
This subtle shift in line weight and texture helps to define a shape and tell a clearer visual story.
23. Add Texture with Directional Satin Fills
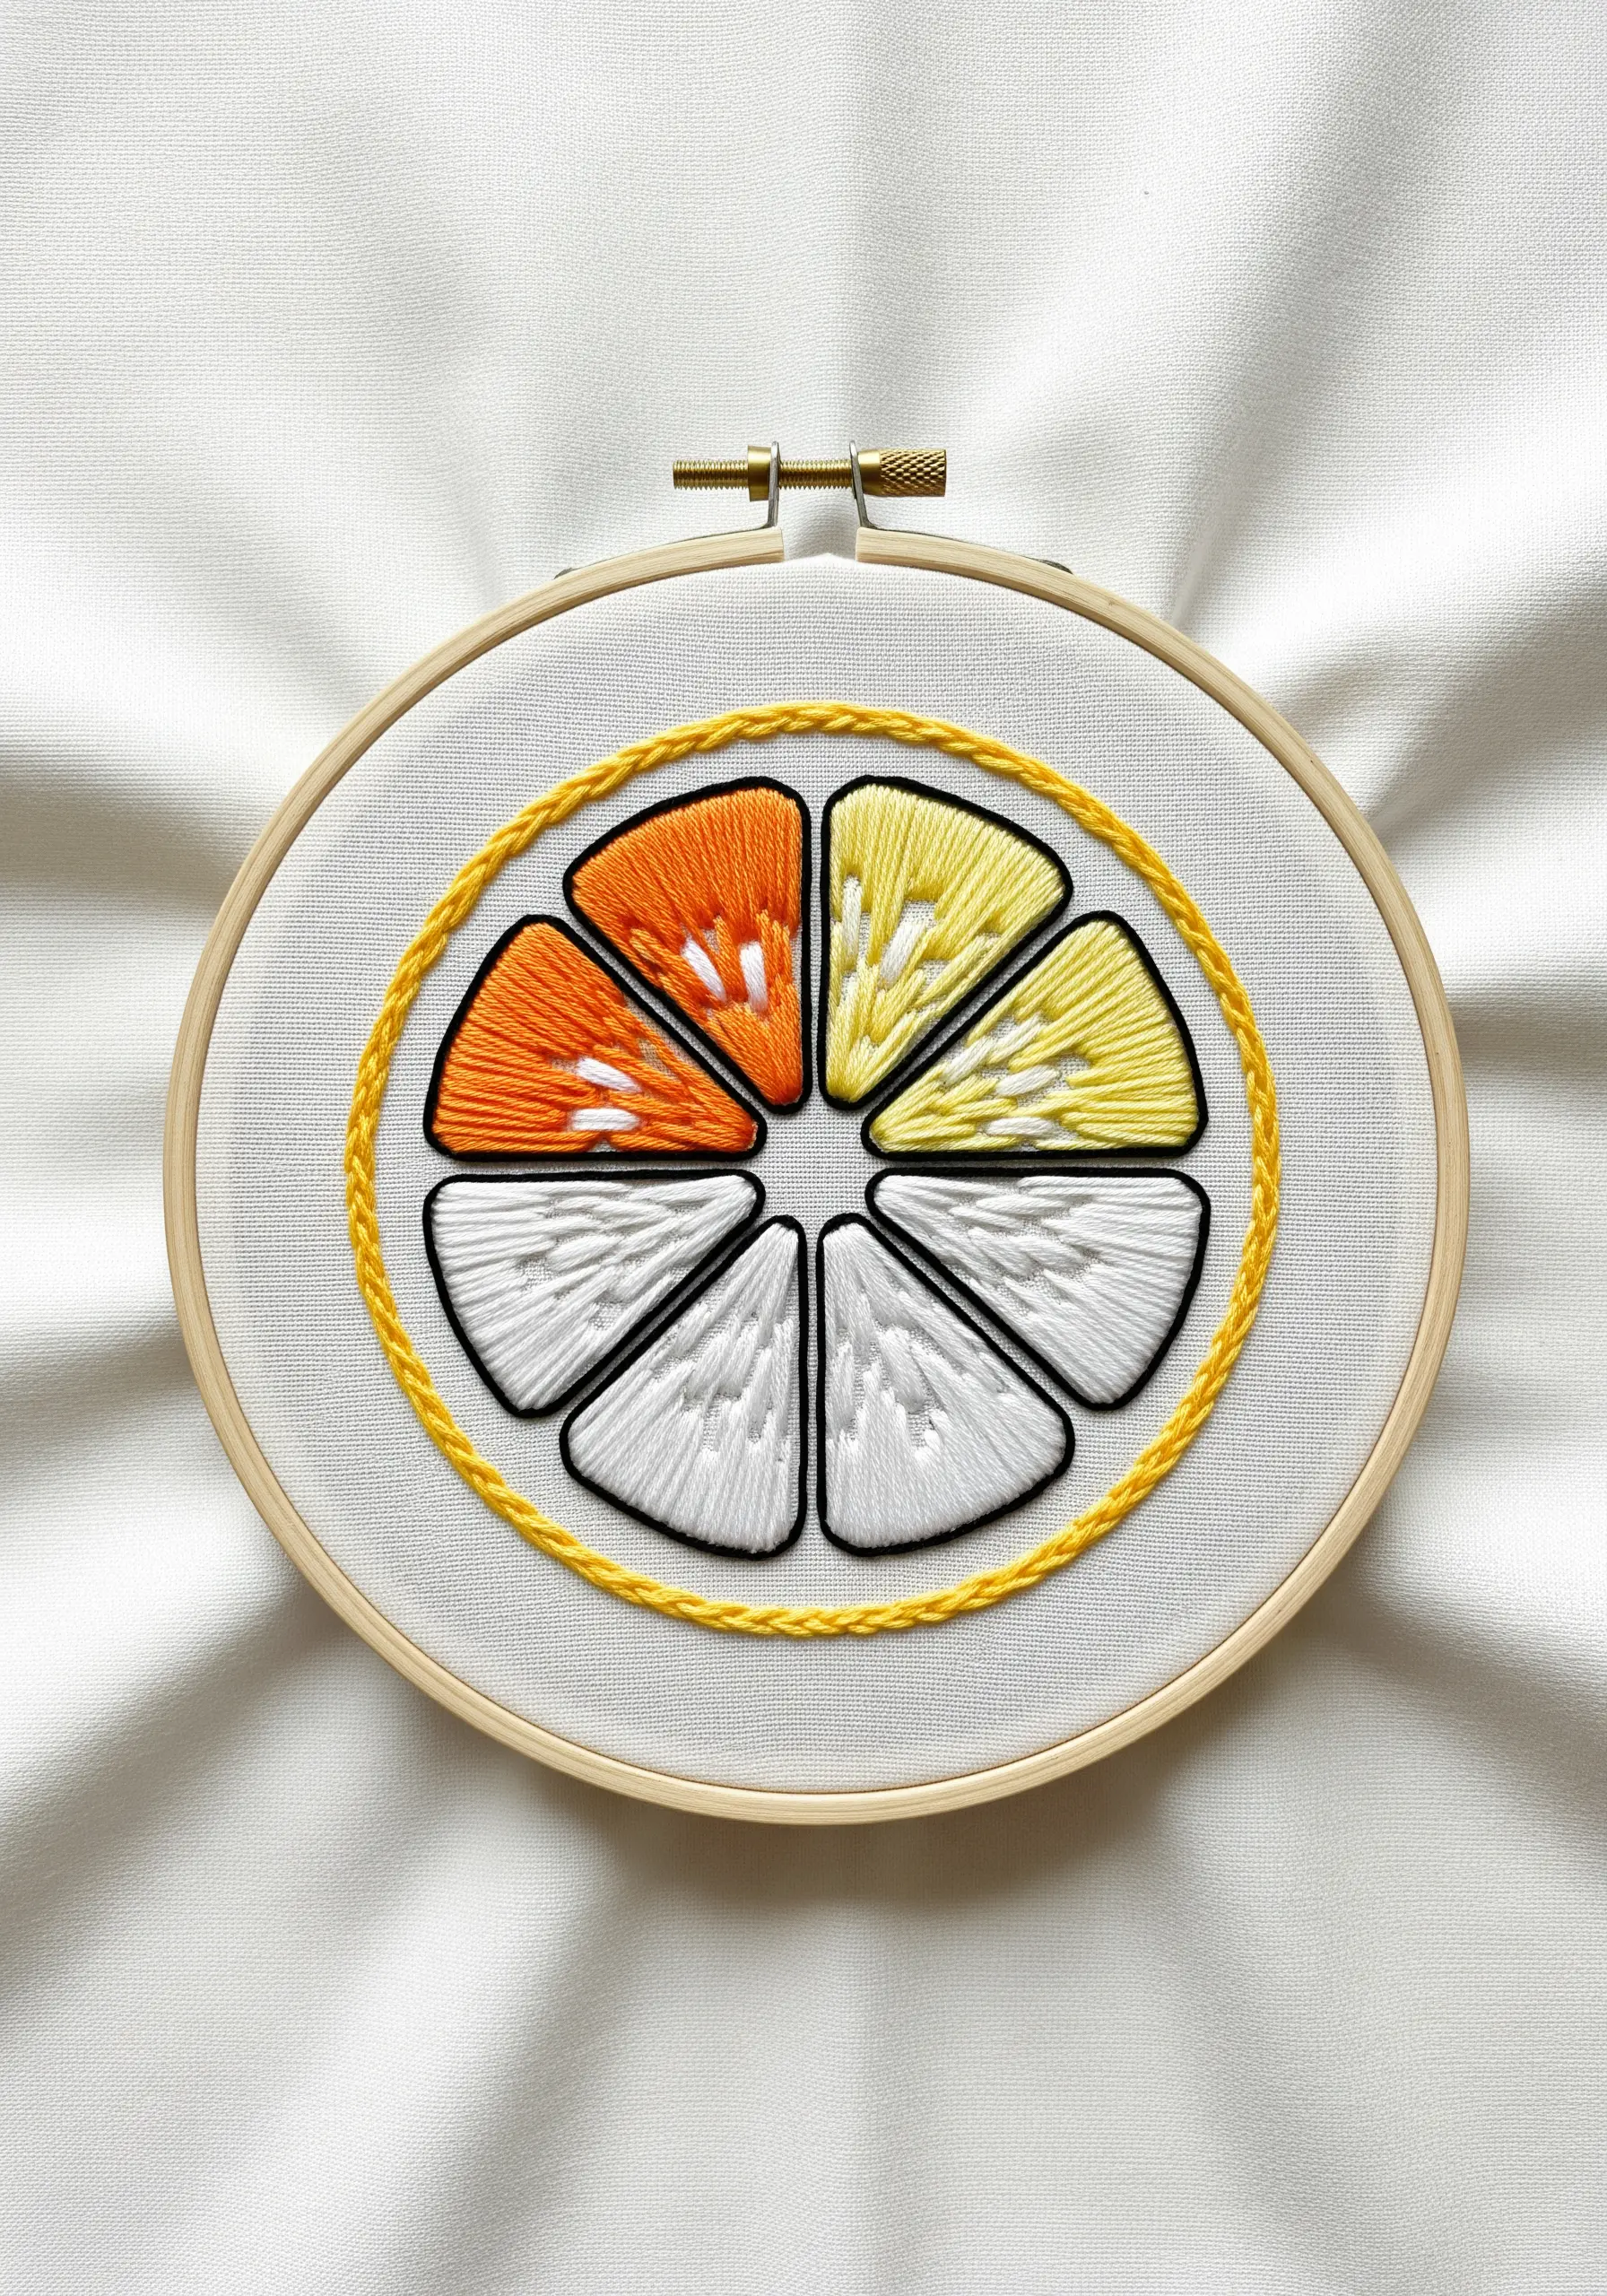
Give your satin stitch fills more life by paying attention to the direction of your stitches.
For this citrus slice, fill each segment with satin stitches that radiate from the center, mimicking the natural growth of the fruit’s pulp.
This simple change in angle adds a subtle texture and realism that a uniform fill would lack. A bold backstitch outline makes the segments distinct and makes the colors pop.
24. Add a Secret Detail with Micro-Embroidery
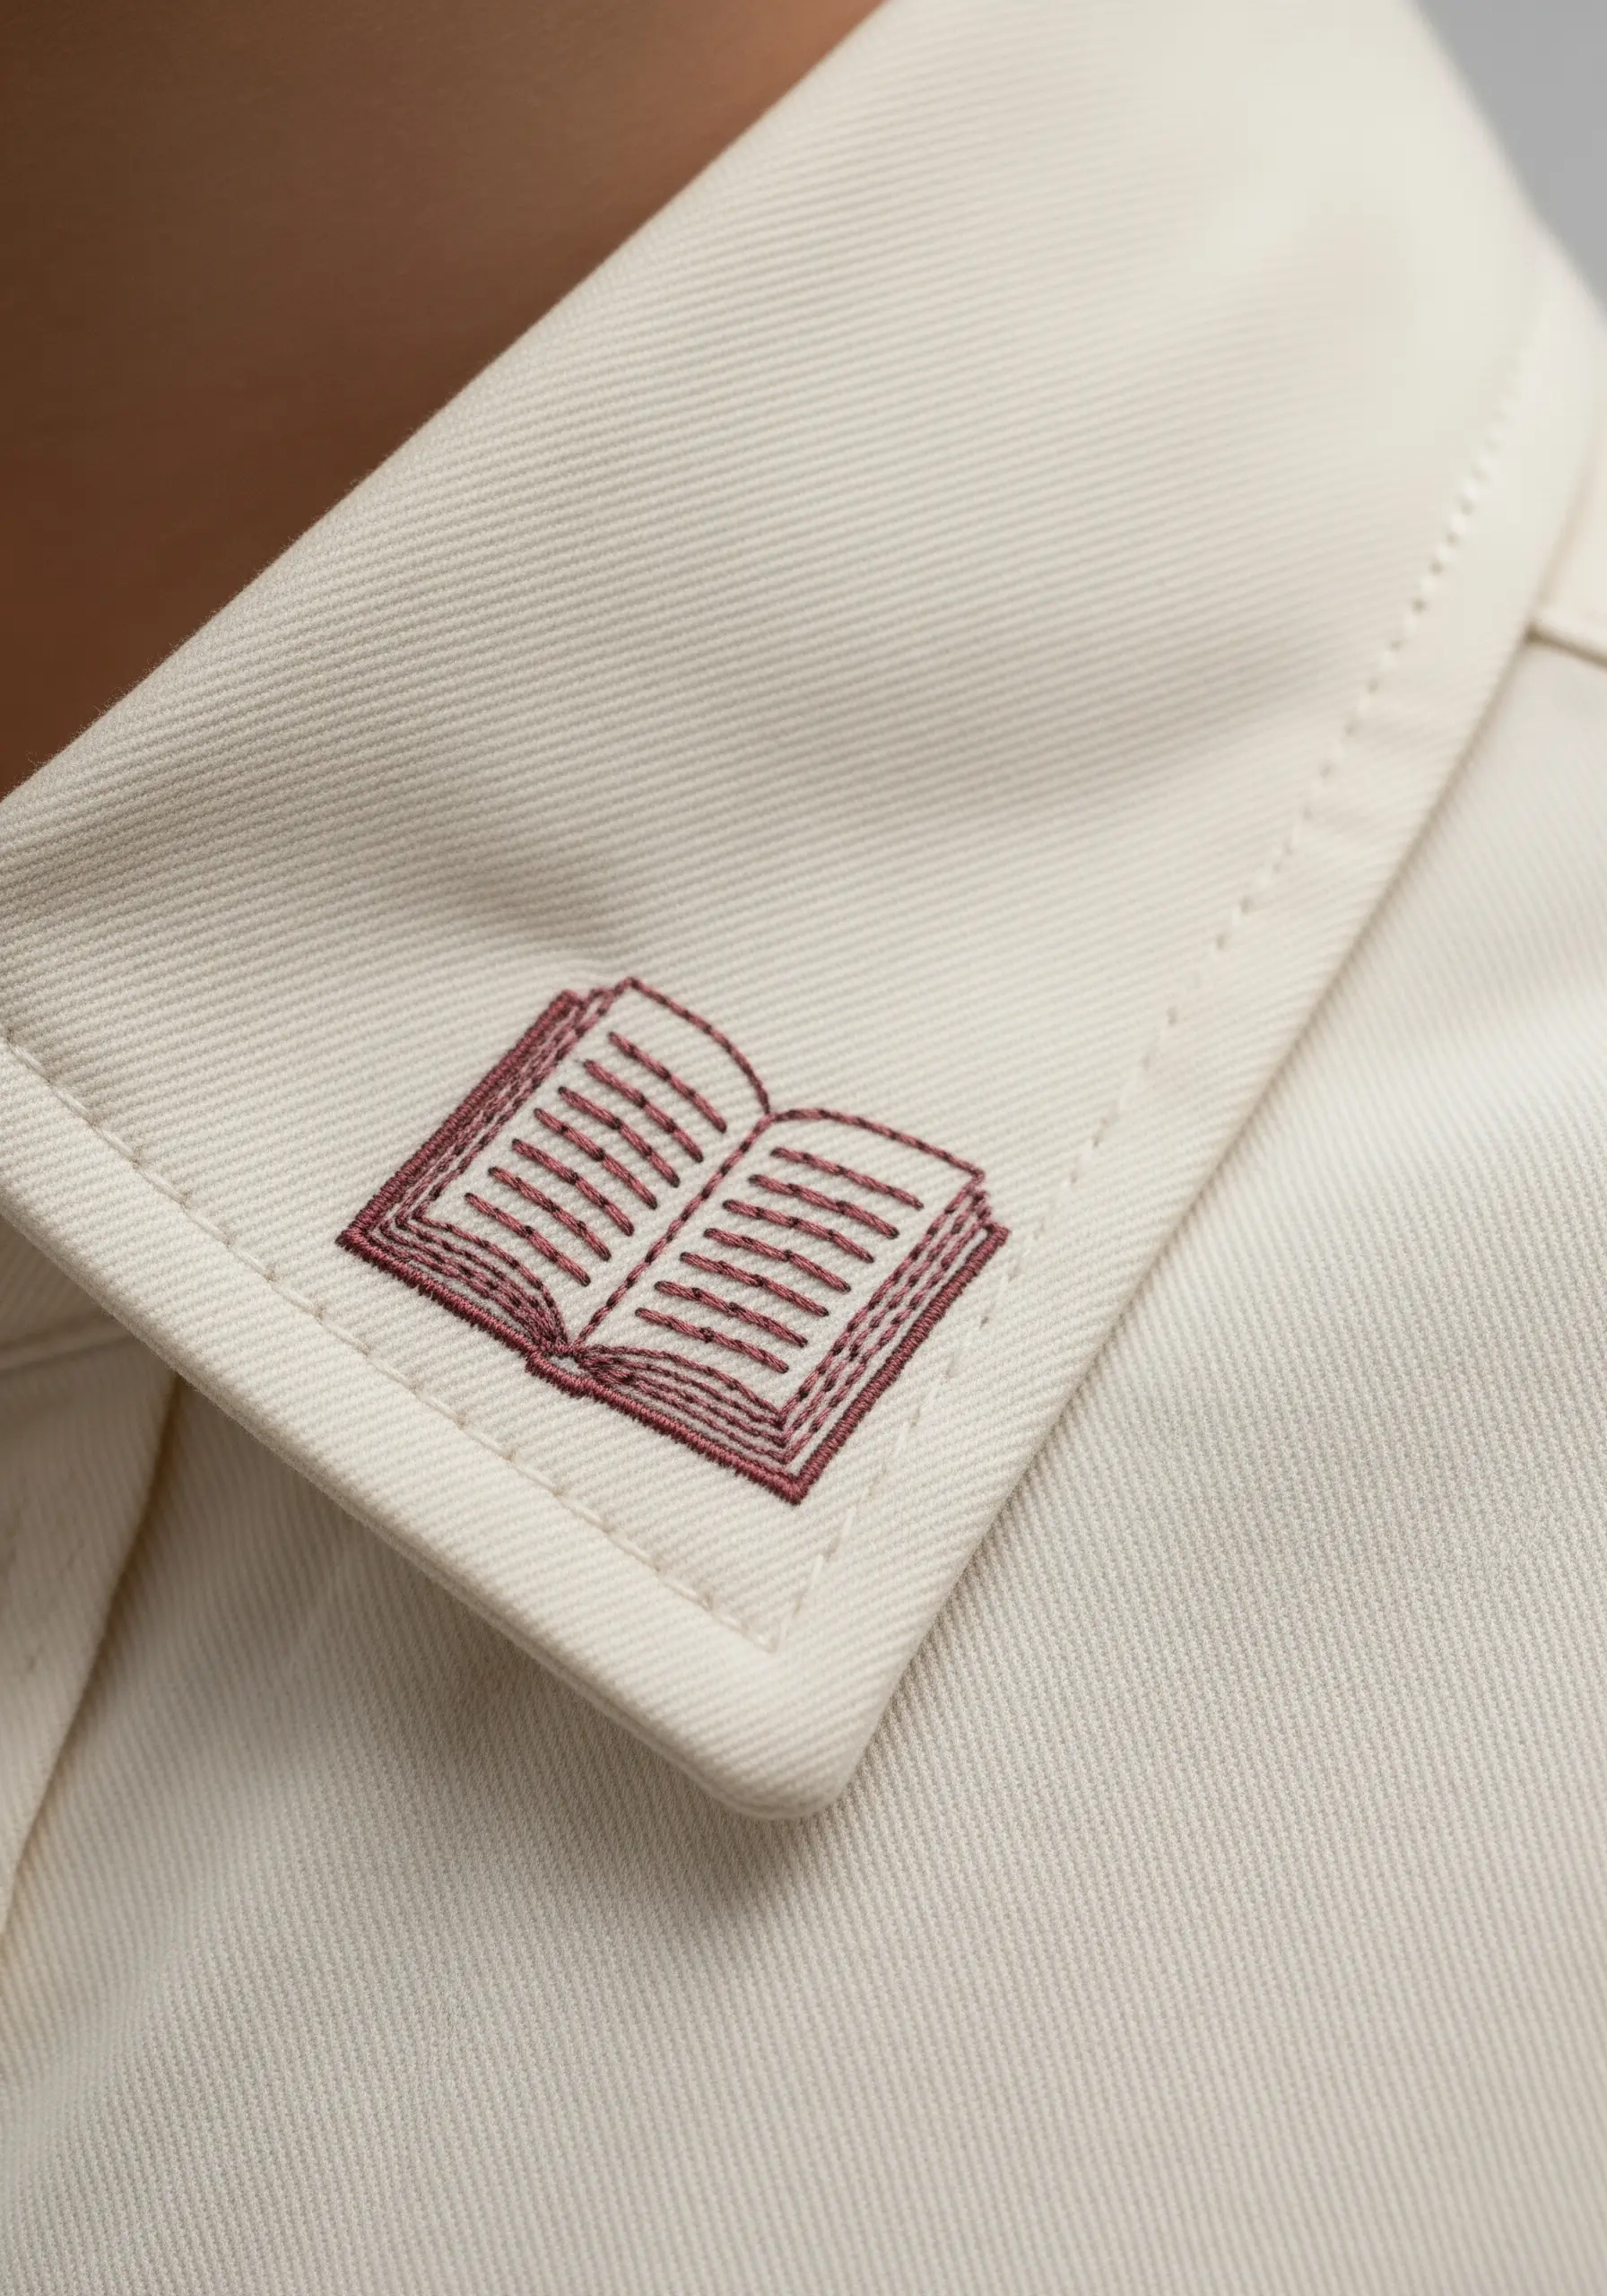
A tiny, beautifully executed motif on a collar or cuff is a sophisticated way to personalize your wardrobe.
The key to success at this small scale is to reduce your thread to a single strand and shorten your stitch length for the backstitch outlines and details.
This ensures the lines remain crisp and legible, not bulky or blurred.
A tiny motif is an intimate detail that elevates an everyday item into something that reflects your unique personal style.
25. Imply Light and Shadow with Straight Stitches
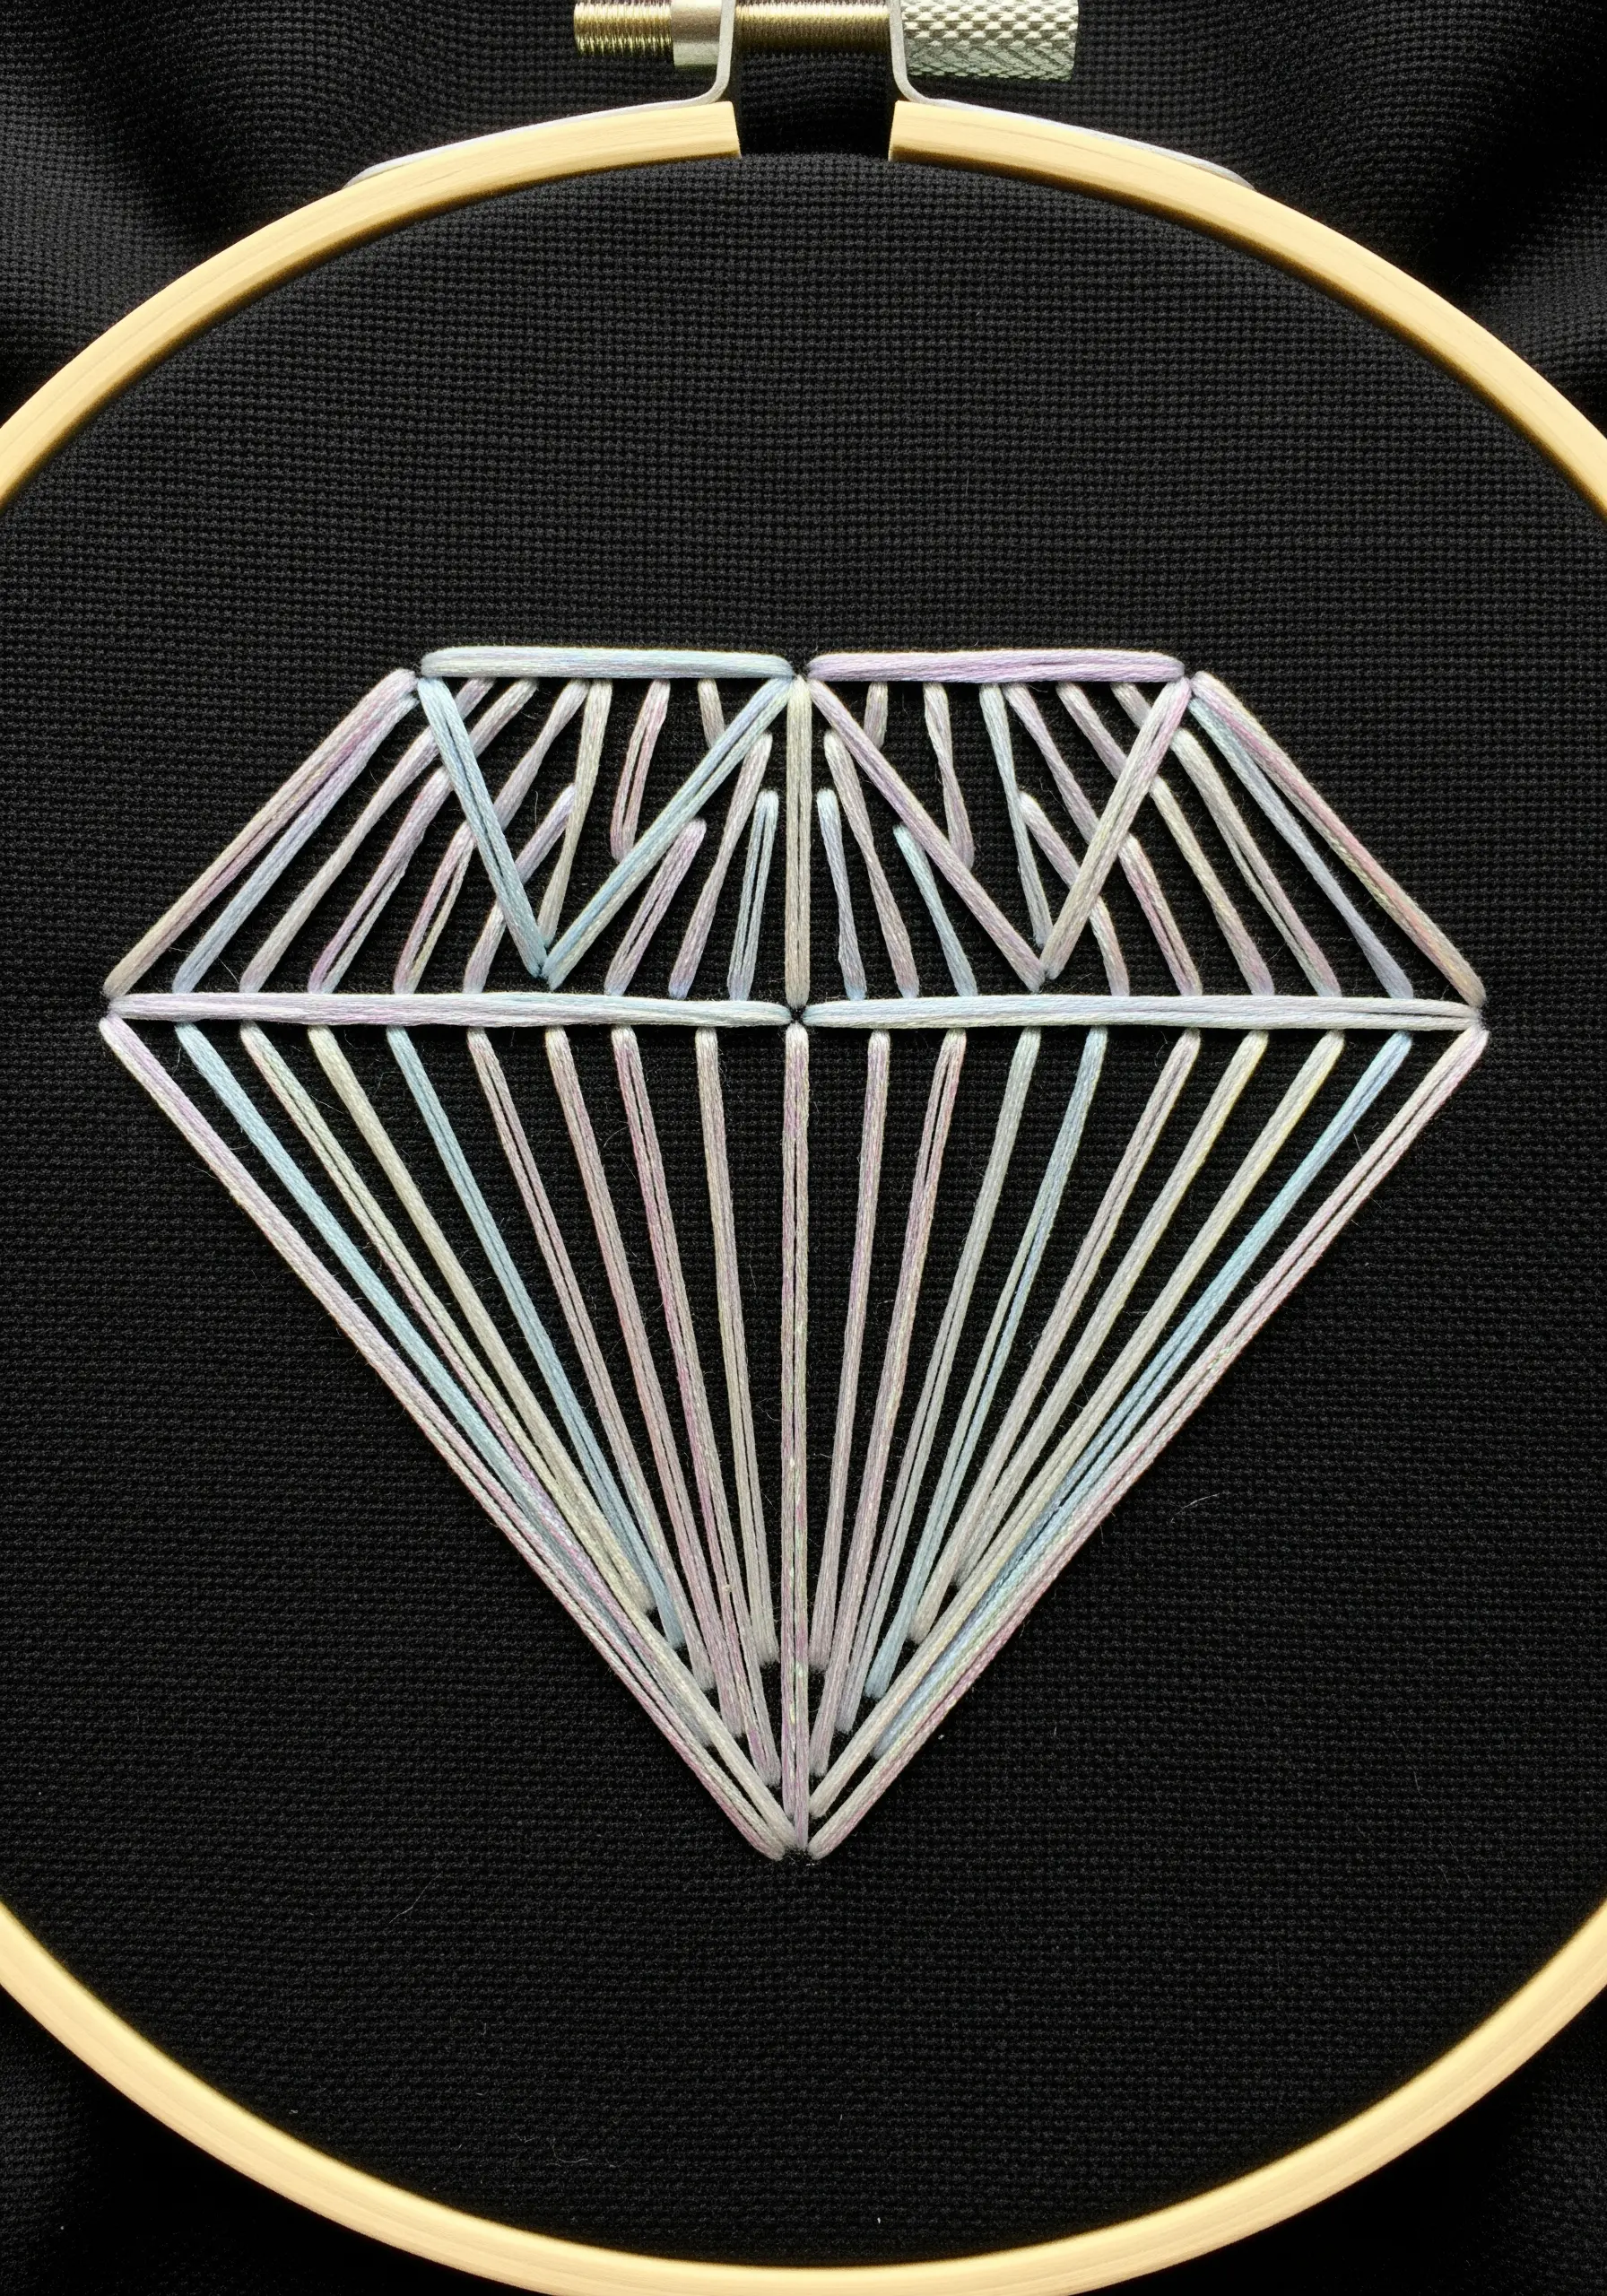
This faceted diamond is created using only straight stitches. The illusion of depth and sparkle comes from the careful placement and direction of the lines.
Think of each stitch as a ray of light reflecting off a surface. By arranging them in geometric patterns, you trick the eye into seeing planes and angles.
Using a variegated or holographic thread on a dark background will dramatically enhance the shimmering, multi-faceted effect.
26. Give Lines Presence with the Stem Stitch

When you want a line to be more than just a line, choose a stem stitch over a backstitch.
The stem stitch creates a slightly raised, rope-like texture that gives the line more definition and presence on the fabric.
It’s perfect for cursive lettering, stems, and any single-line design, like this heartbeat, where you want the line itself to have a strong, expressive quality.
It flows smoothly around curves, making it ideal for creating fluid, unbroken shapes.


