

You have a wardrobe full of clothes you like, but maybe they don’t always feel like *you*. A small, thoughtful touch of embroidery is one of the most elegant ways to change that, turning an everyday item into a personal statement.
Forget large, time-consuming projects. The real magic often lies in a single, well-placed motif—a sprig of lavender on a collar, a tiny flower peeking from a pocket, or a vine tracing a cuff. It’s these subtle details that signal care, artistry, and a unique point of view.
These ideas are not about mastering dozens of complex stitches. Instead, they focus on how to use simple techniques with intention. You’ll see how changing your stitch direction, blending thread colors, or playing with texture can elevate your work instantly. This is your chance to make your clothing a quiet canvas for your creativity.
1. Achieving Texture in Lavender Sprigs
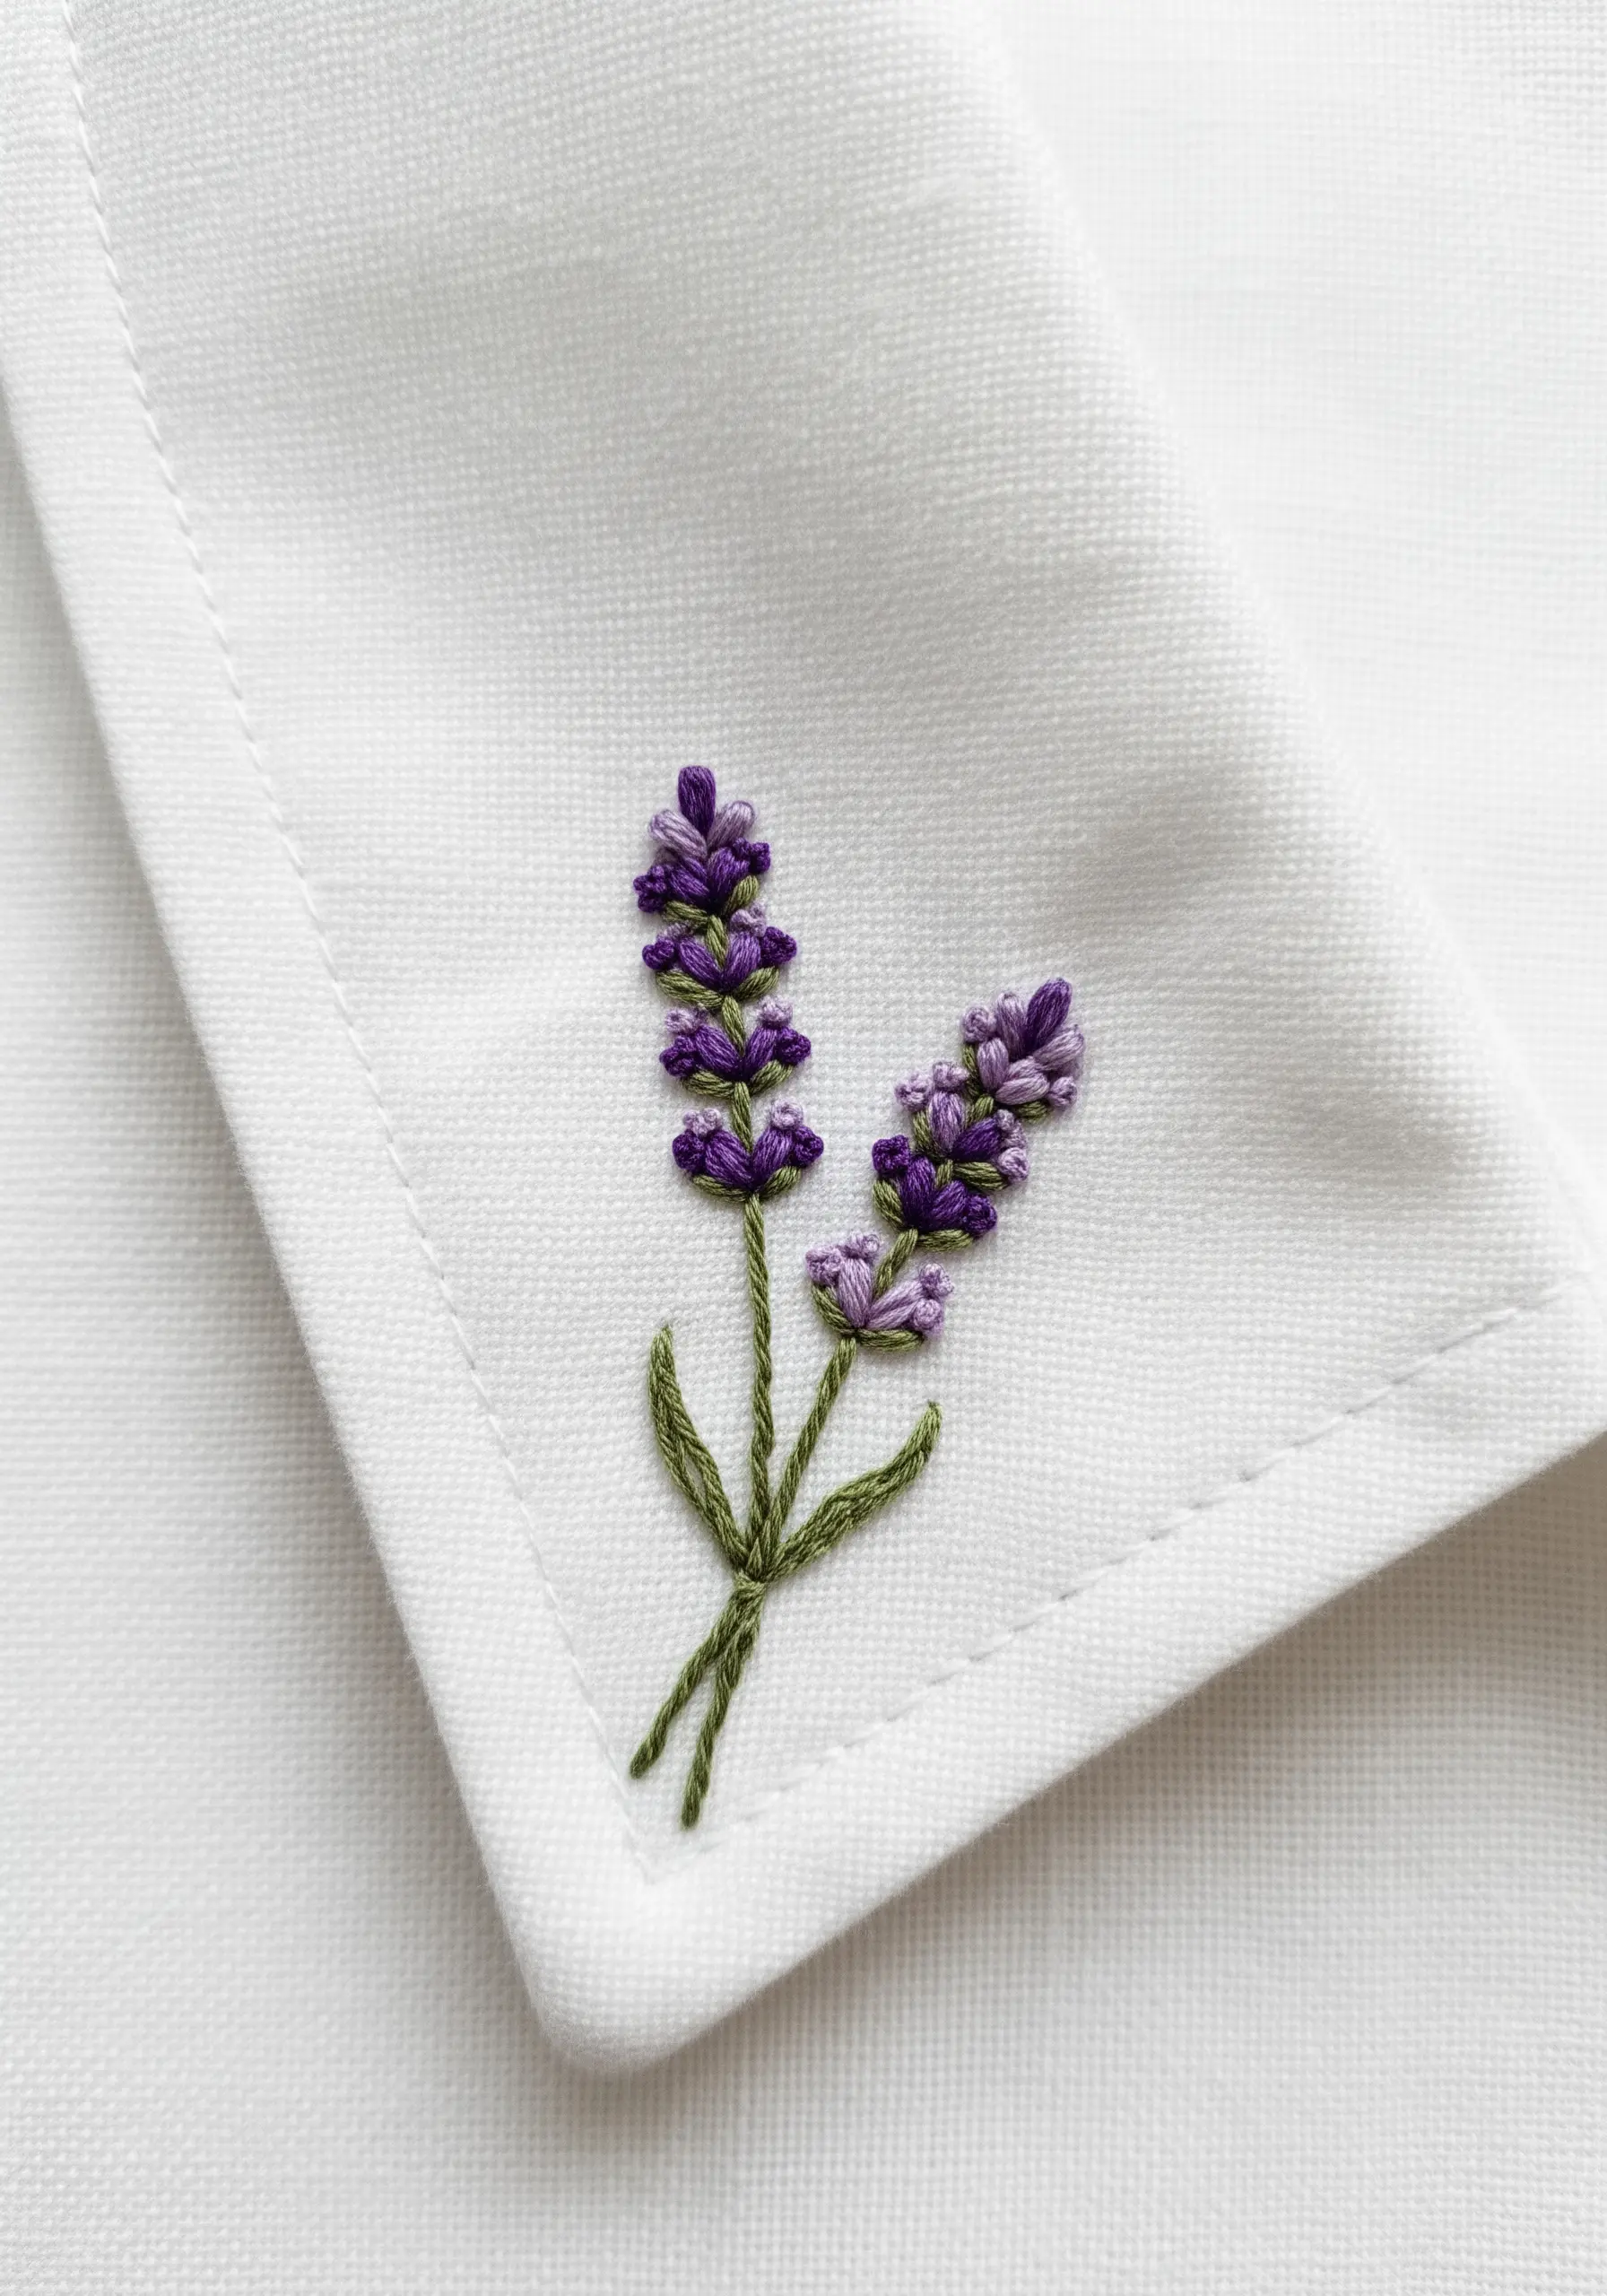
To create realistic lavender buds, use French knots with just two or three strands of floss.
By varying the number of wraps around the needle—one for tiny buds, two for fuller blooms—you add natural dimension.
Use two shades of purple, stitching them randomly to mimic how light hits the plant.
For the stems, a whipped backstitch provides a smooth, solid line that contrasts beautifully with the knotted texture of the flowers.
2. High-Contrast Petals for Denim

Make a simple daisy pop on dark denim by focusing on clean lines and sharp contrast.
Use a bright white thread and outline each petal first with a split stitch before filling with satin stitch.
This outlining technique prevents the edges from looking fuzzy against the denim’s weave and gives each petal a defined, almost graphic quality.
Pack the center with tight, bold yellow French knots to create a focal point.
3. Delicate Cuffline Floral Garland

When embroidering on a cuff, treat the design like a delicate bracelet that moves with the wearer.
Use a simple lazy daisy stitch for each forget-me-not, keeping the stitches small and uniform with just two strands of floss.
A single French knot in a vibrant yellow anchors each bloom and adds a tiny pop of color.
Connect the flowers with a fine, curving stem using a single-thread backstitch, creating a flow that complements the garment’s form.
4. The Minimalist Poppy Outline

This design celebrates the elegance of a single, expressive line.
Use a stem stitch with all six strands of embroidery floss to give the outline a bold, cord-like presence against the soft fabric.
Focus on maintaining even tension to ensure the curves are smooth and the lines don’t pucker the jersey knit.
This minimalist approach proves that a powerful statement doesn’t require complex fills, just a confident line.
5. Framing Apparel with Botanical Lines

Use an embroidered vine to accentuate the natural lines of a garment, such as a button placket or collar.
For the leaves, use a fishbone stitch, alternating their direction slightly to create a sense of natural, upward growth.
To add subtle depth, use two closely related shades of green—a darker tone for the main stem and a slightly lighter one for the leaves.
This technique integrates the embroidery into the shirt’s design, making it feel intentional and high-end.
6. Stitching Florals on Chunky Knits
Embroidering on a knit sweater requires working with the fabric, not against it.
Use a tapestry needle with a blunt tip to glide between the sweater’s stitches instead of piercing the yarn, which prevents snagging.
Keep your satin stitches for the petals relatively short and anchor them securely into the knit’s structure.
Since the sweater’s texture is already rich, a simple, bold design with strong color contrast offers the most impact.
7. Modernizing Florals with Geometric Fills

Reimagine a classic rose by breaking its form down into geometric planes and facets.
Fill each segment with straight satin stitches, but deliberately change the direction of your stitches for every adjacent shape.
This simple trick creates a dynamic play of light and shadow across the surface, giving the flower an almost crystalline appearance.
Using two or three shades of the same color enhances this three-dimensional, abstract quality.
8. Capturing Movement with Dispersed Stitches
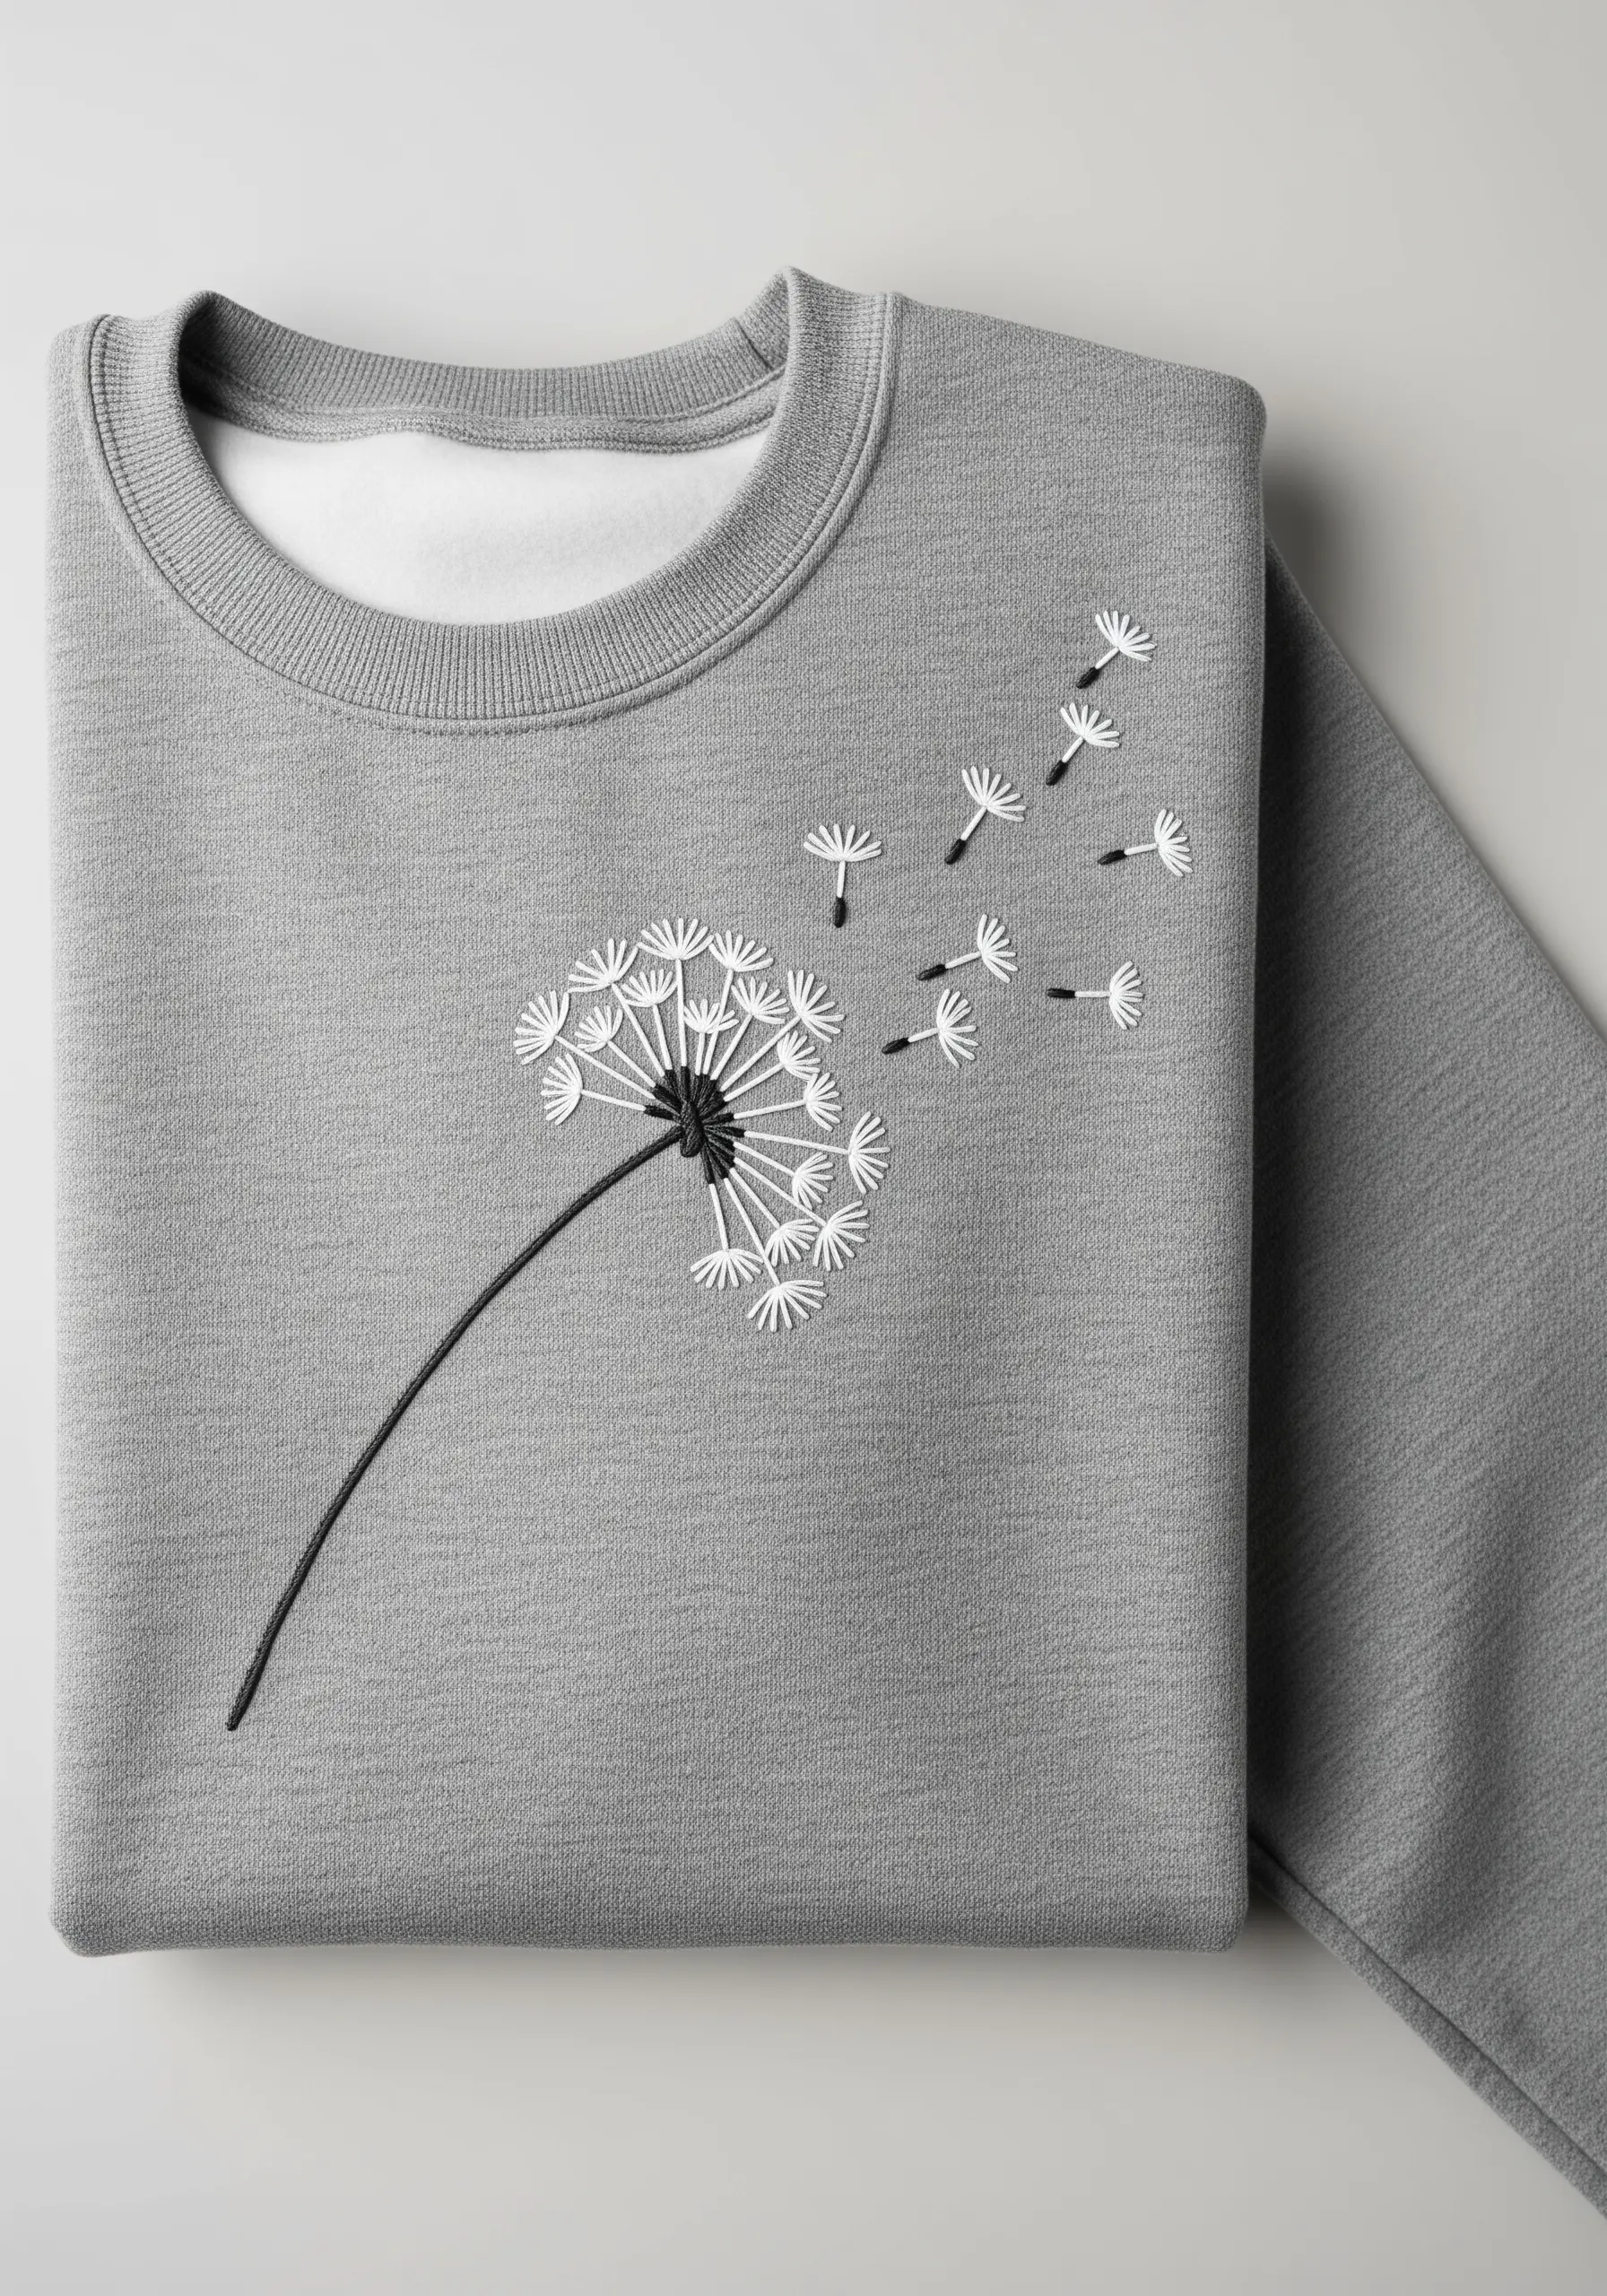
The beauty of this dandelion design lies in its implied motion.
For the main seed head, use straight stitches radiating from a small, circular center.
To create the illusion of floating seeds, scatter tiny detached chain stitches and single straight stitches across the fabric.
Vary their angles and spacing to create a natural, windswept effect, turning the negative space of the sweatshirt into part of the narrative.
9. Subtle Shading on Simple Leaves
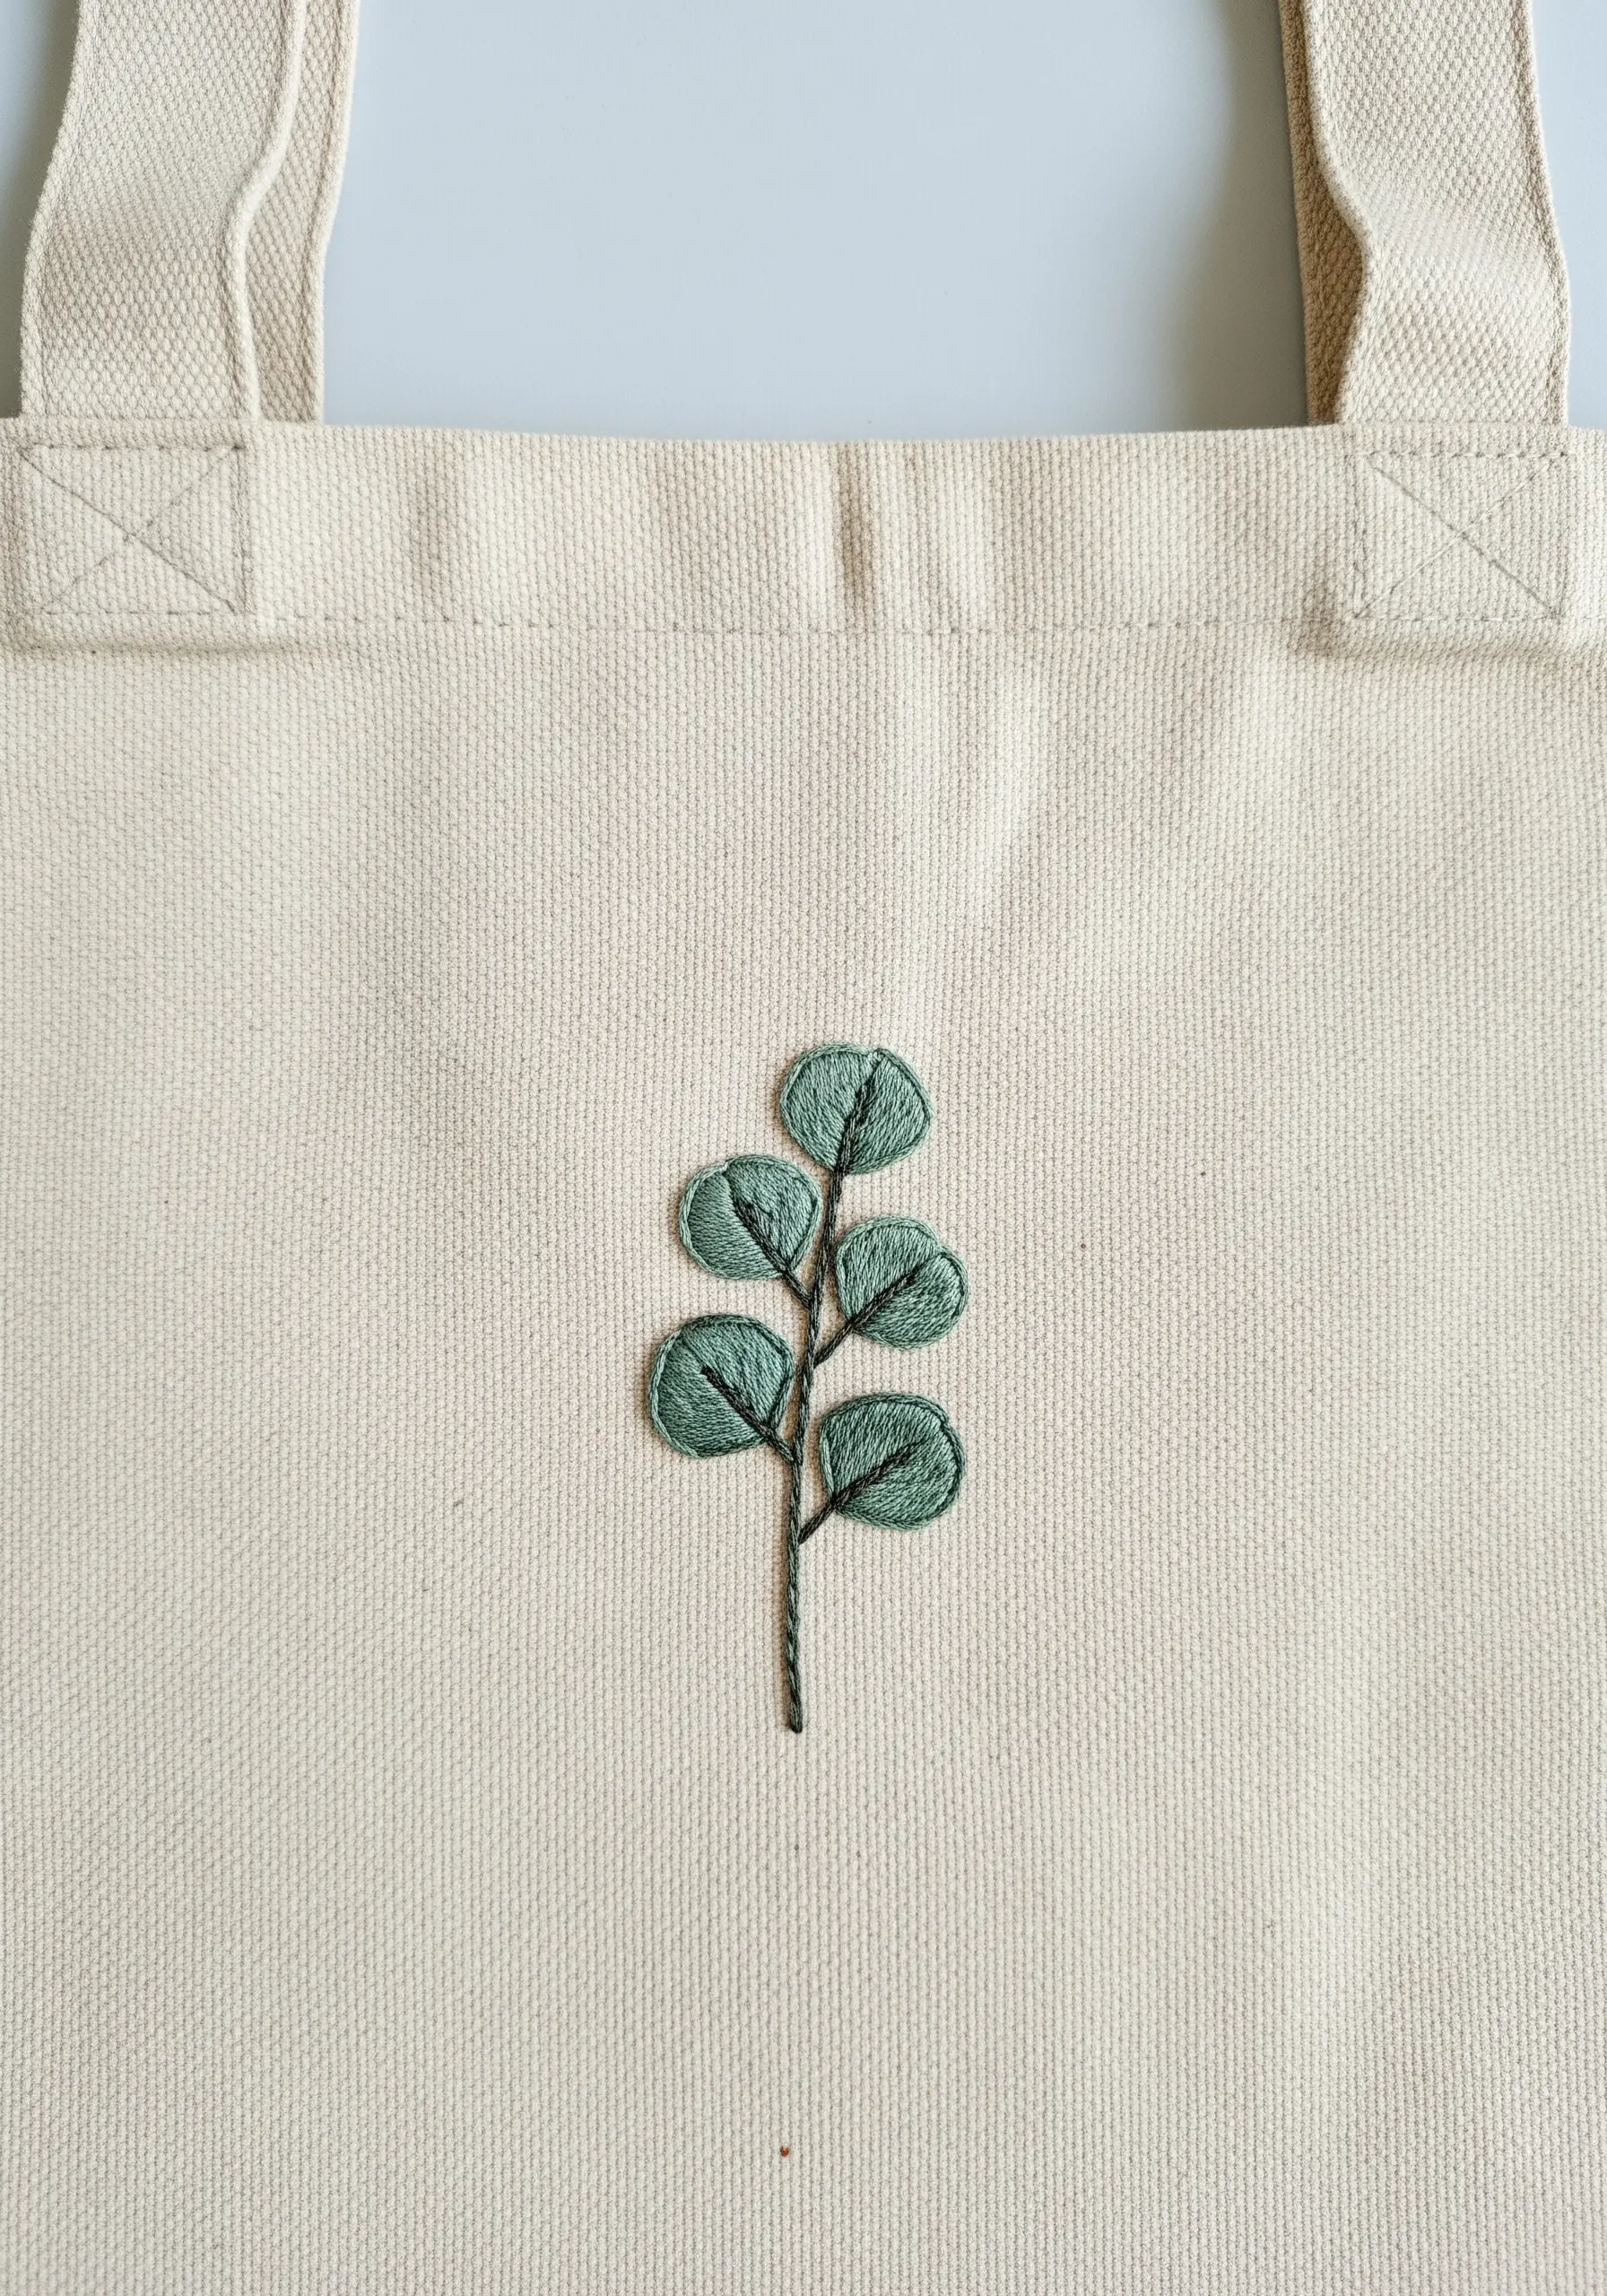
Achieve a soft, painterly look on these eucalyptus leaves with a simple thread-blending trick.
Instead of using one color, thread your needle with two strands of floss at once: one in a medium green and one in a lighter sage.
As you work the fishbone stitch, the colors will mix randomly, creating effortless, subtle variegation.
This technique elevates a simple tote bag motif into something truly special.
10. Painterly Petals with Thread Blending
Capture the velvety, multi-tonal look of pansies by using the long-and-short stitch, also known as thread painting.
Work with two or three shades for each petal—like deep purple, lavender, and white—blending them seamlessly where they meet.
The key is to keep your stitches directional, following the natural curve and growth of the petal for a realistic finish.
This gives your work the soft transitions of watercolor-style floral threads.
11. Creating an Asymmetrical Neckline Feature

An asymmetrical branch of cherry blossoms can beautifully frame a neckline without overwhelming it.
For the branch, use a whipped backstitch with a dark brown thread to create a solid, textured line.
Scatter the blossoms along the branch using a simple five-petal satin stitch, alternating between soft pink and ivory to add depth.
This off-center placement feels more organic and modern than a perfectly symmetrical design.
12. Precision Stitching for Detailed Foliage

A fern’s elegance comes from the delicate repetition of its leaflets.
To capture this, use a small fishbone stitch for each individual leaflet, keeping your stitches tight and angled sharply toward the central stem.
Use a single, fine backstitch for the main stem to keep it delicate.
Consistency in stitch angle and length is crucial; this disciplined approach results in a beautifully detailed and organic texture.
13. Combining Outlines and Textured Fills

Create a striking, modern sunflower by contrasting a light, graphic outline with a dense, tactile center.
Use a simple backstitch for the yellow petals, leaving them unfilled to maintain an airy feel.
For the center, fill the entire circle with tightly packed French knots in a rich, dark brown.
This juxtaposition of texture—smooth lines against a raised, bumpy surface—is what gives this classic flower its contemporary edge.
14. The “Meadow” Effect with Scattered Motifs

Give a plain t-shirt a whimsical, custom feel by scattering tiny flowers across the chest.
The key to a natural-looking meadow is intentional randomness in placement—avoid perfect lines or grids.
Cluster a few tiny lazy-daisy flowers together, then leave more space before the next small grouping.
Using a soft, harmonious color palette ensures these subtle floral embroidery motifs feel cohesive and sweet, not busy.
15. Playful Placement for Visual Storytelling

Let your embroidery interact with the garment itself for a touch of wit and charm.
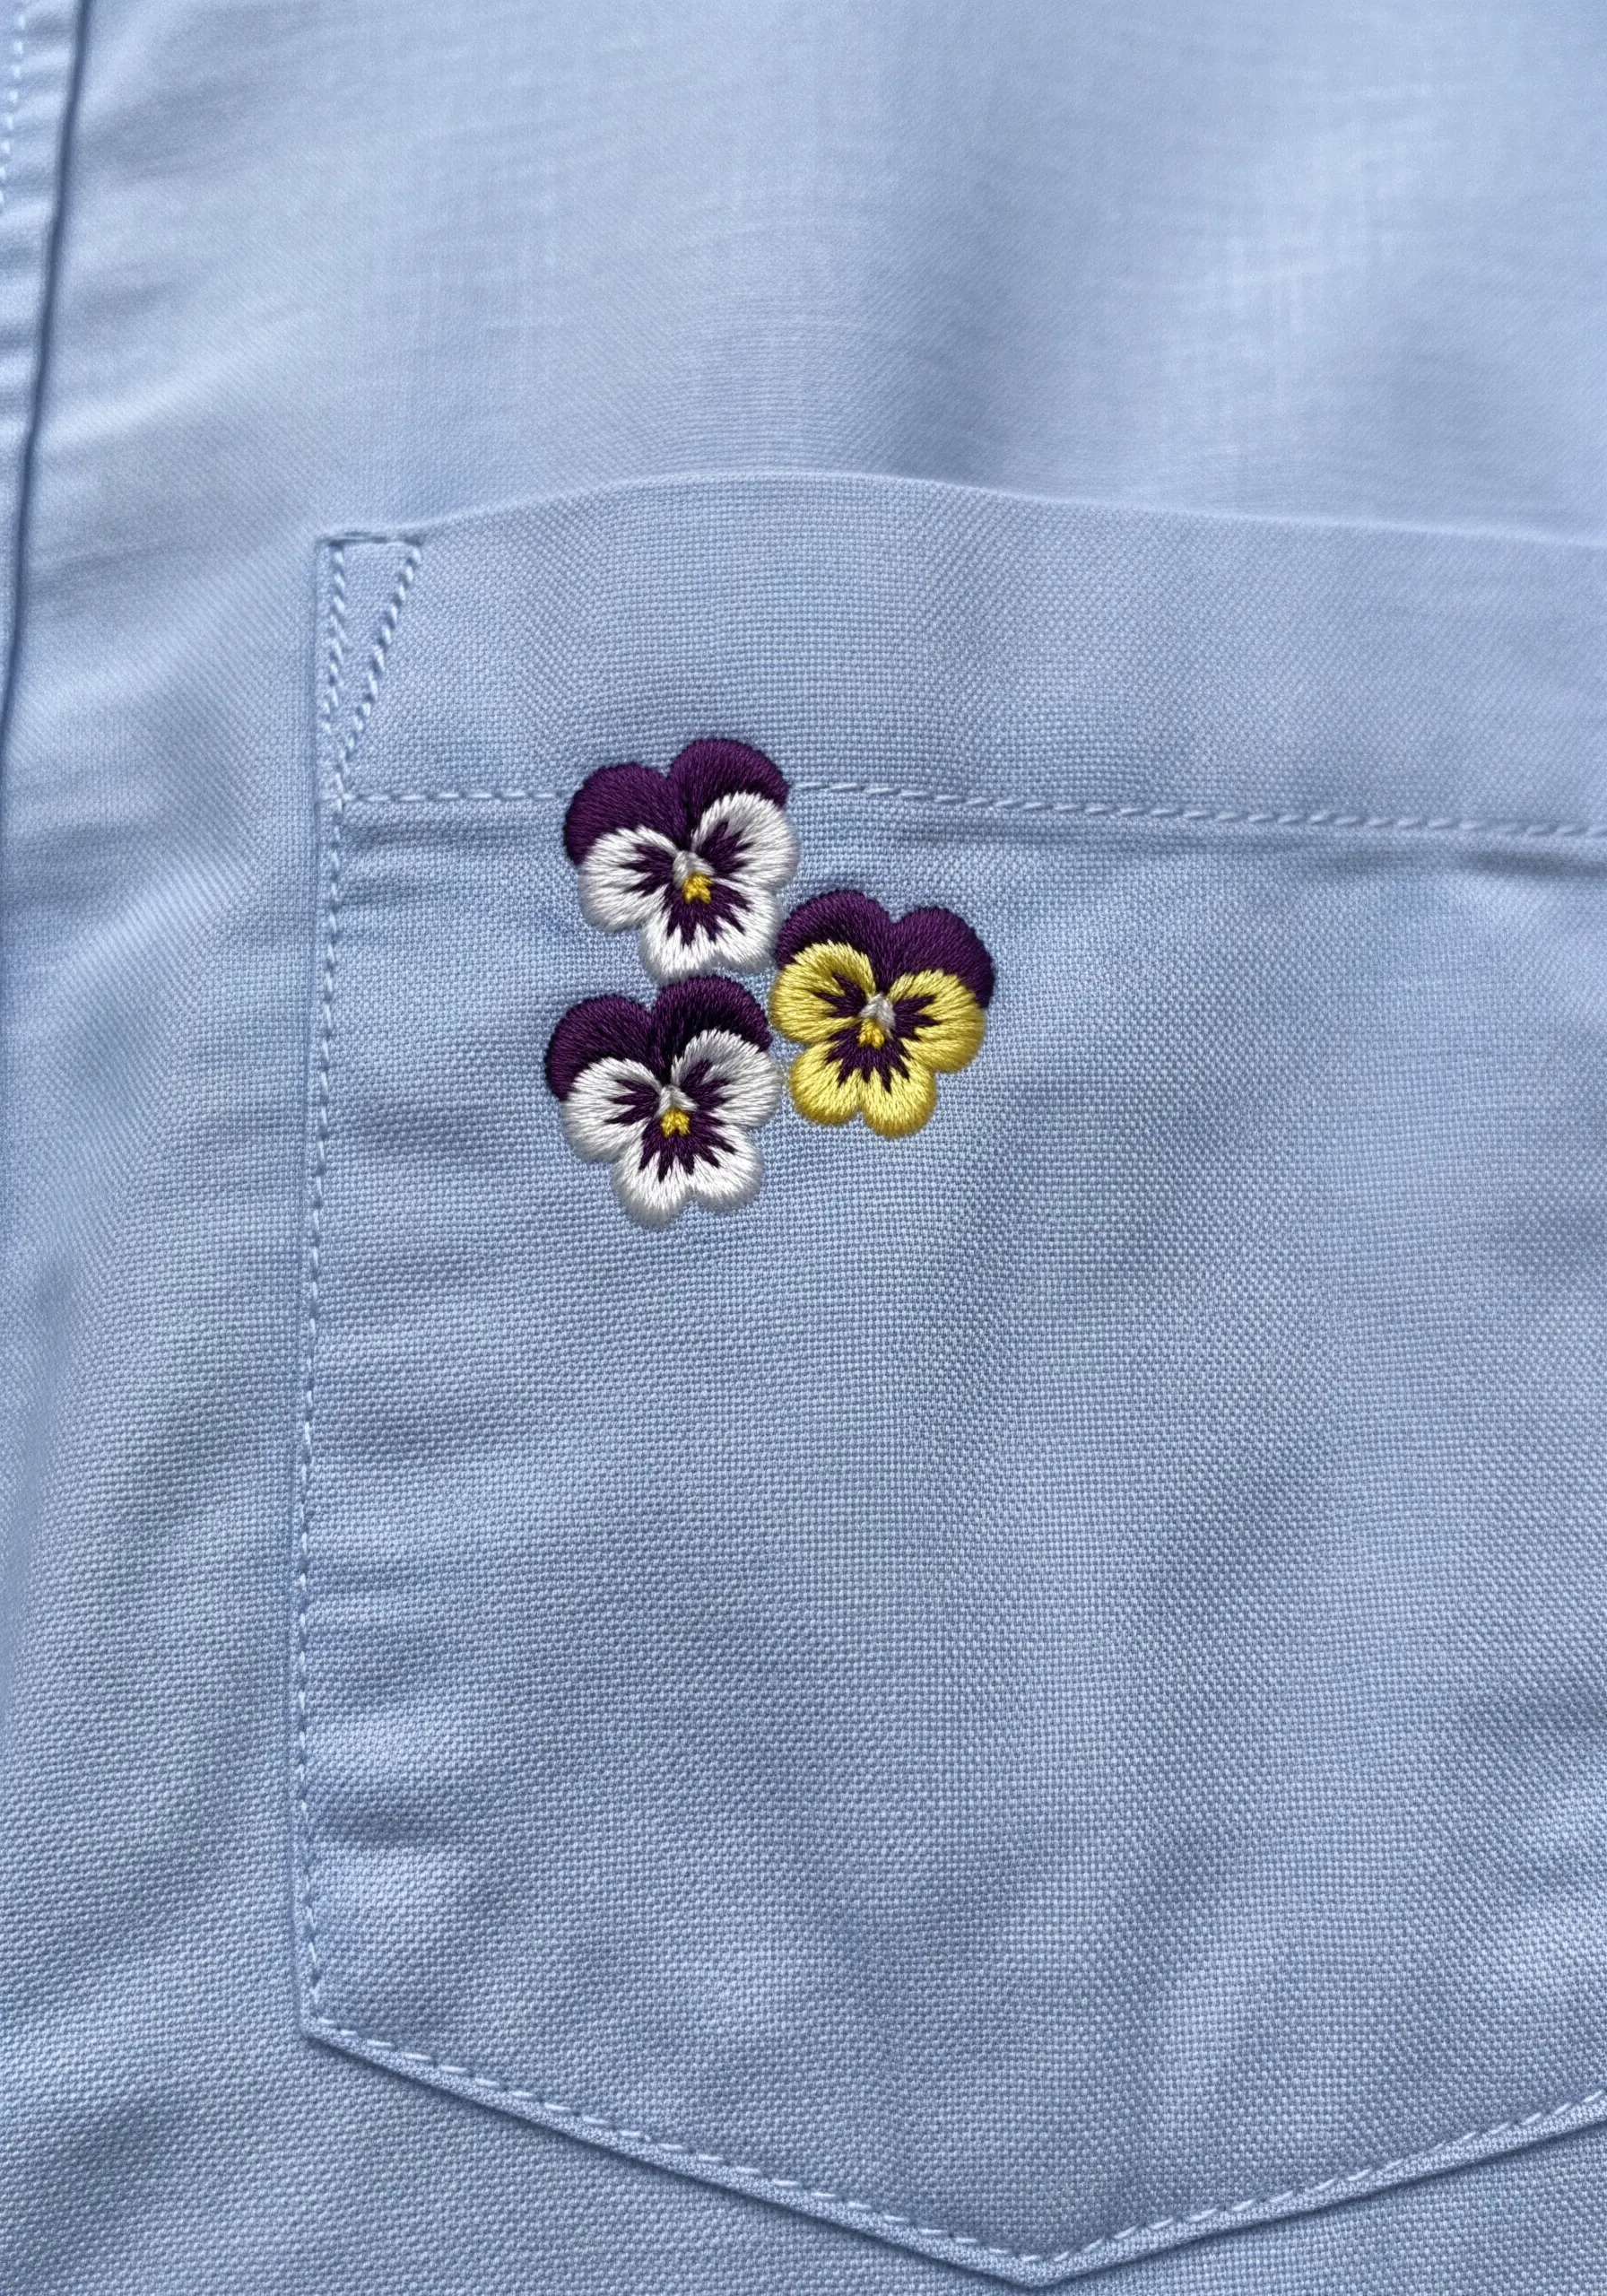
By stitching this tulip to look like it’s growing out of the pocket, you create a delightful visual surprise.
Use a padded satin stitch for the flower—adding a few underlying stitches for volume—to make it pop and feel more three-dimensional.
This thoughtful placement turns a simple motif into a tiny story.
16. Delicate Knots for High-Impact Sprigs
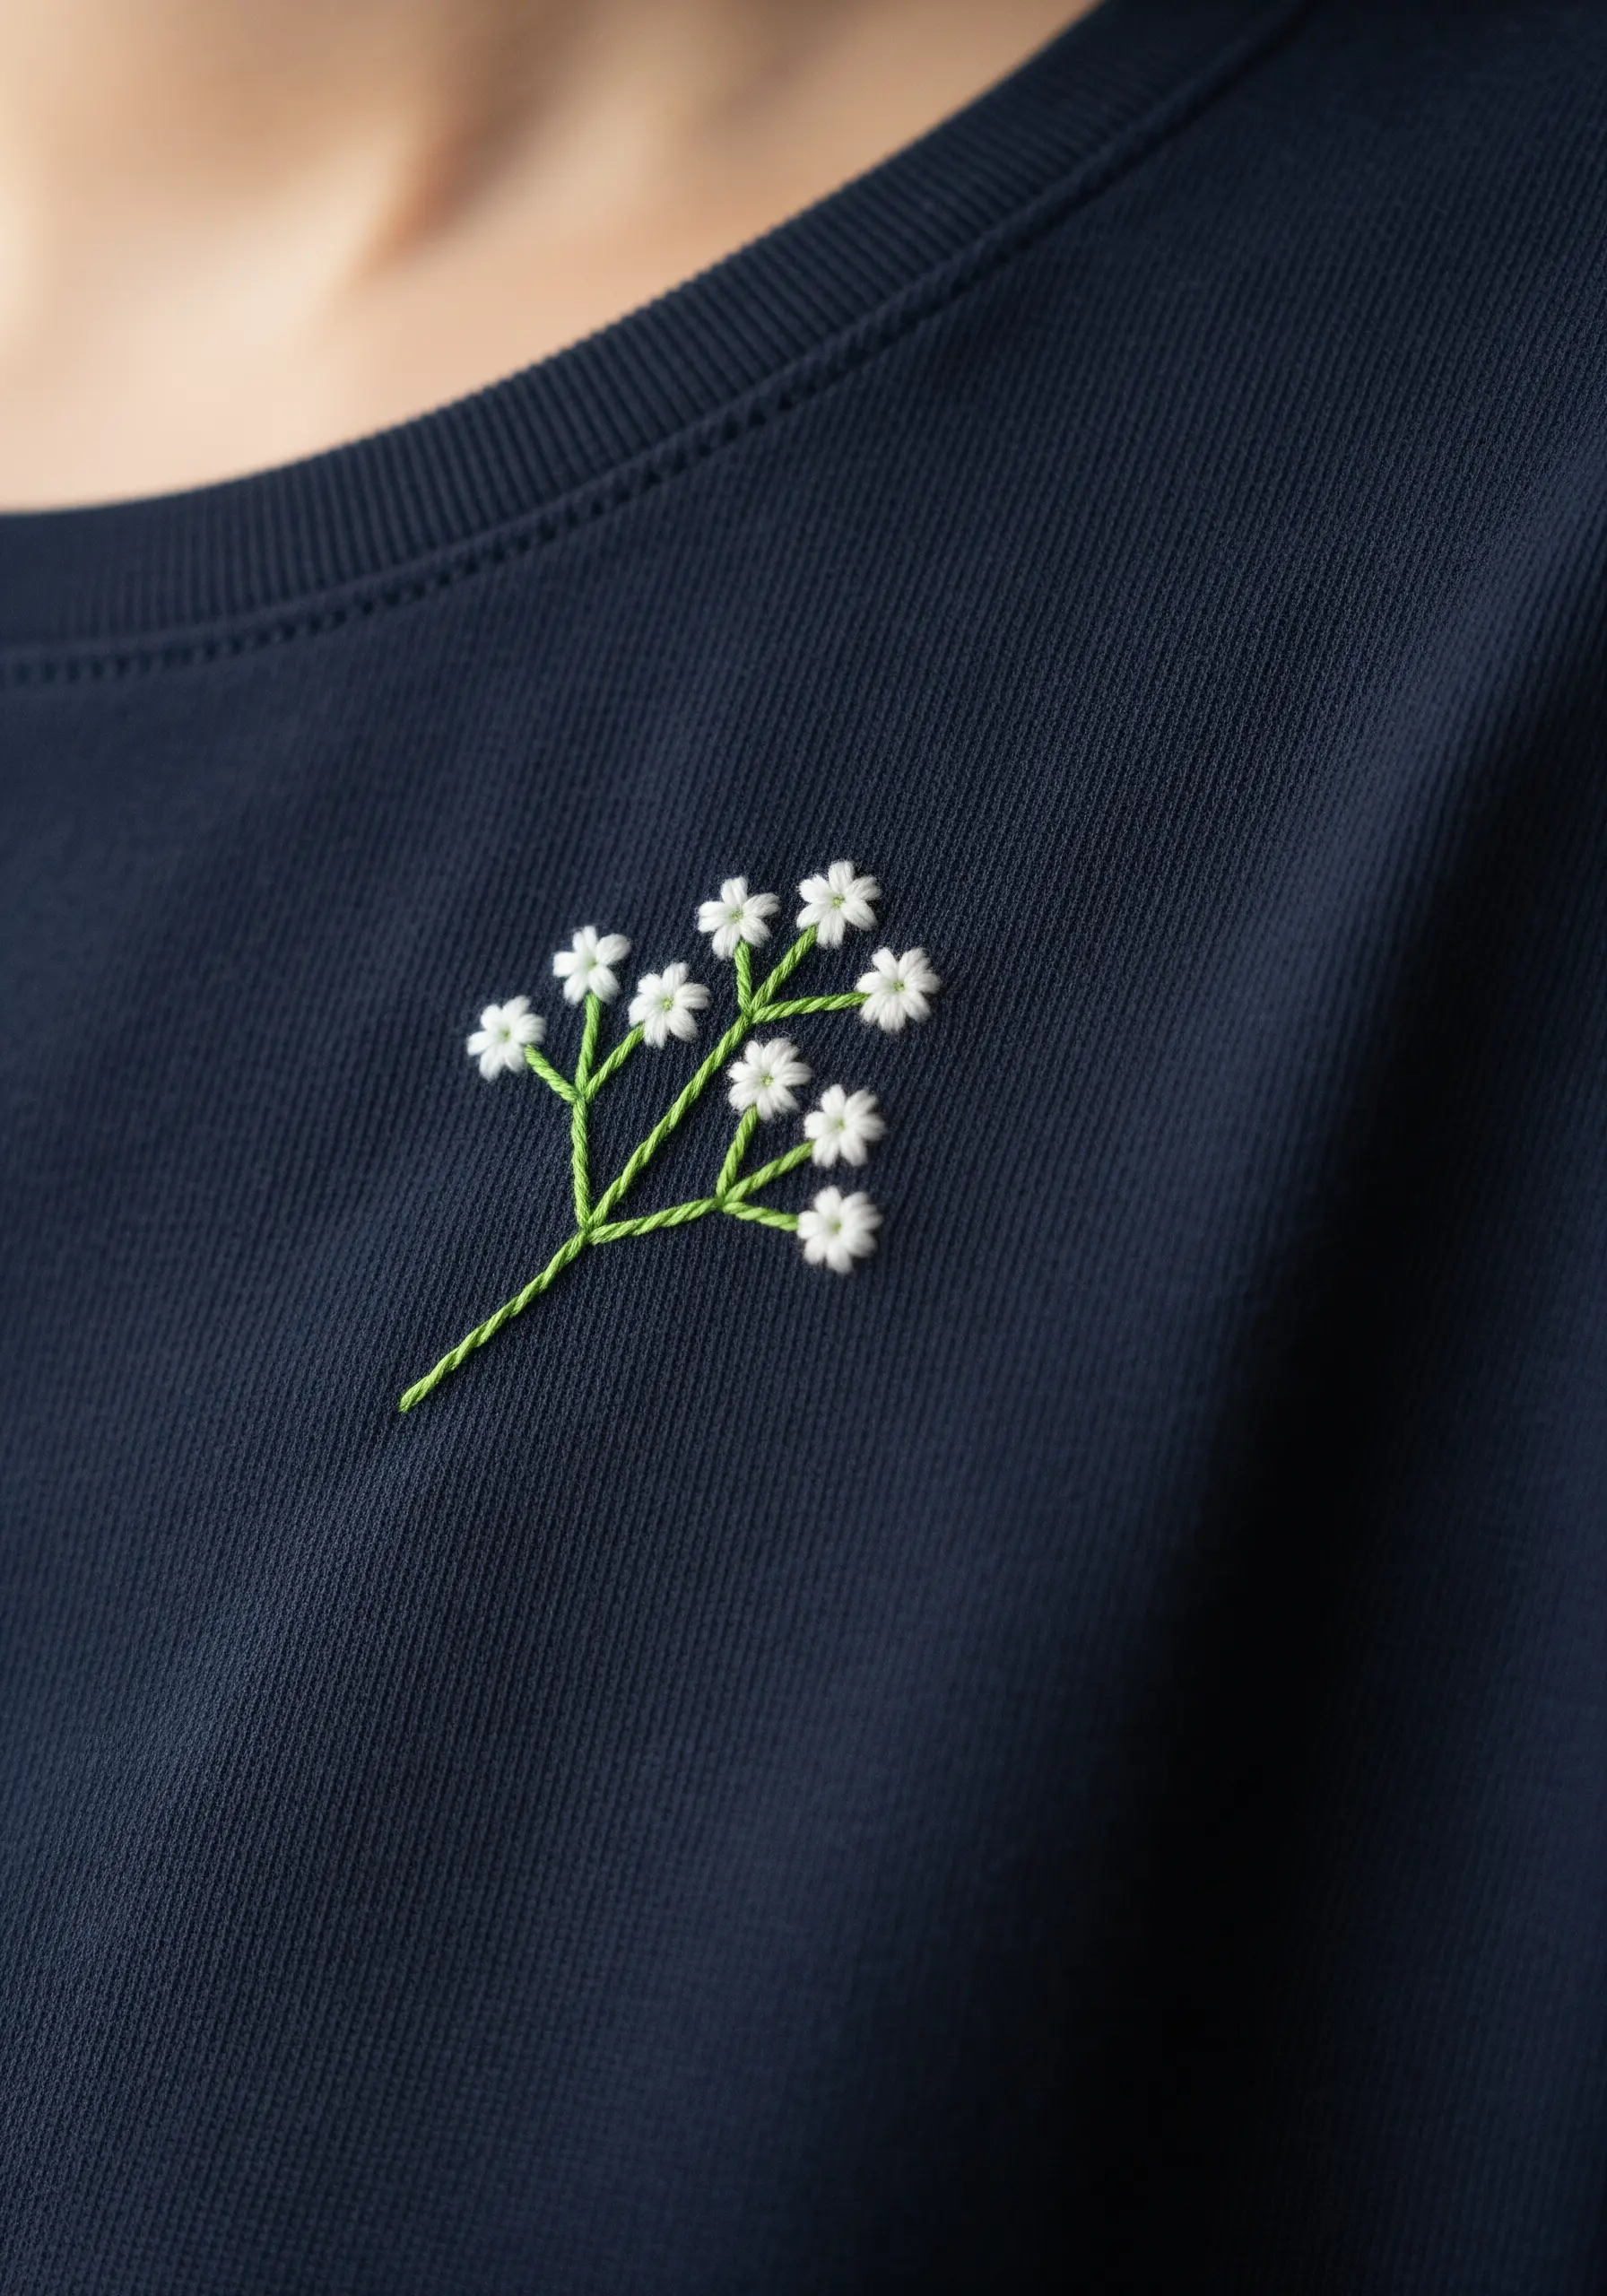
The ethereal quality of baby’s breath comes from its airy structure, which you can replicate with thread.
On a dark fabric, use a bright white floss to create maximum contrast. Form the tiny blossoms with single, small French knots wrapped just once.
Connect them with very fine split stitches in a light green to suggest delicate stems.
It’s the dark, empty space around the stitches that makes the tiny white knots seem to float.
17. Composing a Balanced Floral Wreath

When designing a circular motif like a wreath, achieving a sense of natural flow is key.
Angle your fishbone-stitch leaves and lazy-daisy flowers slightly to follow the curve of the circle.
Space the main flowers evenly to create anchor points, but vary their orientation slightly so they don’t look too rigid.
This attention to directional stitching results in a cohesive design that feels both balanced and alive.
18. Crisp Outlines on Textured Wool

Stitching on a soft, napped fabric like wool requires a technique that ensures your lines stay clean and visible.
Use a whipped backstitch for your outlines; the extra wrapping pass smooths the line and raises it slightly above the fabric’s texture.
Choose a thread color with strong contrast. For the fill, use just a few parallel straight stitches to suggest color and form without getting lost in the wool.
19. Creating Depth in a Pocket Bouquet

To make a bouquet look like it’s truly bursting from a pocket, you must create layers and depth.
Begin by stitching the elements that are furthest back, like background leaves or taller flowers.
Then, work forward, stitching the next layer of flowers so they slightly overlap the stems of the first.
This simple back-to-front layering technique, combined with a mix of textural stitches, is the secret to making tiny floral motifs look lush and abundant.


