

Have you ever wished your embroidery could feel less like coloring within the lines and more like painting? You can achieve that soft, blended, and emotional quality of watercolor, not with paint, but with the threads you already own.
The secret isn’t in mastering dozens of complex stitches. It’s in learning to see your thread as pigment and your needle as a brush. It’s about understanding how to blend colors with a long-and-short stitch, how a simple wash of fabric paint can create an atmospheric backdrop, and how stitch direction alone can sculpt a petal into lifelike form.
These ideas are designed to shift your perspective. They will help you create botanical hoop art that feels less rigid and more alive—pieces that capture the delicate, transient beauty of a garden with the texture and intimacy only thread can provide. Let’s begin.
1. Paint a Crescent of Lavender
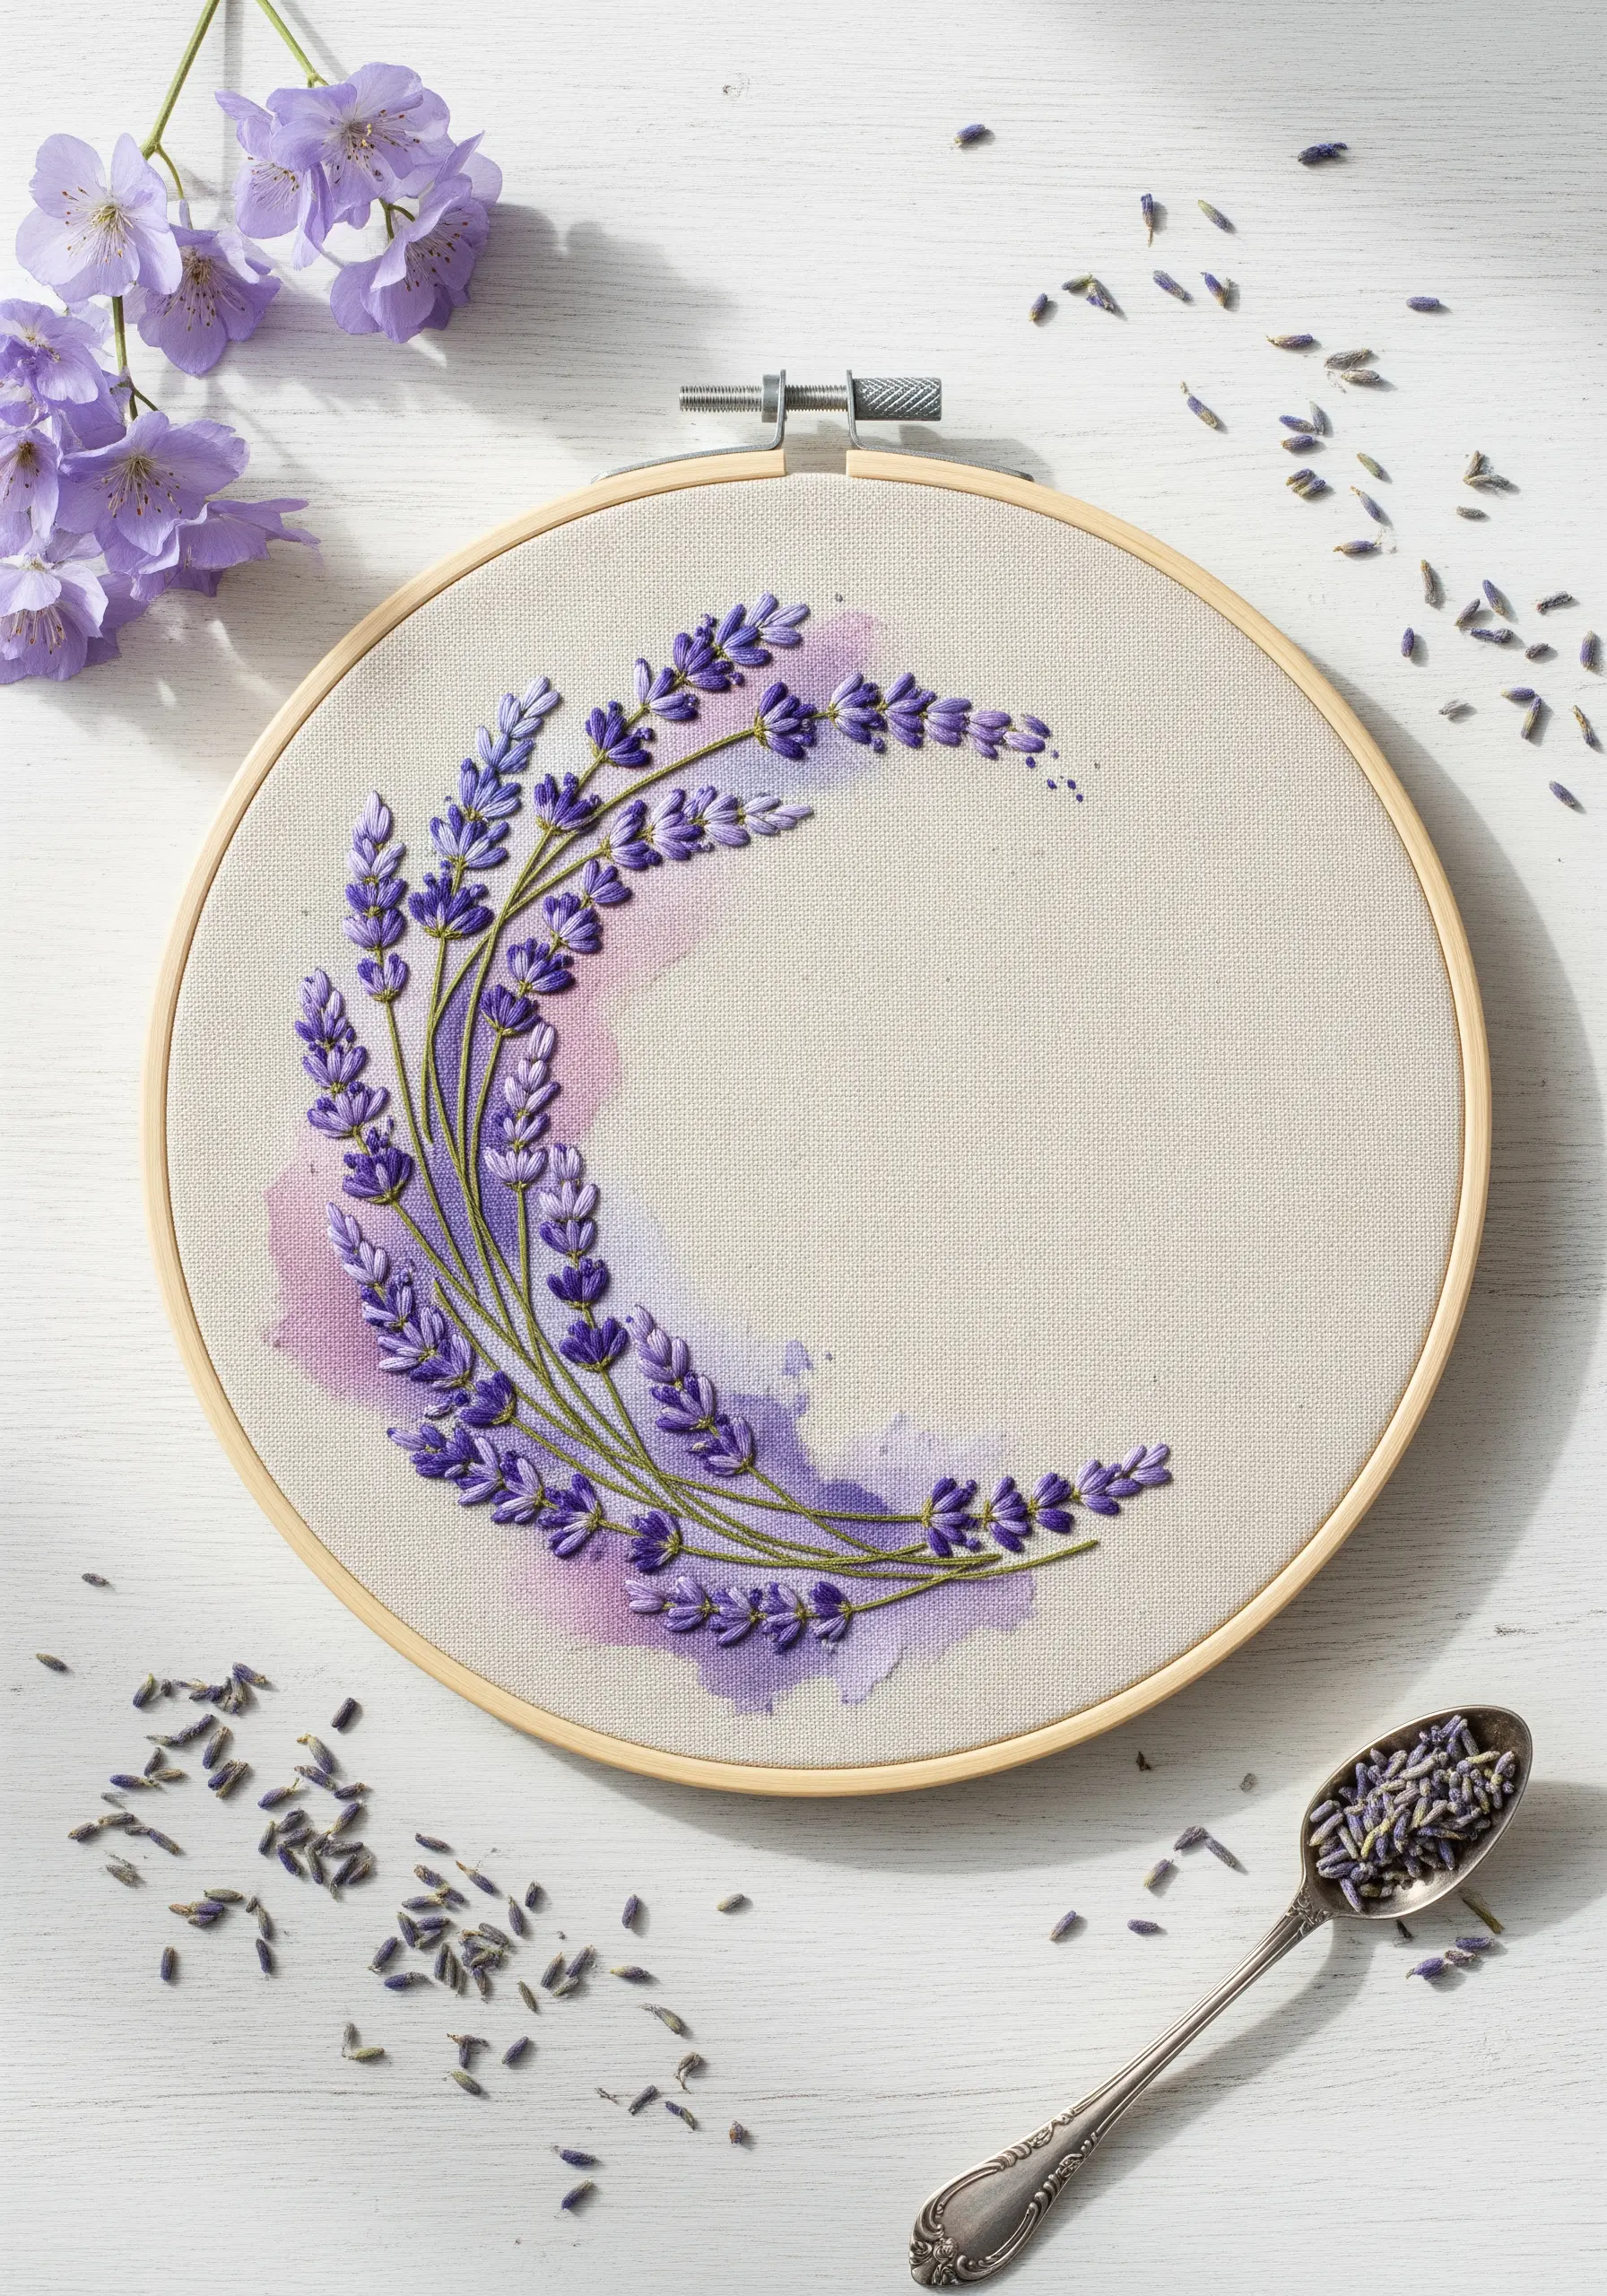
Create a soft, atmospheric base for your stitches by painting a watercolor wash directly onto the fabric before you begin.
Use a highly diluted fabric paint in violet and magenta, allowing the colors to bleed into one another to form a gentle gradient.
Stitch your lavender sprigs over the painted area, using a combination of lazy daisy stitches for the buds and split stitch for the stems.
This technique grounds the embroidery, making the threads feel like a natural extension of the painted background rather than just sitting on top of the fabric.
2. Cascade Wisteria with Thread Painting
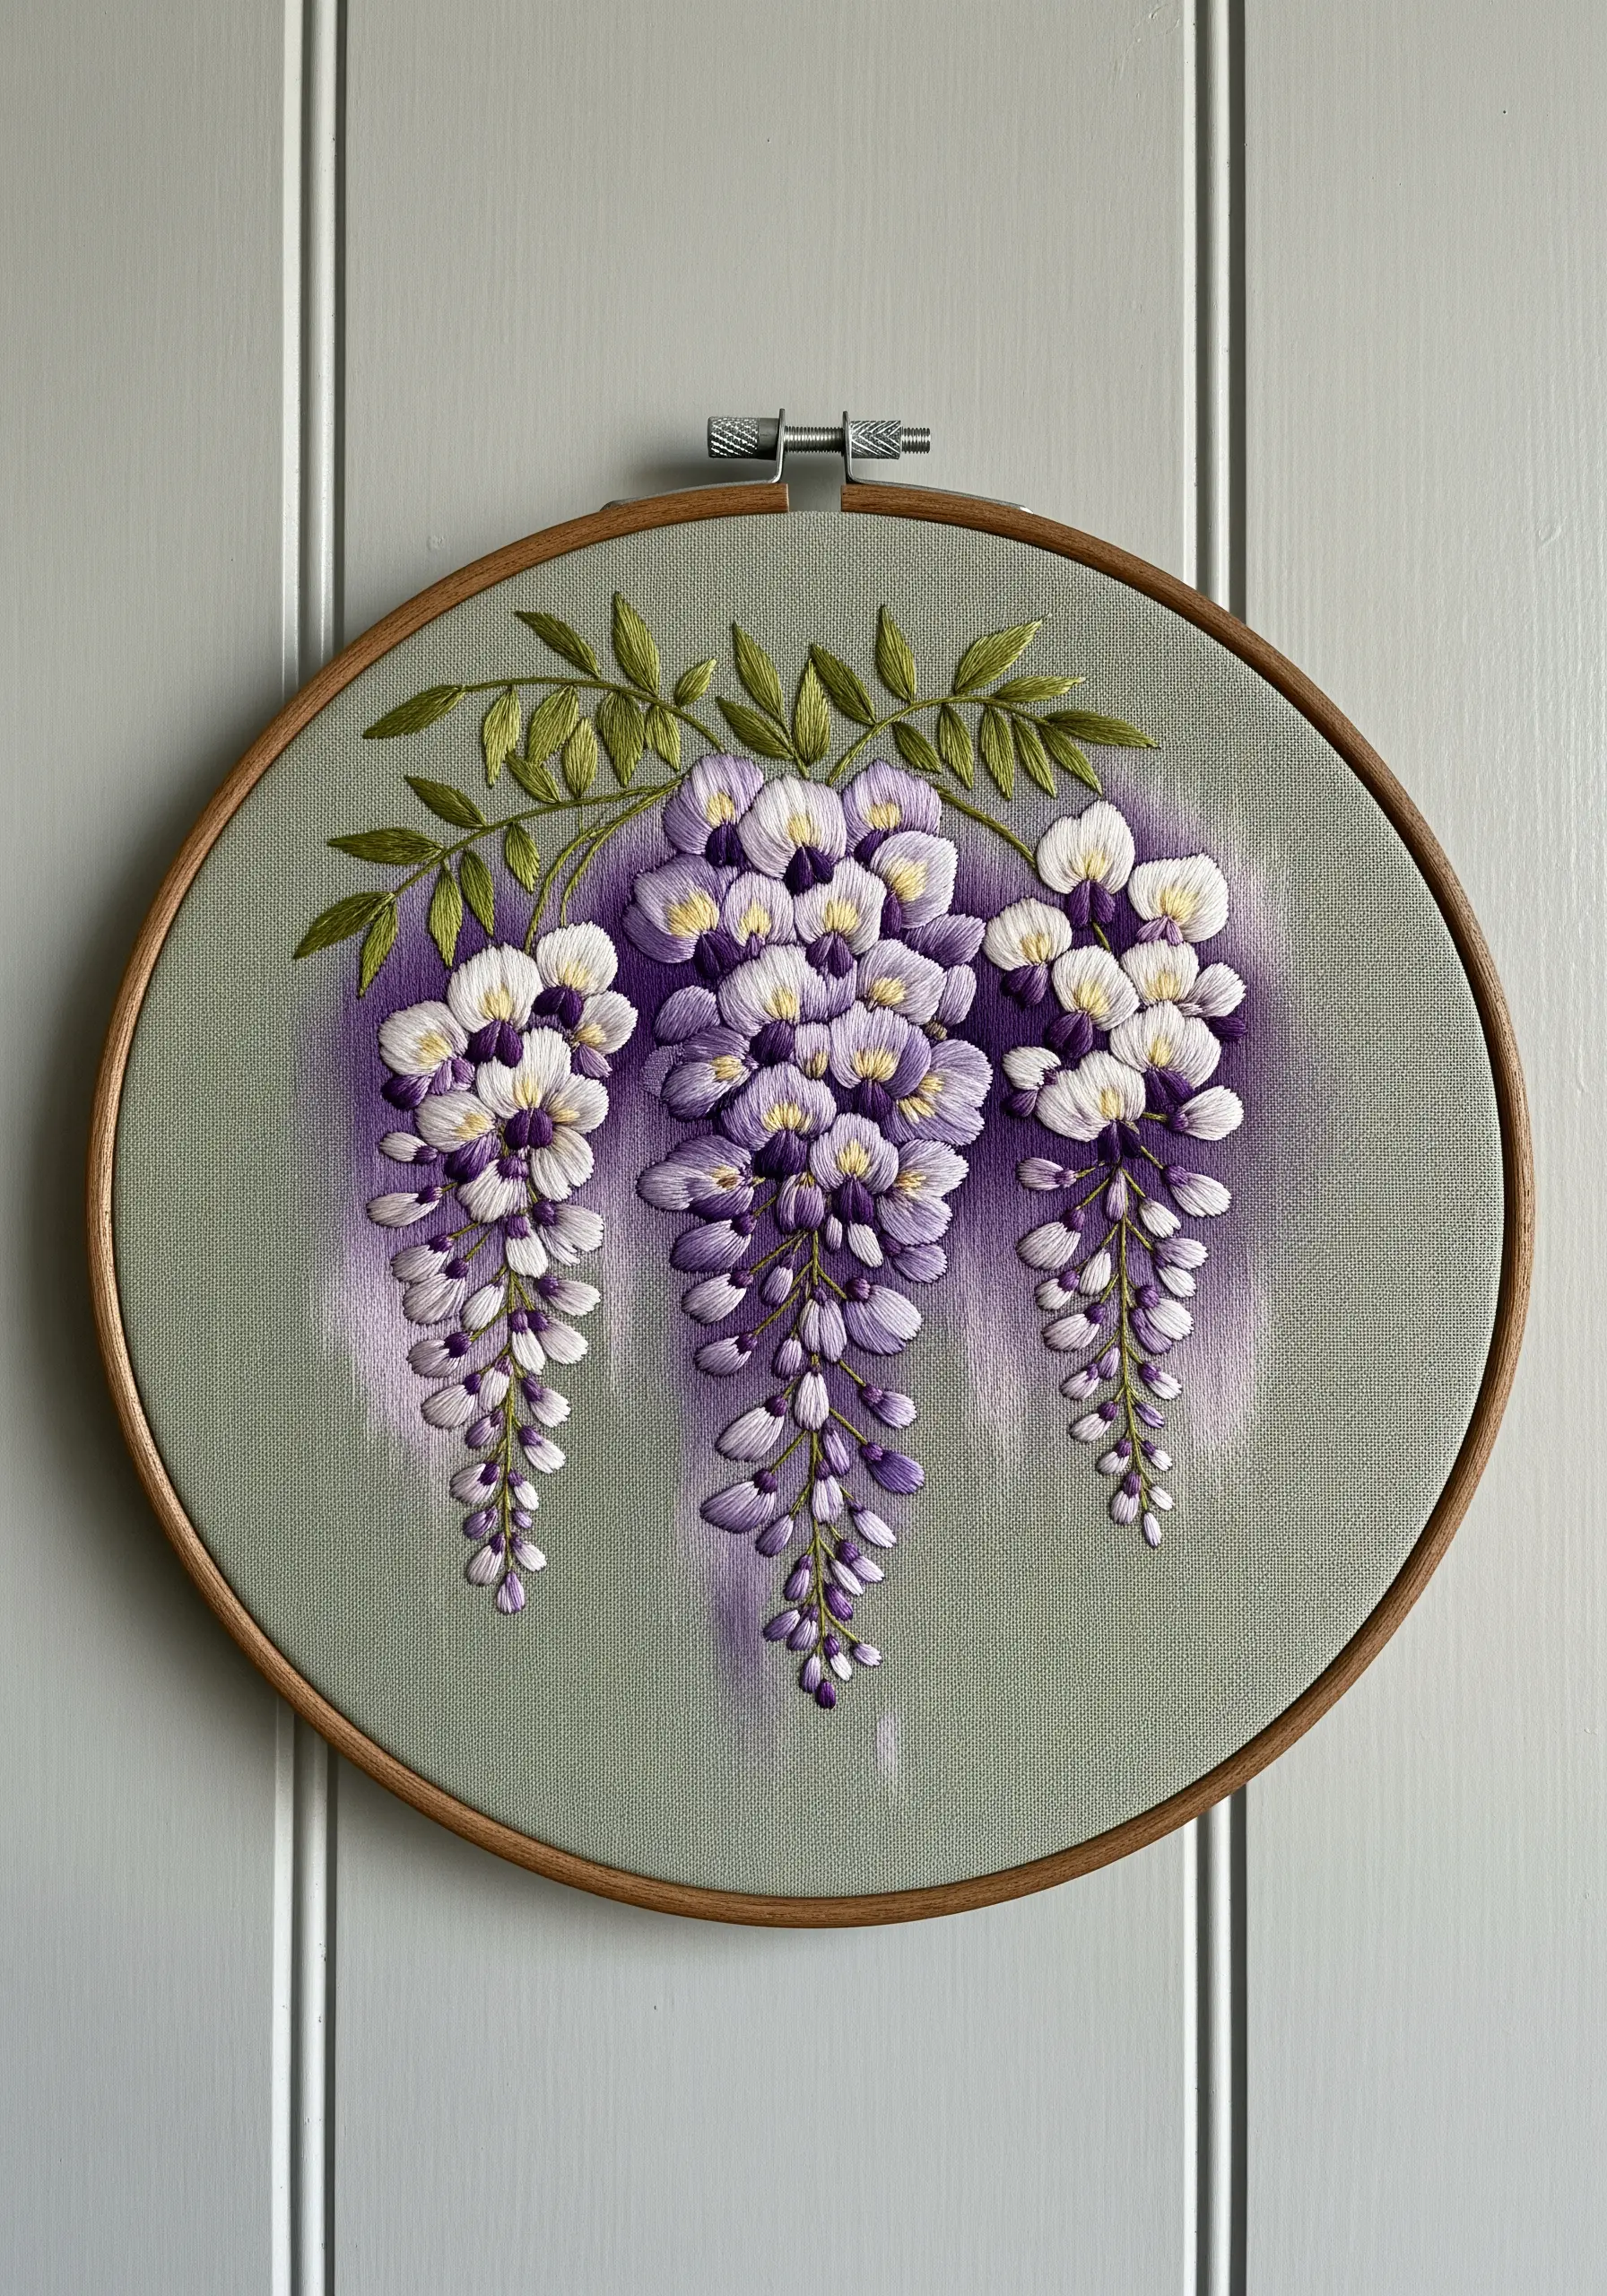
Capture the delicate, drooping clusters of wisteria using the long-and-short stitch technique to blend shades of purple, lilac, and white.
Work each tiny petal individually, starting with the darkest shade at the top of the cluster and transitioning to pure white at the tips.
Using a single strand of floss is crucial for this level of detail; it allows for seamless transitions and prevents the small petals from looking bulky.
The subtle painted background wash adds depth, making the stitched flowers appear to emerge from a soft, atmospheric haze.
3. Sculpt Poppy Petals with Directional Stitches

To give poppies their signature papery texture, ensure your satin stitches follow the natural, curved direction of the petals.
Vary your stitch length slightly, especially near the edges, to create a subtle, organic ruffle instead of a perfectly smooth, hard line.
Introduce a single strand of a darker orange or red thread to create fine veins radiating from the center, adding a layer of realism.
This focus on stitch direction turns a simple satin stitch into a powerful tool for sculpting form and texture.
4. Add a Frosted Sheen to Eucalyptus

Recreate the silvery glow of eucalyptus by combining soft watercolor washes with a hint of metallic thread.
Before stitching, apply a very light, transparent wash of teal or seafoam green fabric paint, letting it dry completely.
After embroidering the leaves with simple satin stitches, use a single strand of silver metallic thread to add tiny seed stitches or French knots as highlights.
This layering of paint and metallic accents creates a luminous effect that mimics morning dew on cool-toned leaves.
5. Layer Cherry Blossoms for Depth
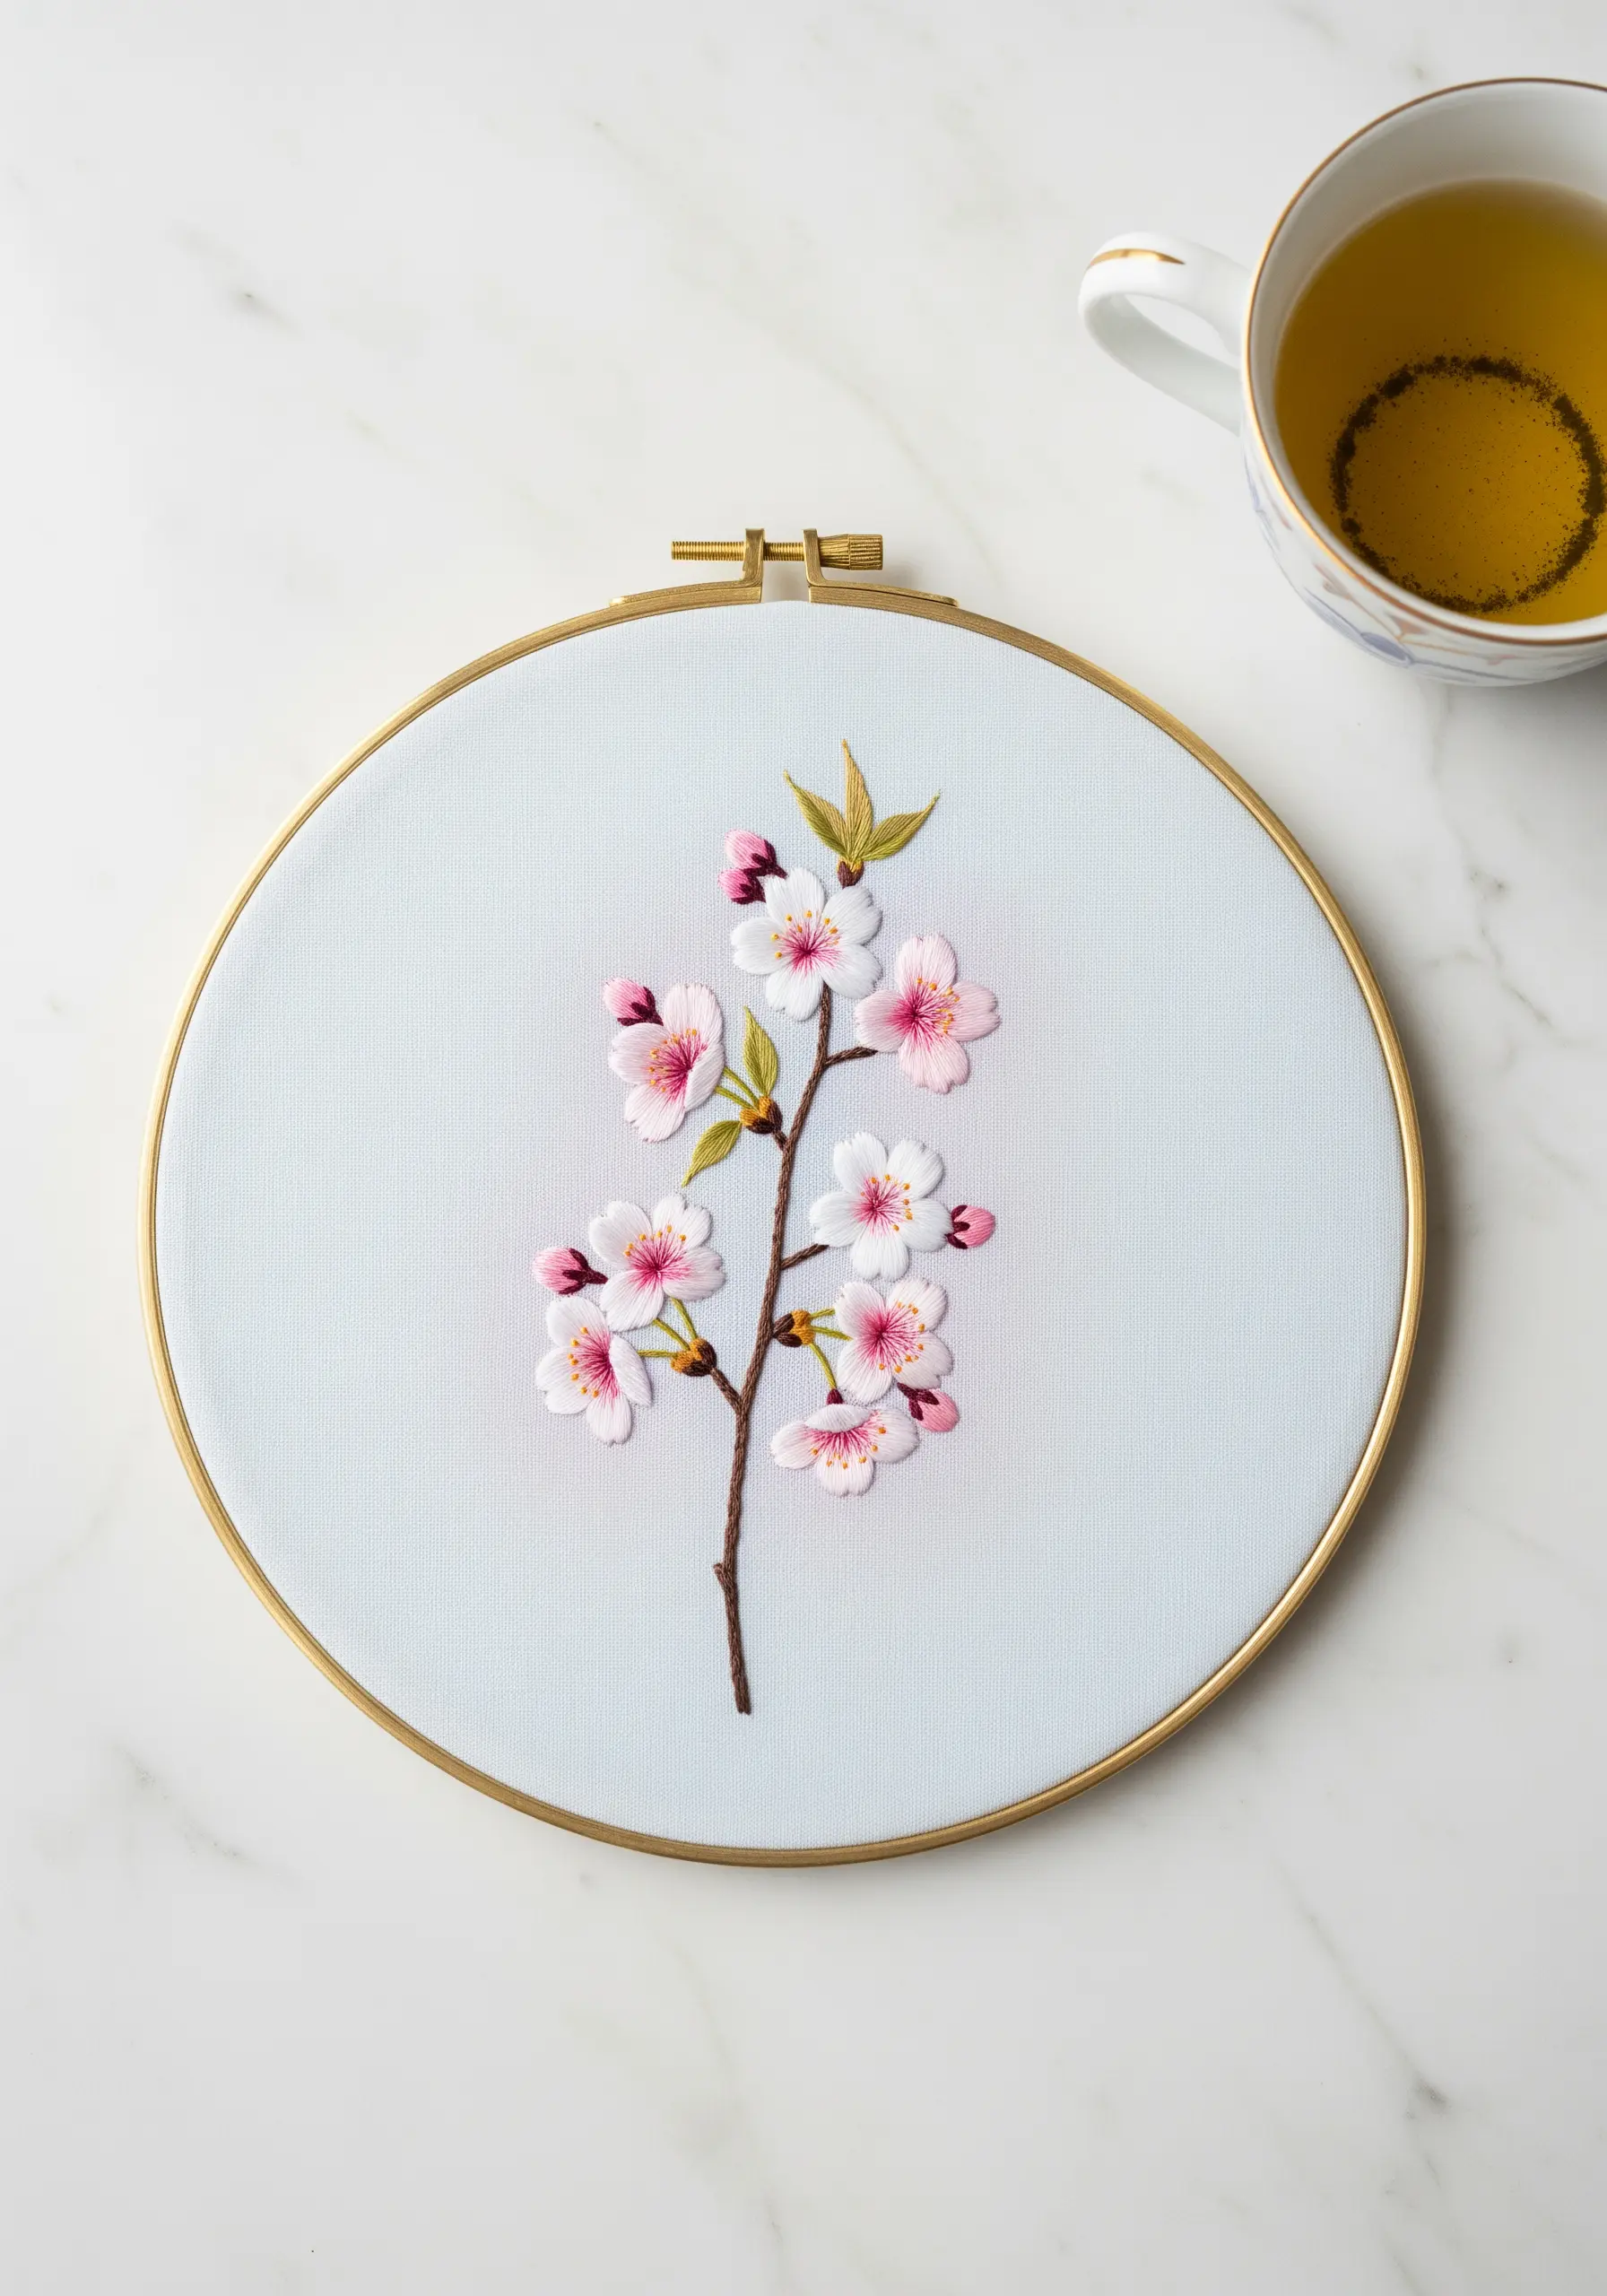
Create believable dimension in your cherry blossoms by stitching them in layers, starting with the petals and flowers furthest away.
Use detached chain stitches for the petals, placing them slightly over one another to build a sense of fullness.
For the centers, use a tight French knot in a contrasting yellow or deep pink to draw the eye and anchor the composition.
Stitching on a pale blue fabric enhances the design, acting as a clear spring sky that makes the delicate pinks pop.
6. Master the Peony with Graduated Shading
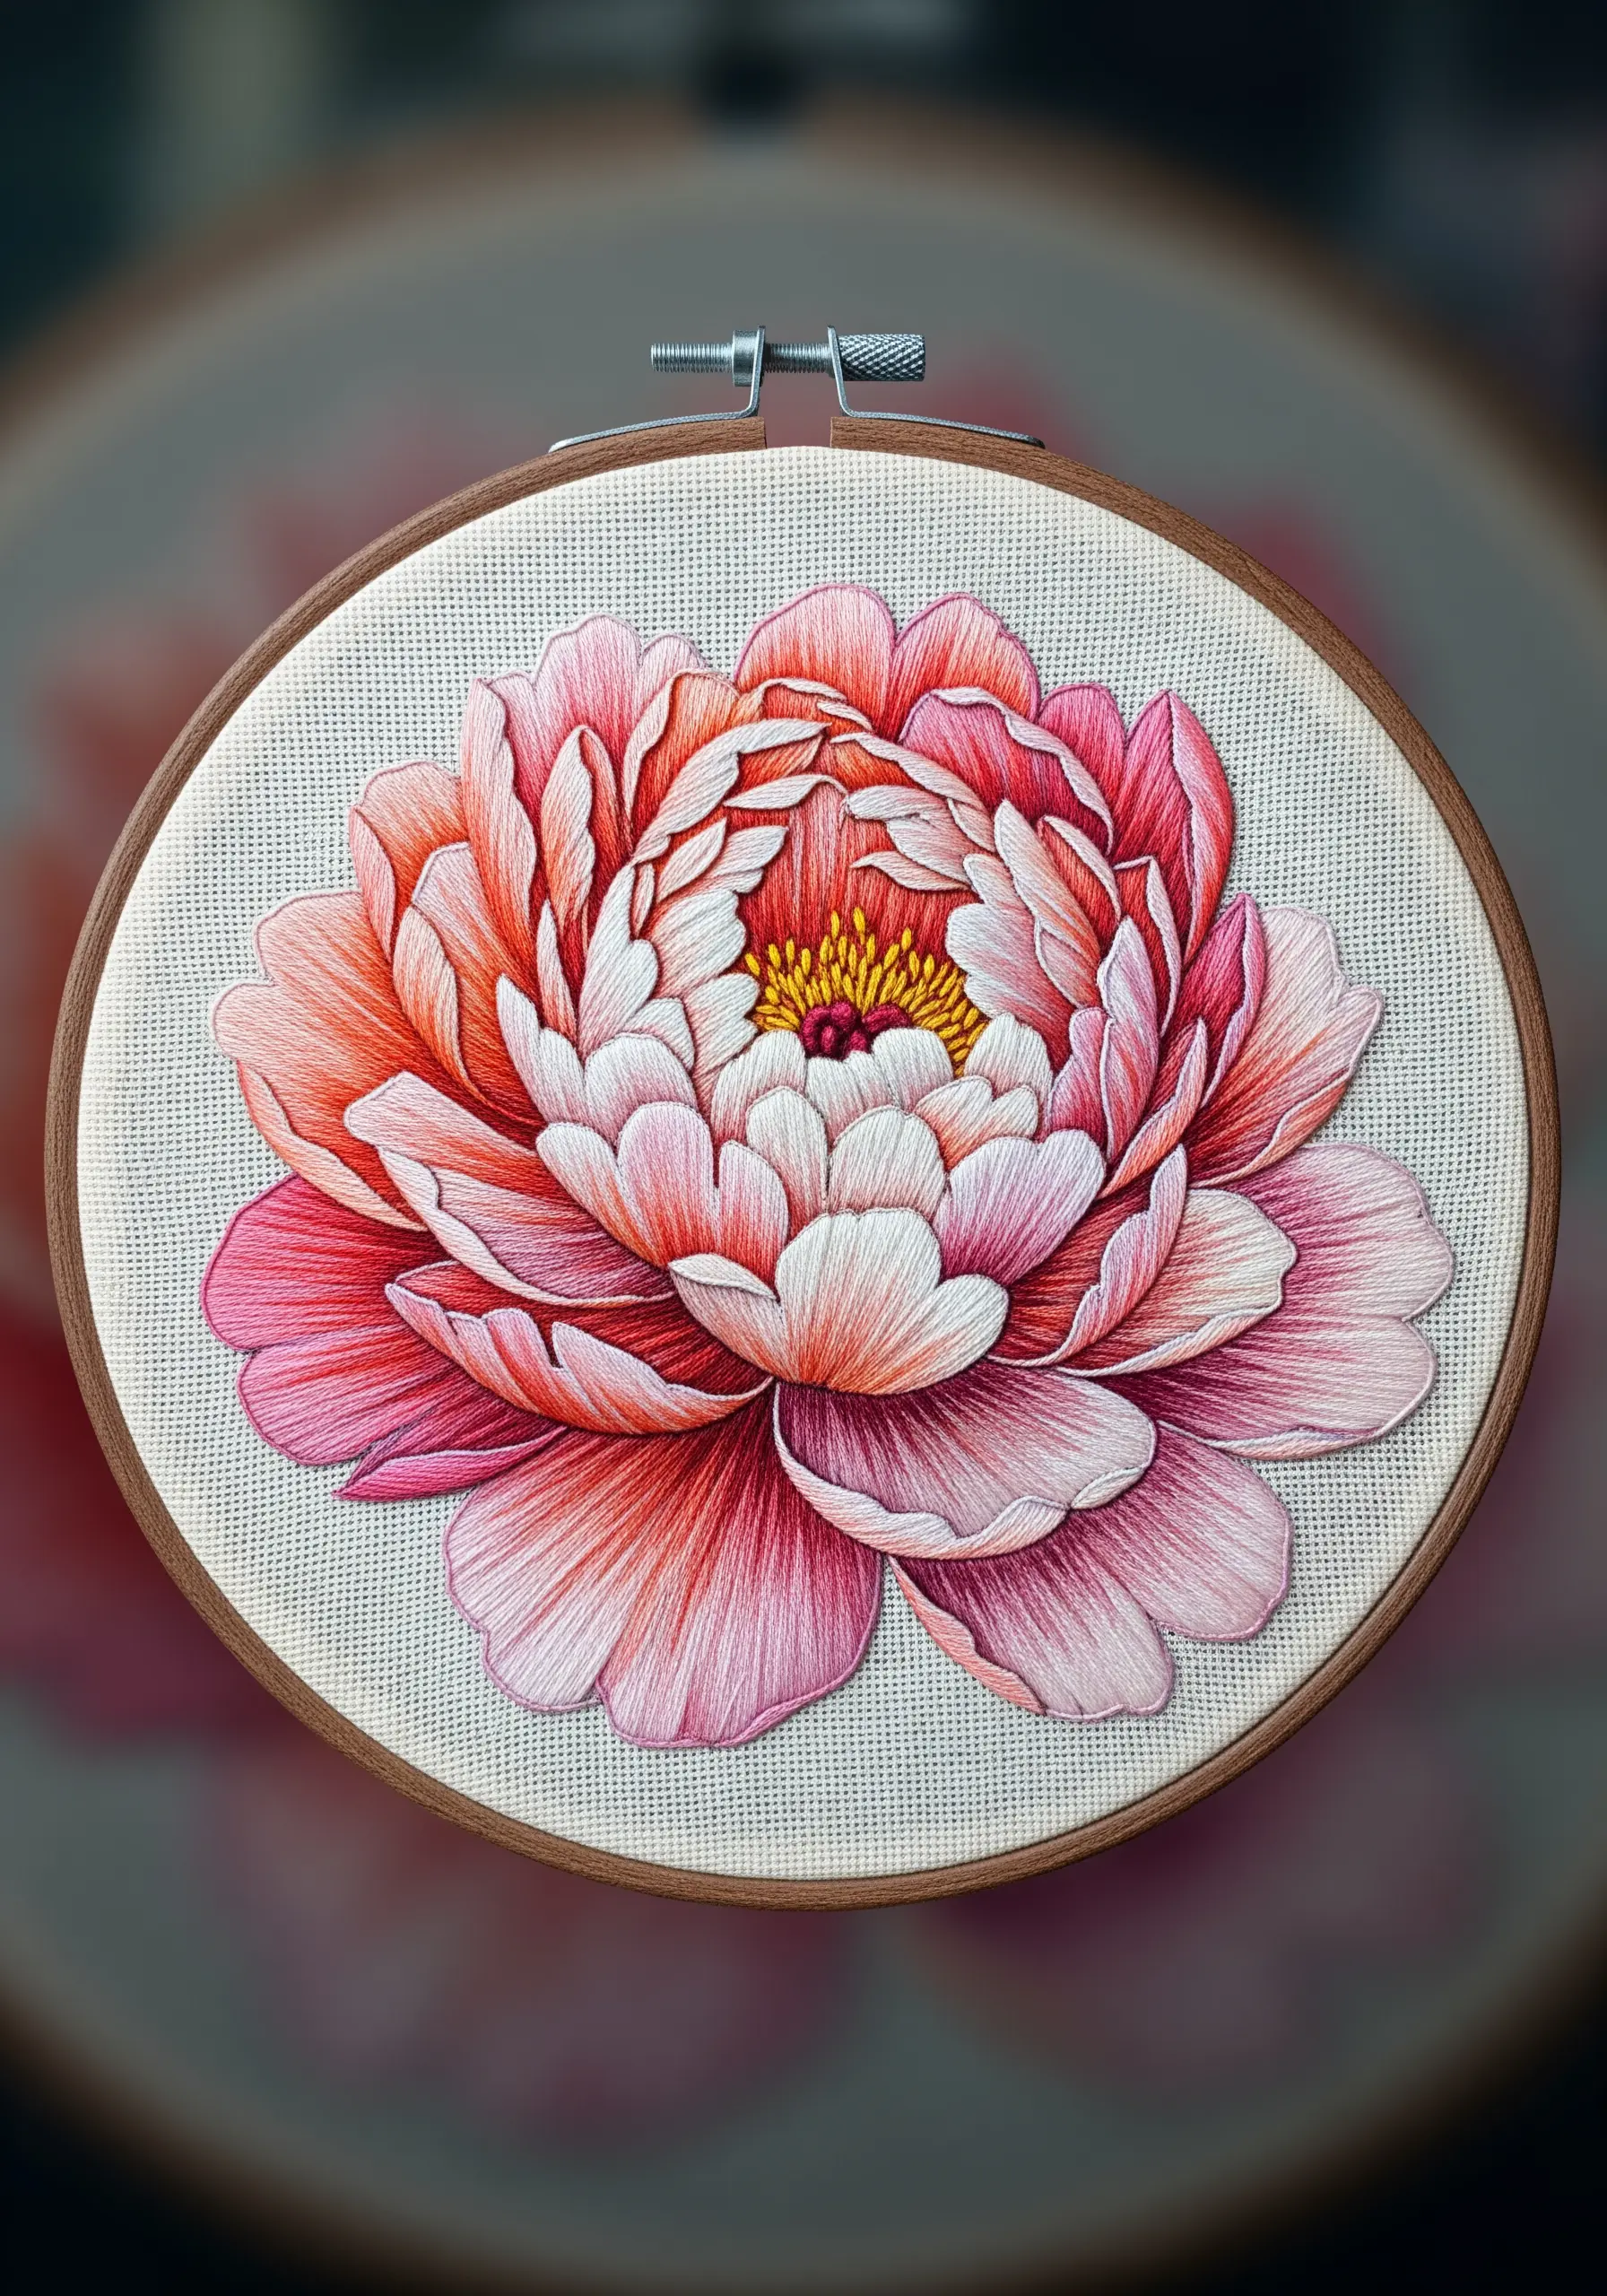
Tackle a complex flower like a peony by breaking it down into individual petals, working from the outside in.
Use at least five shades of a single color family—from deep coral to the palest pink—to achieve a realistic gradient with long-and-short stitch.
Pay close attention to how light would hit the flower, placing your lightest threads on the top edges of the petals to create highlights and dimension.
This methodical approach to thread painting transforms a flat design into a lush, three-dimensional bloom.
7. Stitch an Impressionistic Wildflower Field

Suggest a wildflower meadow rather than rendering every detail by using a variety of stitches and textures.
Combine French knots, lazy daisy stitches, and simple straight stitches in a scattered arrangement to mimic the organic chaos of nature.
Create an atmospheric sky by applying a light blue watercolor wash at the top, then adding tiny, sparse seed stitches in white and pale violet.
This multi-stitch approach creates a rich tapestry of texture that feels more dynamic and alive than a single-stitch design.
8. Frame Forget-Me-Nots with a Soft Halo
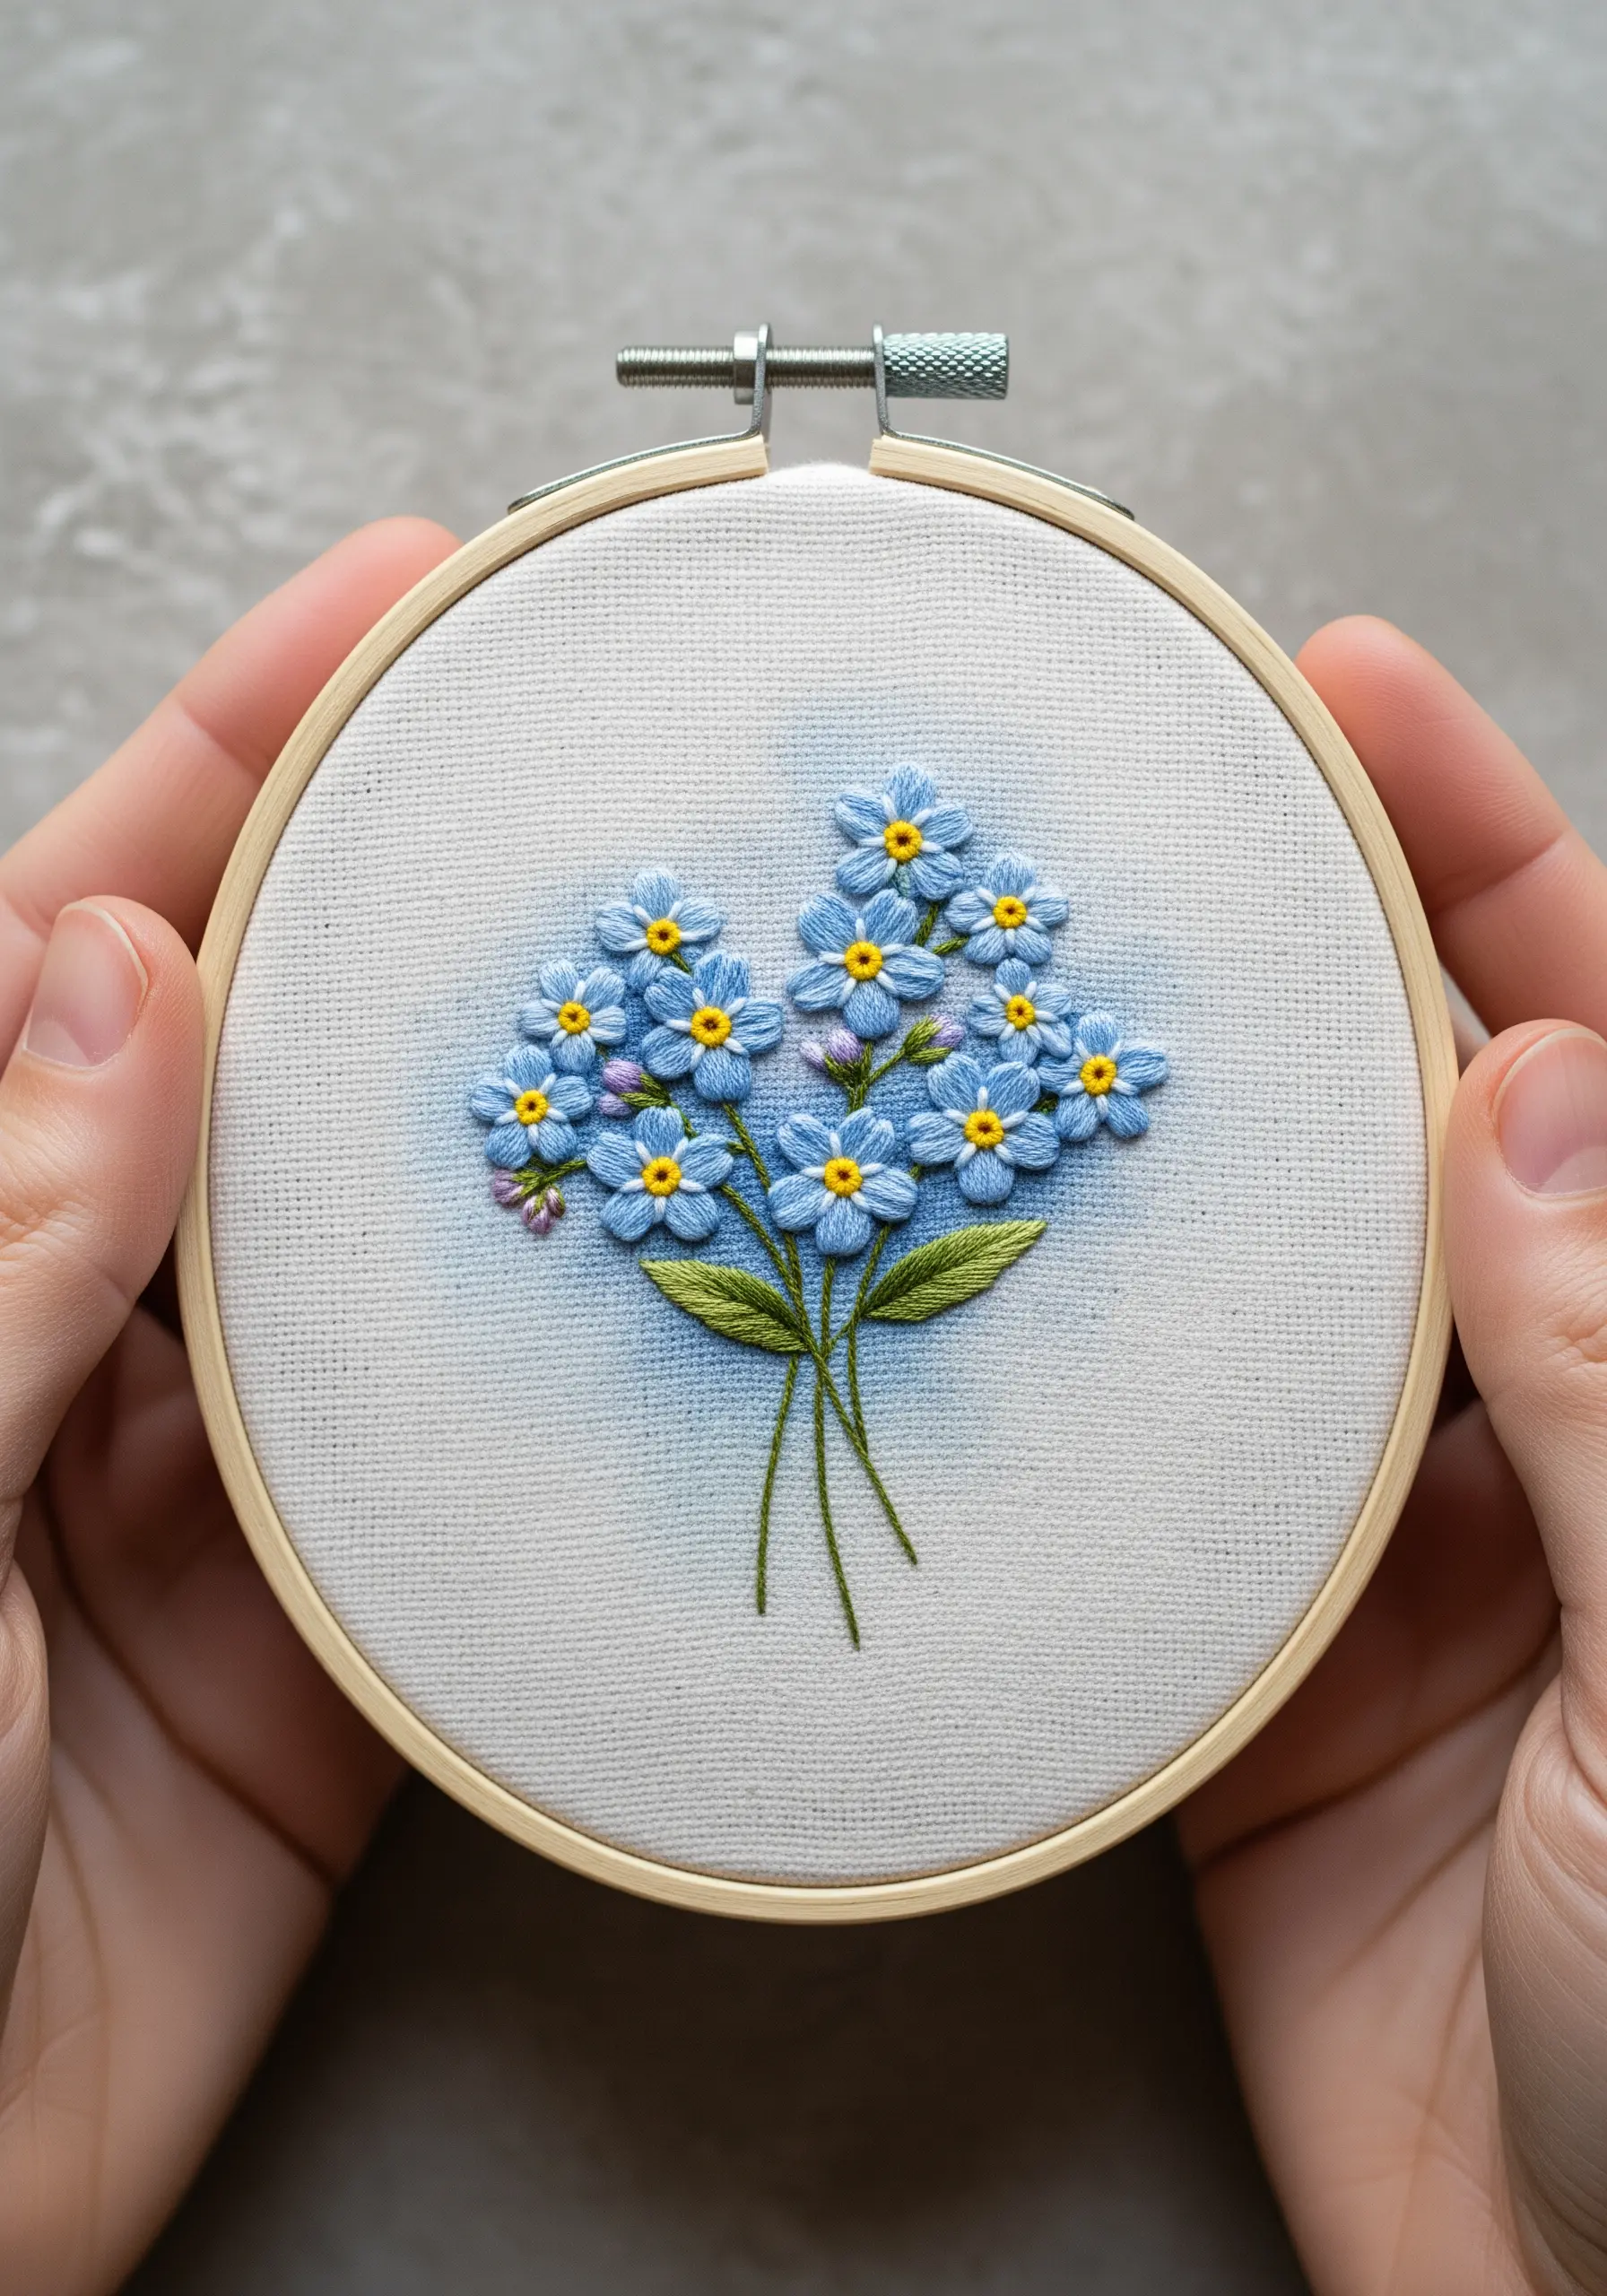
Give delicate florals a dreamy focus by first painting a soft, circular wash of color onto your fabric.
Use a damp brush to apply a small amount of light blue fabric paint, allowing the edges to bleed softly into the unpainted canvas.
Once dry, stitch your forget-me-not bouquet in the center using five simple lazy daisy stitches for each flower.
The halo of color behind the stitches creates a beautiful vignette effect, making the tiny bouquet feel intentional and complete.
9. Build Hydrangea Clusters with Knots
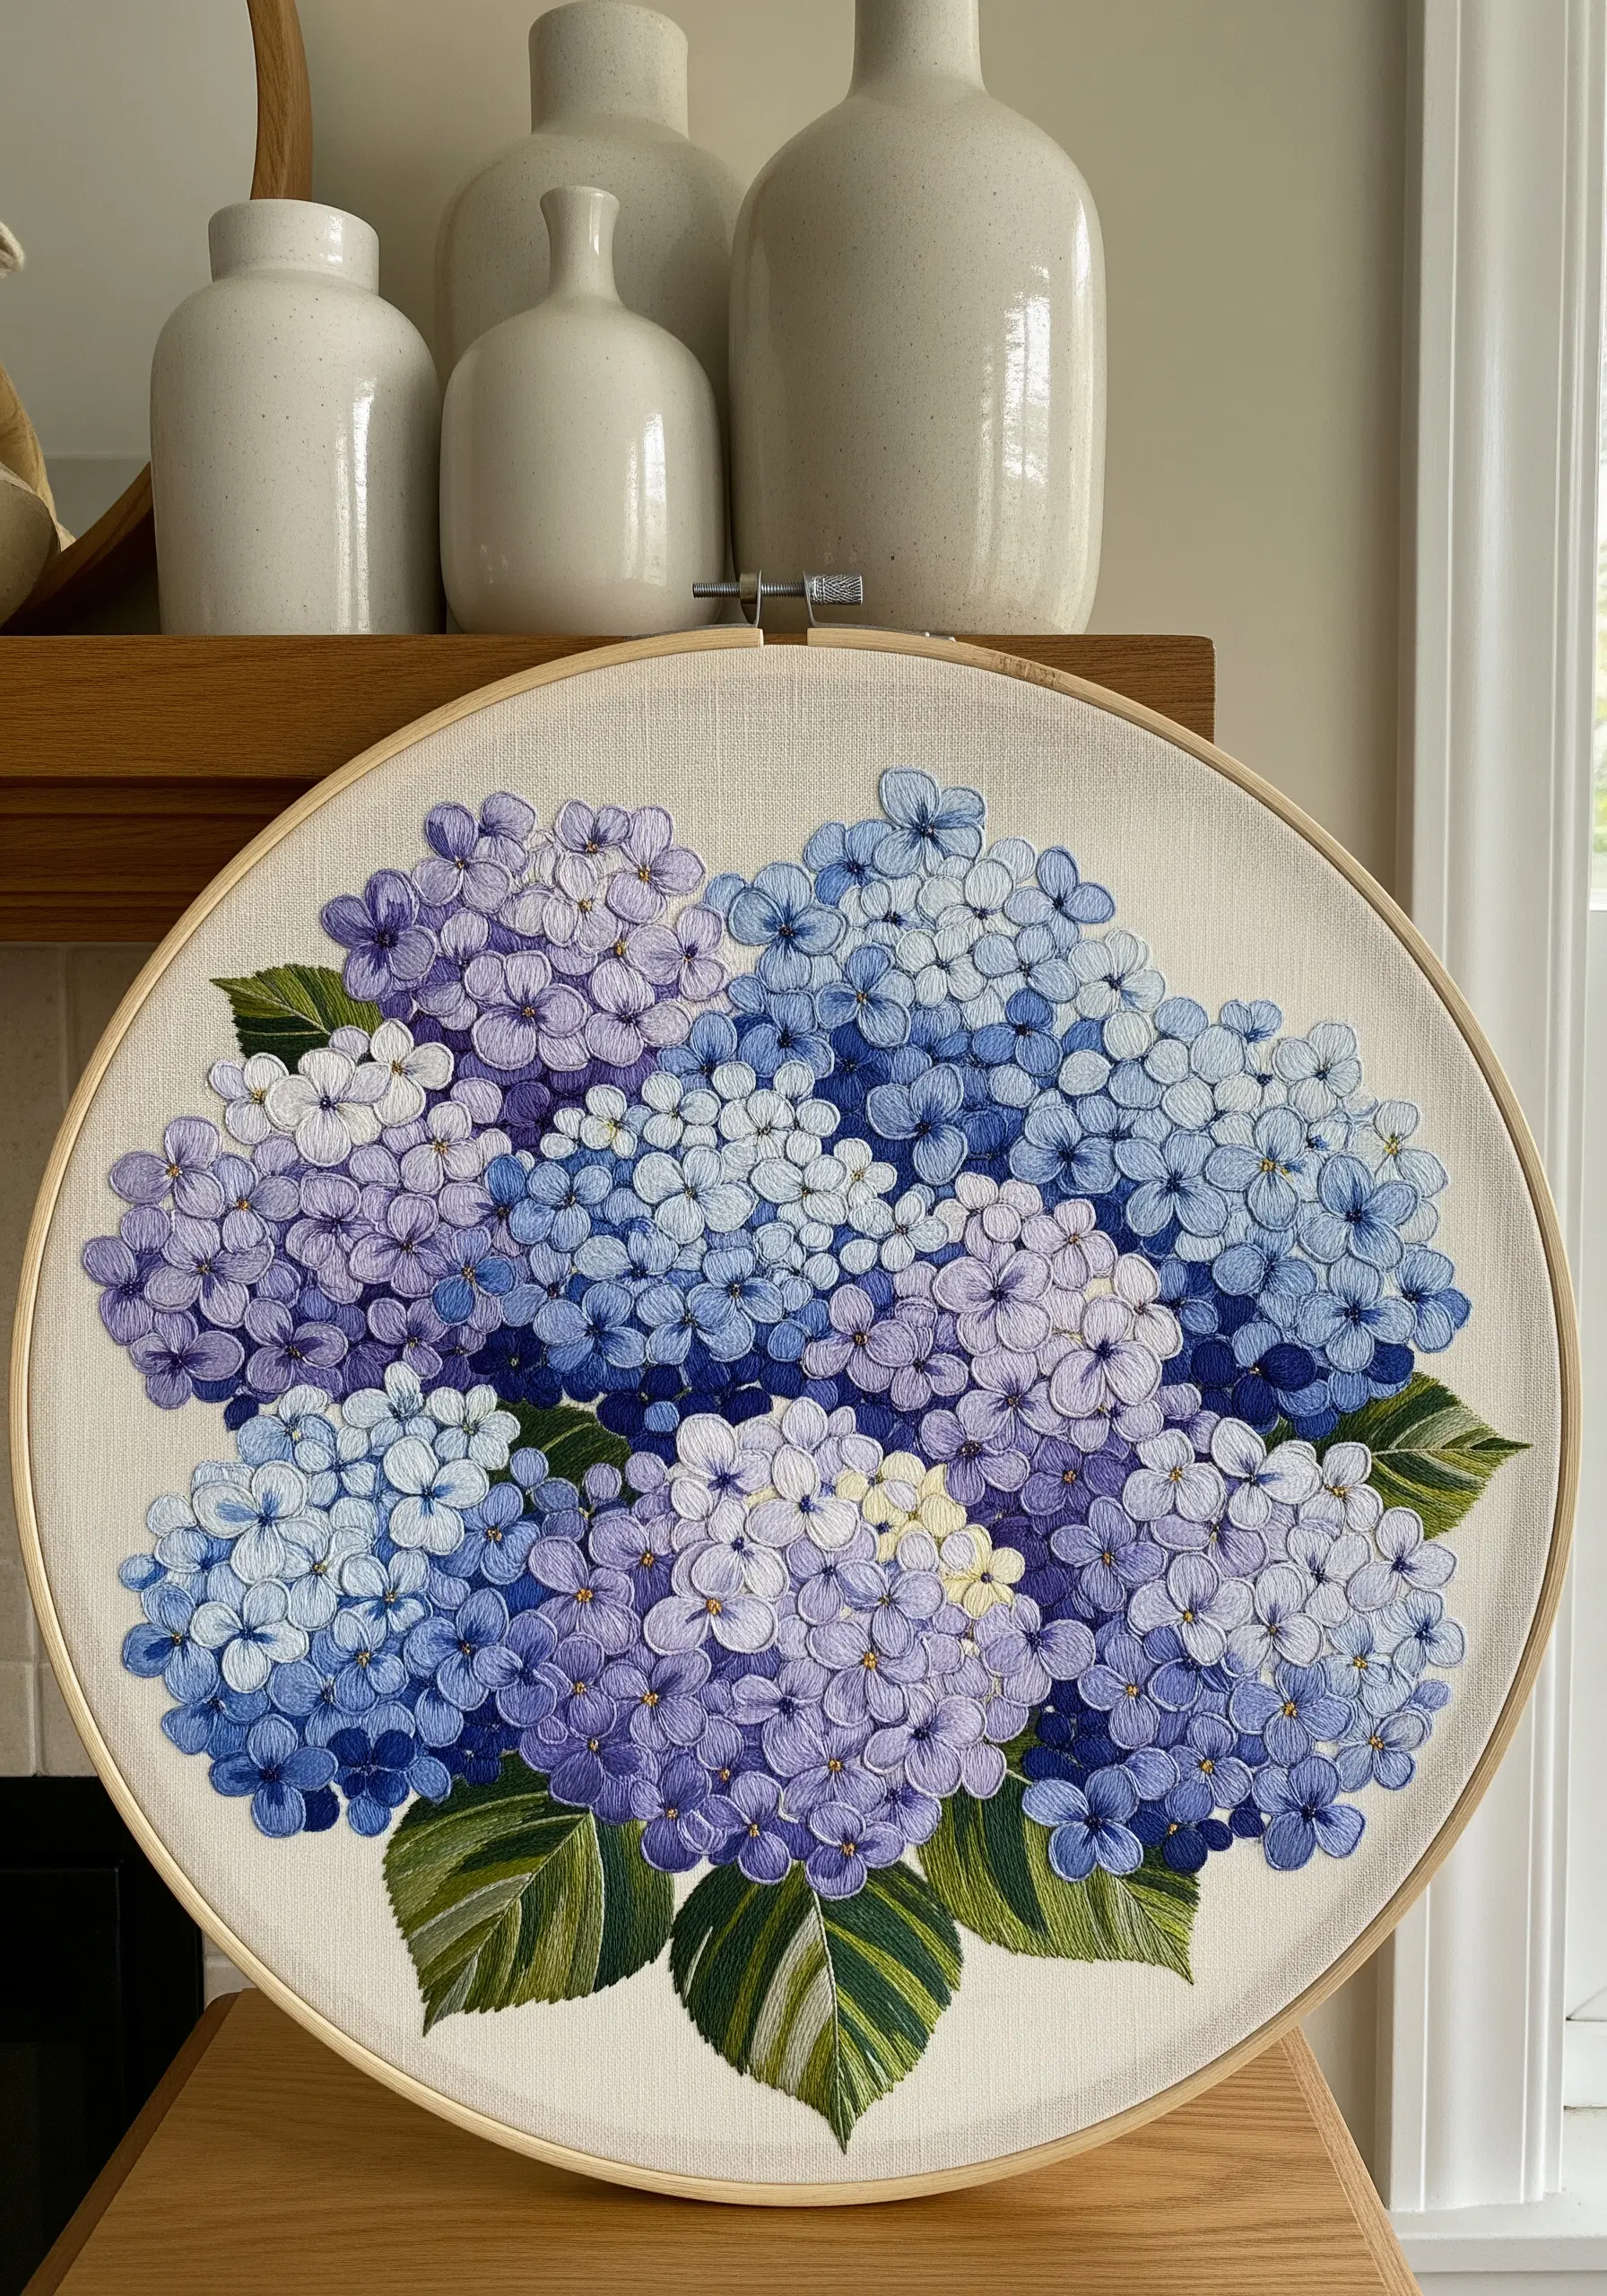
Replicate the dense, clustered blooms of hydrangeas by filling large shapes with hundreds of French or colonial knots.
To achieve a natural look, use three to four similar shades of blue and purple, varying them randomly throughout each cluster.
Stitch with only one or two strands of floss per knot; this keeps them delicate and defined, preventing them from merging into a bulky mass.
The surrounding leaves, stitched in variegated green thread, provide a calm contrast to the textured complexity of the flowers.
10. Illuminate Ferns on a Dark Canvas
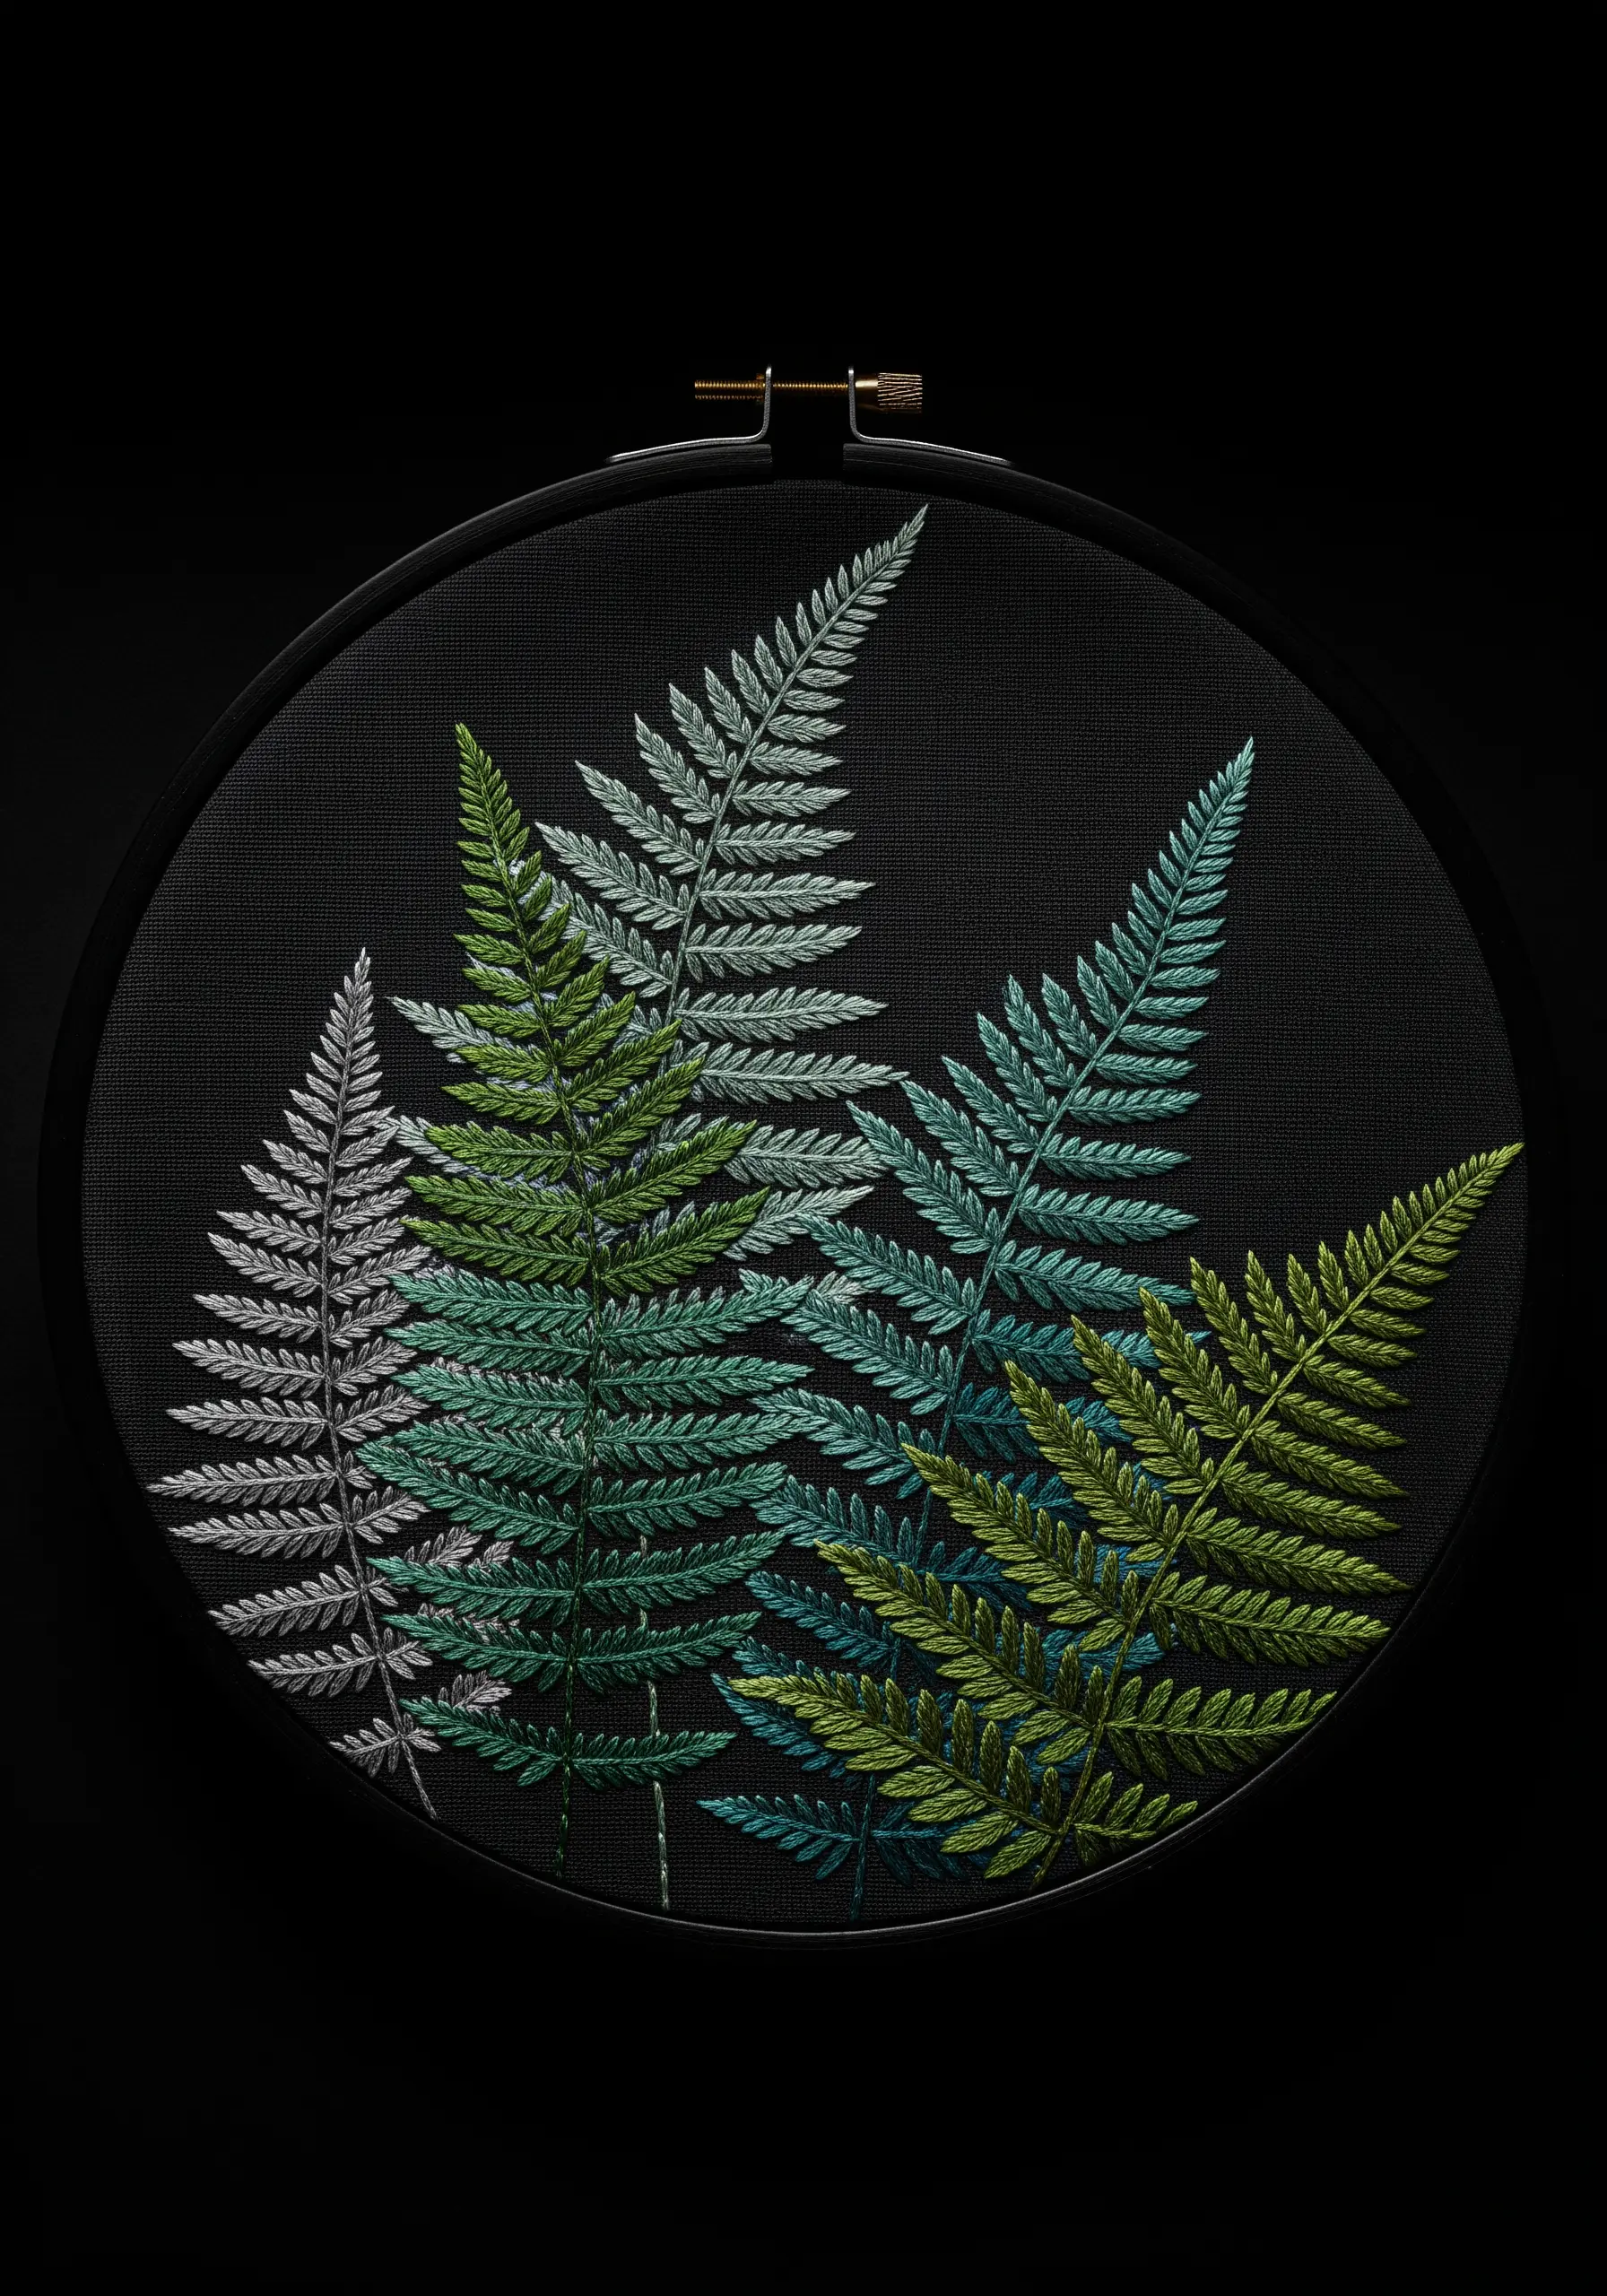
Create dramatic contrast and a sense of depth by stitching with cool-toned threads on black linen fabric.
Use fishbone stitch for the fern fronds to create a central vein and symmetrically angled leaves in one fluid motion.
To achieve a shaded, misty look, blend your greens with silver or pale grey threads within the same frond.
This high-contrast approach makes the thread colors appear more vibrant and gives the botanical forms a striking, graphic quality.
11. Amplify Color with a Painted Backdrop
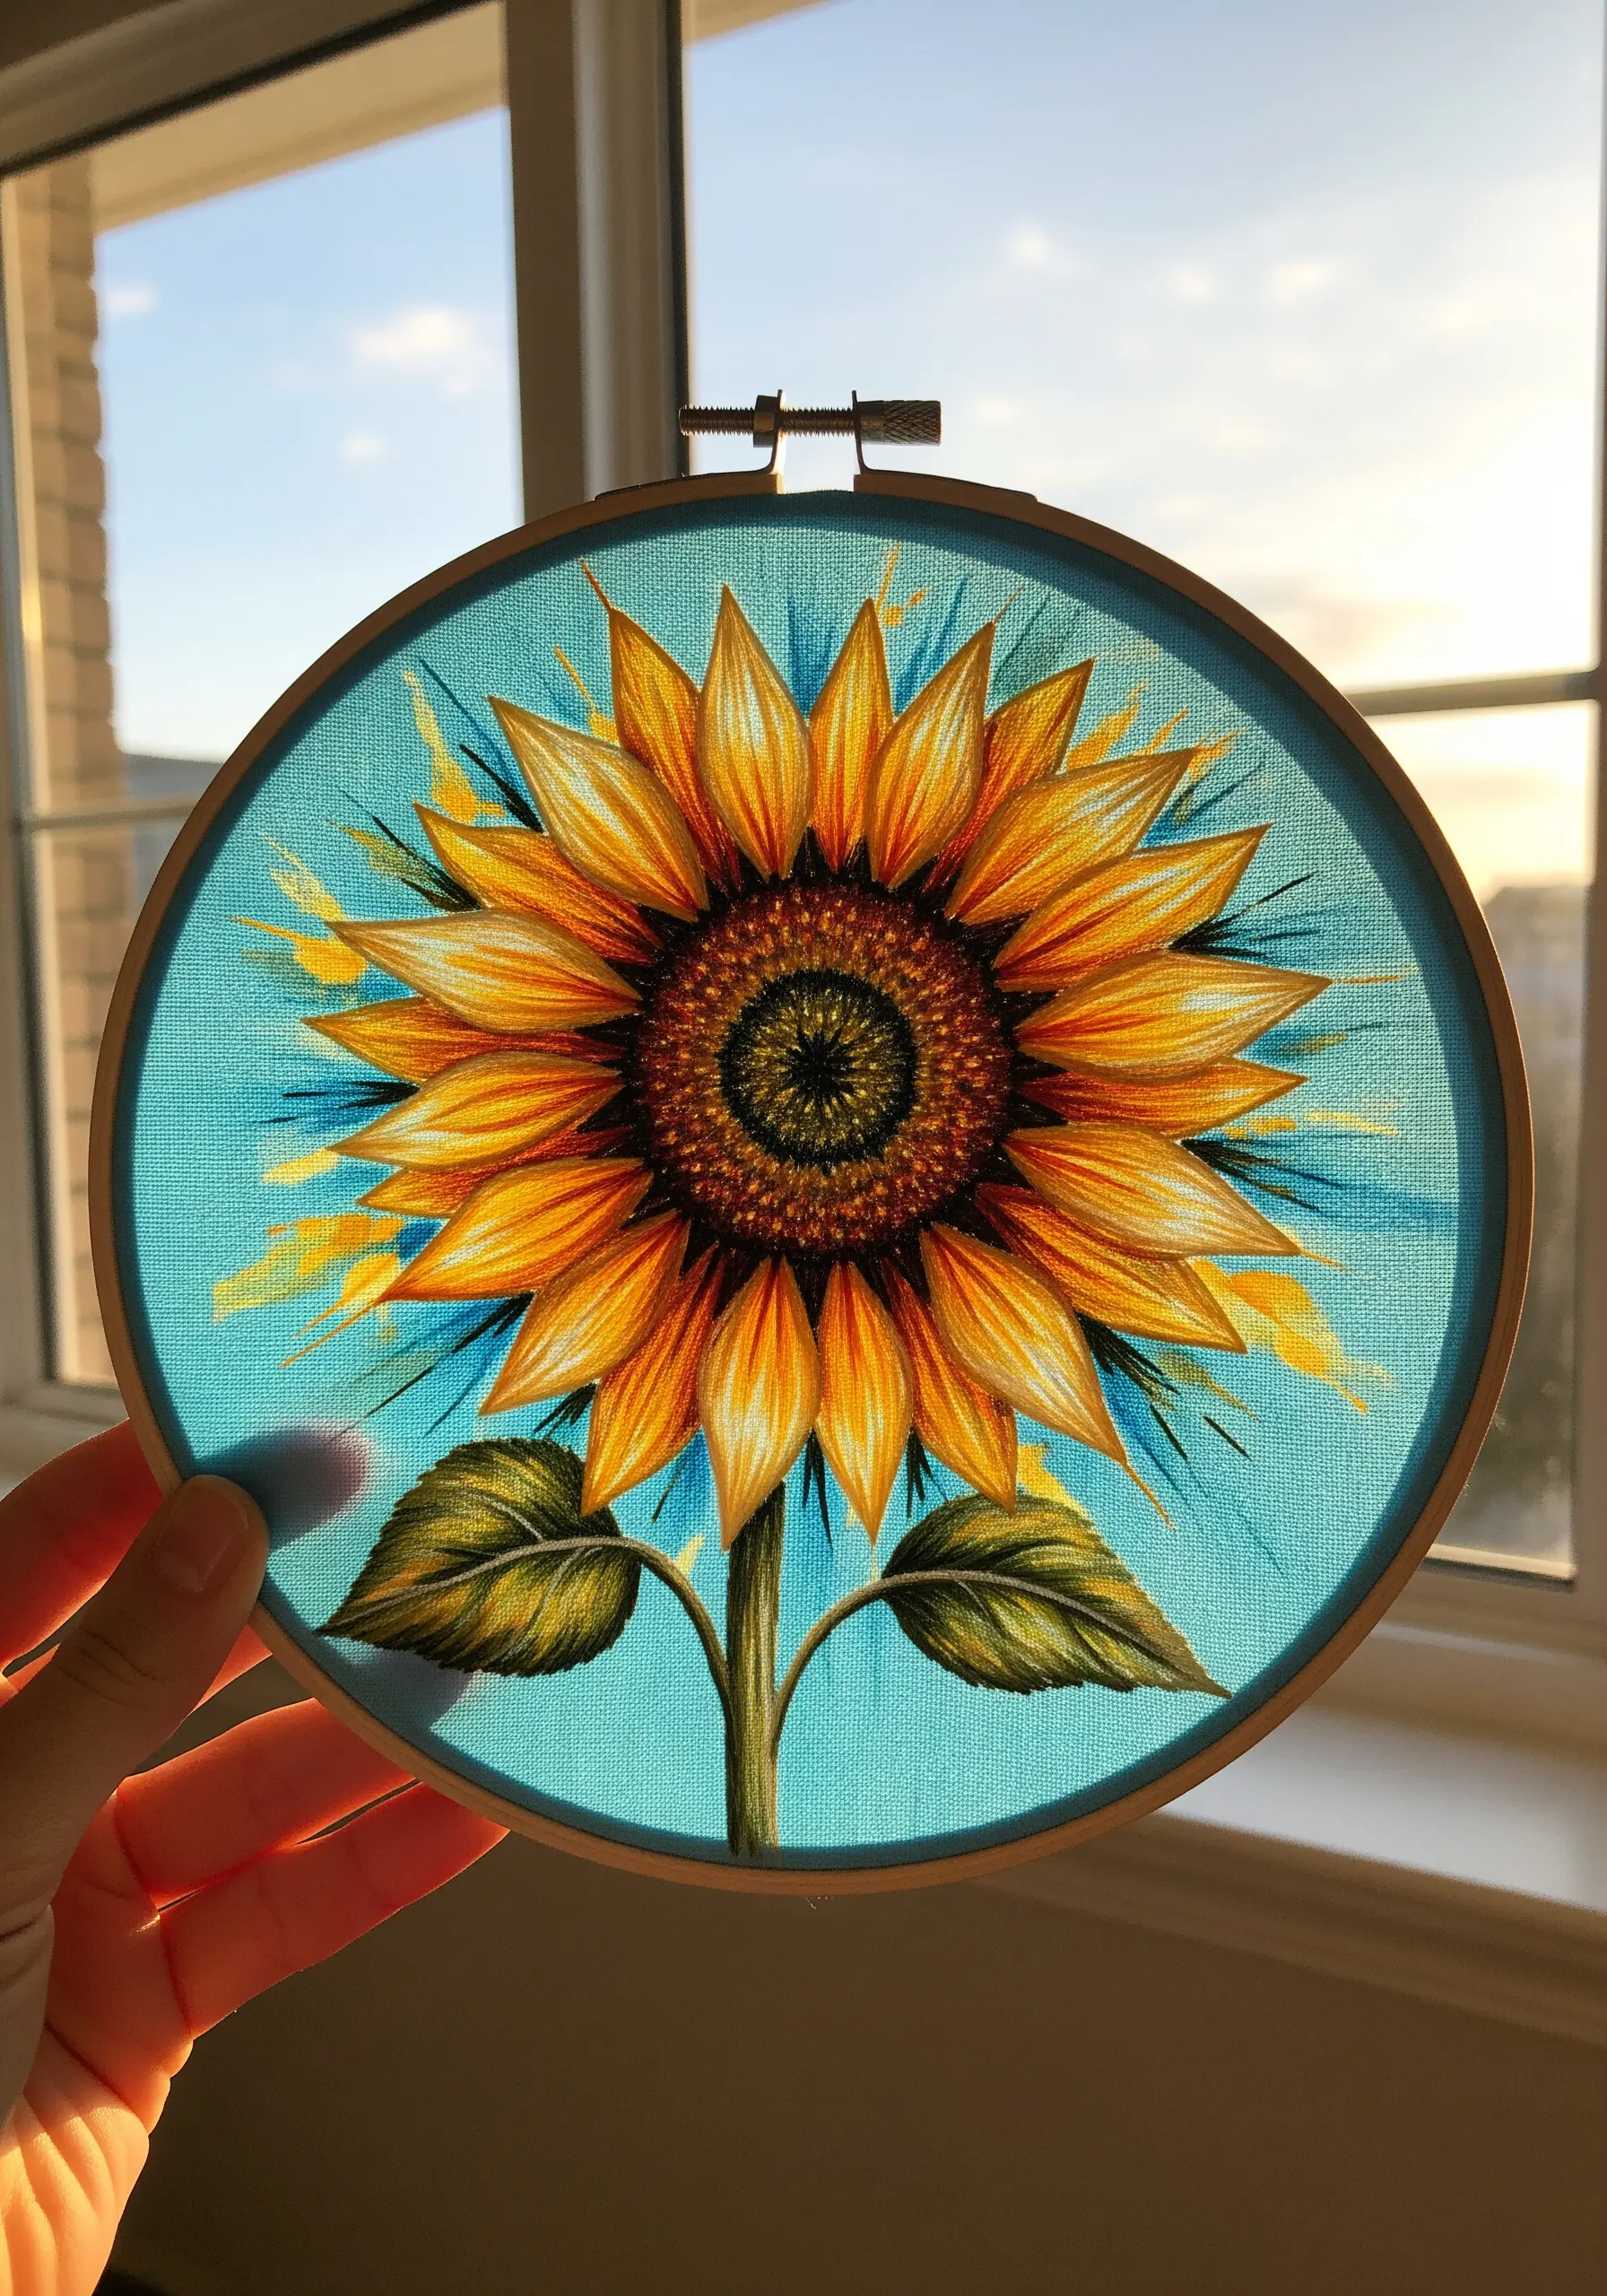
Make your stitched subject pop by surrounding it with a vibrant, expressive painted background.
Before you stitch, use fabric paints to create a bold, energetic backdrop that complements your thread colors—here, a radiant turquoise enhances the sunflower’s golden yellows.
Use embroidery to add the fine details and textures that paint cannot achieve, such as the dense French knot center and the sharp petal definition.
This mixed-media approach allows you to achieve a level of color saturation and dynamism that thread alone cannot provide.
12. Float Cosmos Petals on Sheer Tulle

Create an ethereal, floating effect by stitching your design on sheer organza or tulle instead of opaque fabric.
Use a water-soluble stabilizer to support your stitches, which you will wash away after the embroidery is complete.
Apply a delicate watercolor wash *after* stitching, carefully painting inside the lines to add a translucent blush of color to the fabric.
This technique separates the color from the stitches, resulting in dreamy and delicate hoop art where flowers seem suspended in mid-air.
13. Capture Motion with Dispersed Stitches
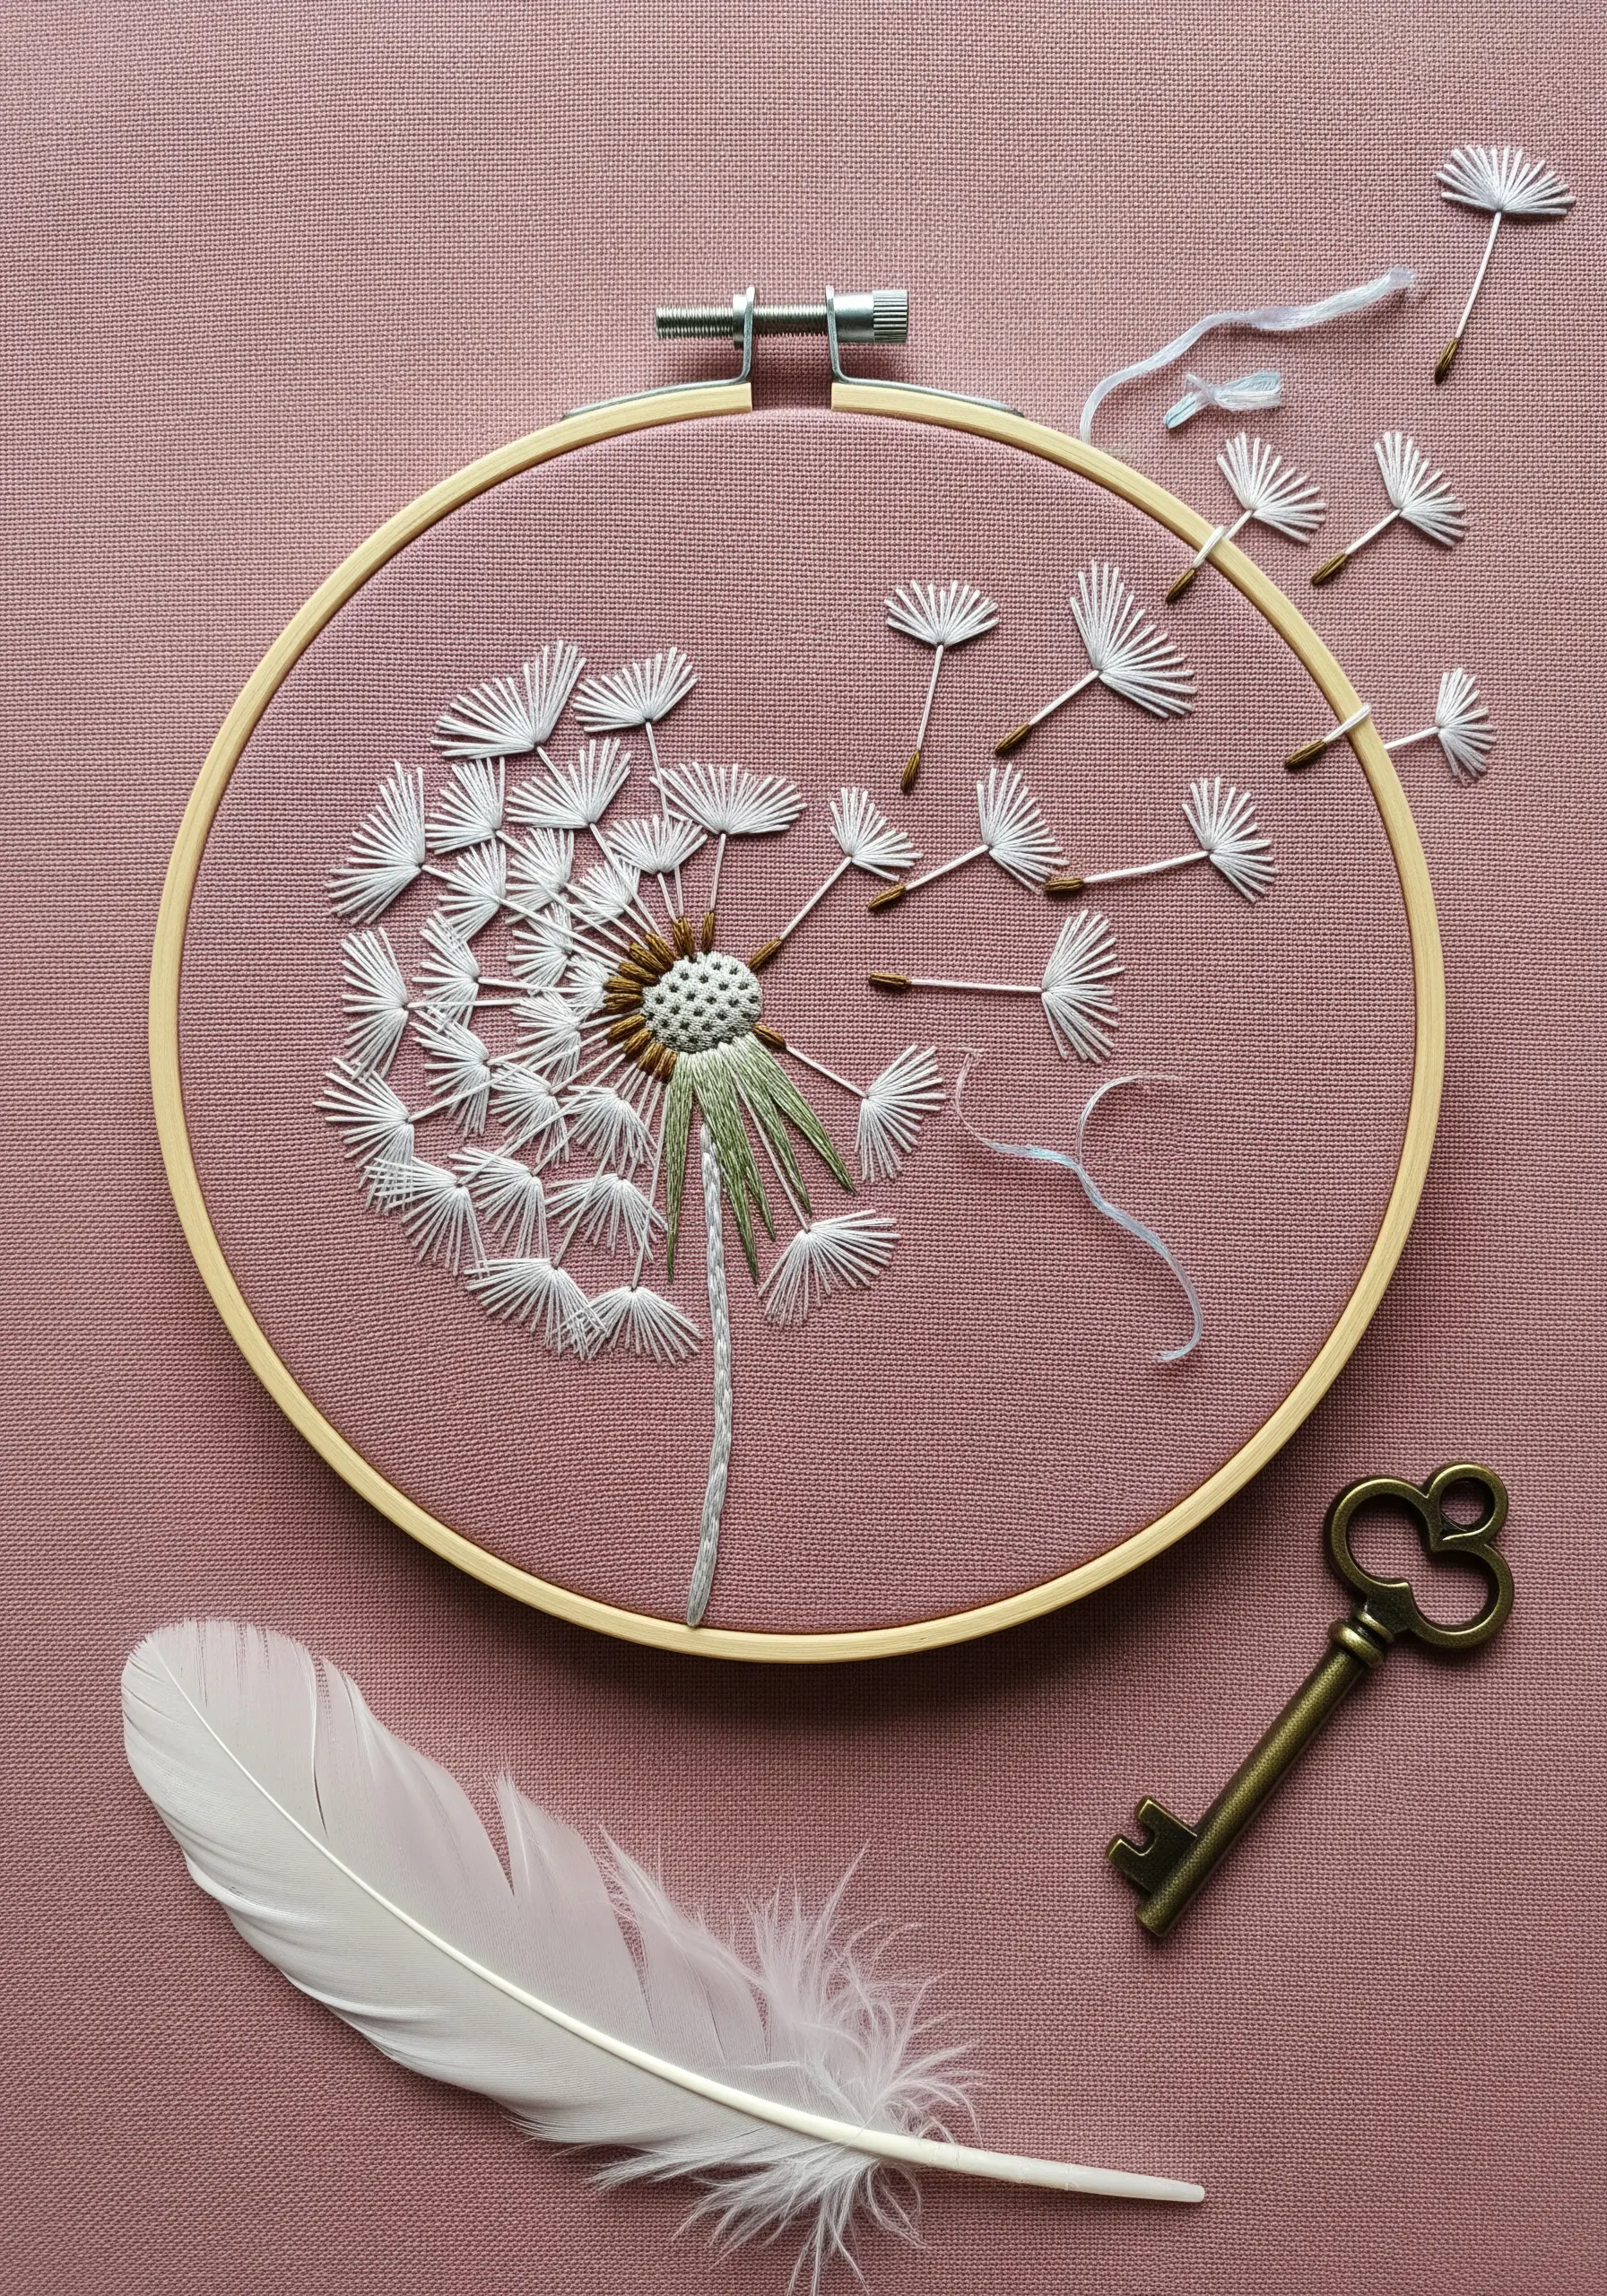
Illustrate movement, like dandelion seeds blowing in the wind, by thoughtfully arranging your stitches across the fabric.
Create each seed with a single straight stitch for the stem and a fan of three tiny straight stitches for the pappus.
To create the illusion of distance, stitch the seeds that are “floating” away with a single strand of floss, while using two strands for the main flower head.
You can even couch a single, untwisted strand of floss in a swirling path to represent the invisible current of wind.
14. Bleed Colors with a Dripping Gradient
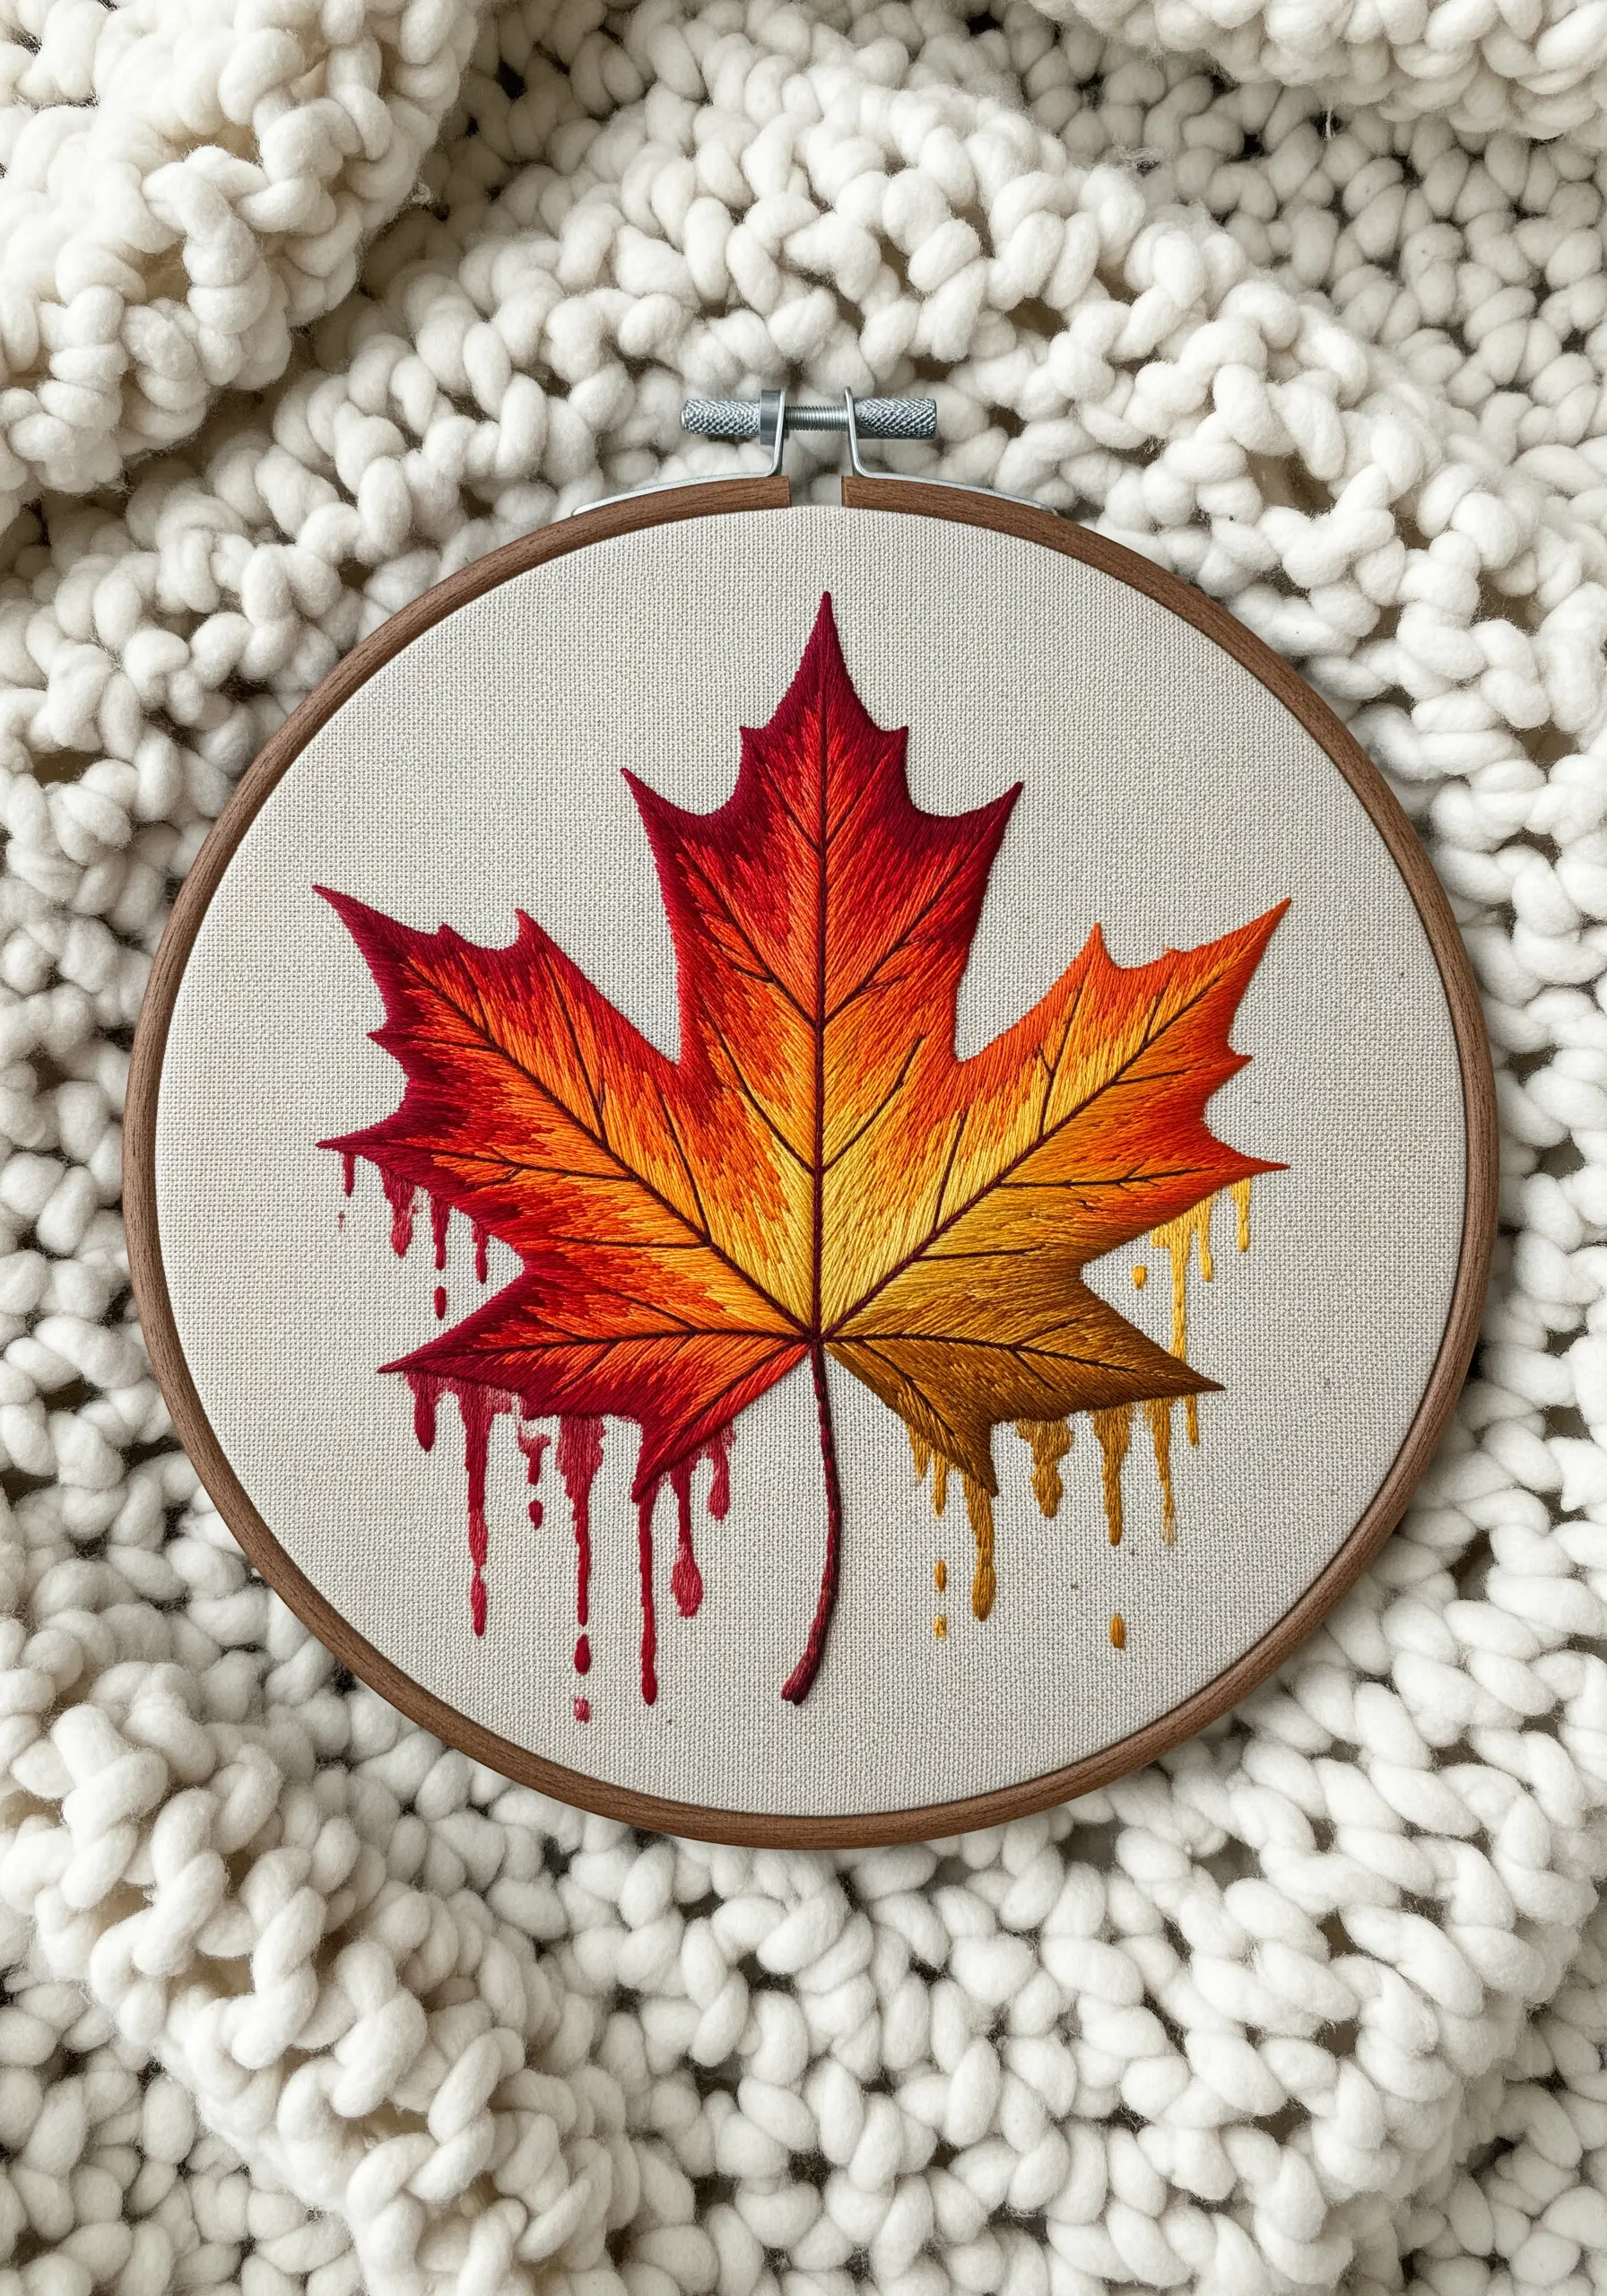
Add a modern, graphic twist to traditional thread painting by incorporating a ‘dripping paint’ effect.
Create a seamless gradient on the maple leaf using long-and-short stitches, blending from deep red through orange to golden yellow.
For the drips, use long, vertical satin stitches of varying lengths, allowing the colors to pool and bleed downwards from the leaf’s edge.
This artistic choice merges the precision of botanical embroidery with the fluid, unpredictable energy of watercolor painting.
15. Define Soft Succulents with Crisp Outlines

When working with soft, blended colors, a sharp outline can provide essential structure and clarity.
Fill in the succulent petals with a gentle gradient of greens and purples using a satin or long-and-short stitch.
Then, use a single strand of black or dark grey thread to carefully outline each plant with a precise split stitch or backstitch.
This technique contains the soft color fills, giving the entire composition a clean, illustrative quality that prevents the muted tones from looking muddy.
16. Convey Petal Texture with Stitch Angles
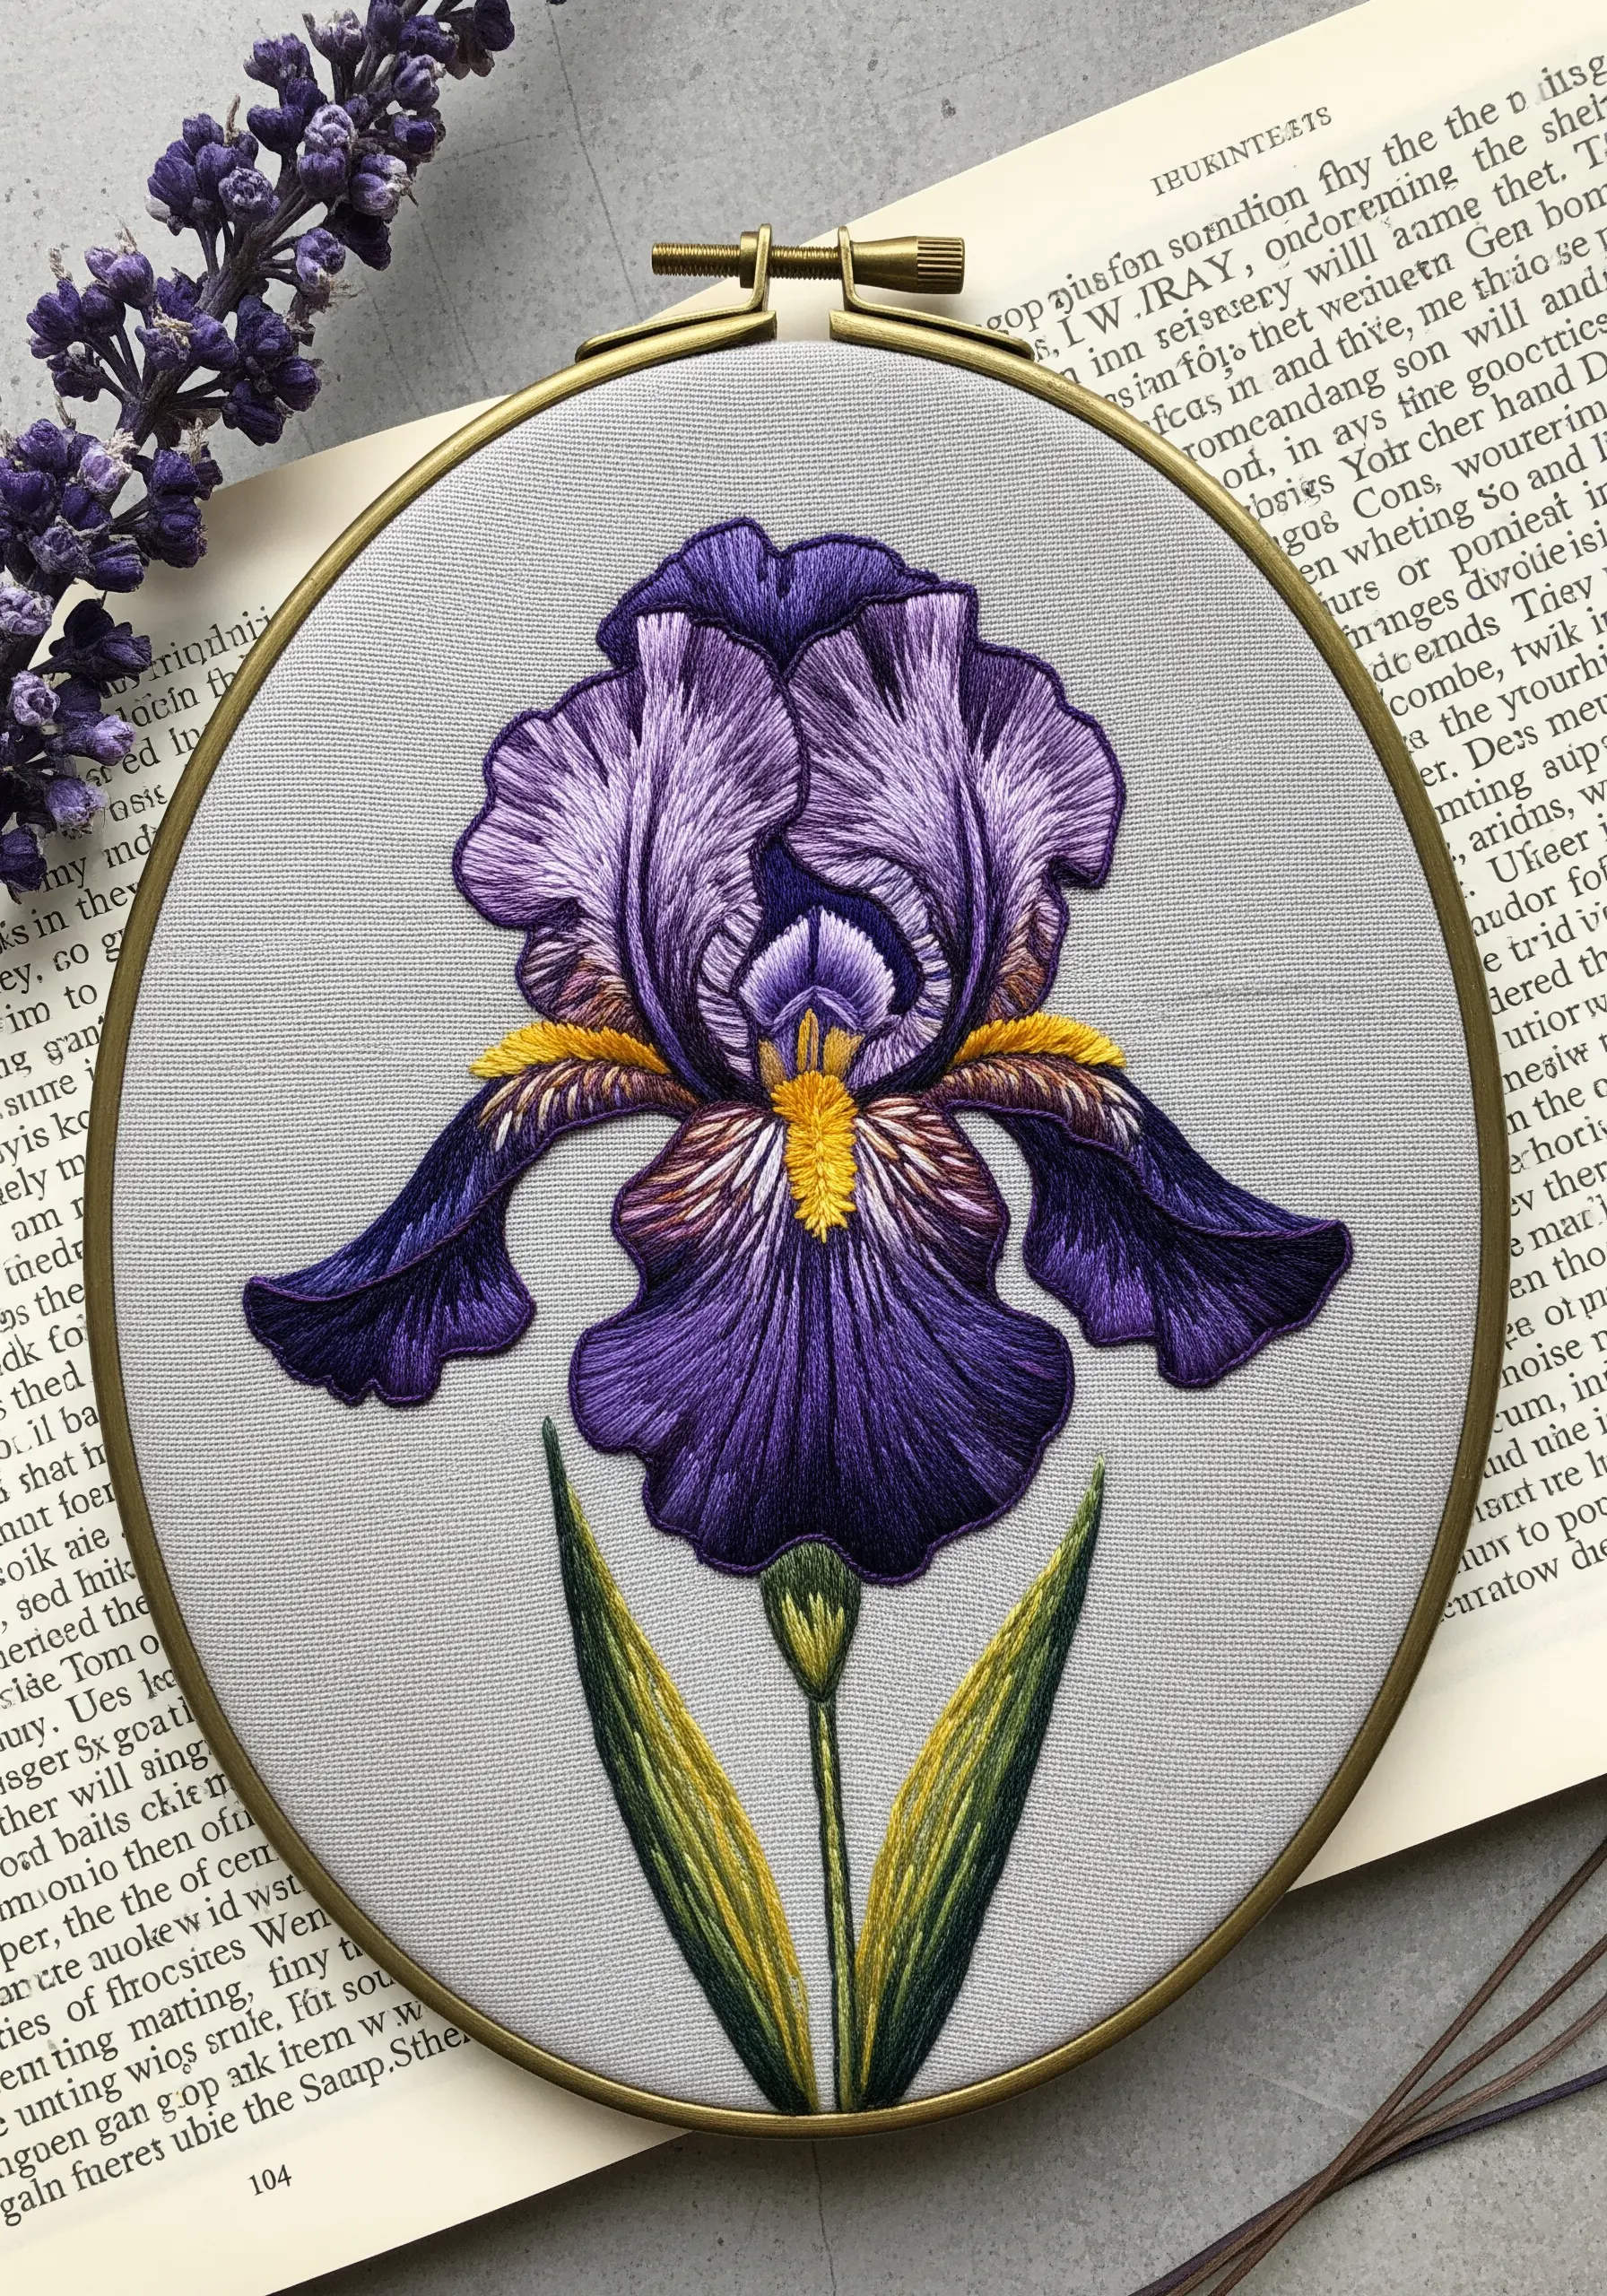
Mimic the velvety, ruffled texture of an iris by carefully controlling the direction of your long-and-short stitches.
For the upright, ruffled ‘standards,’ use shorter, slightly curved stitches to suggest folded texture.
For the cascading ‘falls,’ use long, sweeping stitches that flow downwards from the center, following the elegant droop of the petal.
Using a thread with a natural sheen, like silk or rayon, will further enhance the light-catching qualities of the flower’s surface.
17. Juxtapose Textures for Botanical Realism

Create a more engaging piece by pairing different stitch textures that reflect their real-life counterparts.
For the Scottish thistle, use a dense turkey stitch (cut loops) for the fluffy purple top and a sharp fishbone stitch for the spiky green bracts.
Contrast this with the surrounding heather, created with soft, round Colonial knots in a delicate pink.
This deliberate contrast in texture makes each element more distinct and adds a tactile, three-dimensional quality to the botanical hoop art.
18. Create Depth in Foliage with Color Temperature
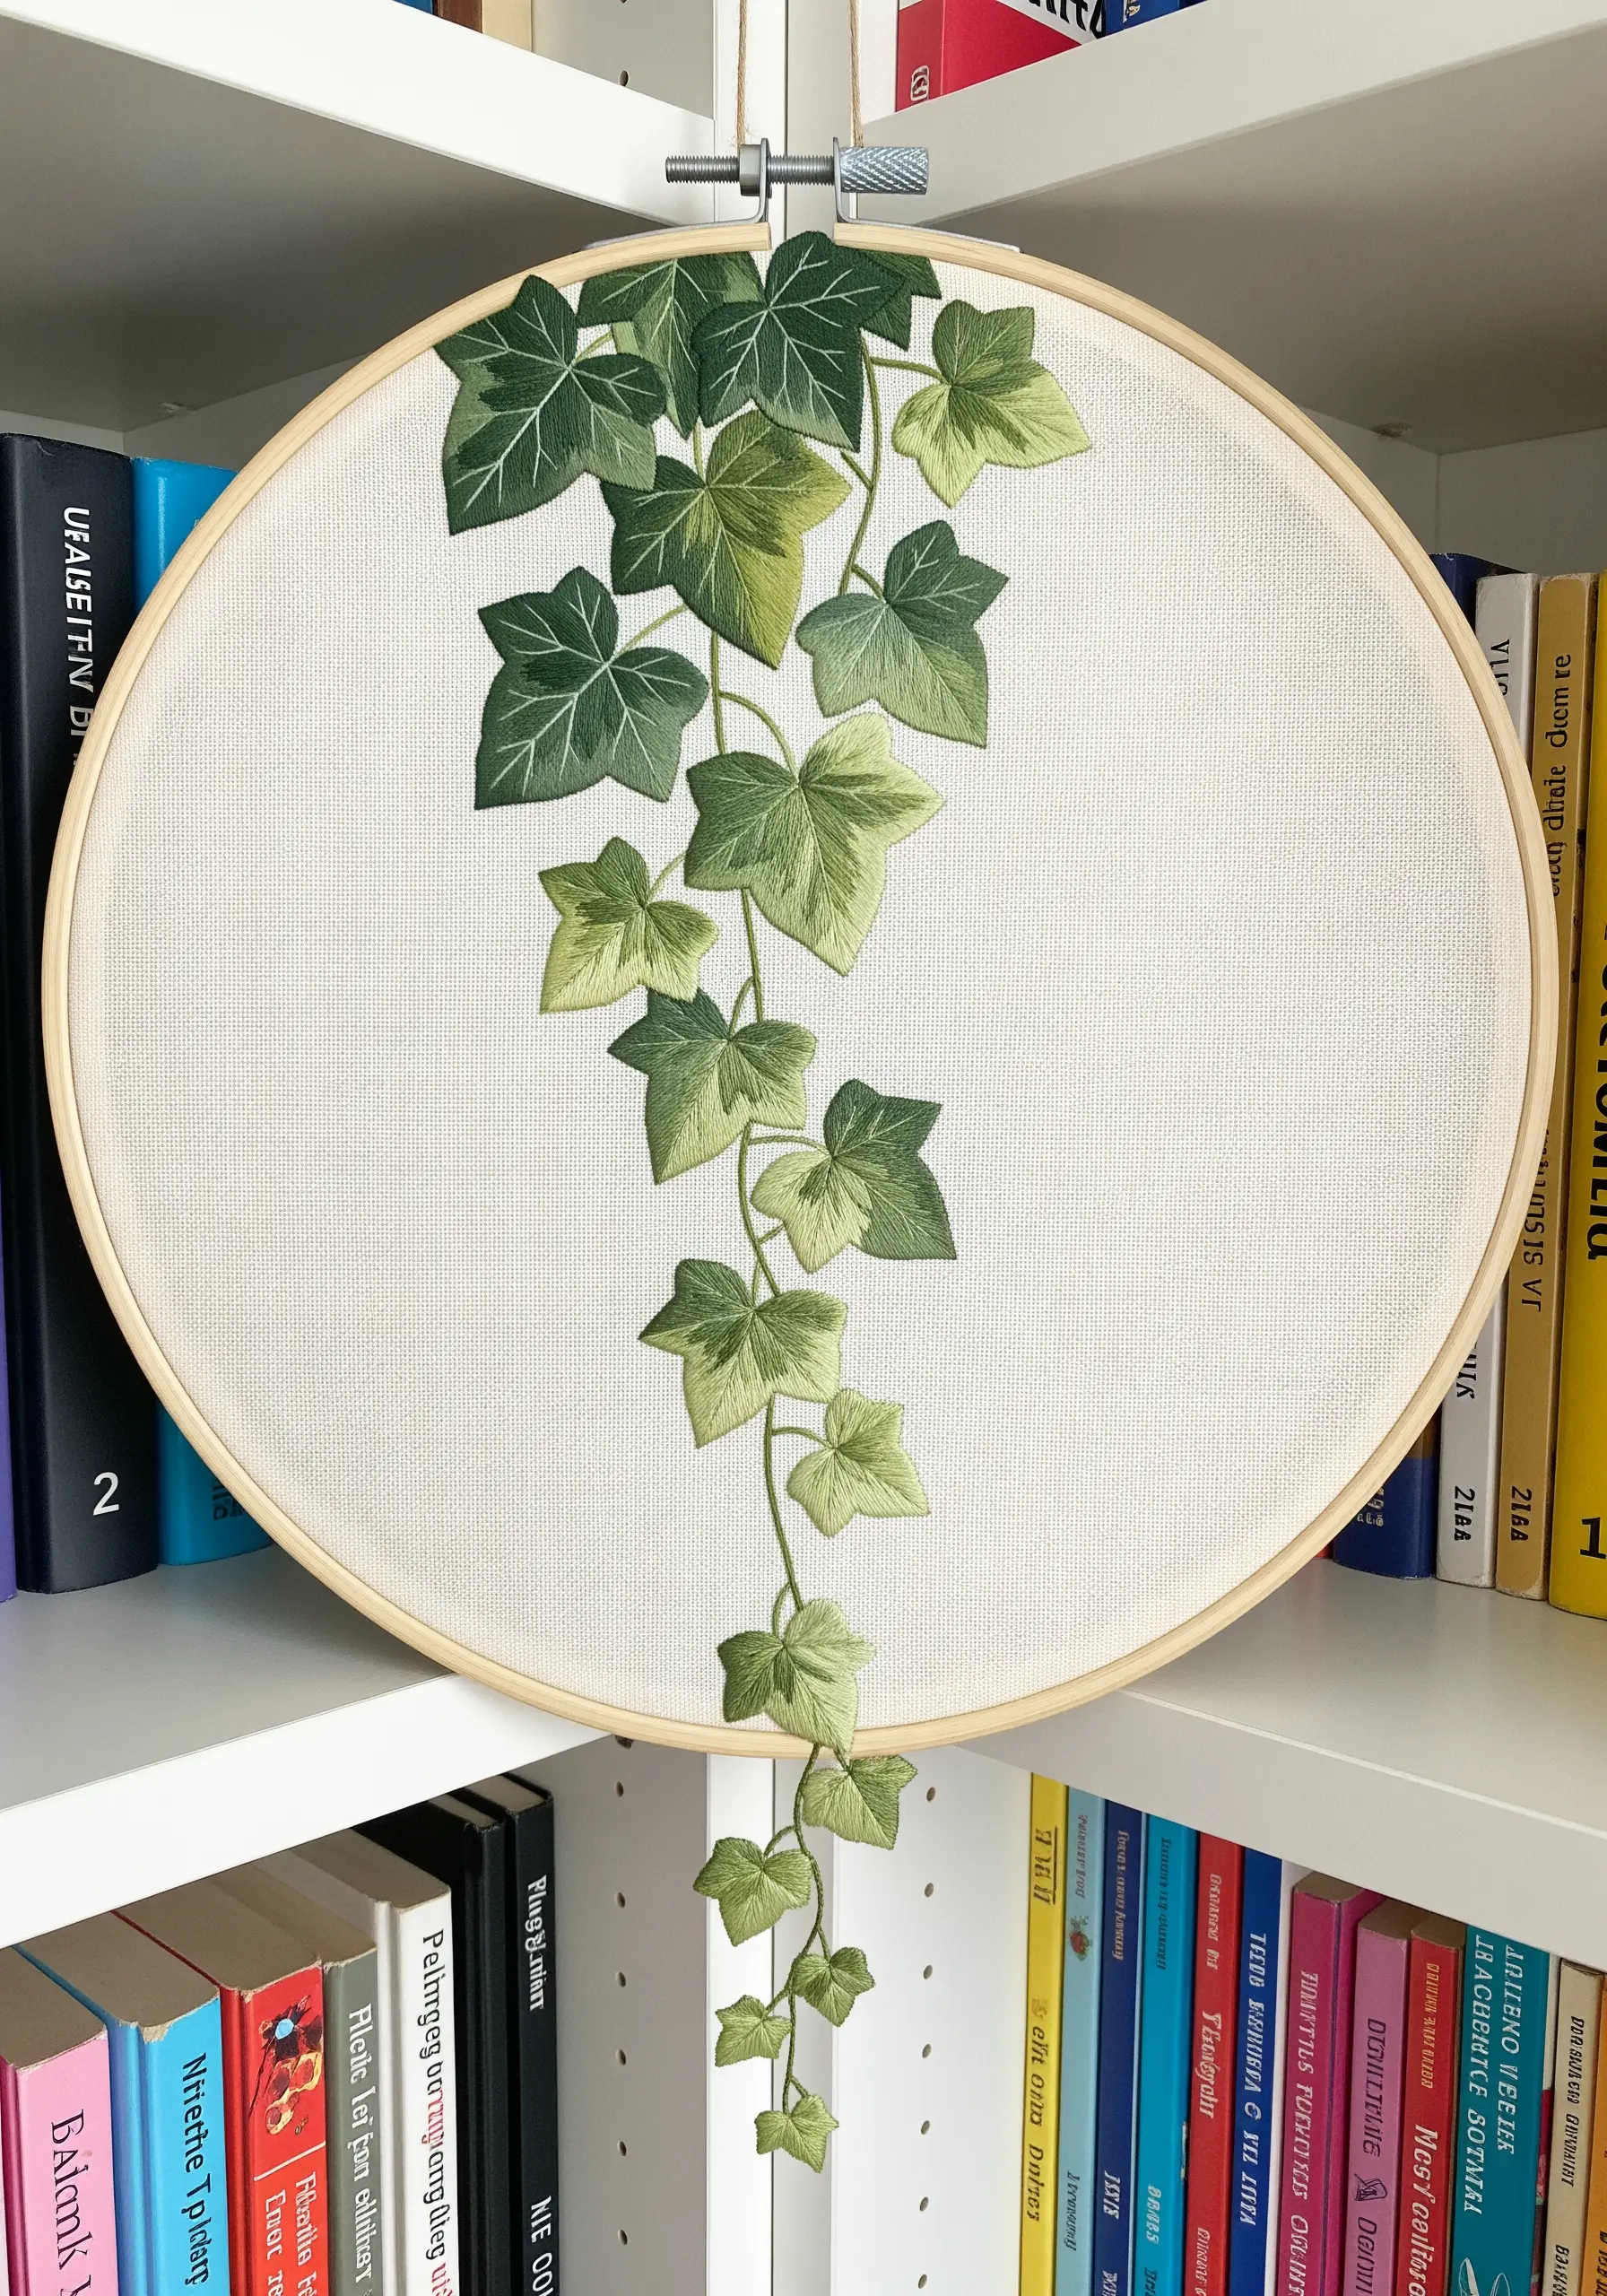
To make a simple ivy vine look three-dimensional, use color temperature to create layers of depth.
Stitch the leaves that appear to be in the background or shadow using cooler, darker greens with blue undertones.
For the leaves in the foreground, switch to brighter, warmer greens with yellow undertones to make them advance visually.
This subtle color strategy tricks the eye into seeing depth and dimension, even in a relatively flat composition.
19. Shade White Petals with Subtle Greys
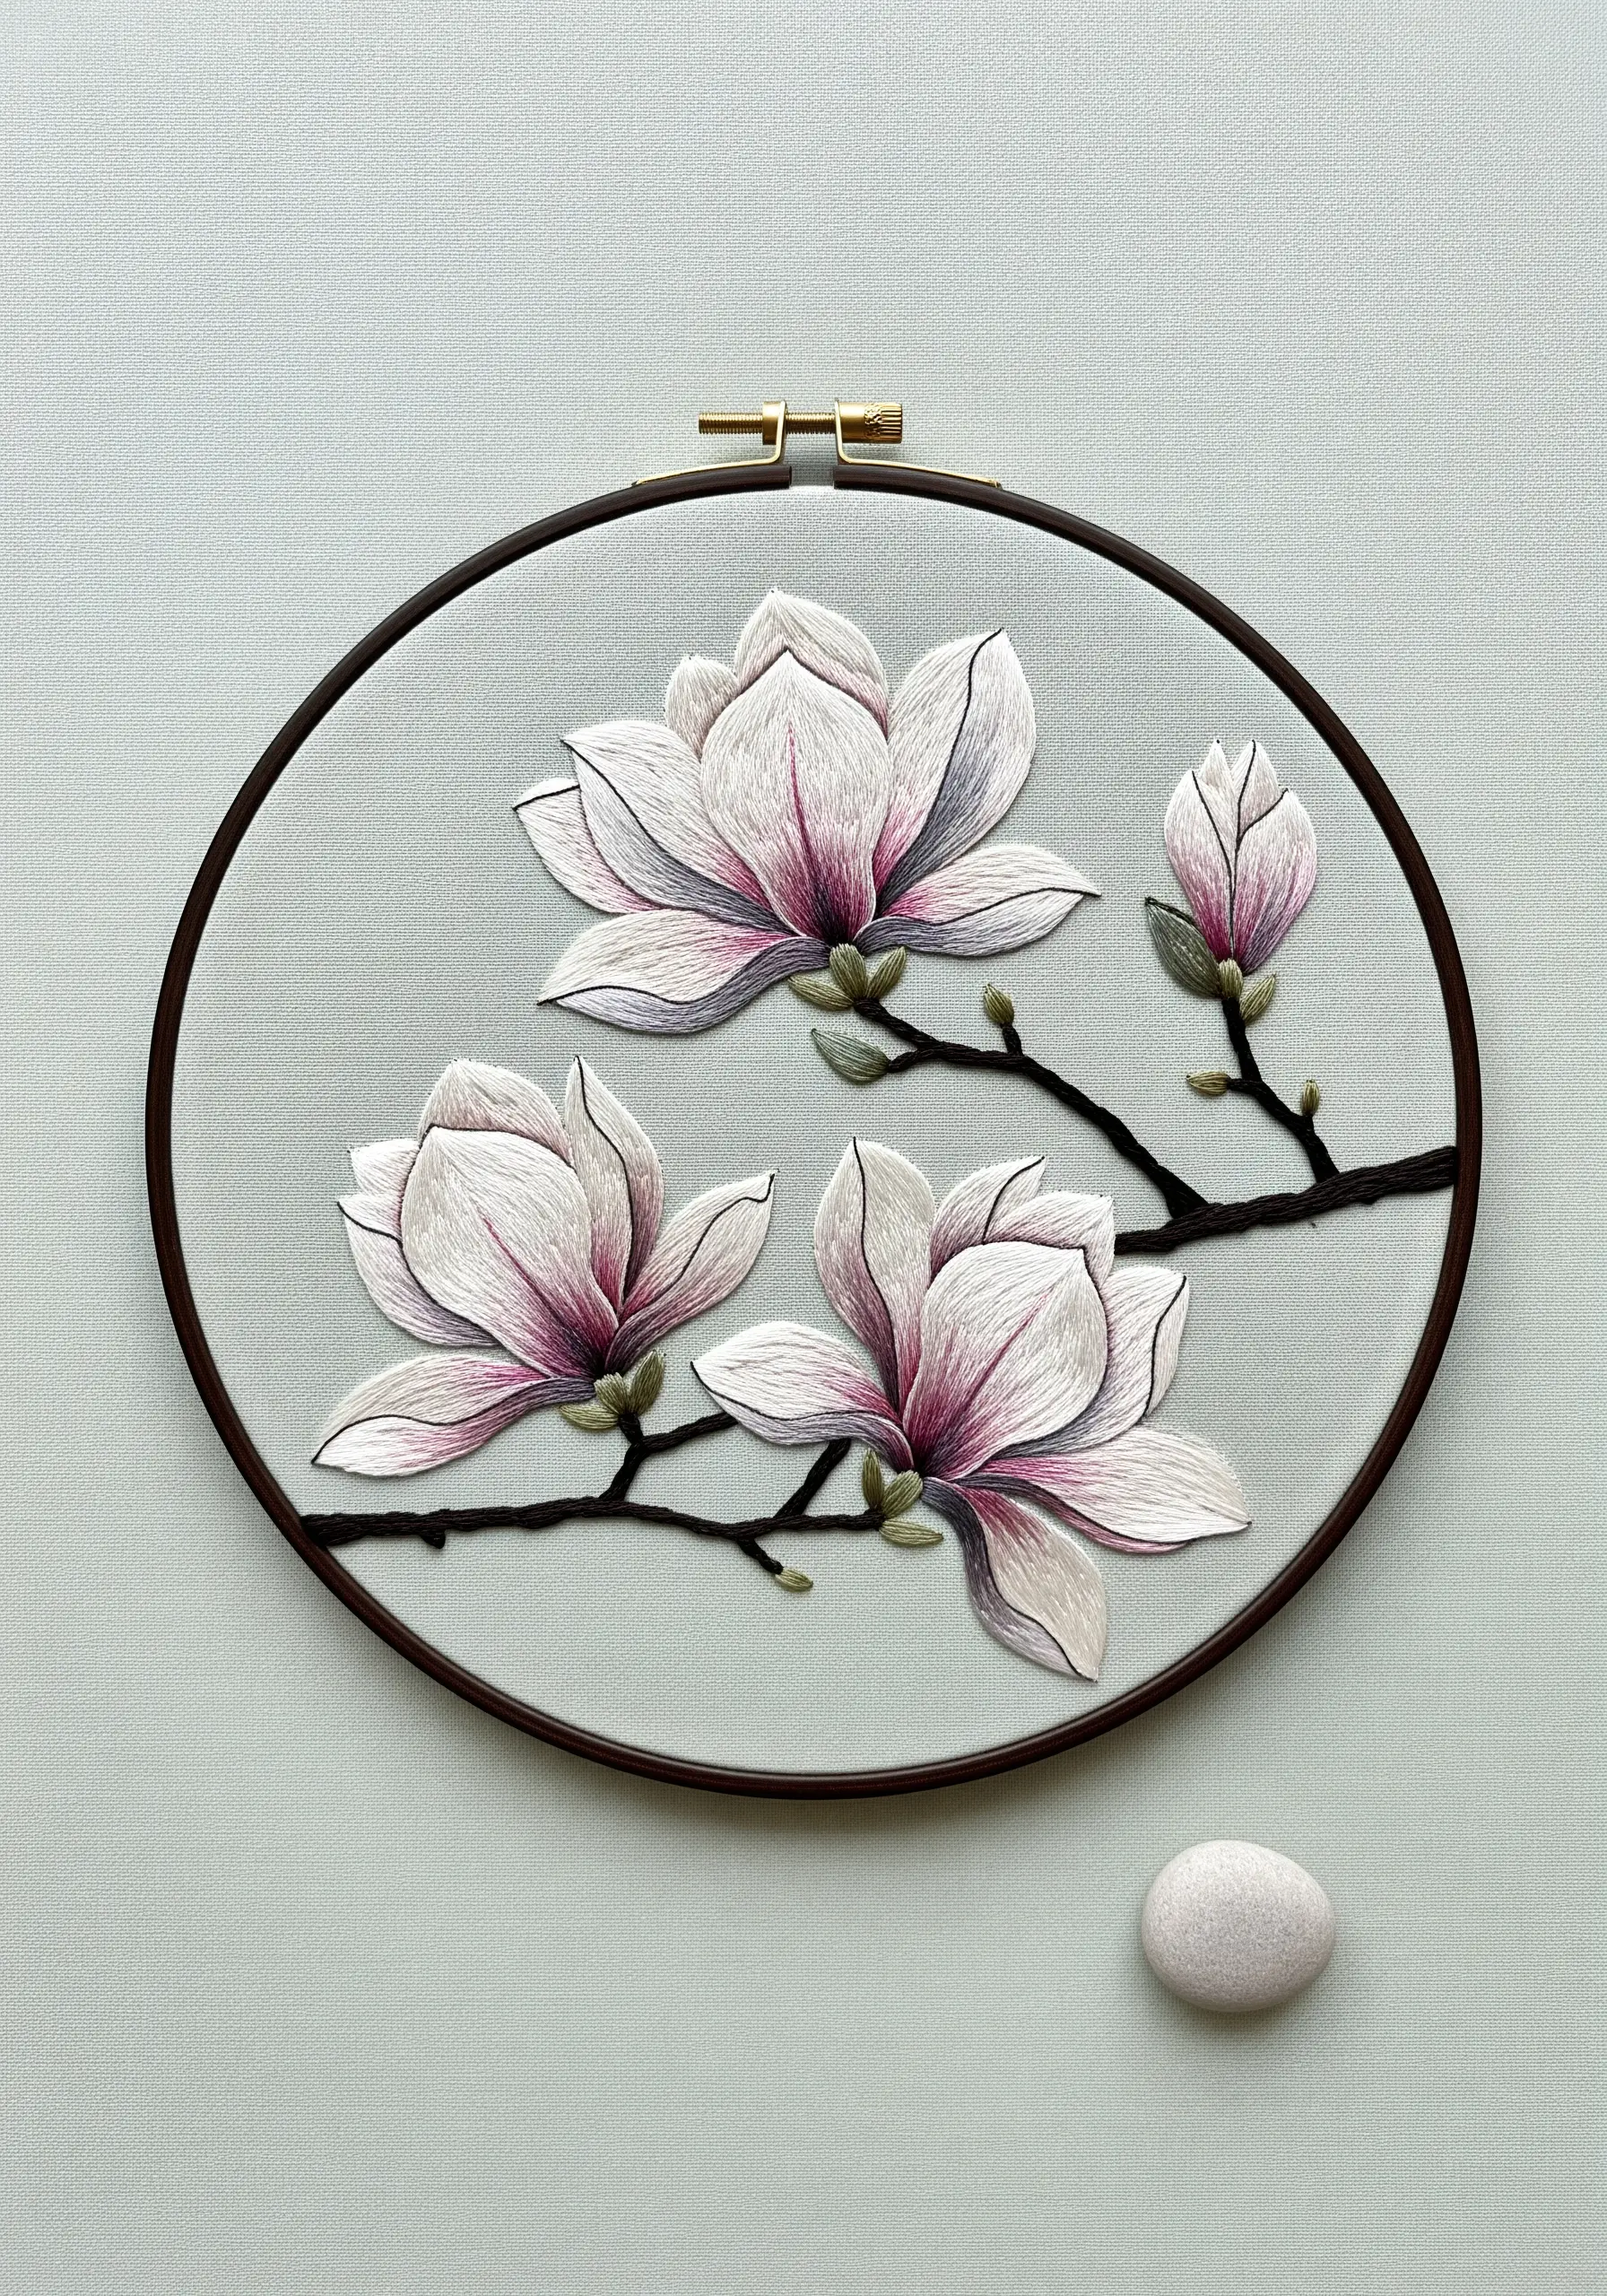
Stitching white flowers on a light background requires a subtle approach to shading to create form.
Instead of using black or dark colors, which can look harsh, use pale greys and muted lilacs to define the shadows on magnolia petals.
Concentrate these subtle shading stitches at the base of the petals and in the areas where they overlap.
This creates a soft, realistic dimension that defines the flower’s shape without compromising its delicate, ethereal quality.
20. Imply Distance with Varied Detail

To create a sense of a field fading into the distance, gradually reduce the detail and texture of your stitches.
In the foreground, stitch your bluebells with more complex stitches like bullion knots and distinct lazy daisies for individual blooms.
As you move towards the background, transition to simpler straight stitches and French knots, using fewer strands and lighter, blended colors.
This atmospheric perspective technique draws the viewer into the scene, creating an immersive and believable floral landscape.
21. Use Highlights to Create a Dewy Effect
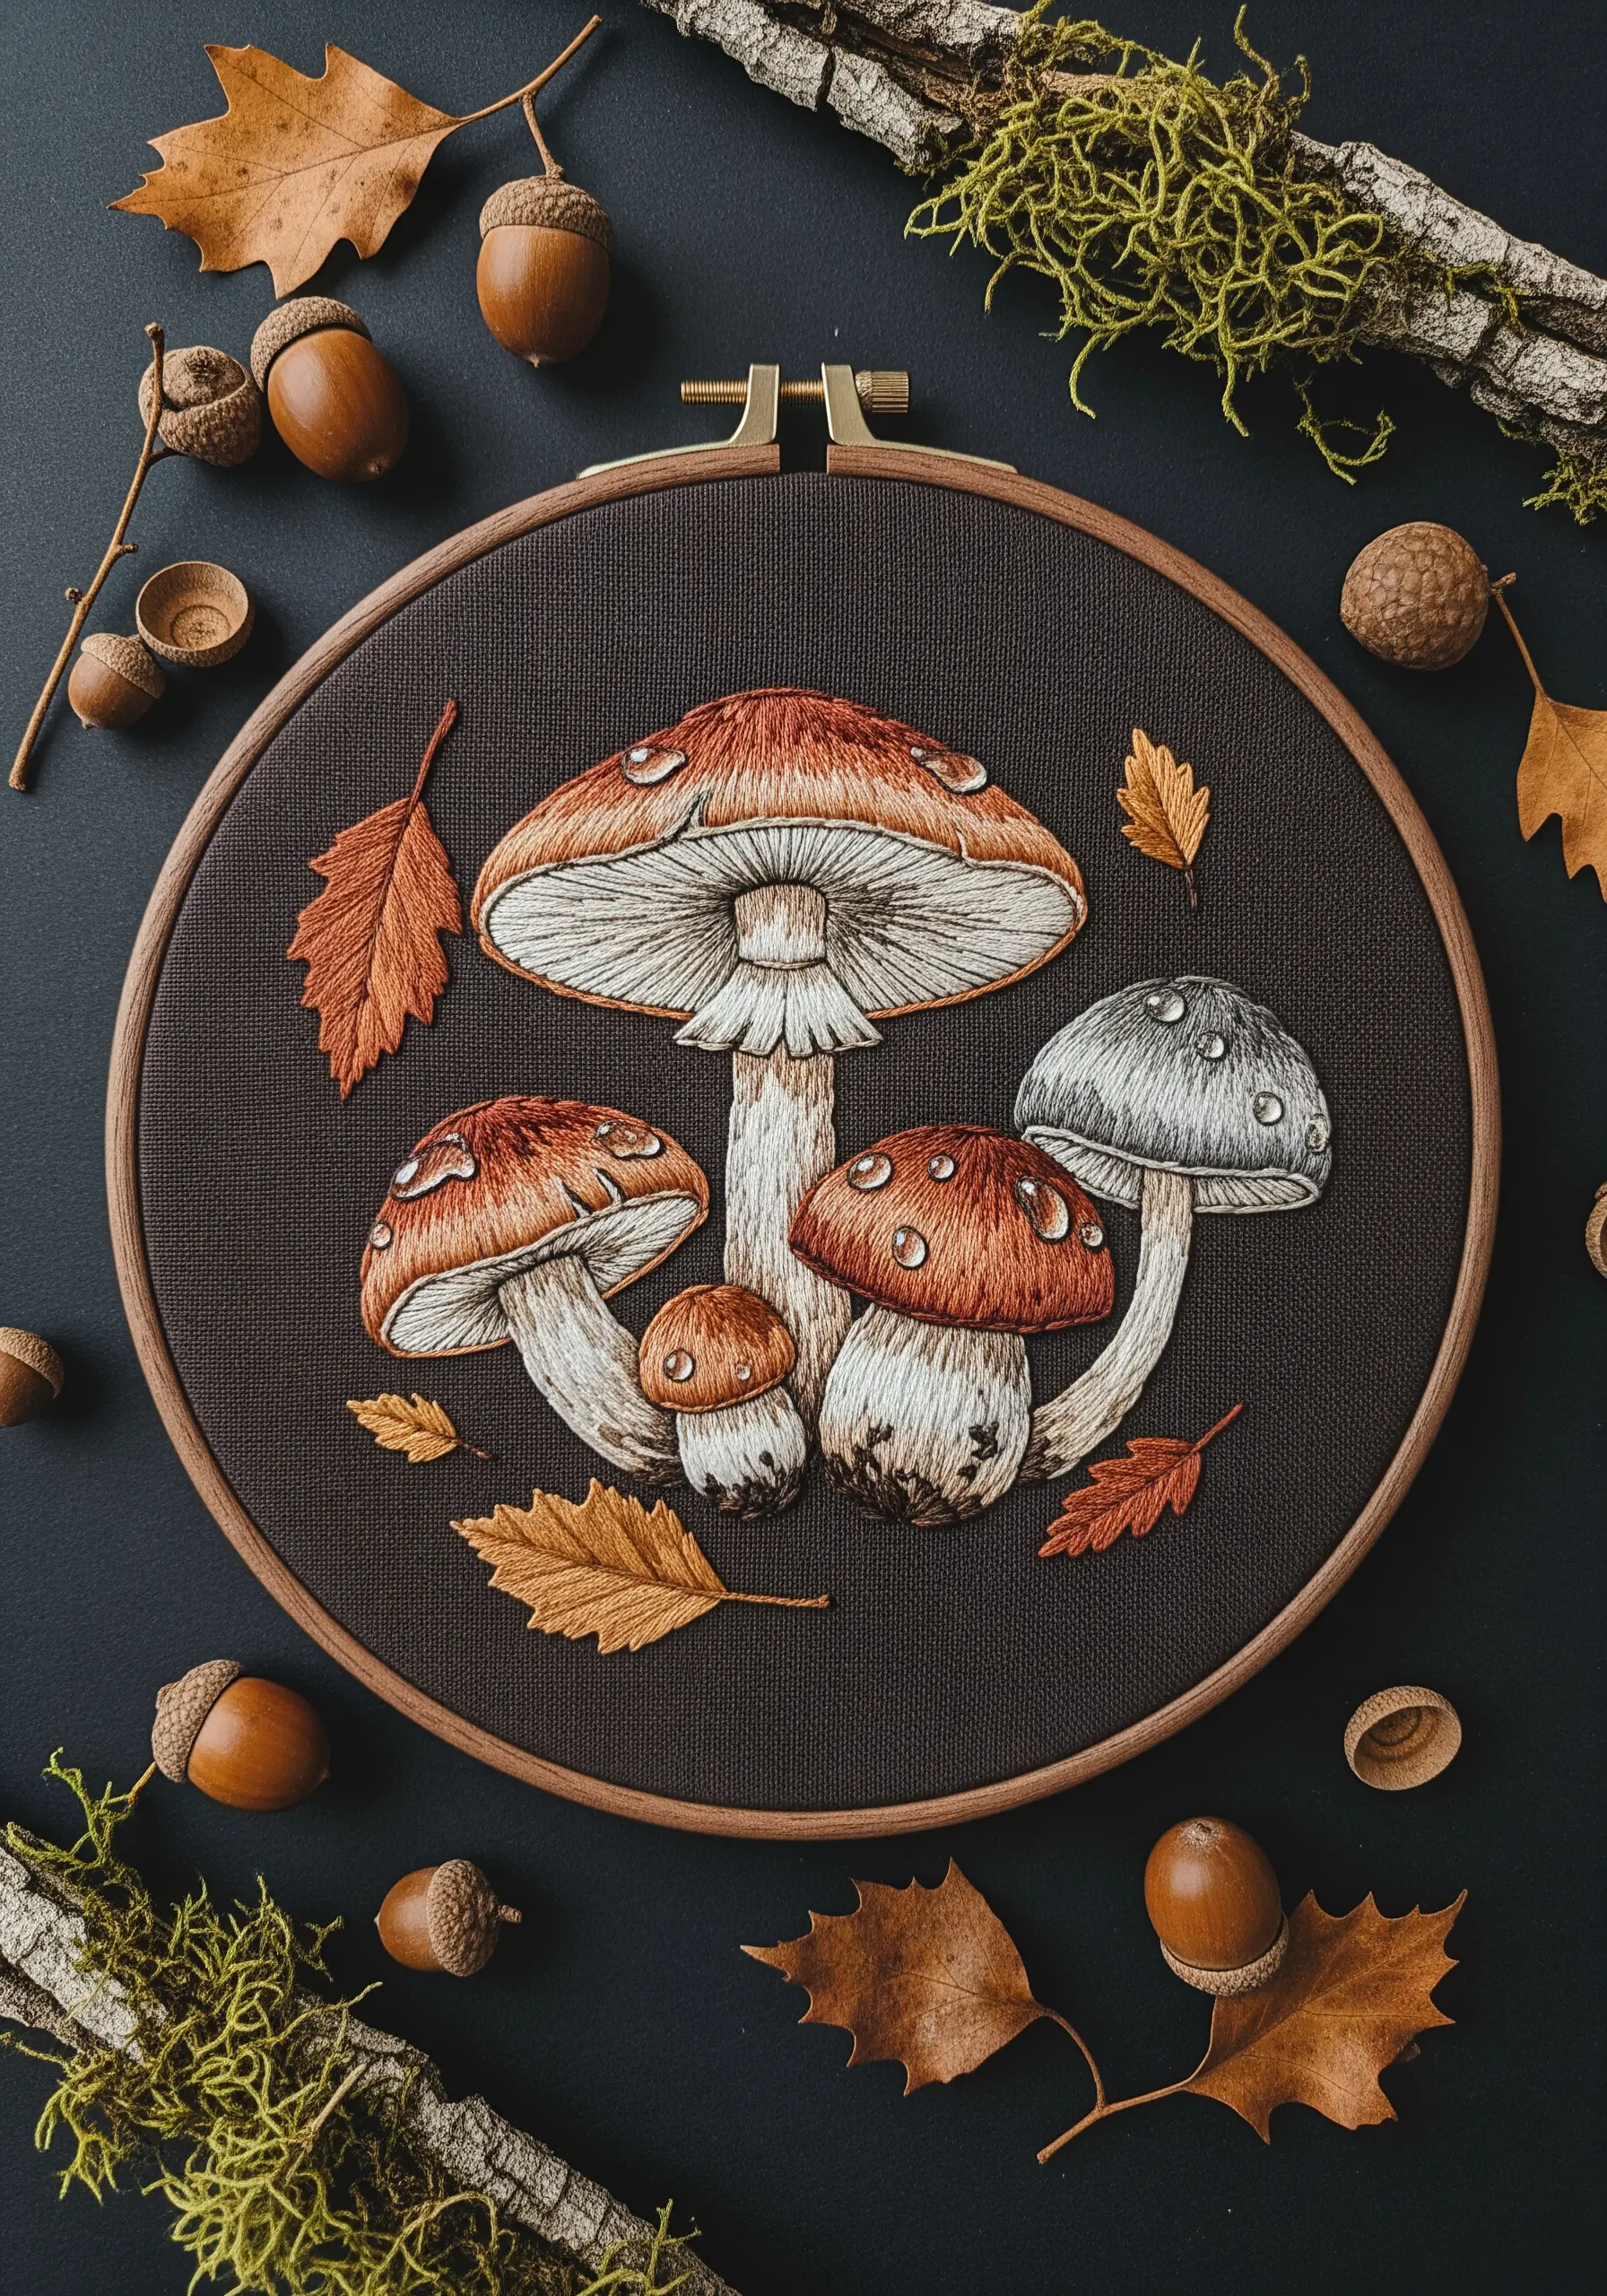
Give your embroidered mushrooms a fresh, moist appearance by adding carefully placed highlights that mimic water droplets.
After completing the shading on the mushroom caps with long-and-short stitch, add tiny highlights using a single strand of bright white or off-white thread.
A single, slightly curved stitch is all that is needed for each droplet. Place them where light would naturally catch, creating a glossy, just-rained-on look.
This small detail adds a story to your piece, elevating it from a simple botanical study to a snapshot of a forest floor moment.
22. Marry Paint and Thread with Splatters
Seamlessly blend your painted background with your embroidery by echoing the background’s texture with your stitches.
After painting a loose, splattered wash of magenta and violet, allow it to dry completely before stitching your main subjects.
Then, add tiny French knots and seed stitches in the same colors around the composition, mimicking the paint splatters.
This repetition of shape and color creates a cohesive, energetic piece where the painted and stitched elements feel perfectly integrated.


