
There’s a quiet moment in embroidery when you look down at your hoop and wonder how to bridge the gap between ‘handmade’ and ‘hand-perfected.’ You have the stitches down, you love the process, but you’re seeking that elusive, professional polish you admire in other artists’ work.
The secret isn’t in learning dozens of impossibly complex stitches. Instead, it lies in small, intentional adjustments: the way you angle a stitch to catch the light, the number of strands you choose for a delicate line, or the subtle texture you build with a simple knot.
This is where your artistry deepens. Here, you will find 34 simple, actionable tricks that focus on these tiny refinements. They are designed to elevate the stitches you already know, turning them into tools for creating depth, texture, and clean, confident lines. It’s time to stitch with not just skill, but with nuance.
1. Add Dimension to Florals with Layered Knots
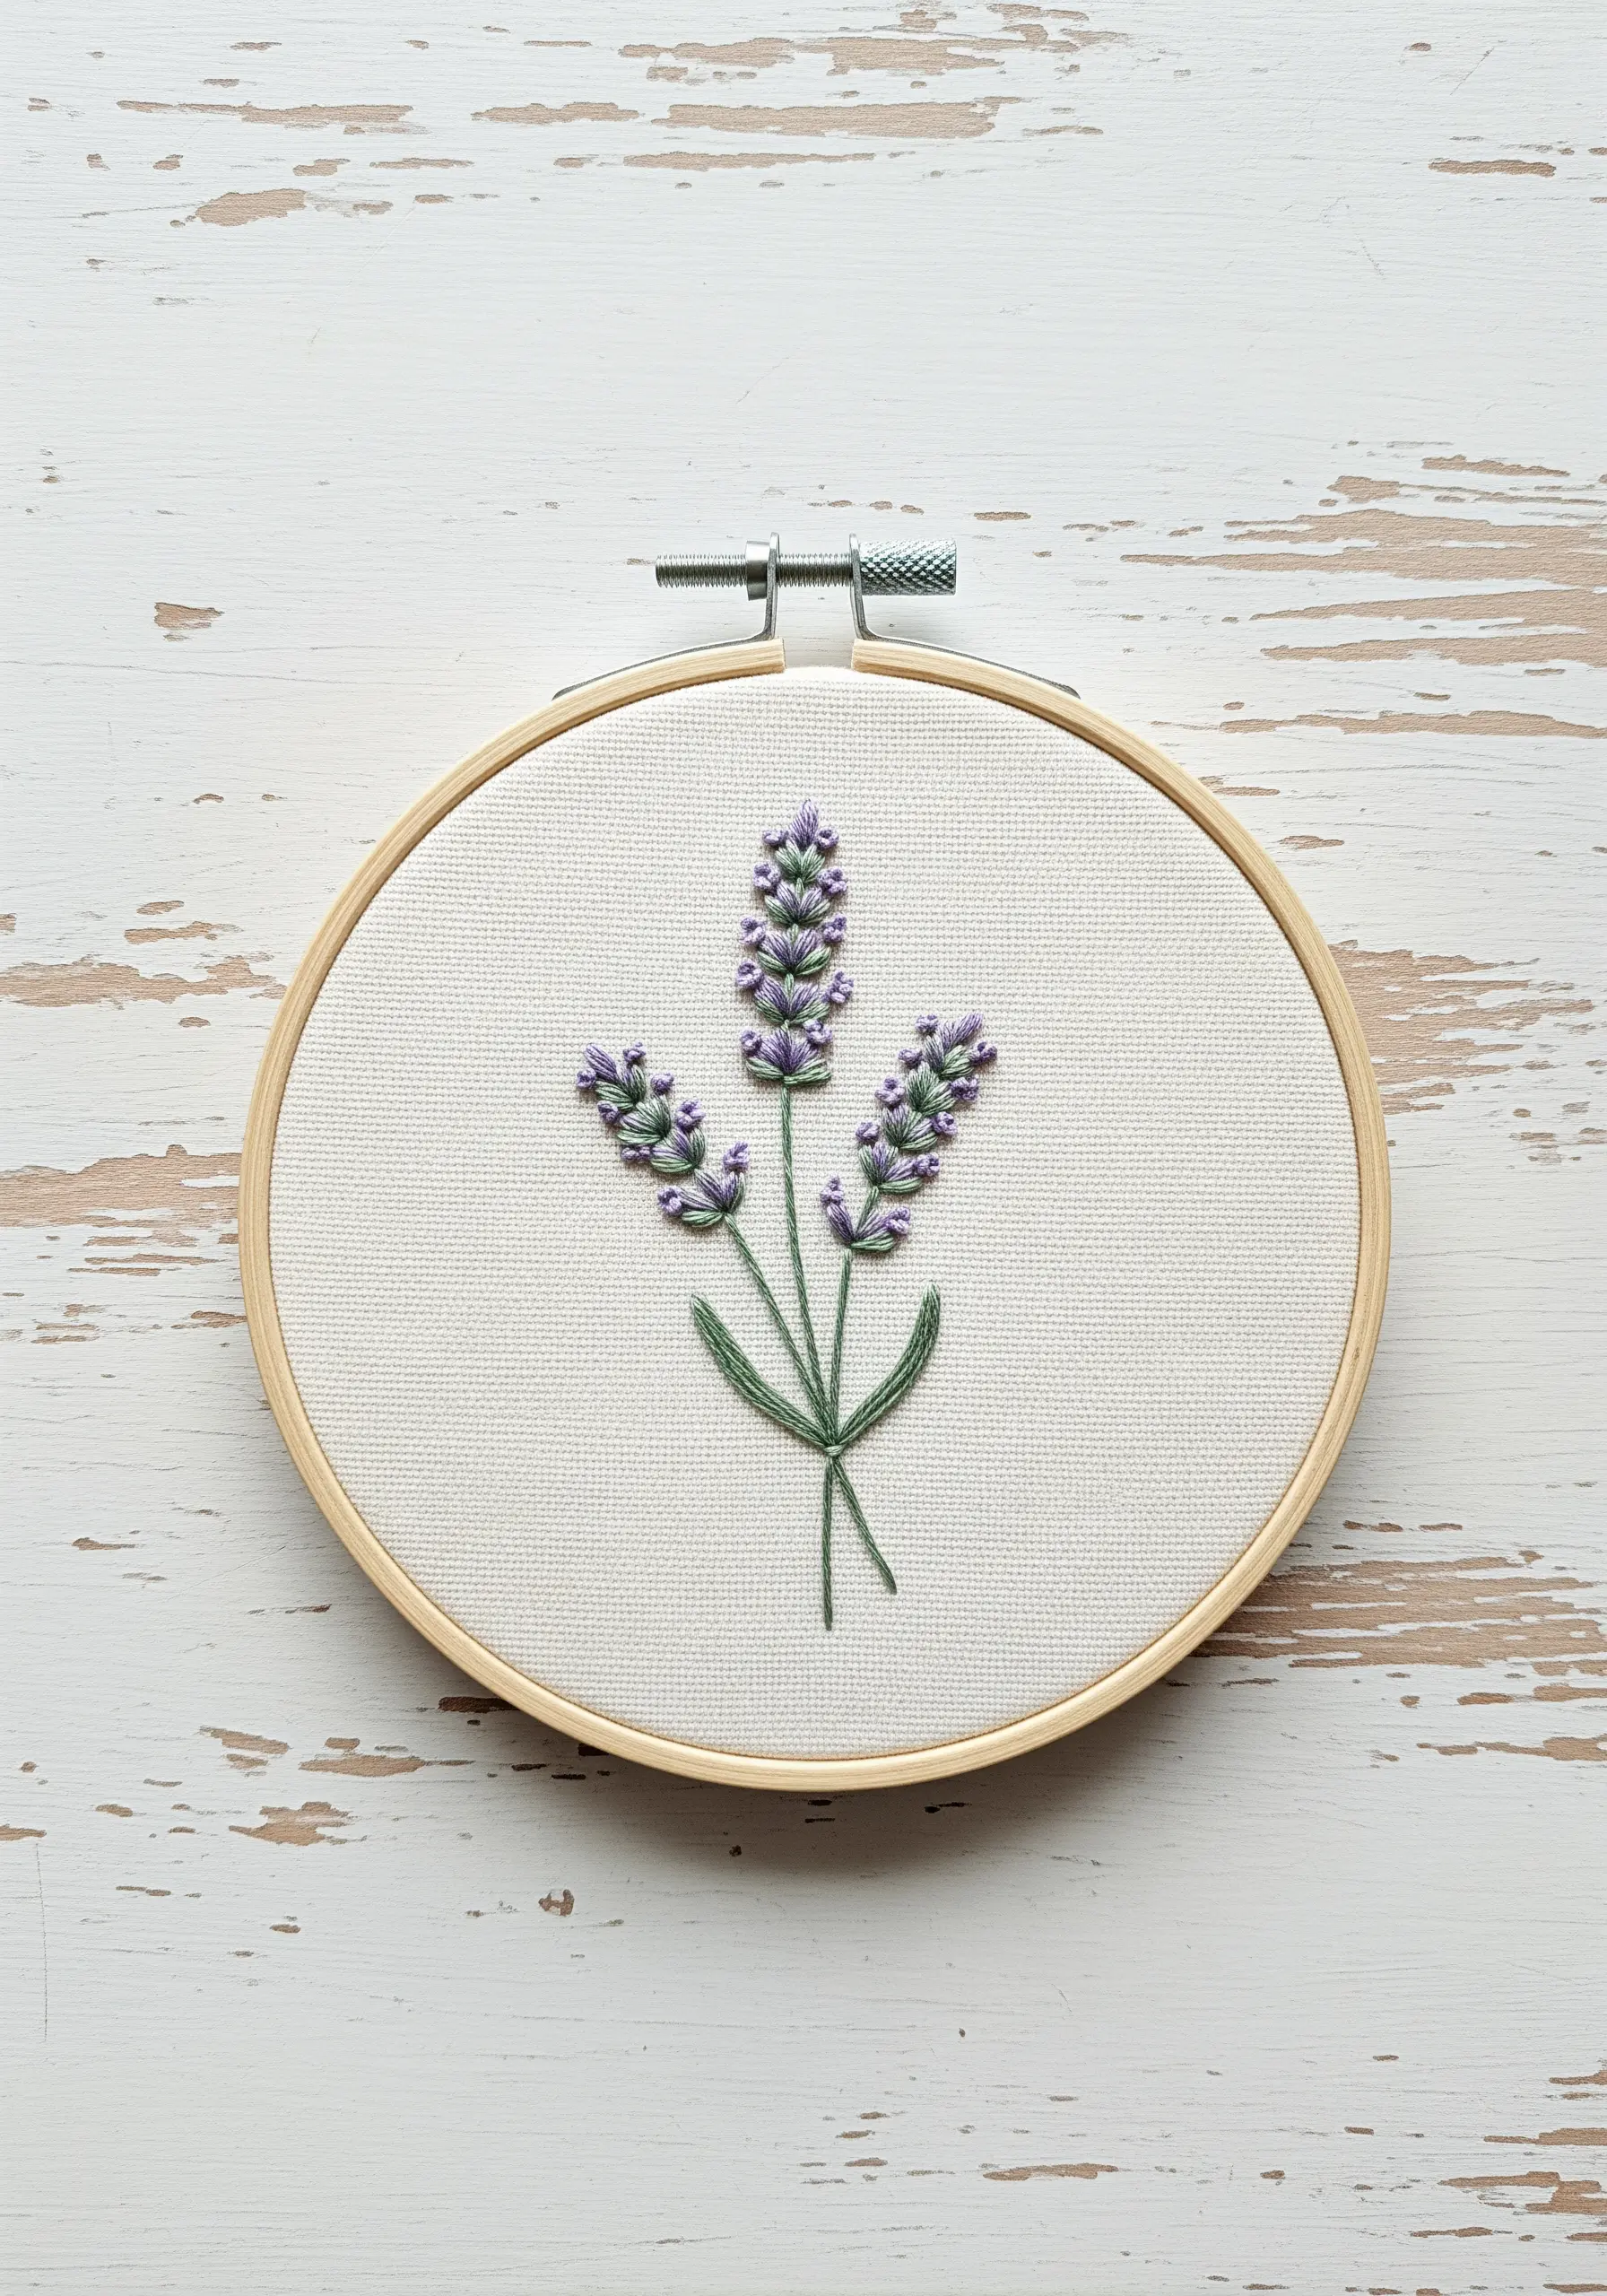
Instead of stitching flat lavender buds, use French knots to create a realistic, textured cluster.
Wrap the thread twice around the needle for smaller, tighter buds at the top, and three times for fuller, blossoming buds at the base.
This subtle variation in size mimics nature and adds immediate depth.
For the stems, use a whipped backstitch instead of a simple backstitch; it creates a smoother, more solid line that contrasts beautifully with the textured flowers.
2. Master Crisp Lines with the Right Stitch

For geometric or minimalist line art, your stitch choice is everything.
Use a backstitch for perfectly straight lines and sharp corners, as it allows you to pivot precisely at each angle.
Reserve the stem stitch or split stitch for any curved elements in your design.
Using only two or three strands of floss—instead of the full six—will give you a sharper, more graphic line that feels intentional and modern.
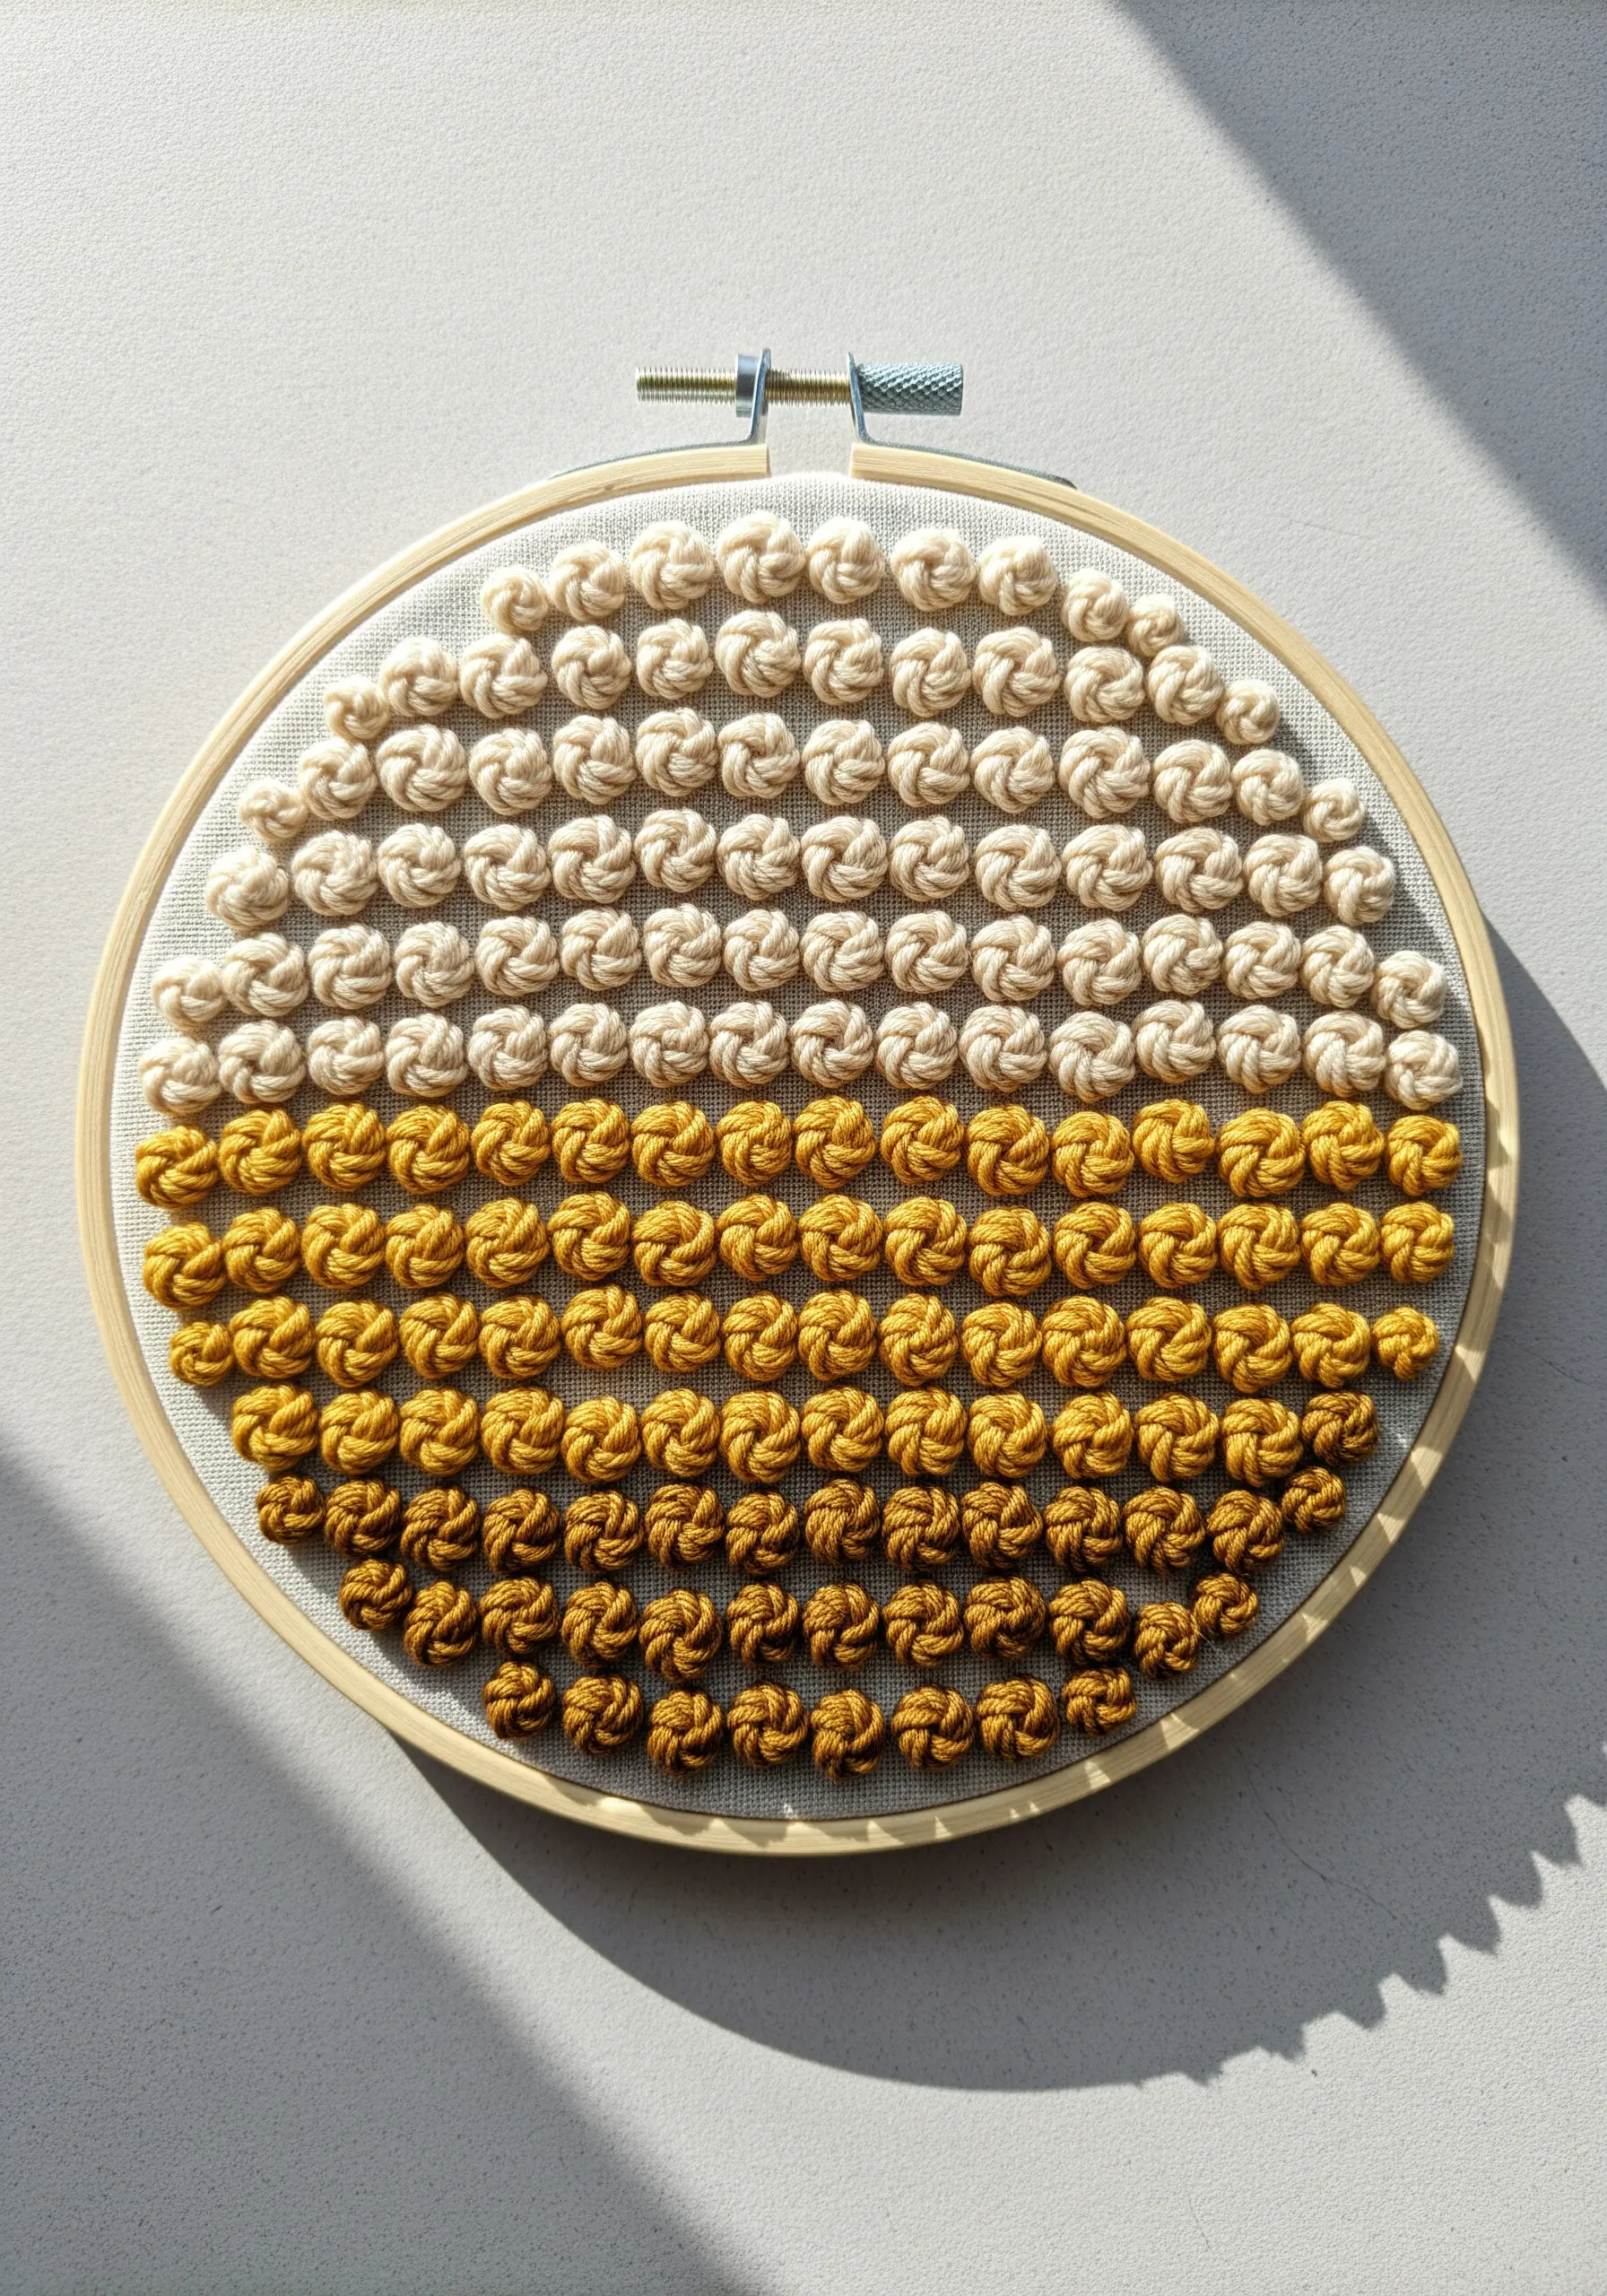
3. Control the Volume of Your Woven Wheel Roses

A woven wheel rose can be fluffy or refined—the secret is in your thread tension and the number of spokes.
For a flatter, more modern rose, use only five spokes and keep your wrapping tension even but not tight.
To create a fuller, more traditional bloom, use seven spokes and allow the thread to build up with slightly looser tension.
Sticking to an analogous color palette—like this trio of cream, pink, and terracotta—ensures your design looks cohesive and elegant.
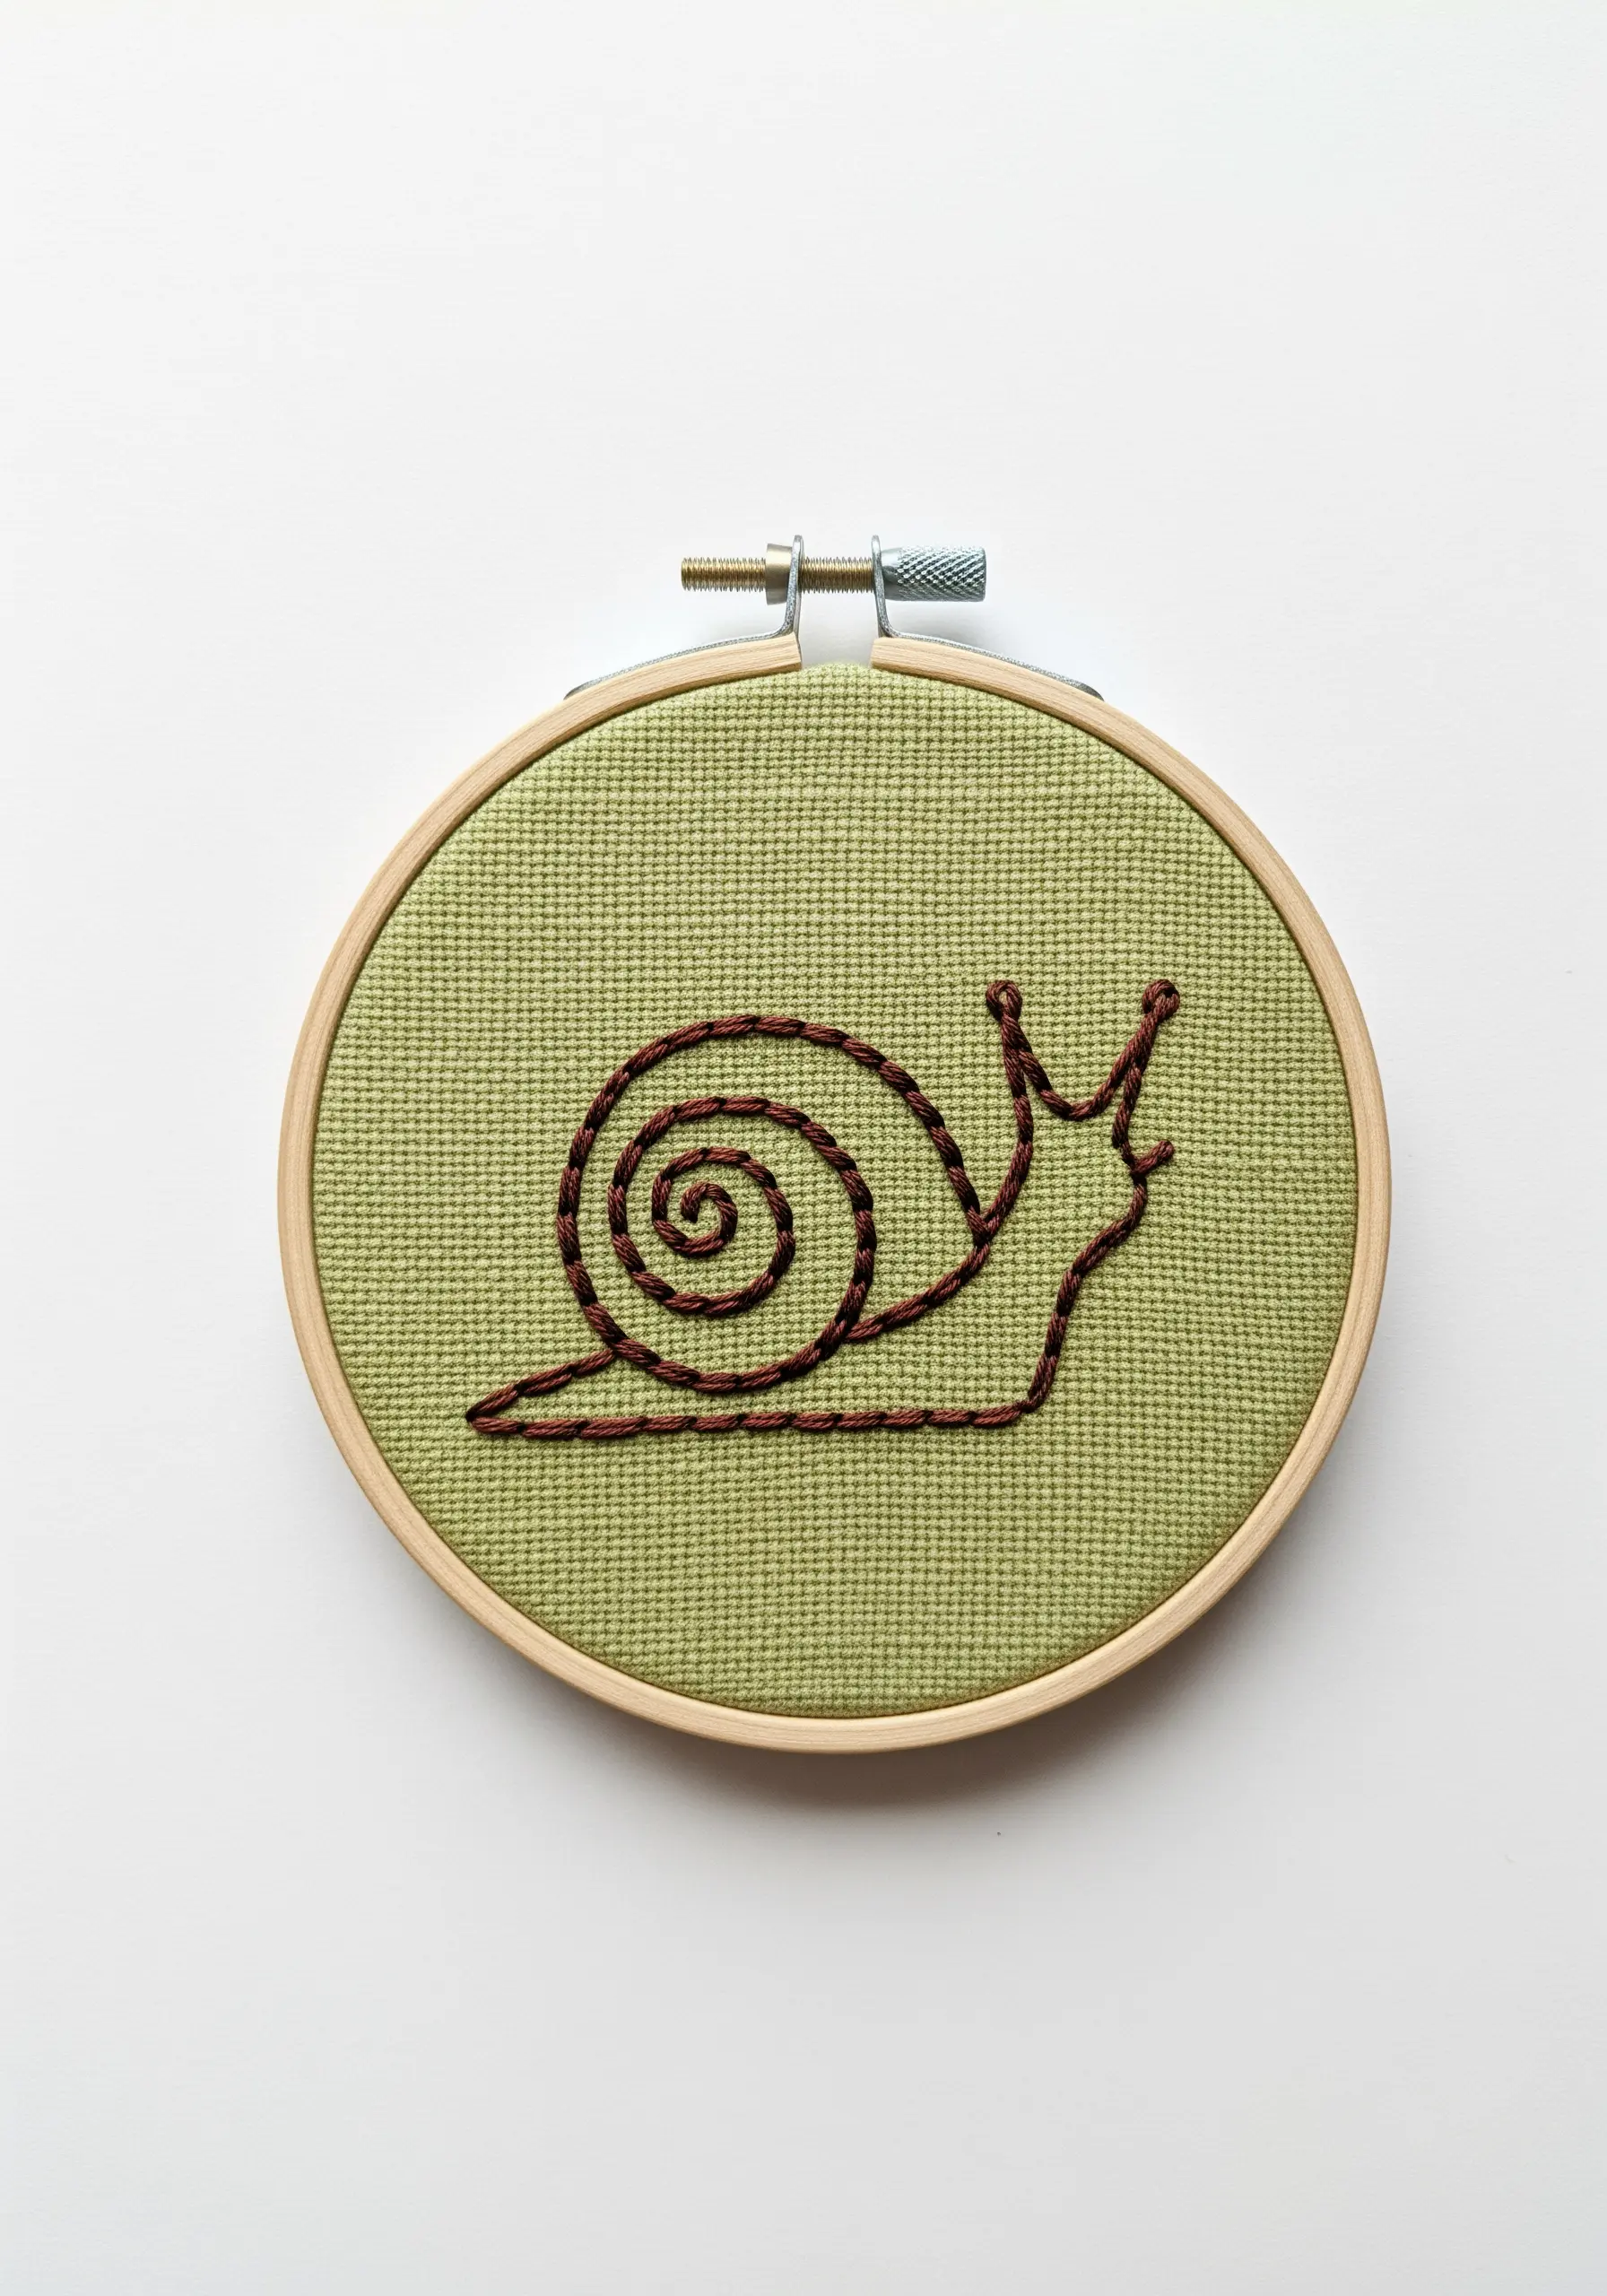
4. Make Stars Sharp, Not Soft

When embroidering constellations, swap soft French knots for a crisper star stitch.
A star stitch is essentially several straight stitches crossing over a central point, creating defined, graphic points of light.
Use a single strand of bright white or metallic thread on a dark, tightly woven fabric like navy cotton twill to maximize contrast.
This technique makes your celestial micro-embroidery look less crafty and more like a refined illustration.
5. Mimic Nature’s Texture with Directional Stitching

To give an embroidered bee its fuzzy texture, use the long-and-short stitch and pay close attention to the direction.
Angle your stitches to follow the natural curve of the bee’s body segments, which creates a sense of form and realism.
For the delicate, translucent wings, outline the shape with a single strand of black thread, then fill with an open fishbone stitch using one strand of off-white or light grey.
This open stitching allows the background fabric to show through, creating the illusion of transparency.
6. Frame Your Fill Stitches for a Flawless Edge
For perfectly smooth, solid blocks of color, always outline your shape before filling it in.
Use a split stitch to create a fine, raised border around the entire shape.
Then, fill the area with satin stitch, making sure each stitch goes just over that outline.
This simple preparation prevents the edges from looking uneven and gives your abstract shapes a clean, almost graphic-printed finish.
7. Create Movement with Couching and Color Blending

To capture the fluid motion of a wave, lay down several strands of floss at once and anchor them with a second thread—a technique called couching.
This method creates bold, expressive lines that are perfect for capturing energy and flow.
Instead of switching colors abruptly, blend them by overlapping the couched lines of different shades of blue and green.
This creates a natural gradient that gives your abstract thread waves a painterly quality.
8. Anchor Radiating Lines for Perfect Symmetry

Achieving a symmetrical sunburst relies on a perfectly anchored center.
Before you begin the rays, create a small, tight circle in the middle using satin stitch or a dense cluster of French knots.
This central point will hide the start of each radiating straight stitch, ensuring a clean convergence.
Always use a water-soluble marker and a ruler to draw guidelines for your rays to keep them evenly spaced and uniform in length.
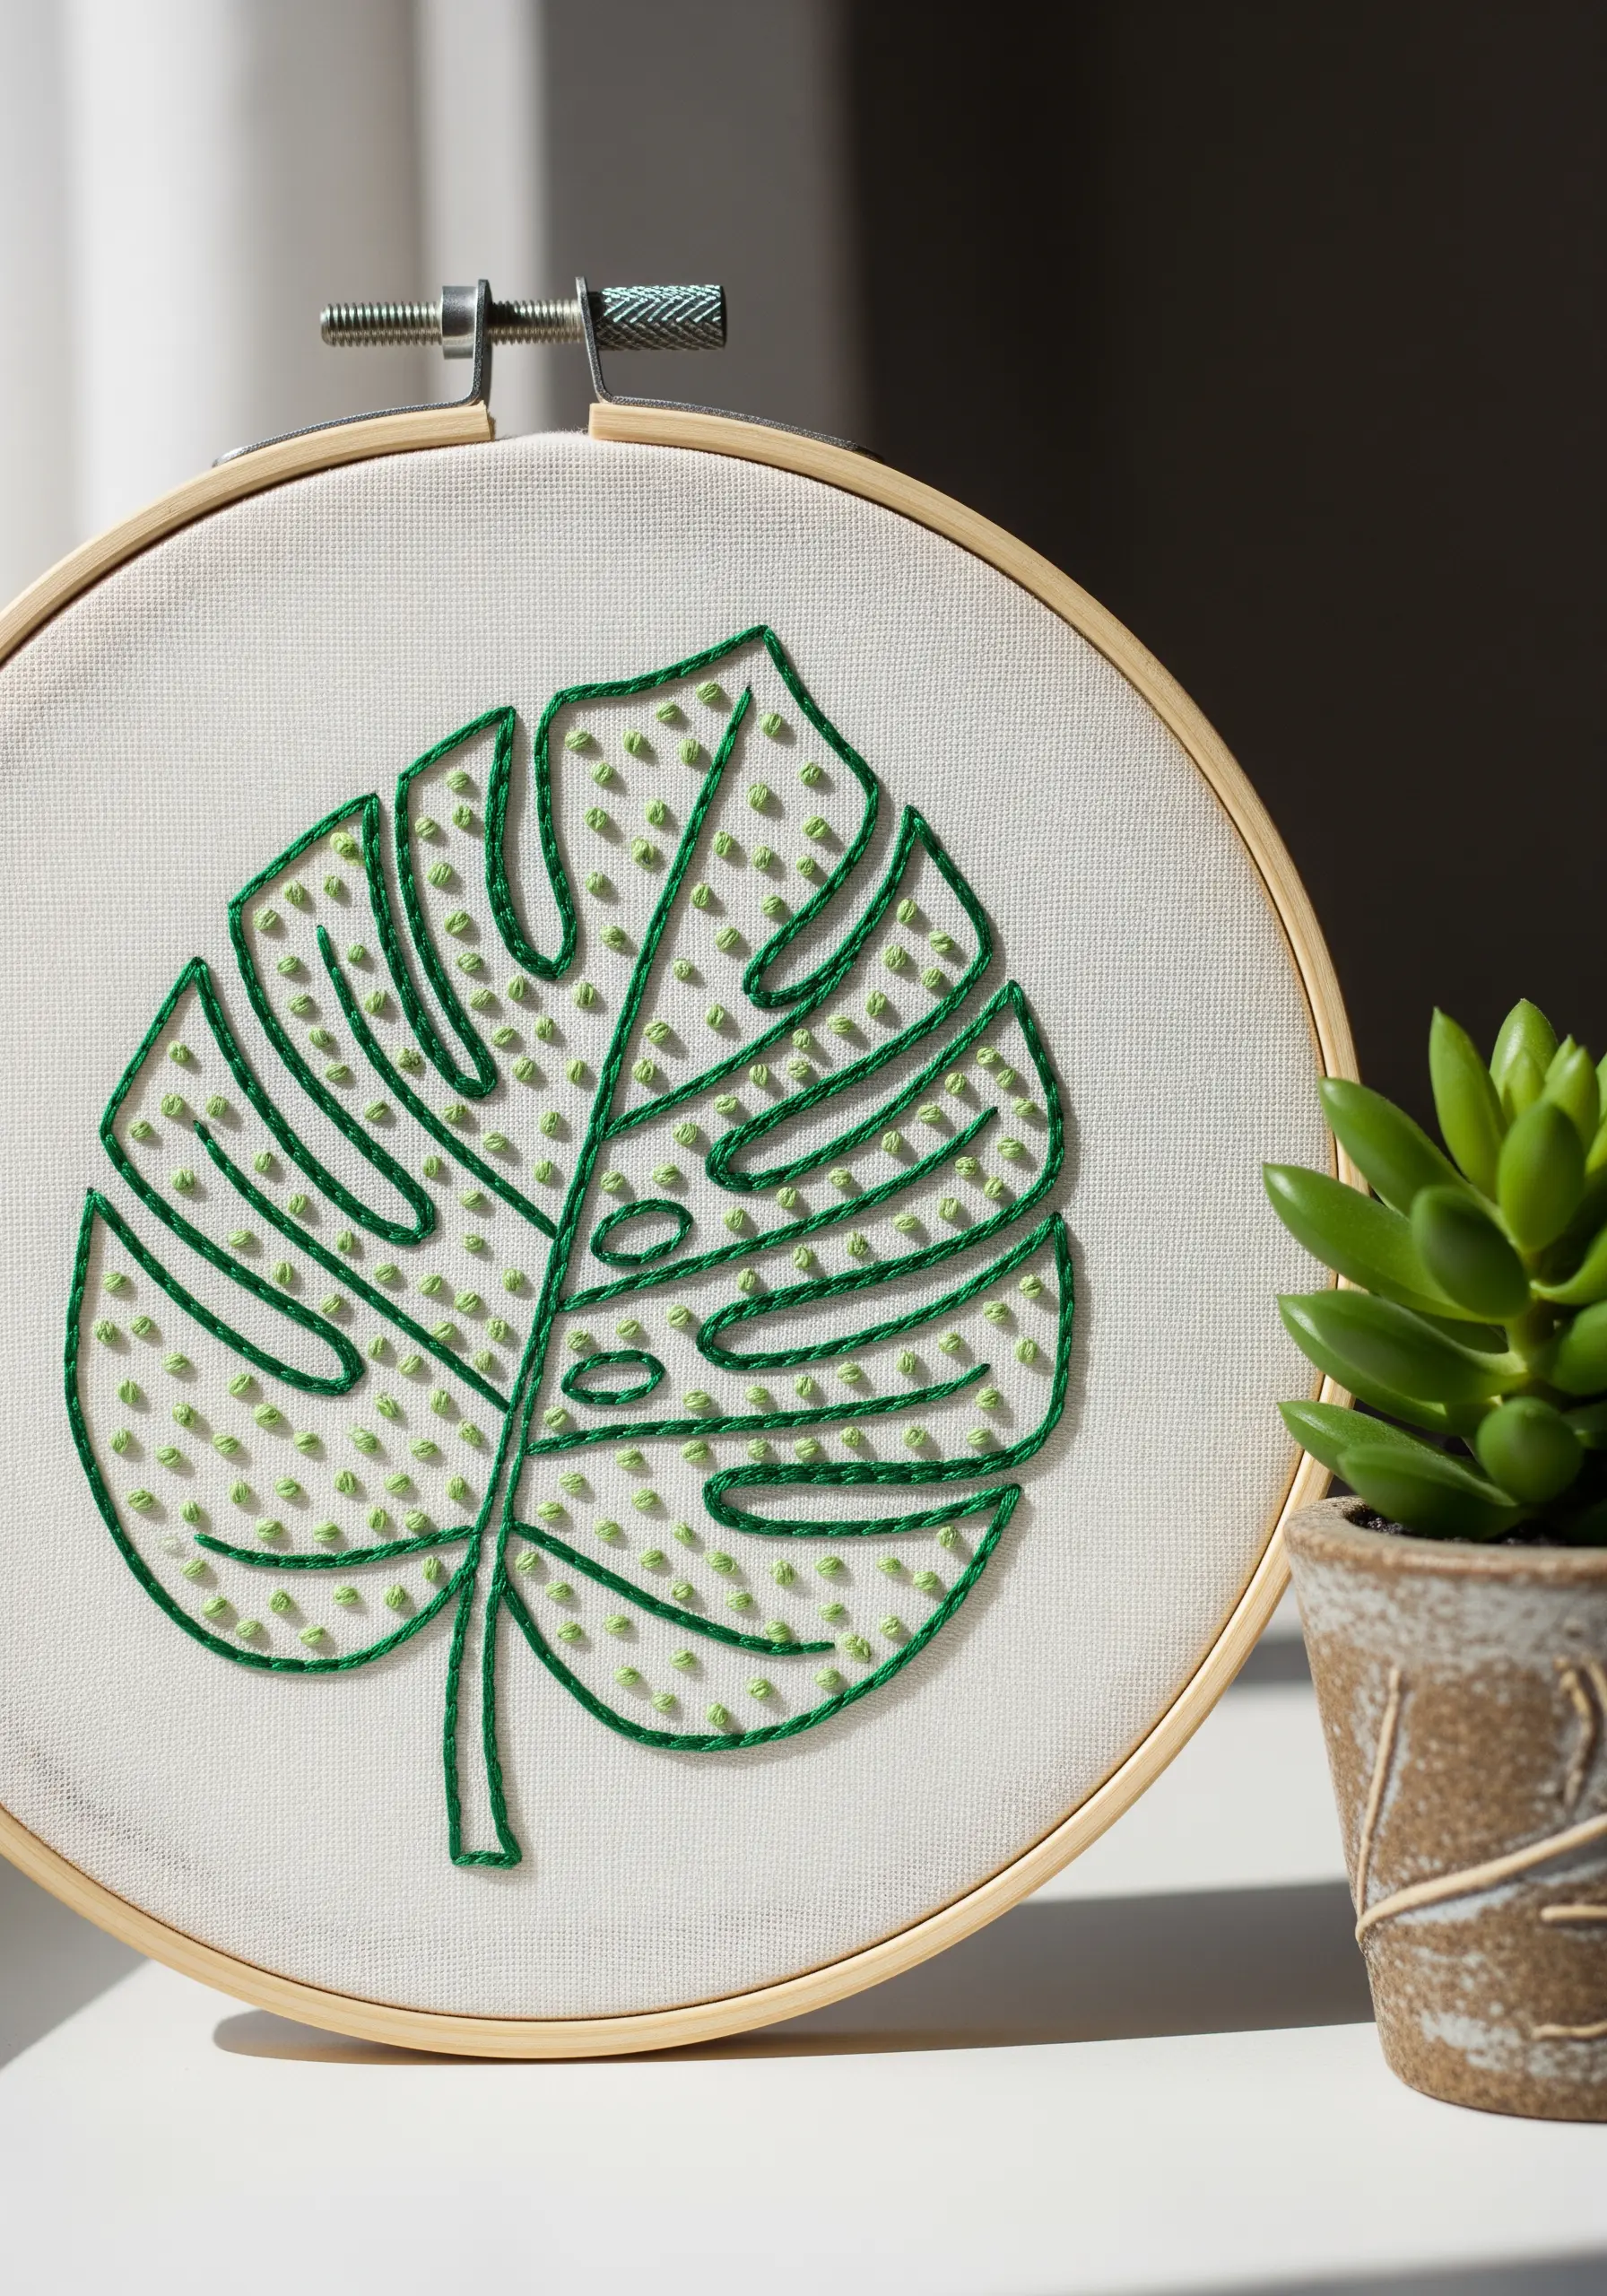
9. Use Negative Space to Define Your Design

For intricate motifs like this leaf, the unstitched fabric is as important as the thread itself.
Instead of filling the entire shape, use a clean outline stitch like a whipped backstitch to define the main form.
Then, use a lighter-weight stitch—like a single backstitch with fewer strands—for the delicate inner veins.
This technique allows the negative space to create the leaf’s texture, resulting in a design that feels light and elegant.
10. Capture Delicacy with Minimalist Stitches

To embroider something as airy as a dandelion head, use the lightest stitches possible.
Form each seed with a single detached chain stitch (a lazy daisy), and then add a short straight stitch for the stem.
For the seeds floating away, use only one or two strands of floss to create a sense of distance and movement.
The key is to resist the urge to add heavy detail; the simplicity is what makes it believable.
11. Conquer Curves in Satin Stitch with Angled Stitches
Stitching a perfect curve with satin stitch is one of the most professional skills you can develop.
The trick is to slightly angle your stitches as you move around the curve, fanning them out like the spokes of a wheel.
Do not keep them parallel, as this will create gaps and uneven edges.
For a bold, typographic look, use all six strands of floss and create a split stitch outline first to build a firm, raised edge to stitch over.
12. Add a Padded Base for 3D Satin Stitch

To make your satin stitch elements physically pop off the fabric, give them a padded foundation.
First, fill the shape with a layer of simple straight stitches or seed stitches running perpendicular to your final satin stitch direction.
Then, work your satin stitch over this foundation. The extra layer underneath raises the surface, creating a subtle, three-dimensional effect and a richer-looking finish.
This technique is perfect for giving small motifs like these raindrops a satisfying, tactile quality.
13. Refine Your Backstitch with Consistent Length
Even the simplest backstitch can look professional if you focus on one thing: consistency.
Aim to make every stitch the exact same length.
When you approach a tight curve, shorten your stitch length just slightly to prevent the line from looking jagged or angular.
This single adjustment transforms a basic outline into a clean, deliberate piece of minimalist line art.
14. Create Realistic Gradients with Thread Painting
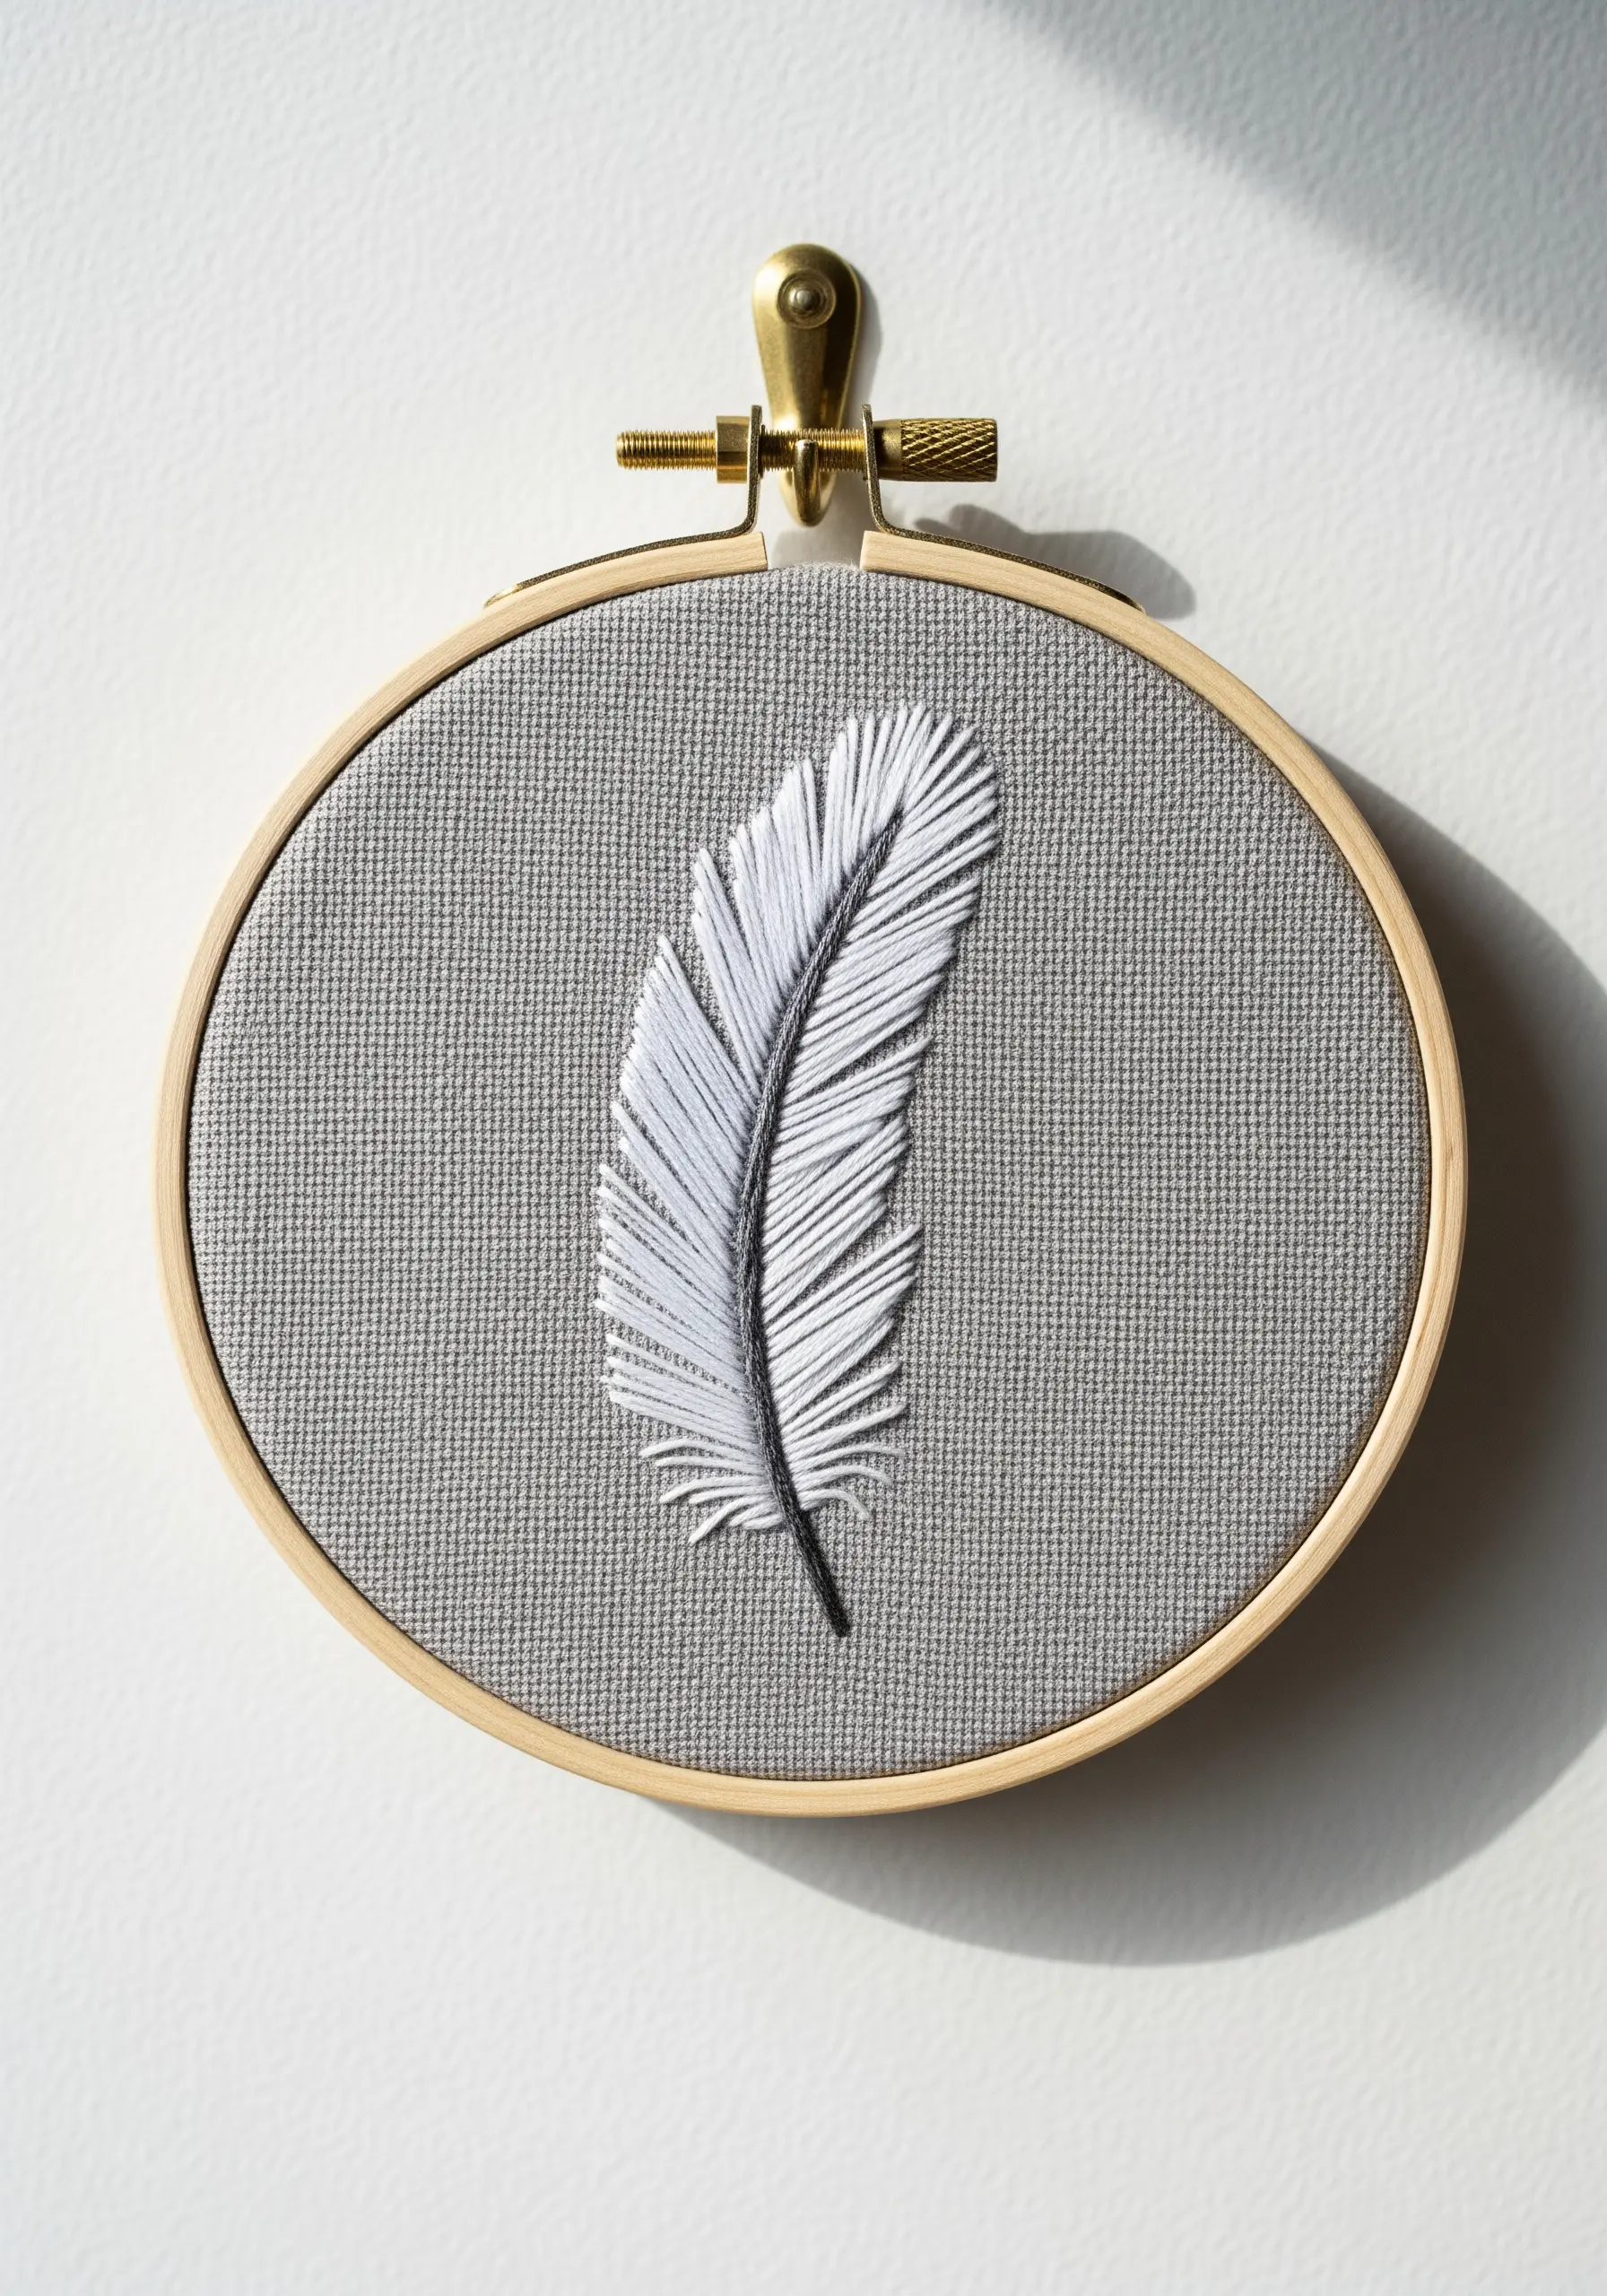
To give this feather its realistic shading, blend shades of grey and white using the long-and-short stitch, also known as thread painting.
Start with the darkest color at the spine, then introduce the next shade by bringing your needle up through the existing stitches to create a seamless blend.
Always angle your stitches to follow the natural direction of the feather’s barbs.
Finish with a sharp backstitch down the center to define the shaft and anchor the entire design.
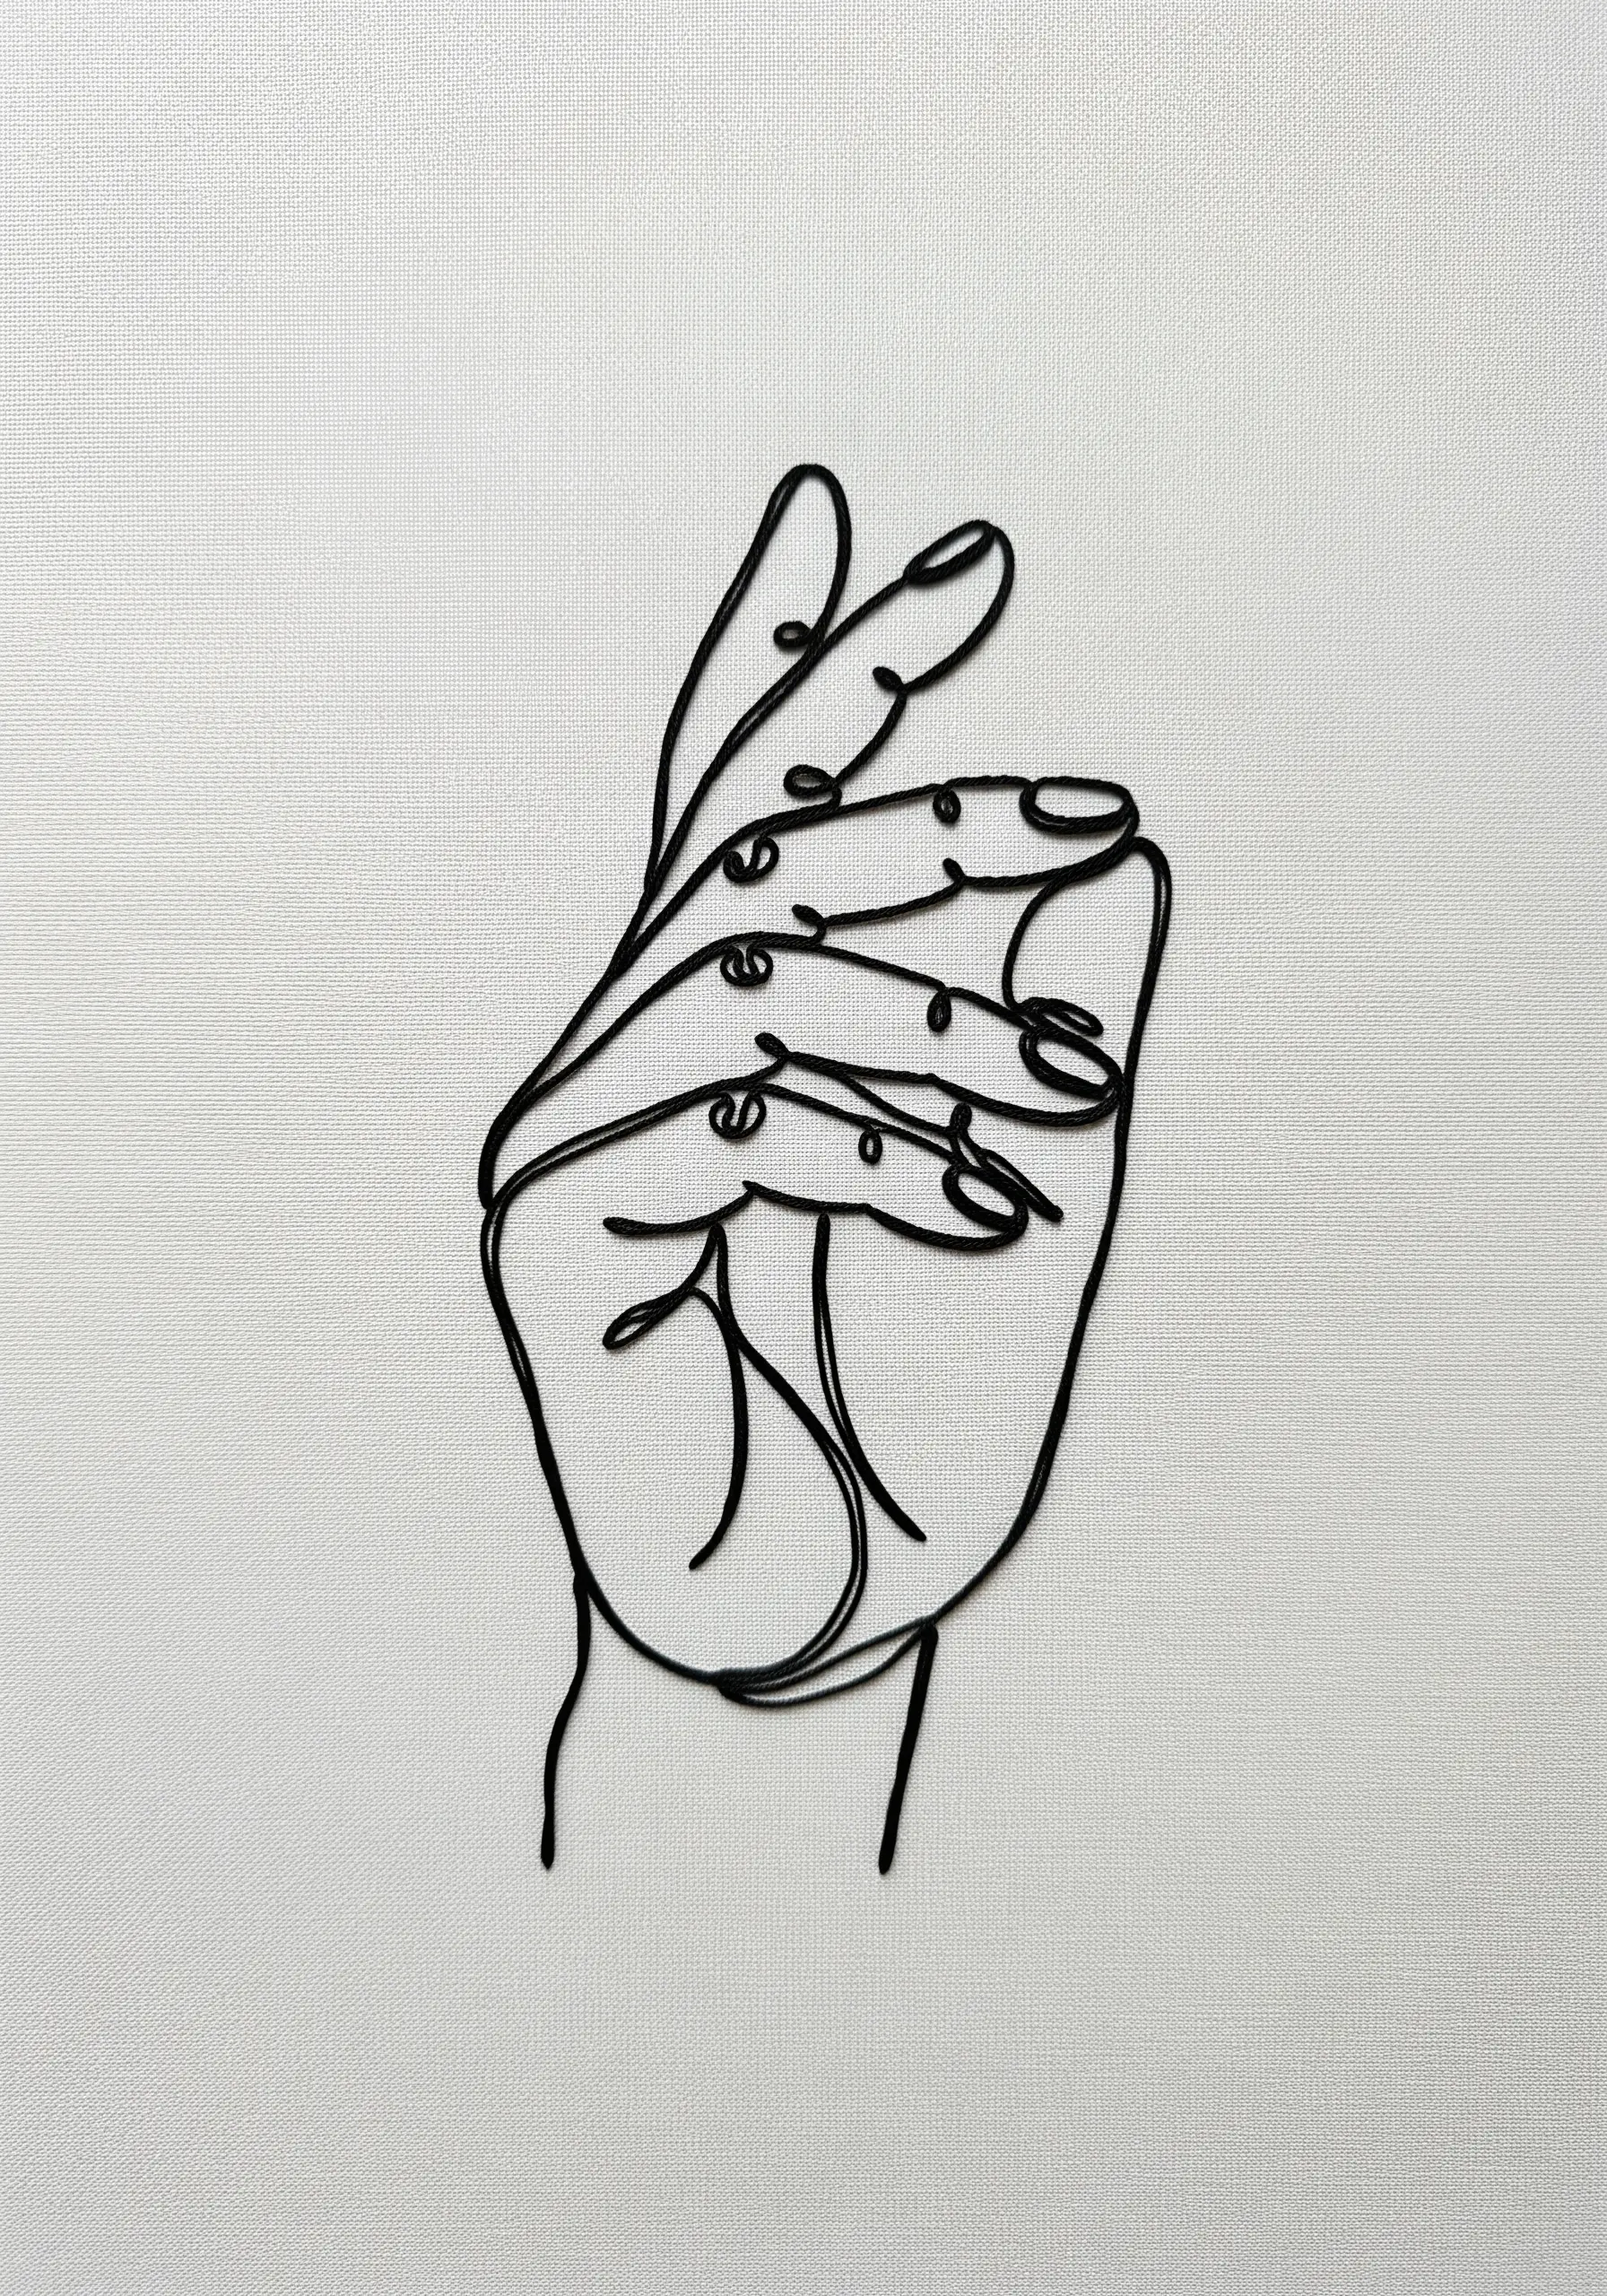
15. Achieve a Fluid Line with Whipped Backstitch

For a design that relies on a single, continuous line, a standard backstitch can sometimes look disjointed.
Instead, first lay down a foundation of simple backstitches.
Then, take a second thread and ‘whip’ it around each stitch on the surface without piercing the fabric.
This technique covers the gaps between stitches, creating a smooth, uninterrupted line that flows beautifully, which is ideal for single-line face profiles.
16. Use Aida Cloth for Perfect Geometric Shapes
When your design is based on crisp angles and straight lines, switch your fabric from linen or cotton to Aida cloth.
Typically used for cross-stitch, Aida’s woven grid provides a natural guide for creating perfectly symmetrical and geometric shapes with a simple backstitch.
The fabric’s structure forces your stitches into alignment, giving your minimalist motifs an effortlessly precise and clean finish.
17. Fill Shapes with Texture, Not Just Color

Instead of filling a shape with flat satin stitch, create a rich, tactile surface with densely packed French knots.
To achieve this pebbled, uniform look, work in neat rows and ensure each knot touches the next, leaving no fabric showing through.
Using a metallic or silver thread, as seen here, enhances the texture by catching the light from multiple angles, creating a shimmering, dimensional effect perfect for celestial designs.
18. Build Intricate Borders from Simple Stitches
A complex-looking border is often just a combination of the simplest stitches you already know.
This design is built from strategically placed lazy daisies, straight stitches, and French knots.
The key to a professional result is flawless repetition and spacing. Use a ruler and a water-soluble pen to mark guides for the center line and the placement of each stitch element.
Perfectly executed rhythm and pattern are what elevate basic stitches into a sophisticated design.
19. Imply Texture with a Stippled Fill
You don’t always need to fill a shape completely to give it substance.
Create a light, modern texture by filling a shape with hundreds of tiny, scattered seed stitches (small, individual straight stitches).
Concentrate the stitches more densely in areas where you want to suggest shadow or depth, and space them further apart for highlights.
This stippling technique is faster than satin stitch and gives leaf embroidery stitches a contemporary, illustrative feel.
20. Elevate a Simple Stitch with Padding
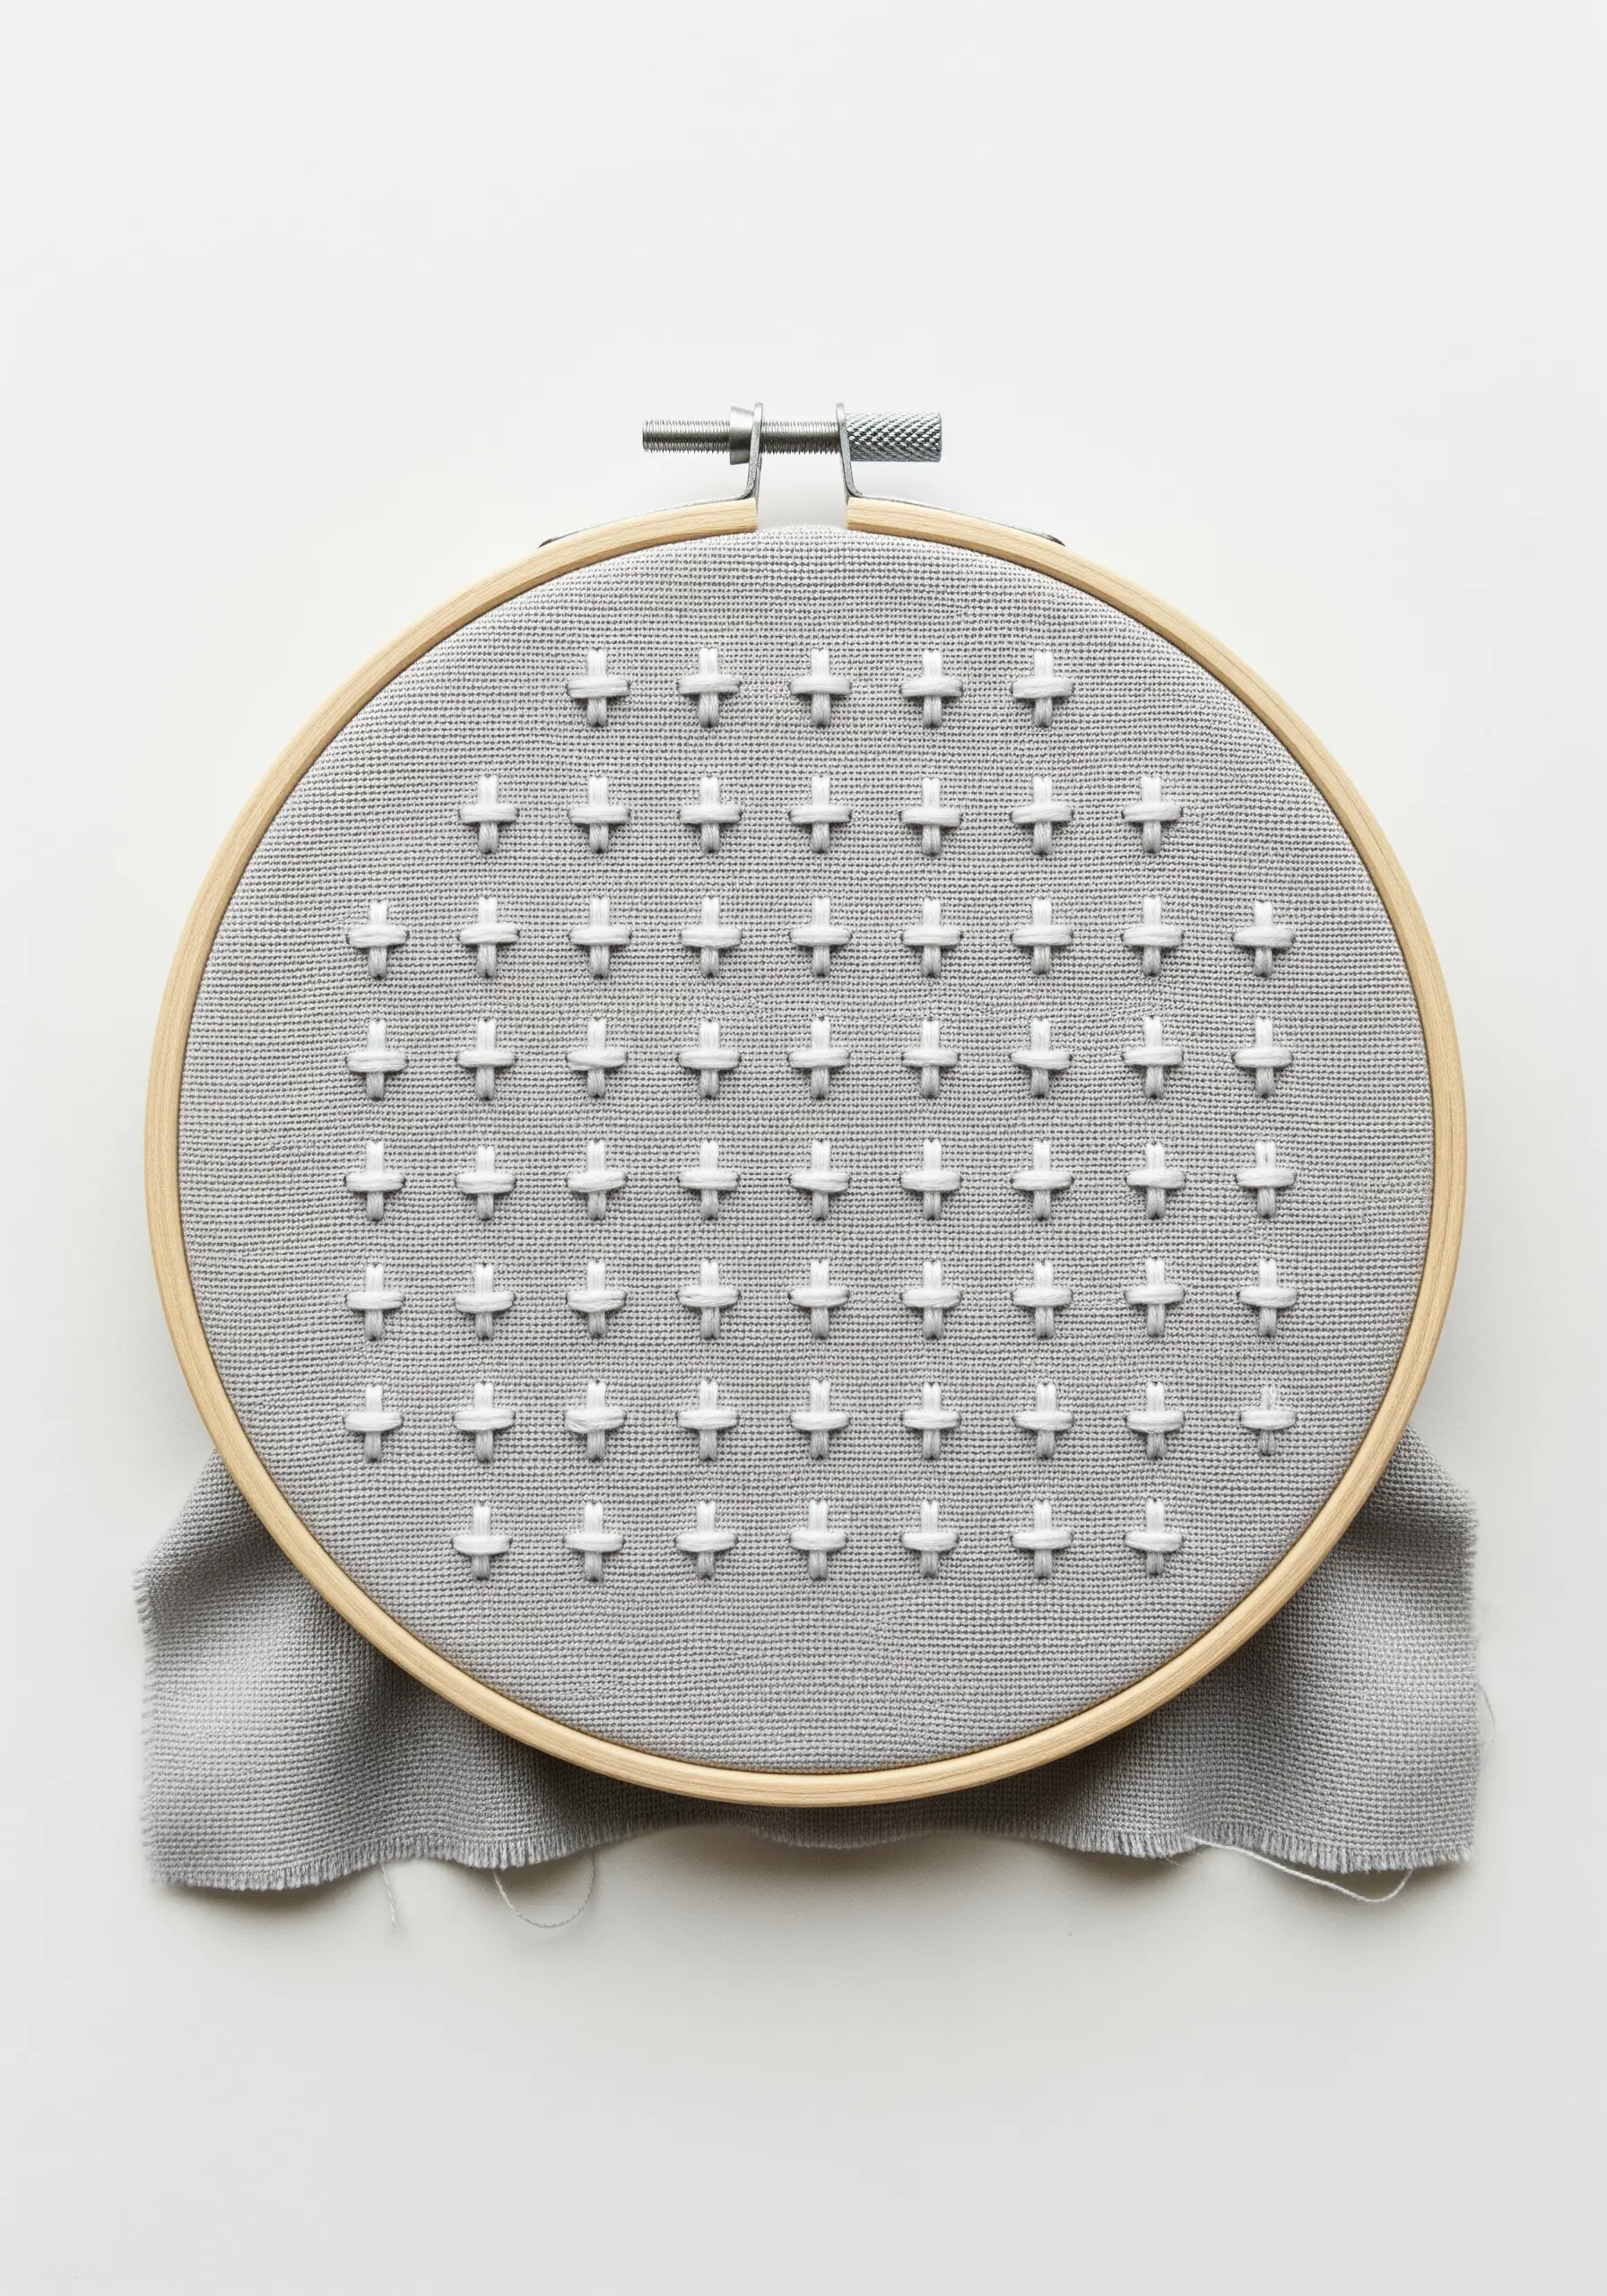
To give a basic cross stitch a sculptural, three-dimensional quality, stitch it over a padded base.
First, lay down two small, parallel horizontal stitches where you want your cross stitch to be.
Then, work your cross stitch directly over this padding. The underlying threads lift the cross stitch from the fabric surface, creating a subtle shadow and a much more substantial, professional-looking grid pattern.
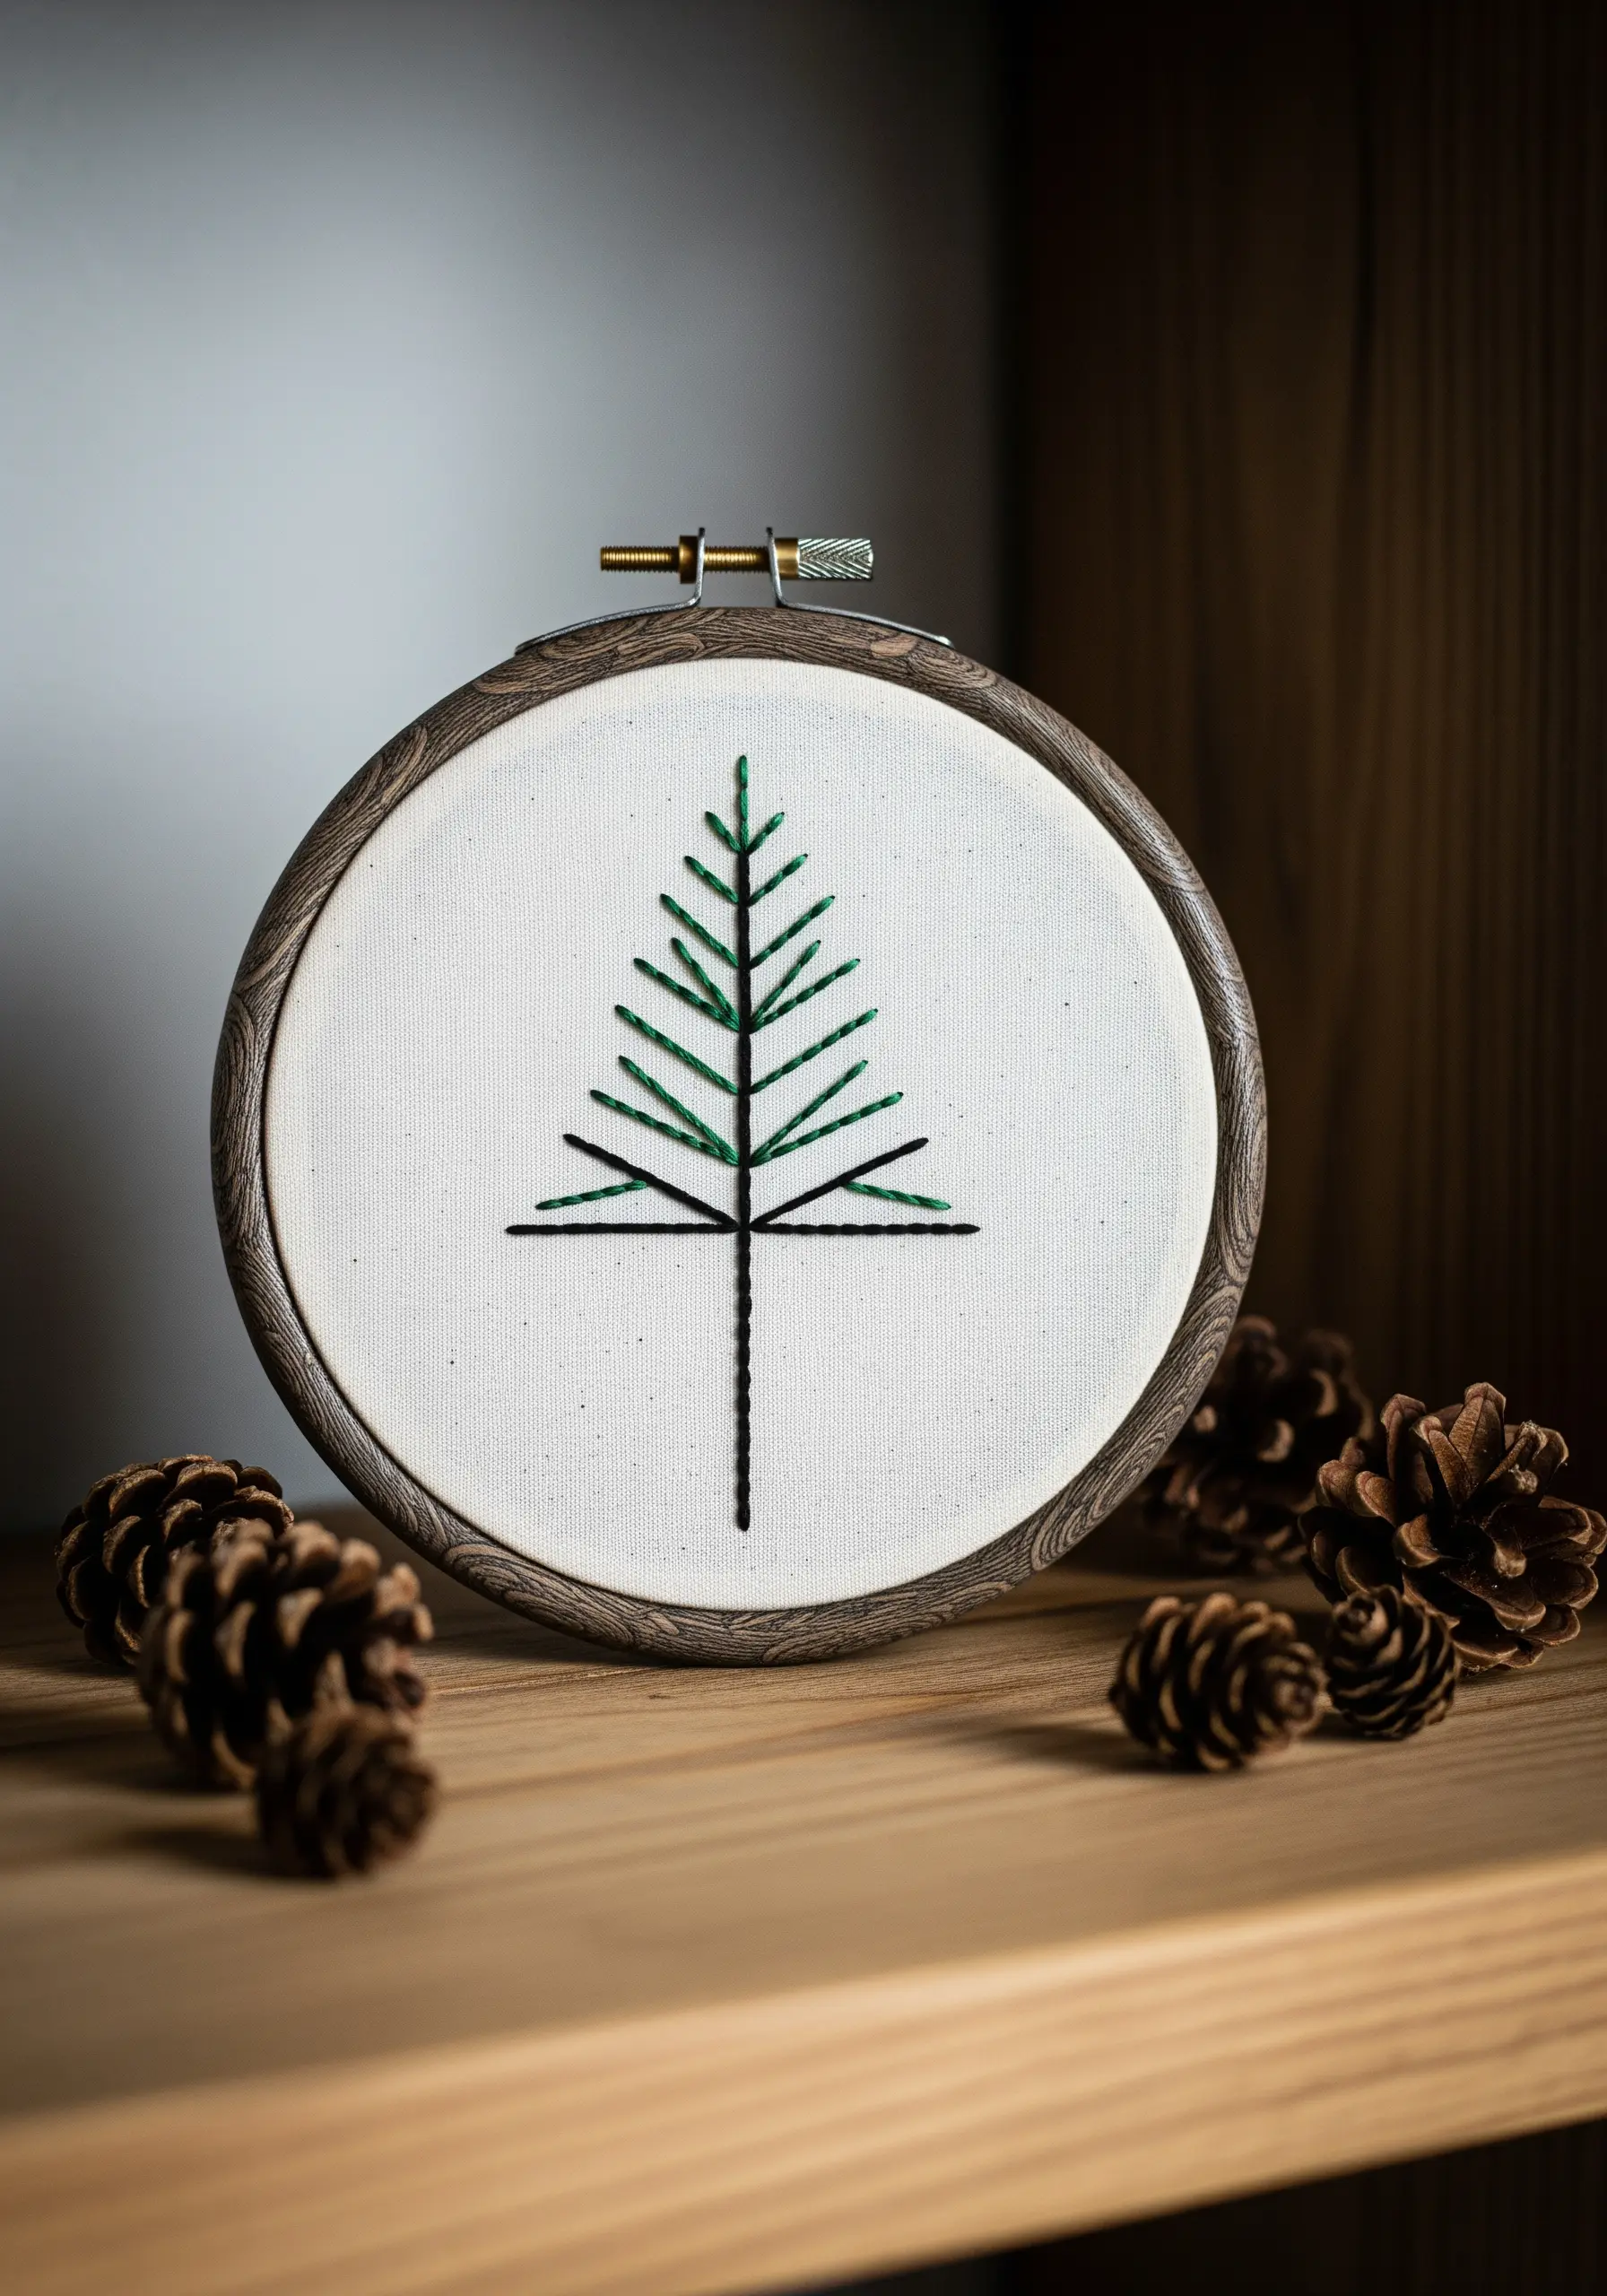
21. Use Varied Line Weights for Visual Interest
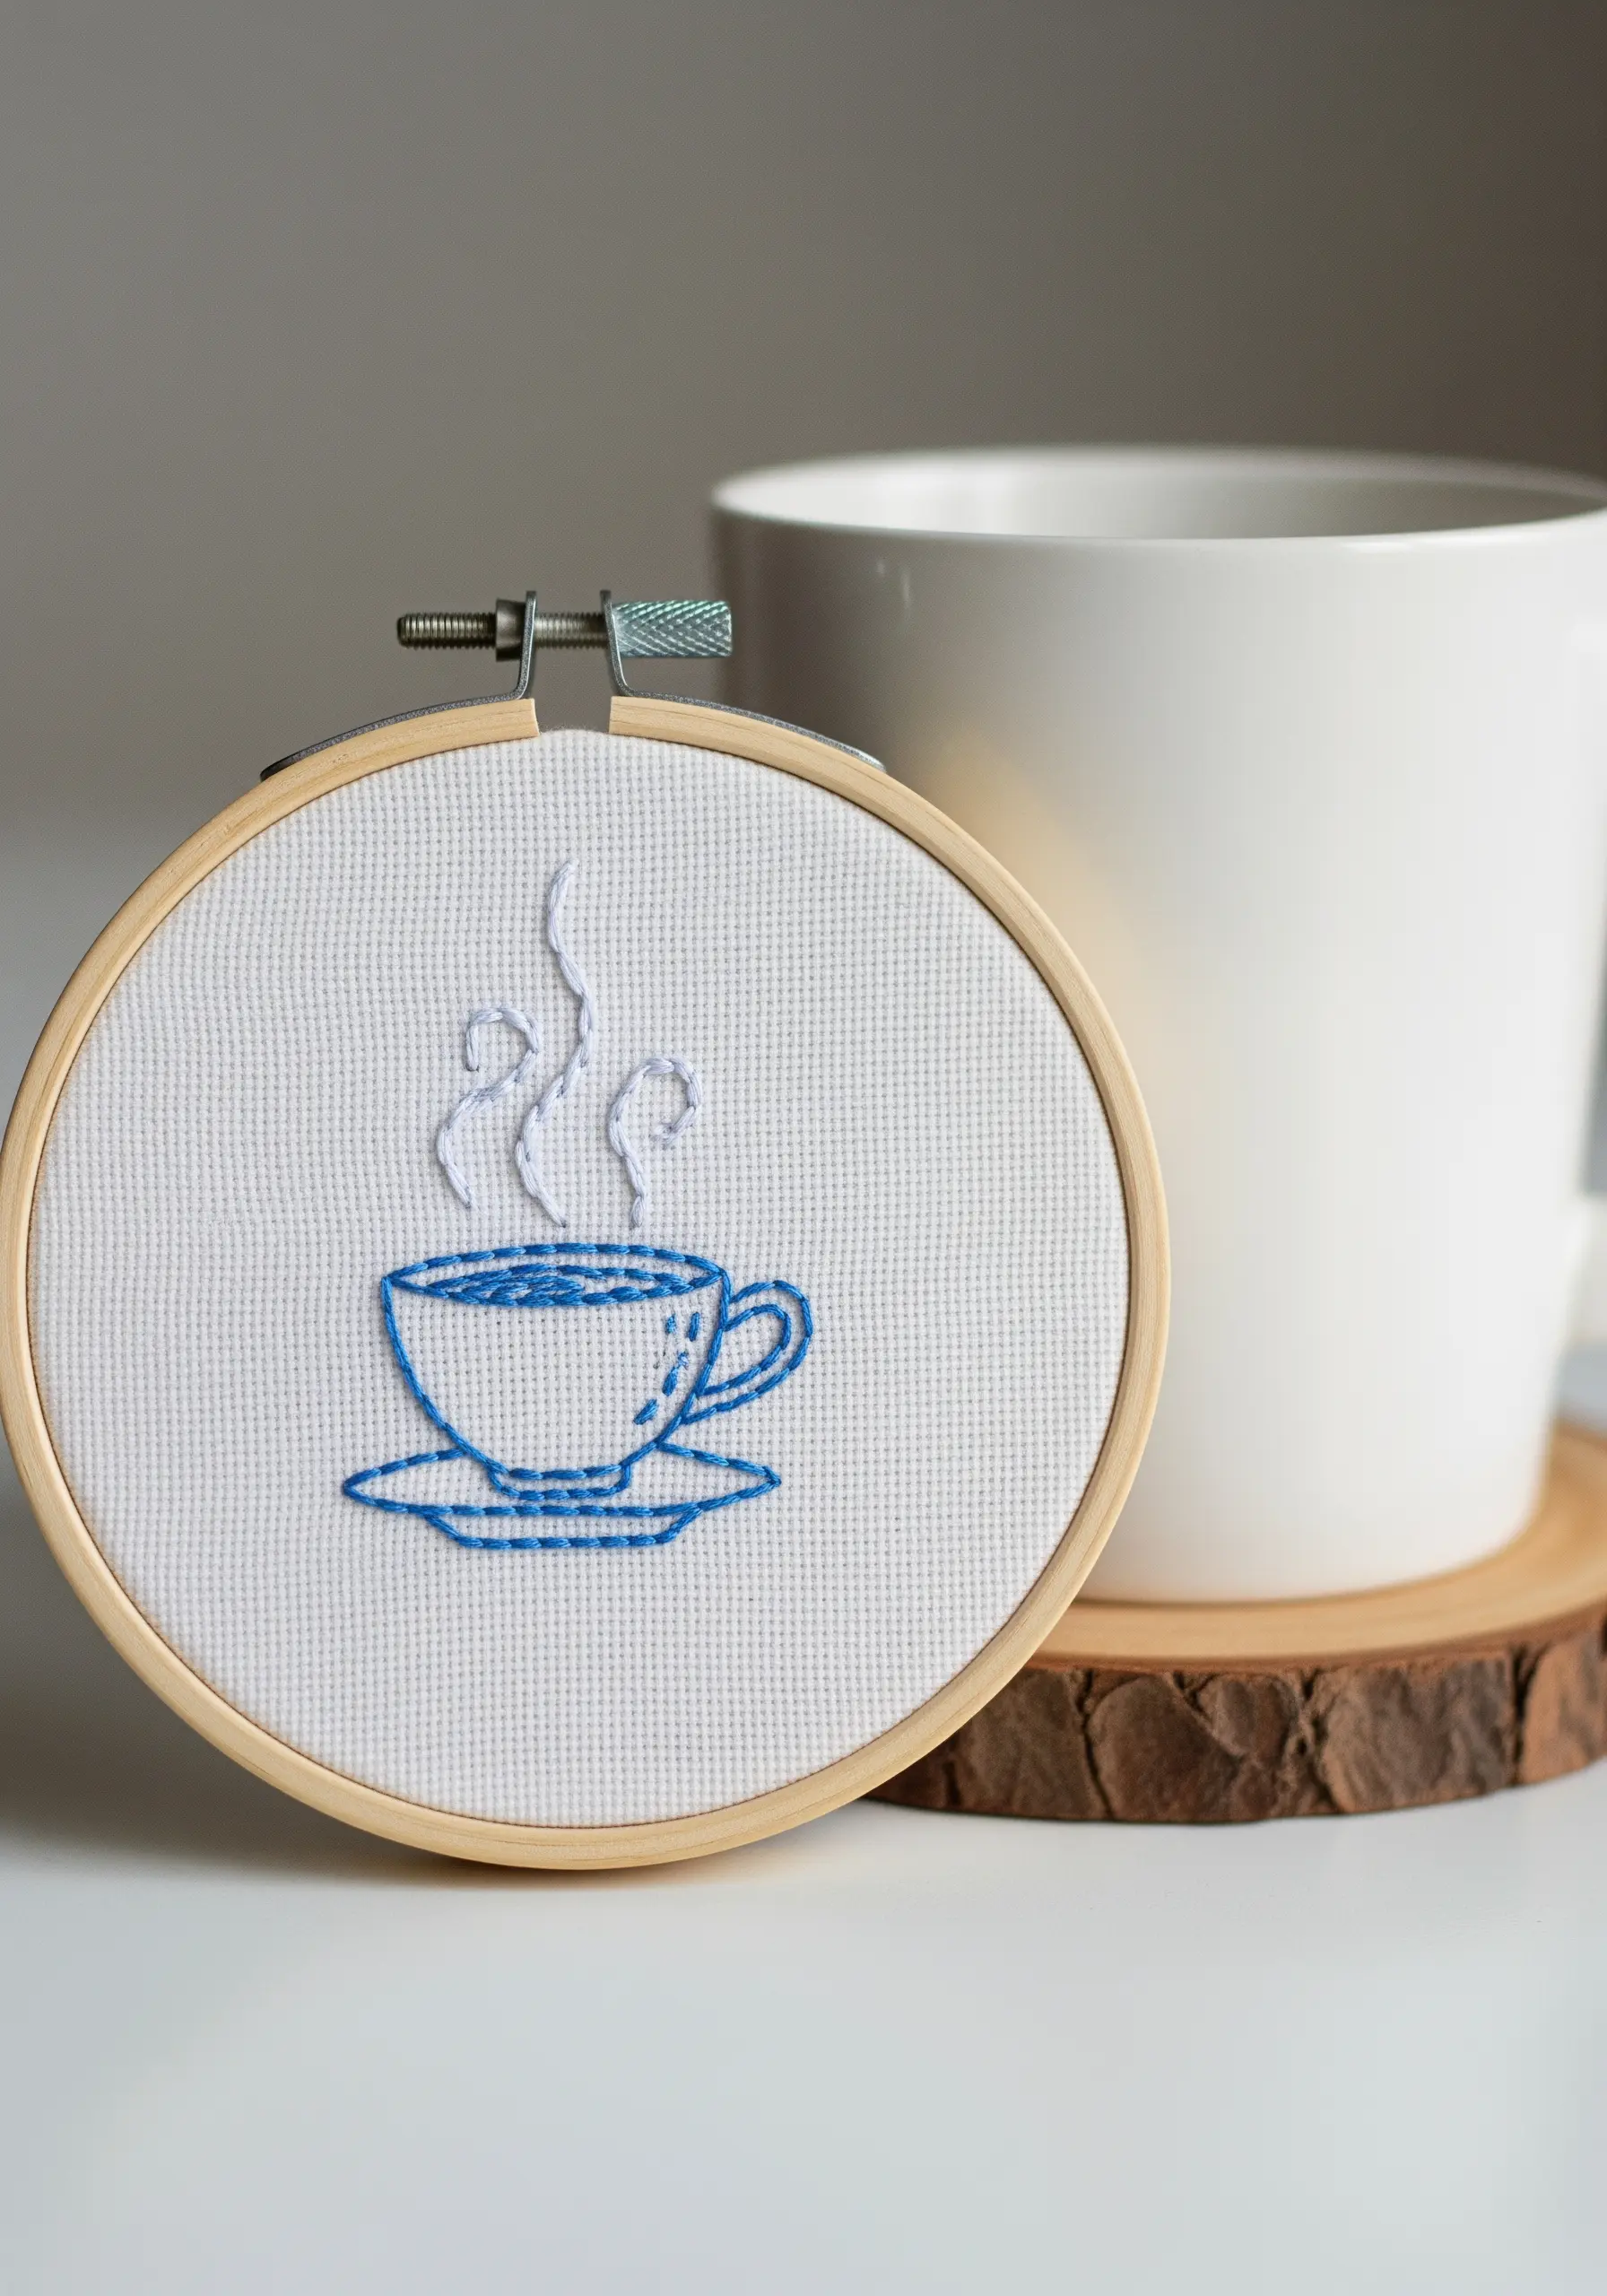
In a simple line drawing, varying the thickness of your lines creates depth and focuses the viewer’s attention.
Use a thicker stitch, like a whipped backstitch or stem stitch with 3-4 strands, for the main subject—the cup and saucer.
Then, switch to a finer, more delicate stitch with only 1-2 strands for secondary elements like the steam.
This subtle shift in line weight makes the design feel more dynamic and professionally illustrated.
22. Define Shapes with a Split Stitch Outline
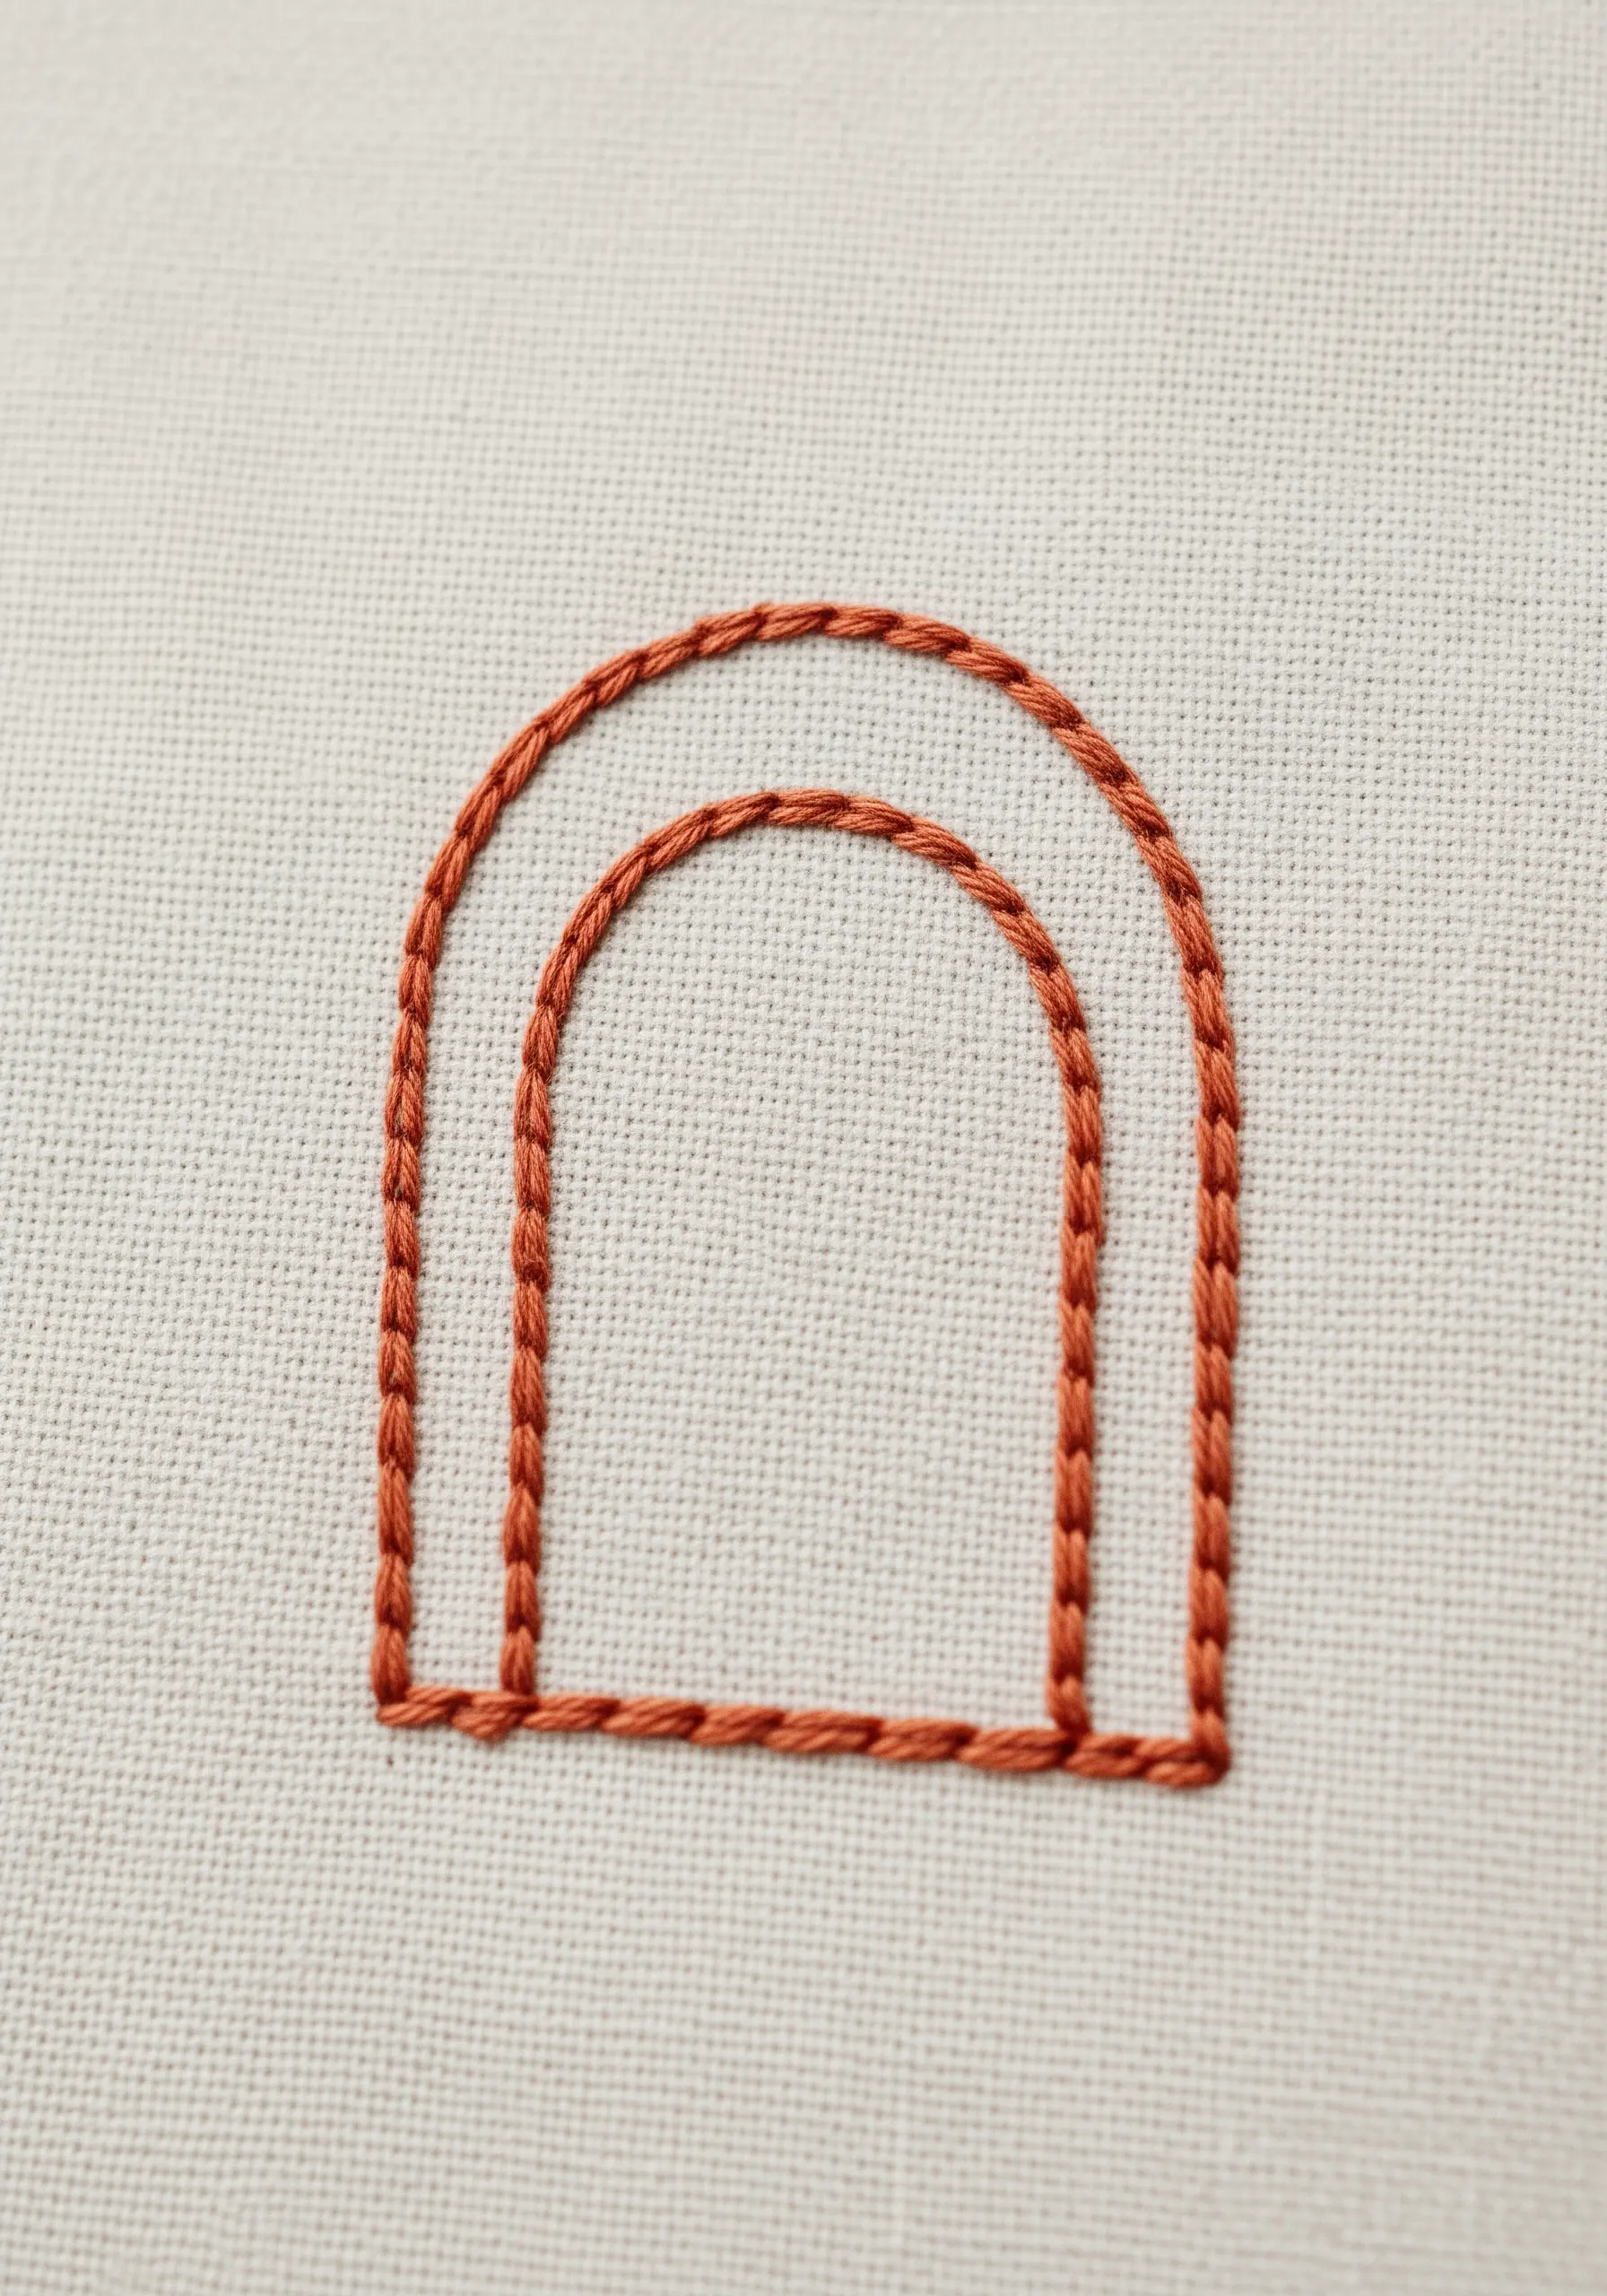
When you need a line that is both delicate and solid, the split stitch is the perfect choice.
By piercing the previous stitch with your needle, you create a continuous, chain-like line with no gaps.
It’s ideal for creating smooth curves and bold outlines in minimalist designs.
Using two parallel rows of split stitch, as in this arch, creates a strong graphic statement that feels both handmade and impeccably clean.
23. Create Orderly Texture with a Grid
When filling a large area with a textural stitch like the French knot, the key to a professional finish is organization.
Instead of placing knots randomly, use a water-soluble pen to draw a light grid on your fabric first.
Place one knot at each intersection of the grid. This ensures perfectly uniform spacing and straight rows, transforming a potentially chaotic fill into a beautifully ordered and tactile pattern.
This method is also perfect for executing flawless neutral color gradient embroidery.
24. Use a Heavier Thread for Bold Single-Line Art
To achieve a bold, continuous line without doubling up your stitches, consider changing your thread type.
Instead of using multiple strands of standard embroidery floss, try a single strand of pearl cotton (size #8 or #5).
Pearl cotton is a non-divisible, twisted thread that has a beautiful sheen and natural thickness.
It glides smoothly when creating a stem stitch or whipped backstitch, giving you that effortless, ink-drawn look with less work.
25. Achieve Precision in Geometry by Mapping Your Stitches
For a design built entirely from straight stitches, perfect placement is non-negotiable.
Treat your fabric like a piece of graph paper. Use a ruler and a disappearing ink pen to mark the exact start and end points of every single stitch.
This meticulous preparation ensures that all your lines are perfectly symmetrical, your angles are correct, and your spacing is flawless, resulting in a crisp, architectural finish.
26. Use Herringbone Stitch for a Fast, Textured Fill

When you need to fill a band or a wide shape, the herringbone stitch is an elegant and efficient alternative to satin stitch.
This stitch creates a beautiful, braided texture that looks far more complex than it is to execute.
Keep your stitch length and angle consistent to produce a neat, woven effect.
It works especially well for borders, bands, and fern foliage stitch variations where you want both coverage and texture.
27. Add a Single Stitch for a Realistic Highlight
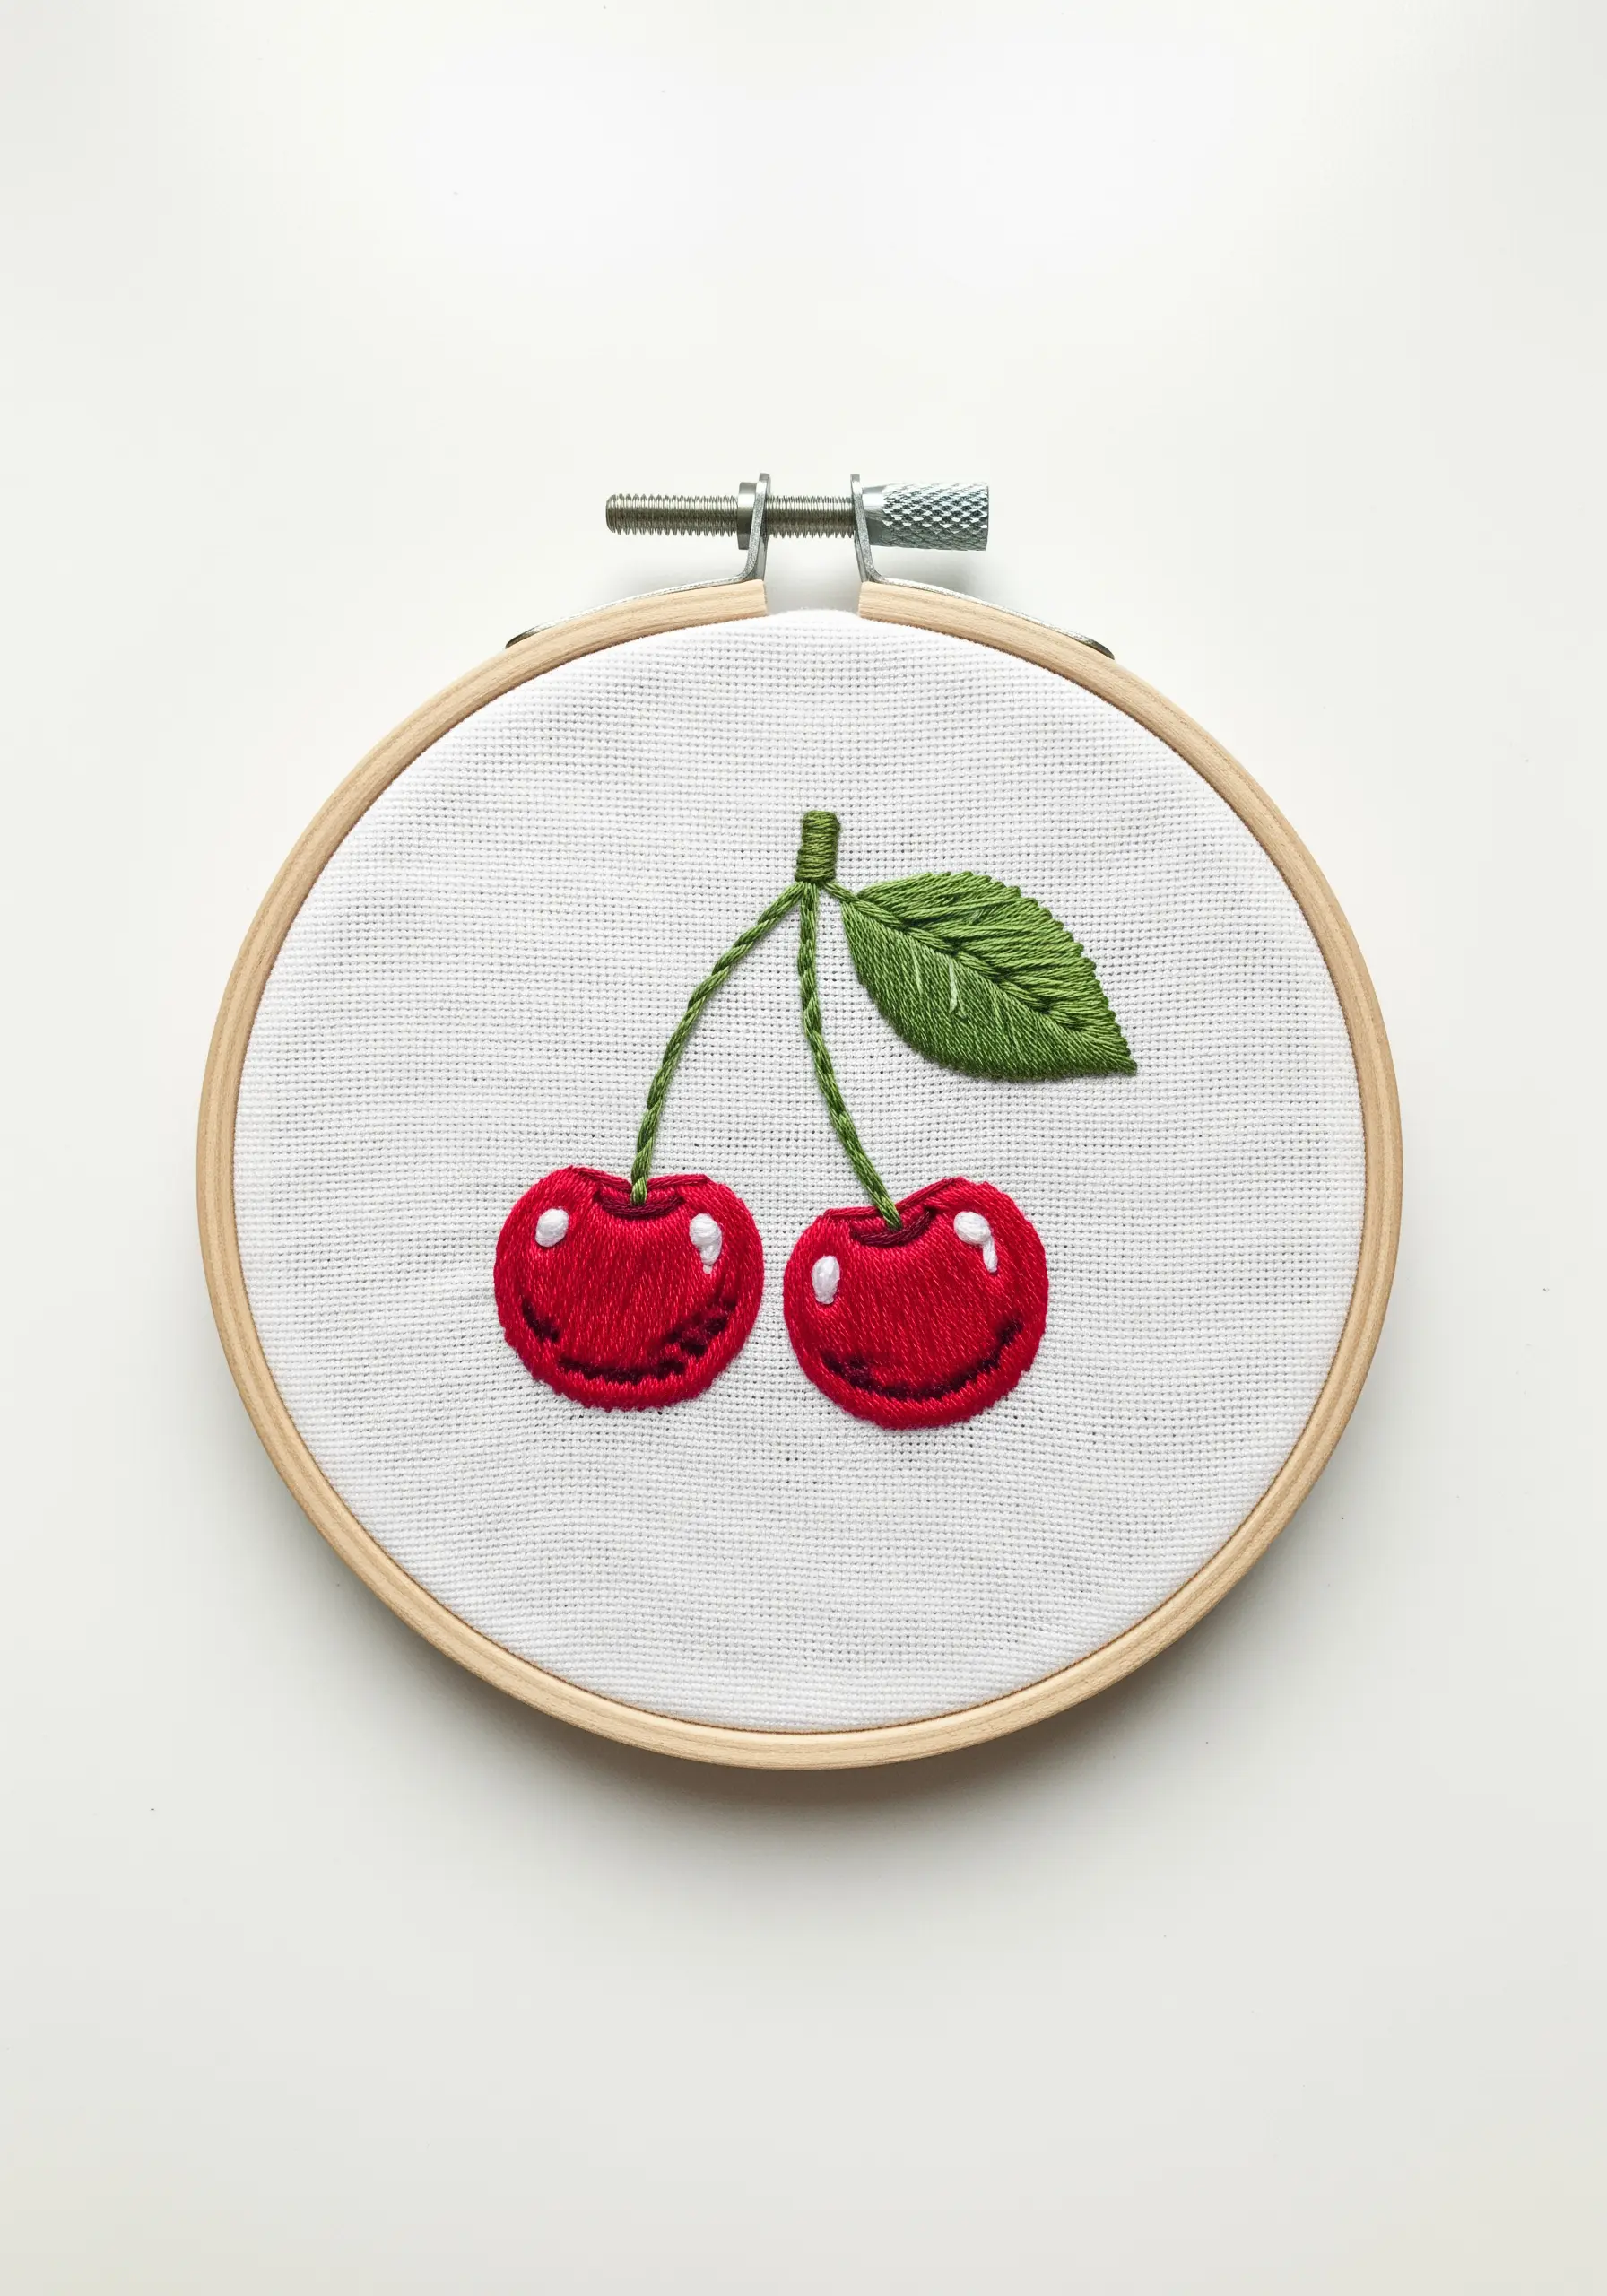
The smallest details often make the biggest impact.
After filling these cherries with a smooth satin stitch, a single, carefully placed straight stitch in bright white instantly creates the illusion of a glossy reflection.
This tiny addition transforms a flat shape into a three-dimensional object by mimicking how light hits a curved surface.
You can either leave a small gap for this stitch or add it directly on top for the sharpest effect.
28. Combine Stitch Types to Delineate Form and Detail

To make an object look authentic, use different stitches to represent its different materials or parts.
For this vintage key, a simple backstitch outlines the metallic form, clearly defining its shape.
Then, a contrasting technique—whipping or wrapping the thread around the bow—adds texture and suggests a decorative grip.
This combination of a clean outline with a textured detail makes the final piece more visually interesting and realistic.
29. Create a Focal Point with Textural Contrast

In a minimalist outline design, you can guide the viewer’s eye by creating a single area of high texture.
The petals of this poppy are rendered in a simple, delicate backstitch, which allows them to feel light.
In contrast, the center is filled with dense, dark French knots, creating a heavy, tactile focal point.
This dramatic shift in stitch density and texture is a powerful compositional tool that adds sophistication to simple line work.
30. Build Meditative Patterns with Bullion Knots

For a truly unique and sculptural texture, fill a space with concentric circles of bullion knots.
A bullion knot is created by wrapping the thread multiple times around the needle before pulling it through, forming a small coil.
Placing these coils side-by-side in tight spirals creates a dense, mesmerizing pattern that resembles woven cord or coral.
The key is consistency in the number of wraps and the tightness of each coil.
31. Let Variegated Thread Add Effortless Dimension
To elevate a simple outline, choose a variegated embroidery floss.
This type of thread is dyed with multiple shades along a single strand, so it automatically creates subtle color shifts as you stitch.
Using it with a basic backstitch or stem stitch gives a simple drawing instant depth and a painterly quality without any extra effort on your part.
It’s the perfect way to make a minimalist design feel richer and more dynamic.
32. Recreate Everyday Objects with Padded Satin Stitch
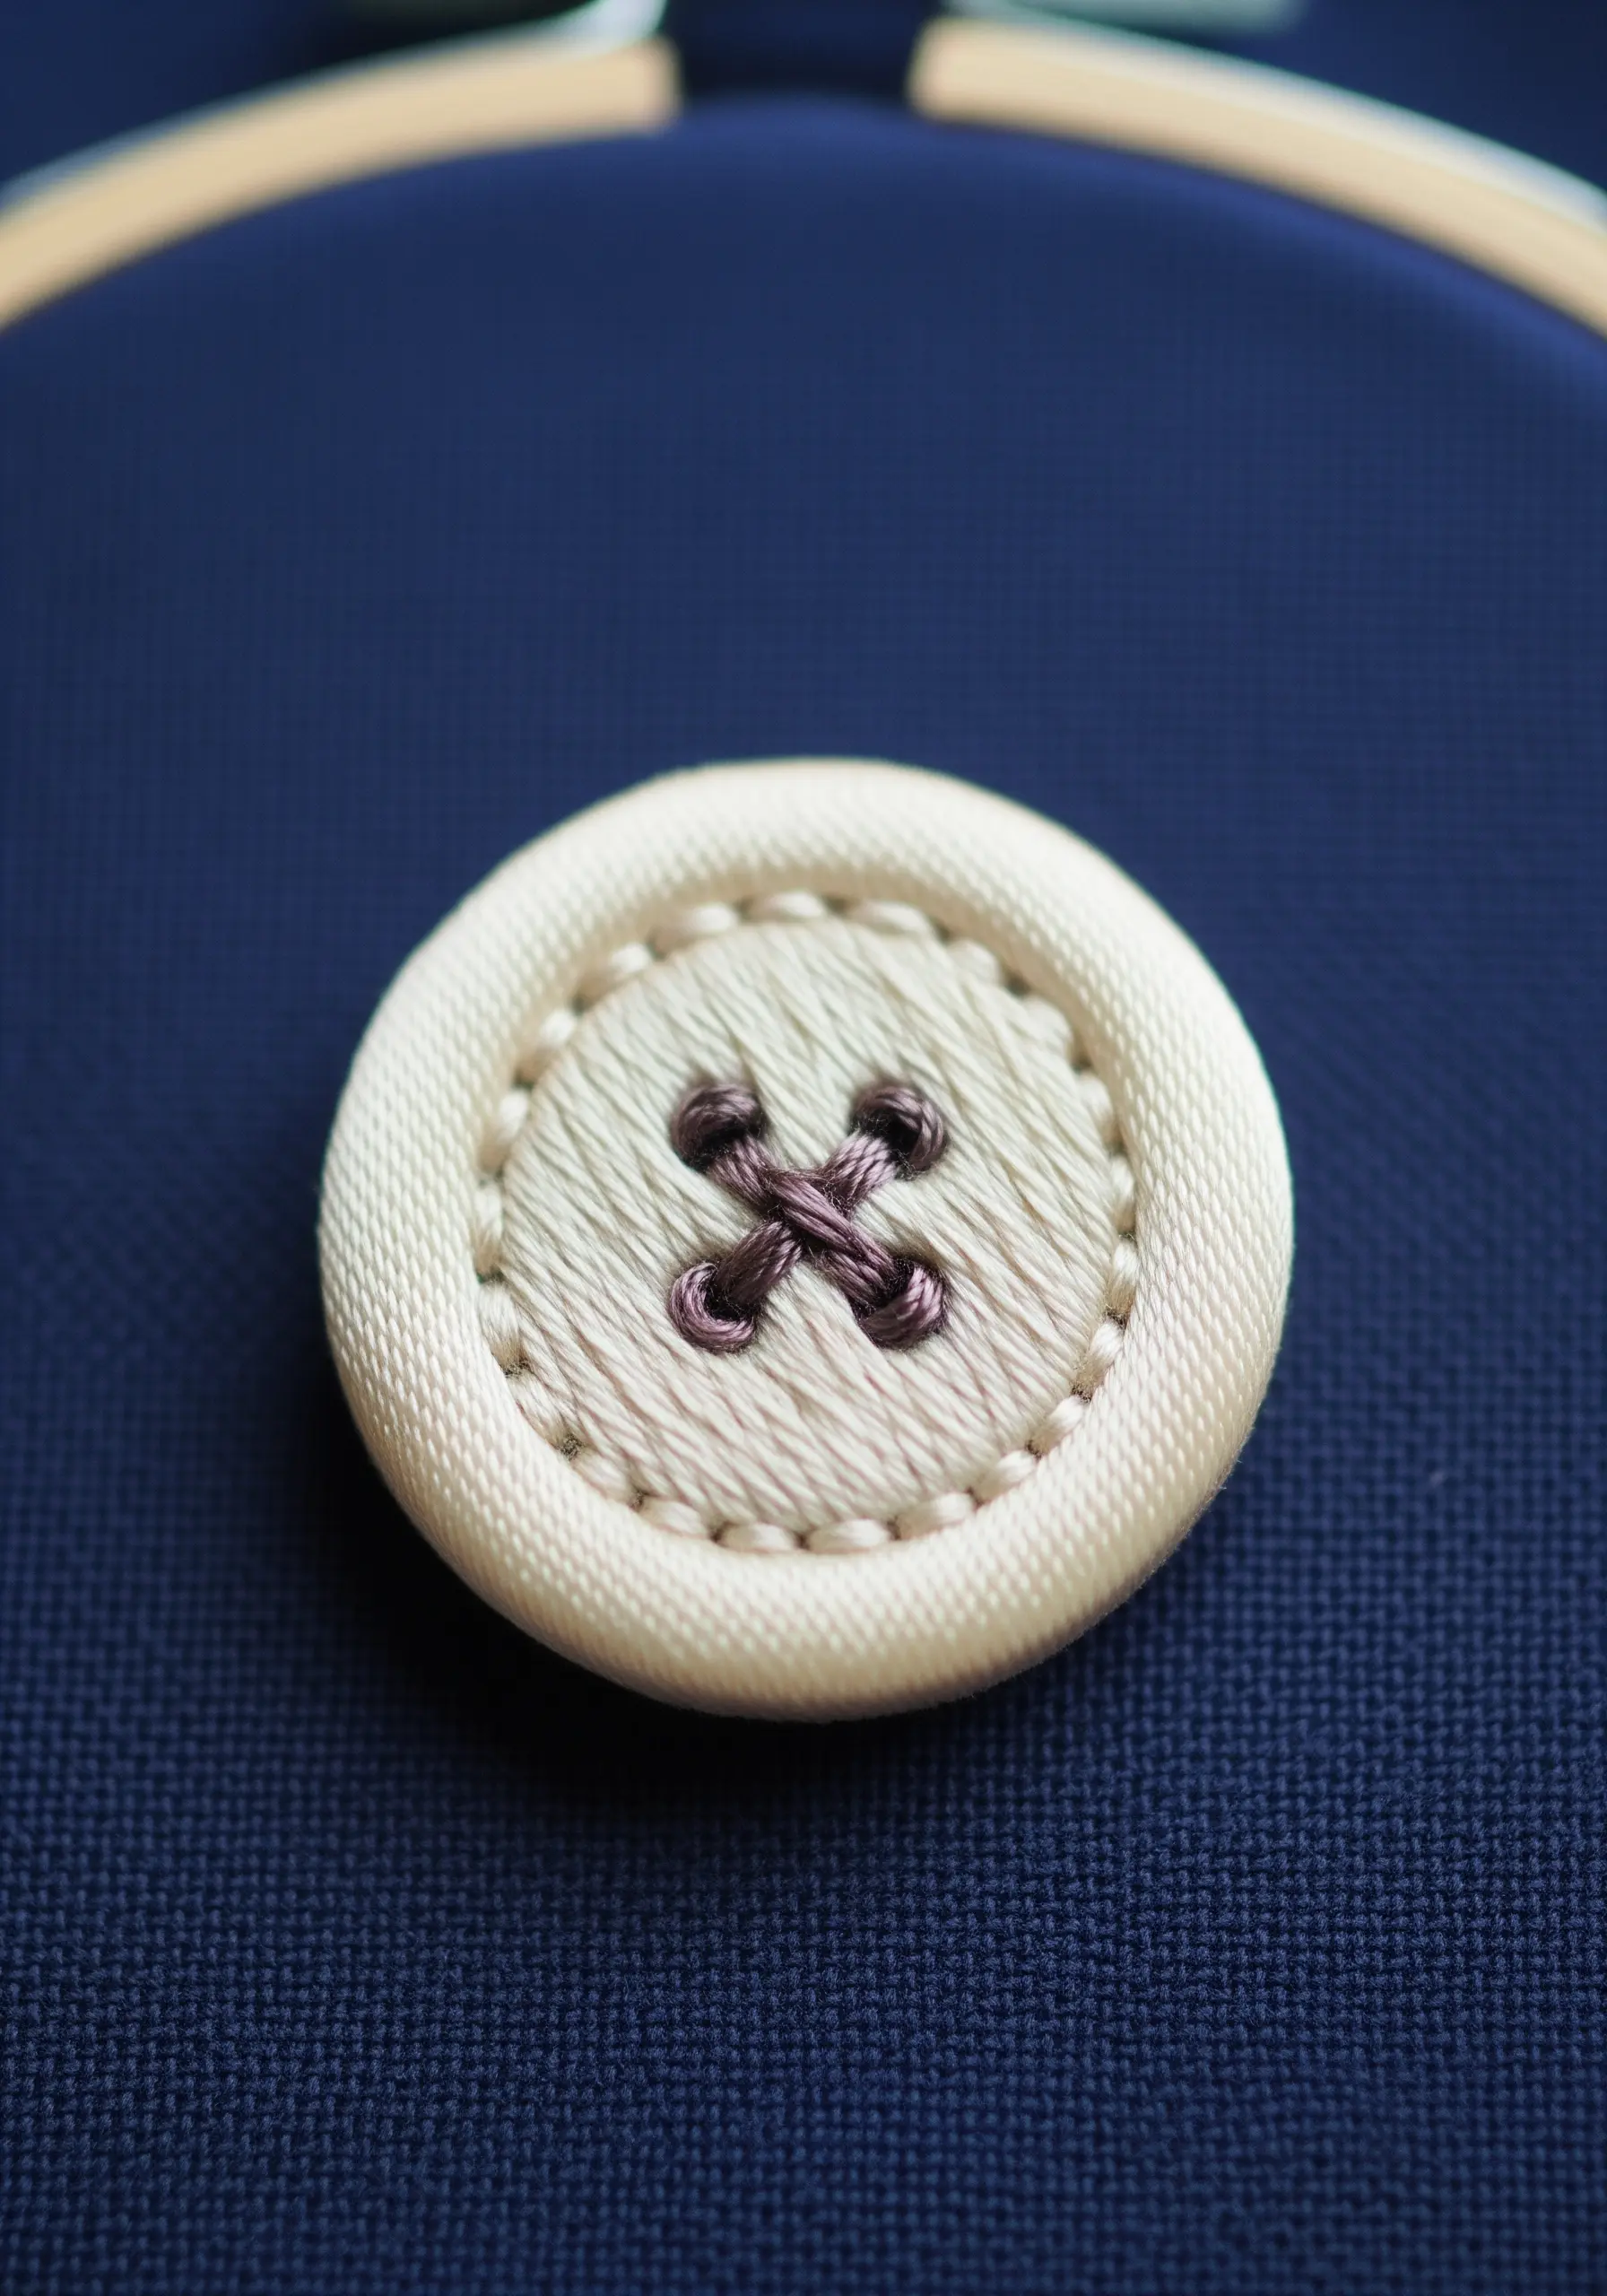
Turn your embroidery into a trompe-l’œil masterpiece by mimicking the construction of real-world objects.
To create this button, use a padded satin stitch for the raised outer rim, wrapping thread around a cord or foundation stitches.
Fill the center with angled satin stitches to suggest a slightly concave surface, then finish with a simple cross stitch for the thread holes.
Observing and translating these structural details into thread is a hallmark of advanced stitching.
33. Use Black Outlines to Unify Geometric Fills

When working with multiple blocks of color in a geometric or low-poly design, a strong outline is essential for a clean, cohesive look.
First, complete all of your colored satin stitch sections, ensuring the stitches within each polygon all lie in the same direction.
Then, go back and outline every shape with a crisp black backstitch.
This final step defines each facet, masks any minor imperfections at the edges of your fill stitches, and gives the entire piece a sharp, graphic quality.
34. Convey a Scene with Intentional Minimalism

You can create a powerful sense of place with just a few carefully considered stitches.
Here, a simple line of alternating backstitch suggests the texture of a road or water, while a small, dense semicircle of satin stitch is all that’s needed to represent a rising sun.
The vast expanse of untouched blue fabric becomes the sky.
This approach proves that professional embroidery isn’t about complexity, but about the confidence to use negative space effectively.


