

Your bedroom is more than just a place to sleep; it’s a sanctuary. But transforming it into a space that feels truly personal can feel daunting. This is where your needle and thread become your most powerful tools. Forget fleeting trends—we’re going to explore how embroidery can bring lasting warmth, texture, and meaning to your headboard and bed linens.
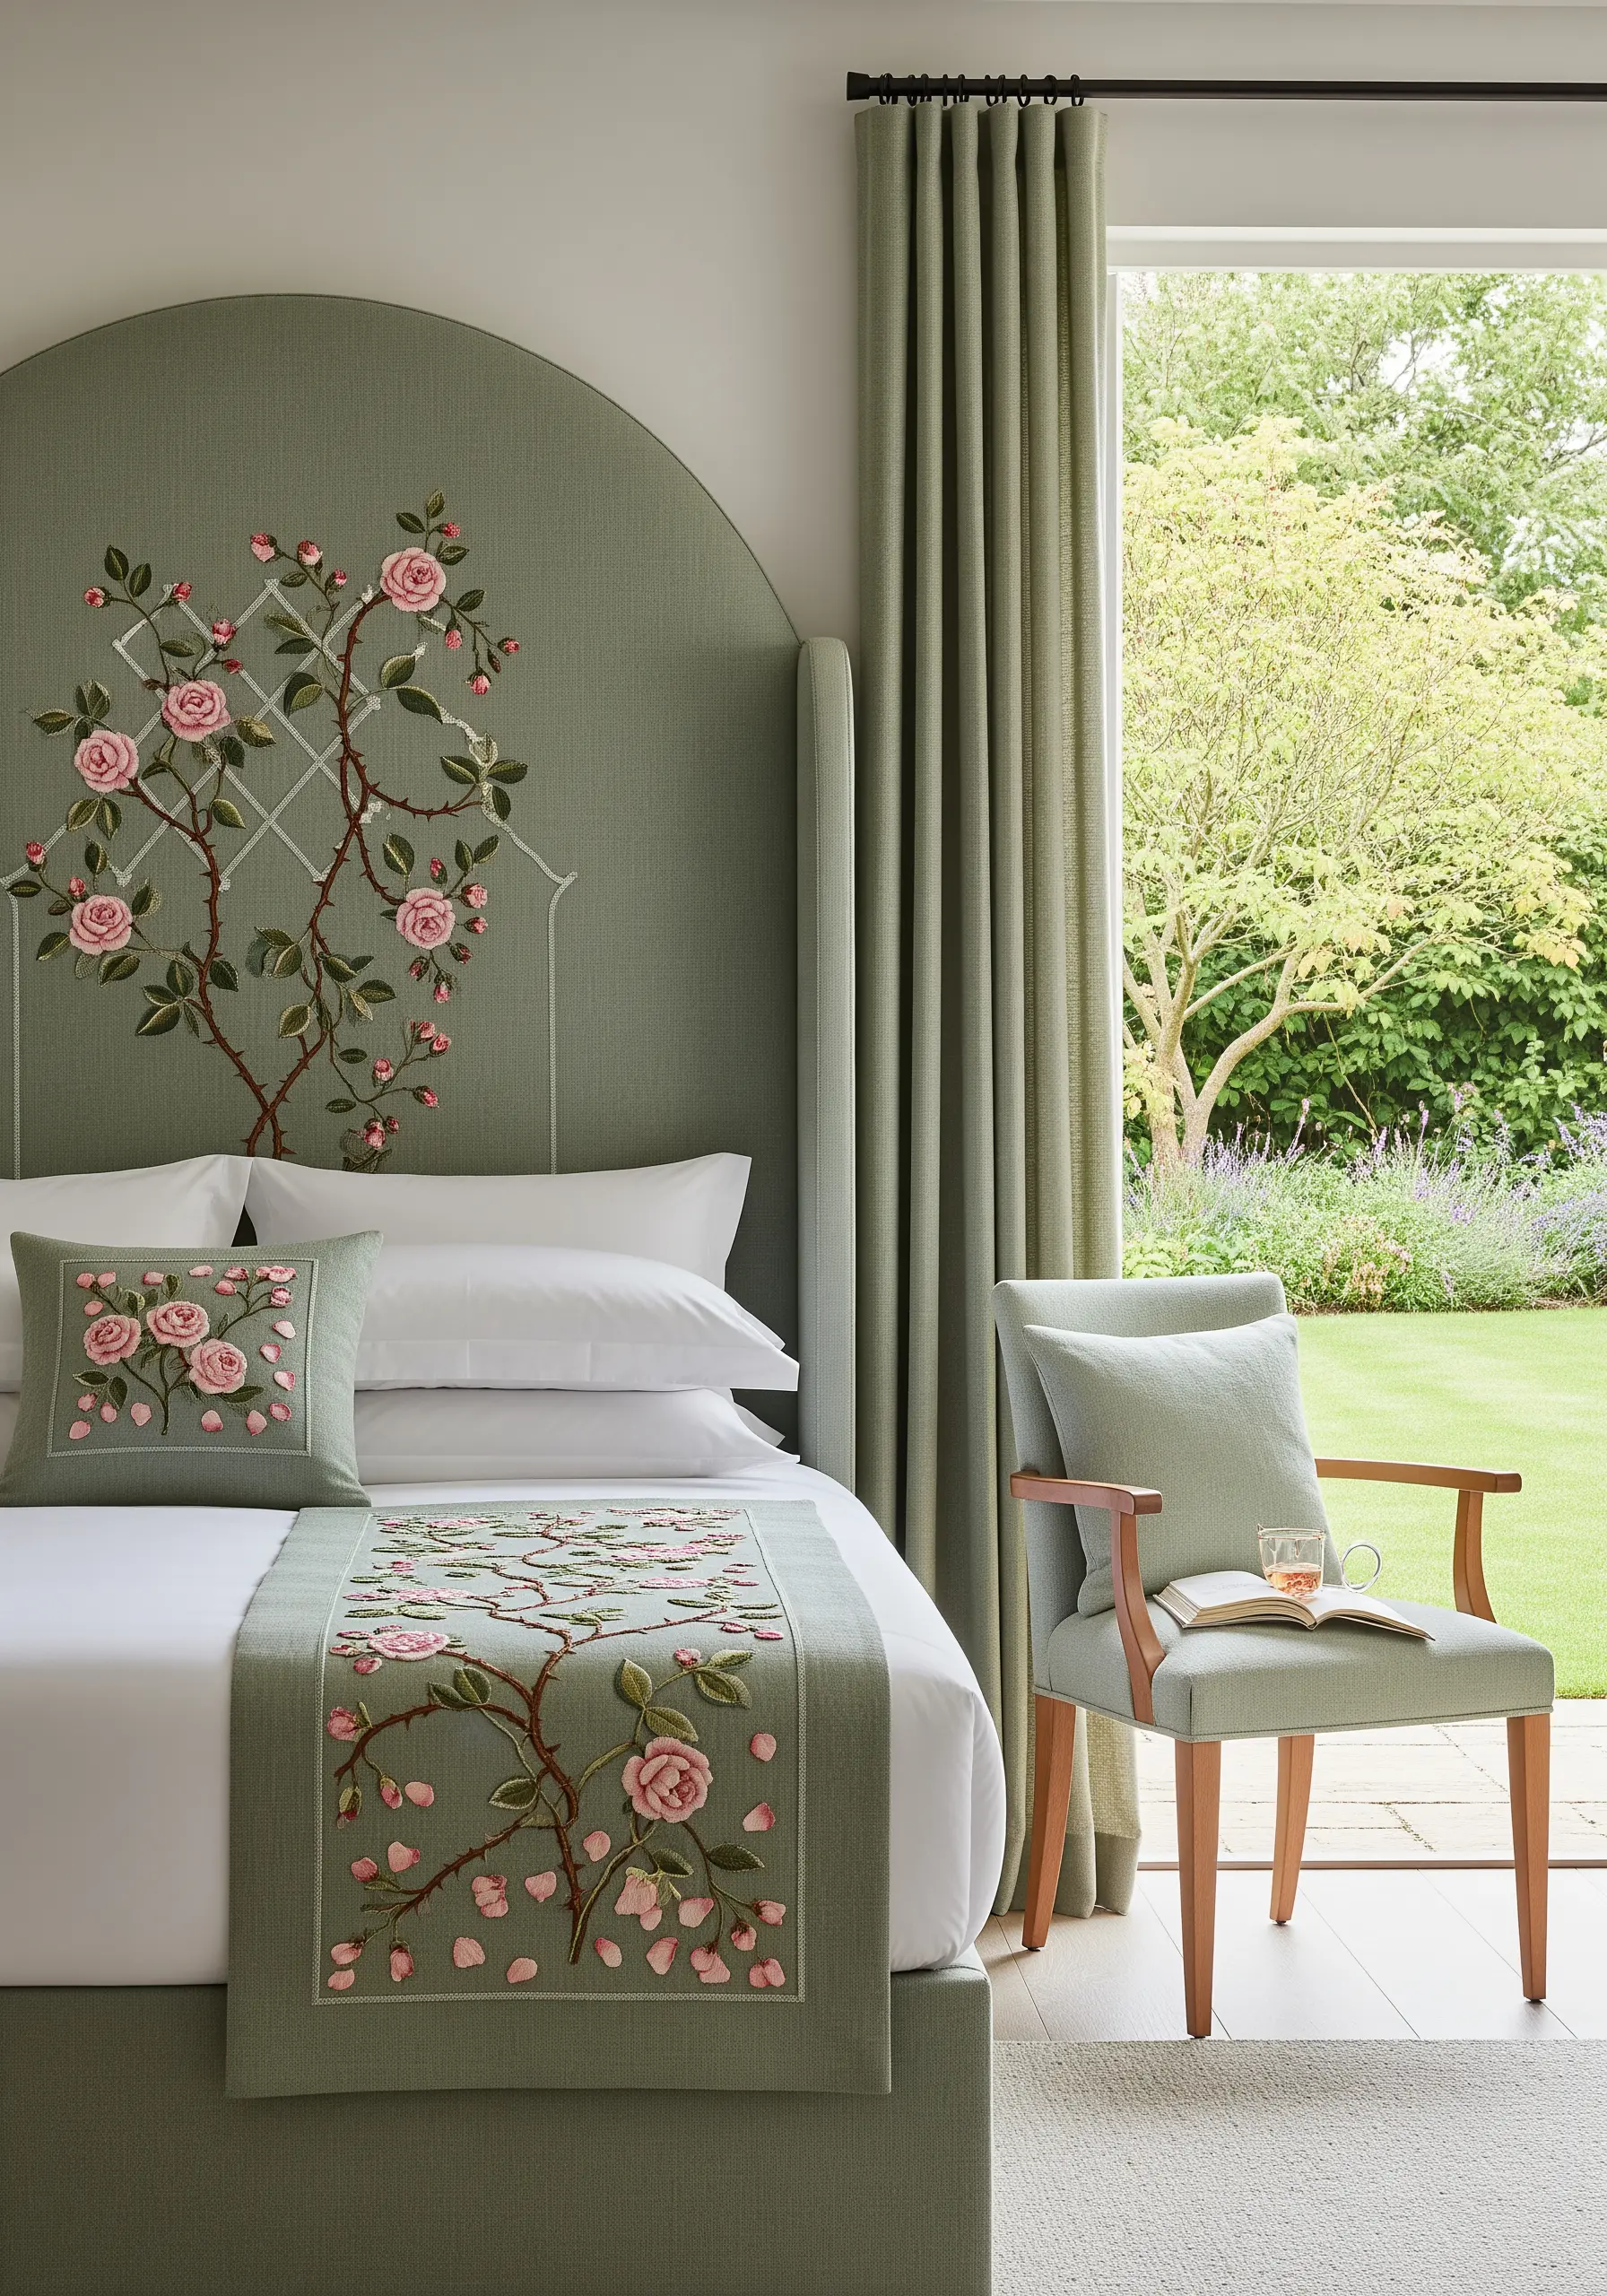
Think of your headboard as a canvas waiting for a story. A few carefully placed stitches can turn a plain surface into a focal point that reflects your style, whether it’s a minimalist line of mountains or a lush botanical scene. The same goes for a bed runner—it’s the perfect place to experiment with a new stitch or color palette, adding a layer of handcrafted luxury to your room.
In these projects, you’ll discover how to use texture to create emotion, from the plush feel of a French knot to the smooth glide of a satin stitch. Let’s move beyond simple patterns and start stitching a bedroom that feels like it was made just for you.
1. Create Lush Dimension with Layered Satin Stitch
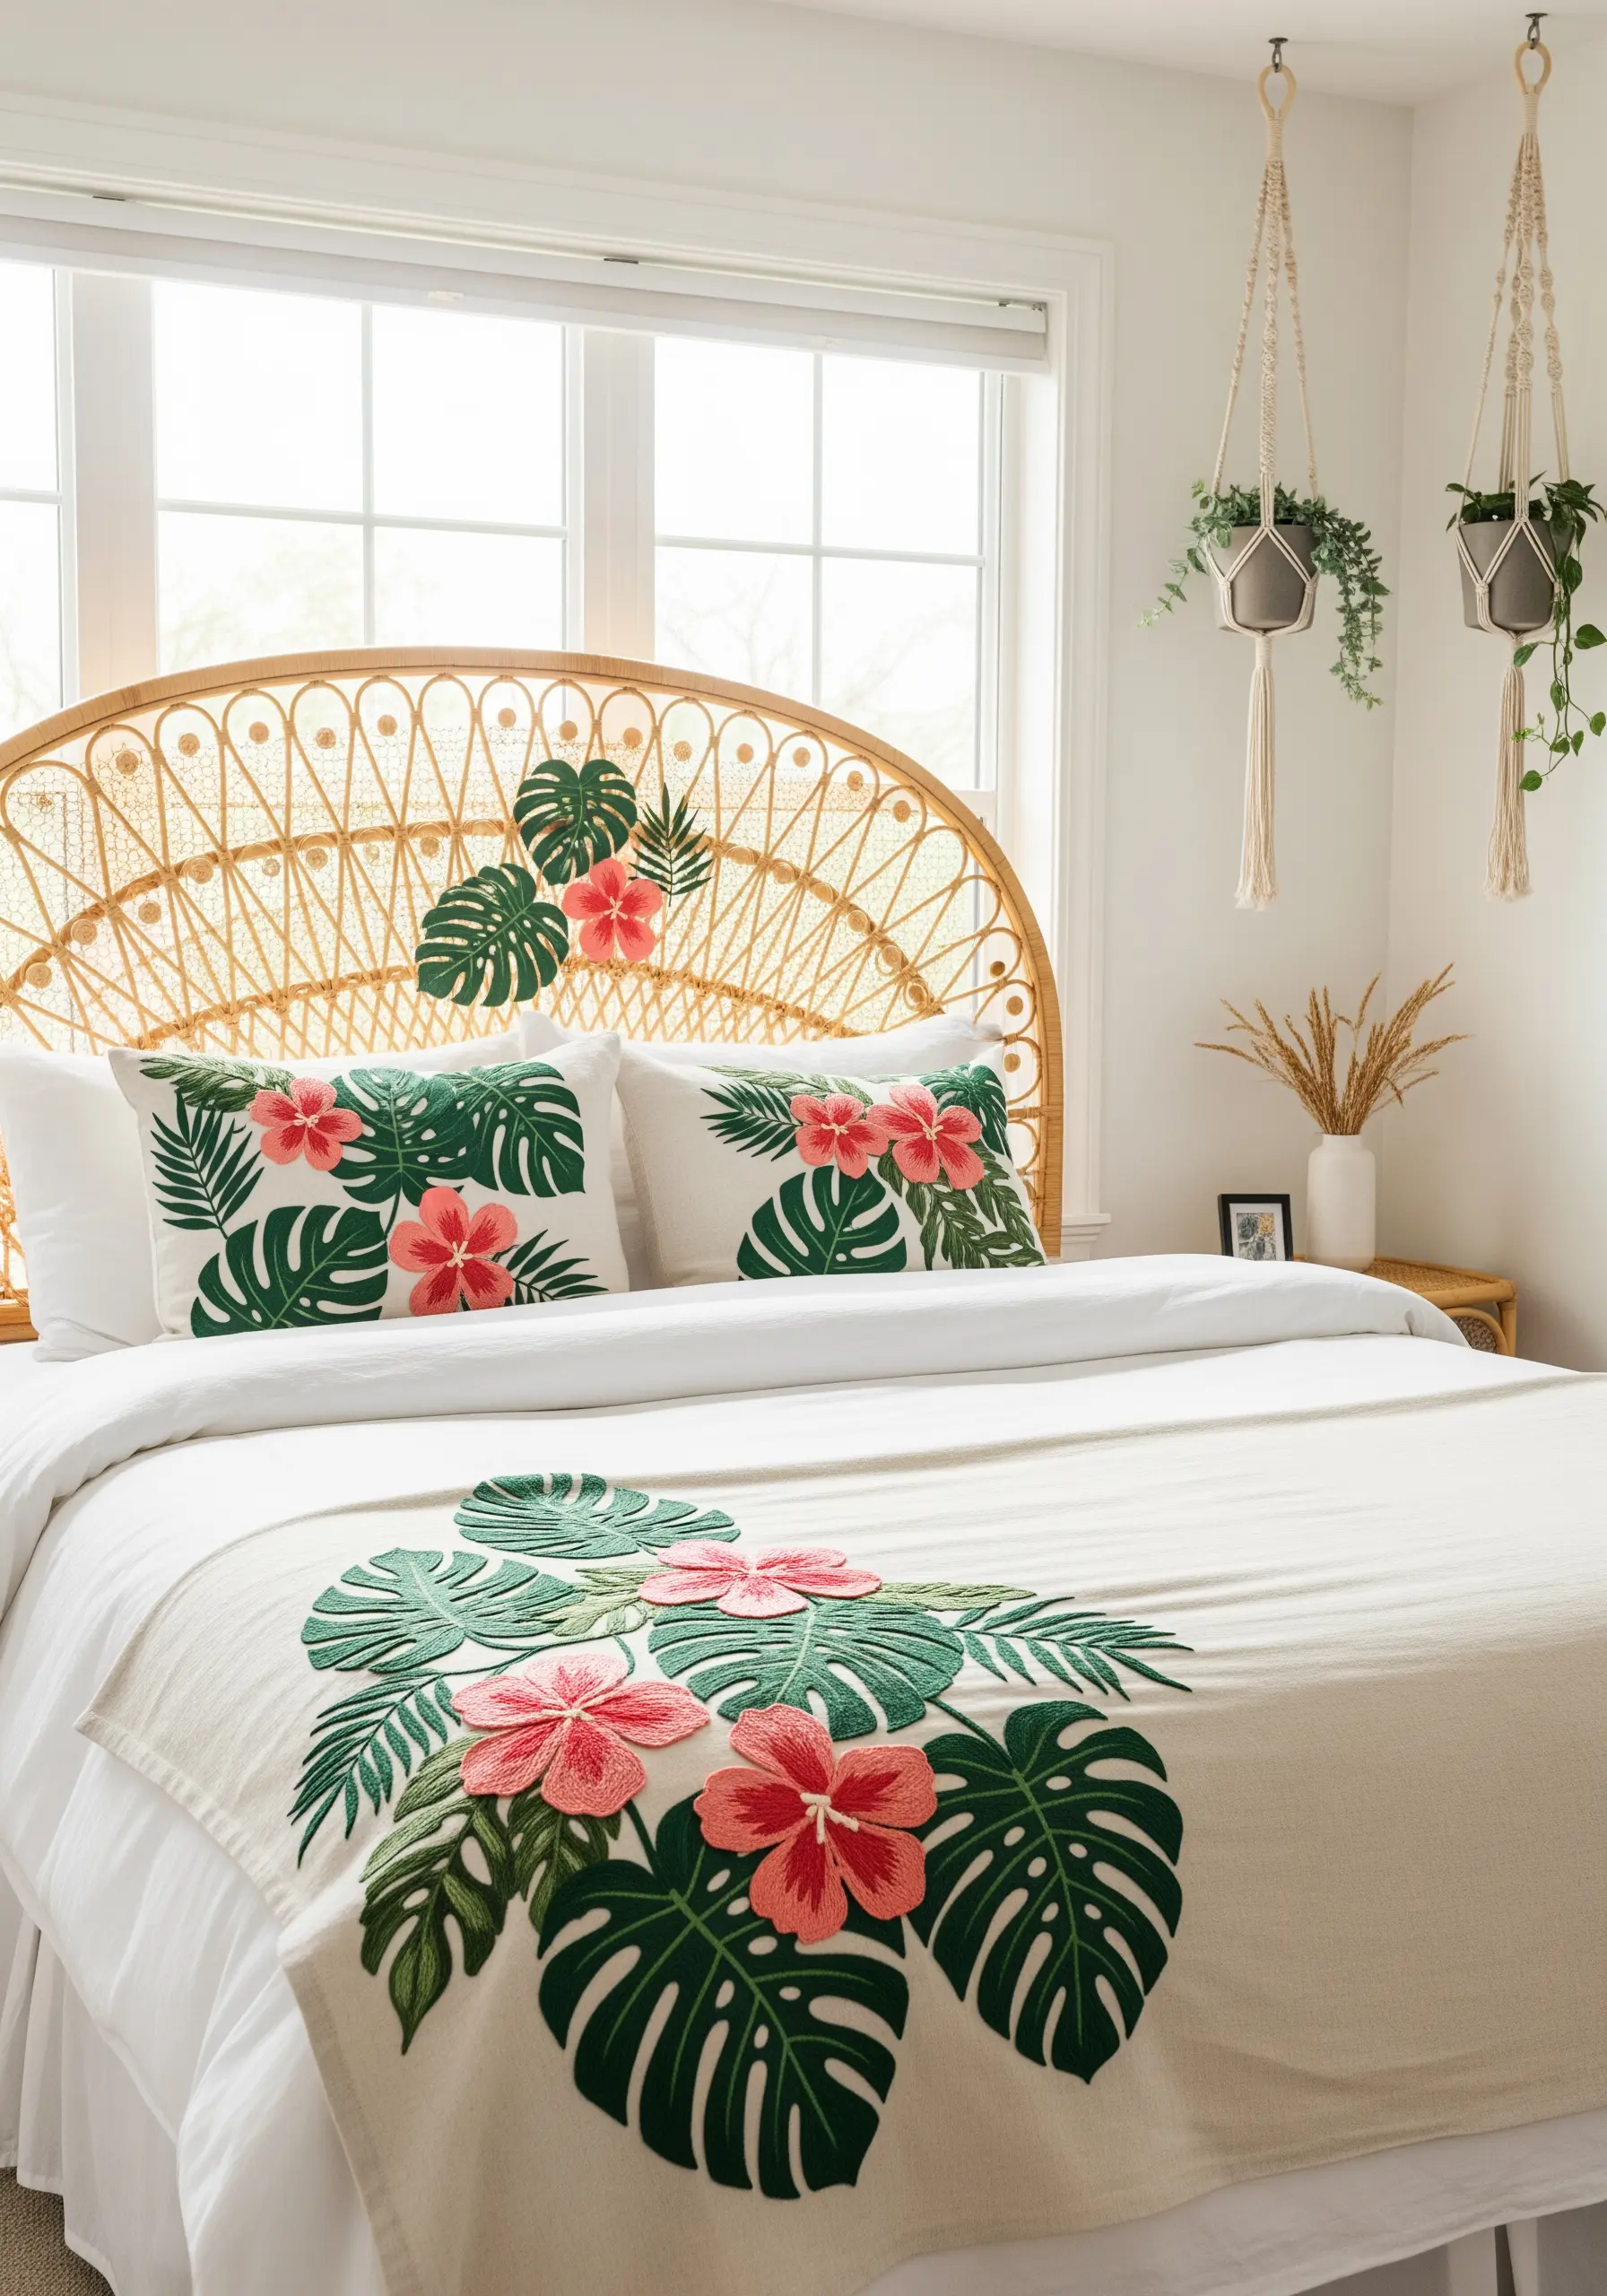
Give tropical leaves a vibrant, three-dimensional quality by layering your satin stitches.
Start with the leaves in the background, completing them fully before stitching the foreground elements on top.
For each leaf, use a directional satin stitch, angling your stitches to follow the natural curve and veins of the leaf.
This technique creates realistic shadows and depth, making the design pop off the fabric instead of looking flat.
Using a six-strand cotton floss enhances the boldness and texture, perfect for a statement piece on a pillow or bed runner.
2. Use Couching for Bold, Graphic Tree Trunks
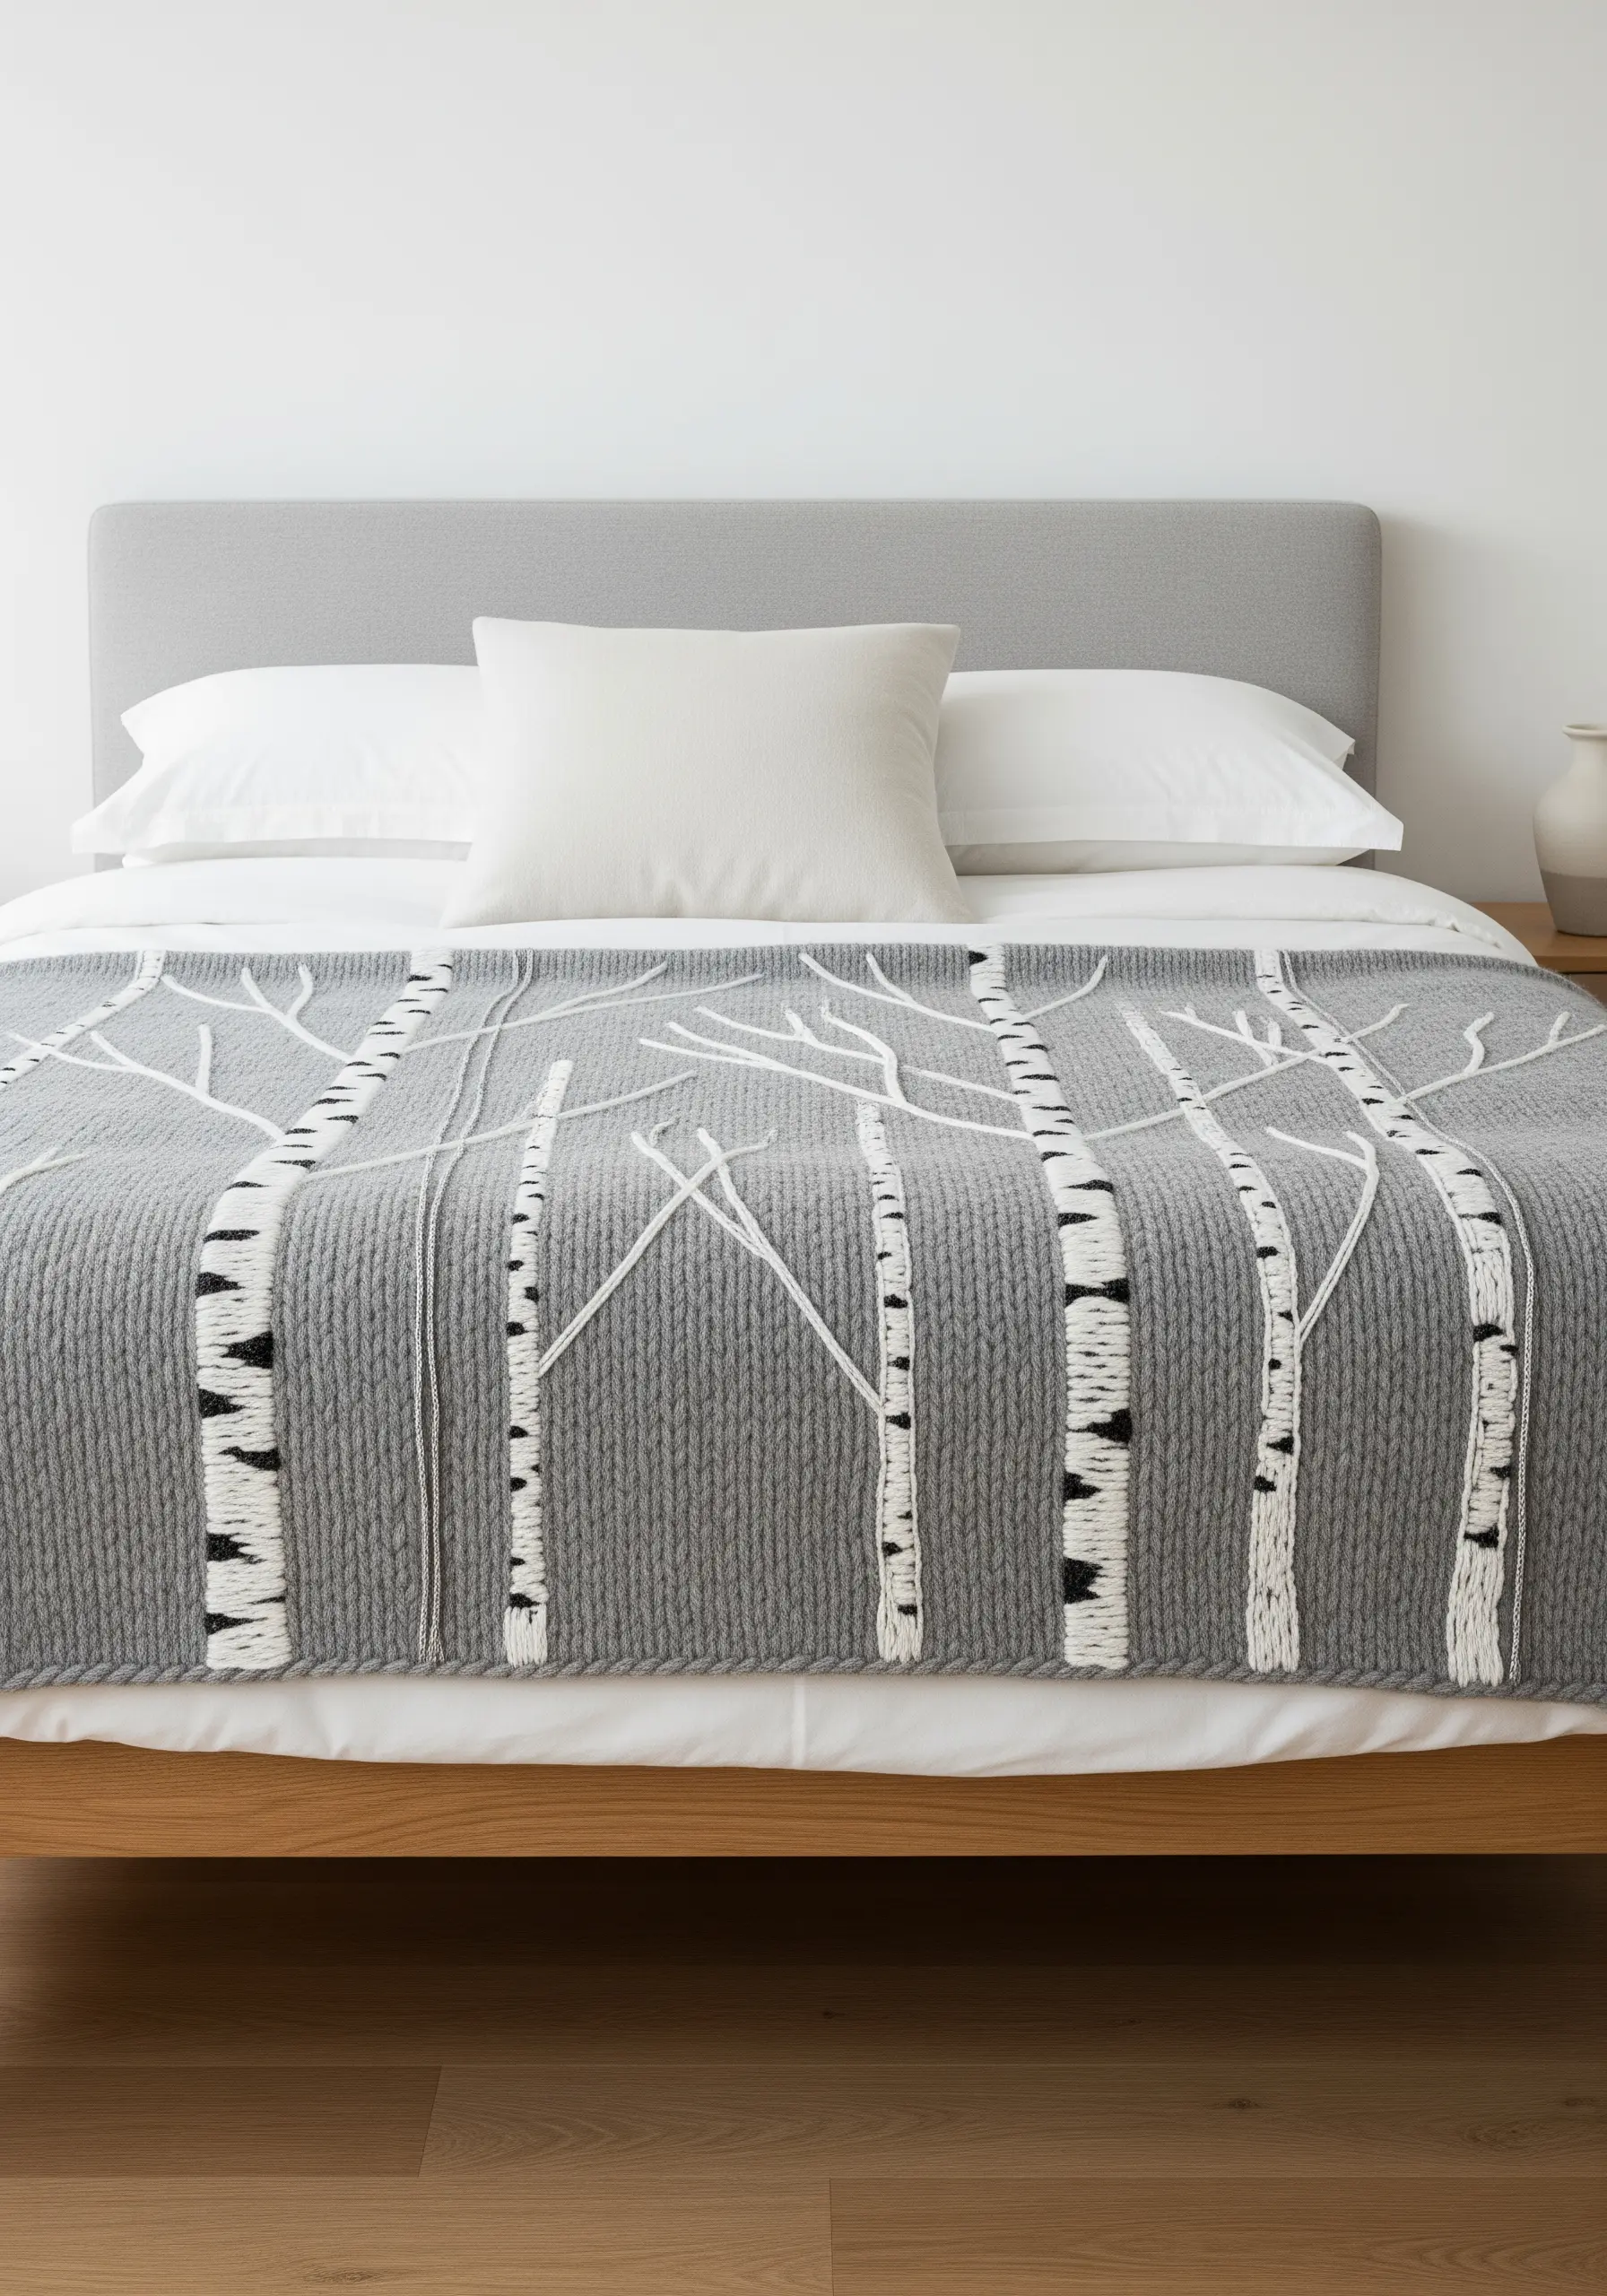
To achieve the clean, striking look of birch bark, couch thick white yarn onto a textured fabric like this knit blanket.
Lay the yarn in place to form the tree trunks and branches, then use a thinner, matching thread to tack it down with small, evenly spaced stitches.
This method keeps your lines perfectly controlled and adds a raised, sculptural quality.
For the characteristic black marks on the bark, use a few simple straight stitches with black yarn, varying their length and placement for an organic feel.
The contrast between the smooth yarn and the woven base fabric creates a powerful visual and tactile experience.
3. Achieve Art Deco Precision with Metallic Threads
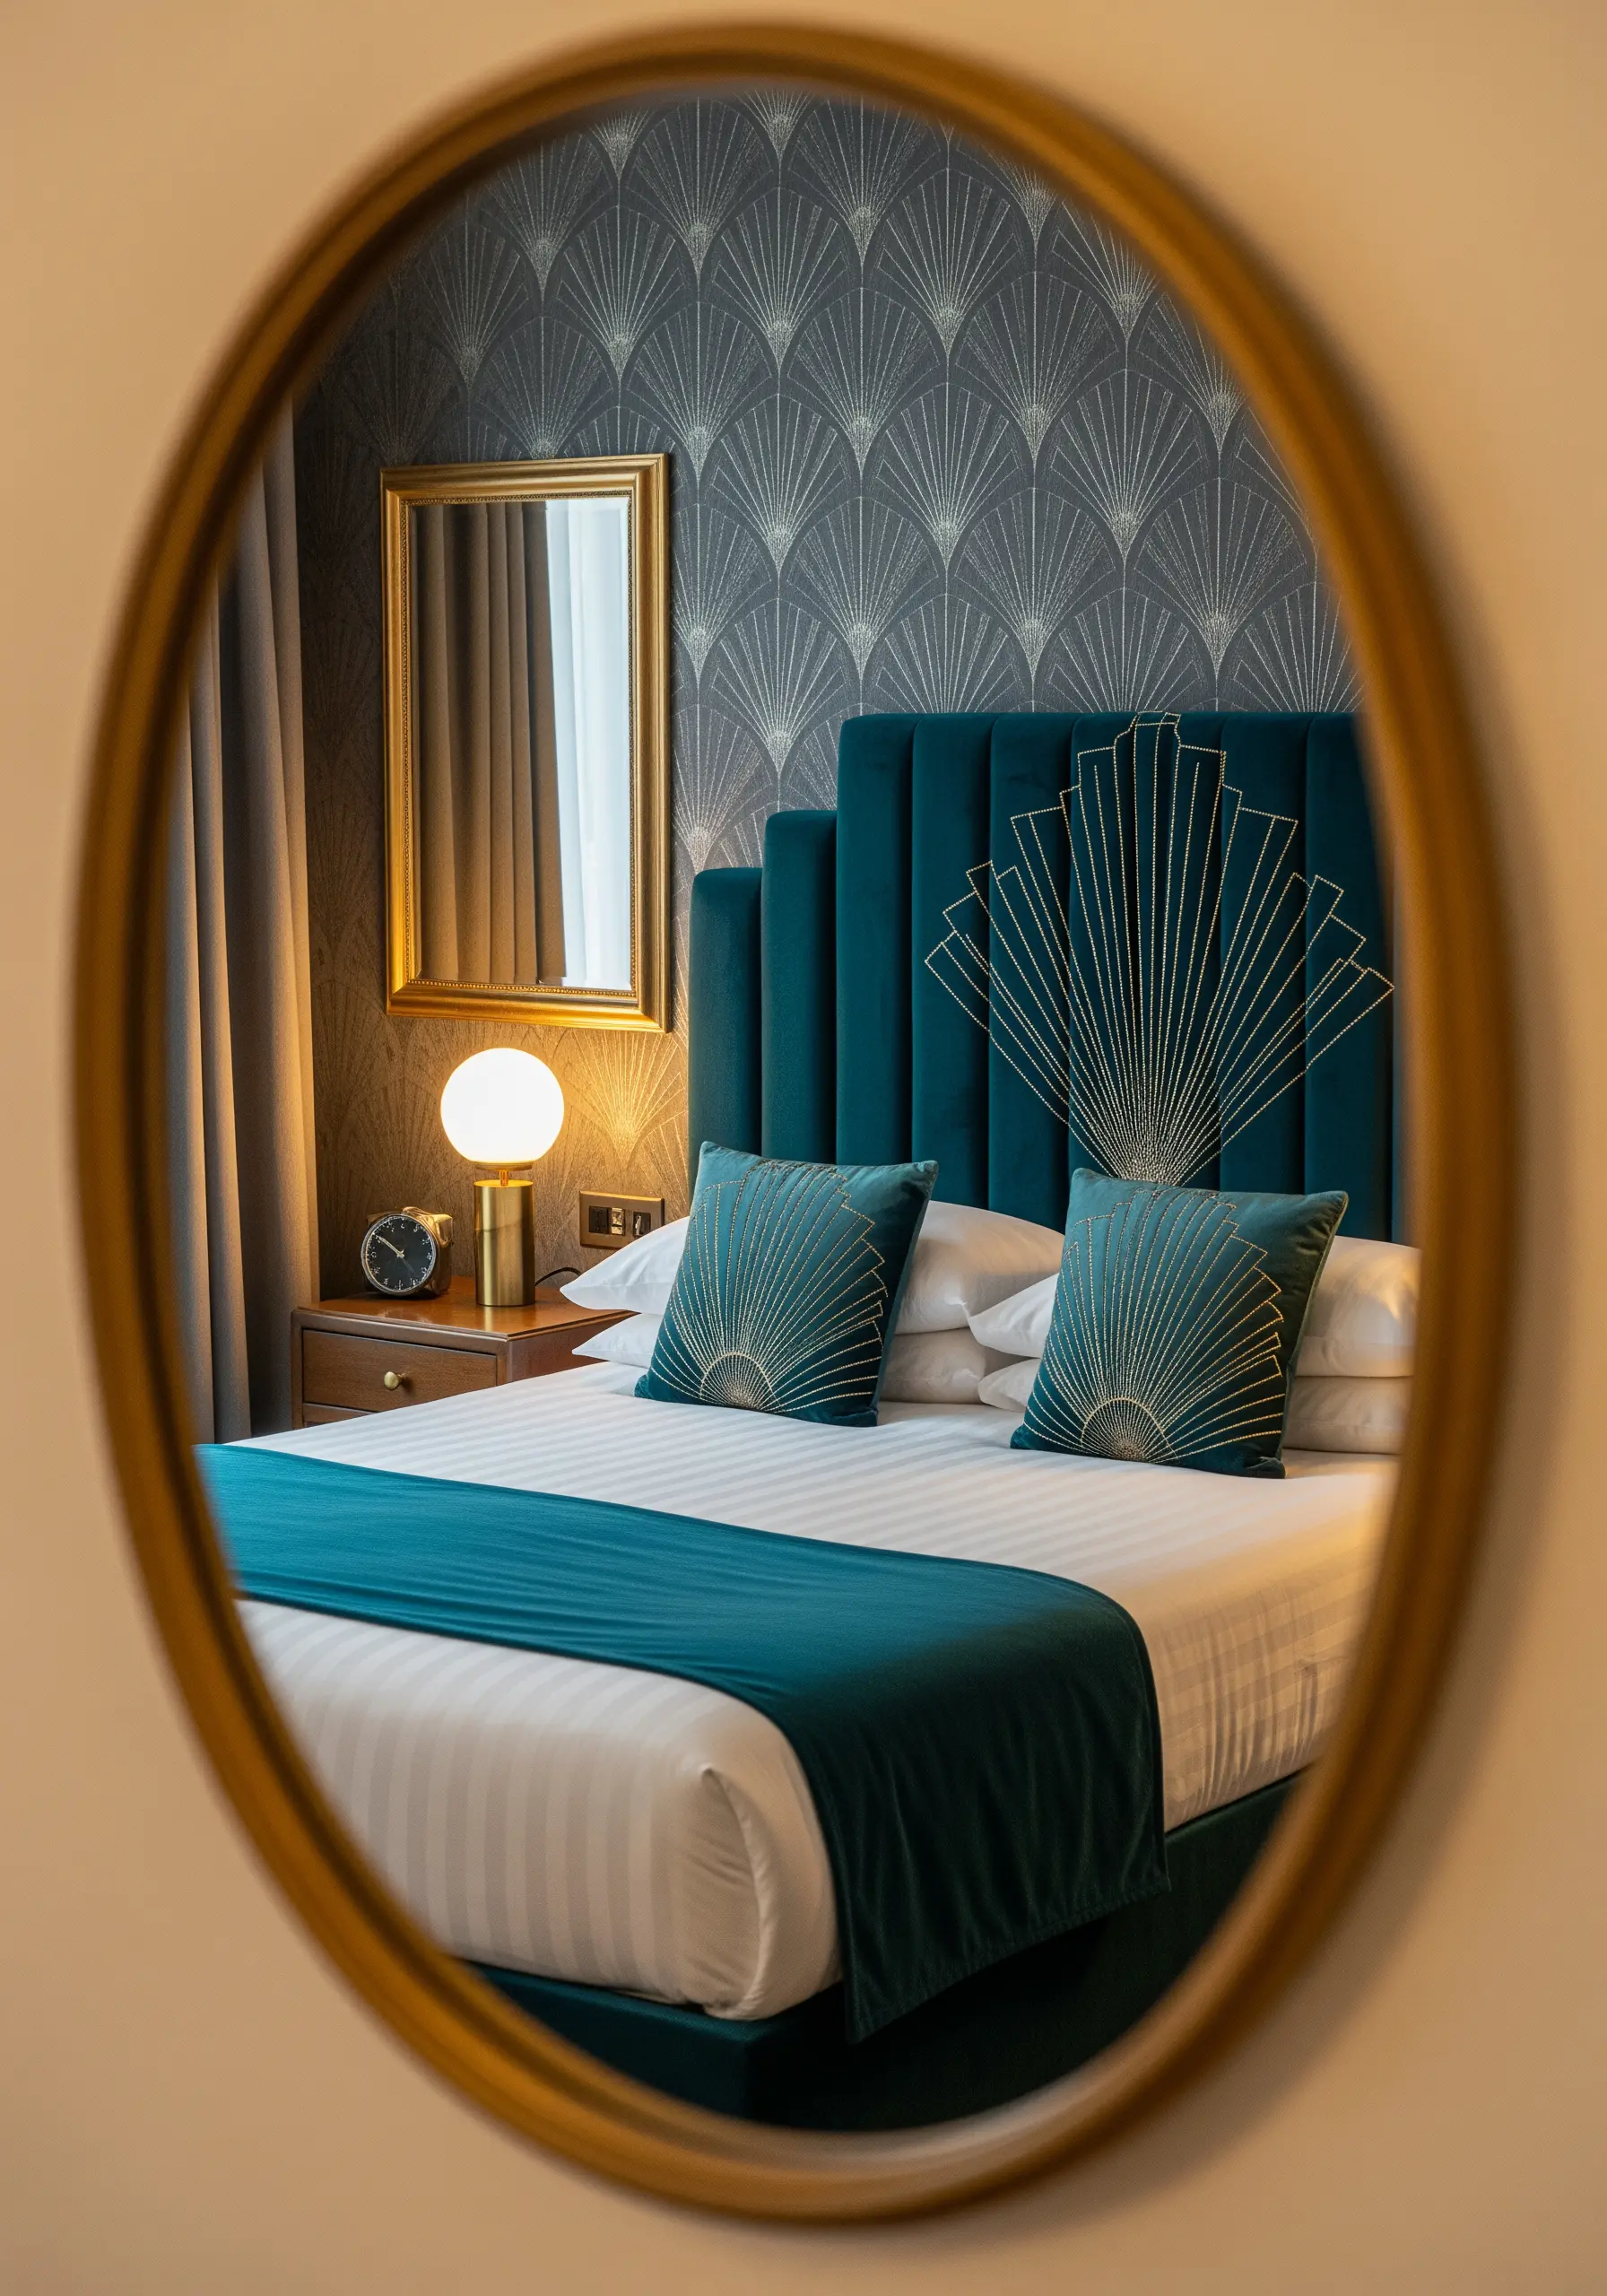
Capture the glamour of Art Deco design by using a fine metallic thread for sharp, radiant lines.
To keep long stitches perfectly straight and prevent snagging, opt for a couching technique instead of a simple backstitch.
Lay your metallic thread down along your design line and secure it with tiny, perpendicular stitches in a similar-colored, non-metallic floss.
This ensures your lines remain crisp and reflective, which is essential for geometric patterns.
Stitching on a rich, dark velvet like this teal enhances the thread’s luster, creating a look of pure luxury.
4. Stitch a Wildflower Meadow with Mixed Textures

Create the feeling of a rambling wildflower meadow by combining several simple stitches for varied texture.
Use detached chain stitches (lazy daisies) for small petals, French knots for flower centers, and a short satin stitch for bold poppy petals.
Vary the height and density of the flowers to make the arrangement feel natural and un-manicured.
Work with a palette of soft, harmonious colors, allowing one or two bolder shades, like the red poppies, to draw the eye.
Finishing a bed runner with thick, handmade tassels provides a lovely, weighted drape and a final touch of craftsmanship.
5. Embrace Meditative Calm with Sashiko-Inspired Patterns

Channel a sense of tranquility by using the principles of Sashiko embroidery on your headboard or linens.
The beauty of this style lies in the consistency of the simple running stitch; focus on keeping your stitch length and the spaces between them uniform.
Use a thicker, high-contrast thread, like white perle cotton on indigo fabric, to make the geometric pattern stand out.
Don’t stitch through intersections, and ensure your corners are sharp—this precision is what gives Sashiko its clean, graphic power.
This technique turns simple lines into a mesmerizing and peaceful design element.
6. Design a Celestial Scene with Padded Satin Stitch

To give embroidered moons and planets a rounded, three-dimensional appearance, use a padded satin stitch.
First, fill the circular shape with a base layer of small seed stitches or running stitches.
Then, cover this padding with smooth satin stitches, working in one direction to create a uniform, light-reflecting surface.
For the constellations and star maps, use a single strand of silver metallic thread and a simple backstitch for delicate, shimmering lines.
This combination of raised, solid shapes and fine lines creates a magical, deep-sky effect on dark fabric.
7. Explore Abstract Composition with Couching
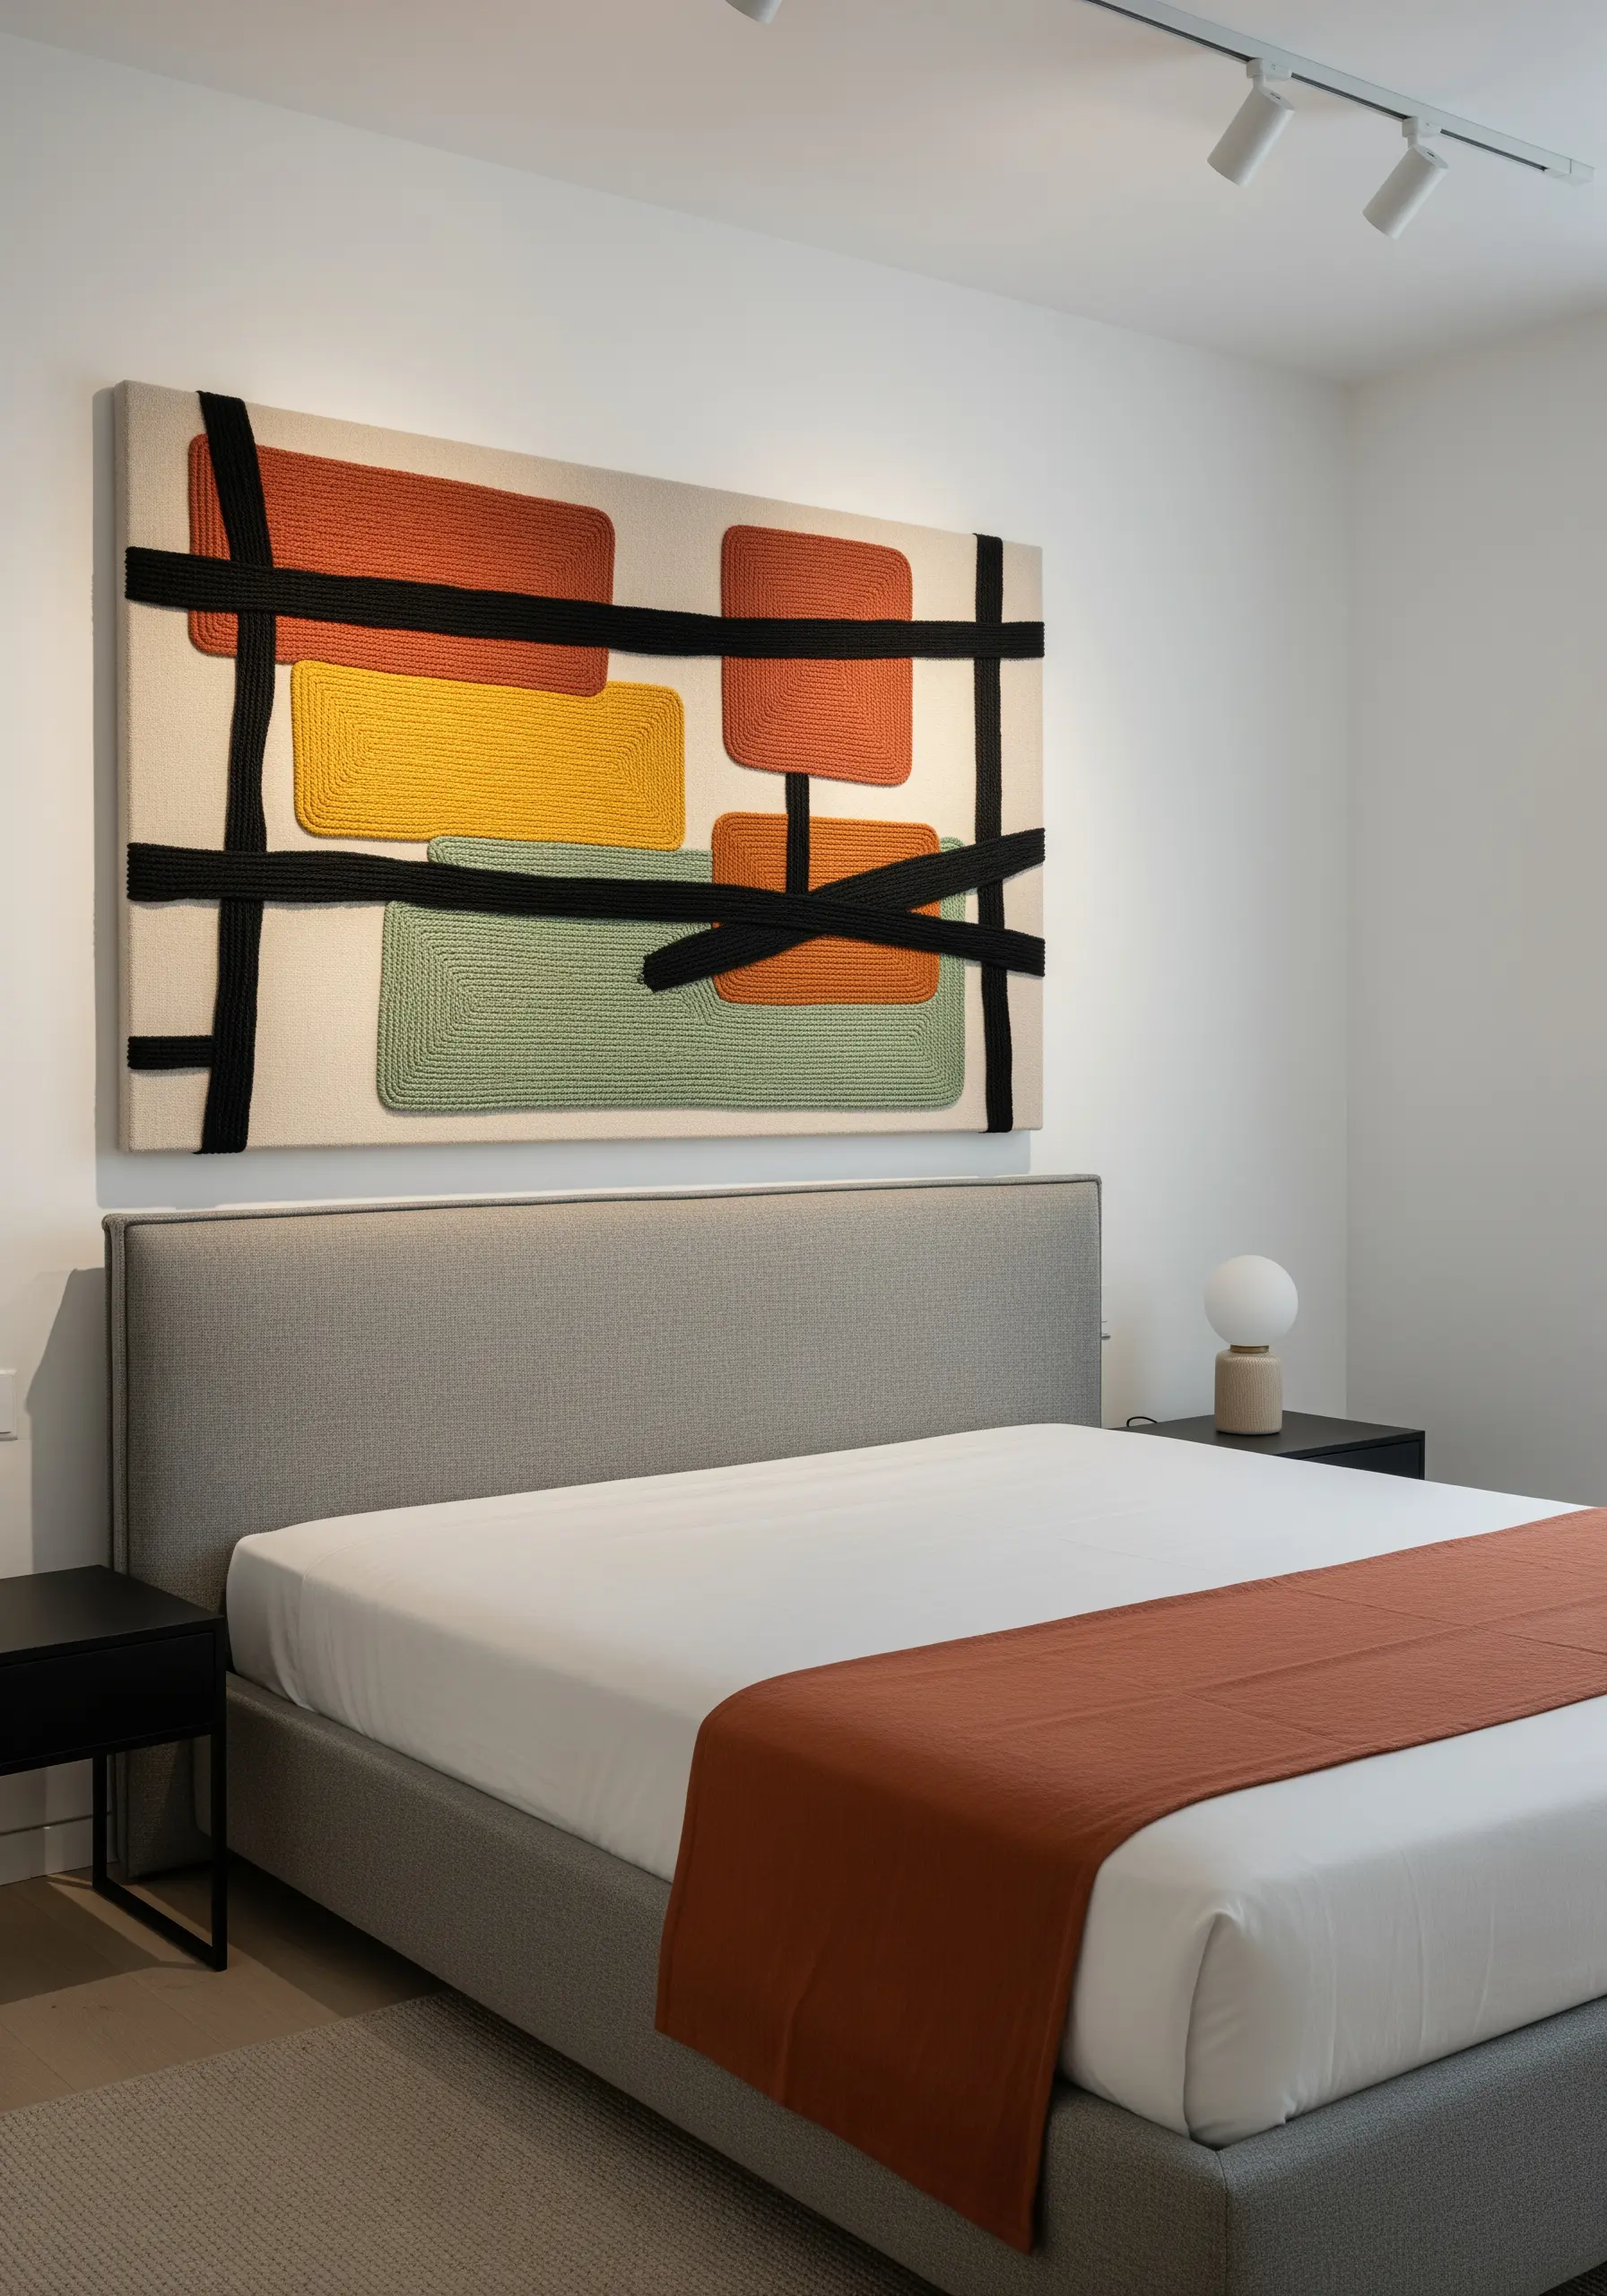
Create a bold, abstract art piece for your headboard using couched cords or thick yarn.
This technique involves laying down thick fibers on the surface of your fabric and tacking them in place with a thinner, matching thread.
To create the filled color blocks, arrange the cord back and forth in tight rows until the shape is complete.
The overlapping black lines are also couched, creating a sense of layered composition and dynamic tension.
This method is faster than traditional fill stitches and produces a highly tactile, modern result perfect for embroidered textile hangings.
8. Mimic Coral Textures with Dense French Knots
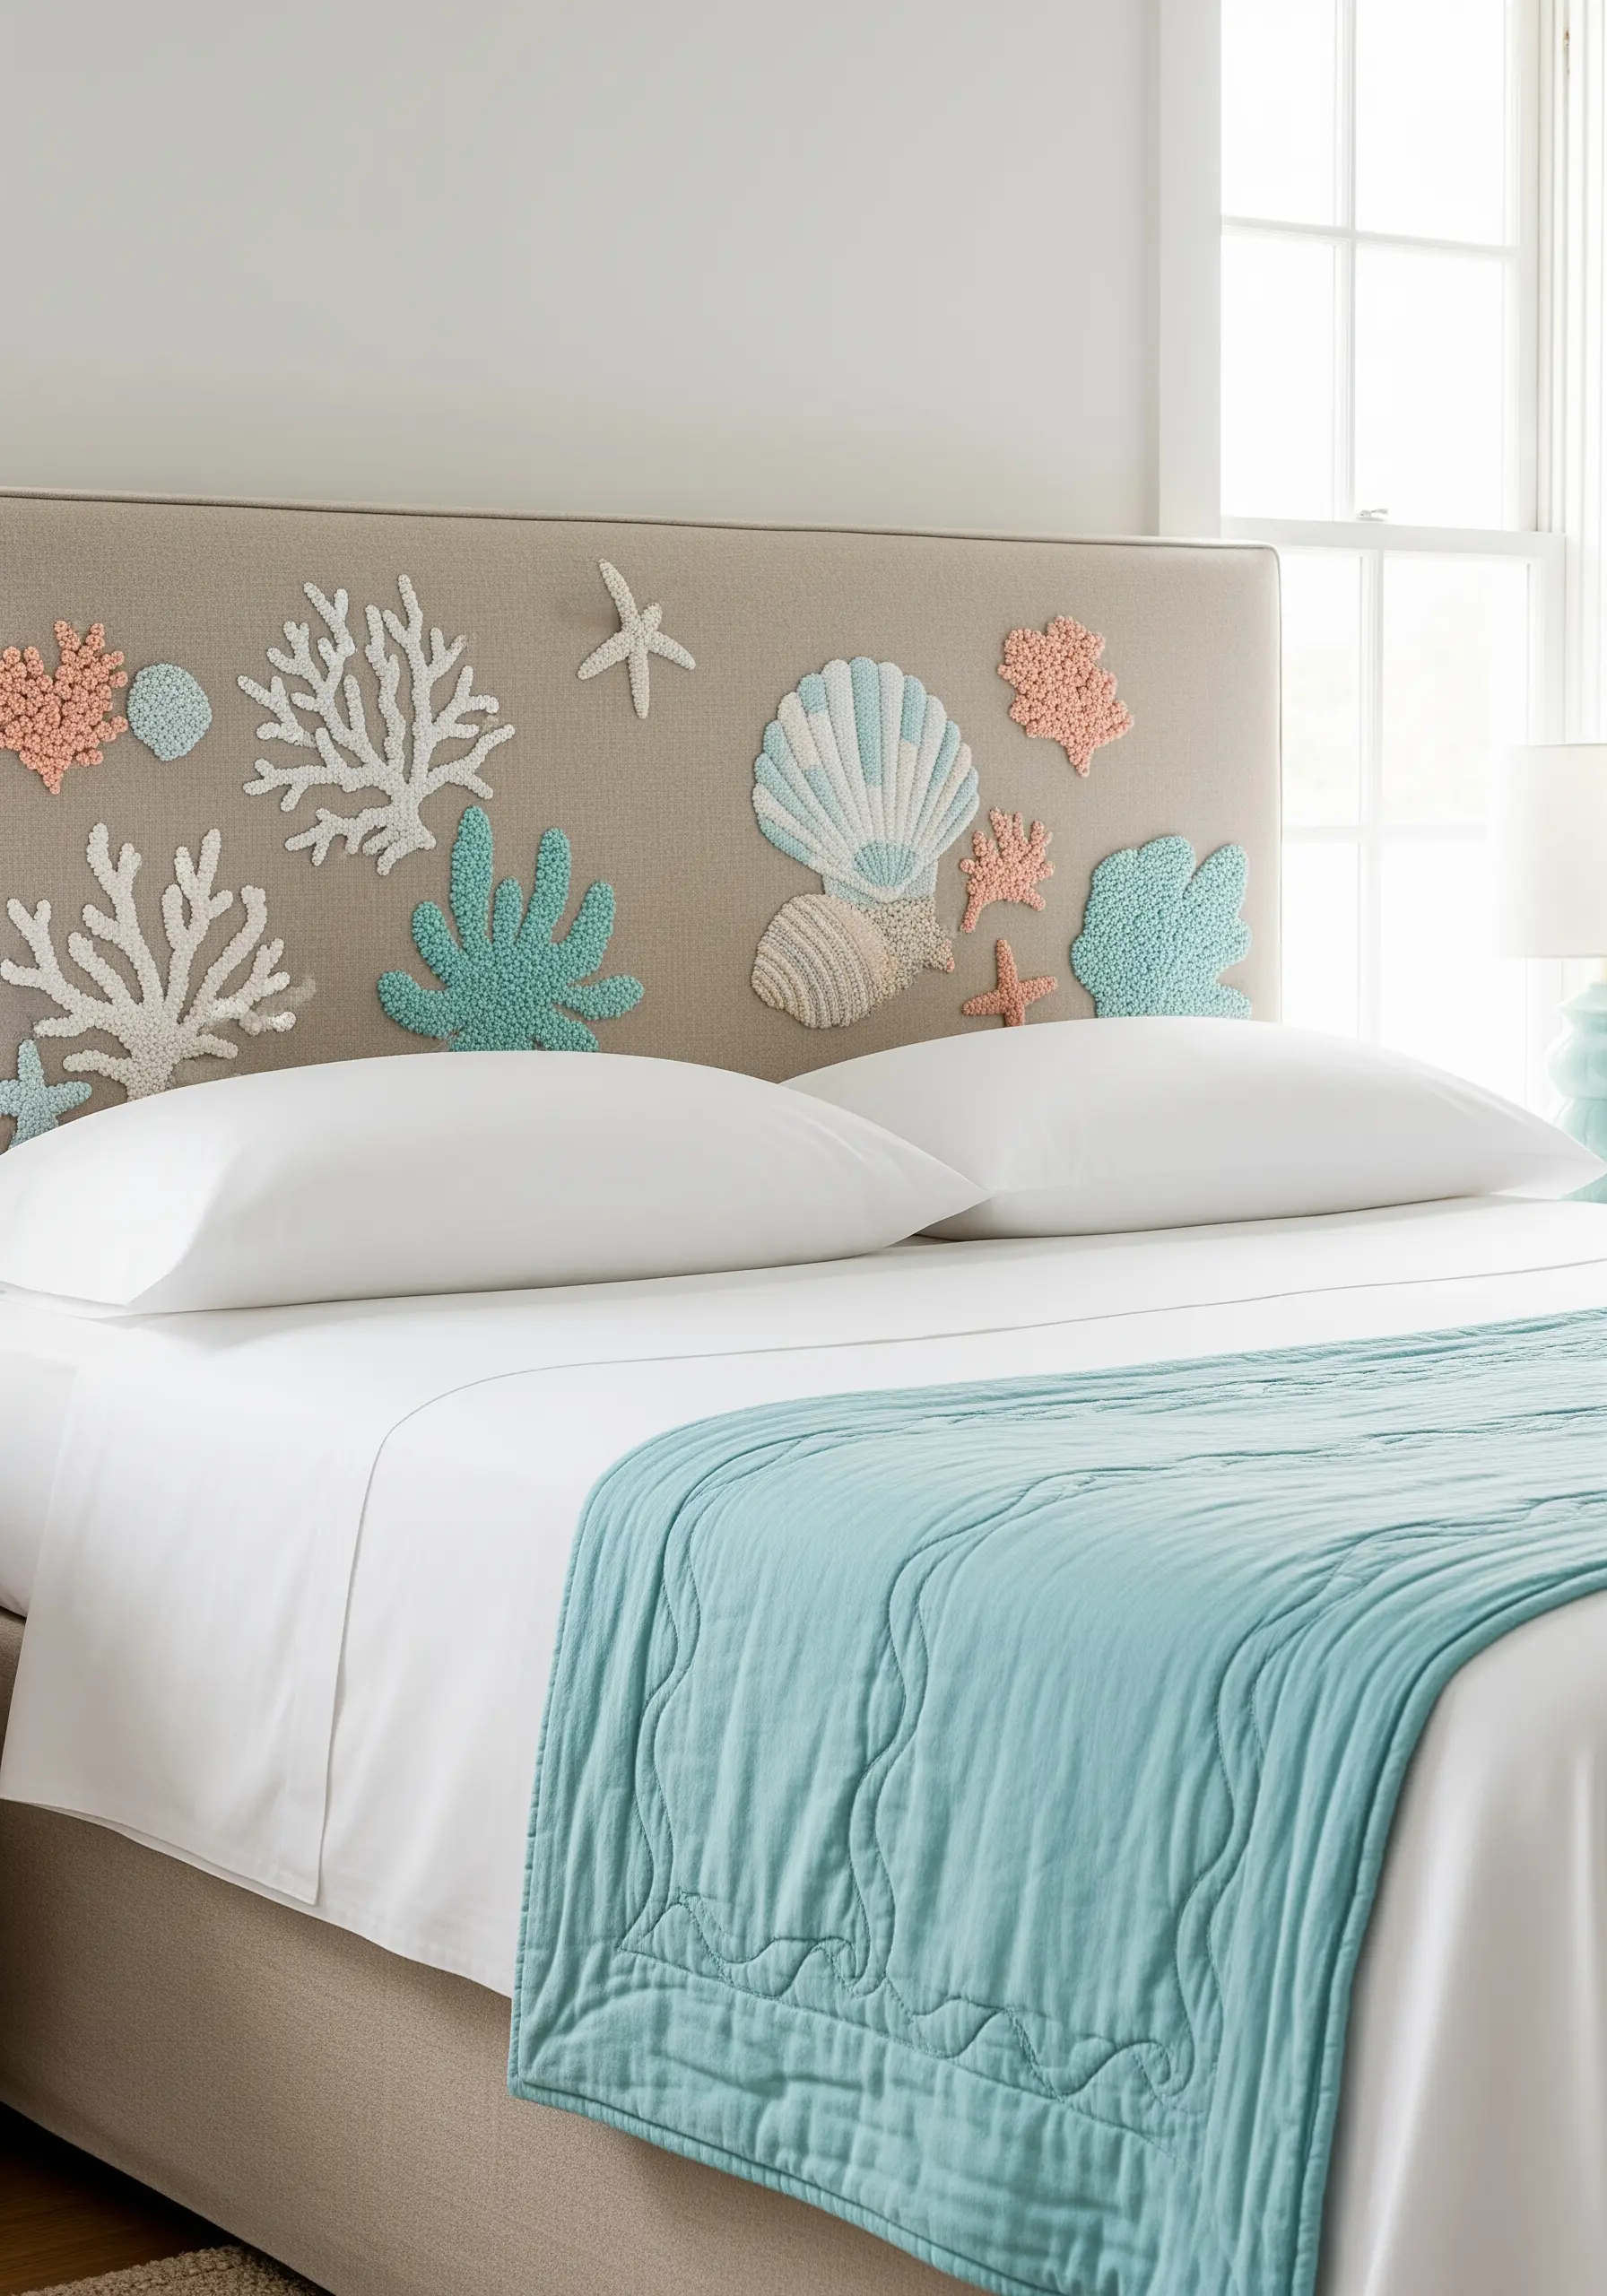
Recreate the organic, bumpy texture of coral by filling shapes with densely packed French knots.
Use a thicker thread, like perle cotton or all six strands of floss, to create plump, substantial knots.
For a more natural look, vary the tightness and size of your knots slightly, and mix in a few colonial knots for a different shape.
To create the elegant fan coral and seashell, switch to a smooth satin stitch or long-and-short stitch for contrast.
This play between smooth and knotted textures brings a coastal-themed design to life with tactile detail.
9. Create Plush Woodland Motifs with Turkey Work

For an ultra-soft, raised texture that you can actually feel, use the turkey work stitch.
This stitch creates loops that can be left as is or snipped to create a plush, velvety pile, perfect for rendering moss, mushroom caps, or furry animals.
Outline your shape first with a backstitch to define the edges, then fill it with rows of turkey work stitches.
Once you snip the loops, you can trim them with small scissors to shape and sculpt the surface.
It’s a fantastic way to add a surprising and cozy element to rustic, woodland-themed decor.
10. Embrace Maximalism with Richly Detailed Stitching
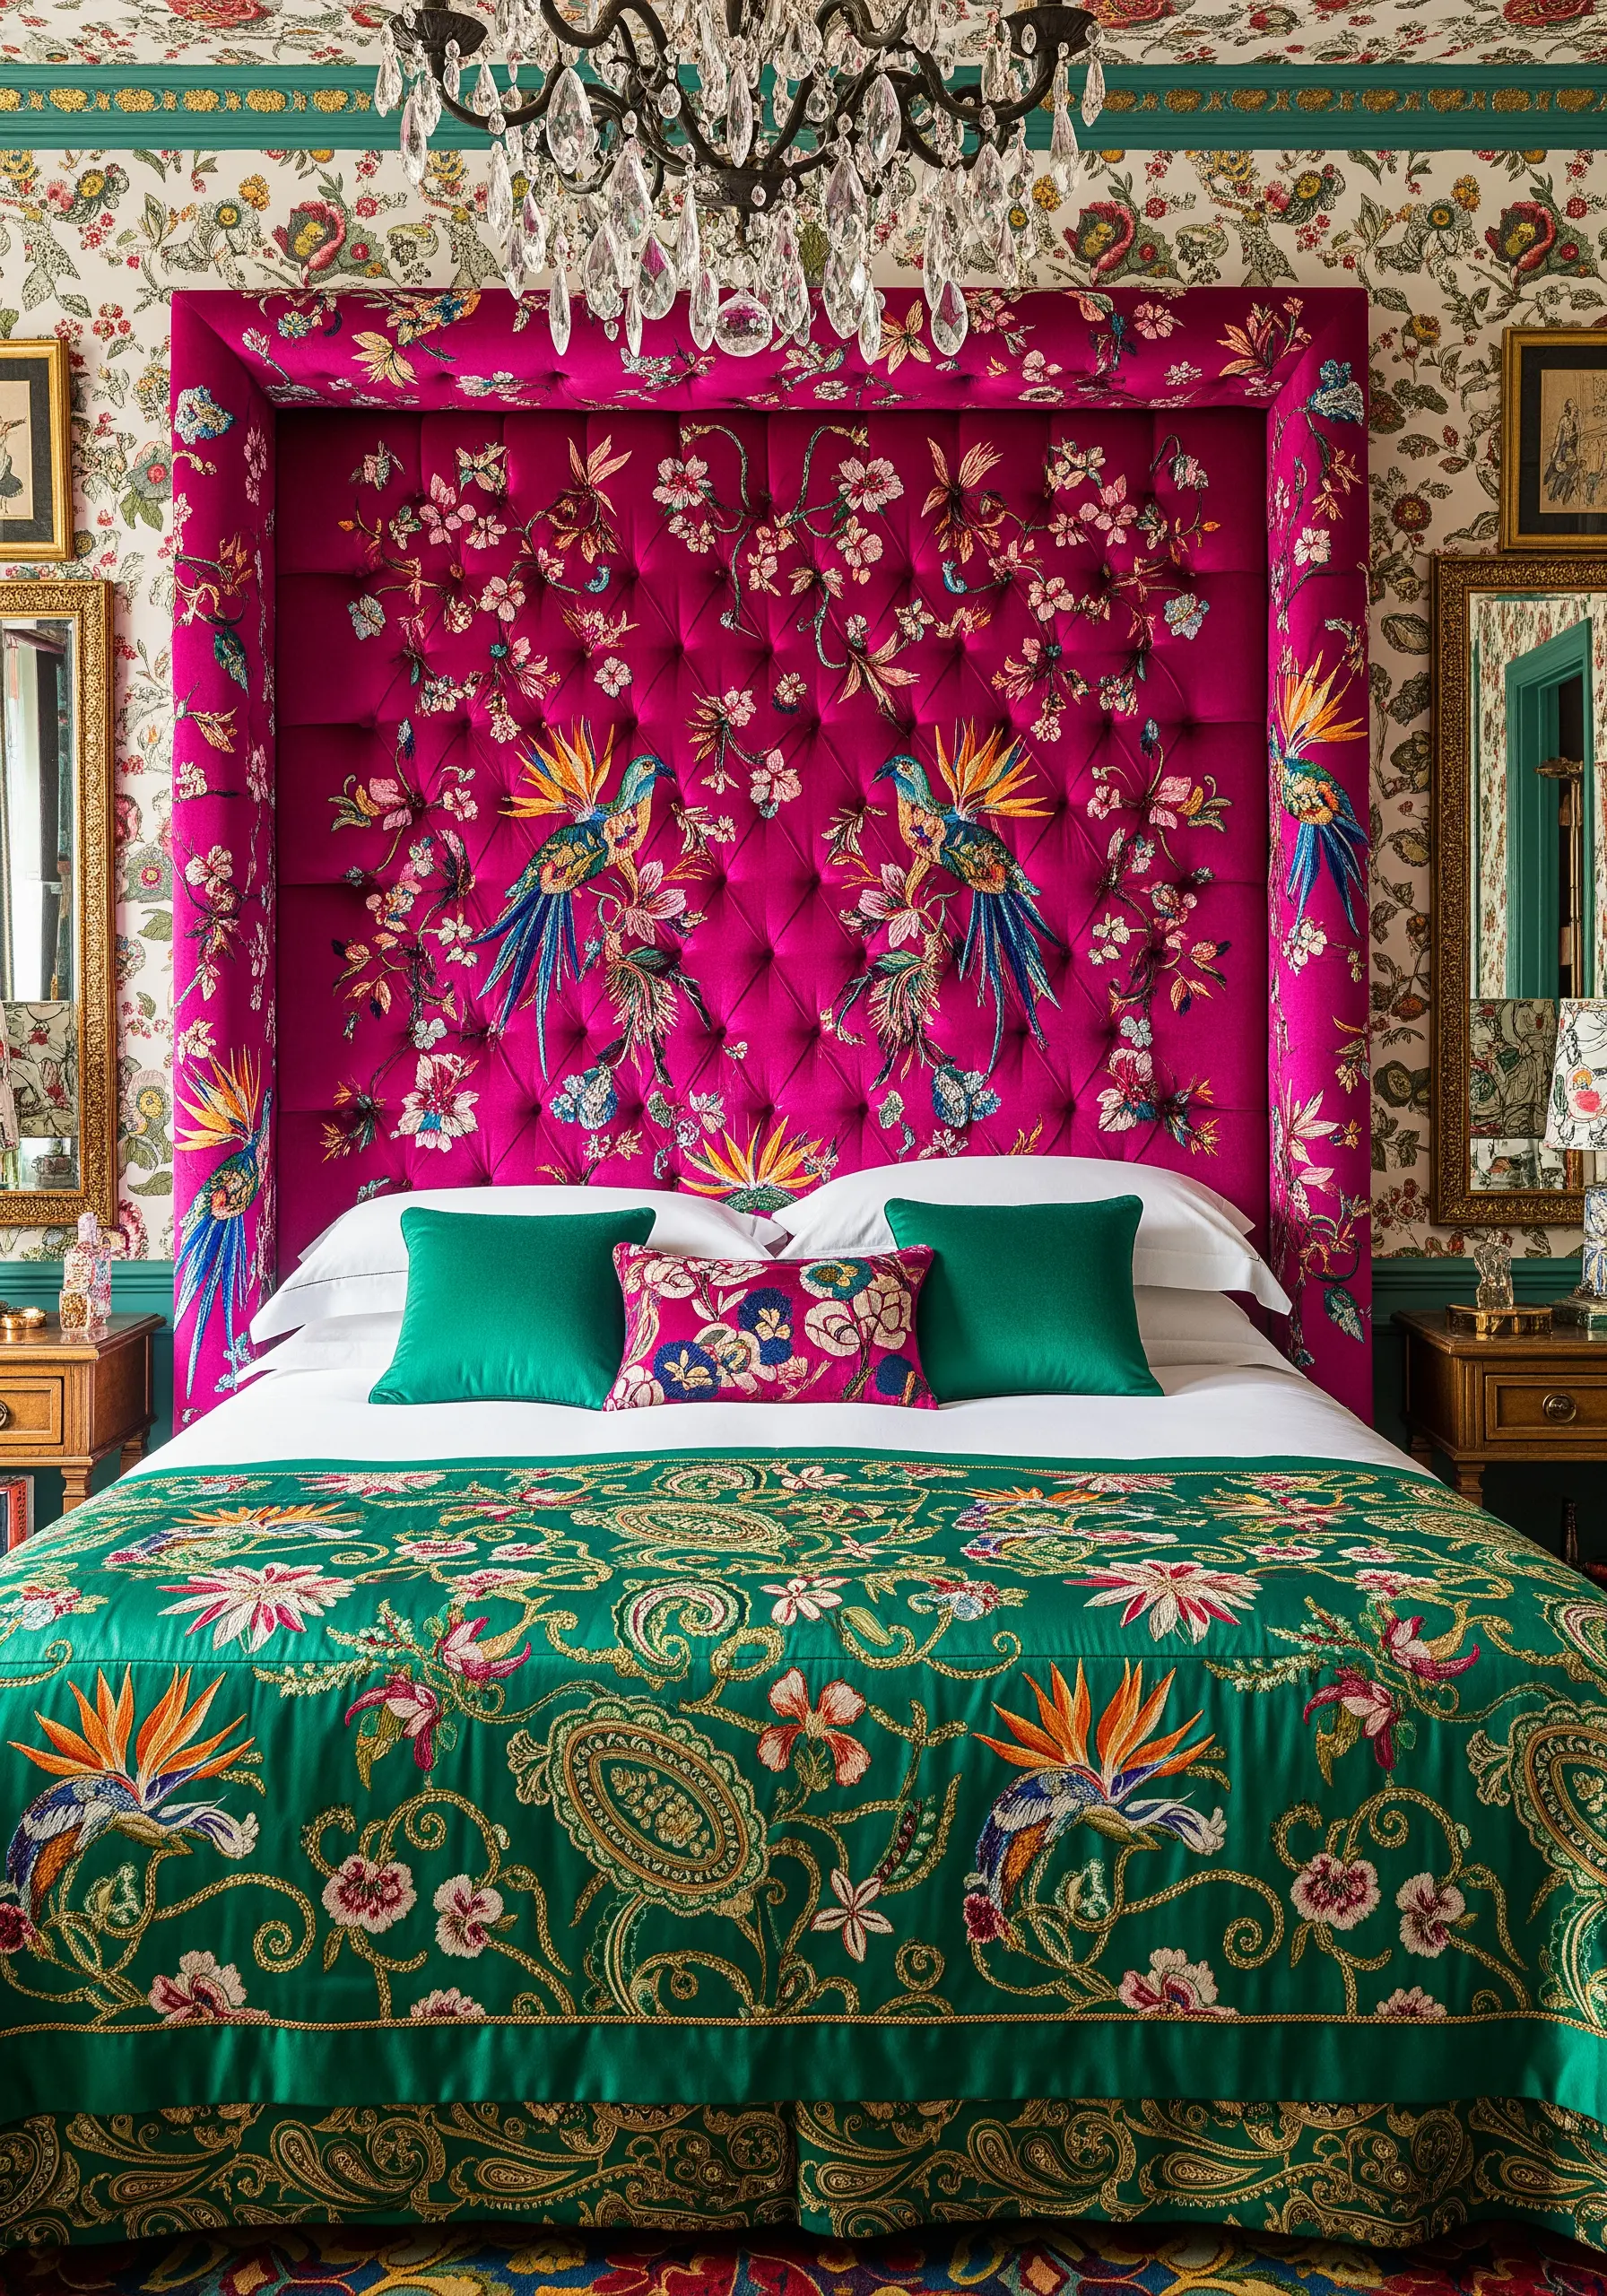
For a bold, maximalist headboard, cover the entire surface with dense, colorful embroidery.
Use a combination of long-and-short stitch for blending colors in flowers and bird feathers, and satin stitch for smaller, solid areas.
Working on a vibrant fabric like magenta velvet makes the colors of your silk or cotton threads appear even more saturated.
Don’t be afraid to let motifs overlap and intertwine—this density is what creates the luxurious, tapestry-like effect.
This approach transforms a simple headboard into an opulent piece of art.
11. Stitch Mid-Century Patterns with Clean Overlapping Lines

Capture a mid-century modern aesthetic by using clean, interlocking lines and a restrained color palette.
Use a smooth stem stitch or whipped backstitch to create the repeating chain-link pattern.
To create the illusion of overlapping, carefully plan your stitch path so that one line appears to pass over another.
Working on a textured fabric like wool or felt enhances the cozy, retro vibe.
Using an iron-on stabilizer on the back of the fabric will prevent any puckering and keep your lines perfectly taut.
12. Add a Delicate Touch with Minimalist Lavender Sprigs

For a subtle, calming accent, embroider simple lavender sprigs on neutral linen.
Use a few carefully placed French knots with purple floss to represent the lavender buds, clustering them more tightly at the top of the stalk.
A single, delicate stem stitch in a soft green is all you need for the stalk and leaves.
The beauty of this design lies in its simplicity and the use of negative space.
Placing these minimal botanical motifs on a lumbar pillow and the corner of a bed runner creates a cohesive, serene look without overwhelming the space.
13. Build a Tactile Landscape with Punch Needle

Create a desert-inspired headboard with incredible texture using punch needle embroidery.
The loop side of the punch needle work creates a plush, rug-like surface that’s perfect for depicting soft, rolling hills or a stylized sun.
Vary the loop height to add subtle dimension between the different elements of your landscape.
Use a simple outline stitch, like a backstitch, with a contrasting color to define the horizon line and add a graphic element.
This combination of plush texture and clean lines results in a stunning, tactile piece of art.
14. Form Lush Roses with Ribbon Embroidery

For romantic, three-dimensional florals, nothing compares to the beauty of silk ribbon embroidery.
Use the woven wheel stitch (also known as the spider web rose stitch) to create full, dimensional roses.
Create a star of straight stitches as a base, then weave the ribbon over and under the spokes until the shape is filled.
Combine these with simple straight stitches and folded ribbon stitches for leaves and buds.
The natural sheen and body of the silk ribbon make the flowers look incredibly lifelike and soft to the touch.
15. Layer Felt Appliqué for a Cozy Autumnal Scene
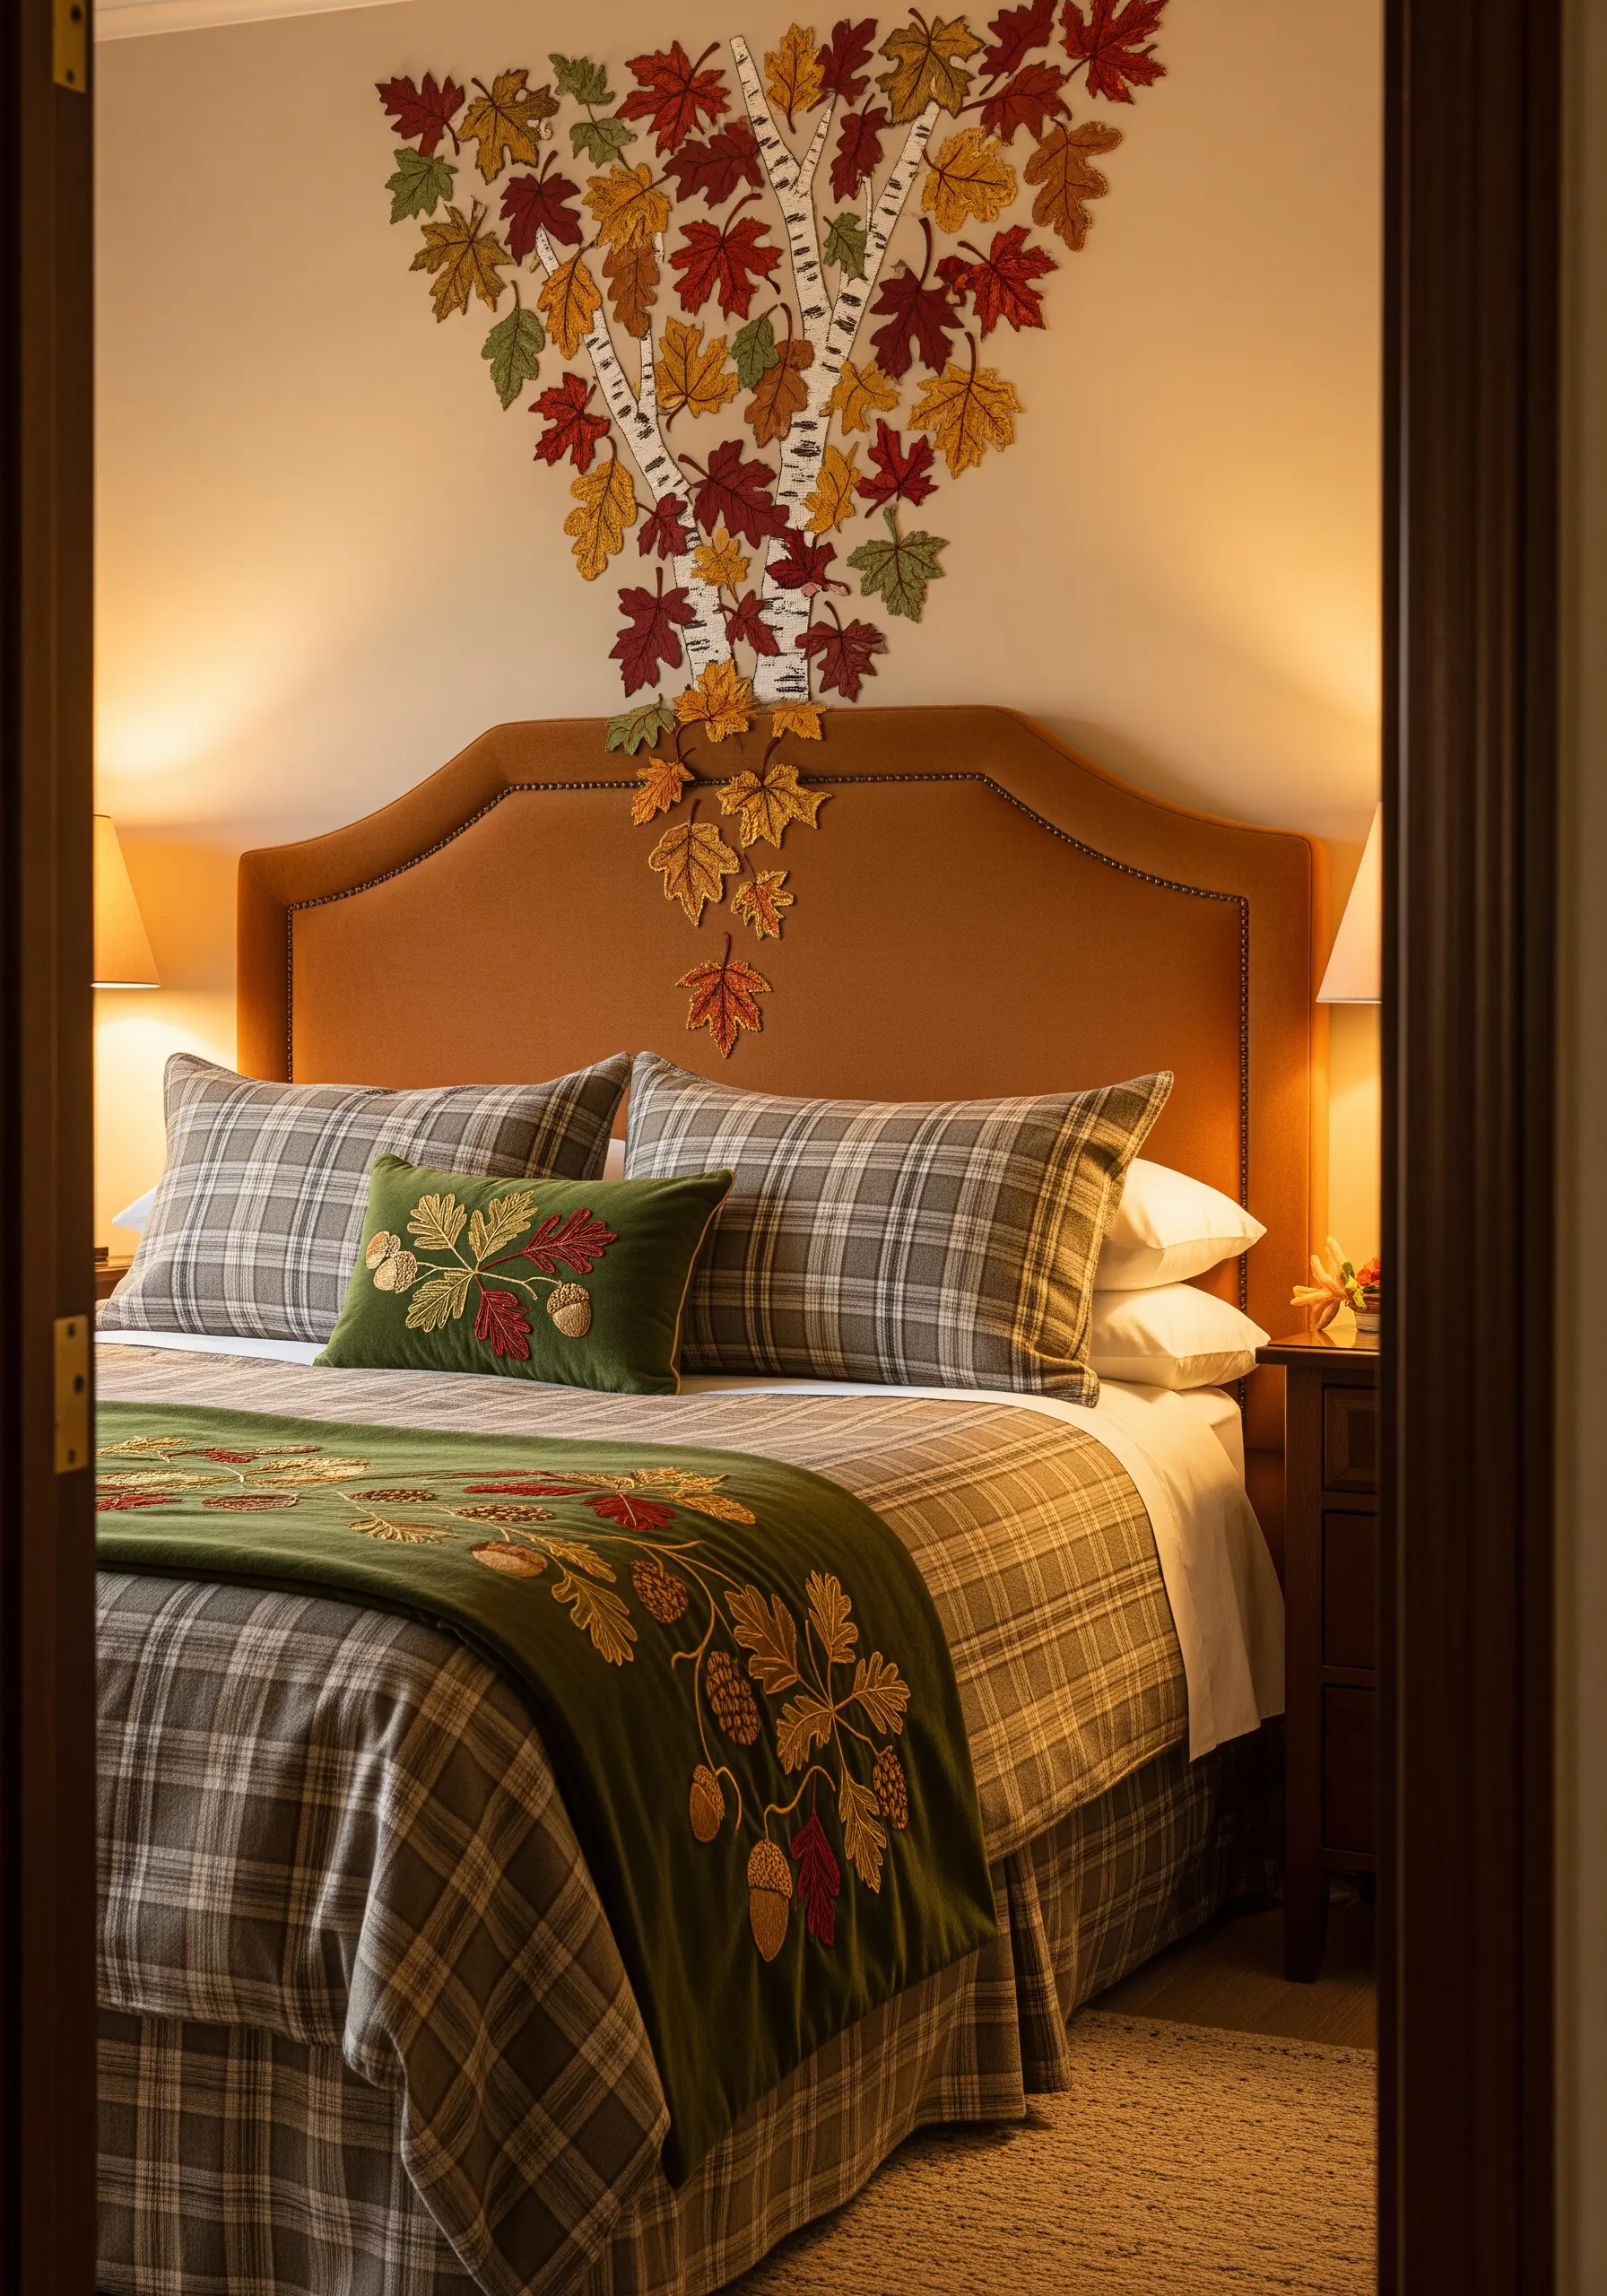
Combine appliqué and embroidery to create a rich, layered autumnal design.
Cut leaf shapes from wool felt in various fall colors and arrange them on your headboard or wall hanging.
Secure each leaf with a decorative blanket stitch around the edge using a contrasting thread color.
Add fine details like the leaf veins with a simple backstitch or stem stitch.
This mixed-media approach is a fast way to cover a large area with color and texture, creating a cozy, cabin-like atmosphere.
16. Craft an Elegant Monogram with Padded Satin Stitch

To give a monogram a raised, luxurious, and professional finish, use a padded satin stitch.
First, stitch a foundation of small running stitches or split stitches inside the outline of your letters.
Then, work your satin stitches over this padding, keeping them smooth, even, and perpendicular to the direction of the letterform.
This simple preparatory step lifts the stitches from the surface of the fabric, allowing them to catch the light beautifully.
Using a thread that perfectly matches the damask fabric creates a subtle, tone-on-tone effect of pure elegance.
17. Fill a Treetop with Textural French Knots

Instead of using a flat fill stitch, create a lush, leafy treetop with hundreds of French knots.
Work with several shades of green floss, clustering the colors together to create areas of light and shadow for a more realistic, dappled look.
Varying the number of wraps around your needle (one, two, or three) will change the size of the knots, adding to the organic texture.
This technique is wonderfully forgiving and meditative, transforming a simple shape into a tactile and visually interesting focal point.
18. Render a Skyline with Minimalist Line Art
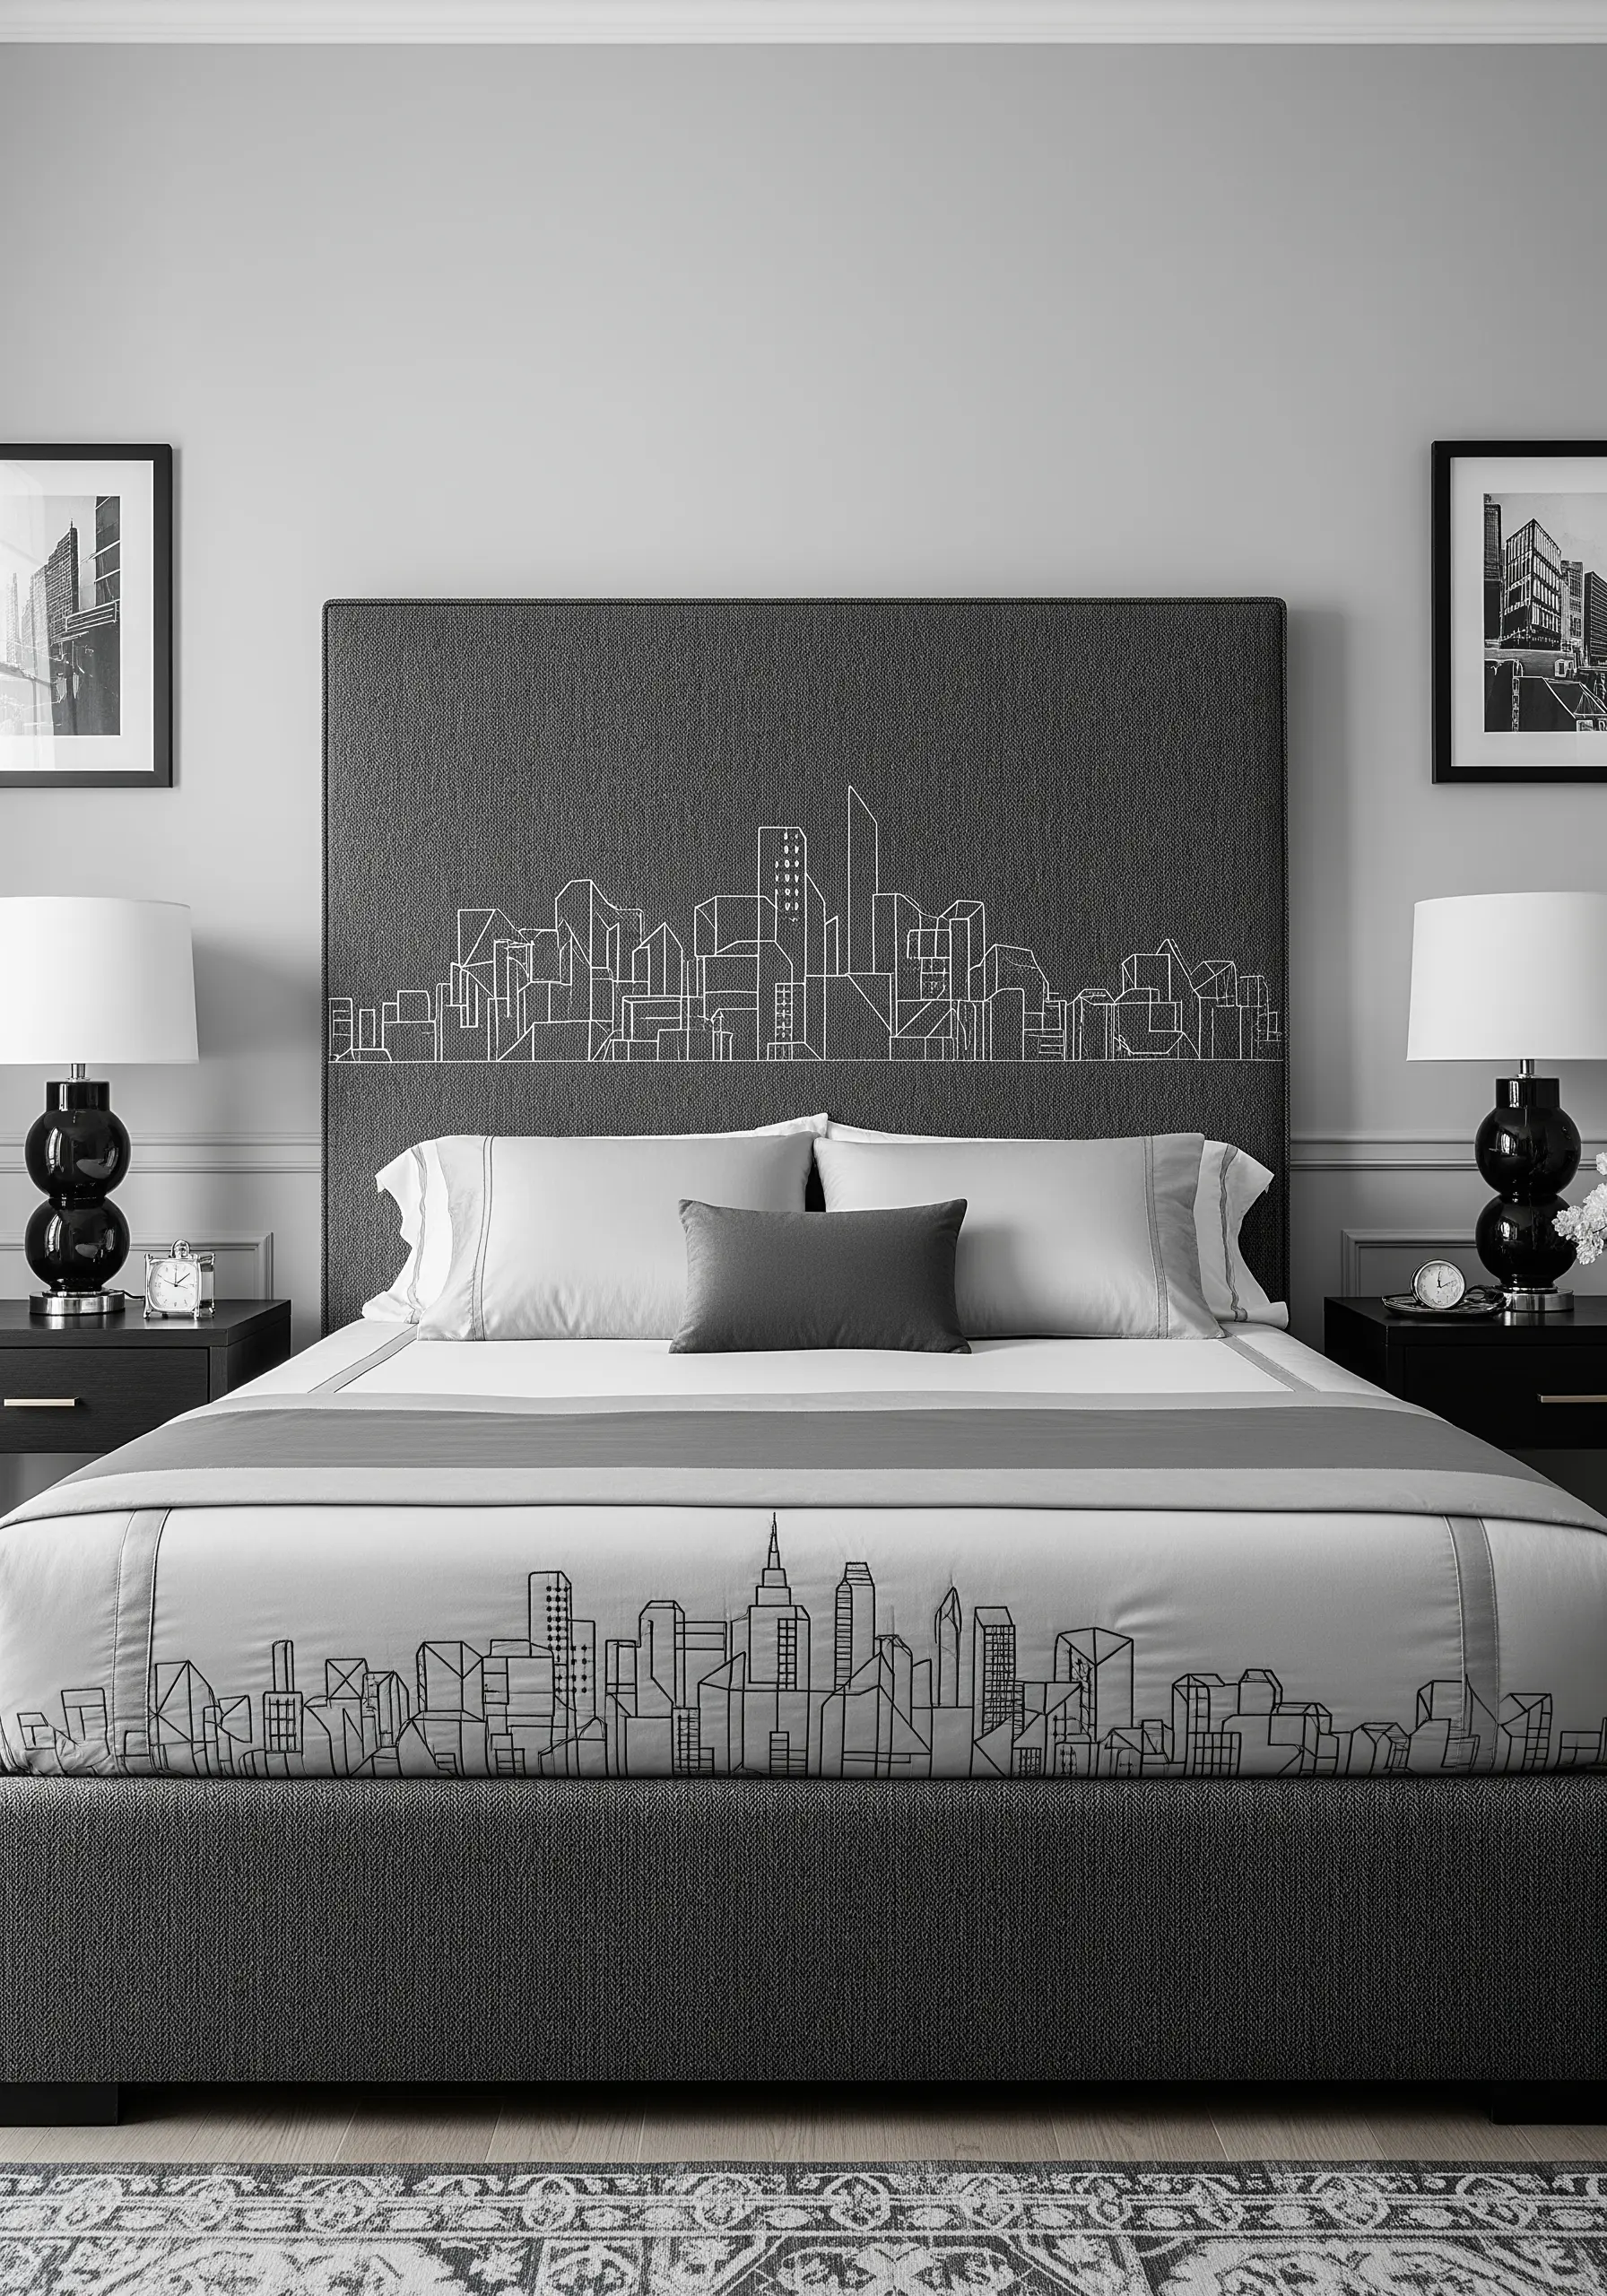
Capture the essence of a city skyline with a clean, graphic line art approach.
Use a single color of thread—like white on charcoal gray—for a high-contrast, modern aesthetic.
A simple backstitch or stem stitch is perfect for this, but for the smoothest possible lines, consider a whipped backstitch.
The key is precision, so transfer your pattern carefully and focus on keeping your stitch length consistent.
This minimalist style proves that you don’t need complex stitches to make a powerful design statement.
19. Achieve Otomi-Style Vibrancy with Dense Fill Stitches

Emulate the joyful energy of Otomi embroidery by using bold colors and dense fill stitches.
The traditional stitch is a close-set satin stitch that covers the fabric completely within the design shape.
Outline your motifs first with a split stitch, which will give your satin stitch a clean, slightly raised edge to fill up to.
Don’t be shy with color—the magic of this style comes from the unexpected and vibrant pairings of blues, pinks, yellows, and greens.
This technique turns a plain headboard into a stunning fiesta of color and life.
20. Create Graphic Mudcloth Patterns with Bold Stitches

Translate the graphic power of African mudcloth (Bògòlanfini) patterns into embroidery.
Use a thick black or off-white cotton floss to create bold, geometric designs on a neutral, textured fabric.
A simple satin stitch worked in blocks, or a thick stem stitch for outlines, will effectively replicate the painted look of traditional mudcloth.
The beauty of these designs is in their handcrafted imperfection, so focus on the overall rhythm and balance of the patterns rather than perfect symmetry.
This approach adds a layer of global-inspired, graphic texture to your bedroom.
21. Blend Color and Thread with a Watercolor Base

Create a soft, ethereal effect by combining fabric paint and embroidery.
Lightly paint abstract watercolor-like shapes onto your headboard fabric and allow them to dry completely.
Then, use a simple running stitch or backstitch to outline the edges of the color washes.
This technique adds a layer of definition and texture to the painted areas, making them feel integrated and intentional.
The thread acts as a contour line, giving structure to the soft, blended colors beneath.
22. Make a Statement with Bold, Industrial Typography

For typography that has a strong, industrial presence, stitch with thick yarn on a heavy-duty fabric like canvas.
A chain stitch is the perfect choice for this, as it creates a bold, rope-like line that stands out.
Use a large needle and work with a relaxed tension to avoid puckering the thick canvas.
The stark simplicity of sans-serif block letters in a high-contrast color (like white on charcoal) enhances the utilitarian, modern aesthetic.
23. Capture a Coastal Mood with High-Contrast Motifs

Create a crisp, nautical feel by stitching in white on a deep navy blue fabric.
Fill your starfish and sand dollar shapes with a scattered seed stitch to give them a speckled, sandy texture.
For the outlines, use a slightly thicker whipped backstitch to ensure they are smooth and prominent.
This high-contrast color scheme is timelessly elegant and instantly evokes a serene, coastal atmosphere.
Repeating the motifs across the headboard and pillows unifies the entire bedding set.
24. Combine Linear and Floral Stitches for Garden Elegance
Create a sophisticated garden trellis effect by combining sharp lines with soft florals.
For the trellis framework, use a whipped backstitch in a light, contrasting color to create perfectly smooth, slightly raised lines.
Then, add climbing roses using ribbon embroidery or woven wheel stitches, allowing them to organically intertwine with the geometric structure.
This contrast between the structured trellis and the free-form, dimensional flowers creates a beautiful sense of depth and romantic order.
25. Echo Upholstery Texture with Punch Needle Embroidery
Create a cohesive, layered look by using punch needle embroidery to mimic the texture of your headboard.
If you have a bouclé or textured headboard, a lumbar pillow stitched with the loop side of punch needle creates a beautiful harmony.
Use a neutral, monochrome palette to focus entirely on the interplay of textures.
The soft, nubby surface of the punch needle loops against the crisp white bedding adds a layer of cozy, touchable comfort.
26. Add Zest with Plump, Satin-Stitched Lemons

Bring a sunny, Mediterranean feel to your bedroom with a vibrant lemon branch design.
To make the lemons look round and full, use a padded satin stitch. First, fill the shape with seed stitches, then cover it with smooth, vertical satin stitches.
Add a single, tiny straight stitch in a lighter yellow or white to create a highlight, which enhances the illusion of roundness.
For the leaves and blossoms, use a simpler satin stitch and a few French knots, letting the plump lemons be the star of the show.
27. Stitch Crisp Musical Notes with Precision

For designs that require precision, like musical notation, your choice of stabilizer is key.
Use a water-soluble or stick-and-peel stabilizer to transfer the pattern perfectly onto dark fabric.
A single strand of floss and a tiny, neat backstitch will ensure every note and stem is crisp and legible.
The contrast of bright white thread on a black headboard gives the design a classic, graphic quality that is both elegant and personal.
28. Create Regal Opulence with Couched Goldwork

Achieve a luxurious, baroque aesthetic by using goldwork techniques on rich velvet.
Instead of trying to stitch with difficult metallic threads, couch them onto the surface. Lay down a thick, metallic cord along your design lines.
Then, use a strong, fine thread (often in a contrasting color like red, called ‘bricking’) to tack the cord down at regular intervals.
This method allows you to create intricate, swirling patterns with perfect control, resulting in a raised, ornate texture that looks incredibly opulent.
29. Convey Majesty with a Single, Bold Outline

You can create a powerful focal point with just a single, well-executed line.
Choose a thick thread like perle cotton or sashiko thread to give your mountain range outline a substantial presence.
Use a bold outline stitch like a chain stitch or a heavy stem stitch to create a continuous, textured line.
The beauty of this minimalist design is its reliance on negative space; the un-stitched area becomes just as important as the line itself, inviting a sense of calm and openness.
30. Capture the Energy of Waves with Textural Stitches

Evoke the movement of the ocean by combining directional fill stitches with textural knots.
For the body of the wave, use a long-and-short stitch or satin stitch, angling your stitches to follow the water’s curve and flow.
To create the sea foam at the crest of the wave, switch to tightly packed French knots in white and off-white.
This contrast between the smooth, flowing water and the bubbly, chaotic foam makes the design dynamic and visually compelling.
31. Achieve a Painterly Effect with Thread Blending

For realistic birds and florals, use the long-and-short stitch technique, also known as thread painting.
Work in rows of staggered straight stitches, using two or three similar shades of a color to create soft, seamless gradients.
On the cherry blossoms, for example, you can blend from a soft pink to an off-white to give the petals depth.
This technique requires patience, but it allows you to ‘paint’ with thread, resulting in a beautifully delicate and artistic finish on fine fabrics like silk or satin.
32. Recreate a Stained-Glass Effect with Bold Outlines
Mimic the look of stained glass by first creating a framework of thick, black lines.
Use a heavy black yarn or multiple strands of floss and couch it down to form the ‘leading’ between your color panels.
Then, fill each segment with a dense, smooth satin stitch in a single, vibrant color.
Working on a fabric with a slight sheen, like velvet, will enhance the jewel-toned colors and make them appear to glow, just like light through glass.
33. Add Dimension to Illustrations with Shading
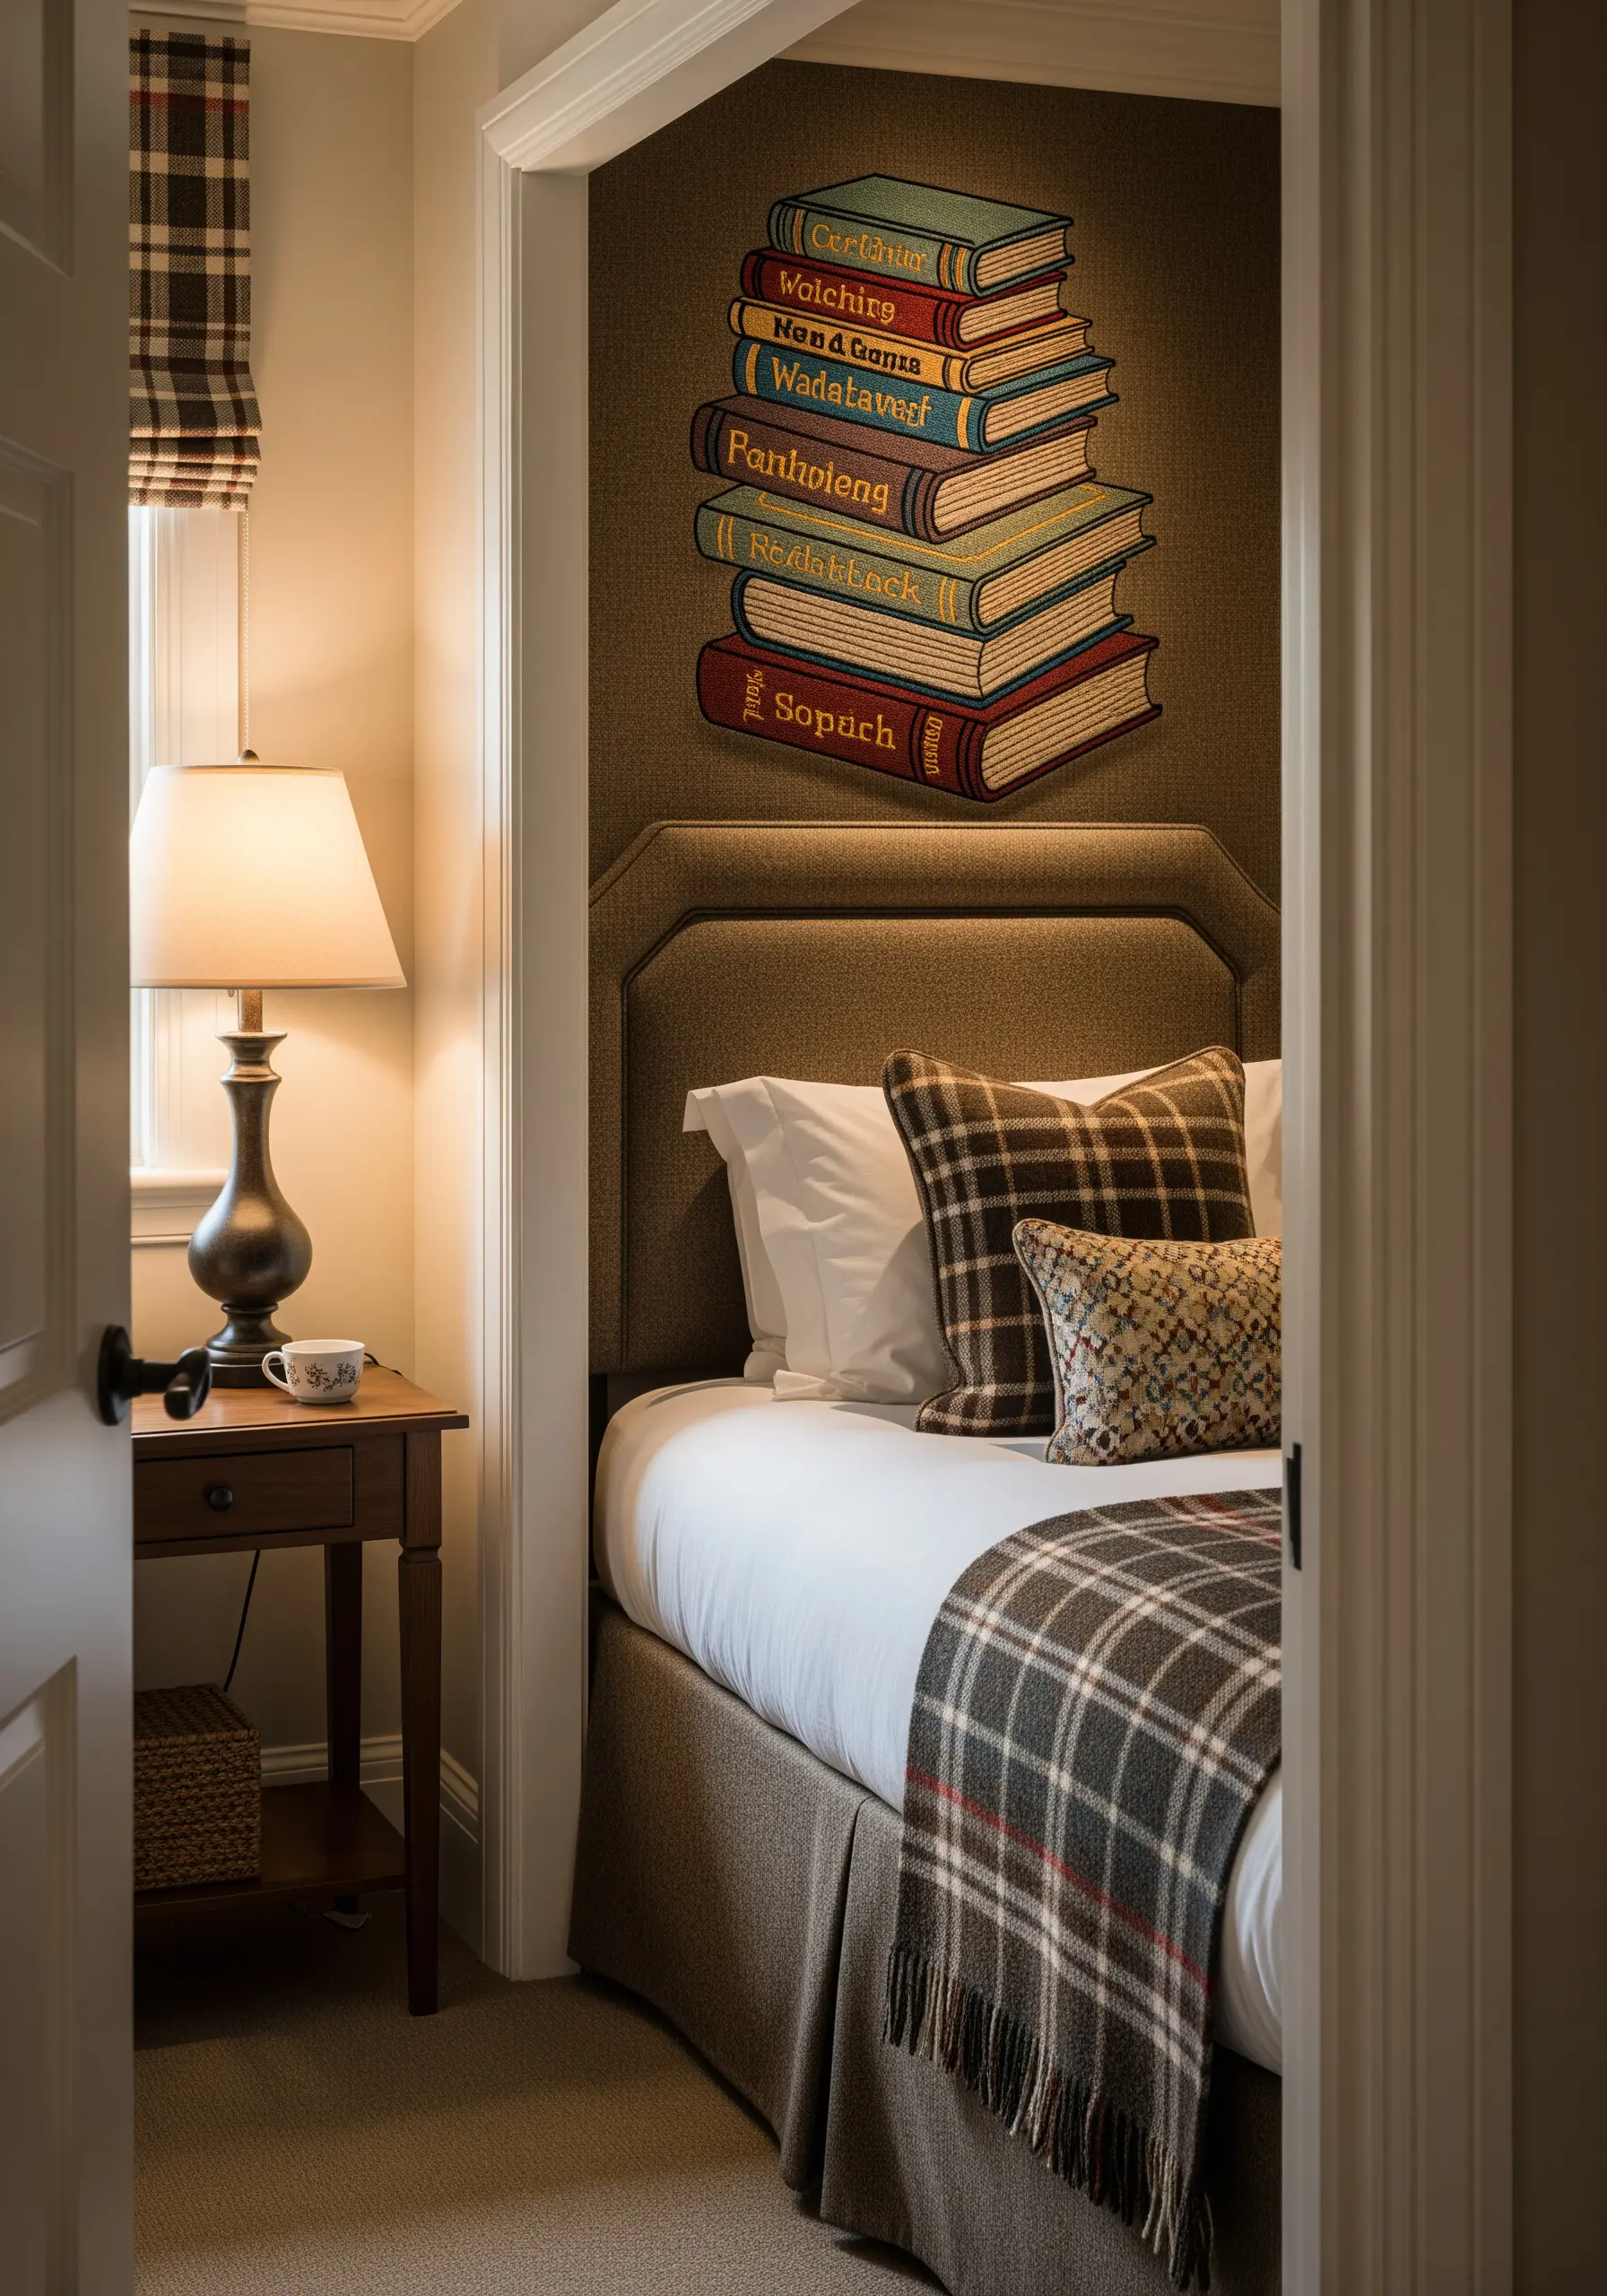
Bring a simple illustration, like a stack of books, to life with subtle thread shading.
Use a long-and-short stitch with two or three shades of the same color to create a gradient on the book spines.
This creates the illusion of a rounded surface and a consistent light source, making the illustration look less flat.
For the fine details like titles and page edges, switch to a single strand of floss and a simple backstitch for clarity.
34. Electrify Your Design with Neon Thread

For a futuristic, high-tech design, use neon or glow-in-the-dark embroidery floss.
These threads create a stunning visual impact, especially on a dark or metallic background fabric.
A whipped backstitch is the ideal choice for creating the smooth, continuous lines of a circuit board, as it eliminates the segmented look of a standard backstitch.
This technique is perfect for adding an unexpected, modern, and playful element to your bedroom decor.
35. Create a Living Artwork with a Stitched Map
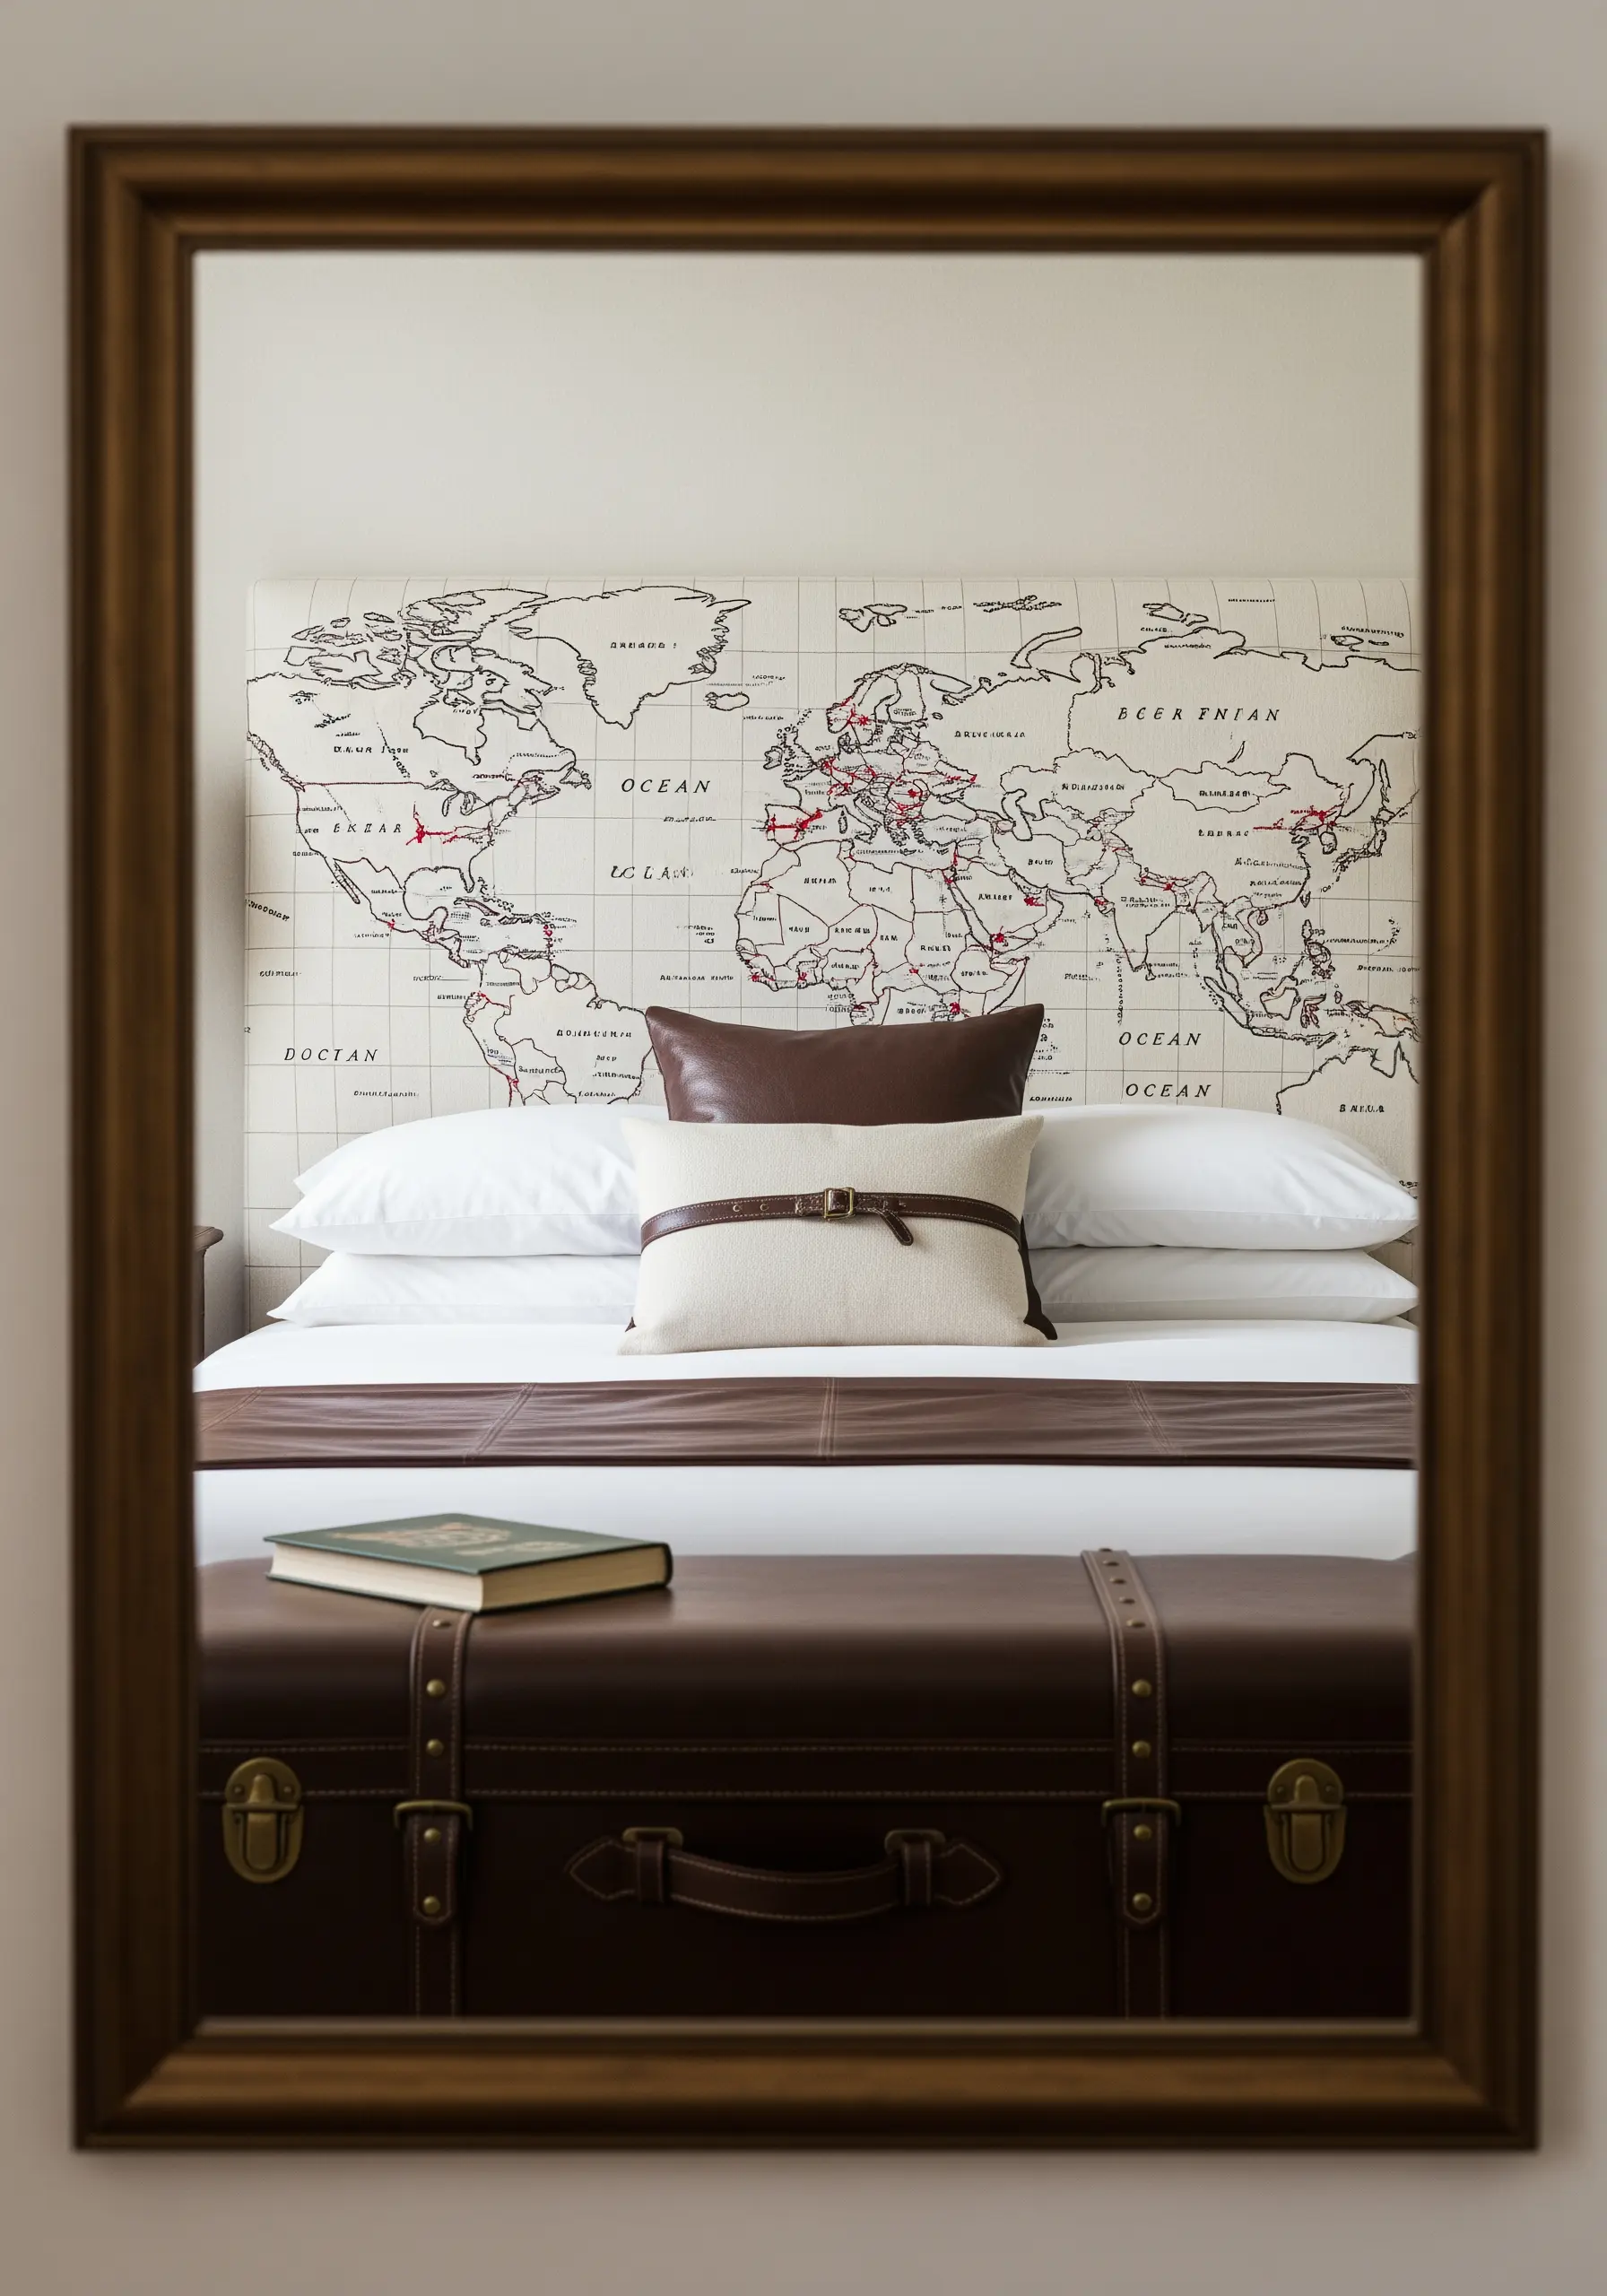
Turn a headboard into a personal story by embroidering a world map.
Use a simple backstitch in a neutral color like black or gray to create the continents and country borders.
Then, use a vibrant red thread to stitch lines tracing your travels, connecting places you’ve been or dream of visiting.
This creates an interactive piece of art that evolves over time, making it a deeply meaningful and personal focal point for your room.
36. Paint with Texture Using Punch Needle Art

Think of punch needle not as stitching, but as painting with yarn and texture.
Create large, flowing blocks of color by filling abstract shapes with the loop side of the stitch.
Instead of focusing on precise lines, concentrate on the direction of your punches and the height of your loops to create movement and depth.
This technique is incredibly fast for covering large areas and results in a soft, tactile piece of yarn wall art that adds warmth and modern style to the space above your bed.


