

Your workspace is more than just a desk—it’s where ideas take shape. And the small details you surround yourself with can quietly influence your focus and calm.
Instead of simply adding another store-bought object, what if you could infuse your everyday tools with your own touch? Embroidery offers a way to do just that, transforming functional items into small, personal works of art.
Here, you won’t find overly complex projects. You’ll find subtle, intentional ways to use thread and fabric to make your desk feel like a true reflection of you—thoughtful, creative, and ready for whatever the day holds.
1. Render Lavender with Delicate Stitches
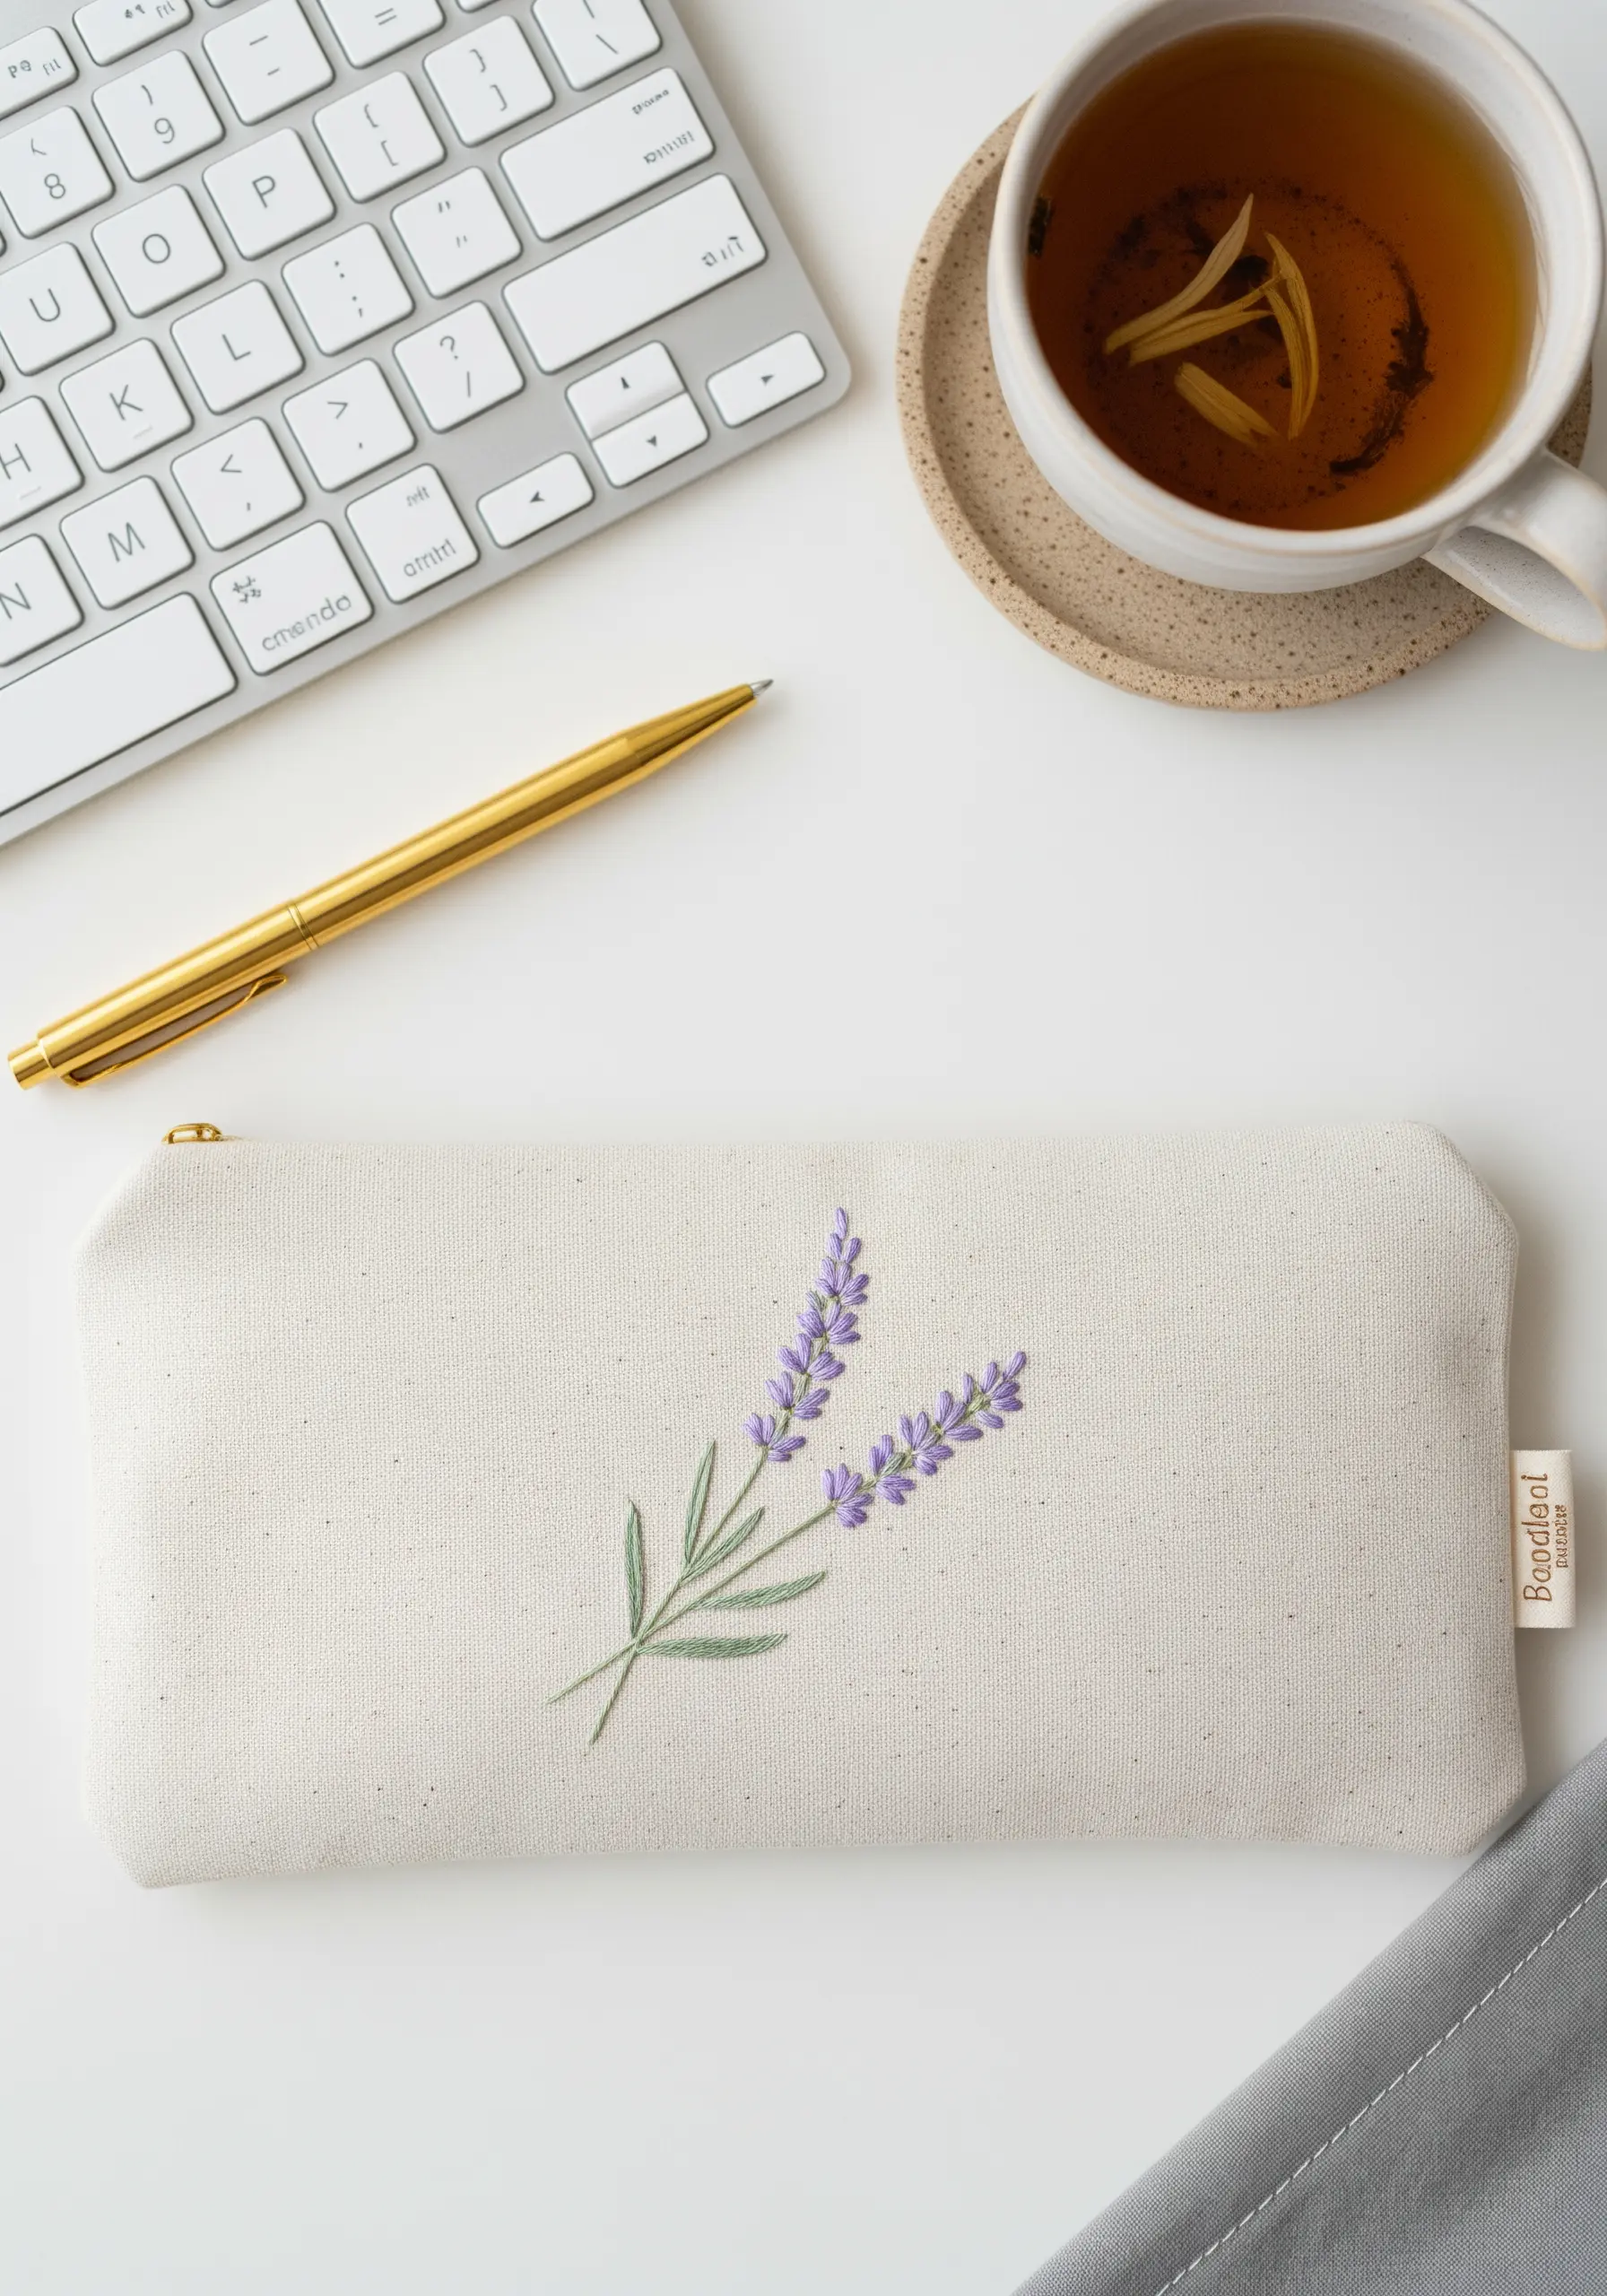
Elevate a simple pencil pouch by focusing on the subtle texture of lavender.
Use single-strand stem stitch for the stalks to keep them elegant and fine.
For the blossoms, create tiny detached chain stitches or French knots, clustering them densely at the base and spacing them out toward the tip for a natural, tapered look.
This technique mimics the plant’s delicate structure and adds a touch of calm to one of your most-used desk items.
2. Stitch Geometric Lines onto Felt
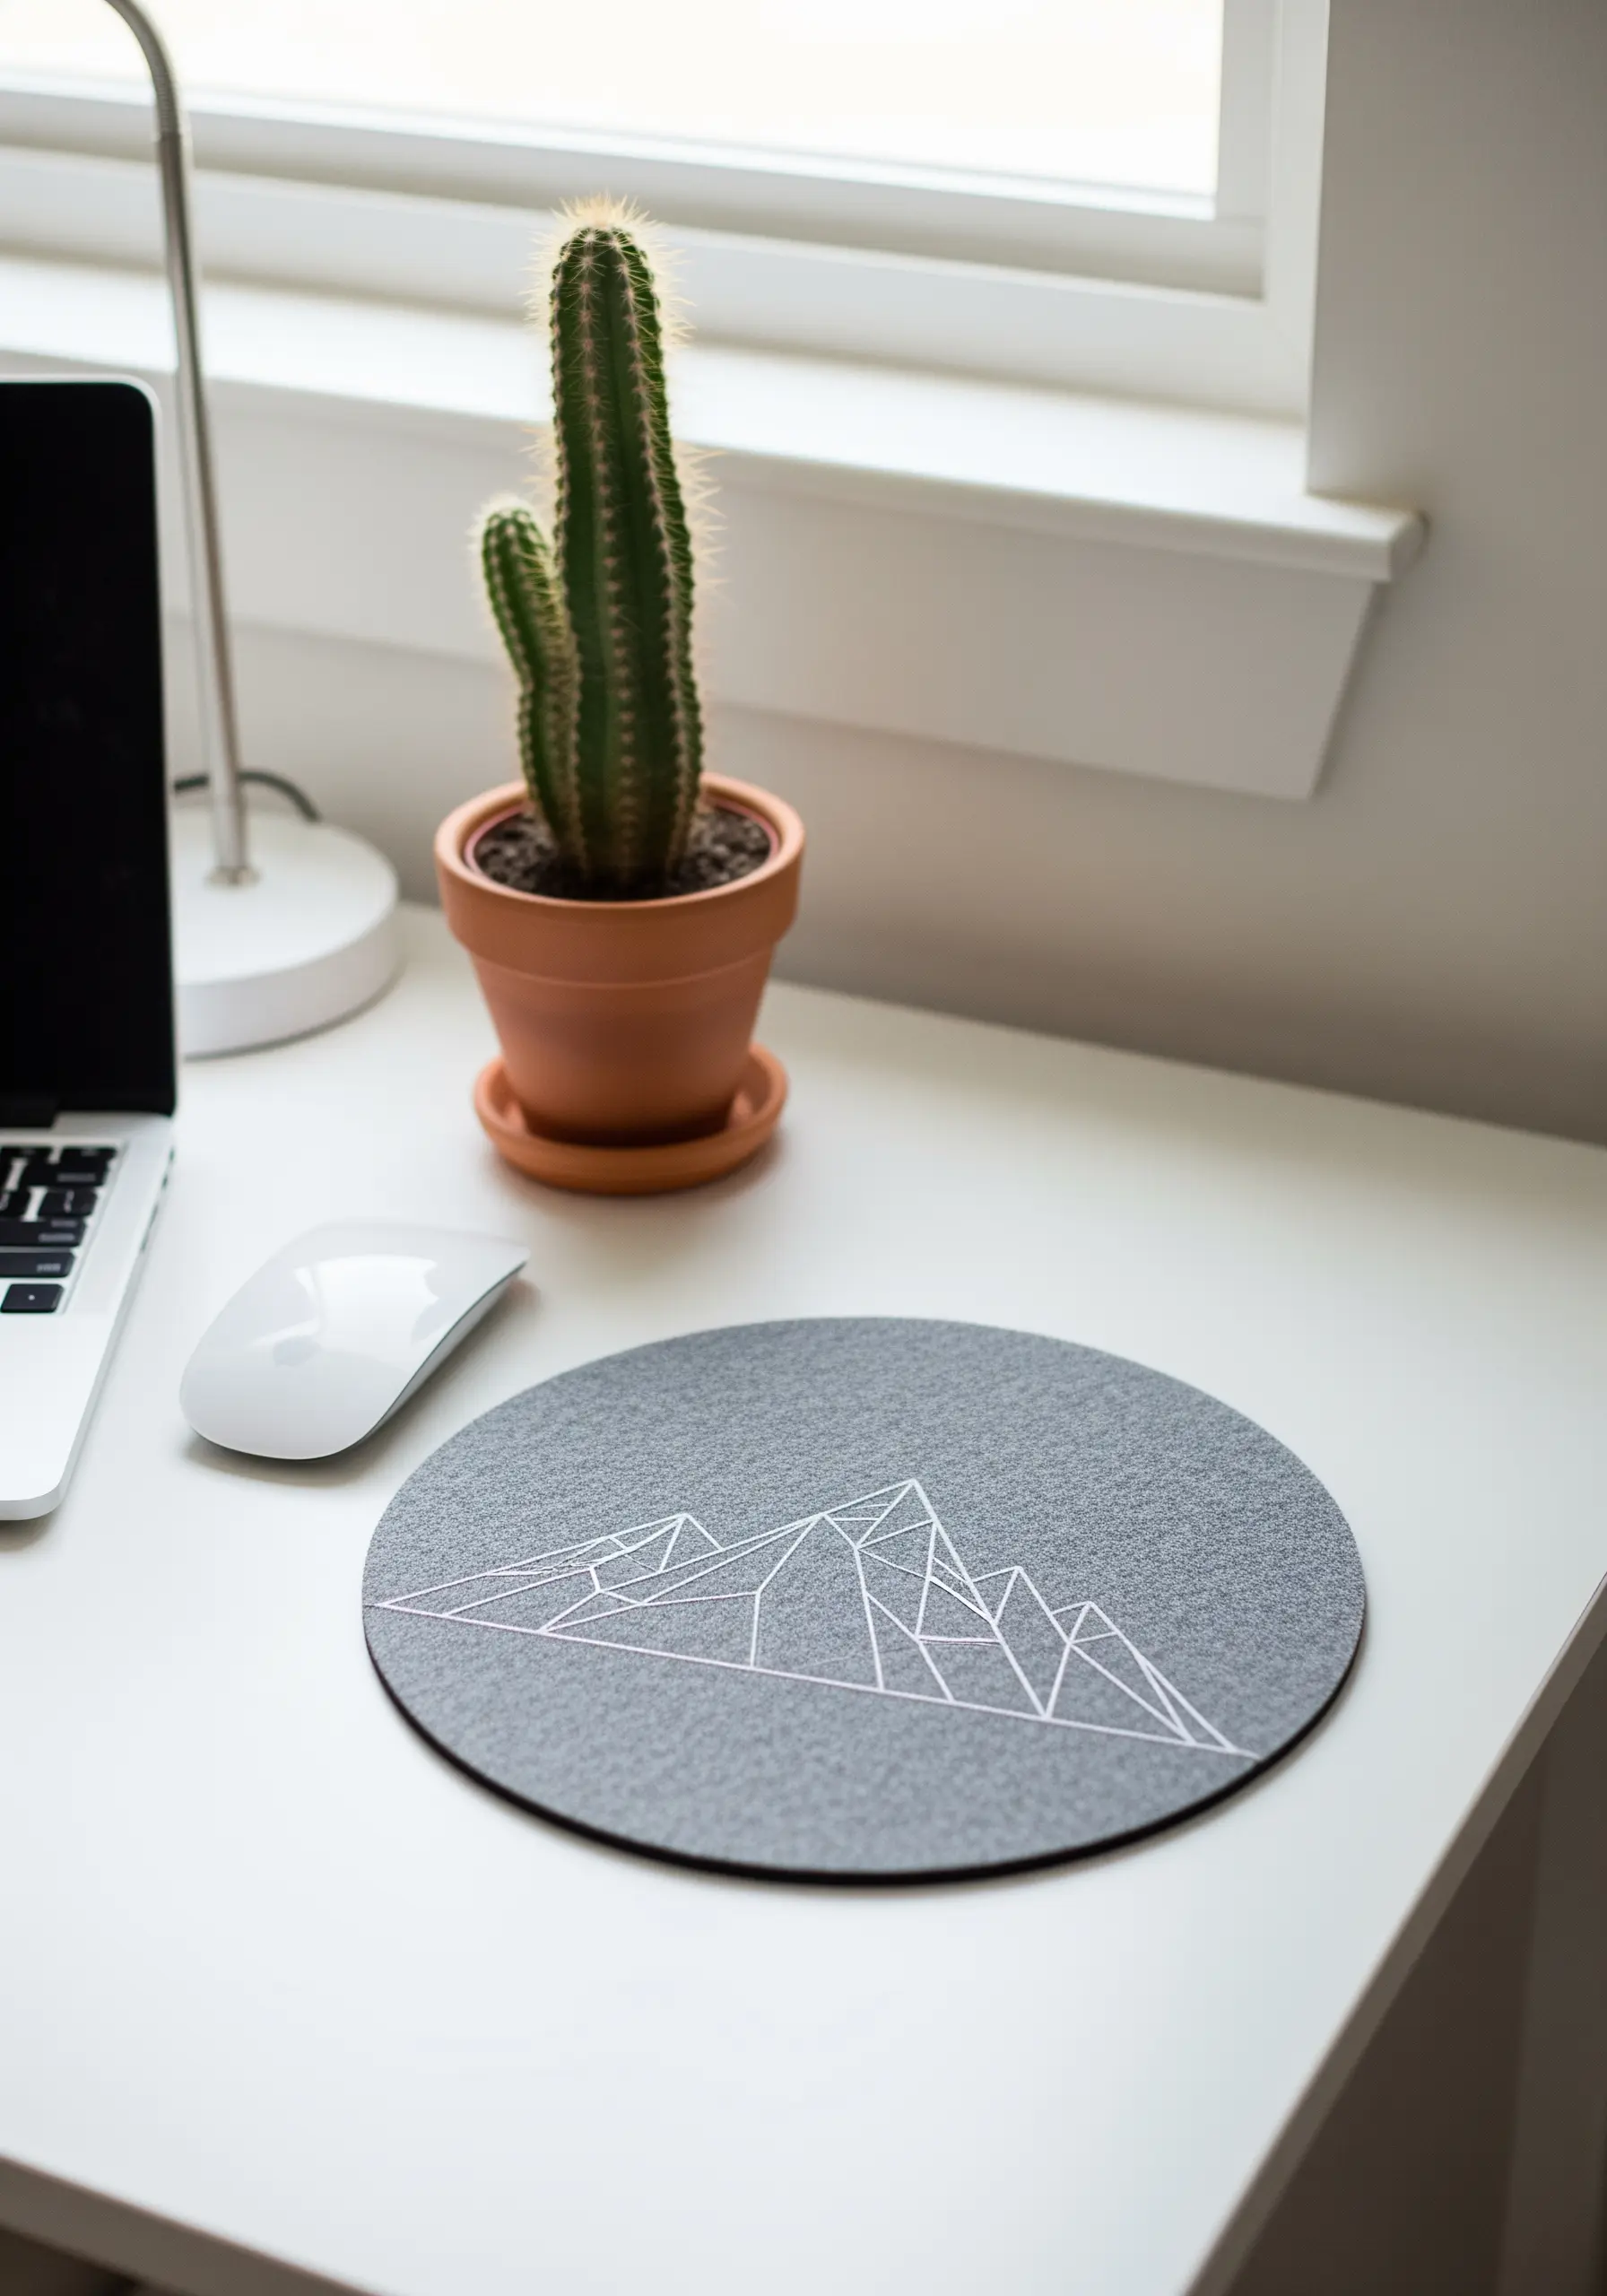
Transform a plain felt mousepad into a piece of modern art by embroidering a clean, geometric design.
Use a backstitch with three strands of floss to create bold, crisp lines that stand out against the soft texture of the felt.
To prevent the felt from stretching or puckering as you stitch, apply a lightweight, iron-on stabilizer to the back before you begin.
This method ensures your lines remain sharp and your composition stays true.
3. Create a Removable Embroidered Patch
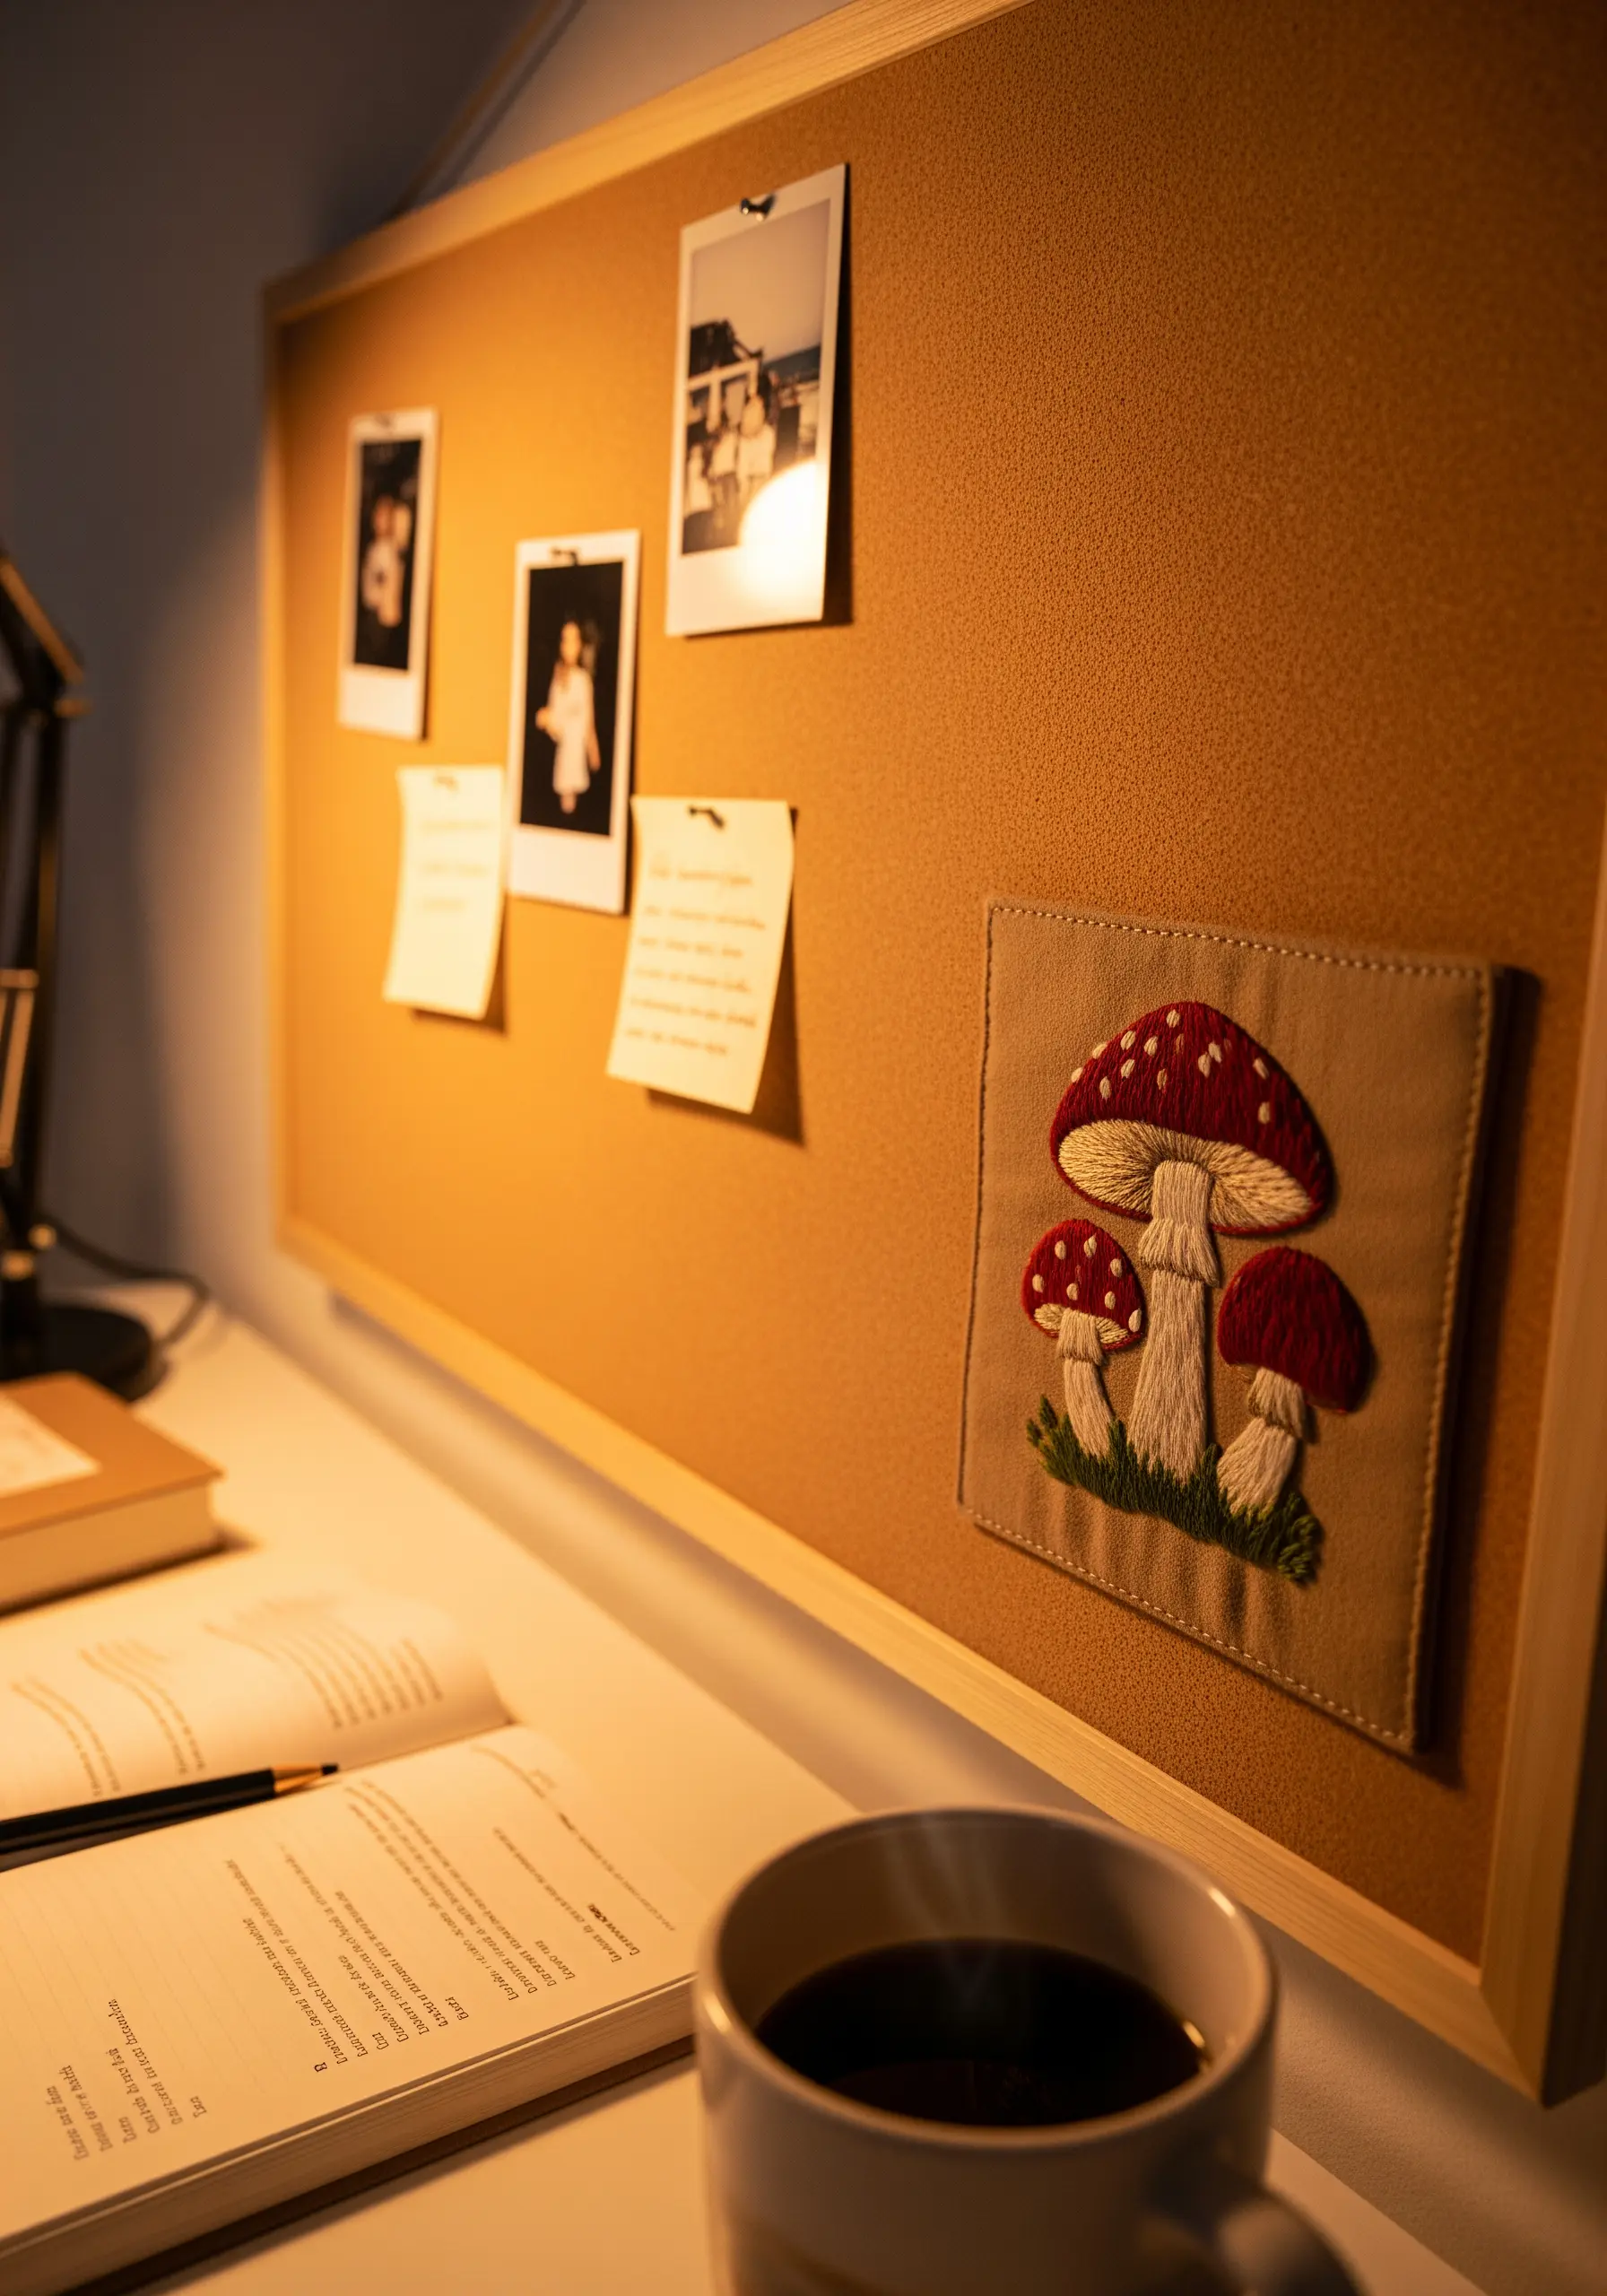
Instead of stitching directly onto a corkboard, create an embroidered patch you can move or swap out.
Work your design on a piece of sturdy canvas or linen, leaving a generous border.
Once finished, trim the fabric, fold the raw edges under, and secure them with fabric glue or a simple running stitch on the back.
This gives you a tidy, pin-able piece of art that adds a cozy, handmade feel to your inspiration board. For a similar look, try some realistic mushroom forest floor embroidery projects.
4. Embroider on Paper with Metallic Thread

Add a touch of celestial elegance to a journal cover by stitching a constellation.
Gently pre-punch your pattern holes with a sharp needle to prevent tearing the paper or bookcloth.
When working with metallic thread, which can be prone to fraying, use shorter lengths and a thread conditioner like beeswax to help it glide smoothly.
A simple backstitch is all you need to create a design that feels both personal and luxurious.
5. Build Texture with Layered Stitches
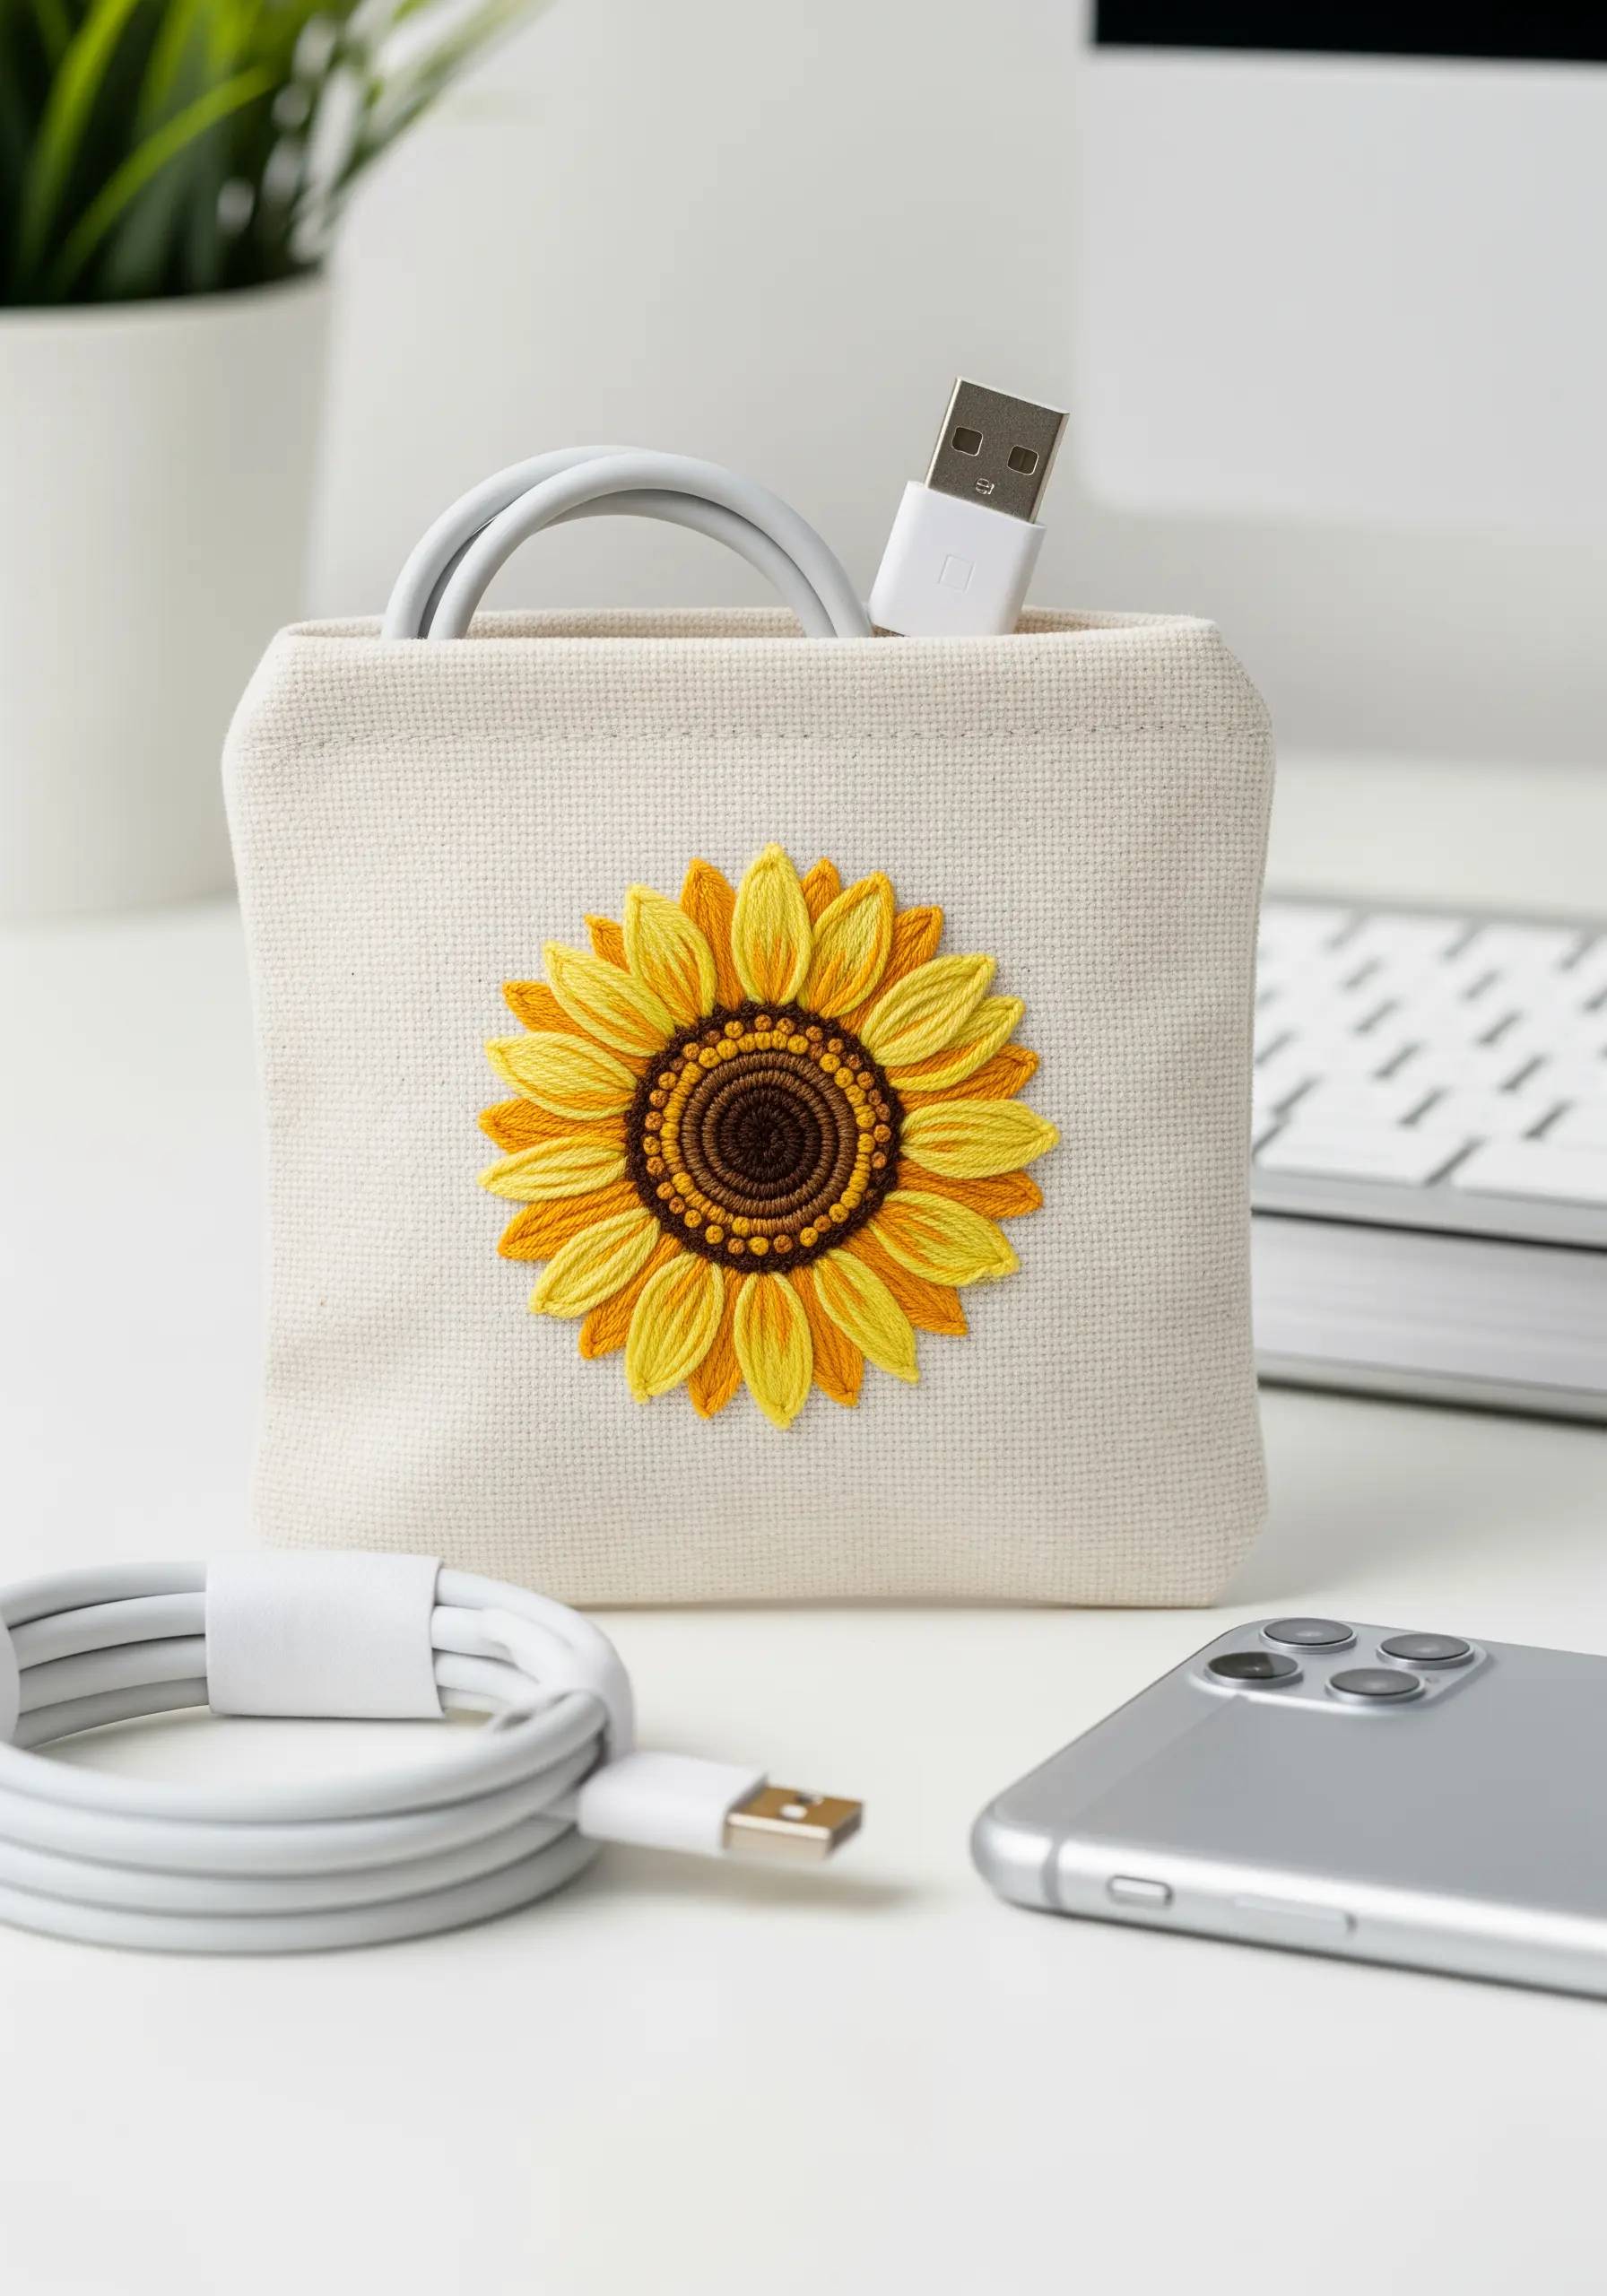
Give a sunflower motif lifelike dimension by focusing on texture and color blending.
Use a long-and-short stitch for the petals, blending two or three shades of yellow to create a soft, painterly gradient.
For the center, fill the area with tightly packed French knots in dark brown, light brown, and ochre to mimic the dense texture of seeds.
This contrast between the smooth petals and the bumpy center makes the design pop.
6. Capture Whimsy with a Scribble Stitch

Embroider a simple line drawing, like a coffee cup, with a technique that embraces imperfection.
Instead of a perfect backstitch, use a loose, slightly uneven running stitch that overlaps in places, as if it were sketched with a pen.
Use three strands of black floss on a light, textured linen to enhance the hand-drawn aesthetic.
This approach gives your coaster a playful, modern character that feels effortless and charming.
7. Compose an Abstract Grid on a Notebook
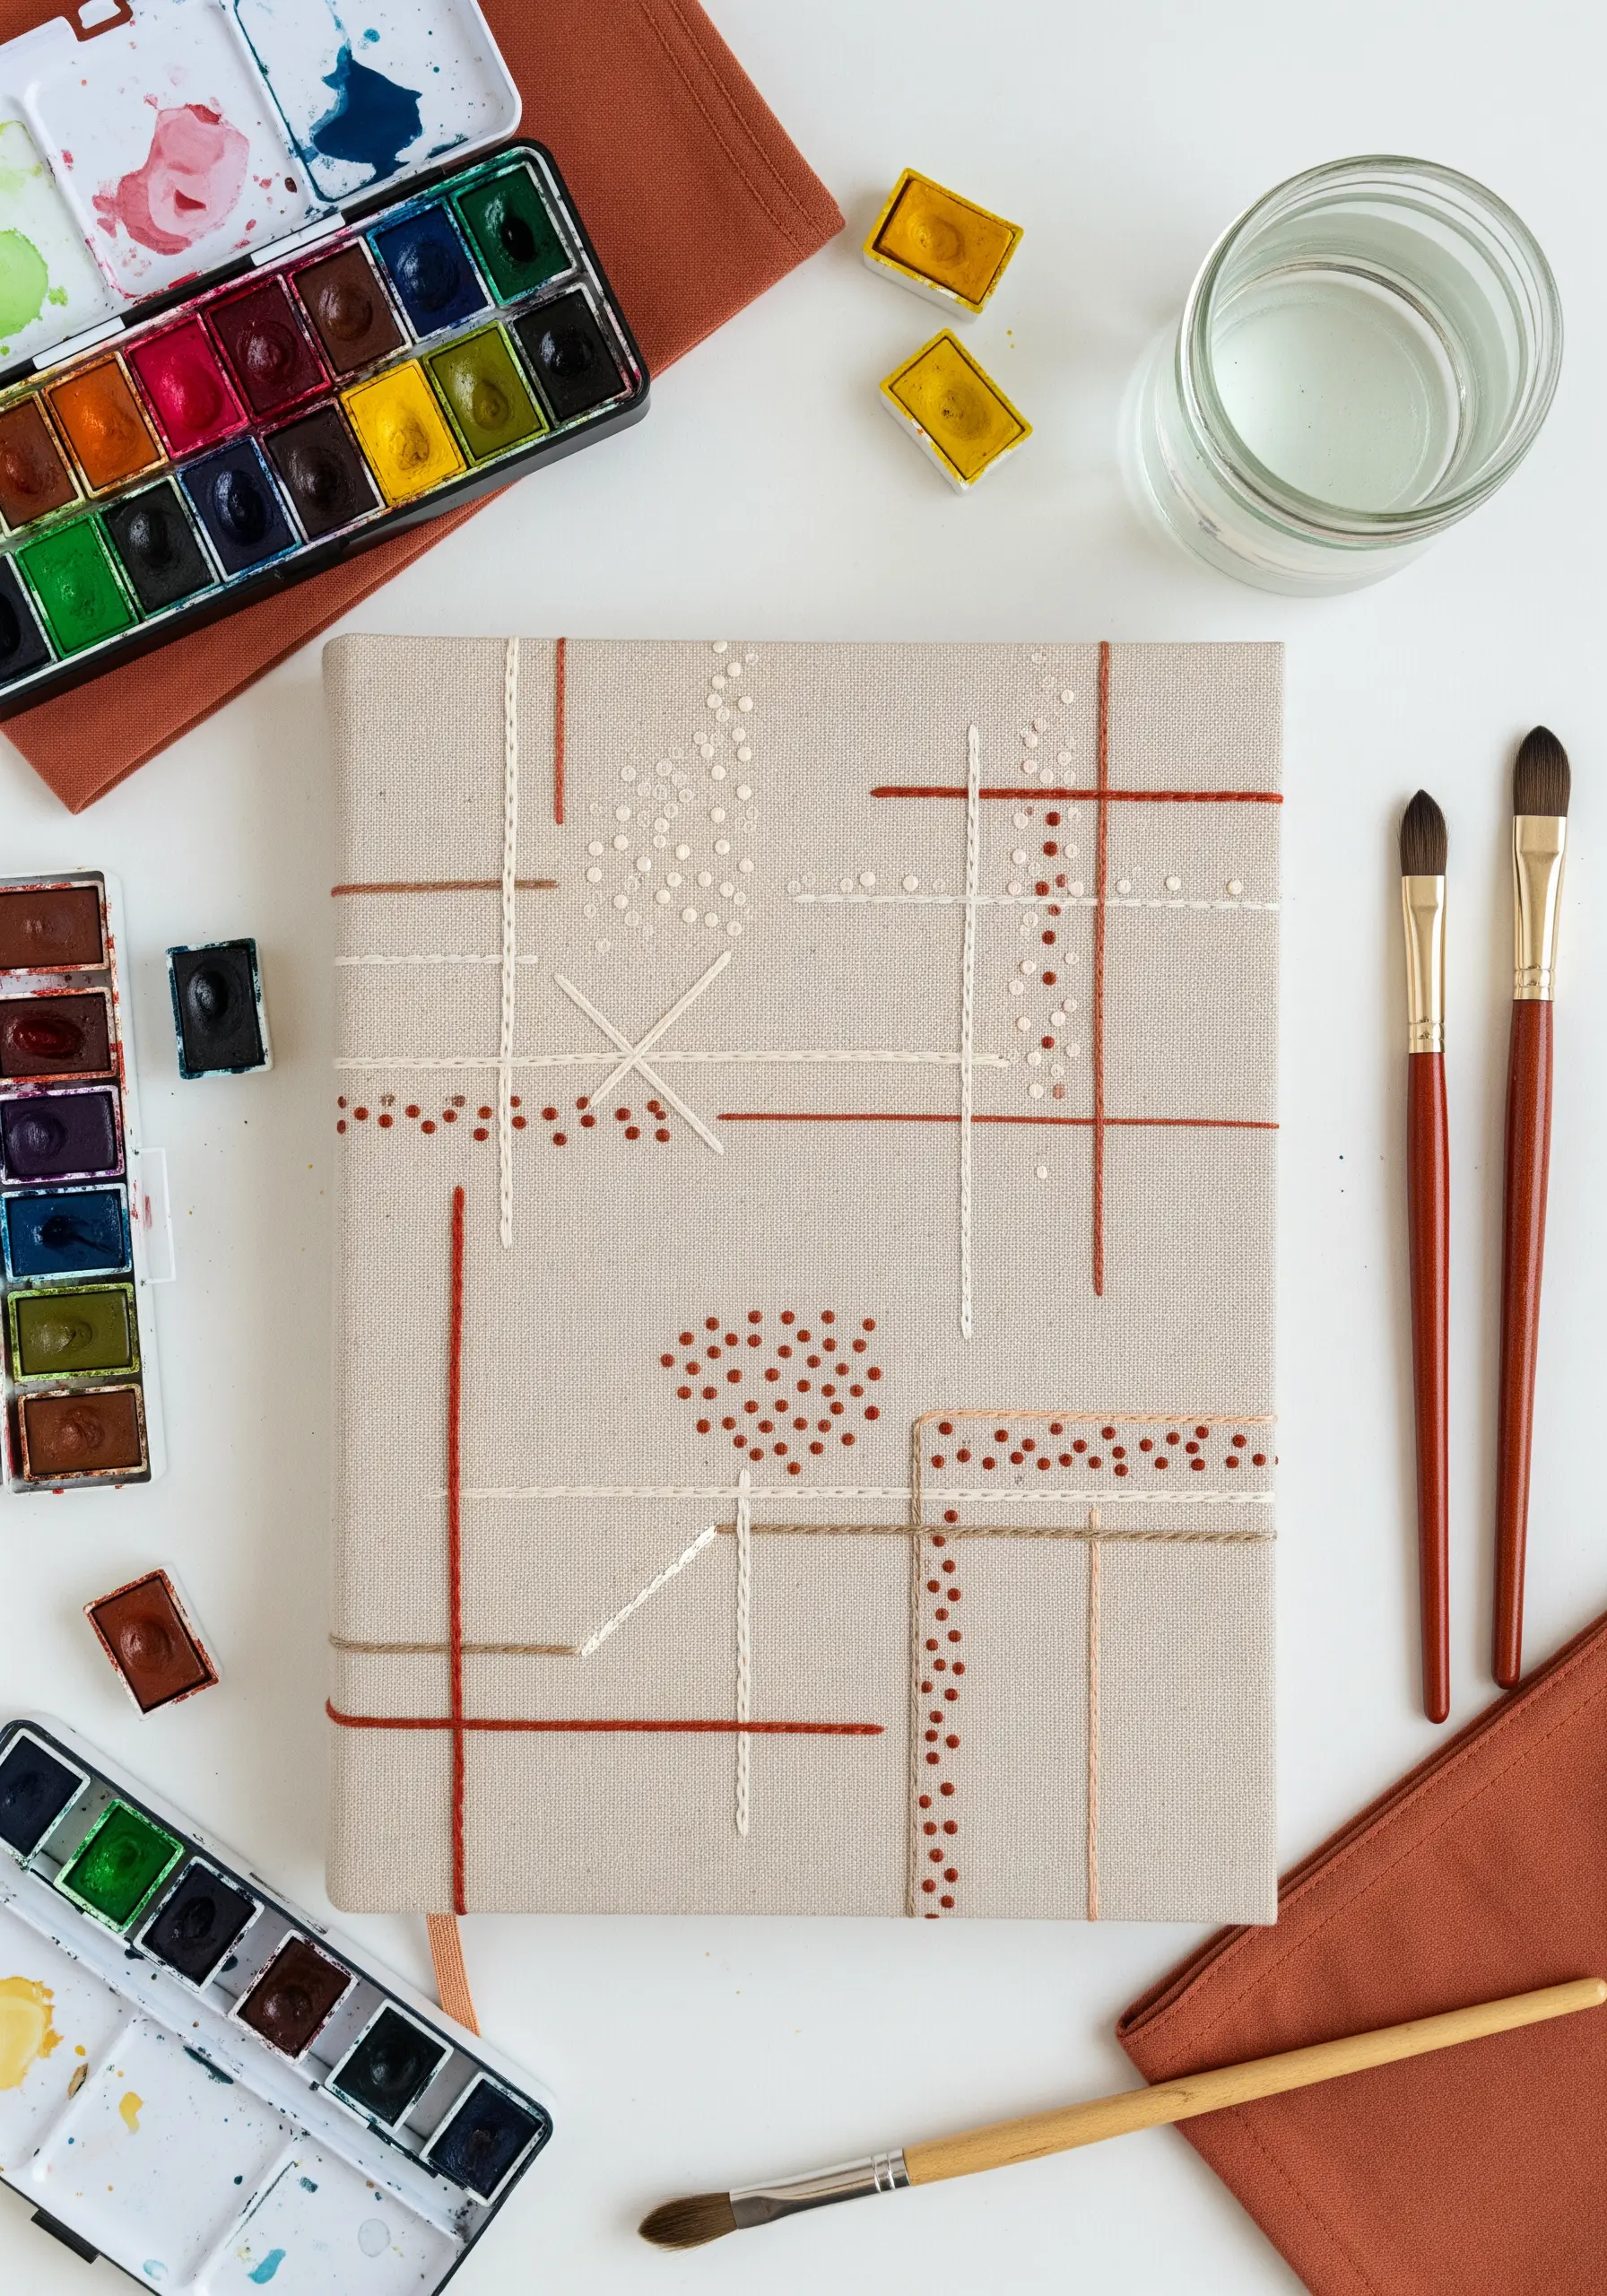
Turn a plain fabric-covered journal into a piece of abstract art using a minimalist grid and textured fills.
Map out intersecting lines with a simple running stitch or backstitch in contrasting threads.
Instead of filling shapes with color, use texture. Fill select areas with clusters of French knots or seed stitches to create focal points.
This technique creates a sophisticated, architectural design that feels both structured and organic.
8. Create a Sense of Movement with Seed Stitches

To embroider something as delicate as dandelion seeds floating in the wind, vary your stitch placement and density.
Use a satin stitch for the main flower head, then scatter single, straight seed stitches for the drifting seeds.
Place them in a gentle, curving path and vary the angle of each stitch to create a convincing illusion of movement.
Using a fine, single strand of thread keeps the design light and airy.
9. Edge a Lampshade with a Bold Couching Stitch
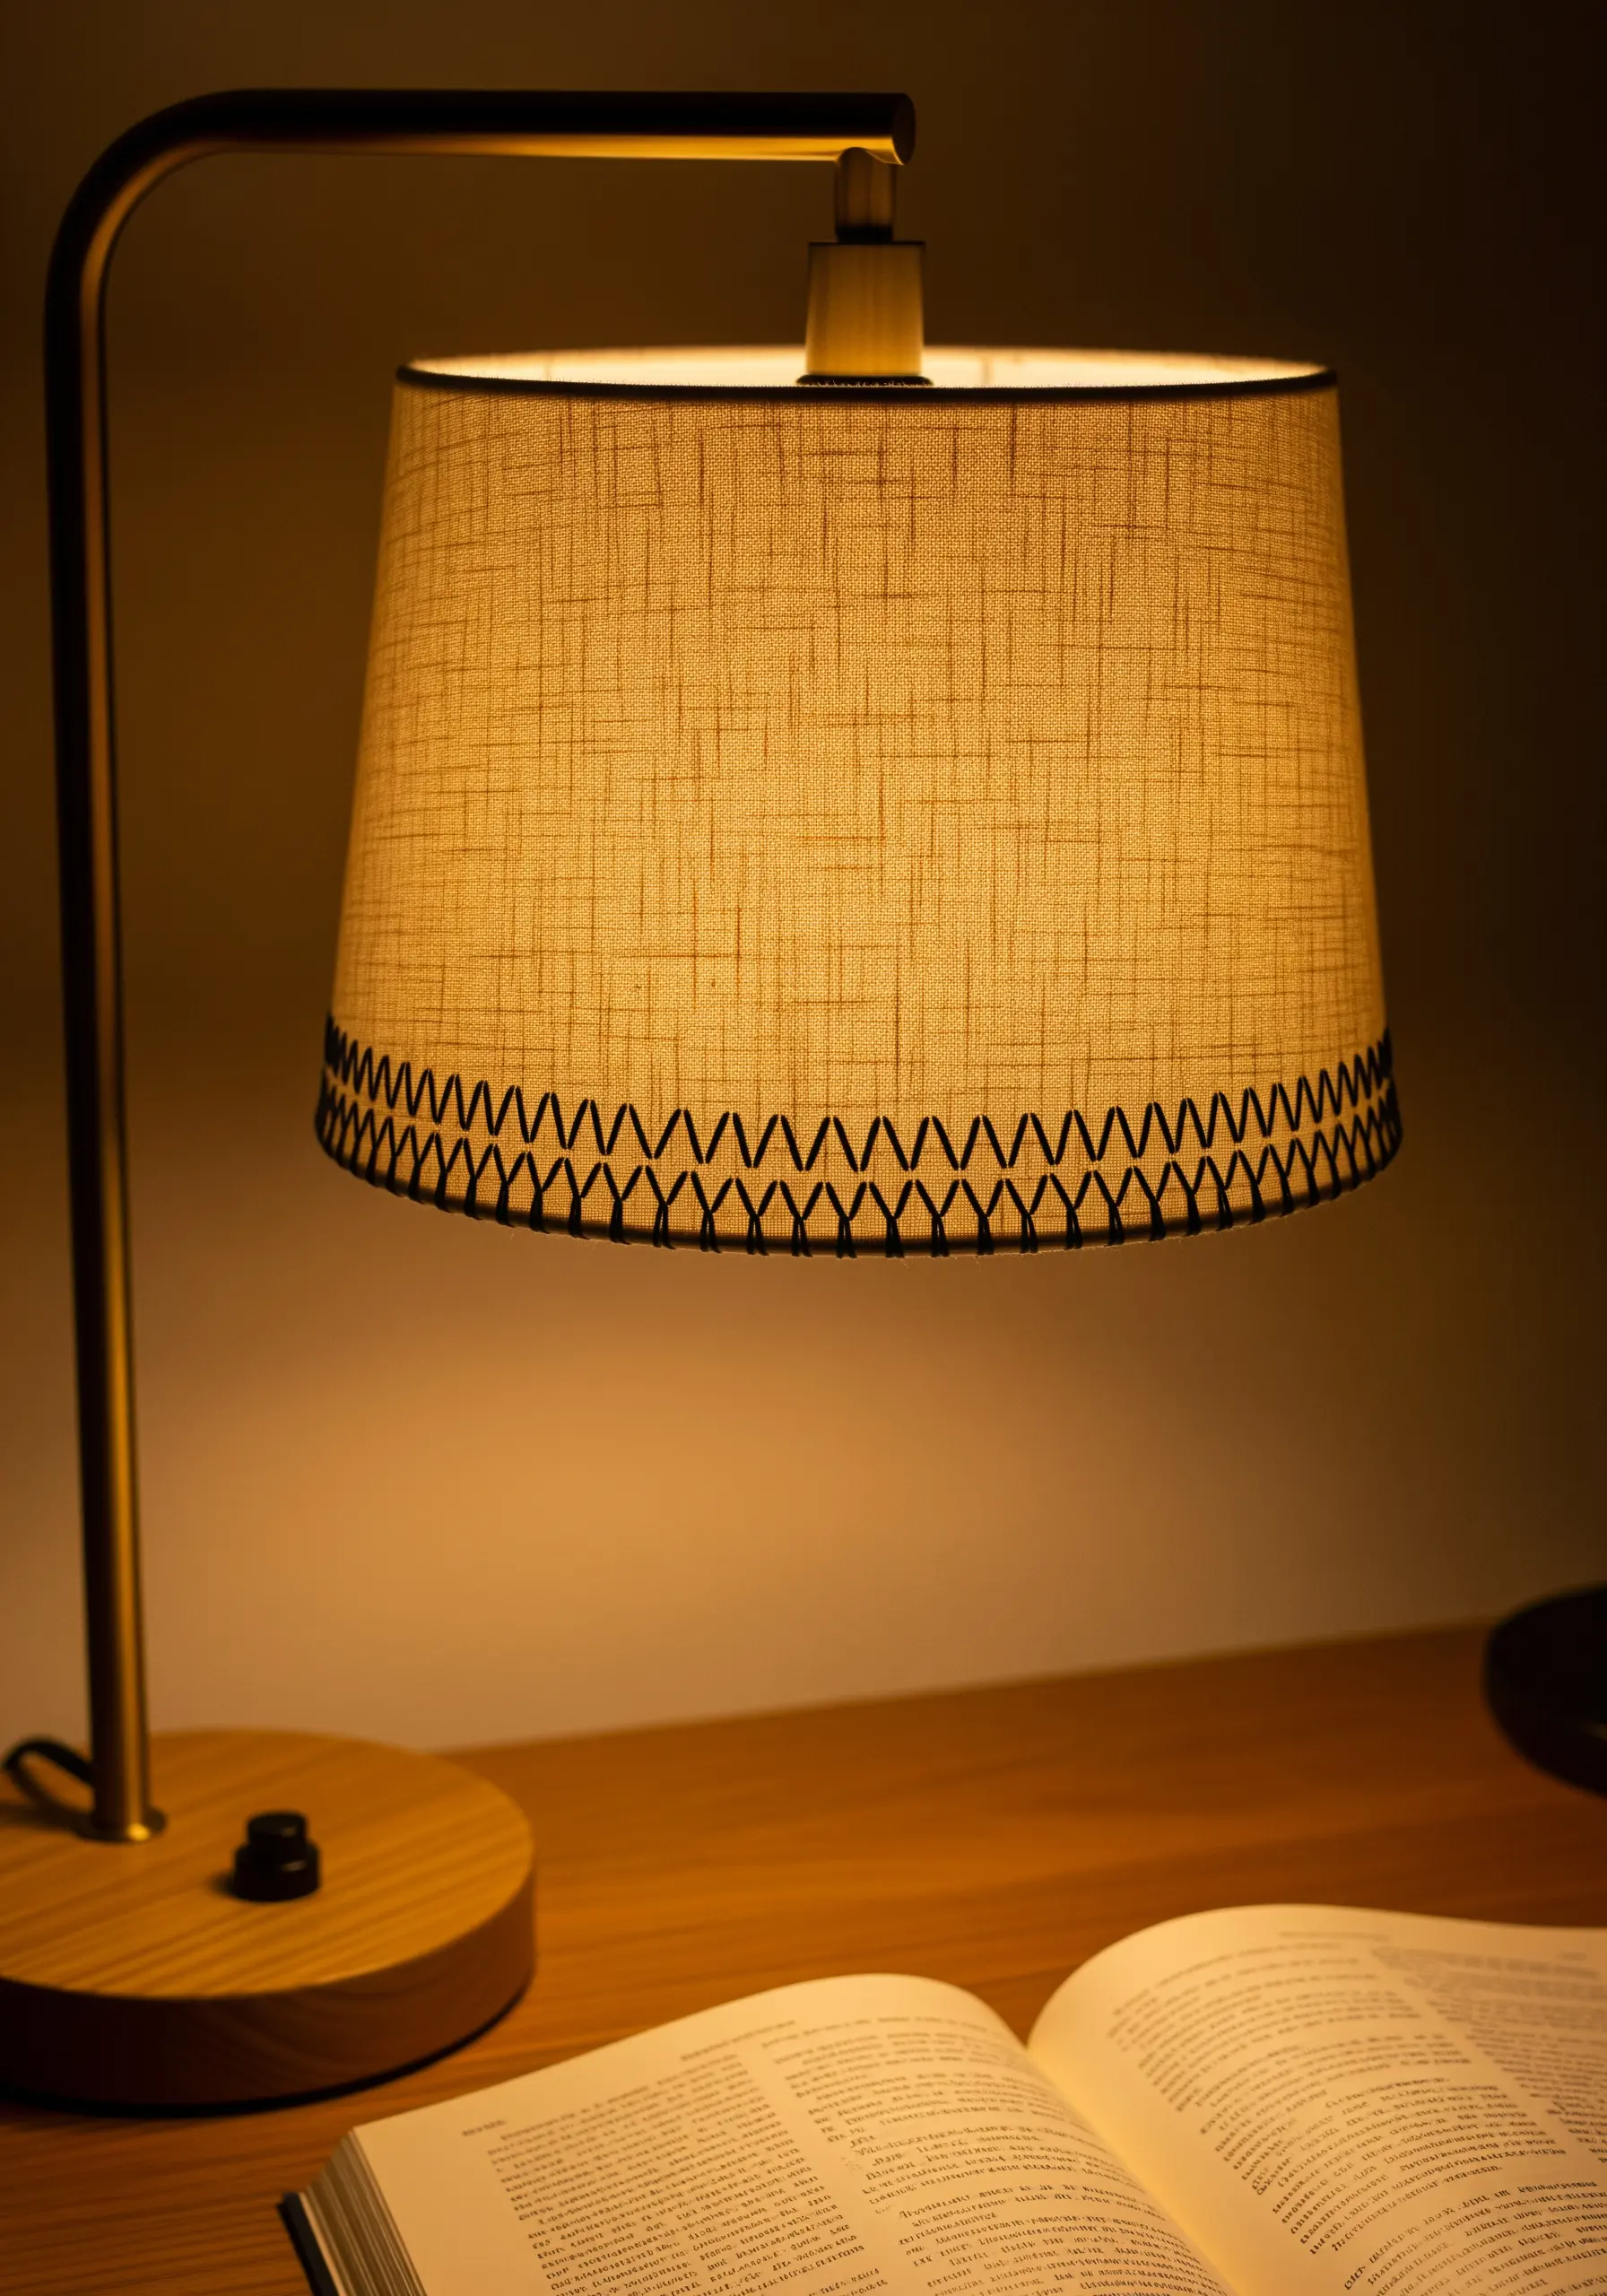
Add a subtle, graphic detail to a plain lampshade by focusing on its edge.
Use the couching technique: lay down a thick piece of yarn or cord along the hem and tack it in place with a thinner, contrasting embroidery floss.
Space your tacking stitches evenly in a V-shape or cross-hatch pattern for a decorative finish.
This adds a custom, tailored look that beautifully frames the light.
10. Craft a Textured Bookmark from Felt
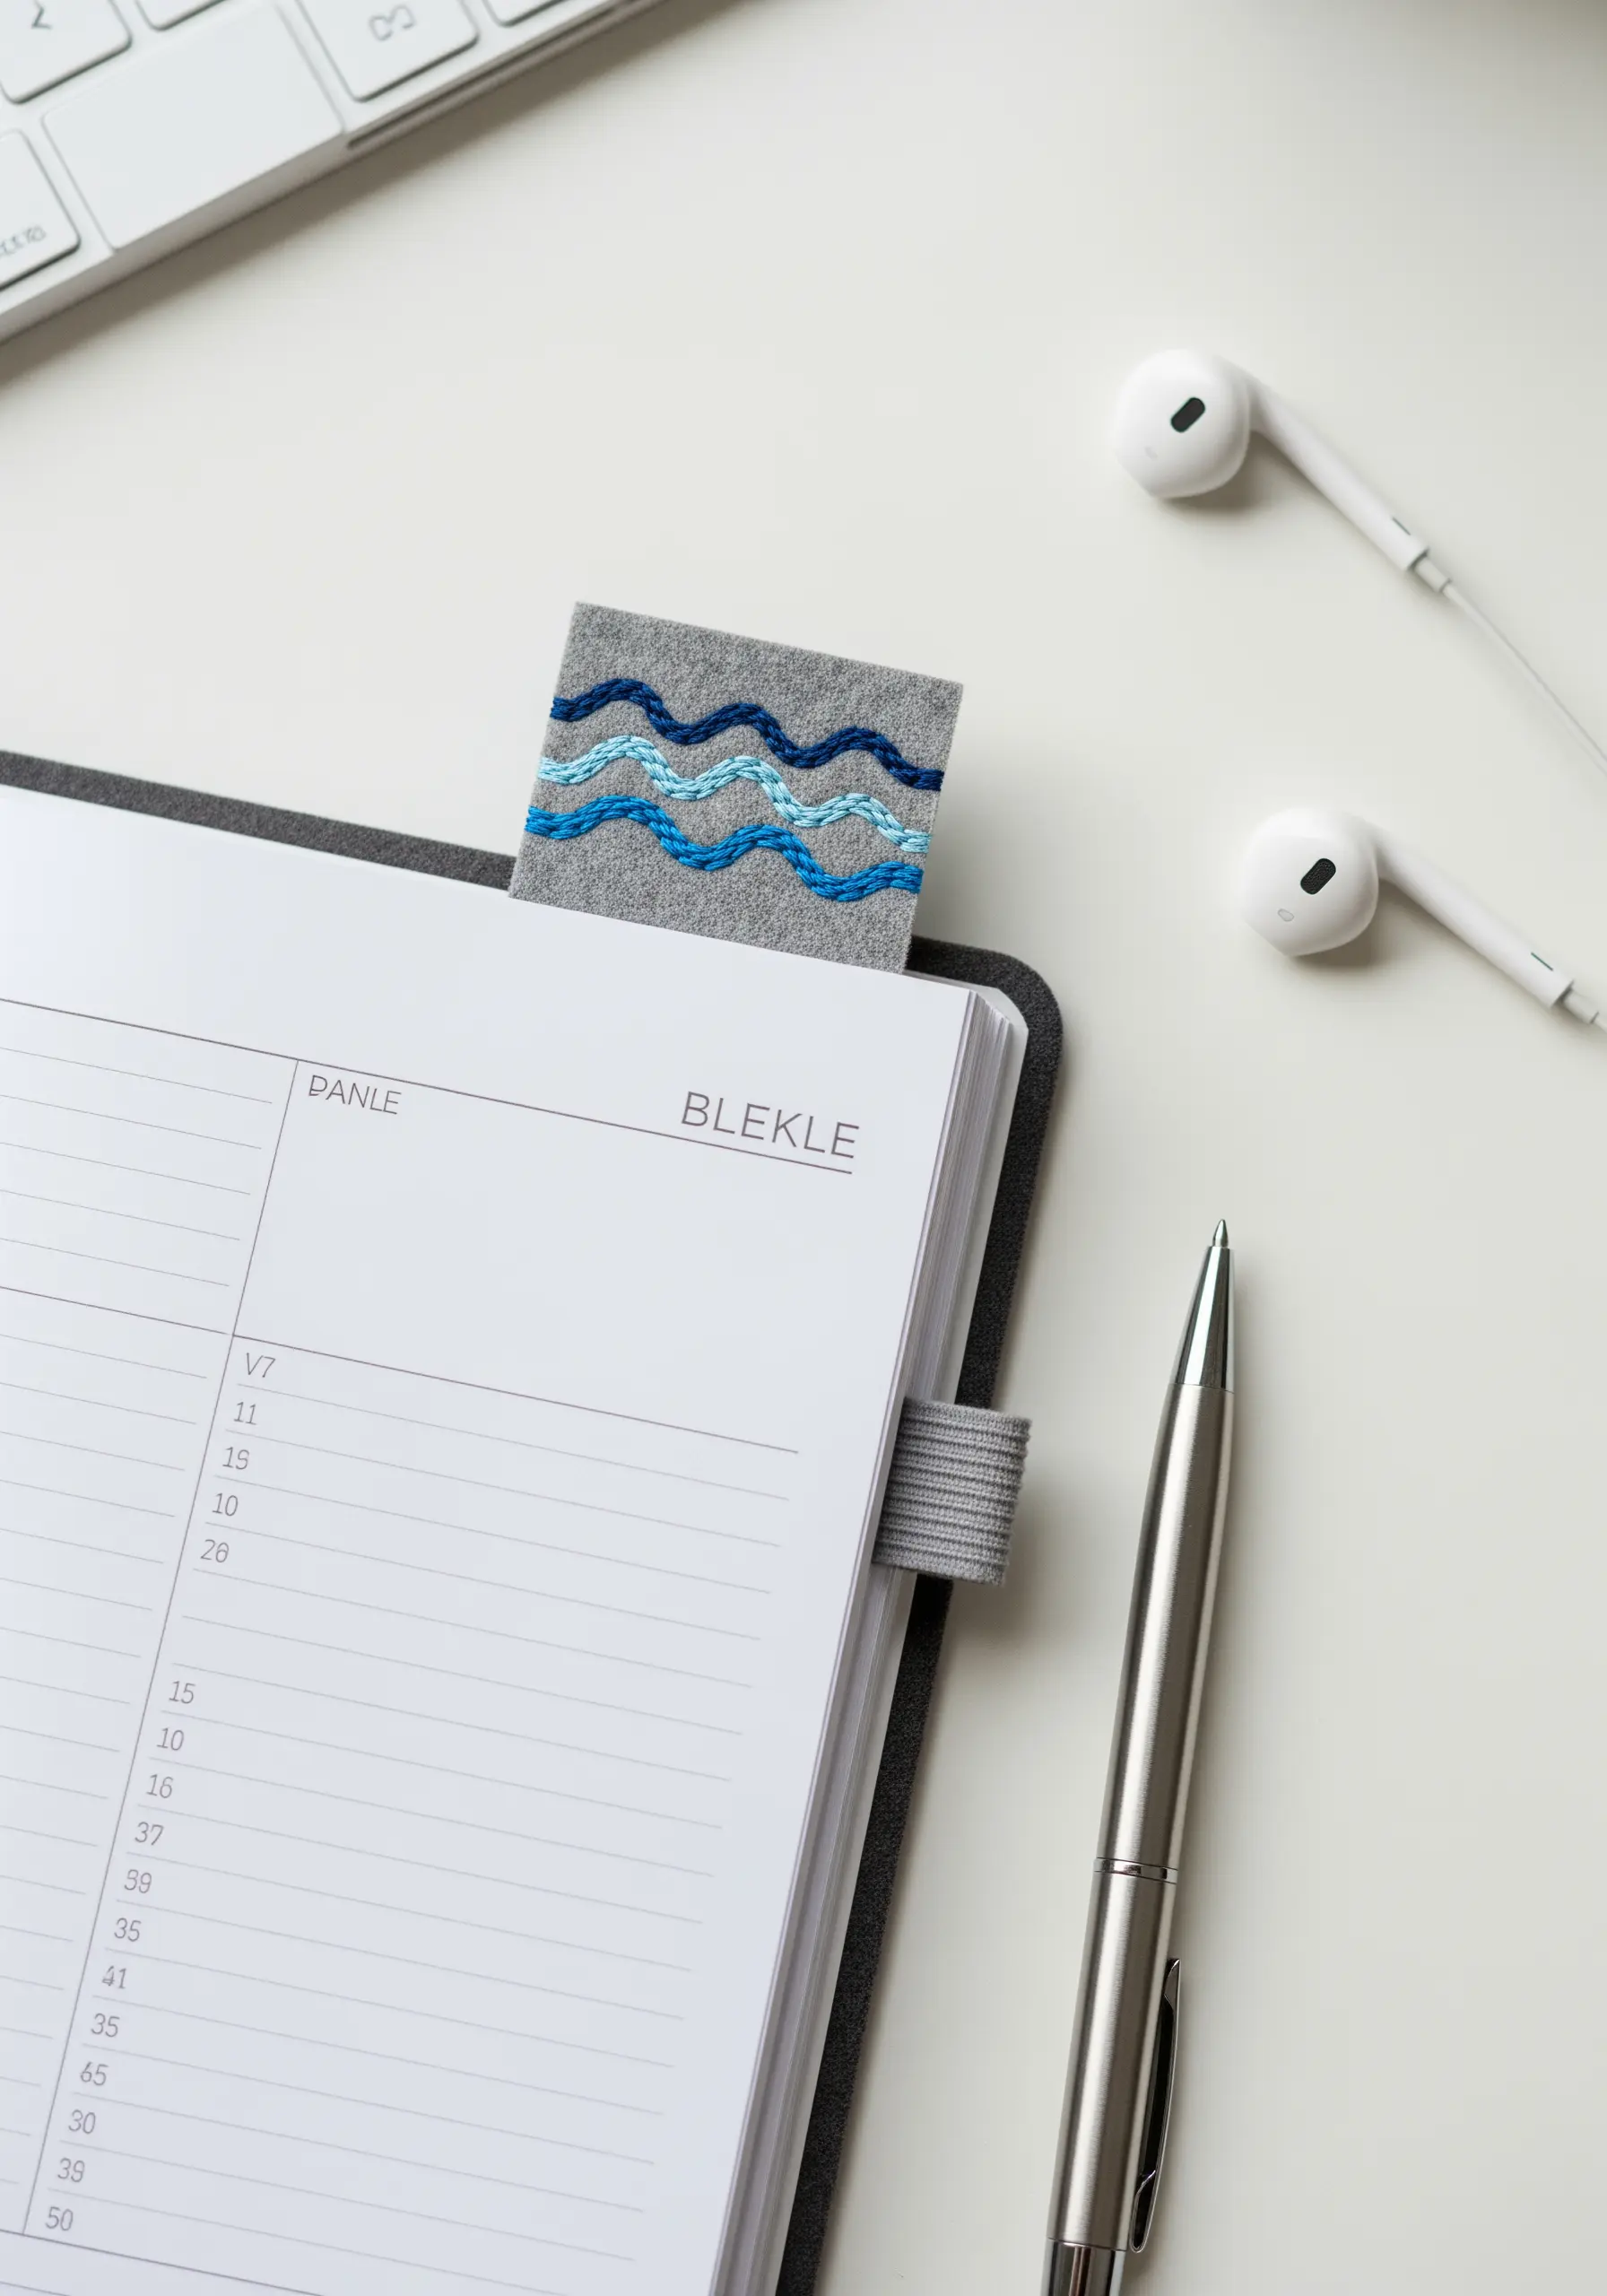
Felt is an ideal base for a sturdy yet soft bookmark that won’t damage your pages.
Embroider a simple pattern, like these waves, using a backstitch or chain stitch with variegated thread to achieve a beautiful color gradient without changing floss.
The thickness of the felt gives your stitches a slightly raised, dimensional quality.
Simply cut the felt to size when you’re done—no hemming required.
11. Add a Secret Sparkle with Metallic Appliqué

Incorporate shimmer without the challenges of metallic thread by using a metallic fabric appliqué.
Cut your shape from a non-fraying glitter or metallic fabric, then secure it to your monitor cover with a neat whipstitch or blanket stitch around the edge.
Add a few tiny star-like straight stitches with regular floss nearby.
This gives you a crisp, sparkling accent that is both durable and easy to apply.
12. Give Botanicals Depth with Directional Stitches
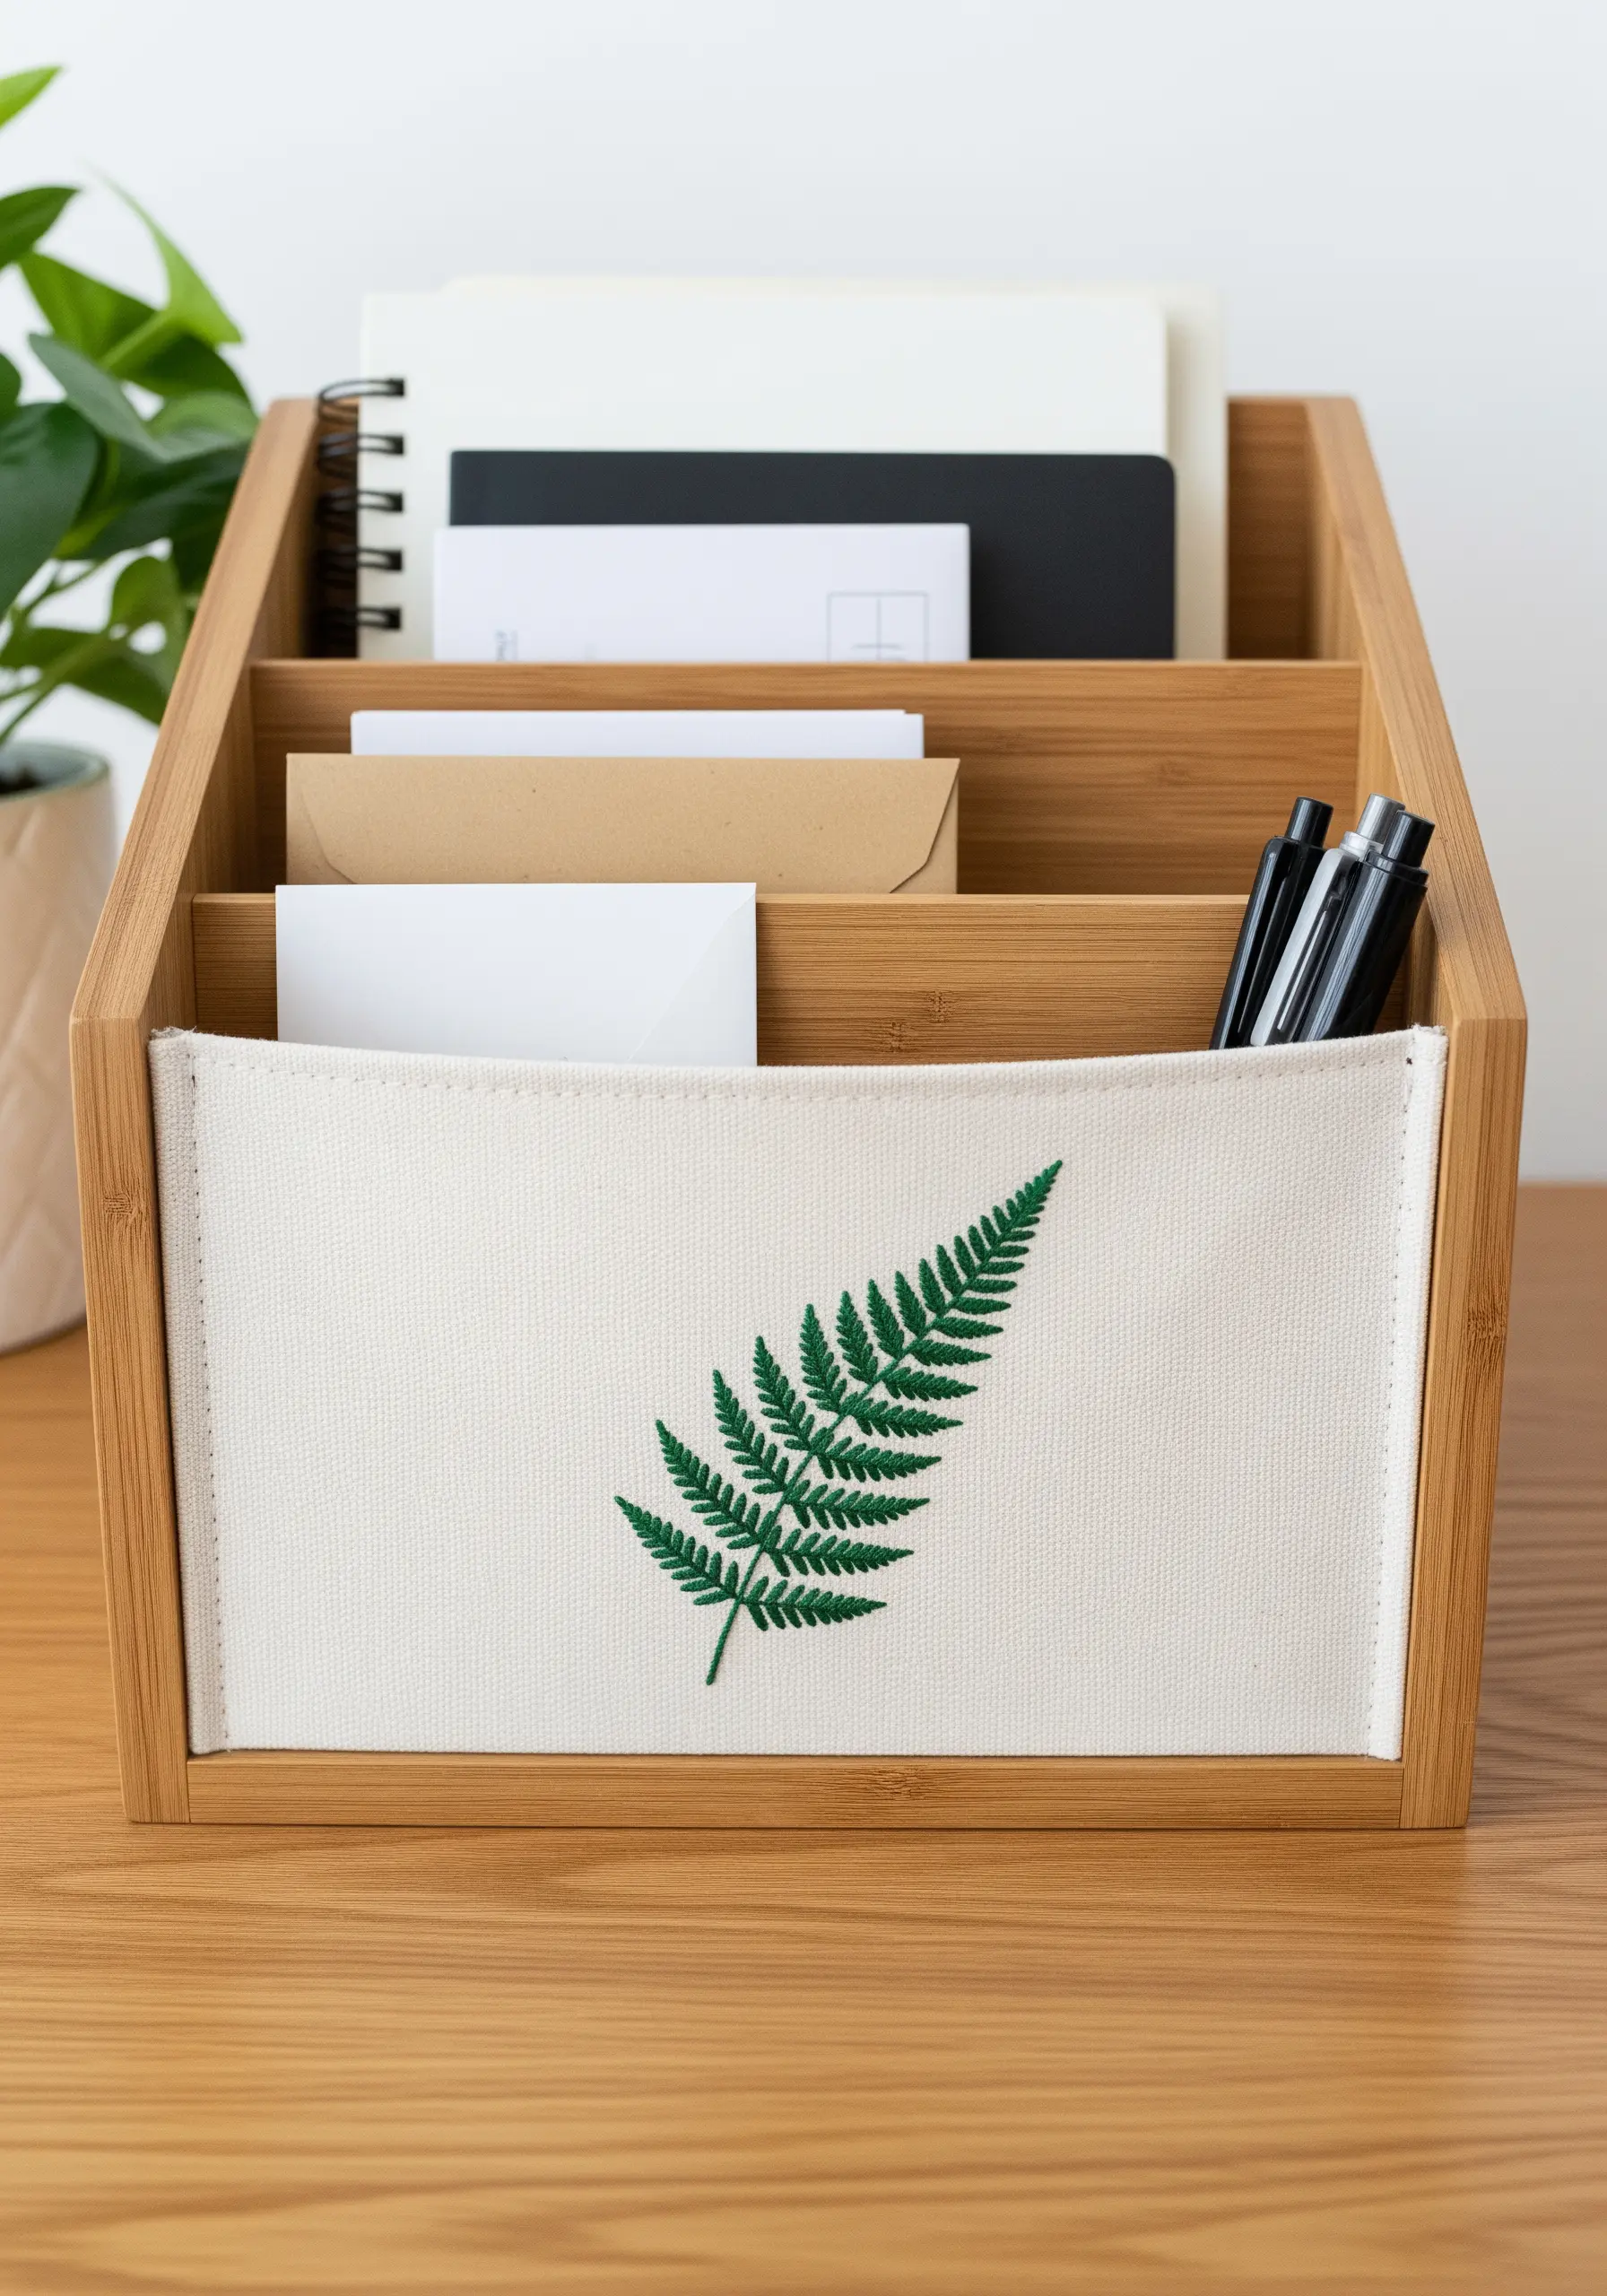
When embroidering a fern or leaf, the direction of your stitches is everything.
For each frond, angle your satin stitches outward from the central stem, mimicking the way a real fern grows.
Use a slightly lighter shade of green for the fronds at the very top to create a subtle sense of light and dimension.
This small adjustment makes hand embroidery leaf patterns look incredibly realistic and vibrant.
13. Master the Fluidity of Single-Line Art

To create a clean, continuous line portrait, the key is a smooth, consistent stitch.
A whipped backstitch—a regular backstitch with a second thread woven through the loops—creates a perfectly smooth, rope-like line with no visible gaps.
Choose a non-stretchy fabric like felt for your glasses case to ensure the lines don’t distort as you stitch.
This technique elevates simple single line face profiles into chic, gallery-style art.
14. Use Negative Space with Simple Icons
Make a wall organizer more functional and stylish with simple, graphic icons.
Choose universally understood symbols and stitch them in a bold, contrasting color using a simple backstitch or stem stitch.
The beauty of this project lies in its minimalism. The negative space is just as important as the stitched lines, creating a clean, modern, and organized look.
These are the kinds of tiny embroidered accents that make your home look designer-crafted.
15. Frame a Memory with a Daisy Chain Border
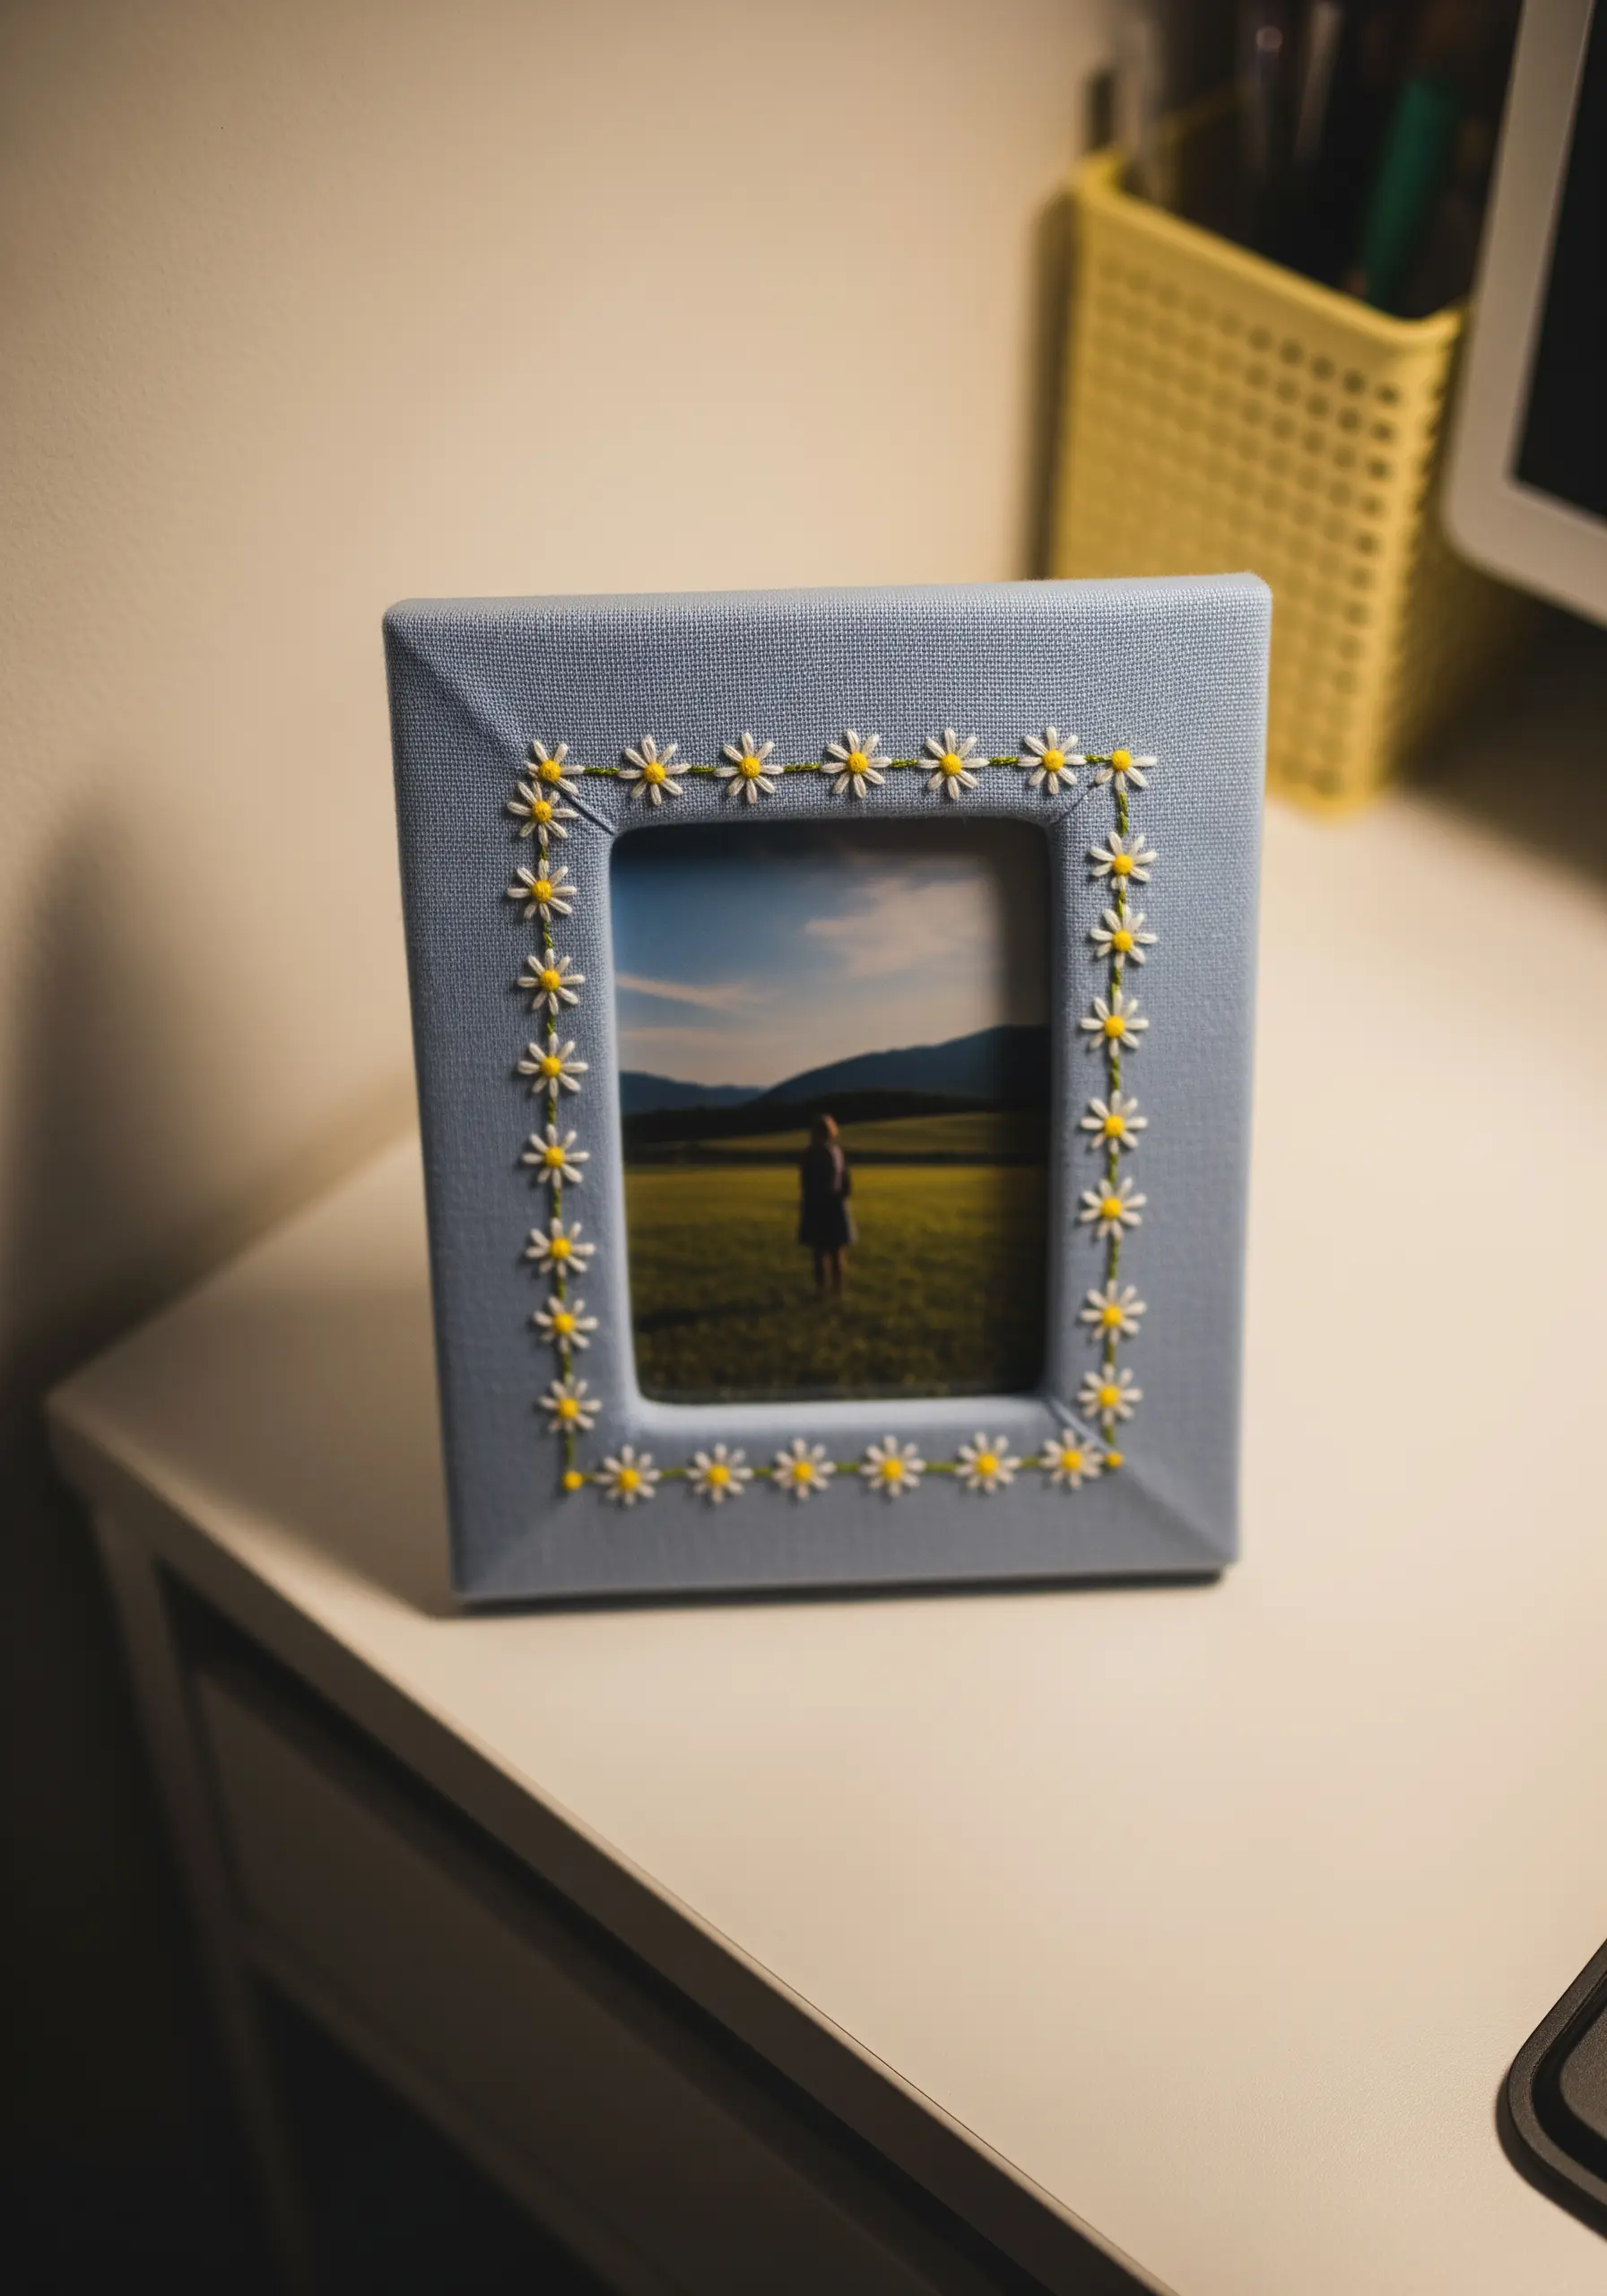
Turn a simple photo frame into a cherished keepsake by embellishing it with a border of embroidered daisies.
Use the detached chain stitch (or lazy daisy stitch) for the petals and a single French knot for the center of each flower.
Stitch them directly onto a fabric-wrapped frame for a soft, textural finish that draws the eye inward.
It’s a sweet, nostalgic touch that adds personal meaning to a favorite photo.
16. Create a Tone-on-Tone Geometric Pattern
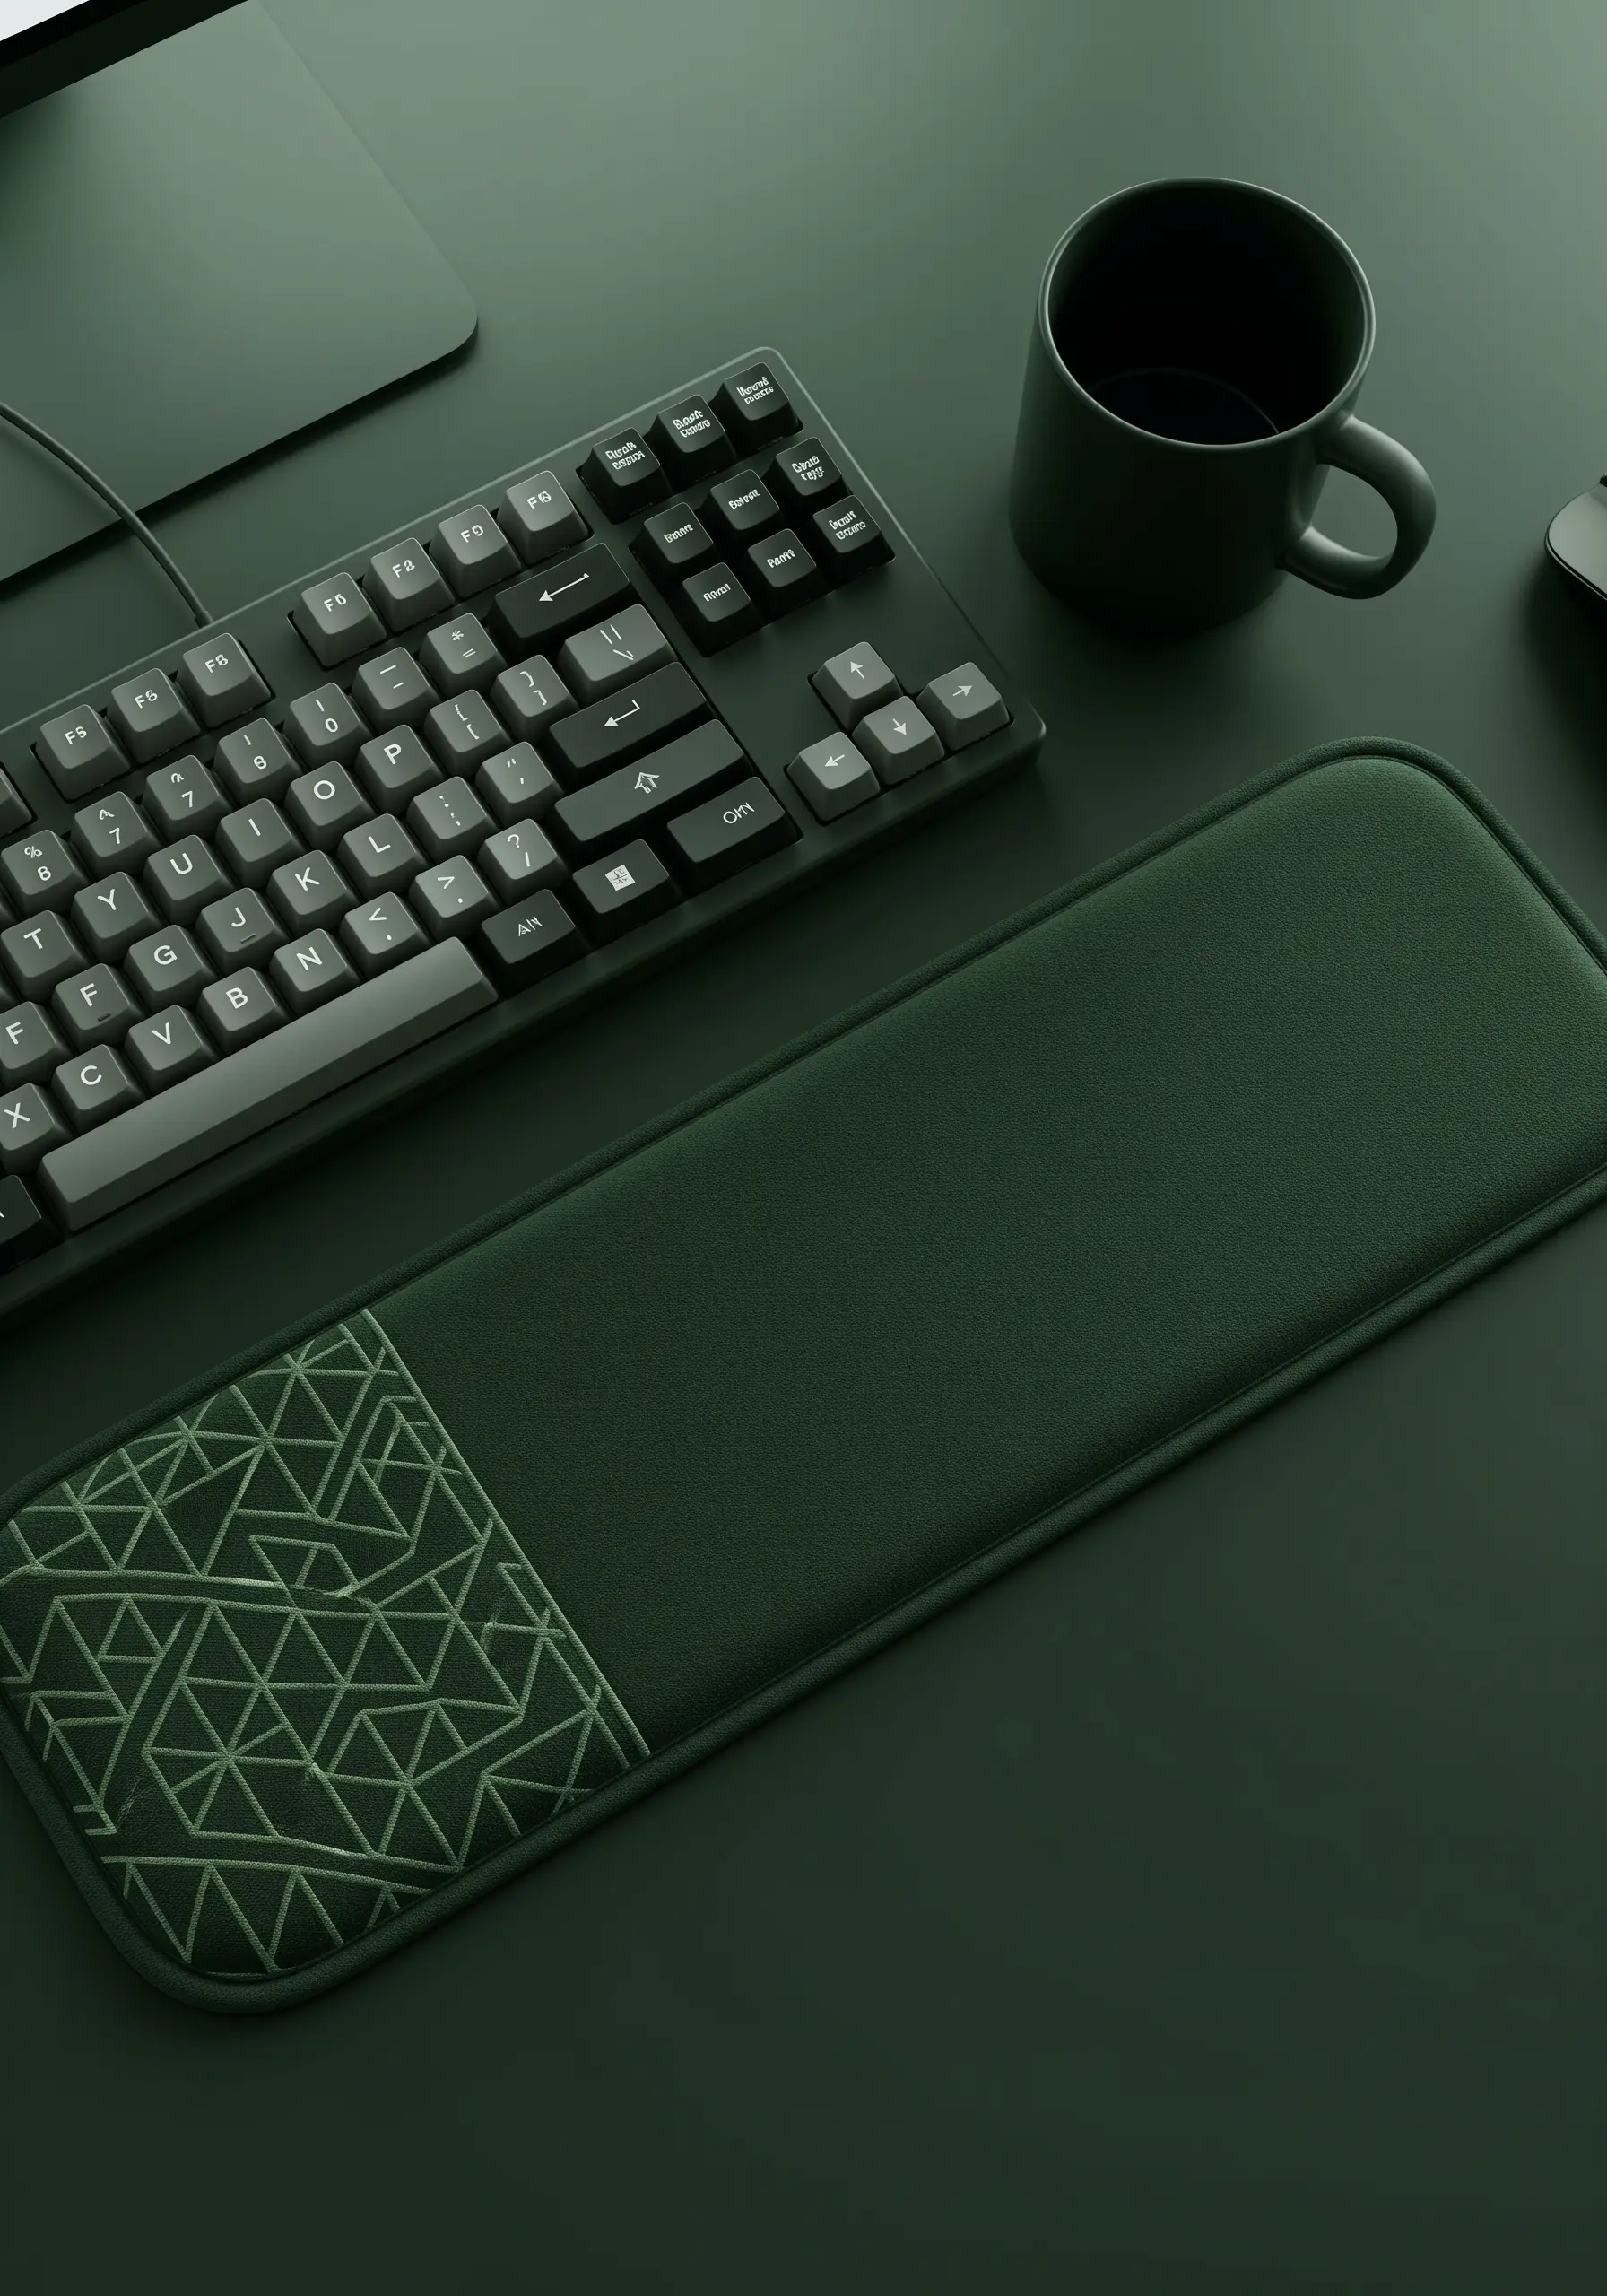
For a sophisticated, understated look, use a thread color that is only a shade or two different from your fabric.
Stitch a sharp, geometric pattern onto a wrist rest using a simple backstitch.
The texture of the stitches, rather than the color, becomes the primary design element, creating a subtle, tactile effect.
This monochrome approach adds a layer of quiet luxury to an ergonomic accessory.
17. Detail Miniature Worlds on a Bookmark

Even the smallest canvases, like a bookmark, can hold intricate details.
Use single-strand floss to stitch tiny book spines, using just a few straight stitches for each book and a single French knot for decoration.
Vary the colors and heights to create a charming, miniature library.
This project proves that even easy small embroidery patterns can be incredibly impactful.
18. Pair Metallic and Matte Threads for Contrast
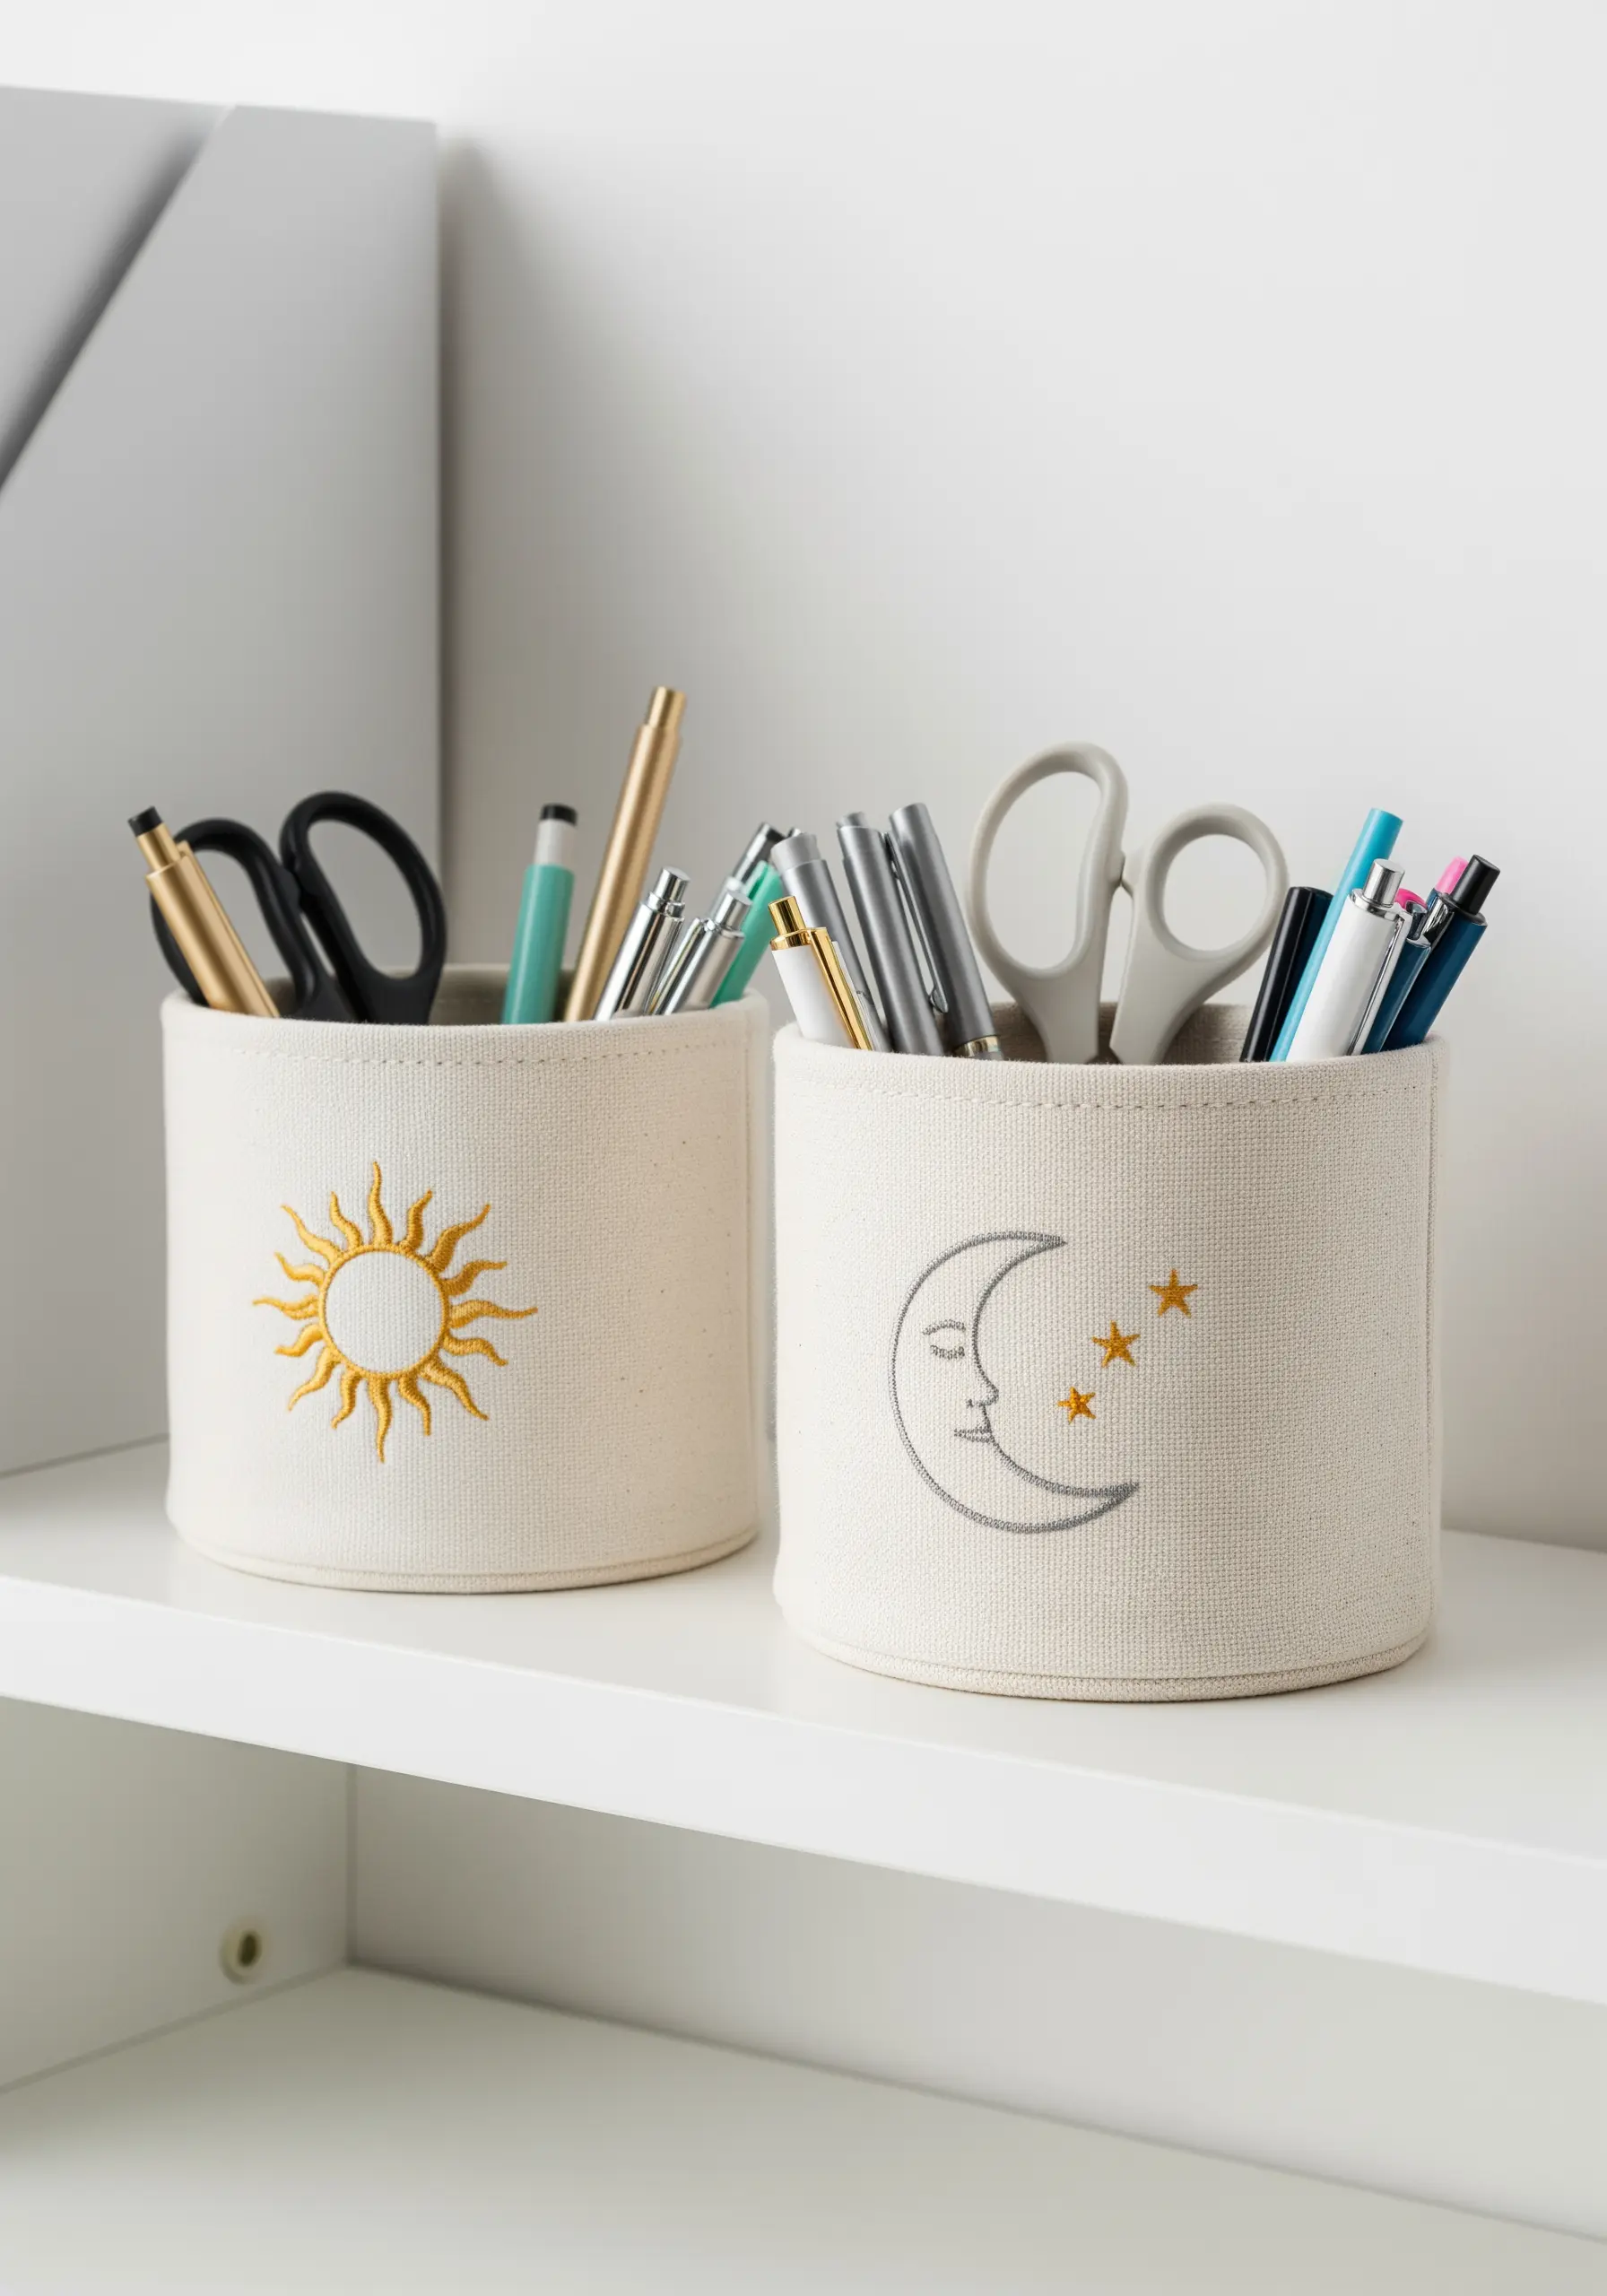
Create a celestial design that feels both soft and radiant by combining two different thread finishes.
Use a matte gray or silver floss for the outline of the moon, stitched with a smooth satin stitch or split stitch.
Then, use a fine, gold metallic thread for the delicate stars and rays of the sun.
This contrast in texture and sheen makes each element stand out, adding a layer of visual interest to your pen holders.
19. Stitch on Leather for a Rustic Finish
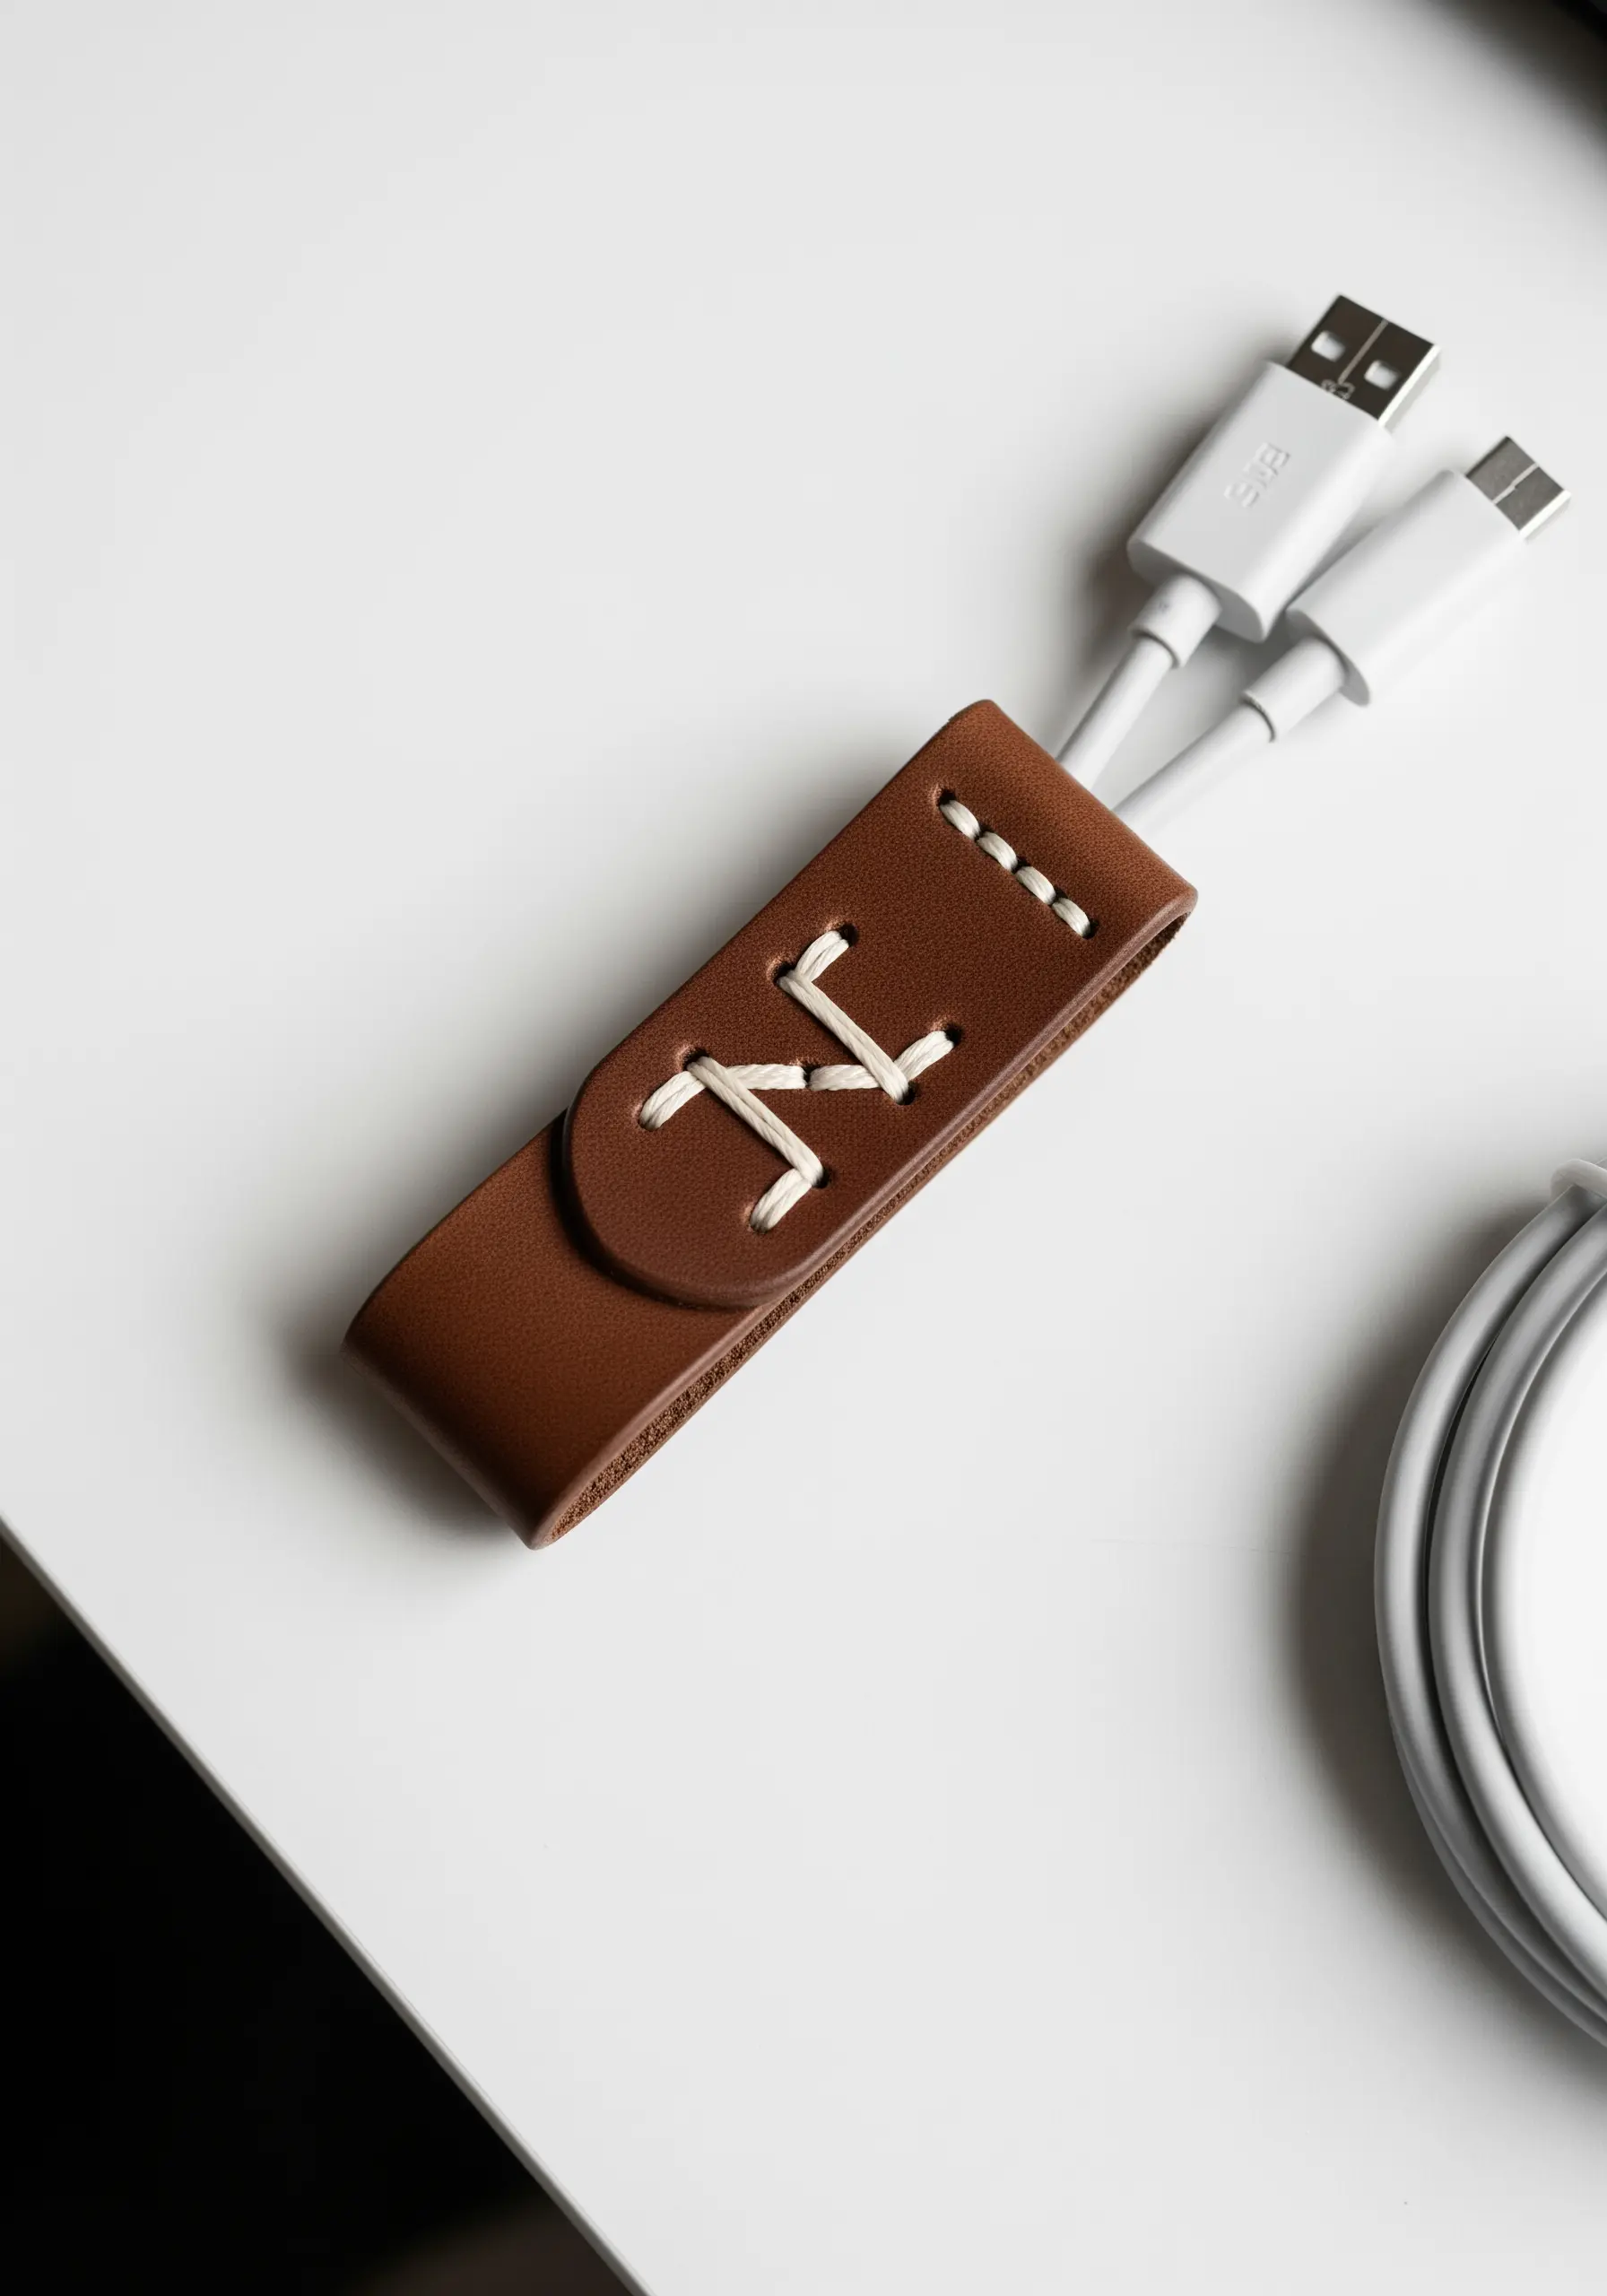
Personalize a leather cable tie with a bold, hand-stitched monogram.
Use a sharp leather needle and pre-punch your stitching holes to ensure clean entry and exit points without damaging the material.
Opt for a thick, contrasting thread—like a pearl cotton or all six strands of embroidery floss—and a simple stitch like a cross stitch or running stitch.
The result is a durable, tactile, and highly personal tech accessory.
20. Embellish a Binder Spine with a Climbing Vine
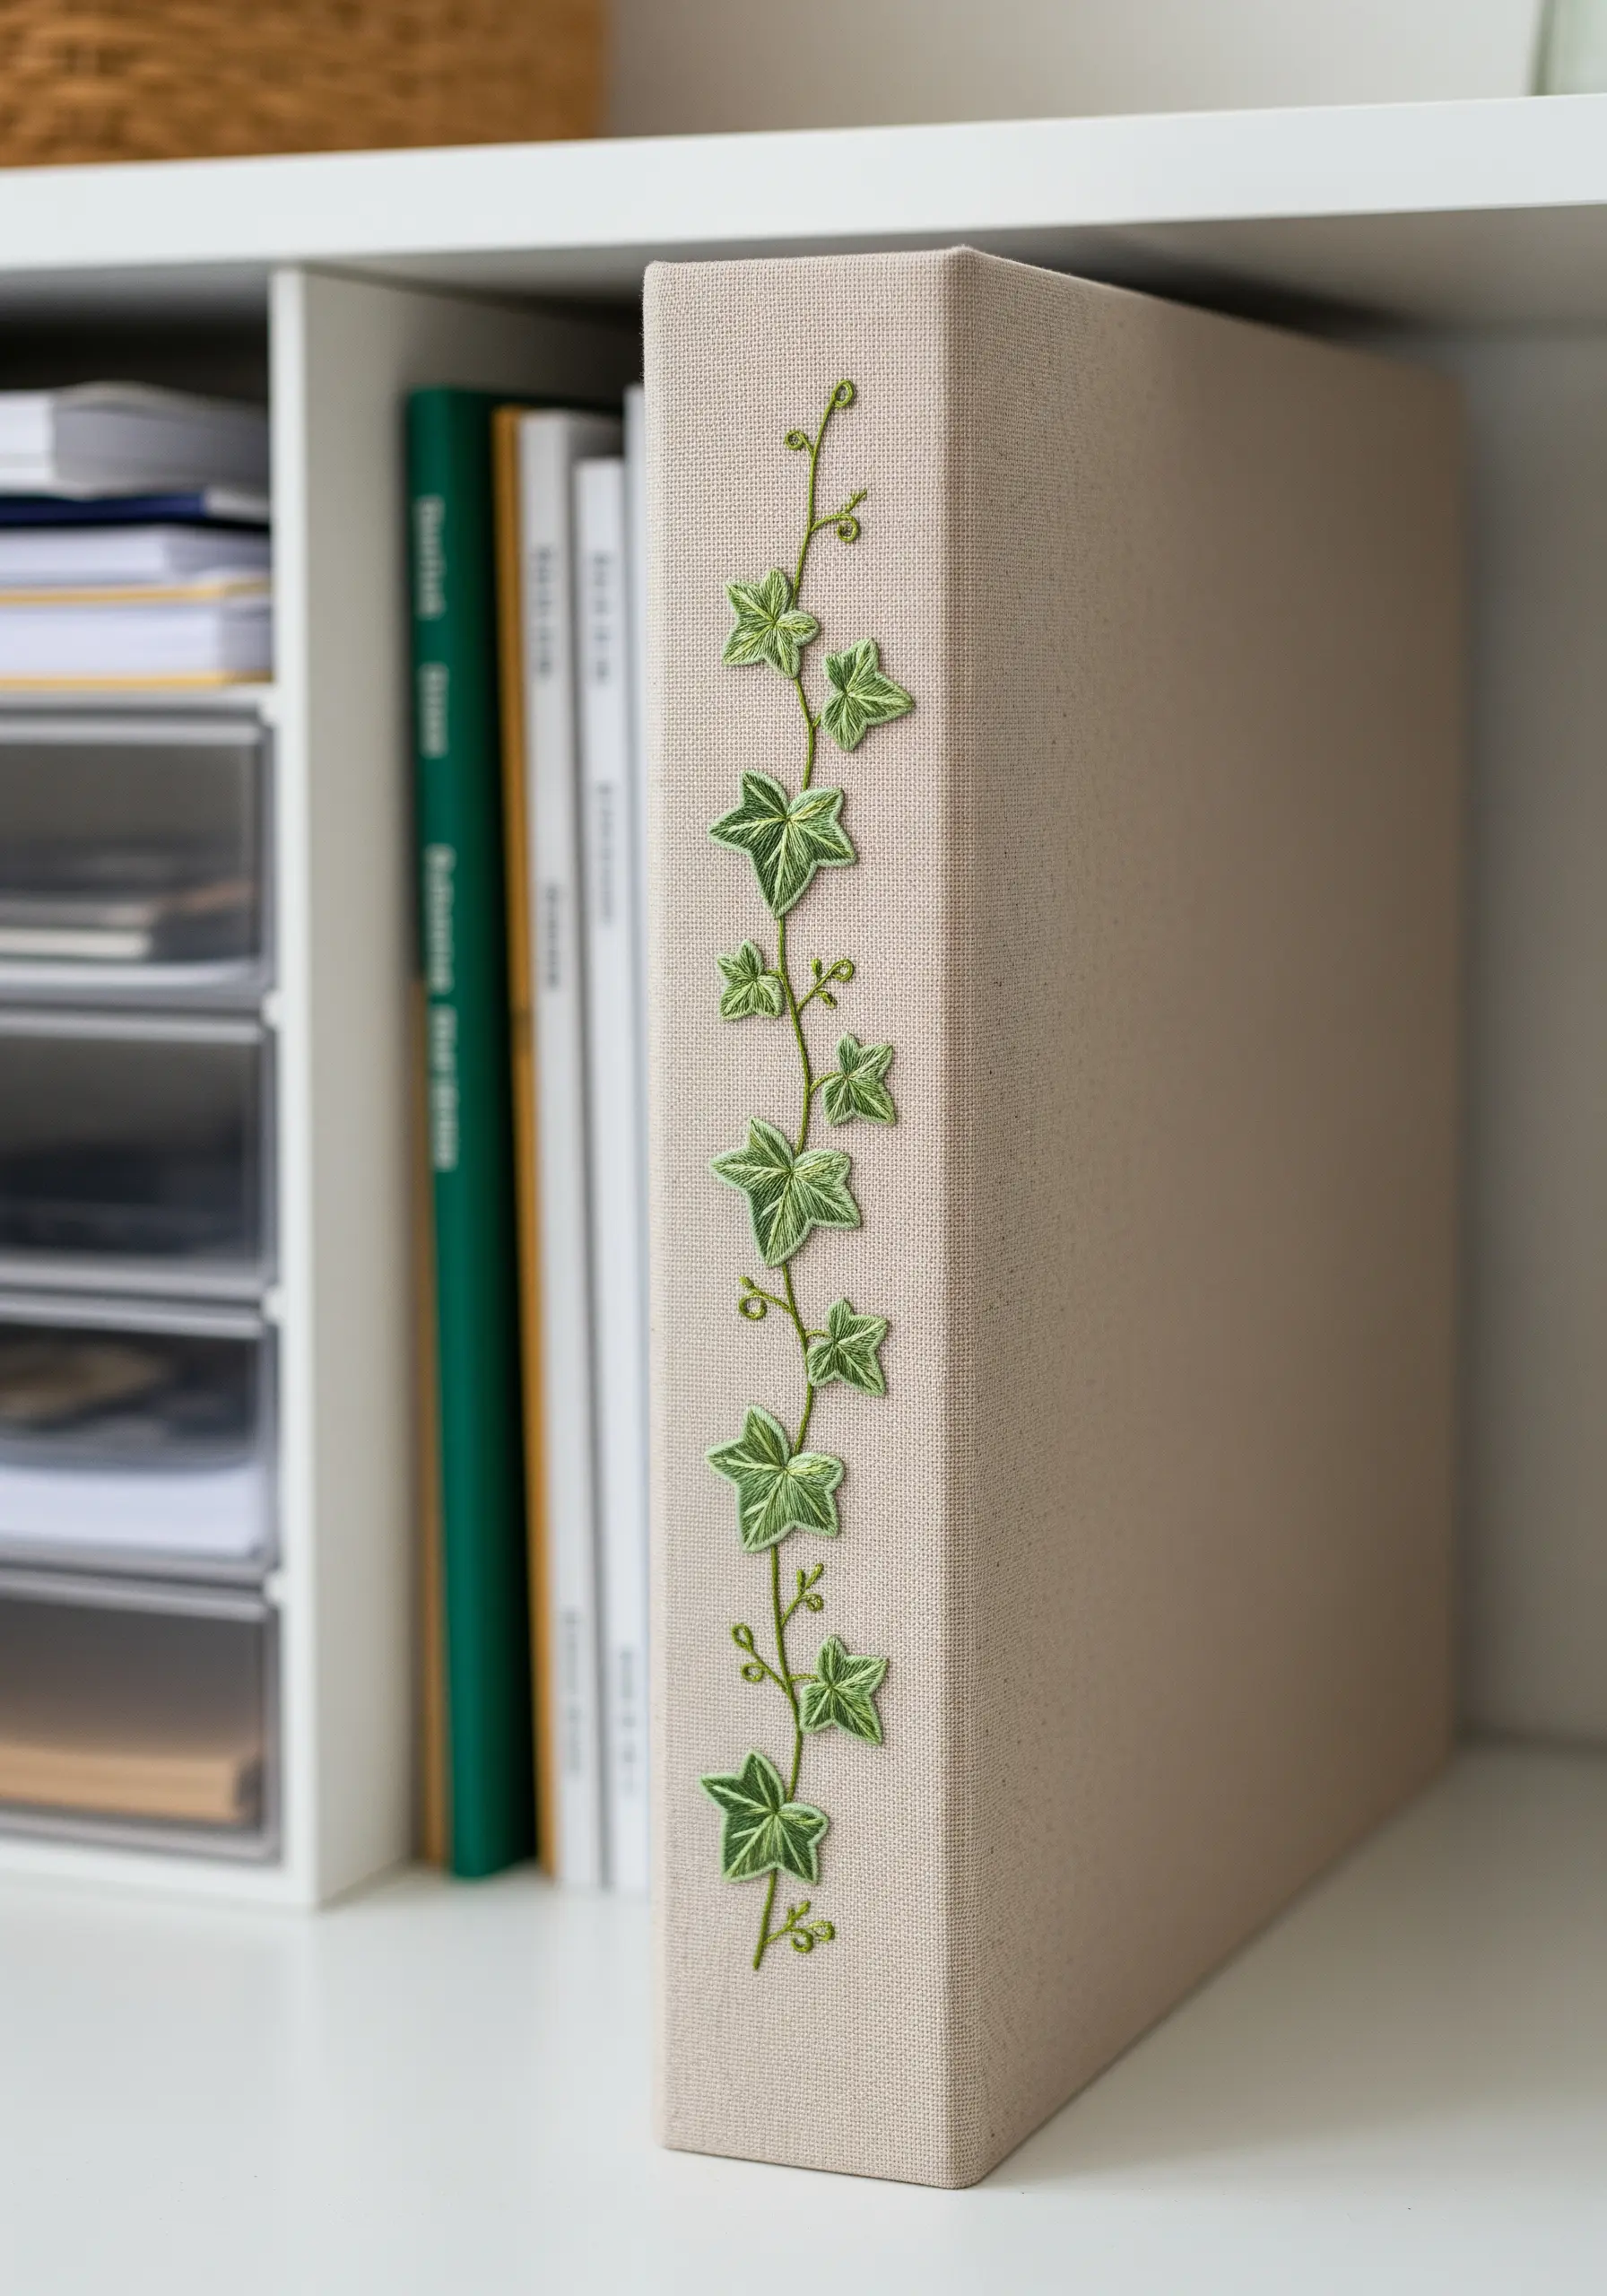
The narrow spine of a binder is the perfect canvas for a vertical design like a climbing ivy vine.
Use a delicate, wandering stem stitch for the main vine.
For the leaves, create dimension by using a fishbone stitch, which gives each leaf a central vein and a slightly padded, realistic appearance.
Using two or three shades of green will make the foliage look even more natural and lush.
21. Add Functional Art with a Grid Pincushion

Make a simple pincushion both beautiful and functional by embroidering it with a simple grid.
Use a contrasting color of pearl cotton or sashiko thread, which is thicker and more durable, for a rustic look.
A simple running stitch or backstitch is all you need to create the grid lines.
The design is not just decorative—it helps you organize your pins by type or color, adding a layer of intention to your craft space.
22. Create Translucent Wings with Organza
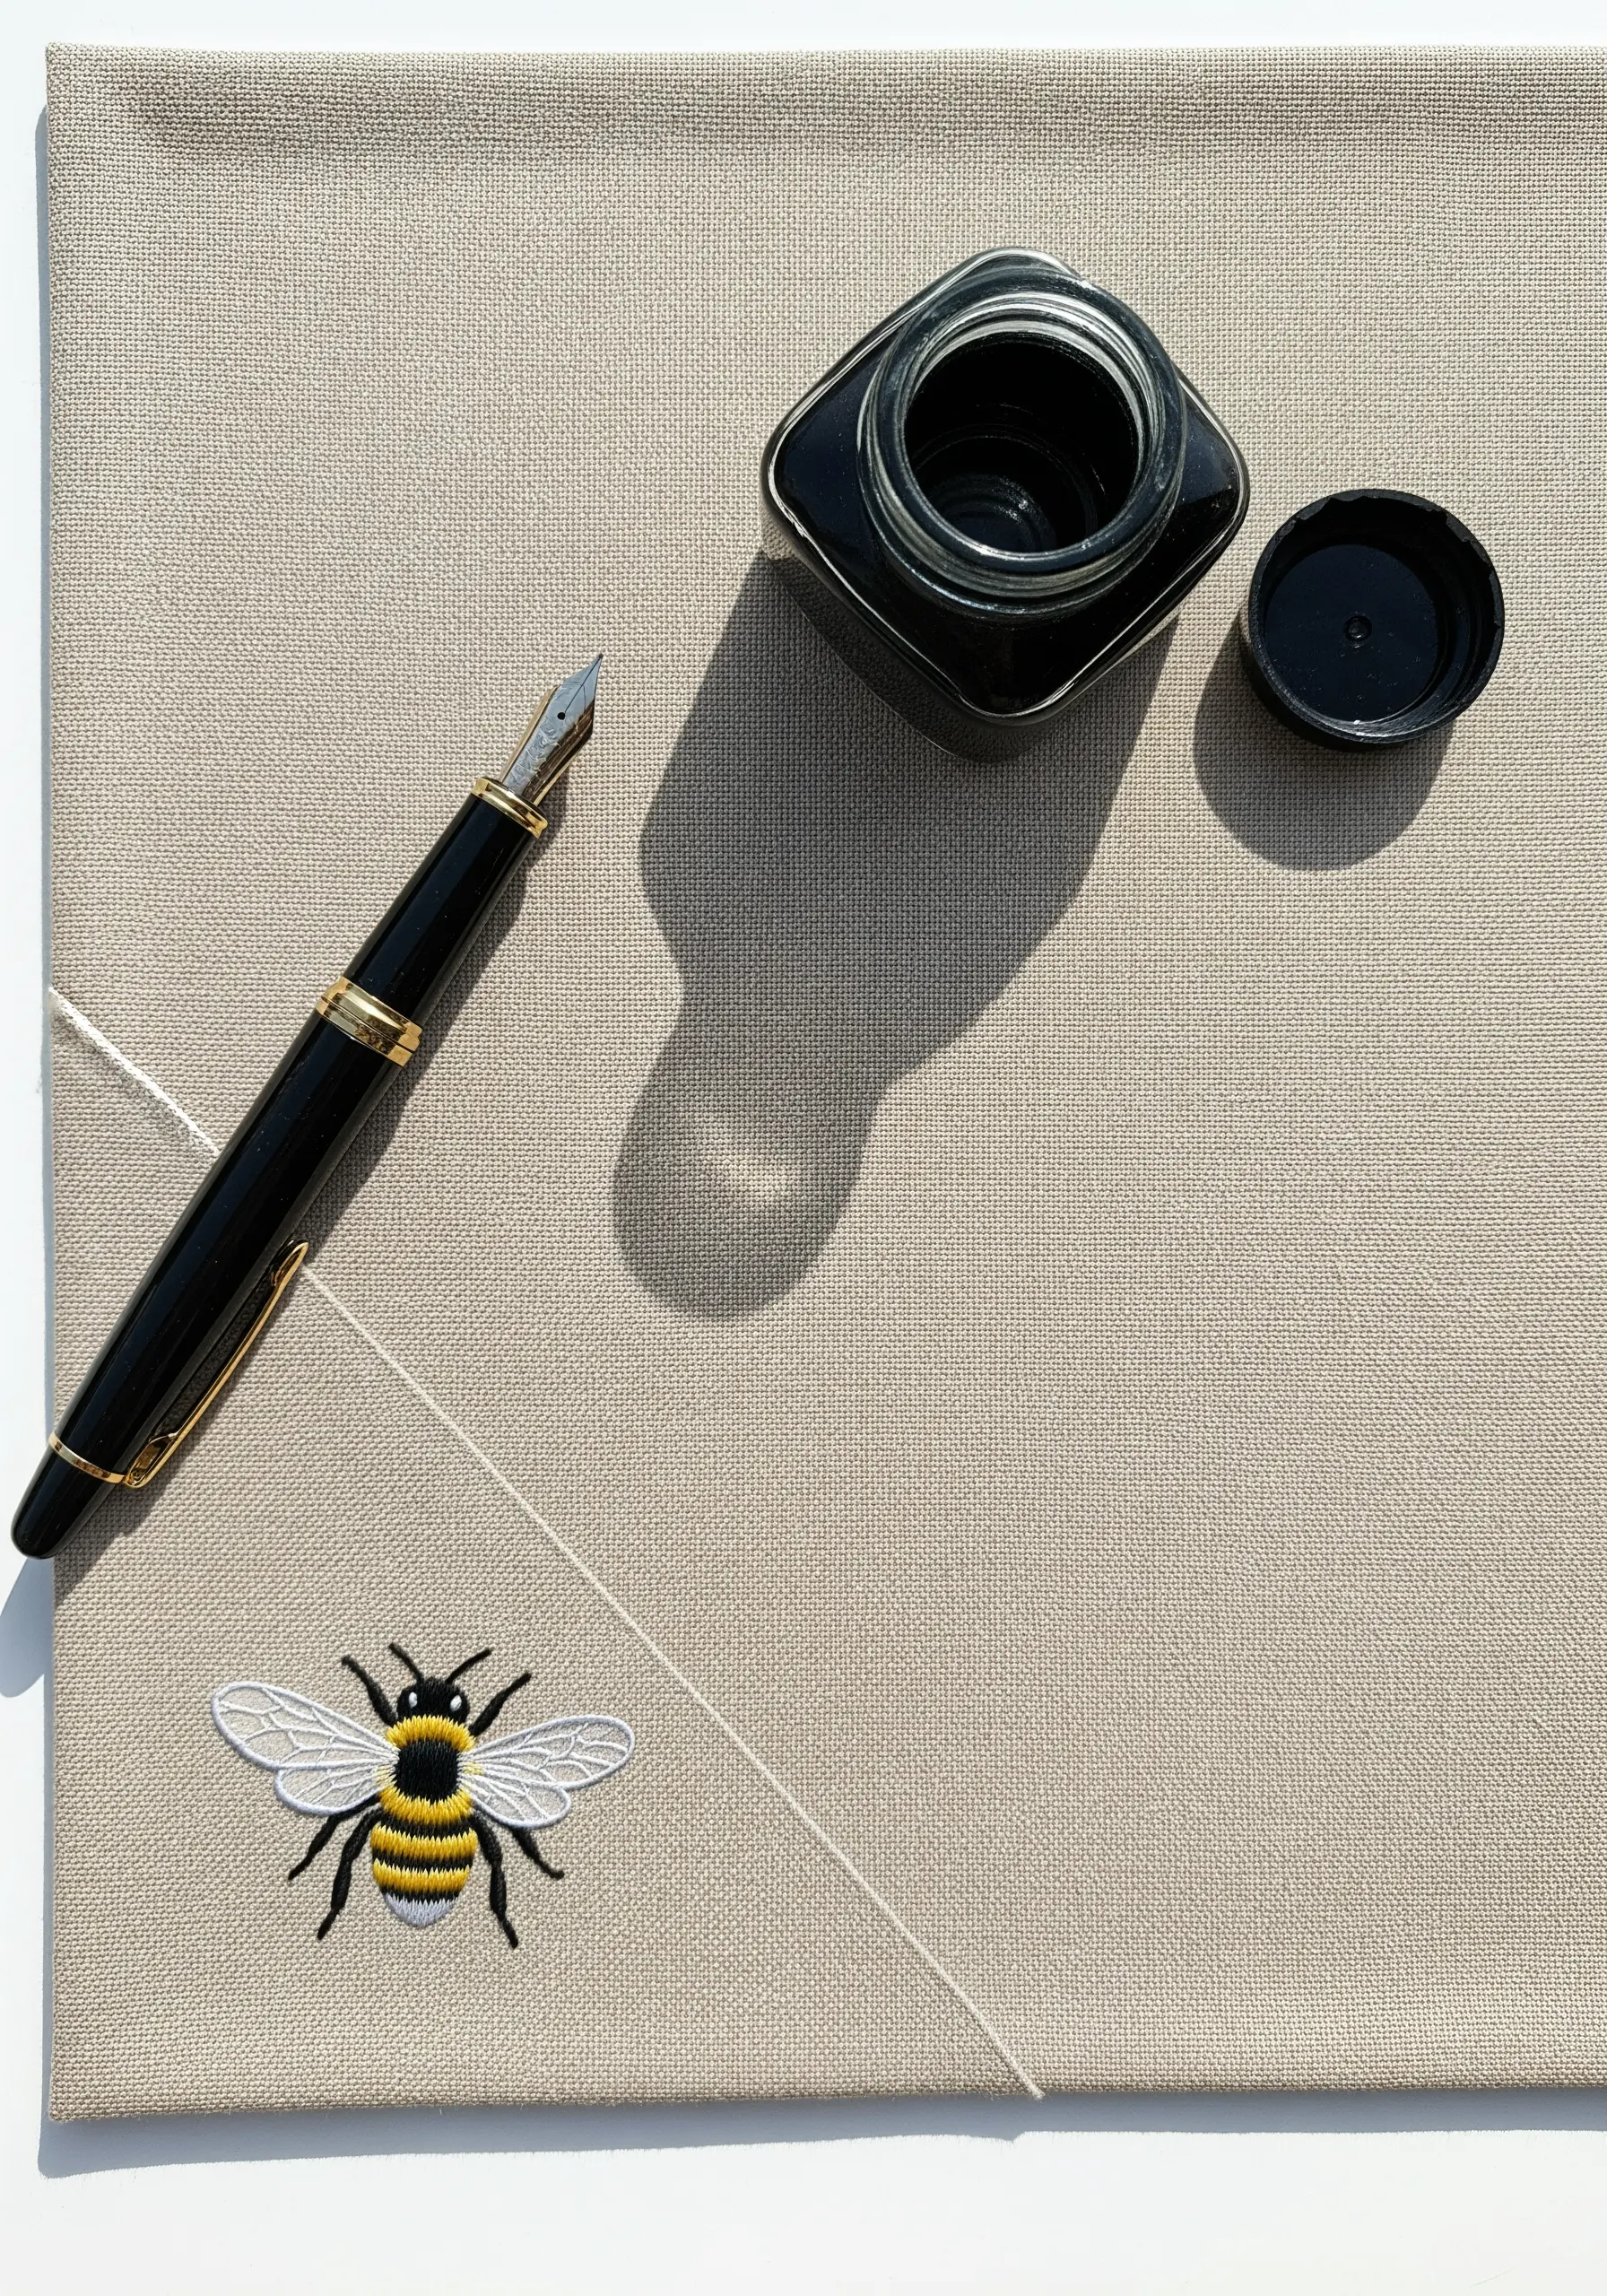
To give an embroidered insect like a bee realistic, delicate wings, use an appliqué technique with sheer fabric.
Embroider the body of the bee directly onto your base fabric using satin stitch for the stripes.
Then, stitch the wing outlines onto a small piece of organza, cut them out carefully, and attach them to the body with a few tiny, discreet stitches.
This layering technique creates a stunning 3D effect that captures the fragility of insect wings.
23. Combine Outline and Fill for Visual Balance
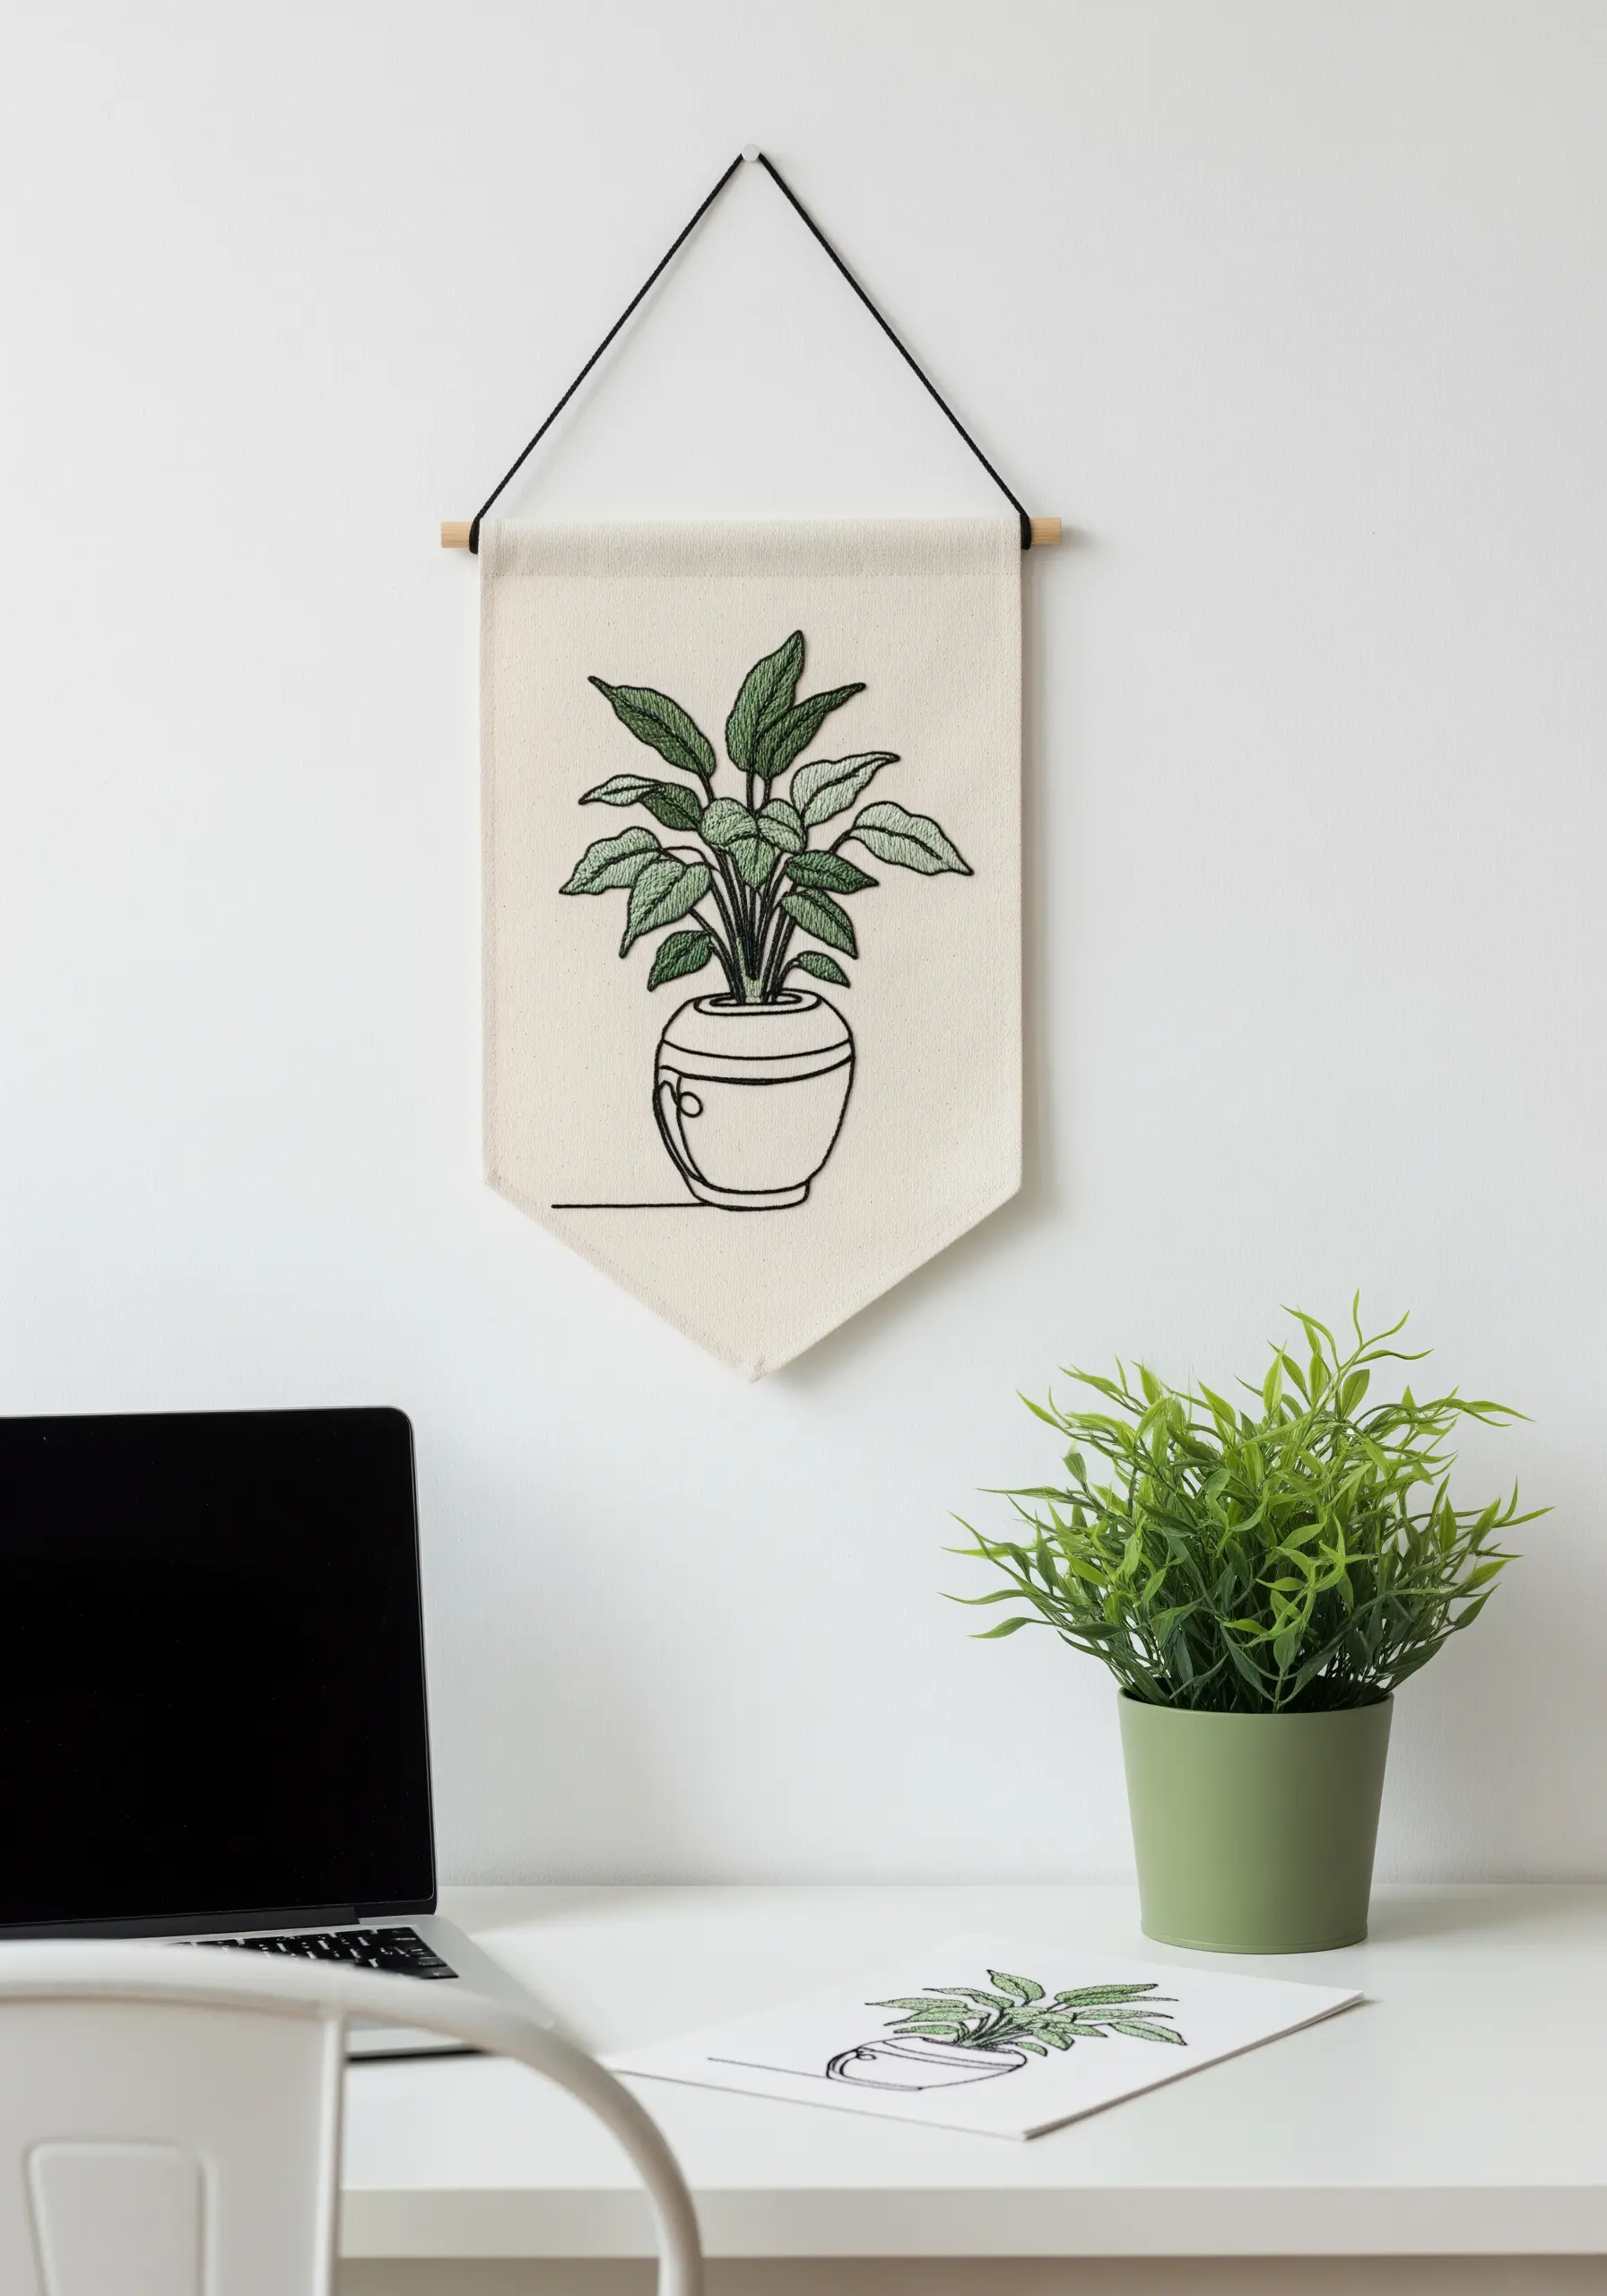
Create a balanced and modern botanical piece by combining two distinct stitching styles.
Use a clean, single-line backstitch or stem stitch for the pot and the main stems of the plant.
Then, fill in the leaves with a fishbone or satin stitch to add color, texture, and weight.
This contrast between the empty space of the outline and the solidity of the fill creates a dynamic composition that feels both light and grounded.


