
A tiny hoop can hold more than just thread and fabric—it can hold a point of view. The small crafts you add to a tote bag, a jacket collar, or a simple pouch are not just decoration; they are quiet statements of your artistry and attention to detail.
Forget complex patterns and dozens of colors. The real magic is in the texture of a single stitch, the thoughtful direction of a satin fill, or the high-contrast pop of a single thread on dark fabric. These are the details that elevate a simple object into something personal and cherished.
Here, you’ll find ways to make your stitches speak with more intention. Let’s move beyond just following a pattern and start making choices that give your work a polished, modern, and deeply personal touch.
1. Master the Directional Satin Stitch
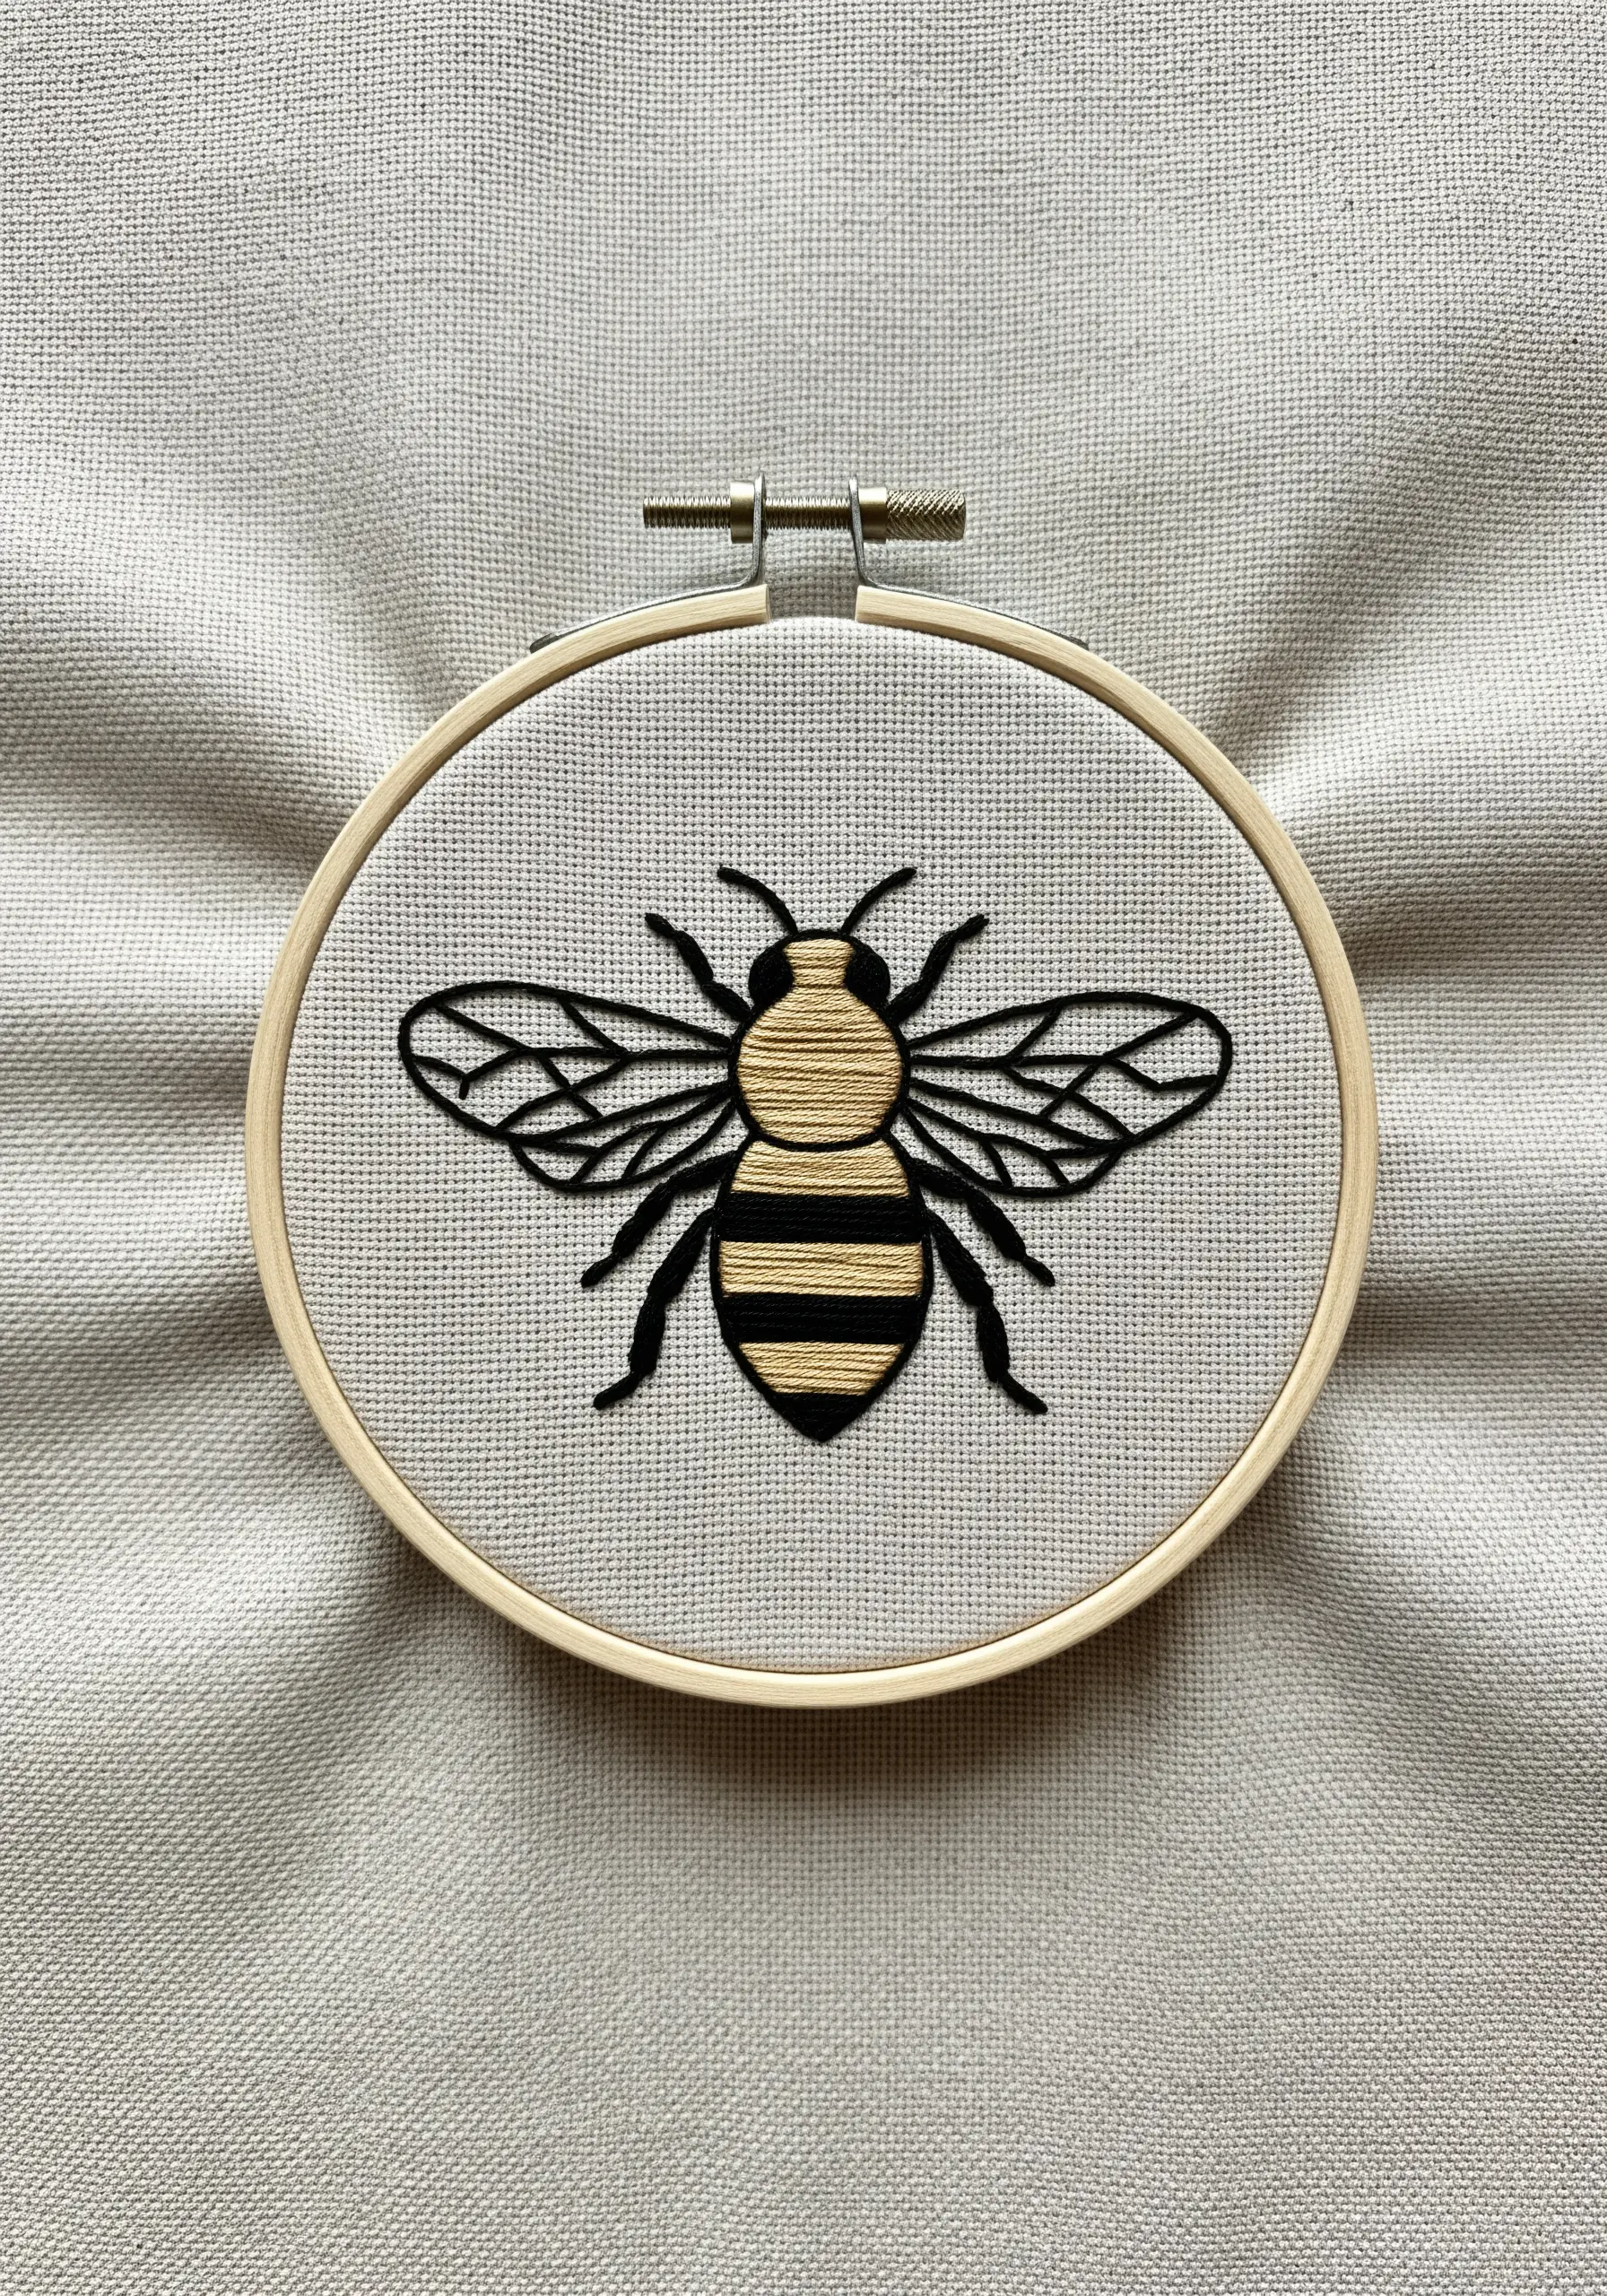
To give a motif like this bee a smooth, light-catching finish, focus entirely on the direction of your satin stitches.
For the body, keep your stitches perfectly horizontal to create defined stripes, ensuring each stitch lies flat against the last with no gaps.
For the wings, switch the angle to follow the natural lines of the wing veins. This subtle shift in direction creates an illusion of transparency and texture, making the design feel more dynamic and realistic.
Use a single strand of floss for the delicate outlines and wing details to maintain a crisp, graphic quality that contrasts beautifully with the filled sections.
2. Create Celestial Accents on Denim
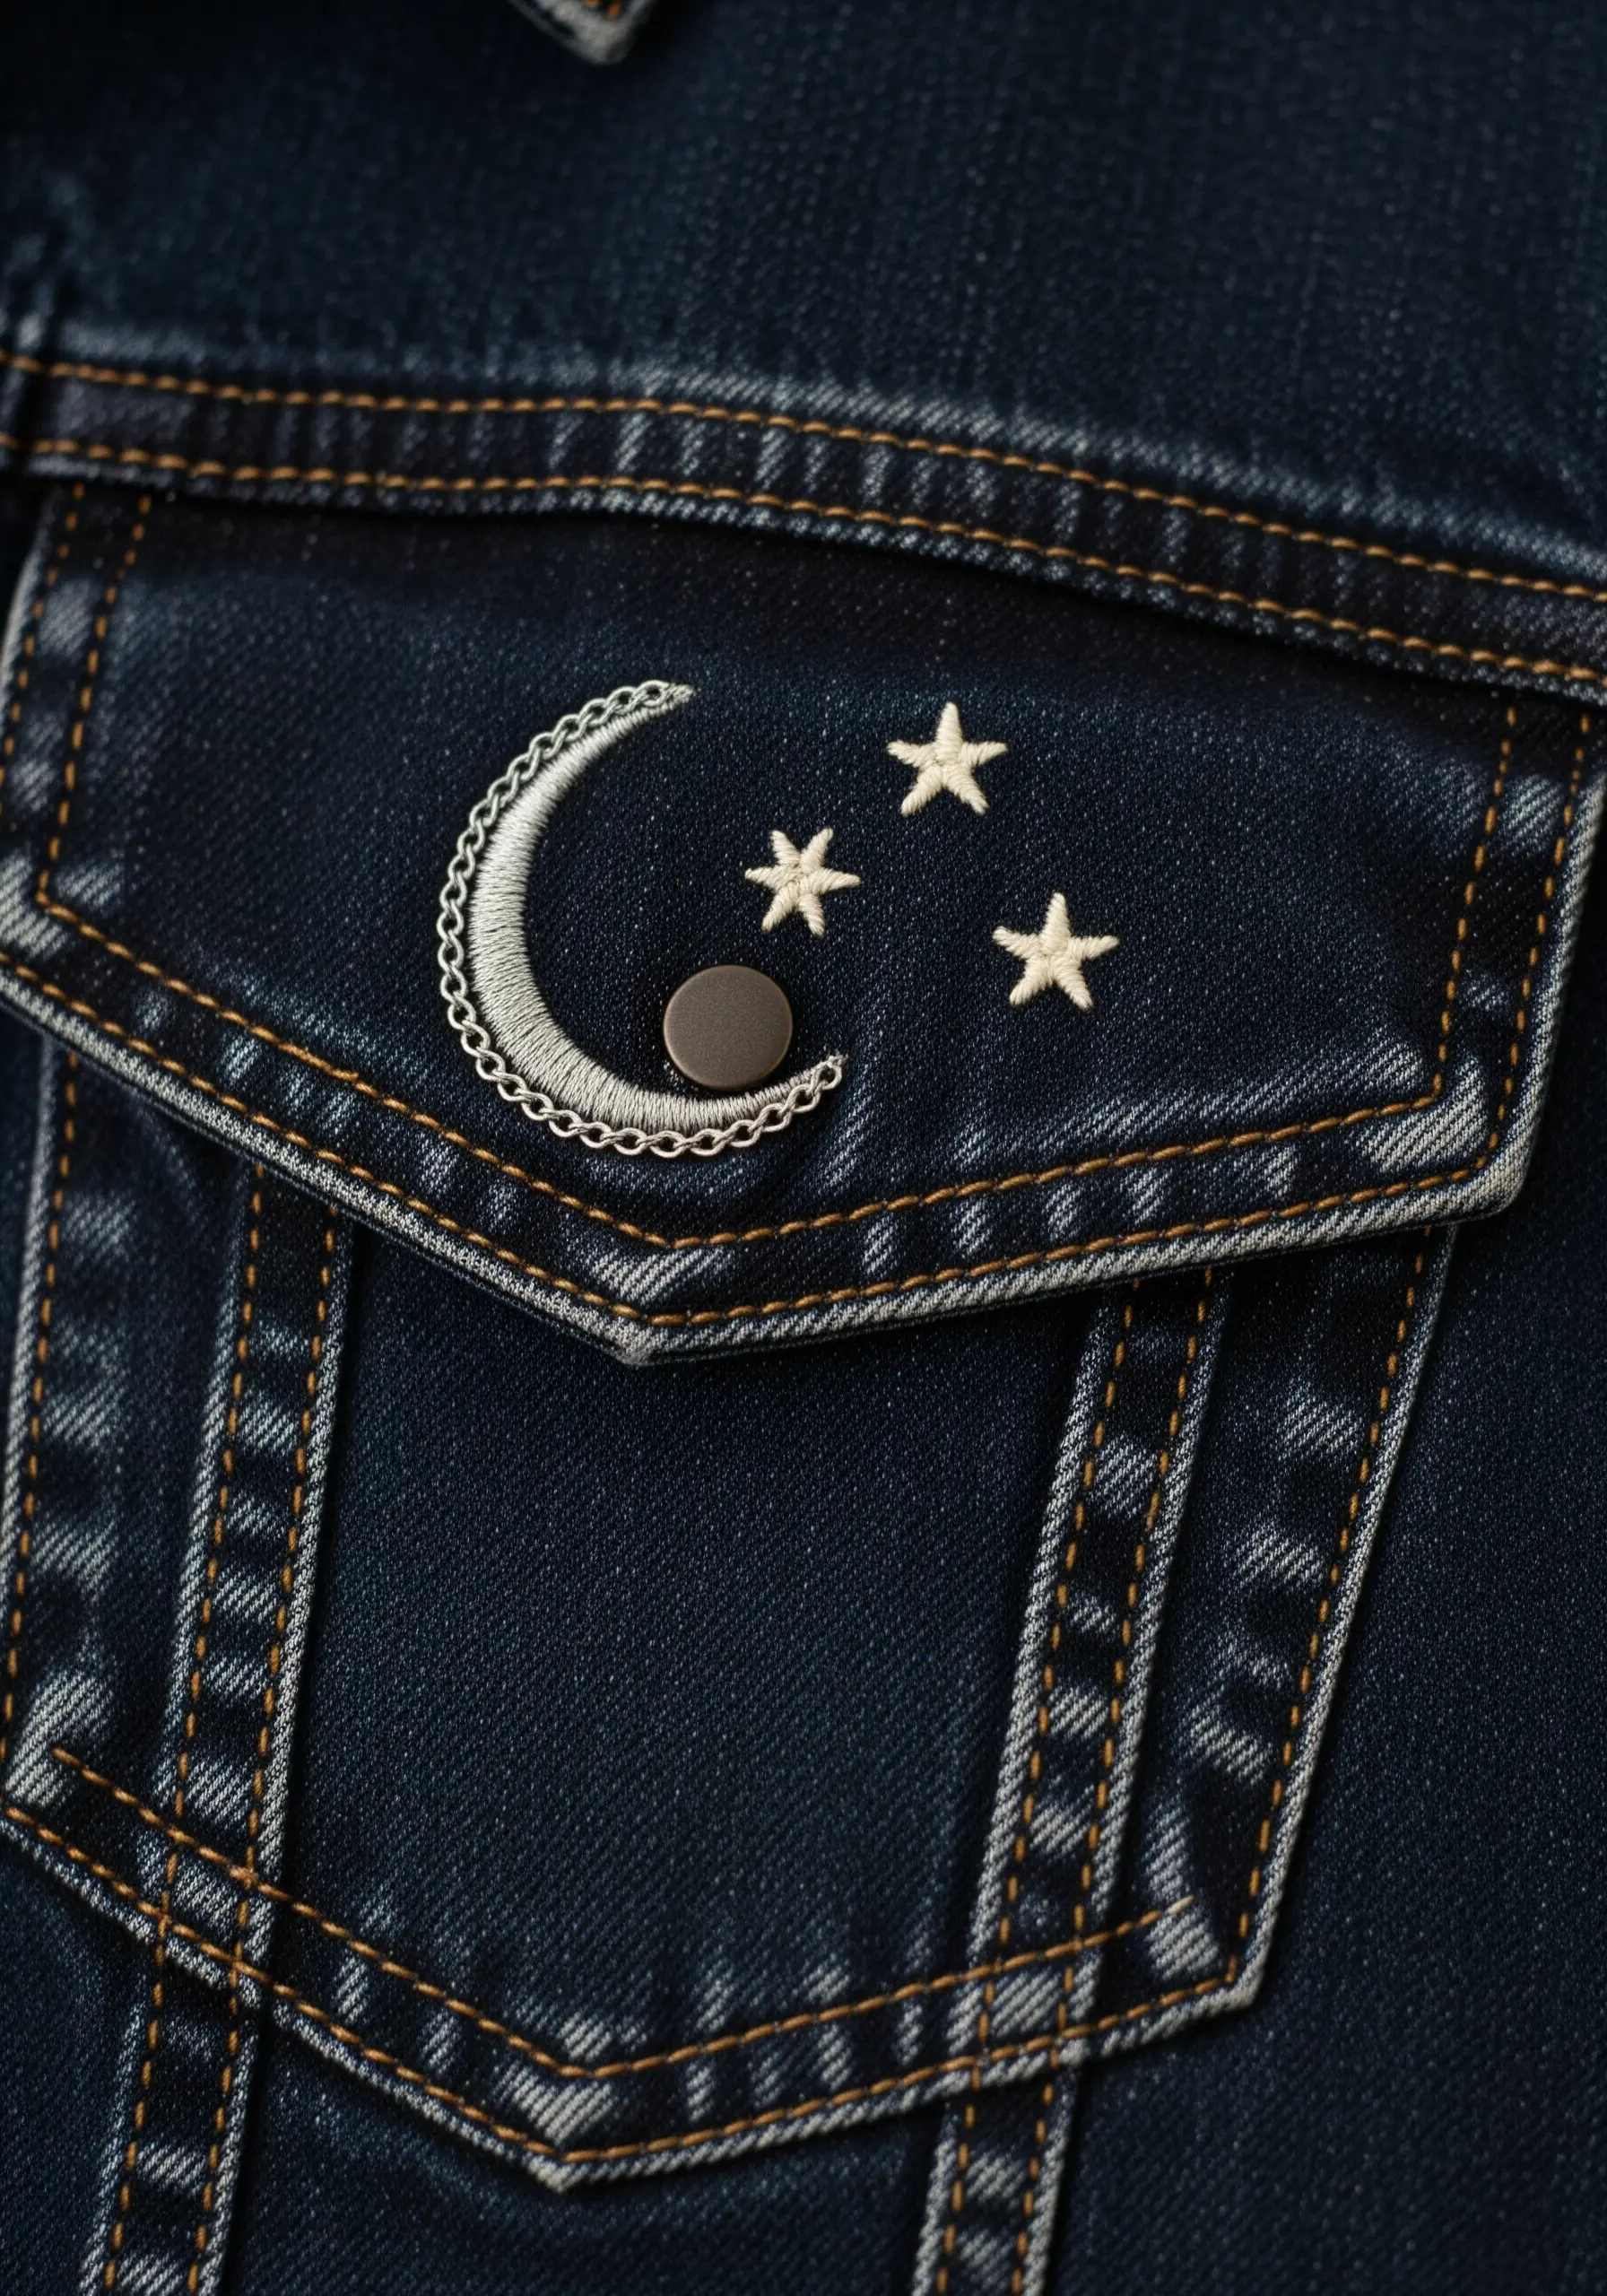
When embroidering on dense fabric like denim, a sharp needle and a stabilizer are your best tools for clean results.
For the crescent moon, use a padded satin stitch by first laying down a foundation of small running stitches within the shape. Stitching over this base gives your moon a raised, three-dimensional quality.
Add a delicate border with a Palestrina knot or a heavy chain stitch for a rope-like texture that frames the moon beautifully.
For the stars, use a bright, high-contrast thread like white or metallic silver. A simple straight stitch star will pop against the dark denim, creating one of these celestial micro embroidery ideas that feels both subtle and magical.
3. Craft a Botanical Patch with Textured Stitches
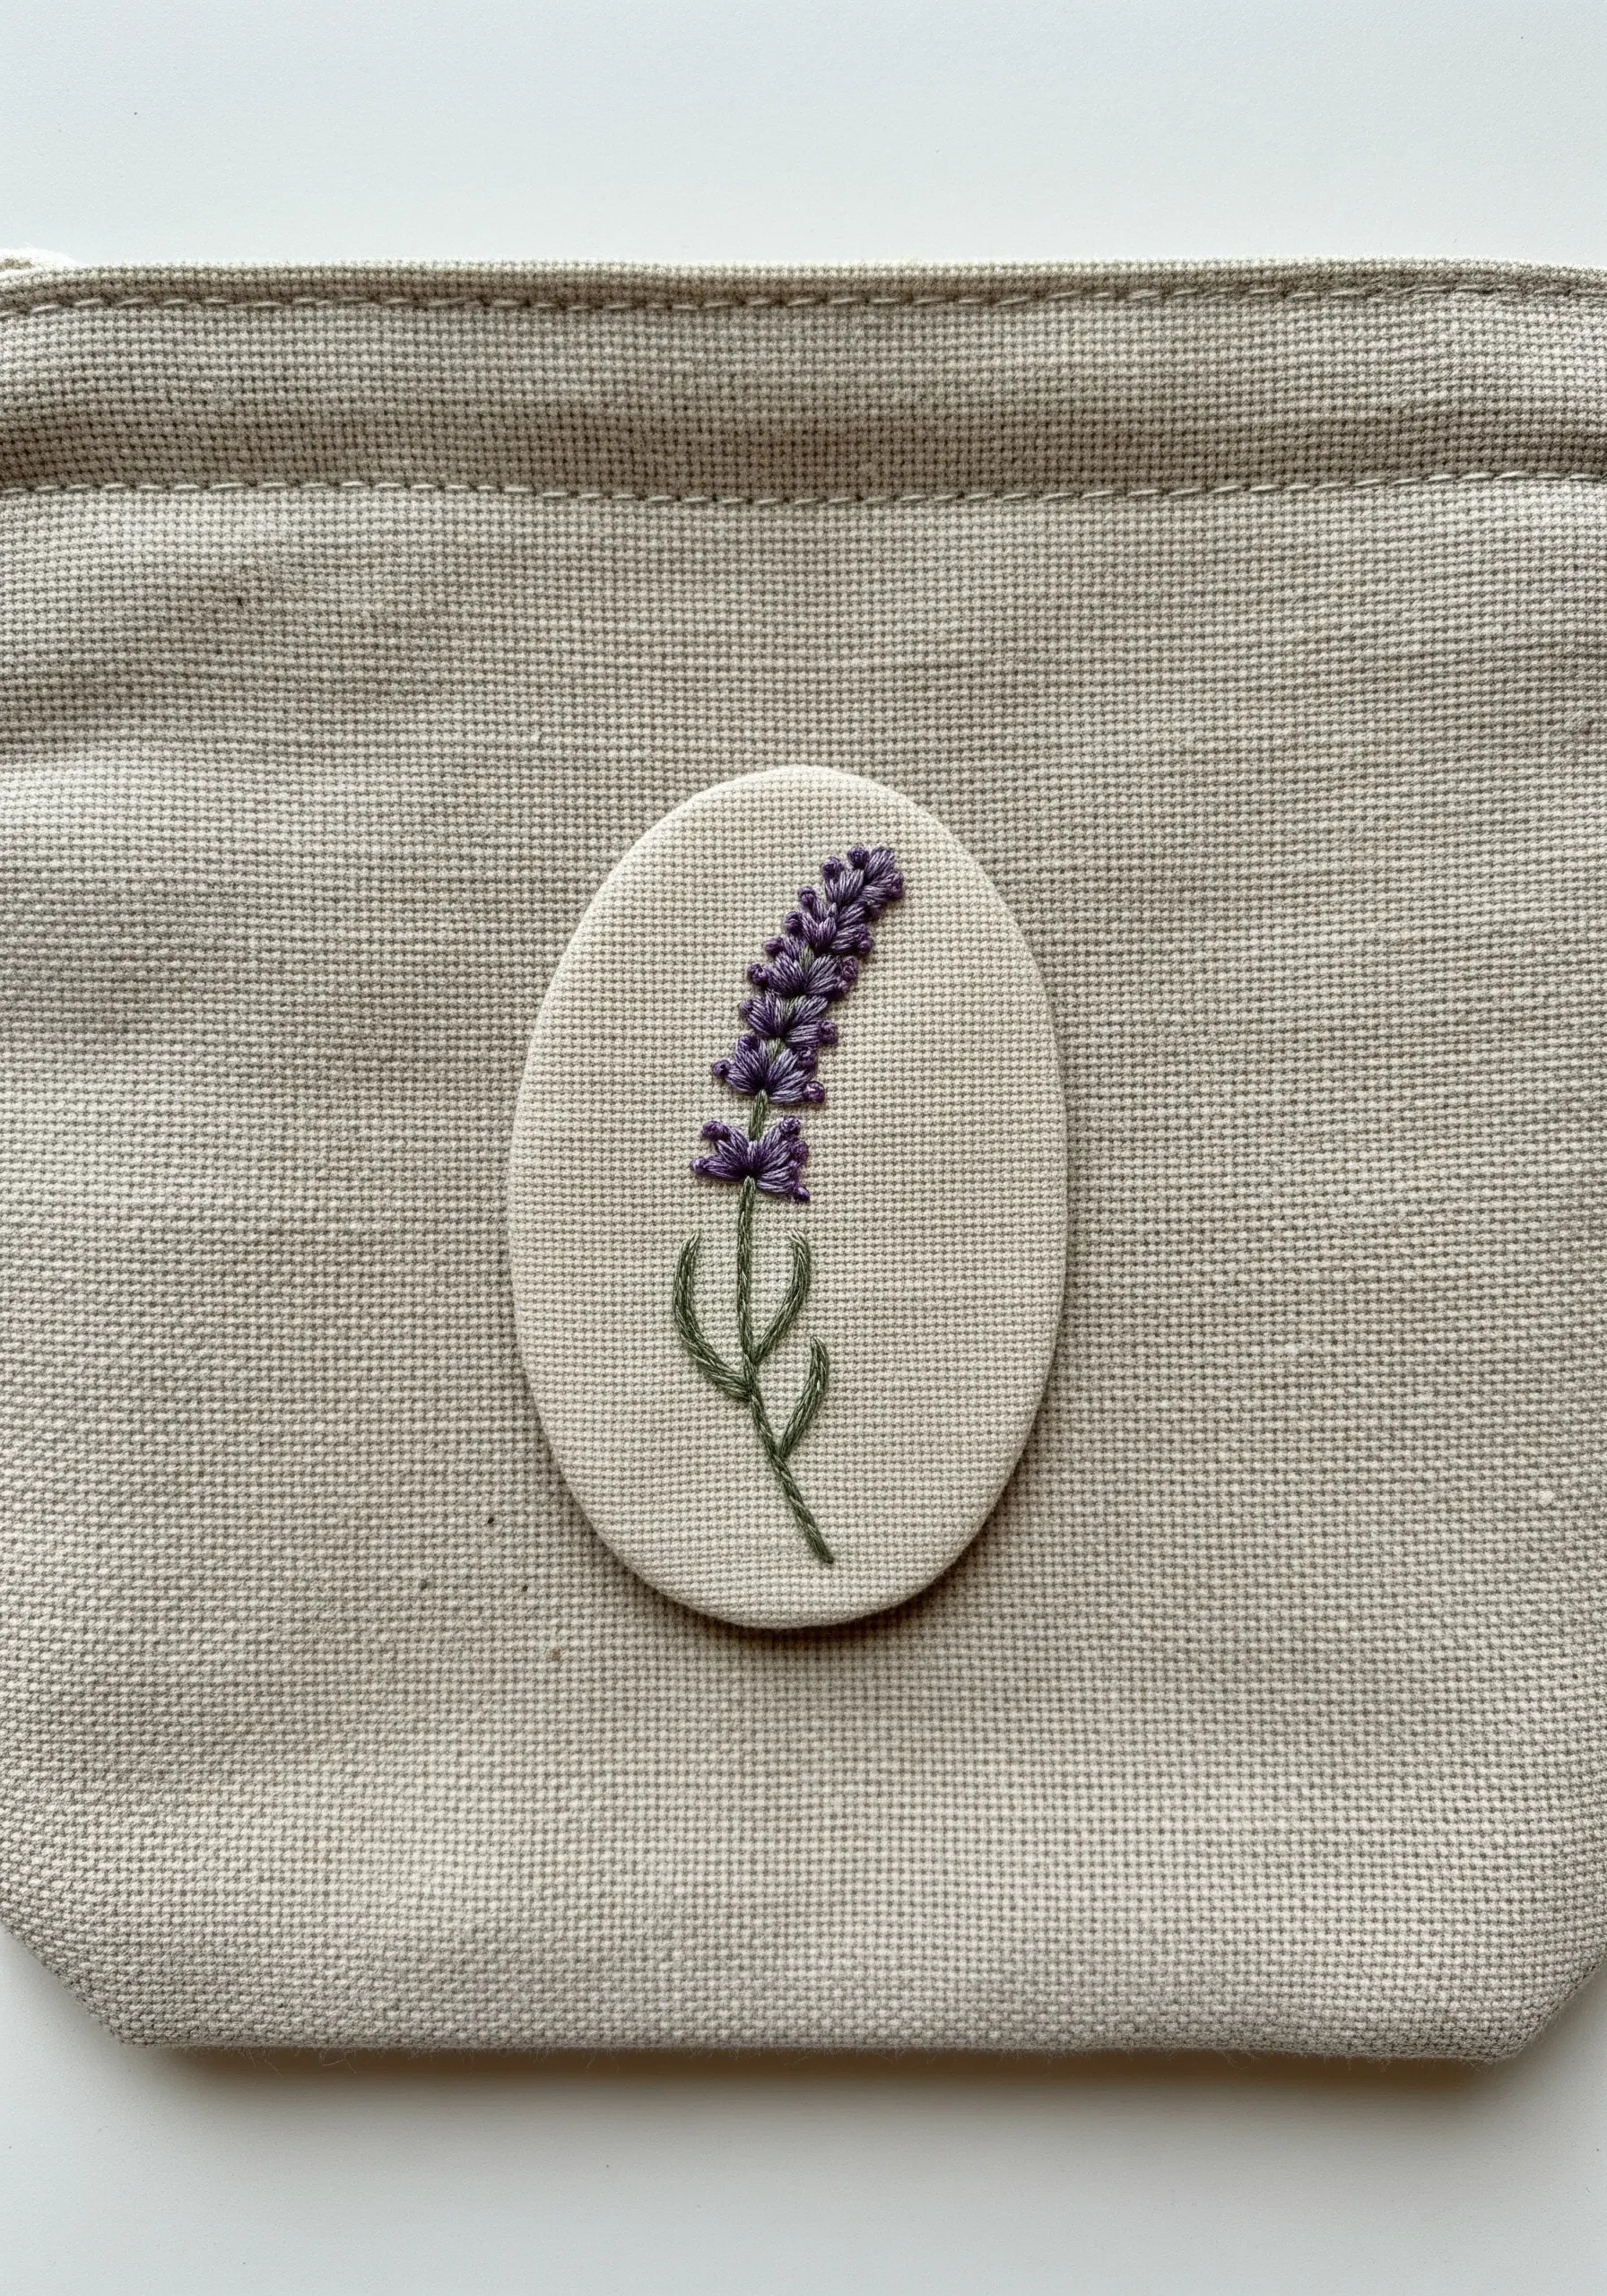
To create an embroidered patch, complete your design on a separate piece of fabric, then trim it, leaving a small border to fold under for a clean edge.
For this lavender sprig, use French knots for the tiny buds, varying the number of wraps around the needle (once or twice) to create clusters of different sizes.
Use a simple stem stitch for the stalk, which gives you a smooth, rope-like line that is perfect for gentle curves.
This method allows you to precisely place your delicate lavender stitch ideas onto bags, pouches, or jackets without having to work directly on a bulky item.
4. Paint a Landscape with Thread
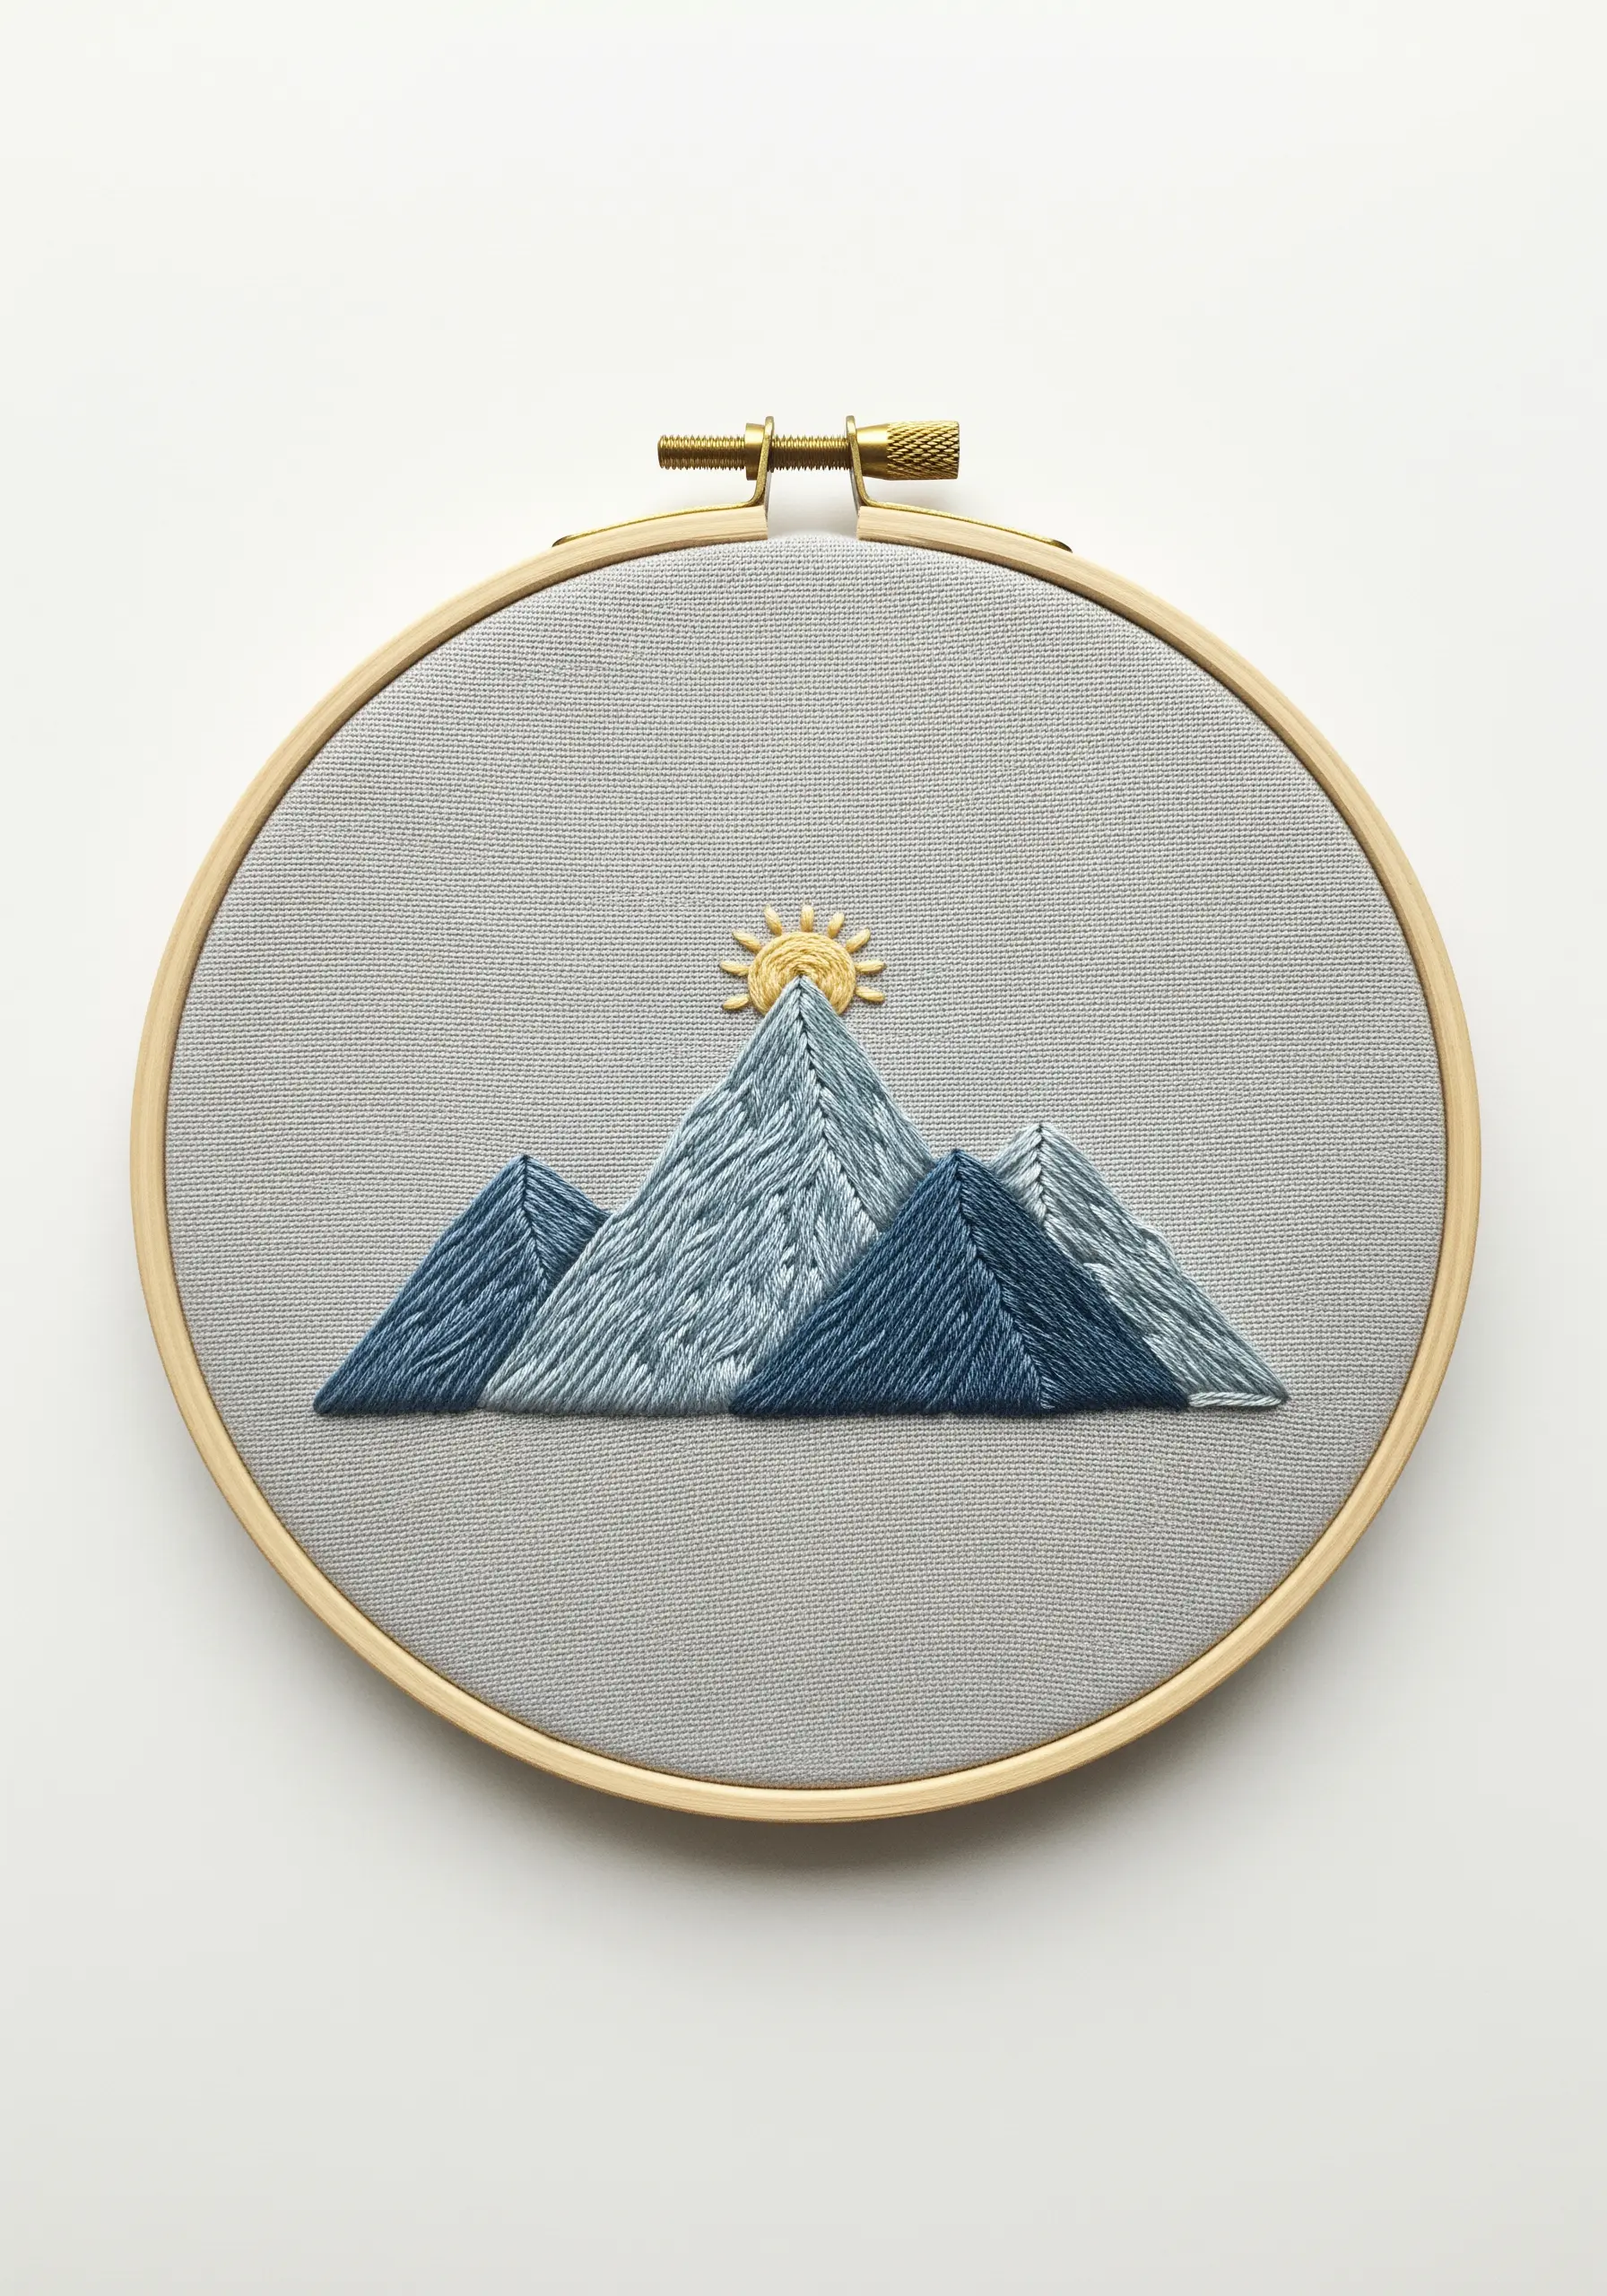
Capture the texture of a mountain range by using long and short stitch instead of a flat satin stitch.
Vary the length and angle of your stitches to mimic the natural, rugged planes of a rock face. Allow the stitches to overlap slightly where colors meet to create a soft, blended transition.
Use a lighter shade for the peak where the sun hits and darker tones for the shadowed areas to build realistic depth.
This technique, often called thread painting, transforms a simple outline into a textured, atmospheric piece of art.
5. Define Form with Angled Fill Stitches
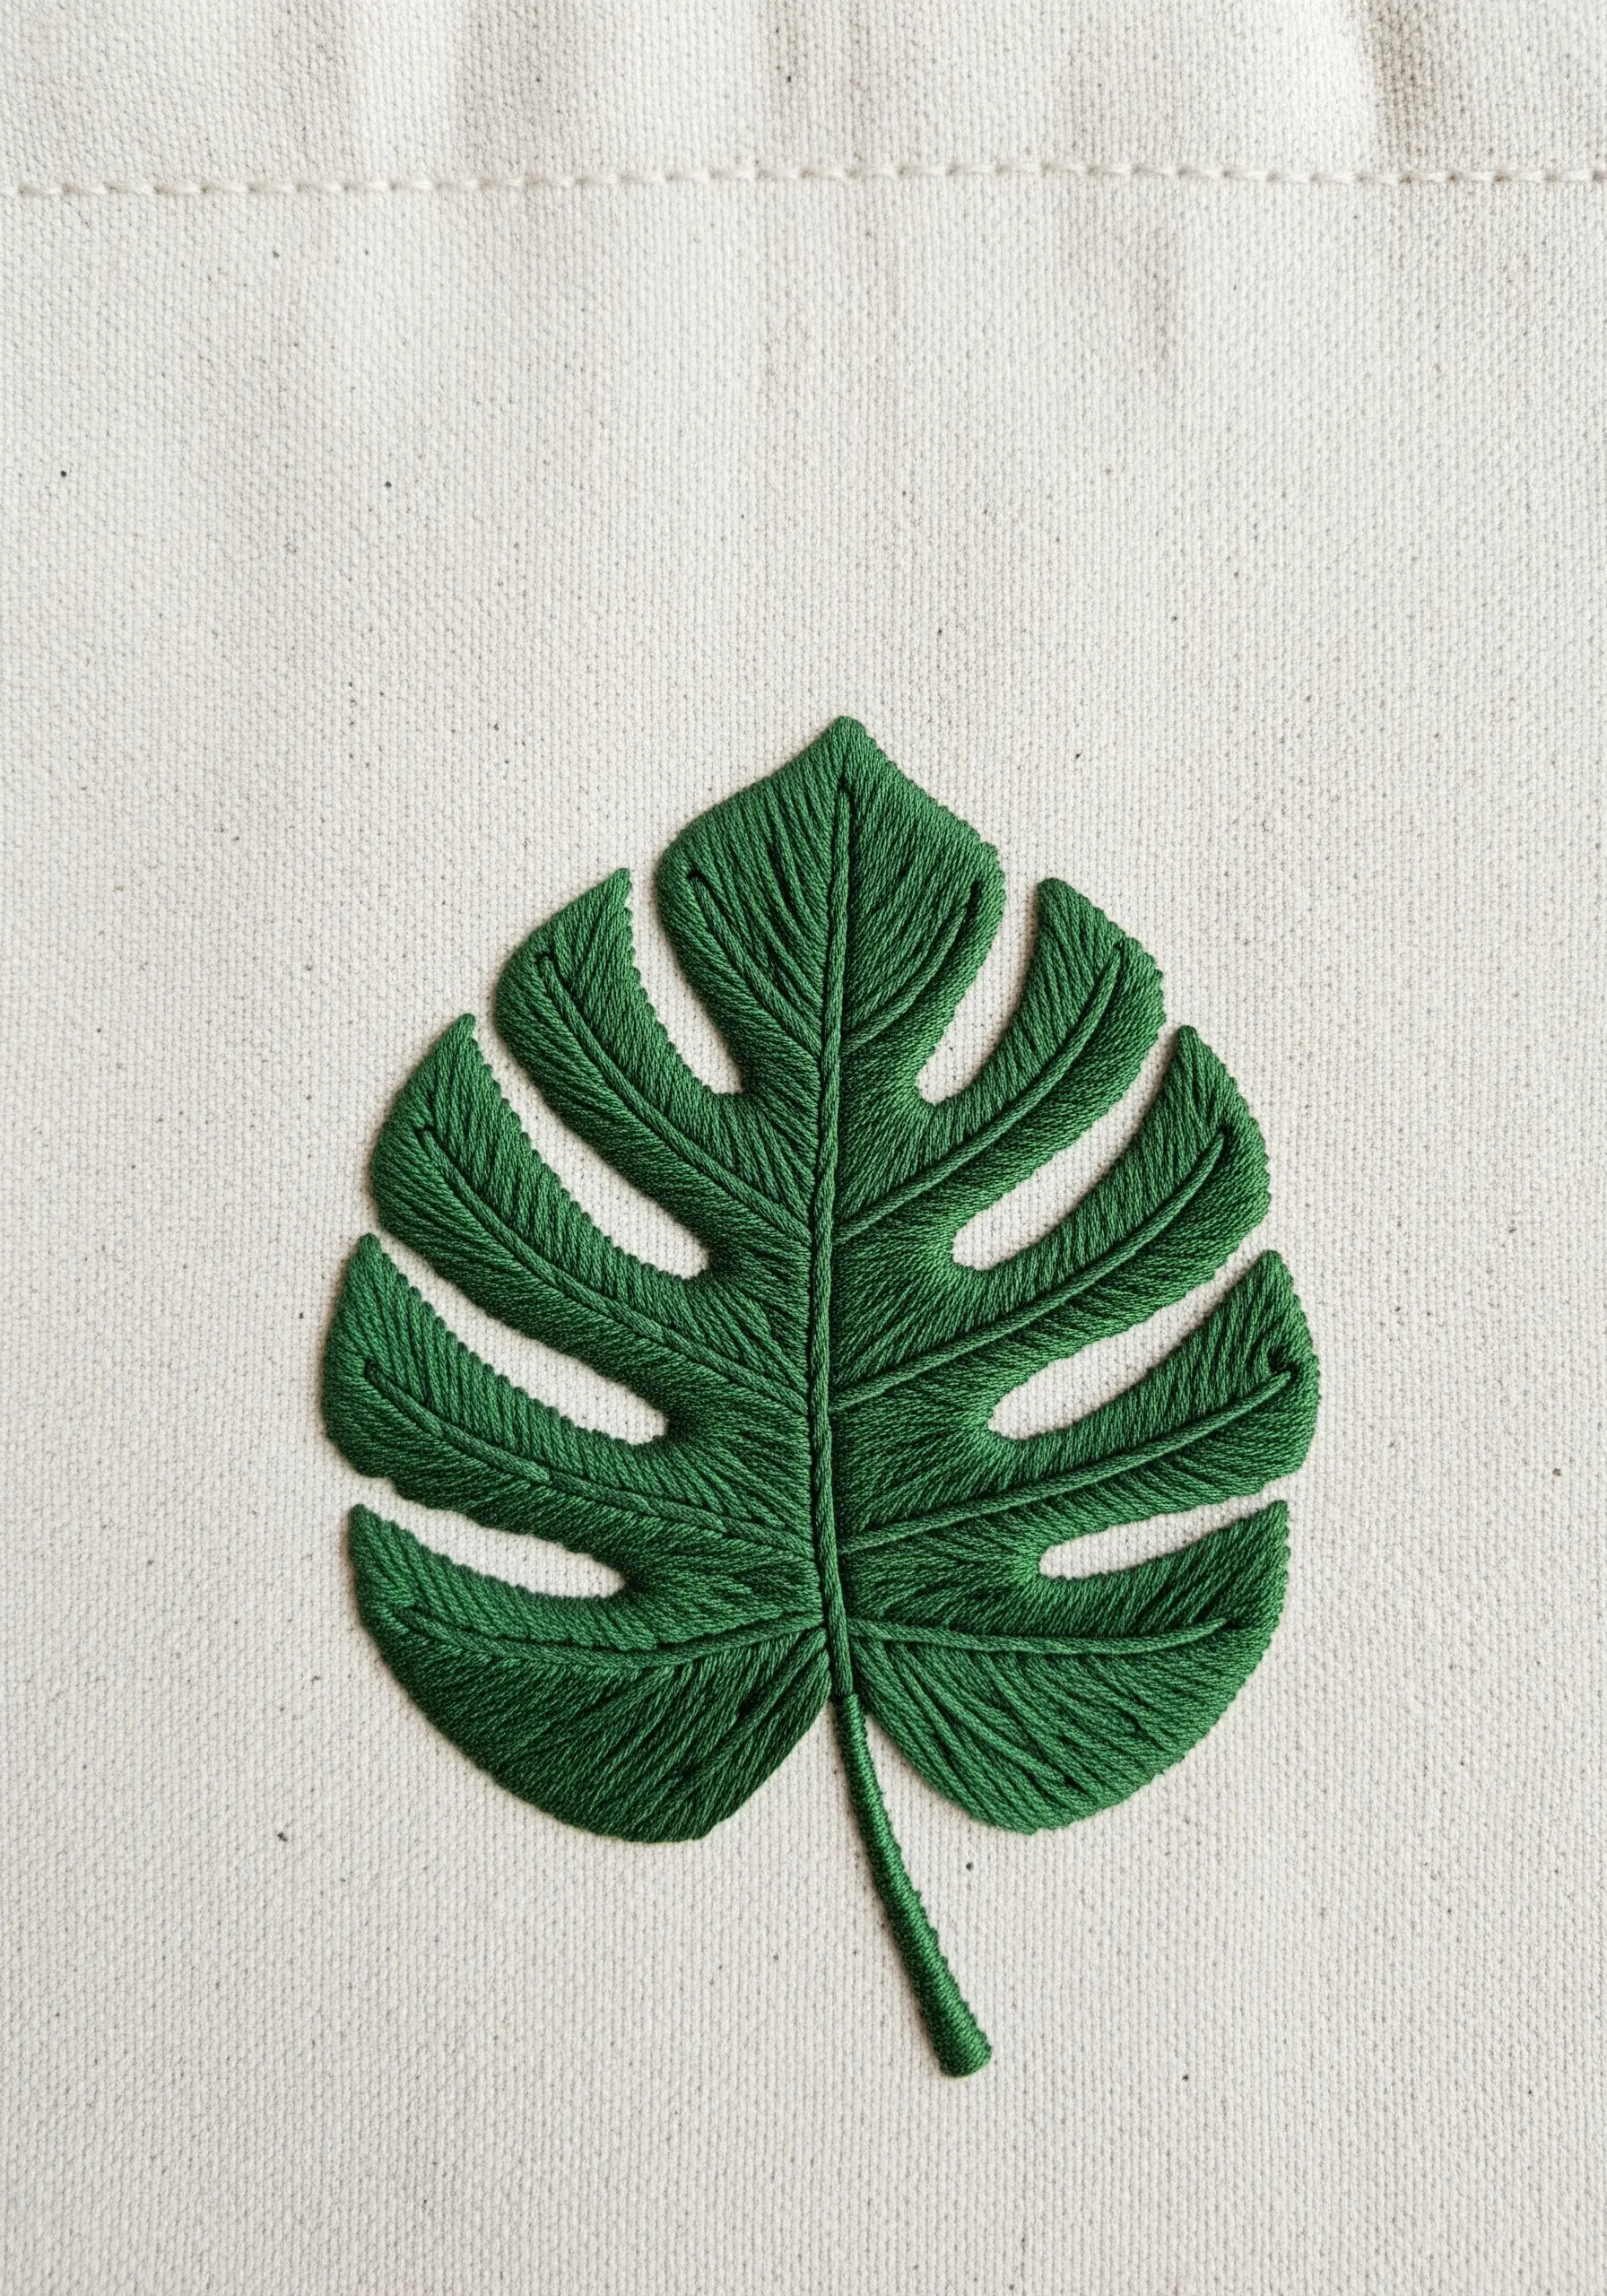
For a botanical motif like this monstera leaf, the direction of your fill stitches is everything. It transforms a flat shape into something with life and movement.
Instead of filling the entire leaf with uniform vertical or horizontal stitches, angle your satin stitches to follow the direction of the leaf’s natural veins.
Work in small sections, changing the angle of your stitches to radiate outward from the central stem. This creates subtle highlights and shadows that mimic how light would hit a real leaf.
Finish with a single, raised stem stitch for the central vein to add a final touch of realistic dimension to these botanical stitch ideas to turn plain tote bags into mini nature gardens.
6. Elevate Outlines with Layered Stitches
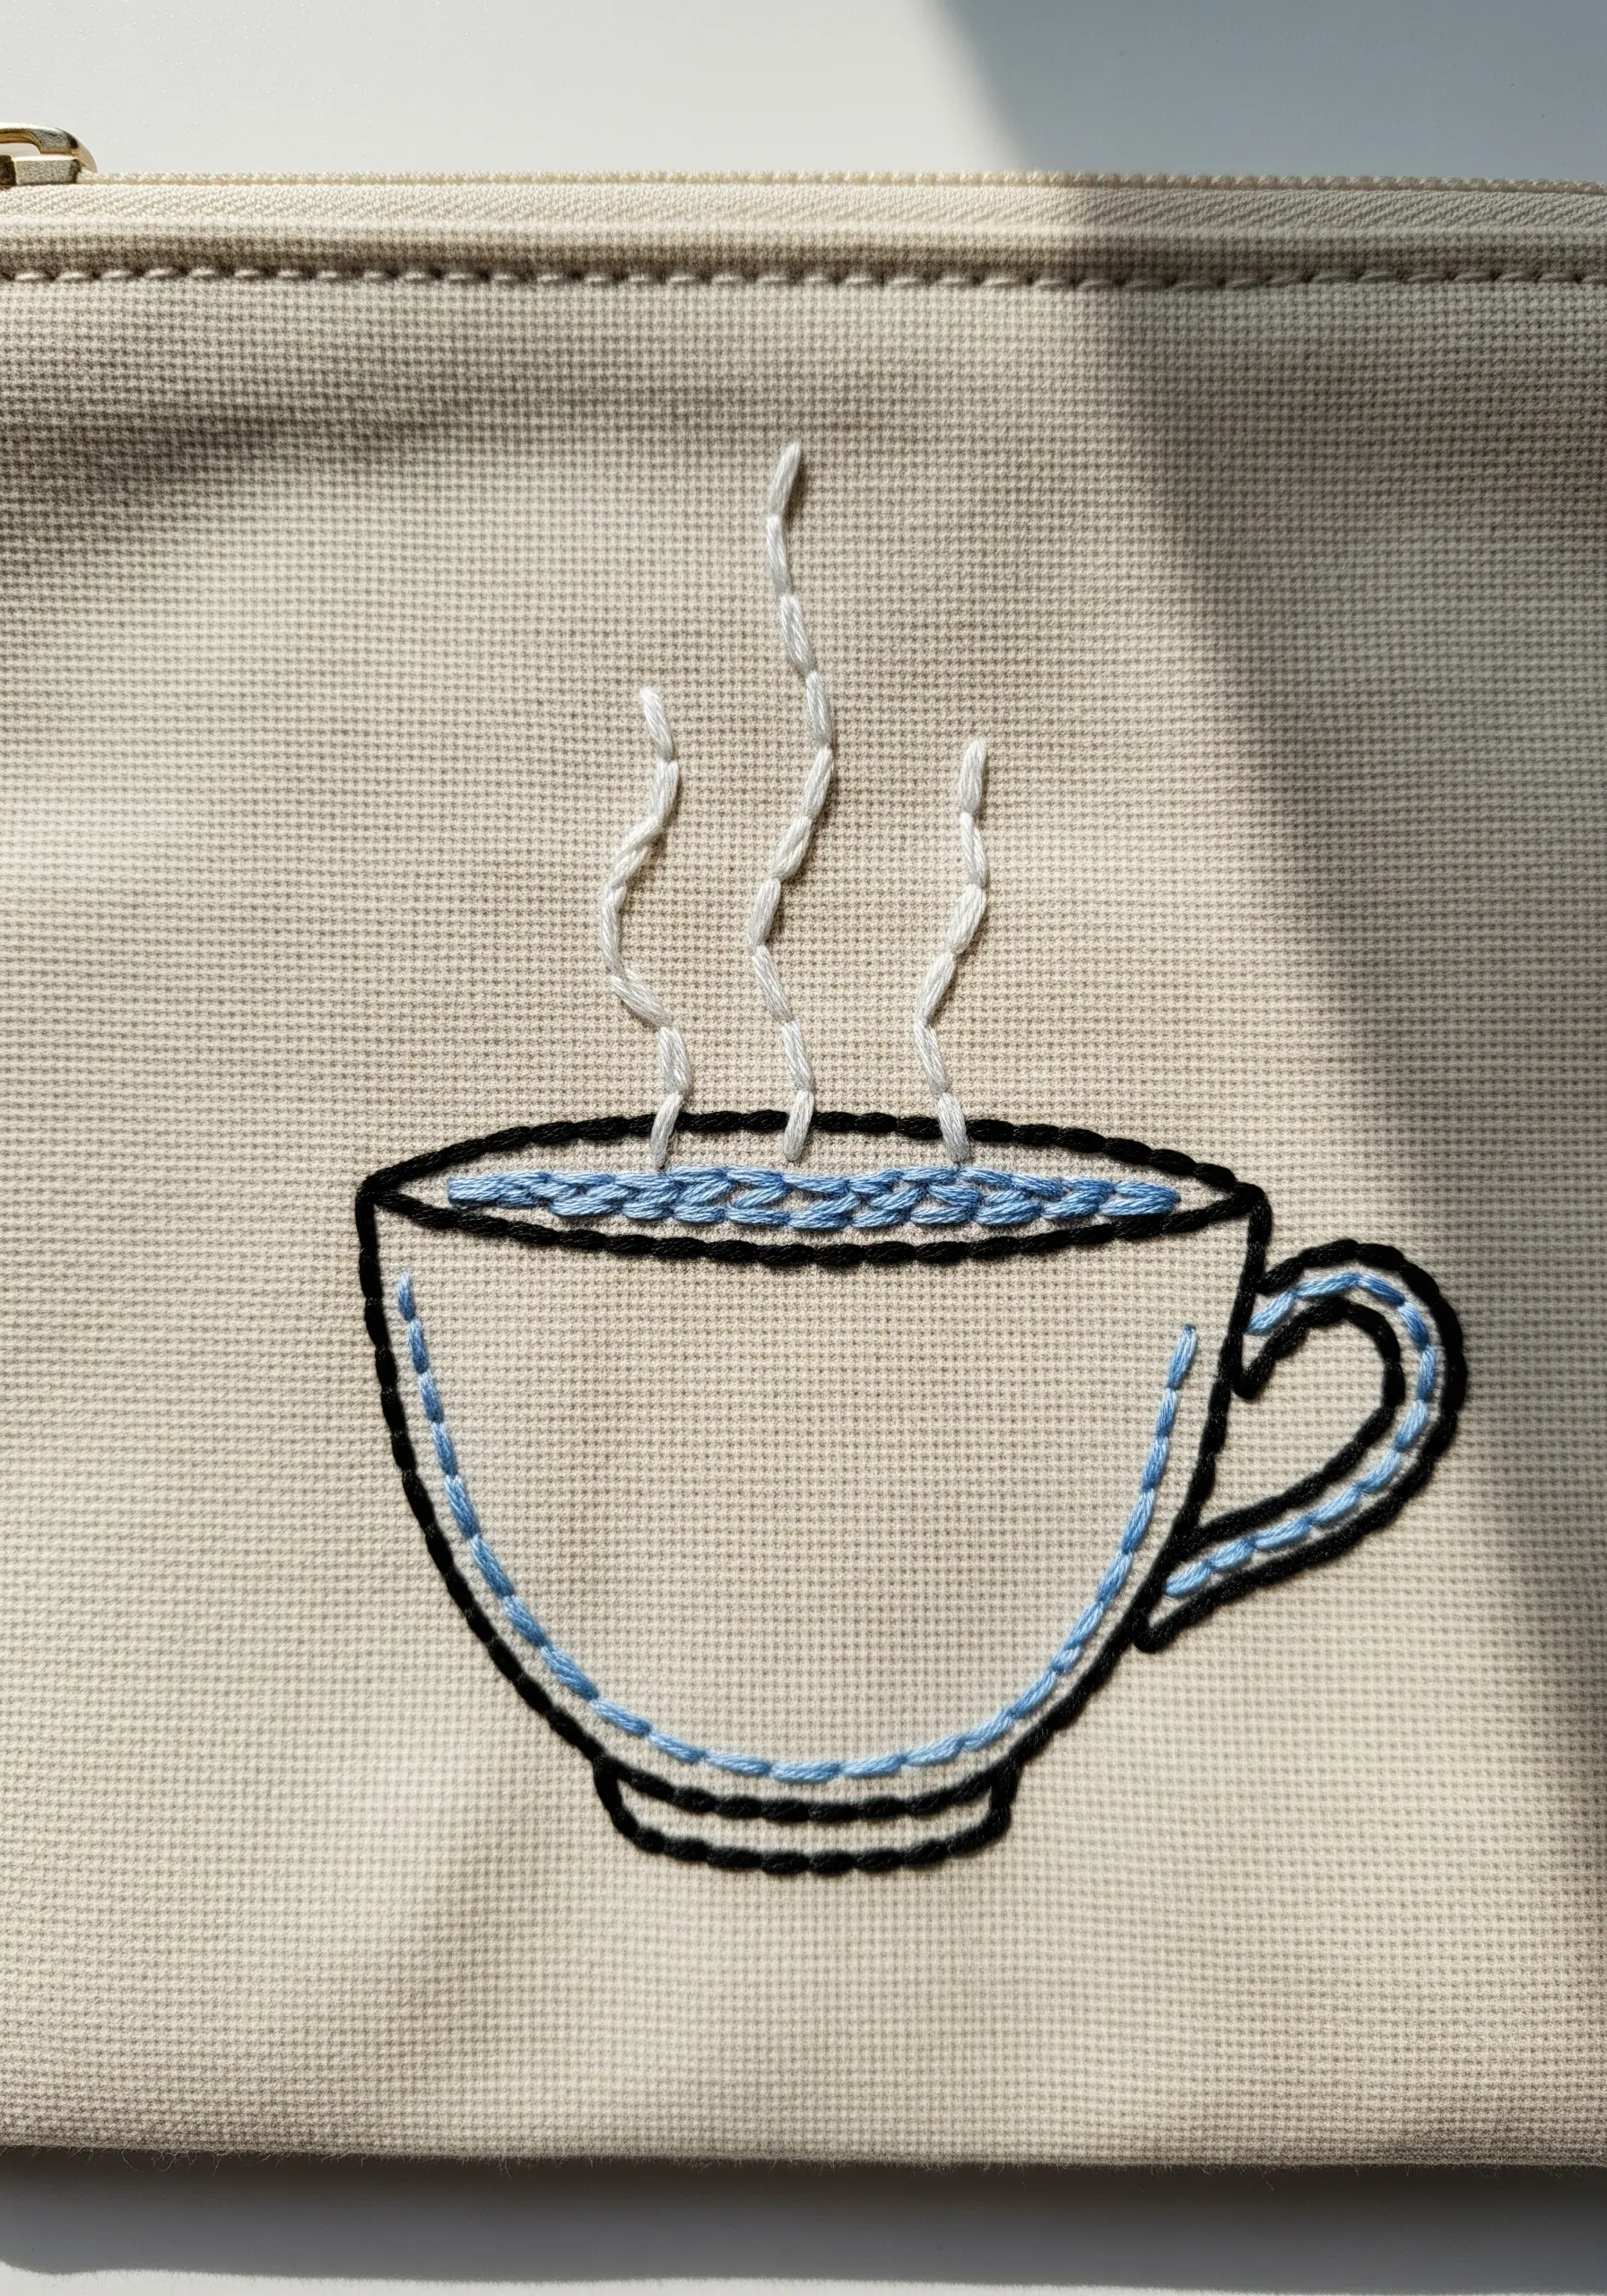
Transform a simple line drawing into something special by combining different outline stitches.
For the cup’s main body, use a clean backstitch with three strands of black floss for a bold, graphic look.
To add a touch of color and texture to the liquid inside, use a whipped backstitch. First, create a line of backstitch, then weave a second color through it without piercing the fabric. This creates a smooth, candy-cane effect.
For the steam, use a looser, more organic stem stitch with fewer strands to convey a sense of gentle movement.
7. Convey Motion with a Simple Dotted Line
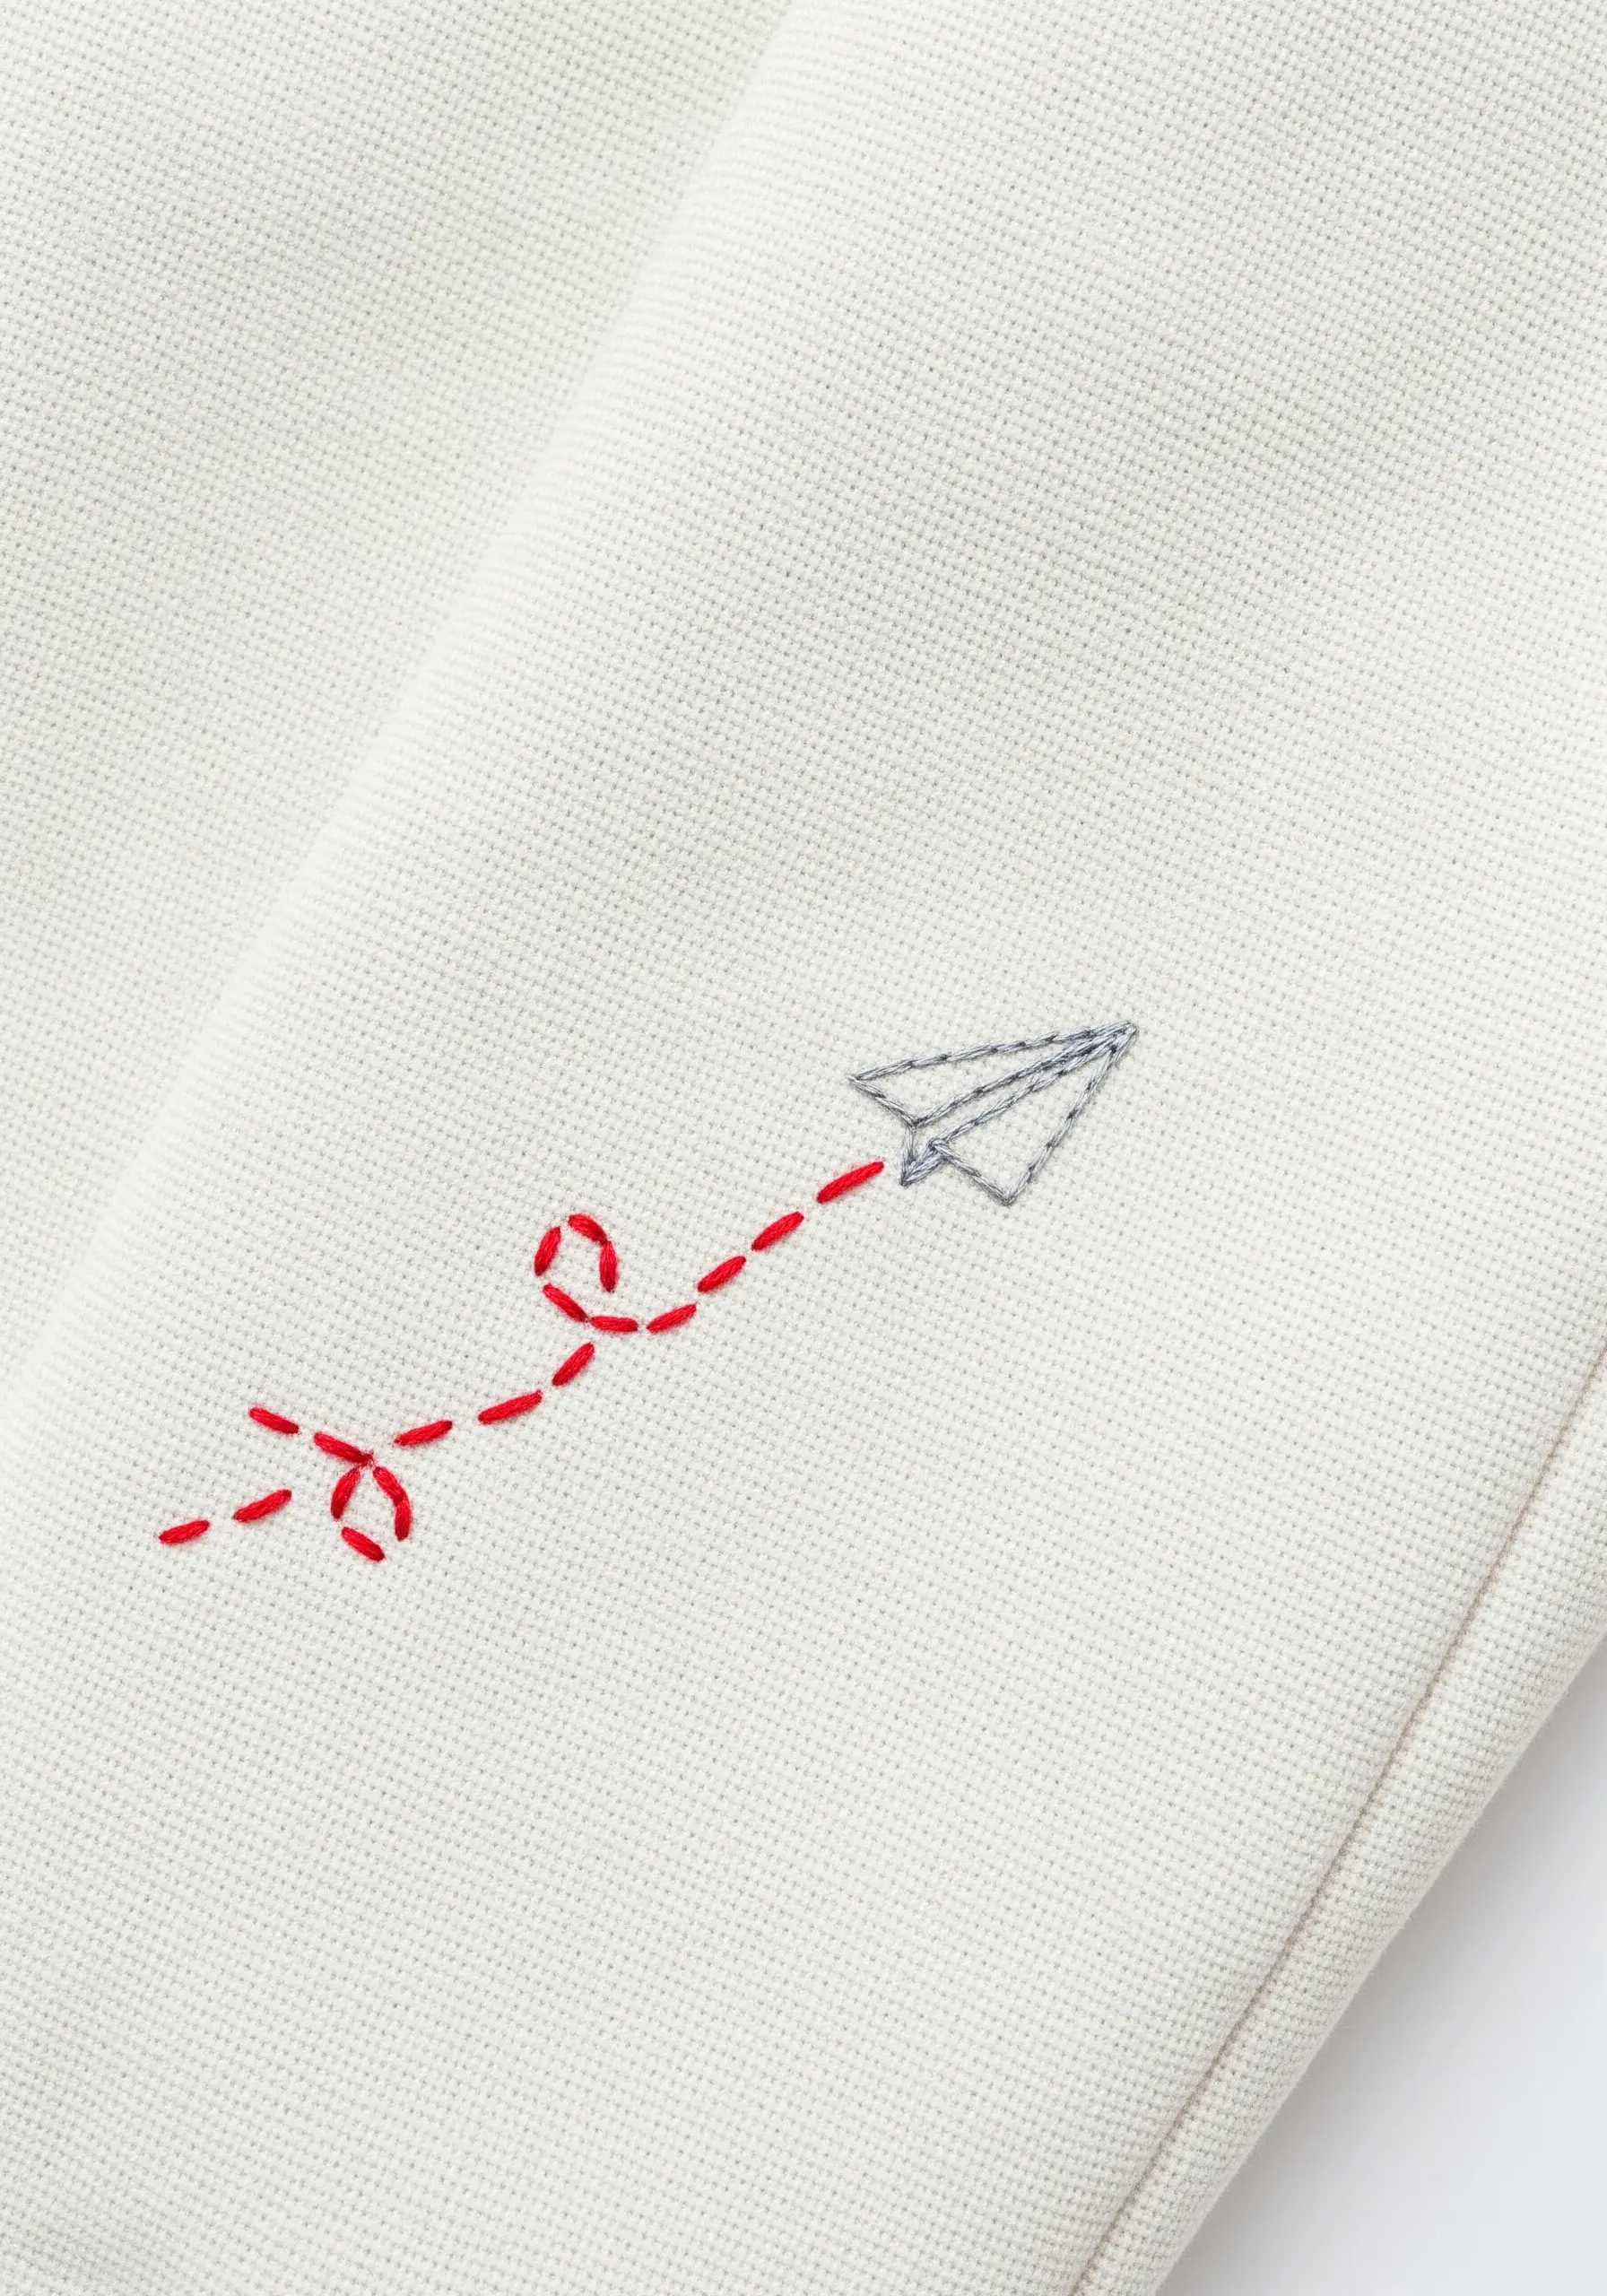
Even the simplest motifs can tell a story. Here, the magic is in the contrast between two distinct stitch styles.
For the paper airplane, use a precise backstitch with two strands of floss for a clean, solid outline. This gives the object a sense of structure and form.
For the flight path, switch to a brighter color and use a looping, playful running stitch. The intermittent nature of this stitch creates a feeling of movement and whimsy.
This pairing of solid form and implied motion makes for a dynamic and charming accent on any piece of clothing.
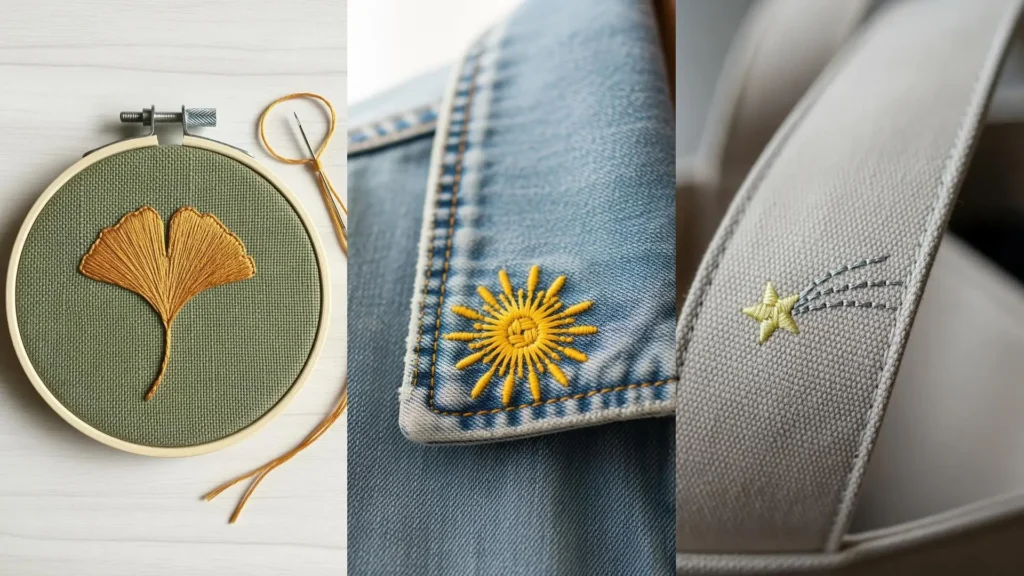
8. Add a Pop of Radiance to a Collar
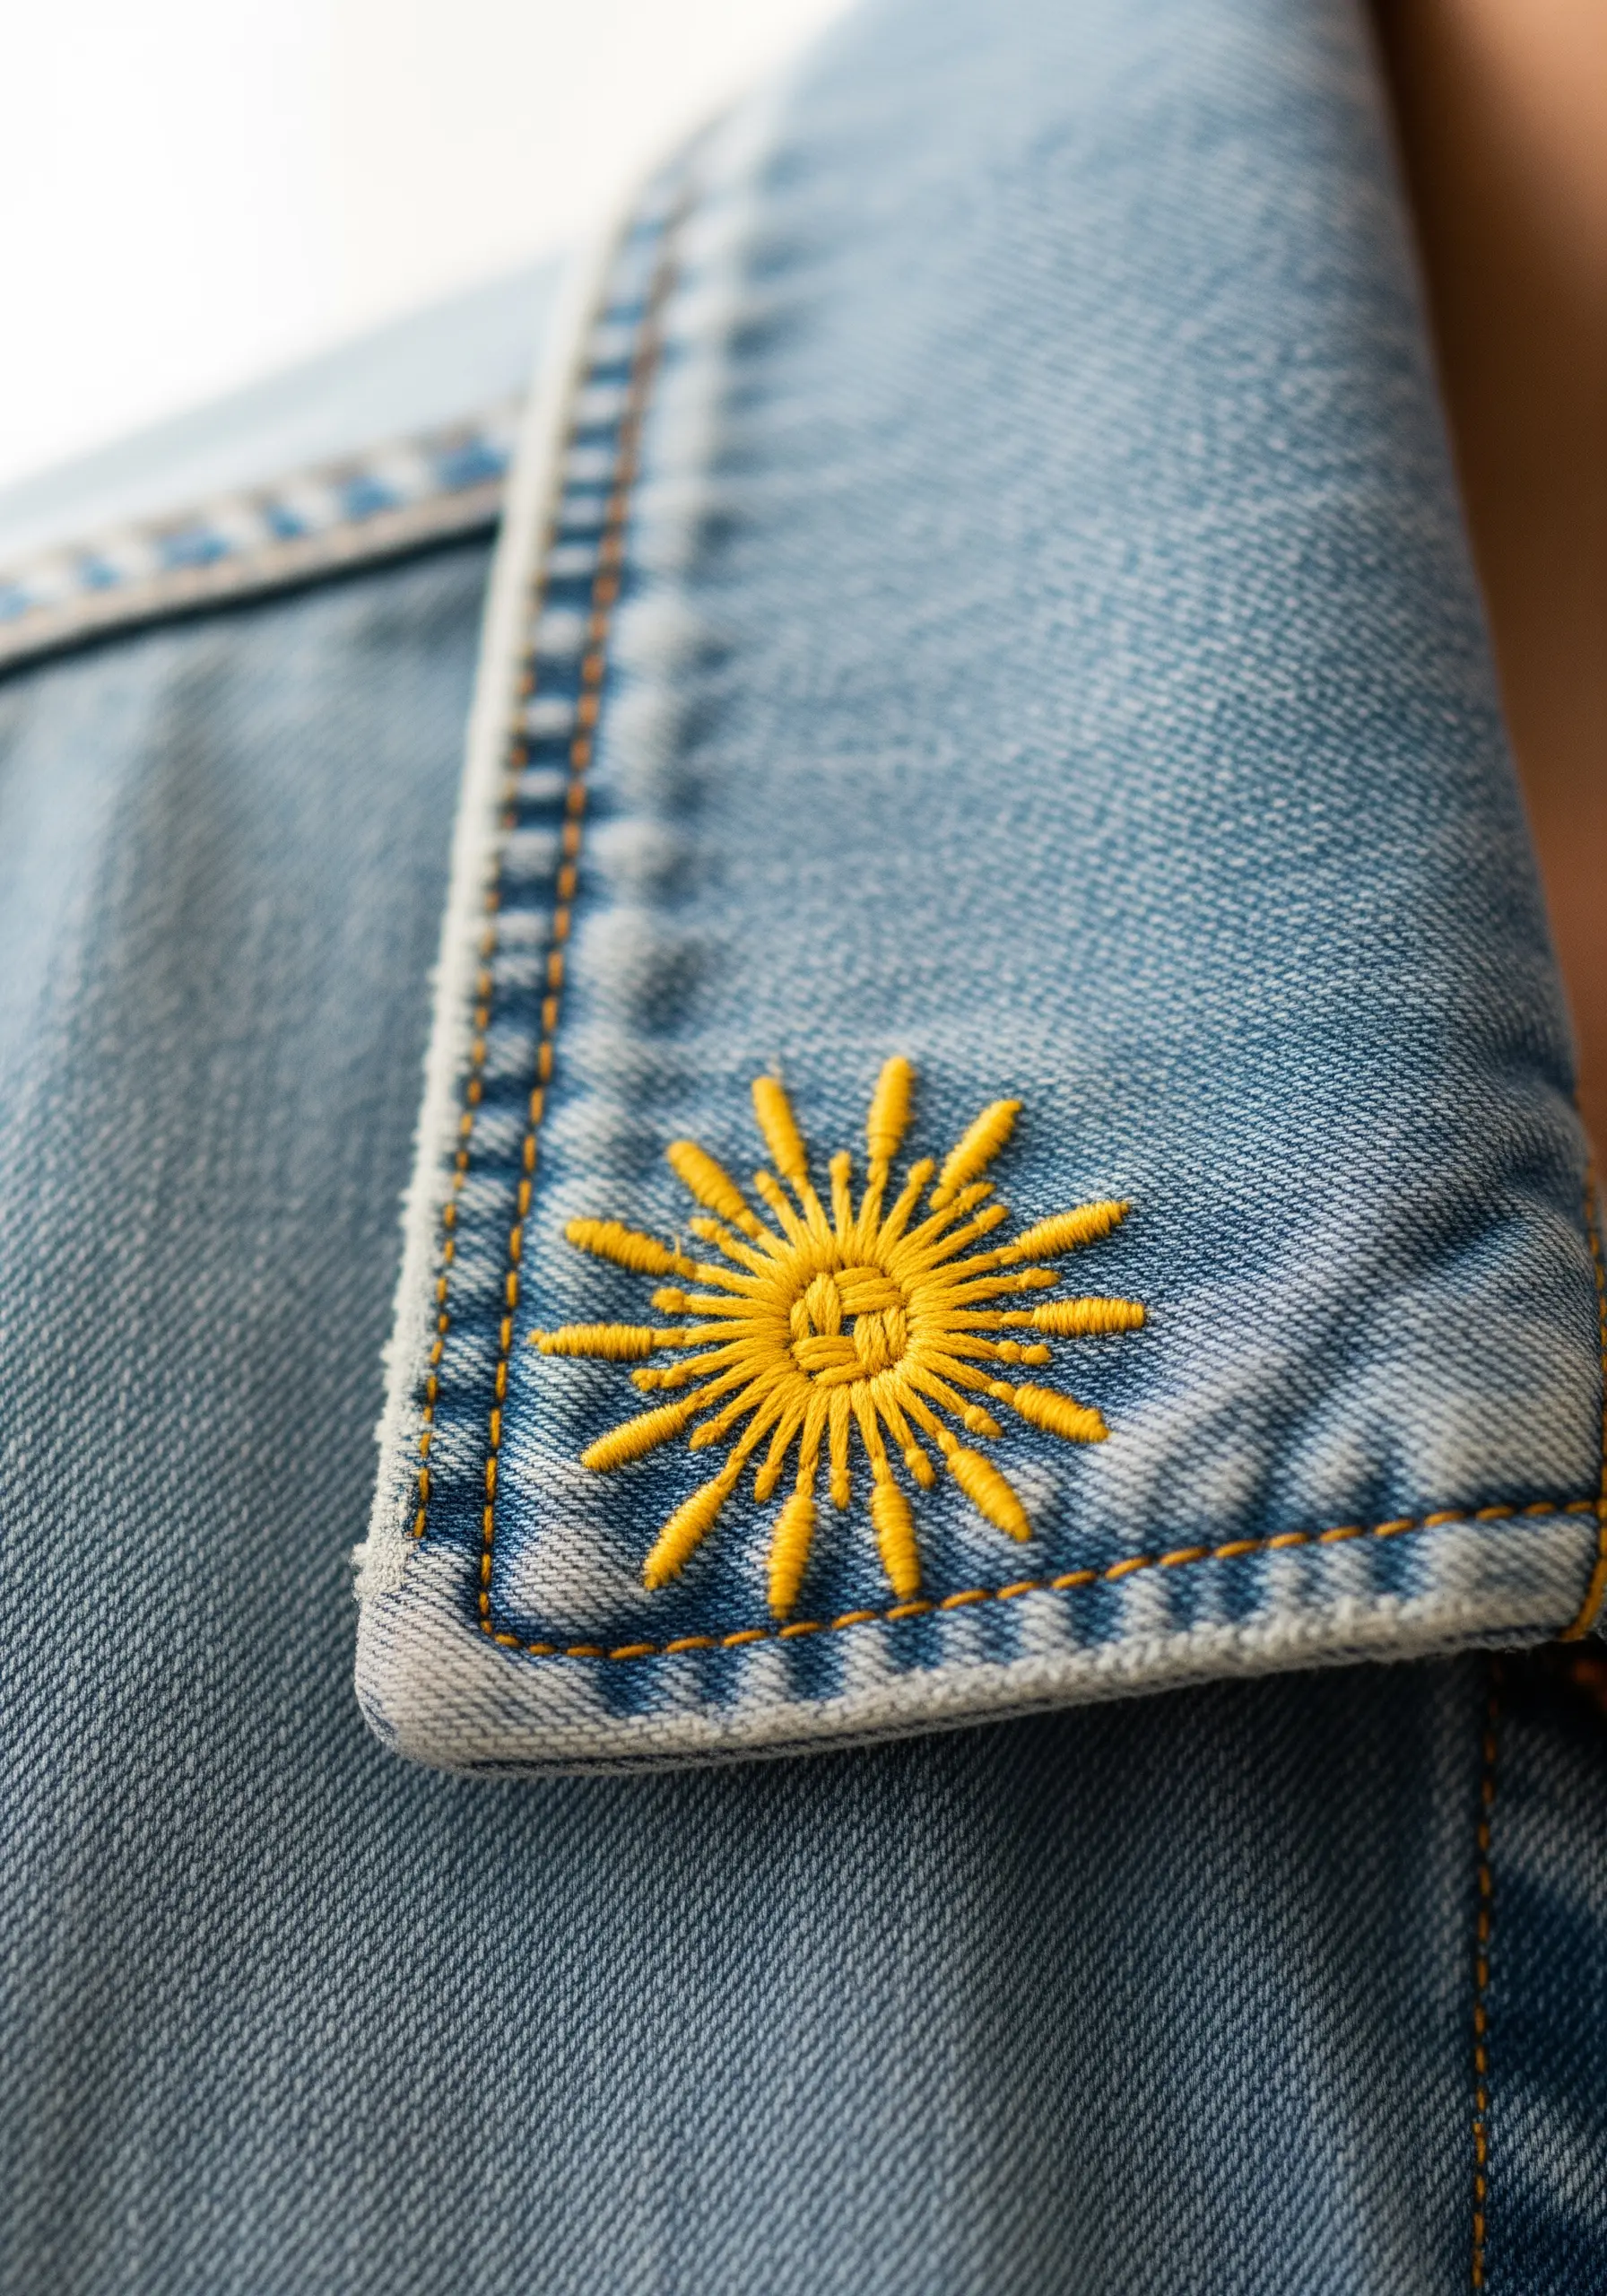
A small, bright motif on a collar corner is a classic way to personalize a denim jacket or shirt.
Create this radiant sun by first making a woven wheel stitch for the center. This involves creating a star-shaped base of straight stitches and then weaving your thread over and under them to form a dense, circular shape.
From this central point, add simple straight stitches of varying lengths for the sun’s rays. The combination of a textured center and sharp, clean rays creates a beautiful visual contrast.
Choose a bold, warm color like marigold yellow that will pop against the cool blue of the denim.
9. Explore Abstract Color Blocking

Create a sophisticated, modern design by focusing on the clean intersection of color-blocked shapes.
For perfectly smooth circles, fill them with a vertical satin stitch, ensuring each stitch is pulled just taut enough to lie flat without puckering the fabric.
To achieve a crisp edge where the colors meet, use a split stitch to outline each shape before you begin filling it. This tiny raised border acts as a guide and gives your satin stitches a clean line to press against.
A palette of harmonious, earthy tones elevates these simple shapes into one of these elegant circle frame minimal embroidery compositions.
10. Capture Organic Flow in a Single Leaf
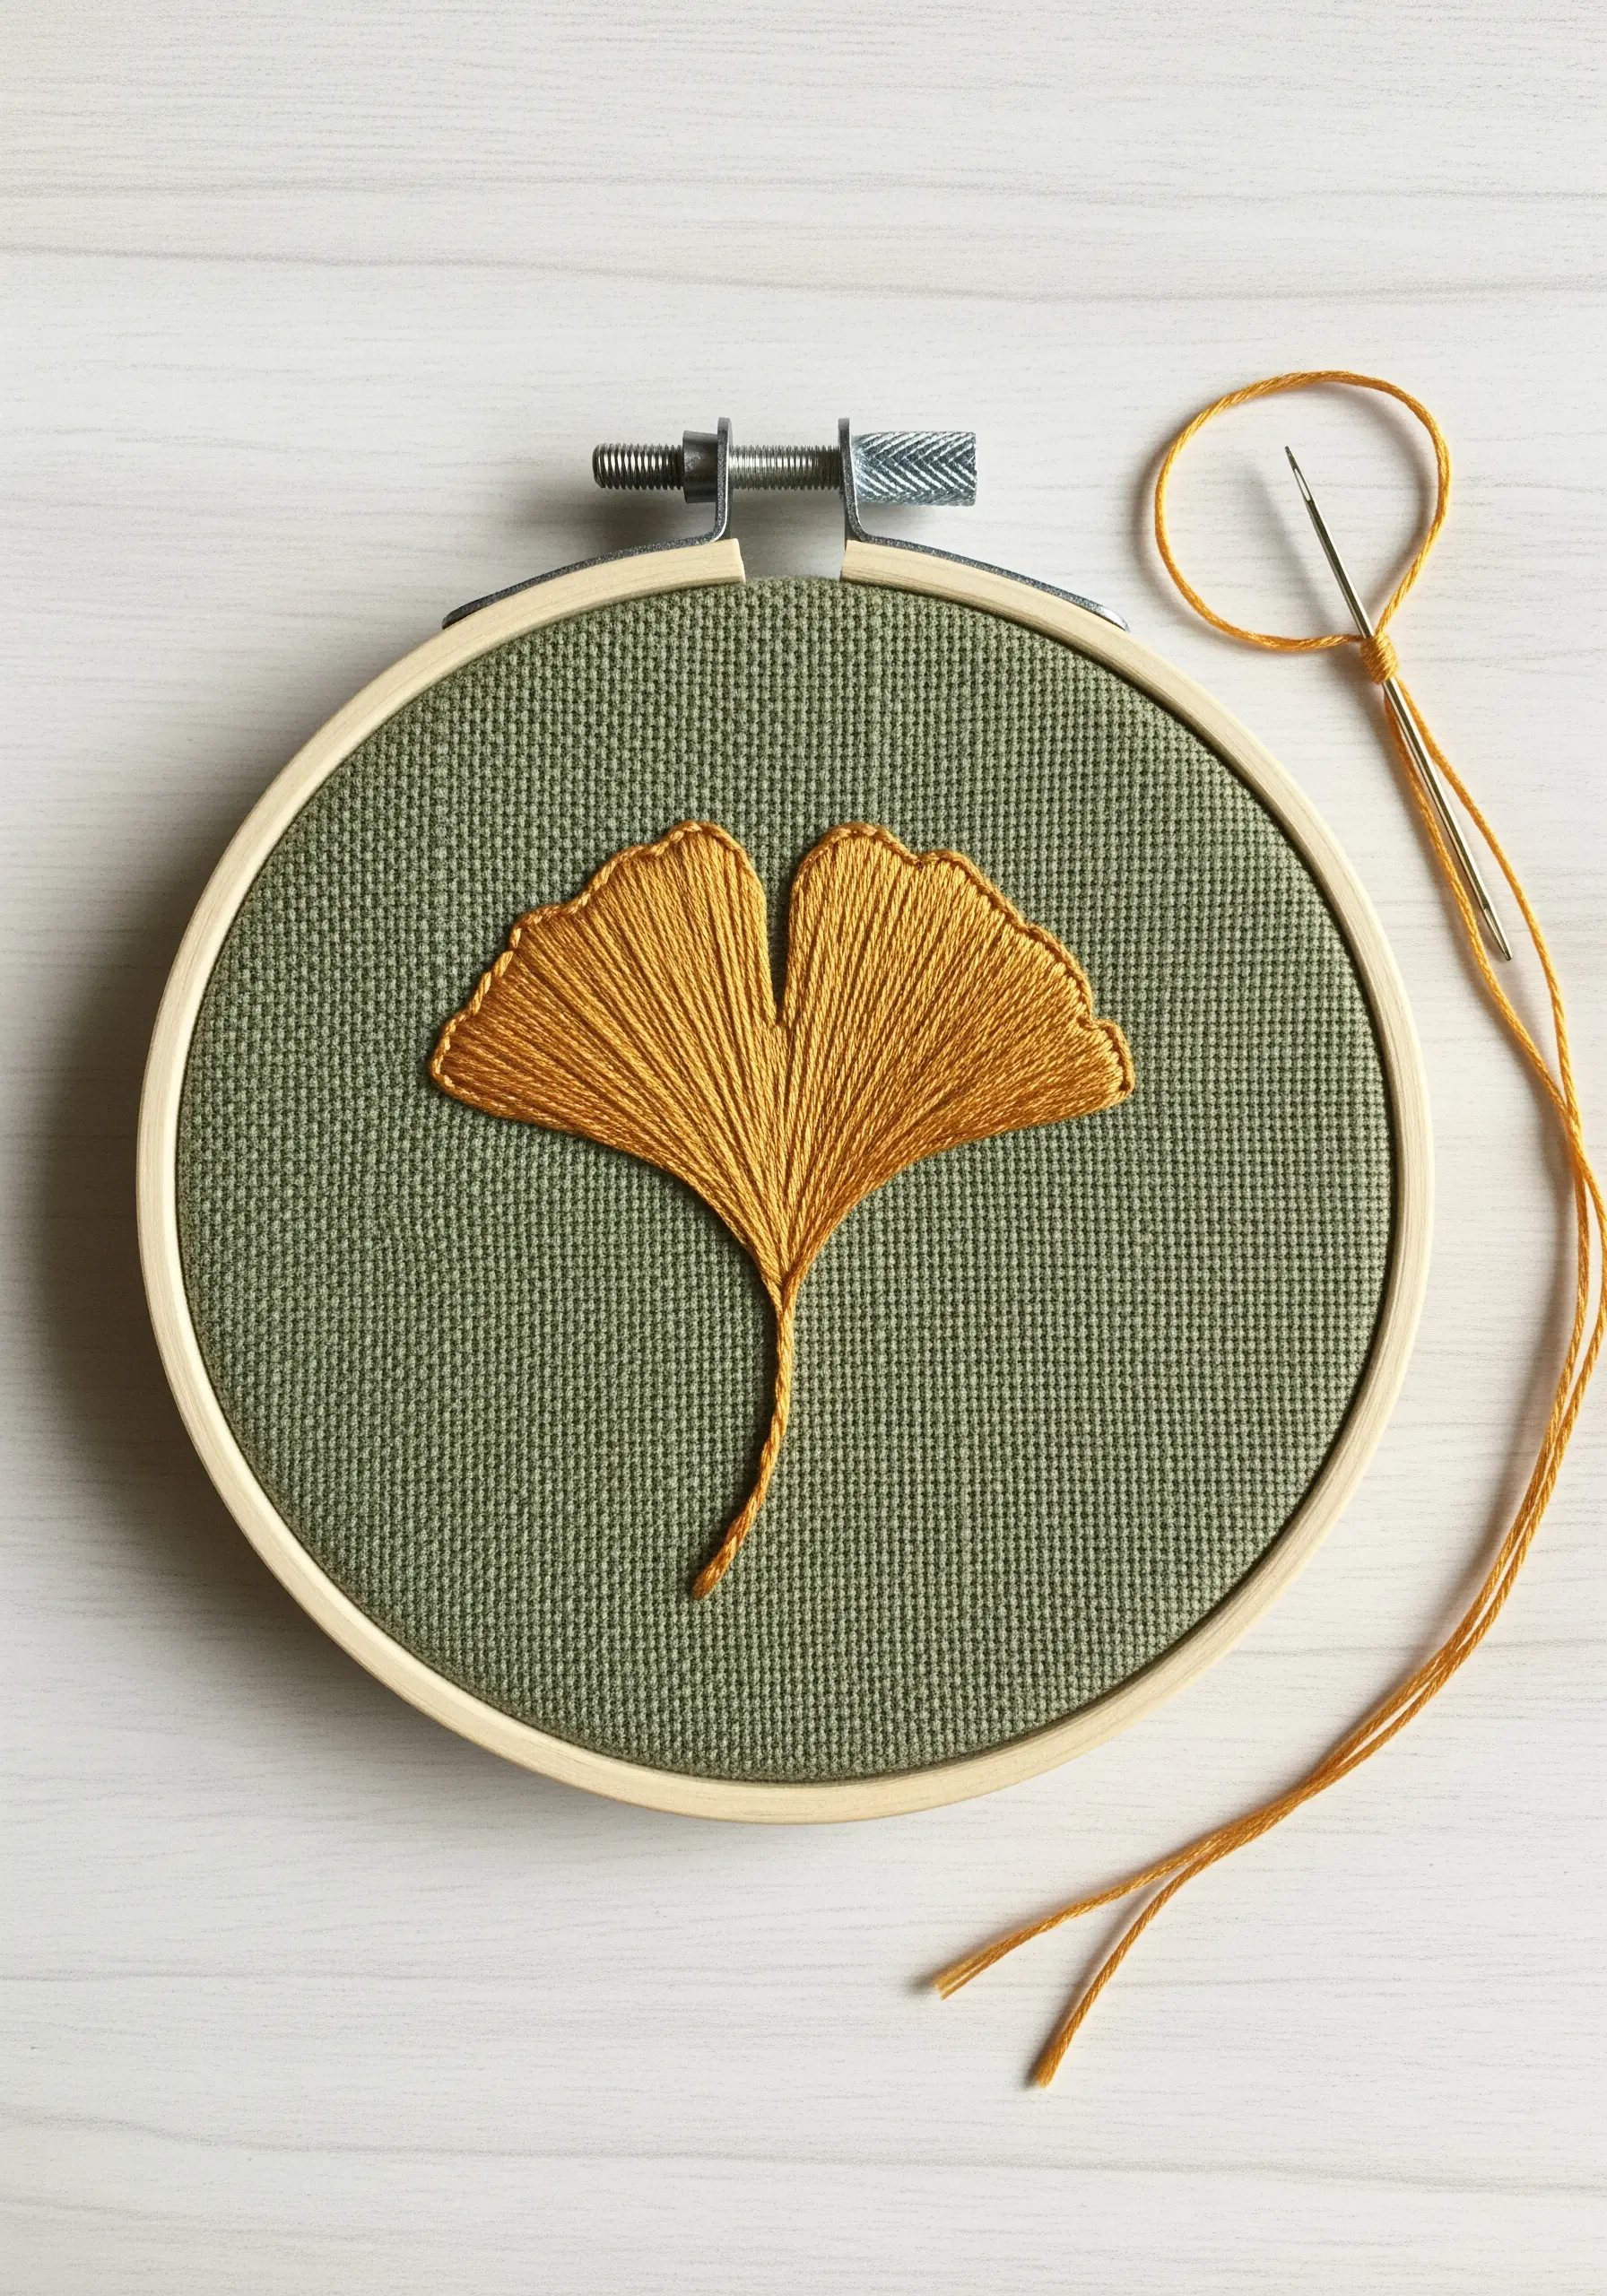
A ginkgo leaf’s beauty lies in its elegant, fan-like shape. Recreate this by using directional satin stitch that radiates from the base of the leaf.
Imagine lines extending from the stem and angle your stitches to follow them. This technique is more forgiving than perfectly parallel stitches and naturally creates the gentle ridges of a real leaf.
Don’t be afraid to split the design into two or three sections, allowing the stitch directions to shift slightly. This adds to the organic, flowing aesthetic.
Using a variegated or slightly shimmering thread can further enhance the illusion of light and texture.
11. Stitch a Wave with Dynamic Texture
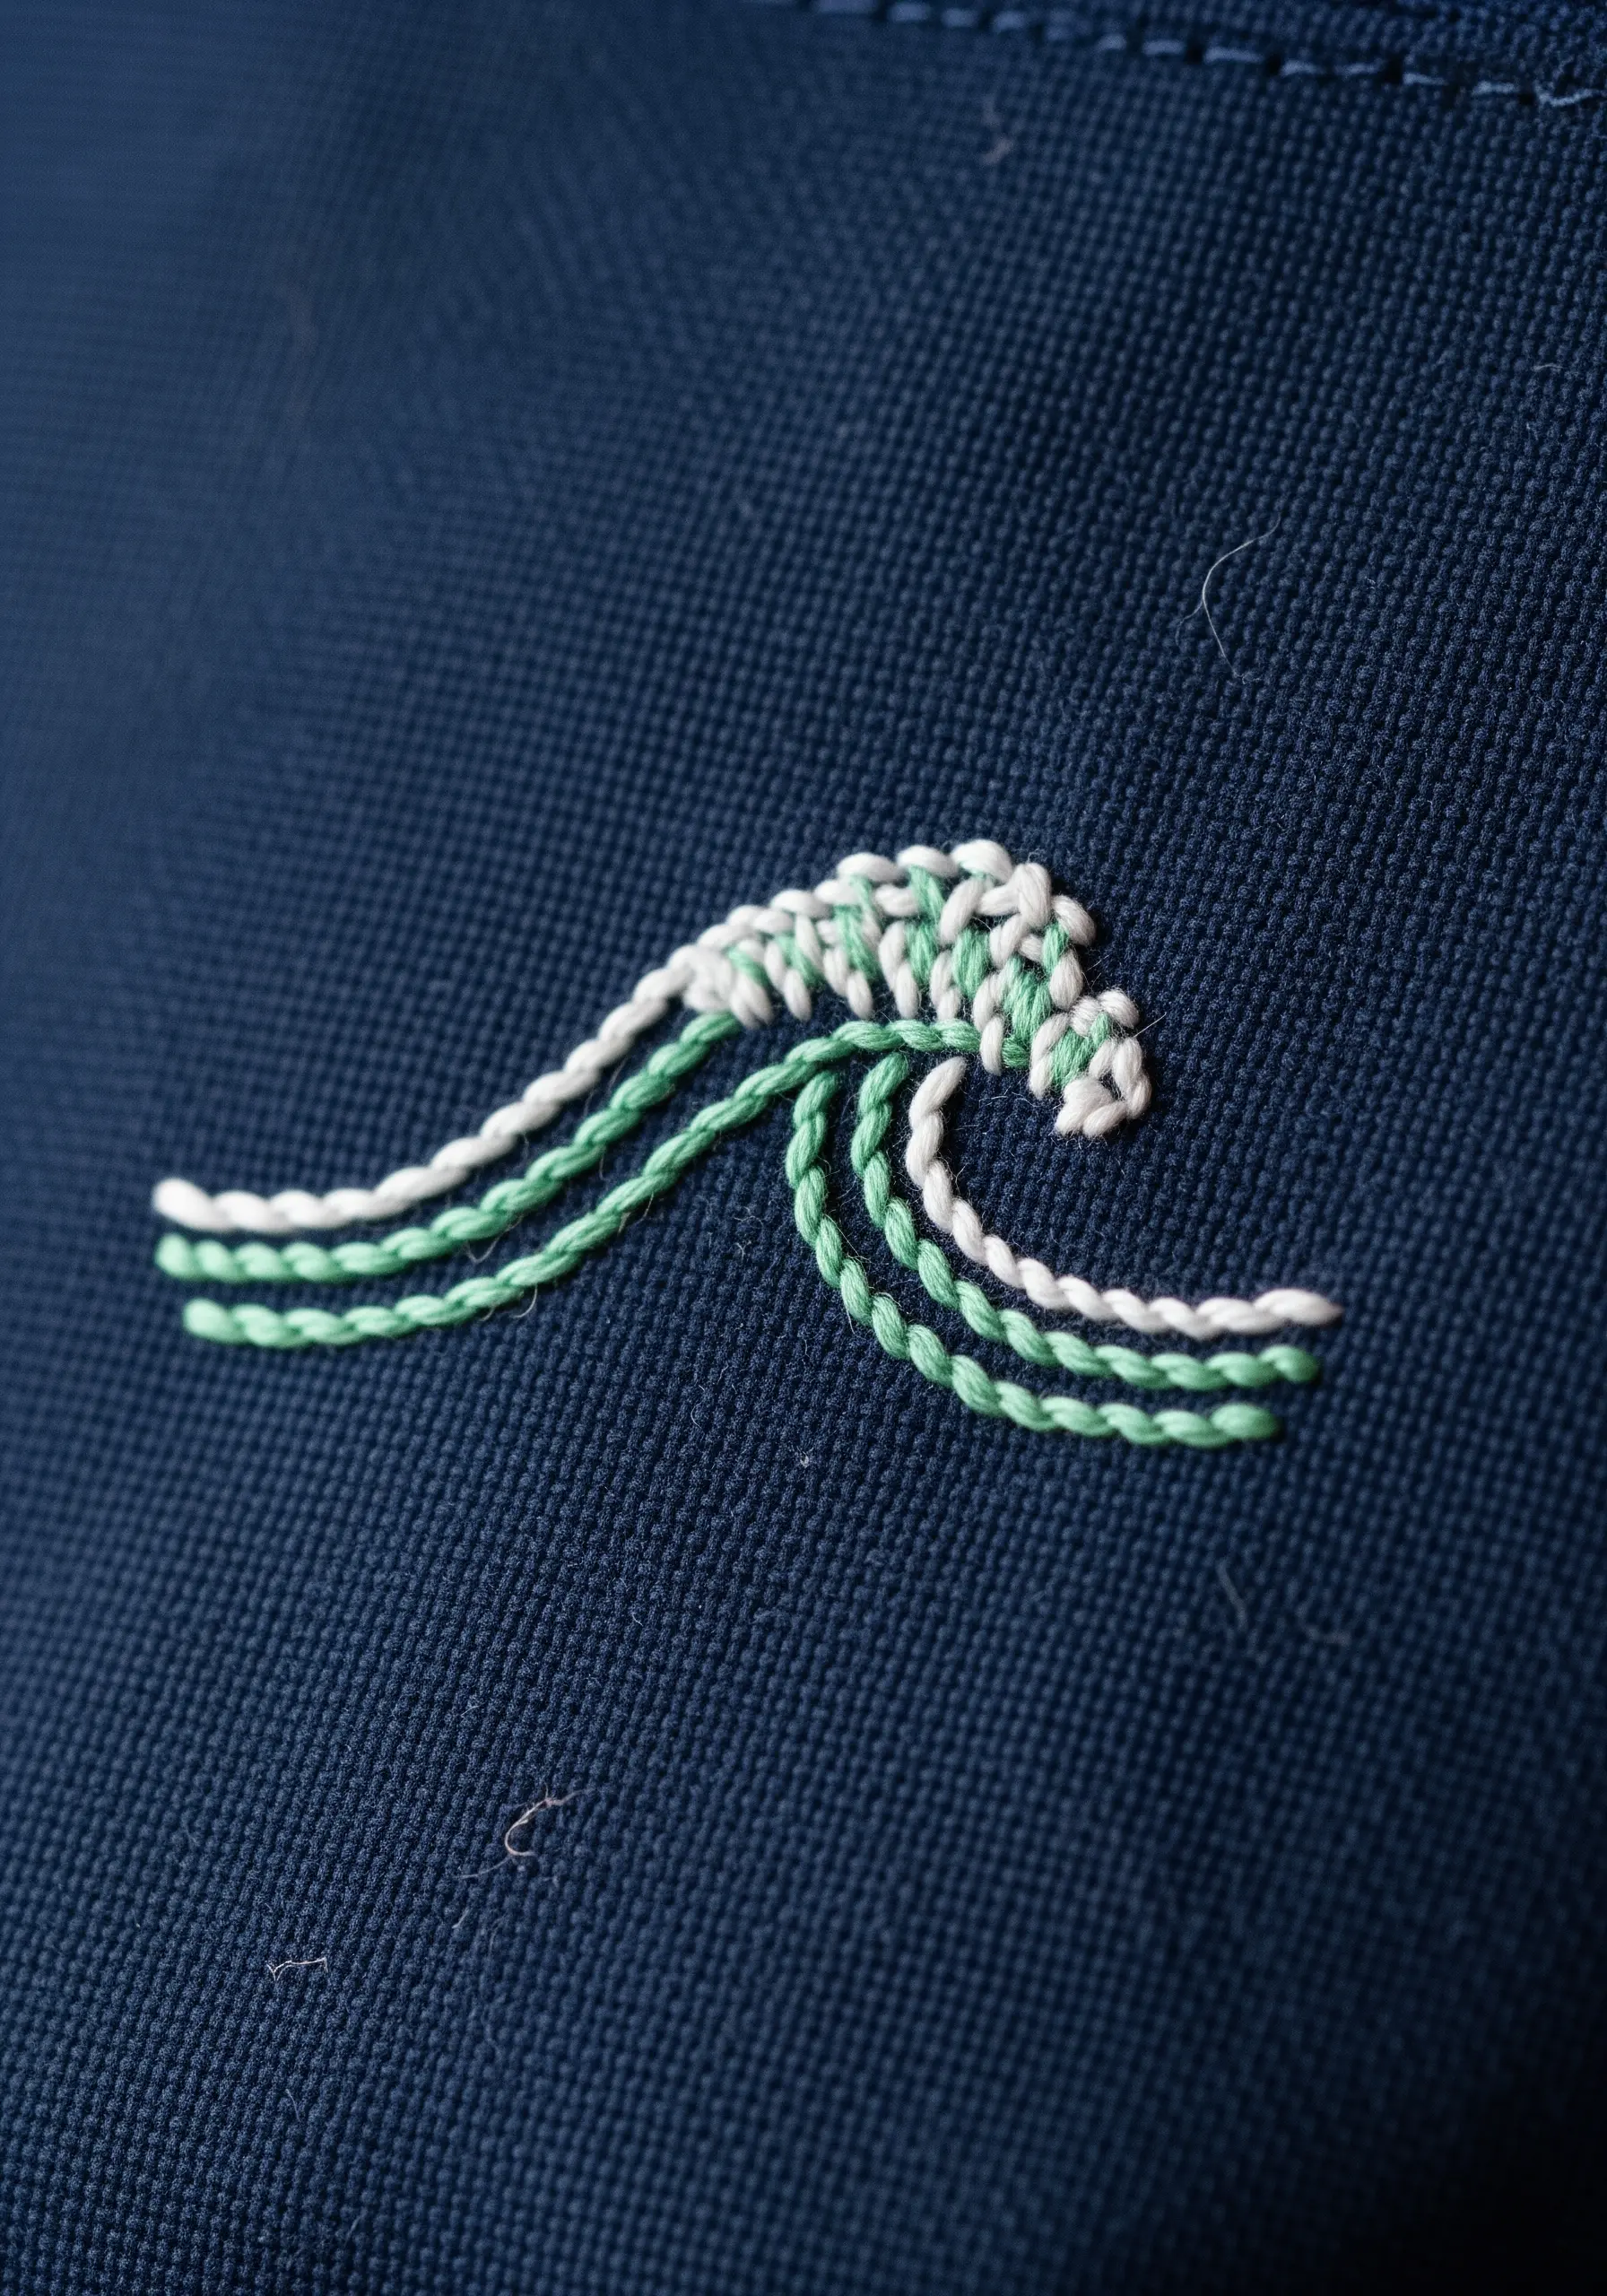
To capture the energy of a crashing wave, combine different stitches and thread weights for texture and movement.
Use a simple backstitch for the flowing lines of the wave, varying the number of strands to make some lines thicker and bolder than others.
For the seafoam at the crest, switch to a series of tightly packed French knots. This instantly creates a bubbly, raised texture that contrasts with the smooth lines below.
Using a few complementary colors, like seafoam green and white, adds depth and makes your tiny ocean-inspired hoop embroidery feel alive.
12. Create Dimension with Tiny Details
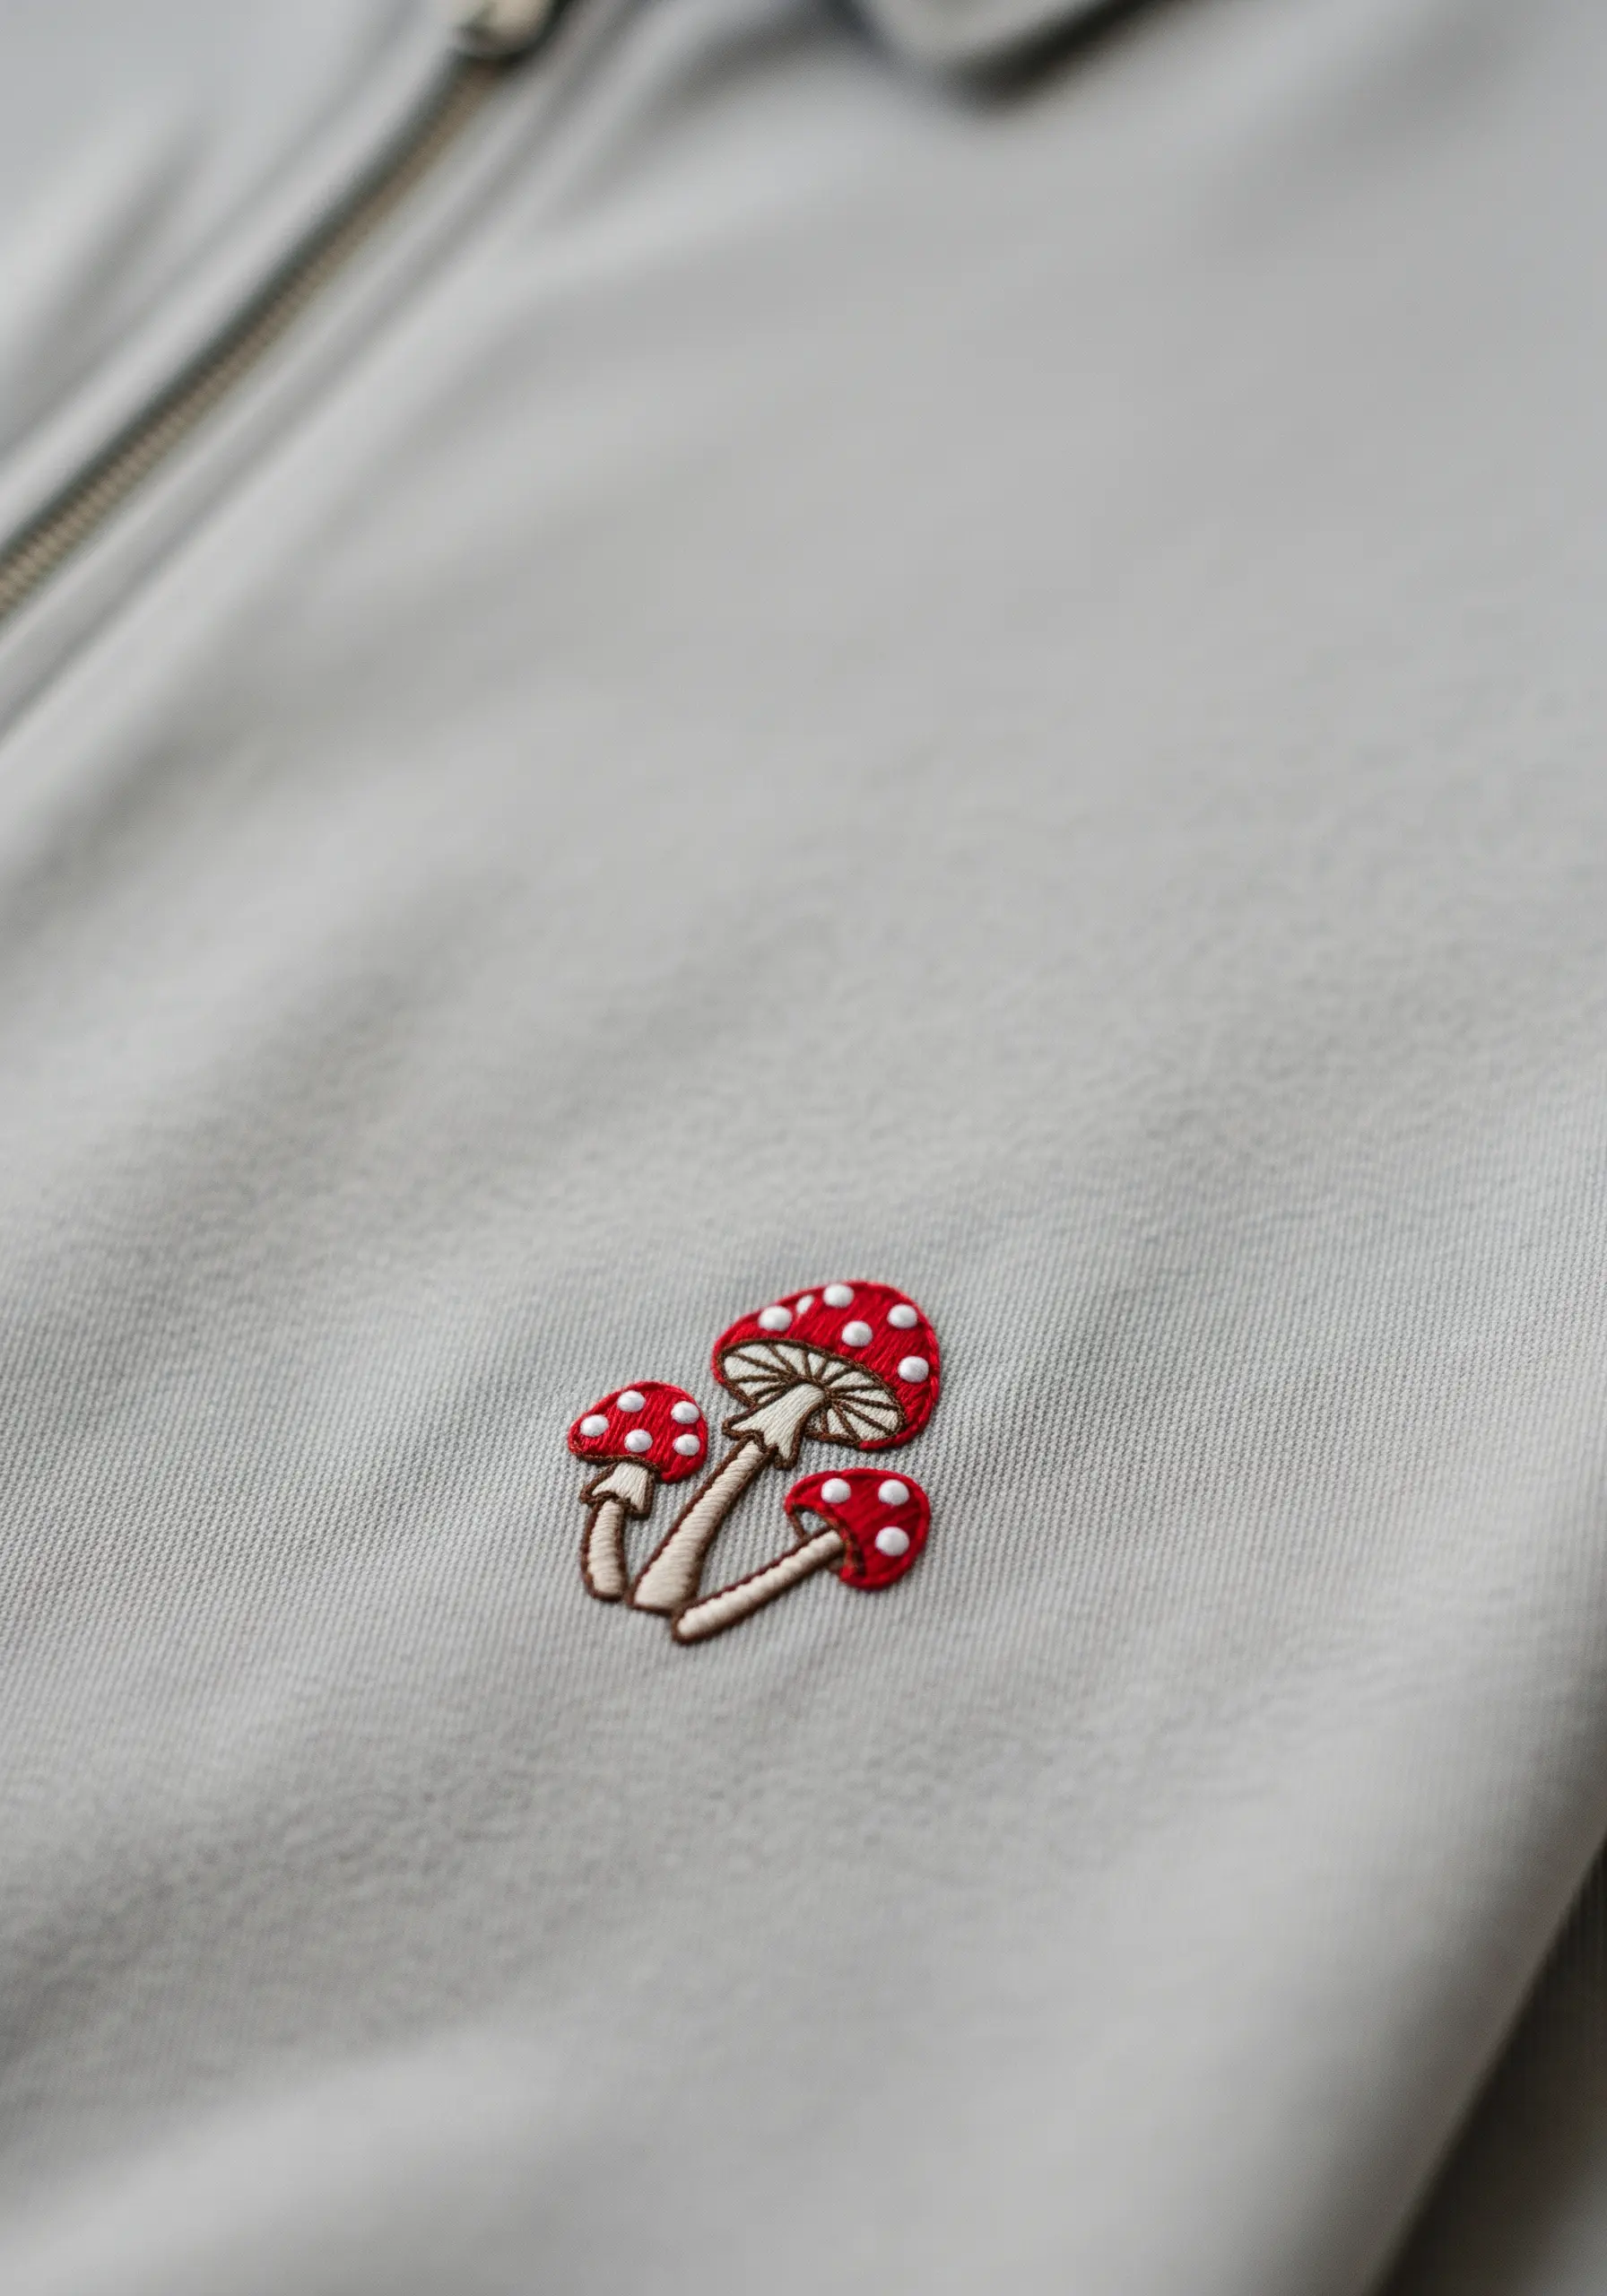
When working on a very small scale, tiny details make all the difference. For these mushrooms, the magic is in the finishing touches.
Fill the red caps with a satin stitch, angling the stitches to follow the curve of the cap for a rounded effect.
Once filled, add tiny white French knots for the spots. Using a single strand of floss will keep them delicate and in proportion with the rest of the design.
Outline the stems with a single line of split stitch to give them definition without adding bulk. This makes the entire realistic mushroom forest floor embroidery motif feel polished and intentional.
13. Achieve a Bold, Padded Monogram
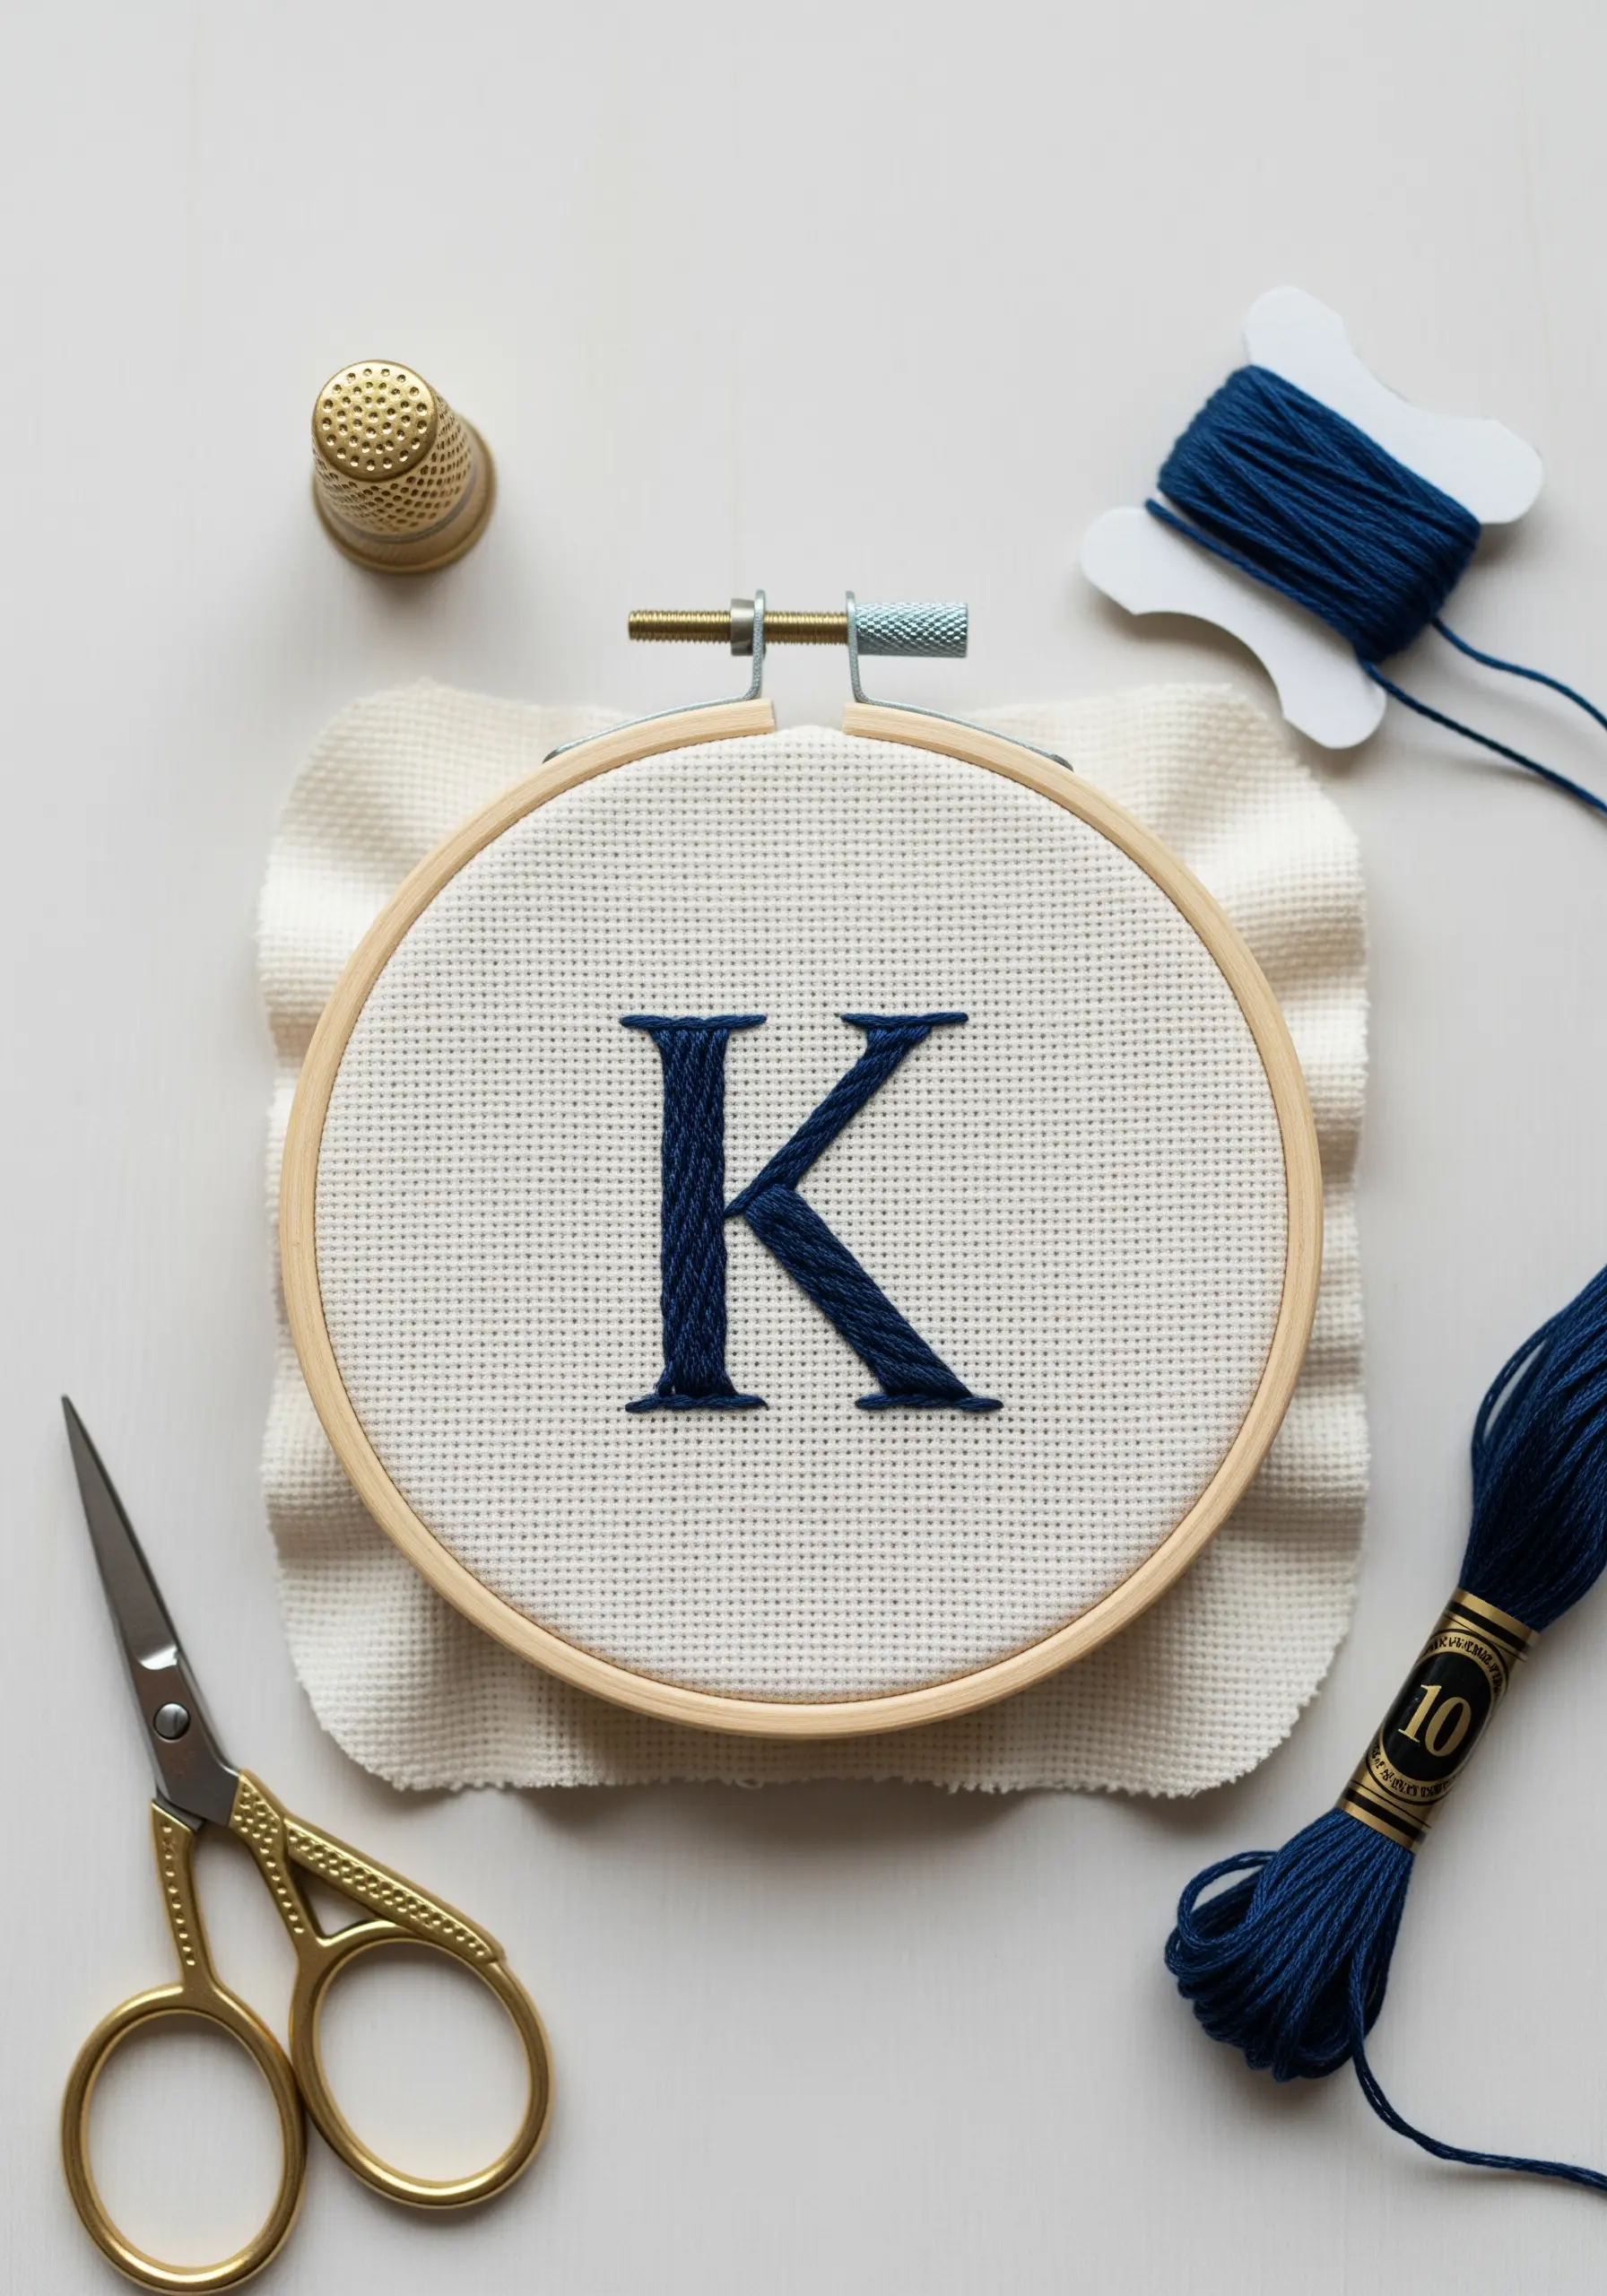
To make a monogram look substantial and luxurious, use a padded satin stitch. This technique gives the letter a raised, almost embossed appearance.
First, fill the entire letter shape with a foundation of horizontal seed stitches. Then, cover this base with smooth, vertical satin stitches using all six strands of cotton floss.
The underlying texture pushes the top layer of stitches upward, creating beautiful height and shadow.
This method is perfect for creating minimal monogram styles that feel both classic and high-end on tote bags, towels, or pouches.
14. Add a Touch of Motion with Trailing Stitches
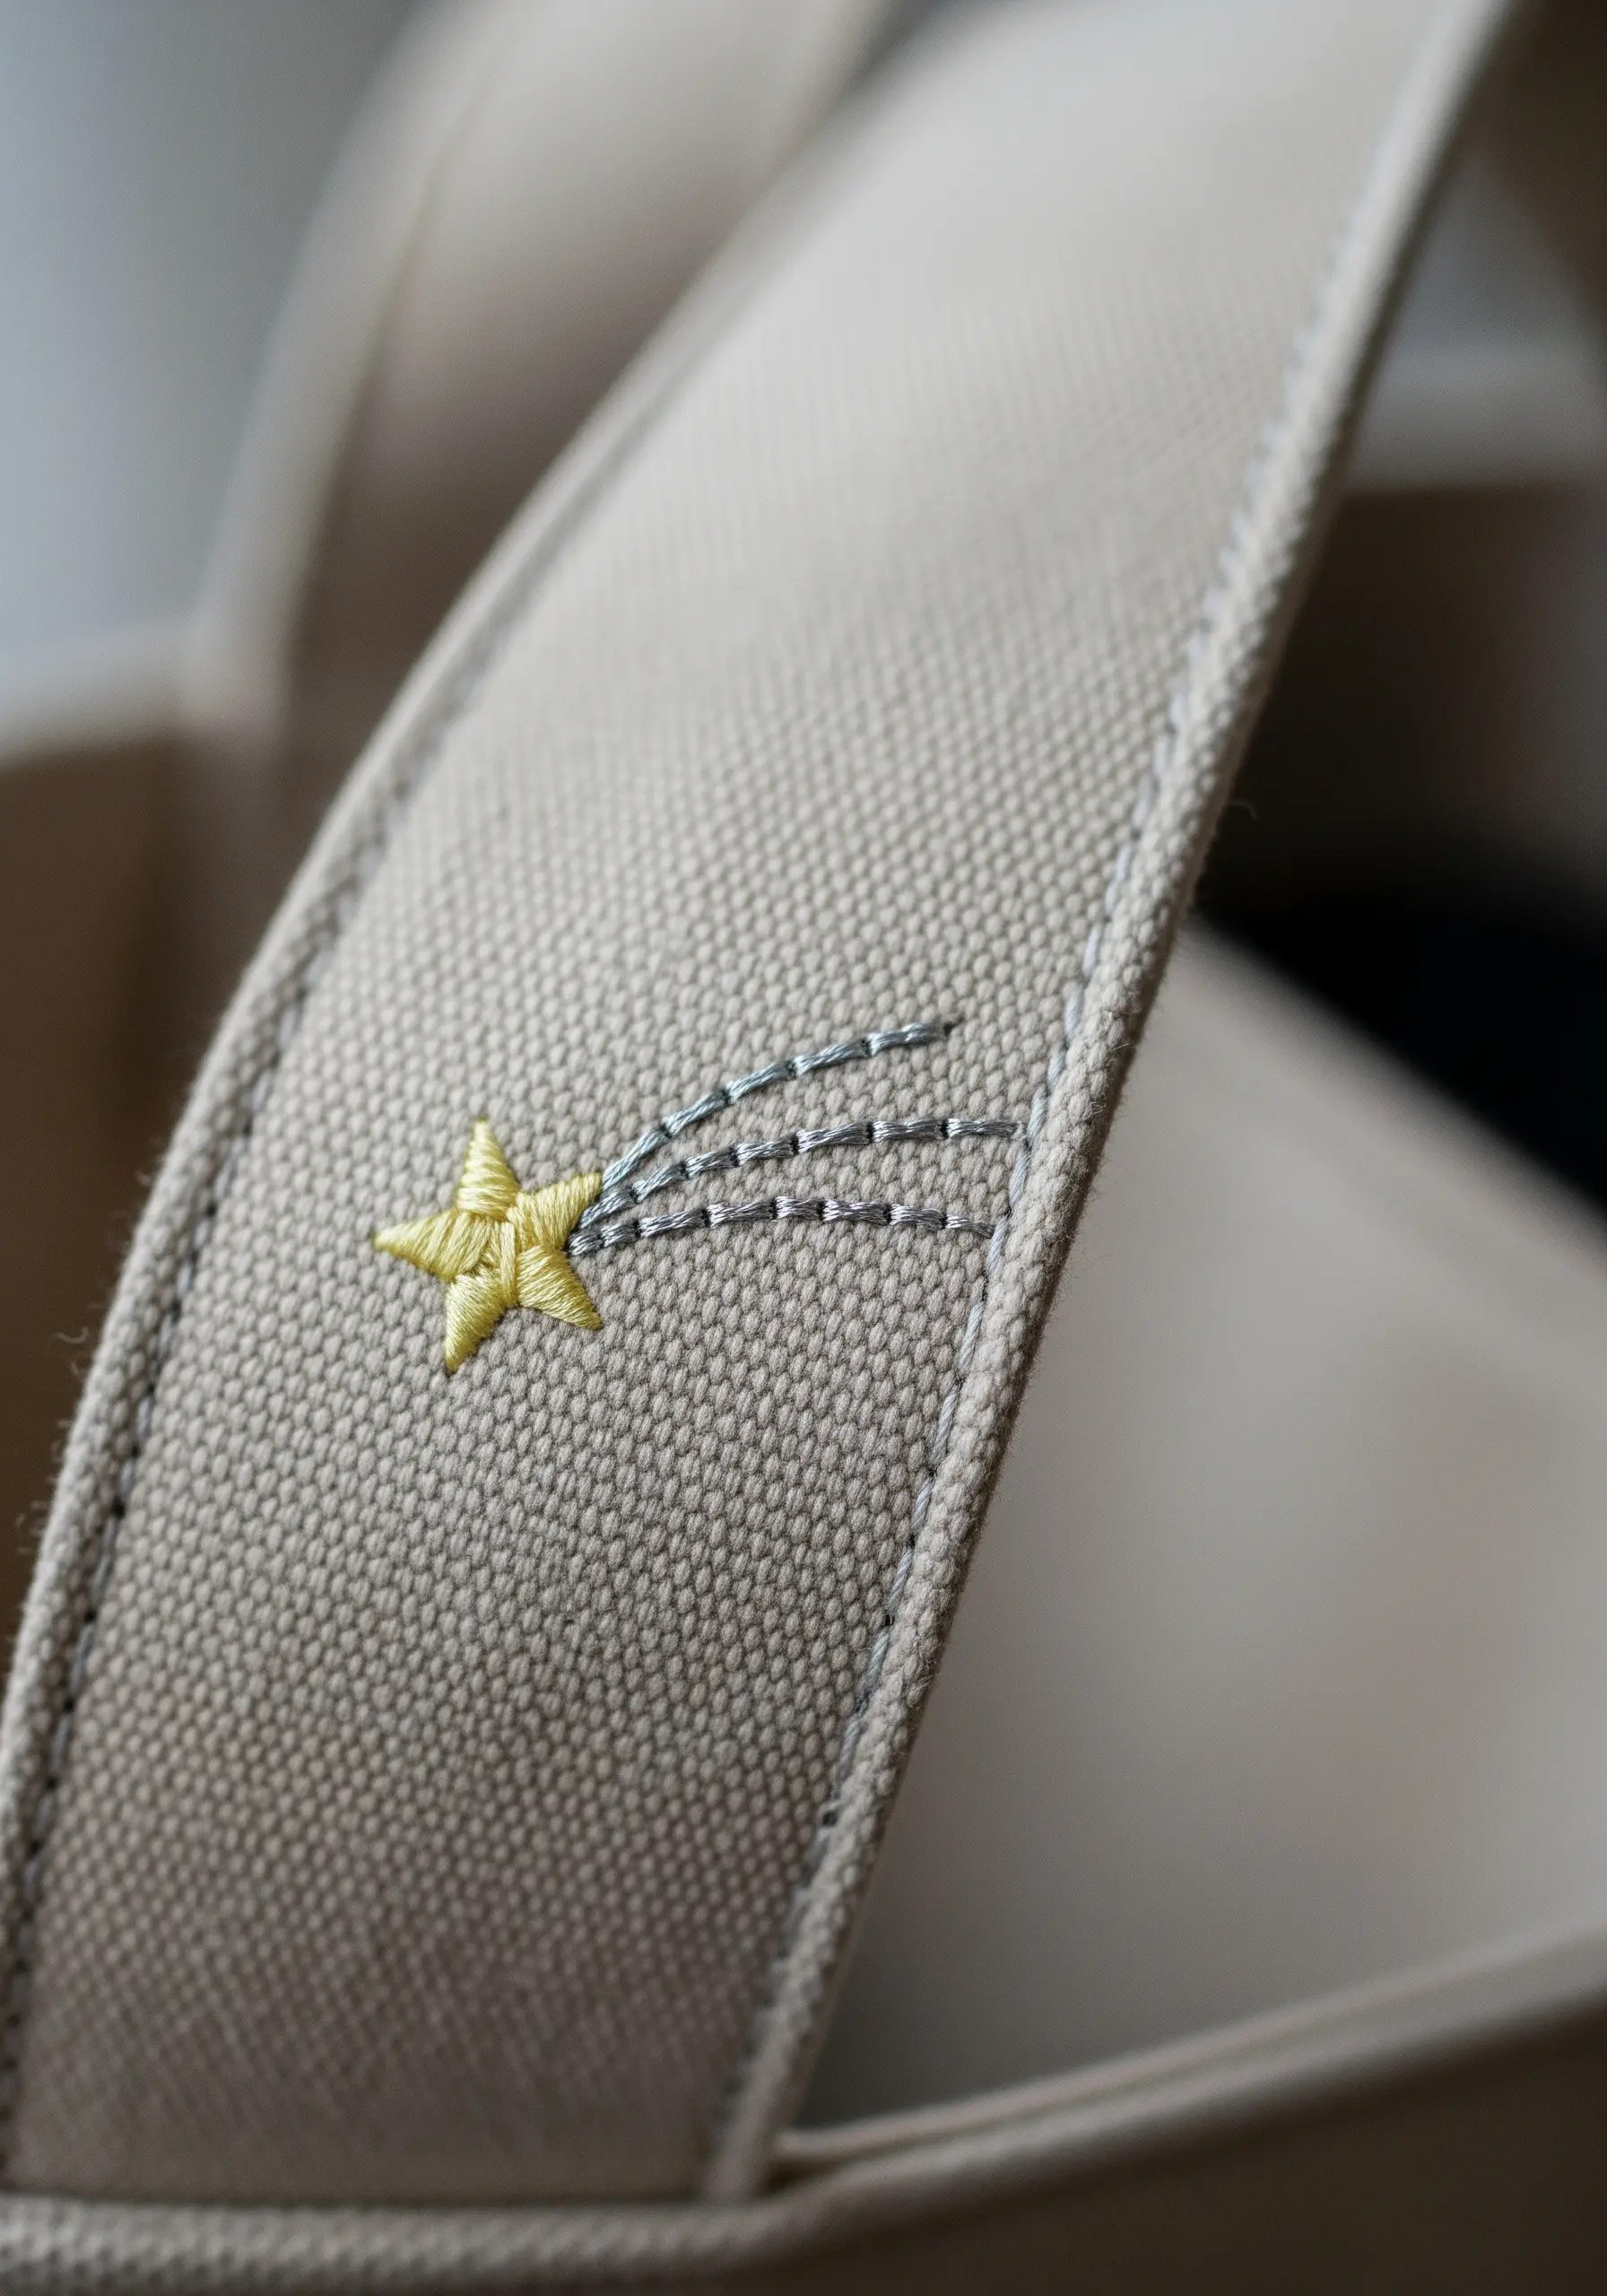
A simple motif can gain so much energy from the suggestion of movement. This shooting star is a perfect example.
Stitch the star itself with a woven picot stitch or a simple satin stitch star for a solid, dimensional feel.
For the trailing tail, use a series of straight stitches that gradually become shorter and more spaced out. Using a thinner, slightly lighter colored thread for the tail enhances the feeling of it fading away.
This technique is one of the quickest ways to add a dynamic story to the tiny embroidery motifs that transform plain tote bags and accessories.
15. Create Delicate Forms with High-Contrast Thread
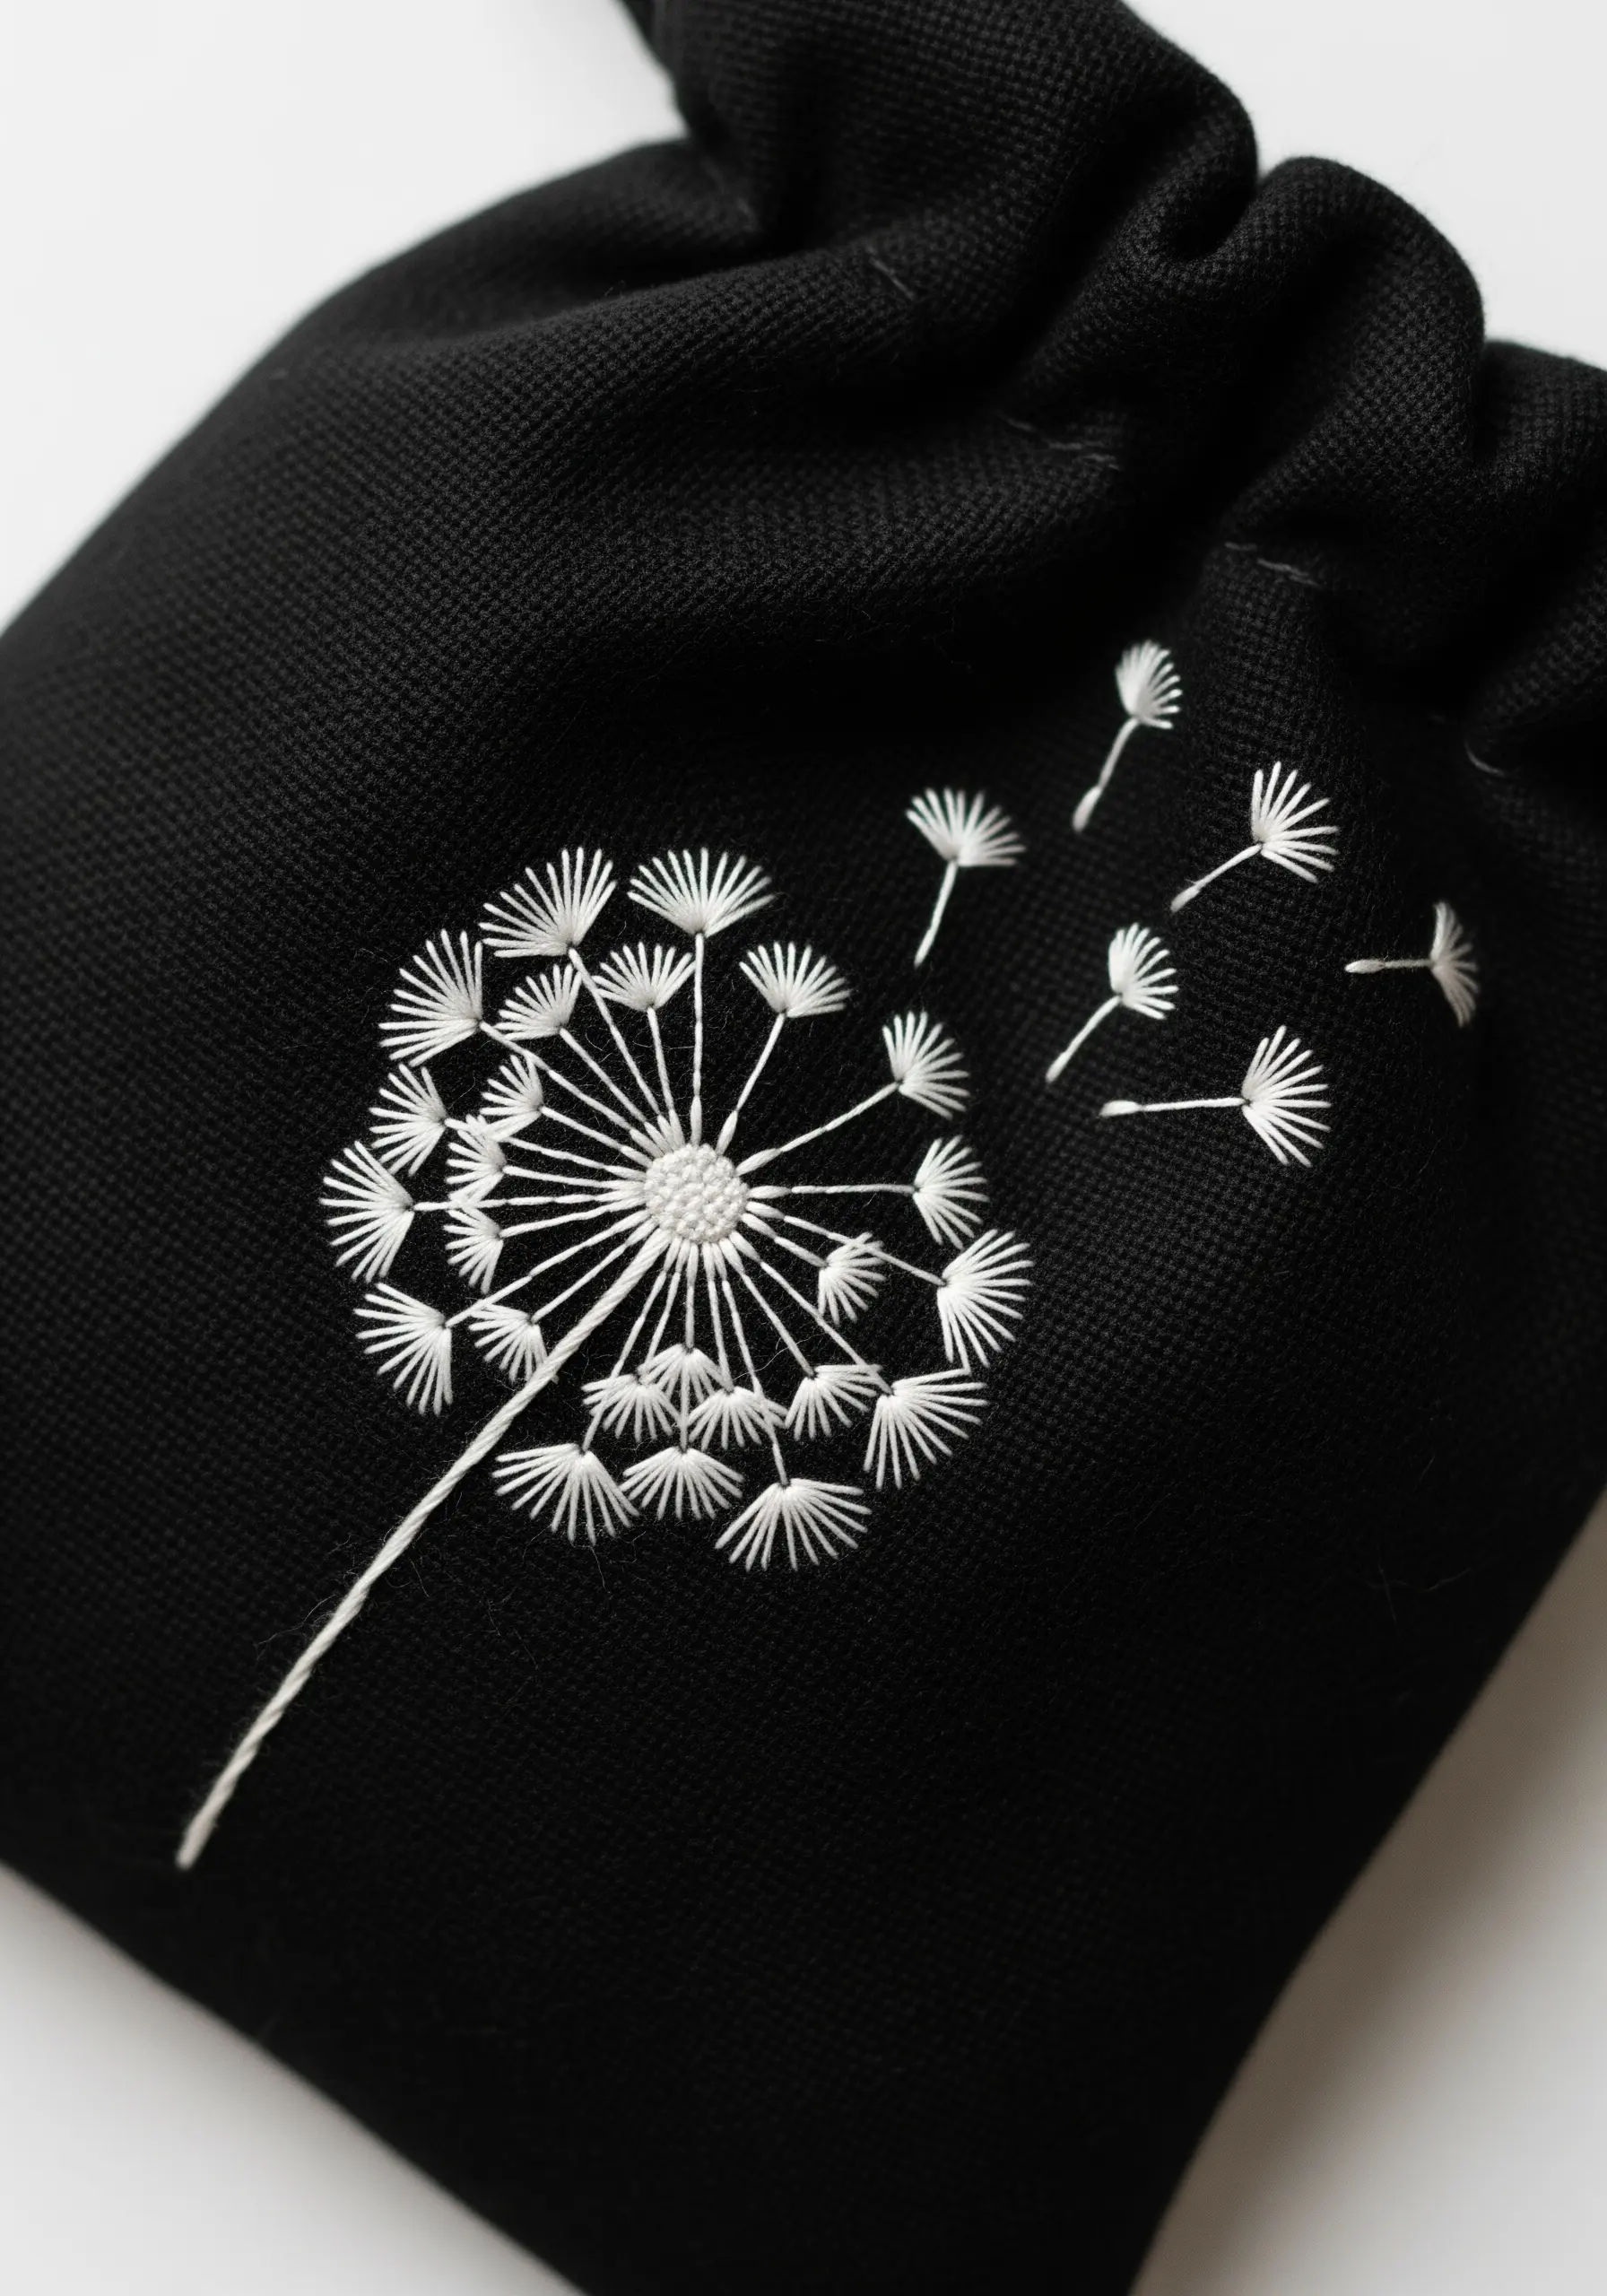
For a design with fine, airy details like a dandelion, choose a dark background fabric to make your stitches pop.
Use a detached chain stitch (or lazy daisy stitch) for each individual parachute seed. This creates a small, teardrop-shaped loop that perfectly mimics the real thing.
Add a tiny straight stitch at the end of each loop to finish the seed shape.
By using a bright white thread on black fabric, even the most delicate single-thread stitches become sharp, visible, and impactful.
16. Build Texture with Woven Wheel Roses
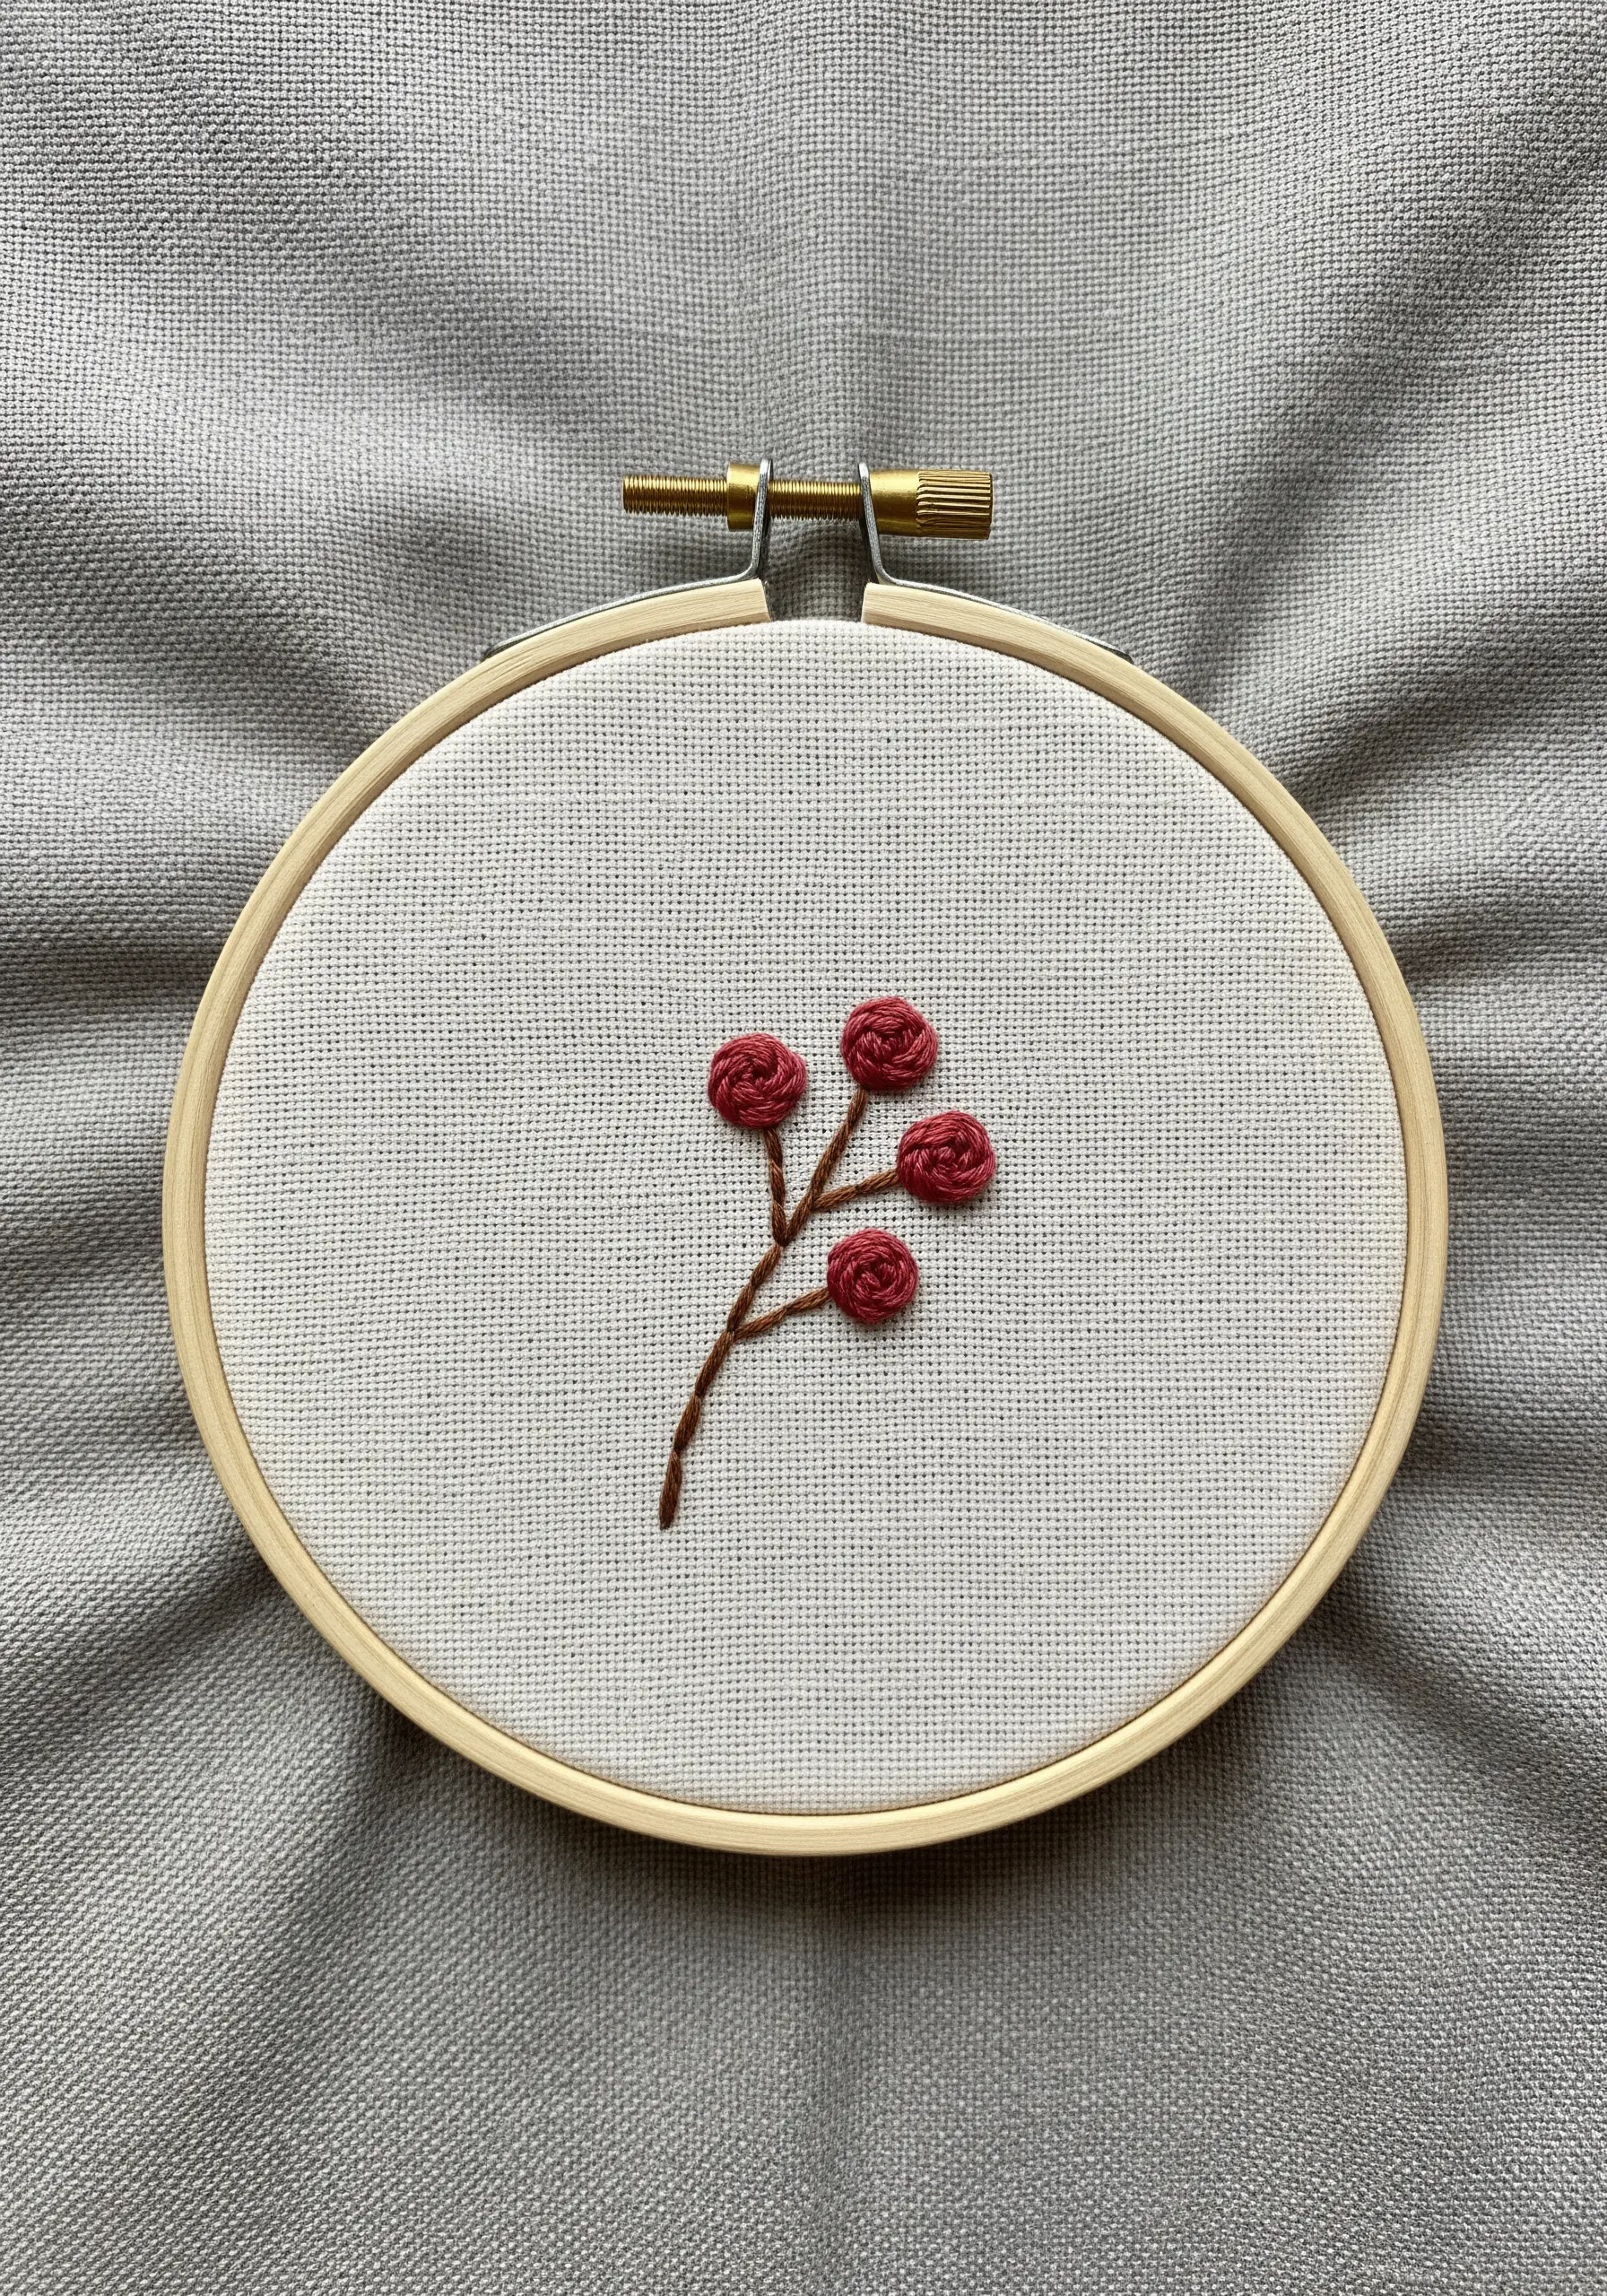
For small, dimensional florals, the woven wheel stitch (or woven spider wheel) is a fast and effective technique.
Start by creating a base of five straight stitches radiating from a central point, like the spokes of a wheel.
Then, using a tapestry needle, weave your working thread over and under the spokes until the entire shape is filled. Do not pierce the fabric while weaving.
This method builds a raised, circular rose that adds beautiful texture and dimension to any botanical design.
17. Embrace the Elegance of Minimal Line Art
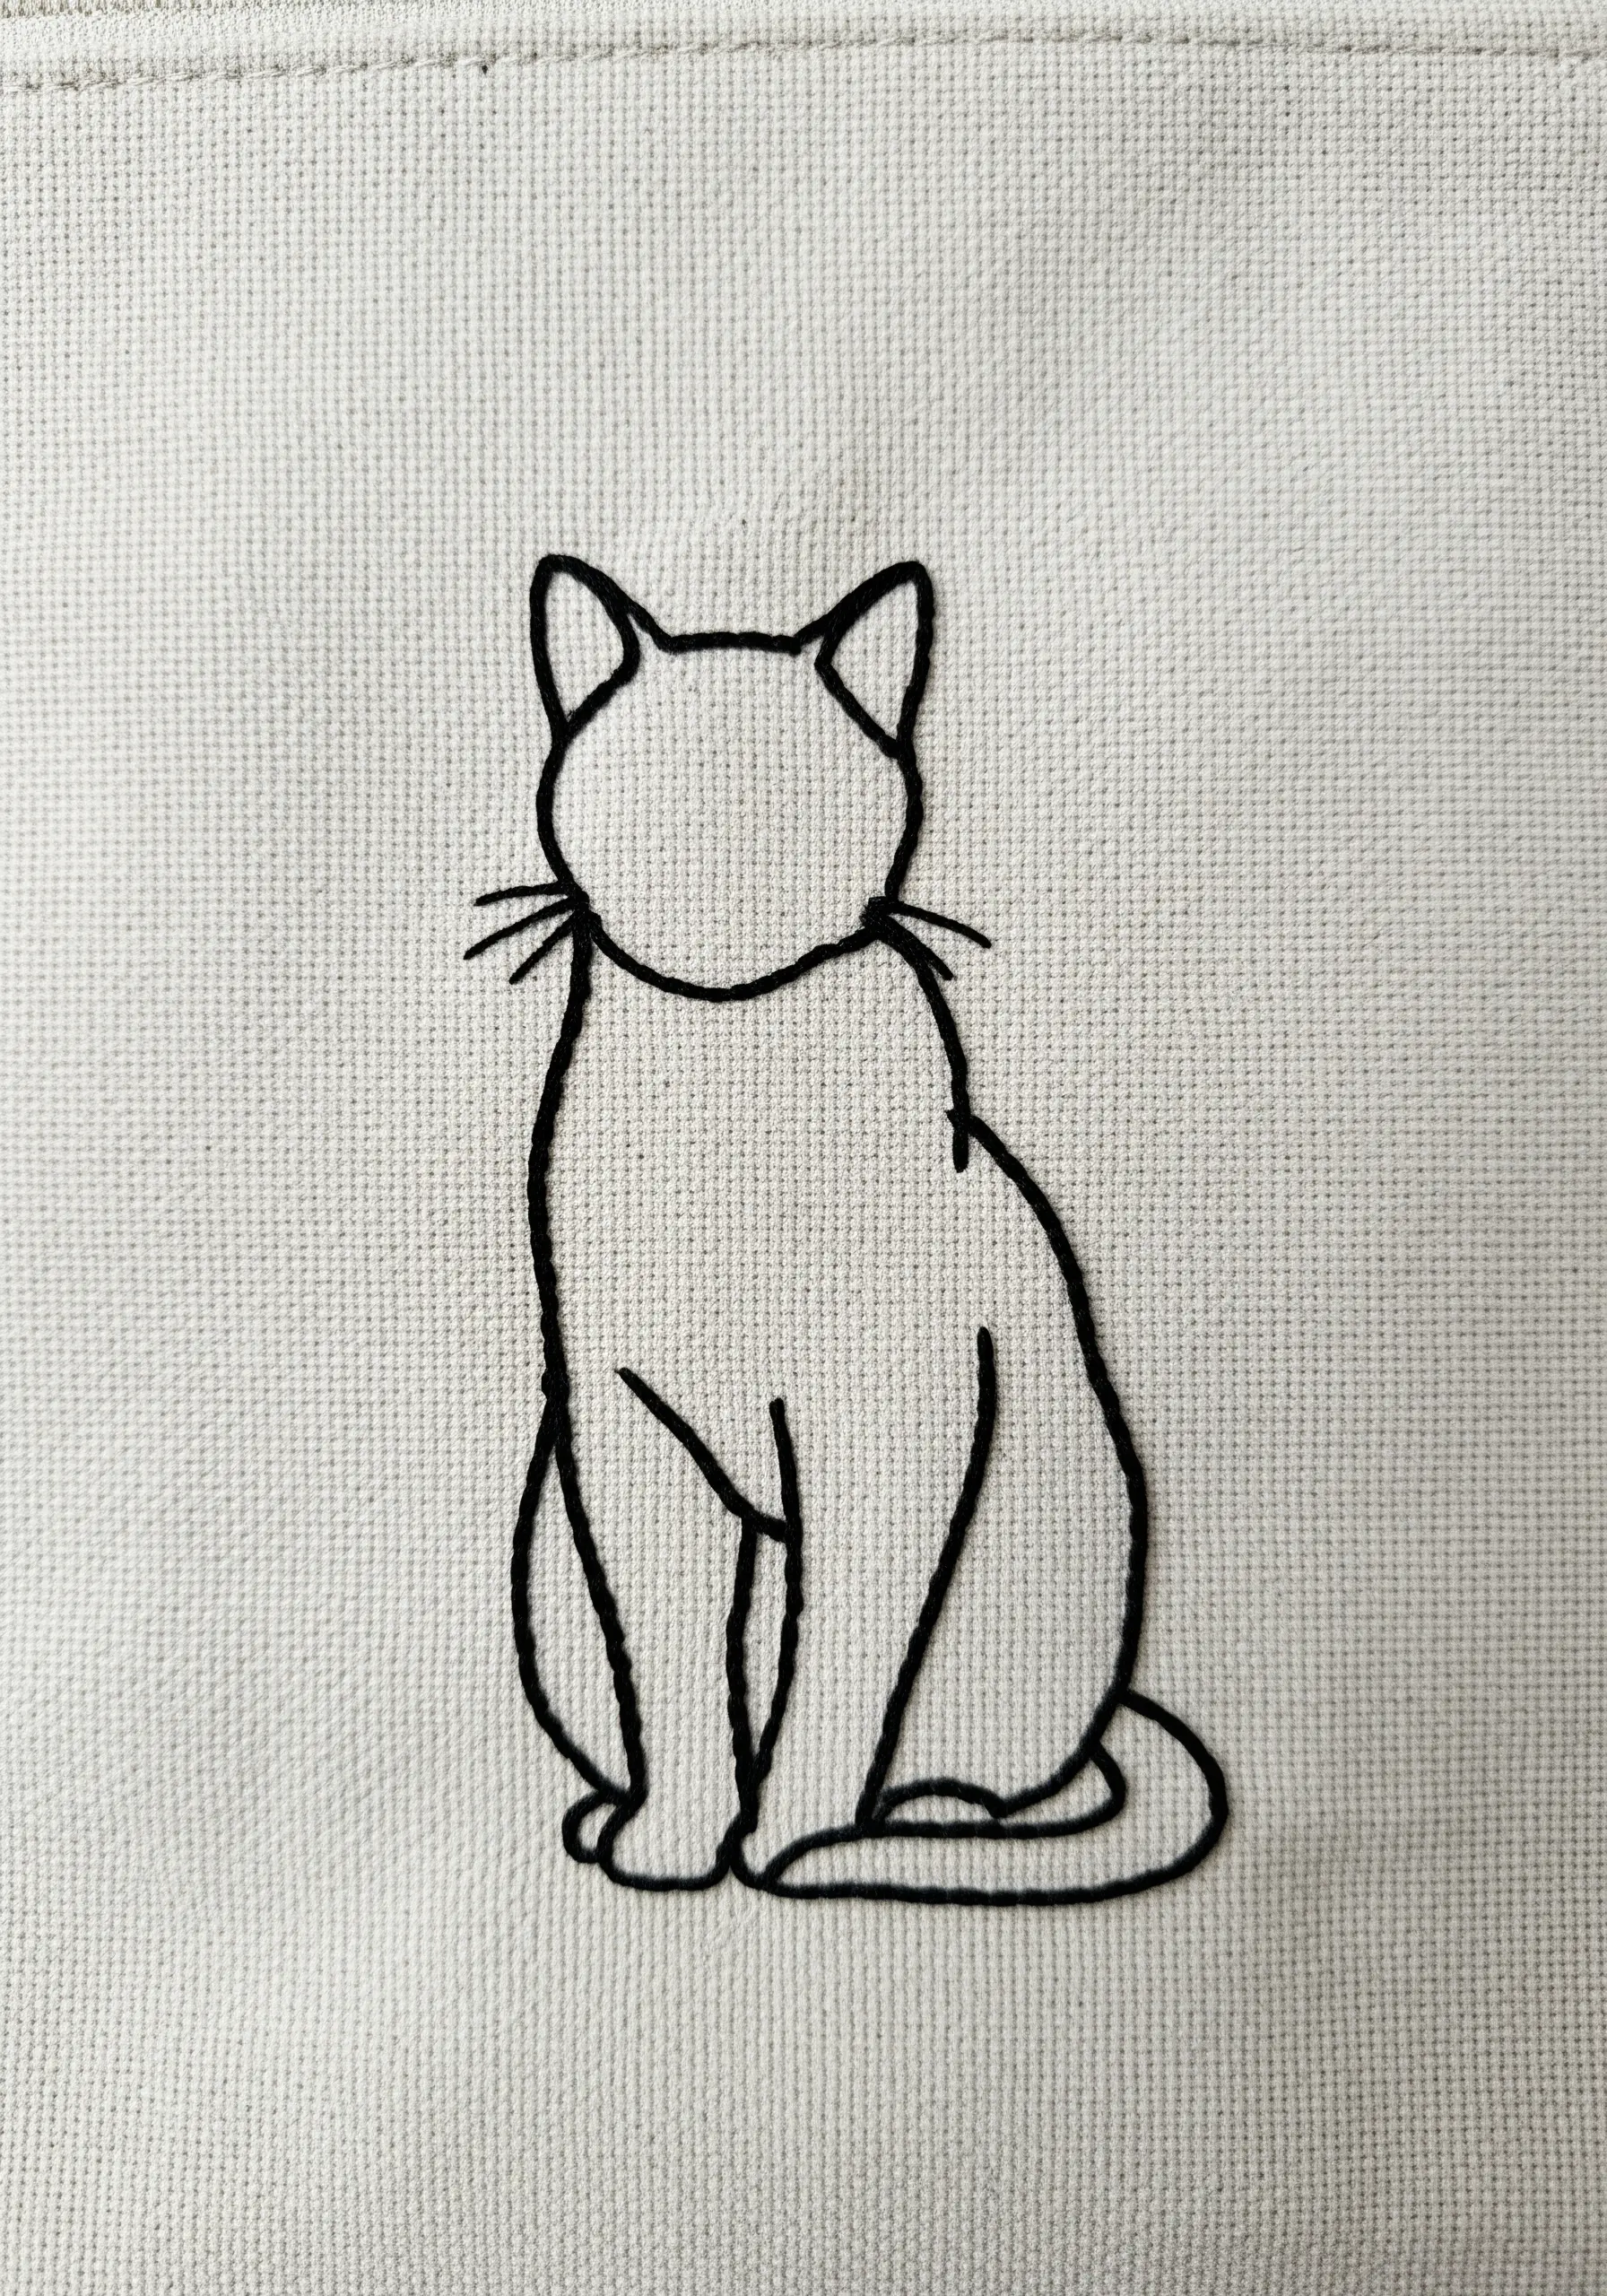
Sometimes, the most impactful designs are the simplest. A clean, single-line drawing allows the form of the subject to shine.
To achieve a smooth and continuous outline, use a stem stitch or a split stitch. Both create a solid, rope-like line that is ideal for curves and clean angles.
Use two or three strands of black floss for a line that is bold enough to stand out but delicate enough to feel elegant.
This approach works beautifully for minimal pet themed line art stitches, portraits, and botanical outlines on canvas bags and pouches.
18. Add a Subtle, Unexpected Accent
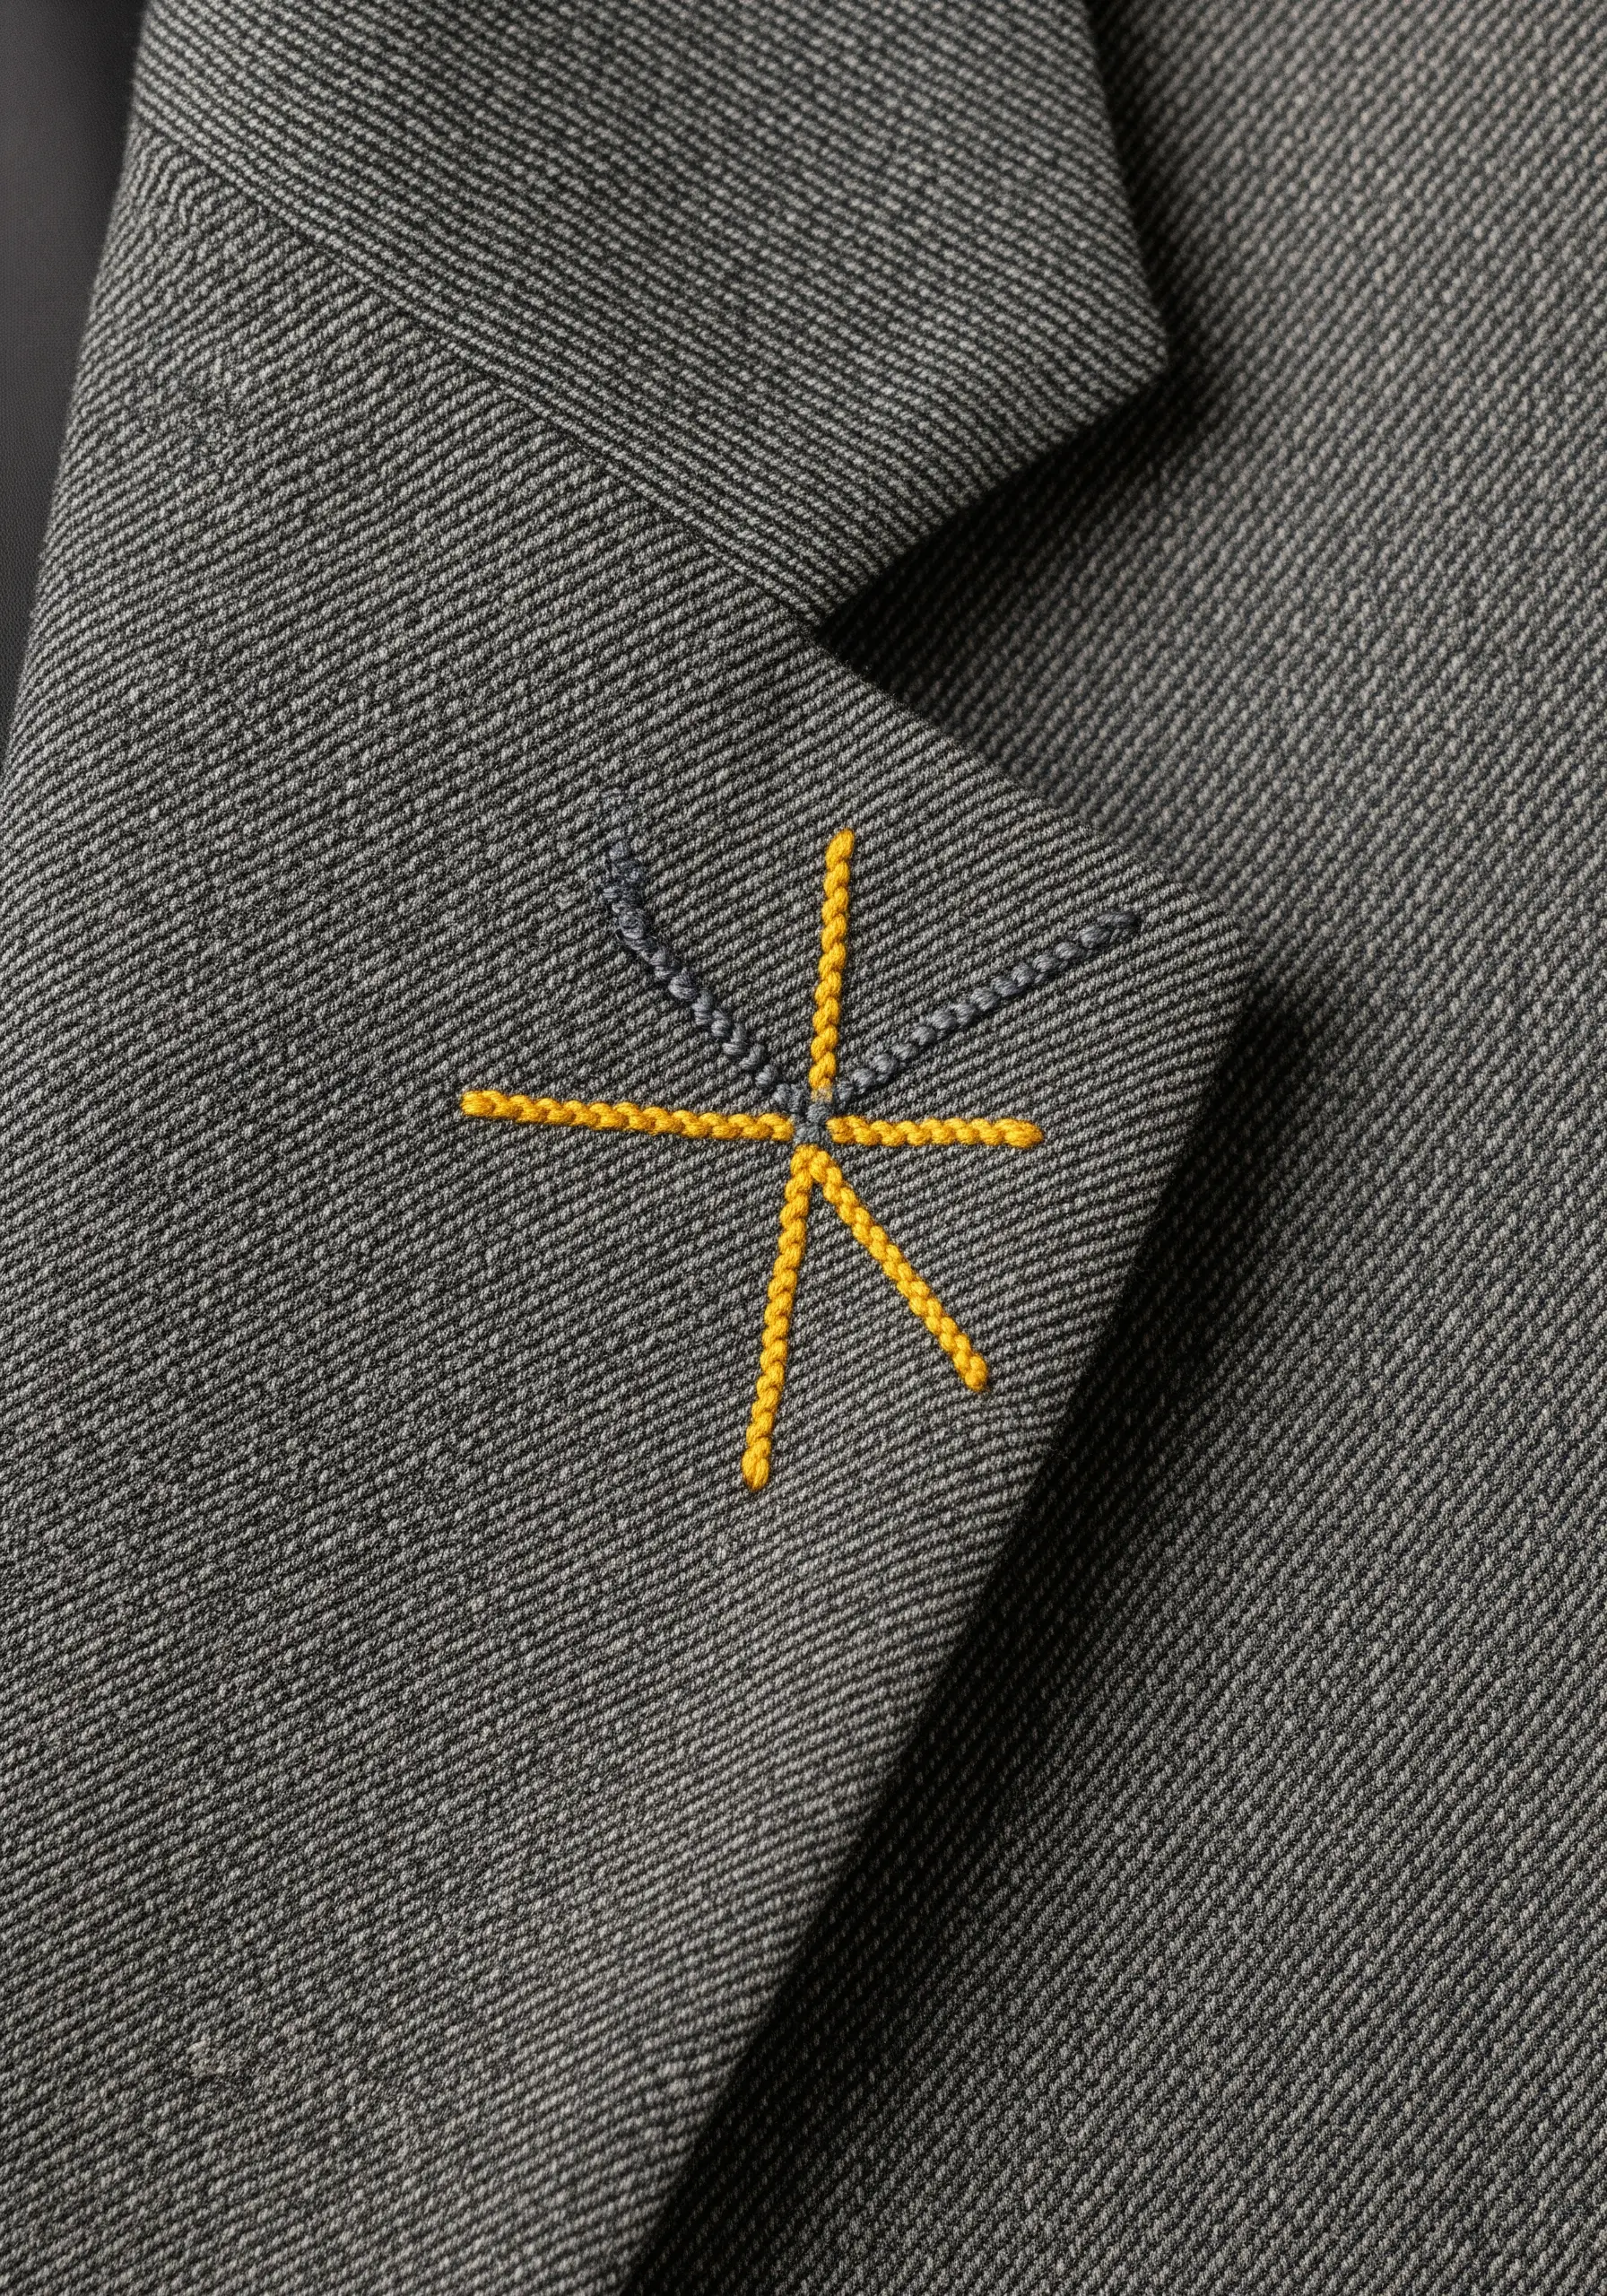
Elevate a tailored piece like a blazer by adding a small, unexpected touch of embroidery to the lapel.
A simple geometric or abstract motif, like this asterisk star, feels modern and intentional.
Use a bright, contrasting color to draw the eye, but keep the design small and crisp. A few well-placed straight stitches are all you need.
This is one of those tiny secret embroidery ideas that adds a whisper of personality without overwhelming the garment’s structure.
19. Form Simple Petals with Lazy Daisy Stitches
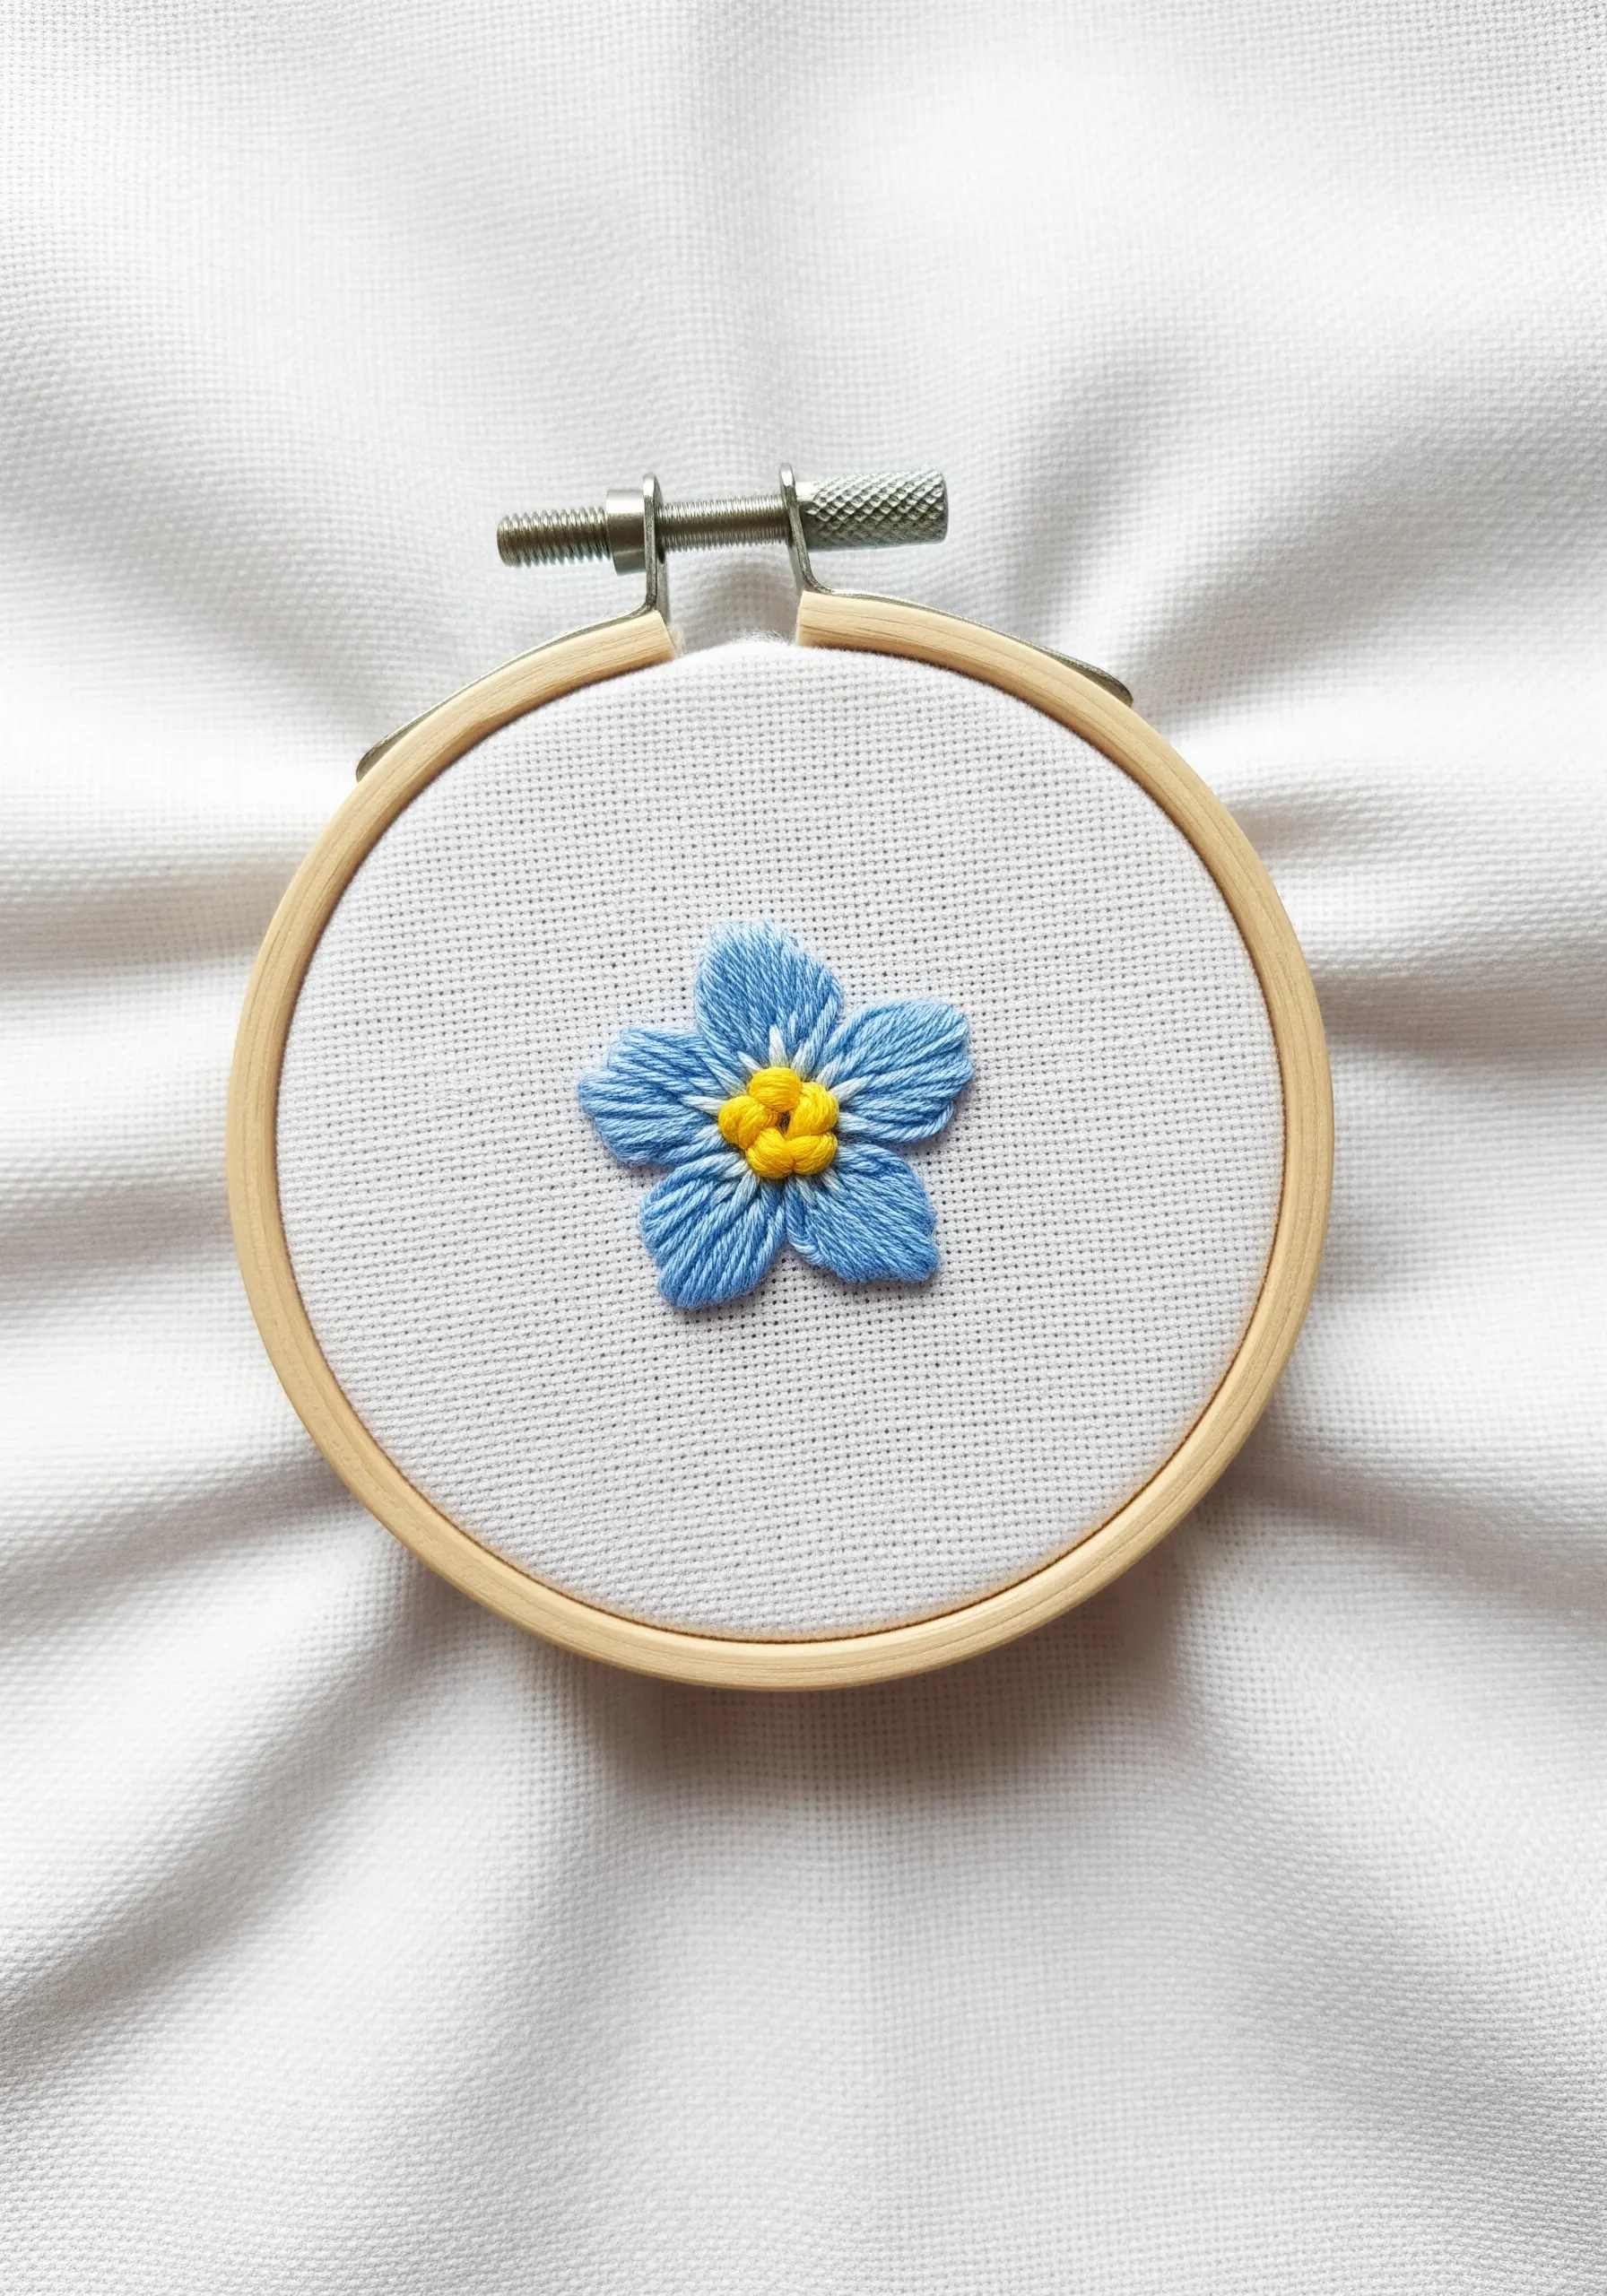
The lazy daisy stitch, also known as a detached chain stitch, is perfect for creating quick and charming flower petals.
Bring your needle up through the fabric, form a small loop of thread, and anchor it with a tiny stitch at the top. Arrange five or six of these loops in a circle to form the flower.
Fill the center with a few tightly packed French knots in a contrasting color like yellow to create a realistic and textured core.
This simple combination is all you need for many kinds of tiny floral embroidery ideas, making it a perfect technique for beginners.


