
You have the threads, the needles, and the desire to create something beautiful for your walls. But perhaps you feel stuck, repeating the same stitches or feeling that your finished pieces lack a certain professional polish. It’s a common feeling, but the path to elevating your work is closer than you think.
It isn’t about mastering hundreds of complex techniques. Instead, it’s about learning to see yarn and fiber differently—as a sculptural material, a painterly medium, a tool for creating texture that tells a story. It’s about understanding *why* a certain knot creates shadow, or how a change in yarn thickness can transform an entire composition.
Here, we will move beyond simple patterns and into the realm of artistry. You will find tangible ways to add depth, emotion, and a modern, intentional aesthetic to your work. Consider this your guide to transforming simple threads into art that feels uniquely, confidently yours.
1. Blend Macrame Knots with Woven Textures
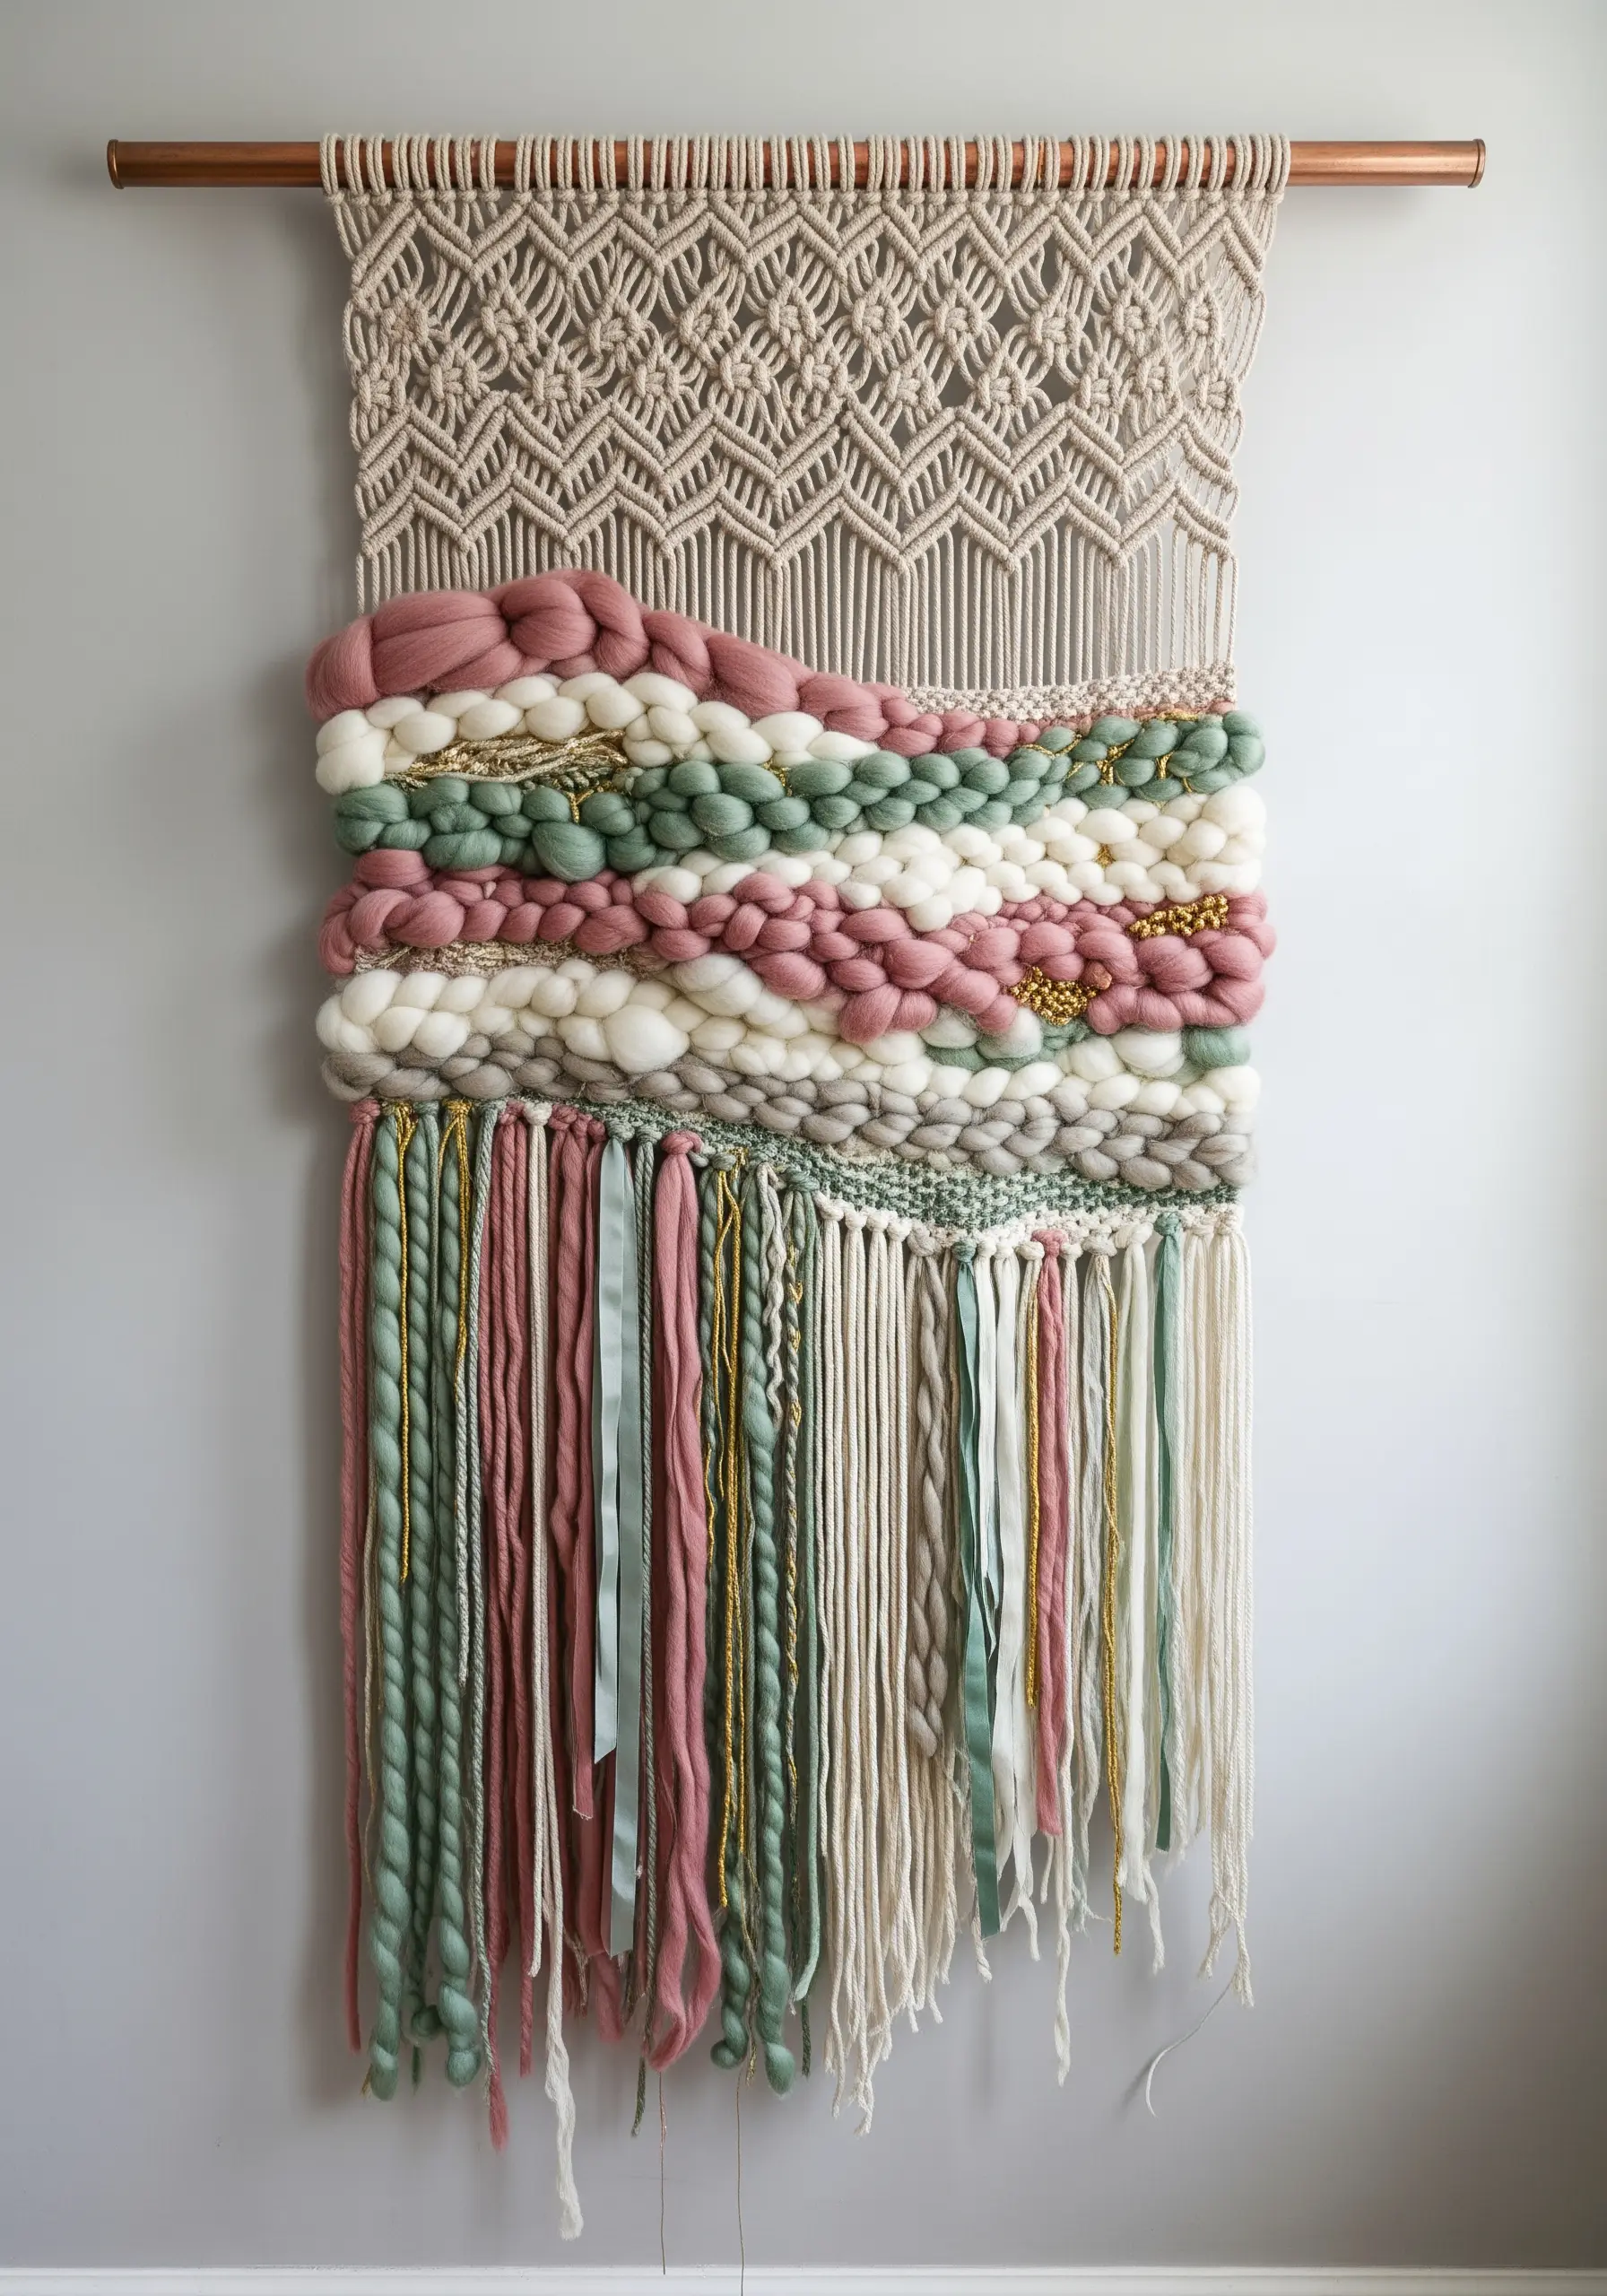
Create a stunning focal point by combining the structure of macrame with the softness of freeform weaving.
Start with a macrame top section using classic square and double half-hitch knots to establish a geometric foundation.
For the woven middle, introduce chunky wool roving and Soumak stitches to build soft, cloud-like bands of color and texture.
Integrate unexpected materials like silk ribbons or metallic threads to catch the light and add a layer of luxury.
This contrast between tight, repeating knots and plush, organic weaves creates a dynamic visual rhythm that feels both intentional and artistic.
2. Compose a Gallery Wall with Woven Hoop Art
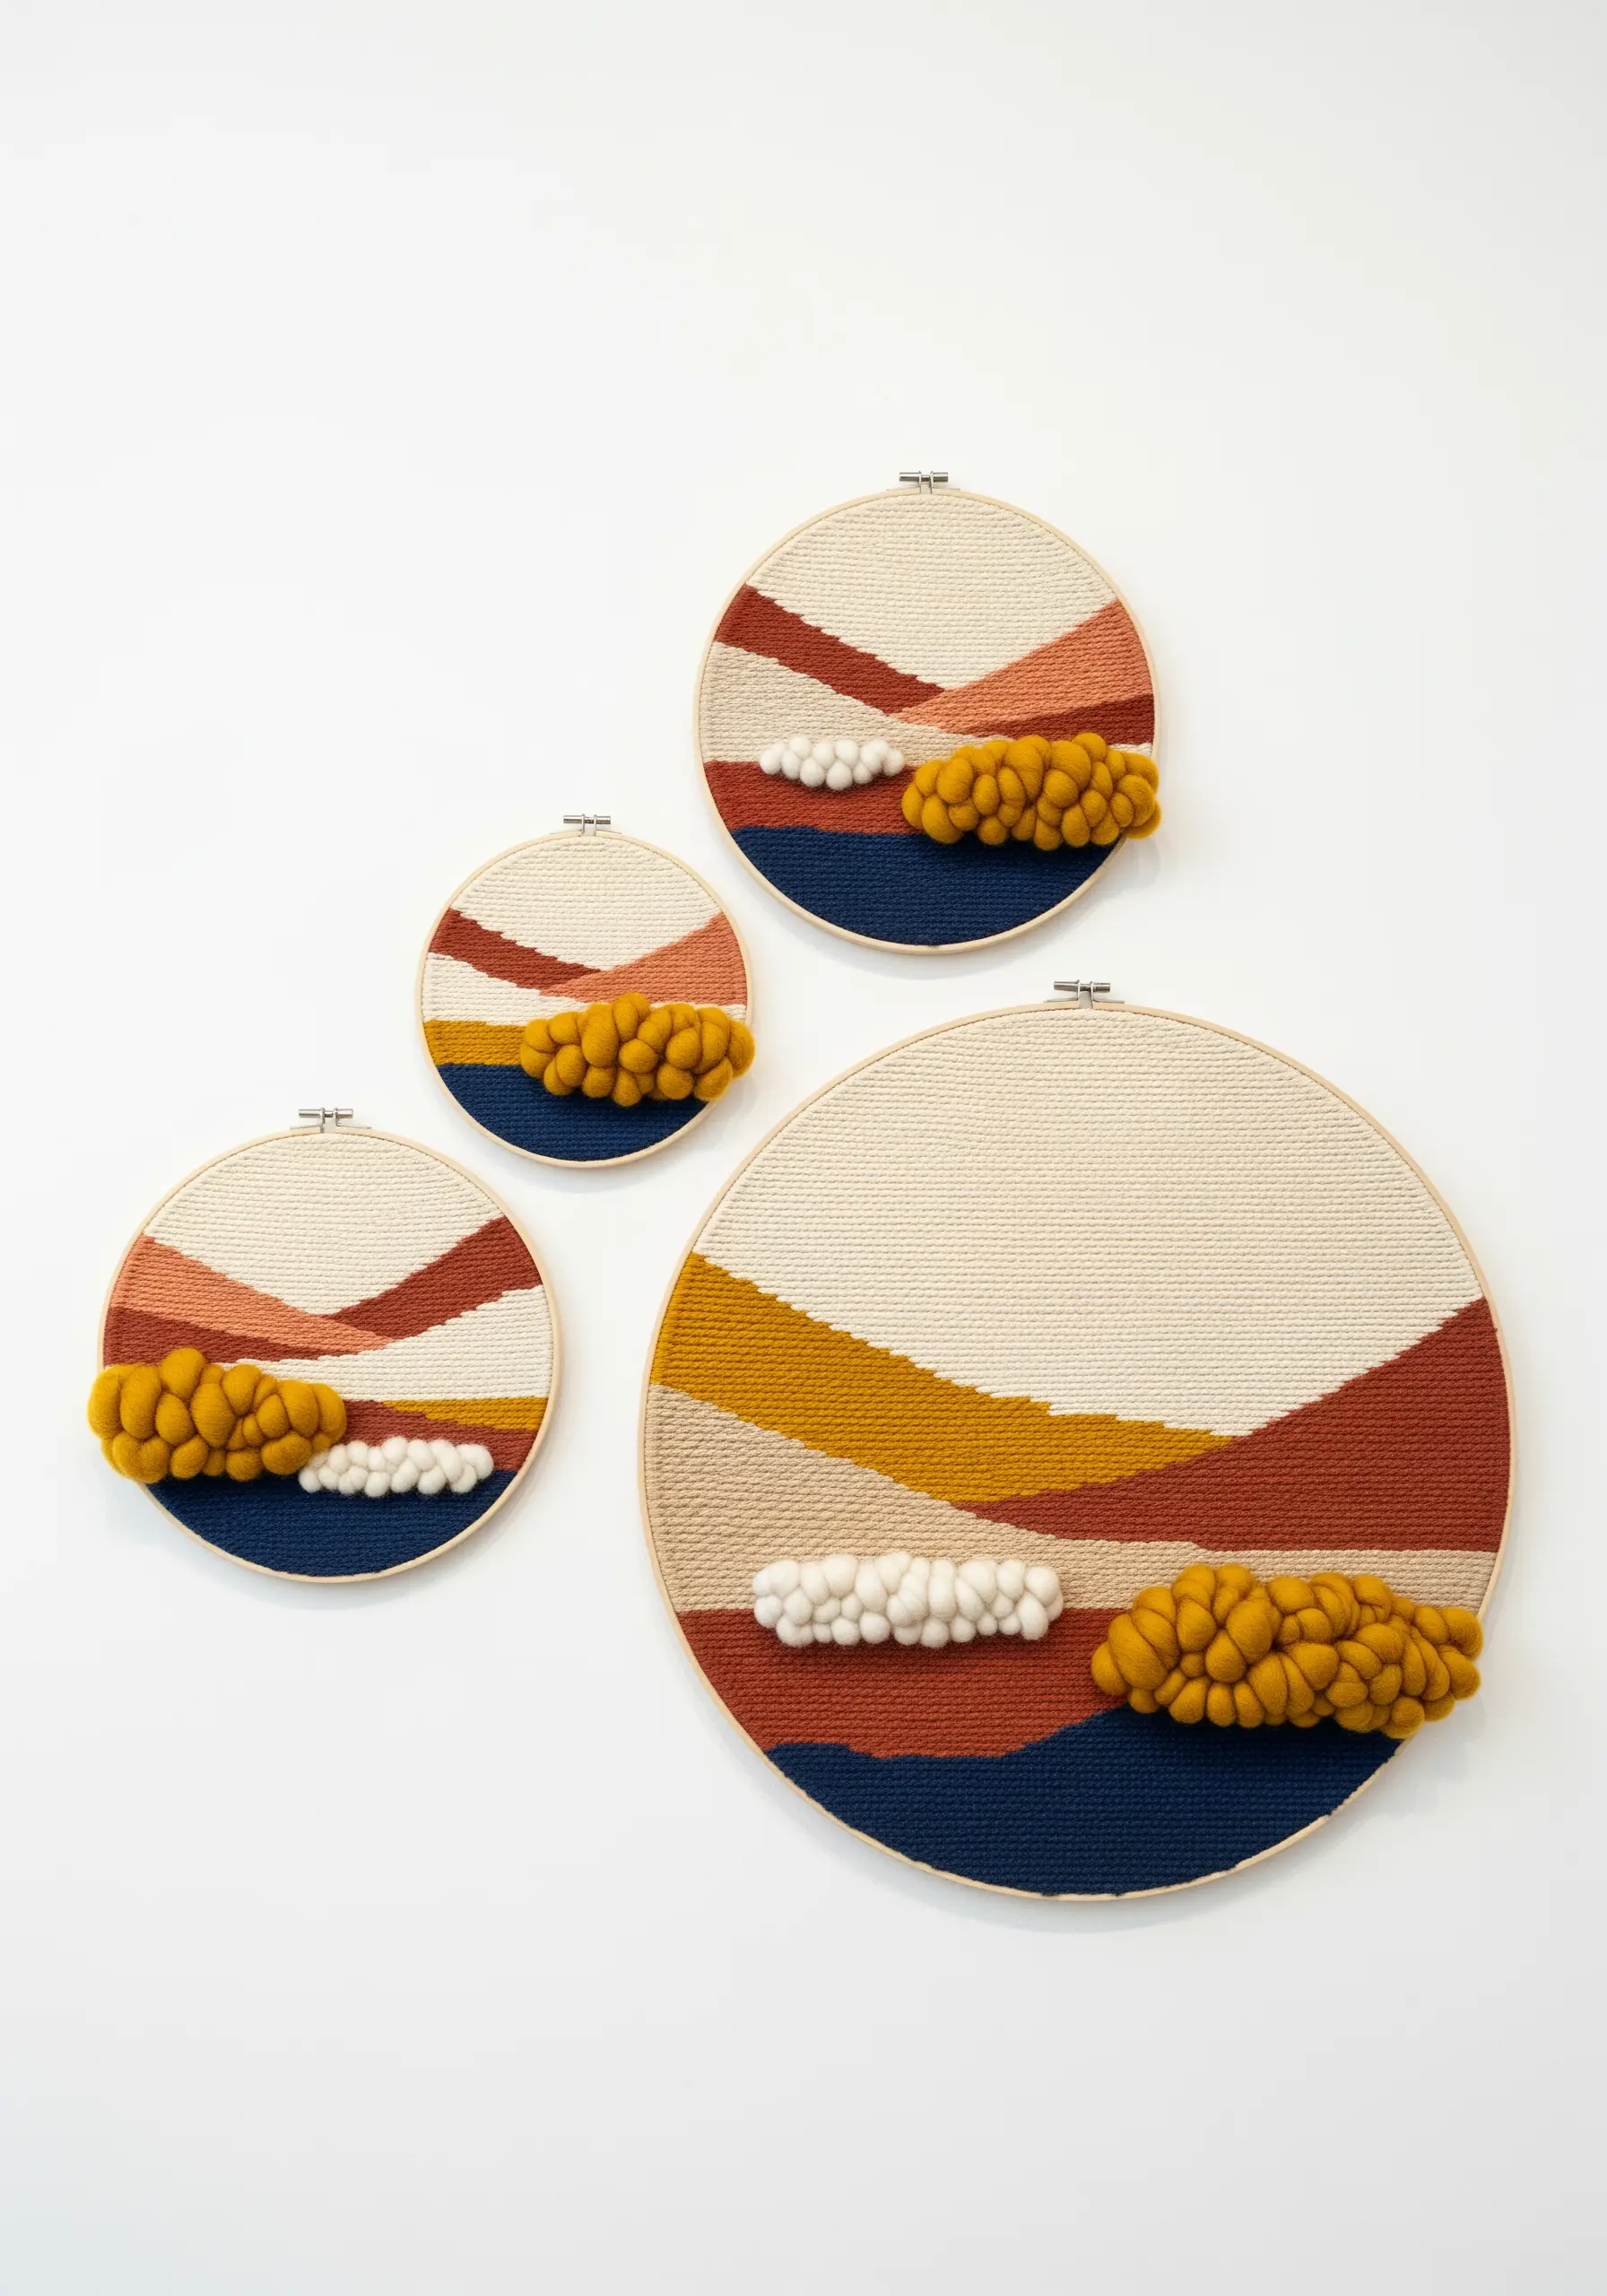
Instead of one large piece, tell a story across several smaller woven hoops to create a modern gallery wall.
To ensure cohesion, use a consistent color palette and a recurring motif, like an abstract horizon line, across hoops of varying sizes.
Experiment with punch needle or weaving on monk’s cloth stretched in an embroidery hoop for a tight, clean surface.
Incorporate chunky, unspun roving to create bold, three-dimensional elements that break the flat plane, adding sculptural interest that connects the individual pieces.
3. Sculptural Dimension with Punch Needle Gradients
Use a punch needle to create dense, plush textures that transform a flat design into a touchable, three-dimensional piece.
To achieve a smooth color gradient within a single shape, thread your punch needle with two different colored yarns at once.
Varying your loop height with an adjustable punch needle adds another layer of sculptural detail, allowing you to make leaves recede and flowers pop forward.
This technique turns simple floral motifs into rich, tactile art with a professional finish.
4. Define Shapes with High-Contrast Tufting
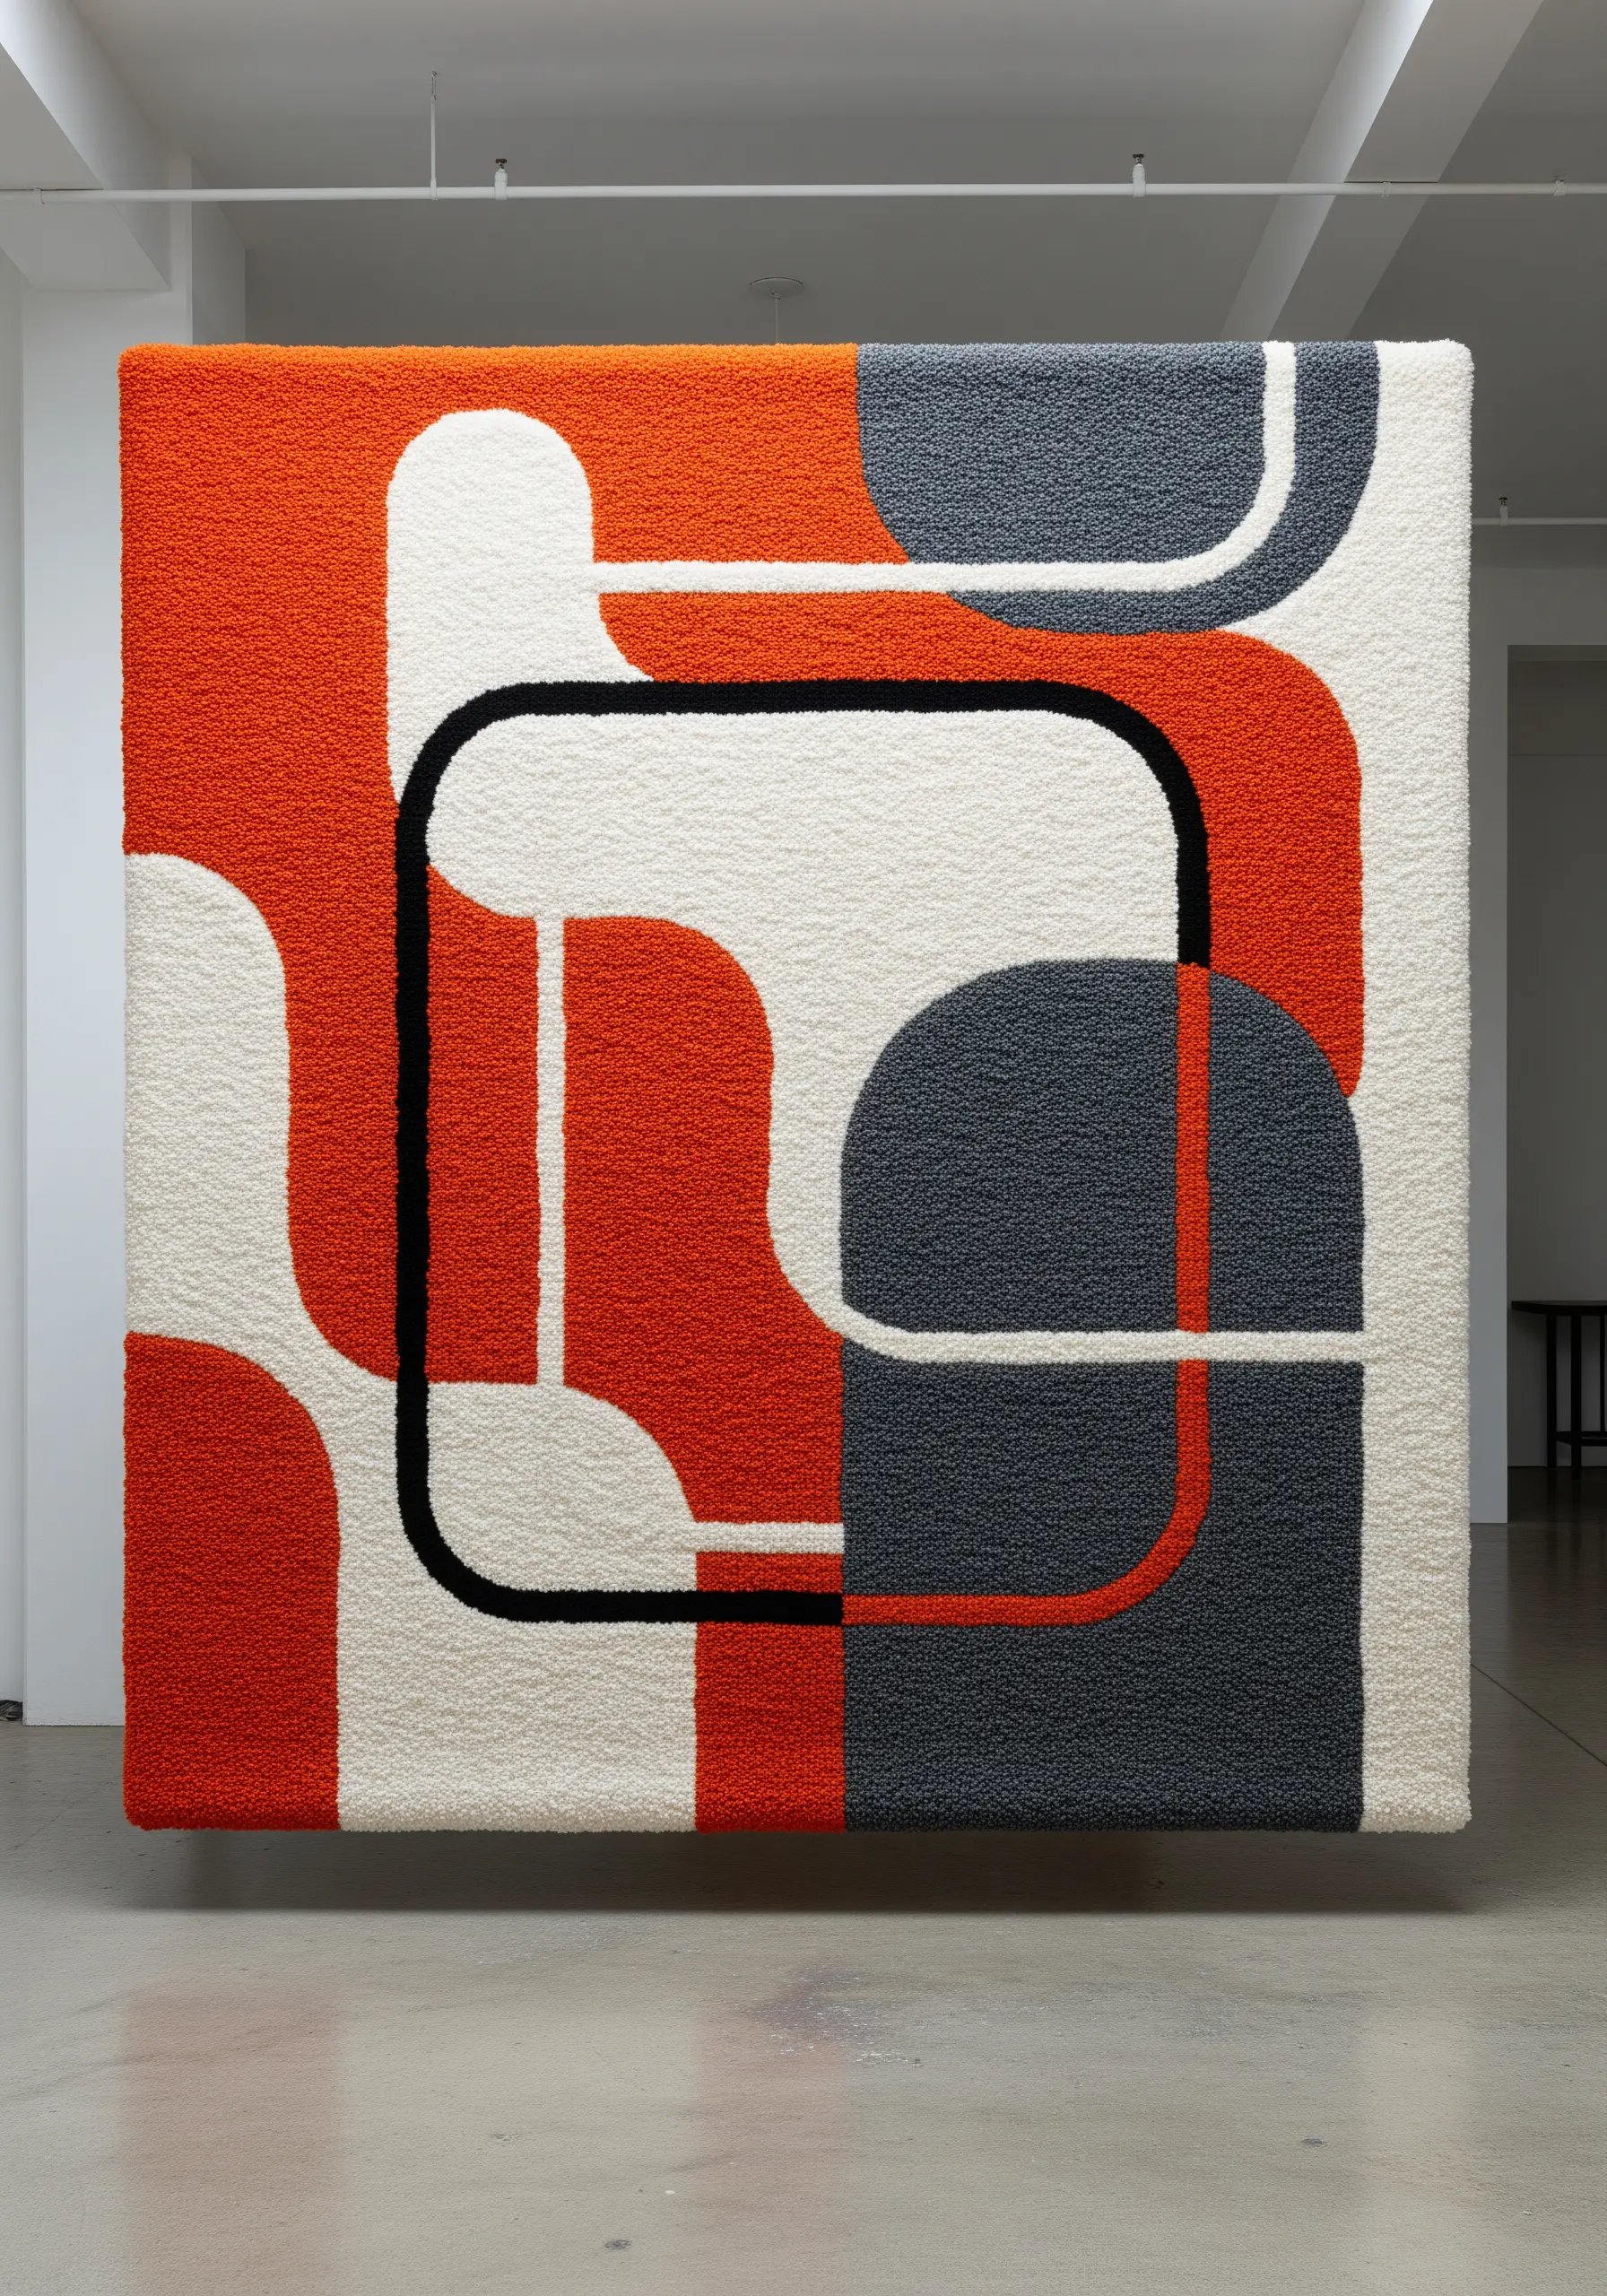
For large-scale, graphic pieces, tufting allows you to fill large areas with dense, satisfying texture quickly.
The key to a bold, modern composition lies in creating sharp, clean divisions between your color-blocked shapes.
Use a strong, dark outline—like black yarn—to frame each color field. This acts like a drawn line in a painting, providing structure and making the adjacent colors appear more vibrant.
This technique is perfect for translating abstract geometric designs into impactful textile art.
5. Integrate Natural Elements into Your Macrame
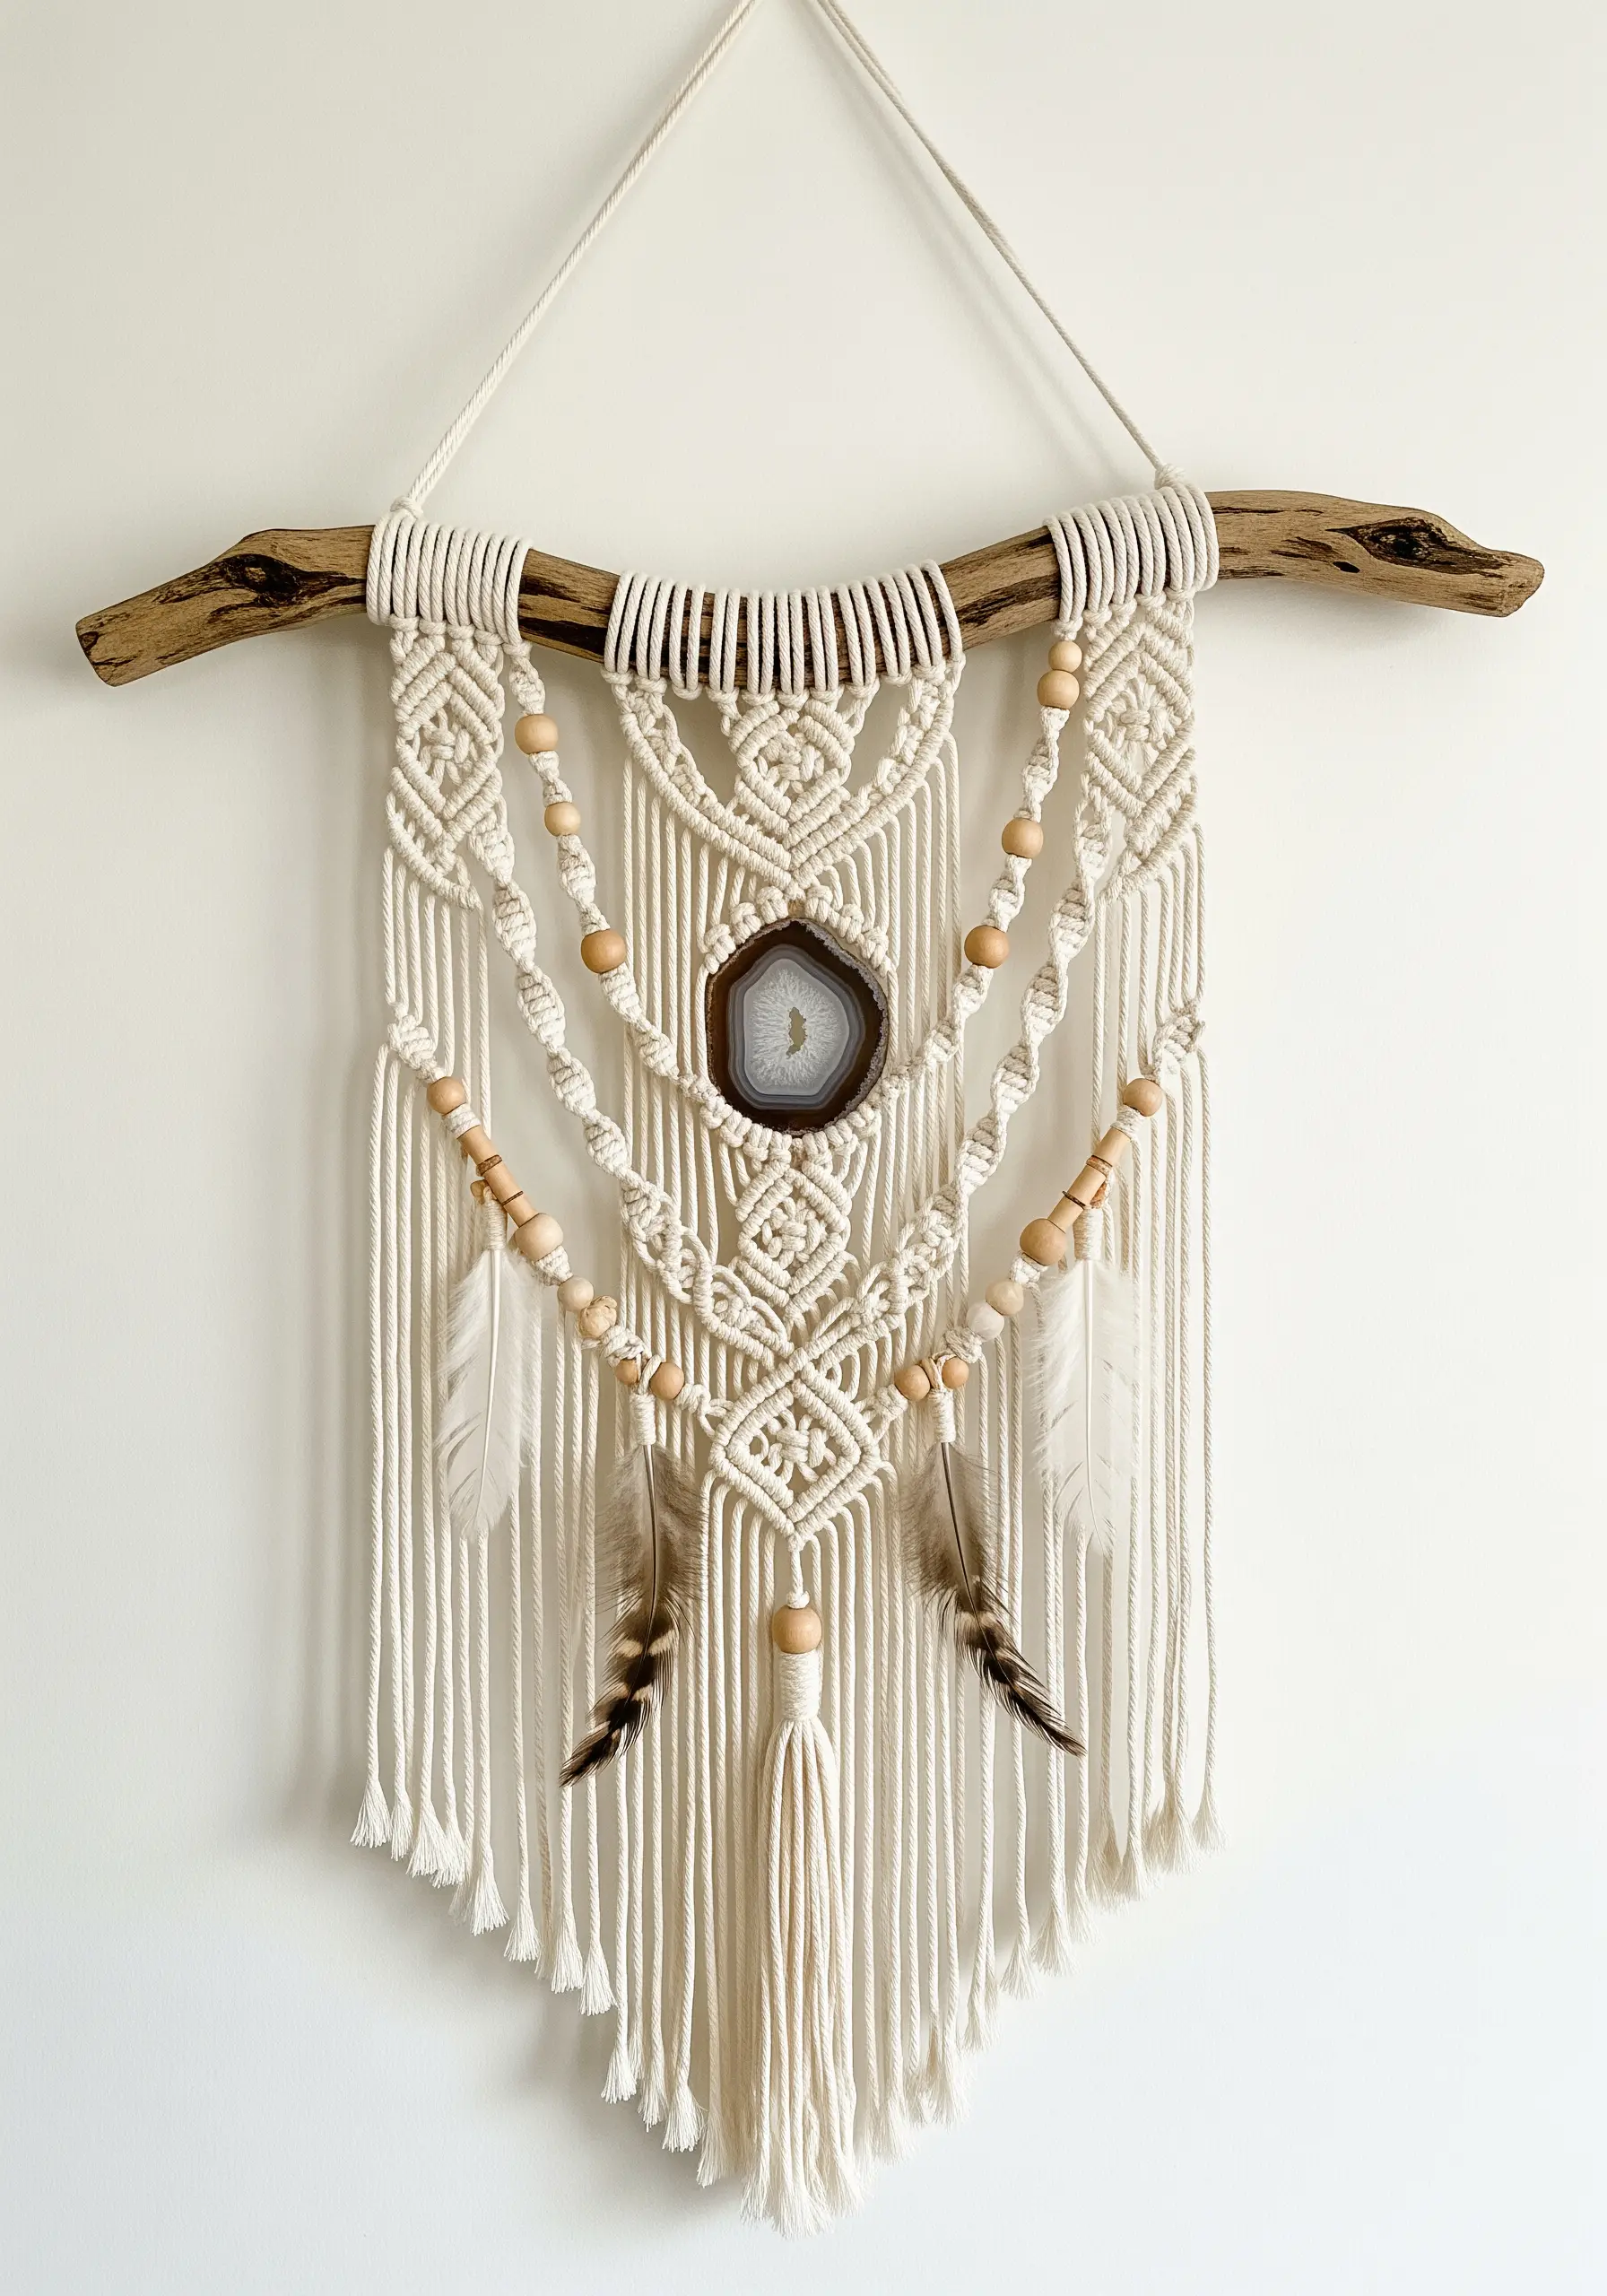
Elevate your macrame by moving beyond knots alone and incorporating a natural object as the centerpiece.
Select a beautiful element like a polished agate slice, a unique piece of driftwood, or a large crystal.
Secure your chosen object using carefully placed lark’s head and double half-hitch knots, creating a bezel-like frame that feels integrated, not just attached.
Let the colors of the natural element inspire your yarn choice, creating a harmonious and grounded piece of art.
6. Create Geometric Depth with String Art
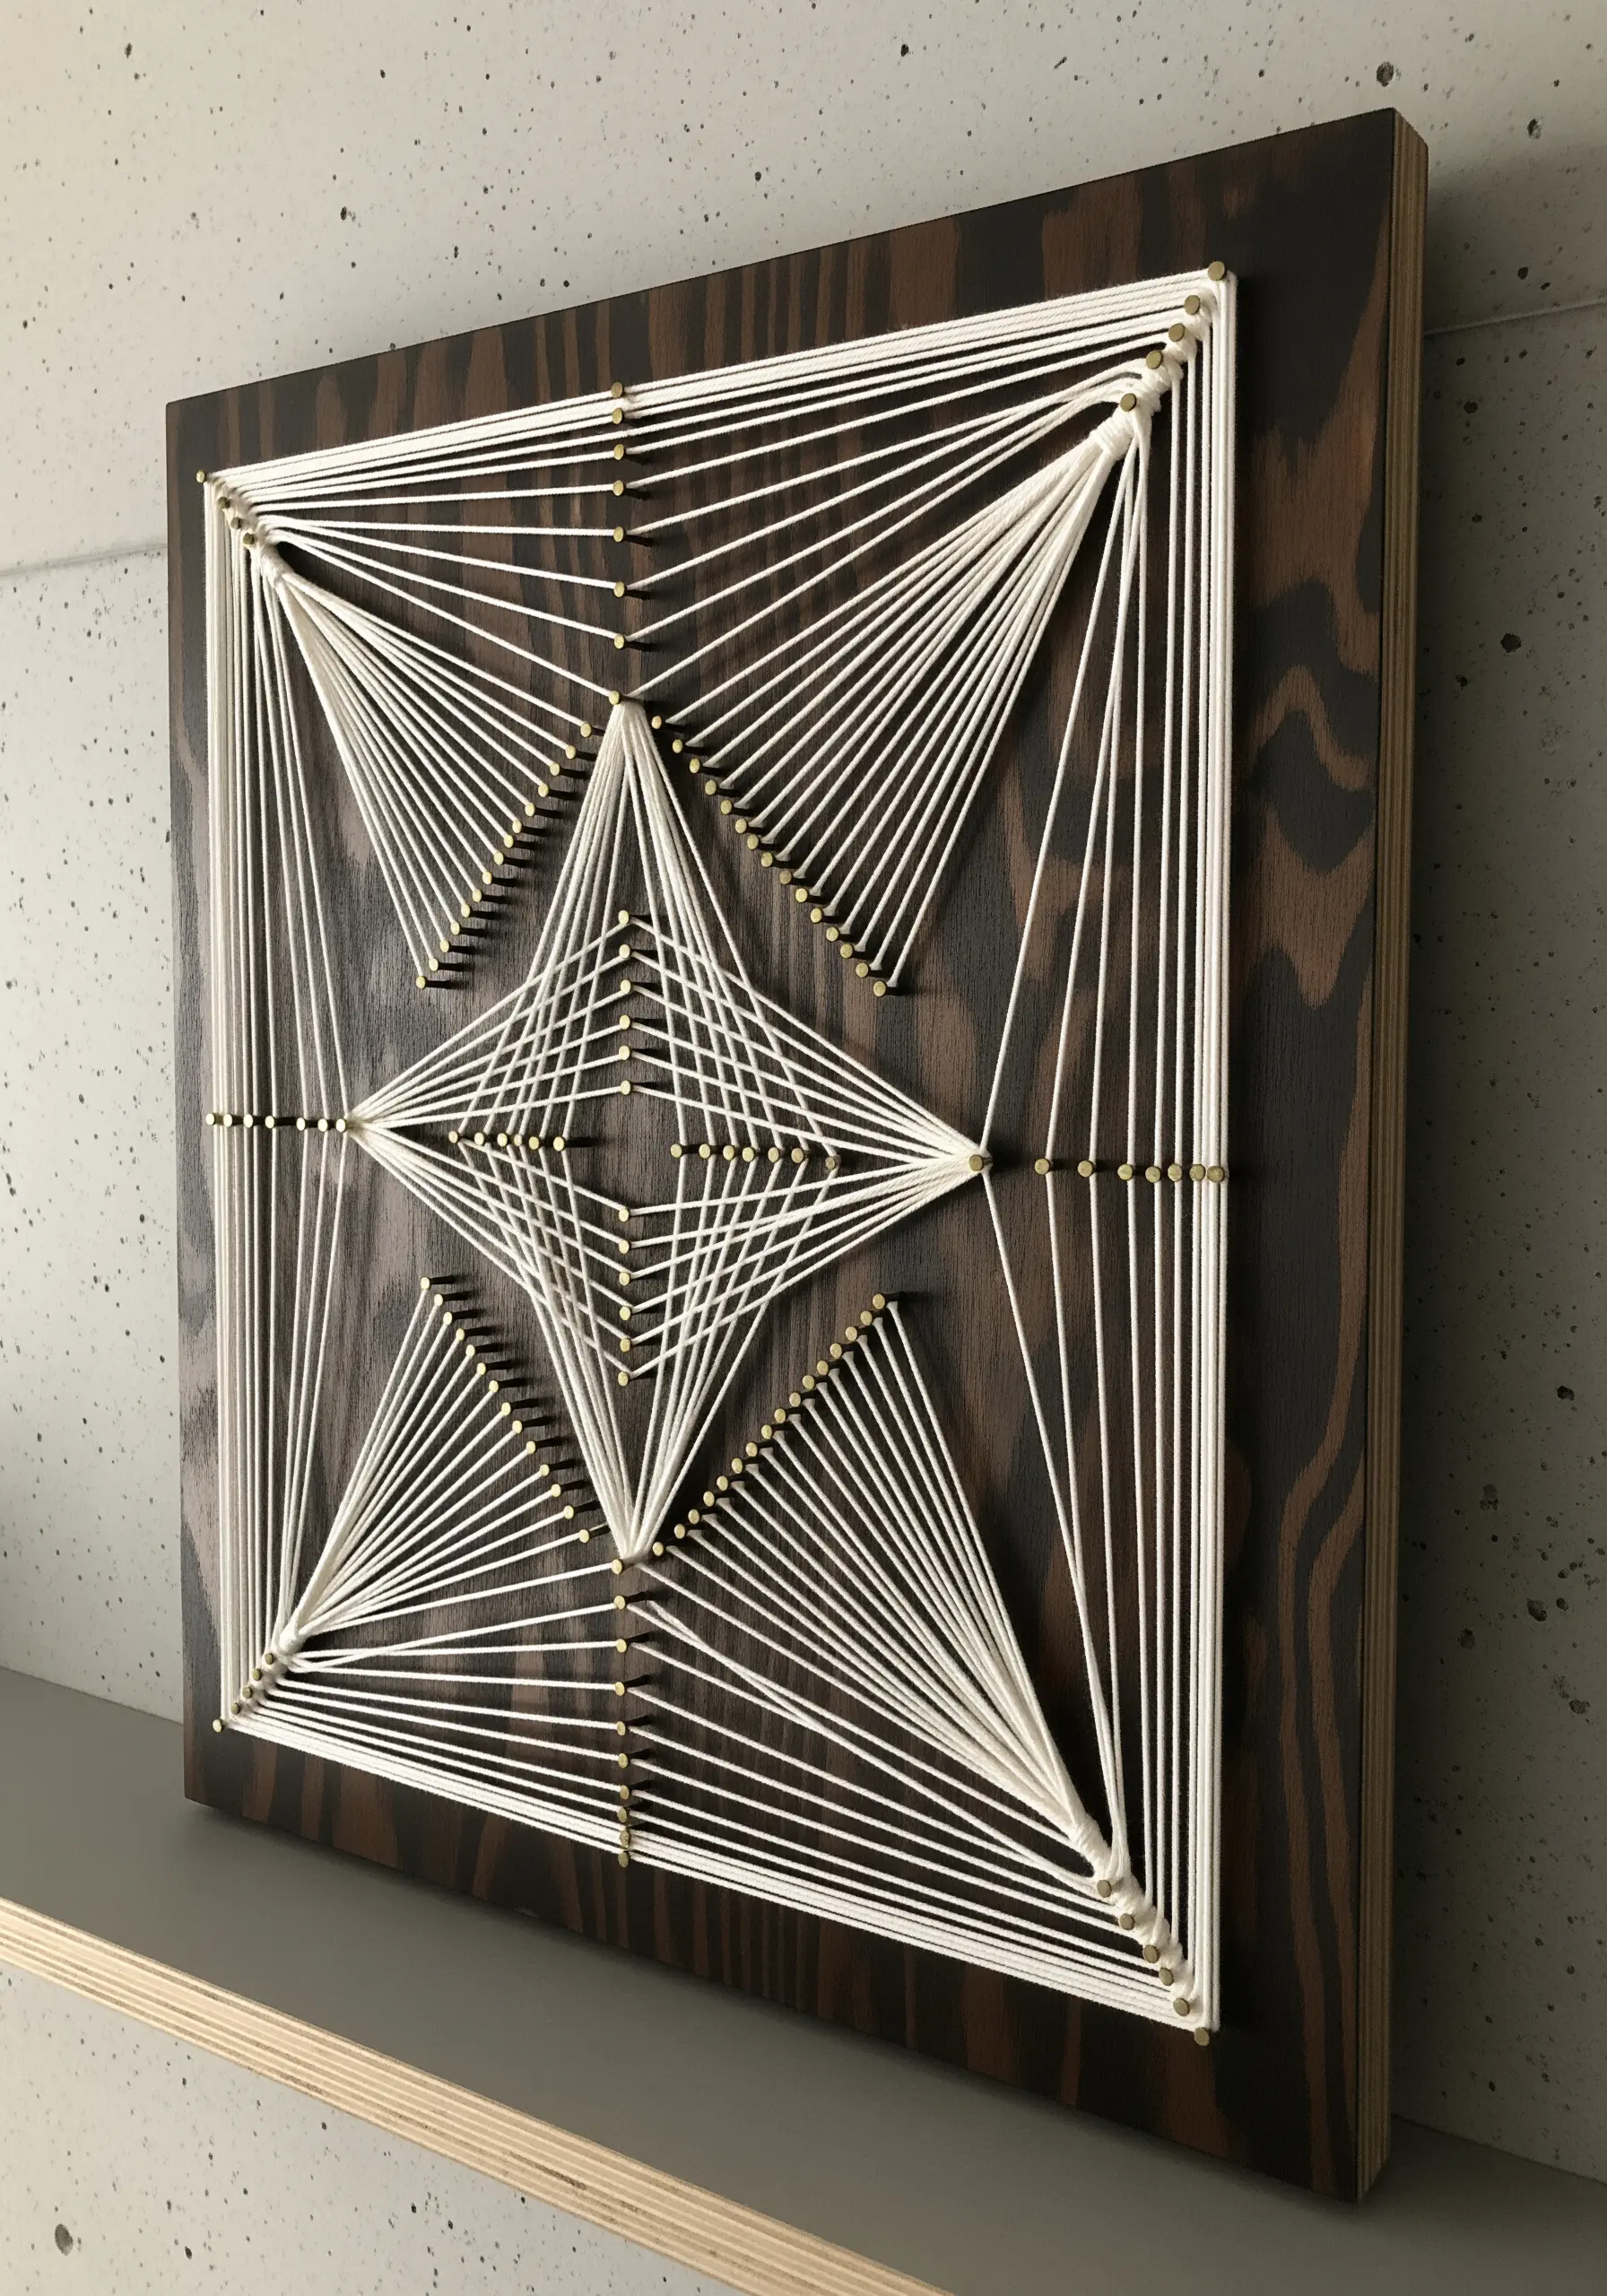
Turn a simple grid of nails into a complex geometric design with the illusion of curves and depth.
Instead of connecting nails in a simple one-to-one pattern, wrap your thread from a single nail to a series of others in sequence.
The magic happens as the threads overlap, building density, shadow, and the appearance of curved surfaces from perfectly straight lines.
Using a dark-stained wood base will make a light-colored string appear to float, enhancing the three-dimensional effect.
7. Build Sculptural Form with Yarn Wrapping
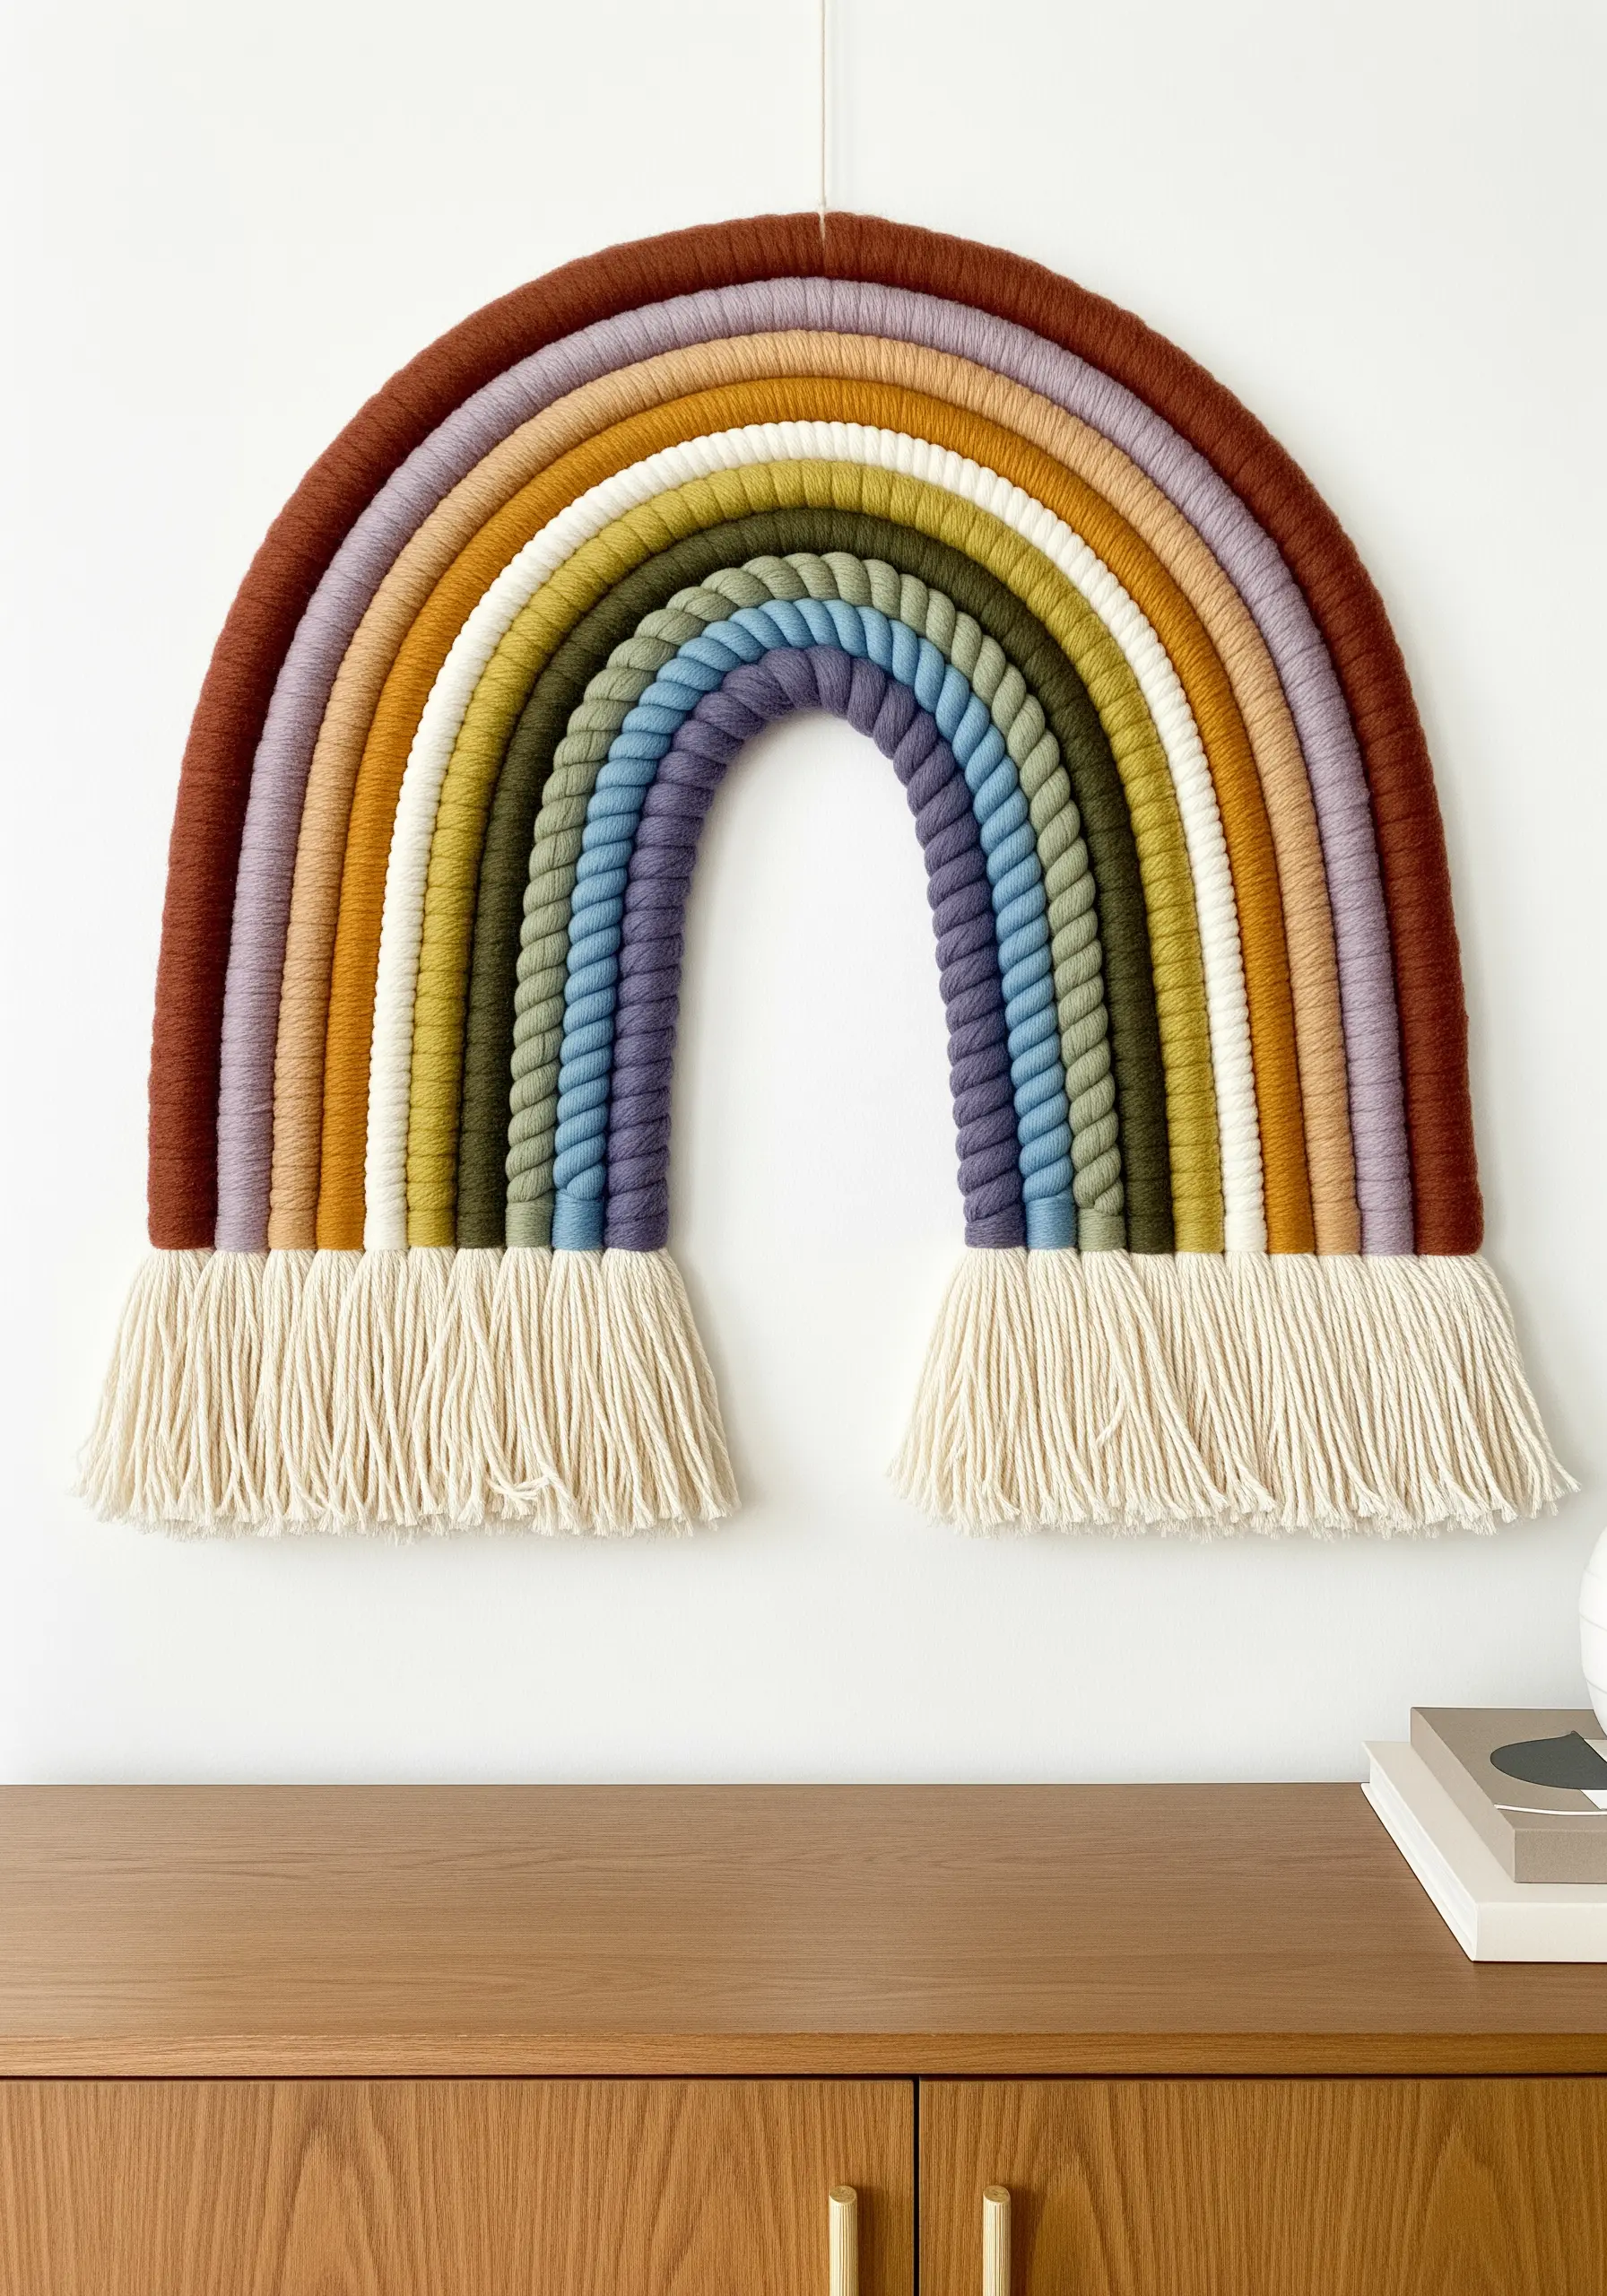
Create a bold, graphic wall hanging by meticulously wrapping yarn around a thick rope armature.
To get a clean, professional finish, ensure each wrap of yarn lies perfectly snug against the last, completely hiding the core rope beneath.
Shape the thick, wrapped ropes into an arc or other form before securing the ends.
Choosing a sophisticated, muted color palette elevates this playful technique into a piece of modern, sculptural art suitable for any room.
8. Radiate Energy with a Latch Hook Sunburst
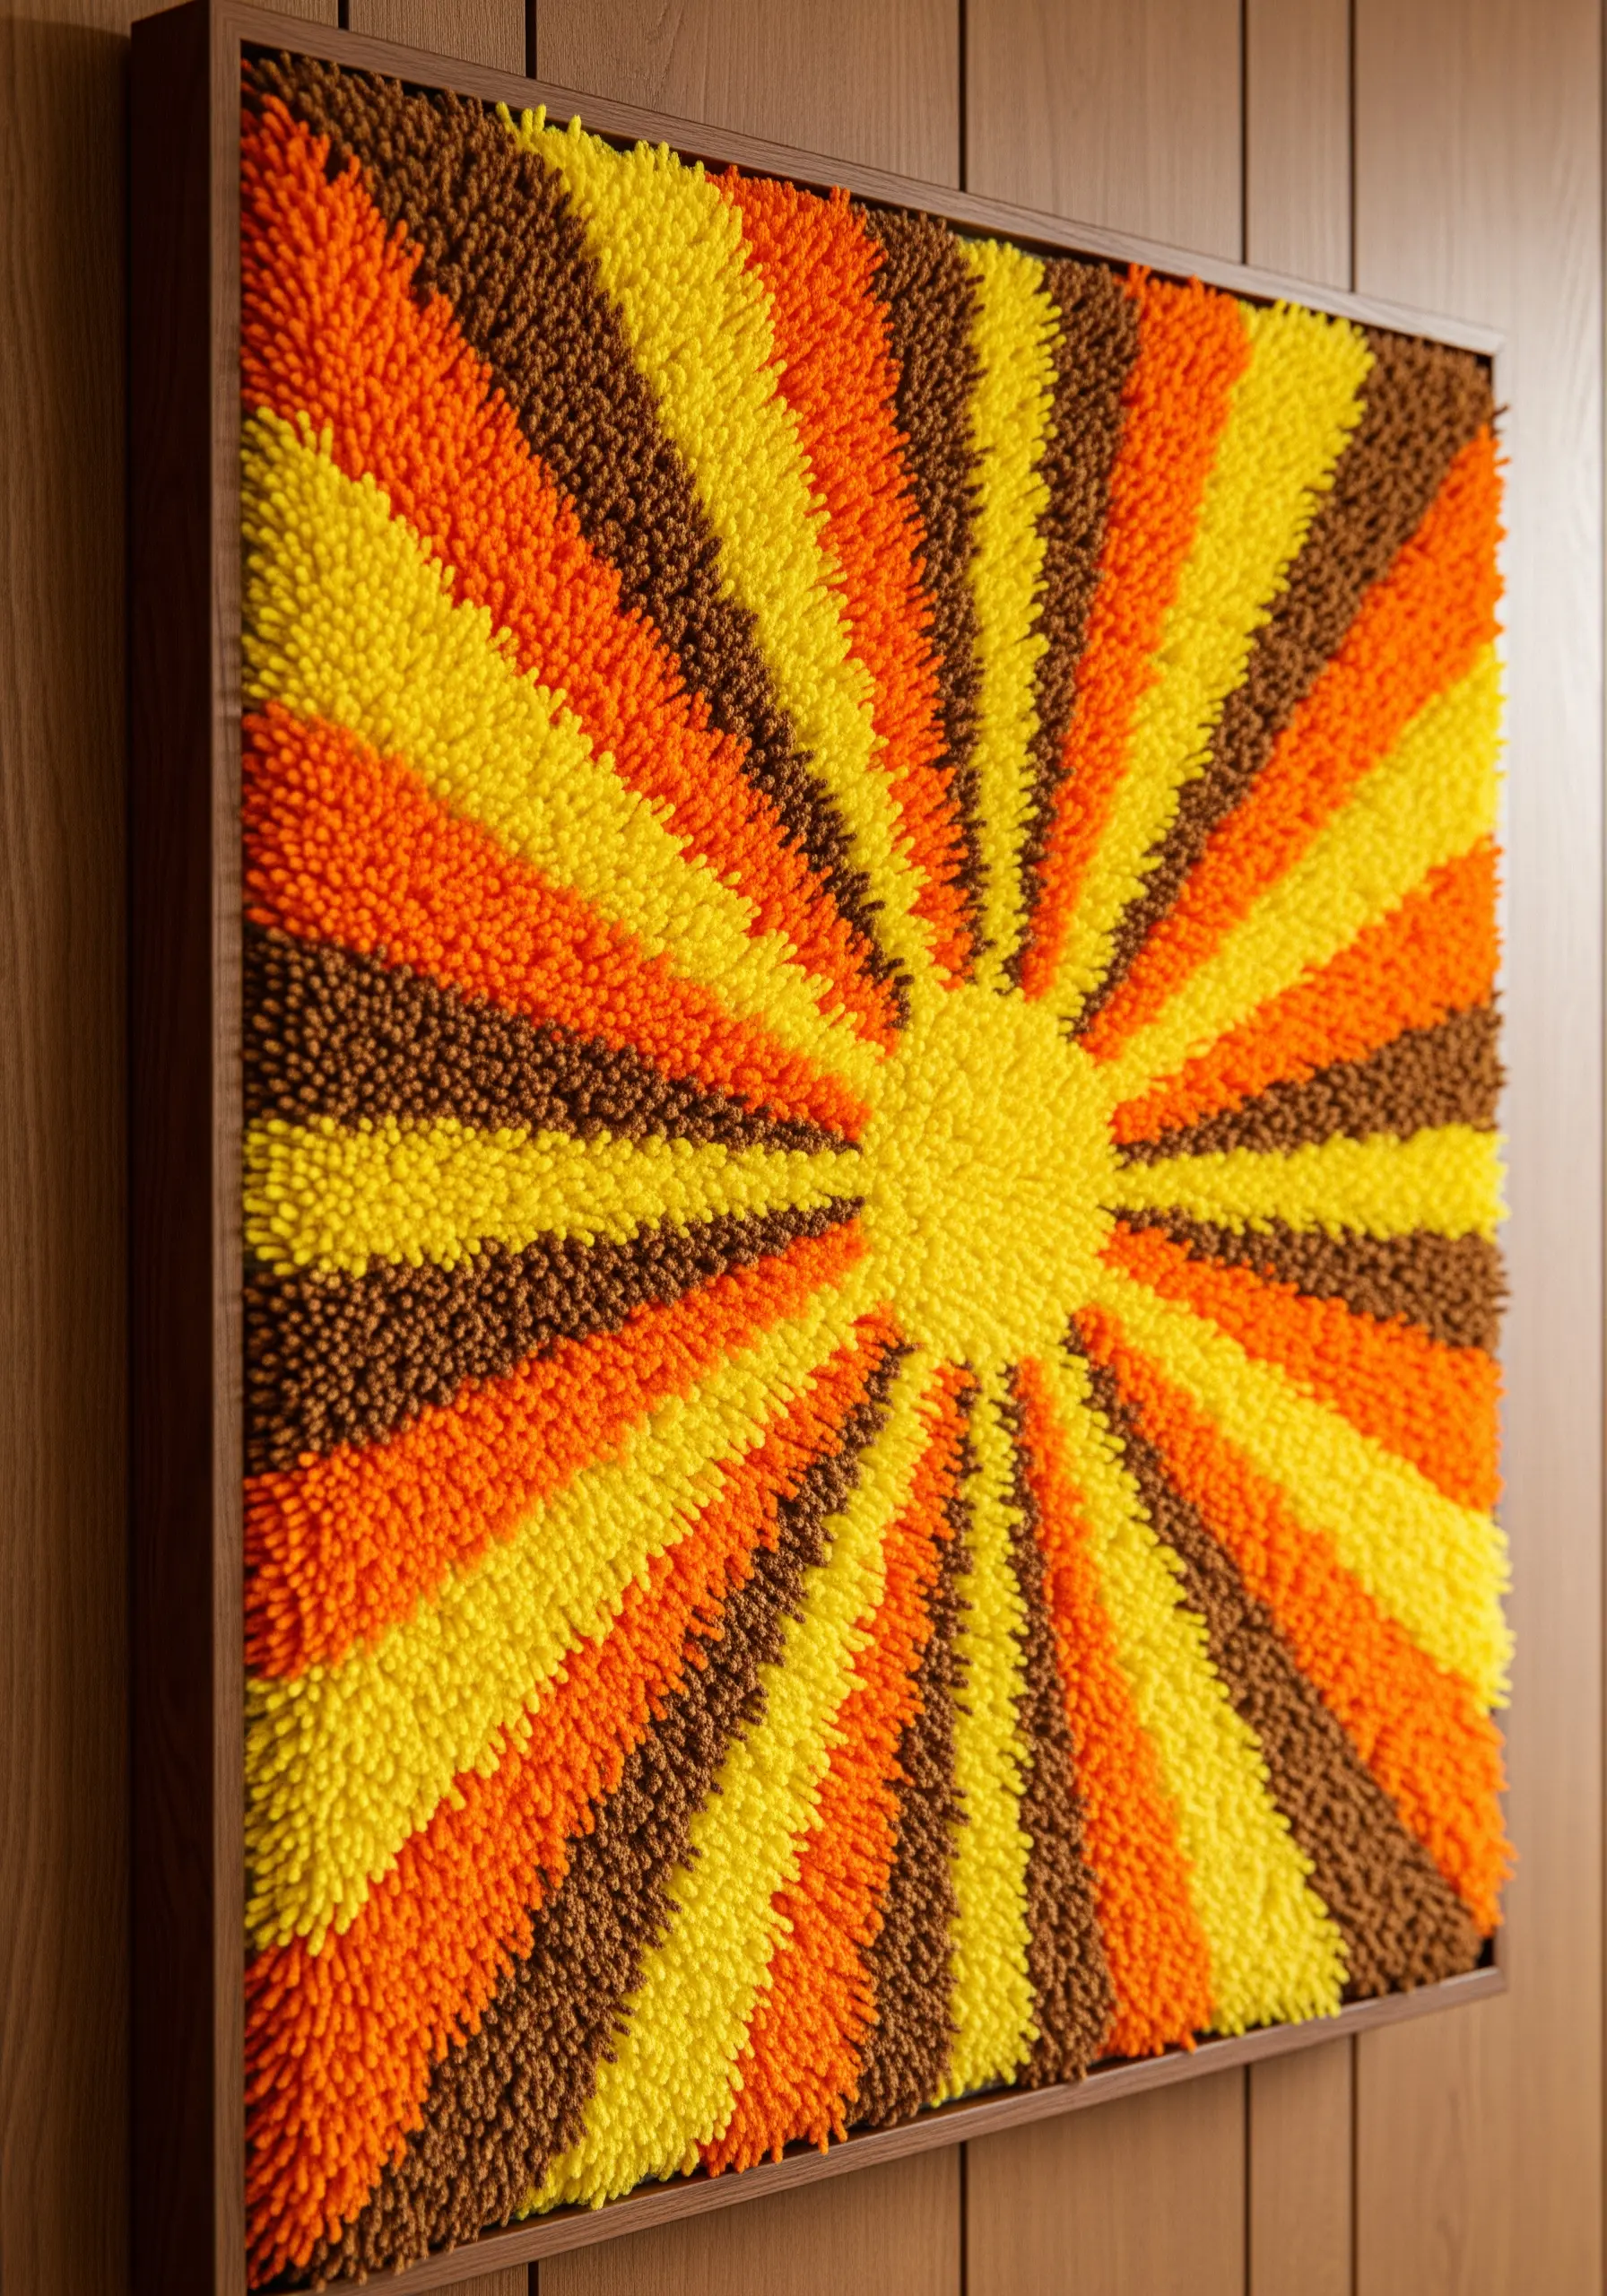
Use the latch hook technique to create a dense, plush pile that’s perfect for bold, graphic designs like a sunburst.
First, draw your radiating lines directly onto a latch hook canvas to act as your guide.
Work from the center outwards, using vibrant, high-contrast colors to define each ray of light.
The uniform, cut-pile texture created by the latch hook tool gives the finished piece a soft, velvety appearance that enriches the bold color transitions.
9. Design with Coiled Rope and Stitched Embellishments
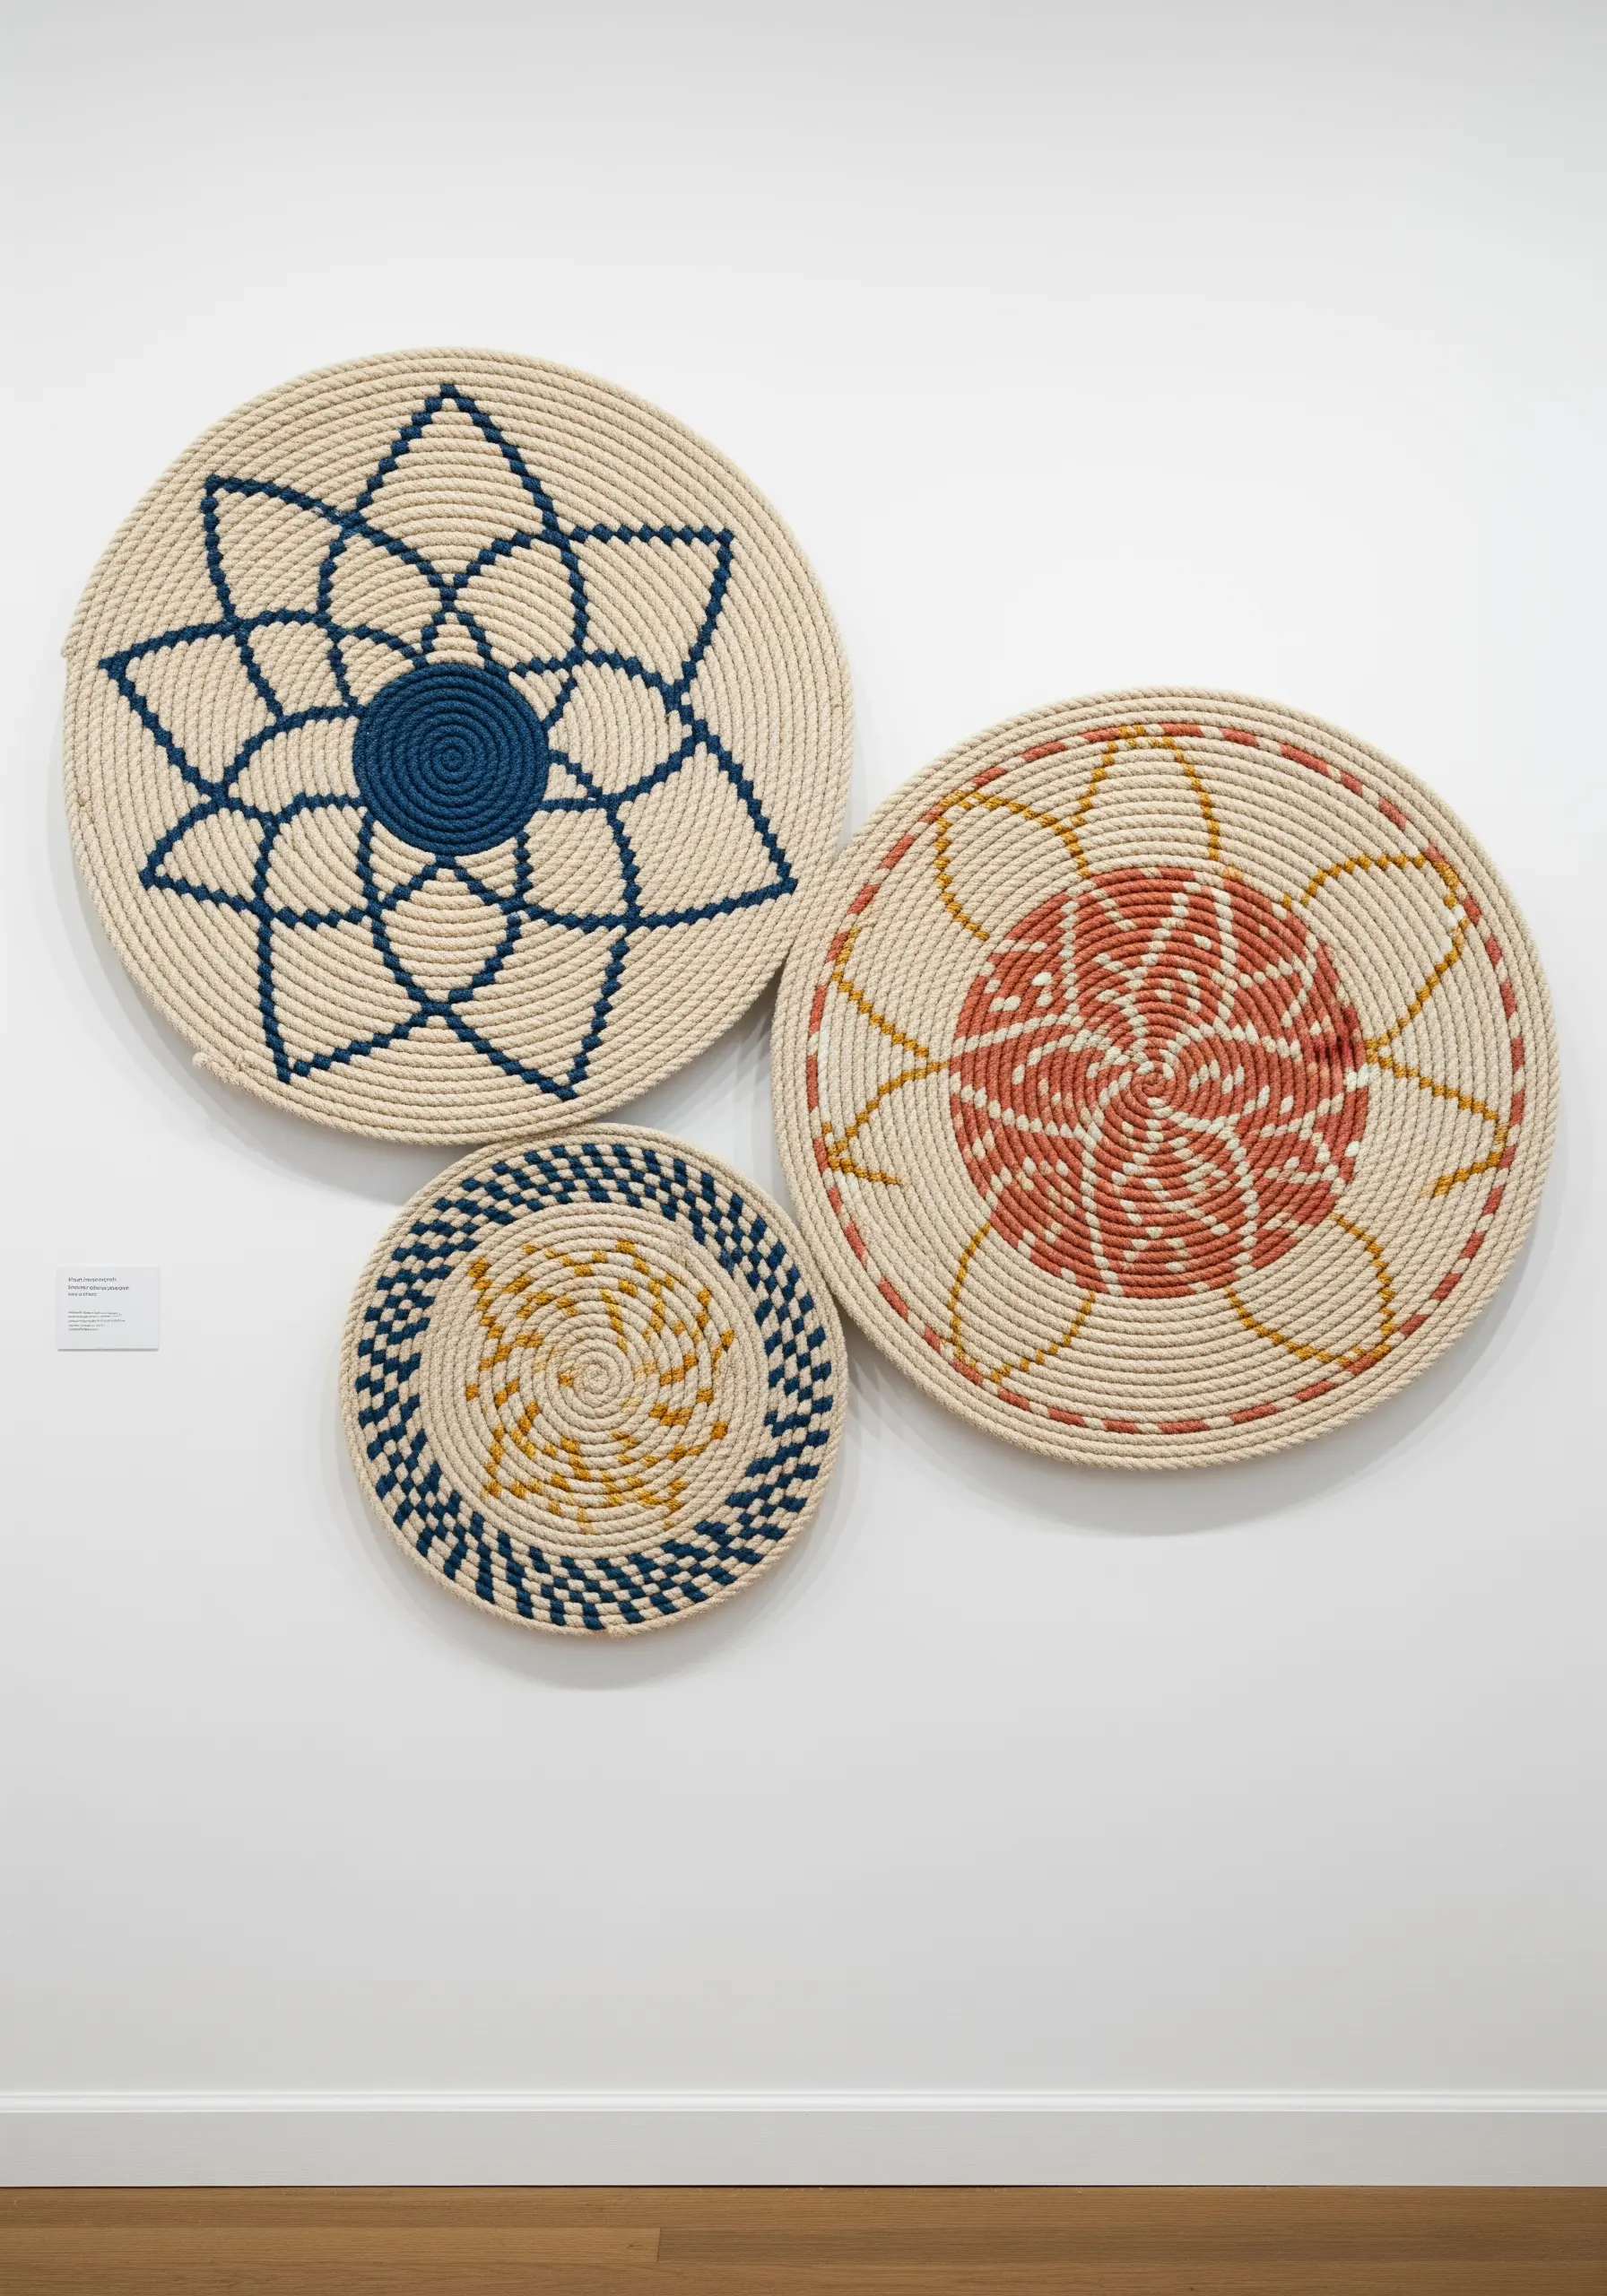
Create stunning decorative plates for your wall by coiling cotton rope and stitching it together with colorful embroidery floss or yarn.
Instead of hiding your stitches, make them a design element. Use a contrasting color and a visible stitch, like a blanket stitch or simple wrap, to create geometric patterns.
Plan your design by marking the rope beforehand, or work intuitively, changing colors to form spirals and stars.
Grouped together, these pieces create a gallery wall with beautiful, handcrafted texture.
10. Expressive Mark-Making with Freeform Couching
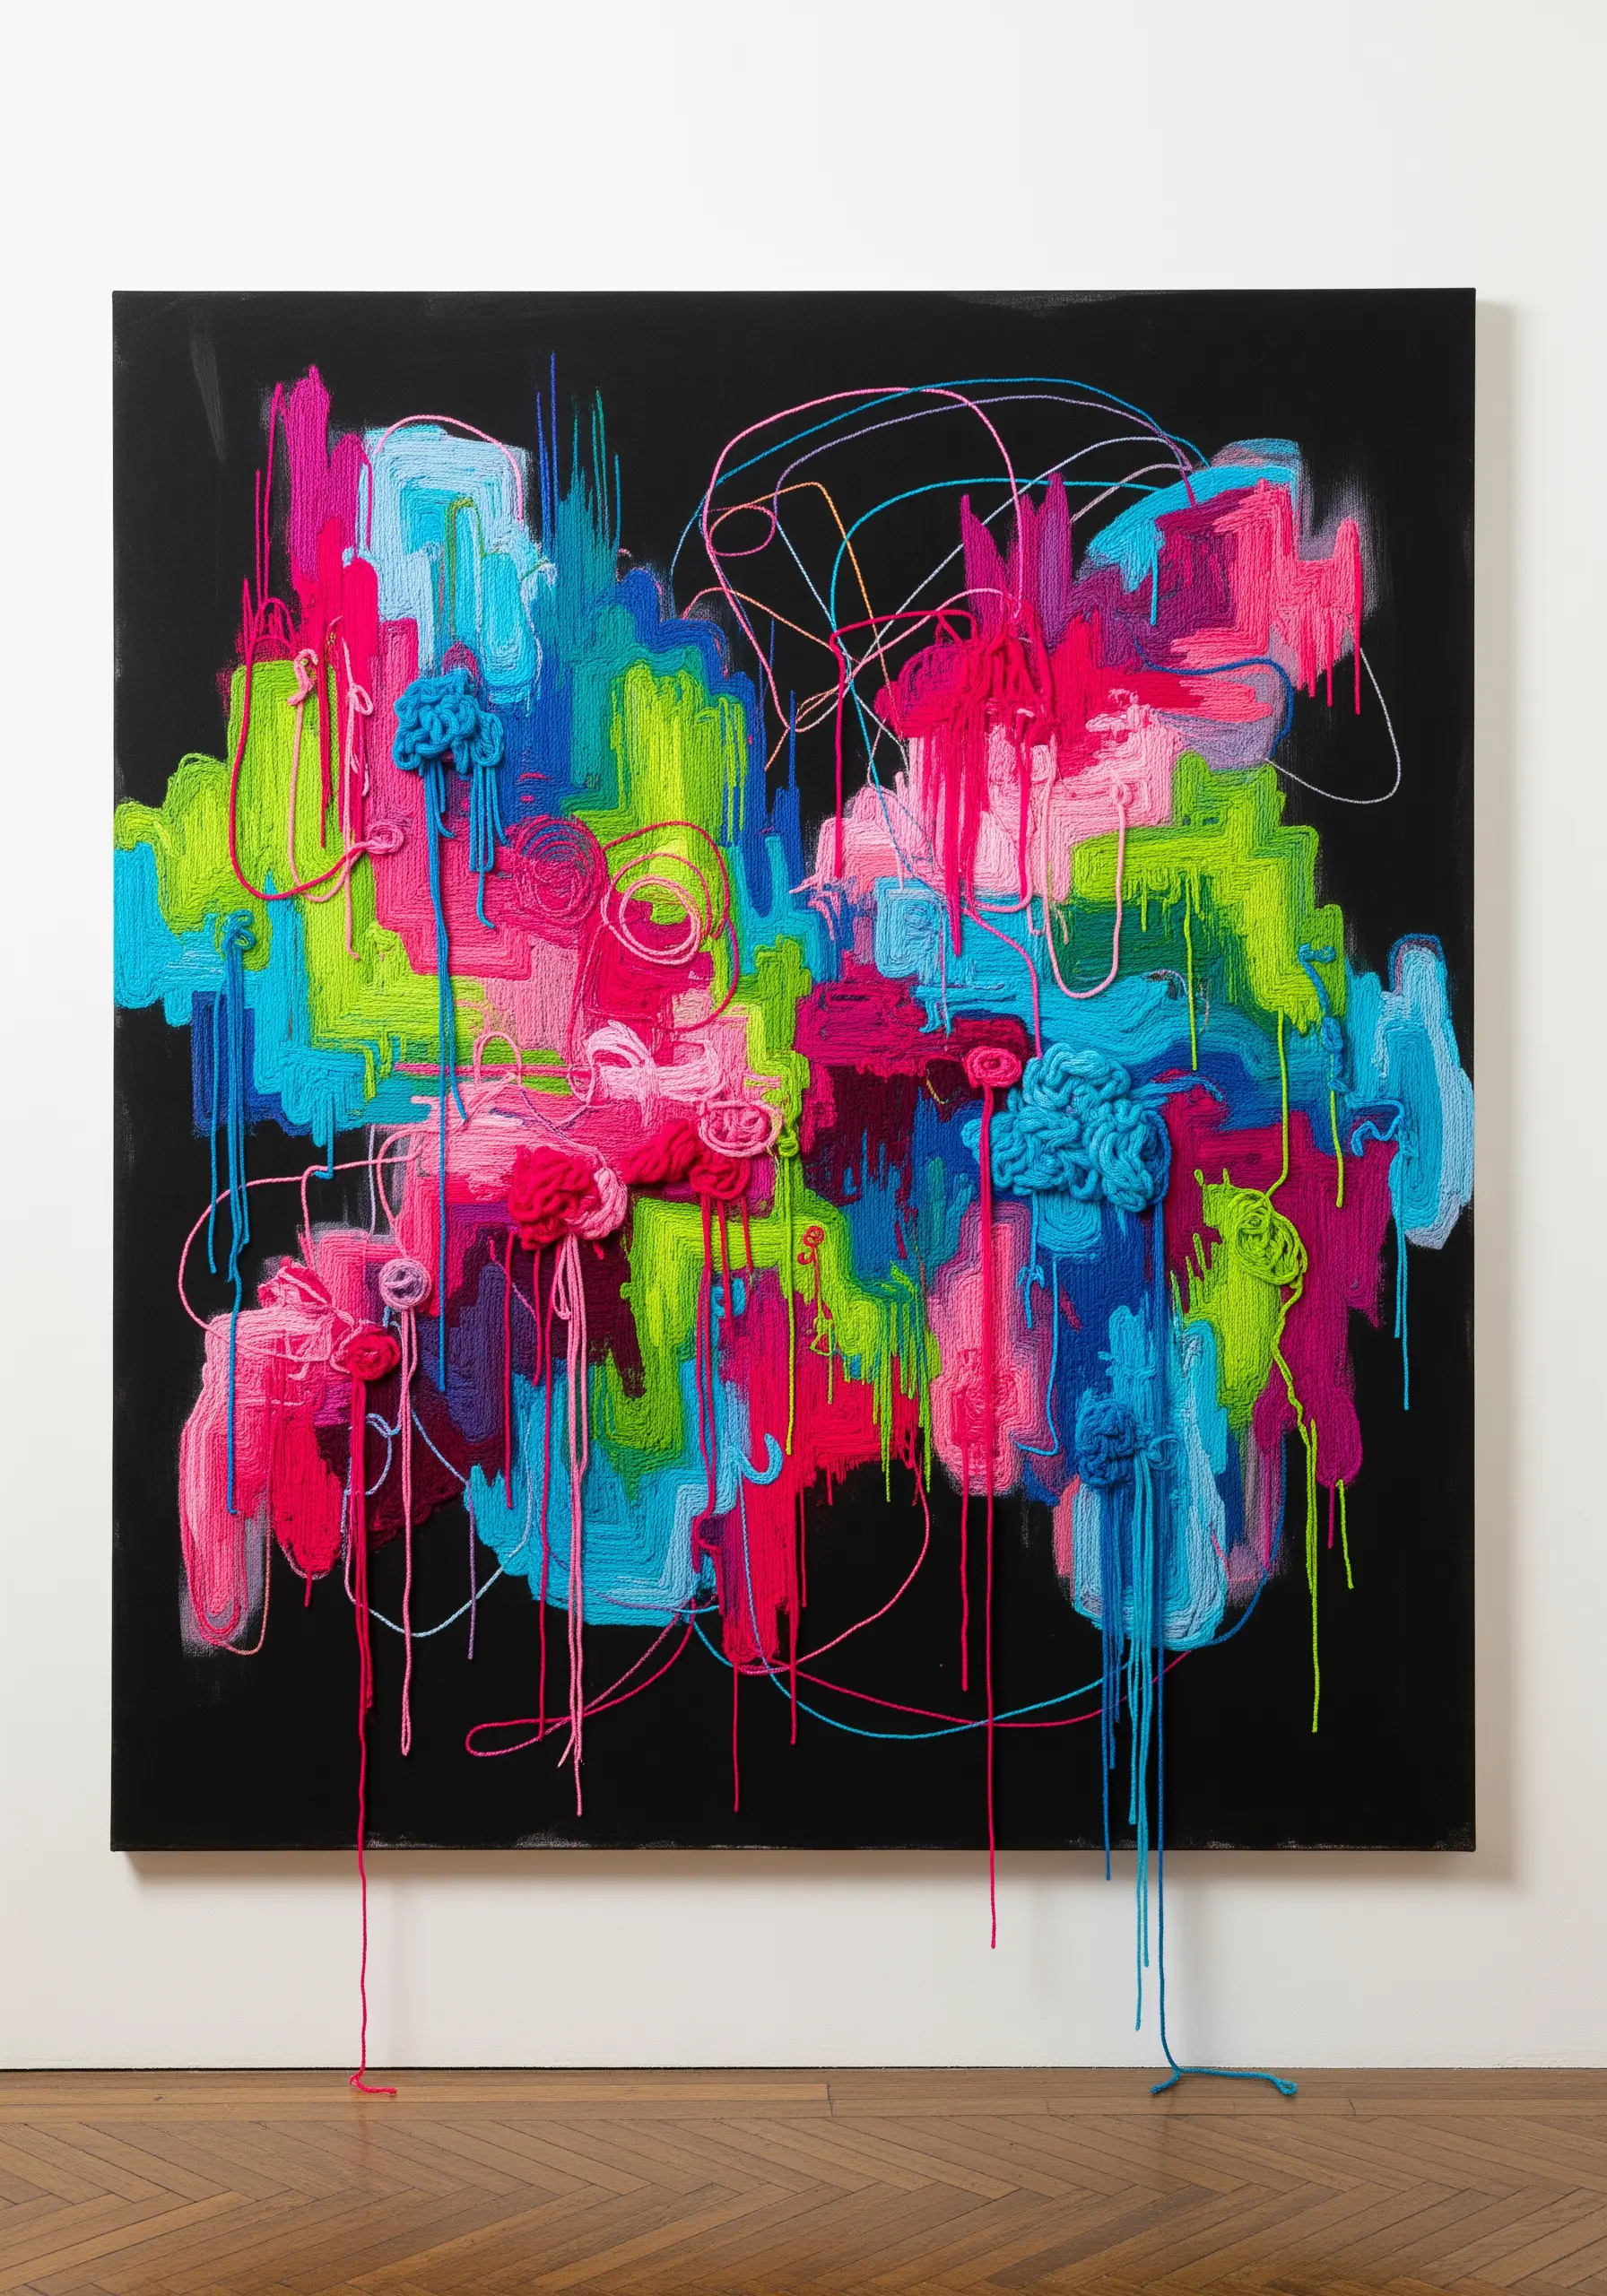
Treat yarn like paint and a blank canvas as your playground for a piece that captures raw energy and movement.
Lay down thick strands of yarn in expressive drips, loops, and tangles rather than forming traditional stitches.
Then, use a thinner, less visible thread to tack the yarn in place with tiny couching stitches.
This method allows for incredible spontaneity and creates a powerful, abstract piece that feels immediate and emotionally resonant.
11. Weave Meditative Mandalas with Ojo de Dios
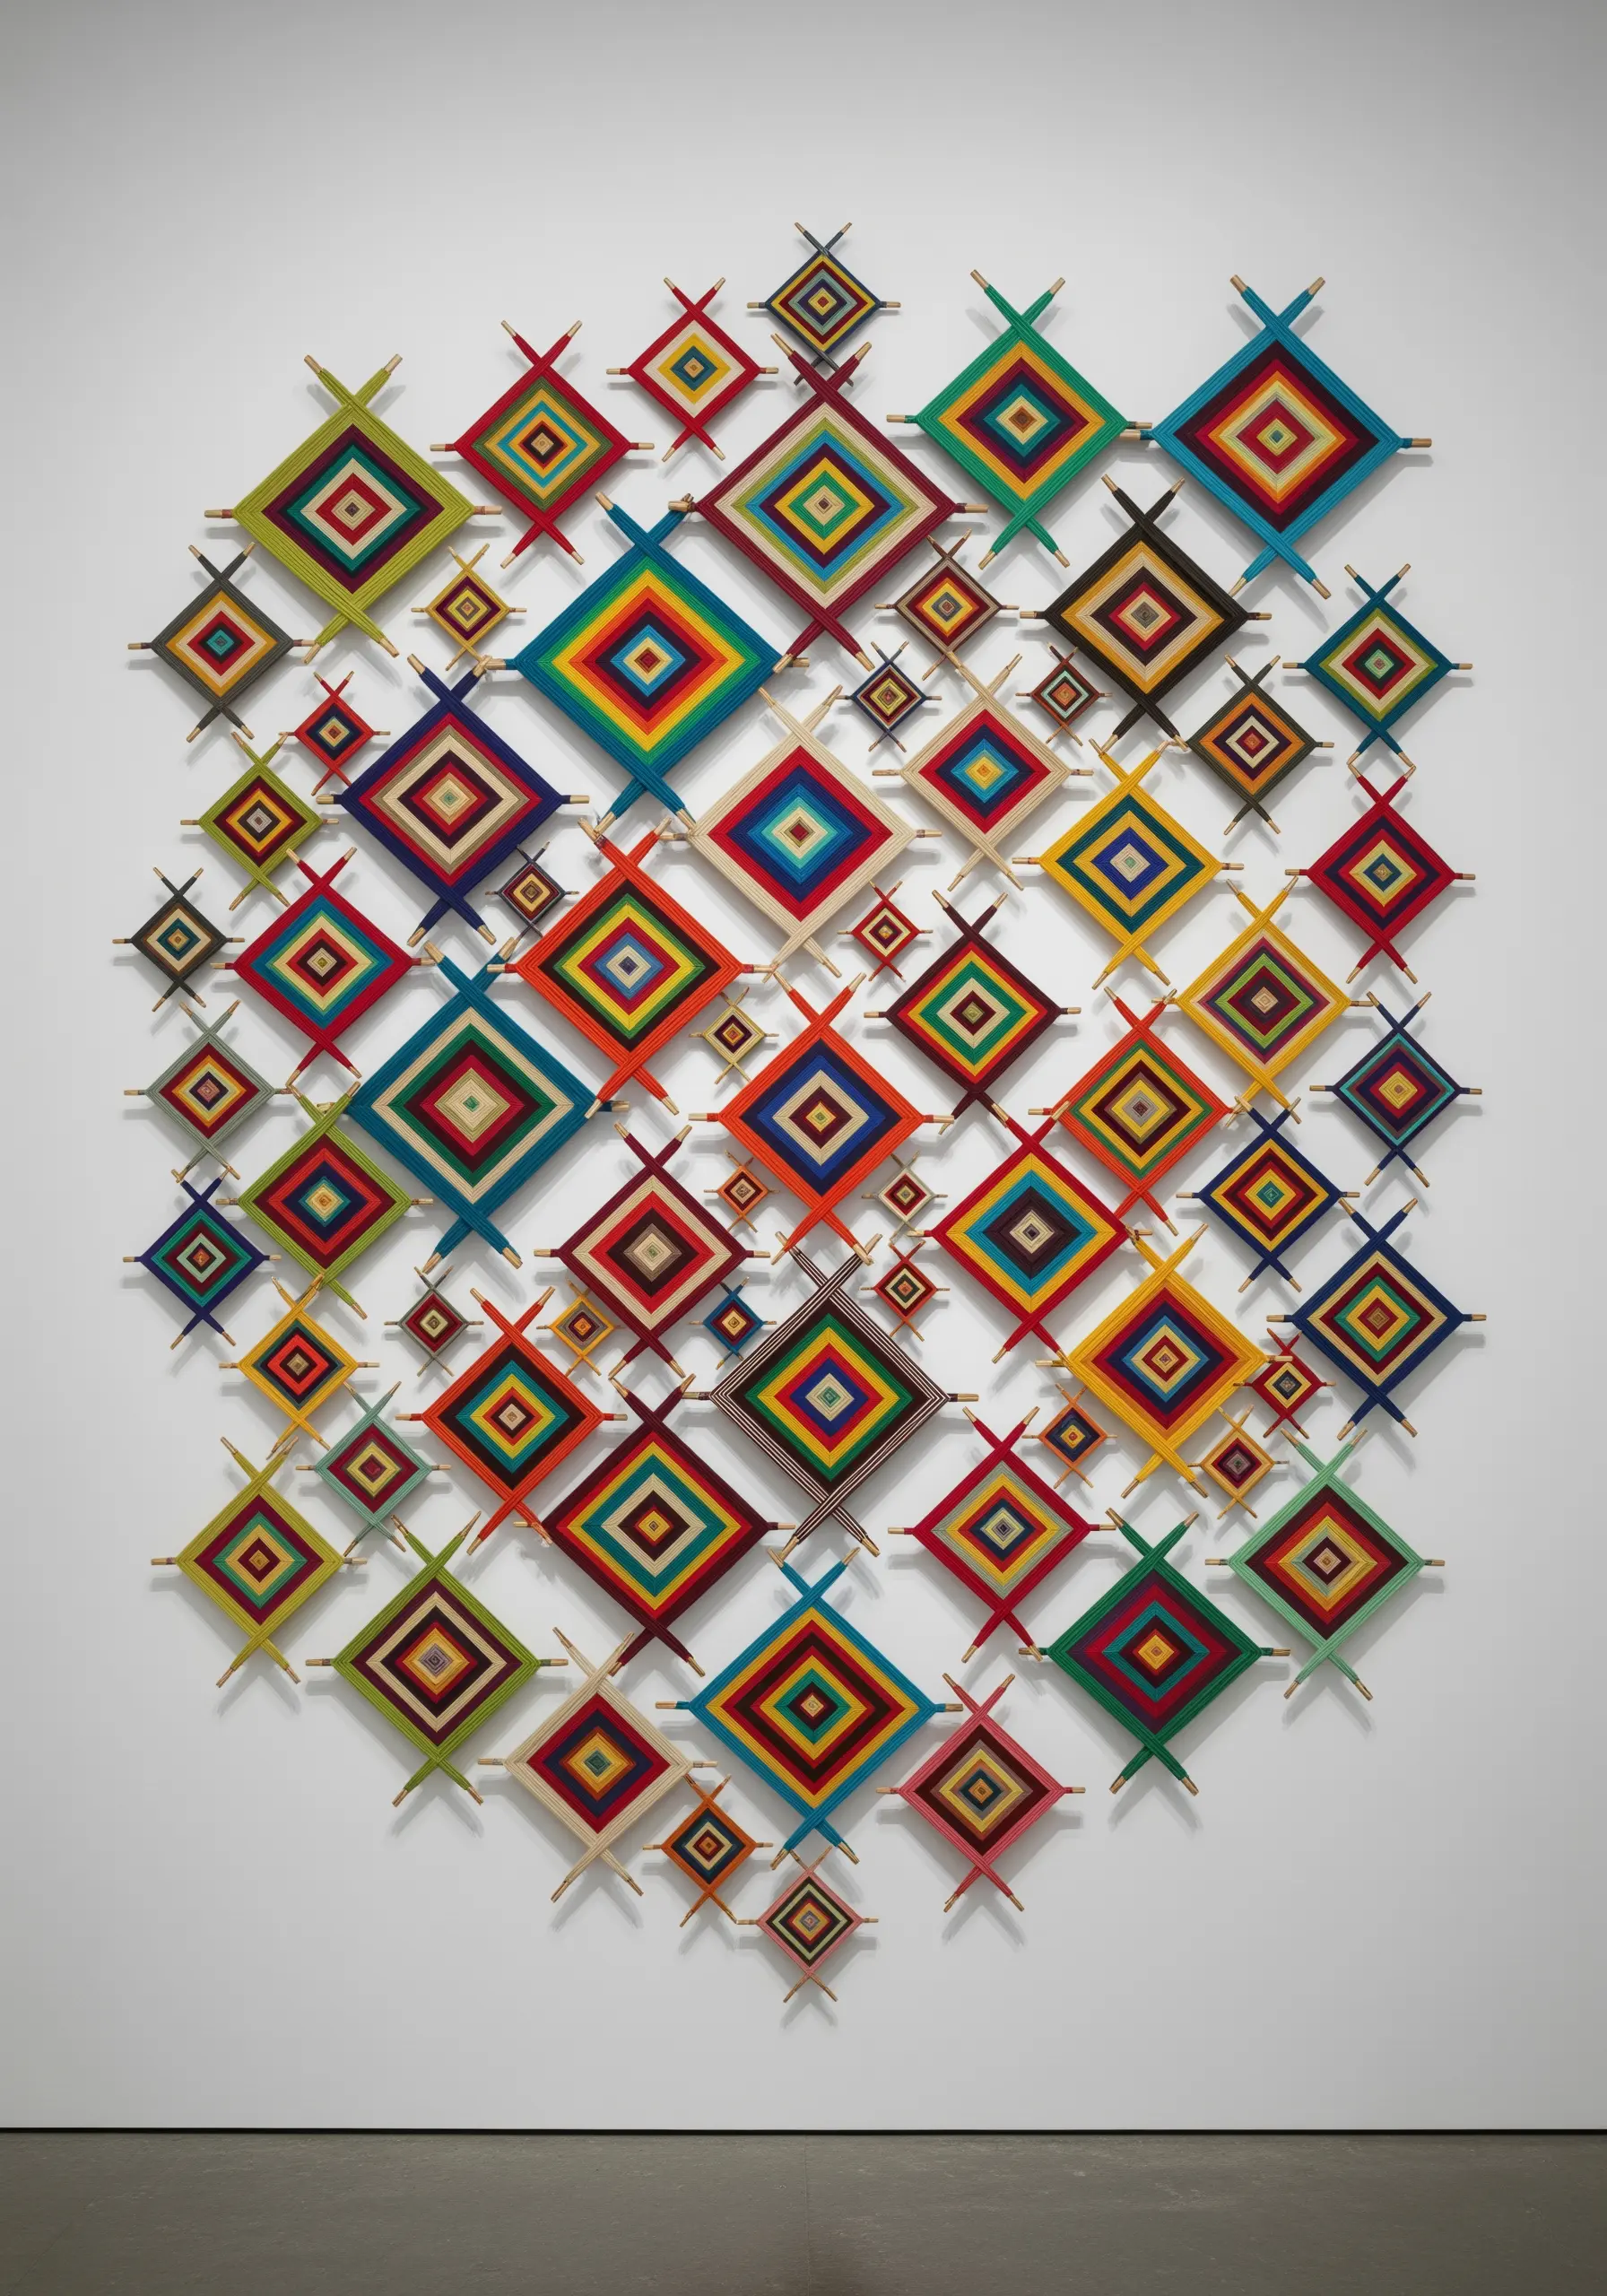
Explore the meditative practice of Ojo de Dios (God’s Eye) by weaving yarn around two or more crossed sticks.
The intricate diamond patterns emerge naturally as you wrap the yarn around each stick in sequence.
The true artistry lies in your color choices. Plan your palette to create gradients, bold contrasts, or repeating geometric motifs.
You can create a large-scale installation by combining dozens of smaller weavings into a stunning, colorful grid on your wall.
12. Construct an Ombré Cascade with Pom-Poms

Create a breathtaking sculptural piece by arranging handmade pom-poms in a seamless color gradient.
To achieve a smooth ombré effect, select yarn in at least five or six closely related shades, from a deep tone to a pale one.
Make your pom-poms in slightly varying sizes to add natural texture and depth to the overall form.
String them tightly together on clear fishing line and hang them in dense clusters to form a soft, cloud-like sculpture that cascades down the wall.
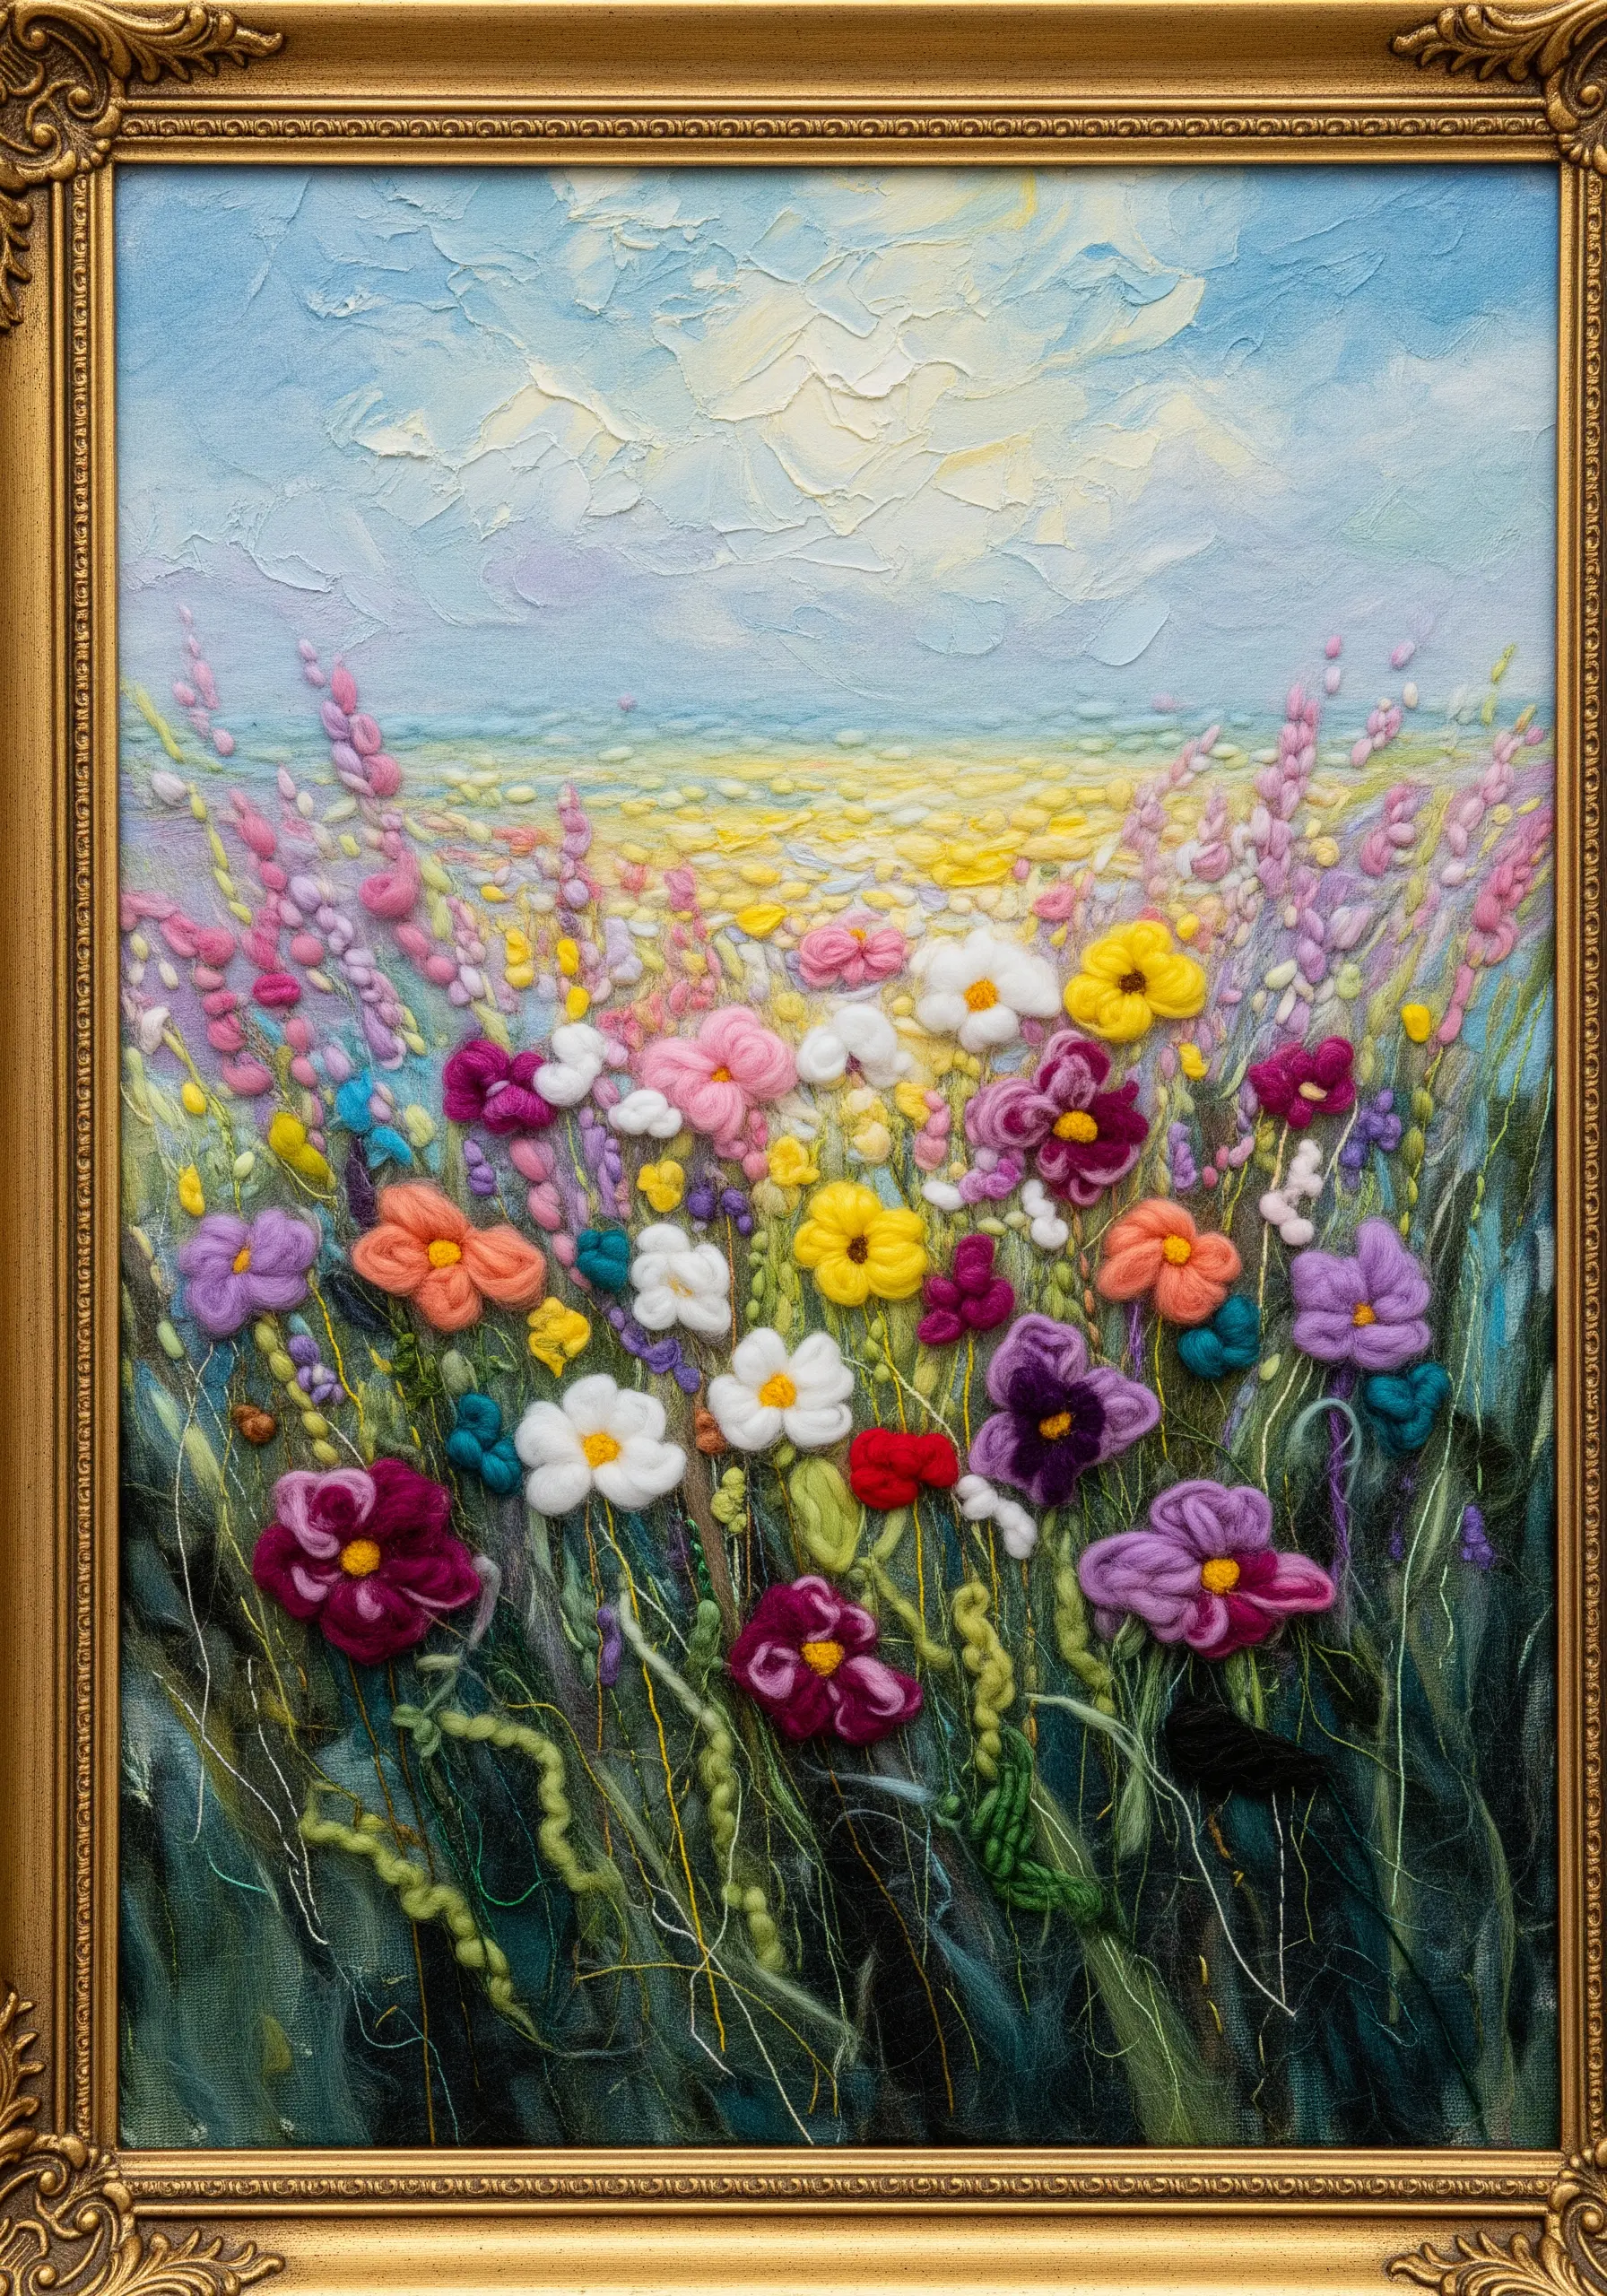
13. Paint with Wool Using Needle Felting
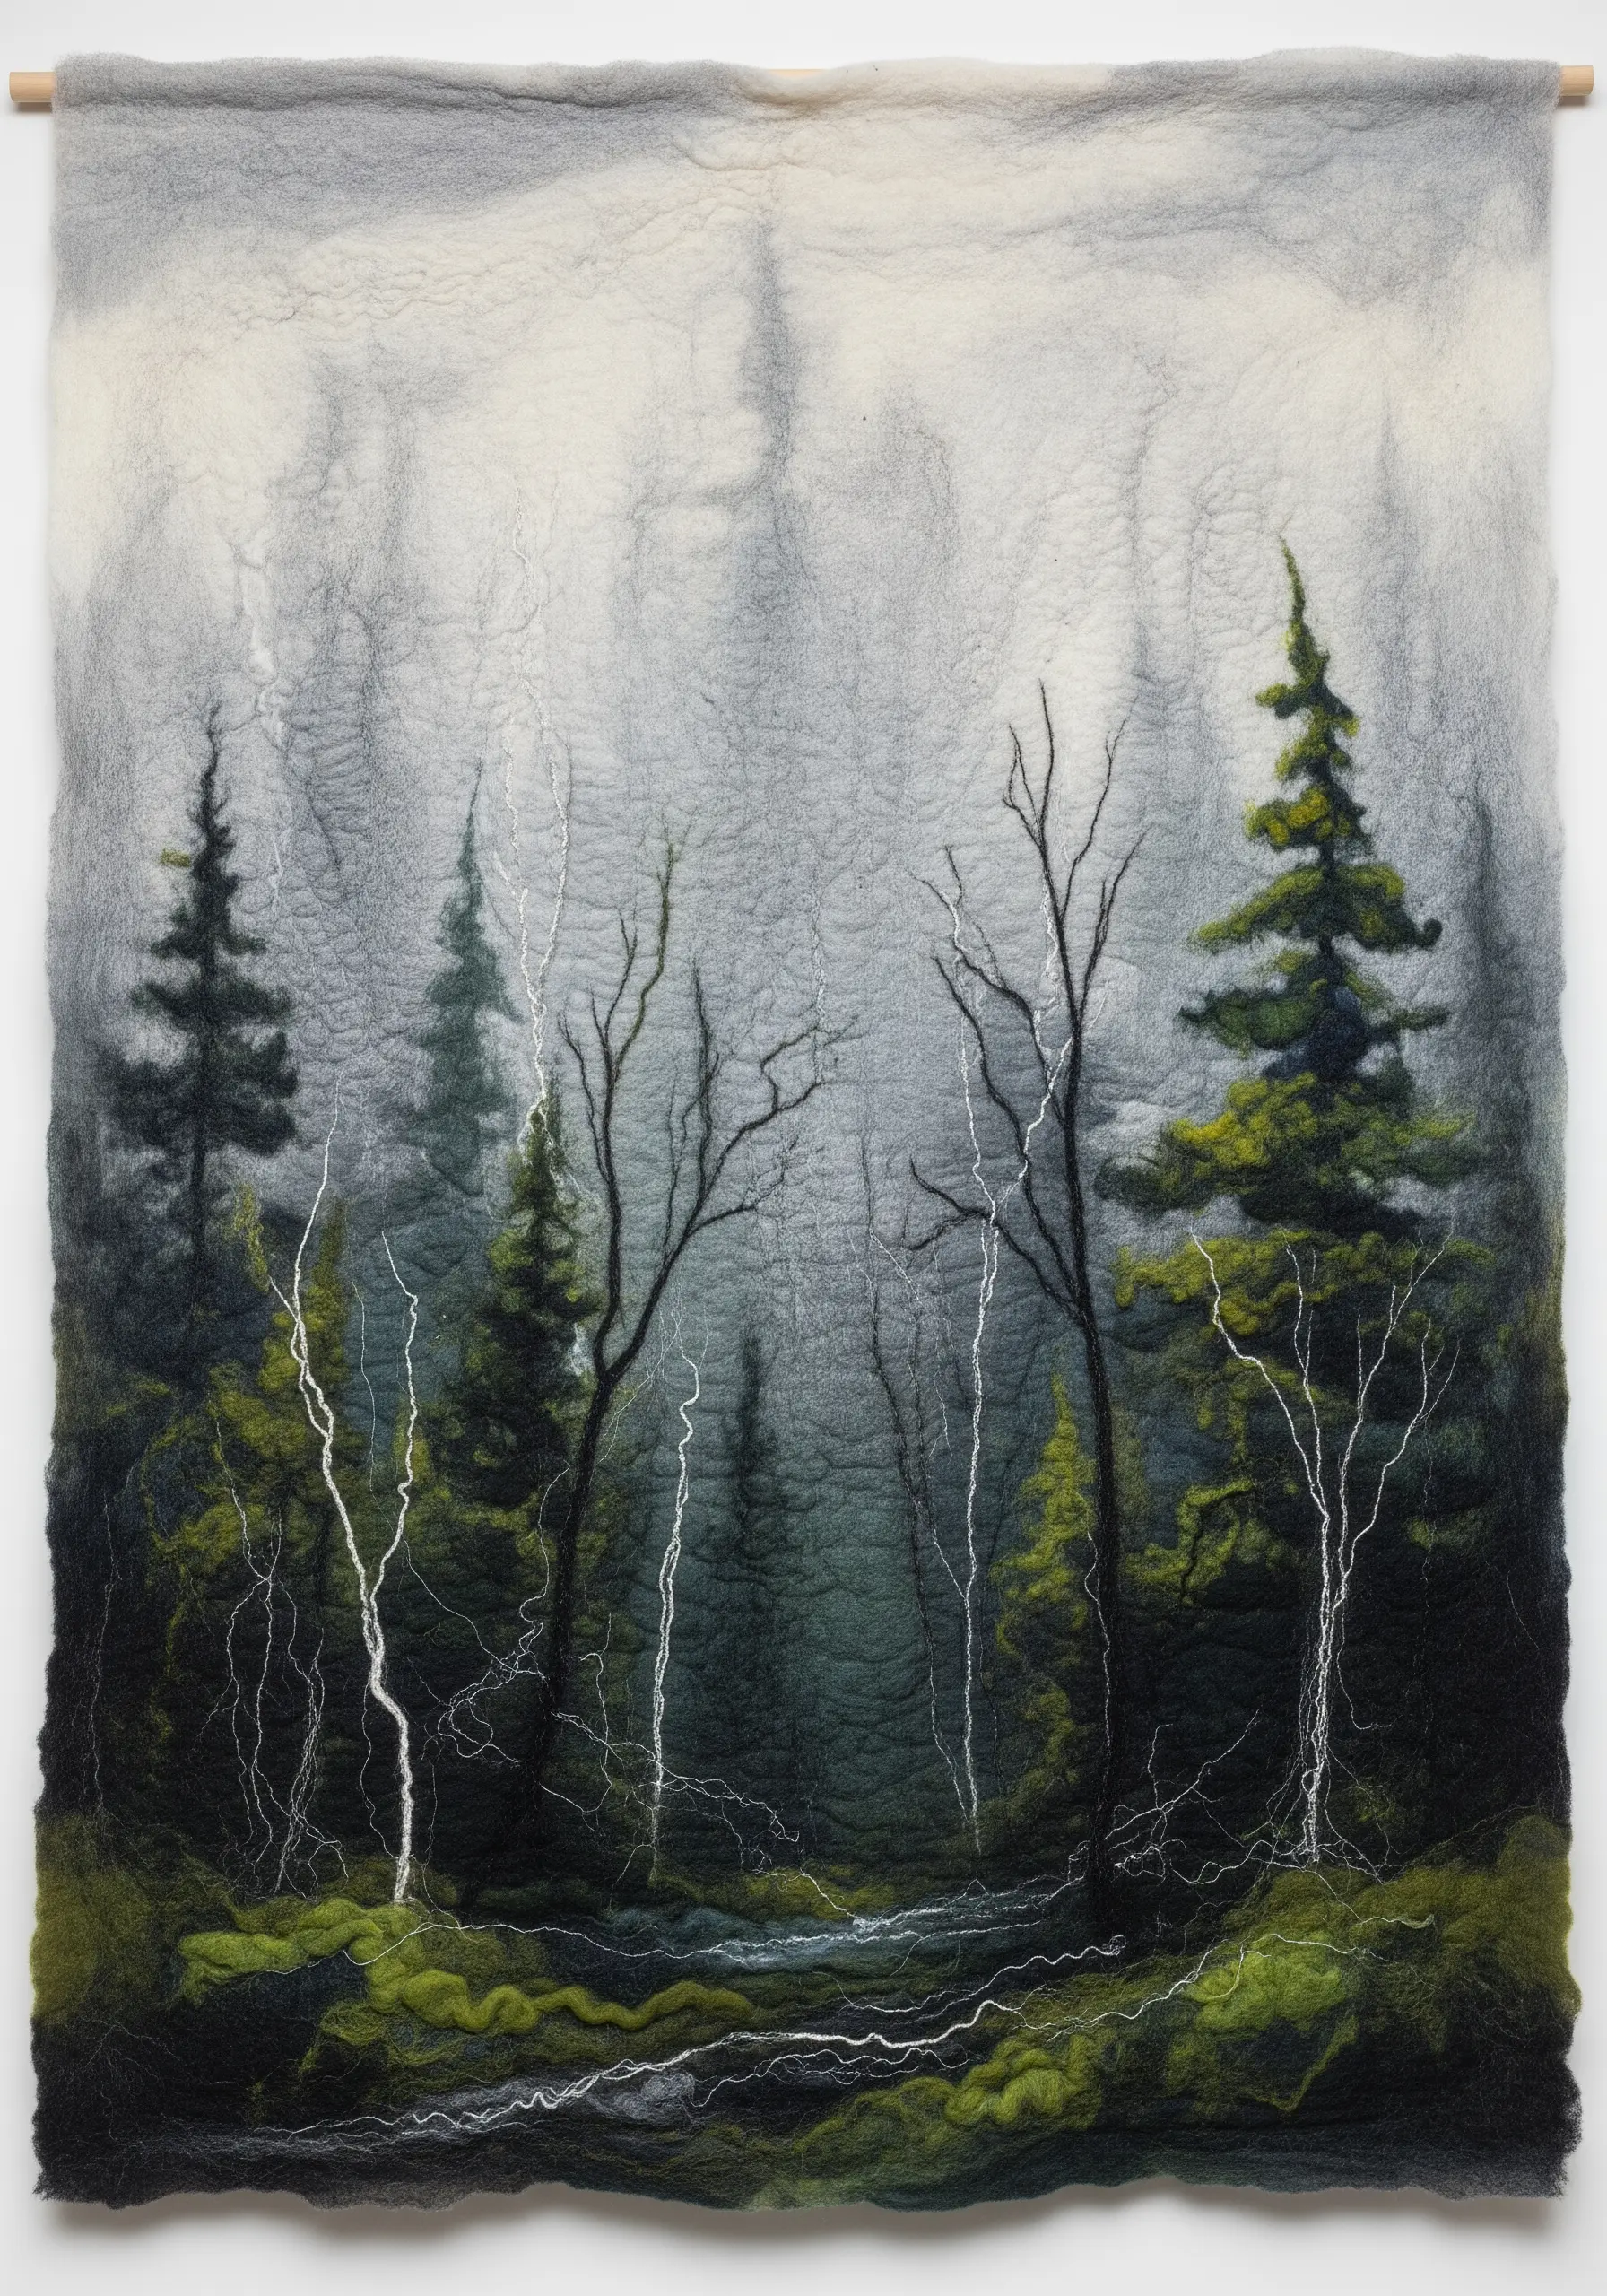
Use wool roving and felting needles to ‘paint’ soft, atmospheric landscapes with incredible depth.
Instead of stitching, you’ll lay down wisps of loose wool fiber onto a felt base and use a barbed needle to stab and interlock the fibers.
Layer different colored fibers to blend them seamlessly, creating effects like mist, clouds, or water reflections that are difficult to achieve with yarn.
For sharp details like branches or blades of grass, felt in single strands of fine yarn as a final touch.
14. Create a Statement Piece with Layered Tassels
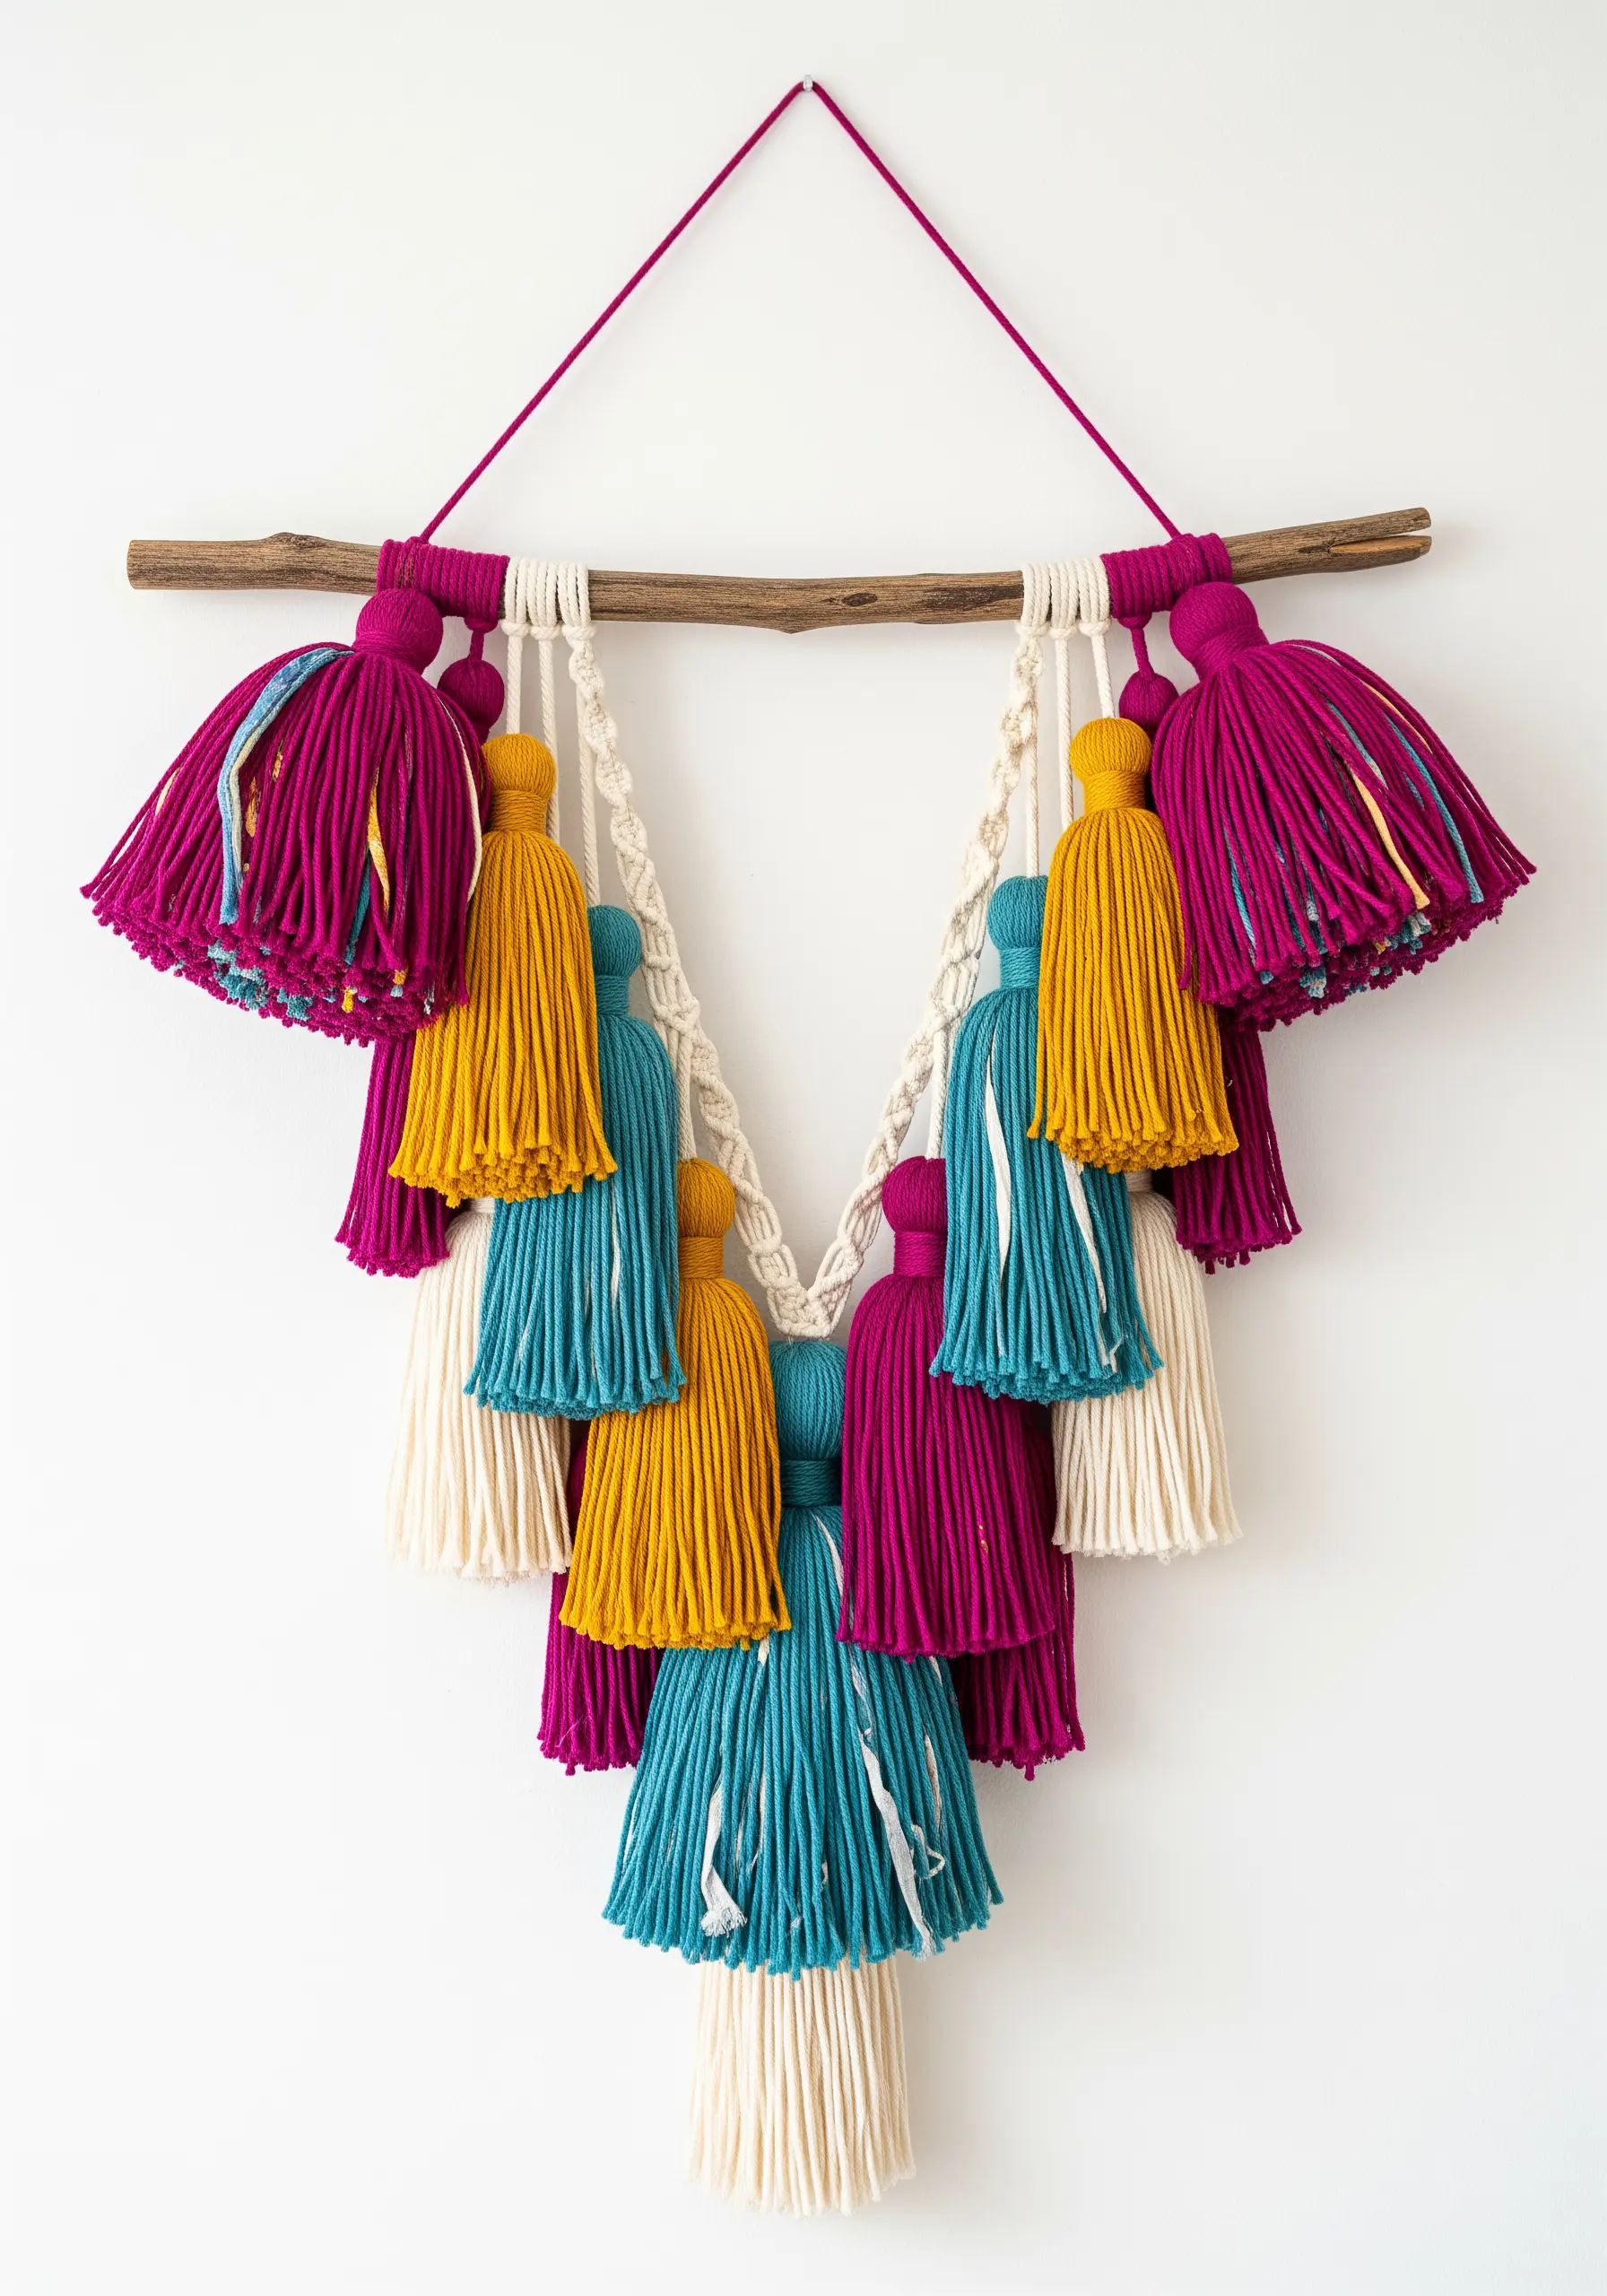
Move beyond single tassels and construct a full, dynamic wall hanging with texture and movement.
The key to a sophisticated look is variation. Create tassels in different sizes and lengths using a cohesive, rich color palette.
For a polished detail, wrap the necks of the tassels with a contrasting yarn or a shimmering metallic thread.
Arrange them on a natural branch in a cascading shape, like a V or an asymmetrical drape, to create a composition with energy and flow.
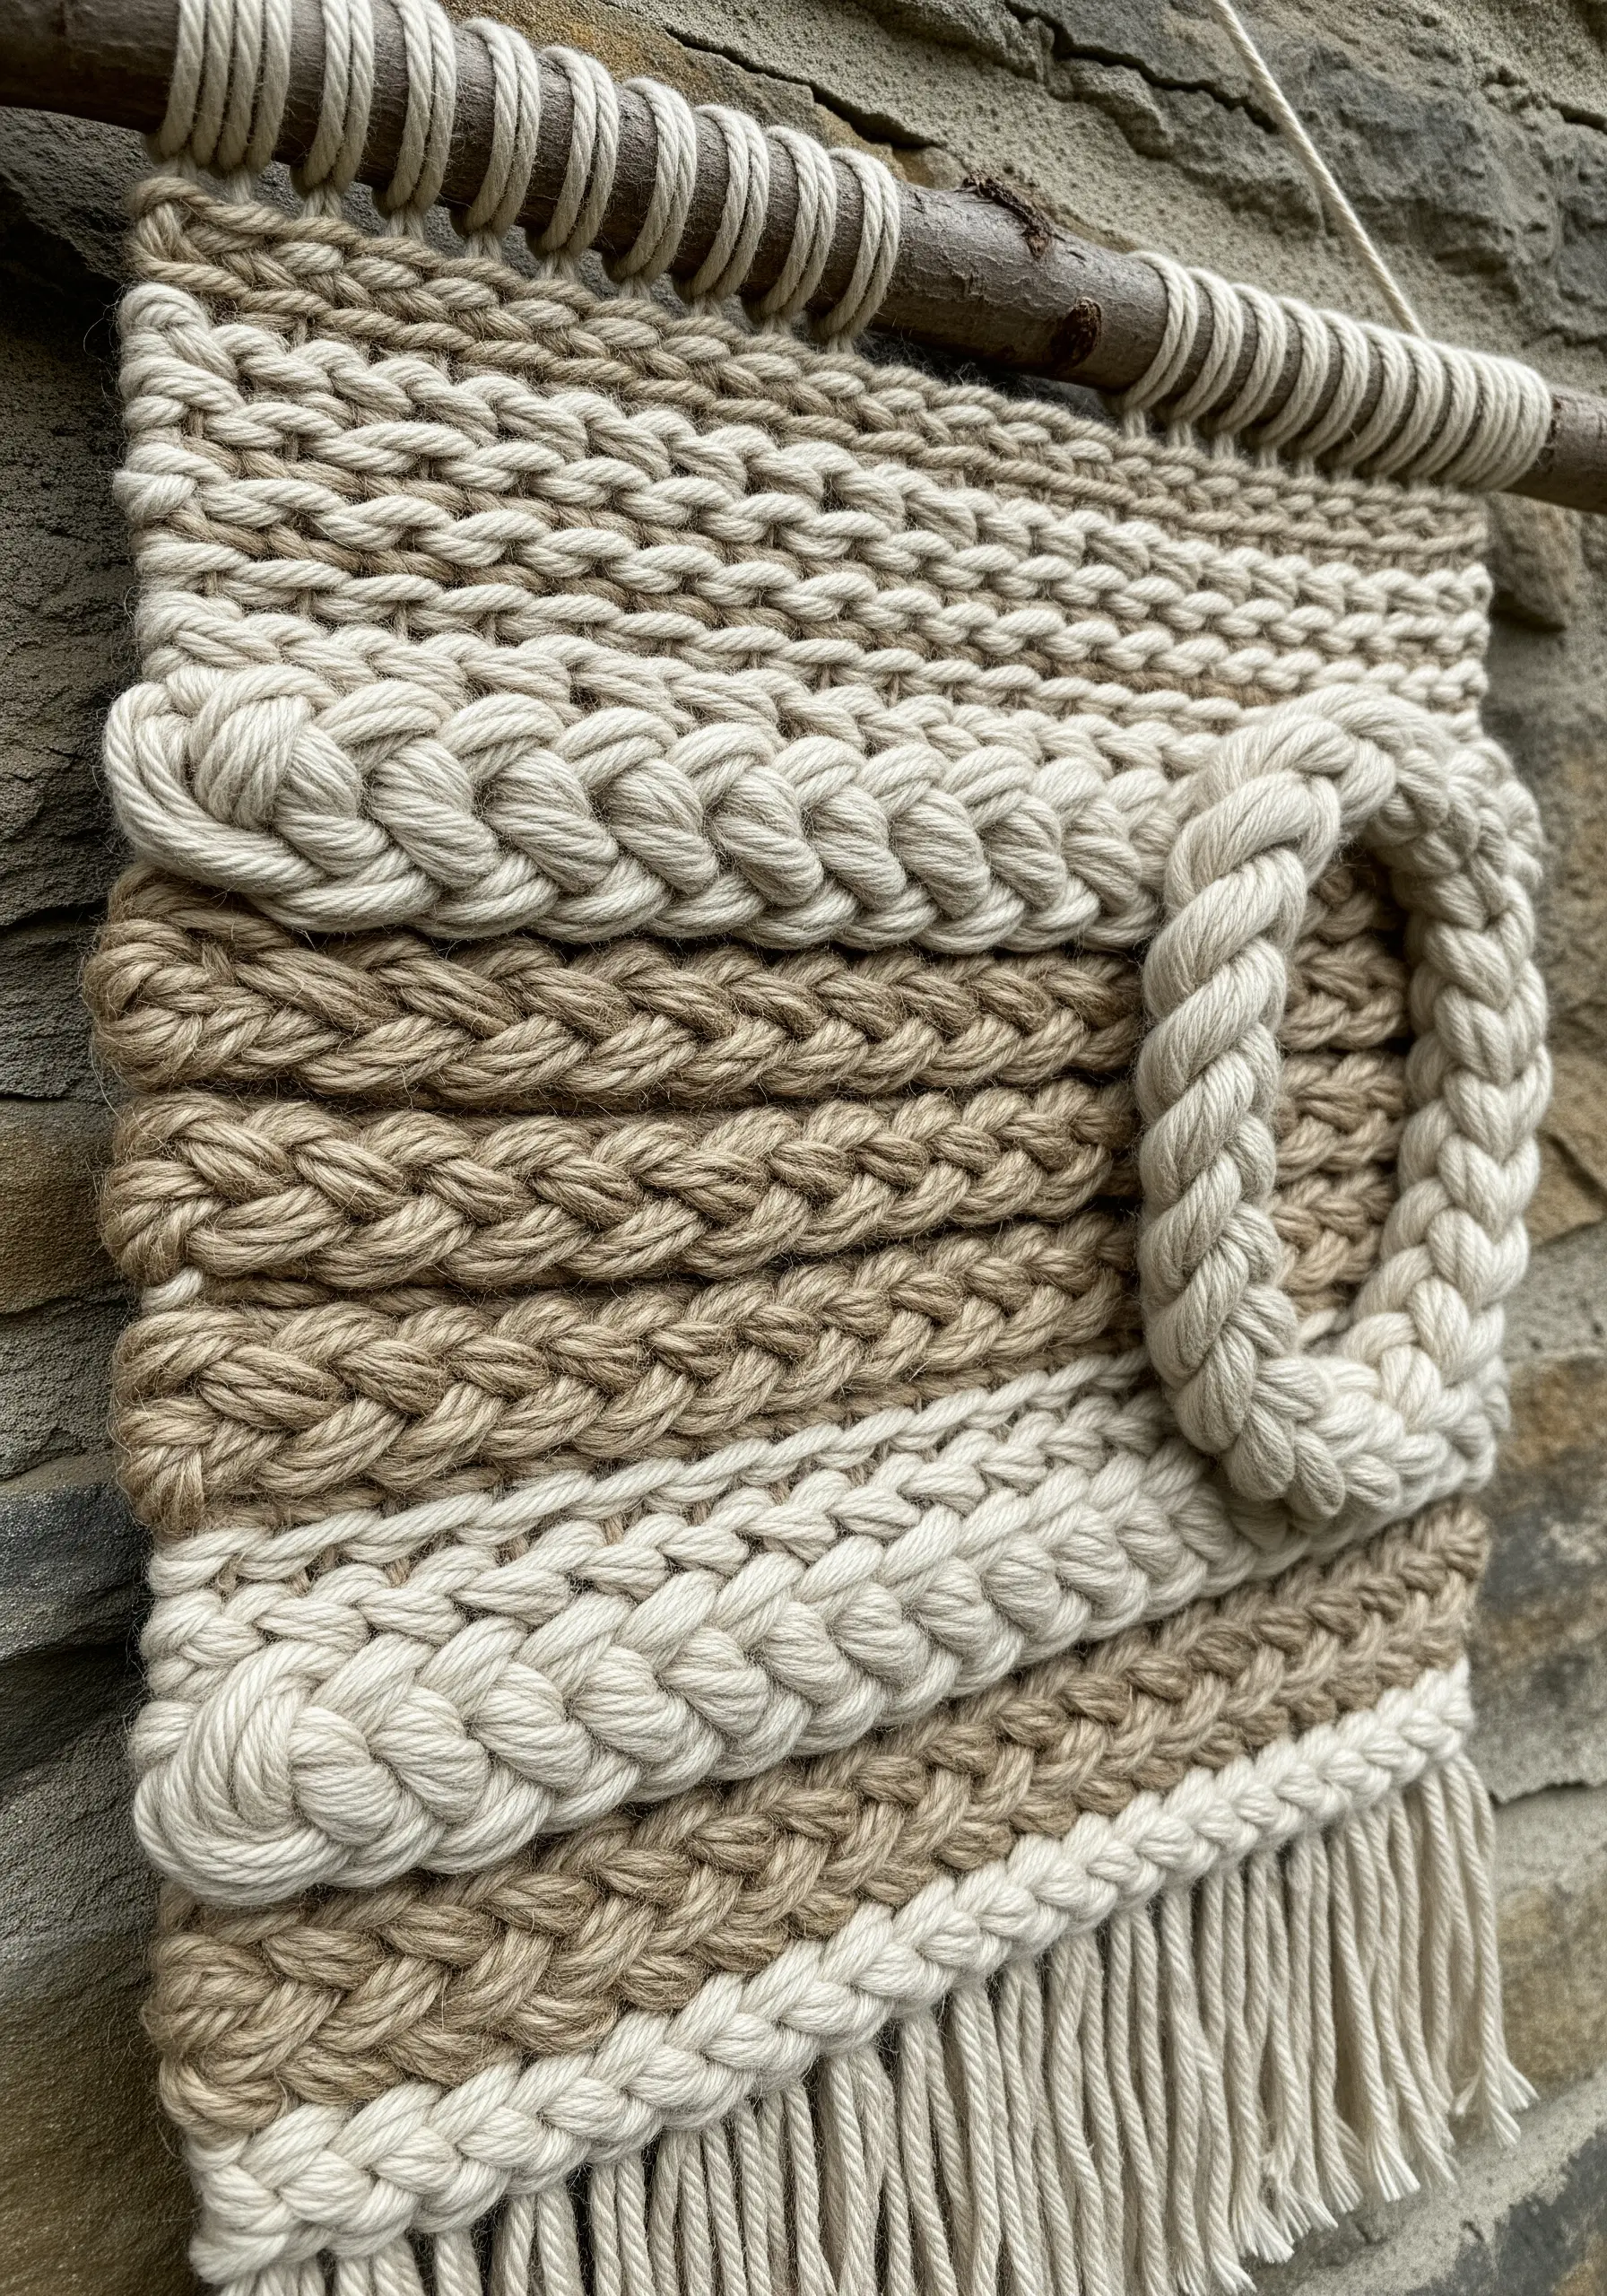
15. Explore Texture in a Monochromatic Weave
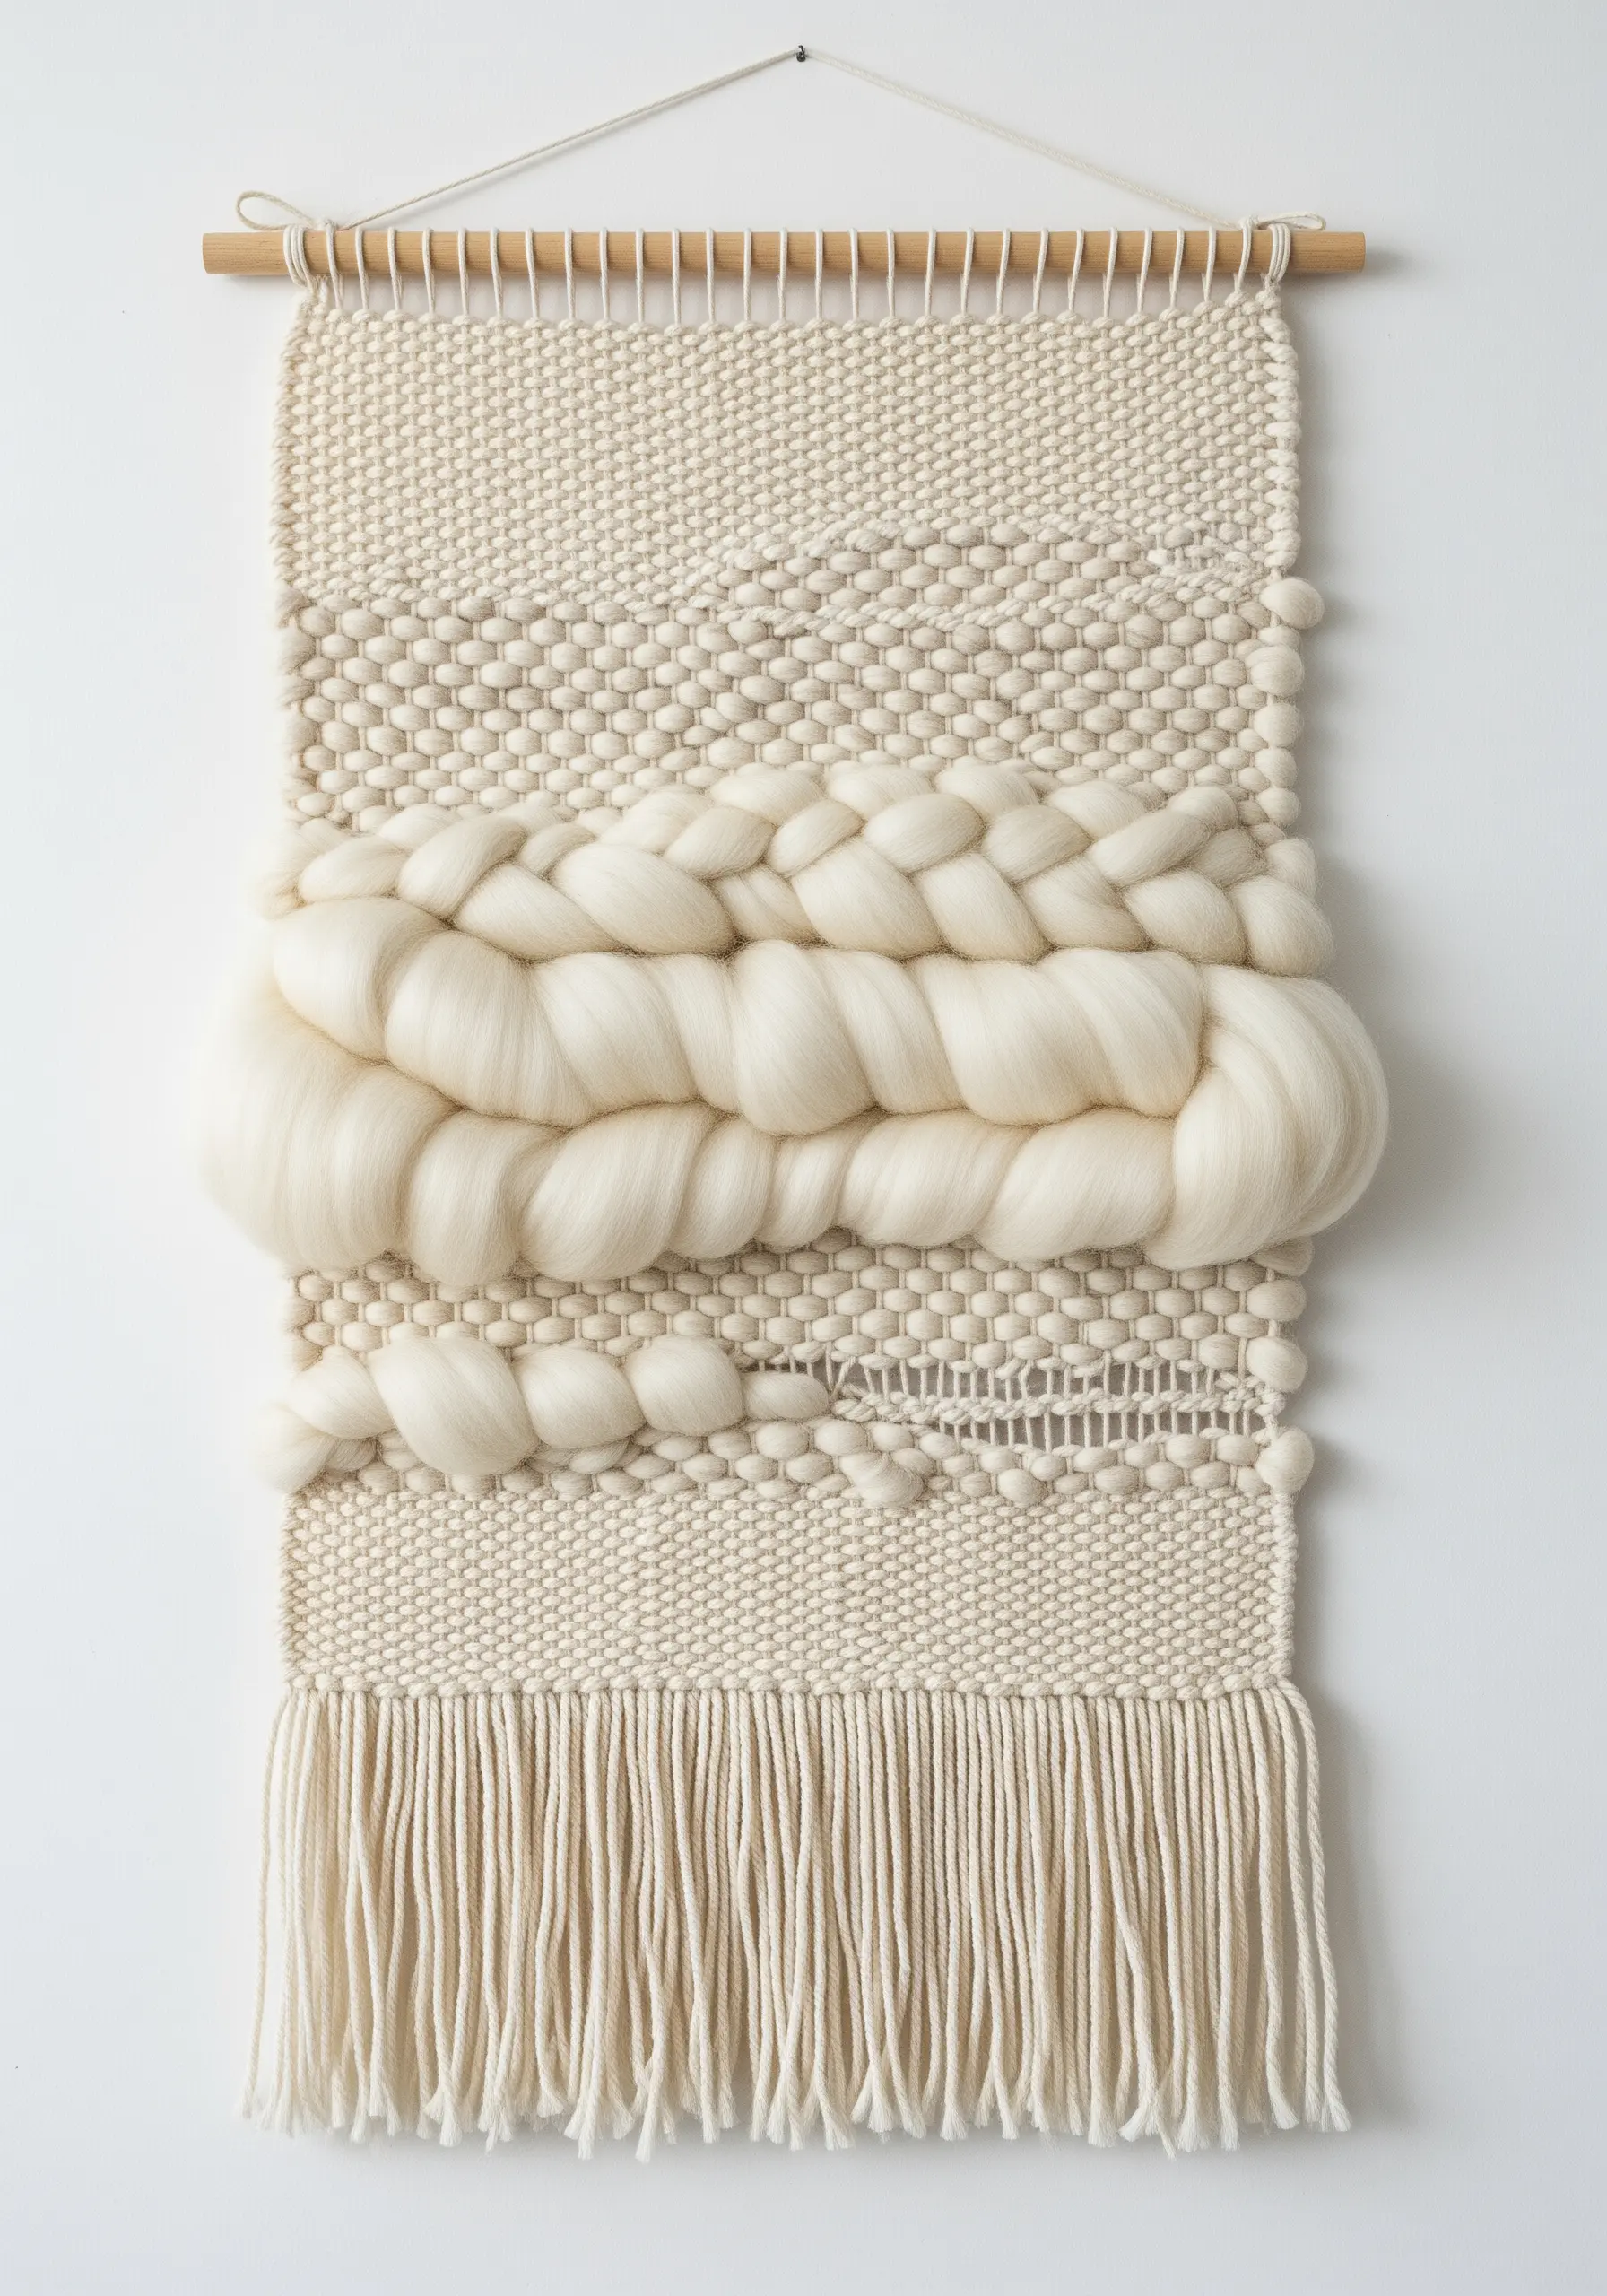
When you limit your palette to a single color, texture becomes the main story, resulting in an incredibly sophisticated piece.
Combine different weaving techniques and a variety of yarn weights and materials—from fine cotton to thick, unspun wool roving—all in shades of white or cream.
Incorporate plain weave for flat areas, Soumak stitch for raised braids, and Rya knots for shaggy fringe.
This tactile landscape invites the viewer to look closer and appreciate the subtle interplay of light and shadow.
16. Combine Macrame Shapes in a Minimalist Hoop
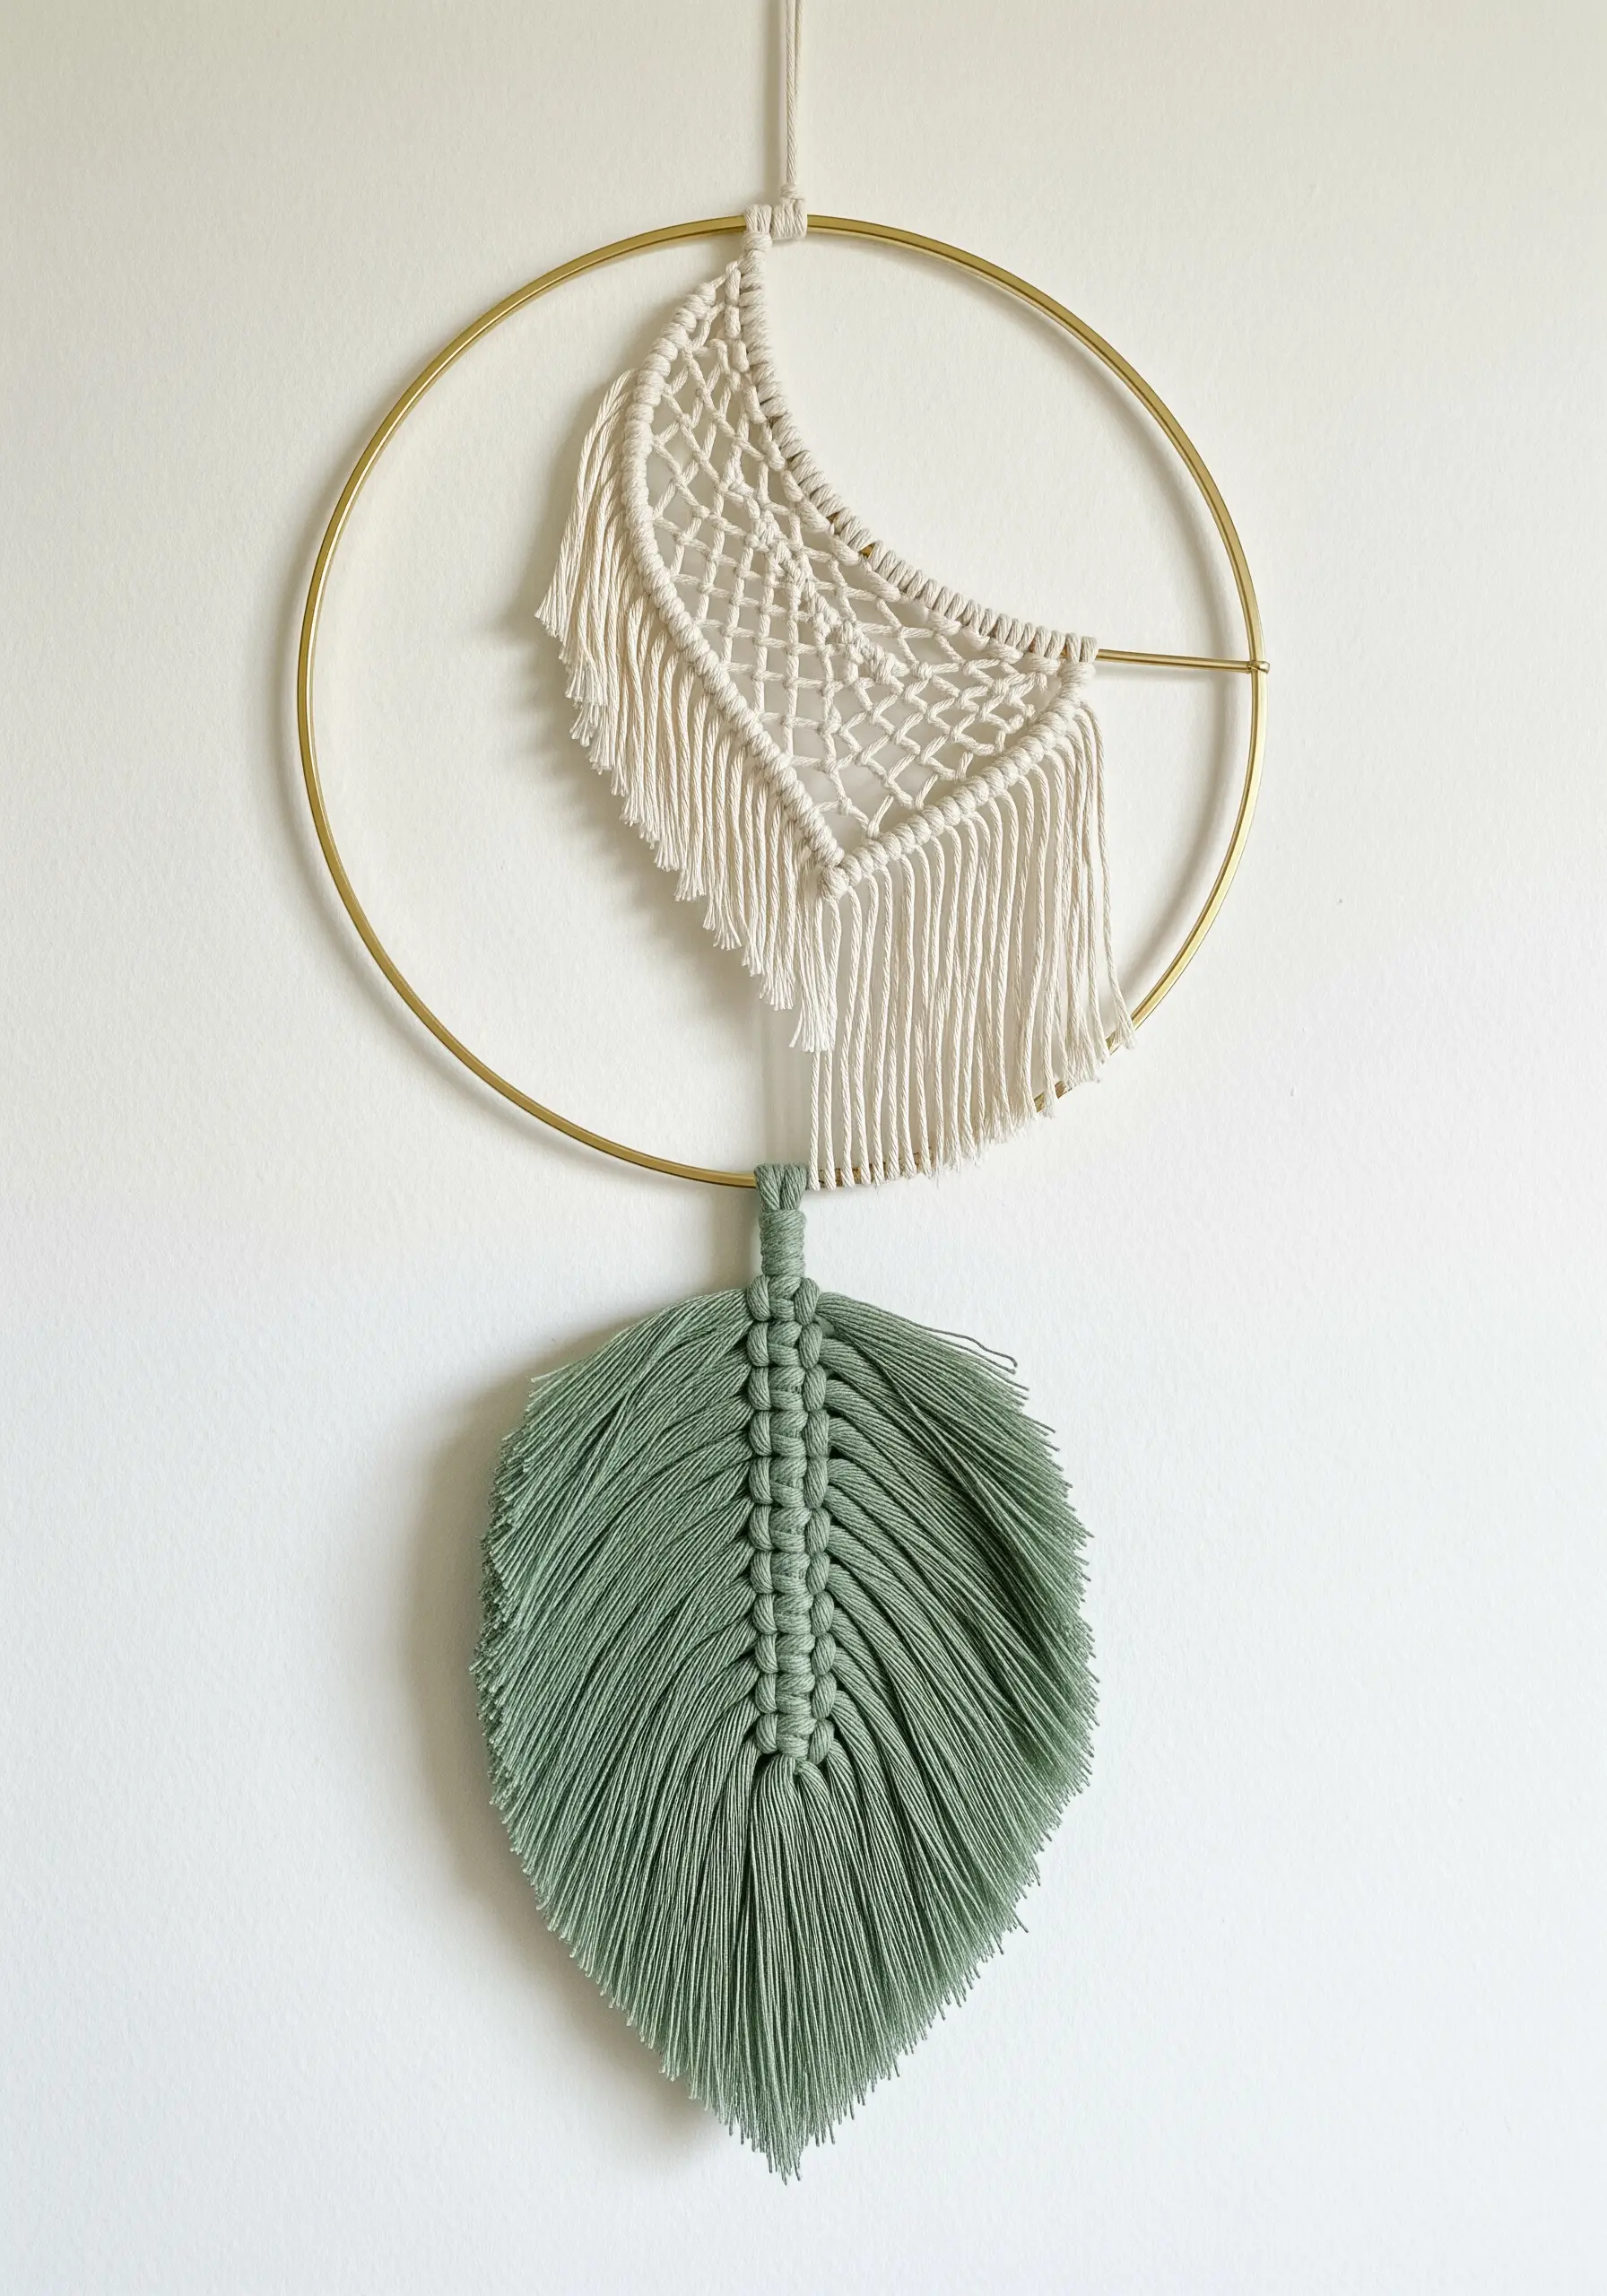
Create a light and airy composition by using a simple metal hoop as a frame for smaller, distinct macrame elements.
Focus on creating one or two beautiful shapes, such as a leaf or a crescent moon, rather than filling the entire space.
To make a soft, feathery leaf, work a series of clove hitch knots around a central cord, then comb out the edges.
The negative space within the hoop is just as important as the knots themselves, giving the piece a modern, balanced feel.
17. Build a Sculptural Burst with Wrapped Spindles
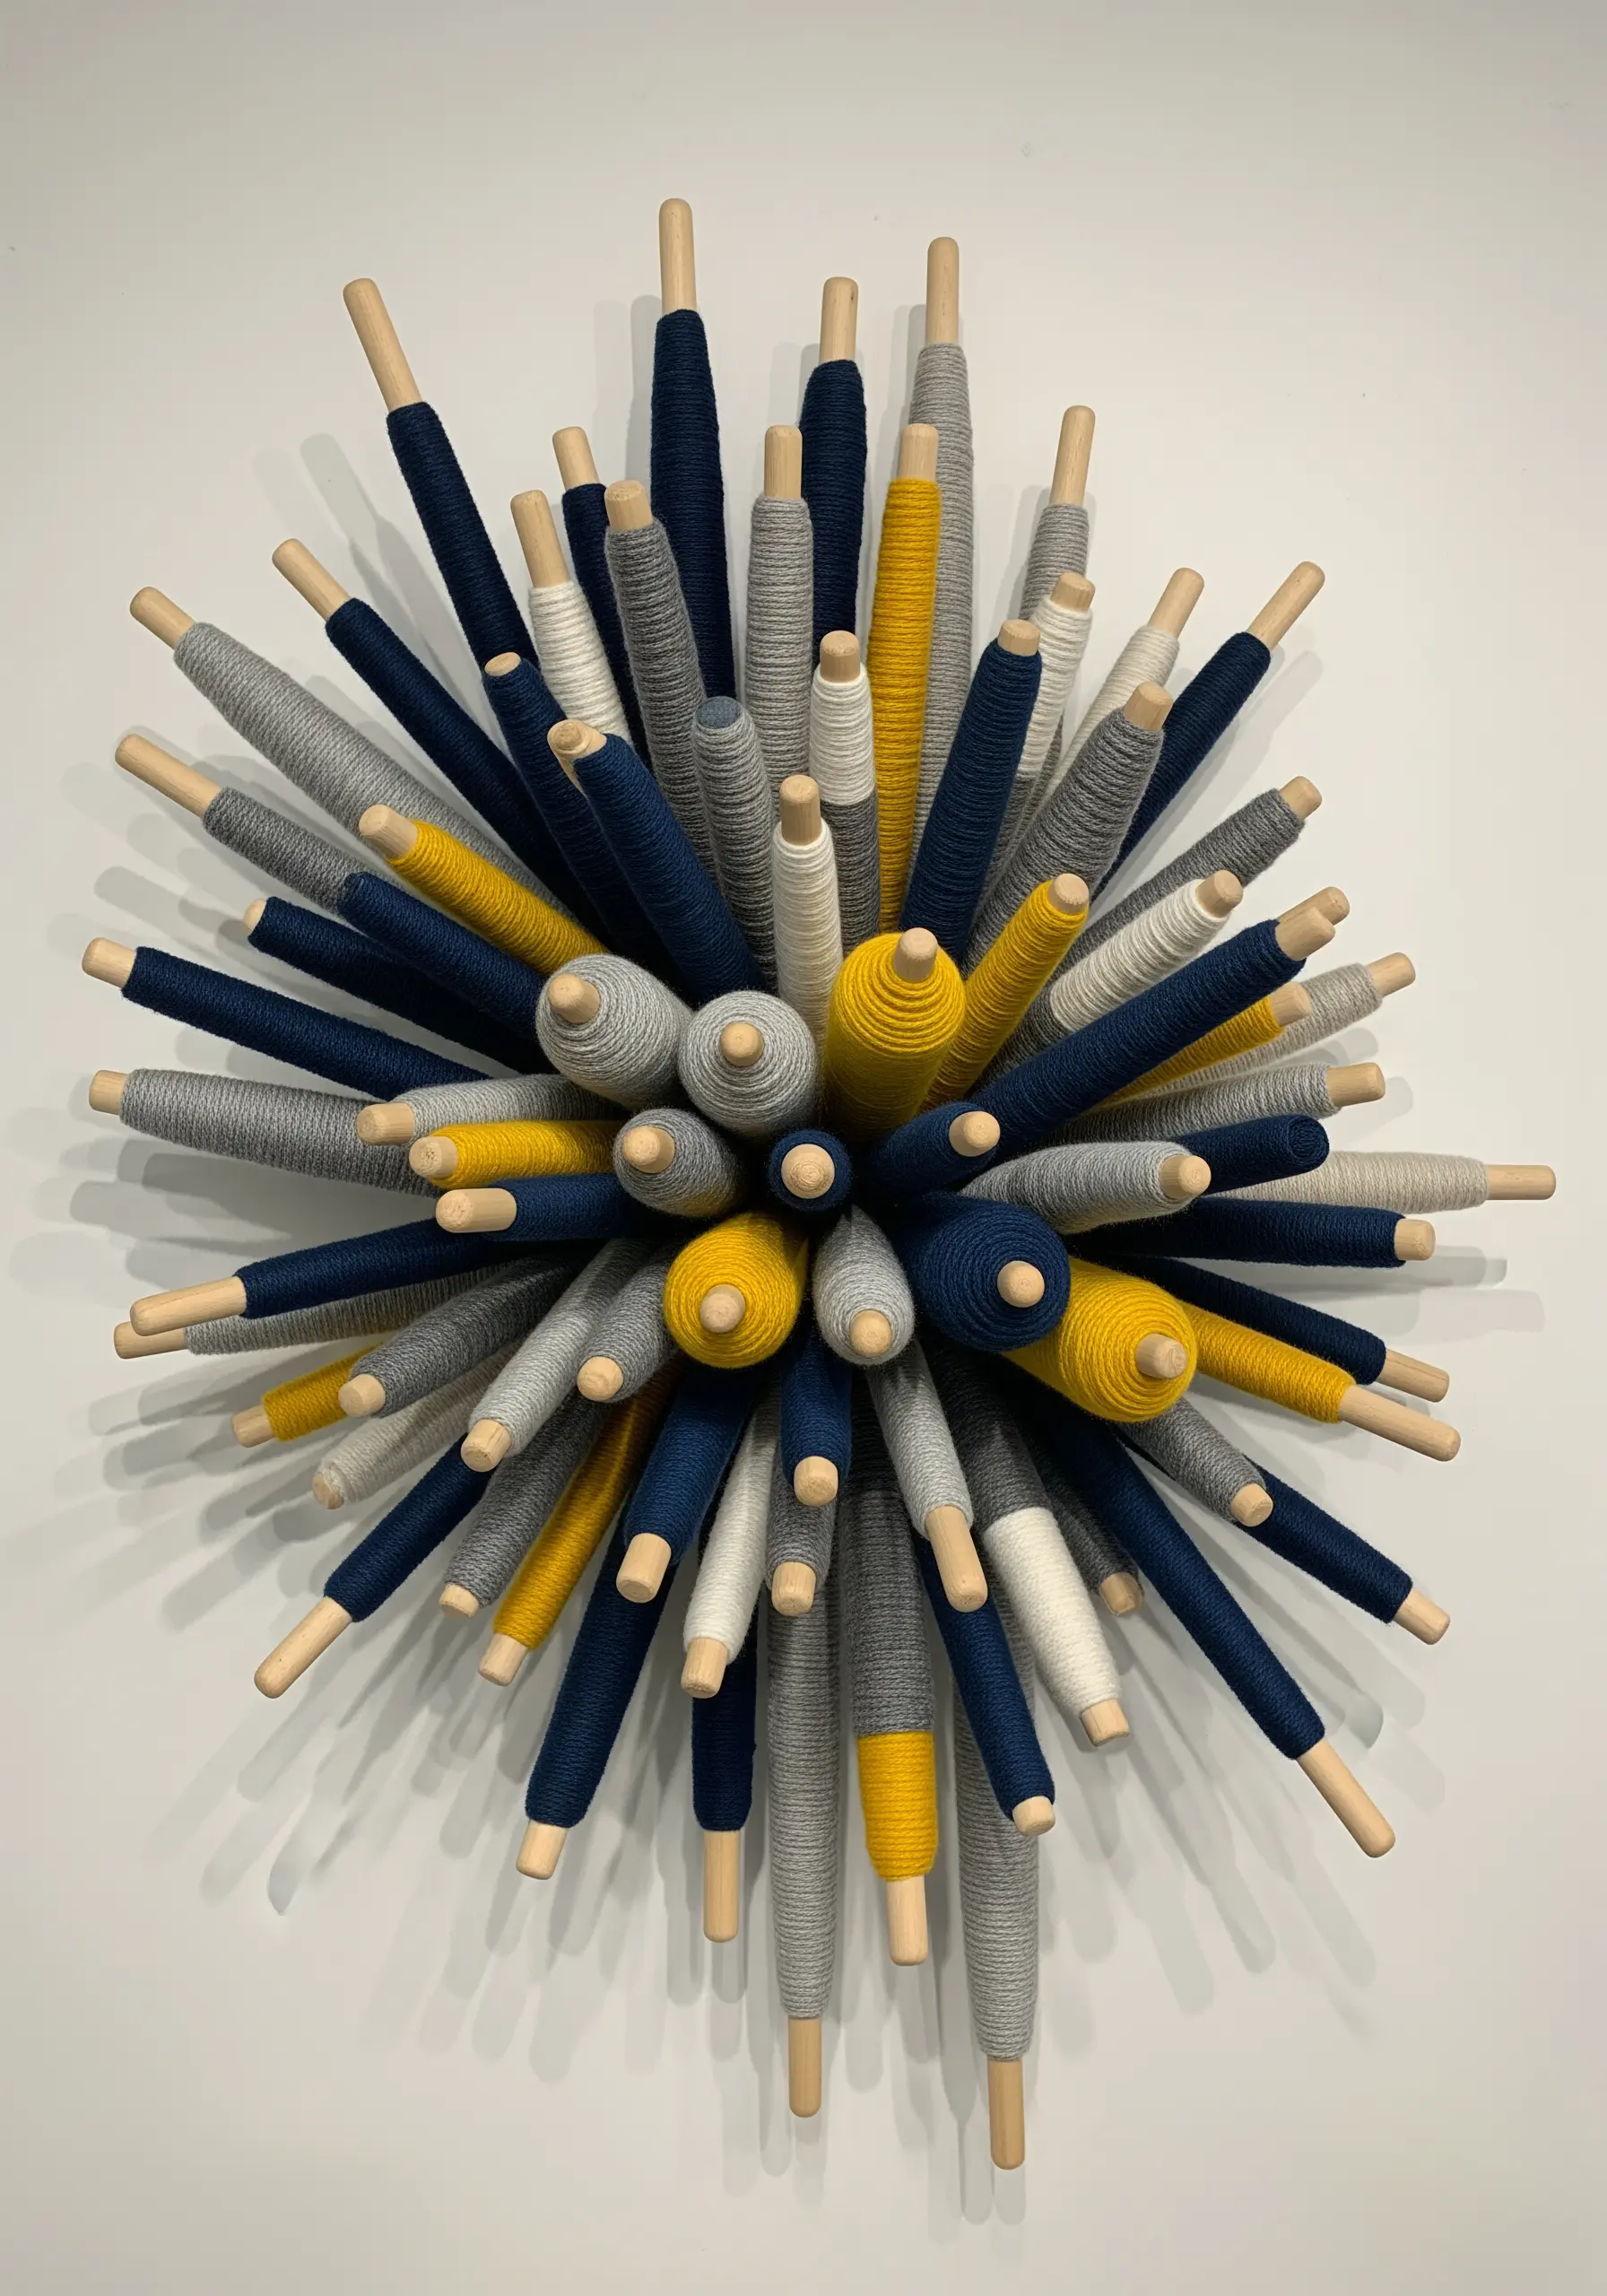
Take your yarn art off the flat wall and into three-dimensional space with a dynamic sculptural piece.
Start by tightly and neatly wrapping wooden dowels or spindles with yarn in a curated color palette.
Arrange the wrapped dowels so they radiate outwards from a central point, securing them to a hidden base.
This explosive composition creates a fascinating interplay of color, line, and shadow that changes depending on the viewer’s perspective.
18. Create Organic Forms with Freeform Crochet
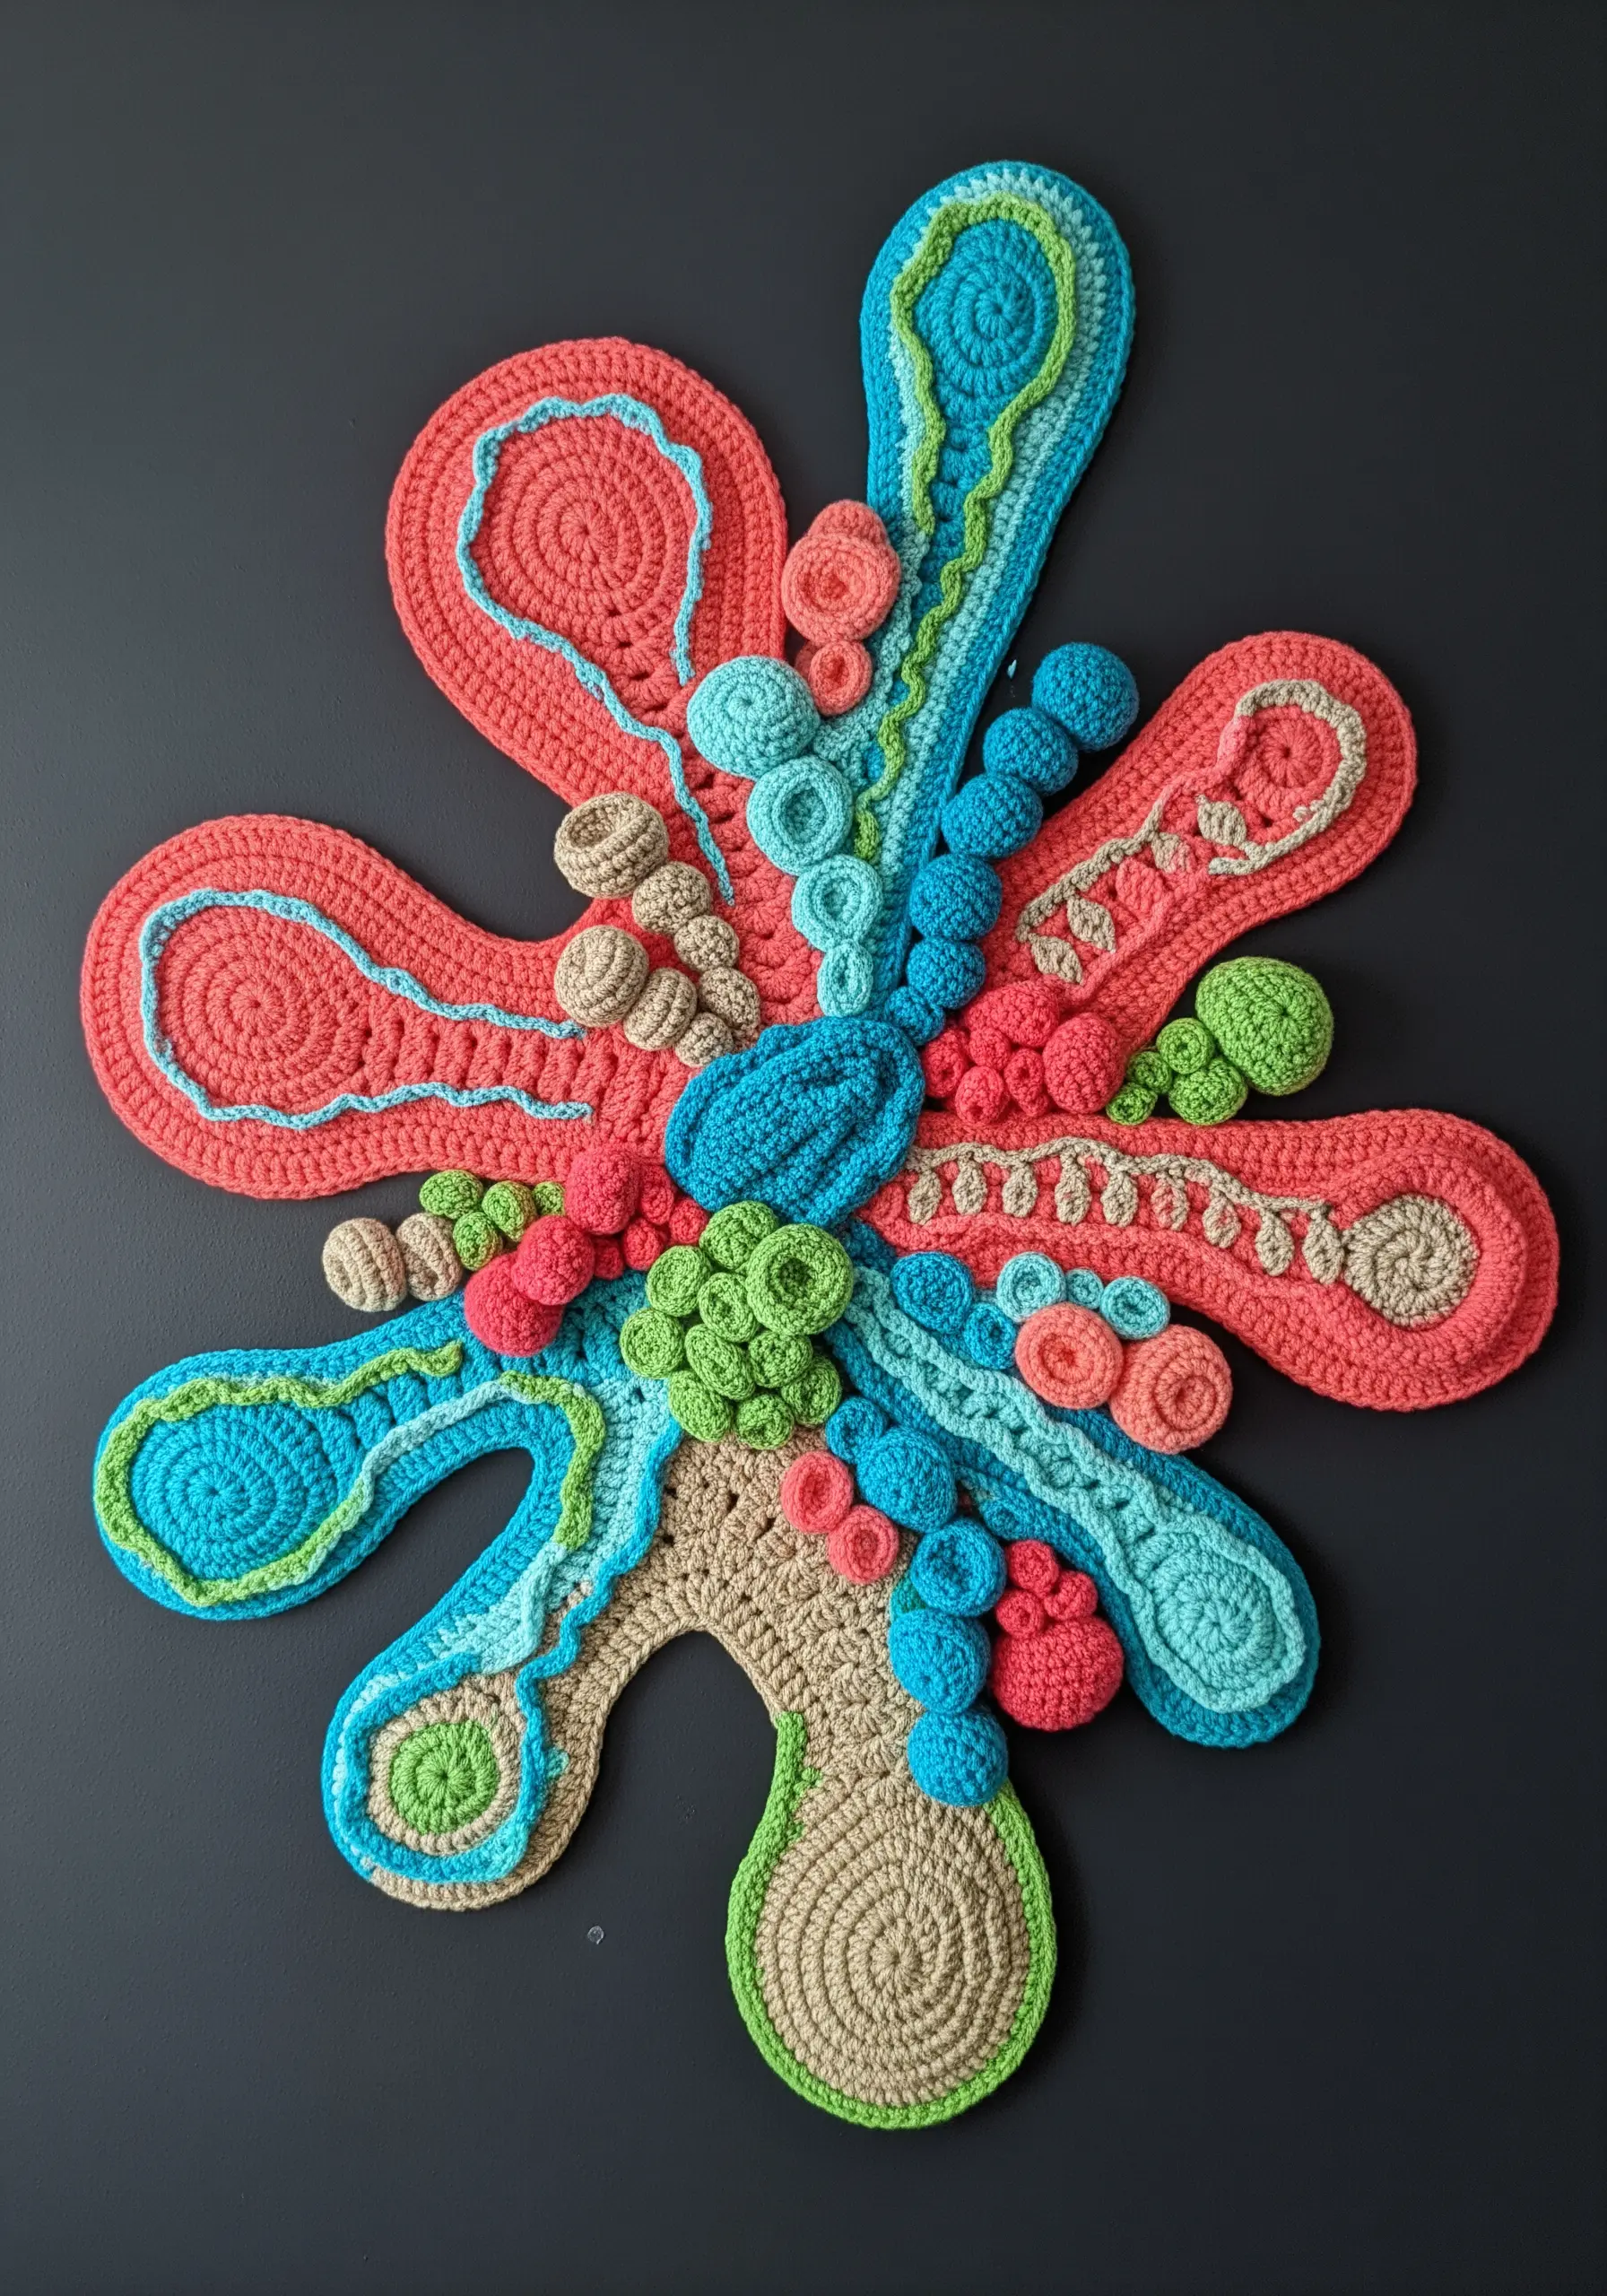
Embrace intuitive making by putting down the pattern and crocheting organic, coral-like shapes.
Using basic stitches like single crochet, half-double, and double crochet, you can create complex forms by simply increasing and decreasing stitches at random.
This will cause your work to curl, ripple, and grow in unpredictable ways, mimicking structures found in nature.
Combine various yarn textures and a vibrant color palette to build a rich, tactile sculpture that feels truly one-of-a-kind.
19. Translate Modern Art into a Crochet Grid
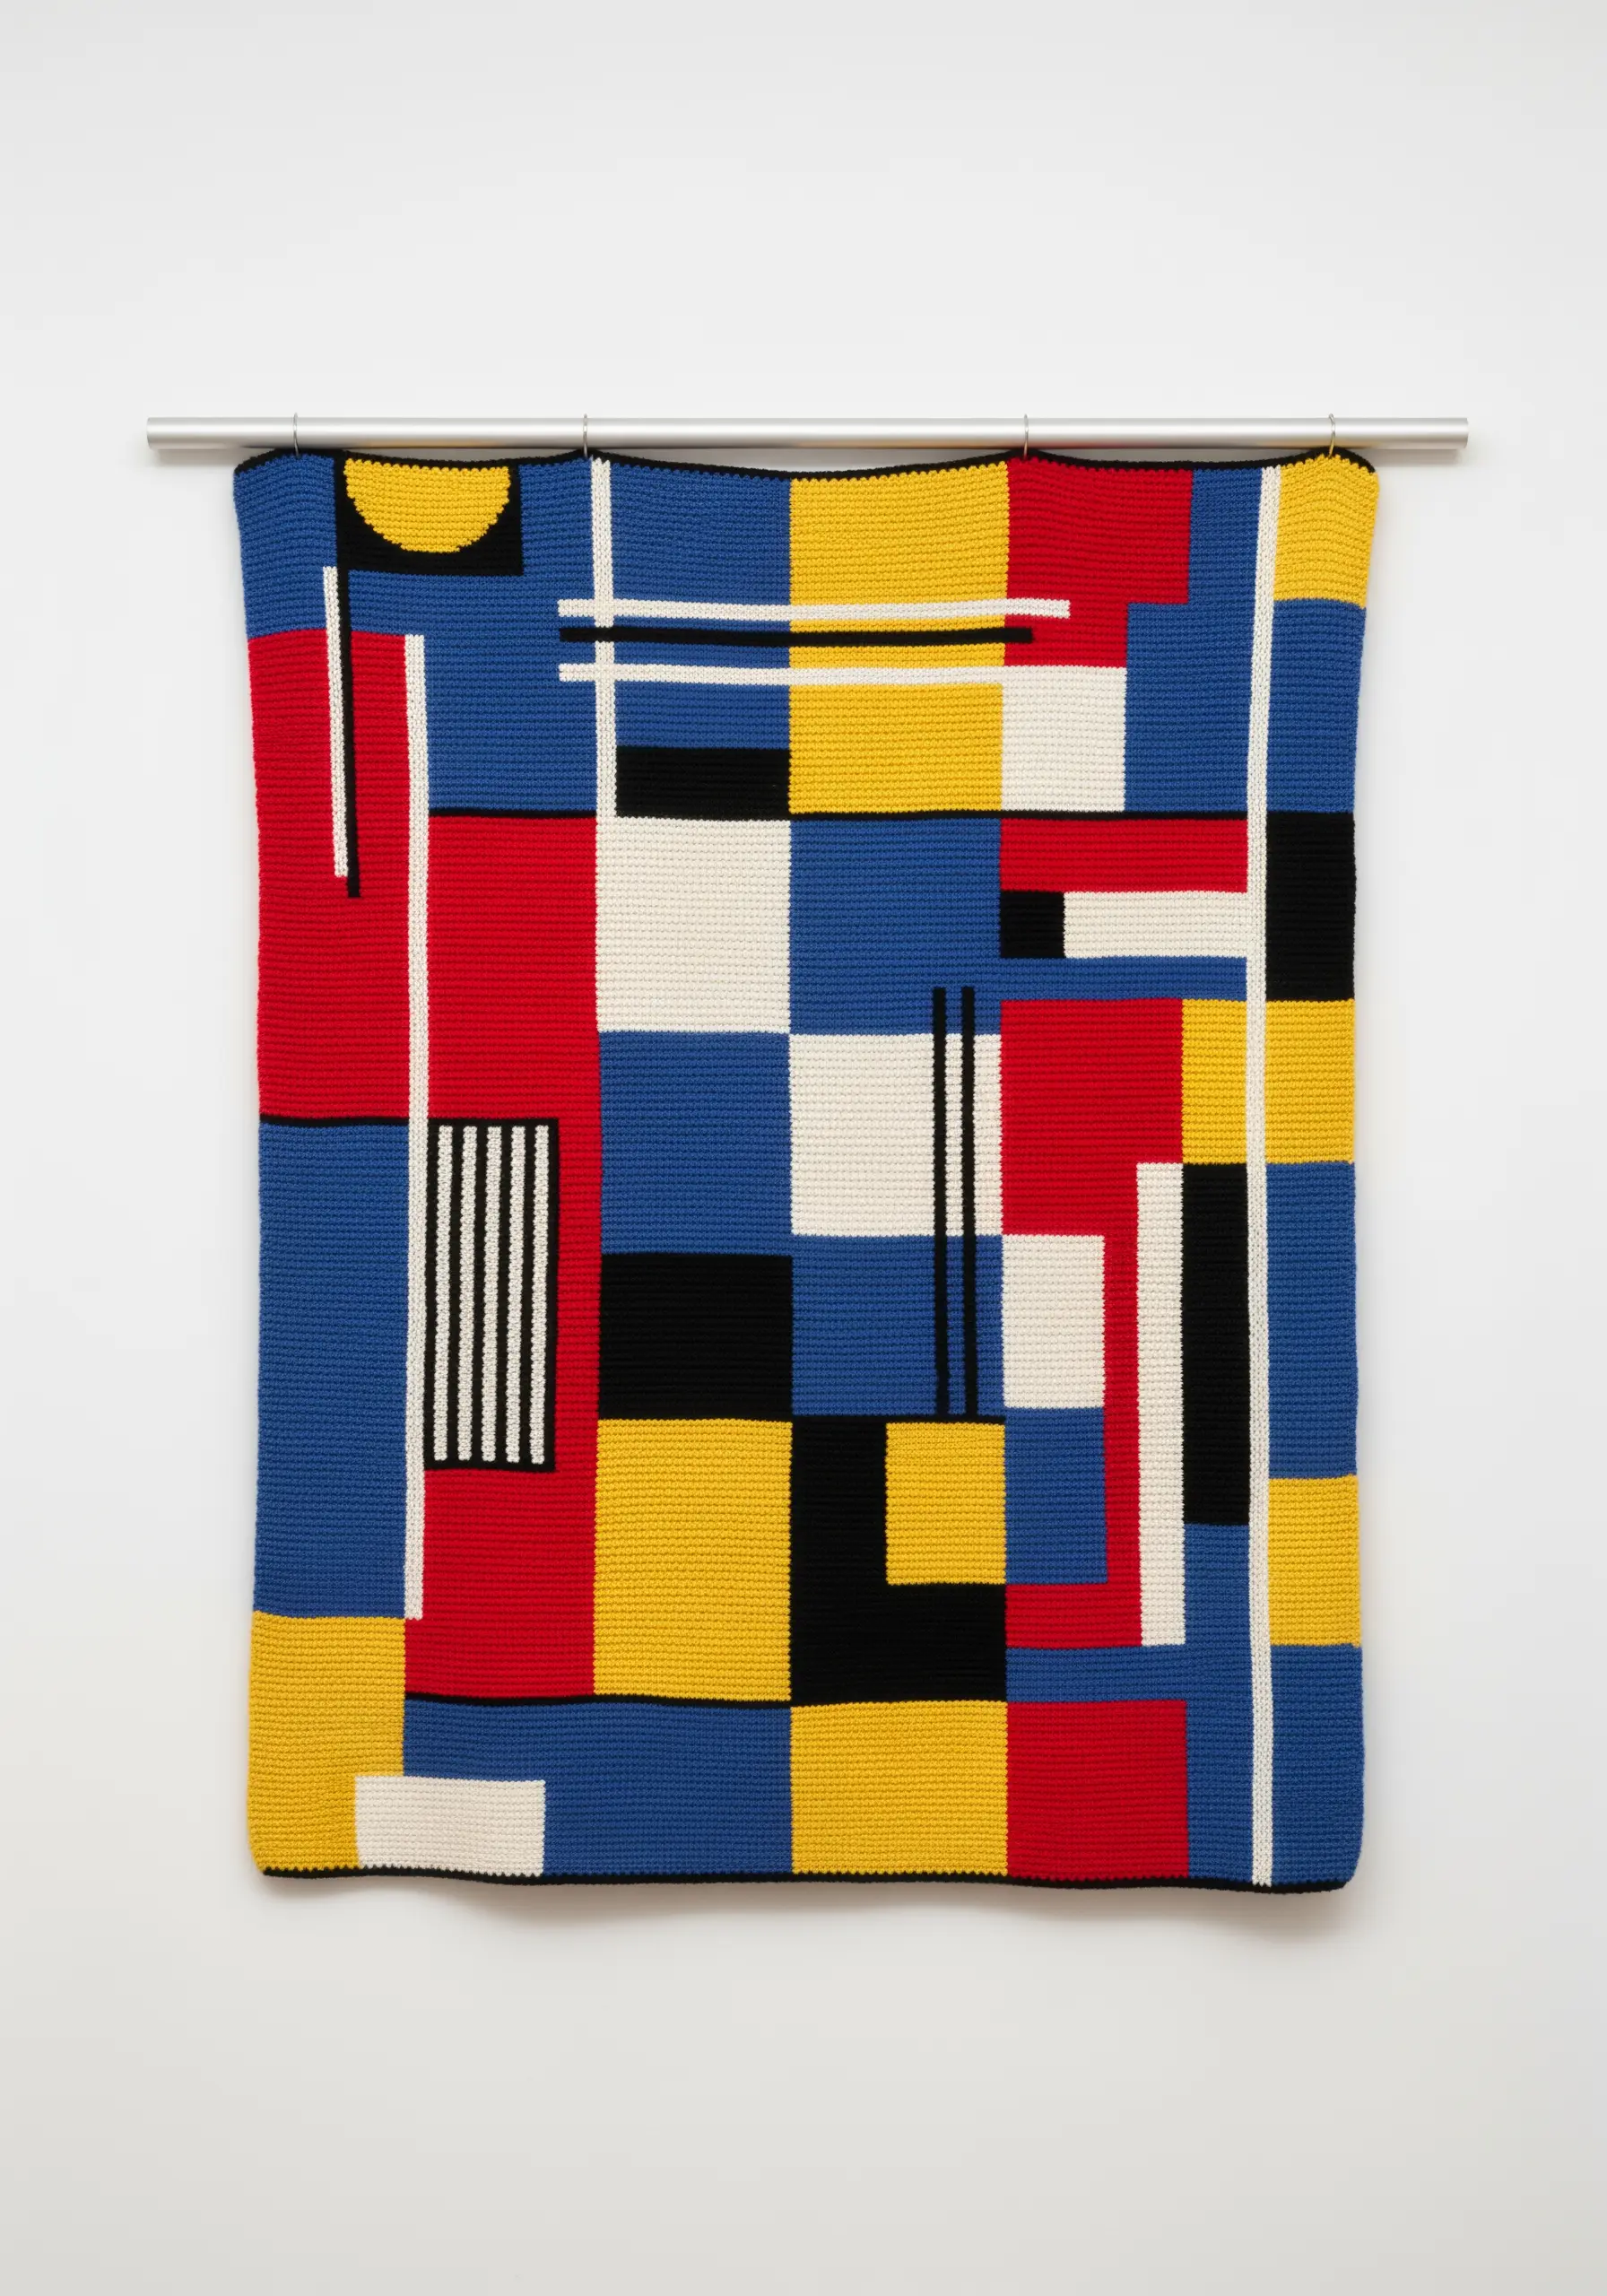
Leverage the natural grid of single crochet to create textile interpretations of geometric modern art, like a Mondrian painting.
Work in solid blocks of color, making sure to change your yarn cleanly at the end of each row to maintain crisp lines.
To add the signature black dividing lines, use a surface crochet slip stitch or a simple backstitch embroidery after the main piece is complete.
This method transforms a basic stitch into a bold, graphic art piece with a satisfying structure.
20. Incorporate Chunky Braids for High-Impact Texture
For an immediate and dramatic textural element in your weavings, integrate thick, chunky braids.
You can either braid several strands of thick yarn off the loom and then weave the entire braid in as a single weft row, or create the braid directly on the loom.
This technique adds a bold, rope-like line that provides a powerful contrast to flatter areas of plain weave.
Even a single, well-placed braid can elevate a simple design into a stunning, sculptural piece.
21. Add Gradual Color with Dip-Dyeing
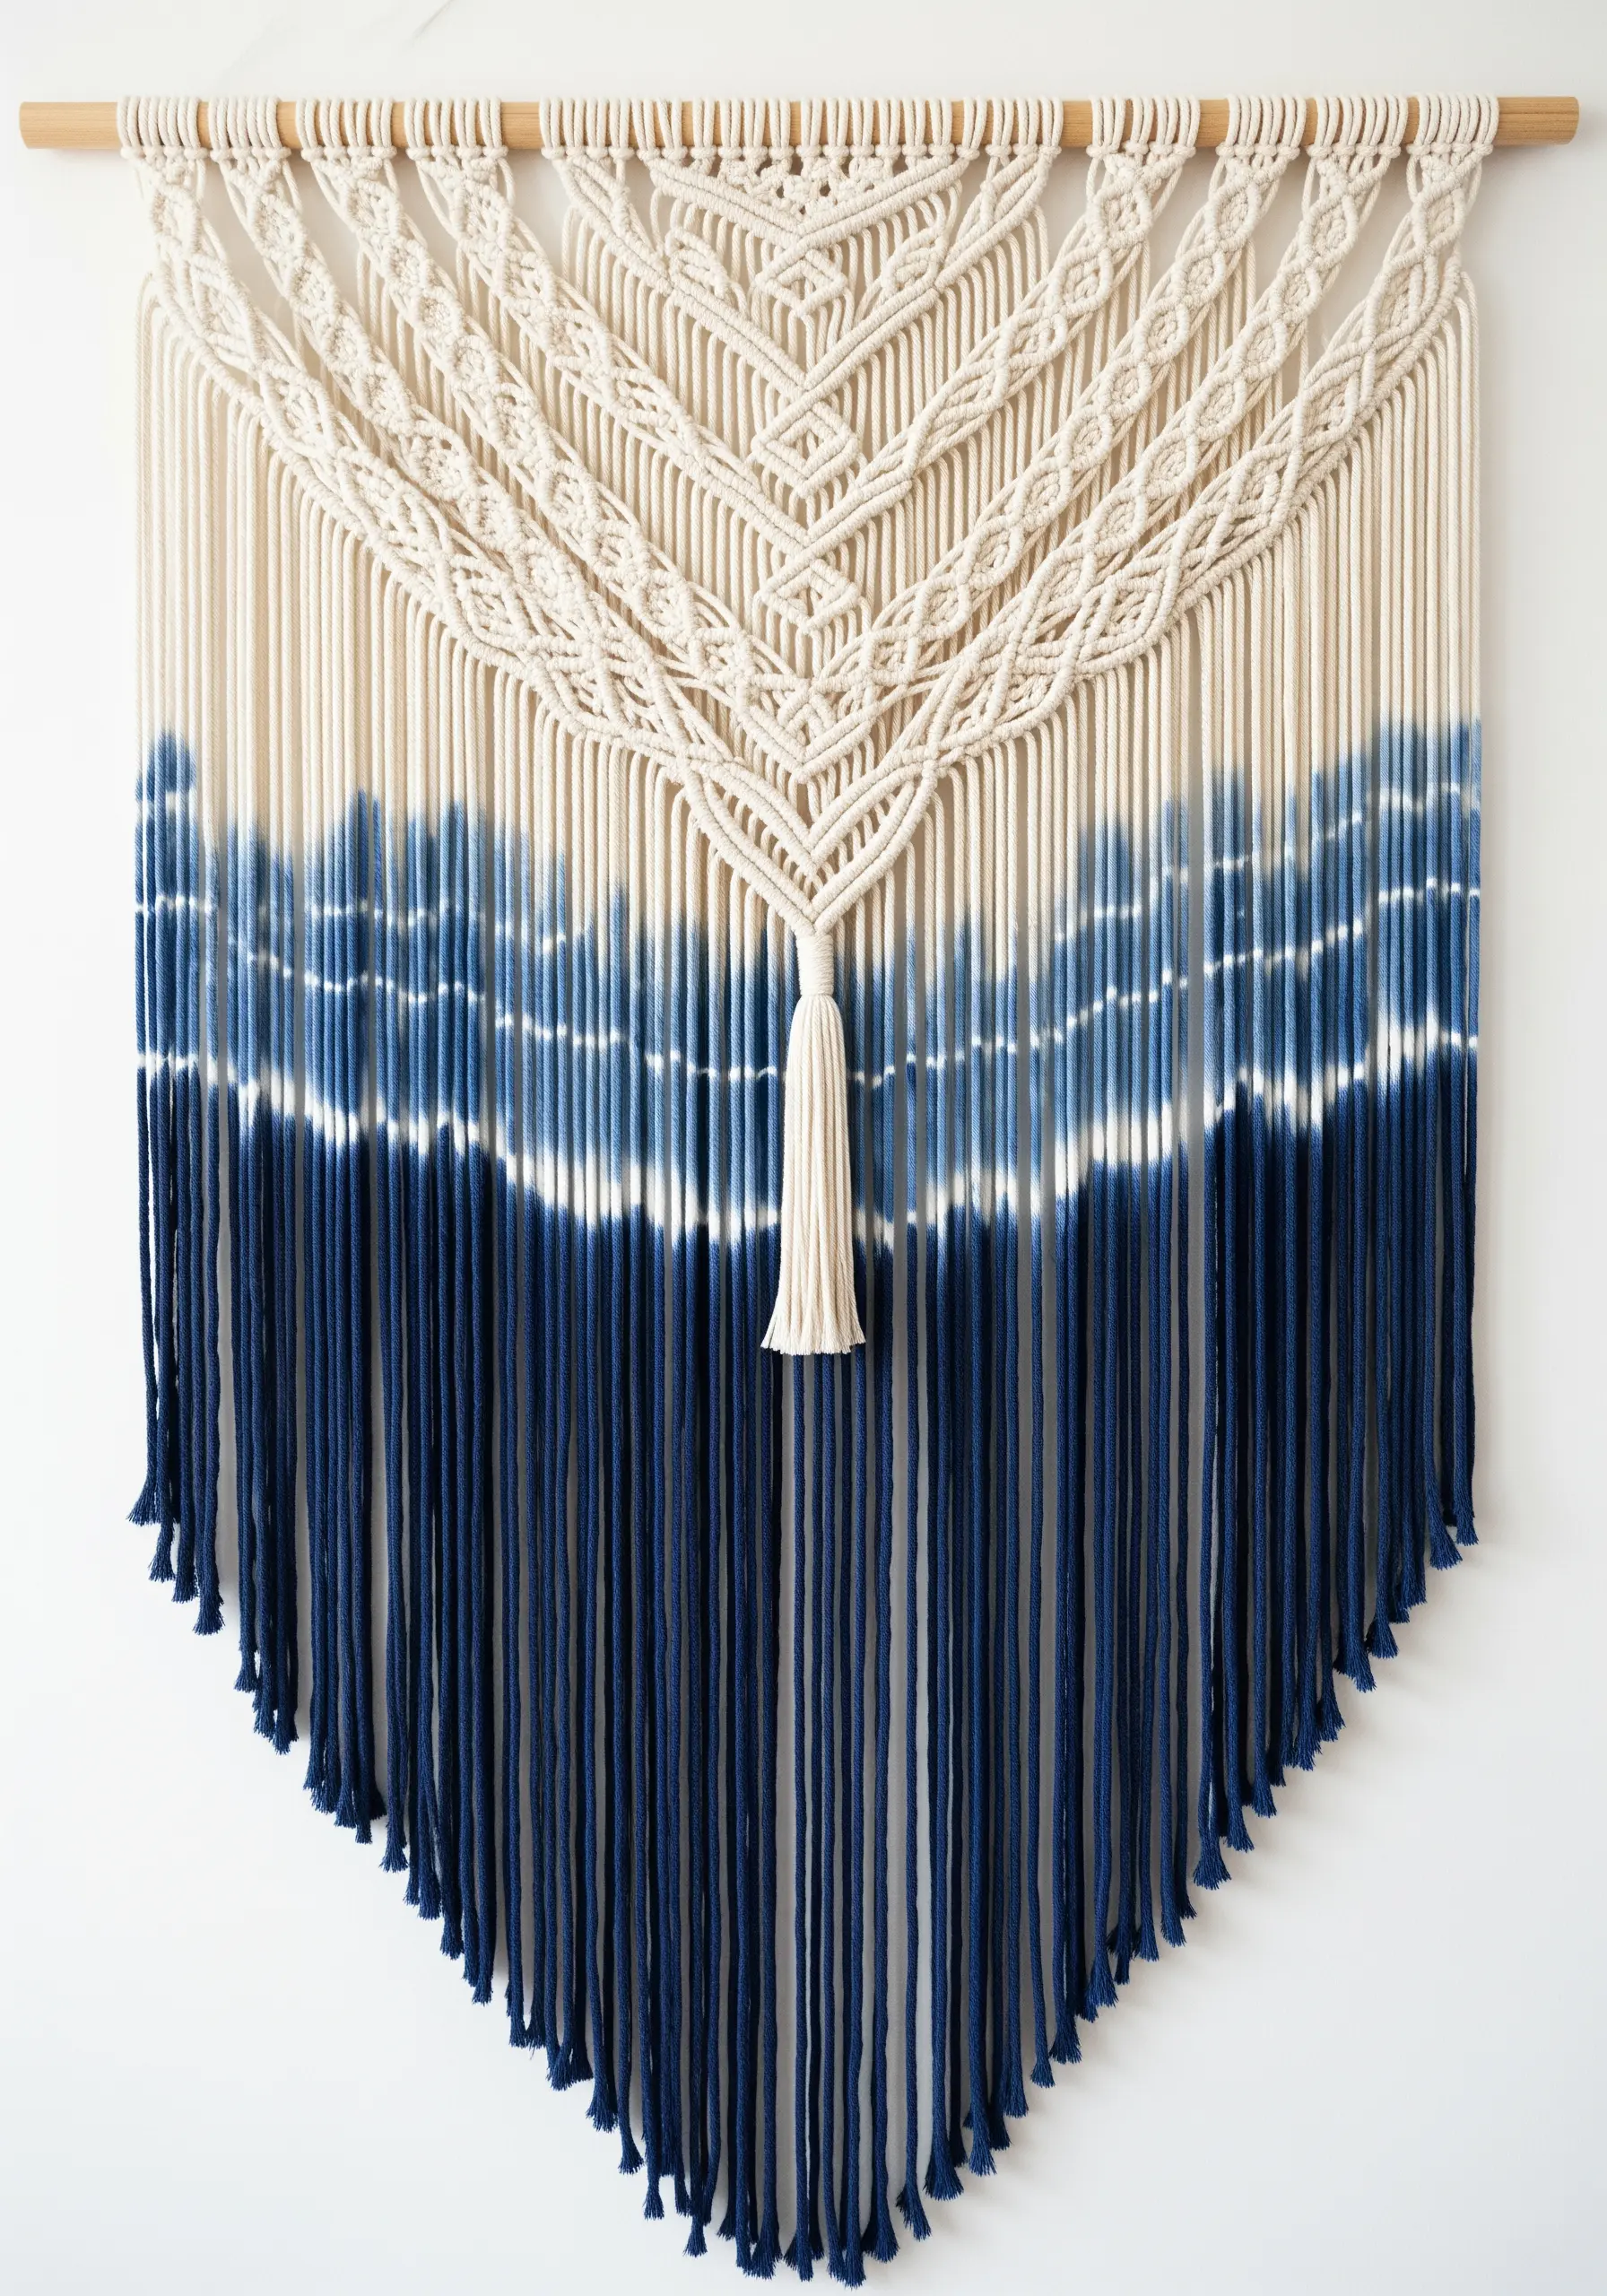
Transform a finished macrame piece from neutral to breathtaking with a custom dip-dye finish.
Using a fiber-reactive dye suitable for cotton, you can create a beautiful ombré effect that flows with the lines of your piece.
For a soft, watercolor-like gradient, submerge the piece in the dye bath and slowly pull it out. The longer a section remains in the dye, the more saturated its color will be.
This technique adds a layer of painterly artistry that elevates the entire design.
22. Master the Art of a ‘Cloud’ Weave
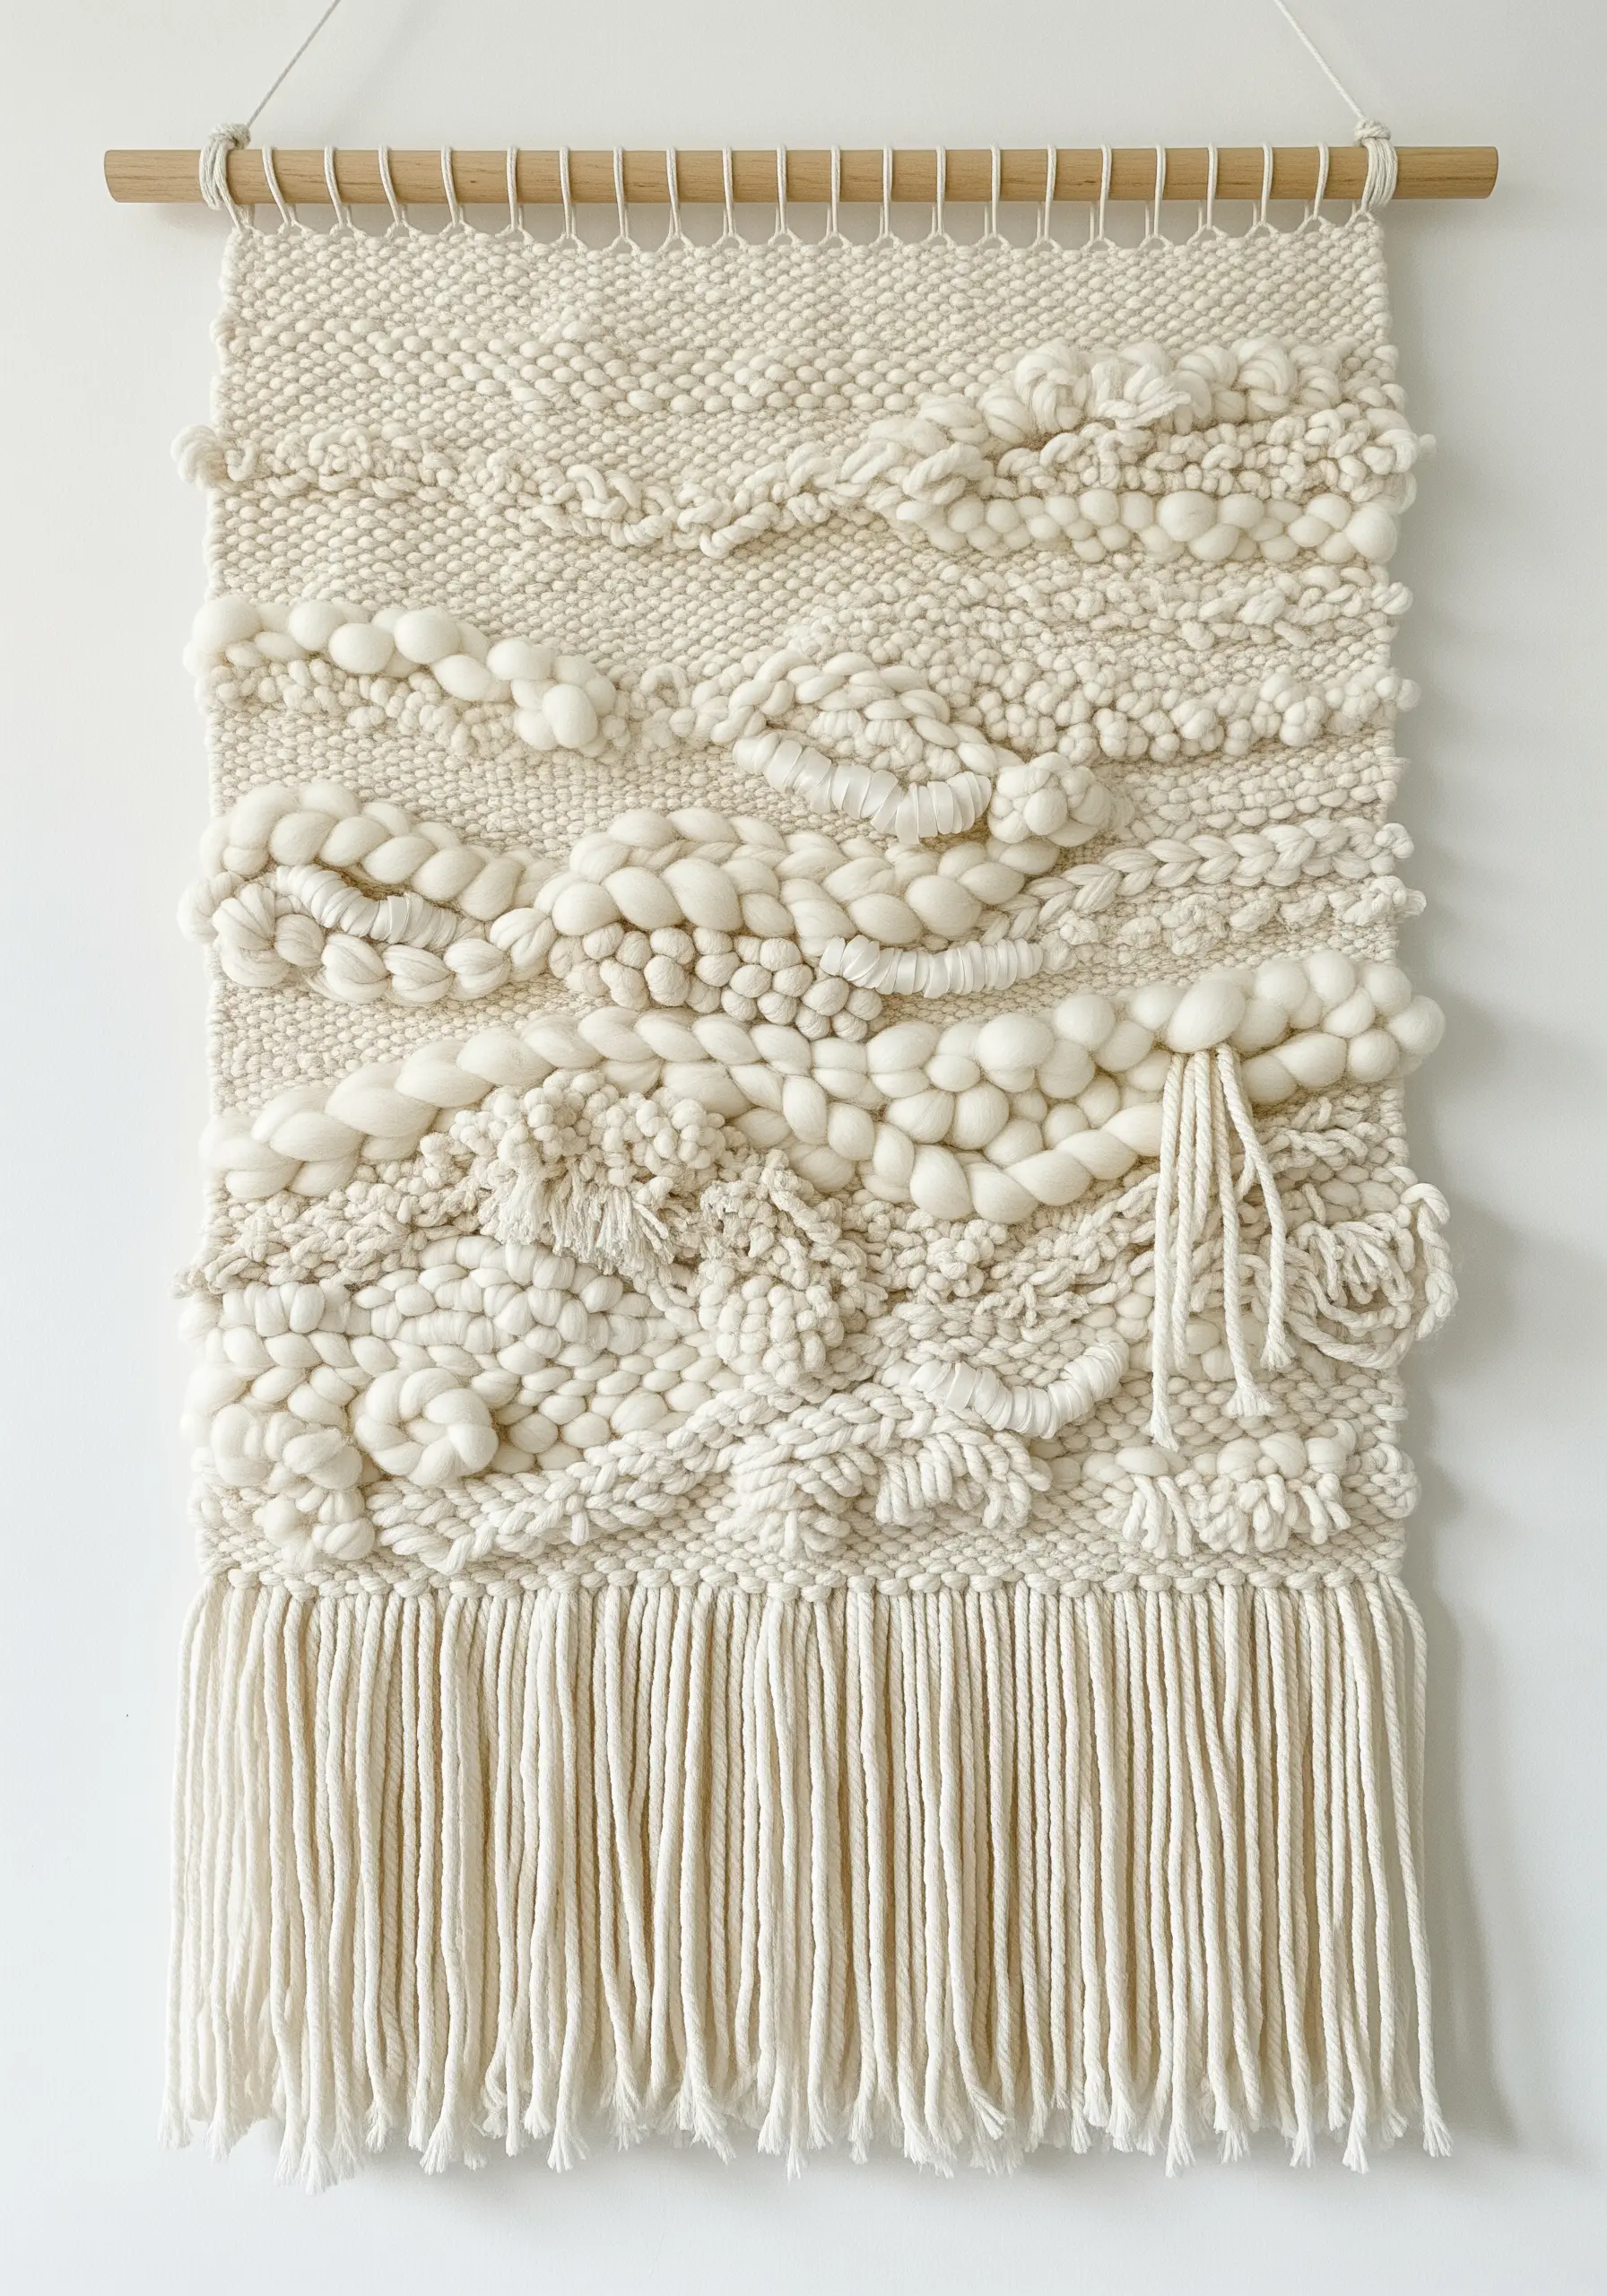
Create a deeply sensory piece by focusing entirely on texture within a single, monochromatic color palette.
To build a ‘cloud’ weave, gather a variety of white and off-white yarns: unspun wool roving for puffiness, boucle for nubby loops, and bamboo silk for shine.
Use textural techniques like pile weaving, soumak stitches, and dense rya knots to create a landscape of softness that invites touch.
This sophisticated approach results in a calming, minimalist piece with incredible depth and character.
23. Design a Cohesive Triptych with Punch Needle
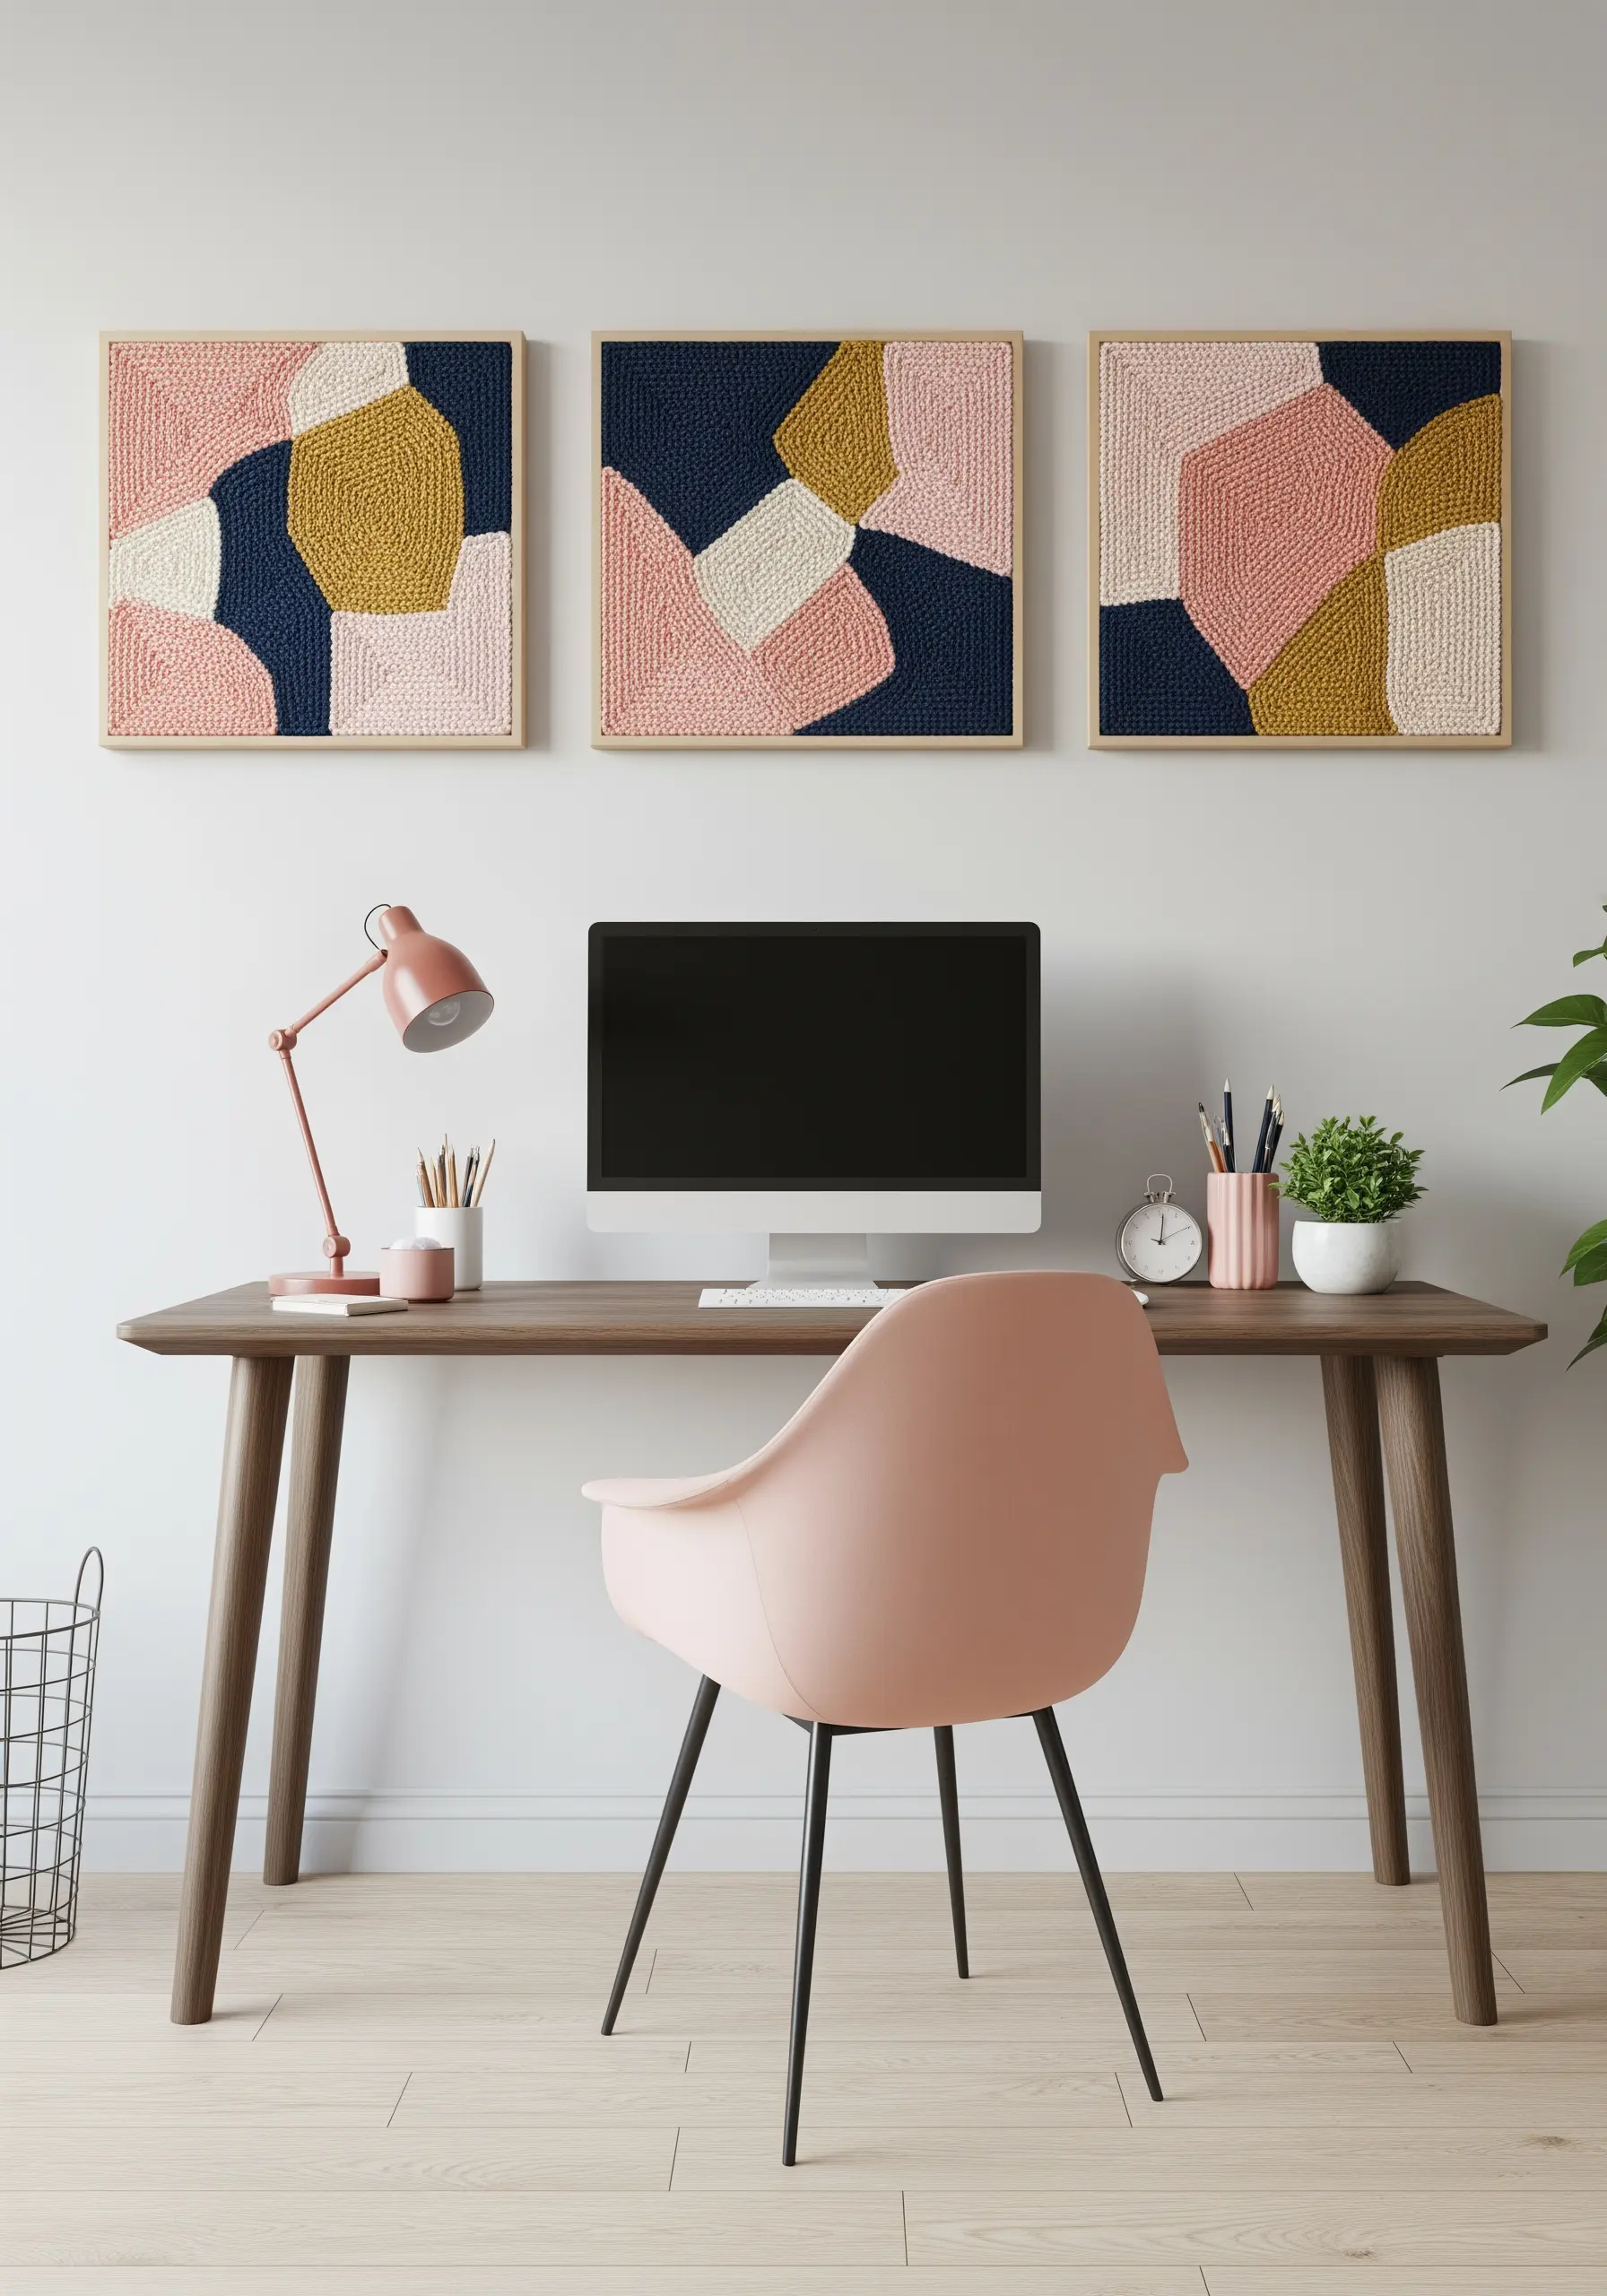
Expand your artistic vision by creating a triptych—a set of three related pieces designed to be displayed together.
To ensure the set feels unified, use a consistent color palette across all three panels.
Design a flowing, abstract shape that appears to travel from one frame to the next, connecting the individual pieces into a larger, continuous composition.
This approach turns a small, manageable project into a significant installation with a strong visual impact.
24. Craft a Delicate Mobile with Yarn and Hoops
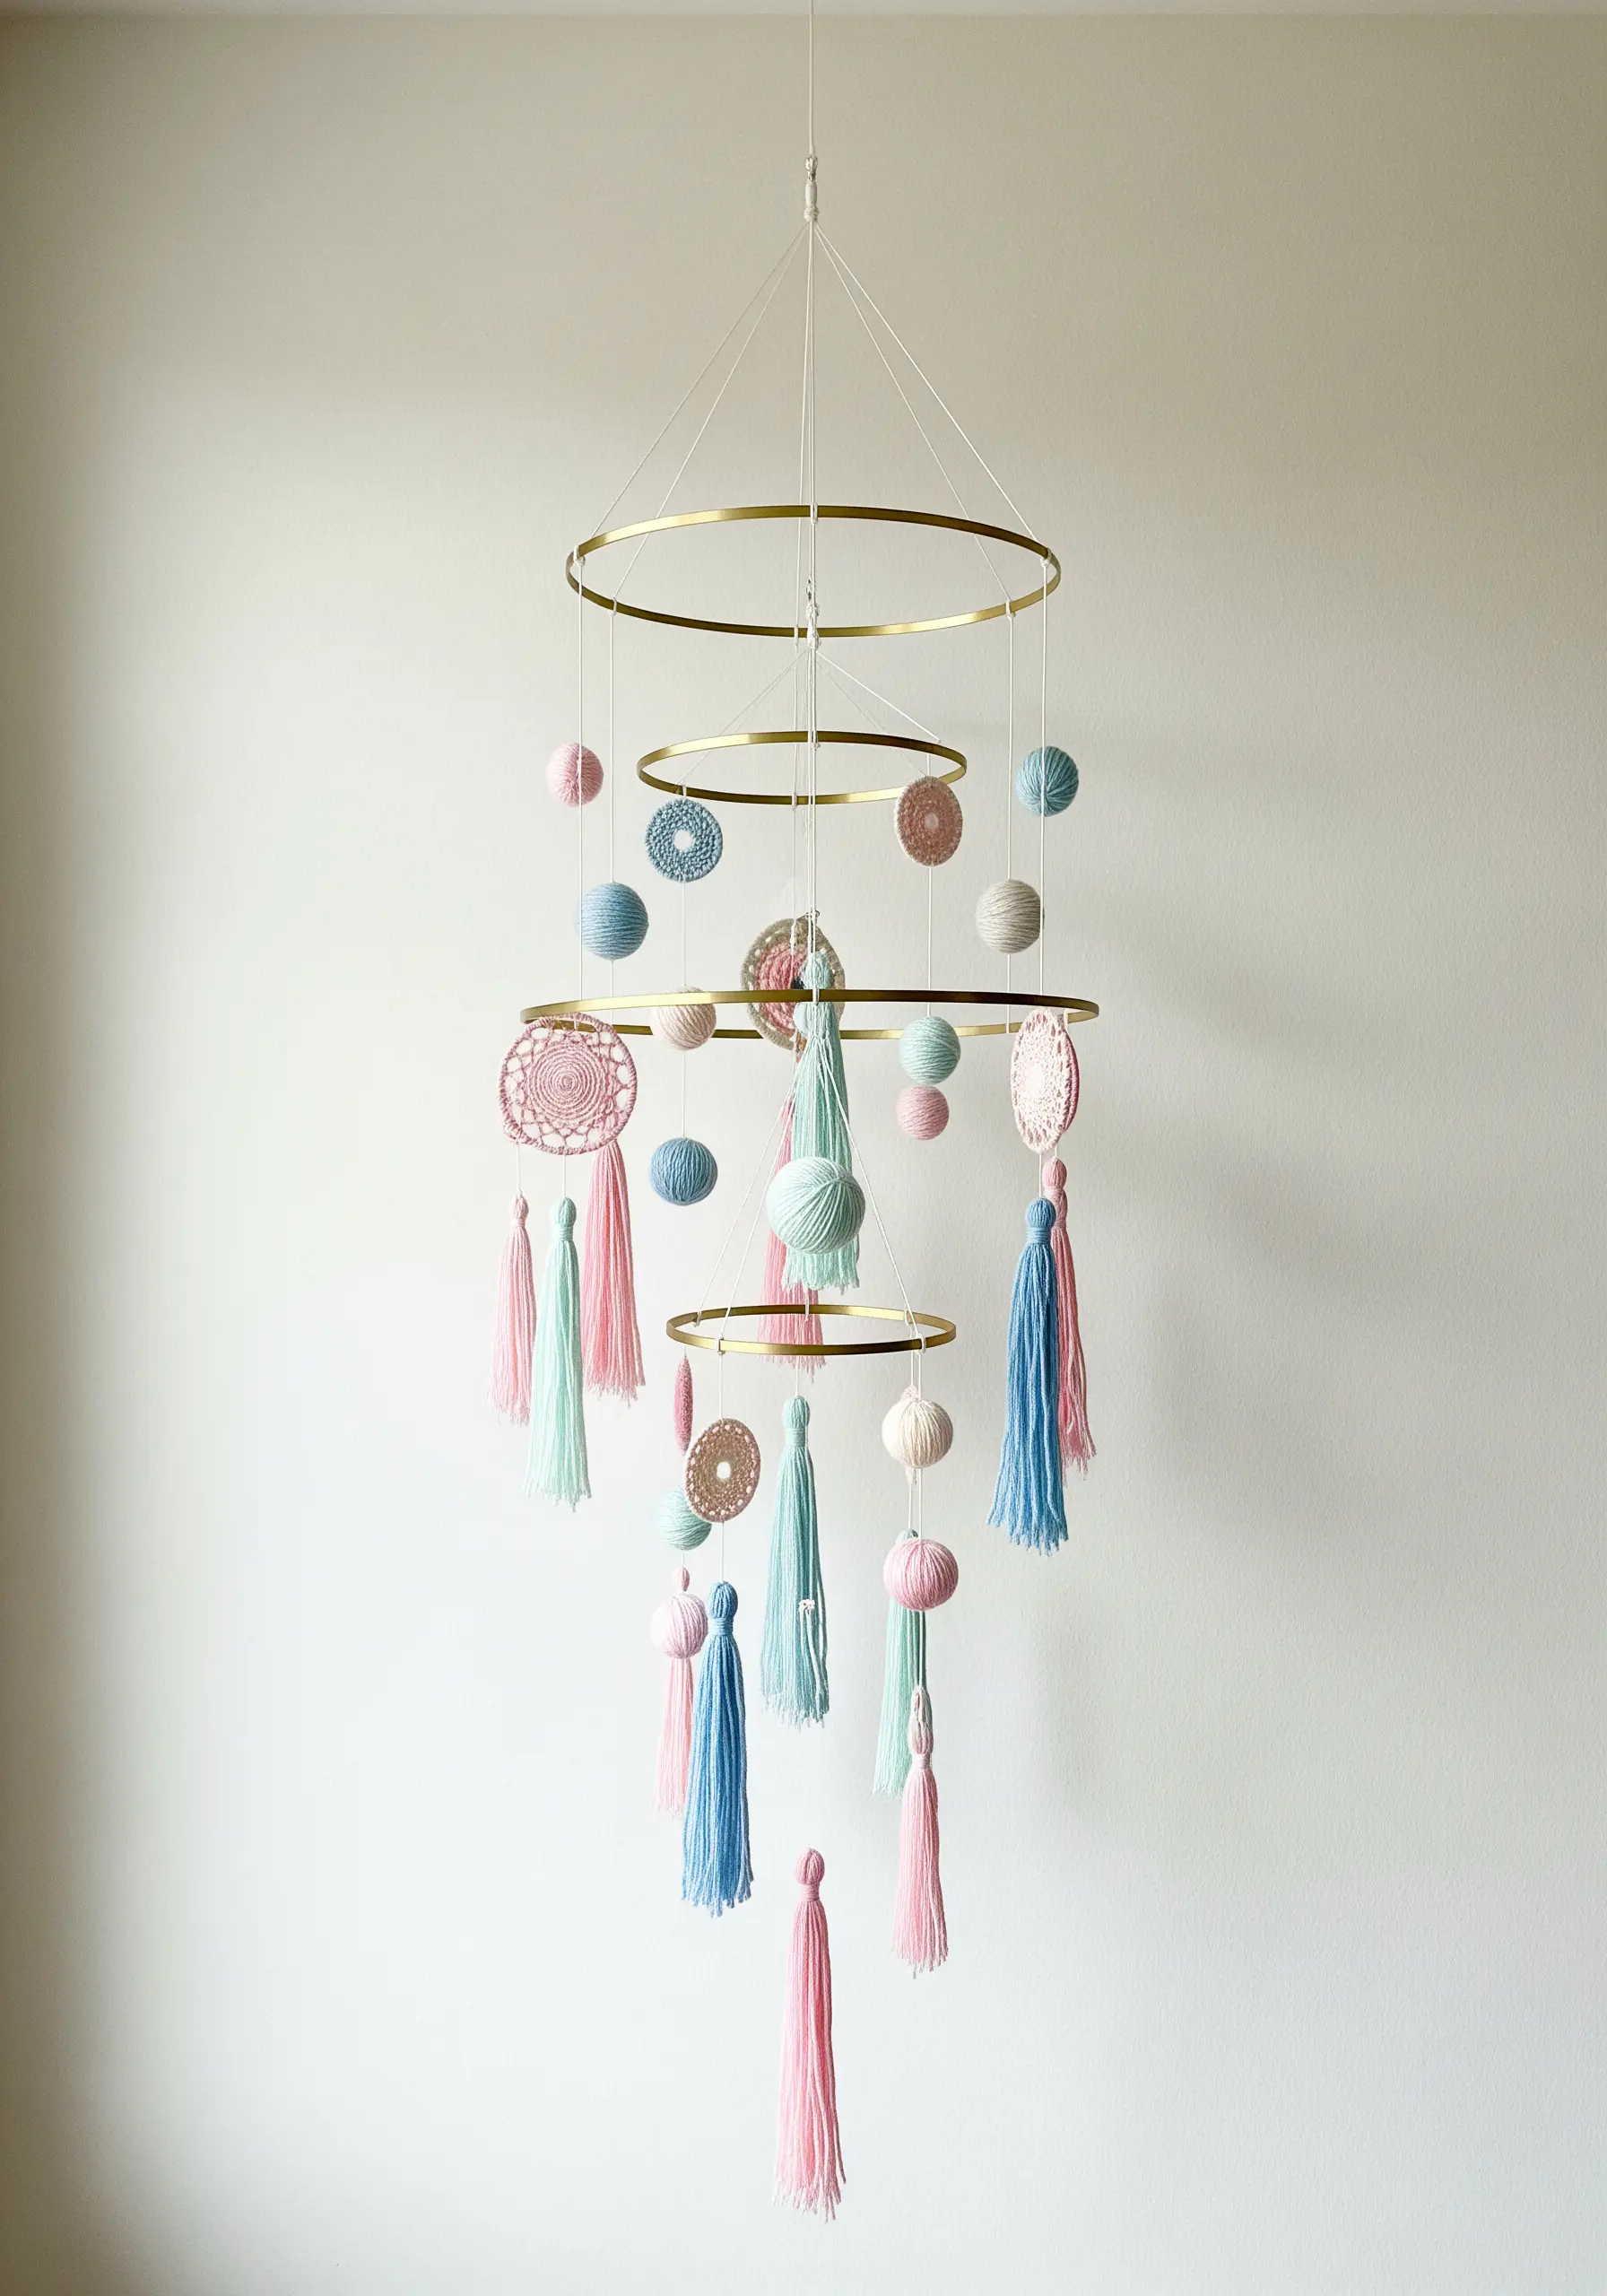
Construct a beautiful, kinetic sculpture that brings gentle movement and handmade charm to any space.
Use lightweight metal or wooden embroidery hoops to create a tiered structure, connecting them with fine, strong thread.
From this frame, suspend a variety of delicate yarn elements: small crocheted spheres, tiny tassels, and flat lace-like mandalas.
The key to a successful mobile is balance; distribute the weight of your elements evenly and hang them at varying lengths to encourage graceful, independent motion.
25. Embellish a Painted Canvas with Stitches

Create a truly unique mixed-media piece by using a painted canvas as the foundation for your yarn art.
Begin by applying abstract washes of watercolor or acrylic paint to your canvas and let it dry completely.
Then, use this colorful background as a guide for adding textural yarn elements. Use couching to lay down bold lines, French knots for dotted texture, and coiling for dimensional shapes.
The paint provides a layer of depth and color complexity that beautifully complements the sculptural quality of the yarn.
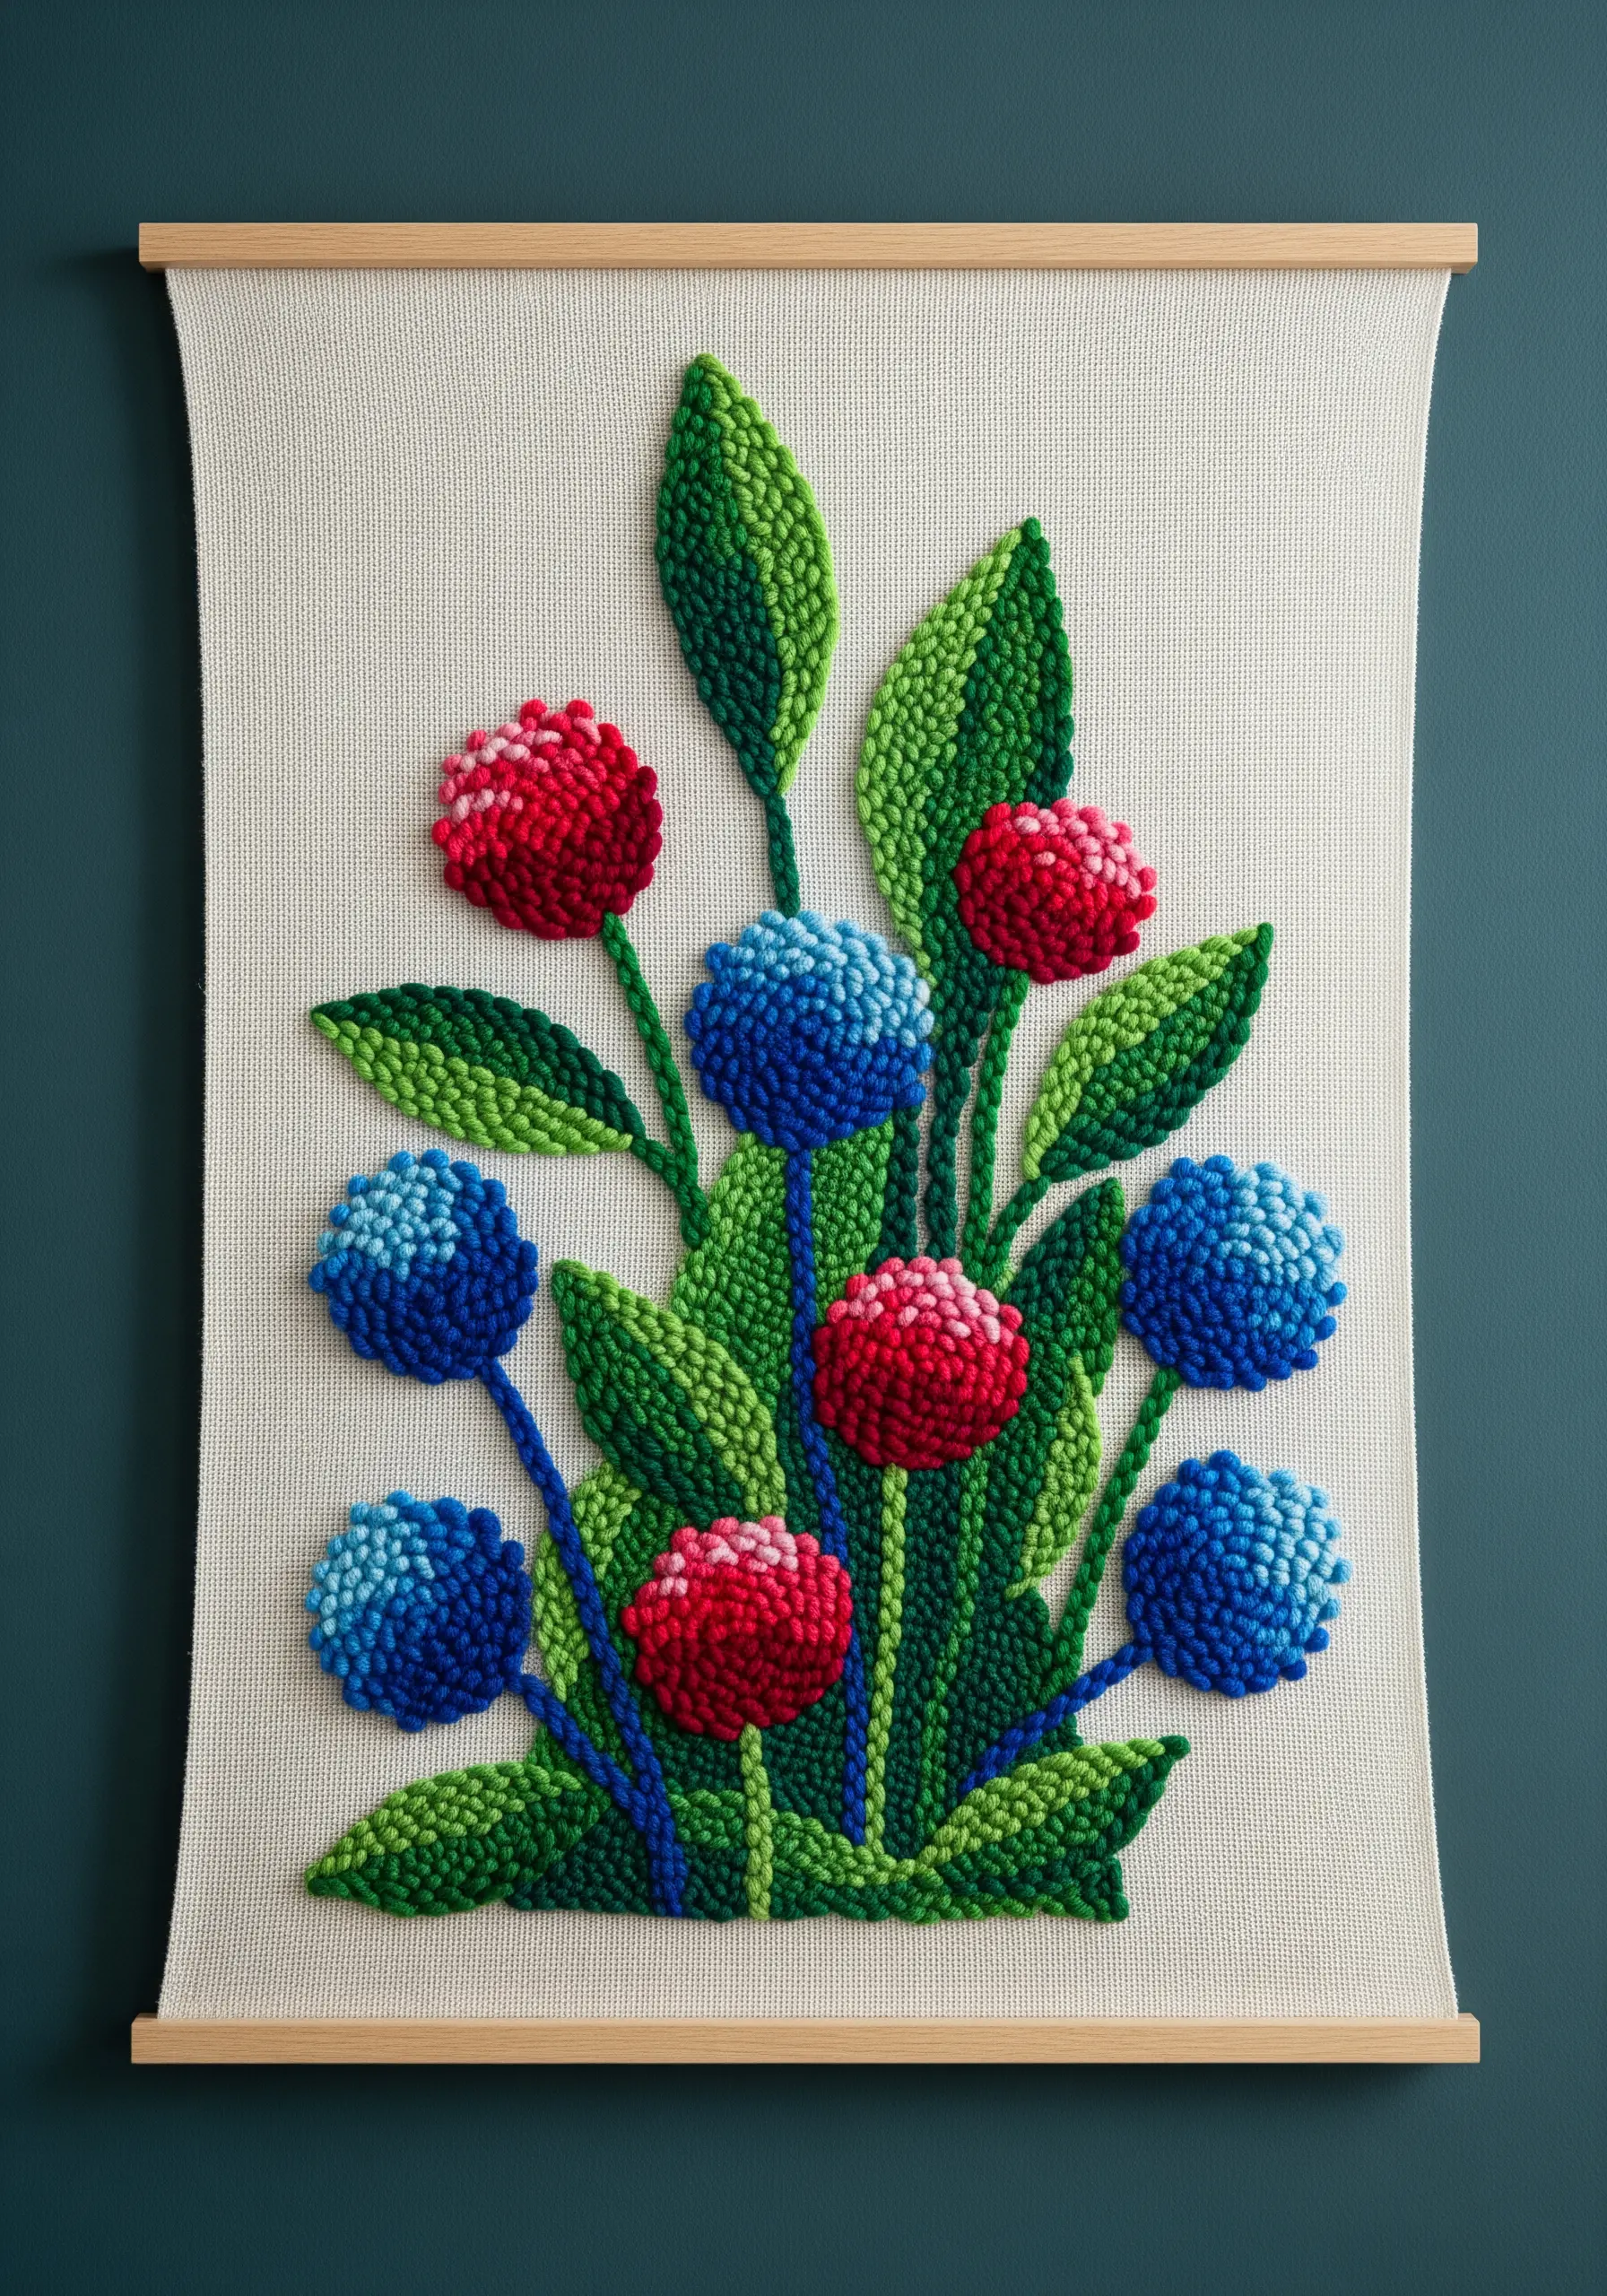
26. Sculpt a 3D Field of Flowers
Make your embroidered landscapes come alive by incorporating dimensional stitches that lift off the canvas.
Use stitches like turkey work or Ghiordes knot to create plush, grass-like textures that you can trim to shape.
For the flowers, use detached techniques like woven picot stitch, cast-on stitch, or bullion knots to form petals that are raised from the surface.
Layering these 3D stitches over a painted or flat-stitched background creates breathtaking depth and realism.
27. Weave with Memory by Upcycling Fabric Scraps
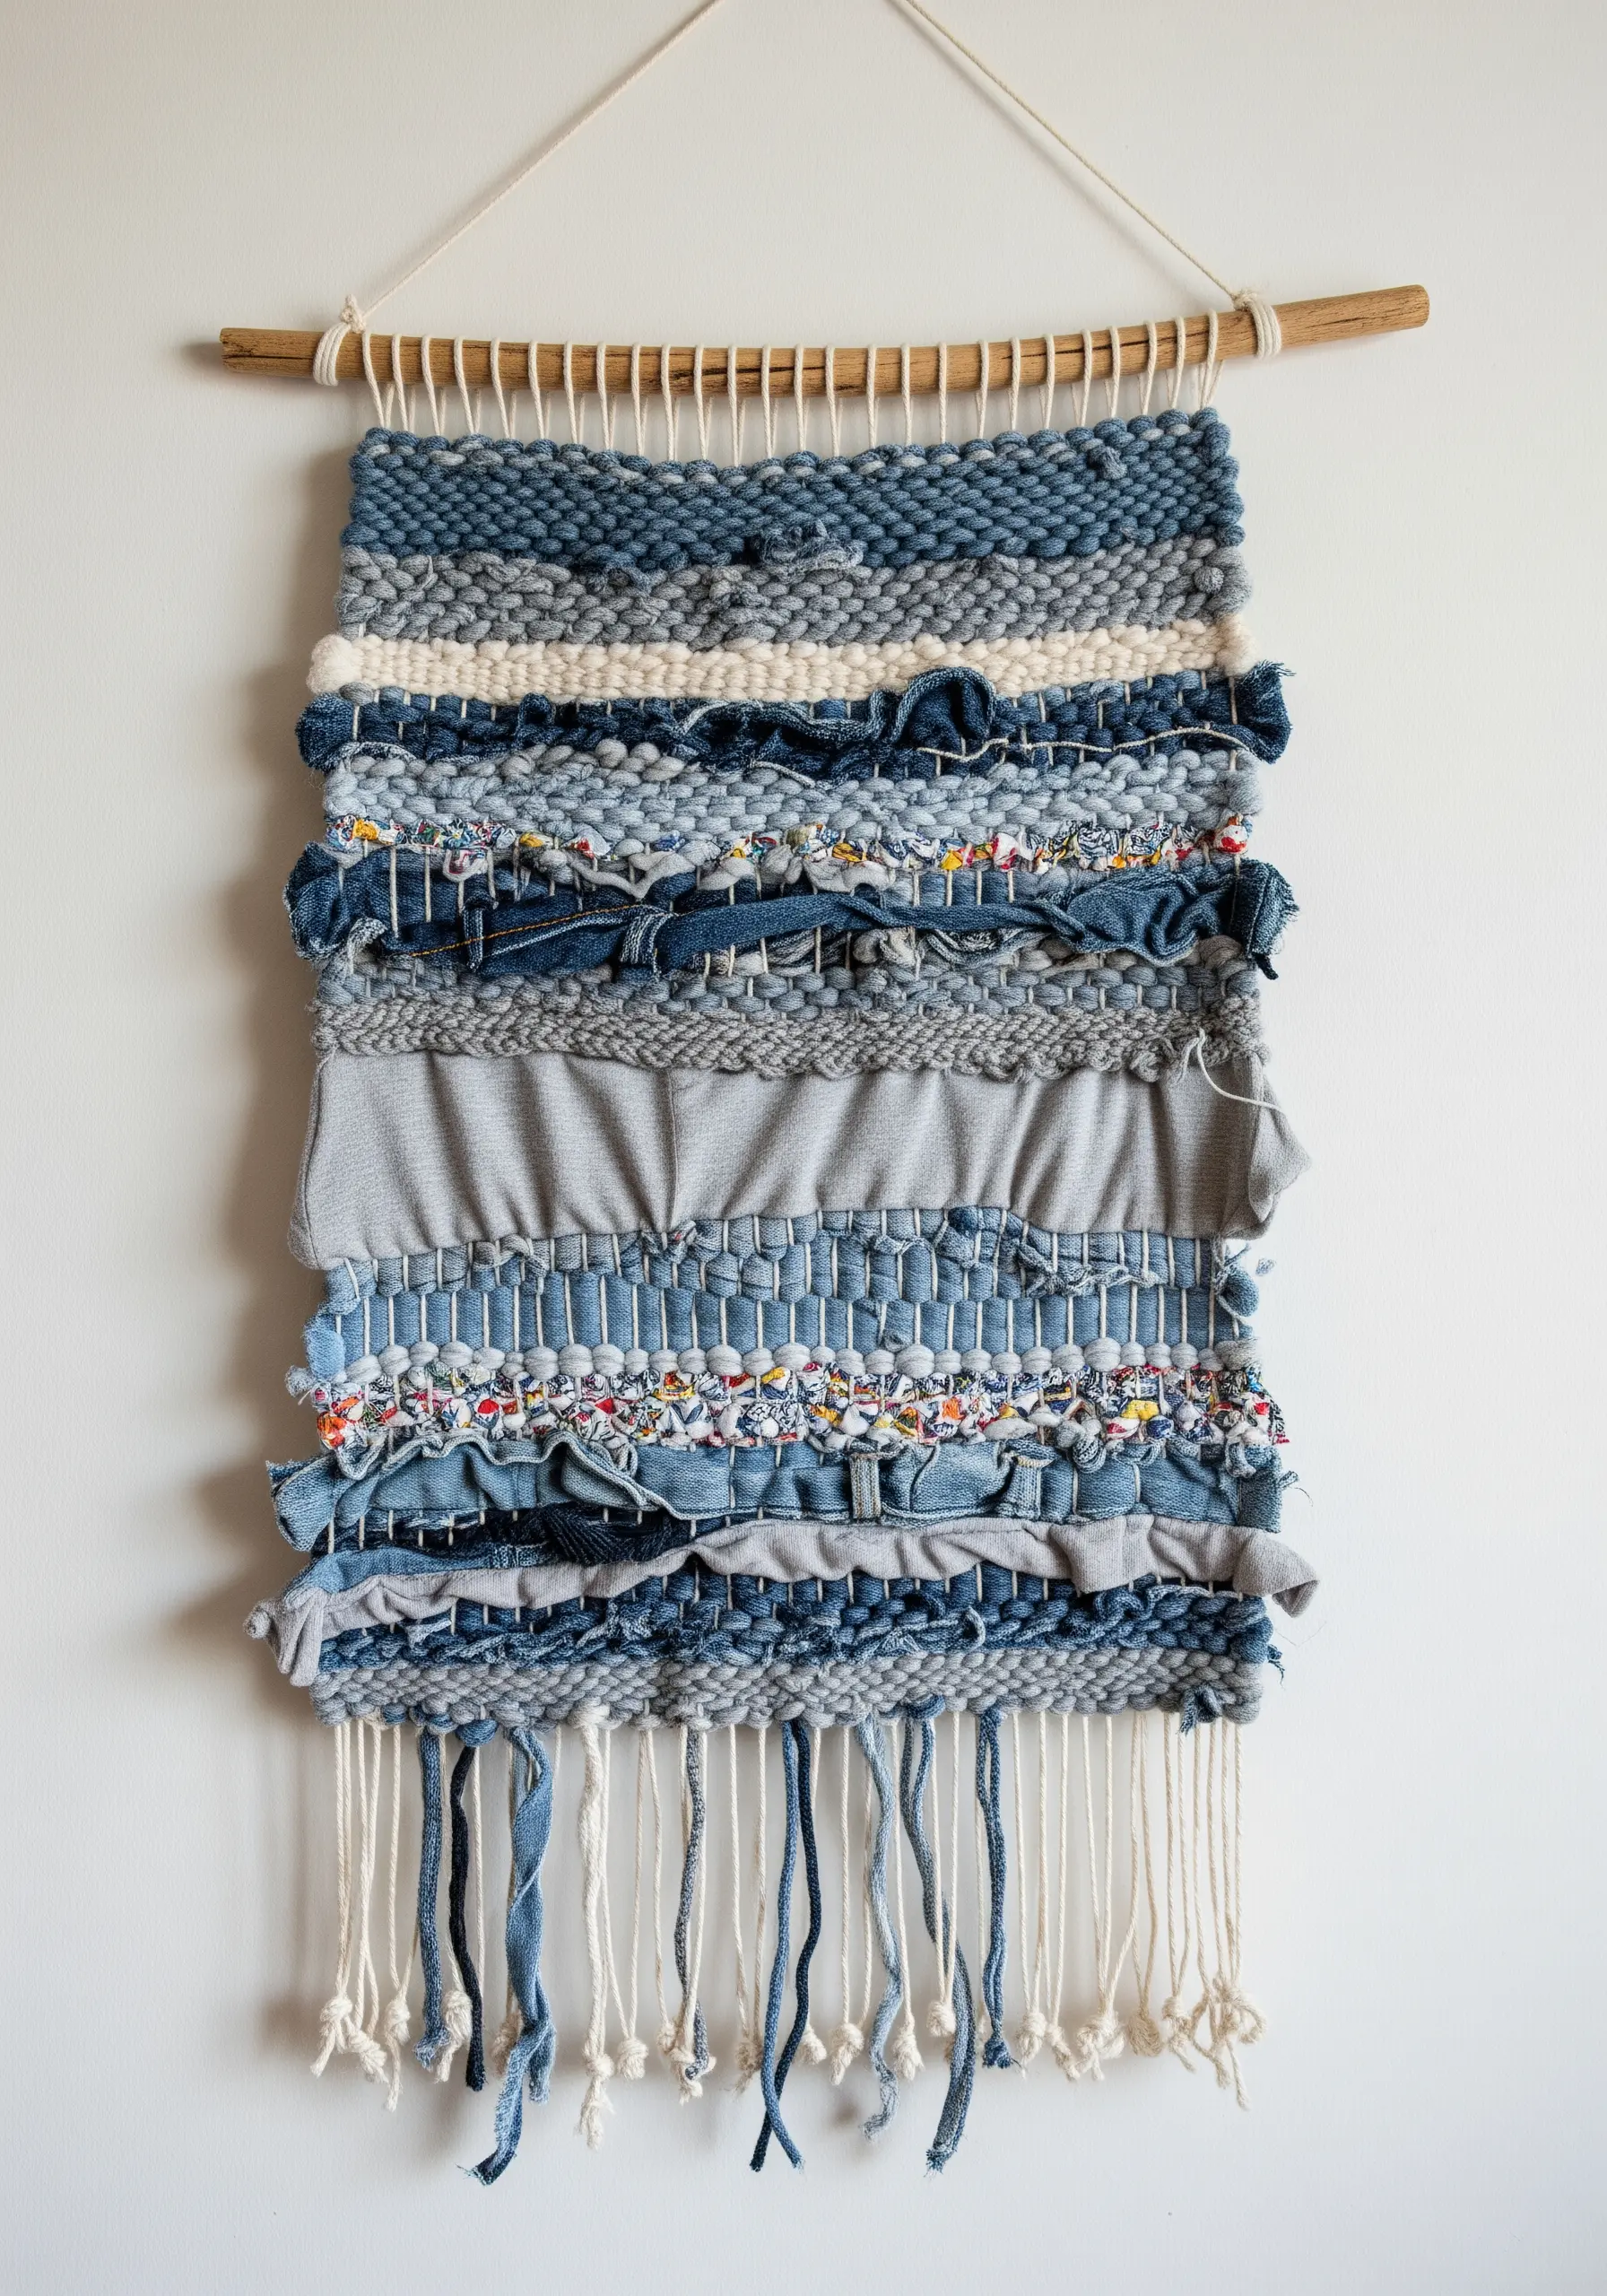
Infuse your weaving with personal history and sustainable style by using strips of old fabric as your weft.
Cut up old denim jeans, soft t-shirts, or patterned scarves into strips about one inch wide.
Don’t worry about perfect, uniform strips—the raw, frayed edges and varying thicknesses will add wonderful character and texture to your finished piece.
This technique not only reduces waste but also creates a textile that tells a unique and personal story.
28. Draw on the Wall with a Yarn Installation
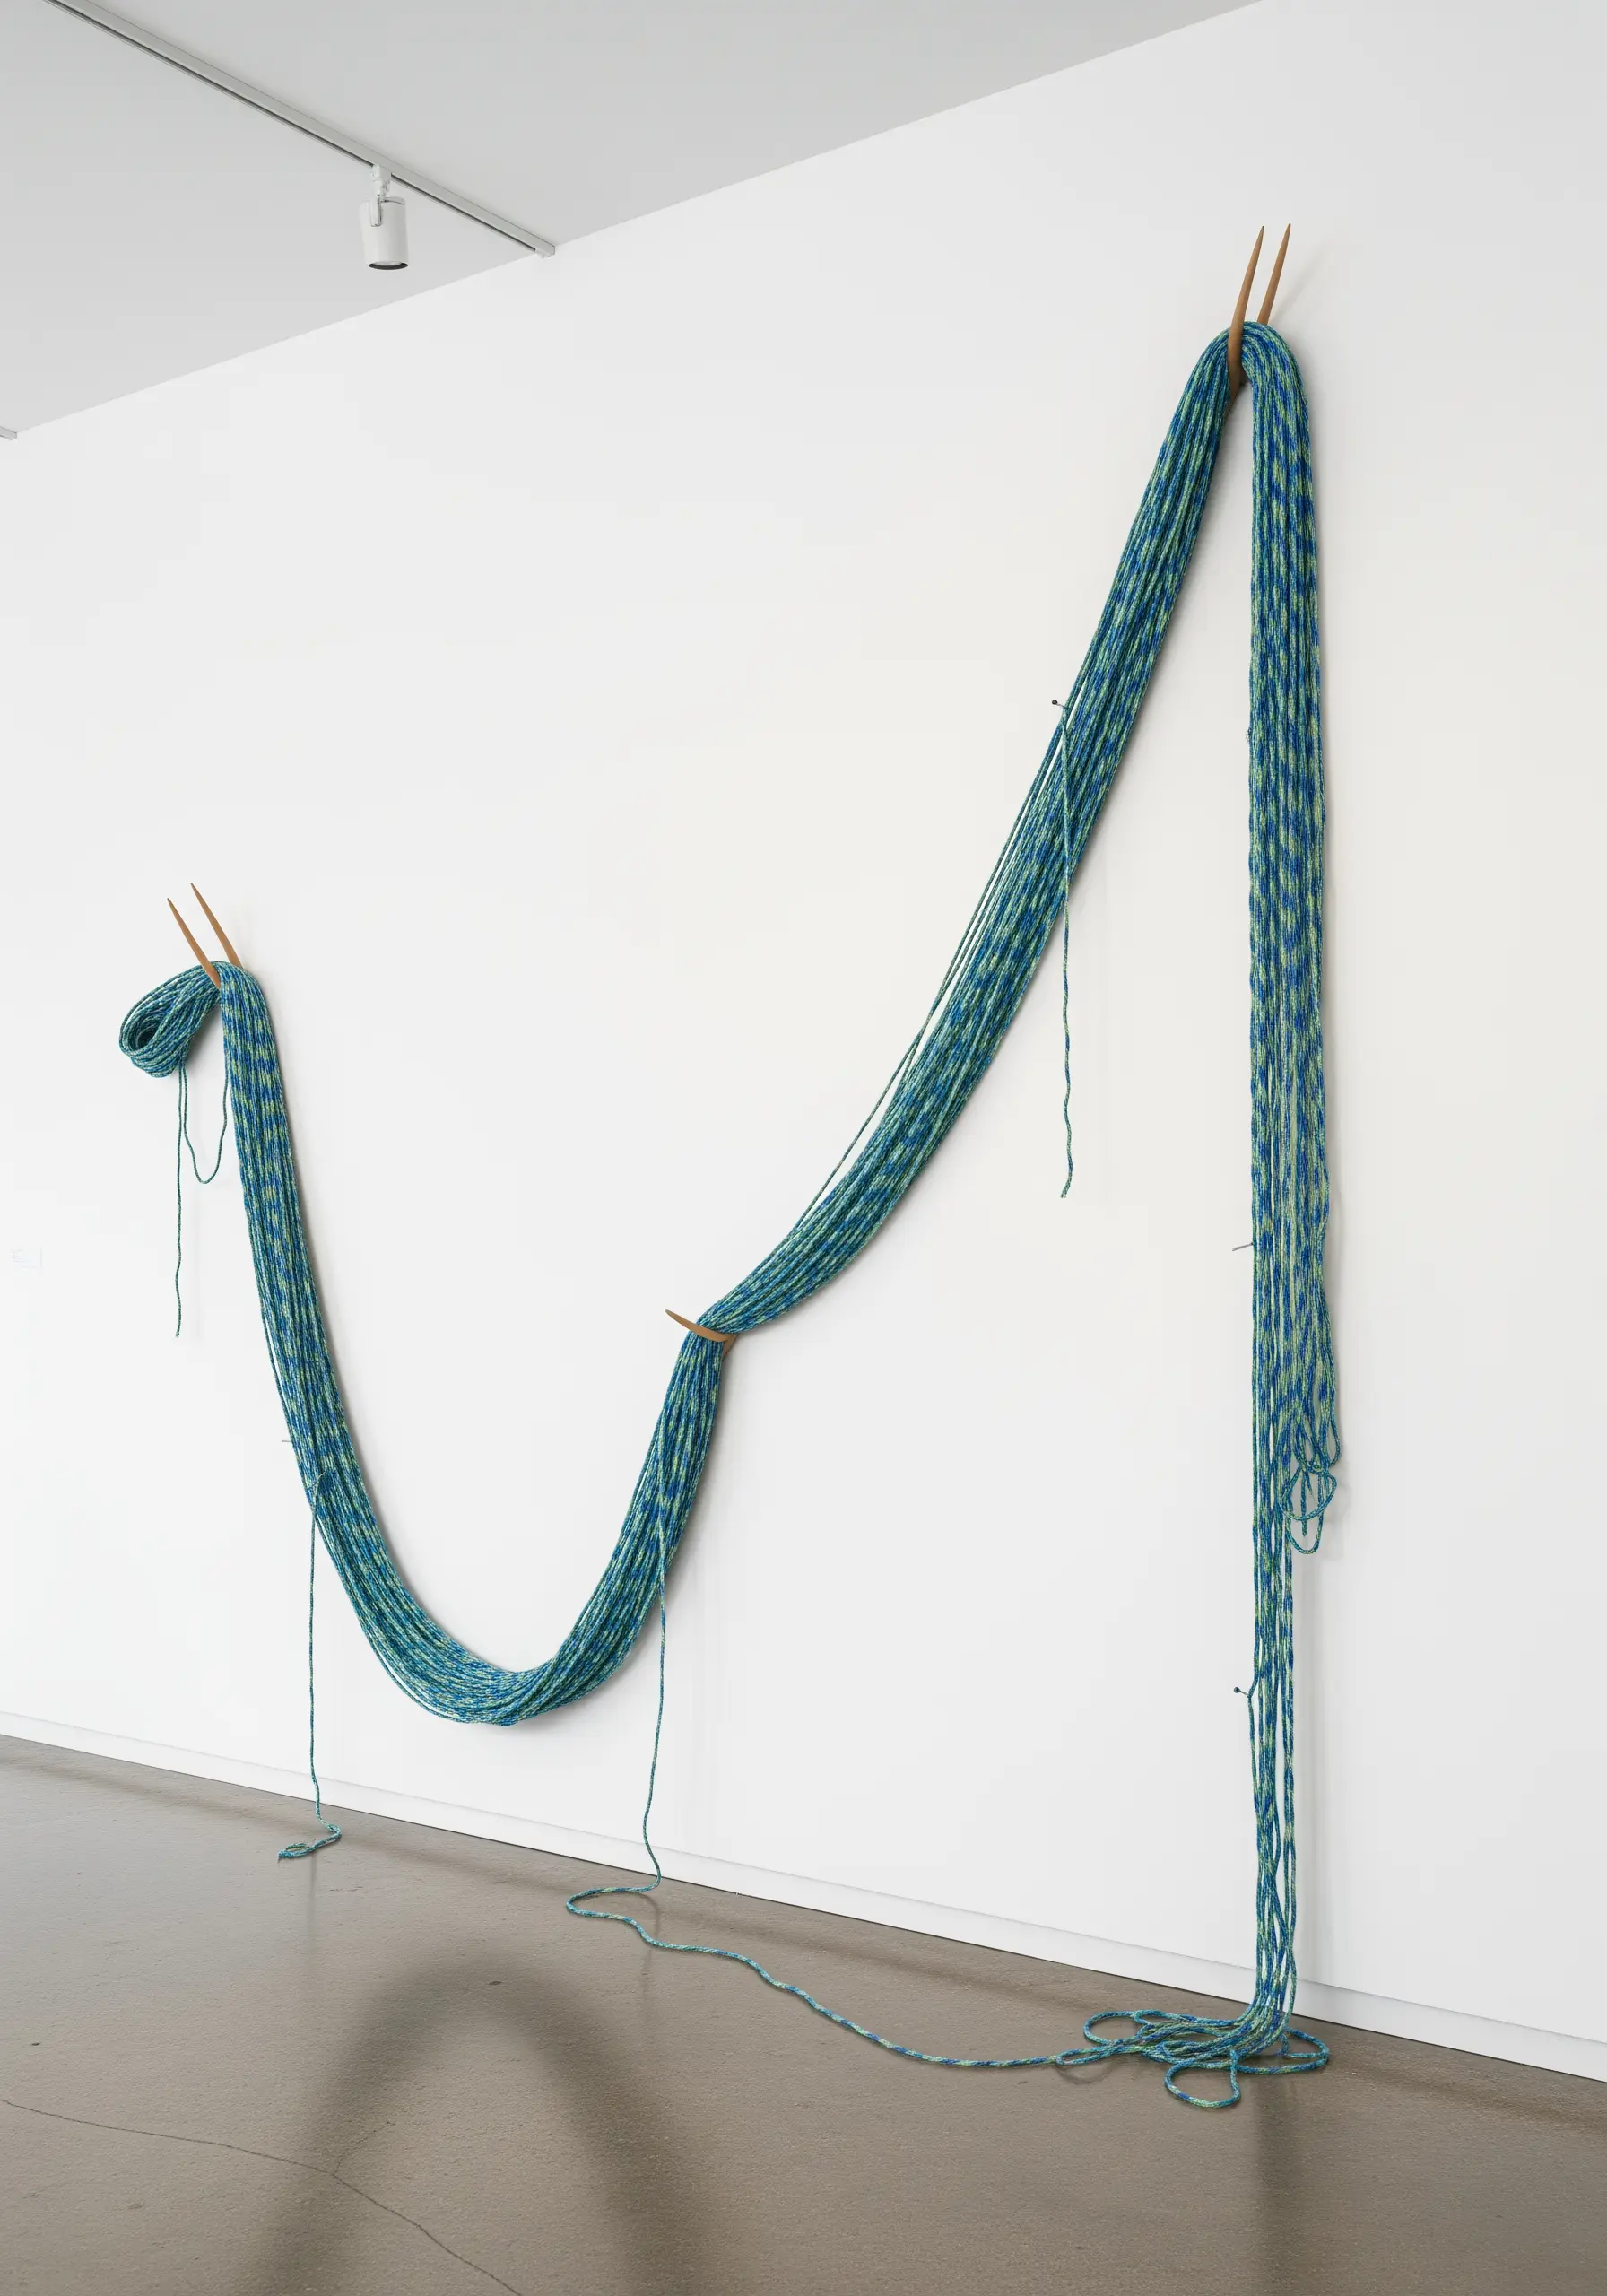
Use your wall itself as the canvas for a large-scale, minimalist line drawing made from yarn.
This technique requires only a few small, strategically placed nails or hooks and a continuous, thick strand of yarn.
Drape, swag, and pull the yarn between the points to create graceful, sweeping lines that interact with the architecture of the room.
The beauty of this approach is in its simplicity, scale, and the dramatic statement it makes with minimal materials.
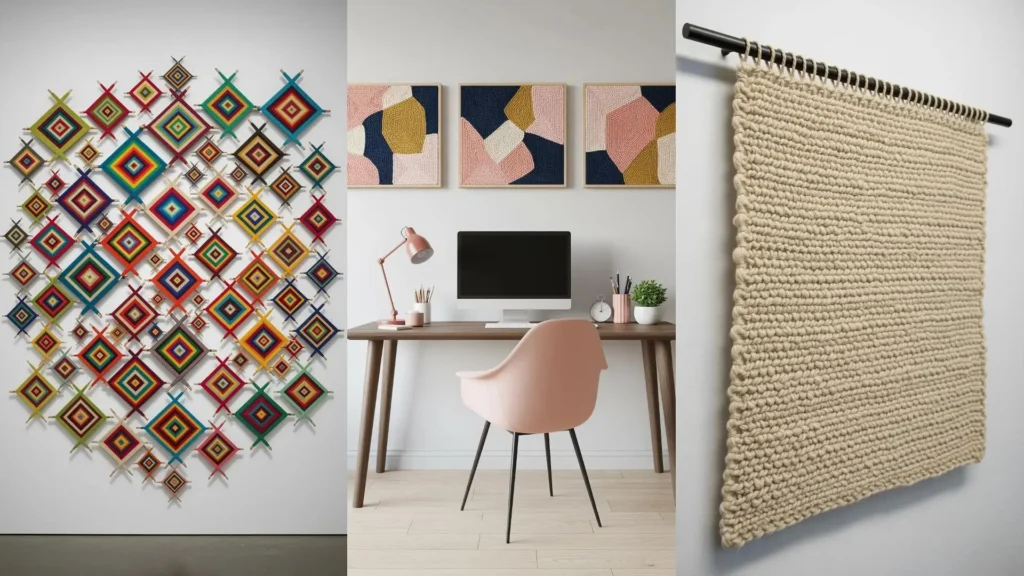
29. Showcase Simplicity with a Knitted Wall Hanging
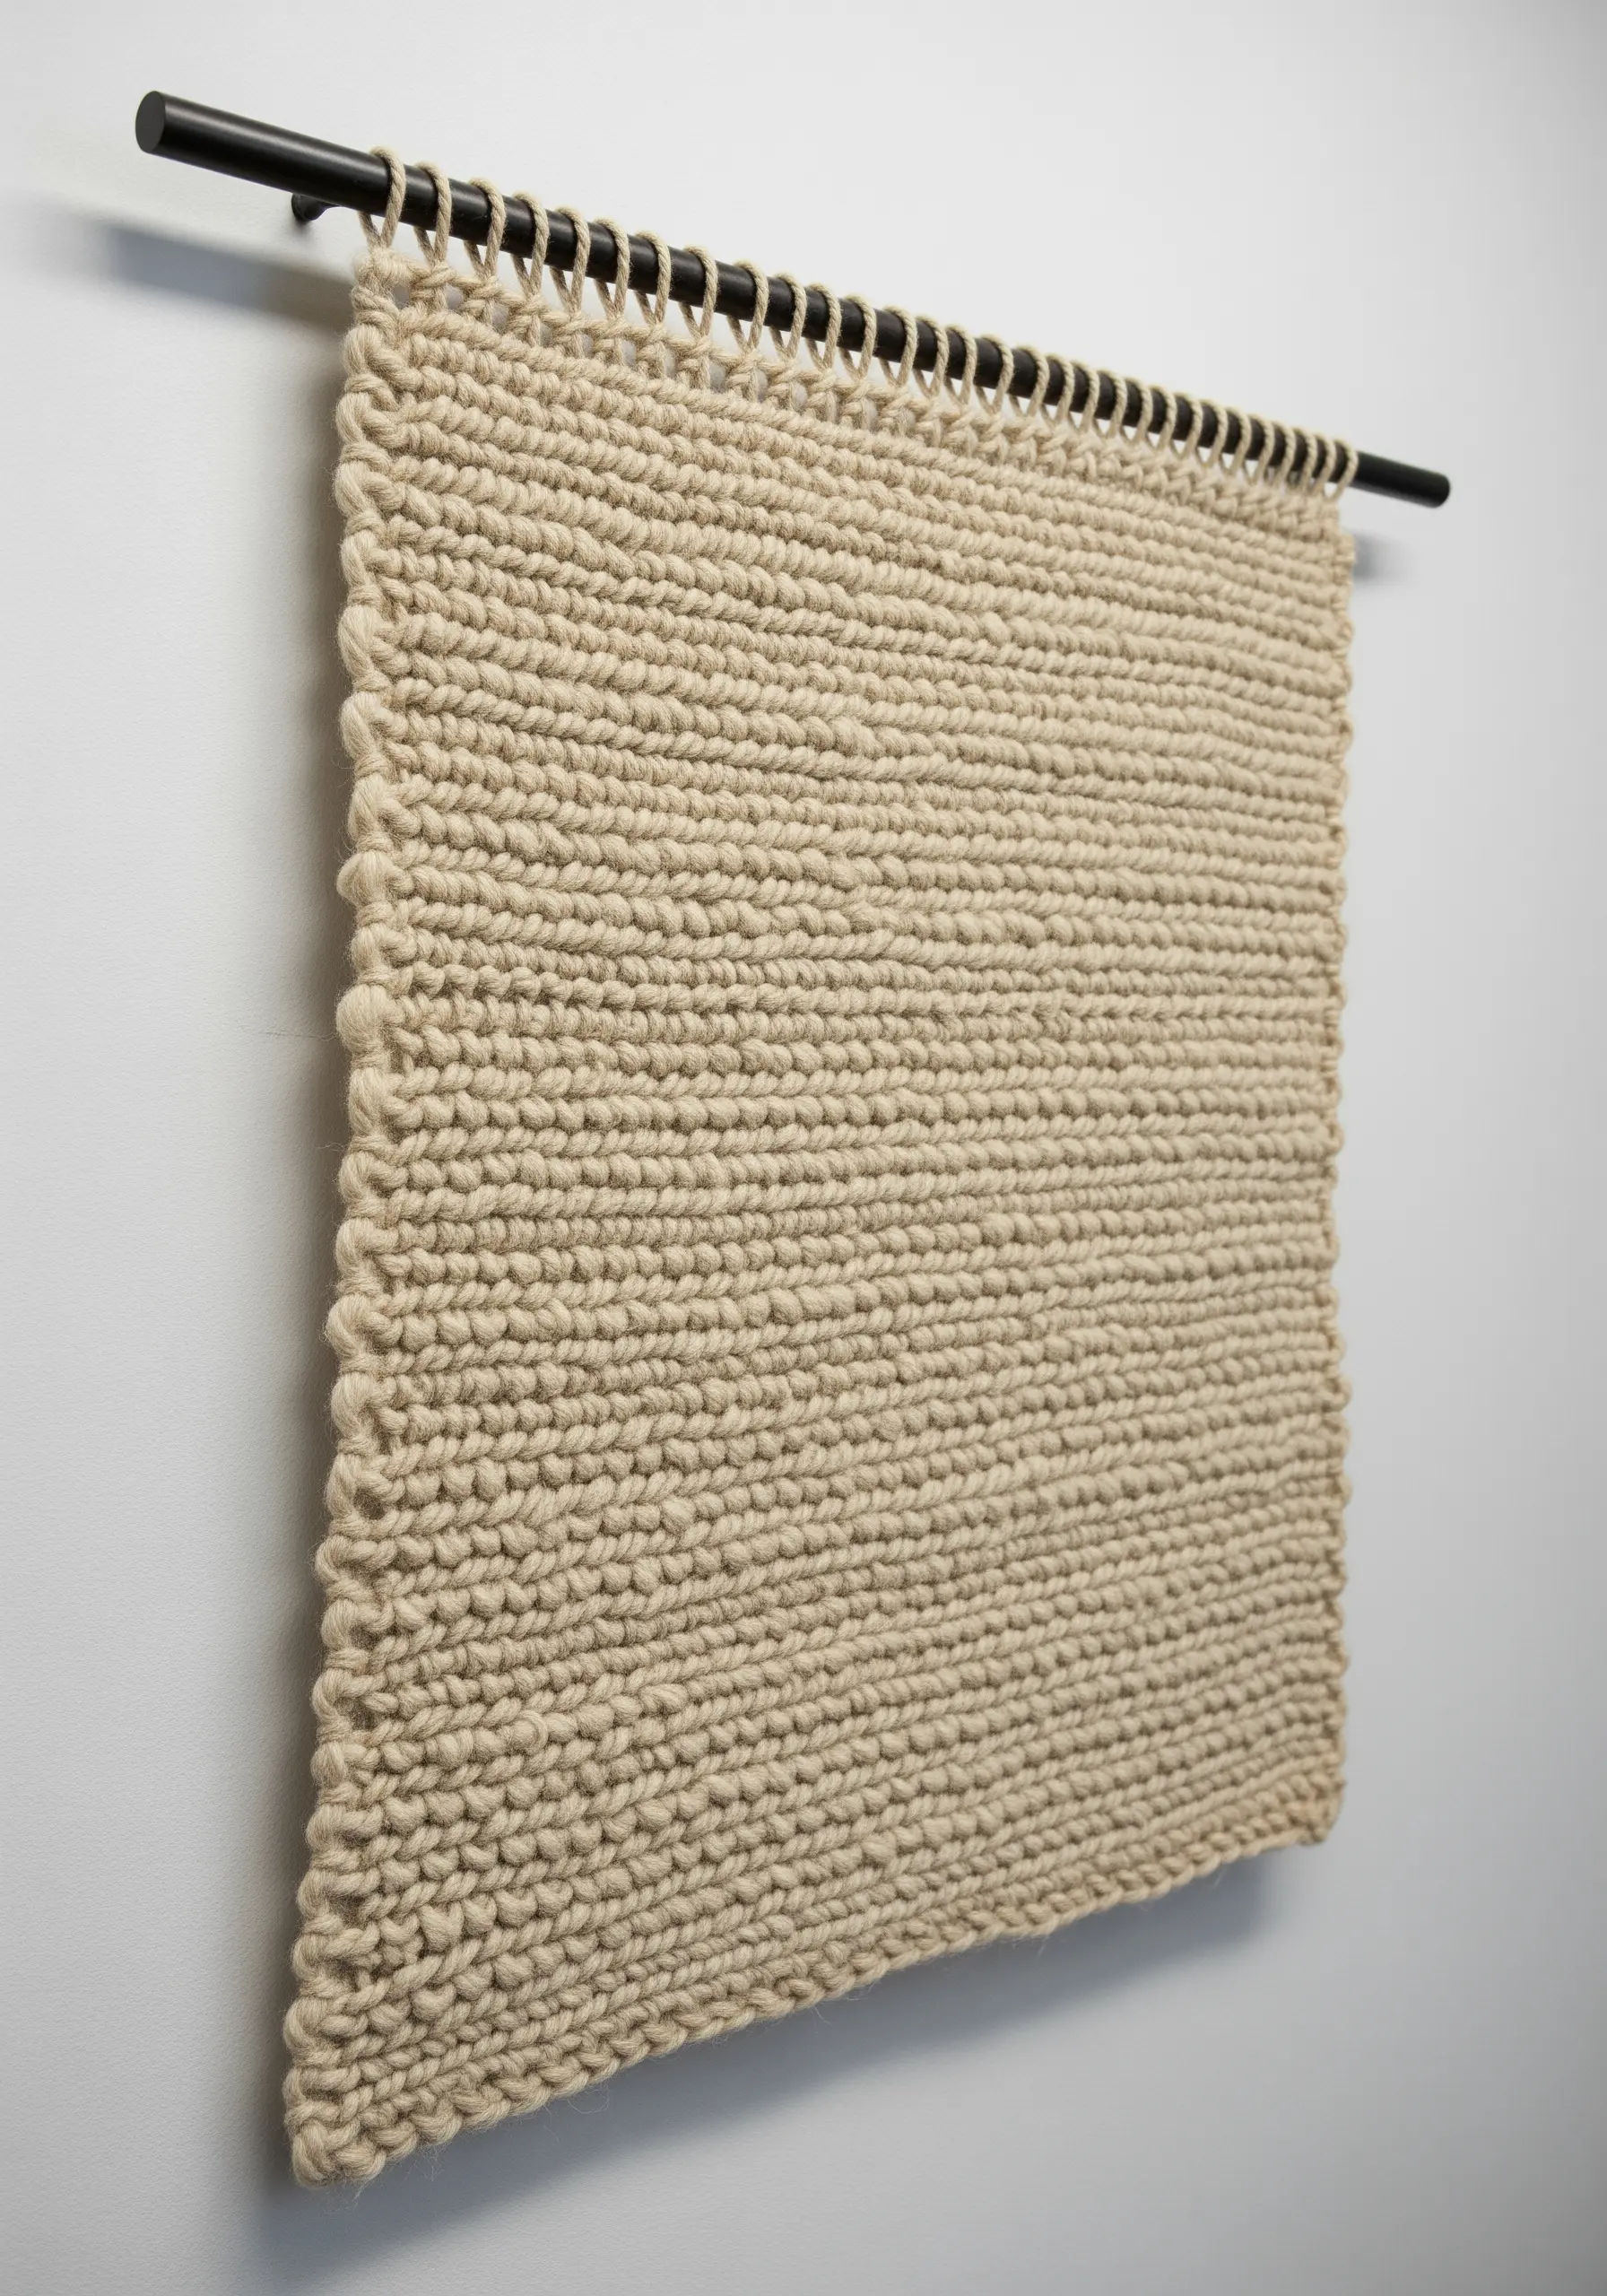
Sometimes, the most powerful statement comes from simplicity and restraint.
Create a minimalist textile piece by using a thick, high-quality natural fiber yarn and a basic knitting stitch, like the garter or seed stitch.
With no complex pattern to distract the eye, the focus shifts entirely to the inherent beauty of the yarn and the rhythmic, meditative texture of the stitches.
Hang it from a clean, simple dowel to maintain the elegant and modern aesthetic.
30. Achieve Photorealism with Woven Jacquard
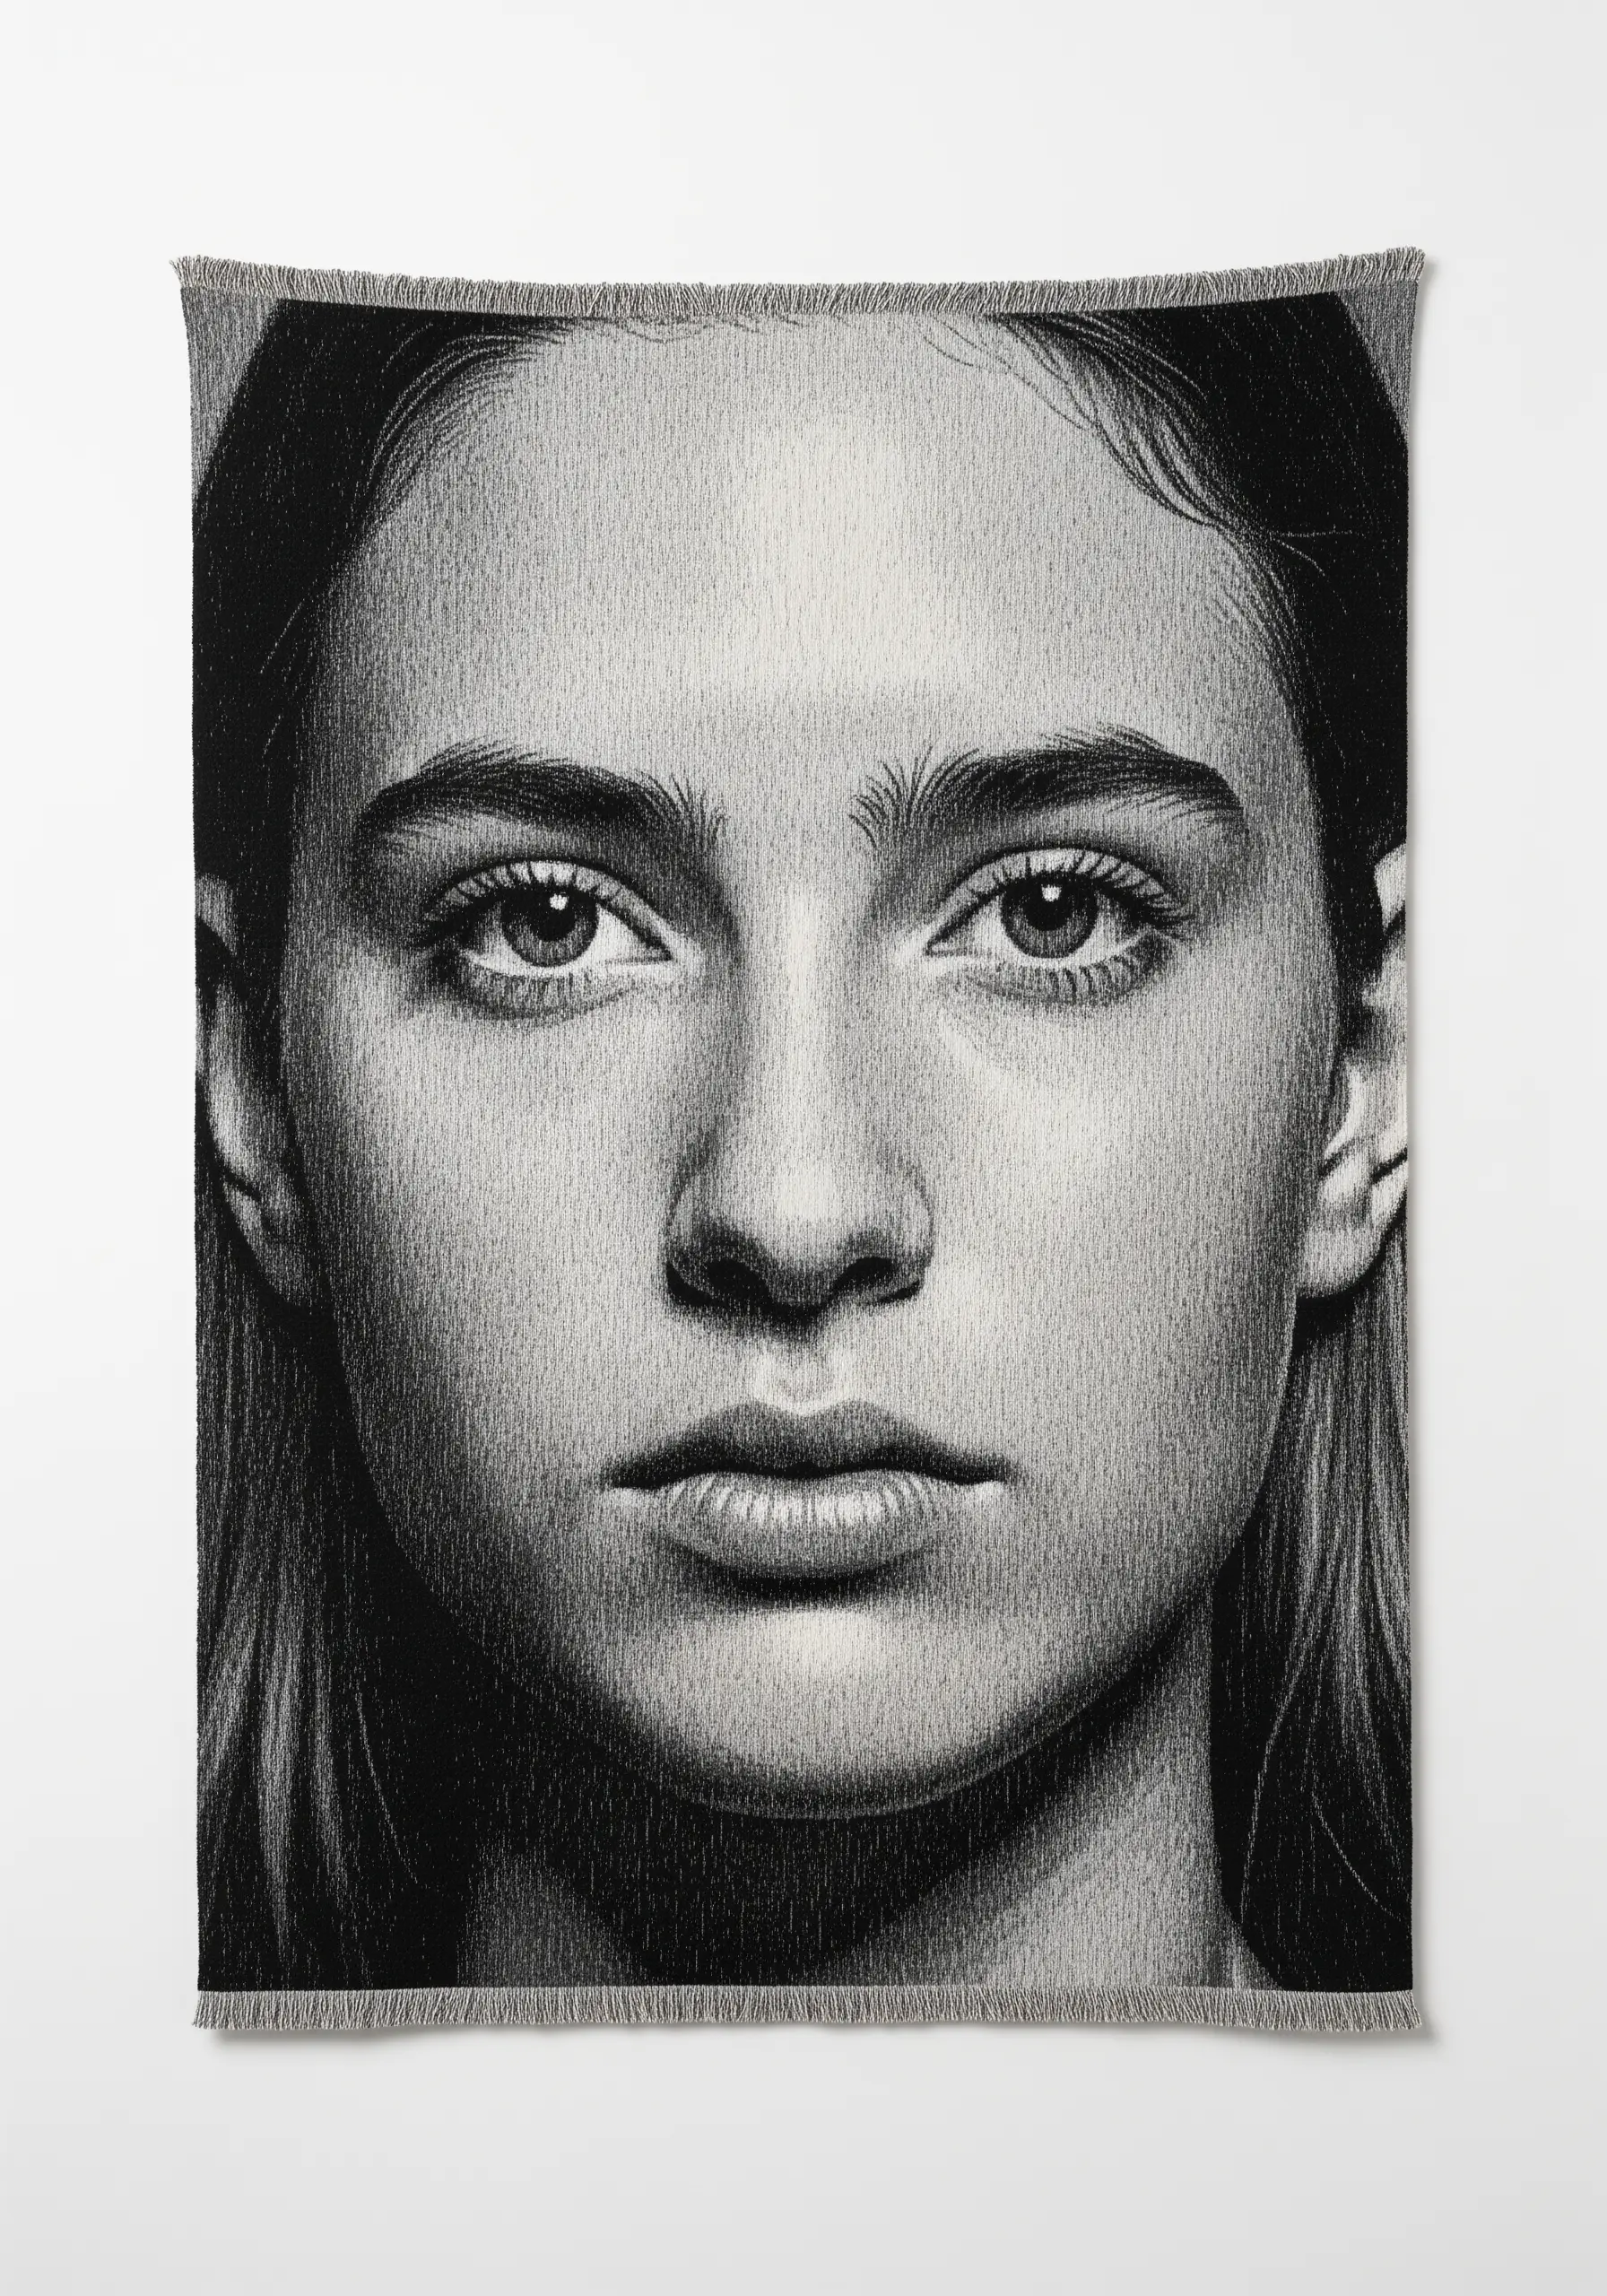
While creating a true jacquard weave requires a specialized digital loom, the principle behind it can inspire your handwork.
Jacquard weaving achieves photorealistic detail by treating individual threads like pixels, interlacing thousands of them to build up a complex image.
To mimic this effect manually, you can use fine-thread tapestry weaving or single-strand blackwork embroidery on a high-count fabric.
By focusing on shading and building tone with tiny stitches, you can create your own stunningly detailed portraits.


