

A simple tote bag is a blank canvas, waiting for a story. Before you thread your needle, I want you to think beyond just filling in a pattern. Think about texture, depth, and the way a single, well-placed stitch can change everything.
Your needle is more than a tool; it’s like a painter’s brush. You can create soft, blended petals with a long-and-short stitch or bold, graphic lines with a simple backstitch. The choice of just two strands of floss versus four can be the difference between a delicate whisper and a confident statement.
In the ideas that follow, I’m not just showing you finished projects. I’m sharing the specific techniques and thoughtful decisions that elevate them. You’ll learn not just what to stitch, but why a certain stitch or color choice works, empowering you to make any design truly your own.
1. The Layered Lavender Wreath

To give your lavender wreath a natural, overlapping depth, stitch the green stems first using a simple backstitch or stem stitch.
Work the lavender buds over the top with satin stitch or straight stitches, varying the angle and direction of each stitch slightly to mimic organic growth.
Instead of a single purple, use three shades—a light, medium, and dark violet—and distribute them unevenly throughout the wreath. This creates highlights and shadows that make the florals look far more realistic.
For the tiny white flowers, use colonial knots instead of French knots. They are sturdier and less likely to pull through the canvas tote fabric, ensuring your work lasts.
2. The Intentionally Scattered Meadow
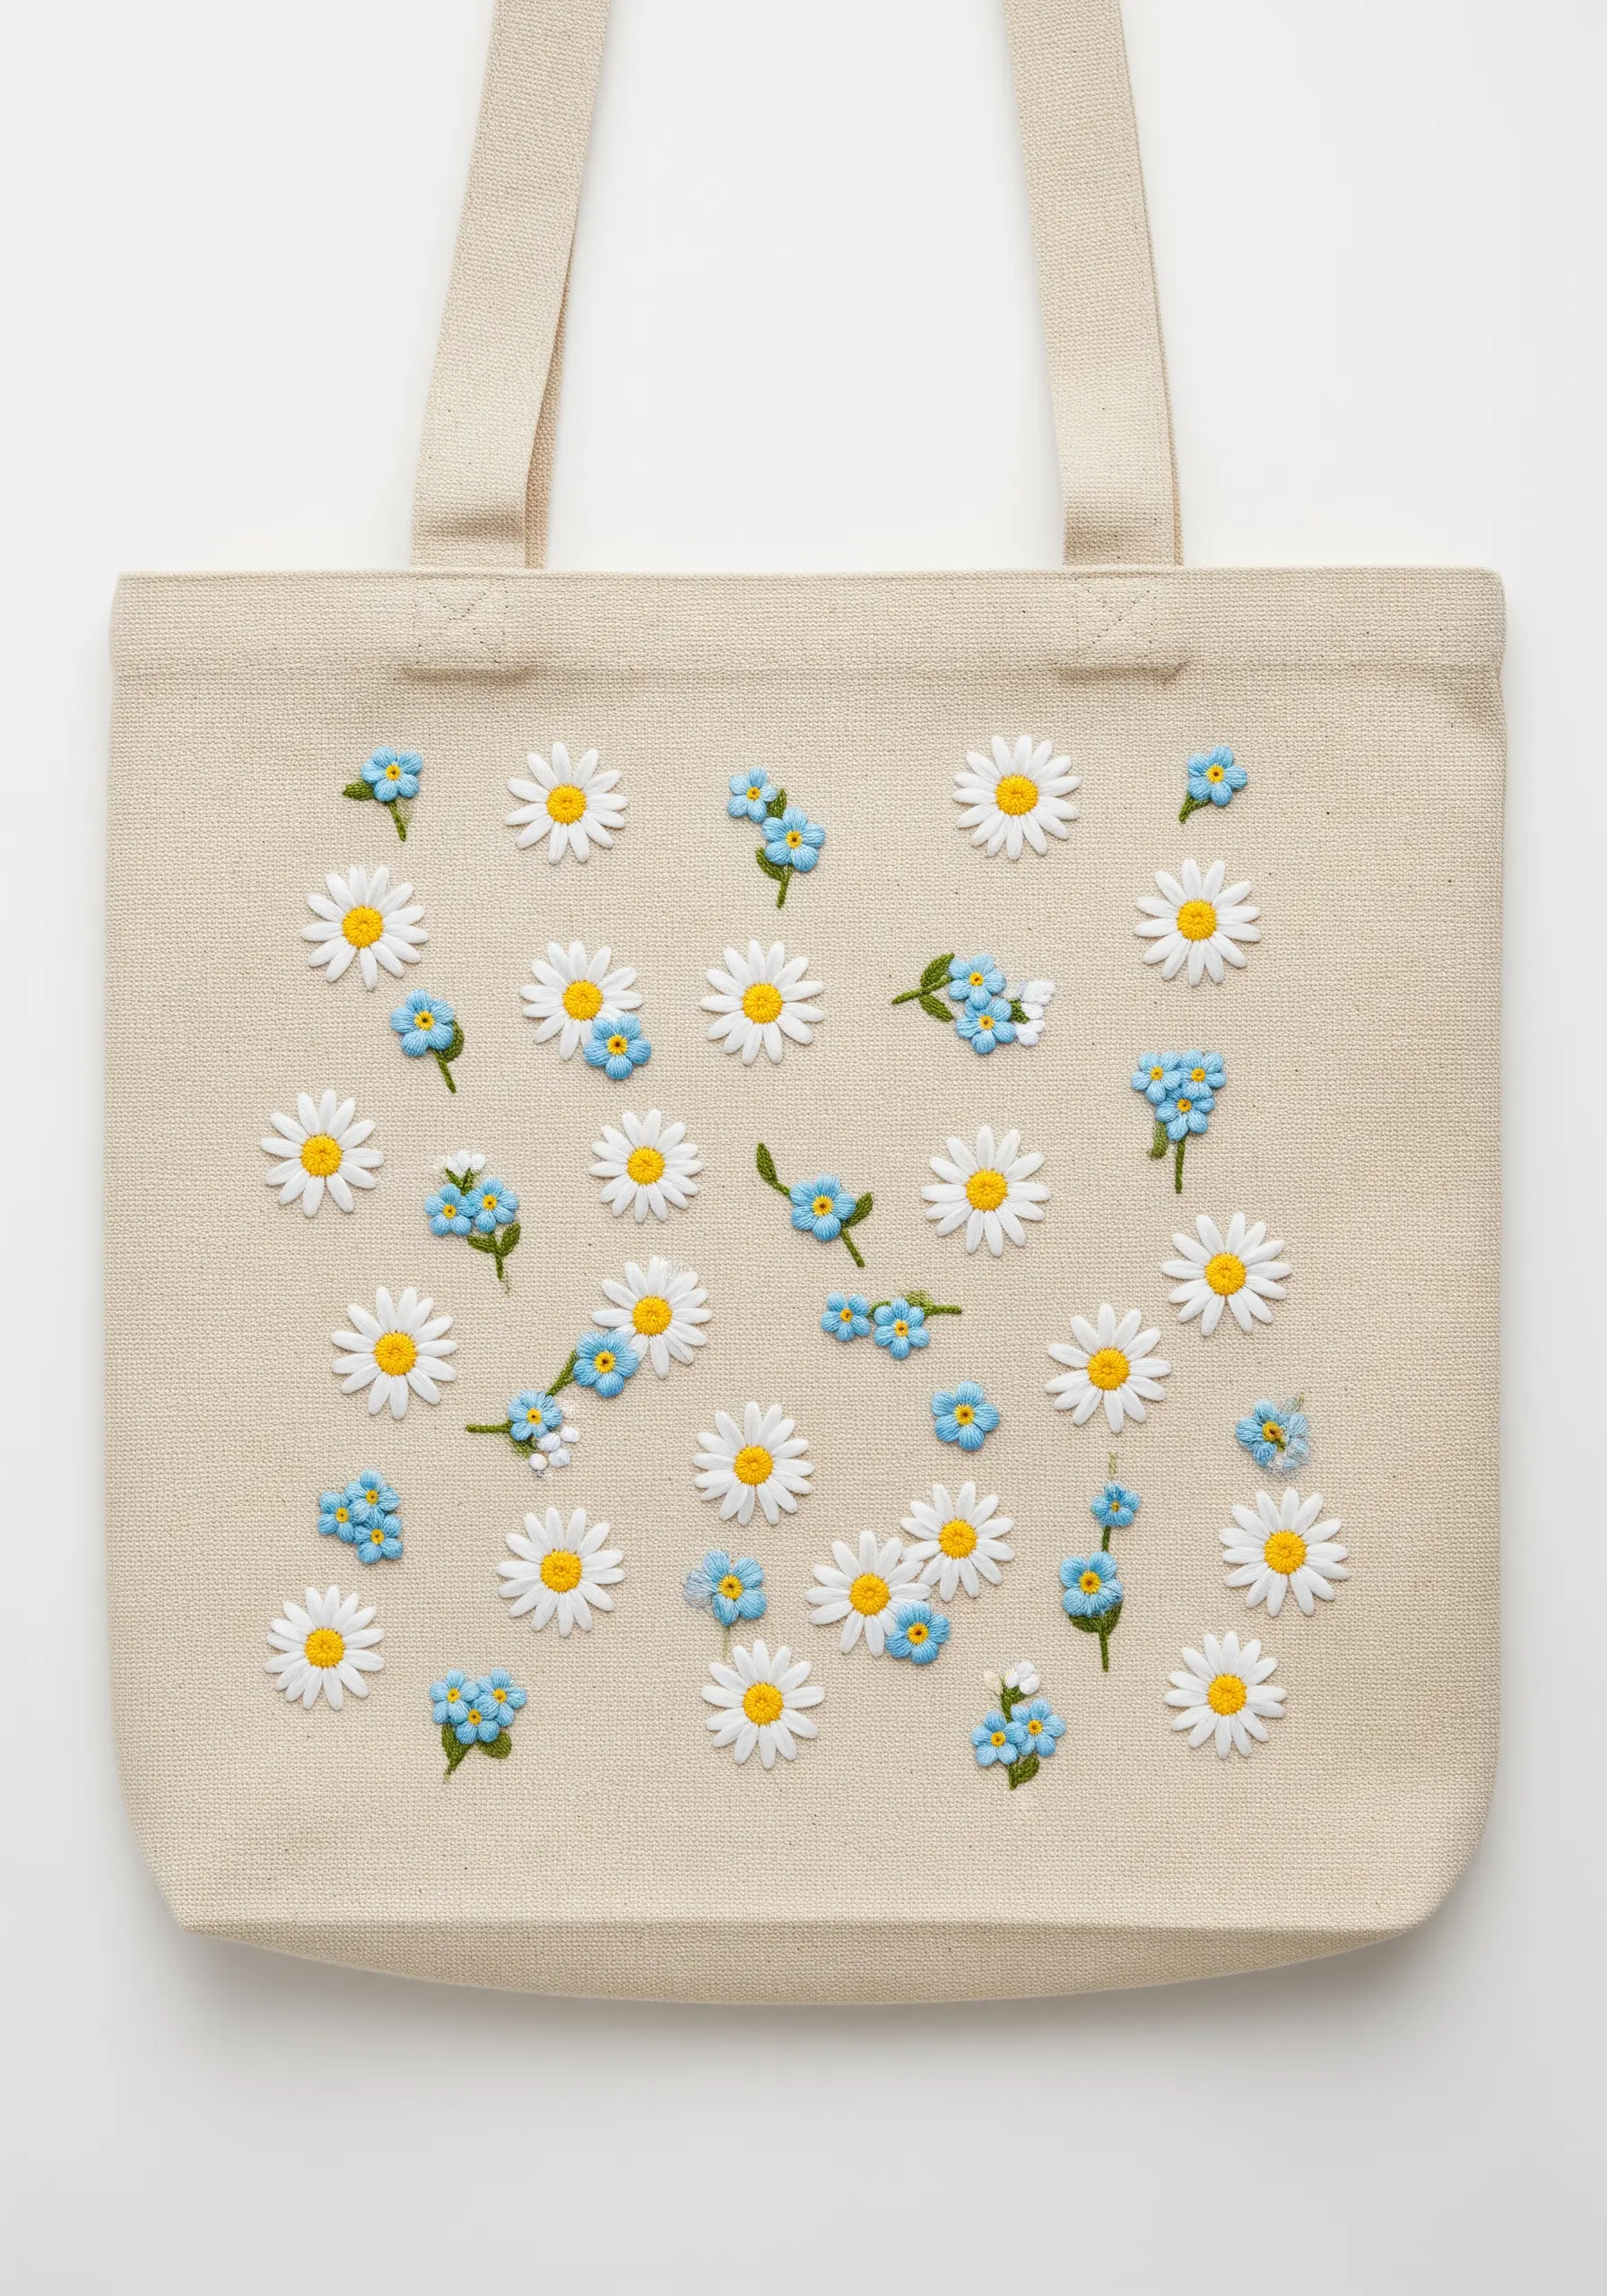
The key to a successful scattered pattern is intentional placement, not random stitching. Lightly sketch faint circles on your tote to mark where each daisy cluster will go, ensuring a balanced composition.
Use a detached chain stitch (lazy daisy) for the white petals, keeping them uniform for a clean look. For the forget-me-nots, use smaller, slightly looser lazy daisy stitches to create a softer, more delicate texture.
Anchor the design with vibrant yellow French knots in the daisy centers. Wrap the thread three times for a full, plush knot that stands out against the white petals.
This design is one of the small stitches that add instant charm to tote bags and pouches without requiring complex techniques.
3. The Painterly Peony in Thread

Achieve this photorealistic effect with the long-and-short stitch, which allows you to blend colors seamlessly, almost like paint.
Work in concentric sections, starting from the outer petals and moving inward. Use at least four shades of pink, from a pale blush to a deep magenta, to create convincing gradients.
Pay close attention to the direction of your stitches. They should follow the natural curve of each petal, creating lines that guide the eye and enhance the flower’s form. This technique is central to floral thread painting techniques.
Stitching on a ribbed fabric like corduroy adds its own subtle texture, but be sure to use a stabilizer backing to prevent the stitches from sinking into the fabric’s channels.
4. The Elegant Honeysuckle Vine
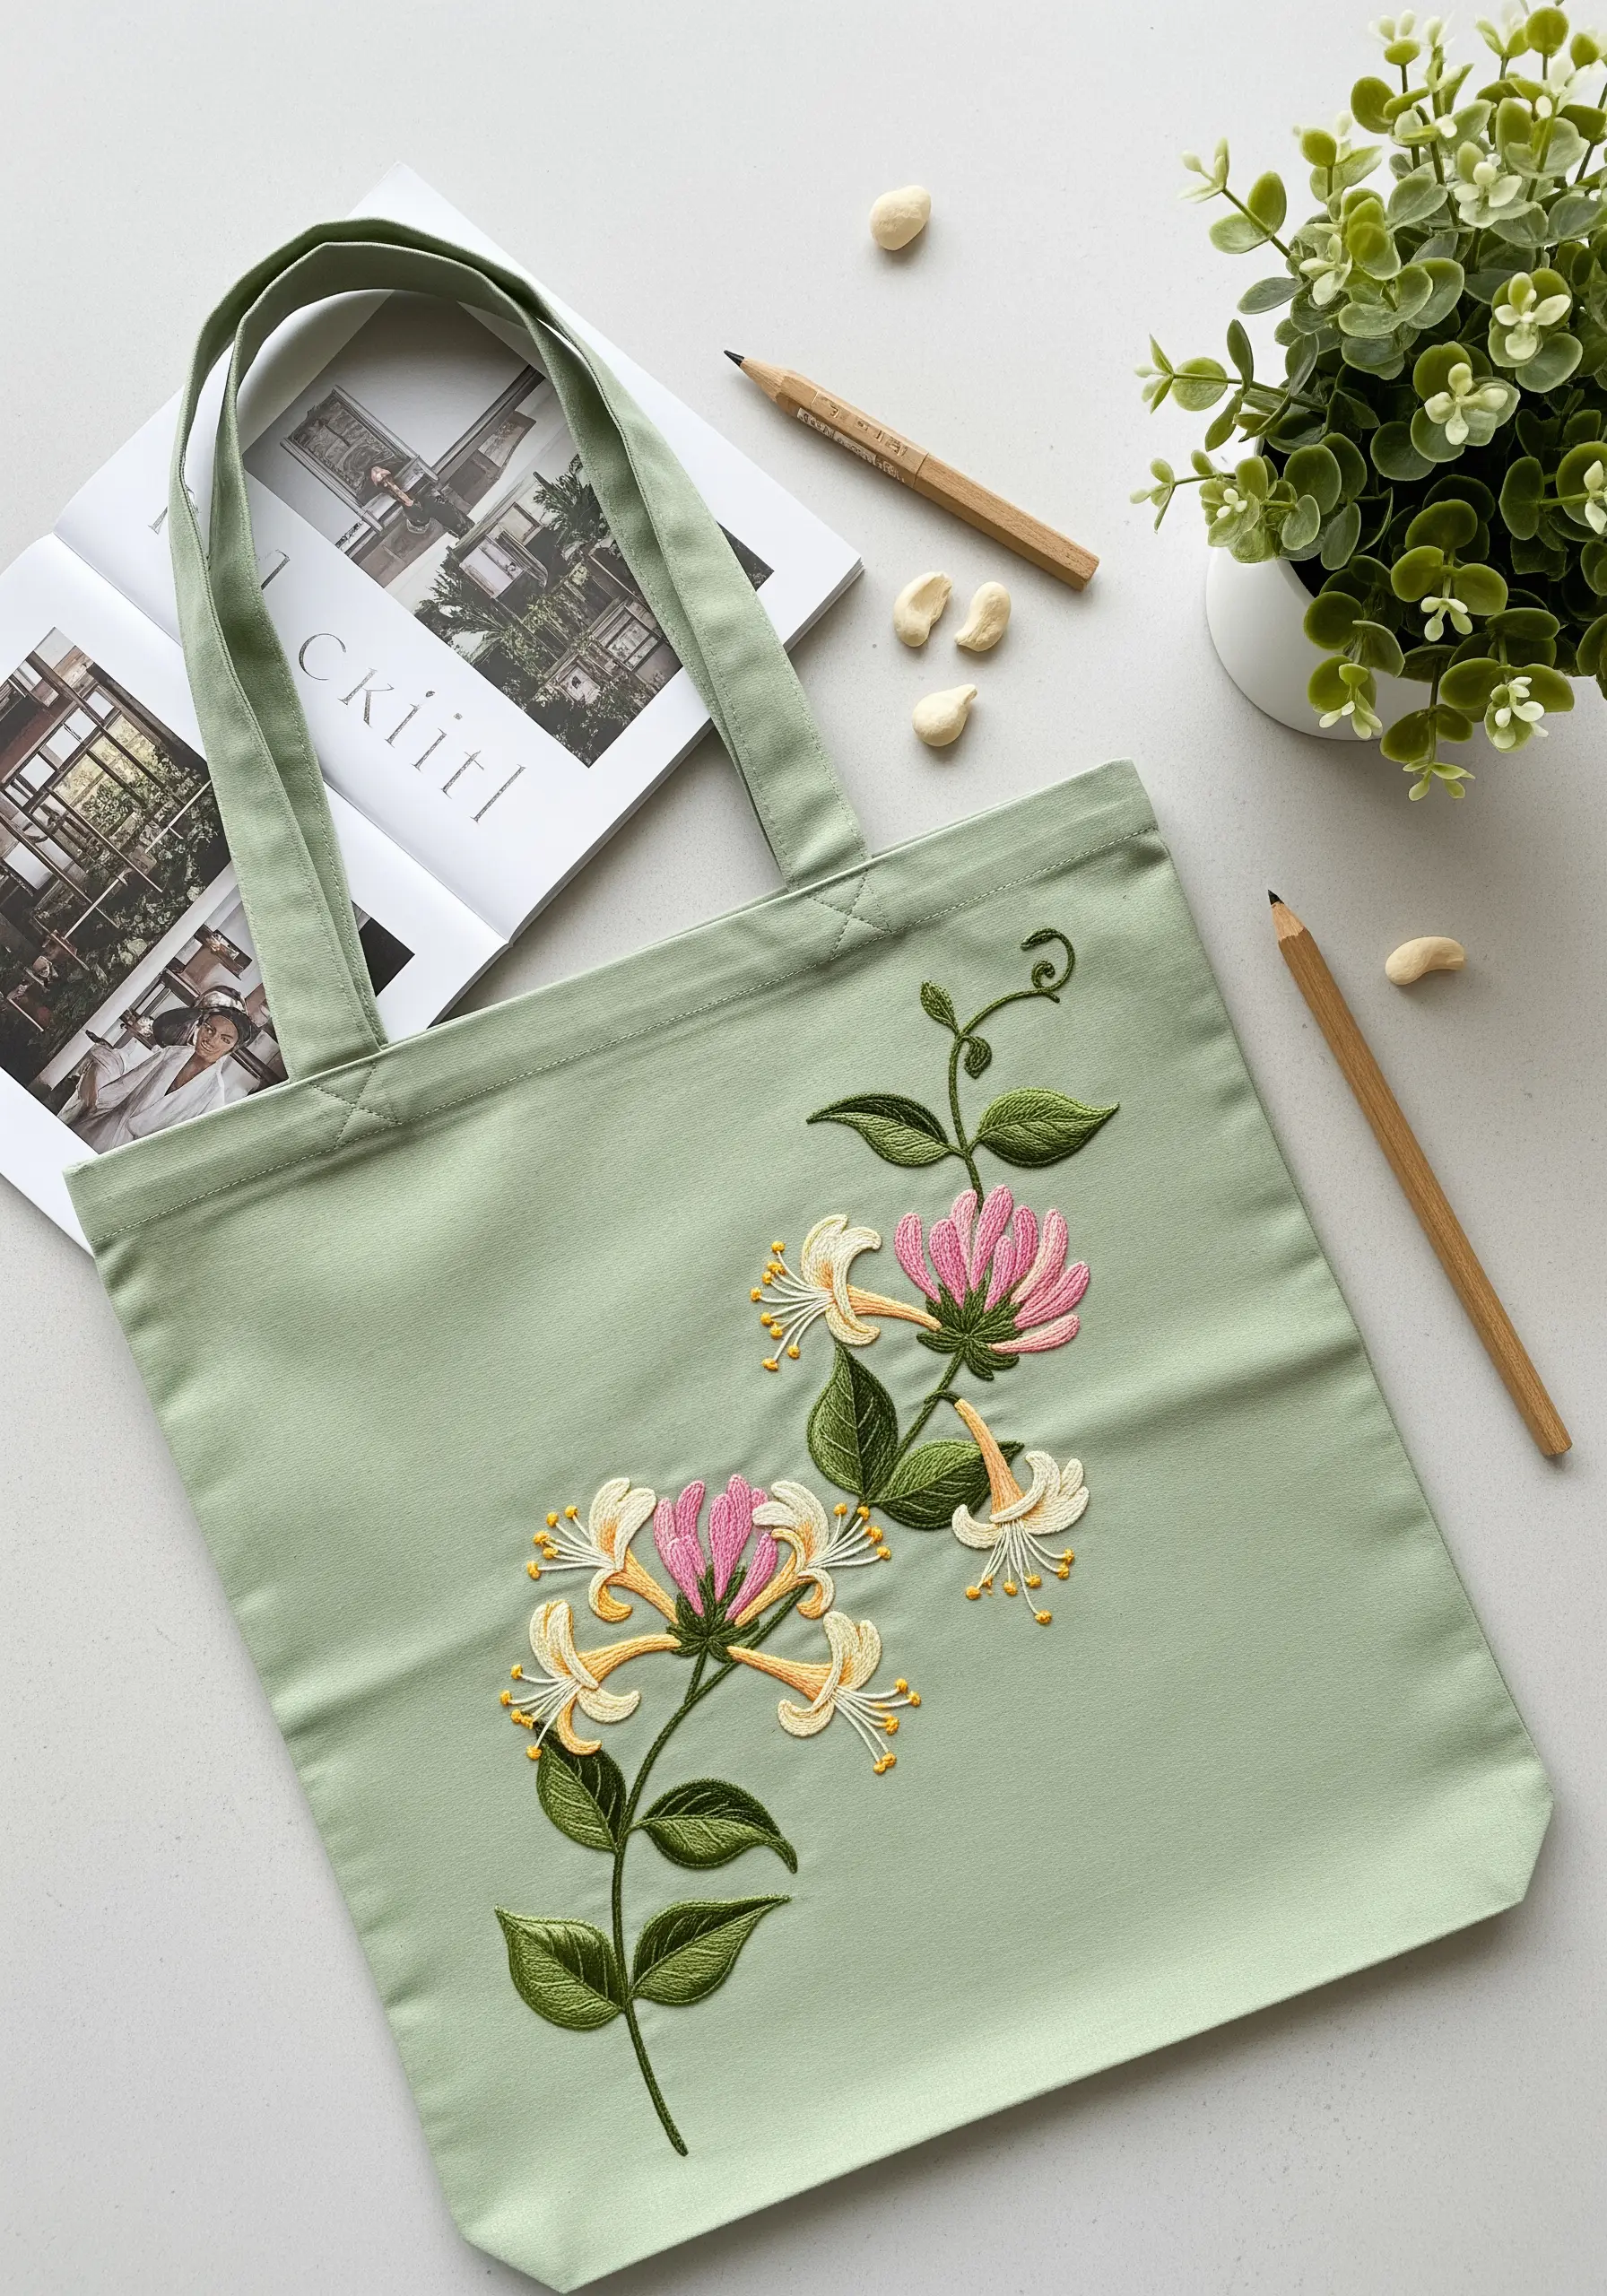
When embroidering on colored fabric, your thread choice is crucial for visibility and elegance. Here, a crisp white and sunny yellow pop against the soft sage green.
Use a split stitch for the outlines of the petals before filling them with satin stitch. This creates a slightly raised, defined edge that makes the shapes look cleaner and more intentional.
For the stems, a whipped backstitch provides a smooth, rope-like line that won’t get lost on the fabric. It adds a touch of refinement that a simple backstitch might lack.
The subtle curls at the end of the vine are key to the design’s delicate feel; use a single strand of thread to keep them light and airy.
5. The Wildflower Crescent Bouquet
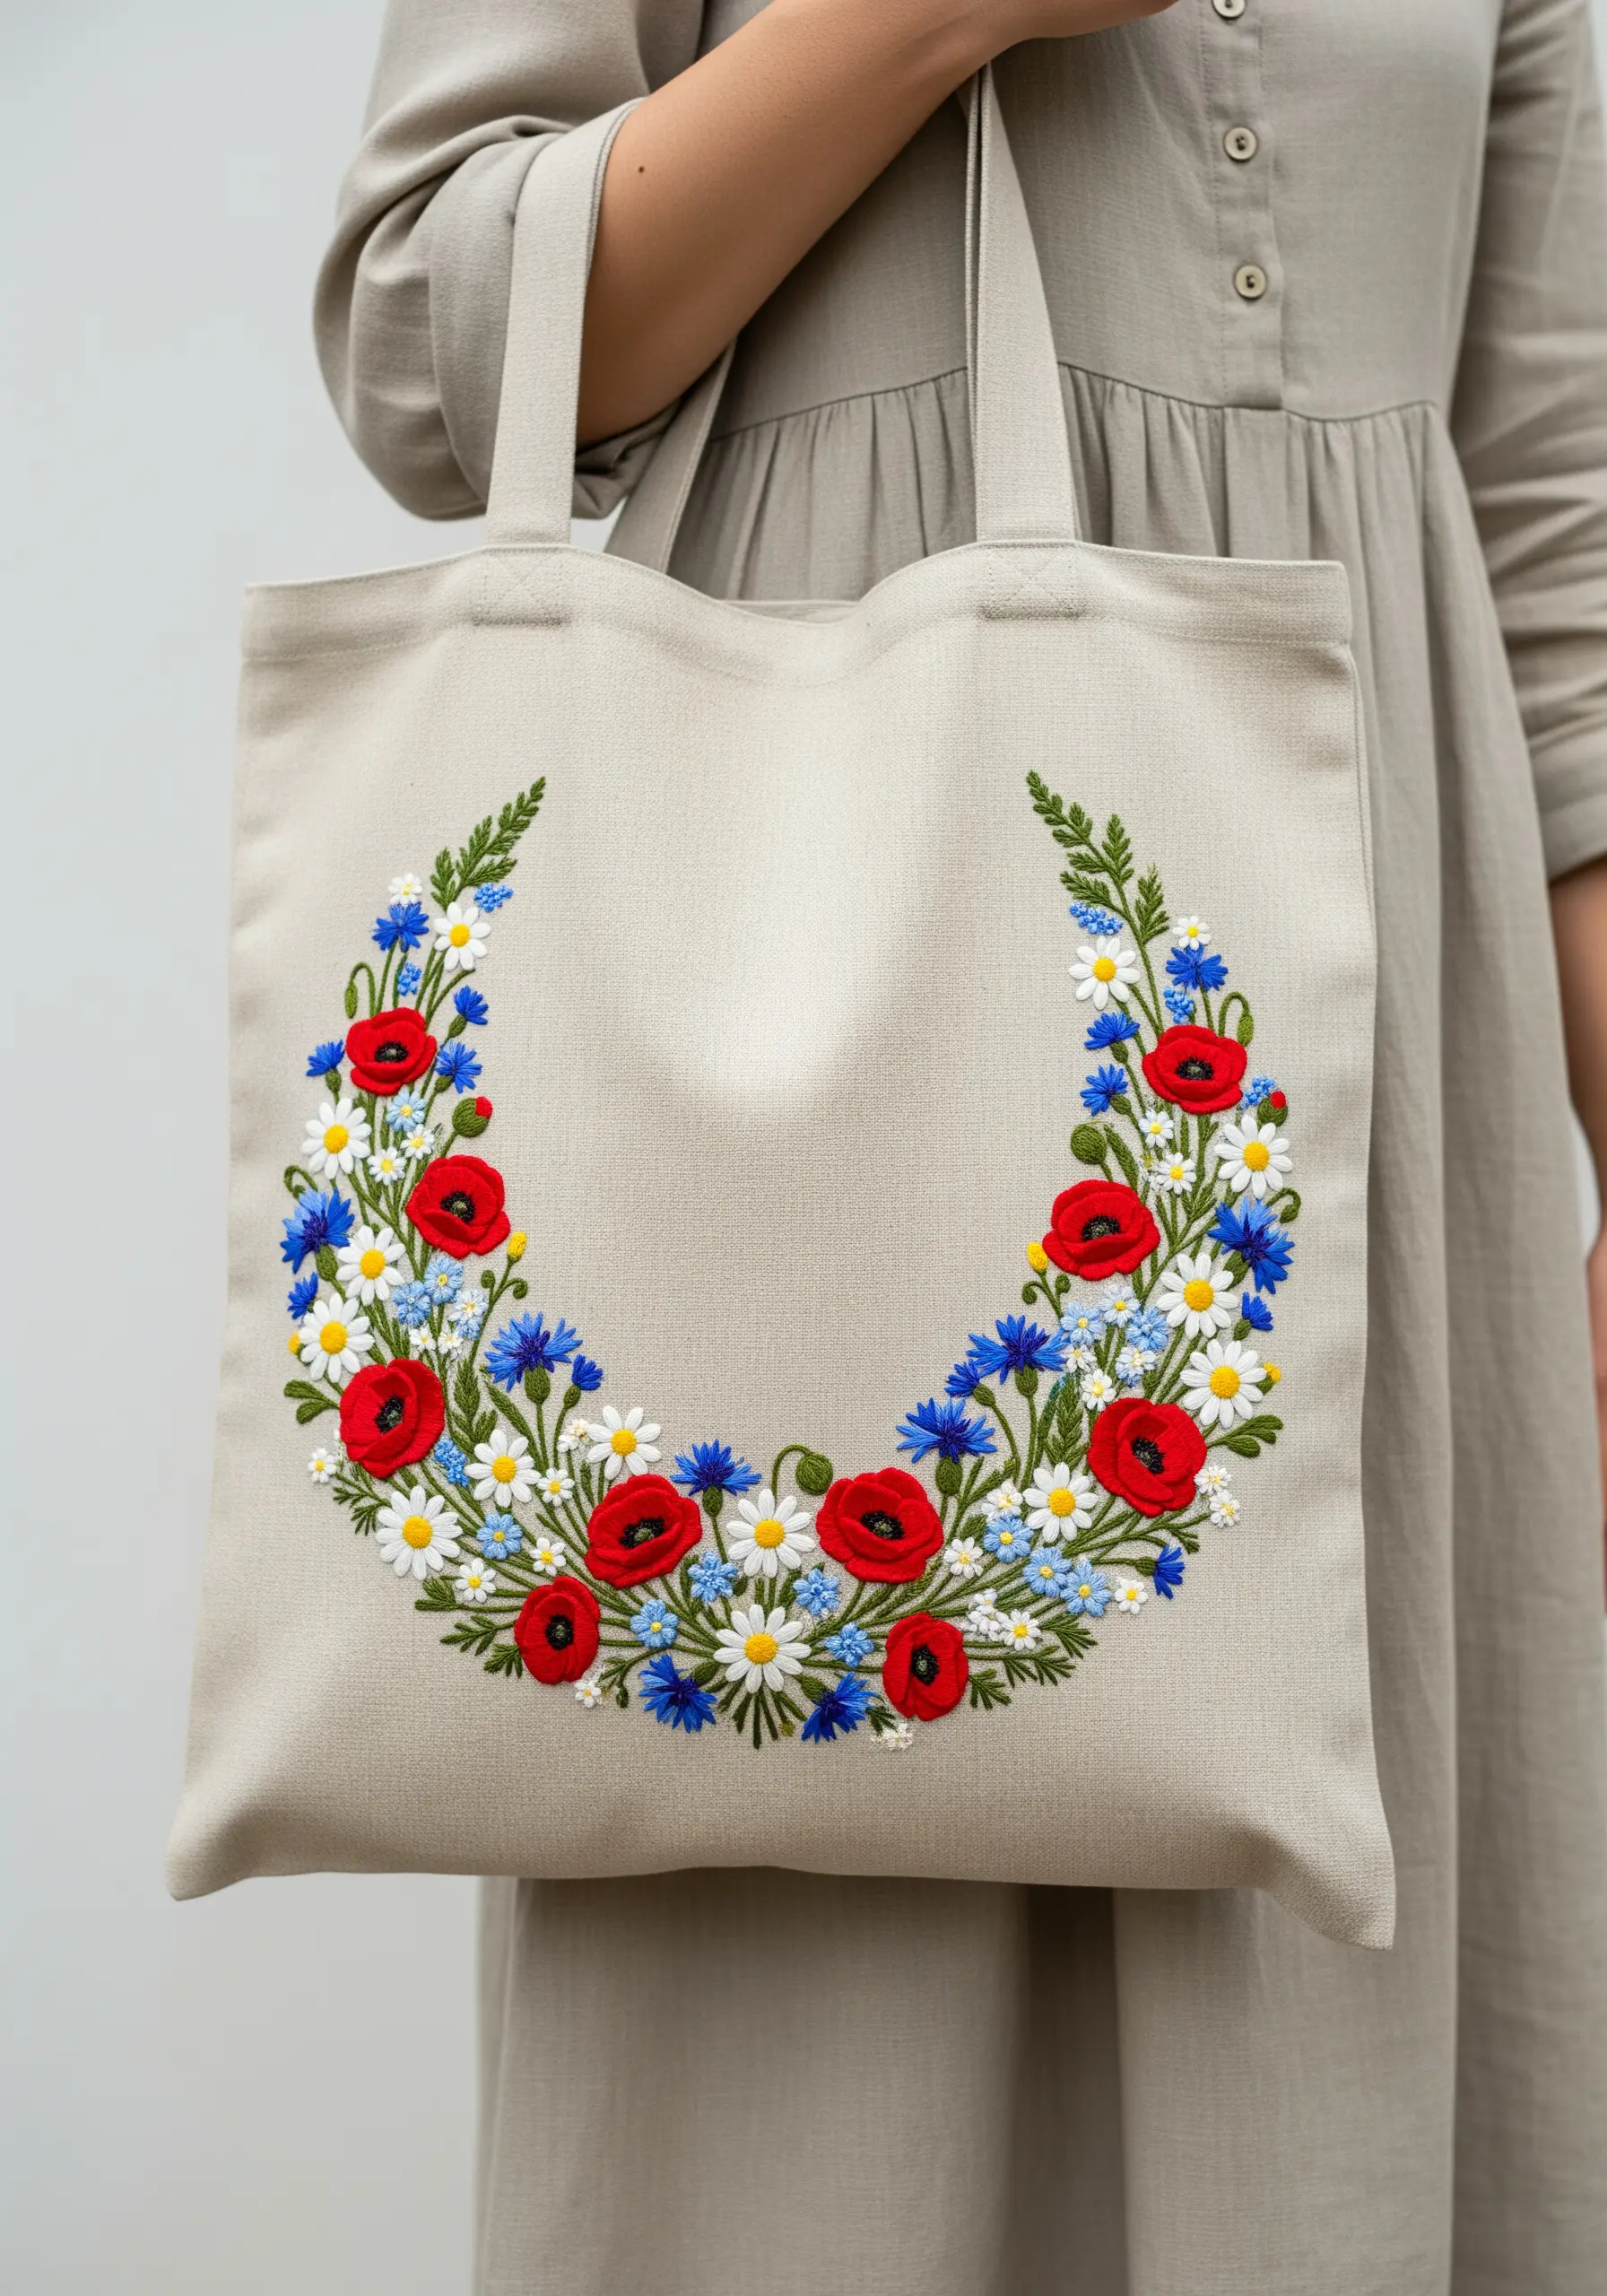
To make a multi-flower design feel cohesive, balance bold shapes with delicate textures. Here, the solid satin-stitched poppies command attention, while the airy cornflowers add softness.
Create the poppies with a padded satin stitch. First, lay down a foundation of straight stitches within the petal shape, then stitch over them. This gives the poppies a raised, 3D effect.
For the cornflowers, use a series of detached chain stitches arranged in a starburst shape. This keeps them light and prevents the design from feeling too heavy.
Tuck in tiny white daisies and French knots as filler flowers to bridge the gaps and unify the entire crescent shape.
6. The Glass Jar Illusion

Create the illusion of a glass jar by using a single strand of white or light grey thread for the outline. Stitch highlights using simple straight stitches to mimic light reflecting off the surface.
The key is to keep the jar’s stitching minimal so it appears transparent. A simple backstitch or stem stitch is all you need.
For the bouquet, use a variety of stitches to differentiate the flowers: lazy daisies for some, French knots for others, and satin stitch for larger petals. This visual variety makes the arrangement feel more dynamic and realistic.
The fish skeleton charm is a whimsical detail. Use a metallic silver thread to make it pop and add a surprising focal point.
7. The Minimalist Daisy Chain Border

A border design requires precision. Use a water-soluble marker and a ruler to draw your guideline first, ensuring the vine is perfectly straight.
Mark the placement for each flower evenly along the vine. This symmetry is what makes a simple border look polished and professional.
For the vine, use a stem stitch with three strands of green floss for a solid, defined line. The leaves can be single, detached chain stitches, angled away from the main vine.
Keep the flowers simple with classic lazy daisy stitches and a single French knot in the center. The elegance of this design comes from its clean execution and repetition.
8. The Woodland Corner on Corduroy

When stitching on a textured fabric like corduroy, use a tear-away stabilizer on the back to provide a smooth surface and prevent the fabric from puckering.
For the fern fronds, use the fishbone stitch. This creates a beautiful, central vein and allows the stitches to angle outwards, perfectly mimicking the texture of a real fern.
Create dimension in the mushrooms by using a padded satin stitch for the red caps. For the white spots, use French knots stitched directly over the satin stitch fill.
Use a darker, earthy green for the moss at the base, created with clusters of tightly packed French knots. This grounds the composition and adds another layer of texture.
9. The Animated Bee and Clover
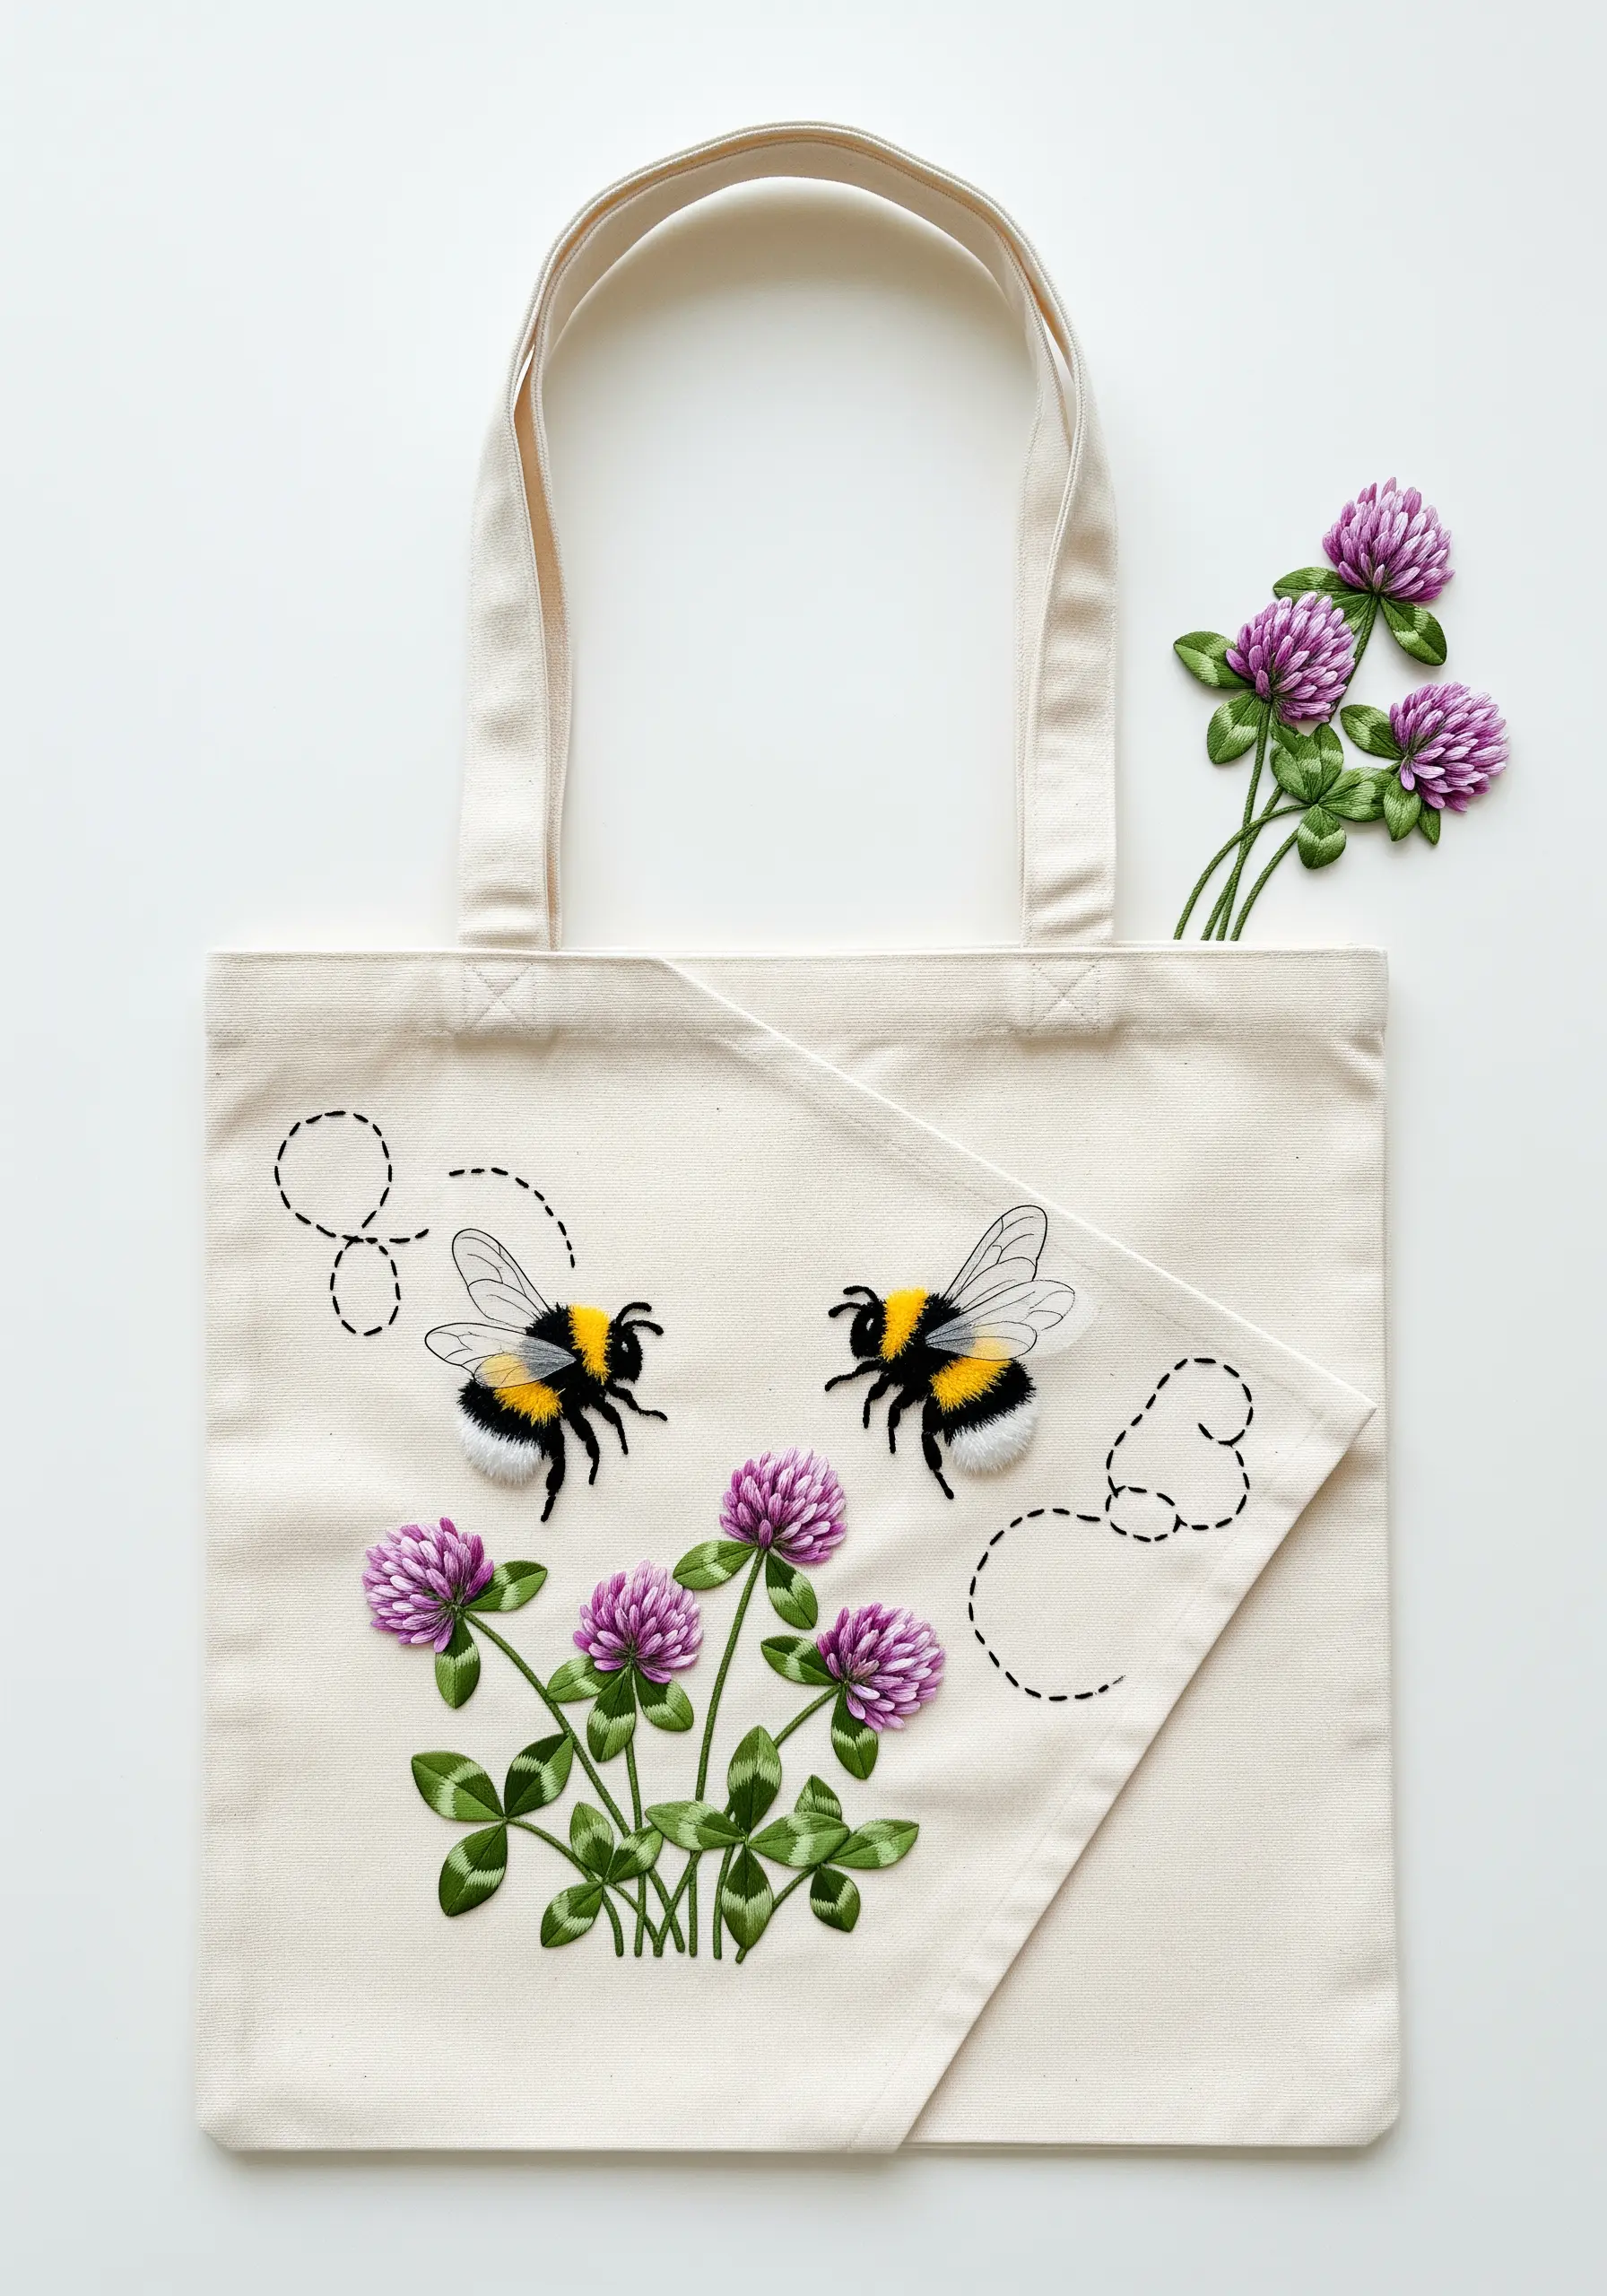
Bring your bees to life with textural stitches. Use turkey work for the fuzzy yellow stripes on the body—stitch the loops, then carefully snip them and fluff the threads with your needle.
For the wings, create an outline with a split stitch, then fill with spaced-out straight stitches using a single strand of translucent or light grey thread to suggest transparency.
The dashed flight path, stitched in a simple backstitch, adds a sense of movement and whimsy that elevates the entire piece from a static image to a tiny story.
Use bullion knots for the clover blossoms to give them a dense, rounded shape that contrasts beautifully with the delicate leaves.
10. The High-Contrast Dandelion

For dramatic effect on dark fabric, choose a high-contrast thread like a brilliant white or a metallic silver. Use at least three strands of floss to ensure the design stands out.
To create a perfectly smooth and solid stem, use a whipped backstitch. First, create a line of backstitches, then weave your thread through them without piercing the fabric. This covers the gaps and creates a seamless line.
The dandelion head is composed of carefully placed straight stitches and French knots. Overlap them slightly to build density toward the center, making the seed head look full and three-dimensional.
The floating seeds add movement and guide the viewer’s eye across the negative space, balancing the composition perfectly.
11. The Vibrant Spring Bulb Bouquet
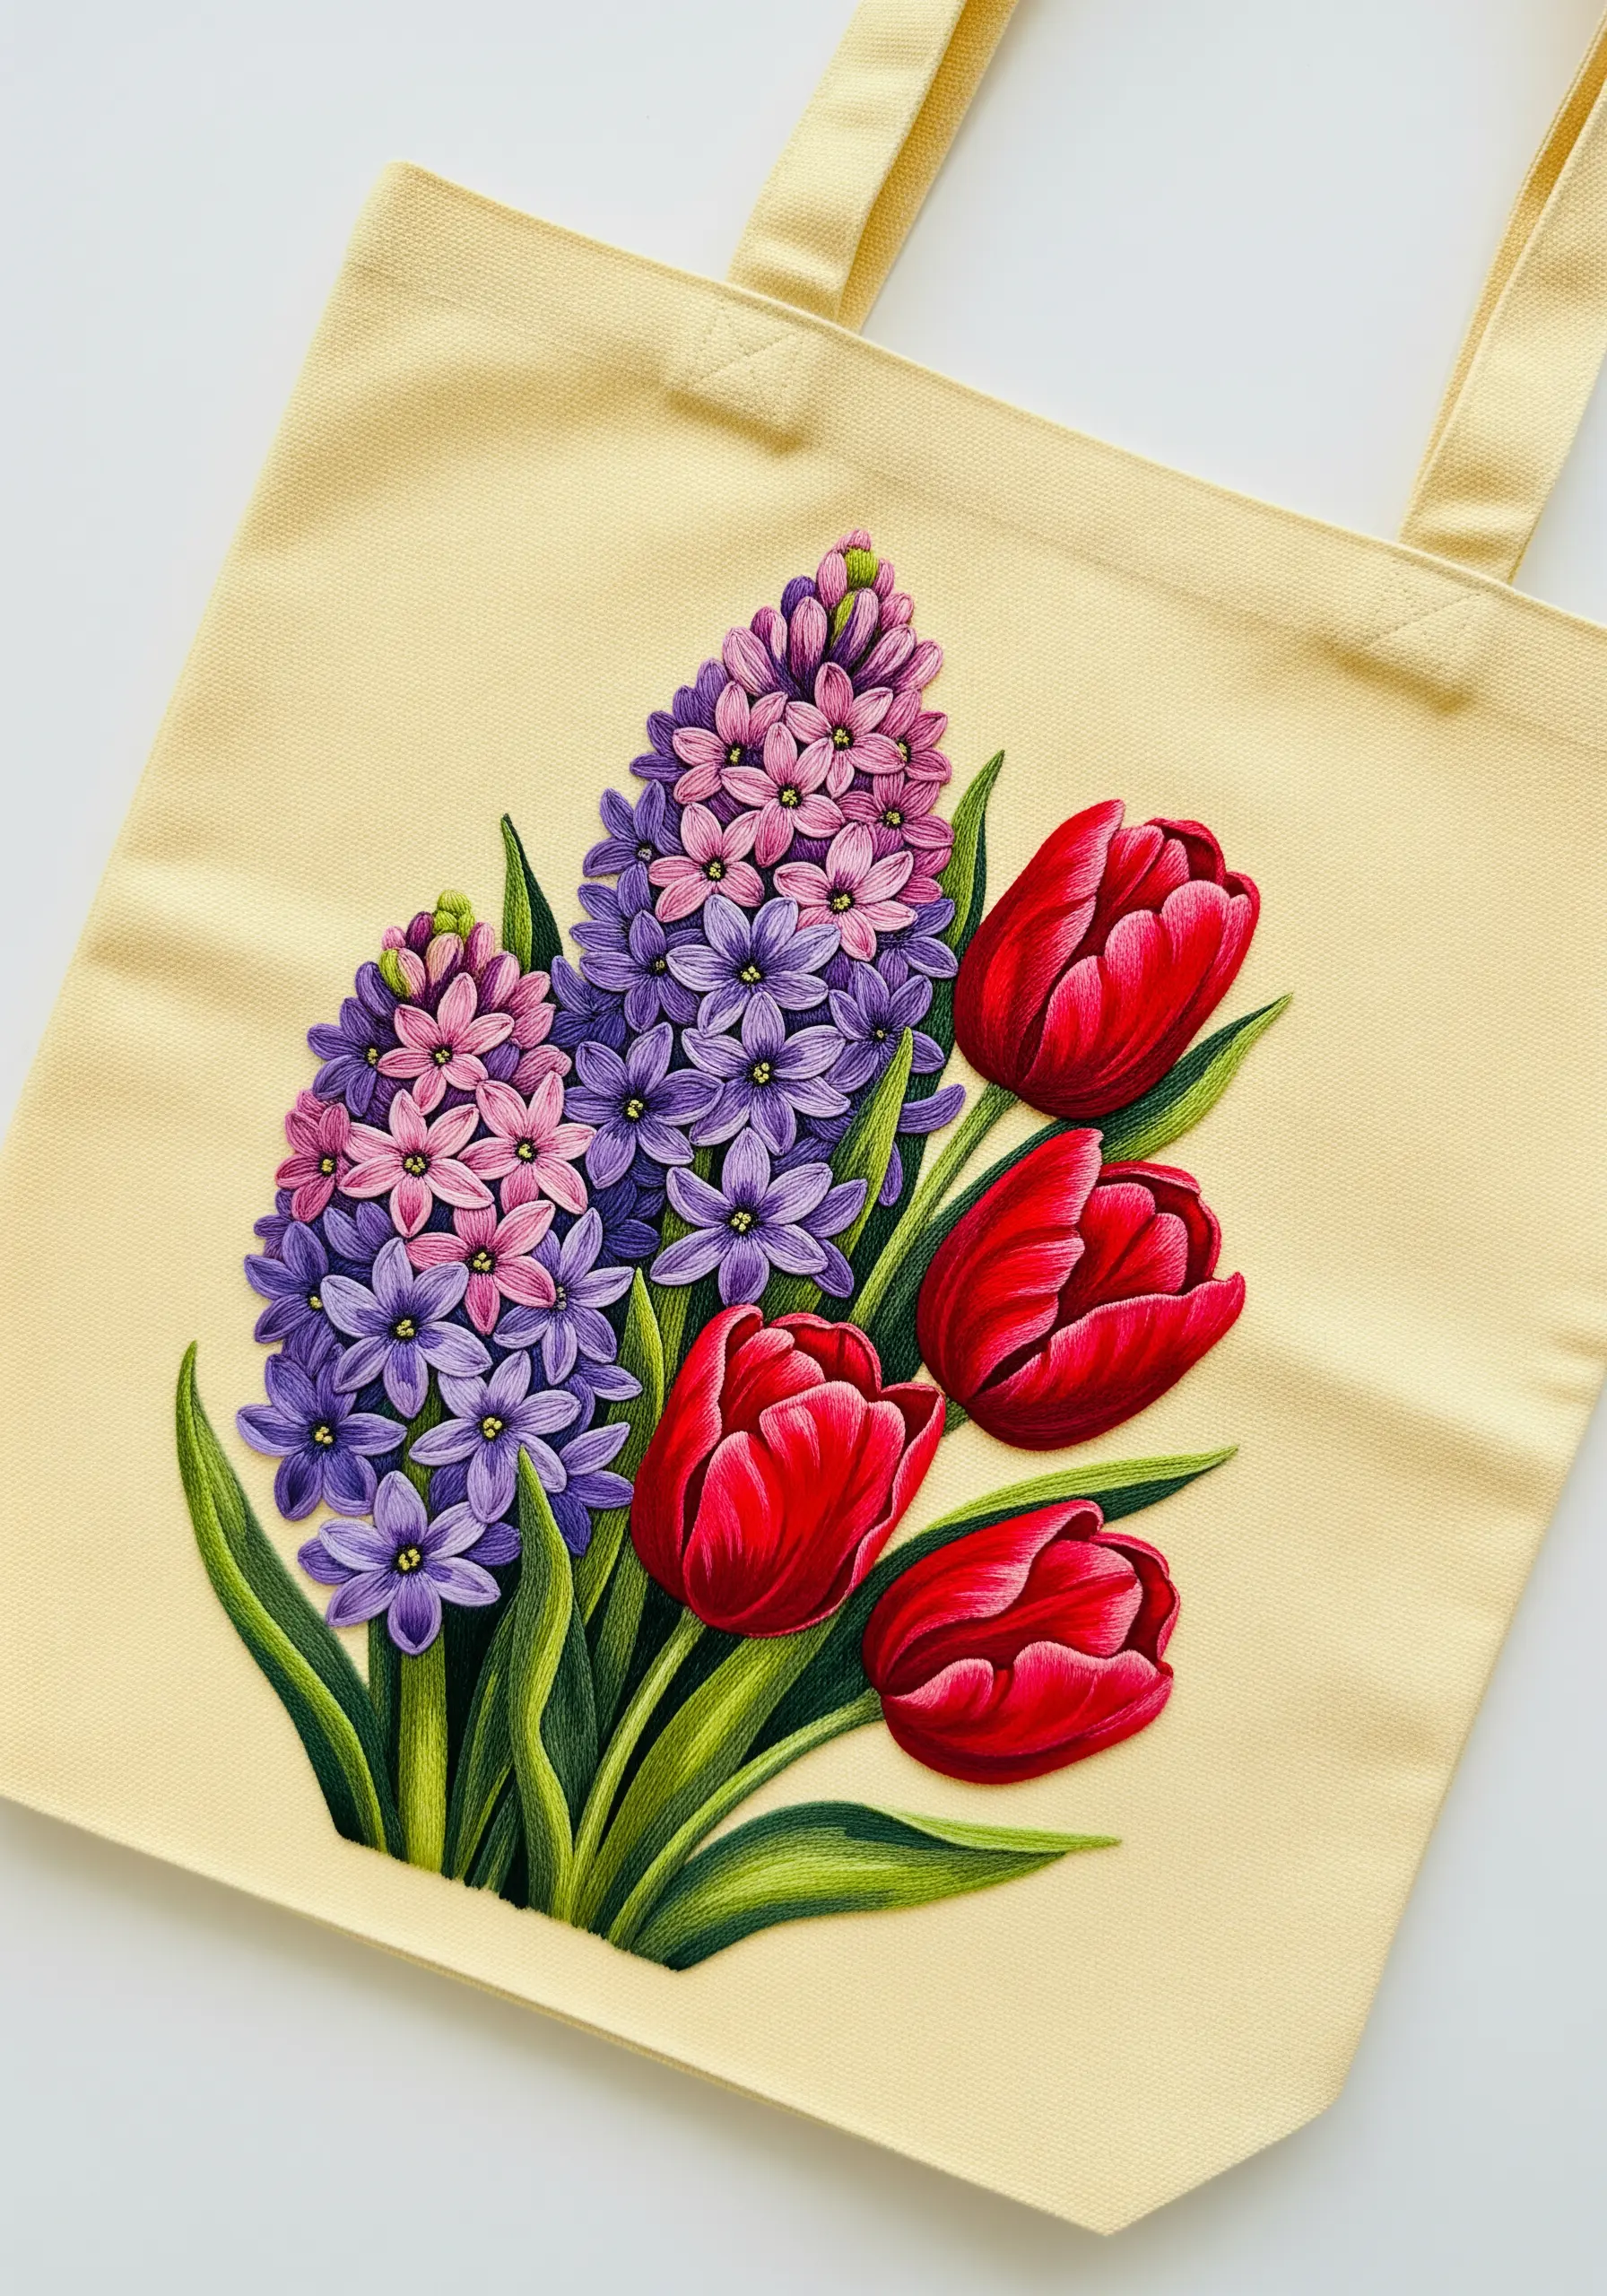
Capture the dense texture of a hyacinth by filling the area with overlapping French knots or bullion knots. Use three or four shades of purple and pink, clustering them together to create a natural color gradient.
Contrast the hyacinth’s texture with the smooth, lustrous finish of the tulips. Use a satin stitch for the petals, ensuring your stitches lie flat and even. Angling the stitches can suggest the curve of the petals.
To make the red of the tulips appear even richer, outline them first with a single strand of a slightly darker red. This contains the satin stitch and makes the color pop.
These gradient color floral embroidery ideas create an almost 3D effect, making the bouquet look incredibly lush.
12. The Modern Bluebell Line Drawing

This design proves that simple line work can be just as impactful as a fully filled piece. The key is a consistent, confident stitch.
Use a stem stitch or a split stitch for all the lines. This creates a slightly raised, rope-like texture that gives the drawing substance and visual weight.
Choose a thread count that matches your desired effect. Three strands of floss will give you a bold, graphic line, while two strands will feel more delicate.
The beauty of minimalist line art embroidery patterns is in their simplicity. Resist the urge to add color or fills; the elegance is in the pure, clean lines.
13. The Cheerful Strawberry Patch Border

Stitching on a coarse, open-weave fabric like jute or burlap requires a few adjustments. Use a blunt-tipped tapestry needle to avoid snagging the fabric’s fibers.
Opt for a thicker thread, like DMC Pearl Cotton No. 8, or use all six strands of standard embroidery floss. This ensures your stitches have enough coverage and don’t get lost in the fabric’s texture.
For the strawberries, use a padded satin stitch to give them a plump, rounded shape. Create the seeds with tiny straight stitches in yellow, which will pop against the red.
The contrast between the smooth satin-stitched leaves and the textured fabric makes the entire design more tactile and visually interesting.
14. The Delicate Queen Anne’s Lace
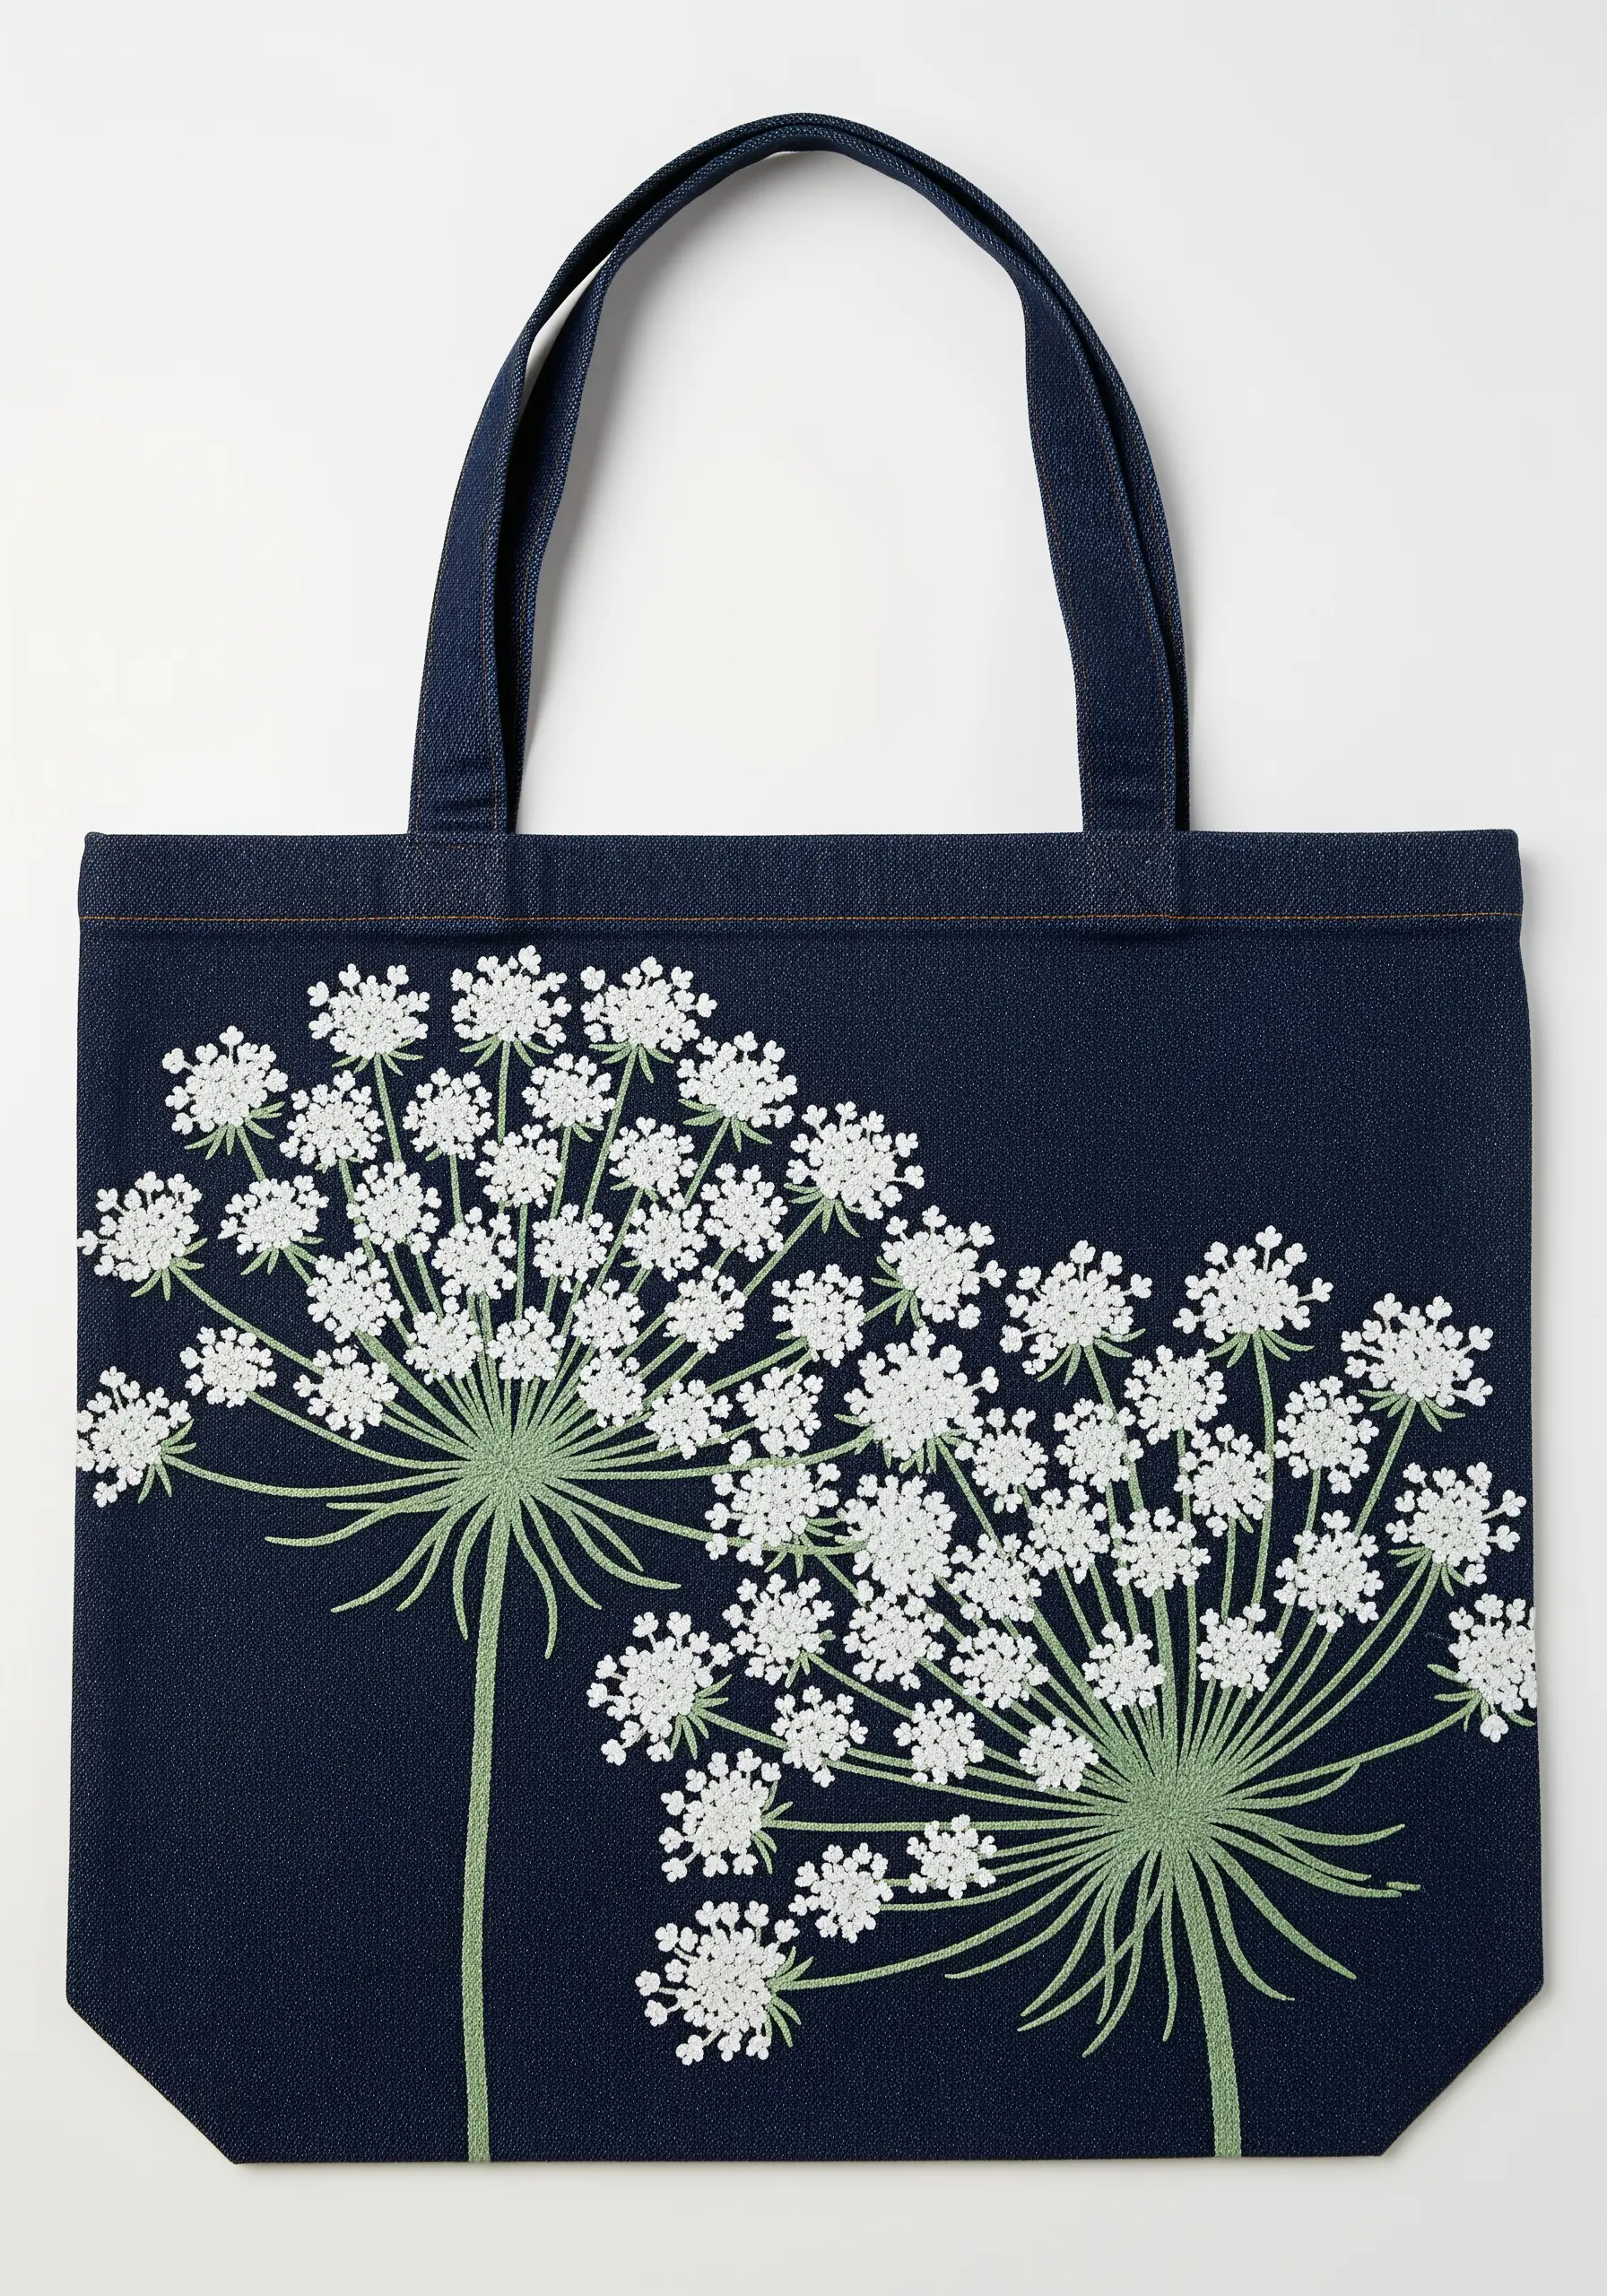
To capture the airy, intricate nature of Queen Anne’s Lace, rely on clusters of French knots. Use a bright white thread to make them pop against a dark background like denim.
Vary the size of your knots slightly by changing how many times you wrap the thread around the needle (once for tiny buds, twice for fuller blossoms). This variation adds realism.
For the thin green stems, use a single strand of floss in a simple backstitch. This keeps them delicate and ensures they don’t overpower the flower heads.
When stitching on denim, always use a sharp, strong needle. A size 7 or 8 embroidery needle works perfectly. Consider these tiny embroidery ideas to personalize your denim jacket as well.
15. The Gardener’s Motif with 3D Florals
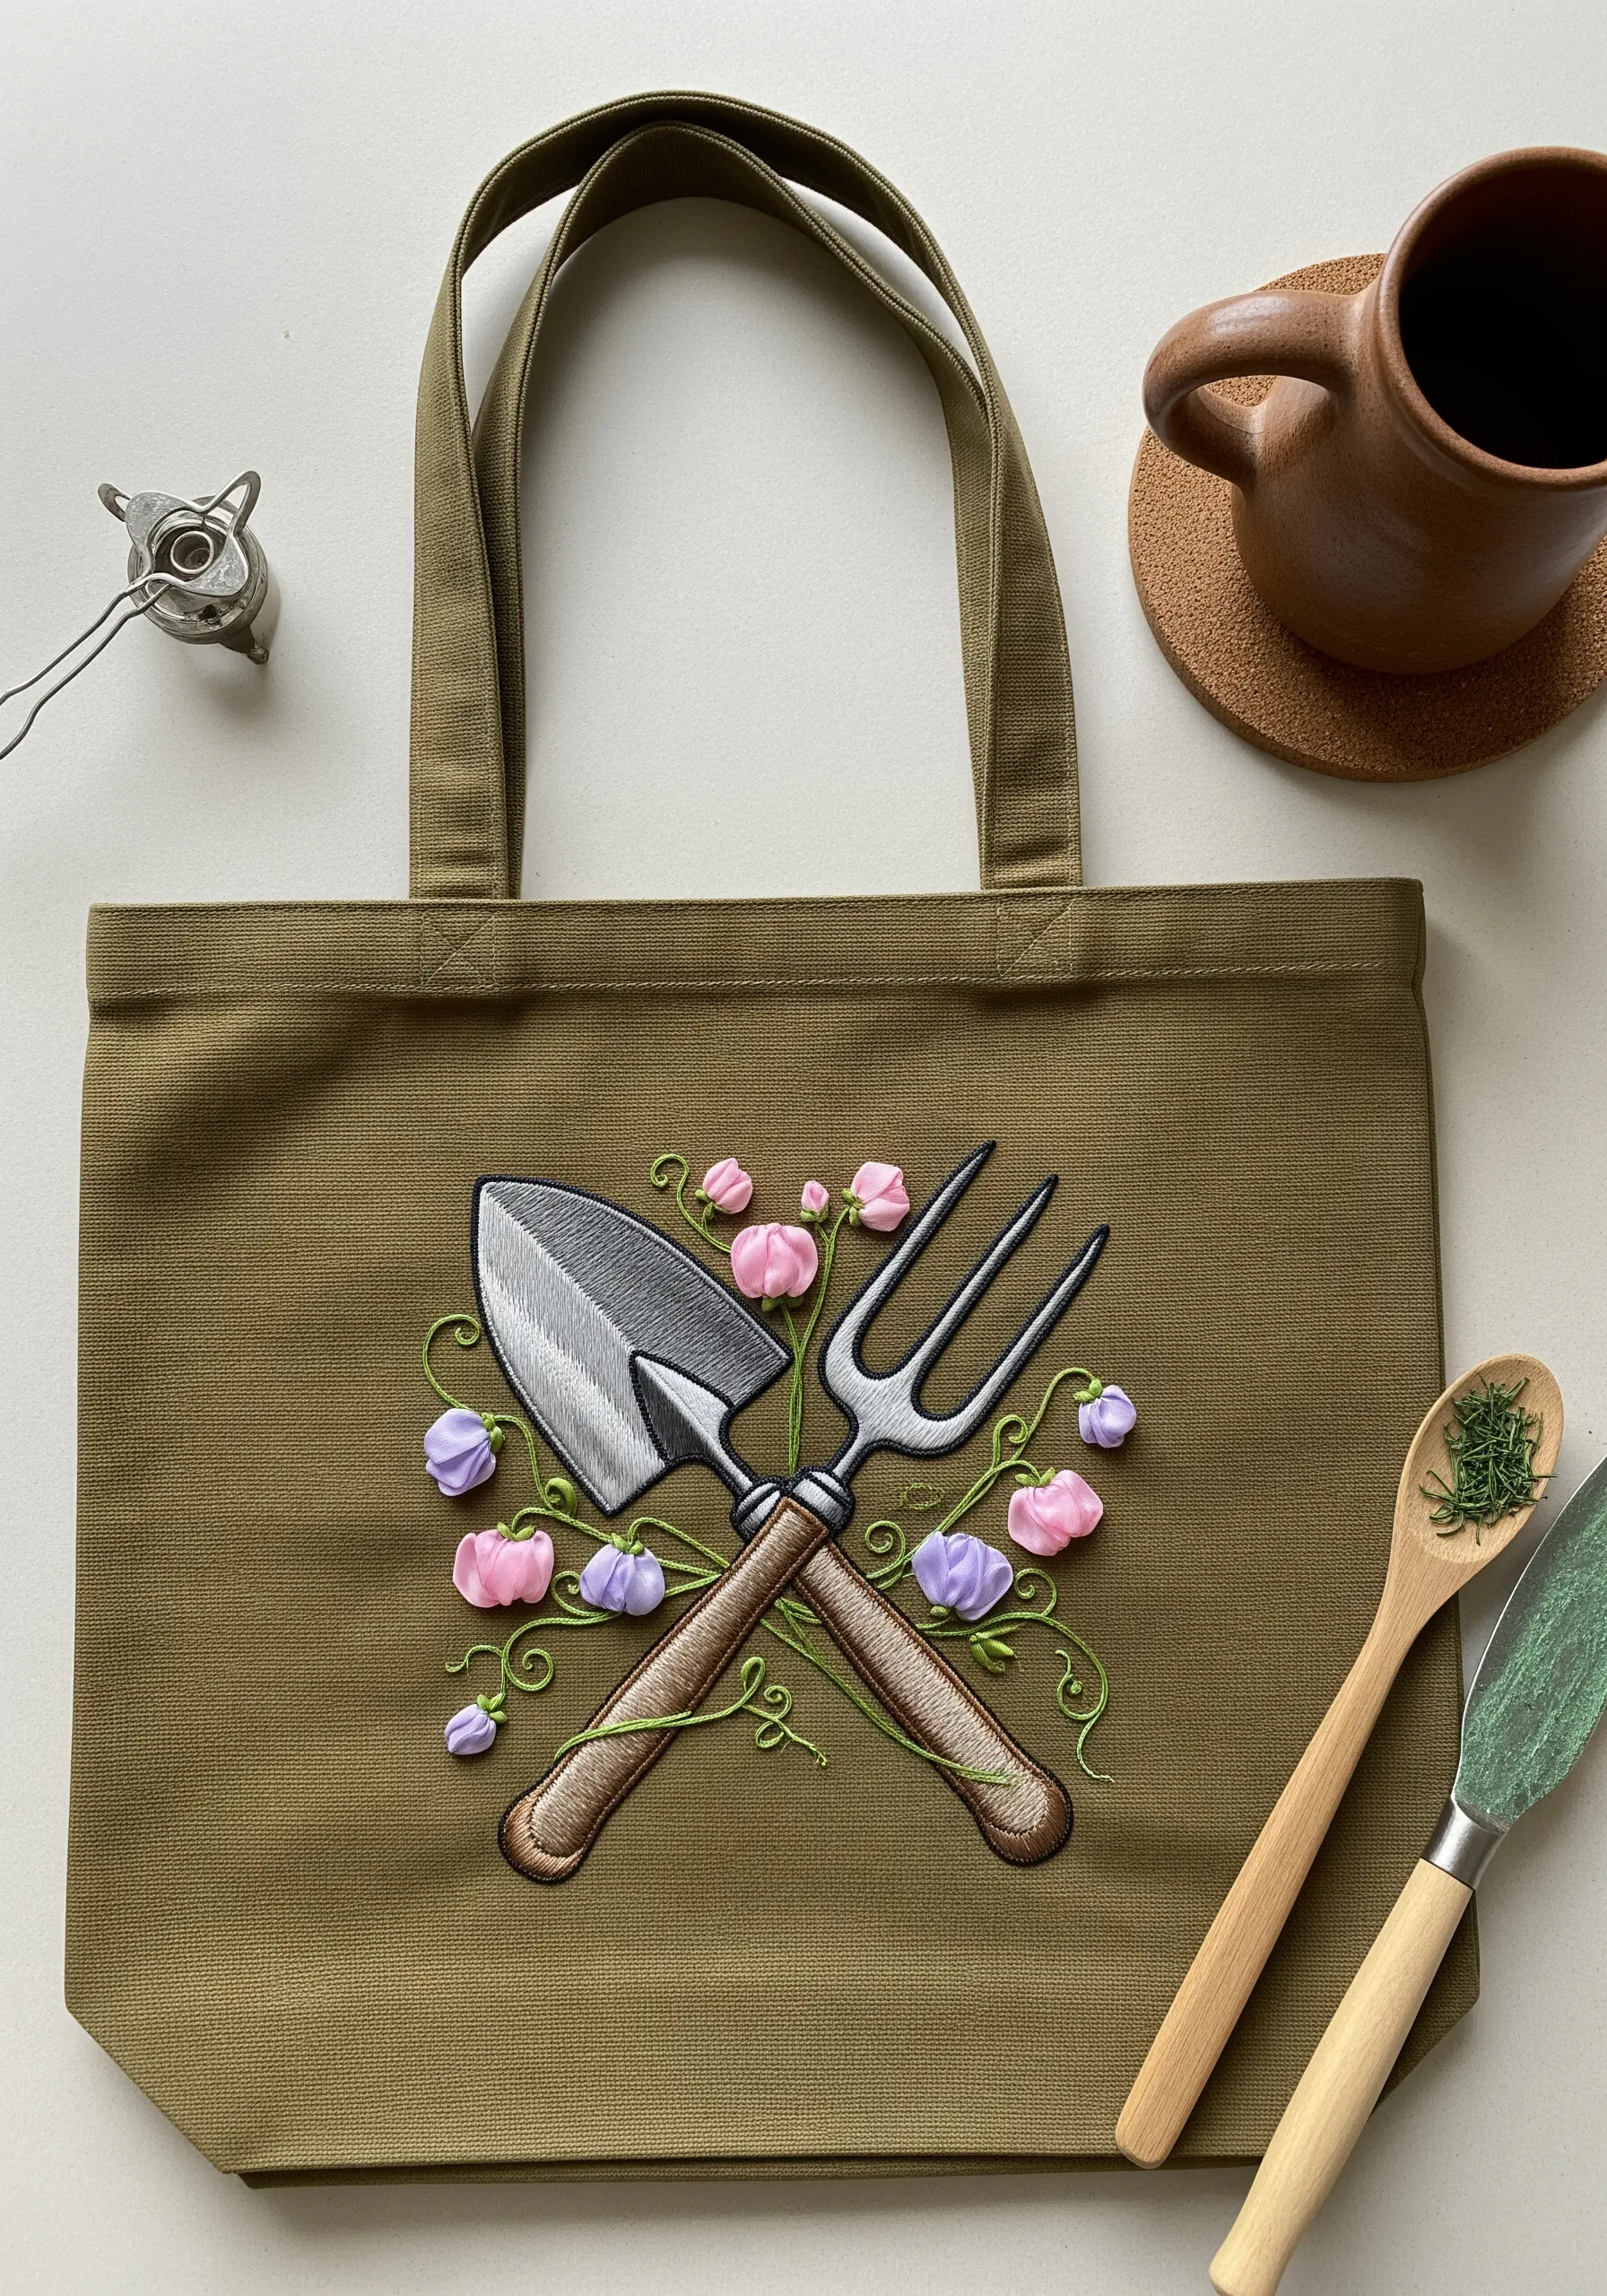
Combine traditional embroidery with three-dimensional stitches to create a captivating design. Use a woven picot stitch for the pink and purple flowers to make them lift off the fabric.
For the metal parts of the trowel and fork, use a silver or grey satin stitch and add a few white straight stitches as highlights to mimic a metallic sheen.
Create a realistic wood grain effect on the handles by using a long-and-short stitch with two shades of brown. Angle your stitches to follow the shape of the handle.
The swirling green vines, done in a simple stem stitch, tie the entire composition together and give it a sense of playful movement.
16. The Lush Wildflower Meadow Border

To create a meadow that feels lush and abundant, focus on variety and density. Use a mix of at least five different stitch types to represent the various flowers and grasses.
Incorporate lazy daisy stitches, French knots, satin stitch, straight stitches, and woven wheel stitches. This stitch diversity is what makes the meadow look so rich and textured.
Overlap your flowers and stems slightly to create a sense of depth and density. Avoid placing flowers in perfect rows; a more organic, slightly chaotic arrangement will look more natural.
Include a tiny, unexpected detail, like the spiderweb, to add a touch of personality and reward the close observer. These are the cottagecore floral patches that tell a story.
17. The Pointillist Floral Monogram
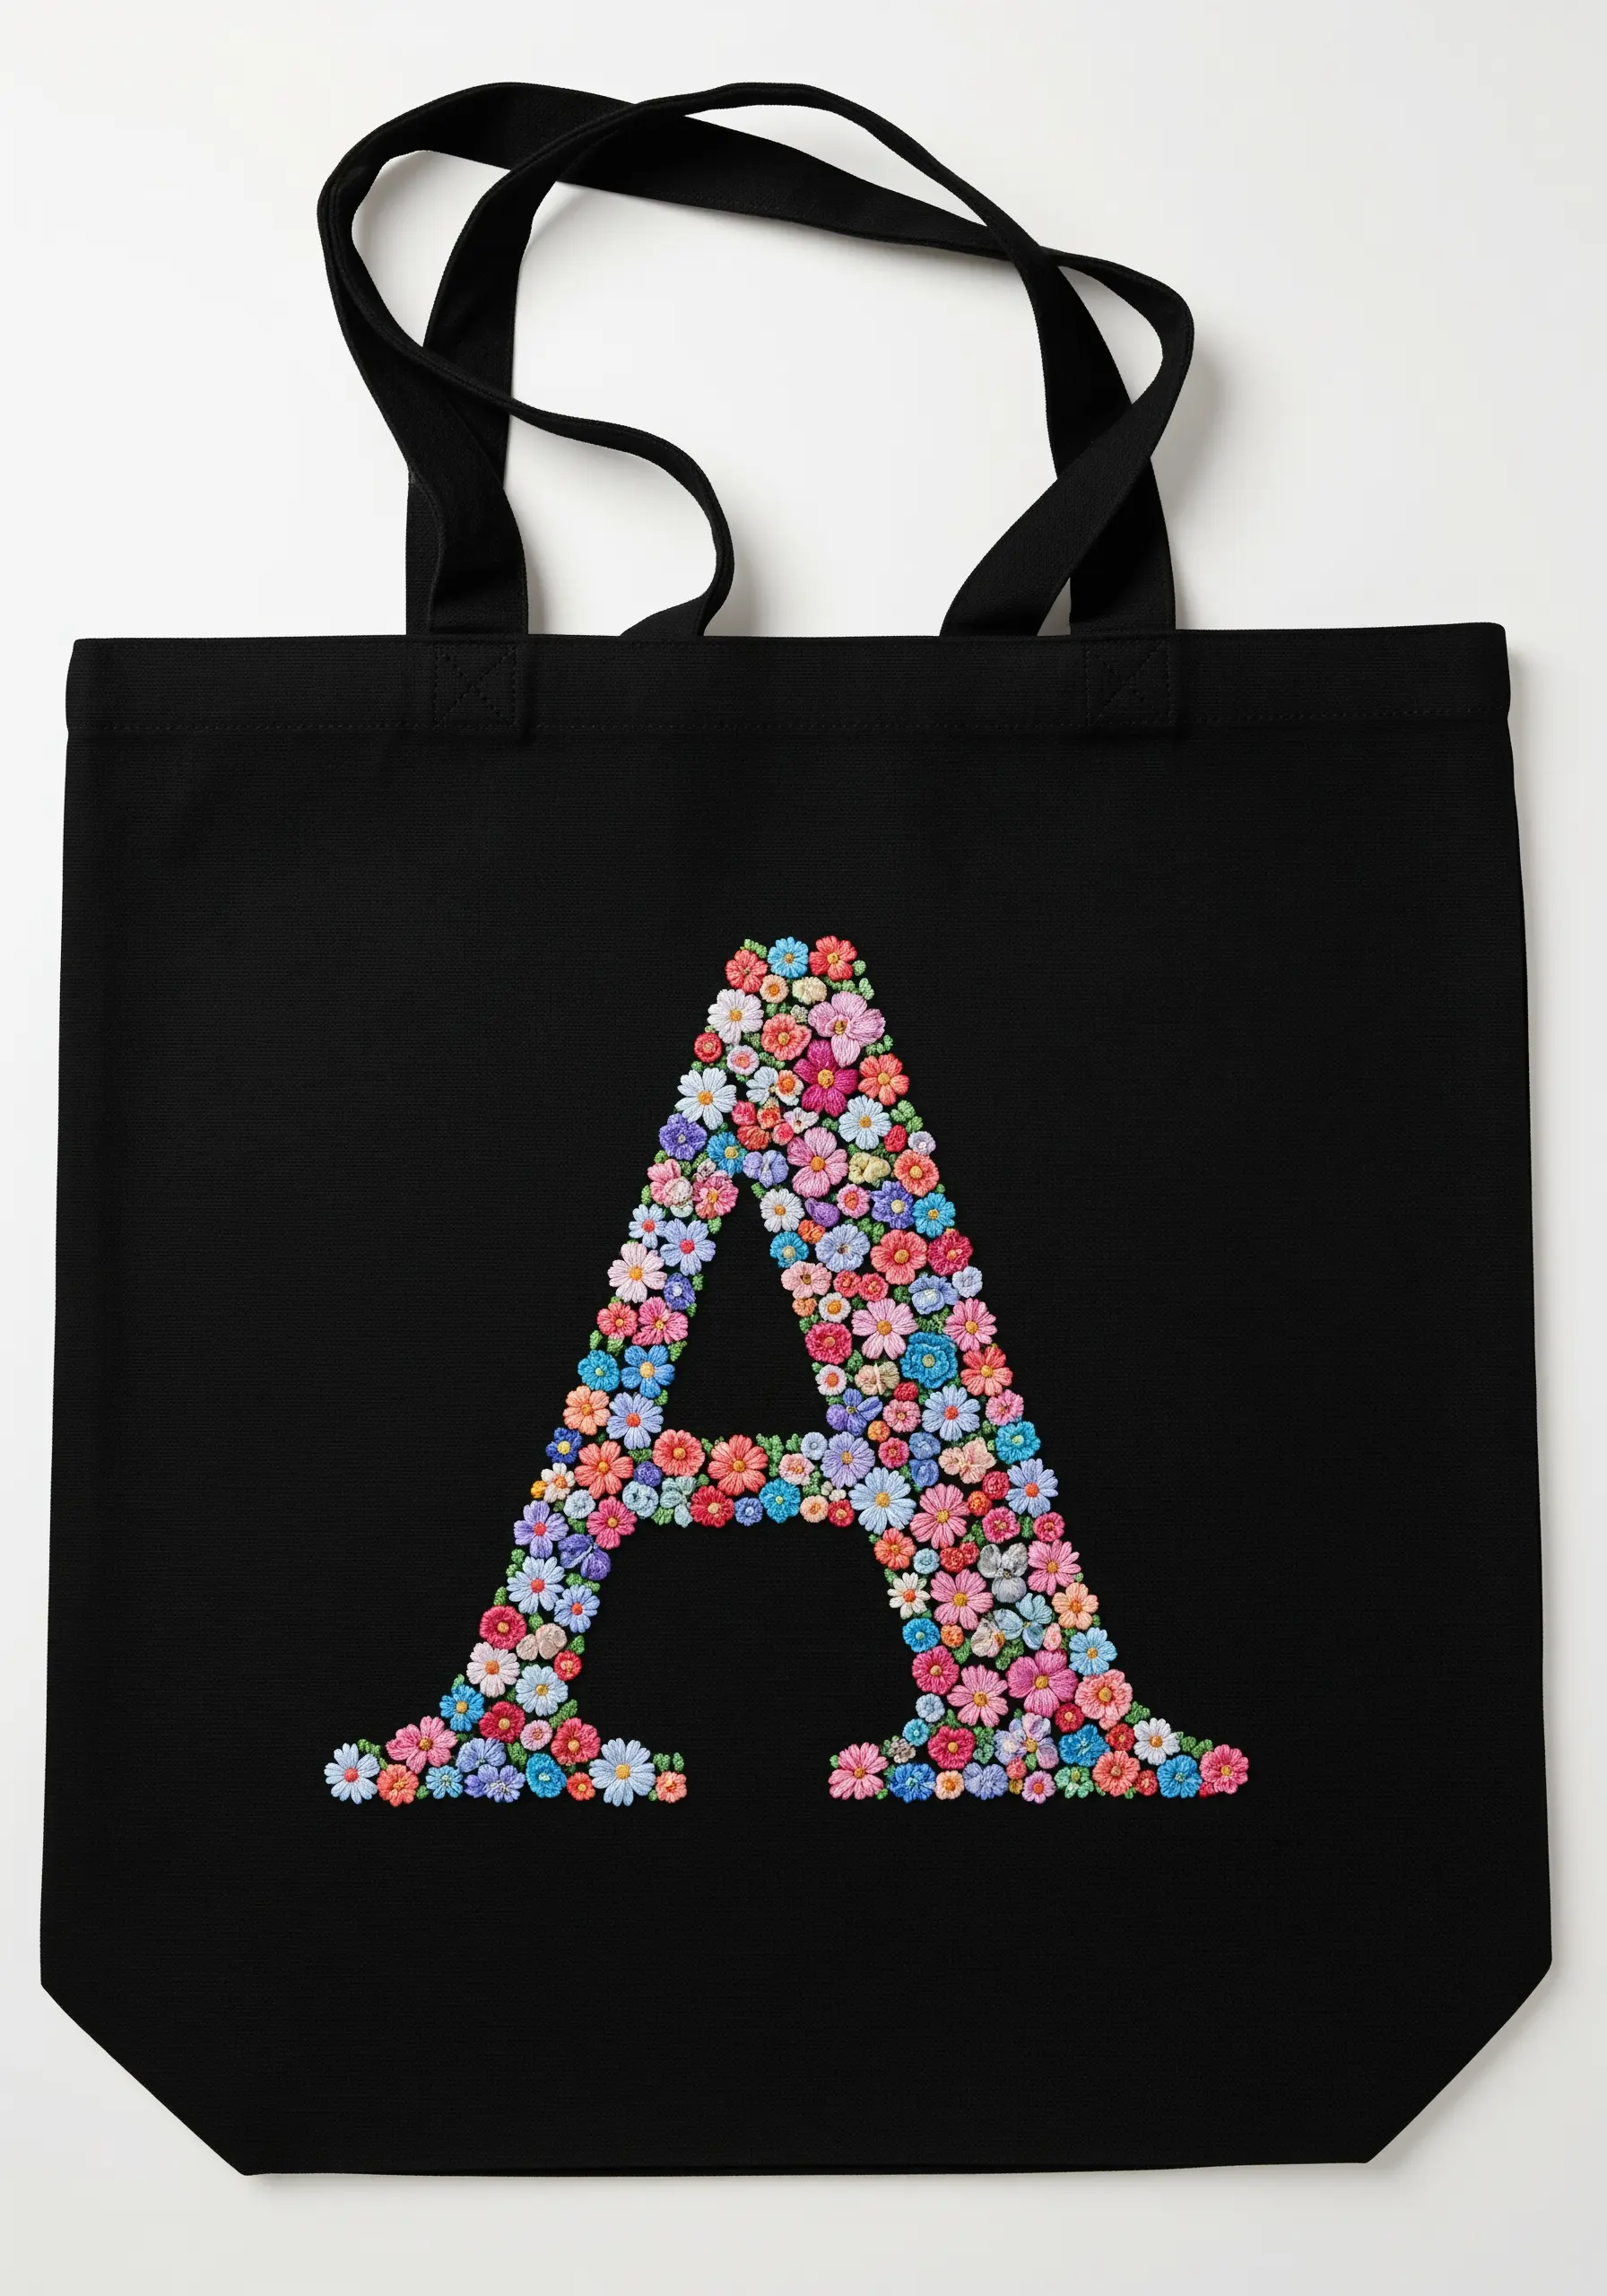
This design uses tiny flowers like paint dots to form a larger shape. Start with a clean, bold outline of your chosen letter, drawn with a water-soluble marker.
Fill the letter with a dense collection of tiny flowers. Use French knots, colonial knots, and very small lazy daisy stitches. Pack them tightly together, especially around the edges, to maintain the letter’s crisp shape.
Work with a varied color palette of at least 10-15 colors to achieve this confetti-like effect. Distribute the colors evenly to avoid large patches of a single hue.
The high contrast against the black fabric makes the colors exceptionally vibrant. This technique is perfect for personalized tote bag embroidery designs.
18. The Teacup Bouquet with Appliqué
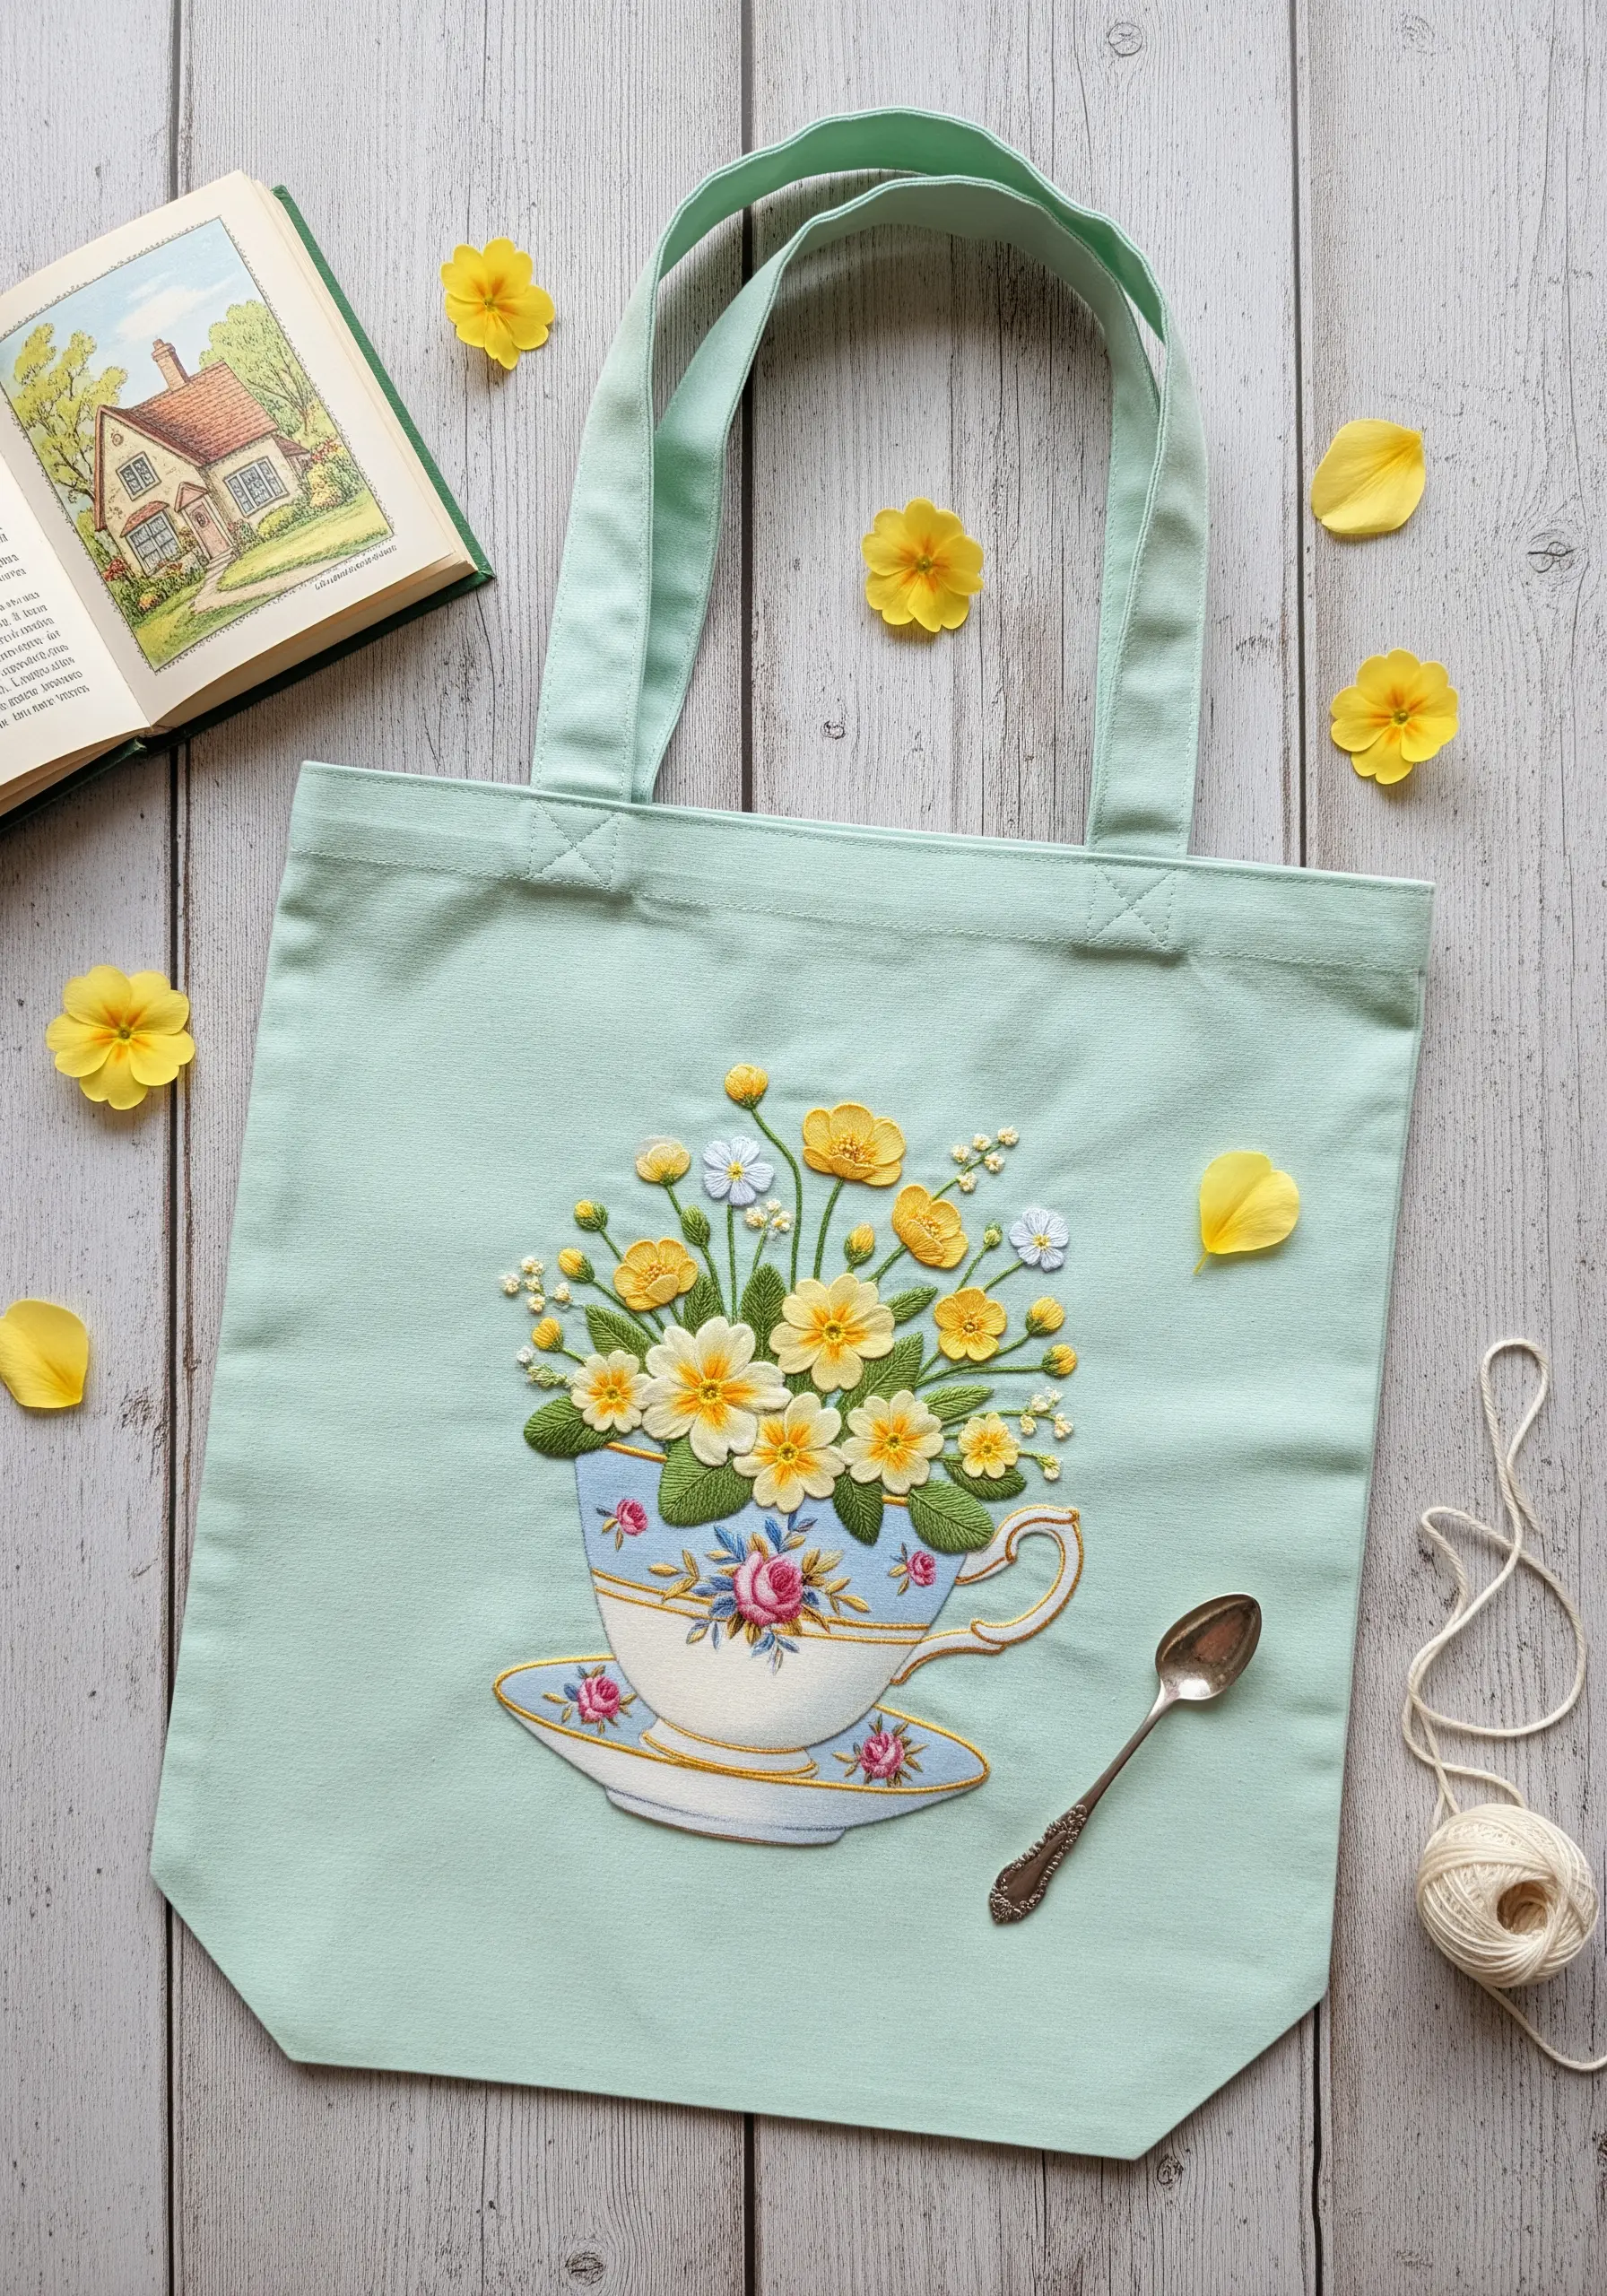
Combine embroidery with appliqué for a charming, multi-media effect. Cut the teacup shape from a piece of patterned cotton fabric.
Tuck the raw edges under and secure the teacup to the tote using a neat blanket stitch or a simple running stitch around the perimeter. This gives it a clean, finished edge.
Embroider the flowers so they appear to be bursting from the cup. Overlap some of the stems and leaves onto the appliqué fabric to create a seamless connection between the two elements.
Add delicate details like the gold rim of the teacup using a metallic thread and a simple backstitch. It’s a small touch that adds a significant amount of polish.


