

An embroidered patch is more than just a decoration; it’s a small canvas that tells a story on a backpack, a journal, or the sleeve of a favorite jacket. But if you’ve ever felt your patches lacked a certain polish, you’re not alone. The key isn’t just in the stitching, but in the thoughtful choices you make before the first thread is pulled.
This collection is designed to help you move beyond simple motifs and into creating patches with intention and artistry. We’ll explore how to balance texture, blend colors for realism, and choose the right stitch to give a flower petal its delicate curve or a leaf its subtle shadow. These aren’t just patterns; they are techniques to elevate your craft.
Forget the pressure to be perfect. Instead, focus on the details that bring your work to life. Whether you’re stitching a single daisy or a whole wildflower meadow, you have the power to turn a simple piece of fabric into a personal, meaningful work of art. Let’s begin.
1. Mastering the Delicate Forget-Me-Not Cluster

For truly delicate florals, use a single strand of floss for the tiny yellow French knot centers; this prevents them from overpowering the petals.
Create petal dimension by using two shades of a similar blue, placing the lighter tone where the light would naturally hit.
Instead of a heavy satin stitch border, a simple, clean running stitch around the patch edge maintains the design’s lightness and elegance.
When applying to a journal, use a fabric glue with a fine-tip applicator to avoid bleed-through on the cover material.
2. Creating Bold, Graphic Mushroom Patches
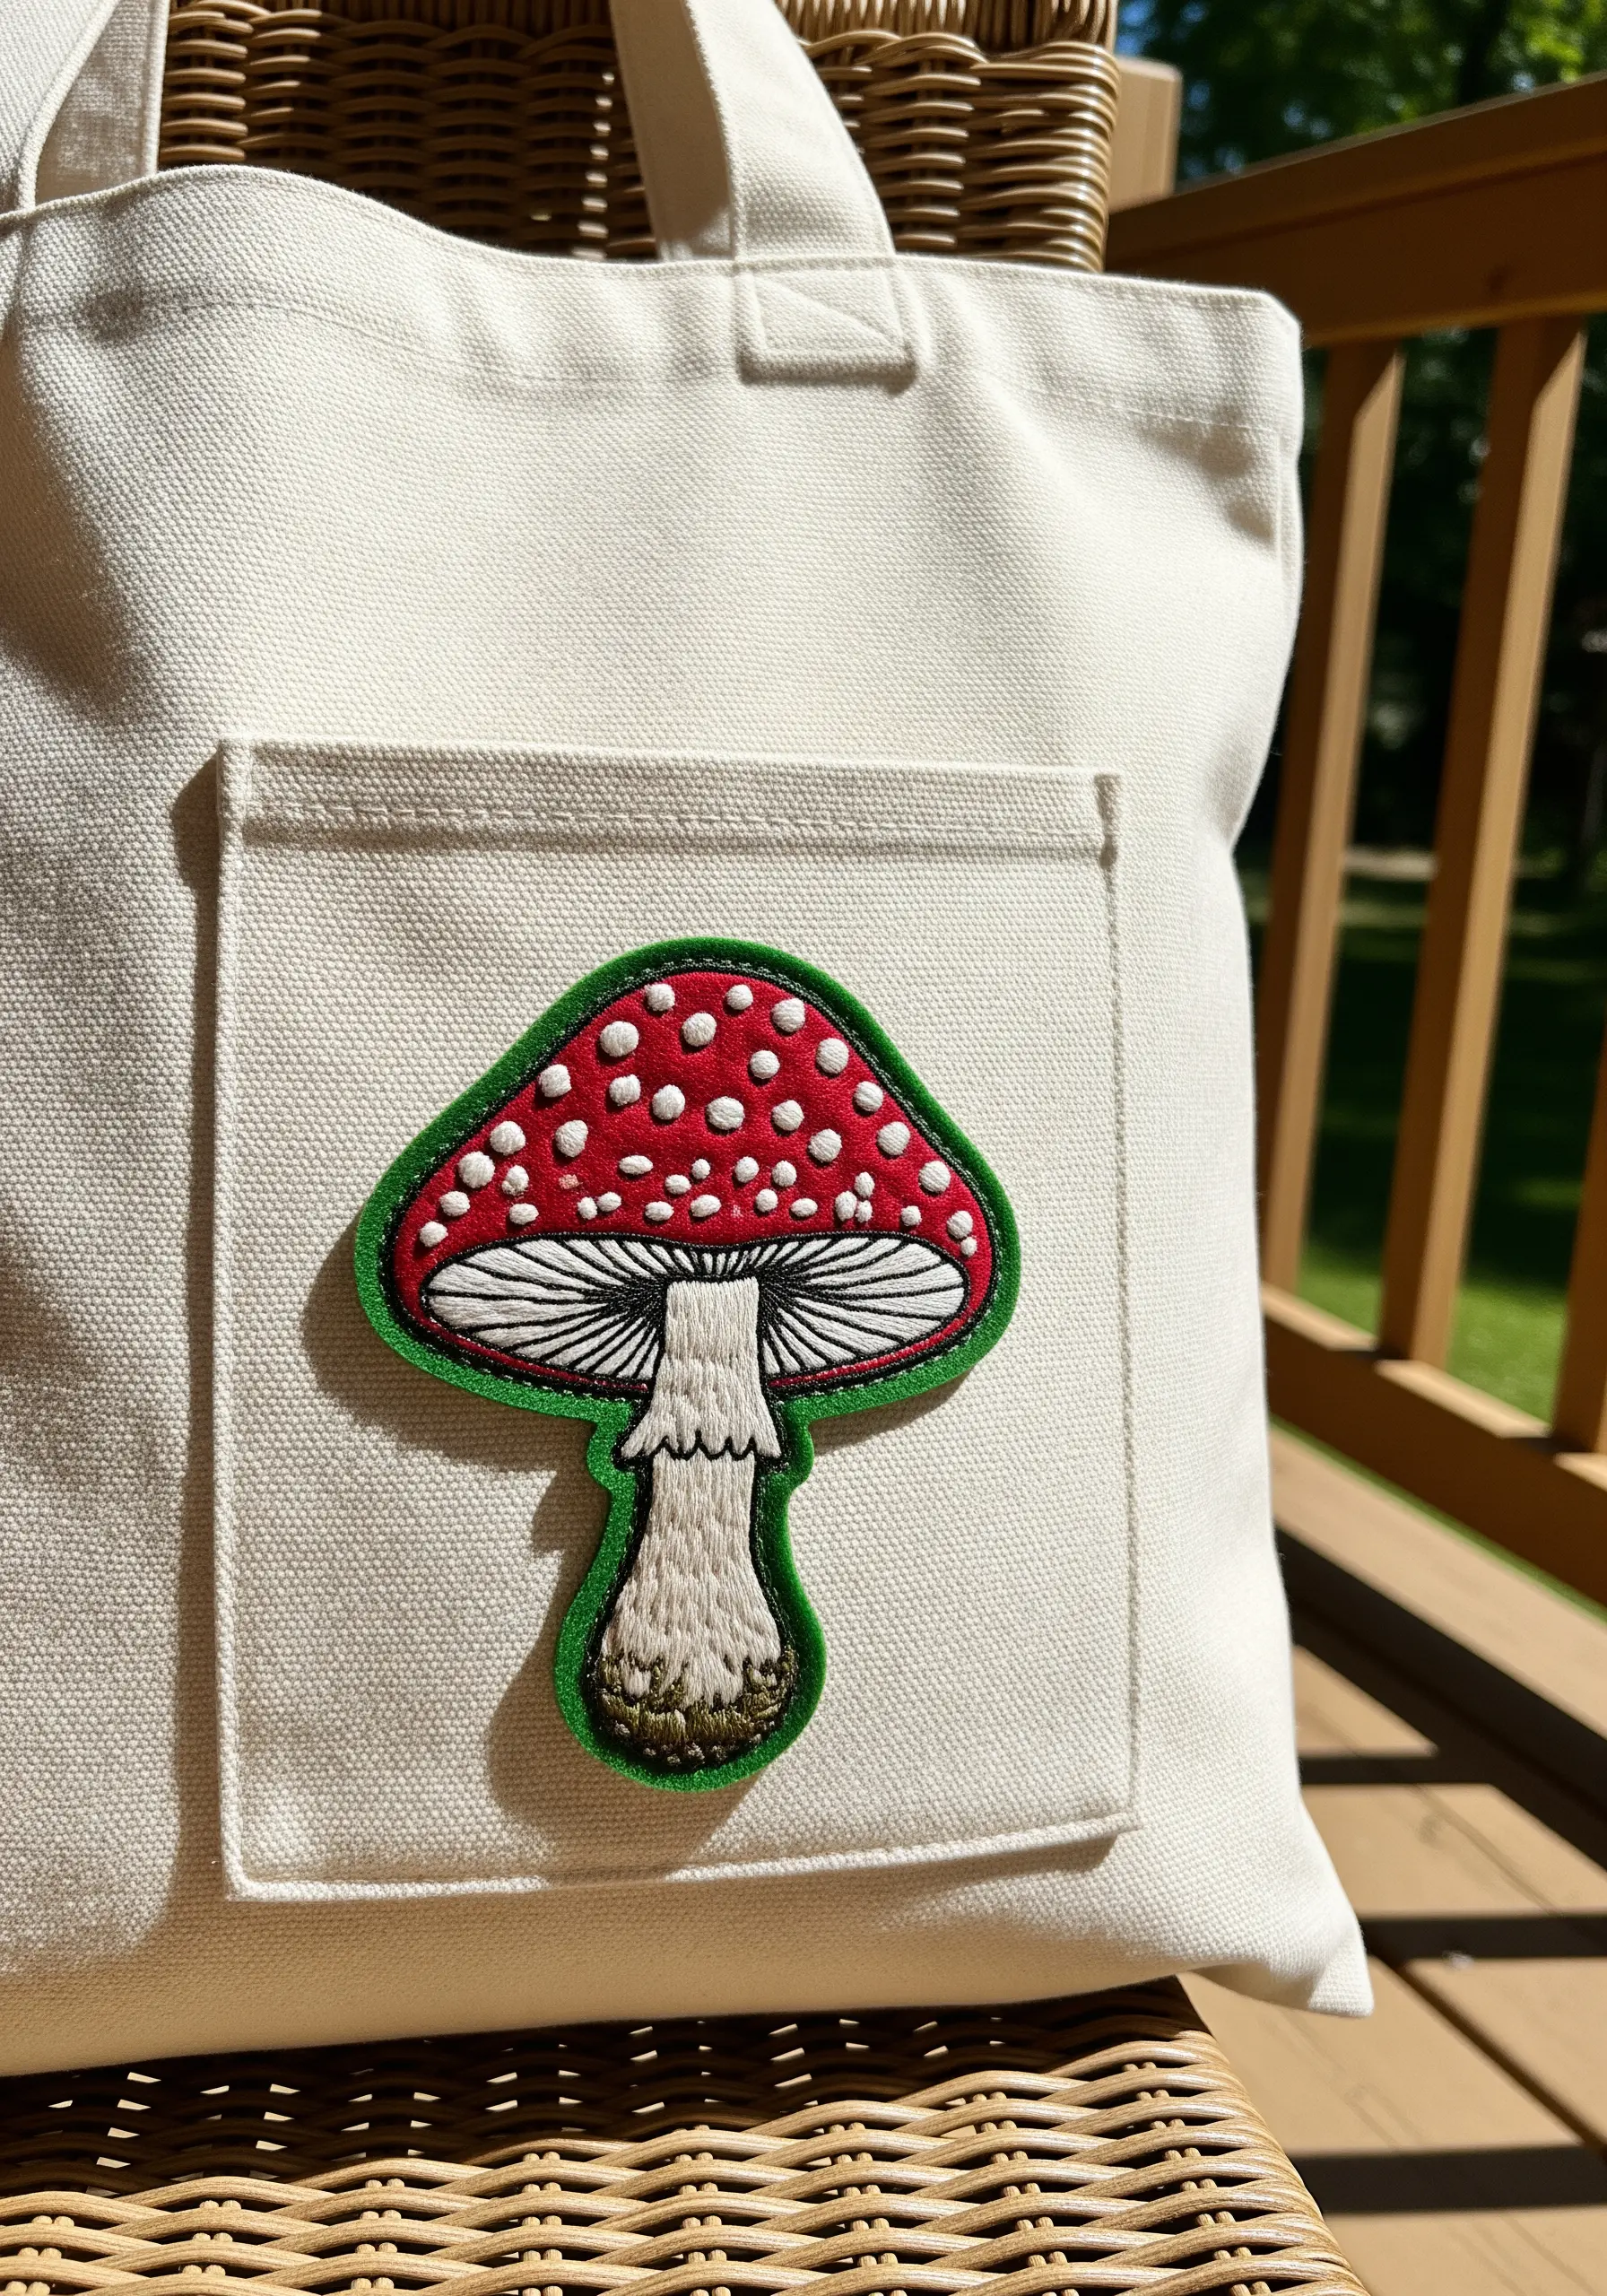
To achieve a perfectly smooth satin stitch fill on the mushroom cap, first lay down a foundation of split stitches.
This underlayer stabilizes the fabric and prevents gaps, ensuring a professional, dense finish.
For the white spots, use French knots with three strands of floss to give them a raised, three-dimensional texture that contrasts with the flat cap.
Define the patch with a thick, raised satin stitch border using at least four strands; this creates a crisp edge that makes the design pop on any fabric.
3. Designing a Cohesive Wildflower Meadow Patch
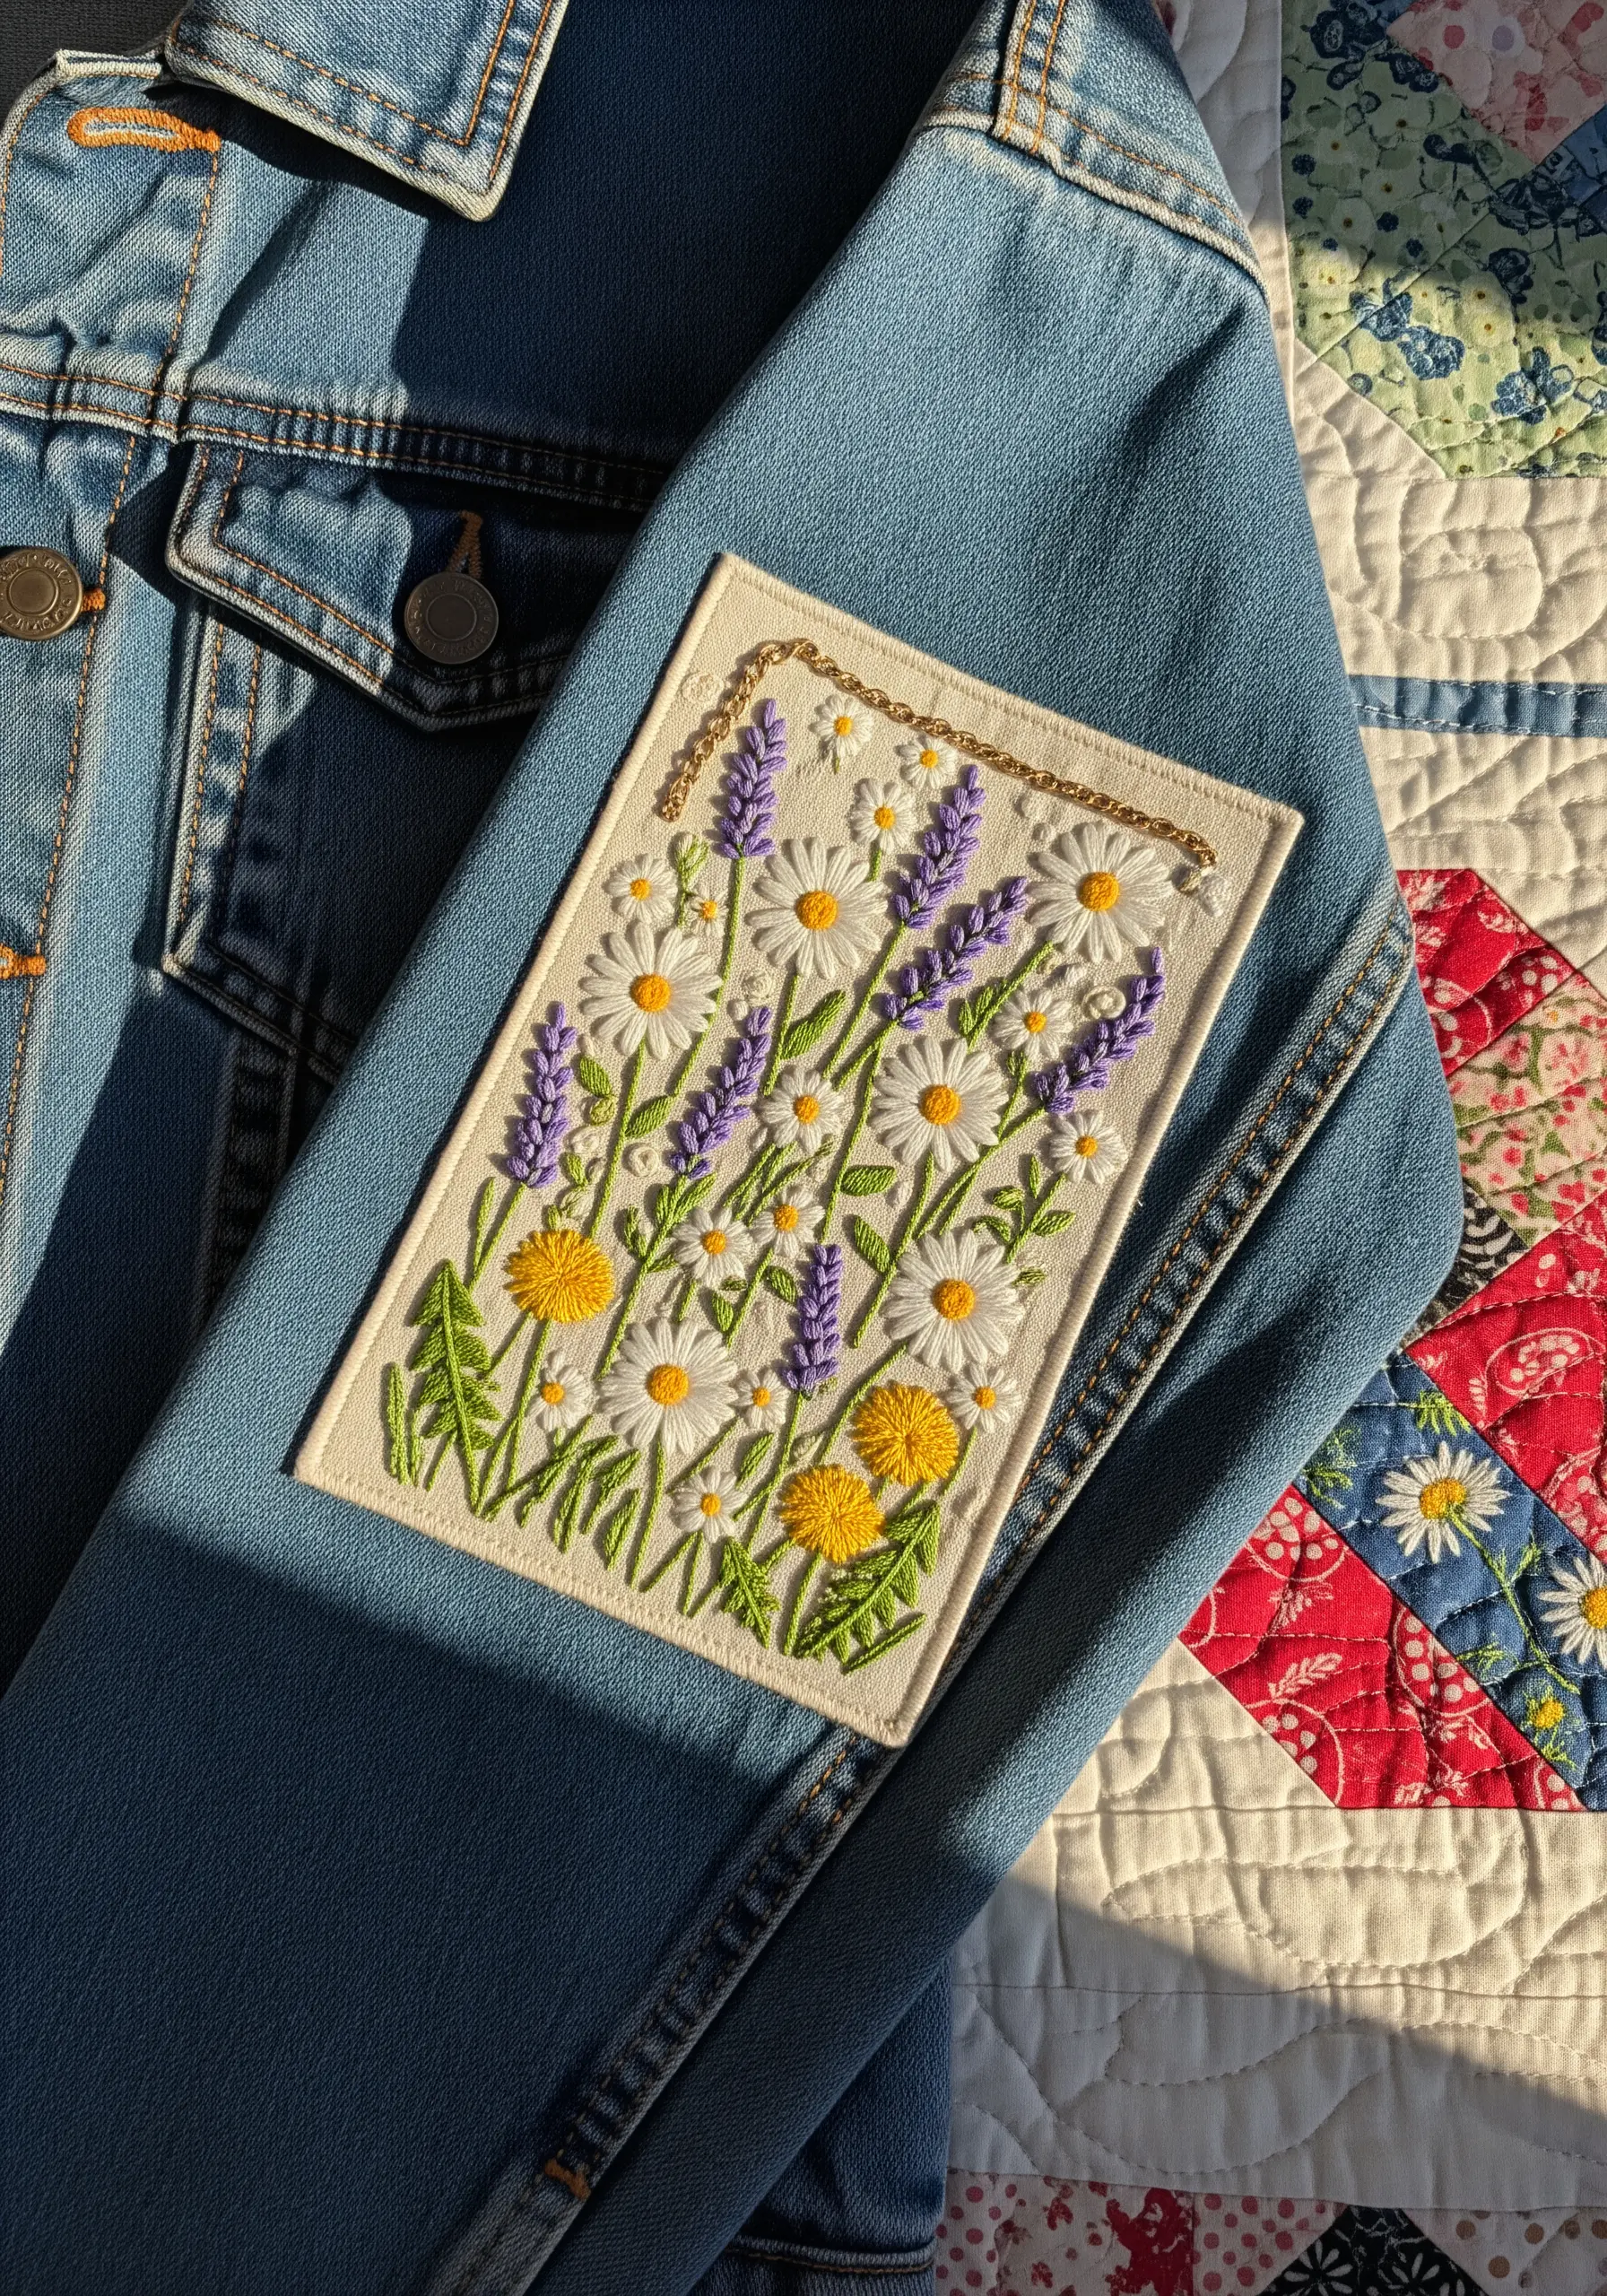
Create textural contrast by pairing smooth satin-stitched daisies with dense, bumpy French knot lavender.
This combination makes each flower type distinct and adds visual depth to your meadow composition.
For the dandelion heads, use a slightly looser satin stitch to suggest a fluffy, airy texture before it goes to seed.
The delicate gold chain stitch border adds a touch of elegance, framing the scene without competing with the intricate floral work inside.
4. Achieving Depth with Directional Satin Stitch
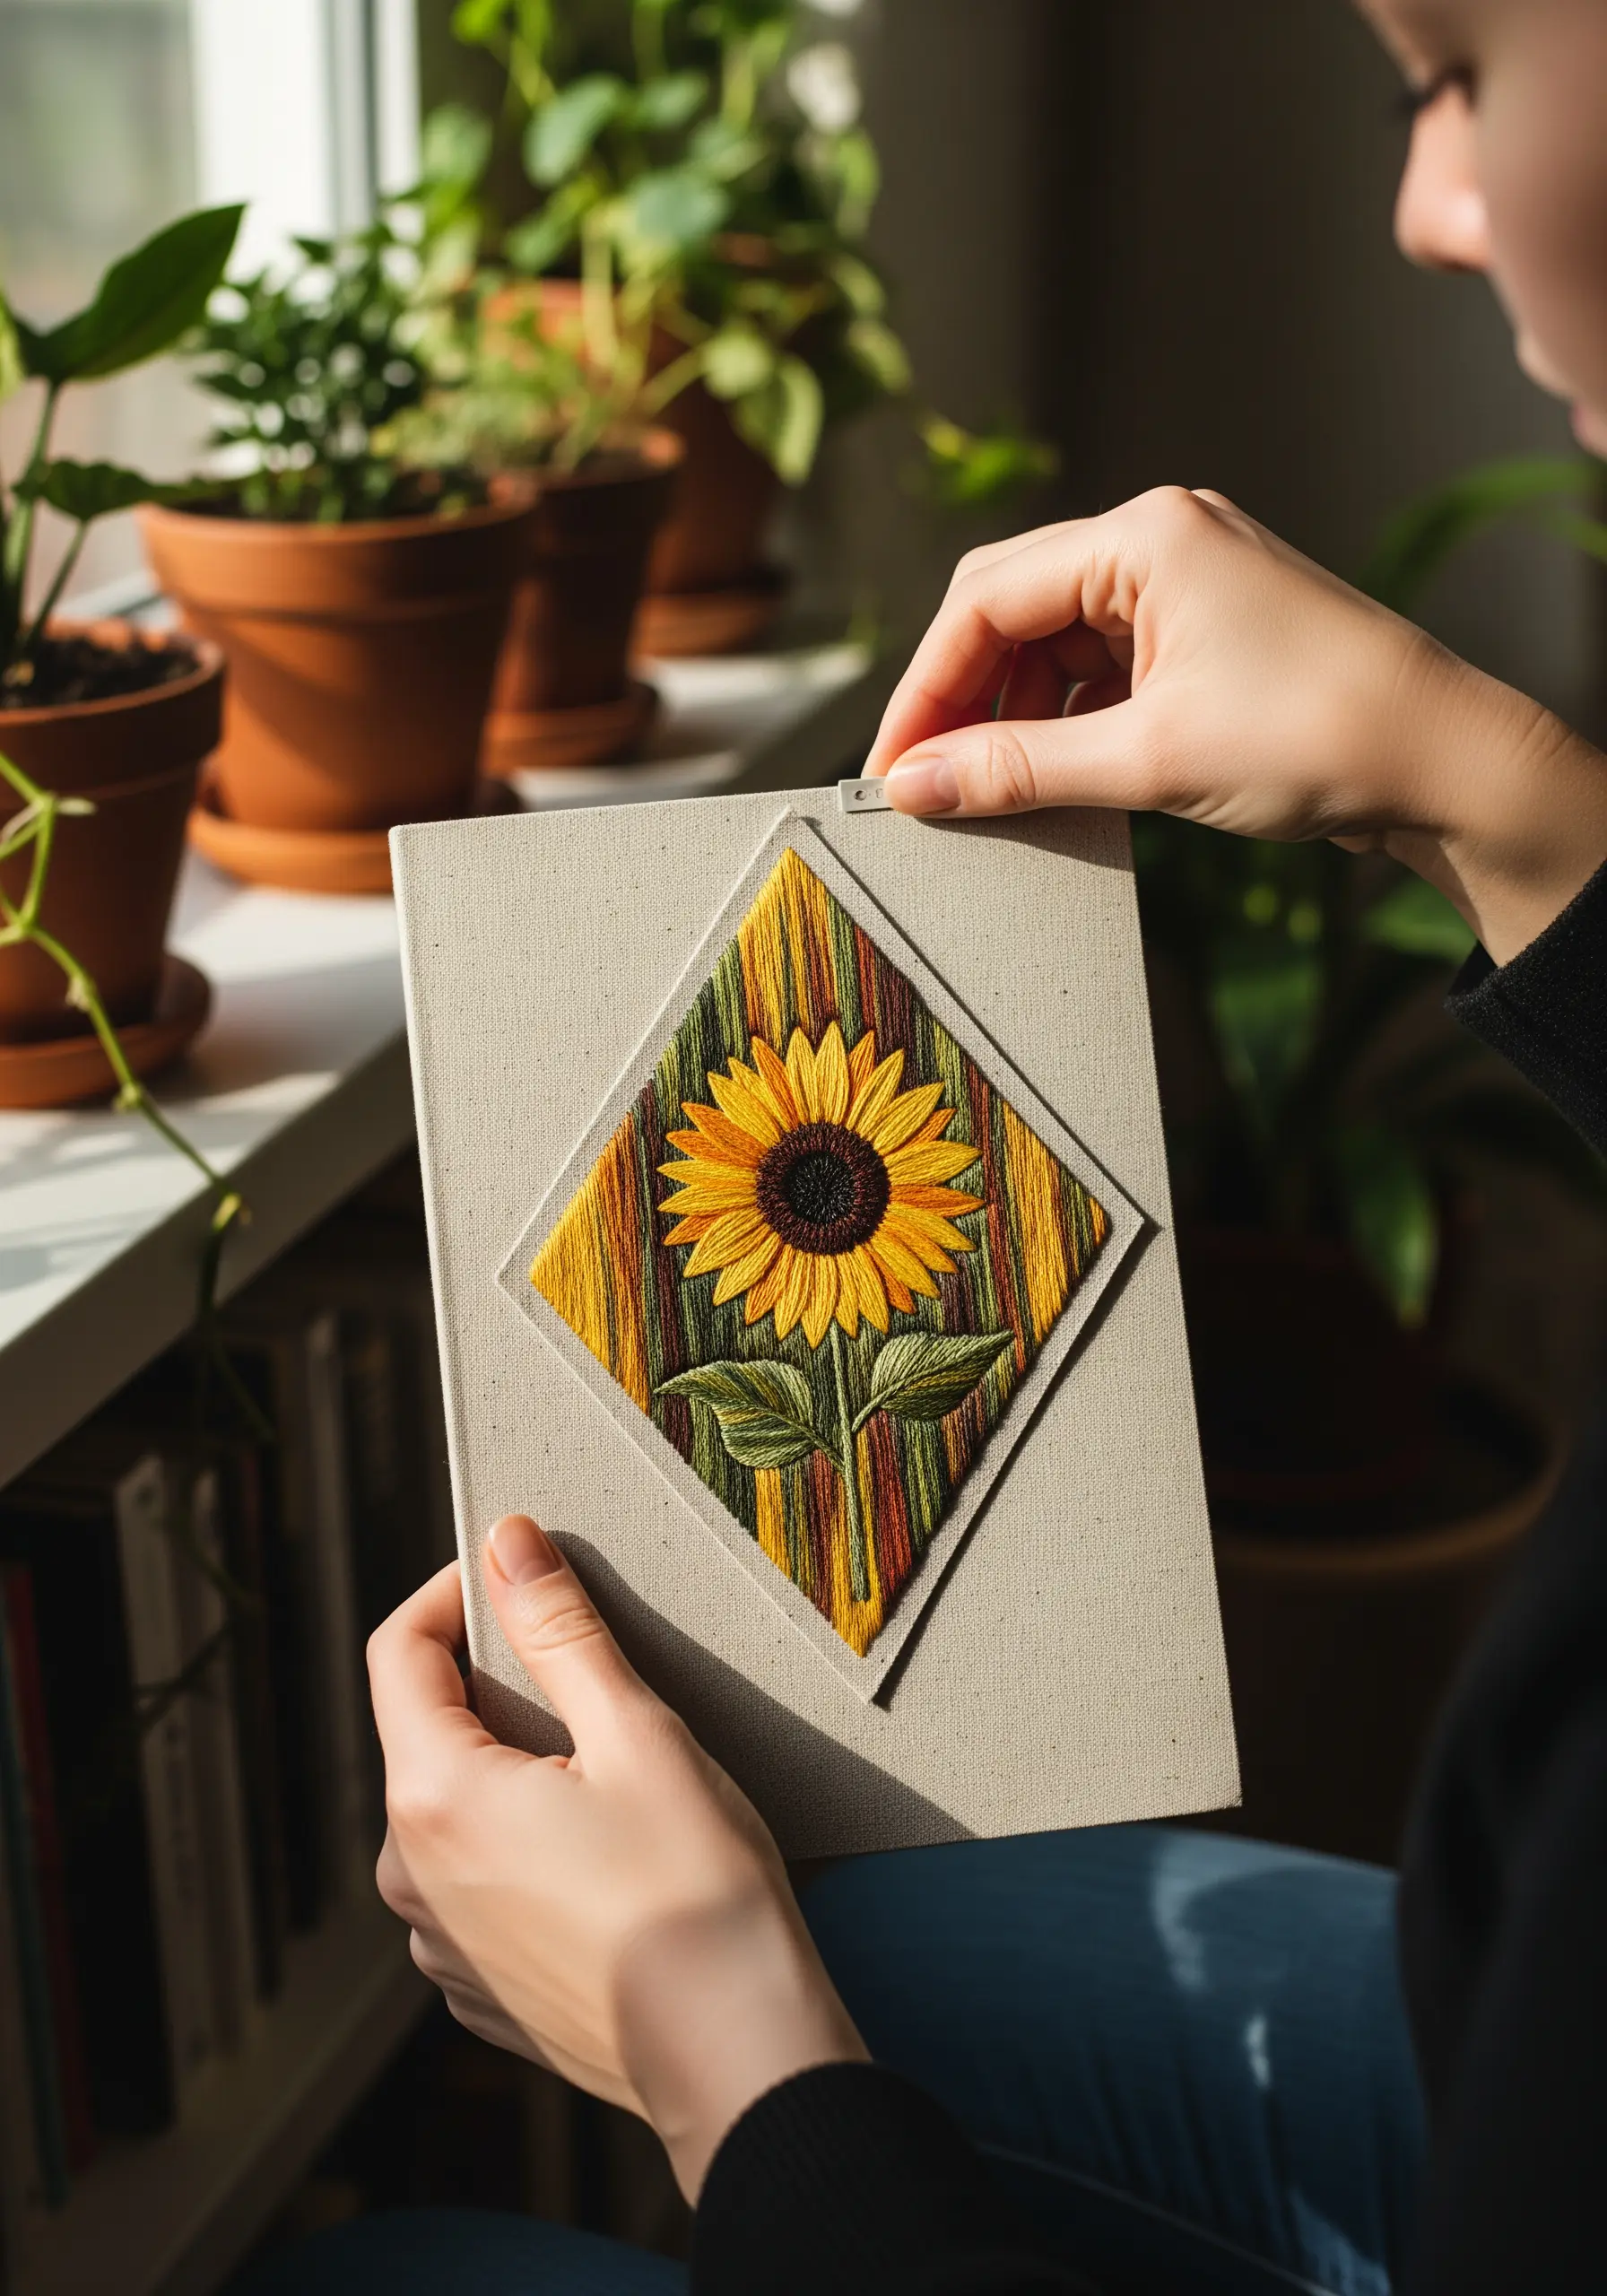
For a sunflower, the direction of your satin stitch is everything; angle the stitches outward from the center to mimic the natural growth of the petals.
Use at least three shades of yellow and gold, blending them with a long-and-short stitch technique to create a realistic, sun-kissed gradient.
The variegated thread in the background adds movement and frames the central flower without requiring complex stitching.
This technique of a ‘window’ cut-out in the fabric elevates the patch into a piece of framed art, perfect for a book cover or a wall hanging.
5. Stitching a Cohesive Set of Nature Patches
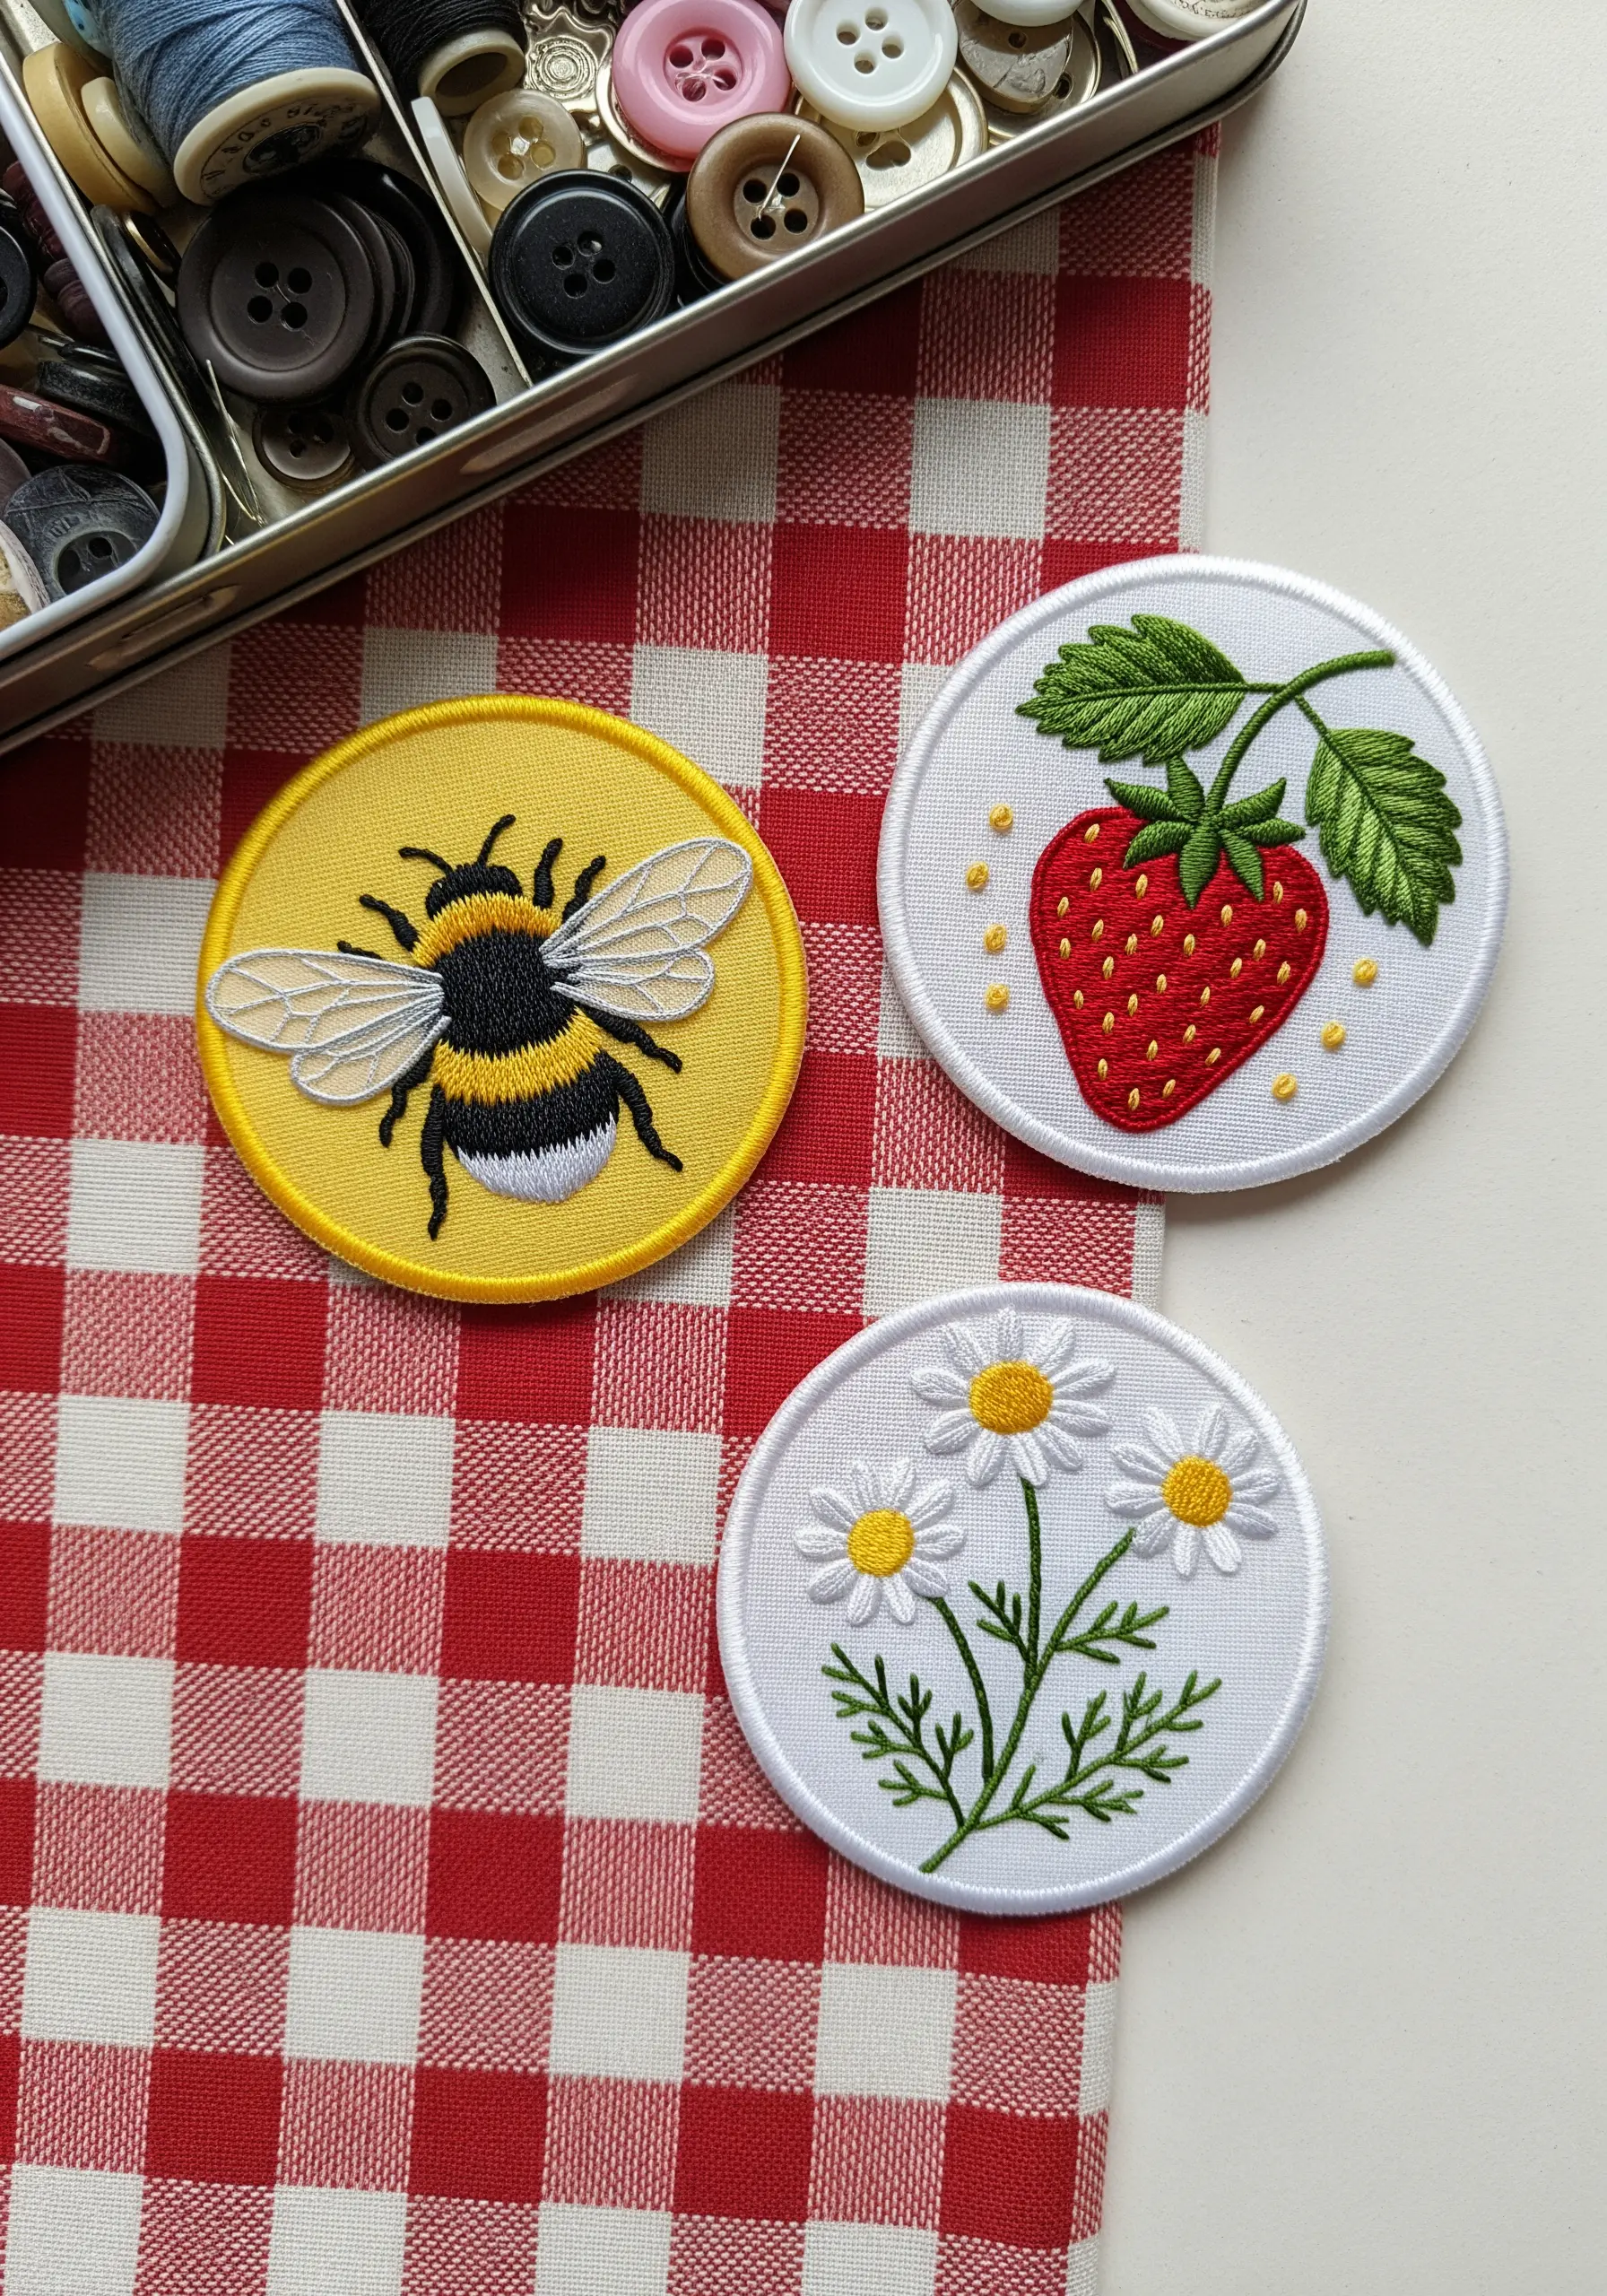
When creating a set, maintain a consistent style by using the same outlining technique for each patch, such as a crisp split stitch.
For the bumblebee’s wings, use a single strand of light grey or off-white thread in an open fishbone stitch to create a sheer, delicate effect.
Make the strawberry seeds pop by stitching tiny yellow seed stitches over the red satin stitch base, adding both color and texture.
These tiny embroidery patterns are perfect for using up scrap fabric and threads, turning them into charming, coordinated embellishments.
6. Building Lilac Texture with French Knots

Capture the full, clustered look of lilacs by layering French knots in three or four shades of purple and lavender.
Vary the number of wraps for each knot—one wrap for smaller buds at the tip, two for fuller blossoms at the base—to create natural shape and depth.
Place a few white or pale pink knots strategically to act as highlights, making the entire cluster feel more vibrant and realistic.
This technique is perfect for adding aesthetic embroidery ideas to backpacks or pouches that need a pop of color and texture.
7. Composing a Delicate Teacup Bouquet
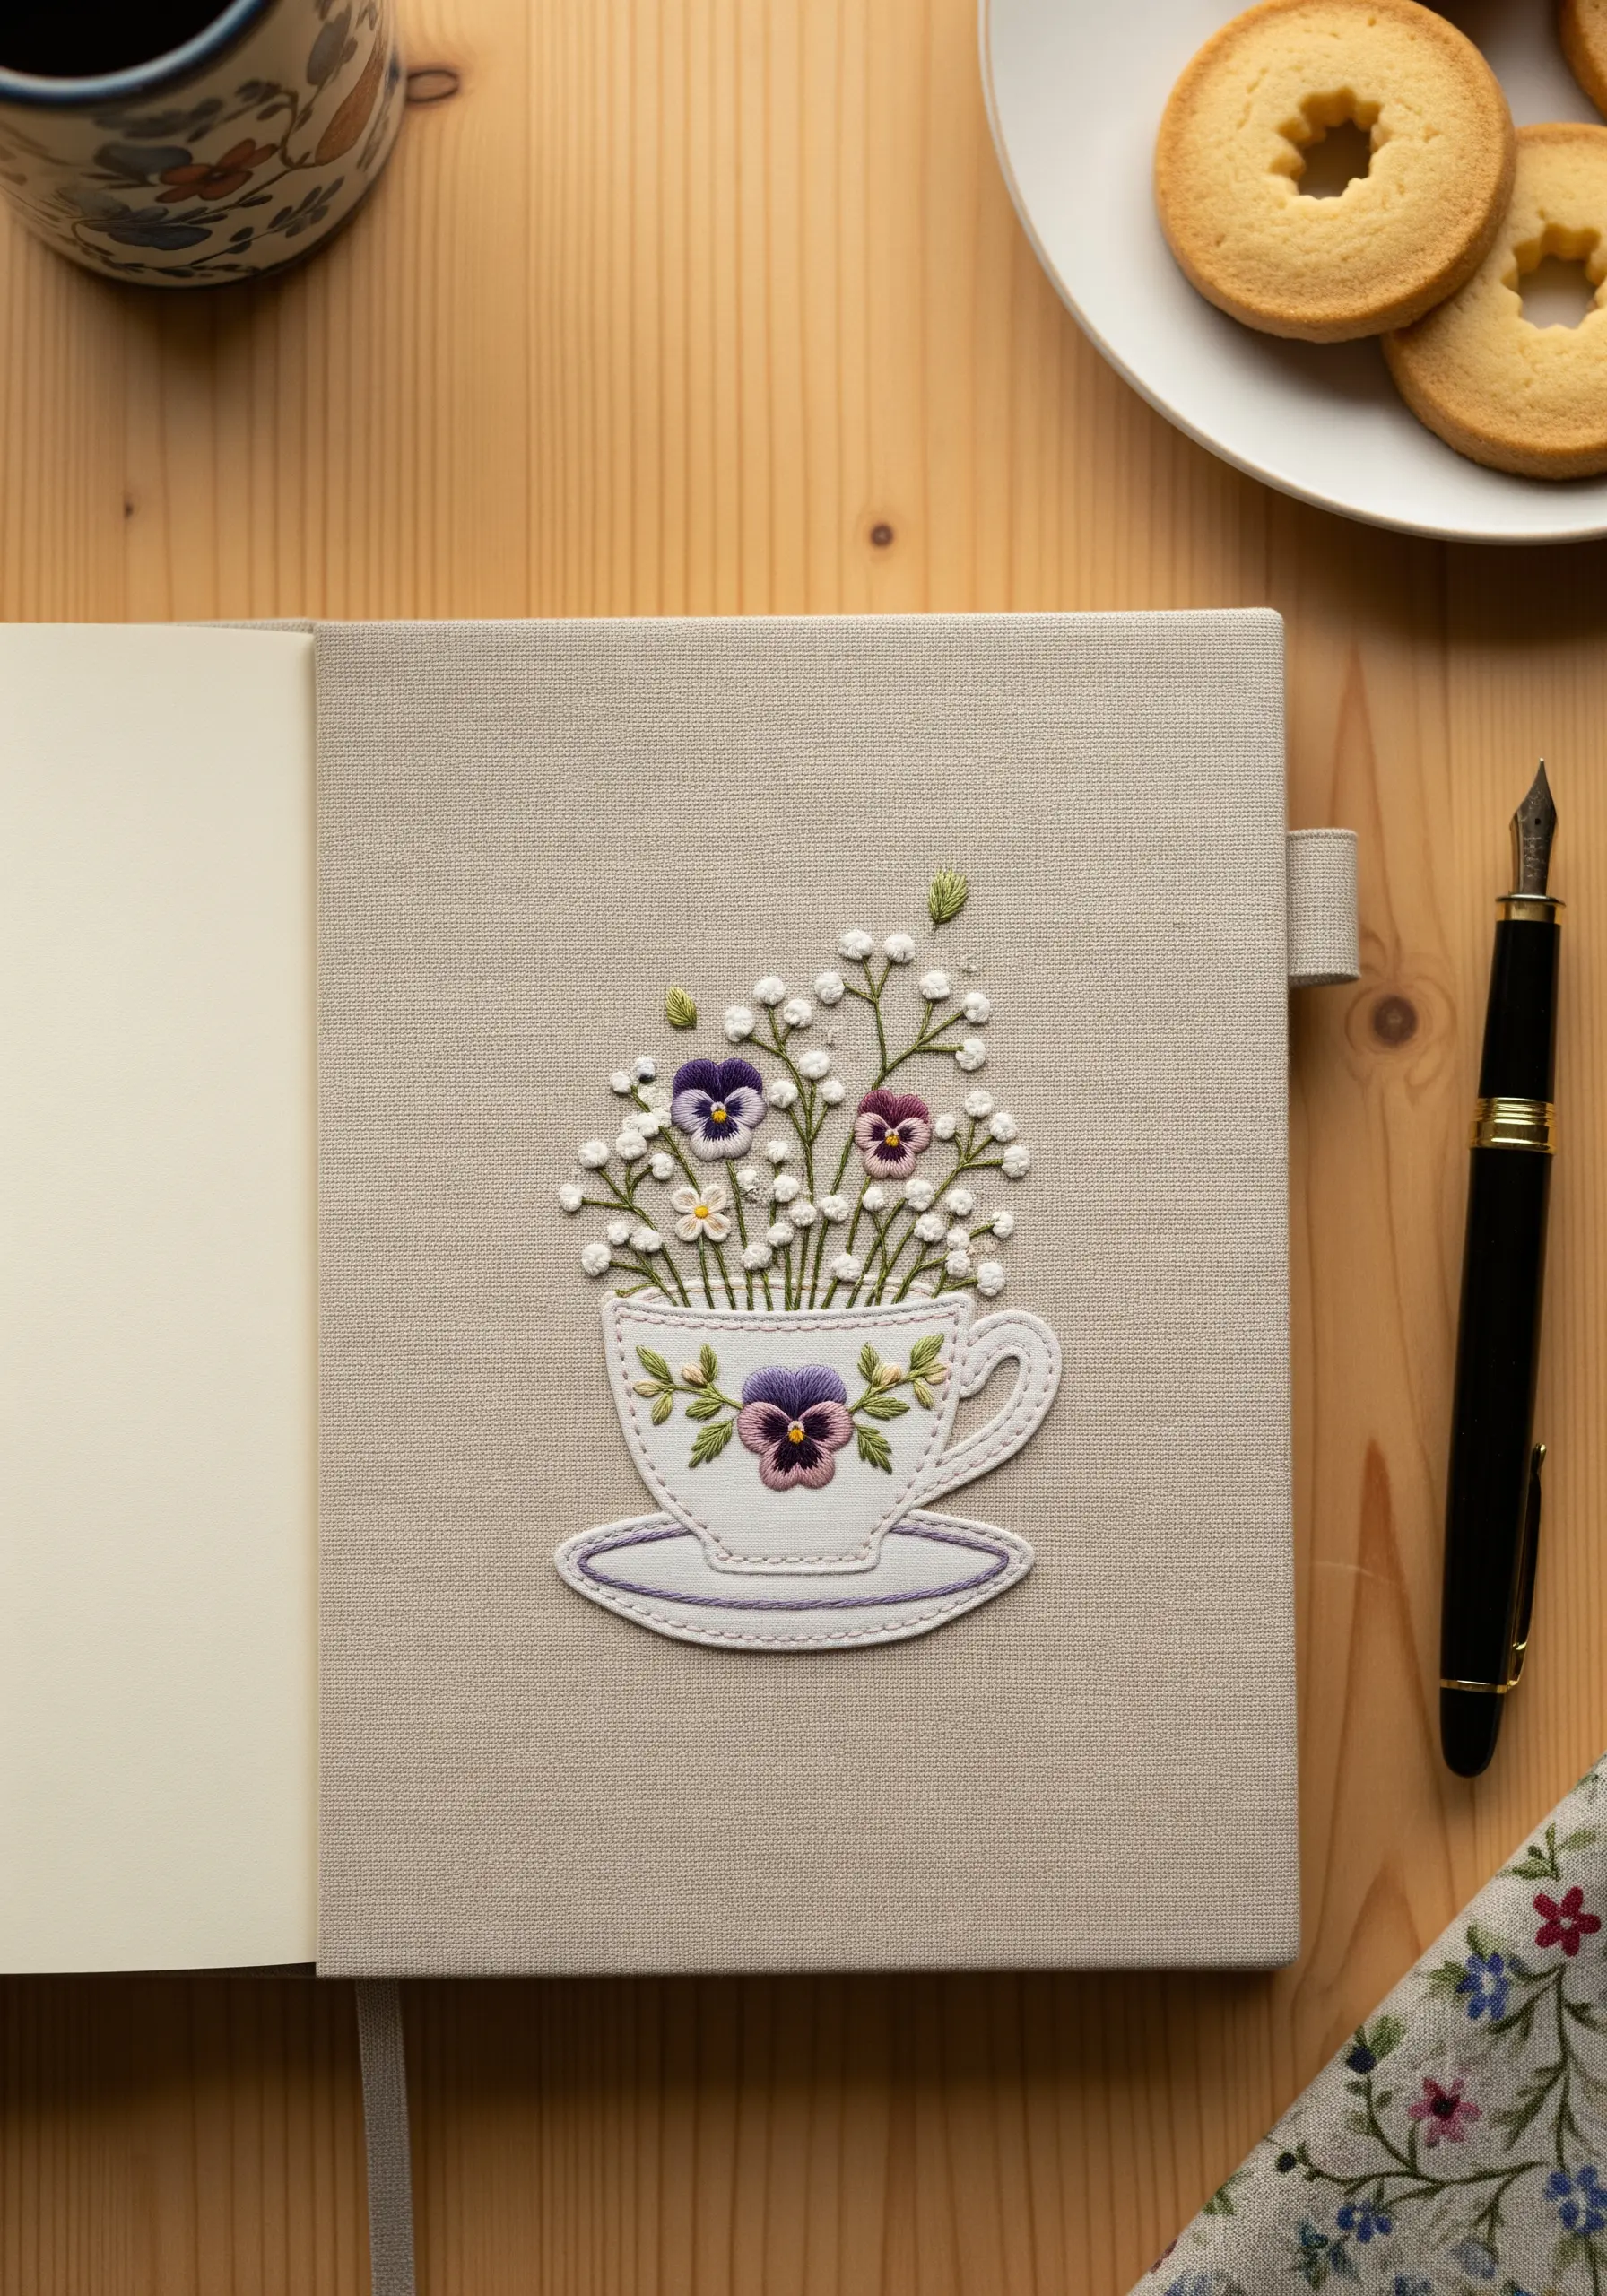
To keep this design from feeling cluttered, focus the detailed stitching on the pansies and use simple French knots for the baby’s breath.
This contrast in detail draws the eye to the main flowers.
Create the illusion of delicate porcelain by outlining the teacup with a fine, single-strand split stitch in a slightly darker shade than the fill.
Let the baby’s breath overflow the edges of the cup; this small detail adds movement and a touch of organic whimsy to the structured shape.
8. Capturing Motion in a Dandelion Seed Head
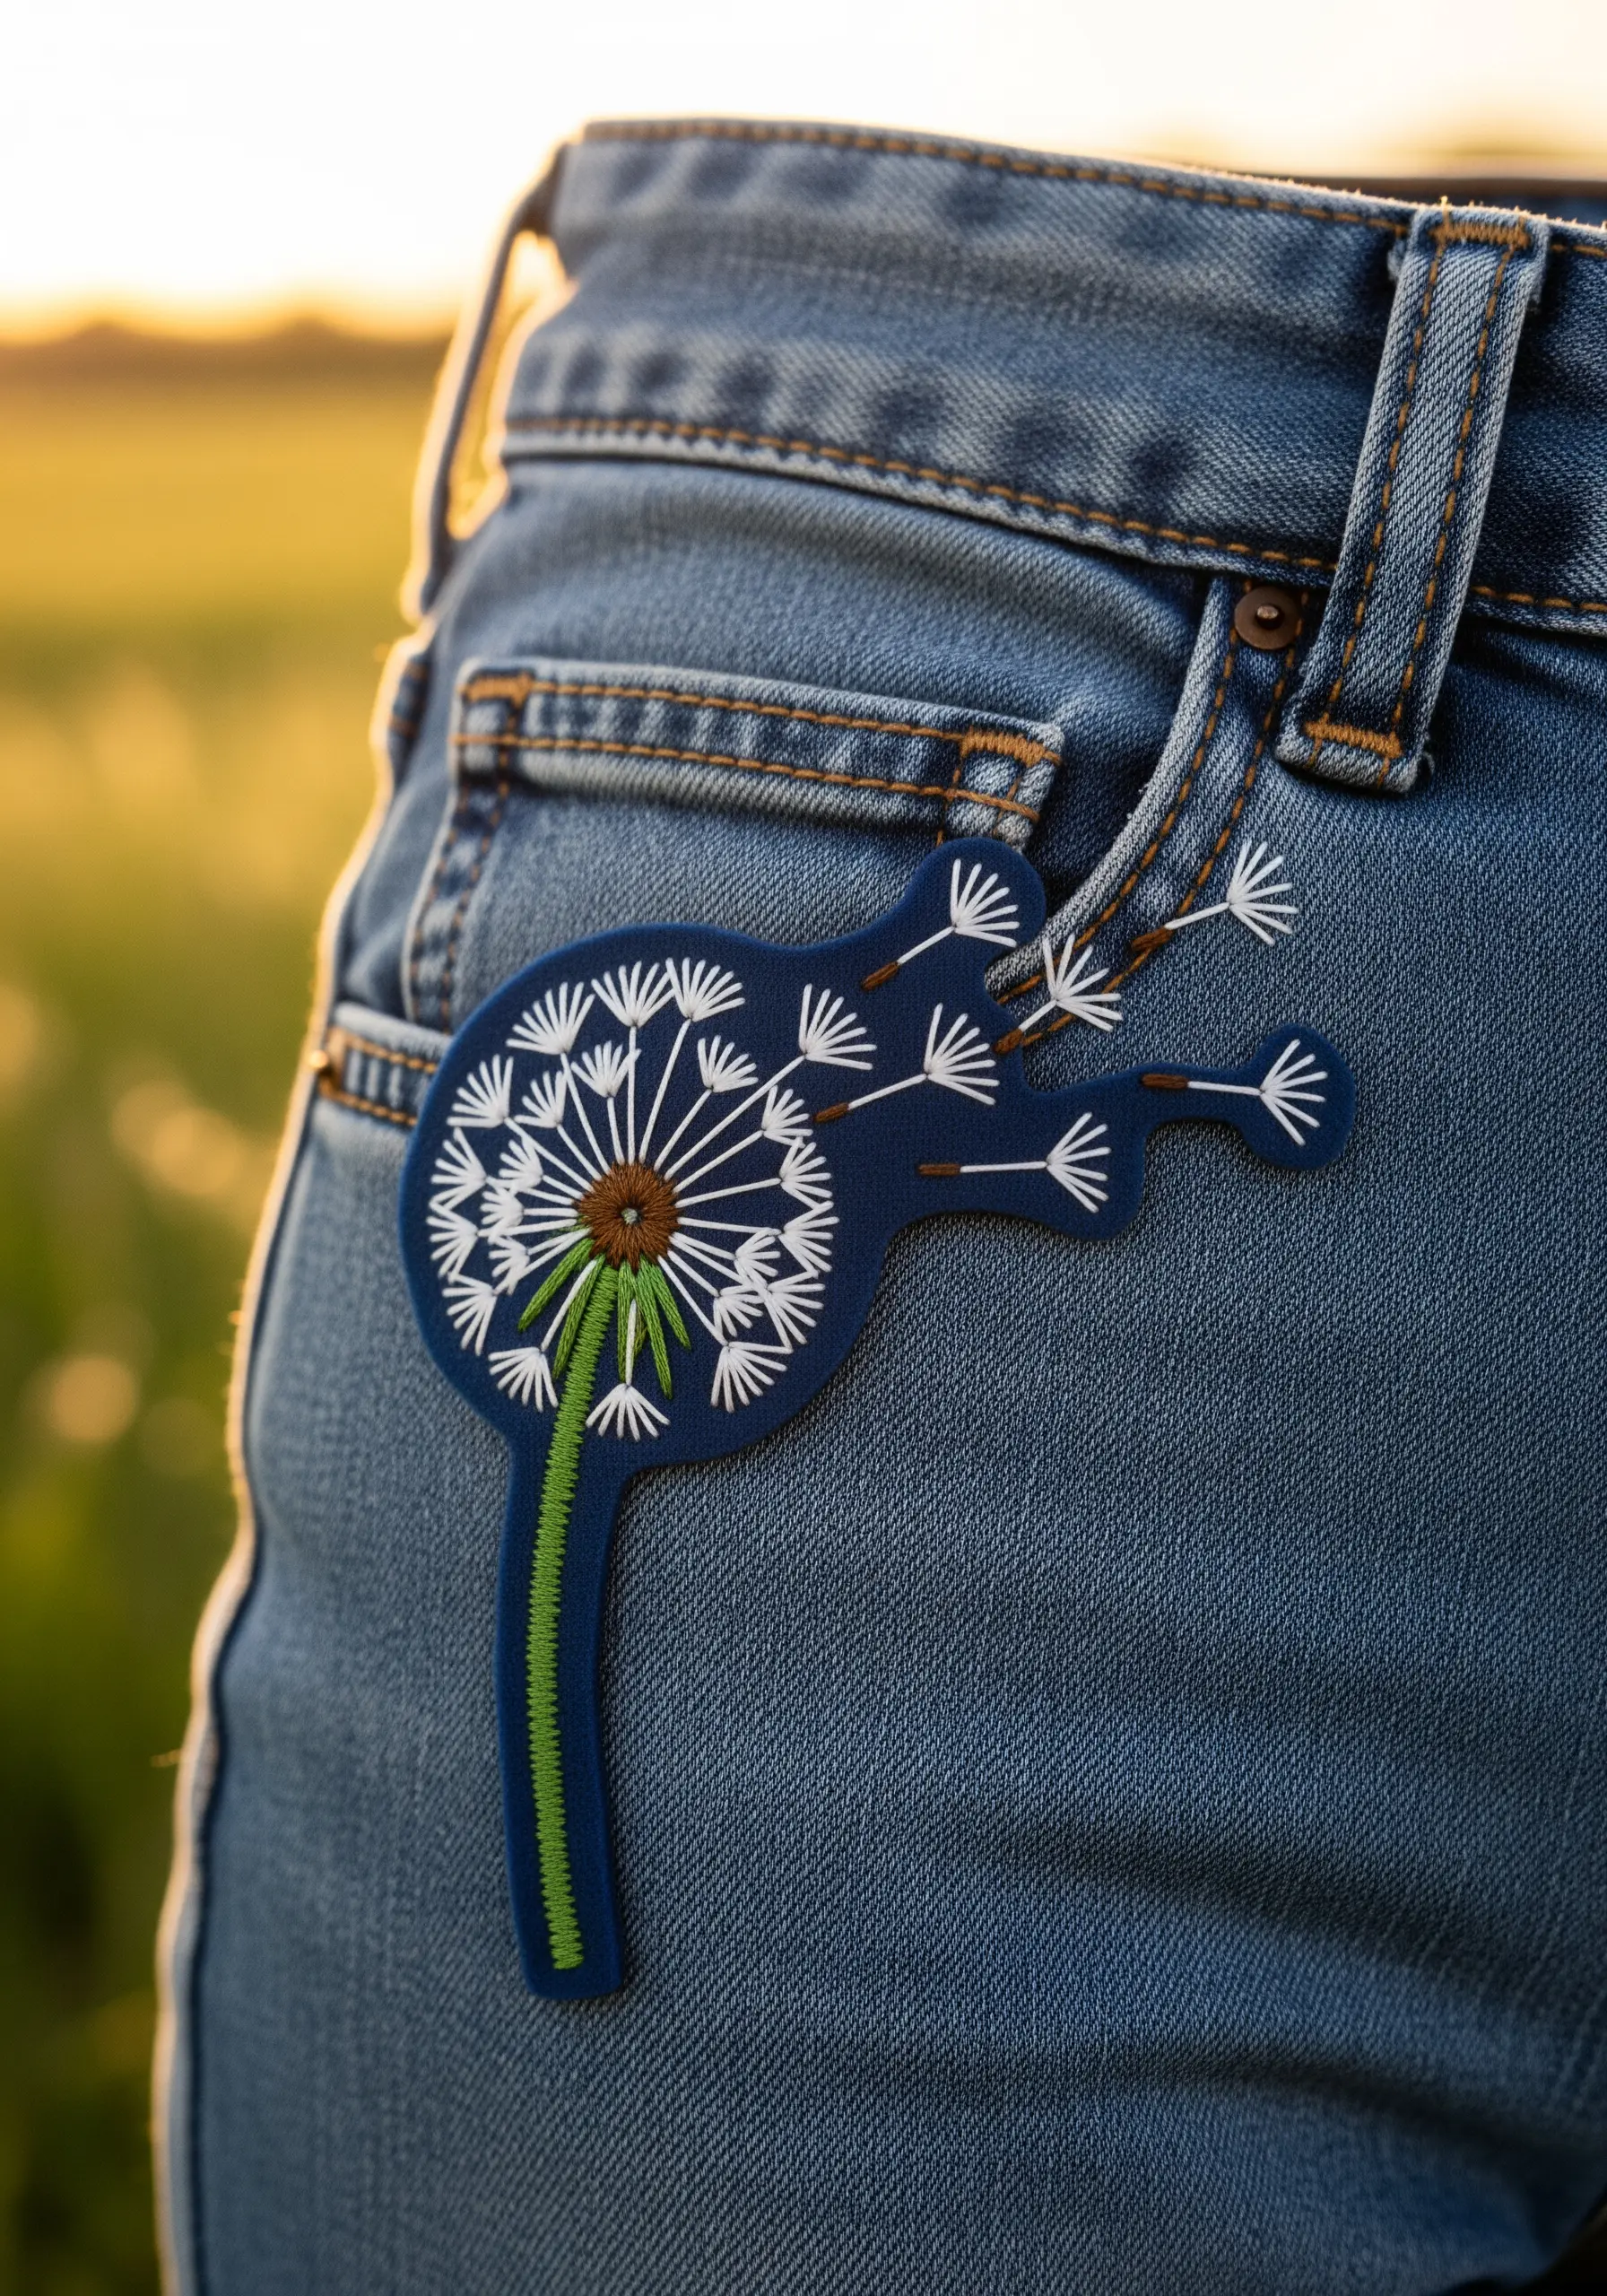
Create the delicate ‘parachutes’ of dandelion seeds with a combination of straight stitches and a single, detached chain stitch at the end.
Stitch the seeds flying away from the main head at varying angles and lengths to create a convincing sense of movement and wind.
For the seed head, use a rich brown satin stitch with a slight spiral direction to suggest density and a central point of growth.
The unconventional shape of this patch, following the motif’s outline, makes it a dynamic and eye-catching addition to denim.
9. Creating Realistic Ivy with Shading and Overlap

To make ivy leaves look realistic, use a fishbone stitch and vary the angle of your stitches for each leaf to mimic natural, chaotic growth.
Layer the leaves by stitching the ones in the ‘back’ first, then embroidering the foreground leaves partially over them. This simple trick creates instant depth.
Use at least three shades of green floss—a dark, a medium, and a light—and blend them to give the leaves dimension and highlight.
These hand-embroidery leaf patterns work beautifully as a border on a journal or as a panel on a tote bag.
10. Balancing Motifs in a Shaped Patch
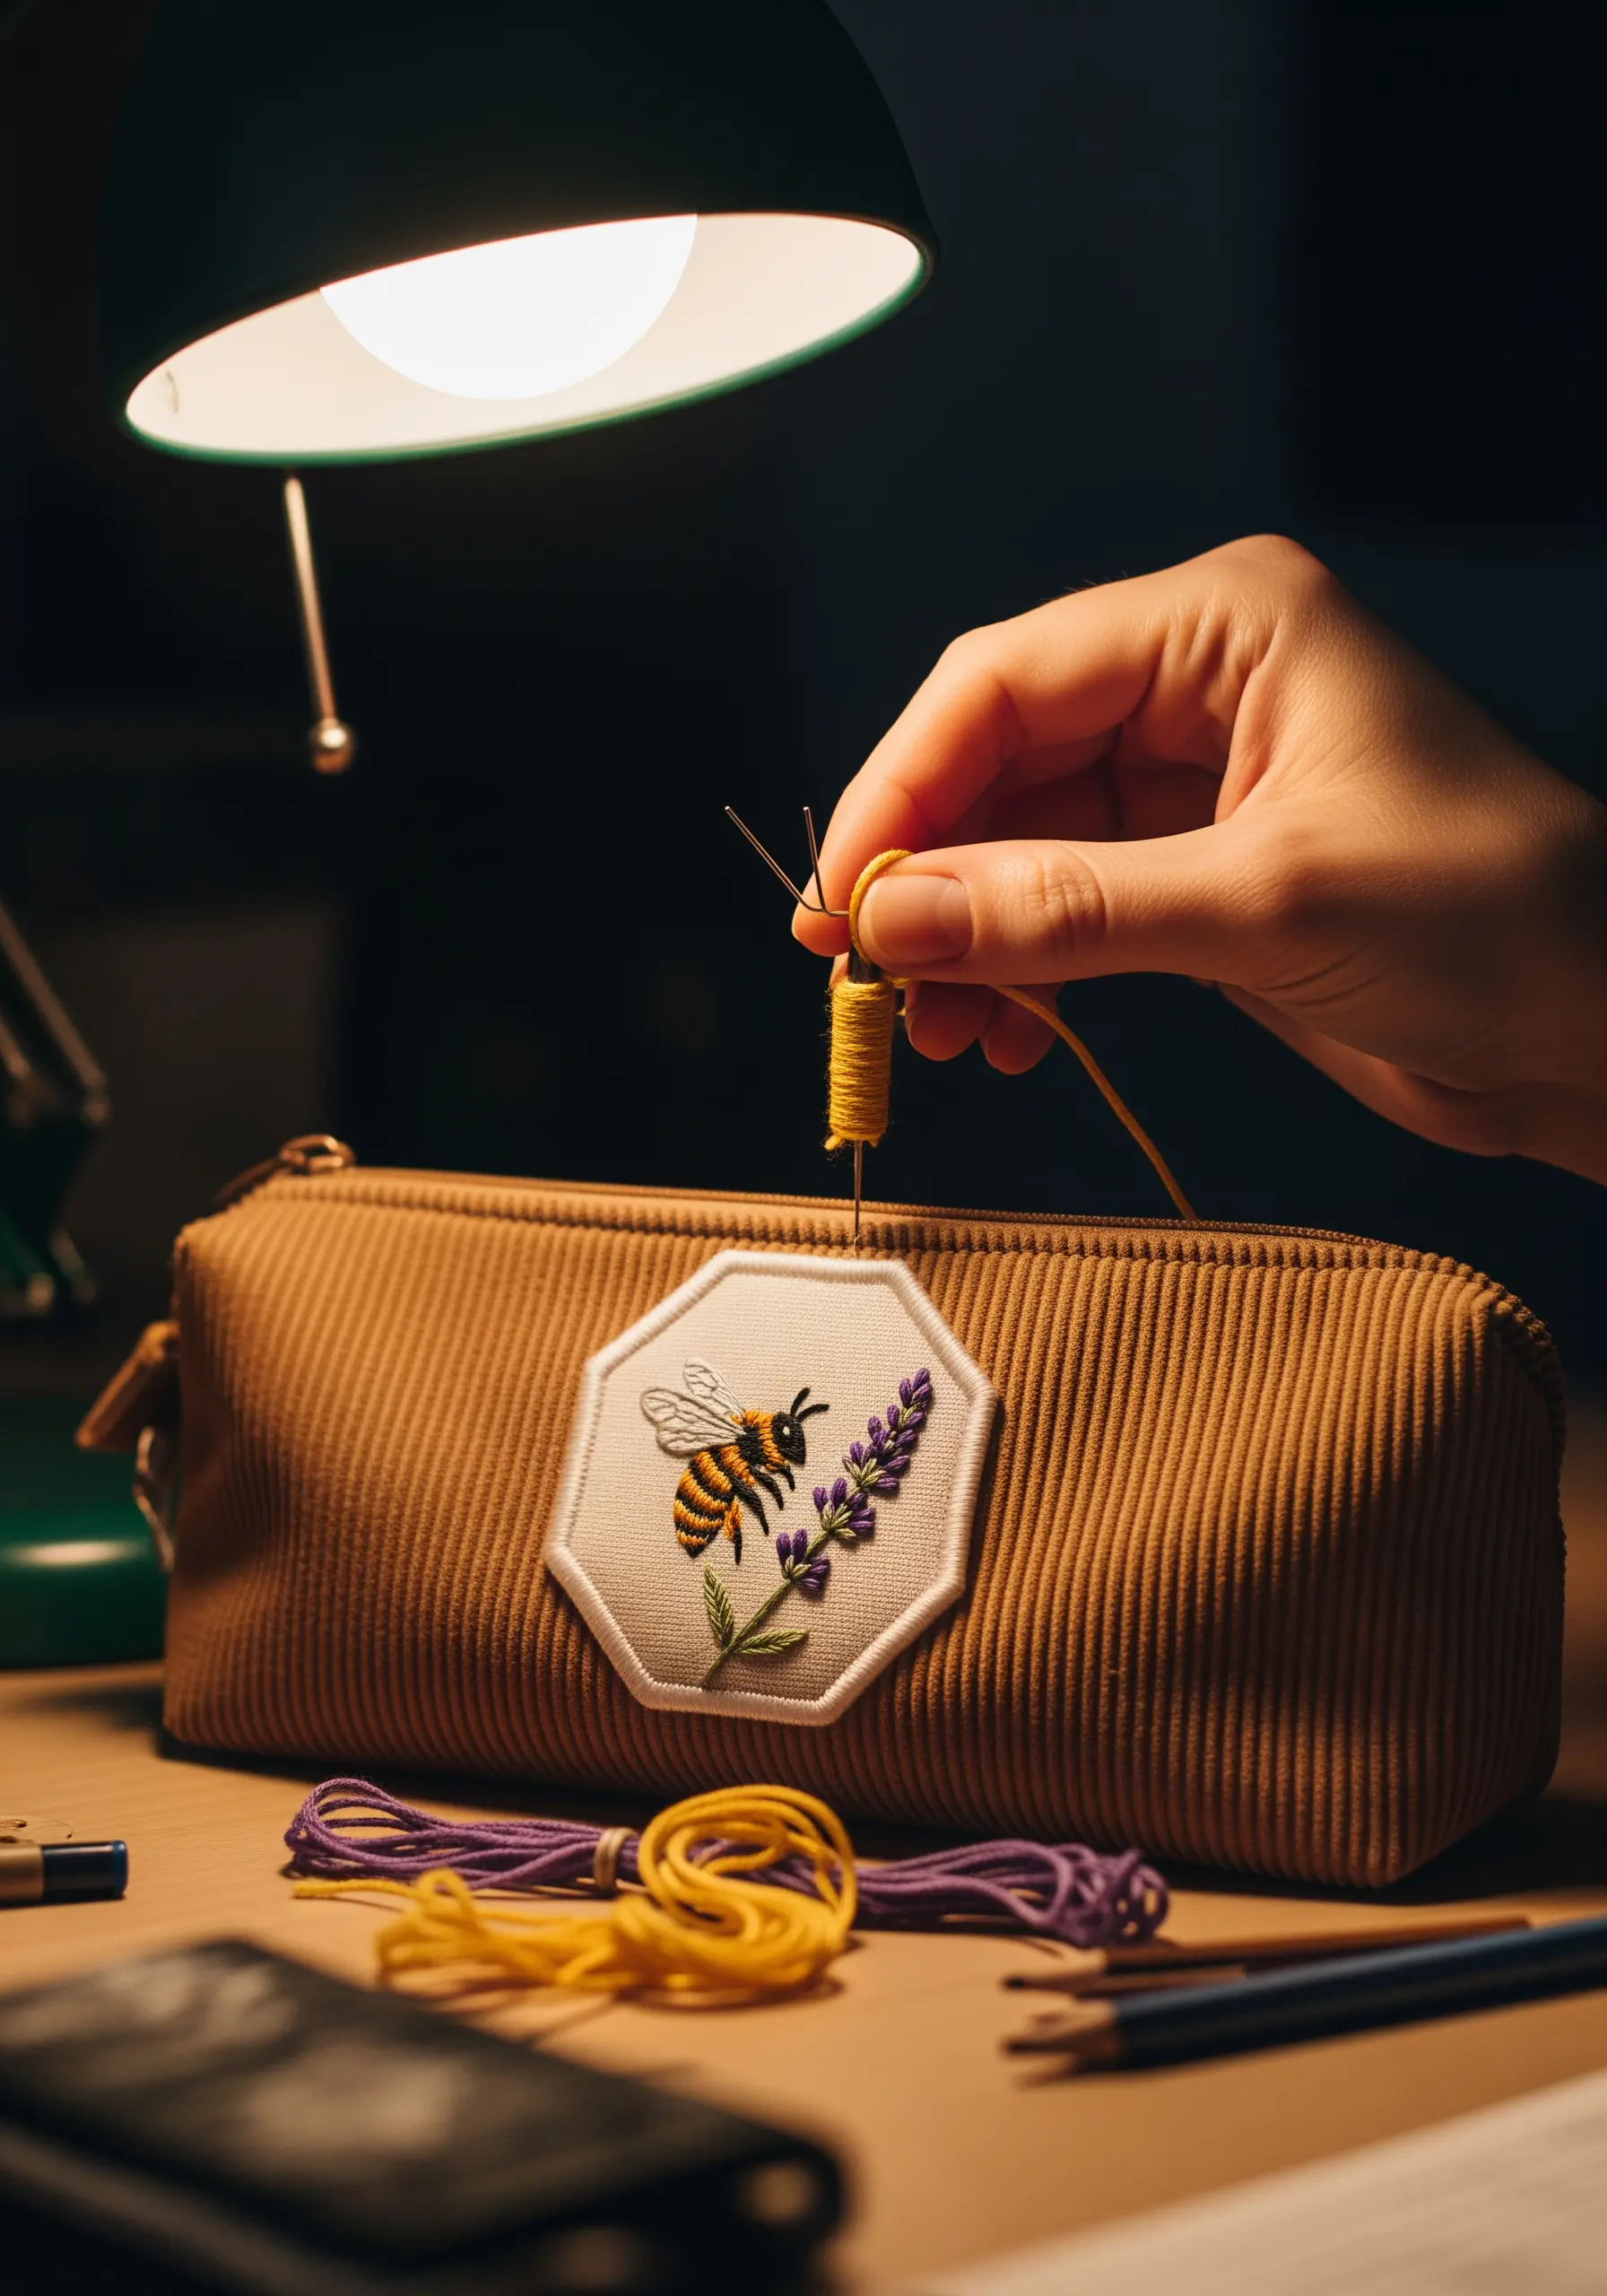
In a multi-motif patch, establish a clear focal point. Here, the bee is slightly larger and more detailed, drawing the eye first.
Position the lavender sprig to curve gently around the bee, creating a harmonious composition that feels balanced within the hexagonal frame.
Use a single strand of metallic silver or grey thread for the bee’s wings to give them a subtle, iridescent shimmer that catches the light.
Applying this patch to a textured fabric like corduroy adds another layer of sensory interest, making it one of those small embroidery patterns that elevates an everyday item.
11. Arranging a Wildflower Heart Composition

When filling a defined shape like a heart, place your largest, boldest flowers (like the poppies) first to anchor the design.
Fill in the gaps with smaller, more delicate florals and foliage, tucking stems behind the main blooms to create layers and depth.
Vary the heights of your flowers; some should reach the edge of the heart while others remain lower, creating a more natural, less static arrangement.
Use a mix of stitches—satin stitch for poppies, French knots for cornflowers, lazy daisies for smaller blooms—to ensure the bouquet has rich visual texture.
12. Embracing Simplicity with Minimalist Herb Patches
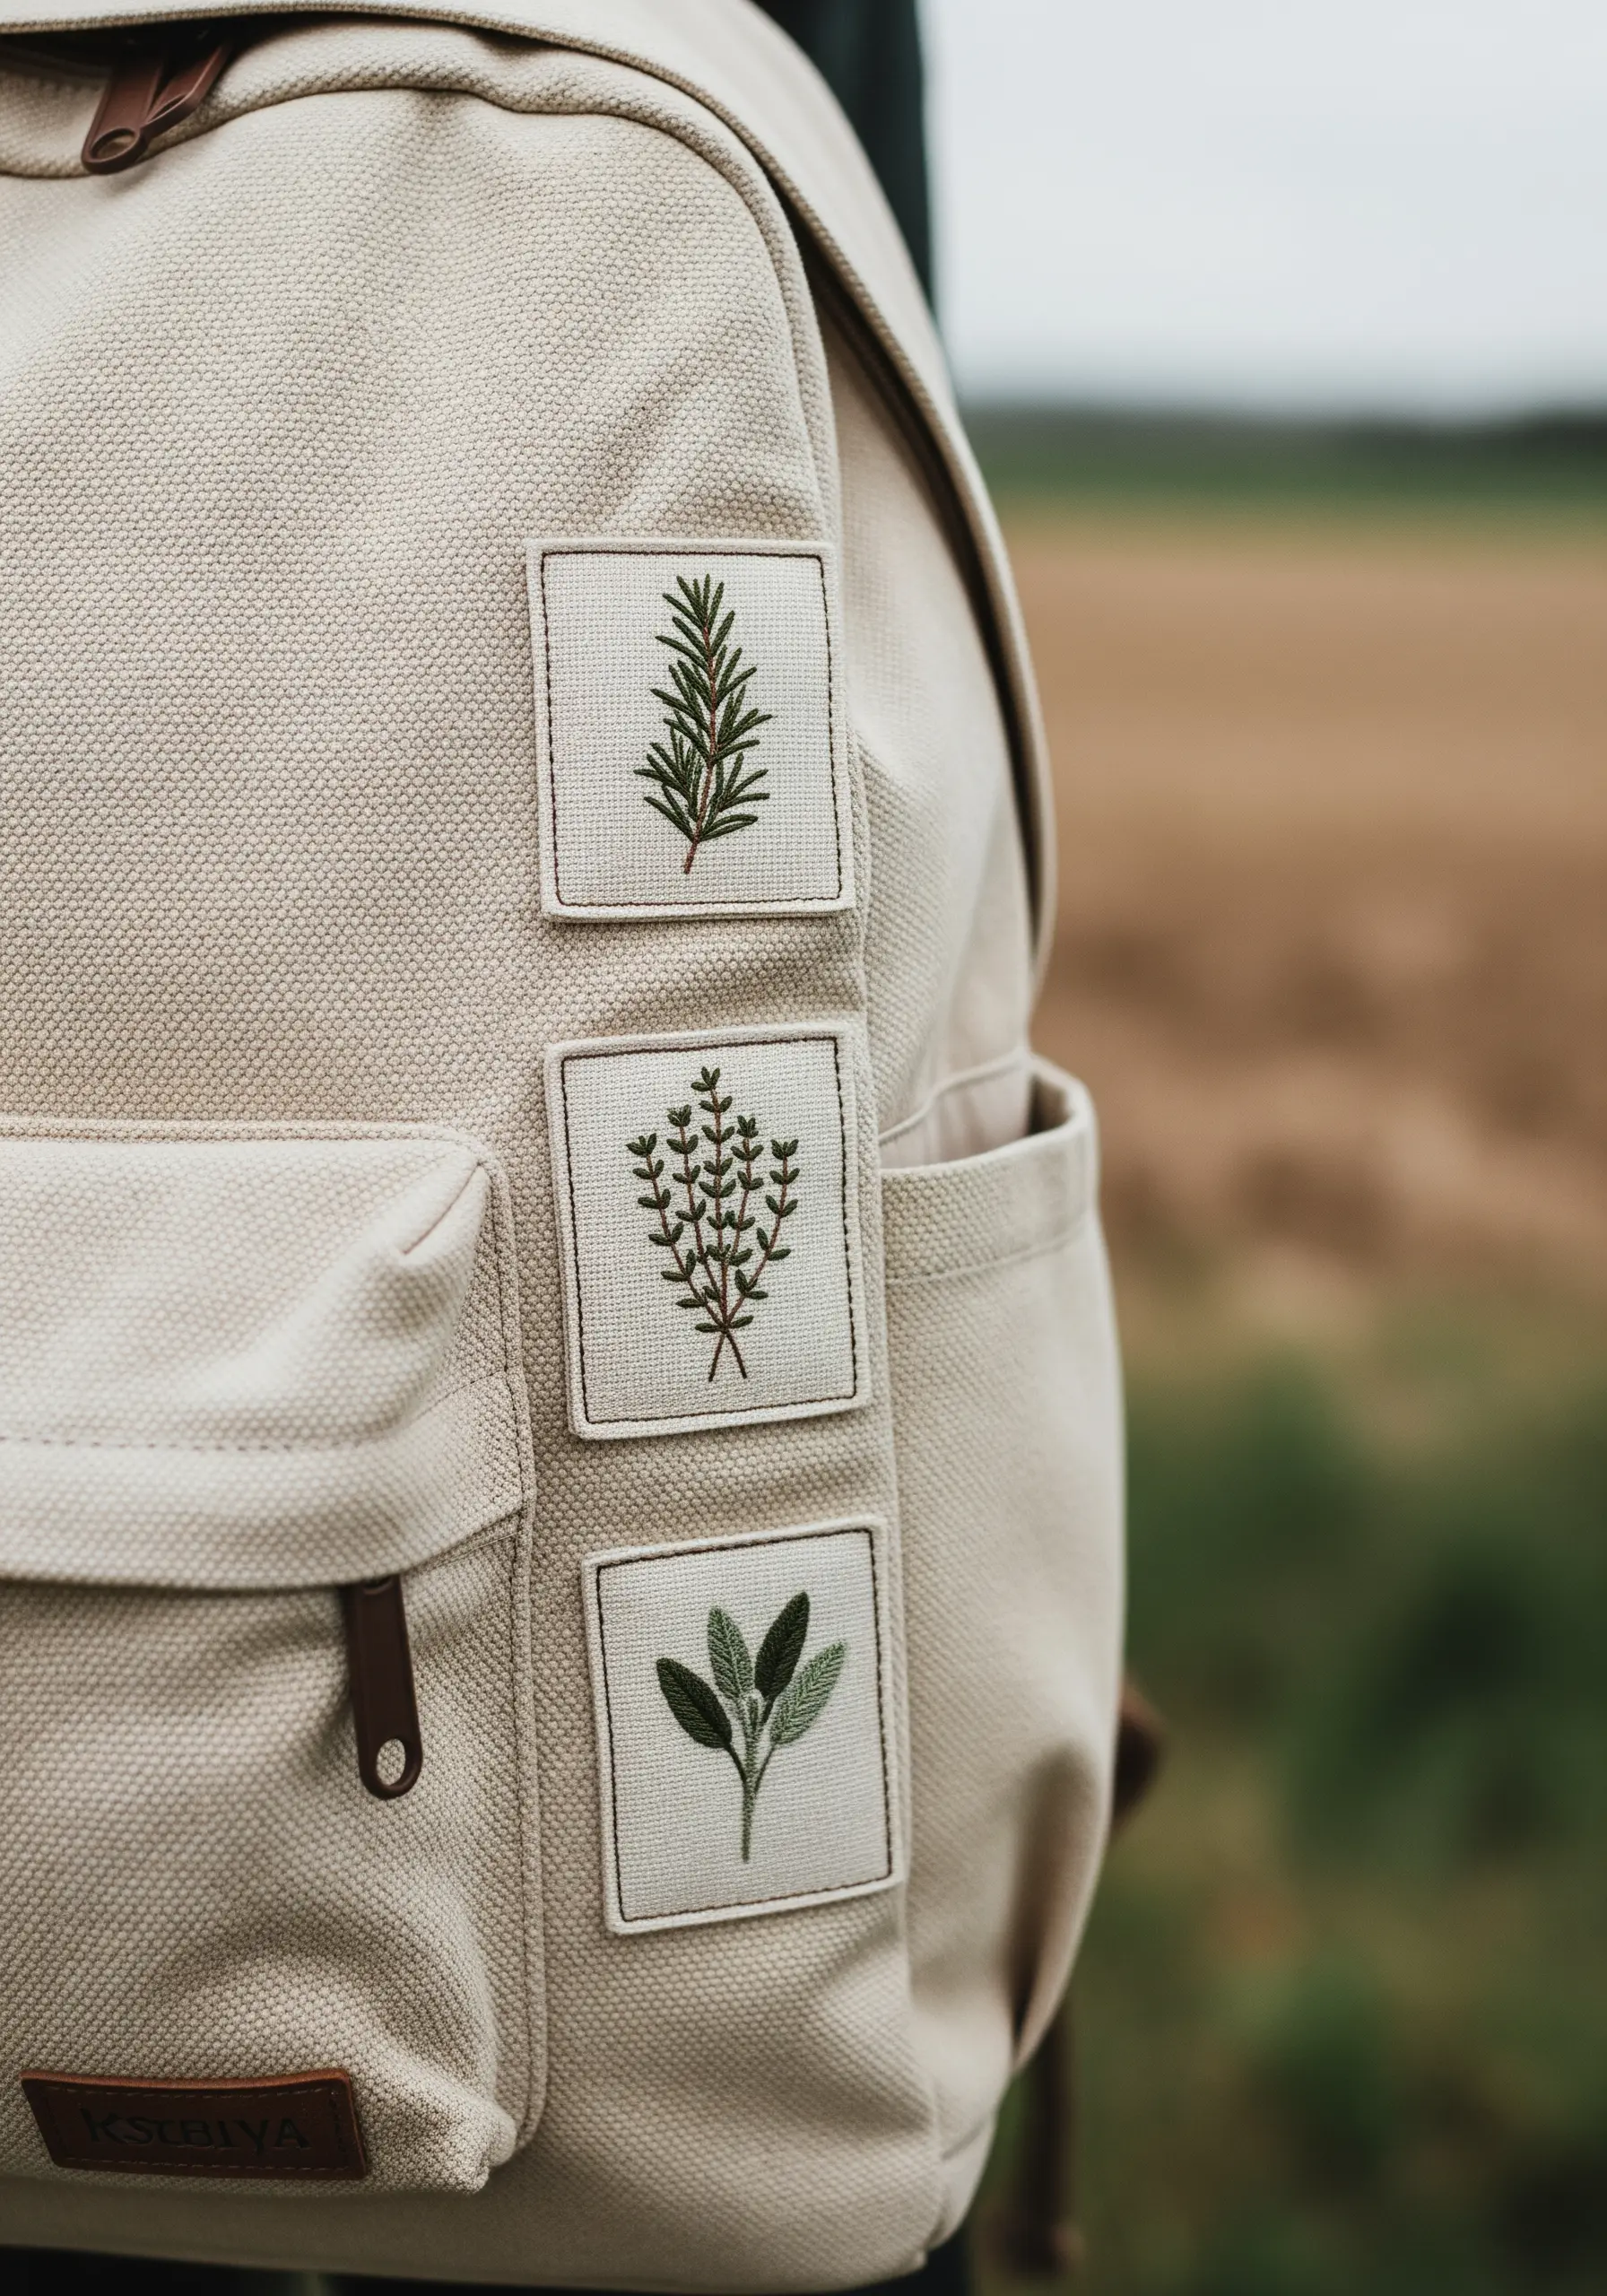
For minimalist designs, the precision of your stitches is paramount. Use a simple backstitch or stem stitch for clean, elegant lines.
Choose a single, naturalistic color for each herb—a deep forest green for rosemary, a softer sage green for sage—to maintain a modern, uncluttered look.
The double border, with a simple running stitch inside a satin stitch frame, adds a touch of polish and structure to the otherwise simple patches.
Grouping these simple embroidery designs vertically on a backpack pocket creates a sophisticated, curated statement.
13. Shading Foxgloves for Photorealistic Depth
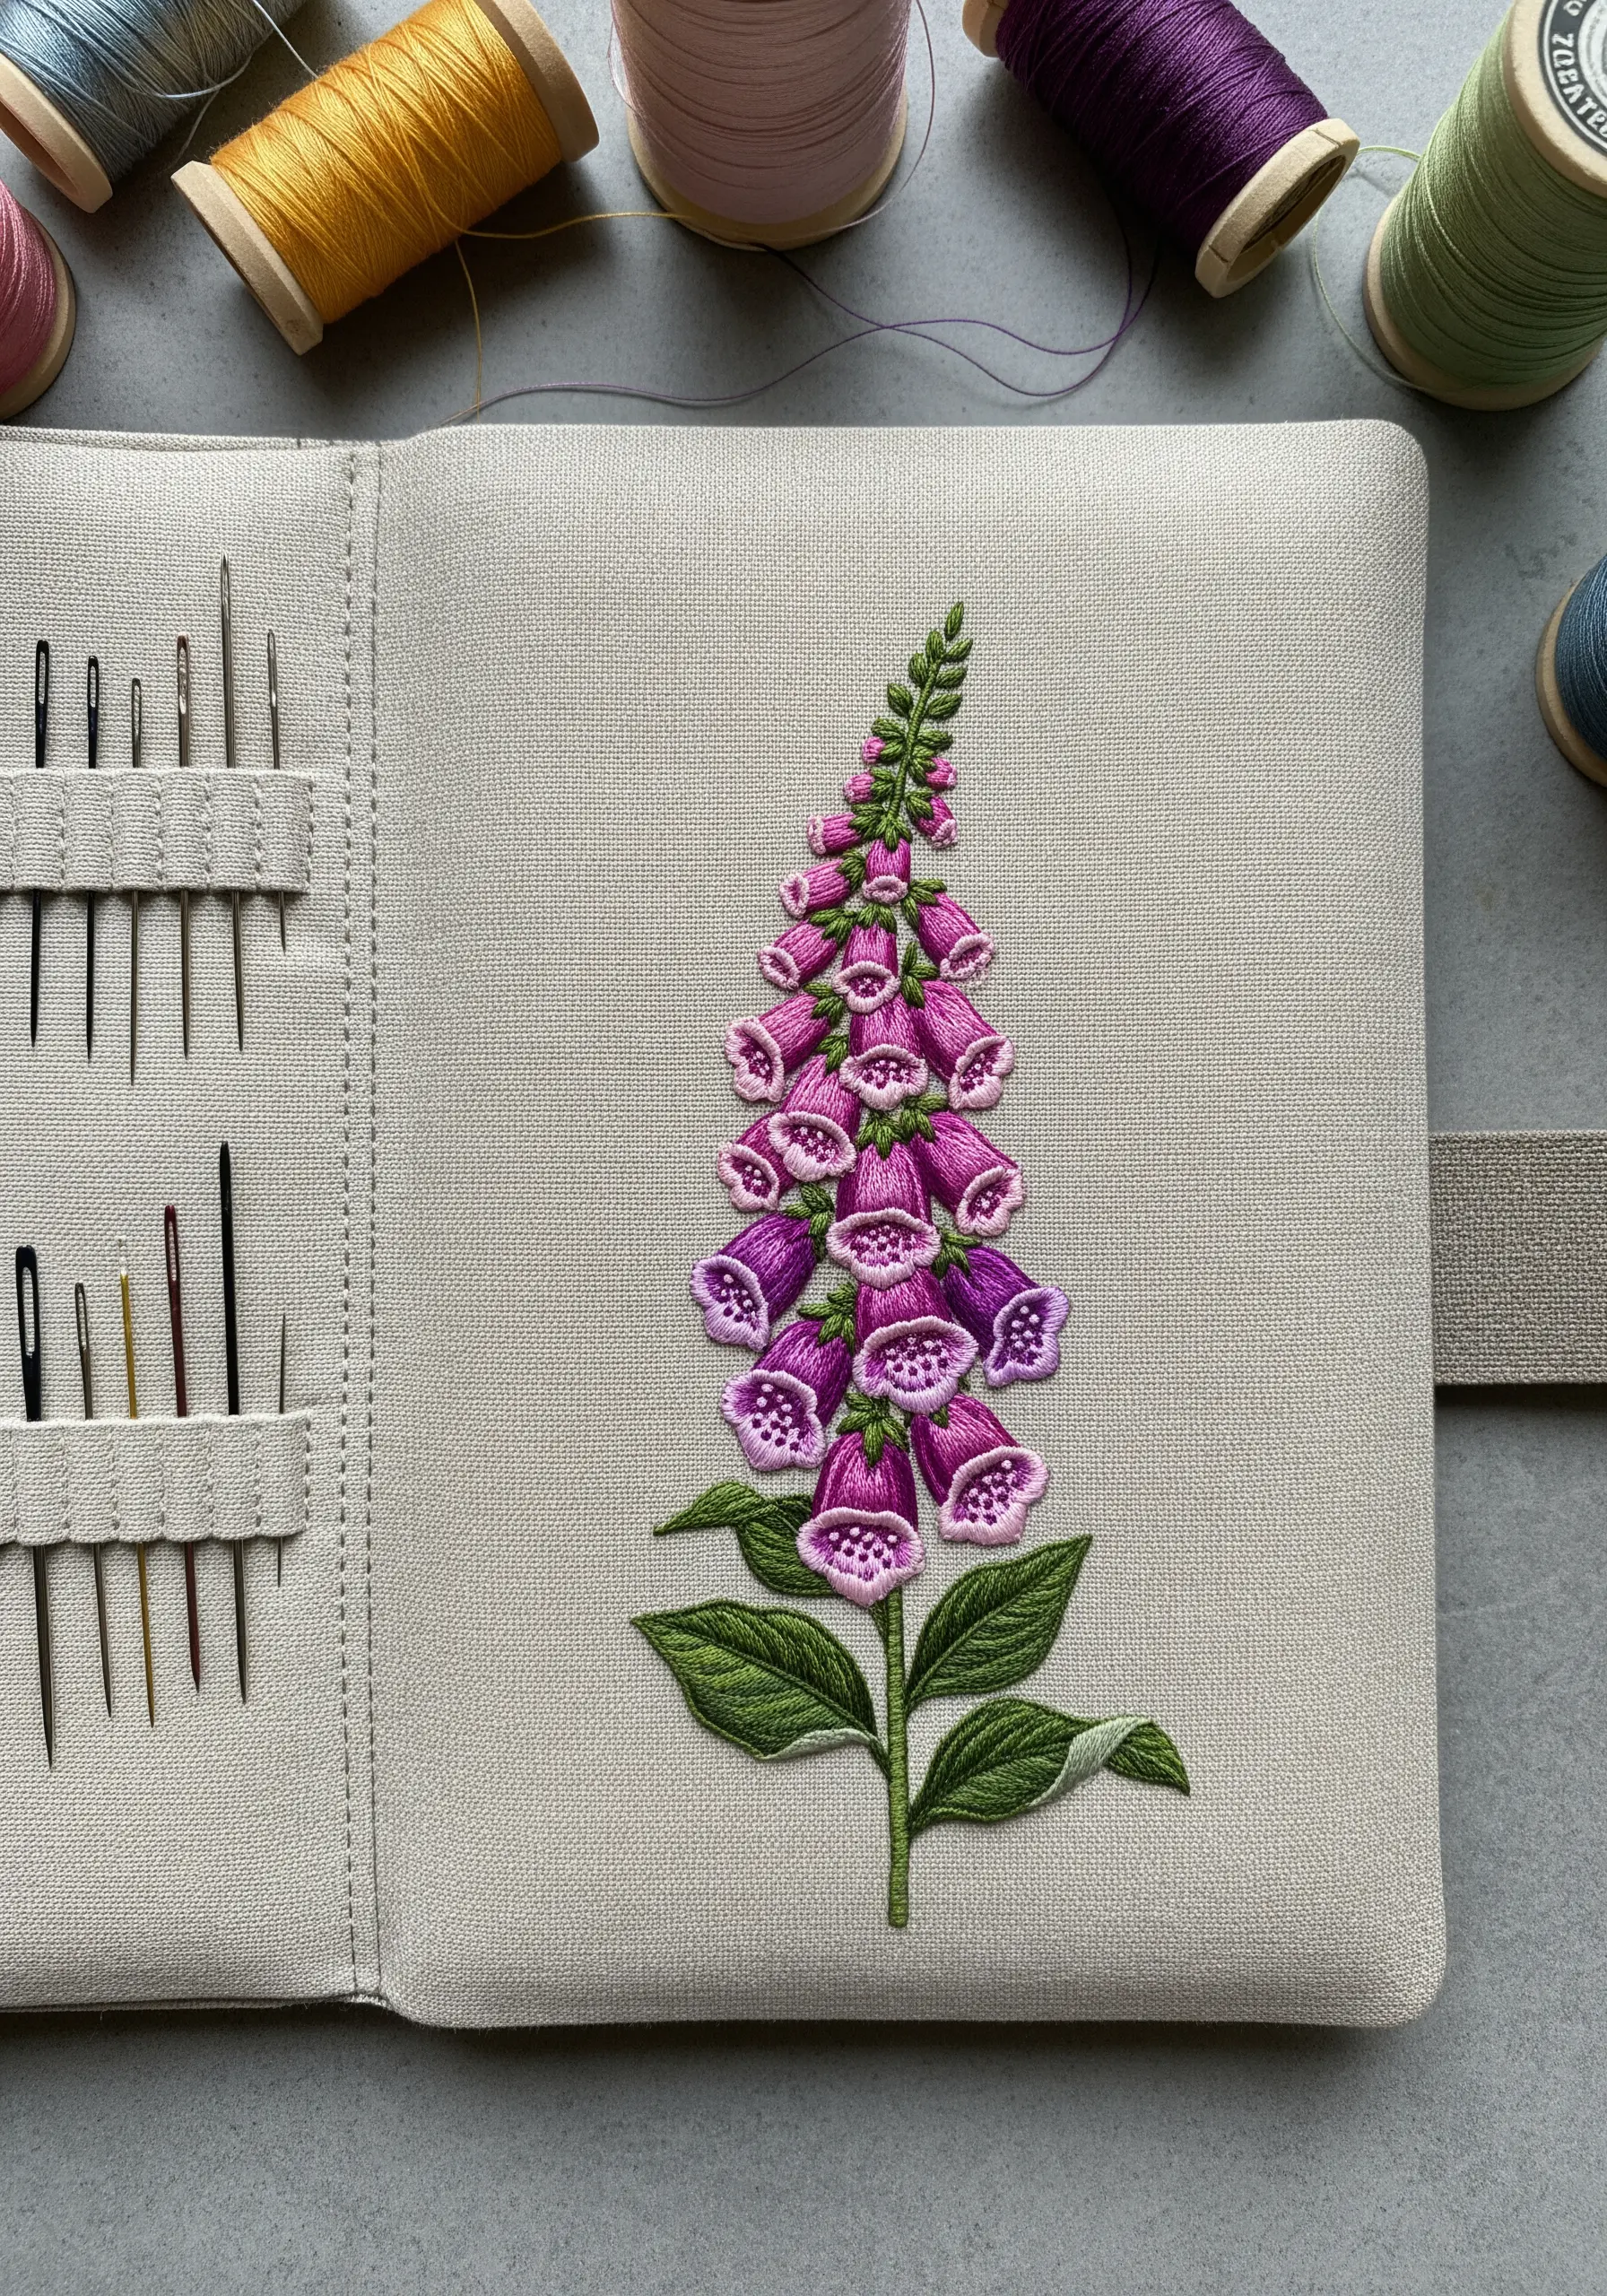
To create the bell shape of a foxglove blossom, use long-and-short stitch, blending from a deep magenta at the outer edge to a pale pink or white near the center.
Add the characteristic spots inside the blossom with tiny, carefully placed seed stitches or French knots in a contrasting dark purple.
Stagger the blossoms along the stem, making them slightly smaller and less ‘open’ toward the top, to mimic the plant’s natural bloom cycle.
This is a perfect project for practicing gradient color floral embroidery ideas, turning a flat patch into a botanical study.
14. Designing with High-Contrast Color Palettes

Make your embroidery pop by placing light-colored motifs, like these white orange blossoms, against a dark, solid background like navy blue felt.
Use a vibrant yellow for the flower centers to create a focal point and add a touch of warmth to the cool-toned composition.
For the stars, use a metallic silver thread and stitch them as simple star stitches or asterisks for a clean, graphic sparkle.
This high-contrast approach is one of the most effective DIY embroidery tricks for creating a visually striking patch with minimal complexity.
15. Crafting a Balanced Botanical Wreath

When designing a wreath, avoid perfect symmetry. Instead, create balance by clustering larger elements, like mushrooms, in asymmetrical groups.
Alternate the direction of your fern stitches—some pointing clockwise, others counter-clockwise—to give the wreath a sense of natural, flowing movement.
Use fishbone stitch for the fern fronds; it creates a central spine and angled leaves all in one fluid motion, perfect for organic shapes.
This design is an excellent example of botanical stitch ideas that transform a simple drawstring bag into a woodland-inspired treasure.
16. Highlighting Florals on Textured Felt

Stitching on felt provides a soft, stable base that requires no stabilizer and adds its own gentle texture to the final piece.
For a delicate flower like a snowdrop, use a padded satin stitch for the main petal to give it a subtle, raised dimension against the flat background.
Create the delicate green markings inside the flower with a few carefully placed straight stitches in a contrasting color.
The layered felt frame gives the patch a clean, finished look, making it a perfect example of handmade embroidery touches for personal items.
17. Achieving Fine Detail in Butterfly Wings
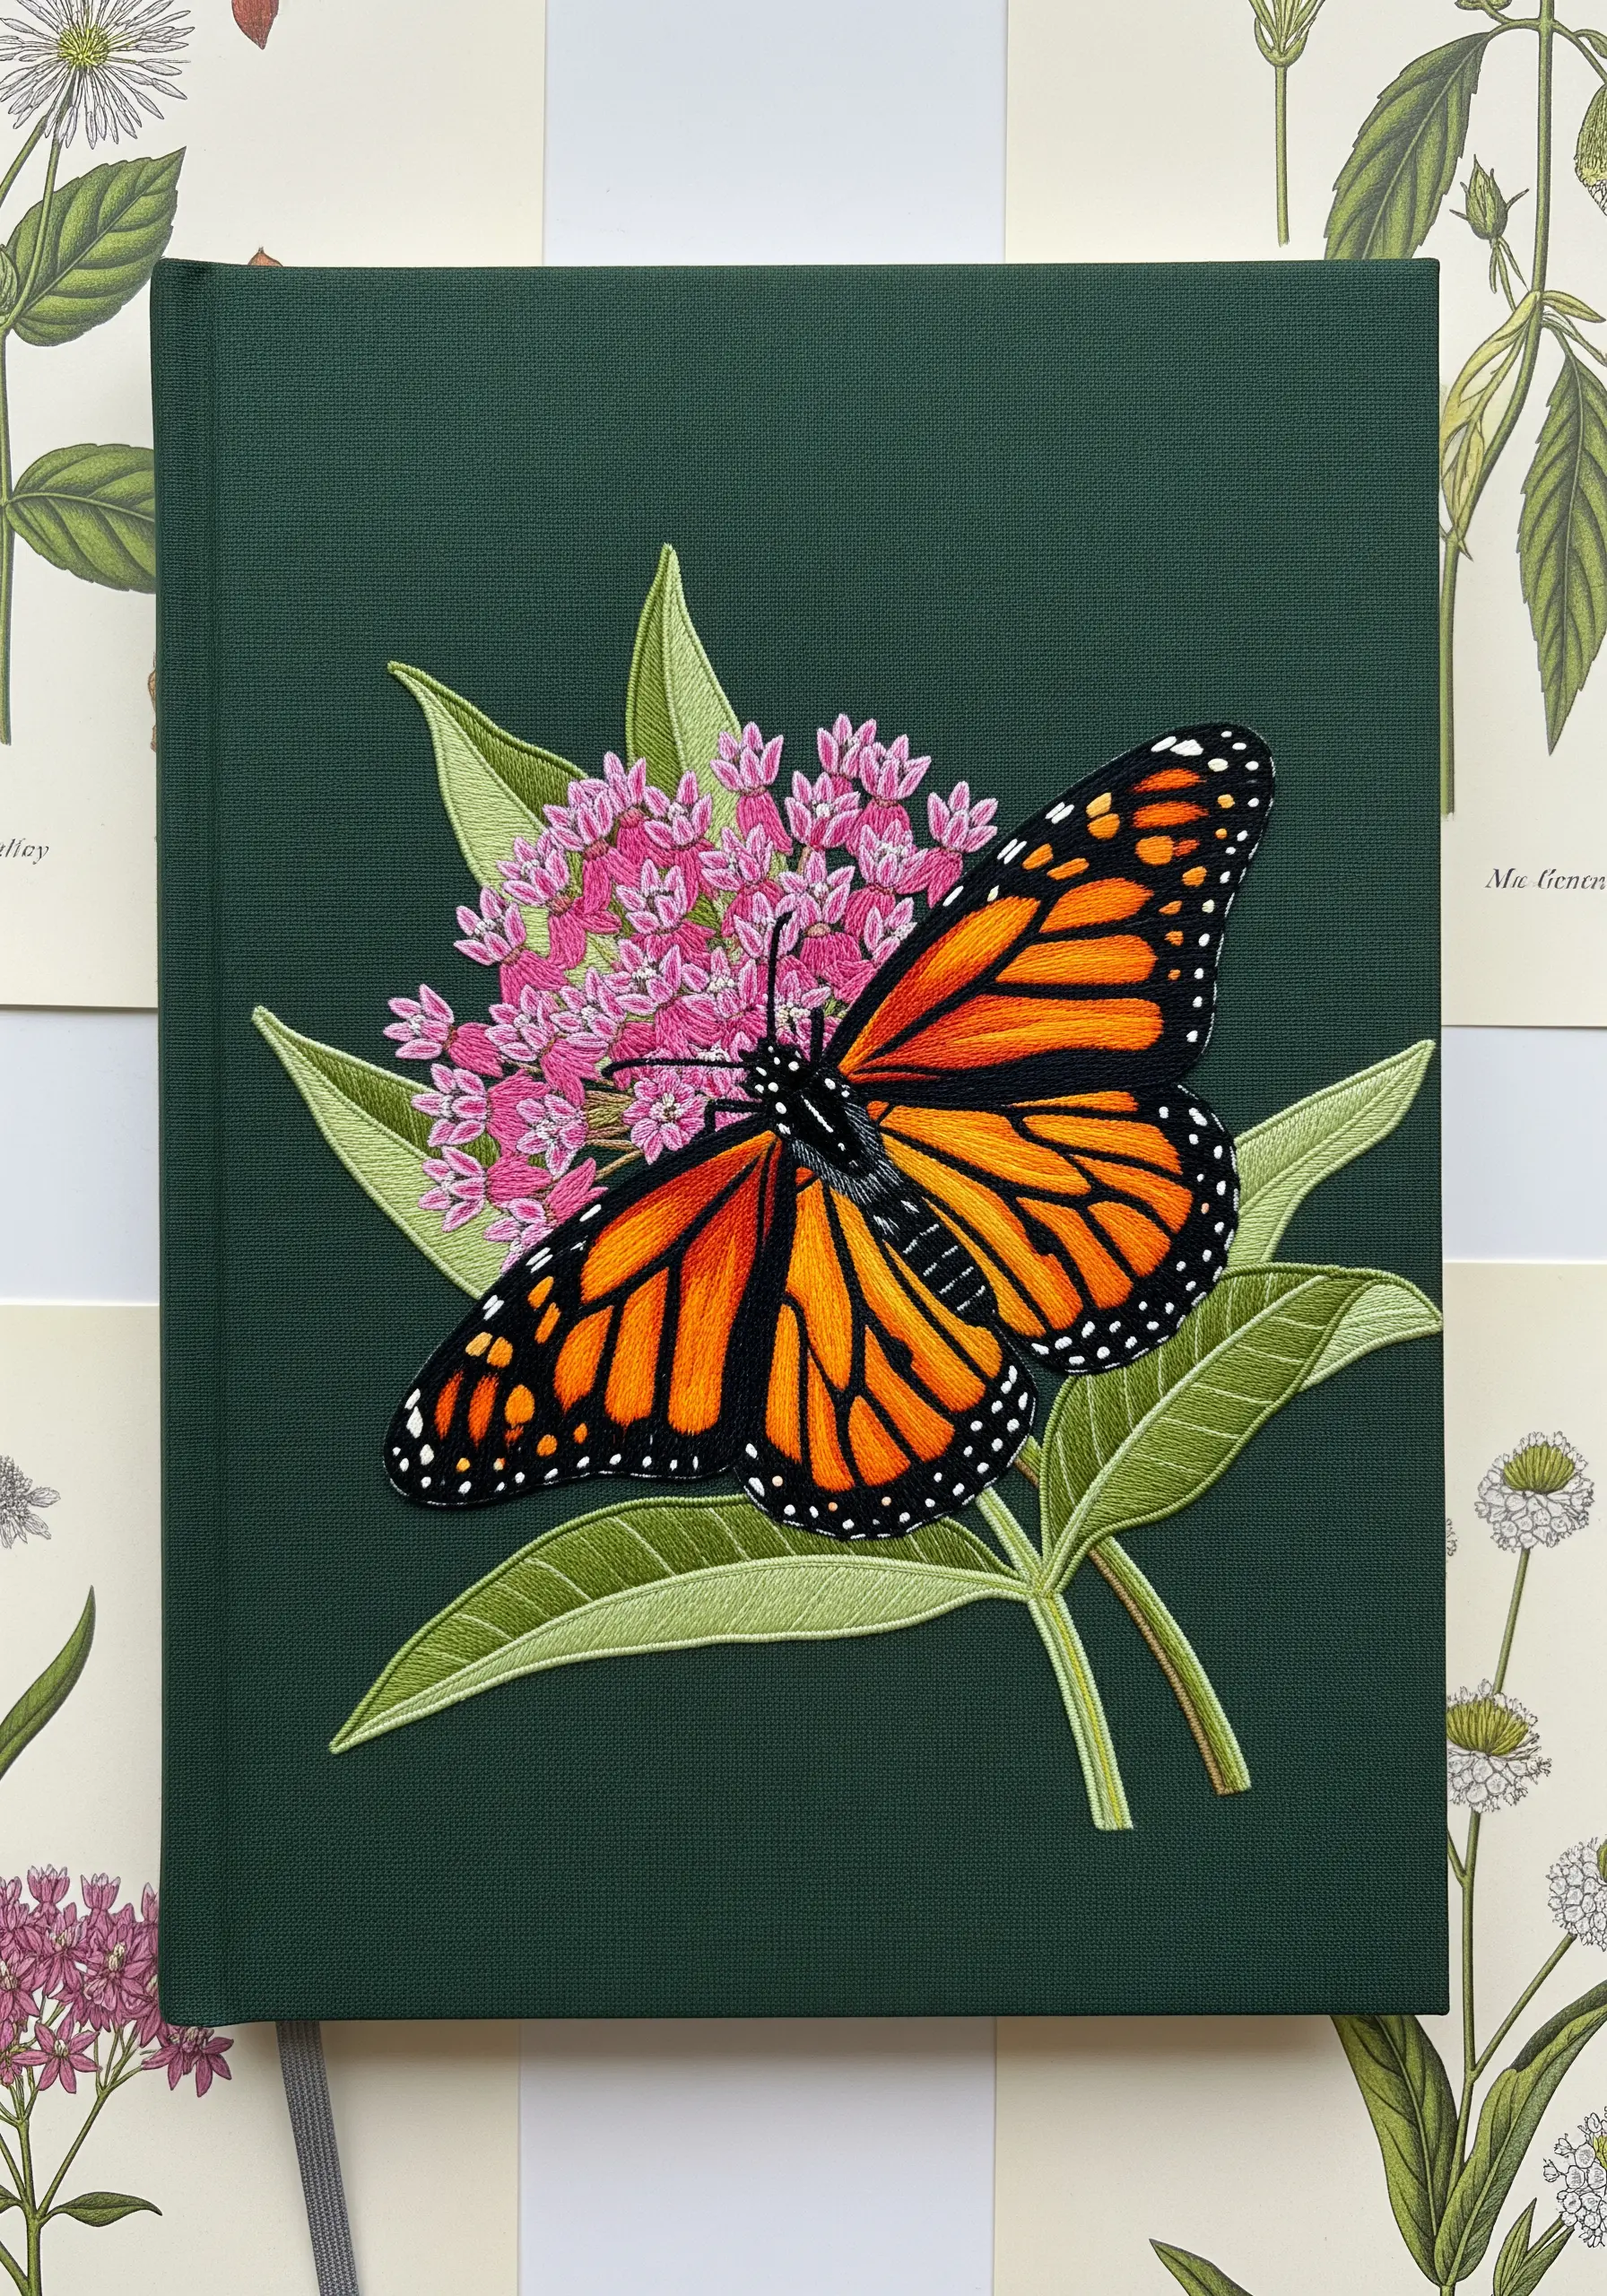
To capture the intricate patterns of a monarch butterfly, use a single strand of black floss and a sharp needle for the fine outlines and veins.
Fill the wing segments with long-and-short stitch, blending orange, yellow, and red threads to create a fiery, realistic gradient.
The white dots along the wing edges should be stitched last, using tiny satin stitches or French knots placed carefully over the black border.
Notice how the butterfly is positioned asymmetrically on the milkweed; this creates a more dynamic and natural composition than a perfectly centered placement.
18. Weaving Texture into a Landscape Patch

For the weeping willow’s foliage, use masses of overlapping lazy daisy stitches in various shades of green to create a sense of lush, cascading leaves.
Suggest movement in the water with horizontal straight stitches in blues and whites, keeping them slightly uneven to mimic ripples.
The tree trunk’s texture comes from vertical split stitches in browns and grays, which give the impression of bark without being overly detailed.
This design demonstrates how to embroider realistic shadows under leaves and other elements for depth, even in a small landscape.
19. Using French Knots for a Jeweled Fruit Effect
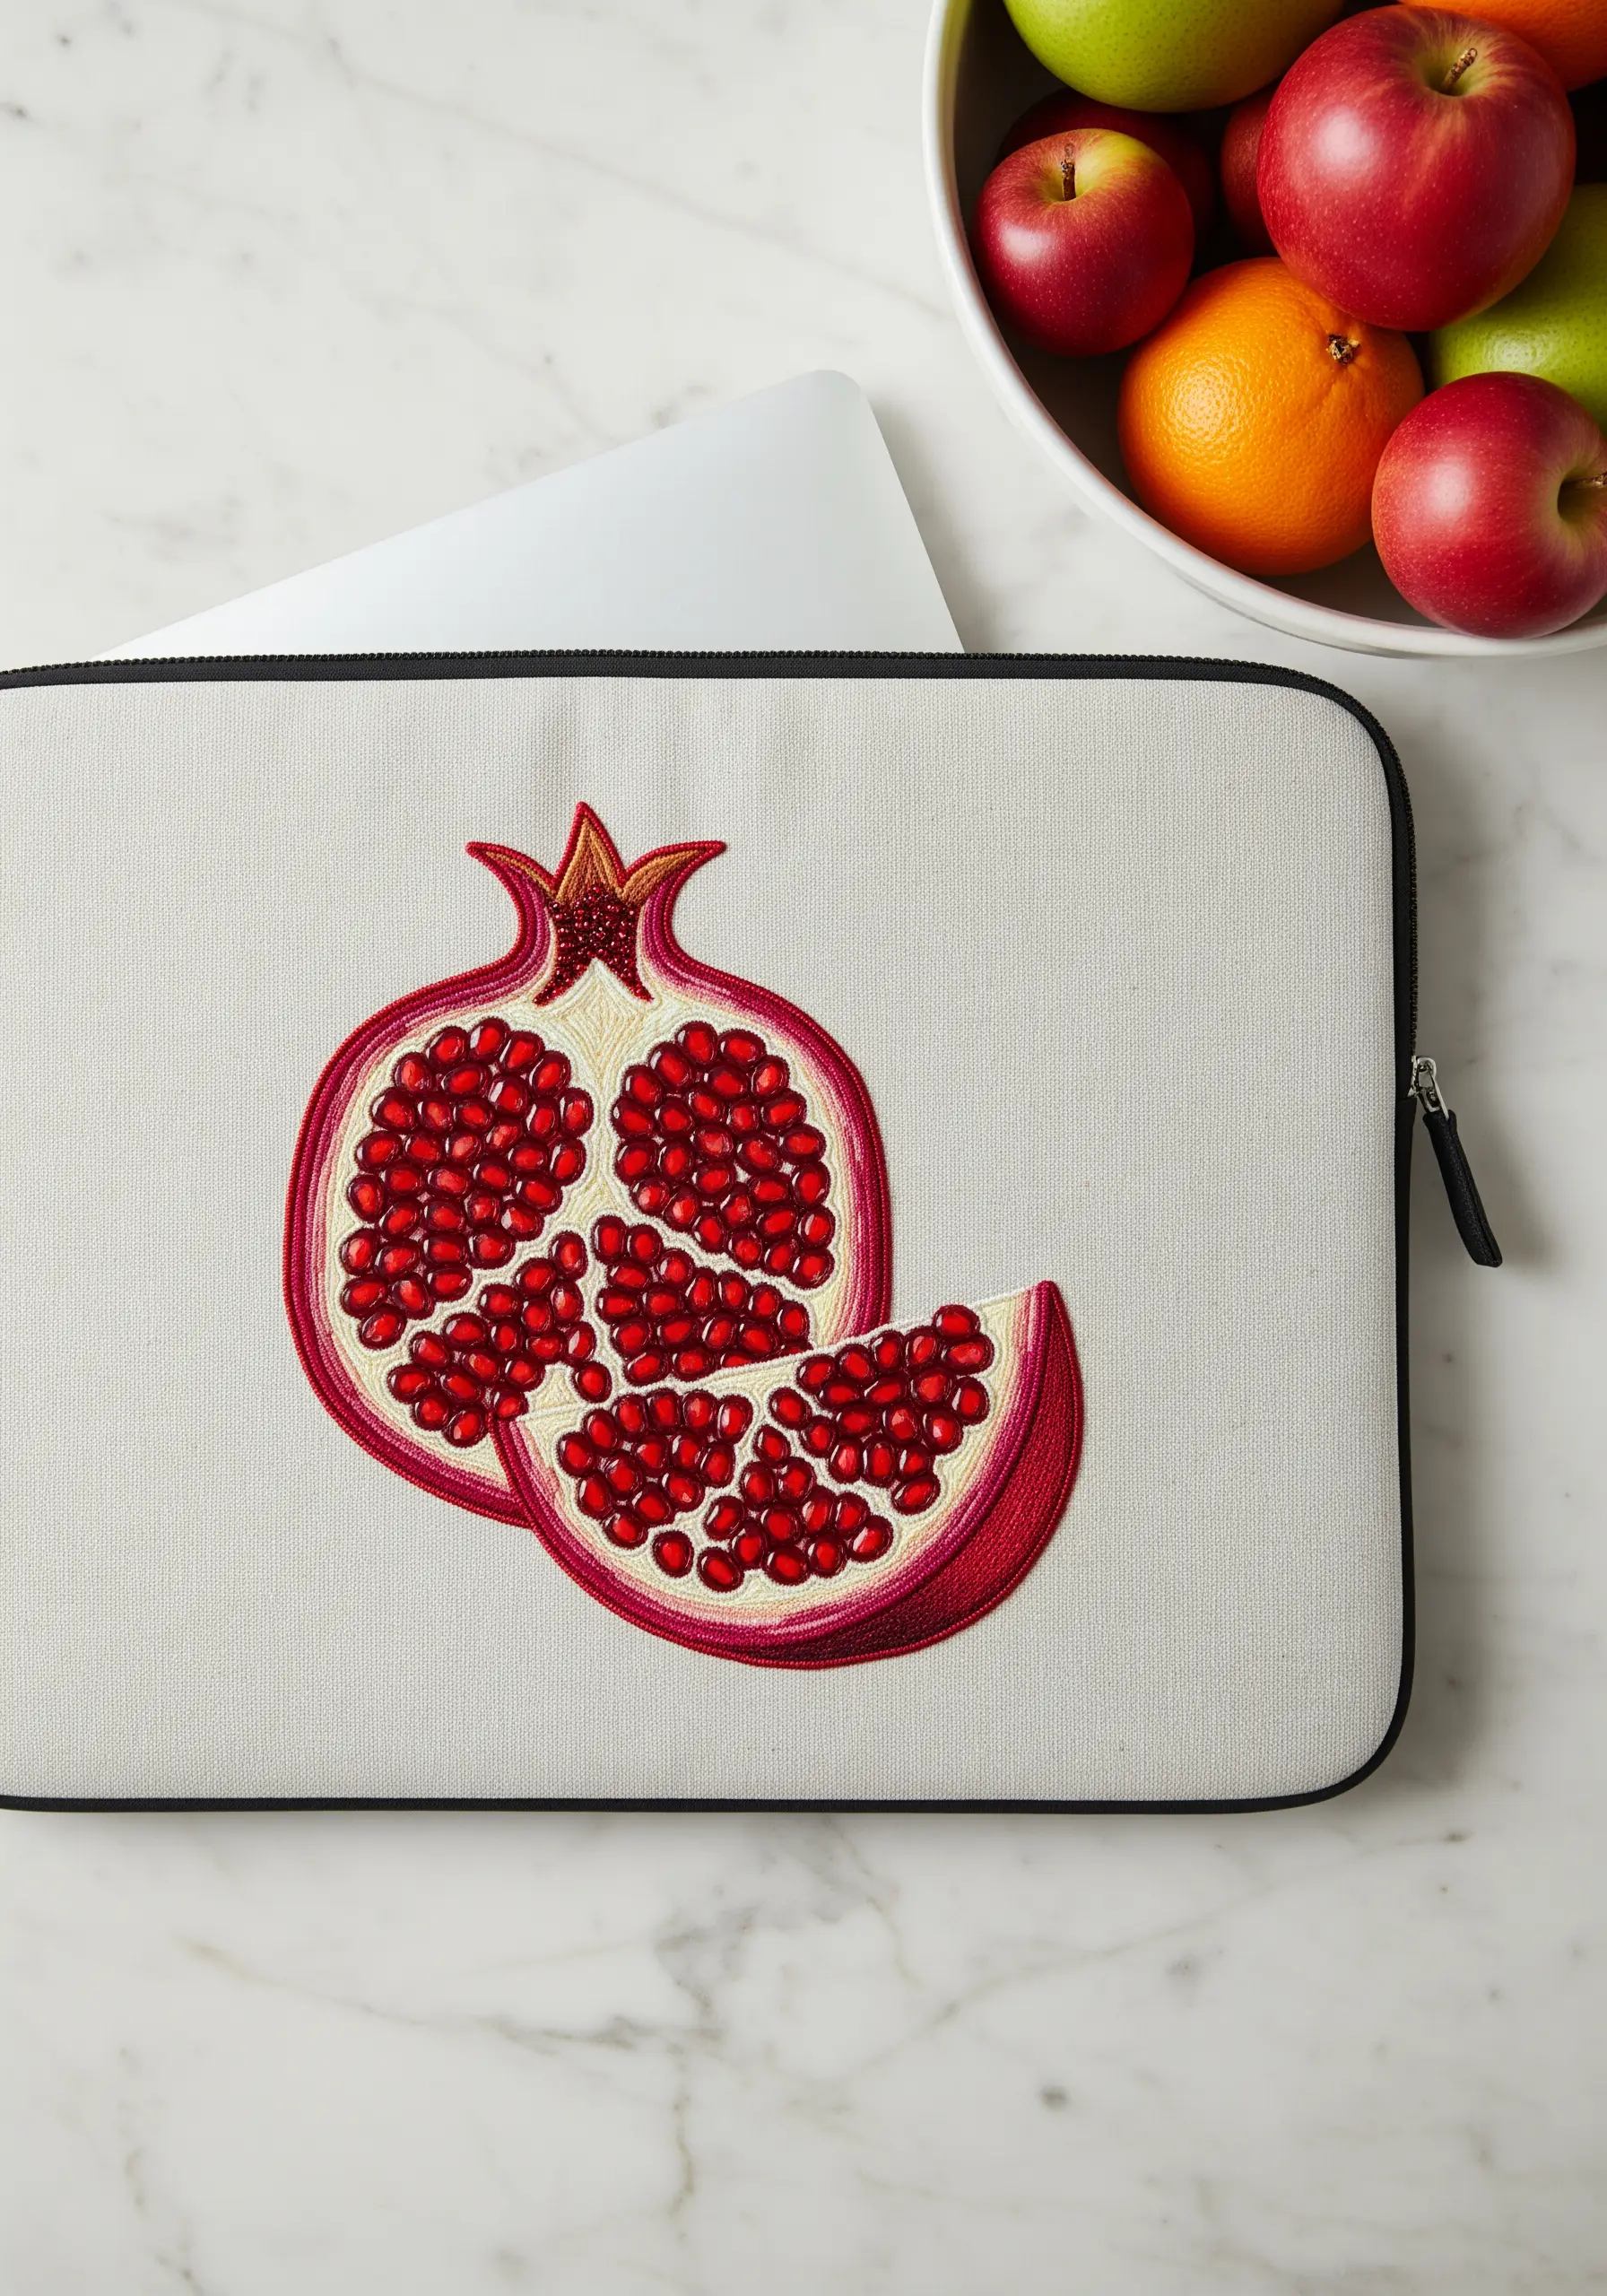
Instead of a flat satin stitch, fill the pomegranate sections with tightly packed French knots in shades of ruby red and garnet.
This technique creates a stunning, gem-like texture that perfectly captures the look of the fruit’s arils.
To create a sense of translucency in the pith, use a long-and-short stitch blending white, pale pink, and cream threads.
Outline the entire piece with a dark red split stitch to define the shape and contain the textured knot-work, giving it a clean, polished finish.
20. Creating an Embroidered Hat Band
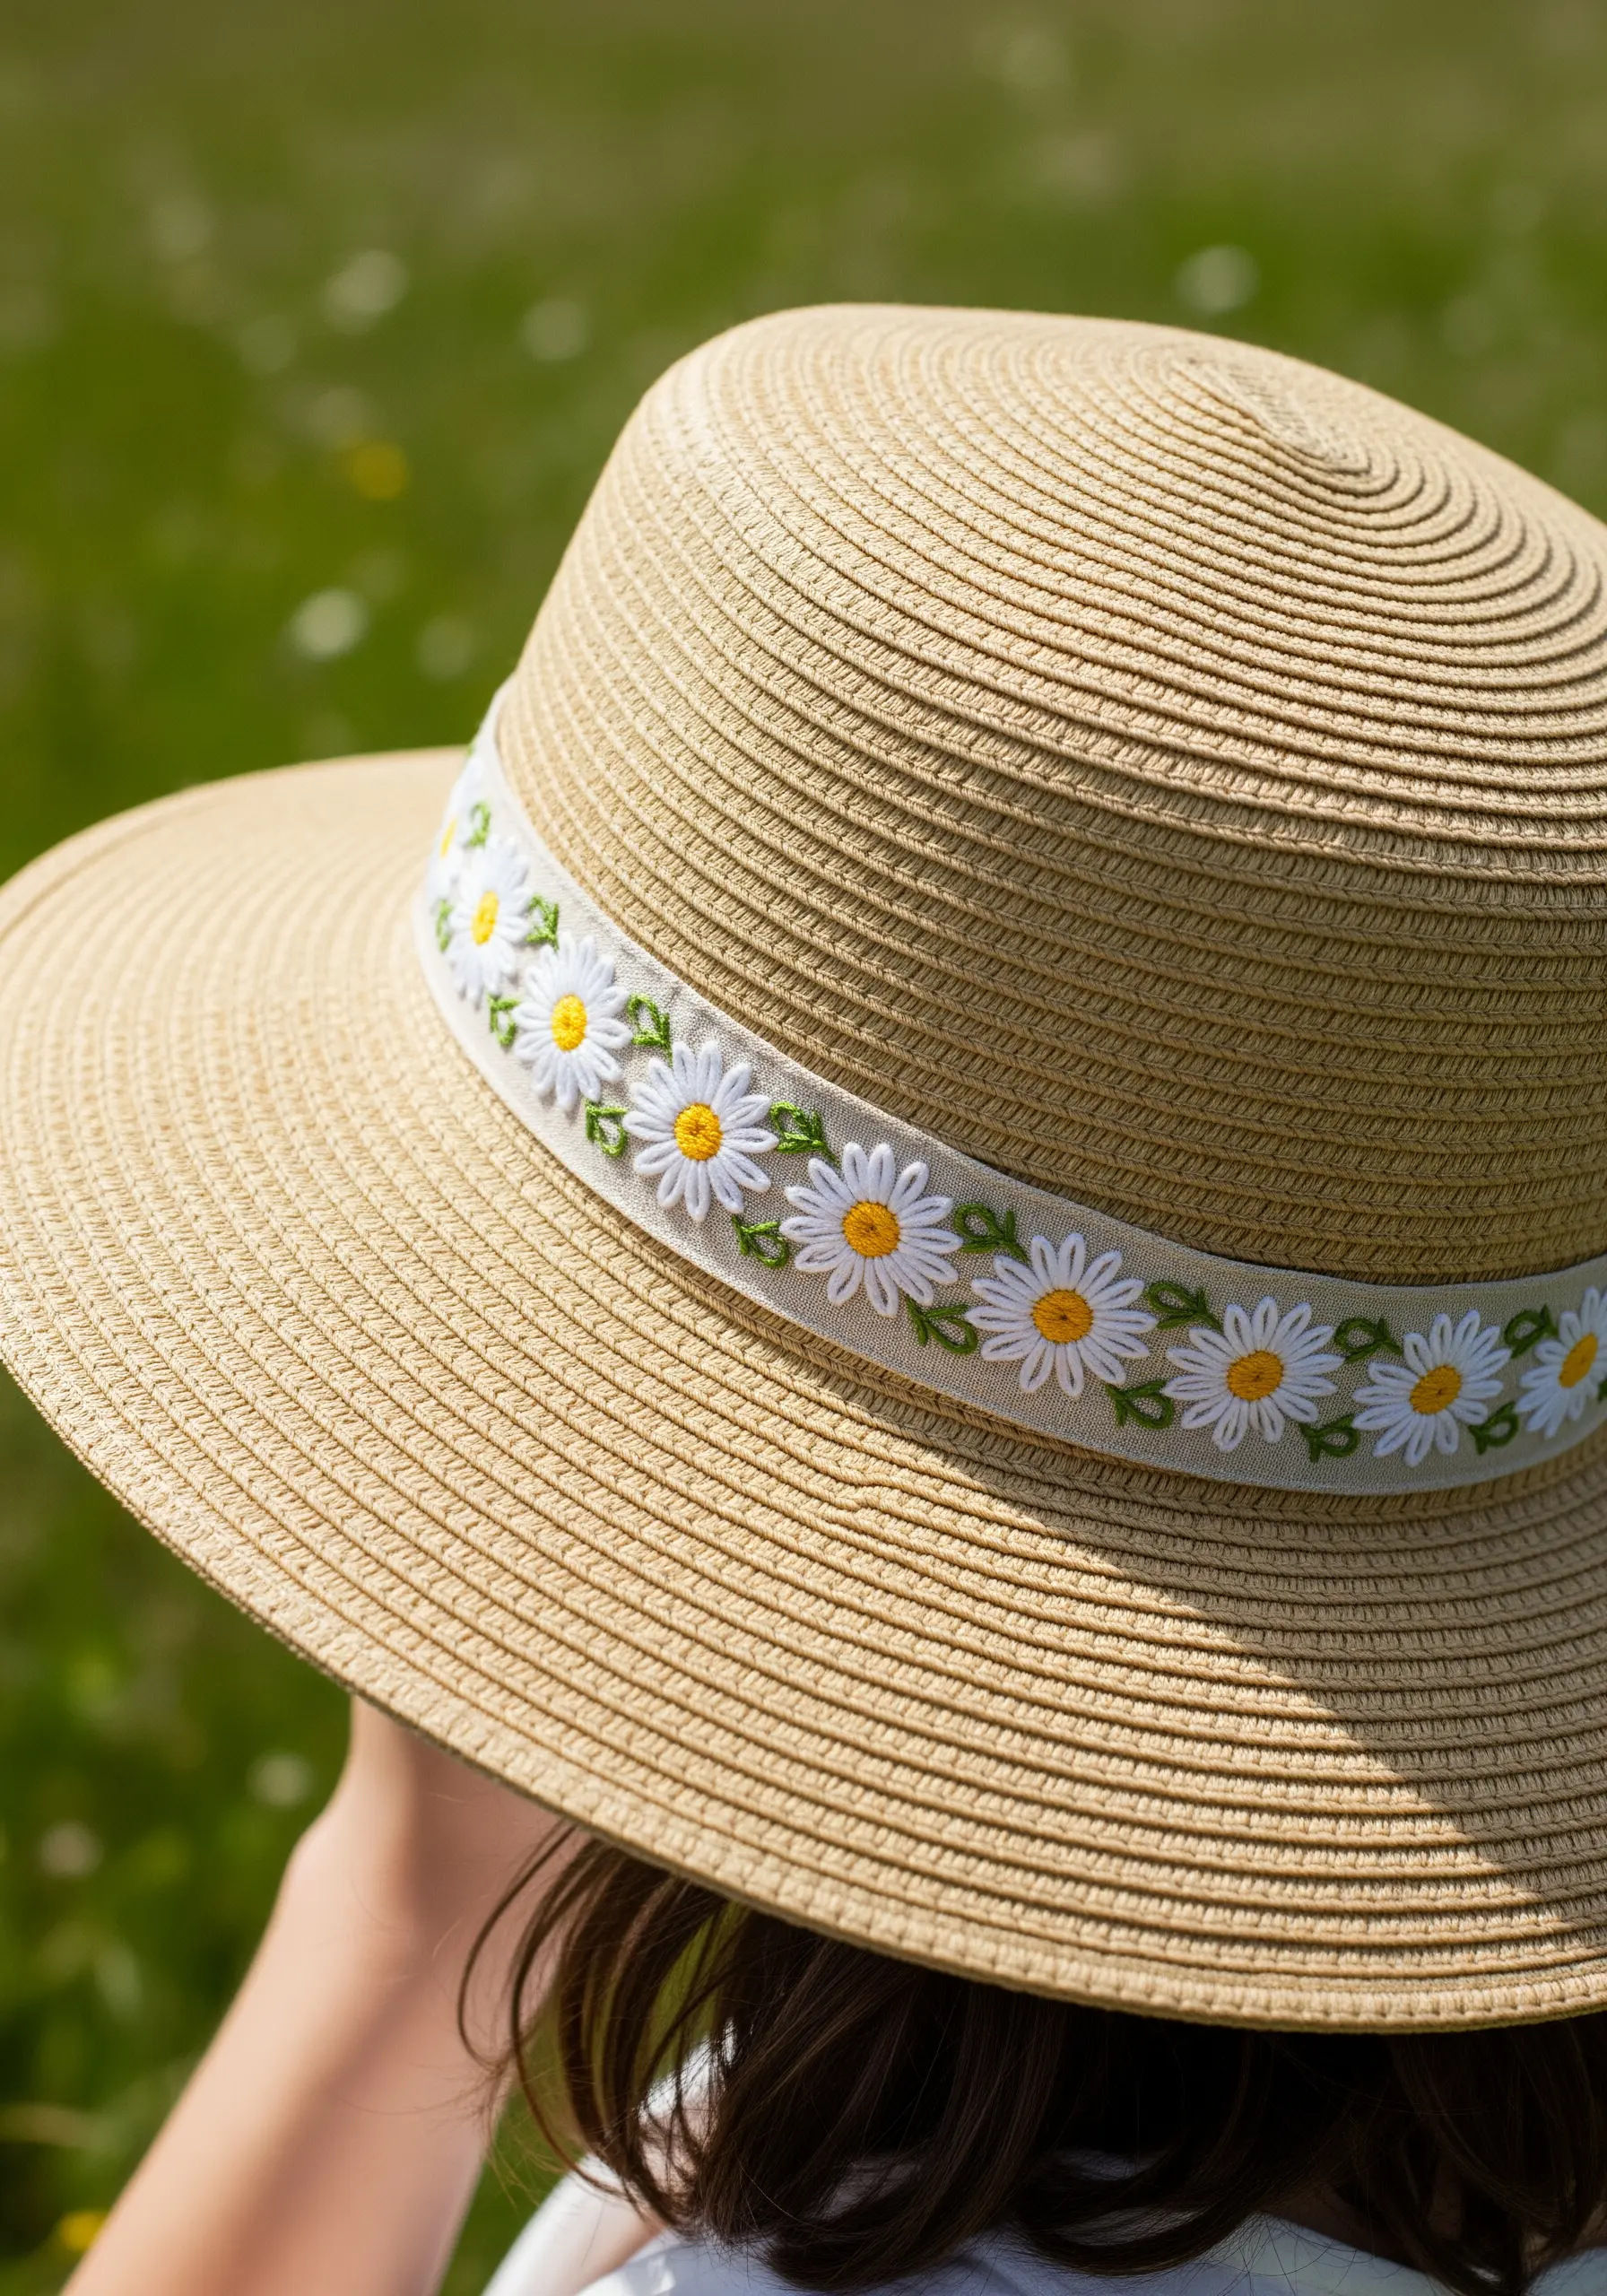
For a continuous design like this daisy chain, first mark your placement evenly around the ribbon with a water-soluble pen.
Use the lazy daisy stitch for the petals; it’s quick, efficient, and creates a perfect petal shape every time.
Anchor the design with bright yellow French knot centers, ensuring they are consistent in size for a uniform look.
Connect the flowers with a simple stem stitch in green, weaving it slightly up and down to give the chain a natural, flowing feel.
21. Adding a Lustrous Sheen to Embroidered Berries
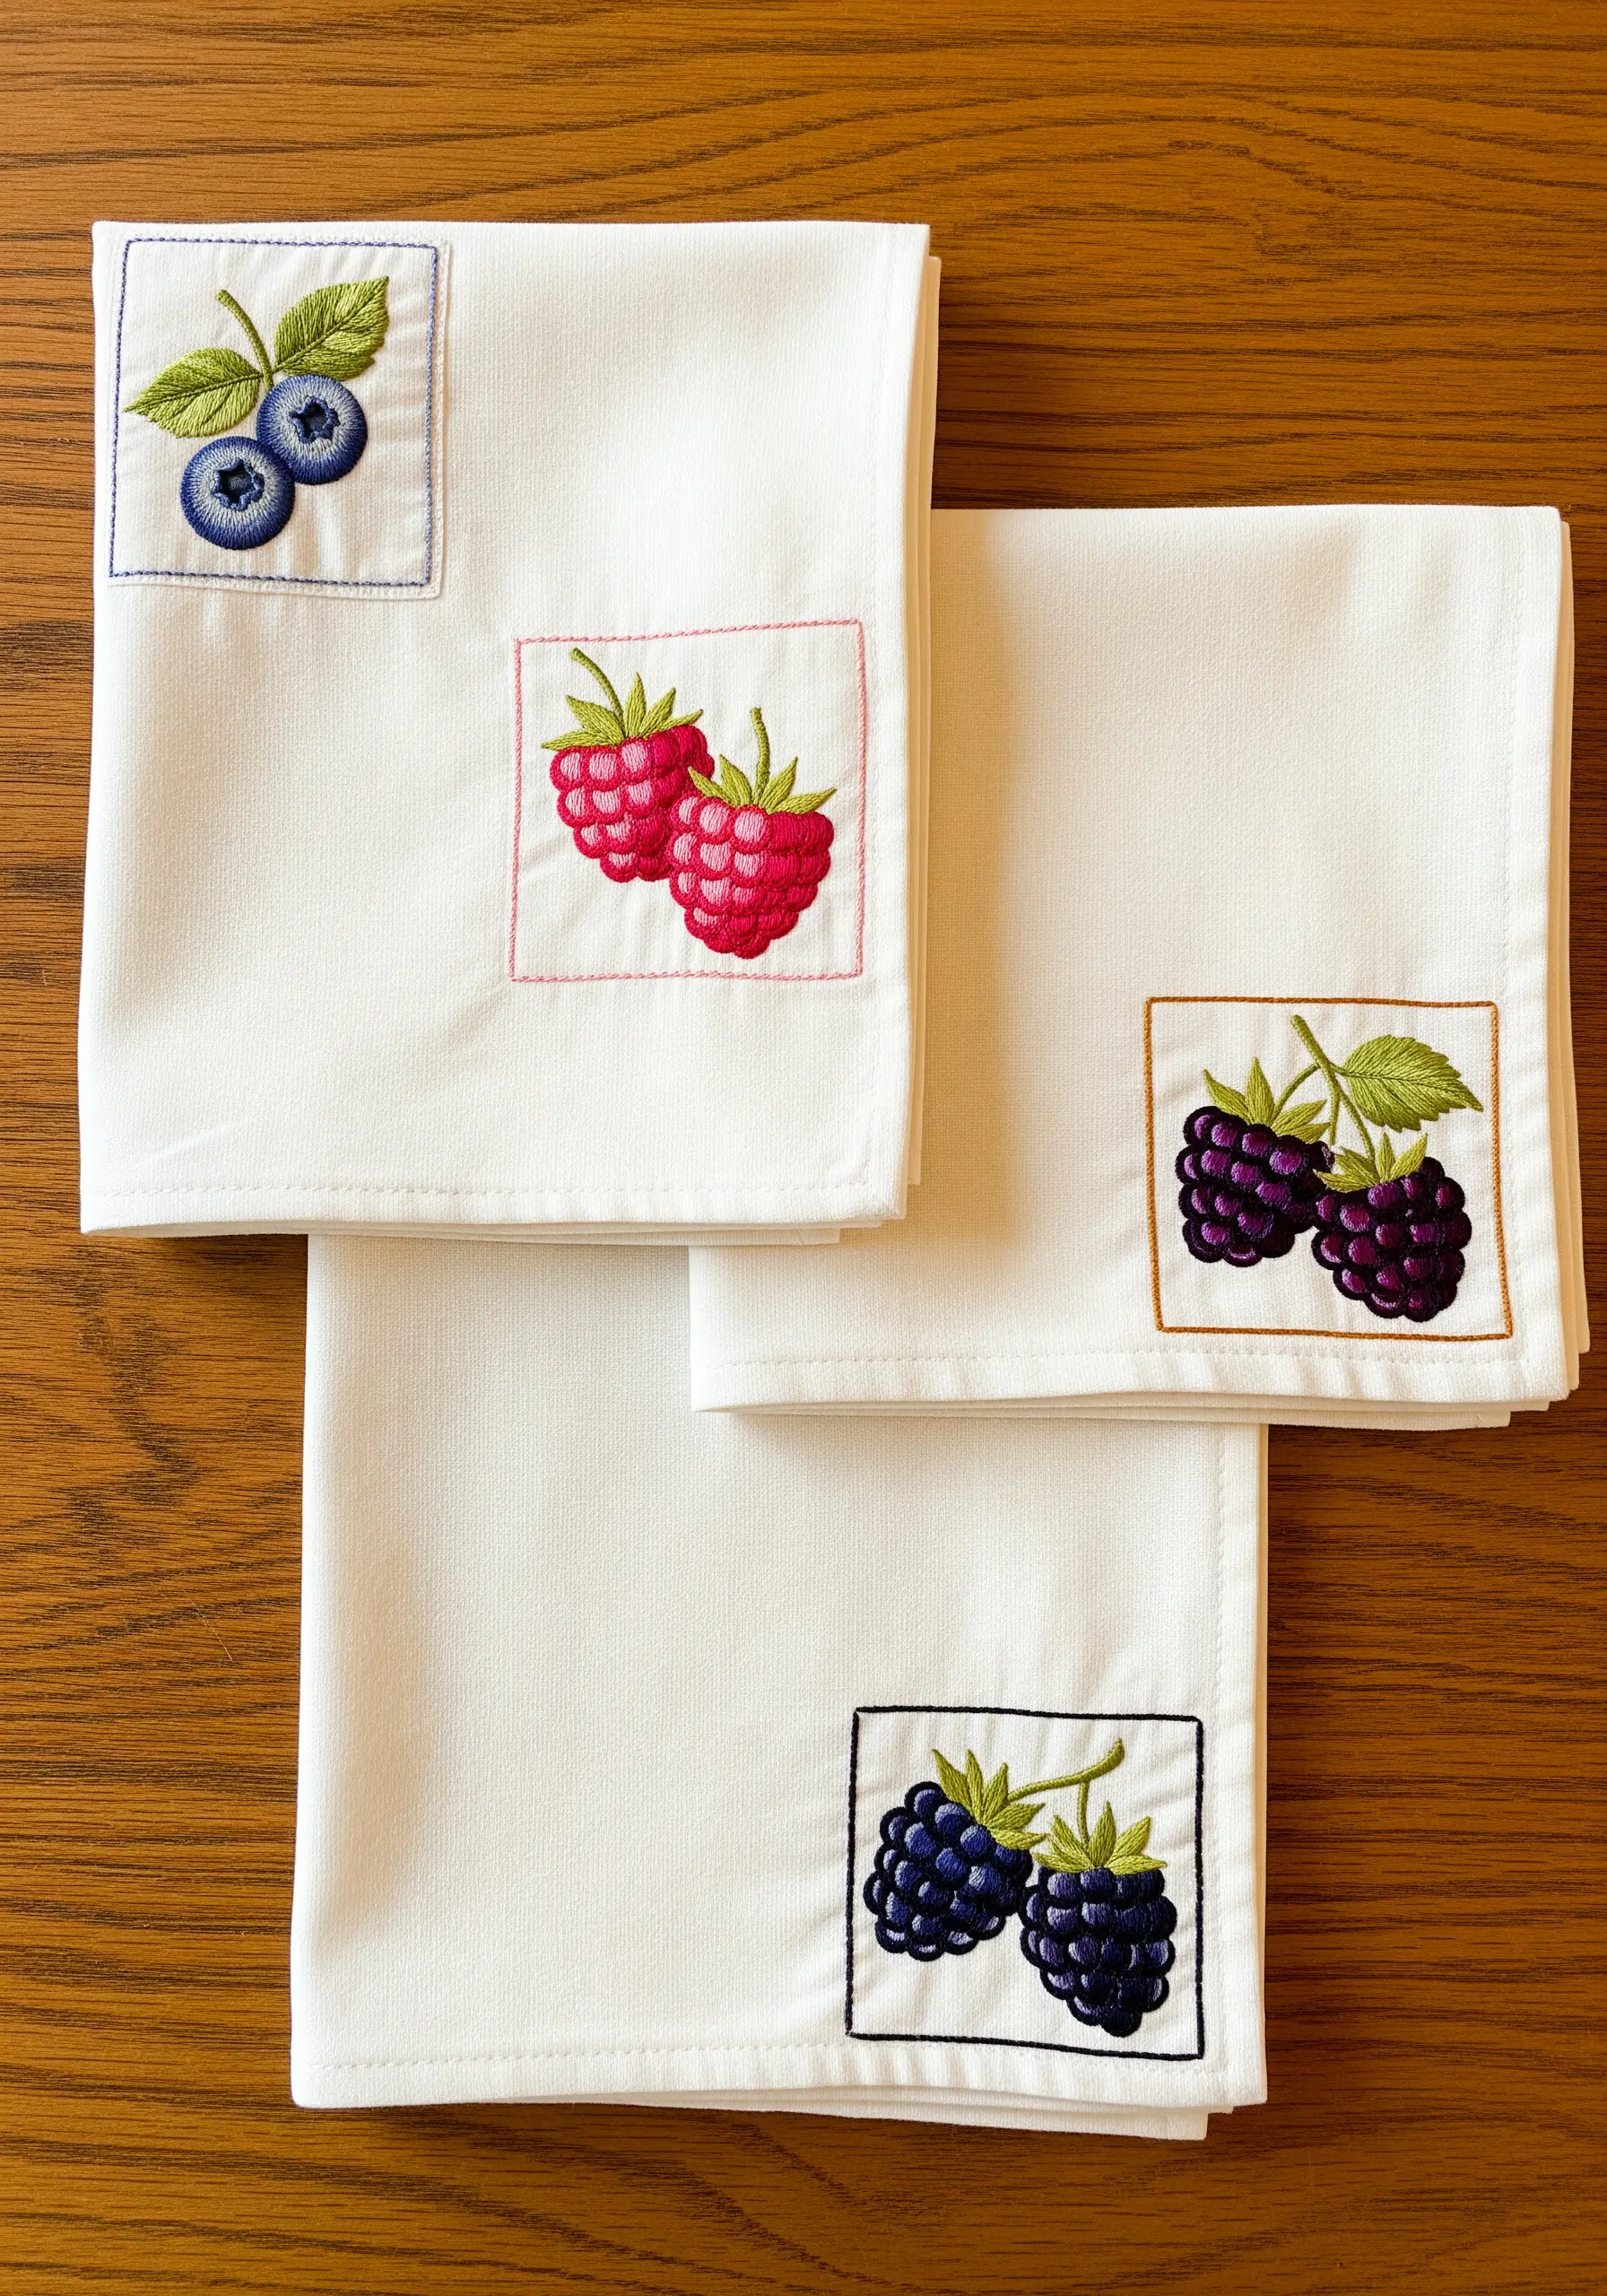
To give berries a plump, glossy look, leave a tiny unstitched spot where the light would hit, or add a single white stitch as a highlight after filling.
Use satin stitch and angle your stitches to follow the curve of the berry; this enhances its round shape and creates a subtle play of light.
Define each individual drupelet on the raspberries and blackberries with tiny backstitches in a slightly darker shade, adding definition and realism.
These easy, small embroidery patterns are perfect for embellishing napkins, tea towels, or handkerchiefs.
22. Designing Large-Scale Appliqué for Bold Surfaces

When working on a large scale, like this guitar case, break the design into smaller, manageable appliqué pieces.
Embroider each rose and leaf section separately on a piece of felt or non-woven stabilizer before cutting them out.
Stitch the pieces onto the case using a whip stitch with matching thread for a nearly invisible finish, starting with the elements in the background (leaves) first.
This modular approach makes a large, complex design feel much less intimidating and ensures each element is perfectly stitched.
23. Creating a Graphic, Heraldic Nature Crest

For a clean, graphic style, outline your shapes first with a precise split stitch before filling them with a smooth, unidirectional satin stitch.
The diagonal background stripes add dynamic energy; use a ruler and a heat-erasable pen to ensure your lines are perfectly parallel.
Choose an analogous color scheme—here, yellows, oranges, and browns—to create a design that is harmonious and visually sophisticated.
Applying this shield to a plaid blanket creates a wonderful contrast between the sharp, graphic embroidery and the soft, woven texture.
24. Combining Stitches for a Desert Bloom
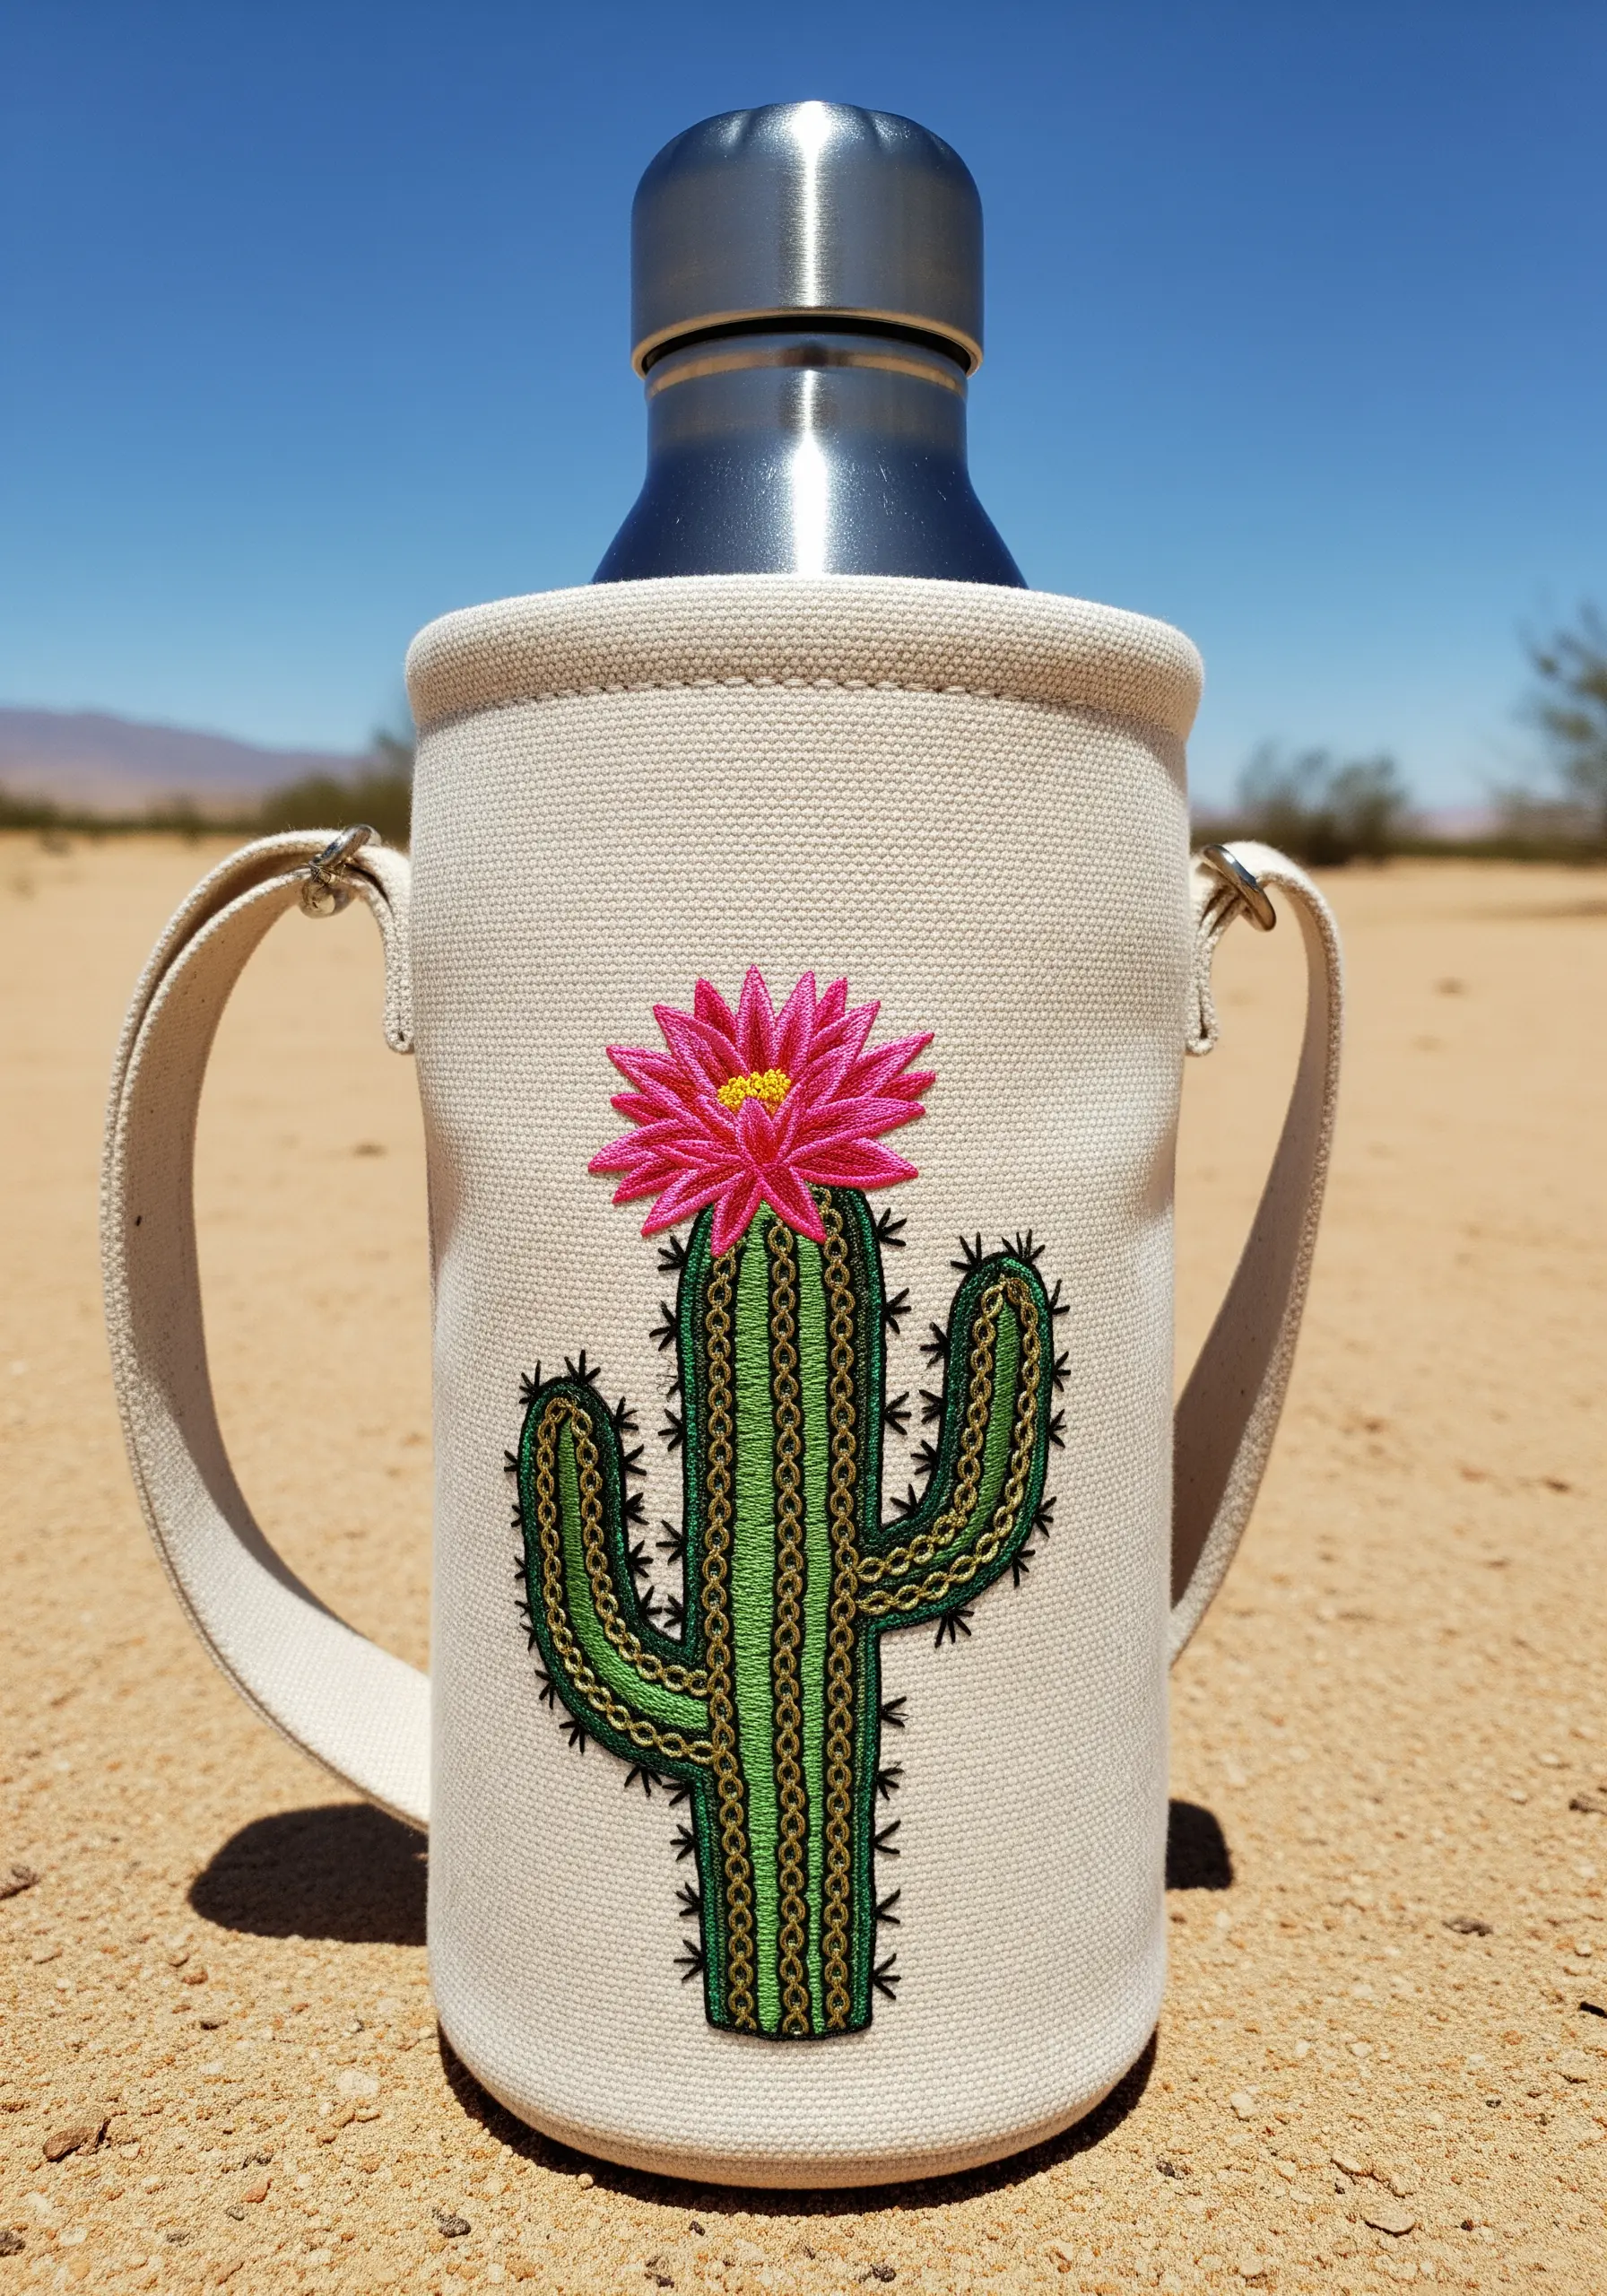
Capture the spiky texture of a cactus by outlining each section with a chain stitch and adding small, straight stitches at angles for the needles.
Contrast the sharp texture of the cactus body with a soft, dense satin stitch for the vibrant pink flower petals.
For the flower’s center, use a cluster of yellow French knots to mimic the texture of stamen and pollen.
This project is a fantastic way to practice combining different stitch families—lines, loops, and knots—to create a single, texture-rich piece.
25. Stitching on Sheer Fabric for an Ethereal Effect

When embroidering on a sheer fabric like organza, your stitches on the back will be visible, so aim for neatness by trimming thread tails closely.
Use a lightweight stabilizer that you can carefully trim away after stitching to prevent the delicate fabric from puckering.
For the Queen Anne’s Lace, use small, white detached chain stitches for the florets and tiny French knots for the centers to create a lacy, airy texture.
Applying the finished sheer patch over a patterned fabric allows the background to peek through, adding another layer of visual interest.
26. Designing Bold and Playful Patches for Kids’ Wear
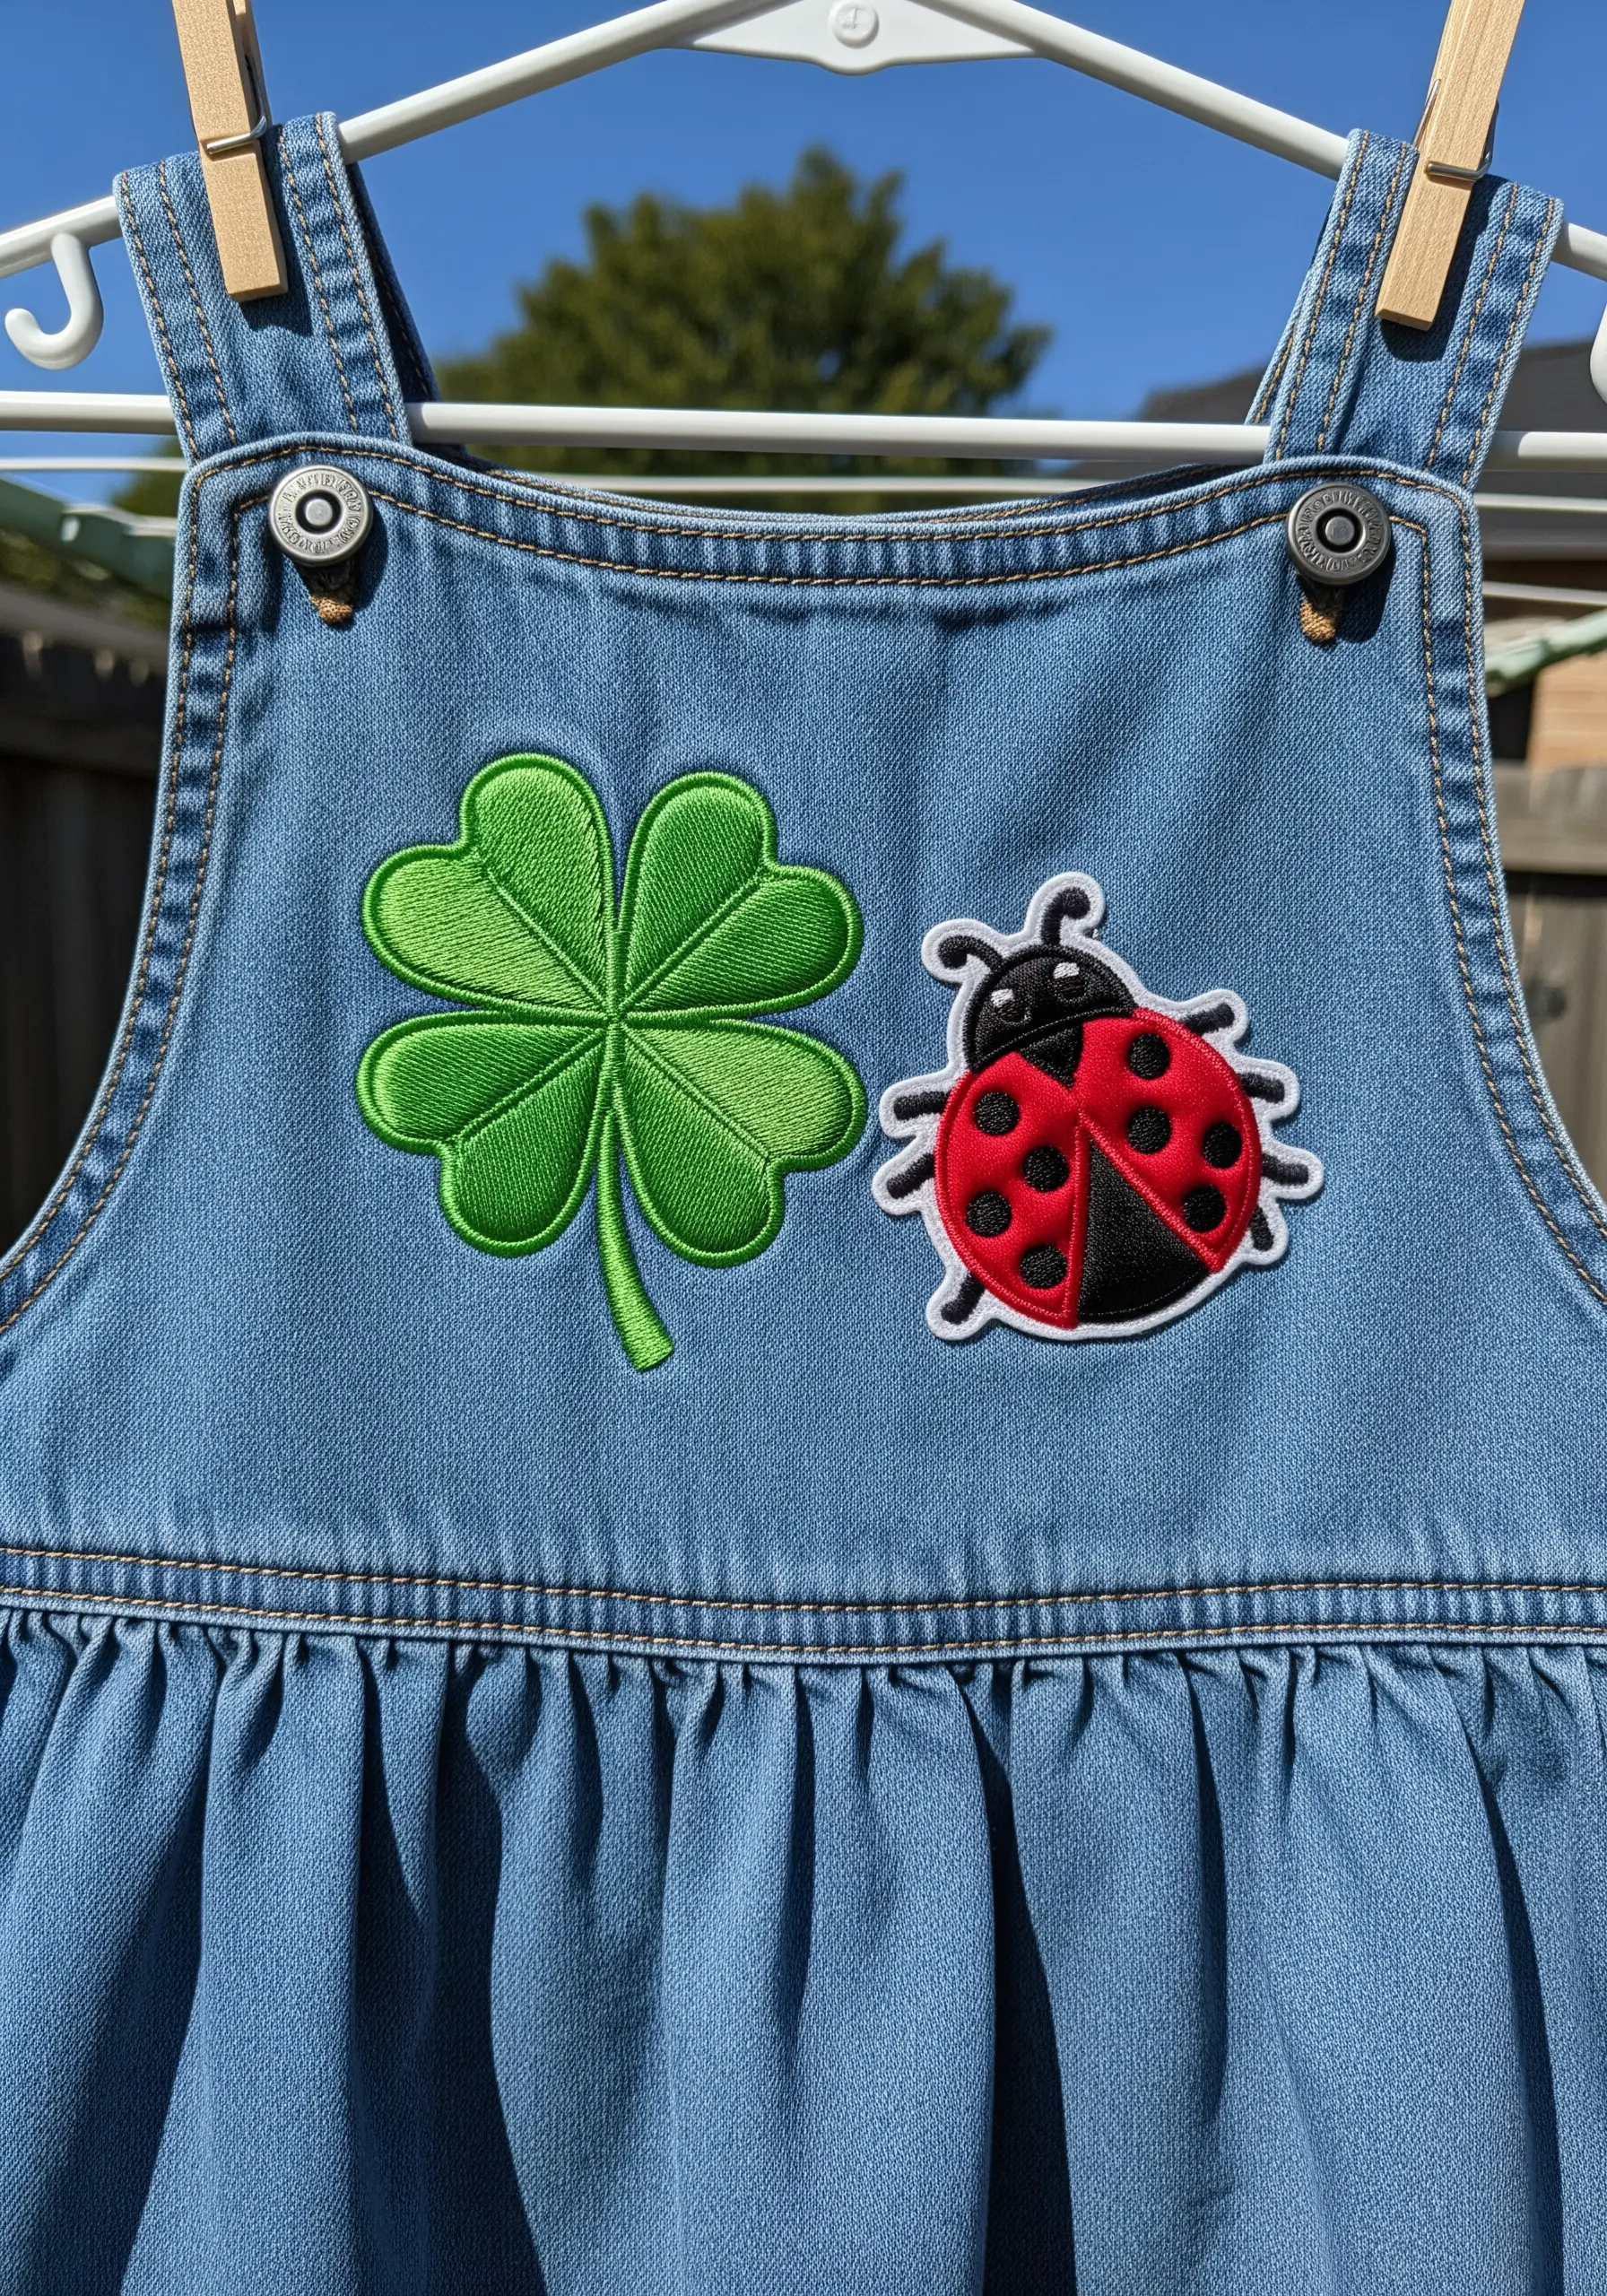
For children’s clothing, choose simple, recognizable shapes and a bright, high-contrast color palette.
Use a thick satin stitch with at least four strands of floss to fill the shapes quickly and create a durable, plush finish that can withstand play.
A bold, black outline defines the shapes and gives them a cheerful, cartoon-like quality that appeals to kids.
When attaching patches to denim, use a strong thread and a simple whip stitch around the edge for maximum durability through washing and wearing.
27. Blending Hobbies: A Knitter’s Floral Bouquet

Create a personal narrative by combining a floral motif with an object representing another hobby, like this ball of yarn.
To create the texture of wound yarn, use a satin stitch, but vary the direction of your stitches to mimic overlapping strands.
Use French knots for the heather blossoms, clustering them tightly on the stems to look like they are blooming directly from the yarn.
The single trailing thread at the bottom leads the eye out of the main design, adding a playful and dynamic touch to the composition.
28. Creating a Glass Effect with Thread
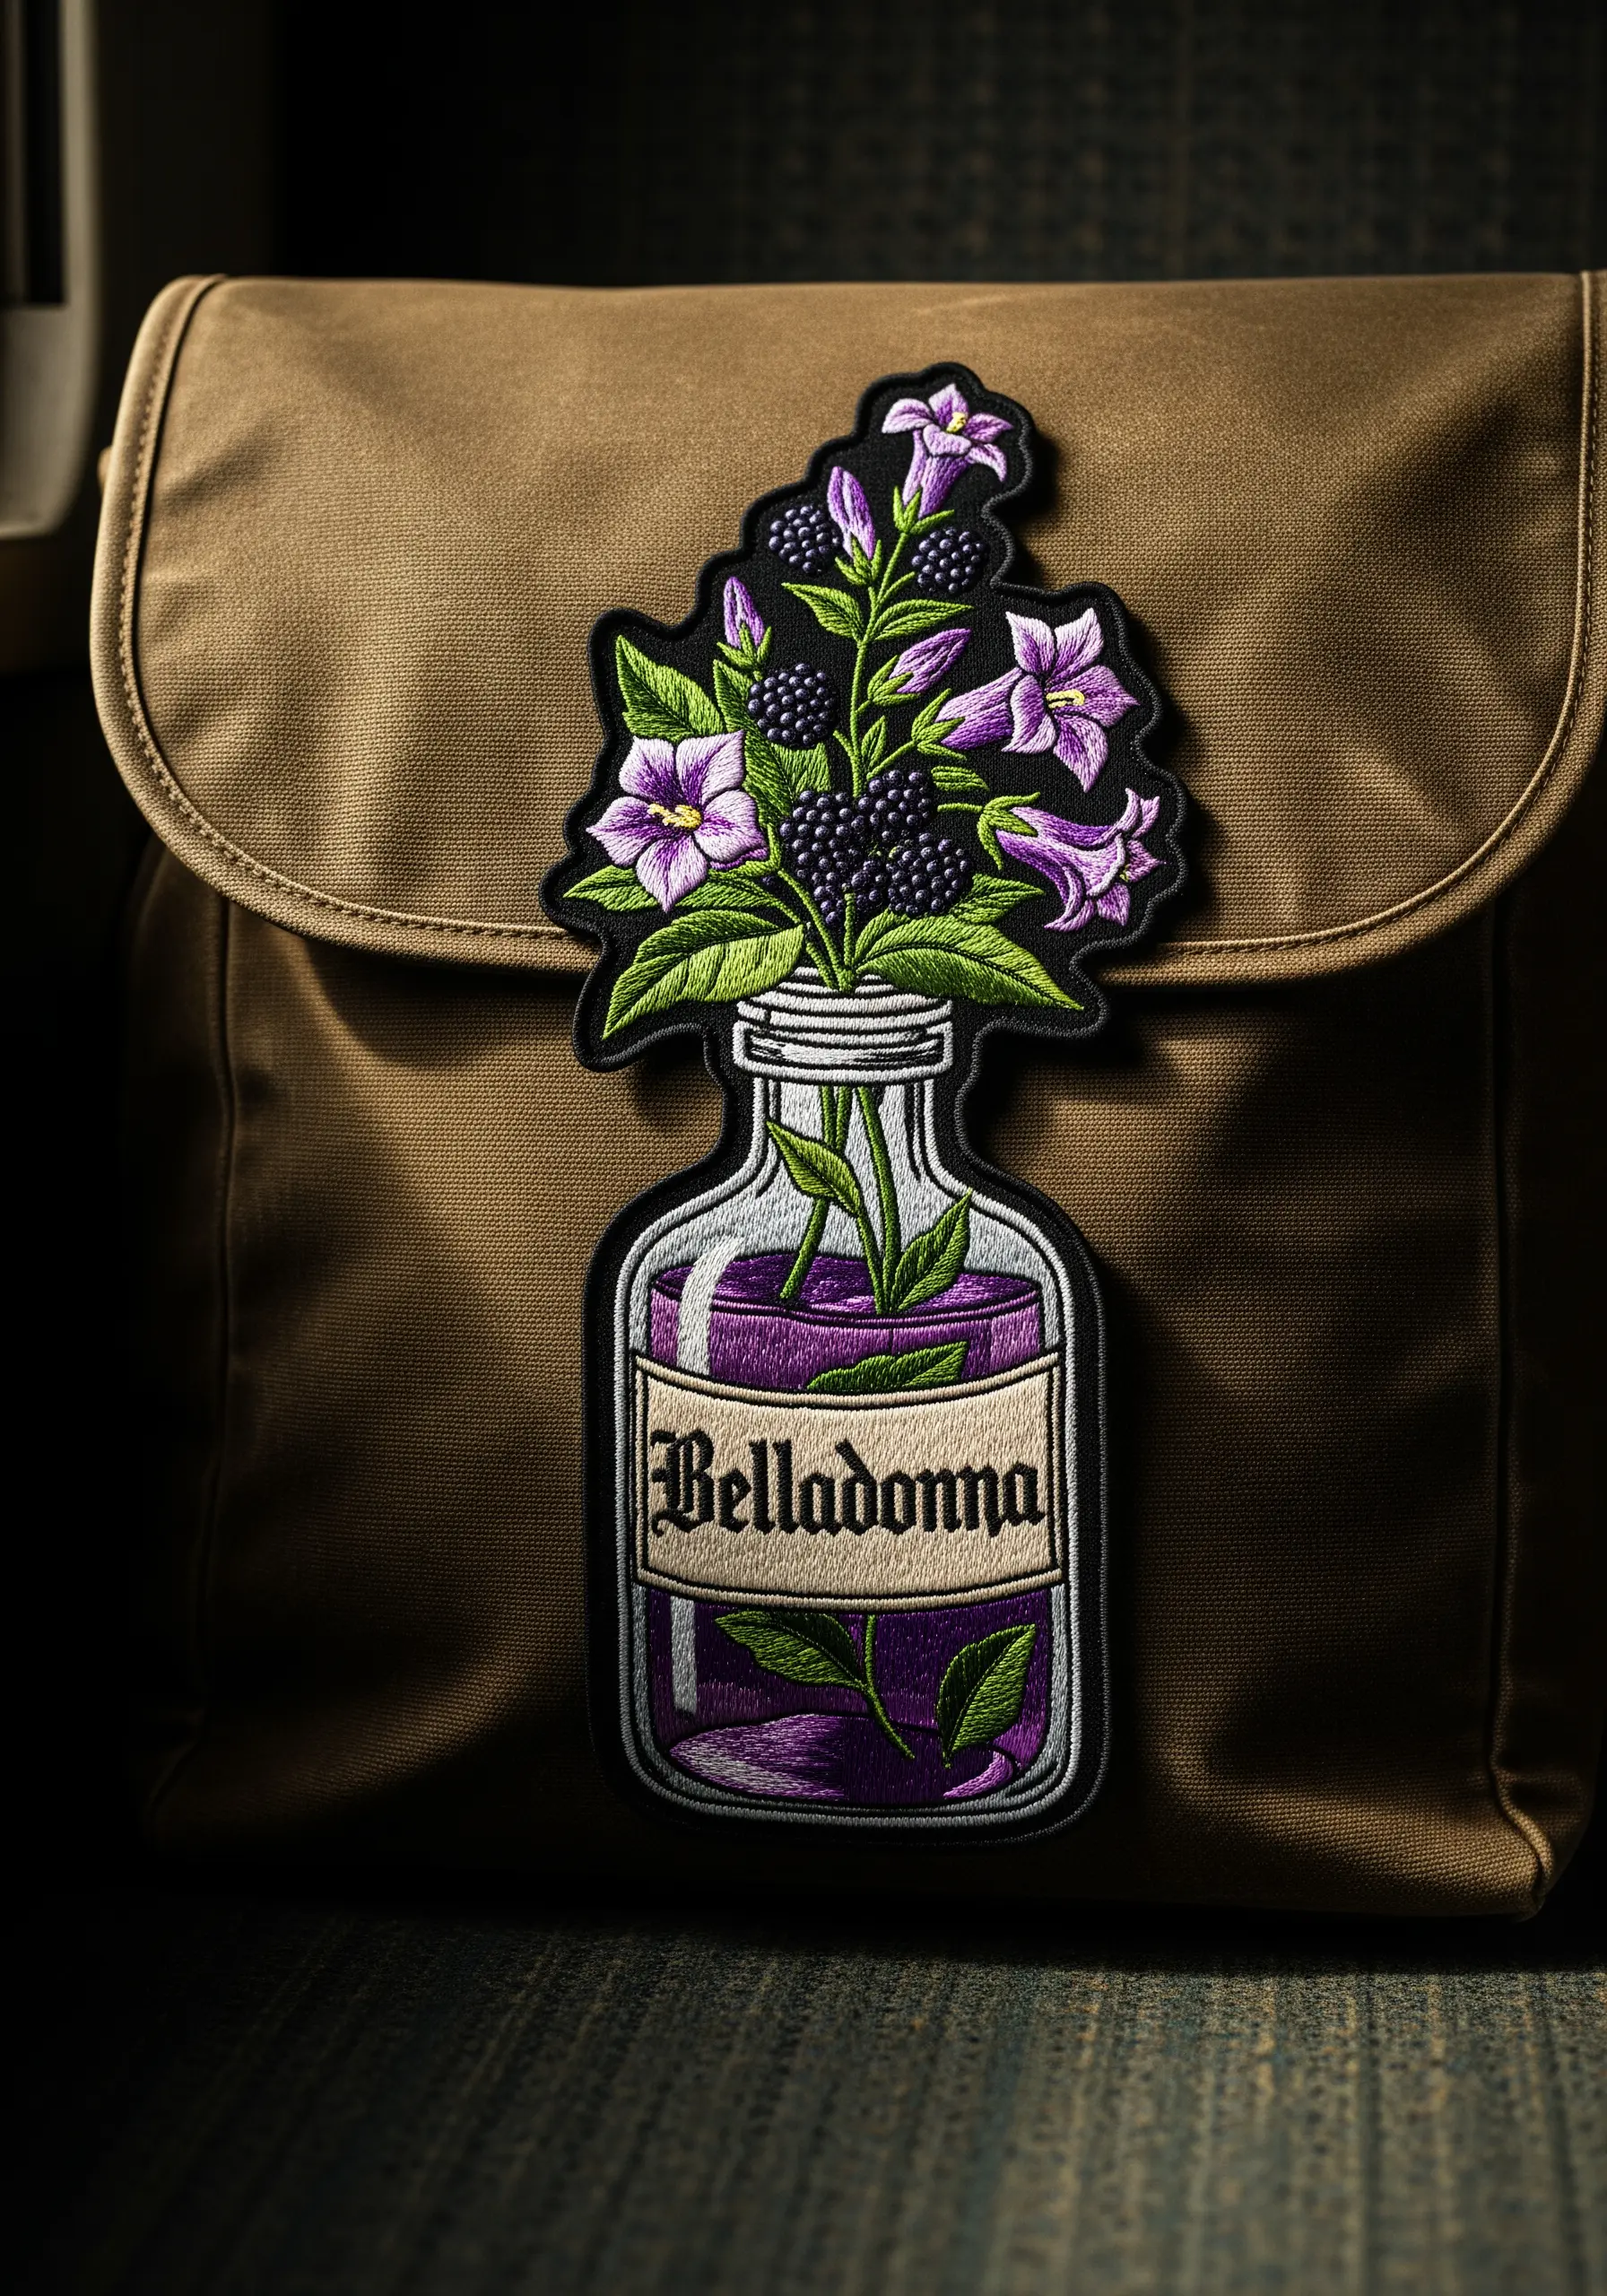
To give the bottle a glassy, transparent look, use a long-and-short stitch with light grey and white threads to create subtle highlights along the edges.
Fill the ‘liquid’ section with a smooth, horizontal satin stitch to differentiate it from the glass and the flowers.
For the small lettering on the label, use a single strand of thread and a tiny backstitch for maximum clarity and precision.
This design is a perfect example of how botanical line art embroidery patterns can be combined with fill stitches for a stunning, illustrative effect.
29. Embroidering on High-Pile Fabrics like Velvet
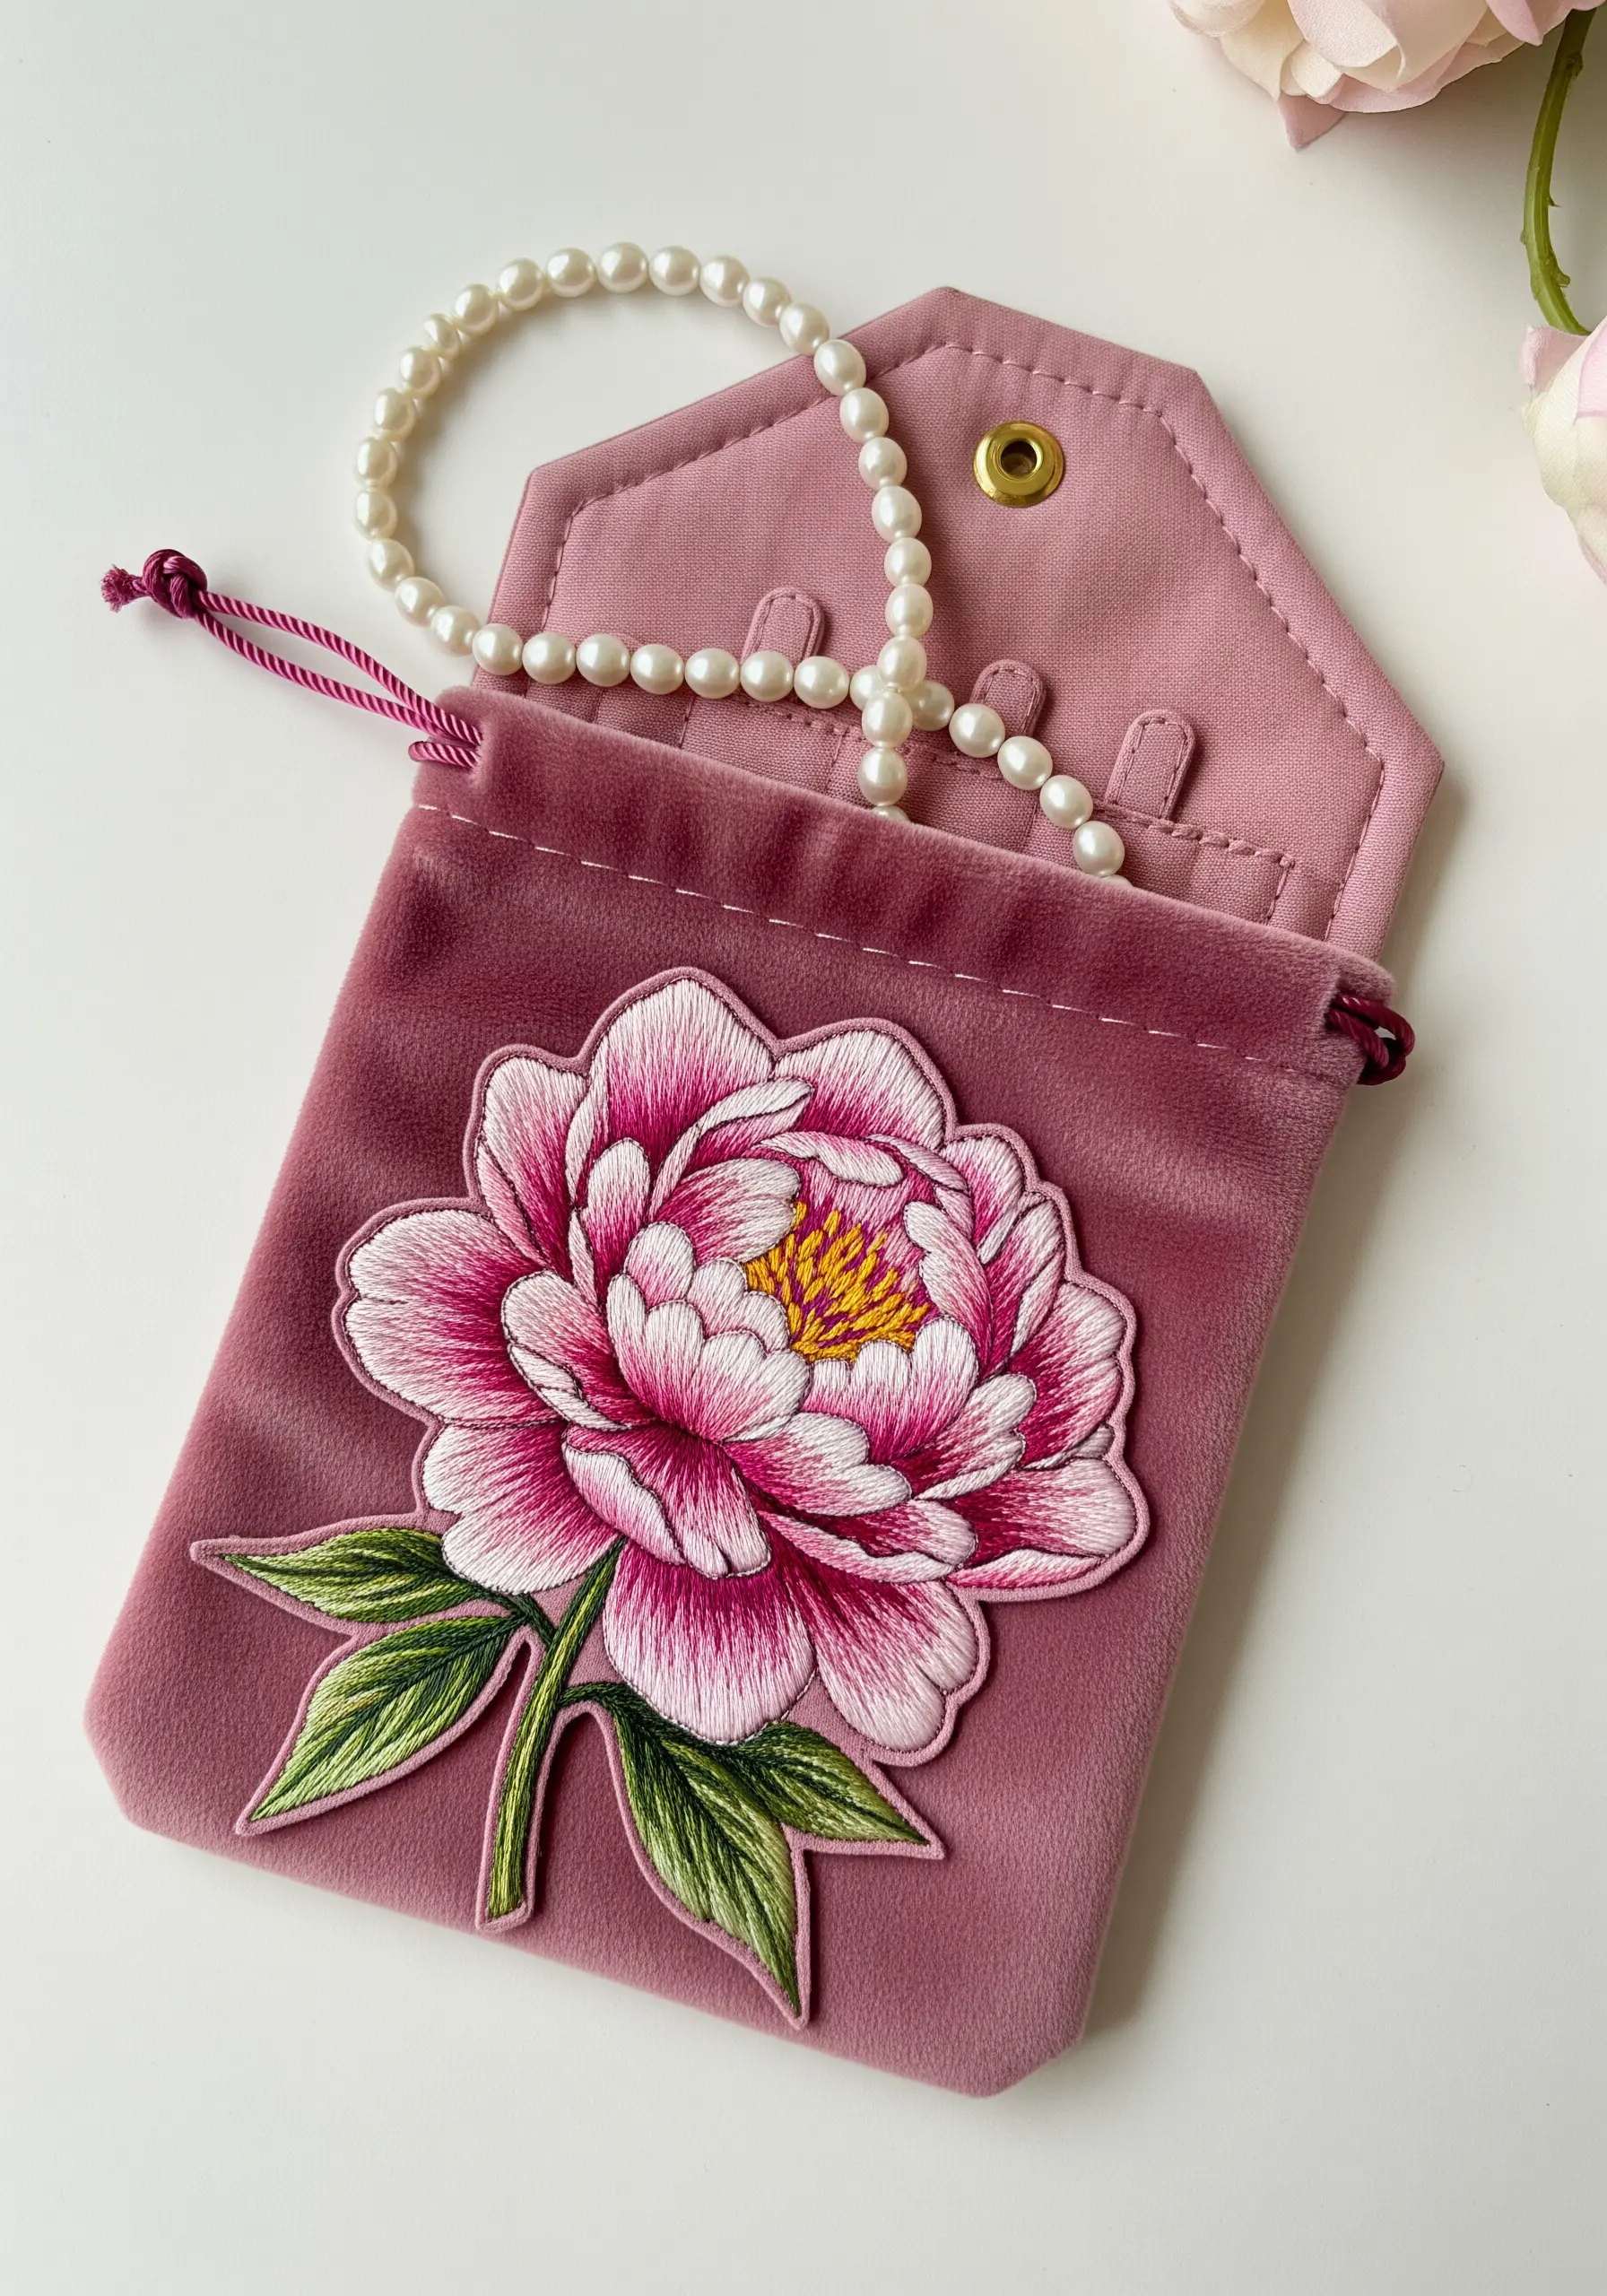
When stitching on velvet, use a topper (like a water-soluble stabilizer) to prevent your stitches from sinking into the fabric’s pile.
Choose stitches that sit on top of the fabric, like satin stitch and French knots, rather than those that pull the fabric tight.
A long-and-short stitch is ideal for blending colors on the peony petals, creating a soft, painterly effect that complements the luxurious texture of the velvet.
The contrast between the smooth, silky thread and the plush velvet creates a rich tactile experience, turning a simple pouch into a treasured object.
30. Customizing Knitwear with Simple Shapes
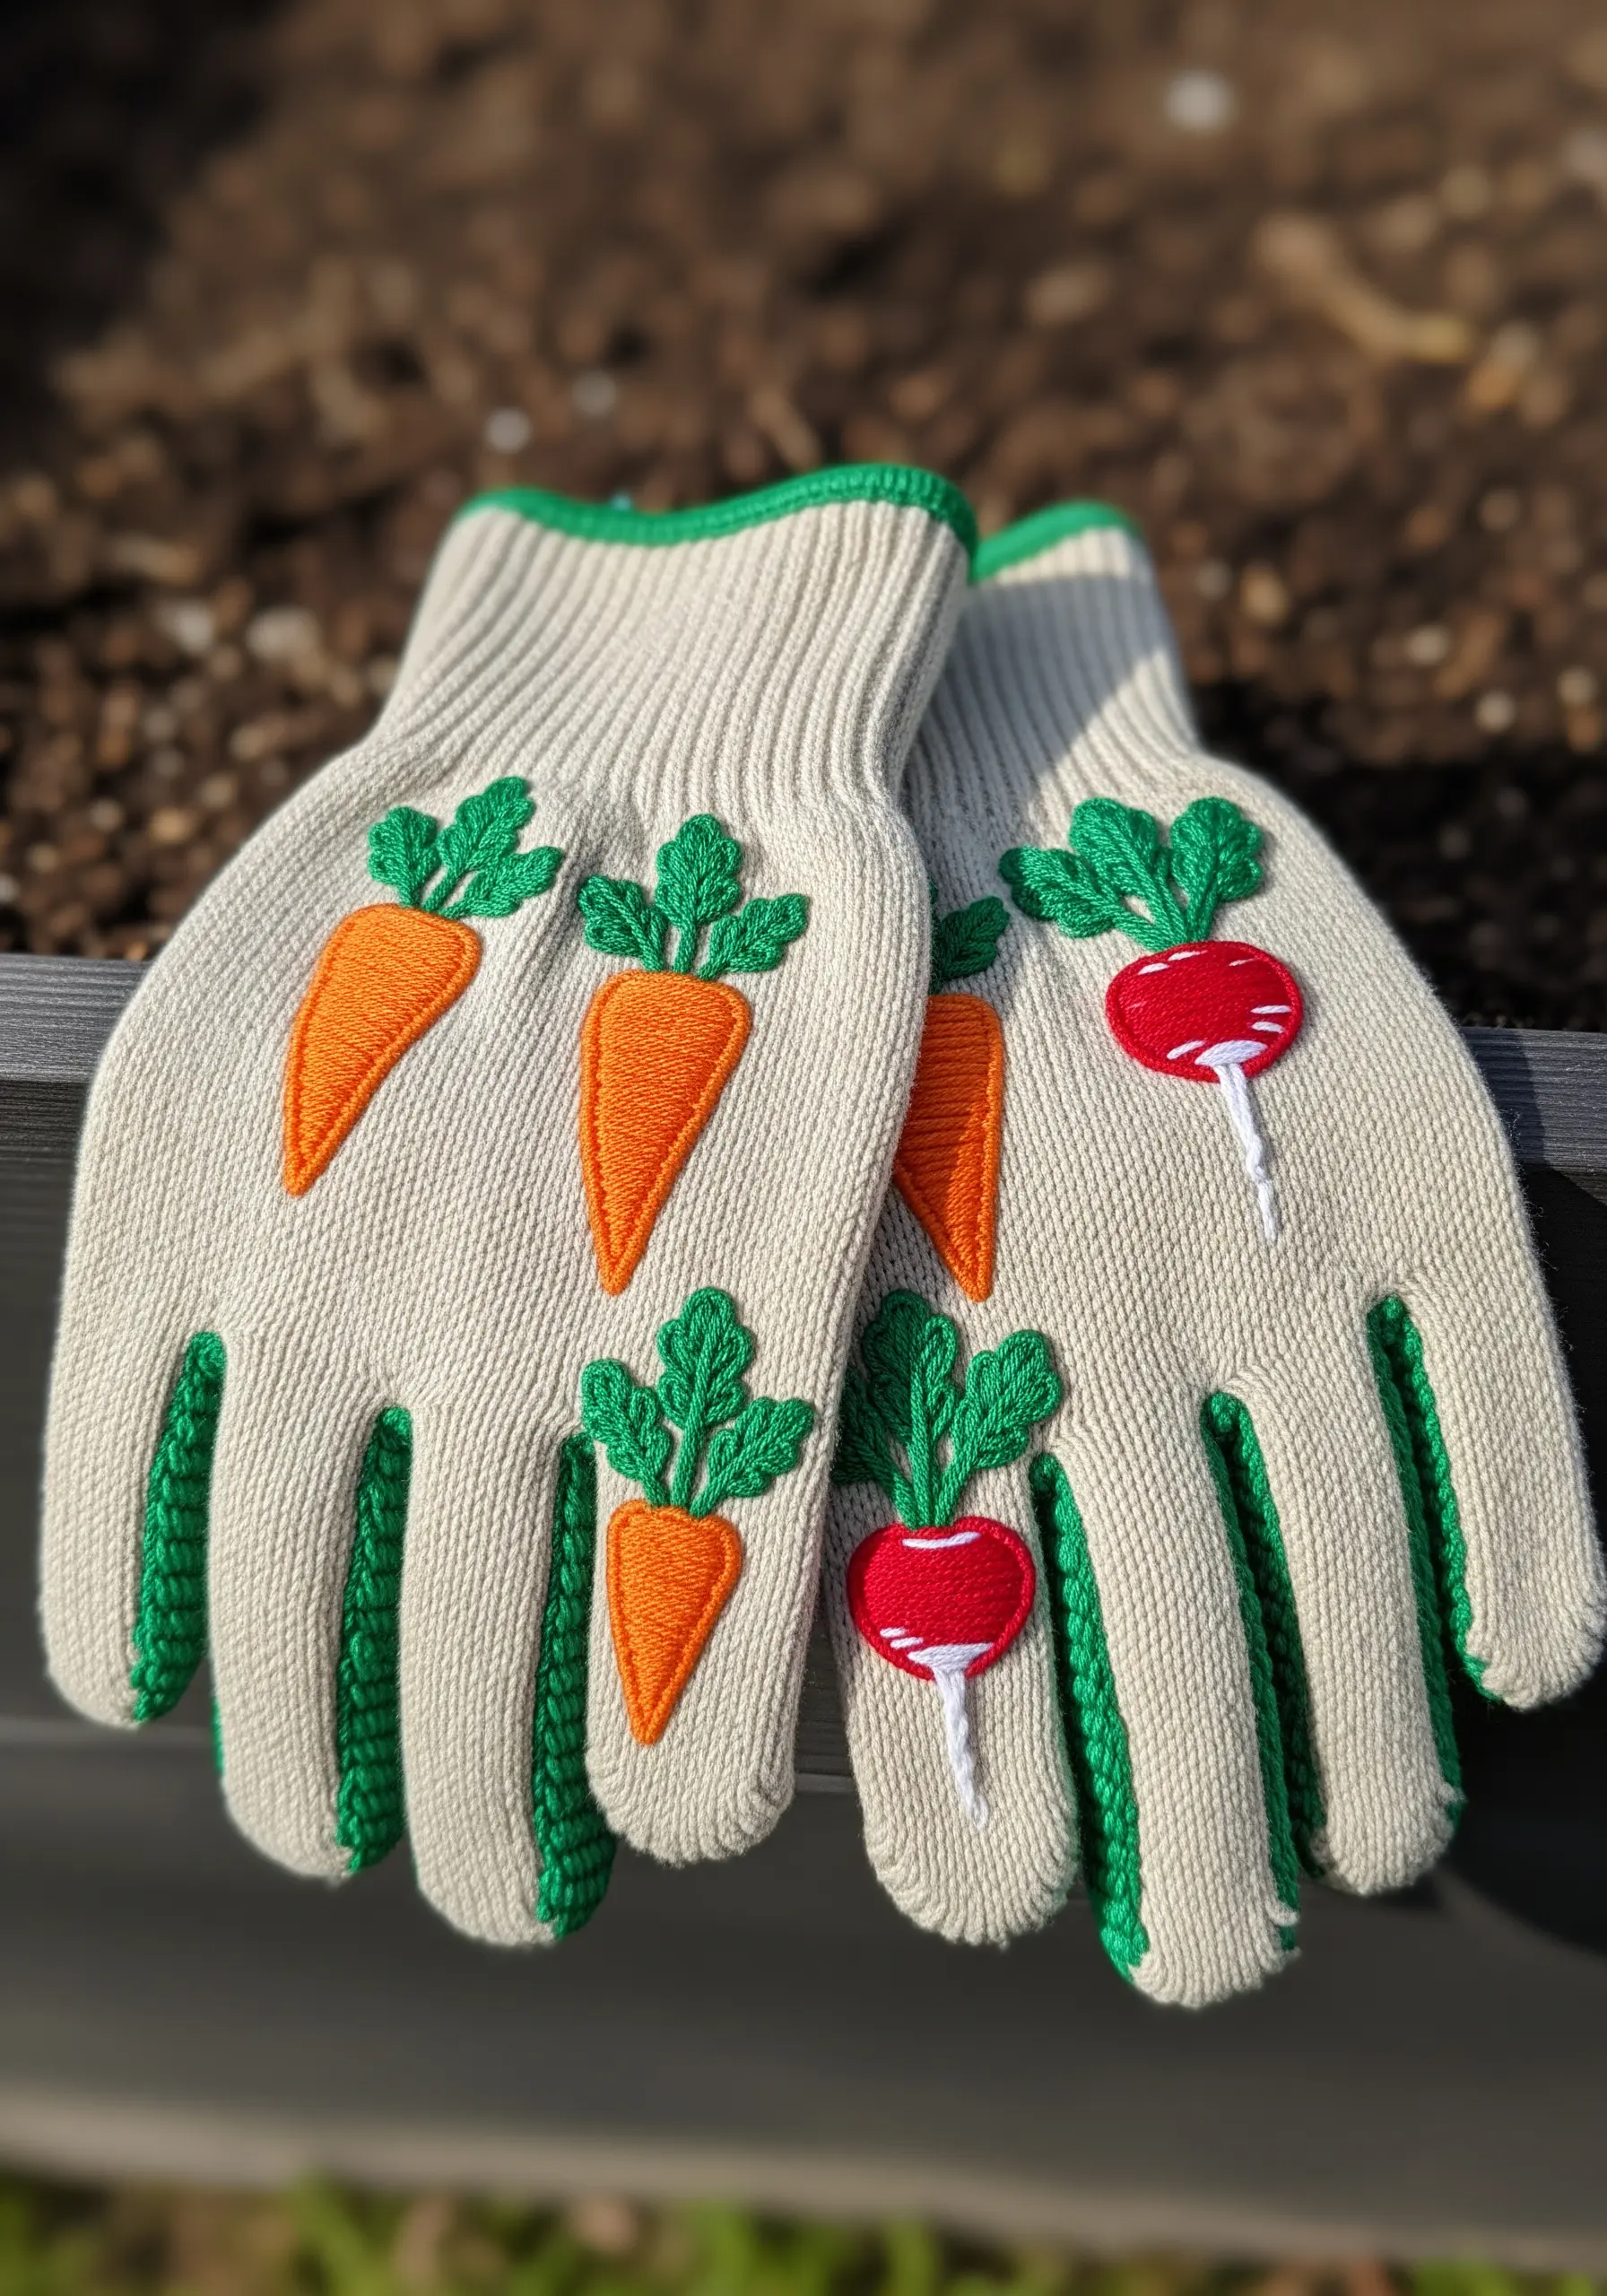
When embroidering on a stretchy knit fabric like these gloves, use a light hand to avoid puckering the material.
Choose simple, graphic shapes like these carrots and radishes, and fill them with a vertical satin stitch that moves with the knit’s grain.
Use a chain stitch for the green outlines and leafy tops; its looped structure has a natural bit of give, which is ideal for stretch fabrics.
These cartoon-style embroidery ideas are perfect for adding a touch of personality to functional items like gloves, socks, or beanies.


