

When you hold a tiny, soft baby garment in your hands, the desire to add something uniquely personal is almost instinctual. It’s a way to stitch your love and hopes into the very fabric that will swaddle a new life, creating not just clothing, but a future heirloom.
But turning that beautiful intention into a polished, treasured piece doesn’t require impossibly complex patterns or years of practice. True artistry in embroidery often comes from thoughtful, simple choices: selecting the perfect stitch to complement a fabric’s texture, using a single strand of thread for delicate details, or placing a motif just so, turning a plain collar into a statement of quiet elegance.
These ideas are more than just inspiration; they are your guide to making those subtle but impactful decisions. Here, you’ll discover how to transform simple clothing into cherished keepsakes, one intentional stitch at a time. Let’s begin.
1. Celestial Sheen with Metallic Threads

When working with metallic floss, which can be prone to snagging, cut your thread into shorter lengths—around 12 inches—to minimize friction and fraying.
For the moon, use a padded satin stitch to create a raised, dimensional effect that gently catches the light.
Create the stars with single-strand French knots or tiny straight stitches, varying their sizes to build a delicate, twinkling starfield that feels both subtle and magical.
2. Lifelike Texture with Thread Painting
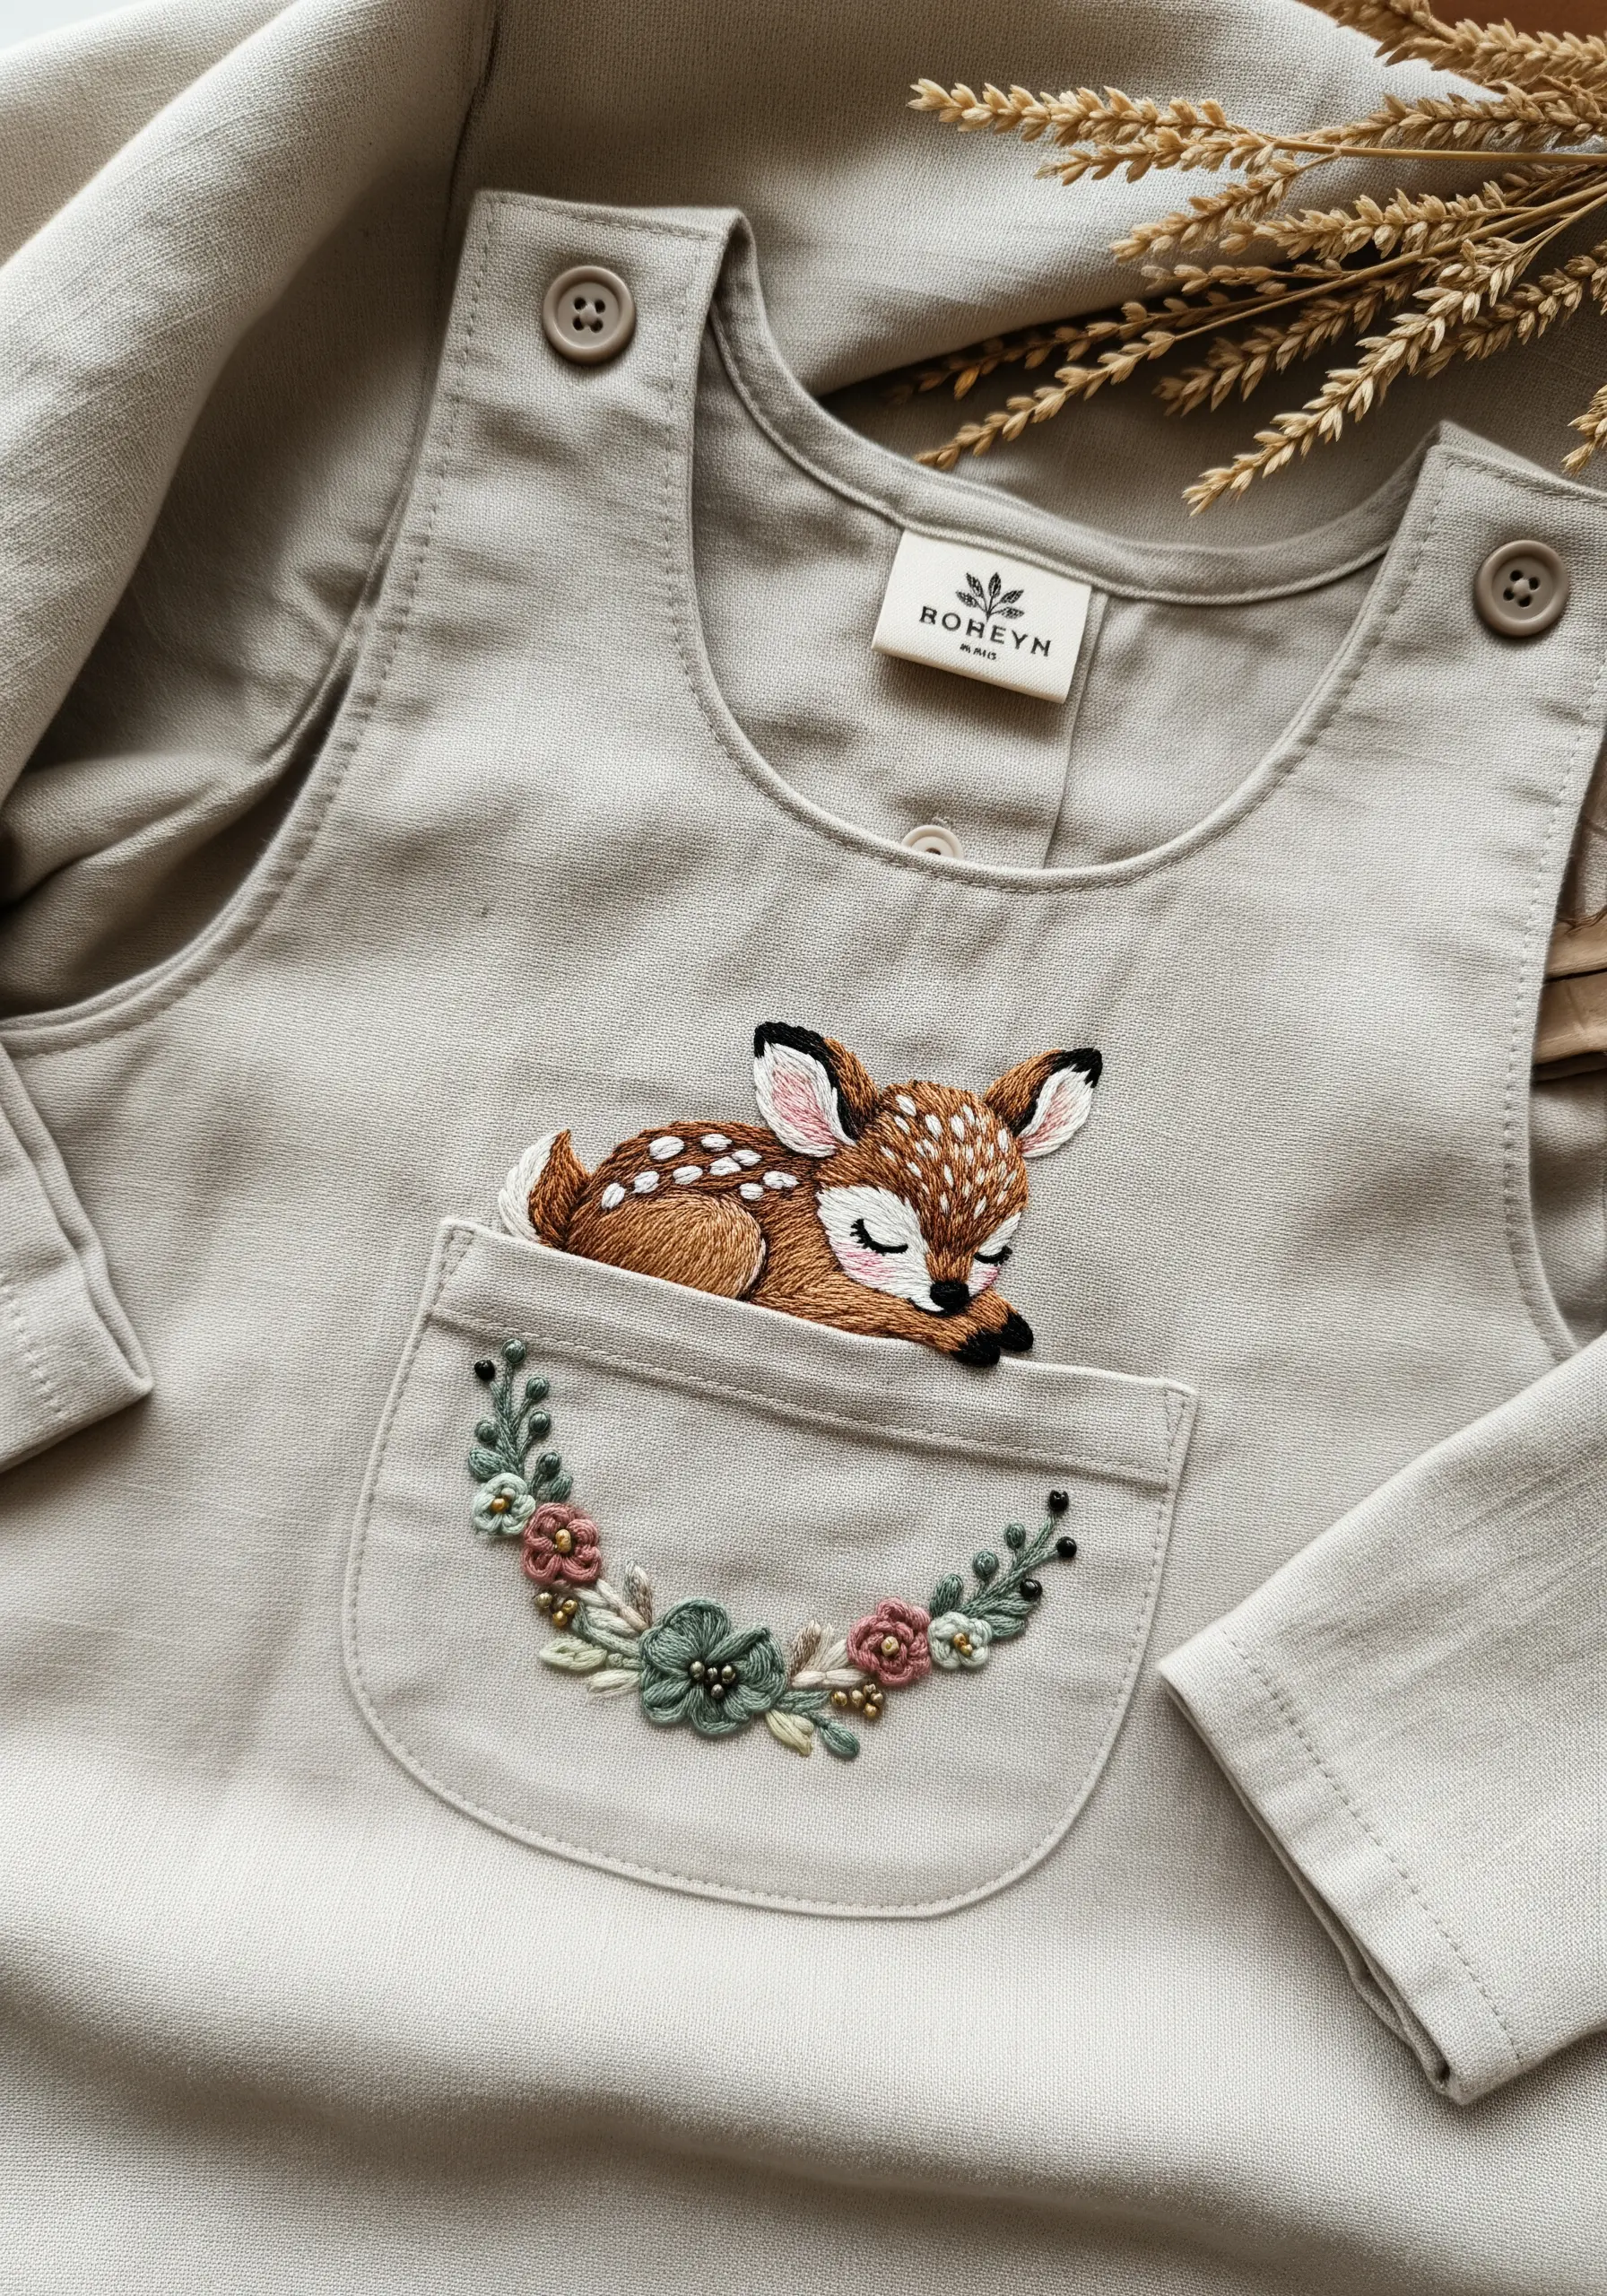
To create the fawn’s soft, realistic fur, use the long-and-short stitch technique, also known as needle painting.
Work with a single strand of embroidery floss to allow for seamless color blending, and always ensure your stitches follow the natural direction of hair growth.
For the floral garland, contrast the smooth fur with textured stitches like woven wheels for roses and French knots for buds; this thread painting technique adds depth and visual interest.
3. Embroidering on Knits Without Distortion

The key to embroidering successfully on knit fabrics is using a stabilizer to prevent the design from stretching or sinking into the weave.
Apply a lightweight, water-soluble stabilizer to the top of the fabric before you begin stitching; it provides a stable surface and washes away cleanly afterward.
Choose dimensional stitches that sit proudly on the knit texture, such as padded satin stitch for the lavender and bullion knots for daisy centers.
4. Fabric Appliqué for Bold, Soft Shapes
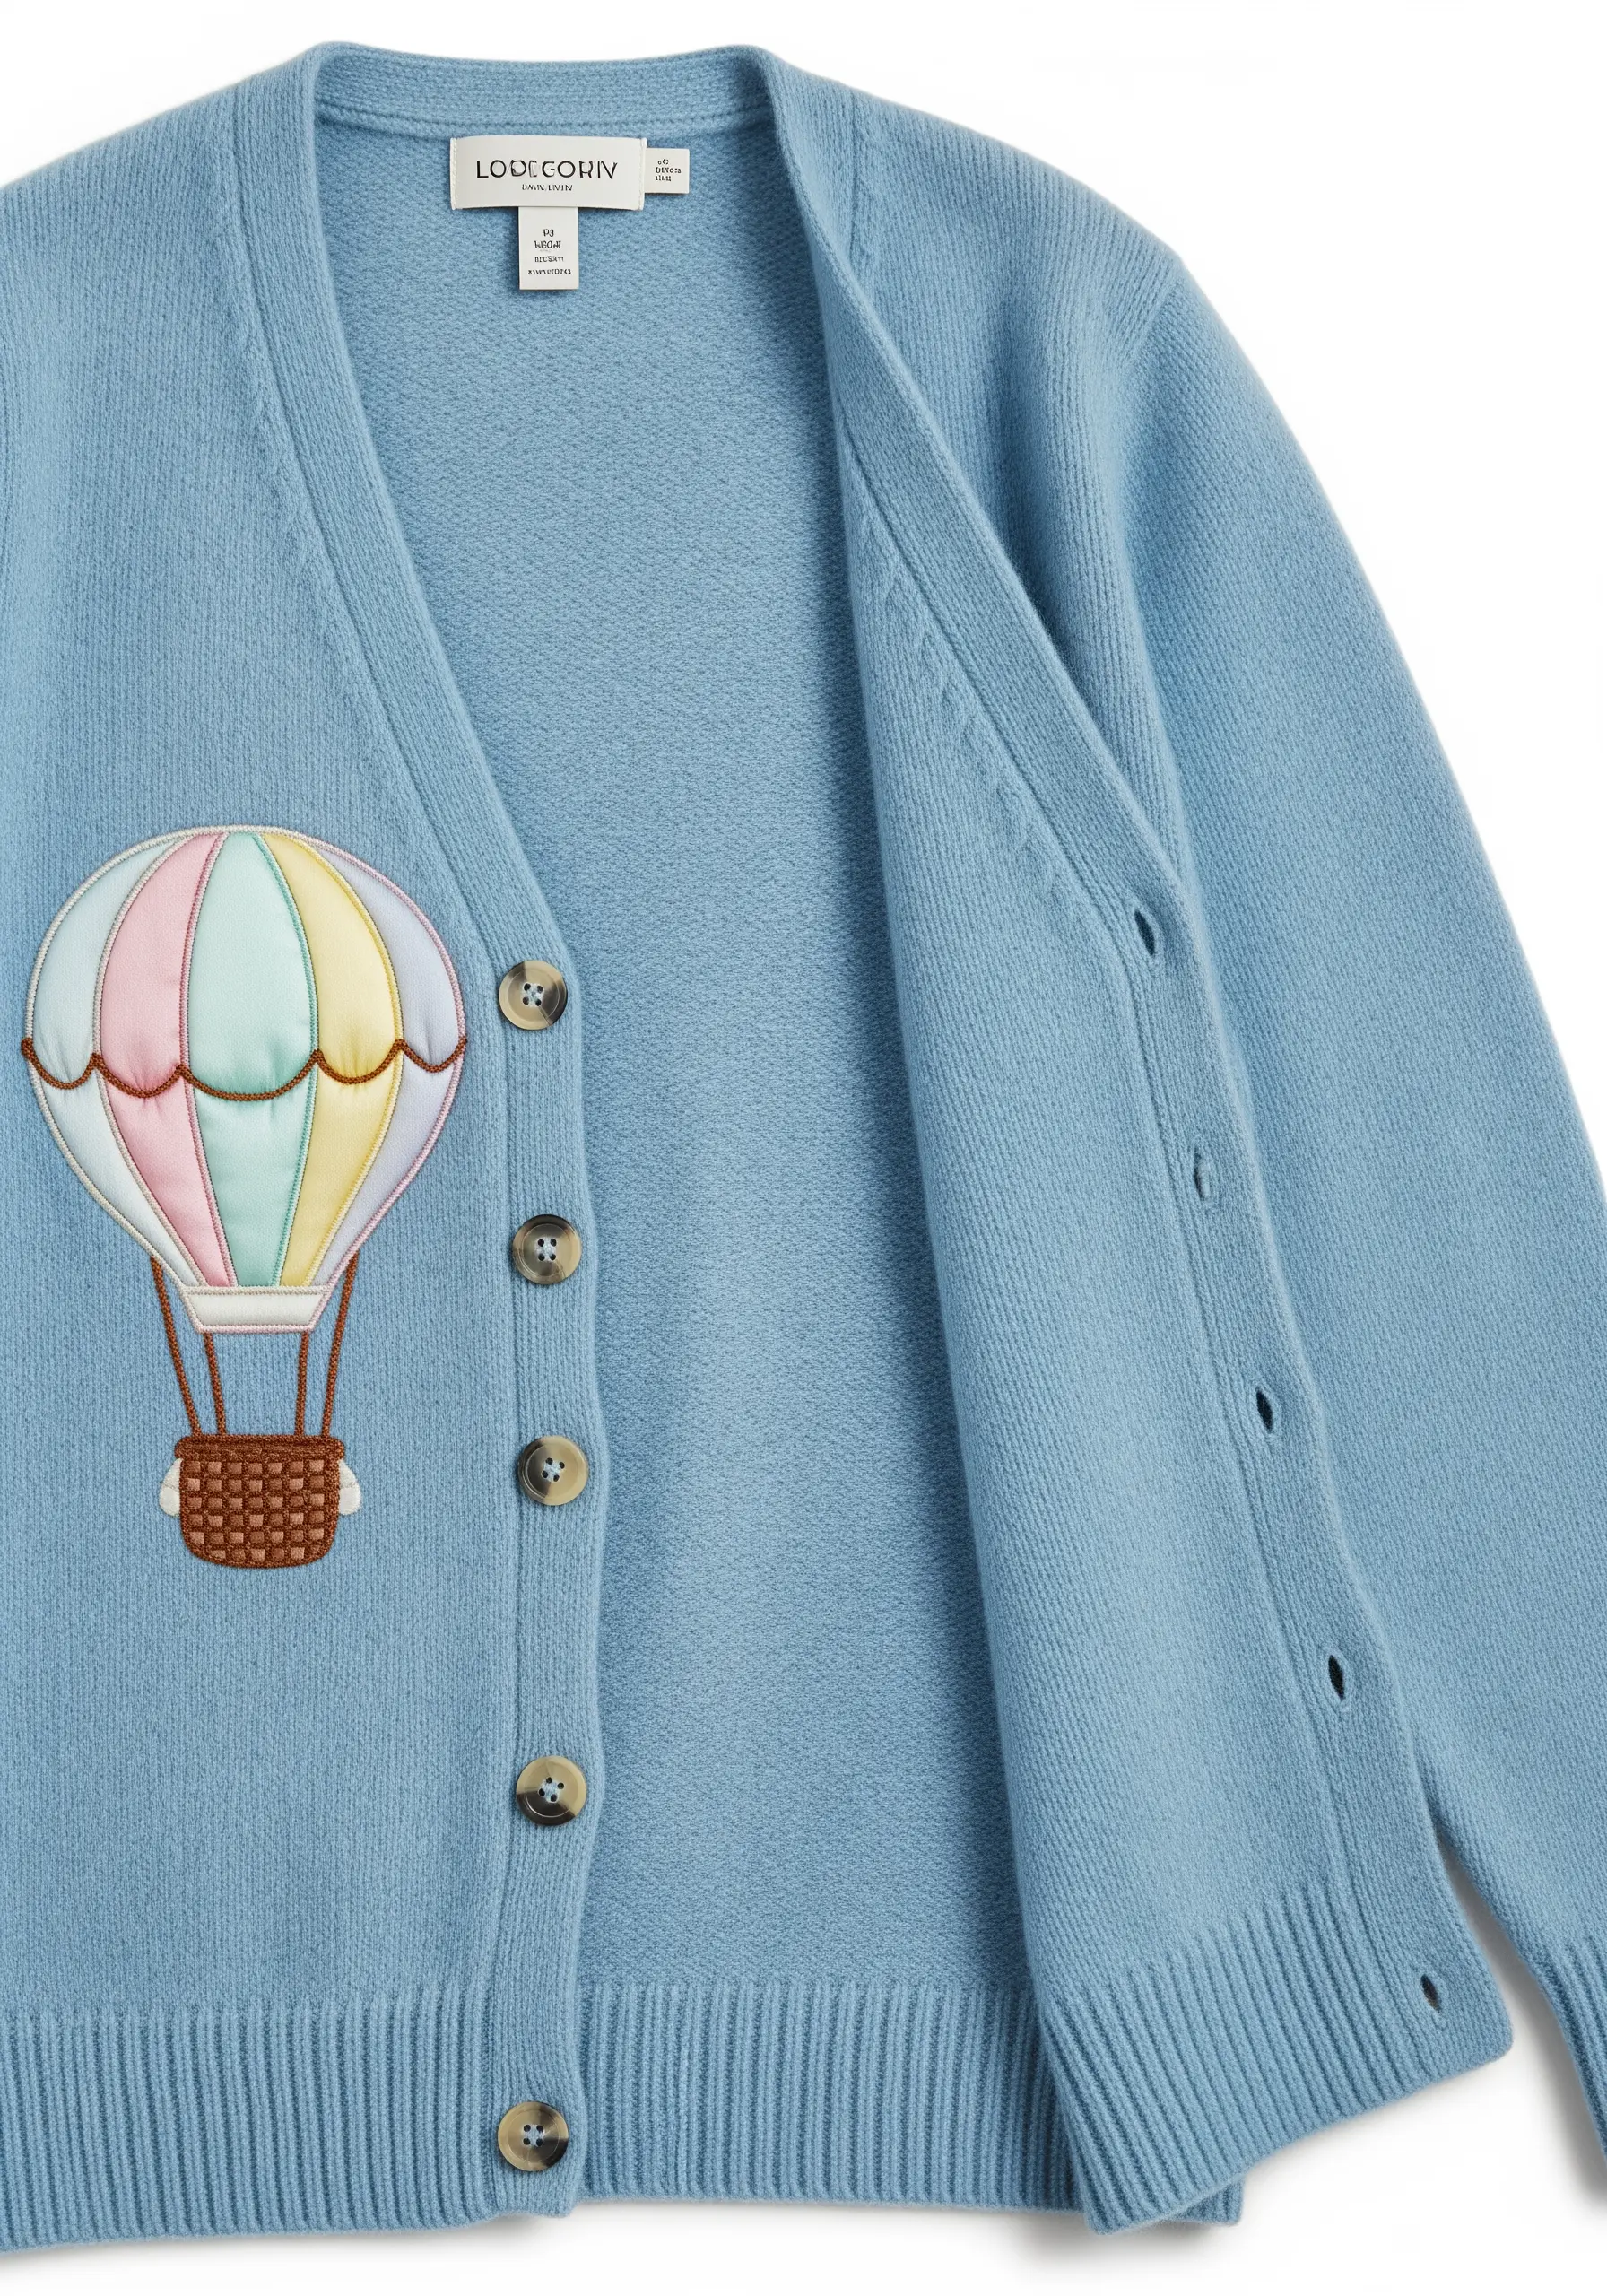
Combine appliqué with embroidery to fill large areas with color and texture efficiently.
Cut the balloon panels from soft cotton fabric, tack them down with a few small stitches, then secure the raw edges with a neat, dense satin stitch border.
This fabric collage embroidery method adds a soft, quilted dimension, uses less thread than a full fill stitch, and creates a clean, graphic look perfect for children’s wear.
5. The Art of the Perfect Monogram

The elegance of a classic monogram lies in the perfect uniformity of its satin stitch.
To achieve this professional finish, first outline the letter using a split stitch. This raised edge acts as a precise guide for your needle, helping you lay each satin stitch perfectly parallel for a smooth, slightly padded effect.
Choosing a thread with a high sheen, like silk or rayon, will further elevate the result, making even the most minimal monogram styles feel luxurious.
6. Mixed Media for Playful Texture
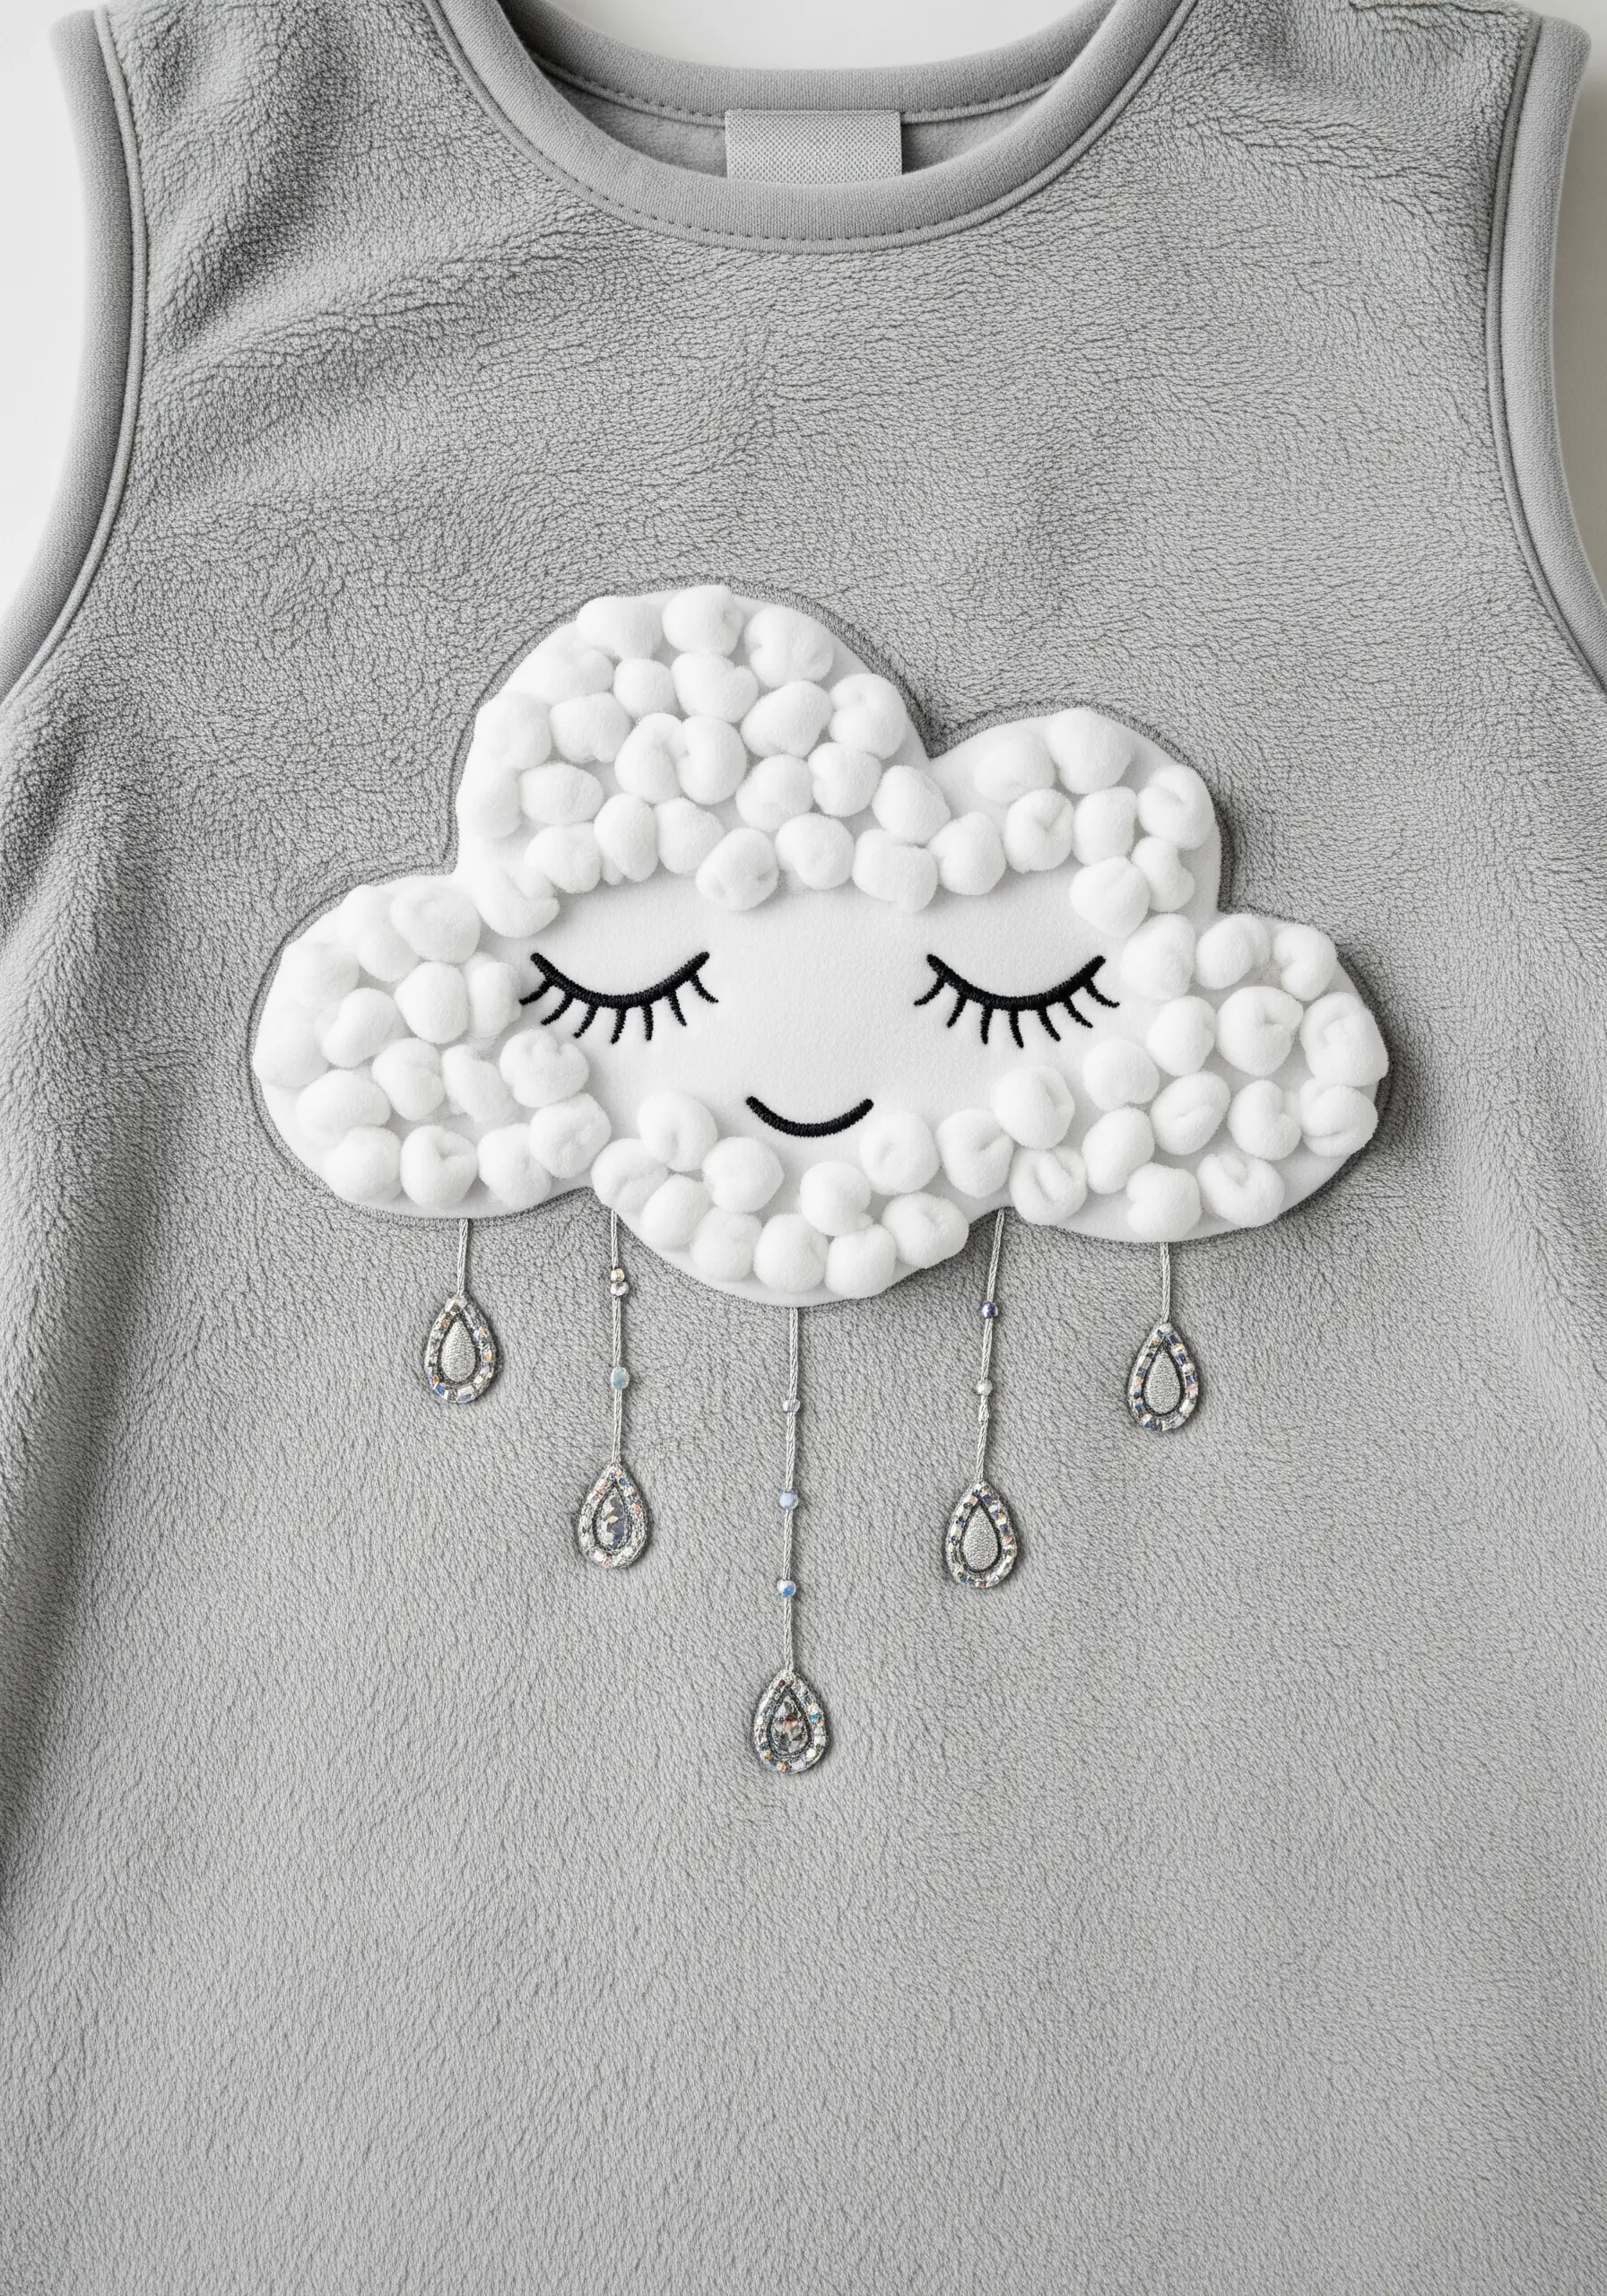
Introduce tactile elements like tiny pom-poms or beads to create a design that’s engaging for little hands.
First, create the cloud shape with a piece of soft felt appliqué, then embroider the delicate facial features with a simple backstitch.
Securely attach the pom-poms with a few anchoring stitches each. This mixed-media approach adds a delightful sensory dimension, but always triple-stitch any beads to ensure they are safe and secure.
7. Graphic Appliqué on Patterned Fabric
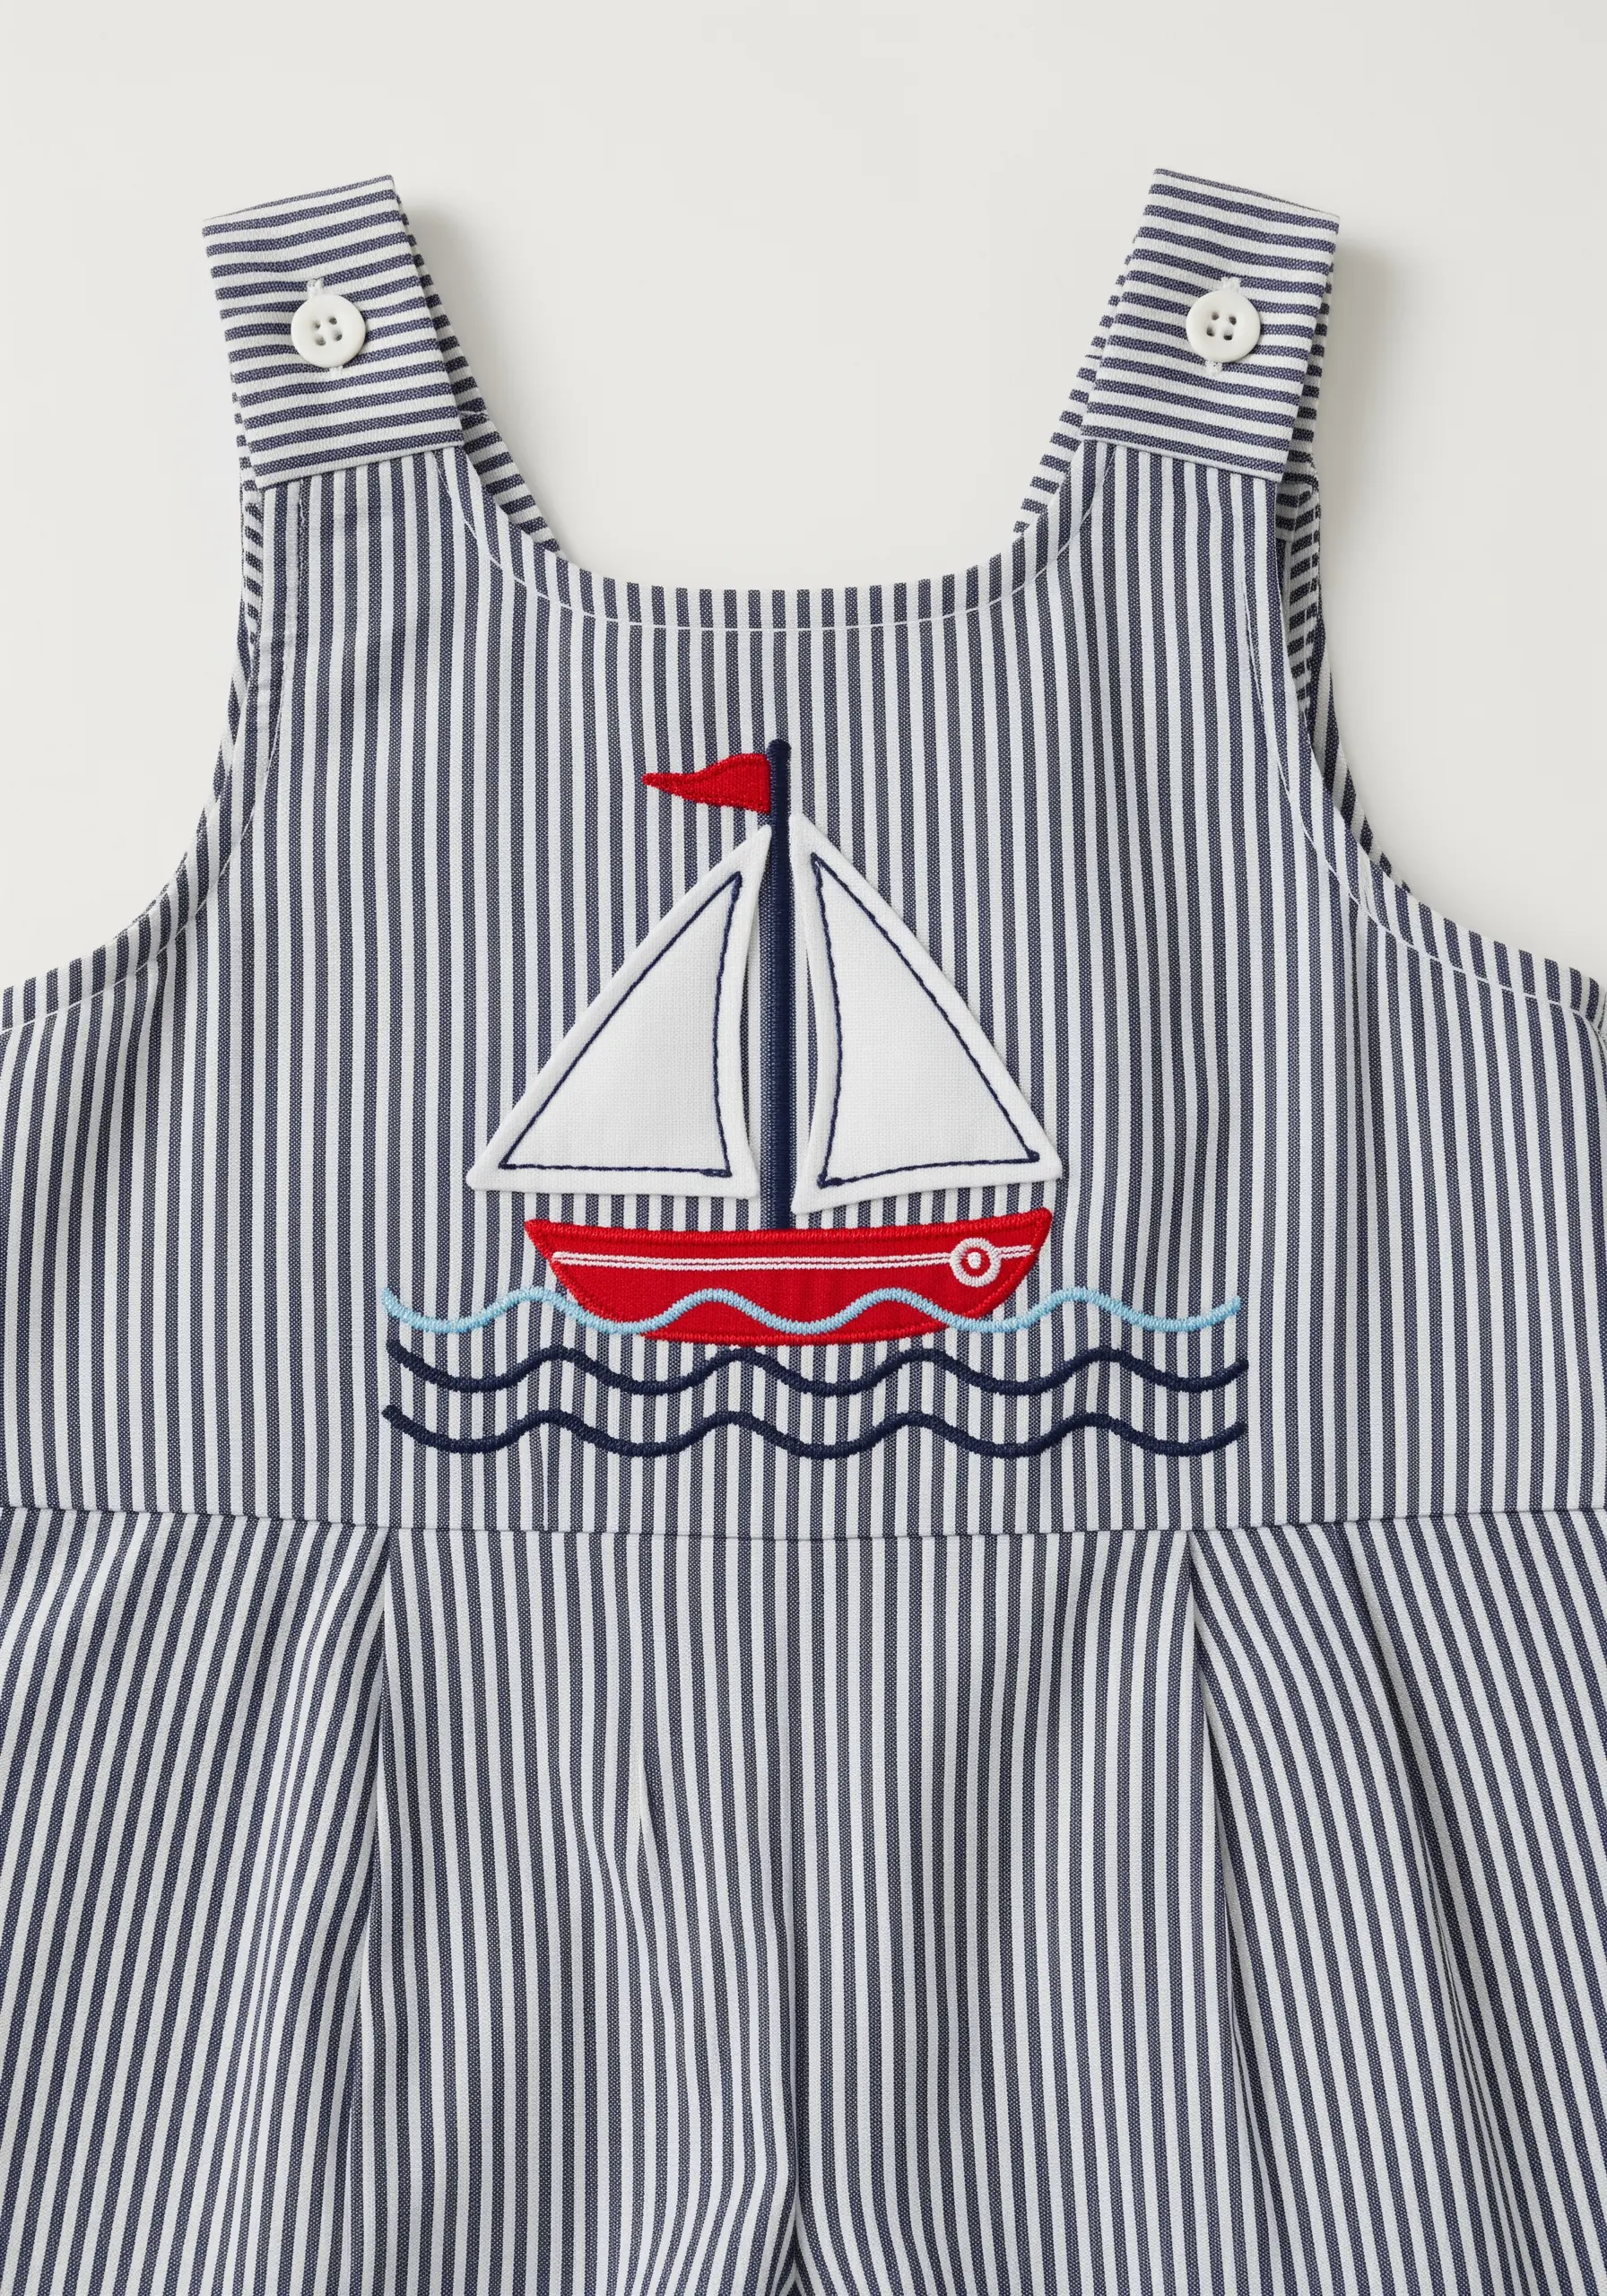
When stitching on a busy background like stripes, a bold, solid shape will always stand out more effectively than intricate linework.
Use a crisp white fabric appliqué for the sails to create a strong focal point that cuts through the visual noise of the pattern.
Define the appliqué’s edges with a sharp backstitch or chain stitch in a contrasting color to make the design pop even more.
8. Bold Couching on Chunky Knits
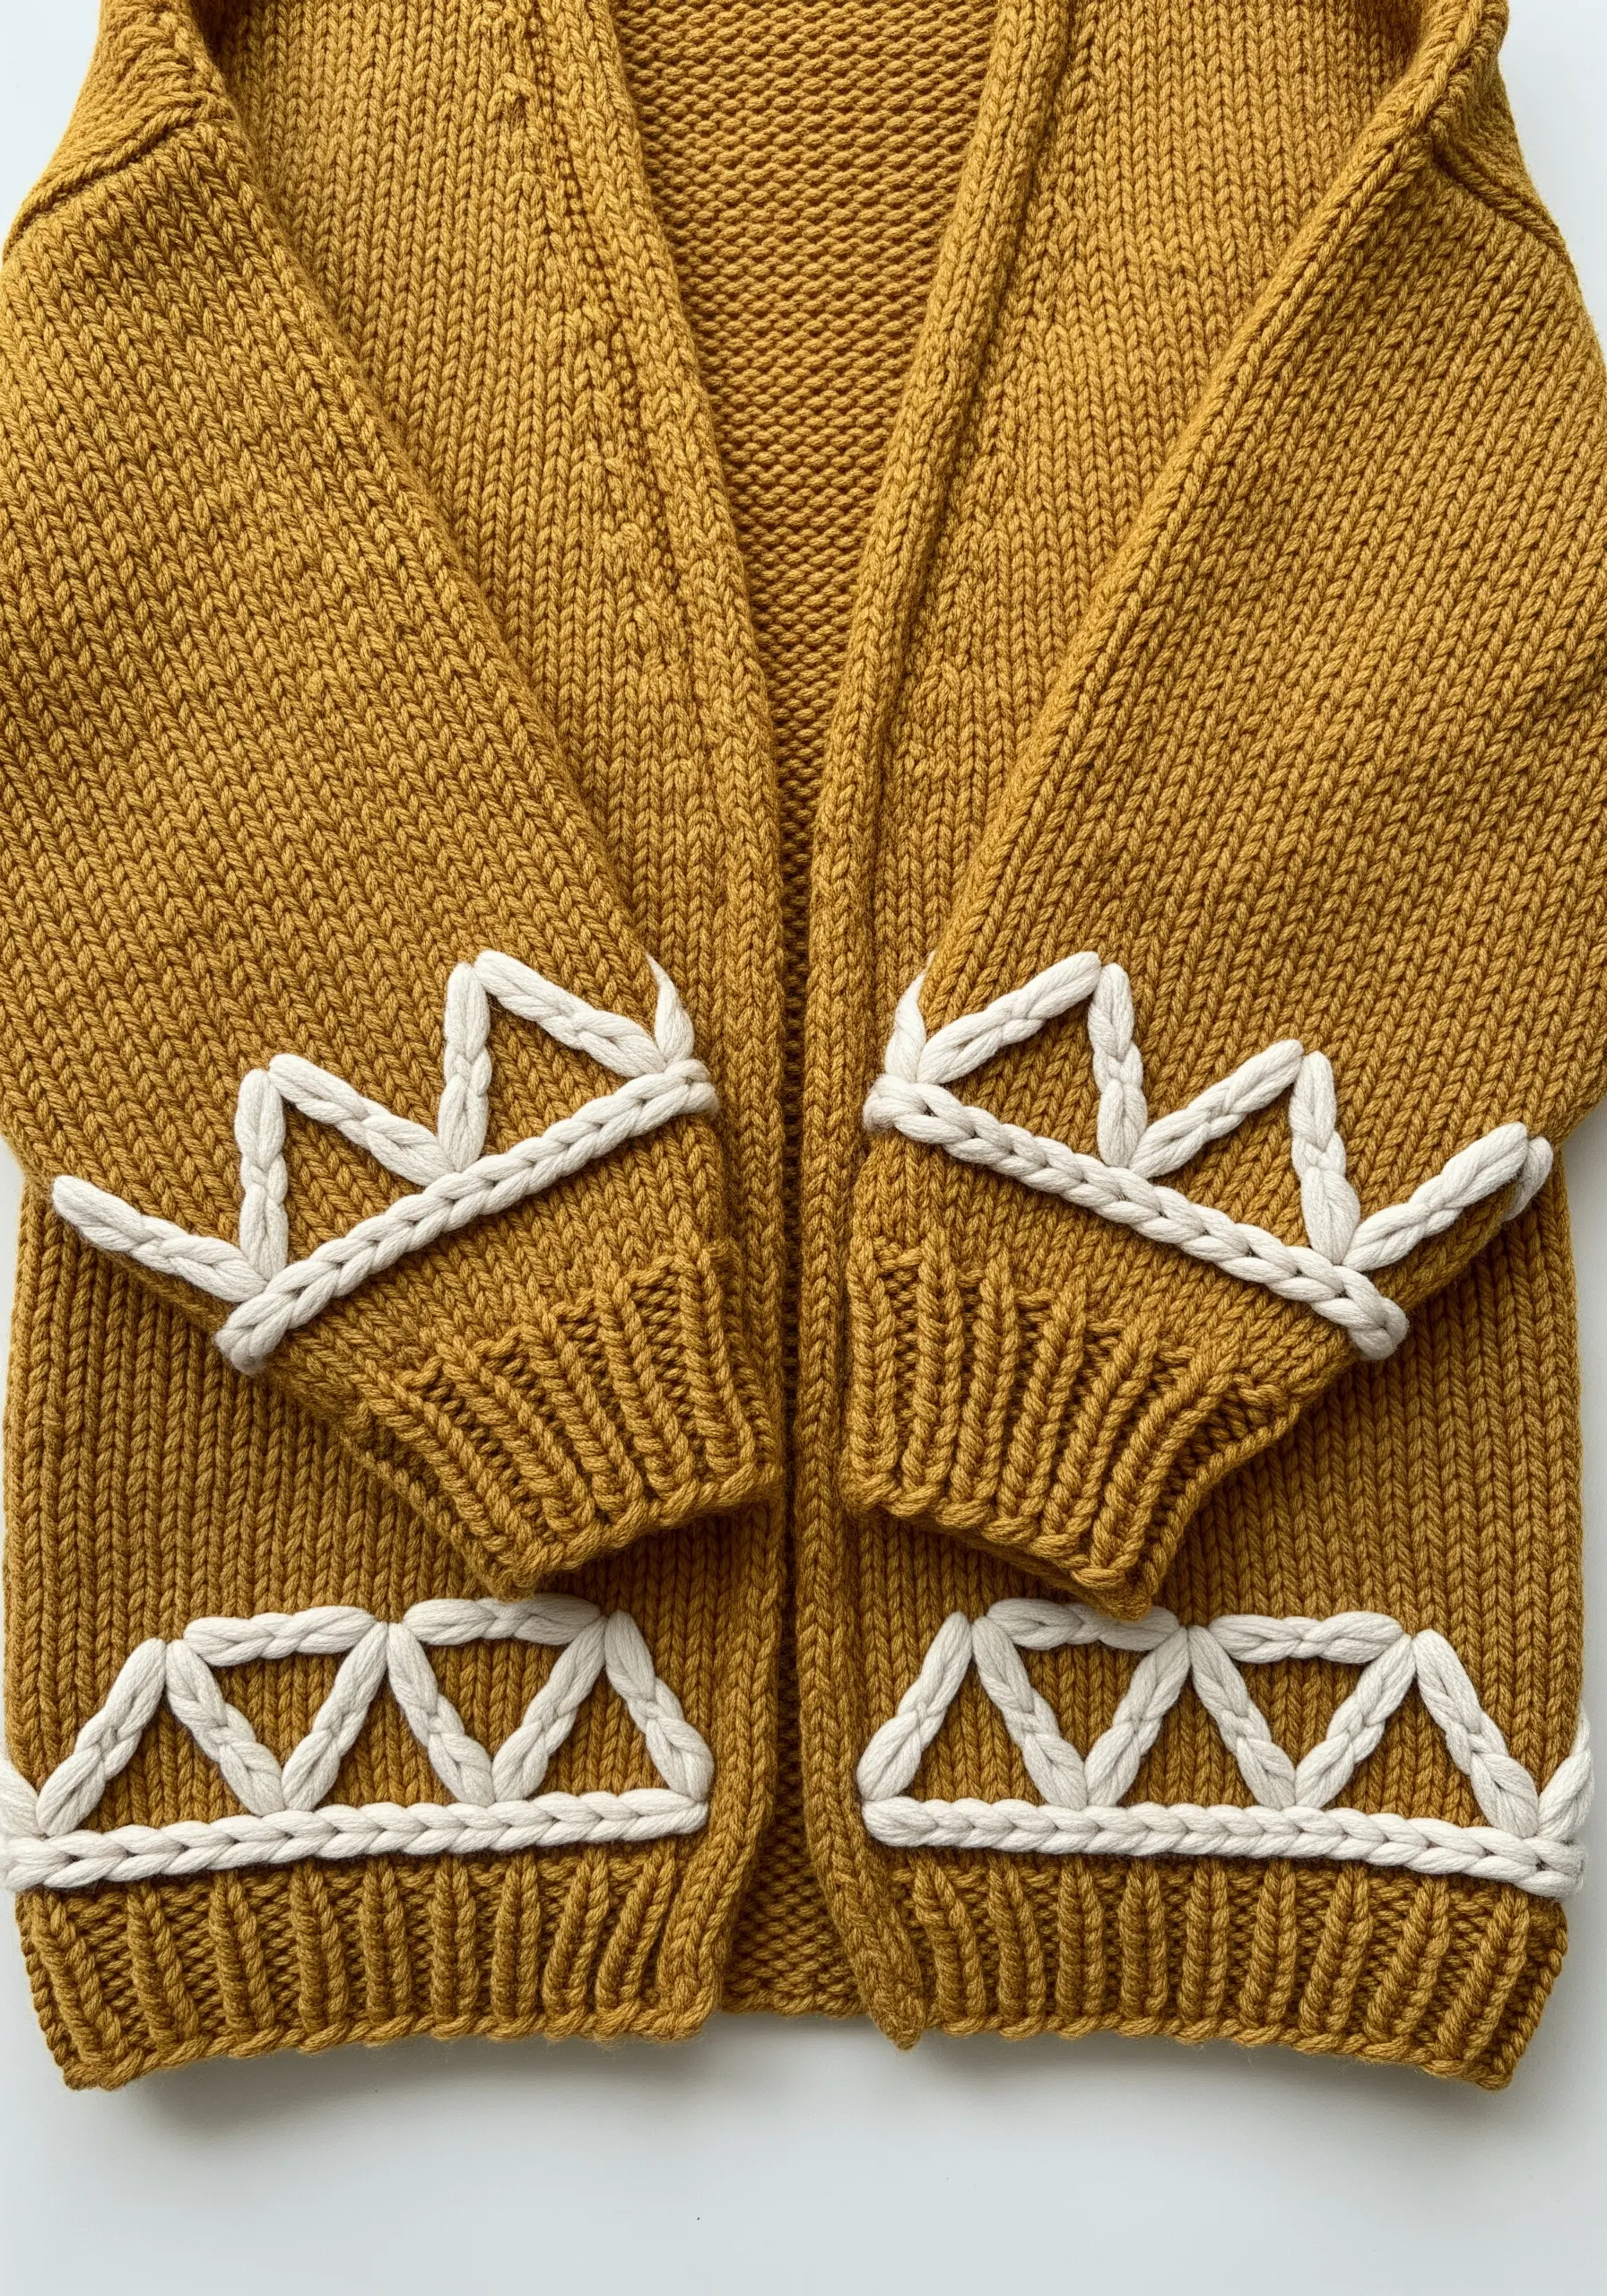
Traditional stitches often get lost in the texture of a chunky knit. The solution is couching.
Lay down a thick yarn or cord on the surface of the garment in your desired shape, then tack it in place with a thinner, contrasting thread.
This technique allows you to create clean, graphic lines that sit on top of the knit, delivering a modern, high-impact design that is both fast and effective.
9. Asymmetrical Florals for Modern Elegance

A classic Peter Pan collar is the perfect frame for an asymmetrical floral design, which feels more organic and modern than a centered motif.
Create visual balance by clustering larger flowers, like woven wheels, near the collar’s point, then let smaller elements like French knots and lazy daisy leaves trail off.
This composition guides the eye and adds a beautiful sense of movement to these gorgeous floral embroidery ideas.
10. Fill Stitch with a Directional Flow
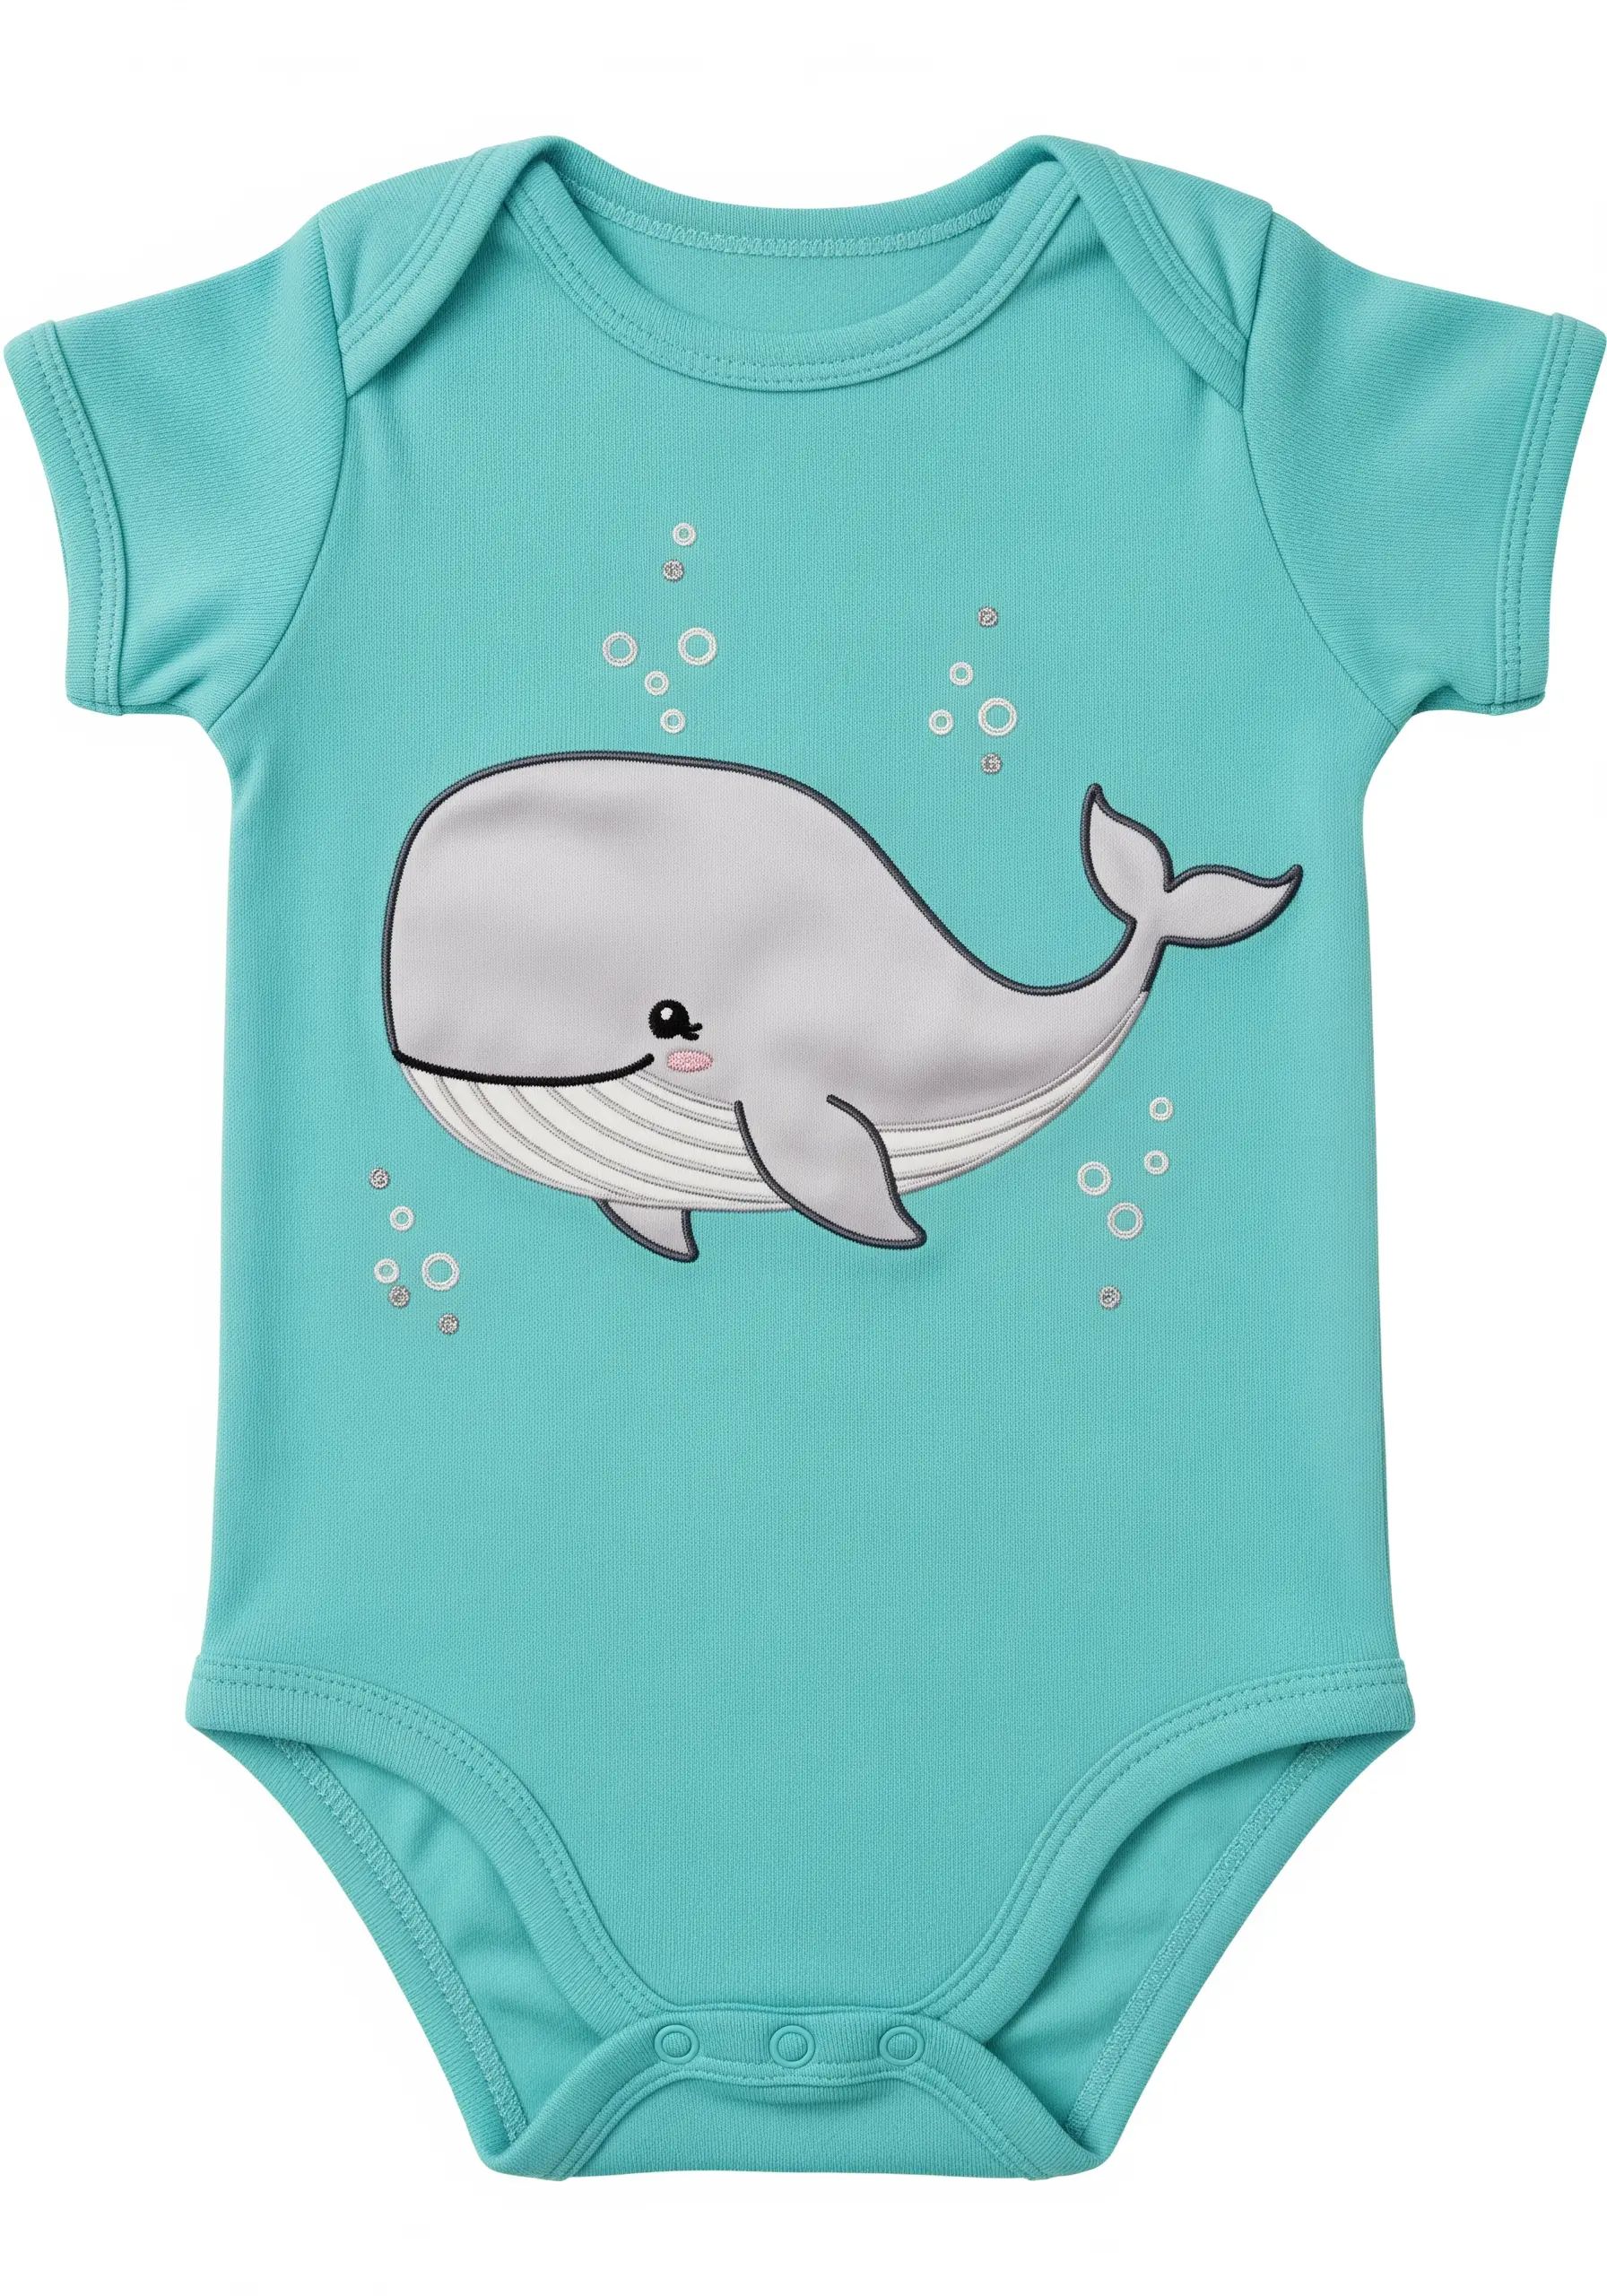
To prevent a large filled area from looking flat, use the direction of your stitches to create a sense of form and volume.
For a motif like this whale, fill the body with long-and-short stitches that follow the natural curves of its back and belly.
This subtle adjustment helps define the shape and adds dimension, making the animal feel more rounded and dynamic without complex shading.
11. Glow-in-the-Dark Constellations
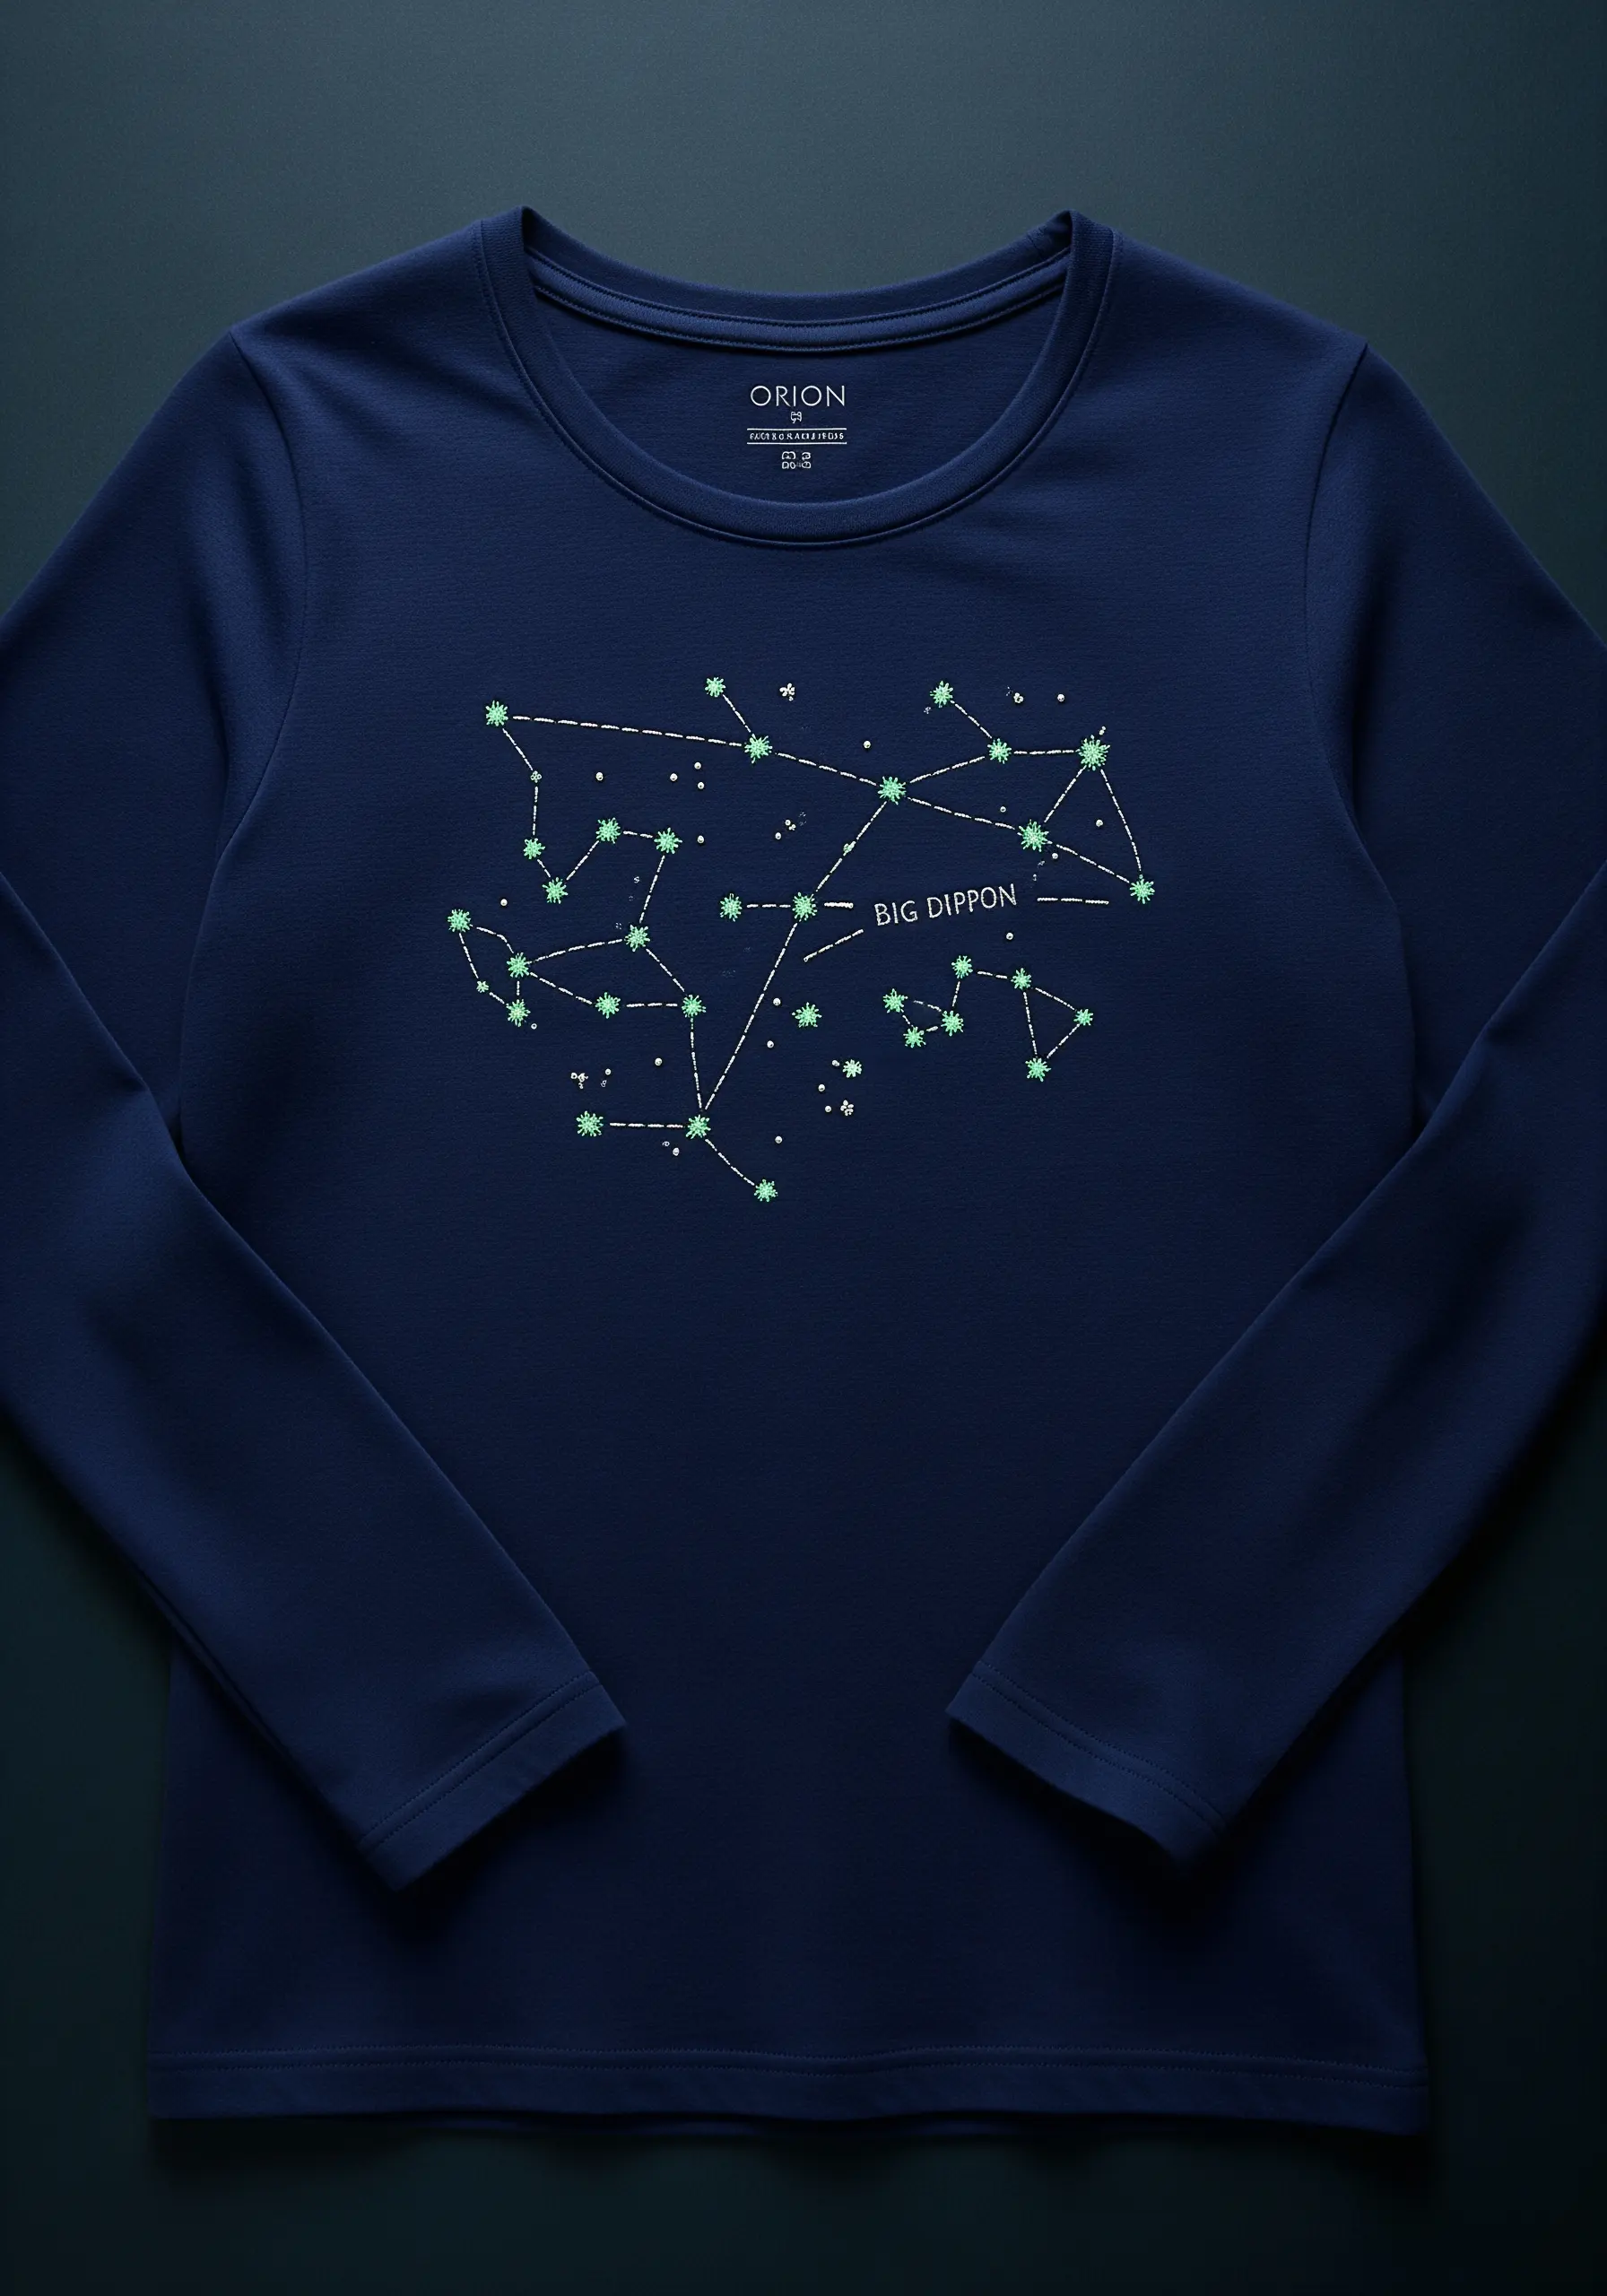
Add a secret, magical element to bedtime apparel by stitching with glow-in-the-dark embroidery floss.
Use simple star stitches or French knots for the stars and a delicate running stitch for the connecting lines to map out a favorite constellation.
The design appears as a subtle embroidery design in daylight but reveals a soft, comforting glow in the dark, making it a truly special keepsake.
12. Interactive 3D ‘Stumpwork’ Embroidery

Create a playful, interactive design by incorporating a 3D or ‘stumpwork’ element.
Embroider the fox’s body directly onto the pocket, but stitch the tail separately on a piece of felt-backed fabric, adding extra thread for a bushy texture.
Attaching the tail so it hangs free transforms the garment from a simple piece of clothing into a delightful toy, inviting touch and play.
13. The Perfectly Spaced Satin Stitch Rainbow

The clean, modern appeal of an embroidered rainbow depends entirely on the quality of its satin stitch.
To ensure each arc is perfectly uniform, start by drawing precise guidelines with a water-soluble fabric pen.
Work your stitches from the inside arc outward to avoid distorting the fabric, and use just two strands of floss for a smooth, non-bulky finish that sits beautifully on soft jersey knits.
14. Combining Felting with Simple Stitches

For plush, 3D designs on soft fabrics like felted wool, combine needle felting with embroidery.
Create the bee’s body by felting yellow and black wool roving directly onto the bootie, which is much faster than filling the area with thread.
Then, add finer details like the flight path with a simple running stitch. This mixed-fiber approach creates wonderful texture and dimension.
15. Raised Lettering with Chain Stitch
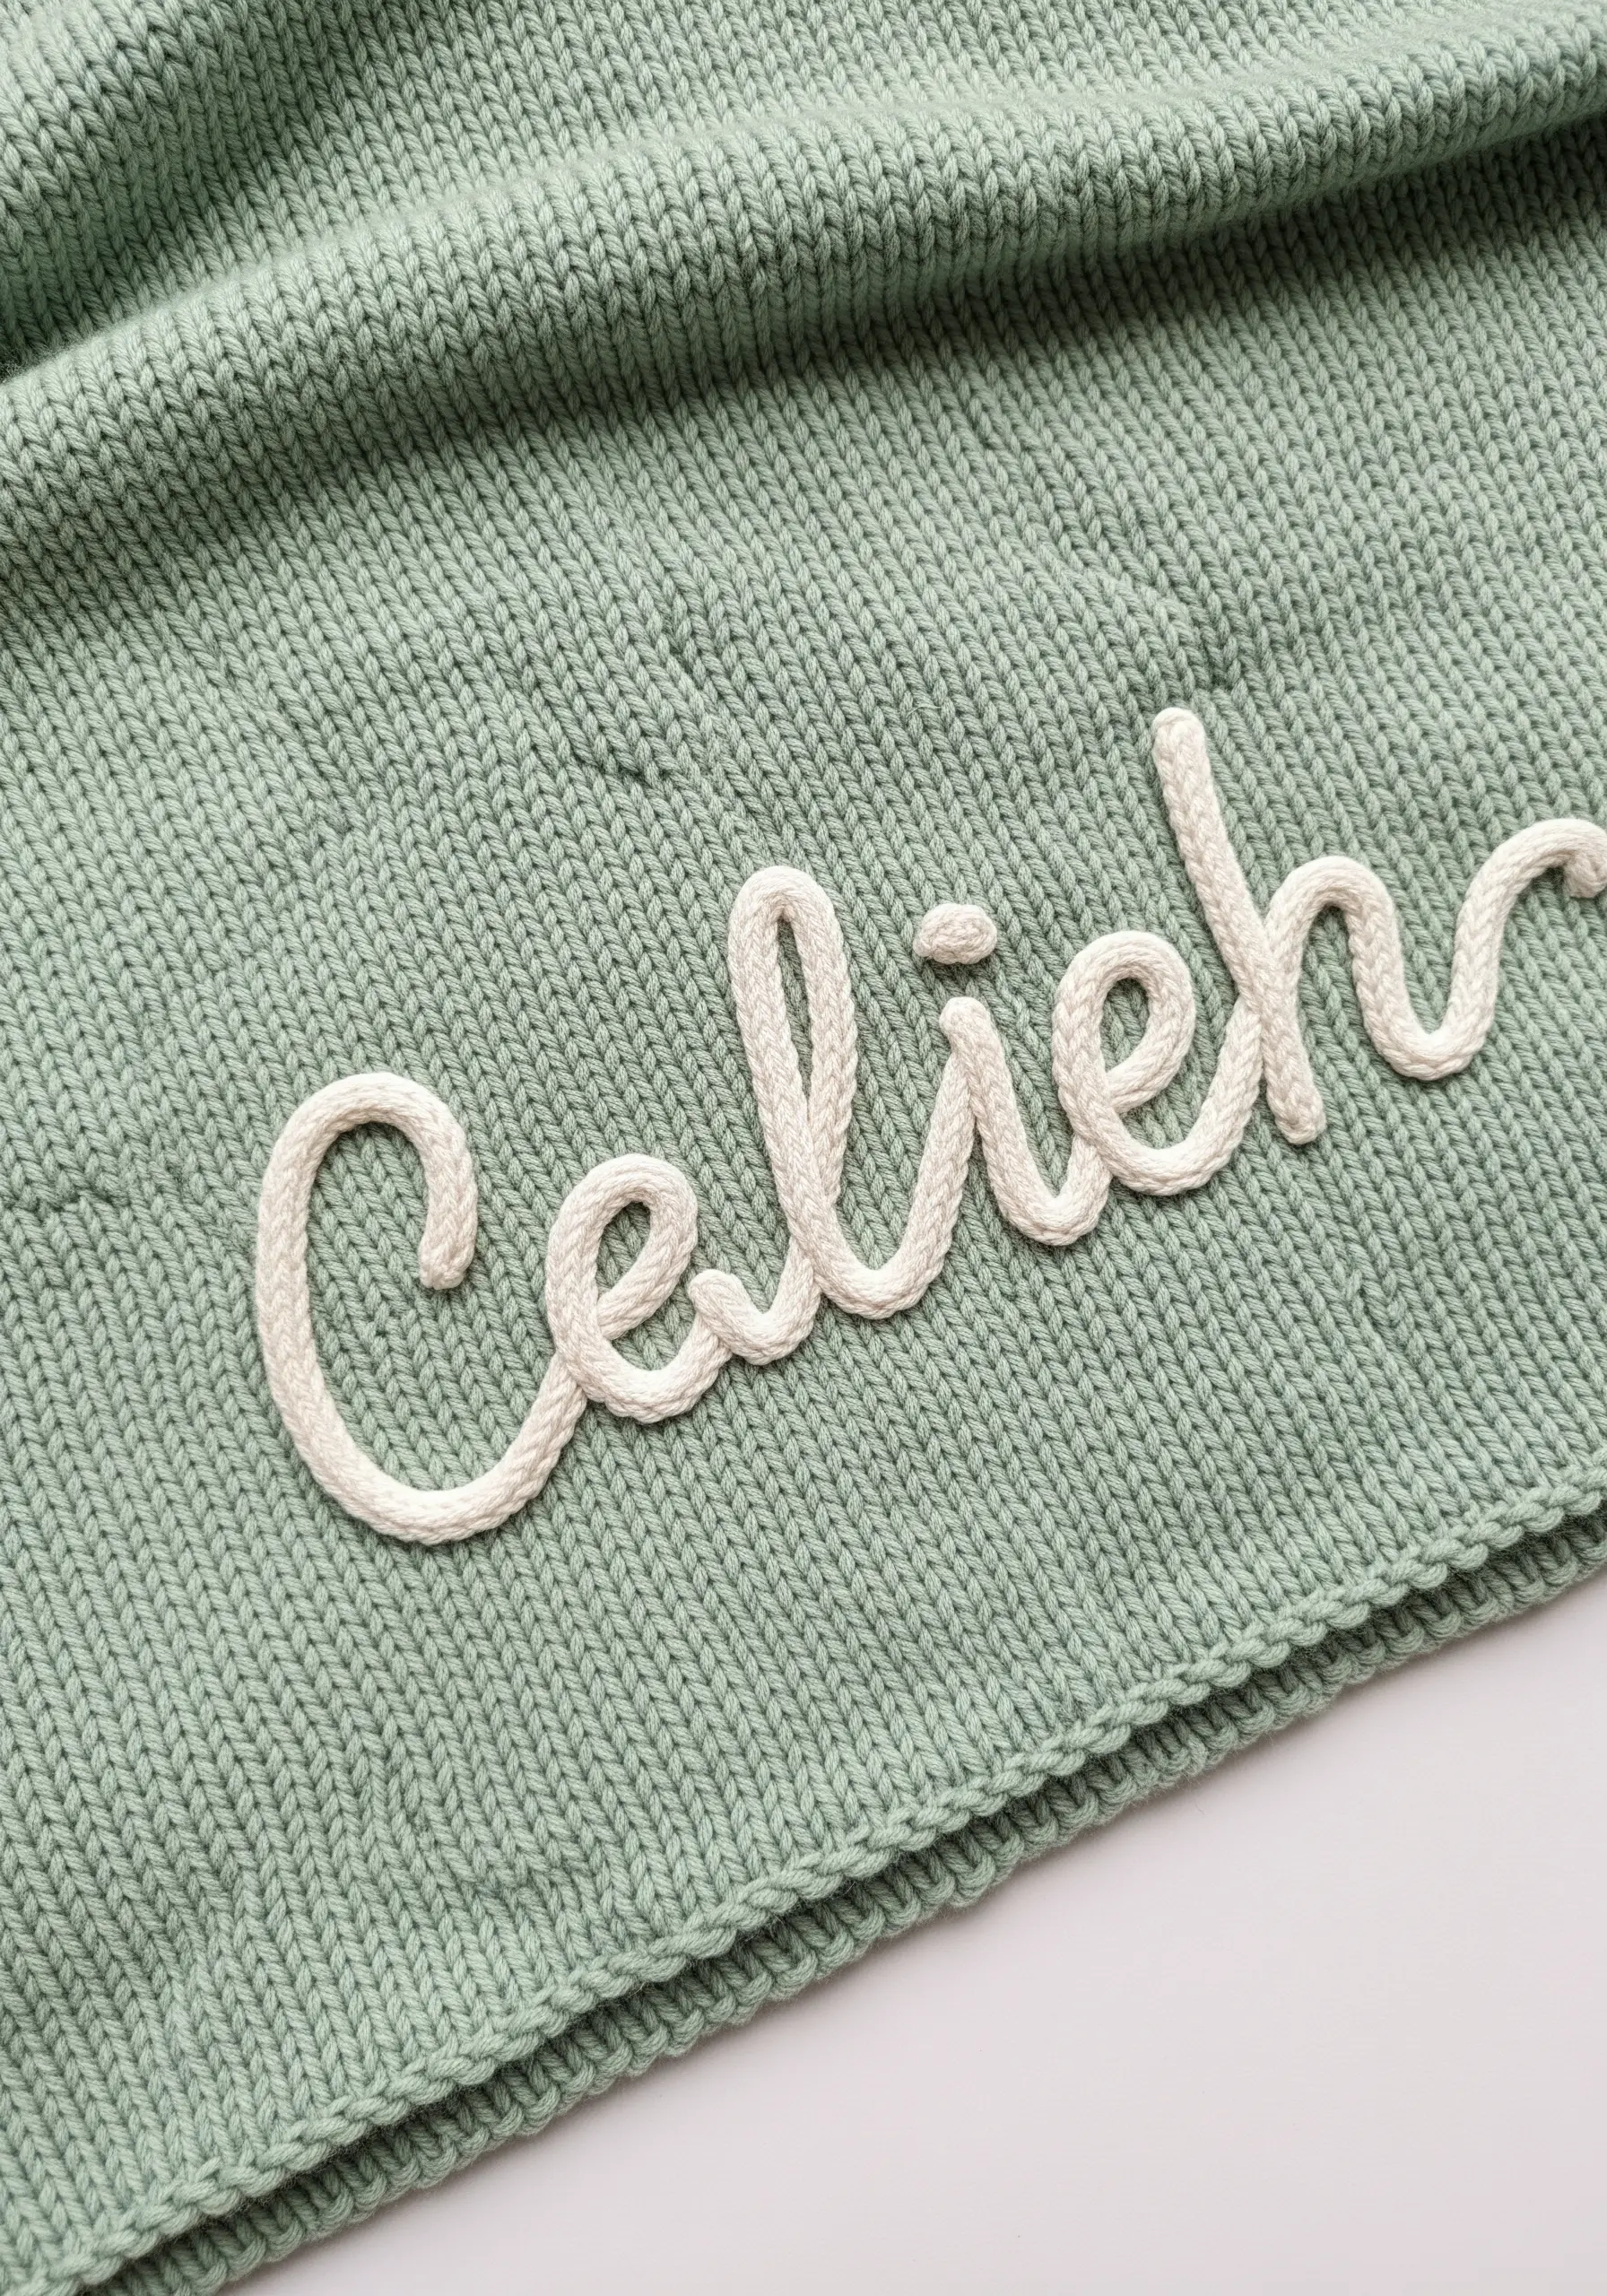
A simple backstitch can get lost on a textured knit blanket. To ensure a name or word stands out, use a chain stitch instead.
This stitch creates a raised, rope-like line that has presence and tactility, making it both visually and physically distinct from the background.
For even more definition, choose a slightly thicker thread, such as pearl cotton, to enhance the effect.
16. Designing a Coordinated Two-Piece Set
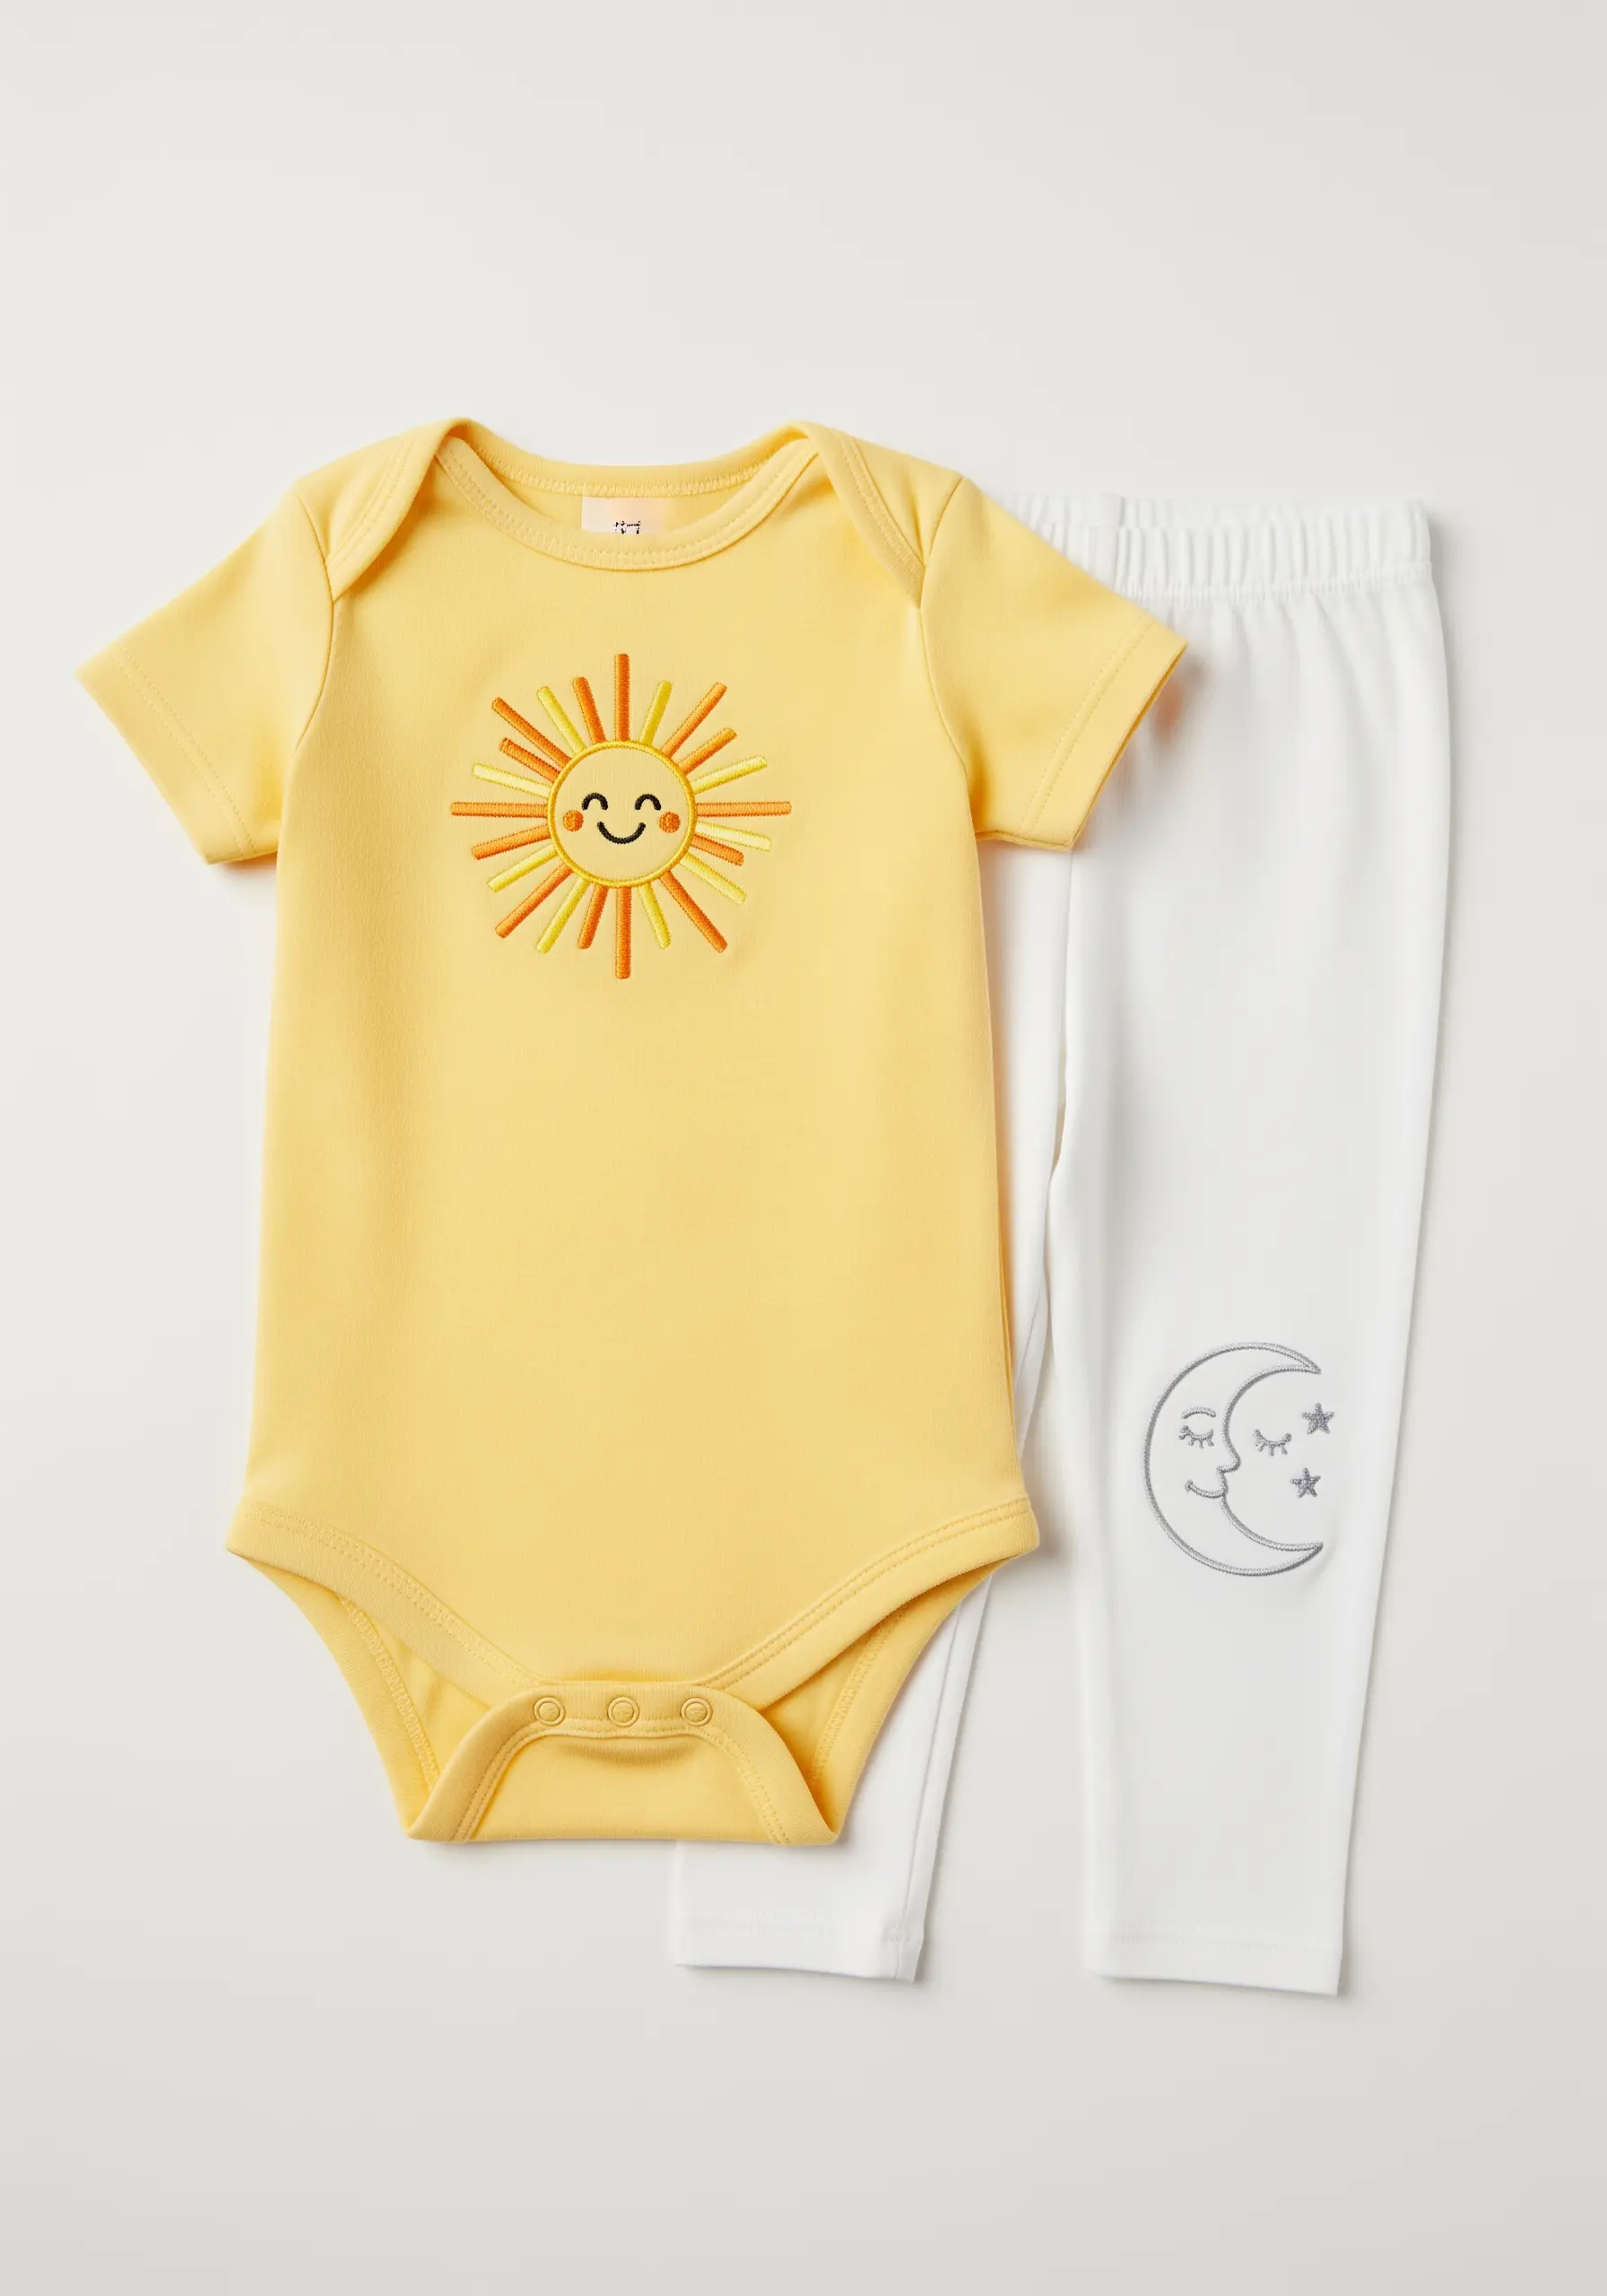
Elevate a simple gift by creating a cohesive set with a shared design theme.
Split a complementary motif, like the sun and moon, across two garments. Embroider one on the bodysuit and the other on the leggings.
By using a consistent color palette and stitch style—like clean satin stitches and simple backstitch outlines—you visually link the two pieces, turning them into a thoughtful, coordinated outfit.
17. Mastering Eyes for Expressive Animals
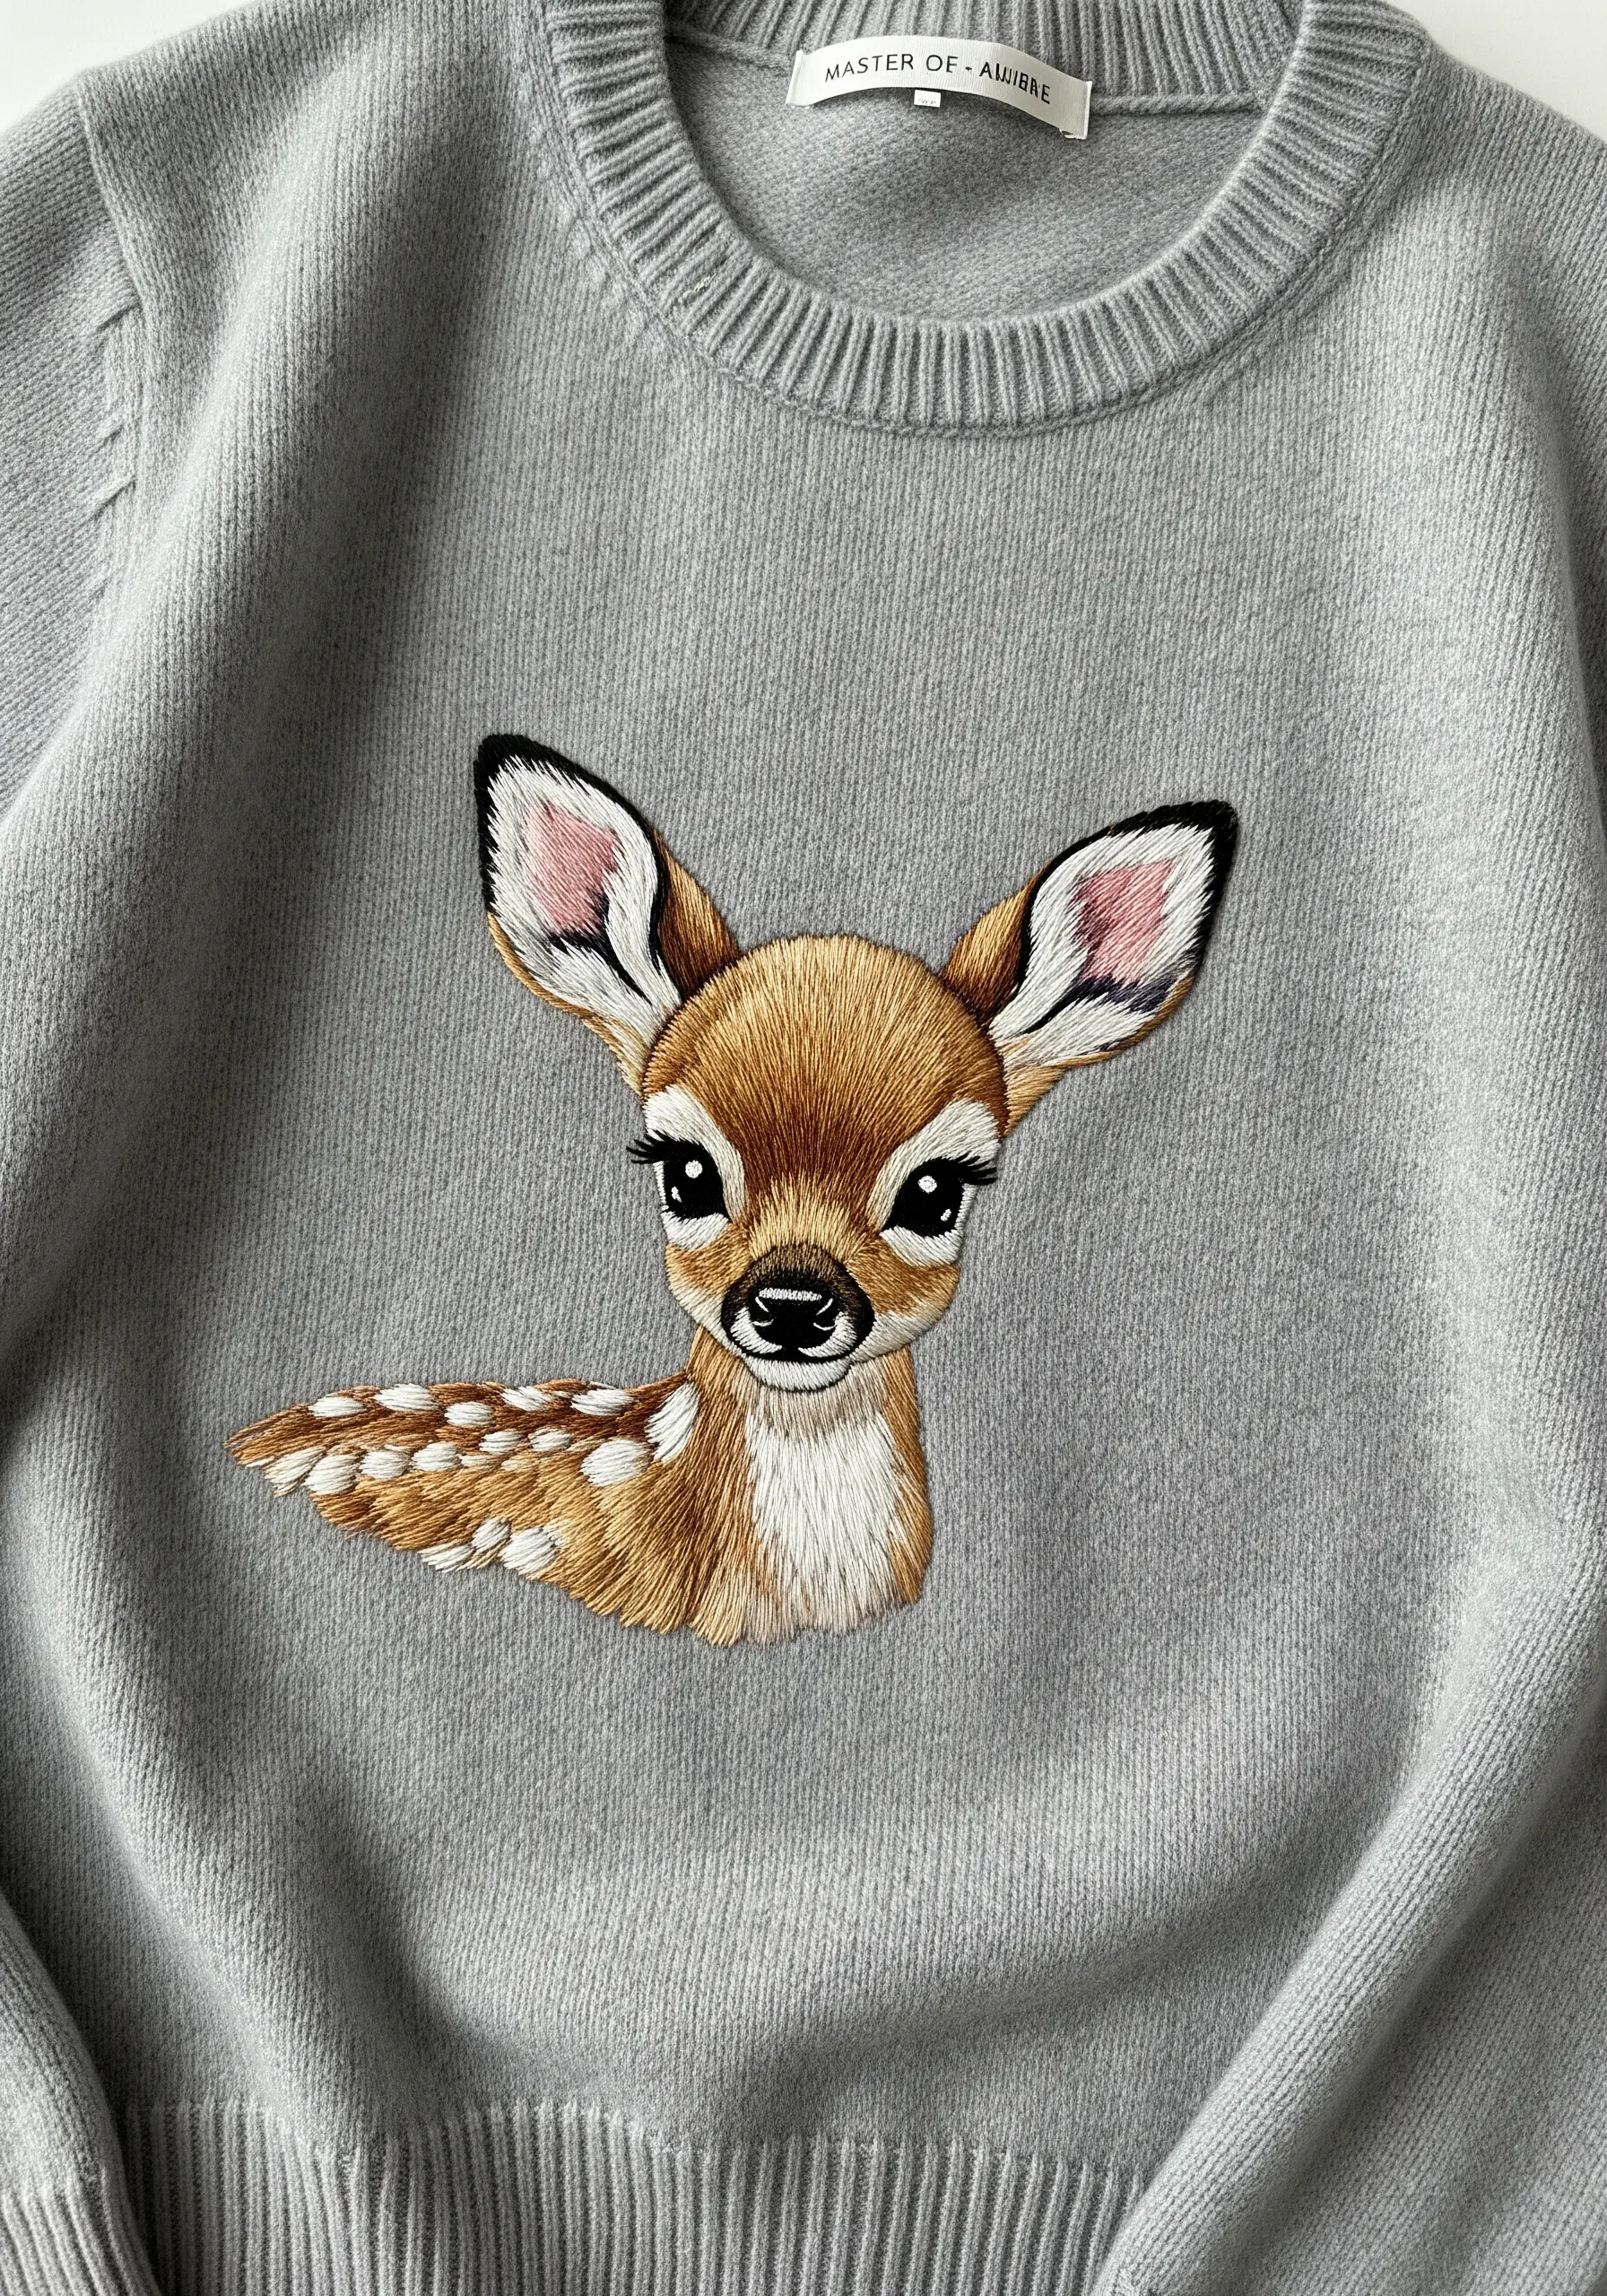
The secret to bringing an embroidered animal to life lies in the eyes. Fill the iris with a tiny satin stitch, but leave a small spot unstitched or add a single white French knot as a catchlight.
This one detail instantly creates a spark of life and depth.
For crisp definition, outline the entire eye with a single strand of black thread. It’s a small step that makes all the difference in creating realistic wolf embroidery motifs and other expressive creatures.
18. Textured Appliqué with Stitch Details
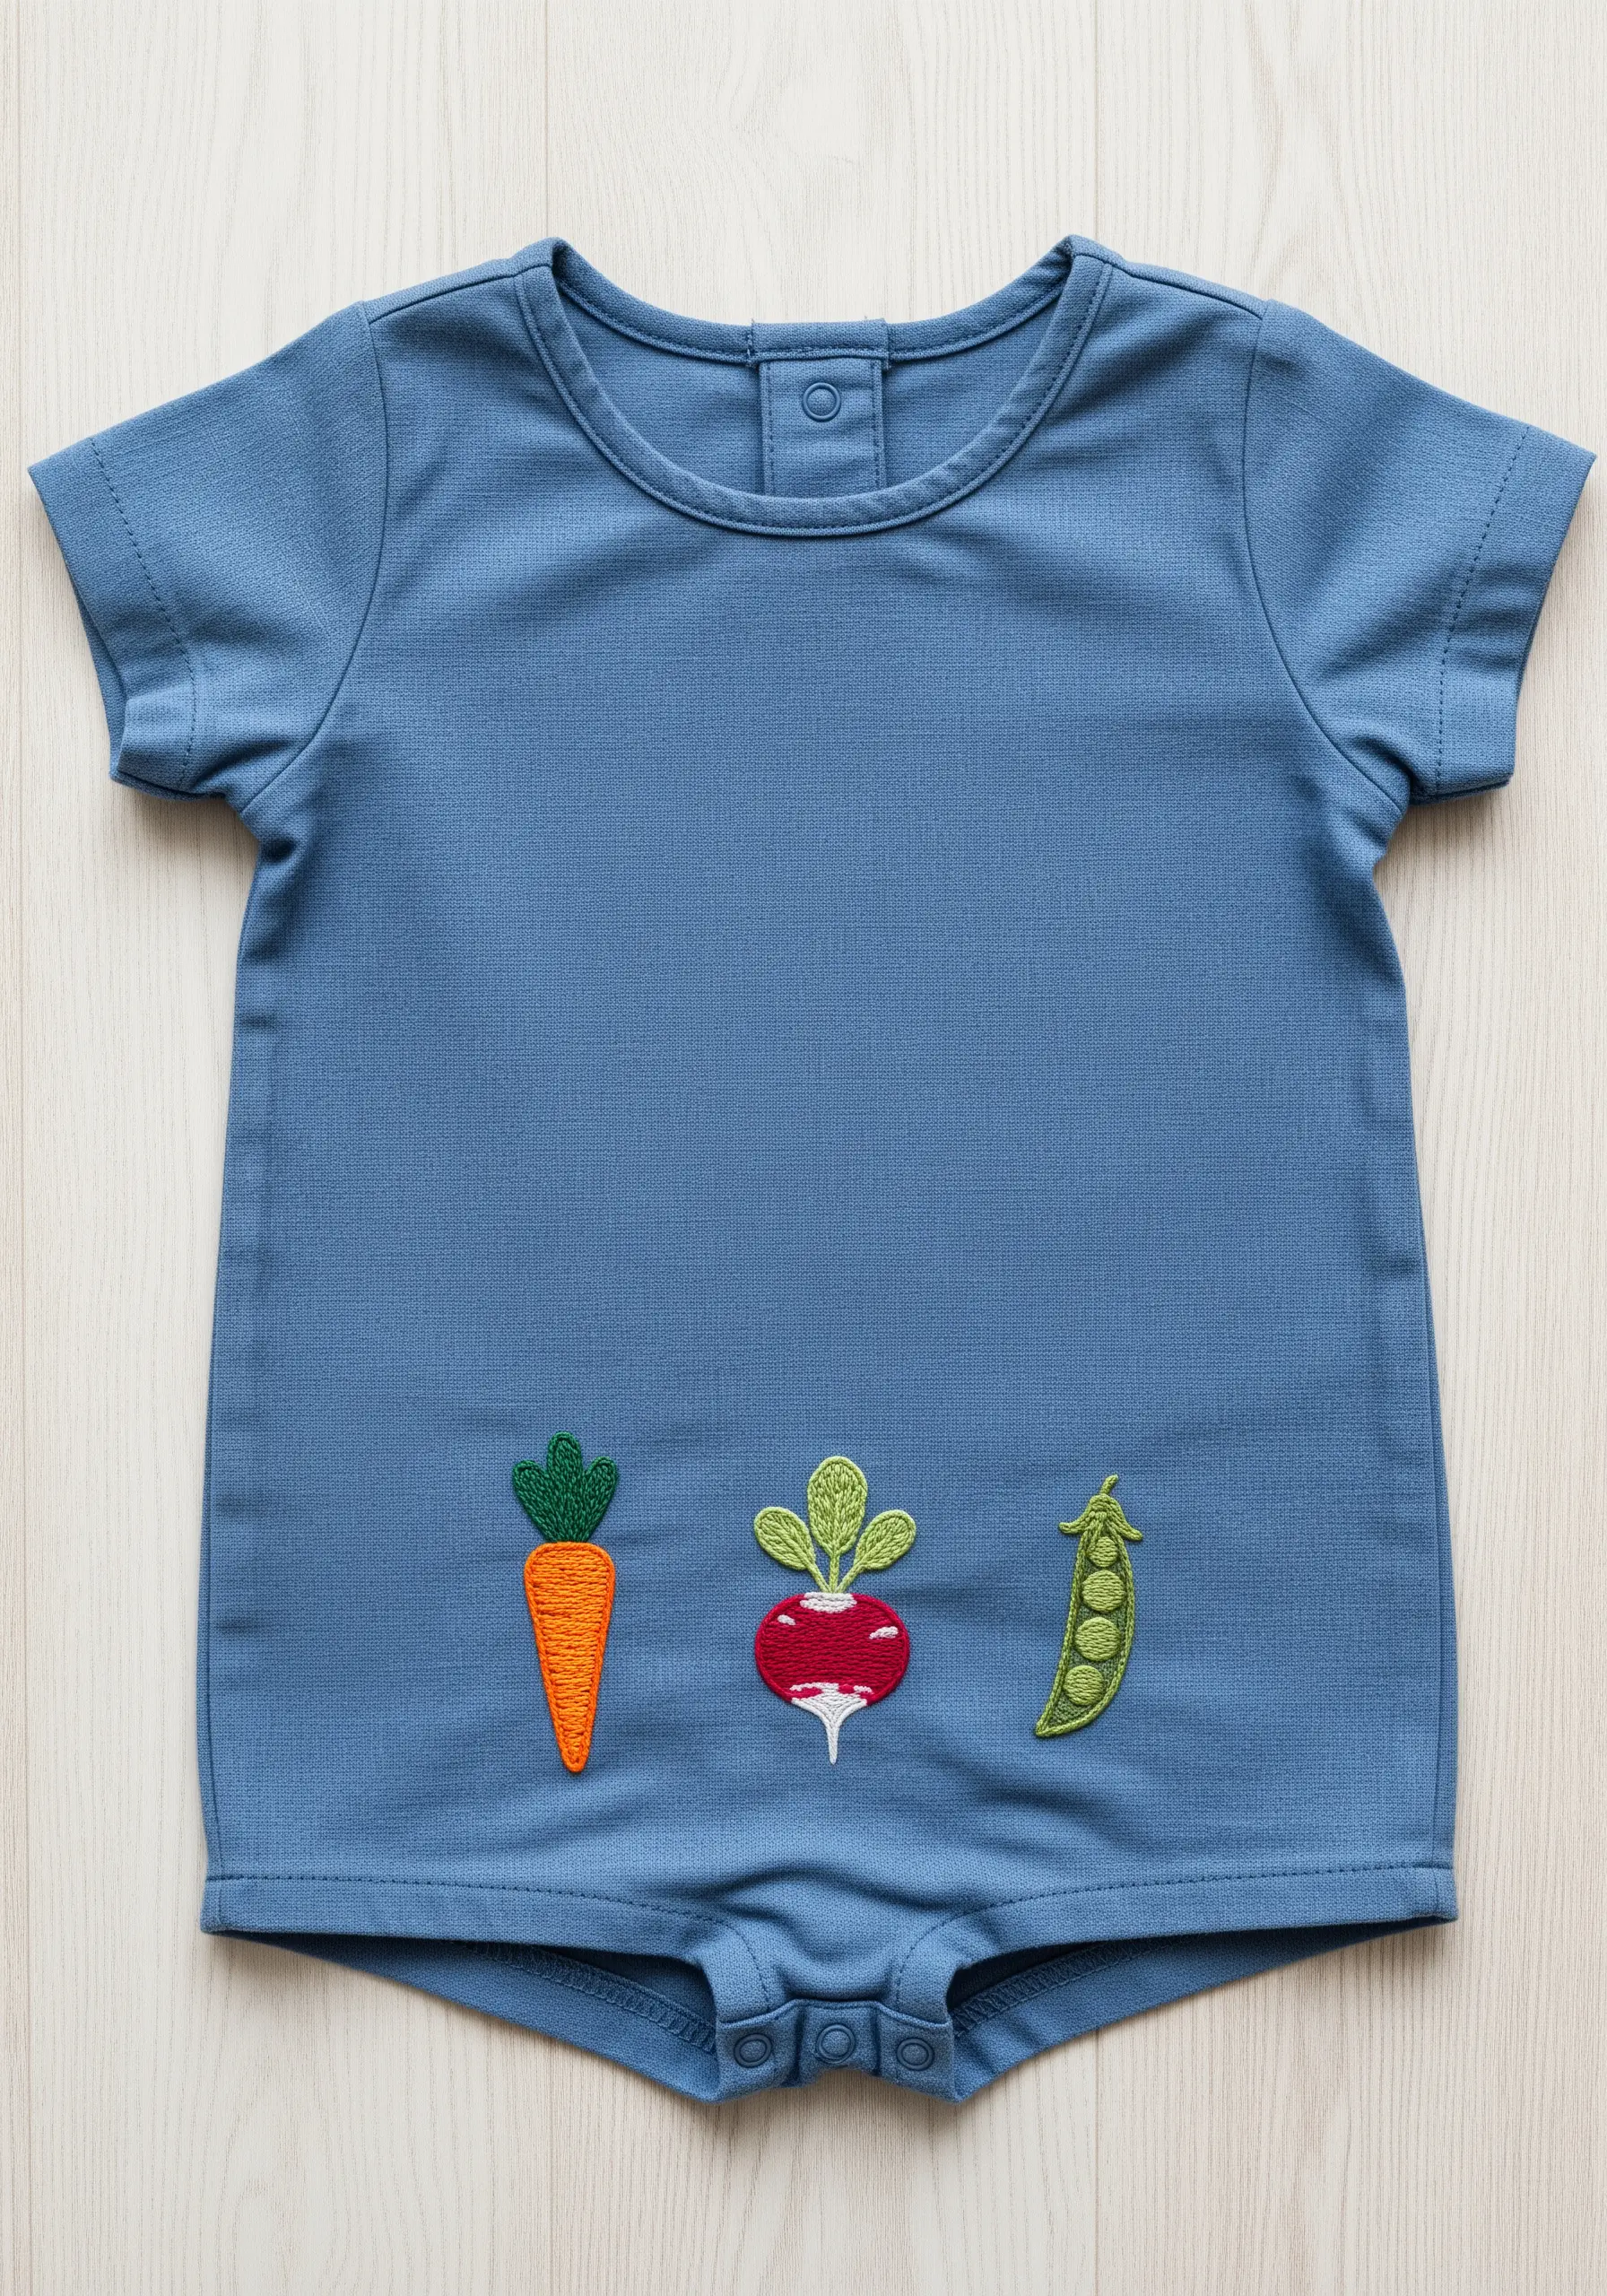
Elevate simple appliqué shapes by adding small, textural stitch details.
After securing your felt vegetable shapes, use embroidery to suggest texture: add horizontal satin stitches to the carrot, tiny seed stitches to the radish leaves, and French knots for the peas in the pod.
These subtle stitch details transform flat shapes into charming, tactile designs with personality and depth.
19. Elegant Outlines with Metallic Thread
For a minimalist design with a touch of magic, an outline in metallic thread is perfect.
To achieve a crisp, solid line that reflects light beautifully, use a whipped backstitch. This involves lacing a second thread through your initial backstitch, which smooths the line and adds definition.
Always work with shorter lengths of metallic thread to prevent it from tangling and fraying.
20. Implying Motion with Stitch Selection
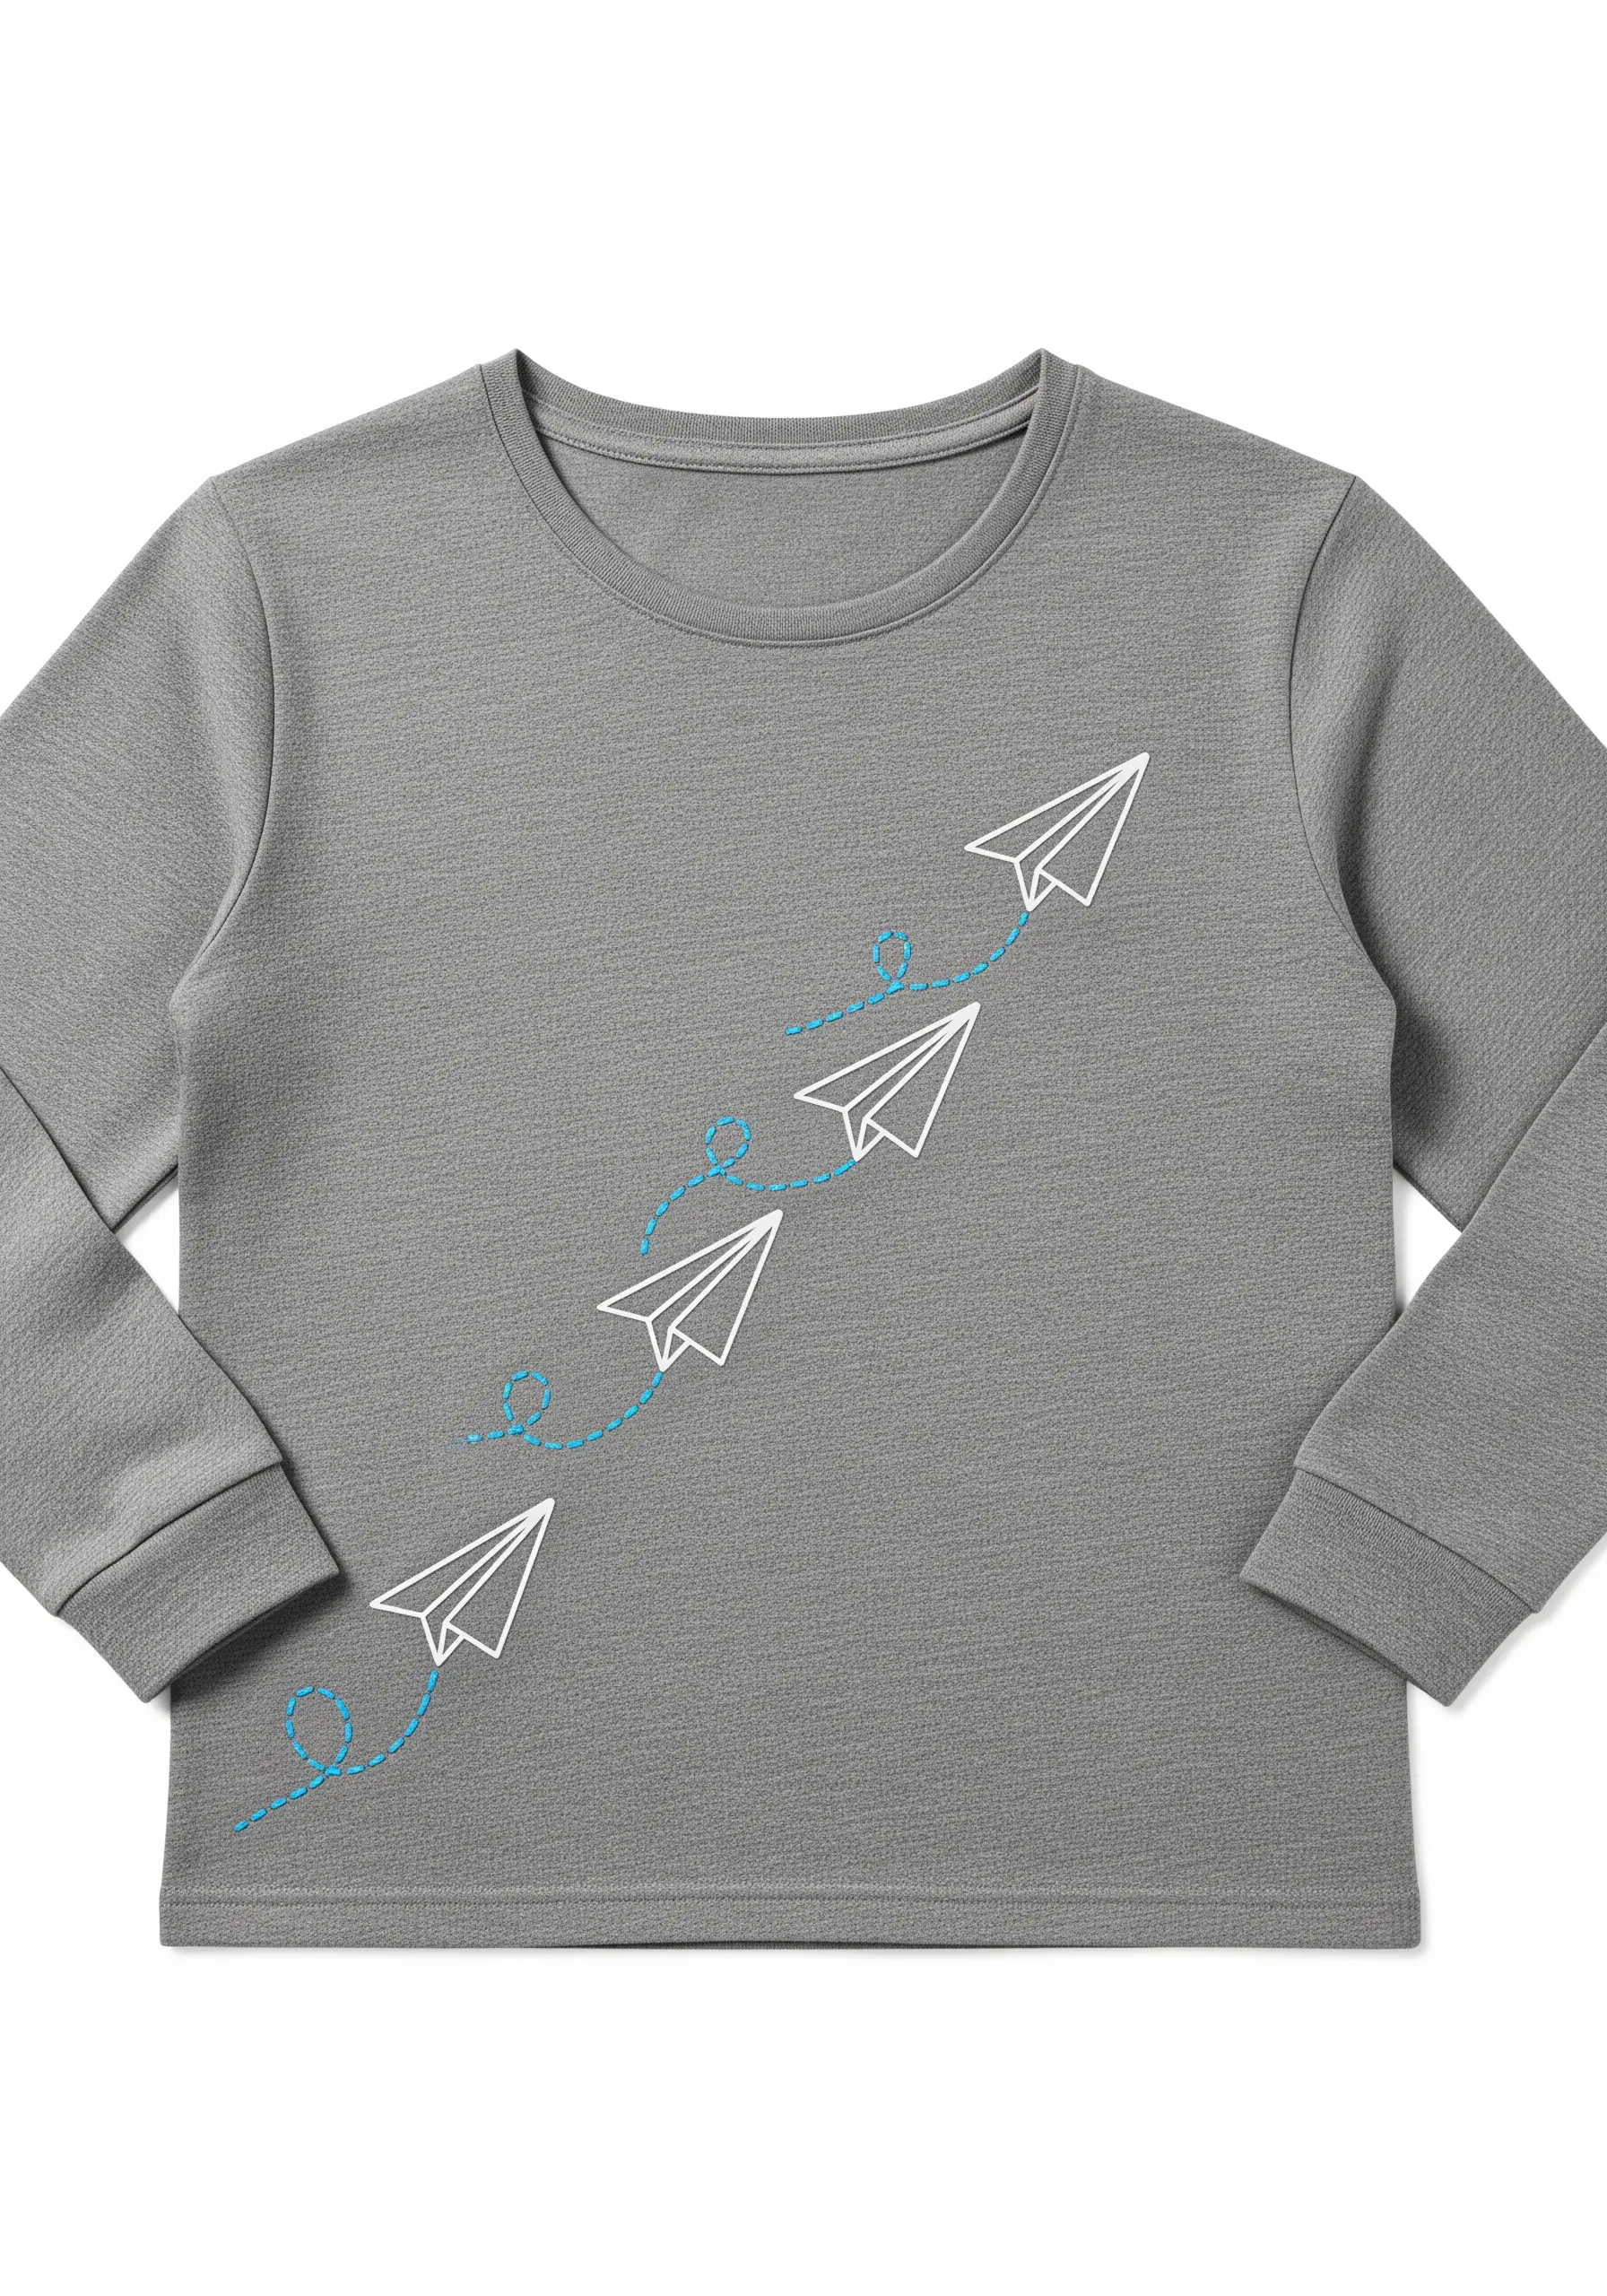
Create a dynamic sense of movement by pairing two distinct stitch styles.
Use a clean, solid backstitch to render the paper airplanes, giving them sharp, defined forms.
Then, stitch the flight path between them with a looping, open stitch—like a scroll stitch or a simple dashed running stitch. This contrast in texture and form makes the planes appear to be soaring across the fabric.
21. High-Contrast Embroidery on Corduroy
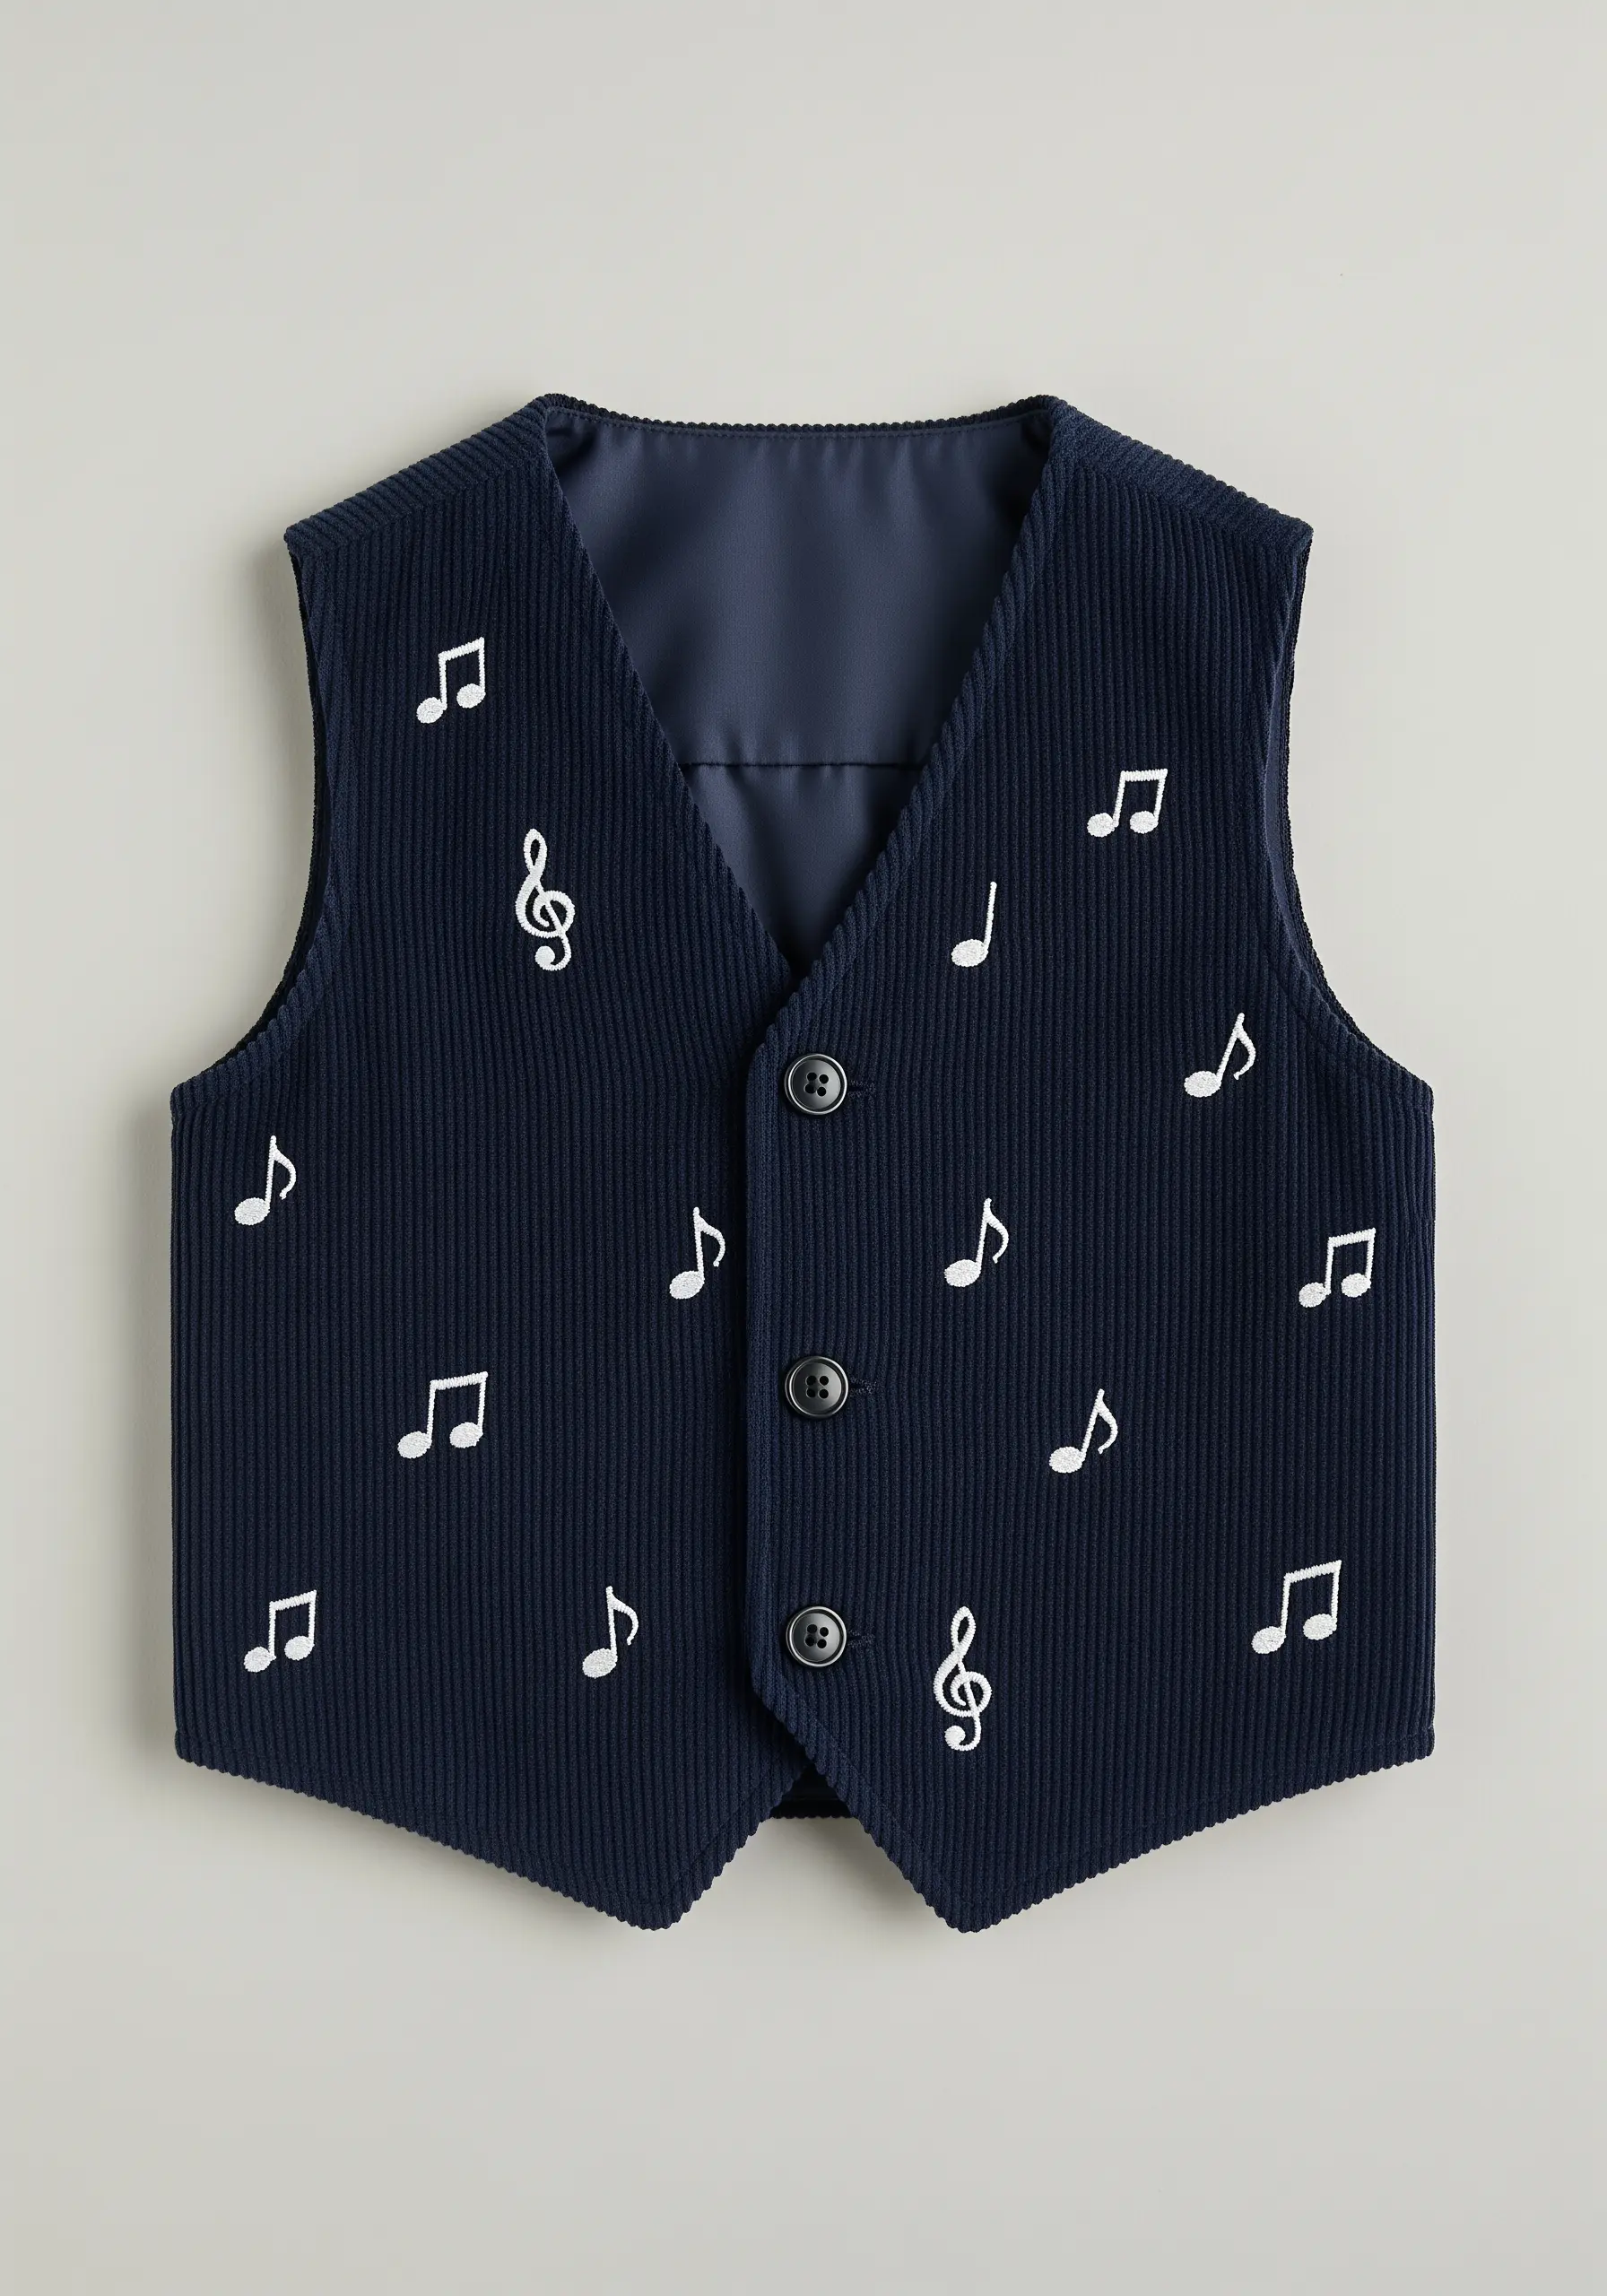
When embroidering on a heavily textured fabric like corduroy, high contrast is essential for your design to be clear and visible.
Pairing white thread with a navy blue background creates a timeless, striking effect.
Use a dense satin stitch to fill the notes; the smooth, raised surface will sit on top of the corduroy’s ridges, ensuring your motifs remain crisp and legible instead of getting lost in the texture.
22. Capturing Delicate Details with Single-Strand Floss

To capture the ethereal, airy quality of a dandelion, the key is to work with only a single strand of embroidery floss.
Use detached chain stitches (lazy daisies) to form the individual seed heads, as their open shape suggests lightness.
Finish with tiny straight stitches for the parachutes. In this design, delicacy is strength, creating a beautiful example of how minimalist embroidery ideas can be incredibly impactful.
23. Creating Rhythm with a Border Design
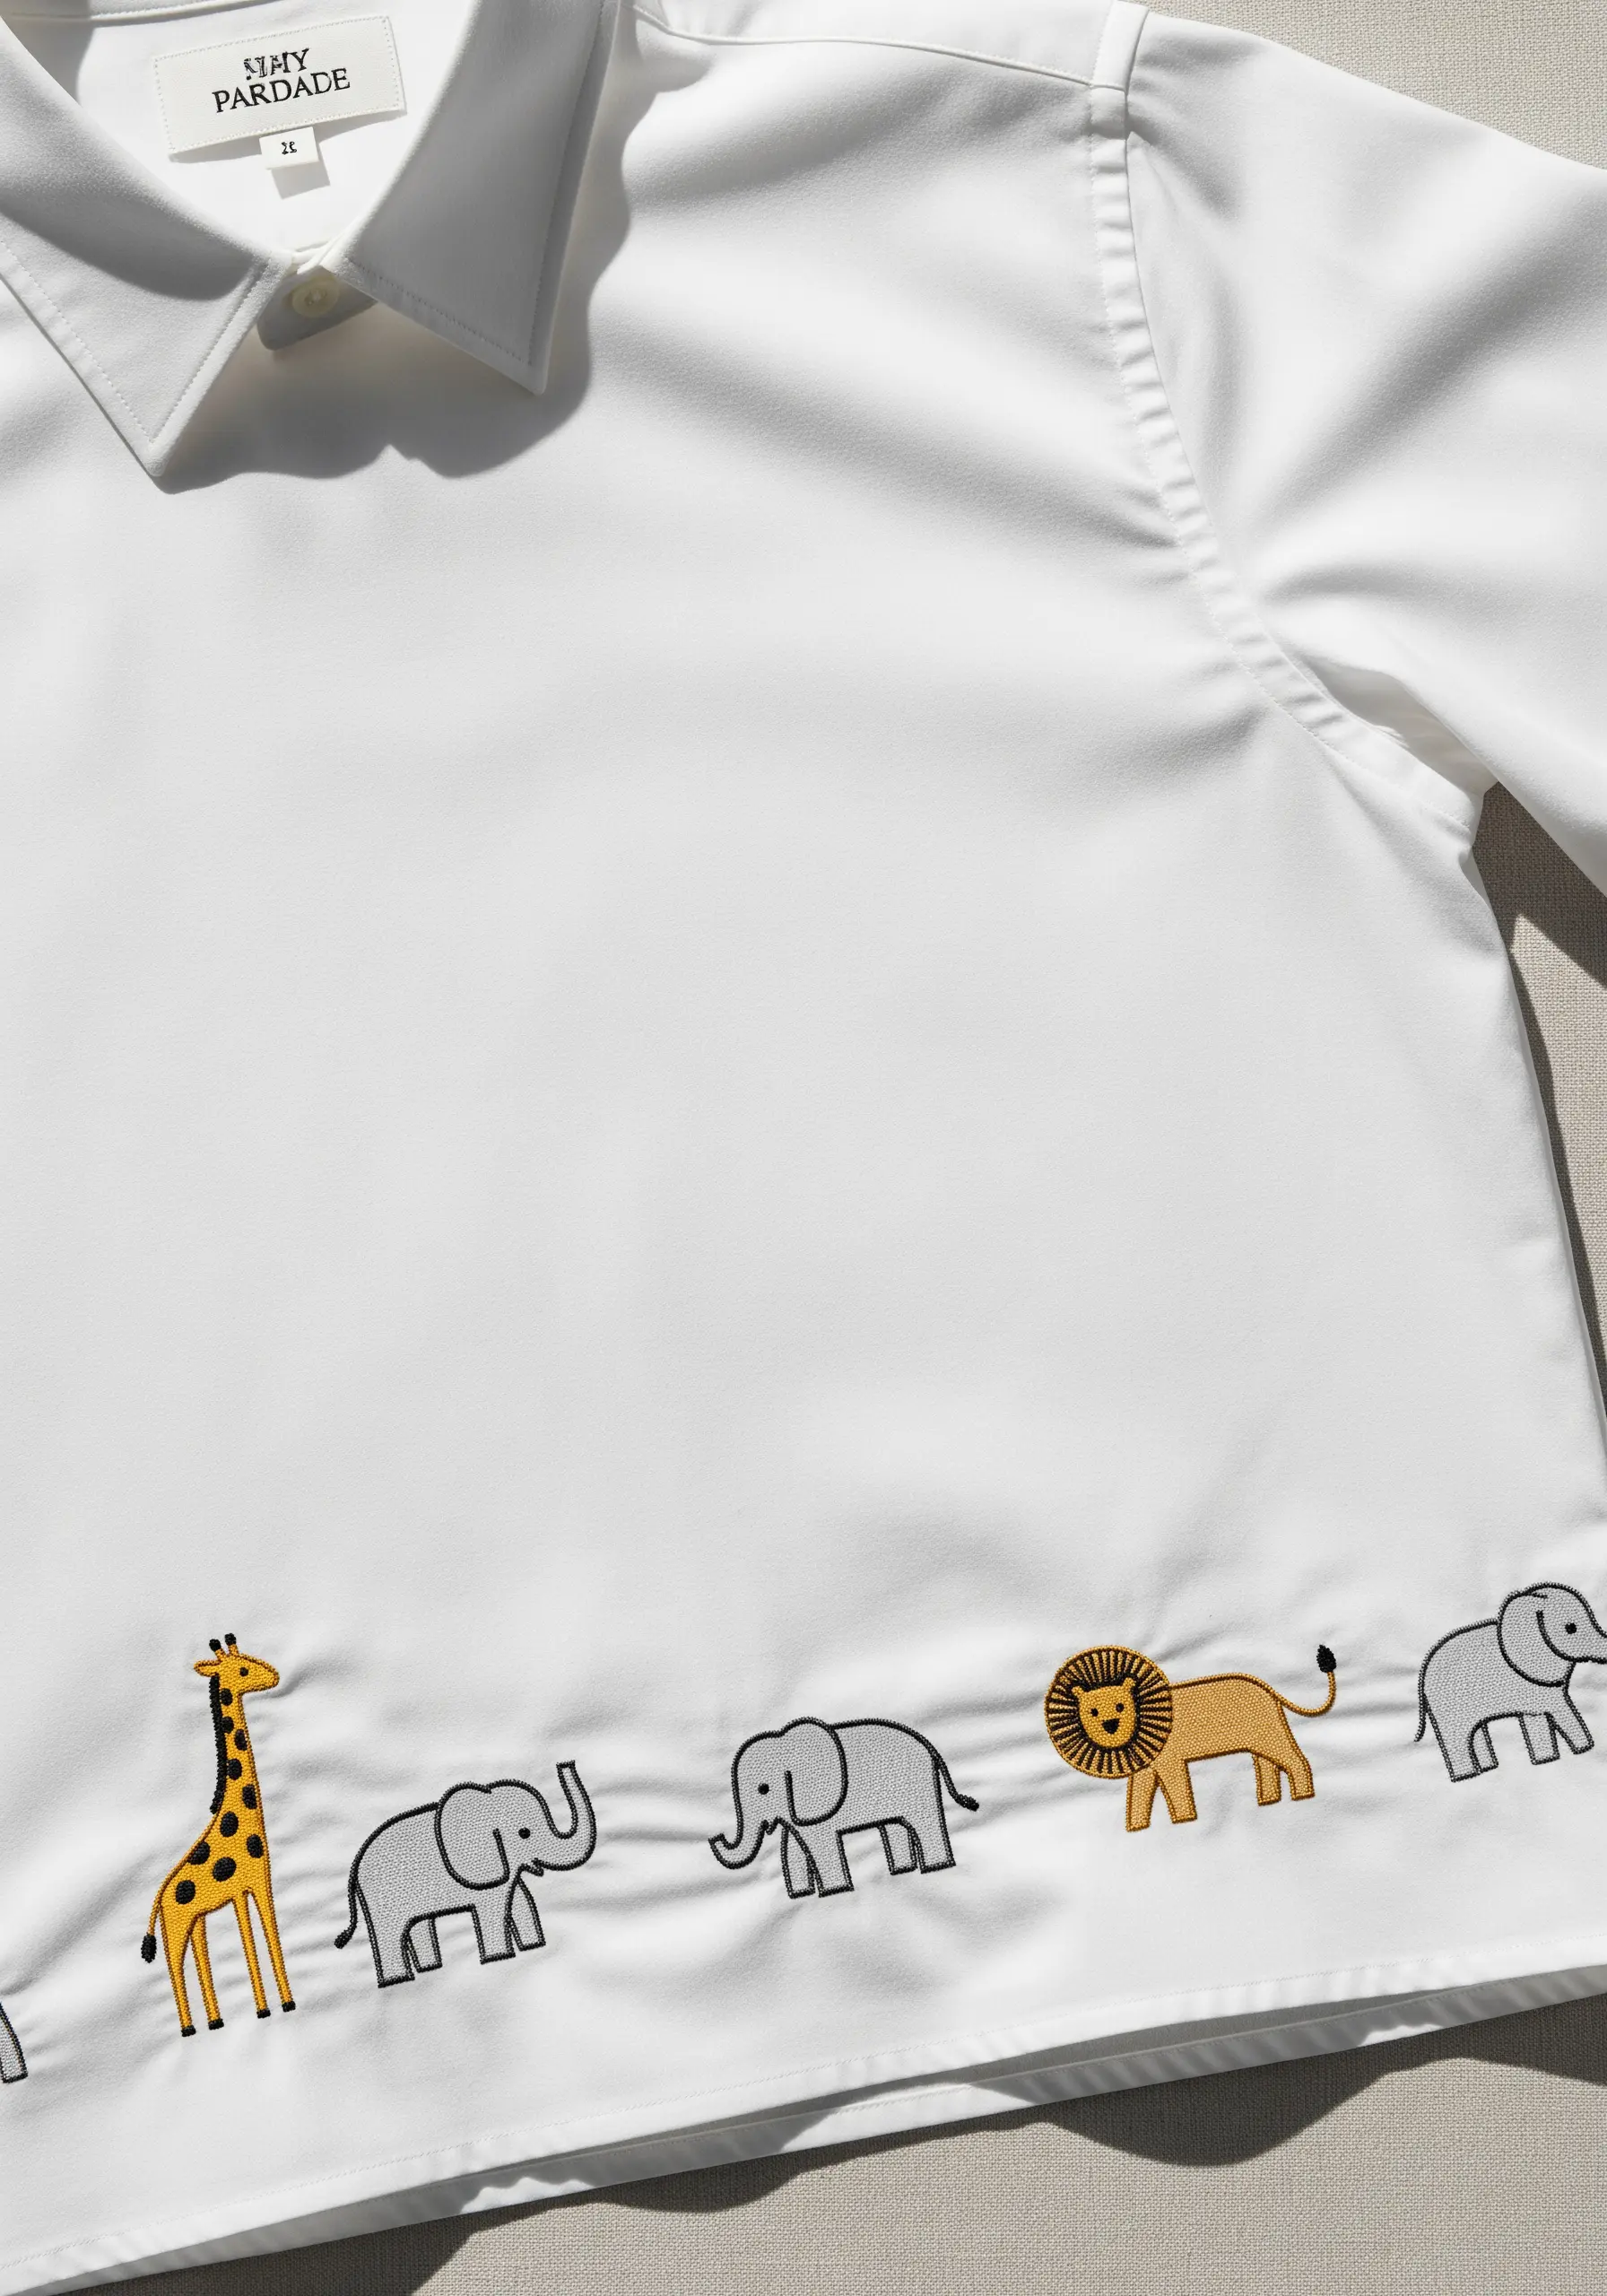
A successful border design relies on a sense of visual rhythm to keep it engaging.
Alternate between simple, solid-filled shapes like the elephants and more complex, patterned motifs like the giraffe. This variation creates interest and guides the eye along the hemline.
Maintain consistent spacing between each animal to give the design a clean, intentional, and processional feel.
24. Variegated Thread for Natural Color Shifts
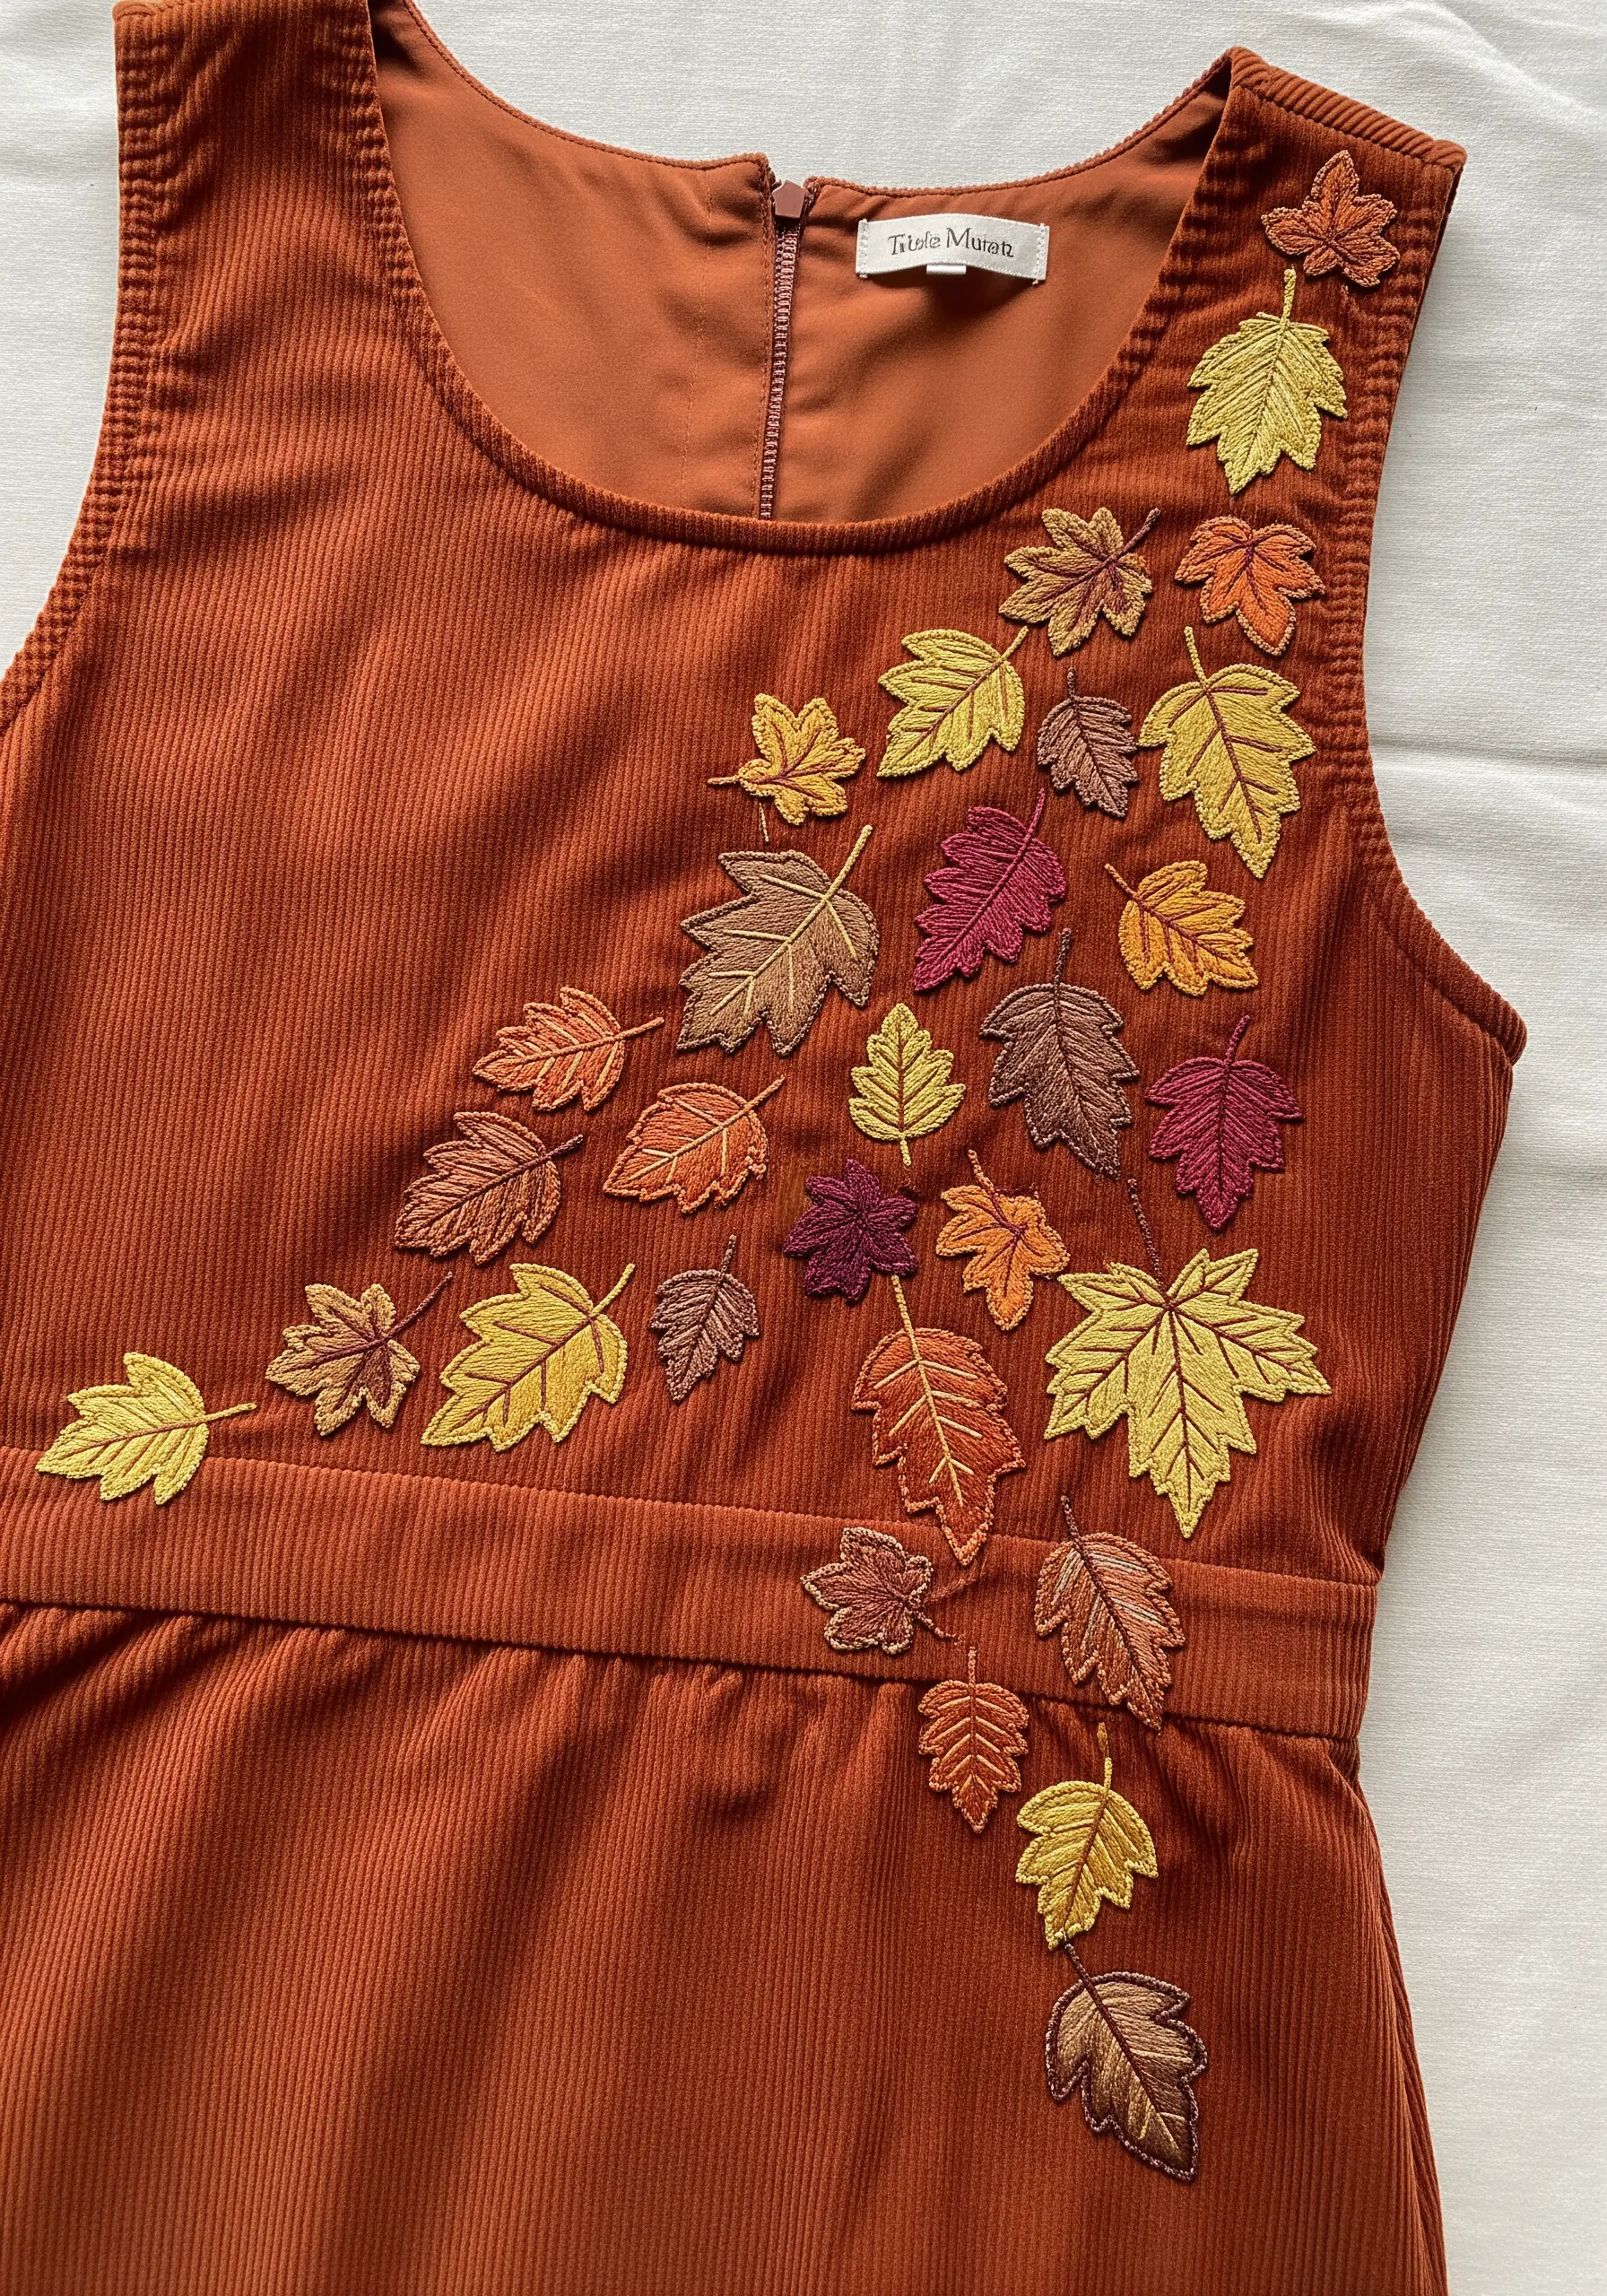
Instead of switching colors constantly to create multi-tonal leaves, use a single variegated thread.
The thread’s color will shift naturally as you stitch, creating beautiful, organic gradients that mimic the subtle variations in real autumn foliage.
Fill each leaf with a fishbone stitch. This stitch not only creates a central vein but also ensures the color changes are distributed beautifully, enhancing these embroidery ideas inspired by leaves.
25. Tiny Motifs for Small, Stretchy Accessories

Embroidering on small, stretchy items like socks requires a light hand and proper stabilization.
Use a small hoop to isolate the area and place a piece of tear-away stabilizer on the inside to prevent the fabric from puckering as you stitch.
Keep the design compact, using only two strands of floss and simple stitches like satin stitch and French knots, to ensure it remains flexible and comfortable against the skin.
26. Embellishing with 3D Fabric Elements
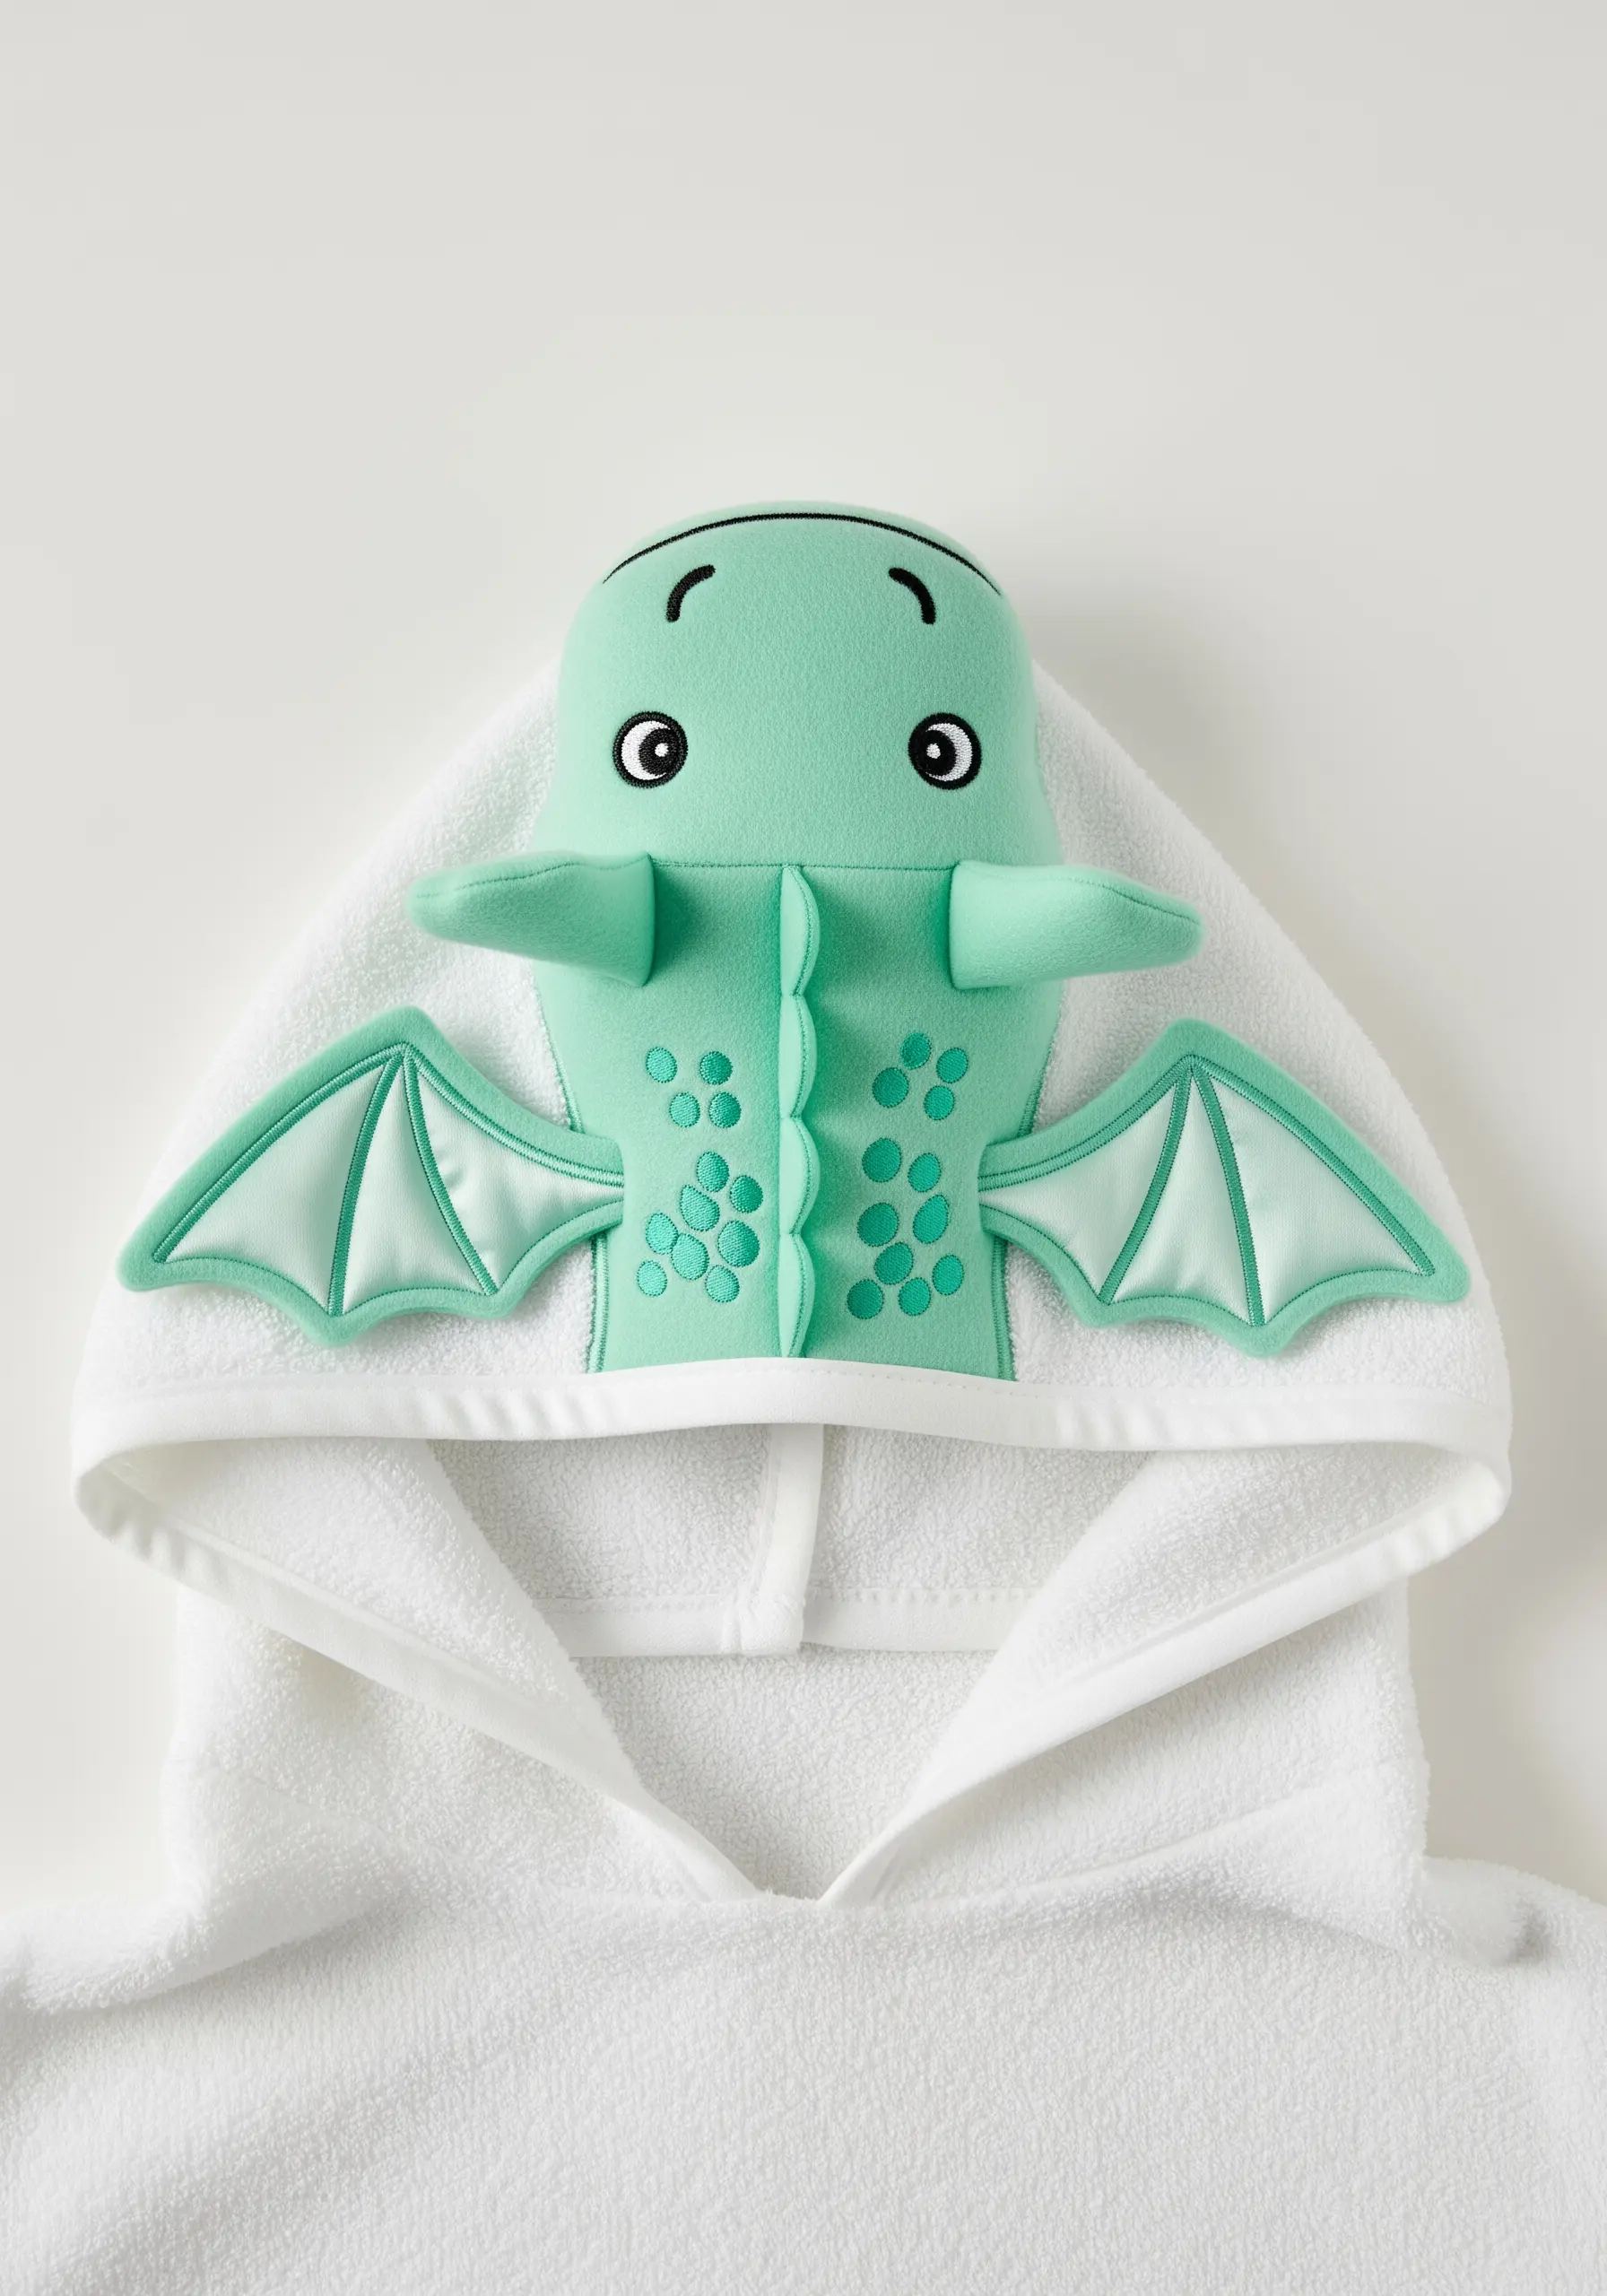
Move beyond thread and incorporate sewn, three-dimensional elements into your design for a truly playful effect.
Create the dragon’s wings, horns, and spines from felt or cotton, lightly stuff them for volume, and sew them securely onto the hood of a towel or jacket.
Use embroidery to add the finer details like eyes, nostrils, and scales, combining techniques to build a captivating and tactile character.
27. Large-Scale Fills for Blankets and Keepsakes

When tackling a large-scale motif on a receiving blanket, the consistency of your fill stitch is paramount for a professional result.
Use a long-and-short stitch to avoid obvious lines and ensure a smooth, paint-like finish. To keep the stitches even, work in small, manageable sections and always stitch in the same direction.
This careful approach prevents puckering and ensures the final piece drapes beautifully.


