

A meaningful gift doesn’t have to take weeks to create. String art embroidery offers a way to craft something beautiful, modern, and deeply personal in just one evening. It transforms simple straight lines into elegant curves and captivating textures, proving that the most profound statements often come from the simplest techniques.
Forget complex stitches and intricate patterns for a moment. Instead, I want you to focus on thread, tension, and color. These designs celebrate the geometry of emotion, turning a classic heart into a piece of contemporary art. Whether you use beads, pins, or tiny stitches as your anchor points, the process is rhythmic, meditative, and incredibly rewarding.
Here, you’ll find ideas that range from minimalist and graphic to soft and romantic. Use them as a starting point to create an anniversary gift that is not just handmade, but truly heartfelt—a visual representation of connection, crafted by you.
1. Create a Twisted Color-Block Heart
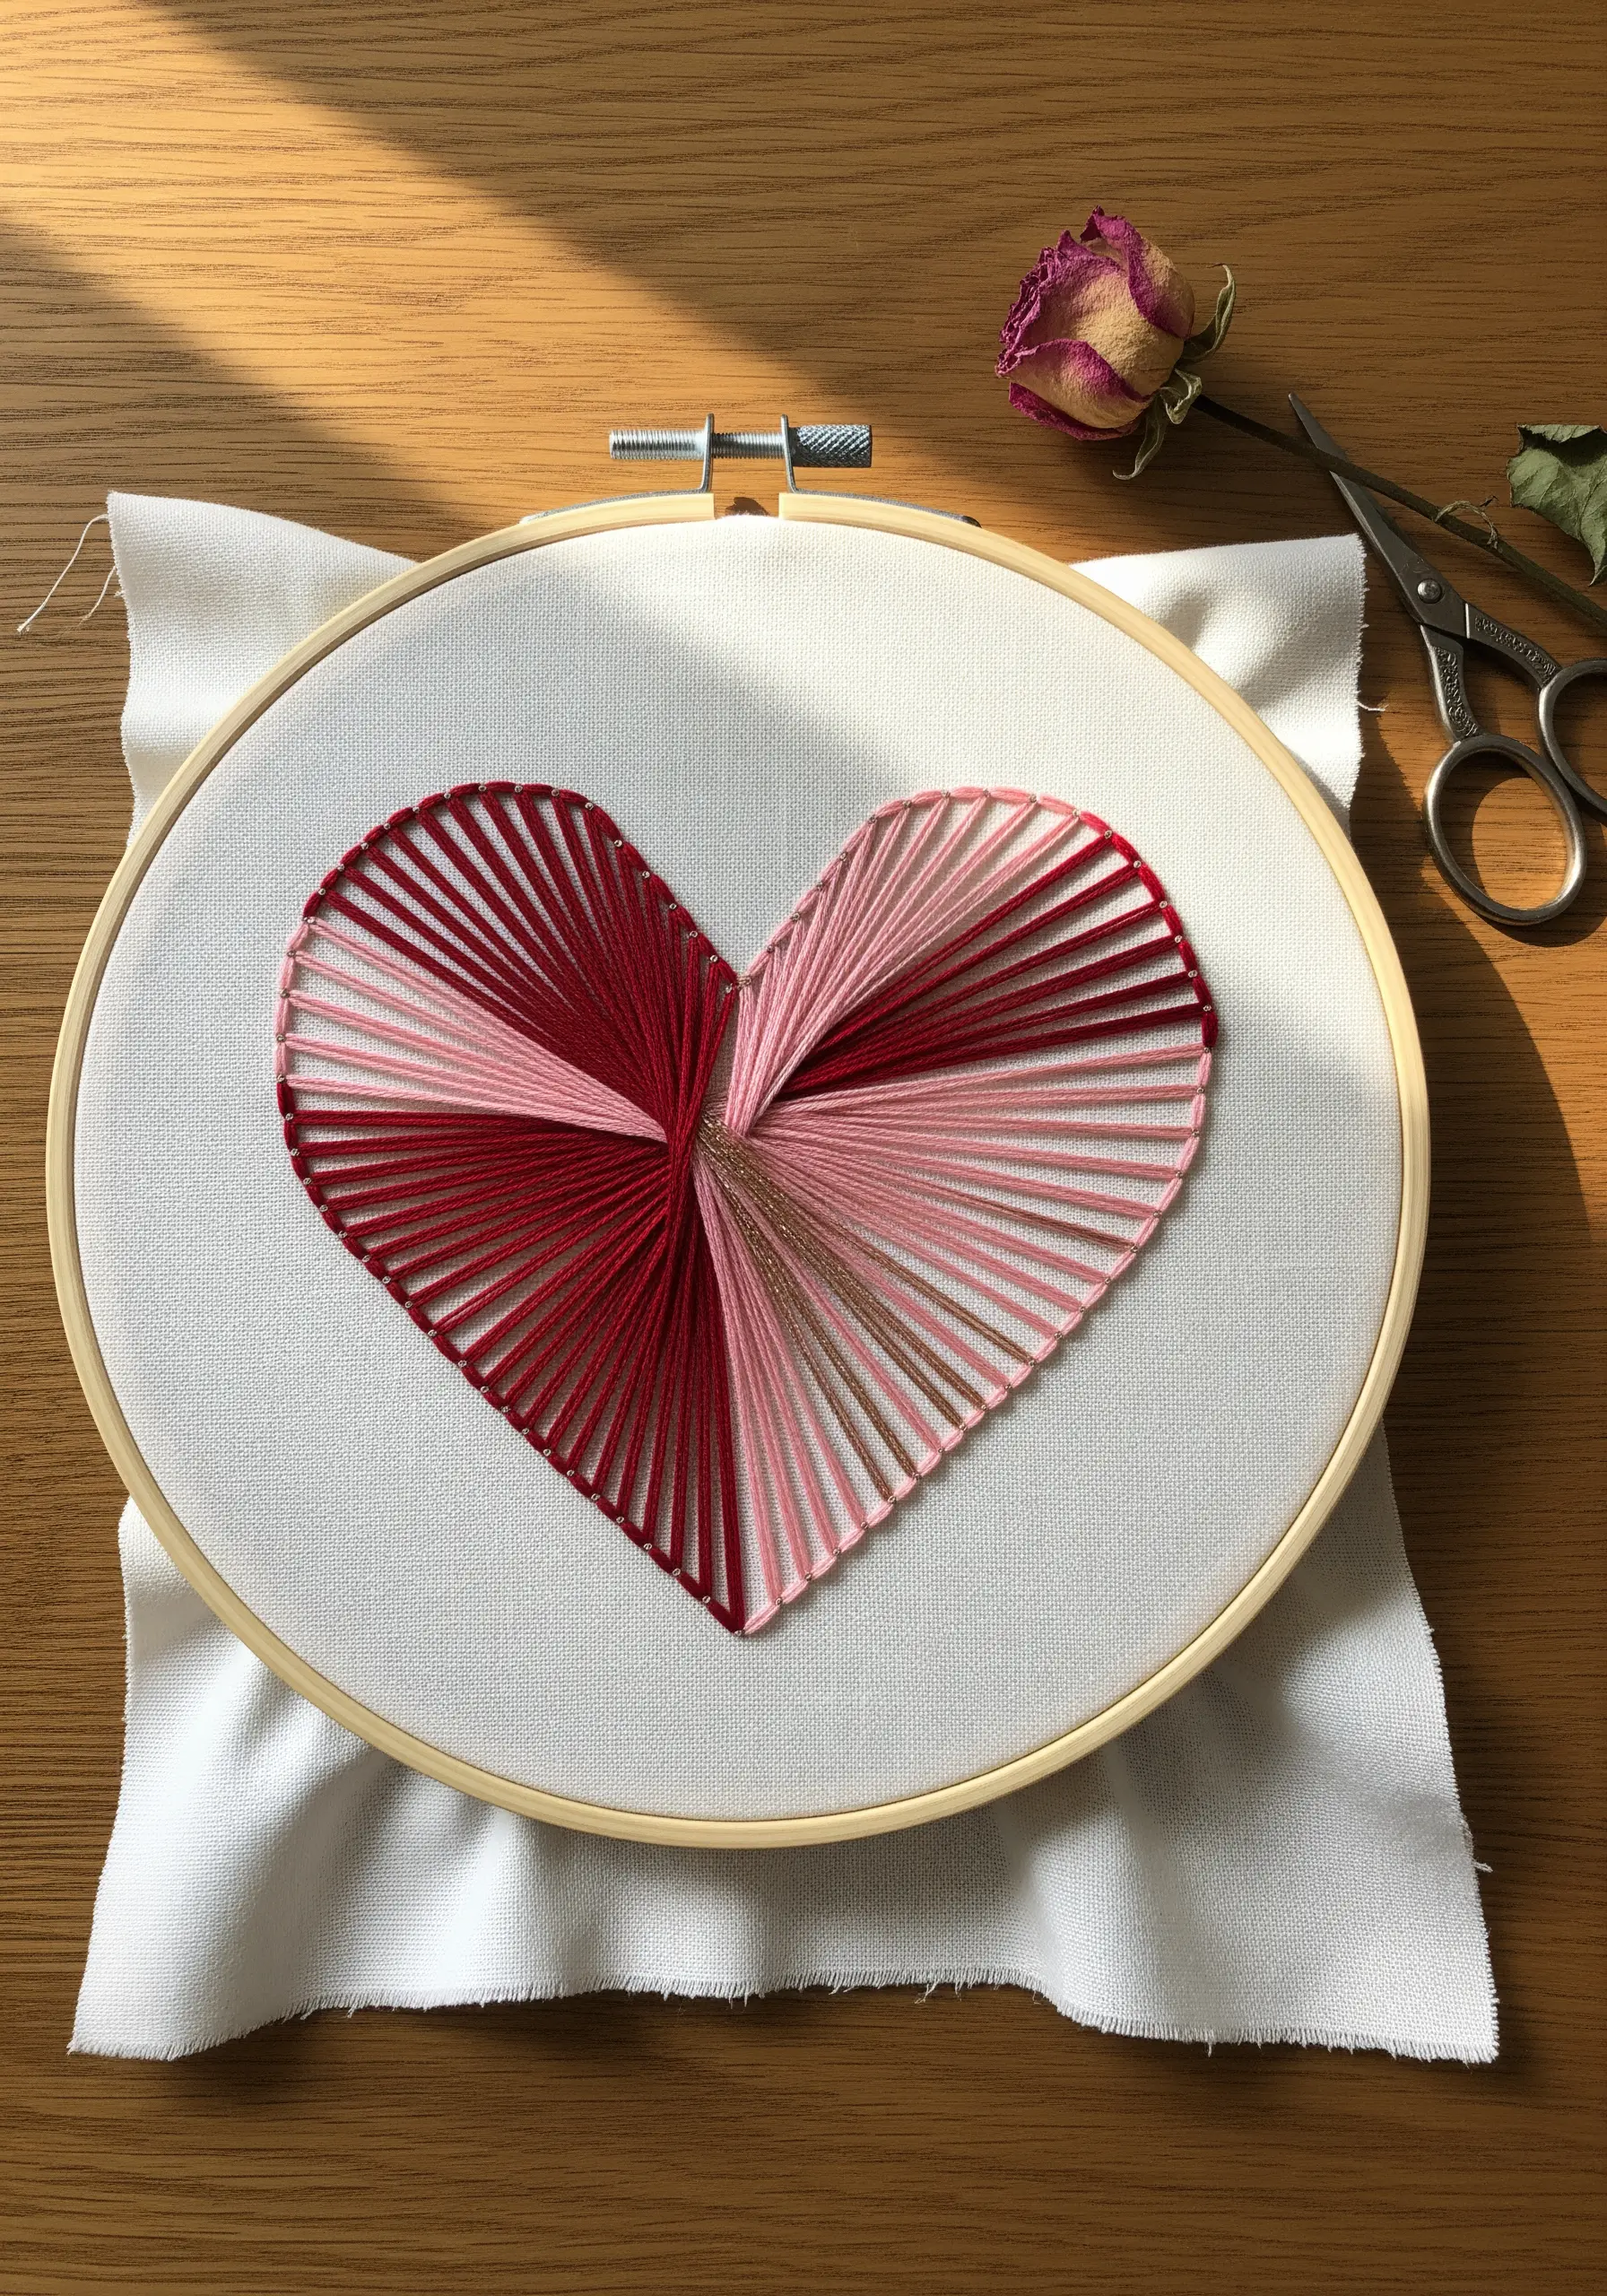
To achieve this dynamic, twisted effect, divide your heart vertically down the center.
Work on one half at a time, using straight stitches that pivot from a single anchor point at the bottom center to various points along the top curve.
For a seamless look, use an analogous color scheme—like deep red, rose, and blush pink—and introduce a single metallic thread as a subtle accent rather than a dominant color.
This method creates a sense of movement and dimension with only the simplest of stitches, making the final piece look far more complex than it is to execute.
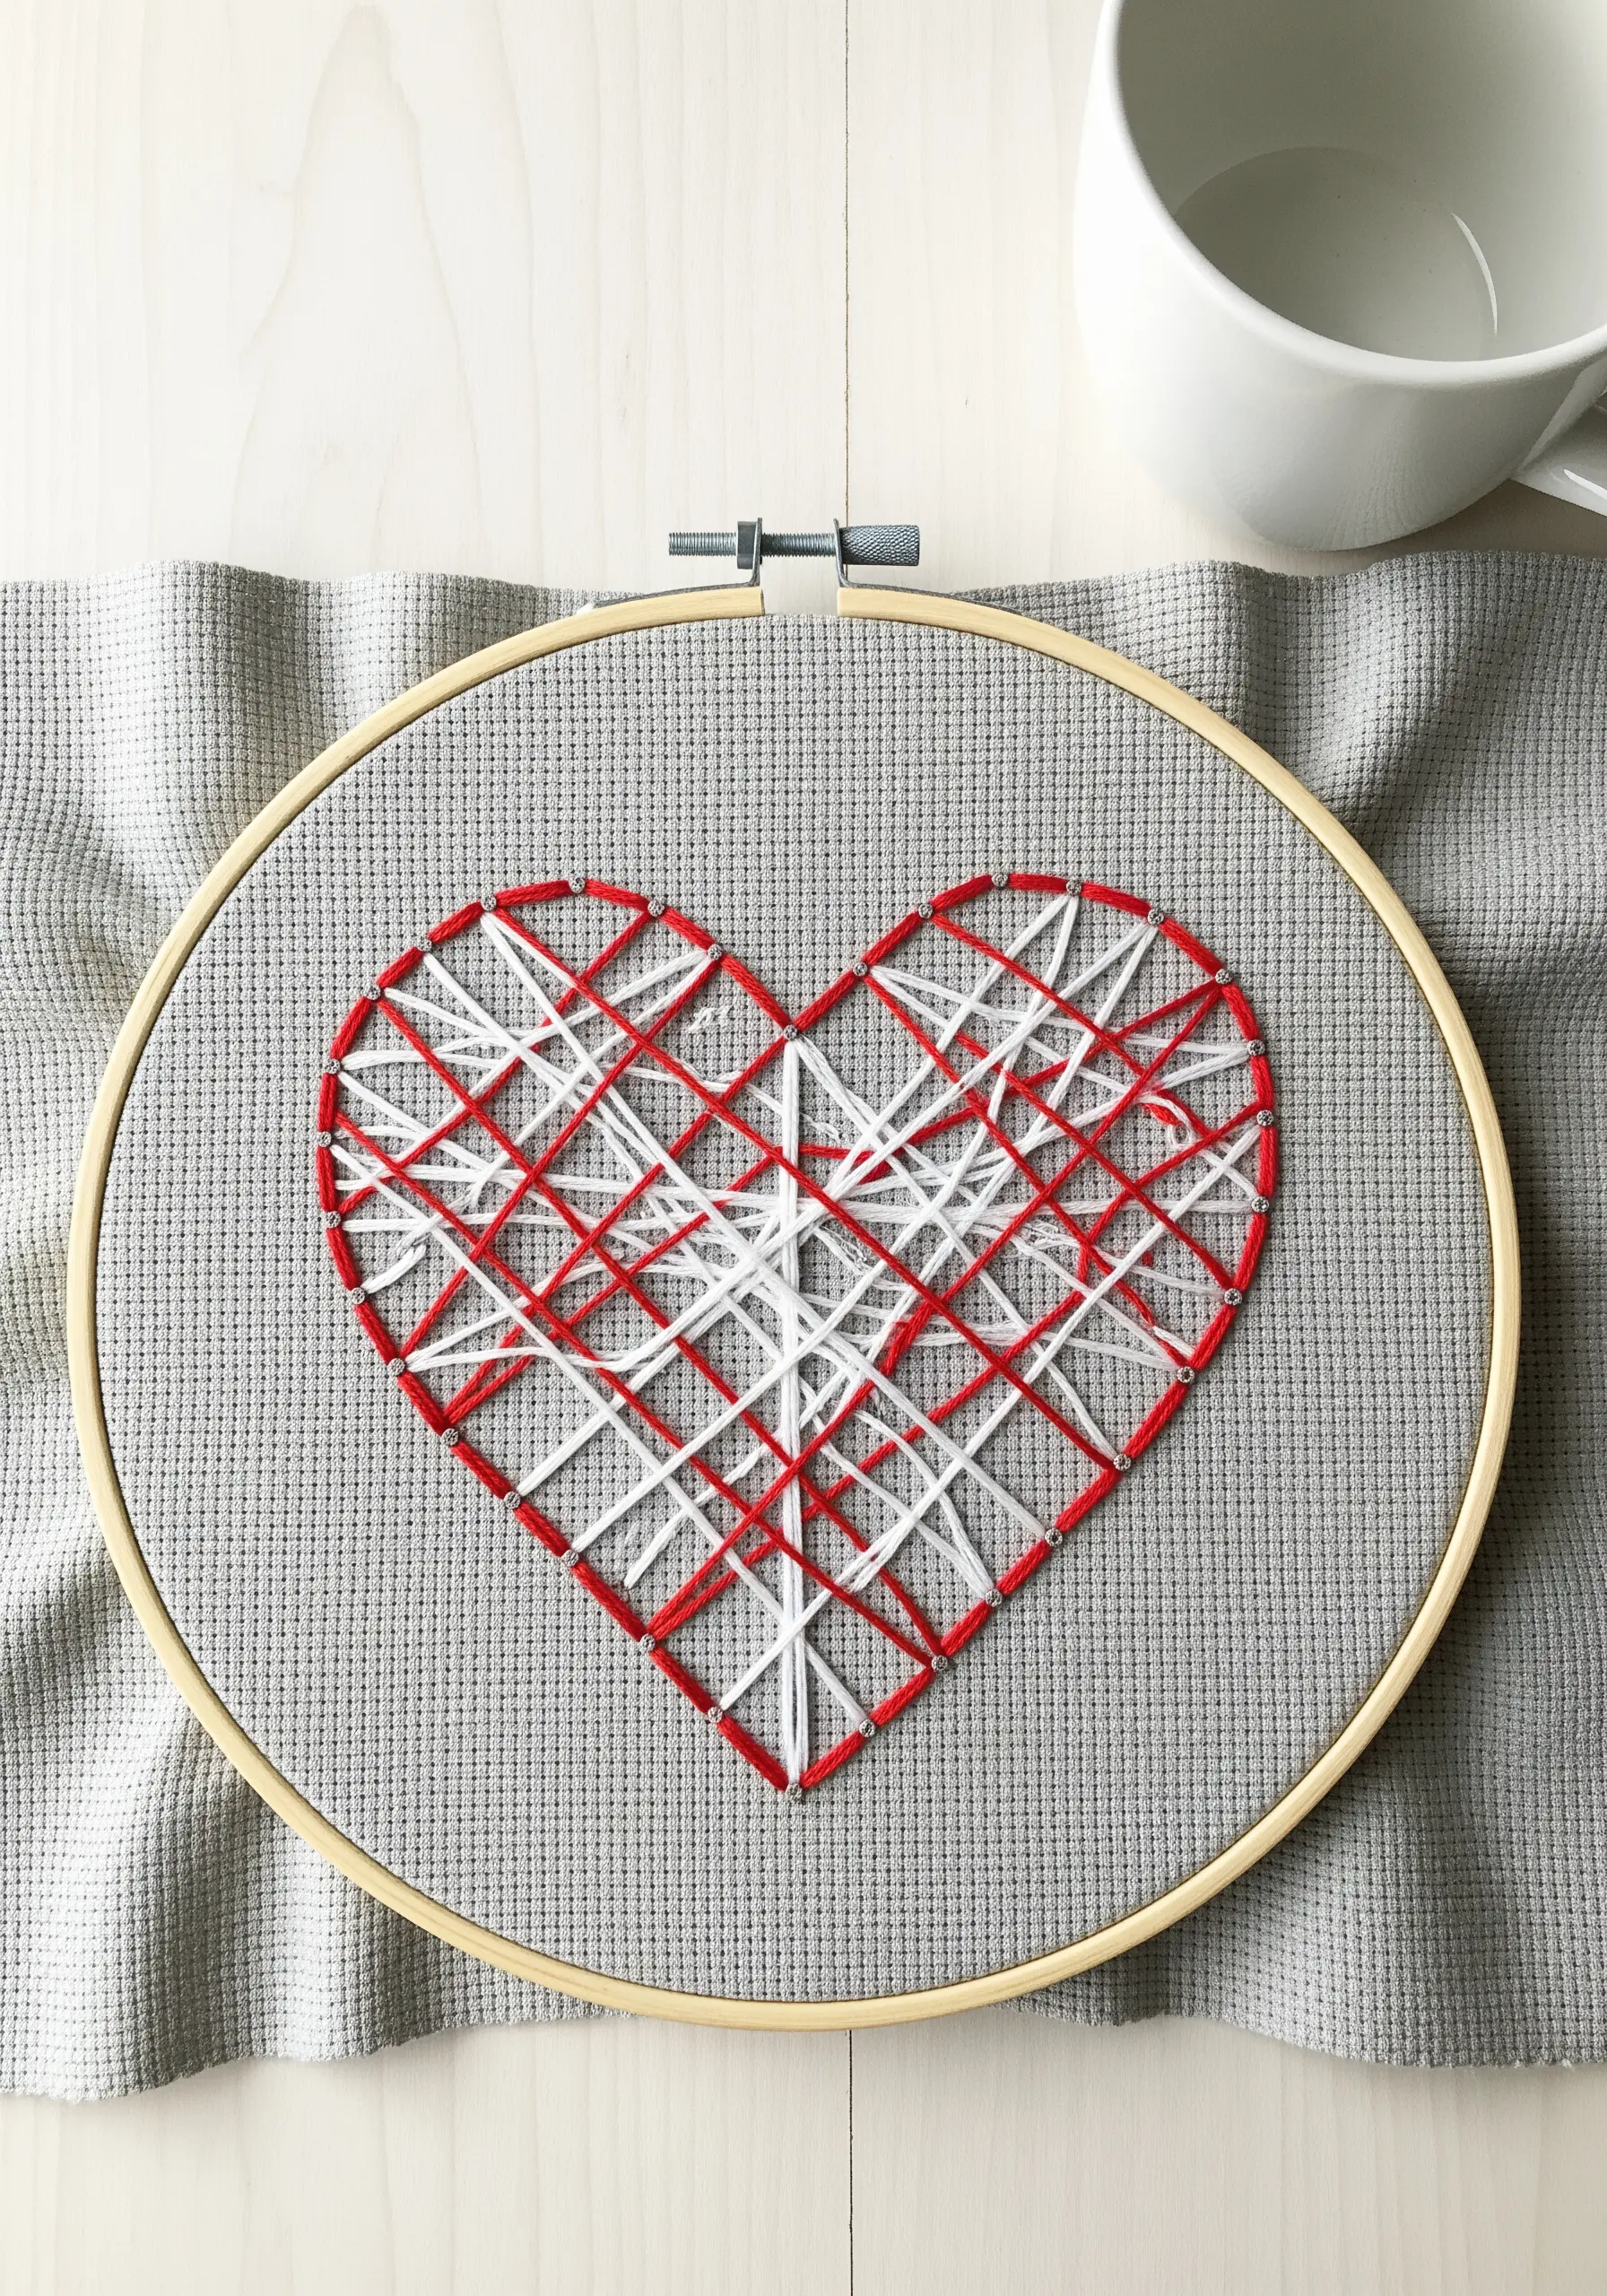
2. Master the Abstract Web Effect
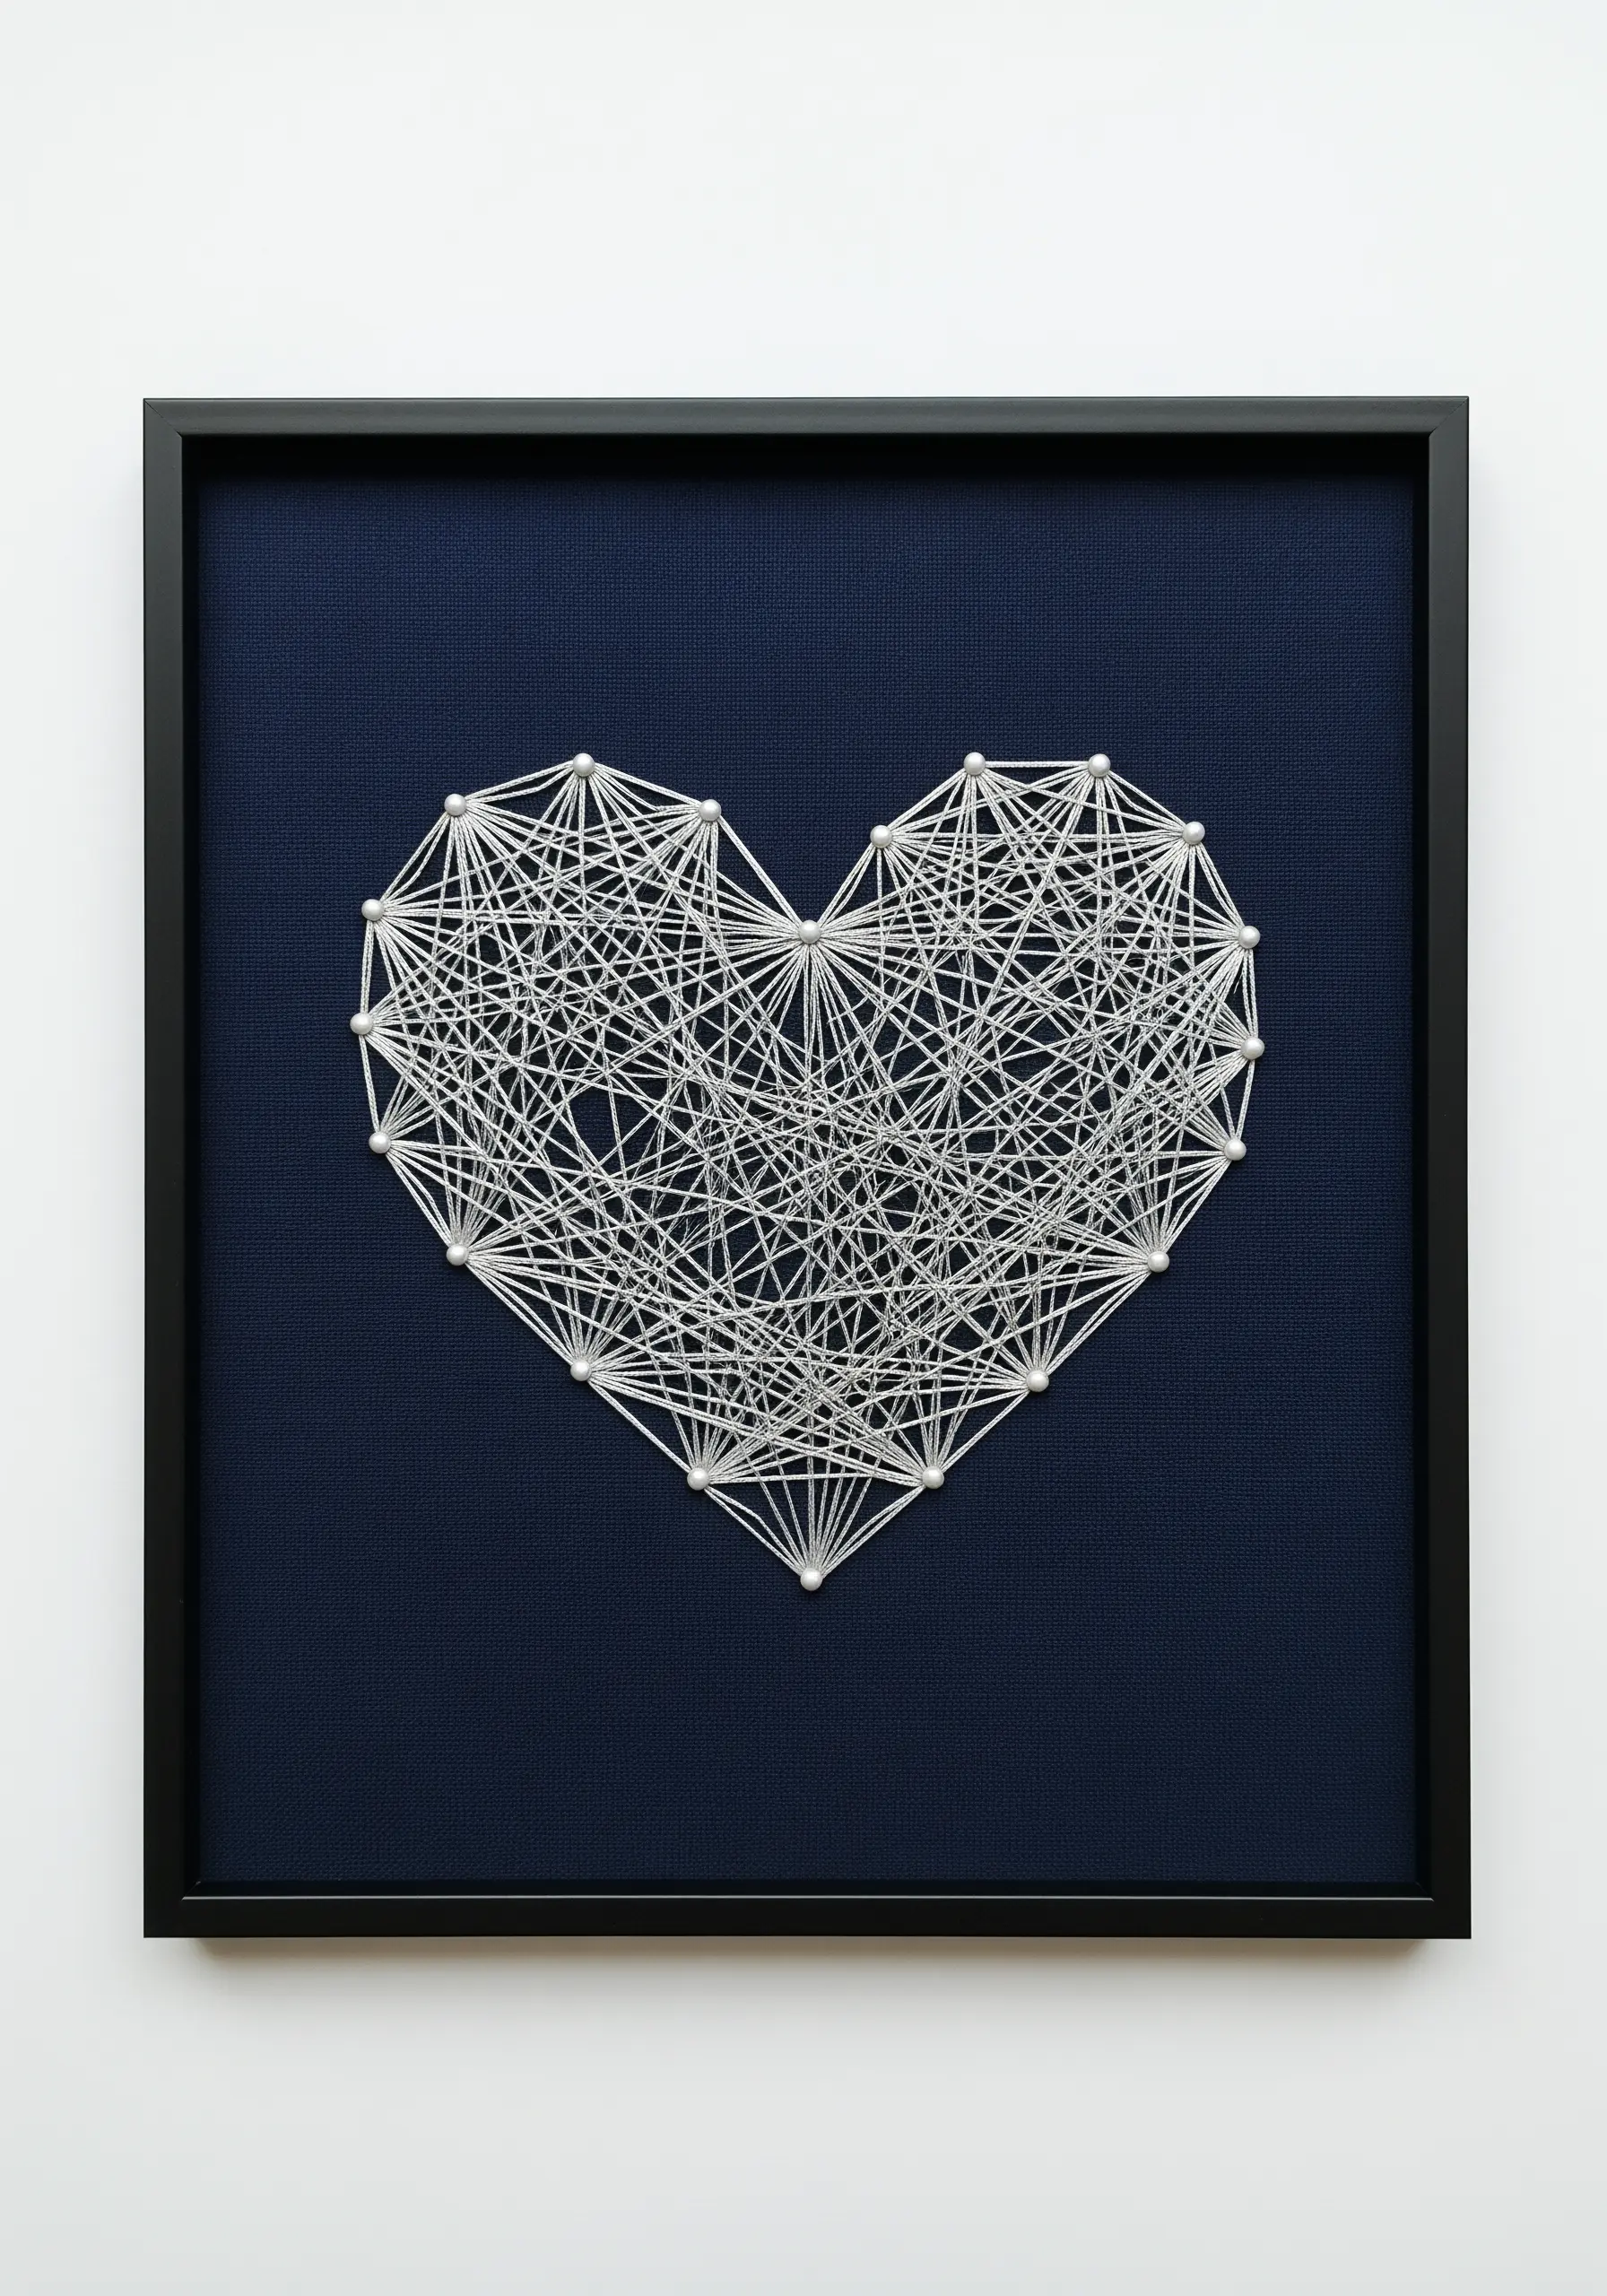
This seemingly chaotic pattern relies on a well-planned foundation of evenly spaced anchor points—in this case, pins, but you can use tiny seed beads or French knots.
Choose a high-contrast pairing, like crisp white thread on navy fabric, to make the geometry pop.
Instead of stitching in a predictable sequence, wrap the thread randomly between anchor points across the heart, layering until you achieve the desired density.
The key is to maintain consistent thread tension to prevent sagging, ensuring a sharp, architectural finish that looks stunning when framed.
3. Layer Interlocking Hearts on Textured Fabric
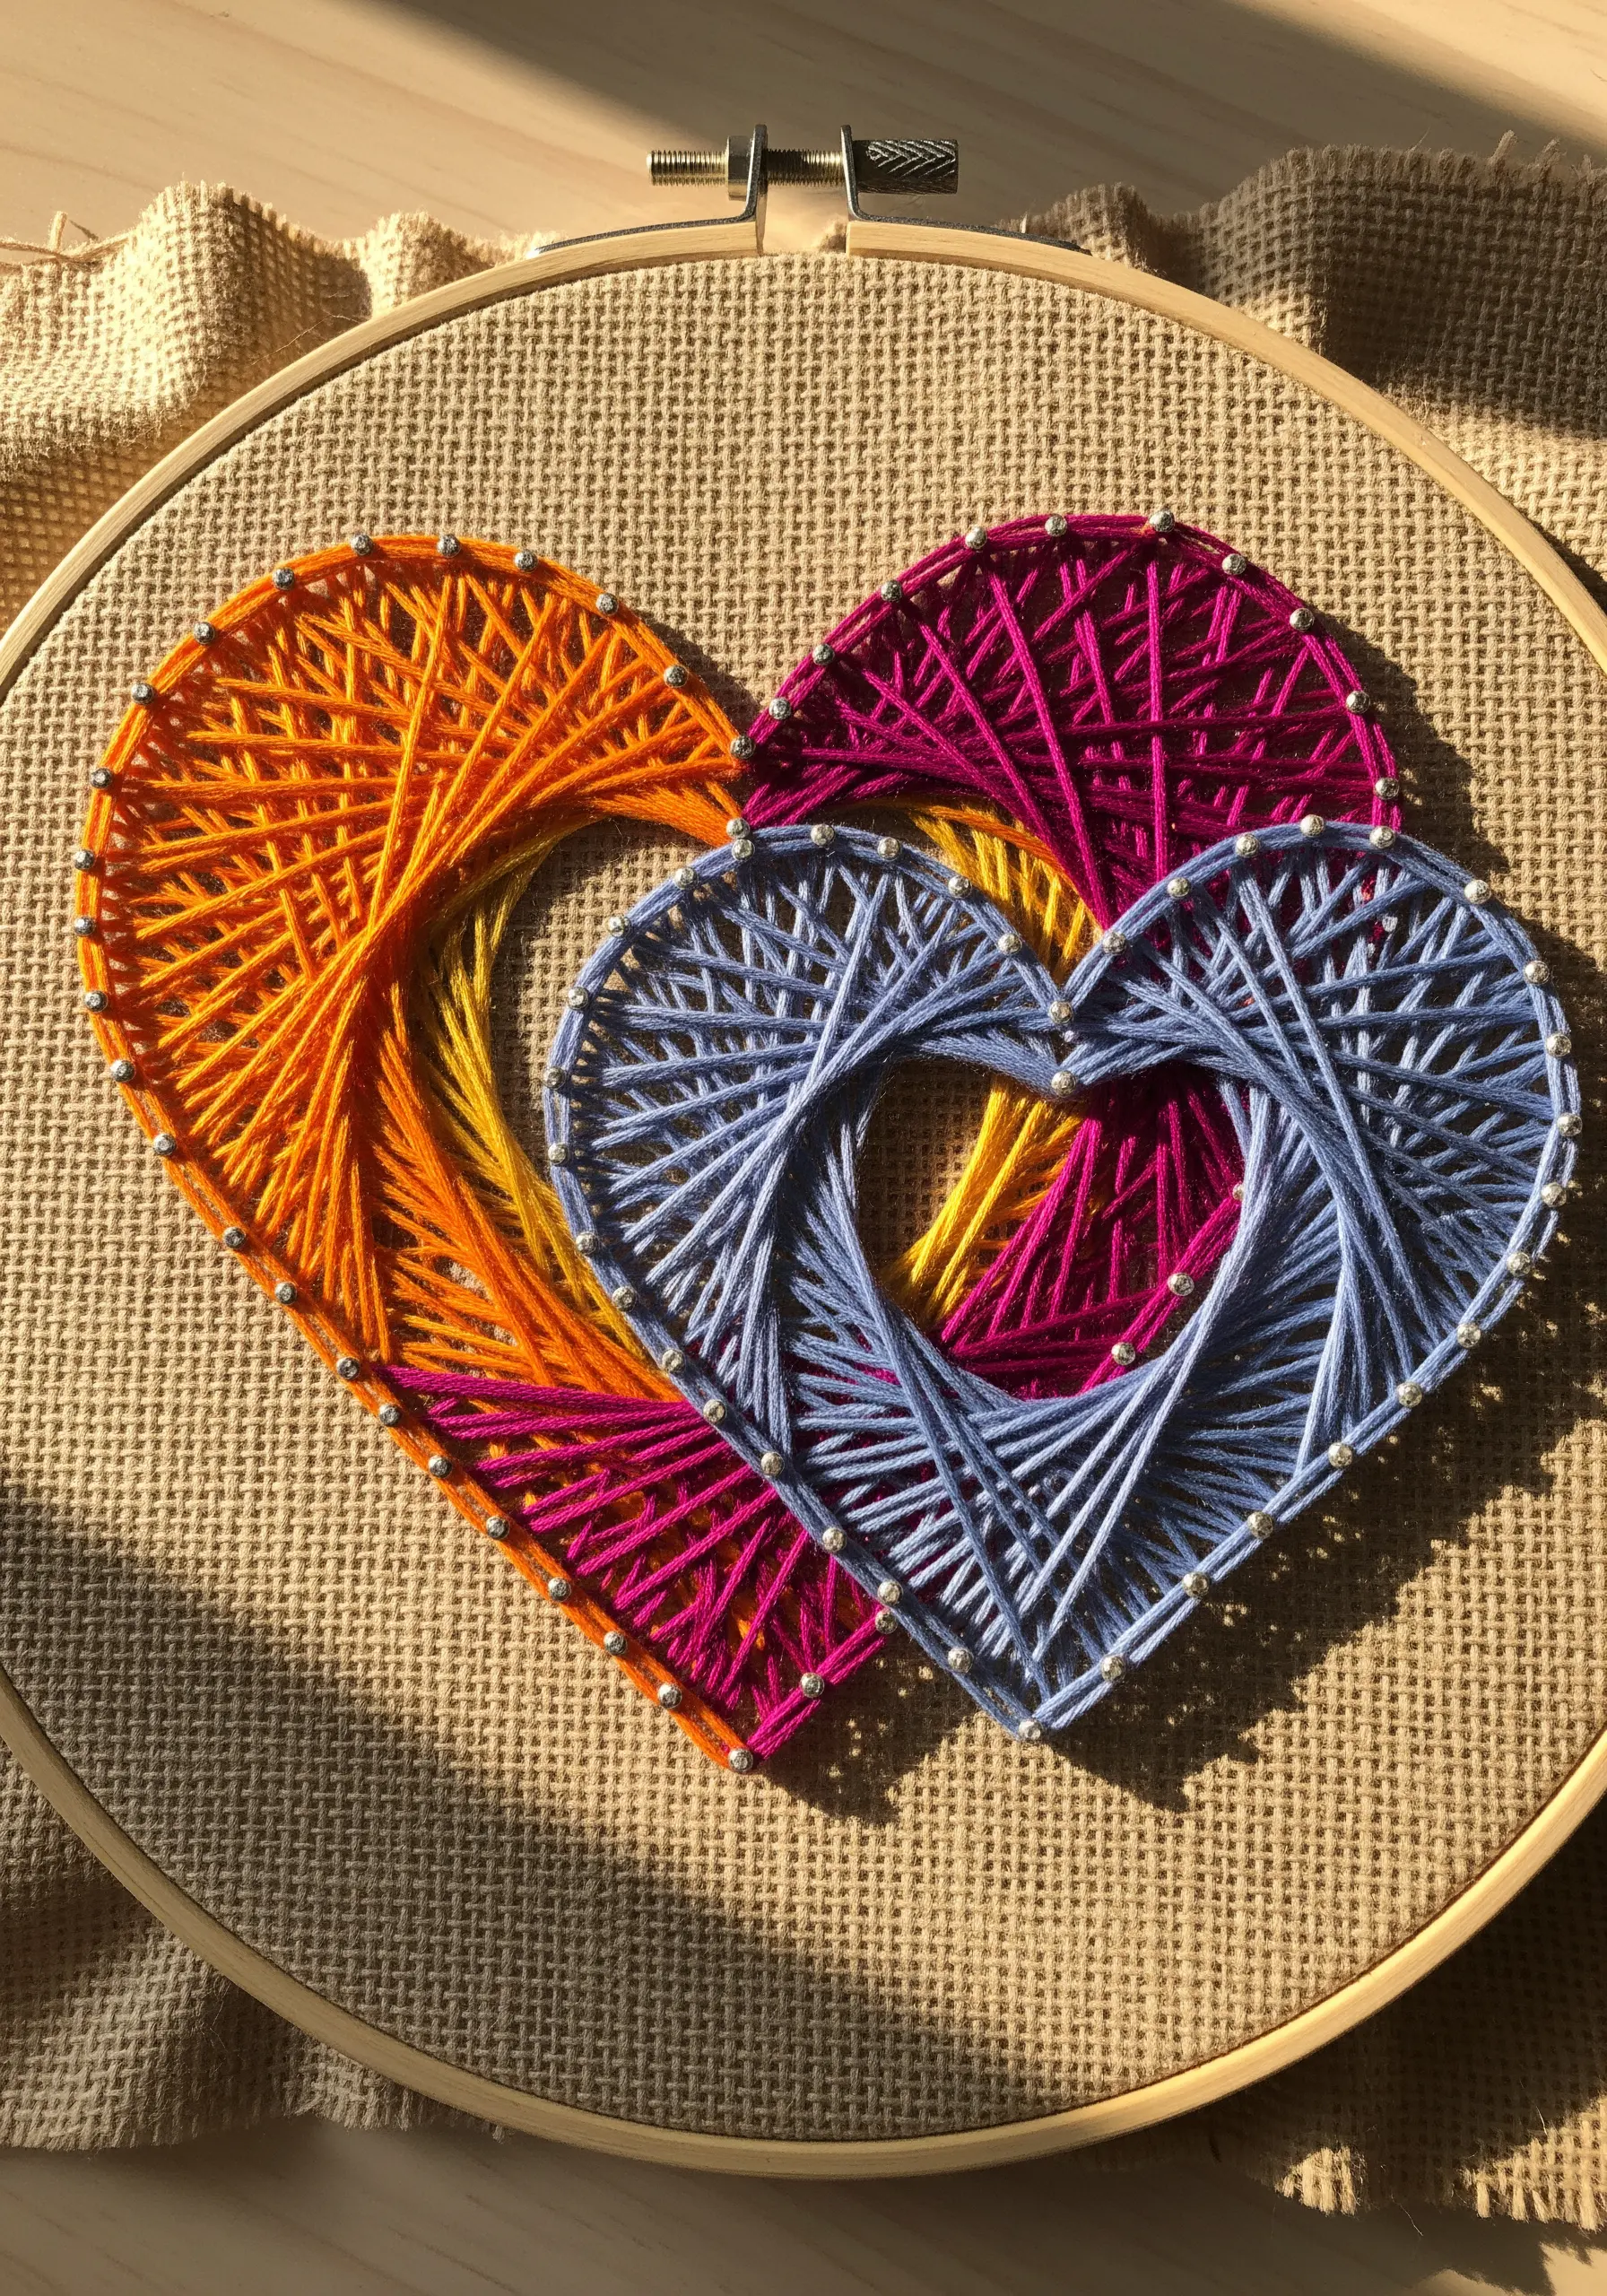
Working on a rustic fabric like burlap or linen adds instant warmth and texture to your design.
To create interlocking hearts, stitch the background heart first, then stitch the second heart on top, making sure its anchor points (small silver beads work perfectly) are placed slightly inside the first heart’s perimeter.
Use bold, contrasting color palettes like sunset orange and cool periwinkle to ensure each shape is clearly defined.
This technique turns a simple motif into a dynamic composition that tells a story of connection.
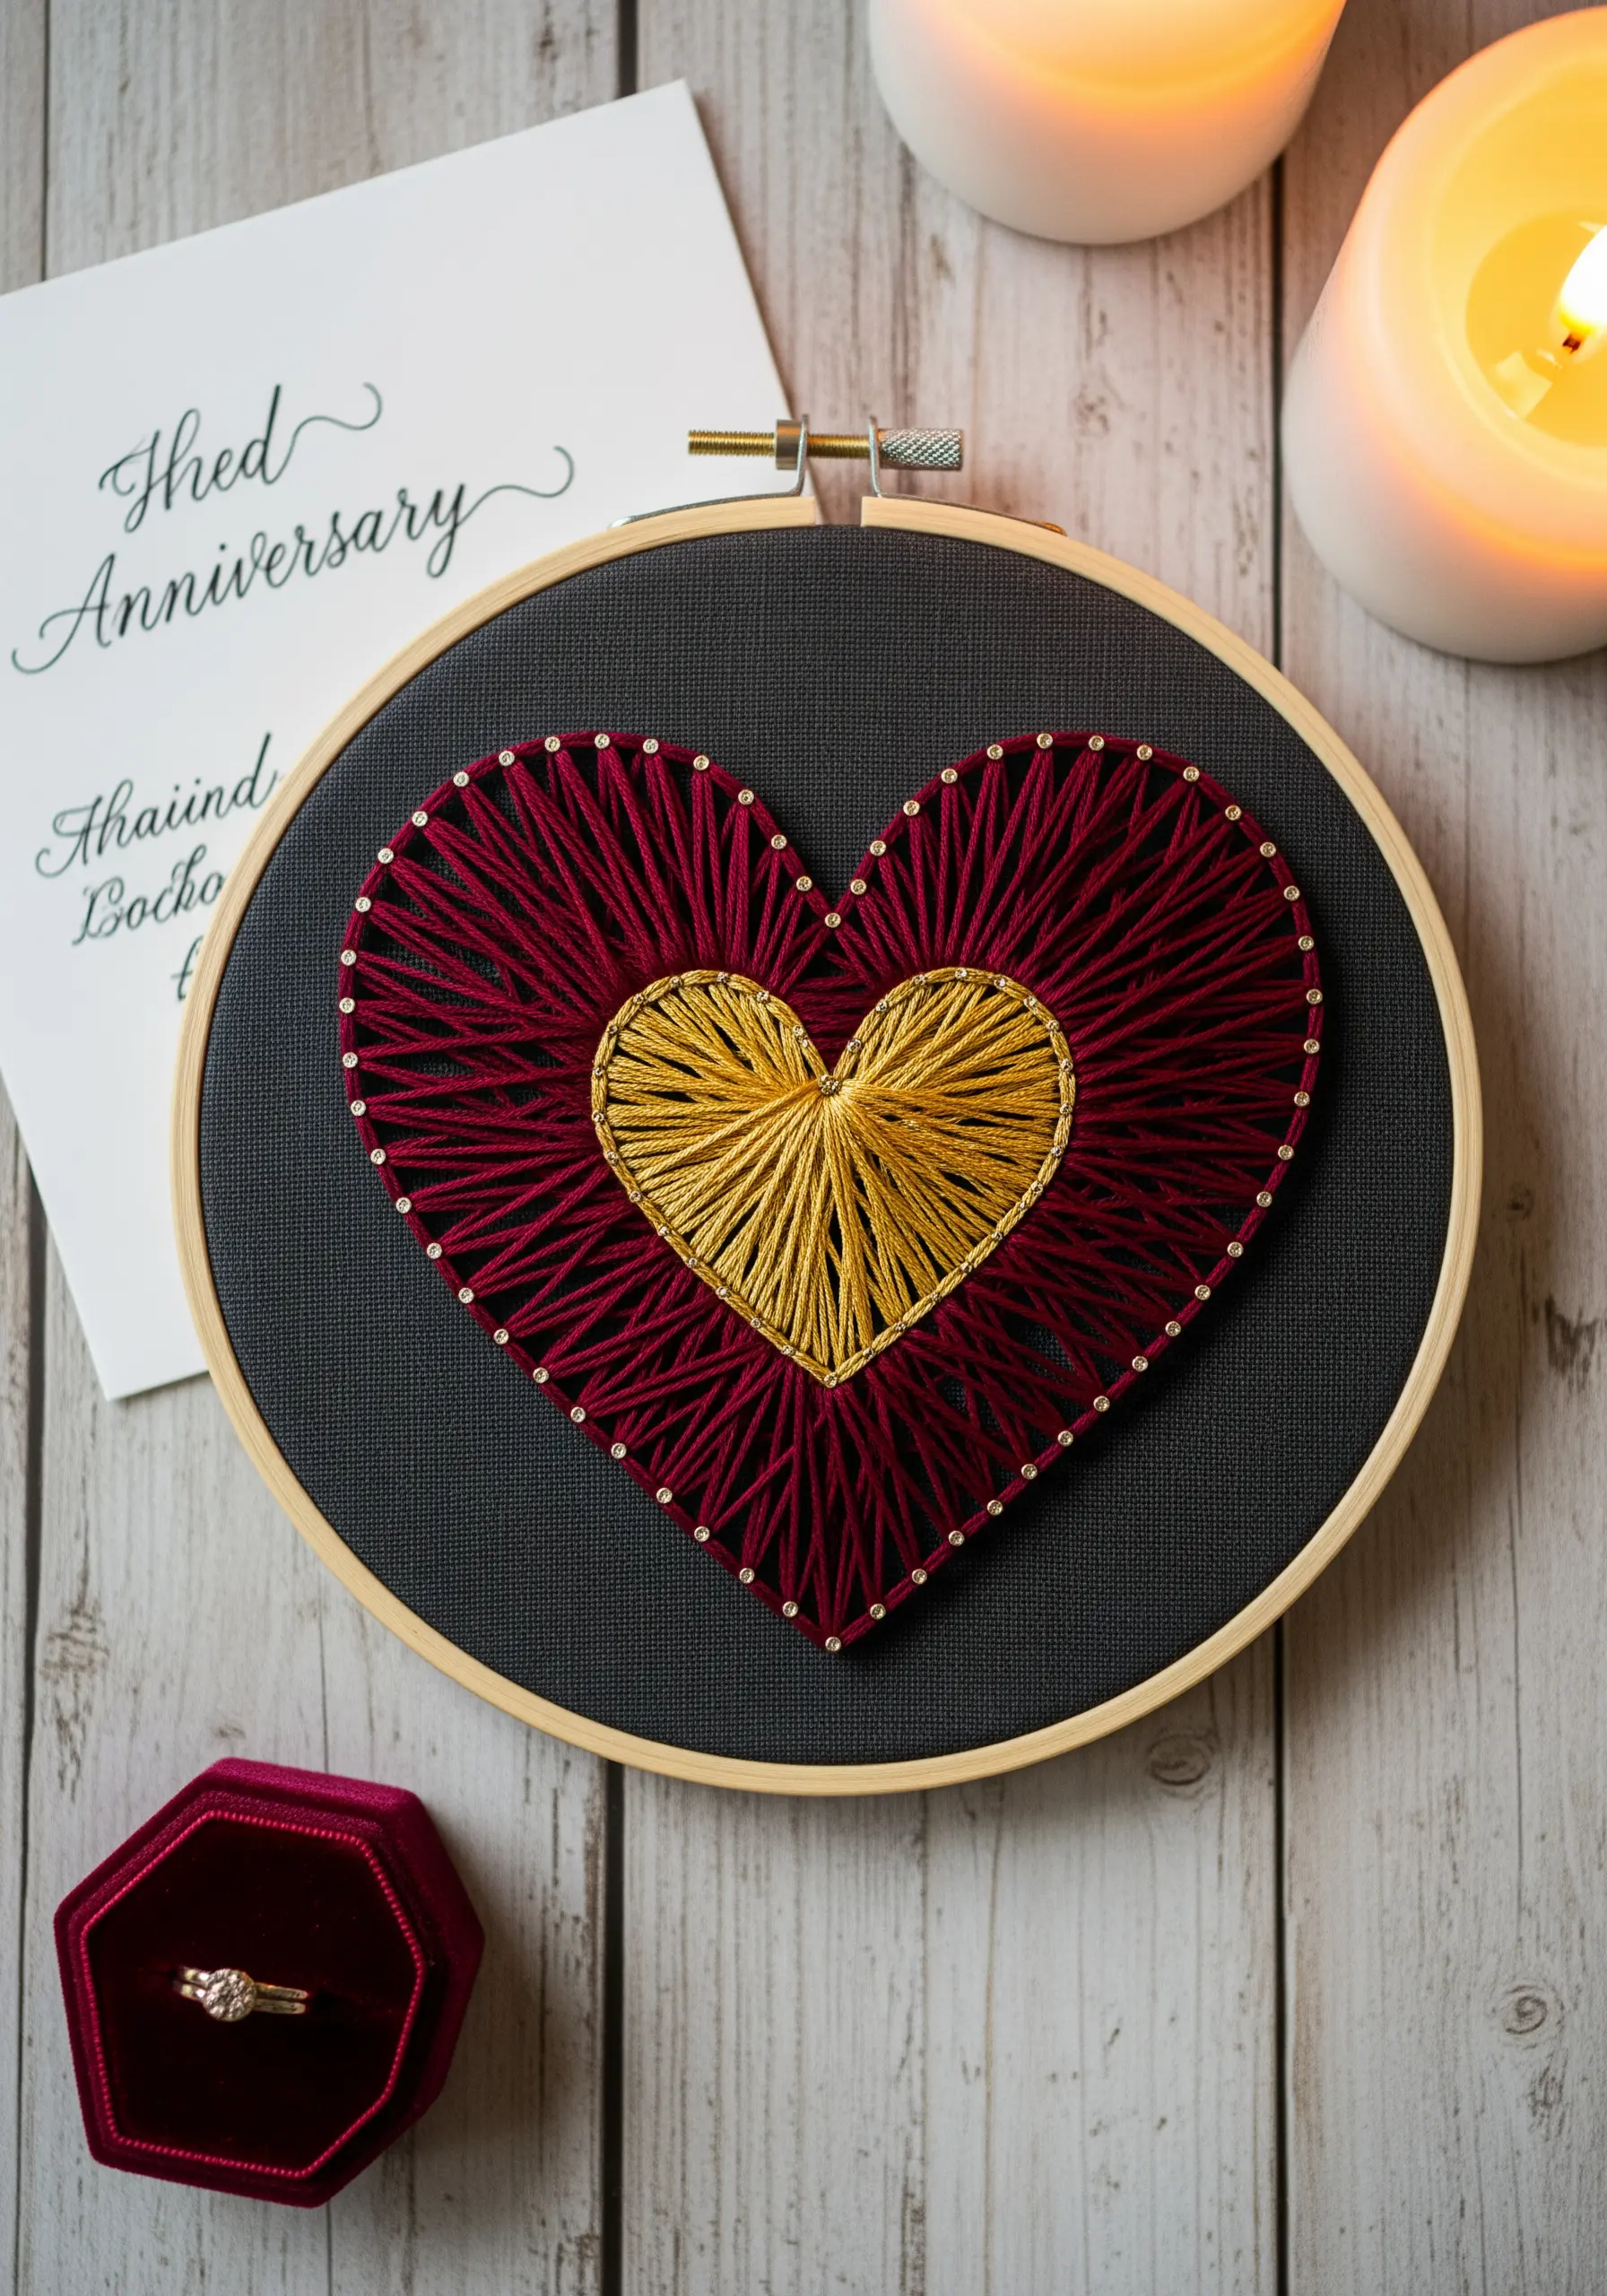
4. Build Depth with Concentric Layers
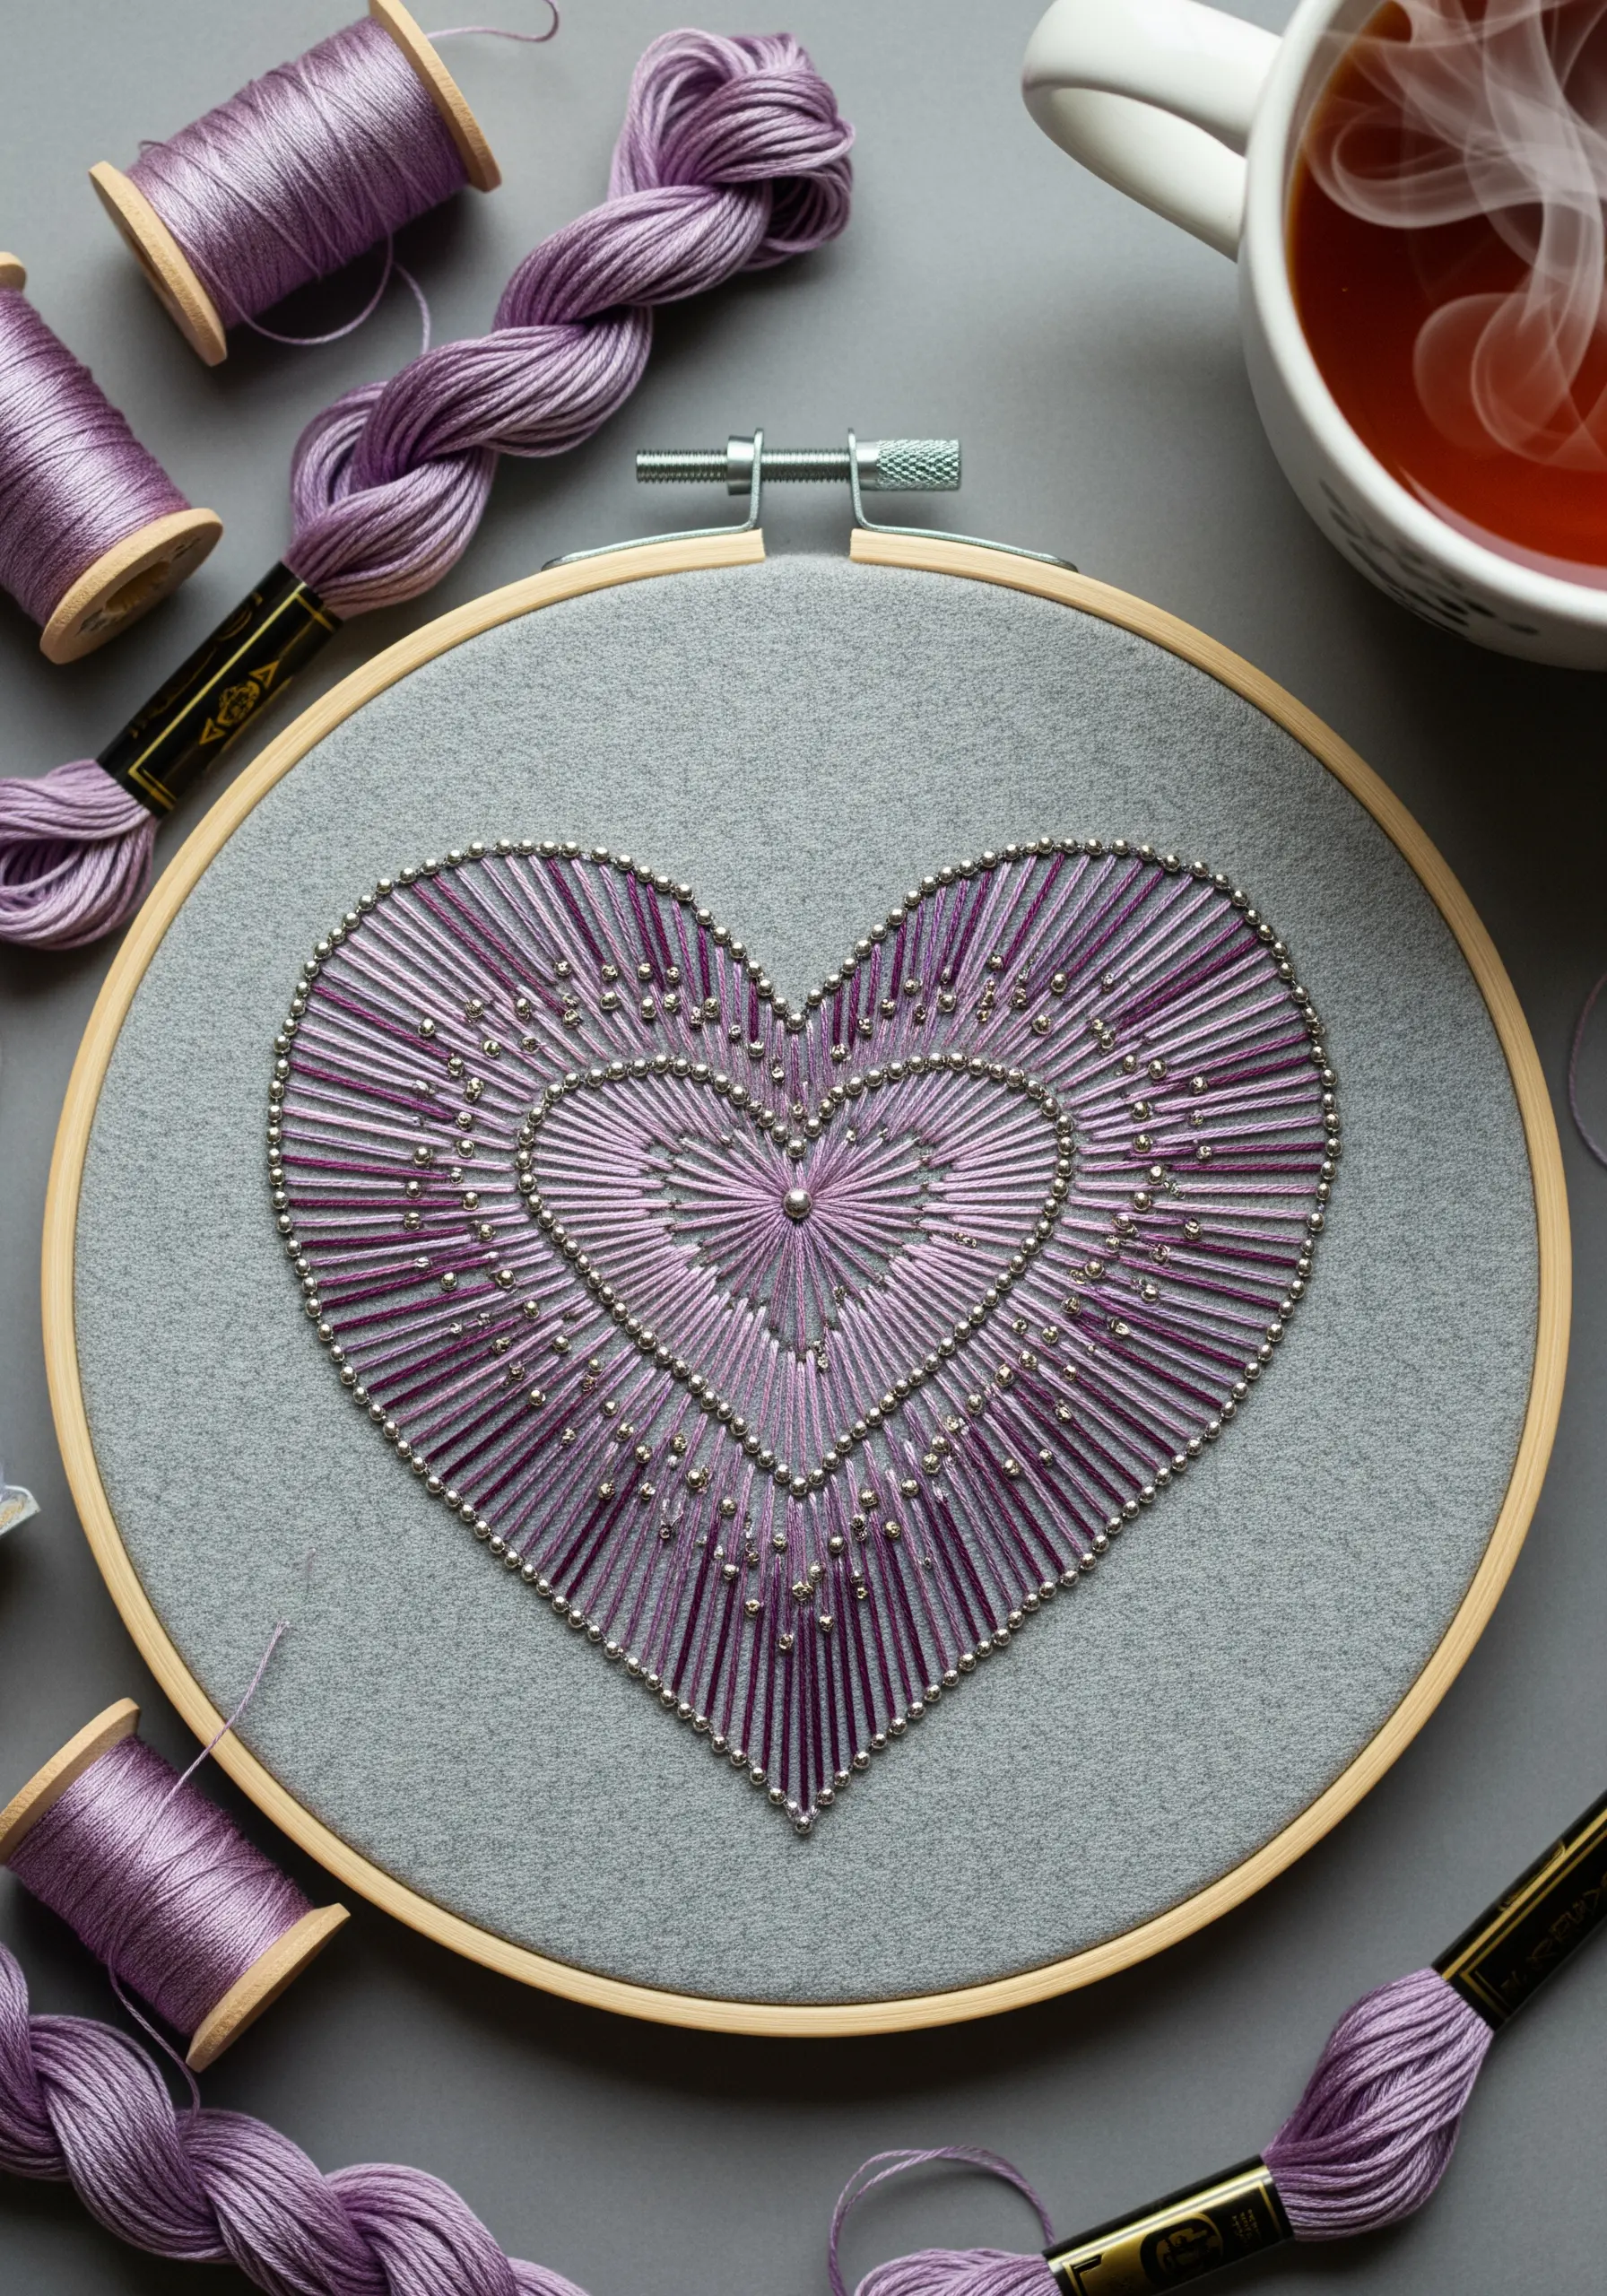
Create a stunning dimensional effect by stitching two or more hearts, one inside the other.
Use small, metallic seed beads as anchor points; their subtle shine adds a touch of luxury and helps guide your thread with precision.
For a sophisticated look, choose a monochromatic color scheme, like shades of lavender and mauve, against a neutral gray fabric.
Start stitching the innermost heart and work your way out, ensuring the thread tension is uniform across all layers for a clean, professional finish.
5. Stitch a Celestial Galaxy Heart
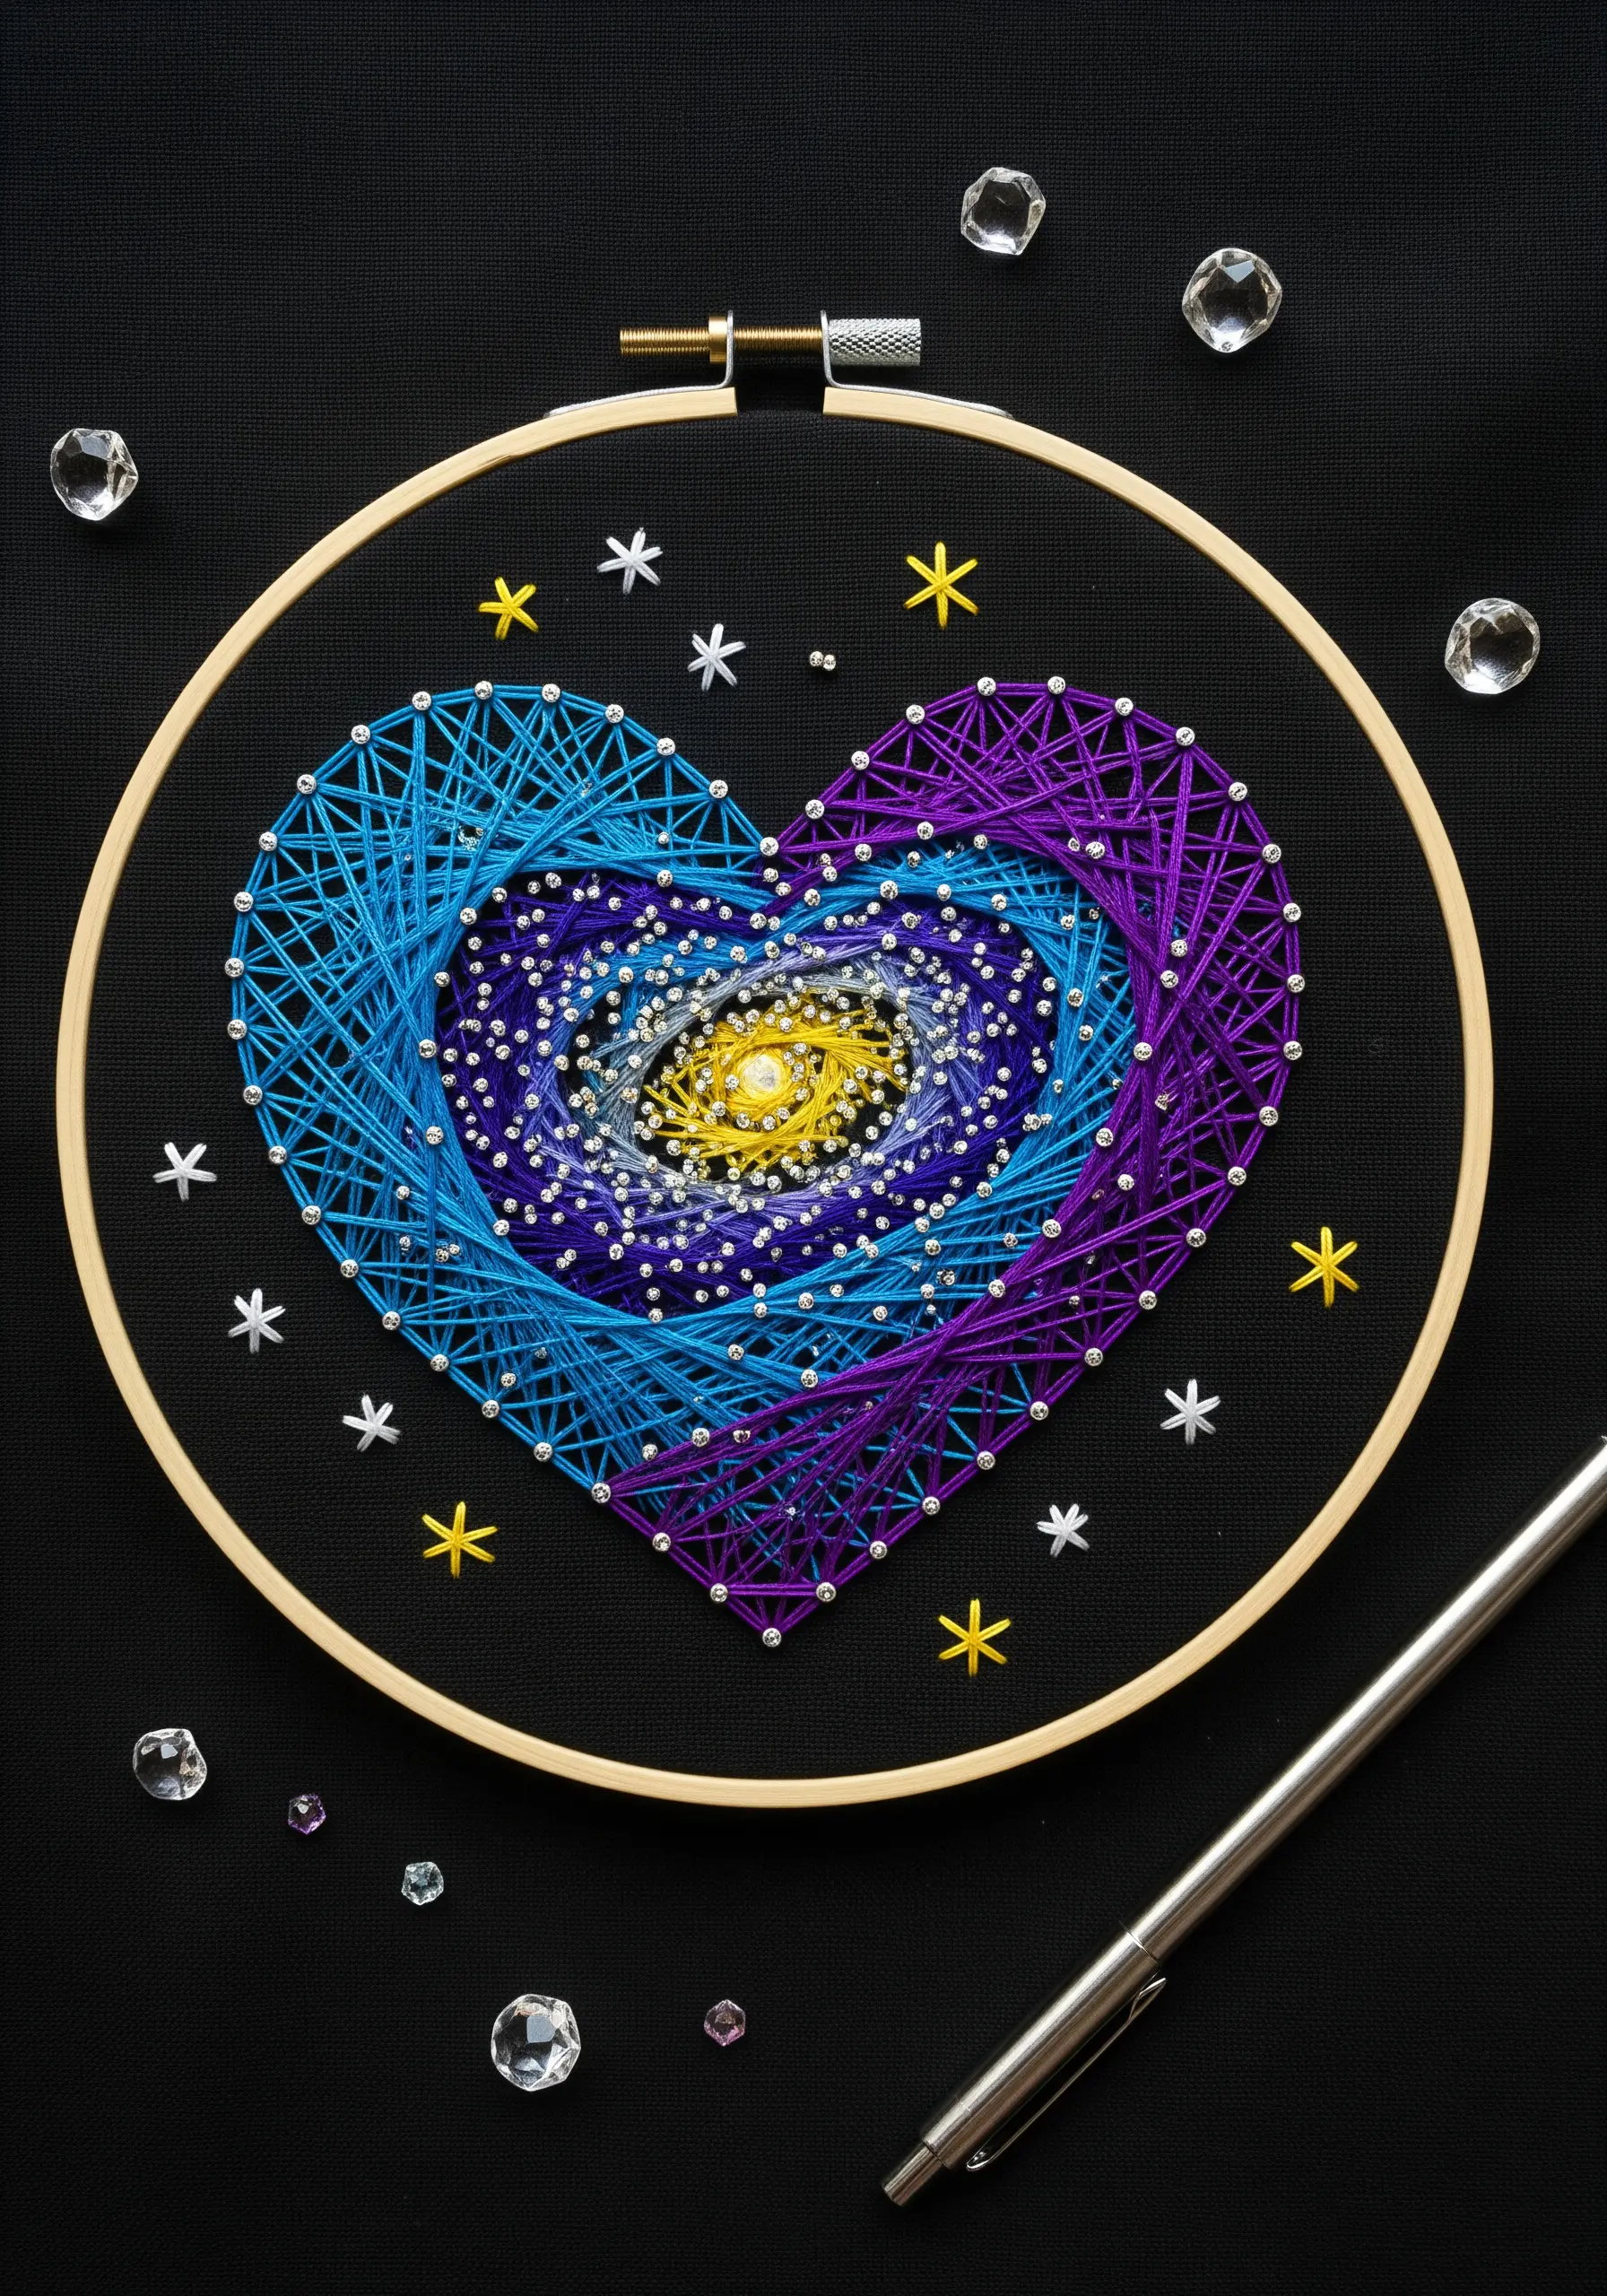
Transform a simple heart into a miniature galaxy by using a rich, dark background like black cotton twill.
Create the swirling nebula effect by blending threads of deep purple, electric blue, and a touch of bright white, stitching them in dense, concentric layers.
Form a glowing central star or planet with radiant stitches in yellow and gold metallic floss.
Finally, scatter tiny French knots or silver seed beads across the design to represent distant stars, adding a final layer of cosmic magic.
6. Weave a Textured Tartan Heart

Instead of traditional string art, create a woven texture by layering long horizontal and vertical stitches.
First, fill the heart shape with parallel horizontal stitches using your chosen color palette—earthy tones like olive green, mustard, and rust work beautifully.
Next, use a tapestry needle to weave vertical stitches over and under the horizontal threads, creating a classic tartan or plaid effect.
This technique produces a wonderfully tactile, dense finish that feels both traditional and modern.
7. Design a Geometric Faceted Heart

Give your heart a contemporary, crystalline look by dividing the shape into smaller geometric facets like triangles and diamonds.
Outline each facet with a bold backstitch or stem stitch in black thread to create sharp, clean divisions.
Fill each segment with vibrant, radiating straight stitches, using a different color for each facet to enhance the gem-like quality.
This methodical approach turns a soft symbol into a striking, architectural piece of art.
8. Craft a Delicate Miniature Heart Brooch

To create a wearable or ornamental piece, use stiffened felt as your base fabric for stability.
Outline the heart with tiny pearl beads, stitching them down securely to serve as elegant anchor points.
Use a fine, single strand of ivory or off-white silk floss to create the delicate web of threads, which will contrast beautifully with the soft pink felt.
Once complete, you can cut out the heart, add a felt backing and a pin, and you’ve made a mini-art piece to be worn or displayed.
9. Elevate Your Gift with Metallic Threads
For a truly special anniversary gift, pair opulent colors with a dramatic background.
Choose a rich black or charcoal gray fabric to make jewel tones like deep crimson and shimmering gold stand out.
Use a high-quality metallic thread for the central heart; to prevent fraying, work with shorter lengths of thread and consider using a thread conditioner like beeswax.
The combination of rich color and reflective thread creates a luxurious and deeply romantic piece.
10. Stitch a Modern Grid Pattern
This design reinvents the heart shape with a clean, graphic grid pattern that feels both modern and playful.
First, create the red outline of the heart using backstitch or stem stitch for a solid border.
Then, lay your grid using long straight stitches in red and white, ensuring your lines are perfectly parallel and evenly spaced for a crisp, architectural look.
The key is precision—use a ruler and a fabric marker to plan your grid before you start stitching.
11. Blend a Soft Ombré Gradient

This design uses a long-and-short stitch fill to mimic the smooth color transition of string art.
To create a smooth gradient, work in horizontal bands of color, starting with the lightest pink at the top.
As you introduce the next darker shade, ensure your stitches interlock with the previous row, staggering their lengths to blend the boundary between the two colors seamlessly.
Continue this process until you reach the deepest magenta at the bottom, resulting in a beautiful, paint-like effect.
12. Explore Abstract and Deconstructed Forms
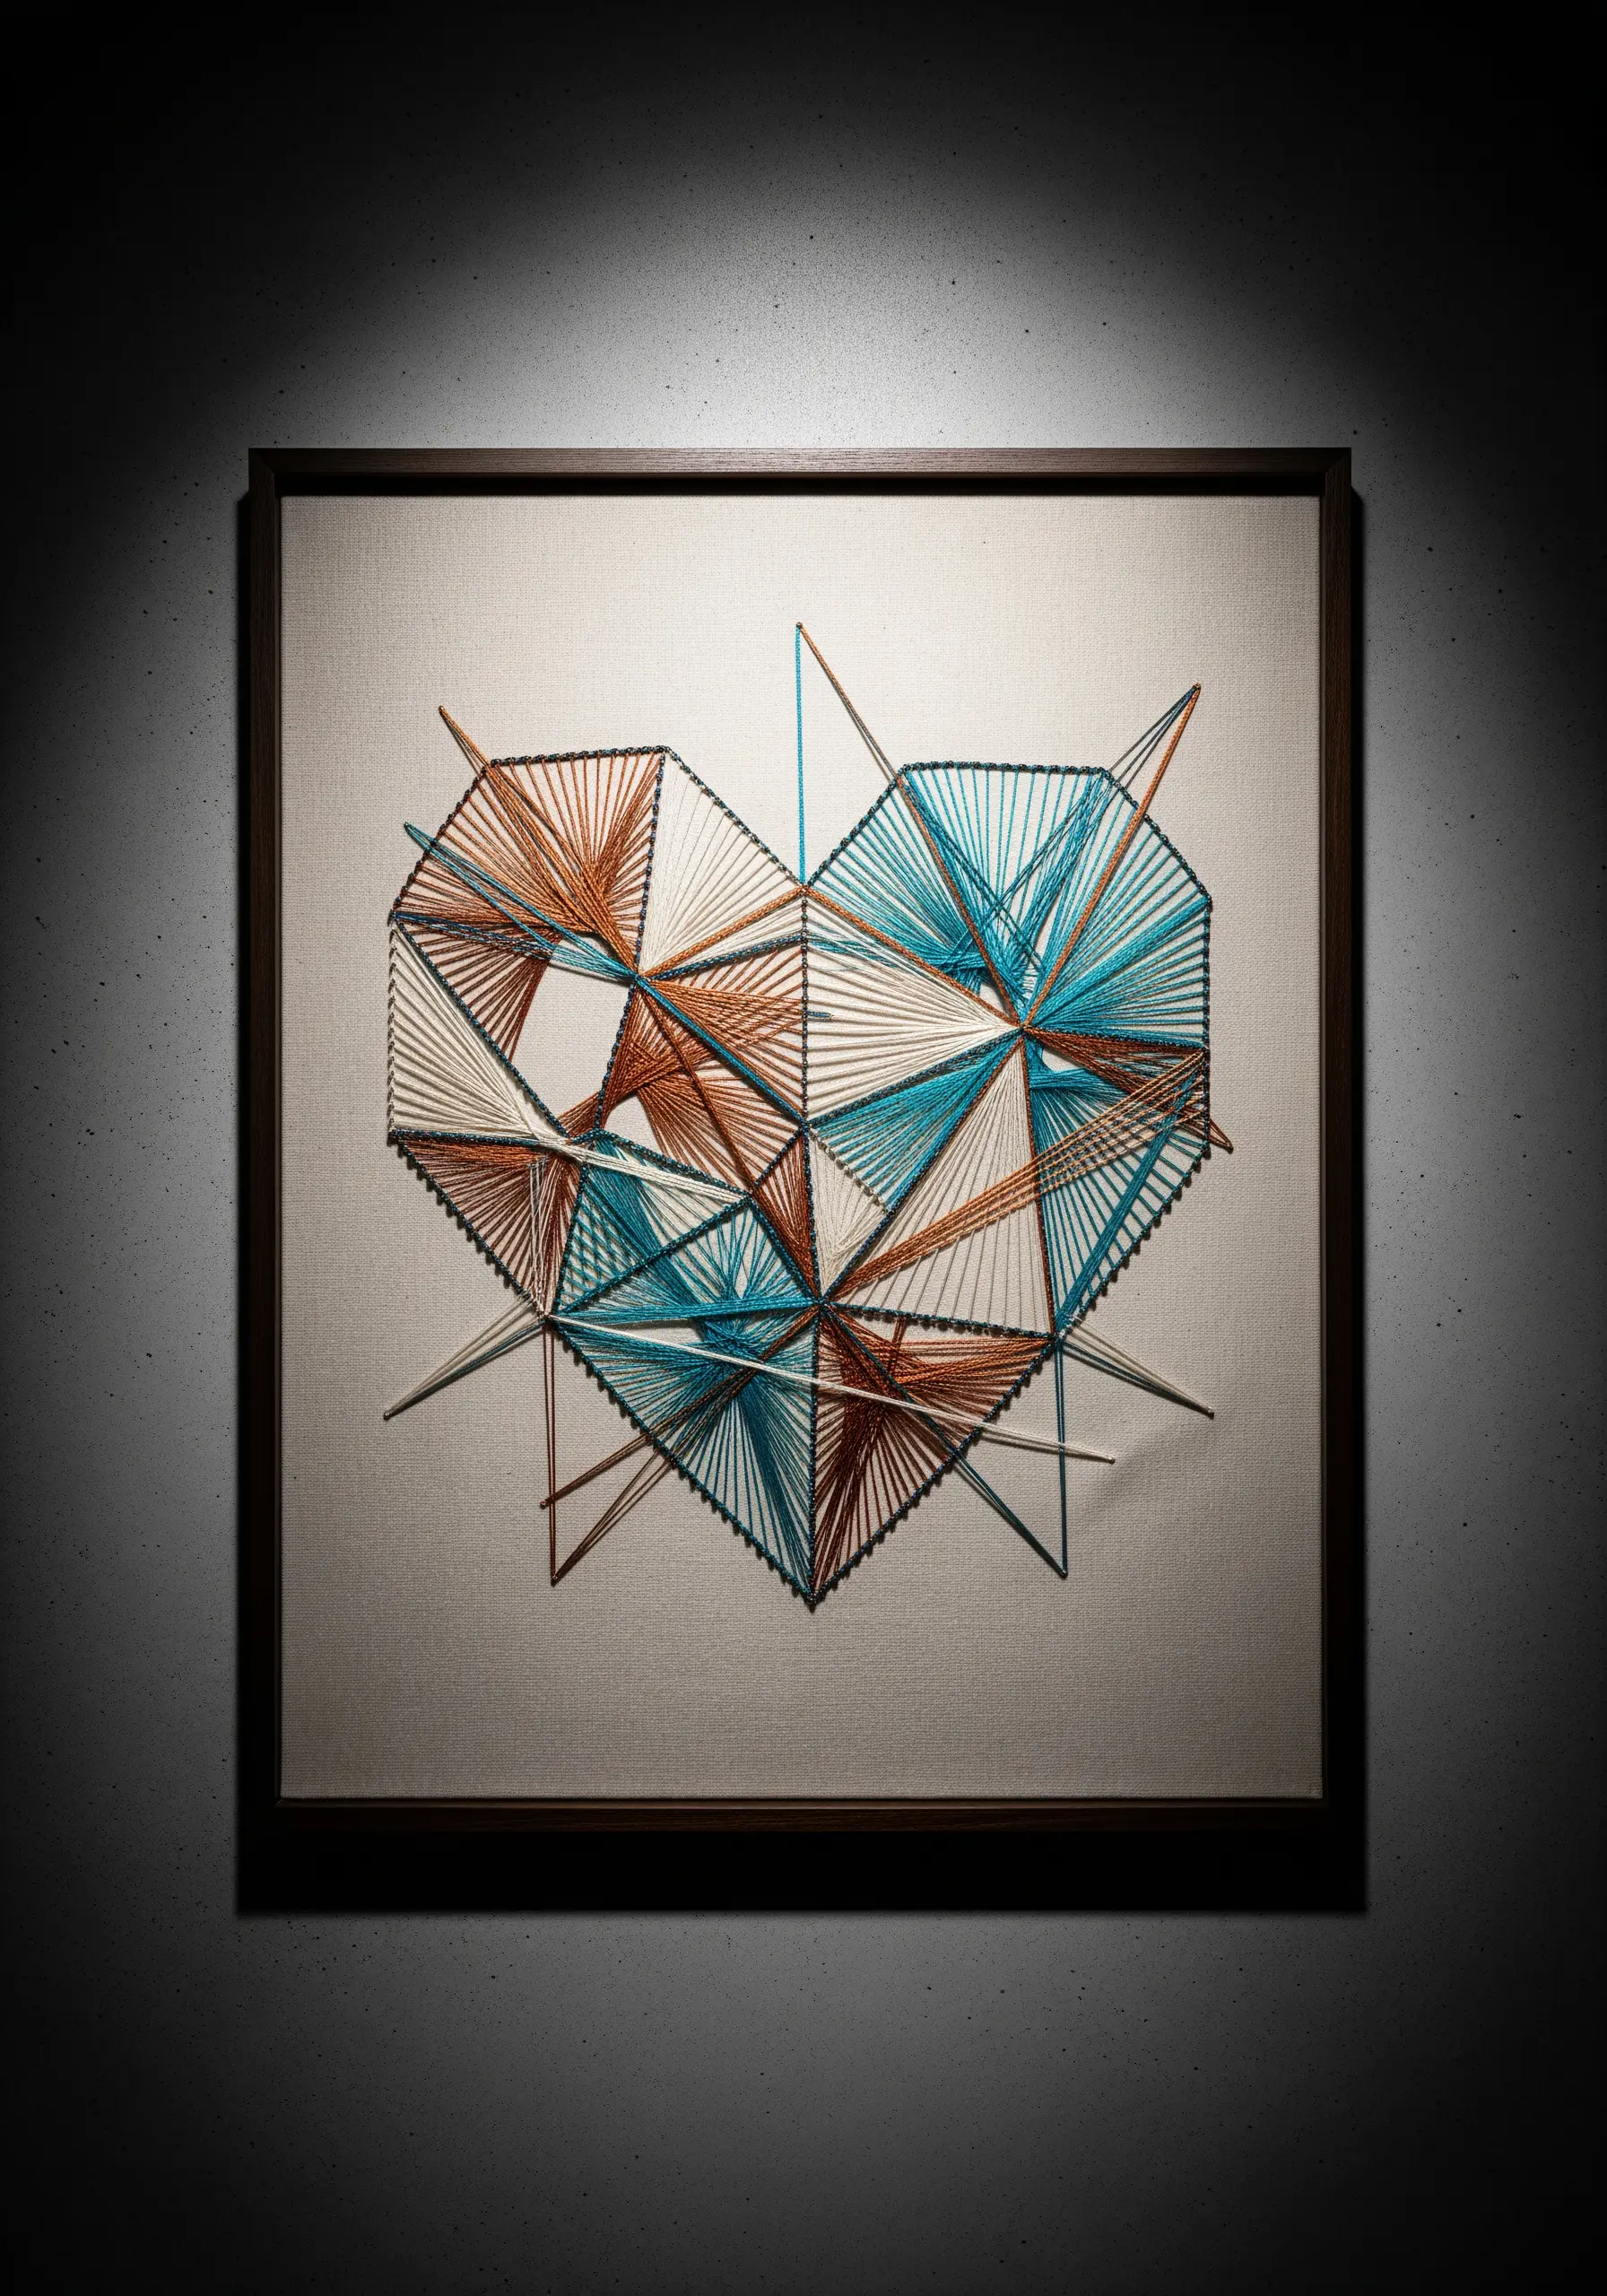
Break free from a perfect heart outline by extending your stitch anchor points beyond the traditional shape.
Start with a basic heart sketch, but then add exterior anchor points at sharp angles.
Connect these extended points with your interior ones, using contrasting colors like copper, teal, and cream to emphasize the intersecting lines and geometric chaos.
This technique deconstructs the familiar symbol, transforming it into a dynamic piece of abstract art that feels charged with energy.
13. Combine Geometric Shapes with Delicate Motifs

Add a layer of narrative to your string art by incorporating small, illustrative elements.
First, create the central heart using classic string art techniques with a soft blue yarn or floss for a gentle look.
Then, stitch two small birds perched on top using simple backstitch and a few satin stitches for their bodies.
This pairing of bold geometric stitching with delicate line work creates a charming contrast and a sweet, romantic story.
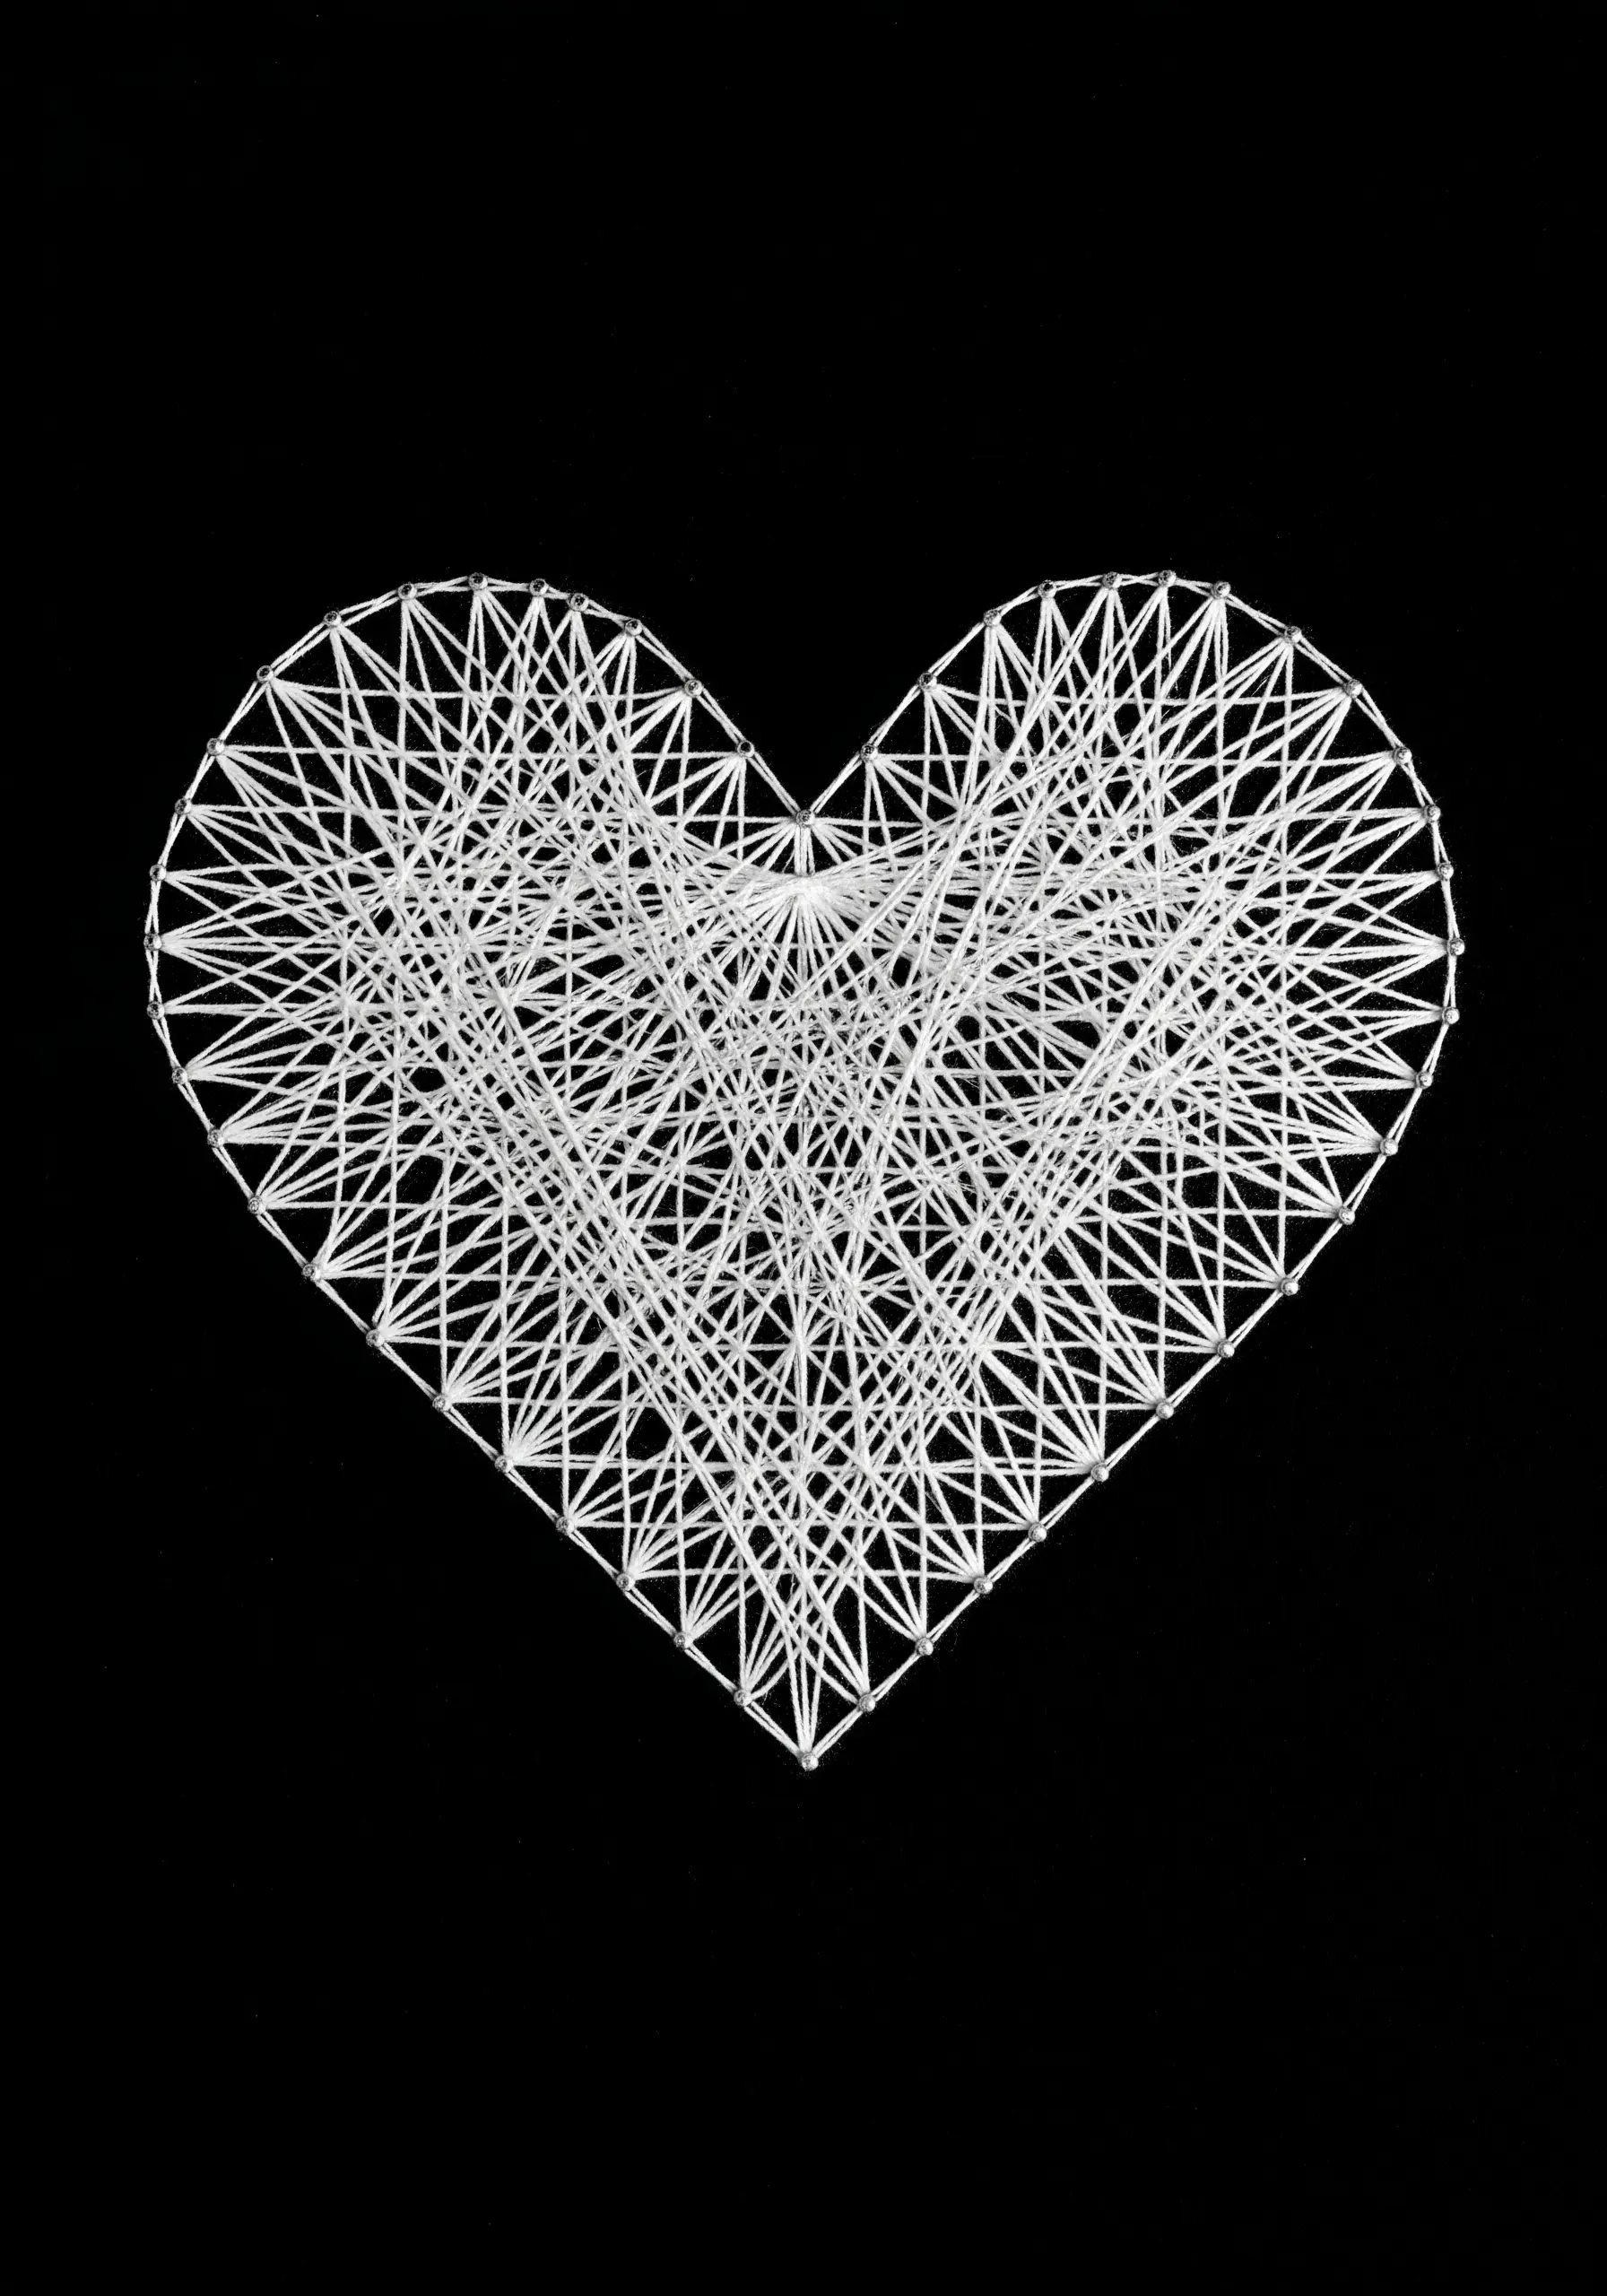
14. Make a Statement with Monochrome Texture
Prove that you don’t need color to make a powerful impact.
Using a single color—in this case, bold black on a clean white background—forces the viewer to focus entirely on texture and form.
Create a dense, overlapping web of straight stitches, allowing the layers to build up and create shadows and depth.
The beauty of this minimalist approach lies in its complexity; the final piece is a testament to how much can be achieved with the simplest materials.
15. Create a Vibrant Color Wheel Heart

This cheerful design uses simple geometry to create a joyful explosion of color.
Divide the heart into six or eight equal, pizza-like slices radiating from the center.
Fill each segment with a different pastel color—like mint, yellow, pink, and sky blue—using straight stitches that all originate from the central point.
This method is incredibly beginner-friendly and results in a perfectly balanced, symmetrical design that feels playful and optimistic.
16. Weave an Intricate Metallic Tapestry

Achieve this incredibly luxe, textured look by breaking the heart into a grid of small diamonds or squares.
Within each square, create a radiant starburst of stitches using a high-shine gold metallic thread. The key is consistency in stitch direction and density within each small section.
This tessellated pattern catches the light from every angle, creating a shimmering, three-dimensional effect that looks like a piece of jewelry.
Work on a sturdy cardstock or fabric-covered board to support the thread tension.
17. Symbolize Union with an Interwoven Knot

This design creates the beautiful illusion of two halves tied together.
Start by stitching the two outer curves in white, leaving the center open.
Next, fill the center with red thread, carefully layering your stitches to mimic the over-and-under pattern of a knot.
Stitch the bottom layer first, then add the overlapping top layer of threads. This small detail transforms the heart into a powerful symbol of connection and unity.
18. Frame a Delicate Garden Within a Heart
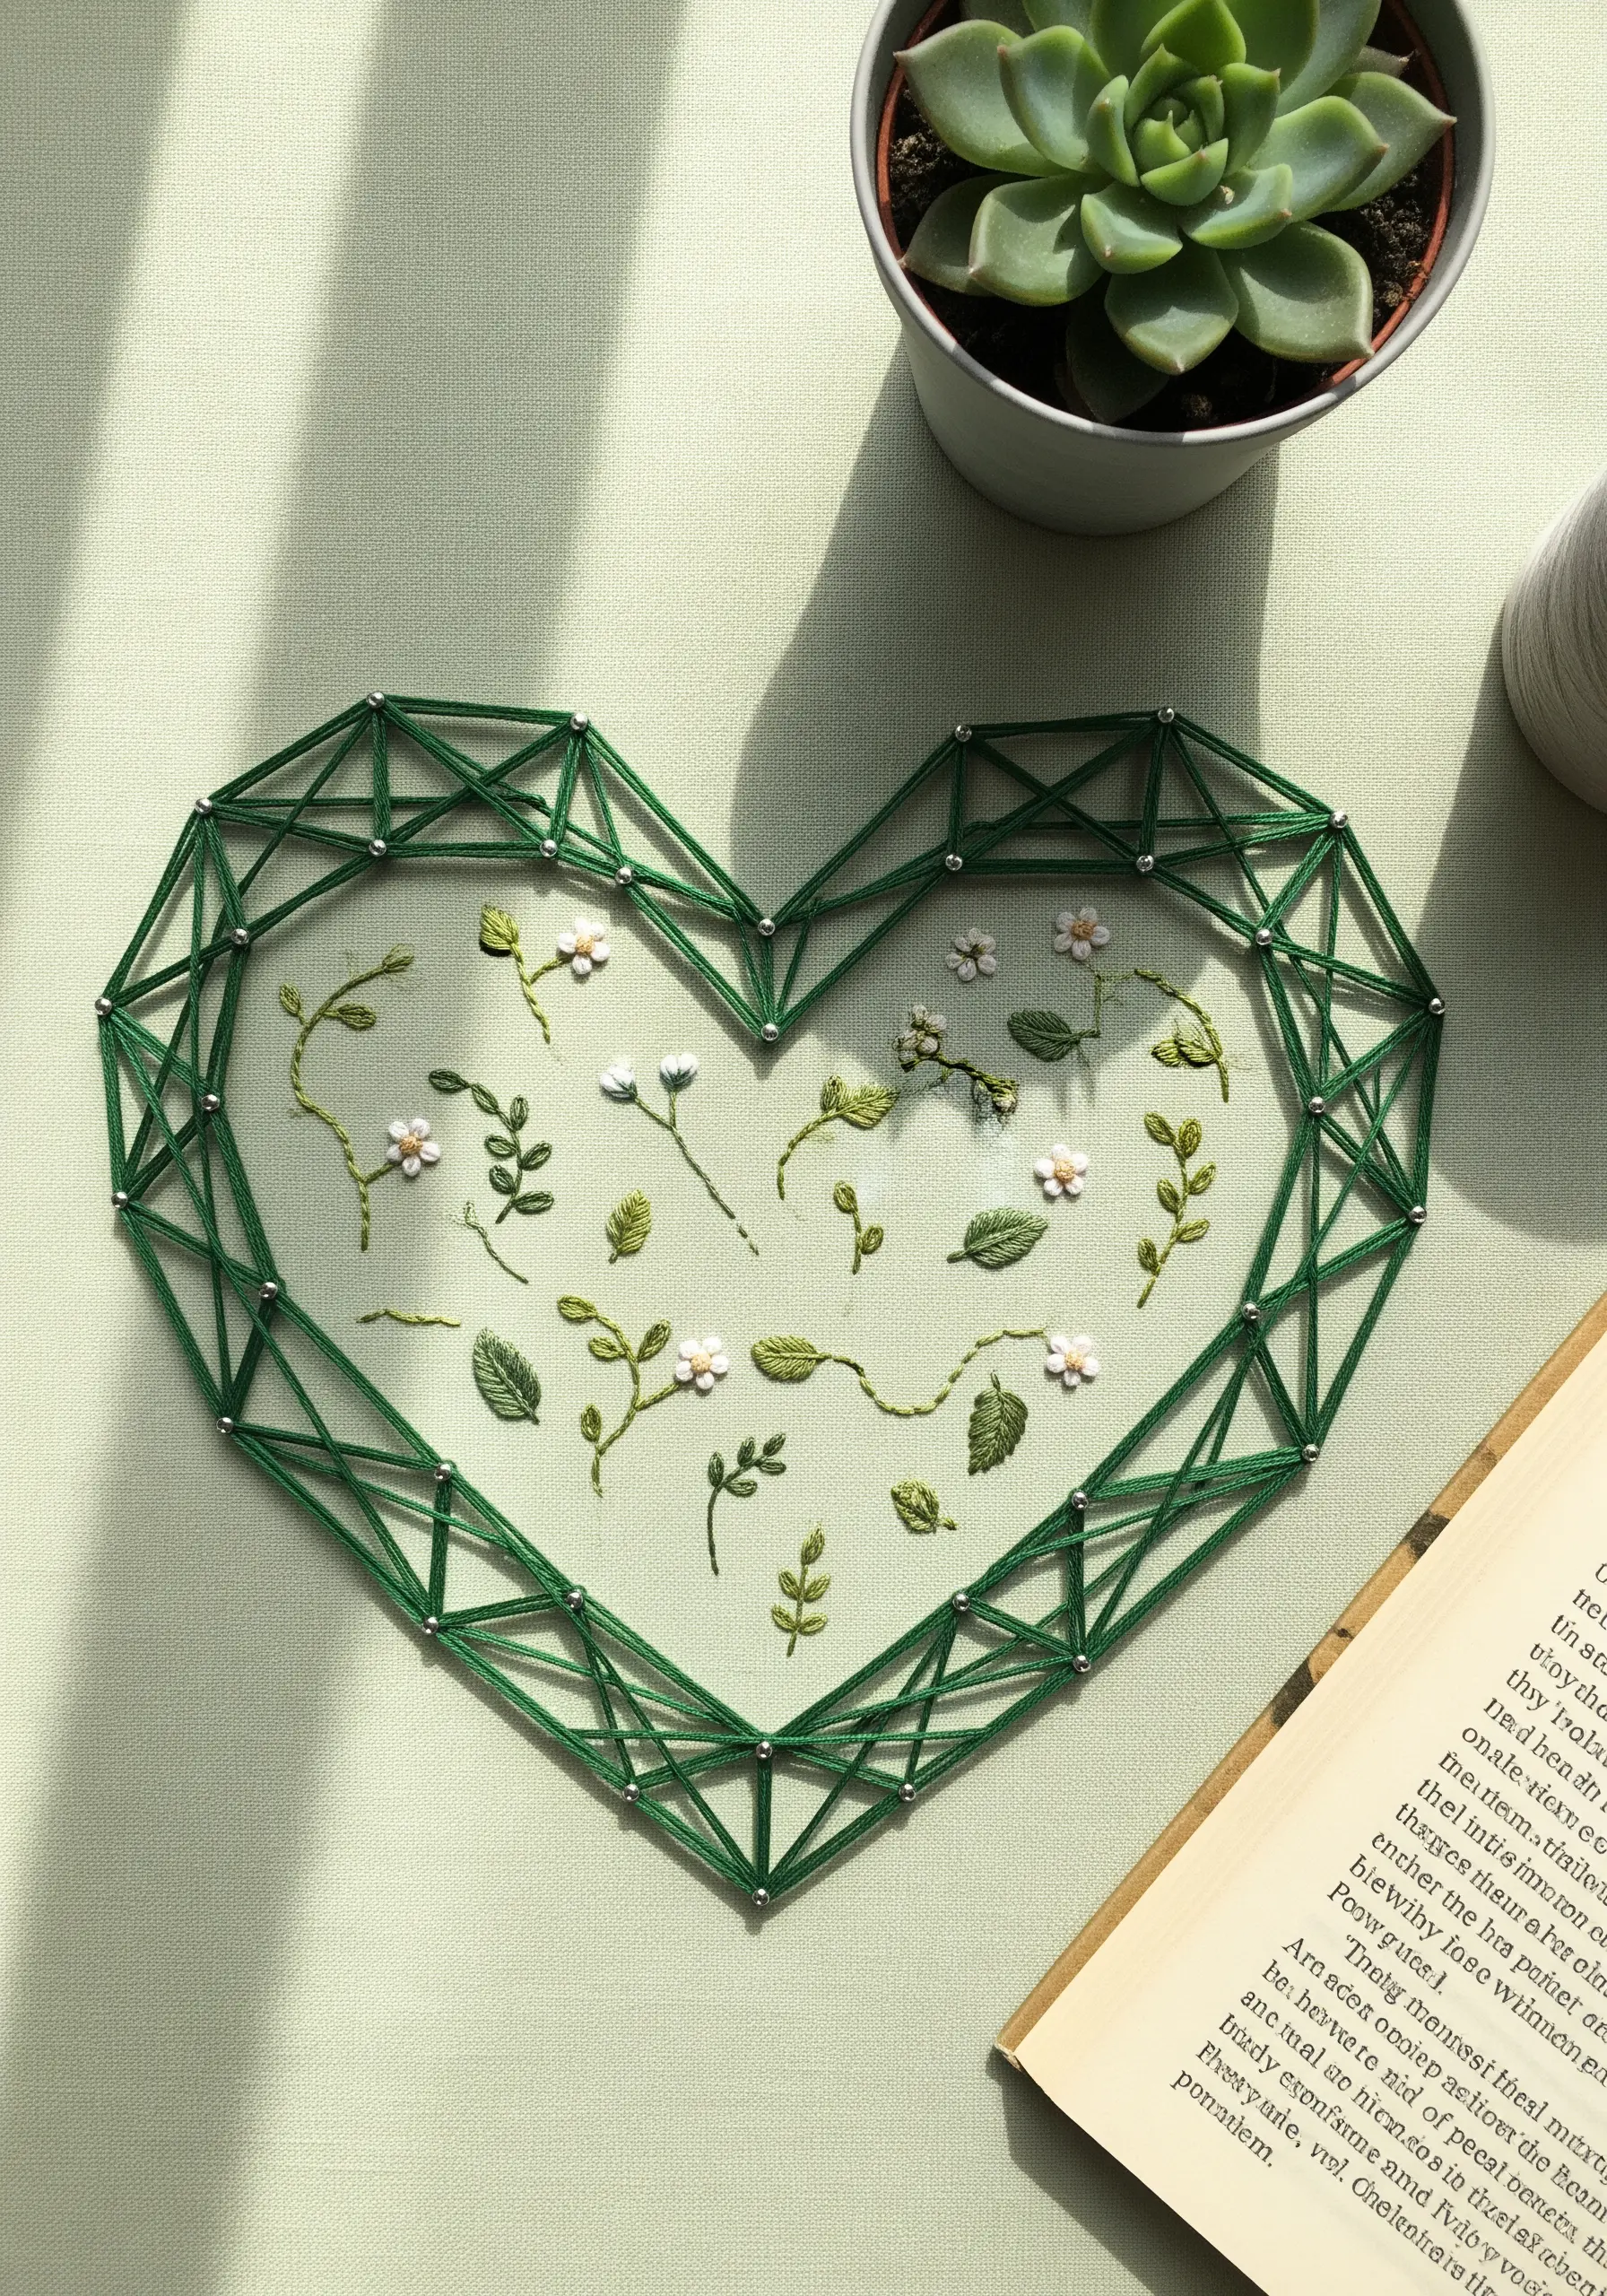
Combine the clean, geometric lines of string art with the organic beauty of botanical stitching.
First, create the outer frame of the heart using green thread and evenly spaced silver beads for a crisp, modern border.
Leave the center of the fabric open to serve as your canvas. Then, fill this negative space with tiny, delicate wildflowers and leaves using stitches like lazy daisy, French knots, and single straight stitches.
This technique to combine a geometric string art frame with delicate floral stitches creates a stunning contrast between structured and freeform embroidery.
19. Capture Coastal Waves with Color and Texture

Evoke the calming energy of the ocean by stitching in wavy, organic bands of color.
Use a palette of blues, greens, and sandy beige to represent water and shore. Vary the thickness of your lines by using different numbers of embroidery floss strands.
Incorporate translucent or pale blue seed beads into the blue sections to mimic sea glass and water texture, adding a subtle sparkle that catches the light like sunlight on water.
This approach is less about precision and more about capturing a fluid, natural movement.
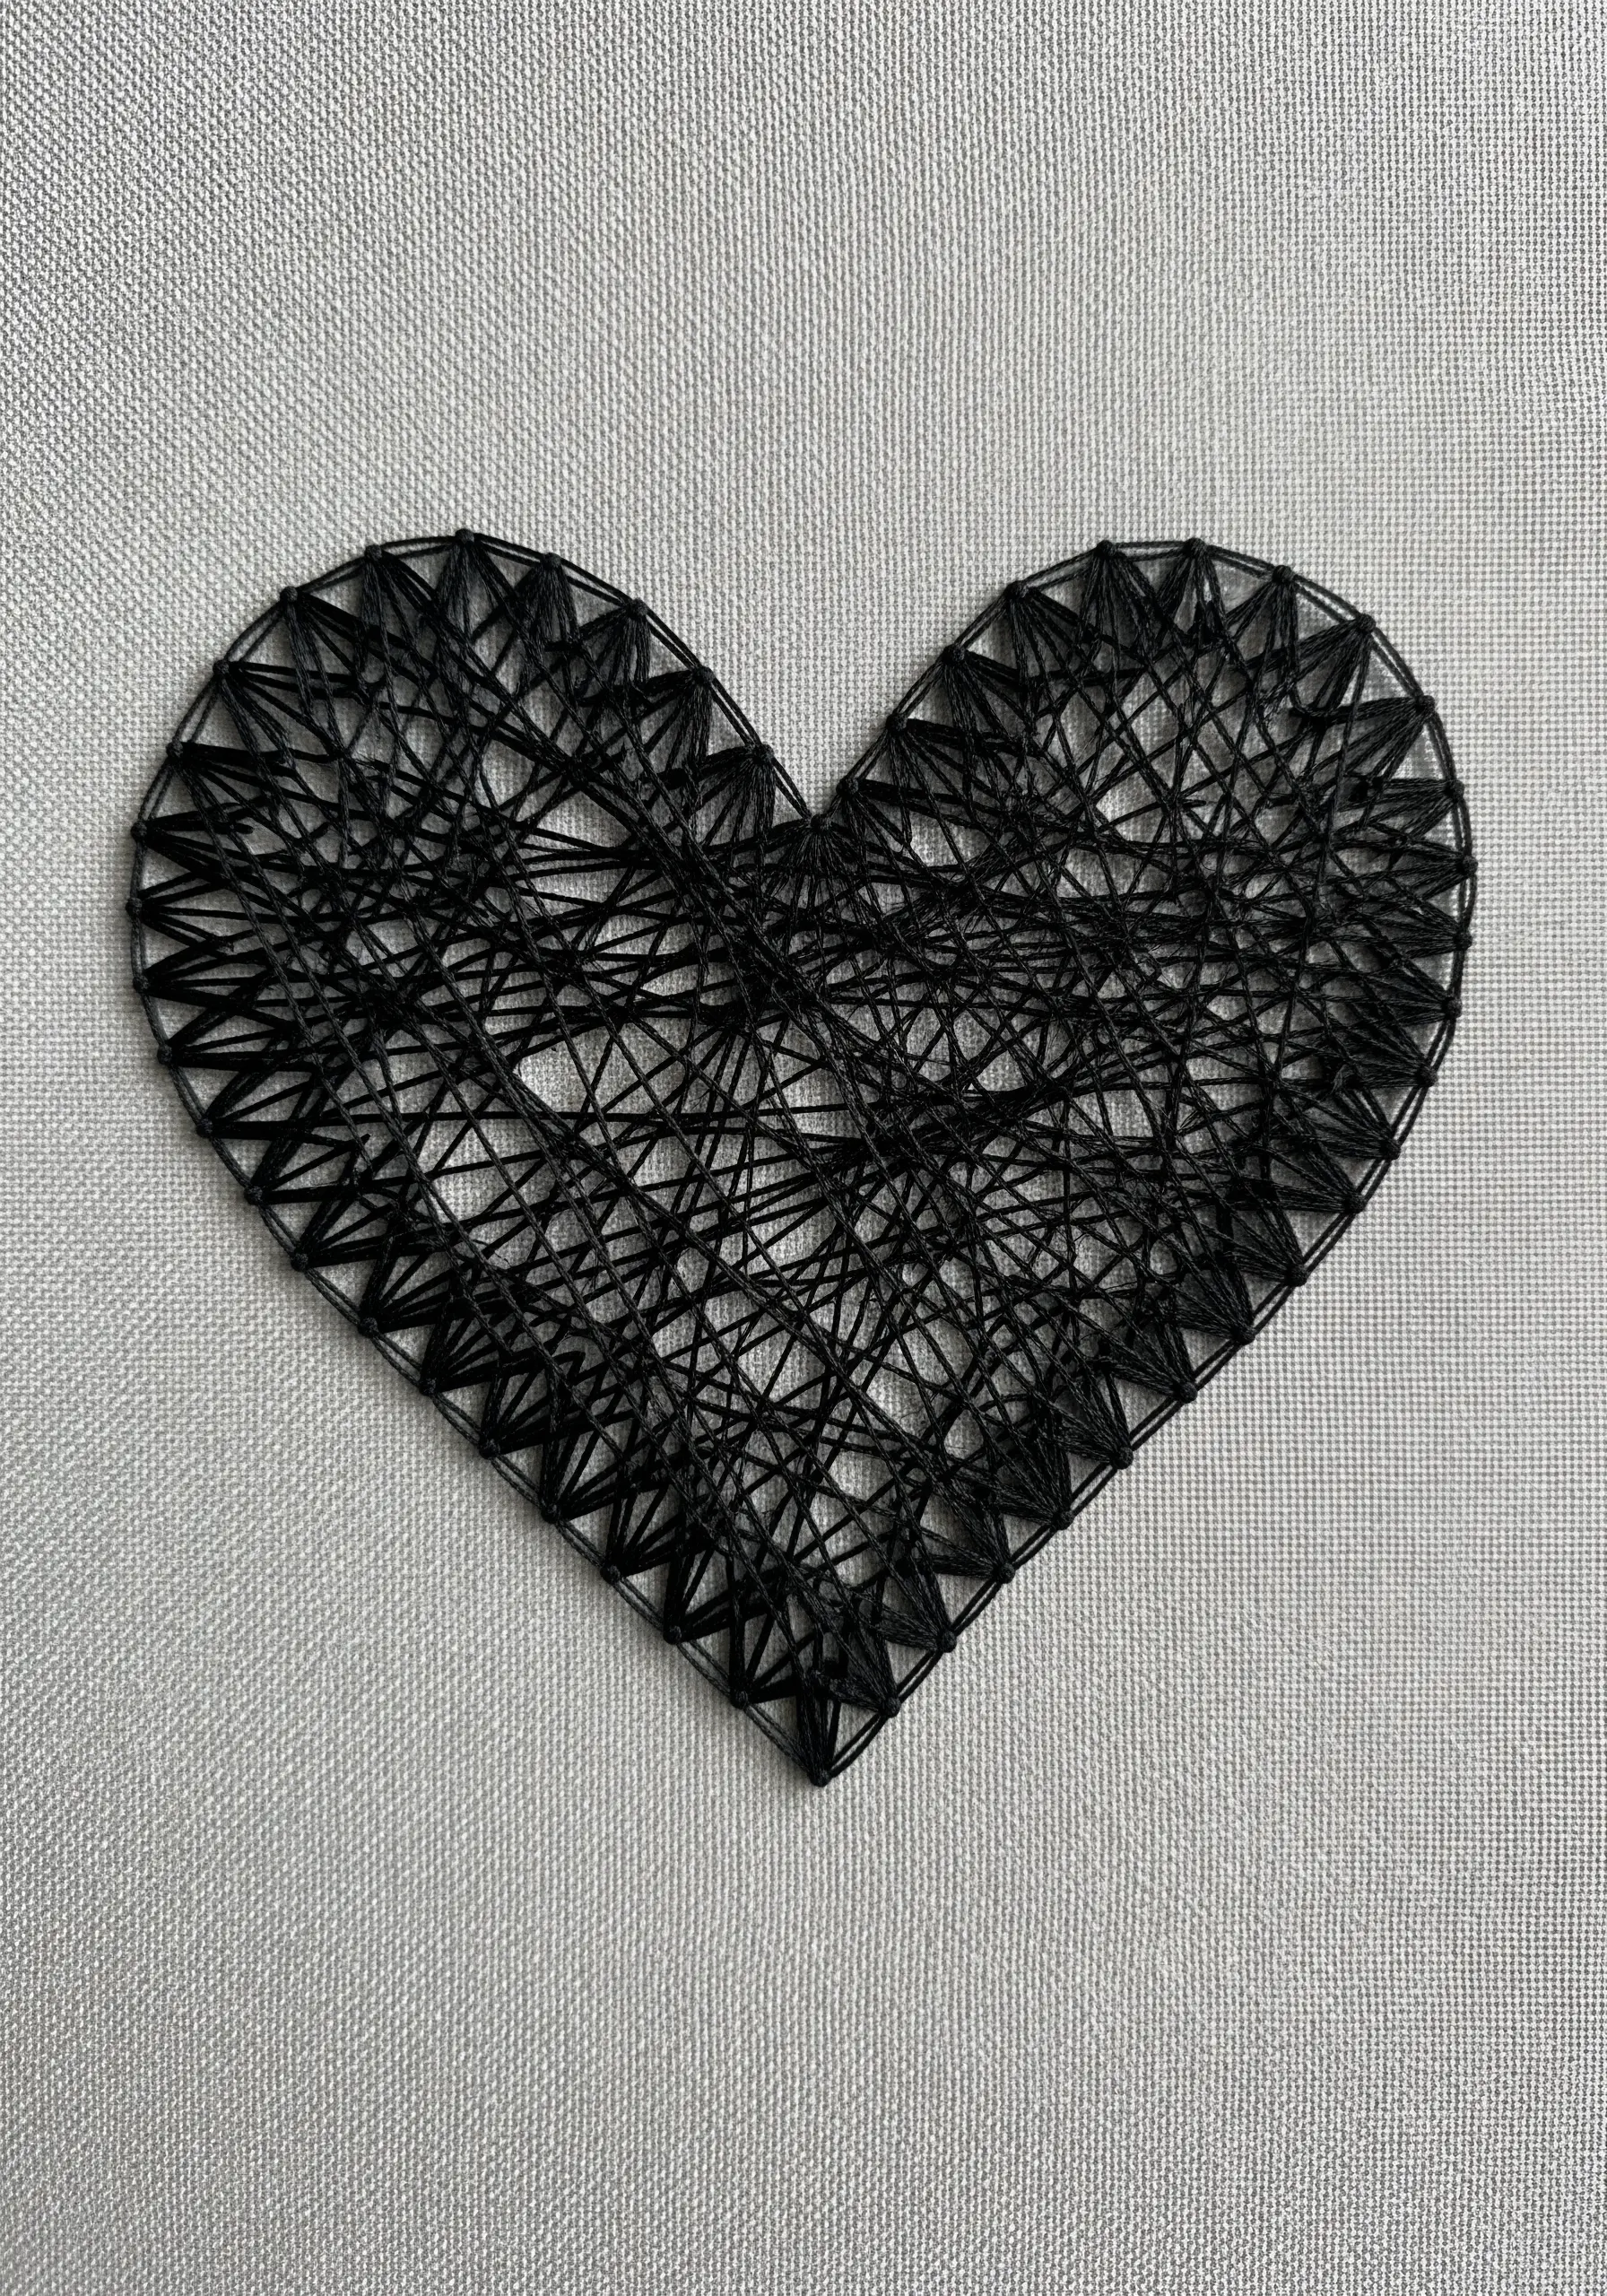
20. Design an Intricate Monochrome Web
This design demonstrates the power of density and high contrast for creating visual impact.
On a stark black background, use a bright white thread to ensure every line is visible and sharp.
The key to this intricate look is a large number of anchor points placed closely together around the heart’s perimeter.
Wrap the thread in a highly random, multi-layered pattern. The more you layer, the more complex and web-like the final texture will become, creating a piece that is both elegant and intense.
21. Embrace Bohemian Texture with Yarn
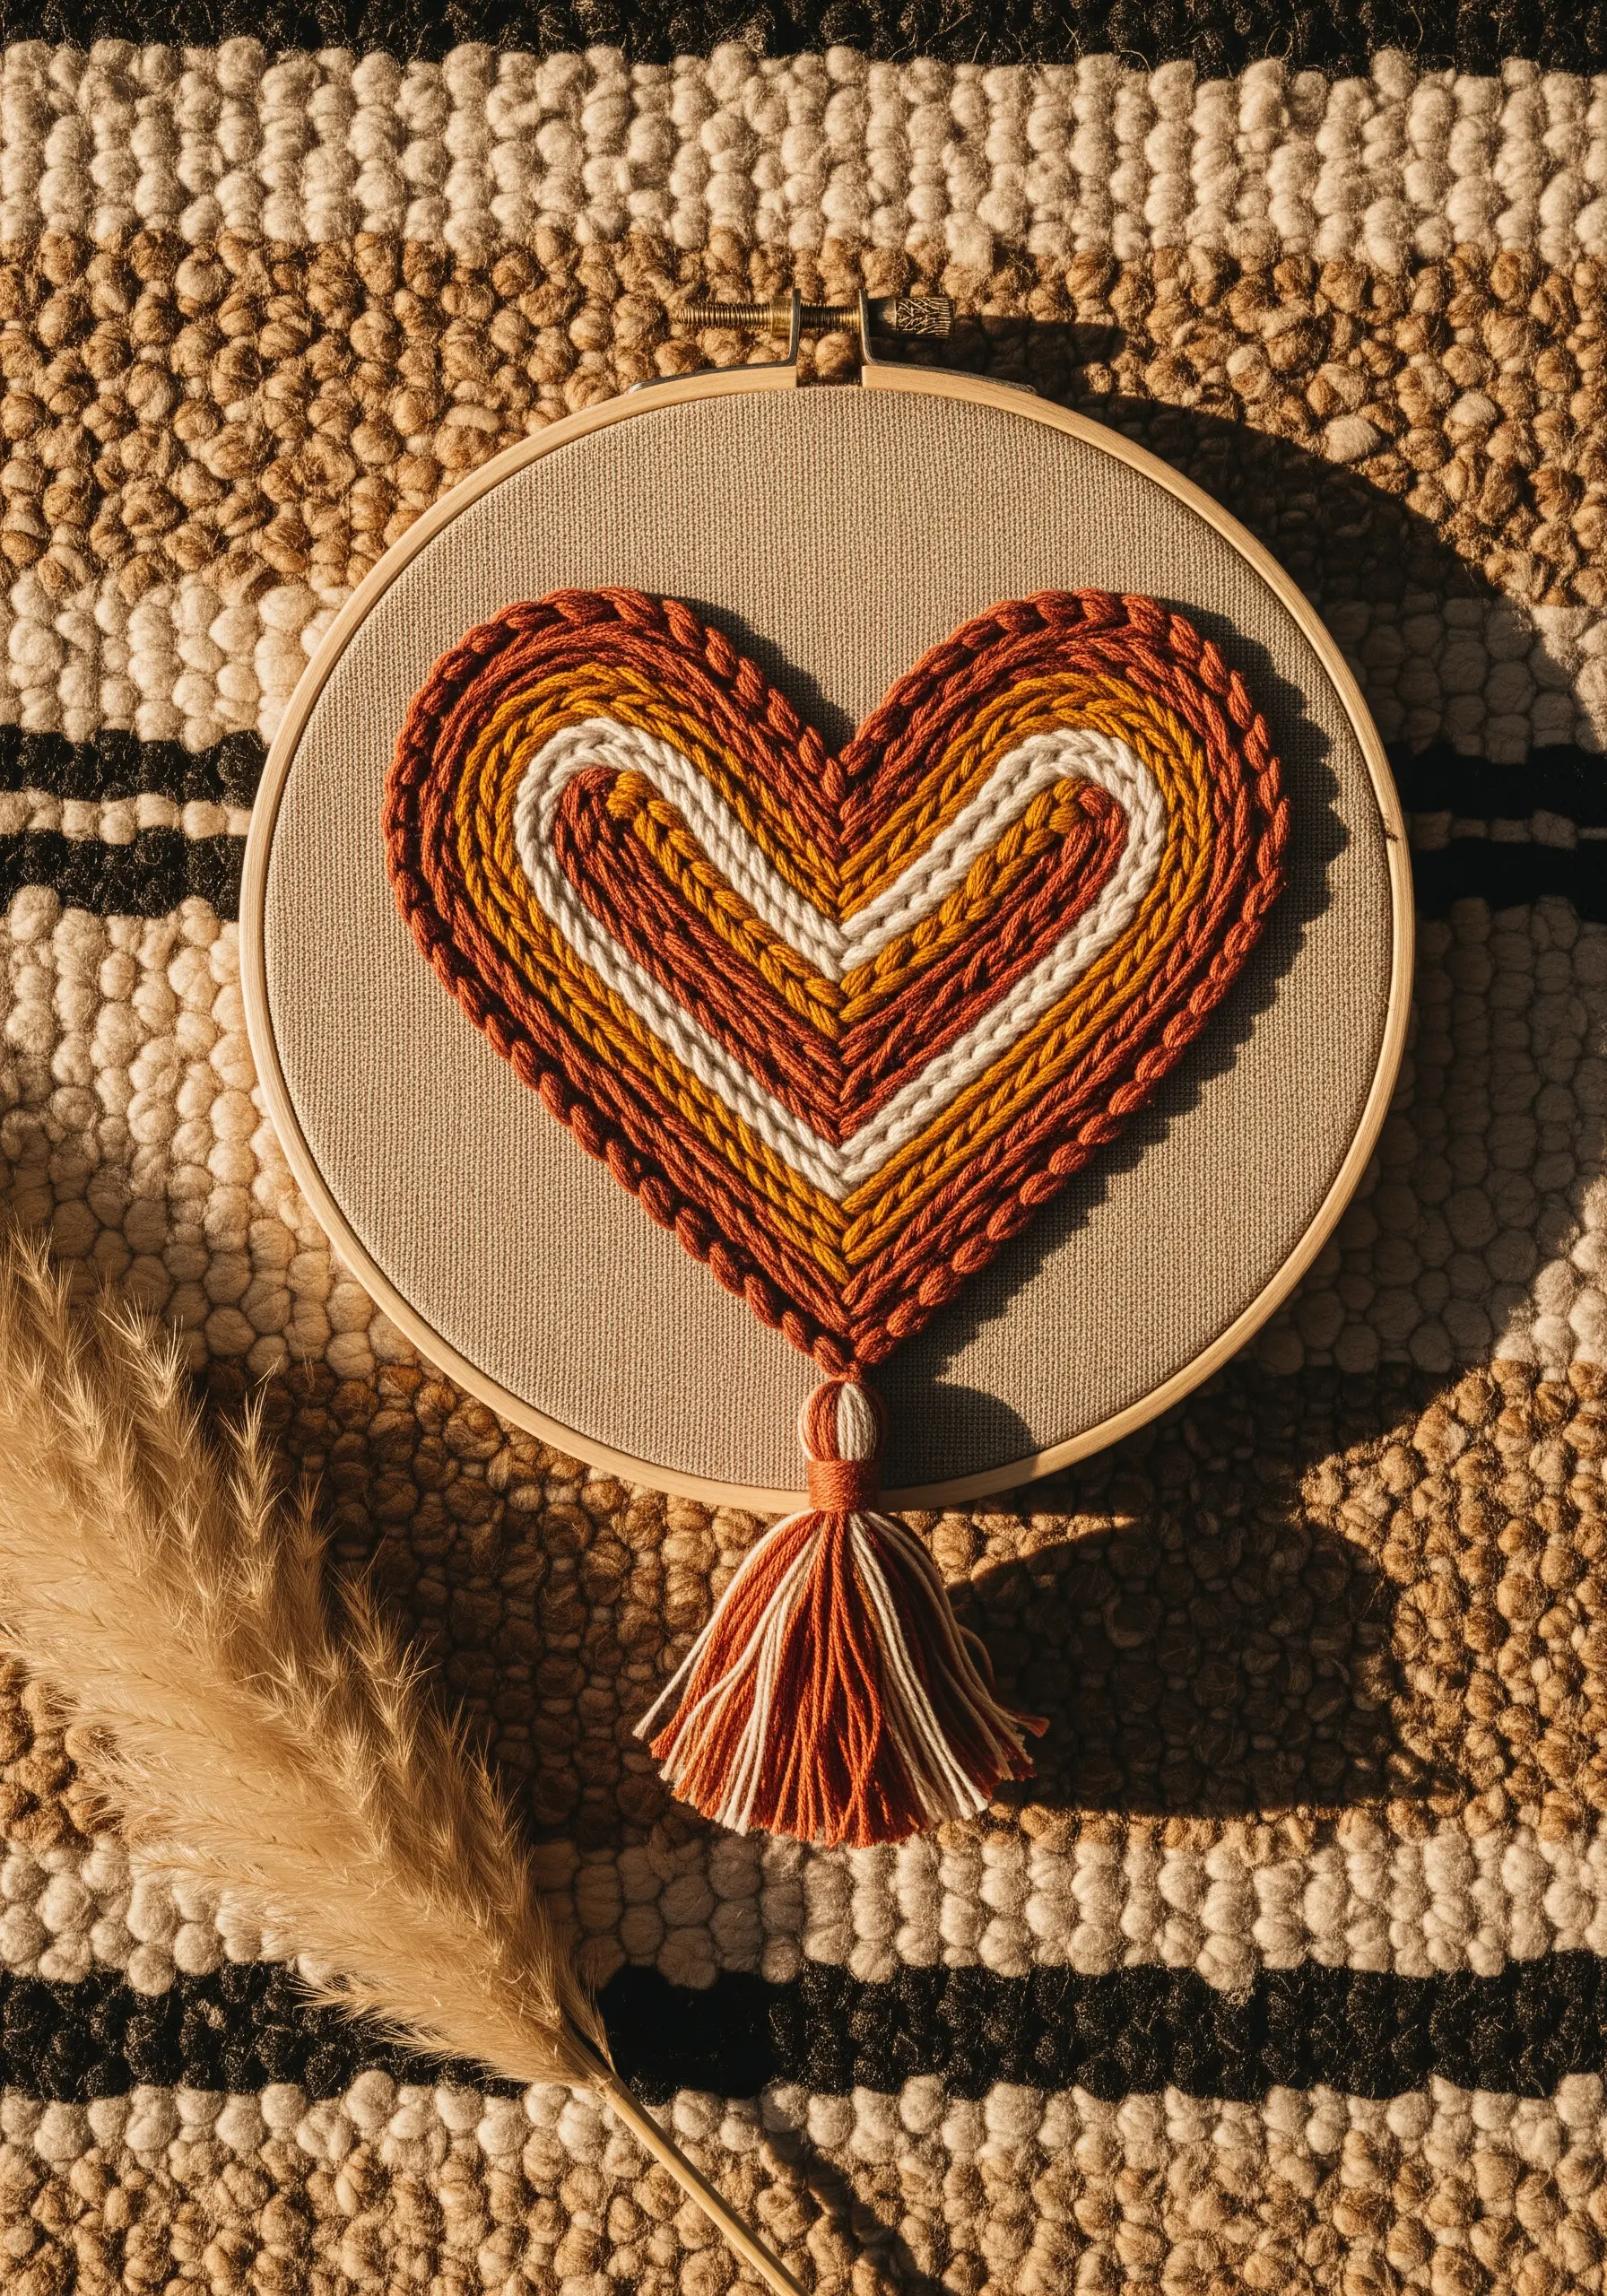
For a soft, cozy, and fast project, swap fine embroidery floss for chunky yarn.
Use a whipstitch or couching stitch to secure the thick yarn in concentric heart shapes, which creates a beautiful raised, corded texture.
Choose a warm, earthy palette of rust, mustard, and cream for a bohemian feel.
Finish the piece by creating a simple tassel from the same yarns and attaching it to the bottom point of the heart, turning your hoop art into a stylish wall hanging.
22. Stitch a Glowing, Fiery Heart
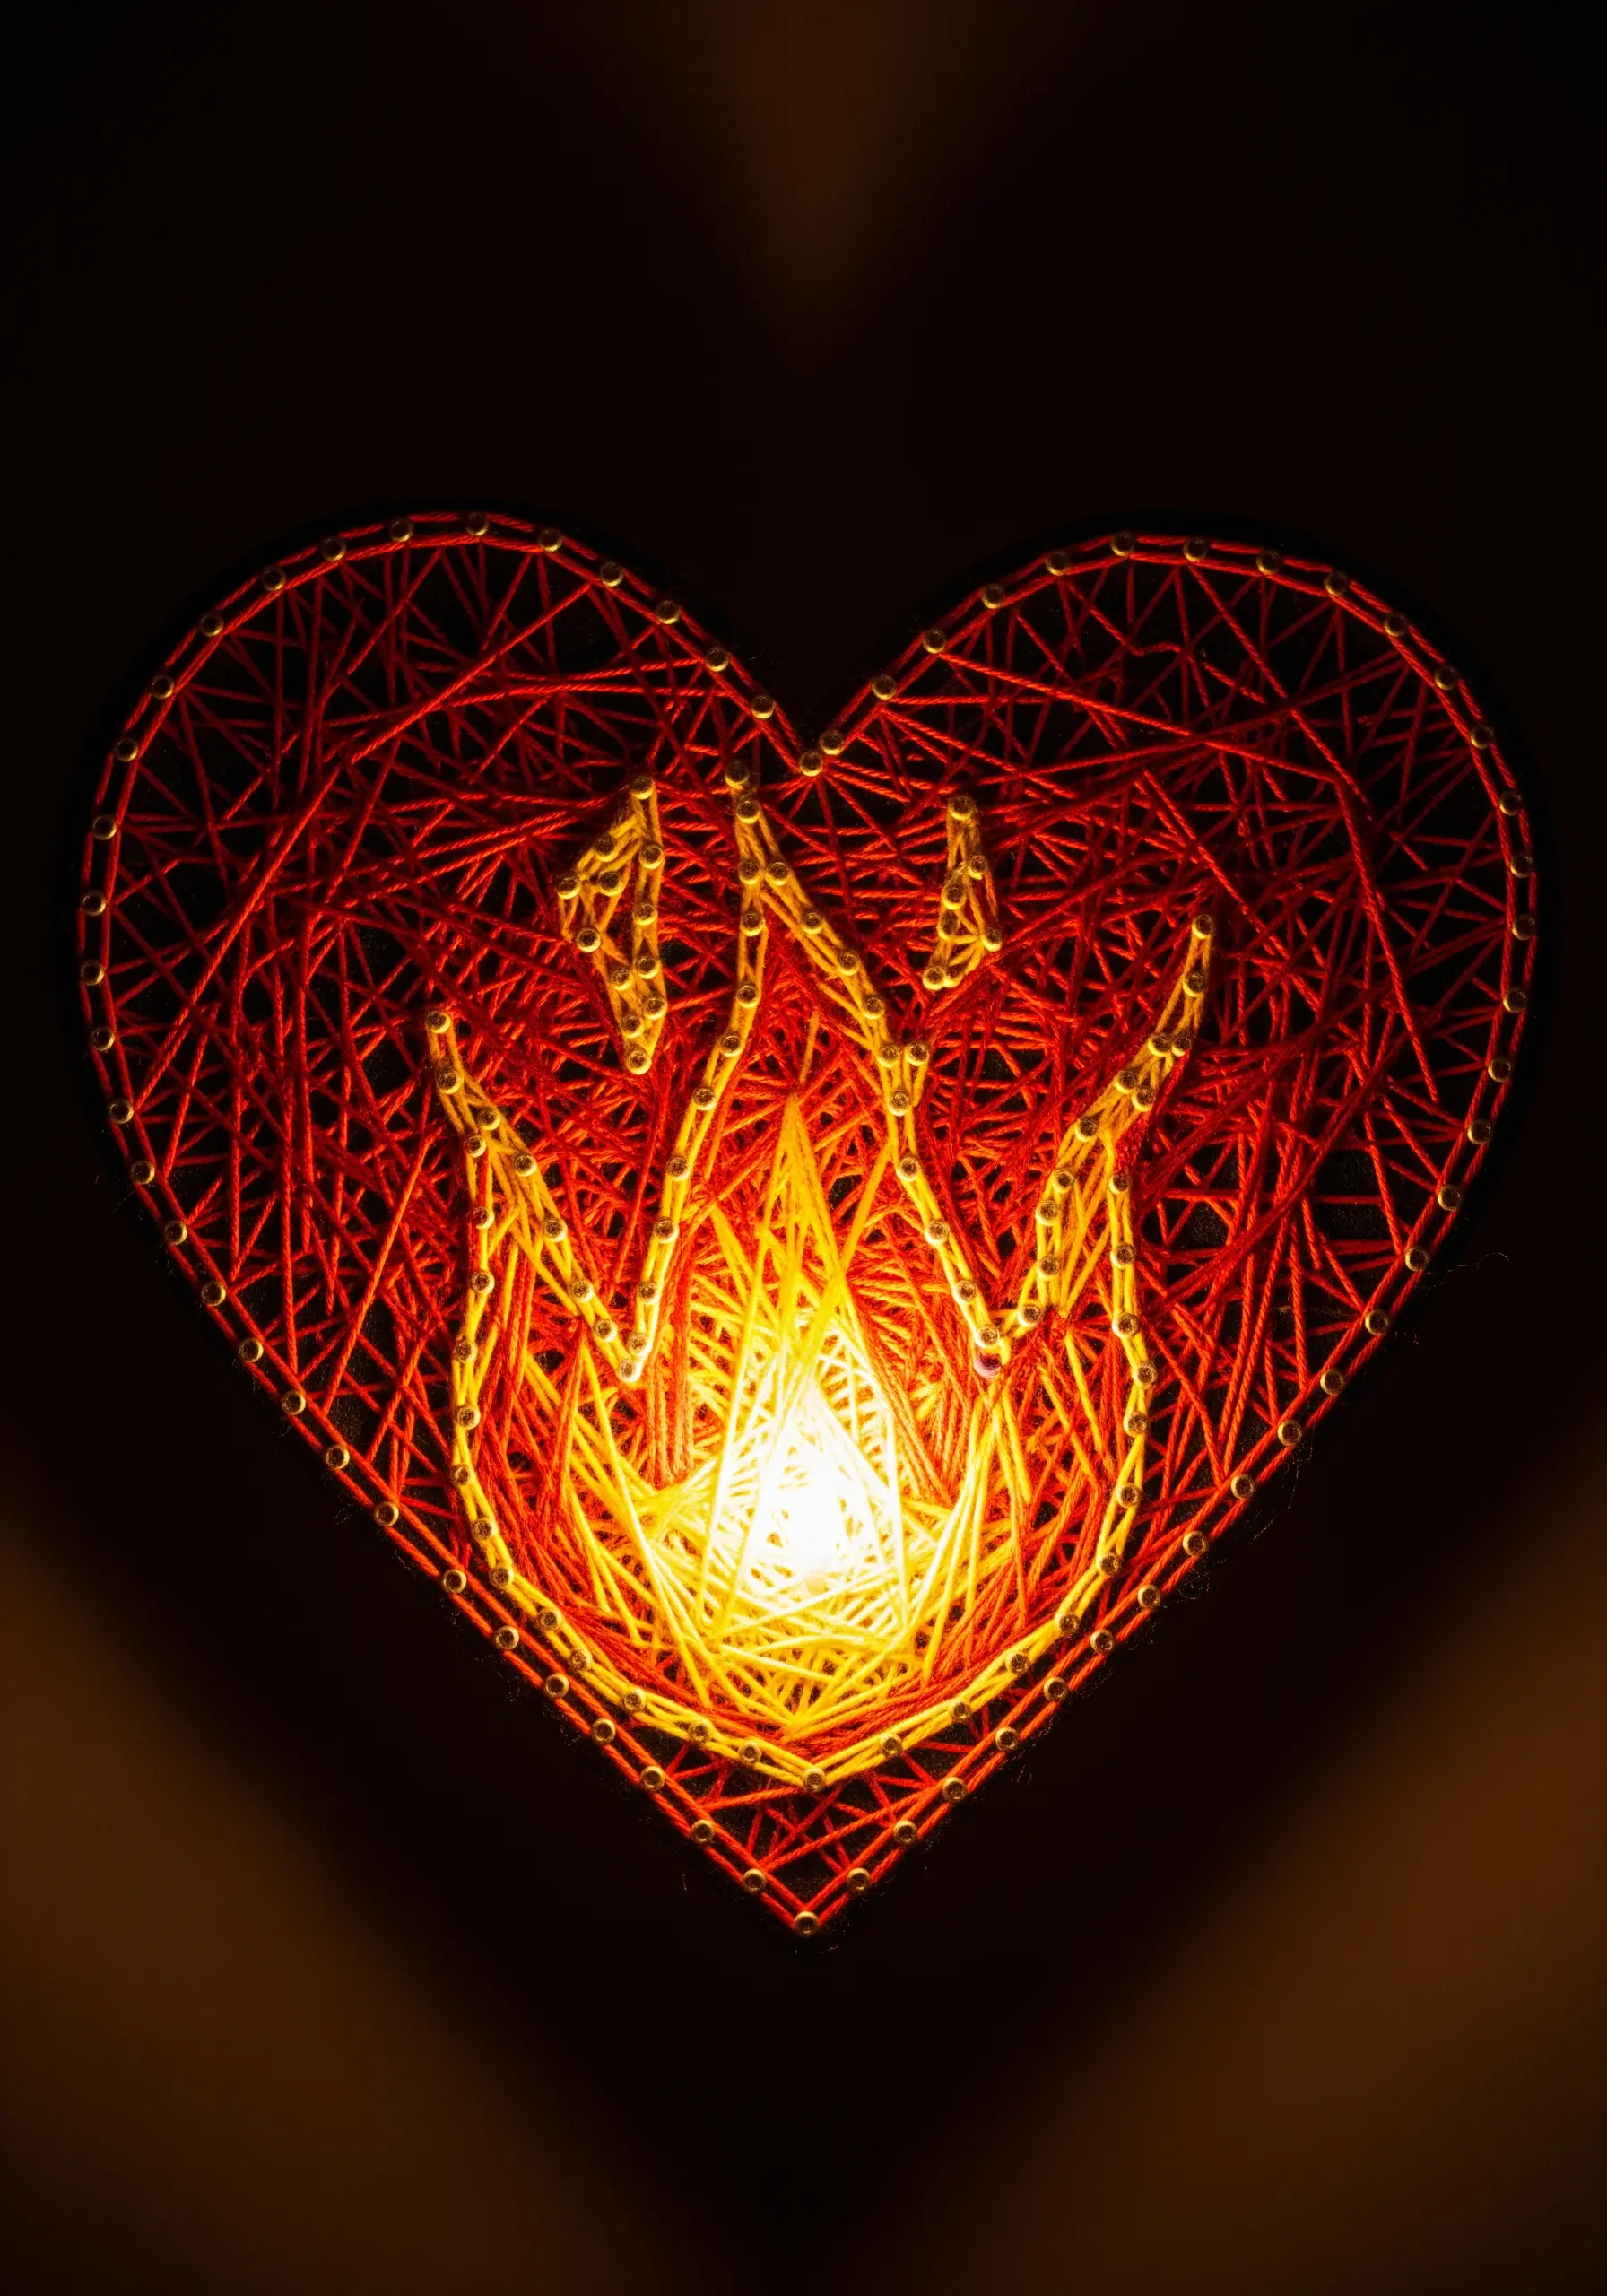
To create the illusion of a glowing flame, color choice and direction are everything.
Start with the brightest yellow and white threads at the very center, stitching them in dense, radiant lines that mimic light.
Gradually work your way outwards, introducing orange and then deep red threads, keeping the stitch direction radiating from the central ‘flame’.
This careful color placement creates a powerful sense of light and heat, making the heart feel alive and passionate.
23. Weave a Message into Your Stitches
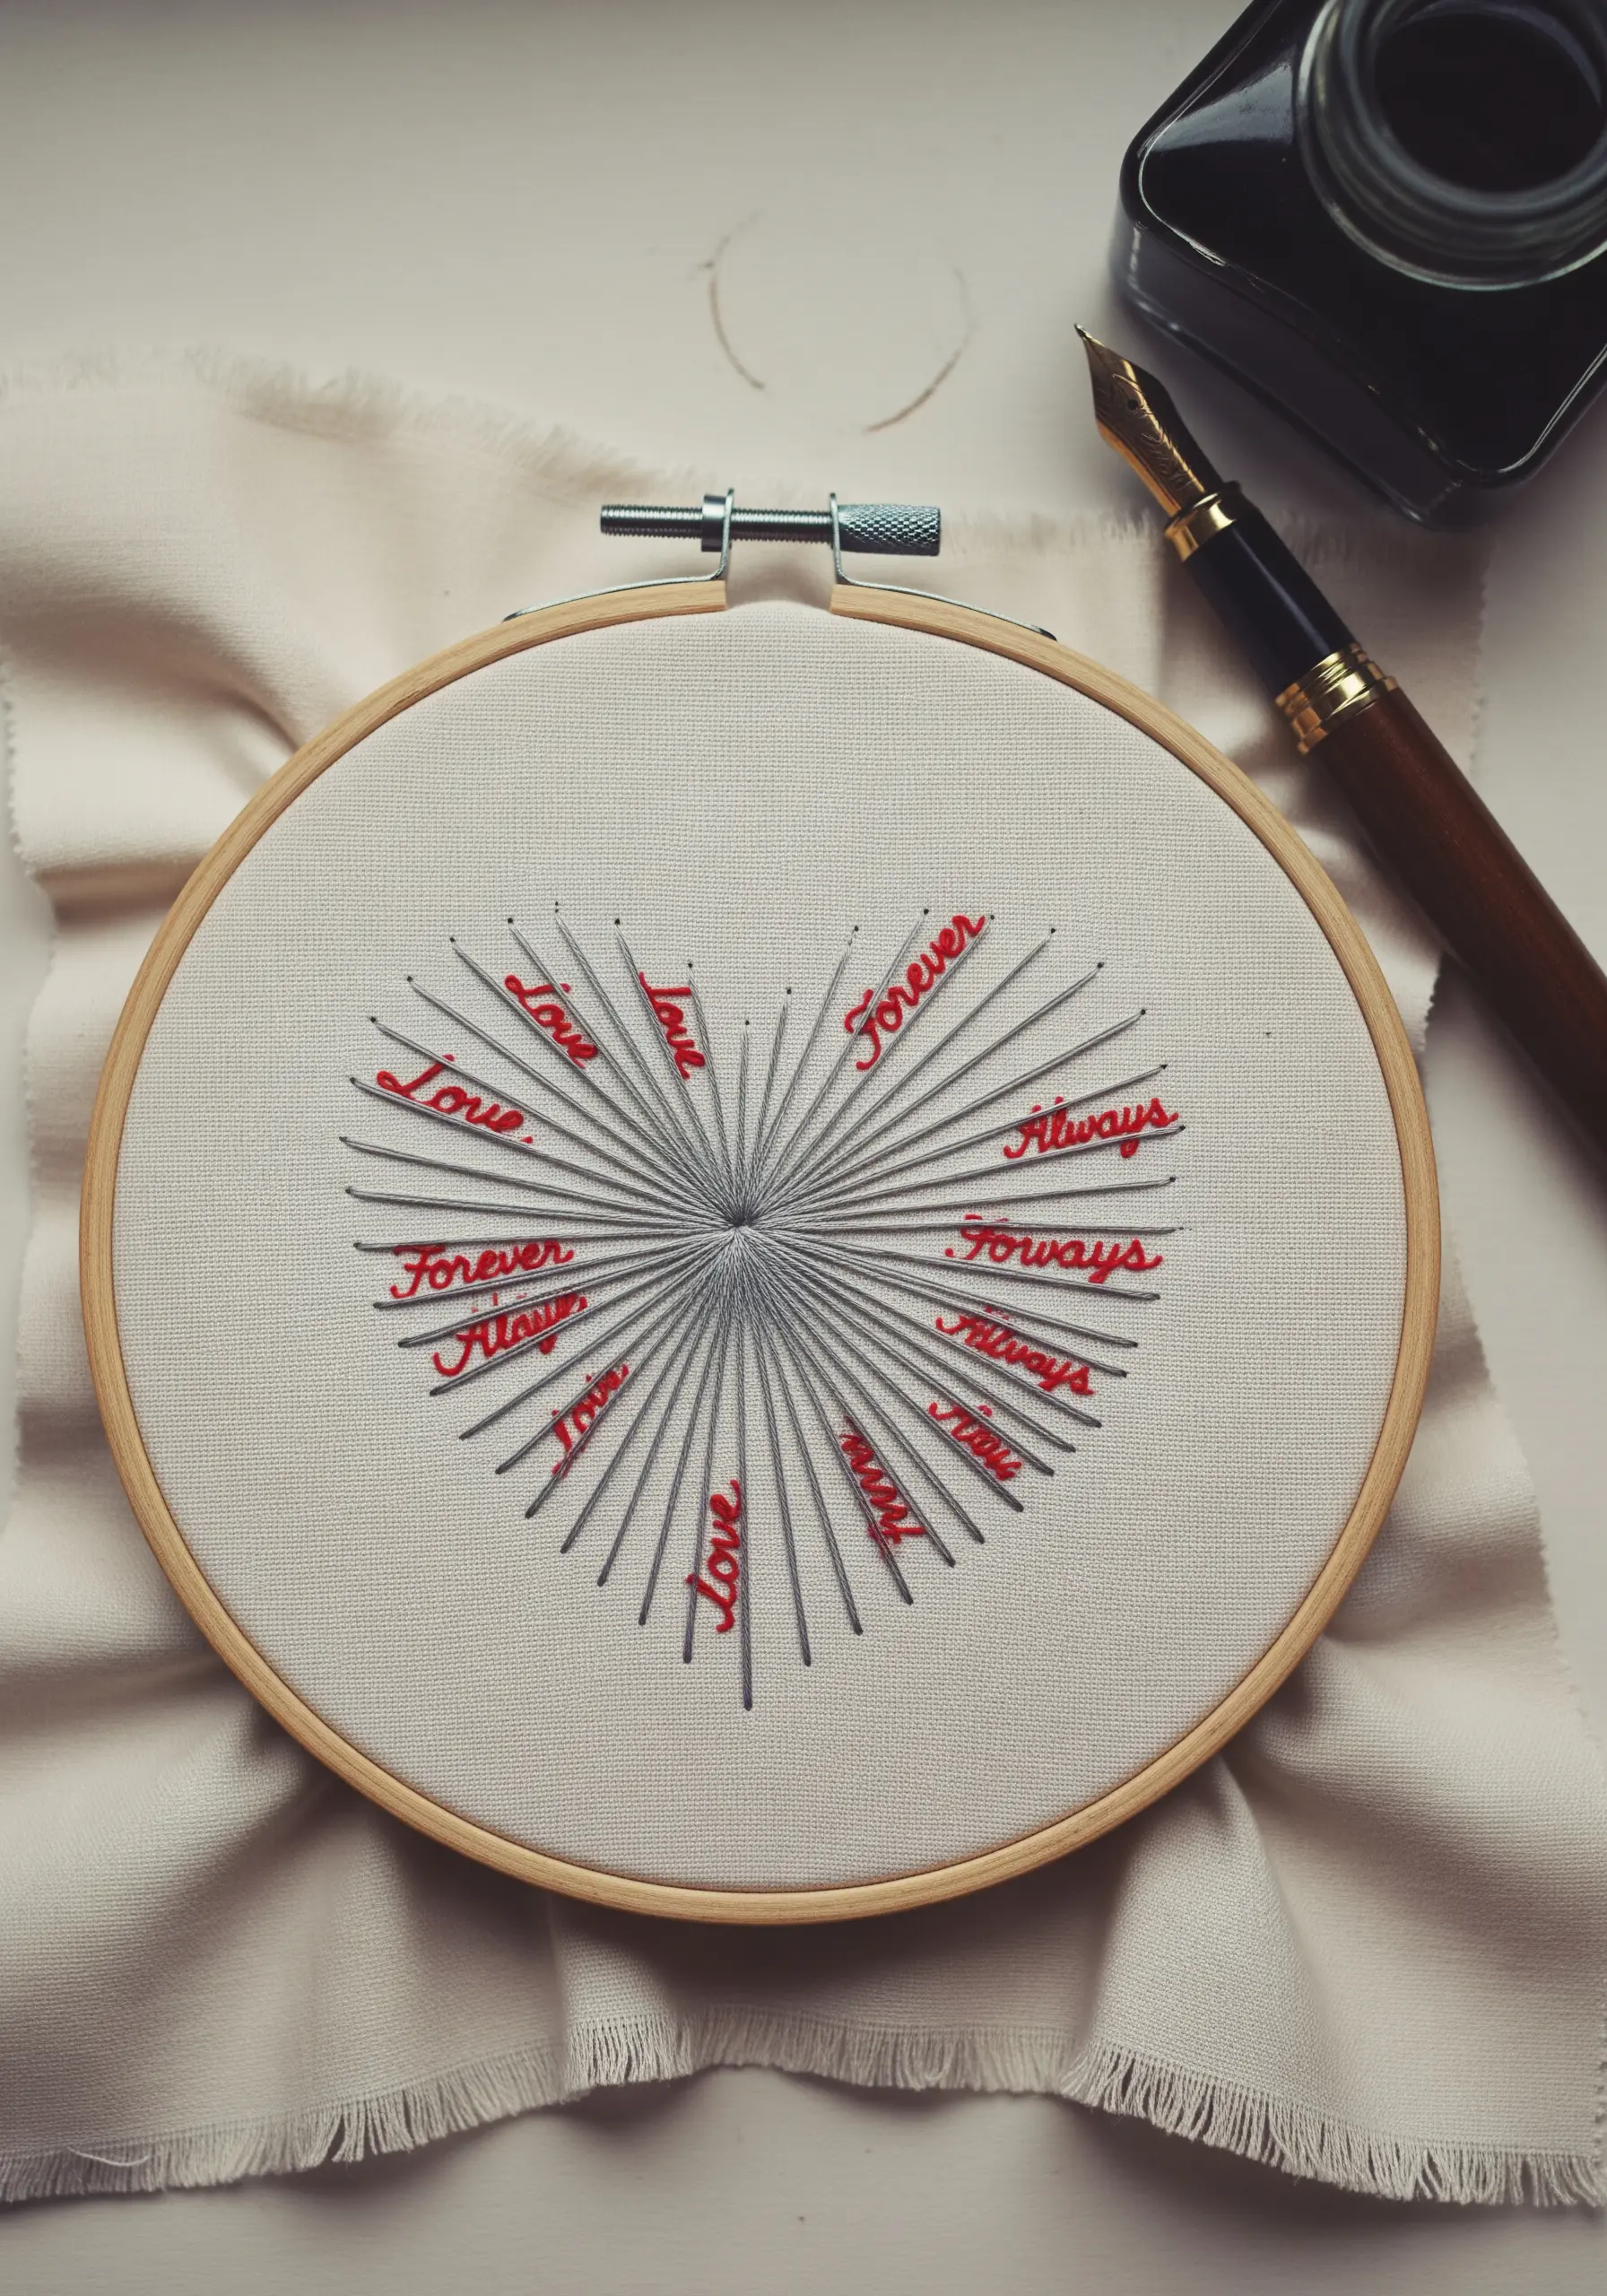
Turn your string art into a deeply personal message by incorporating handwritten words.
First, create the base of gray radiating stitches from a central point.
Then, using a contrasting color like red, use a simple backstitch or stem stitch to add meaningful words like ‘Love,’ ‘Always,’ and ‘Forever’ directly onto the gray threads.
This technique layers meaning onto the design, making it a perfect and heartfelt anniversary gift.
24. Play with Asymmetry and Negative Space
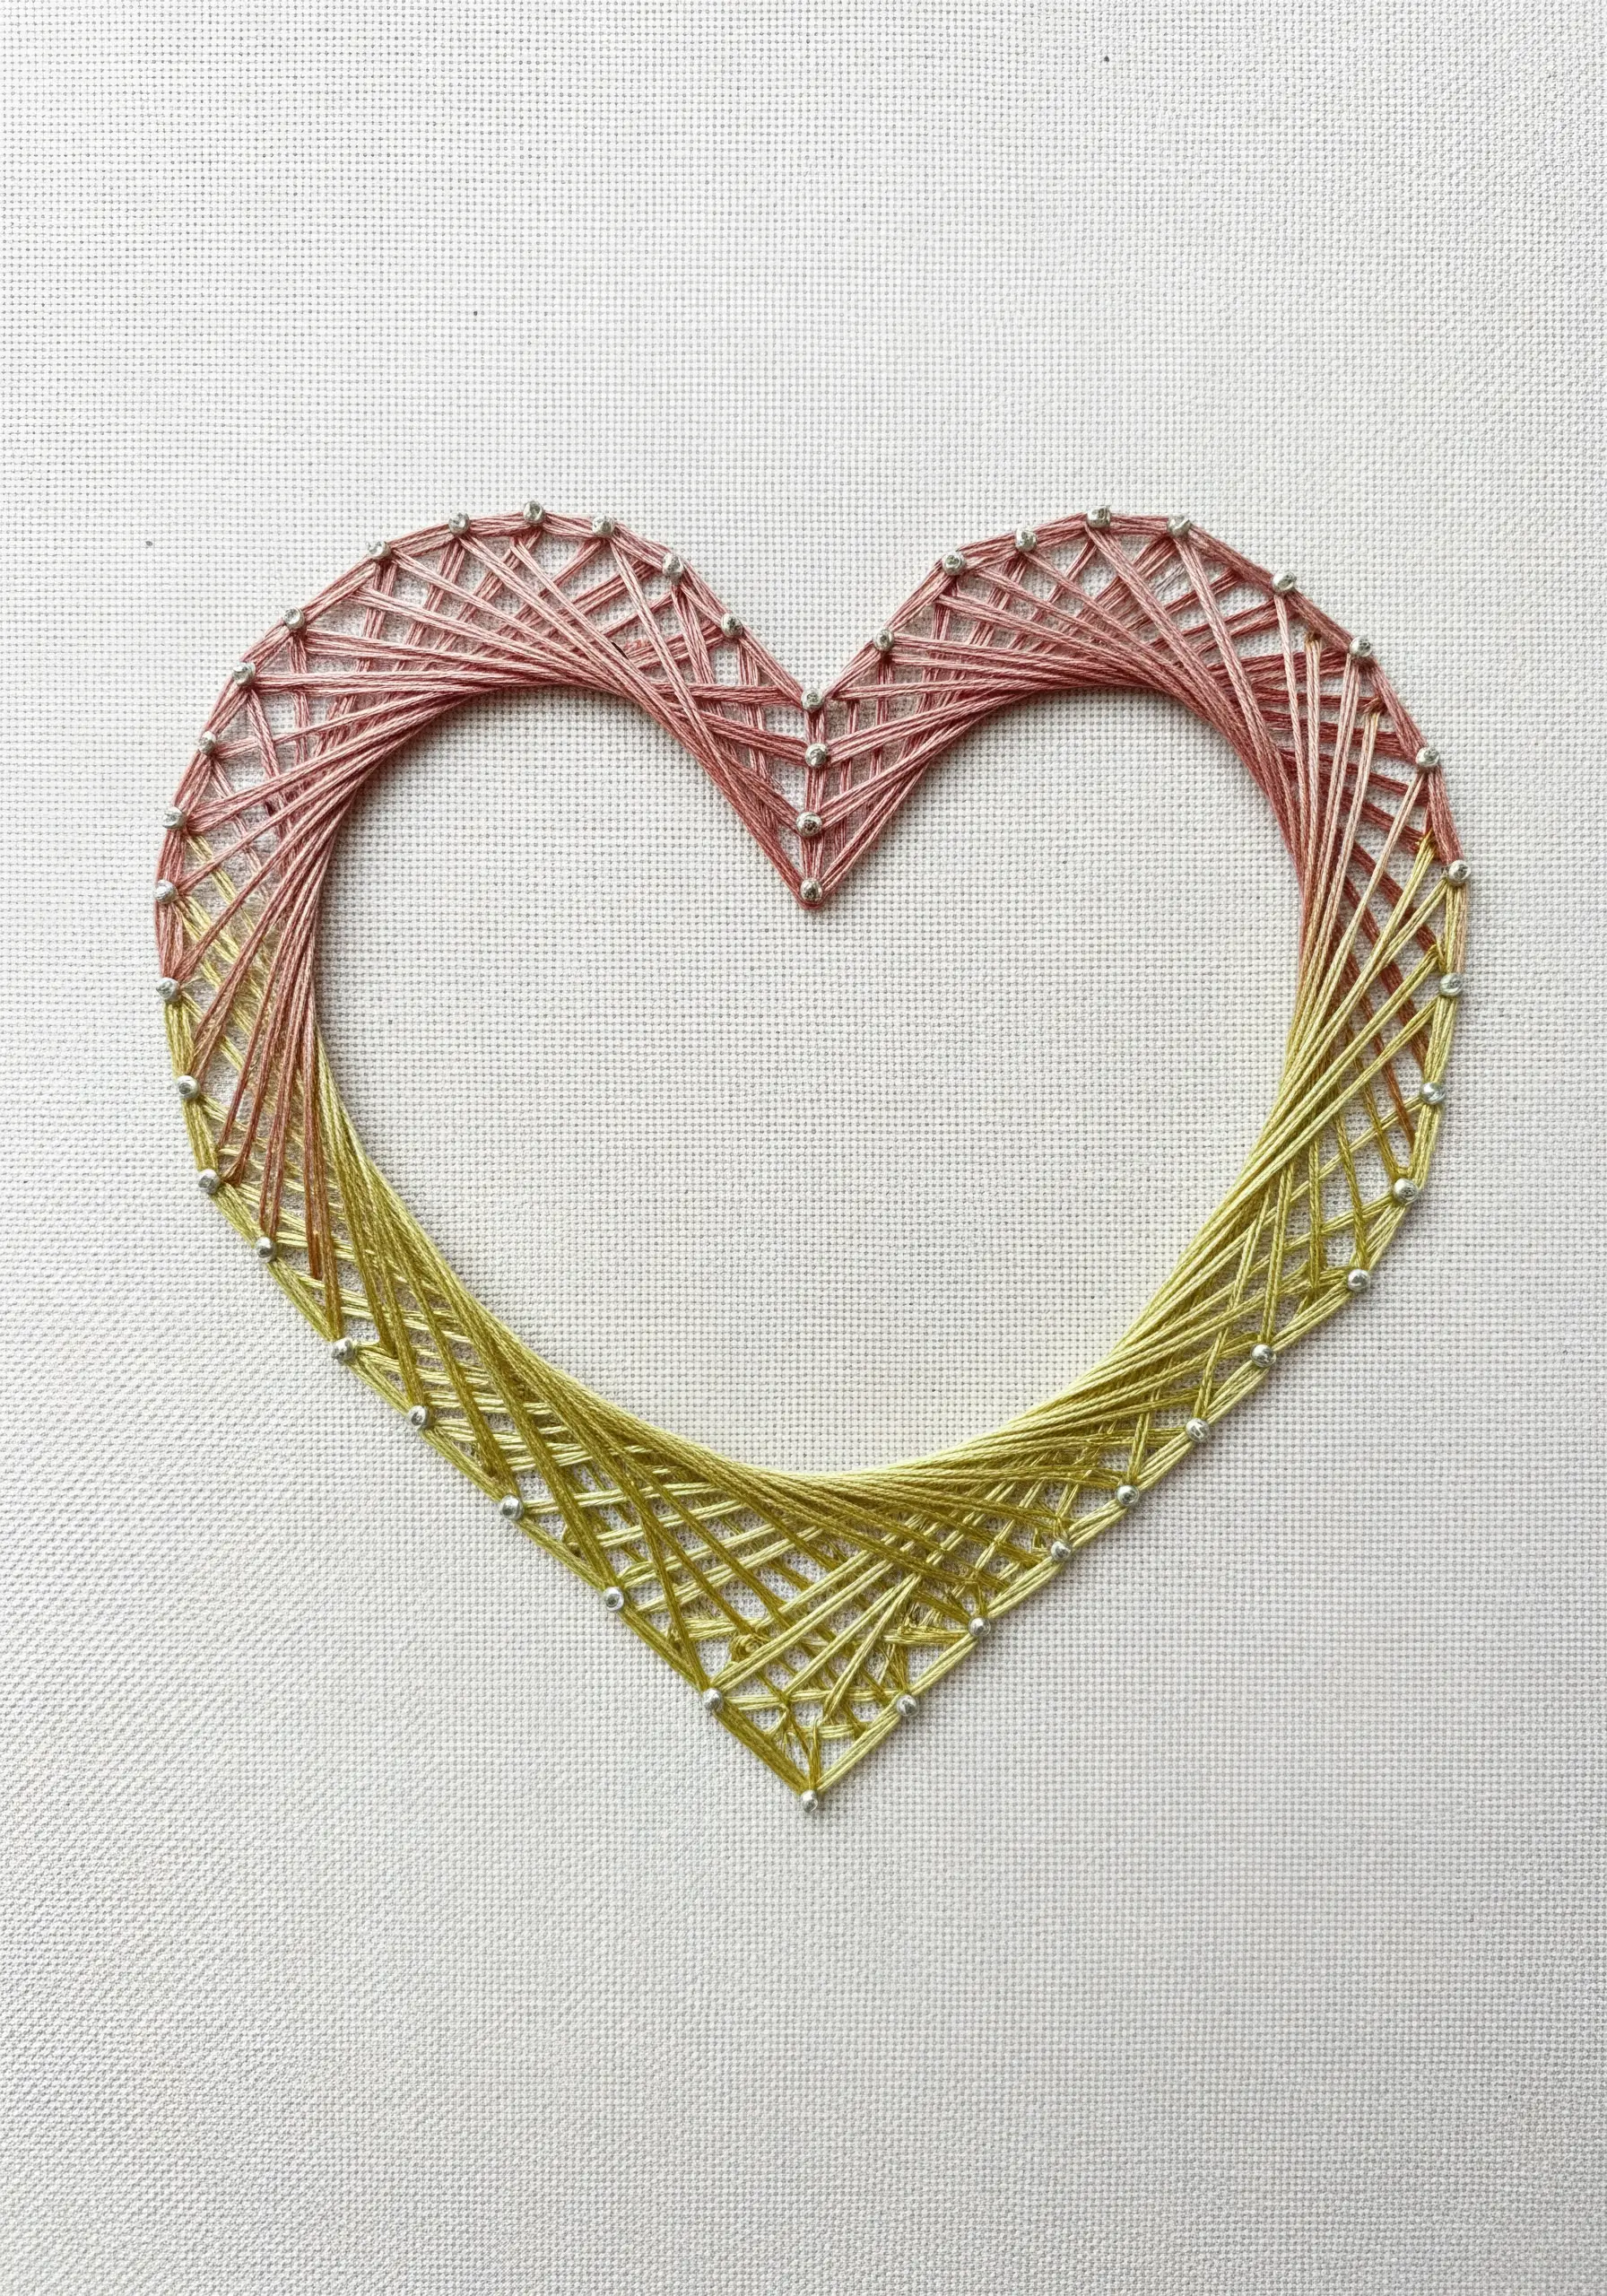
Create a modern, artistic look by focusing on the outline of the heart rather than filling it completely.
Use beads as anchor points along the perimeter of the heart shape. Then, work on each half with a different color, like dusty rose and antique gold.
Instead of filling the shape, create an intricate border by stretching threads between adjacent and opposite beads, leaving the center of the heart open.
This technique highlights the beauty of the shape itself and creates a light, airy design.


