

There’s a quiet magic in building something beautiful, thread by thread. But perhaps you’ve reached a point where your stitches, though neat, feel a little… flat. You’re ready to move beyond filling in shapes and want to create work that has presence, dimension, and a story to tell through its very surface.
This is where sculptural embroidery comes in. It’s not about mastering hundreds of complex stitches; it’s about rethinking how you use the ones you know. It’s about layering, wrapping, and combining materials to build texture that invites touch and captures light in new ways.
Here, you’ll discover how to use yarn, cord, and even simple felt to create raised forms and dynamic surfaces. Forget the rules of flat stitching for a moment. Let’s explore how to give your embroidery weight, depth, and a voice that is uniquely yours, turning every piece into a small sculpture.
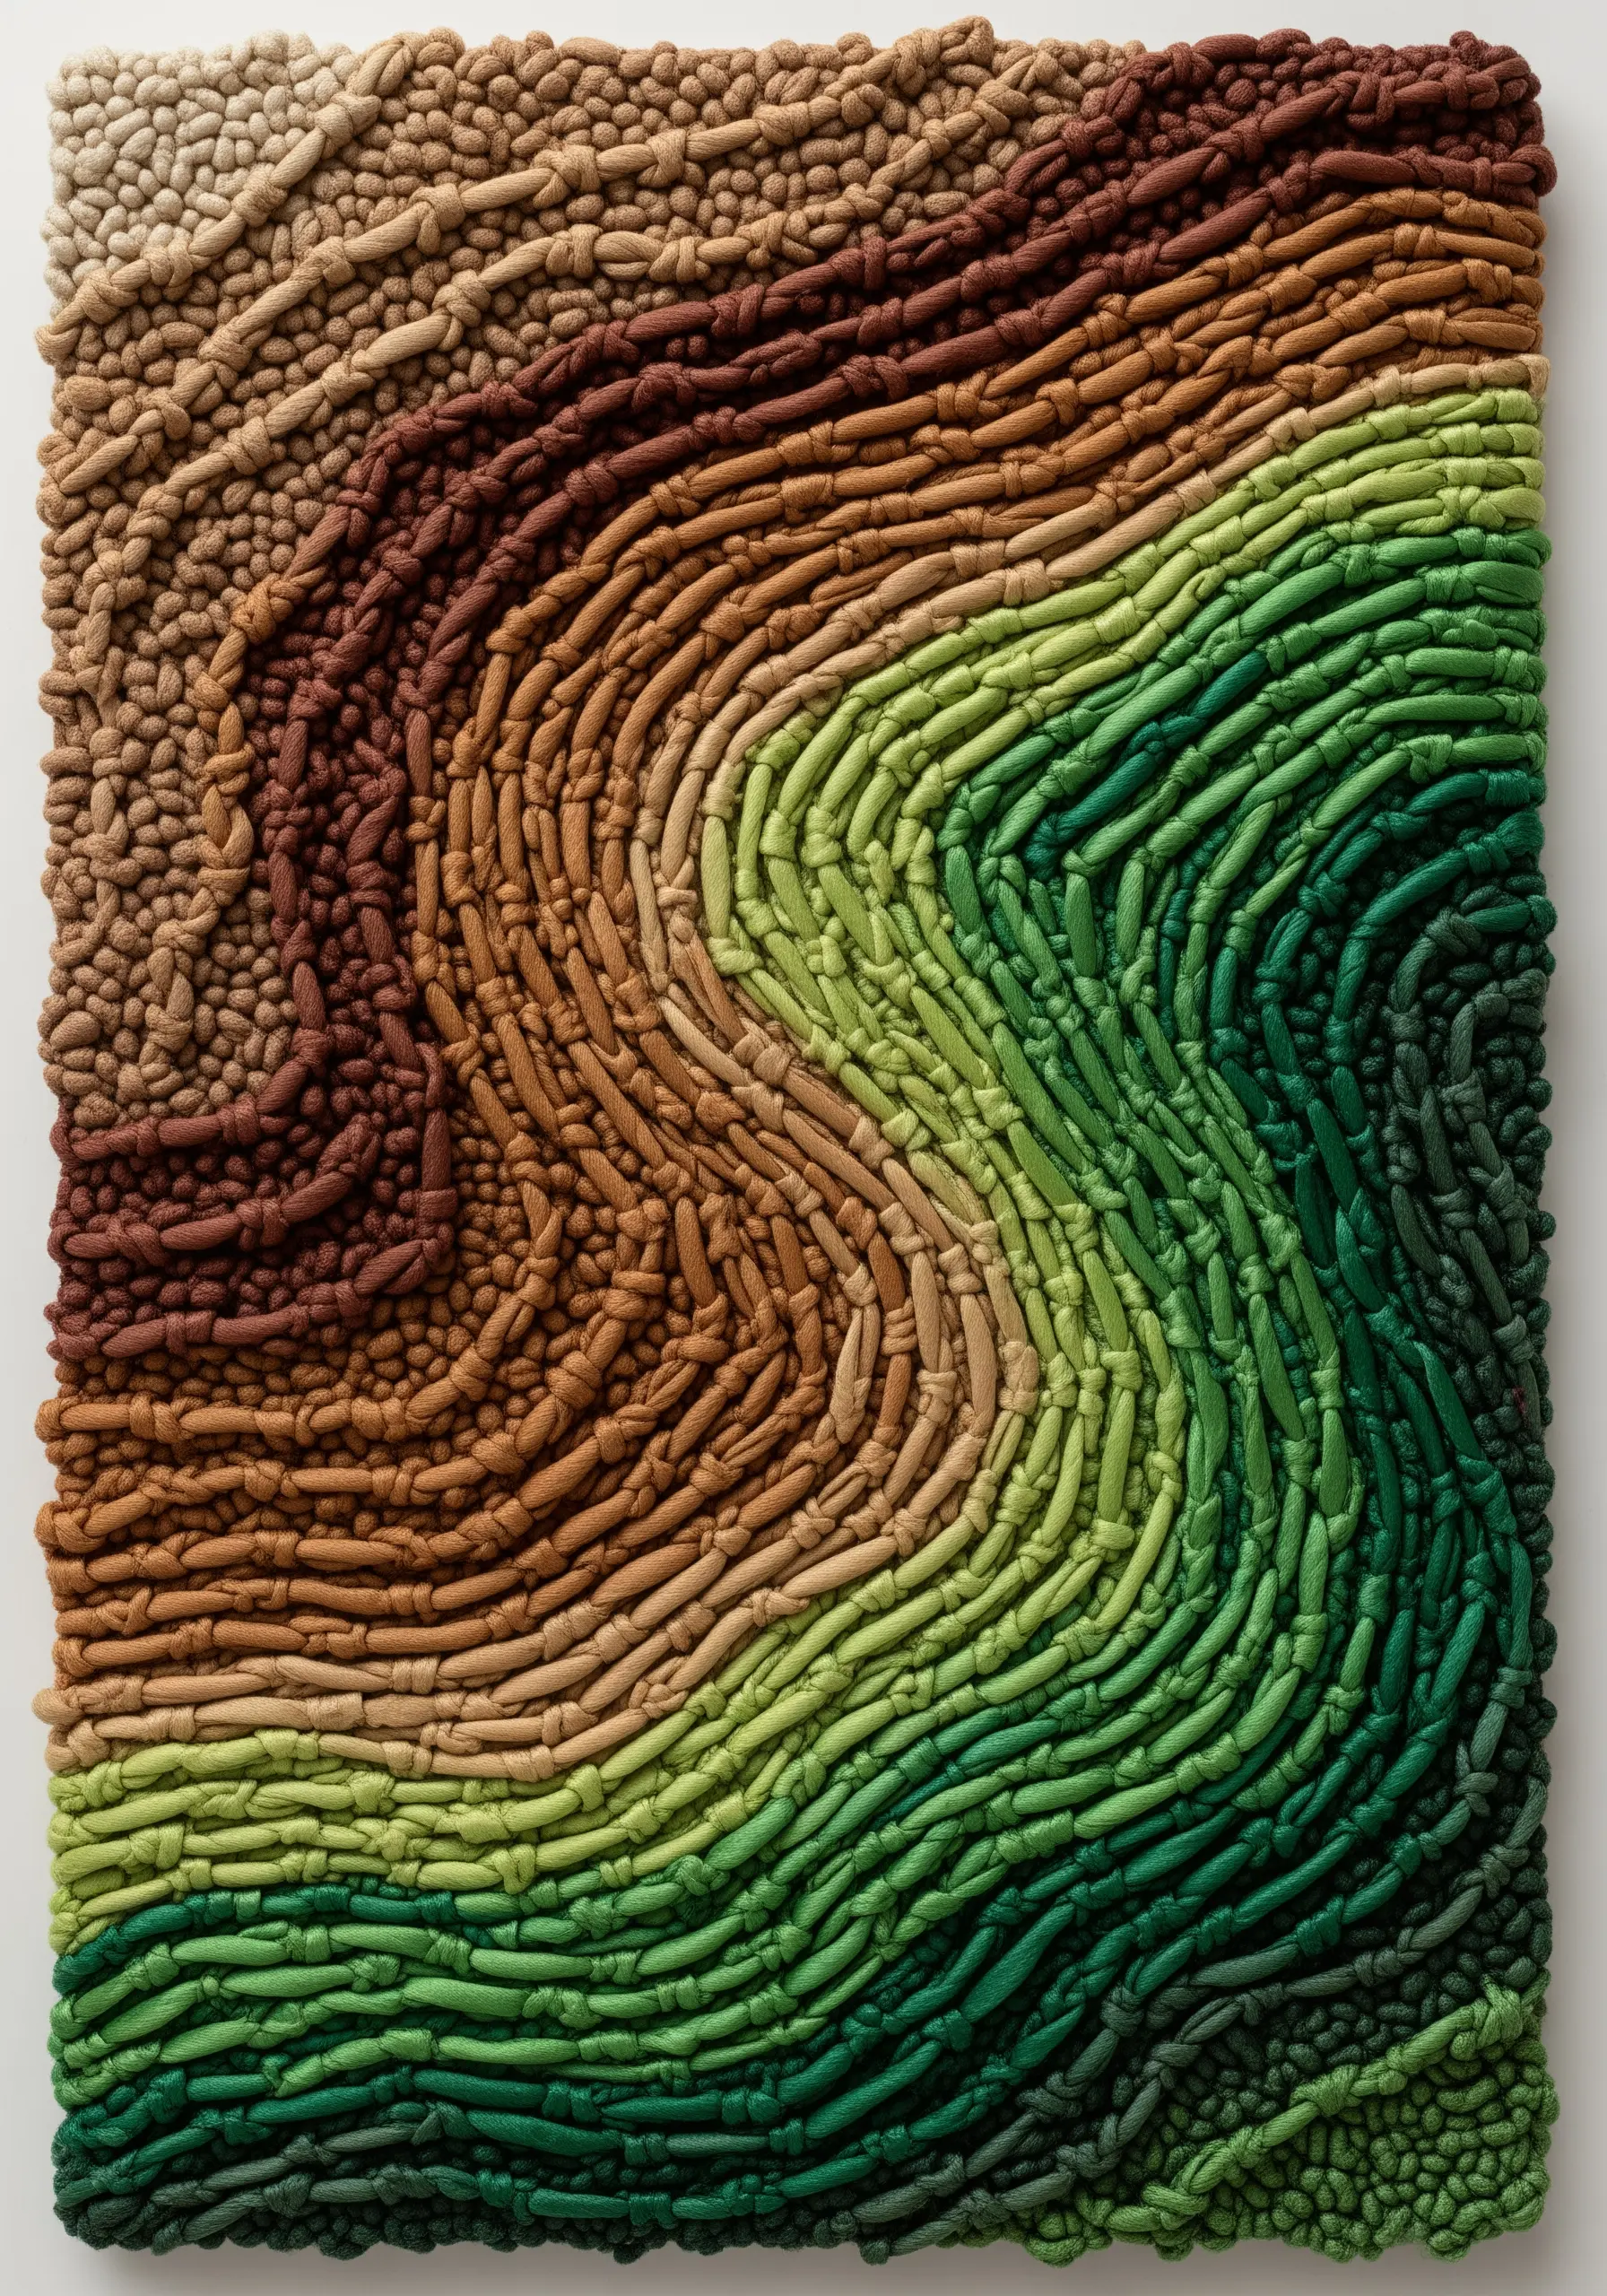
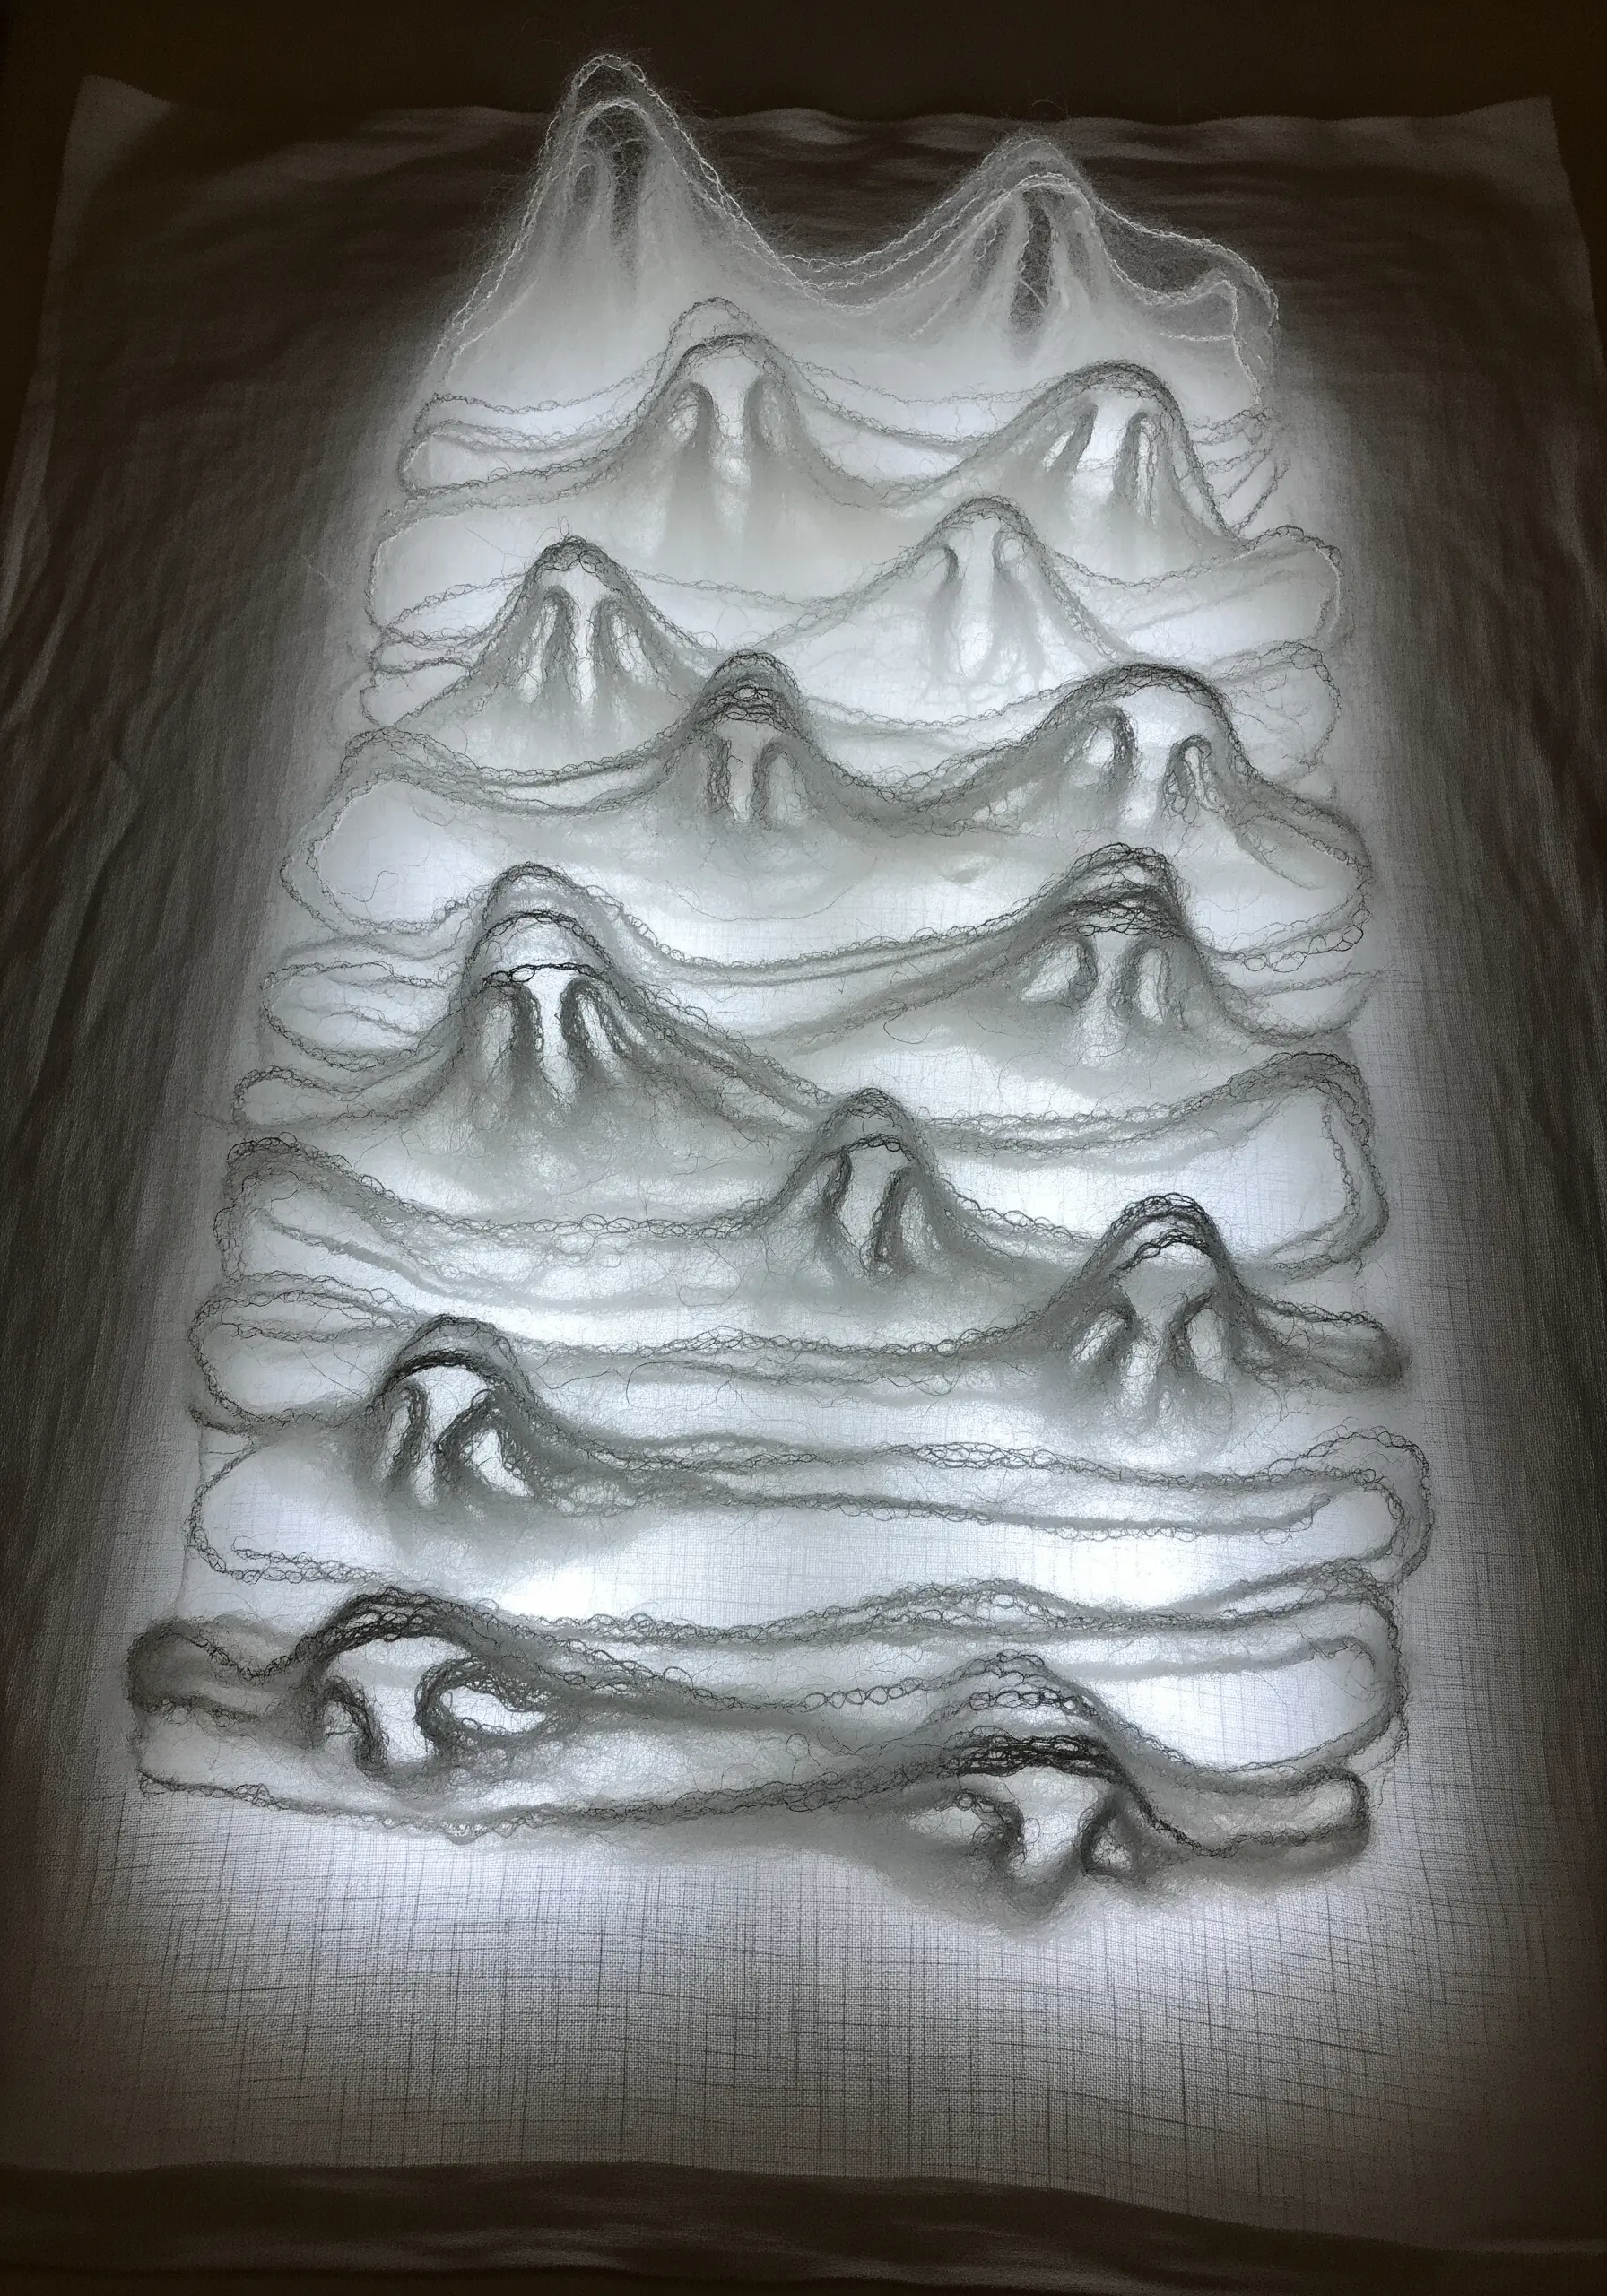
1. Sculptural Topography with Yarn Wrapping
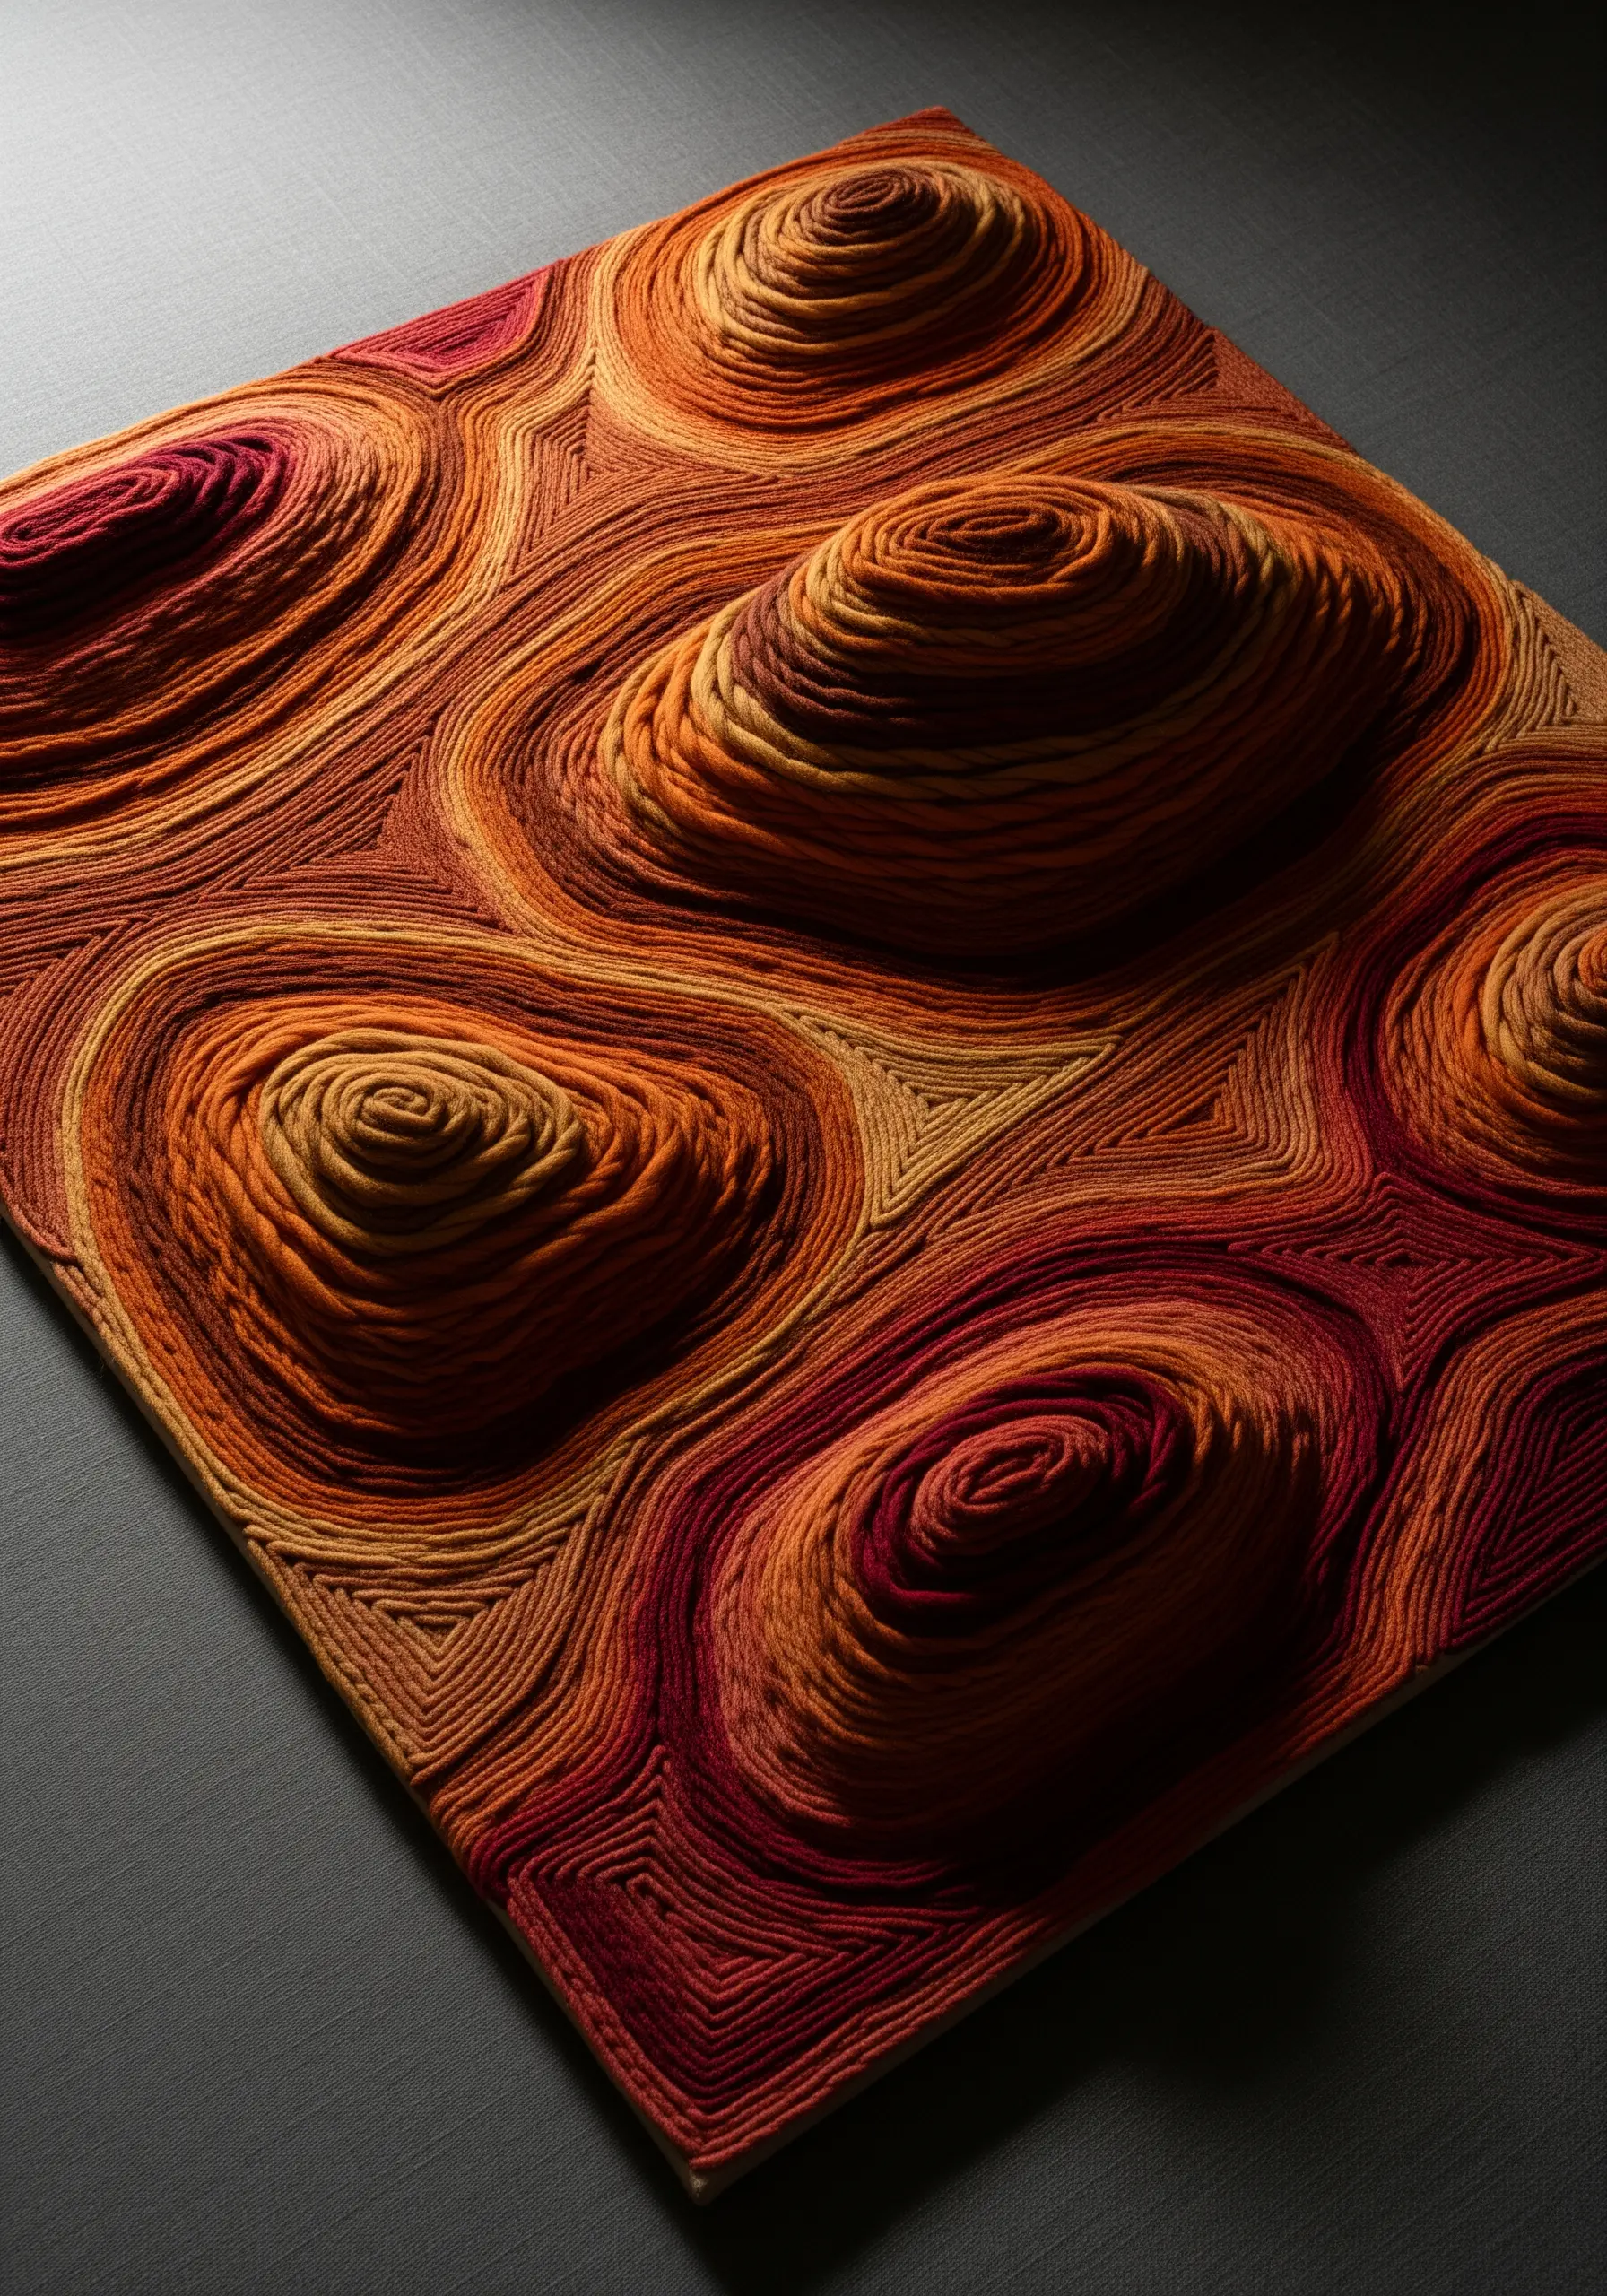
To create these raised, organic forms, begin with a shaped base of felt or foam adhered to your canvas.
Select an analogous color palette of thick yarn or wool—think warm desert tones or cool ocean blues—to create a smooth, gradient-like transition.
Wrap the yarn tightly around the forms, starting from the center of each mound and working your way out, ensuring each new layer of thread sits snugly against the last.
This technique transforms simple yarn into a contoured, three-dimensional map that plays beautifully with light and shadow.
2. Radiant Cones with Metallic Thread
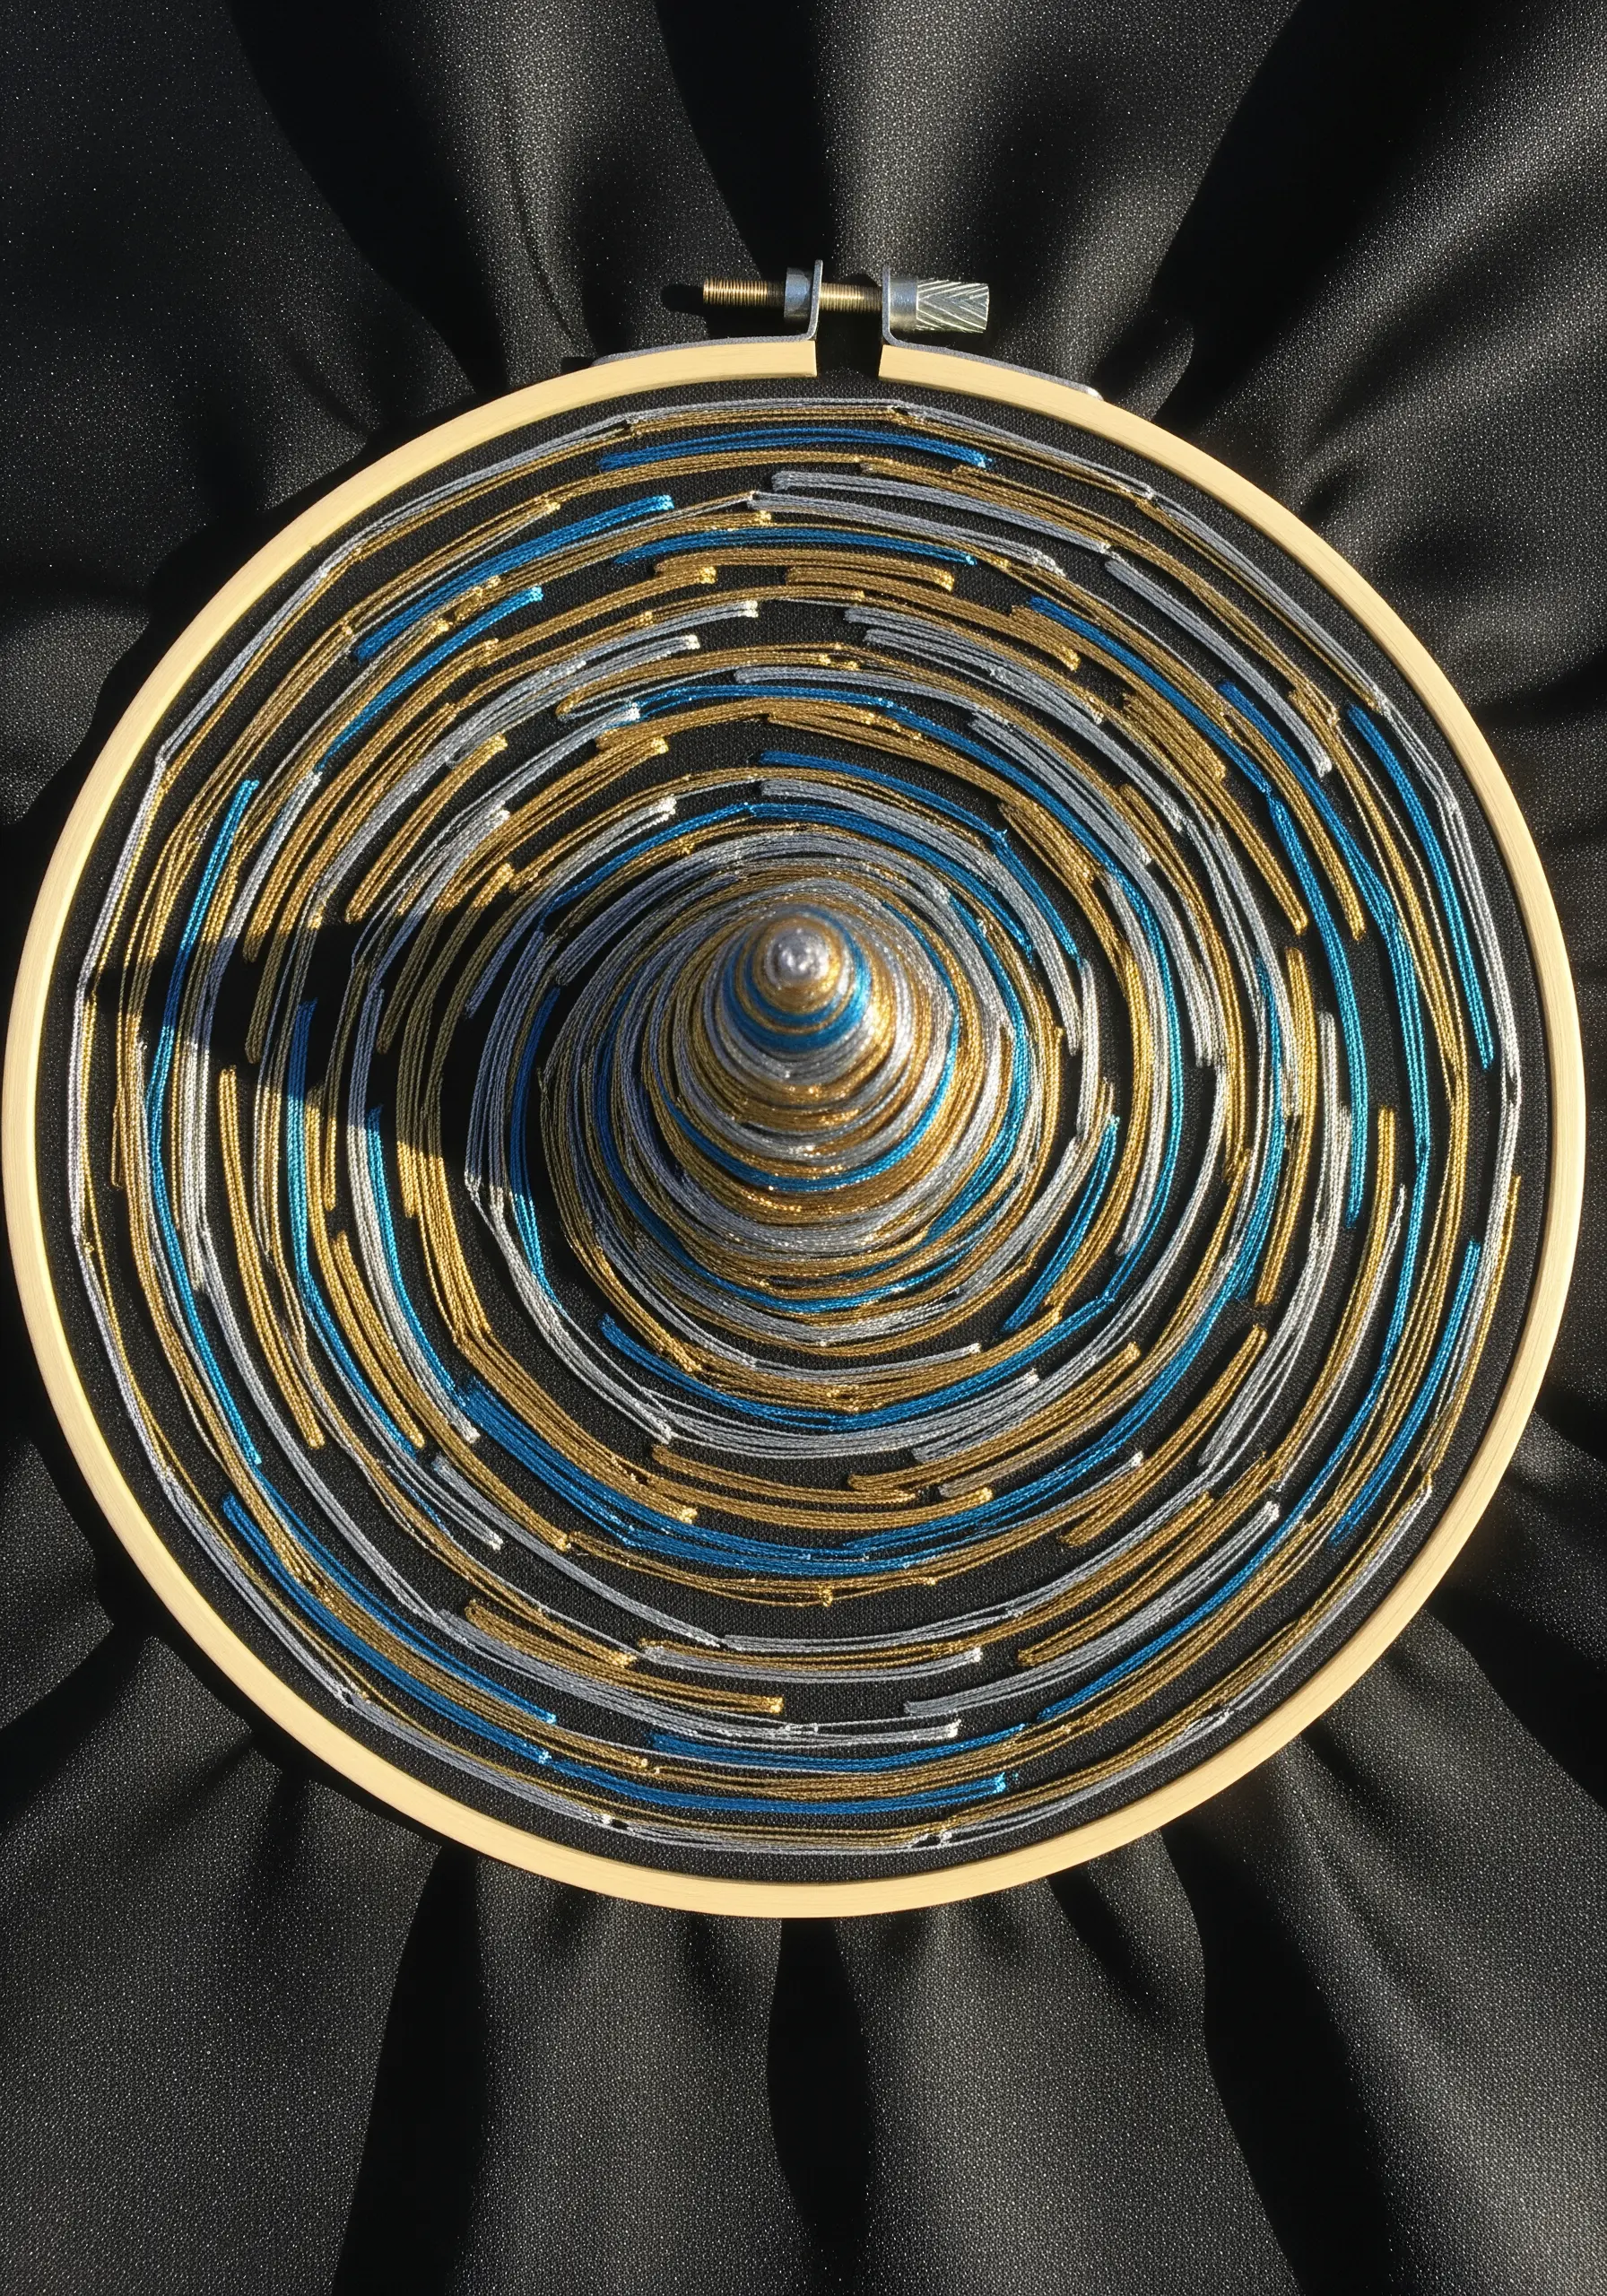
Create this mesmerizing depth by building a cone structure directly in your hoop.
Start with a central anchor point—a sturdy bead or even a small, hidden washer on the back of the fabric can work.
Run straight stitches from the hoop’s edge to the central point, layering them methodically.
The magic is in the tension and the reflective quality of the metallic thread; as you layer gold, silver, and colored metallics, you build a form that captures and refracts light from every angle.
3. Organic Shapes with Couched Wool Roving
For an immediate injection of softness and scale, work with chunky wool roving instead of standard embroidery floss.
Lay the roving on your fabric in free-form, organic shapes and use a standard six-strand floss to tack it down with small, evenly spaced stitches—a technique called couching.
This method allows you to create bold, plush, and highly textural forms without the time commitment of filling a large area with tiny stitches. It’s all about line, volume, and softness.
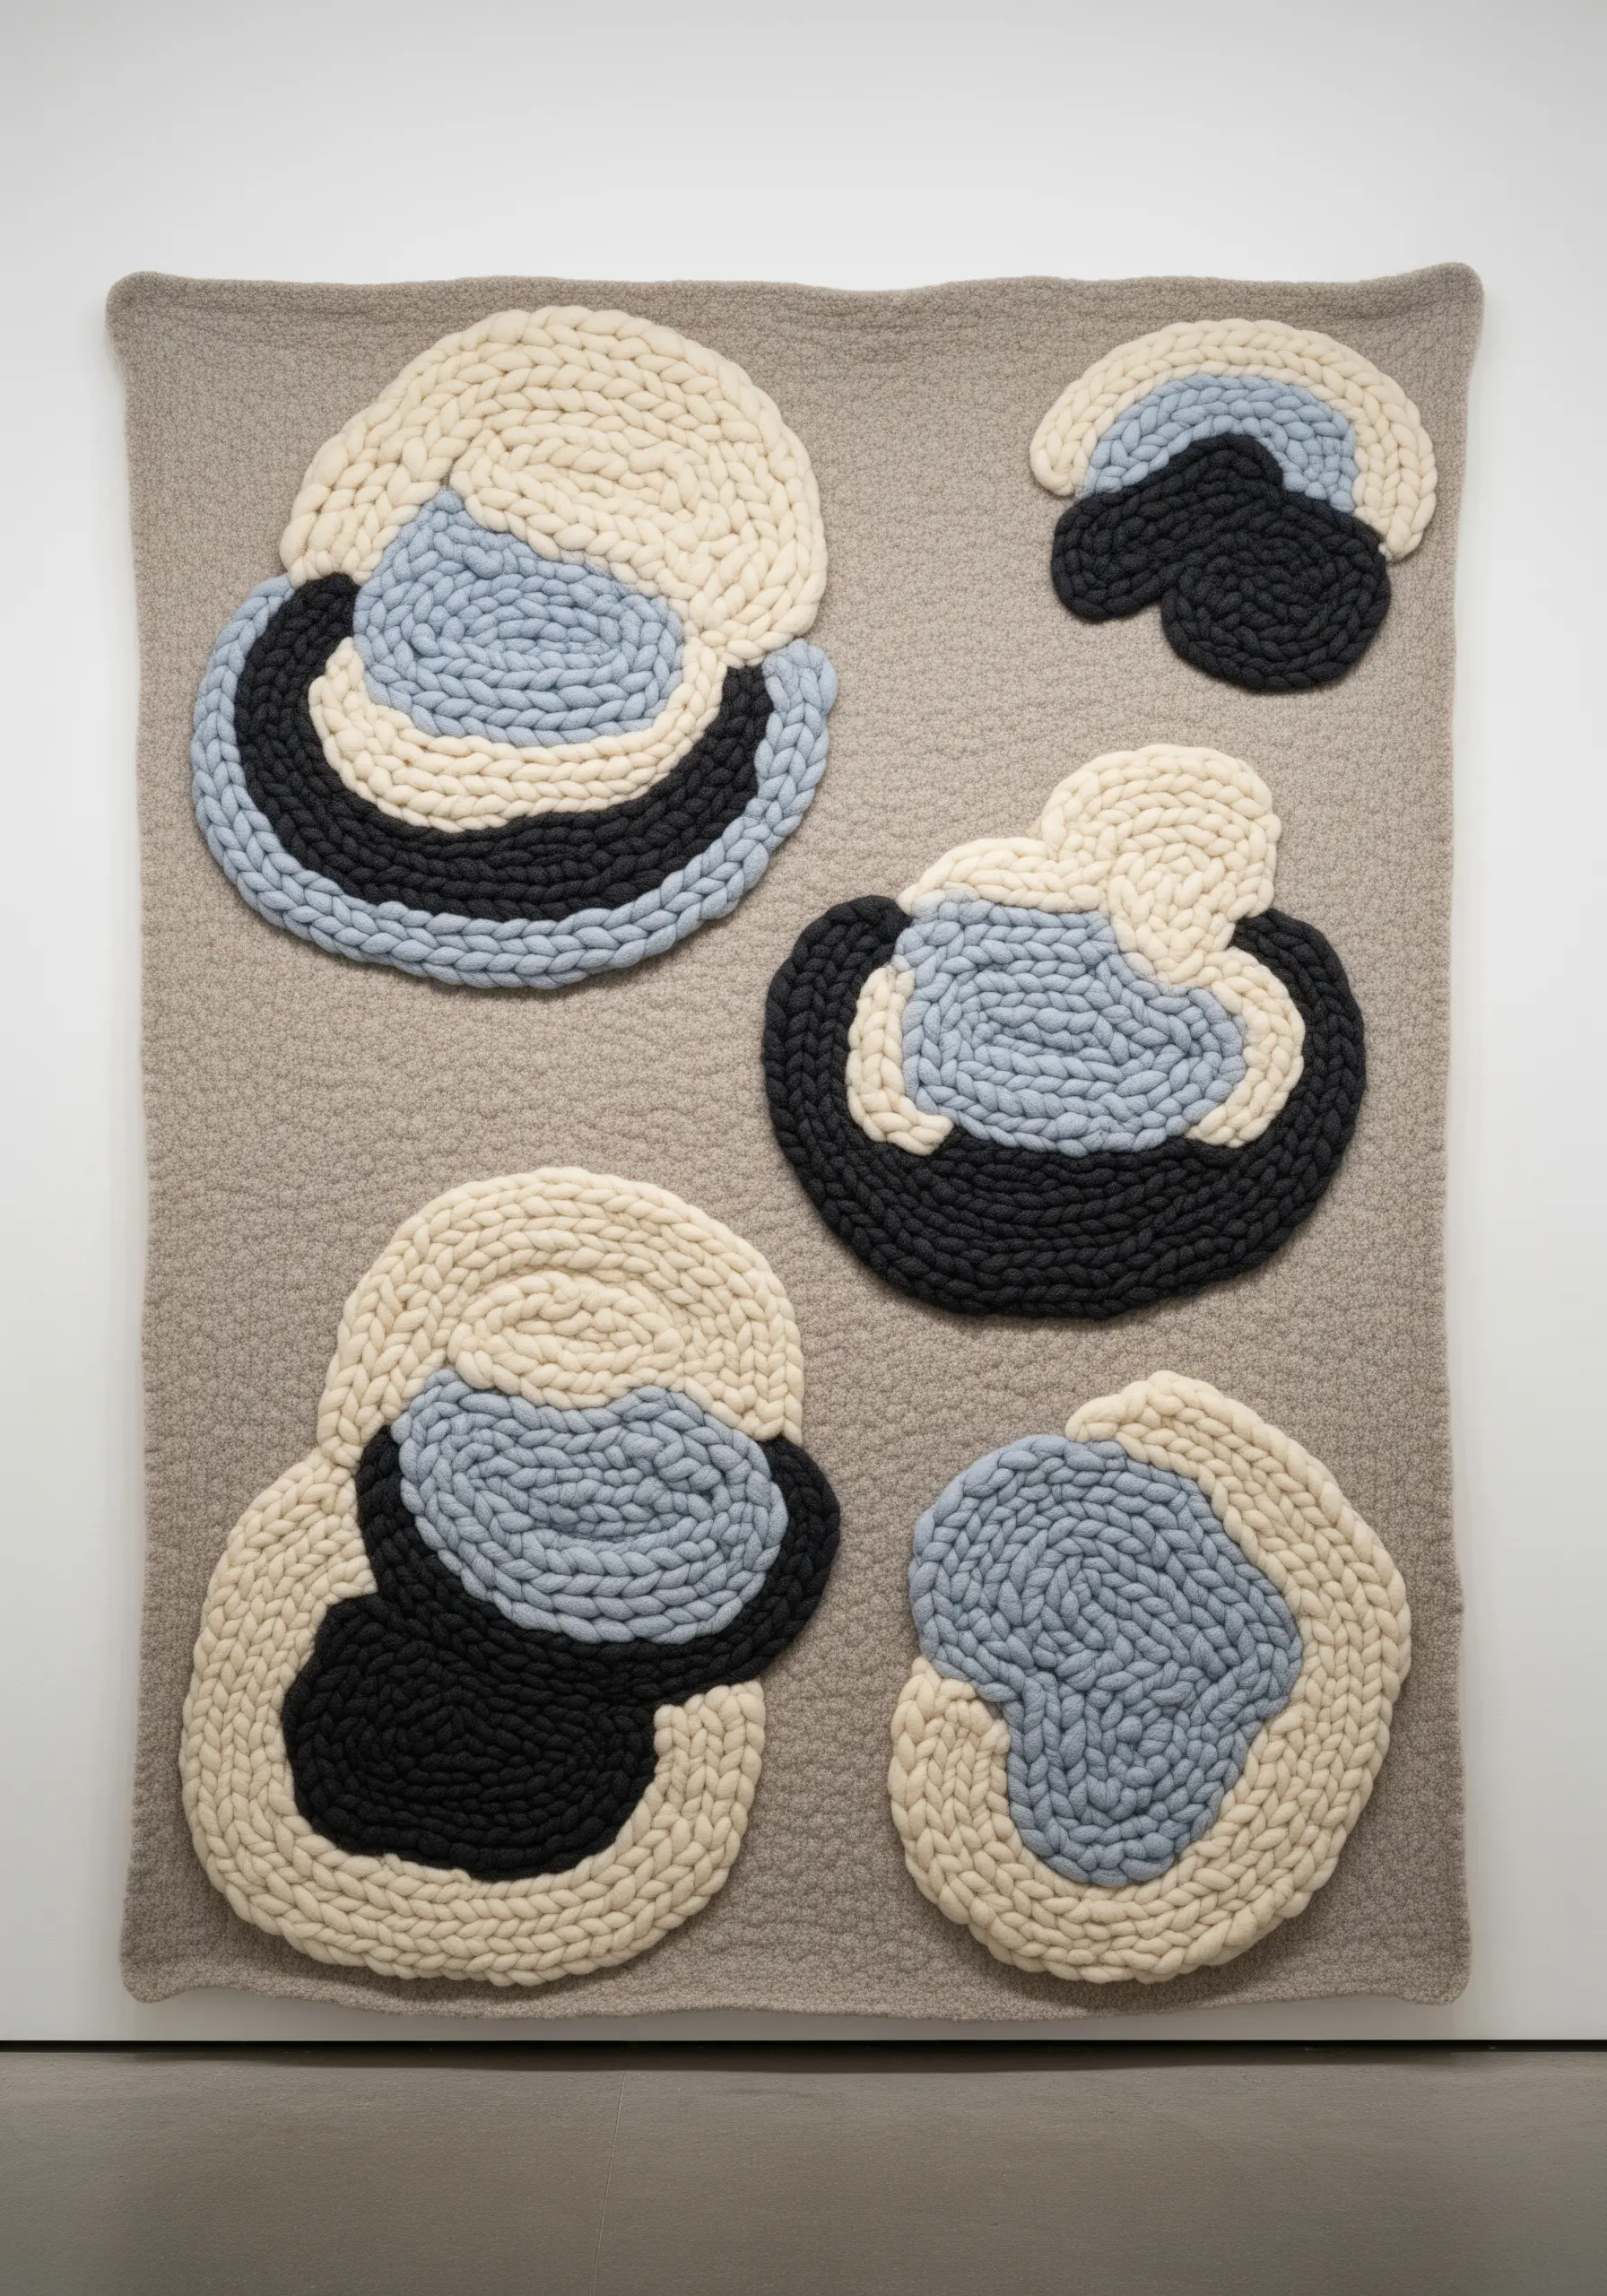
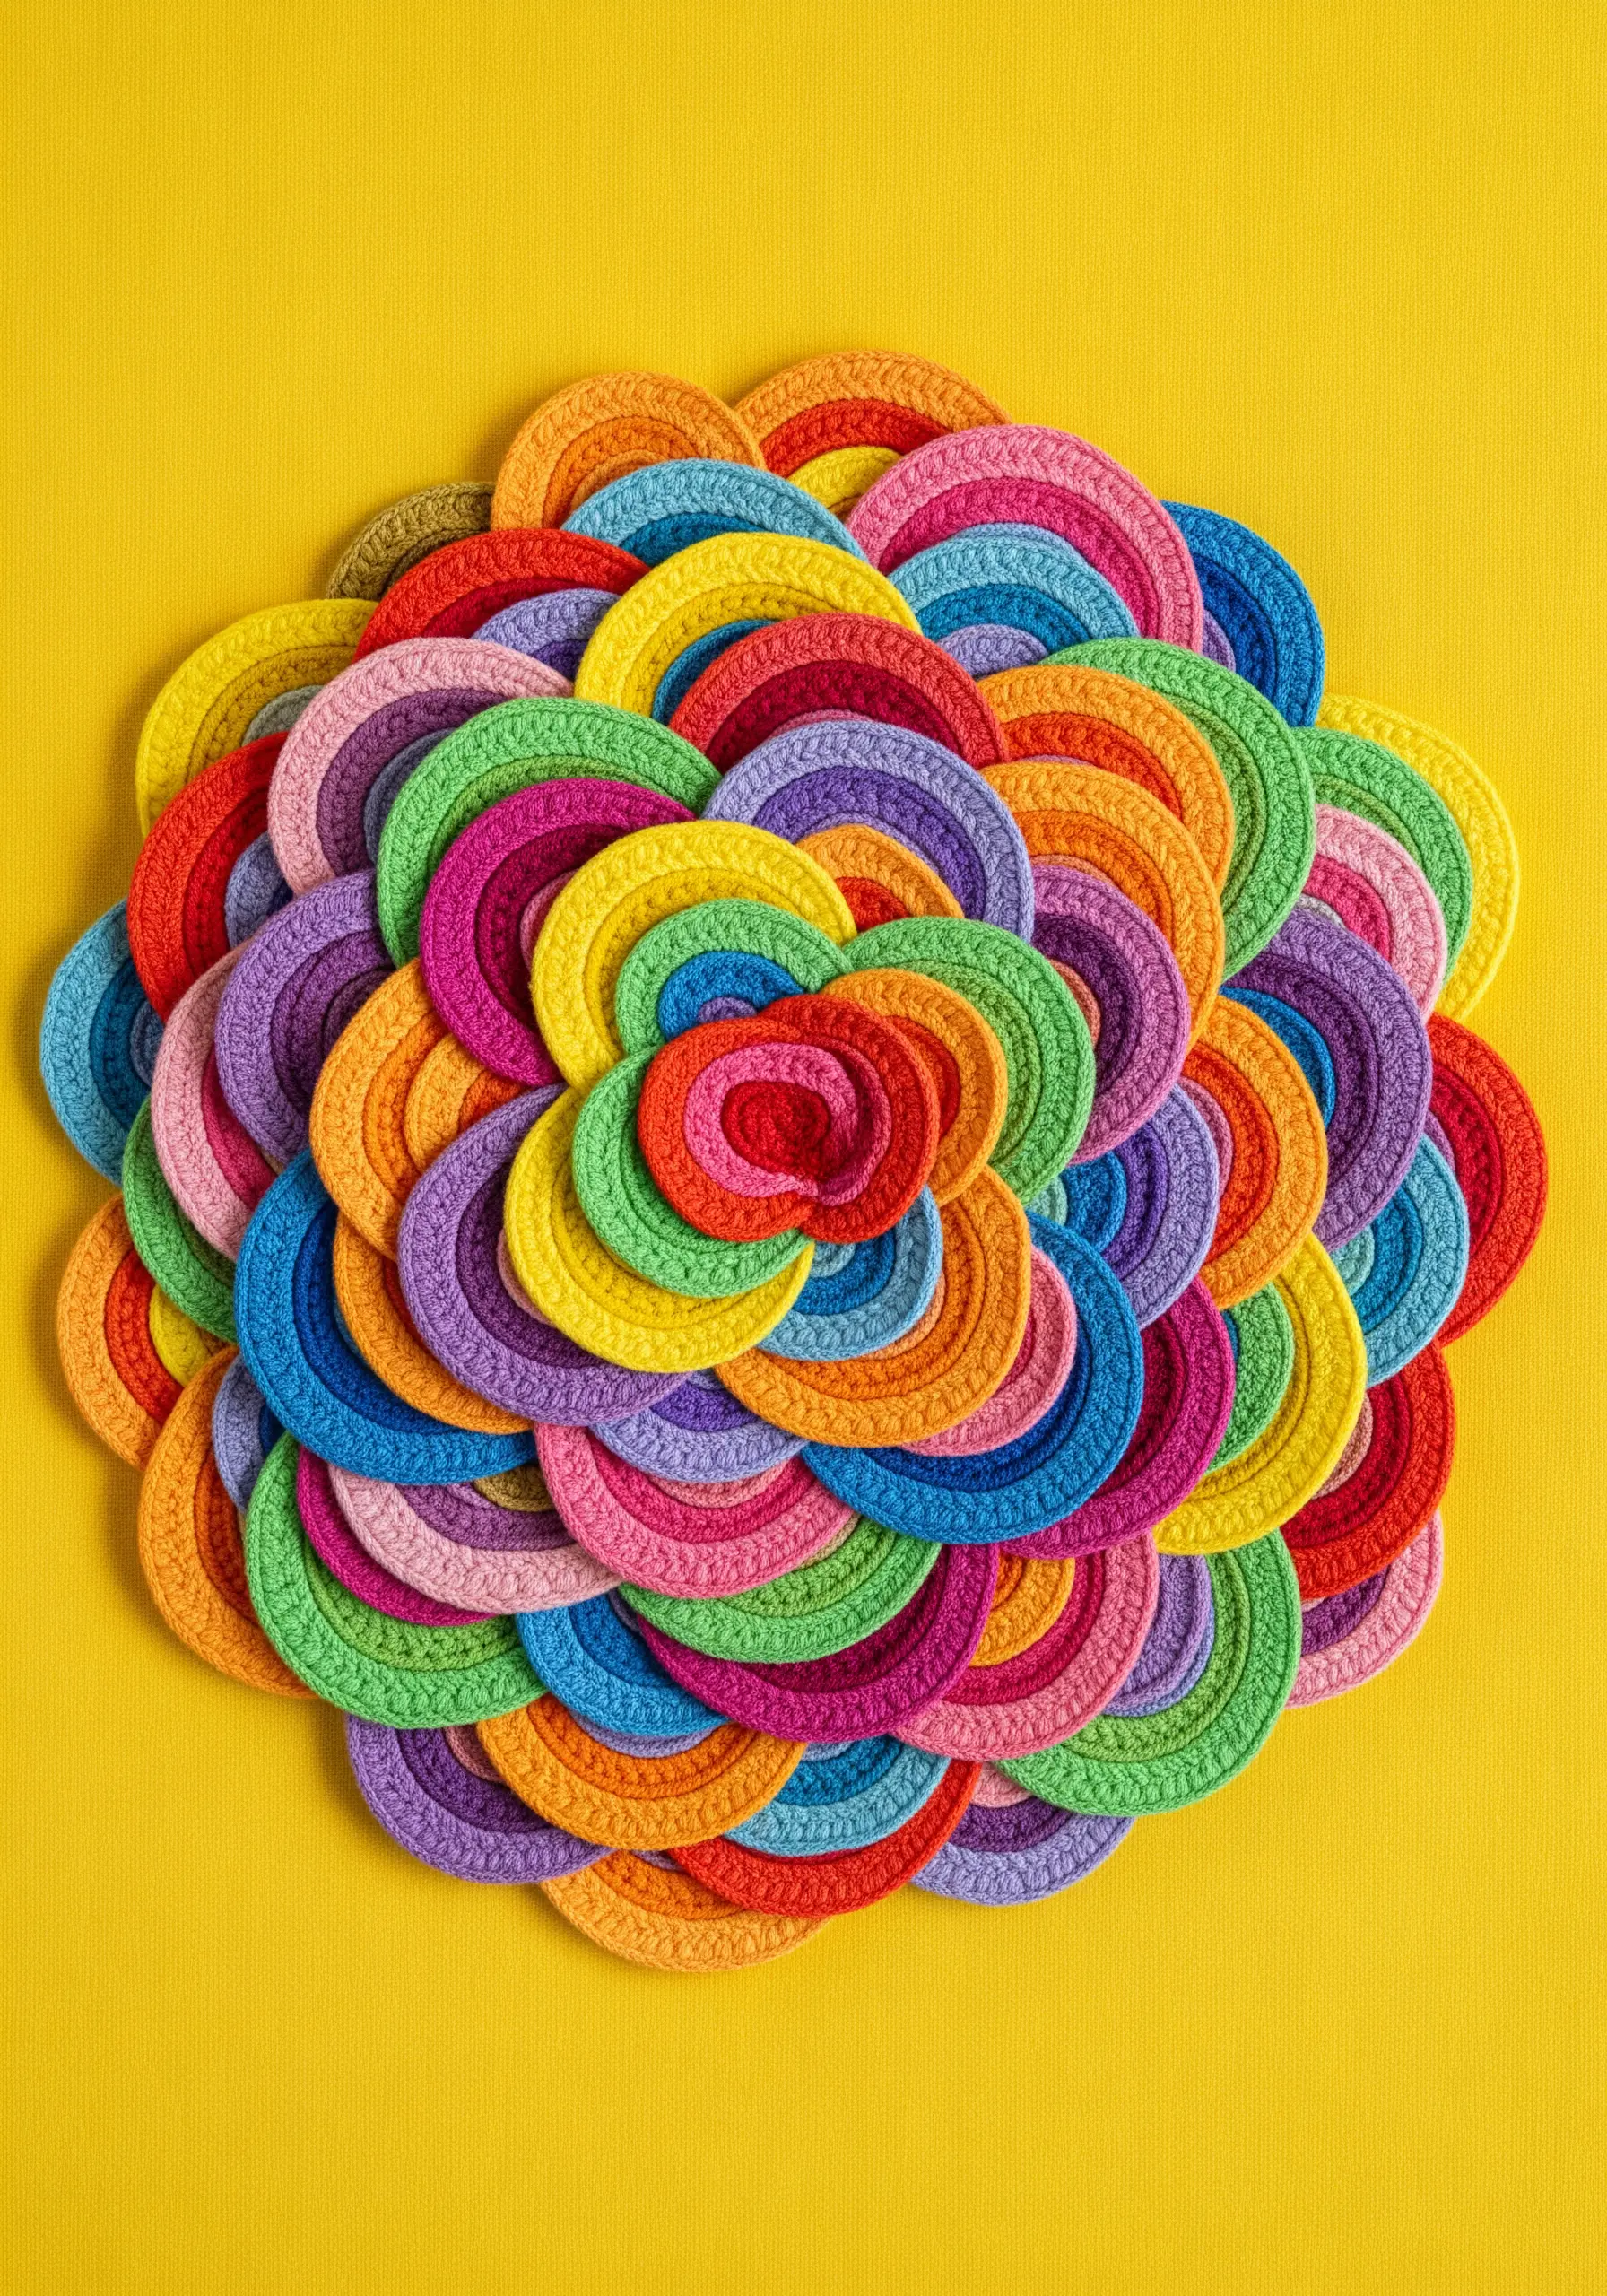
4. Vibrant Color-Blocking with Wrapped Forms
Achieve this clean, graphic look by layering individually wrapped shapes.
Cut your organic shapes from cardstock or thick felt, then wrap each one tightly with a different, vibrant color of yarn.
Arrange the forms by nesting them inside one another, then securely stitch them to your background fabric.
This approach gives you perfectly defined color-blocking embroidery patterns with a satisfying, low-relief sculptural quality.
5. Rhythmic Landscapes of Varied Stitches

Create a seascape of texture by dedicating entire rows to different stitches.
Instead of filling a shape with a single stitch, alternate lines of chain stitch, French knots, satin stitch, and seed stitch within a monochromatic color scheme.
This variation creates a rich, tactile surface where each stitch type contributes its unique texture, like different currents in water.
Allowing some threads to hang loose at the bottom adds a final layer of movement and breaks the composition’s boundary.
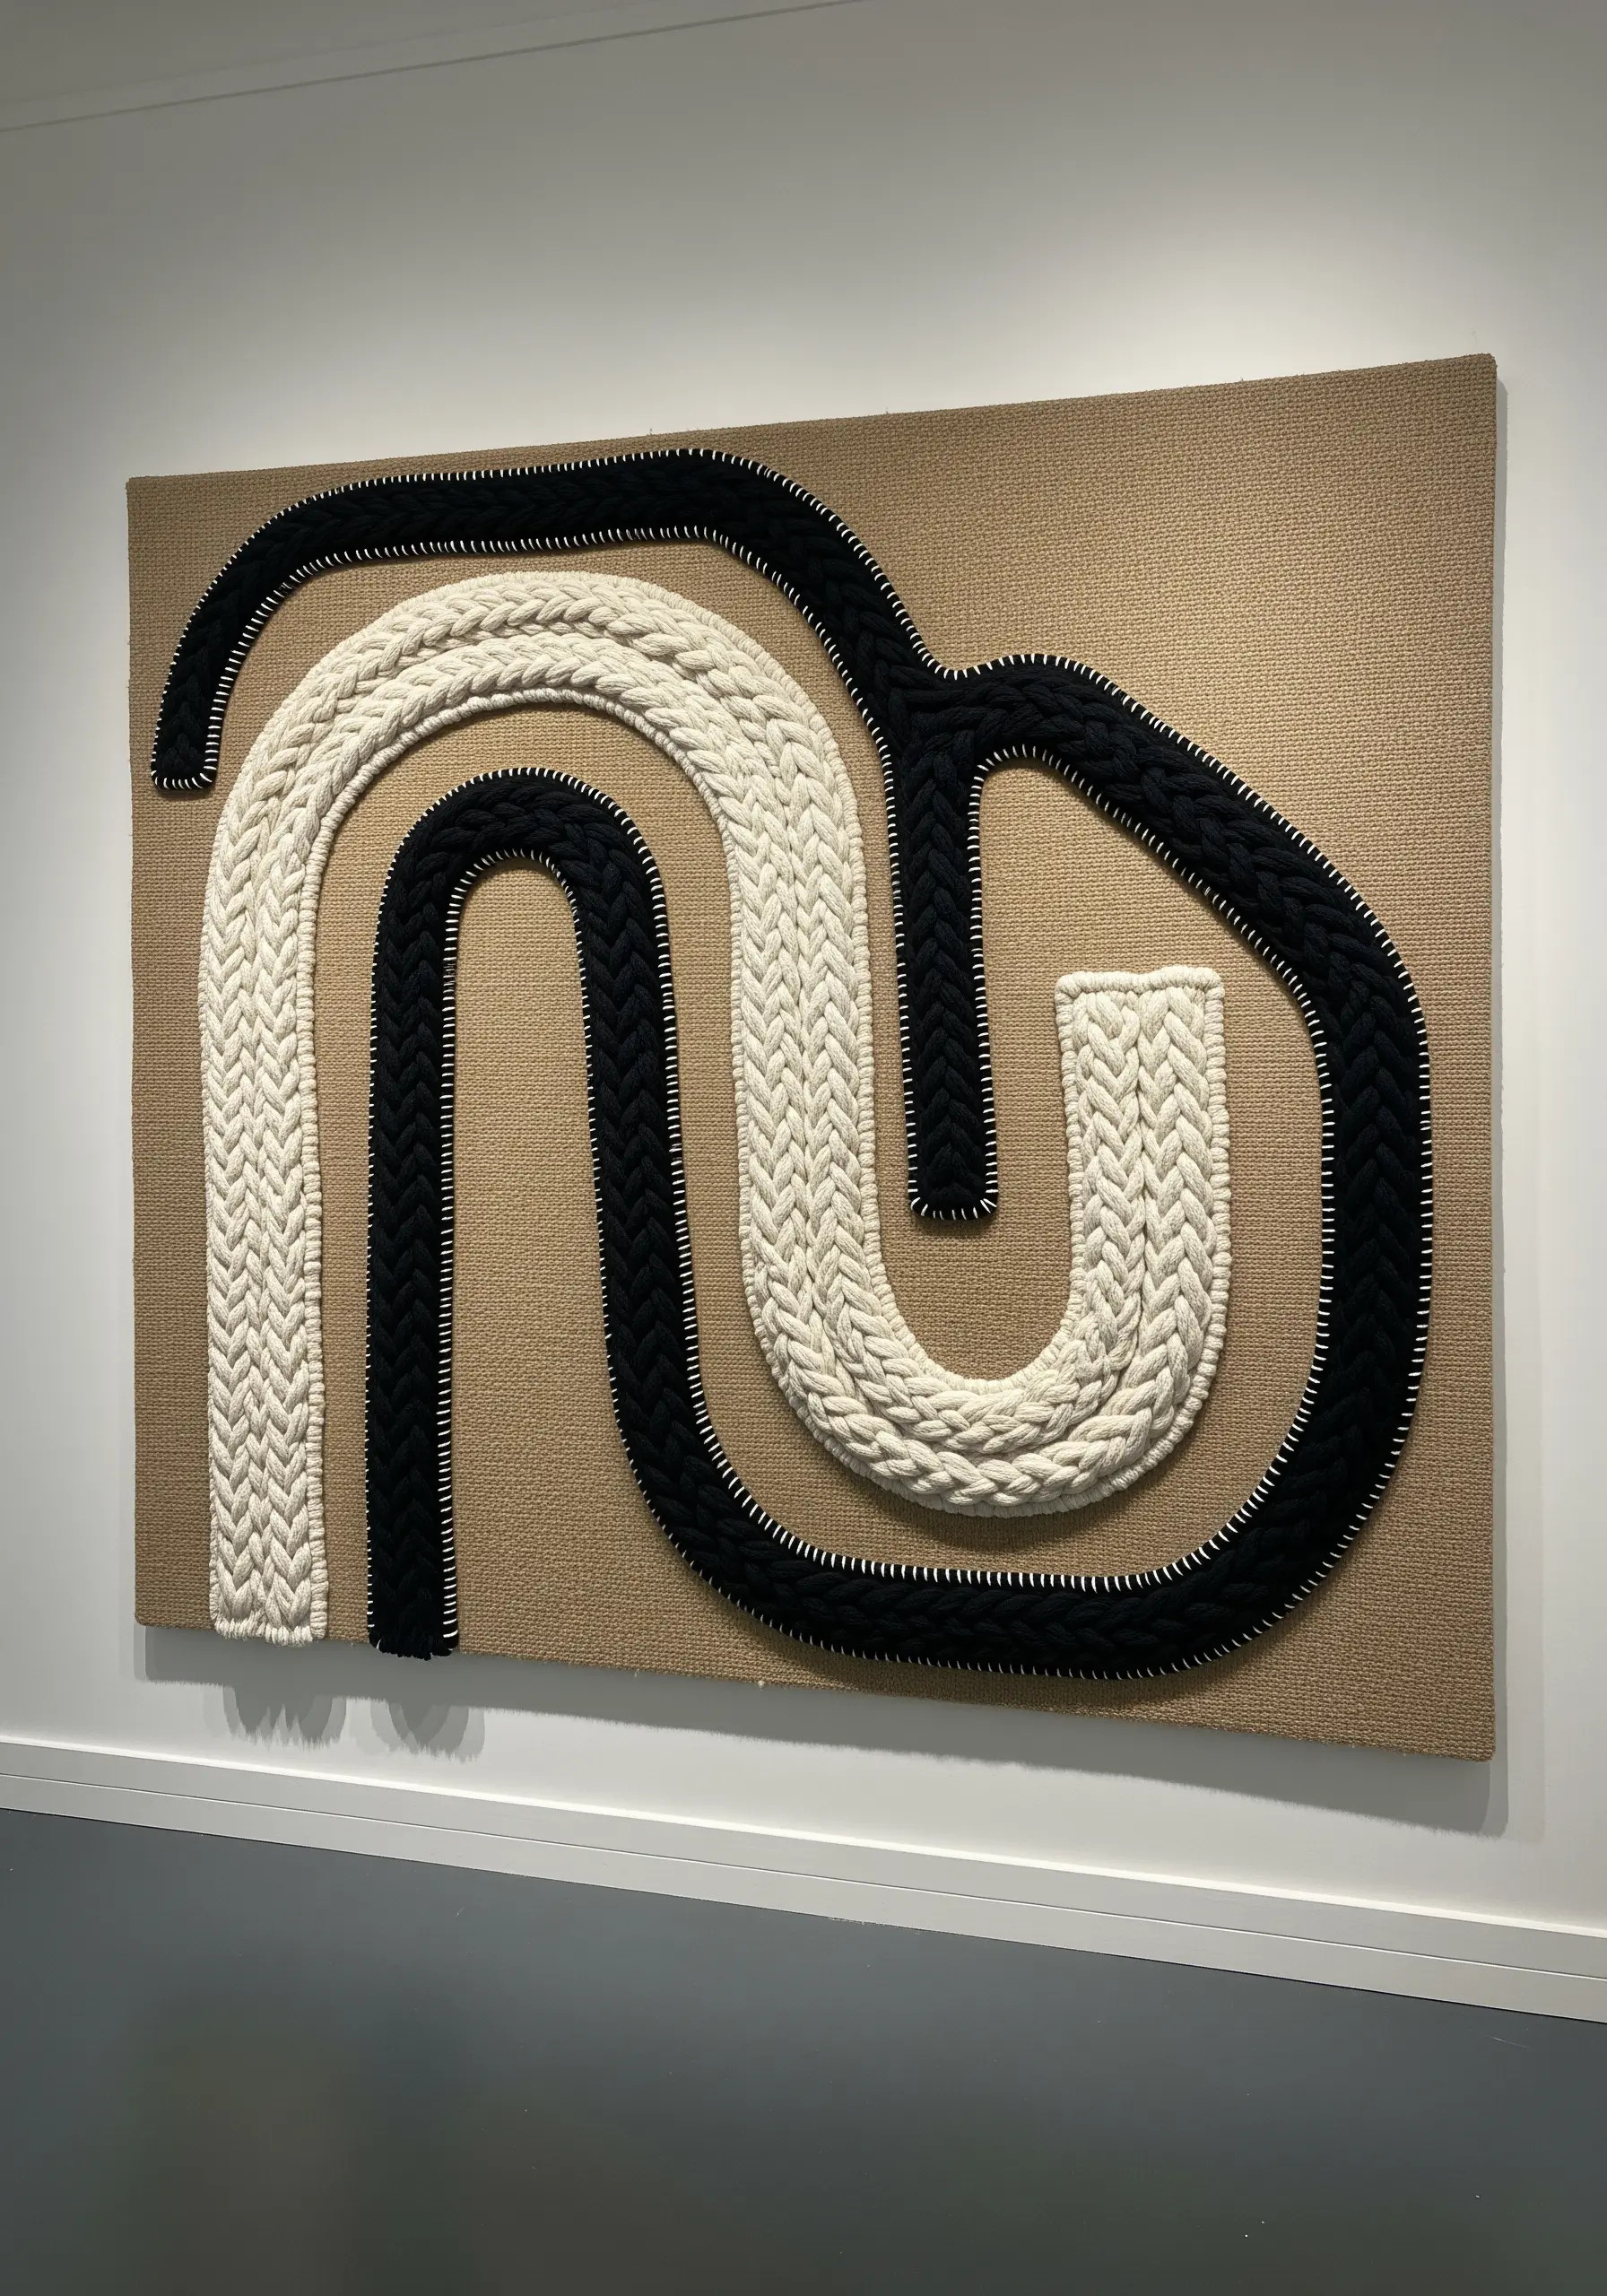
6. Graphic Illusions with Precision Wrapping
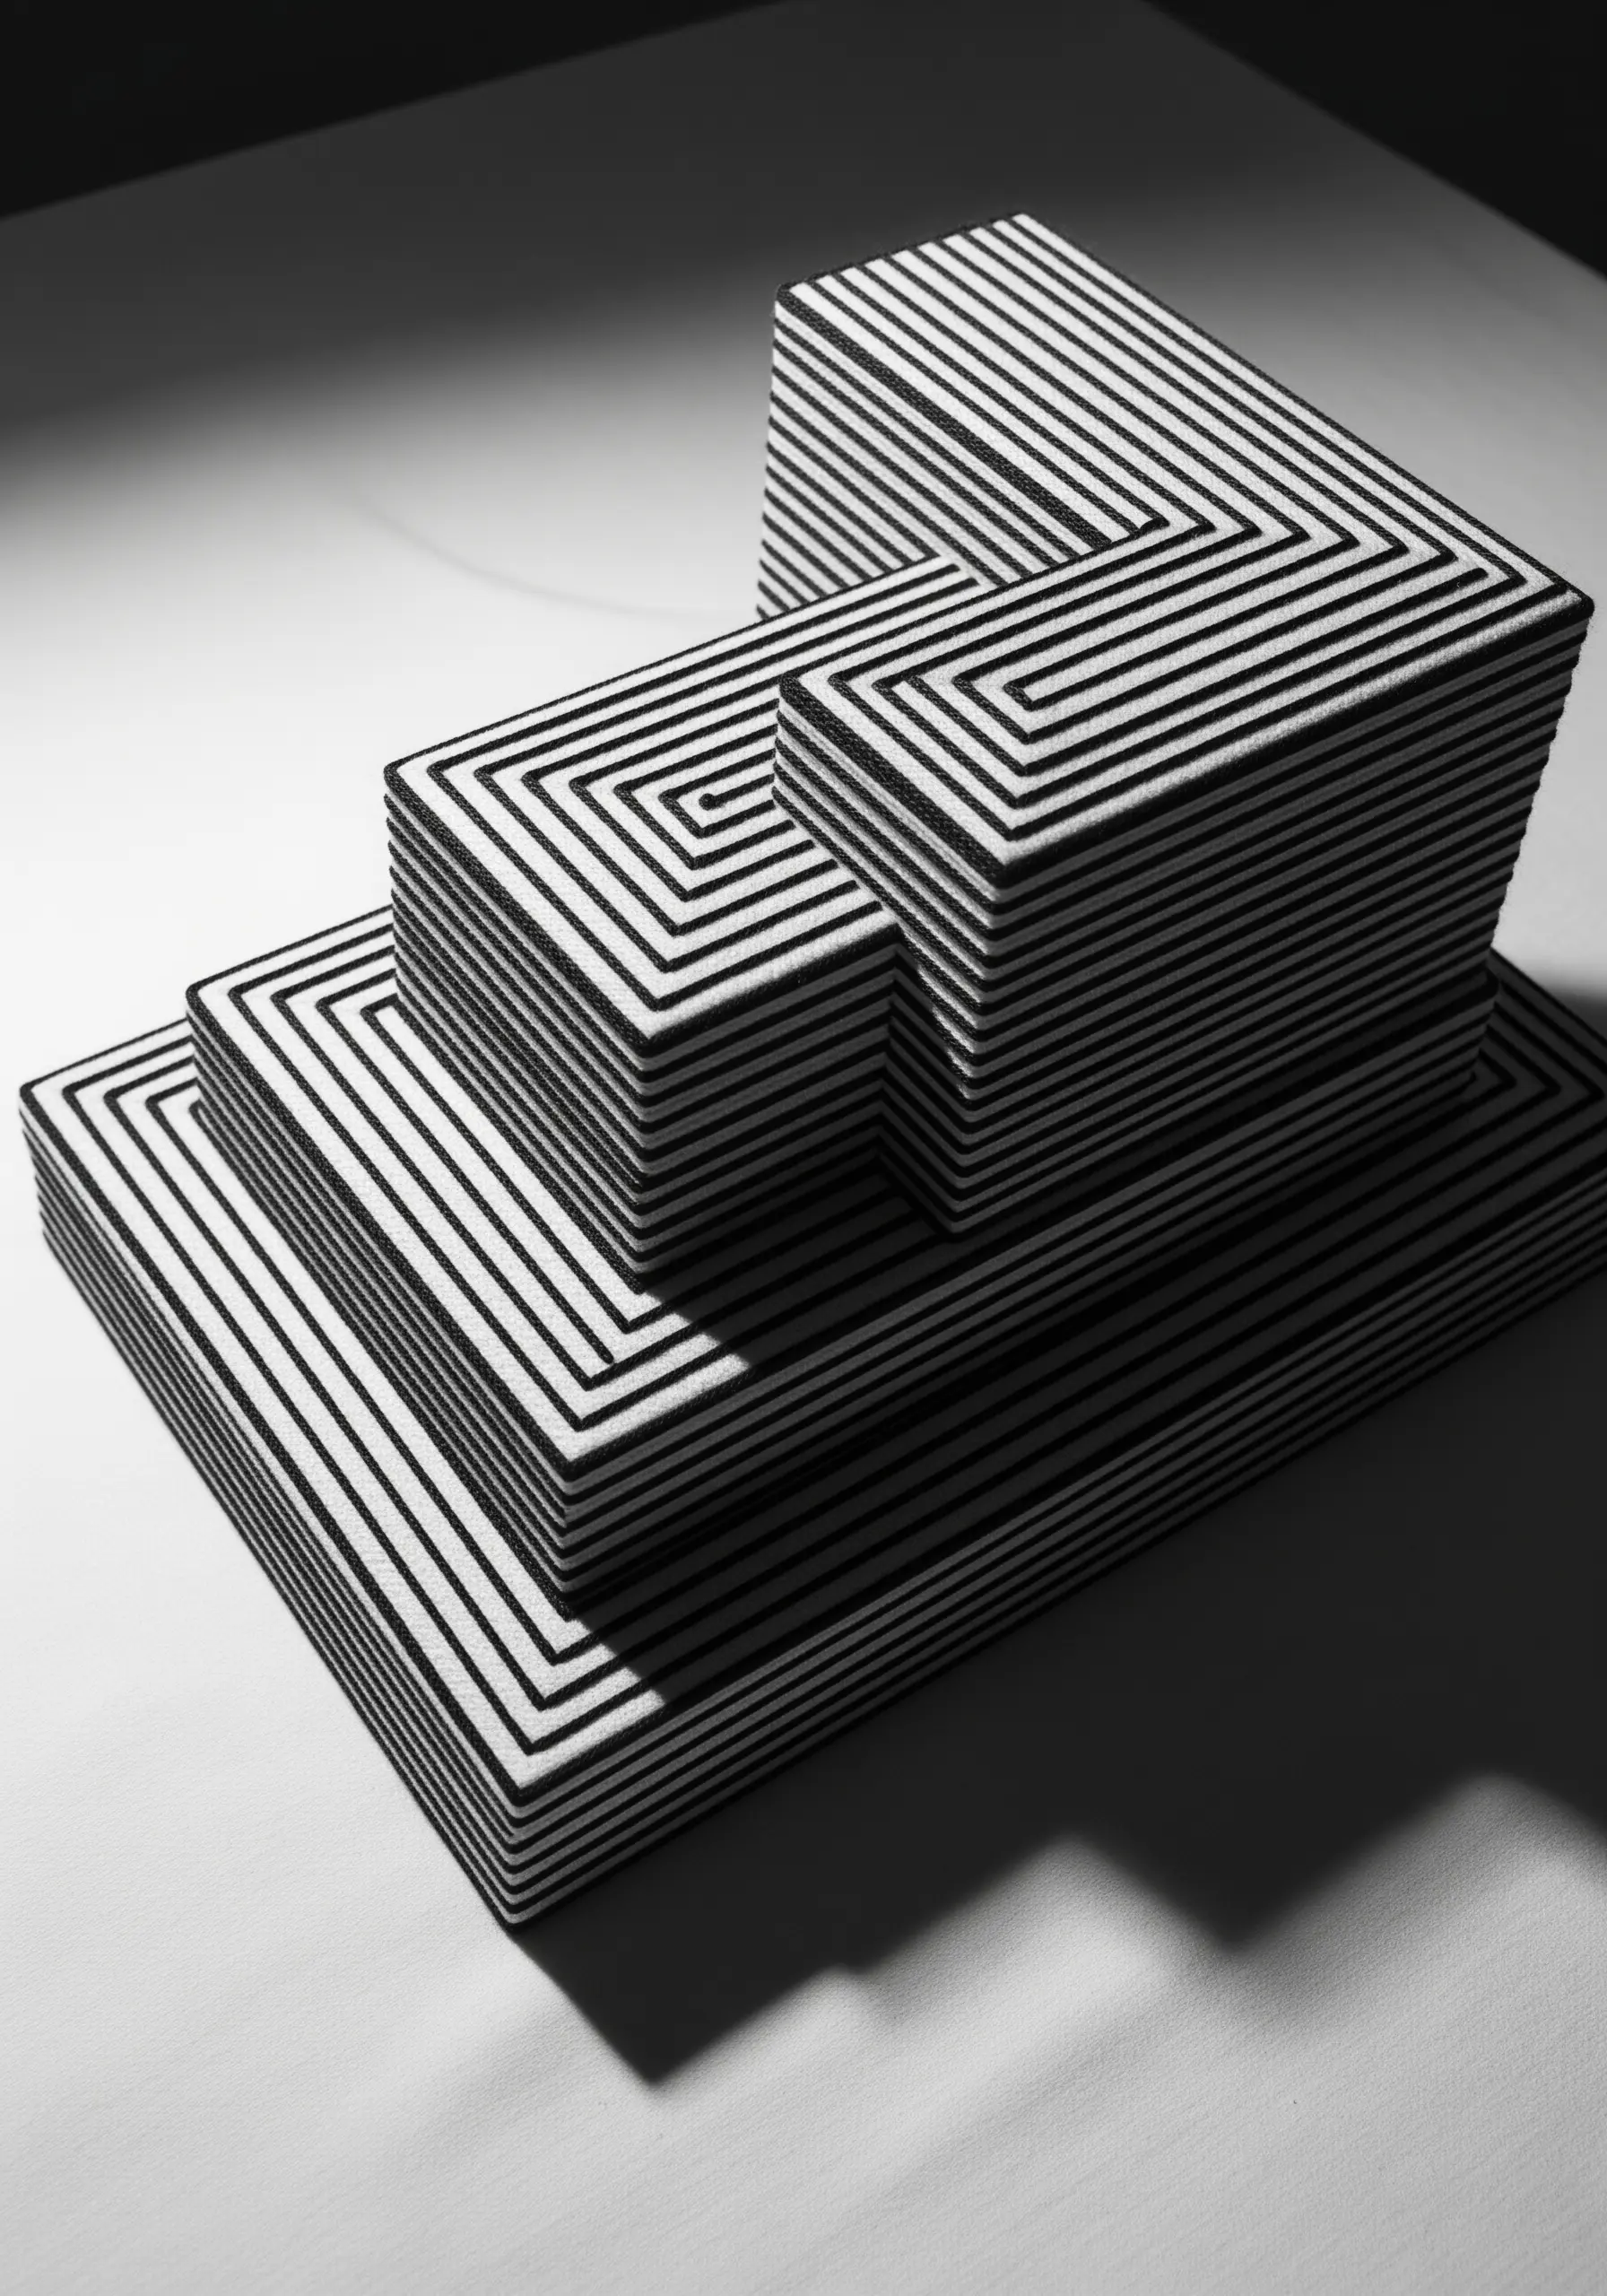
Transform simple wooden blocks into a piece of optical art through meticulous thread wrapping.
The key is absolute precision in your thread placement and maintaining consistent, tight tension.
By wrapping high-contrast black and white thread in concentric lines, you create a powerful graphic illusion that tricks the eye and emphasizes the three-dimensional form.
This method proves that sculptural embroidery isn’t always soft; it can be sharp, architectural, and strikingly modern.
7. Ethereal Volume with Uncut Turkey Work
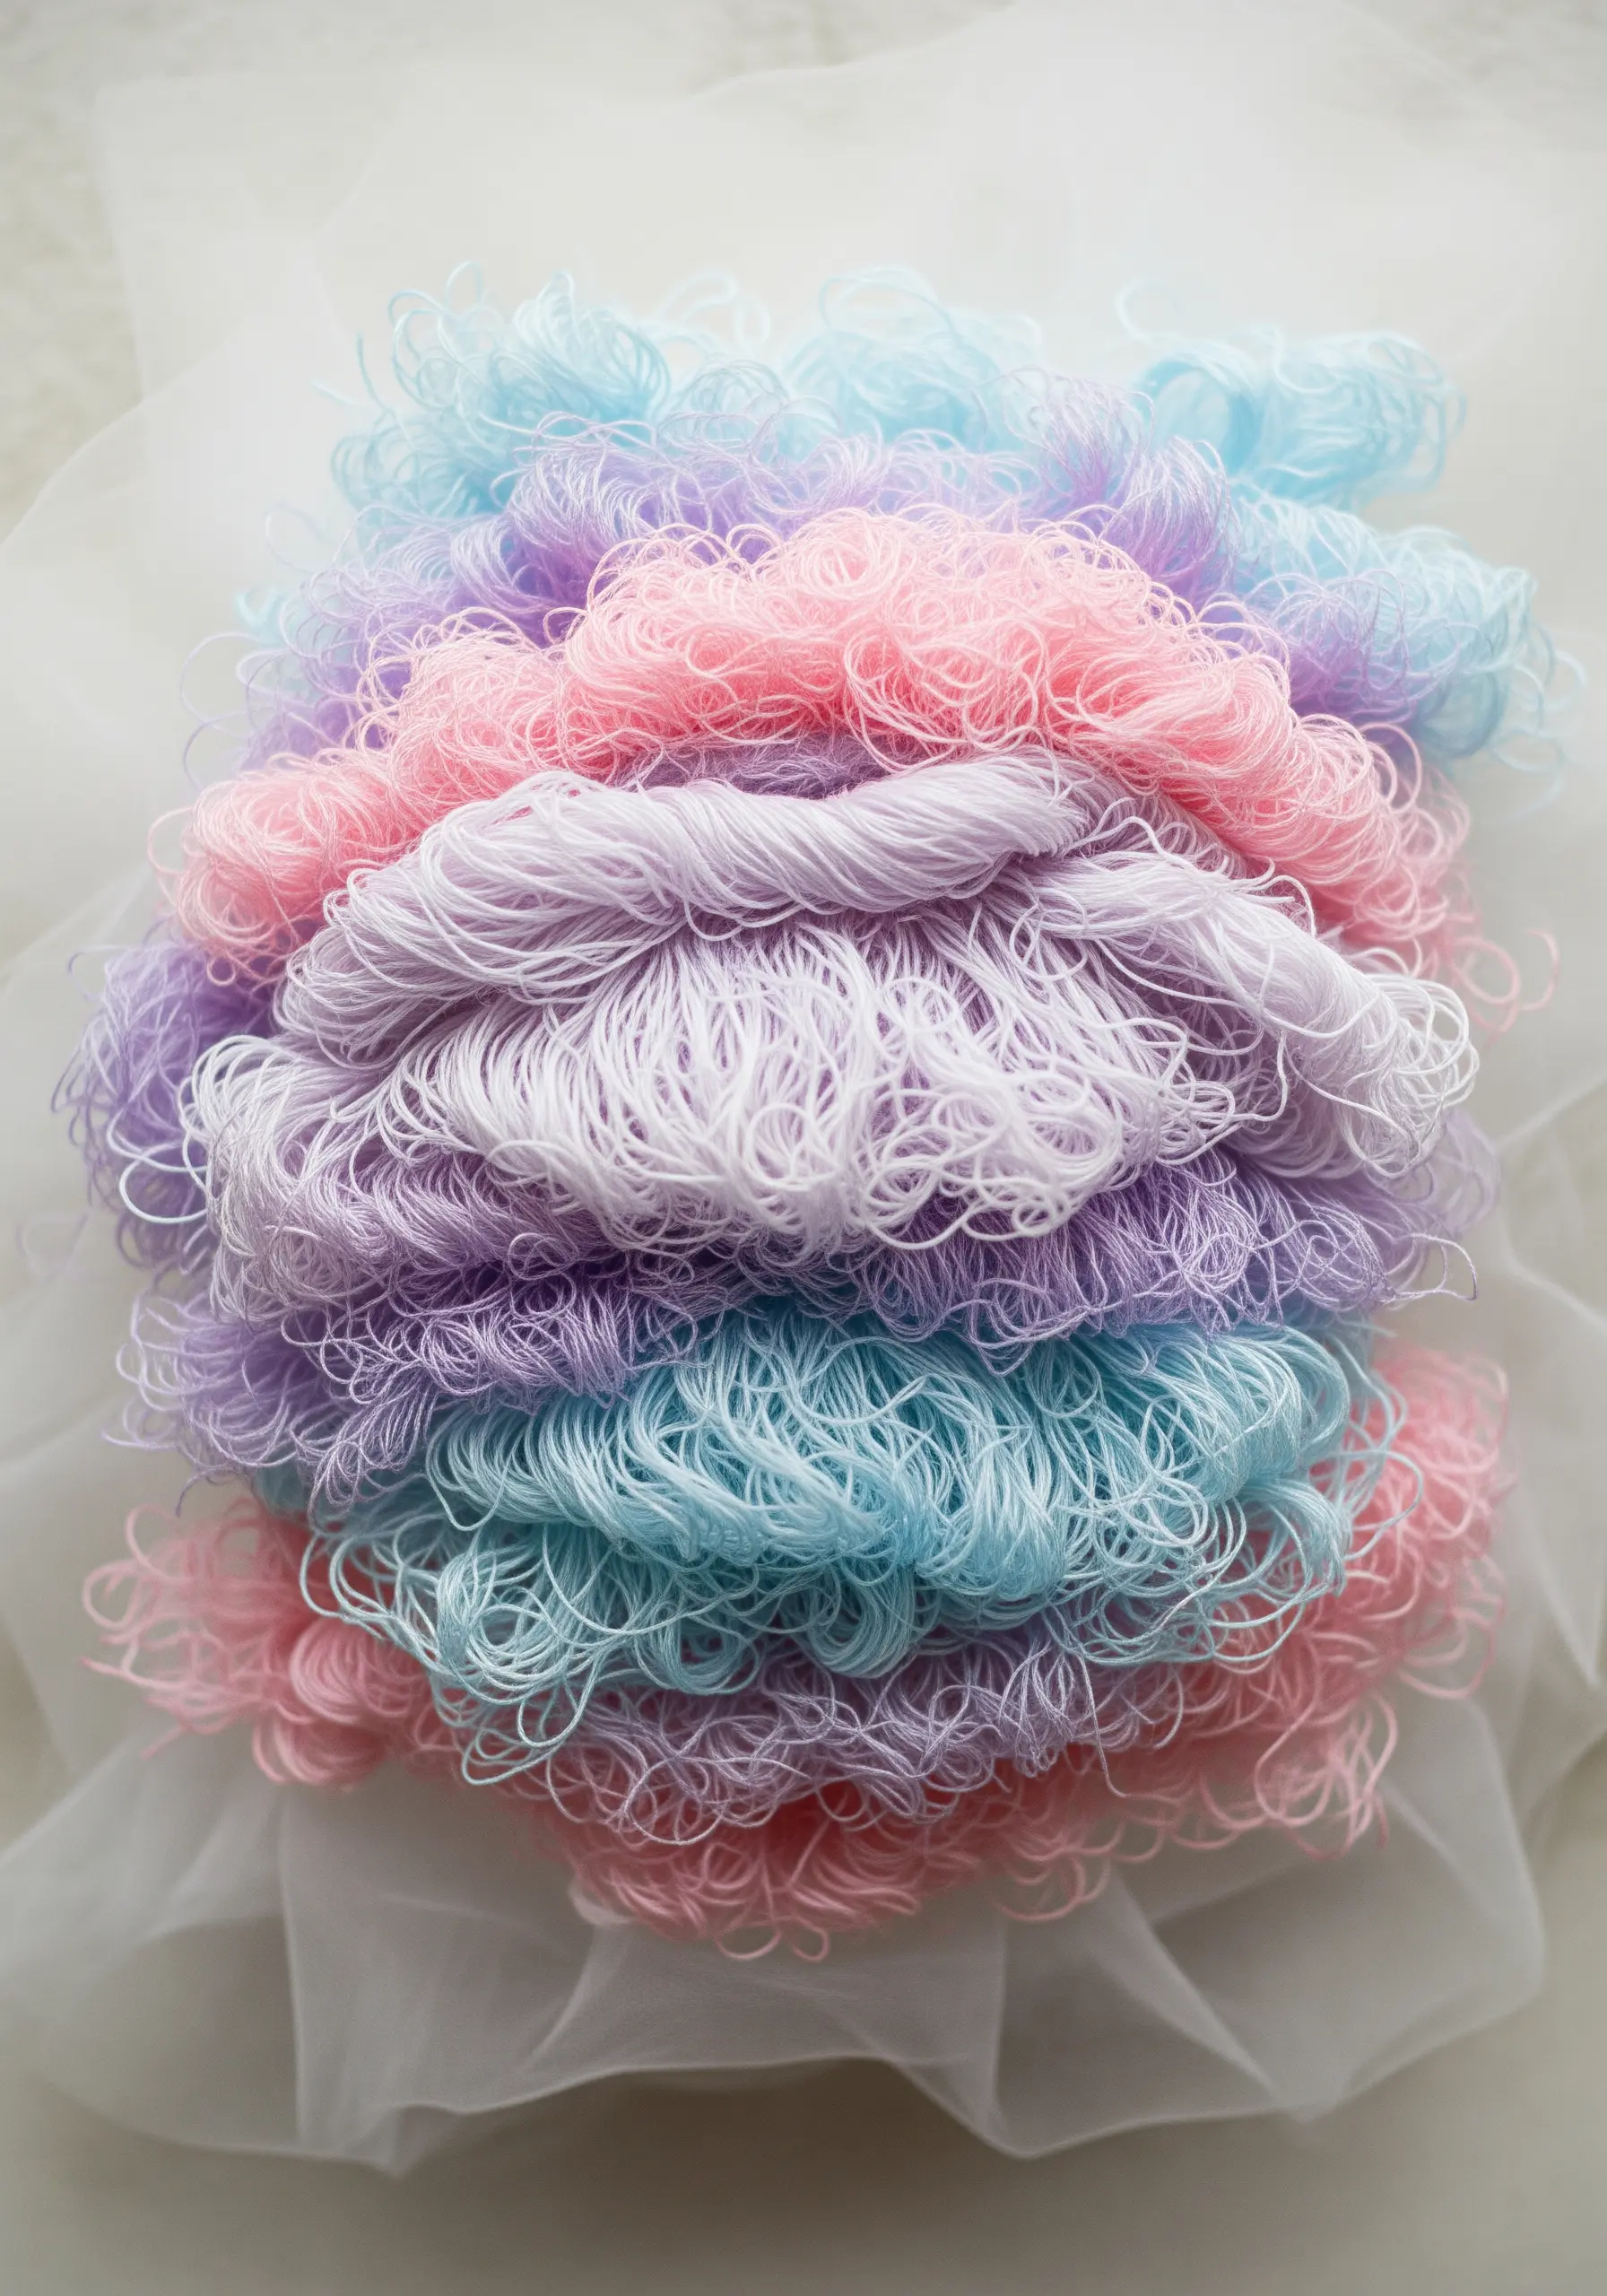
Build a soft, cloud-like sculpture by using a modified Turkey work stitch.
Instead of trimming the loops to create a plush pile, leave them long and chaotic.
Work in dense clusters with fine, lightweight thread in soft pastel colors to enhance the airy effect.
Stitching on a sheer base like organza or tulle makes the cloud of threads appear to float, disconnected from any solid ground.
8. High-Impact Radiance on Velvet

For maximum drama, pair metallic thread with a dark, light-absorbing fabric like velvet.
First, carefully mark the radiating points of your starburst on the fabric to ensure symmetry.
Use multiple strands of a high-quality metallic thread and stitch long, dramatic straight stitches from the outer points to the center.
The texture of the velvet makes the smooth, reflective quality of the metallic thread appear even more brilliant, creating a truly show-stopping piece of metallic thread wall art designs.
9. Sculpting with Knots and Neon Cords
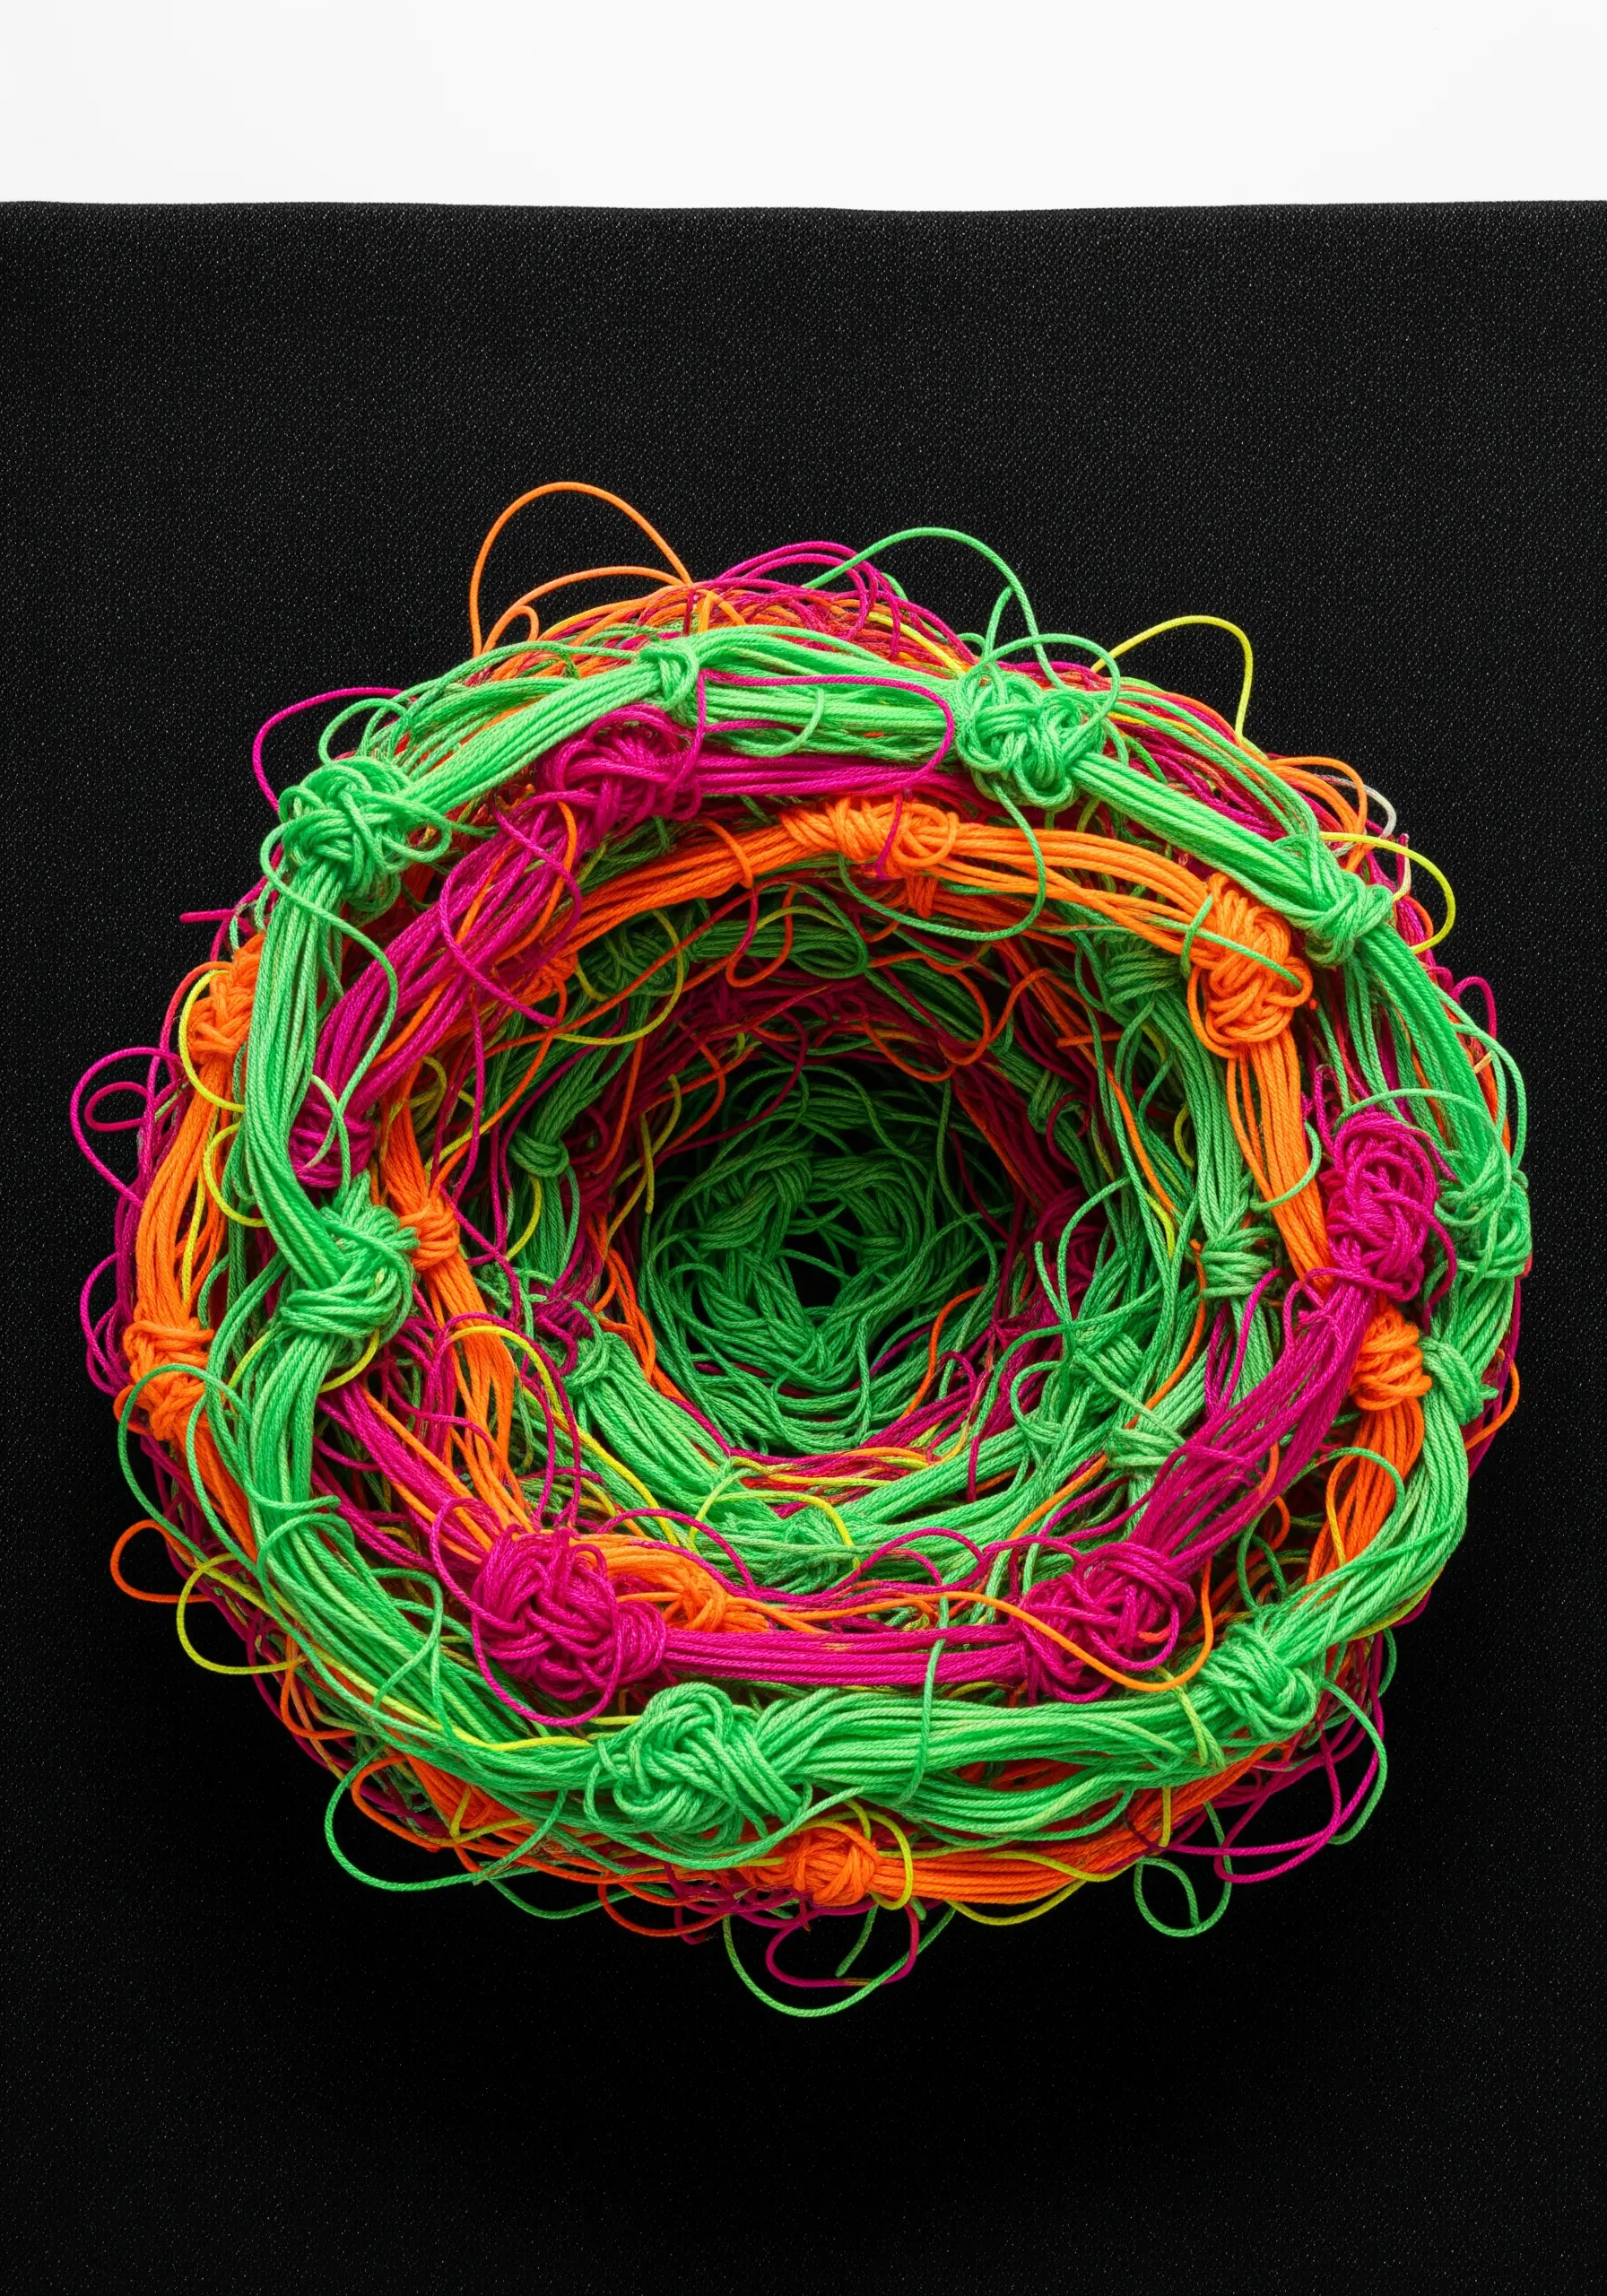
Move your embroidery off the fabric entirely by creating self-supporting structures.
Use a stiff cord or wire as a base and build upon it with knotting techniques borrowed from macrame, like the simple lark’s head or square knot.
Working with vibrant, neon-colored threads turns the structure into an energetic, almost electric, form.
This technique is less about stitching and more about building—a true fusion of embroidery and sculpture.
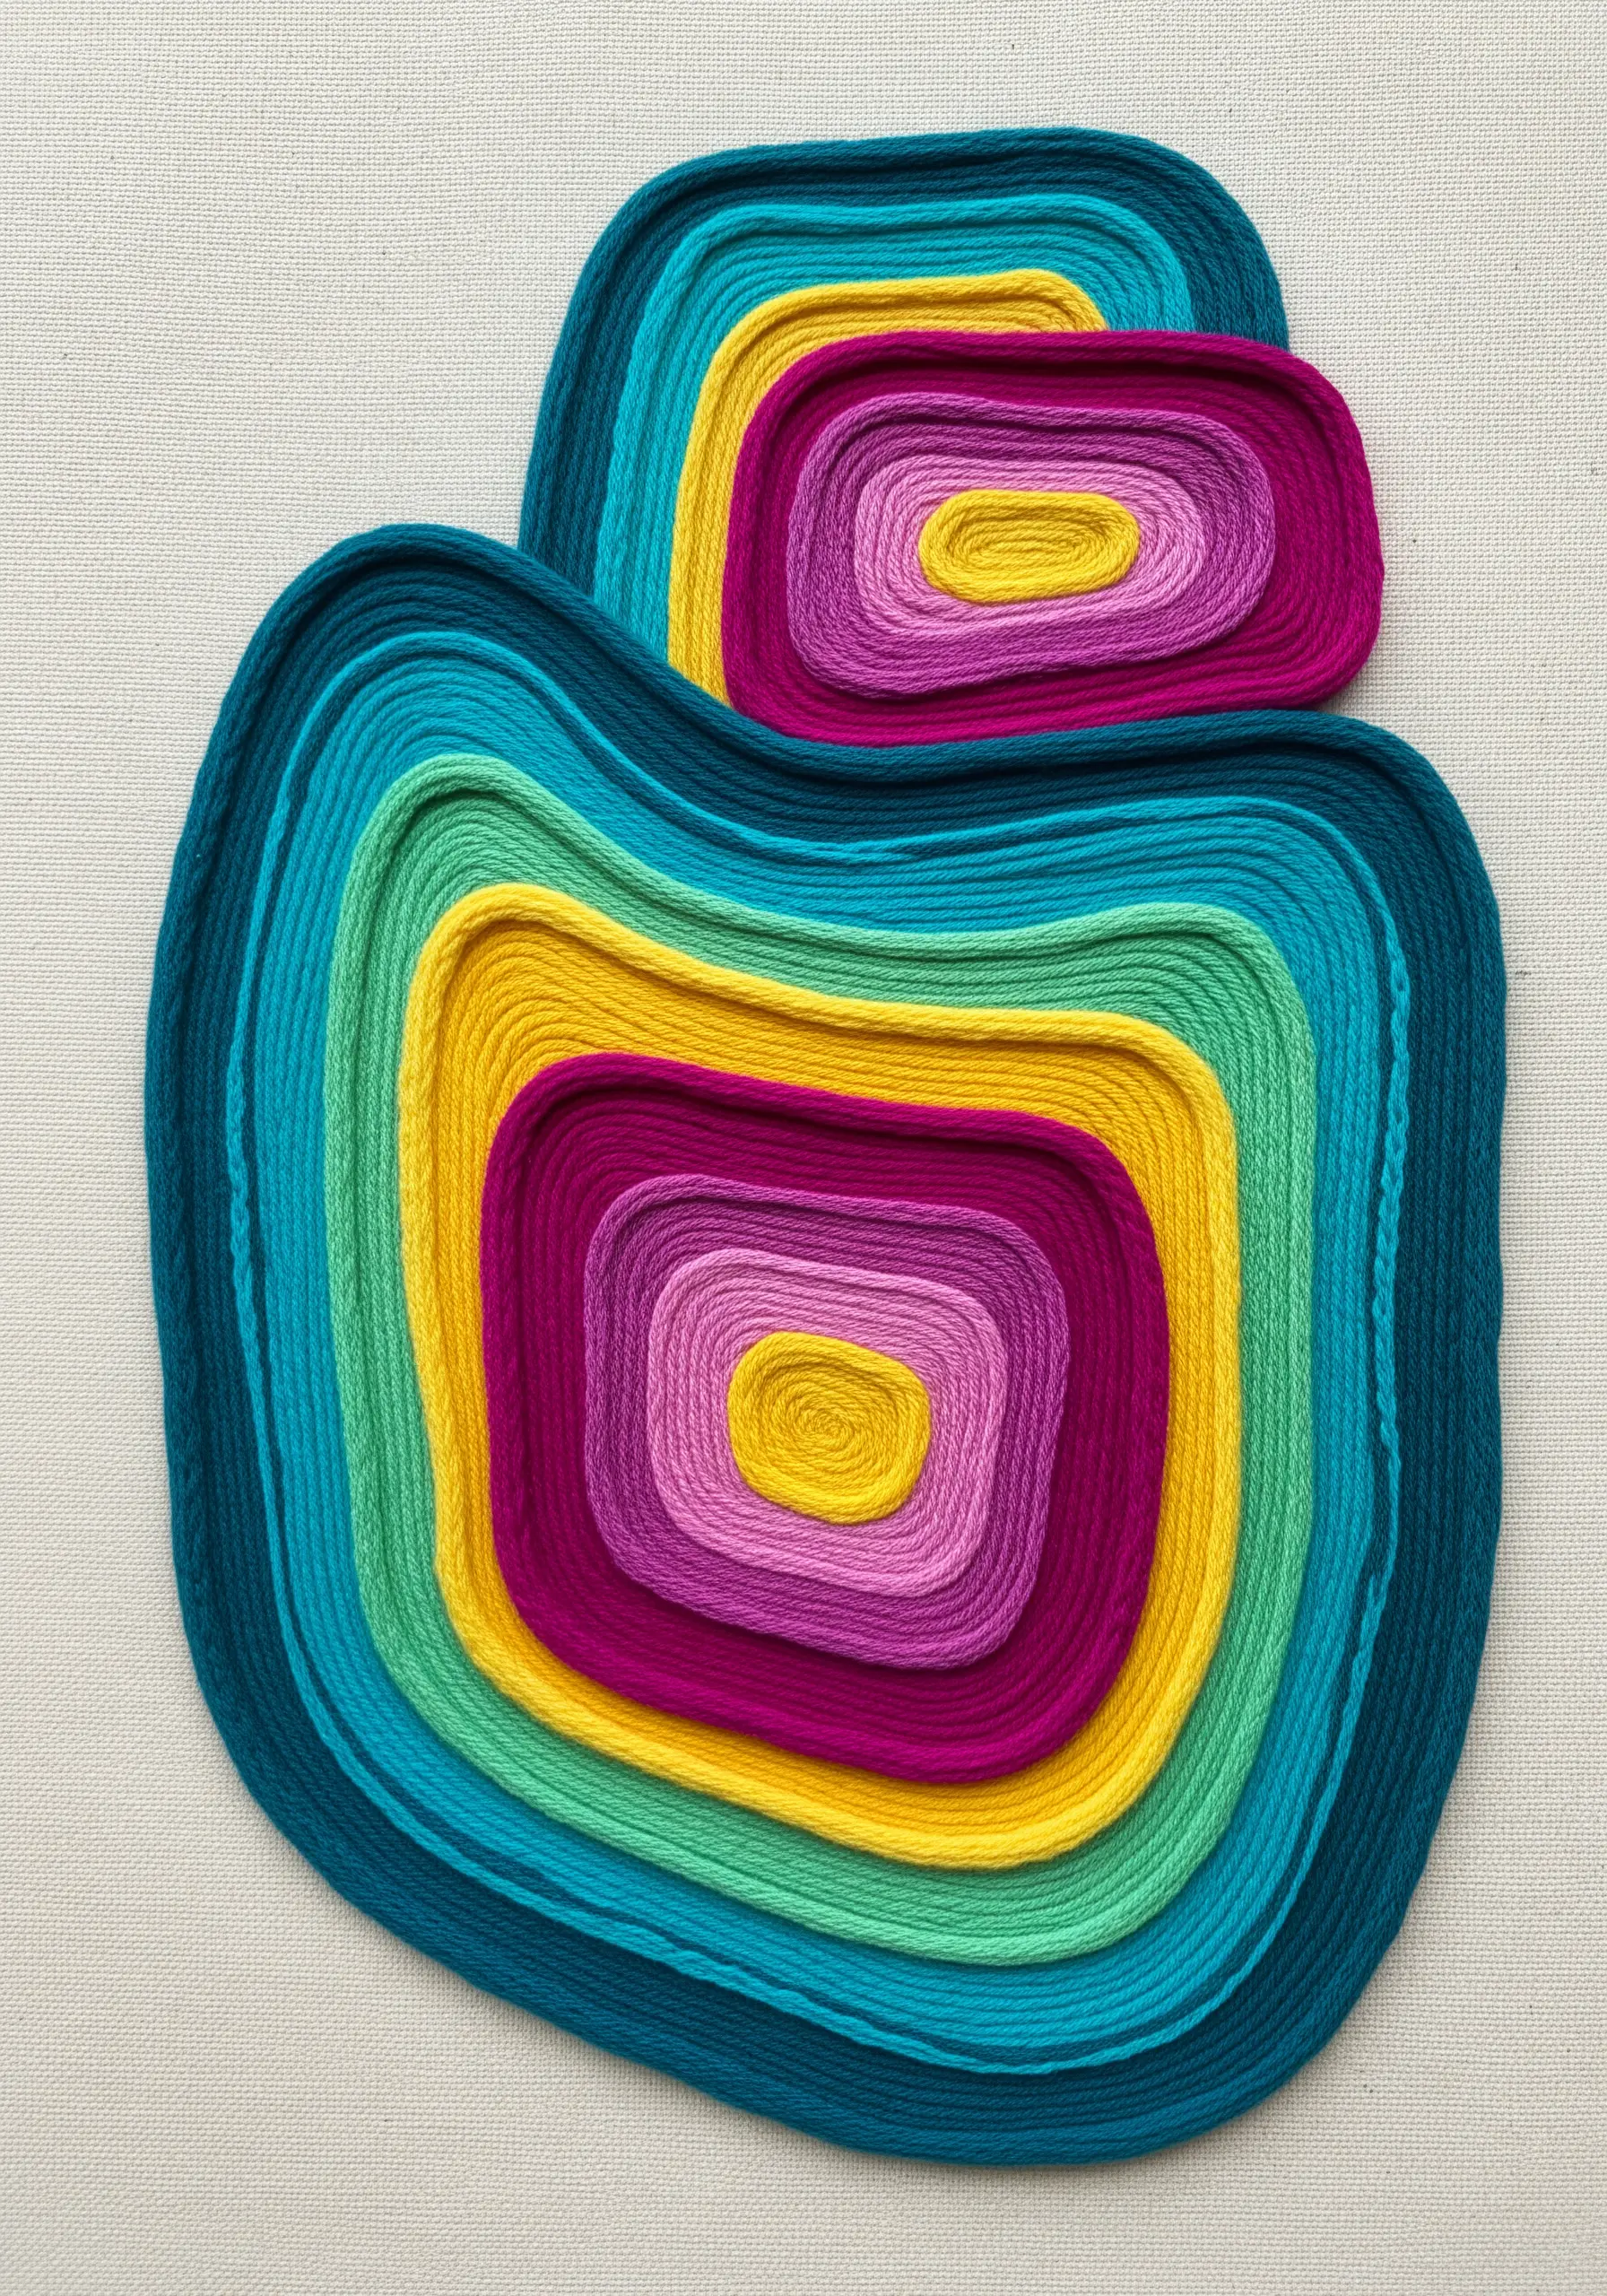
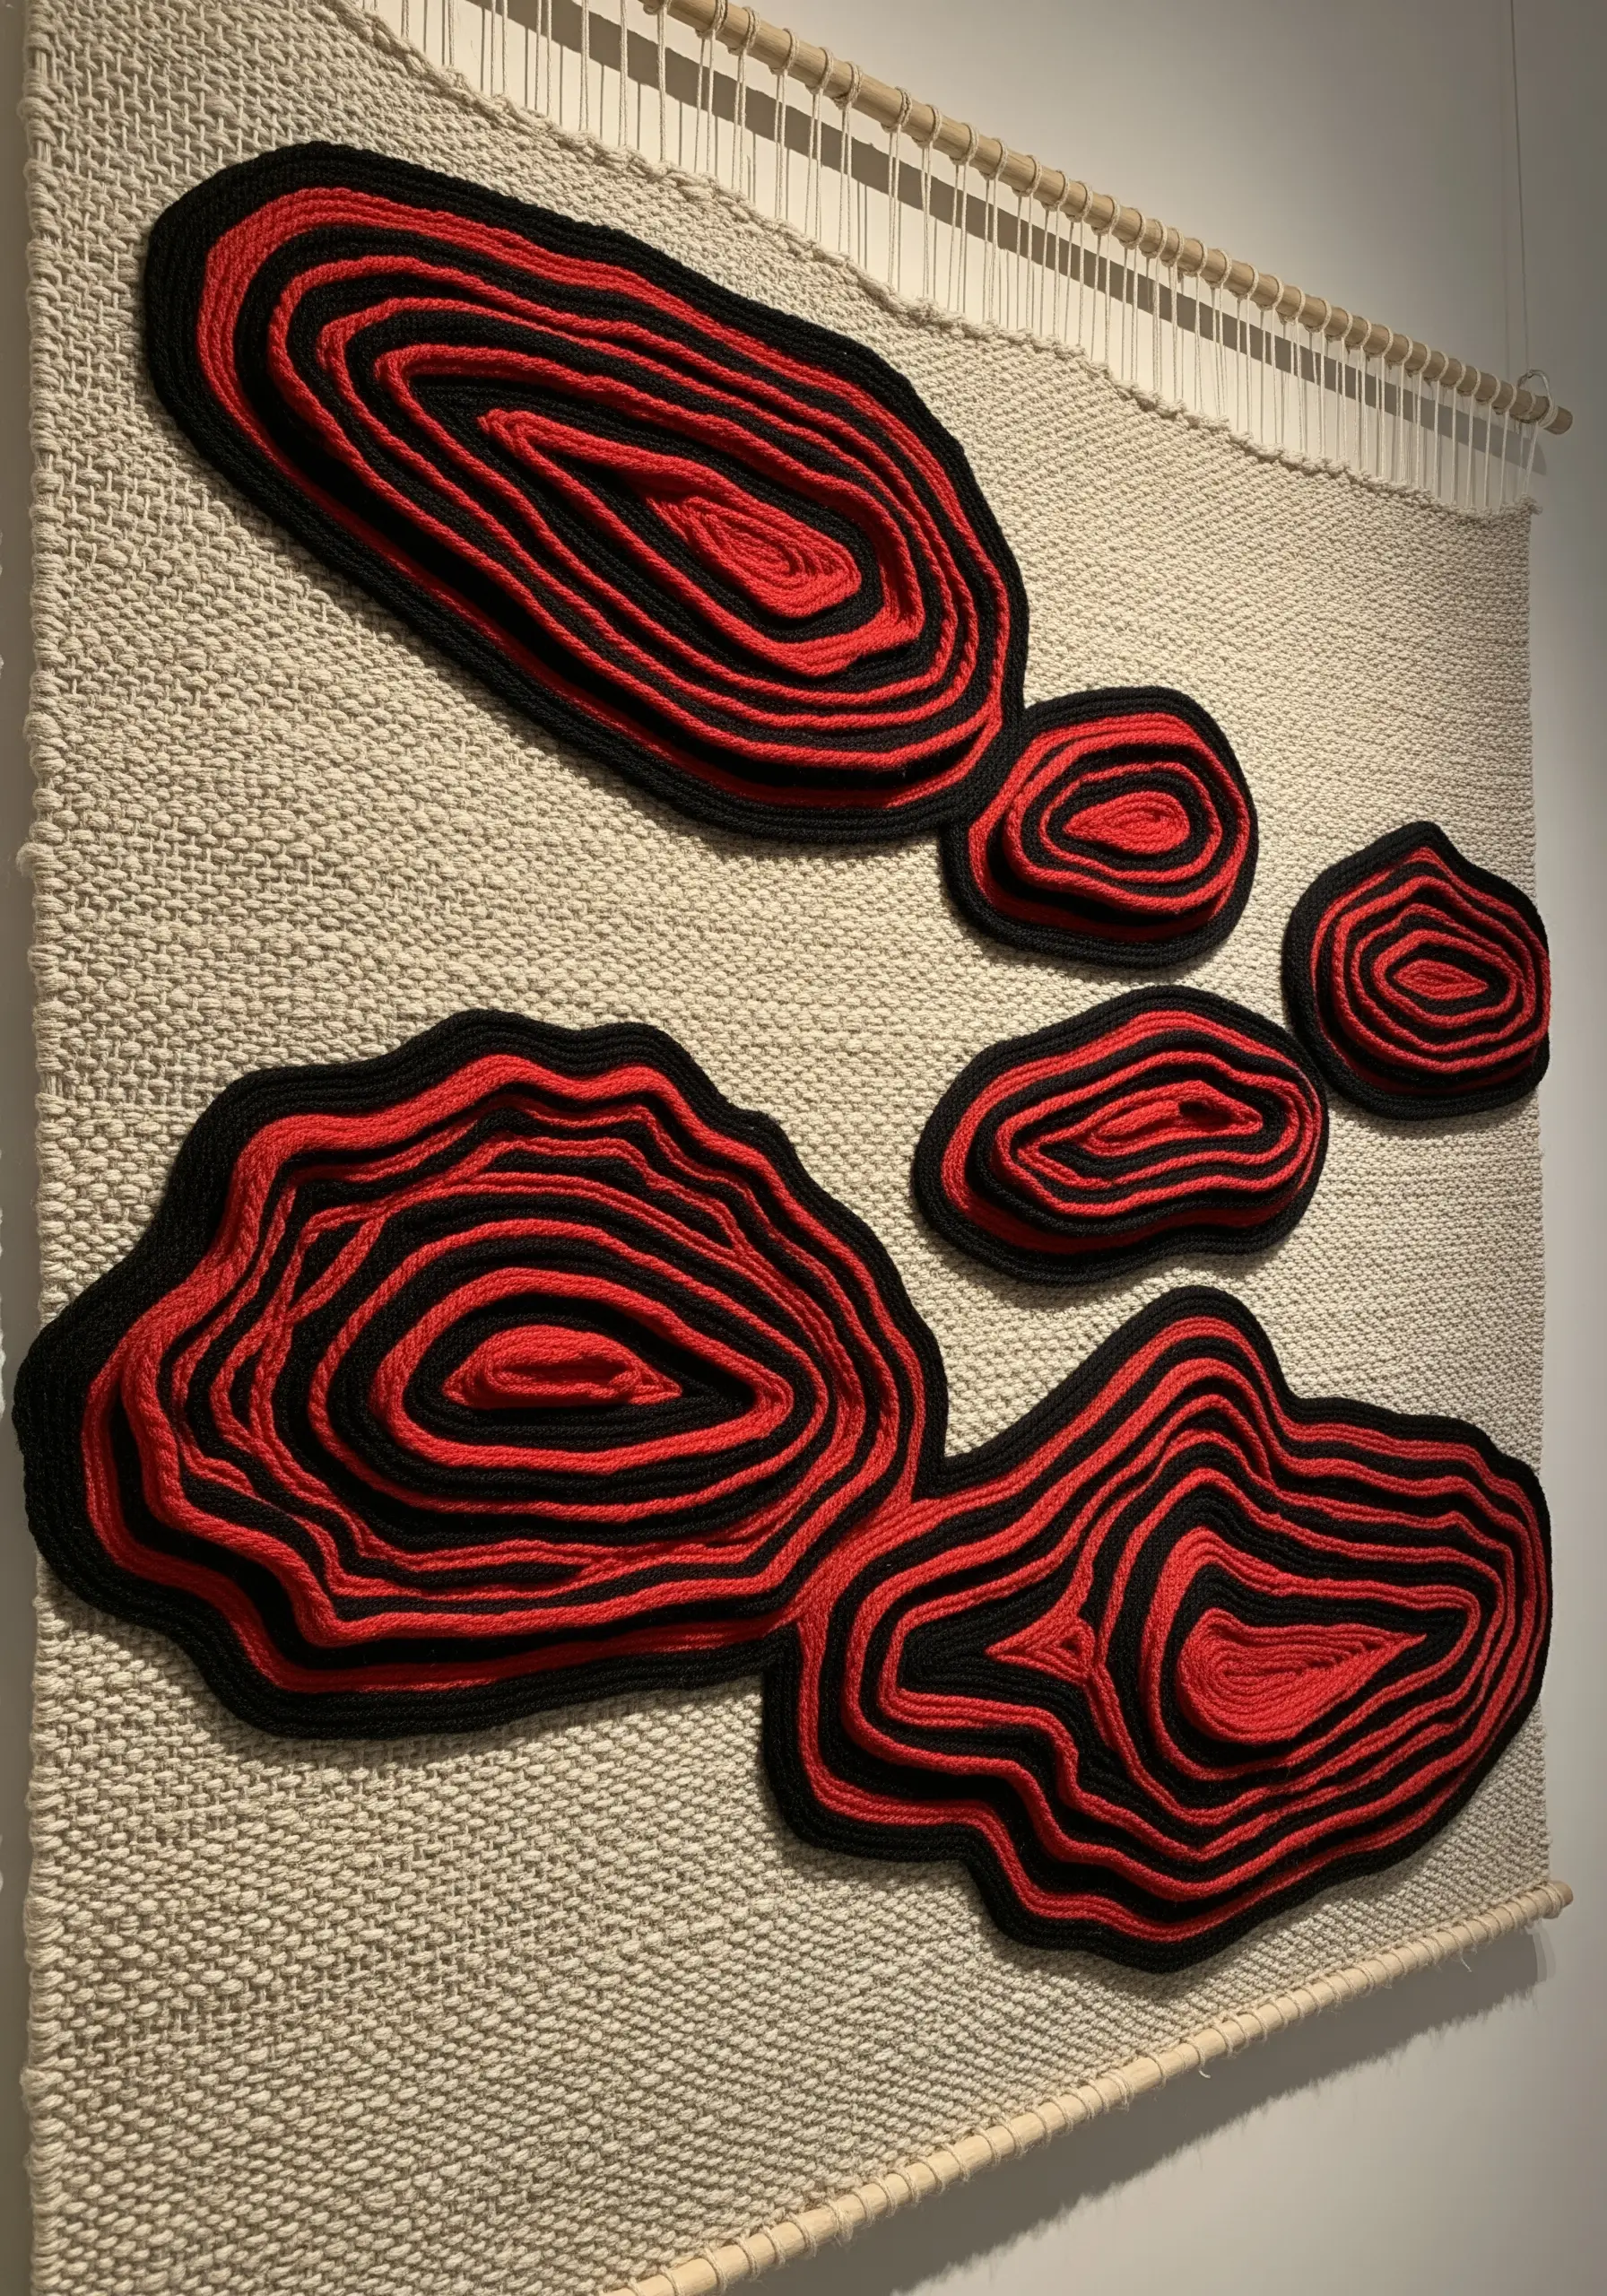
10. Gradient Spirals with Coiled Roving
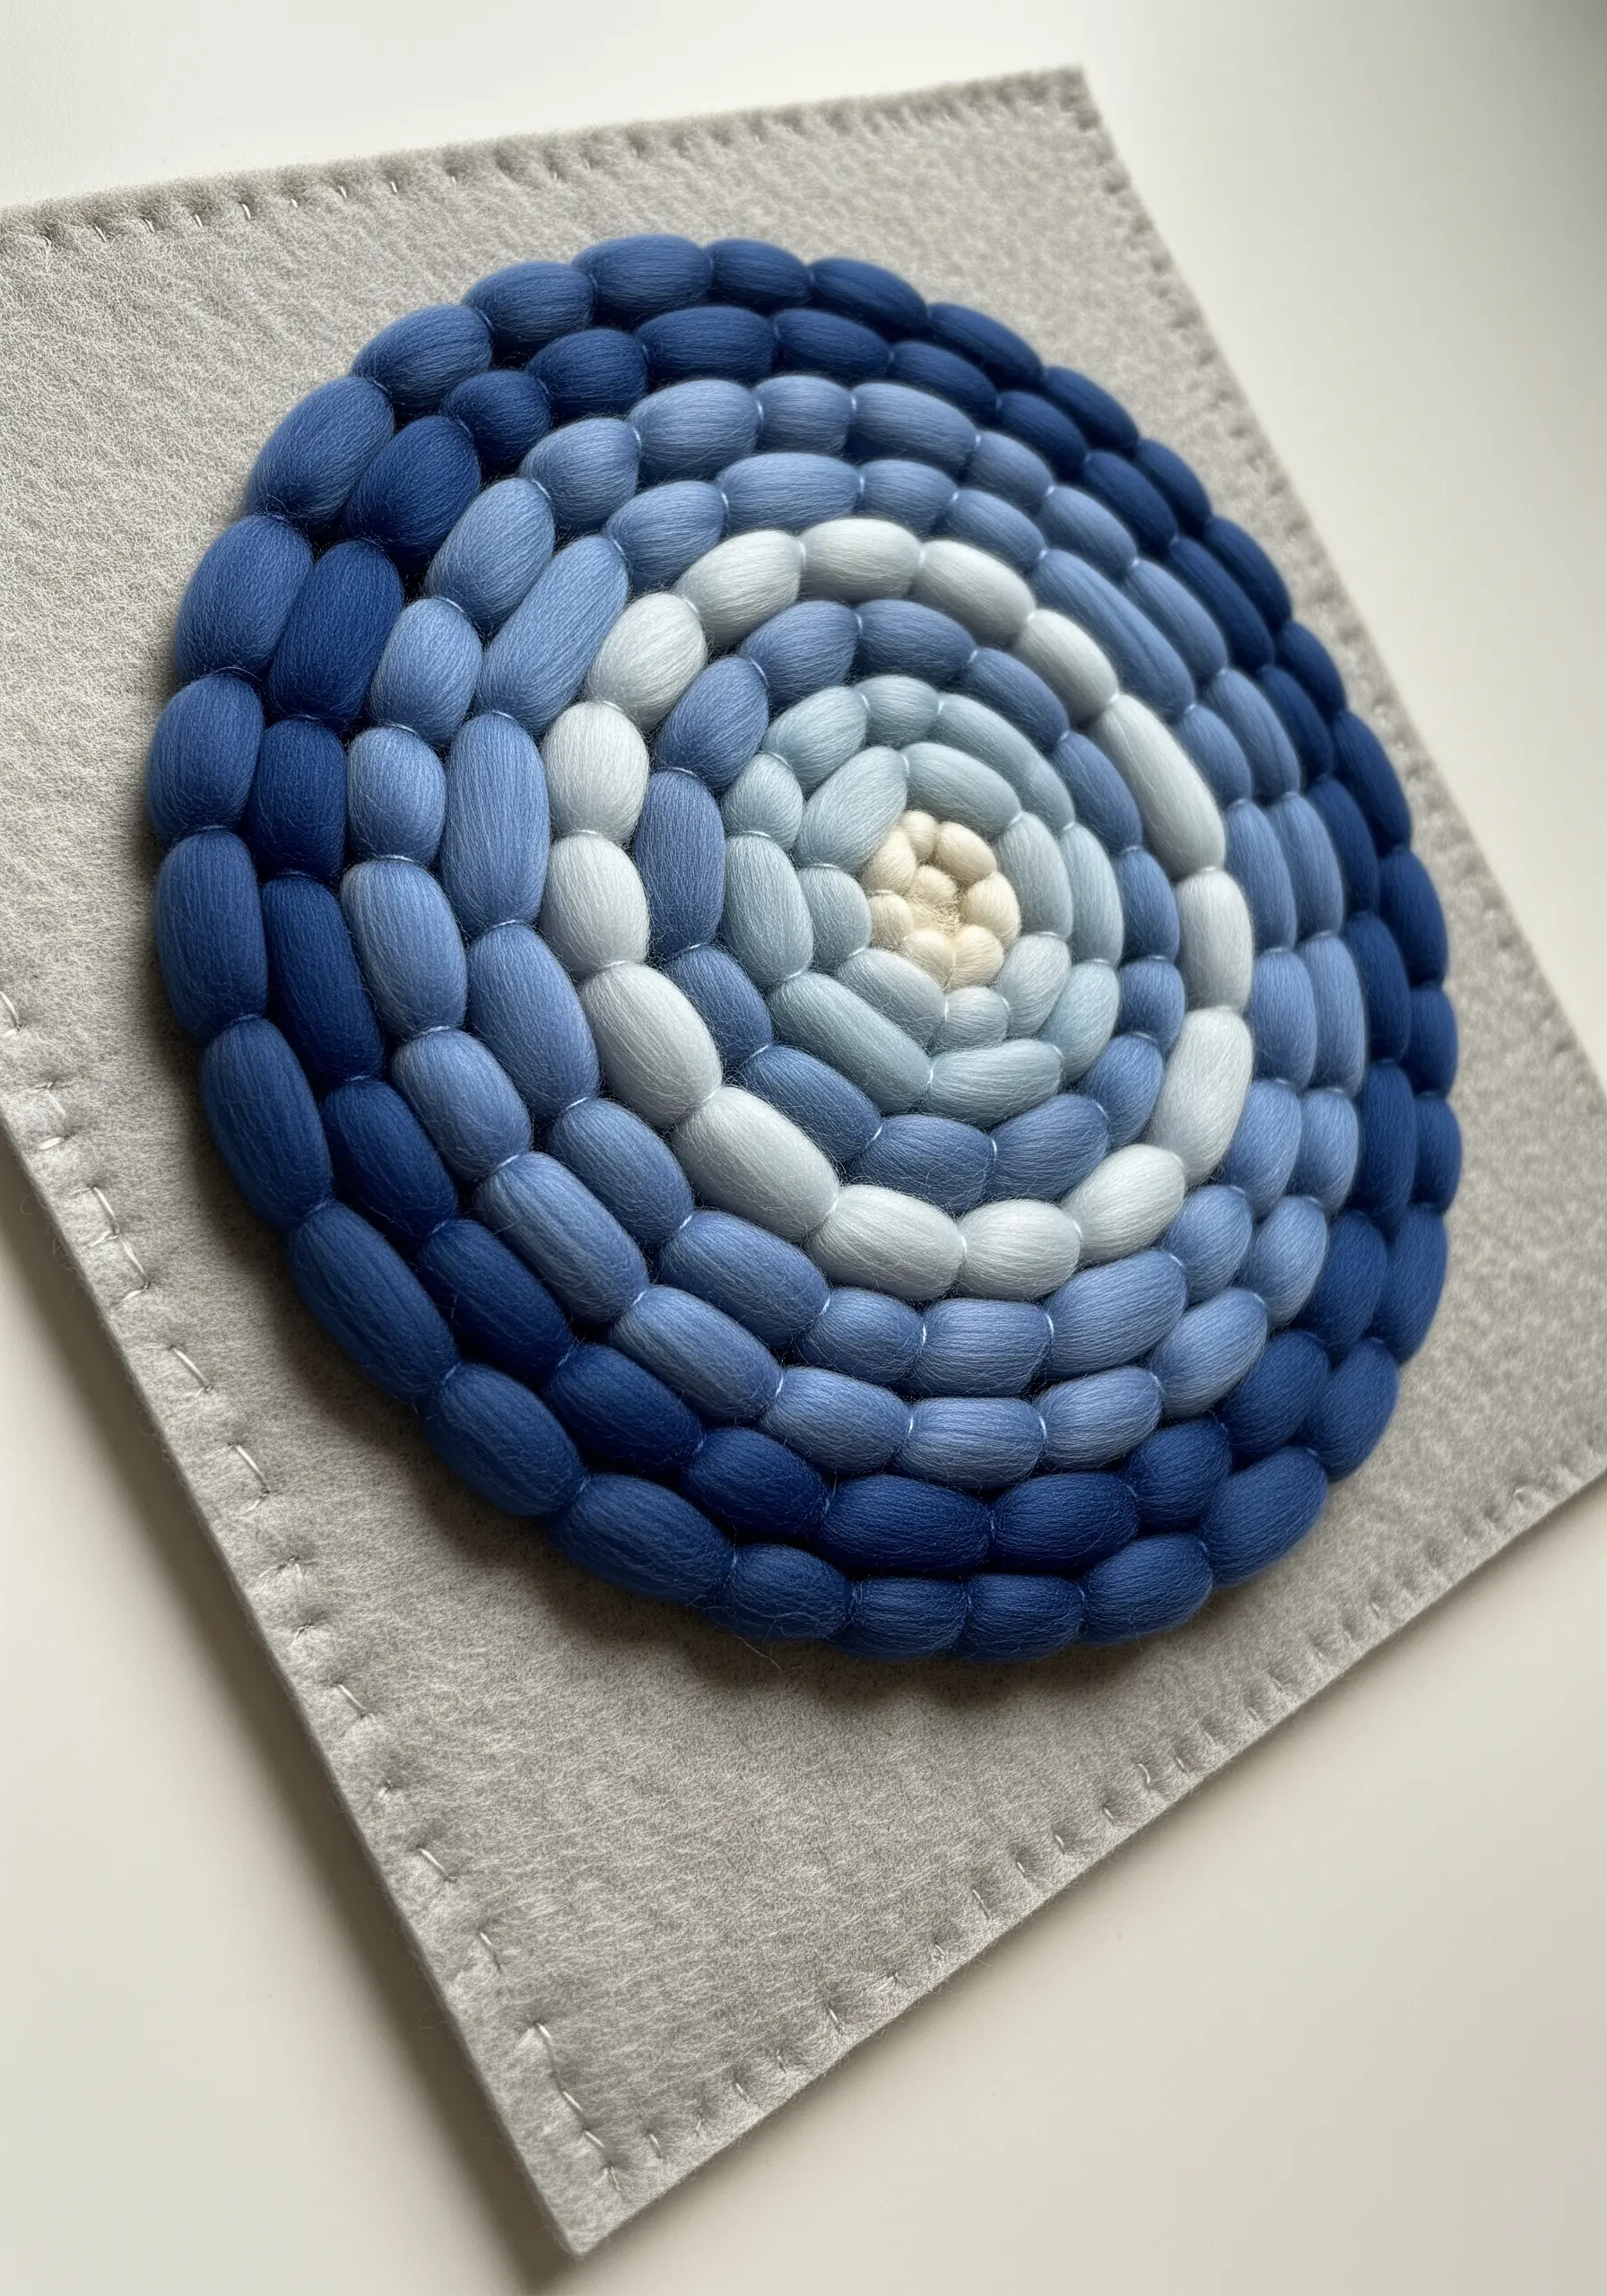
Create this serene, pebble-like texture by working with individual coiled units.
Take a small piece of wool roving or very thick yarn and coil it tightly into a dense, flat spiral, securing the end with a hidden stitch.
Make dozens of these coils in a gradient of colors, then arrange them on a felt backing and stitch them down from behind.
The result is a clean, highly controlled composition that feels both soft and solid, like stones smoothed by water.
11. Topographic Textures with Padded Couching
To achieve this dense, contoured surface, use a padded couching technique.
Lay down thick cords or bundles of yarn in flowing lines across your fabric.
Then, completely cover these foundation cords by stitching over them with a thinner thread, using satin stitches that wrap tightly around the padding.
This method allows you to build significant height and texture, creating undulating surfaces that mimic natural terrain and other earth-inspired embroidery textures.
12. Embellished Contours with Beads and Sequins
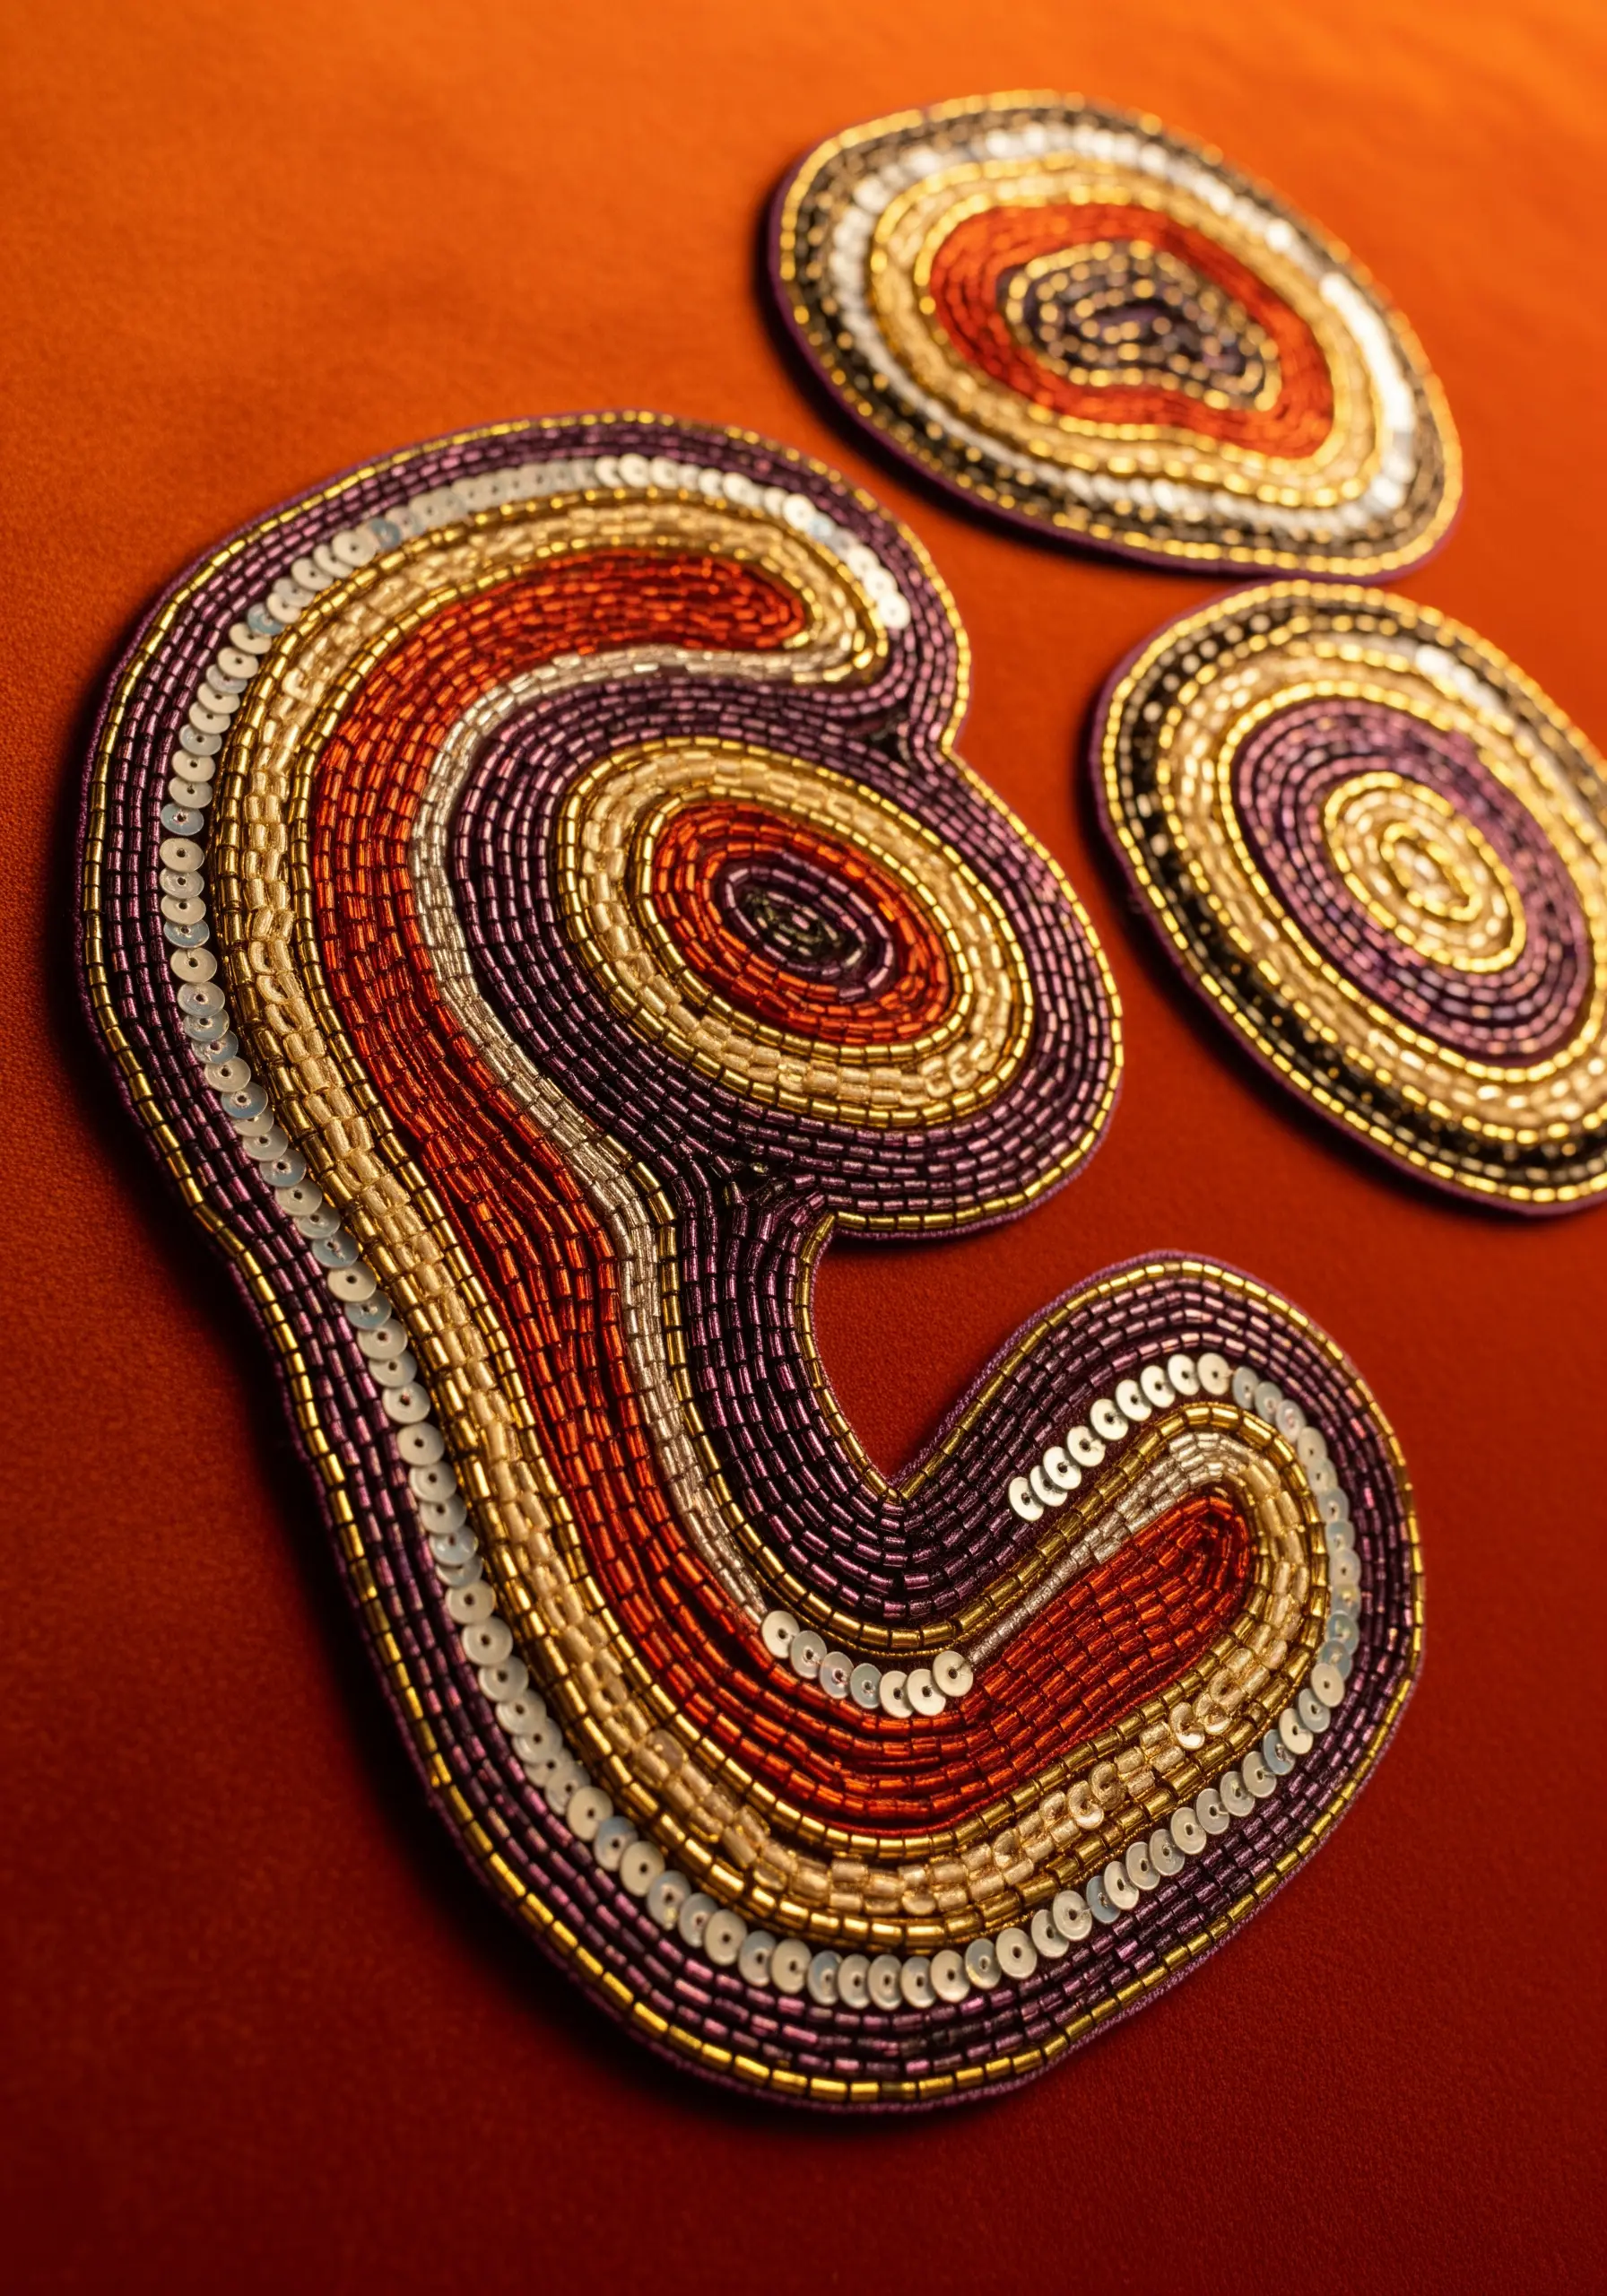
Transform simple lines into luxurious, glittering pathways by incorporating beads and sequins.
Instead of filling shapes with thread, outline them with rows of embellishments.
Stitch down rows of seed beads, then accent them with a line of flat sequins to catch the light differently.
This technique is a perfect way to combine embroidery and mixed media for home decor masterpieces, adding dimension, shine, and a sophisticated finish.
13. Layered Landscapes with Raw-Edged Fabric
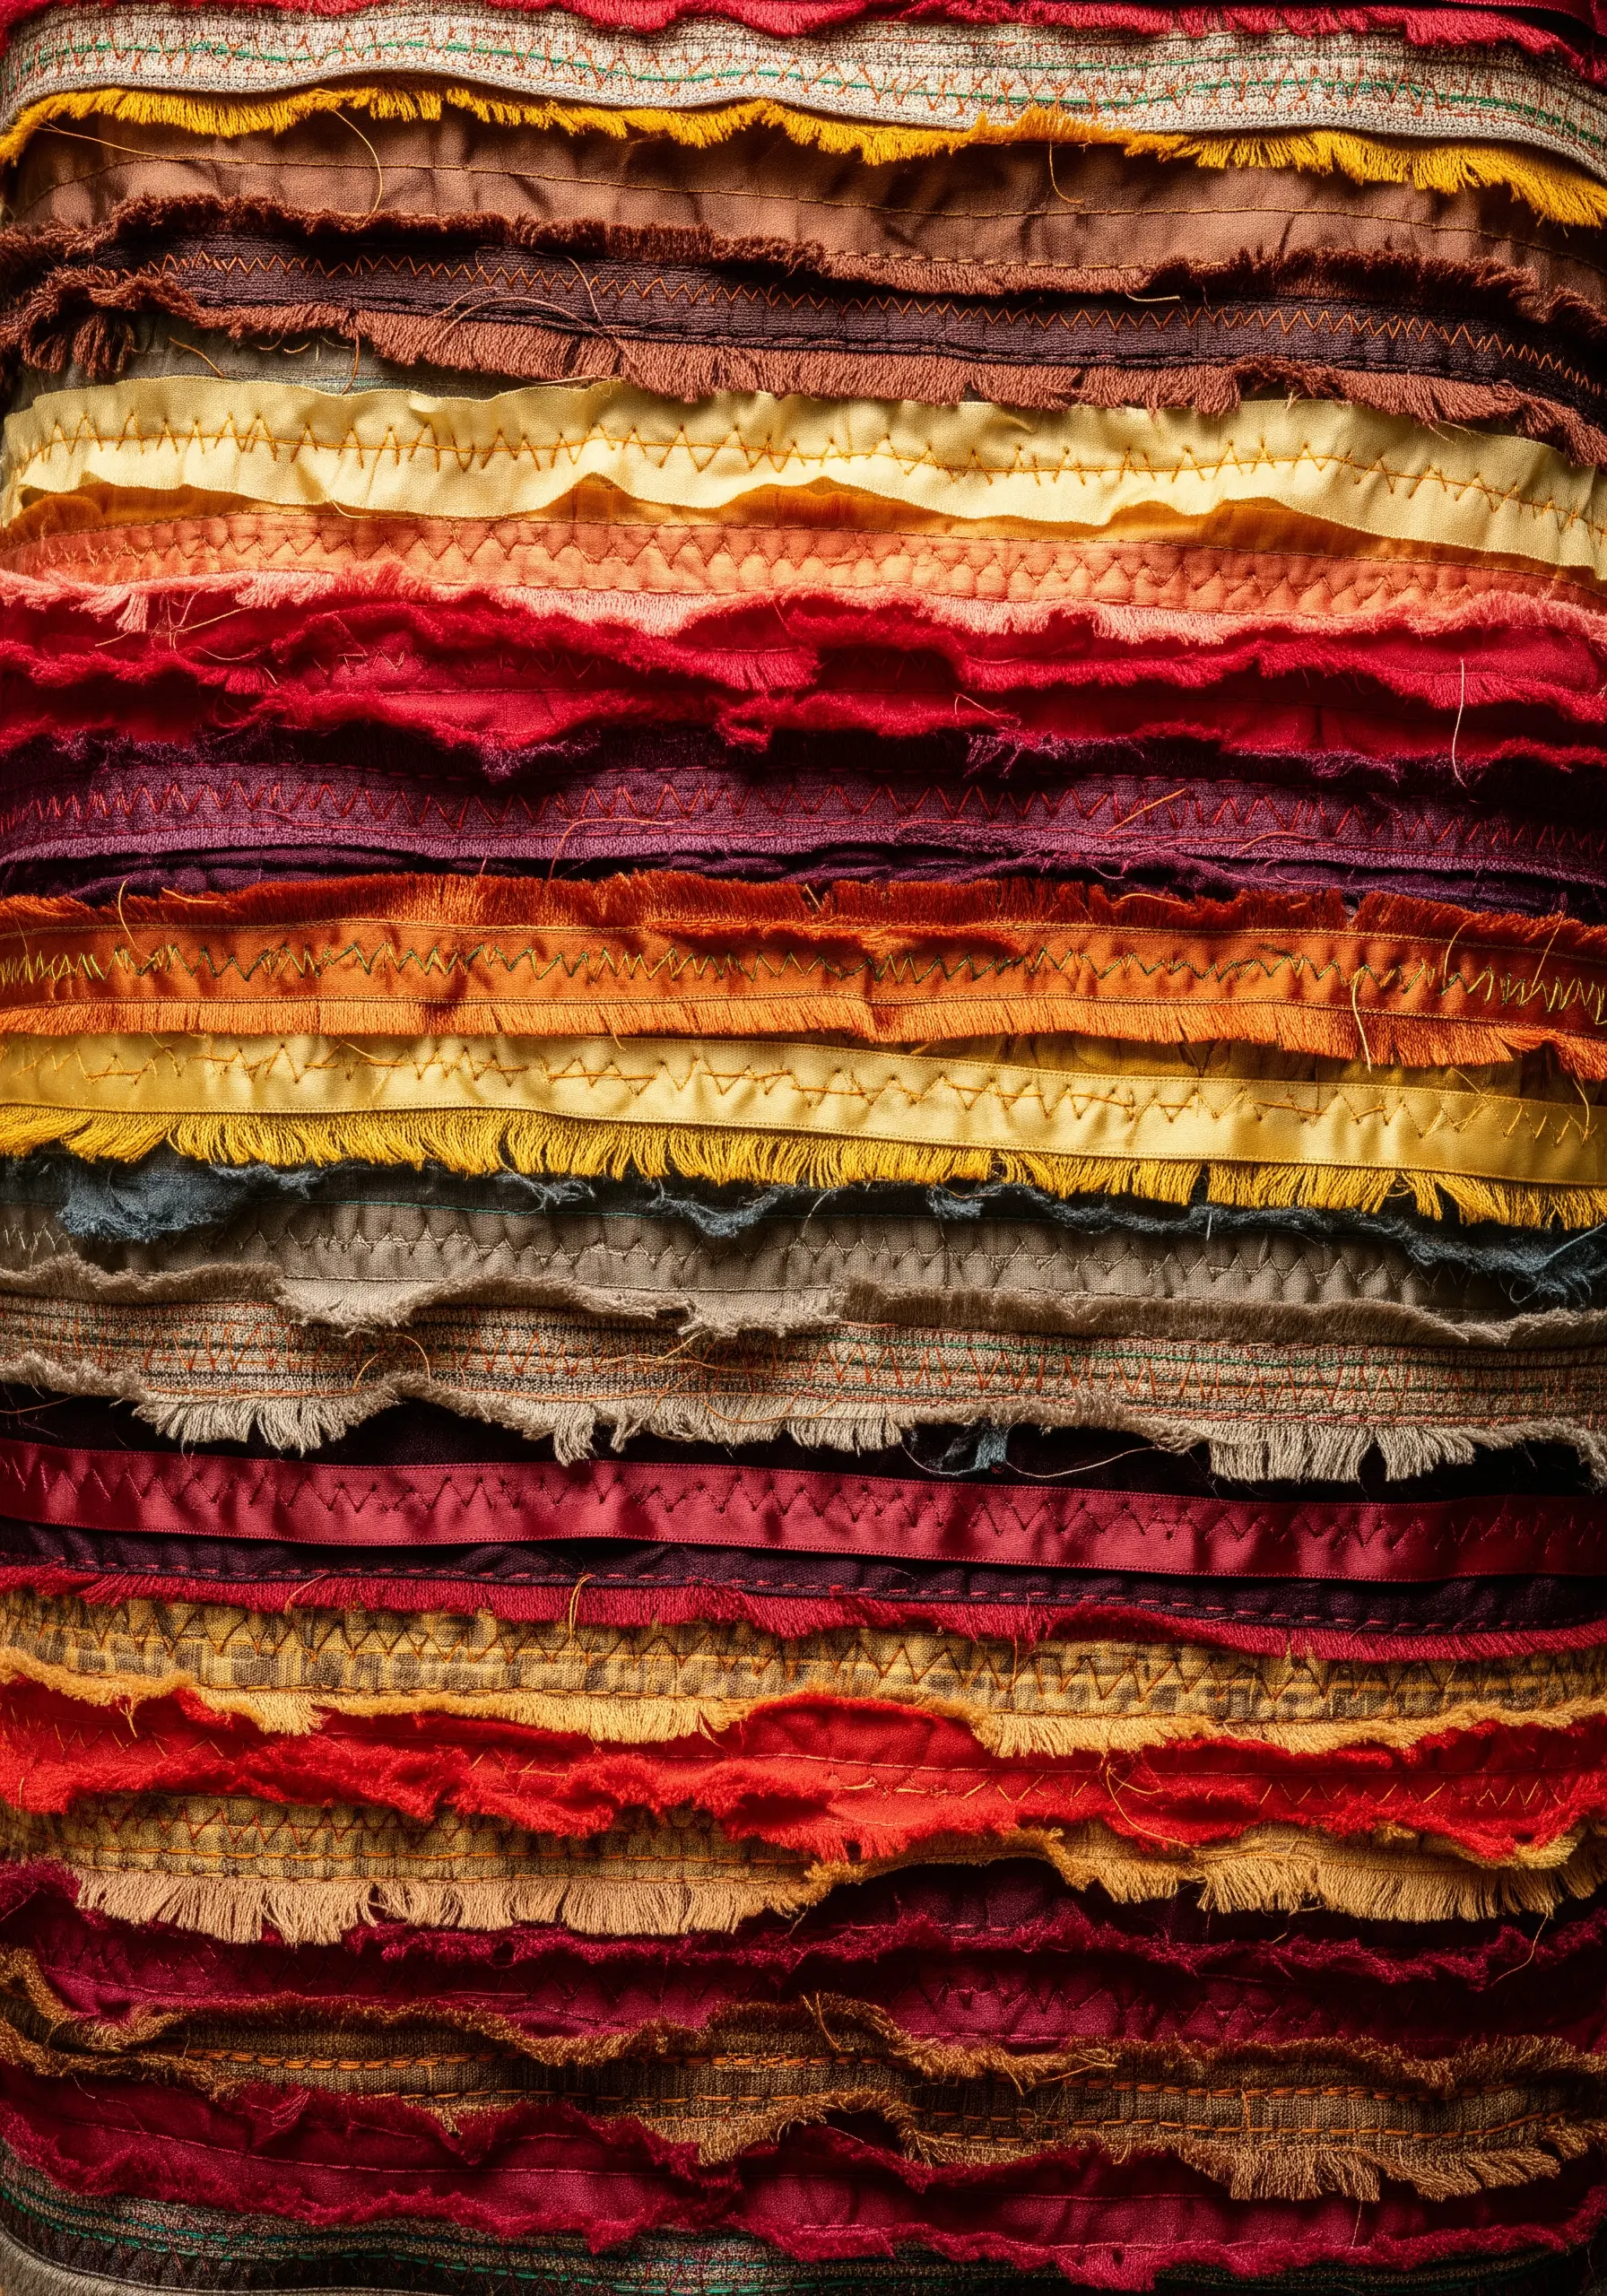
Embrace a more painterly, deconstructed approach by working with torn strips of fabric.
Layer different fabrics—cottons, silks, linens—to play with their varying textures and sheens.
Secure the strips with simple, utilitarian running stitches, allowing the frayed, raw edges to become a key part of the design.
This fabric collage method creates rich, rustic surfaces that are full of depth and character.
14. Bold Graphic Lines with Braided Cord
Make a powerful statement by couching oversized, braided cord onto your canvas.
You can braid your own cord from chunky yarn or use a pre-made decorative rope.
Lay it on your background fabric and secure it with a contrasting thread using a simple whip stitch or cross stitch.
By making the securing stitches visible and rhythmic, they become an integral part of the final design, adding another layer of detail to your DIY yarn wall art patterns.
15. Ghostly Forms with Layered Sheer Fabrics
Create an ethereal, three-dimensional effect by stitching on stacked layers of organza or tulle.
Stretch a single piece of sheer fabric in your hoop as the base, then float additional, un-stretched layers on top, stitching your design through all of them.
The slight shifts and gaps between the layers create a hazy, dreamlike quality that gives the simplest line work incredible depth.
This is one of the most effective fabric collage embroidery projects using sheer fabrics for dreamy effects.
16. Kaleidoscopic Petals with Layered Buttonhole Stitch
Build this dense, floral-like form by layering arcs of buttonhole stitches.
Start with a central ring, then work outwards, stitching rows of buttonhole crescents that overlap the previous layer.
Use a riot of different colors to create a joyful, kaleidoscopic effect.
The structure of the buttonhole stitch gives each arc a clean, raised edge, which contributes to the overall sculptural feel of these colorful embroidery hoops to transform any boring wall into a gallery.
17. Architectural Tension with Stiffened Thread
To create rigid, self-supporting structures, you need to move beyond fabric and embrace thread as a building material.
Wrap your thread around a temporary form—like pins stuck in corkboard or a balloon—and then paint it with a fabric stiffener or a water-and-glue mixture.
Once it’s completely dry and rigid, you can remove the support, leaving behind a delicate but strong architectural form that exists entirely on its own.
18. Meditative Stacks with Wrapped Cord
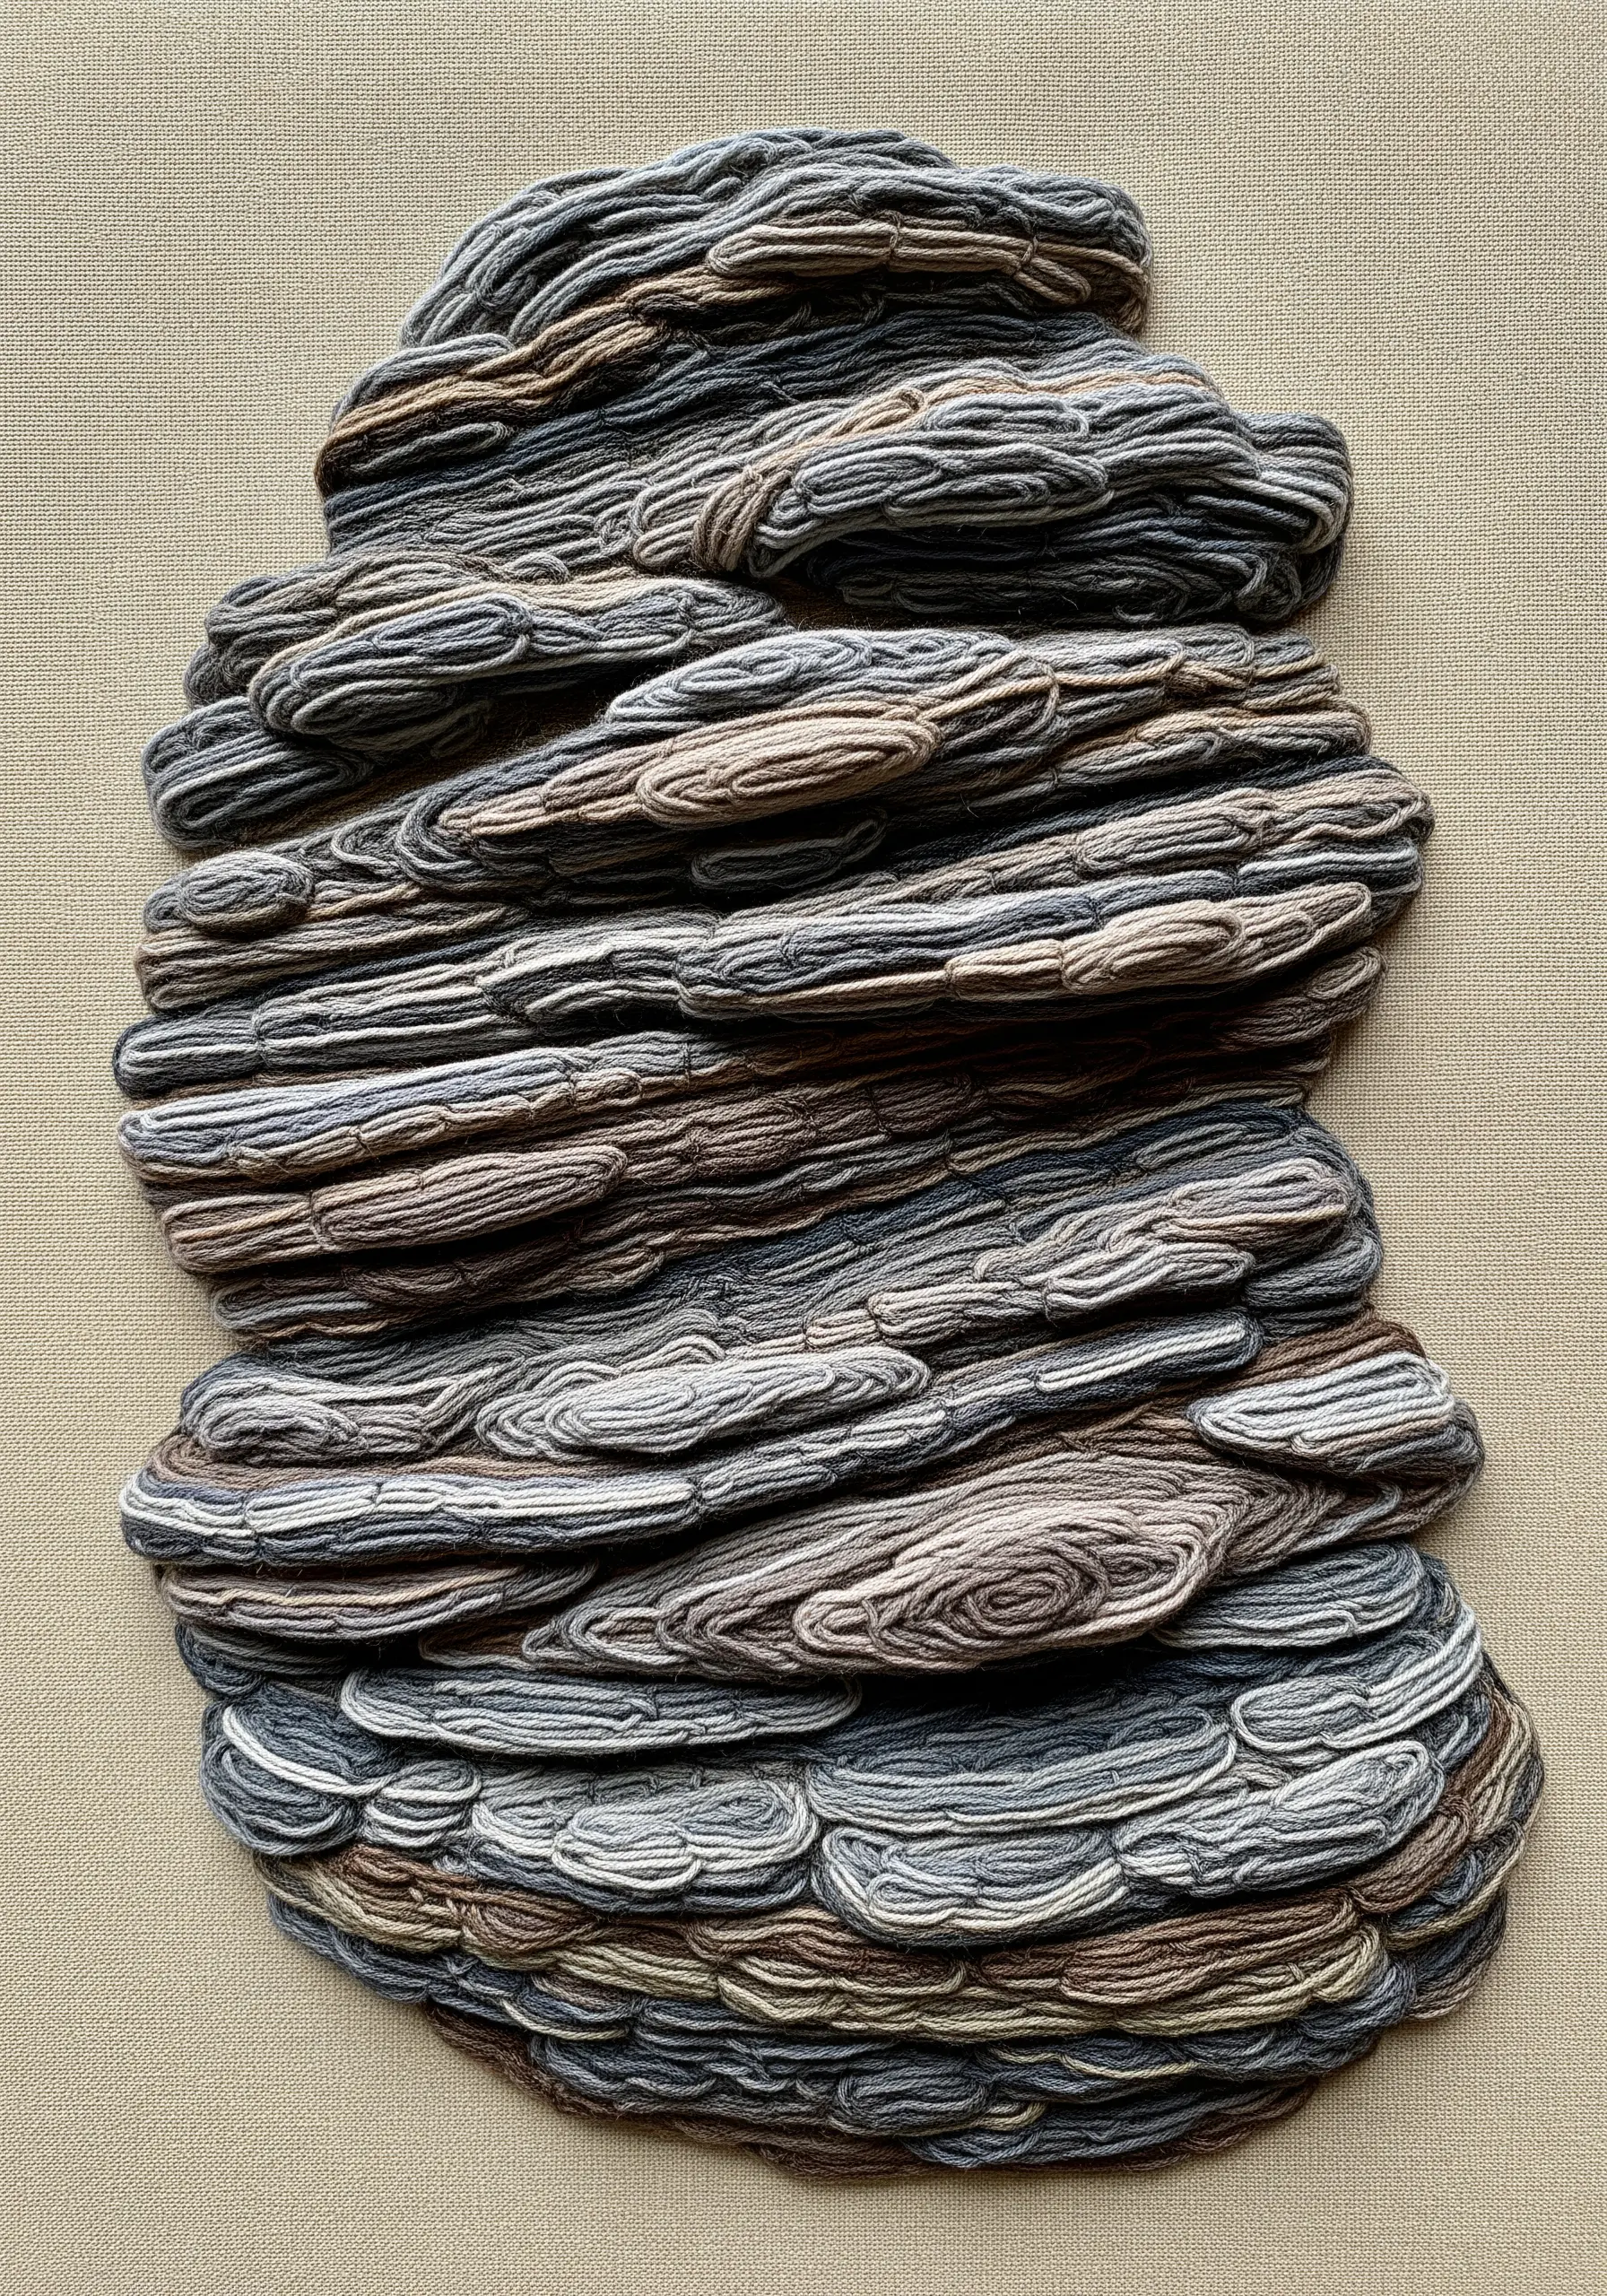
Achieve the look of stacked, weathered stones by wrapping thick cotton cord with variegated yarn.
The subtle color shifts in a variegated thread do all the work, creating natural-looking striations as you wrap.
Shape the wrapped cord into organic, flattened coils and stack them, securing them to each other with a few hidden stitches.
This process is wonderfully meditative and results in beautiful, embroidery ideas inspired by stones, sand, and soil.
19. Minimalist Weaving on a 3D Canvas

Use a small, stretched canvas block as a three-dimensional loom.
Wrap a single color of thread around the canvas, crossing and layering the strands to create geometric patterns and varying densities.
In this minimalist approach, the focus shifts to the subtle interplay of light and shadow across the taut threads and the texture created by the layers.
This technique is all about exploring how to combine thread and negative space to achieve luxury minimal art for living rooms.
20. Geode Slices with Layered Felt and Beadwork

Mimic the stunning layers of a natural geode using felt and beads.
Cut concentric, free-form shapes from different colors of craft felt and stack them.
Then, stitch along the edge of each layer with coordinating seed beads, adding a few larger crystals or sequins to represent crystalline formations.
This is a fast, fun way to create highly decorative and sculptural pieces that feel precious and intricate.
21. Maximalist Texture with Cascading Tassels
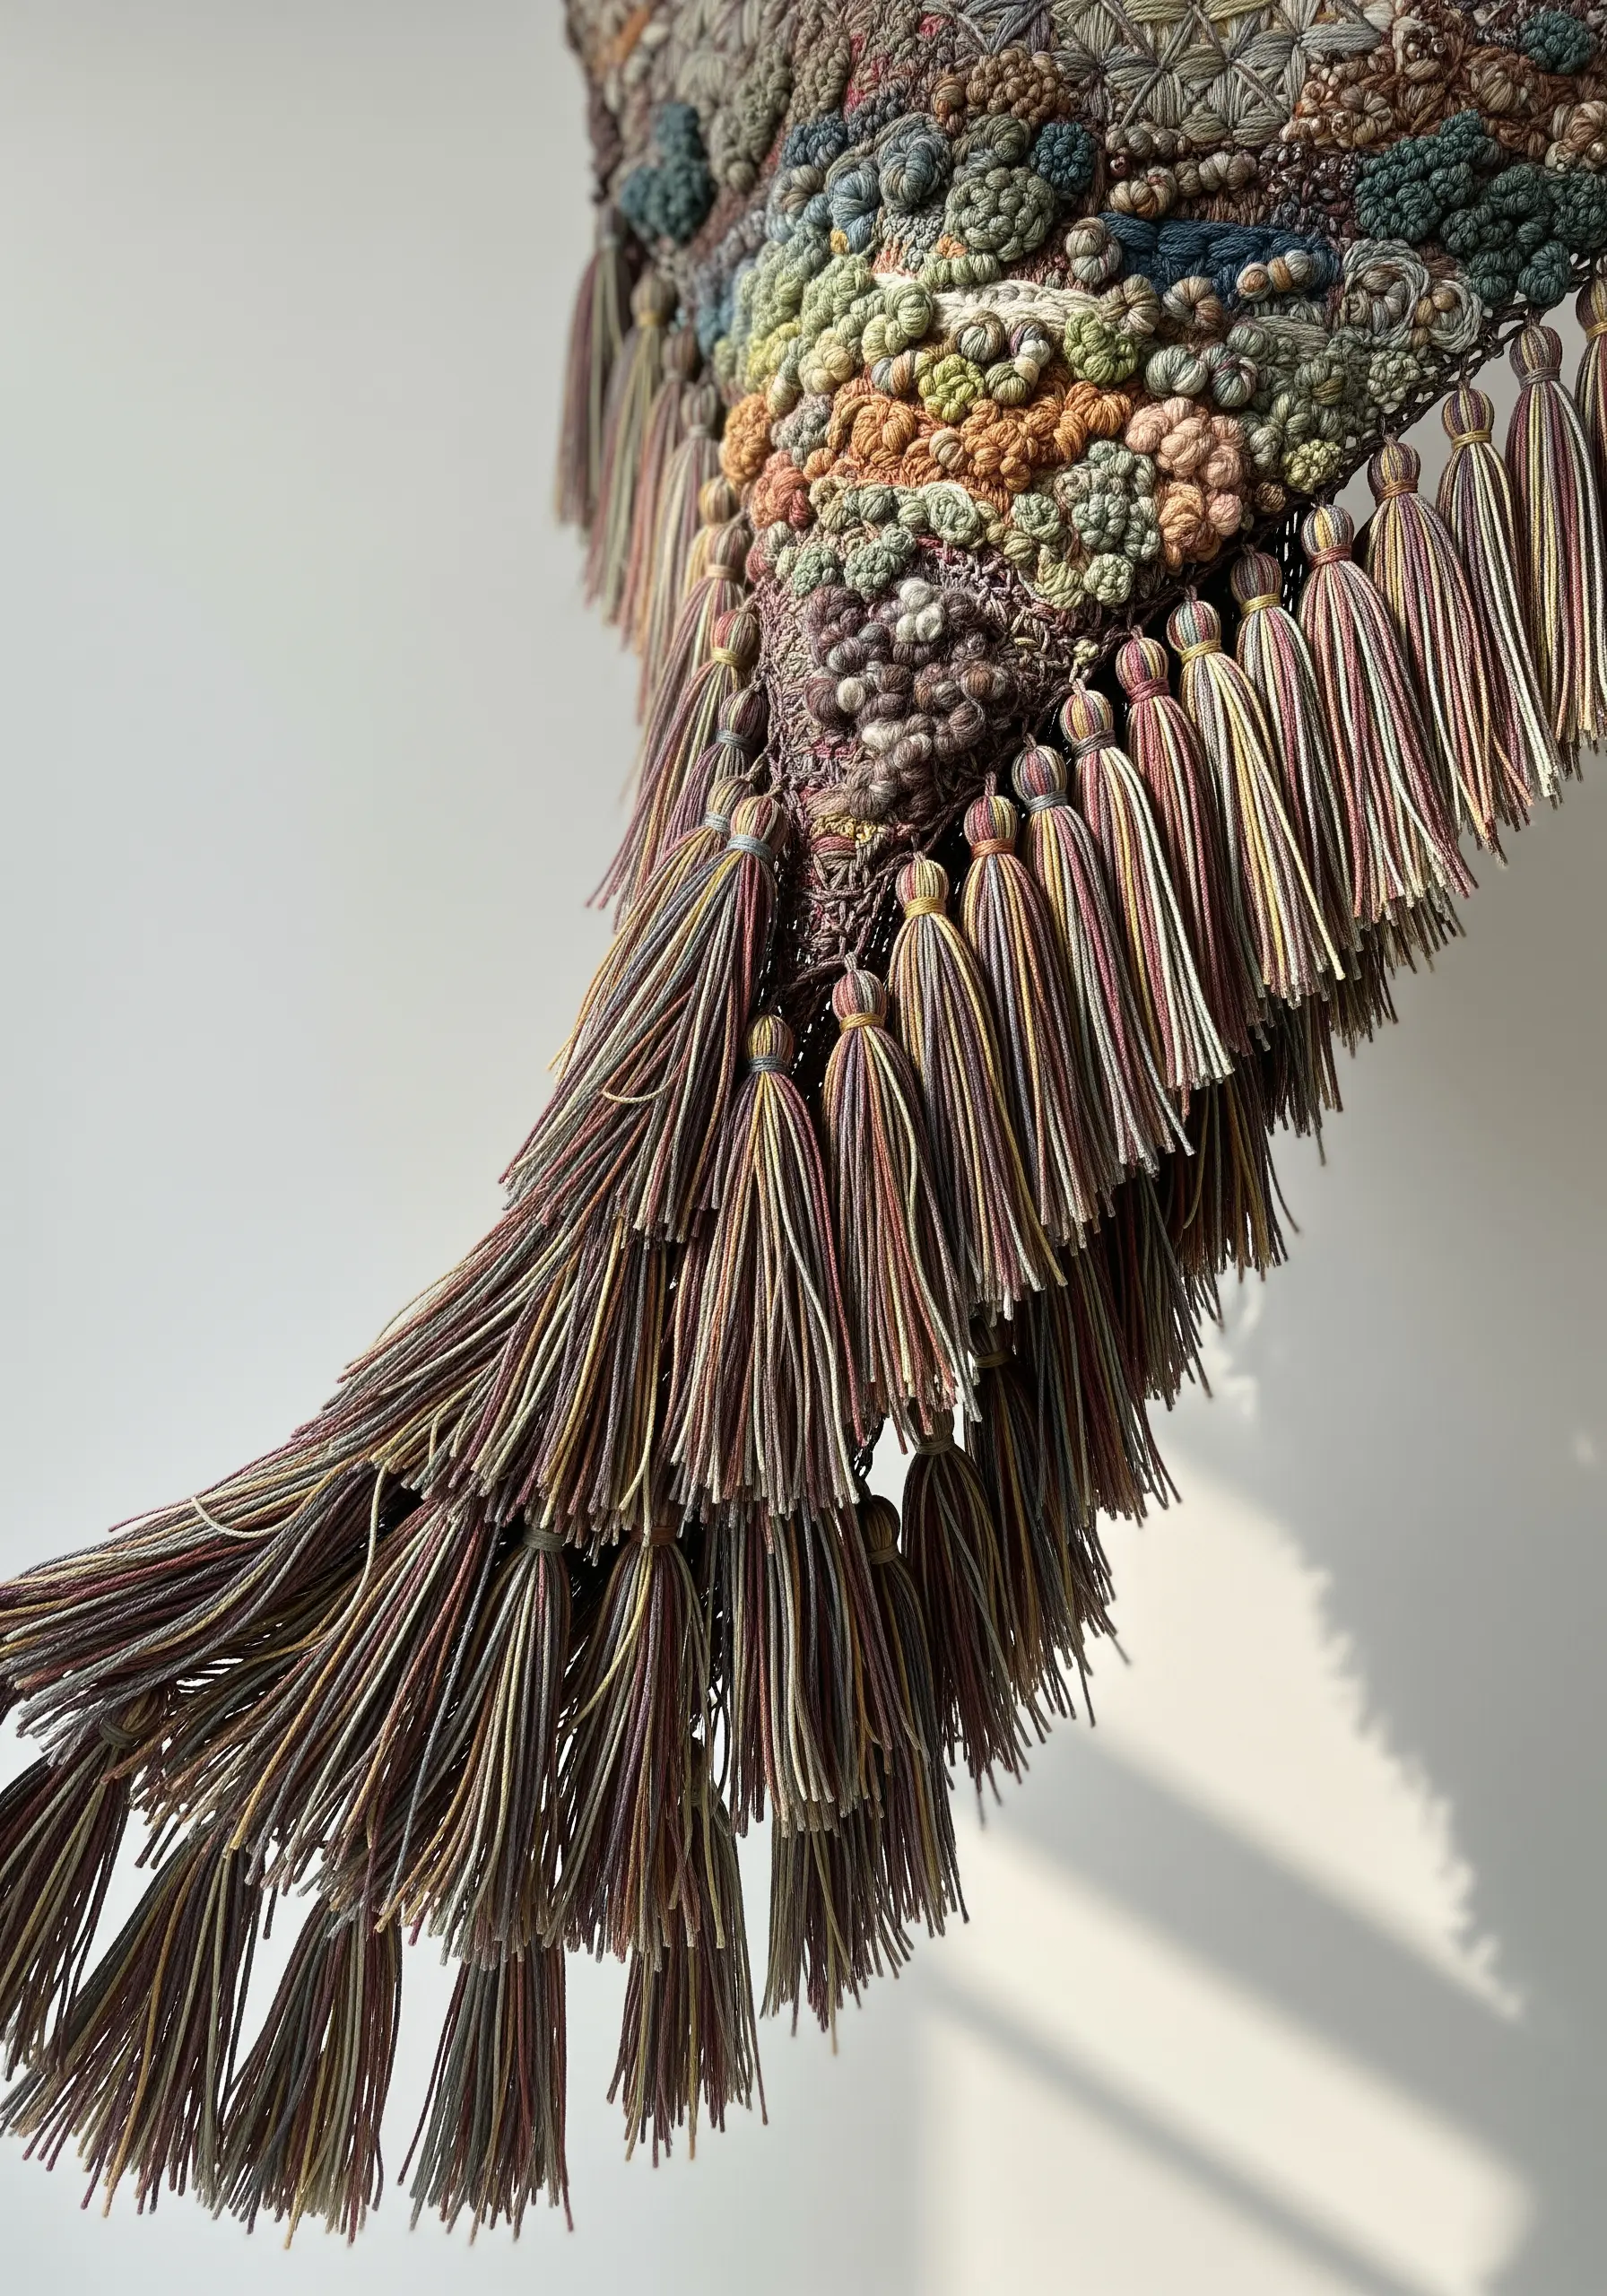
For a design that is unapologetically bold and luxurious, combine heavily textured stitches with an abundance of fringe.
Fill areas with dense clusters of French or colonial knots, then surround them with rows upon rows of handmade tassels.
Use a variegated thread for the tassels to create subtle color variations within the fringe, adding even more depth and visual interest.
These modern texture layering embroidery techniques that add drama depth are all about embracing a ‘more is more’ philosophy.
22. Building a Coral Reef with Knots and Loops
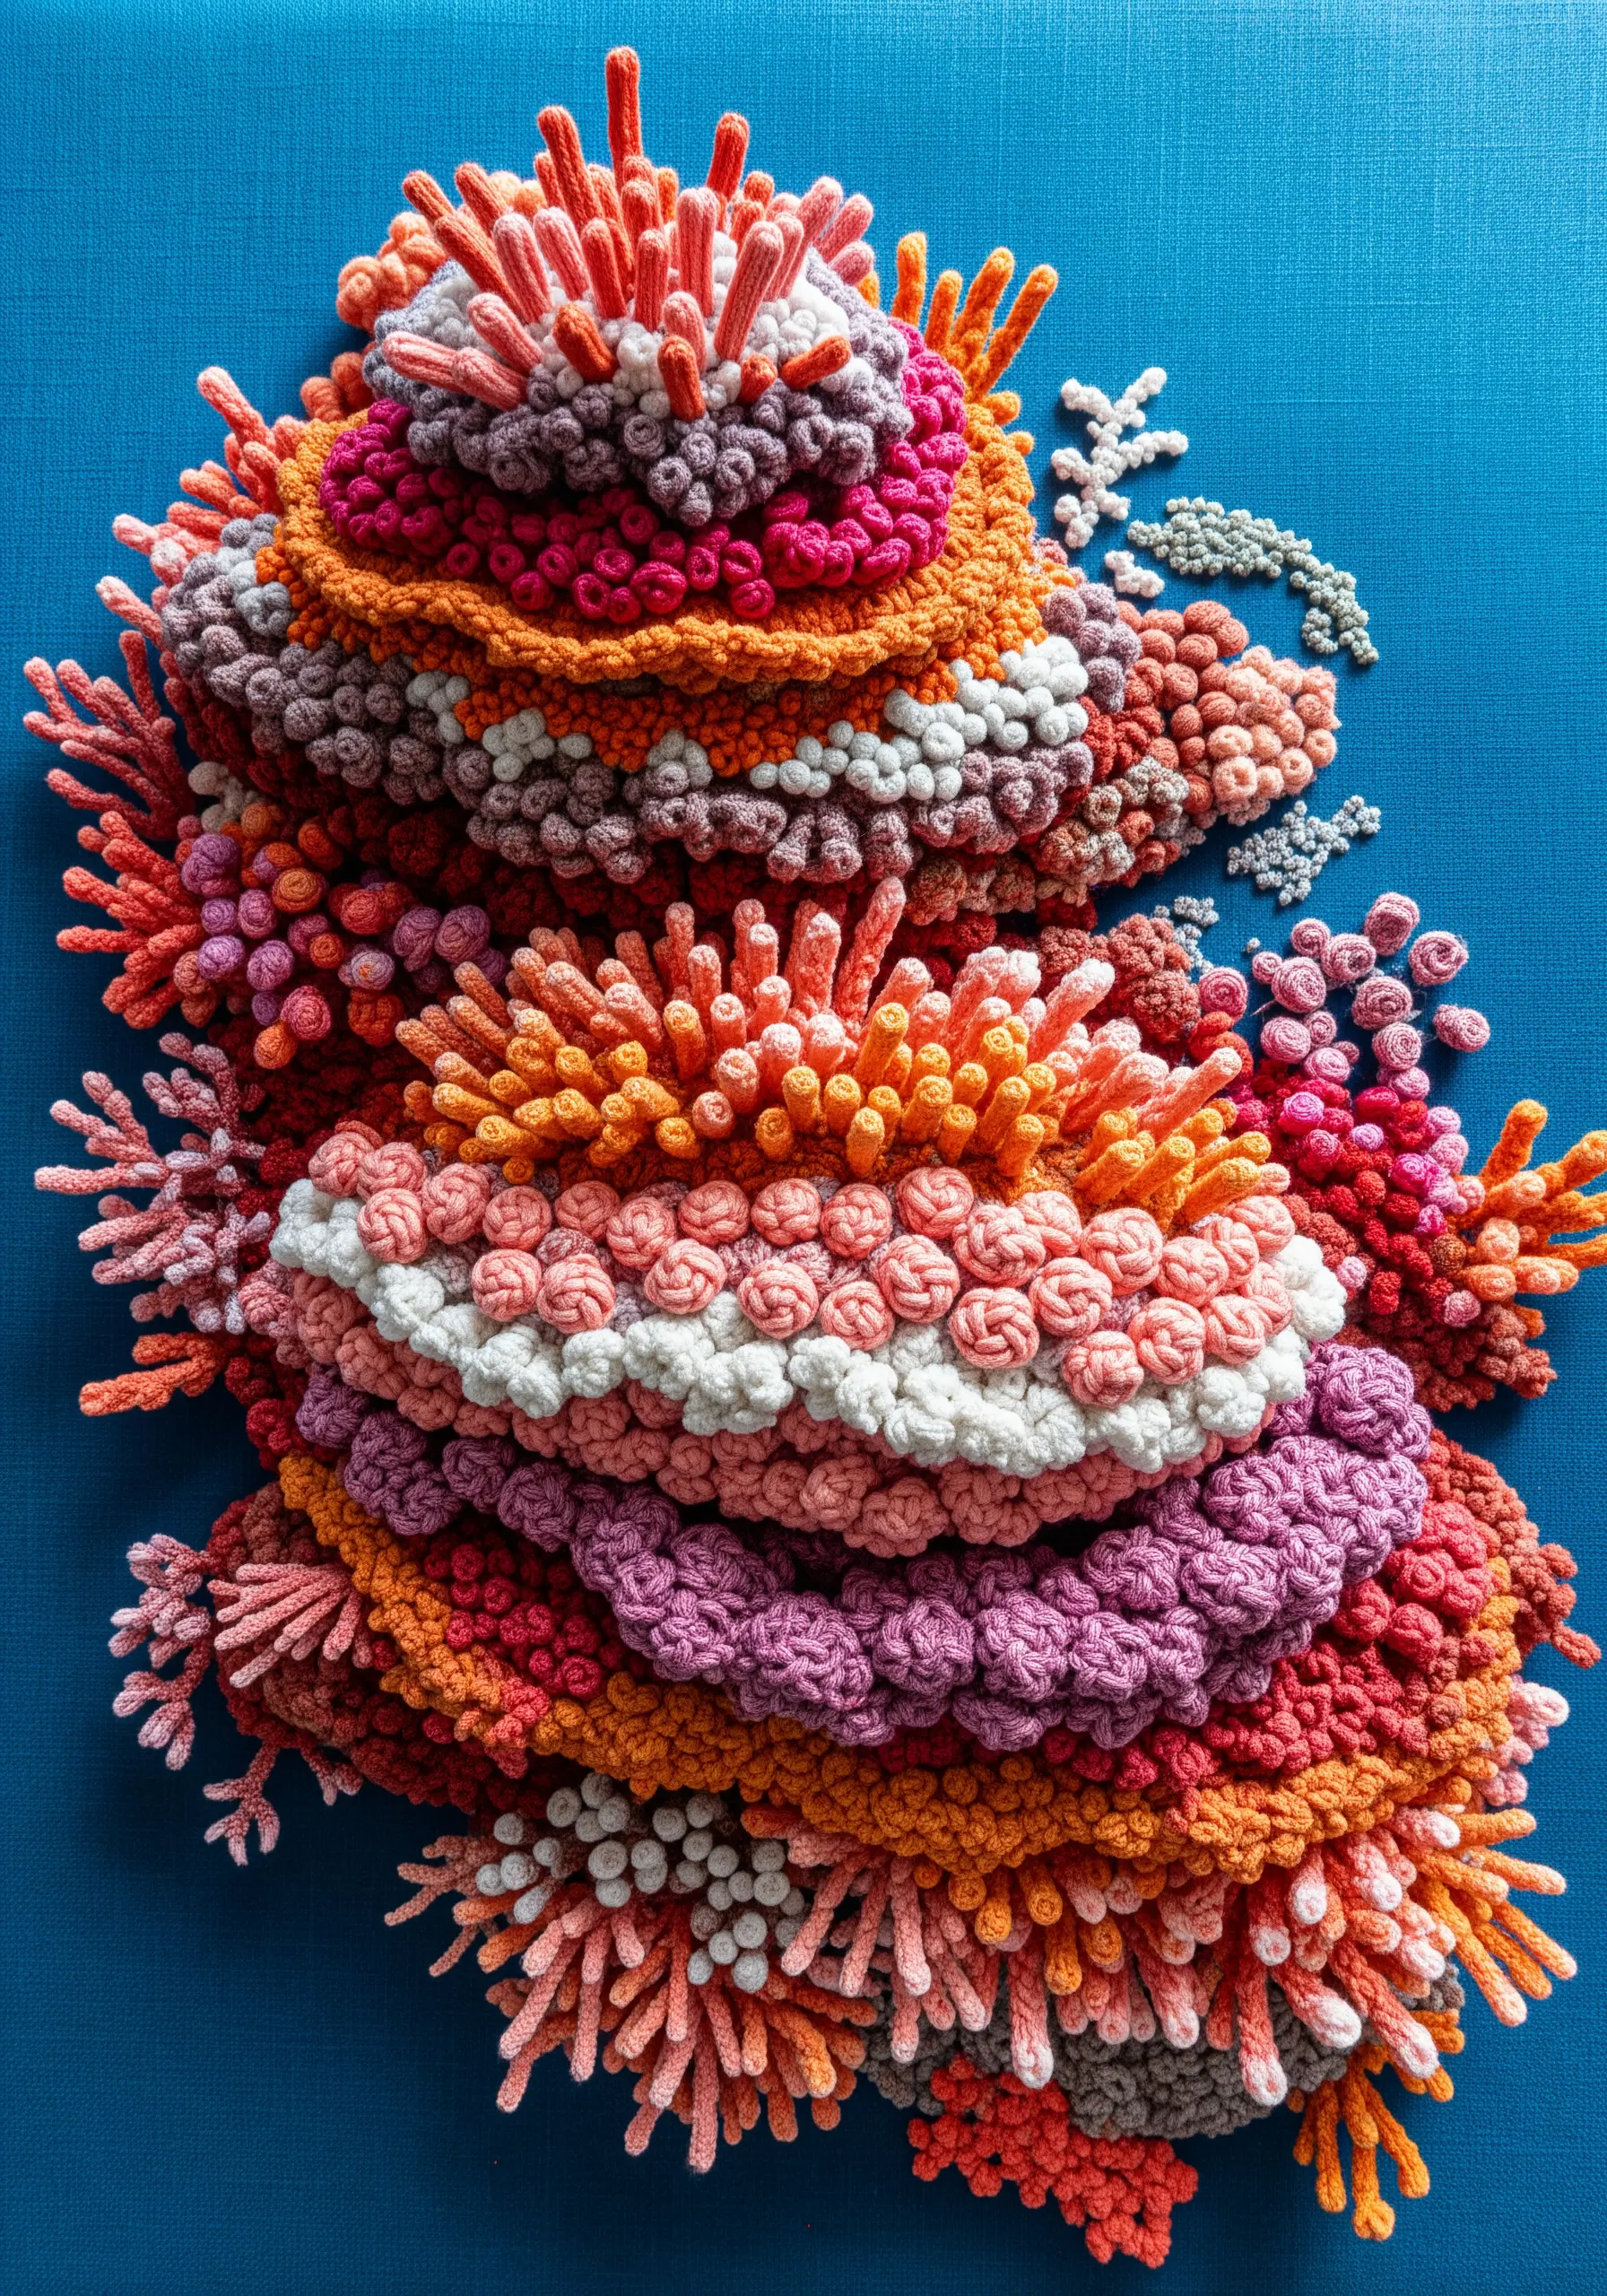
Create an underwater ecosystem with a vocabulary of raised, textural stitches.
Use tightly packed French knots for coral clusters, long bullion knots for tube worms, and detached chain stitches (lazy daisies) for sea anemones.
Build the stitches up in layers, allowing them to overlap and crowd each other, just as they would in a natural reef.
This approach transforms your fabric into a vibrant, three-dimensional world of organic texture embroidery designs.
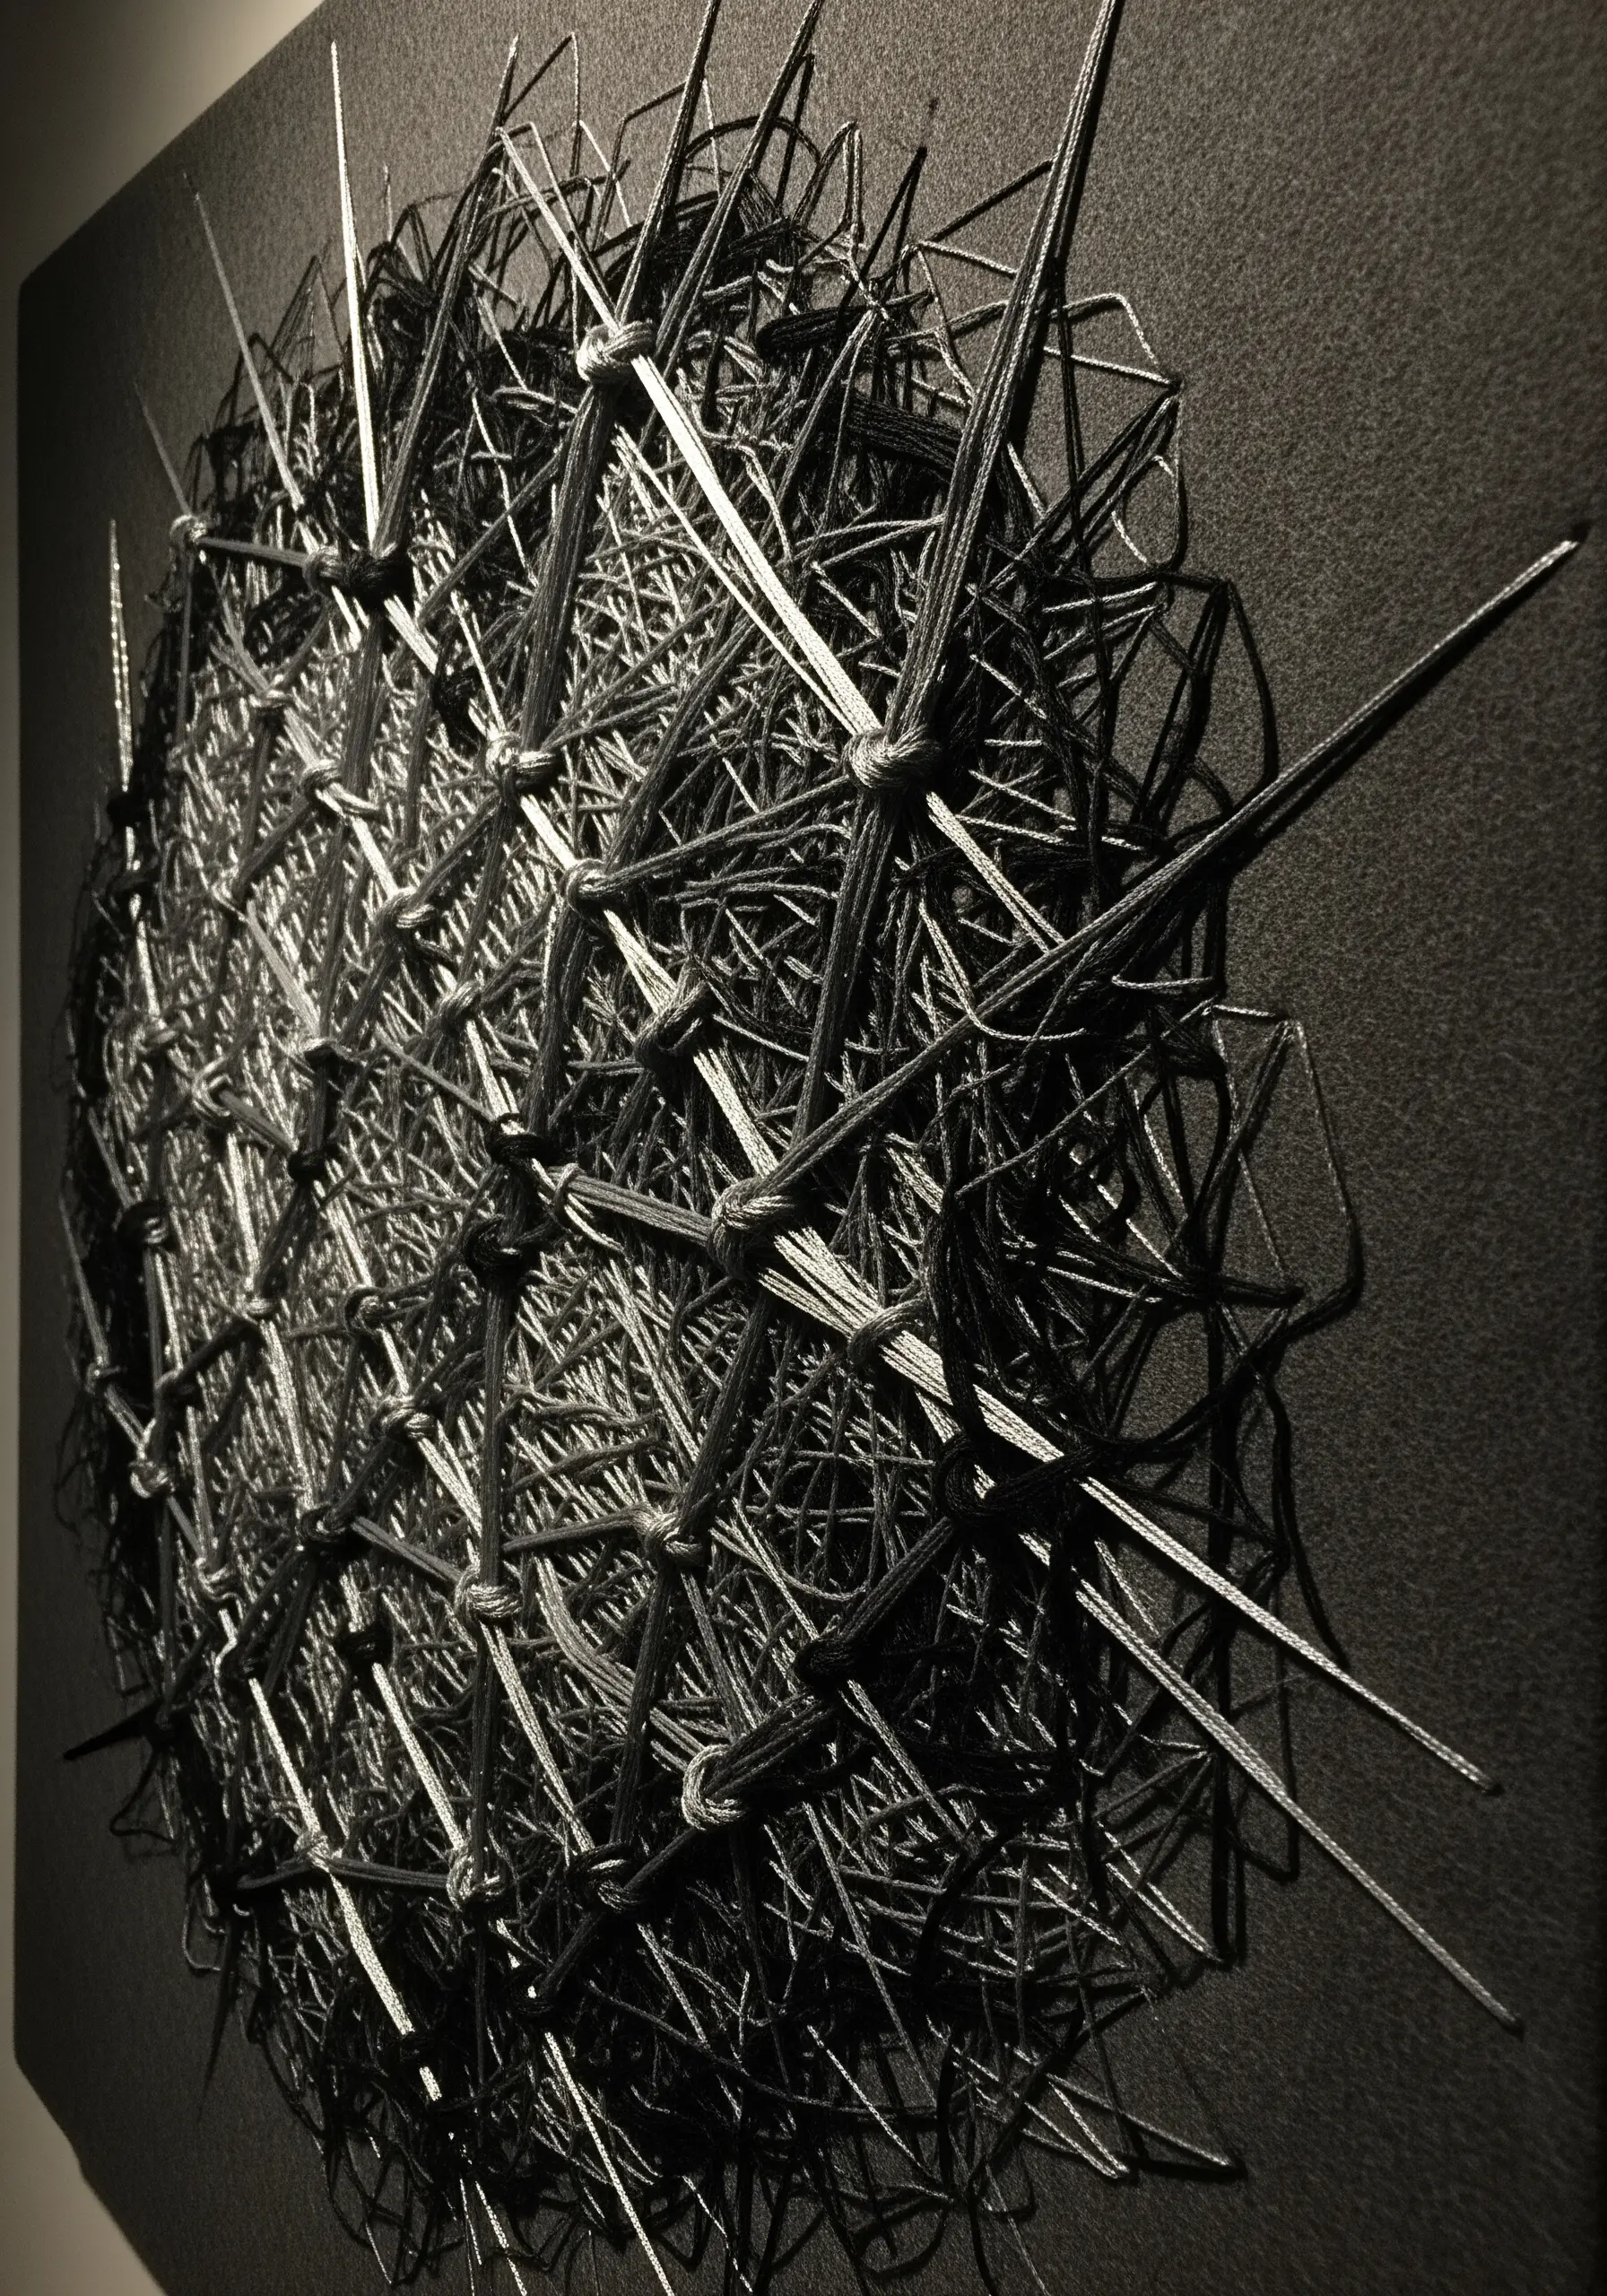
23. Geometric Precision with String Art
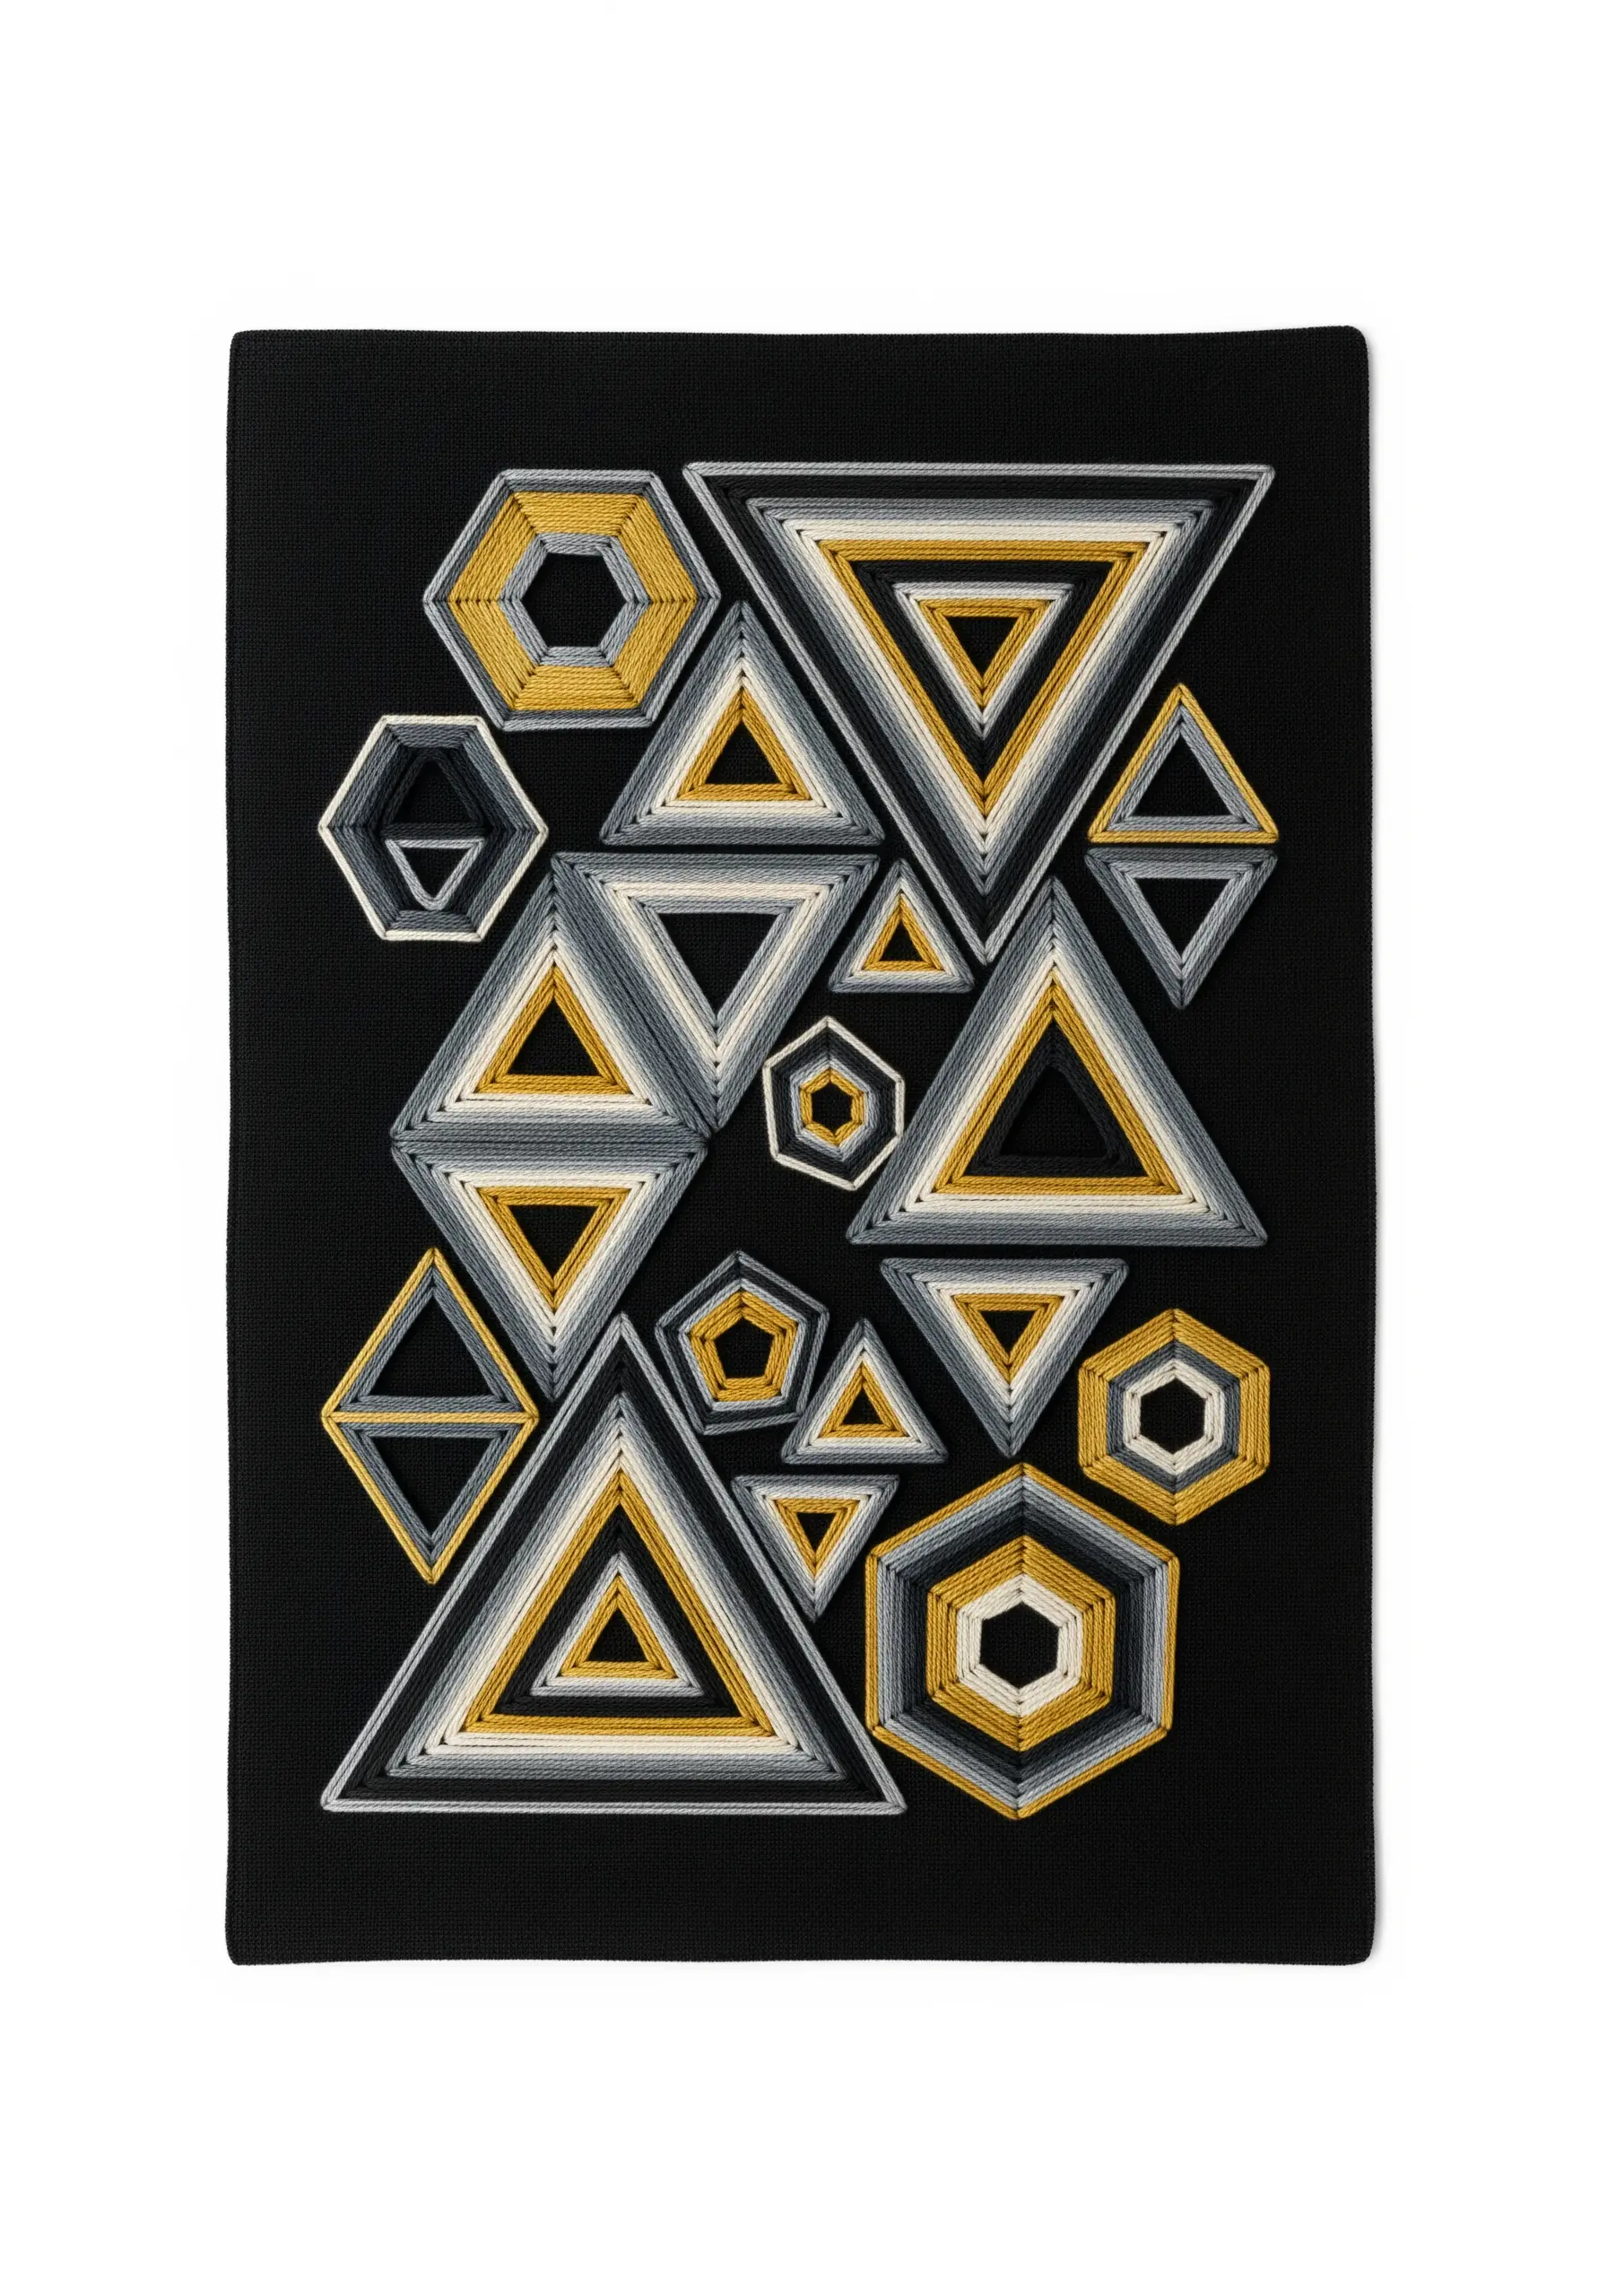
This technique relies on a grid of anchor points—traditionally small nails tapped into a board—to create flawlessly straight lines.
Wrap your thread from anchor to anchor to build up geometric shapes, layering different colors to create depth and pattern.
The tension of the thread is what defines the forms, resulting in crisp, clean geometric abstract thread patterns for bold statement wall hoop installations that feel both mathematical and artistic.
24. Raised Appliqué on a Woven Ground
Create a dynamic interplay of textures by combining flat weaving with raised embroidery.
First, create your abstract forms by wrapping yarn around padded felt shapes.
Then, couch these dimensional elements onto a hand-woven or heavily textured background fabric, like burlap or linen.
The contrast between the flat, grid-like texture of the weave and the smooth, rounded volume of the appliquéd forms is what gives the piece its power.
25. Labyrinthine Pathways with Metallic Cord
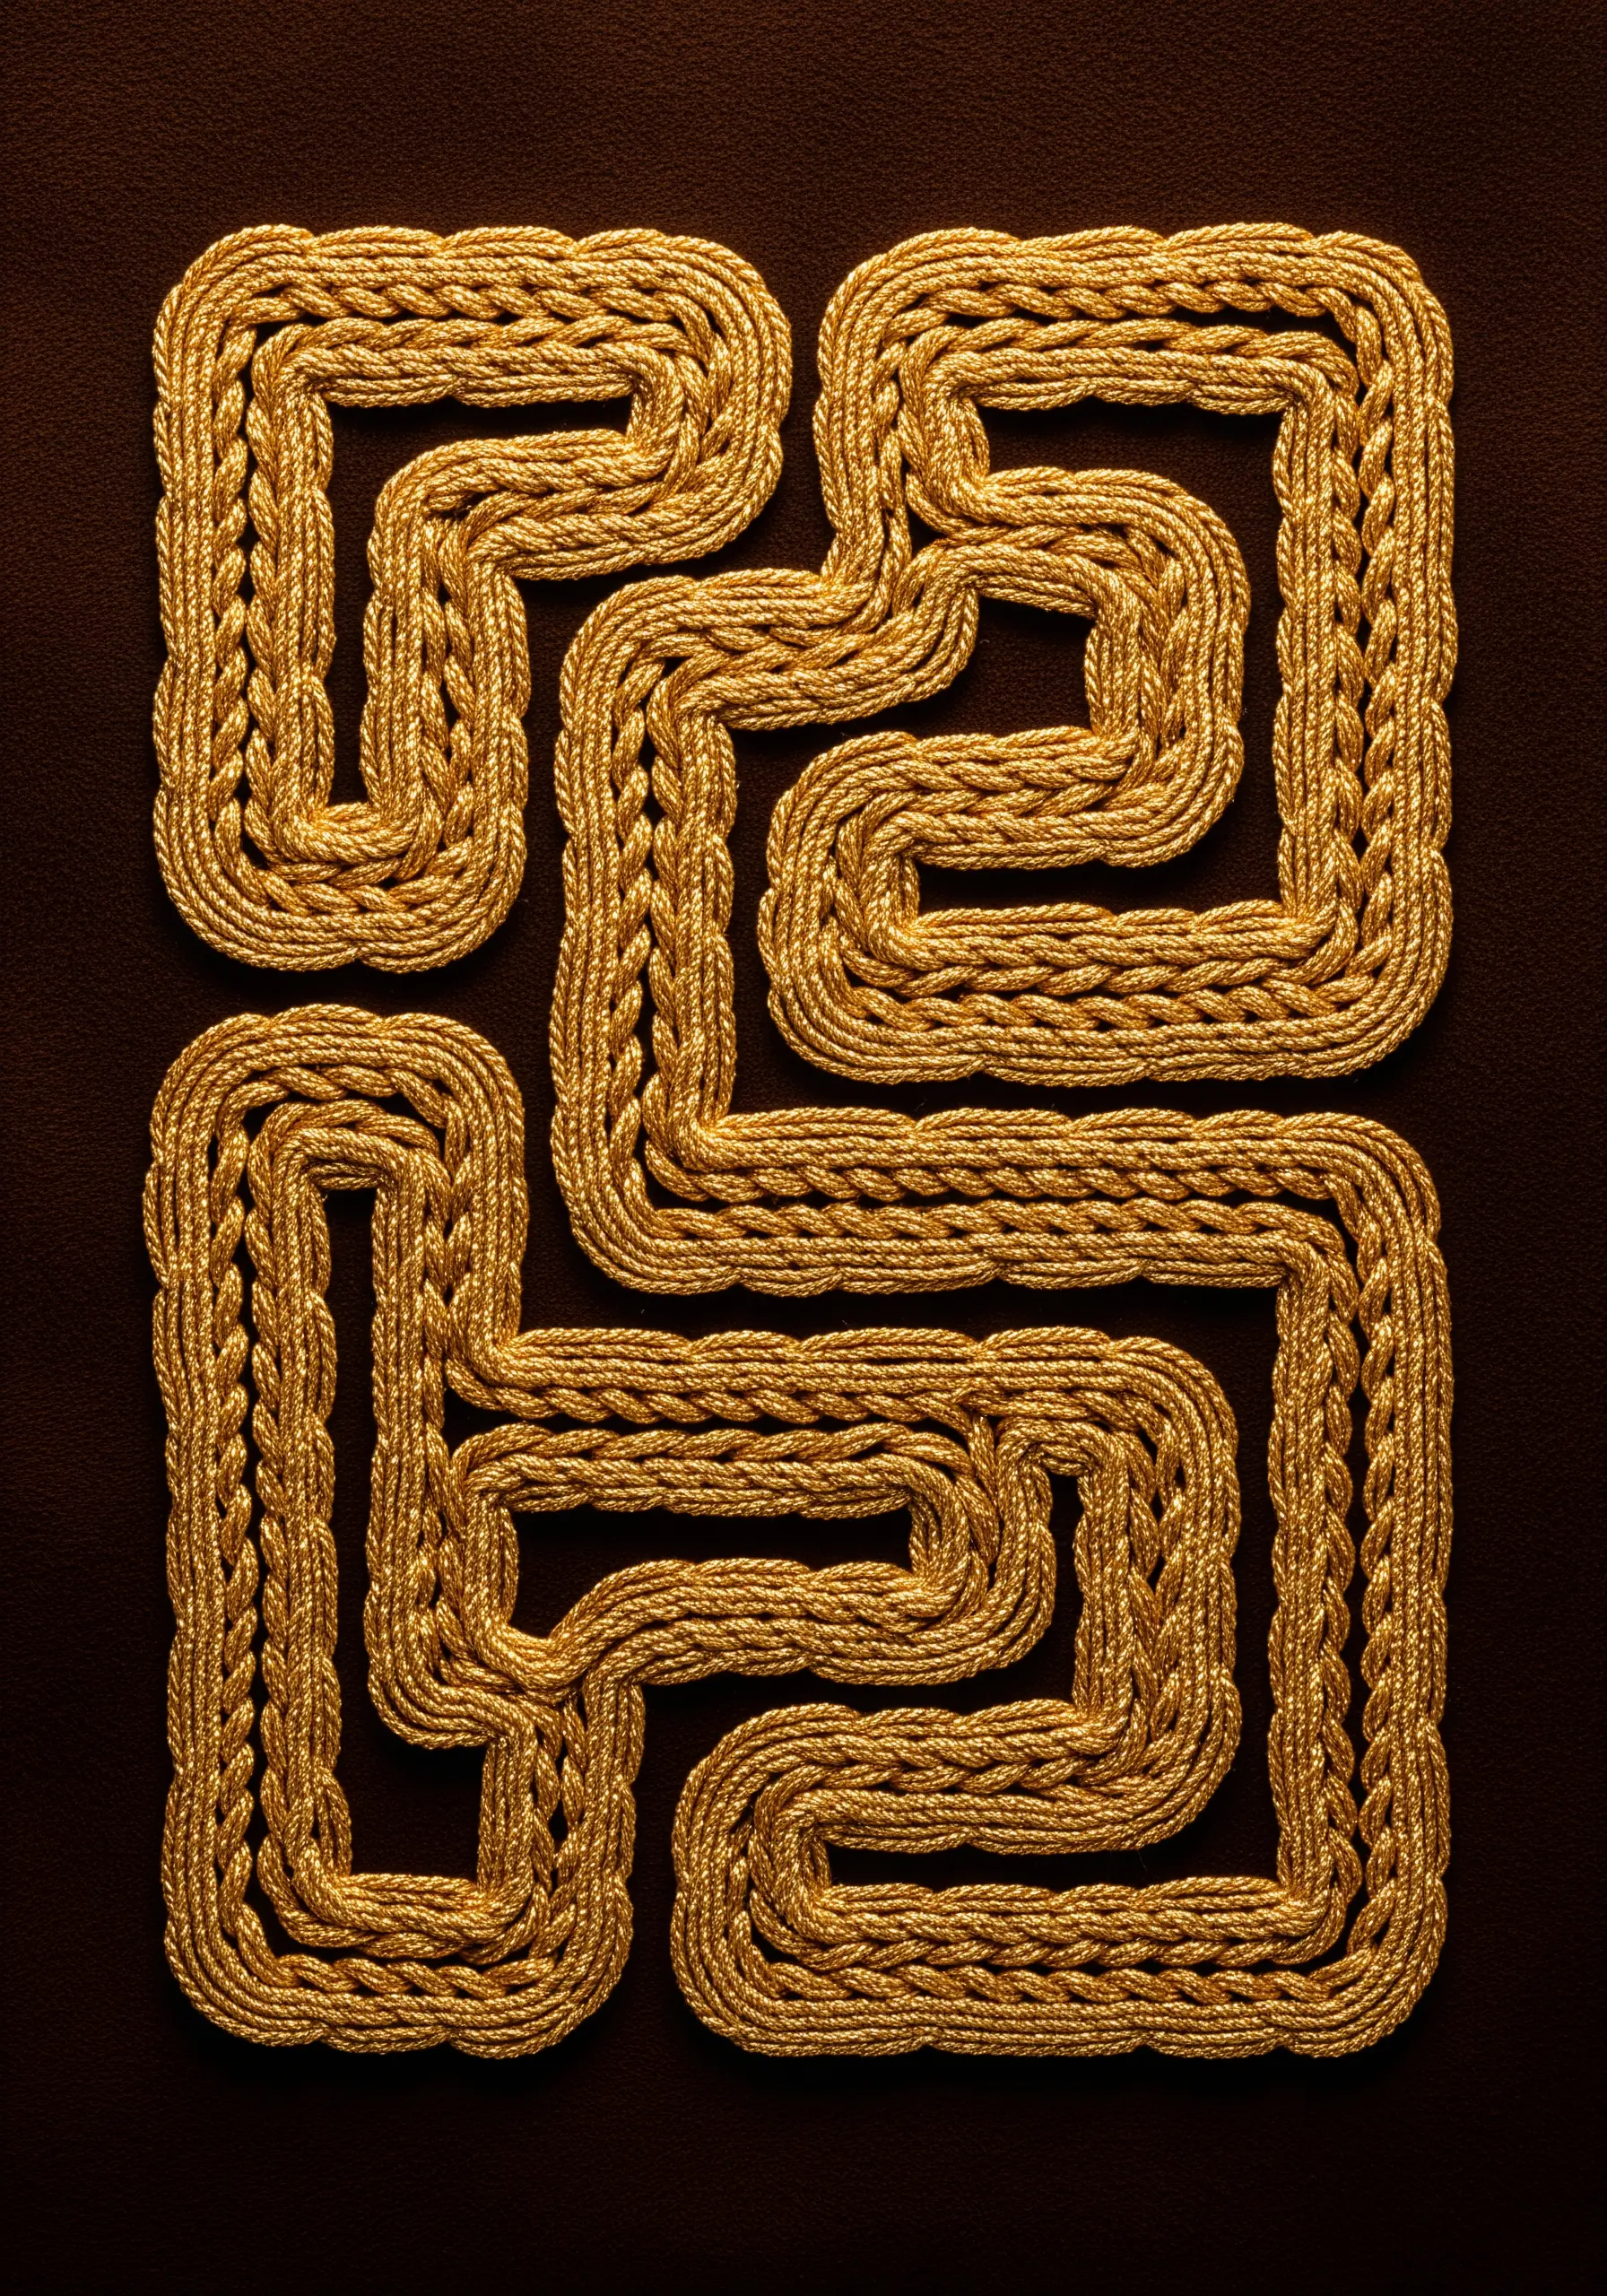
Elevate the simple couching technique by using a thick, braided metallic cord.
Draw your continuous, maze-like pattern onto a rich, dark fabric first to act as your guide.
Then, carefully stitch the cord down using a fine, matching metallic thread, hiding your tacking stitches within the crevices of the braid.
The result is an opulent, uninterrupted line of gold that feels both ancient and modern, perfect for gold thread luxury wall art projects.
26. A Quiet Composition of Contrasting Cords

Explore texture on a micro-level by creating a composition from different types of thread and cord.
Lay down lines of smooth cotton floss, rustic jute twine, thick twisted rope, and fine wool yarn side-by-side.
Use simple whip stitches or running stitches to secure them, focusing entirely on how the different materials feel and reflect light next to one another.
This is an excellent exercise in appreciating the inherent beauty of your materials.
27. An Impressionistic Forest with French Knots

Use the humble French knot as a building block to ‘paint’ a textural landscape.
Create depth and realism by varying your knots: wrap the thread once for small, tight buds and three or four times for larger, looser treetops.
Cluster different shades of green and blue together to create the illusion of light and shadow filtering through a dense canopy.
This is one of the most effective creative ways to stitch natural textures like a pro, turning a simple stitch into a complex surface.


