

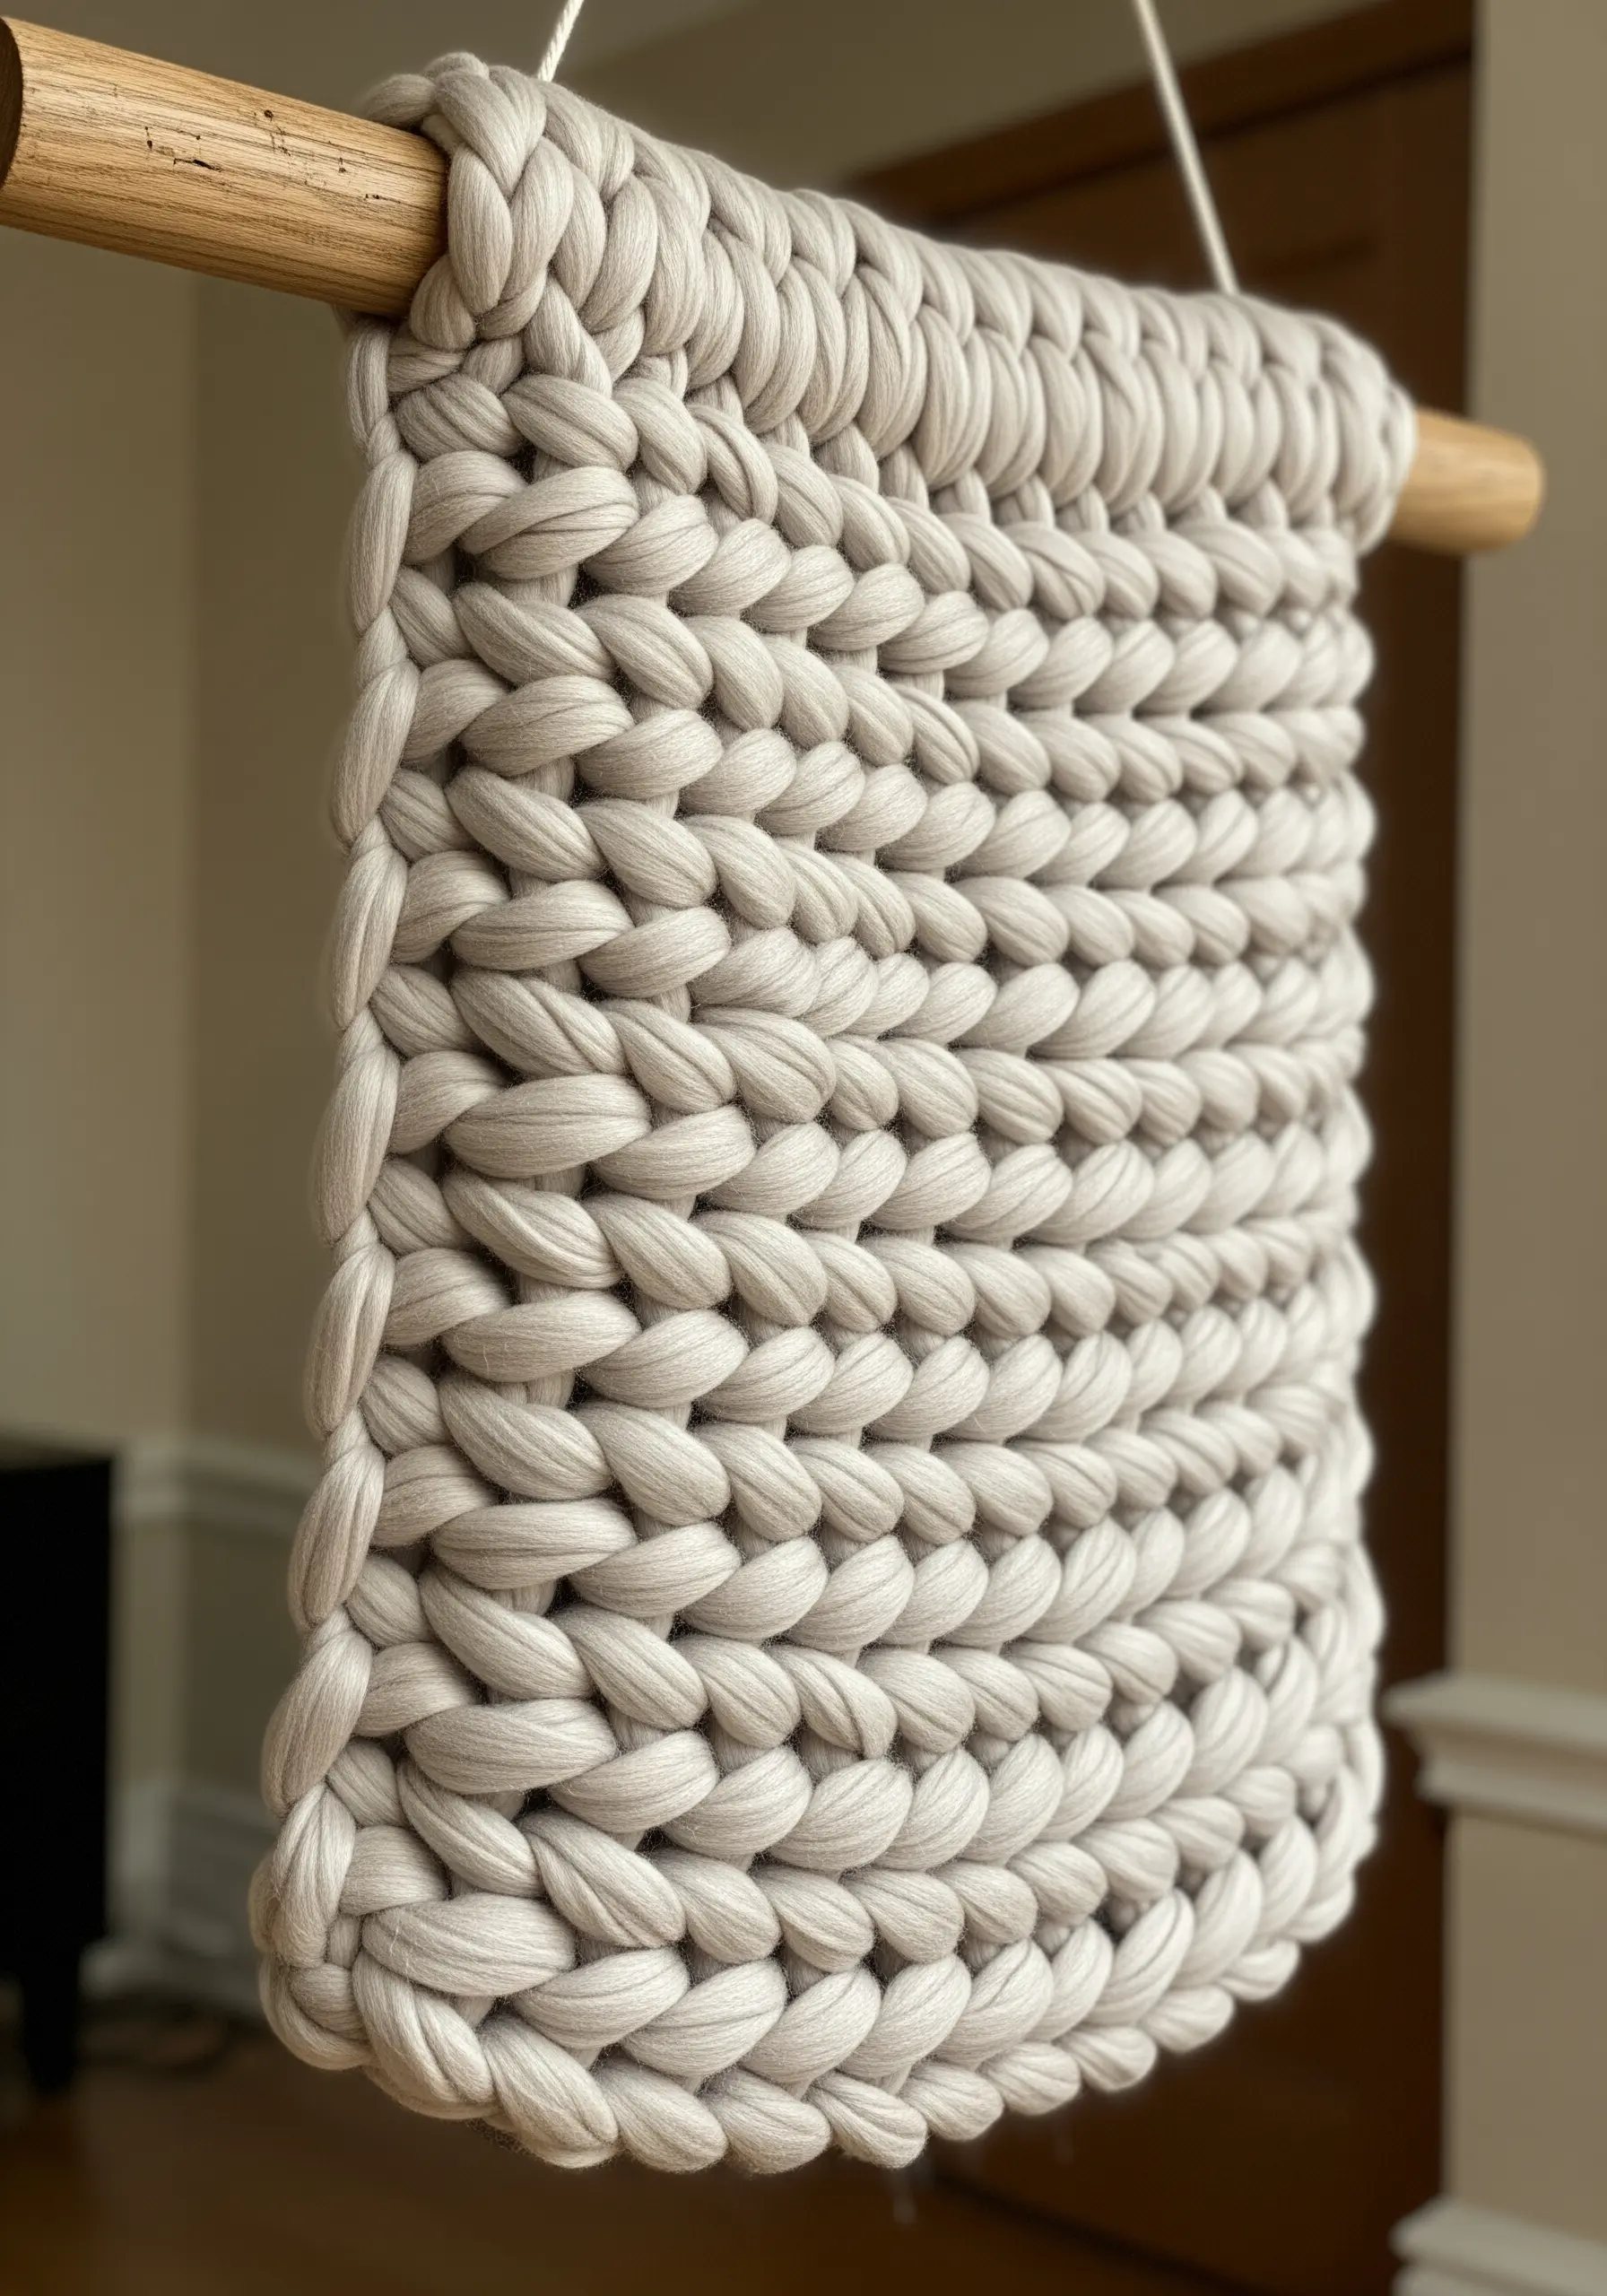
You don’t need intricate stitches or complex patterns to create something beautiful. Often, the most stunning works of art come from exploring the simple, tactile joy of the materials themselves.
Think of yarn not just as thread, but as a sculptural element. Consider its weight, its twist, its texture. How does a chunky wool roving feel different from a smooth cotton cord? How does light catch a strand of silk versus a matte merino?
This weekend, I invite you to play. To wrap, to knot, to weave, and to combine fibers in ways that feel intuitive and personal. These projects are more than just decoration; they are meditations in texture and color, ready to bring warmth and a touch of your own spirit into your home.
1. Frame a Neutral Palette with a Pop of Color

Create a focal point in your macrame by introducing a single, bold accent color for your tassels.
This technique draws the eye downward, enhancing the hanging’s natural V-shape and adding energy without overwhelming the intricate knot work.
To ensure the color feels intentional, choose a warm tone like marigold or terracotta to complement the natural cotton cord.
Integrate small wooden beads above the tassels to create a visual transition between the neutral knots and the vibrant yarn, making the composition feel balanced and complete.
2. Weave a Landscape with Sculptural Texture
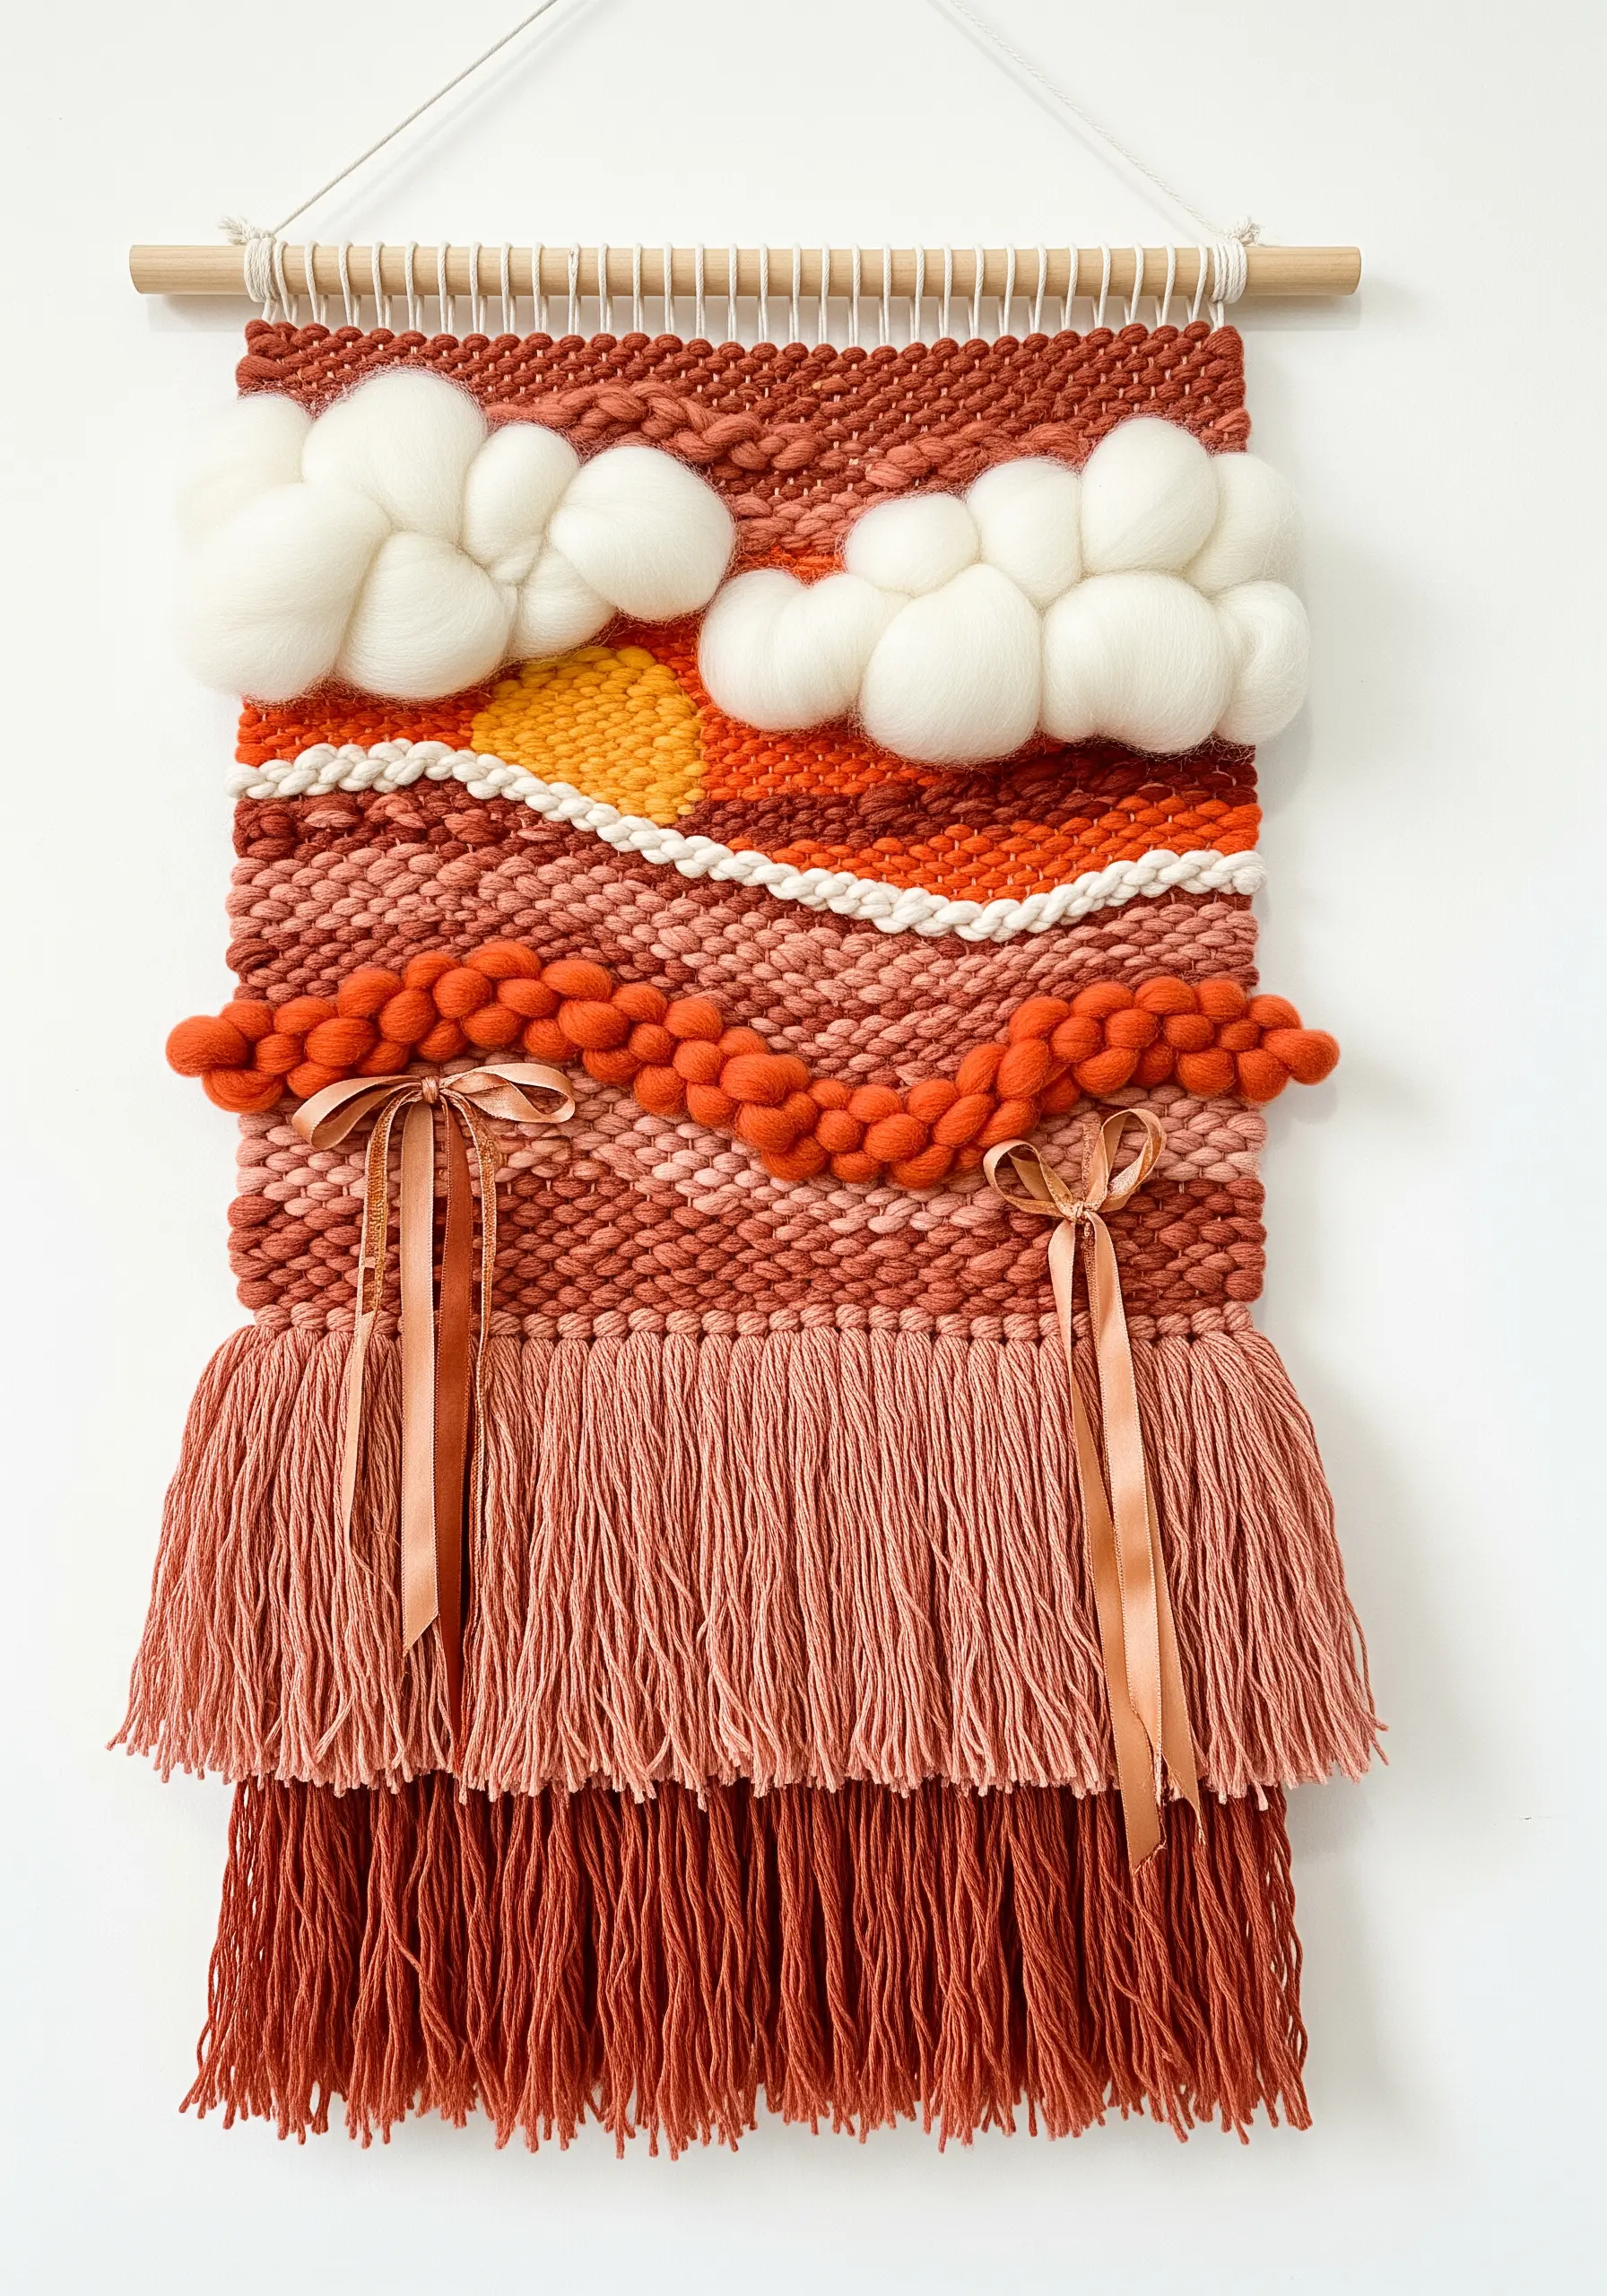
Move beyond flat tapestry by incorporating unspun wool roving to create three-dimensional forms, like clouds or rolling hills.
Instead of weaving it flat, gently lay the roving across the warp threads and secure it with a few passes of a thinner yarn underneath, allowing it to billow outward.
Use a soumak weave—a technique where the yarn wraps around the warp threads—to build raised, braid-like textures that define different sections of your landscape.
This contrast between the soft, diffused roving and the tightly defined soumak weave gives your piece incredible depth and tactile appeal.
3. Master Punch Needle Curves with Consistent Loops

For clean, graphic shapes in punch needle, the key is maintaining a consistent loop height and stitch direction.
Work your outlines first, punching every hole to create a dense, sharp border that prevents colors from bleeding into one another.
Fill the inner sections by following the curve of your outlined shape, which ensures the loops lie uniformly and catch the light evenly.
Using a muted, earthy color palette transforms playful rainbow motifs into a sophisticated piece of boho-inspired textile wall art that feels both modern and calm.
4. Design a Garland with Rhythmic Texture
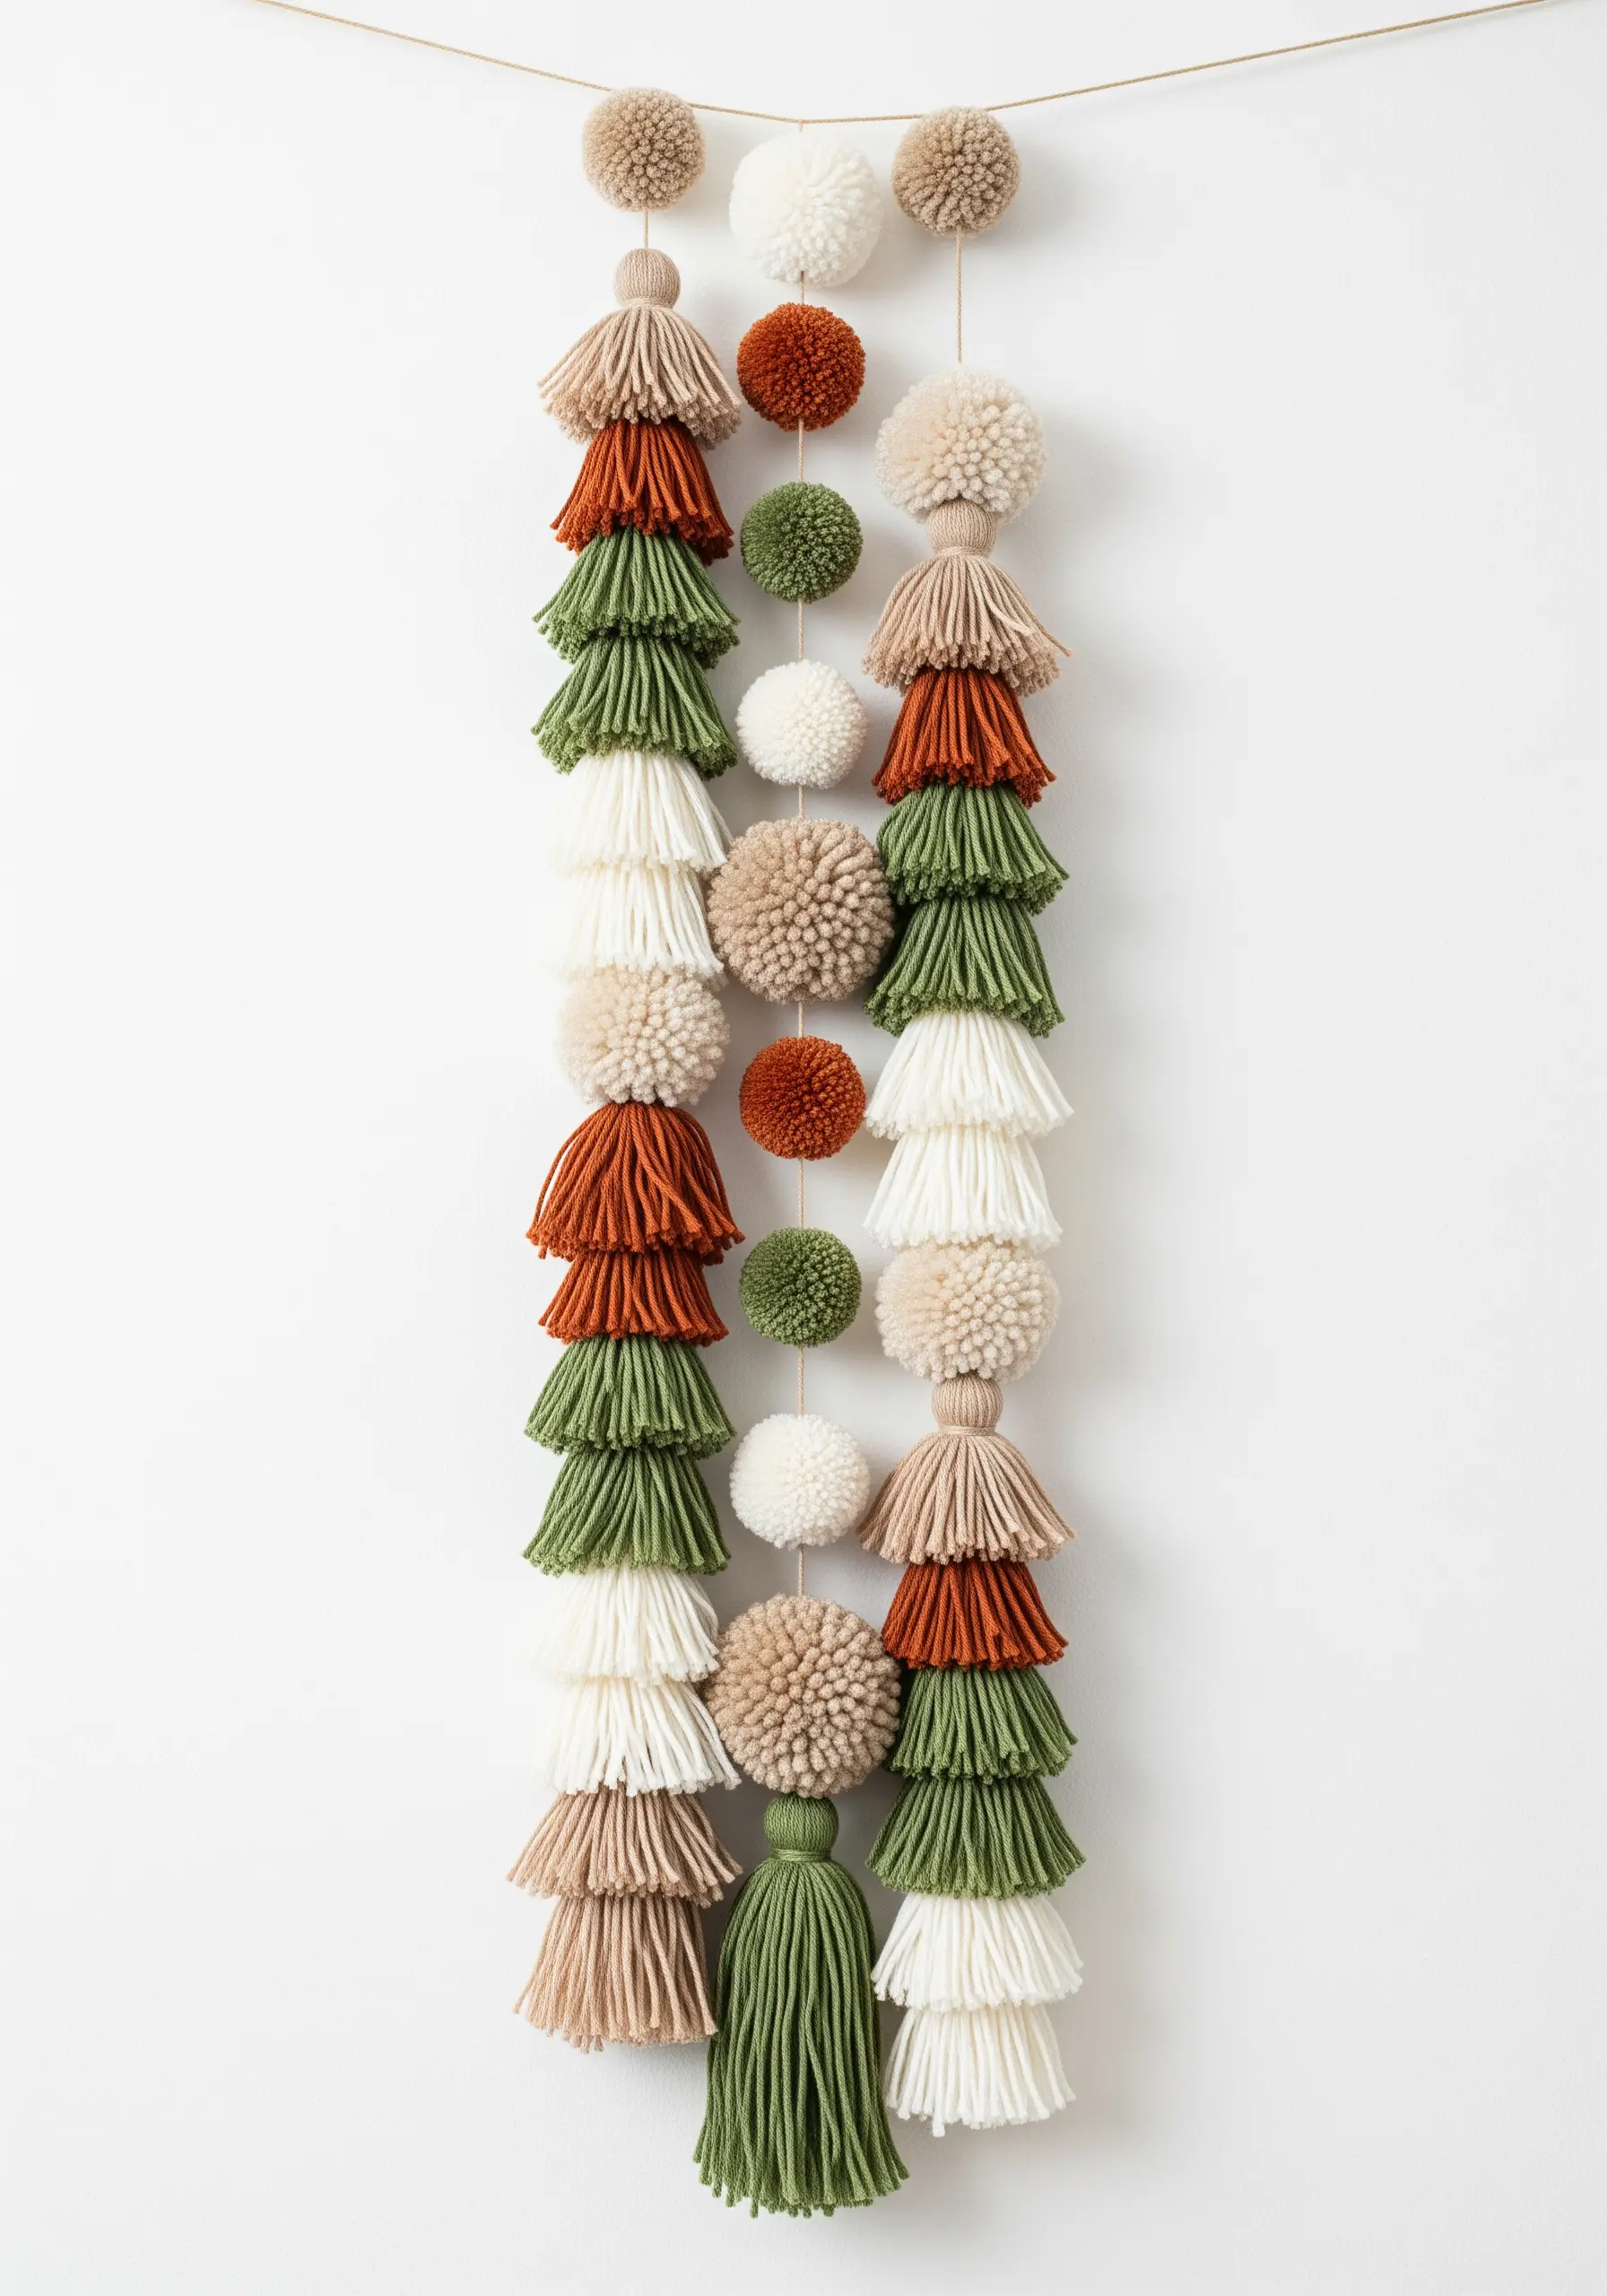
Elevate a simple garland by creating a repeating pattern of textures and shapes, such as alternating stacked tassels with fluffy pom-poms.
The visual rhythm makes the design feel intentional and cohesive, rather than random.
To create lush, full tassels, wrap your yarn around a piece of cardboard, tie it at the top, and cut the bottom loops; the more wraps, the denser the tassel.
Stick to a palette of three or four complementary colors—like olive, rust, and cream—to maintain a sophisticated, earthy aesthetic that works in any season.
5. Build a Rainbow with Layered Fiber Textures
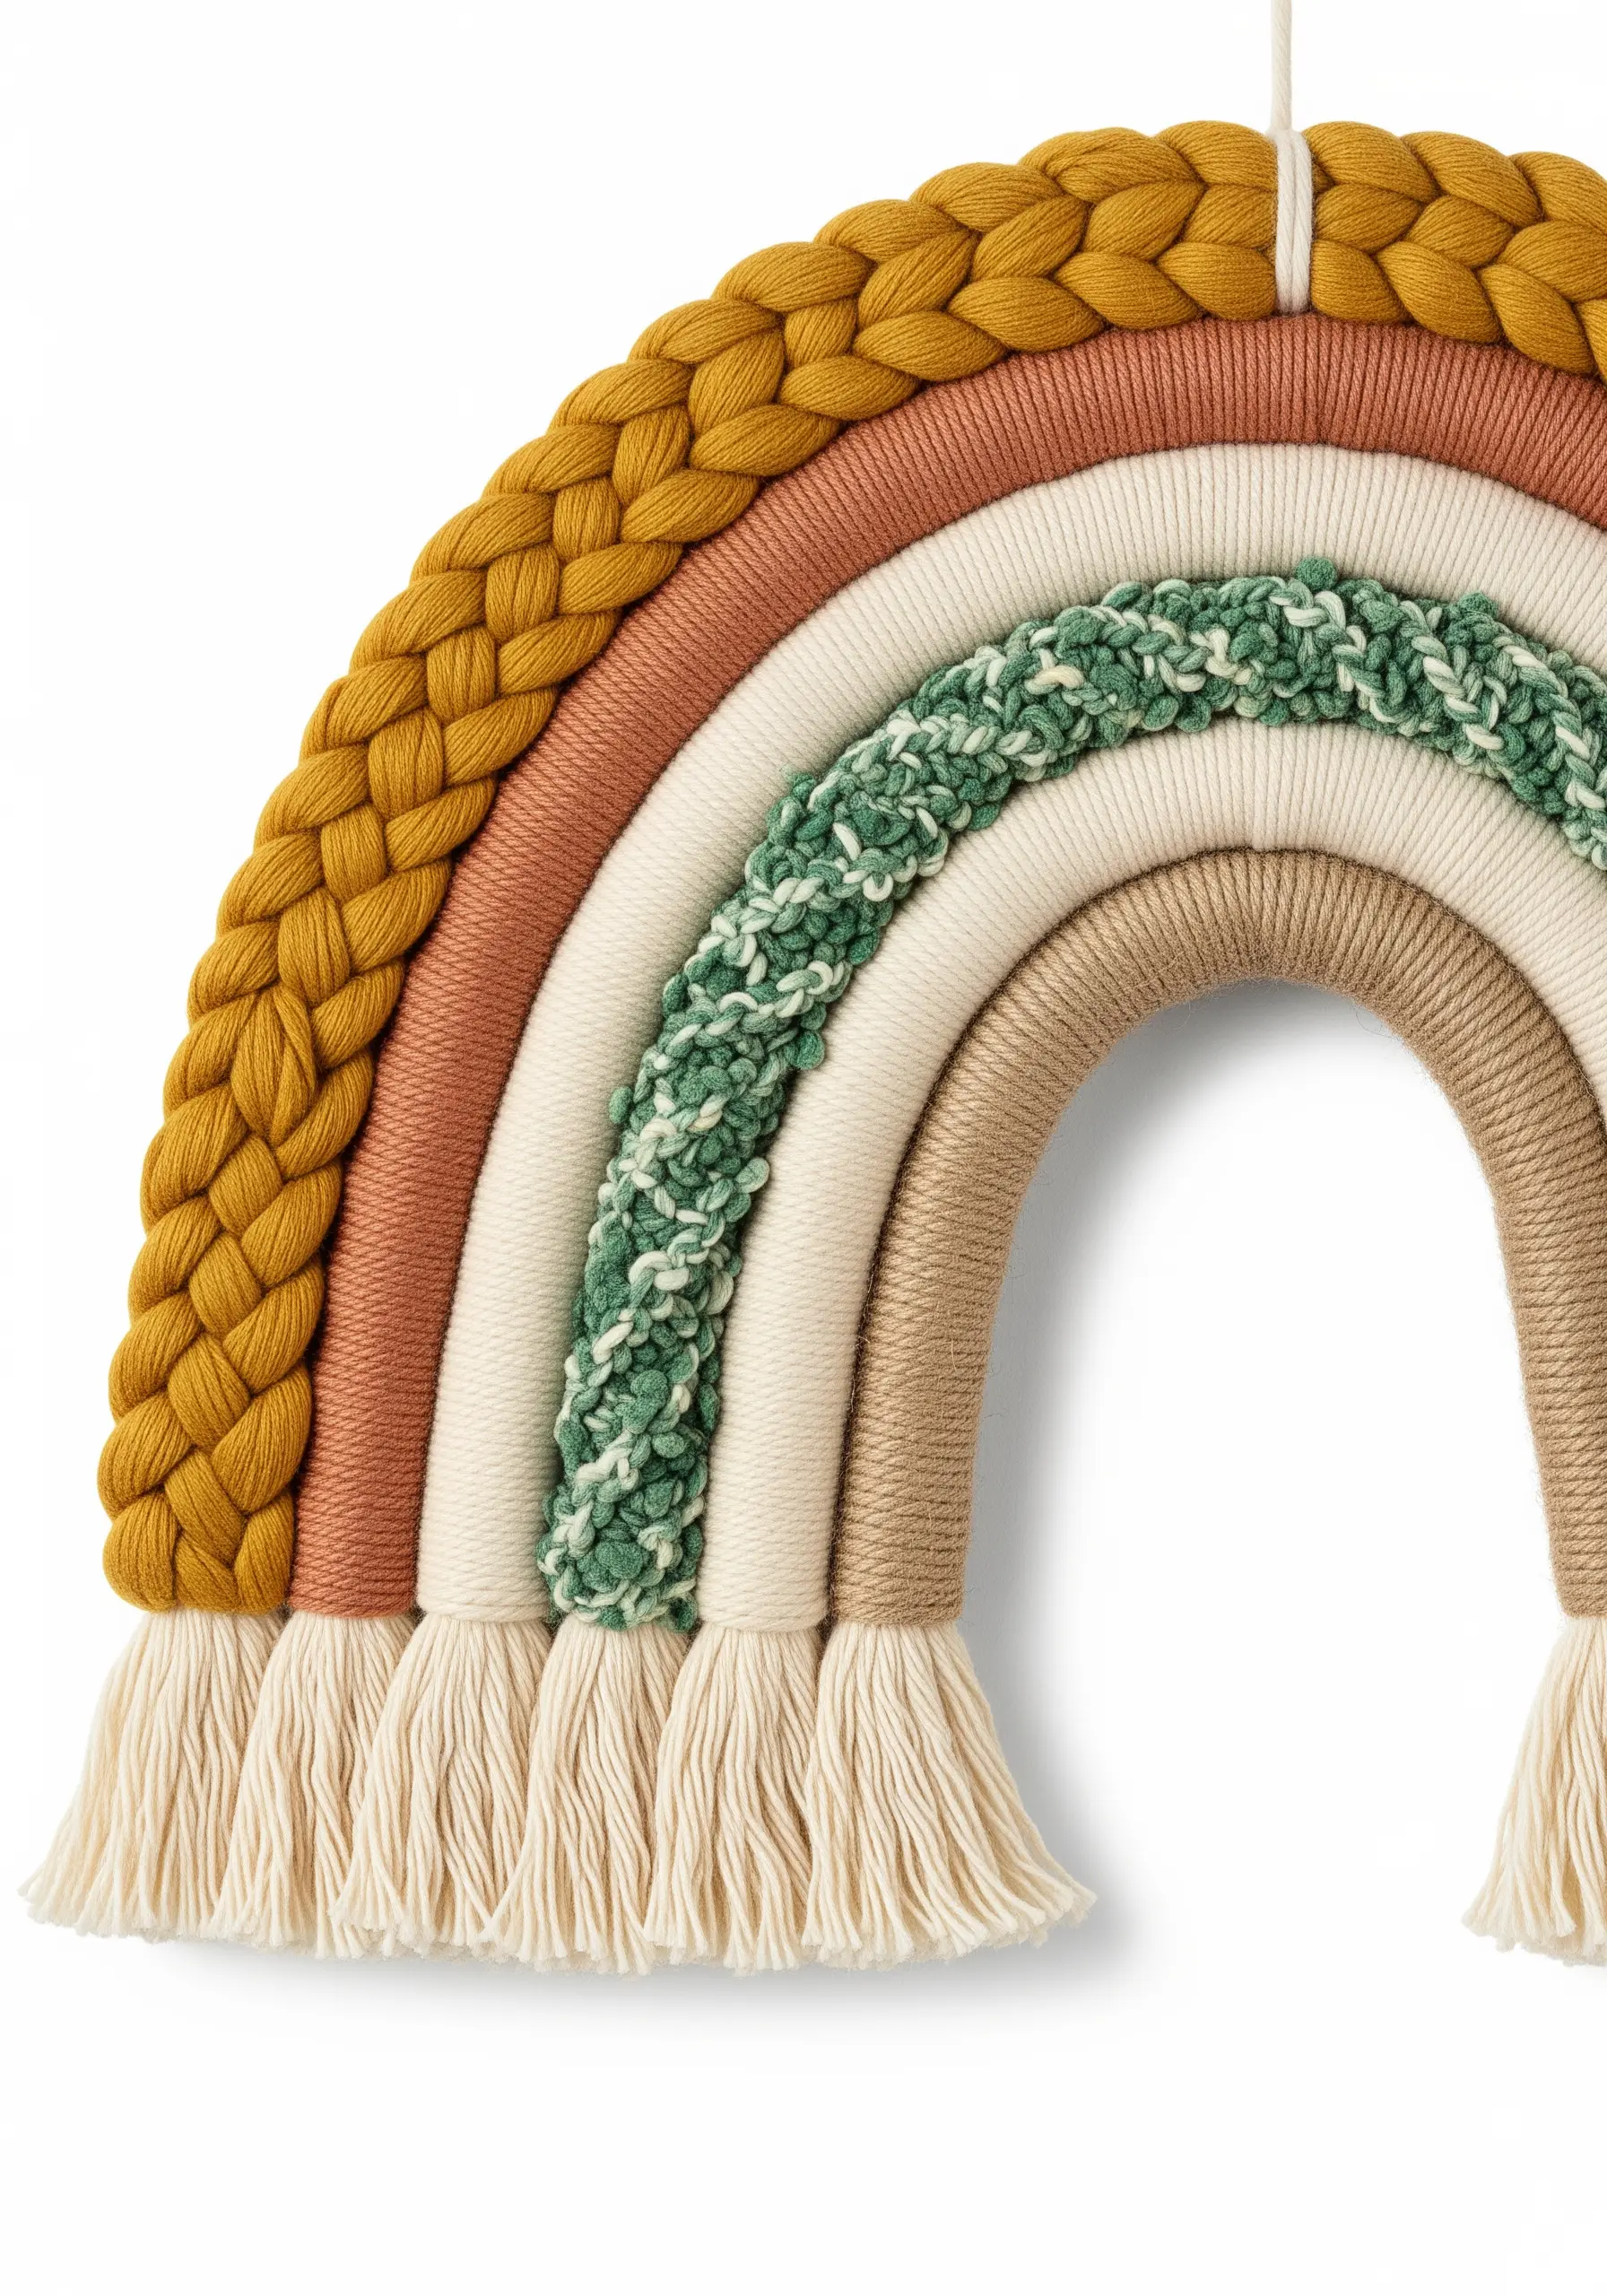
Construct a multi-dimensional rainbow by wrapping thick cotton rope with a variety of yarns instead of just one.
Combine a smooth merino wool, a nubby bouclé, a simple cotton, and even a braided cord to give each arch a unique tactile quality.
This technique turns a simple shape into a rich sensory experience and is one of the most playful mixed-fiber art projects for a colorful home.
When assembling, ensure the wrapped ropes are secured tightly together with a strong upholstery thread to maintain a clean, uniform curve.
6. Integrate Natural Elements into Macrame Mandalas
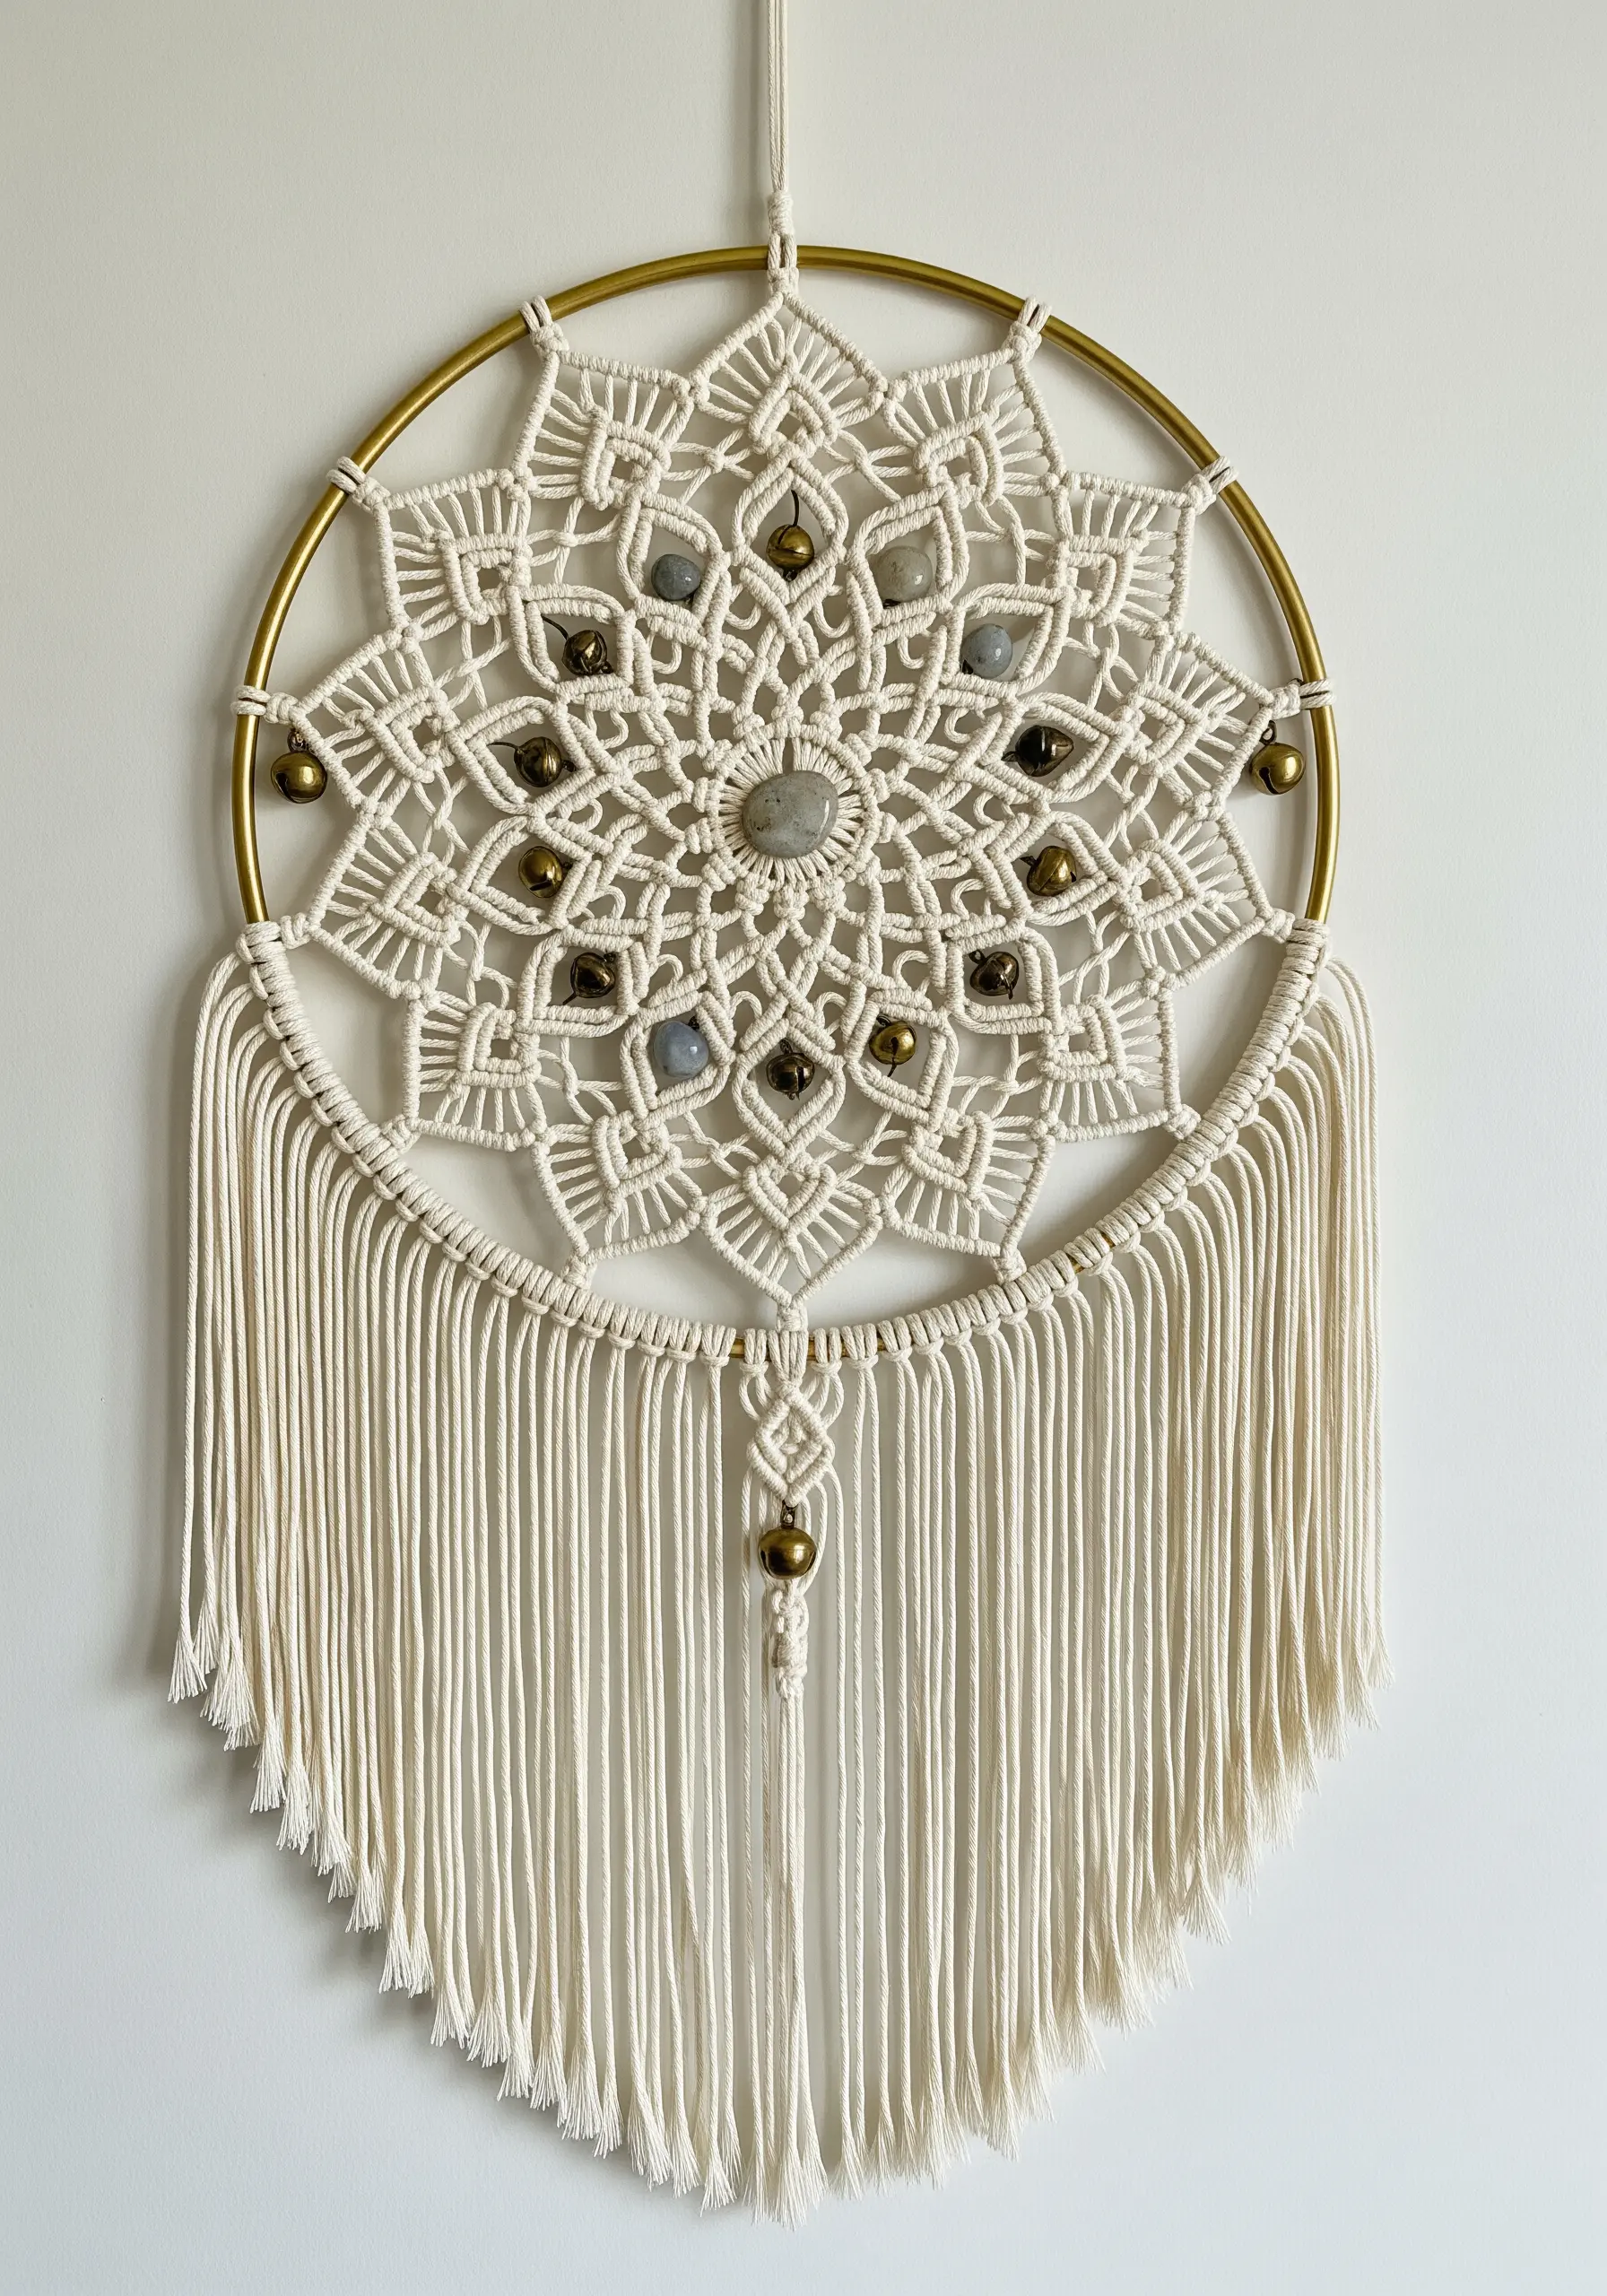
Enhance a macrame mandala by incorporating beads, stones, or small metal bells directly into your knotting patterns.
Plan your design on paper first, marking where you want to add embellishments to ensure the final piece is symmetrical and balanced.
To add a bead, simply thread it onto your filler cords before tying the next knot around it, locking it securely in place.
This fusion of soft cotton and hard, natural elements adds an earthy, spiritual quality that elevates the design beyond simple knots.
7. Create Sharp Geometric Forms with a Latch Hook
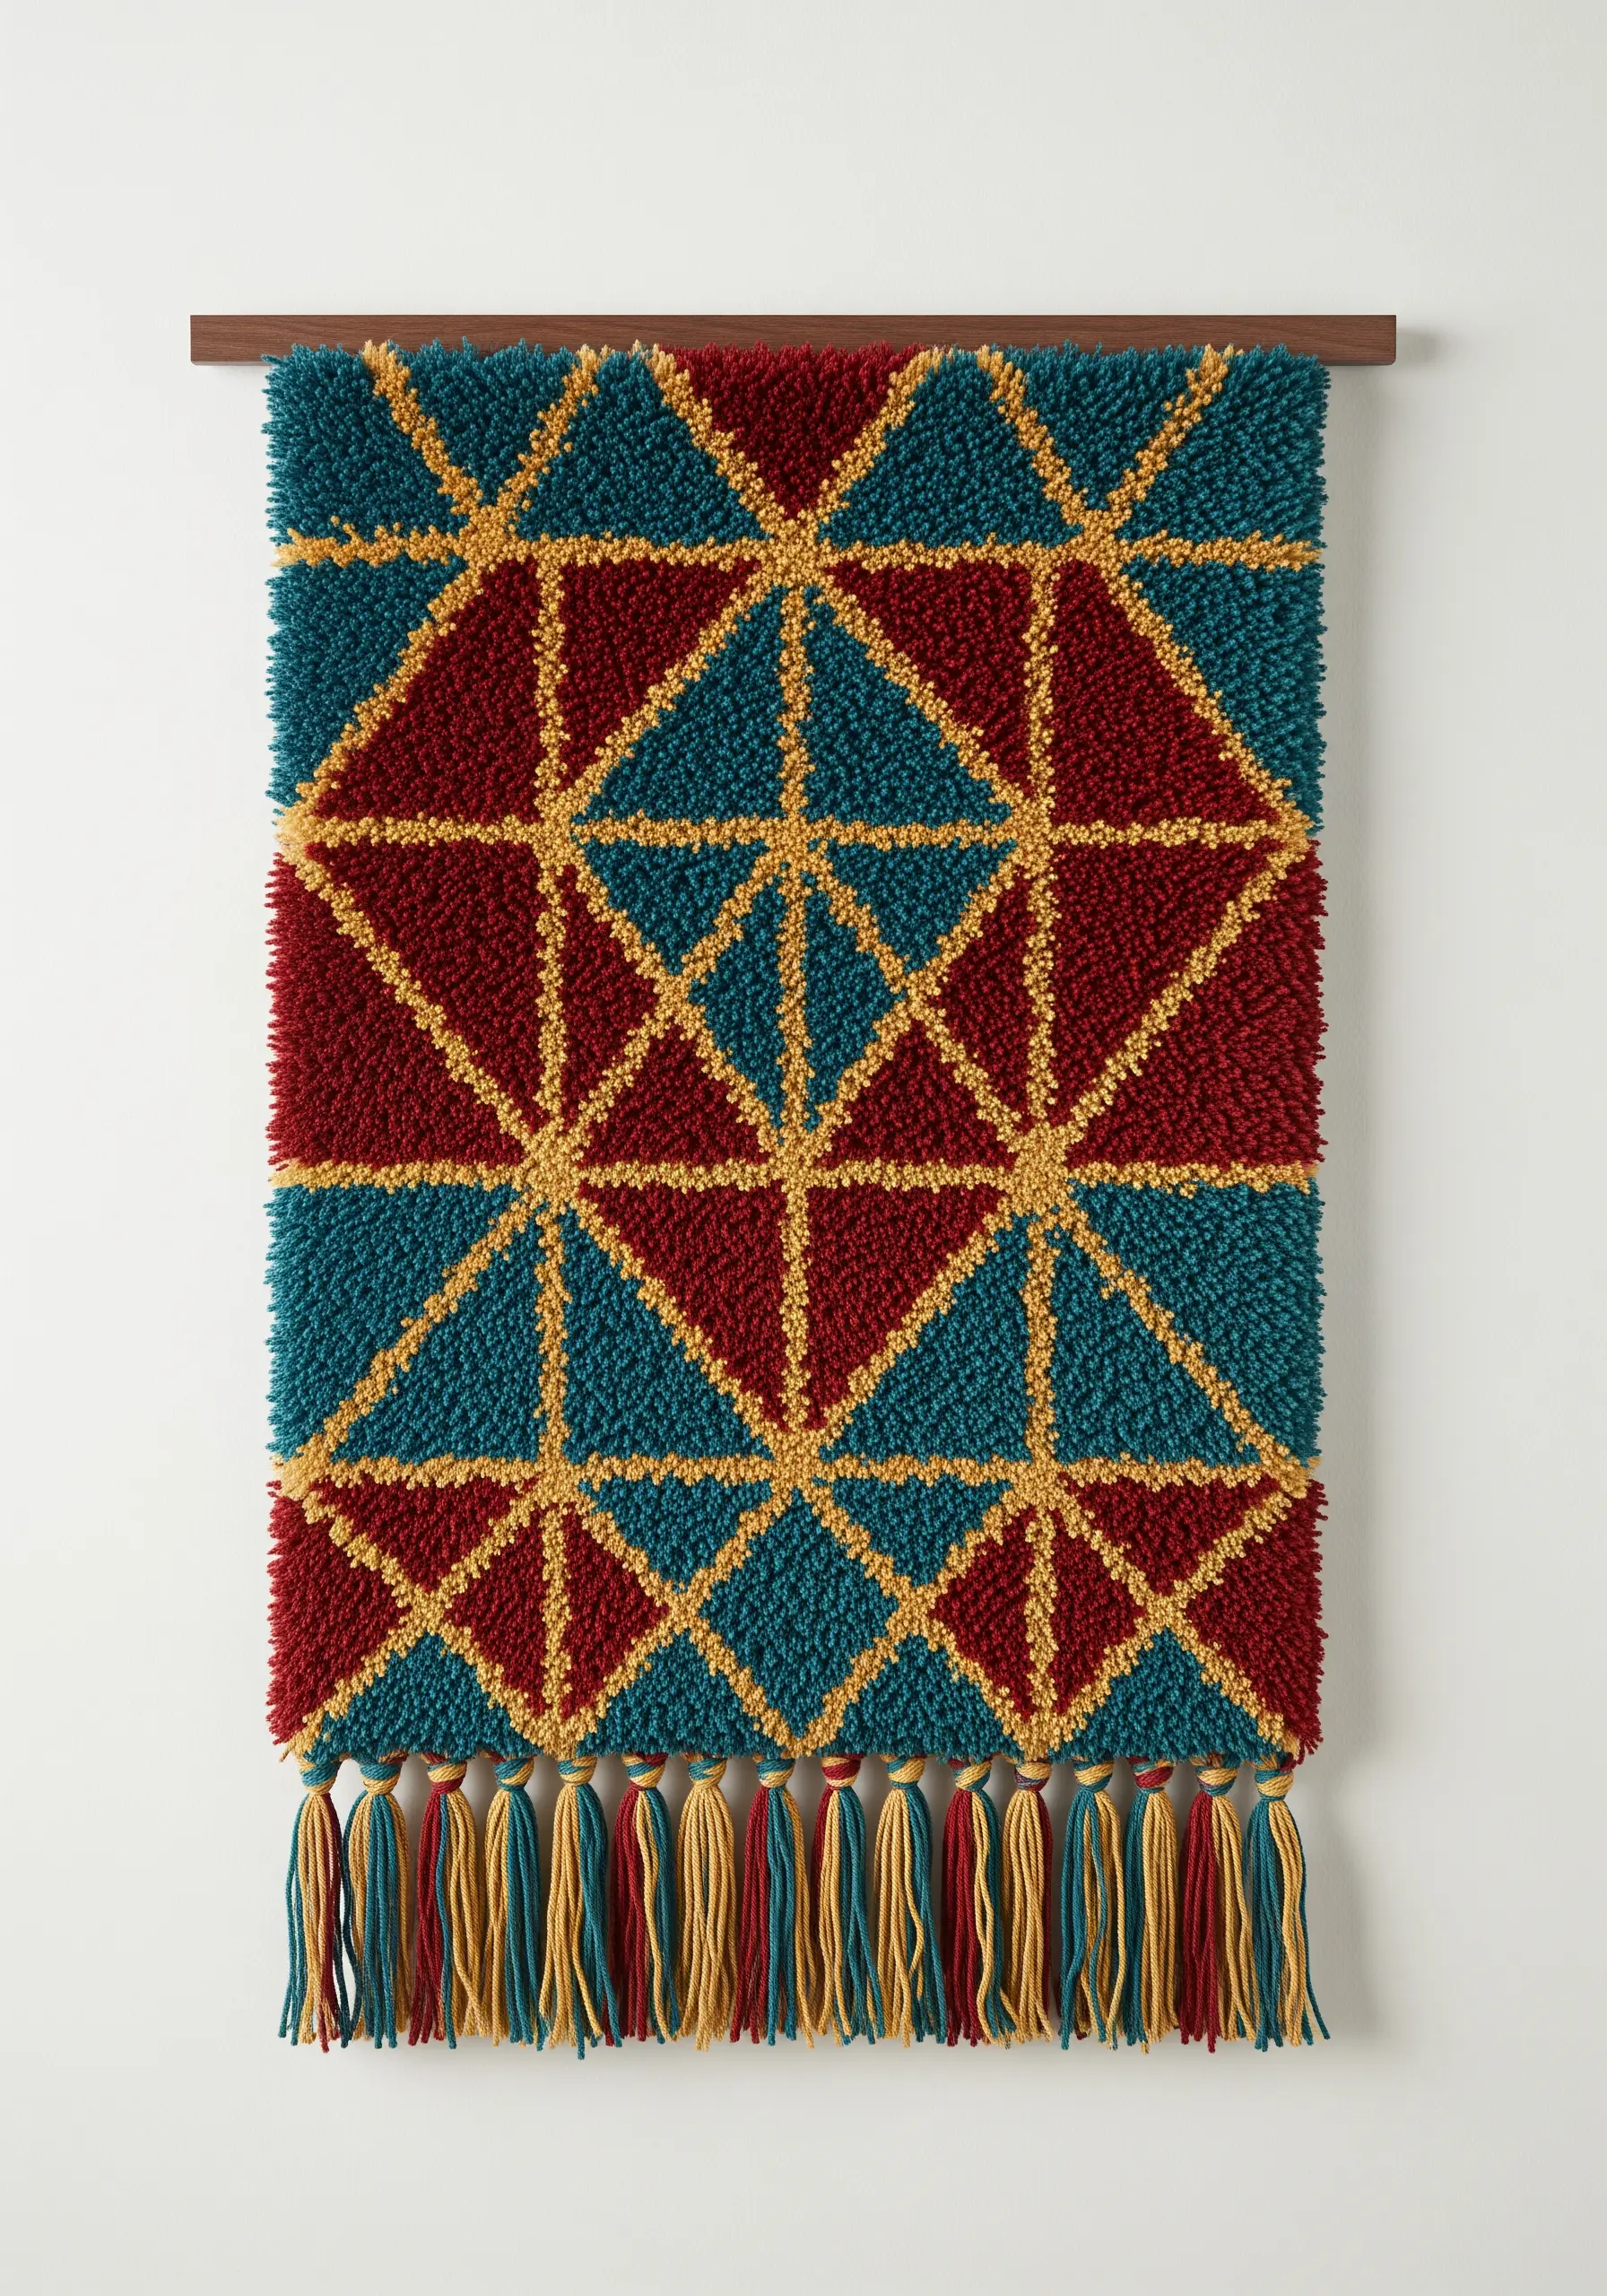
For a plush, rug-like texture with crisp geometric lines, use a latch hook technique with pre-cut yarn bundles on a canvas grid.
The grid provides a built-in structure that makes achieving sharp, clean edges between color-blocked triangles effortless.
Select a high-contrast color palette, such as deep teal, burgundy, and gold, to make the geometric pattern pop.
This method is faster than punch needle for large color-blocked areas and creates an incredibly dense, satisfying texture.
8. Blend Weaving and Macrame for Dynamic Wall Art

Combine the structured patterns of macrame with the freeform softness of weaving in a single piece for ultimate textural contrast.
Start with a top section of macrame square knots, then leave the central warp threads open for a woven element.
Use thick, unspun wool roving to weave undulating, organic shapes that flow across the center, creating a soft focal point.
Finish with another section of macrame to frame the woven center, and let the remaining cords hang loose or curl them with water for a wavy finish.
9. Craft Elegant Macrame Feathers with Precise Combing
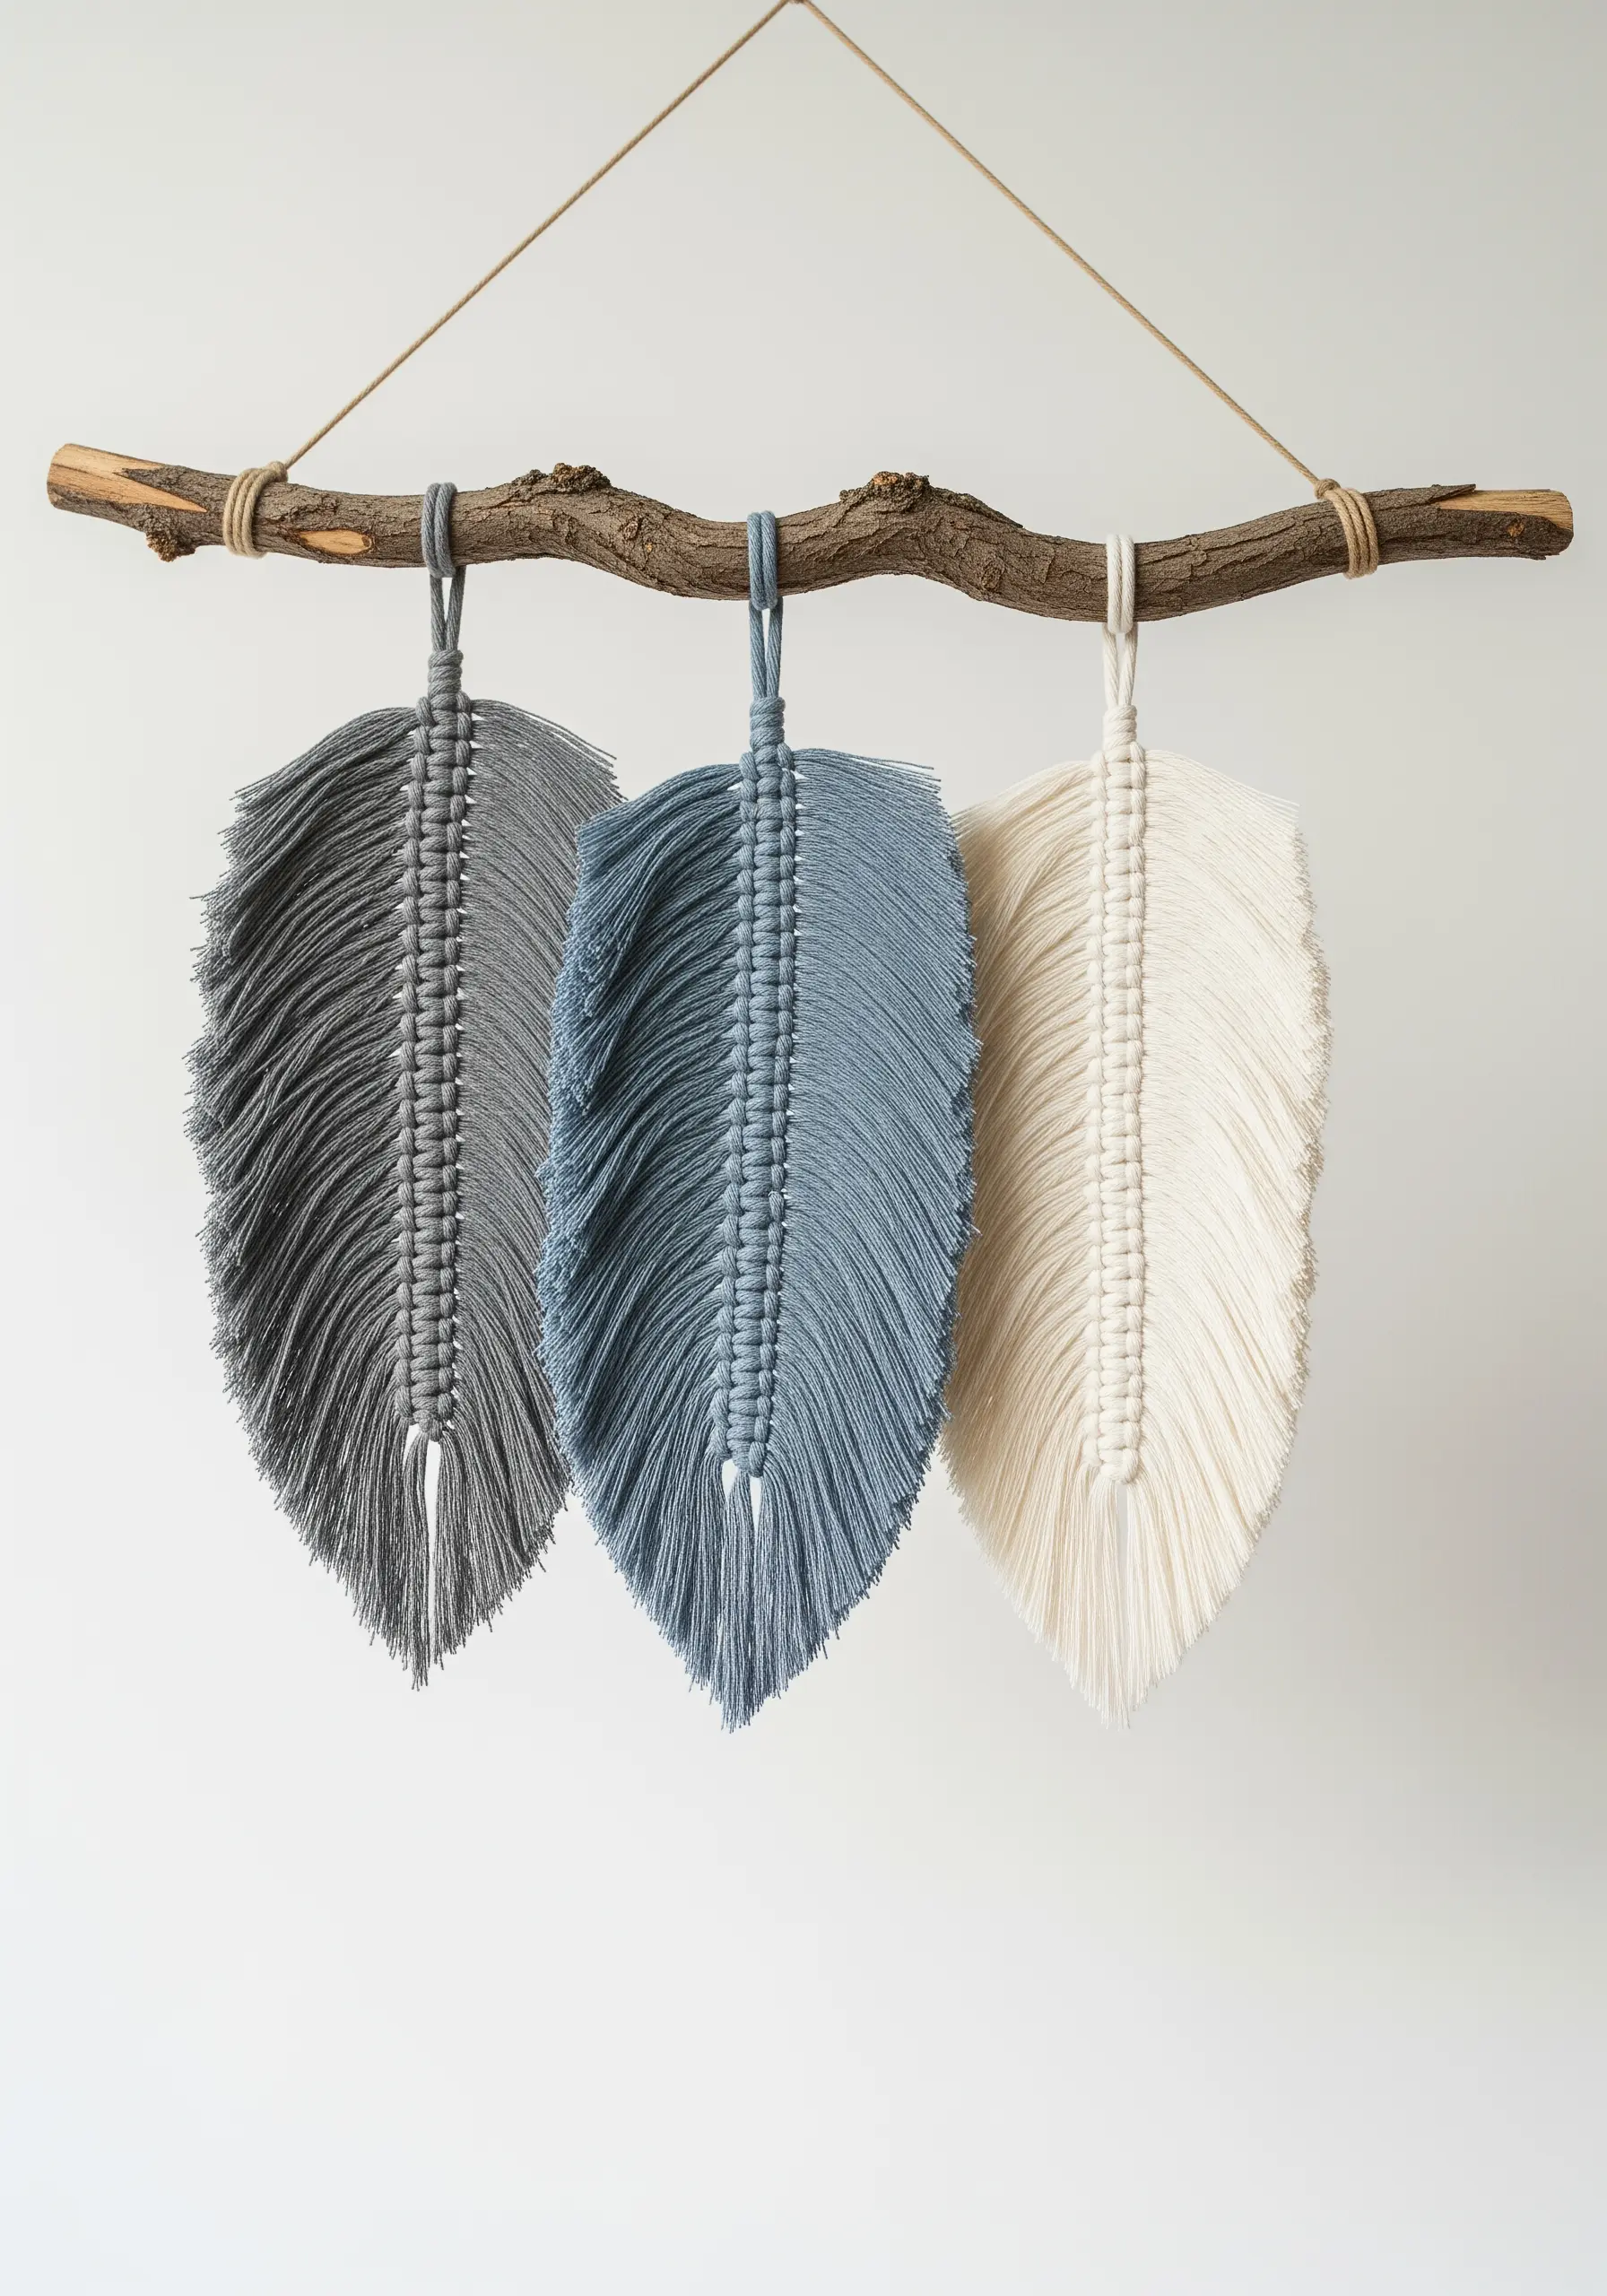
To create perfectly shaped macrame feathers, the secret is in the brushing and trimming, not just the knots.
Use a single-twist cotton string, as it’s easier to unravel and brush out into a soft, uniform fringe than braided cord.
After tying your knots along a central spine, use a fine-tooth pet brush to comb the fringe from the center outwards until it’s completely smooth.
Finally, lay the feather flat and use sharp fabric scissors to trim it into a clean, leaf-like shape. A light mist of stiffening spray will help it hold its form.
10. Weave a Vibrant Ojo de Dios with Tension Control
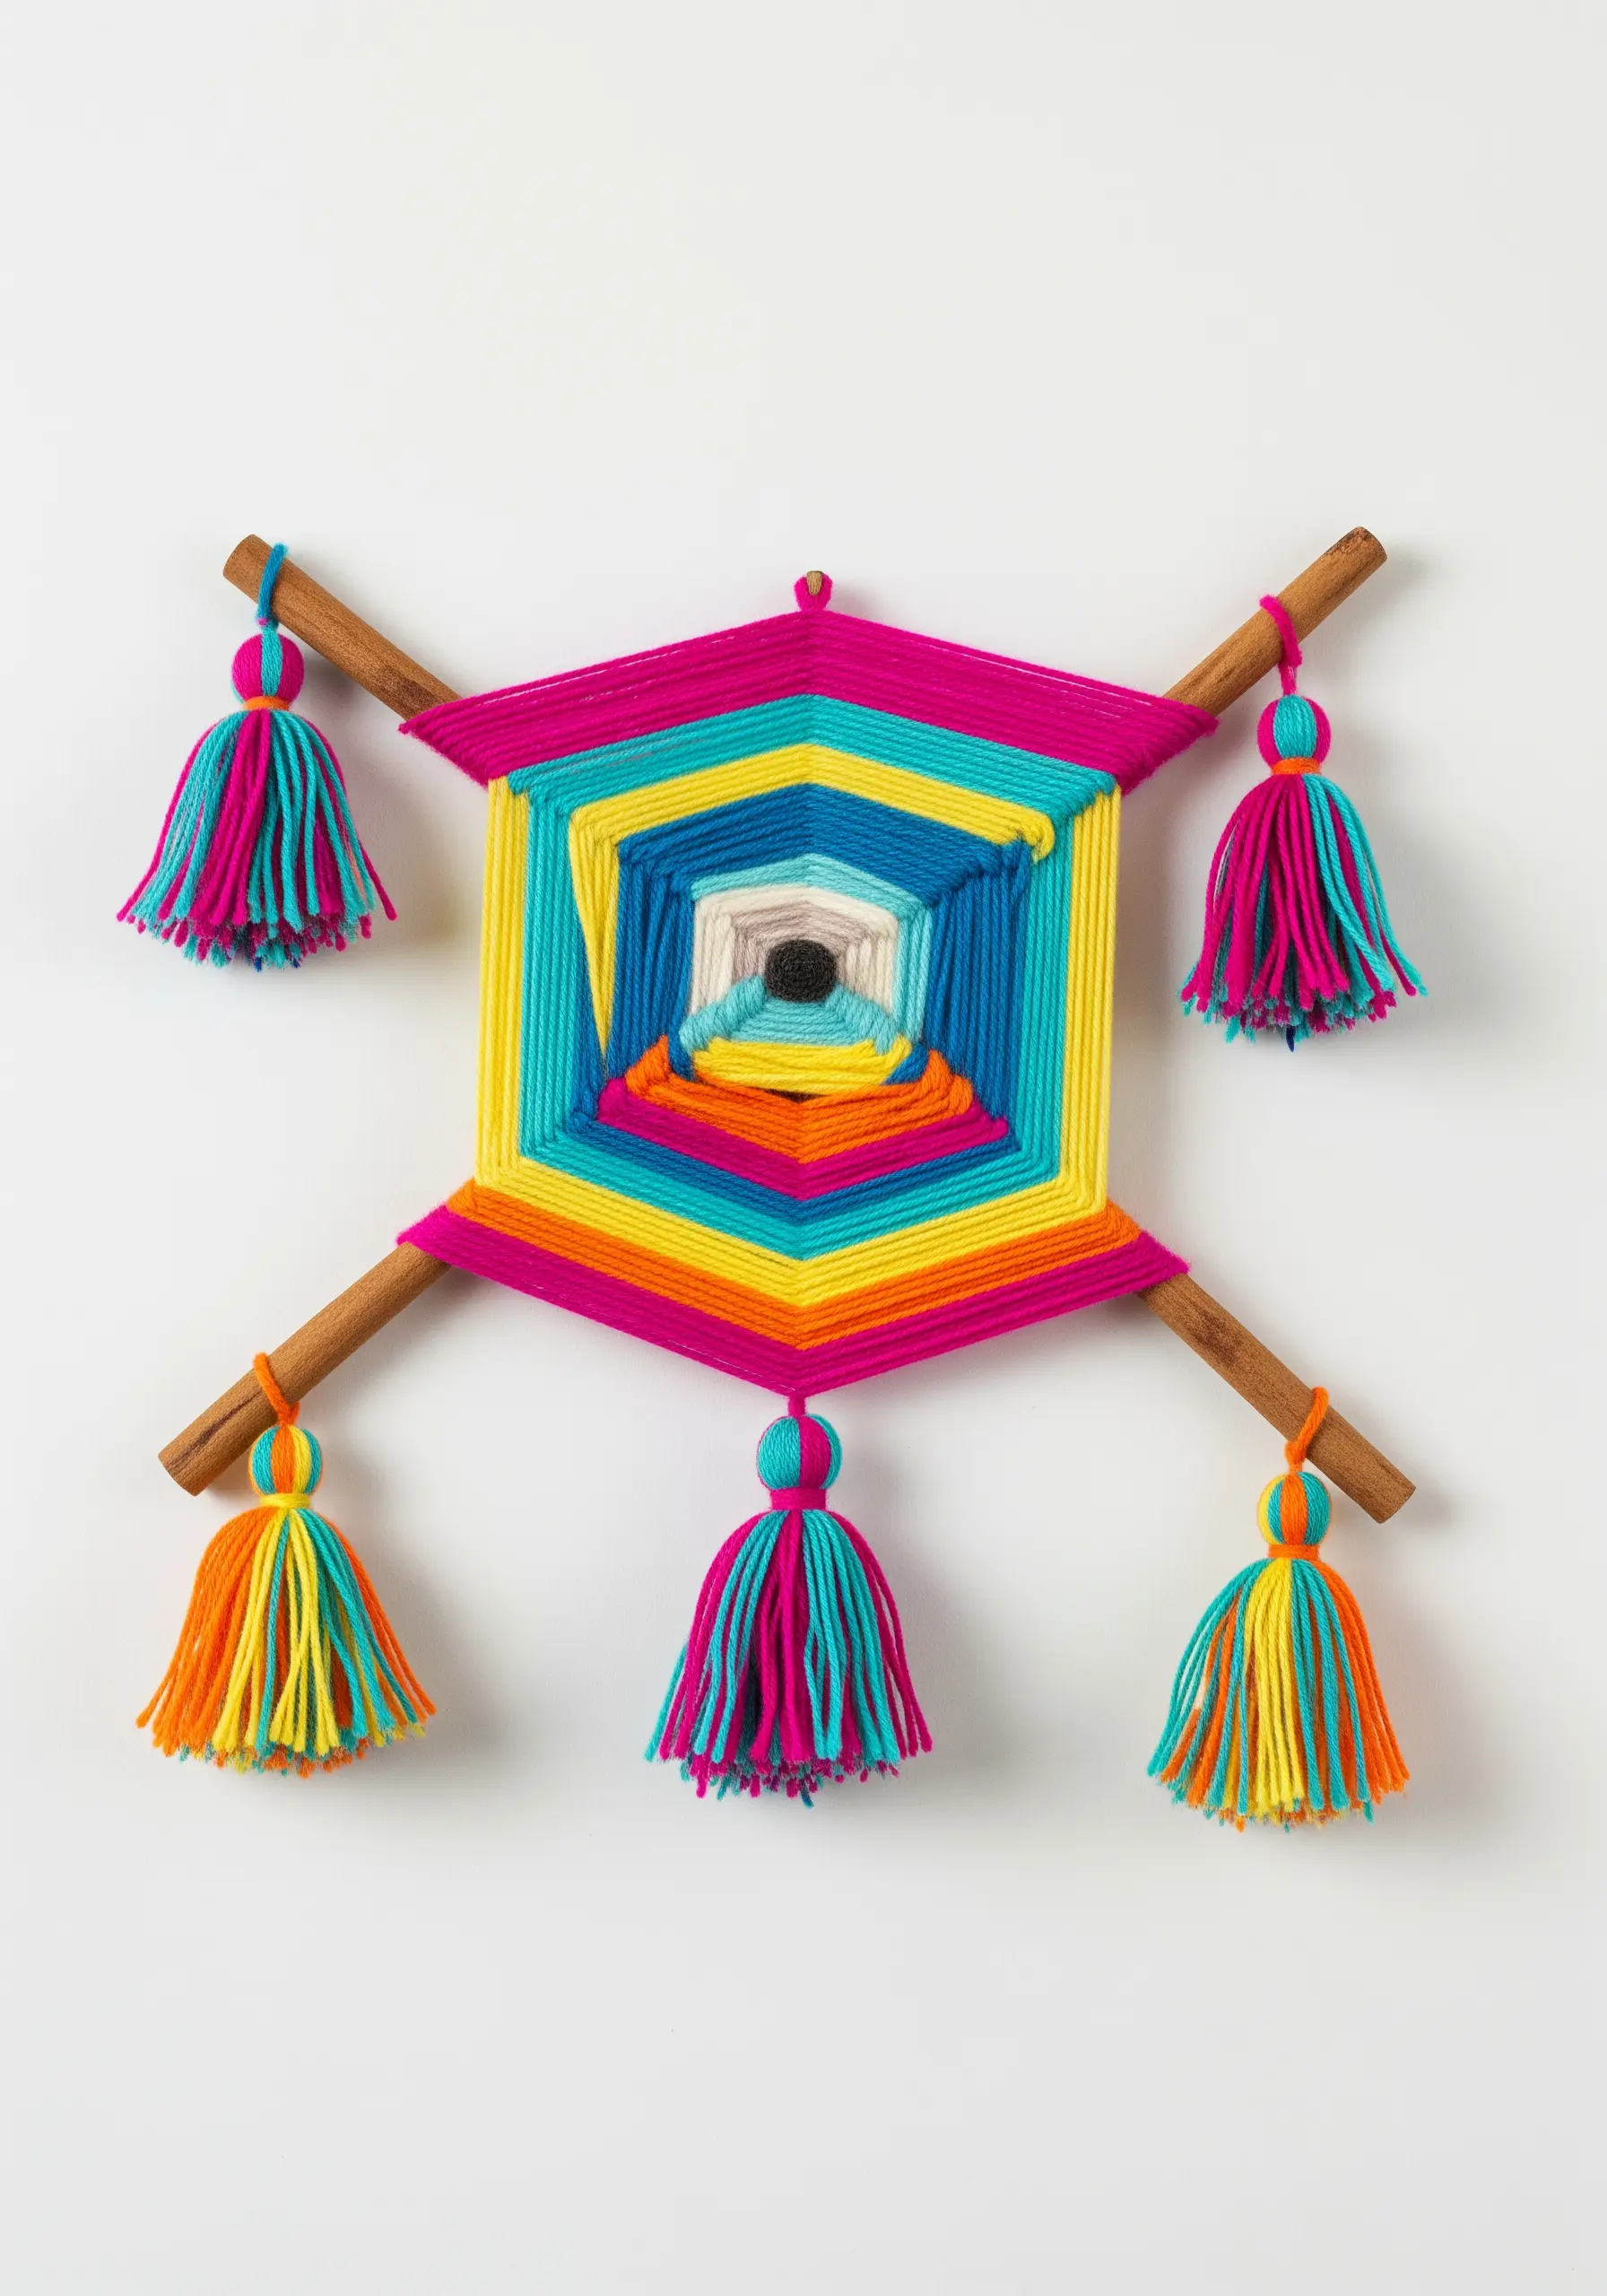
Create a mesmerizing God’s Eye (Ojo de Dios) by mastering consistent tension as you wrap your yarn around crossed dowels.
Start by wrapping the yarn in a figure-eight pattern around the center to secure the sticks, then begin wrapping over and around each stick in a clockwise or counter-clockwise motion.
Keep the yarn taut, but not so tight that it bends the dowels. This ensures your lines remain straight and the final shape is a perfect square or octagon.
Change colors frequently to create vibrant, concentric patterns, and finish the ends with multi-colored tassels for a playful, bohemian touch.
11. Make a Statement with Minimalist Color Blocking
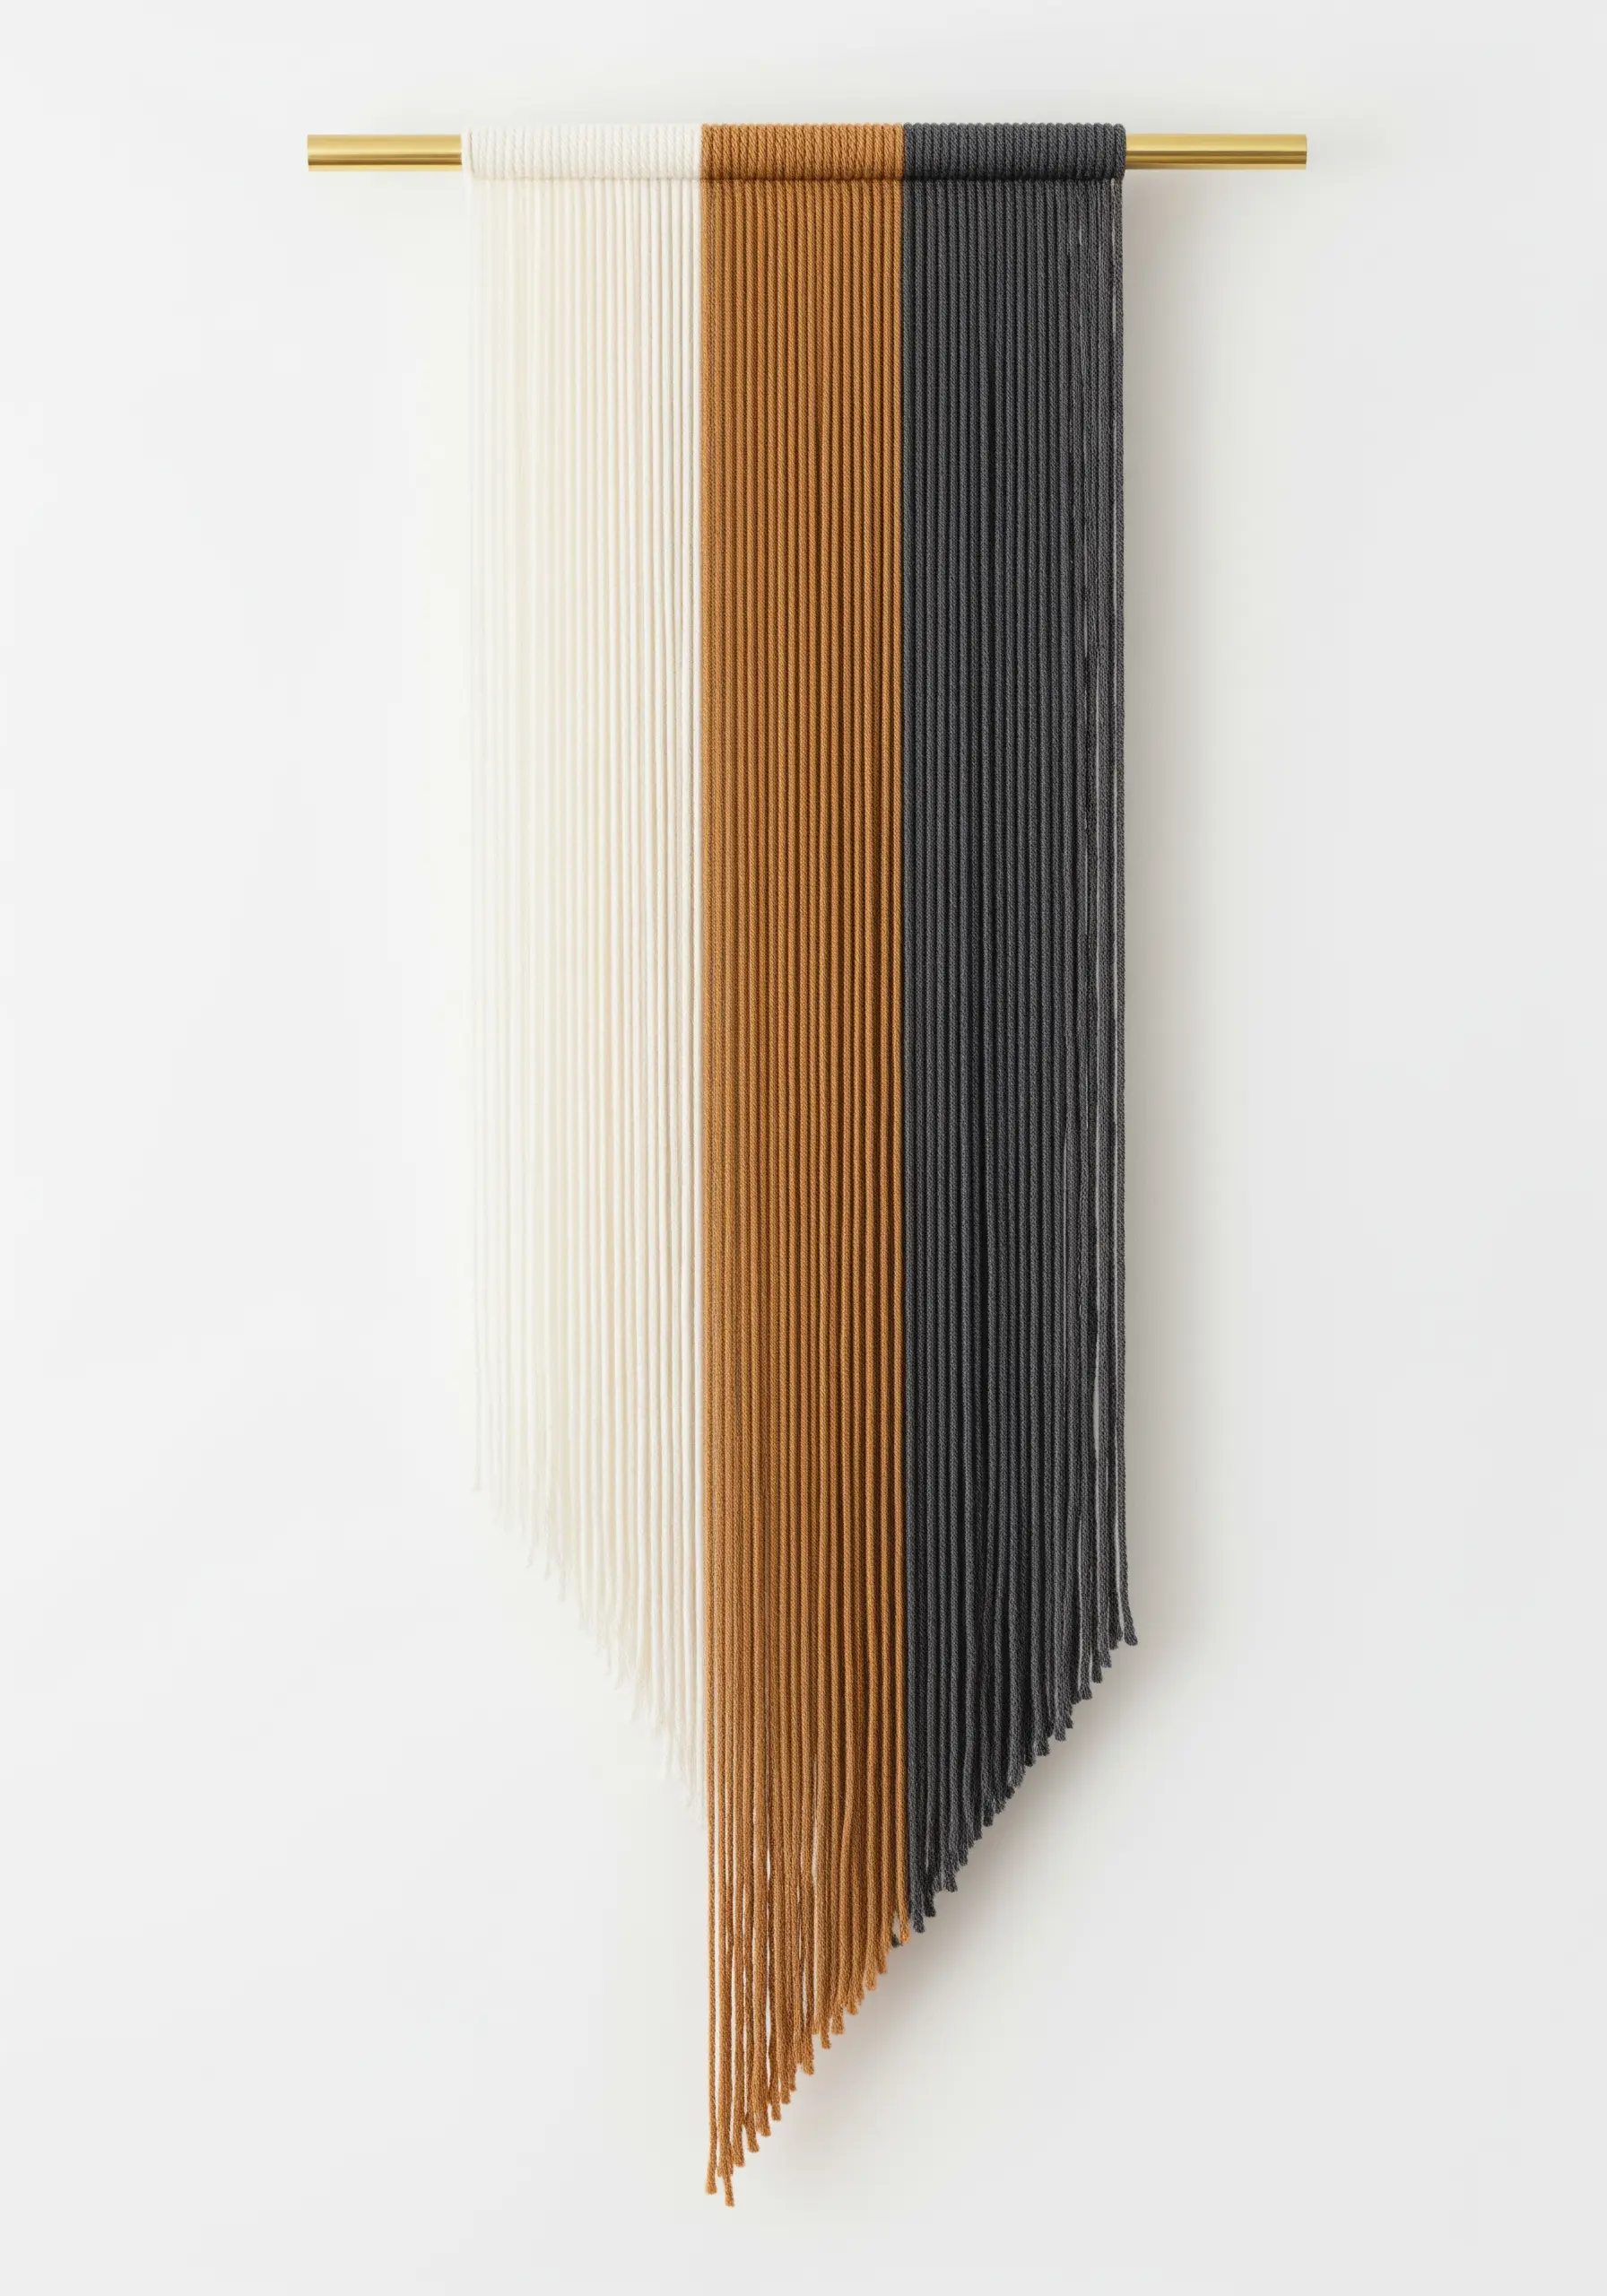
Achieve a dramatic, modern look with a simple color-blocked wall hanging that focuses entirely on yarn and form.
Instead of knots, attach long, equal lengths of yarn directly to a dowel using a Lark’s Head knot, placing each color in a distinct block.
Use a weighted ruler and a rotary cutter to trim the bottom at a sharp, clean angle for a professional finish.
This design’s power comes from its simplicity, allowing the neutral tone thread palettes and clean lines to make a sophisticated statement.
12. Design a Dreamcatcher with Asymmetrical Balance

Reimagine the traditional dreamcatcher by creating an asymmetrical design that feels organic and modern.
Weave a partial web on a metal hoop, leaving negative space that draws the eye and feels intentionally minimalist.
Instead of uniform feathers, attach a mix of materials at varying lengths: leather strips, thick wool roving, braided yarn, and even a natural element like a seashell.
This approach transforms the dreamcatcher into a piece of mixed-fiber wall hangings that is both delicate and grounded.
13. Explore Chunky Knits Beyond Blankets
Use the technique of arm knitting or finger knitting with jumbo tube yarn to create a small, sculptural wall hanging.
Cast on just a few stitches onto a thick wooden dowel and knit several rows of a simple stockinette stitch.
The oversized stitches create immediate visual impact and a soft, cloud-like texture that feels cozy and contemporary.
This is a perfect weekend project, as the chunky yarn allows you to create a substantial piece of art in under an hour.
14. Construct a Geometric Mobile with Felt and Fiber
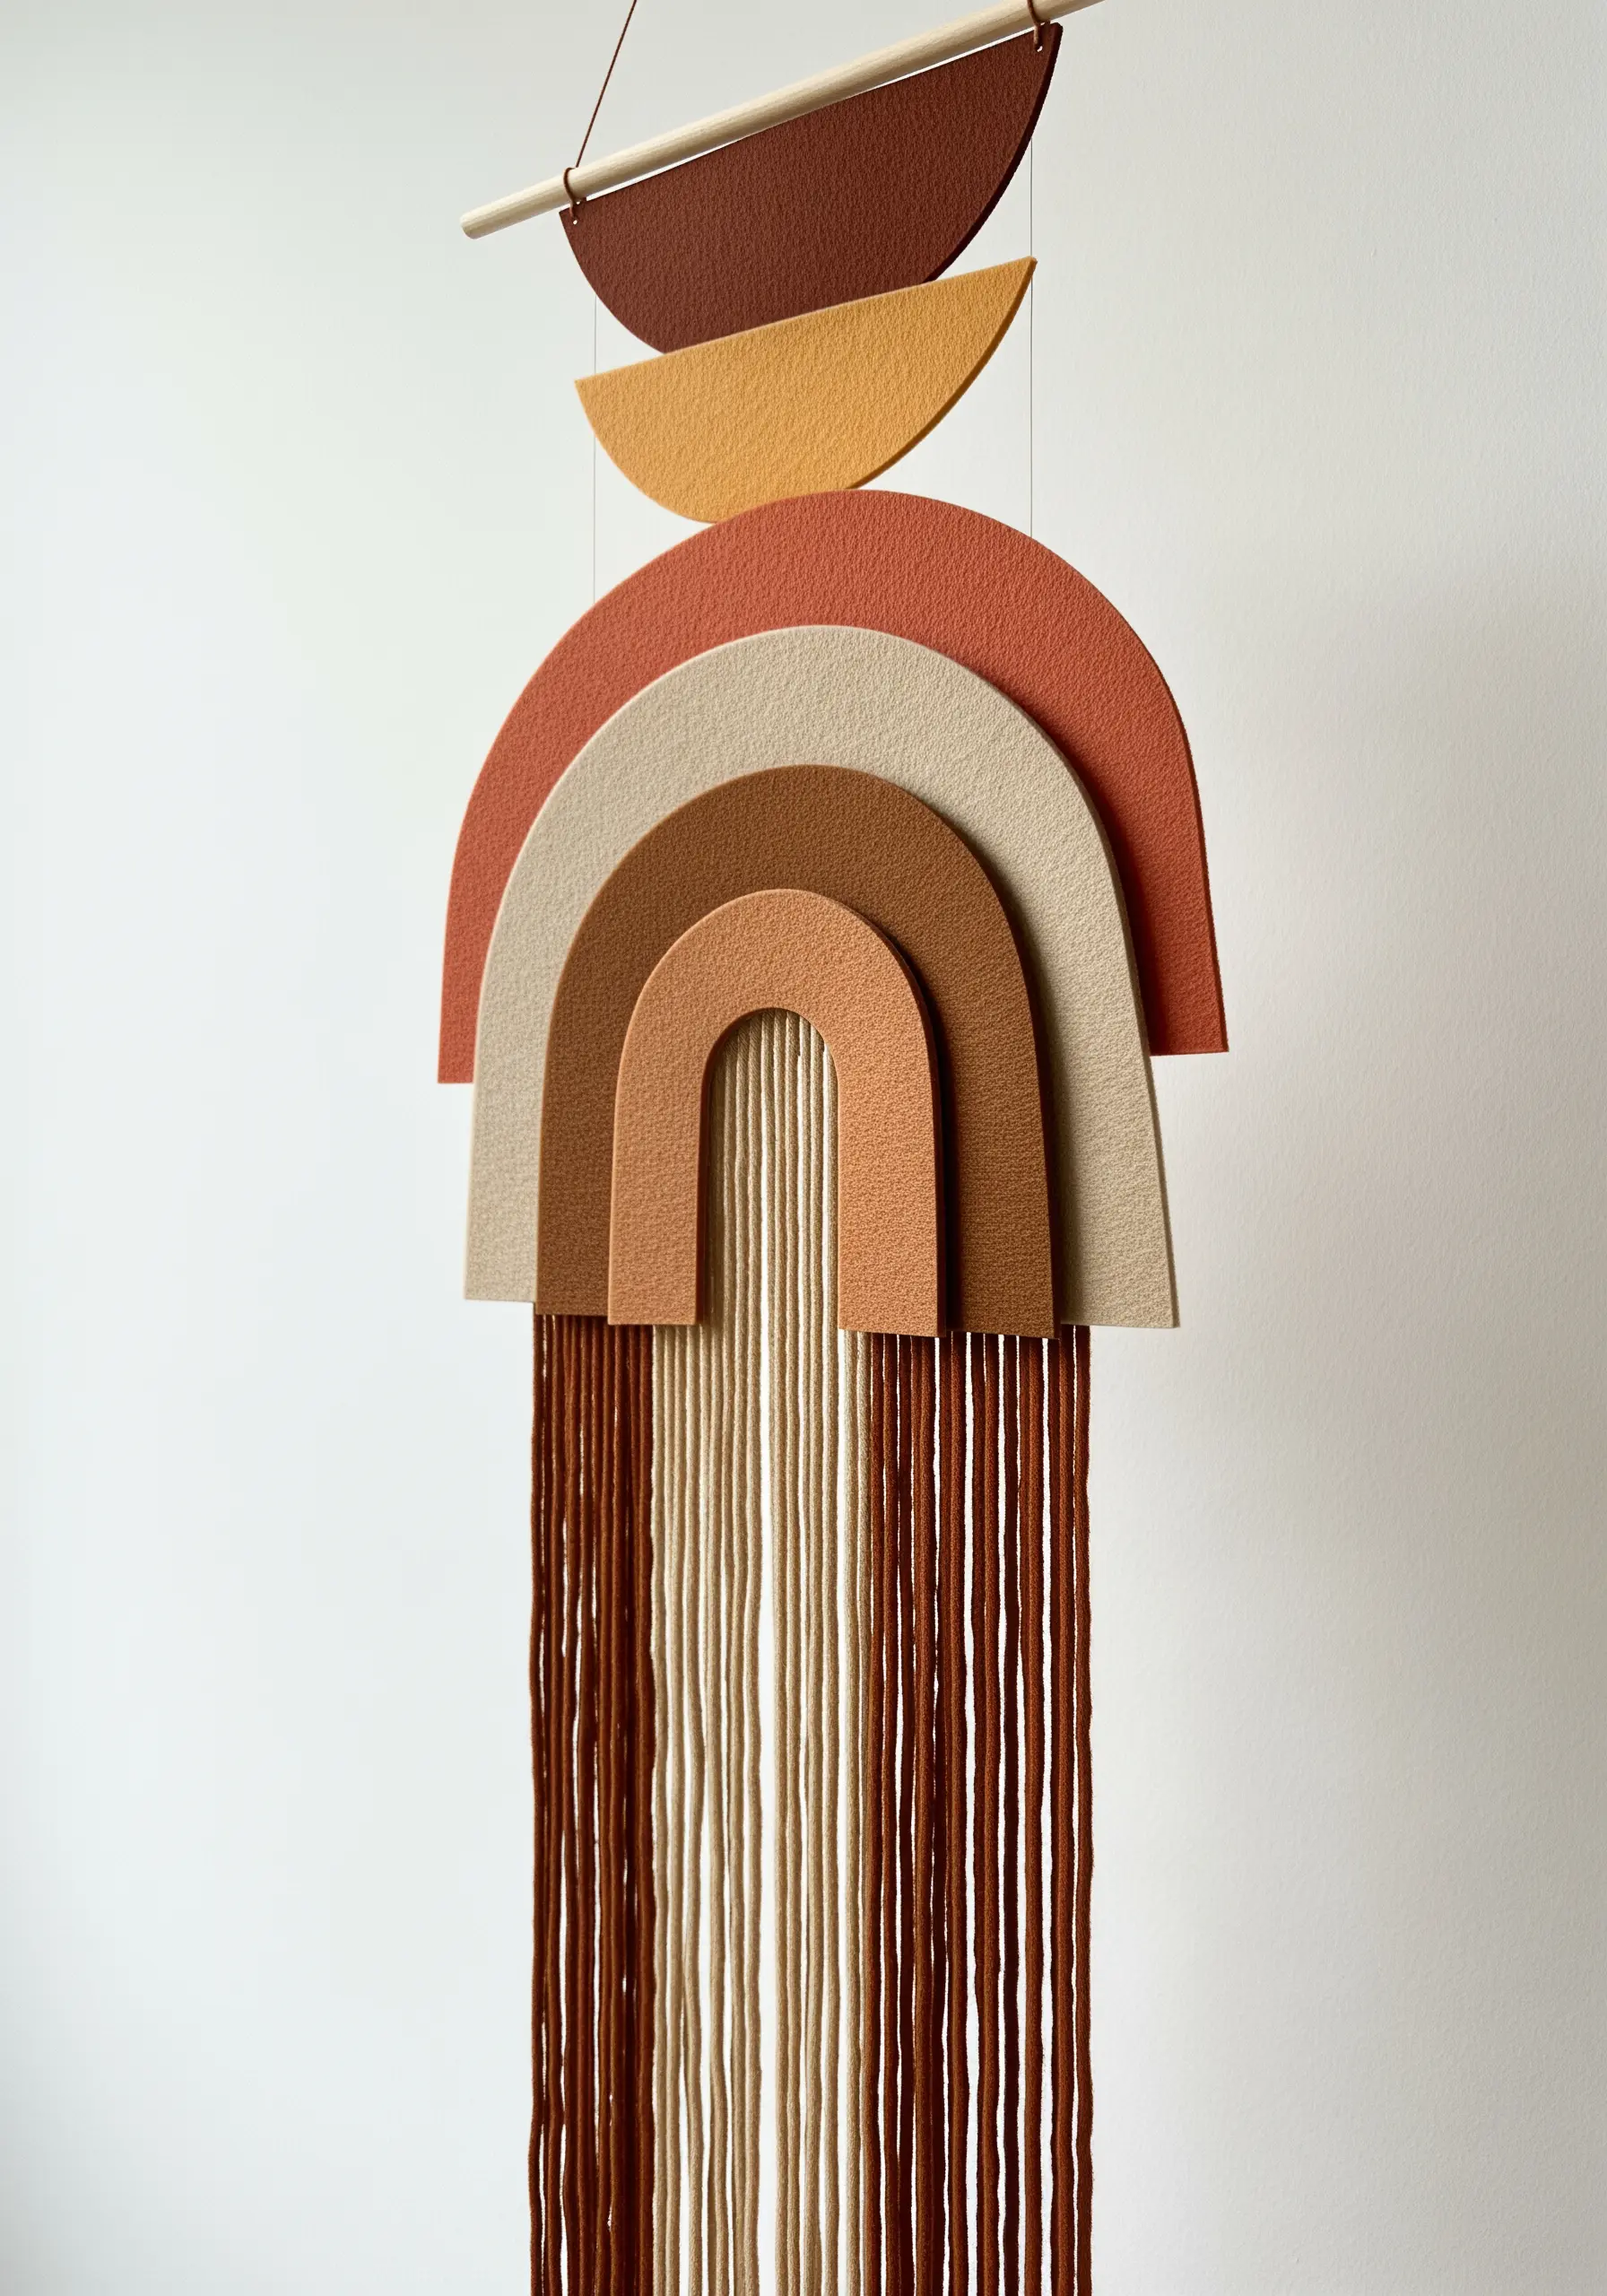
Combine the soft texture of yarn with the clean lines of cut felt to build a balanced, modern mobile.
Use a rotary cutter and a ruler to cut precise geometric shapes—semicircles, arches, and circles—from stiffened felt sheets.
Assemble the pieces using strong thread, interspersing the felt shapes with yarn tassels or fringe to add movement and softness.
The key to a successful mobile is balance; lay out your design on a flat surface first to ensure the visual weight is distributed evenly before hanging.
15. Add an Ombré Effect with Dip-Dyeing
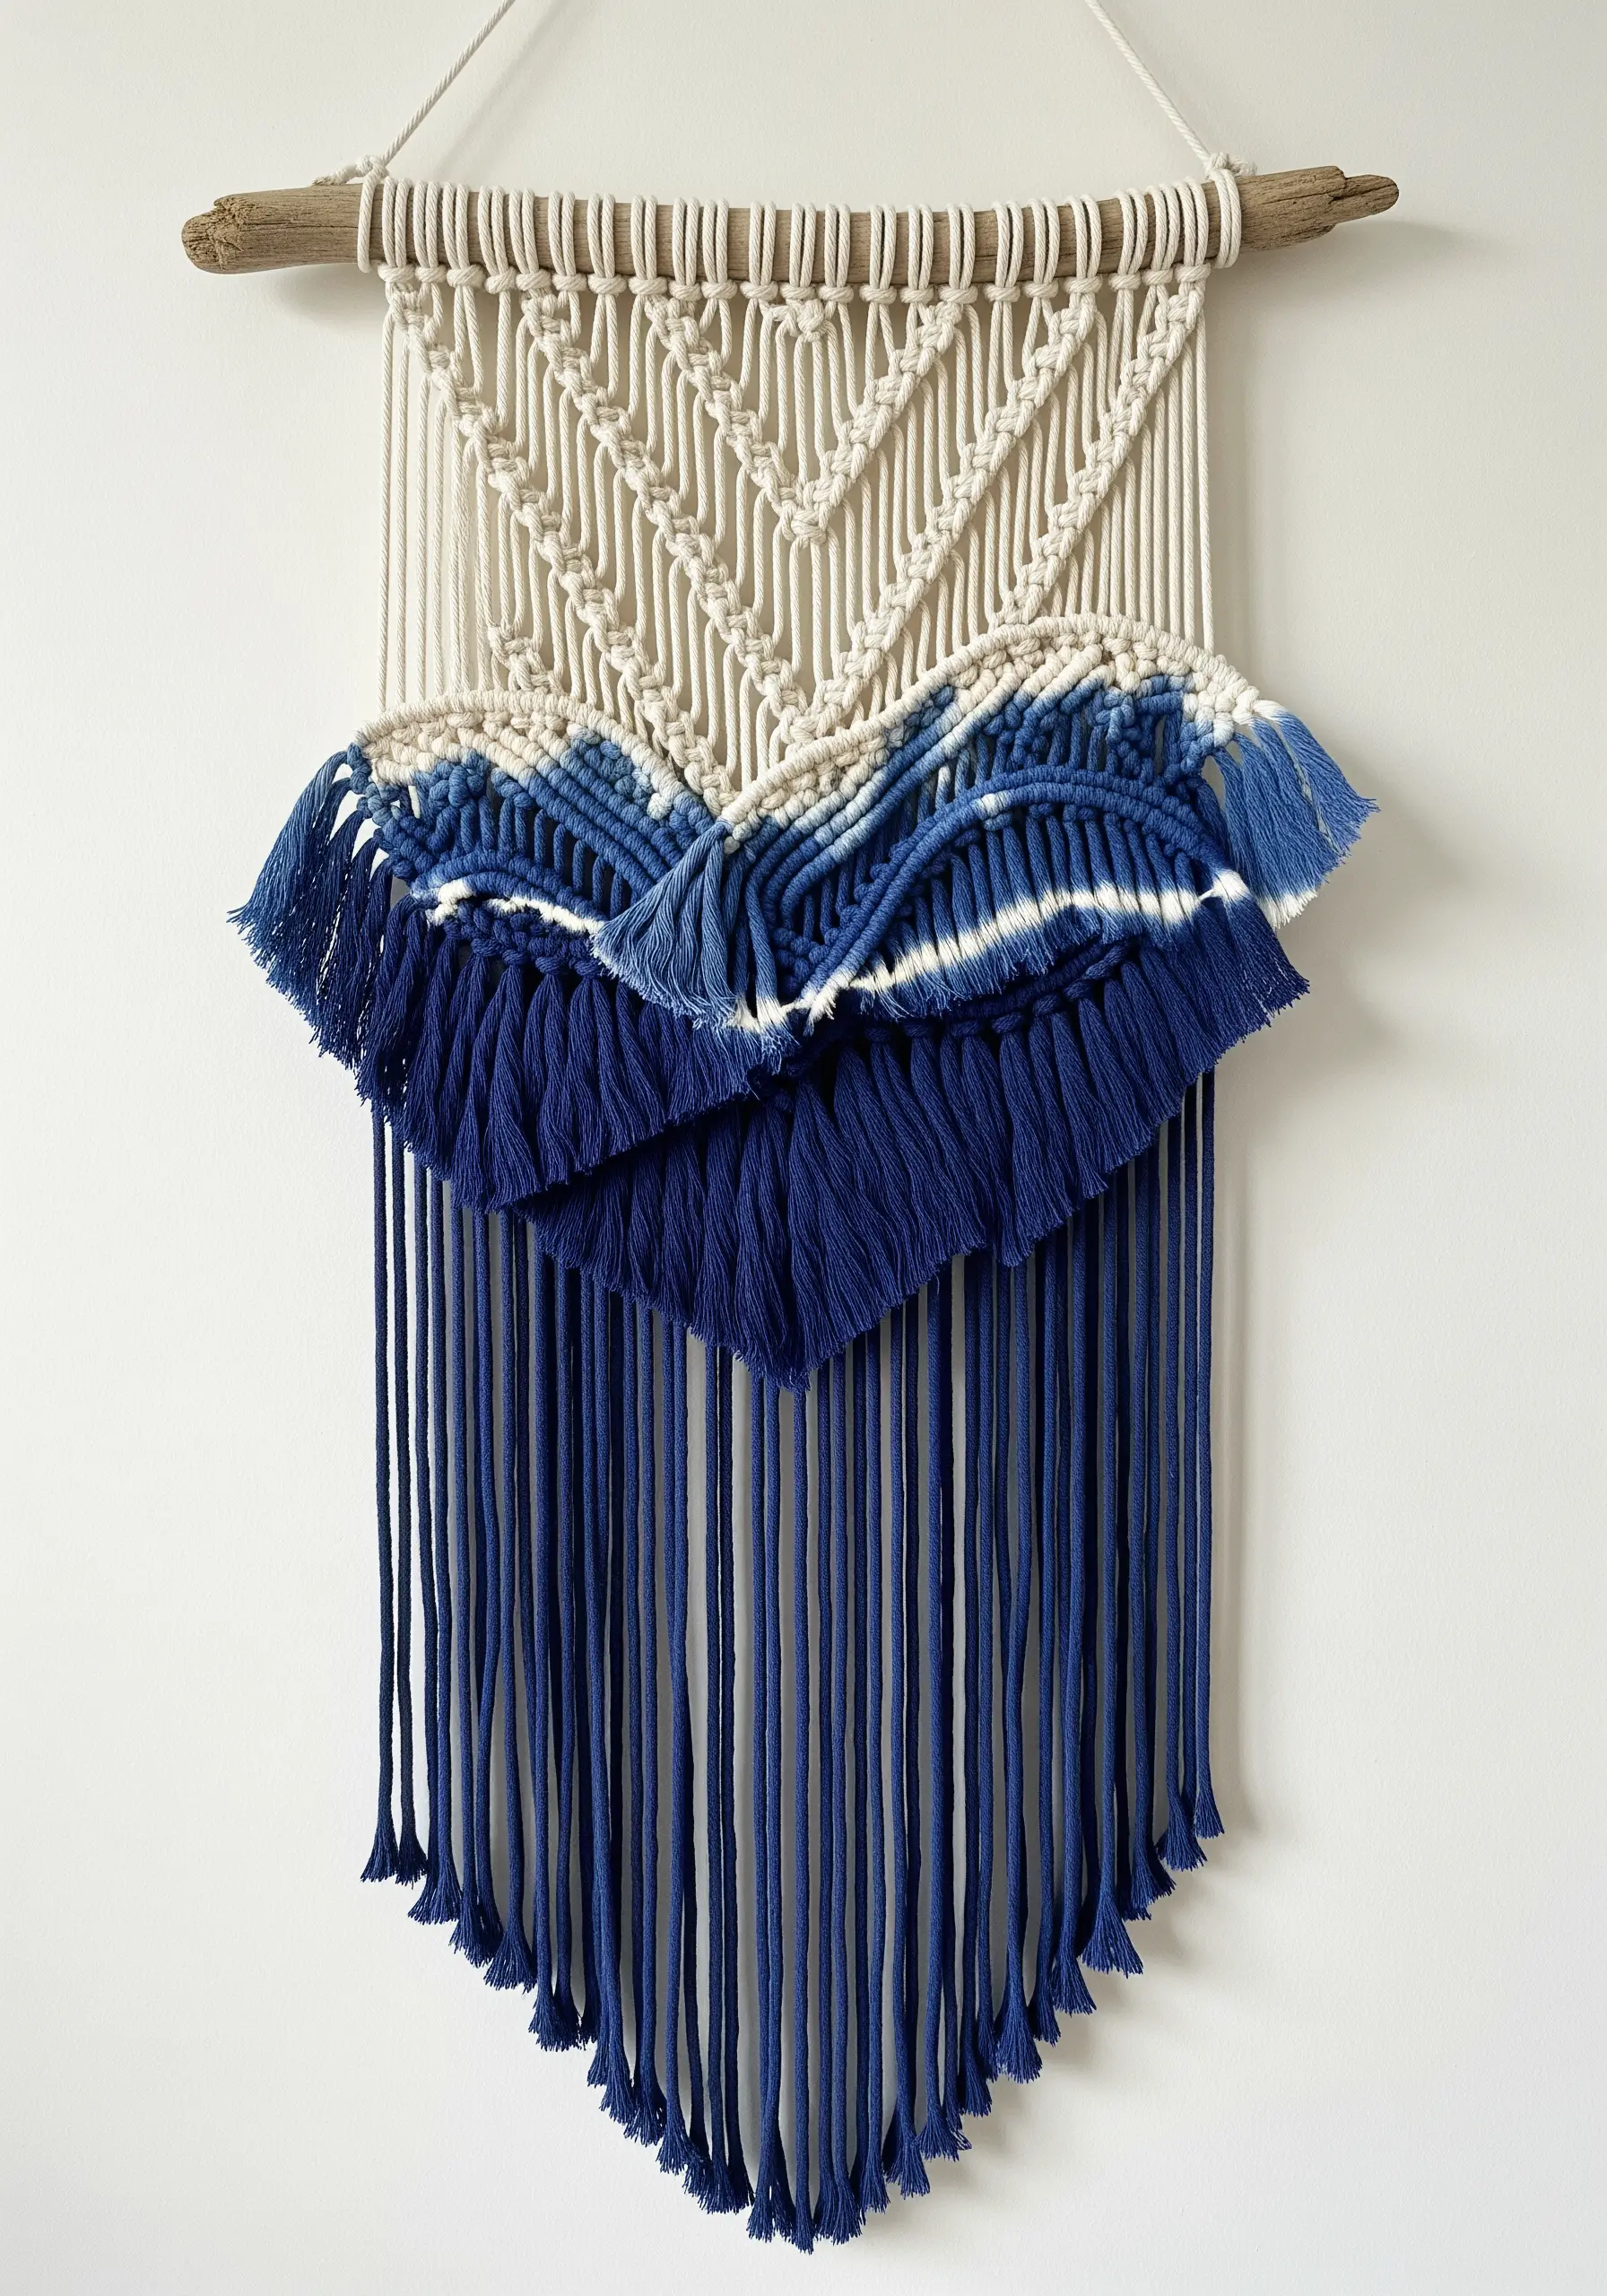
Transform a neutral macrame piece by dip-dyeing the fringe to create a beautiful, watercolor-like gradient.
Use a fiber-reactive dye designed for cotton and mix it in a shallow basin. For a smooth transition, dip the very ends of the yarn first, then gradually submerge more of the fringe for shorter periods.
You can also create a tie-dye effect by binding sections of the yarn with rubber bands before dyeing them.
This technique adds a layer of artistry and color that makes a simple macrame design completely unique.
16. Paint a Woven Picture of the Desert

Use tapestry weaving techniques to create a detailed landscape, treating your yarn like paint and your warp threads like a canvas.
Sketch your design onto paper and place it behind your warp threads as a guide.
To create distinct shapes like cacti and mountains, use the slit tapestry or interlocking technique, where different colored weft threads meet but don’t cross.
Vary the texture by using different yarn weights—a smooth cotton for the sky, a nubby wool for the ground—to add physical depth to your woven scene.
17. Weave a Galaxy with Mixed-Media Embellishments

Create a cosmic scene by combining various weaving techniques and adding sparkling embellishments.
Use a circular loom or an embroidery hoop to weave a central spiral for a galaxy, blending colors from light to dark.
Create planetary textures with French knots or tufted Rya knots, and wrap rings around them with a contrasting color.
Finally, stitch in metallic threads or tiny seed beads to represent stars, which catch the light and bring your celestial creation to life.
18. Focus on a Single, Sculptural Statement Knot
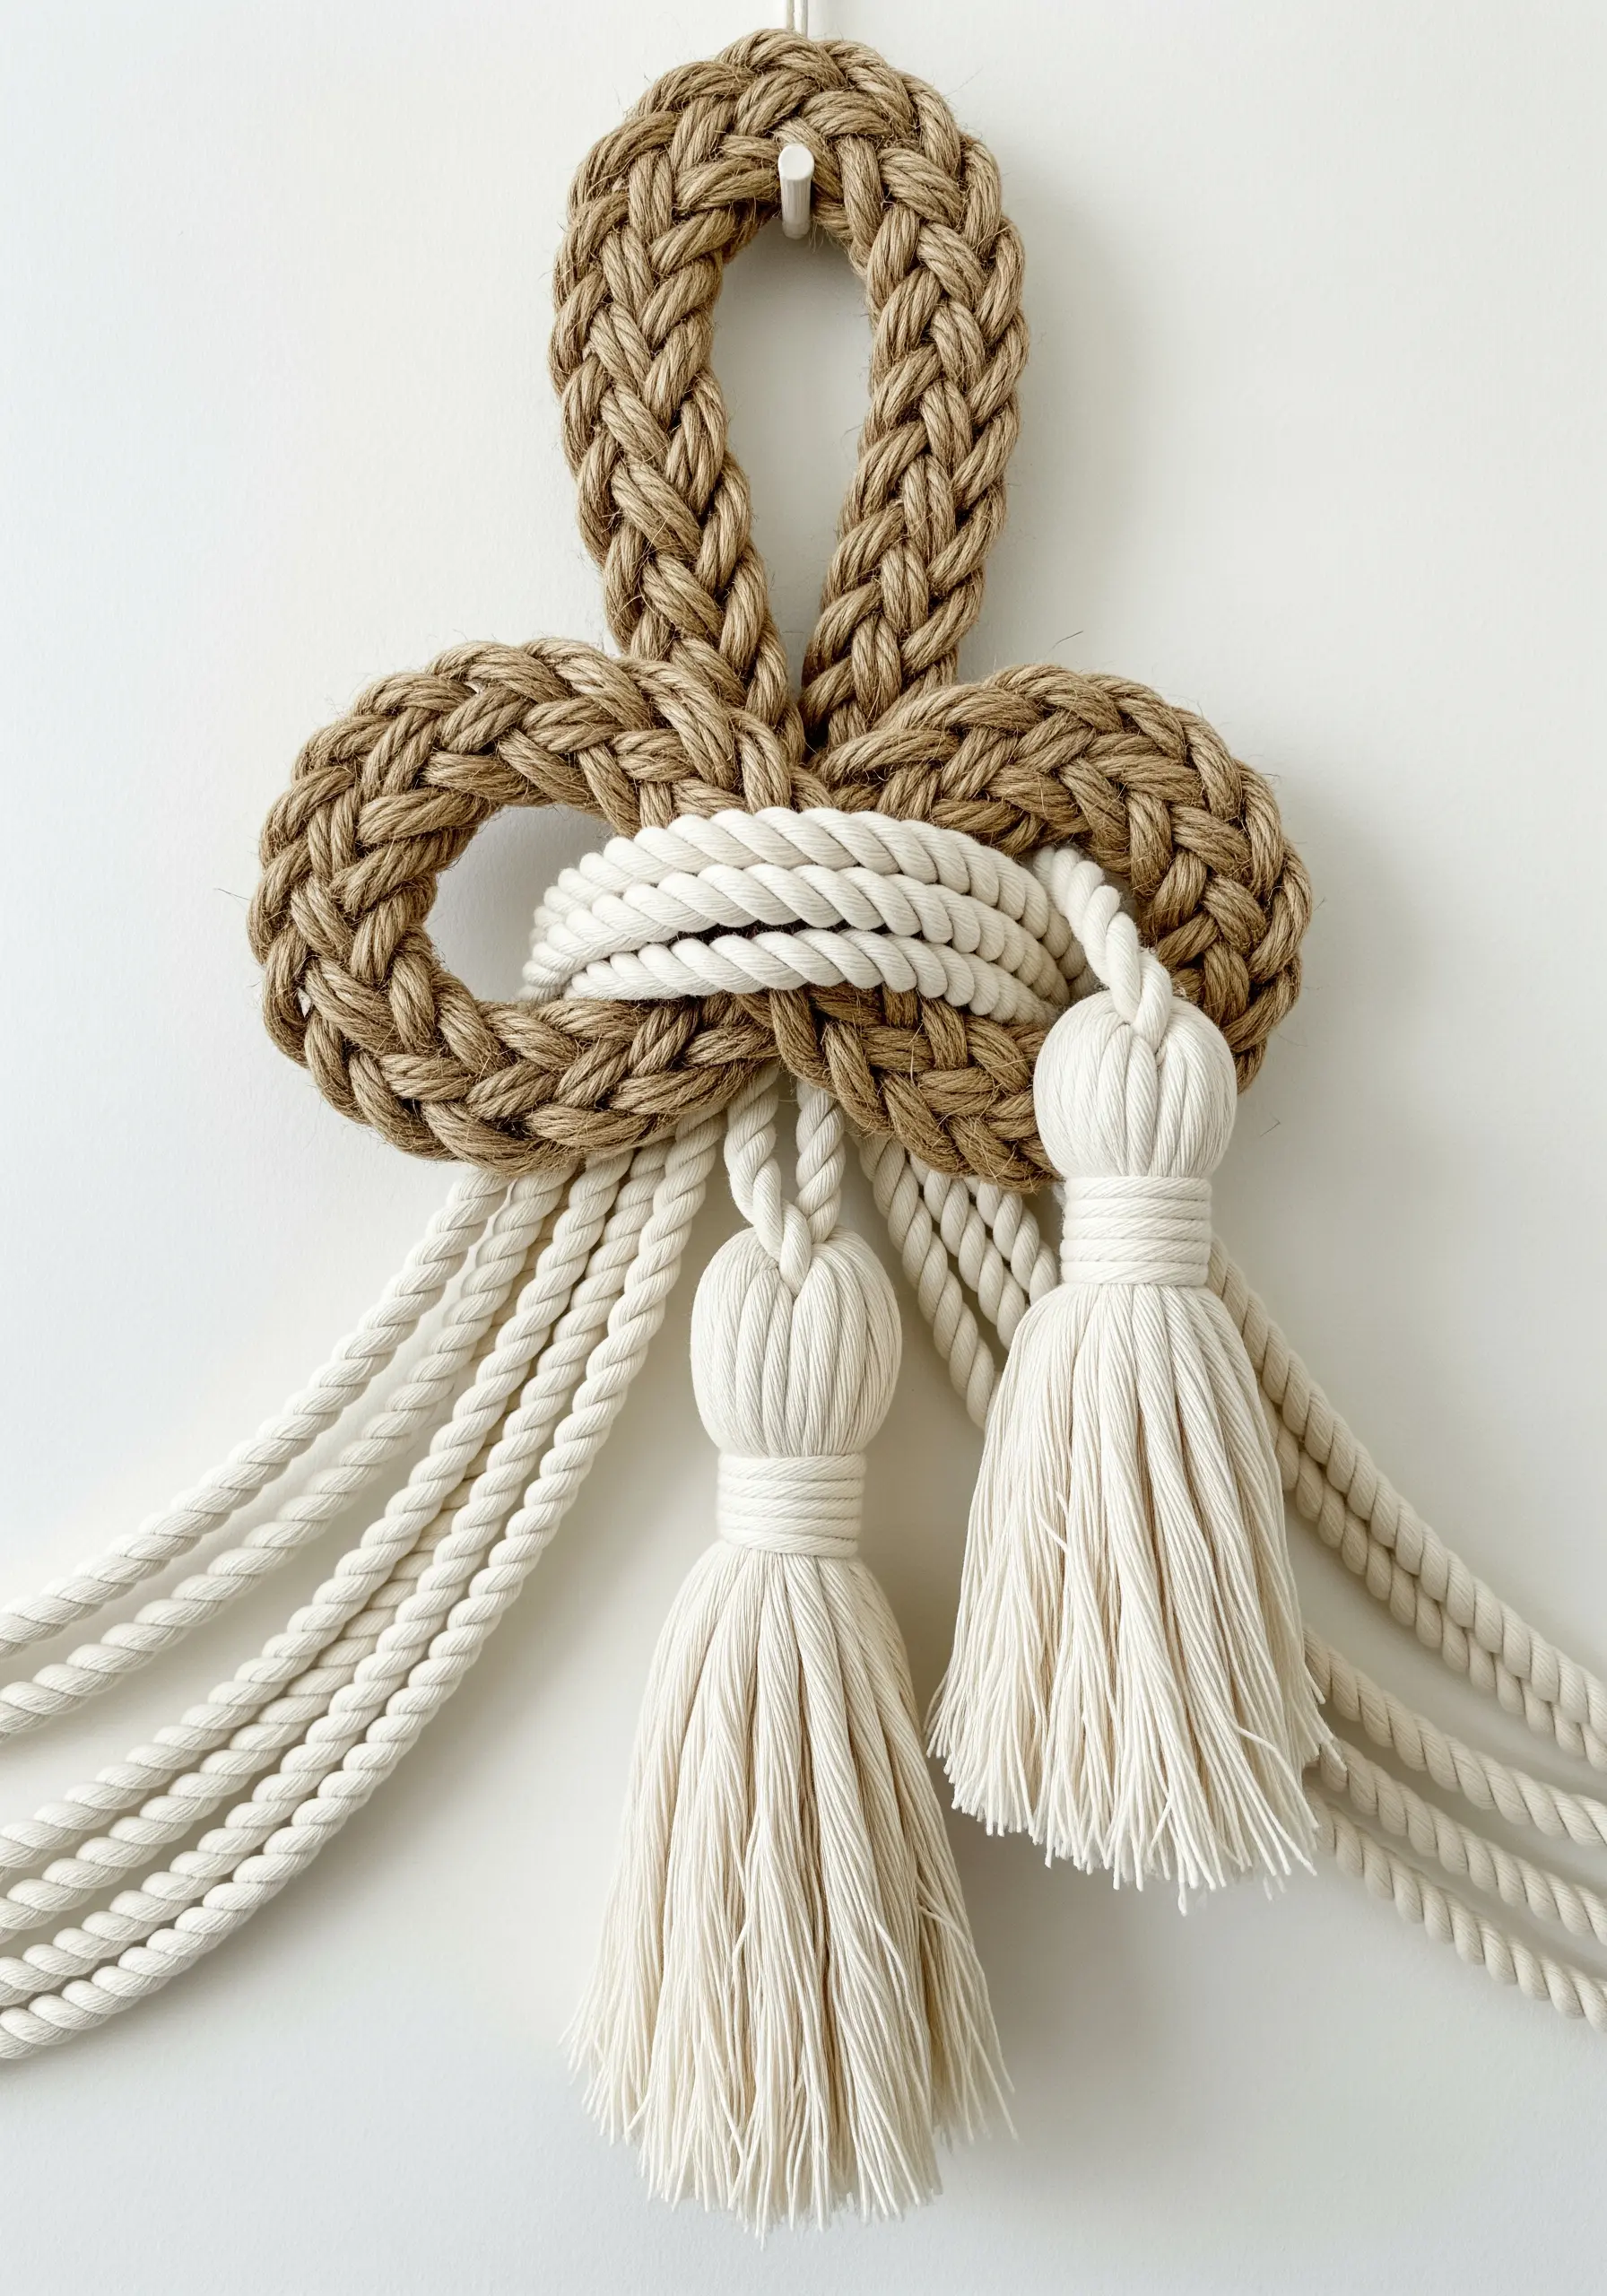
Instead of filling a space with many small knots, create a powerful focal point with one large, beautifully tied decorative knot.
Use a thick, braided rope for substance and visual weight. The Celtic button knot or Josephine knot are excellent choices for creating a symmetrical, sculptural shape.
Contrast the thick, braided rope with a smooth, thinner cord for wrapping the tassels, adding a touch of refinement.
This minimalist approach celebrates the form and texture of the rope itself, making it one of those understated embroidery projects that look expensive but aren’t.
19. Embroider on Felt for Bold, Graphic Art

Use felt as your base fabric to create a pennant or banner with bold, yarn-embroidered motifs.
Felt’s non-woven structure means it won’t fray, providing a stable, forgiving surface for thick yarn stitches.
Use a long satin stitch to fill in the sun rays, varying the shades of orange and yellow to create a sense of warmth and dimension.
A simple running stitch around the edge of the felt pennant gives it a clean, finished look, and a fringe at the bottom adds a classic bohemian touch.
20. Create Depth with a Monochromatic Palette
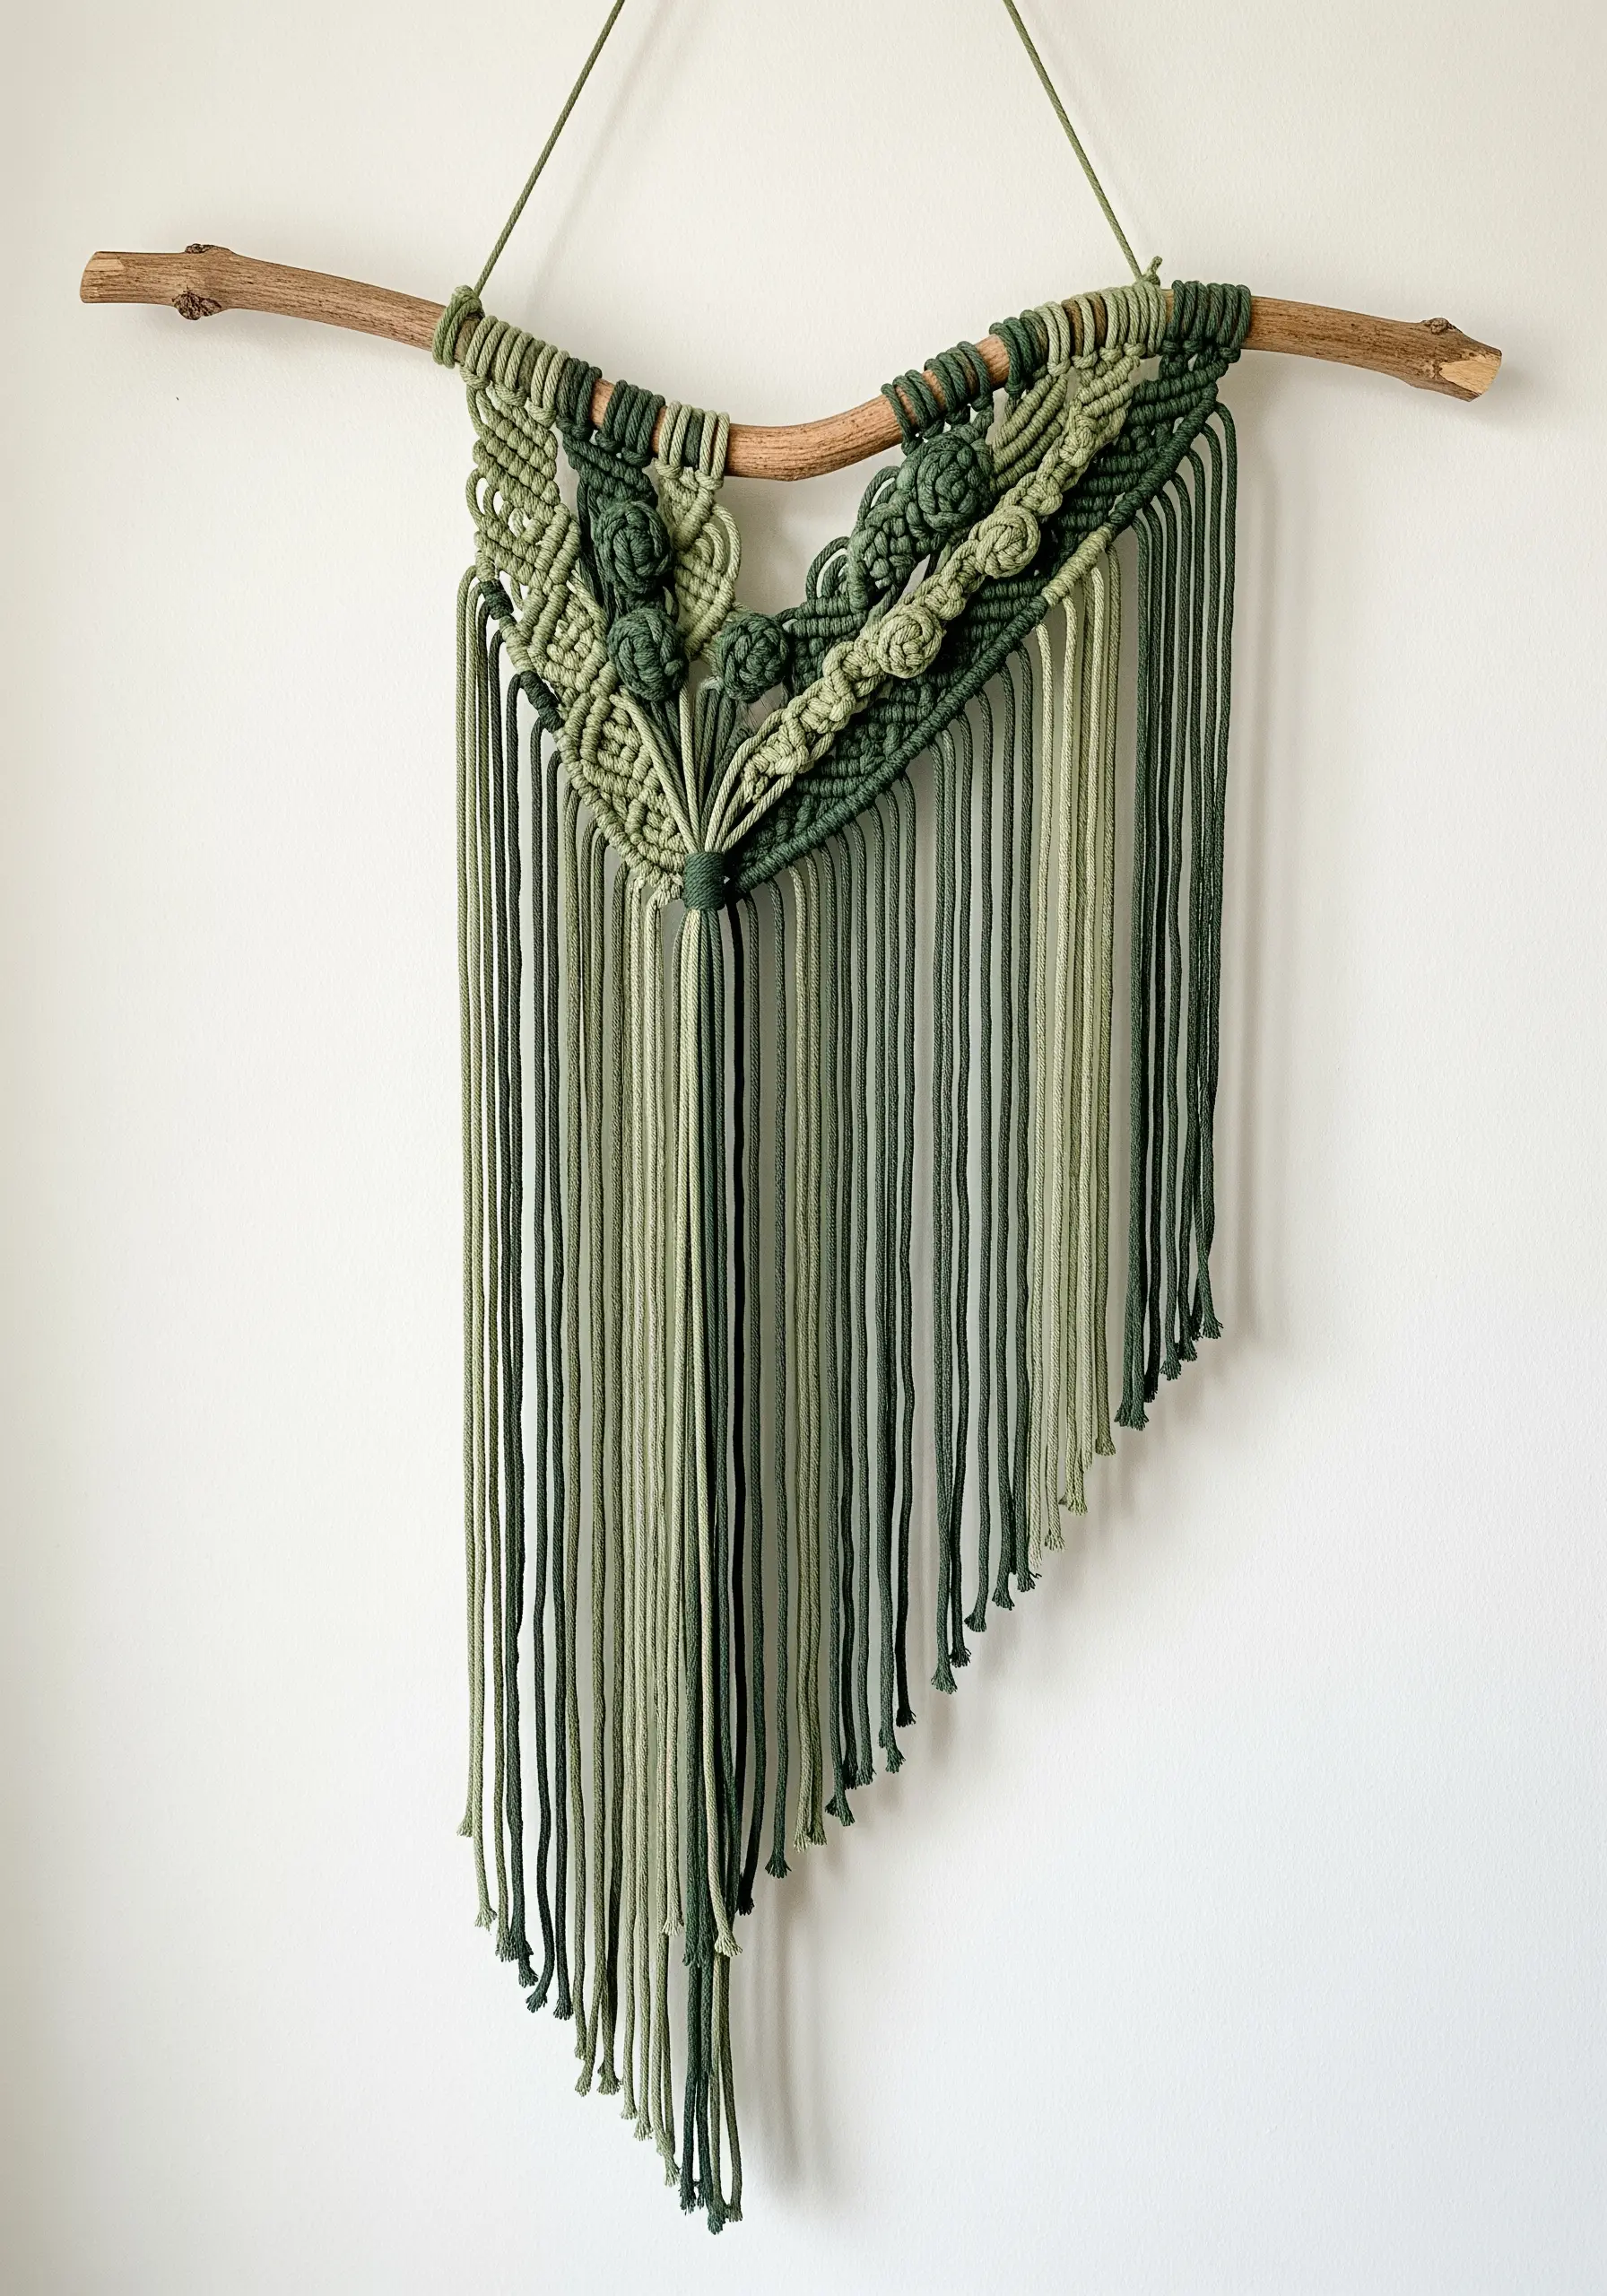
Explore the power of a single color by creating a macrame piece using various shades within the same family, such as sage, olive, and forest green.
The subtle shifts in tone create visual interest and depth without the distraction of multiple colors.
Incorporate different types of knots—like the raised berry knot—to add textural variation that stands out against the simple square knots.
This technique results in a sophisticated, cohesive piece that feels both calming and complex.
21. Build a Sculptural Shape from Pom-Poms

Create a stunning, three-dimensional piece of art by arranging dozens of handmade pom-poms into a single, cohesive shape.
Draw your desired shape, like a heart, onto a sturdy piece of felt or foam board to use as a base.
Use a hot glue gun to attach each pom-pom securely to the base, packing them tightly together to create a dense, plush surface.
Vary the sizes and shades of your yarn within a warm color family—like reds, pinks, and oranges—to give the final piece a vibrant, painterly quality.
22. Use a Grid Frame for Geometric Macrame
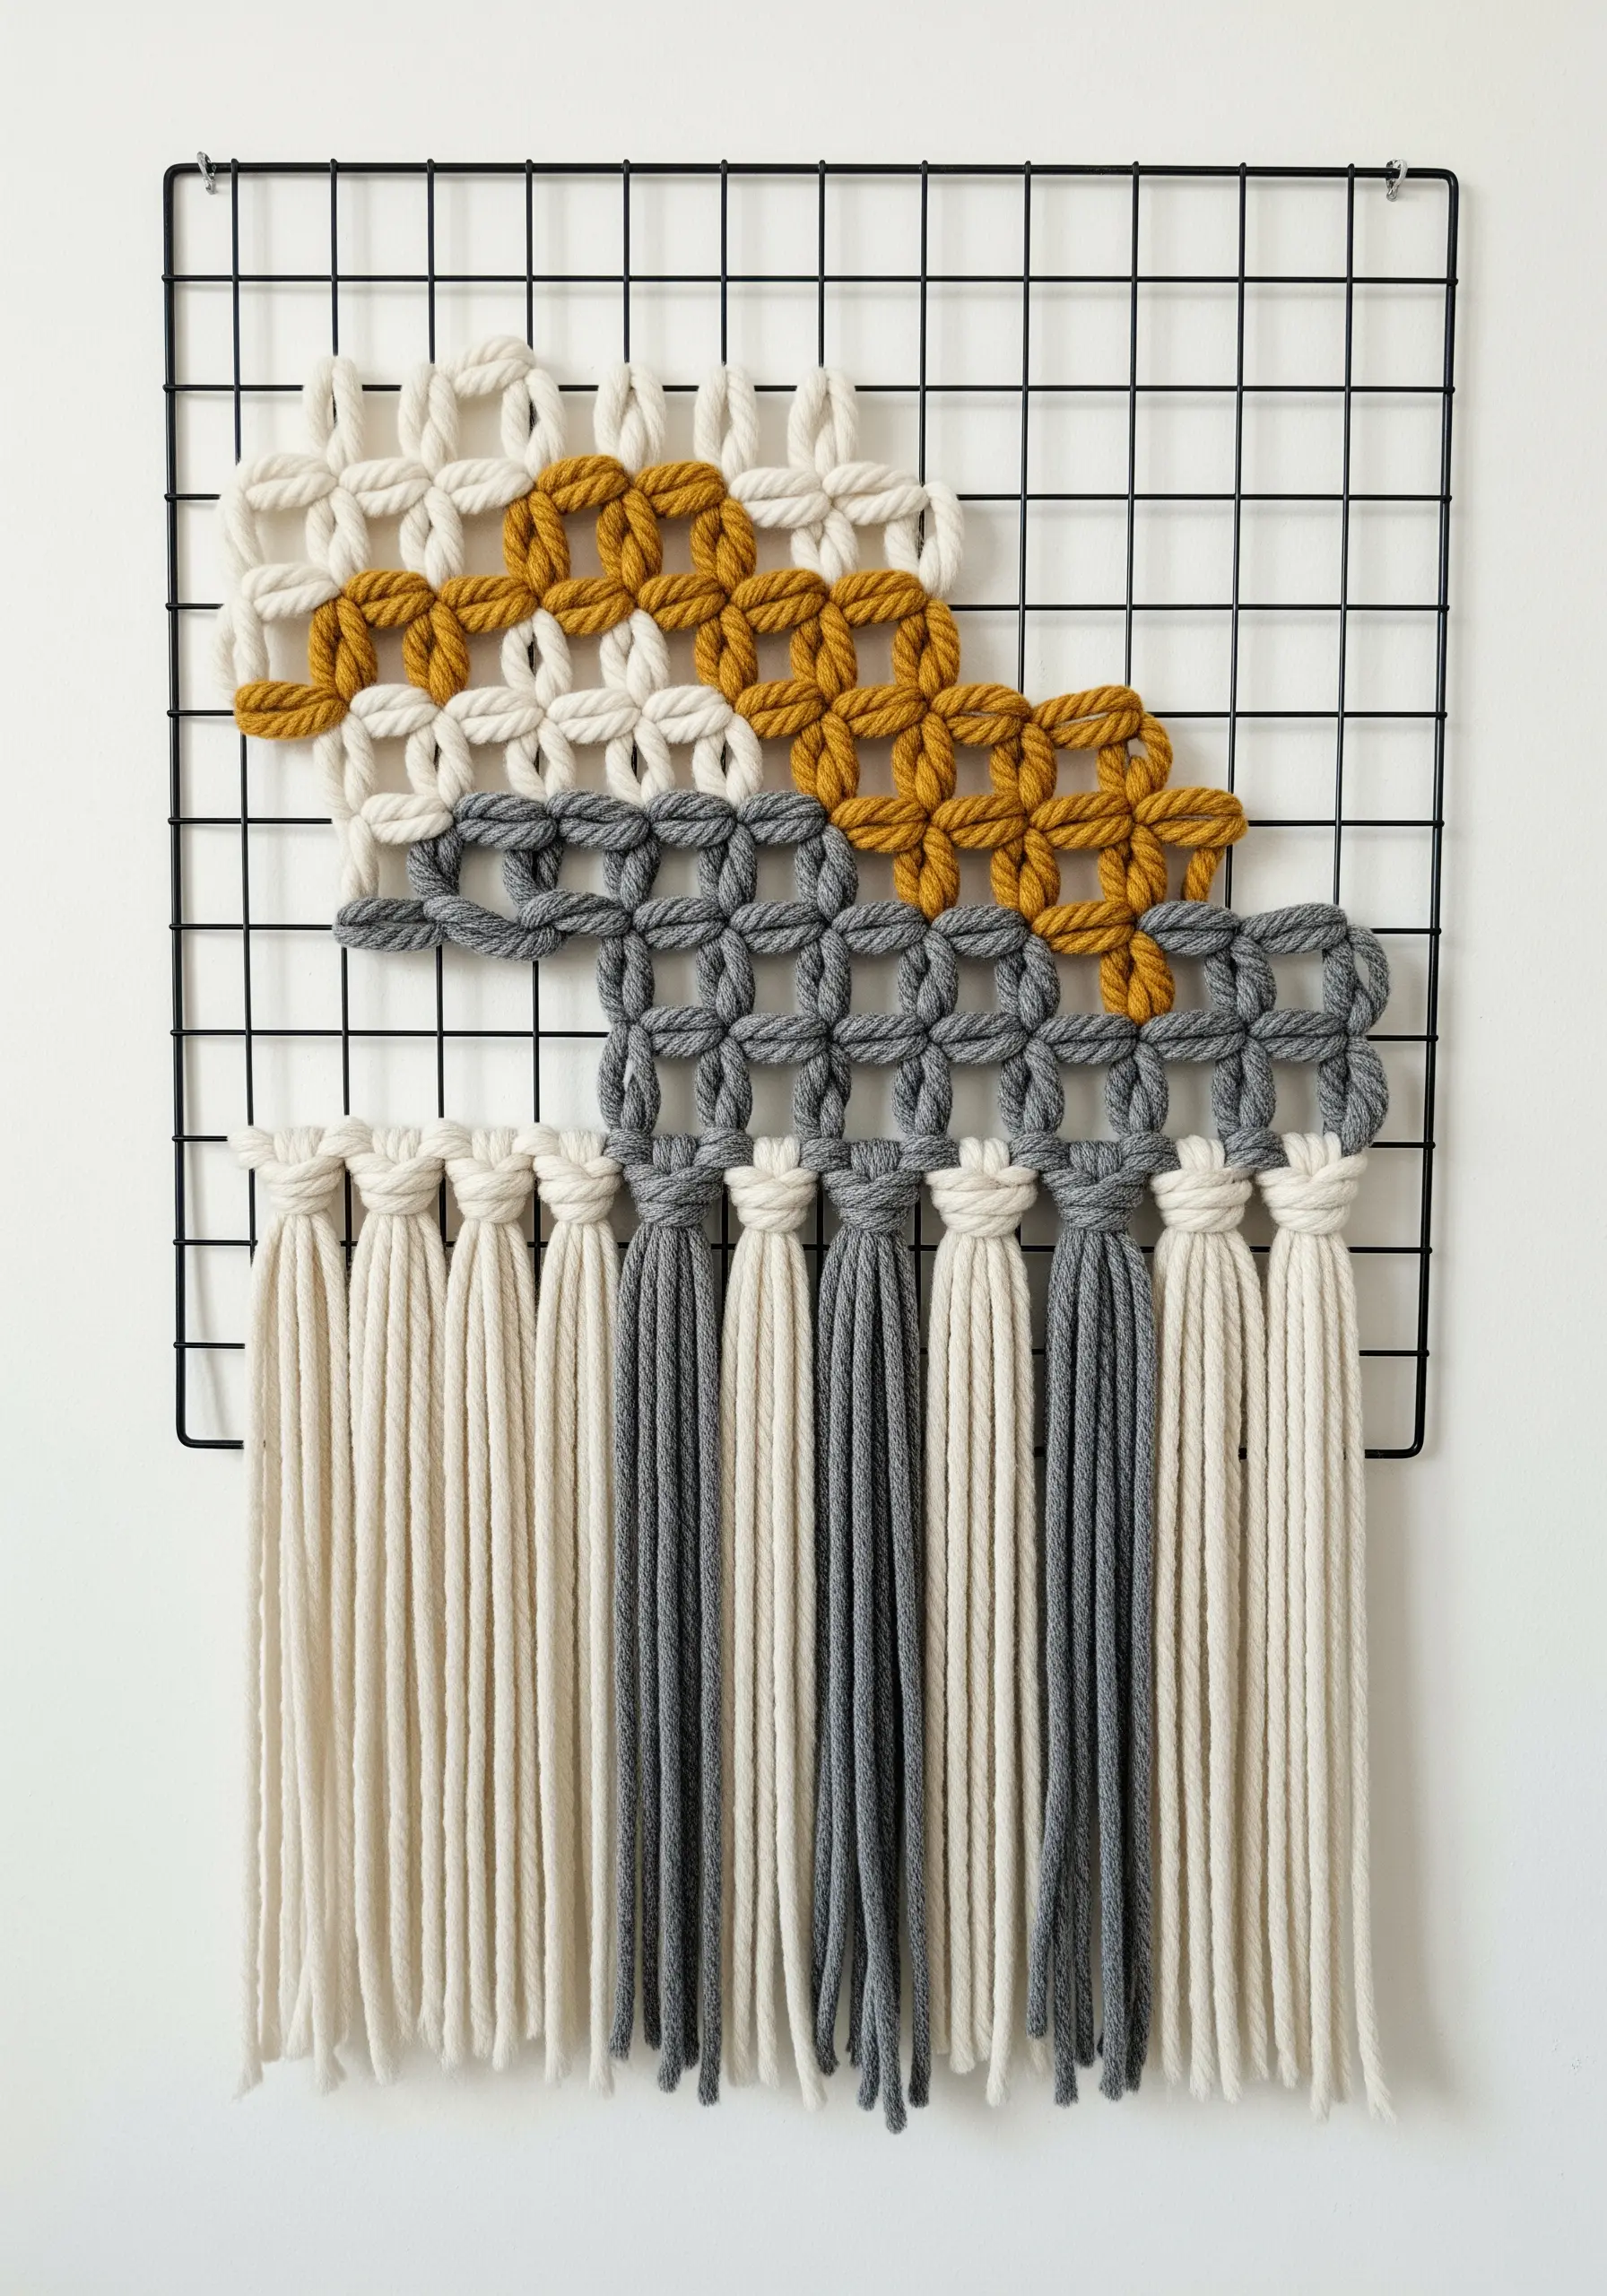
Break free from the traditional dowel and use a metal wire grid as the foundation for your macrame.
The grid structure allows you to tie knots both horizontally and vertically, opening up possibilities for geometric, checkerboard, or woven-style patterns that are impossible with a standard hanger.
This technique blends the softness of fiber art with a modern, industrial aesthetic.
Leave the bottom cords to hang as a simple fringe, which creates a beautiful contrast between the structured top and the free-flowing bottom.
23. Craft an Ombré Cascade with a Fiber Medley

Design a simple yet breathtaking wall hanging by arranging different types of fibers in a seamless color gradient.
Gather a variety of materials—wool yarn, silk ribbon, cotton string, and thick roving—all within a single color family, like shades of blue.
Attach each strand to a dowel with a simple Lark’s Head knot, arranging them from lightest to darkest to create a smooth ombré effect.
The beauty of this project lies in its celebration of texture and color, proving that you don’t need complex knots to create stunning fiber art installations.
24. Adapt Punch Needle Art into Functional Decor
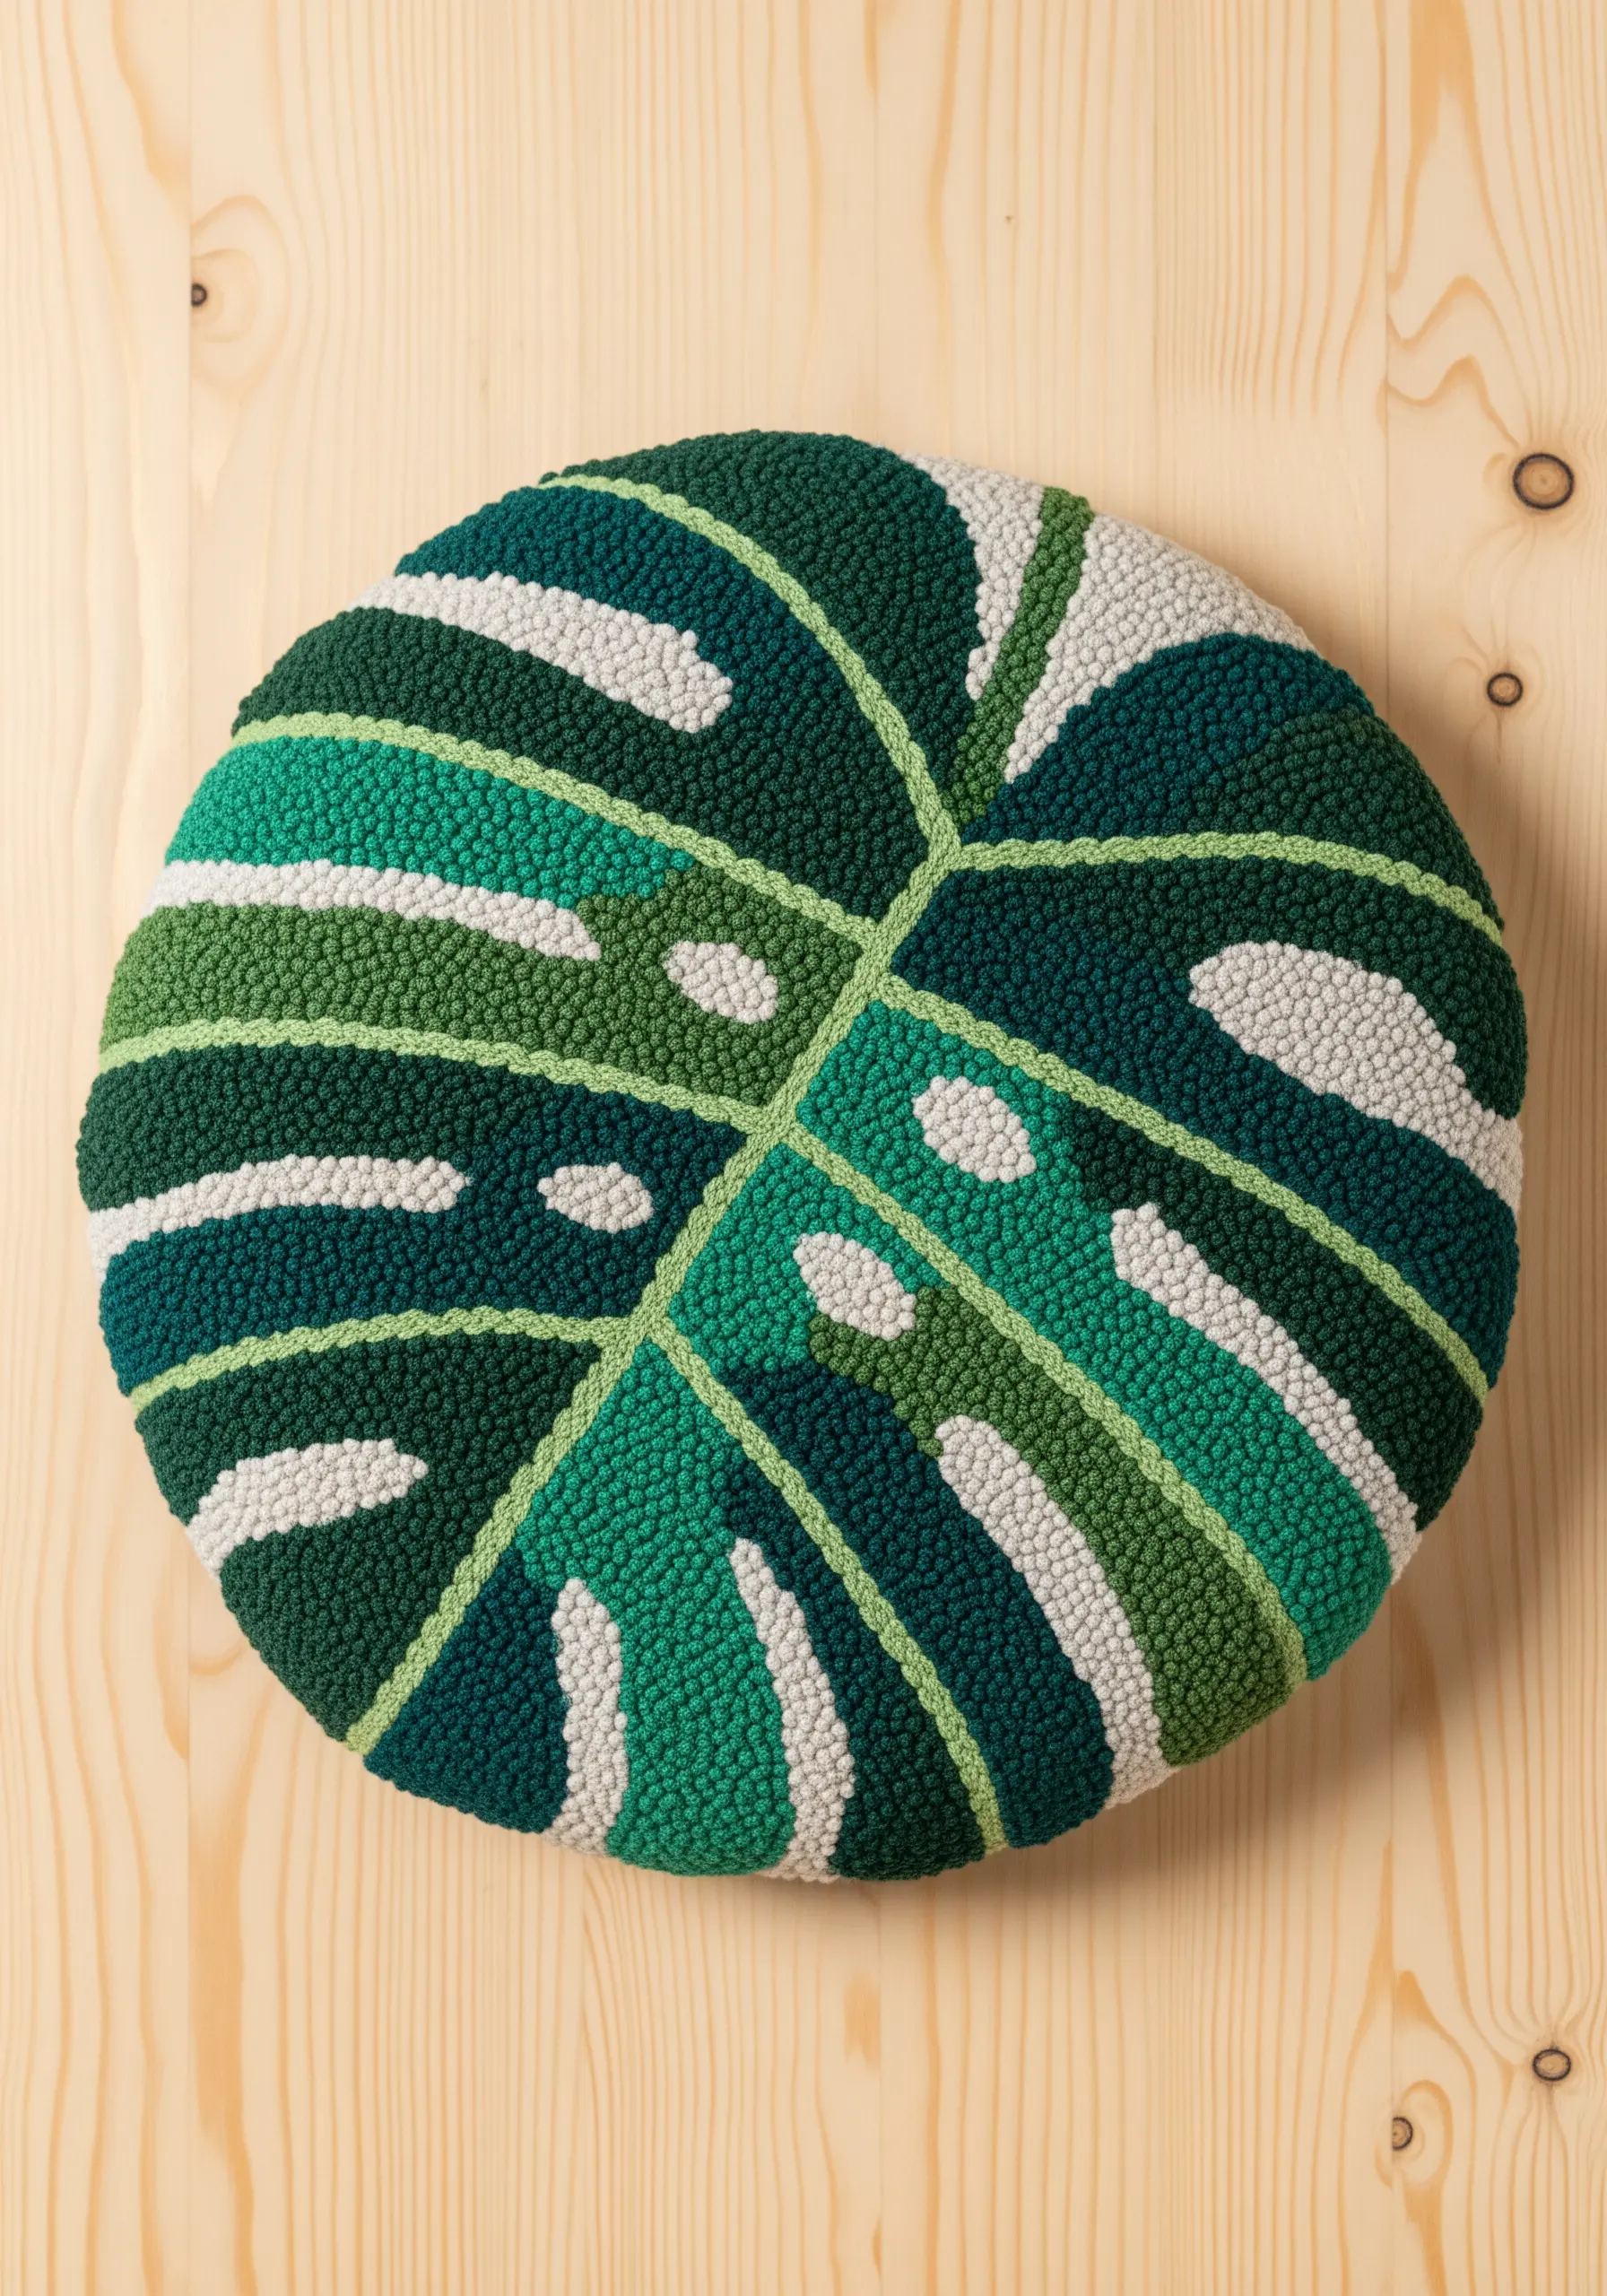
Take your punch needle skills off the wall and create a functional piece of art, like a decorative throw pillow.
To create the distinct sections of a monstera leaf, outline each vein and segment with your punch needle first to create a clear boundary.
Use varying shades of green to add depth and realism, and choose a contrasting color like off-white for the background to make the leaf design stand out.
To turn it into a pillow, simply sew a piece of backing fabric to your finished punch needle piece, add stuffing, and stitch it closed.
25. Weave with Ribbon for a Touch of Luster

Introduce an unexpected element into your weaving by incorporating strips of satin or velvet ribbon among your wool yarns.
The smooth, light-reflecting surface of the ribbon creates a beautiful contrast against the matte finish of the wool, adding a touch of luxury.
You can weave it flat like regular yarn or twist it to create a bumpy, bubbled texture known as soumak.
Even in a neutral palette, this mix of materials adds a layer of sophistication and makes the entire piece more visually engaging.


