

Working with neon thread on black fabric is an act of painting with light. It’s a chance to move beyond traditional embroidery and explore a world of graphic intensity, where every stitch is a brilliant mark against the void. This isn’t just about color—it’s about contrast, energy, and creating art that has a secret life under UV light.
You don’t need a vast collection of complex stitches to master this style. In fact, the simplest stitches—backstitch, straight stitch, and French knots—often have the most power here. The key is precision. A perfectly straight line, a smooth curve, a densely packed shape—these are the elements that will make your work sing.
Embrace the darkness of your fabric as an active part of your composition. Let it define your shapes, create your shadows, and give your neon threads an unparalleled stage to glow. Whether you’re stitching a pulsating soundwave, a distant constellation, or an abstract burst of energy, you are crafting a piece that is both a beautiful object in daylight and a secret, luminous world in the dark.
1. Render Geometric Forms with Razor-Sharp Precision
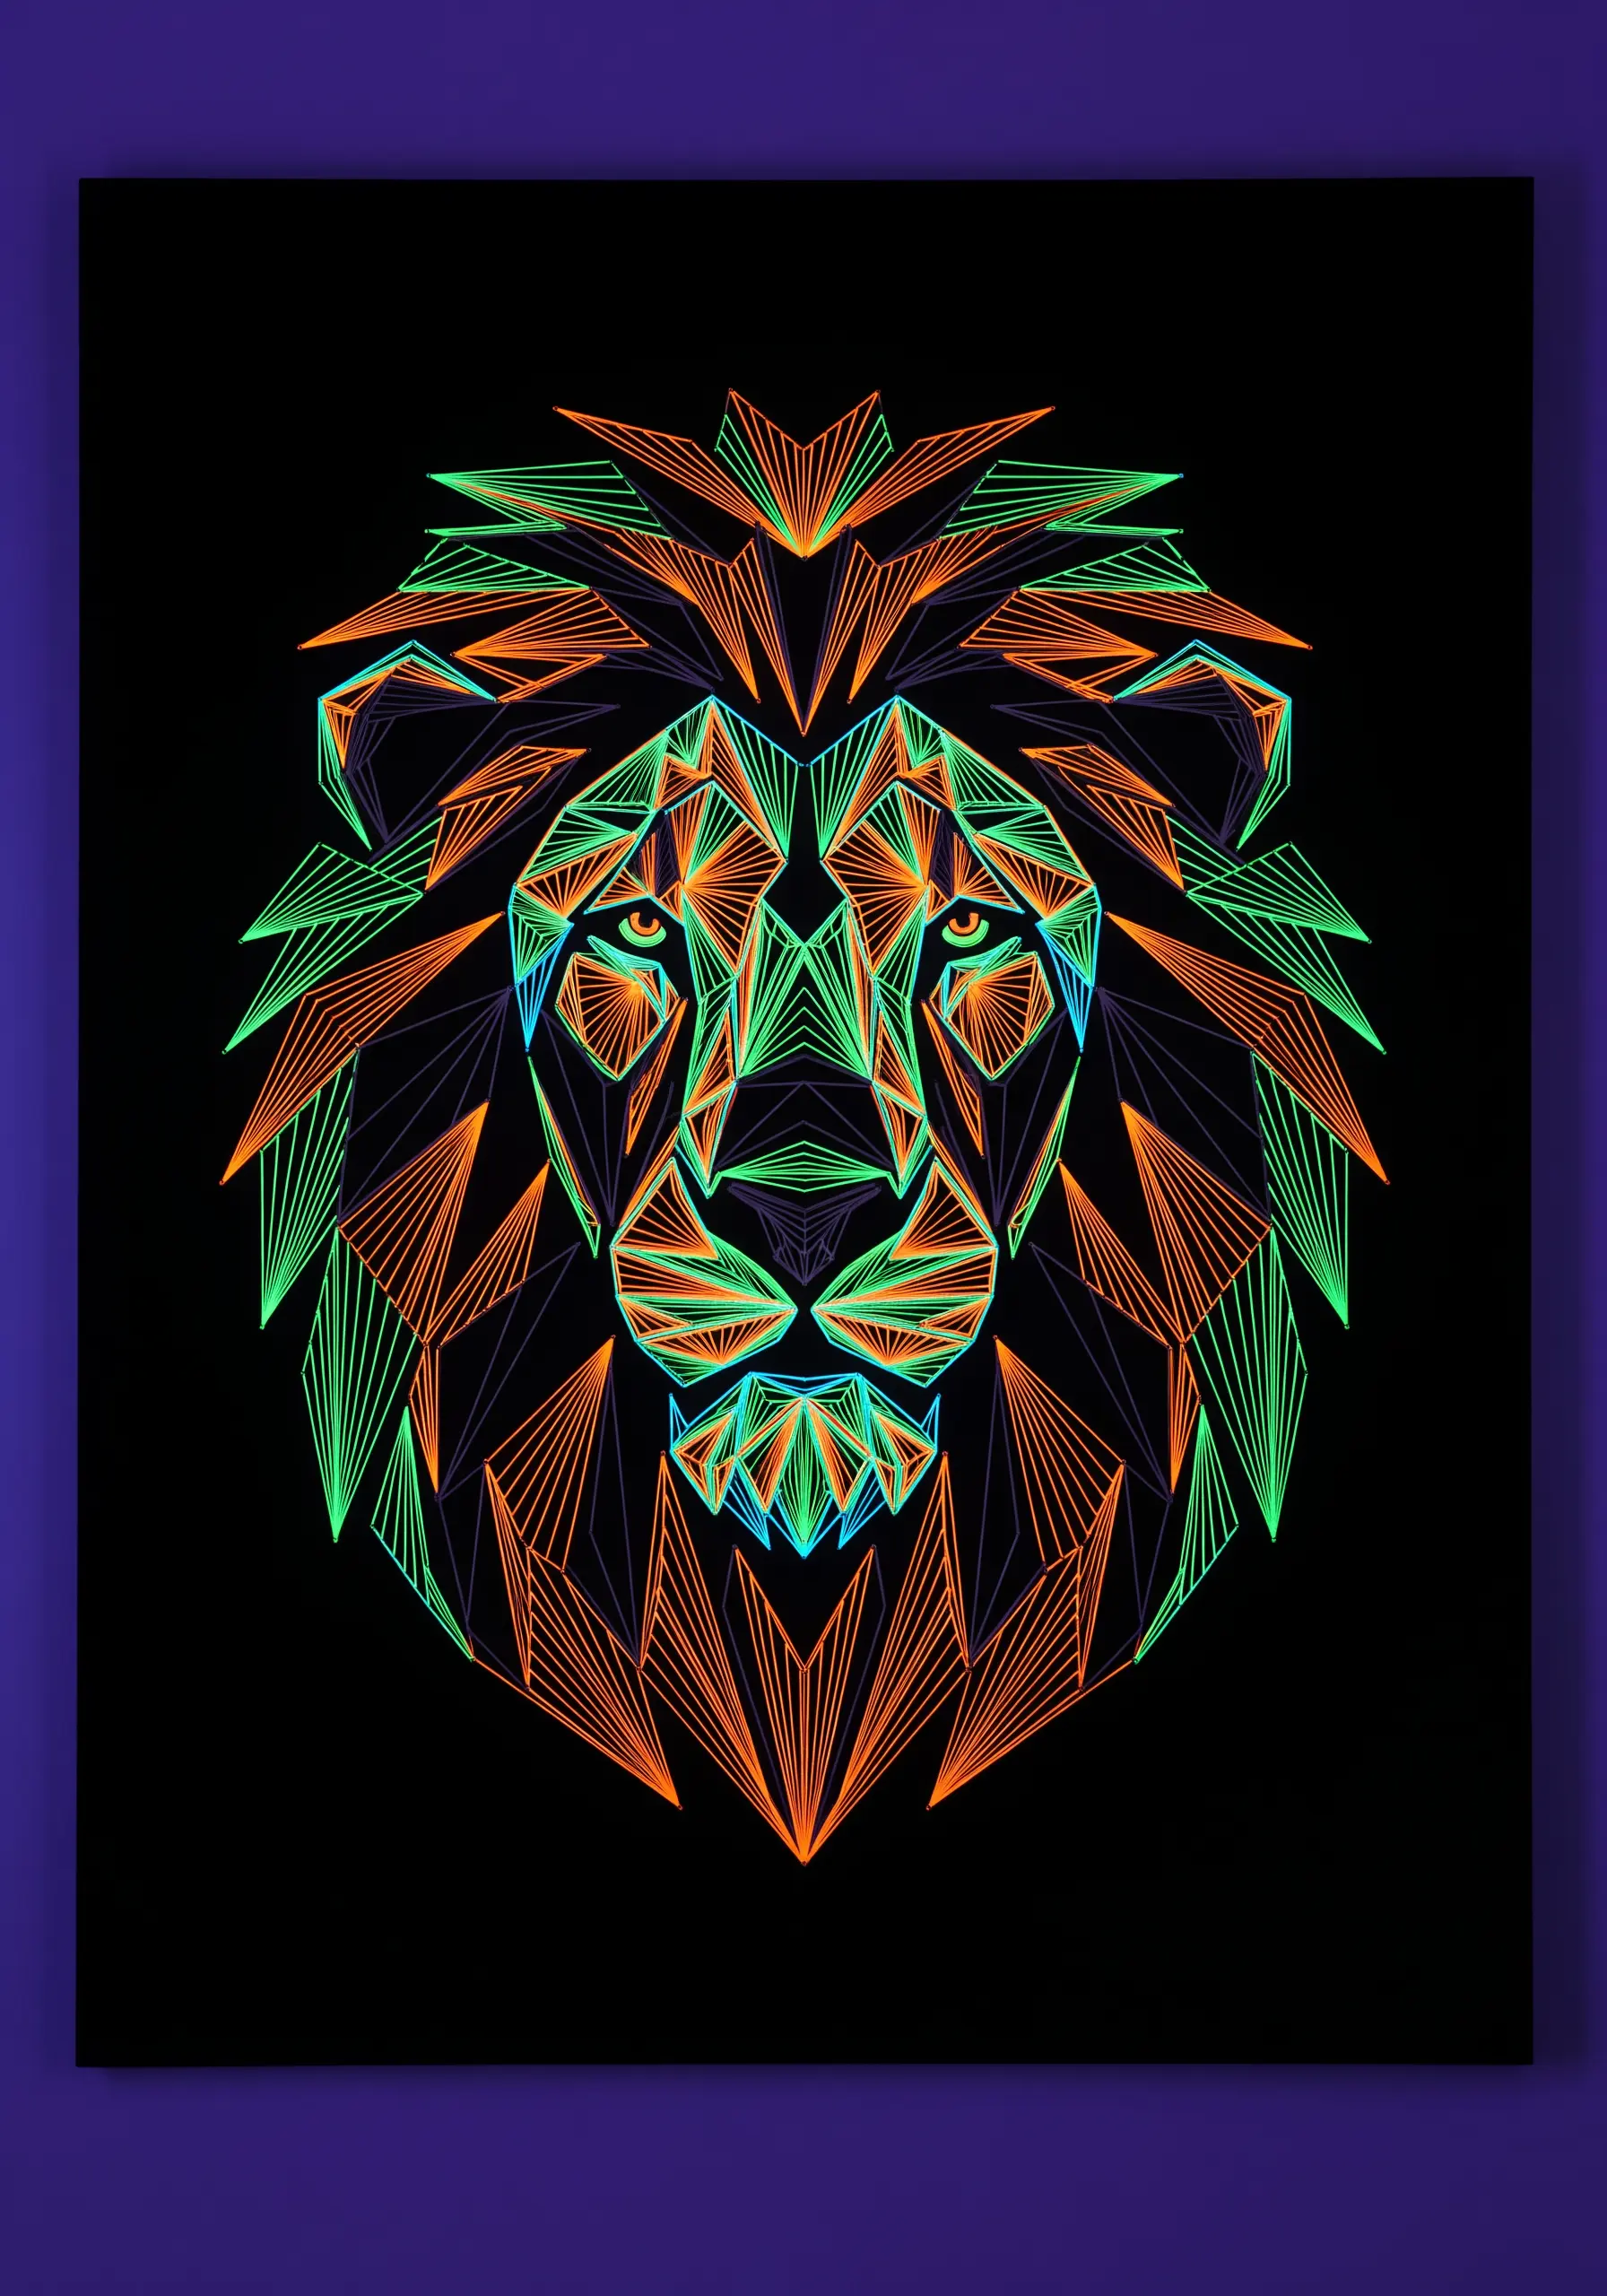
To achieve the crisp, graphic lines of a geometric animal, map your design onto the fabric using a white water-soluble transfer pen.
Use a two-strand backstitch for all outlines to ensure they are defined and solid against the black background.
For the radiating mane, work with long, single straight stitches, pulling each one taut but not so tight that it puckers the fabric.
This tension control is what separates a professional finish from a homemade one, especially on a non-stretch cotton canvas.
Alternate between two or three high-contrast neon colors, like electric orange and lime green, to create a vibrating visual effect that enhances the design’s energy.
2. Capture Cosmic Energy with Fluid, Organic Lines

Create the illusion of a swirling galaxy by using a whipped backstitch, which smooths out the curves and gives your lines a tube-like, neon glow.
Instead of a single color, try blending two strands of different neon threads in your needle—like hot pink and electric blue—to create a subtle, energetic color shift.
To mimic a starfield, scatter tiny seed stitches or French knots using a single strand of glow-in-the-dark white thread across the black fabric.
This adds depth and makes the entire composition feel boundless, turning a simple hoop into a portal to another dimension.
3. Construct a Cityscape with Architectural Straight Stitches

Build a luminous metropolis using only straight stitches, focusing on perspective and line weight to create depth.
Use three strands of floss for buildings in the foreground and taper to a single strand for those in the distance.
This subtle shift in thread thickness is a simple but highly effective way to create an illusion of distance and scale.
Keep your stitches perfectly parallel and evenly spaced to evoke a sense of order and modernity. A ruler and a disappearing ink pen are your best tools here for perfect placement.
4. Blend Colors to Create a Bioluminescent Glow

To make these mushrooms feel like they are emitting their own light, use a long-and-short stitch to blend several shades of a single neon color family.
Start with the lightest shade (like neon yellow) at the brightest point and gradually blend into darker shades of turquoise and blue toward the edges.
This technique, often used in thread painting, creates a realistic gradient that looks incredibly complex but is quite methodical.
Accent the caps with tiny French knots in a contrasting bright color to add texture and enhance the otherworldly, magical quality of the design.
5. Isolate a Single, Perfect Line for Maximum Impact
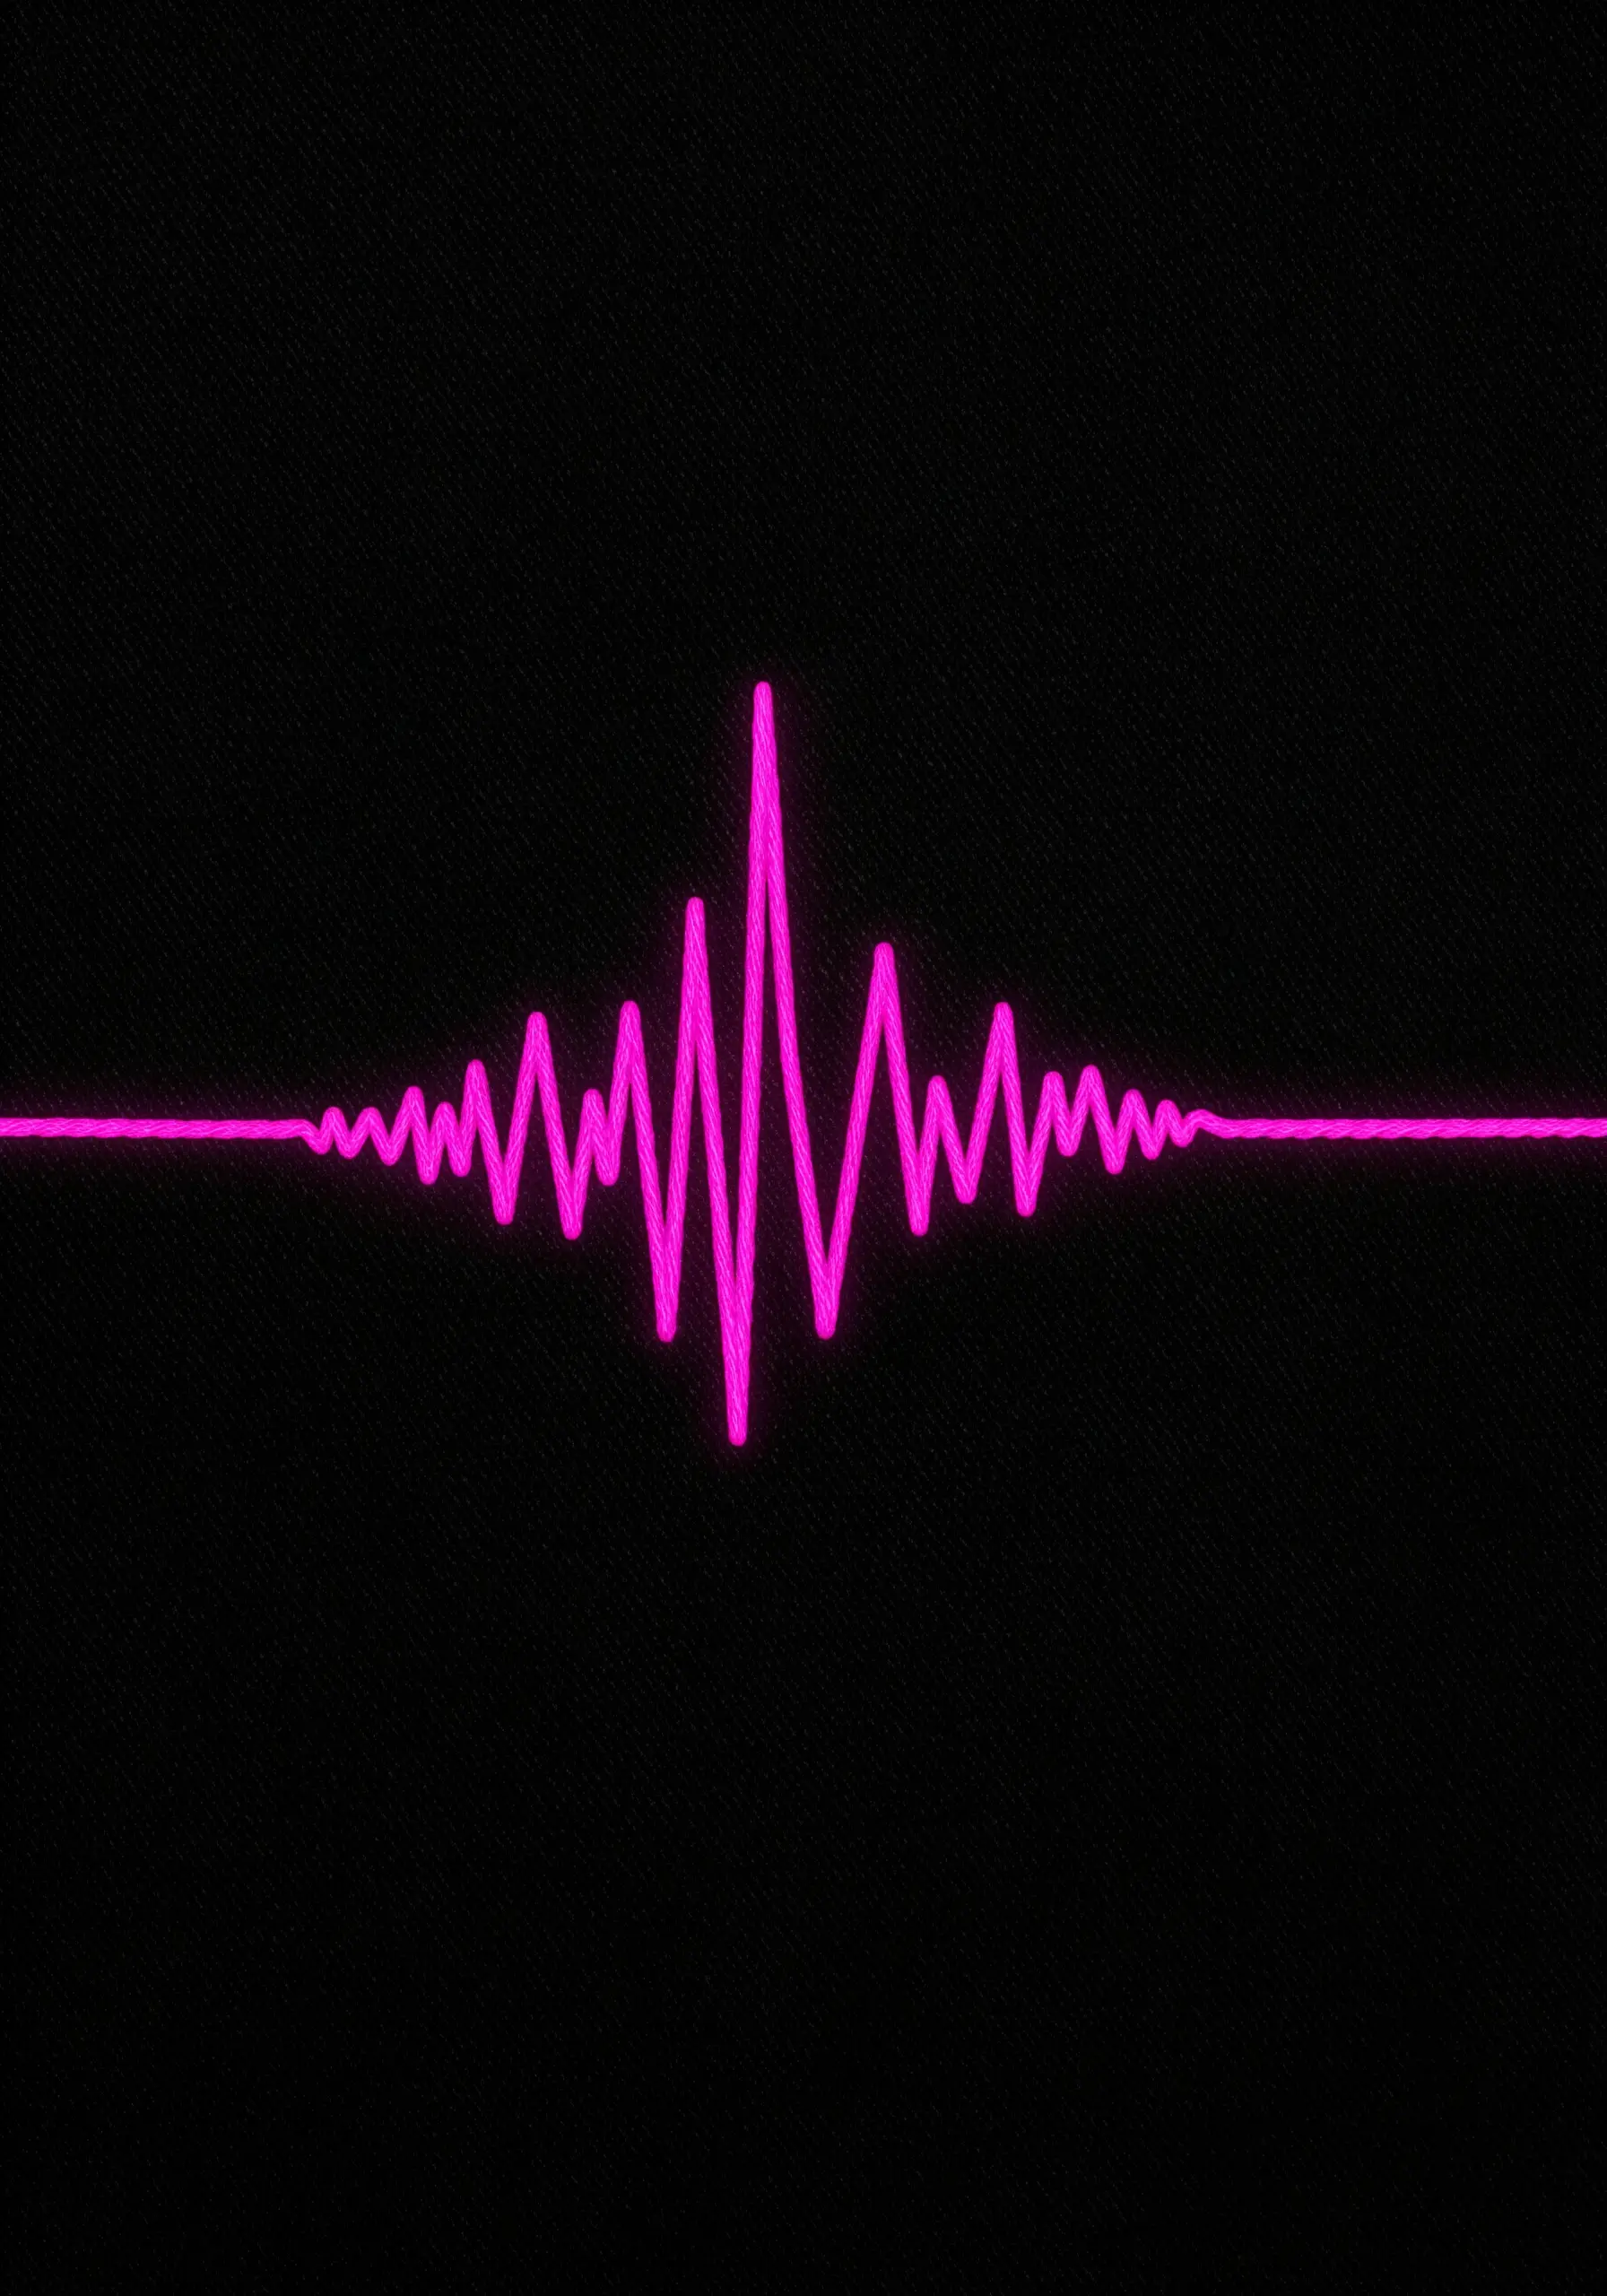
Sometimes, the most powerful statement is the simplest. To create a flawless, uninterrupted line like a soundwave, couch a thicker neon cord or yarn onto your fabric.
This technique involves laying the thicker fiber on the surface and securing it with tiny, nearly invisible stitches using a single strand of matching thread.
Couching ensures your line has a consistent thickness and a perfectly smooth curve that a standard stitch might not achieve.
The result is a bold, graphic element that feels pure and intentional against the stark black void.
6. Weave Light with Layered Mandala Stitches
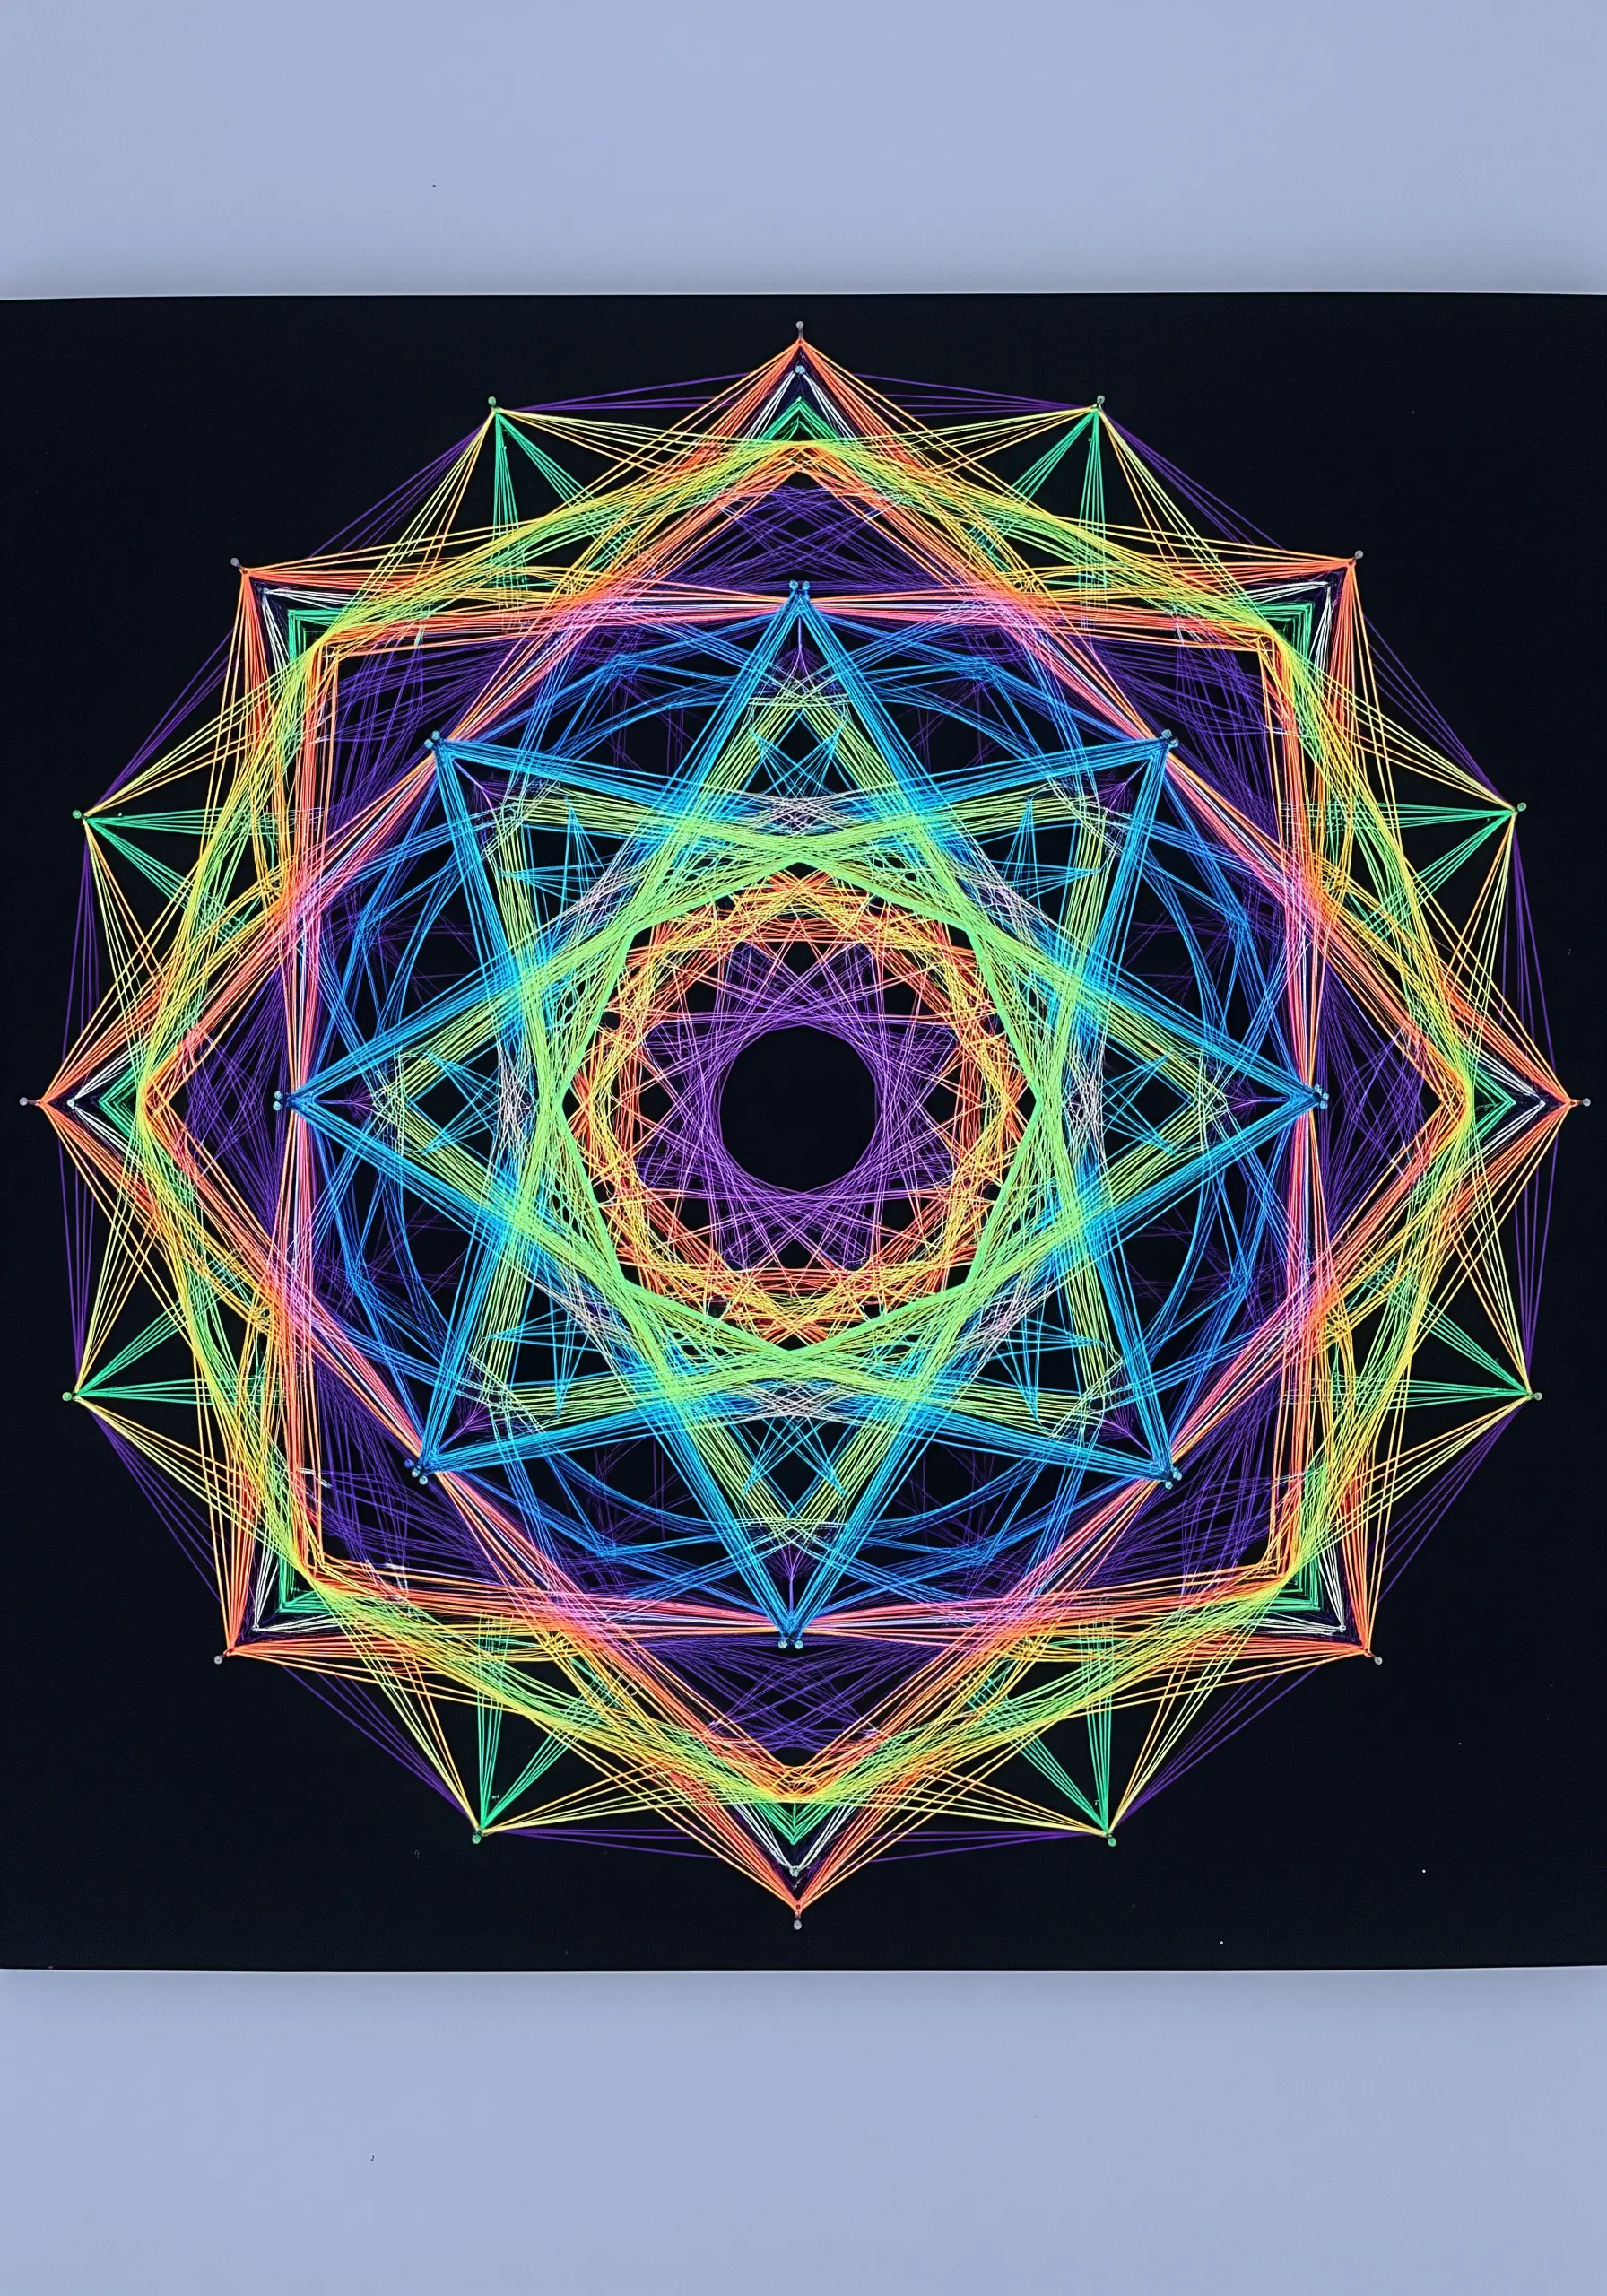
This intricate effect relies on long straight stitches pulled between carefully plotted anchor points, much like string art.
To translate this to embroidery, mark your geometric points on the fabric and use a single, strong seed stitch at each point to serve as an anchor.
Stretch your neon thread from one anchor to another, layering colors and shapes to build up the pattern’s density.
Using a variegated neon rainbow thread will create effortless color transitions, adding incredible depth without needing to switch threads constantly. These modern thread mandala ideas can turn simple geometry into a meditative practice.
7. Stitch Ethereal Jellyfish with Delicate, Flowing Threads

Capture the weightless drift of jellyfish by varying your thread weight and stitch style.
For the delicate tentacles, use a single strand of neon thread in a wavy stem stitch or simply let long, loose straight stitches drape downwards.
For the bell, combine a dense satin stitch in hot pink with a backstitch outline in electric turquoise. This contrast in texture and color makes the creature feel both solid and translucent.
Letting the threads overlap creates a beautiful, chaotic sense of movement, as if they are floating in the deep sea.
8. Achieve Technical Perfection with a Circuit Board Design

For designs that demand absolute precision, your setup is everything. Transfer your pattern using a fine-tipped chalk pencil and use a ruler to guide your needle for perfectly straight lines.
A simple backstitch using two strands of floss is ideal for creating the clean, conductive pathways of a circuit board.
The small connection points can be rendered as flawless circular satin stitches or eyelet stitches for a hollow effect.
Alternating between two or three cool neon tones, like green, blue, and cyan, enhances the futuristic, high-tech aesthetic.
9. Create 3D Illusions with Directional Satin Stitch
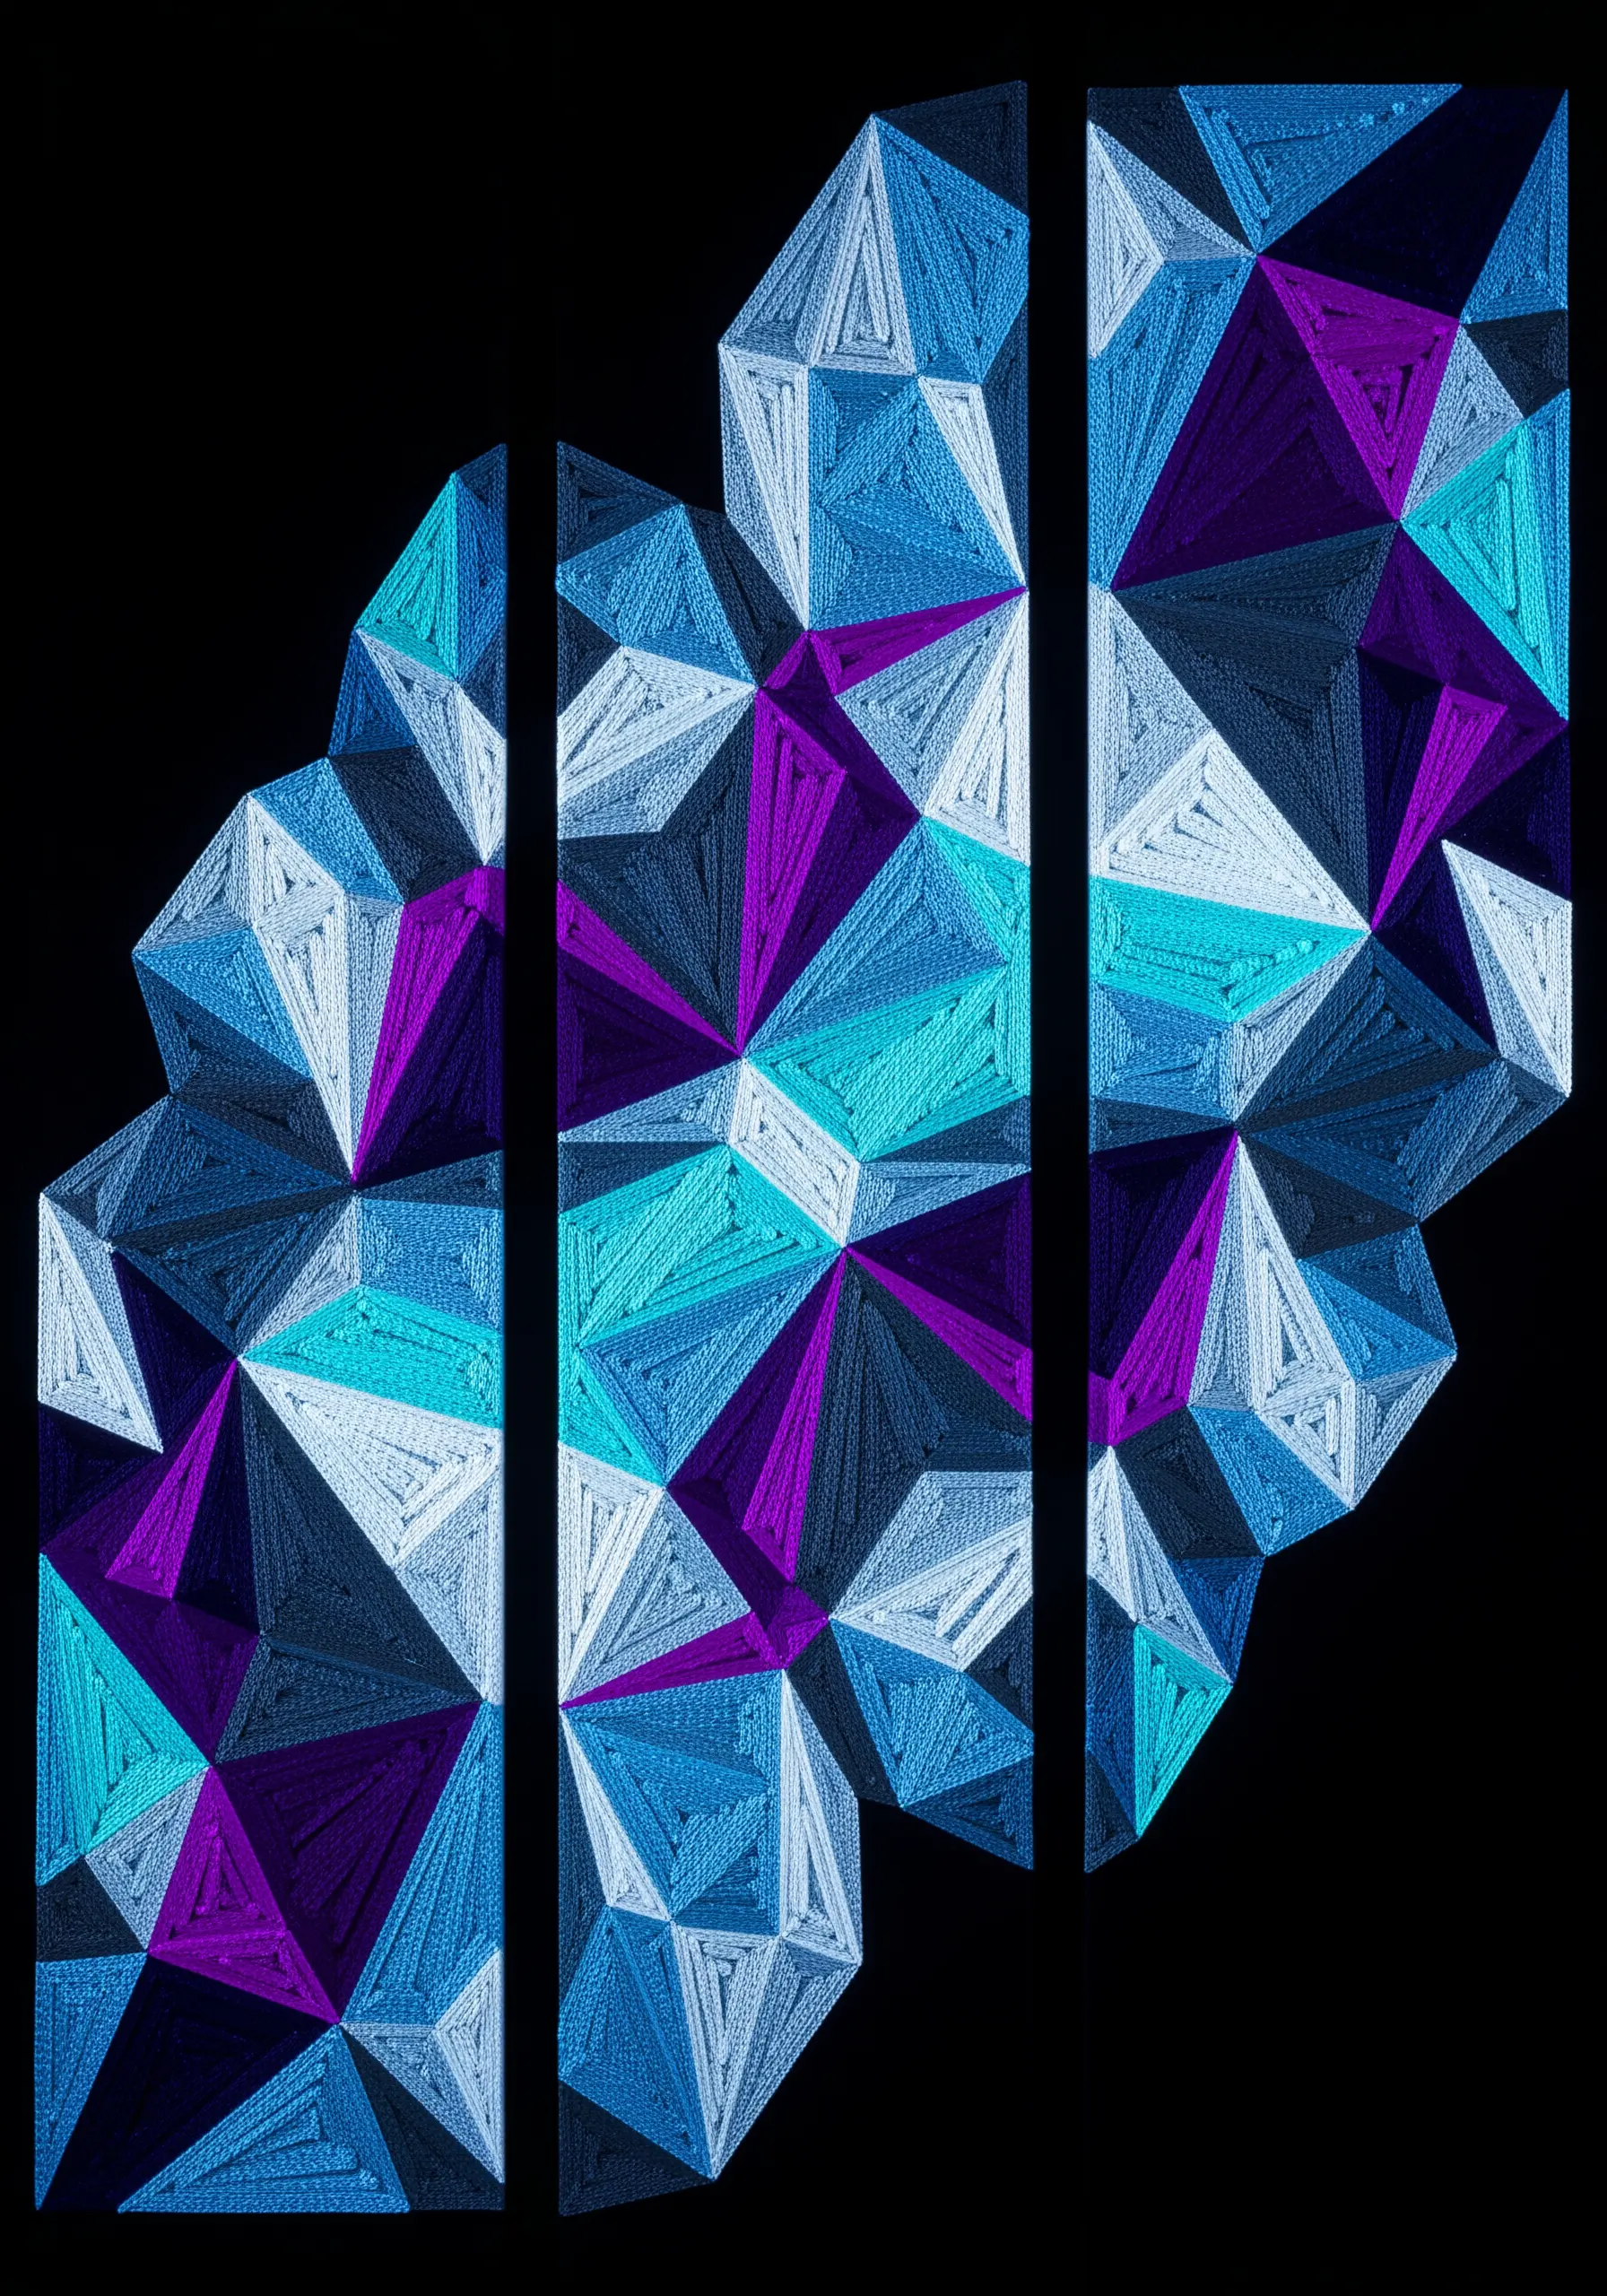
The key to making these geometric forms look three-dimensional is the disciplined use of satin stitch.
Fill each triangular facet with stitches running in a single, consistent direction. Then, for an adjacent facet, change the stitch direction by 45 or 90 degrees.
This simple shift in direction causes the light to reflect differently off the thread, creating the illusion of planes and shadows without ever changing your thread color.
Mounting the finished work as a triptych on separate panels adds a sculptural quality and enhances the architectural feel.
10. Build Luminous Texture with Glow-in-the-Dark Knots

Move beyond neon thread and explore glow-in-the-dark beads or densely packed French knots to create a truly radiant surface.
By filling the shapes of the moon phases with these textural elements, you create a piece that has a physical presence even in daylight.
Under UV light or in the dark, the effect is amplified, transforming the flat surface into a celestial body with palpable dimension.
Arranging the hoops in a classic lunar cycle formation turns a series of small pieces into a cohesive and impactful hooped wall collage.
11. Electrify Apparel with Bold, Graphic Outlines
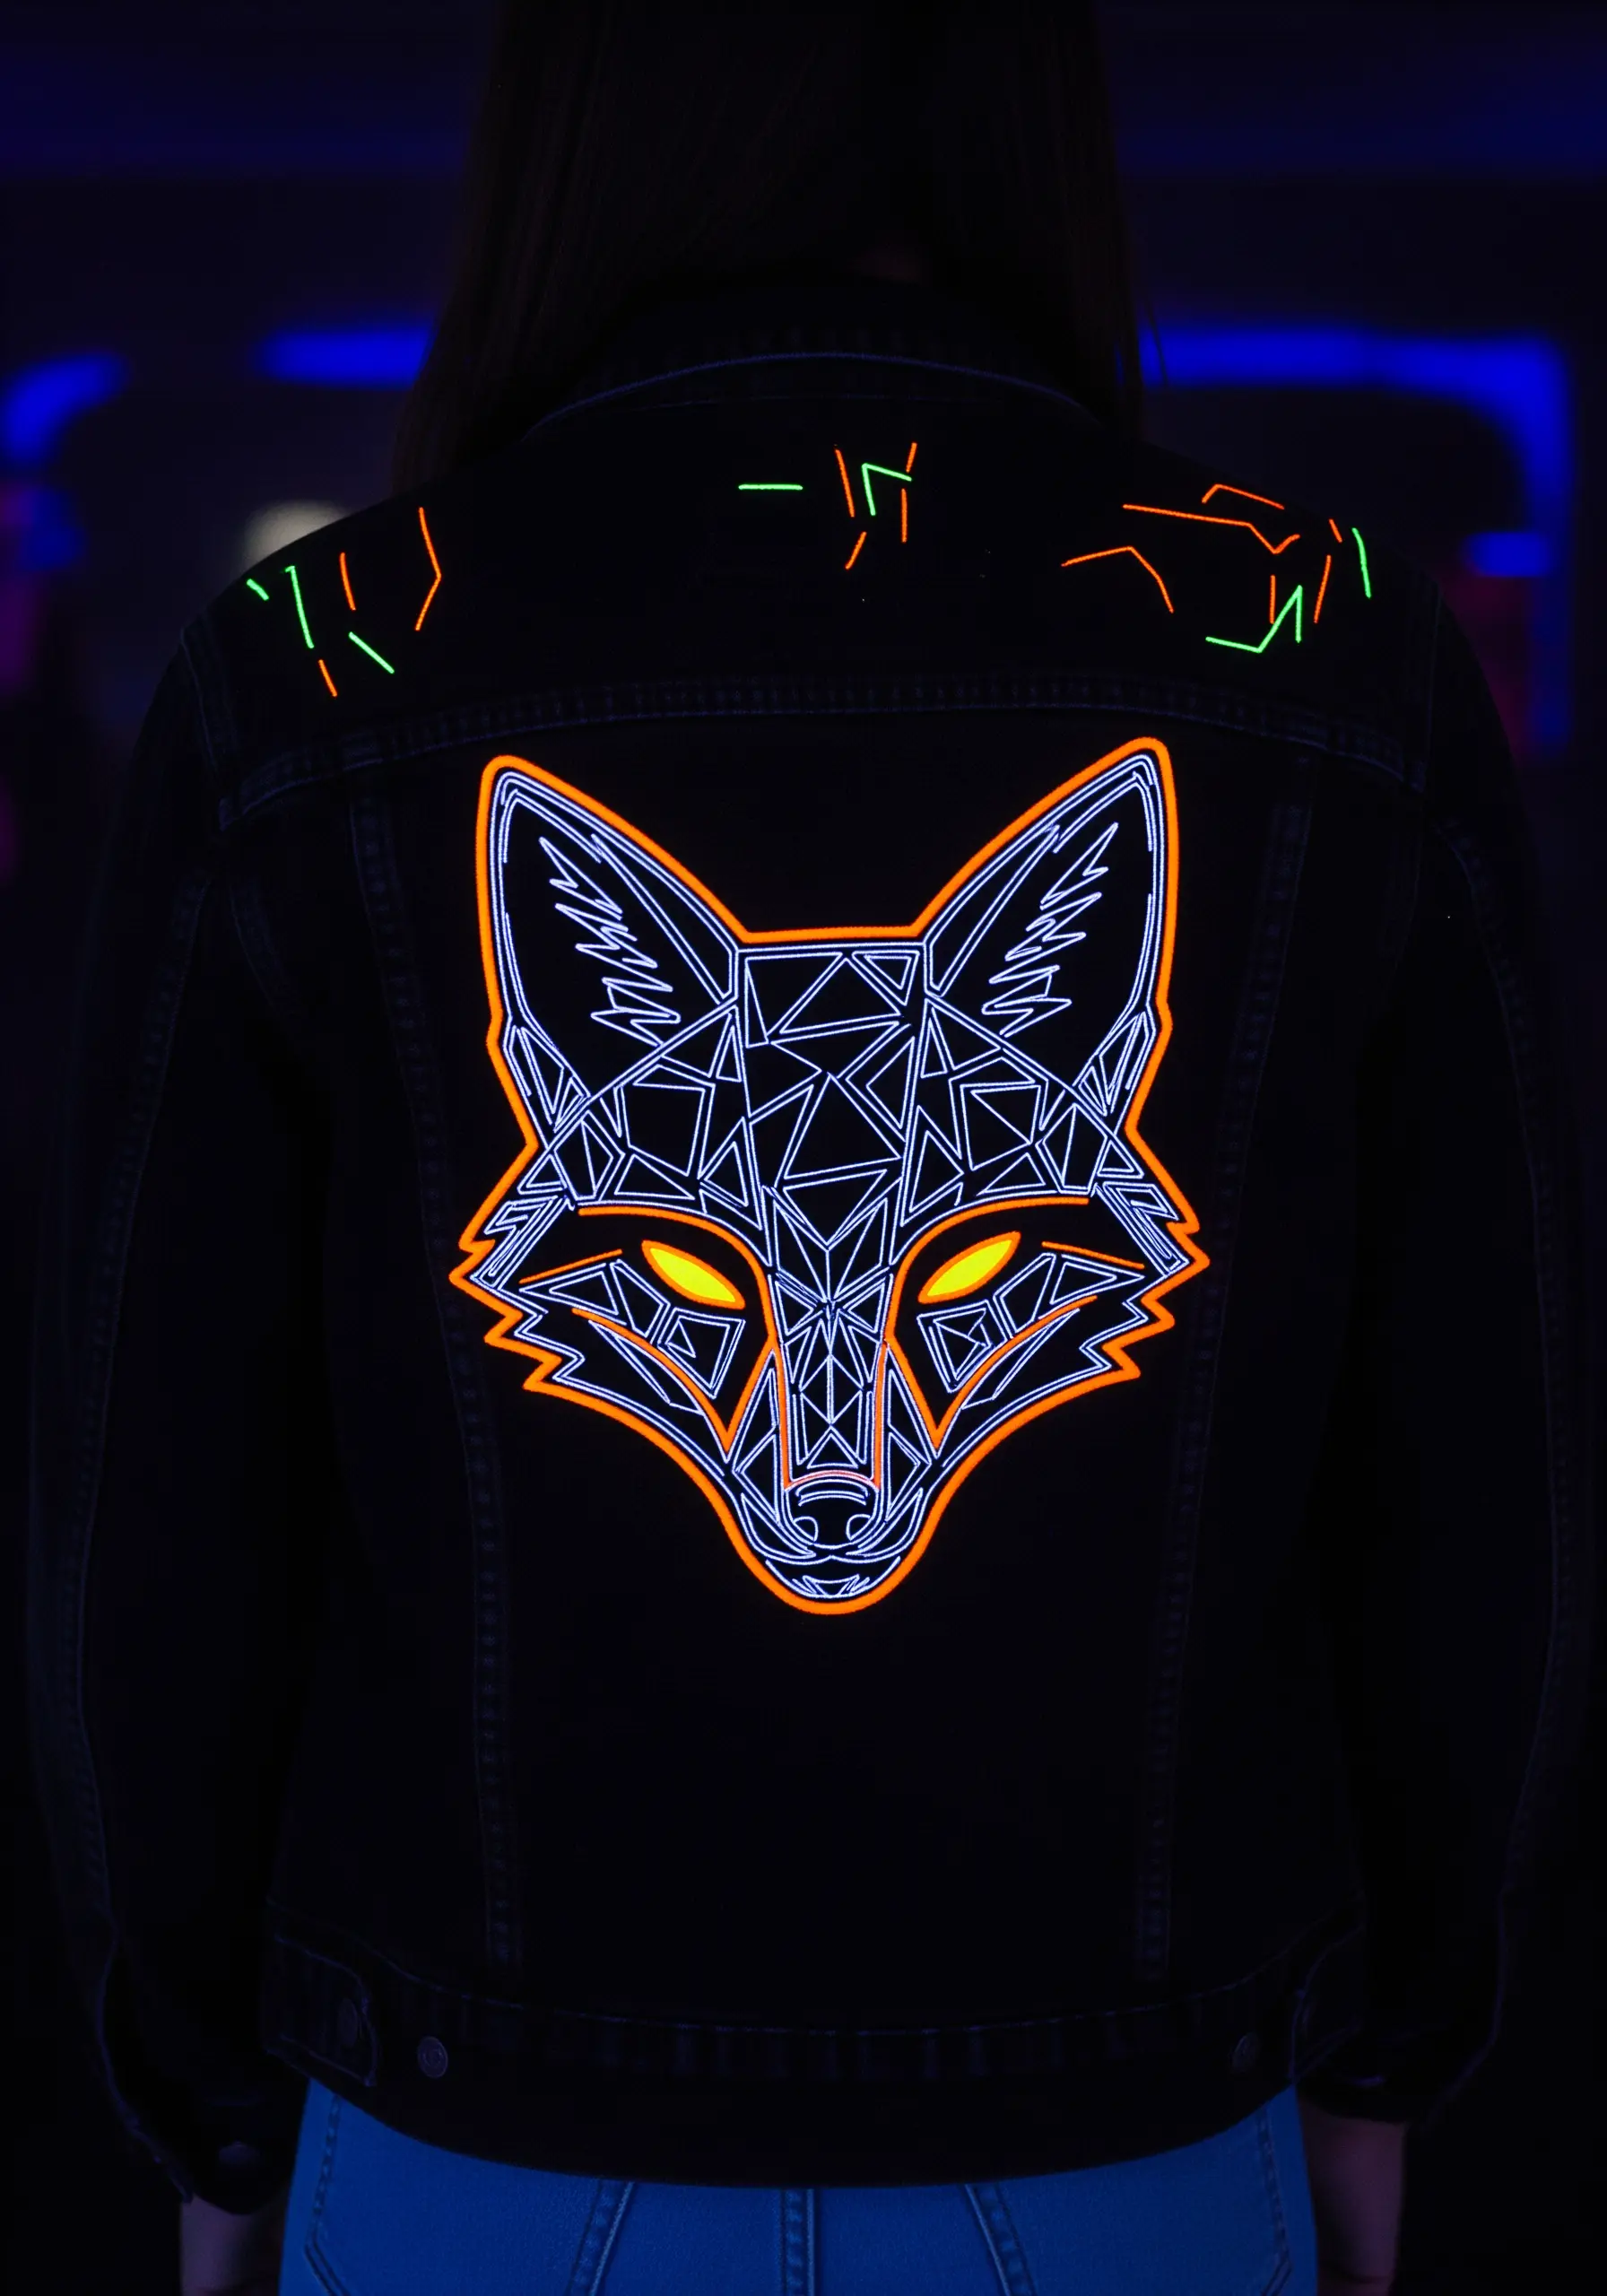
When embroidering on durable fabric like a denim jacket, you need your design to be bold and resilient.
Use a thick, six-strand floss or even a fine neon yarn for the main outlines, securing it with a heavy chain stitch or couching it for maximum impact.
This creates a strong border that contains the finer, more delicate backstitched lines within the design. Using a bright, contrasting color for the eyes, like fluorescent yellow, draws focus and gives the creature a piercing gaze.
These string art wildlife designs translate beautifully to wearable art.
12. Weave a Psychedelic Tapestry with Seed Stitches

To create a complex, kaleidoscopic pattern without overwhelming yourself, think of your thread as pixels of light.
Fill each small, defined area of your design with a dense layer of tiny seed stitches, using a variety of neon colors.
This technique creates a rich, grainy texture that blends the colors visually from a distance, much like a pointillist painting.
It’s a meditative process that allows you to build intricate patterns organically, one stitch at a time, resulting in a piece with incredible visual density.
13. Design with Gravity Using Dripping Thread

This minimalist yet high-impact design leverages the thread itself as a sculptural element. It works best off-hoop, on a stretched canvas or sturdy board.
Instead of stitching through the fabric, secure your neon cord or yarn at the top edge of the canvas and let it hang freely.
Trim the ends at varying lengths to create the organic, dripping effect. A small dab of fabric glue at the top will keep each strand perfectly in place.
This is one of the most effective abstract thread illusion techniques, turning simple strands into a dynamic installation.
14. Split a Simple Motif for a Modern Two-Tone Effect

Elevate a simple line-art design by splitting it down the middle with two contrasting neon colors.
Use a clean, continuous stitch like a whipped backstitch or stem stitch to ensure the outline is smooth and uniform, resembling a neon sign.
The sharp division between the hot pink and electric green creates a visual tension that is modern, bold, and immediately eye-catching.
This technique proves that you don’t need a complex pattern to create a striking piece; a thoughtful use of color is often all it takes.
15. Create an Optical Burst with Radiating Stitches
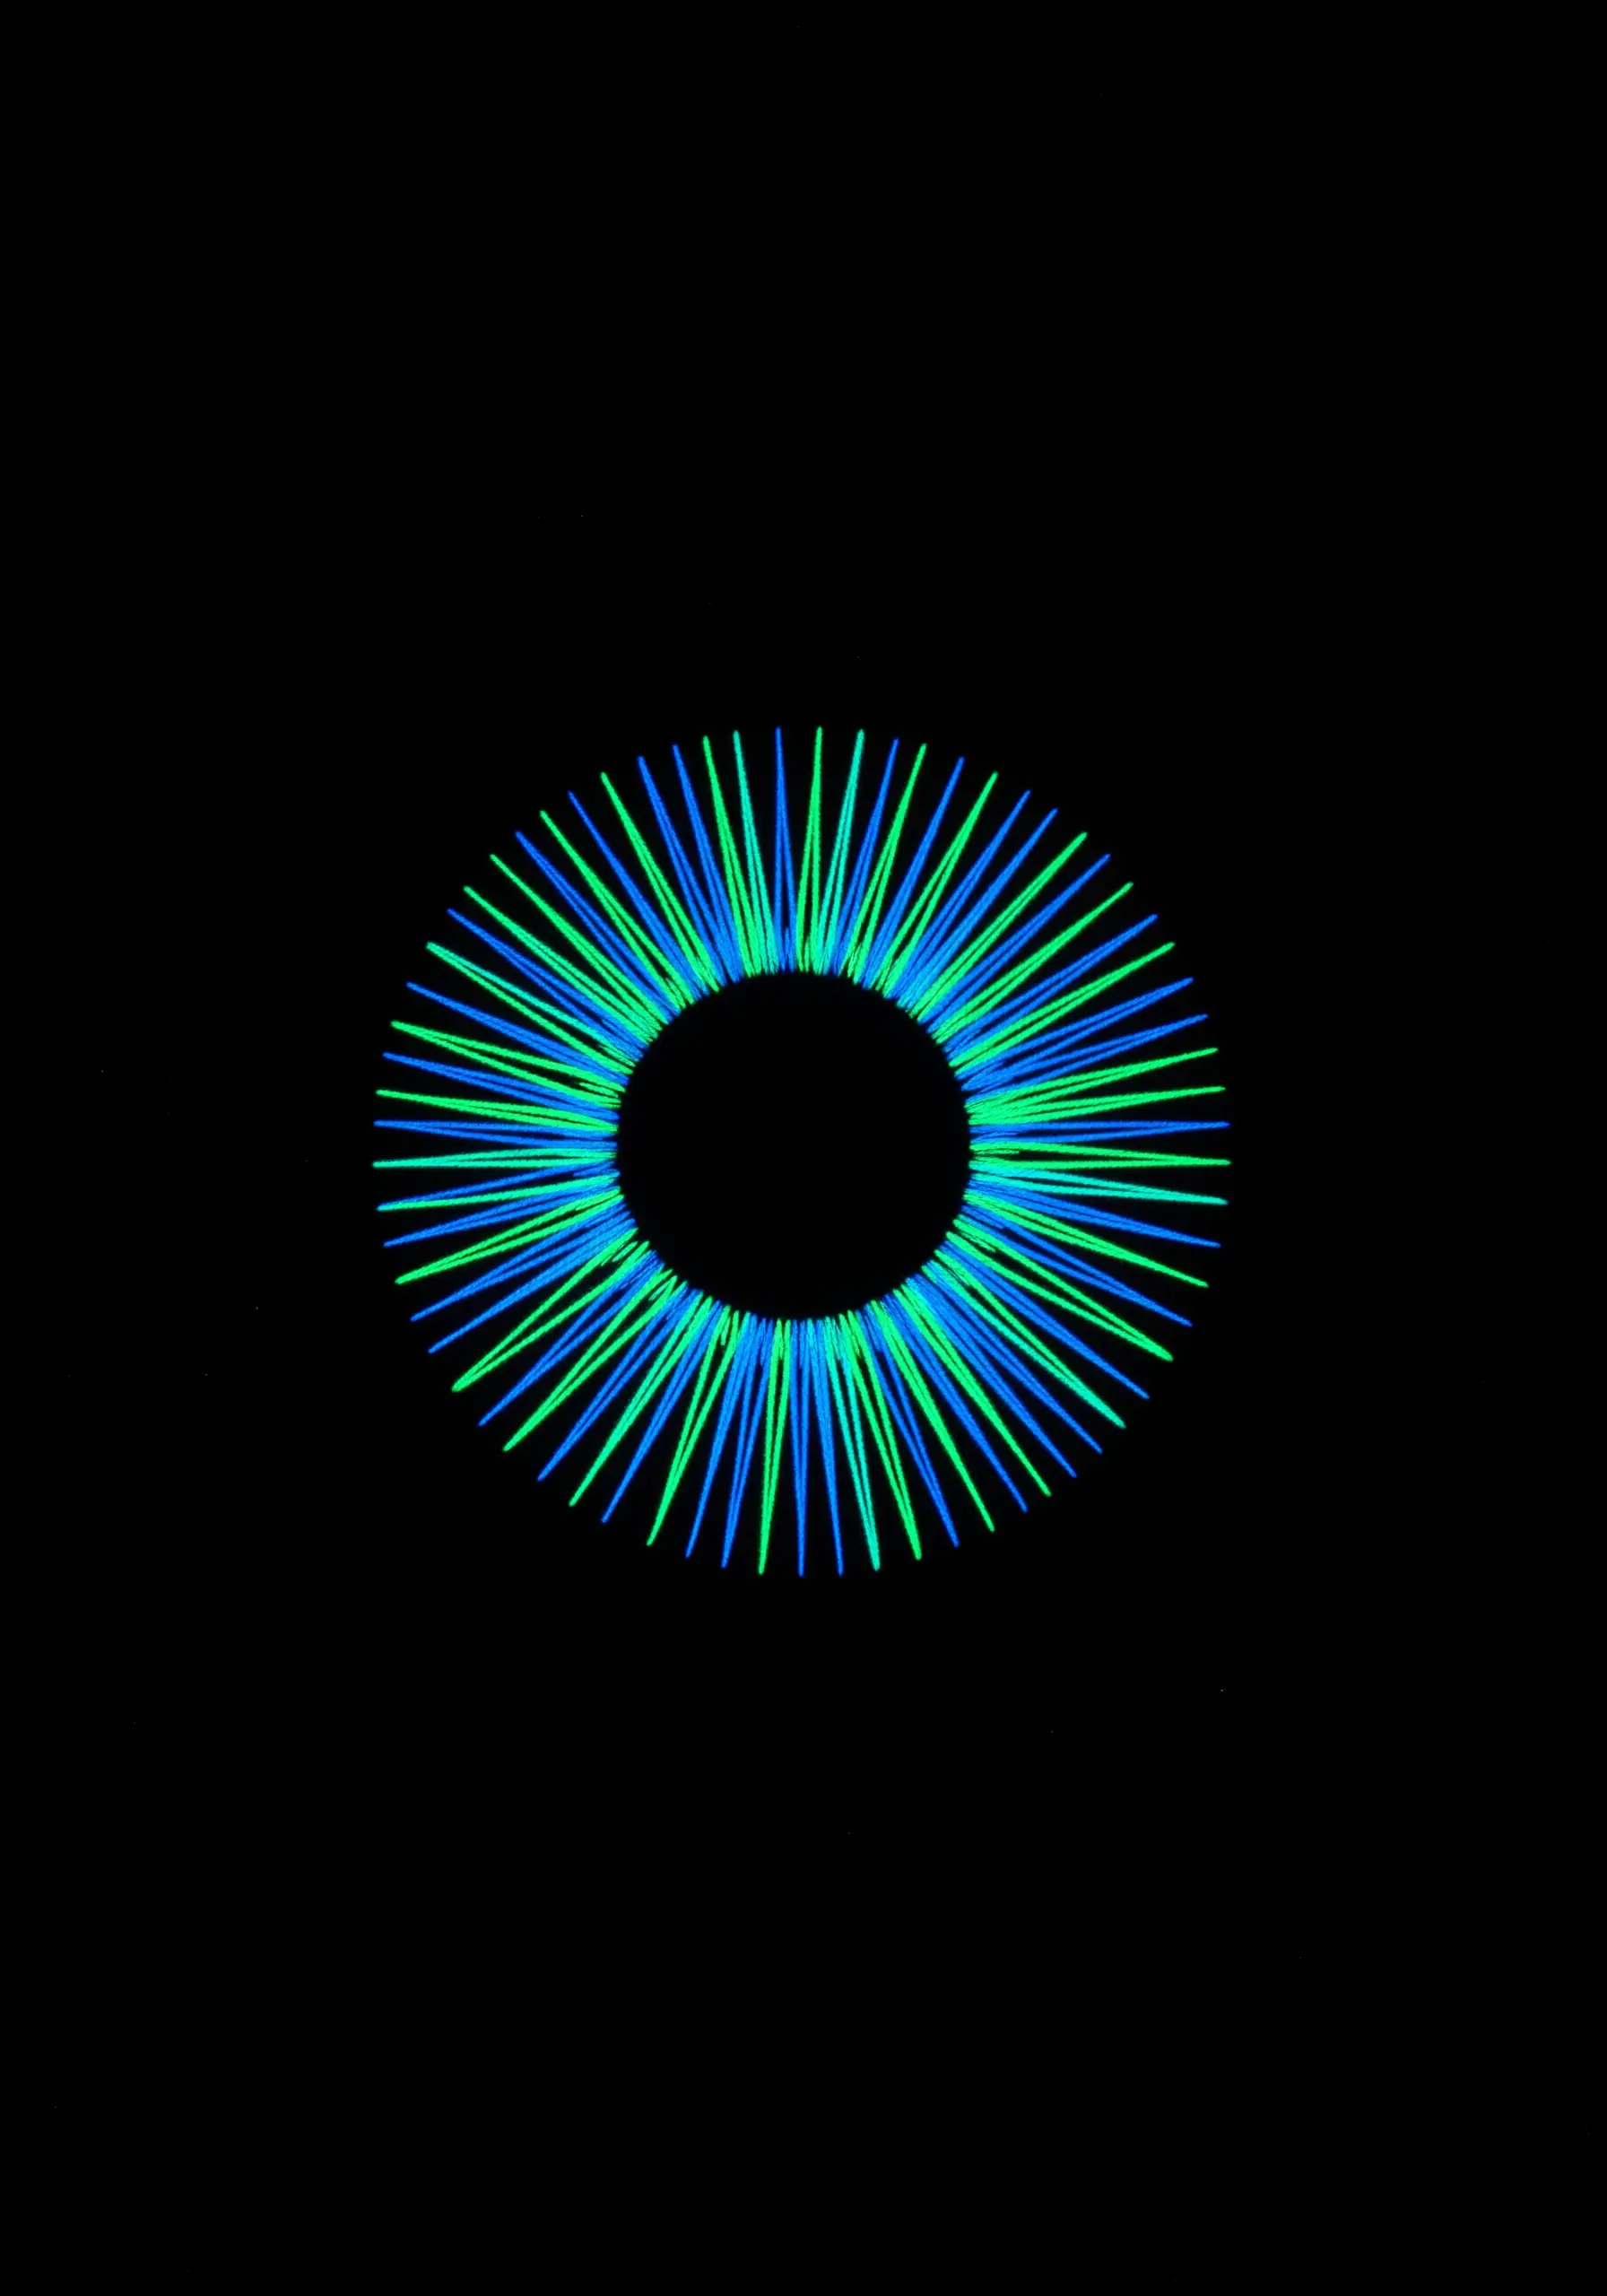
This design is a masterclass in tension and color theory. To create this explosive effect, use single straight stitches radiating from a central point.
To avoid creating a hole in the fabric, bring your needle up from the back at the center for each stitch, but return it to the back along the outer edge. Don’t pull the central stitches through the exact same hole every time.
Alternating between two complementary neon colors, like blue and green, creates a vibrant, optical flicker that makes the design feel like it’s vibrating.
16. Trace Crisp Folds with a Single, Bright Line

To capture the sharp, precise folds of an origami figure, use a single strand of high-contrast thread, like glow-in-the-dark white.
A meticulous backstitch is the perfect choice, as it creates a solid, unbroken line that defines each geometric plane clearly.
Focus on achieving perfect corners and straight lines; this isn’t about texture, but about graphic precision.
The negative space within the outline is just as important, allowing the viewer’s eye to fill in the form of the paper crane.
17. Map the Night Sky with Stitches and Knots

Recreate a favorite constellation by using a variety of stitches to represent different celestial bodies.
Use four- or six-pointed star stitches for the brightest stars, executed with a glow-in-the-dark thread for extra luminosity.
Connect them with a faint, single-strand backstitch in a subtle neon blue. Then, fill the surrounding space with a sparse scattering of tiny white or pale green French knots to represent the vastness of the Milky Way.
This thoughtful variation in stitch and scale is what brings the cosmic scene to life.
18. Build Dense, Textured Shapes with Concentric Stitches
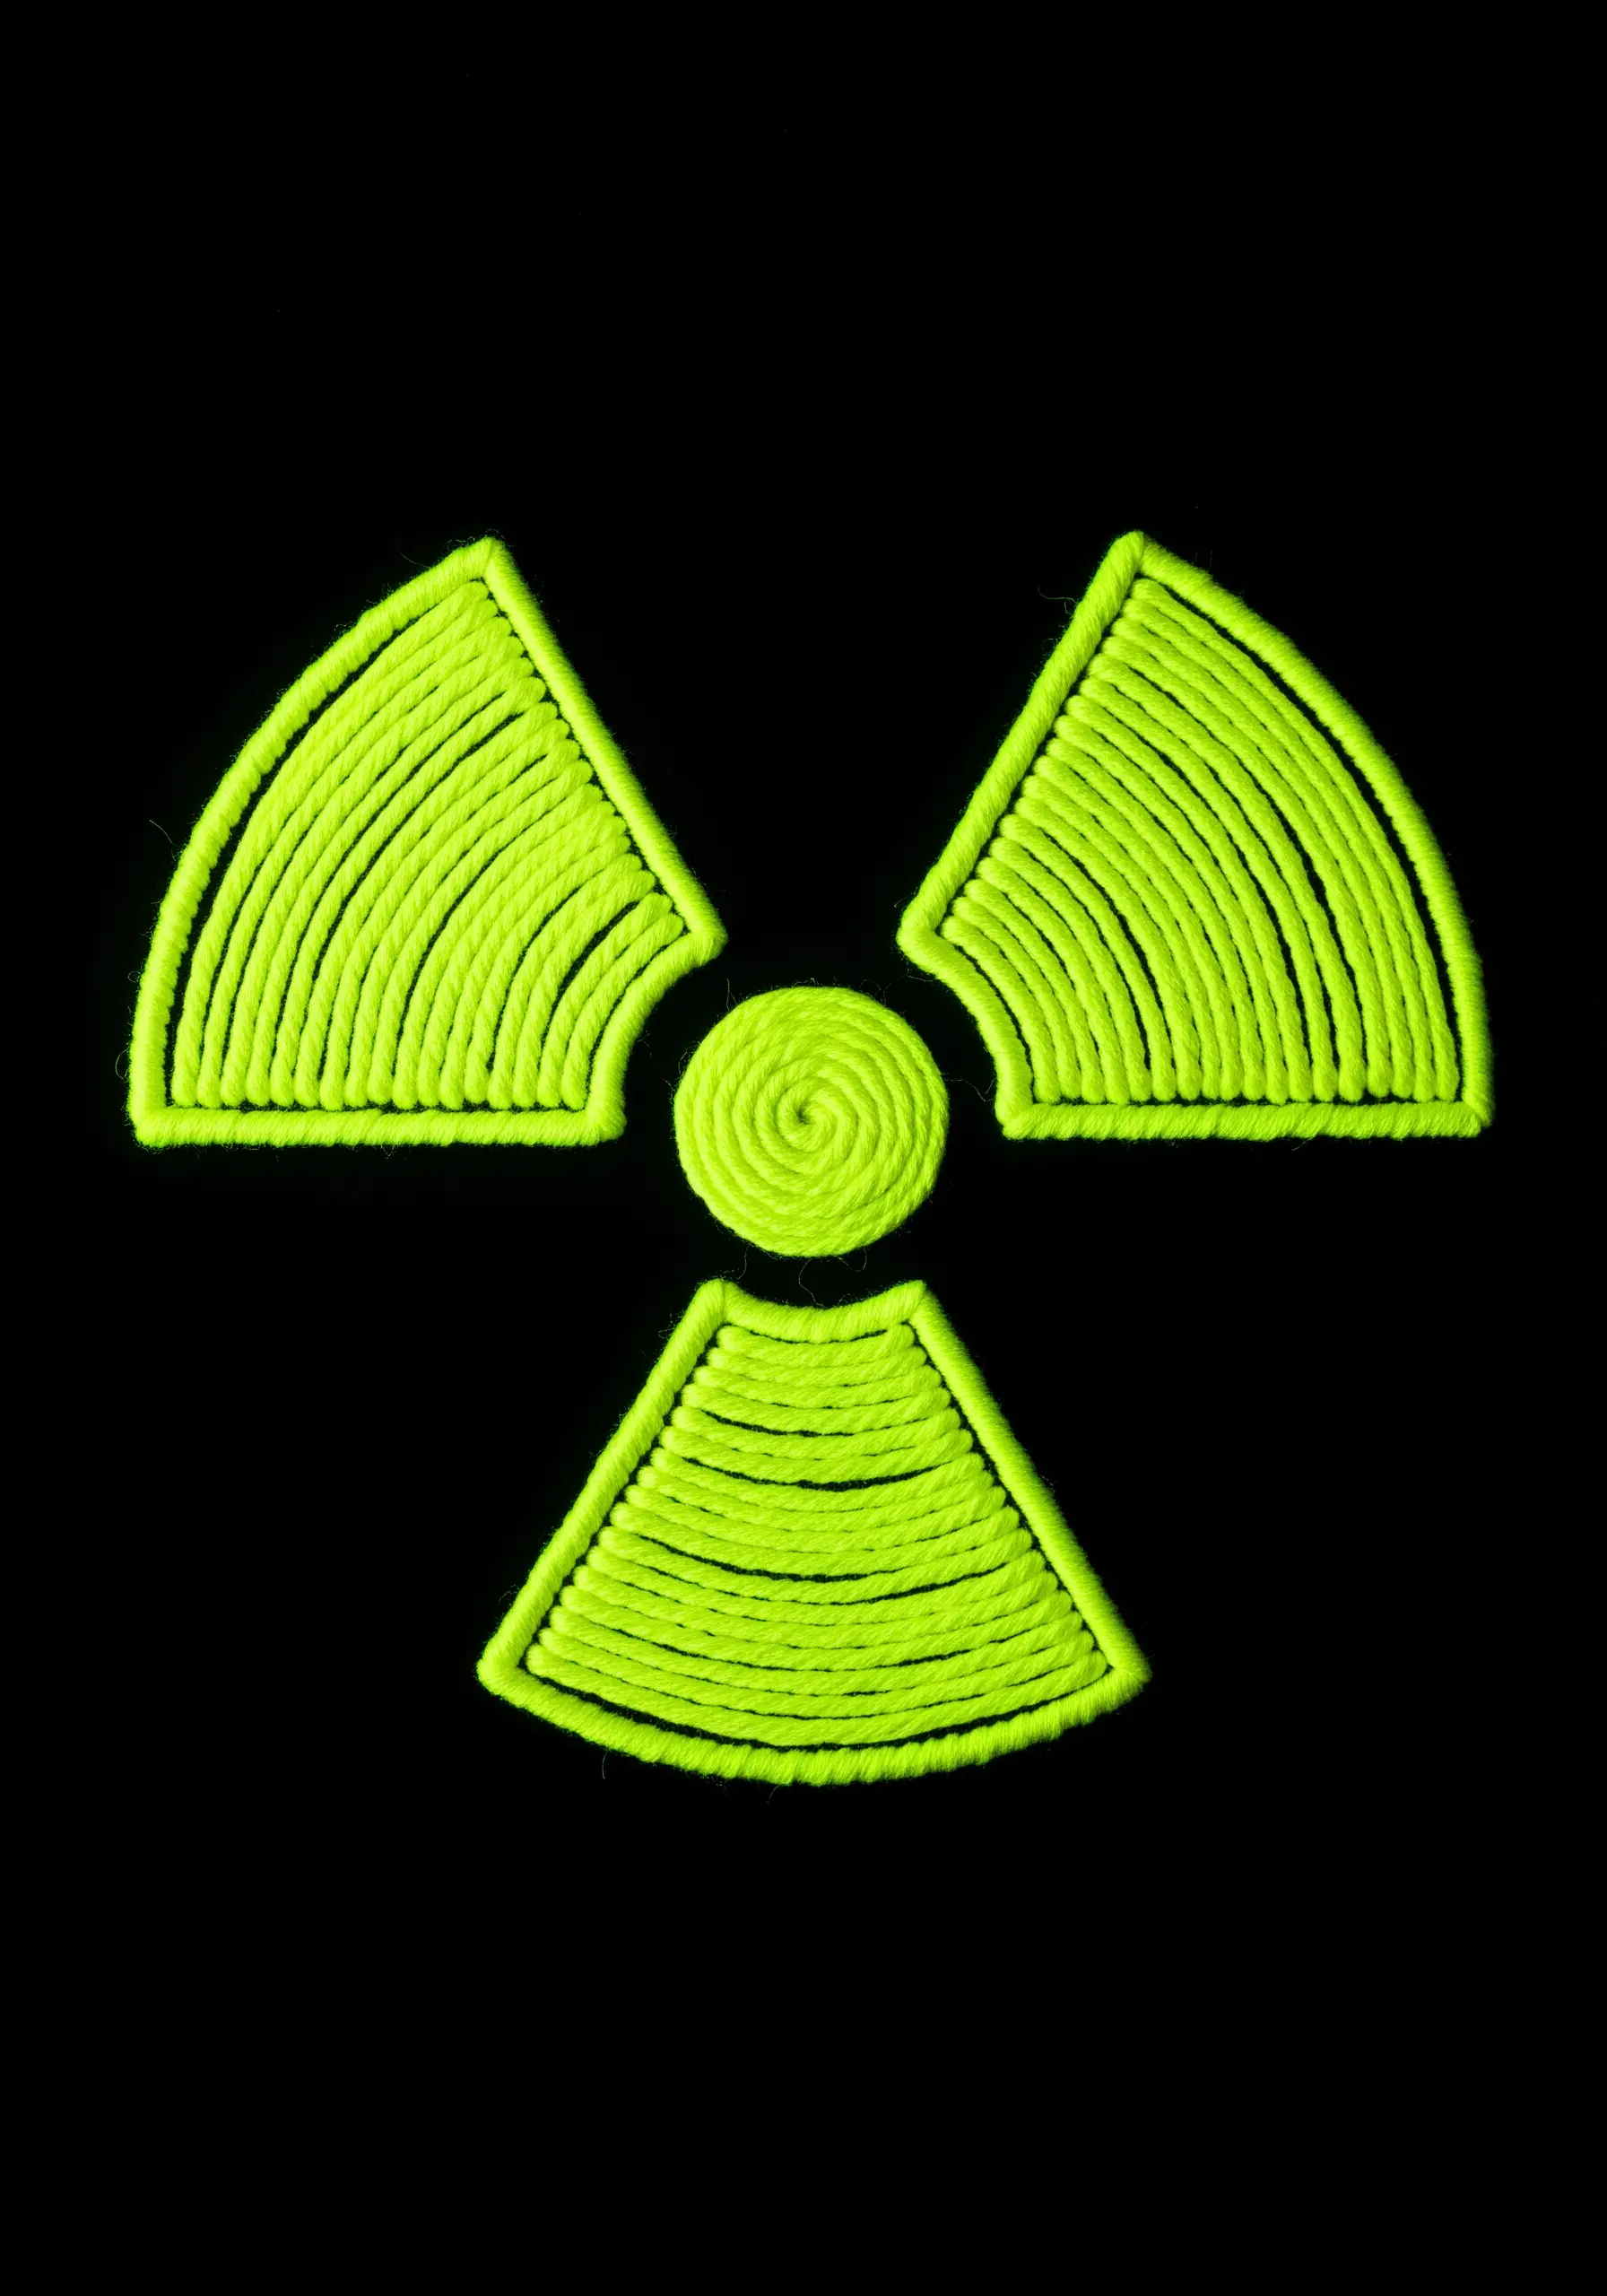
For a design that needs to feel solid and almost sculptural, use a dense filling technique.
Outline your shape first with a split stitch, then fill the interior with stitches that follow its contours. For the circular center, stitch in a spiral. For the fan-like sections, use curved satin stitches.
This method creates a beautiful, corded texture that has a tangible, raised quality.
Using a single, unapologetically bright color like chartreuse makes the symbol feel potent and iconic.
19. Combine Stitching and Painting for Graphic Clarity

For a clean, scientific diagram, don’t be afraid to combine mediums. Stitch the structural lines of the molecule using a simple backstitch in a bright neon color.
Then, use a UV-reactive fabric paint and a fine brush to create the perfectly round atoms and crisp lettering.
This mixed-media approach allows you to achieve a level of graphic precision that would be difficult with thread alone.
The combination of the thread’s texture and the paint’s flat, solid color creates a visually interesting and polished result.
20. Embrace Chaos with Freeform Abstract Stitches

Capture the raw energy of graffiti by abandoning patterns and embracing intuitive, freeform stitching.
Use a mix of stitches—long, aggressive straight stitches, loopy chain stitches, and sharp, jagged backstitches—to create a sense of movement and spontaneity.
Layer multiple neon colors over one another without a plan, letting them intersect and tangle. This is your chance to stitch sound, rhythm, and flow, turning your hoop into a canvas of pure expression.
The key is to work quickly and trust your instincts.
21. Define a Creature with Minimalist Outlines
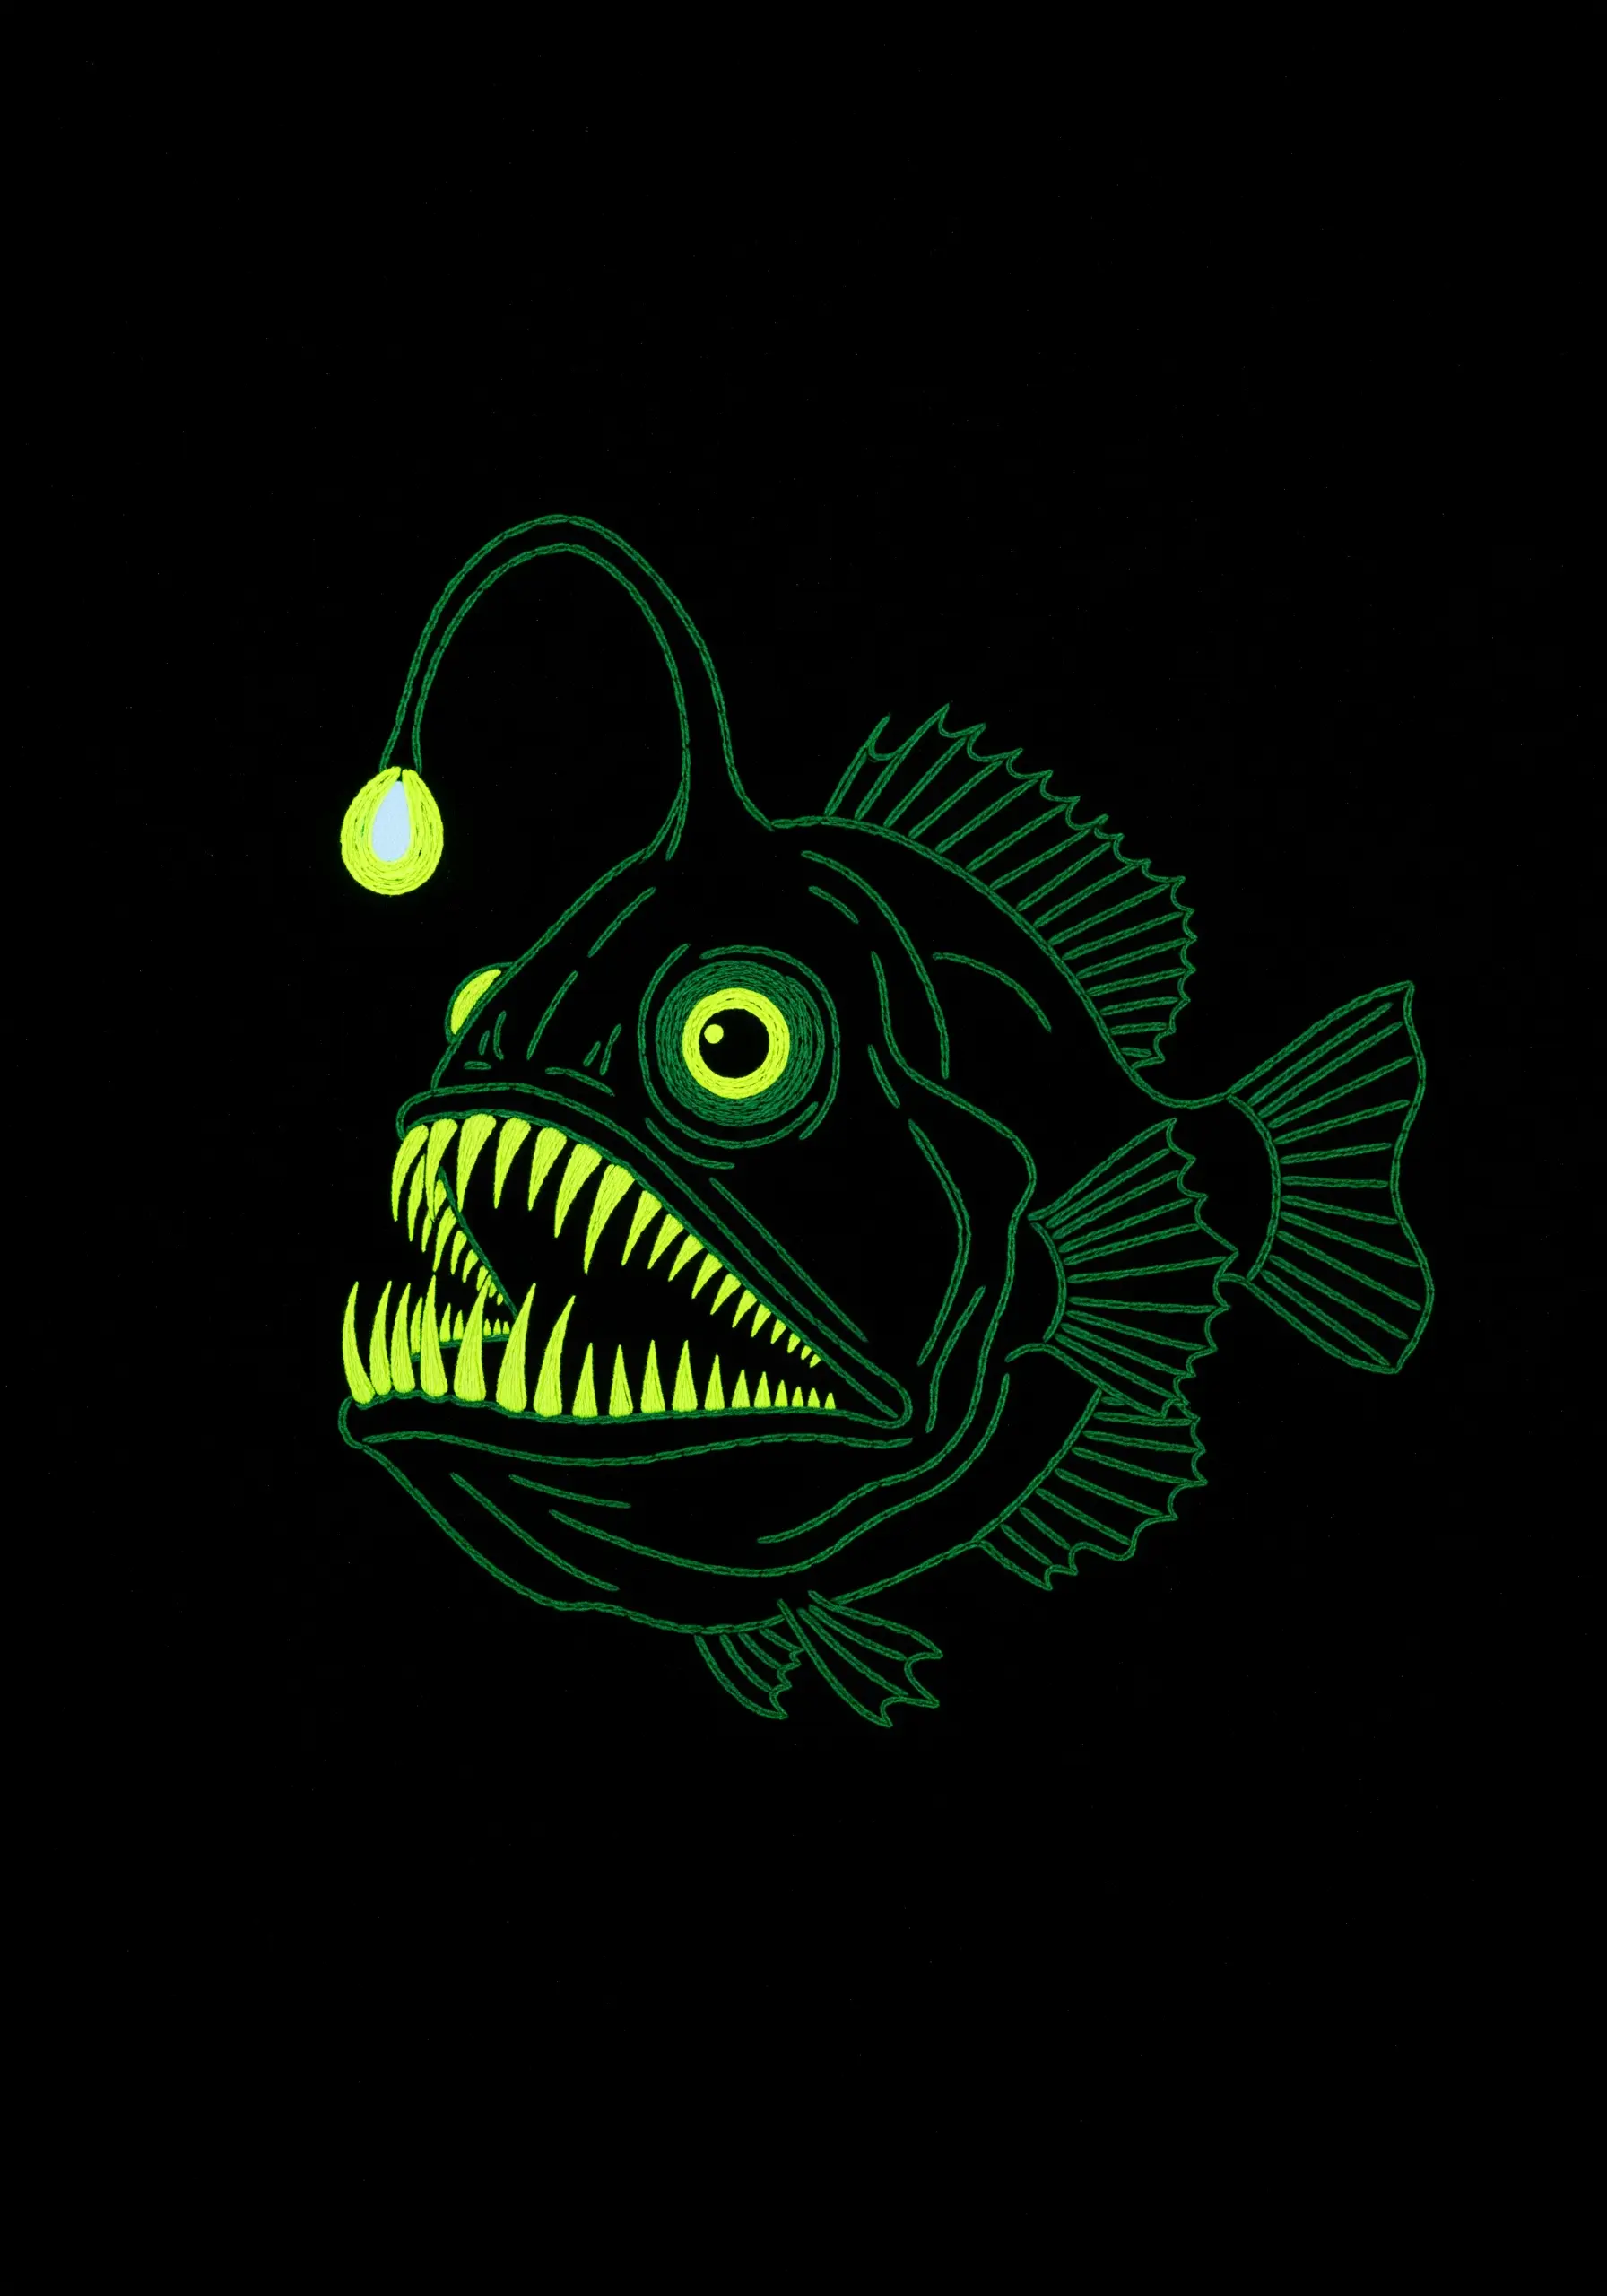
You can bring a creature to life using only outlines, allowing the black fabric to form its body.
Use a consistent backstitch or split stitch for the main form, ensuring your lines are clean and communicative.
The magic is in the selective use of fill stitches. A block of satin stitch for the teeth and a circular satin stitch for the eye immediately draw focus and add character.
This technique is incredibly efficient, creating a detailed illustration with a surprisingly small number of stitches.
22. Stitch a Starburst with a Fiery Color Gradient
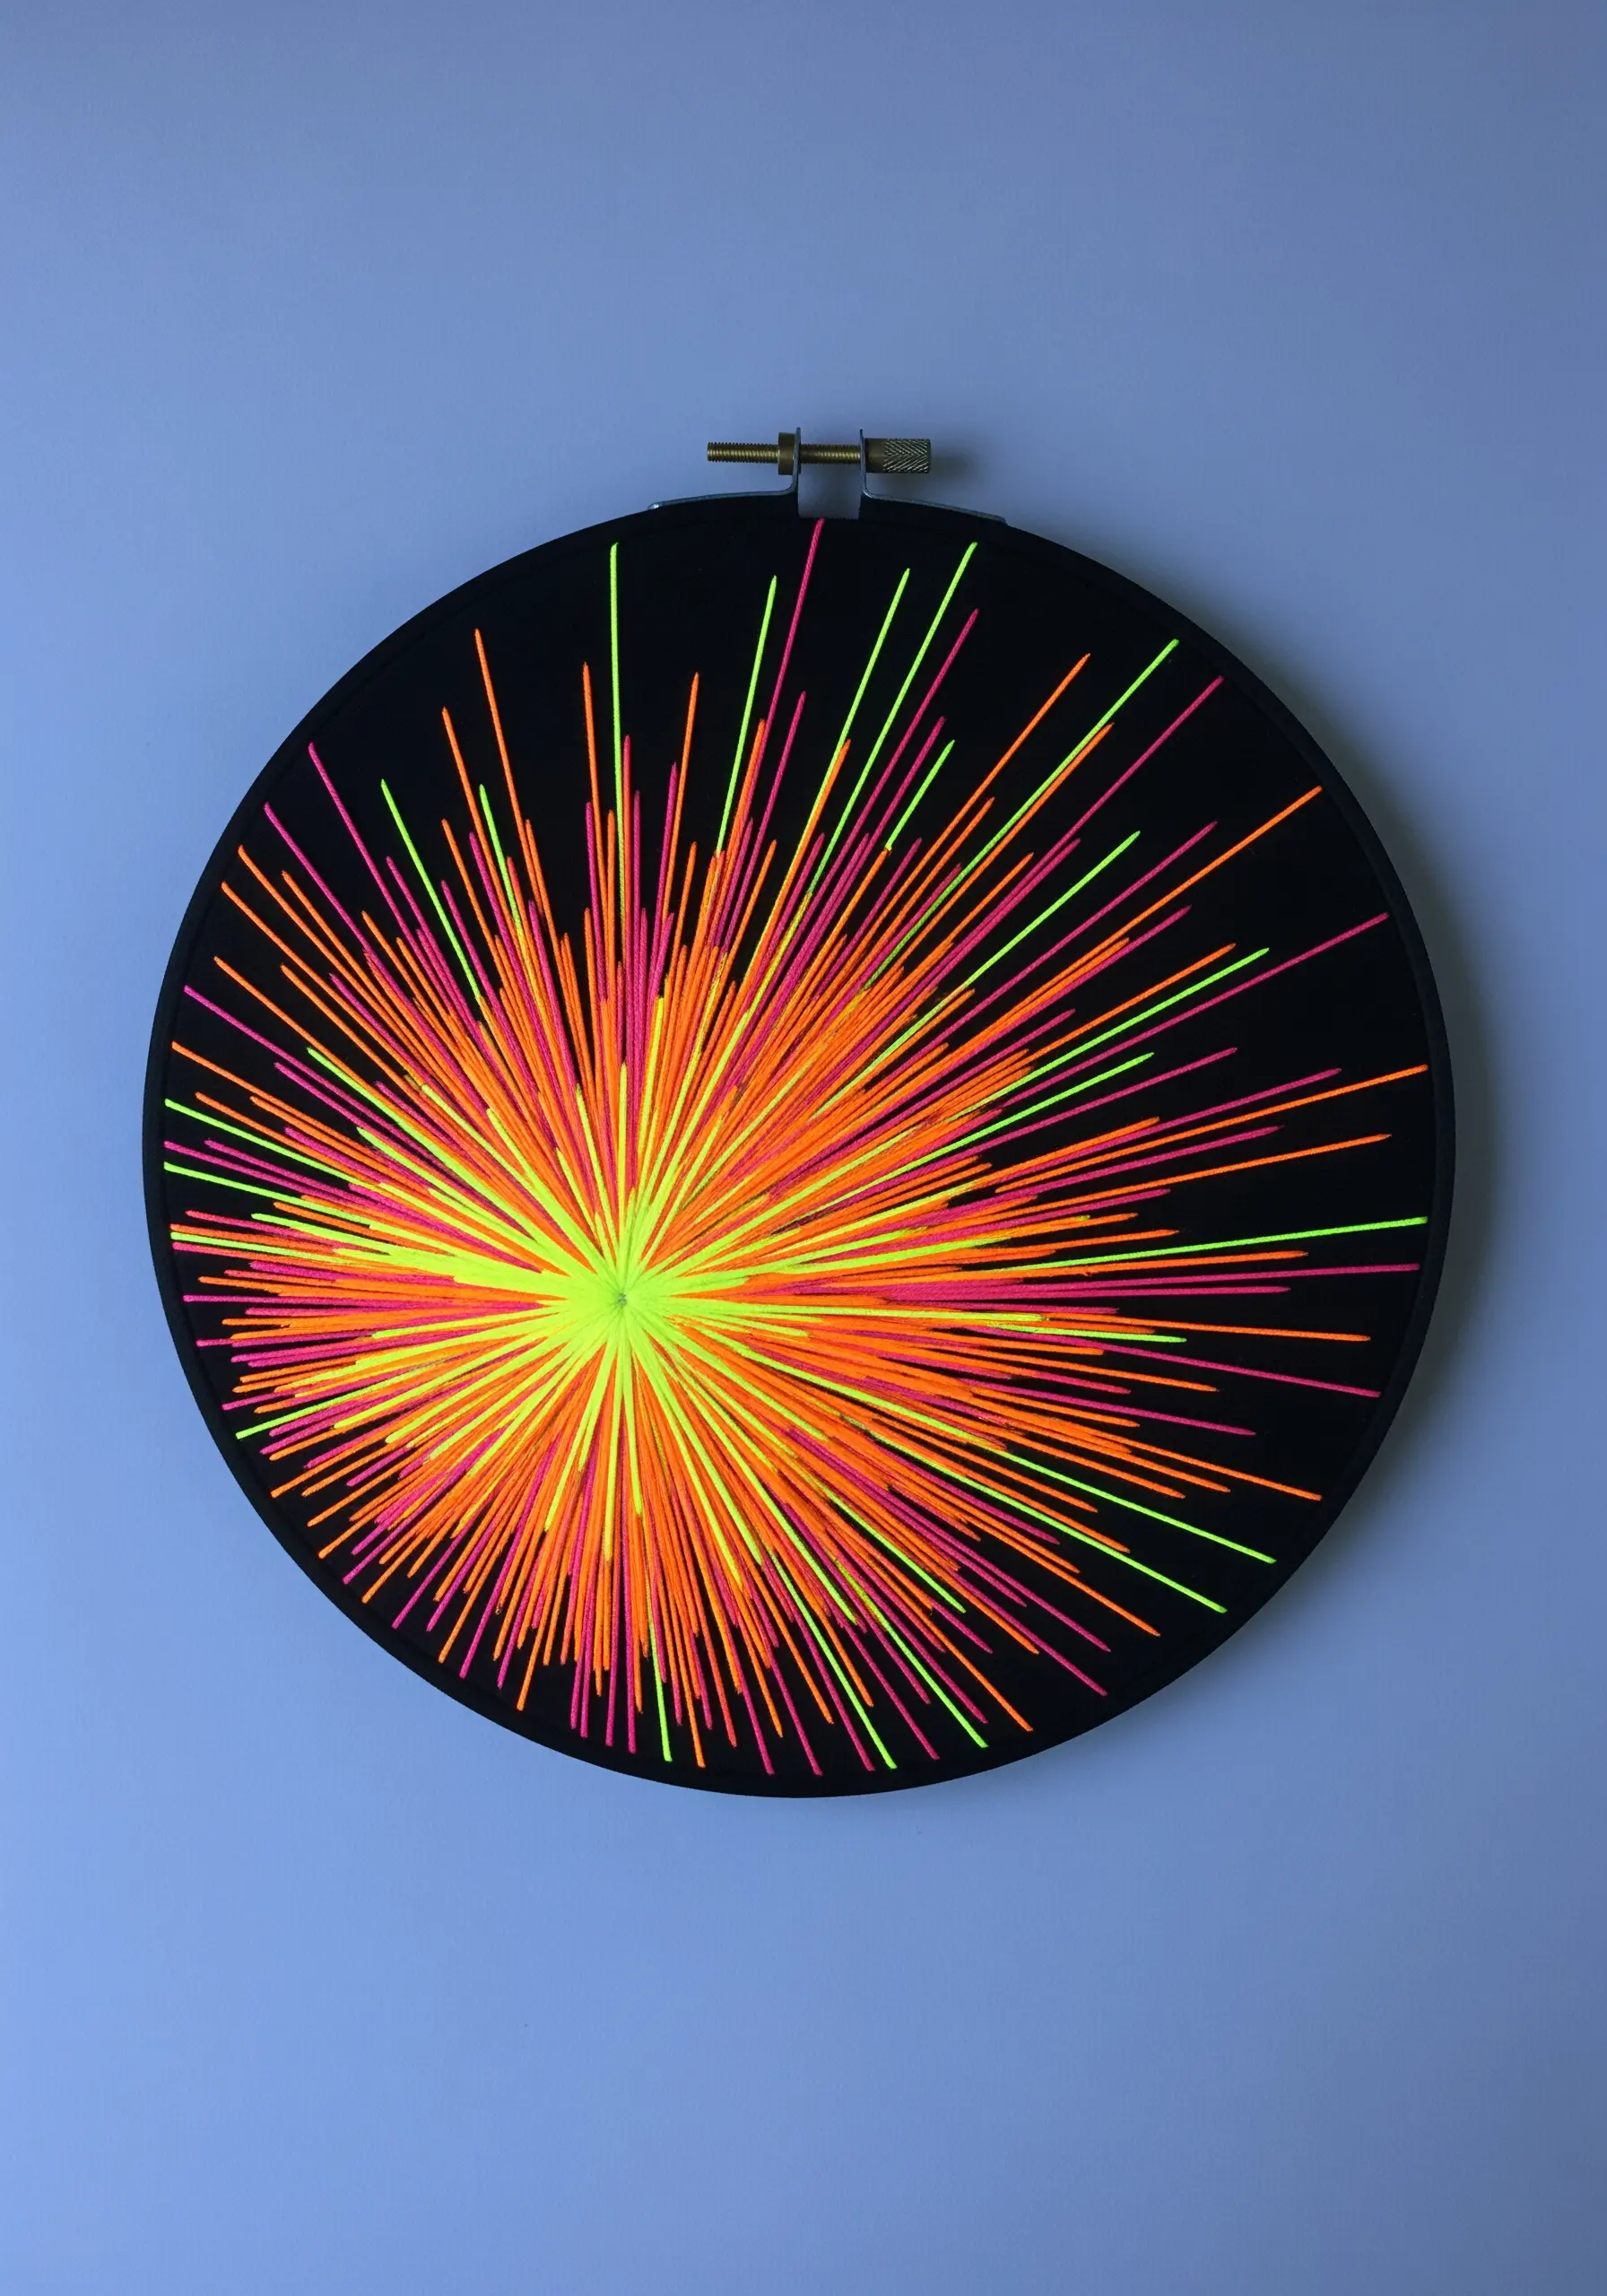
To create a truly explosive starburst, focus on a strategic color gradient. This isn’t just random; it’s controlled energy.
Start with the hottest, brightest color—like a fluorescent yellow—at the very center of the explosion, using the densest concentration of stitches.
As you move outward, transition your stitches to neon orange, and then to hot pink at the very tips of the longest rays.
This gradual shift in color creates a powerful illusion of heat and light radiating from the core, giving your design an intense, dynamic feel.


