

You have a growing collection of finished embroidery hoops, each one holding hours of your focus and care. But now they sit in a stack, waiting. You know they deserve to be seen, but arranging them on a wall feels daunting. How do you turn a collection of individual pieces into something that feels intentional, cohesive, and beautiful?
The answer is to think like a curator, not just a creator. A gallery wall of hoops isn’t a random assortment; it’s a conversation. It’s about finding the common thread—whether through color, theme, or texture—that ties each piece to the next. It’s about using size and spacing to create rhythm and flow, guiding the eye through a story you’ve stitched yourself.
In this guide, we’ll move beyond simply hanging your work. You will learn to see your wall as the final canvas. You’ll discover how to group your hoops into a single, impactful piece of art that reflects your unique style and transforms your space. It’s time to give your stitches the gallery-worthy display they’ve earned.
1. The Art of Geometric Cohesion
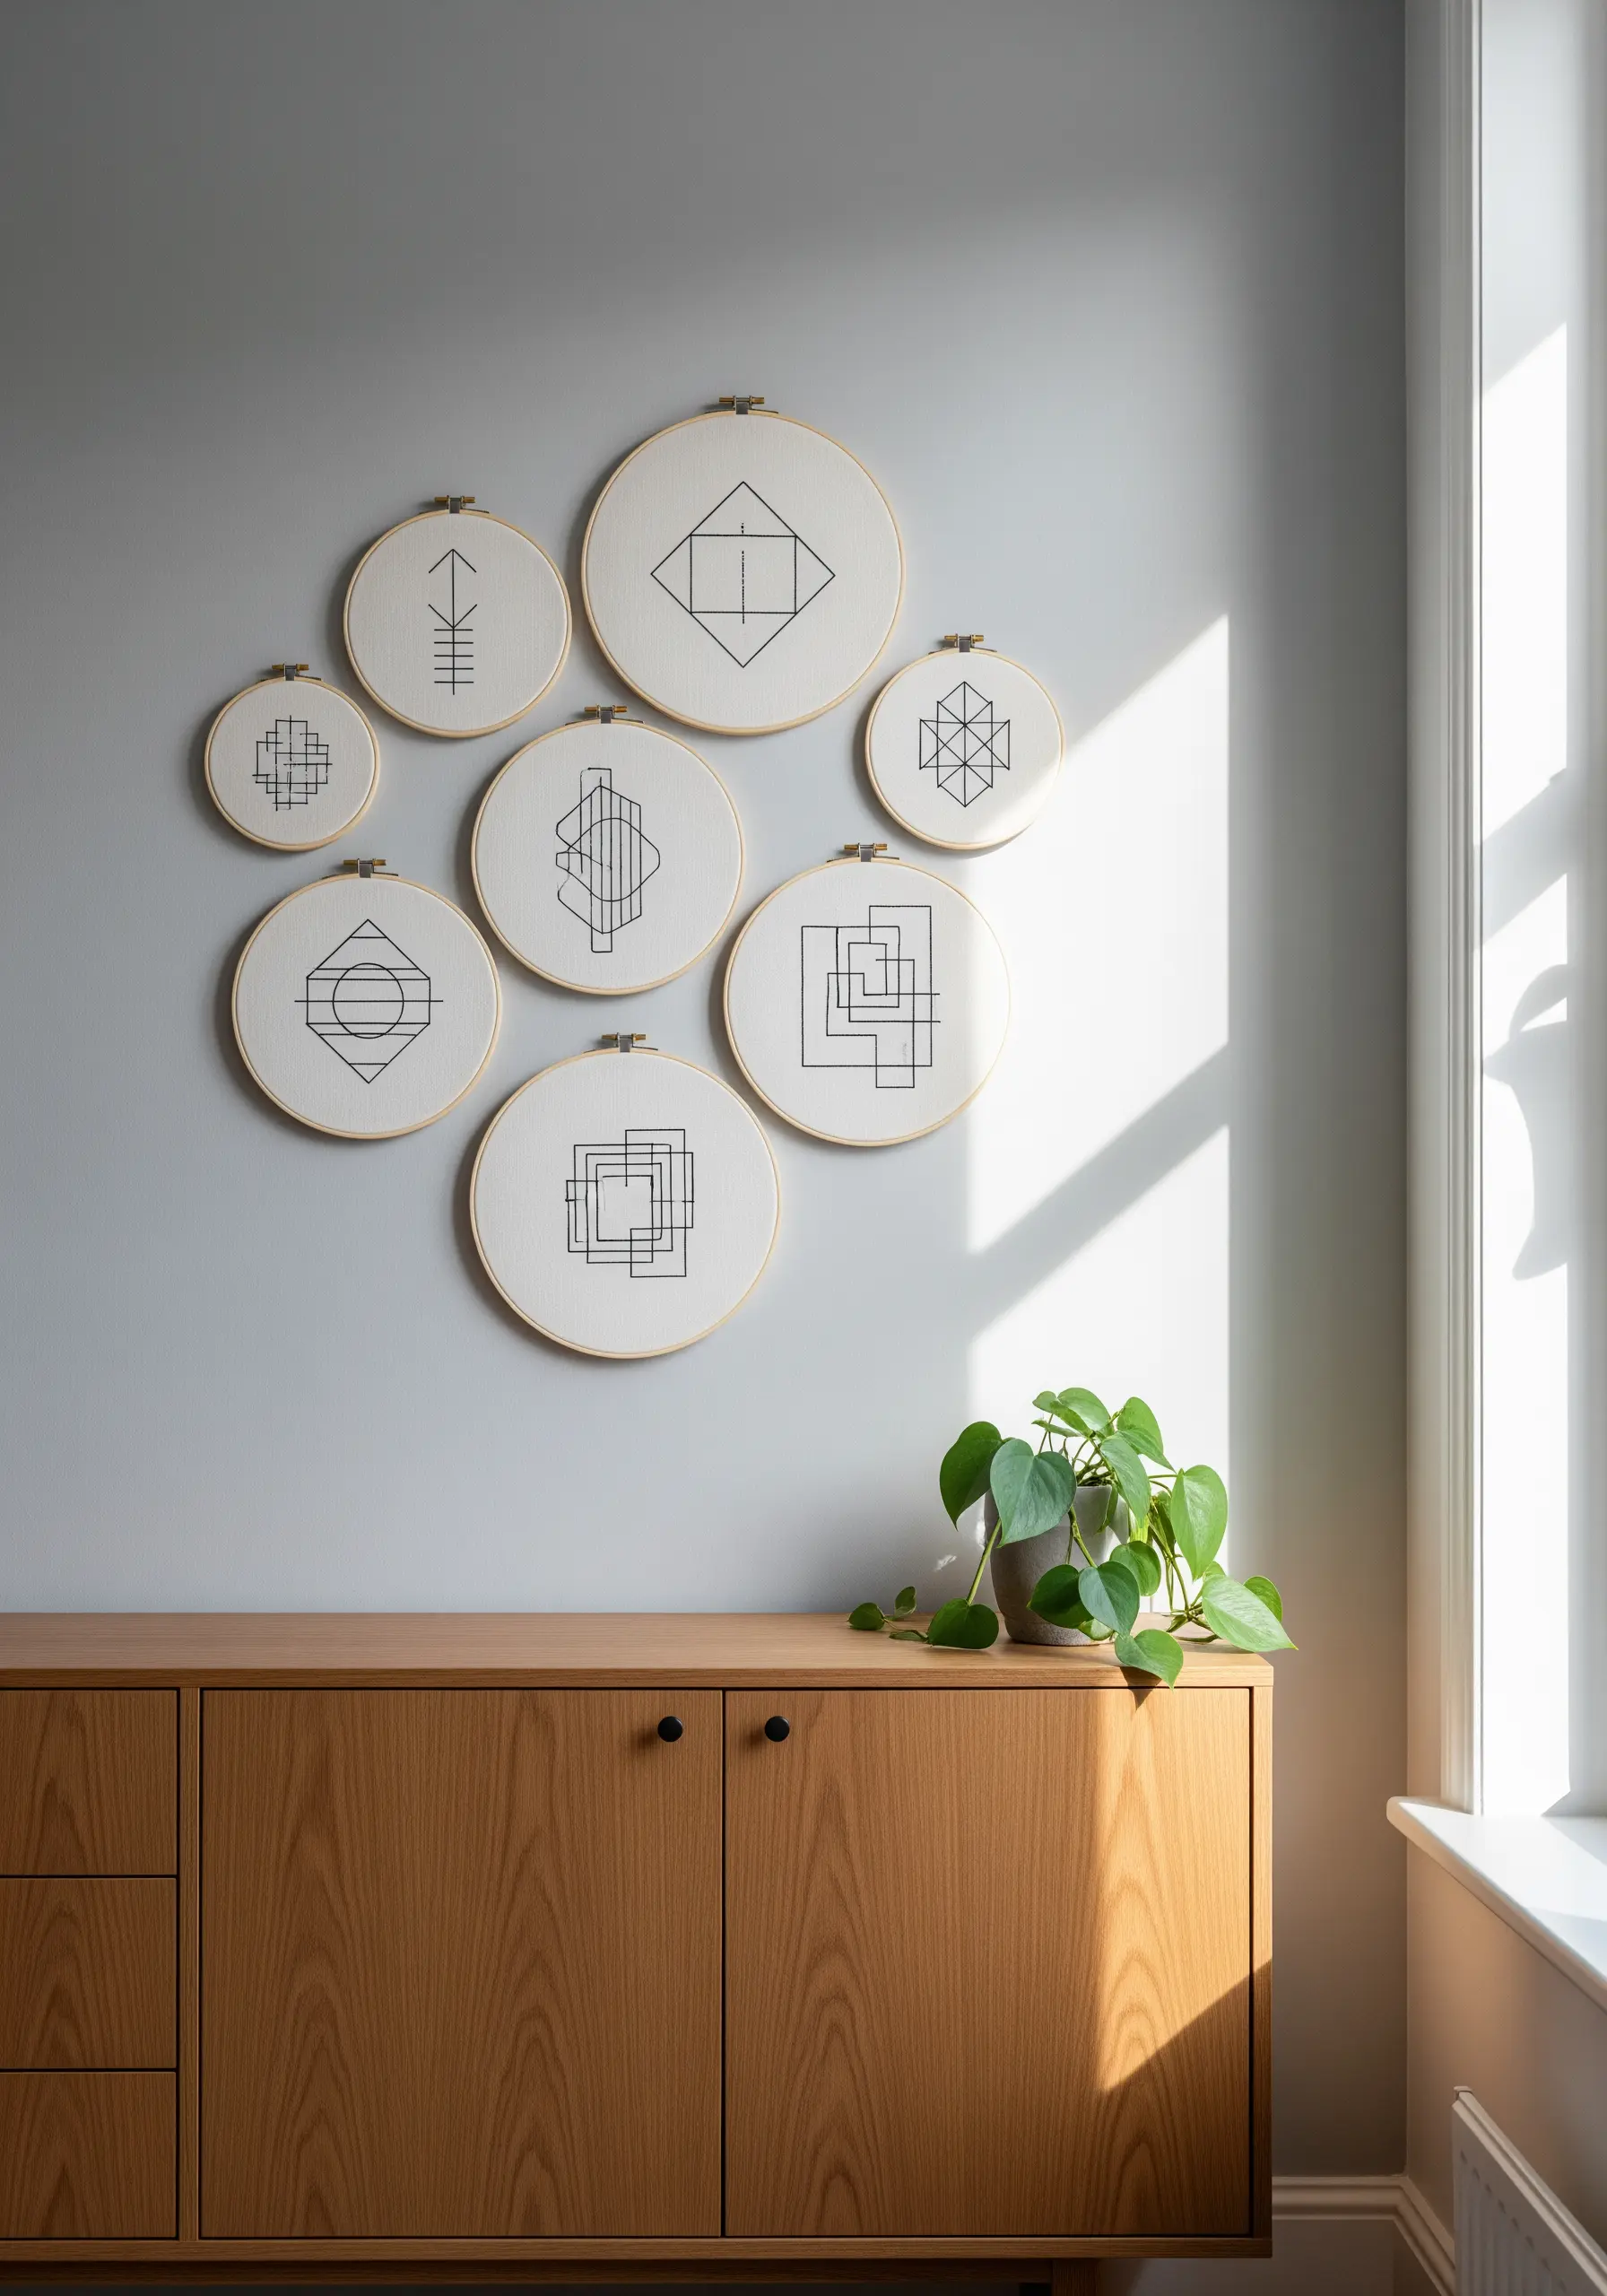
Focus on a single thread color and weight to unify a collection of varying sizes and patterns.
Use a simple backstitch or stem stitch for clean, consistent lines.
The key is precise tension—too loose and the lines will sag; too tight and the fabric will pucker.
Plan your layout on paper first to ensure the arrangement feels balanced and intentional, transforming geometric abstract thread patterns into a sophisticated installation.
2. Curating a Botanical Story

To create a cohesive botanical collage, choose a limited color palette that repeats across different hoops.
For instance, use the same shade of green for all monstera leaves and ferns to build visual harmony.
Vary stitch textures to add depth: use satin stitch for bold petals, French knots for flower centers, and long-and-short stitch for subtle leaf shading.
This approach makes each piece unique yet part of a larger, harmonious narrative, resulting in dreamy, nature-inspired embroidery designs.
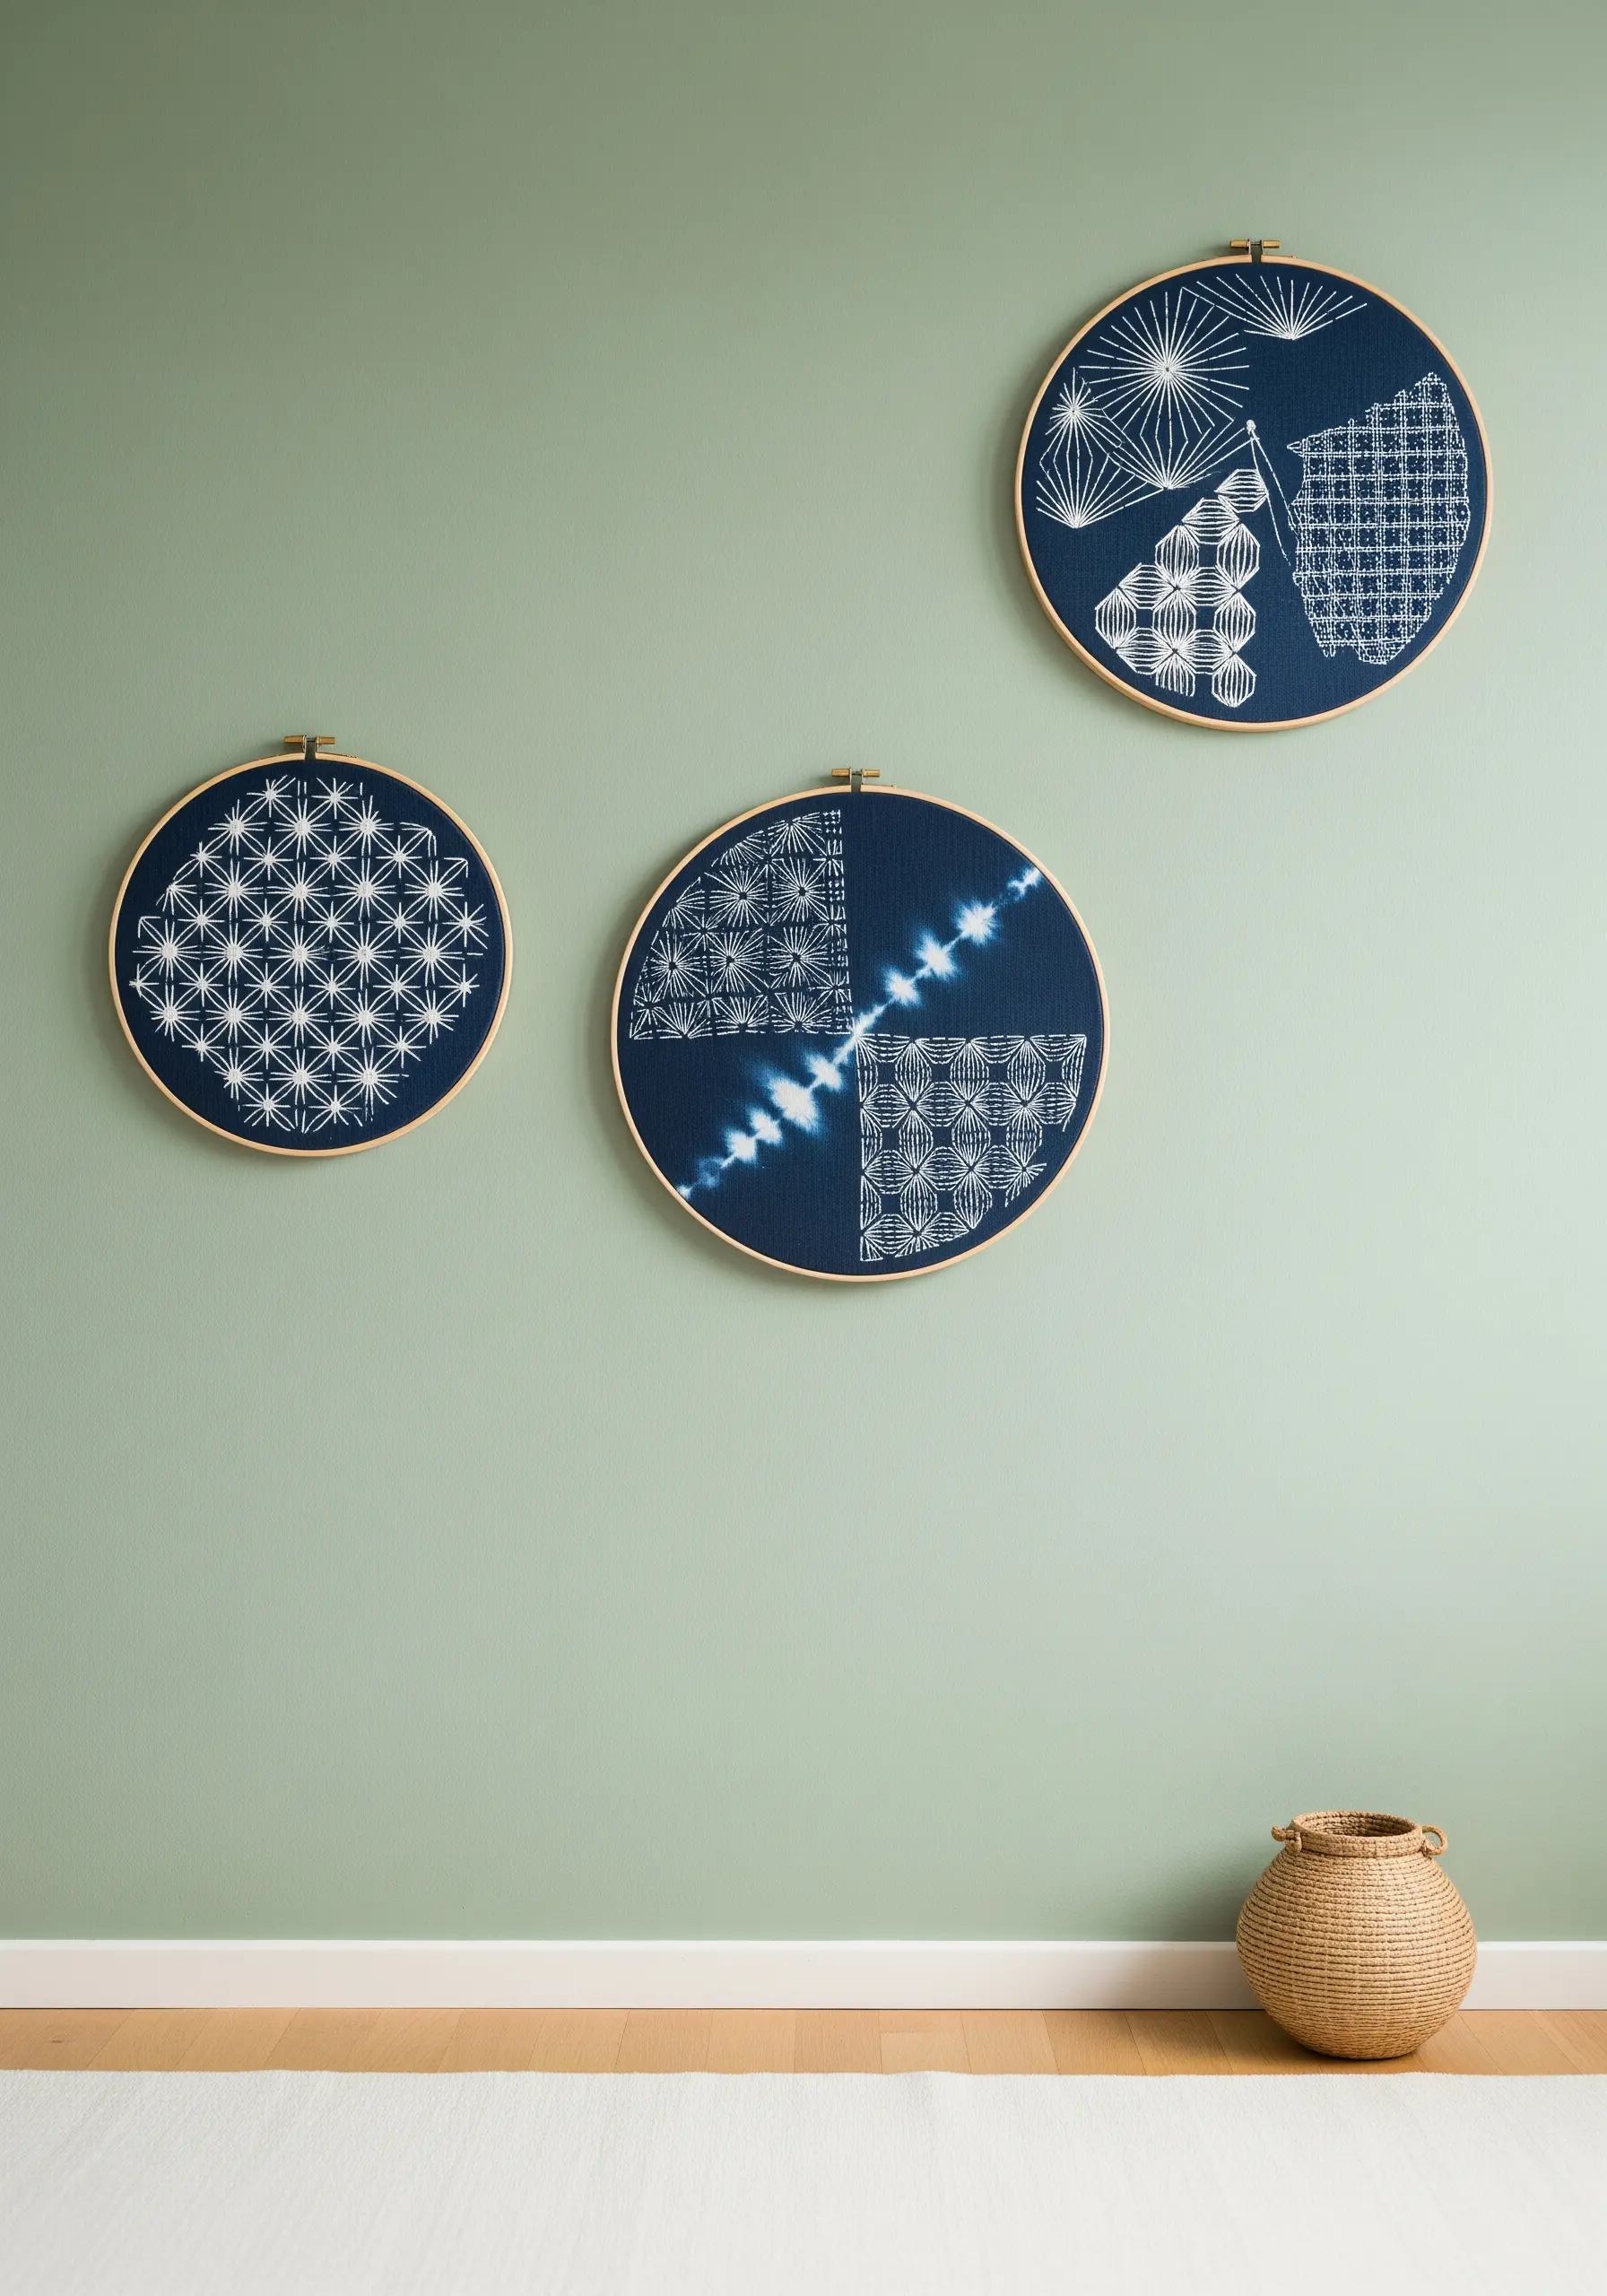
3. Celestial Mapping in Thread

Recreate a celestial masterpiece by breaking it down into a cluster of interconnected hoops.
Use a large central hoop for the main crescent moon shape, then surround it with smaller hoops depicting individual constellations.
For a luminous effect, stitch with metallic thread on a dark navy or black linen.
Vary the density of French knots to represent star clusters, creating a sense of deep space and texture.
4. The Vertical Herb Garden
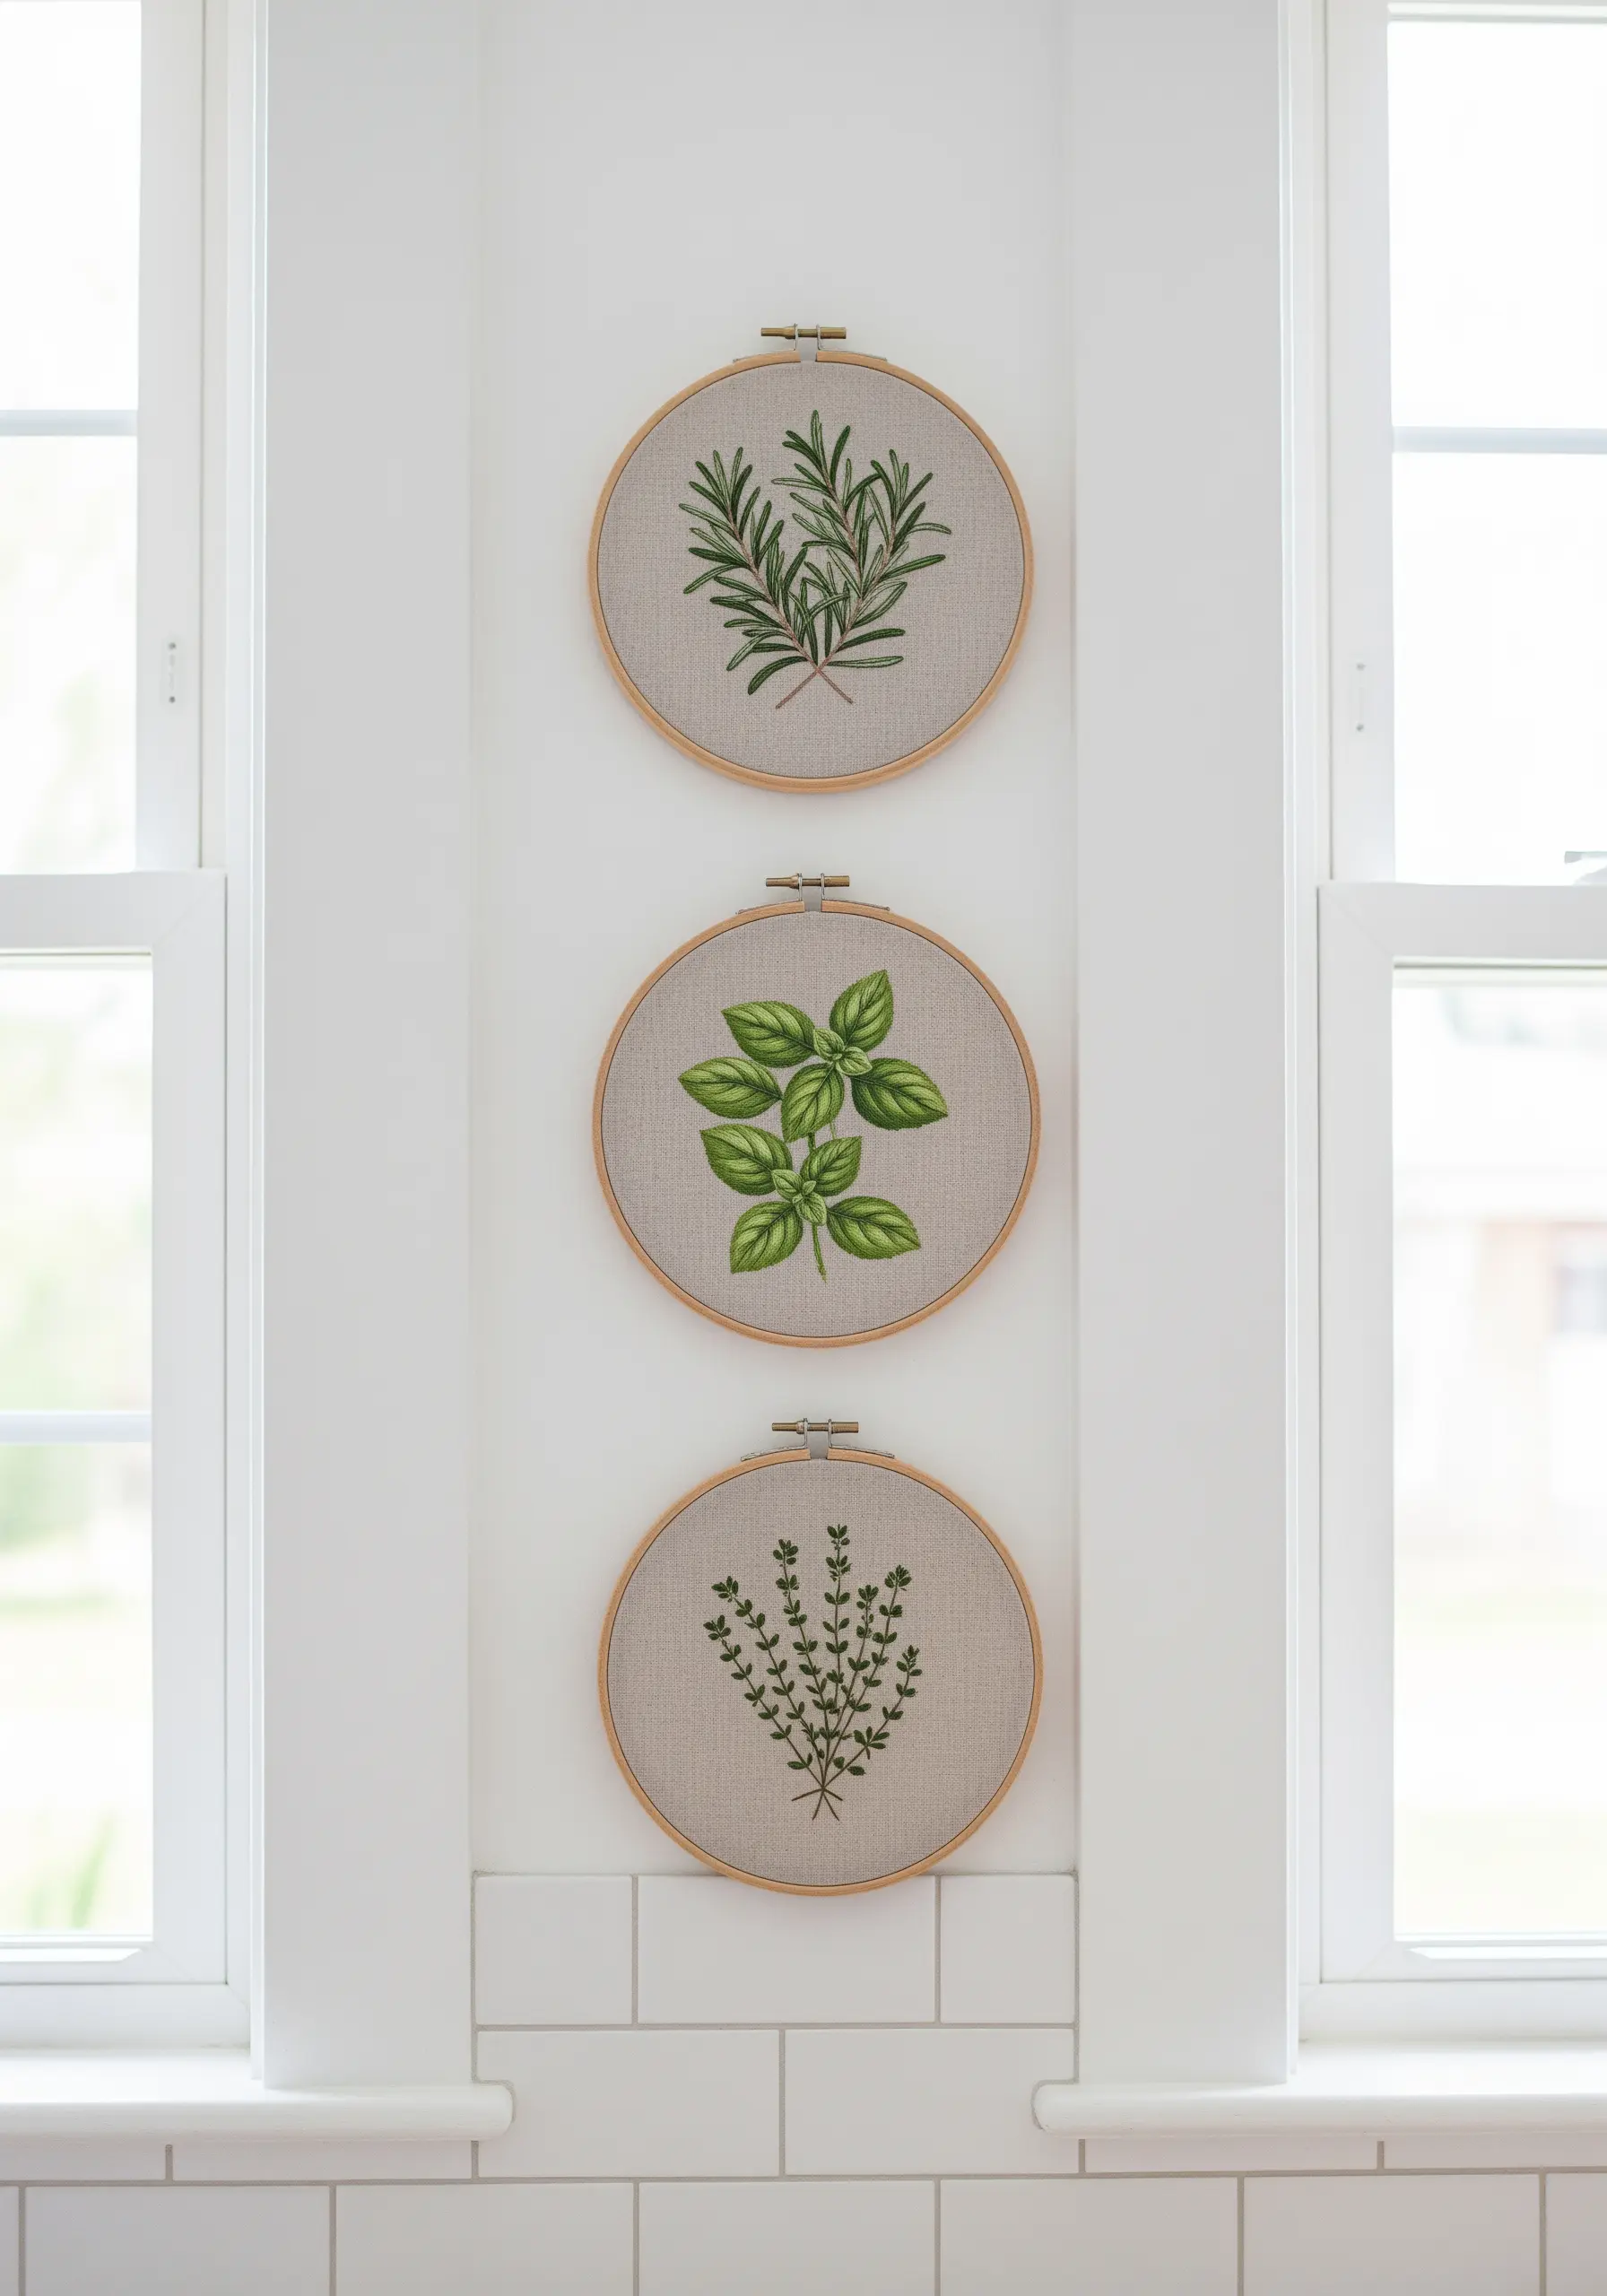
For a narrow wall space, a vertical stack of hoops offers elegant visual impact.
To make your herbs look realistic, use a mix of split stitch for fine stems and fishbone stitch for leaves, which creates a natural-looking central vein.
Use just one or two shades of green per herb to maintain a clean, botanical illustration style.
This approach is perfect for kitchen wall decor that looks boutique-made and feels effortlessly chic.
5. Sculptural Landscapes with Punch Needle
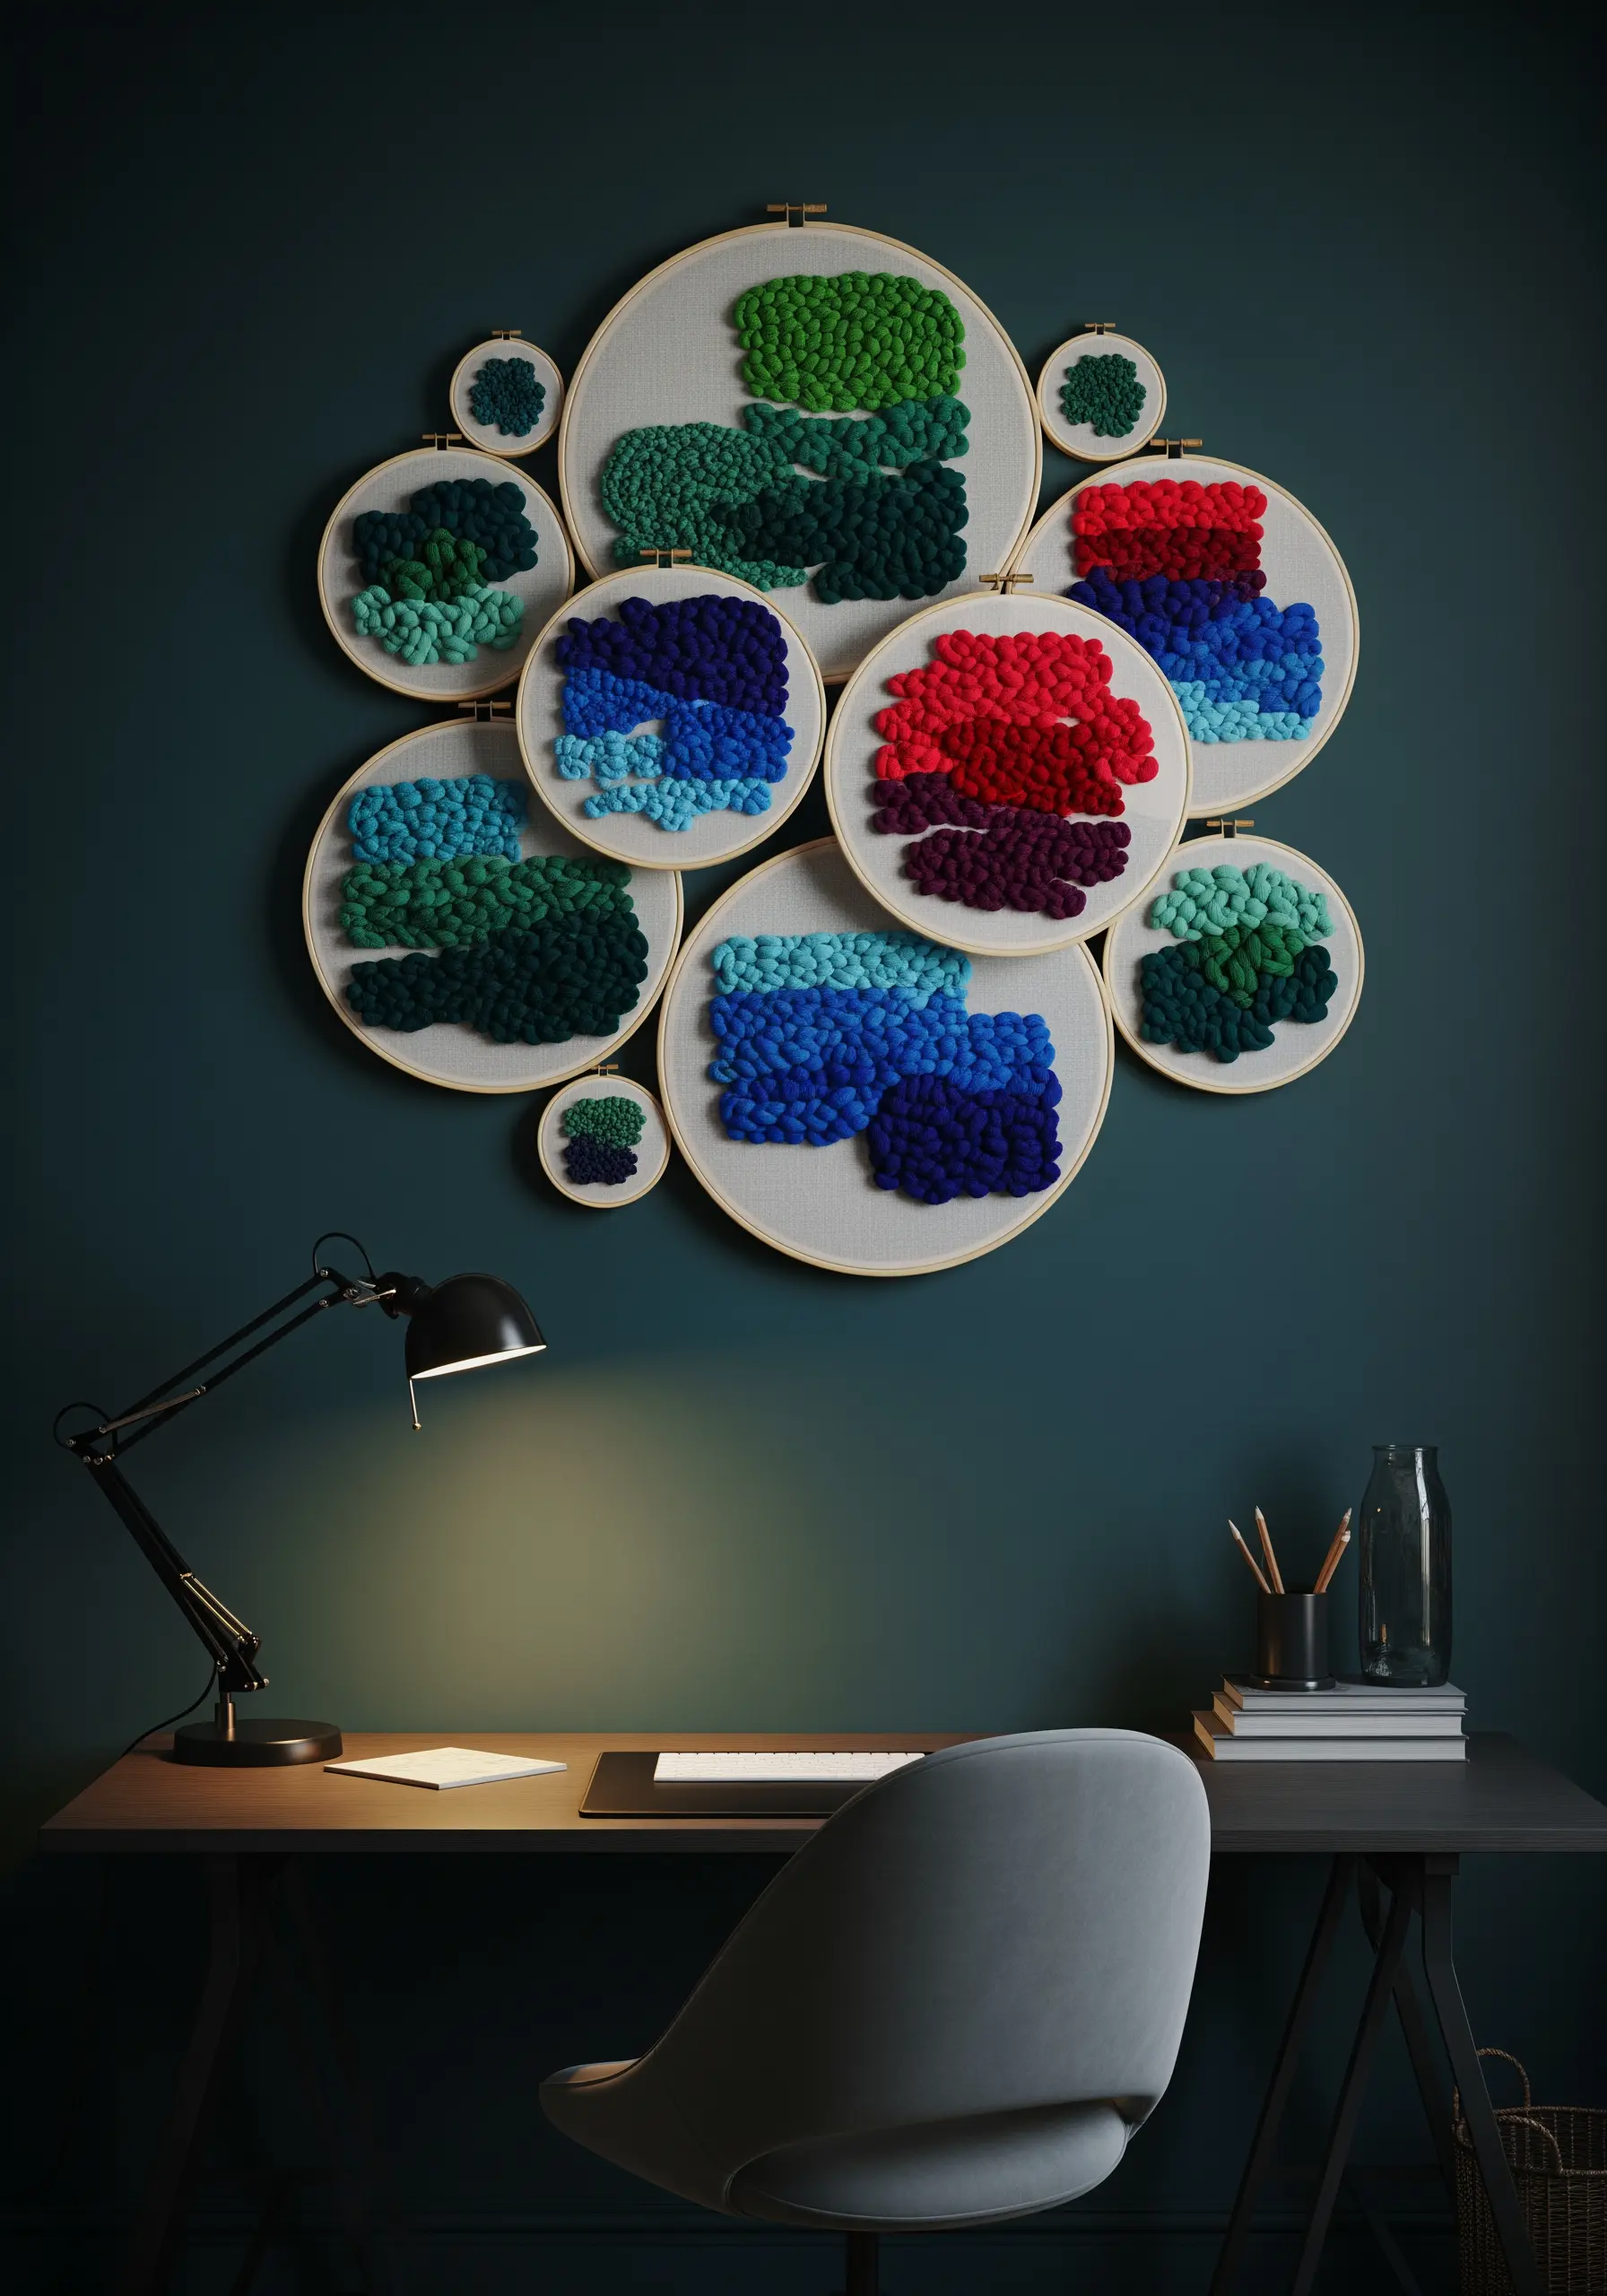
Combine punch needle with traditional embroidery for dynamic texture.
Use varying loop heights in your punch needle work to create a topographical, 3D effect within each hoop.
Then, use fine backstitches to add sharp, defining lines around the textured blocks.
Arranging these abstract pieces in a cloud-like formation allows the colors and textures to flow into one another, creating a single, immersive piece of abstract thread art.
6. The Quiet Impact of Monochrome Texture
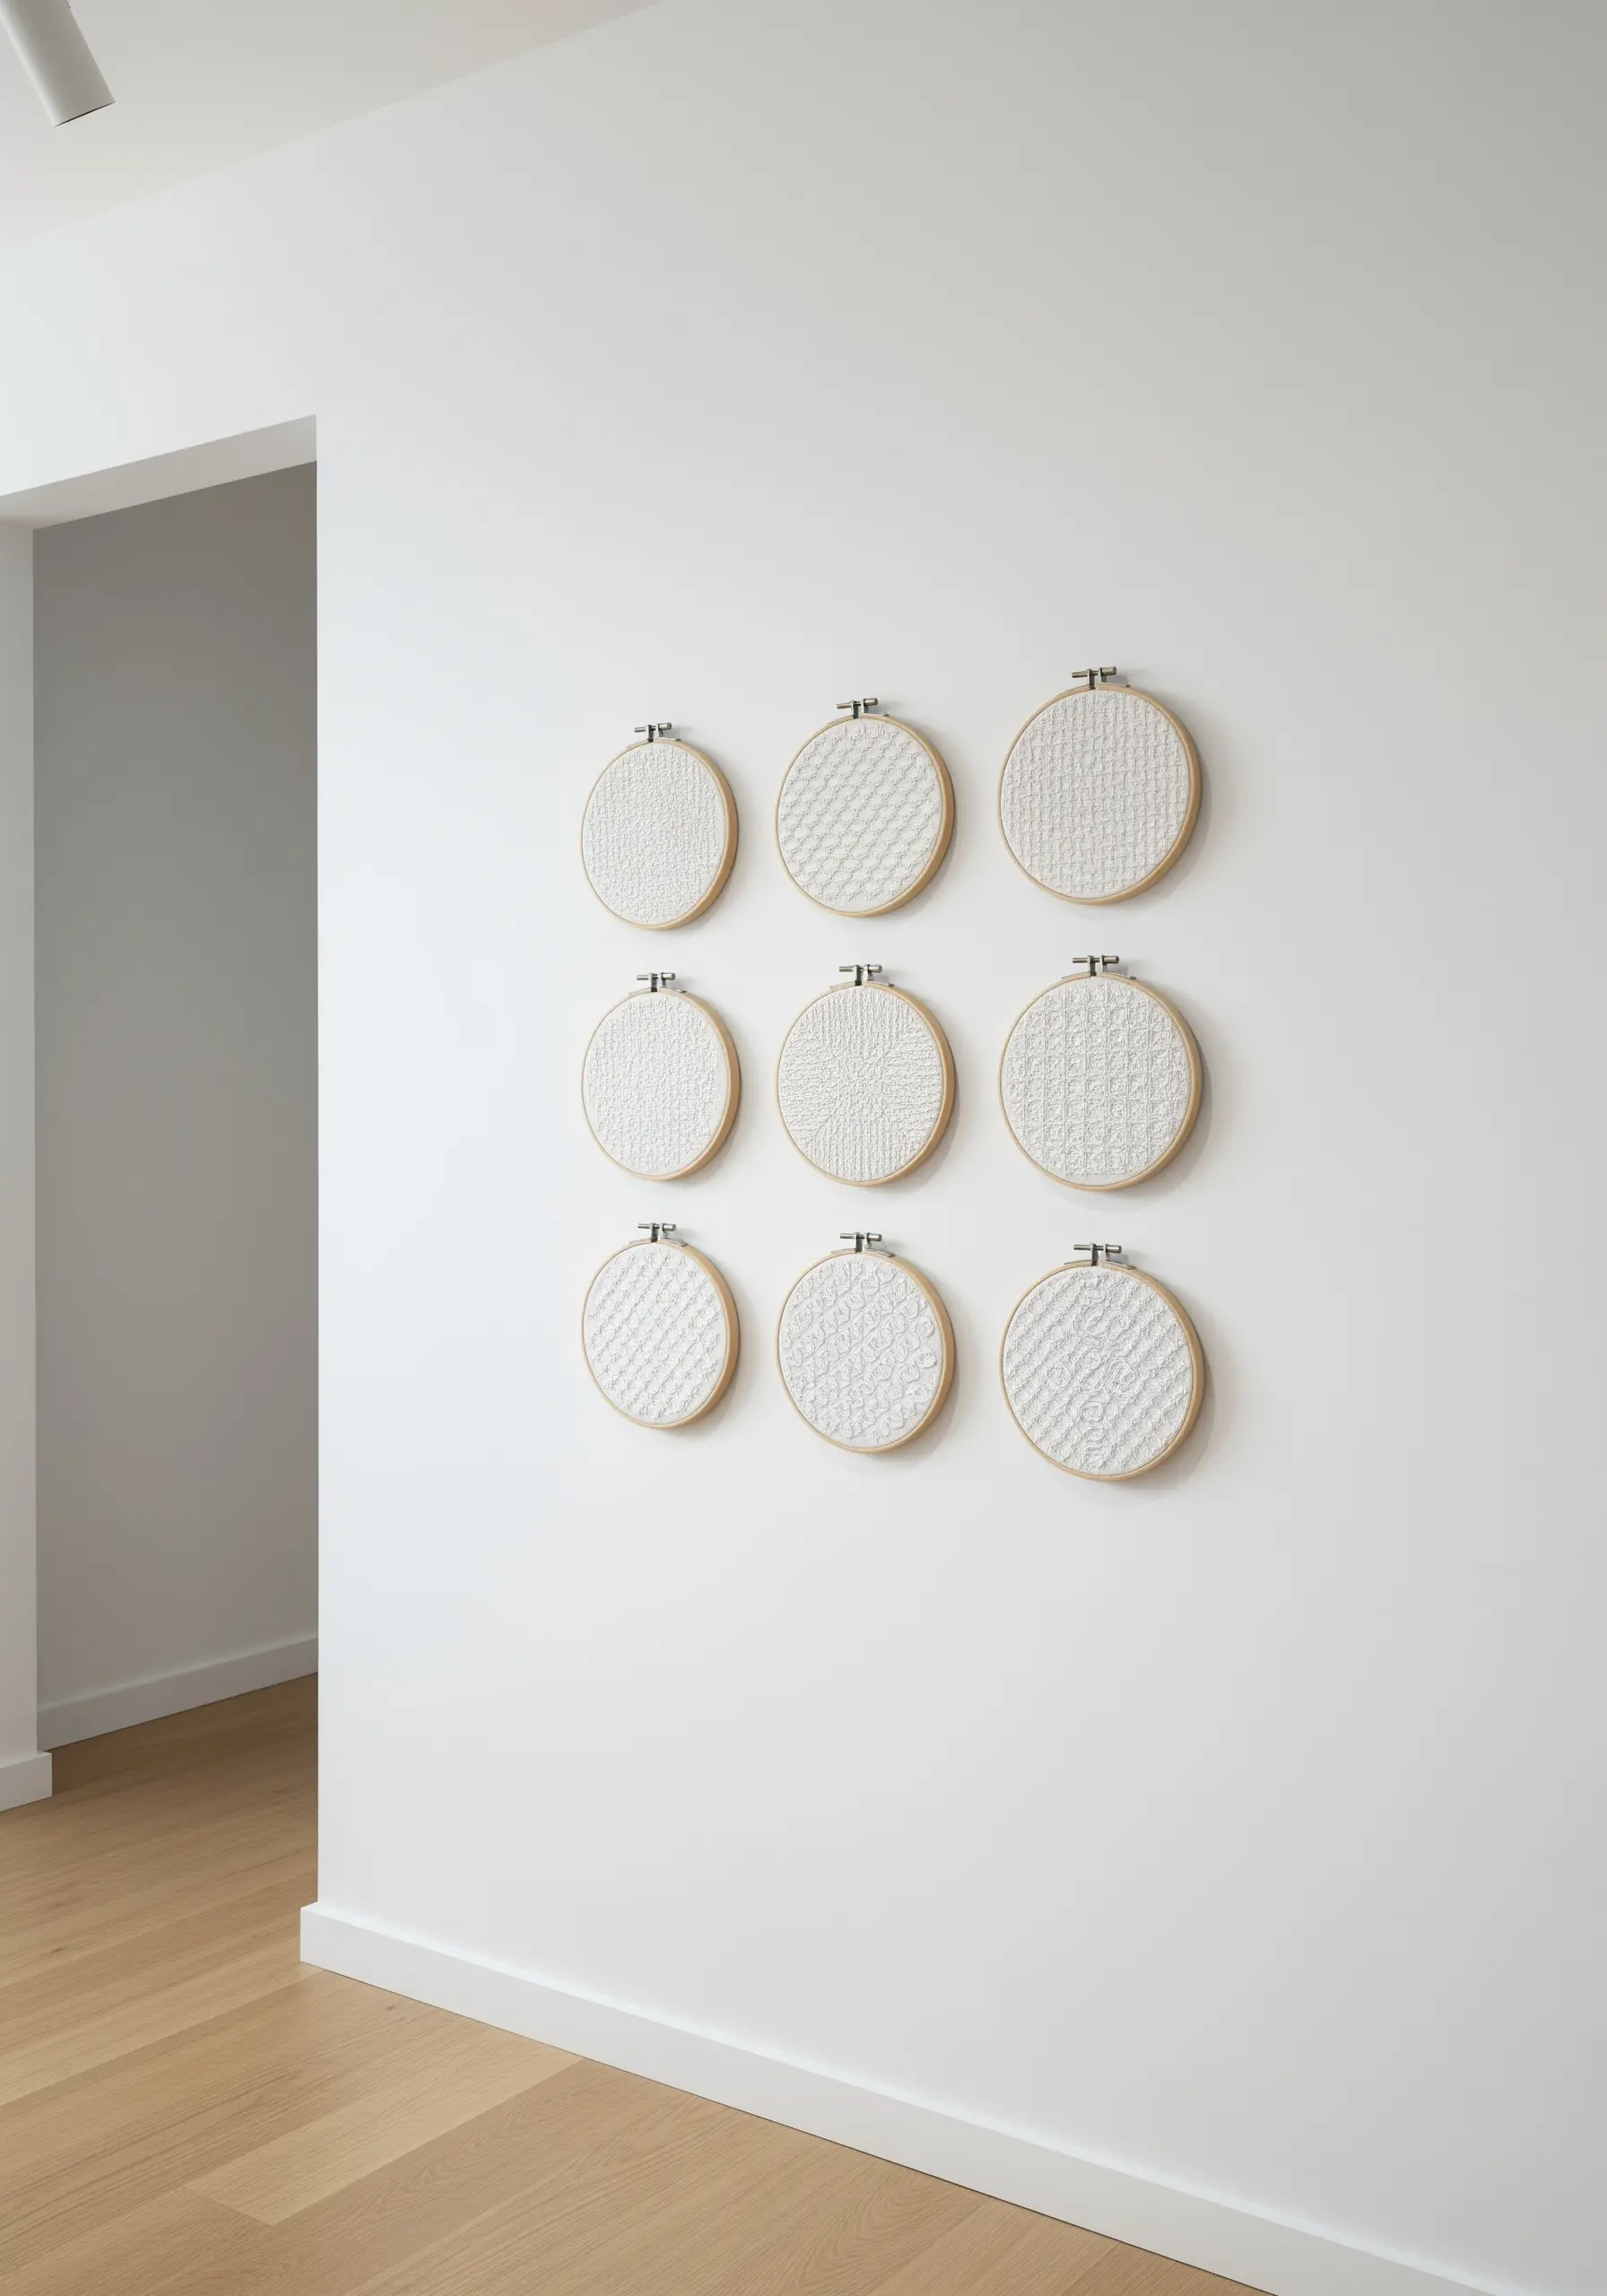
Explore the power of texture by creating a nine-hoop grid using only white thread on white fabric.
Dedicate each hoop to a different textural stitch: seed stitch, French knots, satin stitch blocks, or woven picot stitch.
The absence of color forces the eye to focus on the interplay of light and shadow across the different surfaces.
This disciplined approach shows how to combine thread and negative space to achieve luxury minimal art that feels both modern and timeless.
7. A Gradient Wall of Light
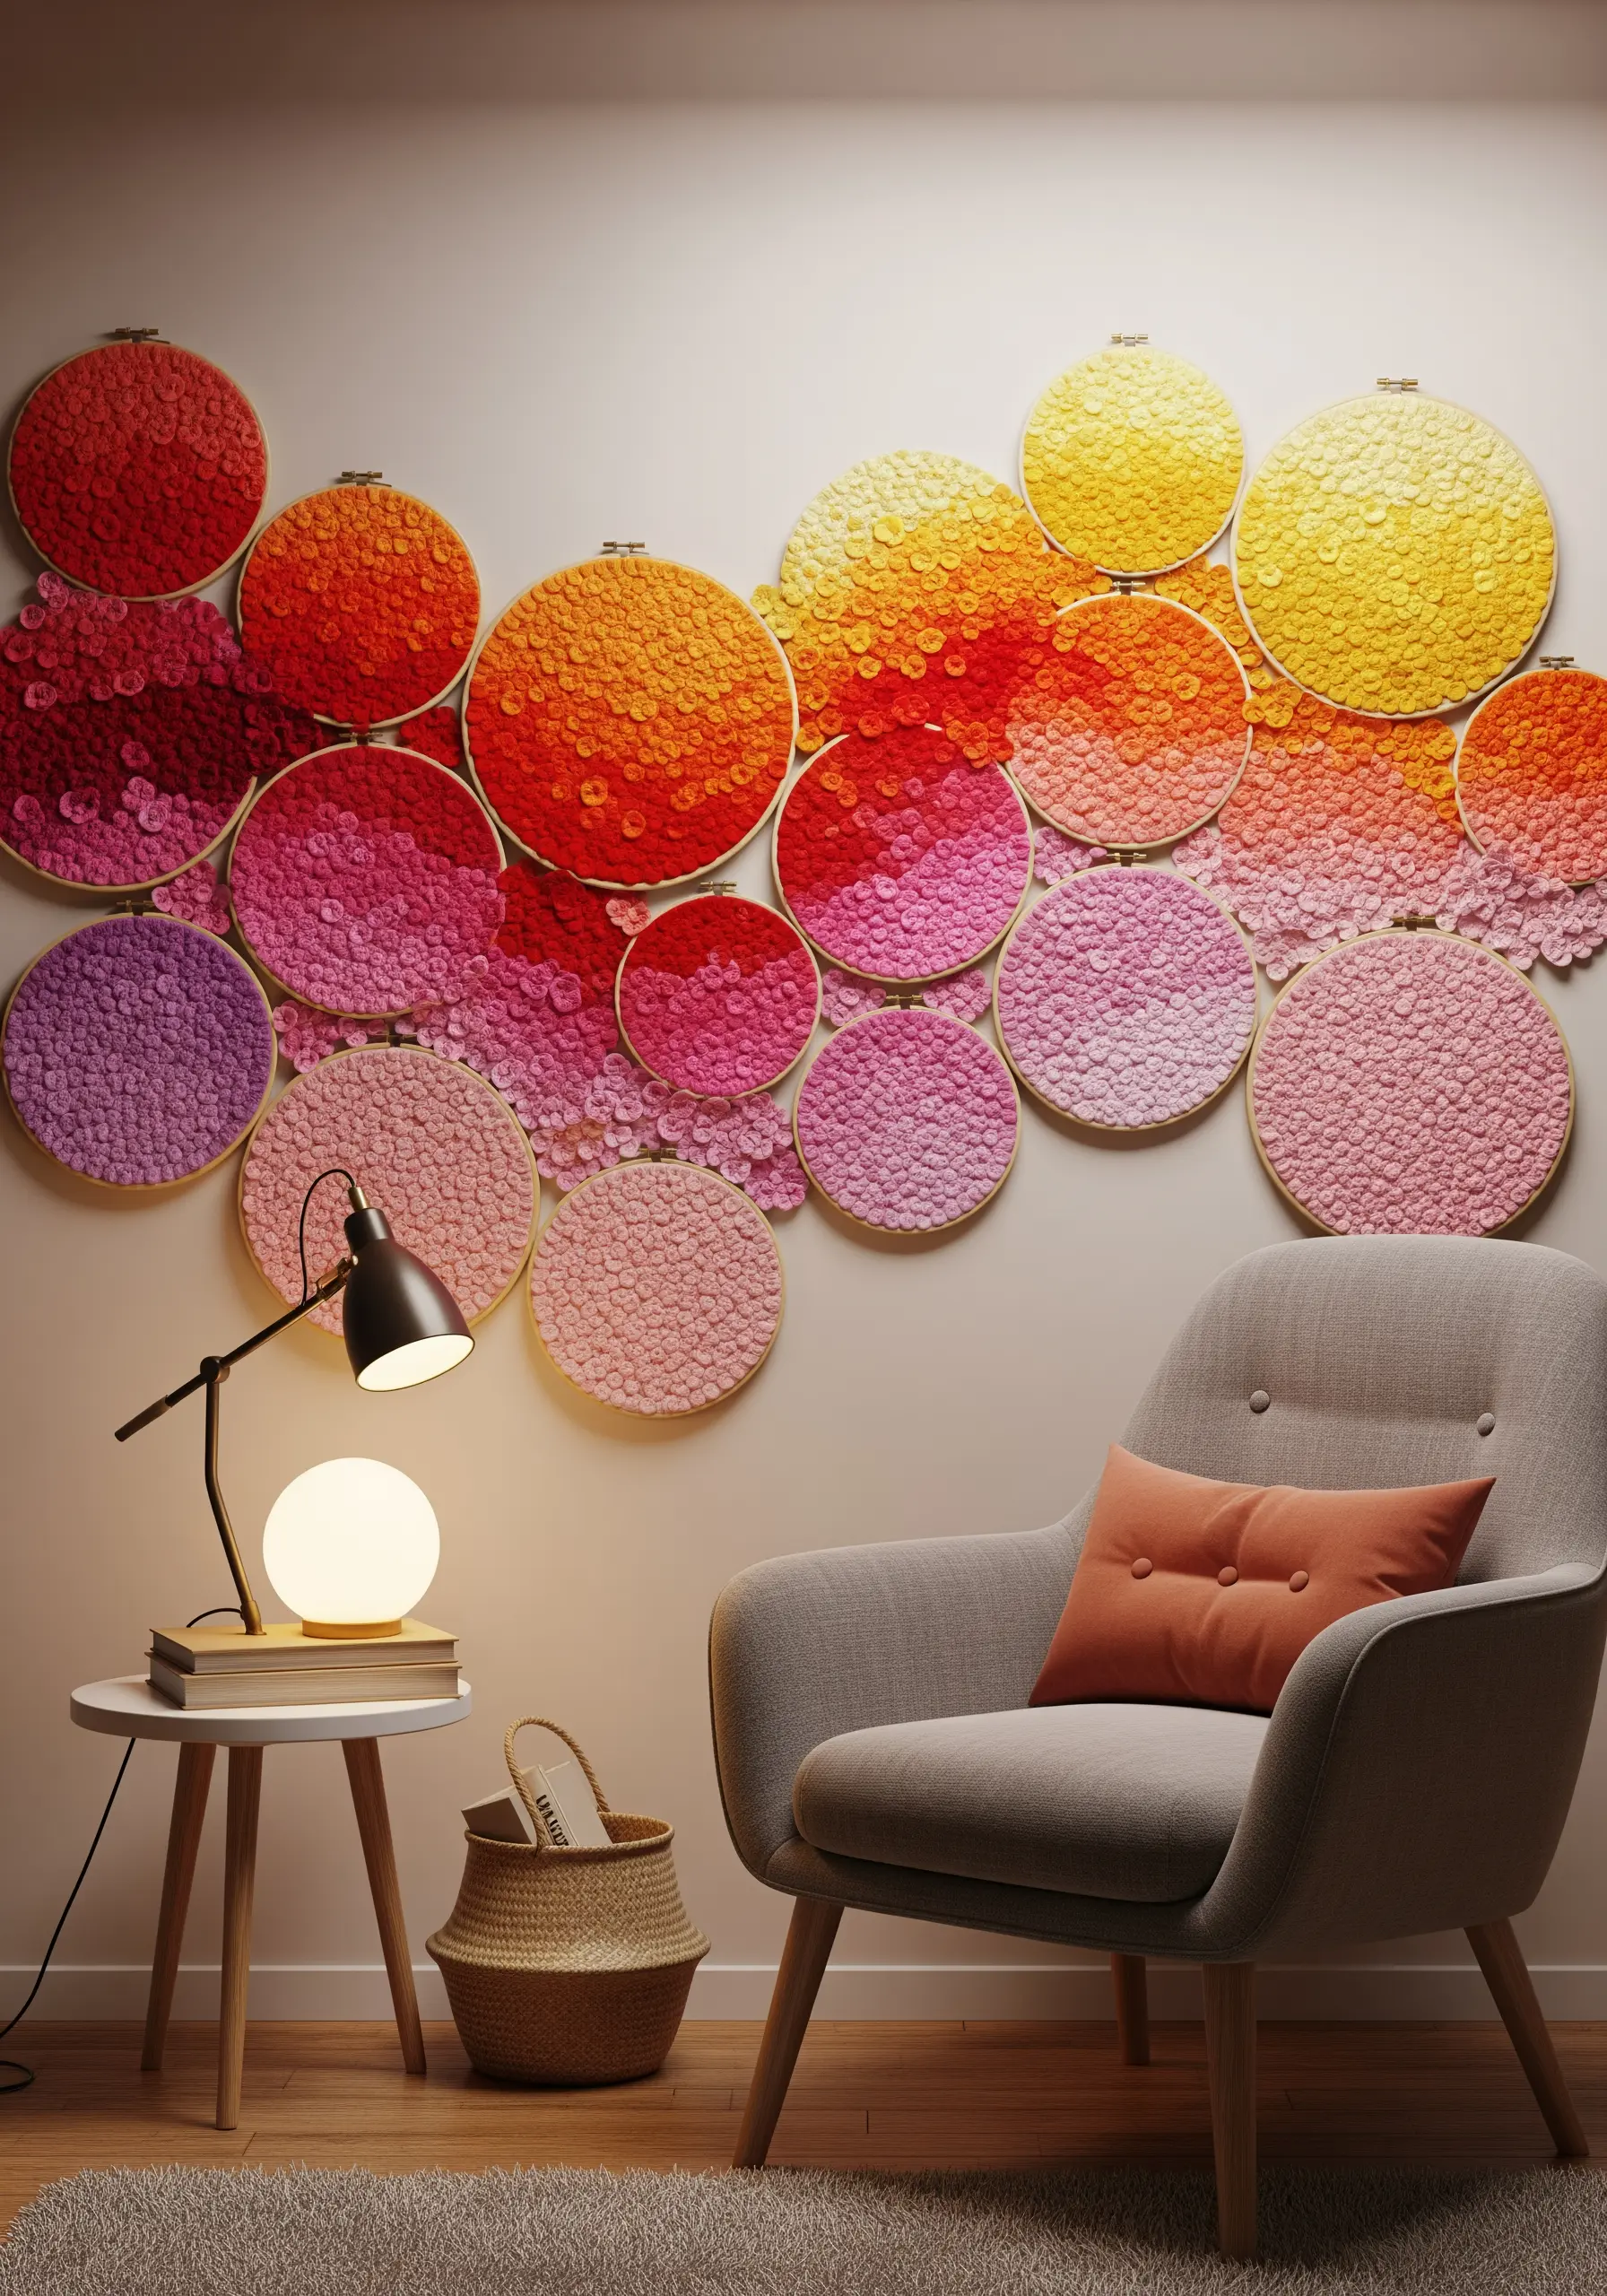
Instead of thread, fill your hoops with sequins or beads to create a shimmering, light-catching installation.
Plan a color gradient that flows across the entire collection, from warm reds to cool purples.
To secure the sequins, use a single matching thread and a small seed bead for each one—this locks them in place more securely than a simple knot.
Overlapping the hoops slightly enhances the illusion of a single, flowing piece of art, showcasing advanced mixed-media embroidery techniques.
8. The Floating Coastal Collection
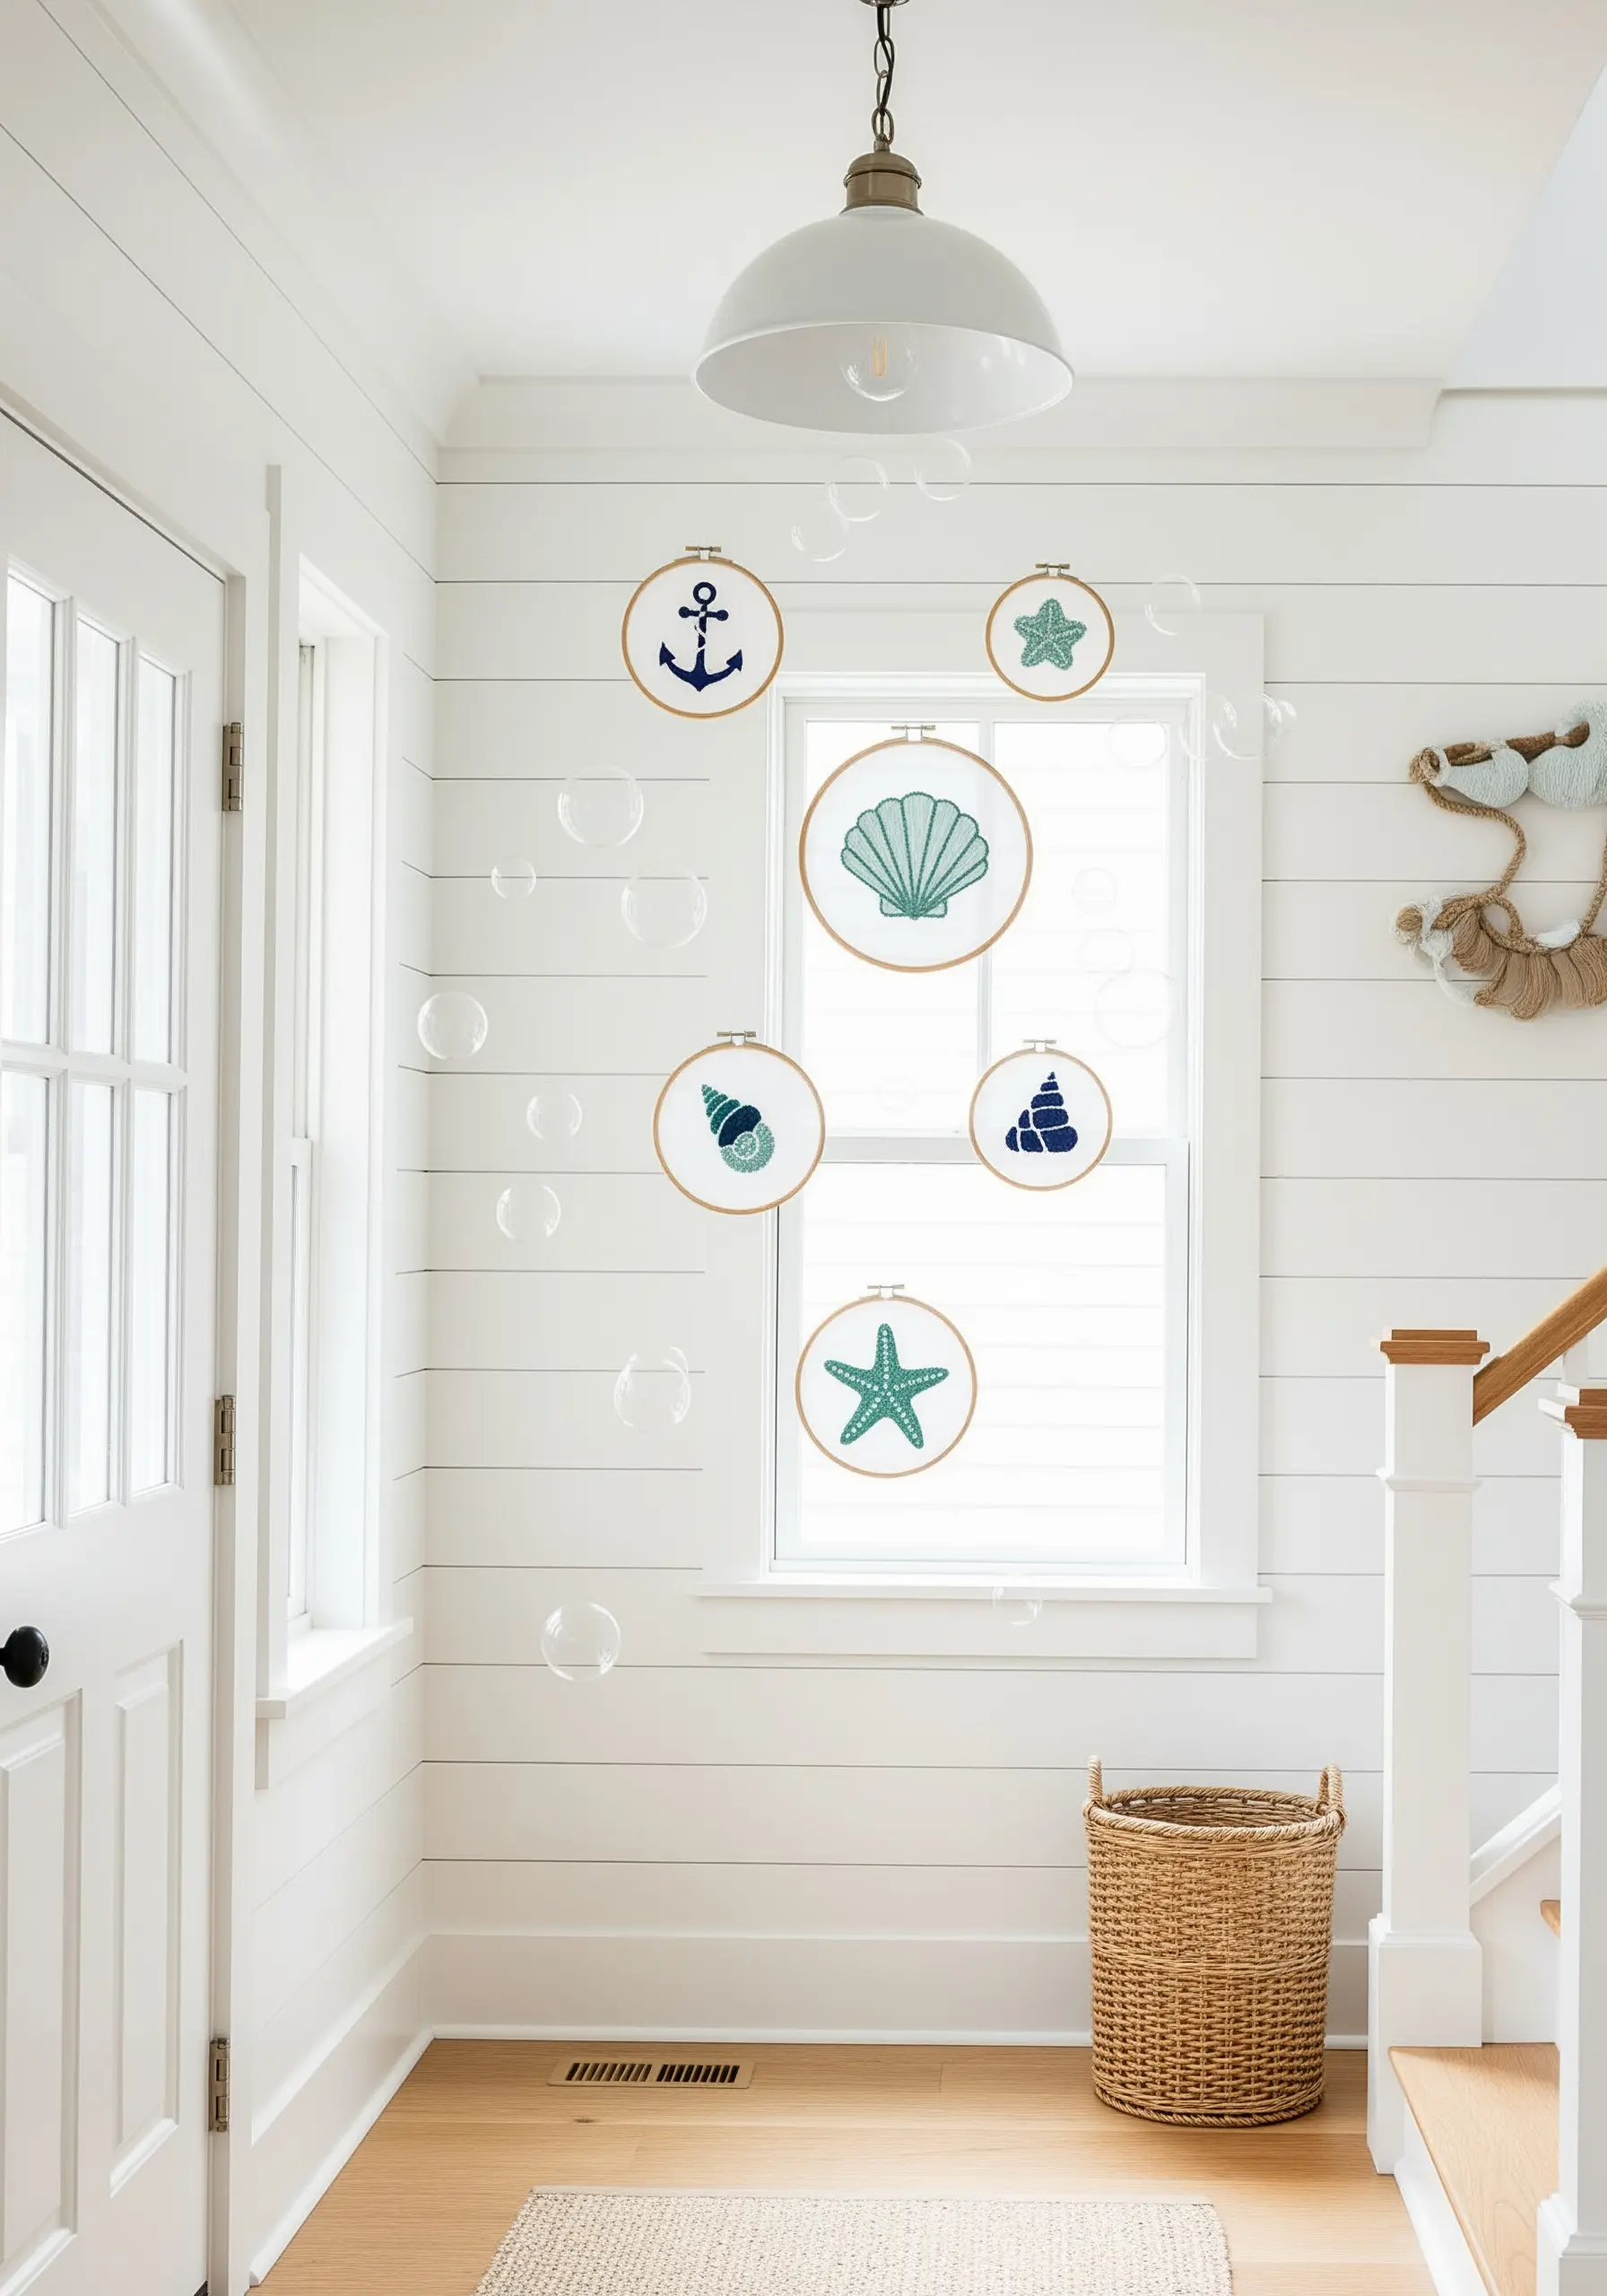
For an airy, delicate display, stretch sheer organza or tulle in your hoops and suspend them in front of a window.
Use a simple backstitch for the outlines of shells and starfish, allowing the light to pass through the negative space.
The minimalist designs will appear to float, casting subtle shadows that change with the daylight.
This technique is perfect for creating coastal vibe embroidery projects that feel light and serene.
9. Art Deco Elegance in Gold Thread
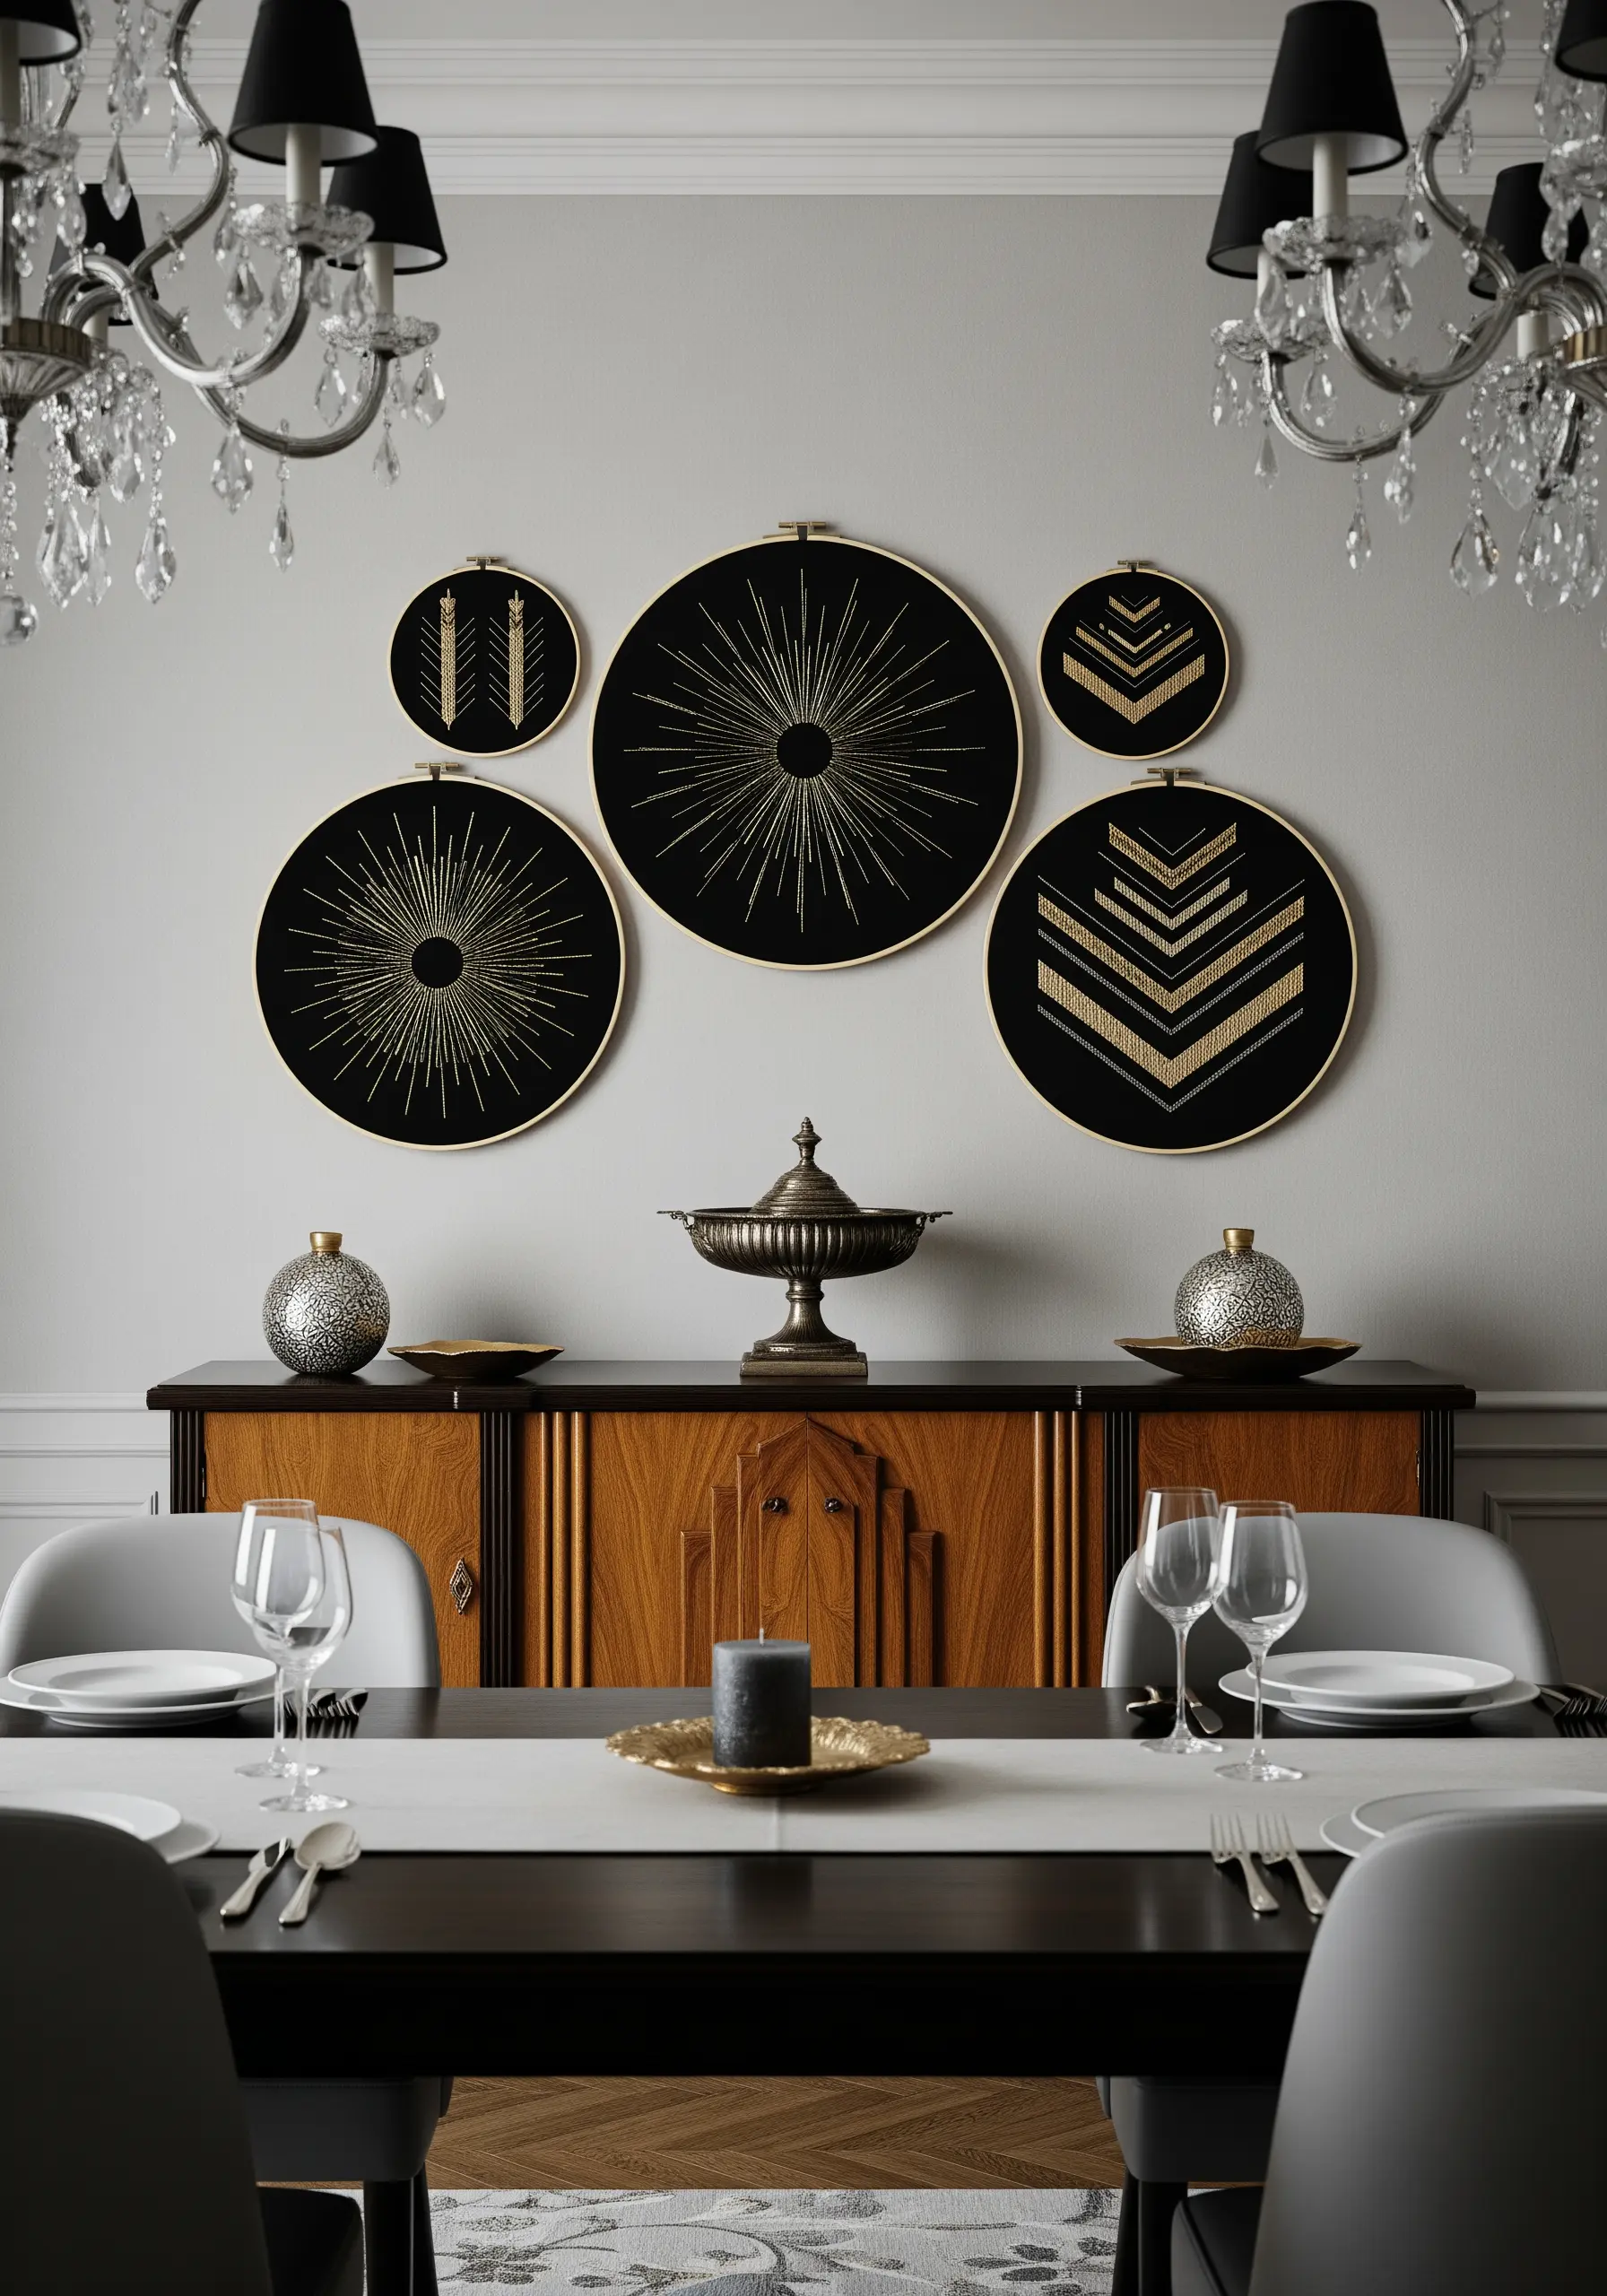
Achieve a luxe, Art Deco feel by pairing black fabric with metallic gold thread.
Use straight stitches radiating from a central point to create dramatic sunburst effects.
For the sharp, geometric chevrons, outline them first with a split stitch to build a stable foundation, then fill with a satin stitch.
The contrast between the dark fabric and the reflective thread creates a powerful, glamorous statement, resulting in beautiful gold thread luxury wall art projects.
10. Symmetrical Woodland Storytelling
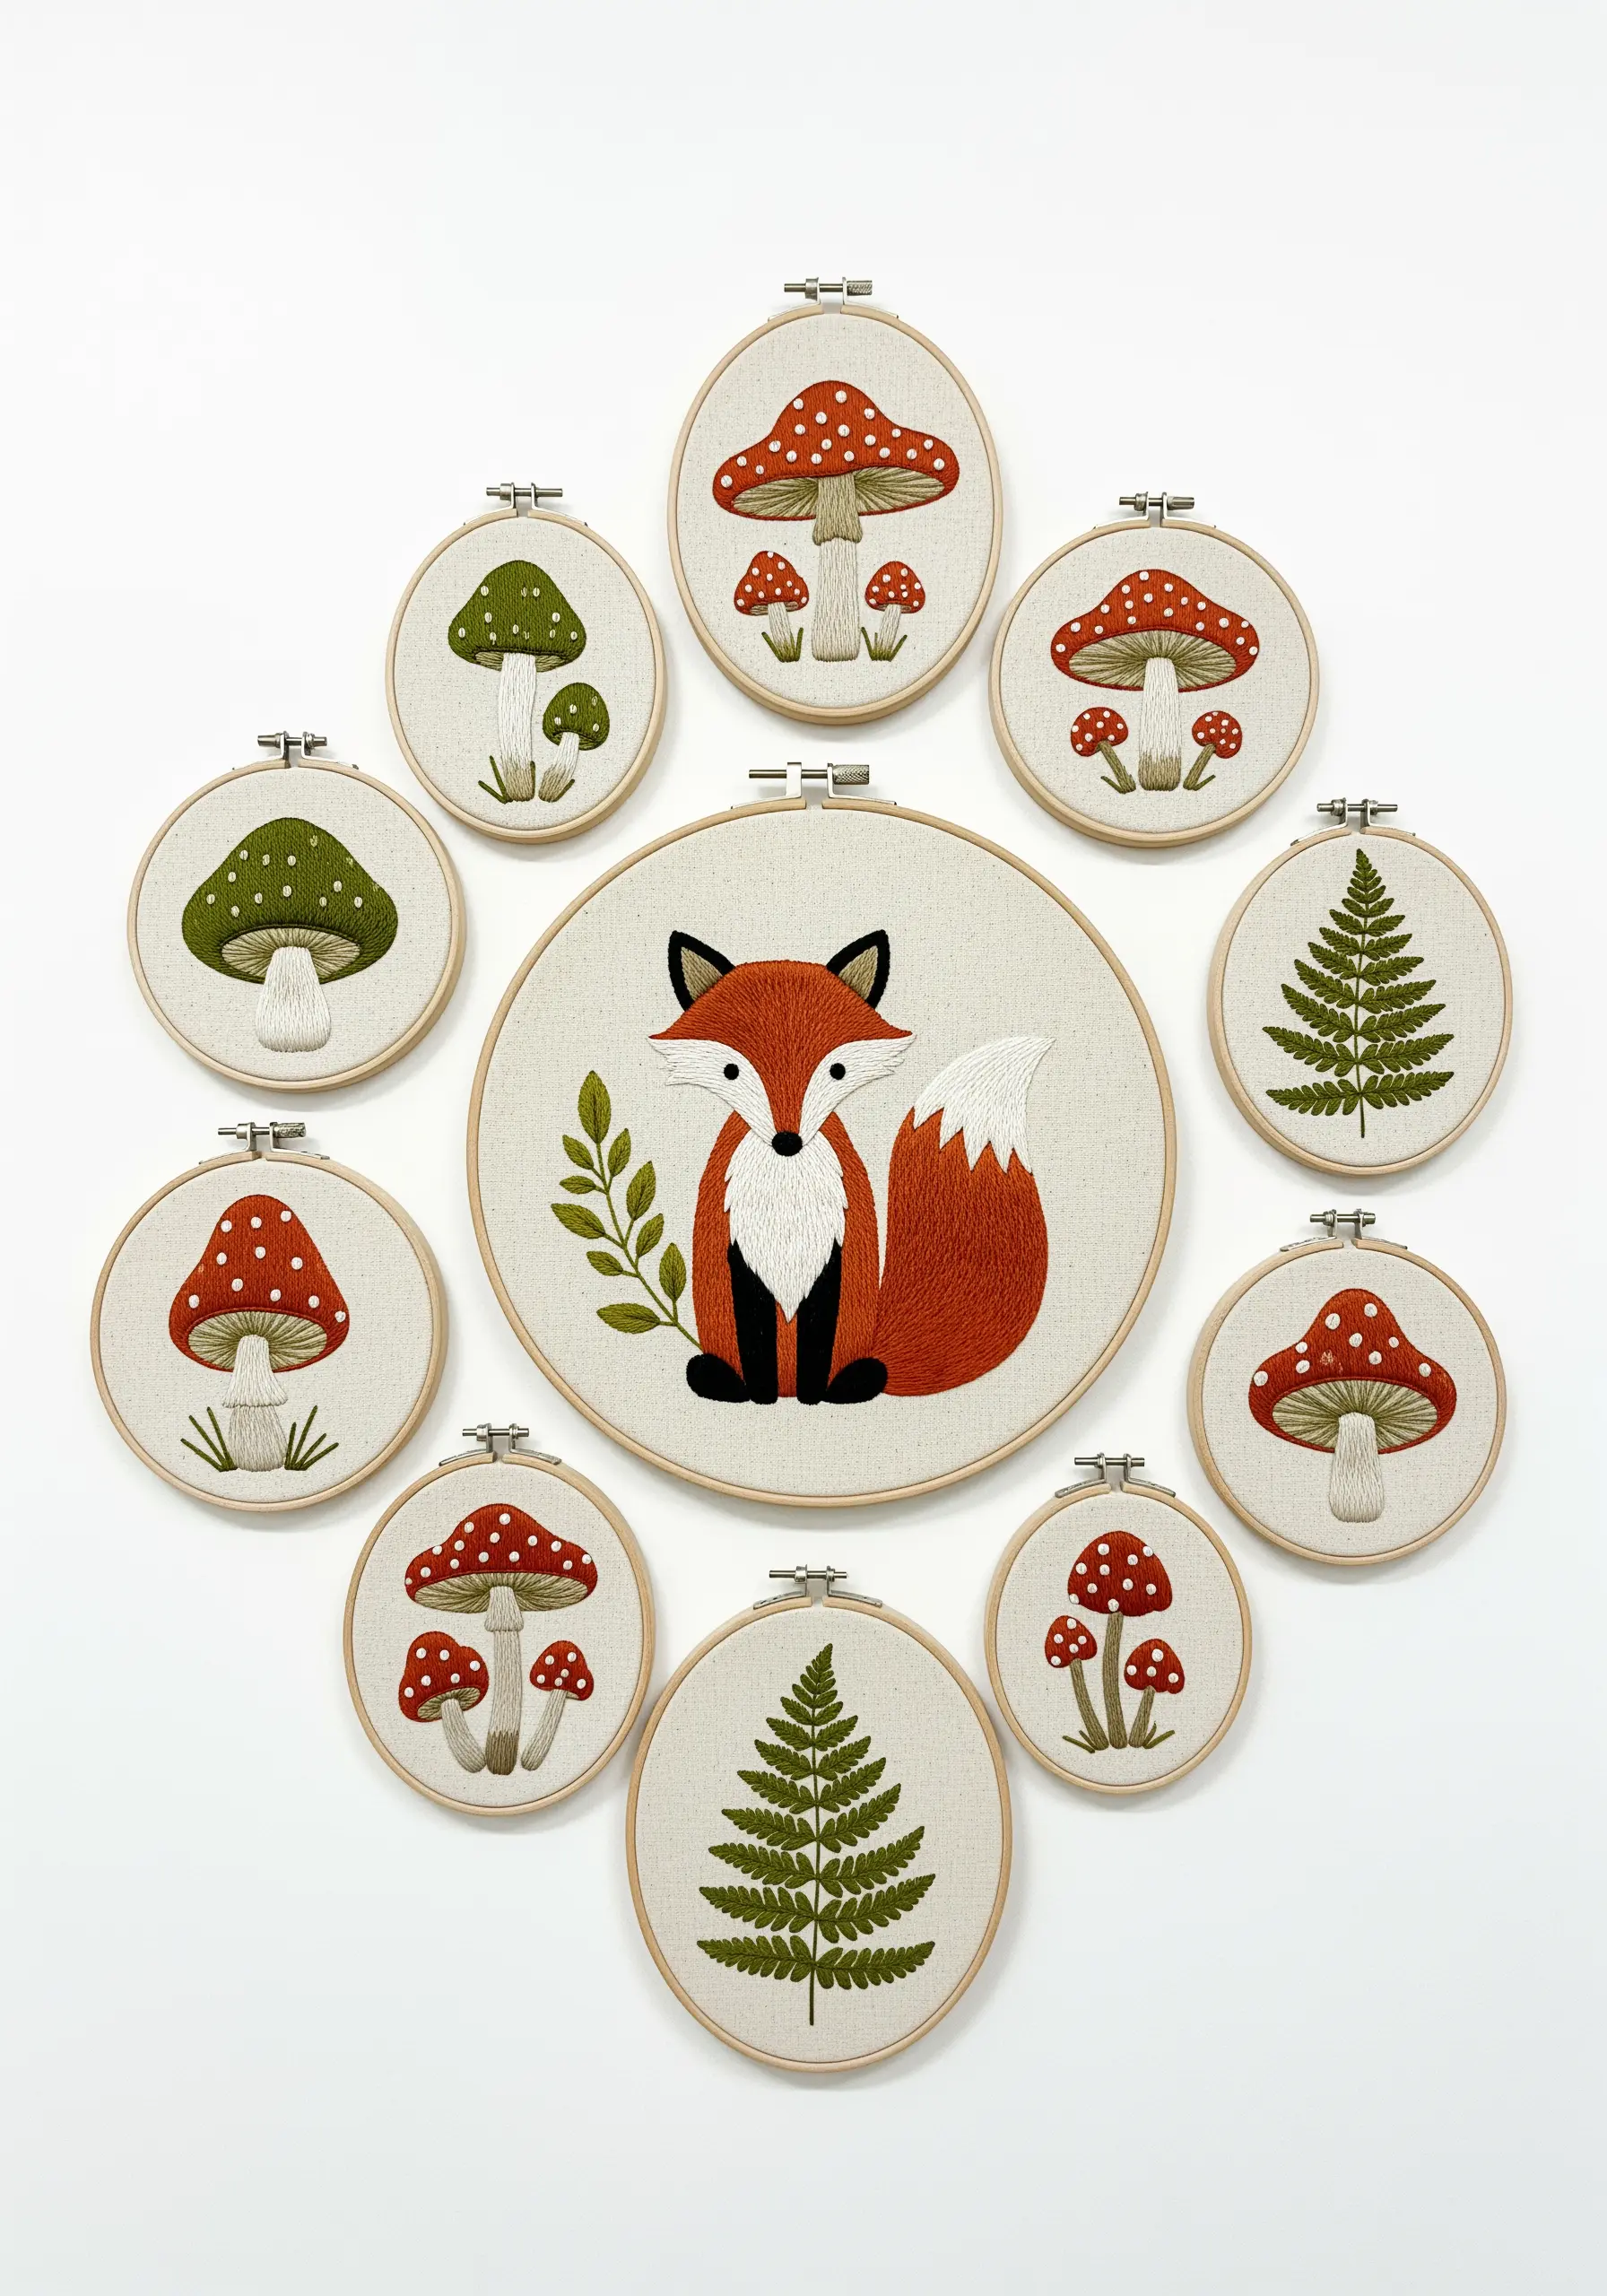
Create a narrative centerpiece by placing a larger, detailed character hoop at the center and surrounding it with smaller, symmetrical motifs.
For the fox, use long-and-short stitch to blend the red and white fur for a soft, realistic texture.
Use a dense satin stitch for the mushrooms to make their colors pop.
The symmetrical layout provides structure and balance, turning a collection of adorable forest animal embroidery ideas into a single, enchanting scene.
11. The Power of a Single Line
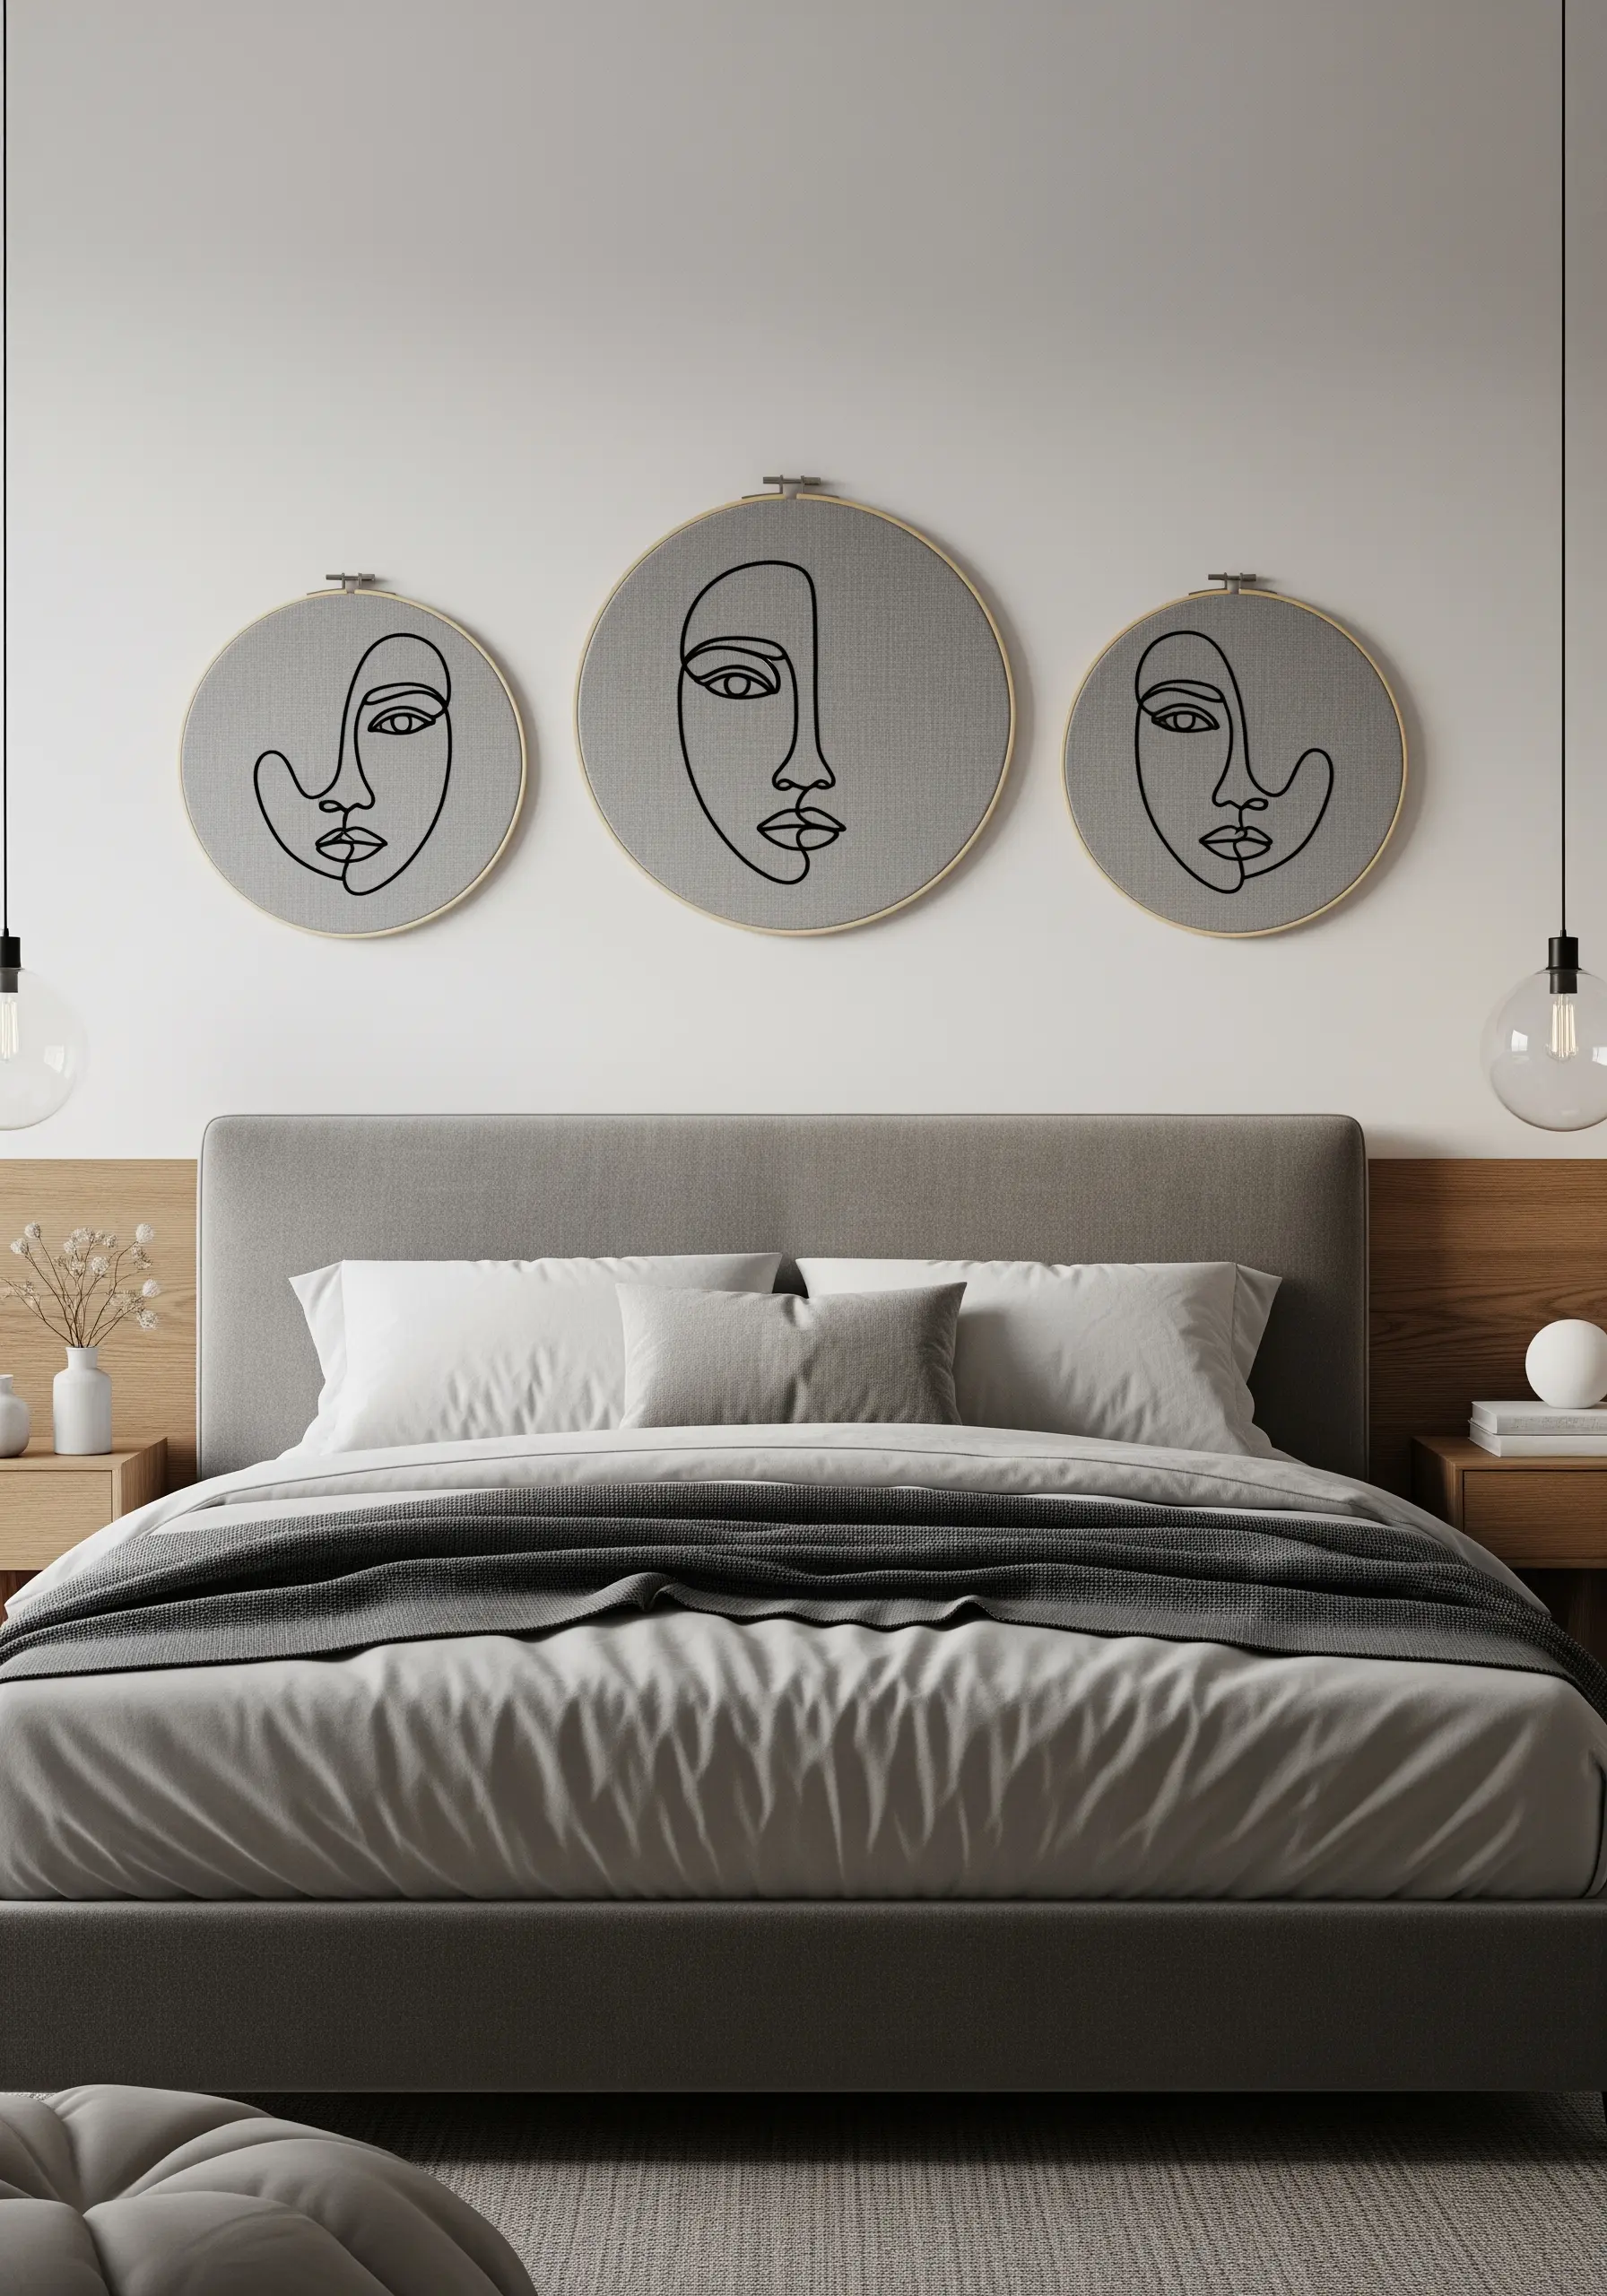
Convey emotion and form with the absolute minimum of stitches.
For these abstract line art silhouettes, use a thicker thread, like a #8 pearl cotton or all six strands of embroidery floss, to give the single line weight and presence.
Stitch on a textured fabric like linen to add subtle depth.
A whipped backstitch will create a smooth, uninterrupted line that mimics ink on paper, giving the piece a graphic, modern feel.
12. The Framed Cityscape Collection
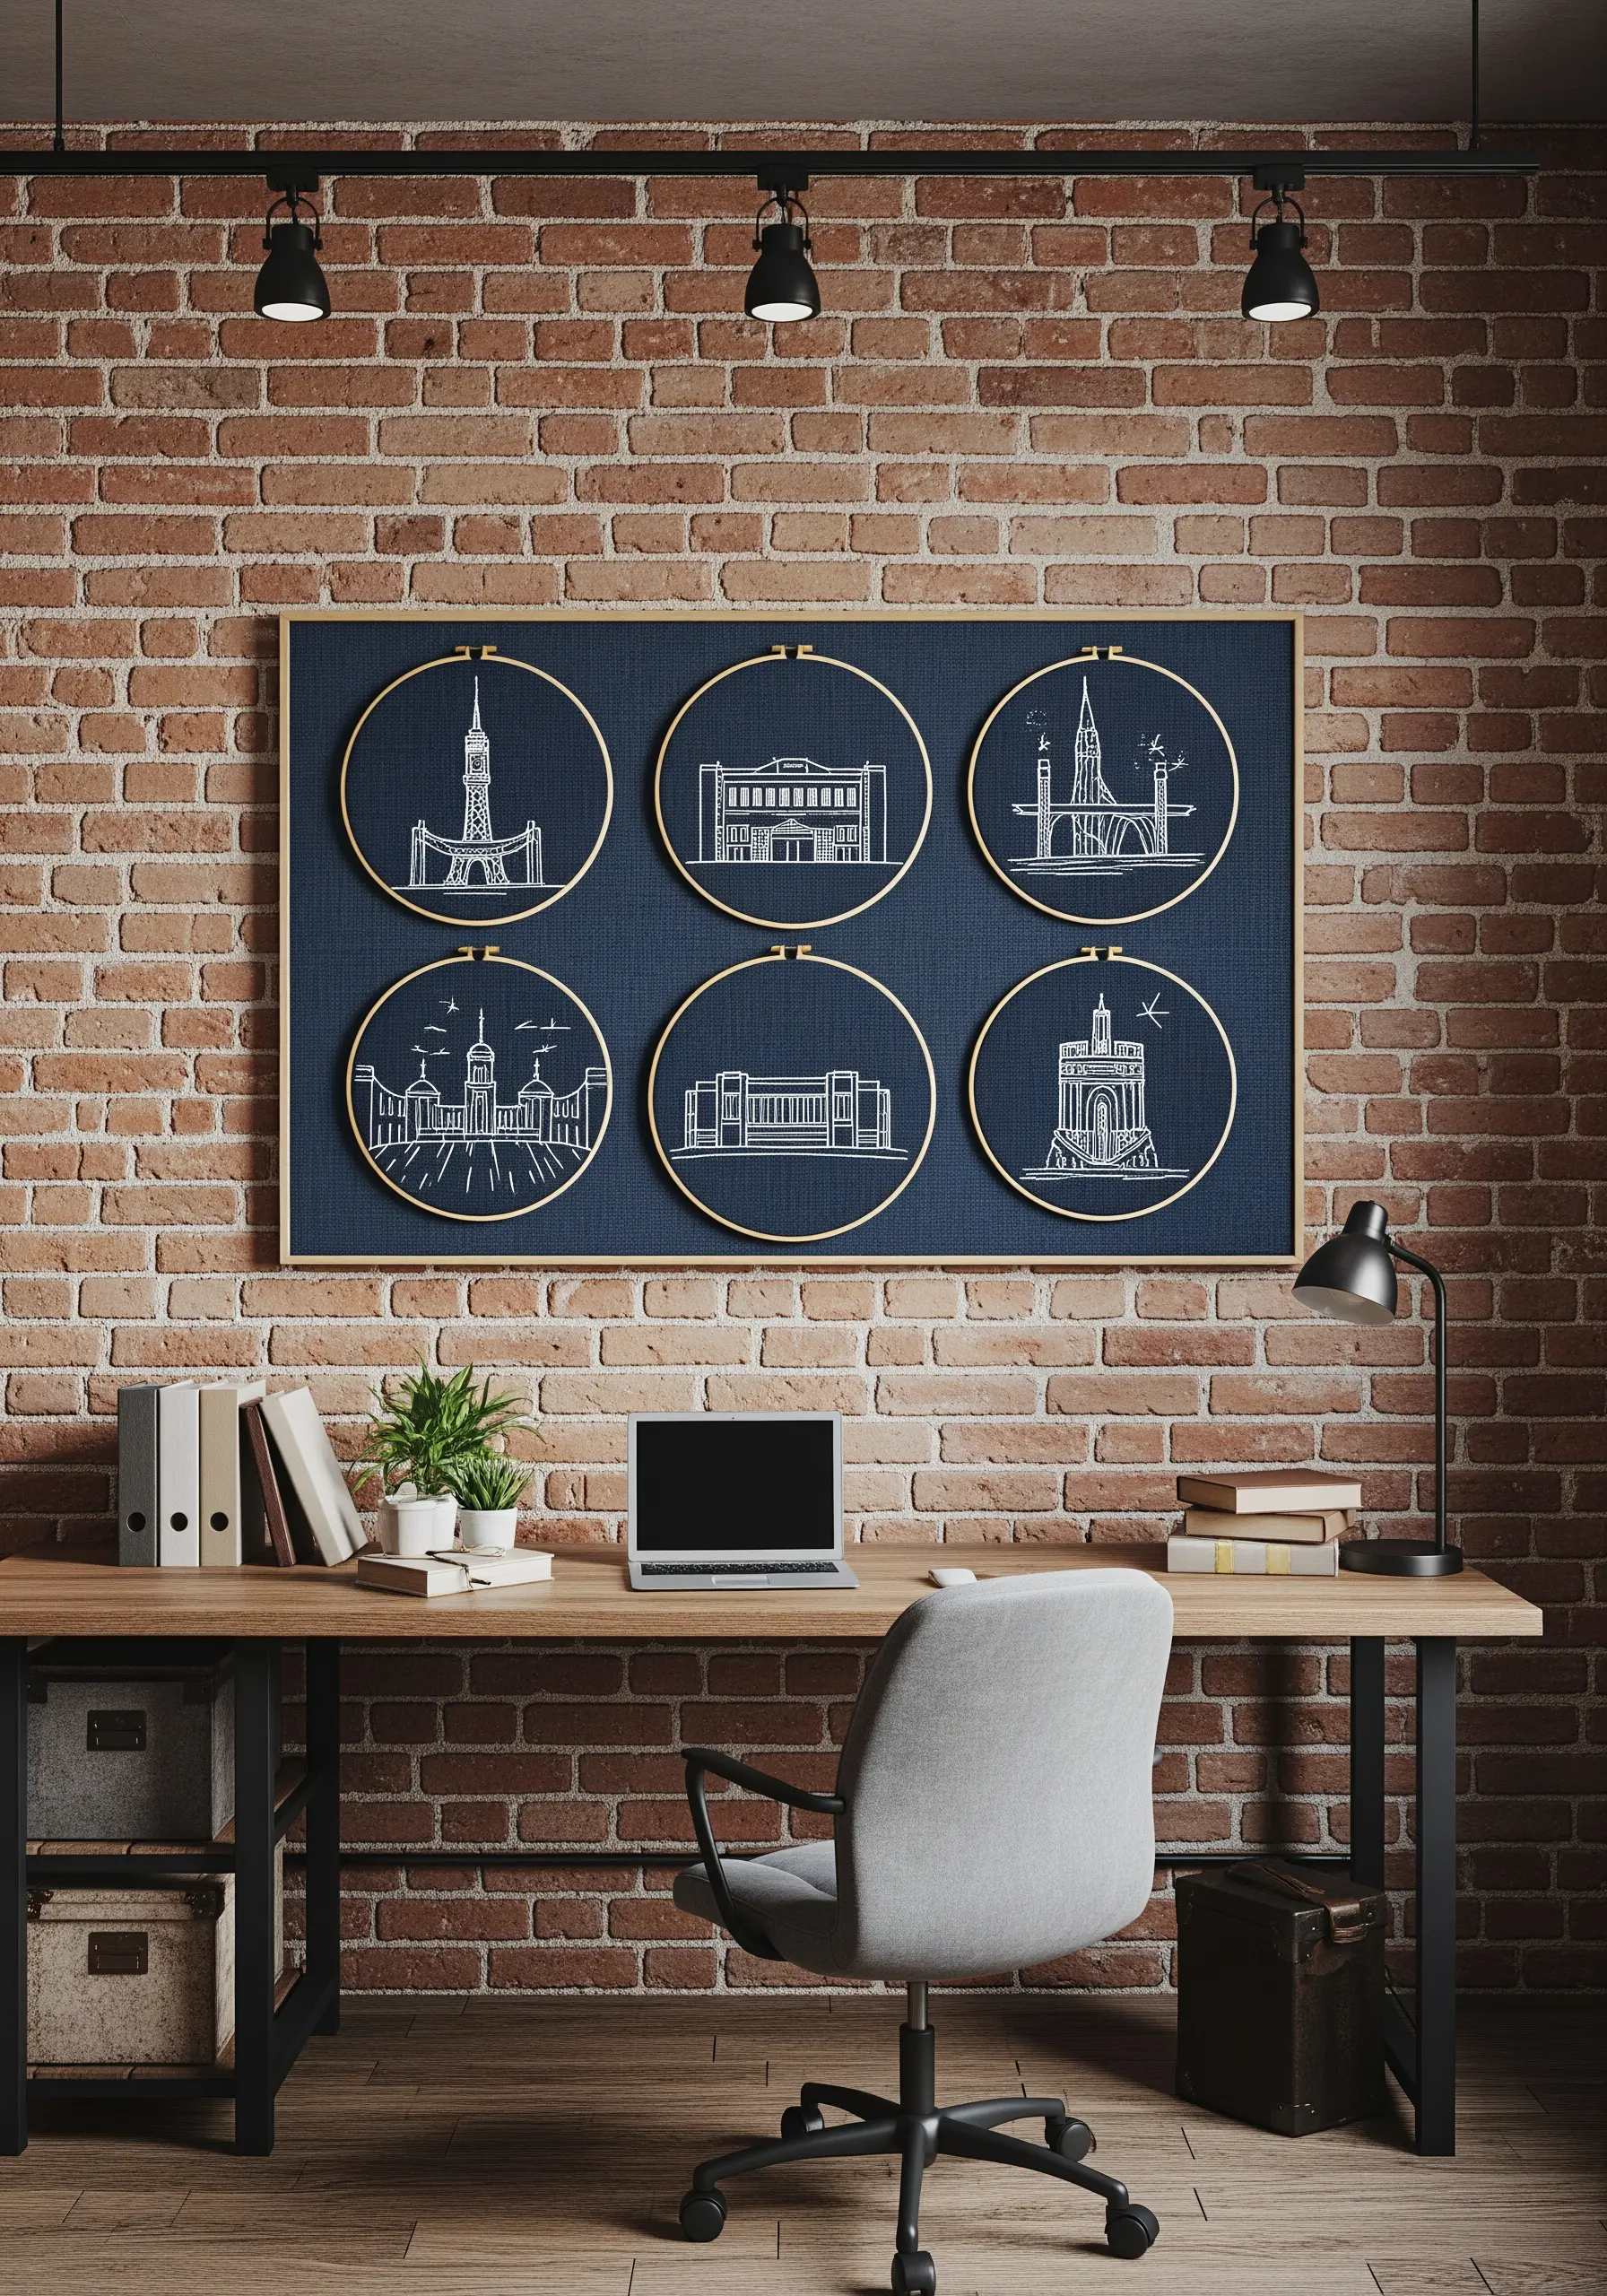
To present a collection of architectural sketches as one cohesive piece, mount your finished hoops onto a larger, fabric-covered board and frame it.
This elevates the hoops from individual crafts to a unified art installation.
Use a fine, single strand of thread to capture the delicate details of buildings.
Stitching on dark blue fabric with white thread creates a striking blueprint effect, making for DIY wall hoop patterns that double as stunning gifts.
13. The Suspended Floral Message
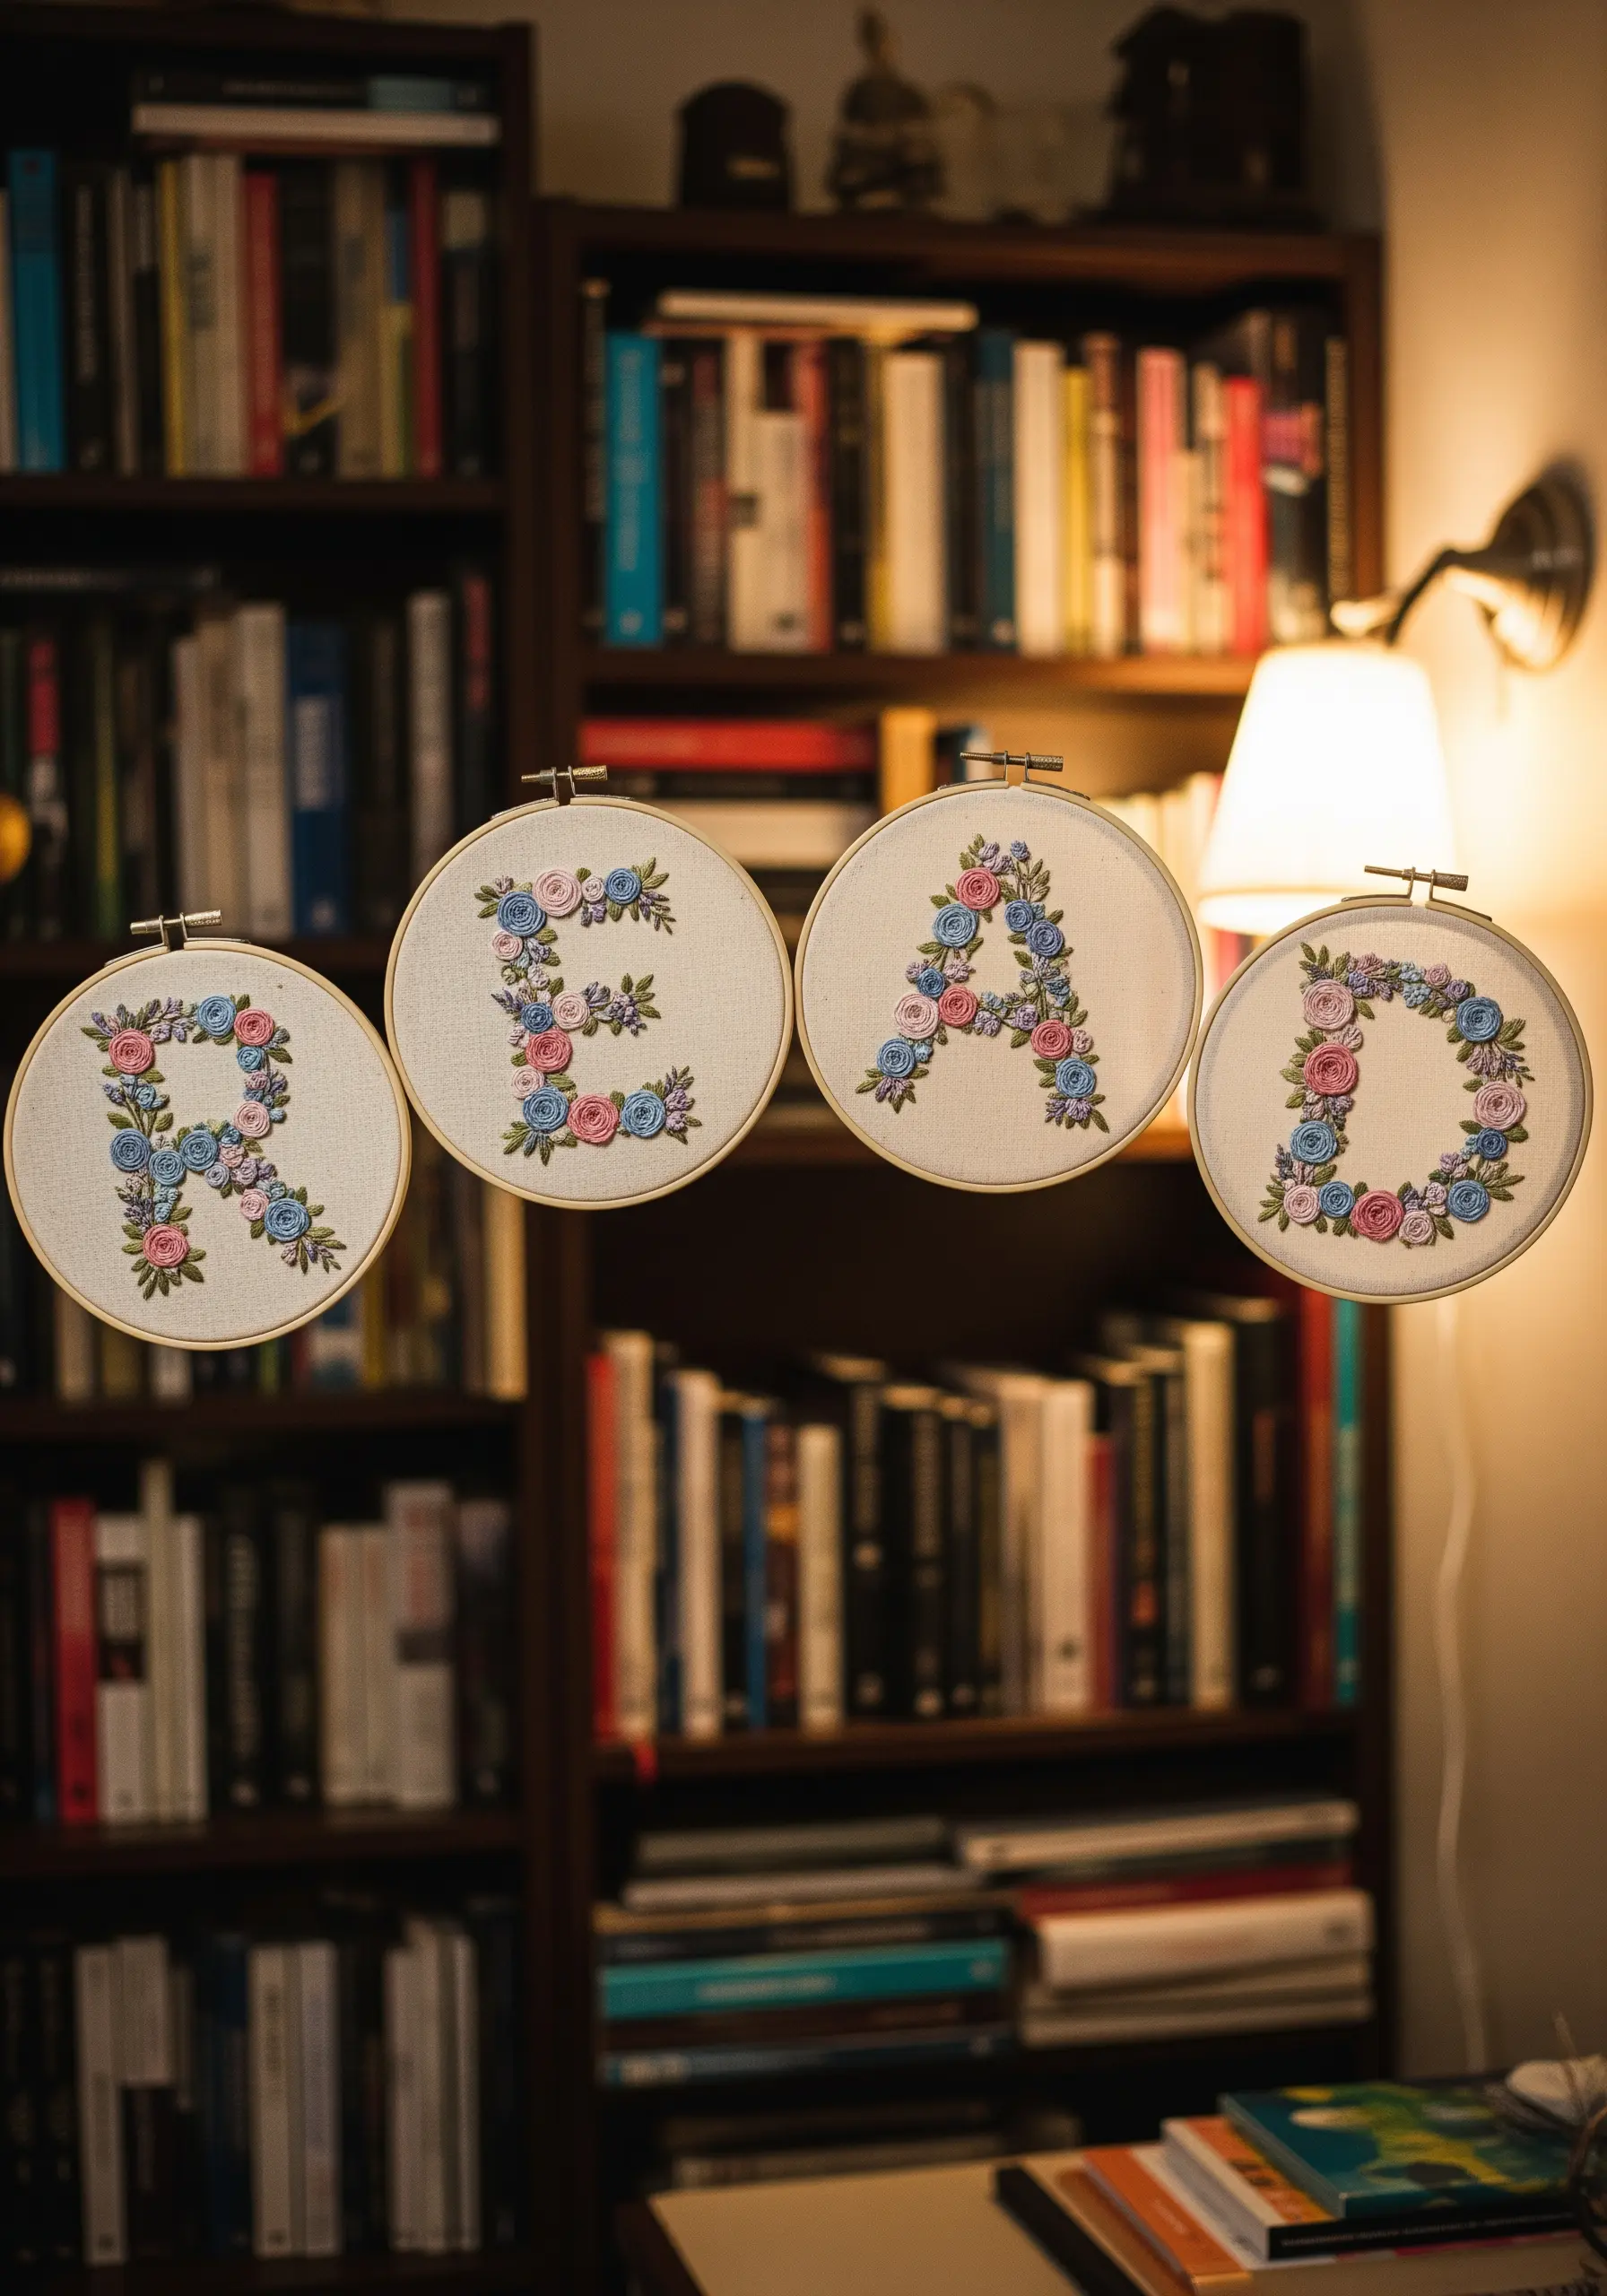
Connect individual letter hoops with invisible thread or a delicate ribbon to spell out a meaningful word.
For the tiny florals, use bullion knots for rosebuds and lazy daisy stitches for petals—they are quick to work and add beautiful texture.
By using a consistent floral style and color palette across all four hoops, you ensure the word reads as a single, cohesive statement.
This is a lovely way to create botanical monogram embroidery ideas on a larger scale.
14. Mid-Century Modern Motif Medley
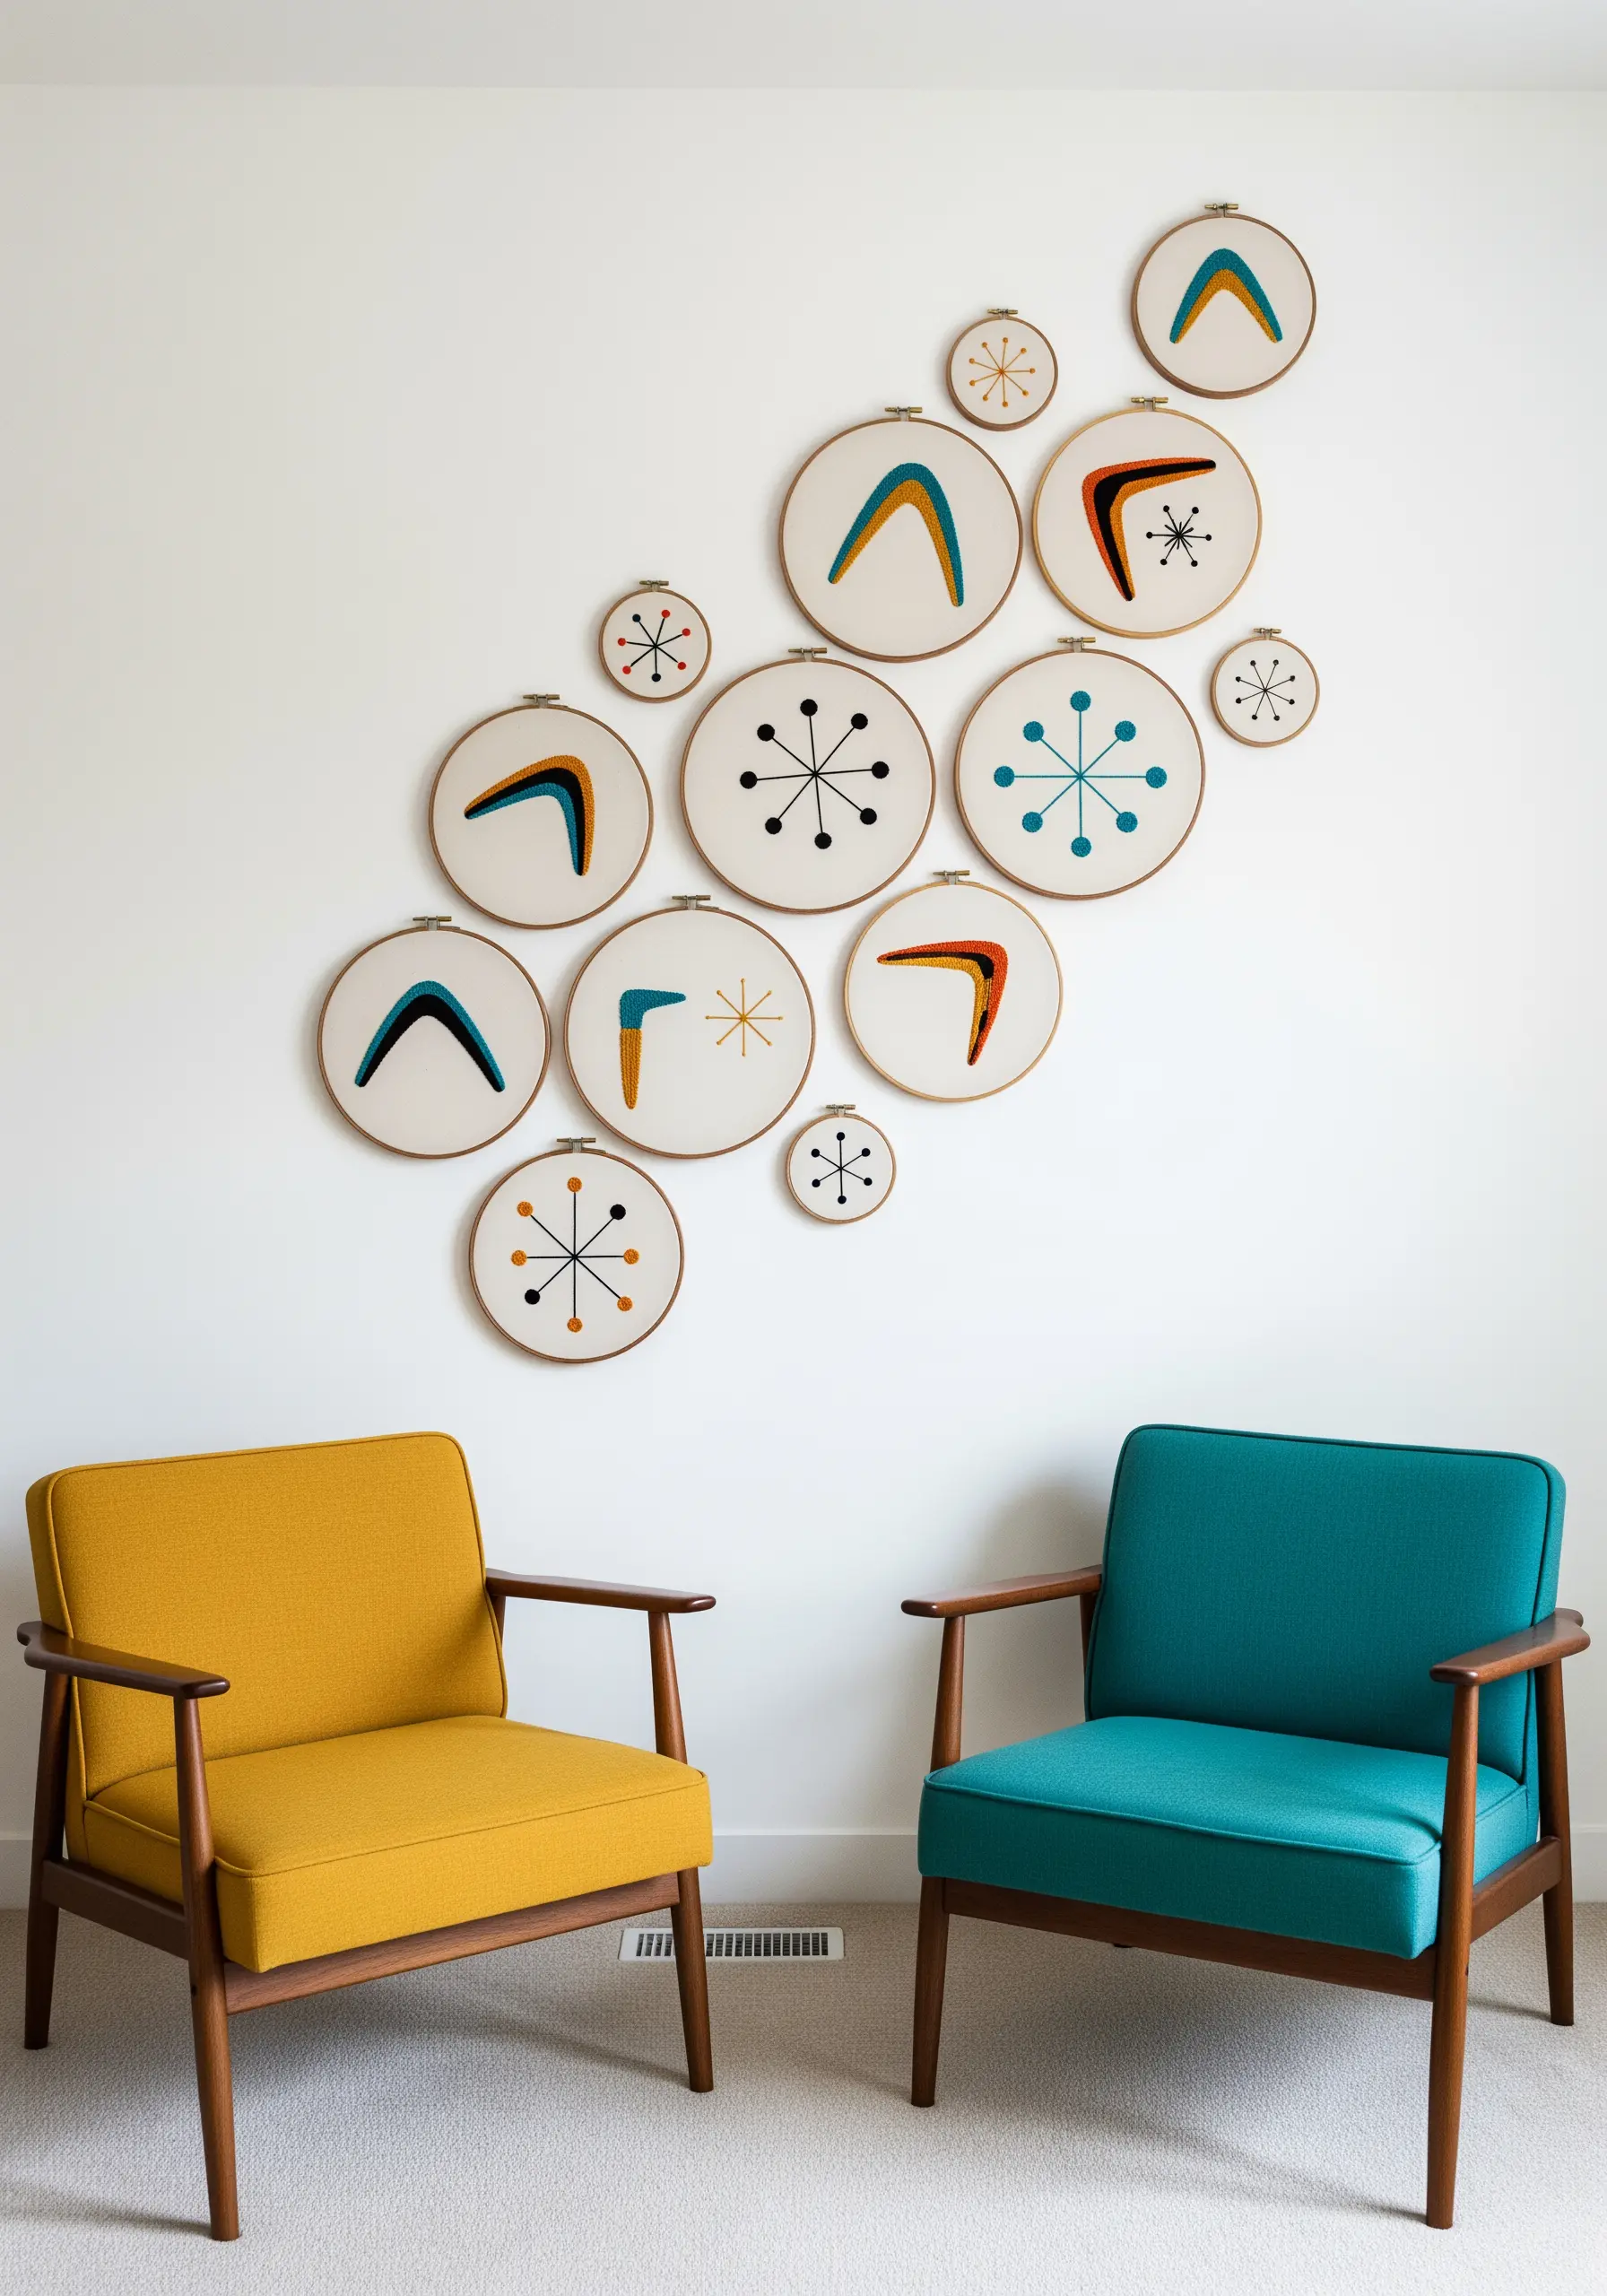
Capture a retro aesthetic by focusing on iconic mid-century shapes and a limited color palette of teal, orange, and black.
Use a clean satin stitch to fill the bold boomerang and starburst motifs.
The key to this style is the negative space—don’t overcrowd the fabric.
Let the simple, graphic shapes breathe.
Varying the hoop sizes adds a playful, dynamic quality to the arrangement, echoing the era’s design principles and creating unique minimalist stitched ideas inspired by geometry.
15. The Honeycomb Hive Installation

Build a large-scale, organic shape on your wall by clustering many small hoops together.
Create a sense of rhythm by alternating between detailed motifs (bees) and graphic patterns (honeycombs, dots).
Using just three colors—yellow, black, and pale blue—keeps the busy composition from feeling overwhelming.
This modular approach allows you to expand the design over time, creating an ever-evolving piece of wall art or one of many hand-stitched aesthetic projects.
16. The Meditative Rhythm of Sashiko
Embrace the beauty of Japanese Sashiko stitching by dividing a single piece of indigo-dyed fabric among three hoops.
Before cutting, complete your patterns across the fabric.
Then, strategically place your hoops to frame interesting intersections of the patterns, creating a triptych that feels both unified and dynamic.
The power of these monochrome embroidery ideas lies in consistency—focus on keeping your stitch length and spacing perfectly even.
17. The Sunset Window Curtain
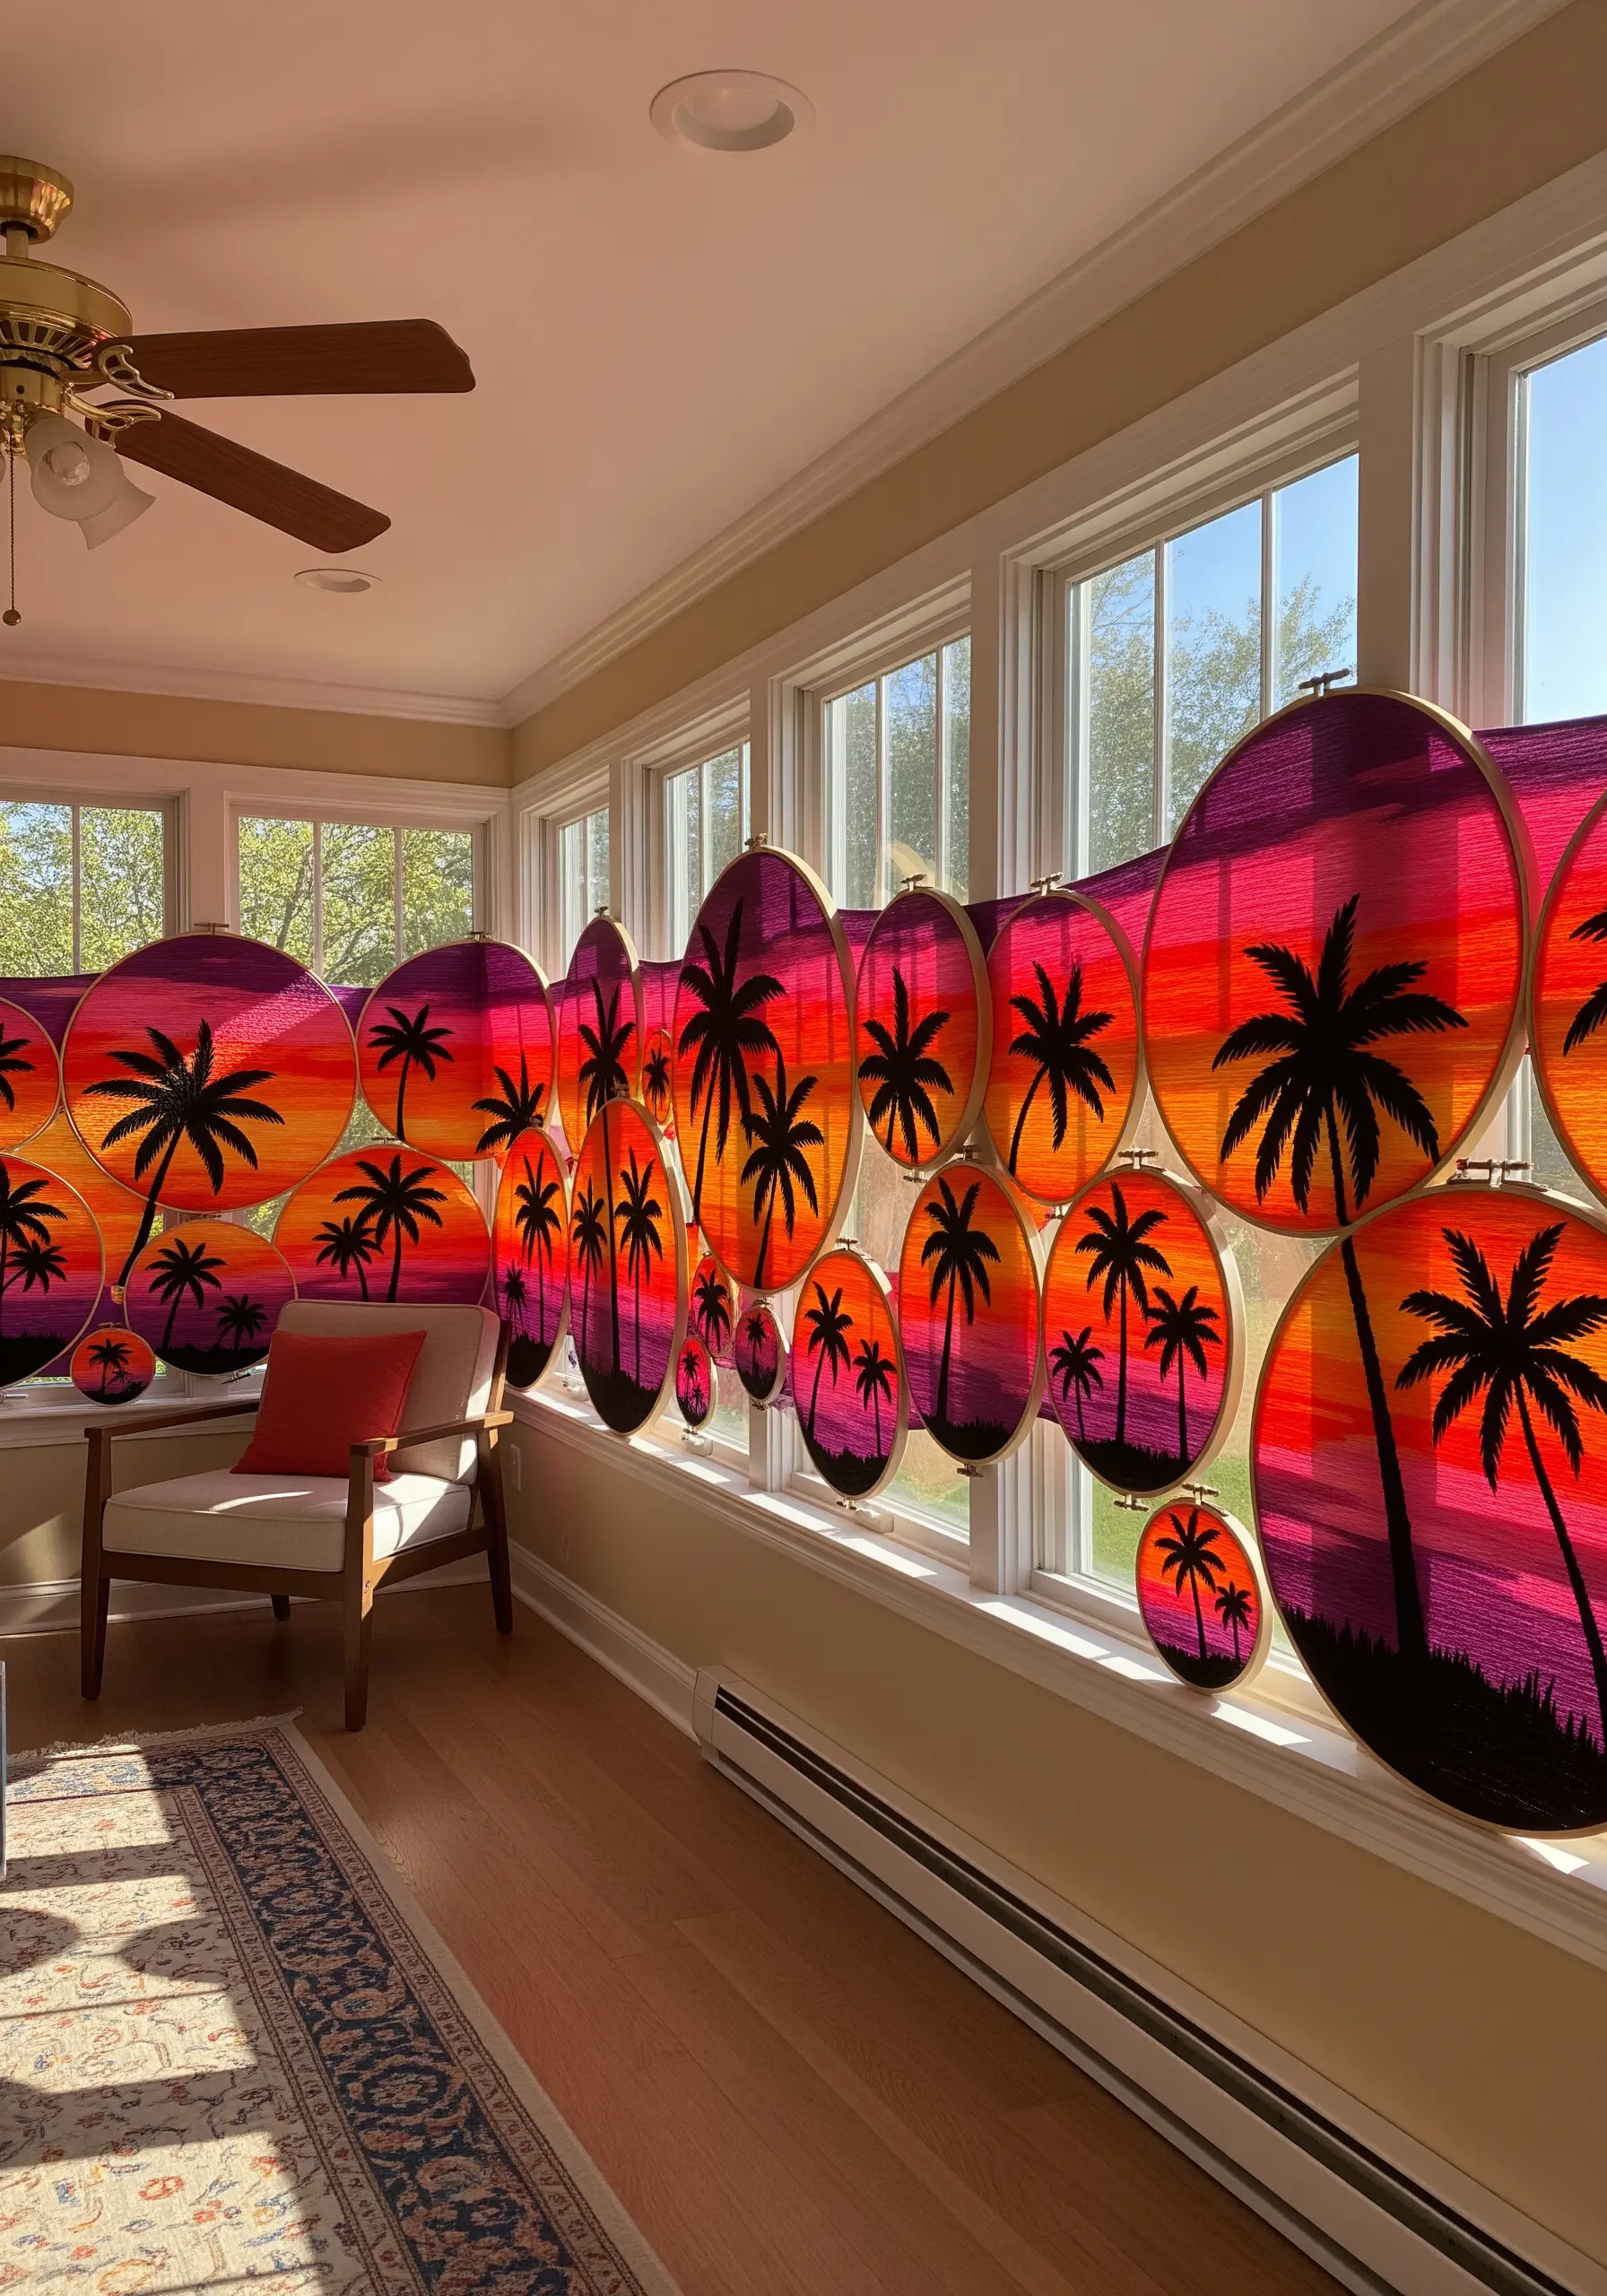
Transform a window into a piece of art by creating a curtain of embroidered hoops.
Use a single long piece of sheer fabric and stitch a gradient sunset with long satin stitches, then add palm tree silhouettes in black thread.
Stretch different sections of this continuous scene into hoops of various sizes and hang them tightly together.
The light shining through will make your sunset glow, creating one of the most unique seasonal wall art projects you can imagine.
18. The Zodiac Gallery Wall
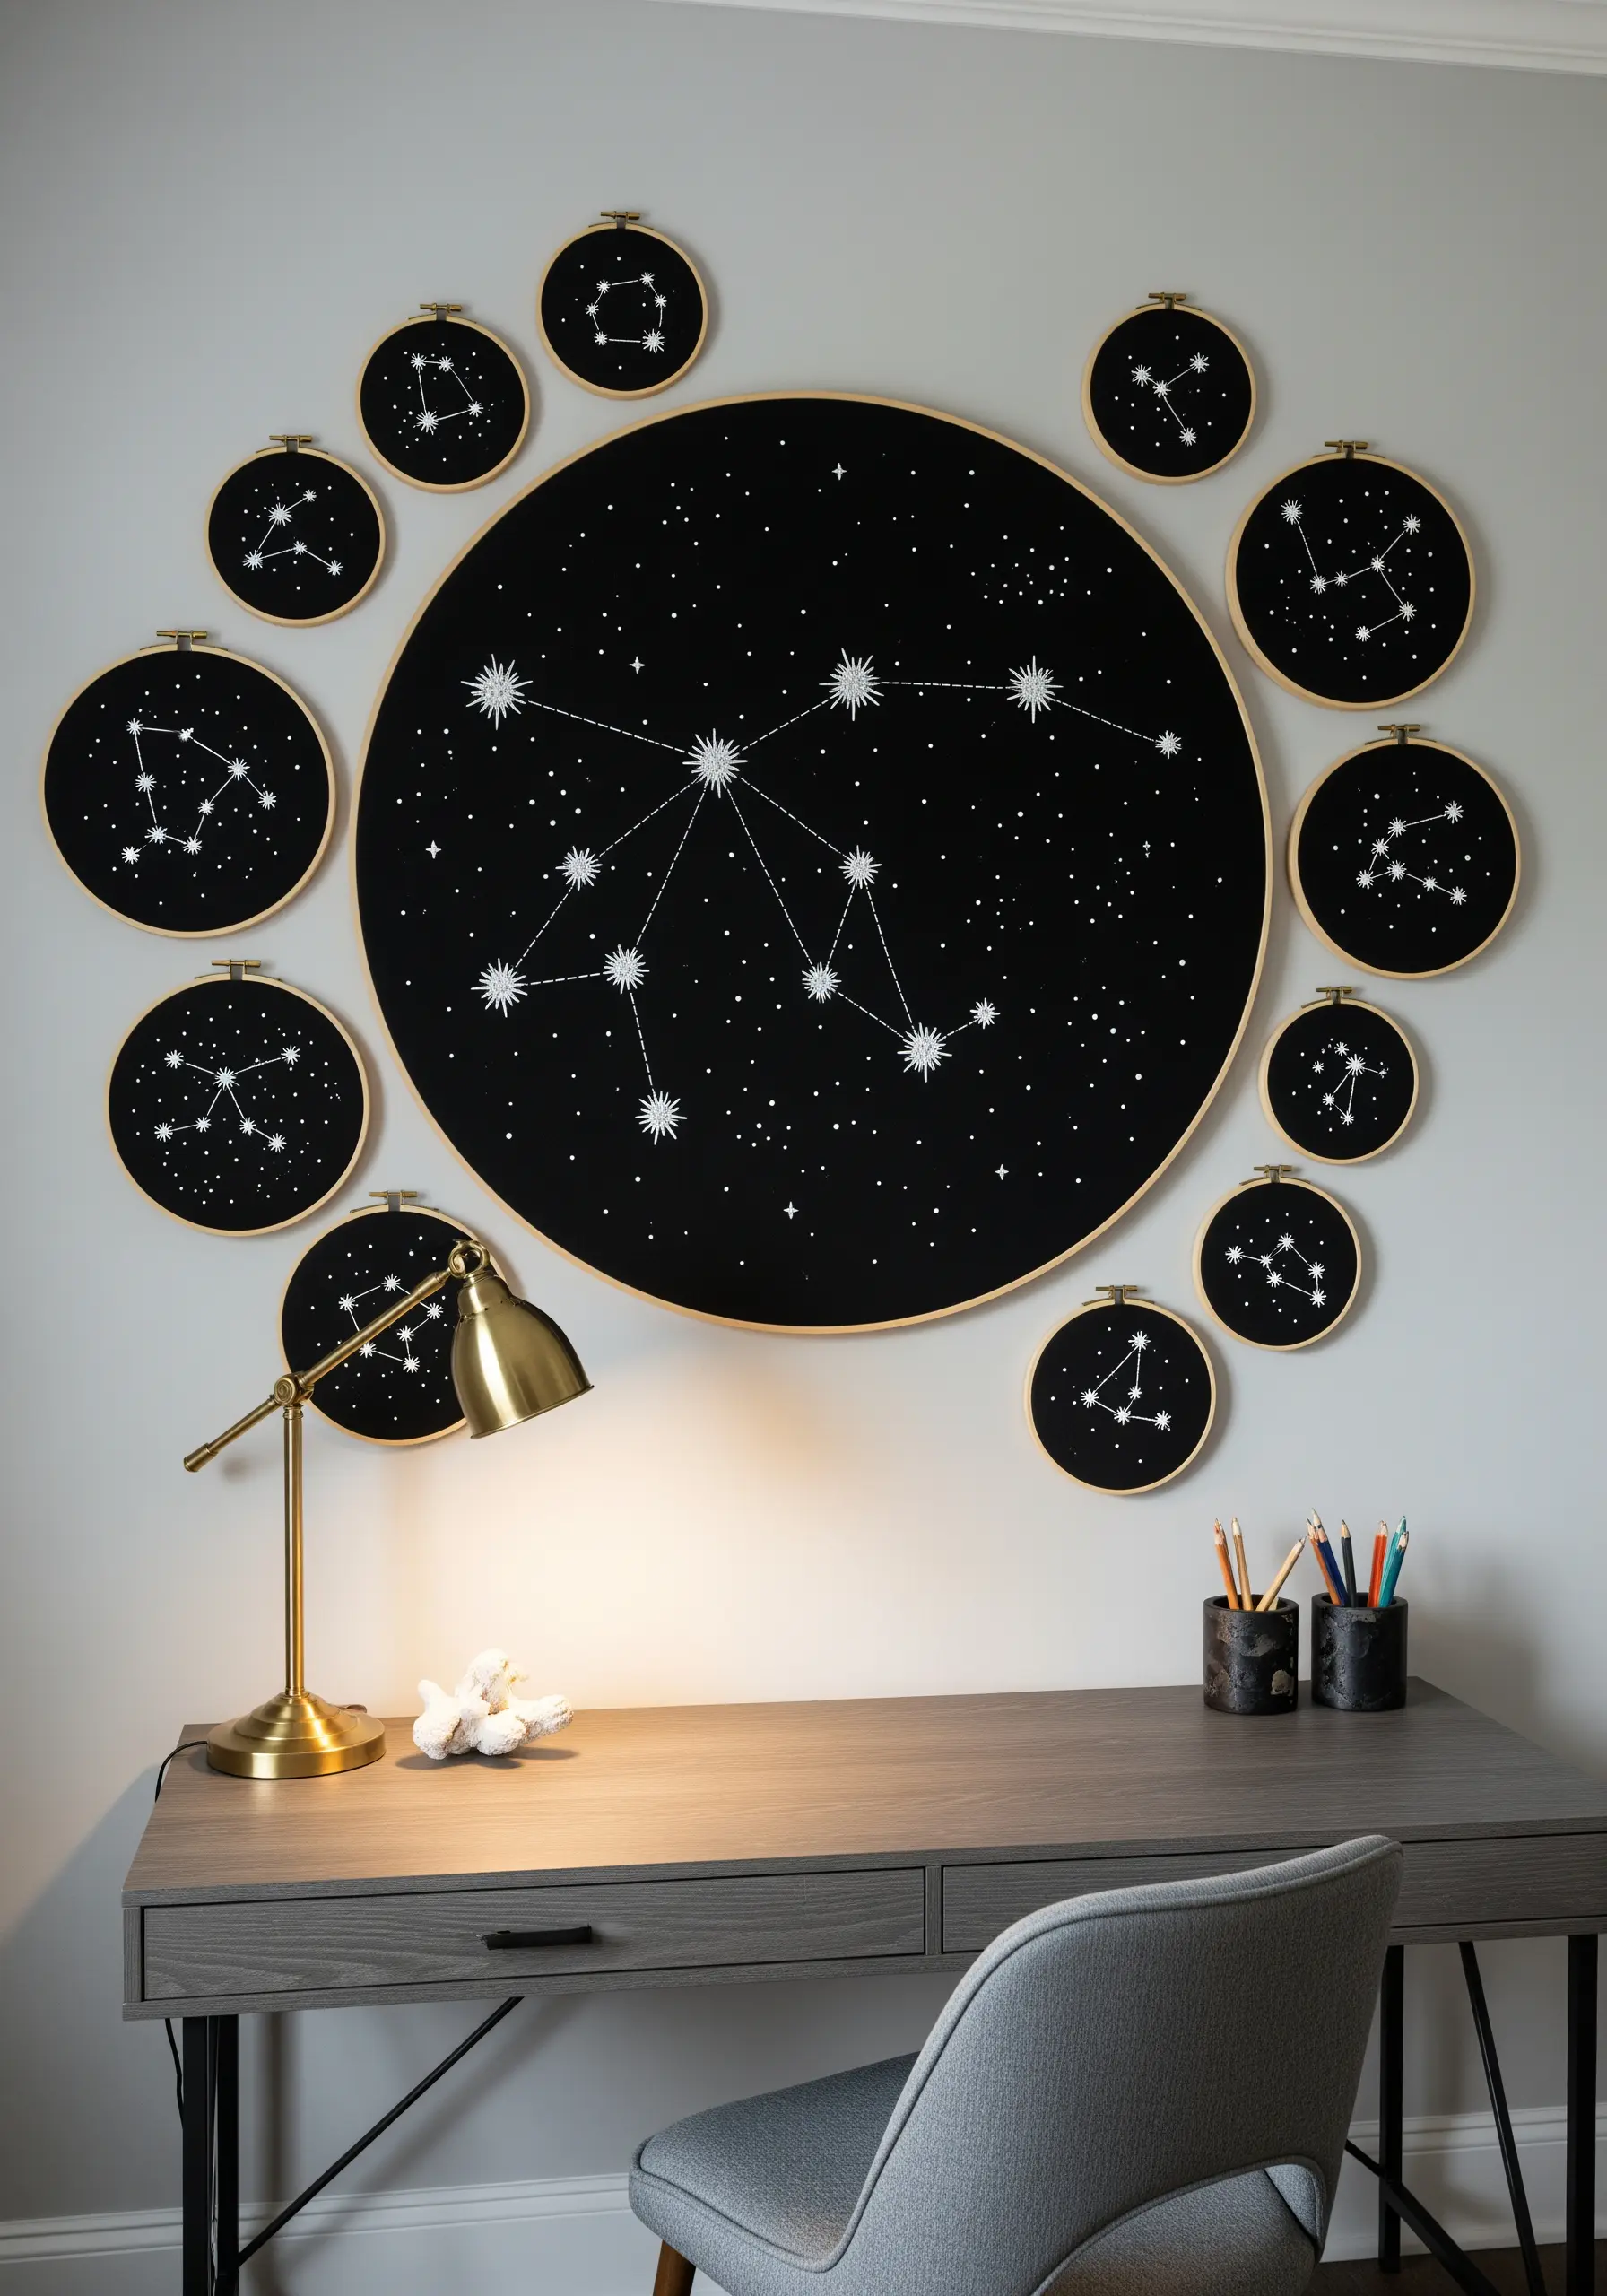
Design a celestial gallery with a large central hoop for a major constellation and smaller surrounding hoops for others.
Use white or silver metallic thread on black fabric for high contrast.
Stitch the main stars with star stitch or French knots for emphasis, and connect them with a simple backstitch.
Scatter tiny seed stitches across the background to represent distant stars, giving your minimal embroidery wall pieces depth and realism.
19. The Cascading Autumn Column

Create the illusion of falling leaves by arranging your hoops in a narrow, vertical cascade.
To give your leaves realistic texture, use a fishbone stitch for the main body and a stem stitch for the central vein.
Blend two or three autumnal shades within each leaf using the long-and-short stitch technique for a natural, variegated look.
This focus on realistic leaf vein details is what elevates the design from simple to stunning.
20. The Textured Desertscape

Build a desert-inspired collection by mixing different textural stitches to represent various cacti and succulents.
Use French knots for fluffy plant tops, woven wheel stitches for succulent rosettes, and straight stitches in rows for classic cactus ribs.
Adding dimensional elements like tassels at the bottom of a few hoops introduces another layer of texture and a touch of bohemian flair.
This is a wonderful way to play with earthy texture embroidery patterns.
21. The Ascending Flock
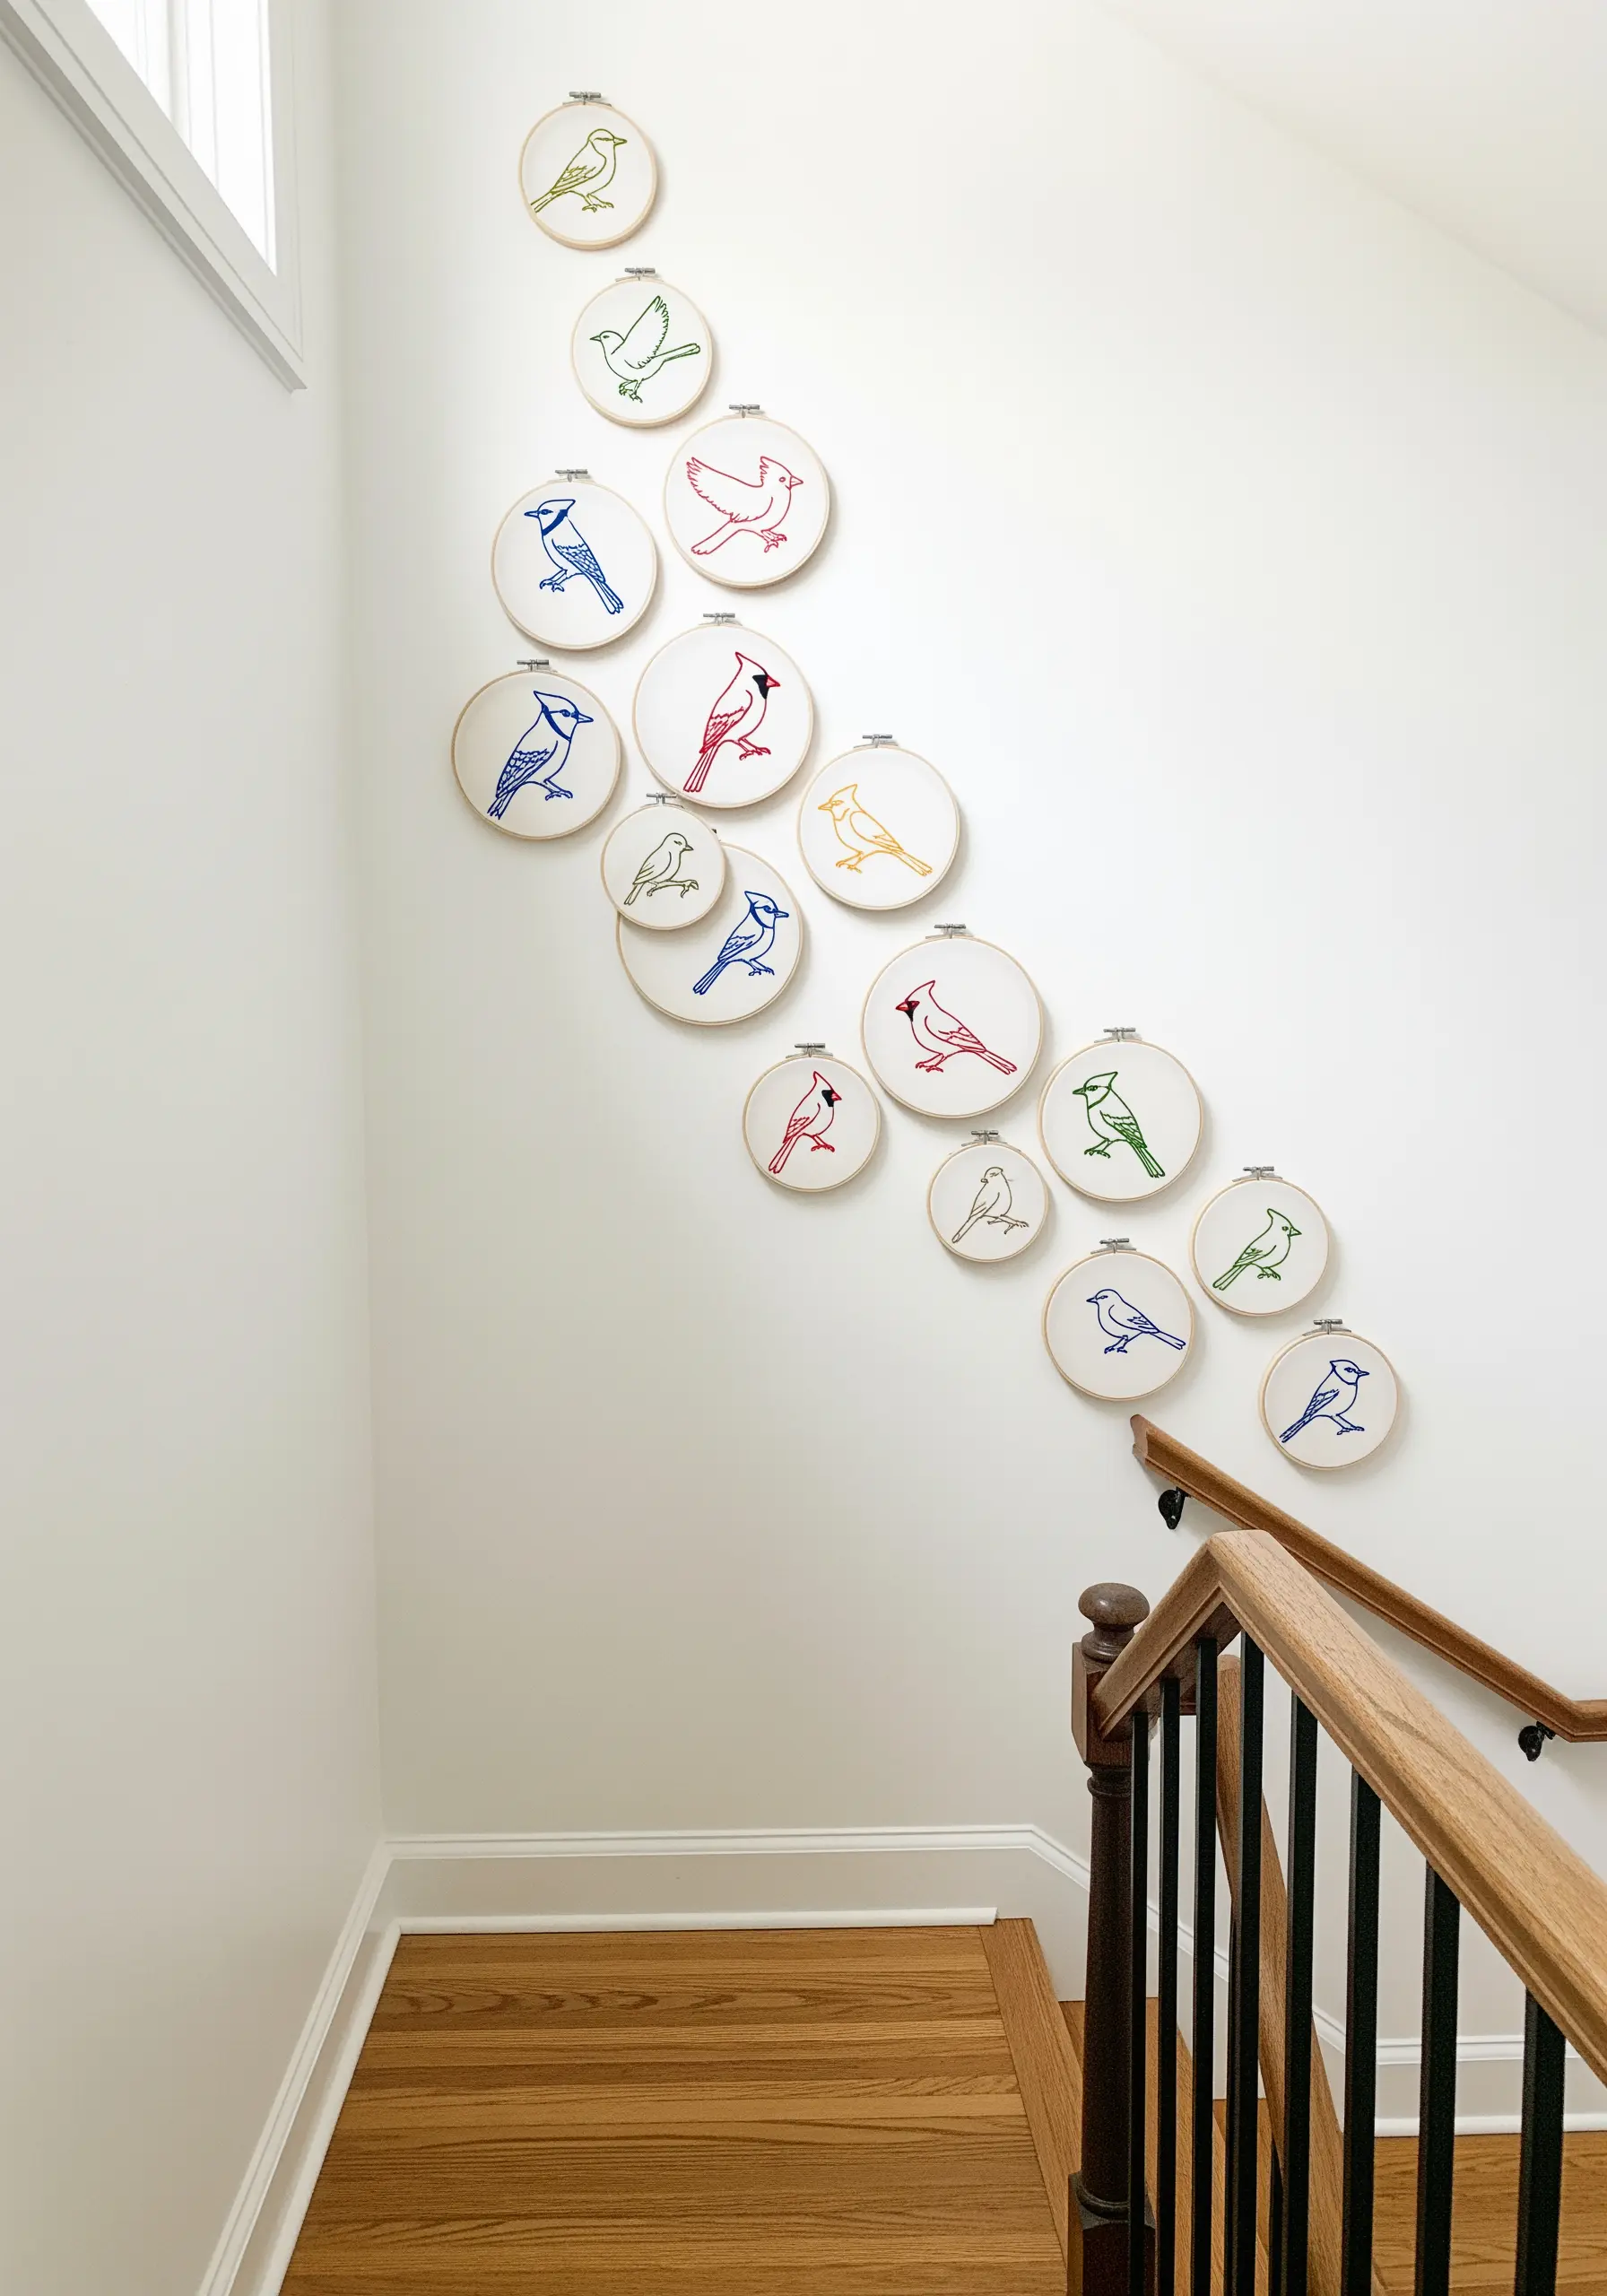
Guide the eye up a staircase by arranging simple bird outlines in a sweeping, upward curve.
To keep the look light and airy, use a single color for each bird and stick to a basic outline stitch like backstitch or stem stitch.
Introduce a subtle gradient by shifting the thread color from cool blues at the bottom to warmer reds and yellows at the top.
This simple color shift adds a layer of conceptual artistry to these minimalist line art animal designs.
22. The Farmhouse Triptych
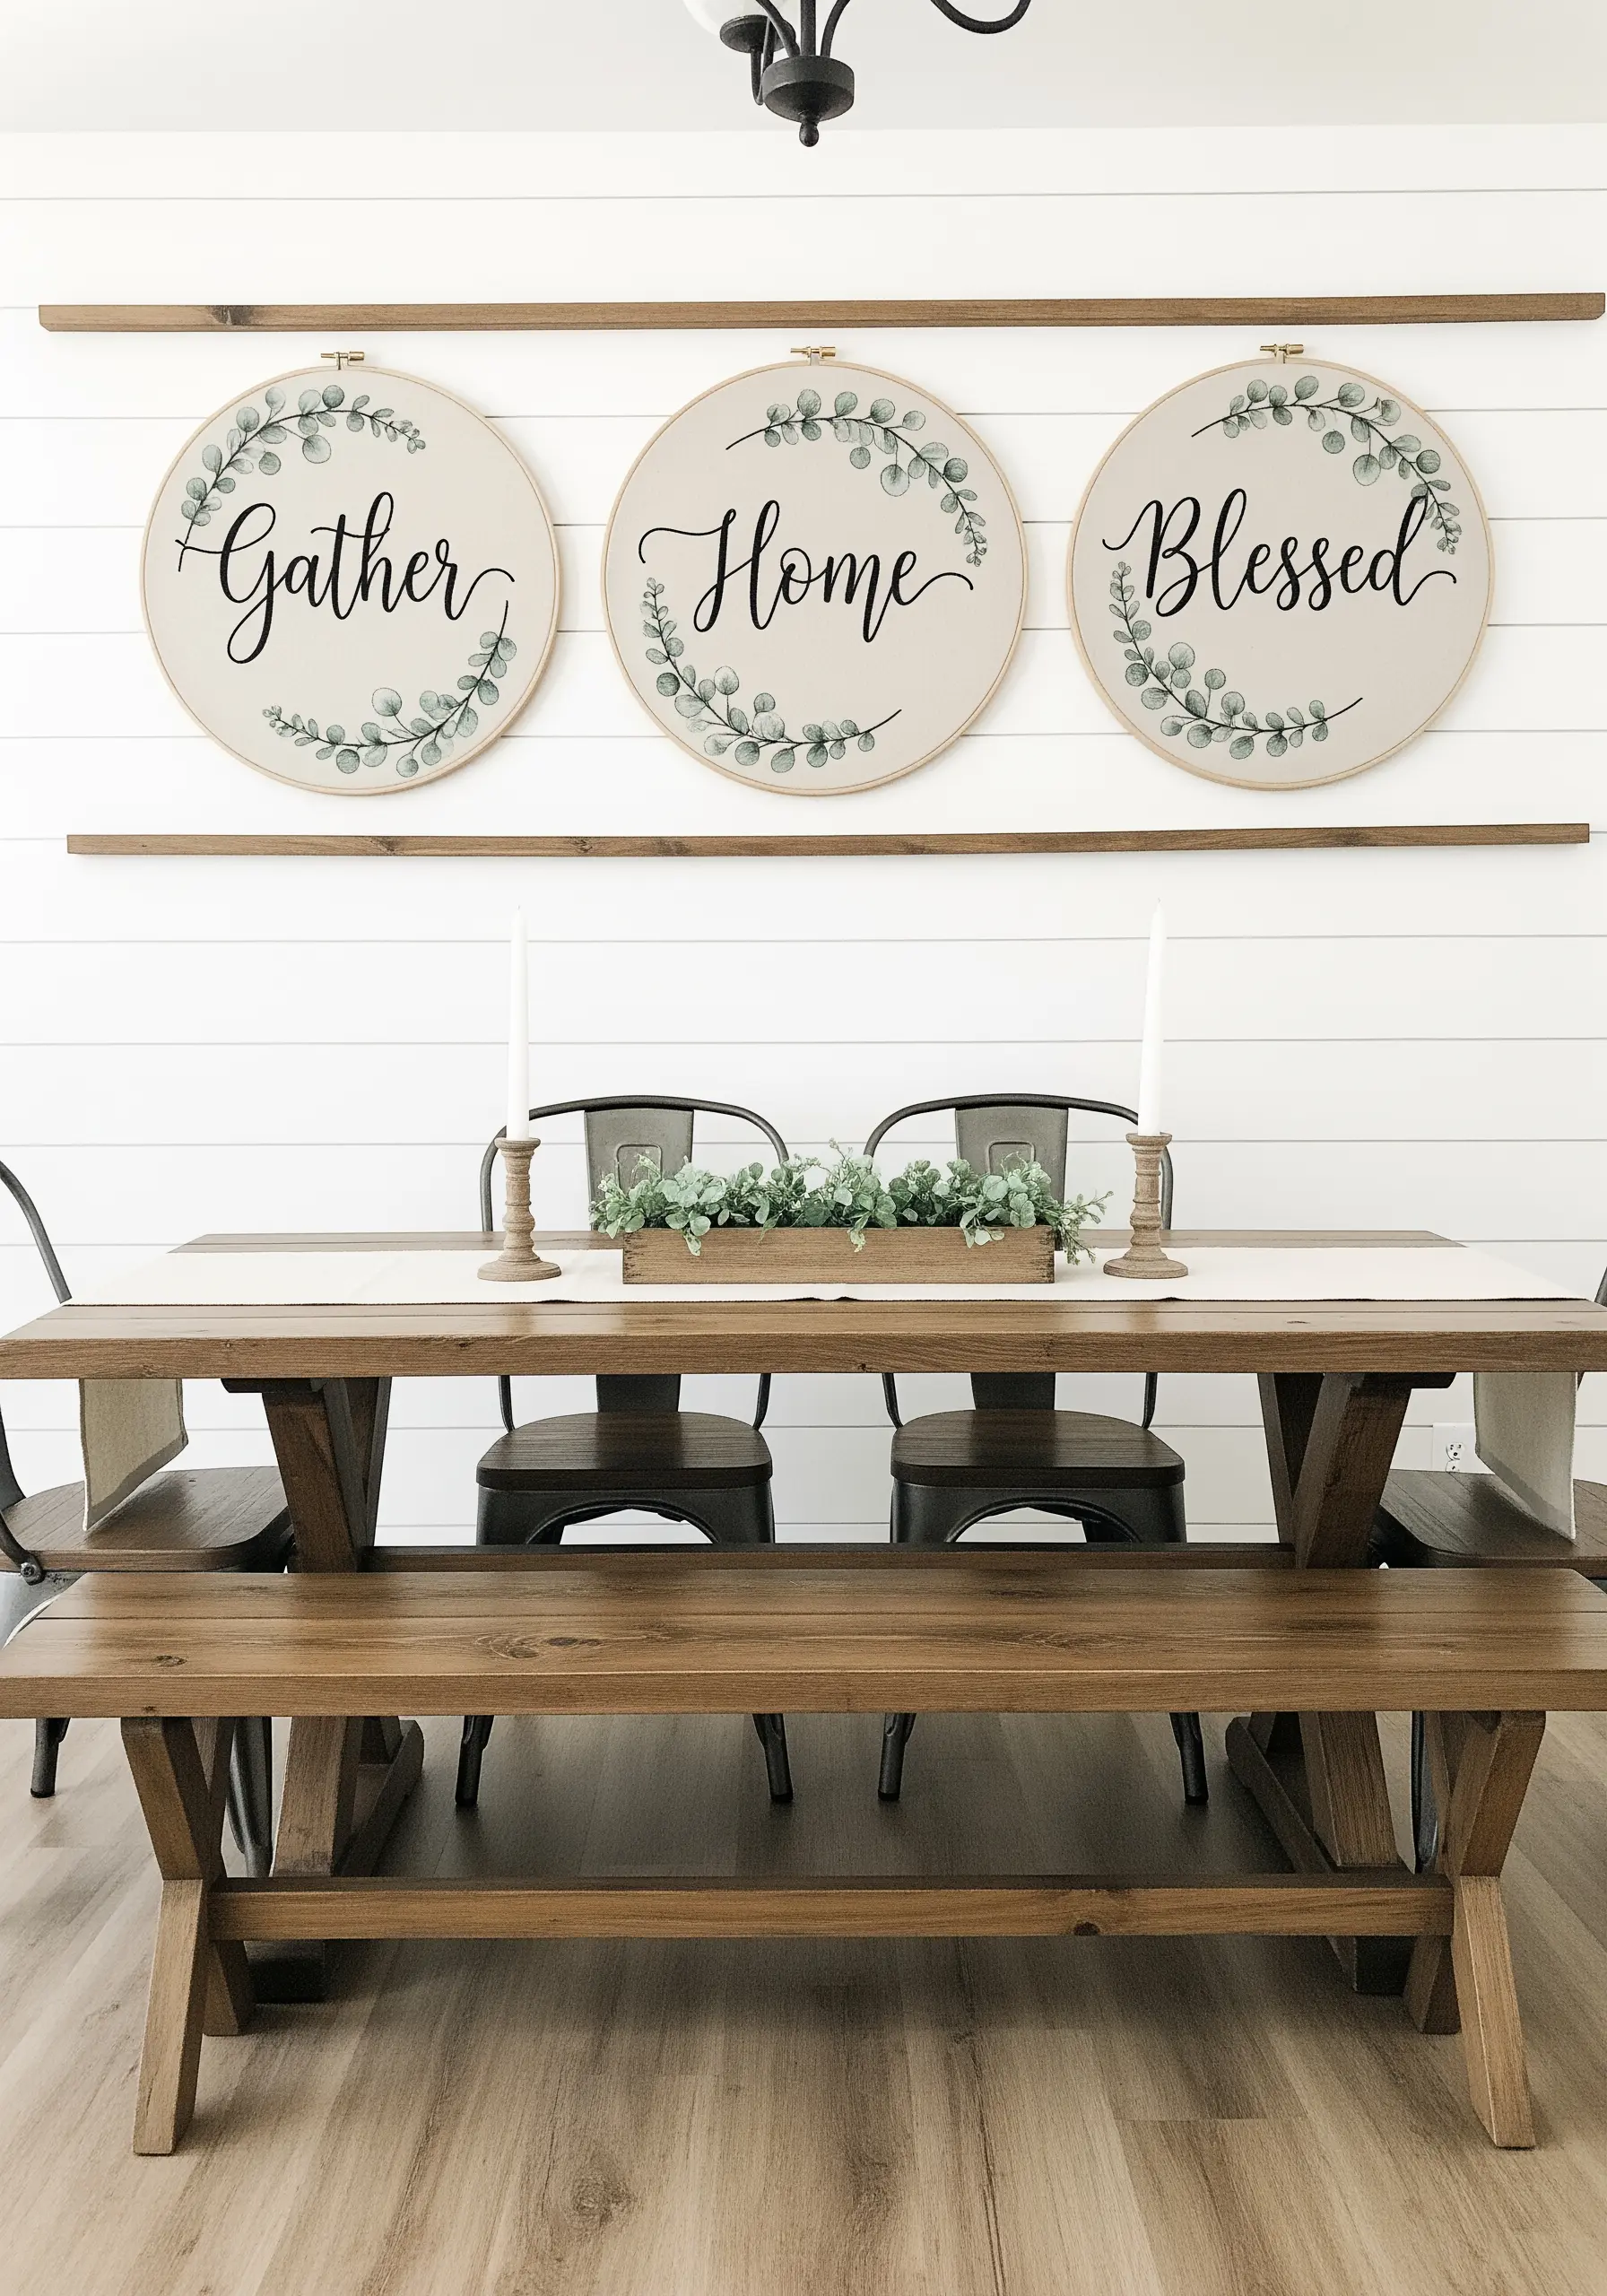
For a classic farmhouse look, stitch welcoming words in large, elegant script.
Use a padded satin stitch to give the letters dimension: first, create a base of small straight stitches, then cover it with satin stitches laid perpendicularly.
Frame the text with delicate eucalyptus branches using fishbone stitch for the leaves and stem stitch for the branches.
These rustic vintage embroidery wall decor ideas feel both modern and timeless when hung in a clean, straight line.
23. The Pop Art Quadtych
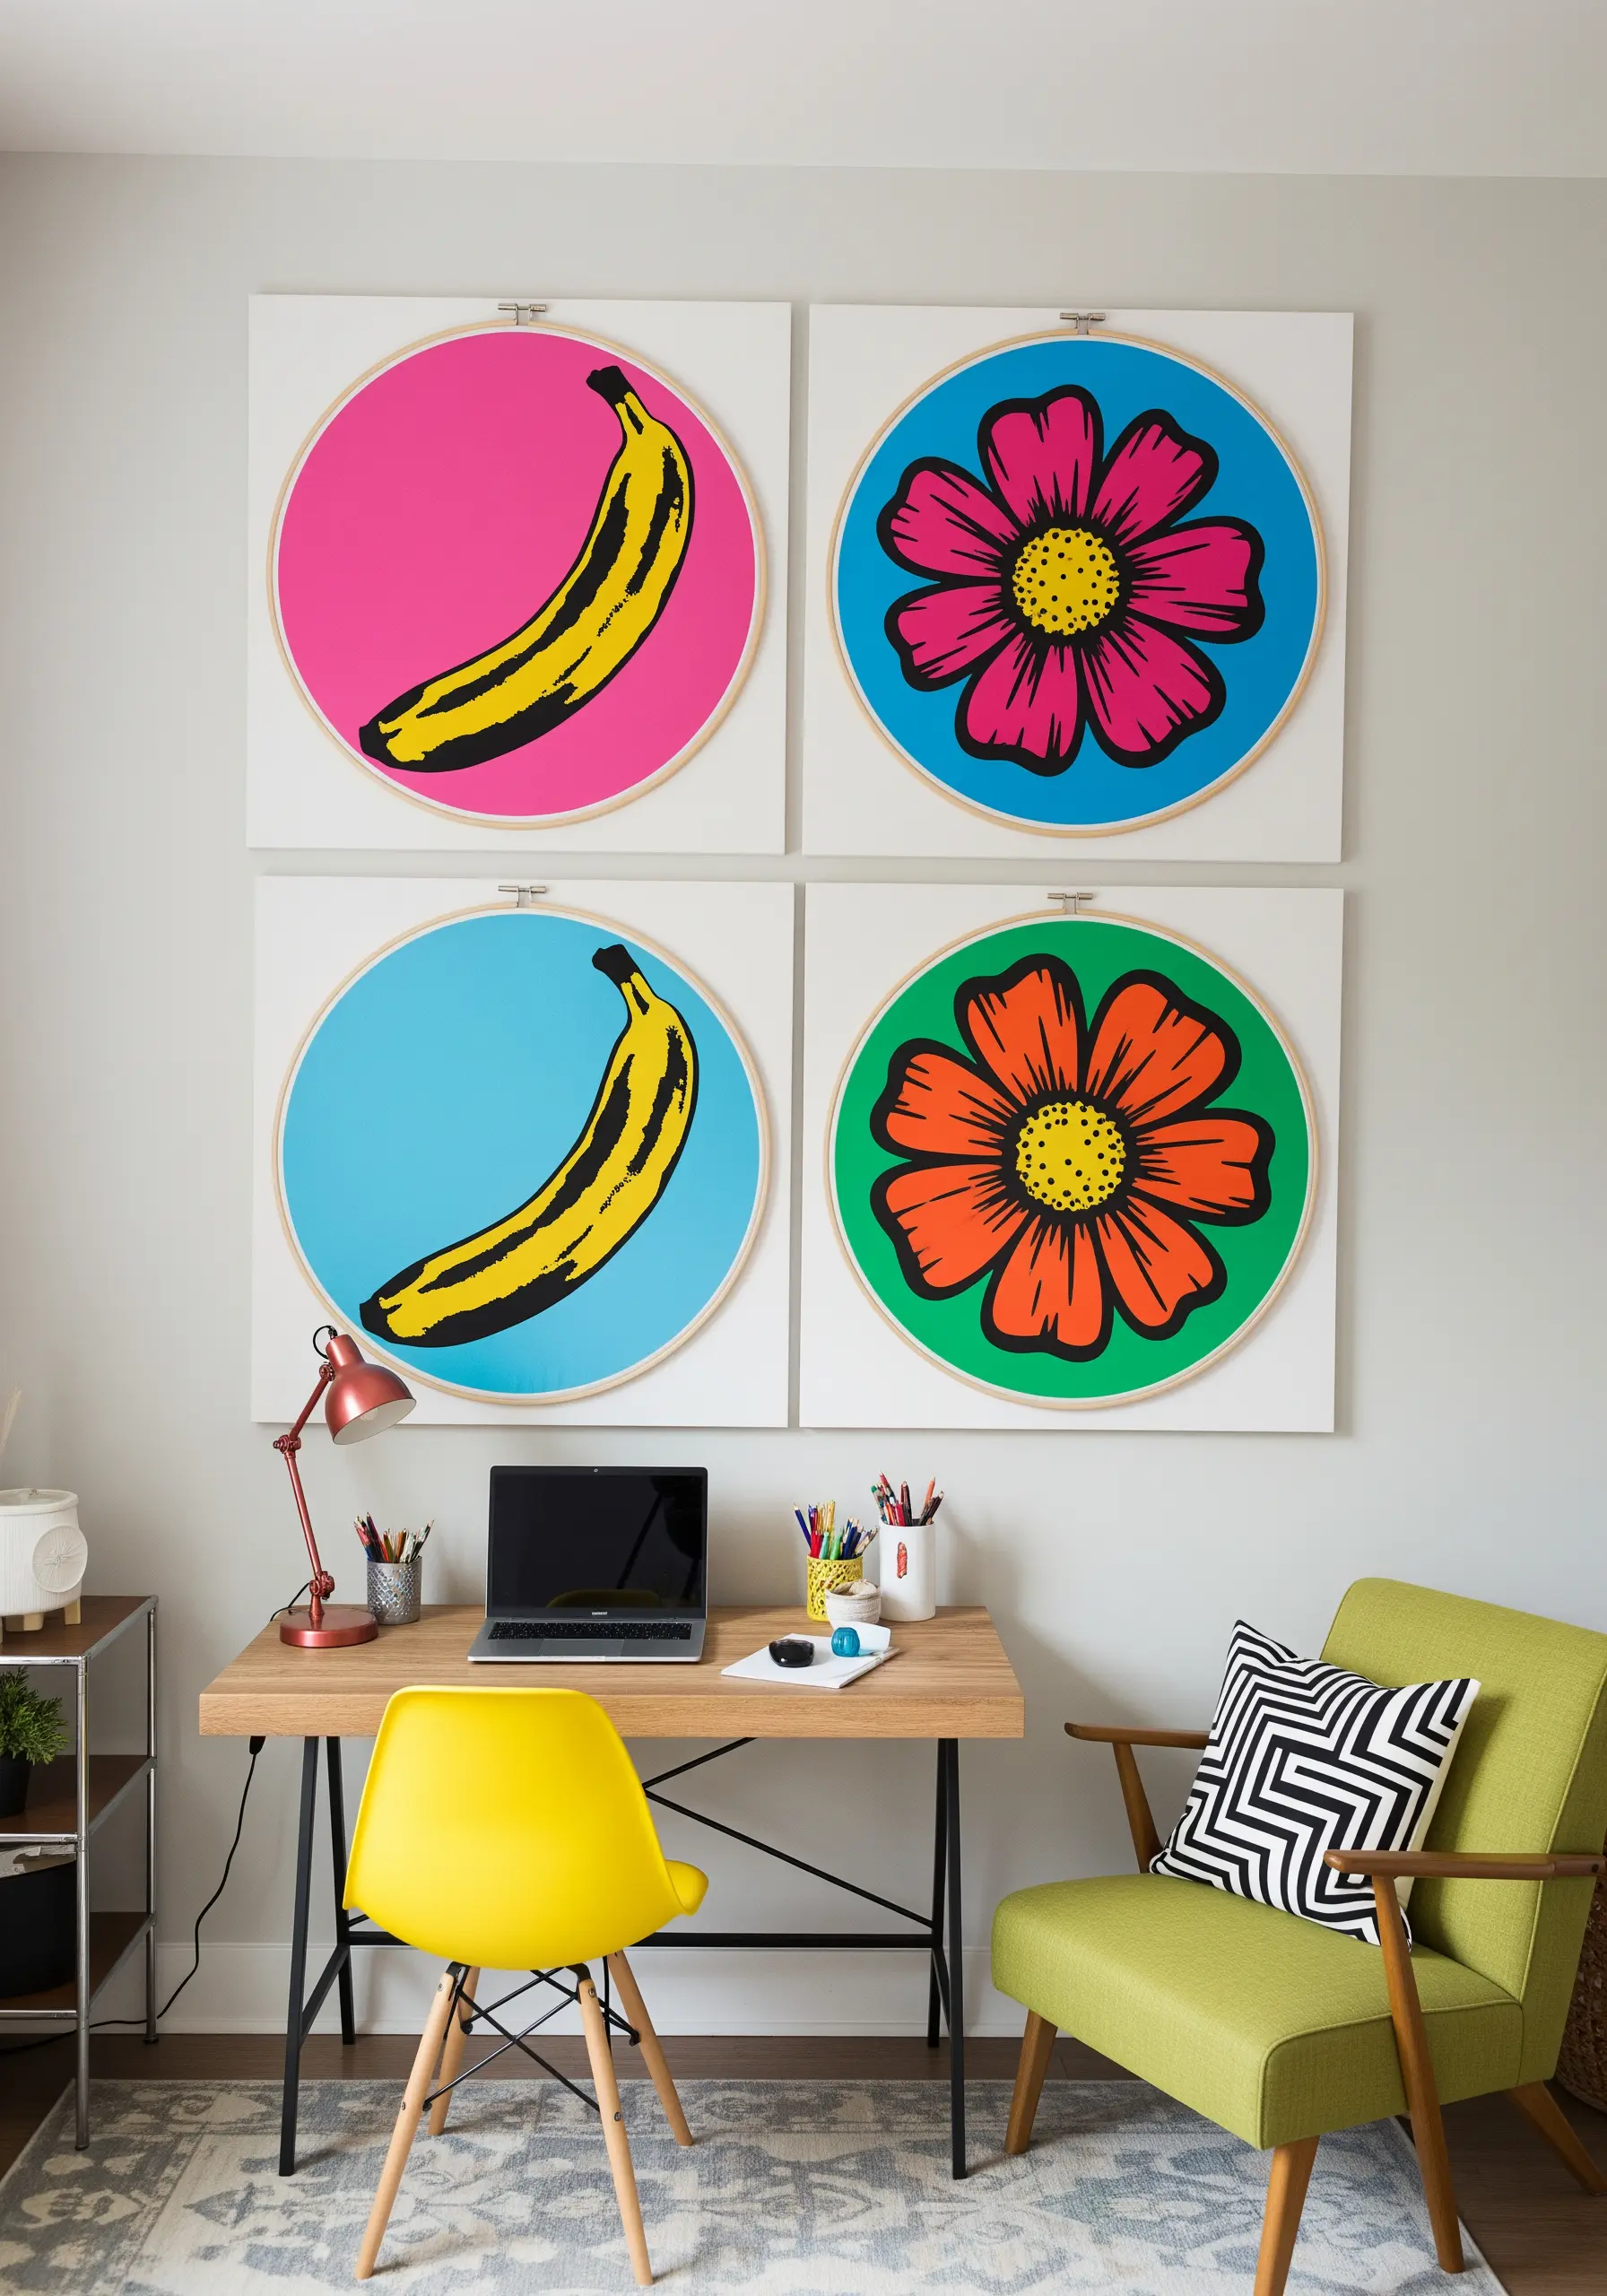
Make a bold statement by mounting four large, vibrant hoops onto square canvases.
This technique bridges the gap between craft and fine art, giving your embroidery a gallery-like presence.
Choose simple, iconic subjects and fill them with intensely saturated color using a dense, smooth satin stitch.
A thick black outline, created with a heavy chain stitch, is essential for achieving that classic pop art definition and creating effective color pop embroidery art ideas.
24. The Panoramic Mountainscape
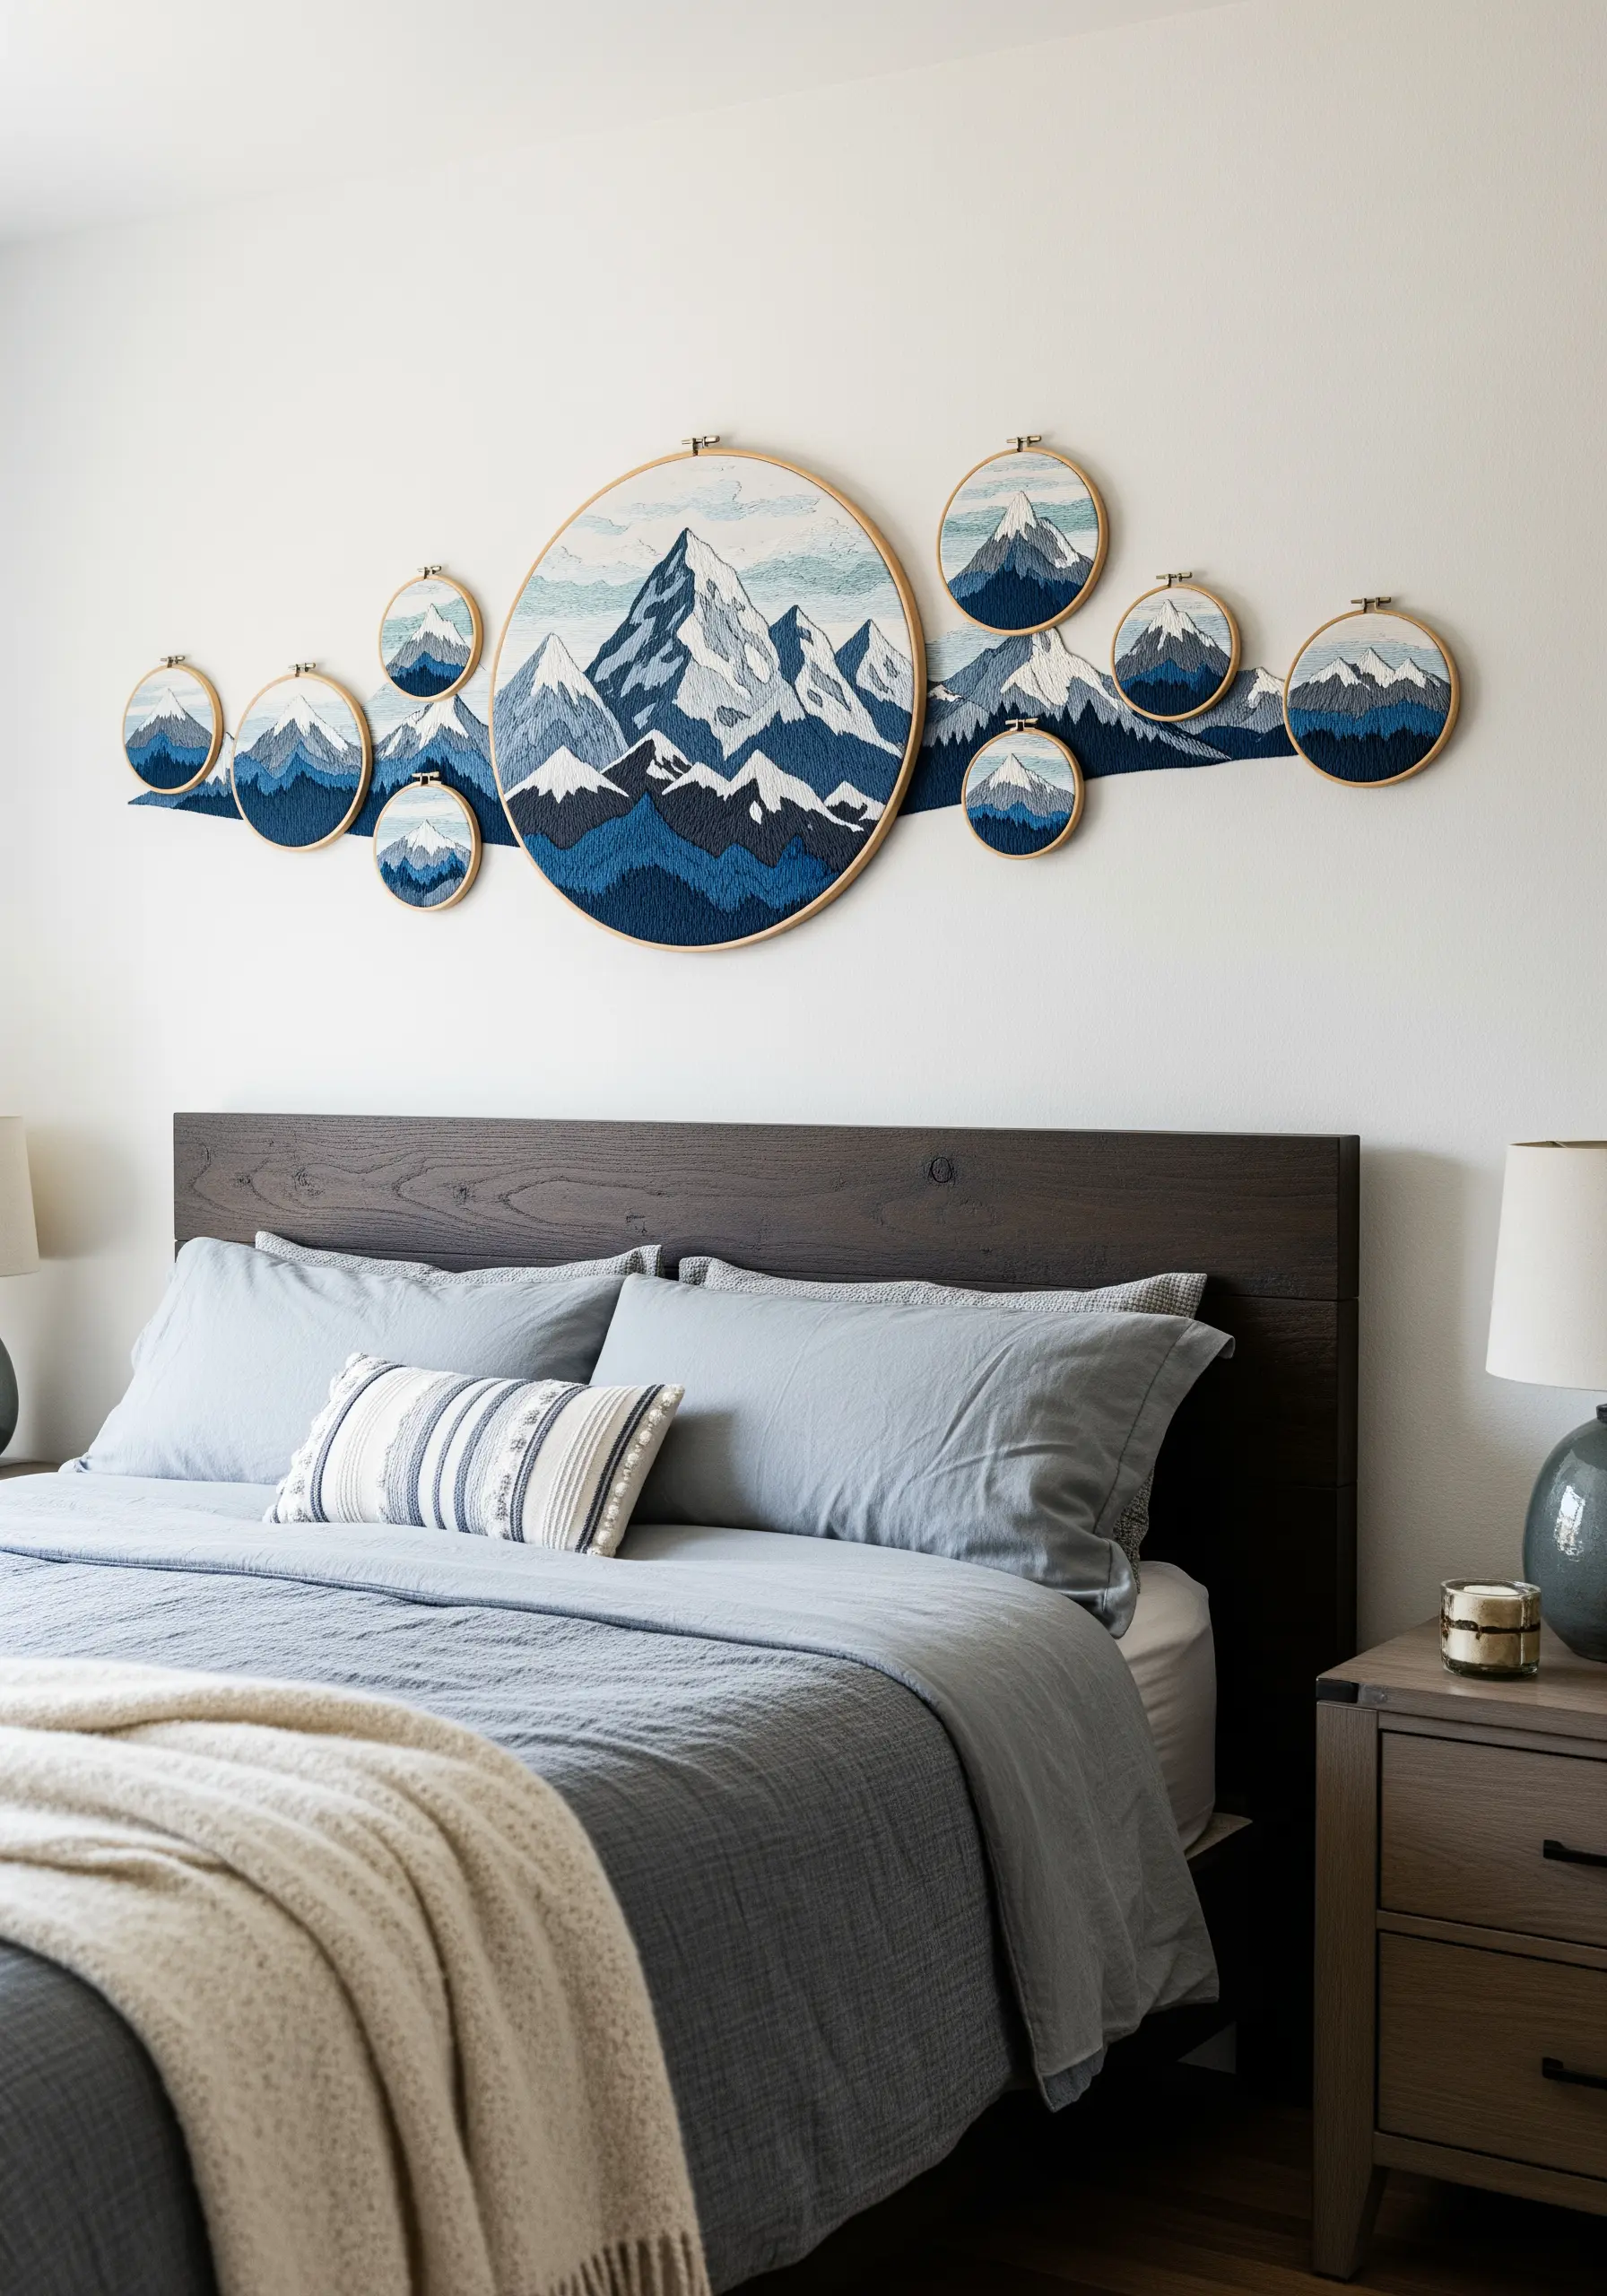
Create a breathtaking panoramic view by stitching a continuous landscape across multiple hoops.
Use a large central hoop for the main peak and smaller flanking hoops for the surrounding ranges.
To achieve depth, use darker threads and denser stitches for the foreground, and lighter threads with simpler stitches for distant peaks.
The fabric itself becomes the sky, unifying the entire scene.
Explore different mountain landscape thread painting techniques to add stunning realism.
25. The Botanical Specimen Grid
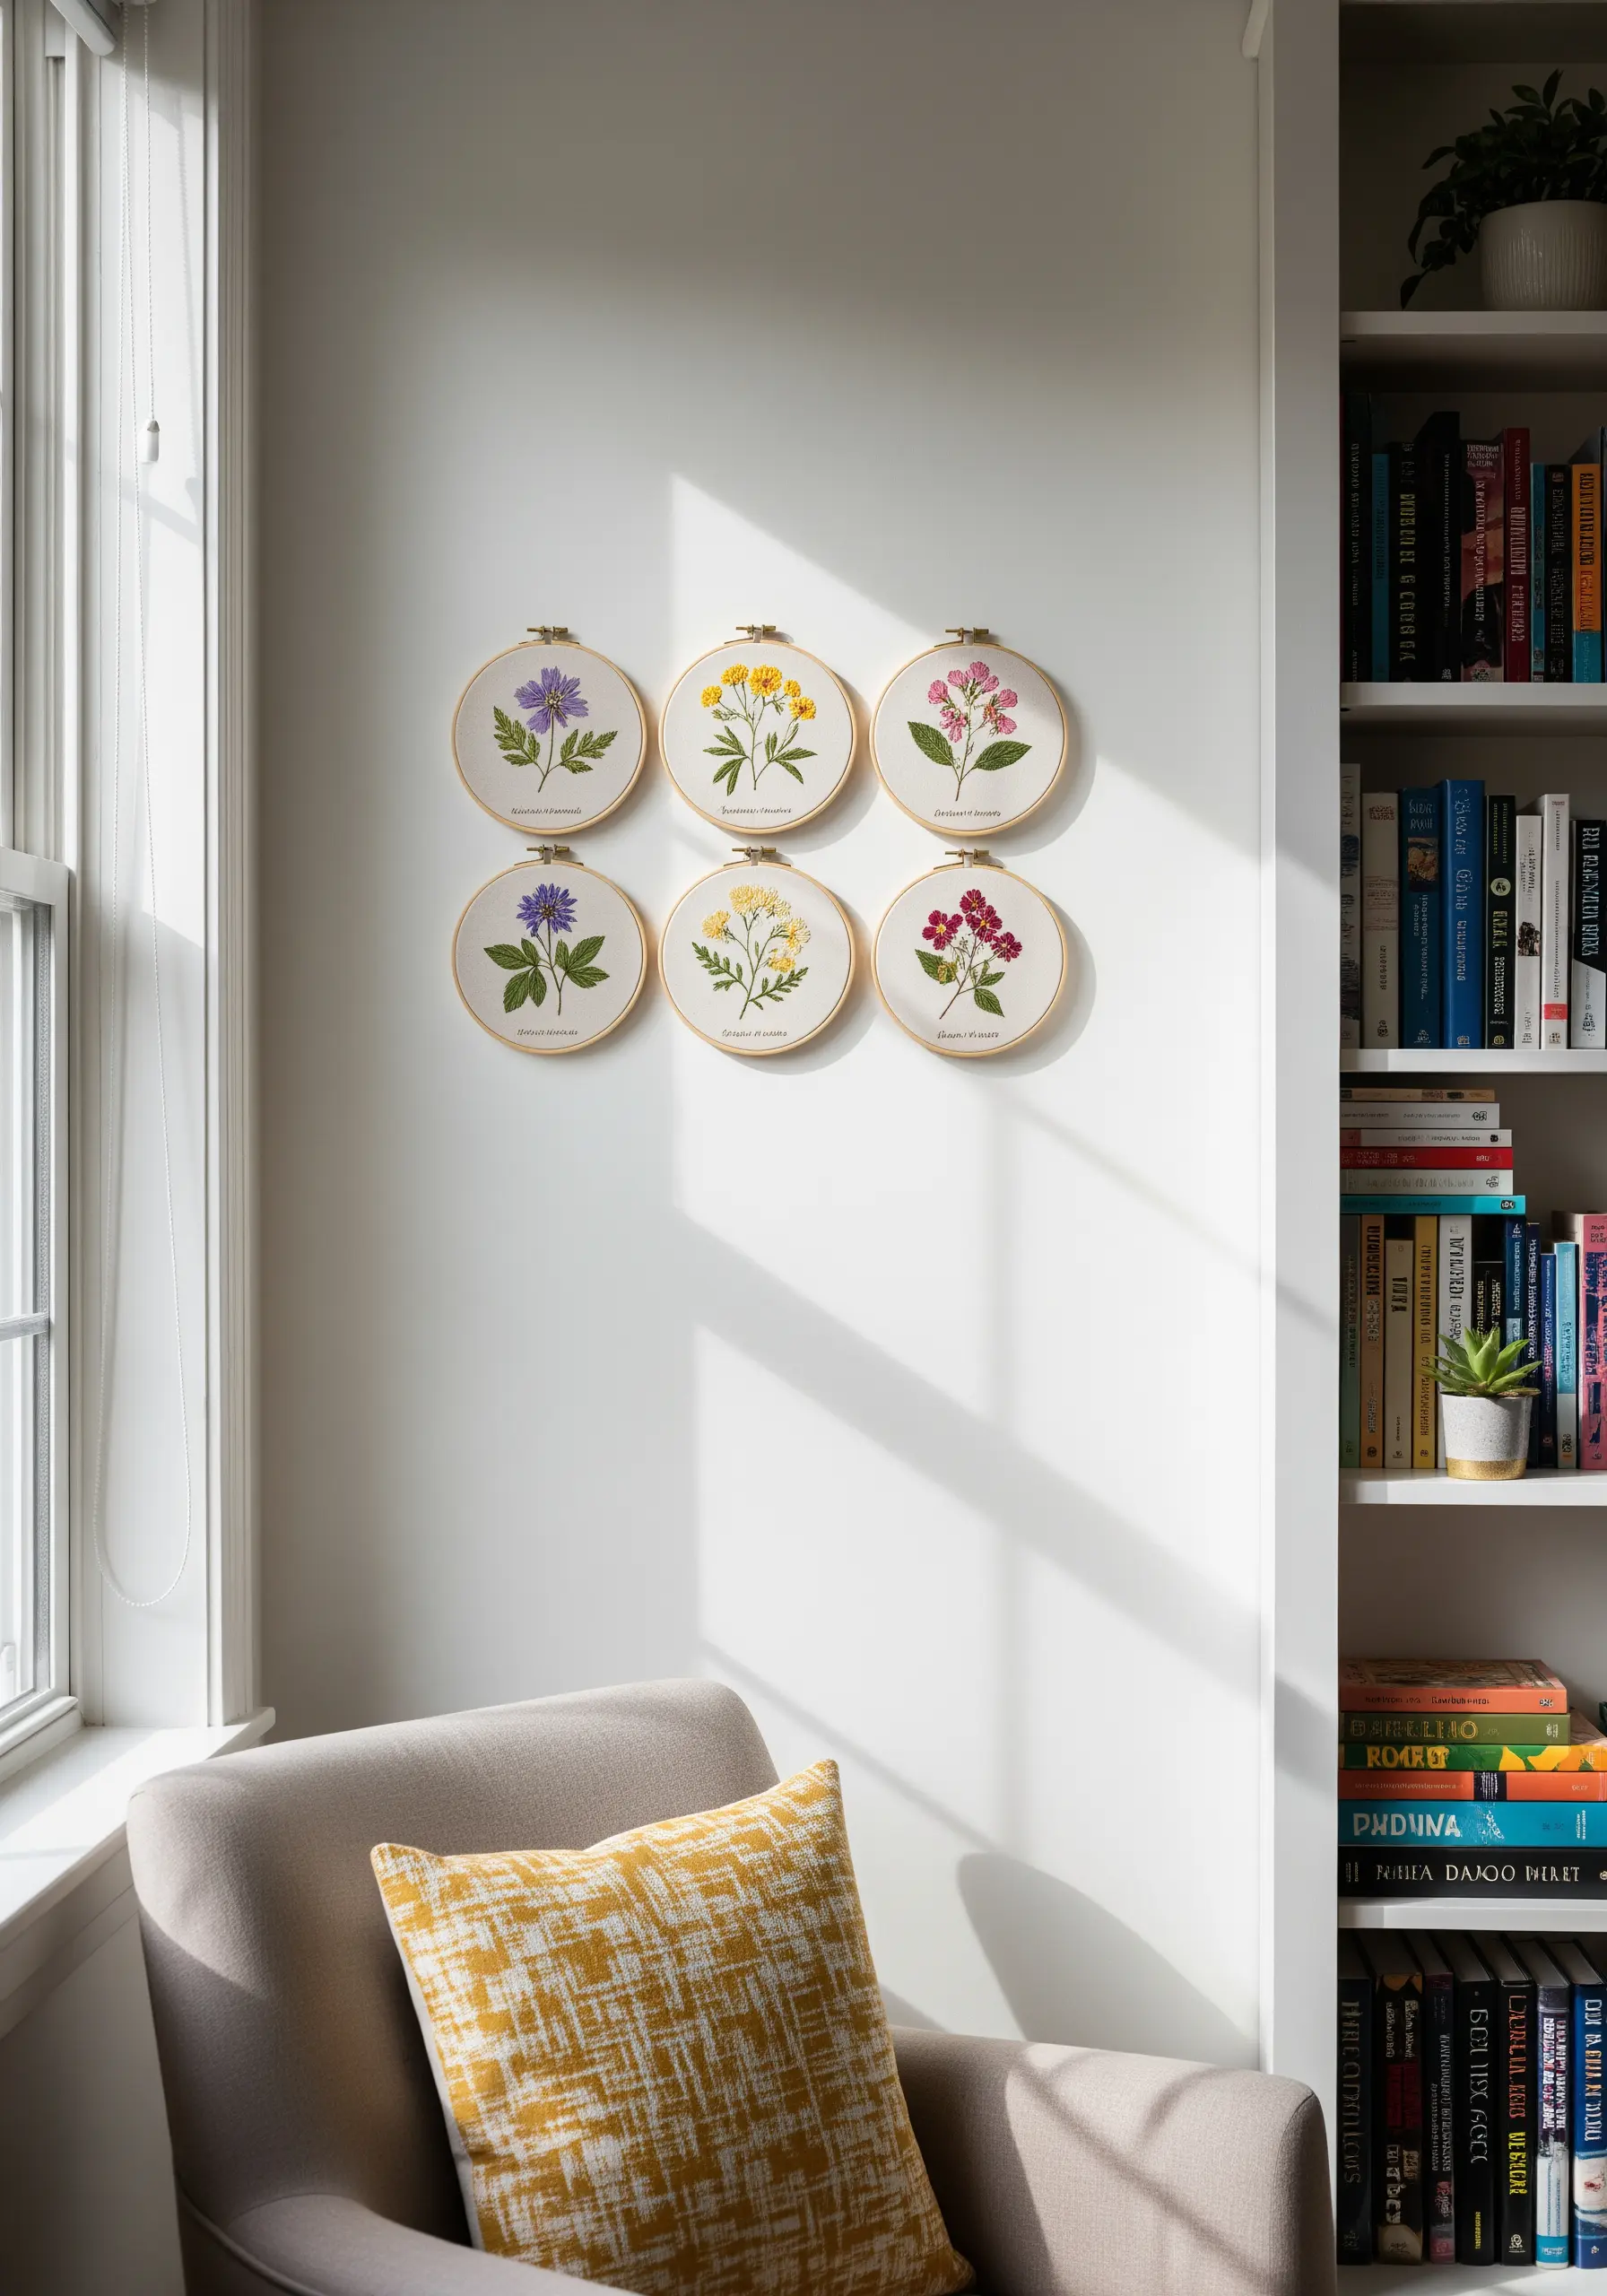
Emulate the look of vintage botanical illustrations by stitching detailed floral specimens in a neat grid.
Use fine, single-strand thread to capture the delicate details of petals and stems.
Add the plant’s scientific name below each one using a tiny backstitch to complete the scholarly aesthetic.
This layout works best with hoops of the same size, turning gentle botanical embroidery stitches into a piece of ordered, scientific art.
26. The Wanderlust Constellation
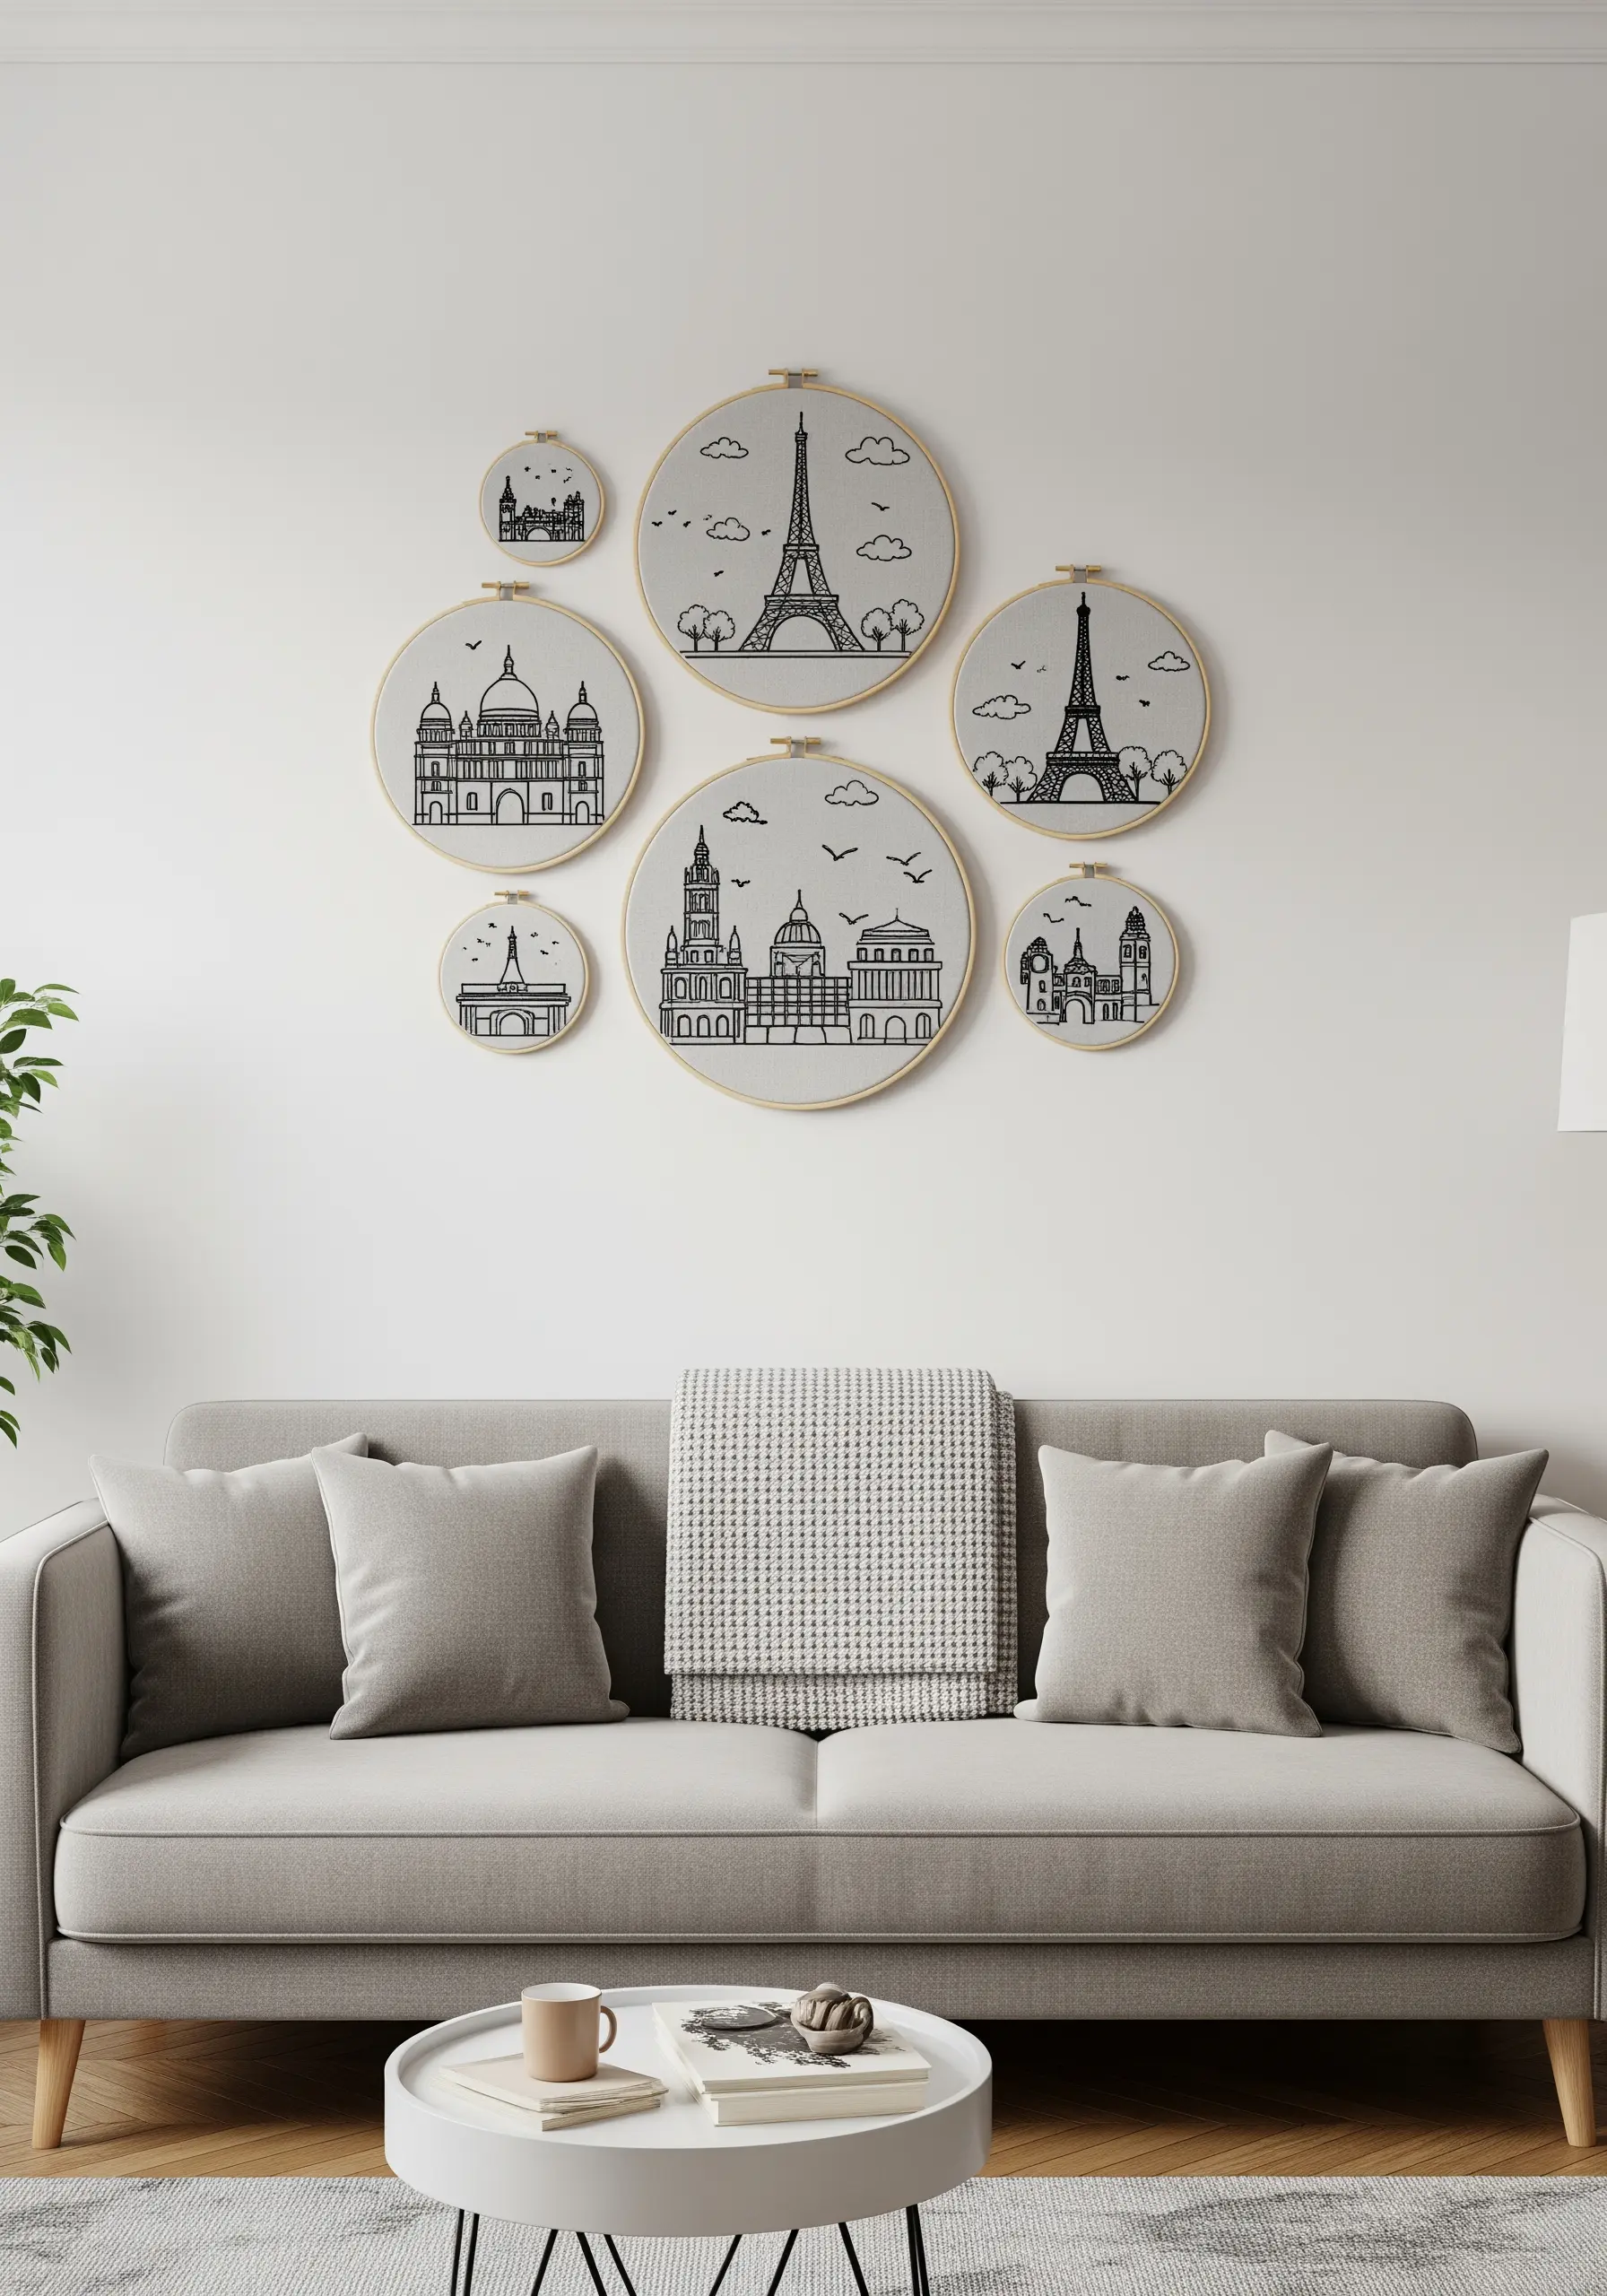
Curate a collection of your favorite travel memories by stitching minimalist cityscapes and landmarks.
Arrange the hoops in a loose, organic cluster that allows you to add more as you travel.
Use a simple backstitch in a single color on neutral linen for a chic, sketchbook feel.
Adding tiny stitched birds connects the individual scenes and transforms minimal travel-themed embroidery ideas into a cohesive story.
27. The Embroidered Family Tree
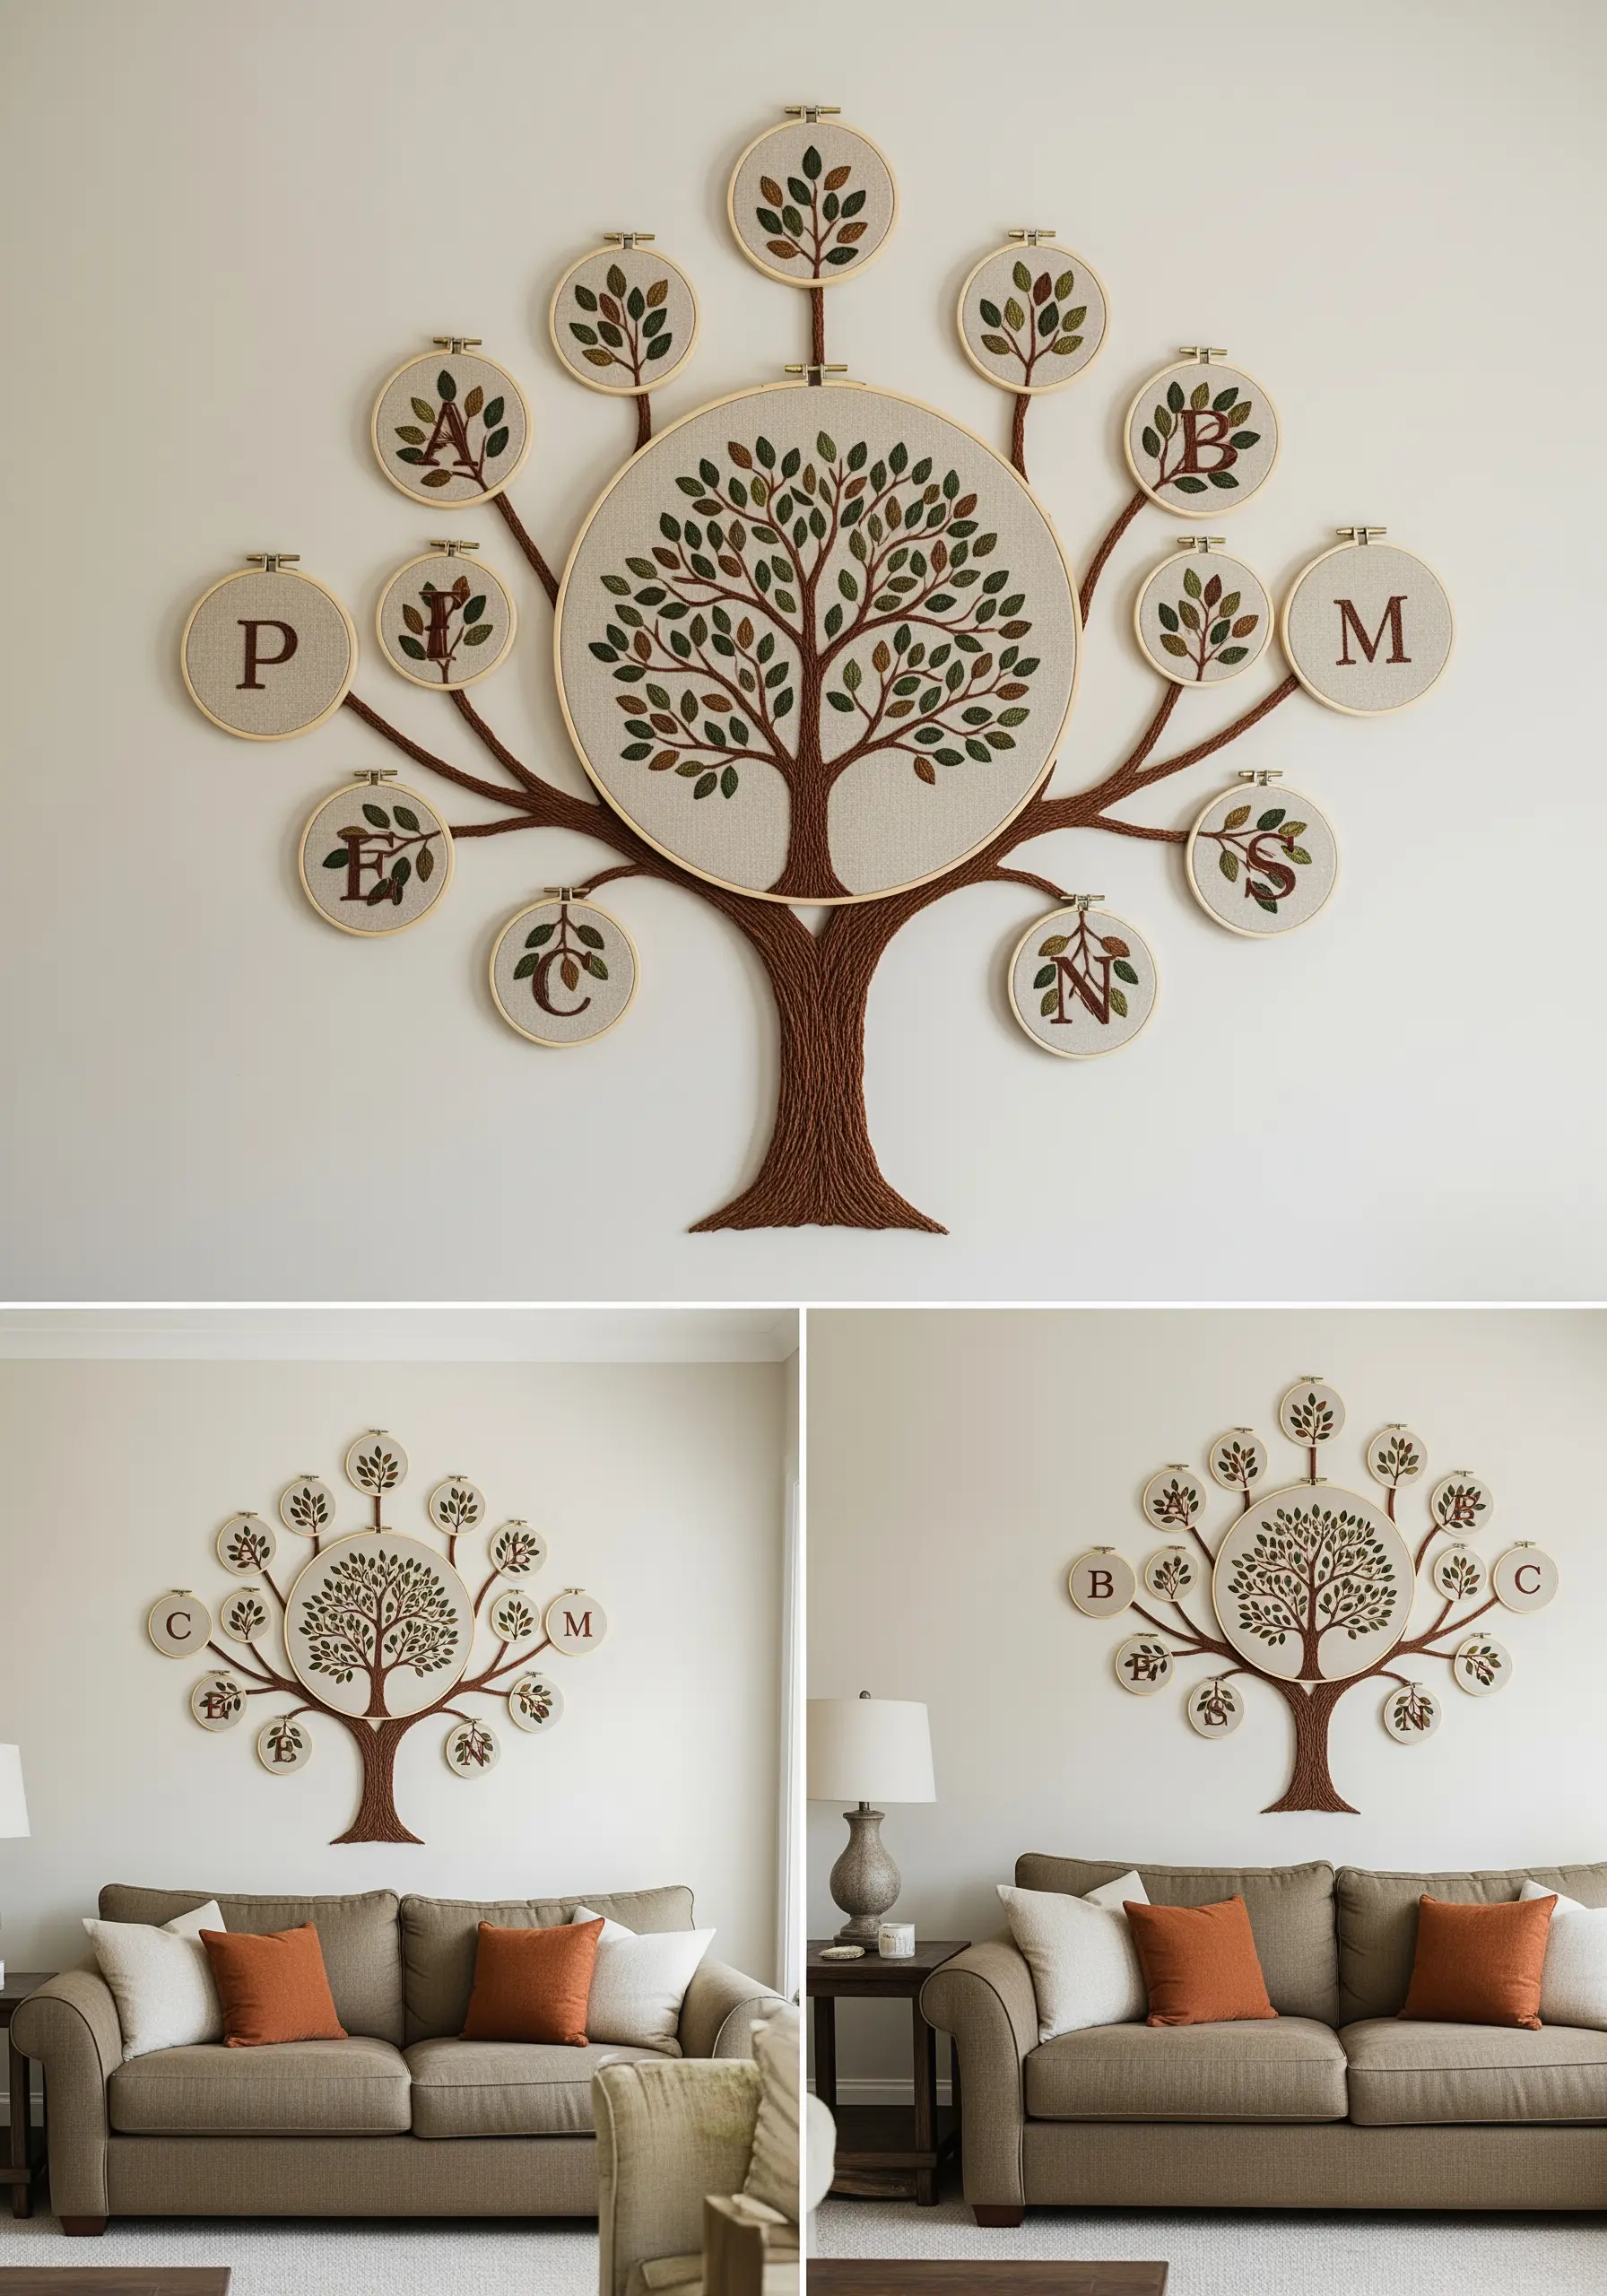
Create a living heirloom by designing a family tree with a large central hoop for the trunk and smaller hoops for each initial.
Use couching stitch with thick yarn or multiple strands of floss to create the textured trunk and branches that physically connect the hoops.
This technique turns a simple display into a sculptural, interconnected piece.
It’s a truly meaningful way to create personalized name & monogram wall embroidery gifts that will be treasured.
28. The Immersive Coral Reef
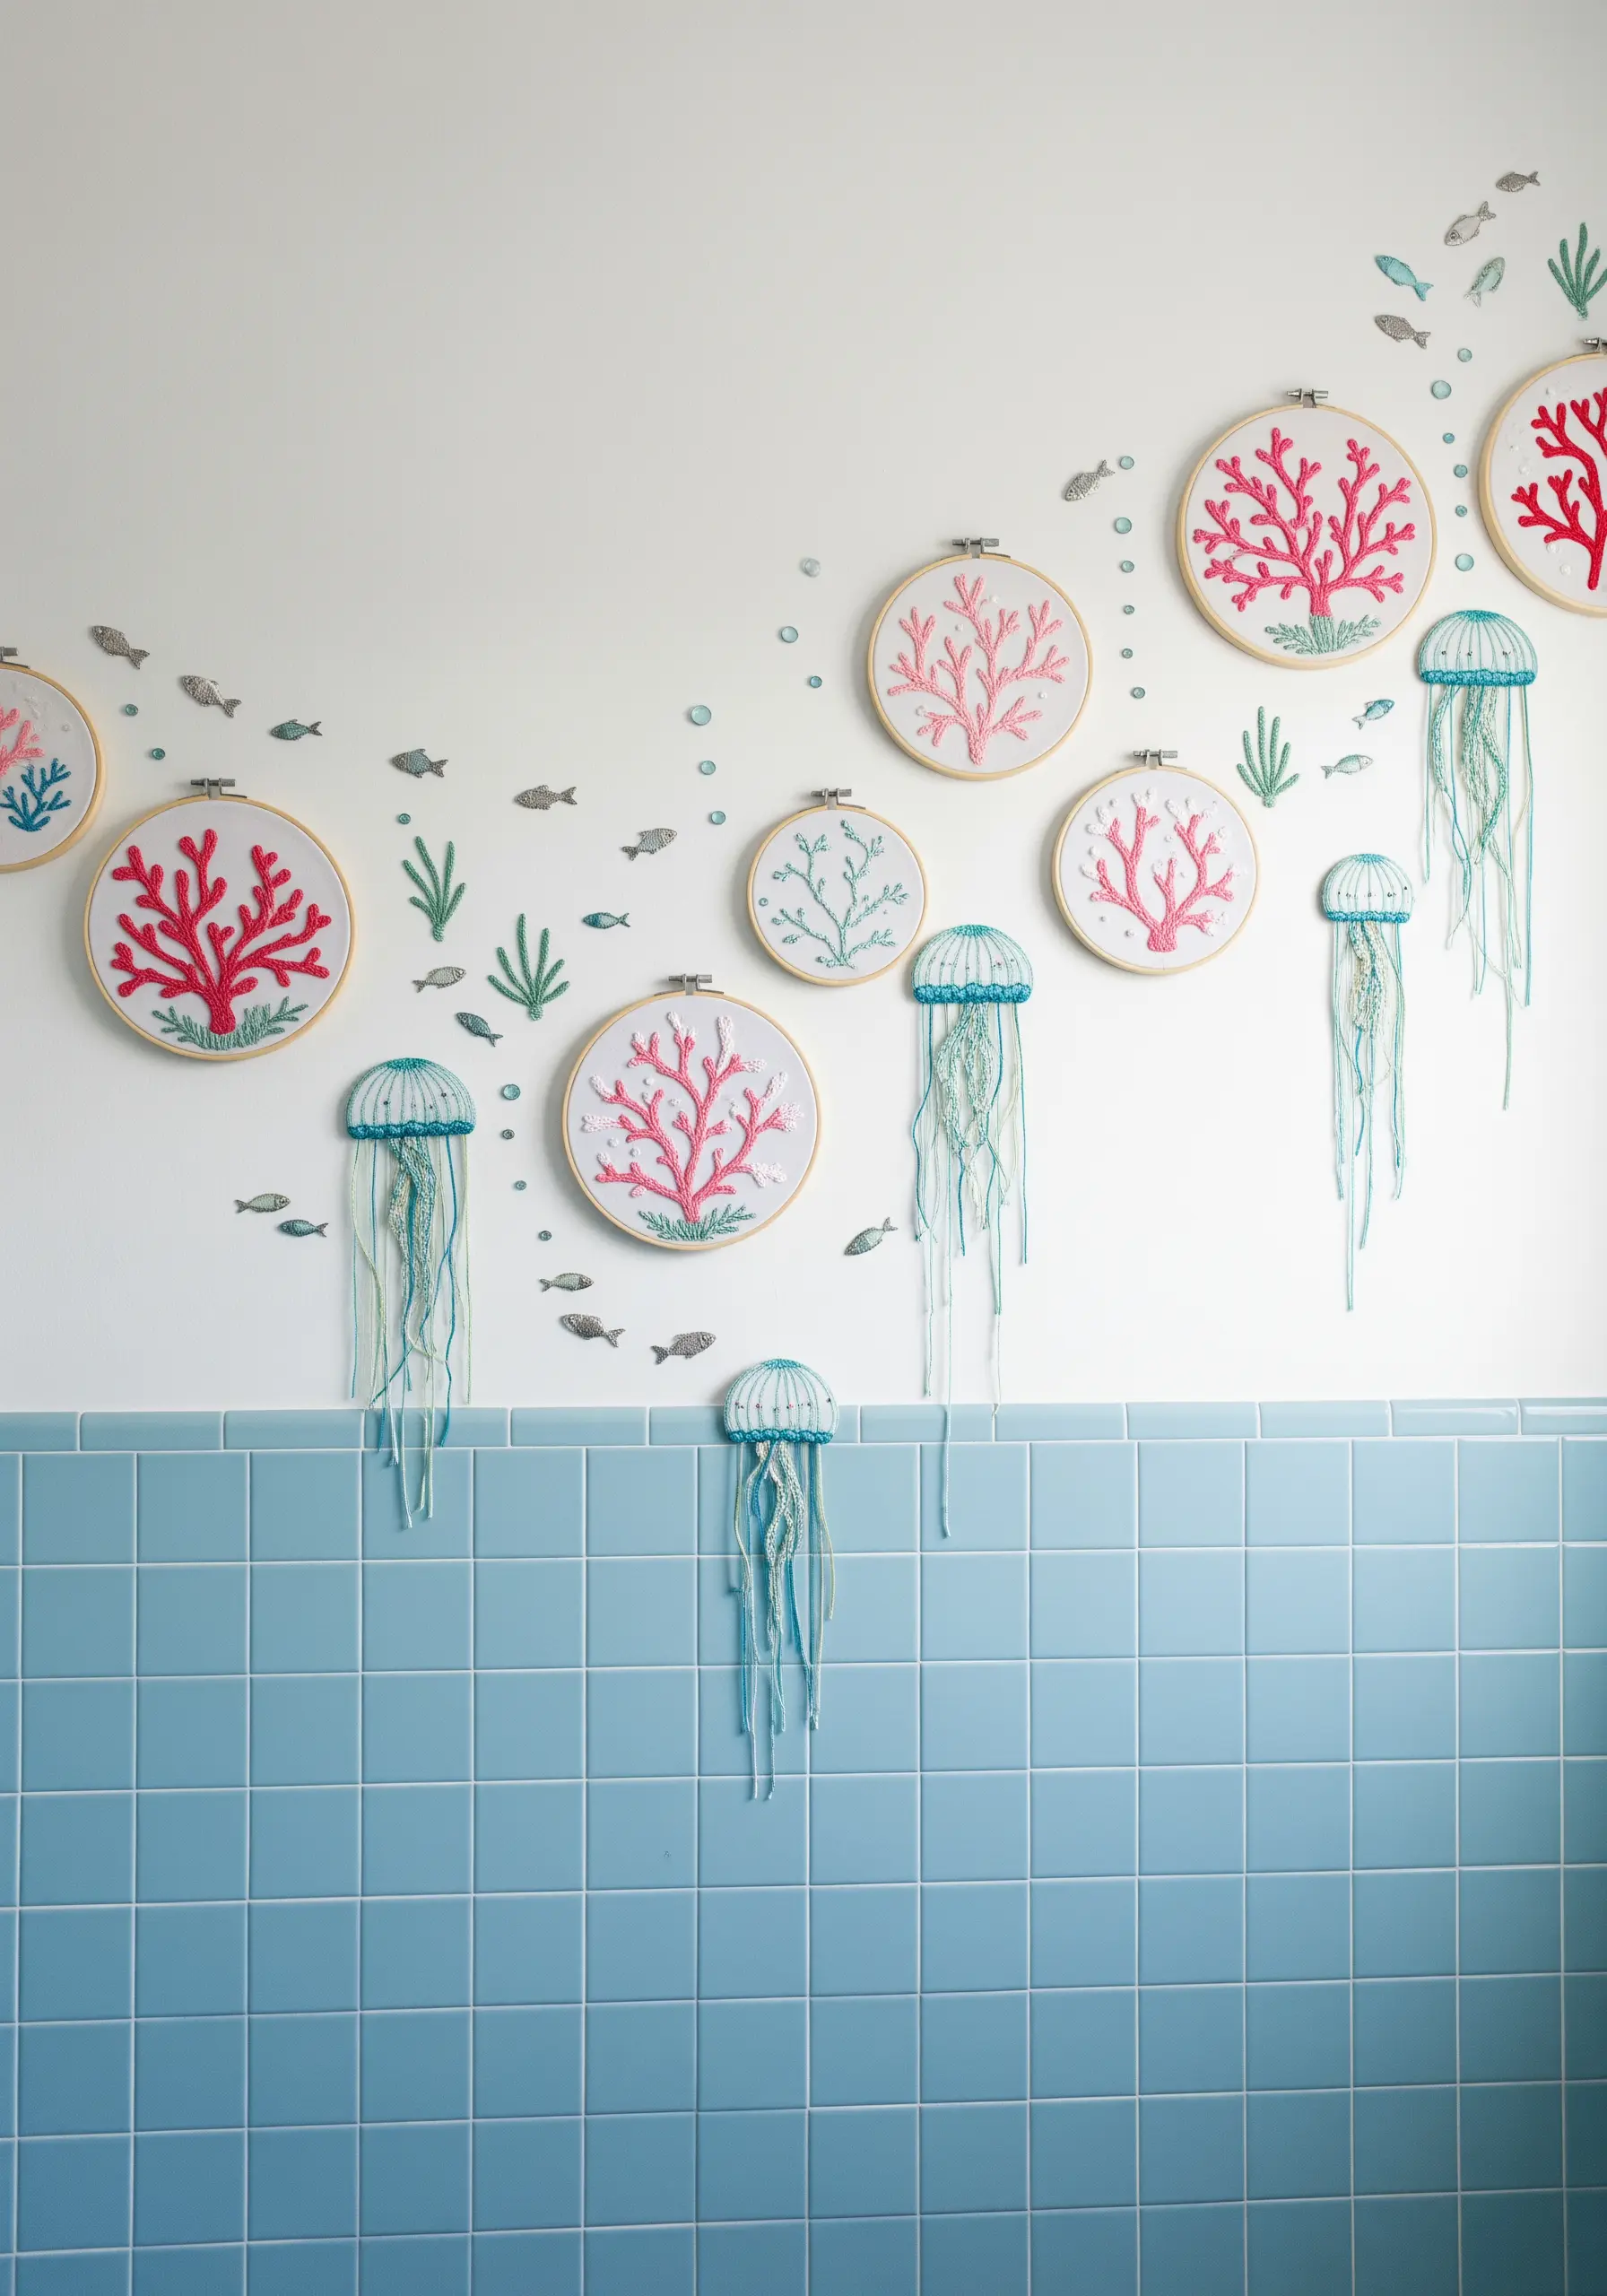
Bring an underwater scene to life by extending your embroidery beyond the hoop.
Stitch vibrant coral in the hoops using French knots and pistil stitches for texture.
For the jellyfish, let the threads of their tentacles hang freely below the hoop, adding movement and a three-dimensional quality.
This is a perfect example of mixed media embroidery wall art techniques, making the scene feel truly immersive.


