

Sometimes, the quiet ritual of stitching is all you need—a cup of tea, the gentle flicker of a candle, and the simple focus of needle and thread. But what if that quiet time could also help you create embroidery that looks more intentional, more polished, and more uniquely you?
It’s not about learning dozens of complex stitches or buying expensive new materials. It’s about making small, intelligent adjustments to the techniques you already know—like changing the direction of a stitch to catch the light, or using a different number of threads to create a sense of depth.
Here, you’ll find seventeen ways to refine your craft. Think of them not as rules, but as gentle suggestions to help you see your work in a new light. Each one is a small step toward making embroidery that feels as good to create as it does to display.
1. Render Botanicals with Dimensional Stitches
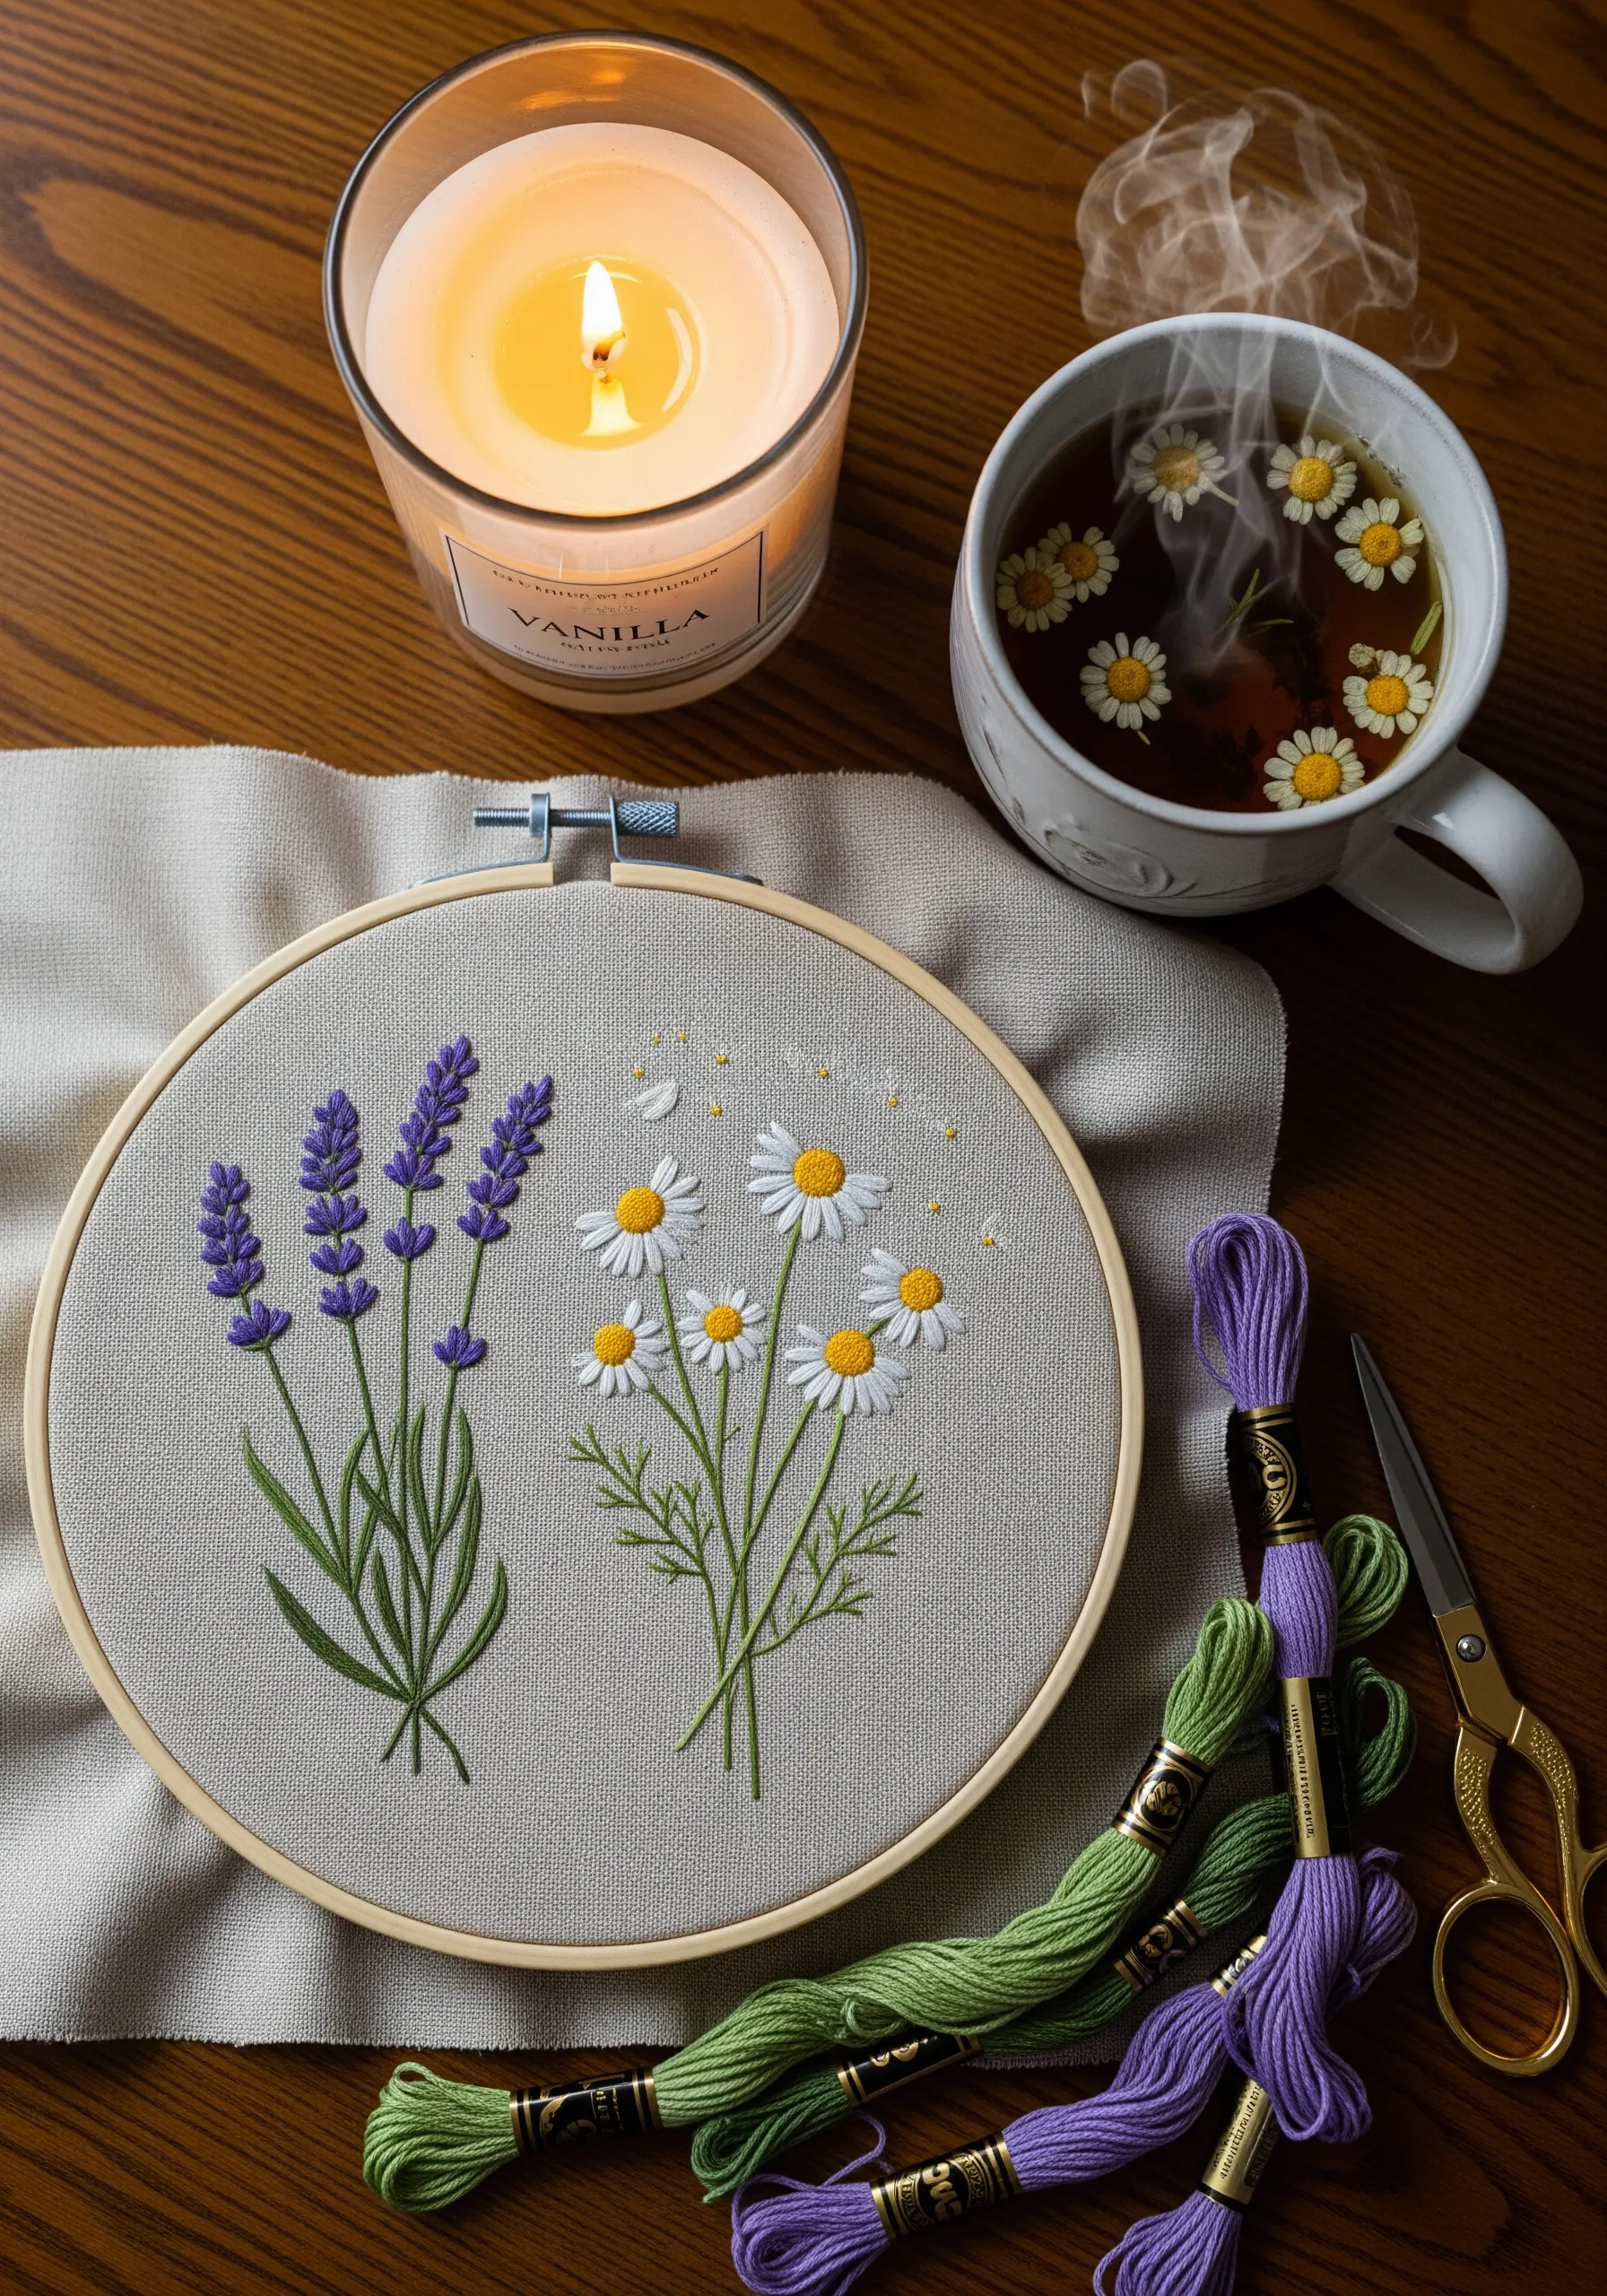
Give your lavender stalks a plush, three-dimensional feel by using padded satin stitch for each floret; this involves creating a small satin-stitched base before covering it with your final stitches.
For the chamomile petals, shift from a flat satin stitch to a long-and-short stitch to create subtle color gradients that mimic how light hits real flowers.
A sprinkle of tiny French knots in a contrasting yellow-gold thread suggests fallen pollen, adding a layer of delicate realism to your composition.
These simple nature-inspired patterns gain sophistication through texture, not complexity, making the final piece feel both serene and expertly crafted.
2. Combine Quilting and Appliqué for a Tactile Scene

Instead of drawing a scene, build it with fabric scraps using the art of appliqué.
Cut out your house and roof shapes from patterned fabric and secure them with a fusible web before stitching the edges with a neat blanket stitch for a clean, handcrafted border.
The magic is in the quilting—use a simple running stitch in a contrasting thread to outline the scene and add details like window panes.
This quilting adds a soft, pillowy dimension that turns a flat image into a cozy, touchable piece of textile art.
3. Master Insect Wings with Sheer Stitches
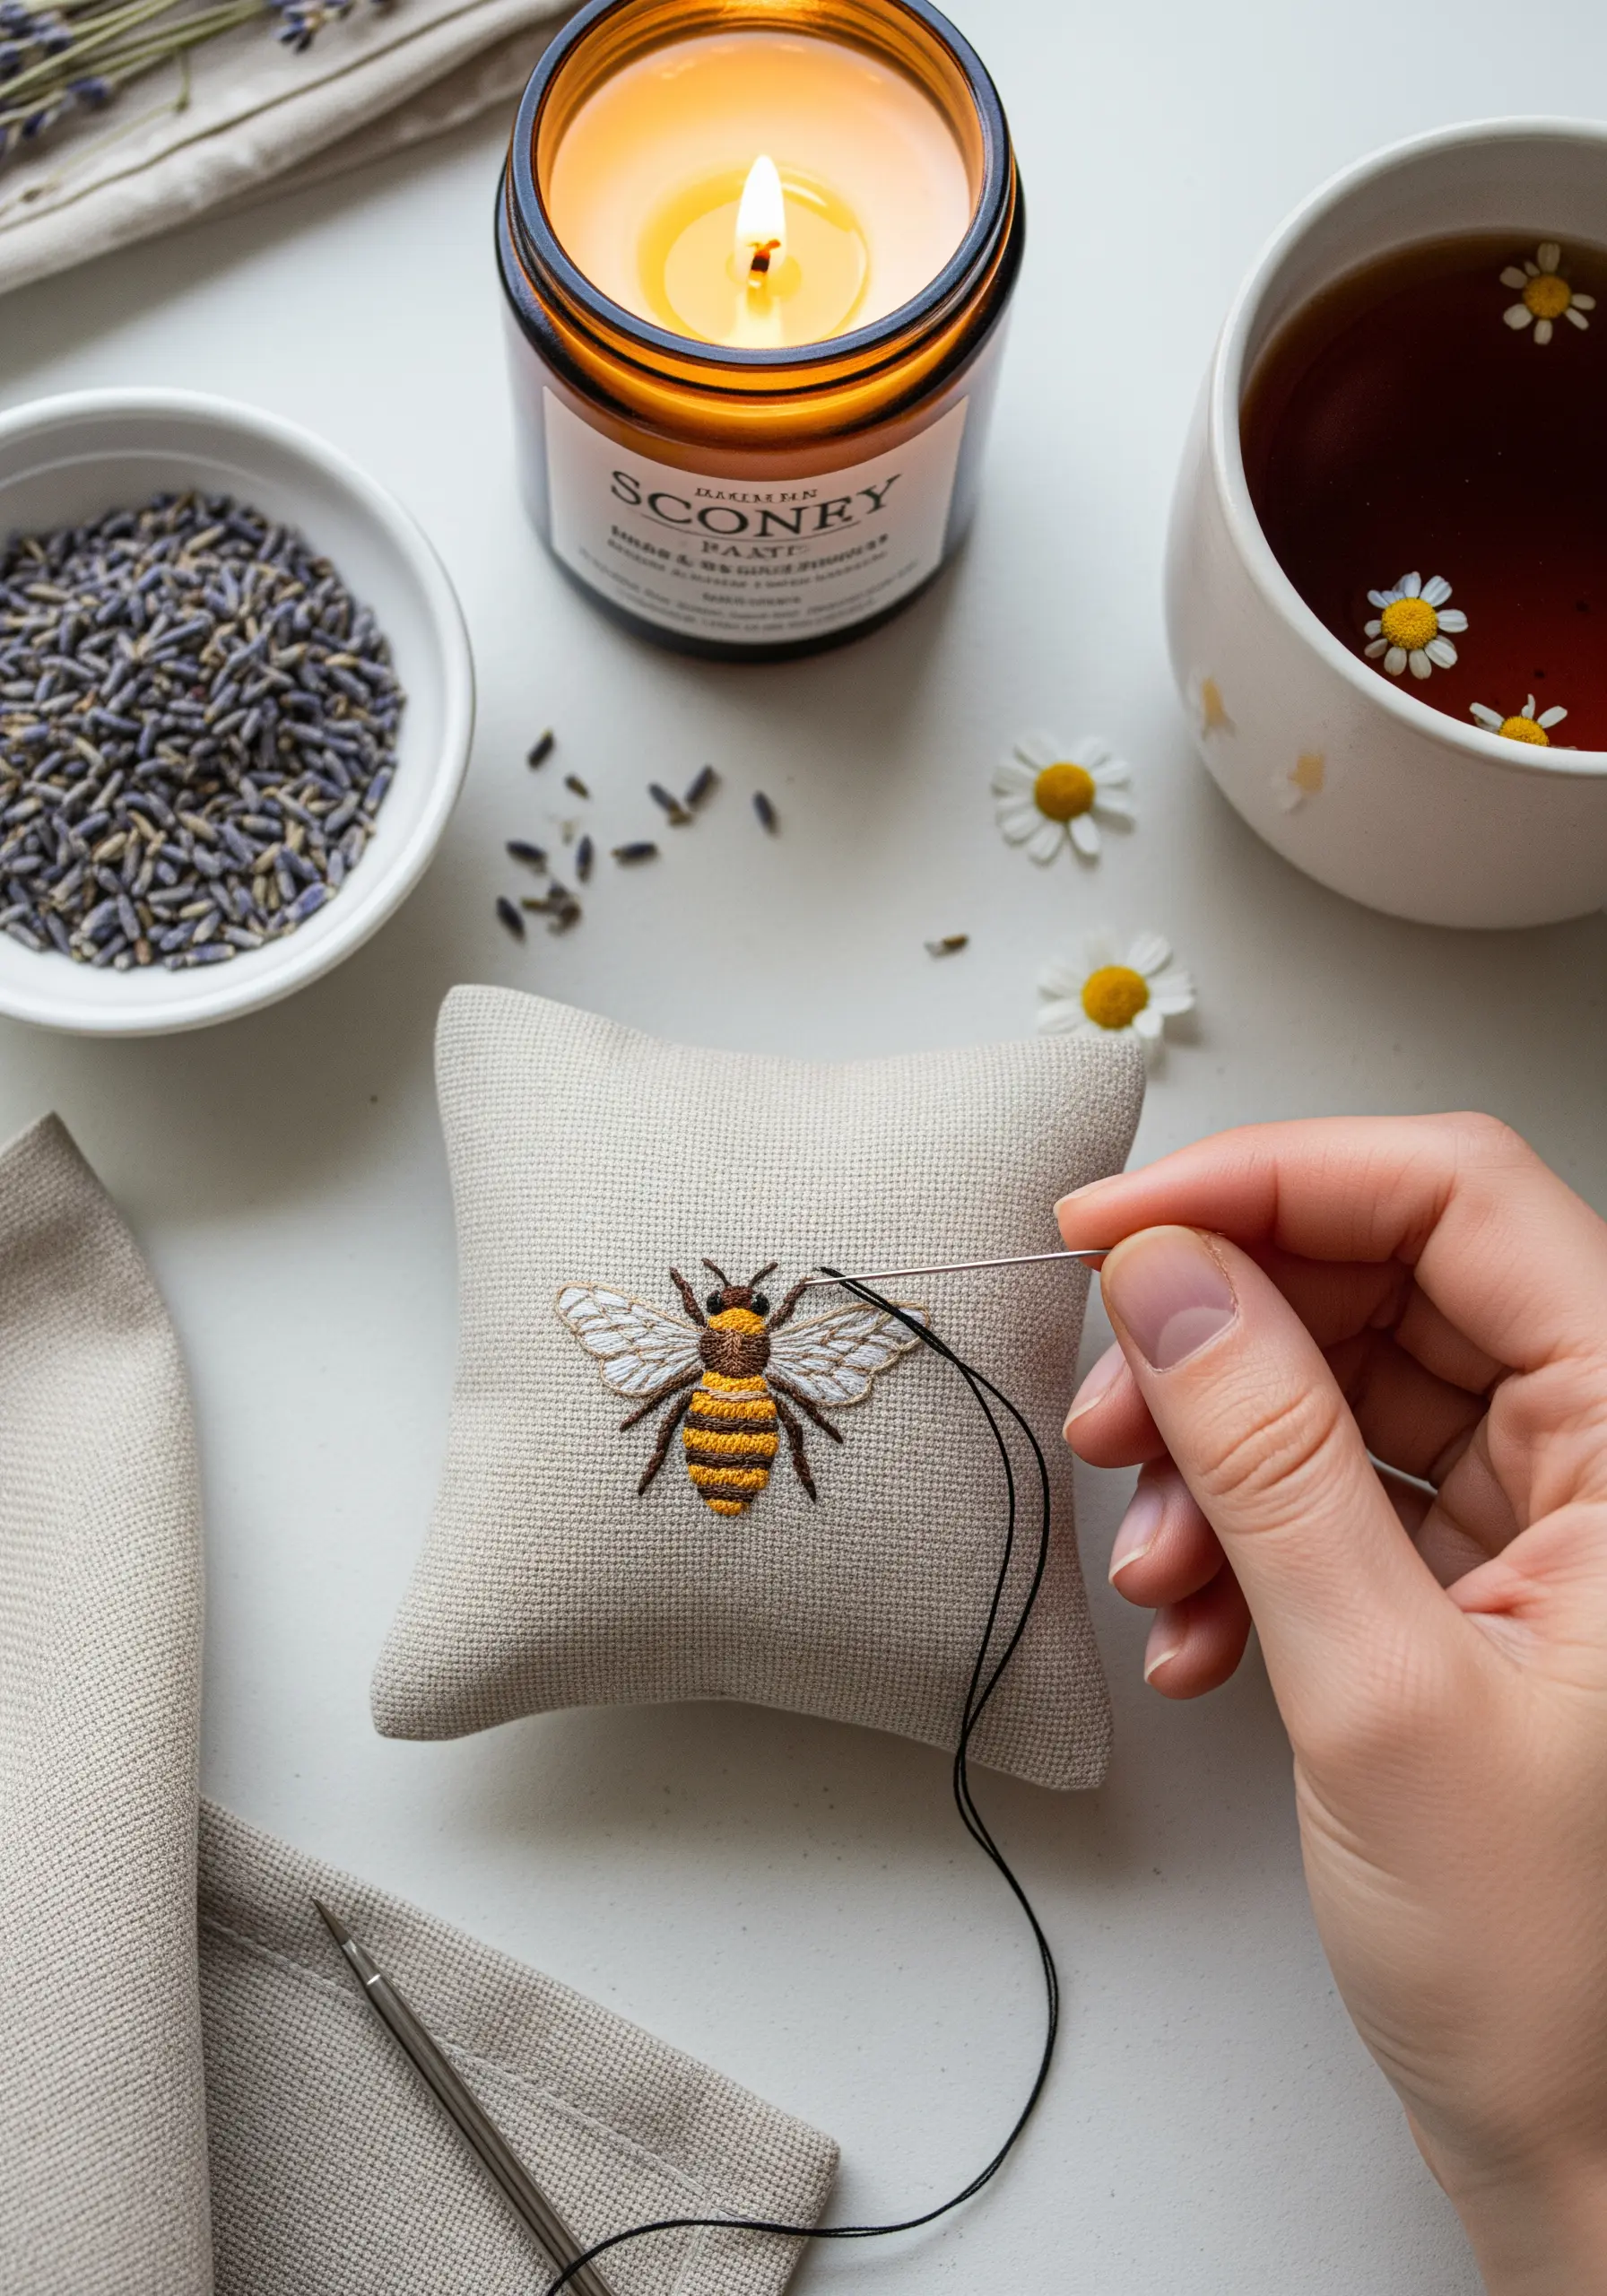
Create the illusion of translucent bee wings using a single strand of gray or off-white thread on a light linen fabric.
Work an open fishbone stitch or use laid work, where you create a sparse framework of stitches rather than a dense fill.
This technique allows the background fabric to show through, perfectly mimicking the delicate transparency of real wings.
Contrast this with a densely filled satin stitch for the body, where alternating the stitch direction for each stripe creates a subtle sheen that defines its form.
These are perfect for mini embroidery projects that require a touch of refined detail.
4. Paint with Thread Using Needlepoint Gradients
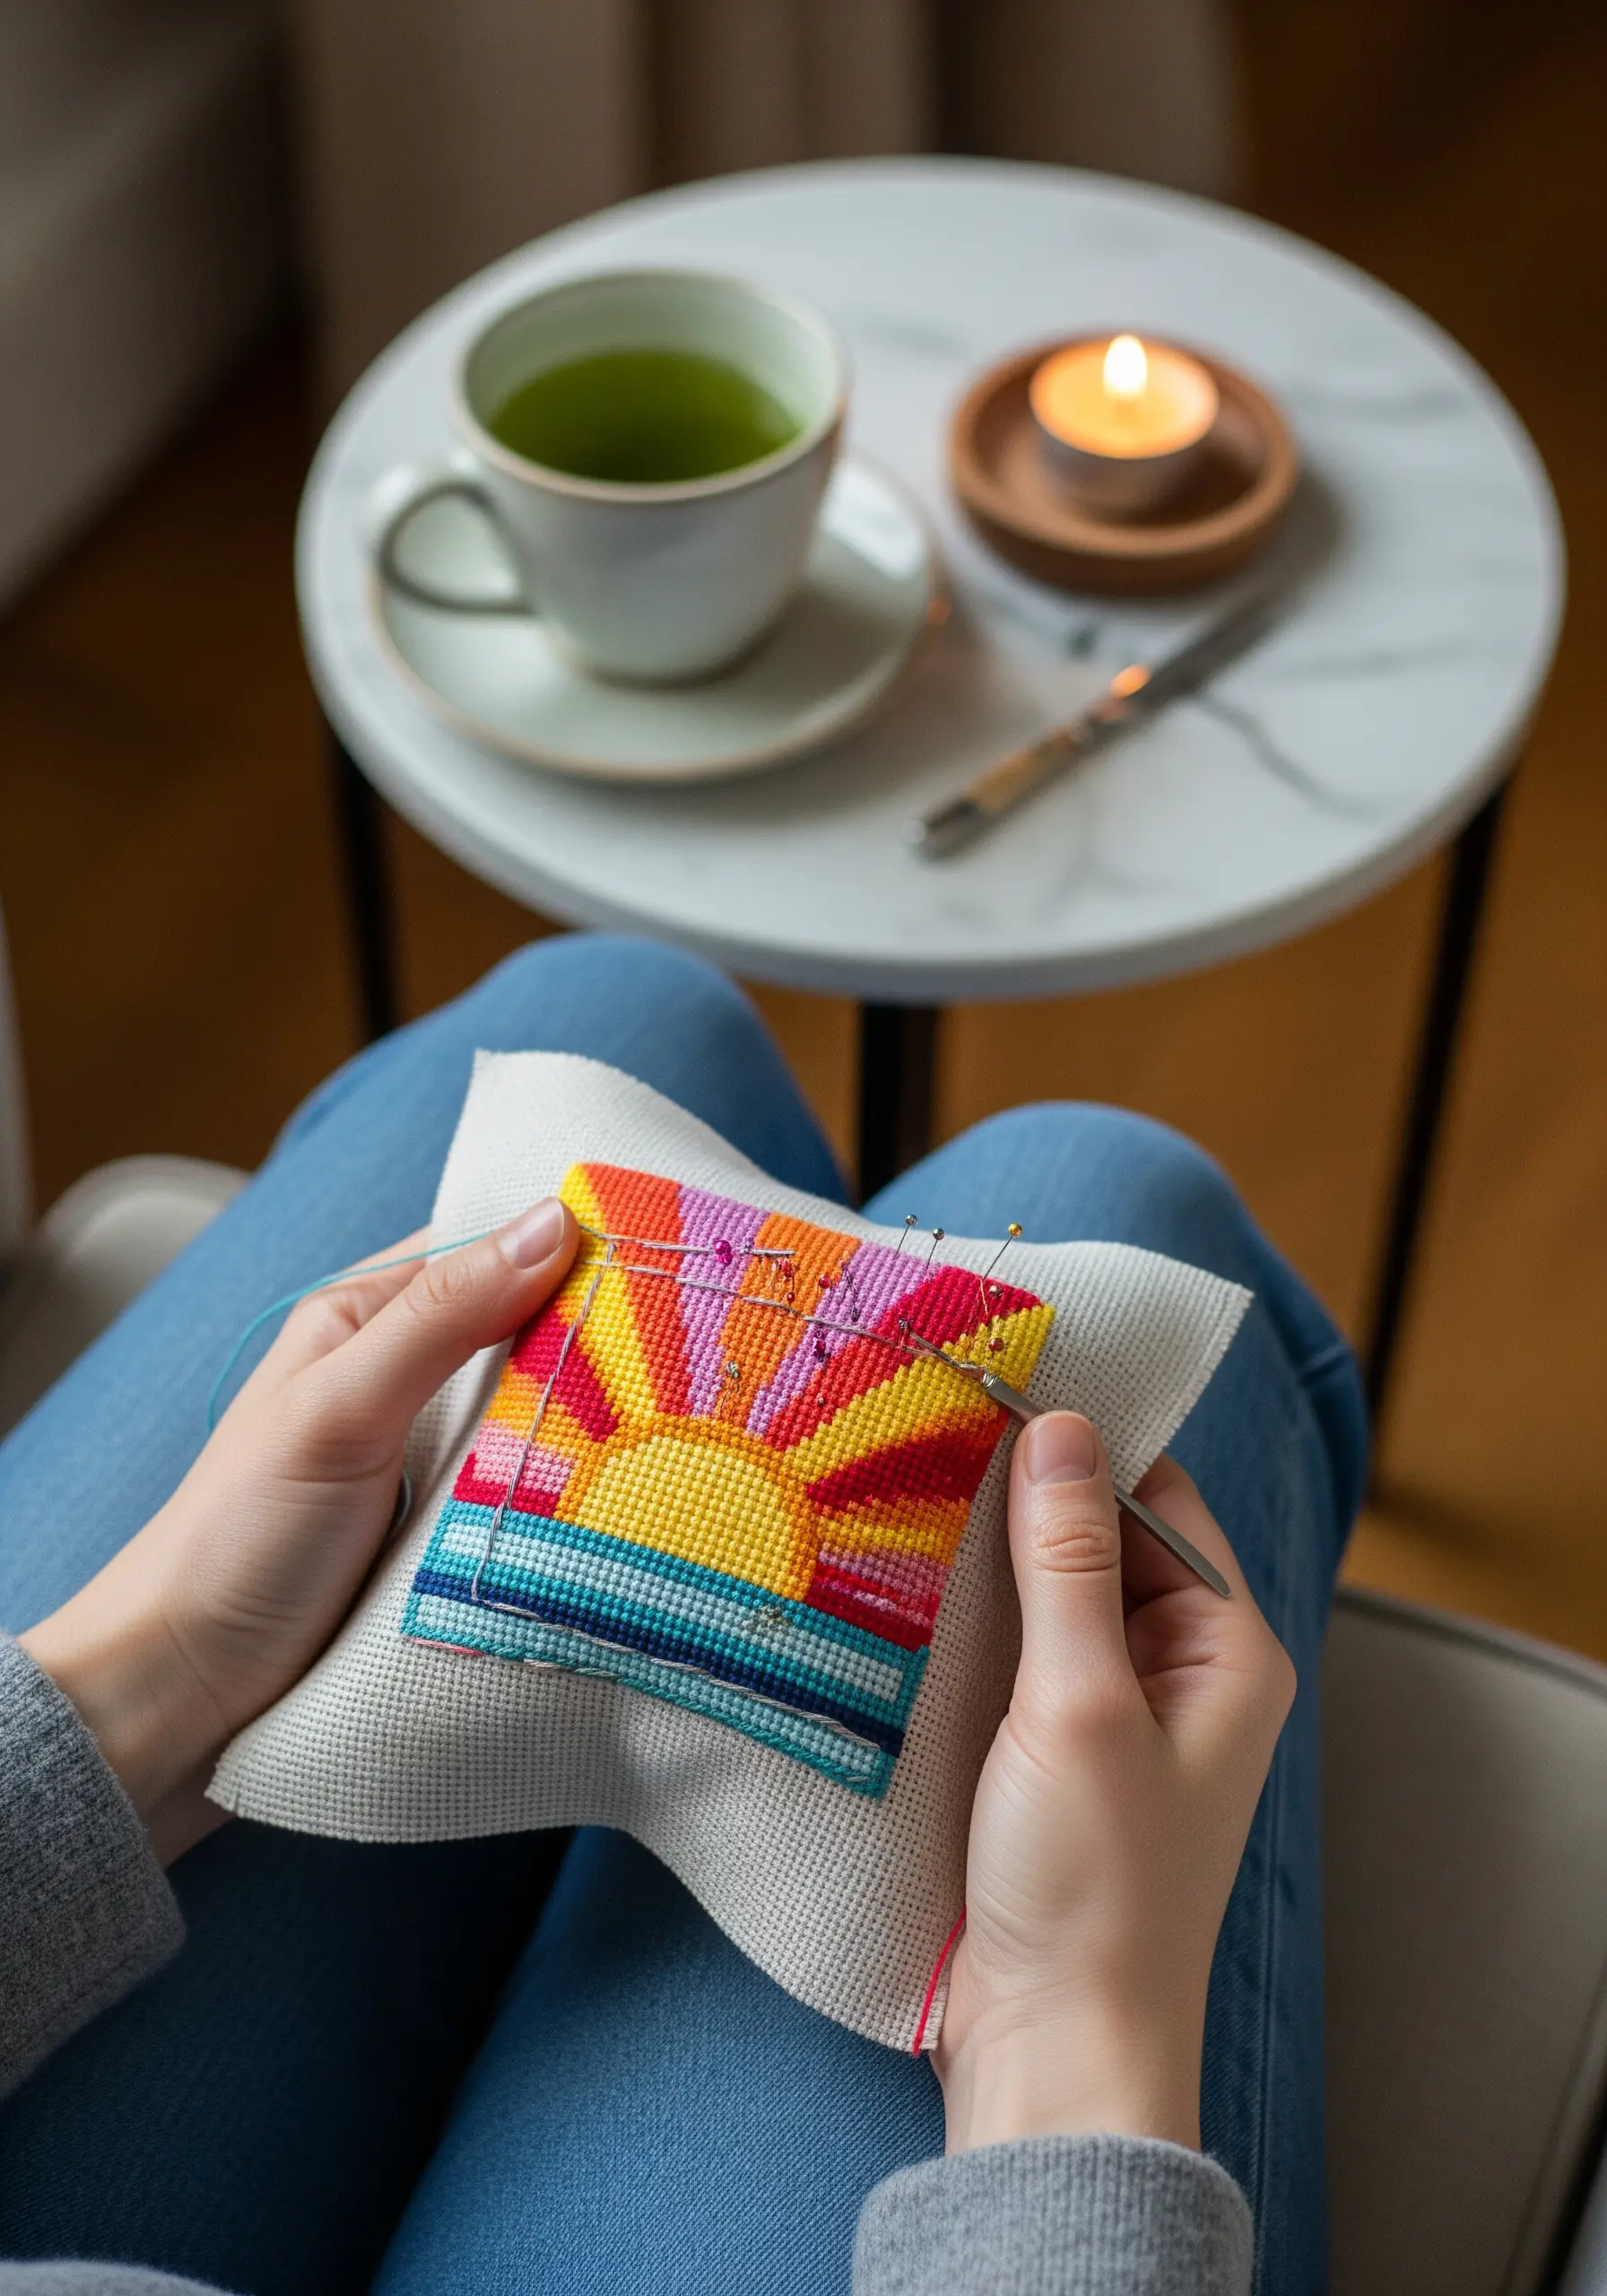
Achieve a smooth, painterly effect in your sunset by working on canvas with tapestry wool or floss using the tent stitch.
The key to a flawless gradient is to map out your color zones first, then blend the edges by alternating stitches between two similar shades.
This technique, often called needlepoint shading, builds color without harsh lines, creating a soft, atmospheric transition from one hue to the next.
Work in small, consistent stitches to let the colors, not the texture, become the focus of the piece.
5. Create Atmospheric Depth in Cross-Stitch
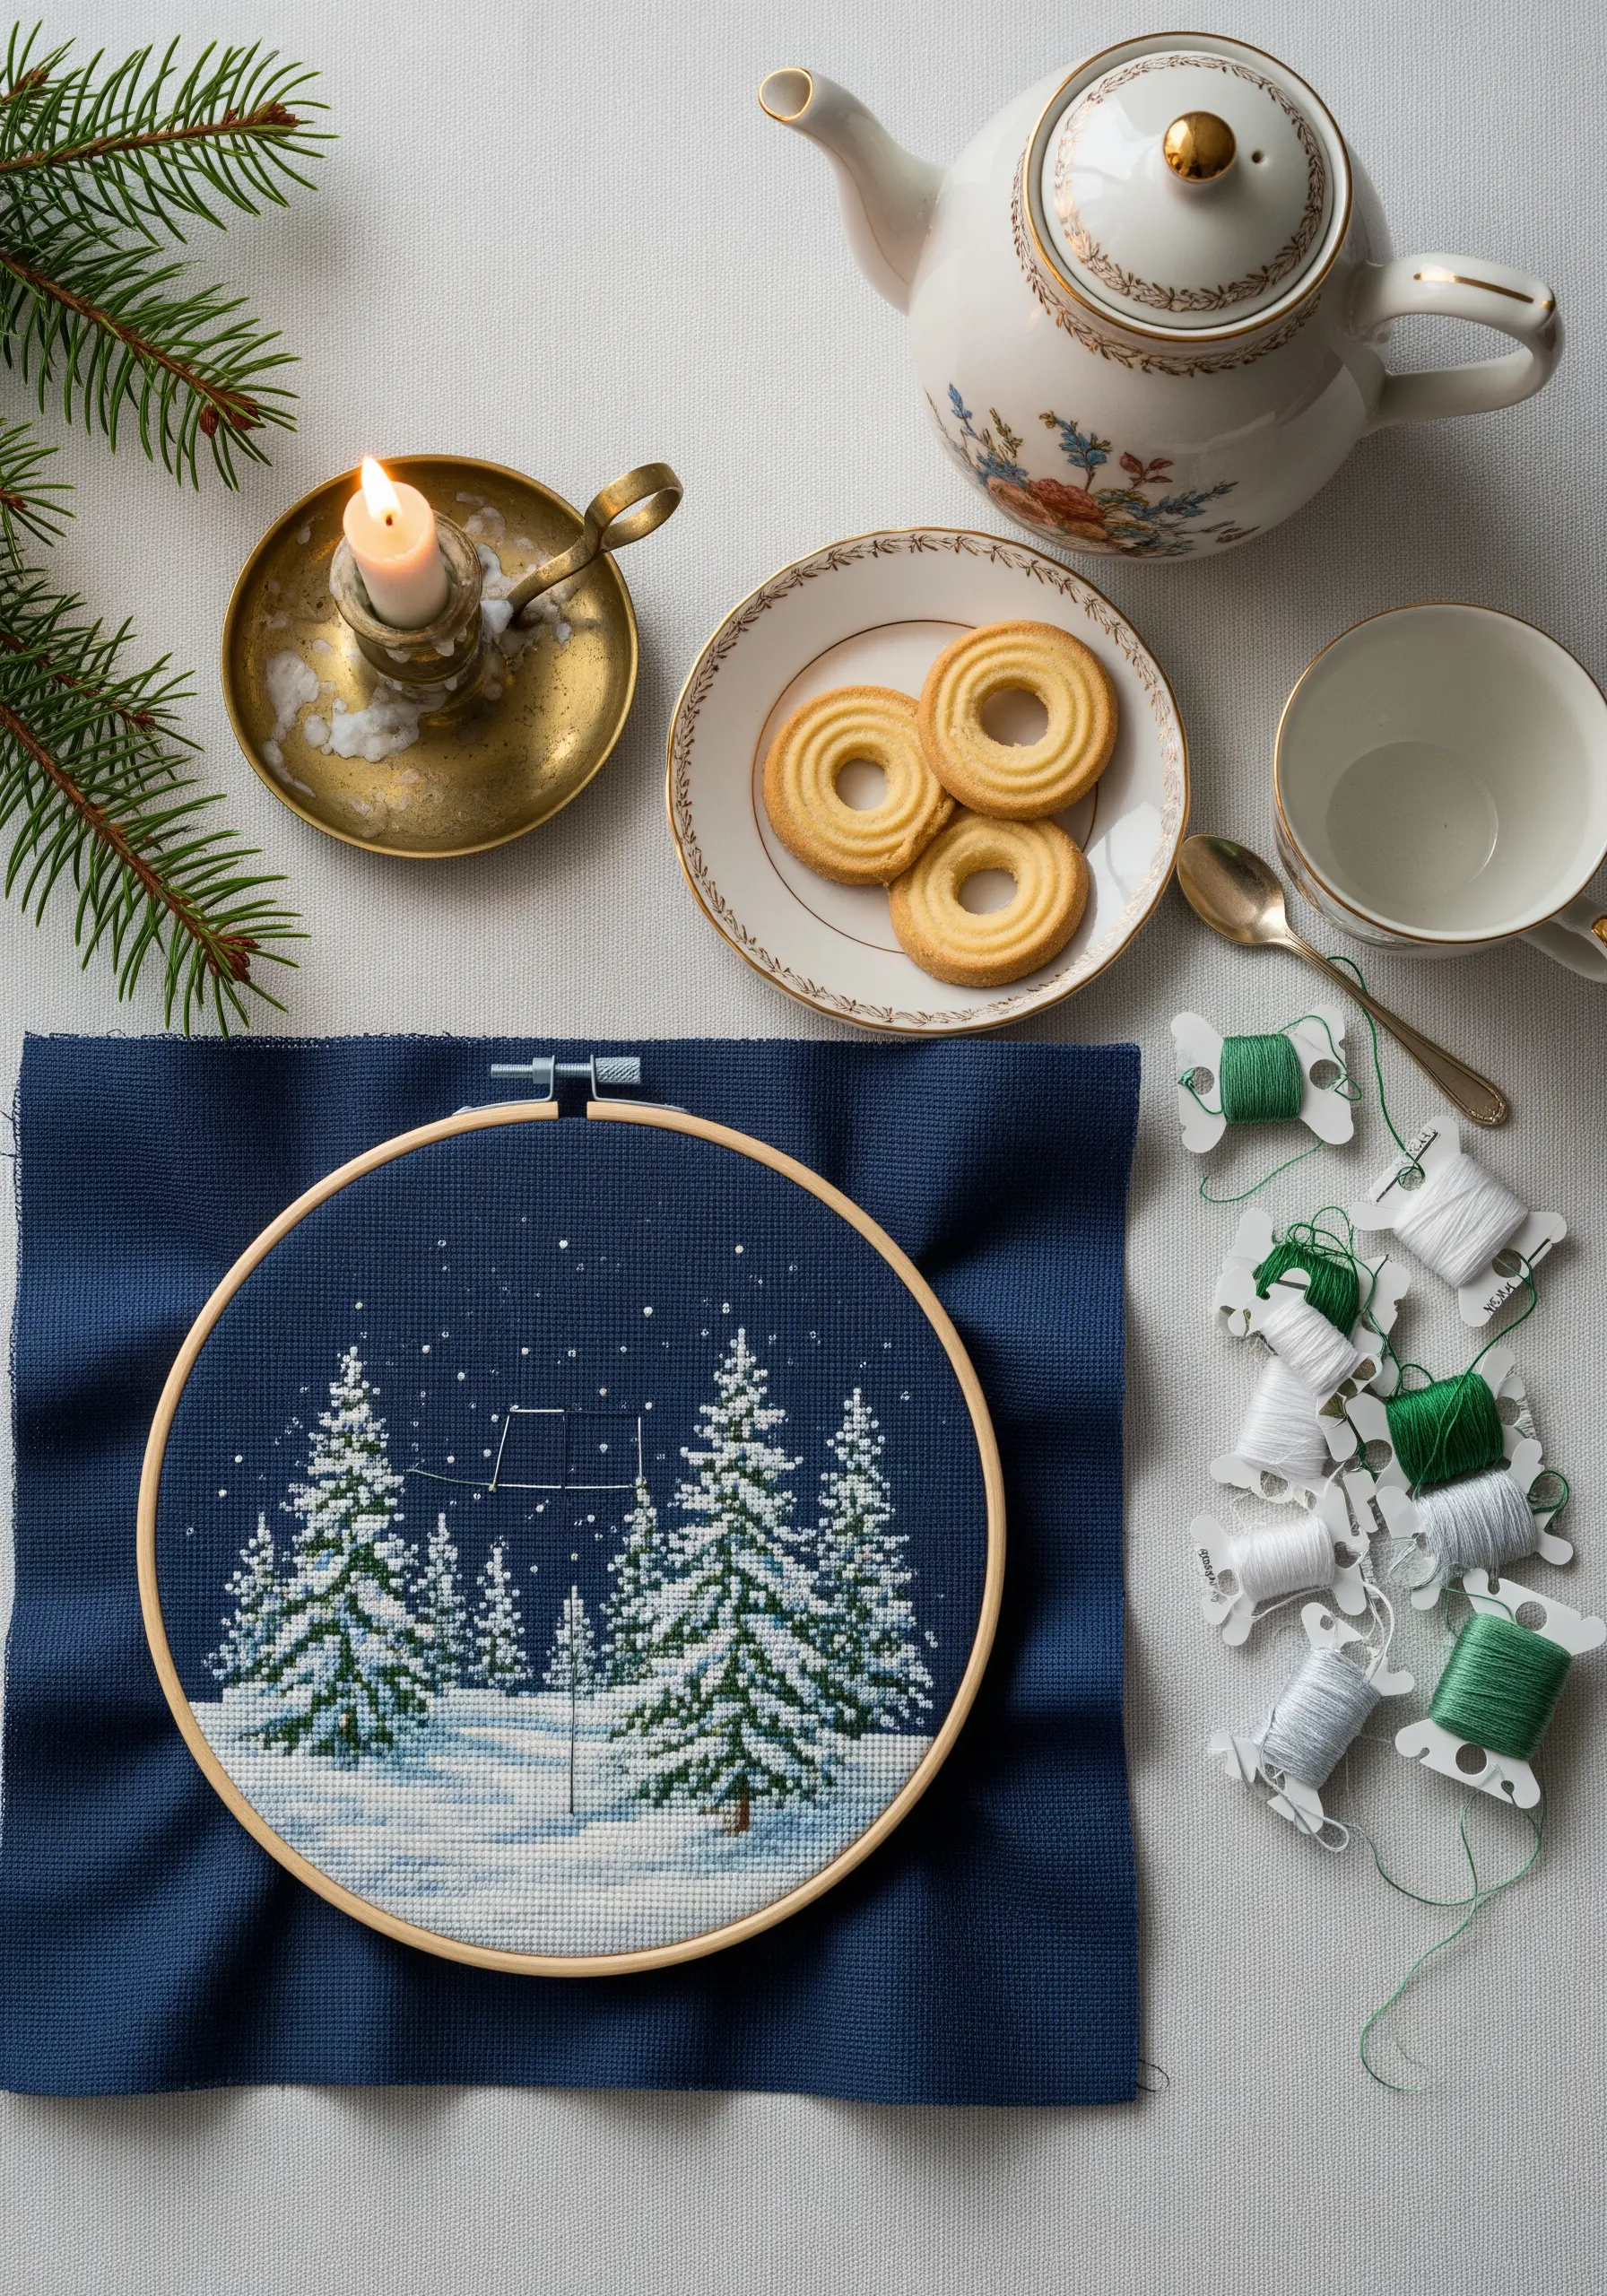
Give your winter landscape a sense of distance by varying the number of thread strands you use.
Stitch foreground trees with three strands for a bold, textured presence, use two strands for the mid-ground, and just a single strand for the trees on the horizon.
This subtle shift in thread weight tricks the eye into seeing depth, making your scene feel more expansive and realistic.
For a final touch, scatter a few French knots in a single strand of white or silver metallic floss to represent falling snow, adding a touch of sparkle to your framed embroidery art pieces.
6. Design a Balanced Botanical Table Runner
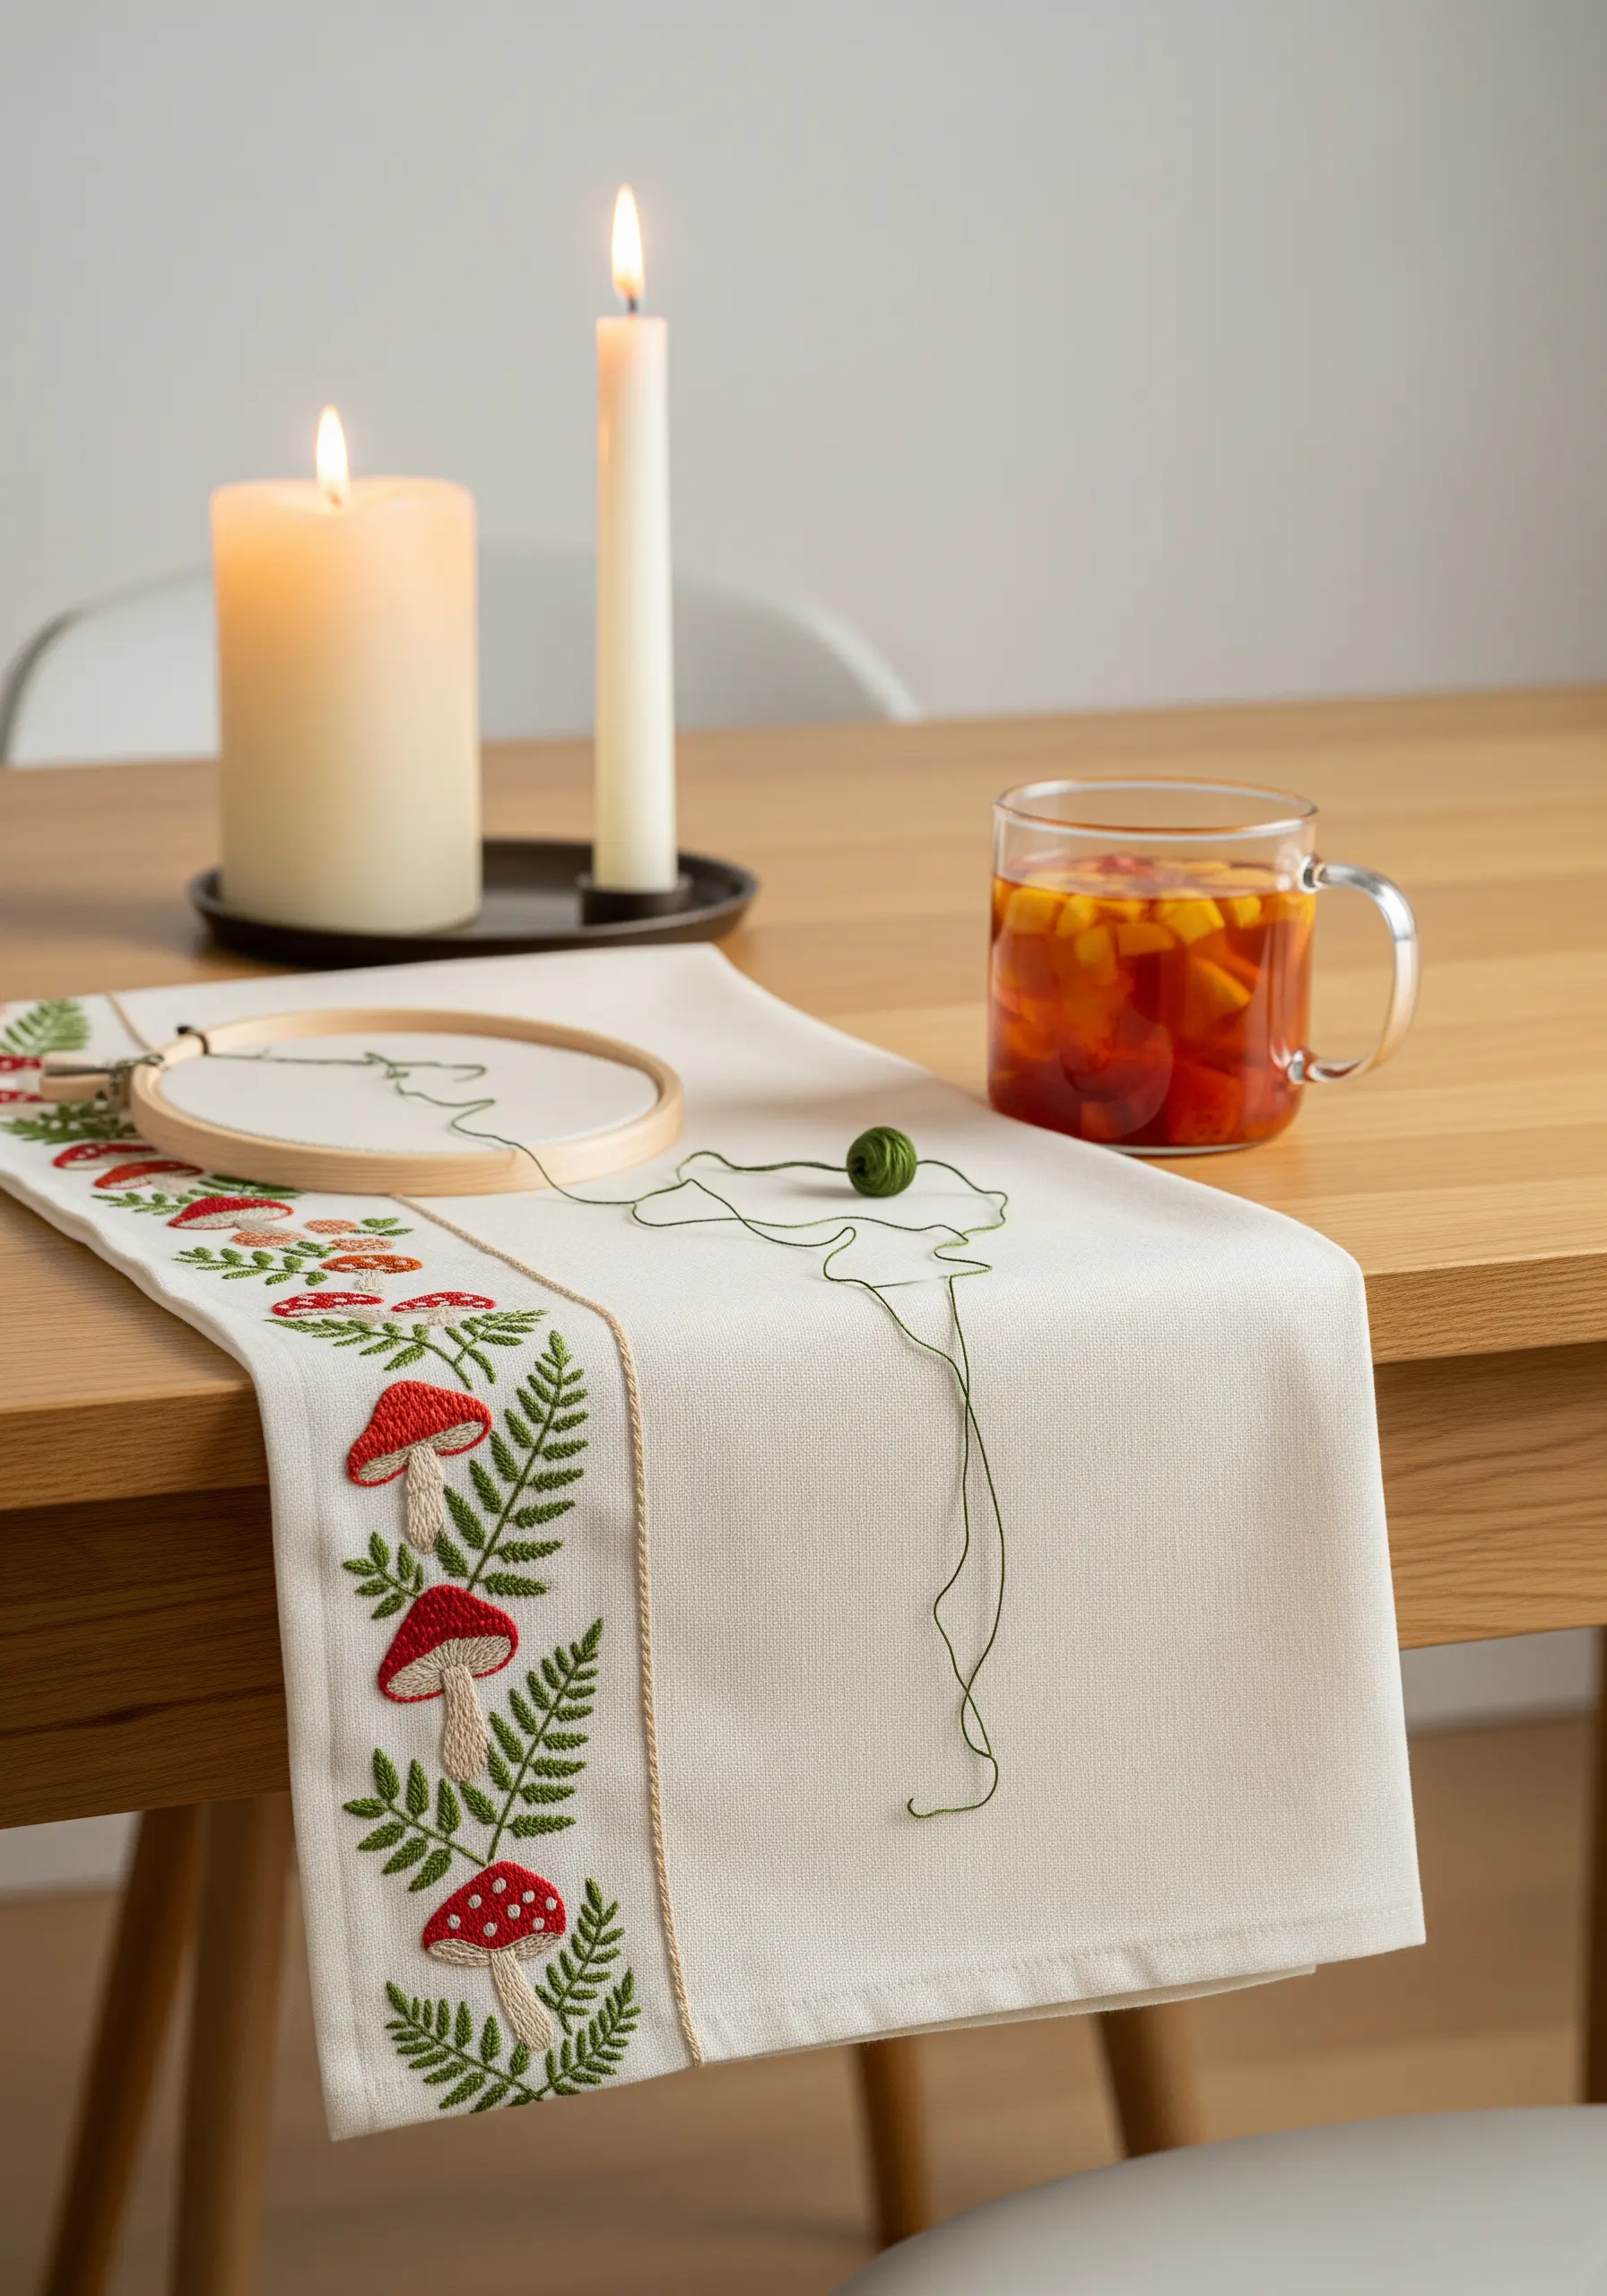
When embroidering a repeating pattern on a long piece of fabric, precision is everything.
Create a simple paper stencil of your main motifs—the mushroom and fern—to ensure consistent placement and spacing along the runner.
For the fern’s flowing stems, use a whipped backstitch; it creates a solid, rope-like line that is much smoother than a standard backstitch.
Add dimension to the mushroom caps with raised satin stitches, and use single, straight stitches for delicate leaf embroidery stitches and vein details, which add a layer of botanical accuracy.
7. Stitch Constellations with Metallic Thread
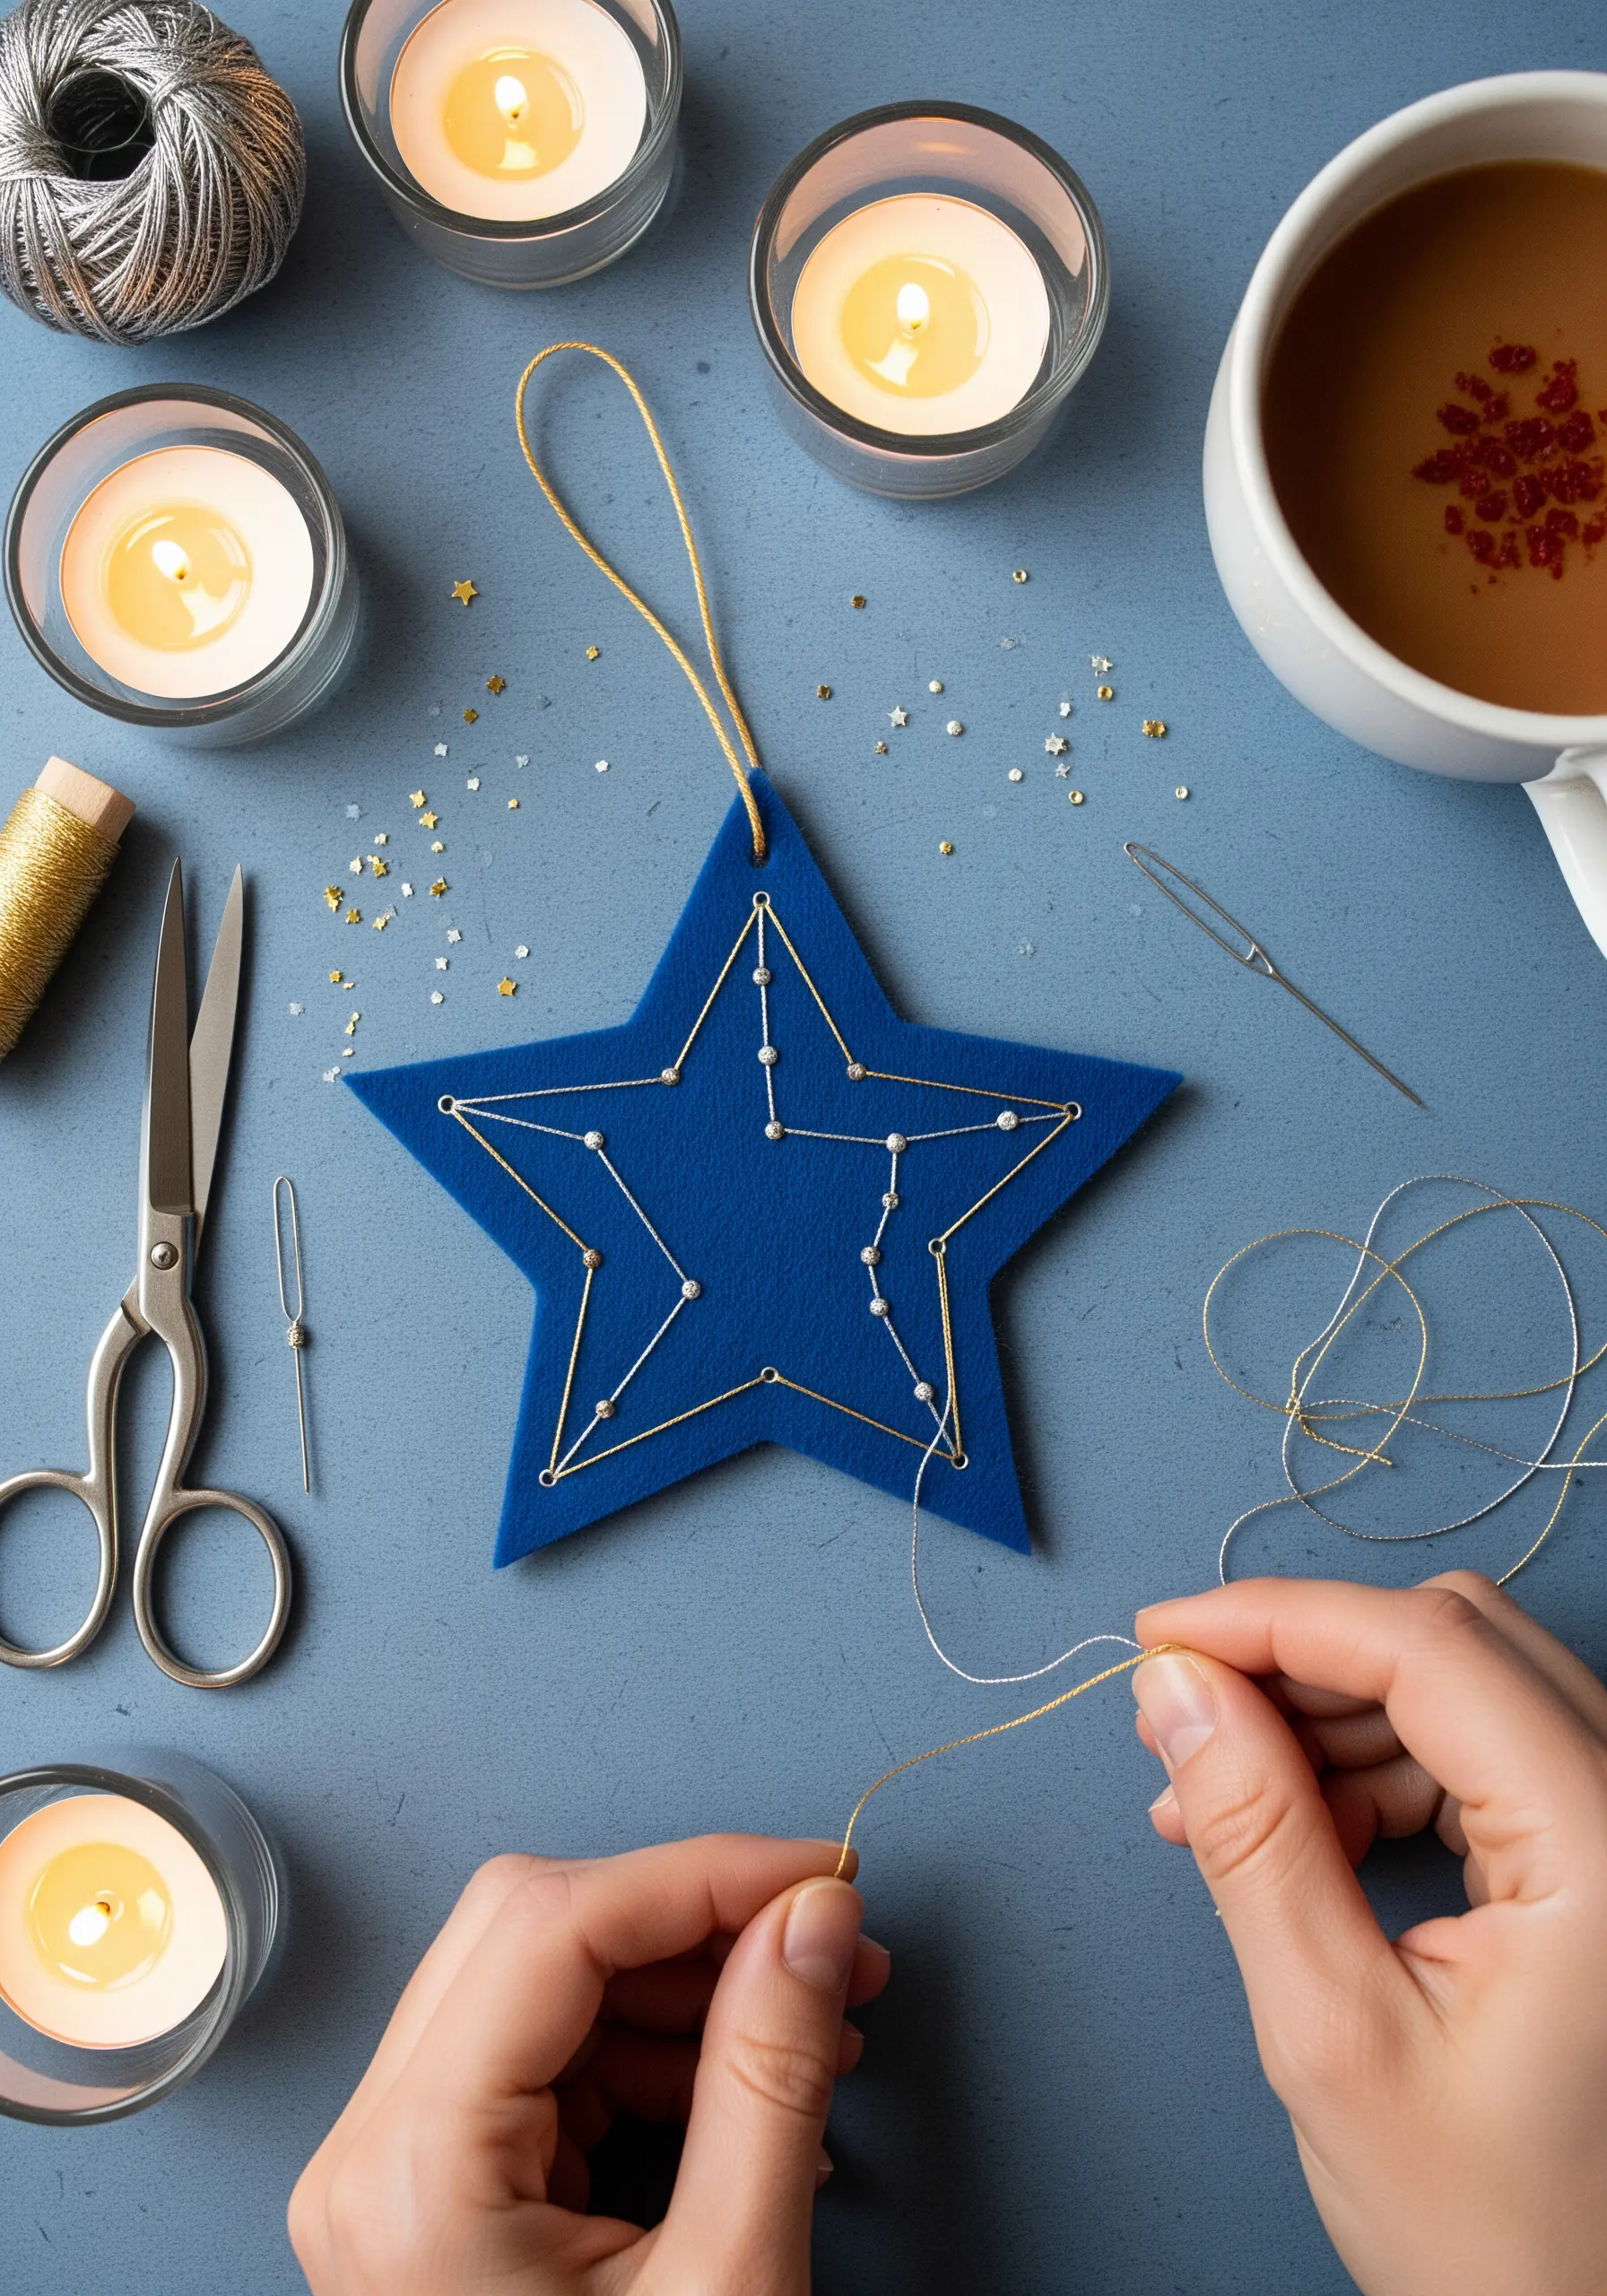
Working with metallic thread can be challenging, but a few adjustments make it effortless.
Use a needle with a larger eye to reduce friction and fraying, and run your thread through a conditioner like beeswax to help it glide smoothly through the felt.
Instead of traditional knots, anchor your constellation points with tiny seed beads or pearls; this secures the thread while adding a celestial, decorative element.
The combination of soft felt, shimmering thread, and luminous beads creates a beautiful textural contrast.
8. Embroider on Paper and Book Cloth
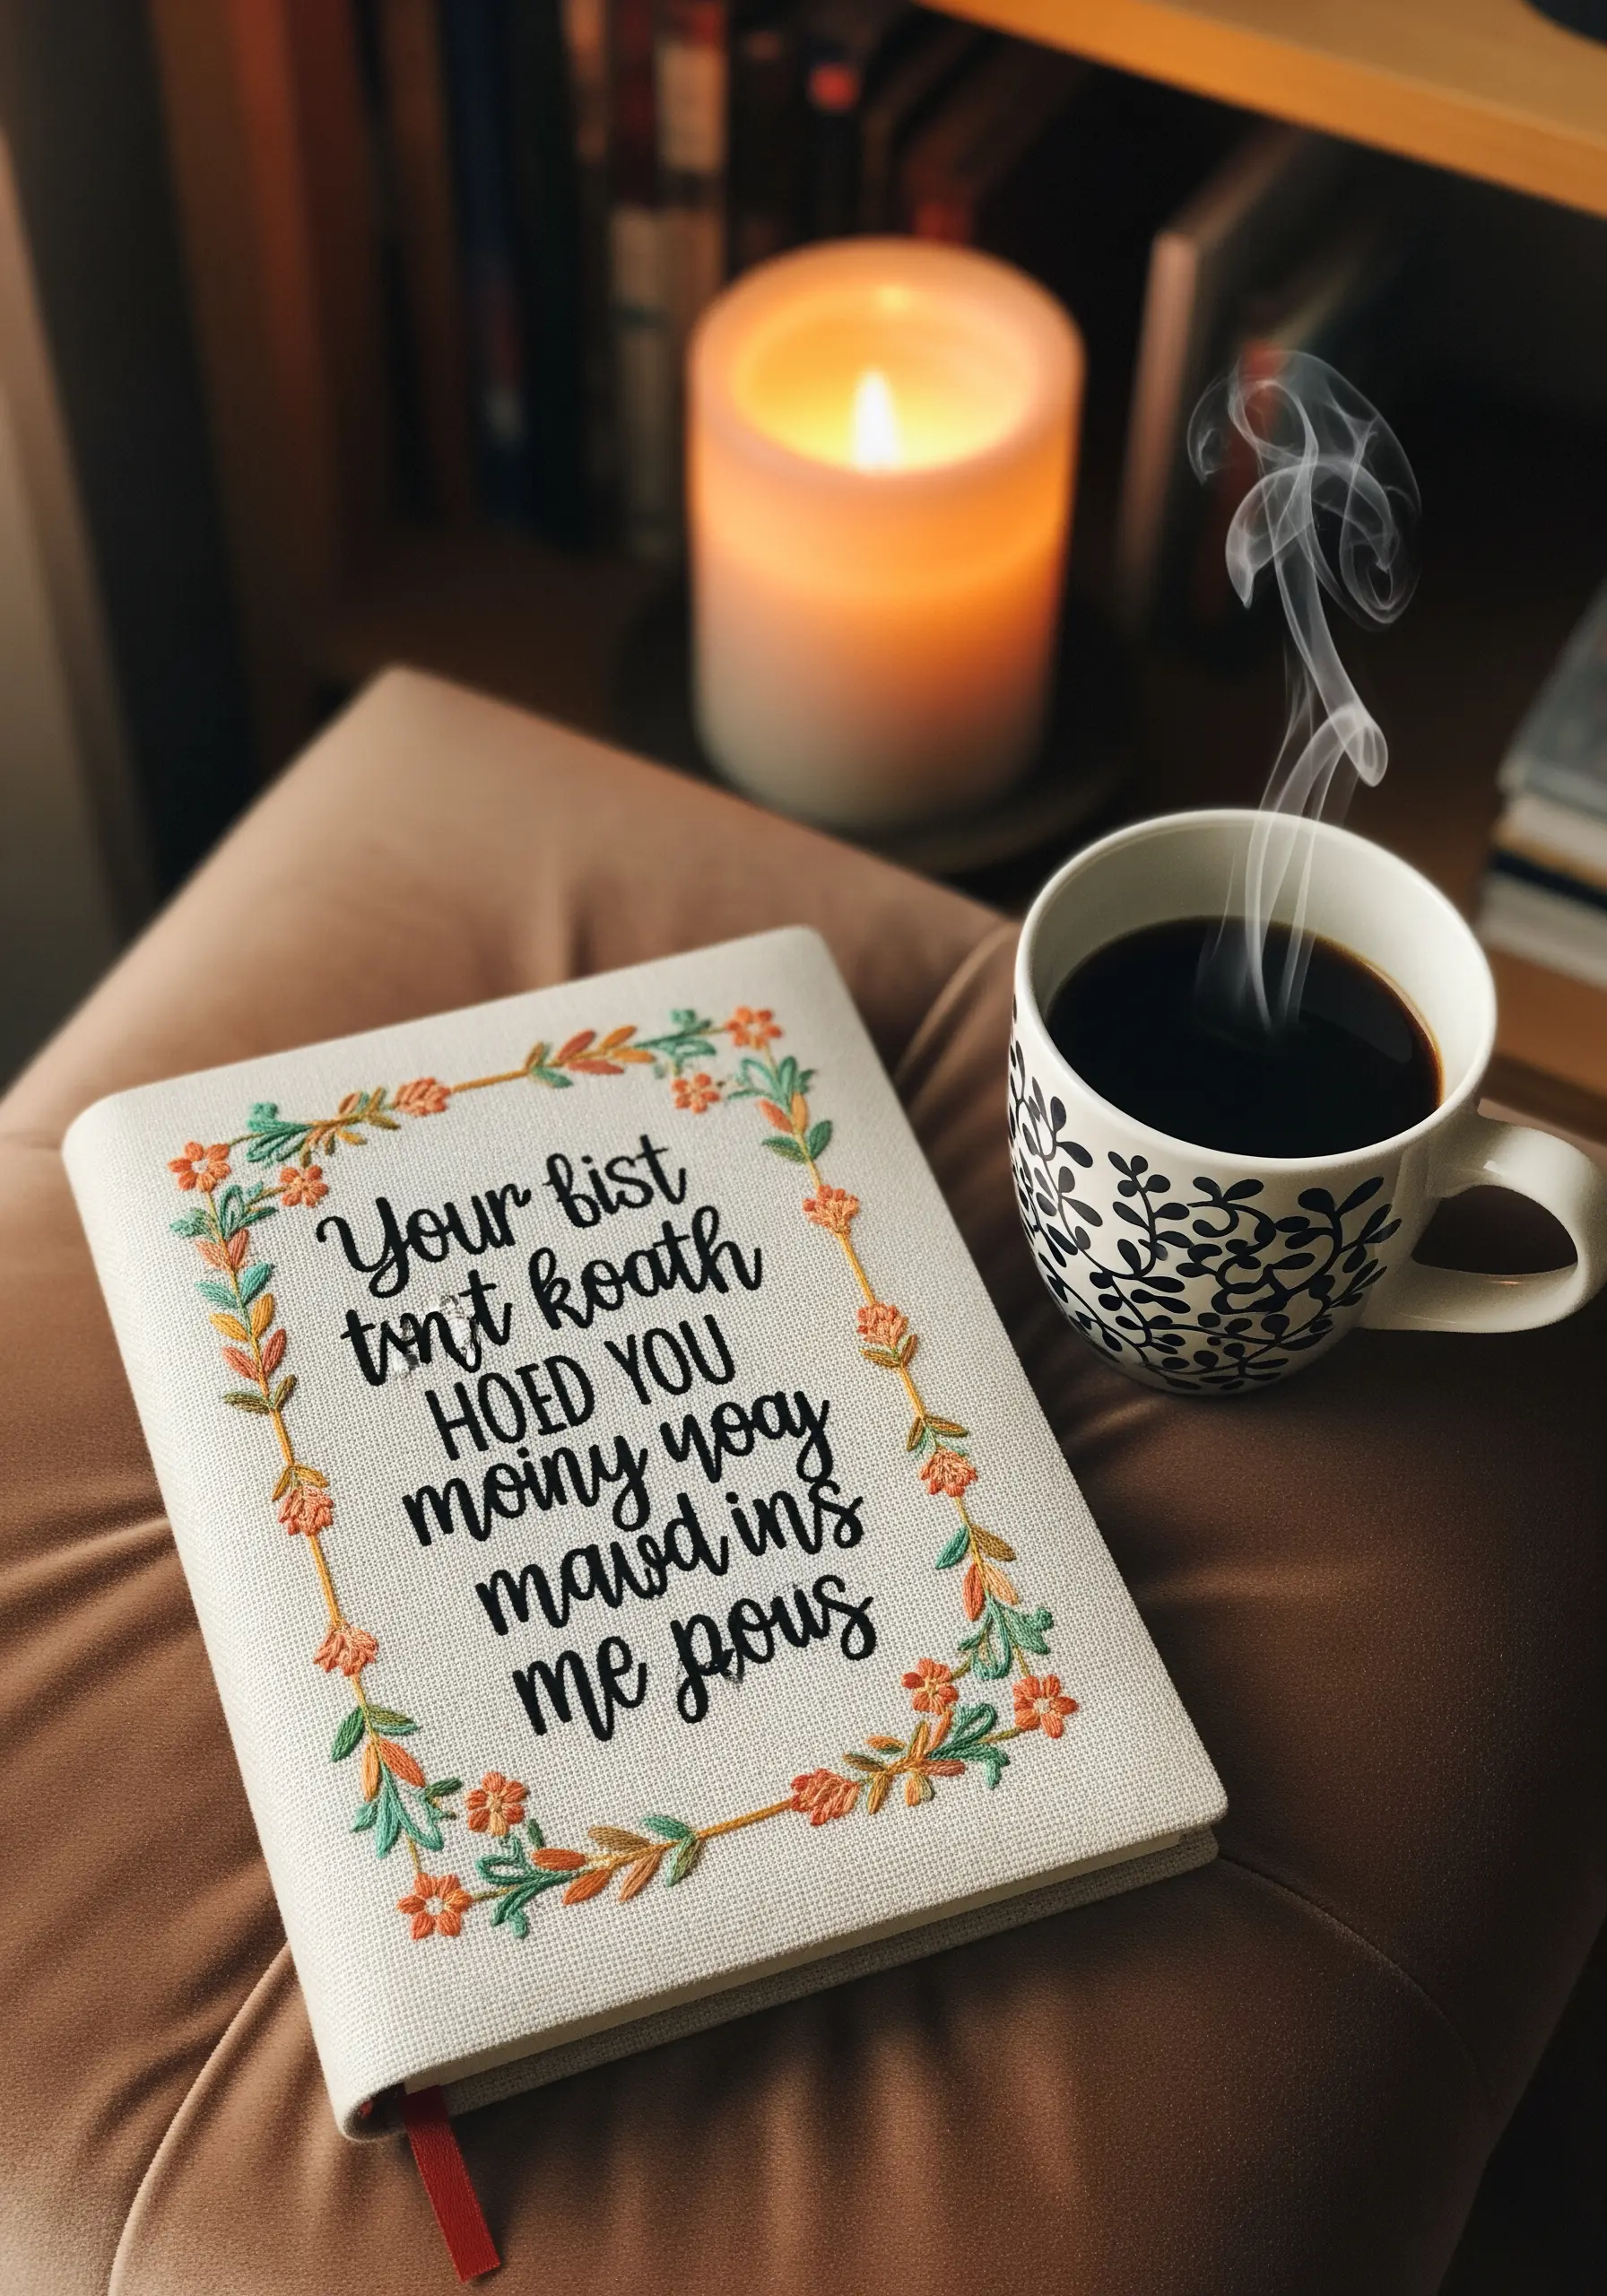
To stitch cleanly on a journal cover, first transfer your design onto a sheet of sticky, water-soluble stabilizer.
Adhere it to the cover; it provides a guide and reinforces the surface, preventing tearing as you stitch.
For crisp lettering, use a two-strand backstitch. To make the text stand out even more, whip the stitches with a third strand in the same color for a rounded, corded effect.
This technique elevates simple floral border stitch concepts and lettering into a polished, professional finish.
9. Practice Mindful Mending with Sashiko
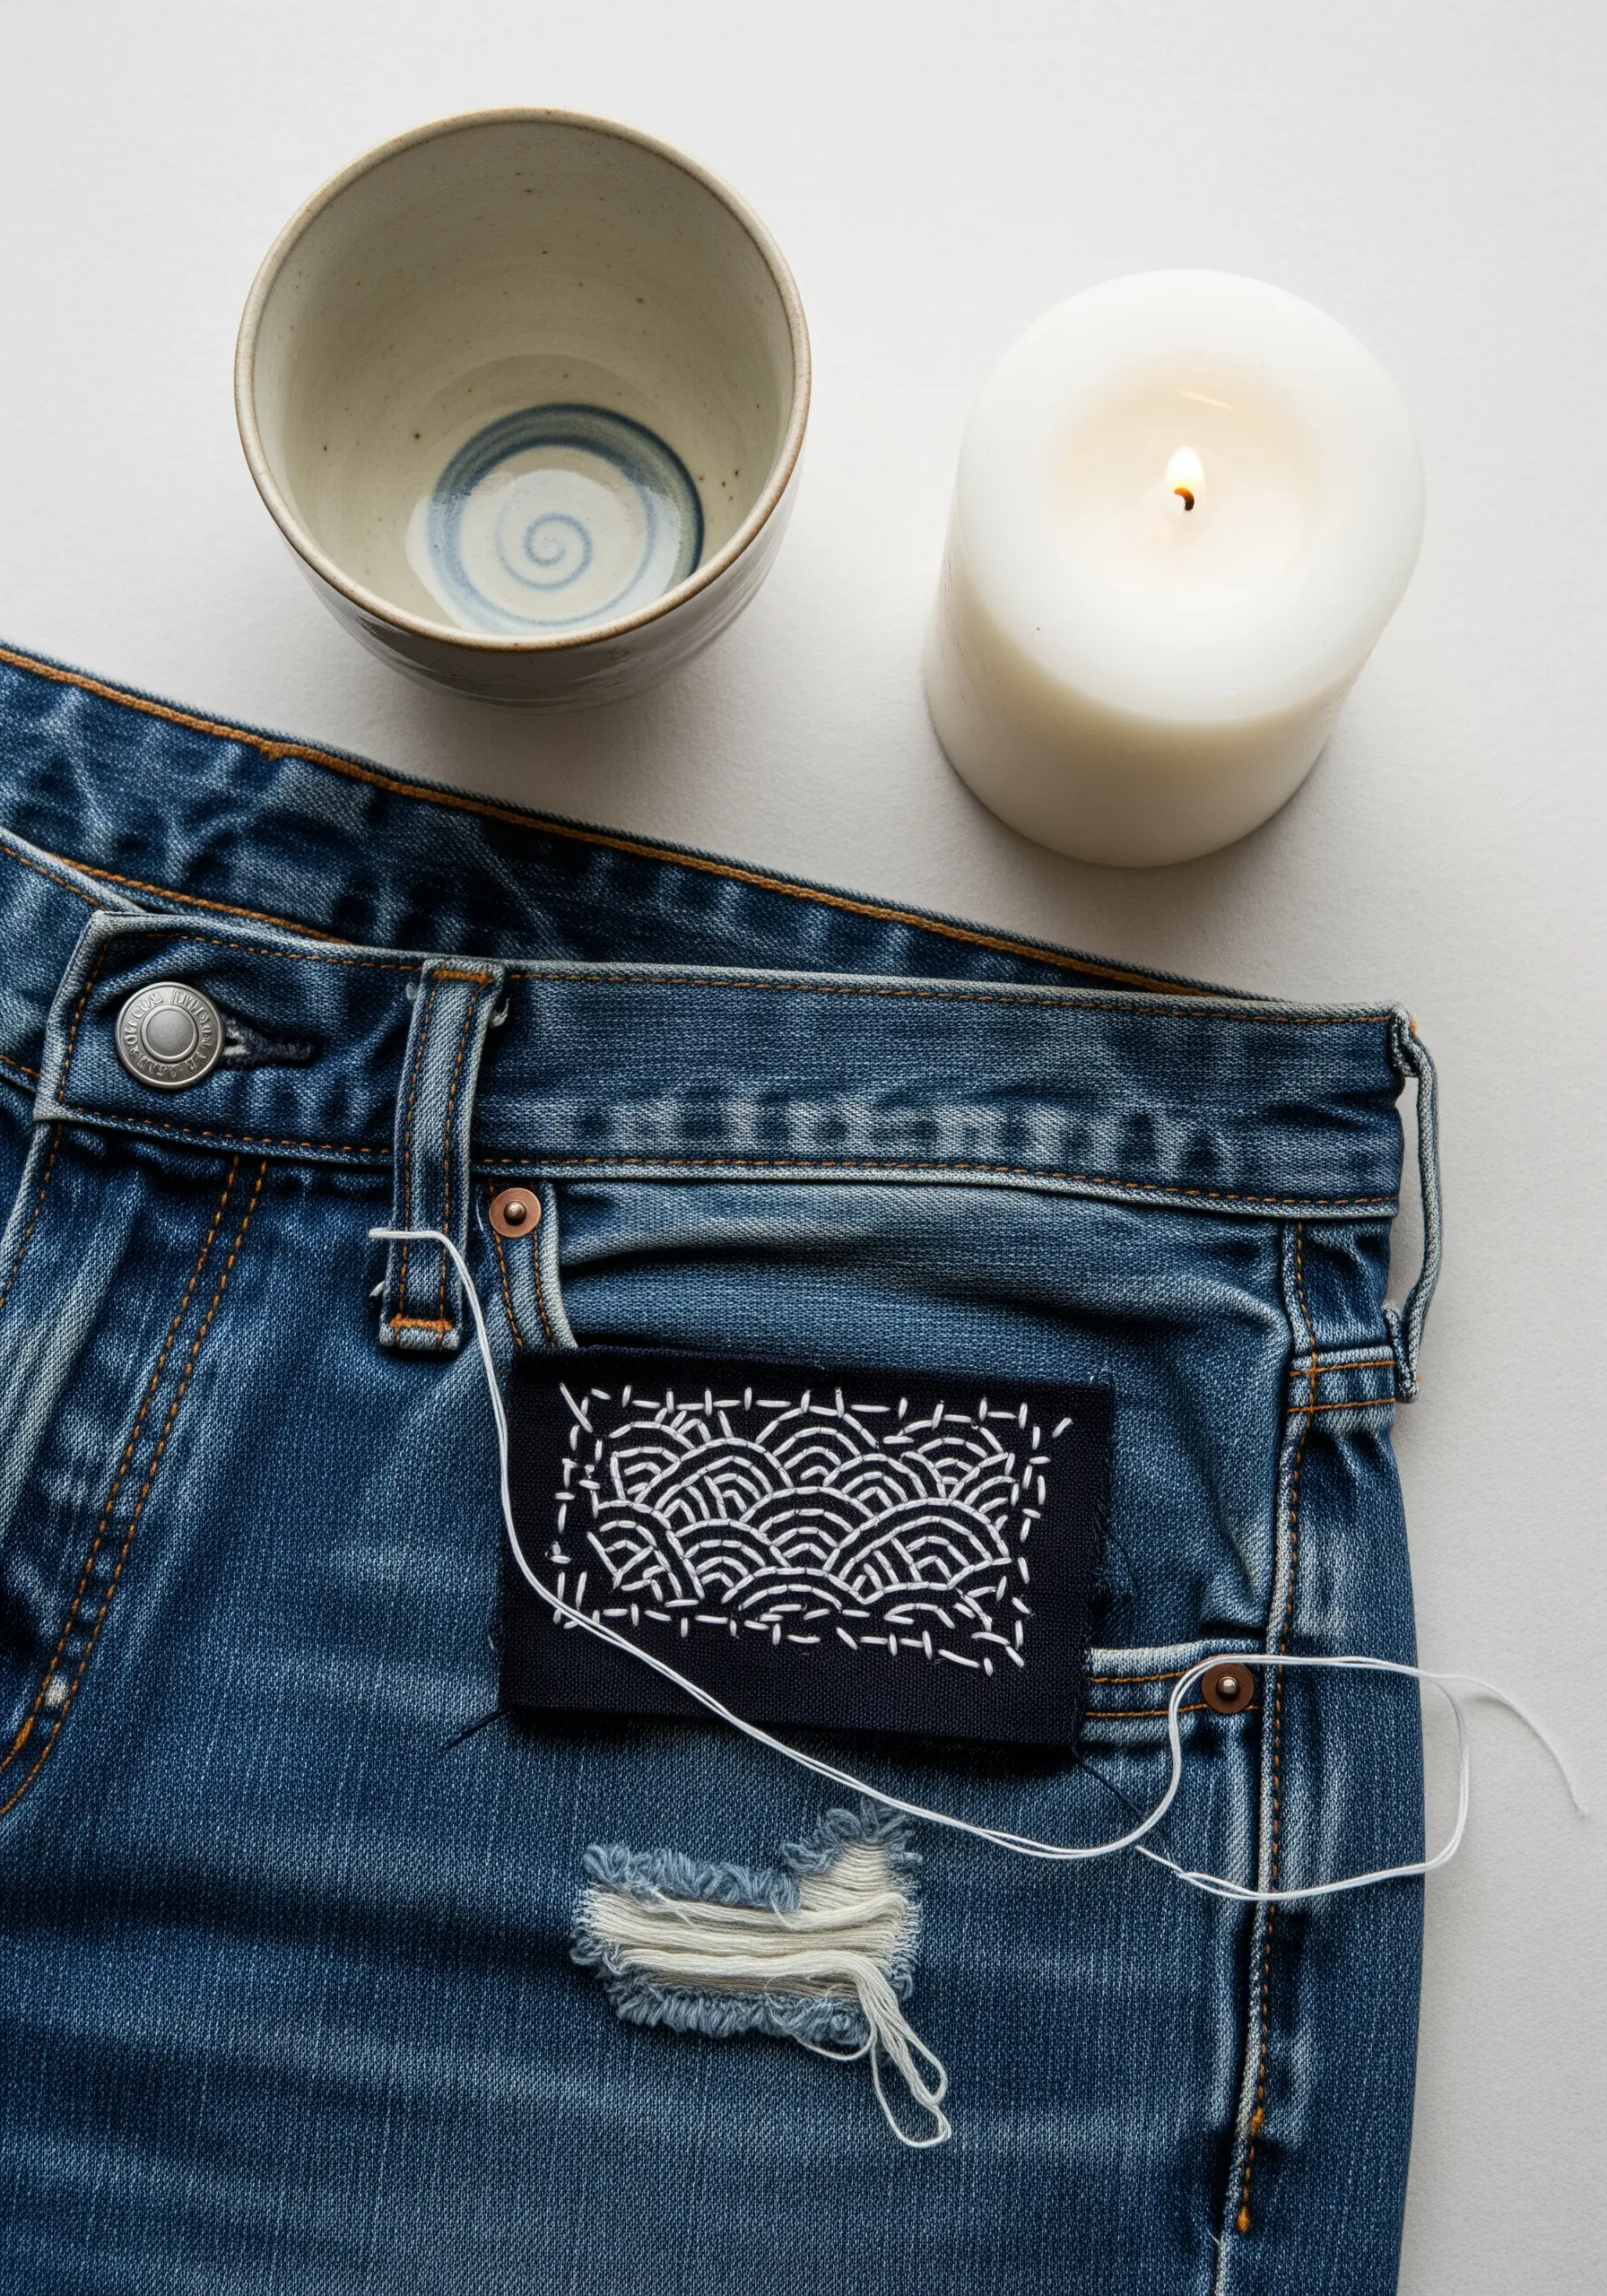
Sashiko stitching is not just for mending; it’s a meditative art form that transforms worn fabric.
Use a long sashiko needle and high-contrast cotton thread to create your geometric patterns with a simple, repeating running stitch.
The key to authentic sashiko is stitch consistency—aim for stitches the length of a grain of rice, and maintain even spacing.
Most importantly, don’t pull the thread taut; leave a little slack on the back of the fabric at the end of each row to prevent puckering, ensuring the patch remains flat and flexible. These minimal embroidery patterns add character to any textile.
10. Build Intricate Patterns with Simple Blackwork
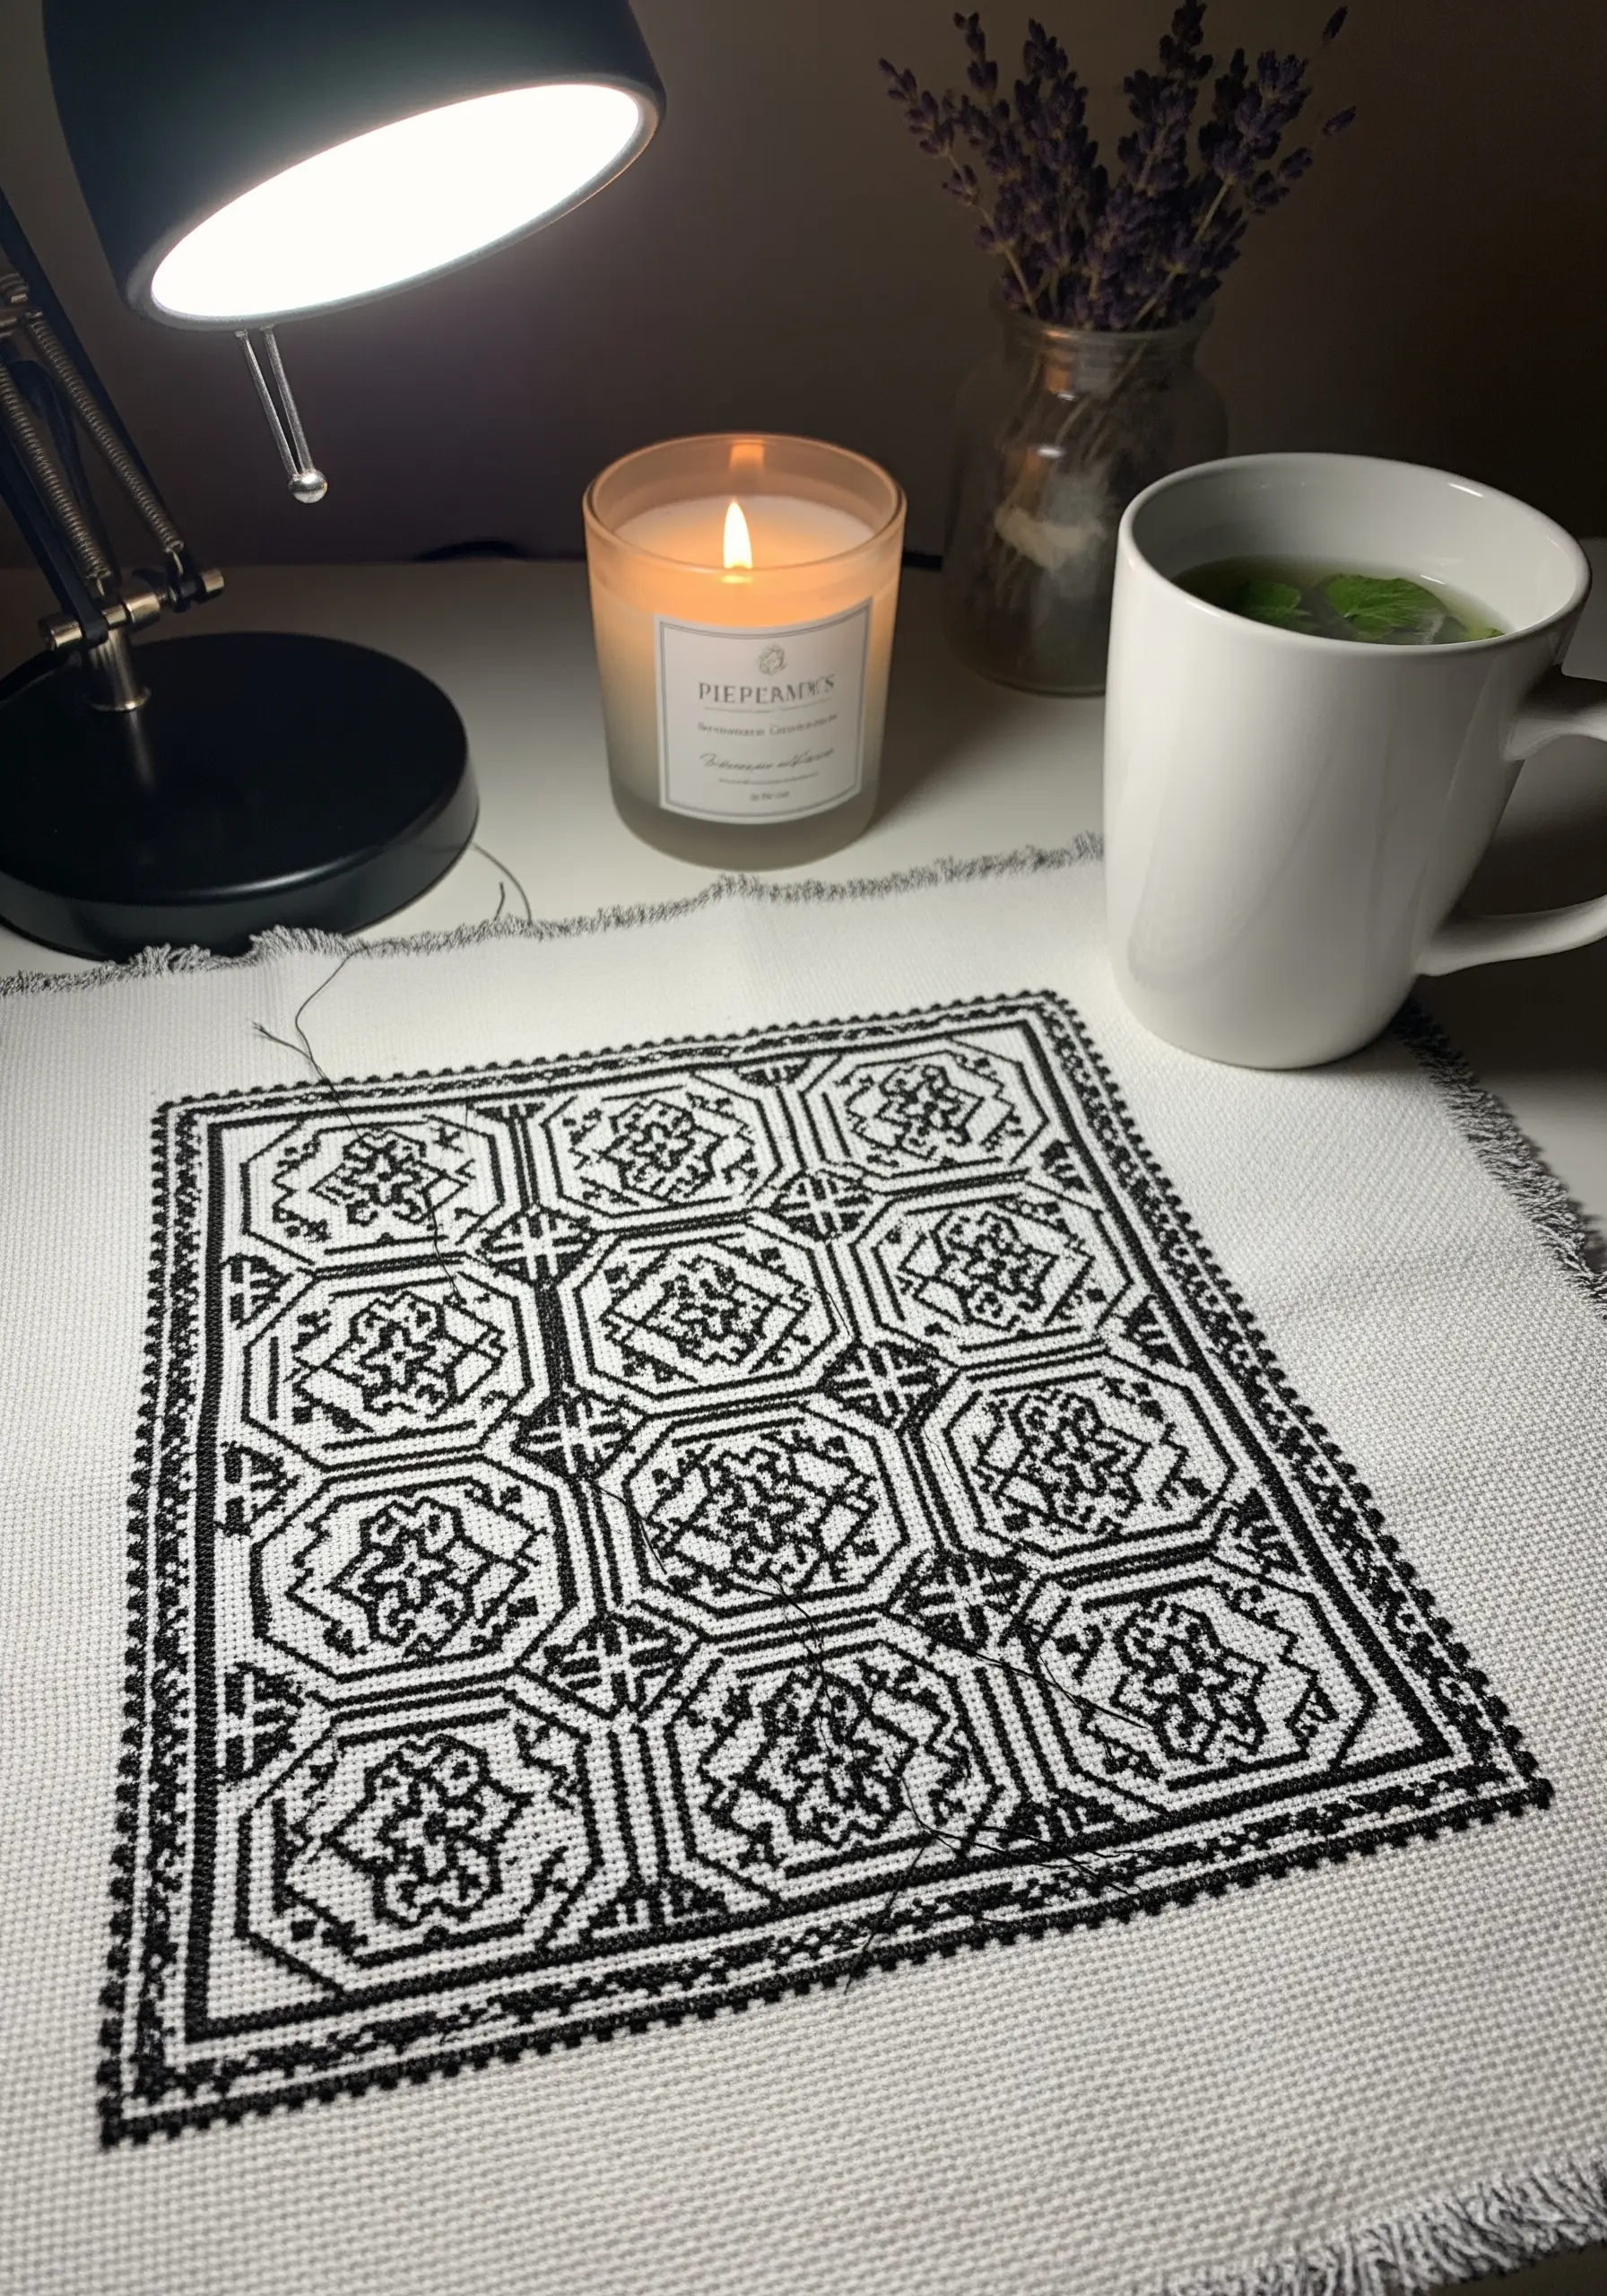
Blackwork’s complexity is an illusion built from simple, repeating geometric stitches—primarily backstitch and Holbein stitch (double running stitch).
Begin with a single motif in one of the squares and focus on completing it perfectly before moving to the next.
Maintain consistent thread tension to ensure the fabric doesn’t pucker and the pattern lies perfectly flat, creating a uniform, lace-like appearance.
Working on an even-weave fabric like Aida or linen is crucial, as it provides a natural grid for your geometric fills.
11. Sculpt with Yarn Using a Punch Needle

Create incredibly lush, high-pile textures with punch needle embroidery, which forms loops of yarn on the surface of your fabric.
To achieve a dense, plush finish like a miniature rug, ensure your punches are placed very close together; the closer the stitches, the thicker the pile.
You can also play with texture by trimming some loops to be shorter than others (a technique called sculpting), which creates dramatic visual and tactile depth.
This method is perfect for bold, graphic florals and transforms a simple pillow into a vibrant piece of fiber art.
12. Add Luminous Detail with Beading on Velvet
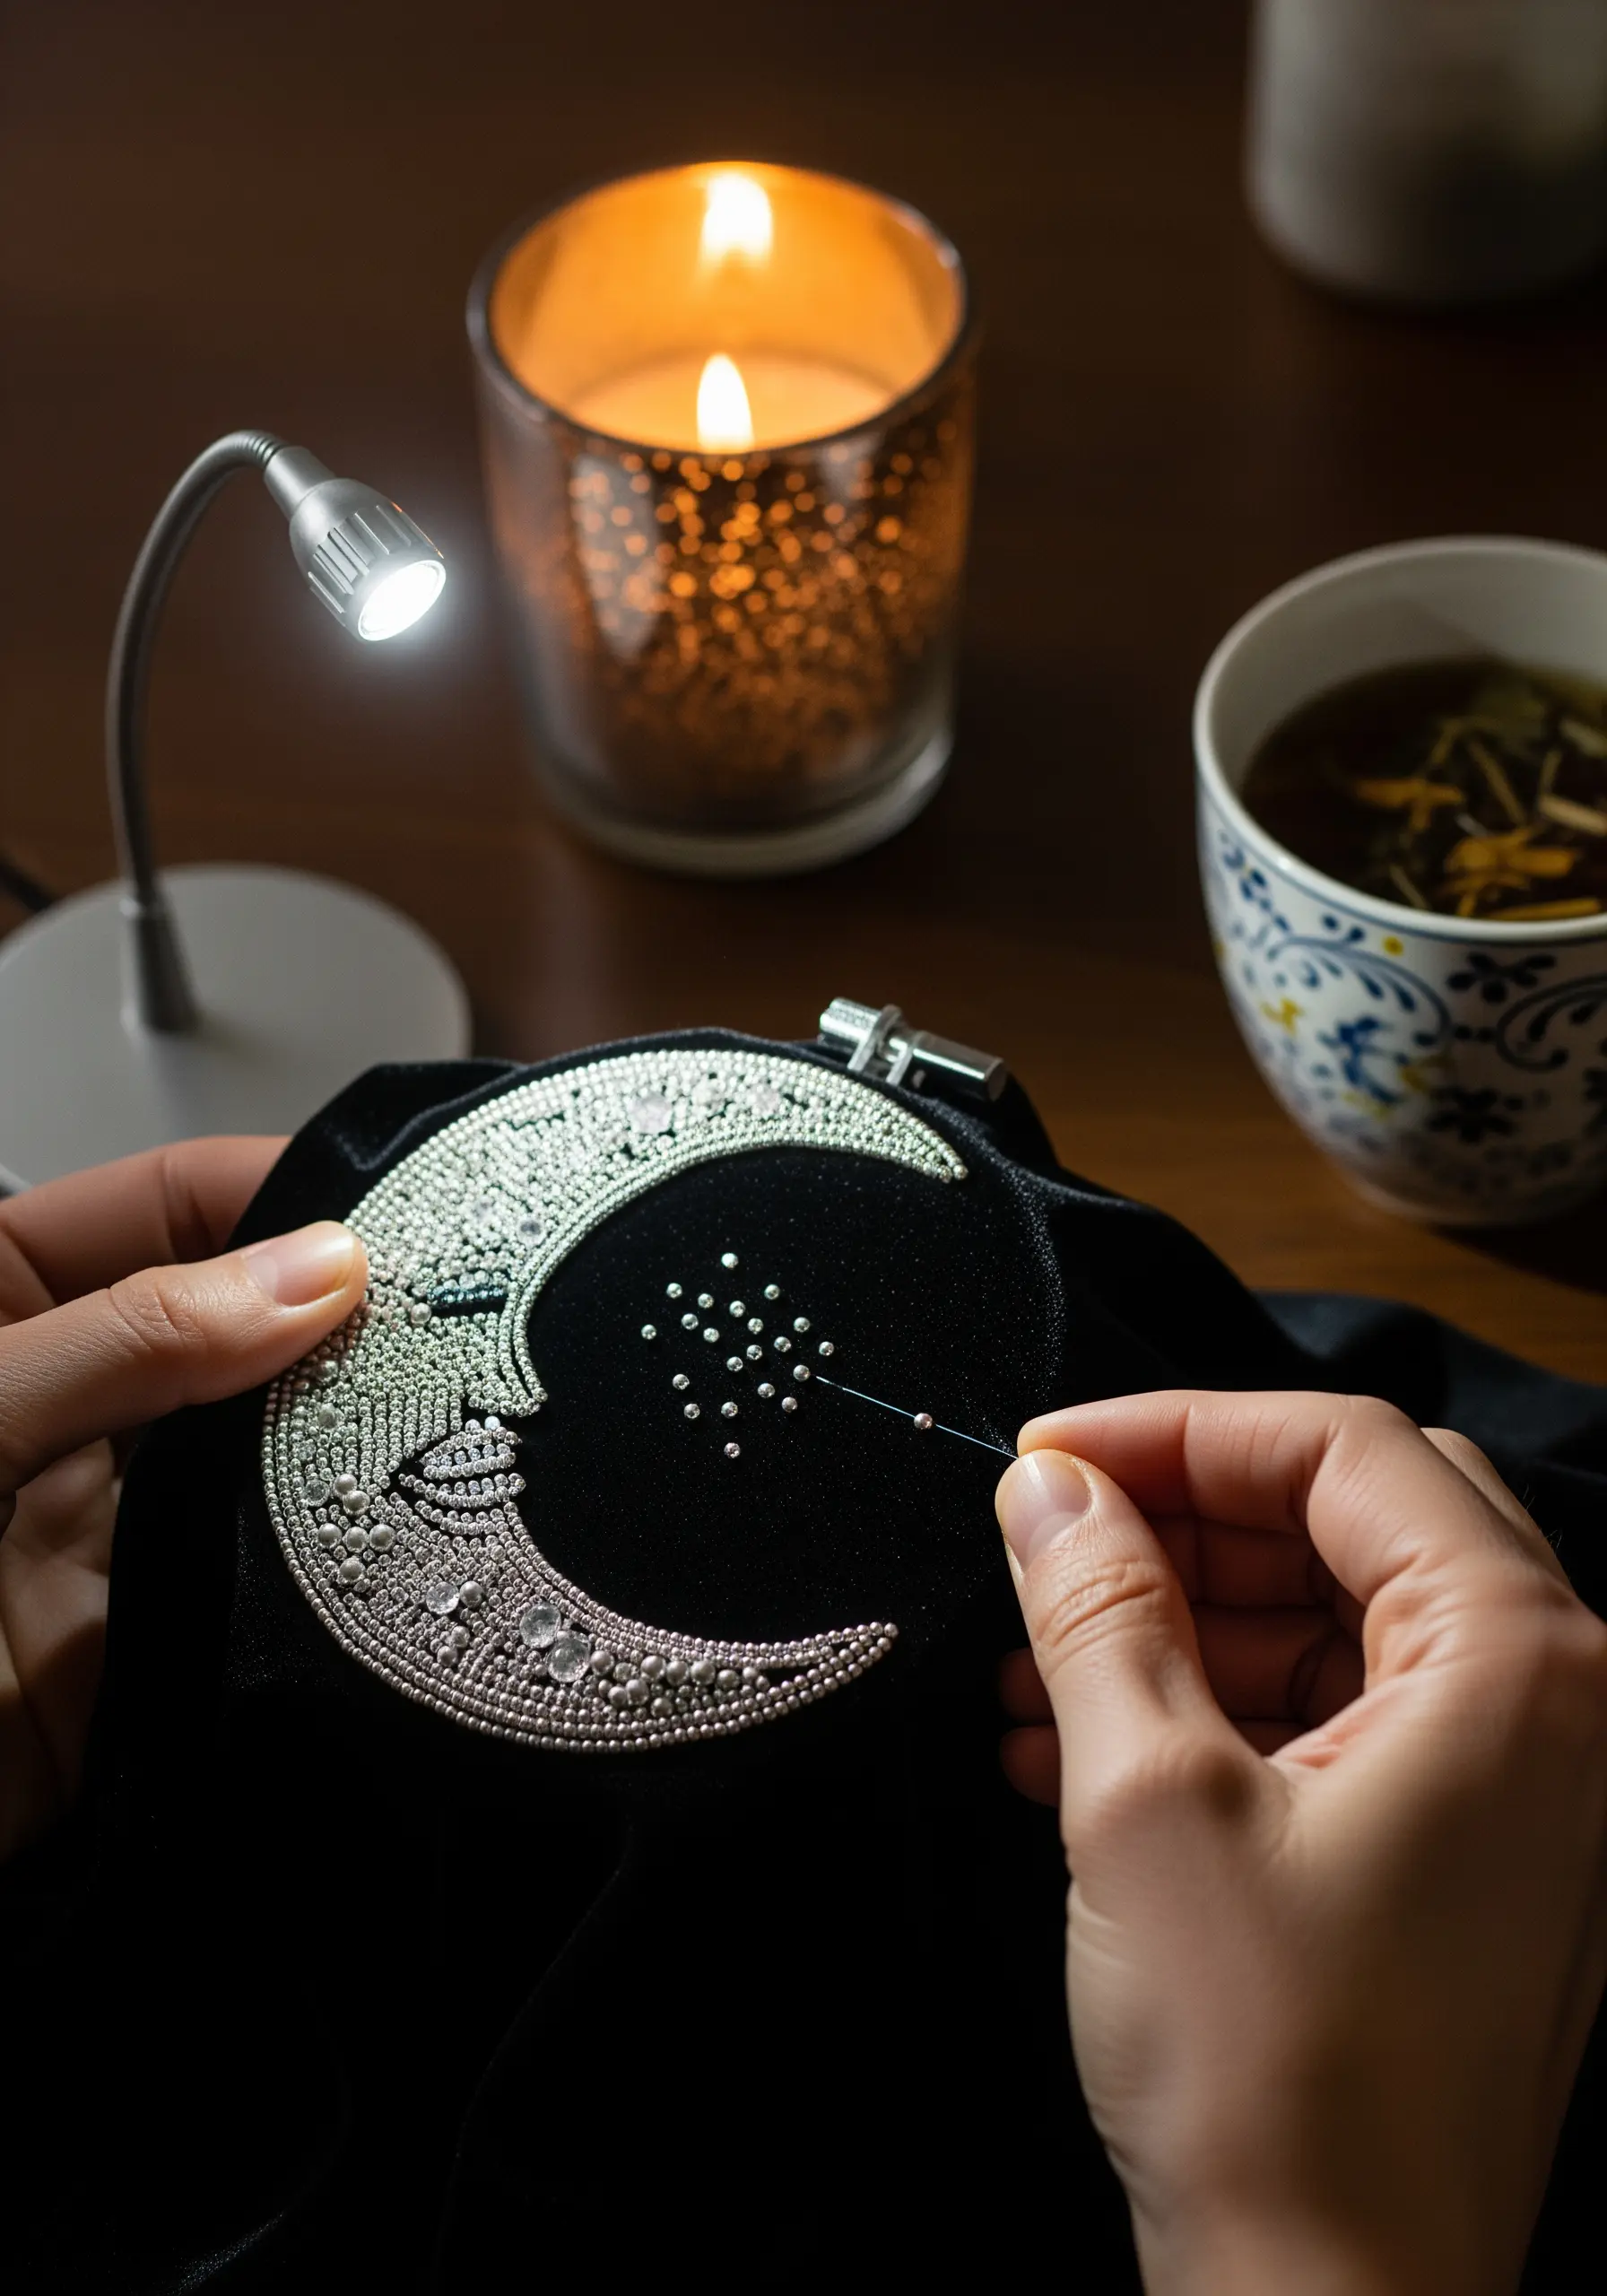
Stitching on a plush fabric like velvet requires a delicate touch to avoid crushing the pile.
Always use a hoop with the inner ring wrapped in cotton twill tape to gently grip the fabric without marking it.
Use a fine beading needle and a strong, synthetic thread like Nymo to attach your seed beads and crystals one or two at a time with tiny backstitches.
The combination of reflective beads against the light-absorbing velvet creates a stunning celestial effect, where your stitches seem to float on a dark sky.
13. Create a Personal Stitch Library Sampler
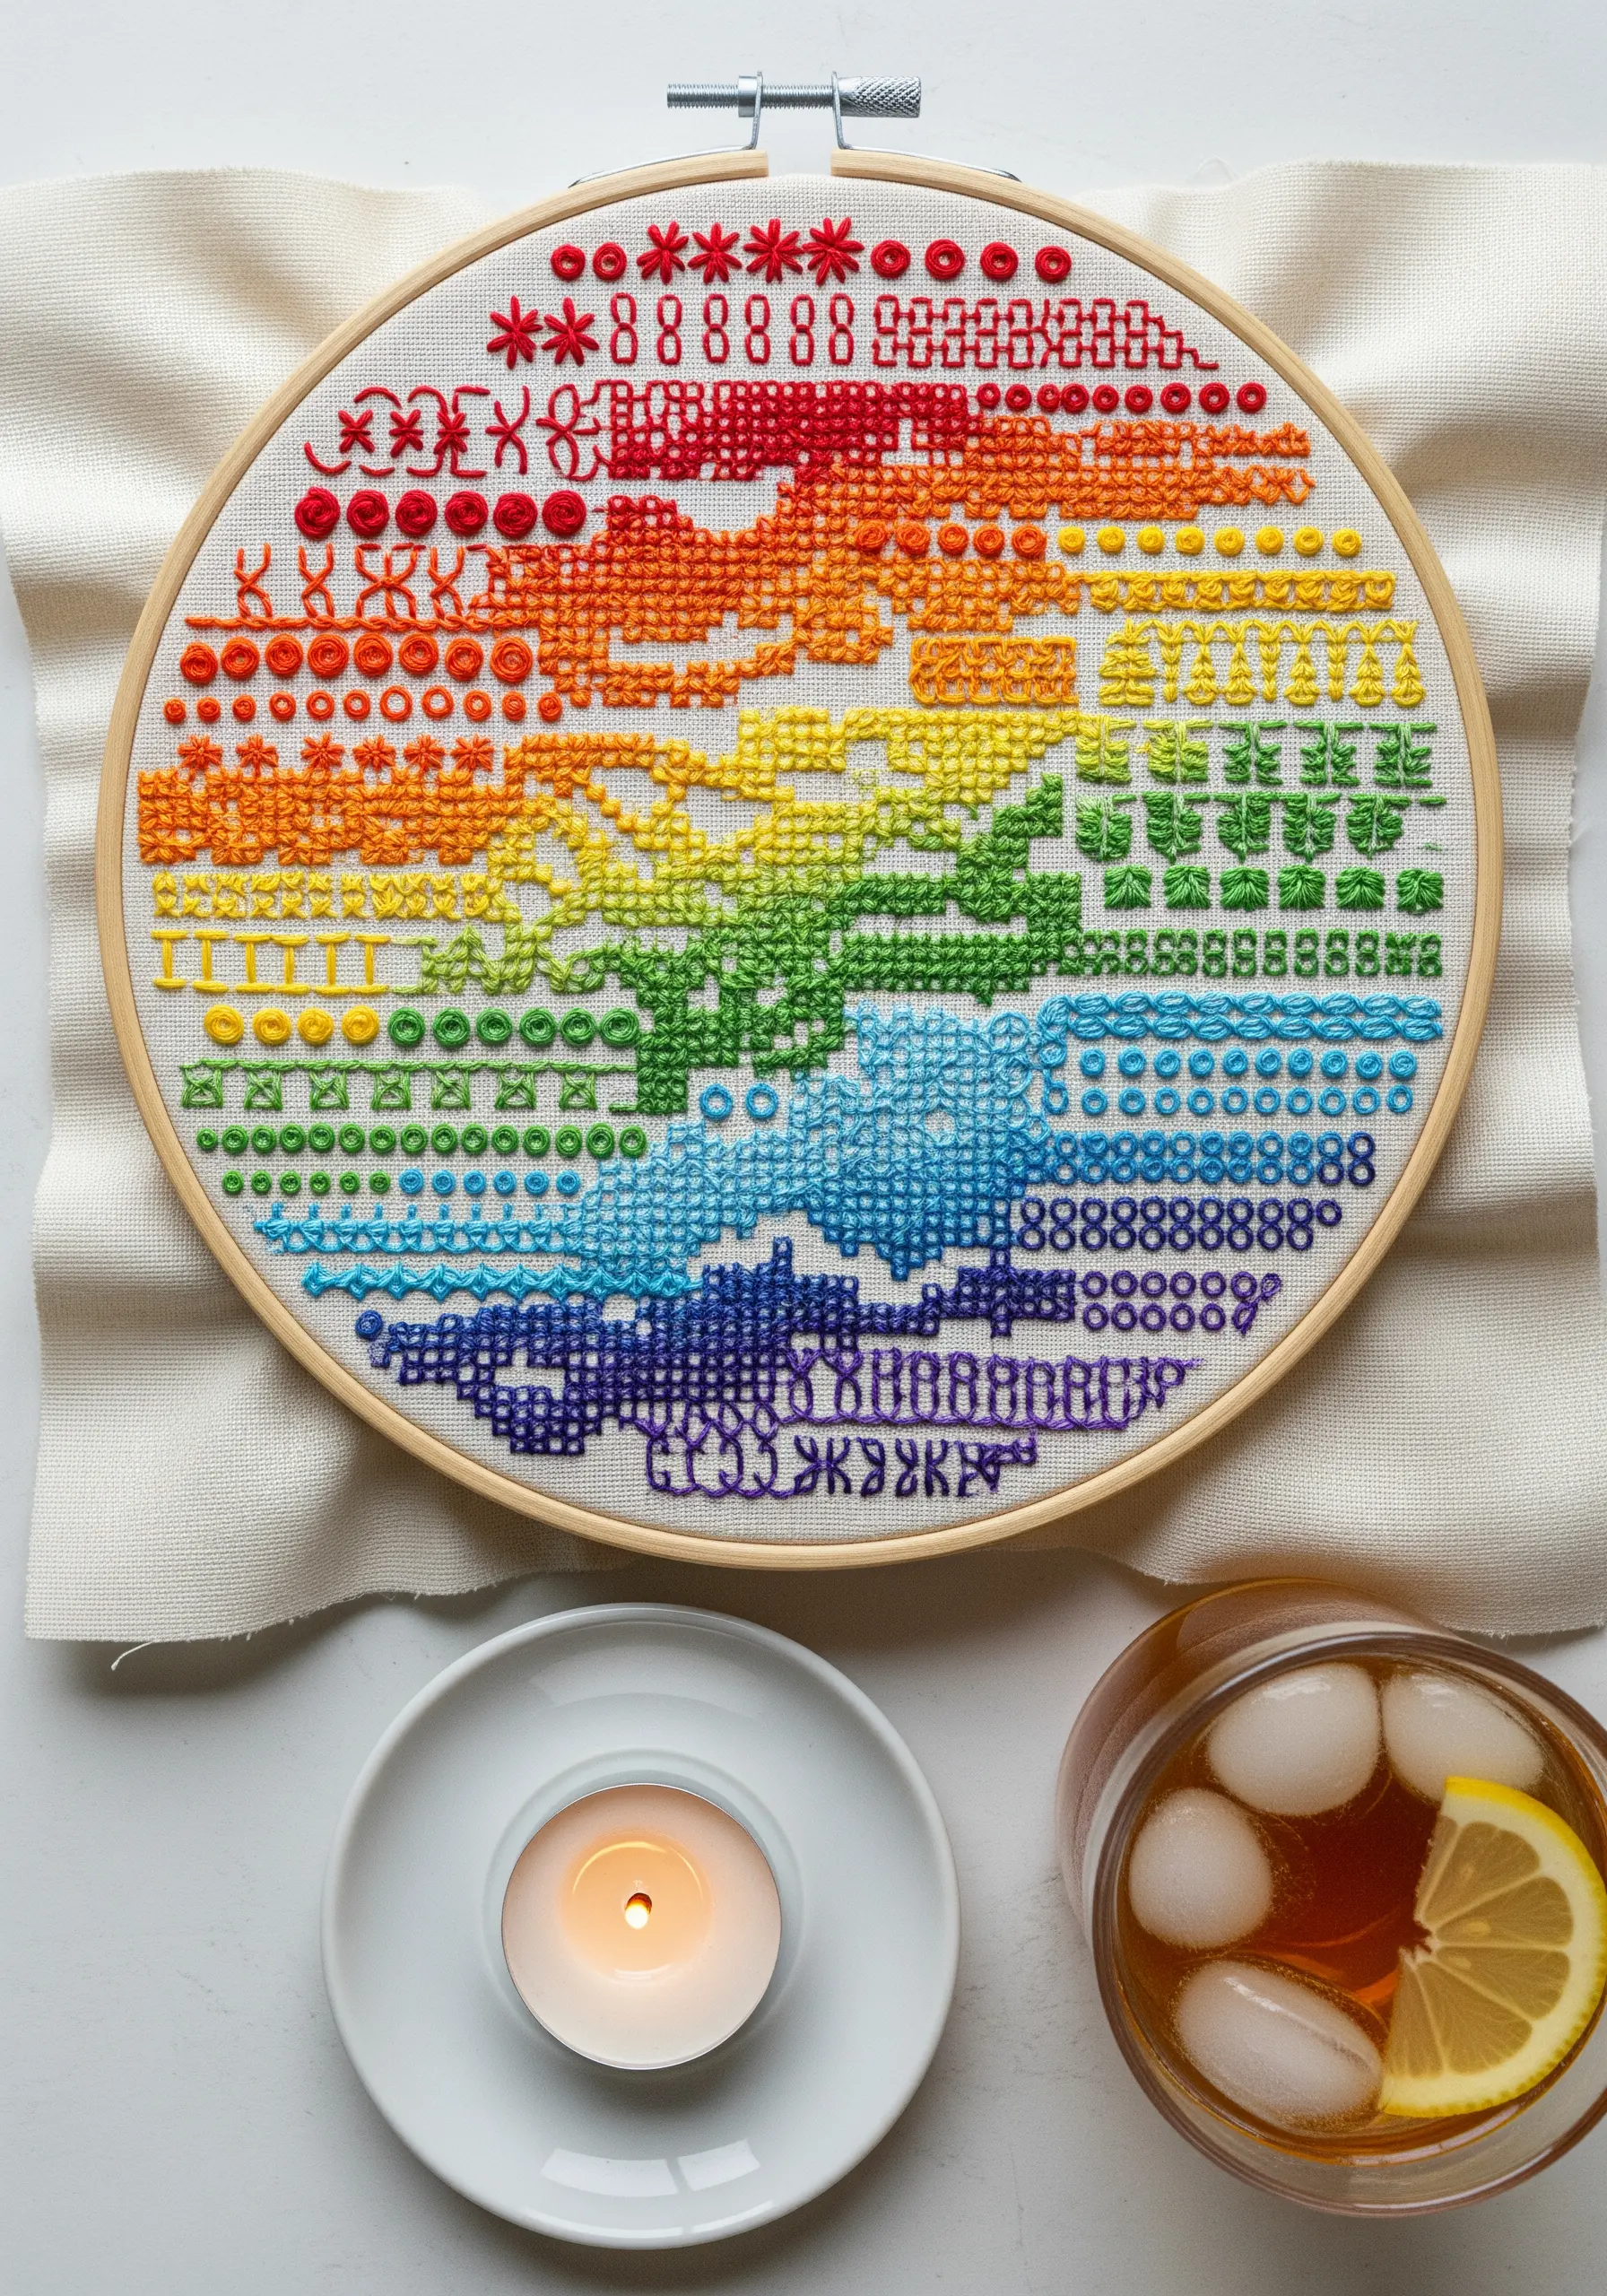
Transform your stitch practice from a simple exercise into a beautiful piece of reference art.
Instead of stitching random lines, arrange your stitches—from chain stitches to French knots to woven wheels—into a cohesive, abstract landscape.
Organize them by color to create a rainbow gradient, or group them by texture to explore how different stitches can be used for shading, outlining, or filling.
This sampler becomes your personal encyclopedia of textures, a beautiful reminder of your skills that is also a stunning piece of wall art.
14. Achieve Realism with Thread Painting
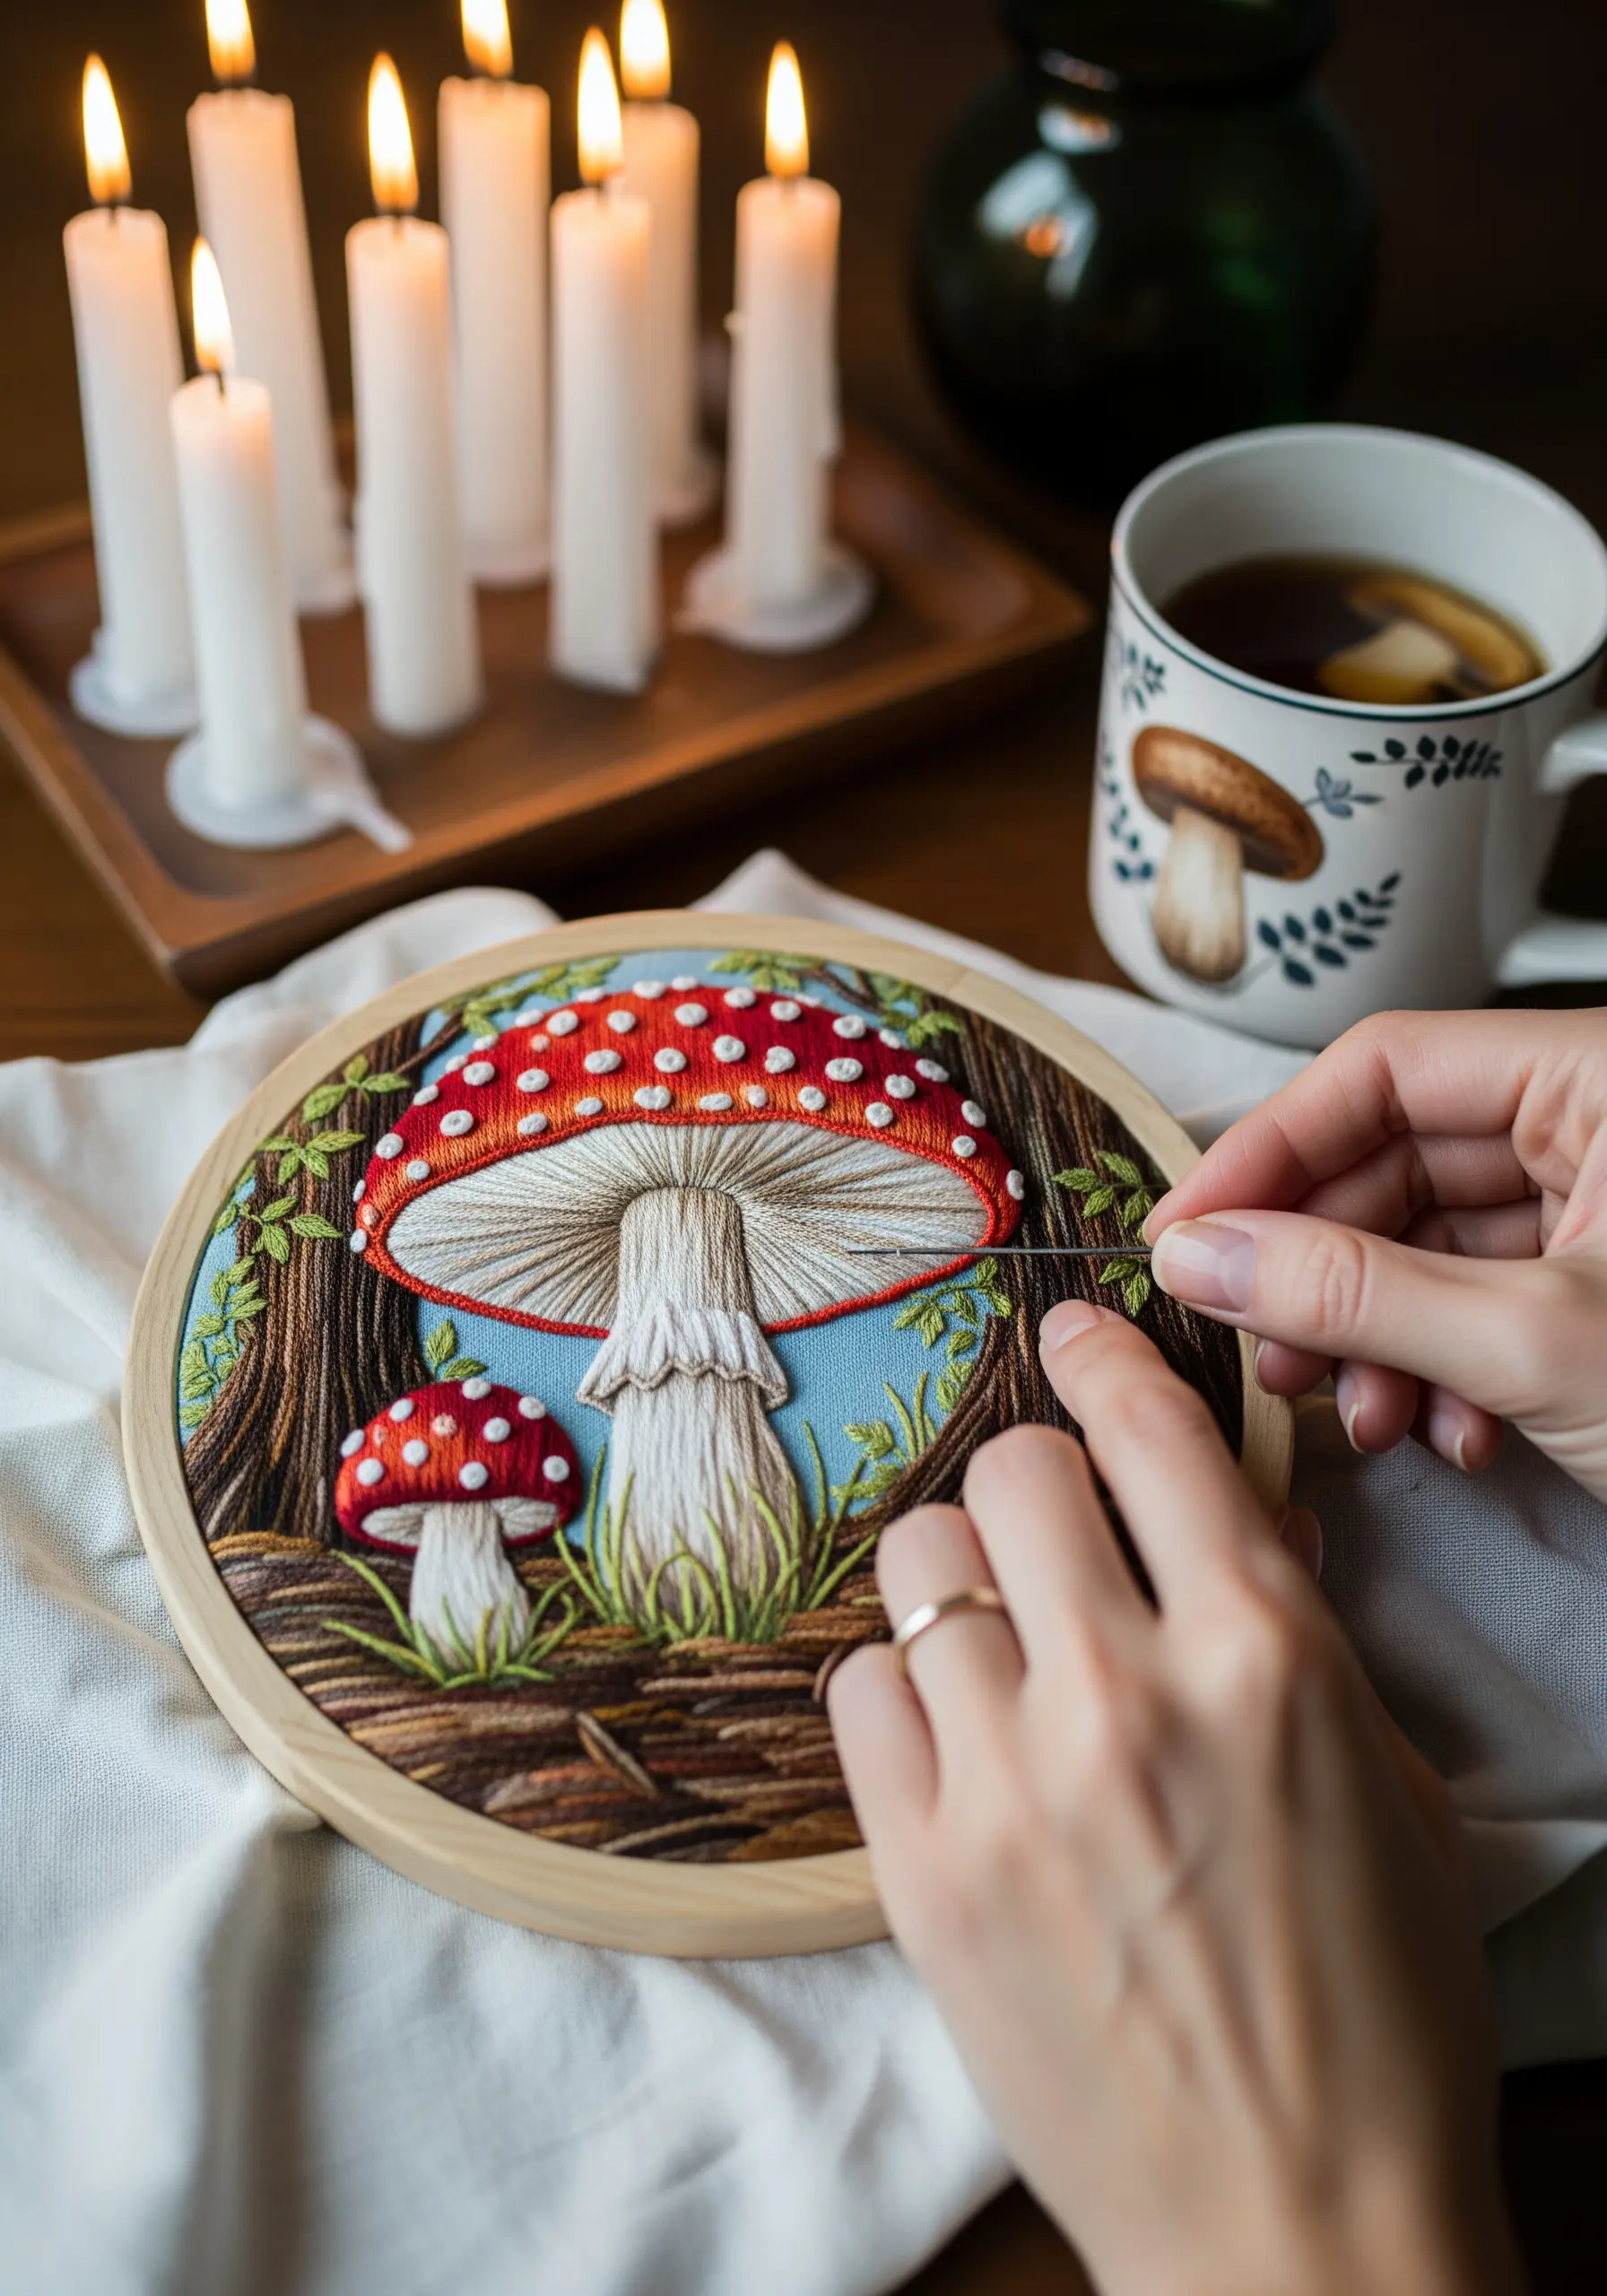
Thread painting, or needle painting, is the art of blending colors with long-and-short stitch to create a photorealistic effect.
For the mushroom’s gills, use single strands of several shades of cream and taupe, angling your stitches to radiate out from the stem just like real gills.
The key is to make your stitches directional; they should always follow the contours and growth direction of the object you are rendering.
This technique turns your thread into paint, allowing you to create depth, shadow, and form for stunningly realistic hyper-realistic botanical embroidery.
15. Capture Fur Texture in a Pet Portrait
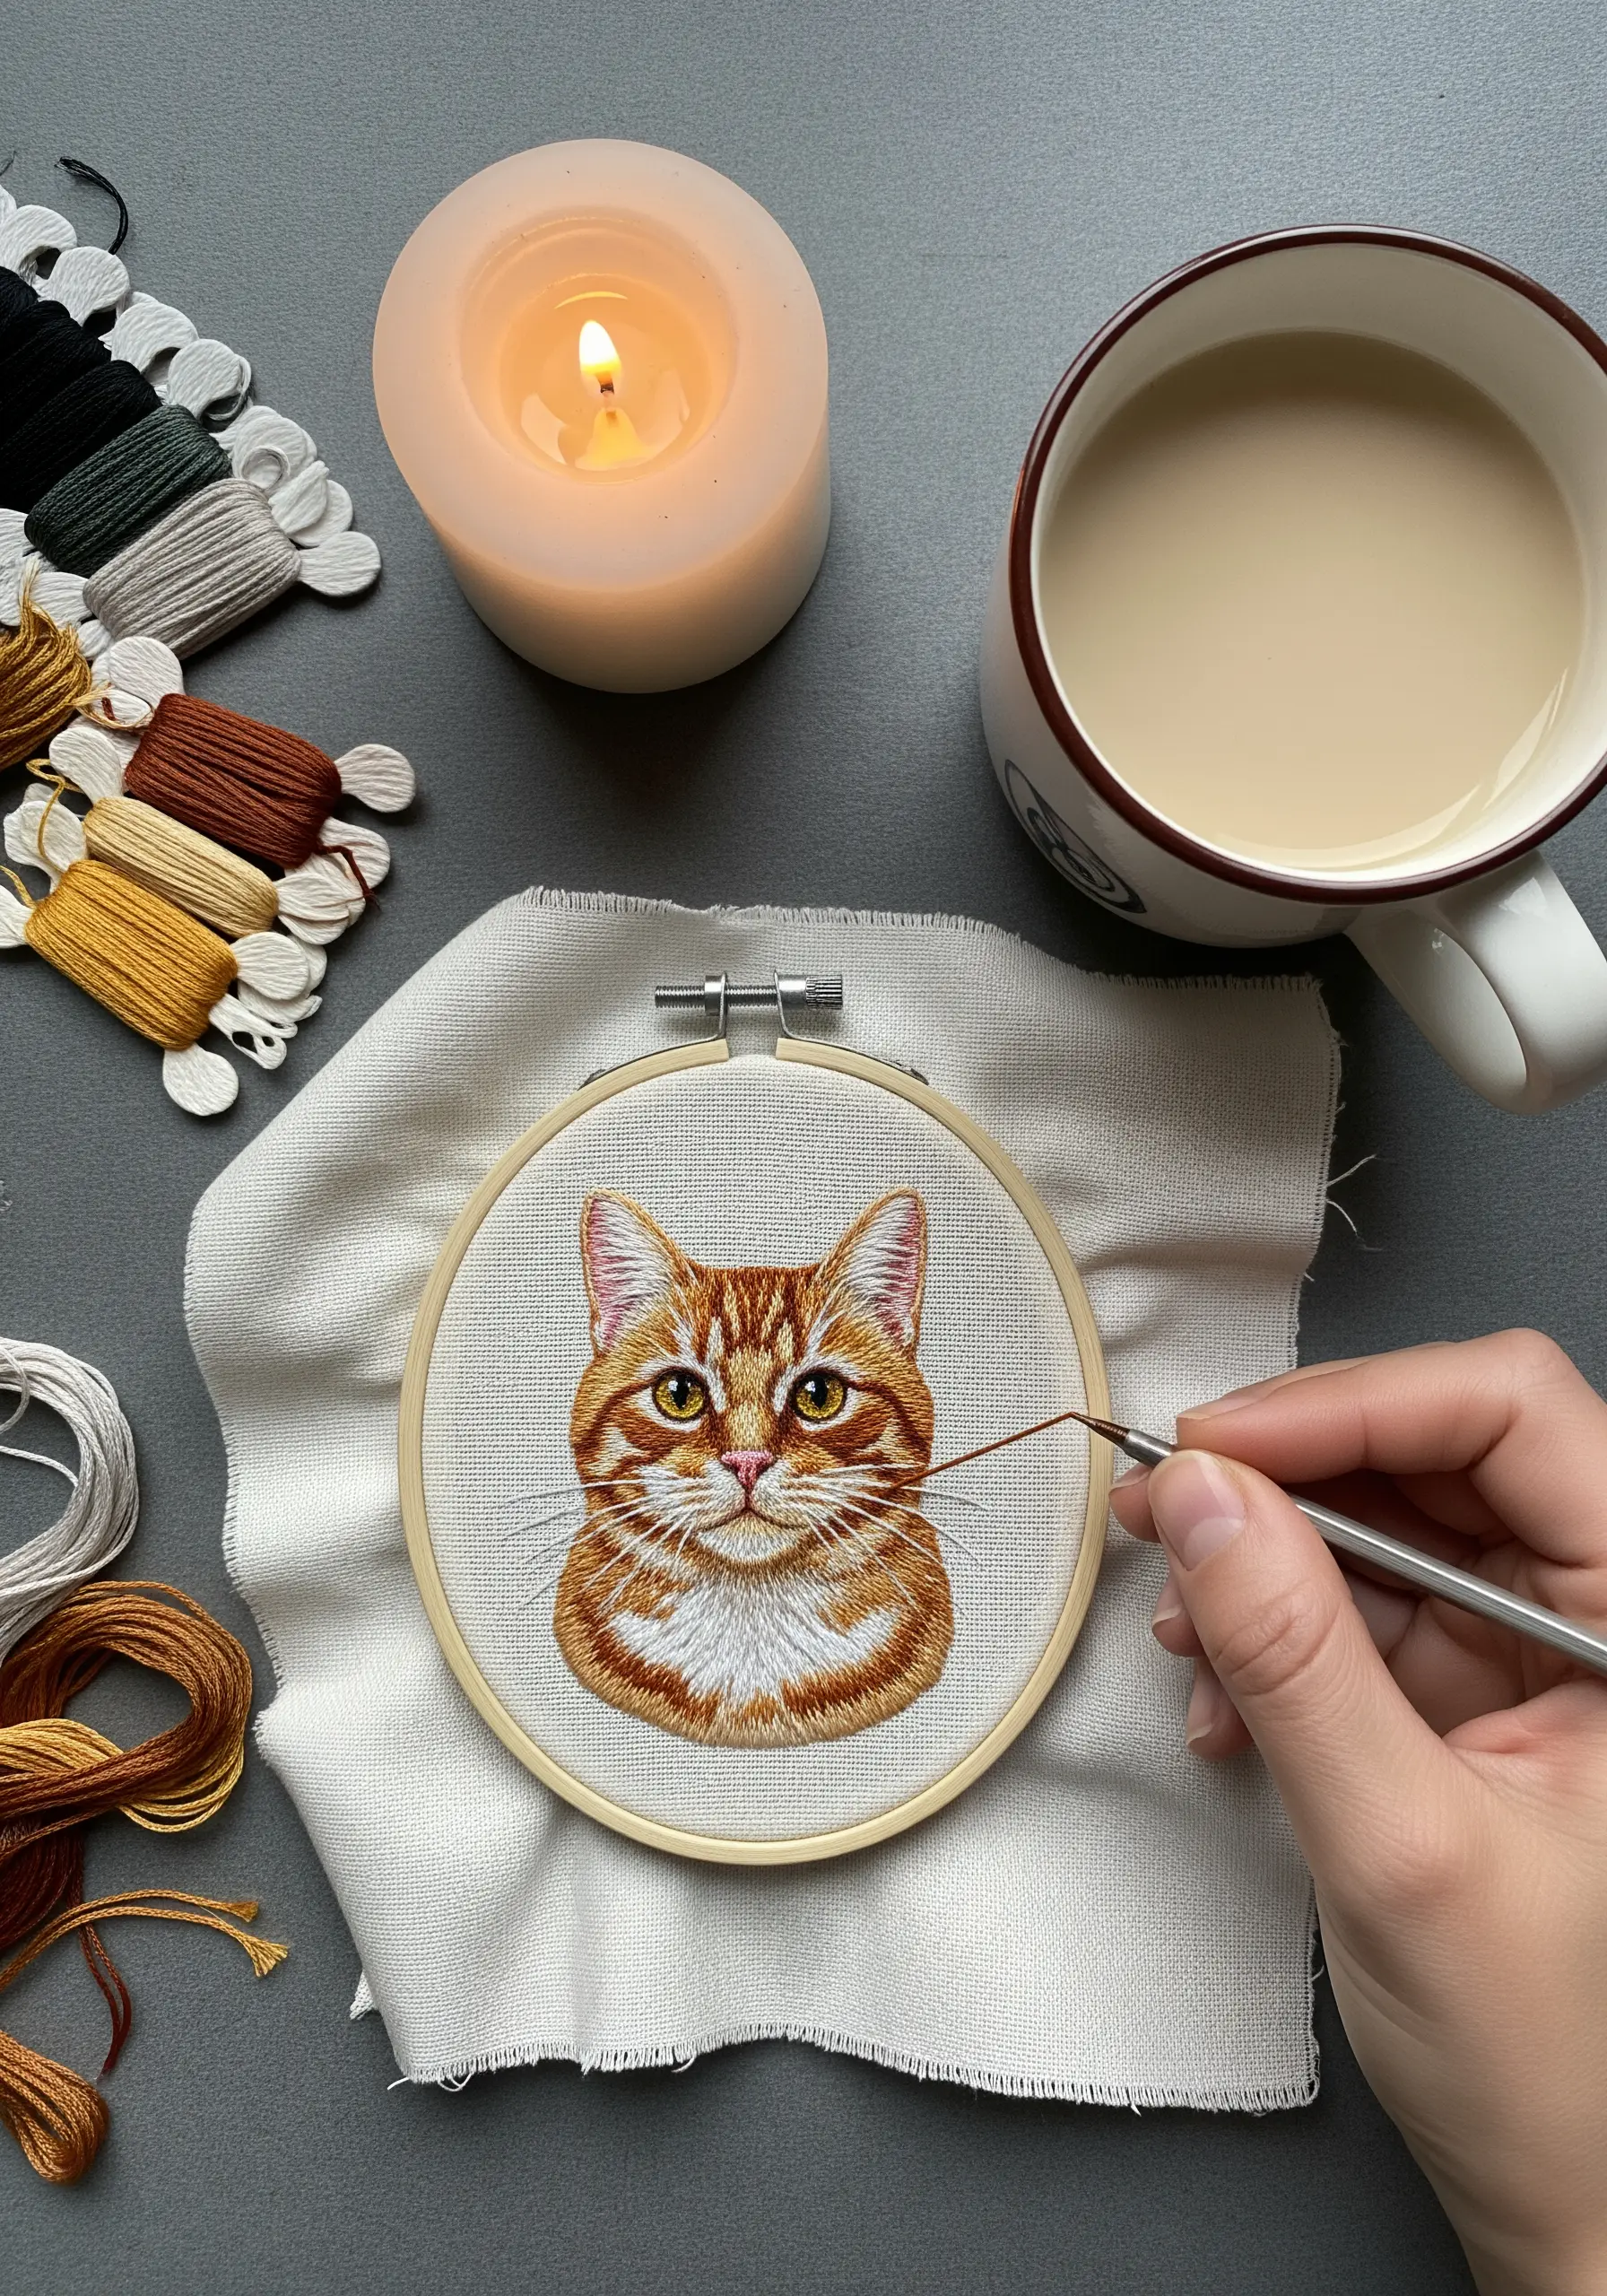
The secret to lifelike embroidered fur is to use a single strand of cotton floss and think like a sketch artist.
Work in short, layered stitches that follow the natural direction of the animal’s fur growth—outward from the nose, down the cheeks, and fanning around the eyes.
Build up colors slowly, starting with the darkest shades for shadows and layering lighter colors on top for highlights.
This meticulous layering creates a soft, believable texture that captures the essence of a beloved pet, turning a photo into a hand-stitched portrait.
16. Elevate Appliqué with Decorative Edges
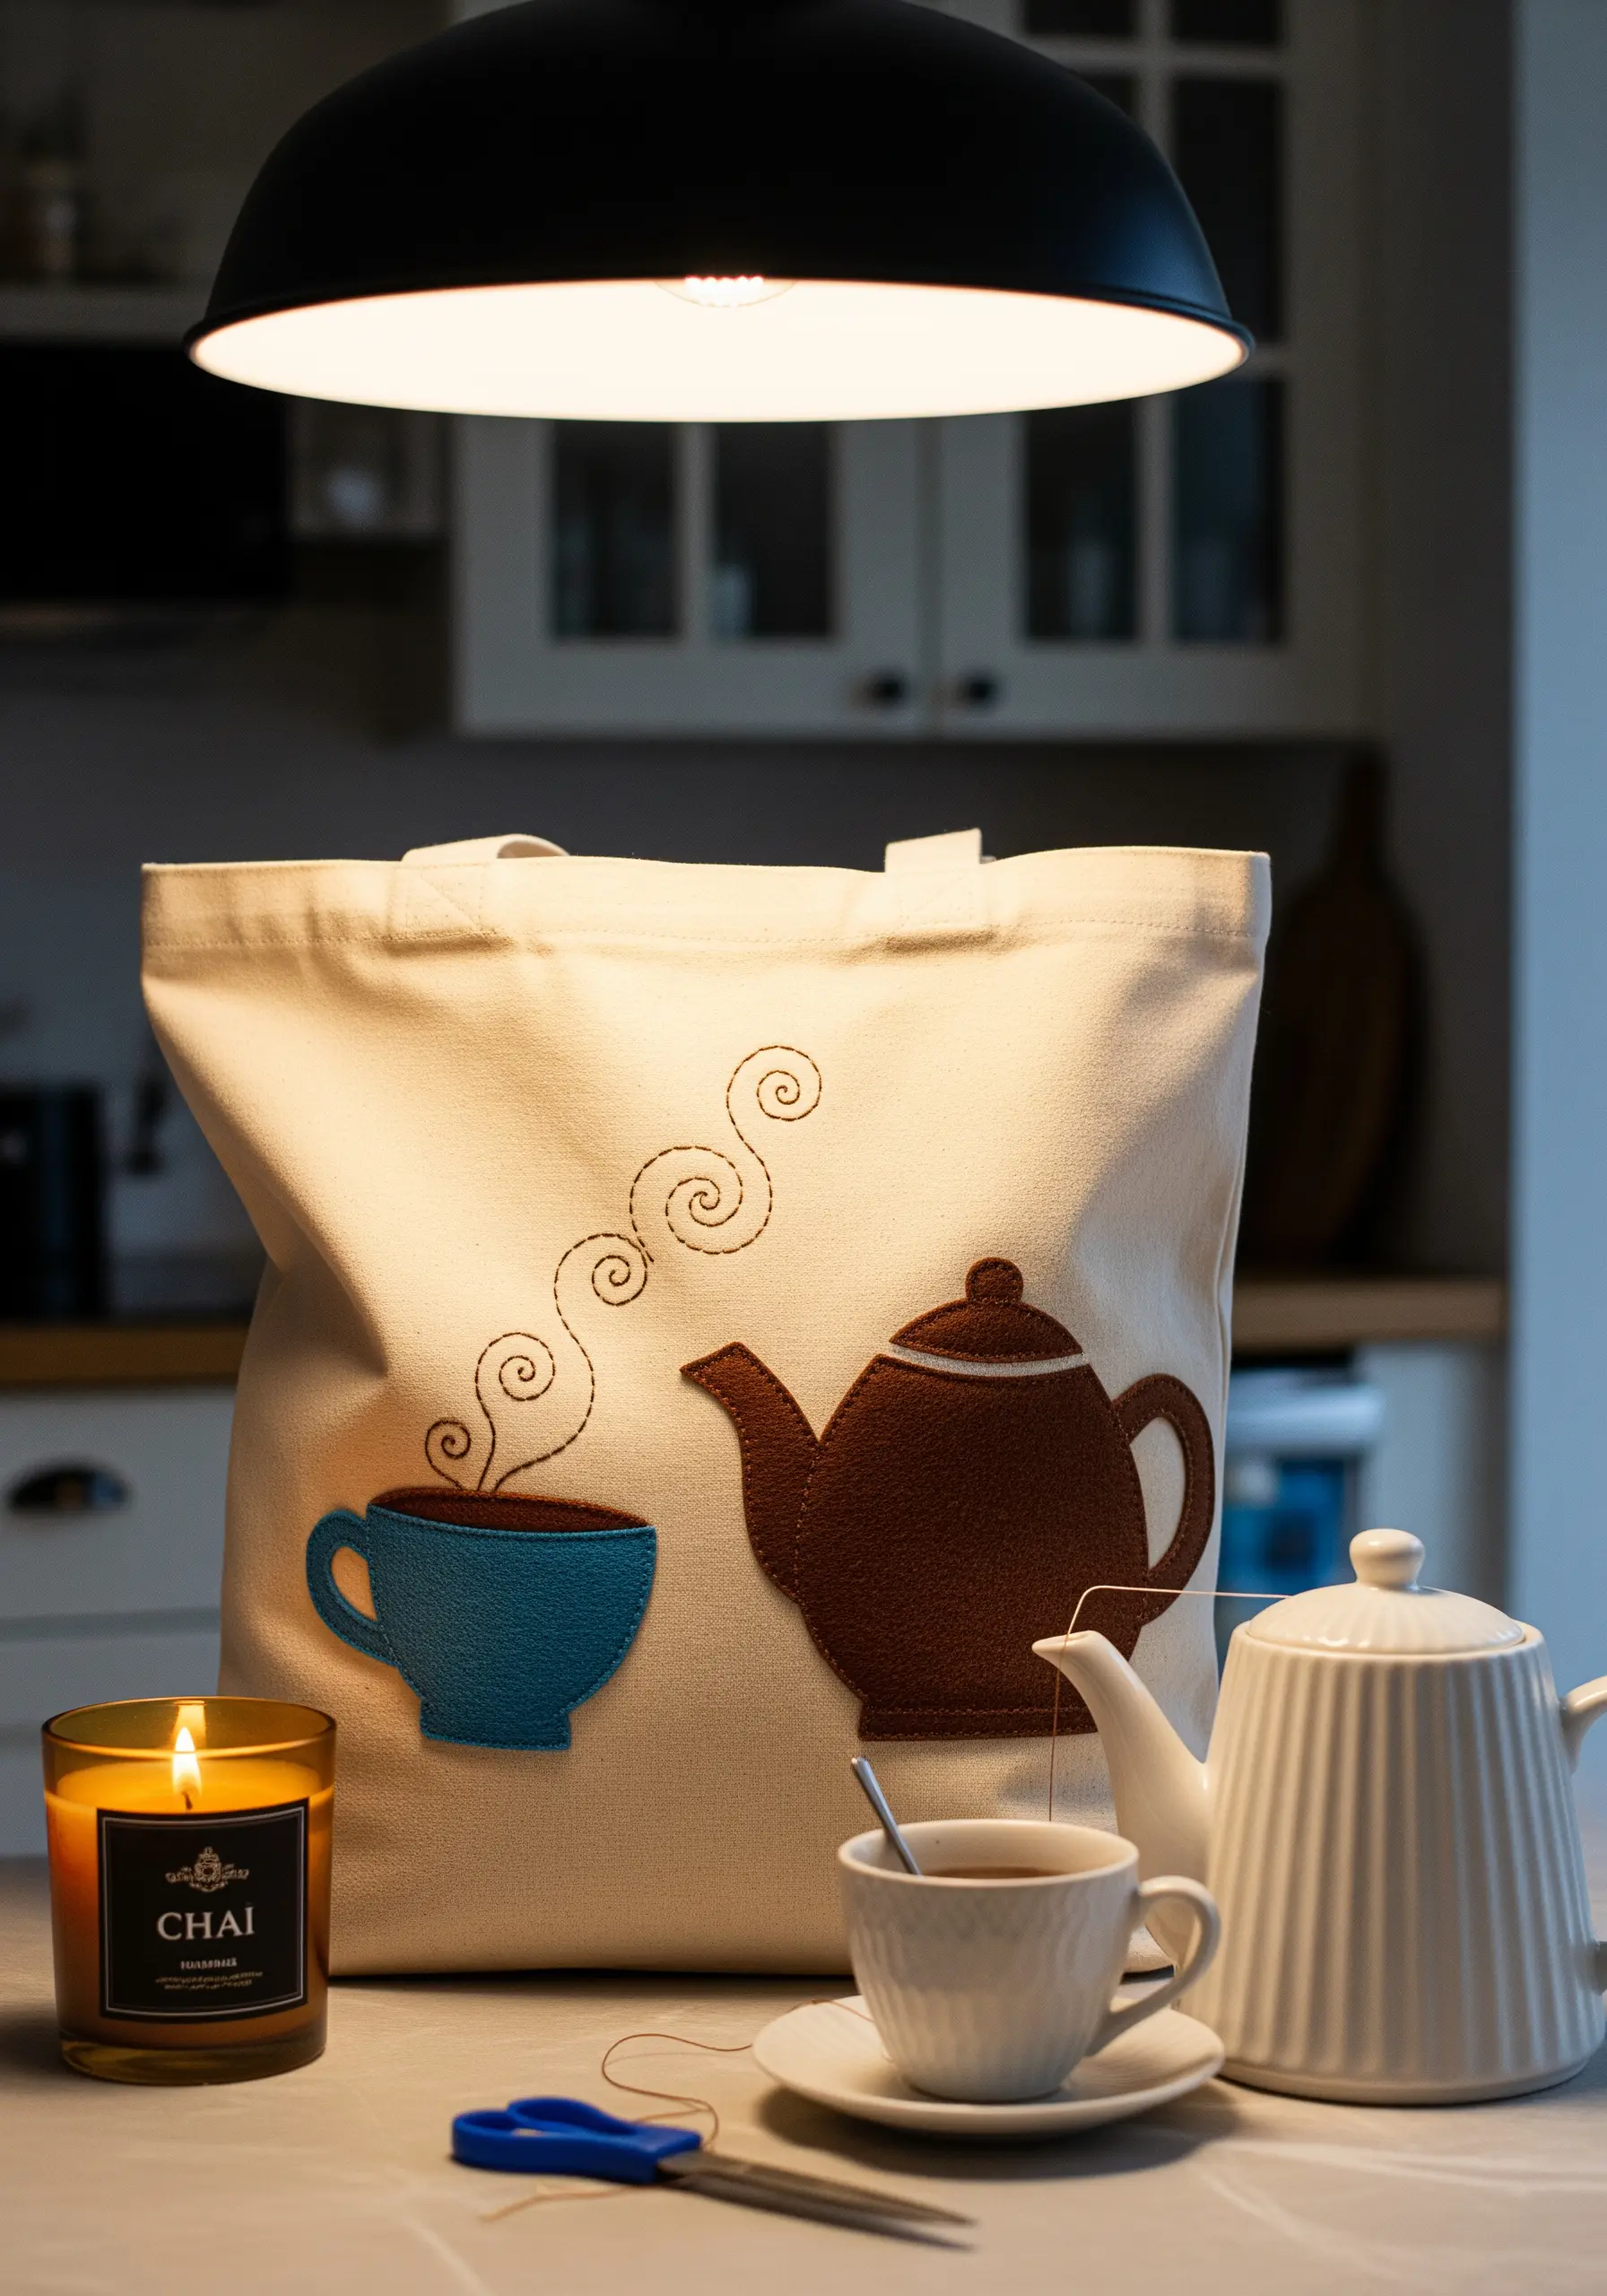
Move beyond a simple running stitch to secure your appliqué pieces for a more polished and durable finish.
Use a classic blanket stitch around the edges of your felt shapes; it provides excellent coverage and adds a charming, decorative border that frames each element.
For the curling steam, ditch the simple backstitch and opt for a stem stitch. It creates a naturally curved, rope-like line that flows beautifully.
These simple stitch upgrades make your fabric embroidery ideas look intentional and professionally finished.
17. Couch Metallic Threads for Flawless Radiance
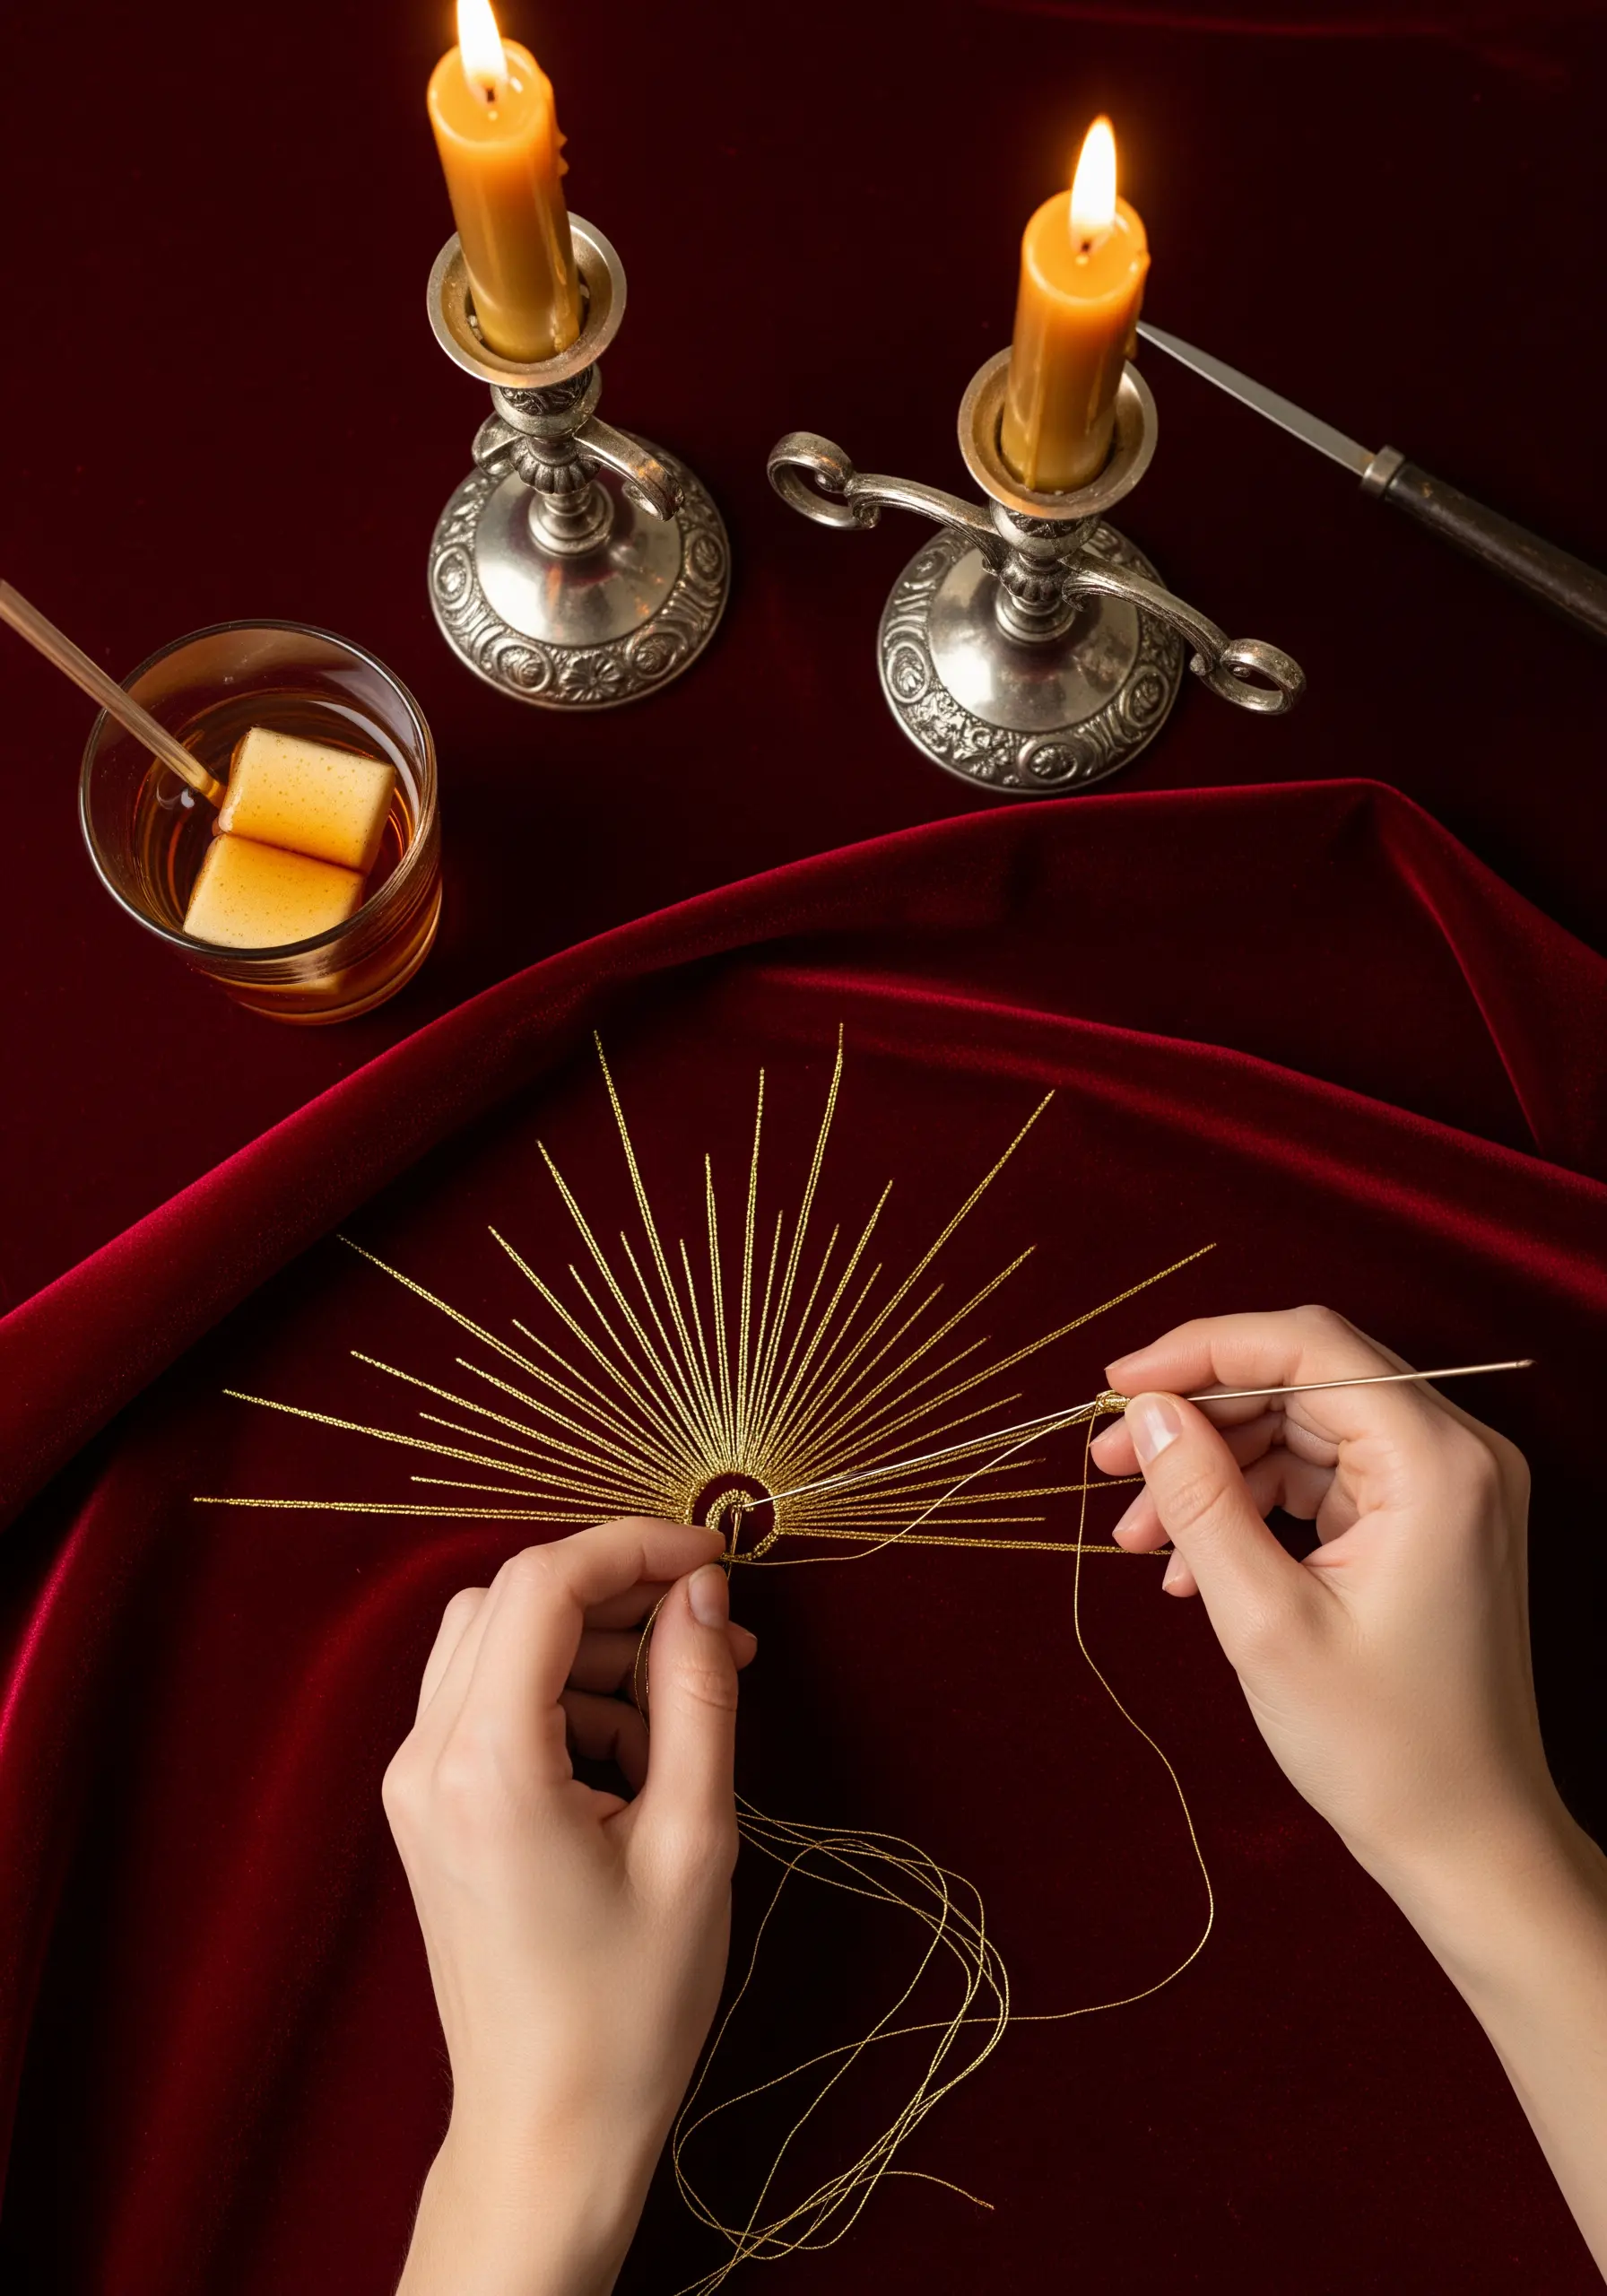
To create long, perfectly straight lines with metallic thread without it twisting or snagging, use the couching technique.
Lay your metallic thread on the surface of the fabric along your design line, then use a second, finer thread (in a matching or contrasting color) to tack it down with tiny, perpendicular stitches.
This method keeps the metallic thread sitting smoothly on top of the fabric, maximizing its shine and preventing it from sinking into a plush material like velvet.
It’s the perfect technique for abstract metallic thread embroidery that requires precision and high impact.


