

Have you ever felt a gap between the idea in your mind and the embroidered piece in your hands? You choose the perfect quote, the right colors, but the final result feels… polite. It’s nice, but it doesn’t have the voice or the presence you imagined.
The secret to changing that isn’t always learning a more complex stitch. It’s about rethinking your main material: the thread itself. By focusing on how thread can be wrapped, layered, twisted, and combined, you can turn simple letters into sculptural, expressive statements that command attention.
This collection is your invitation to move beyond filling in outlines. Here, you’ll discover how to build letters from texture, define them with negative space, and give them a voice through material choices alone. It’s time to let your words take up space—beautifully and unapologetically.
1. Achieve Depth with Directional Satin Stitch

To give your block letters a sculptural, ribbon-like quality, focus on the direction of your satin stitches.
Instead of stitching horizontally across the entire letter, fill each segment based on its natural curve or angle.
For the letter ‘C’, your stitches should radiate from the inner curve to the outer curve, like spokes on a wheel.
This simple adjustment creates subtle highlights and shadows that trick the eye into seeing dimension, making the letters feel solid and woven.
2. Couch Chunky Yarn for Effortless Texture
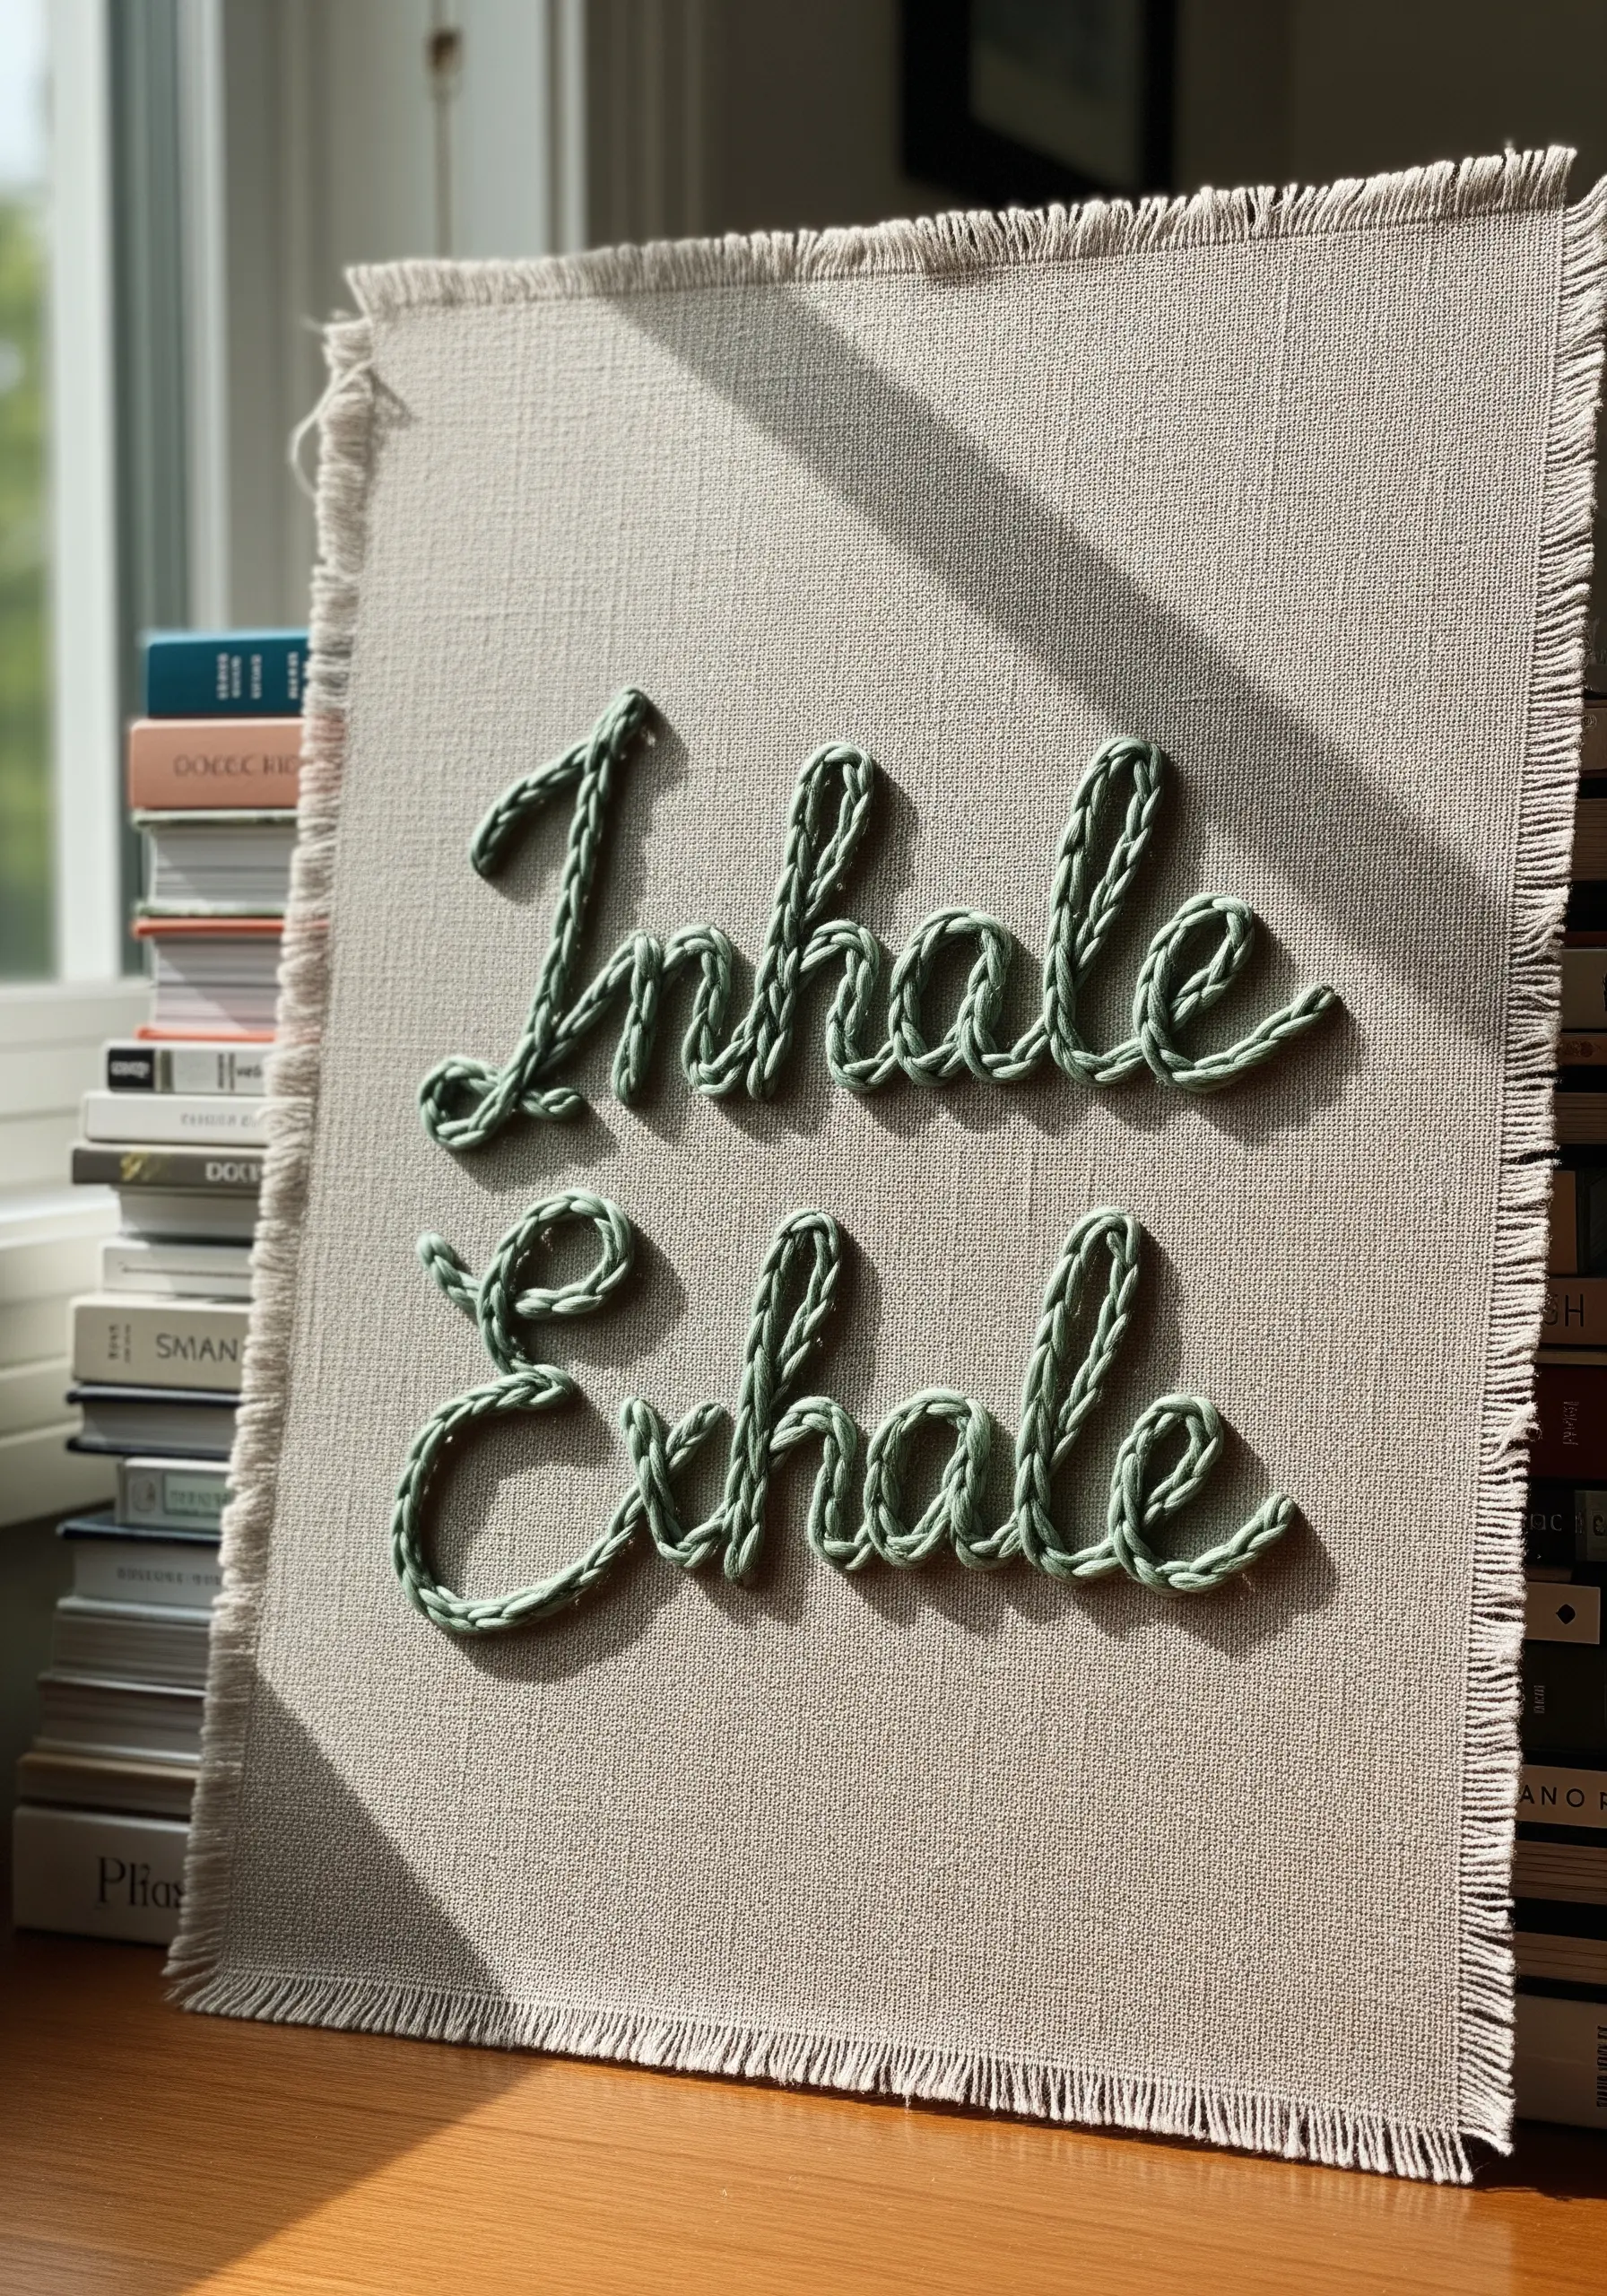
For a fast and impactful result, switch from embroidery floss to a thicker yarn or plied cord.
Instead of trying to stitch with it, lay it along your design line and use a matching, finer thread to tack it down every quarter-inch—a technique called couching.
This method preserves the yarn’s natural twist and volume, creating bold, rustic lettering with incredible texture.
Pair it with a coarse fabric like linen or burlap to enhance the organic, tactile feel of your rustic farmhouse embroidery.
3. Construct Graphic Letters with String Art
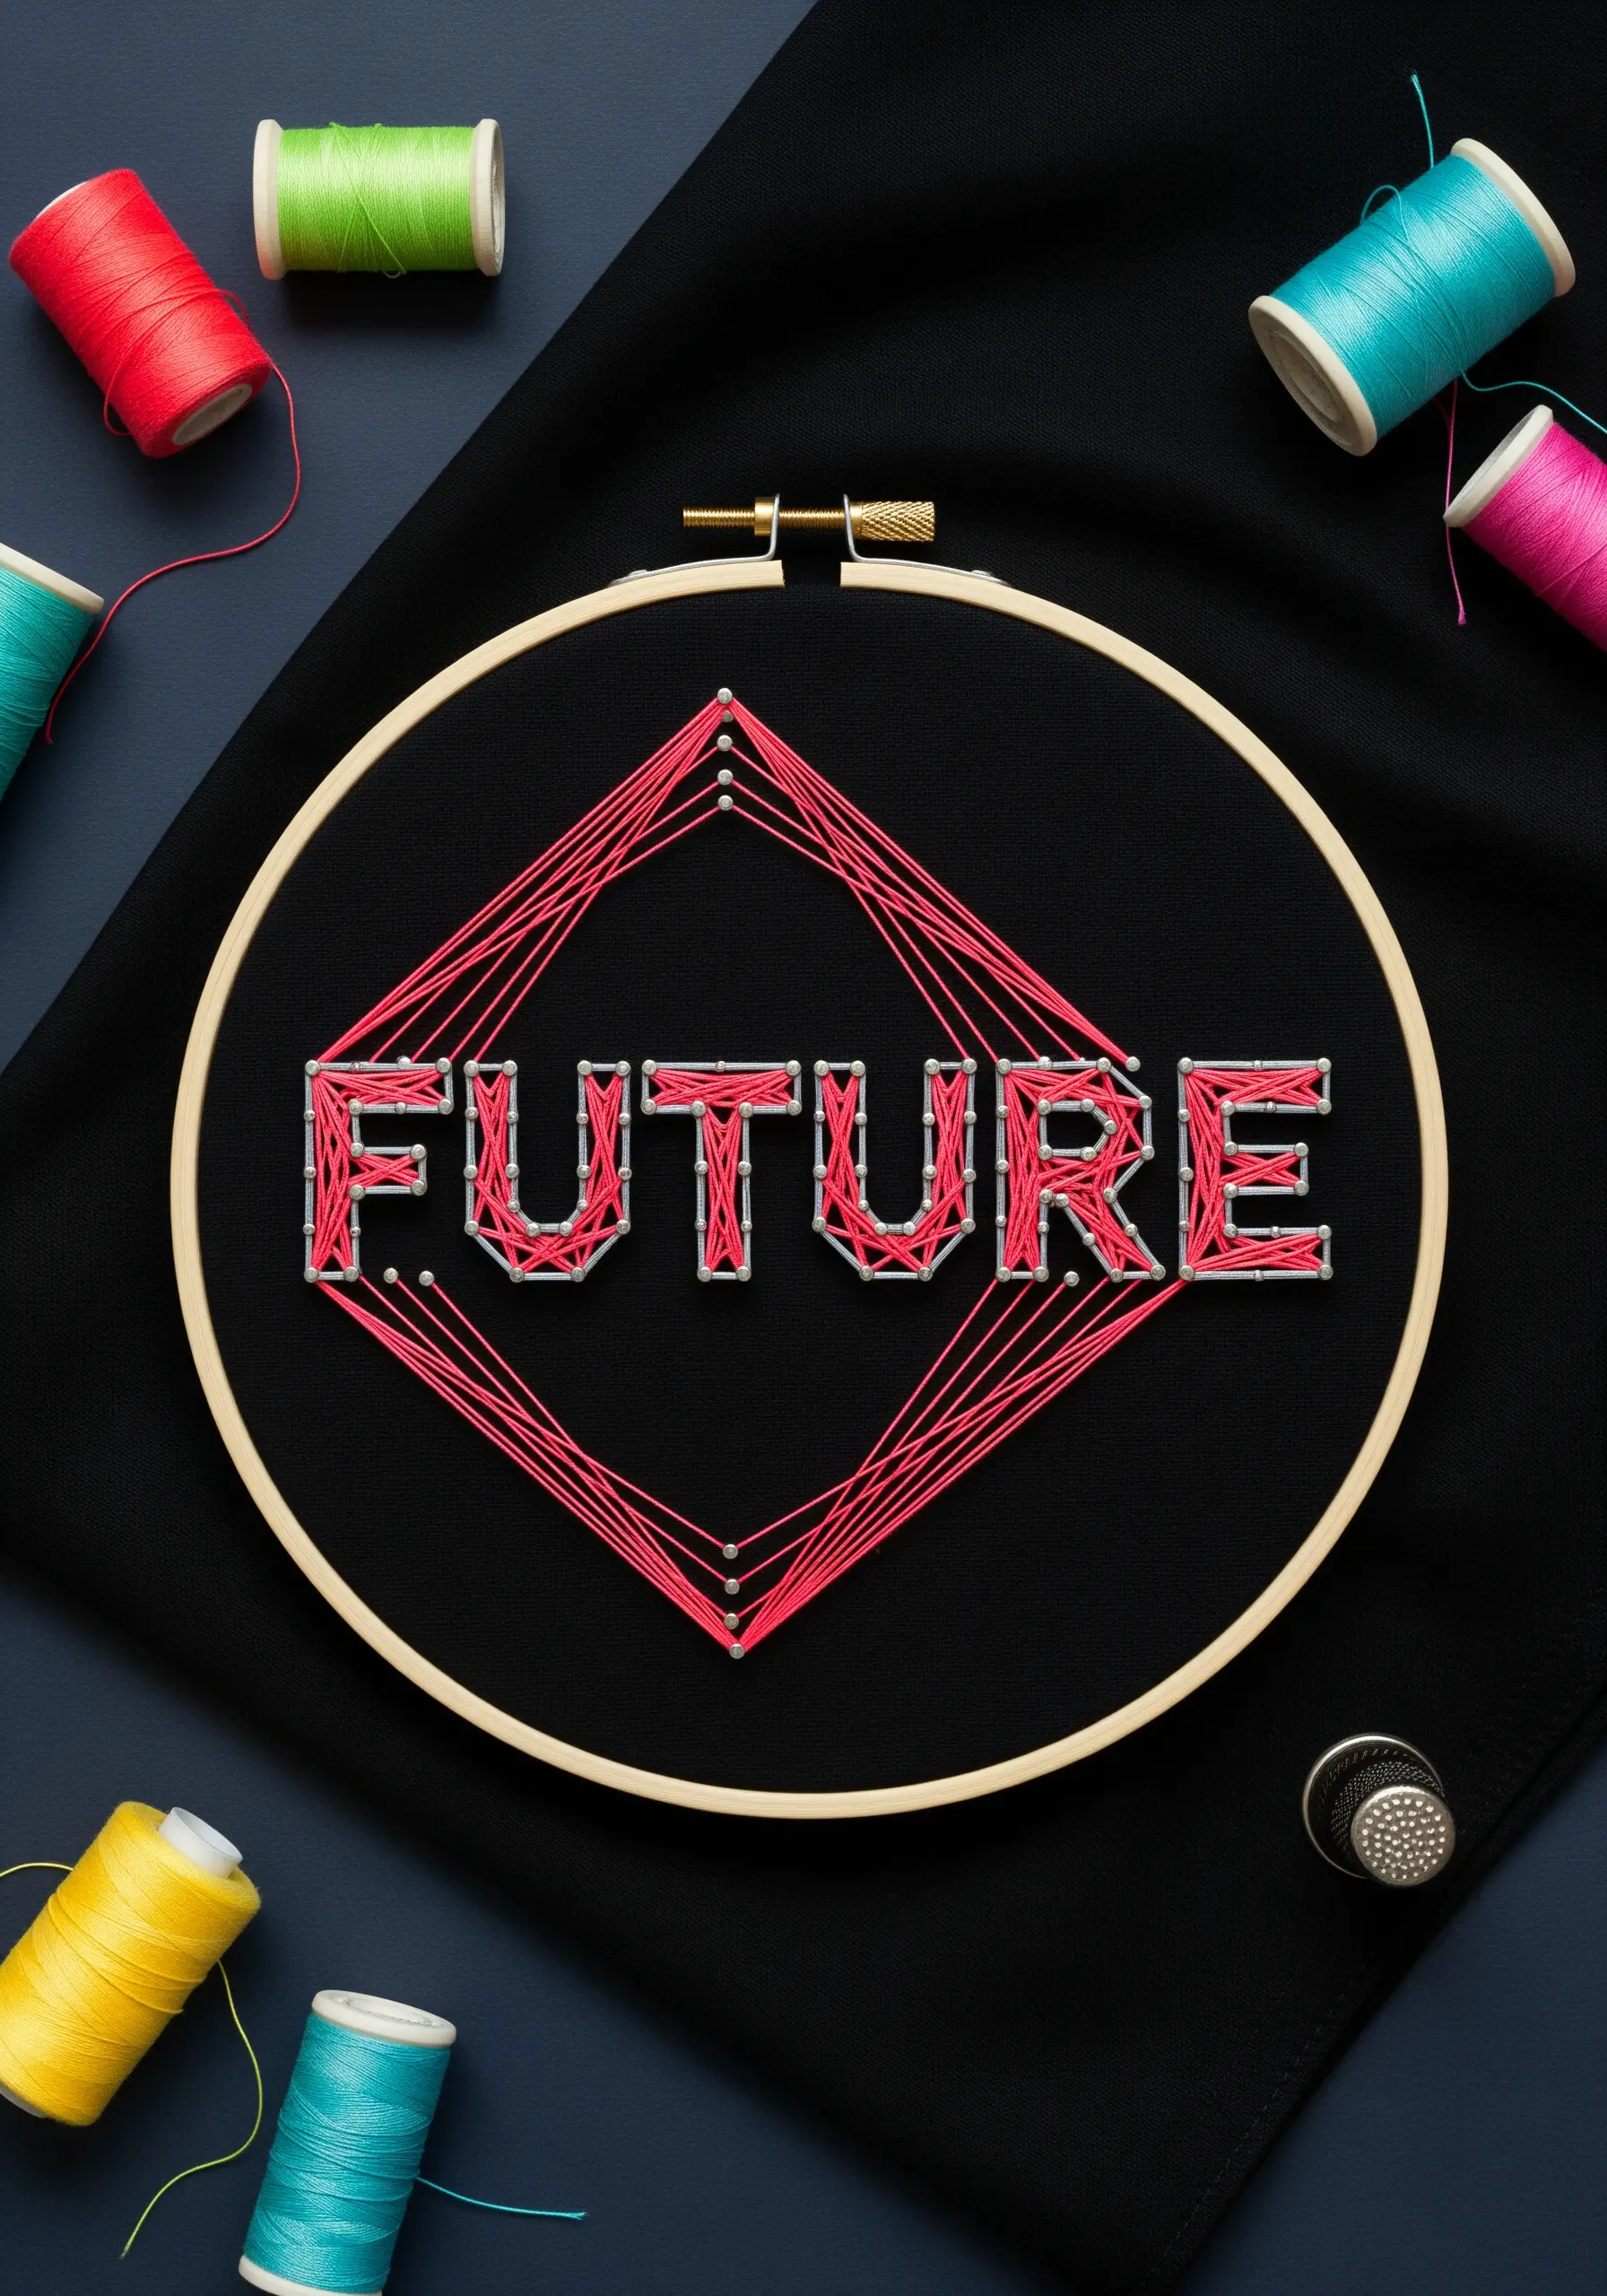
Move beyond traditional stitching by turning your hoop into a loom for string art typography.
Use small pins or a foundational backstitch around the letter outlines as anchors.
Then, wrap your thread tautly between these anchor points to fill the shape.
This creates sharp, geometric letterforms defined by tension and line, offering a modern, architectural alternative to filled stitches.
The contrast between the tight thread and the open fabric is visually striking.
4. Define Typography with Negative Space

Instead of stitching the letters, stitch the space around them.
Lightly trace your word onto the canvas, then fill the background with dense, long straight stitches, stopping precisely at the letters’ edges.
The unfilled fabric becomes the text, creating a powerful design where the absence of thread speaks loudest.
For added subtlety, you can stitch the word itself in a matching thread, relying on the change in stitch texture—not color—to make it visible. This explores how to combine thread and negative space for a sophisticated finish.
5. Weave Intricate Patterns into Letterforms
Transform each letter into a miniature textile sampler.
Begin with a raised letter base, cut from felt or craft foam and attached to your canvas.
Wrap different sections of each letter with various colors and textures of thread, or create small woven patterns directly on the surface.
This technique turns typography into a detailed mosaic, inviting the viewer to appreciate not just the word, but the intricate craftsmanship within each character. It’s a perfect way to experiment with mixed fiber creations.
6. Paint with Thread Using French Knot Gradients
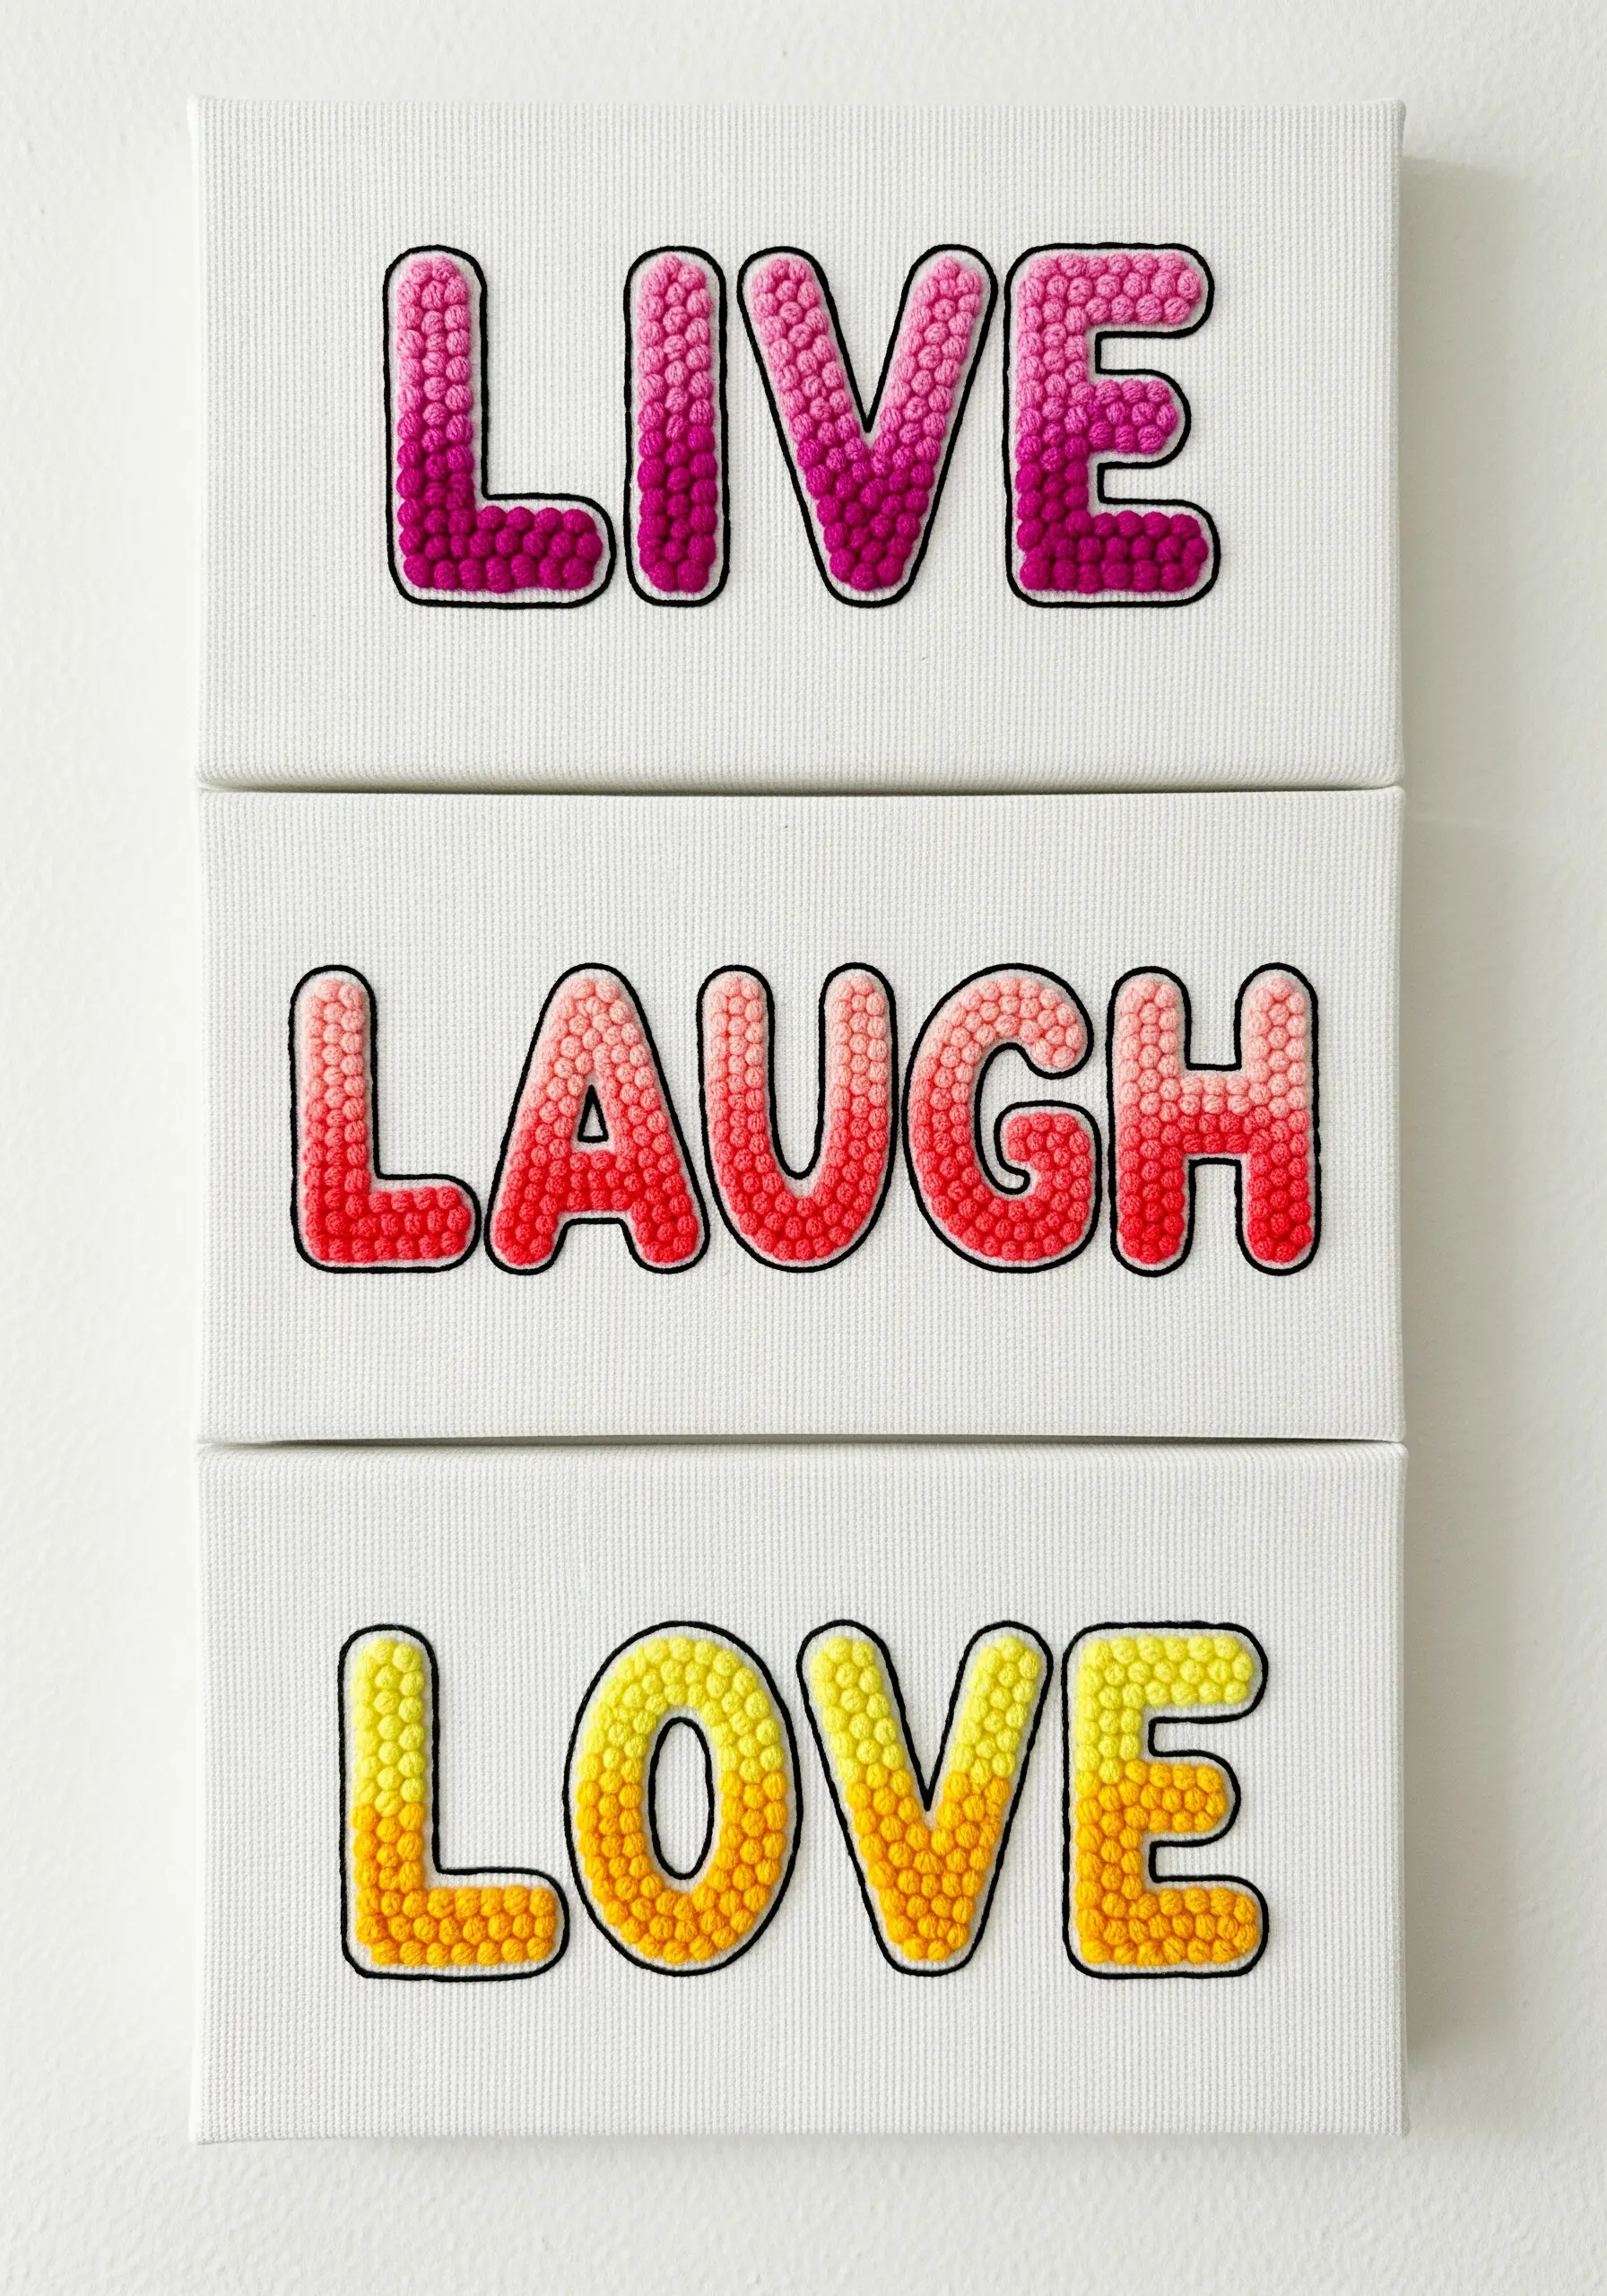
Use French knots not just as accents, but as a dense, textural fill to create a pointillist effect.
Map out a color gradient within each letter and fill it with tightly packed knots, transitioning smoothly from one shade to the next.
Using a single strand of floss creates a fine, detailed texture, while three or more strands will give you a plush, bumpy surface.
The key is density—leave no fabric showing—to create a solid field of touchable, blended color.
7. Integrate Lettering into a Painted Fabric Sky

Create a truly immersive piece by combining fabric paint with your stitching.
Use a wash of purples, blues, and pinks on a dark fabric to create a nebula effect. Let it dry completely.
Then, stitch your lettering over the top using a variegated or metallic thread to catch the light.
A whipped backstitch or stem stitch will create smooth, flowing script that appears to float within the celestial background. Add tiny seed stitches or French knots as distant stars to complete the scene.
8. Create High-Impact Drama with Sculptural Wrapping

For typography that physically comes off the canvas, work with three-dimensional letterforms.
Cut your letters from a thick material like styrofoam or build them from cardboard, then mount them onto your fabric-covered panel.
Wrap each letter meticulously with a high-sheen thread, like rayon or silk.
The tightly pulled thread creates a tense, liquid surface that plays with light, resulting in a bold, powerful piece where texture and shadow do all the talking.
9. Master the Clean Lines of Digital-Look Satin Stitch

To achieve the flawless finish of machine embroidery by hand, precision is everything.
Always use a stabilizer behind your fabric to prevent puckering. For smooth curves, angle your satin stitches slightly to follow the bend of the letter, rather than keeping them strictly vertical or horizontal.
This technique, known as directional satin stitch, ensures full coverage and creates a clean, graphic look that feels professional and intentional.
10. Convey Emotion with Deconstructed Stitches
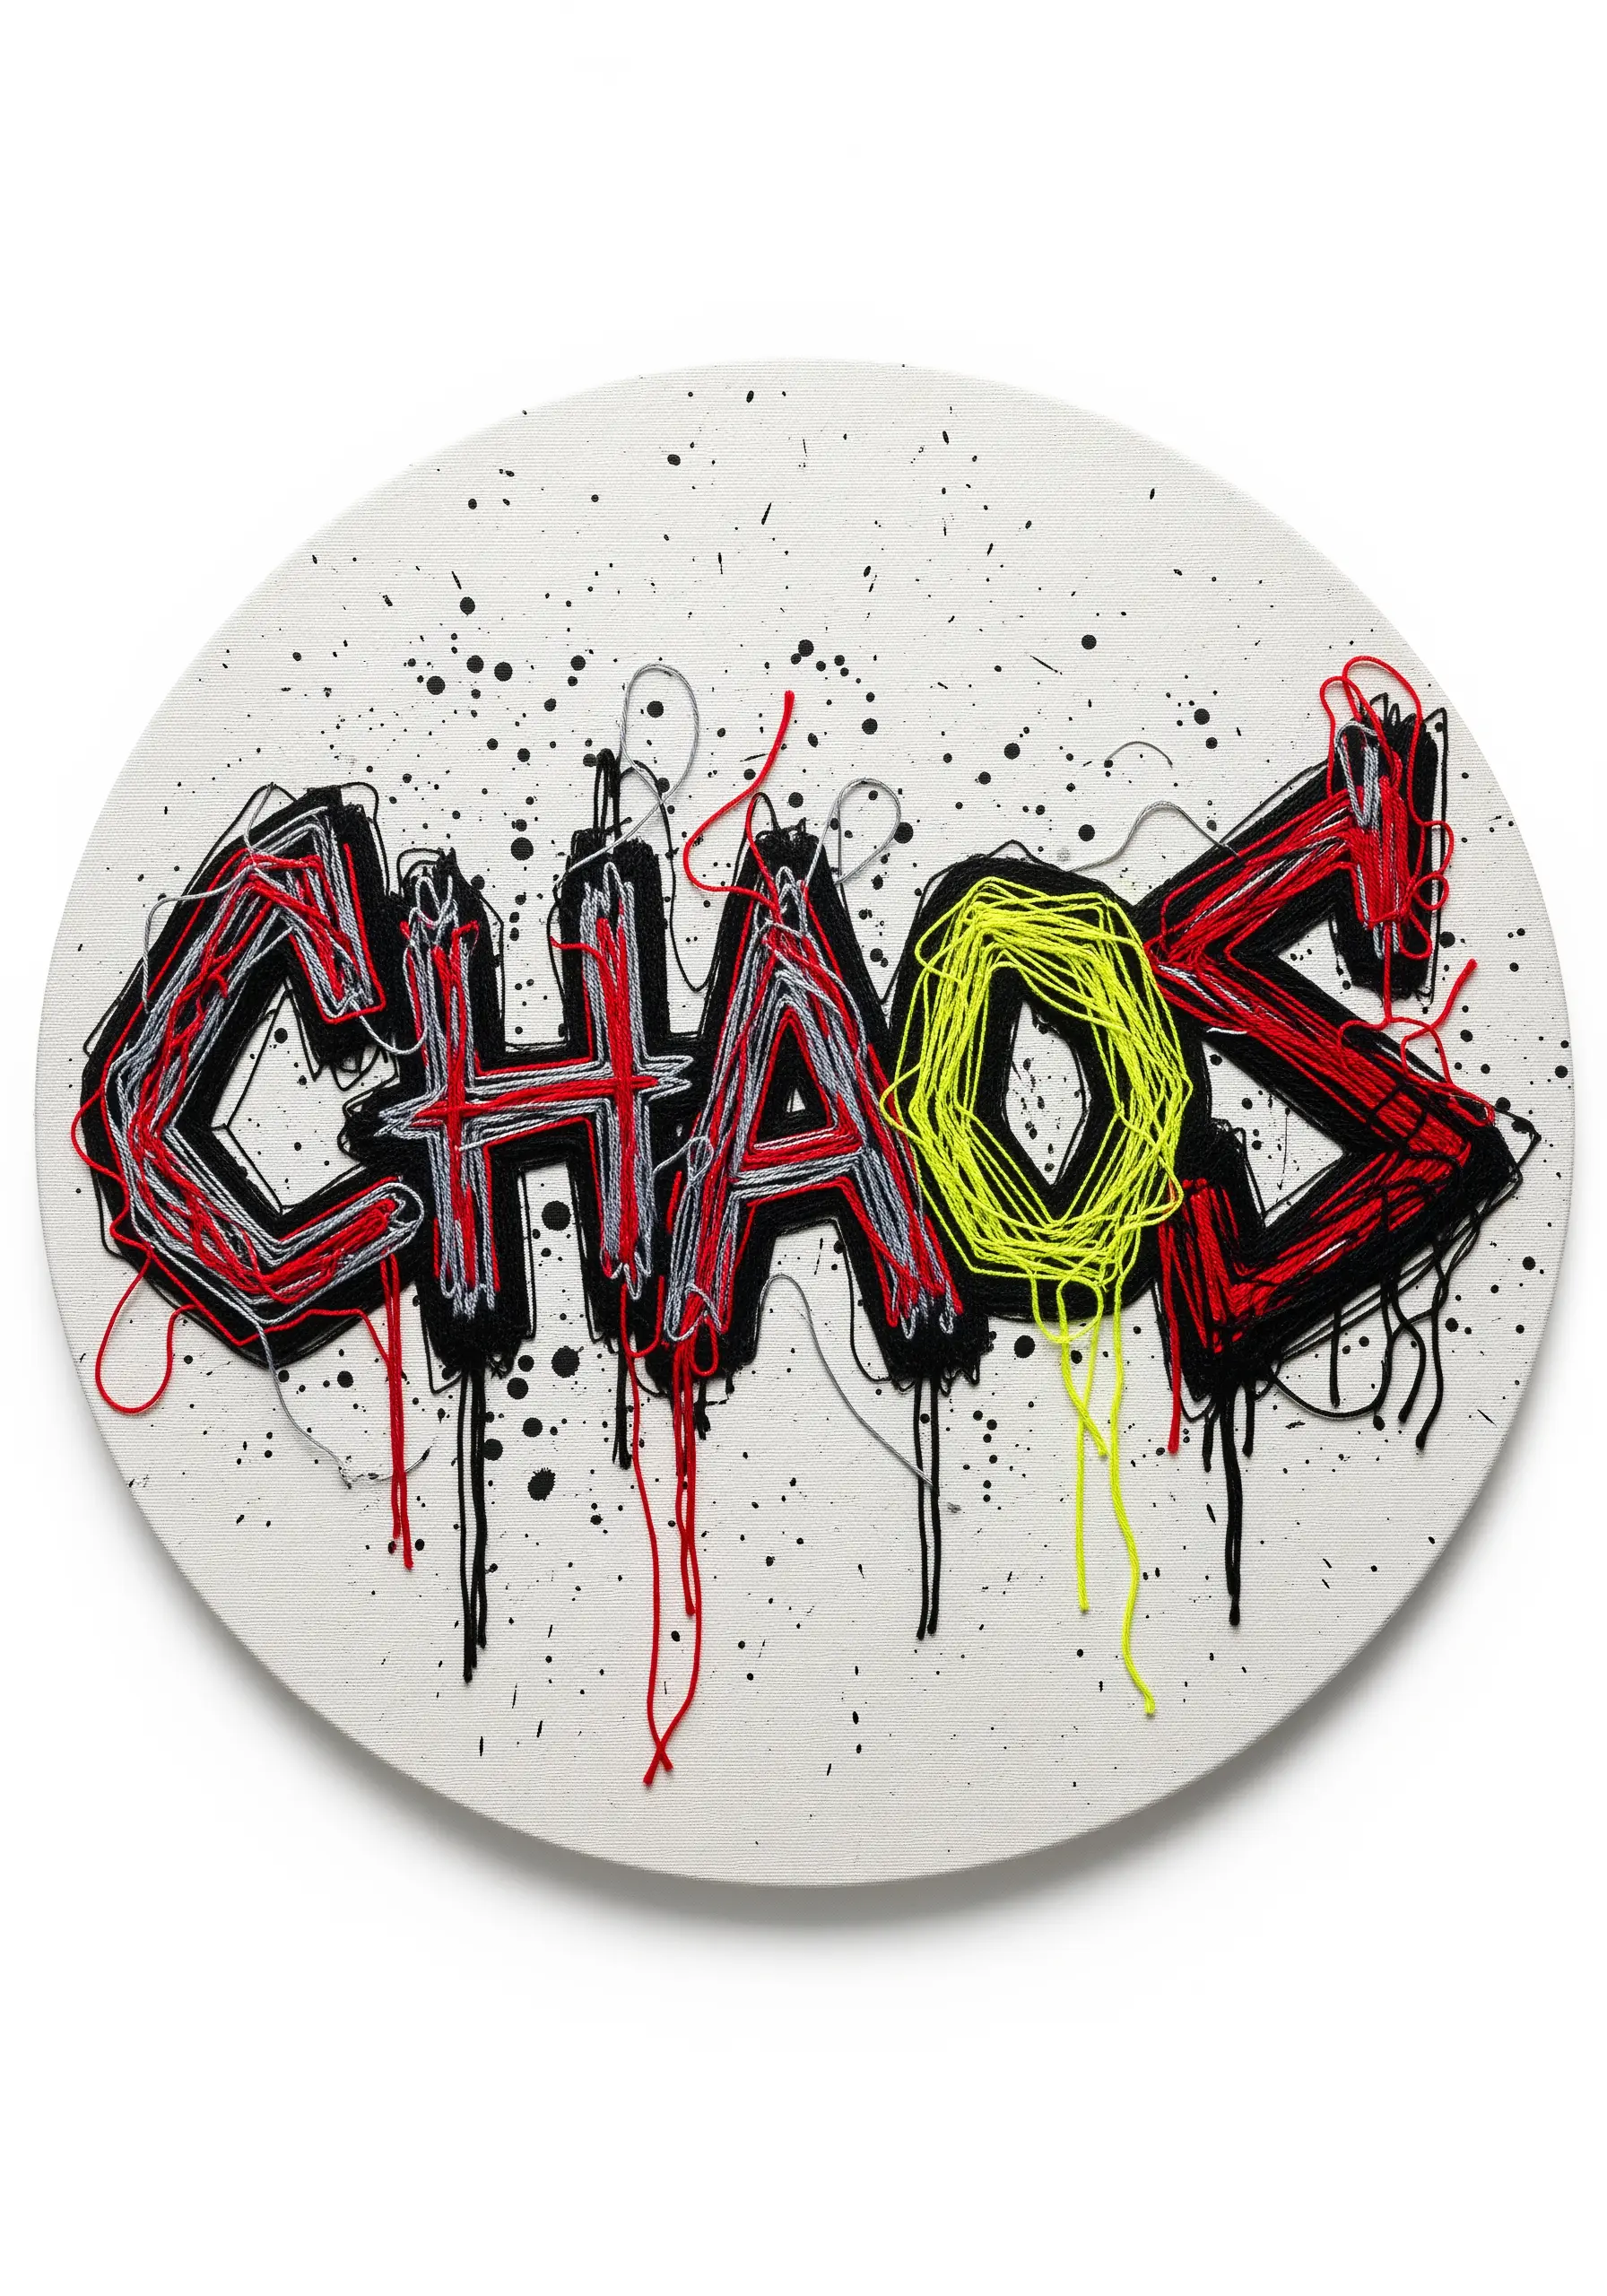
Break free from neatness to create lettering with raw, expressive energy.
Use jagged, uneven backstitches for your outlines and fill the shapes with chaotic straight stitches that overlap and pull in different directions.
Don’t trim your thread tails—let them hang loose to add to the rebellious, street-art aesthetic.
This style works because the chaos is intentional, turning messy stitches into a powerful design choice.
11. Form a Message with One Continuous Line
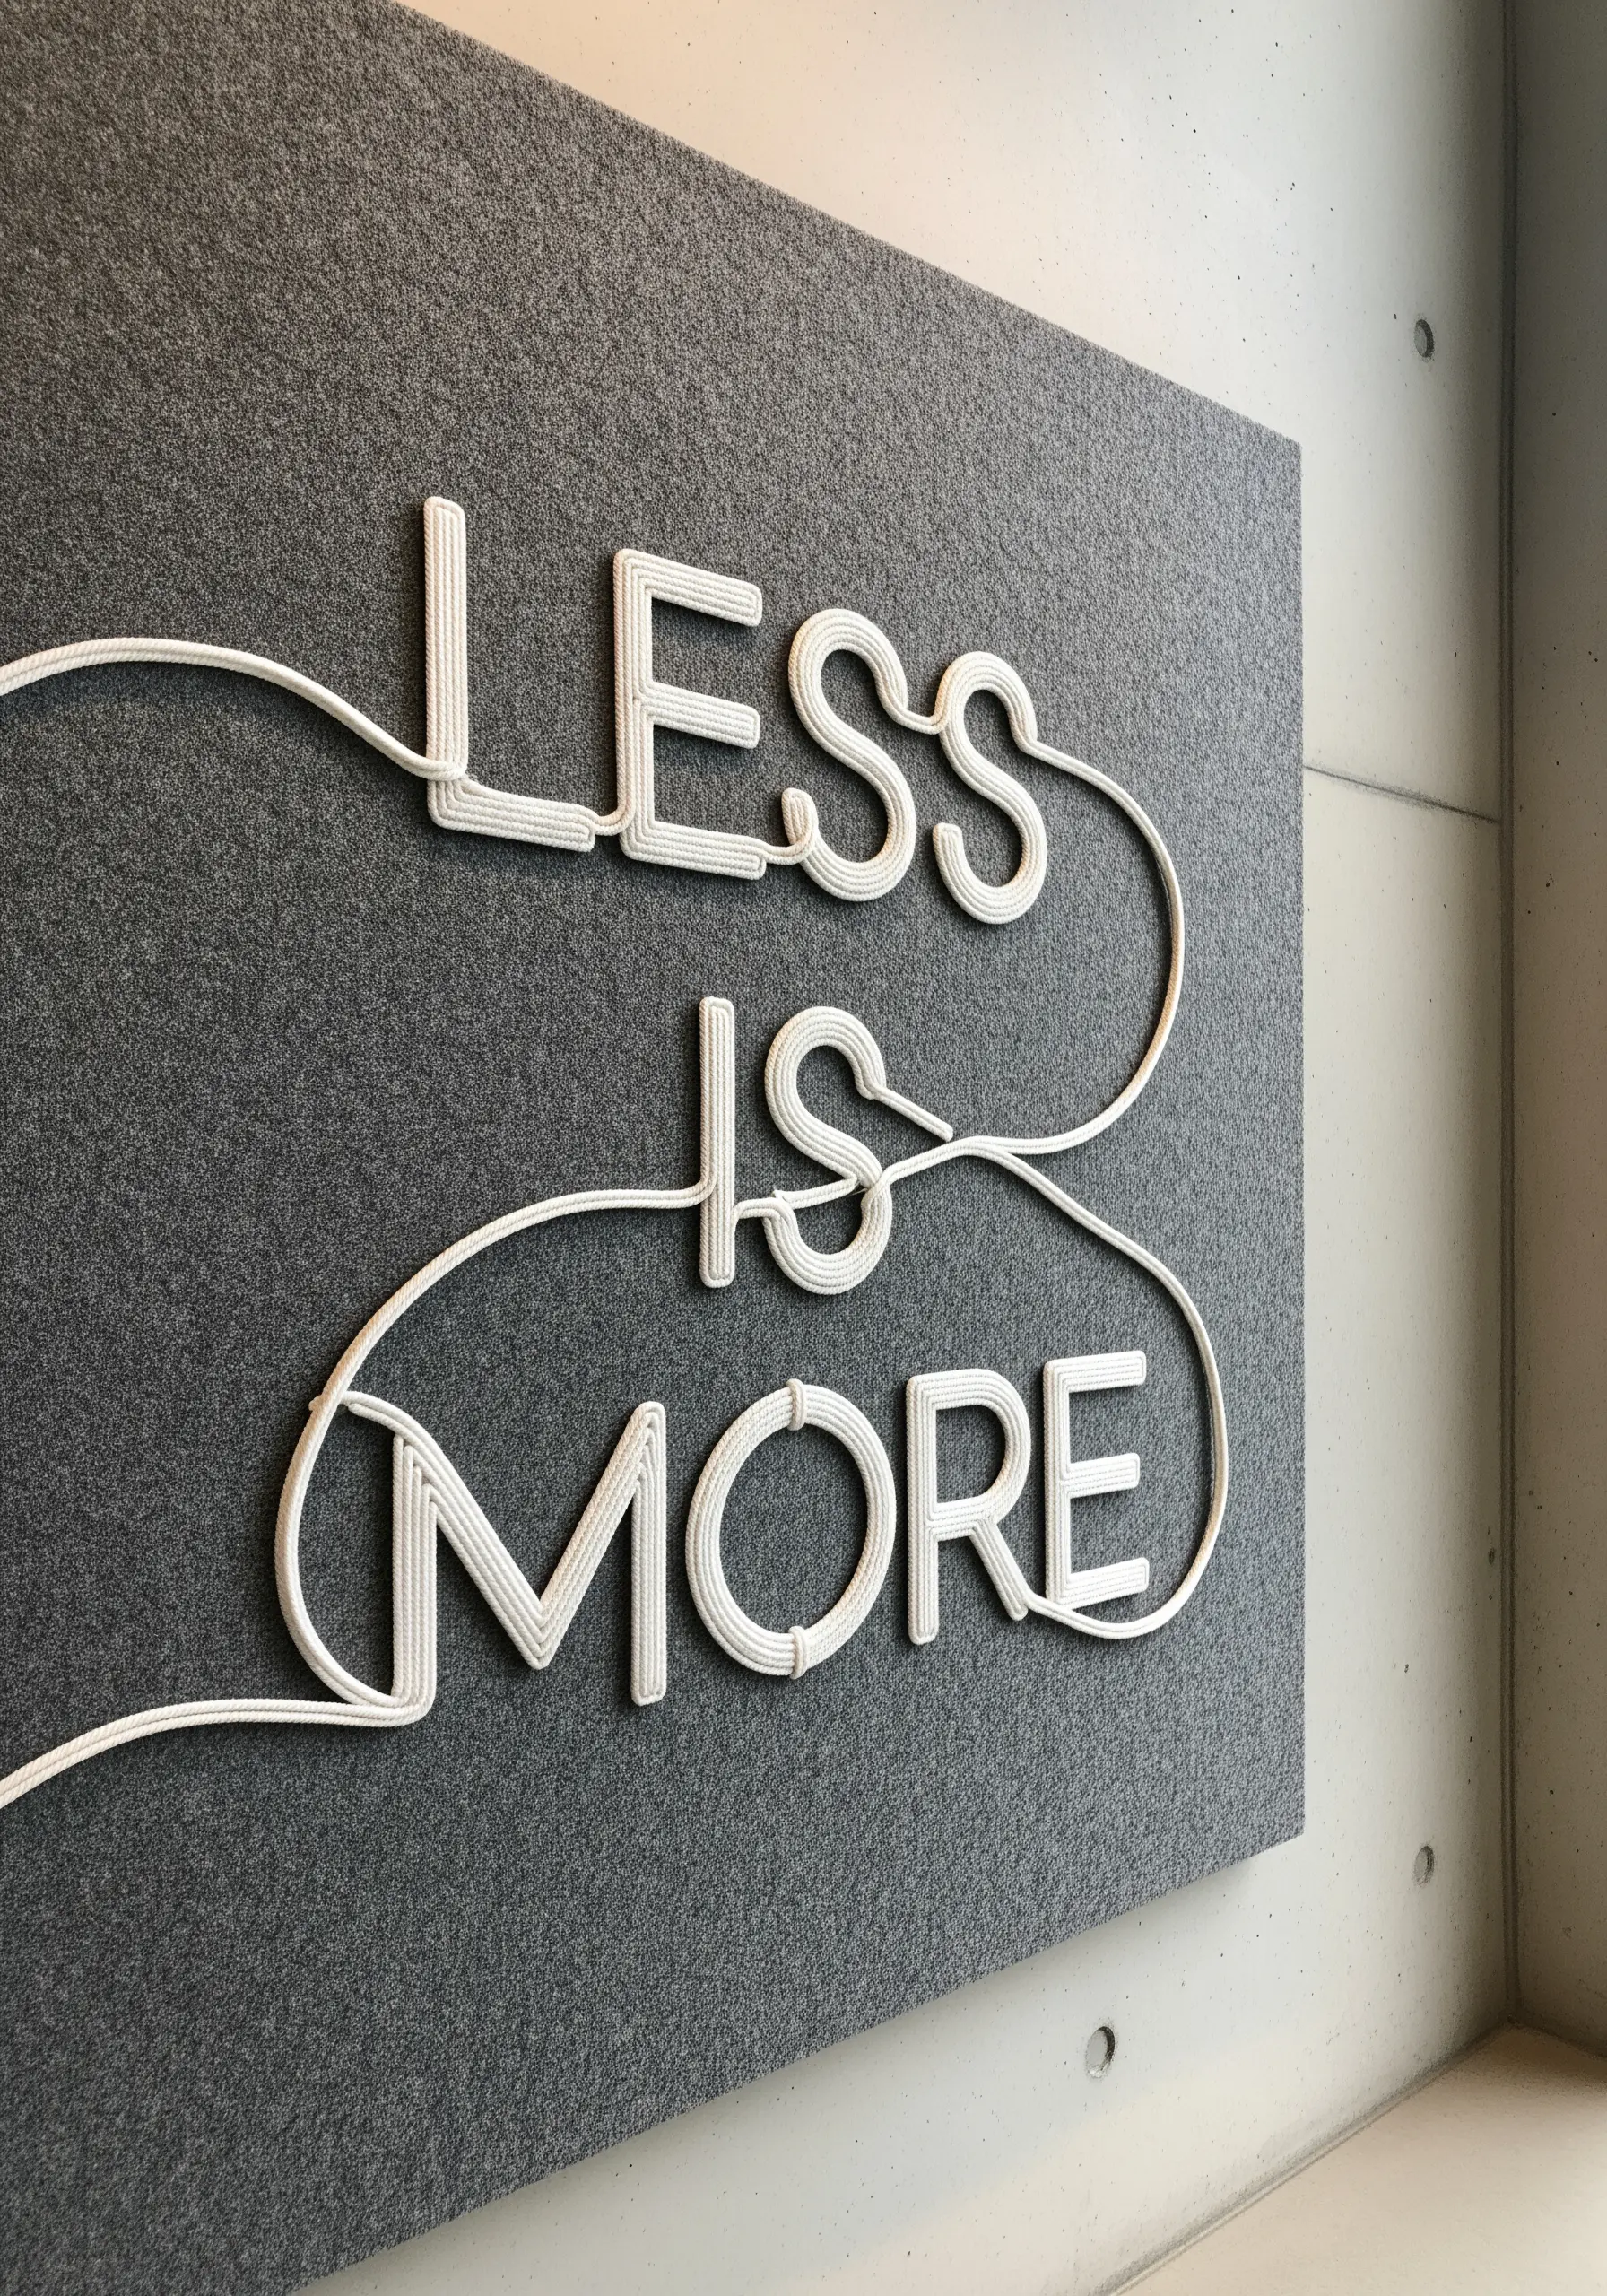
Challenge your design skills by creating an entire phrase from a single, unbroken piece of cord or yarn.
Plan the path of your line carefully on paper first, then couch it onto the fabric with small, discreet stitches.
This one-line embroidery technique turns the text into a fluid, minimalist sculpture, where the journey of the thread is as important as the words it forms.
It emphasizes connection, flow, and elegant simplicity.
12. Juxtapose Soft Watercolor with Crisp Metallics

Elevate your work by combining the softness of paint with the texture of thread.
Apply a gentle watercolor wash to a sturdy piece of paper or tightly woven fabric. Once it’s completely dry, couch a fine metallic cord over the top to form your word.
The sharp, reflective line of the cord provides a beautiful contrast to the diffuse, dreamy background, turning a simple quote into a sophisticated piece of mixed-media art.
13. Build Letters from Botanical Elements
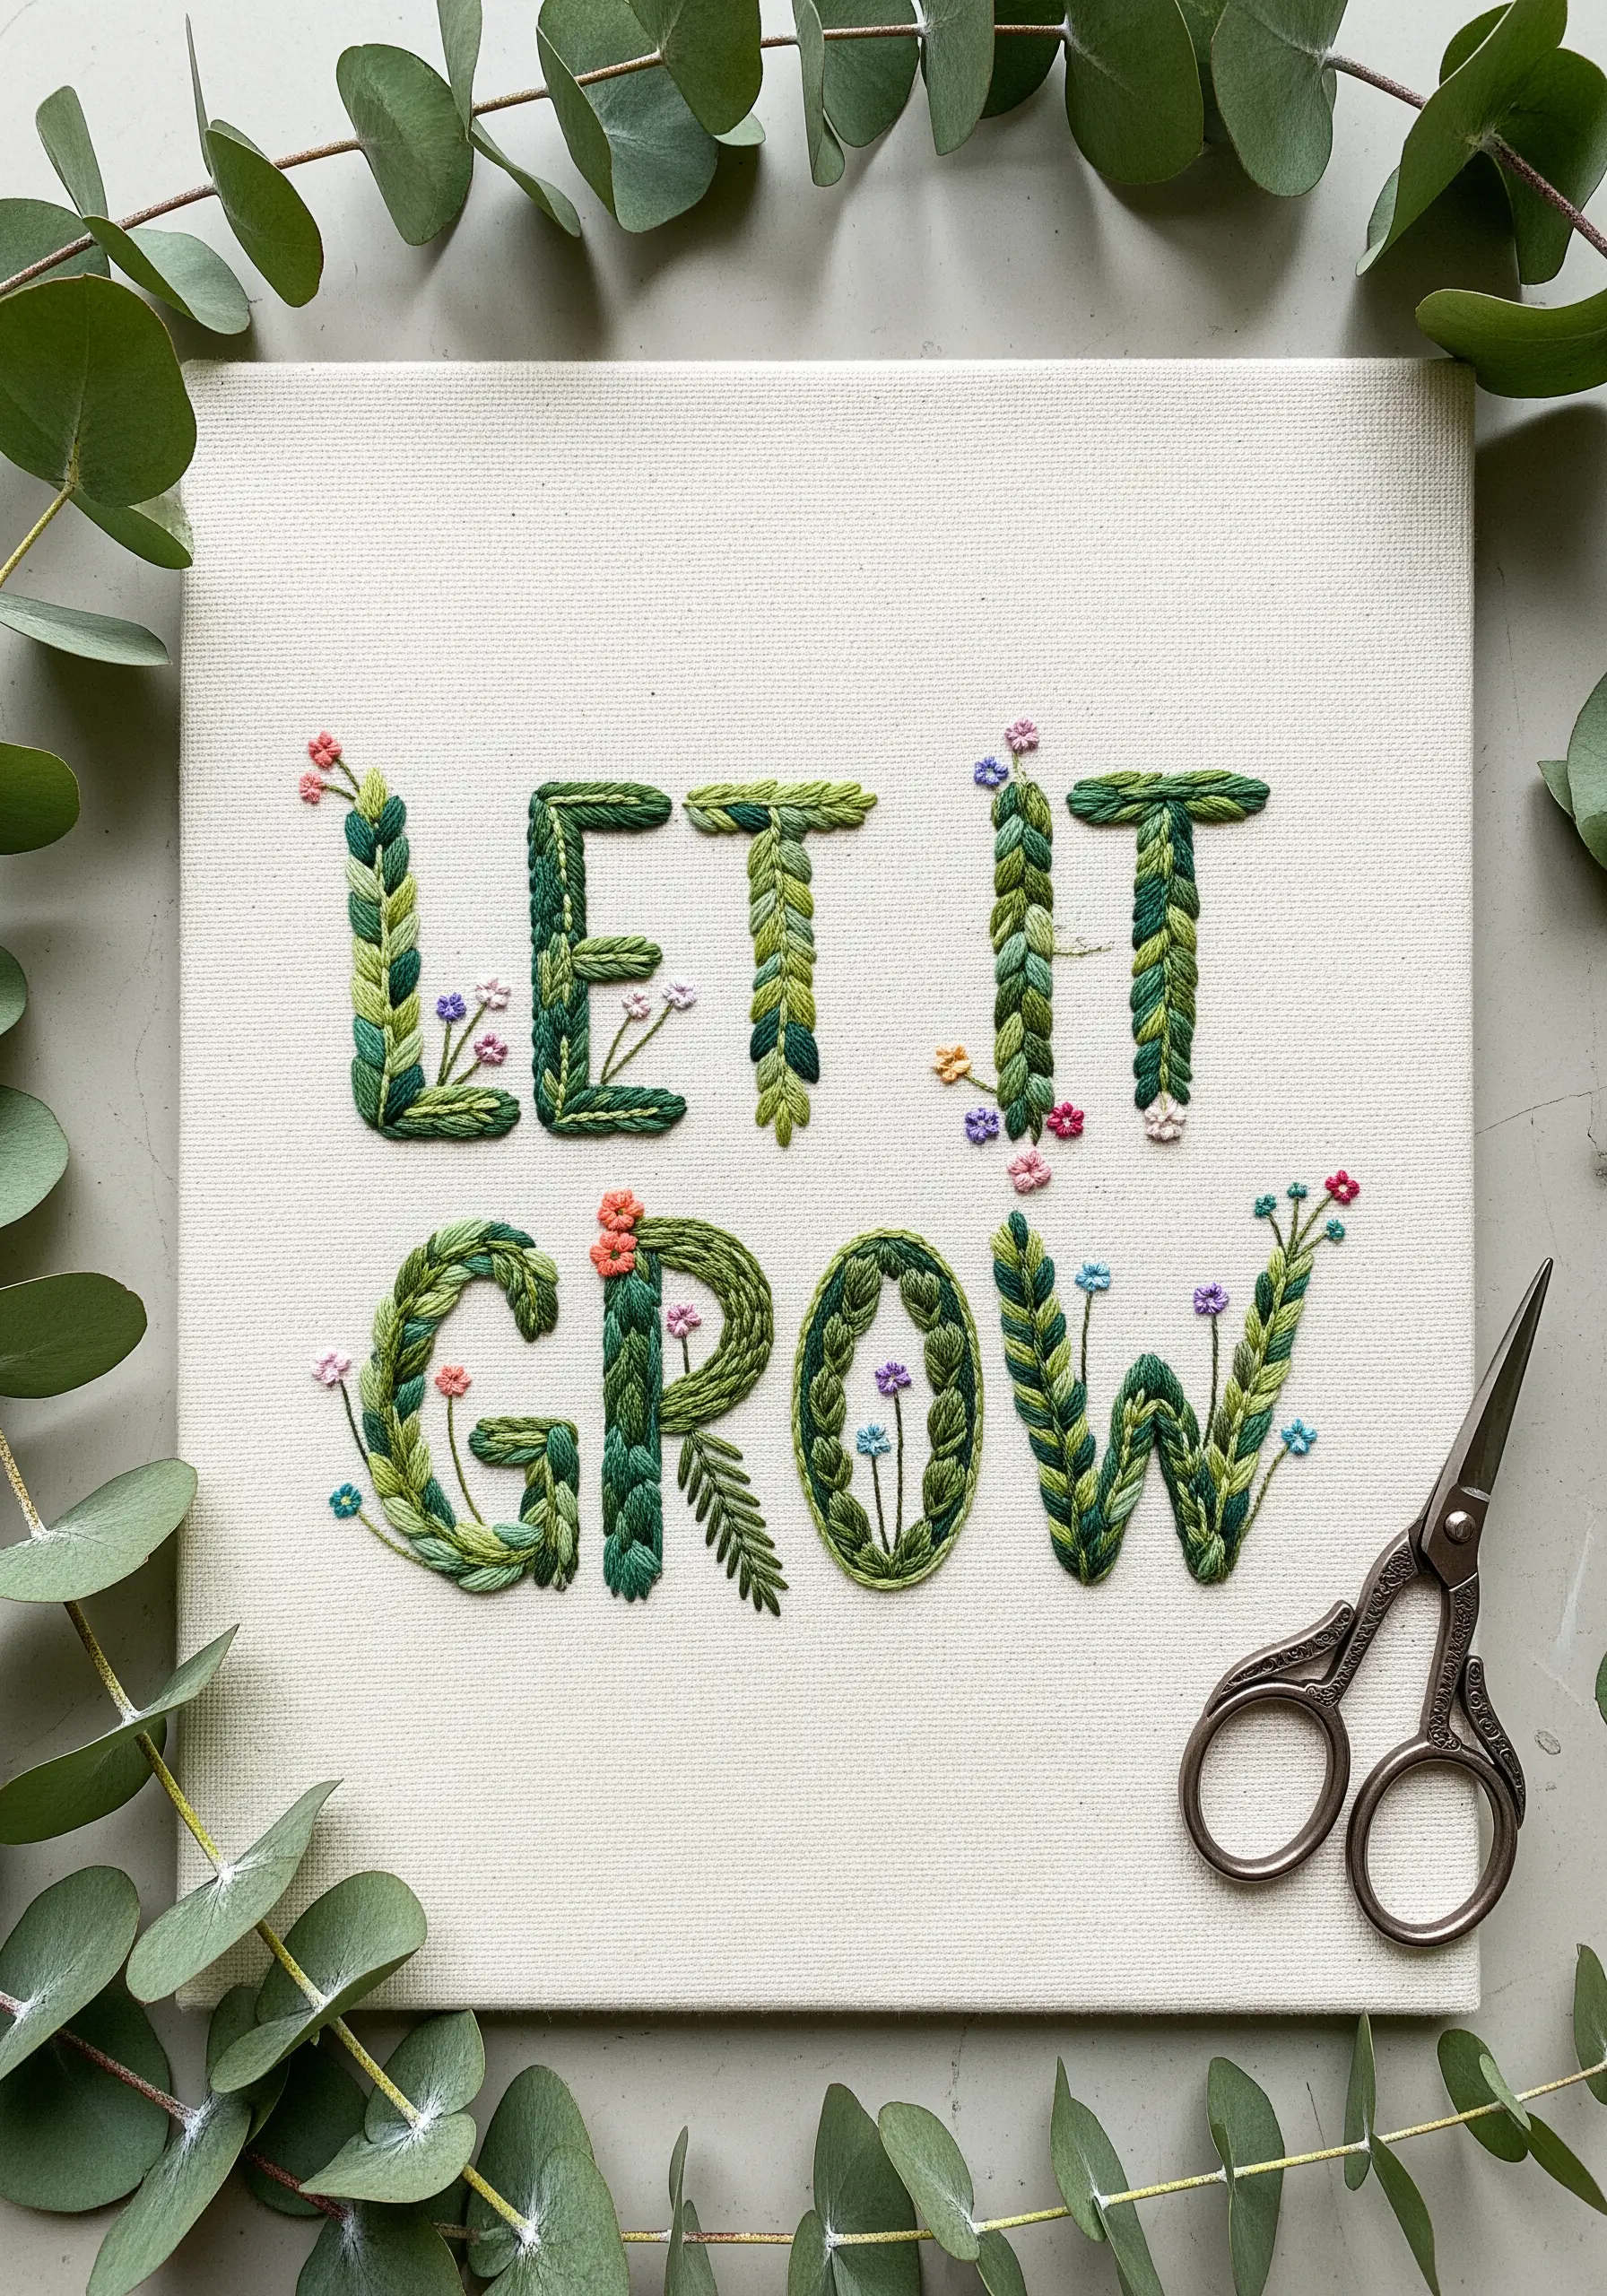
Instead of just filling a letter’s outline, construct the letter itself from botanical stitches.
Use fishbone stitches to form leaves that create the stems of an ‘L’ or ‘T’. Arrange lazy daisy stitches into blossoms to form the curve of a ‘G’.
Varying the shades of green and adding pops of color with French knot buds will give your lettering depth and life.
This approach allows the visual form of your letters to embody the meaning of your words.
14. Fill Typography with Meditative Blackwork
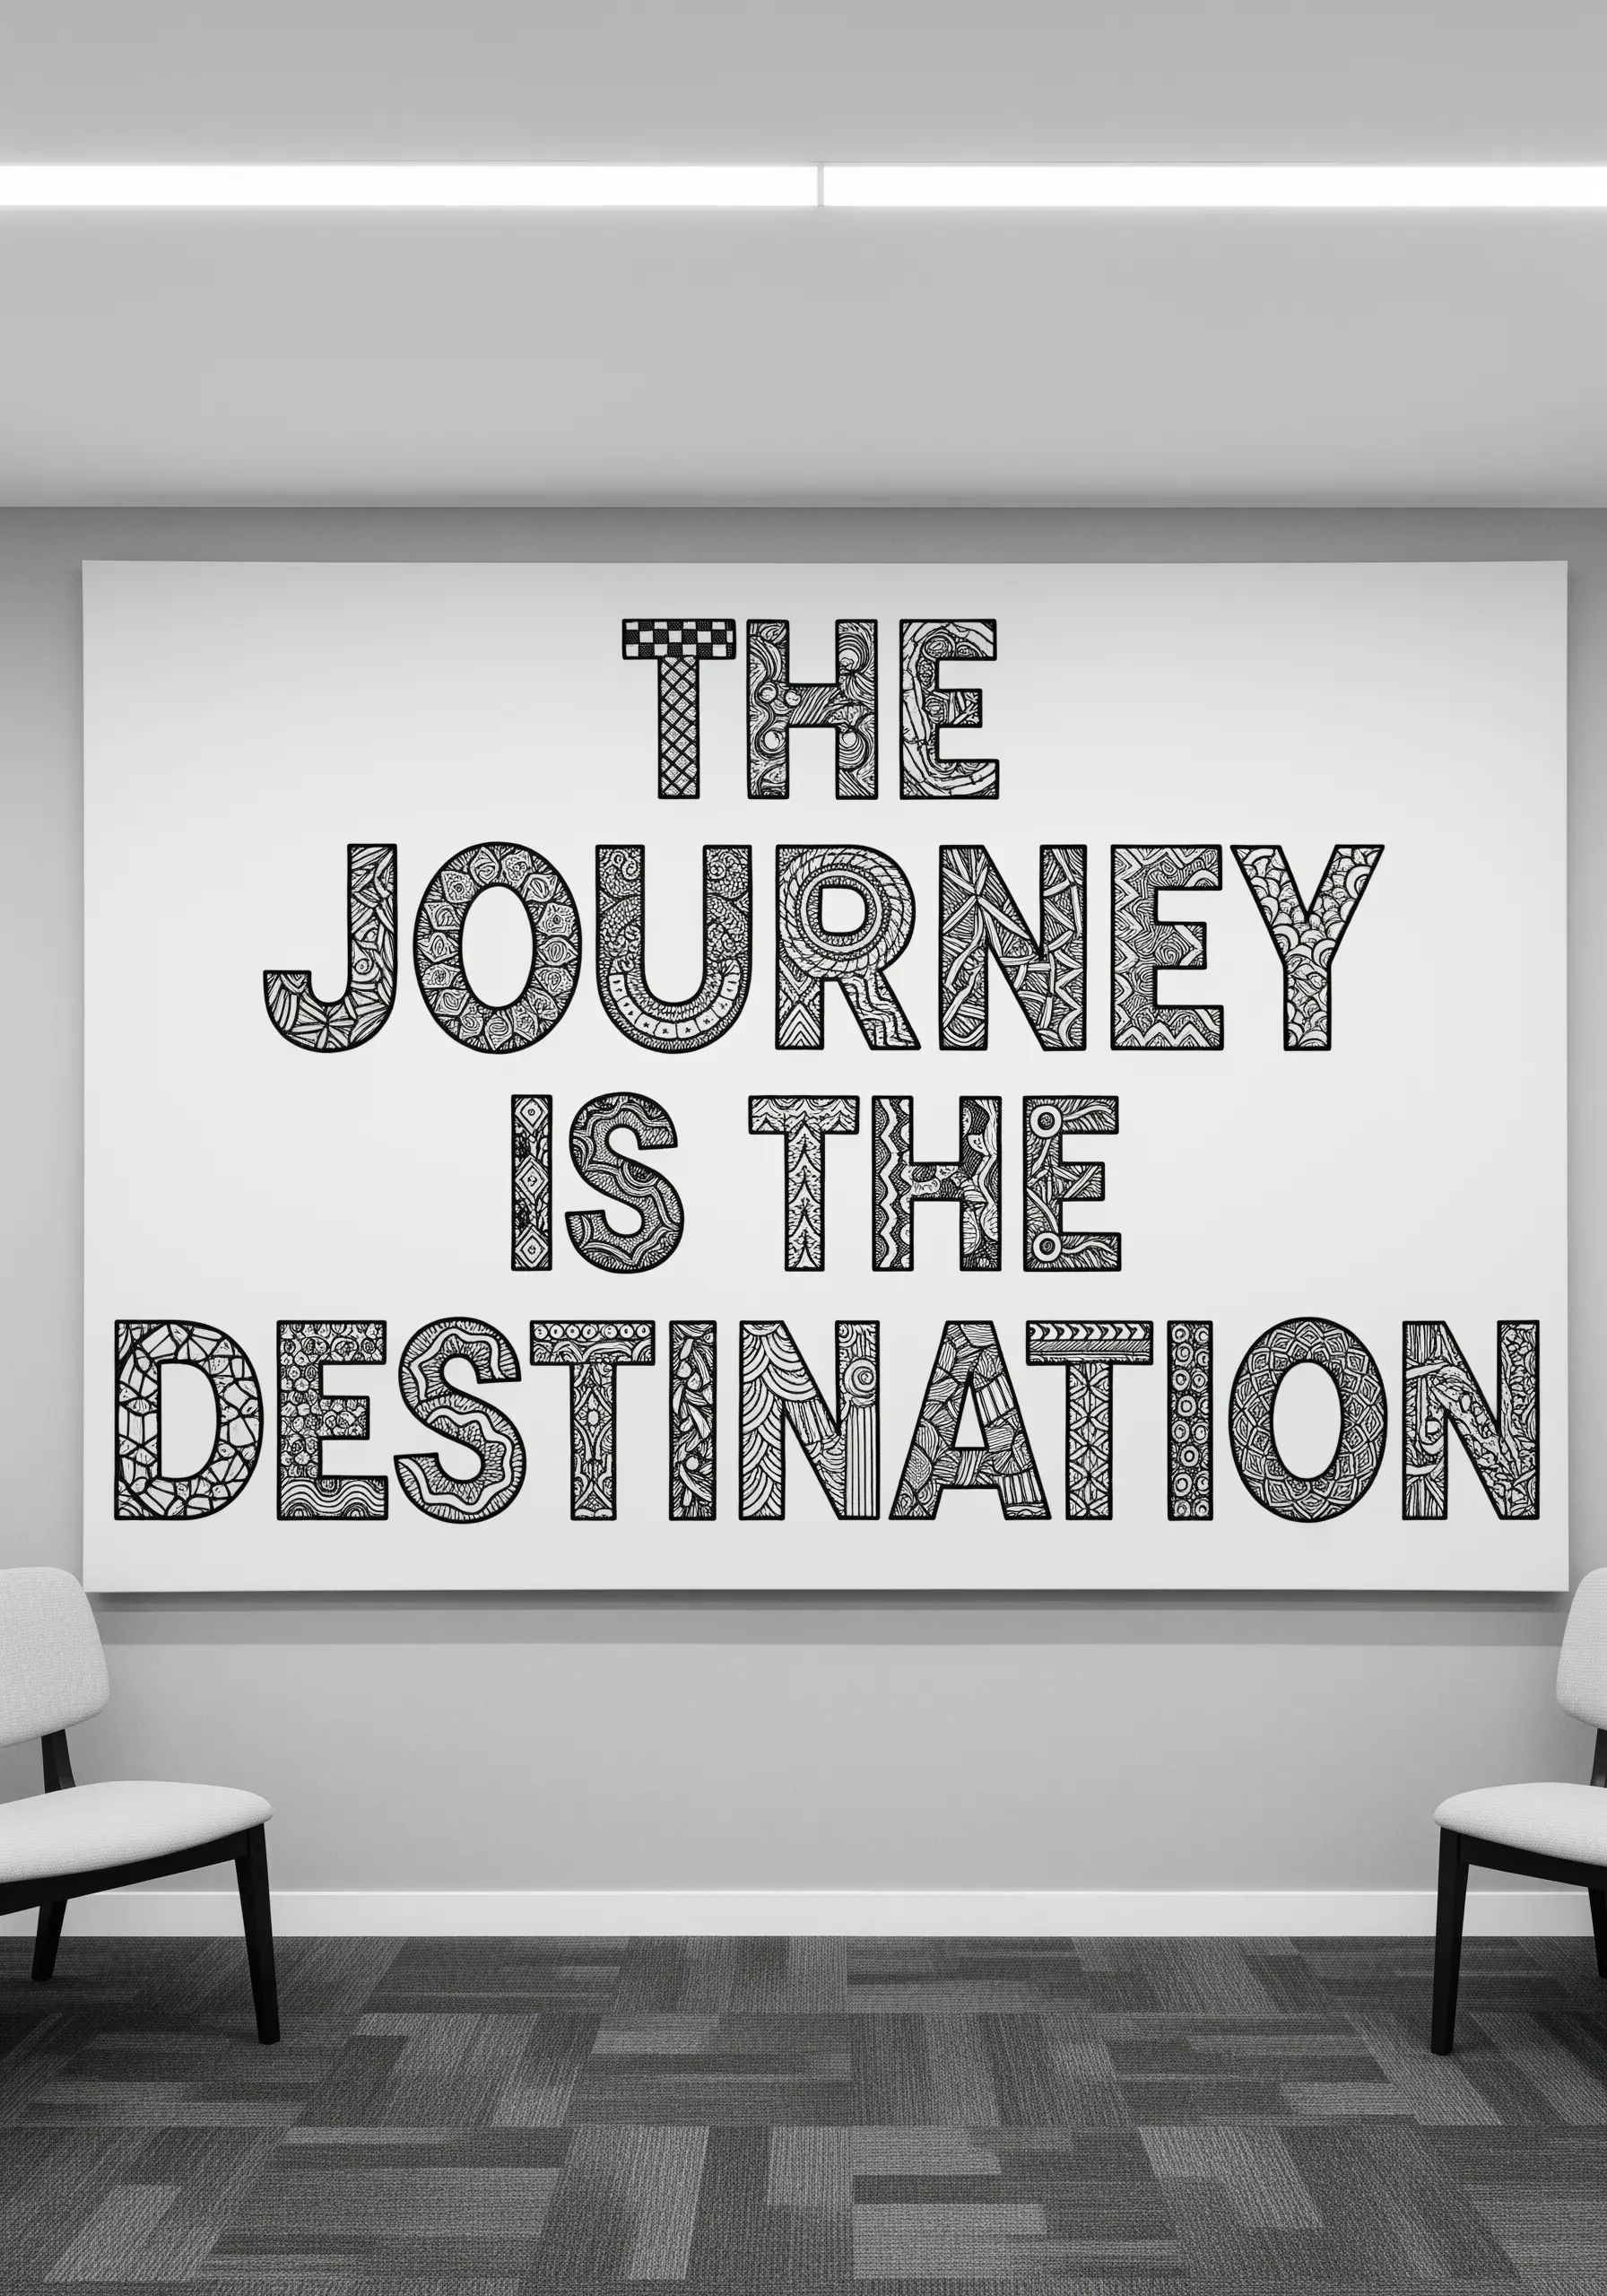
Use your letter outlines as containers for intricate, geometric patterns.
Known as blackwork, this technique uses a single strand of black thread to create complex, repeating motifs like grids, diamonds, and lattices.
The high contrast against a plain background draws the eye in, making each letter a discovery.
It’s a wonderfully meditative process that transforms bold, simple fonts into incredibly detailed works of art.
15. Add Cozy Dimension with Braided Yarn

For an instantly cozy and textural feel, braid several strands of yarn together before you begin stitching.
Couch the resulting braid onto your fabric to form your letters. This adds significant dimension and a comforting, handmade quality.
To add a layer of storytelling, substitute one of your letters for a small, stitched motif—like turning the ‘O’ in ‘HOME’ into a tiny wreath. This personal touch makes the piece even more meaningful.
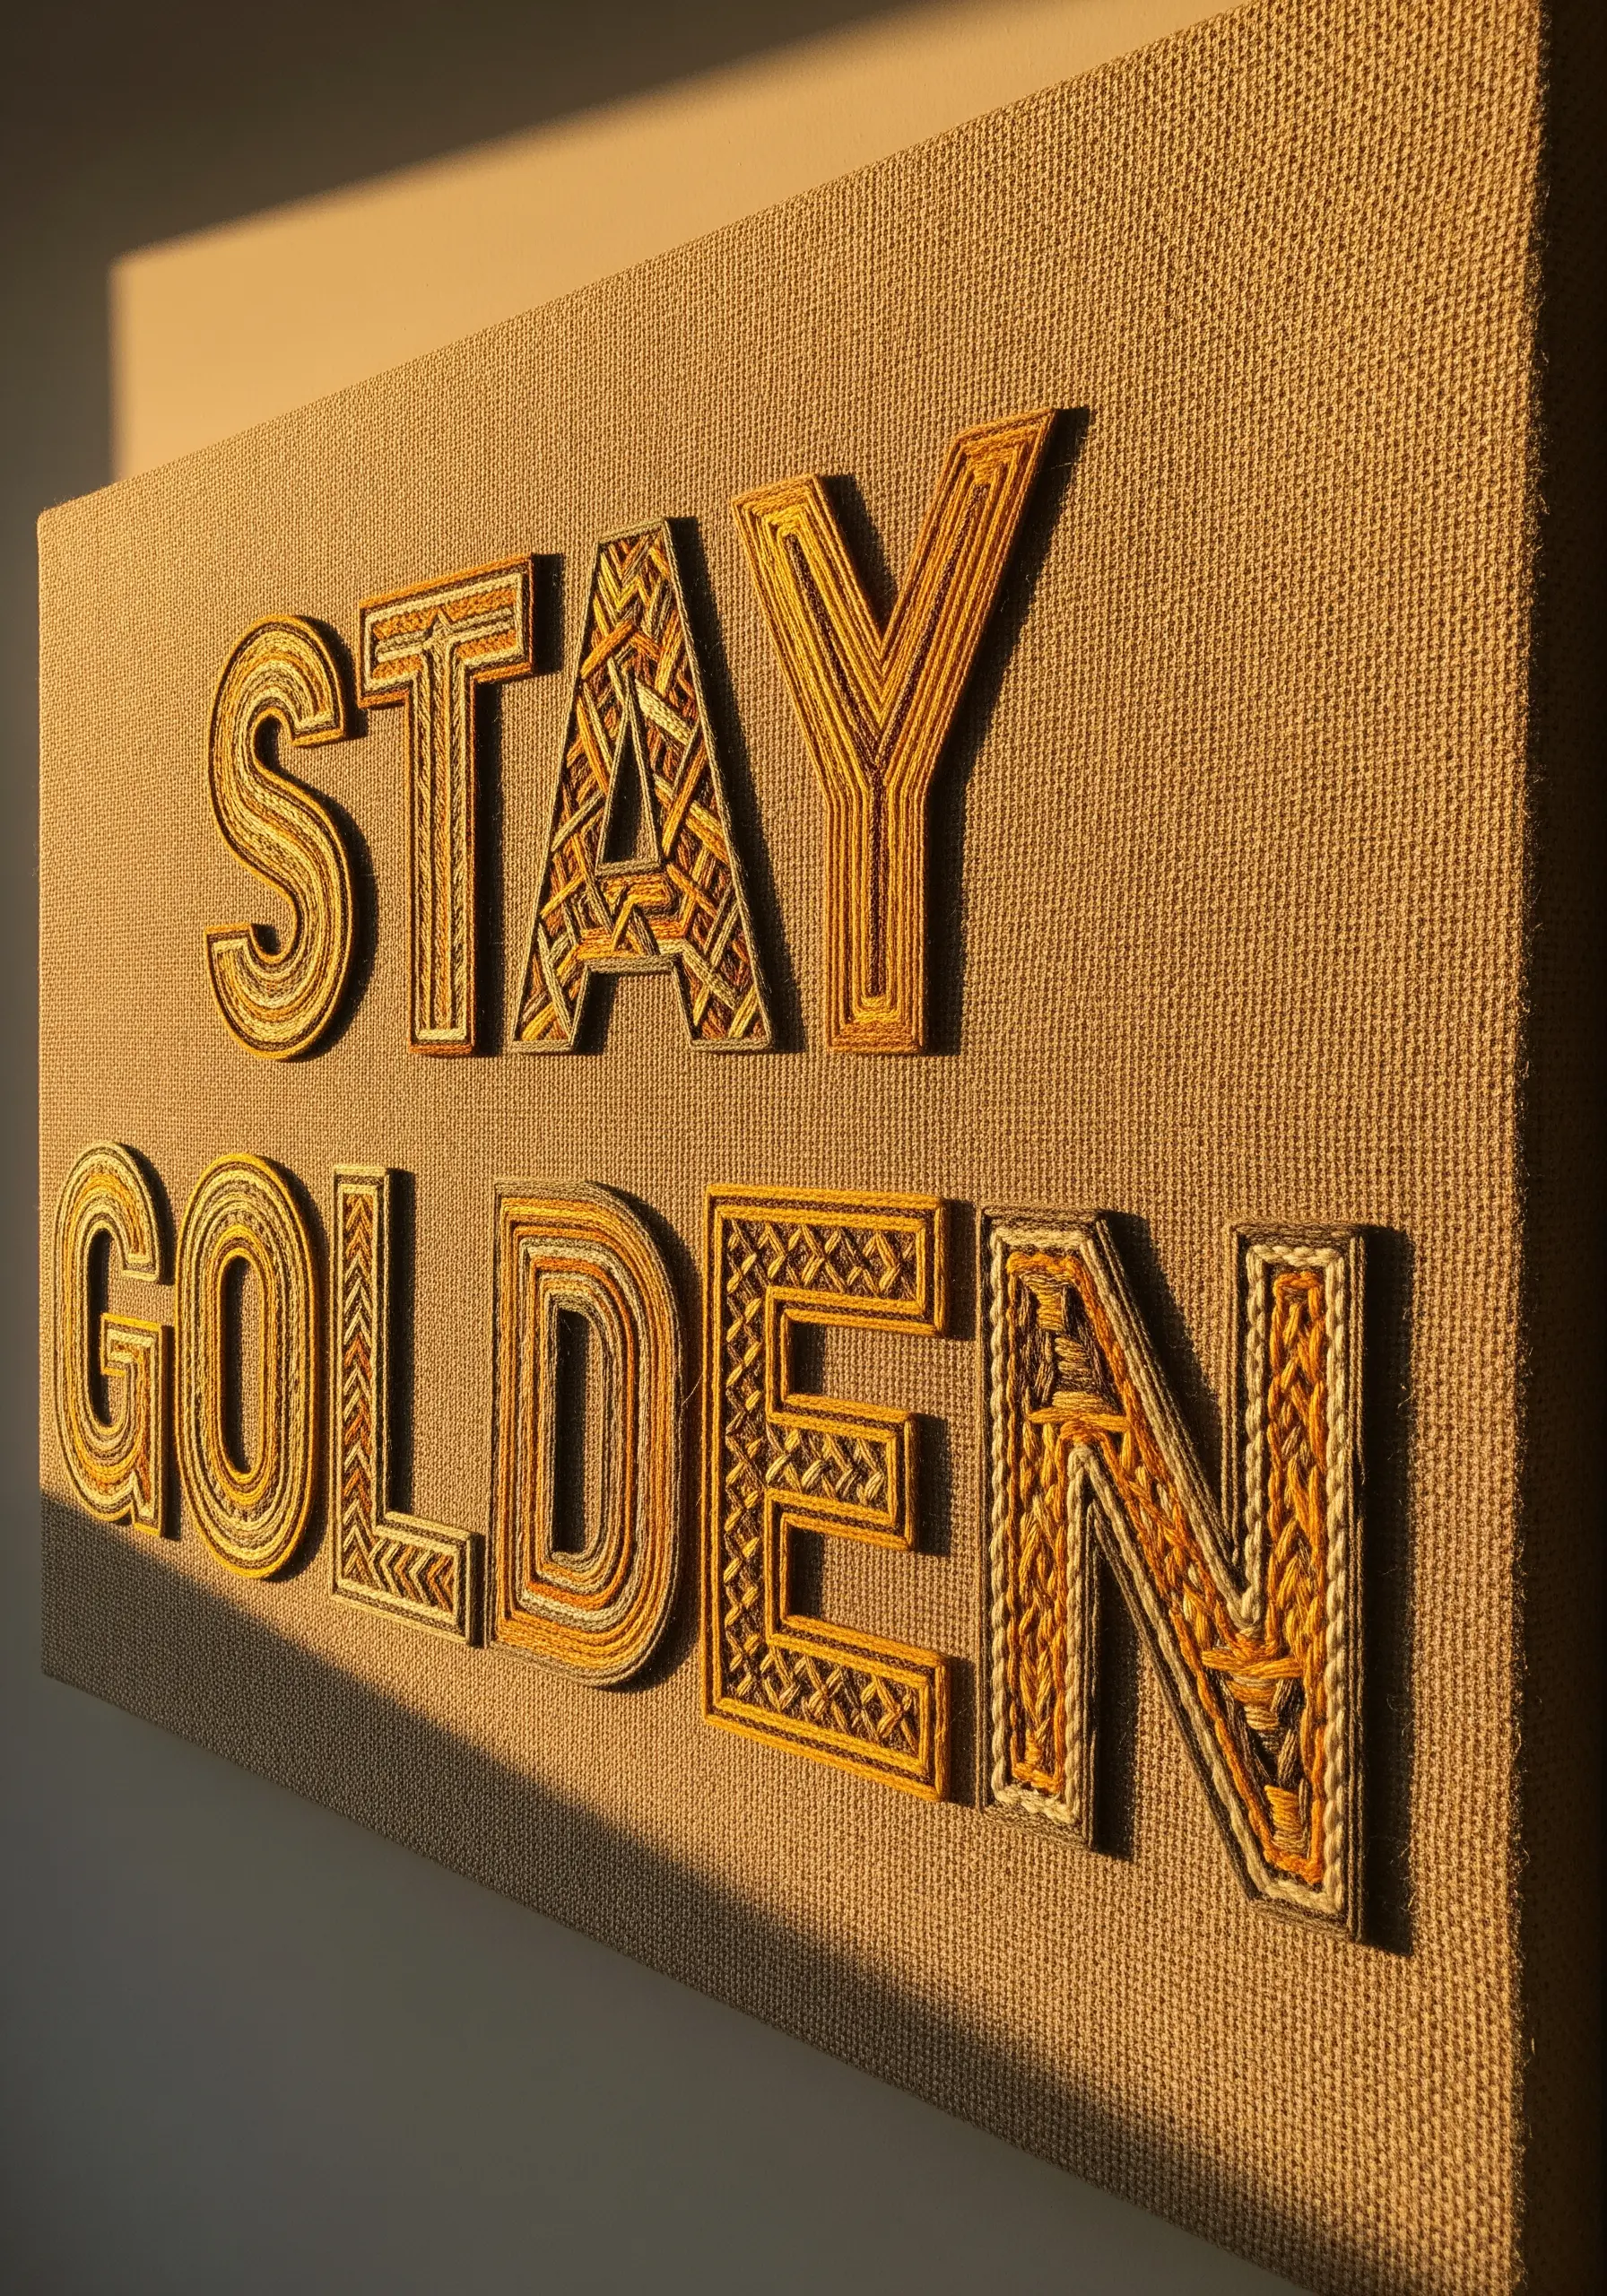
16. Evoke an Era with Art Deco Metallics

Capture the glamour of the 1920s by pairing a bold, geometric font with high-contrast threads.
Fill your letters with a shimmering gold metallic thread using a smooth satin stitch.
Then, add graphic flair with radiating lines of matte black thread, stitched with a simple backstitch.
The interplay between the lustrous gold and the stark black is the key to achieving that iconic, luxurious Art Deco style.
17. Refine Cursive with a Whipped Backstitch

If your backstitched script looks a little choppy, elevate it with a simple extra step.
First, complete your word using a standard backstitch. Then, take a new length of the same thread and ‘whip’ it by sliding the needle under each backstitch without piercing the fabric.
This action covers the small gaps between stitches, transforming a dotted line into a single, smooth, and continuous stroke. It’s perfect for delicate, flowing script.
18. Emulate Fire with Chaotic, Layered Color
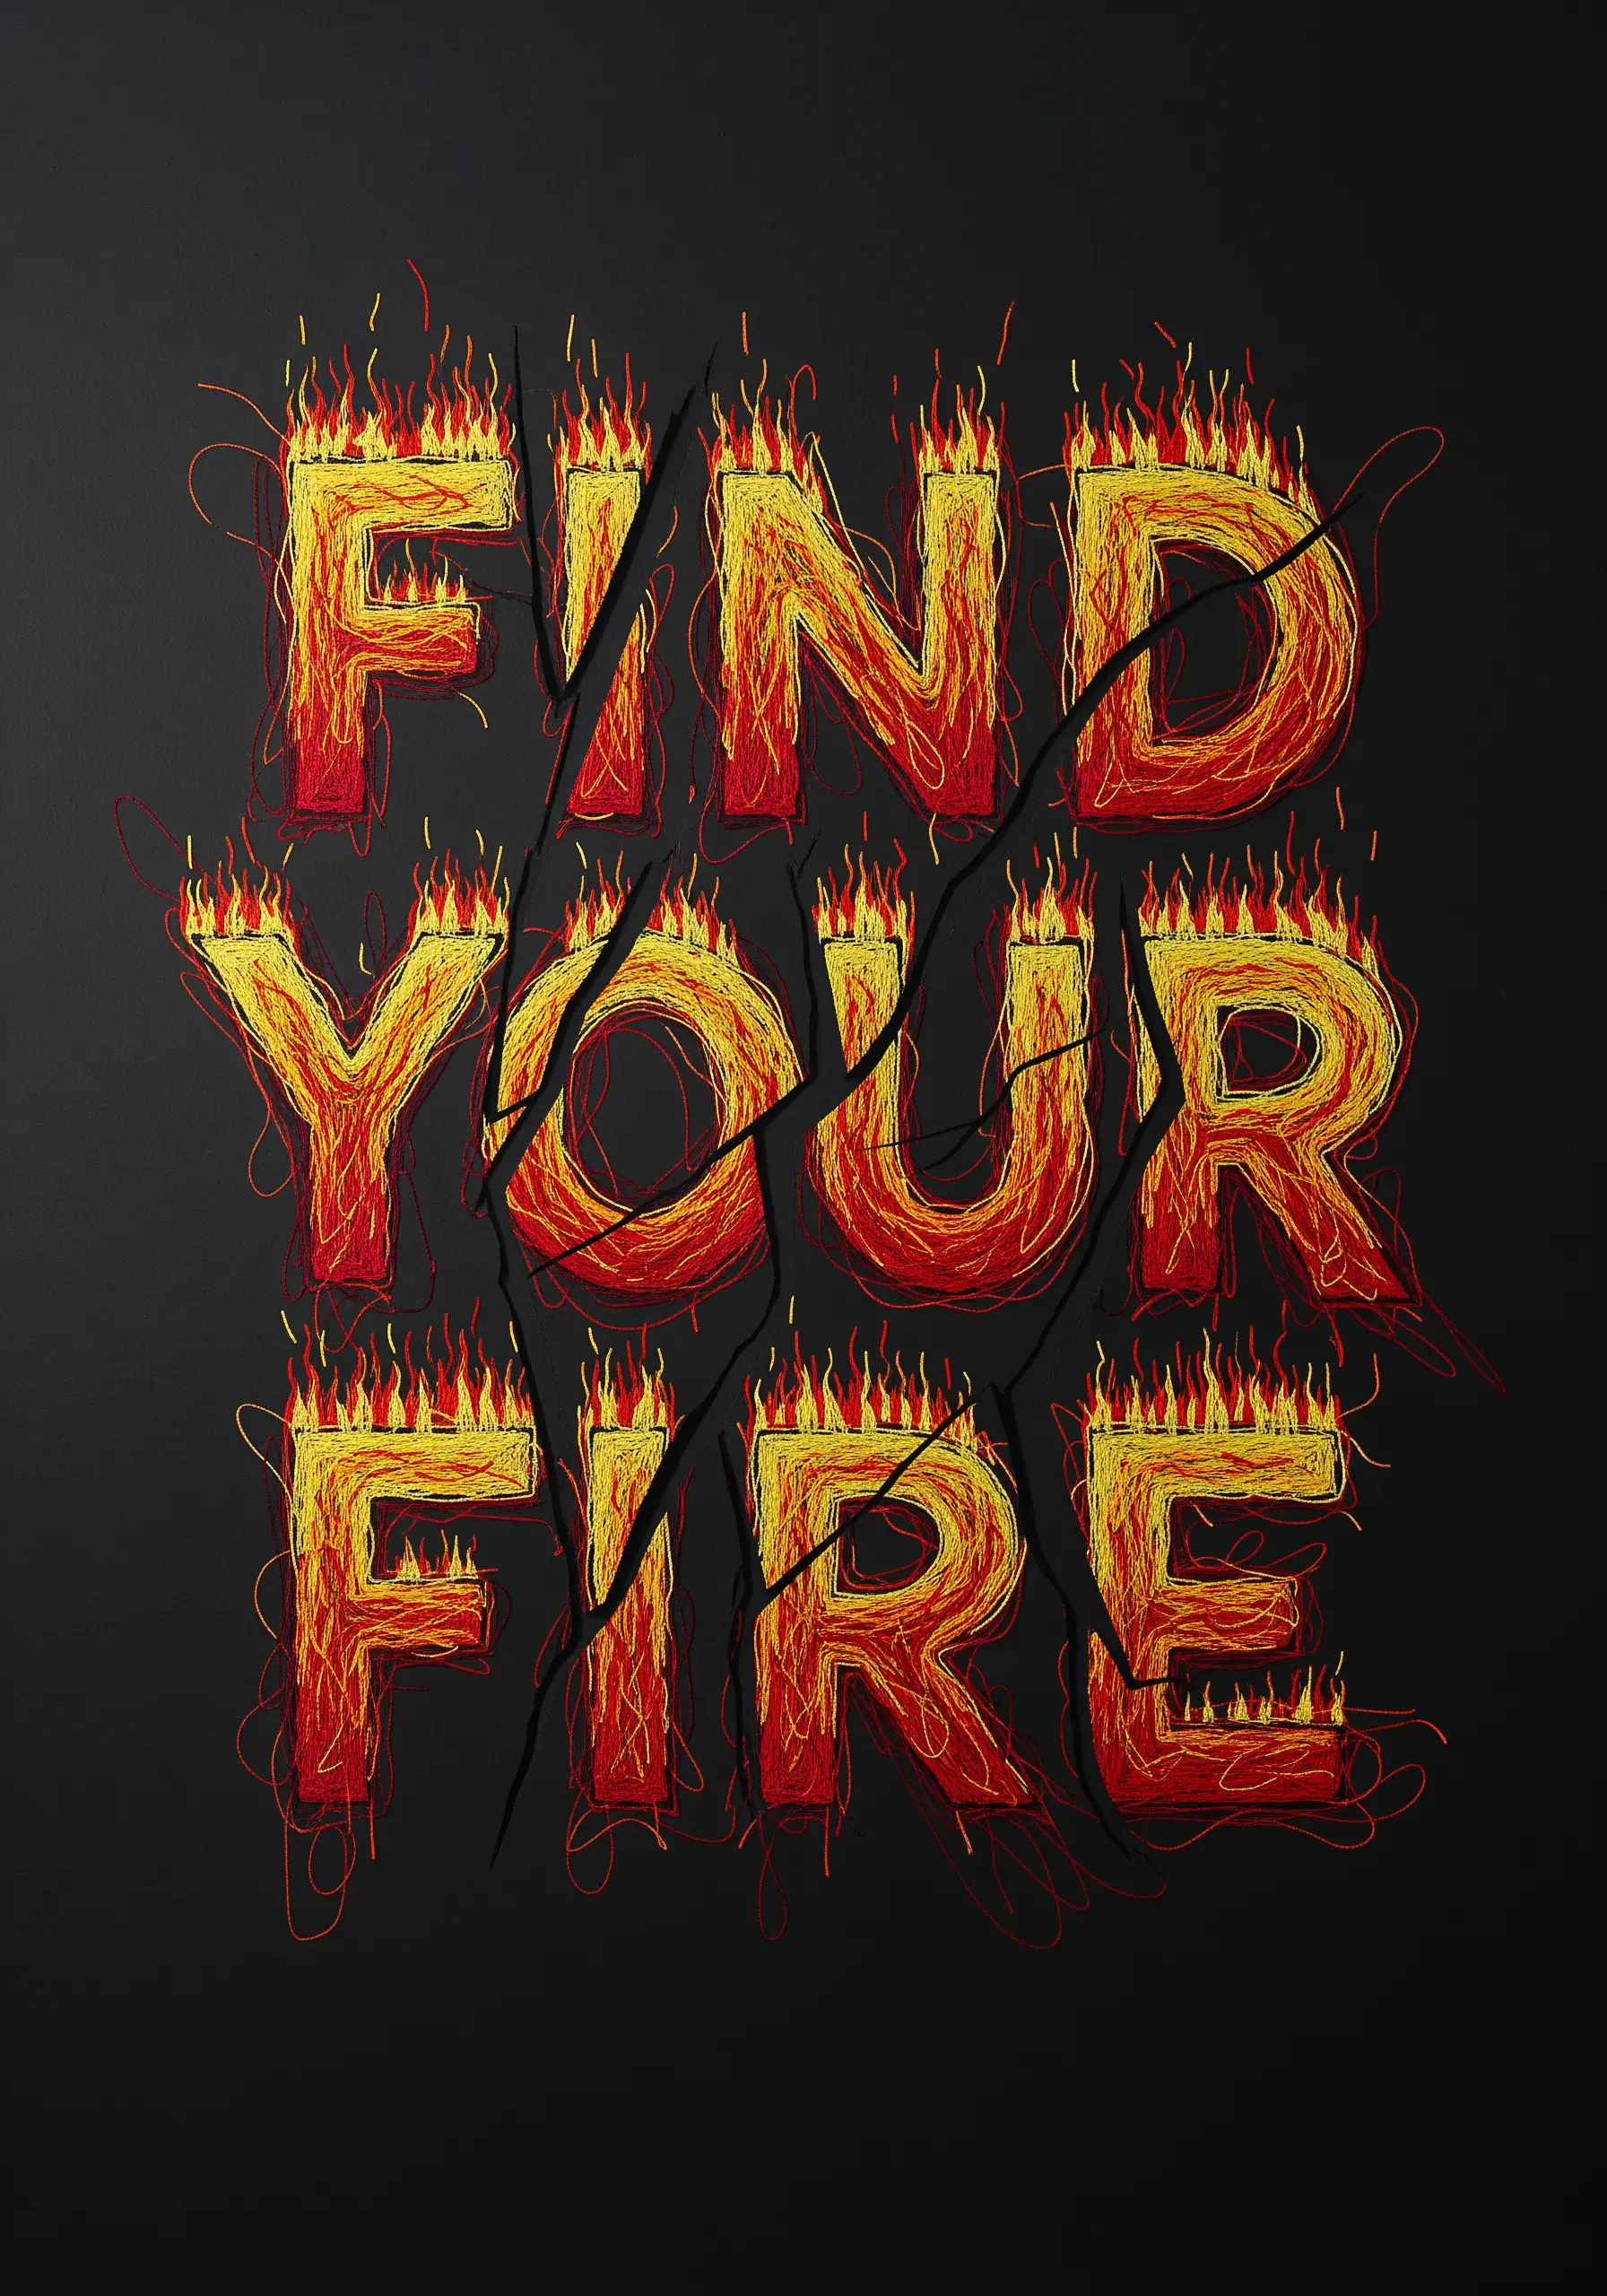
To make your lettering glow and crackle, think in layers of color and texture.
Start with a base of dense, chaotic straight stitches in bright yellow. Layer fiery orange on top, followed by deep red, letting the stitches get longer and wilder as you move outwards.
Finally, use a single strand of black thread to add sharp, decisive lines that cut through the word, giving the impression of heated cracks or shattering embers.
19. Capture a Retro Vibe with Bold Outlines
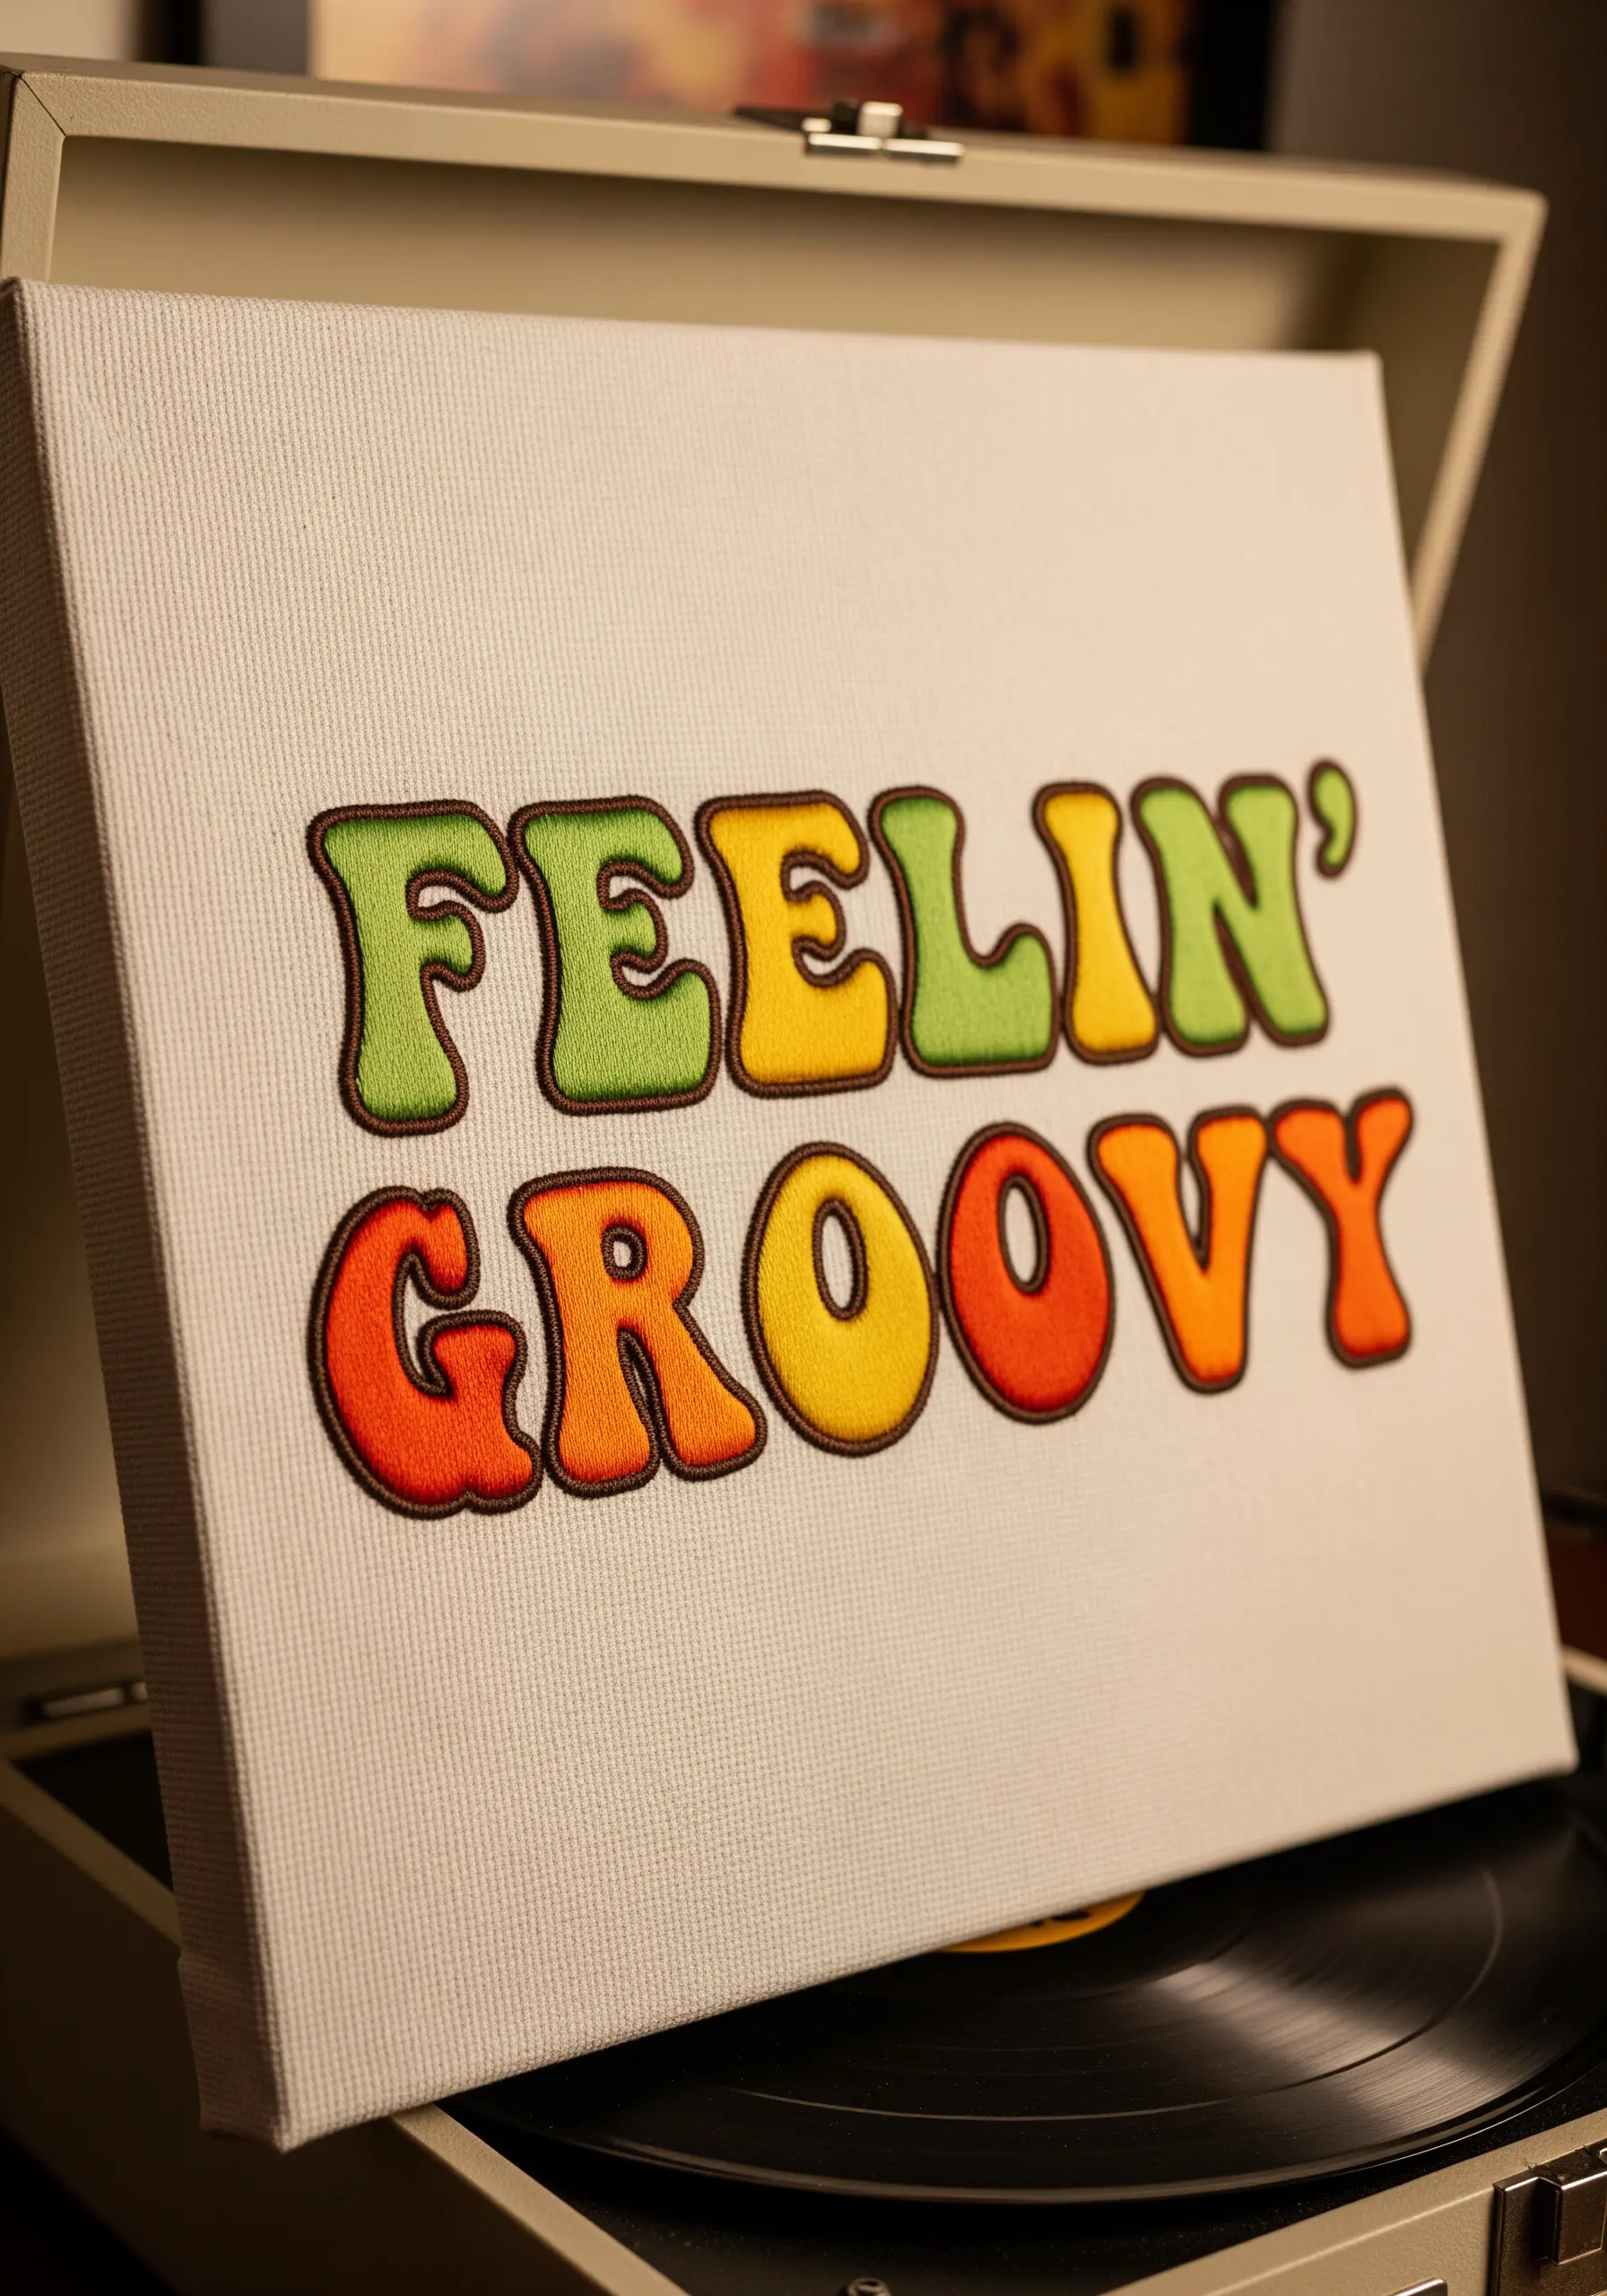
To achieve a classic 70s feel, the outline is just as important as the fill.
Choose a rounded, bubble-style font and fill the letters with a dense satin stitch in warm, earthy colors like orange, yellow, and green.
Then, frame each color block with a thick, confident outline in a contrasting color like dark brown. Use a stem stitch or split stitch for your outline to ensure it’s solid and smooth, which is essential for making the soft shapes pop.
20. Create Delicate Lettering with Lace-Inspired Fills
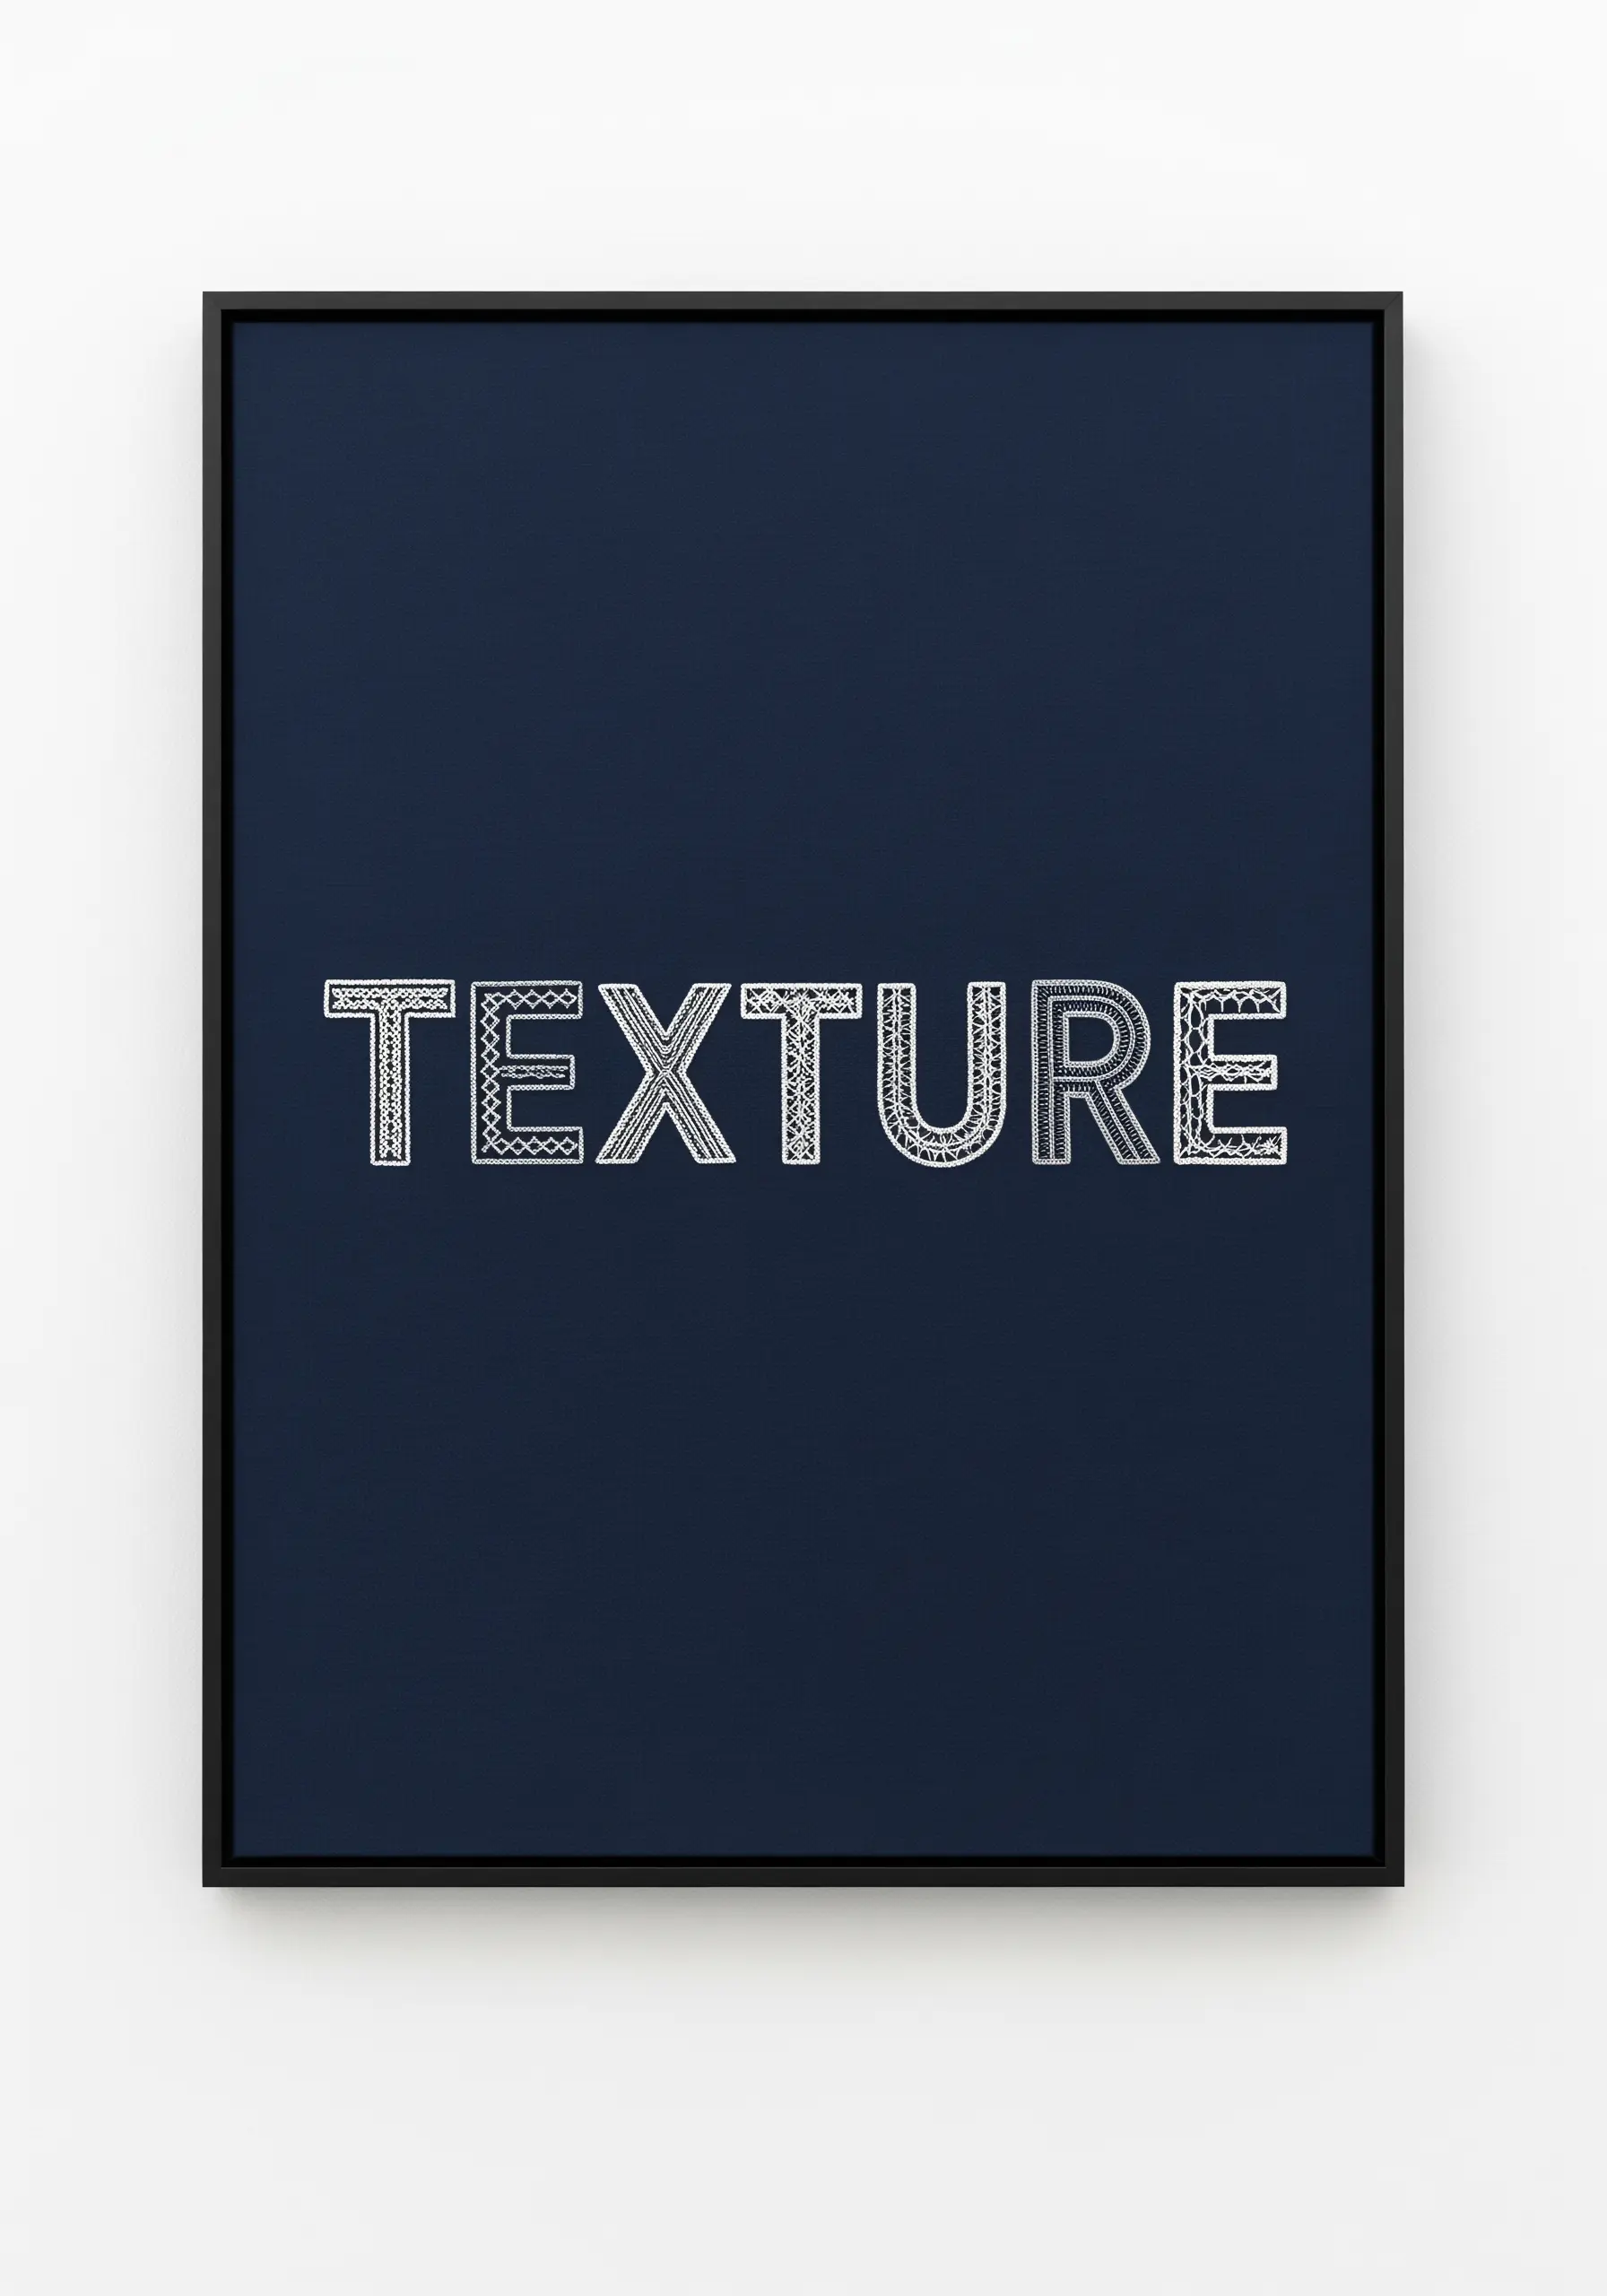
Instead of filling your letters with solid color, use stitches that create open, airy patterns.
Explore techniques from lacemaking, such as trellis stitch, honeycomb stitch, or fagoting, to create a delicate web of thread inside your letter outlines.
Using a single strand of white floss on a dark fabric background puts all the focus on the intricate structure of the stitches, giving your typography a light, ethereal quality.
21. Add Dimension and Shine with Beaded Typography
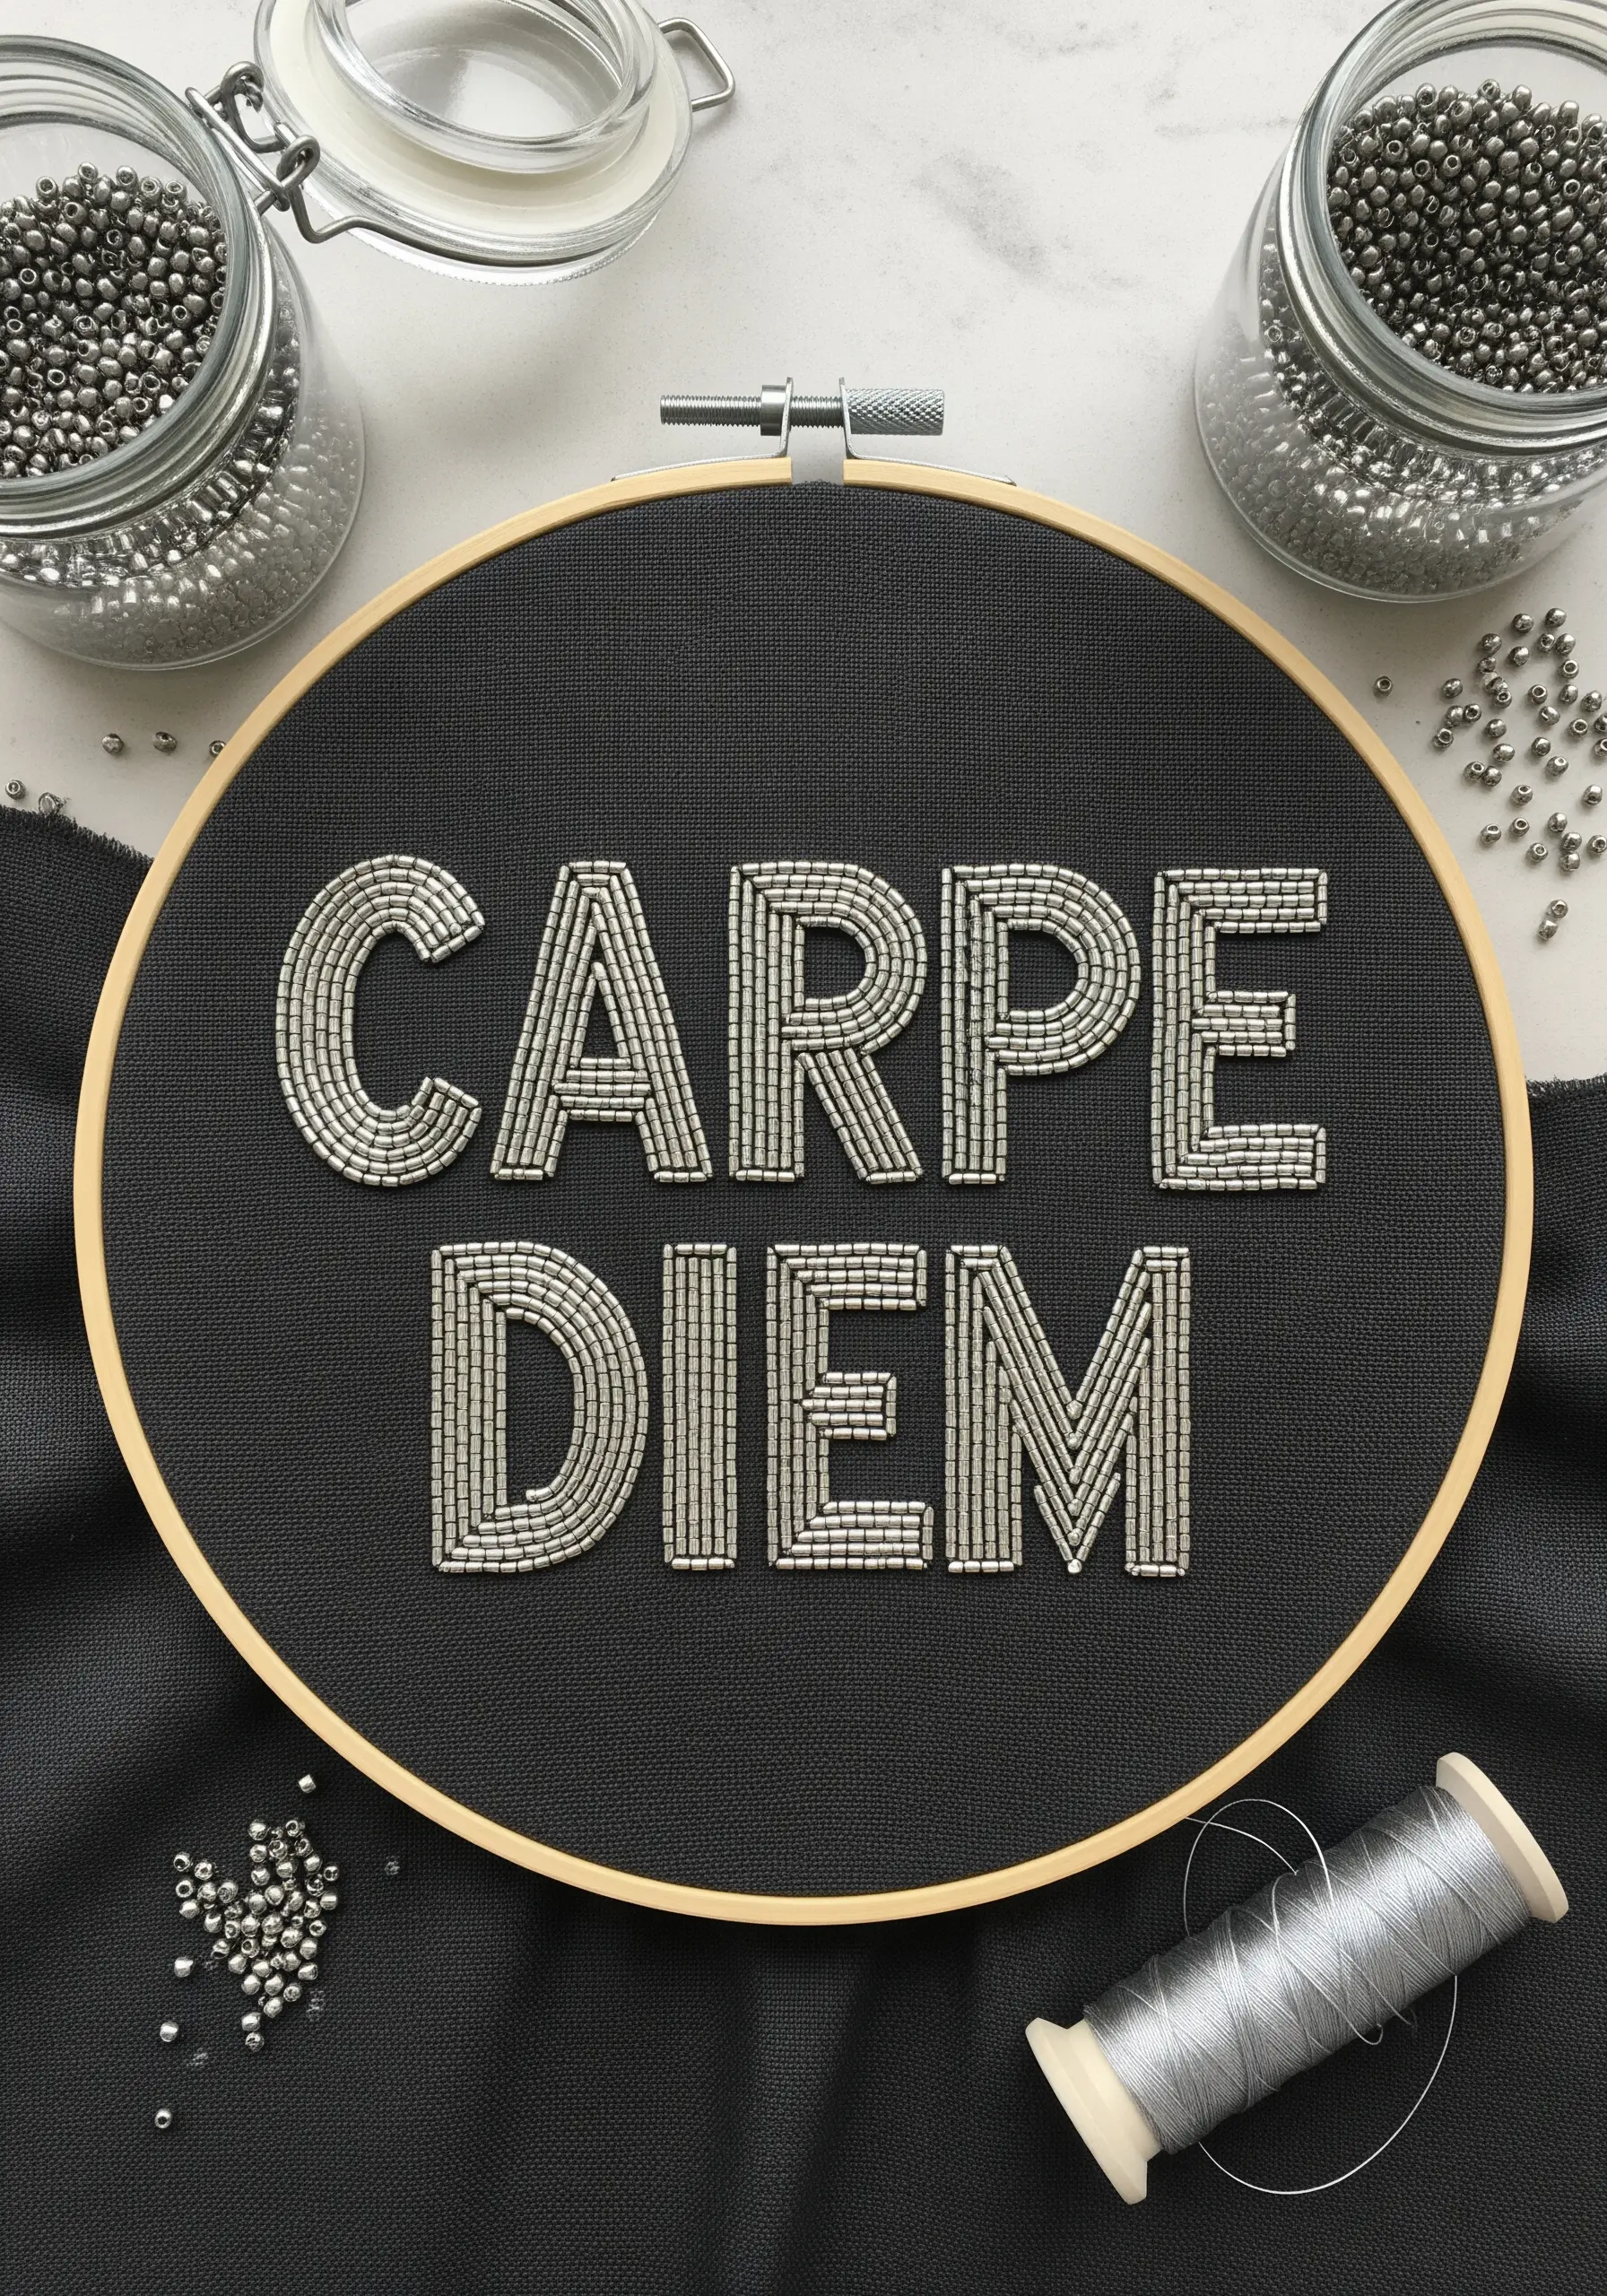
For the ultimate in texture and light-play, substitute thread with beads.
Outline your letters and then fill them with rows of tiny seed beads, stitching them down securely with a strong beading thread.
You can create straight lines, follow curves, or even create patterns within the letterform.
This technique adds physical weight and a luxurious, shimmering quality to your work, transforming a simple quote into a piece of tactile jewelry.
22. Sculpt Words with Soft Wool Roving

For lettering that is soft, bold, and incredibly fast to create, use unspun wool roving.
You can gently felt it into place with a needle-felting tool for a seamless look, or couch it down with a matching thin thread for more definition.
The lofty, unspun fibers create immediate sculptural dimension and a warm, inviting texture that standard yarn can’t replicate. It’s a wonderful way to create large-scale yarn wall art with a soft, organic presence.
23. Create a Digital Aesthetic with Cross-Stitch
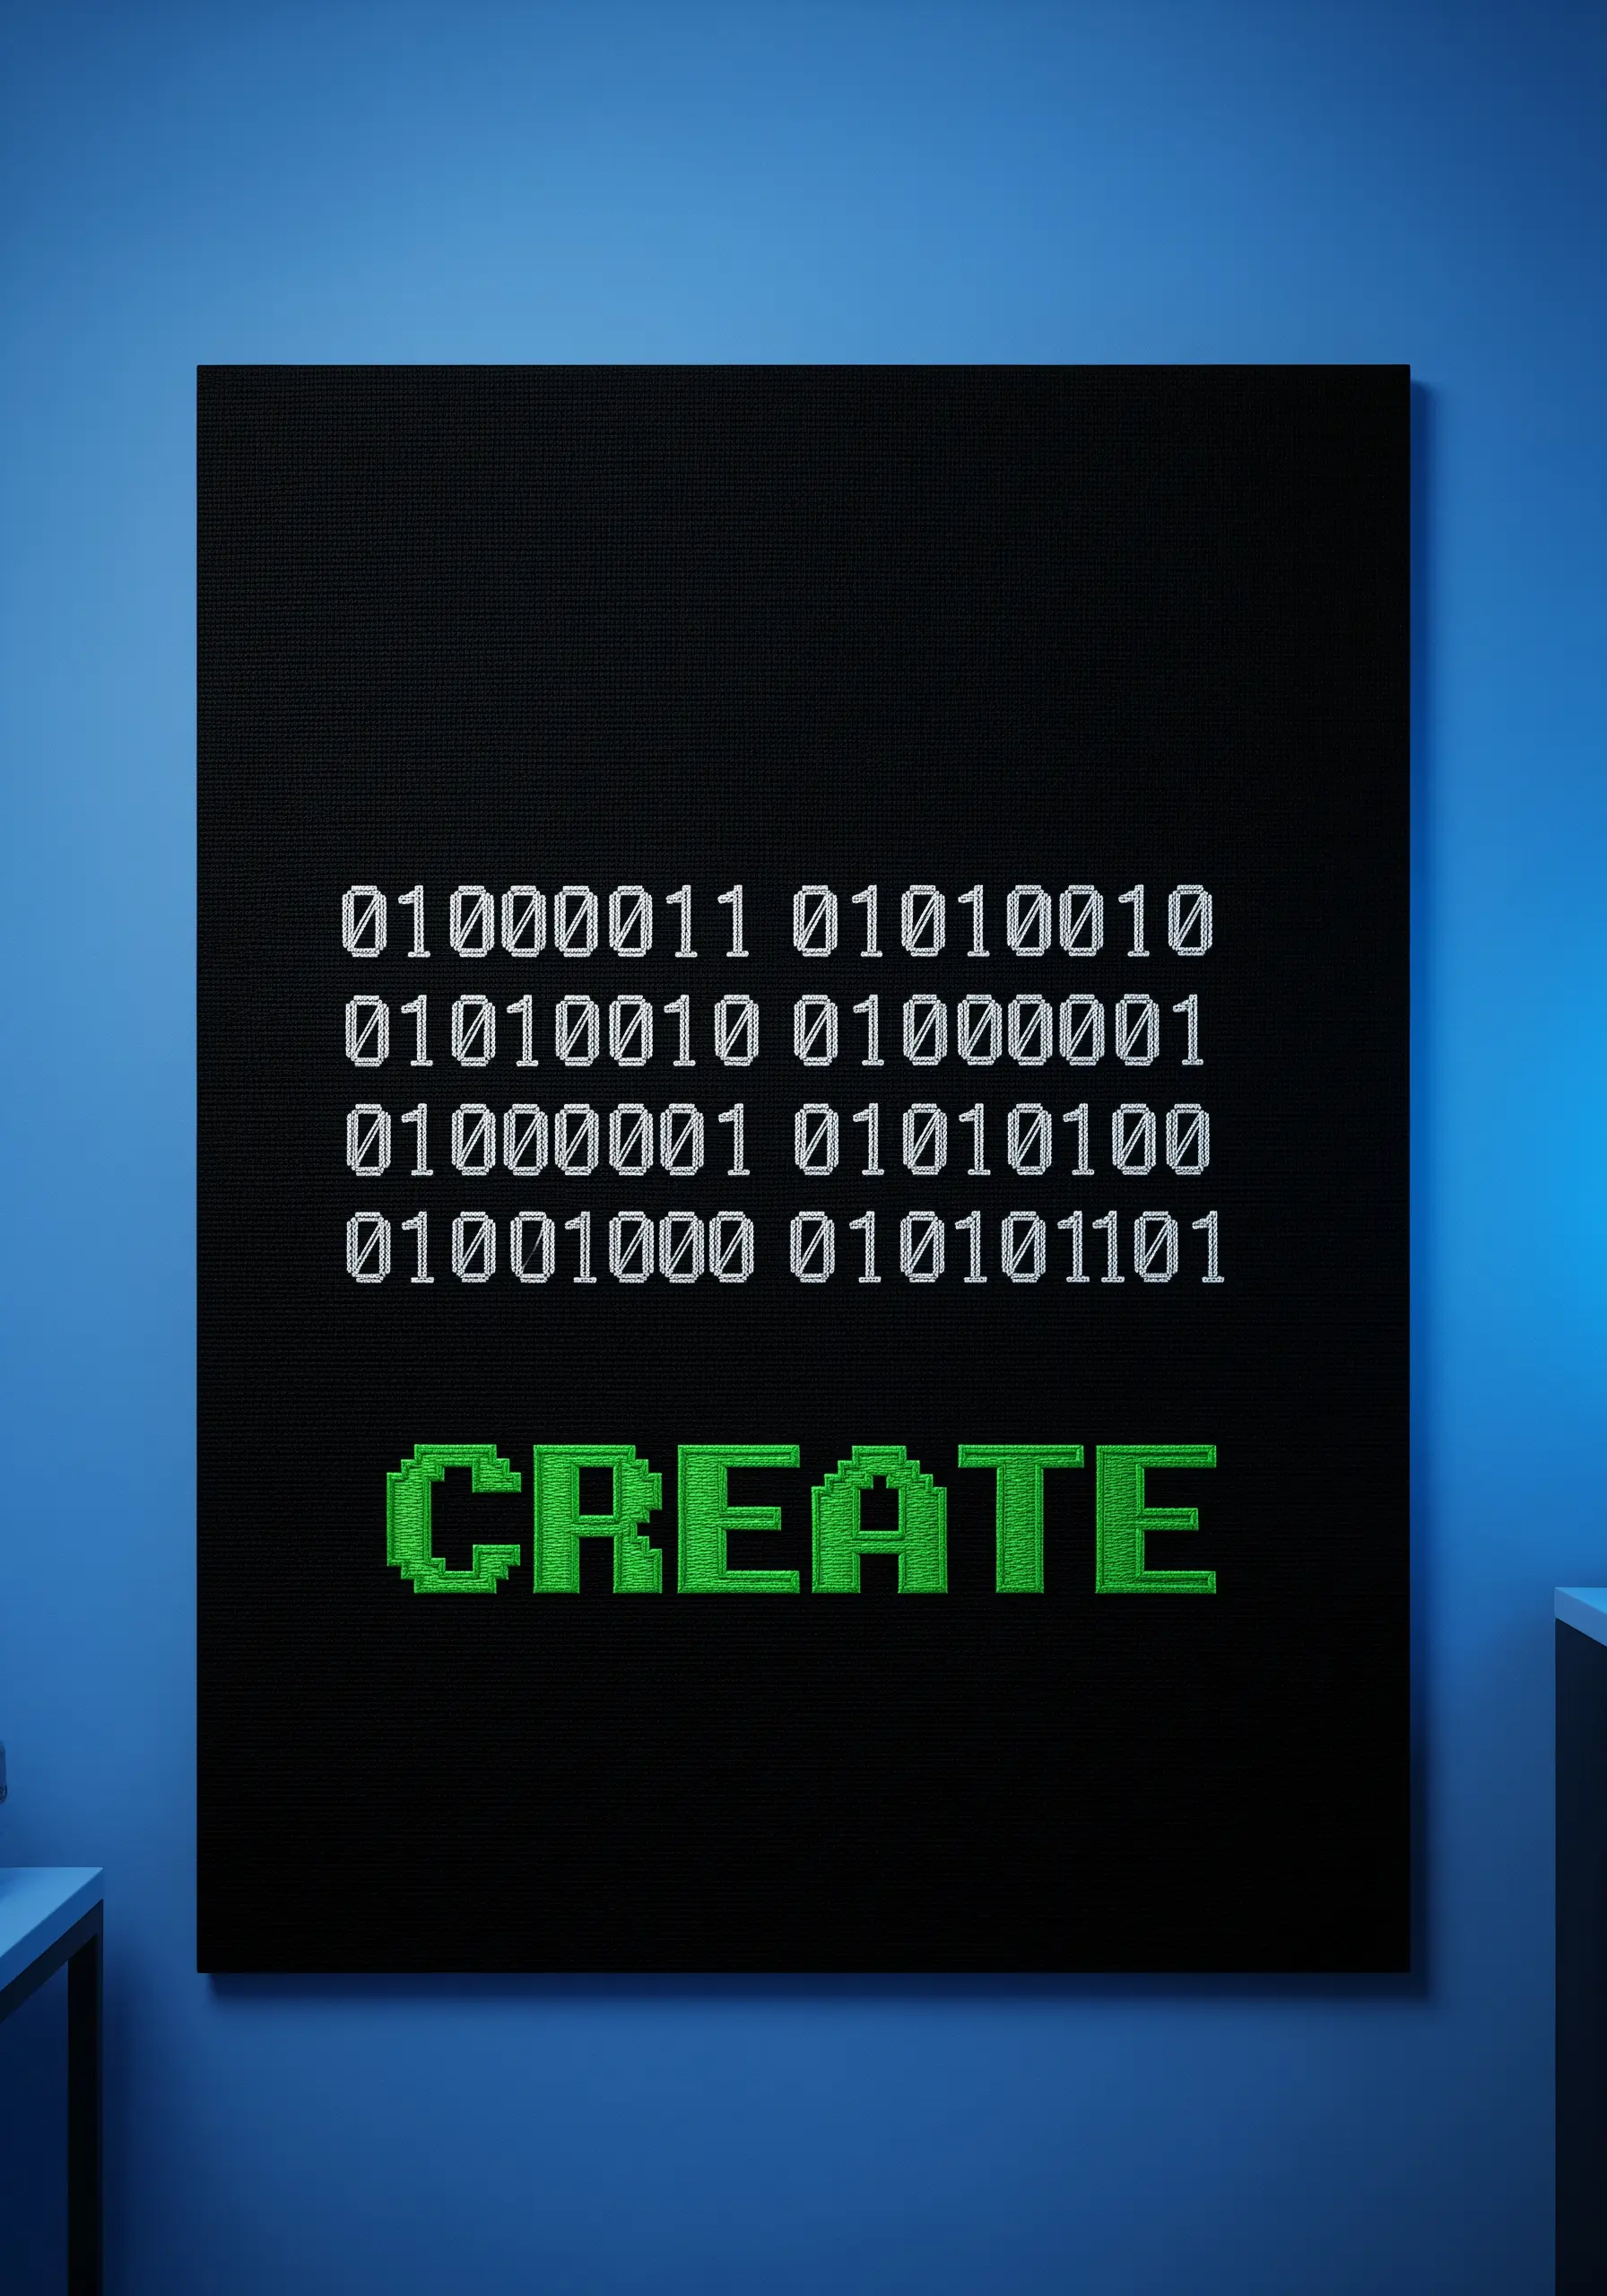
Embrace a retro, pixelated look by using cross-stitch to form your letters.
Working on Aida cloth or an even-weave fabric, this technique naturally lends itself to blocky, geometric fonts that recall early computer graphics.
The methodical, grid-based nature of cross-stitch provides a clean, precise finish that is a refreshing contrast to more freeform embroidery styles. It’s perfect for tech-inspired quotes or gamer art.
24. Stitch Directly onto Paper for a Fragile Statement

Embroidery isn’t limited to fabric. Stitching on heavy, handmade paper creates a unique effect.
To avoid tearing, gently pre-punch your stitching holes along your design line with a sharp awl or a thick needle.
Use a simple backstitch or stem stitch to create clean, graphic lines that contrast with the paper’s soft, fibrous texture.
The act of piercing the paper adds a sense of permanence and fragility to your words.
25. Achieve a Pop Art Look with Appliqué

For that bold, graphic look of comic book lettering, combine fabric and thread.
Cut your main letter shapes from brightly colored felt and appliqué them onto your background fabric. This gives you a perfectly flat, saturated block of color.
Then, use a thick black thread to add the characteristic heavy outlines and dramatic drop shadows with a dense satin stitch. This mixed-media approach is the secret to getting truly sharp, impactful results.
26. Craft Ethereal Script on Sheer Fabric
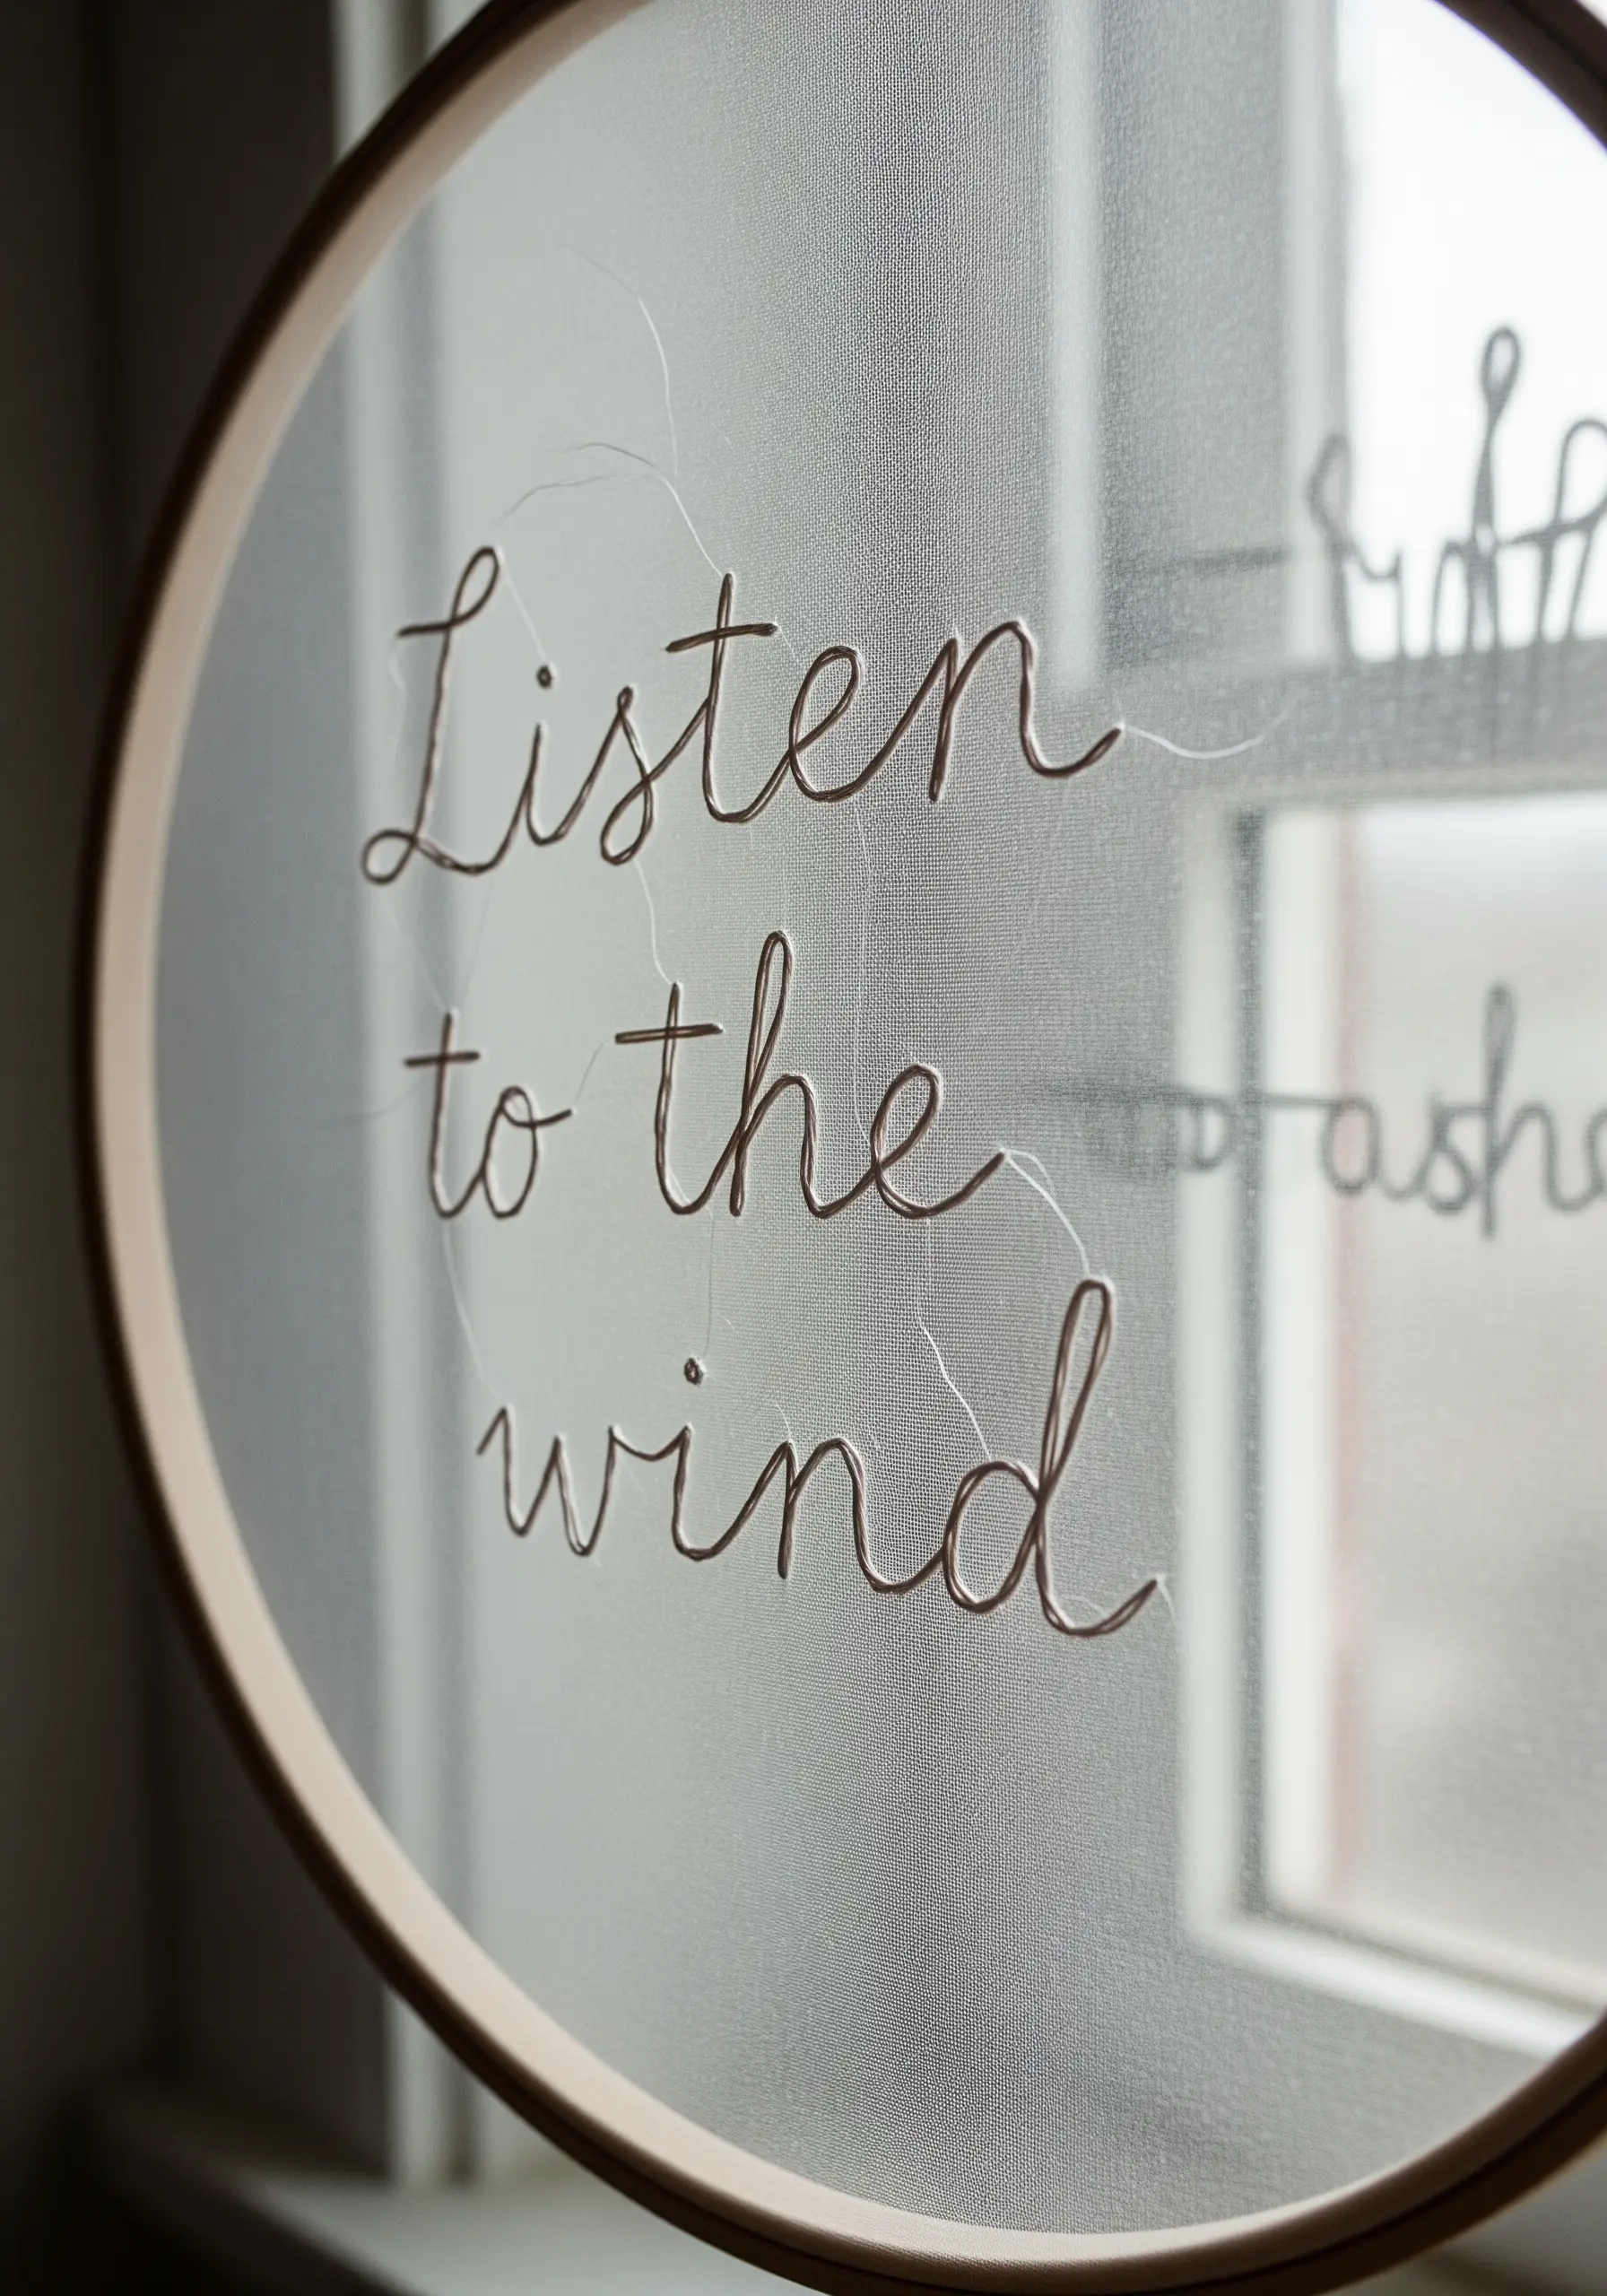
Create words that seem to float in mid-air by stitching on a transparent fabric like organza or tulle.
Use a simple, elegant stitch like a stem stitch or a whipped backstitch to keep the lines clean and light.
Because the back of your work will be visible, this technique challenges you to be exceptionally neat with your starts and stops.
The final effect is delicate and almost magical, especially when hung in a window where light can pass through it.
27. Contrast Rustic Braids with a Gilded Background
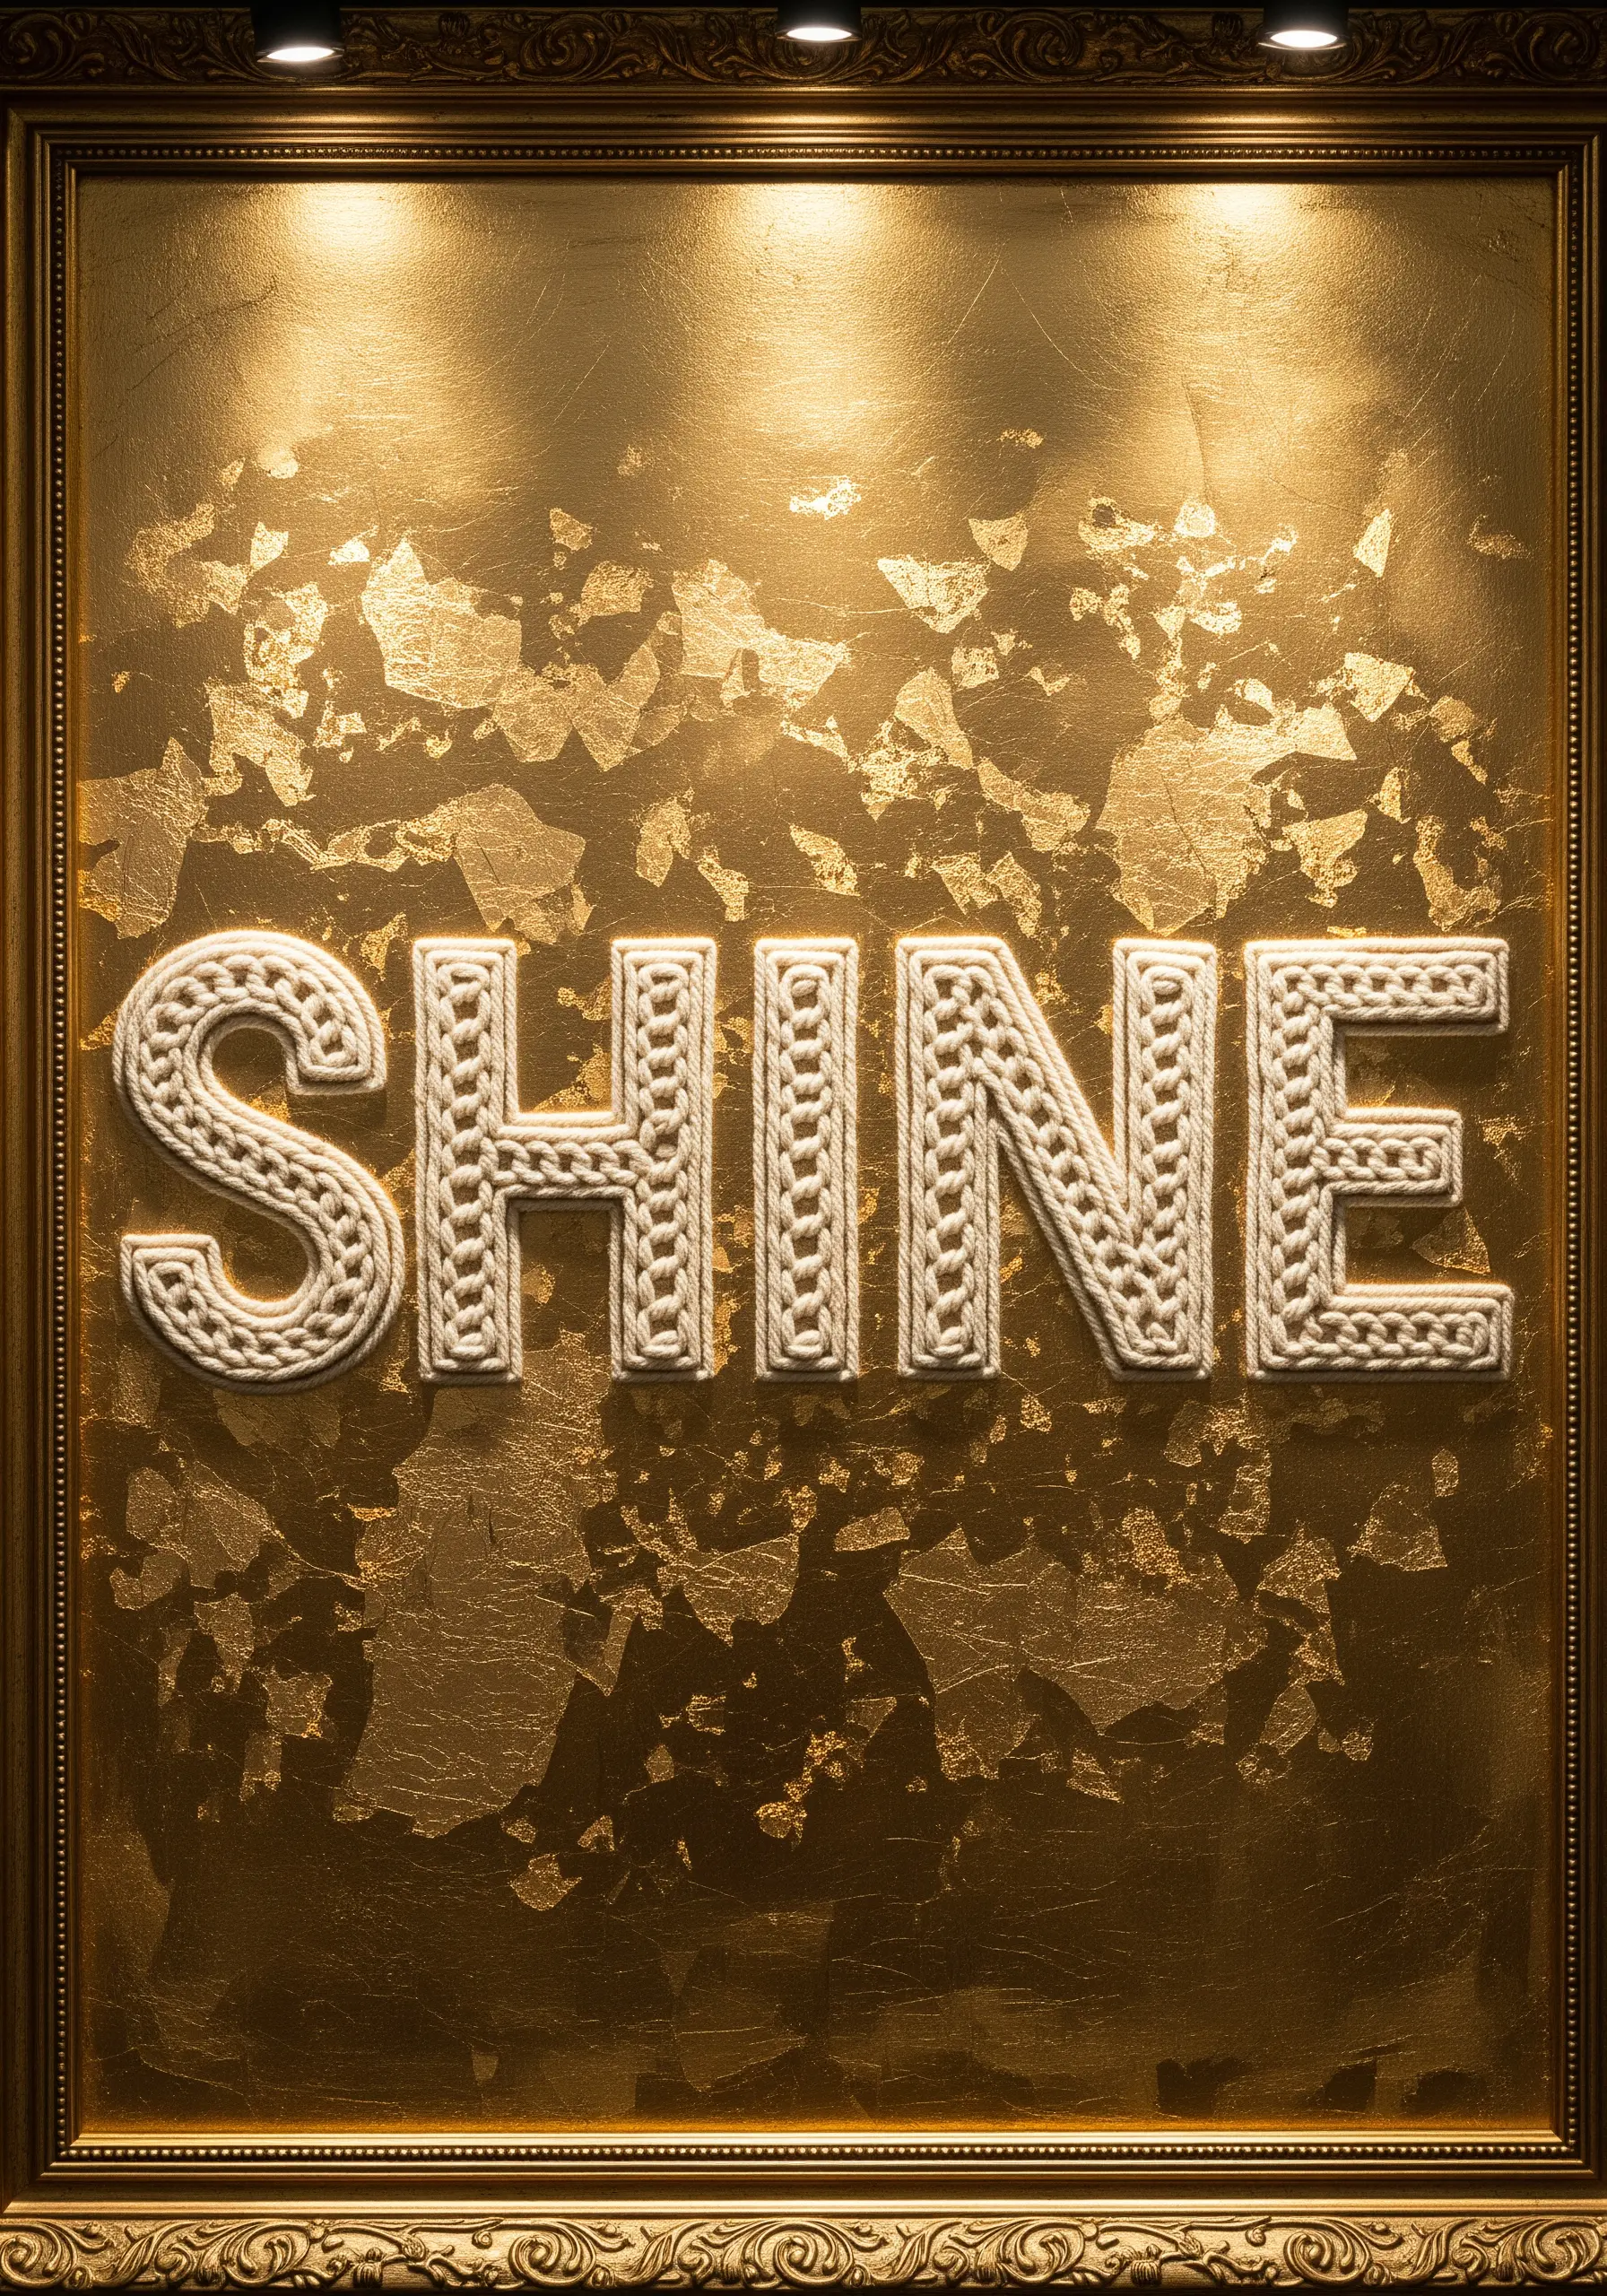
Create a stunning visual dialogue by pairing humble textures with luxurious surfaces.
First, apply gold leaf to your canvas or board for a fractured, shimmering background. Then, couch a chunky, matte-textured braid—made from natural fibers like cotton or wool—over the top.
The contrast between the rustic, tactile braid and the cool, reflective gold leaf is incredibly dynamic and gives the piece an unexpected sophistication.
28. Merge Illustration with Selective Stitching

Your needle doesn’t have to do all the work. Begin with a line drawing on your fabric using a permanent art pen.
Then, choose specific elements of the design to enhance with embroidery. Use thread to add a pop of color, to emphasize a particular word, or to give a flat shape three-dimensional texture.
This mixed-media technique creates a dynamic interplay between the drawn line and the stitched thread, allowing you to tell a more complex visual story.


