

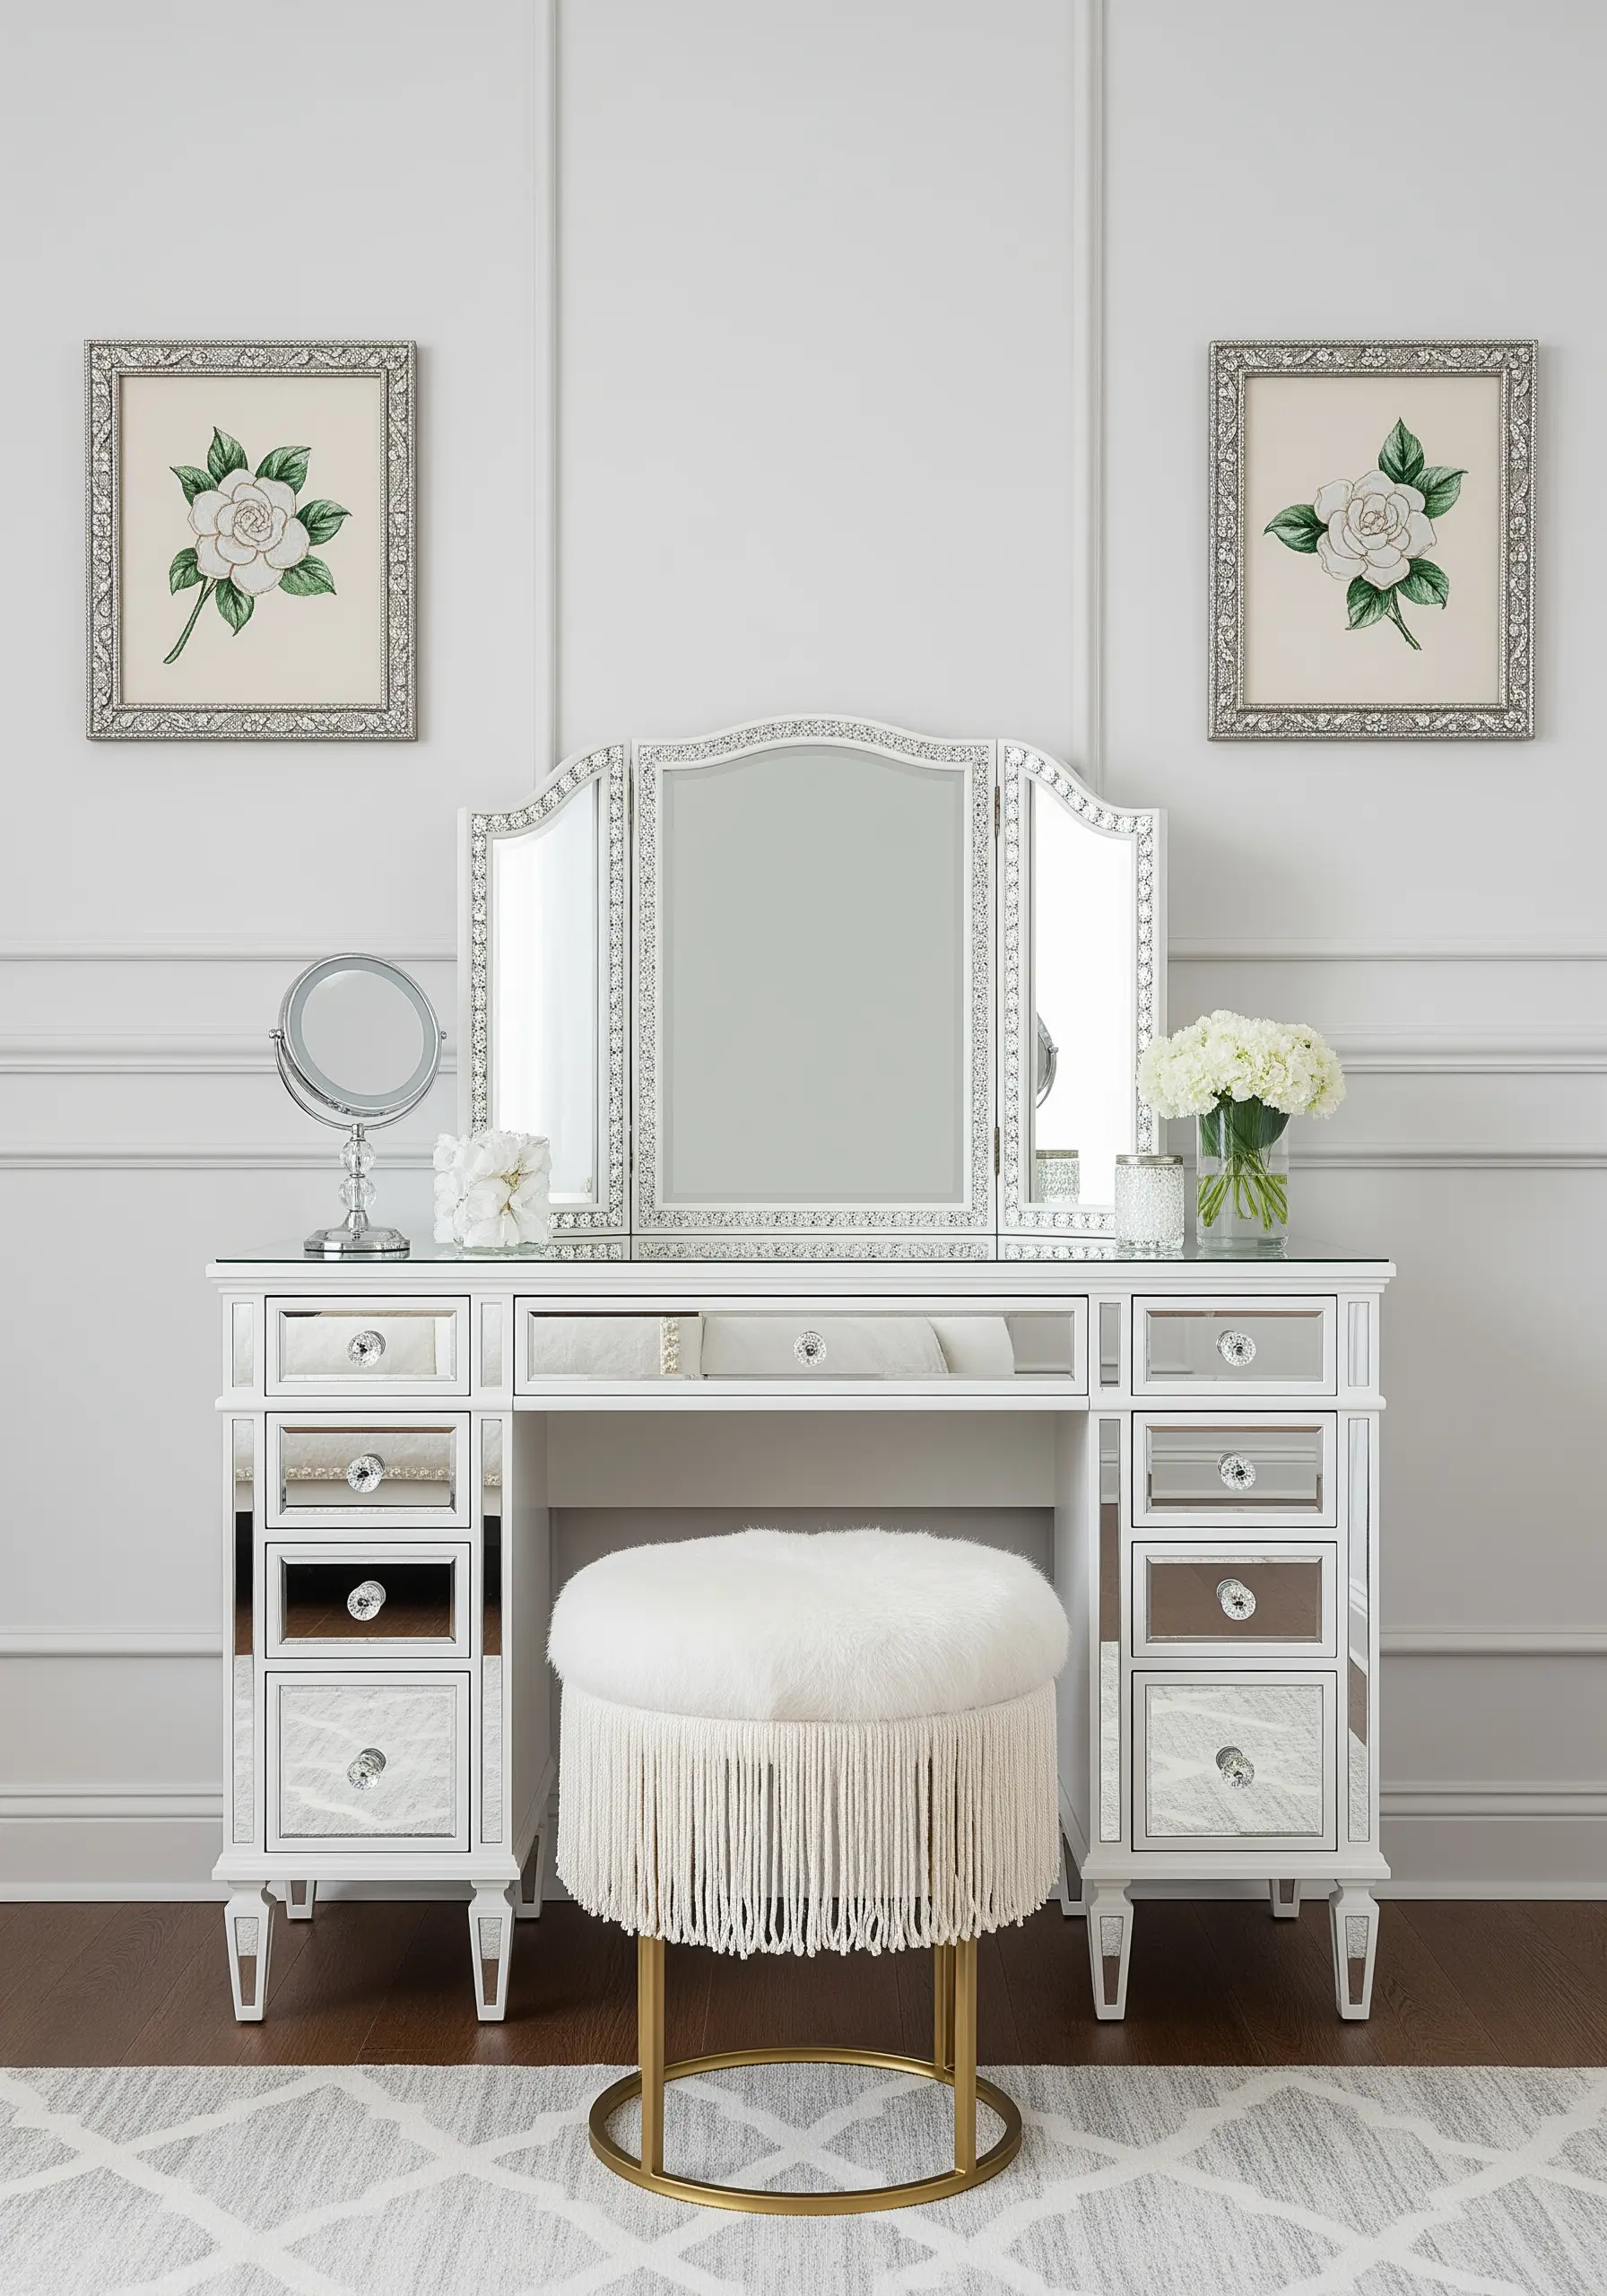
Your dressing area is more than just a place to get ready; it’s a small sanctuary, a corner of the world that is entirely yours. Why not fill it with art that feels just as personal? With a needle and thread, you can transform this compact space into a gallery of meaningful, handmade beauty.
Forget thinking of embroidery as just a series of stitches. Instead, consider yourself a designer composing with thread. The small, intentional choices you make—the weight of your floss, the texture of your fabric, the shape of your frame—are what elevate a simple floral motif into a polished work of art. It’s in these details that your unique style emerges.
Here, you’ll find techniques and display ideas designed to give you that professional finish, turning your passion into decor that feels both elegant and deeply personal. Let’s create a space that not only looks beautiful but also reflects the care and creativity you pour into every stitch.
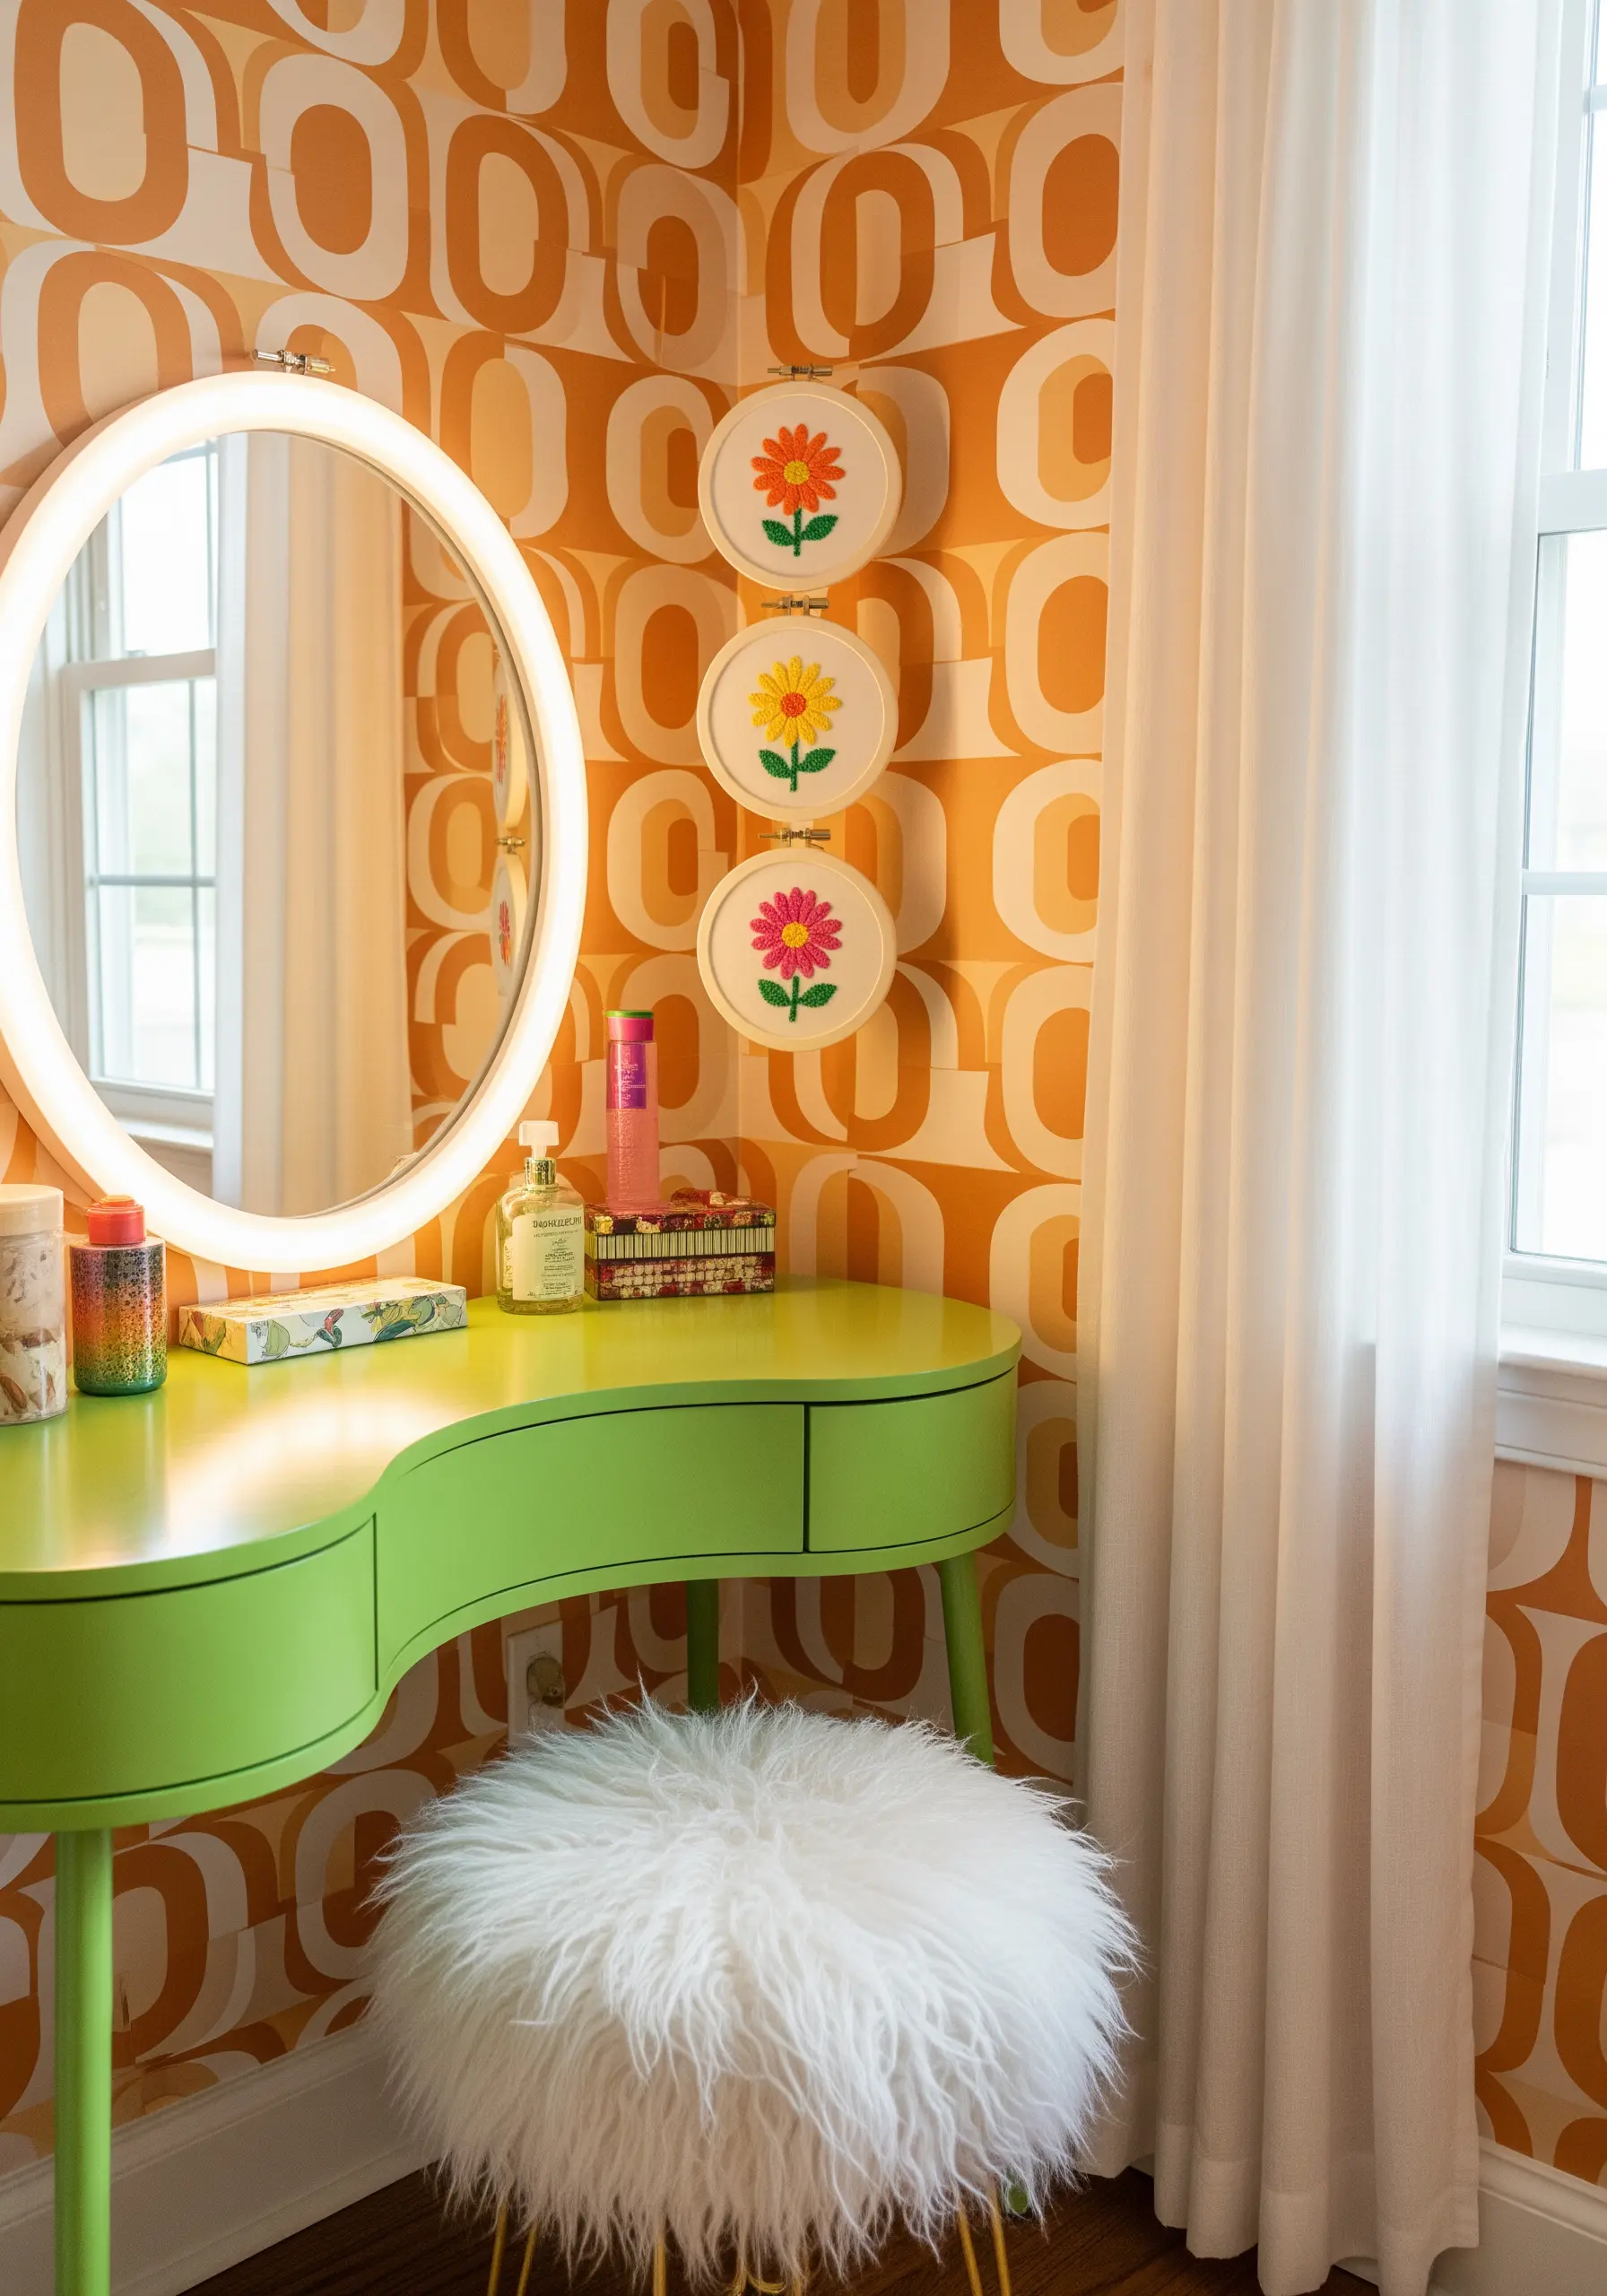
1. Create a Modern Triptych with Geometric Hoops
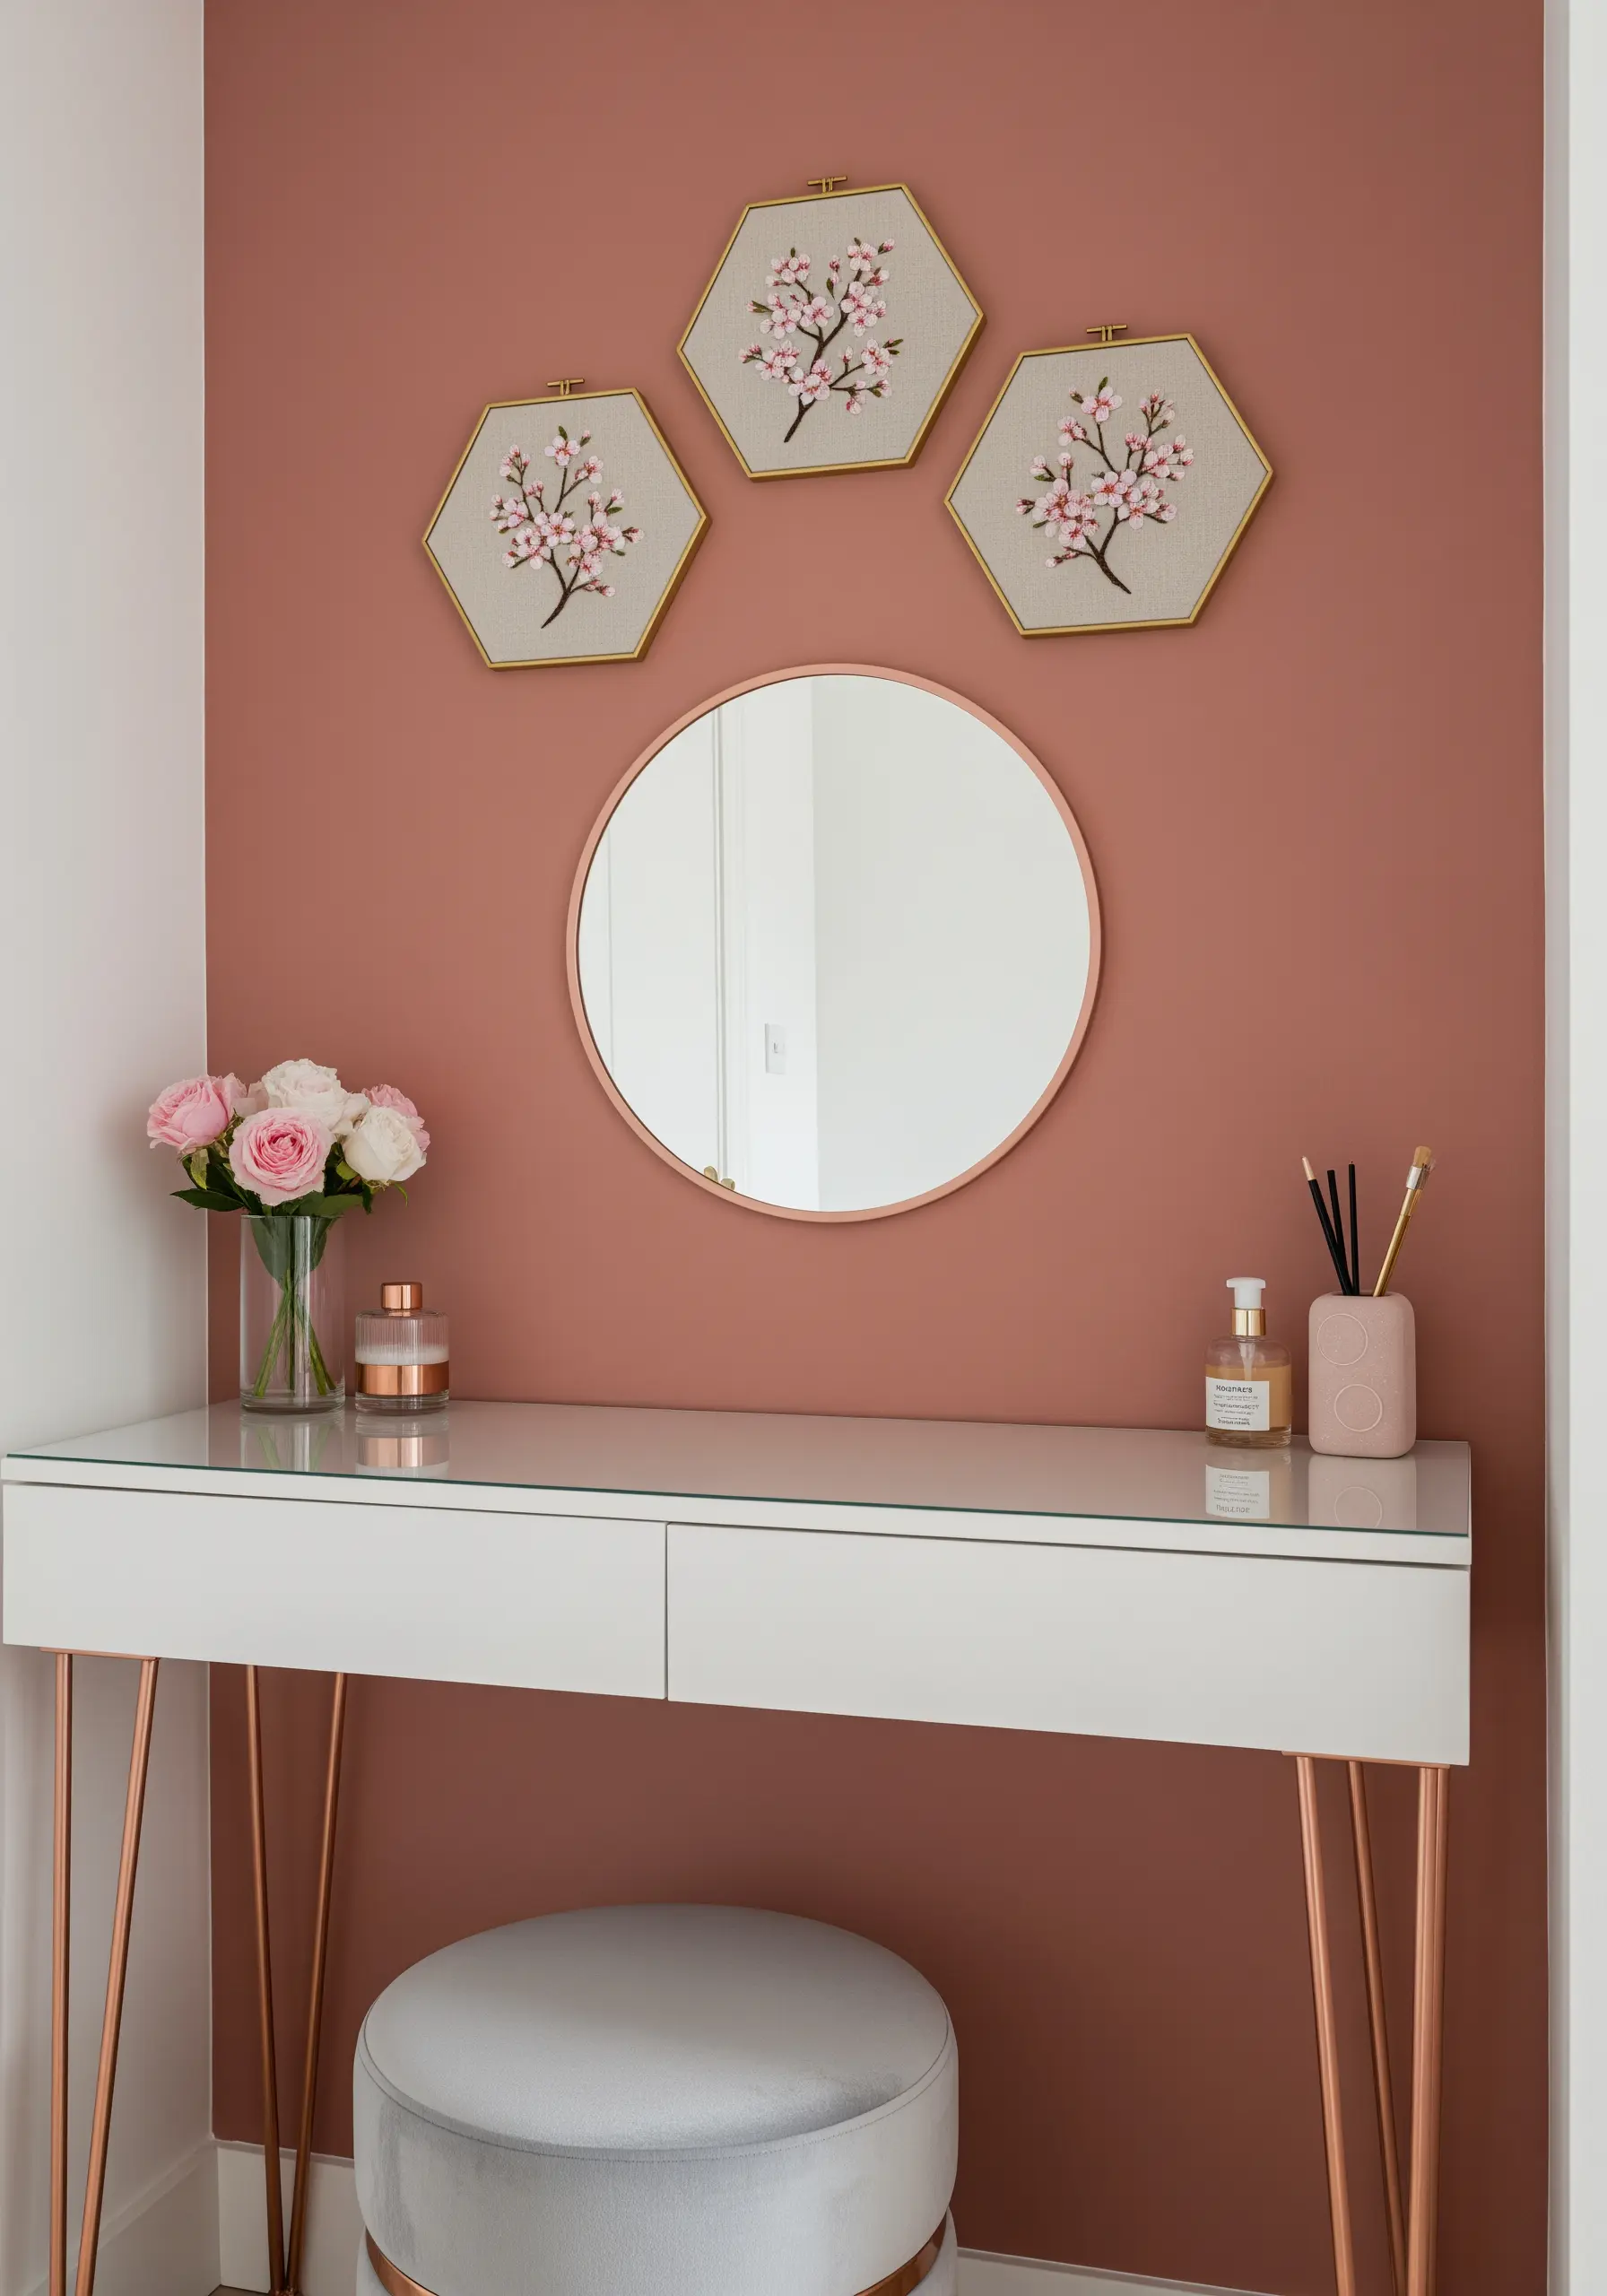
Group three identical hexagonal frames to give classic cherry blossoms a contemporary, structured feel.
Use French knots for the flower centers, pulling them tight for a delicate, beaded texture that contrasts with the smooth satin stitch petals.
To ensure consistency across the trio, create one master pattern and transfer it exactly to each piece of fabric before you begin stitching.
This repetition transforms individual hoops into a single, cohesive art piece, adding balance and intention above a dressing table.
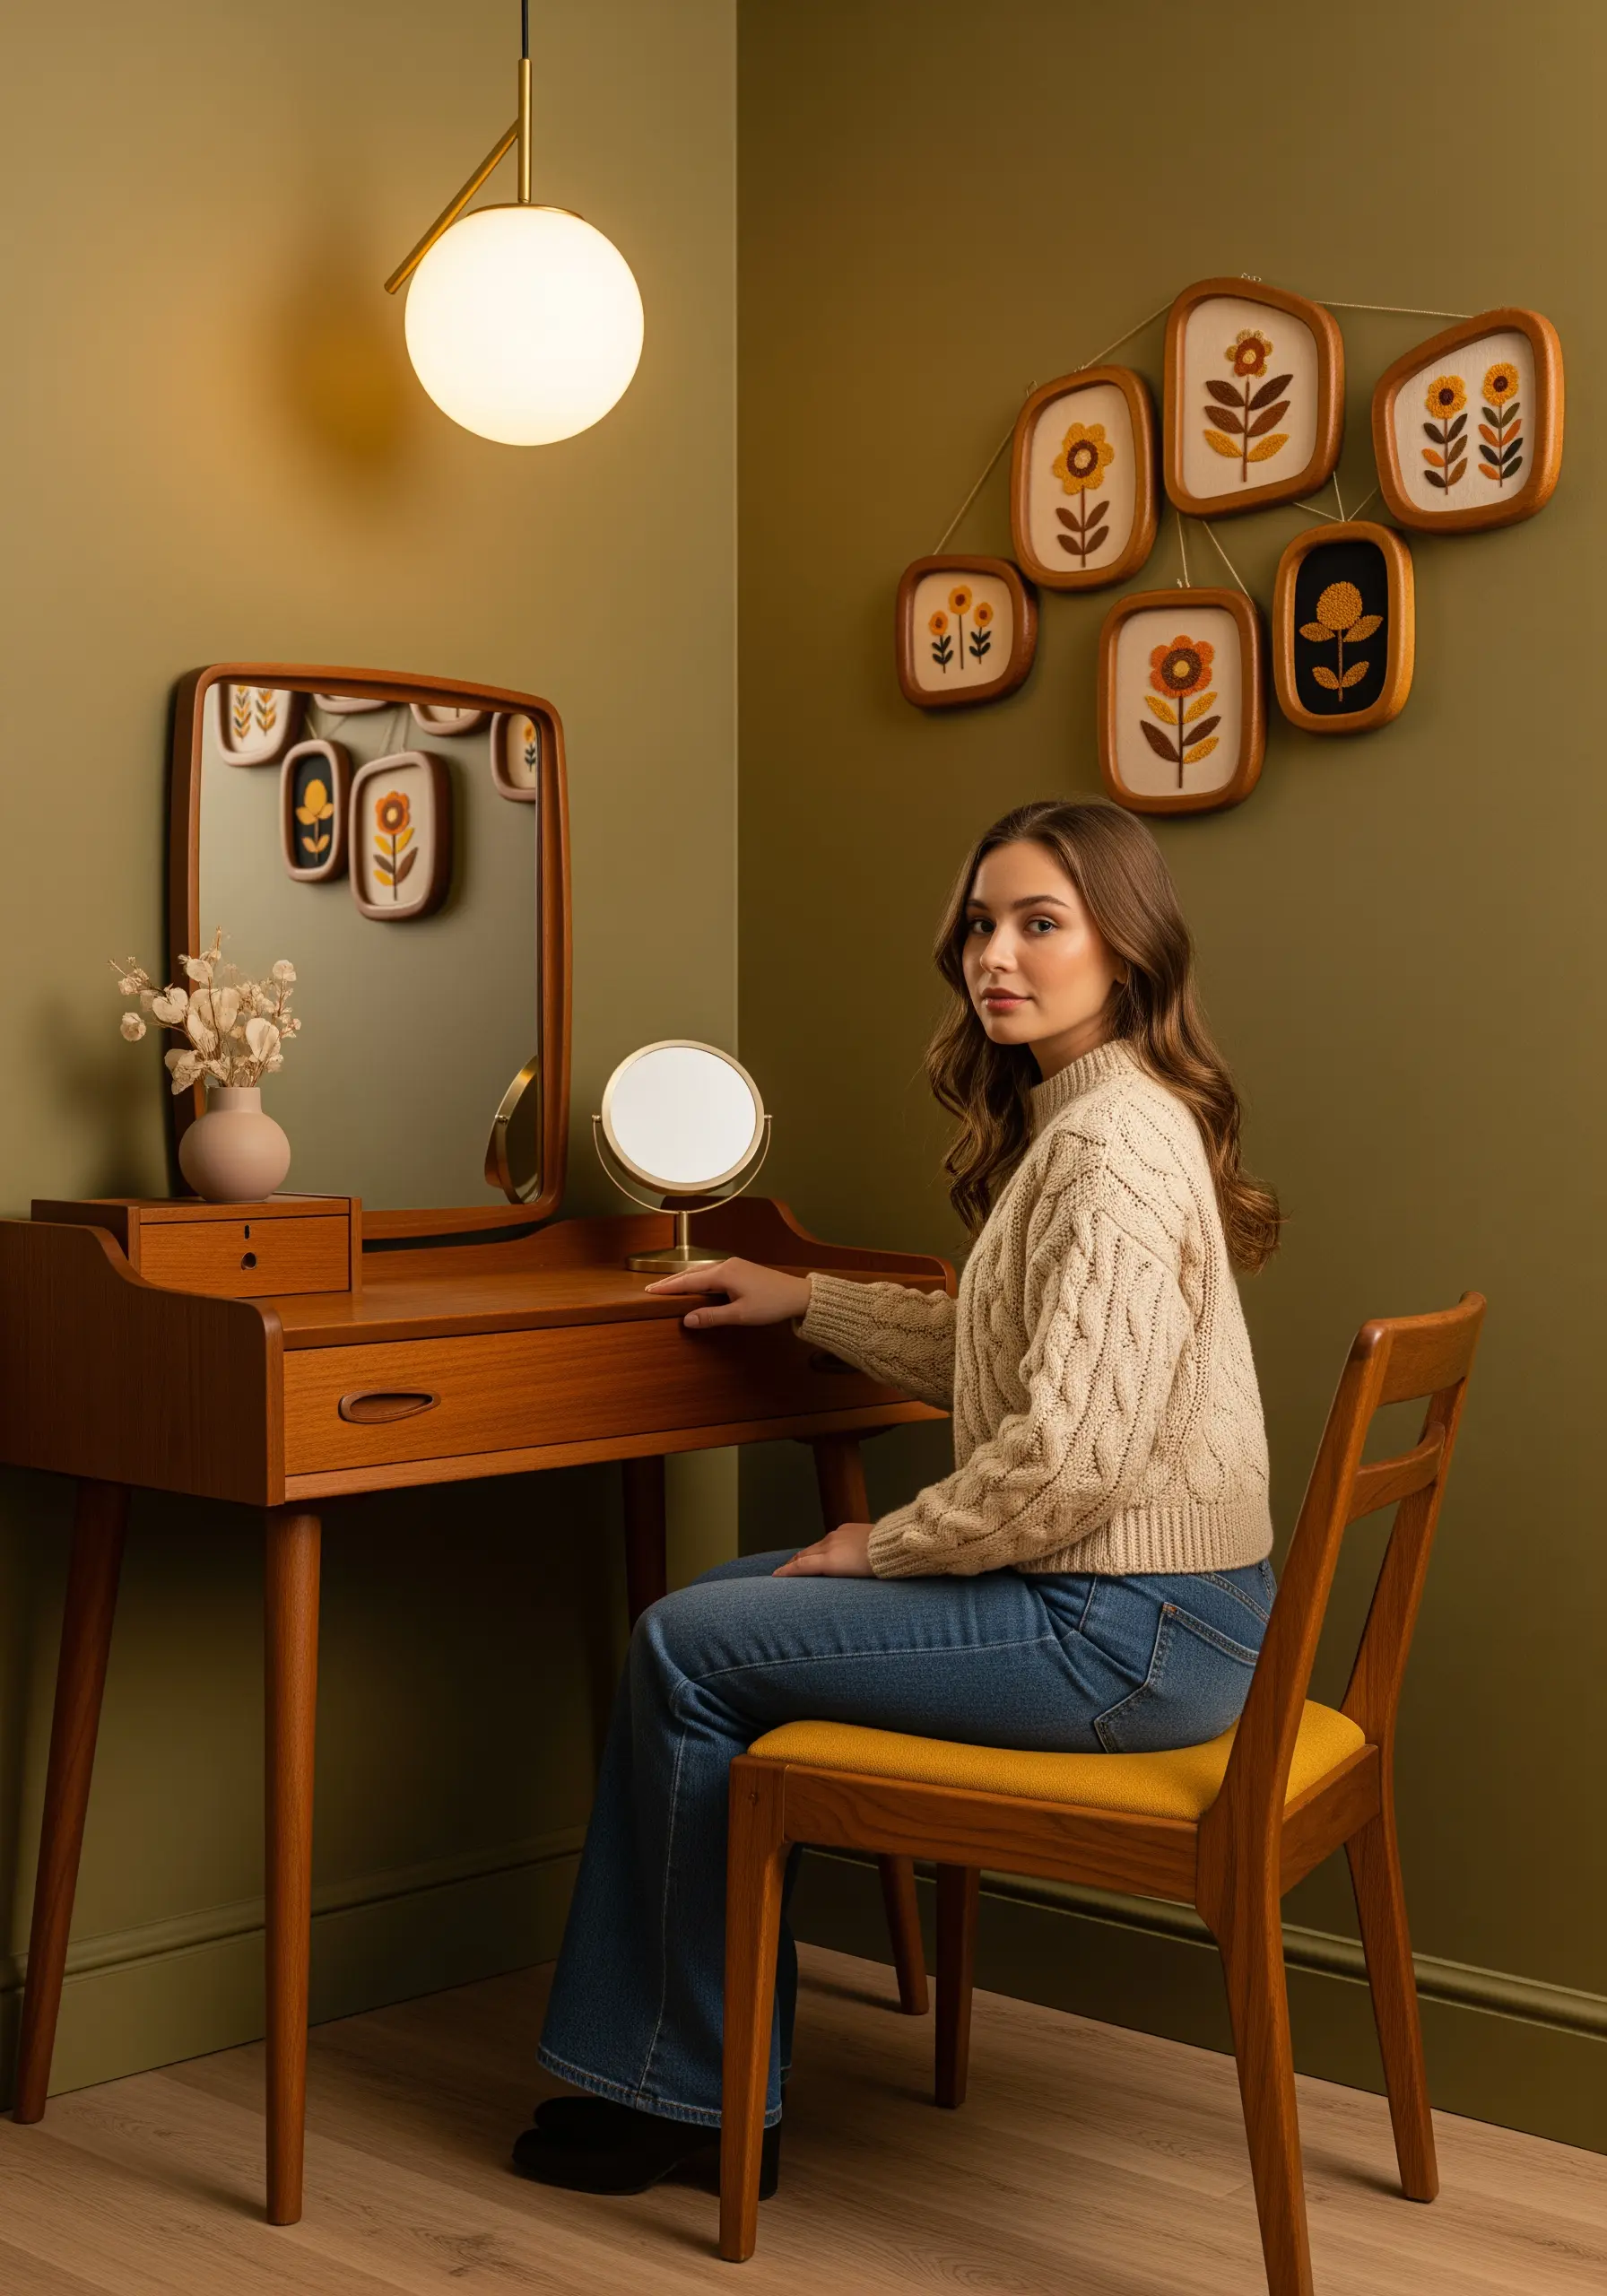
2. Curate a Vintage-Inspired Gallery Wall
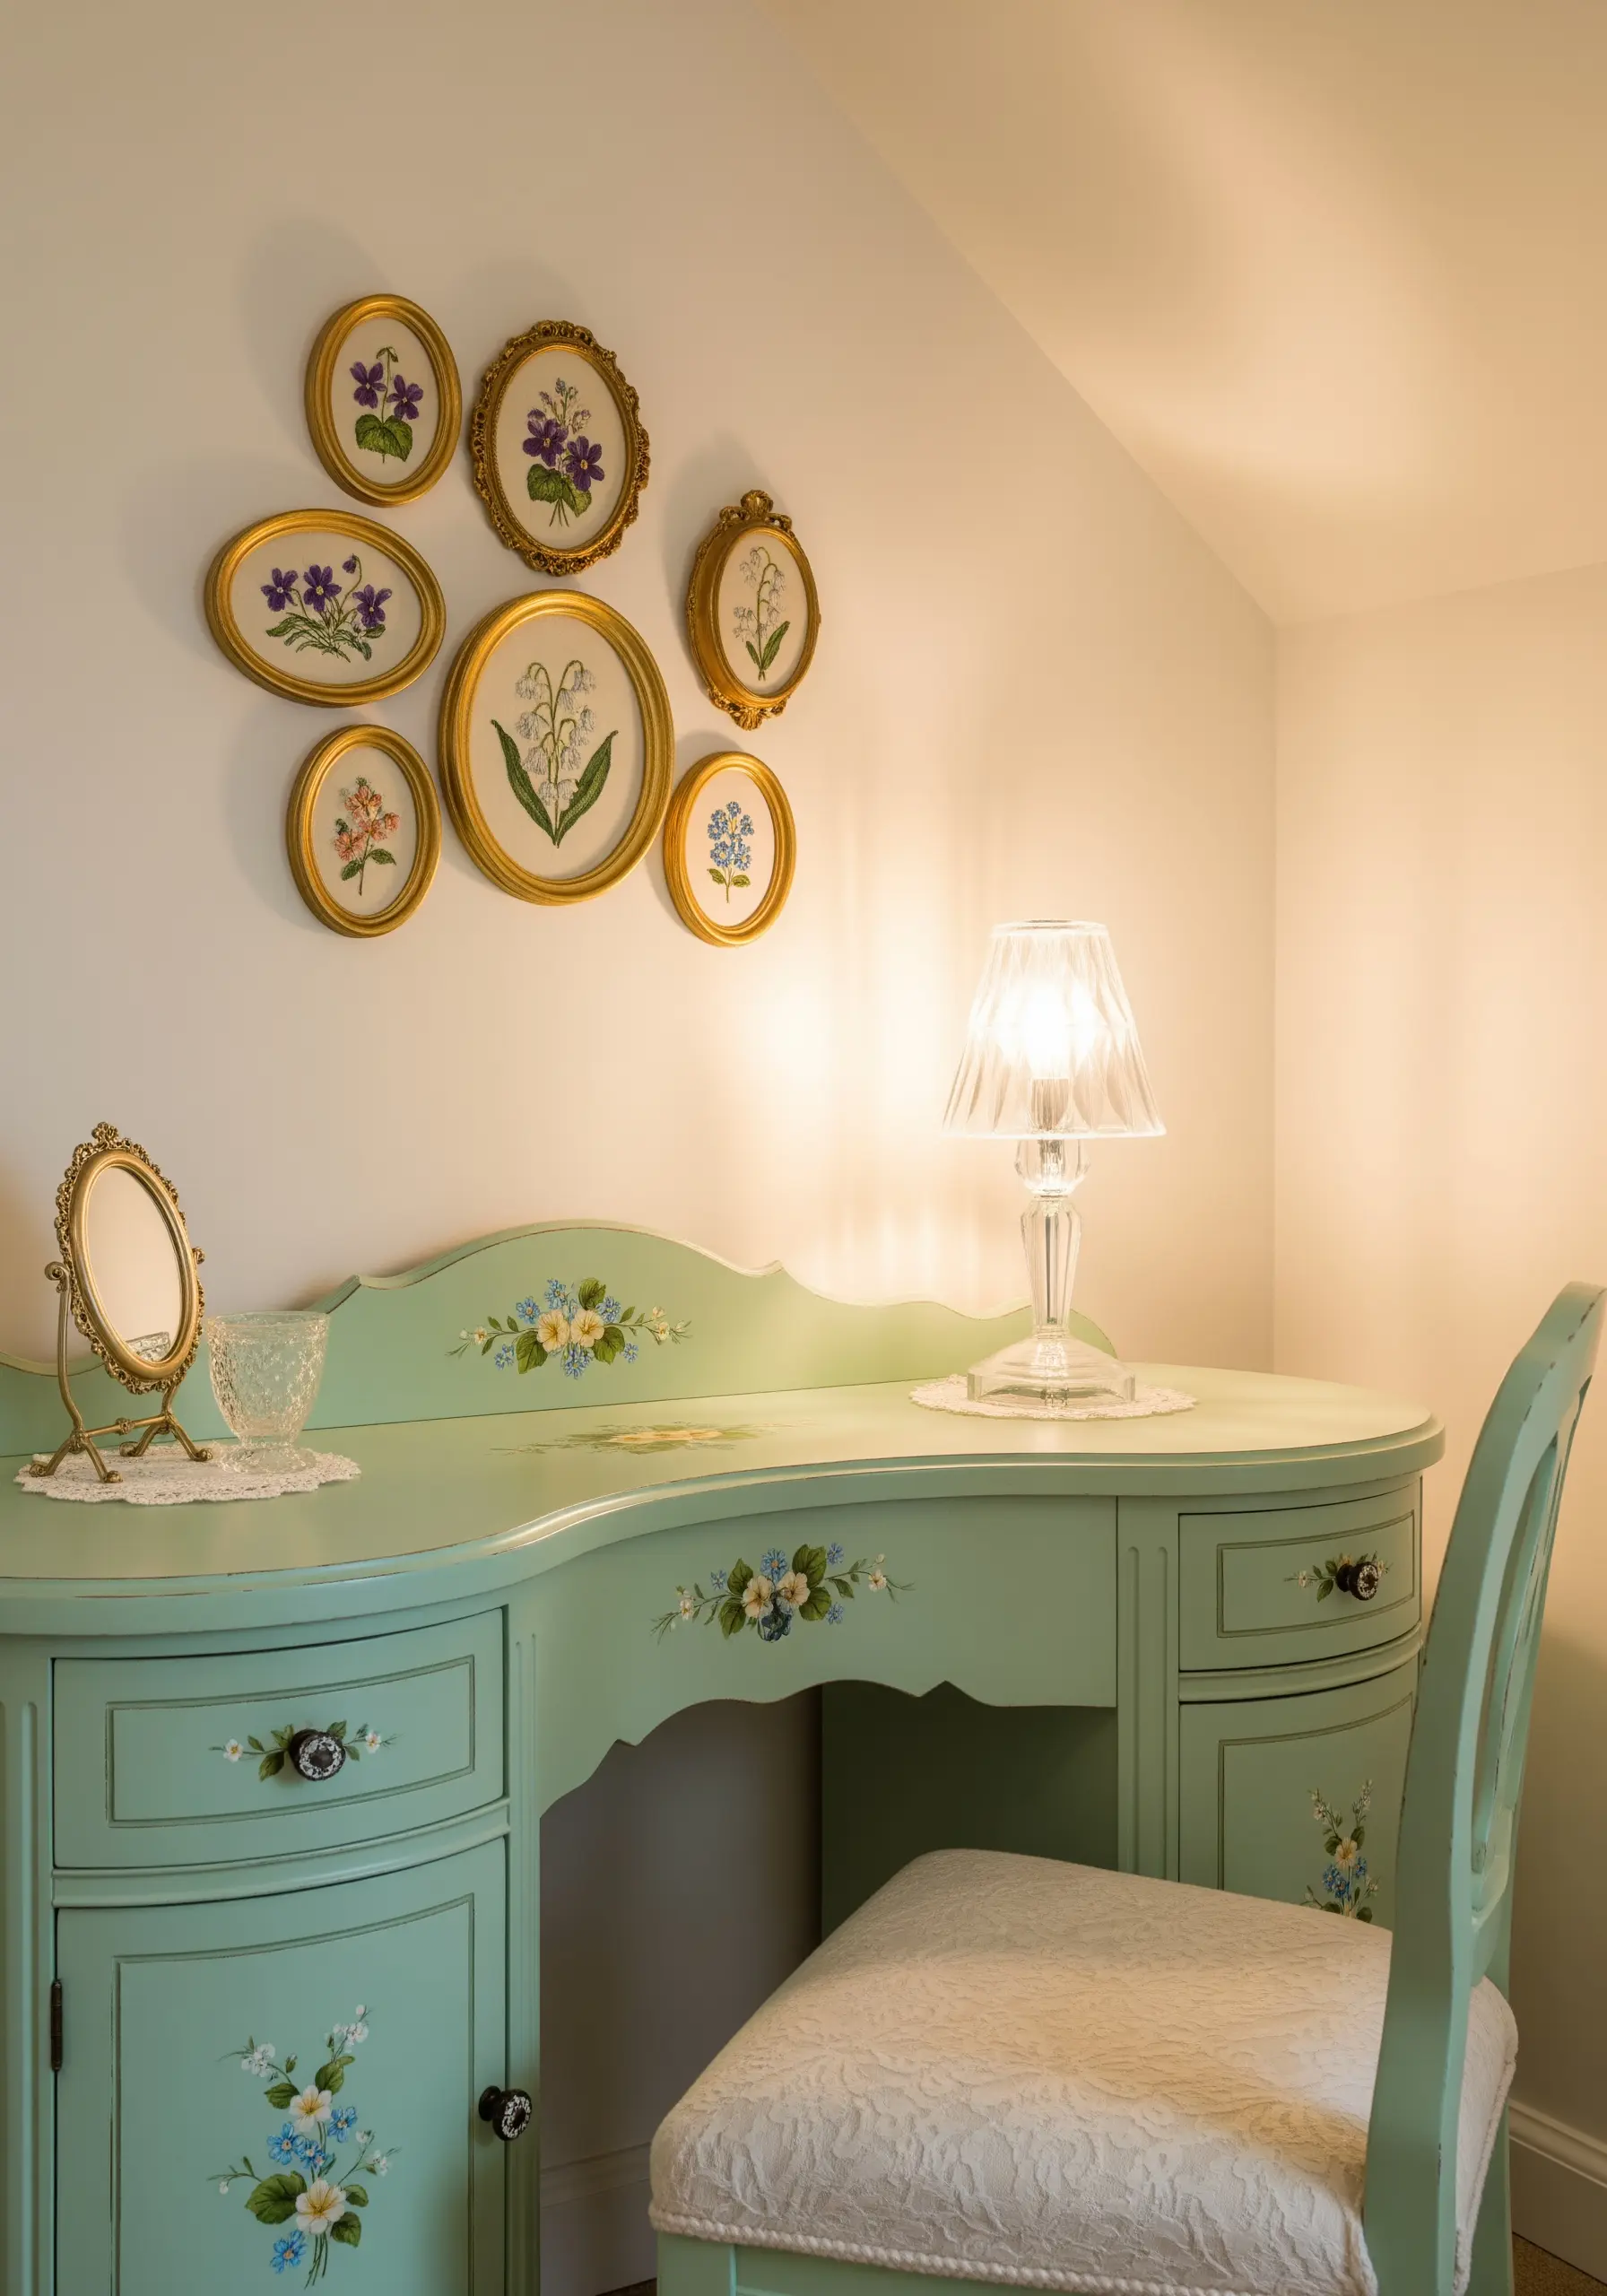
Combine various small, ornate oval frames to create the feeling of a cherished, inherited collection.
Don’t worry about matching frame styles; the eclectic mix is what creates the charm.
Tie the collection together by using a consistent theme, such as woodland wildflowers, and a shared color palette of soft purples, blues, and greens.
This approach allows you to build your display over time, turning each small finish into a part of a larger, evolving story in your space.
3. Embrace Elegance with Minimalist Line Art
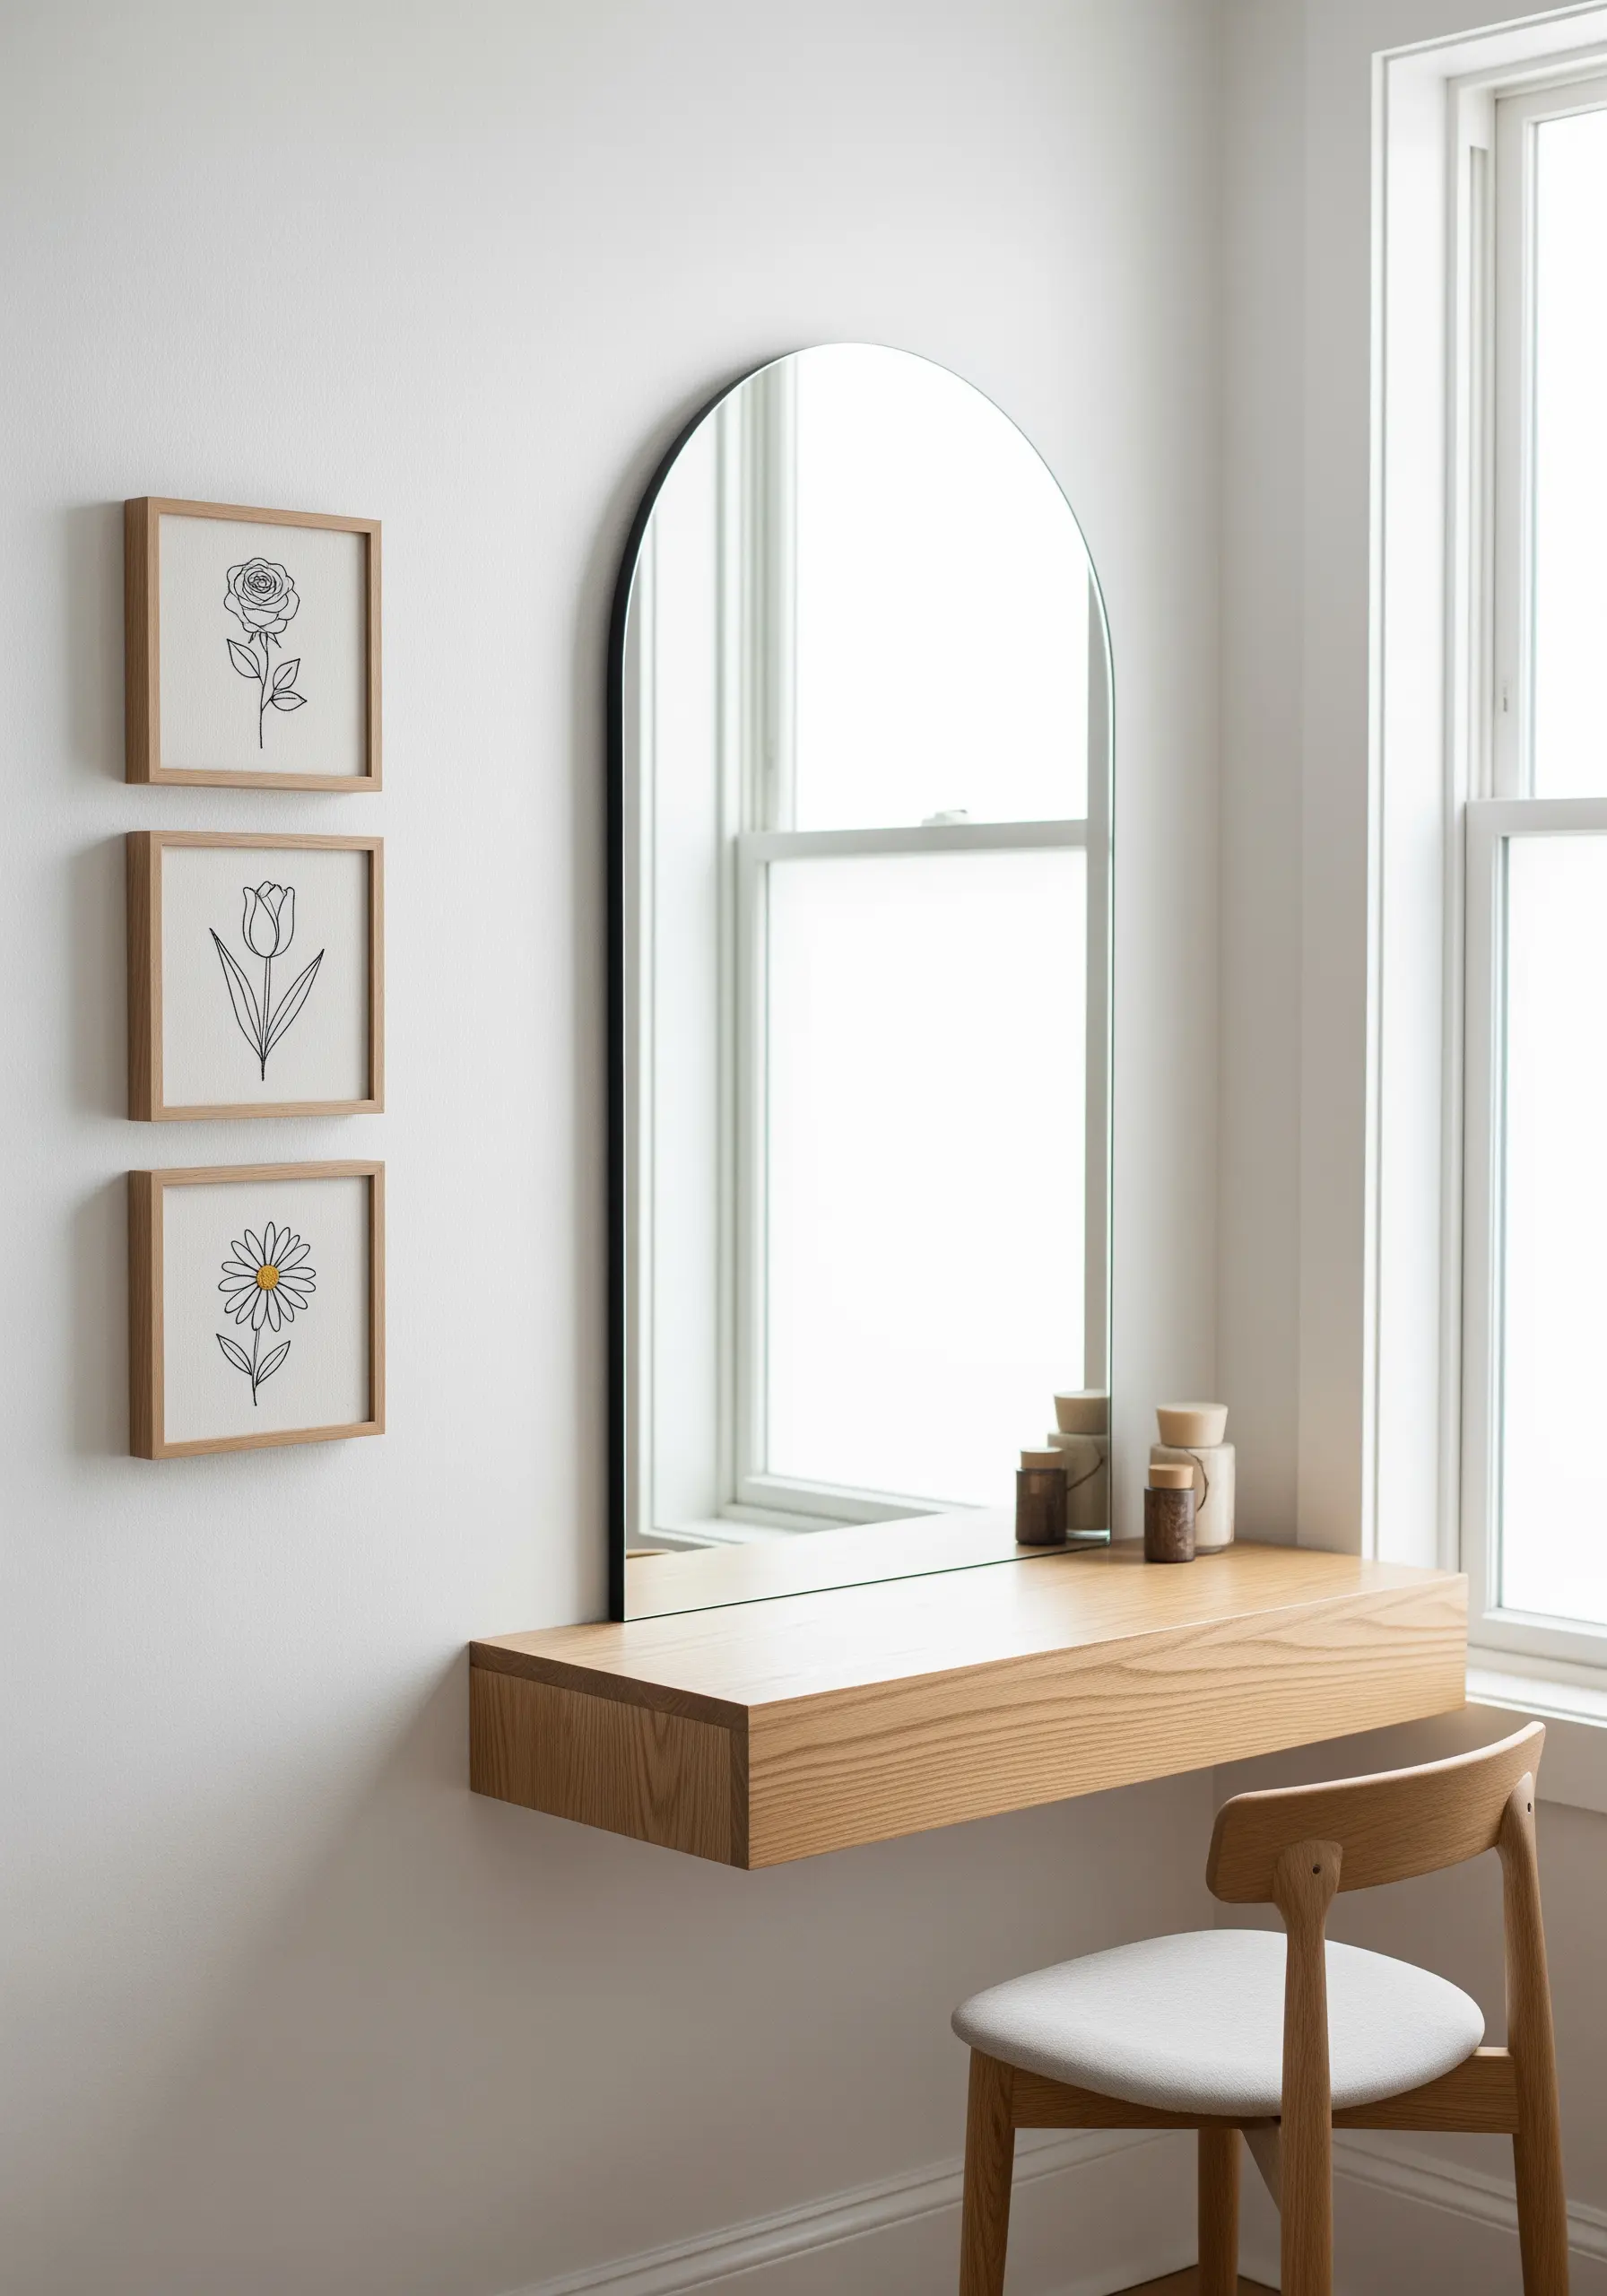
Achieve a clean, graphic look by focusing on the pure outline of each flower, using only a single strand of black thread.
A simple backstitch or stem stitch is all you need to create these simple line art designs, making them perfect for a quick yet impactful project.
The power of this style lies in its use of negative space; the unstitched fabric is just as important as the embroidered lines.
Frame them in simple, light wood to maintain a modern, airy aesthetic that complements minimalist decor.
4. Build an Abundant Floral Hoop Cluster
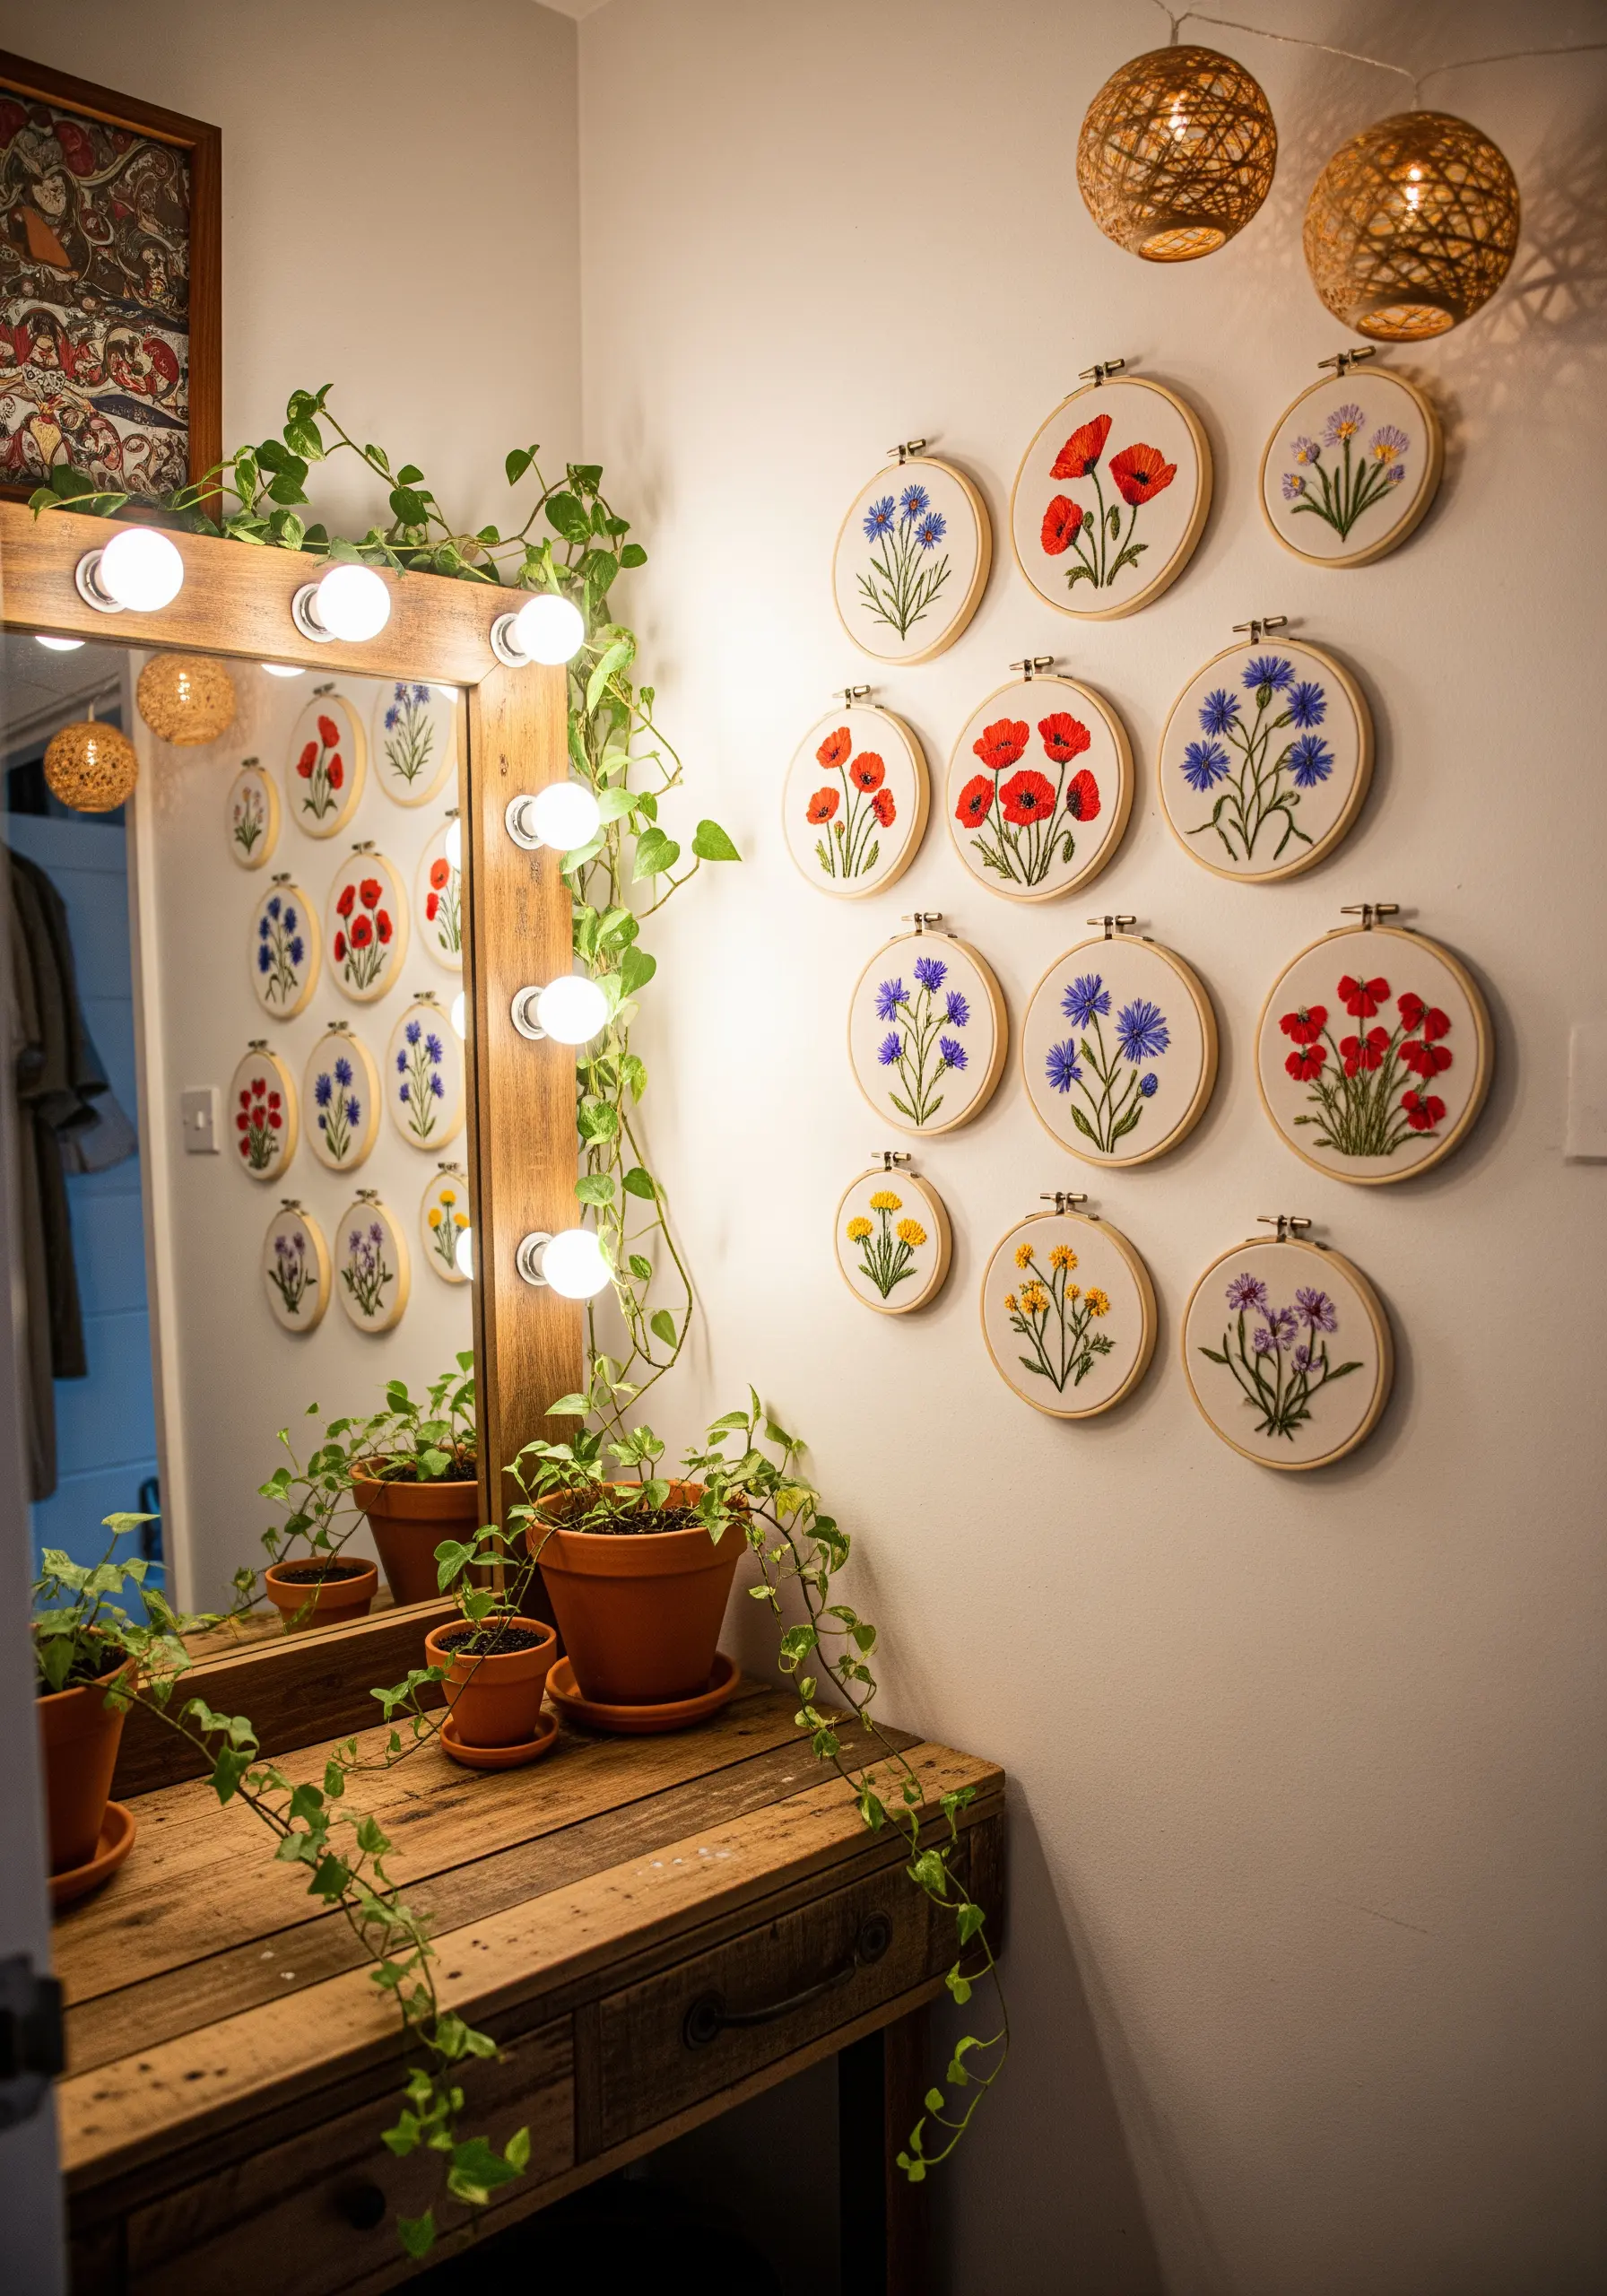
Create a sense of lush, organic growth by arranging multiple hoops in a dense, flowing cluster on the wall.
Vary the hoop sizes to add rhythm and visual interest, placing larger pieces at the center and smaller ones scattered around the edges.
Stick to two or three complementary flower types, like poppies and cornflowers, to maintain a cohesive theme while still offering variety.
This technique is perfect for filling a blank wall with vibrant color and texture, turning it into a joyful indoor garden.
5. Integrate the Frame as a Sculptural Element
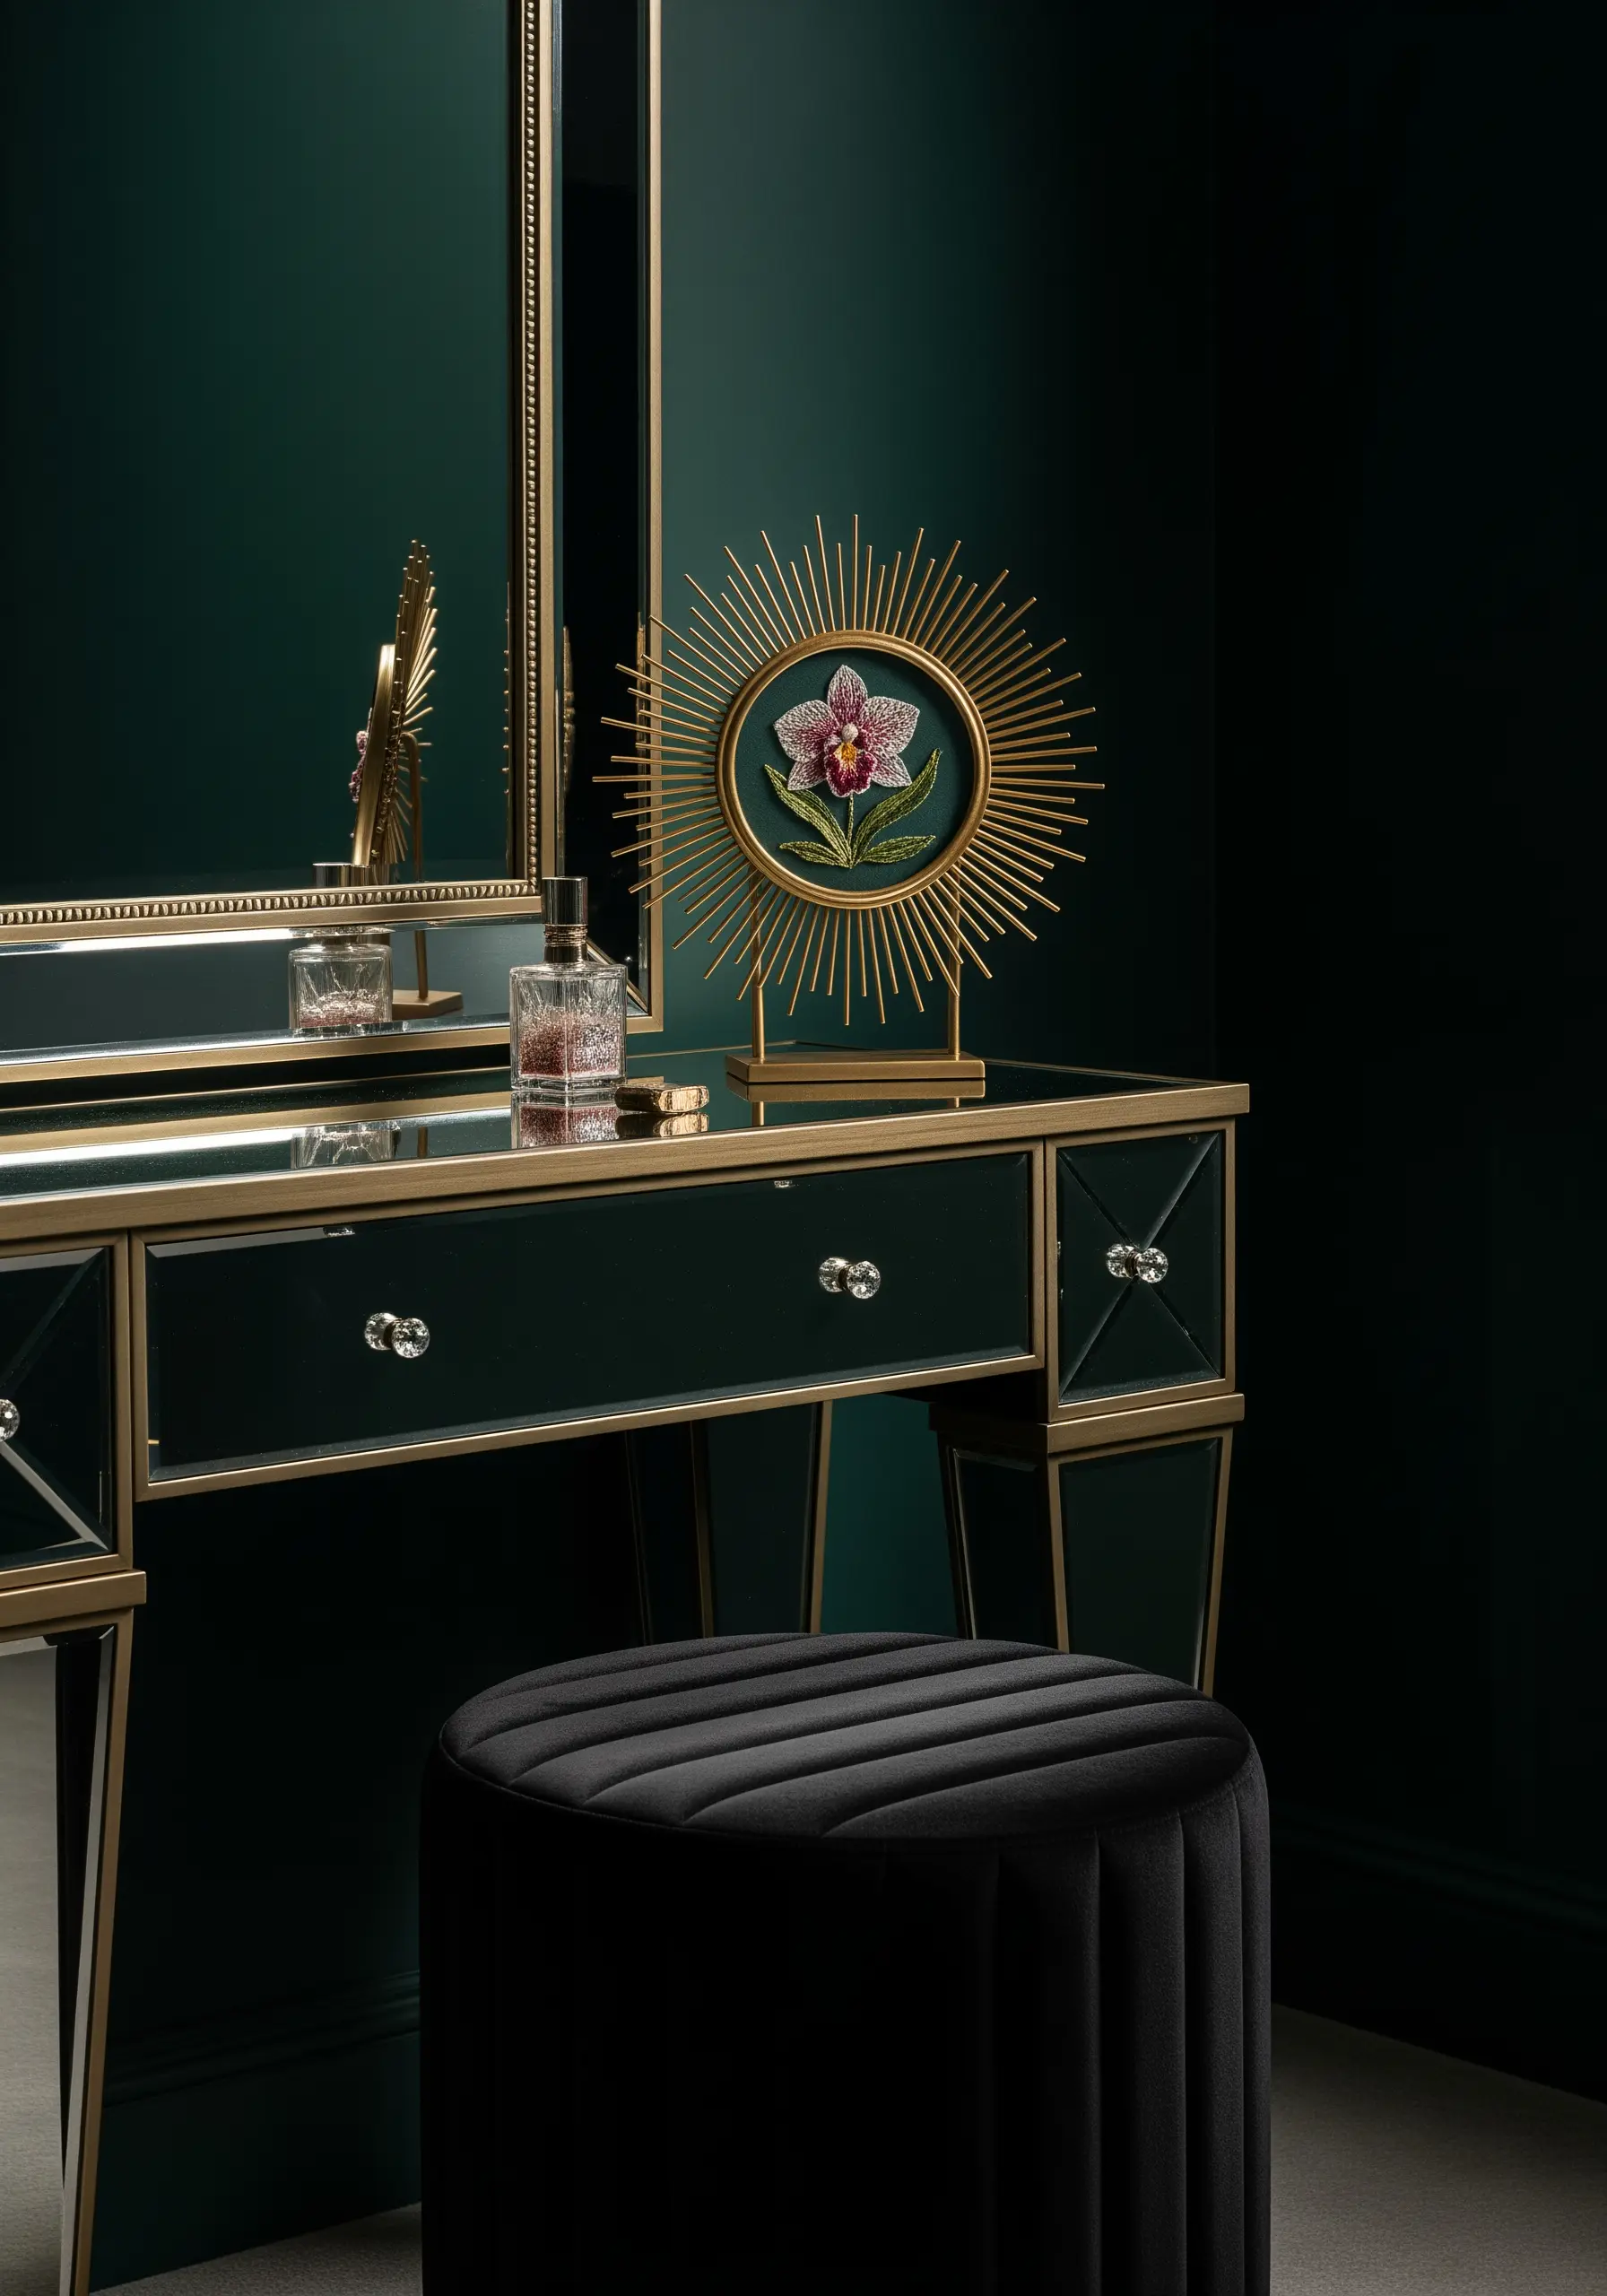
Elevate a single, beautifully stitched orchid by choosing a frame that is a piece of art in itself.
The golden sunburst design here does more than just frame the work; it radiates outward, drawing the eye to the delicate thread painting at its center.
To achieve this realism, use a long-and-short stitch with single strands of thread, blending shades of pink and purple seamlessly.
This approach transforms your embroidery from a simple craft into a sophisticated, handmade art object.
6. Practice Restraint with a Minimalist Series
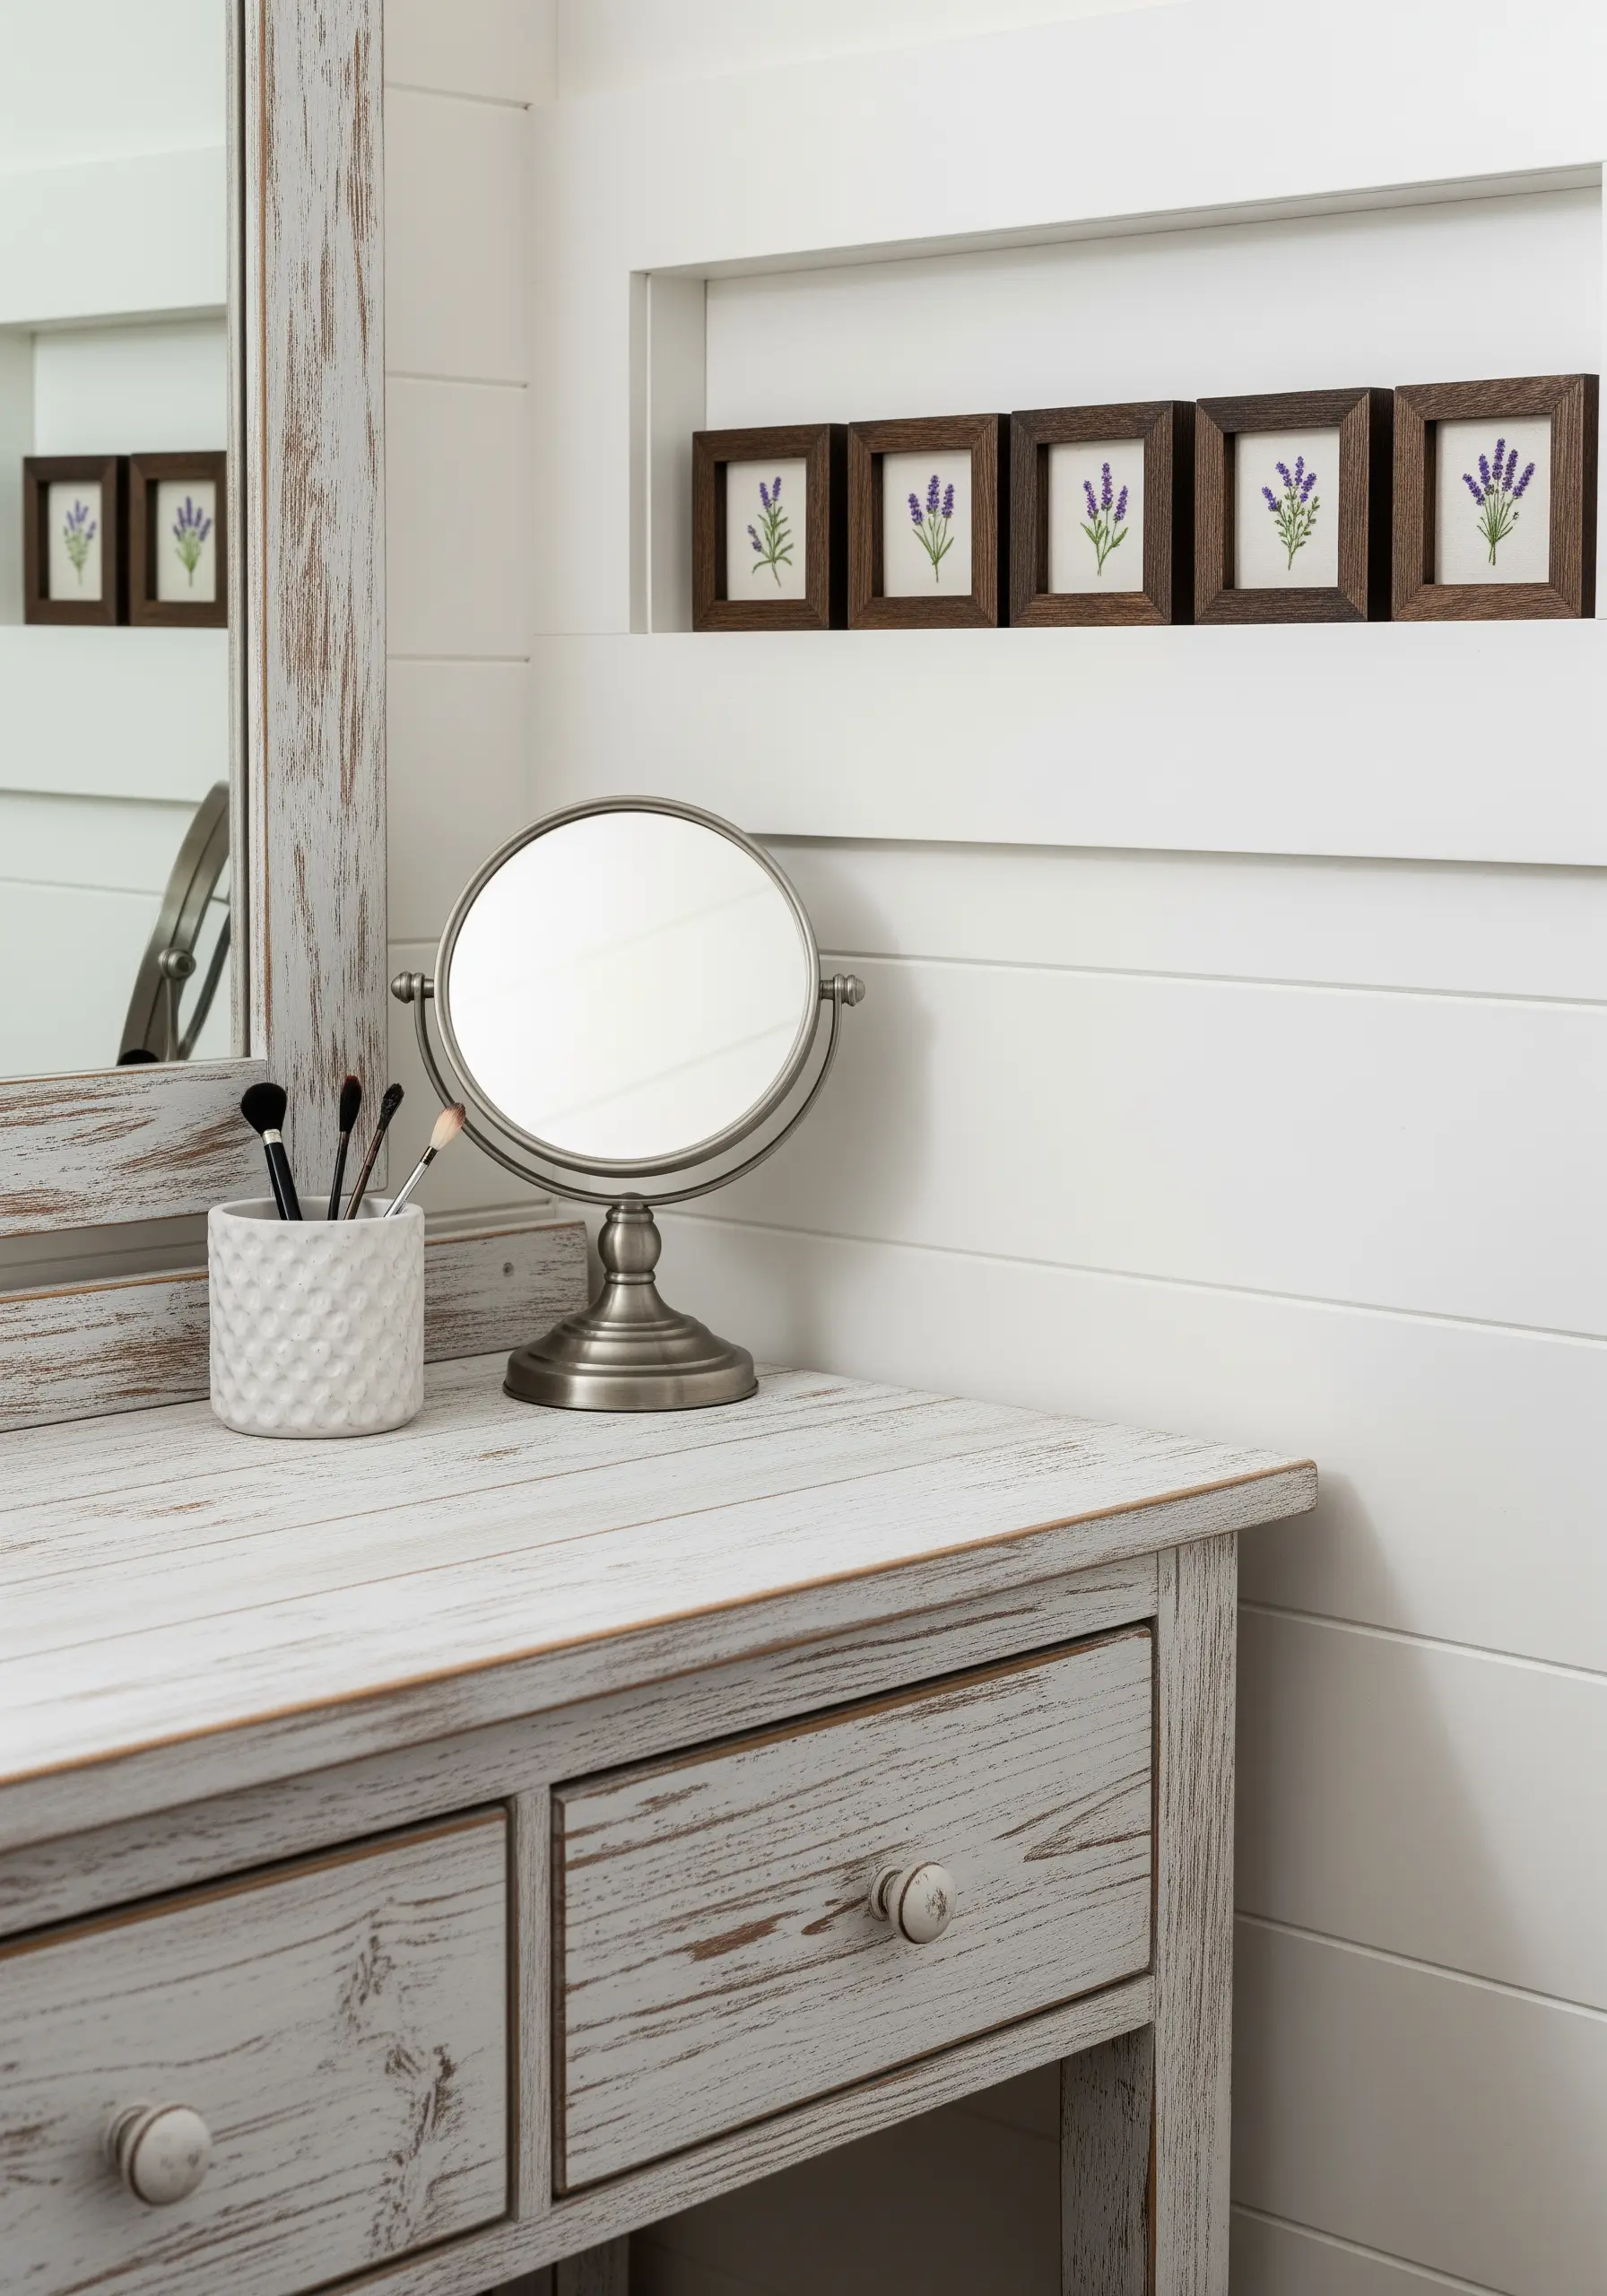
For a calm and orderly display, stitch a series of identical motifs, like these delicate lavender sprigs.
Using just two or three shades of thread and simple stitches—stem stitch for the stalk and French knots for the buds—keeps the design clean and uncluttered.
Displaying them in a neat row inside a recessed shelf adds depth and architectural interest.
This technique demonstrates that even the tiniest stitched details can make a significant impact when presented with intention.
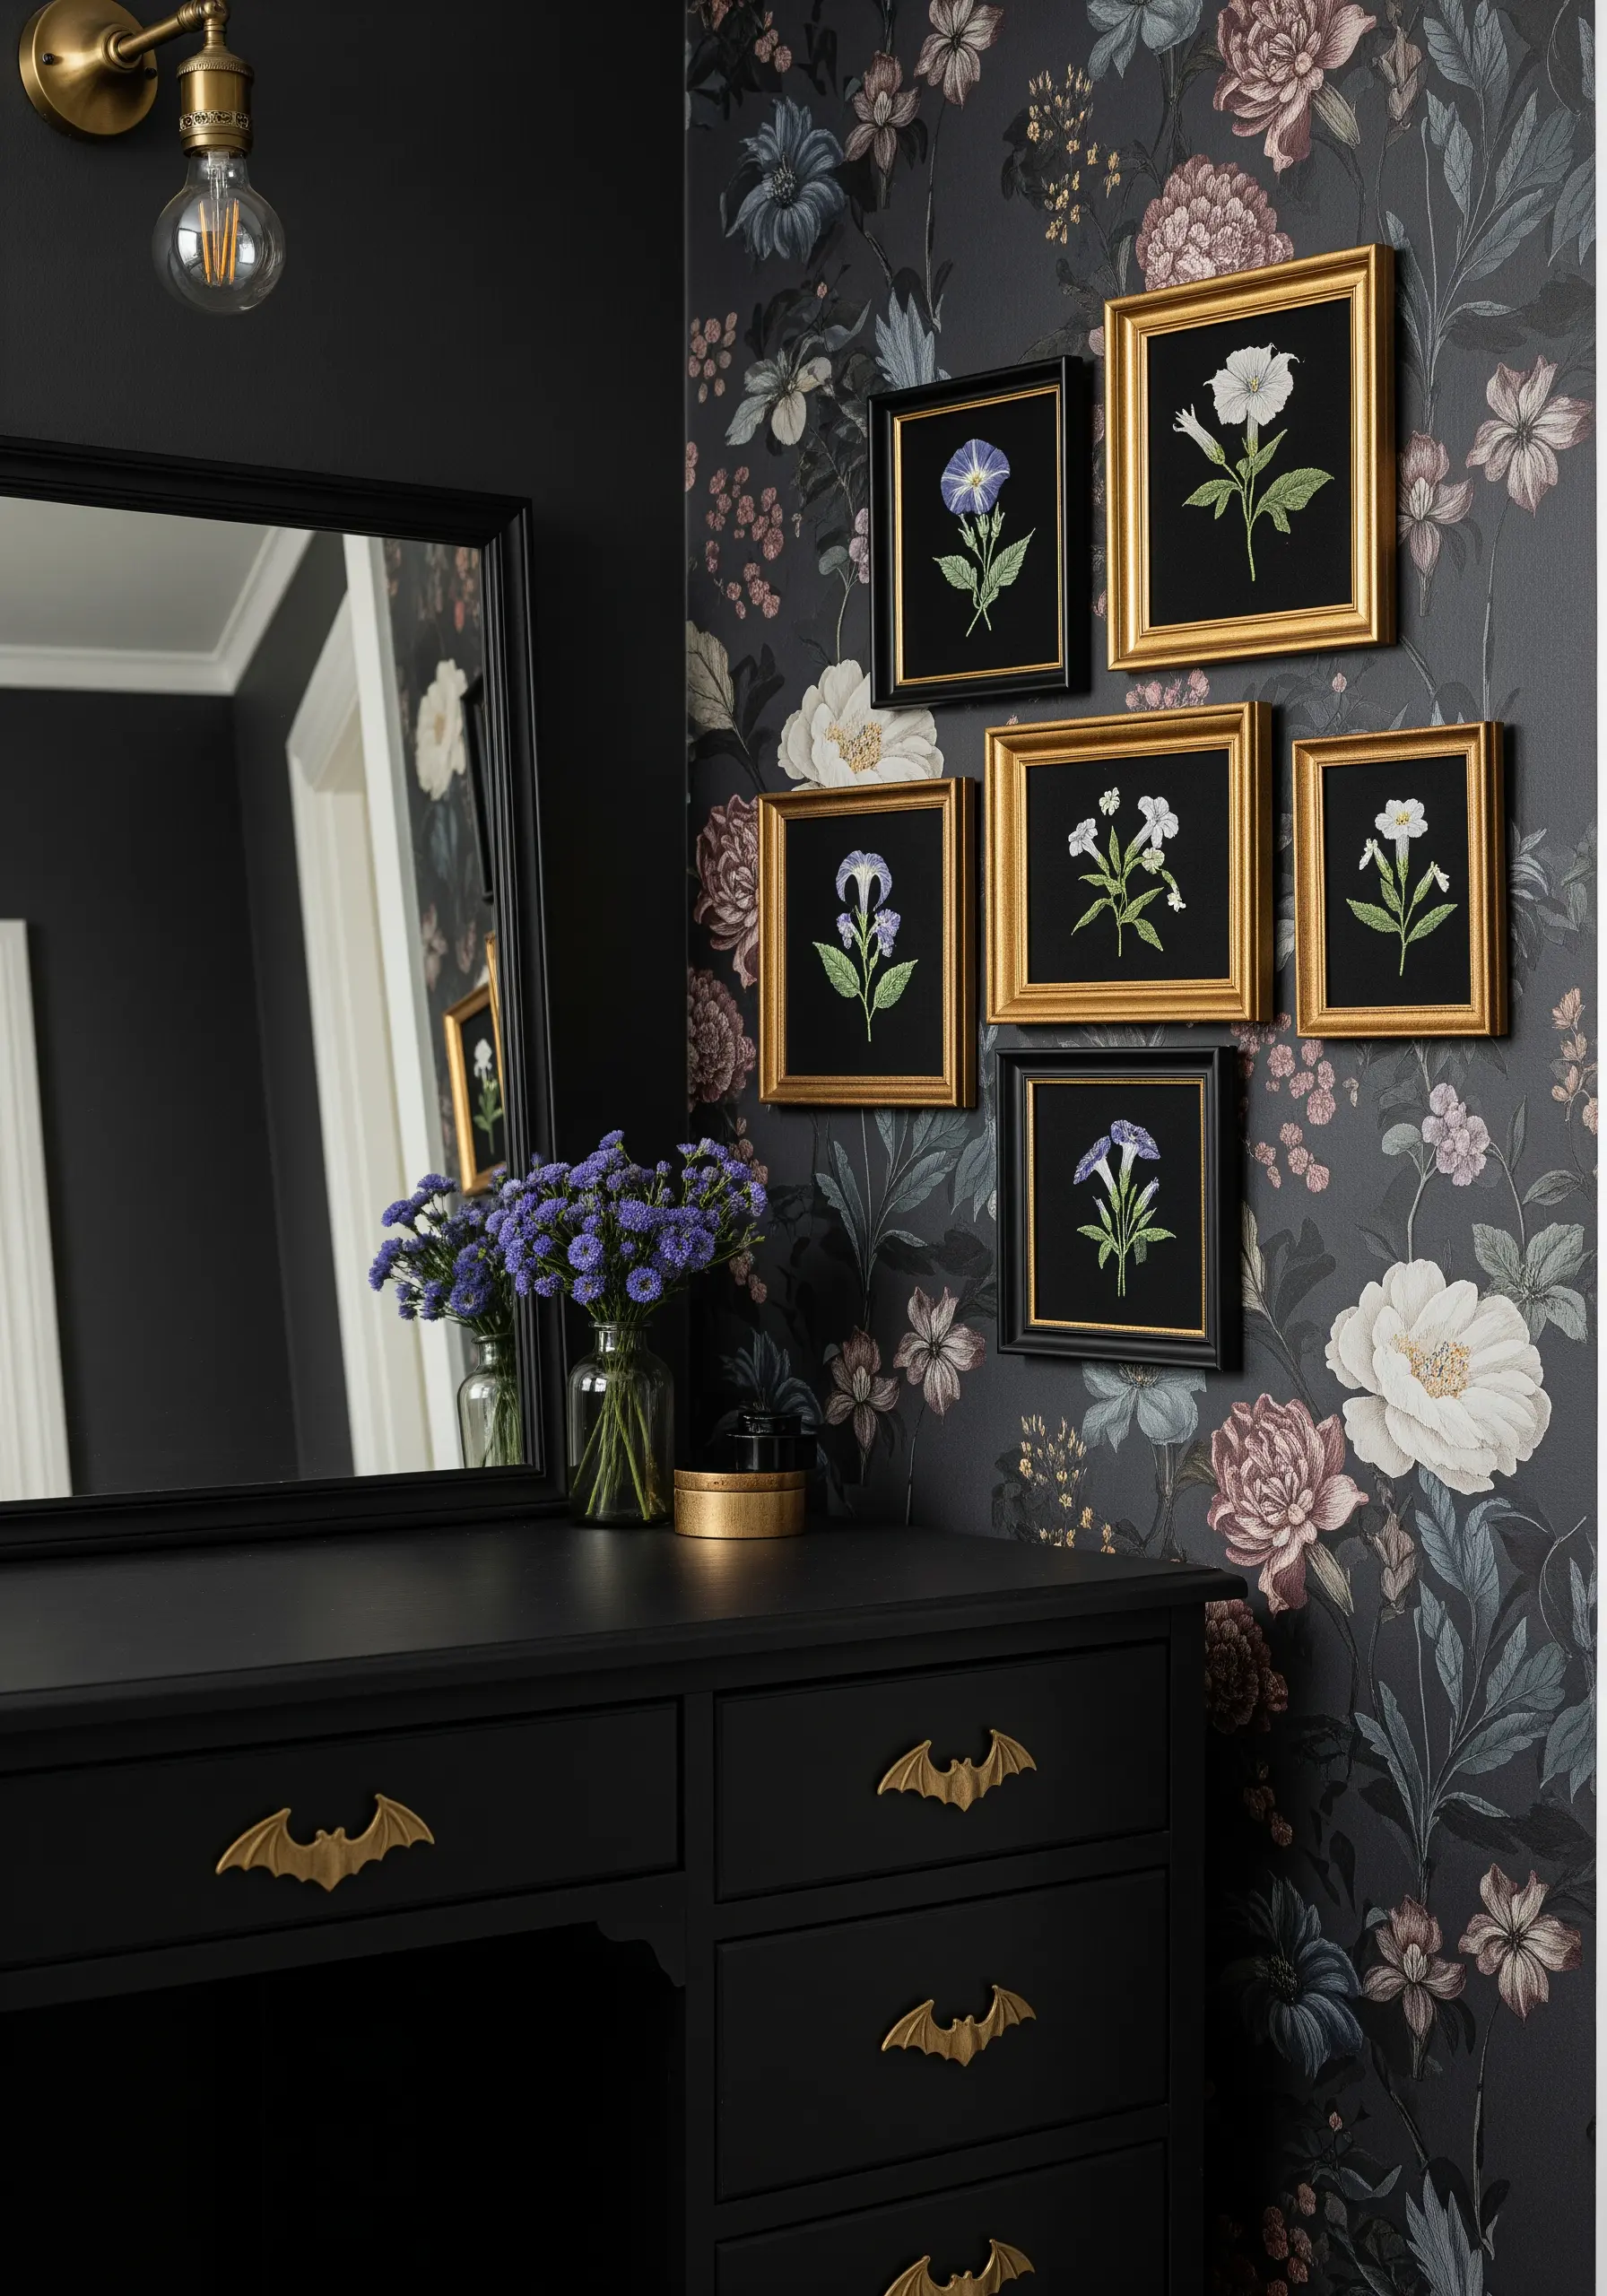
7. Make a Statement Against a Patterned Wall
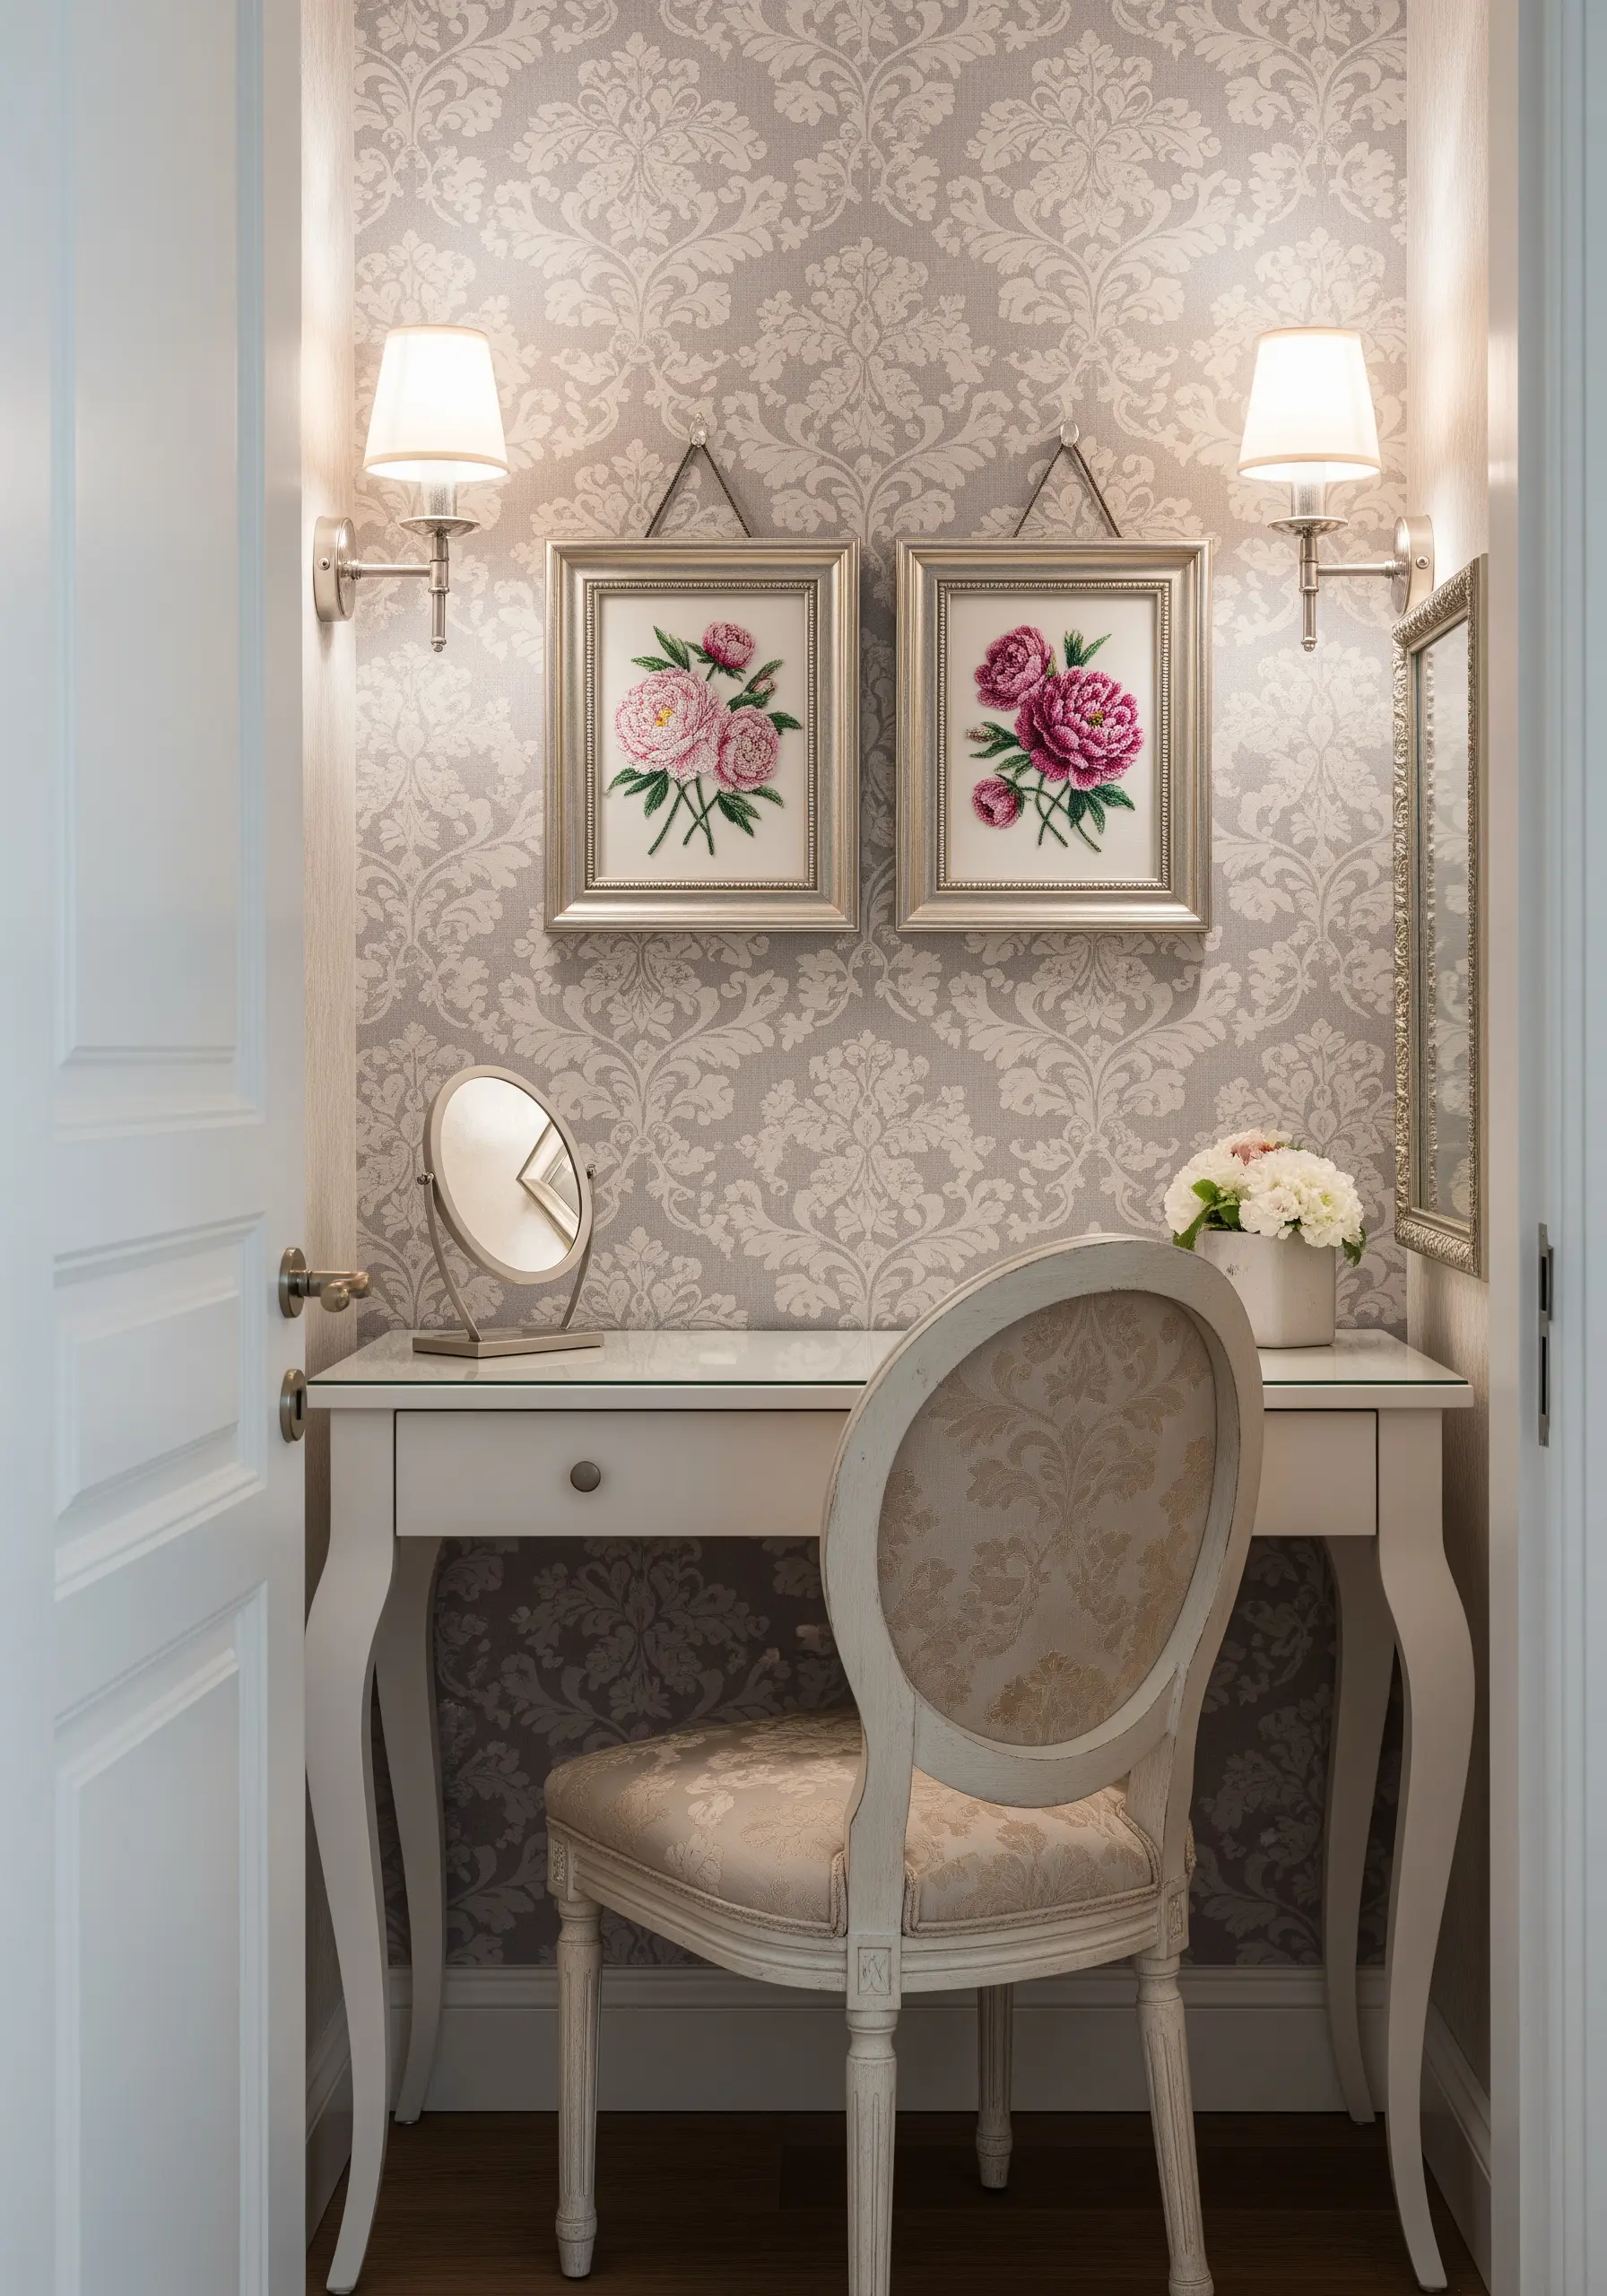
Don’t be afraid to hang your embroidery on a patterned wall; the key is to create contrast.
Choose a thread palette for your peonies that is significantly brighter or bolder than the wallpaper’s tones, allowing your work to pop instead of blend in.
A thick, simple frame in a neutral color like silver or white acts as a buffer, visually separating your art from the background pattern.
To create those full, lush petals, use a padded satin stitch by laying down a base of straight stitches first, which adds dimension.
8. Experiment with Unconventional Display Methods
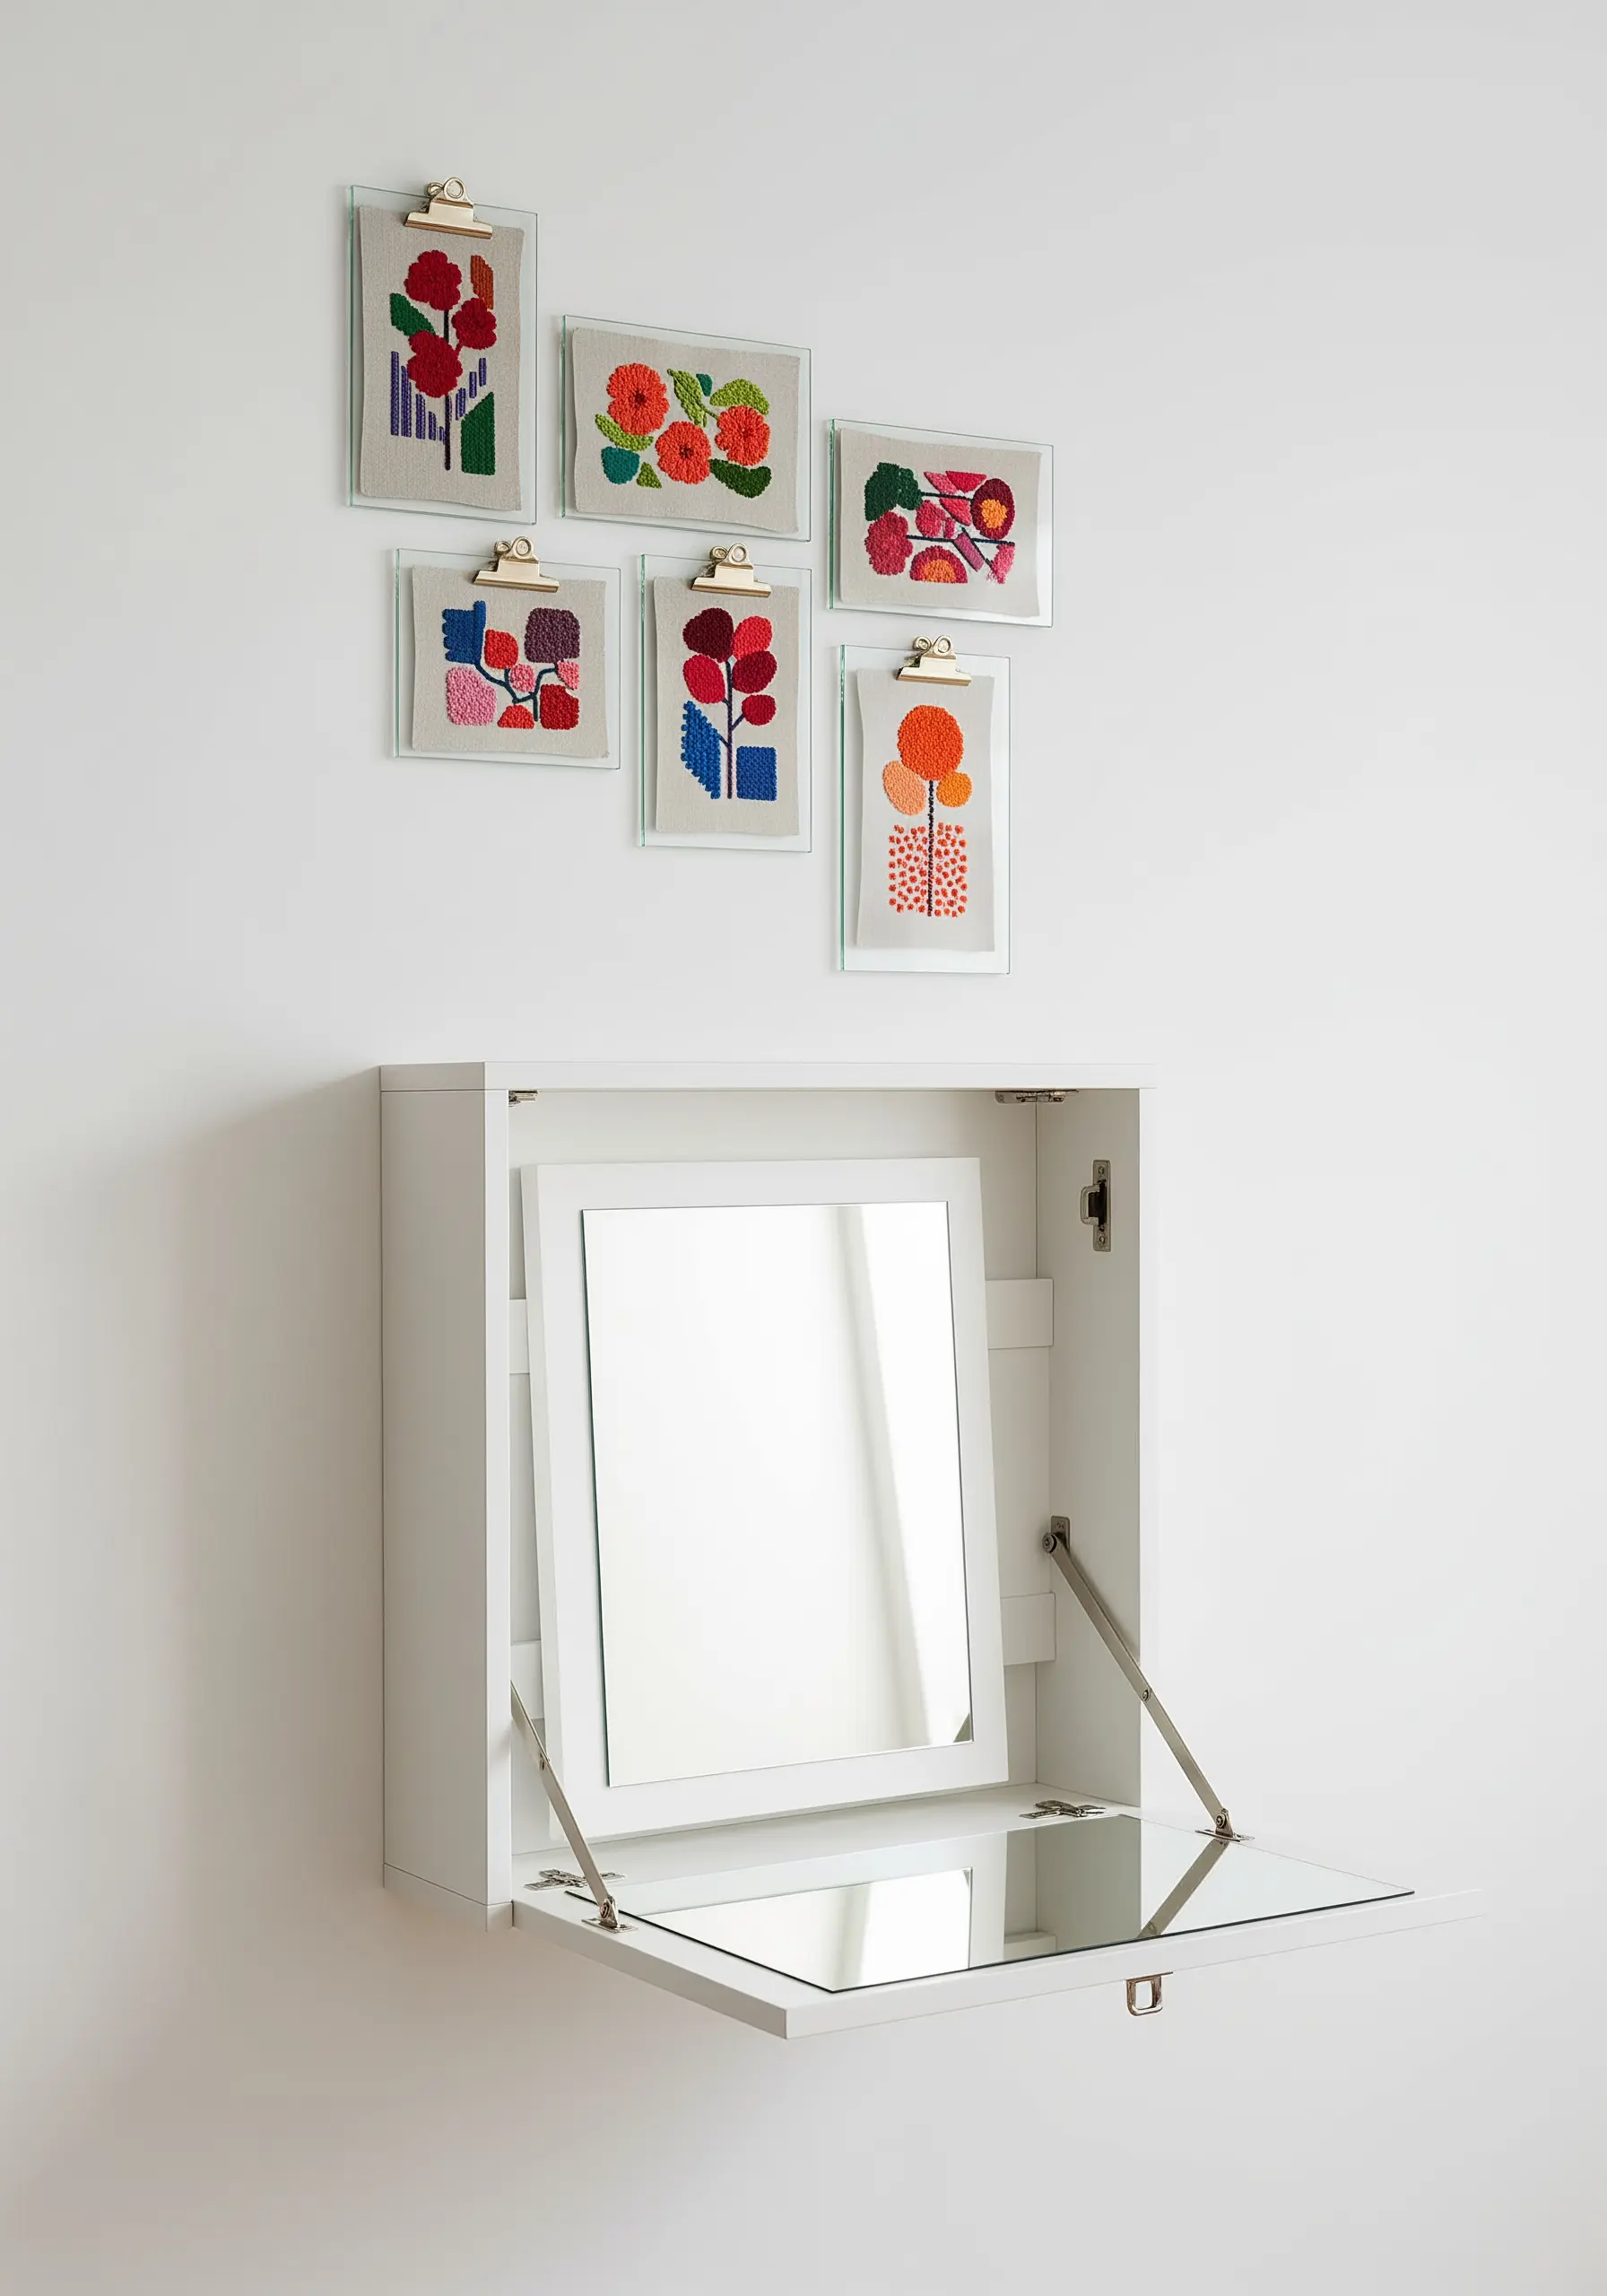
Move beyond traditional frames by mounting your finished pieces on clear glass clipboards.
This method gives your work a floating, modern appearance and allows the texture of the fabric to be fully appreciated.
Embrace an abstract thread layering style with bold color-blocking and simplified floral shapes to match the contemporary display.
This is a perfect solution for renters or for those who love to rotate their art frequently, as no permanent framing is required.
9. Unify a Trio in a Single Frame
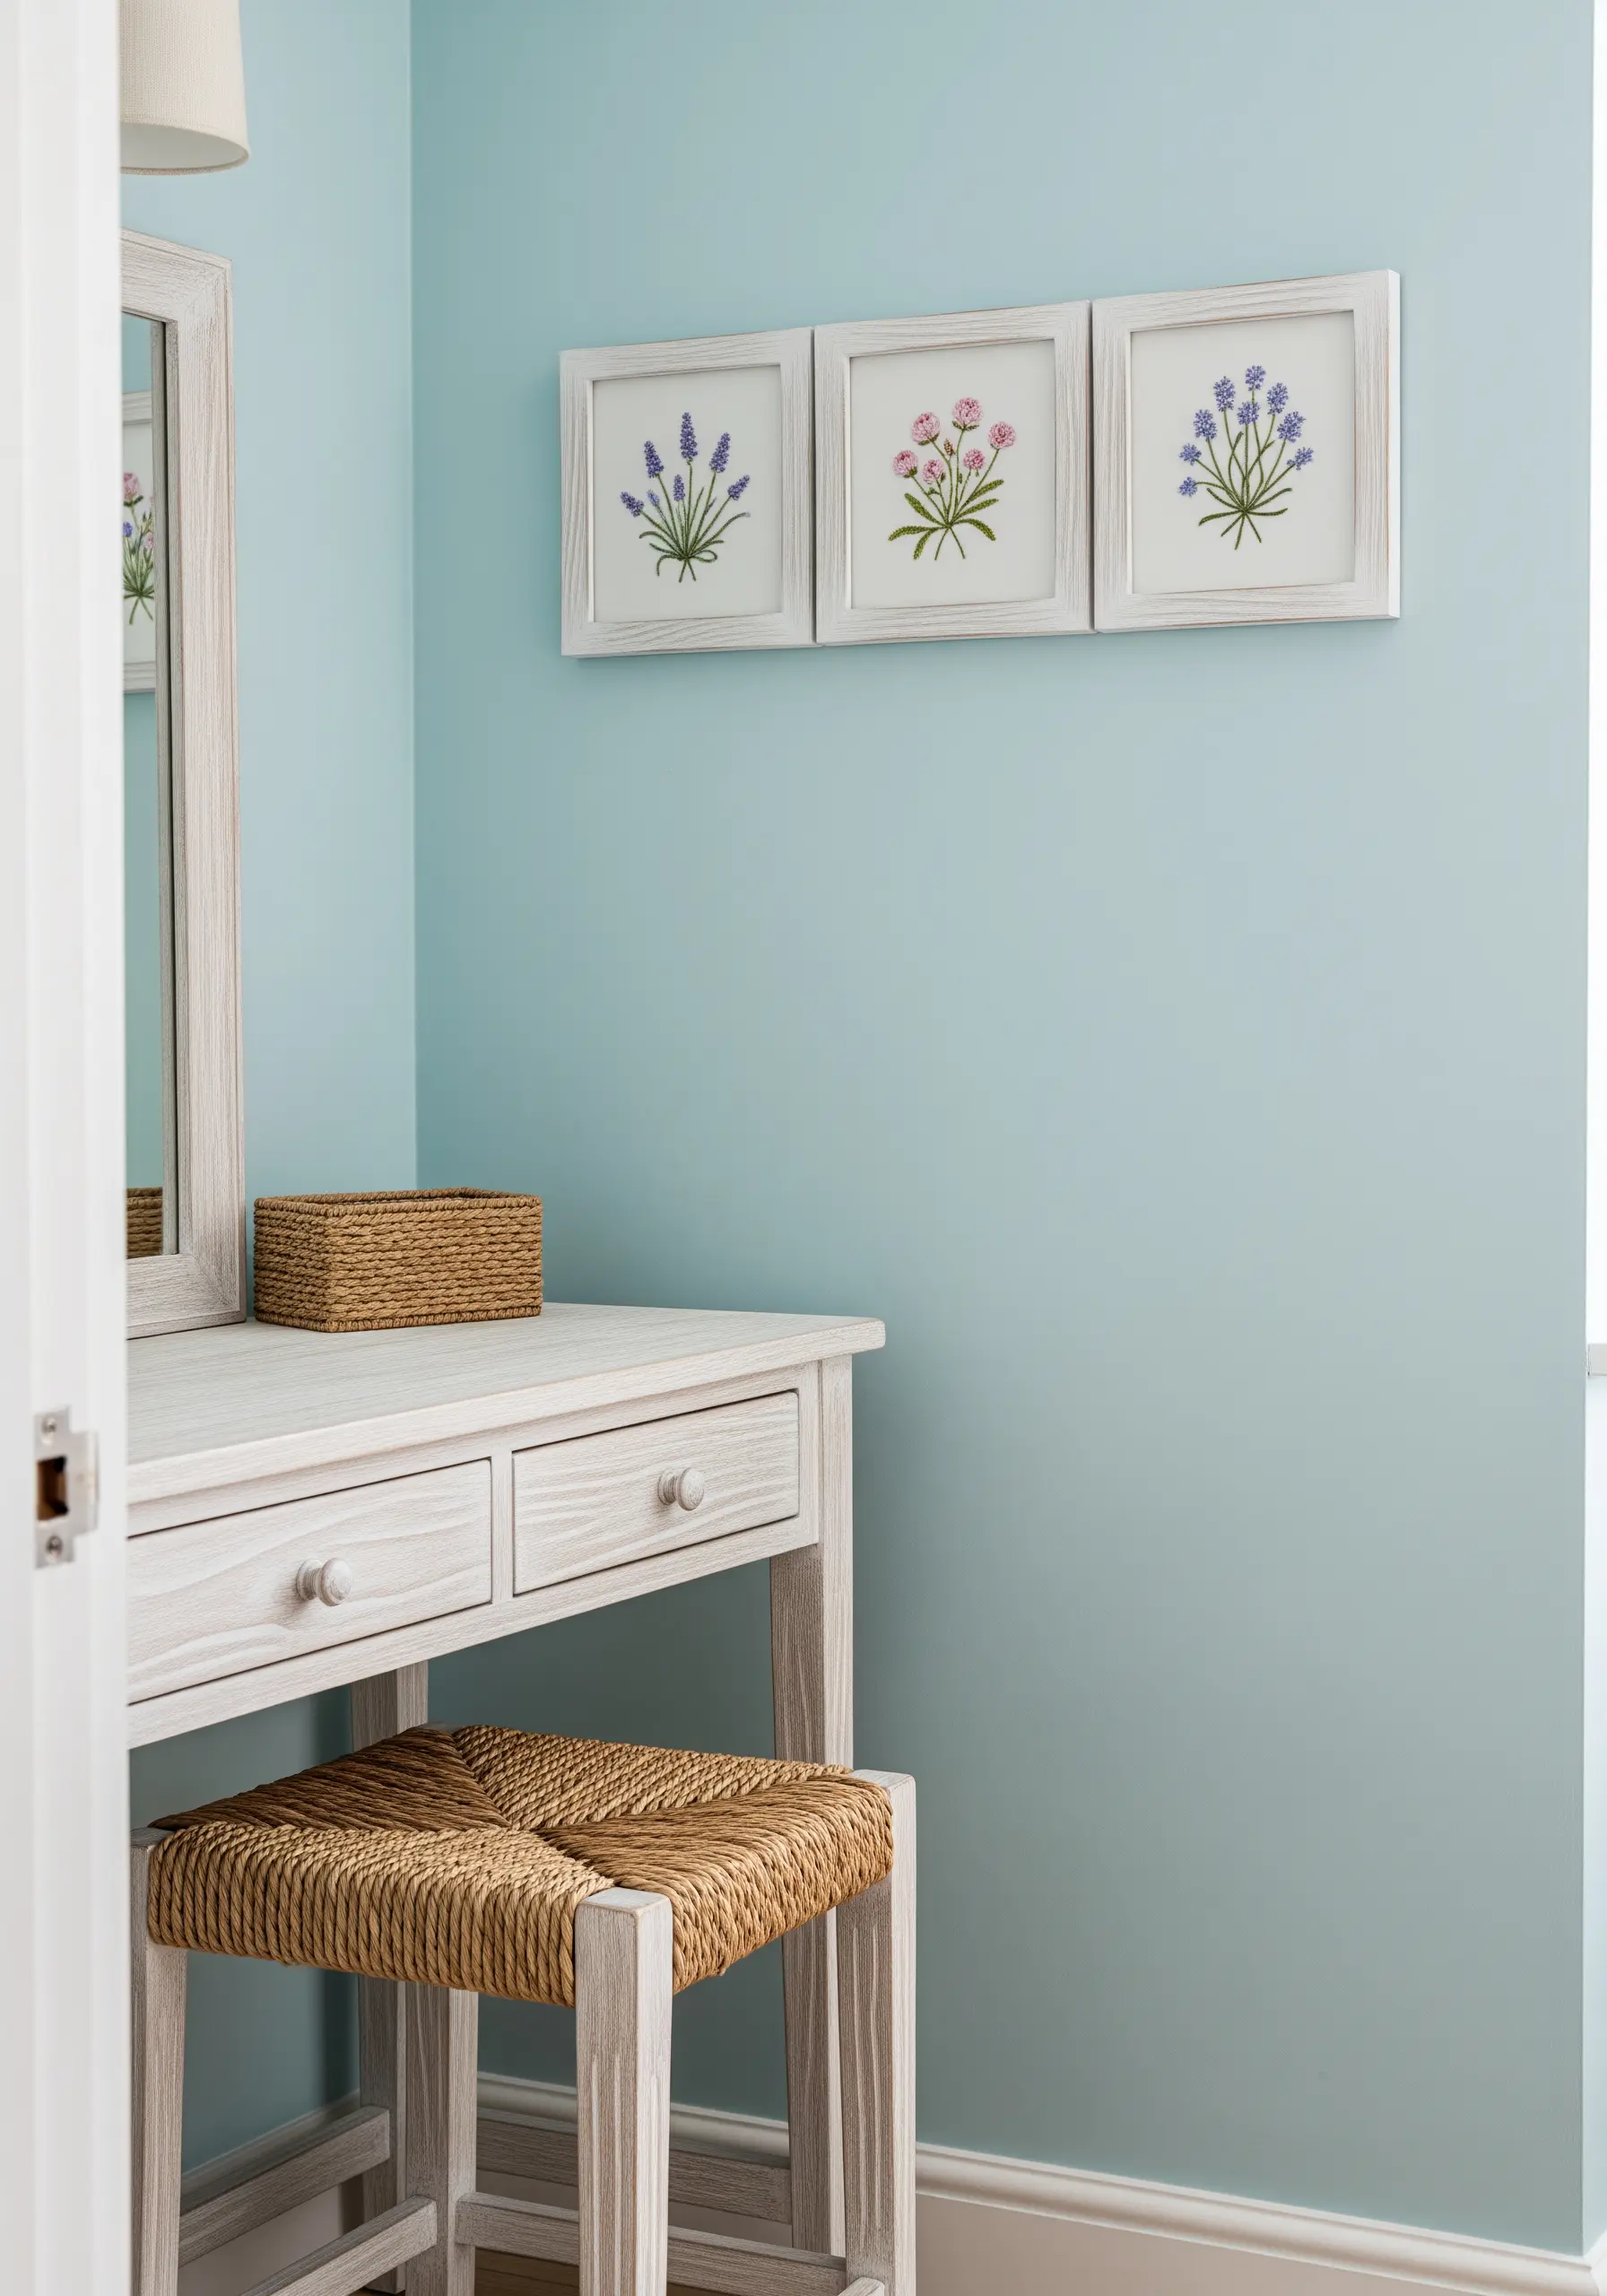
Instead of three separate frames, use a single triple-aperture frame to instantly create a cohesive, polished look.
This approach is perfect for a series of small botanical studies, like lavender, carnations, and wildflowers.
Plan your composition by ensuring the scale and style of each embroidered sprig are consistent.
Using the same fabric and a complementary color palette across all three motifs will make the final piece feel like a unified, intentional design.
10. Create High-Contrast Drama on Black Fabric
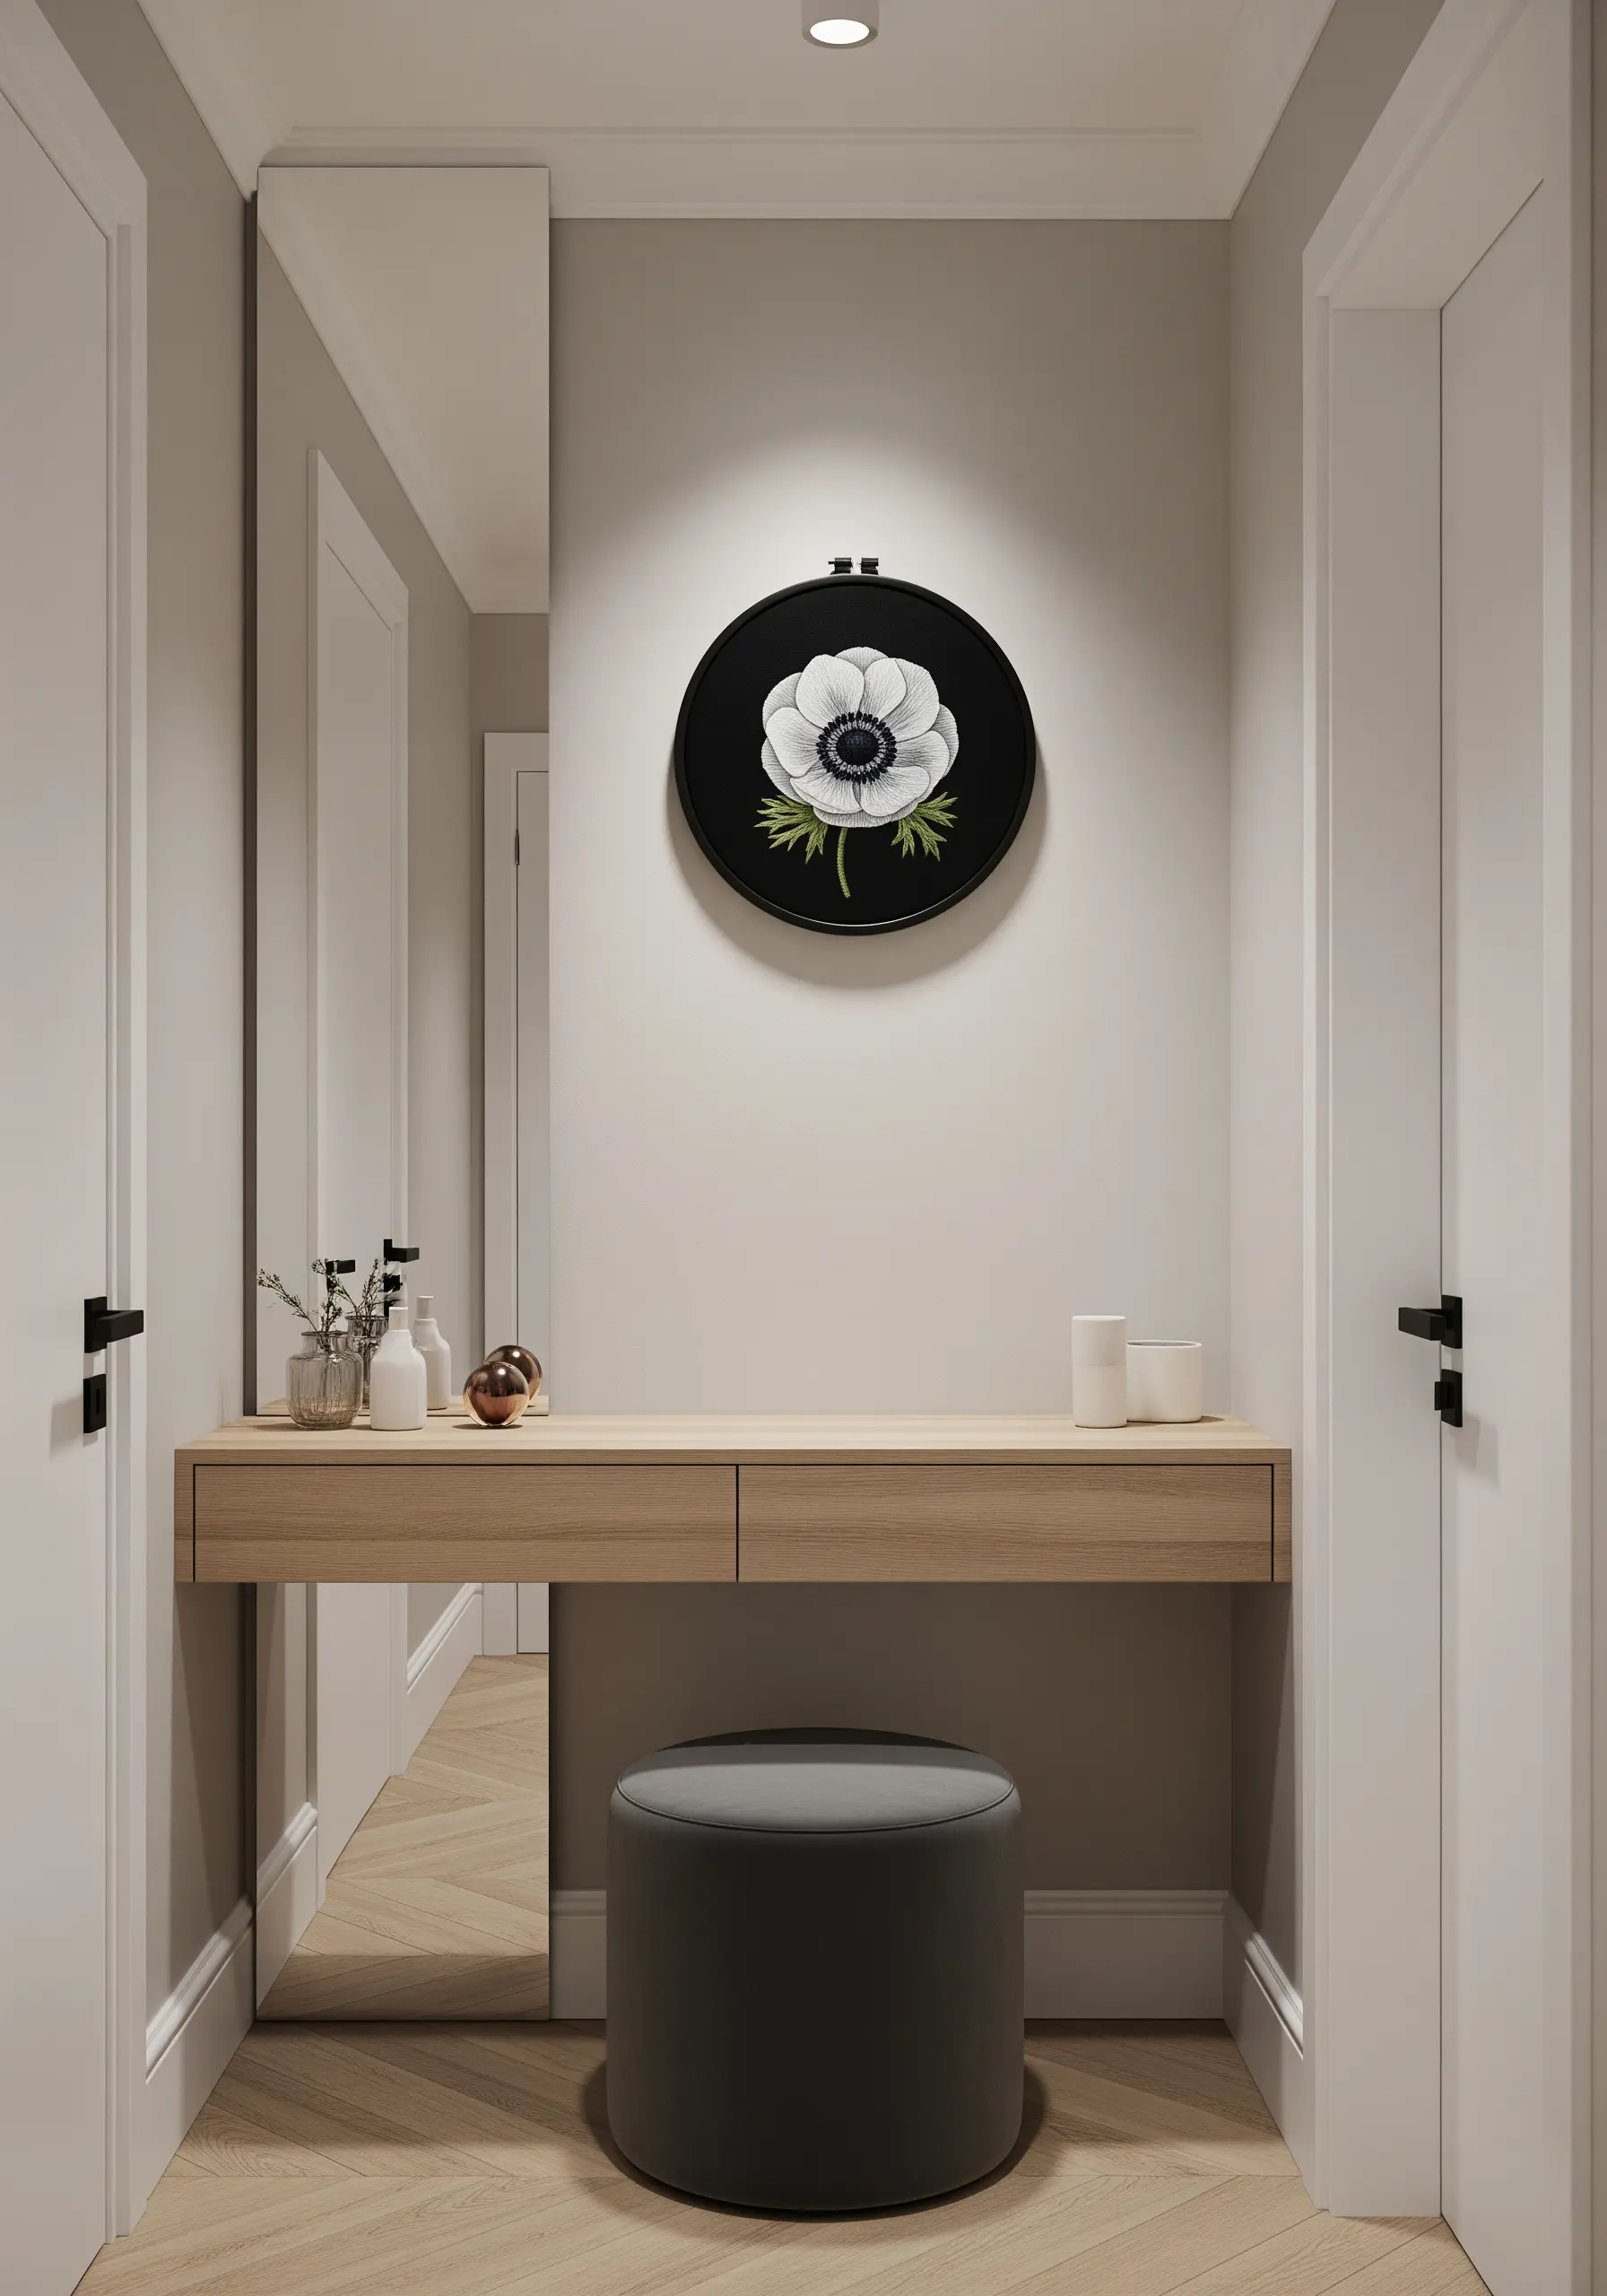
Make a single white anemone command attention by stitching it on a taut piece of black linen or cotton.
The dark background eliminates distractions and makes every white and grey stitch appear more luminous and detailed.
Use several shades of grey and off-white to create soft shadows on the petals, giving the flower realistic depth.
Finishing the piece in a simple black hoop keeps the focus entirely on the dramatic contrast between thread and fabric.
11. Design a Whimsical Trellis Installation
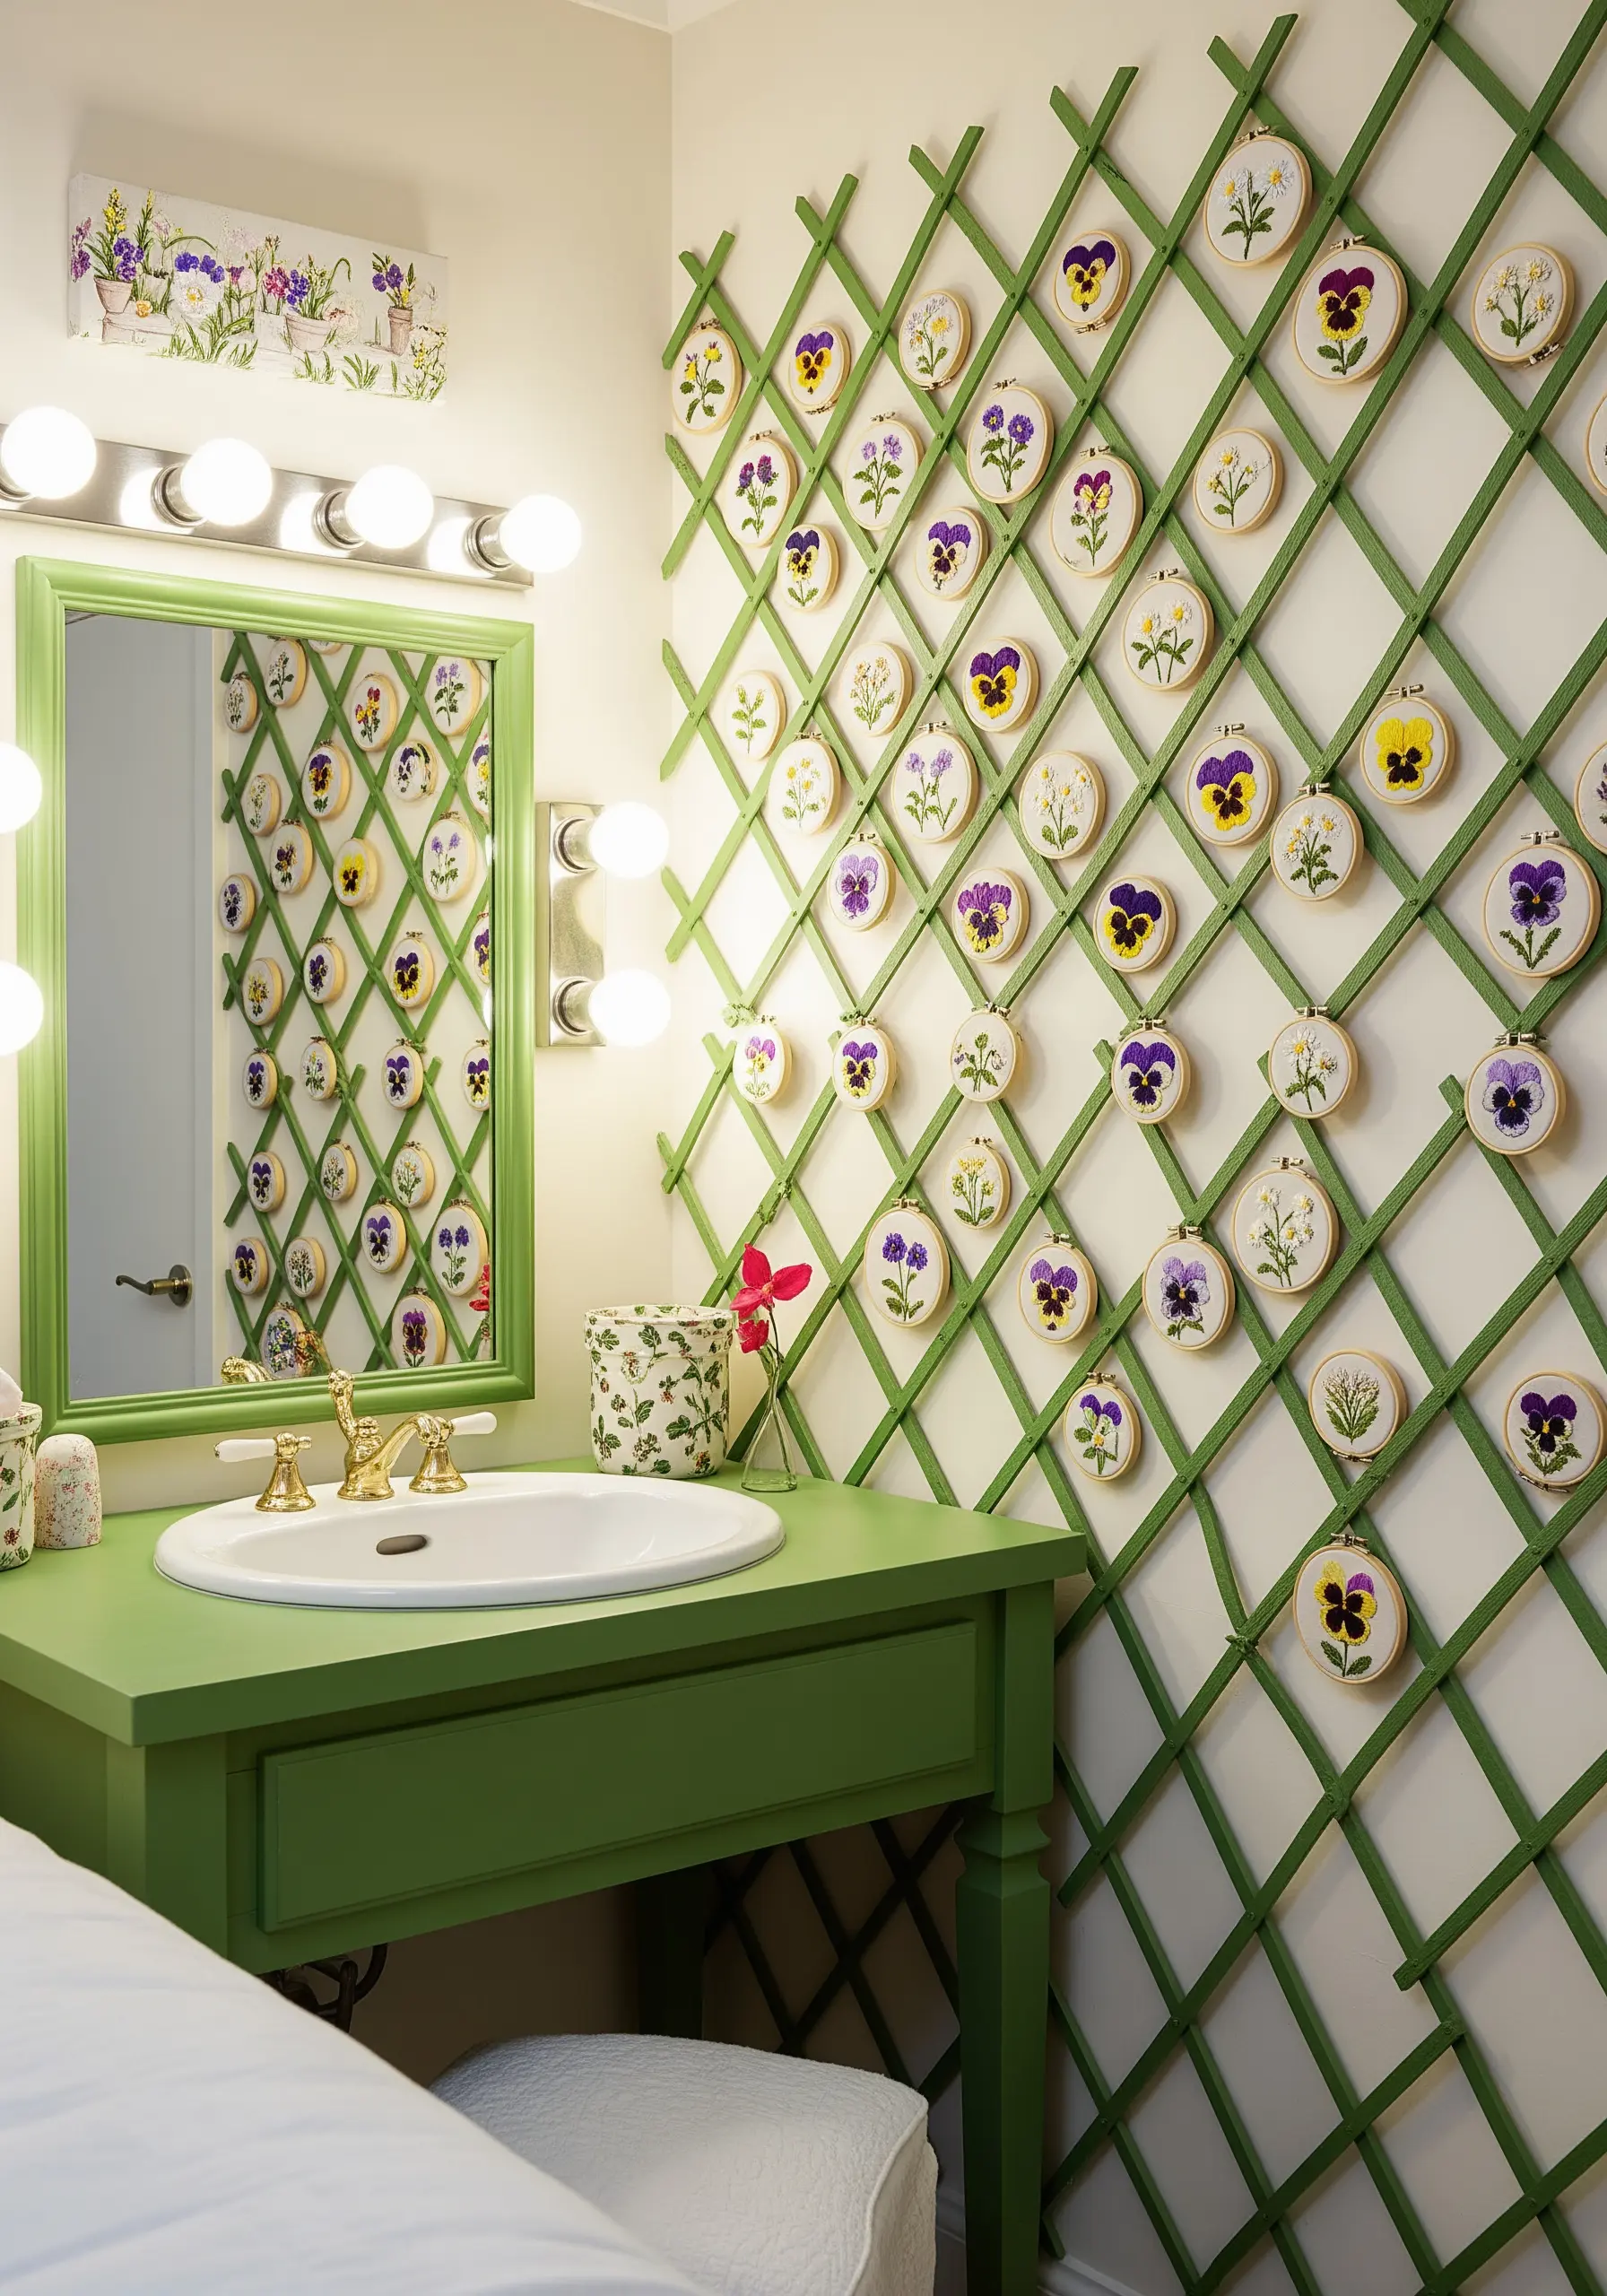
Transform an entire wall into a vertical garden by attaching dozens of mini hoops to a painted wooden trellis.
This is an excellent way to display a large collection of small studies, such as different varieties of pansies.
Keep the hoops and fabric consistent (e.g., all 3-inch bamboo hoops on off-white cotton) to let the colorful flowers be the main focus.
The grid structure of the trellis provides a beautiful sense of order to the playful, scattered arrangement of the hoops.
12. Achieve Sophistication with a Monochromatic Grid
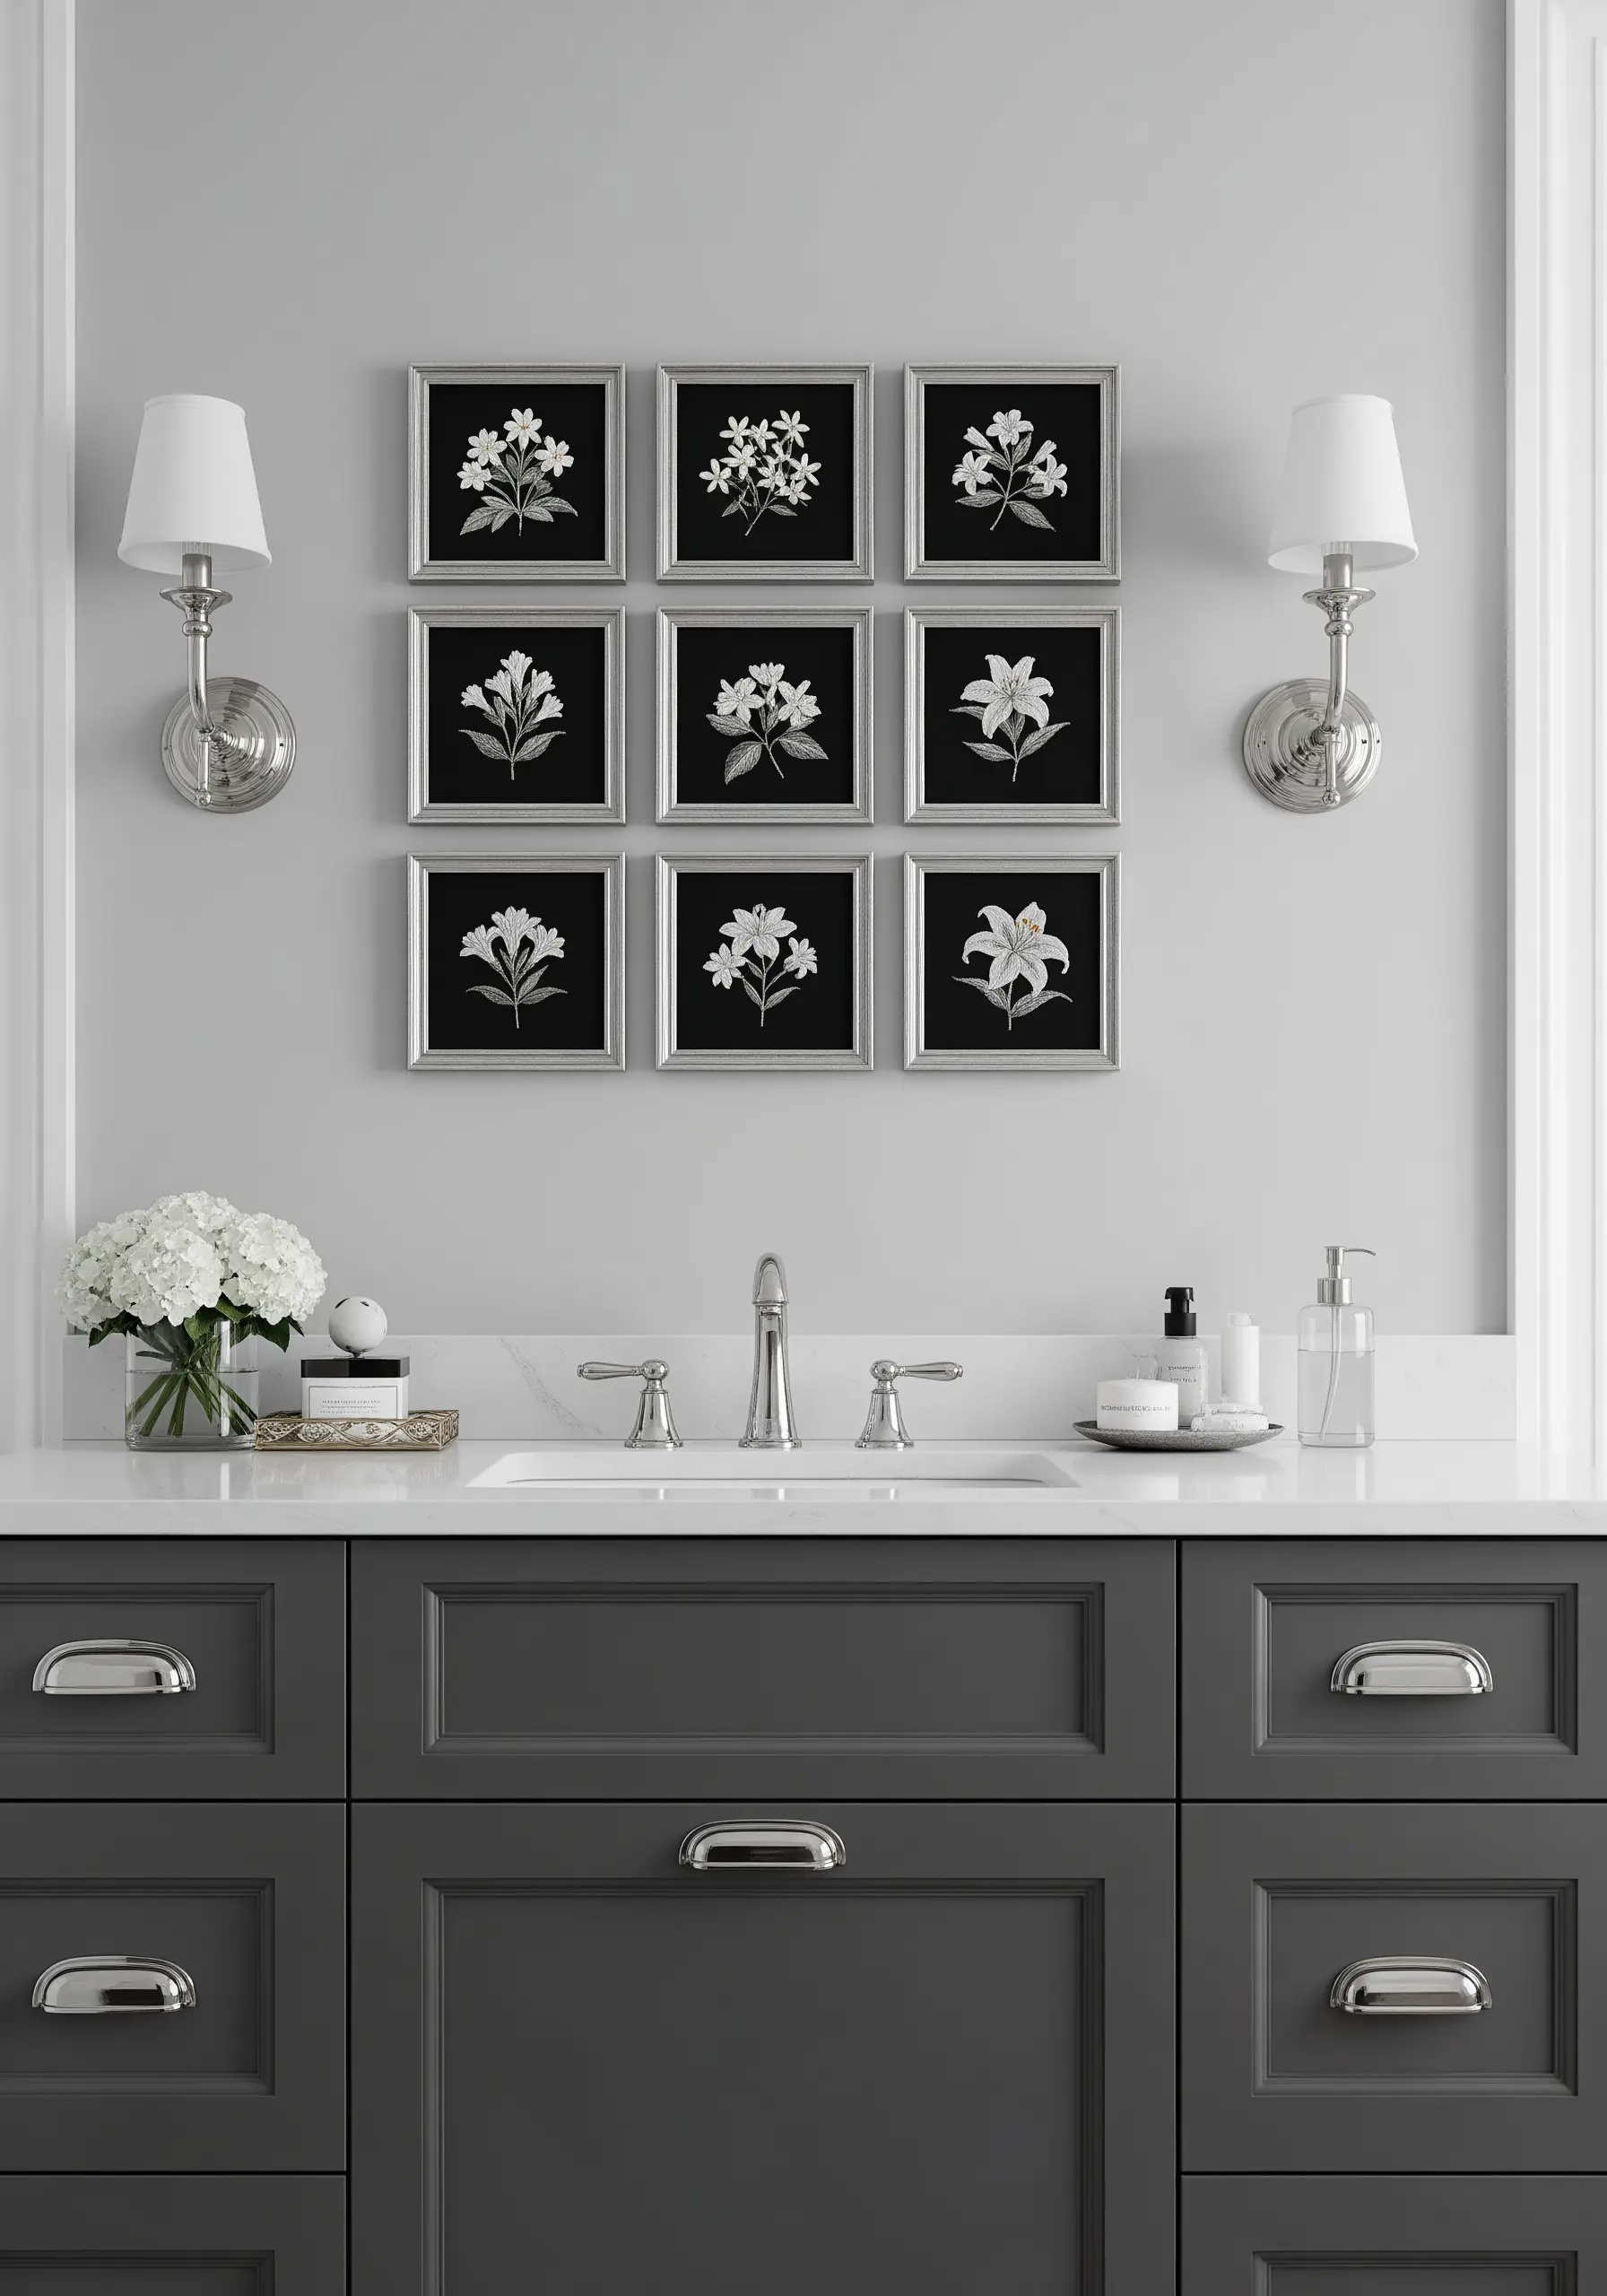
For a timeless and elegant display, limit your palette to black, white, and silver.
Stitching white floral silhouettes on black fabric creates a stunning visual impact that feels both classic and modern.
Arrange your nine pieces in a perfect three-by-three grid to emphasize symmetry and order, turning them into a single, large-scale art piece.
Using identical silver frames for each piece provides a polished, gallery-like finish that elevates the entire bathroom vanity area.
13. Channel Retro Charm with a 70s Palette
Capture a warm, nostalgic mood by stitching simple, graphic florals in a classic 1970s color scheme of mustard yellow, orange, and brown.
Use satin stitch to create solid blocks of color, which enhances the bold, graphic quality of the design.
The rounded-corner wooden frames are essential for completing the retro aesthetic; they echo the furniture and design styles of the era.
Group the frames in an organic, cascading arrangement to add a touch of playful, bohemian energy to the room.
14. Float Your Art with an Acrylic Frame
Give your embroidery a clean, contemporary edge by mounting it in a clear acrylic or ‘floating’ frame.
This framing style makes your stitched hibiscus appear suspended in mid-air, allowing the wall color and texture to show through.
To ensure a flawless finish, carefully trim the excess fabric right to the edge of your stitching before sandwiching it between the acrylic panes.
This is an ideal choice for a minimalist space where traditional frames might feel too heavy.
15. Embrace Opulence with Jewel Tones and Gold
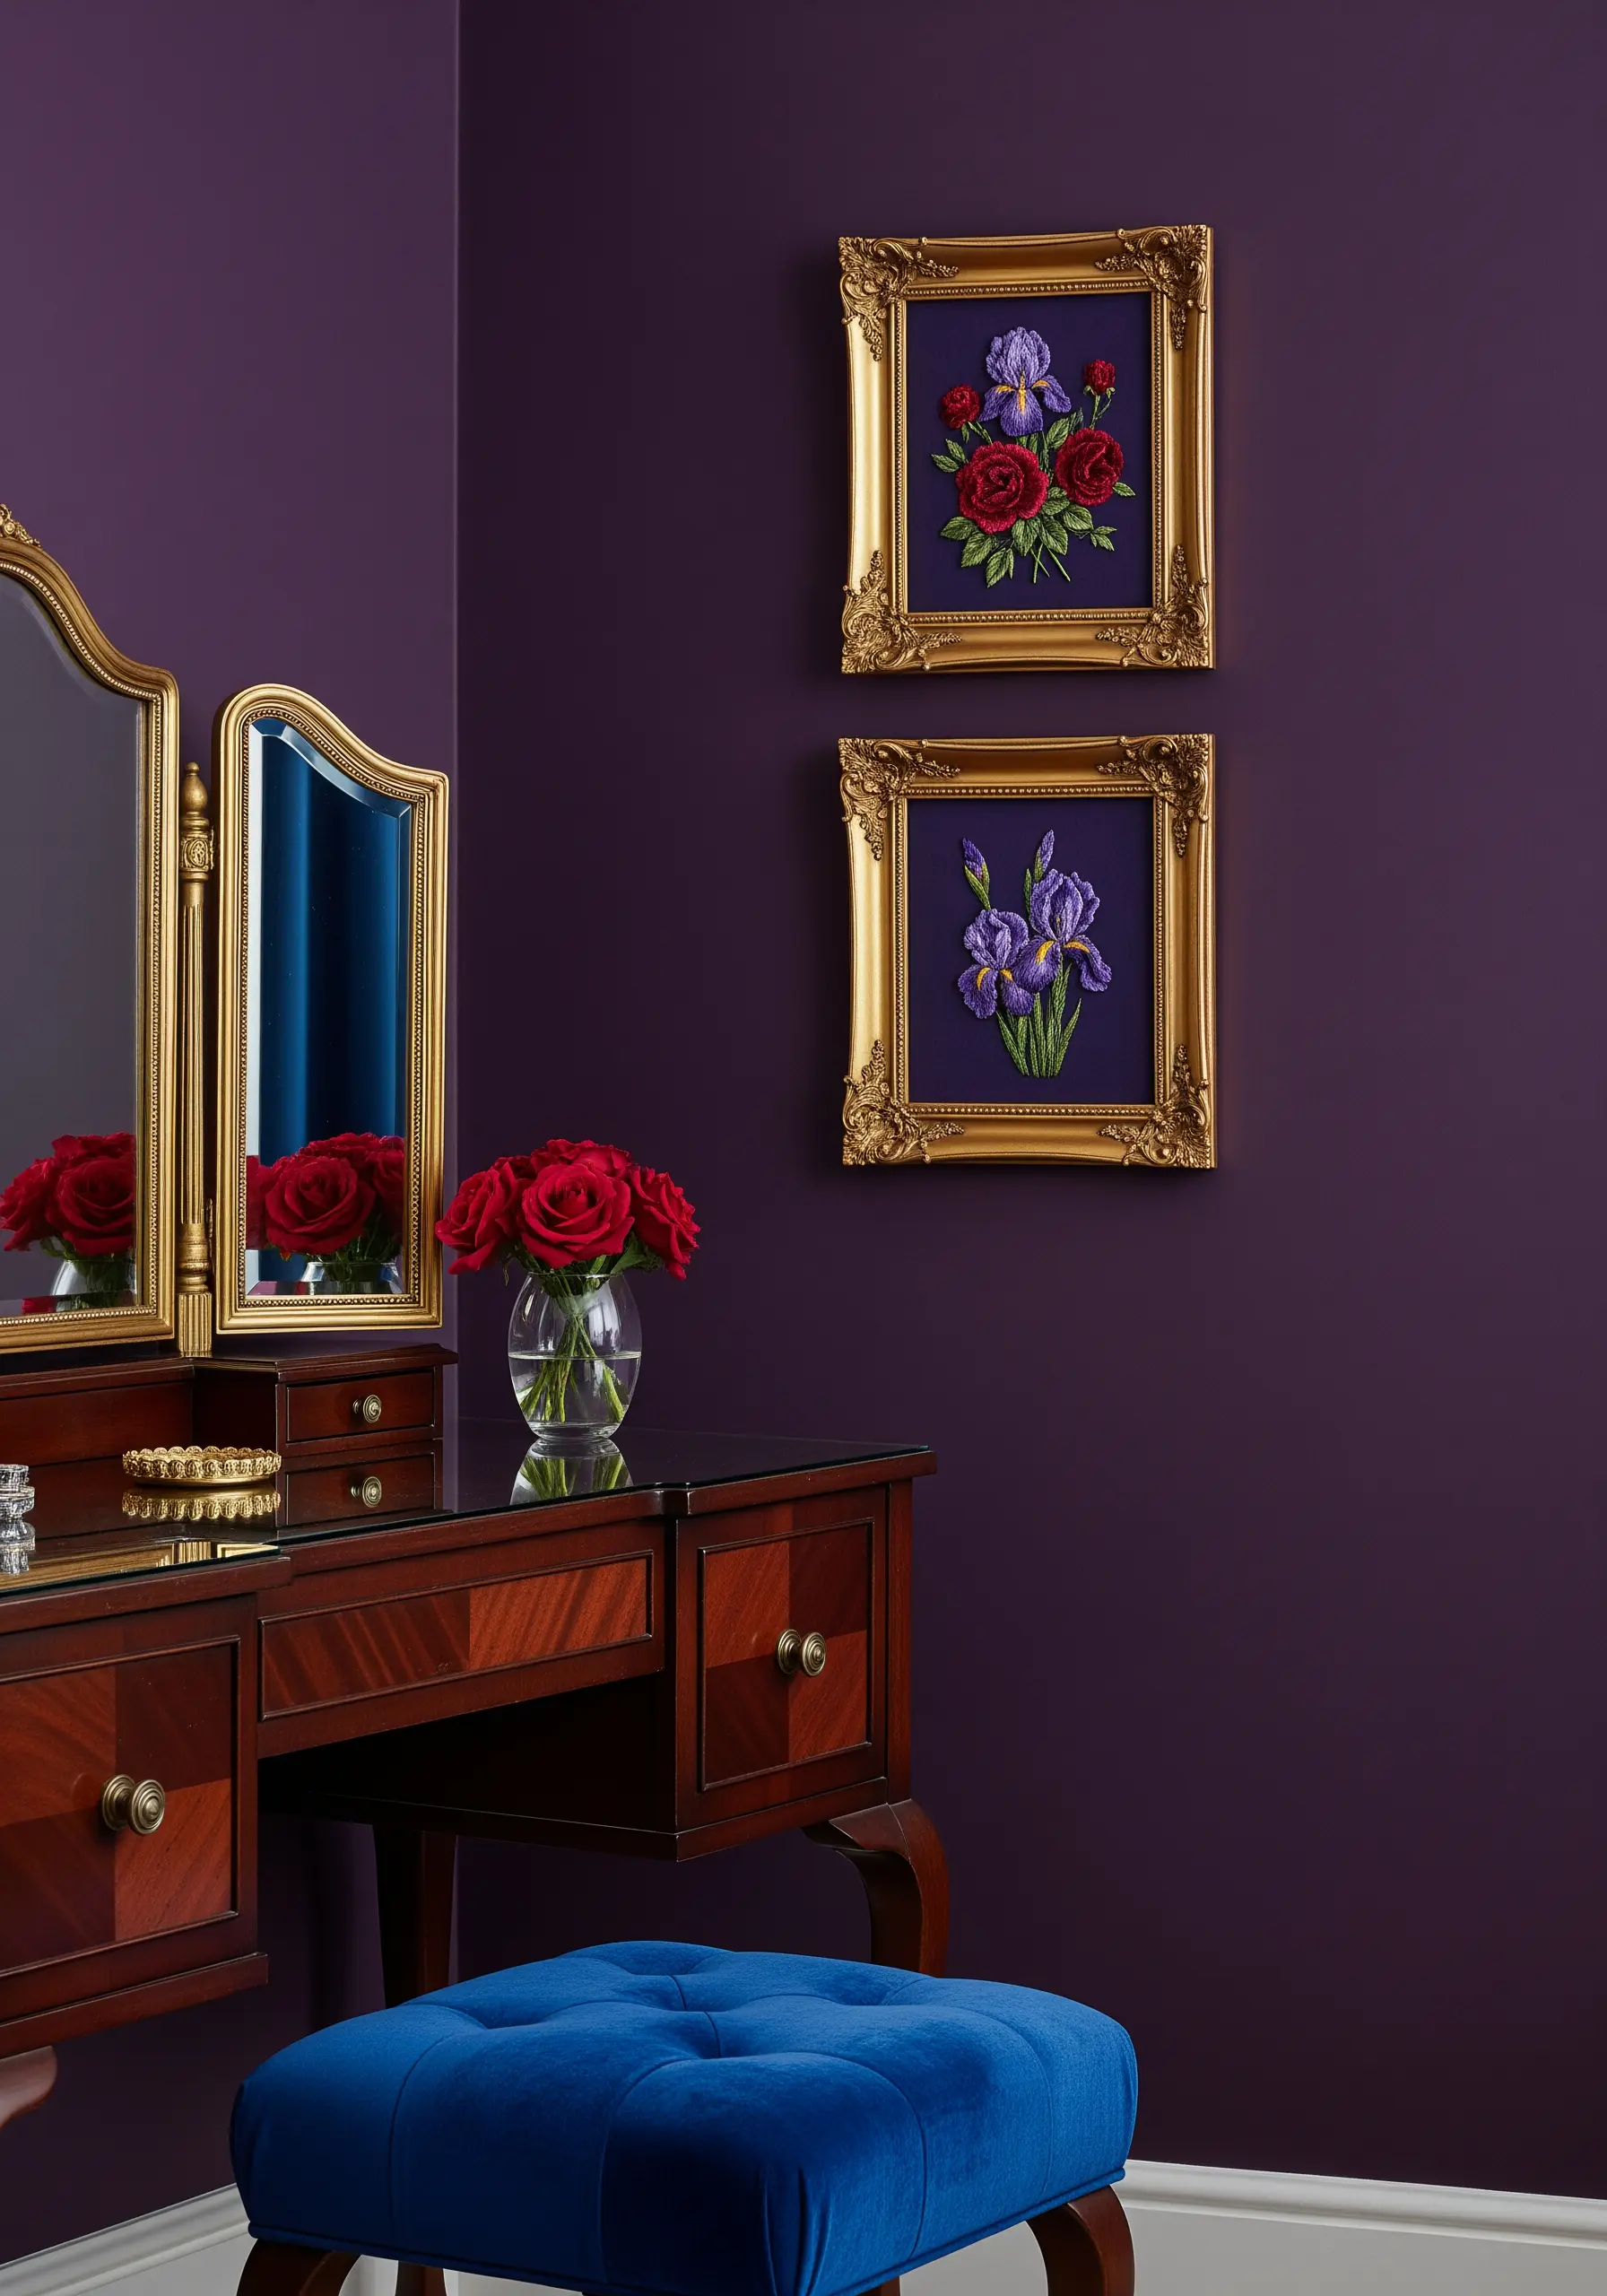
Create a sense of drama and luxury by pairing richly colored threads with ornate, gilded frames.
Stitch your irises and roses in deep jewel tones—sapphire blue, ruby red, and emerald green—on a dark navy or black background to make the colors feel even more saturated.
The choice of heavy, baroque-style gold frames enhances the regal feel of the composition.
This bold combination works beautifully against a deep, moody wall color like aubergine, creating a cohesive and immersive space.
16. Tell a Story with a Panoramic Frame
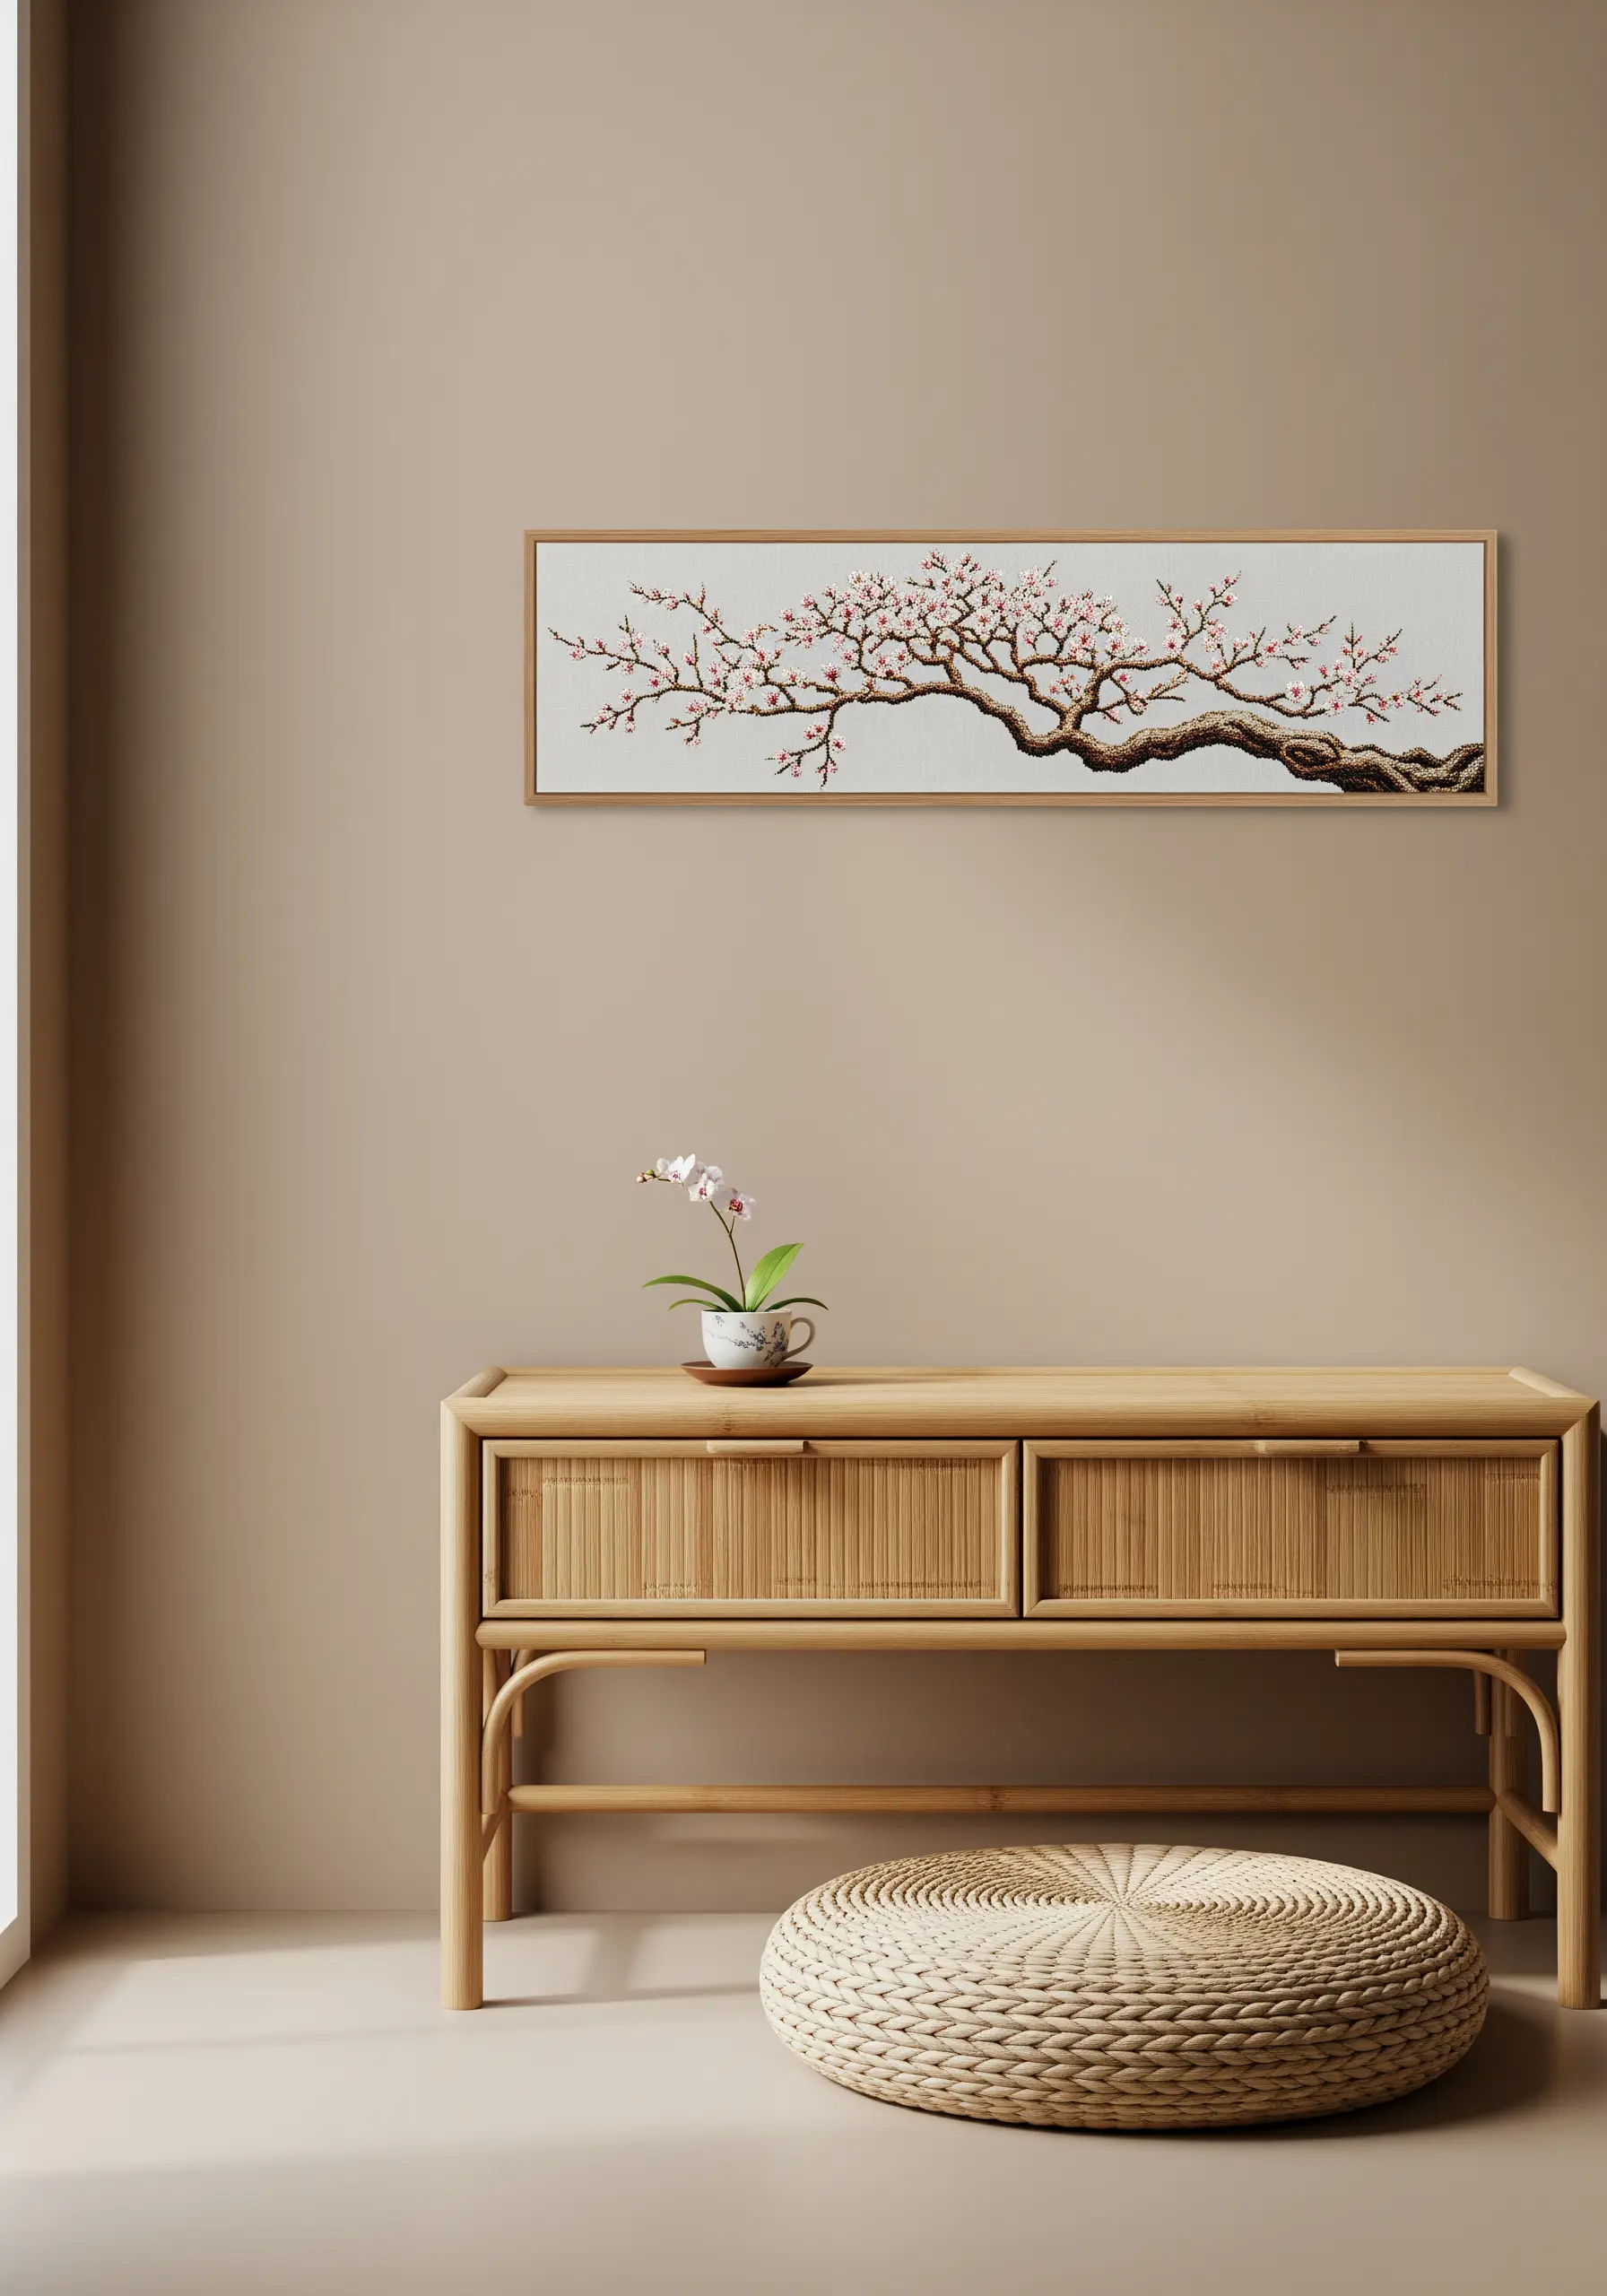
Break away from conventional shapes by stitching a design specifically for a long, panoramic frame.
This format is perfect for depicting a sprawling cherry blossom branch, allowing the composition to breathe and flow naturally across the fabric.
Use a variety of pink and white threads for the blossoms and several shades of brown for the branch to create realistic texture and depth.
The minimalist wooden frame keeps the focus on the delicate, sprawling nature of your stitch work.
17. Create Depth by Matching Art to Wallpaper
Instead of contrasting with your wallpaper, try complementing it for a rich, layered, and immersive effect.
Select one or two flowers from your wallpaper pattern and recreate them in thread, using a slightly brighter or more intense color palette.
Stitching on a solid dark background helps the embroidered flowers stand out as dimensional versions of their printed counterparts.
Mix and match frame styles and colors, like black and gold, to add another layer of texture and visual interest to your moody floral composition.
18. Craft a Delicate Hoop Garland
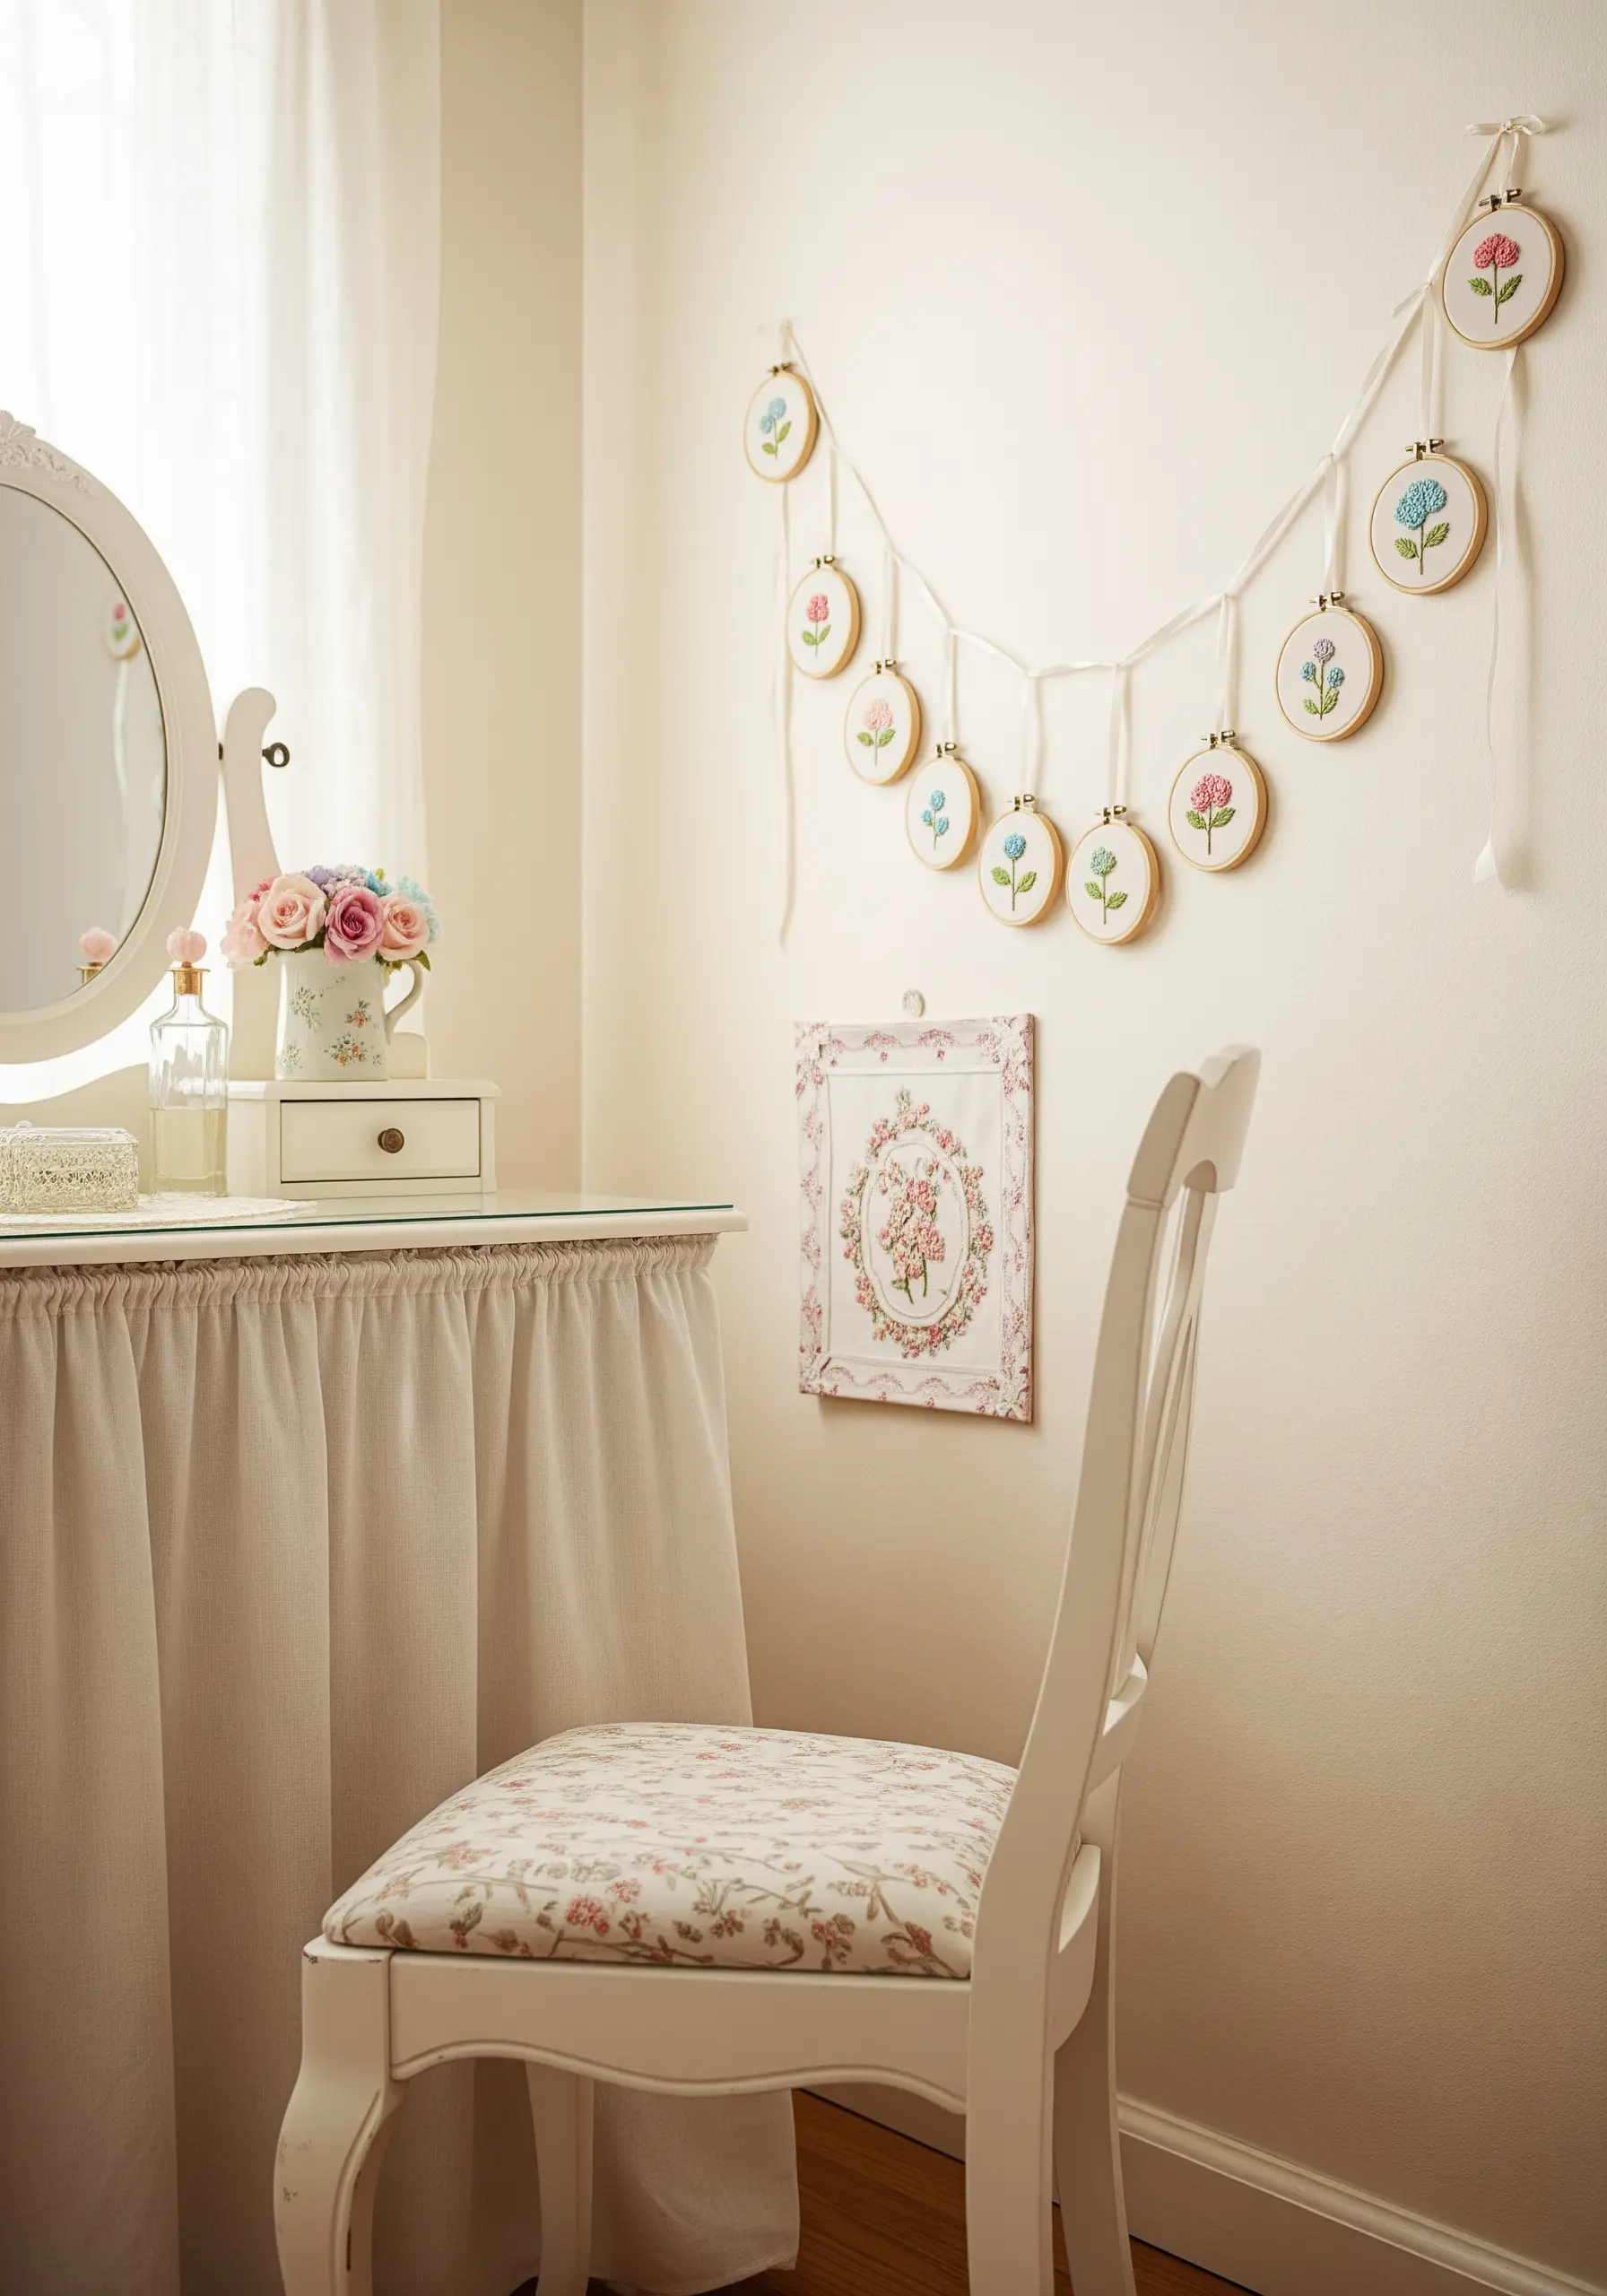
For a soft and romantic touch, connect a series of mini hoops with a beautiful piece of cream-colored ribbon or twine.
Stitch simple, individual floral sprigs in each hoop, using a pastel color palette to maintain a light and airy feel.
Vary the lengths of the ribbon connecting each hoop to create a gentle, scalloped swag effect on the wall.
This is a wonderfully charming way to decorate a small or awkward space, adding soft, minimal charm without overwhelming it.
19. Explore Abstract and Geometric Florals
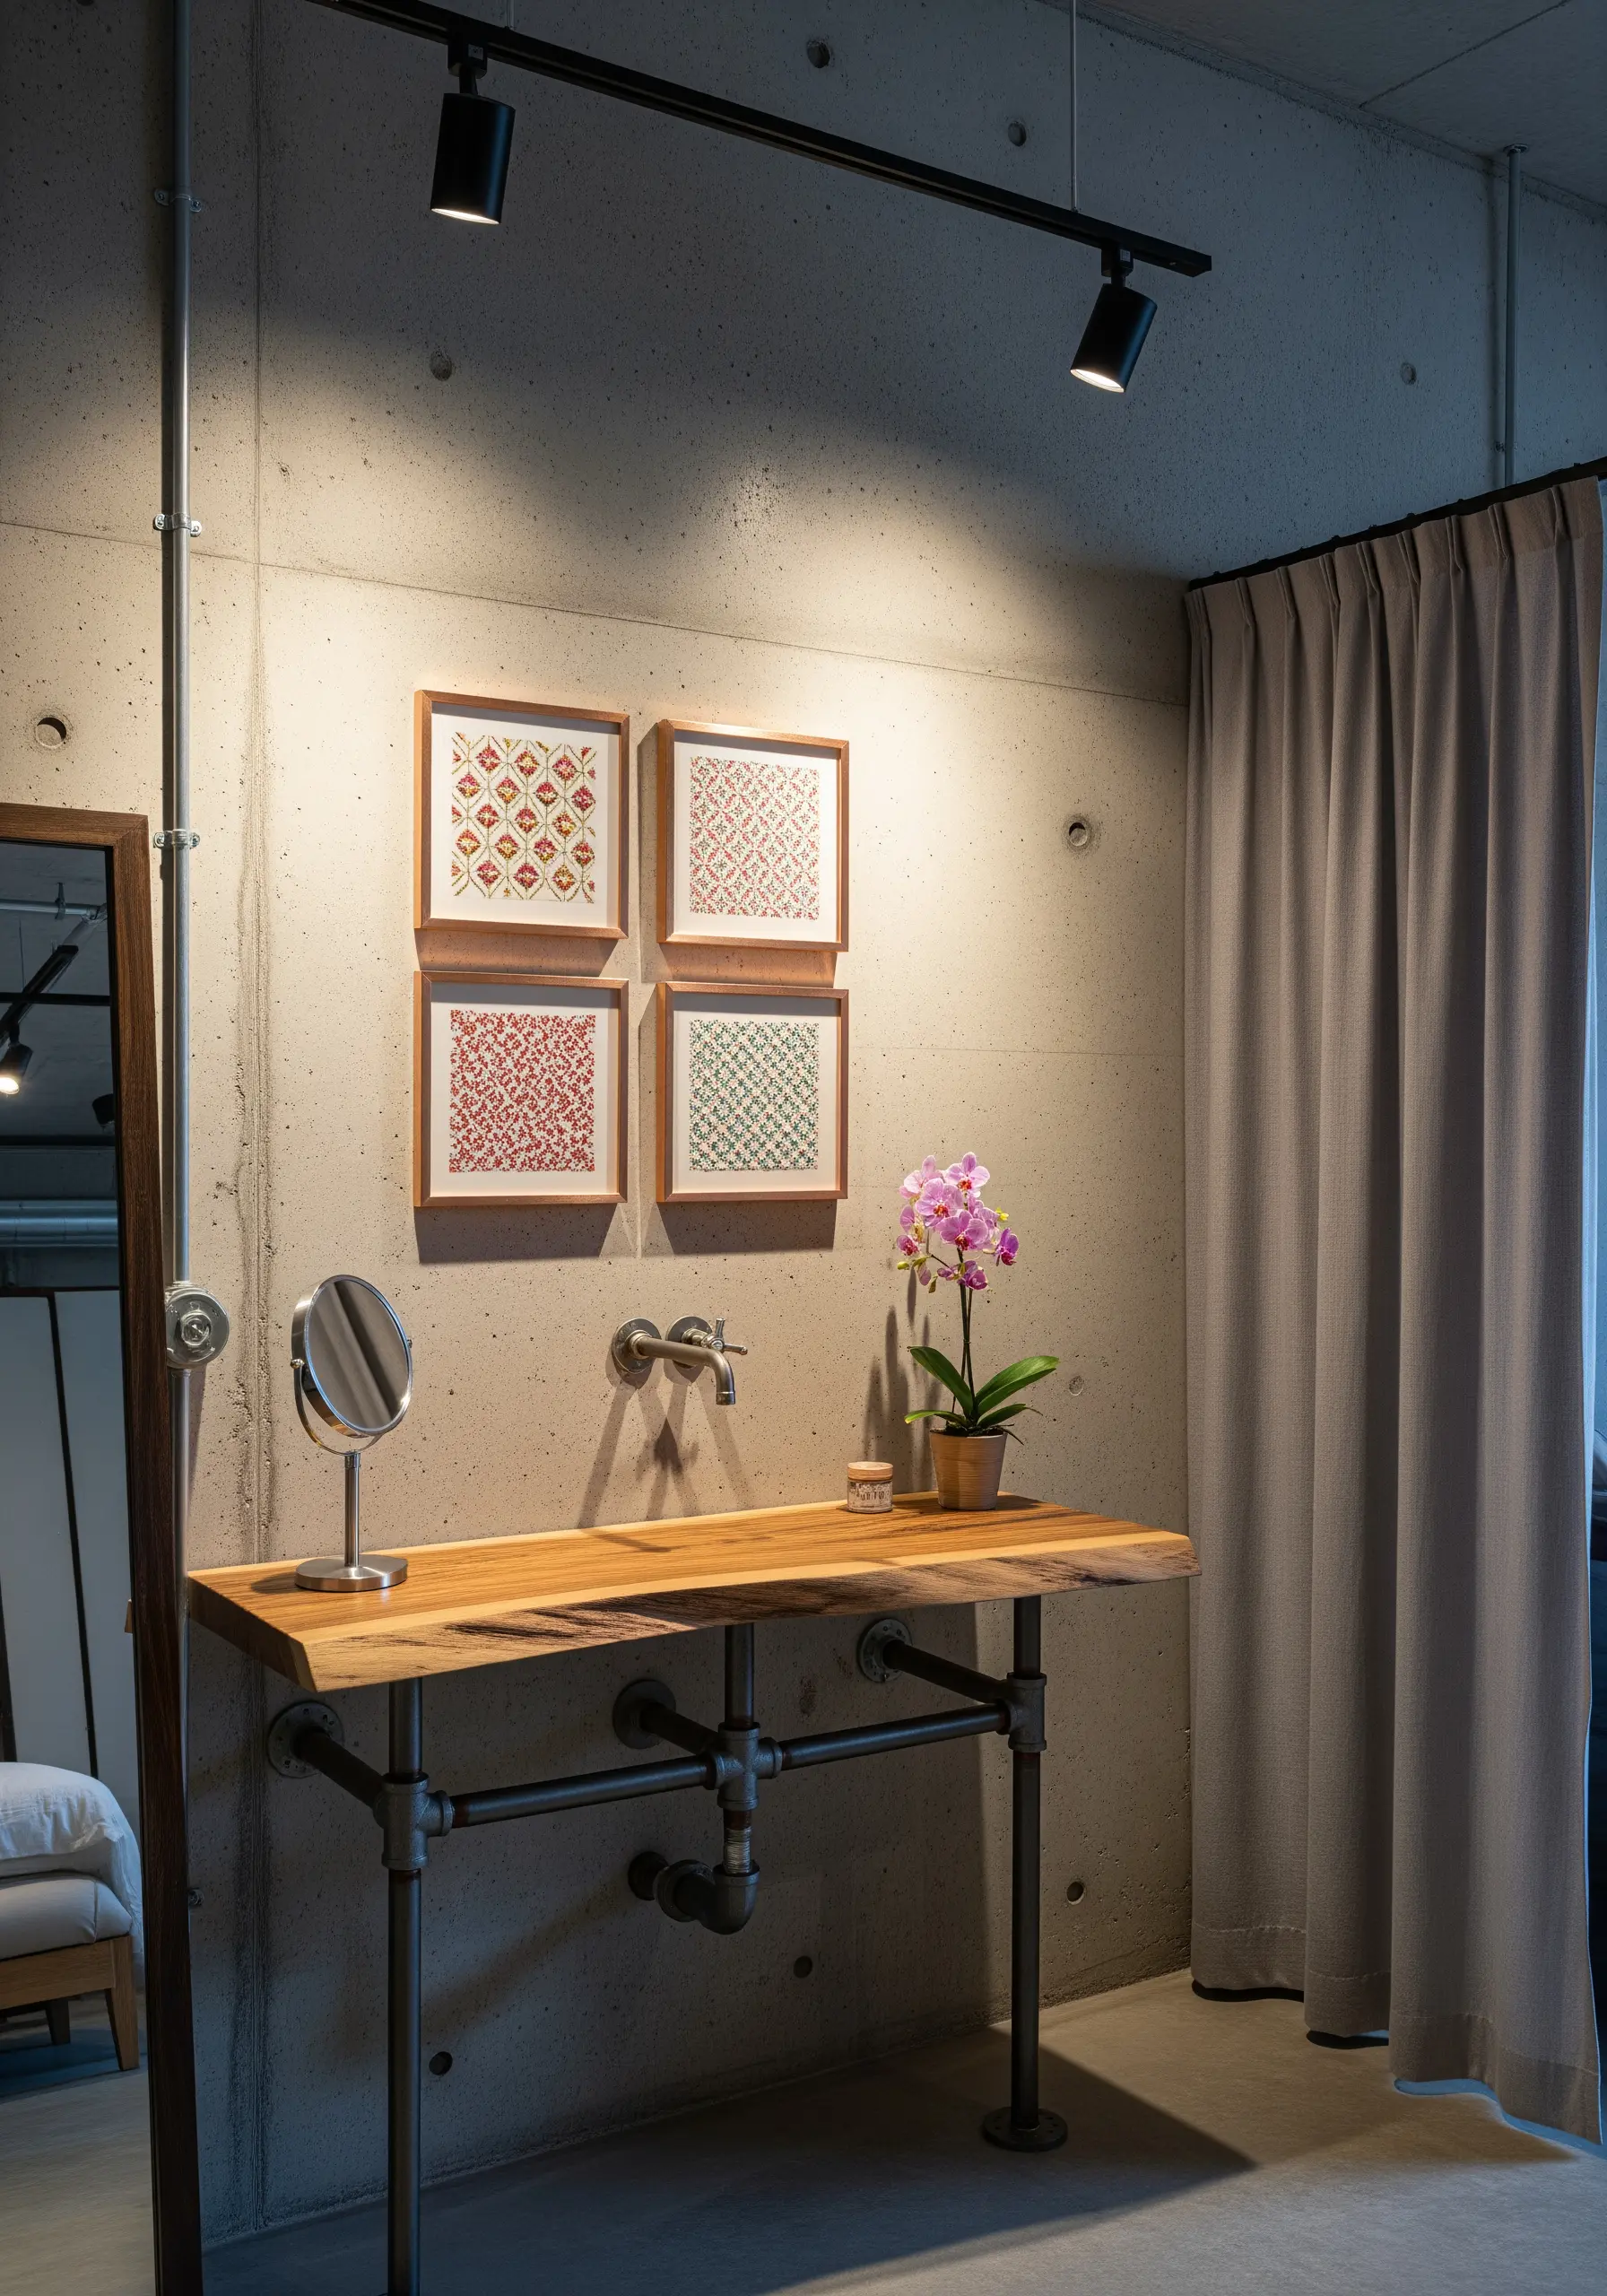
Deconstruct flowers into their basic shapes and colors to create modern, pattern-based artwork.
Use techniques like color blocking and simple satin stitch fills to achieve a clean, graphic look that feels more like a print than traditional embroidery.
This style is particularly effective against the raw, industrial texture of a concrete wall, as the softness of the thread contrasts with the hard surface.
These geometric framed embroidery patterns add a sophisticated, artistic touch to contemporary spaces.
20. Infuse Energy with a Tropical Palette
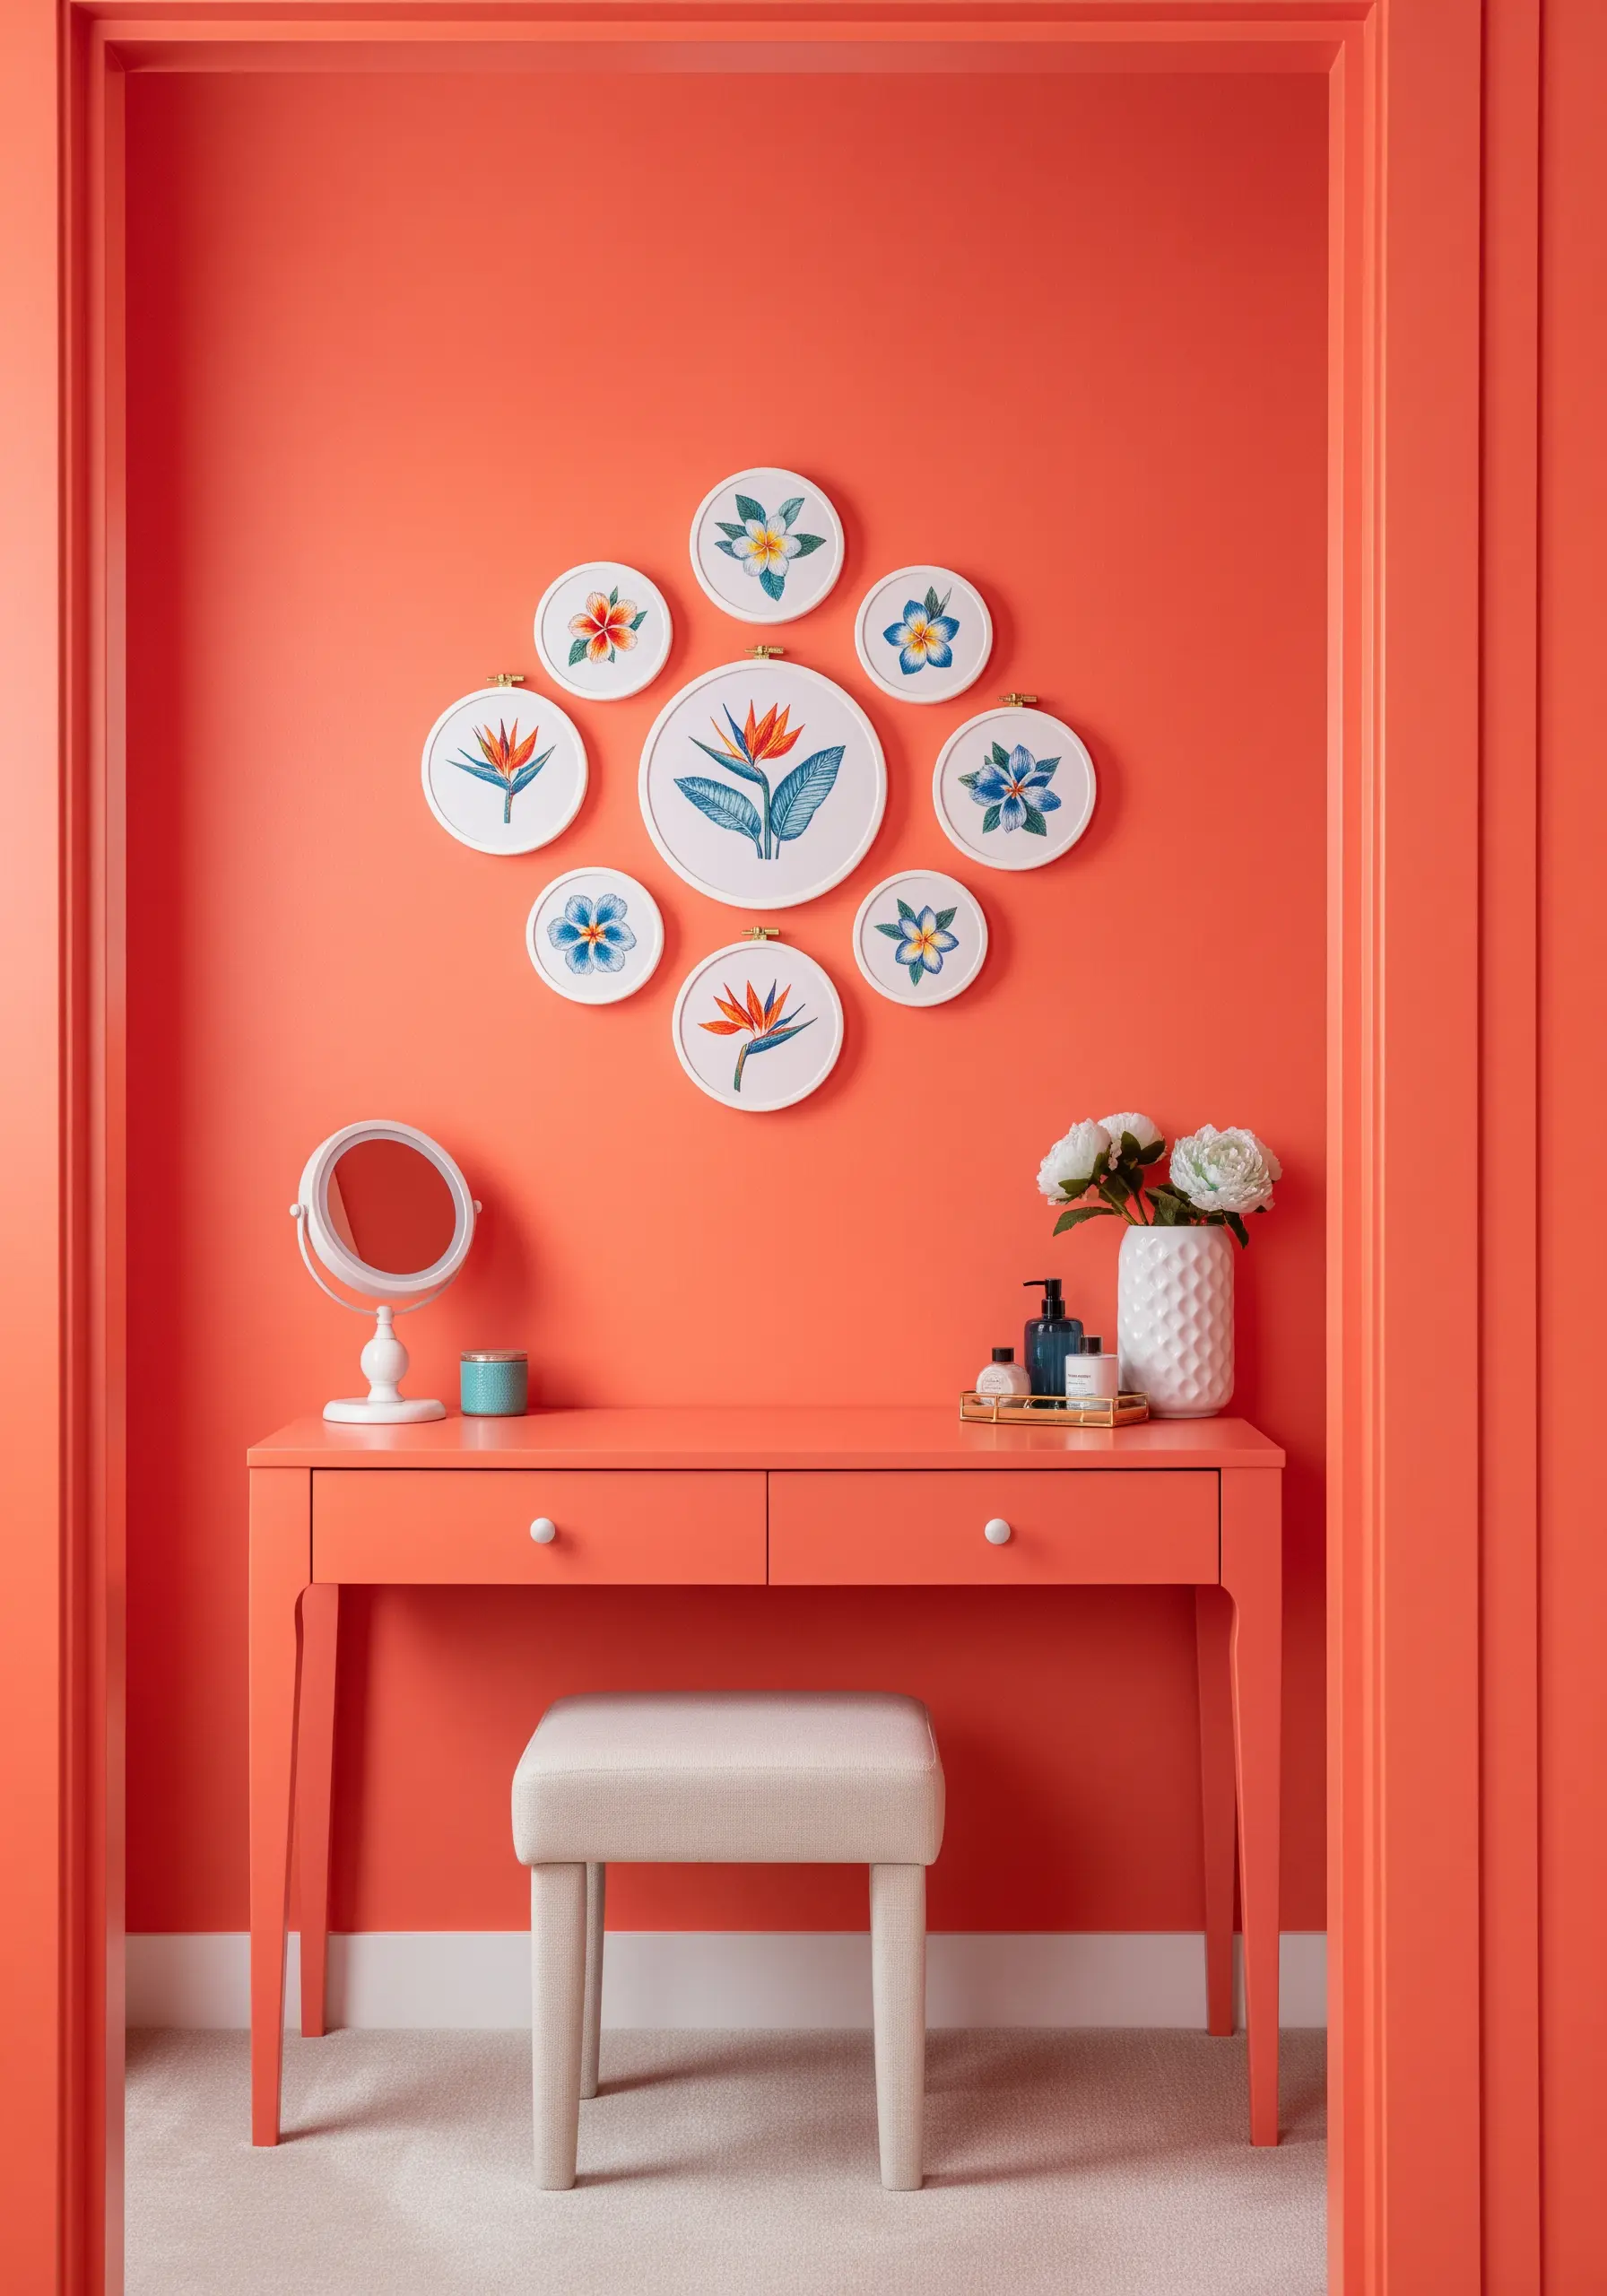
Capture the vibrant energy of a tropical paradise by stitching exotic flowers like the bird of paradise.
Use bold, saturated colors—tangerine orange, electric blue, and sunny yellow—to make your composition come alive.
Arrange your hoops in a circular or diamond formation, placing a larger, central piece as the focal point surrounded by smaller supporting motifs.
This dynamic arrangement creates a burst of color and joy, perfect for a bright and cheerful dressing area.
21. Personalize Your Space with Monogram Wreaths
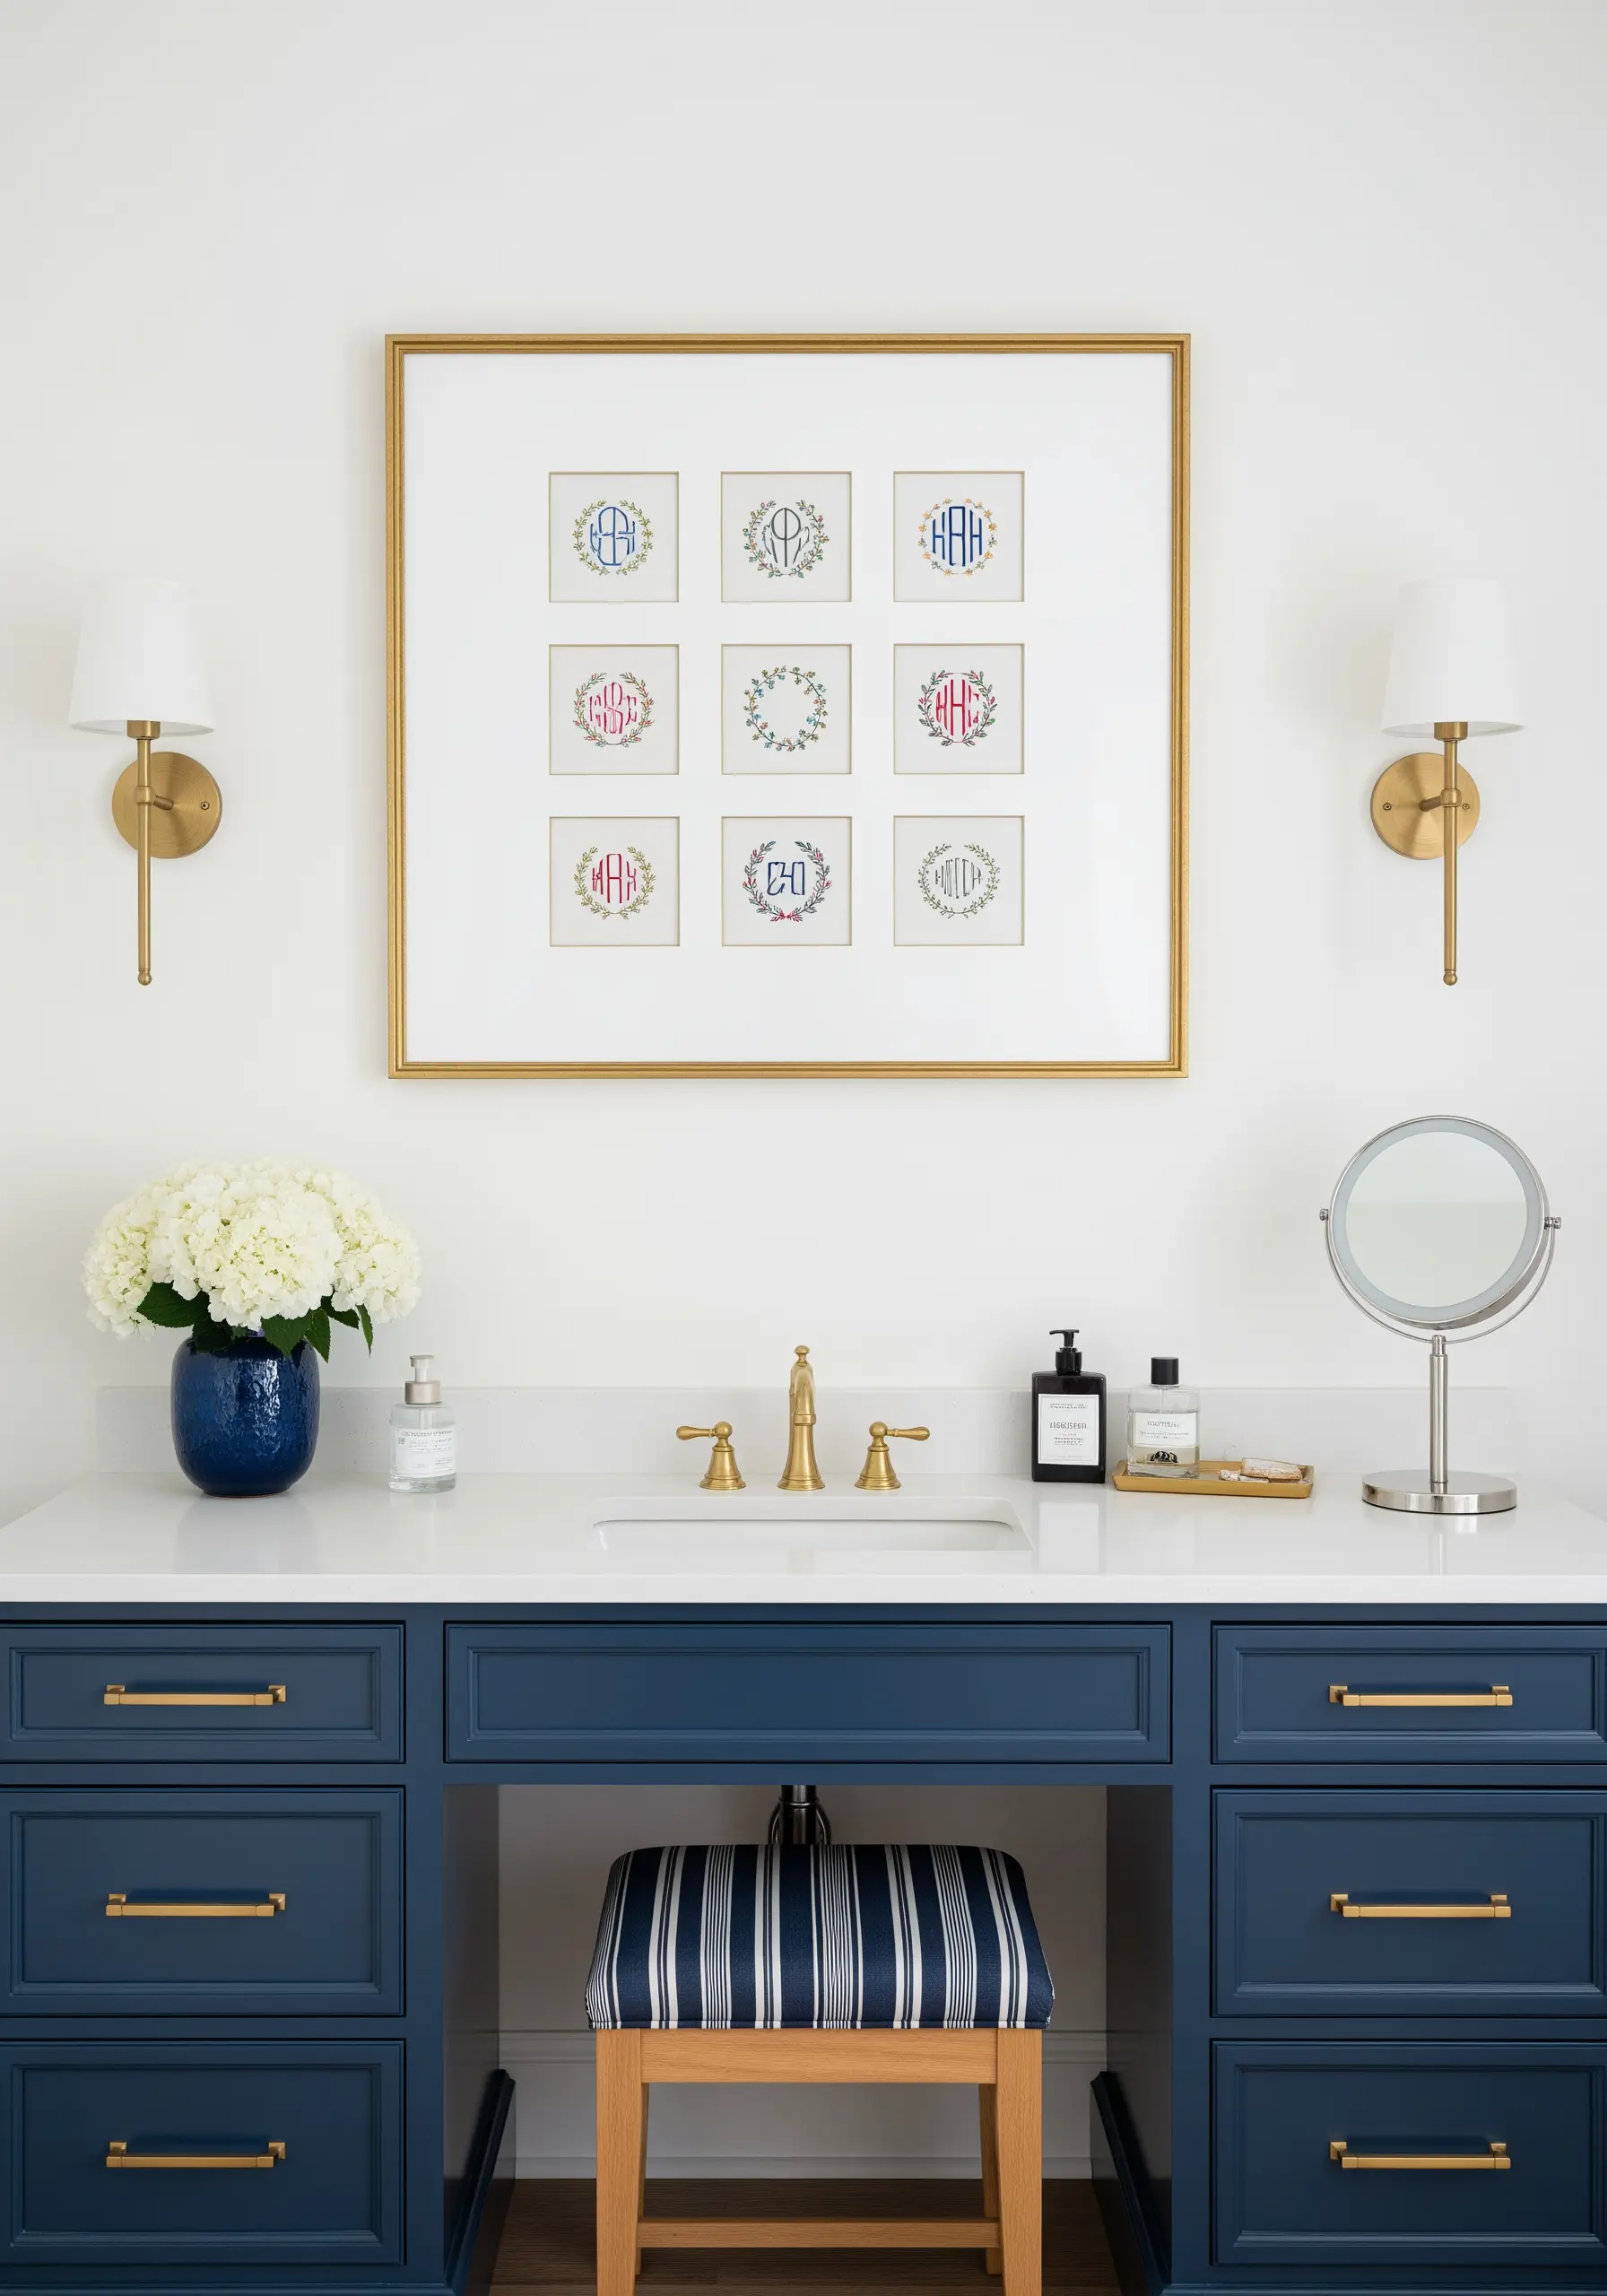
Combine the timeless appeal of floral wreaths with the personal touch of a monogram for a truly custom piece of art.
Design nine unique mini wreaths, each encircling a different set of initials, to create a family-themed gallery wall.
Use a fine backstitch or stem stitch for the lettering to ensure it is crisp and legible.
A large, single gallery frame with a custom-cut mat neatly unifies all the personalized monogram pieces into one impressive statement.
22. Style an Embroidered Shelf Display
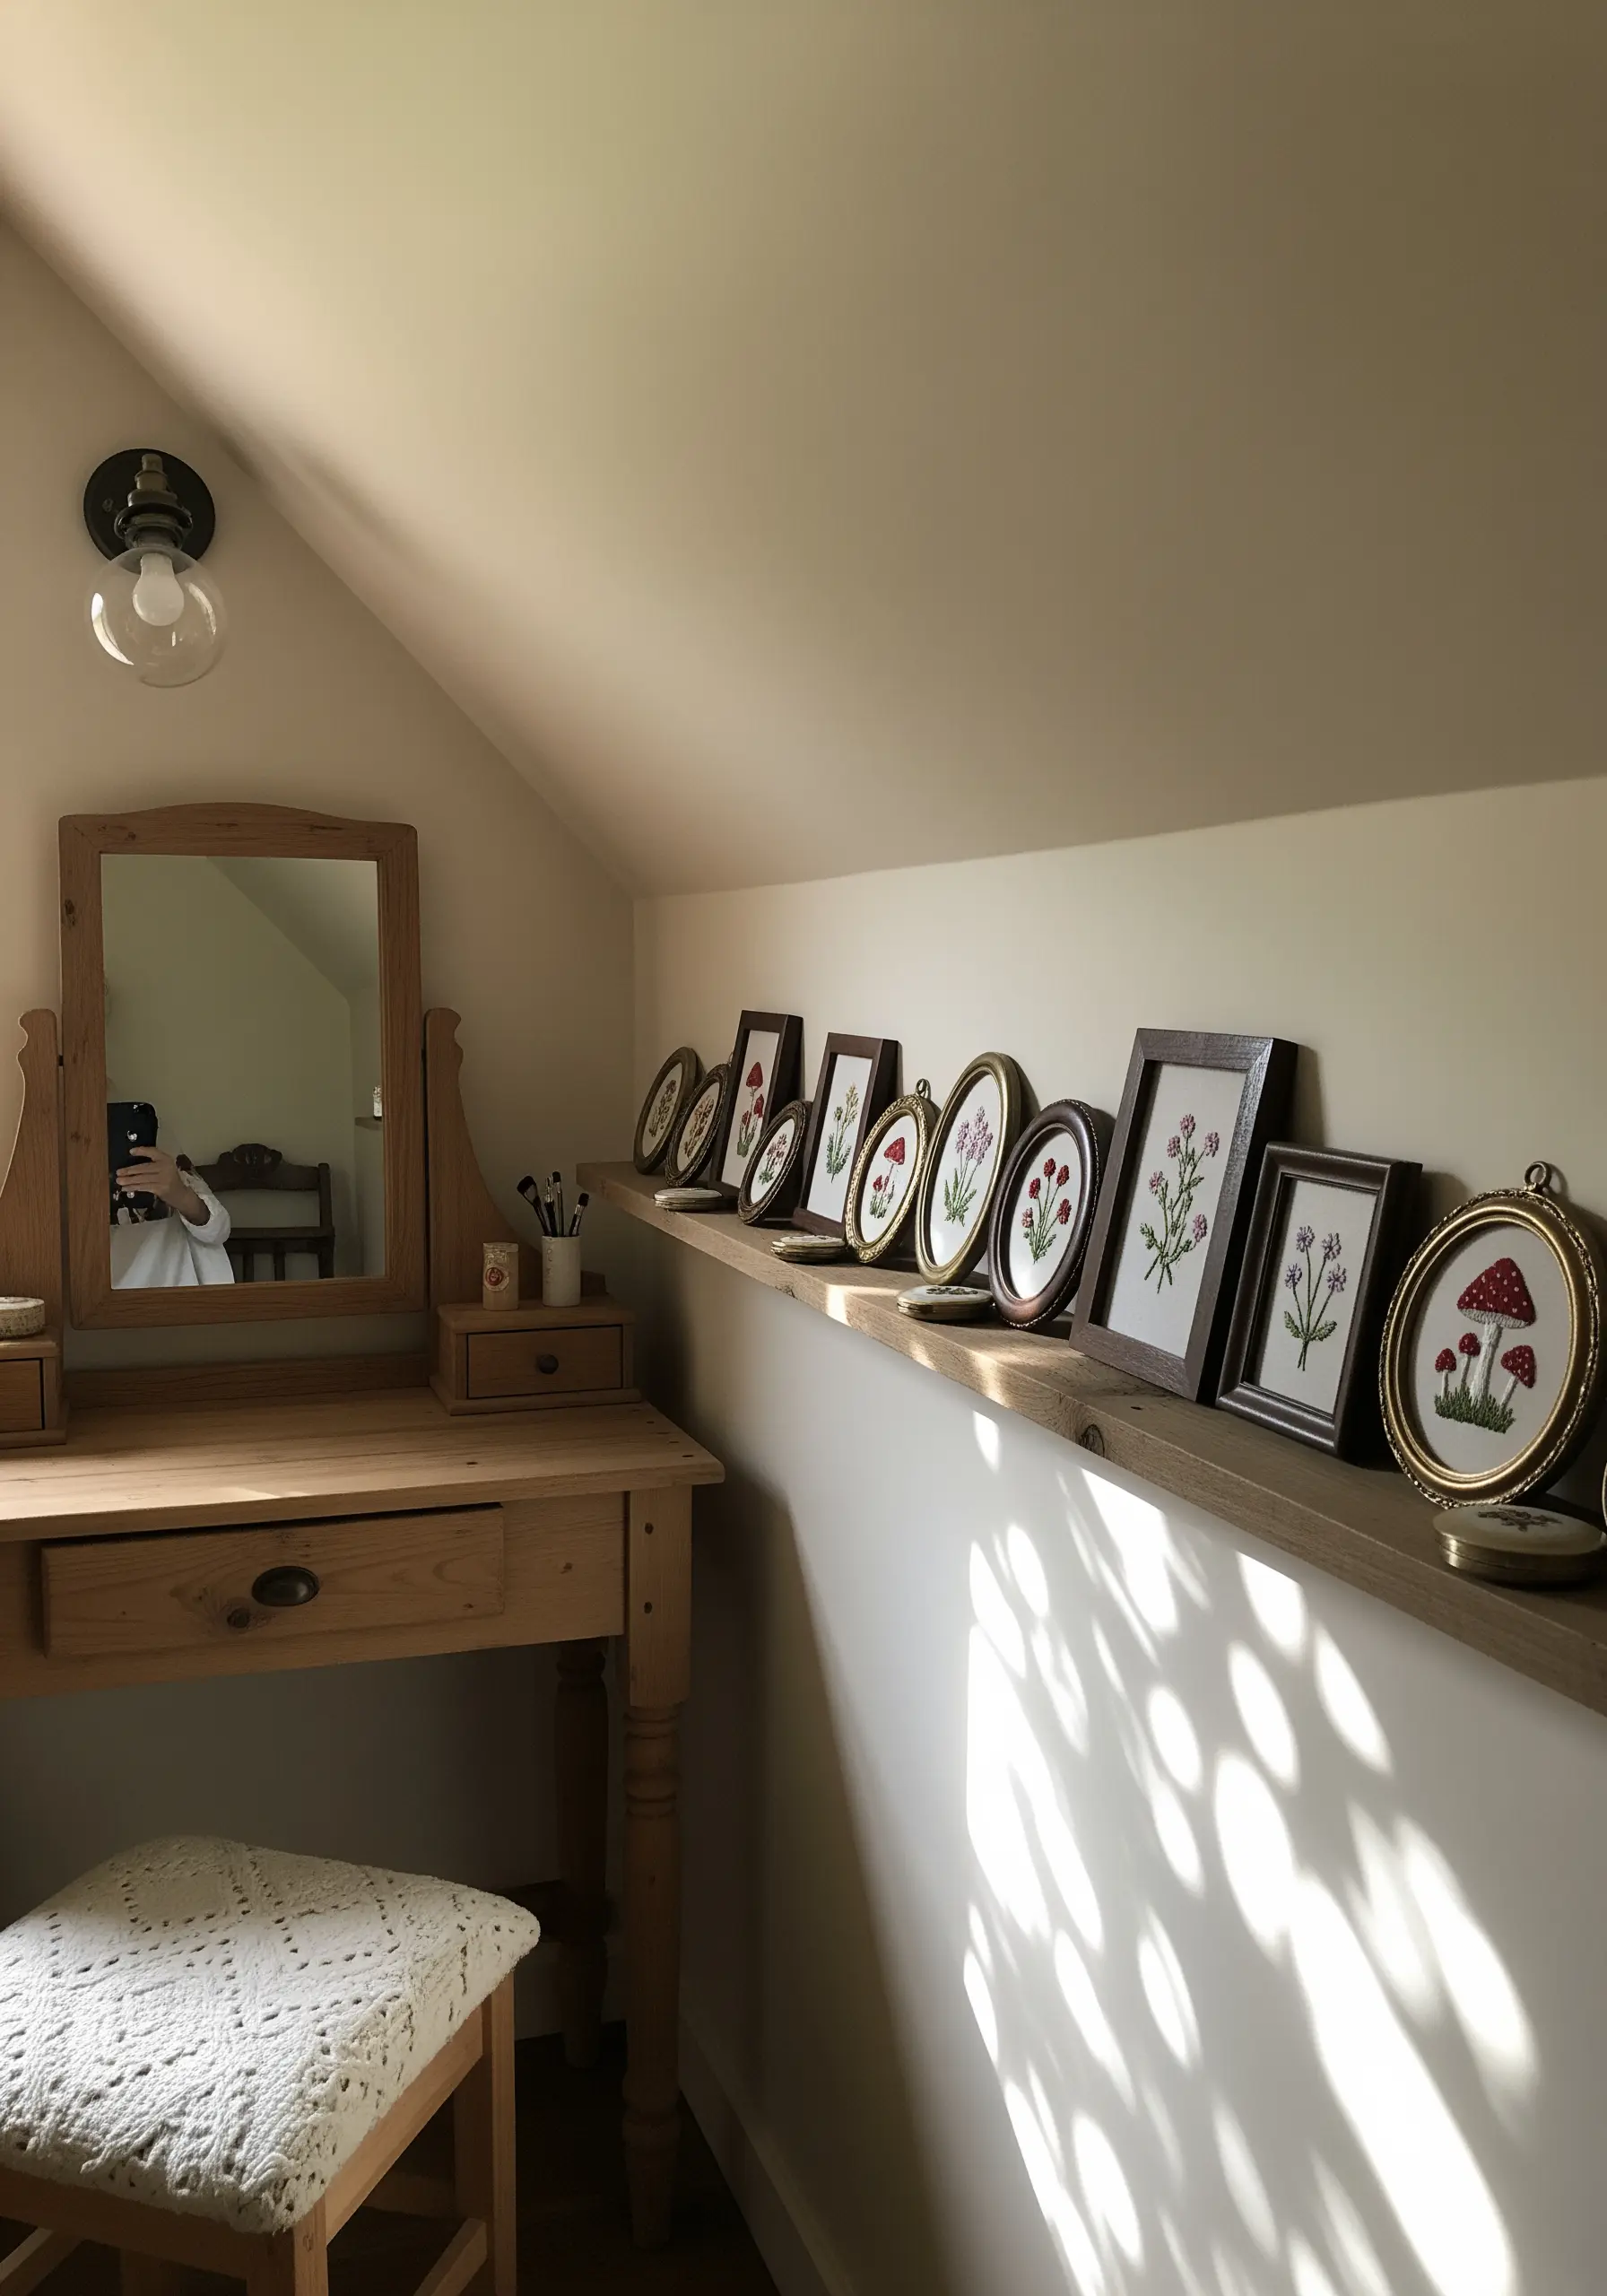
Utilize a narrow shelf or picture ledge to create a flexible and layered display of your finished work.
This approach allows you to easily rotate pieces, add new creations, and play with composition without putting more holes in the wall.
Mix different frame shapes, sizes, and styles—from ornate ovals to simple squares—for an eclectic, curated feel.
The shelf itself acts as a grounding element, bringing harmony to a diverse collection of your favorite floral and botanical stitches.
23. Create a Botanical Specimen Collection
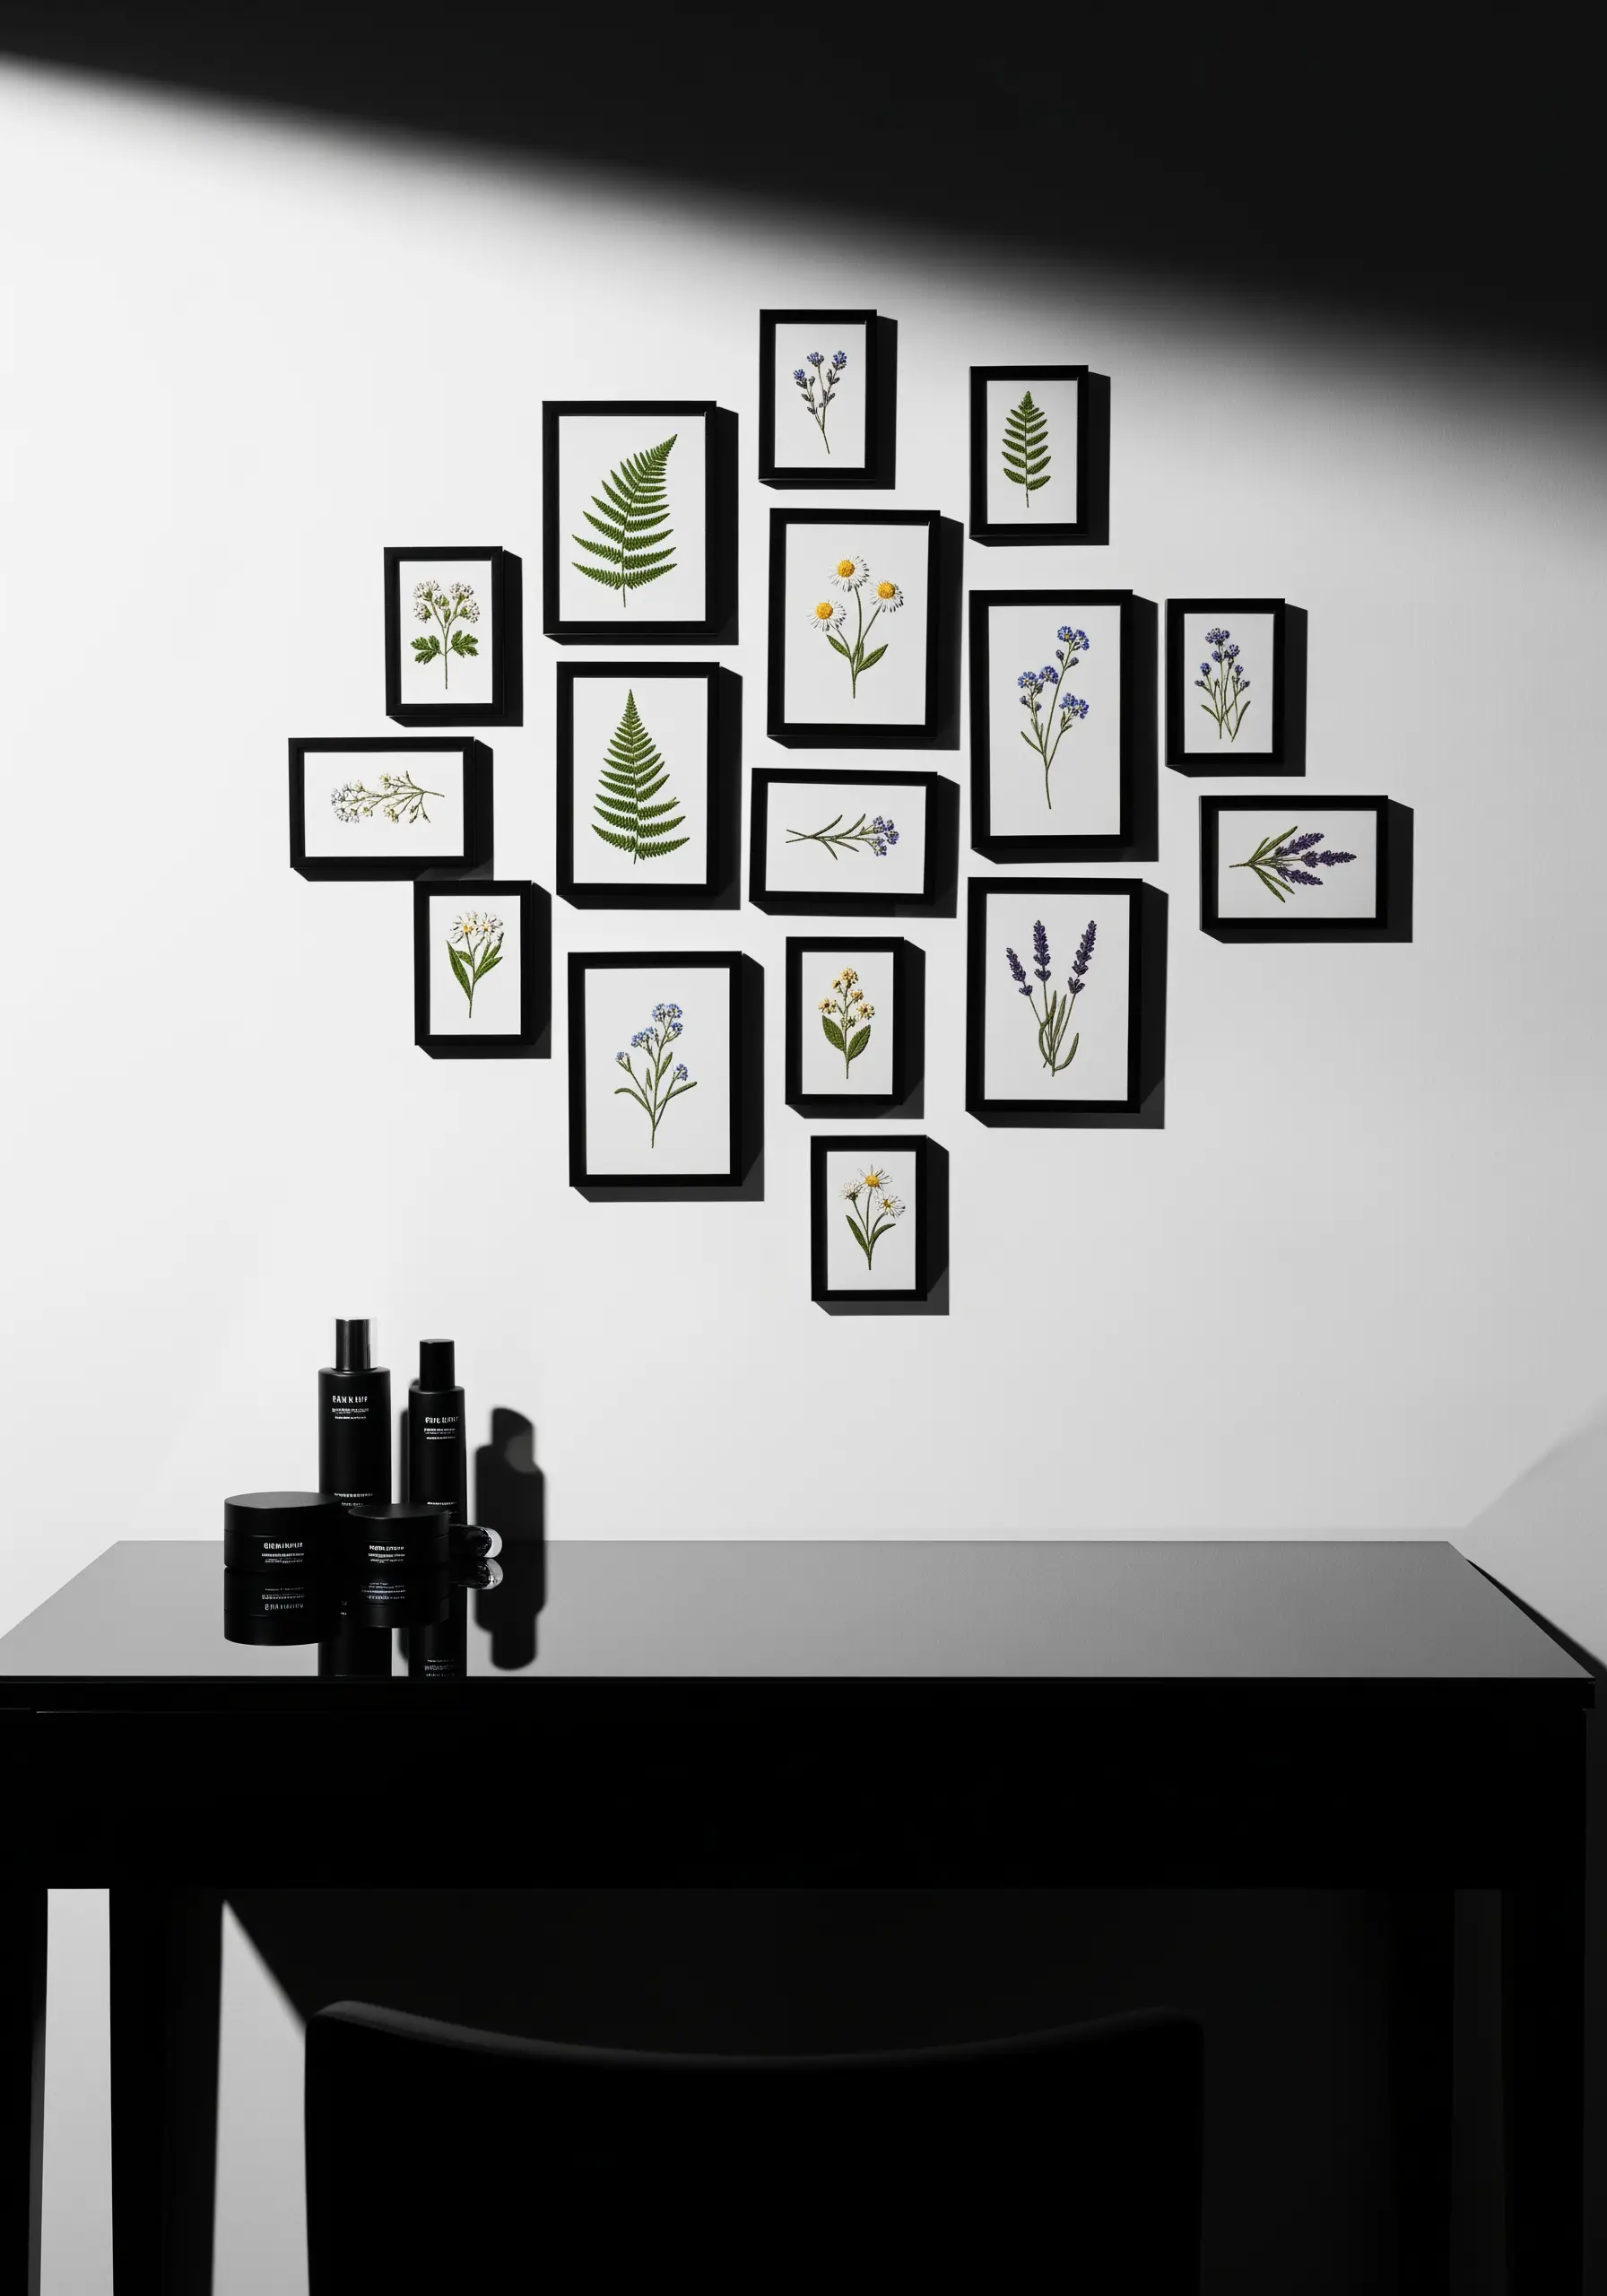
Emulate the look of pressed botanicals by stitching detailed, realistic studies of individual leaves and wildflowers.
Focus on scientific accuracy, capturing the unique shapes of fern fronds and the delicate structure of forget-me-nots.
Arrange the collection in an organic, cloud-like cluster with varied spacing between the frames to create a sense of natural discovery.
Using simple, identical black frames allows the intricate detail of each embroidered specimen to take center stage.
24. Add a Pop of Color with a Vertical Stack
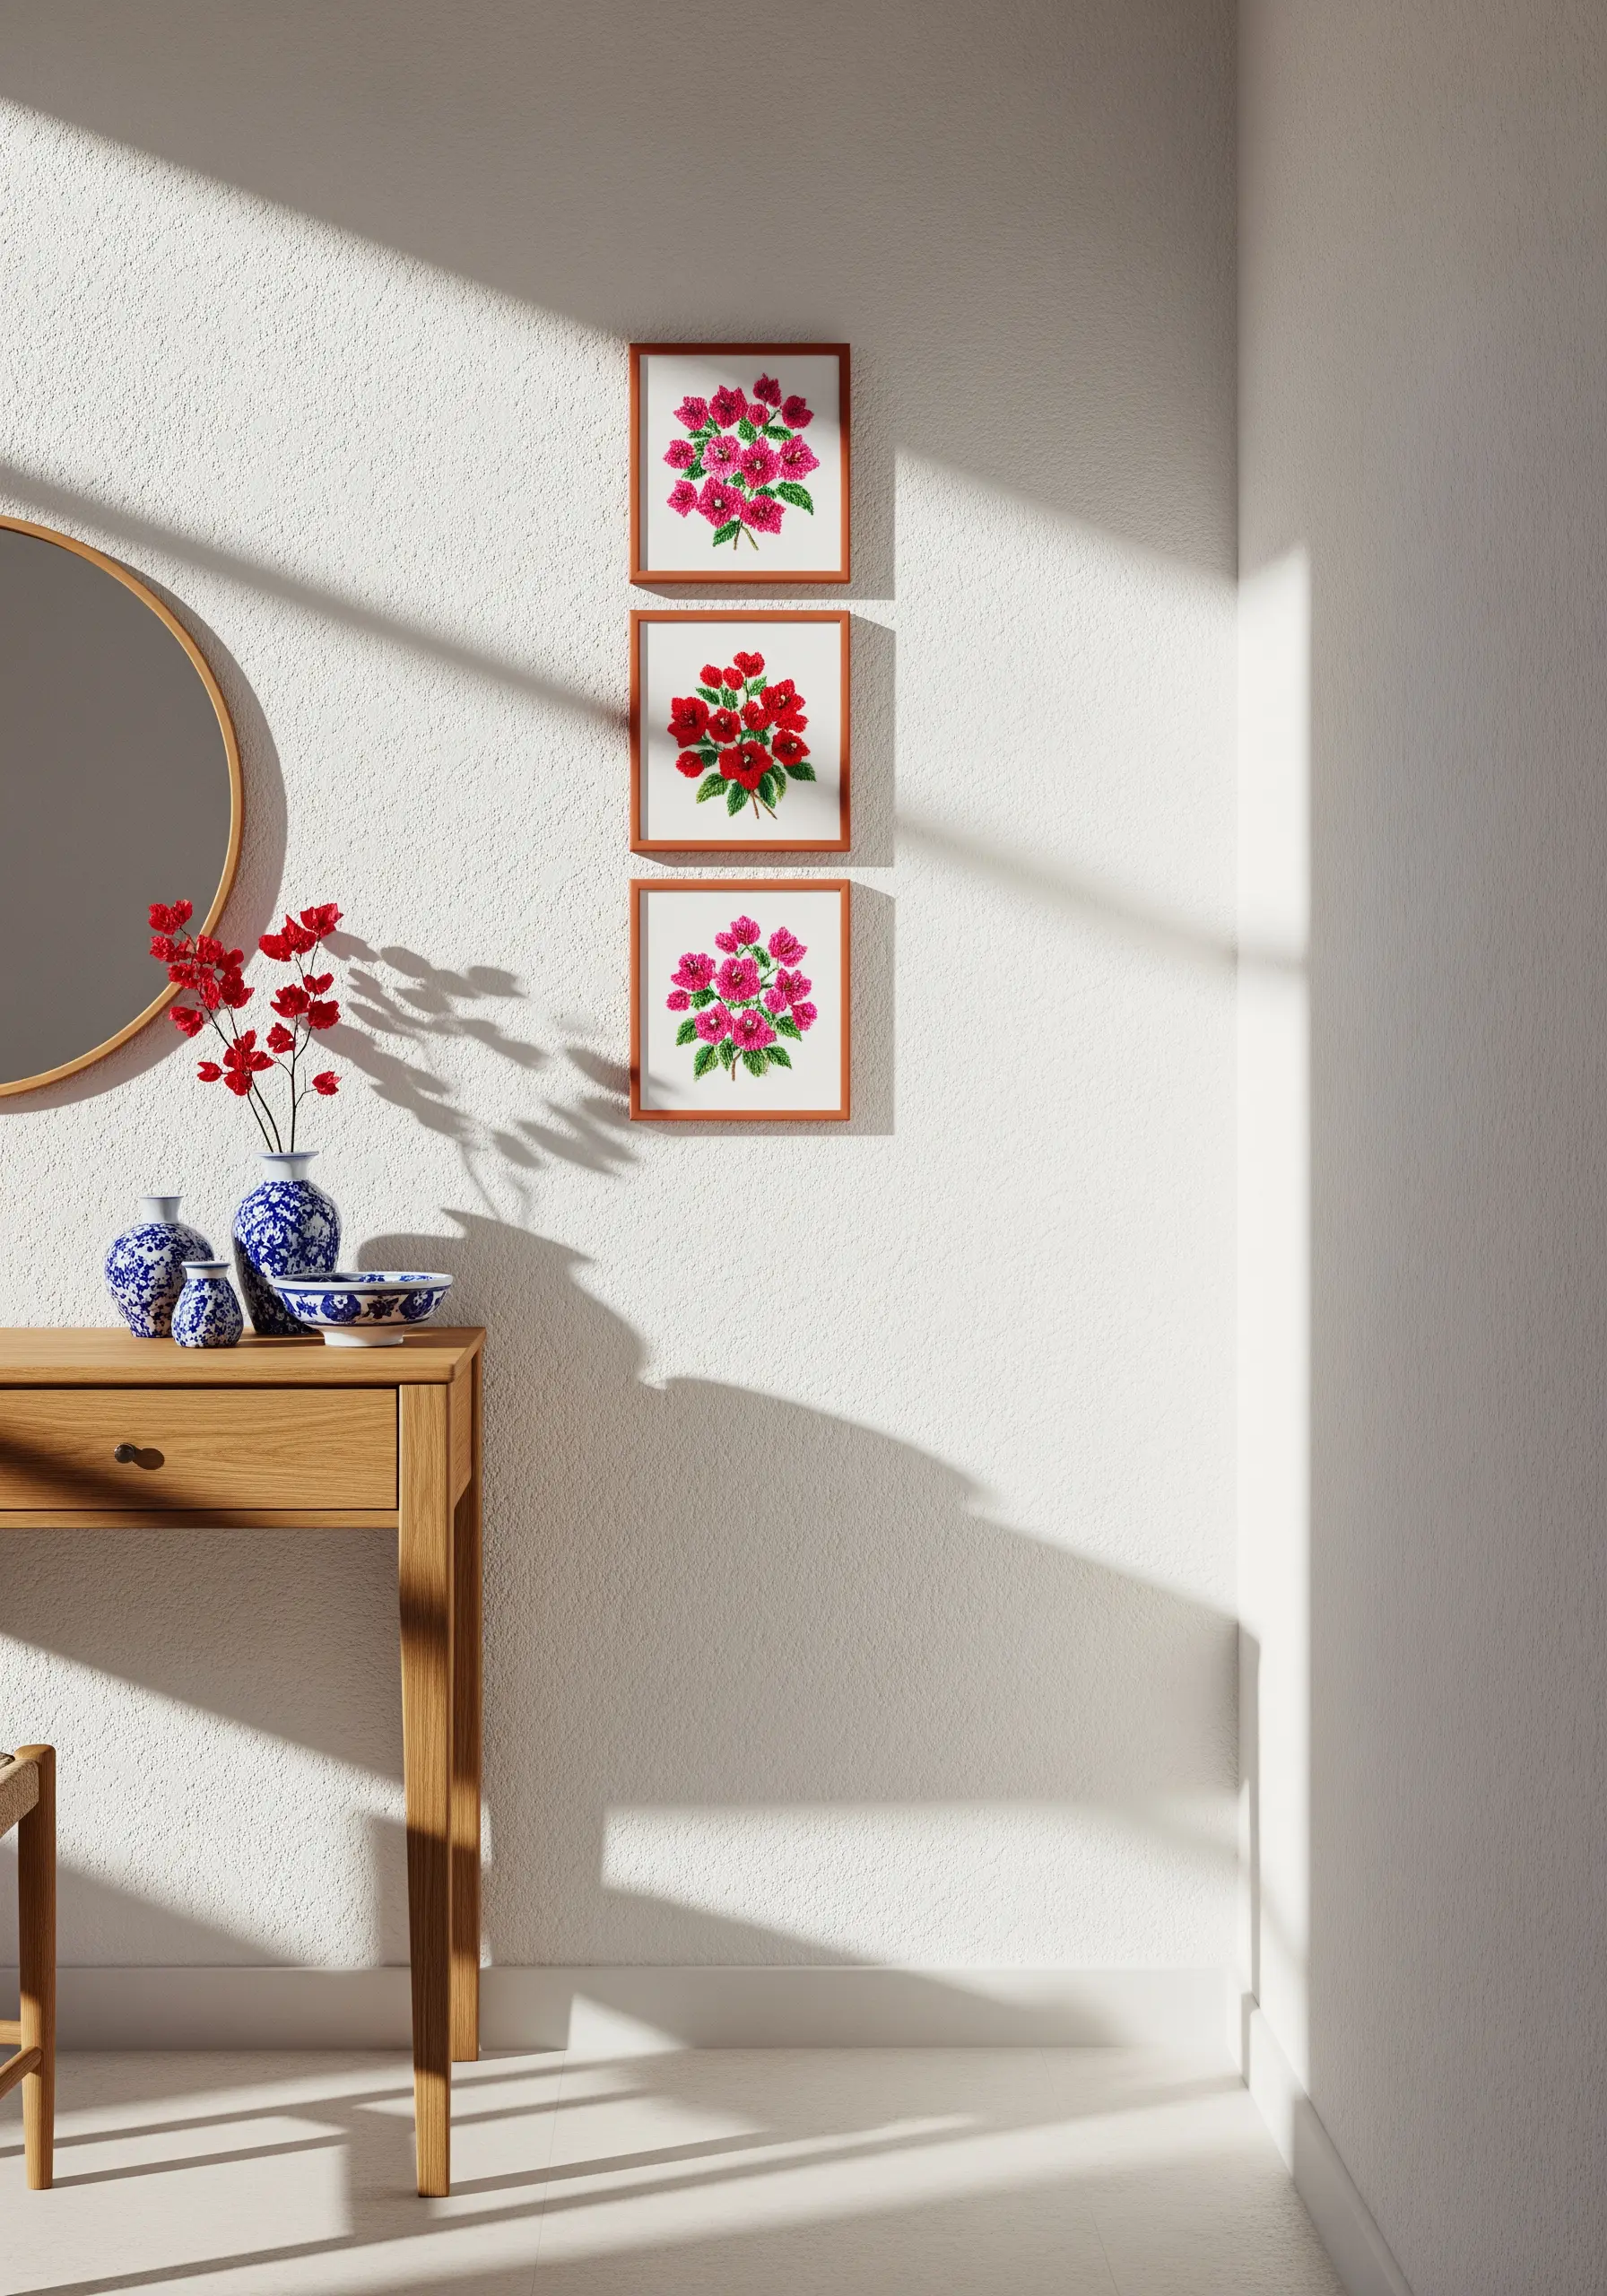
When you have a narrow vertical space, a simple stack of three identical frames creates a clean and impactful design feature.
Choose bright, cheerful thread colors like magenta and crimson to stand out against a neutral wall and draw the eye upward.
Keep the floral motifs simple and graphic, using satin stitch and French knots for a bold, textured finish.
This arrangement is perfect for adding a touch of color and personality to a small corner or the space beside a mirror.
25. Hang a Playful Ribbon Display
Create a charming, informal display by hanging three hoops vertically from a single, decorative ribbon.
This method is ideal for a retro or cottage-core aesthetic, adding a soft, handmade touch to the room.
Use simple, stylized flower designs with bright, happy colors that complement the playful wallpaper and vibrant furniture.
The ribbon not only connects the pieces but also adds another layer of texture and color to the overall composition.
26. Conduct a Study in Green Foliage

Dedicate an entire gallery wall to the intricate beauty of leaves for a display that is both calming and scientifically fascinating.
Explore different leaf shapes and textures by stitching a variety of ferns and botanicals, using several shades of green thread in each piece to create realistic shading.
Arranging them in a gentle oval shape creates a soft, cohesive focal point that feels natural and organized.
The simplicity of the leaf stitching against plain fabric in natural wood hoops evokes a sense of peace and connection to nature.
27. Add an Unexpected Touch to a Mirror
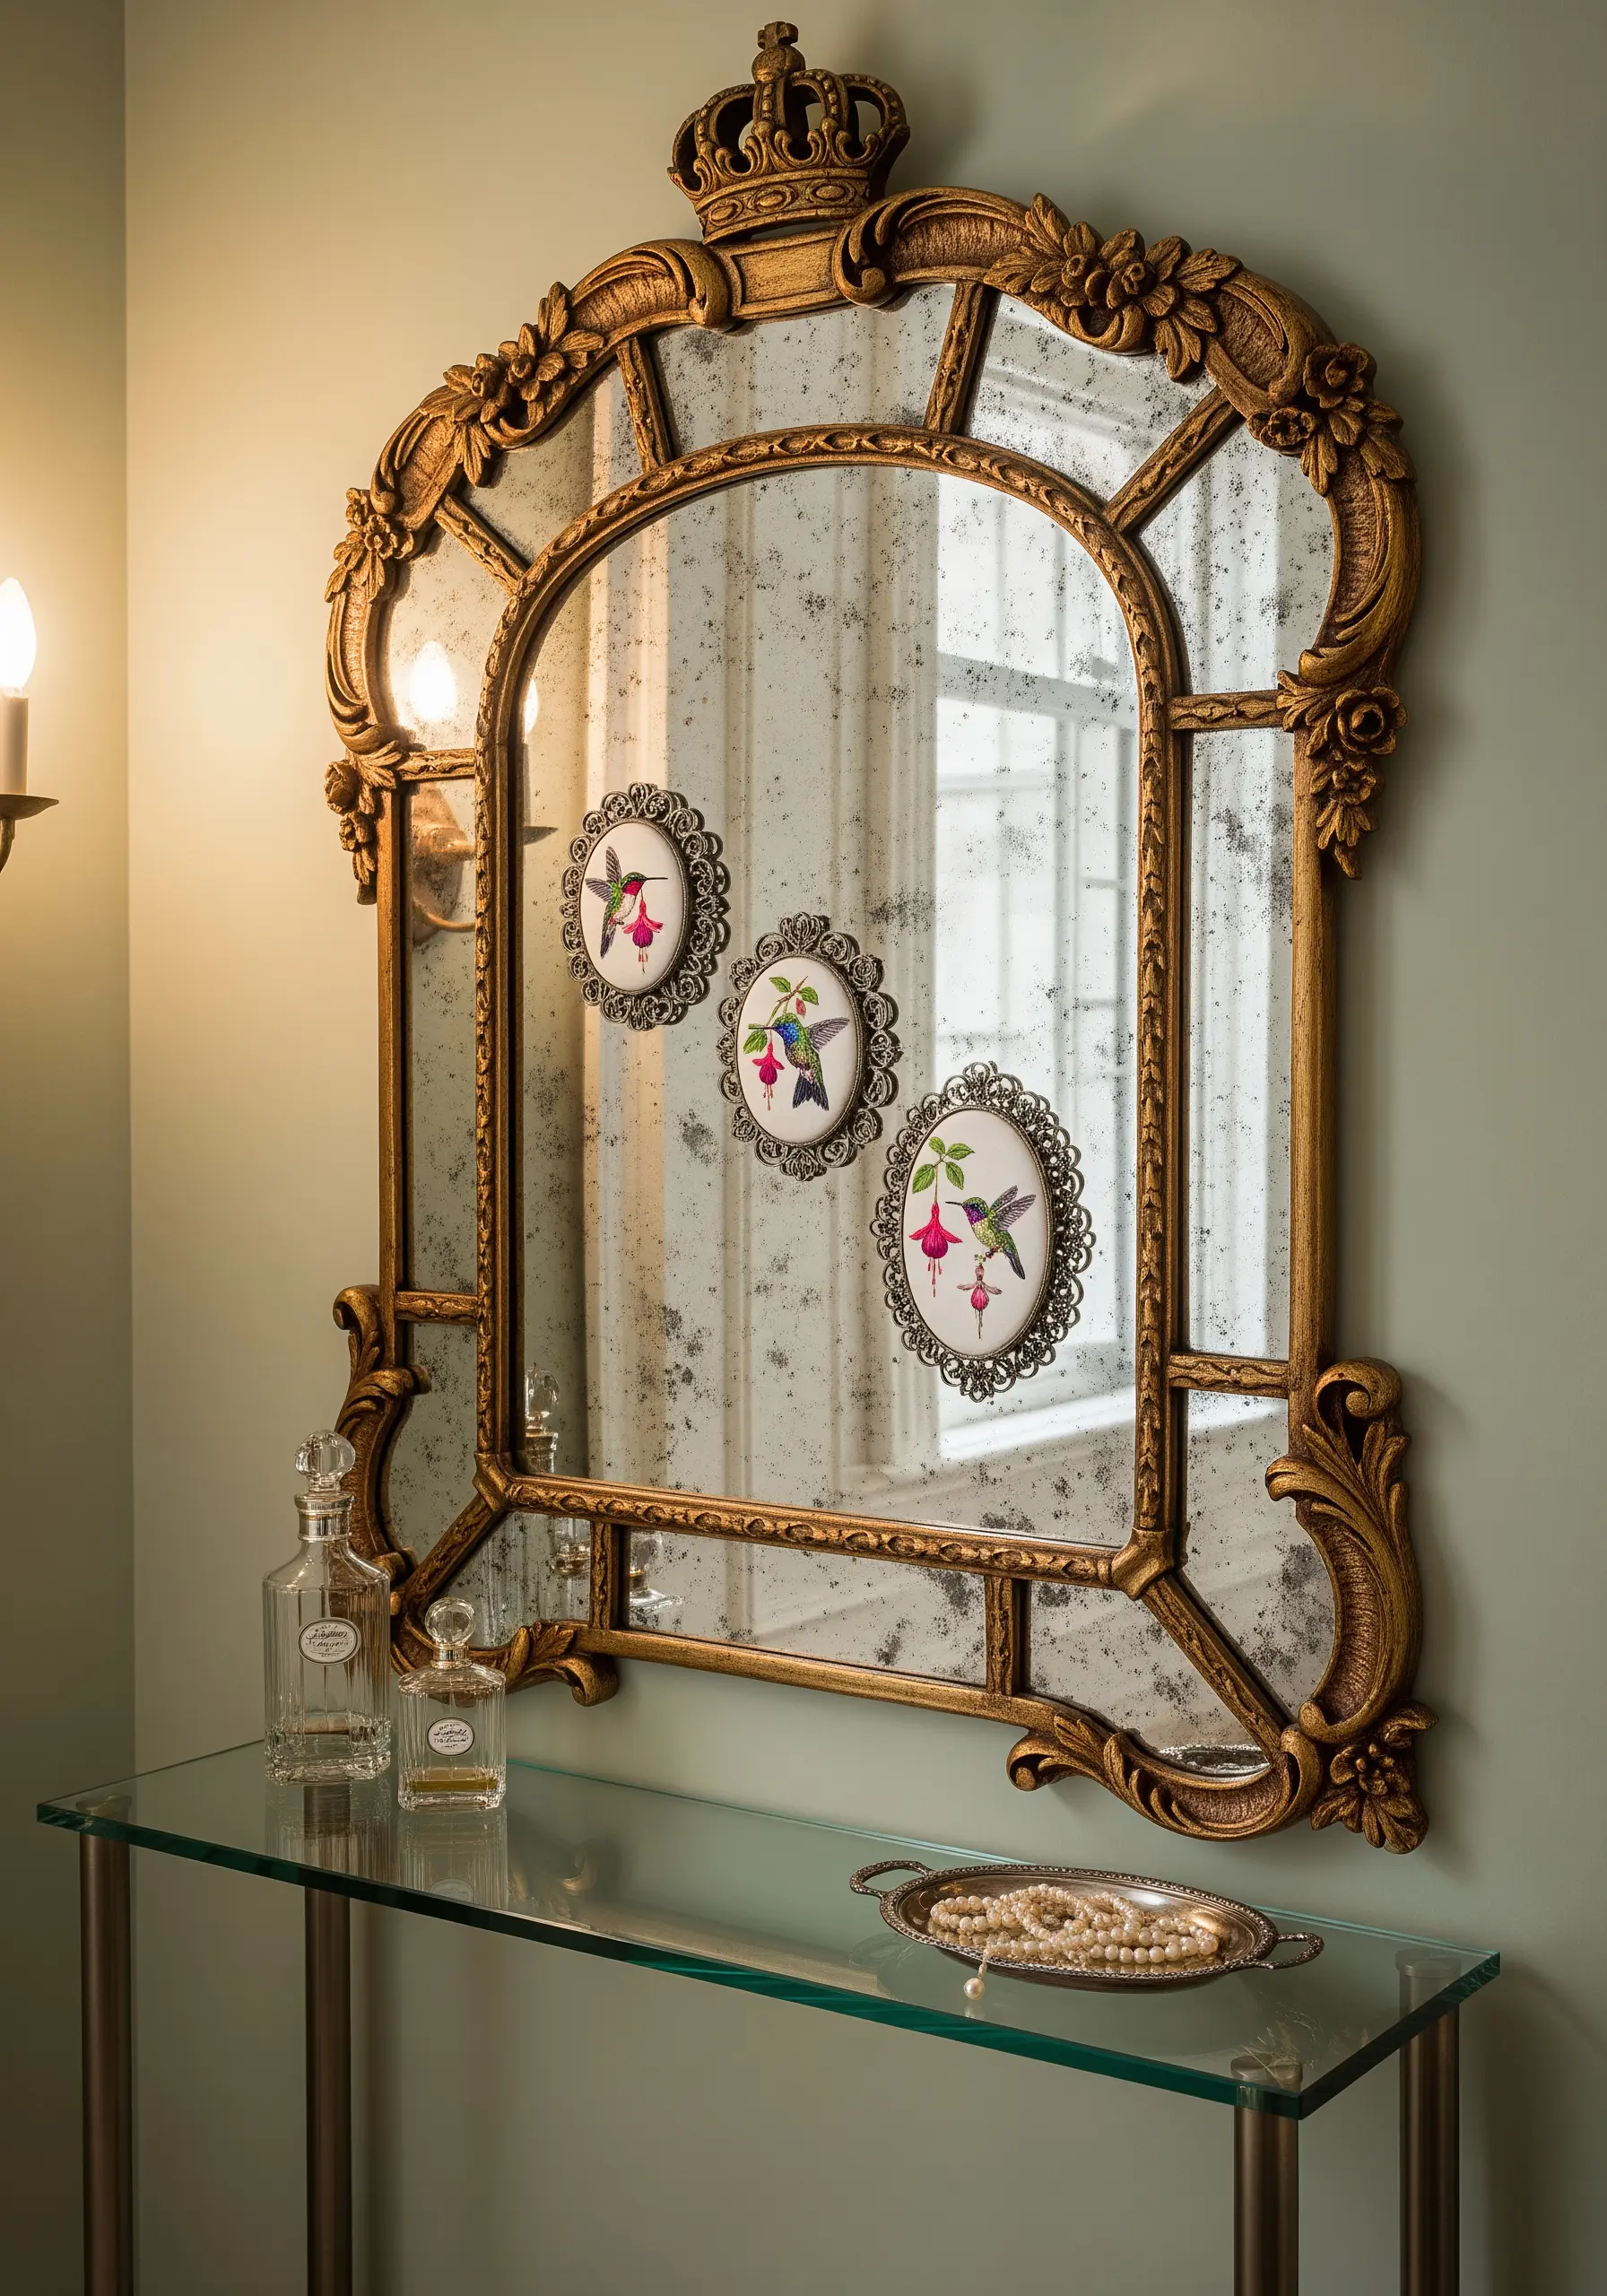
For a truly unique and whimsical effect, mount your small embroidered pieces directly onto the surface of an ornate mirror.
Use strong, clear adhesive dots to secure the finished, backed hoops to the glass.
The reflection in the mirror adds an extra layer of depth and light, making the embroidered hummingbirds and flowers seem to float in space.
This technique turns a functional object into a multi-layered piece of art, blending your craft with your decor in a surprising way.
28. Embrace Texture with Raw, Earthy Fabrics
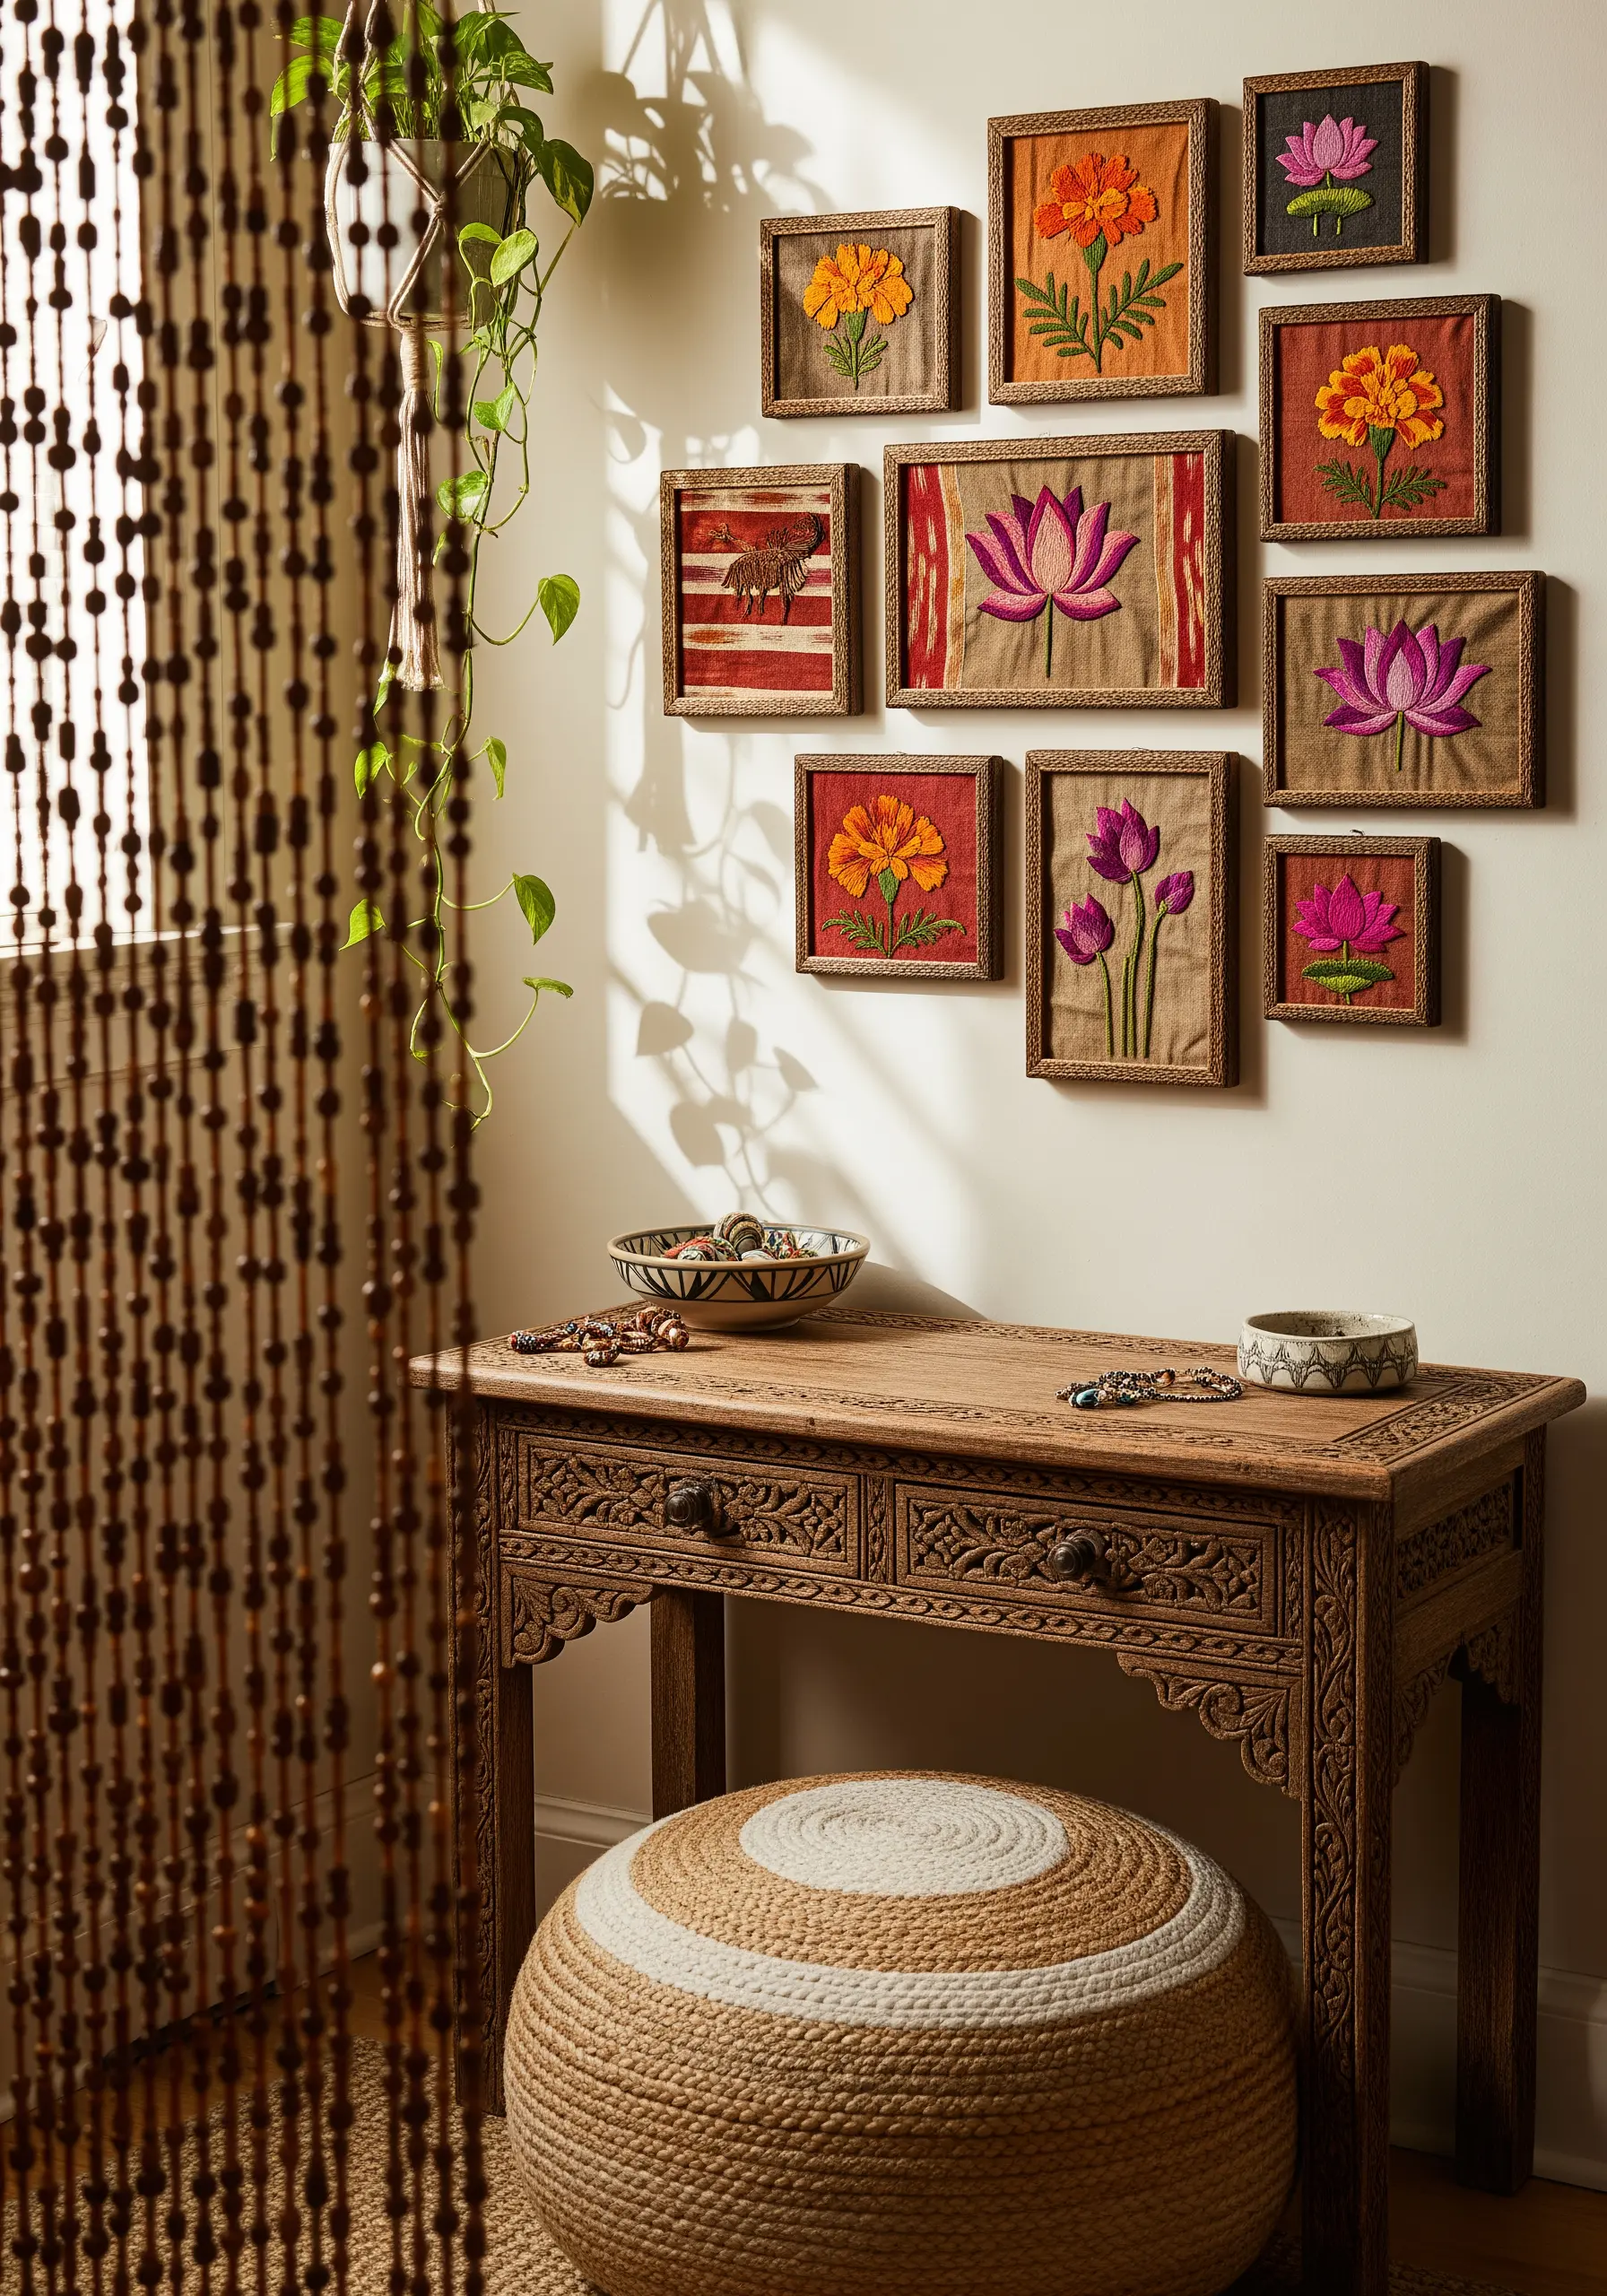
Elevate your floral designs by stitching on unconventional, textured fabrics like burlap, jute, or raw, slubby linen.
The natural, rustic weave of the background adds instant depth and an organic quality to your work before you’ve even made a stitch.
Pair these earthy texture patterns with a warm, sun-faded color palette of marigold, lotus pink, and terracotta.
Simple wooden frames complement the natural feel, creating art that is rich in both color and tactile interest.
29. Master Realism with Thread Painting
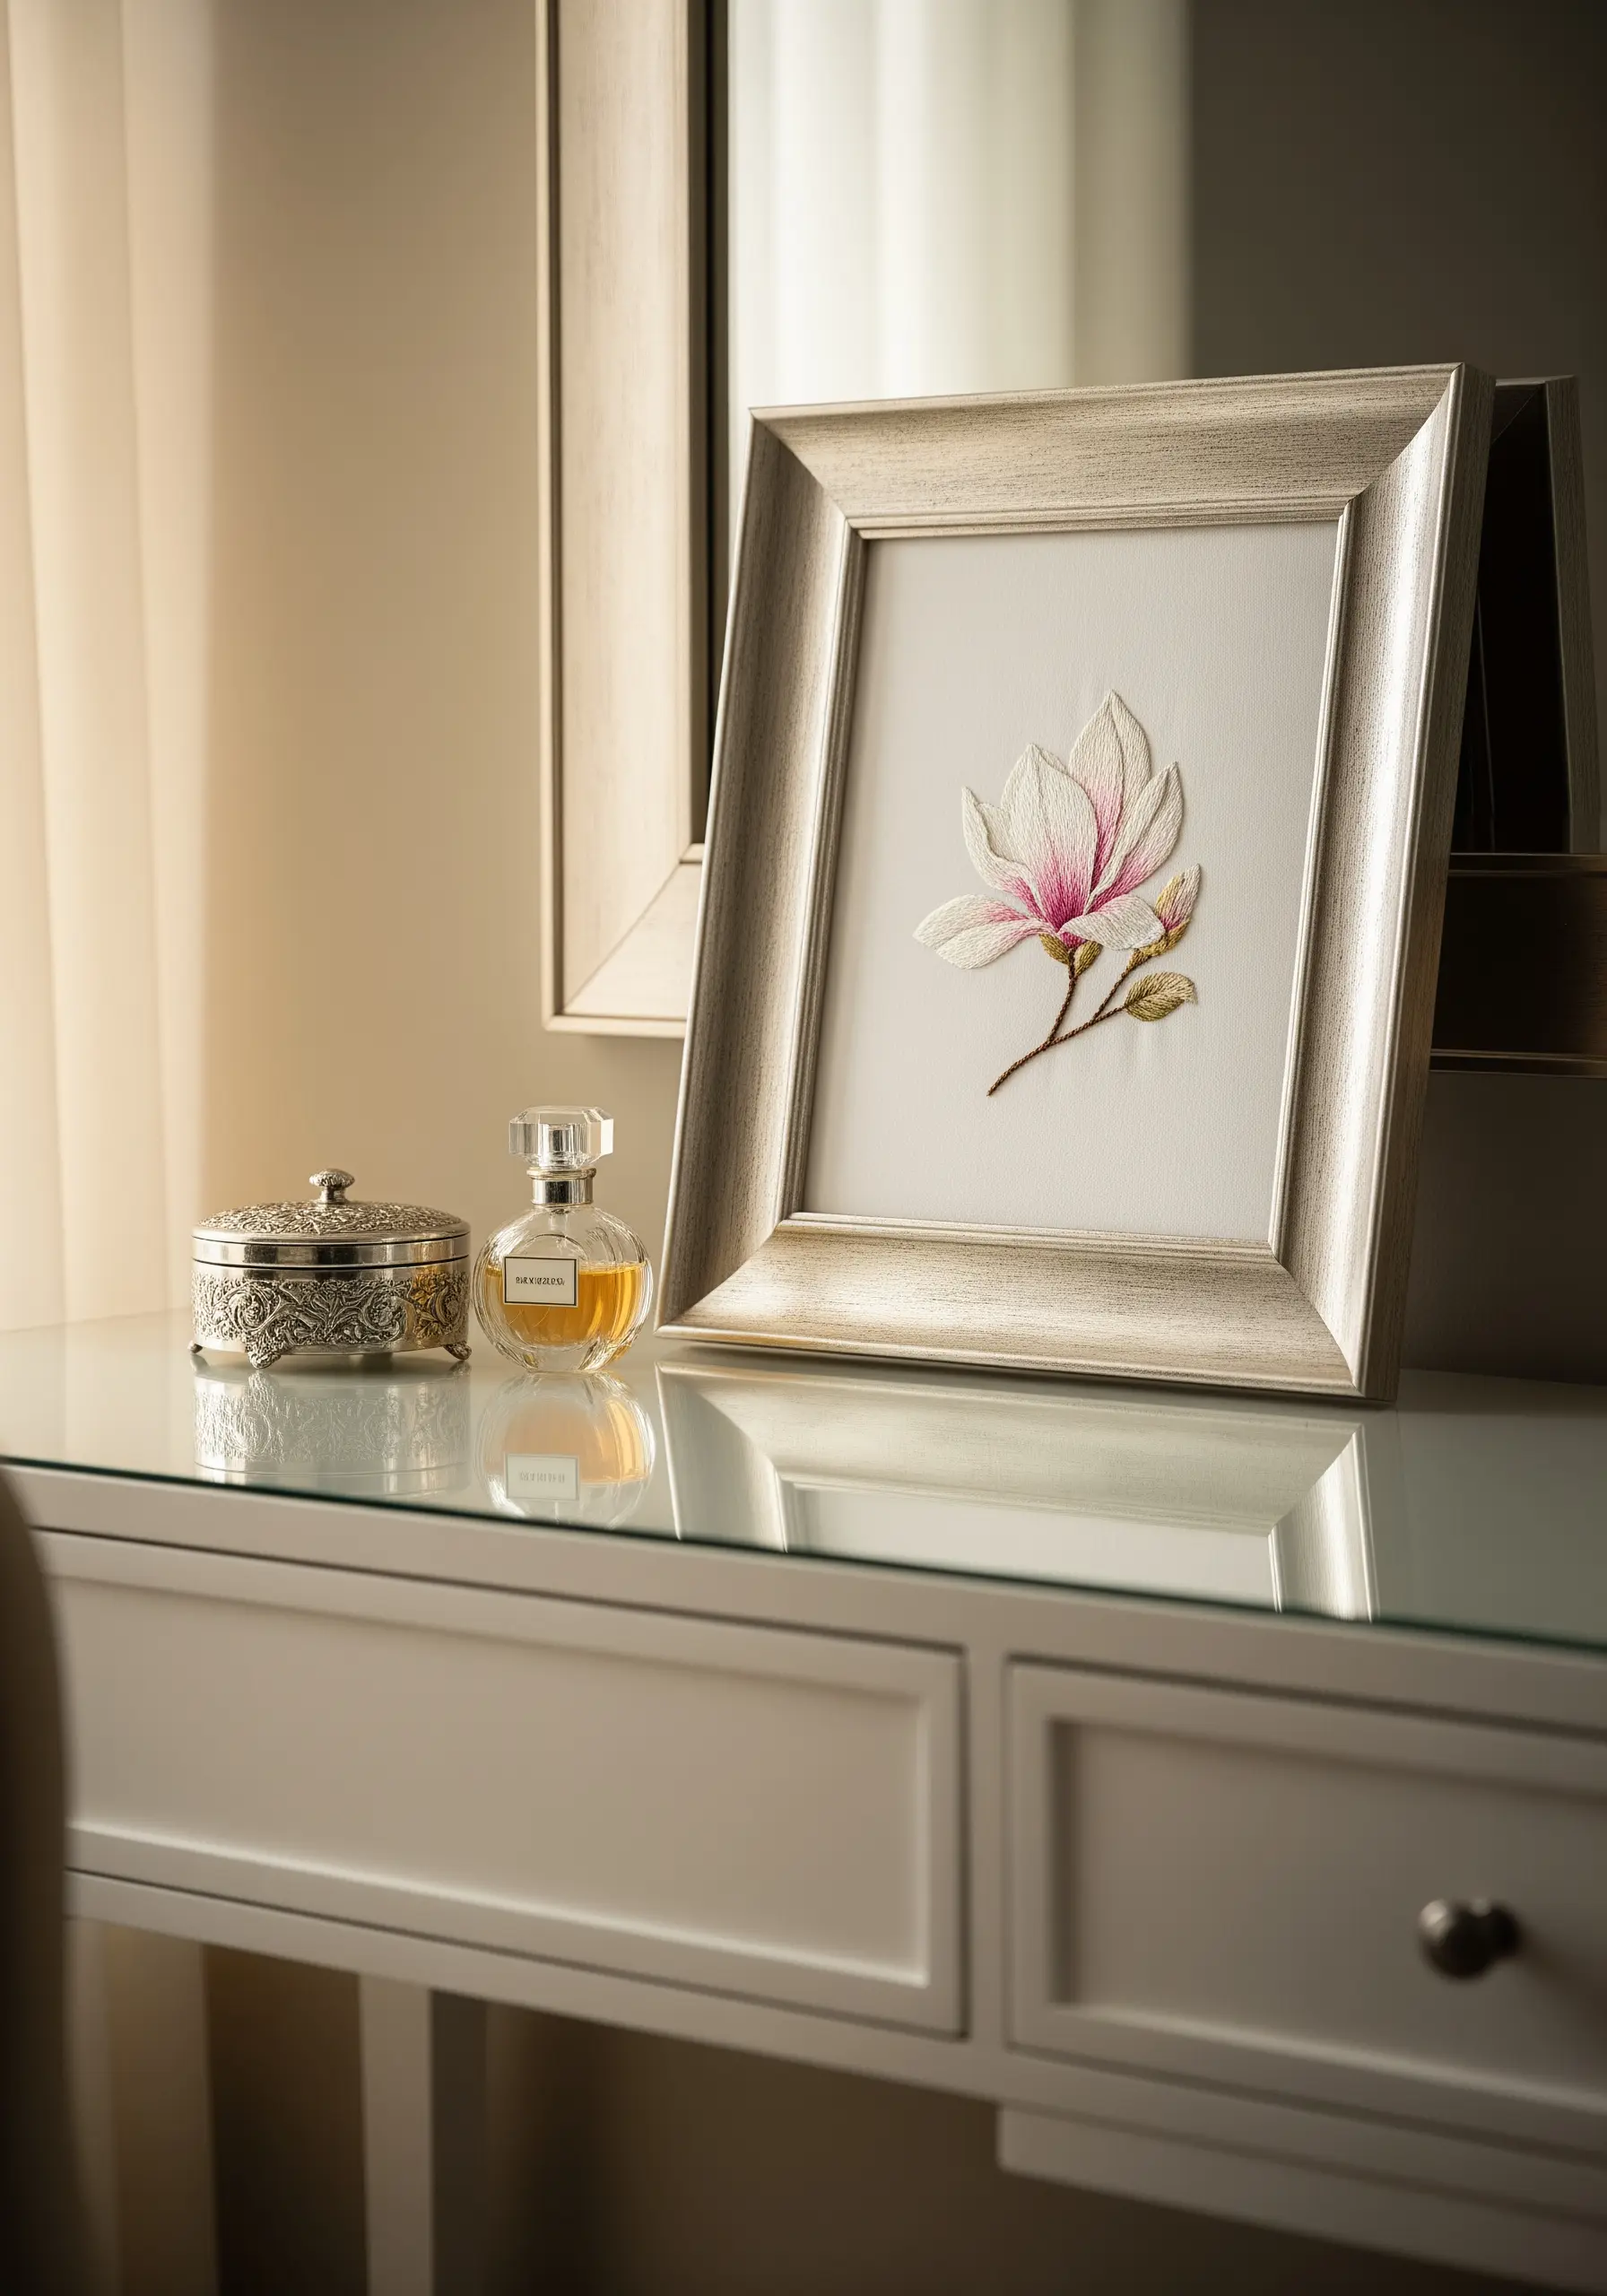
Achieve the delicate, painterly quality of a magnolia blossom by using the thread painting technique, also known as long-and-short stitch.
Work with a single strand of floss and blend multiple shades of white, cream, and soft pink to create subtle, realistic gradients on the petals.
A directional satin stitch on the leaves can mimic the natural sheen and vein structure, adding to the lifelike effect.
Presenting this single, stunning piece in a classic silver frame gives it the importance of a fine art painting.
30. Stitch on Canvas for a Modern Look

For a departure from traditional hoops, try embroidering directly onto small, stretched art canvases.
You’ll need a sharp, sturdy needle and possibly a thimble to pierce the canvas, but the result is a clean, frameless piece of art.
Use satin stitch with high-sheen rayon or silk thread to give your sunflower petals a vibrant, reflective quality that mimics paint.
Stacking or leaning the finished canvases on a shelf creates a casual, modern display perfect for a contemporary space.
31. Capture Classic Beauty with Symmetrical Pairs
Create a sense of formal balance and serenity by hanging two identical or complementary pieces symmetrically.
Stitching delicate white gardenias requires a subtle hand; use shades of light grey, ivory, and ecru to define the petals without overwhelming them.
Elegant, silver-beaded frames reinforce the classic, refined aesthetic and tie in with other polished finishes in the room.
This balanced arrangement is perfect for flanking a mirror or a window, bringing a quiet, graceful order to your dressing area.
32. Transform a Corner with Custom Frames
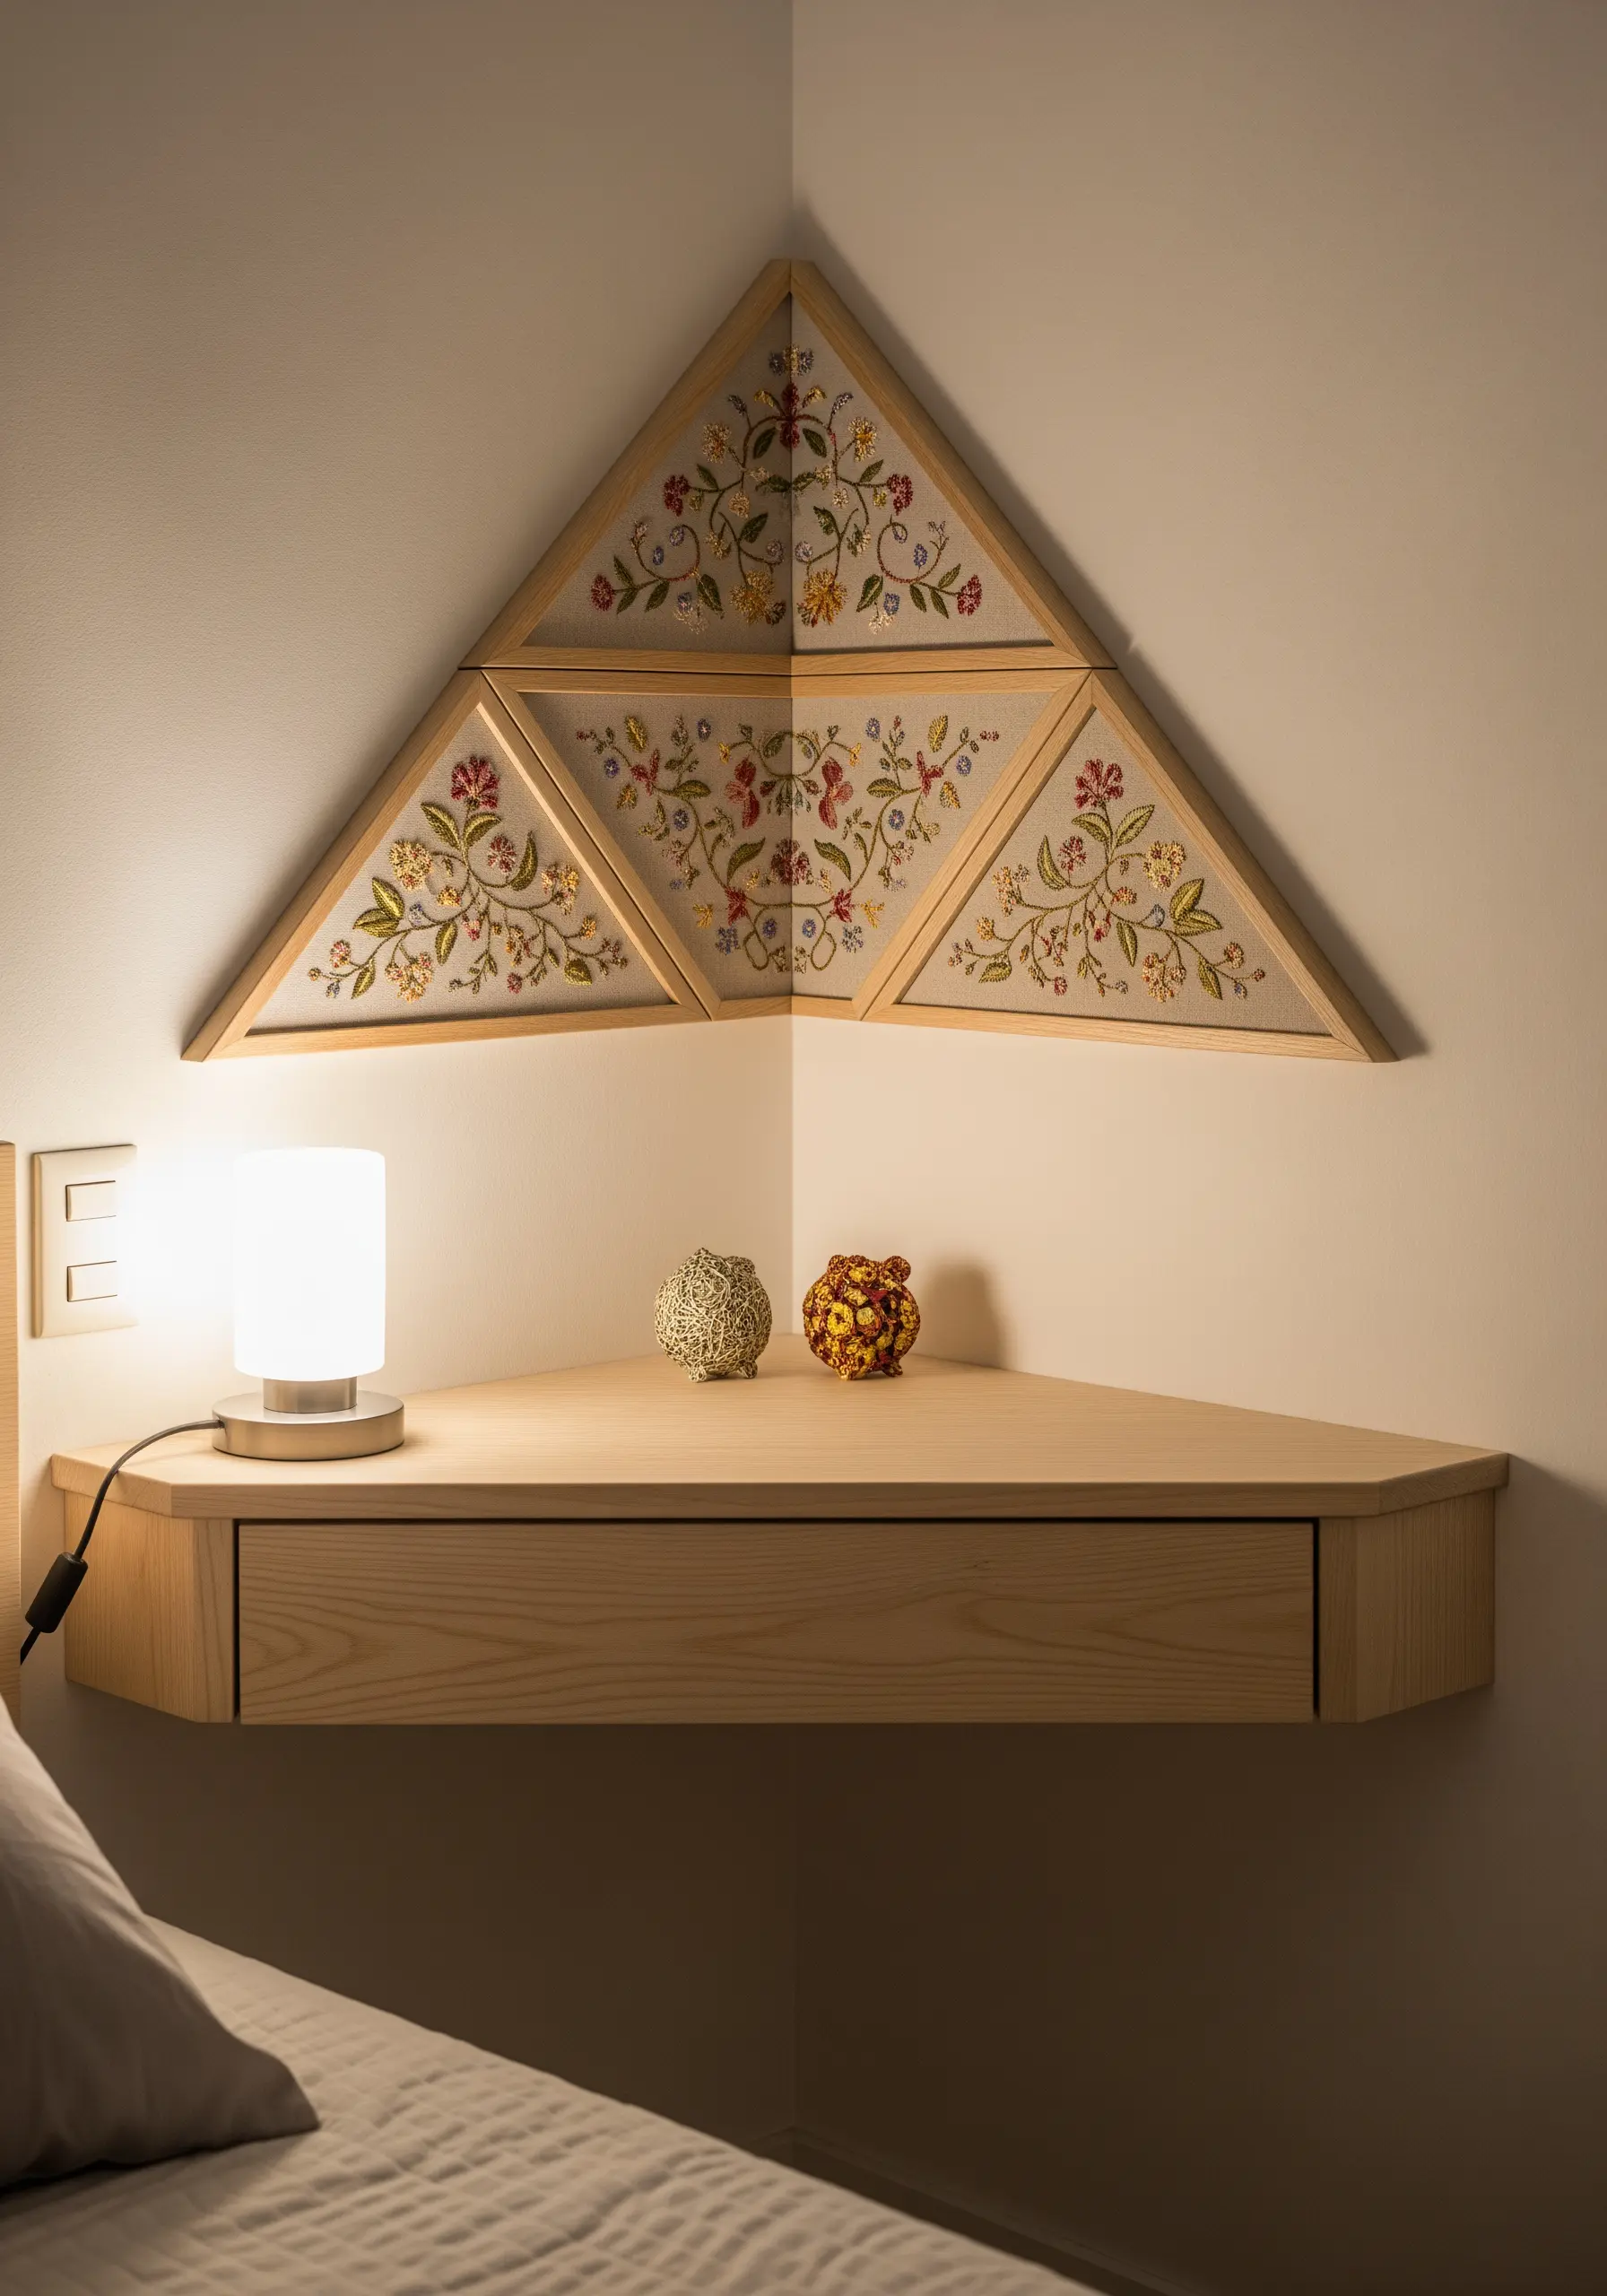
Turn an often-overlooked corner into a stunning design feature with custom-made triangular frames.
This innovative approach allows your embroidery to wrap around the corner, creating a continuous, three-dimensional art installation.
Embroider a flowing, traditional folk-art floral pattern that can be divided across the multiple frames, ensuring the design connects visually where the frames meet.
Backlighting the frames, as shown here, adds a soft glow that highlights your stitch work and turns the corner into a cozy, illuminated nook.
33. Go Maximalist with a Floor-to-Ceiling Gallery
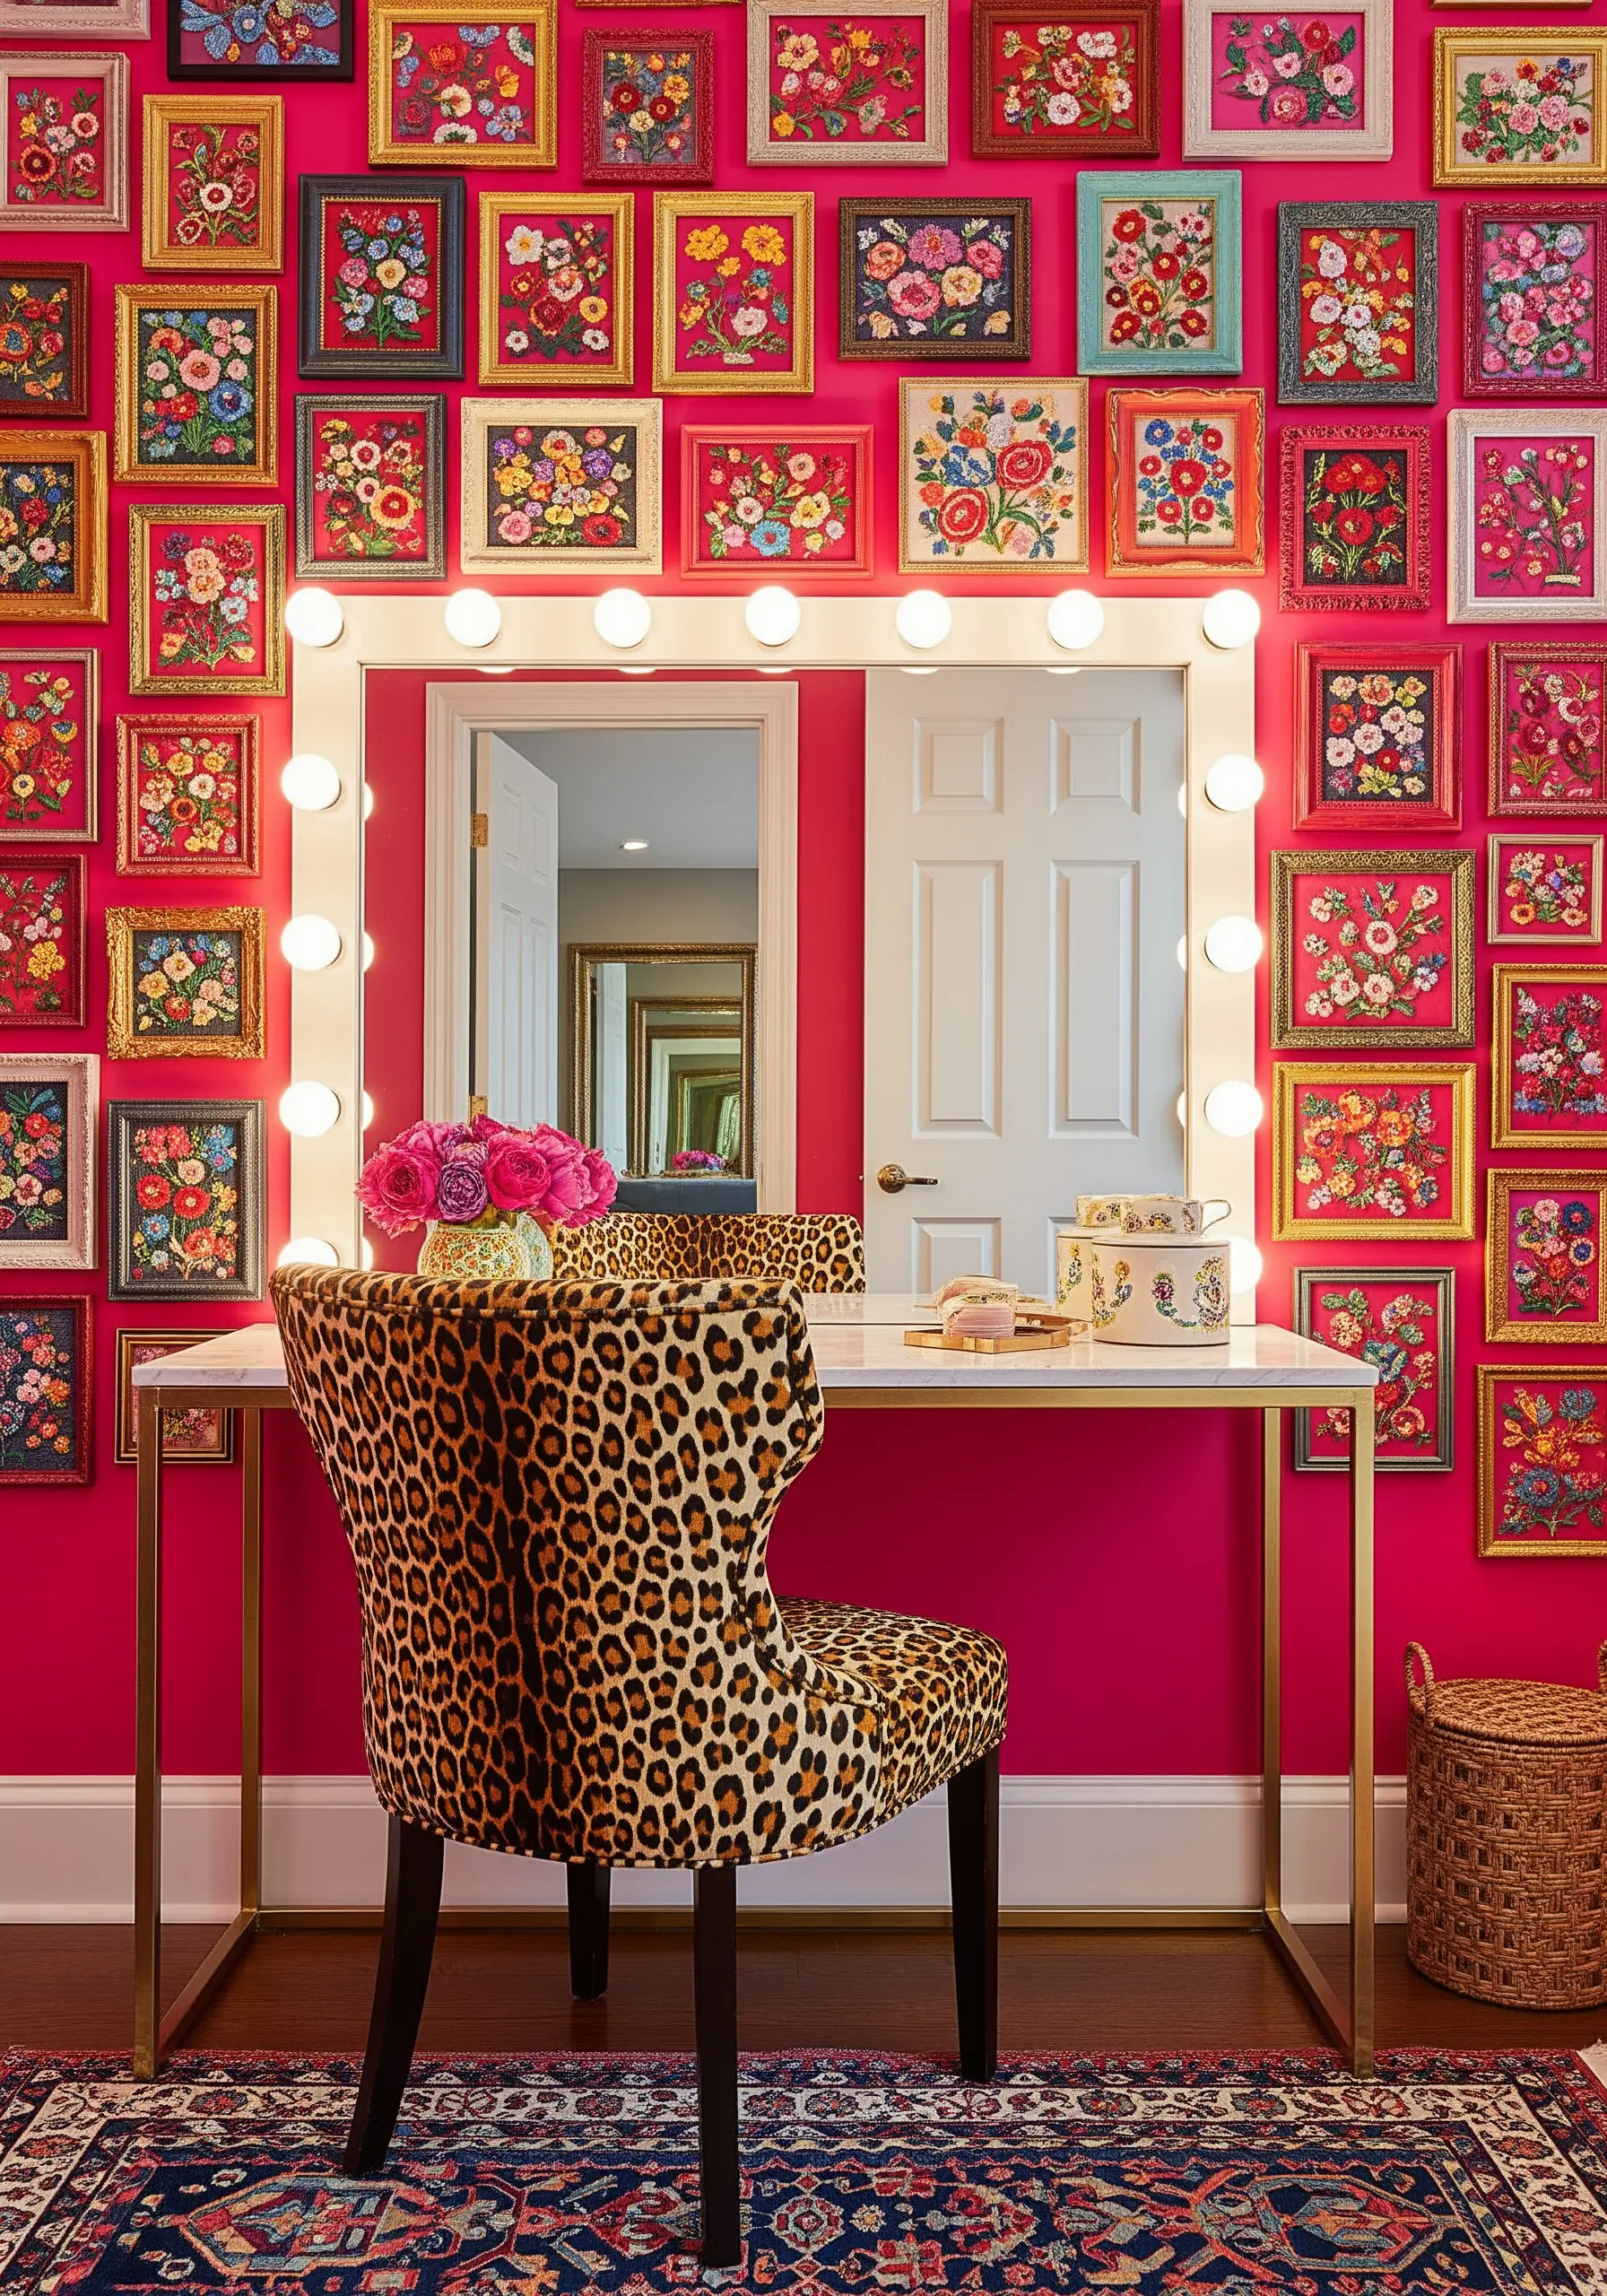
Embrace a bold, more-is-more aesthetic by covering an entire wall with a vibrant collection of floral embroideries.
To make this maximalist approach feel cohesive, use a riot of color but maintain consistency in the motif (florals) and frame size (small squares).
Vary the frame colors—red, blue, green, gold—to create a dynamic, mosaic-like effect against a brightly painted wall.
This joyful, energetic display turns your dressing area into an immersive, art-filled sanctuary that is uniquely you.
34. Complement an Ombré Wall with a Graduated Palette
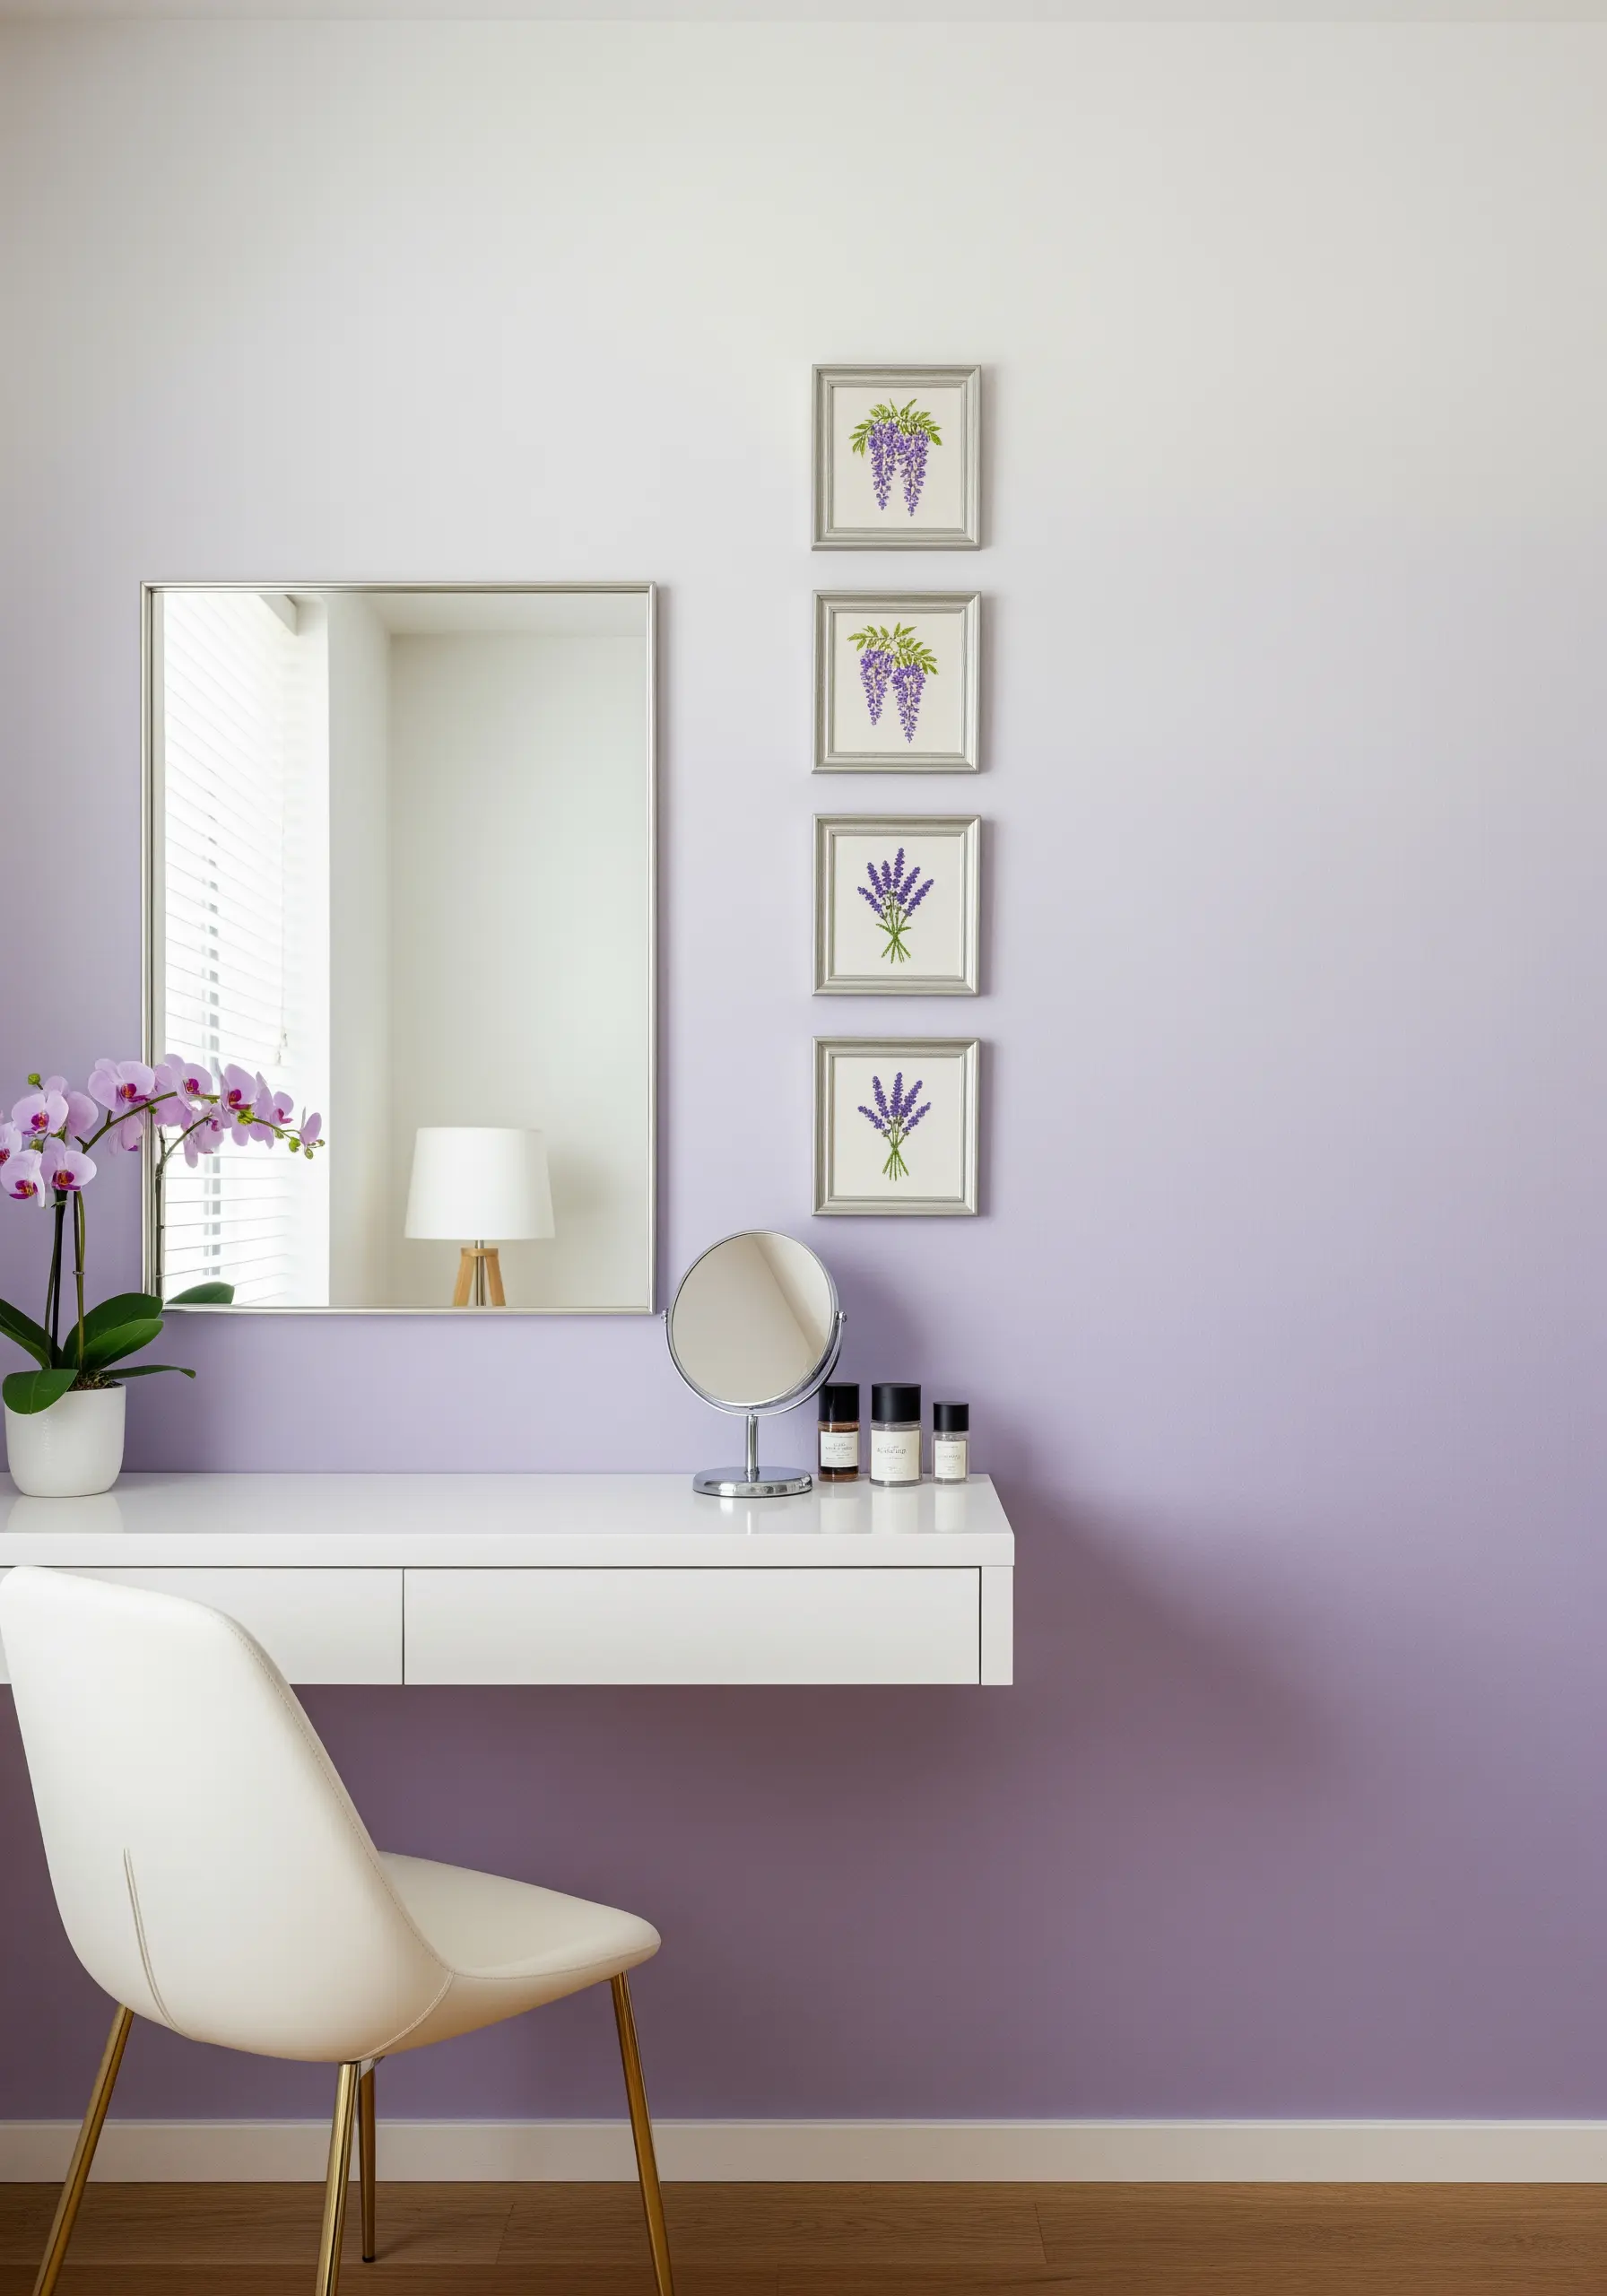
Enhance the effect of a gradient-painted wall by choosing thread colors that harmonize with the shifting tones.
For the lavender and wisteria pieces, use deeper purples for the art hung on the darker part of the wall and lighter lilacs for the pieces on the paler section.
This thoughtful color coordination creates a seamless, designer look where the art and the wall feel intentionally connected.
A simple vertical arrangement of four identical frames keeps the display clean and allows the subtle color story to shine.
35. Arrange a Celestial-Inspired Hoop Constellation
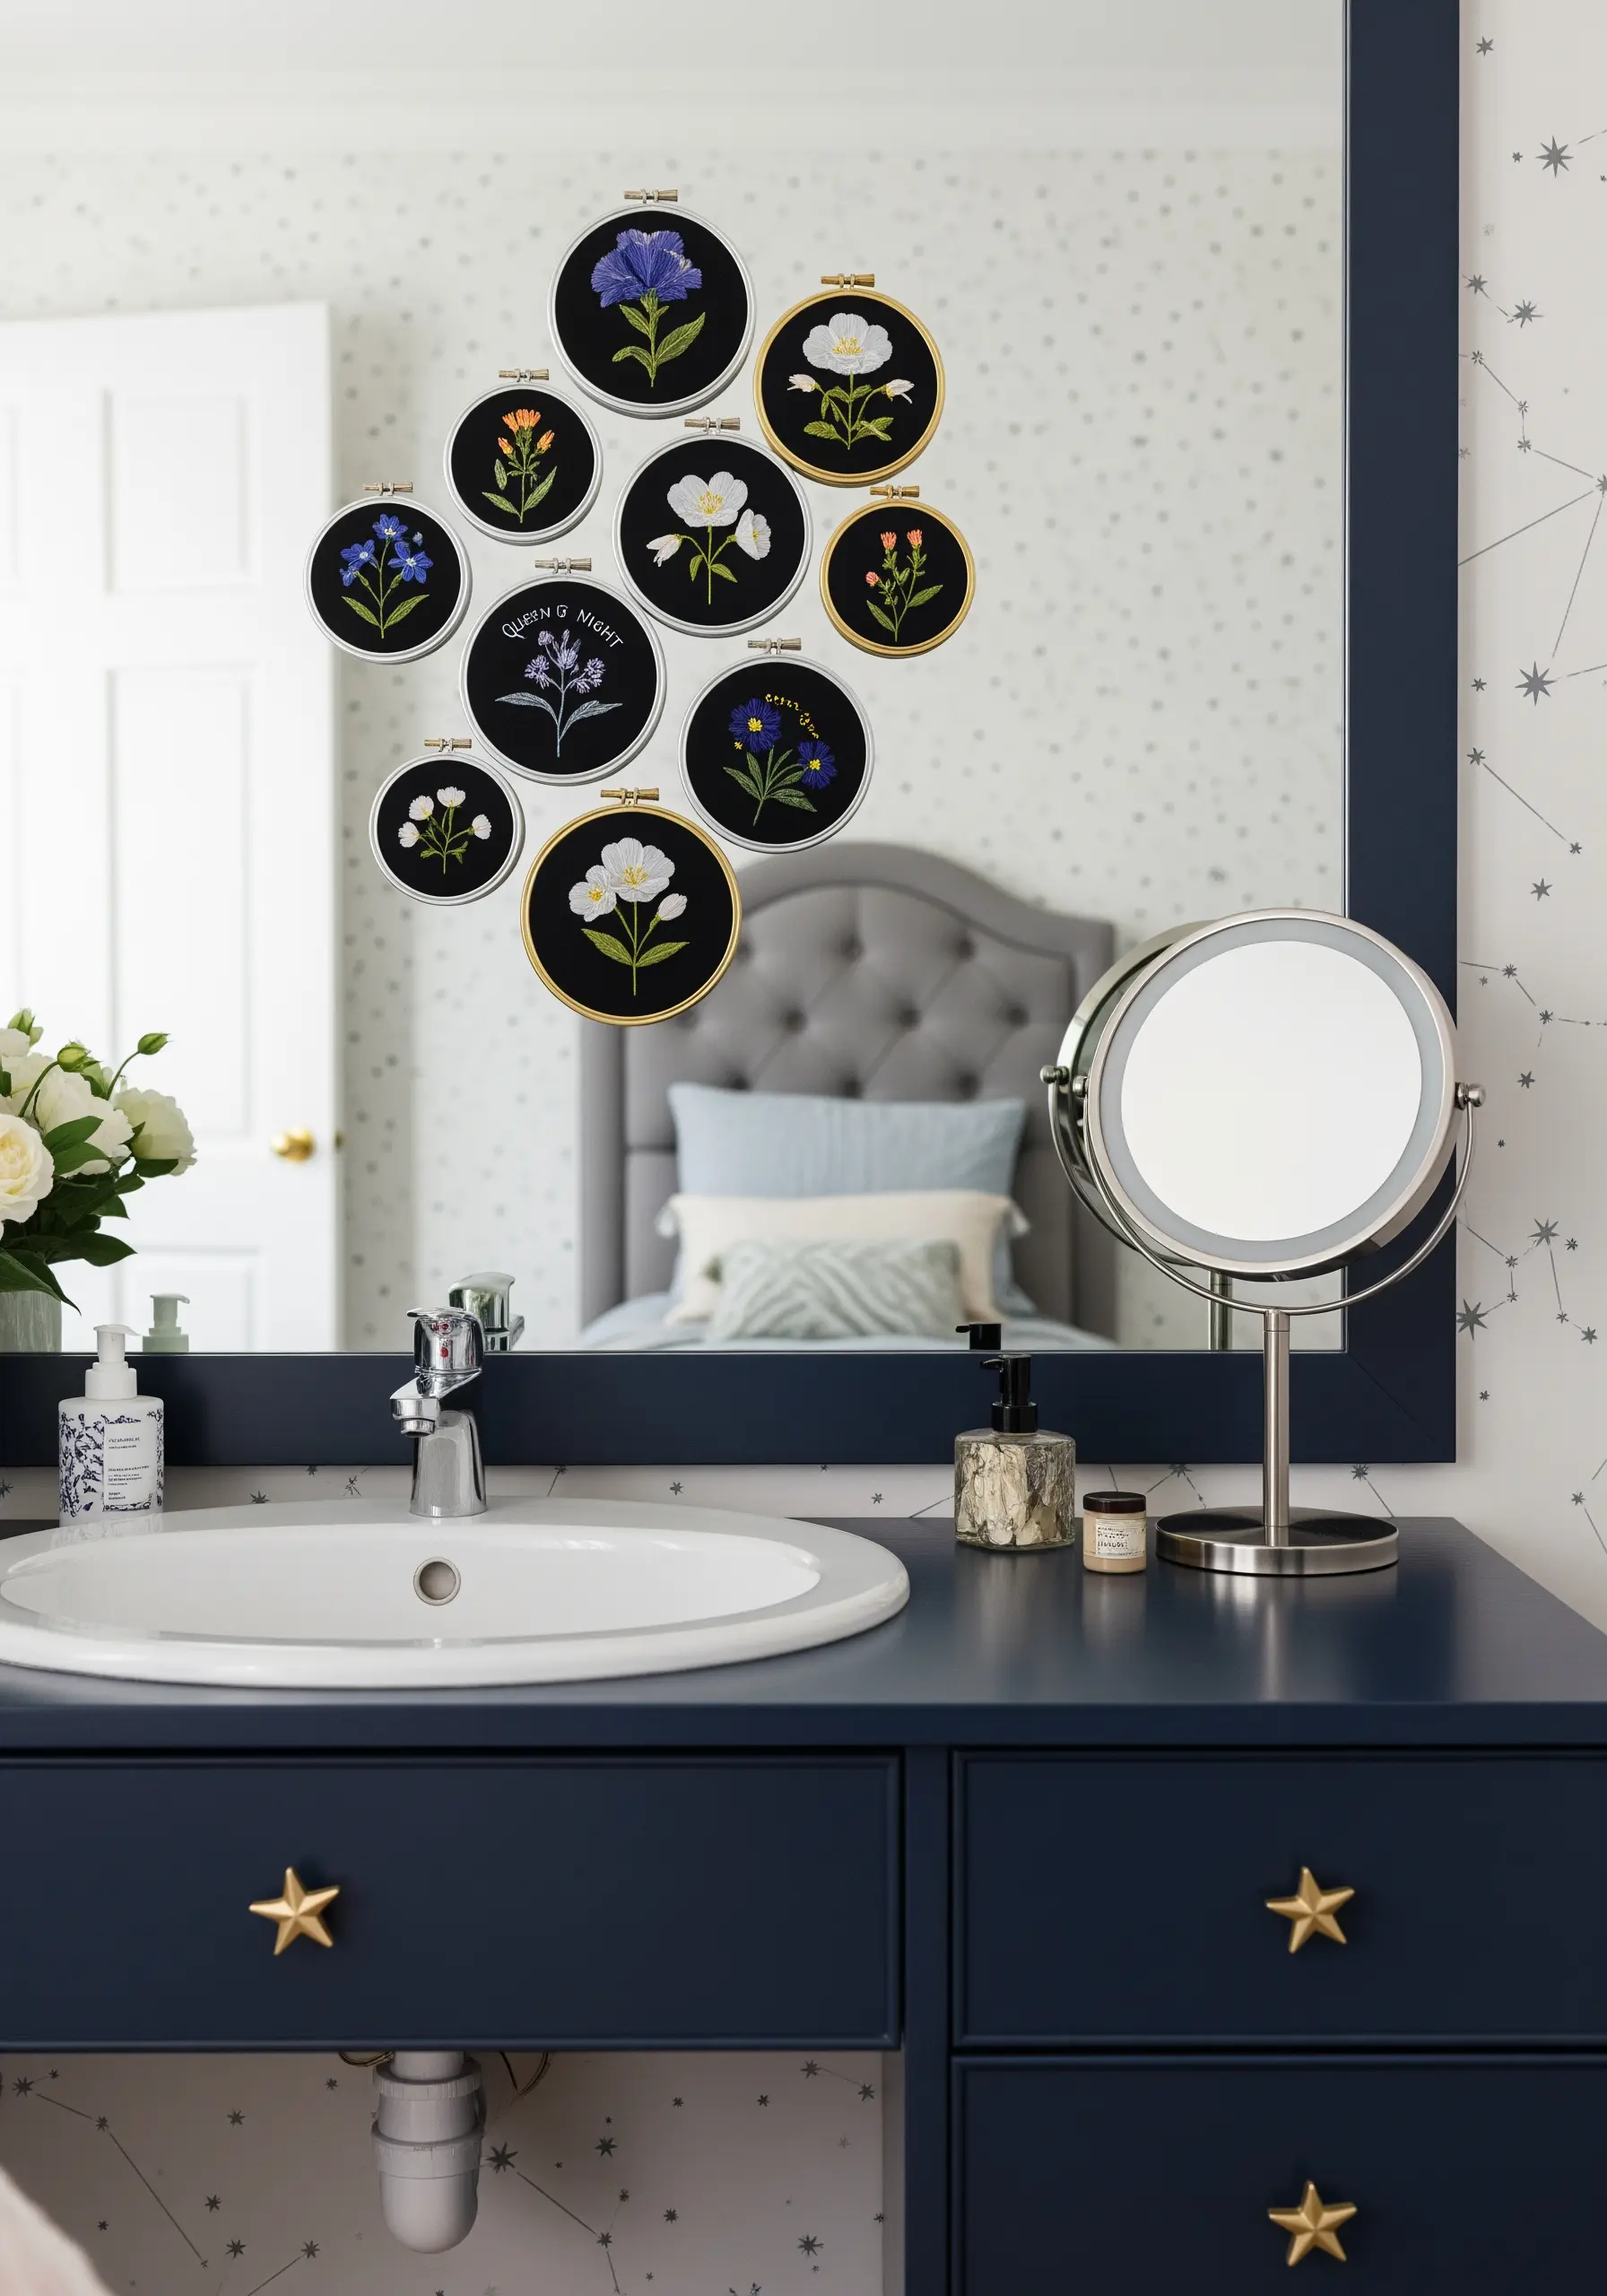
Create a dreamy, constellation-like effect by arranging your hoops in an organic, scattered cluster on a dark wall or mirror.
Stitching night-blooming flowers like evening primrose or Queen of the Night on black fabric enhances the celestial theme.
Incorporate small touches of metallic gold thread for the flower stamens or as tiny scattered stars to add a subtle sparkle.
Varying the hoop sizes and their proximity to each other will make the final arrangement feel as magical and random as a starry night sky.


