

You’ve mastered the stitches, but now you’re searching for that next step—the one that transforms your work from a lovely craft into a piece of true textile art.
The secret isn’t about learning more complex stitches. It’s about inviting new materials into your hoop. Paint, wire, beads, and even unexpected textures can add depth, dimension, and light in ways that thread alone simply cannot.
This is where your unique voice as an artist emerges. Let’s explore how to blend these elements with intention, creating work that feels not just handmade, but deeply personal and visually captivating. You have everything you need to begin right now.
1. Integrate Beads and Wire for Dynamic Seascapes
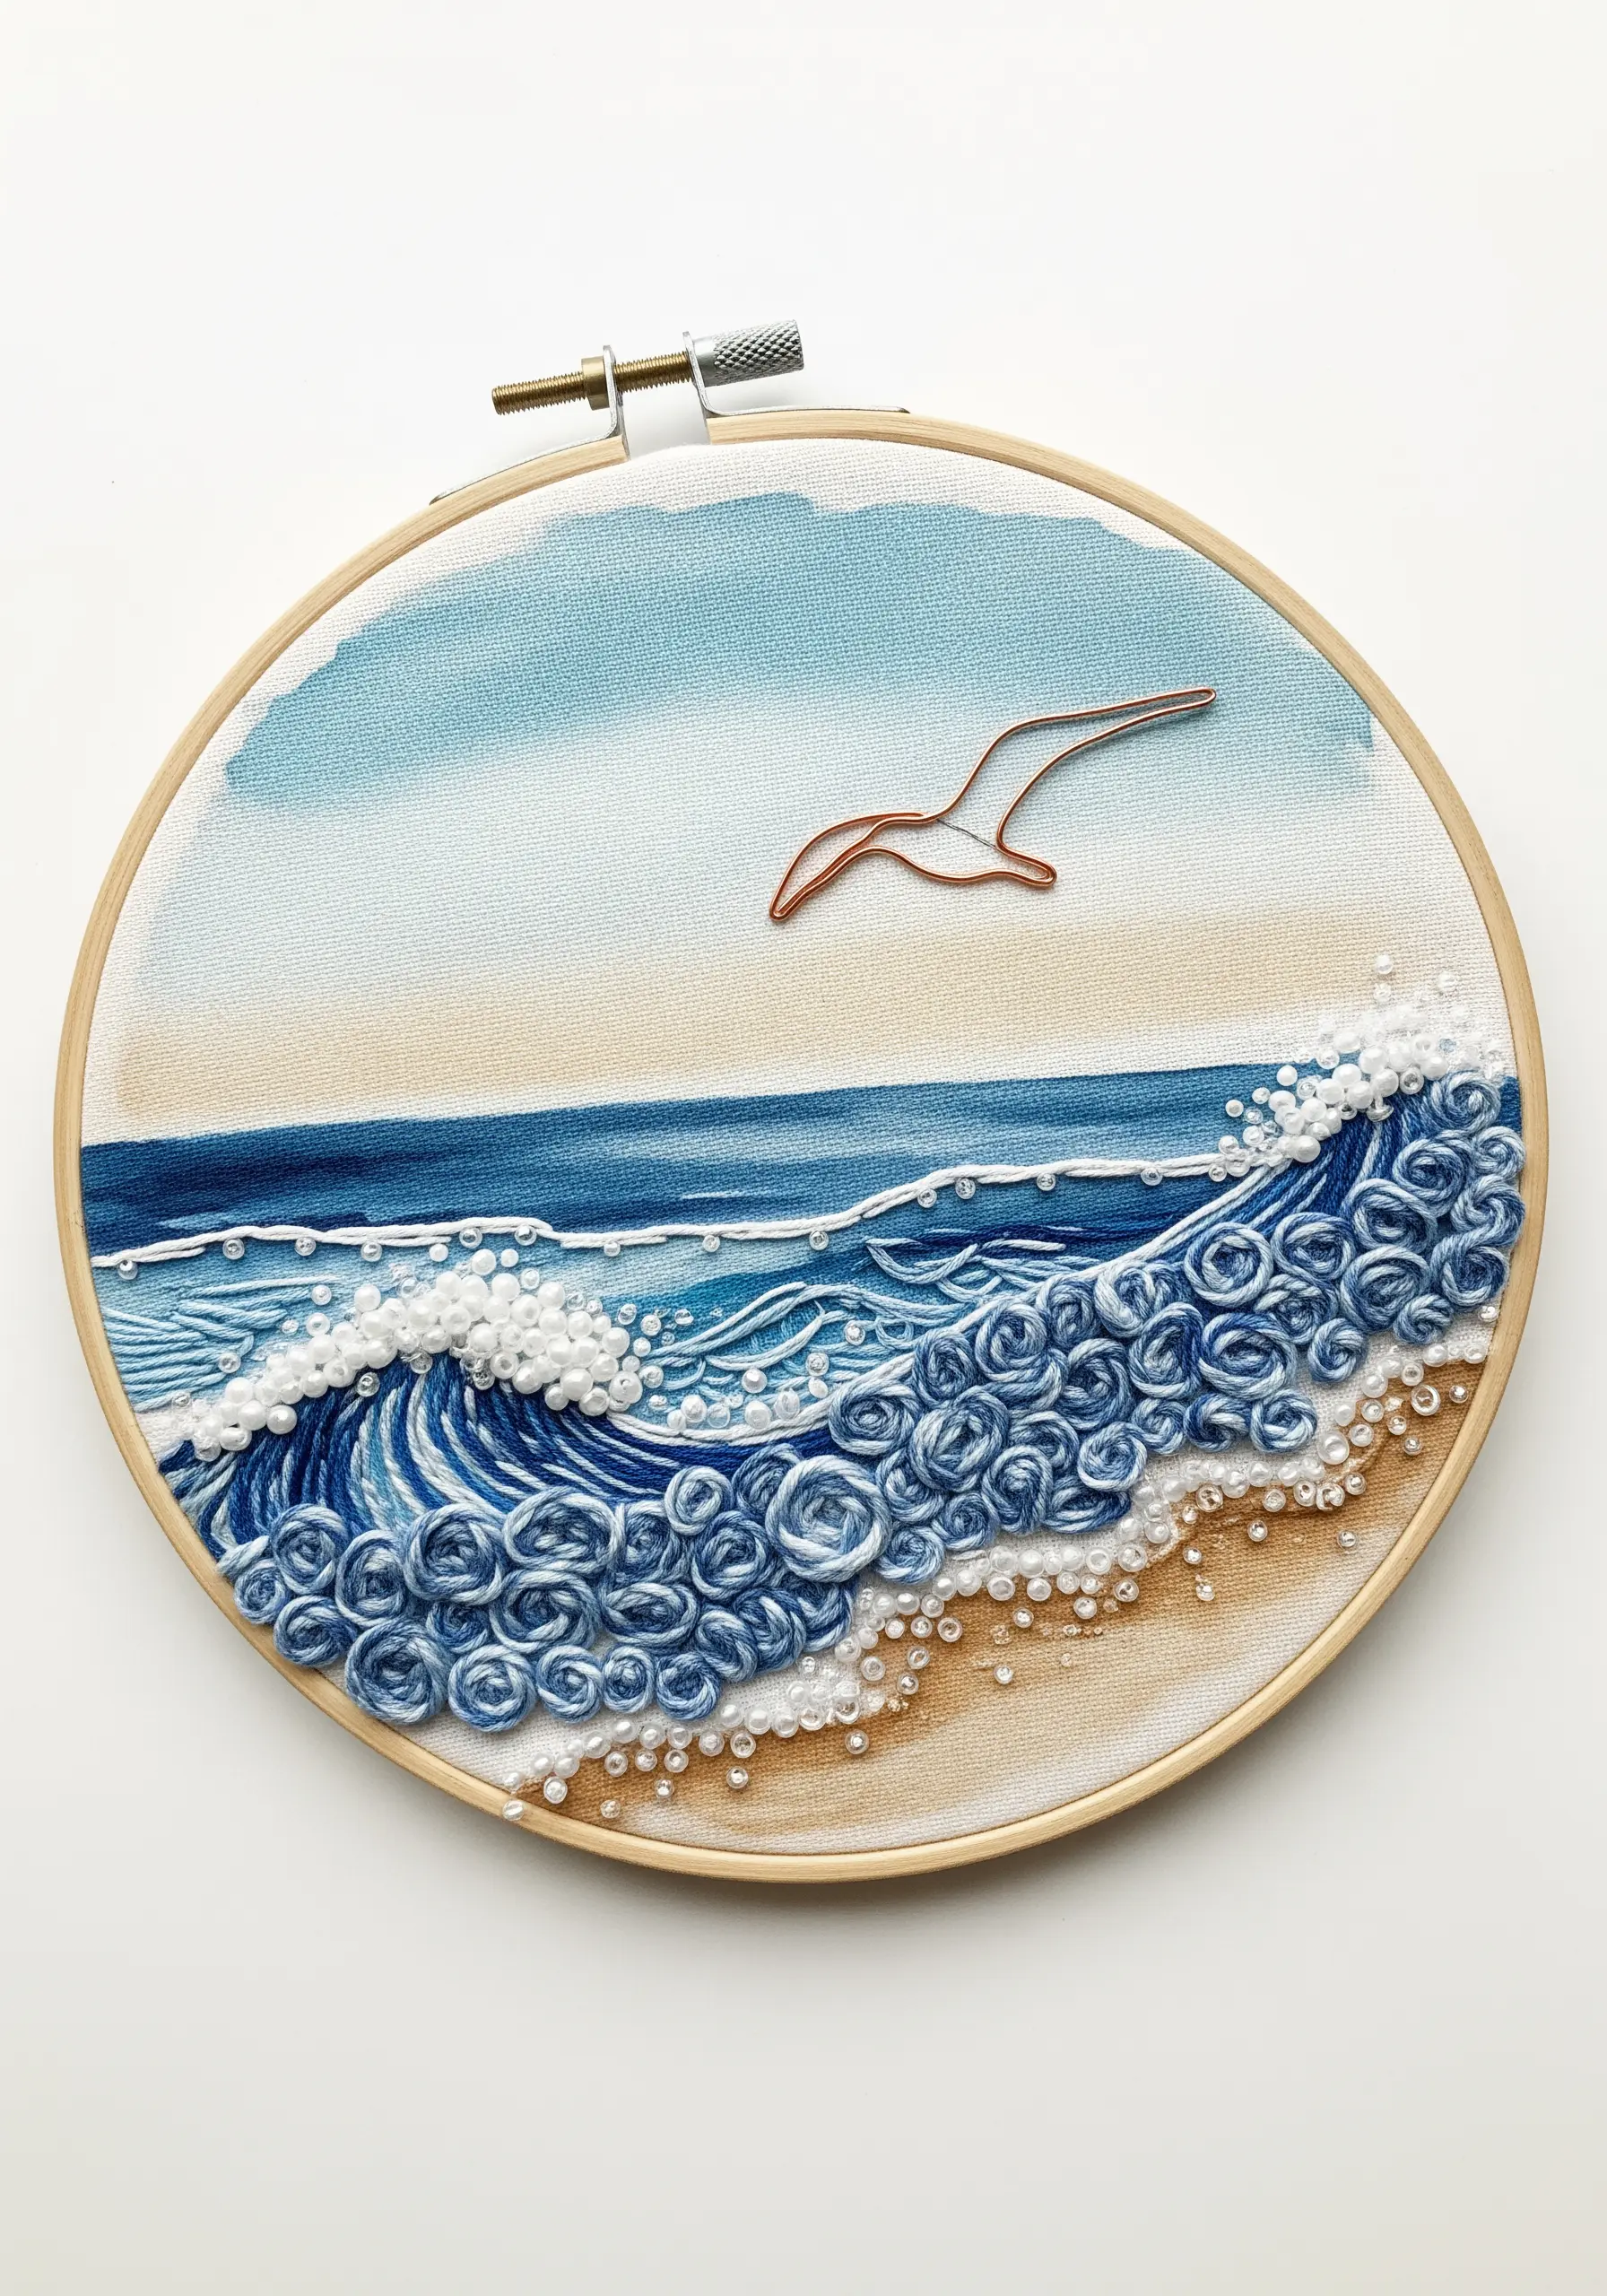
Begin by applying a watercolor wash directly onto your fabric to create a soft, blended background for the sky and sand.
Use whipped backstitch or thick chain stitches with variegated blue threads to build the body of the wave, letting the color shifts create natural movement and depth.
To mimic sparkling sea foam, scatter clear, white, and iridescent seed beads along the crest of the wave; this adds a light-reflecting texture that thread alone cannot achieve.
For the final touch, shape a thin-gauge copper wire into a simple bird silhouette and couch it onto the sky, adding a clean, sculptural outline that elevates the entire composition.
2. Use Wire to Structure Abstract Compositions
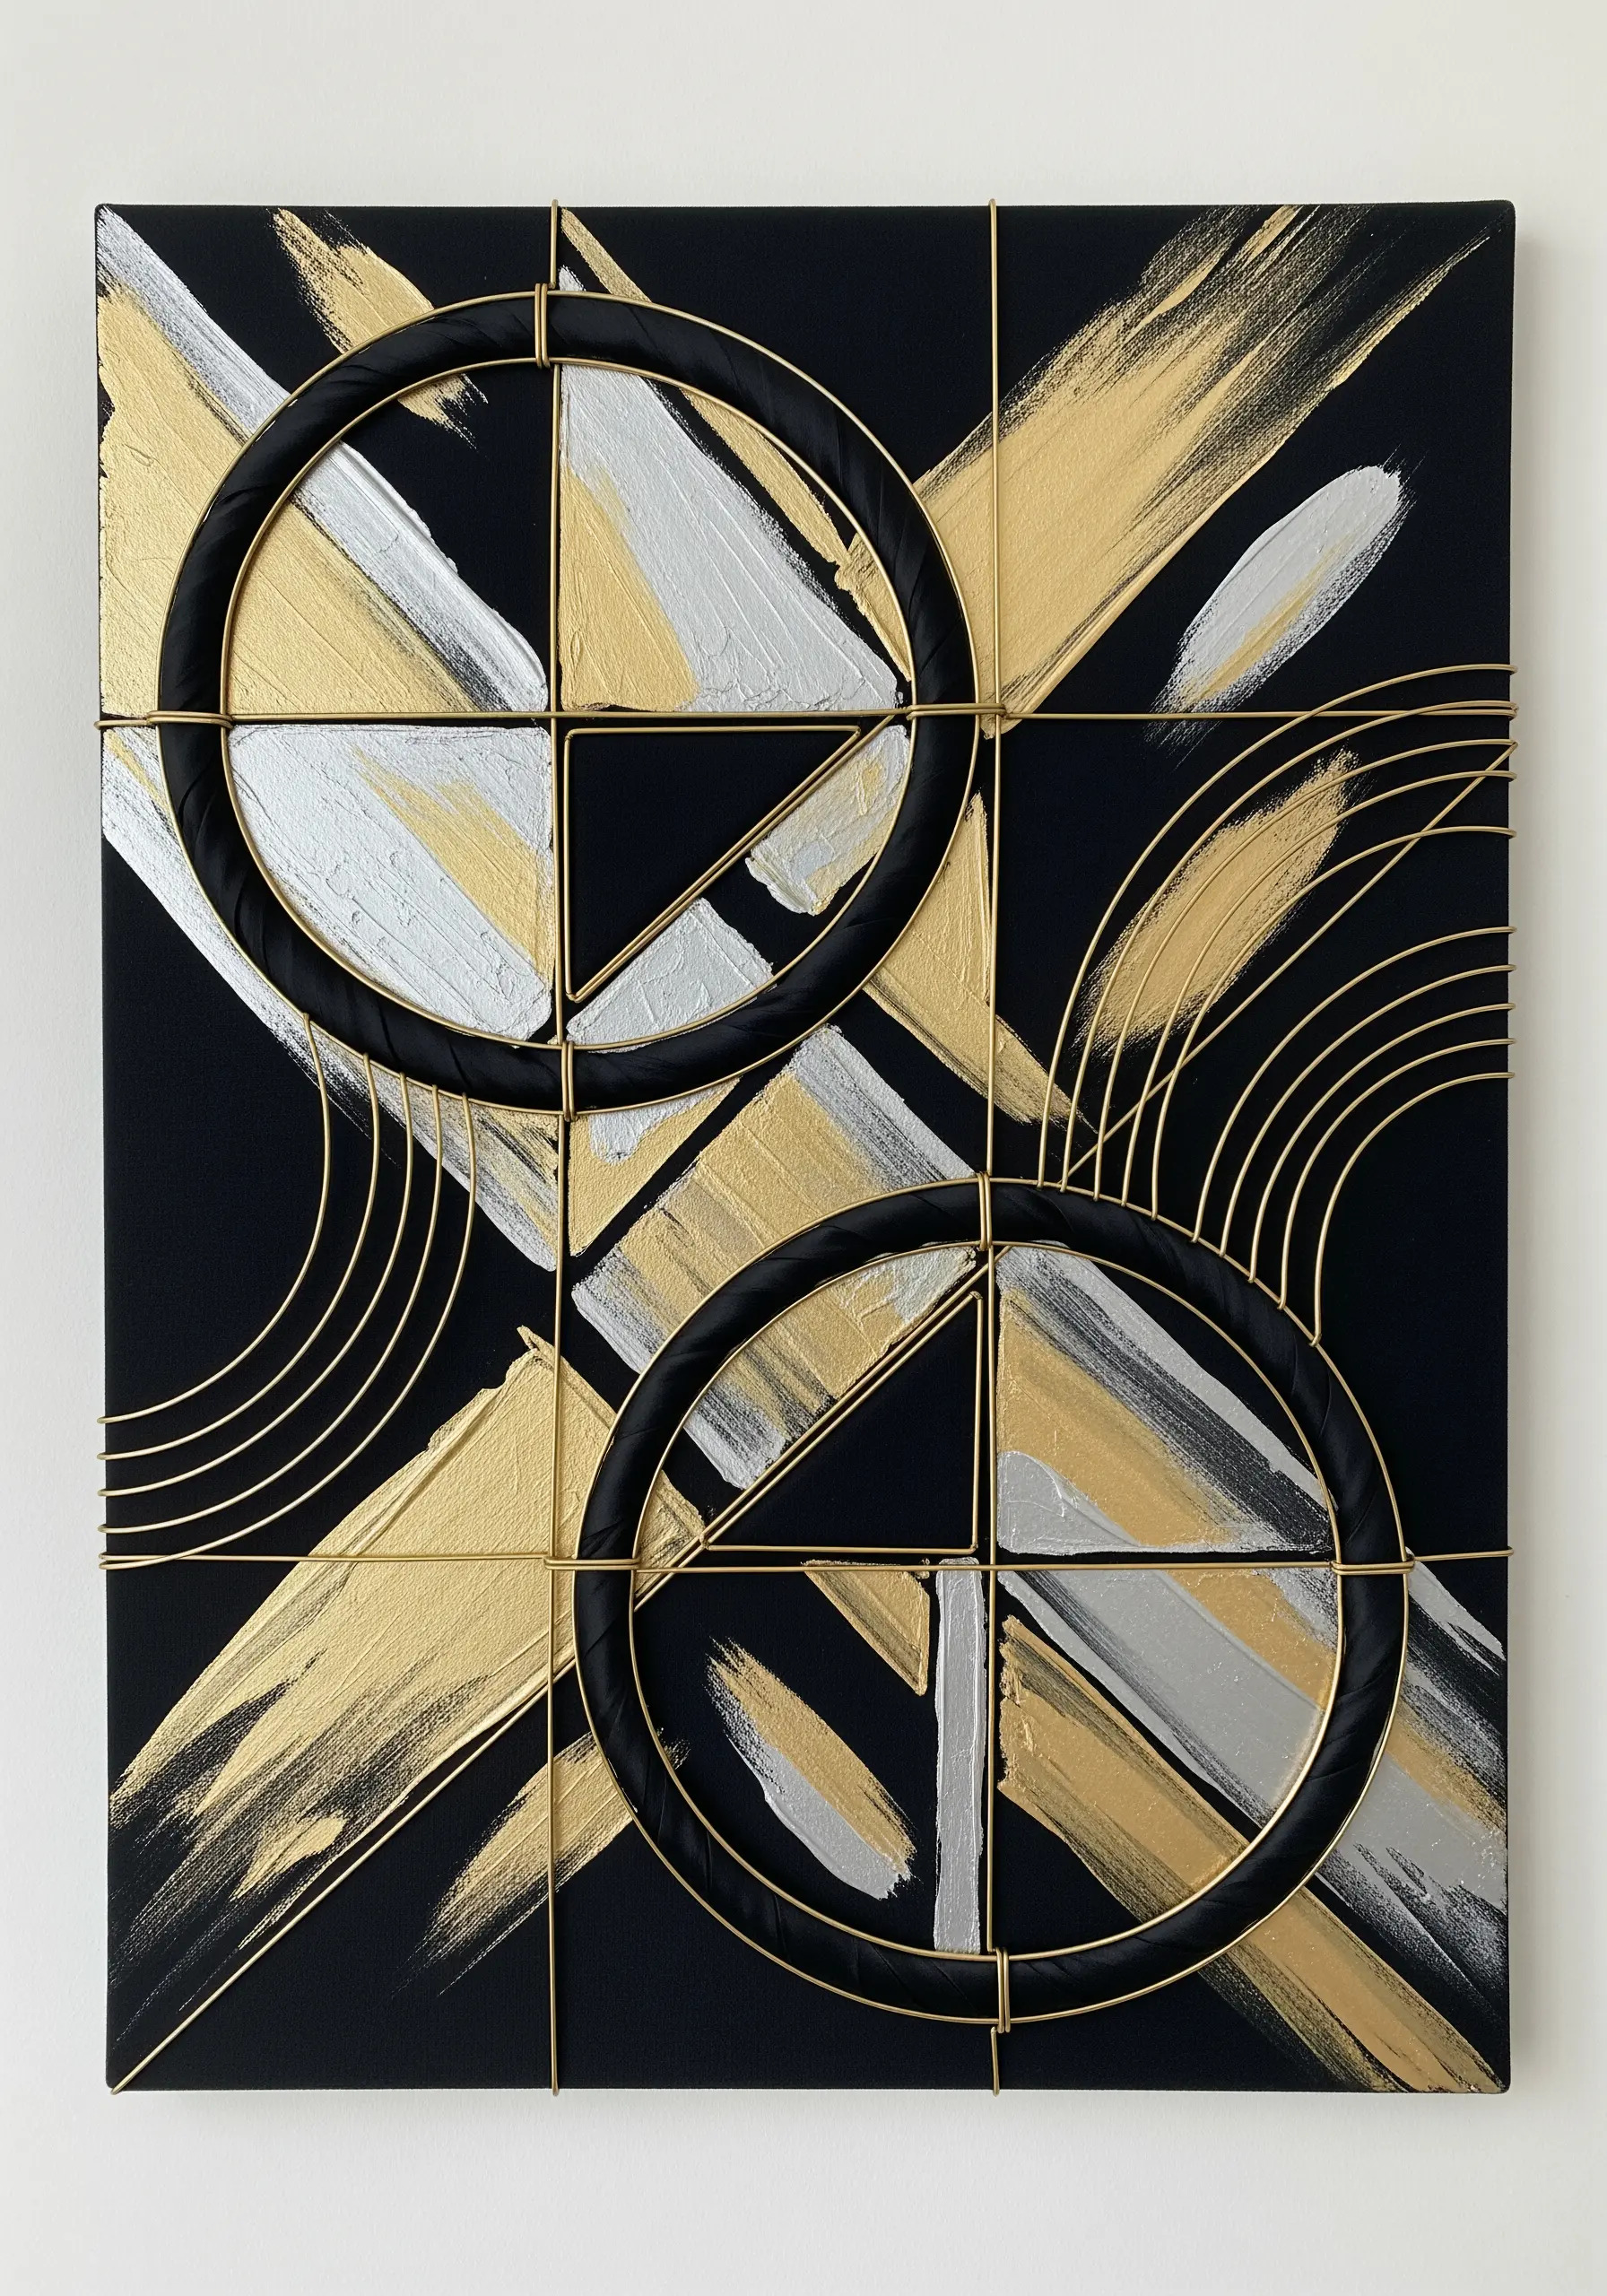
Transform a simple painted canvas into a dimensional piece by integrating bold, structural wire.
Start by painting graphic shapes with metallic gold and silver acrylics, creating a high-contrast base with energetic brushstrokes.
Once the paint is fully dry, use a thick-gauge wire (around 18-gauge works well) to outline key elements, securing it by couching it down with a matching or contrasting thread.
This technique introduces a rigid, architectural quality that plays against the fluid paint, turning a flat design into a striking fiber art installation.
3. Map Celestial Designs with Beads and Metallic Thread

Create a luminous galaxy background by painting a nebula-like wash with fabric paints or diluted acrylics, blending purples, blues, and pinks.
For the crescent moon, build up texture by layering random long-and-short stitches with silver metallic thread over a simple satin stitch base.
Instead of stitching the constellation lines, connect pearl beads with a single strand of fine silver thread.
This method makes the stars pop three-dimensionally, providing a delicate, refined finish that looks elegant against the cosmic backdrop.
4. Blend Watercolor and Thread for Botanical Realism
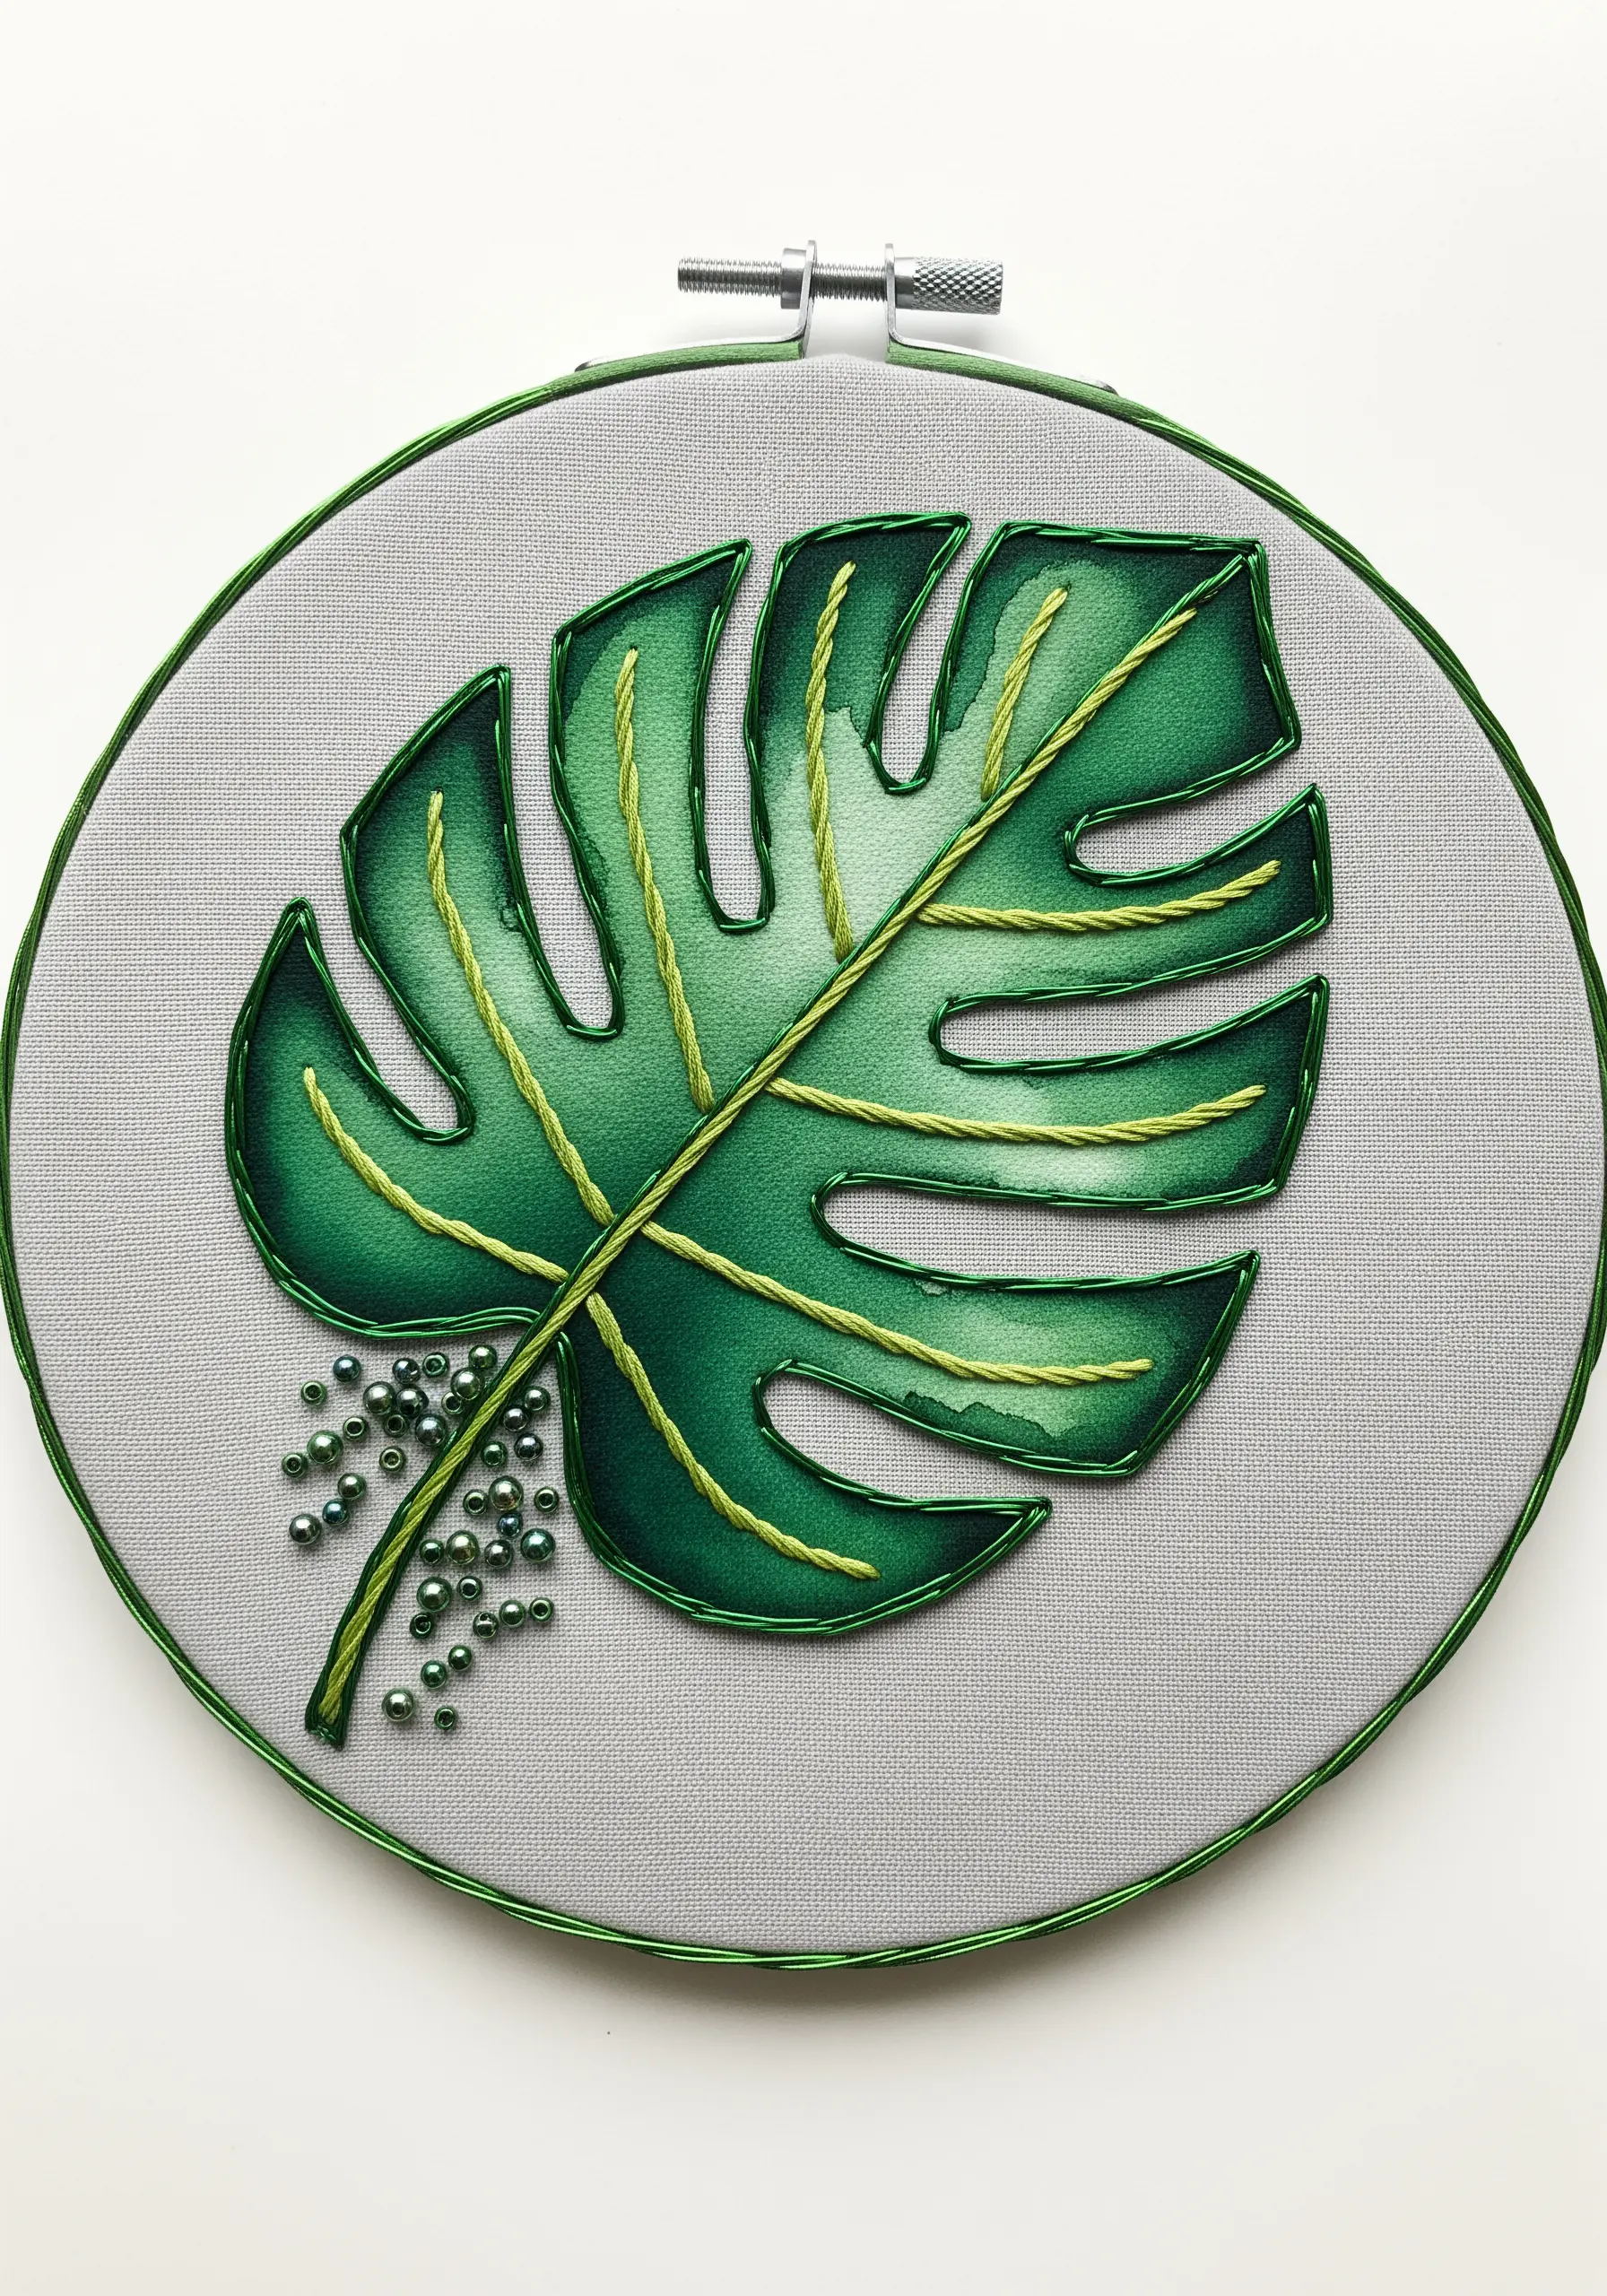
To achieve a soft, painterly look on botanical subjects, begin by applying watercolor directly to the fabric, allowing the colors to bleed slightly for a natural gradient.
Once dry, use a simple backstitch or stem stitch in a contrasting color to outline the leaf and define its veins, cleanly separating the painted form from the background fabric.
Finally, cluster a small group of green seed beads at the base of the stem to add a touch of dew-like texture and a single focal point of light.
It’s a simple way to add depth to your botanical stitch ideas.
5. Explore Crackle Medium for Aged, Earthy Textures
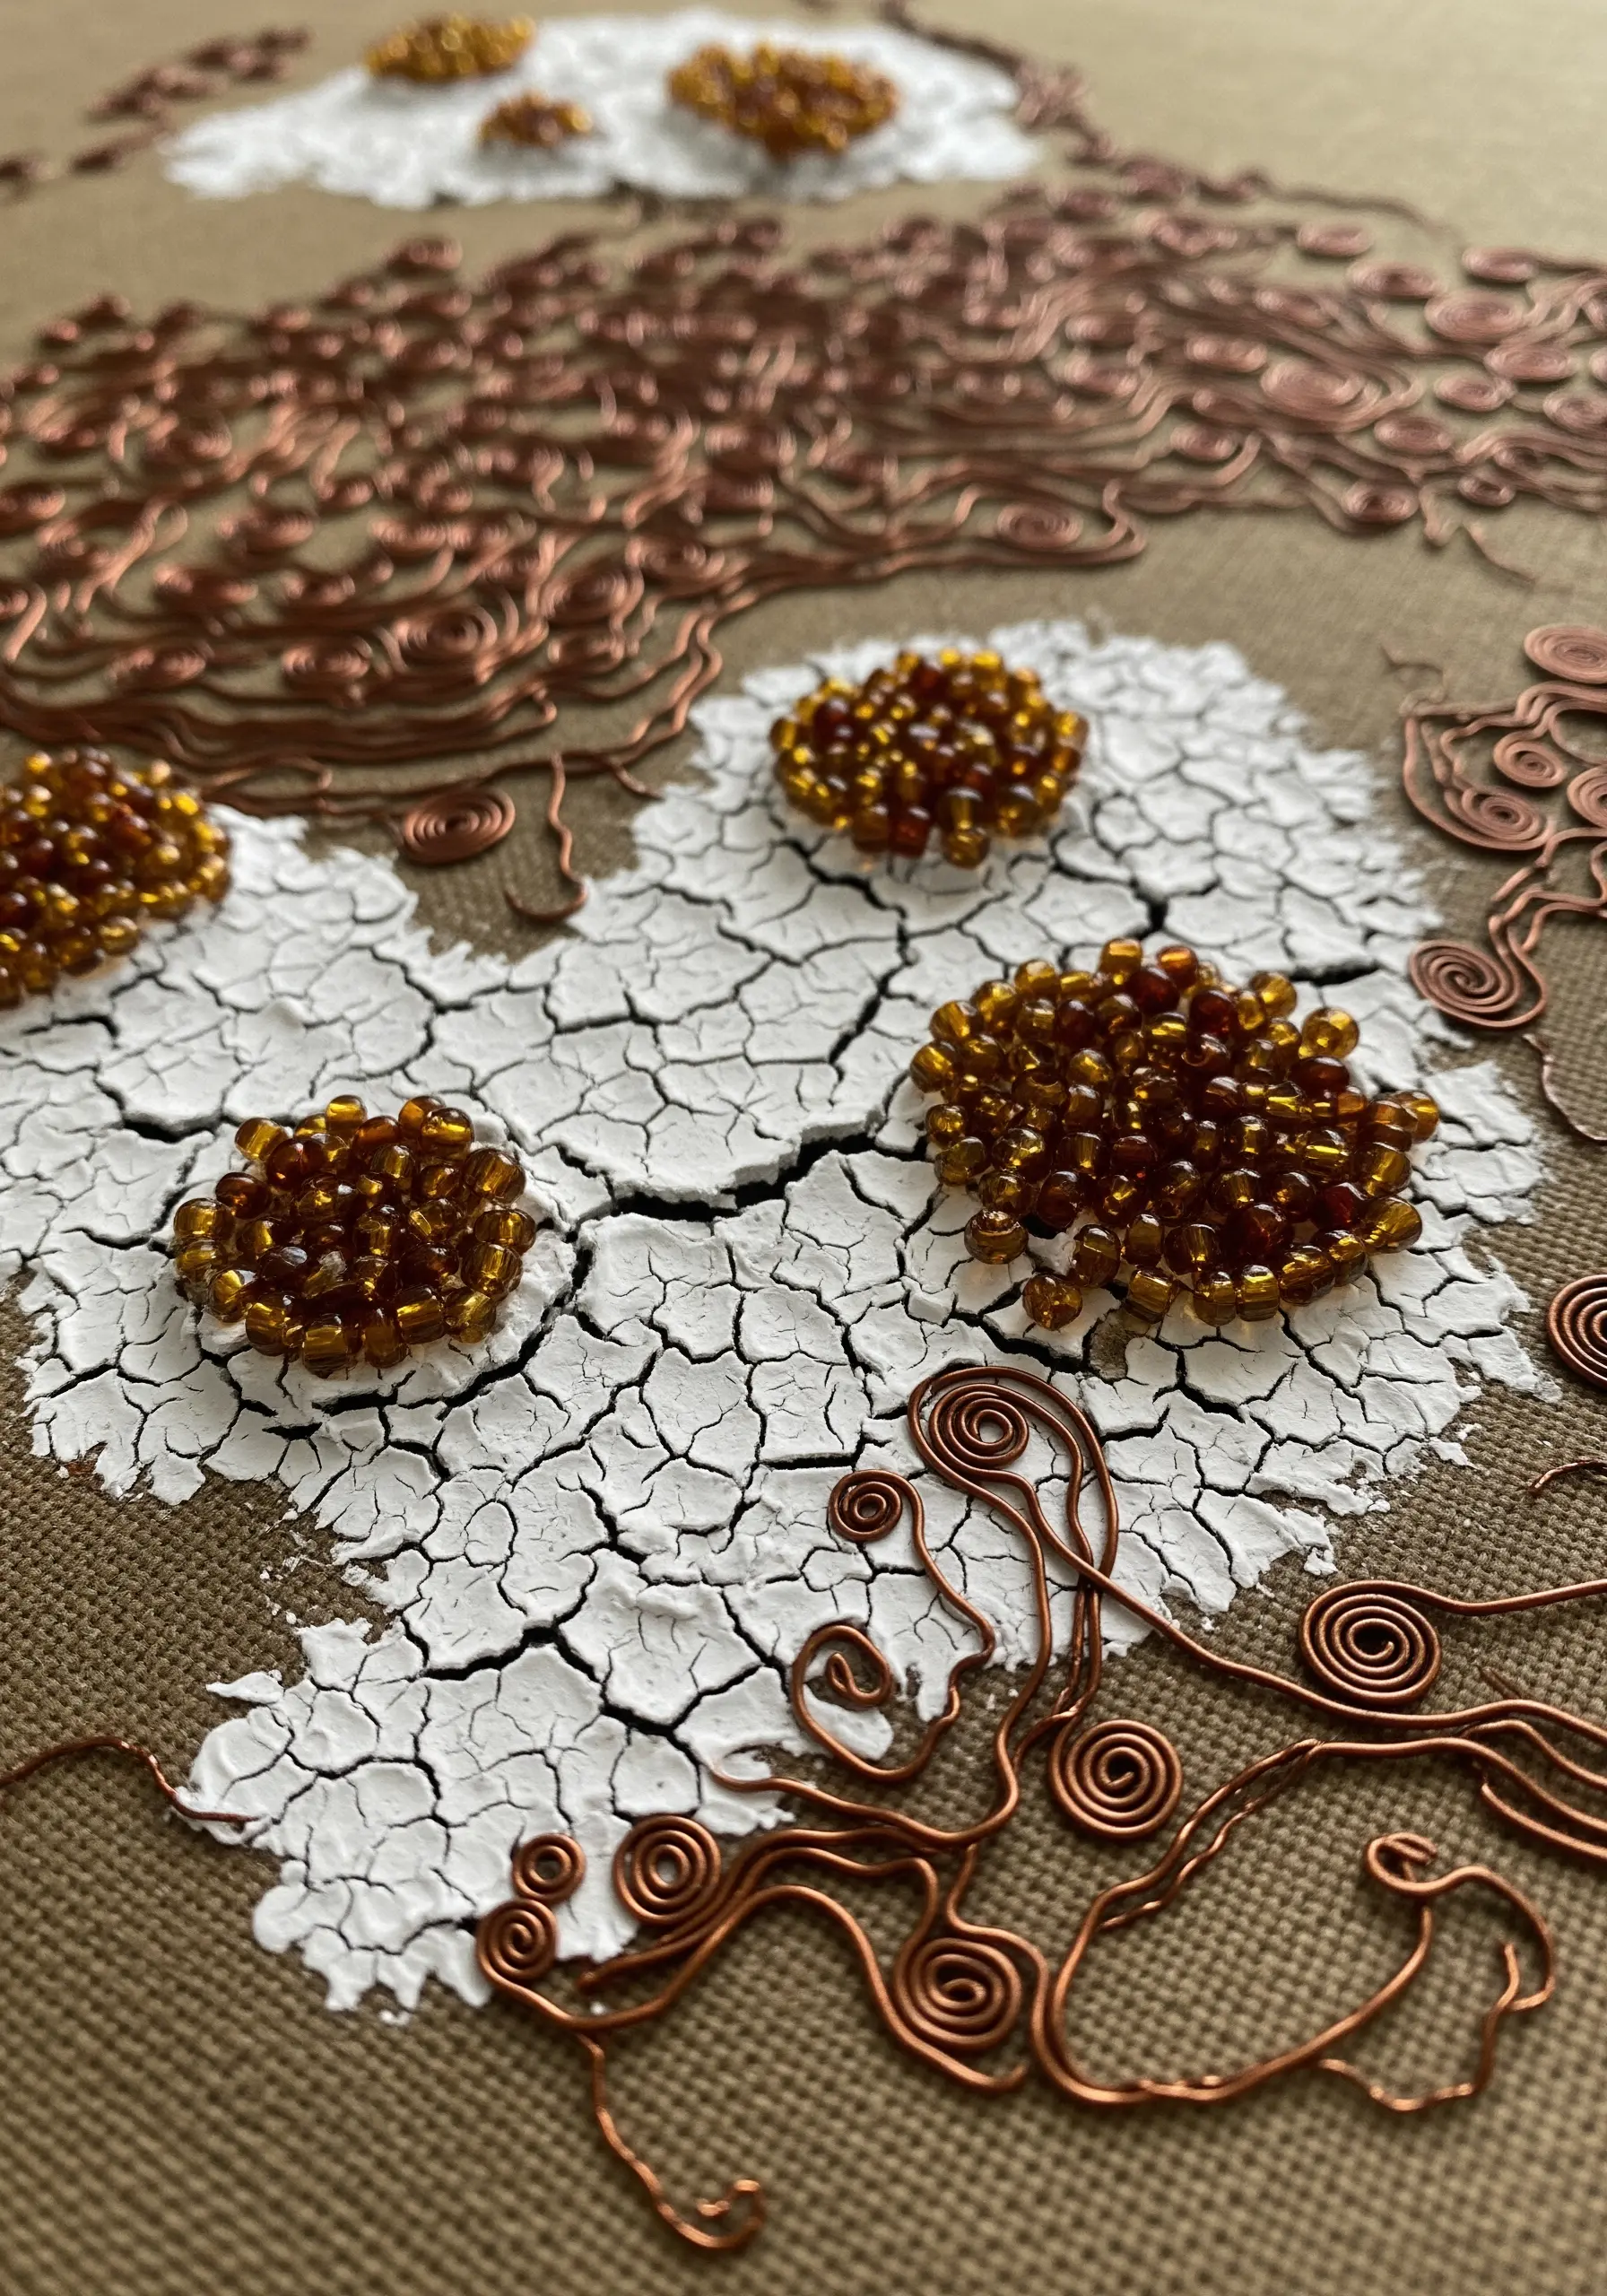
Introduce an unexpected textural foundation by working with crackle medium on fabric.
Apply a base coat of acrylic paint, let it dry, then add a layer of crackle medium followed by a top coat of a contrasting color.
As it dries, the top layer will shrink and crack, revealing the color beneath for a beautifully aged effect.
Frame these textured areas with coiled copper wire and fill floral centers with densely clustered seed beads to create a rich contrast between the rough paint and precise embellishments.
6. Define Portraits with Paint and Sculptural Wire
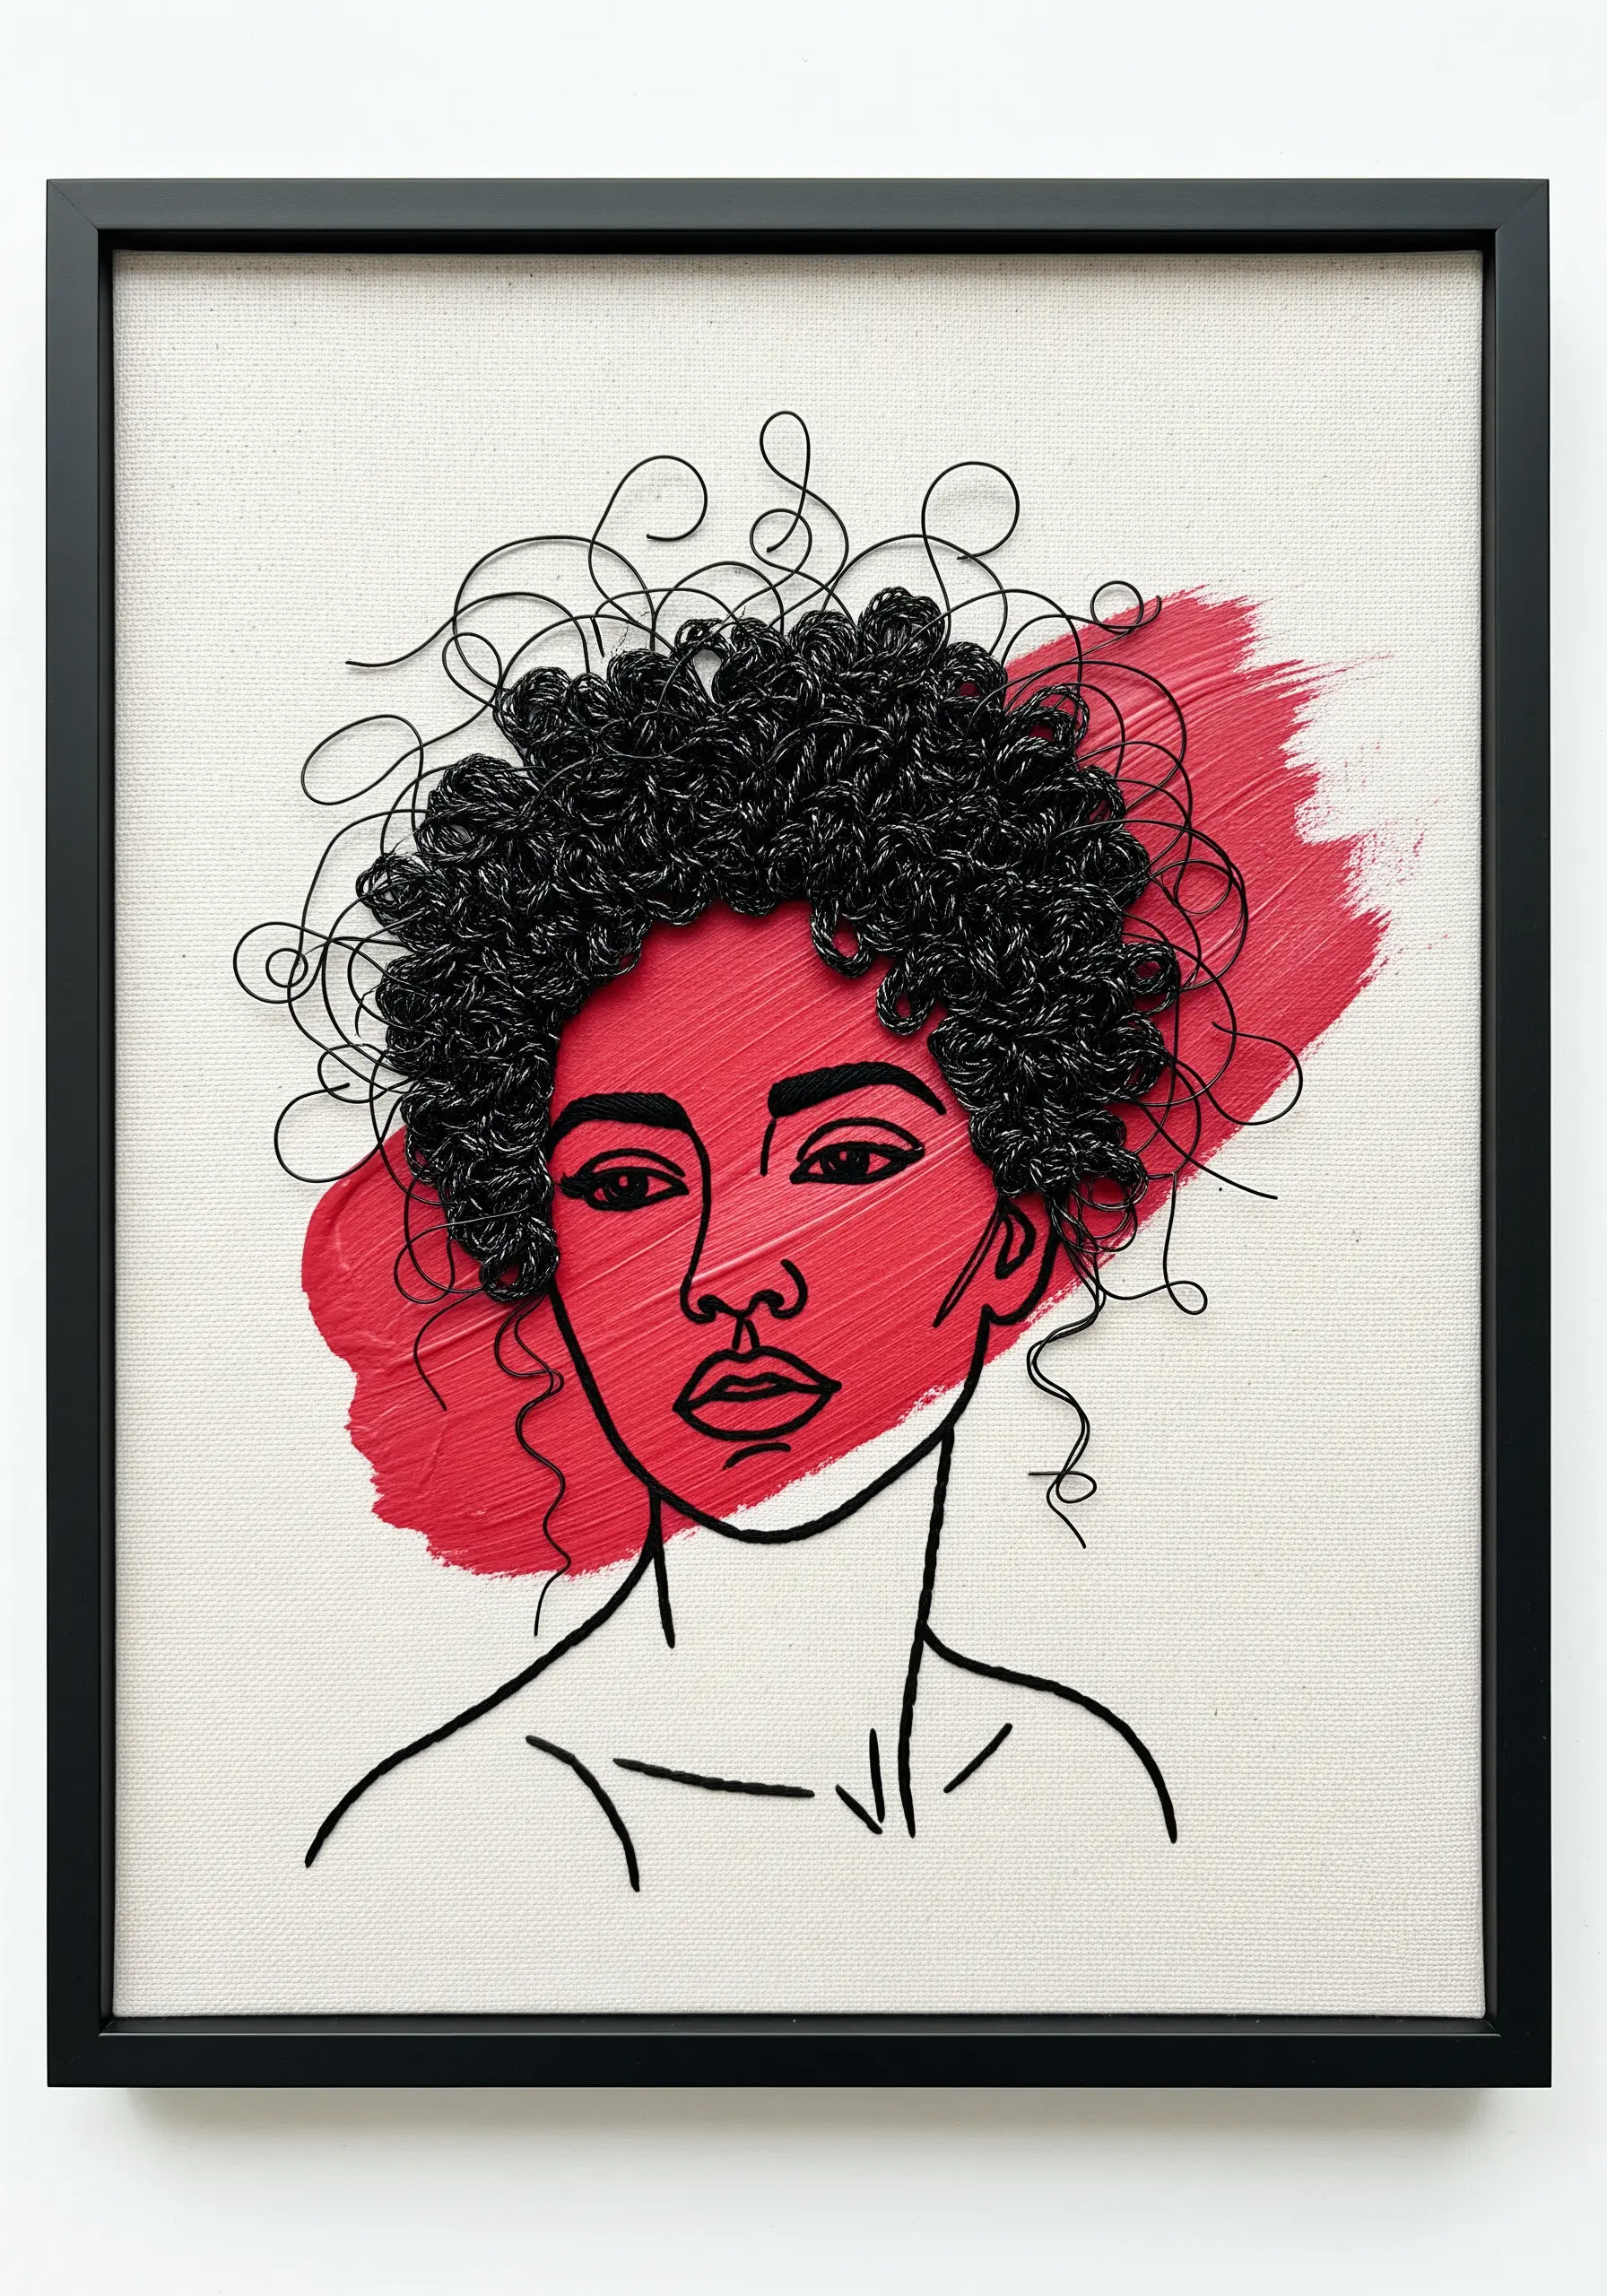
Create a striking mixed-media portrait by combining clean line art with a block of expressive color.
First, stitch the facial features and outline using a simple backstitch for a graphic look.
Next, apply a bold swipe of acrylic paint to define a section of the face or hair, letting the visible brushstrokes add raw energy.
For the hair, build volume with dense French knots and then integrate coiled black wire—this technique adds incredible texture and dimension that thread alone cannot replicate, creating powerful and emotional line art motifs.
7. Build a Vibrant Coral Reef with Layered Materials

Mimic the diverse textures of a coral reef by layering multiple materials over a watercolor-washed background.
Use basketweave stitch for fan corals and bullion knots for tube-like structures.
Introduce dense clusters of seed beads in various colors and finishes to create shimmering surfaces that catch the light like sunlight underwater.
For delicate sea anemones, shape fine-gauge silver wire into fluid, organic forms and couch them onto the fabric for a weightless quality that contrasts with the heavy beading.
8. Achieve Metallic Sheen with Faux Leather Appliqué
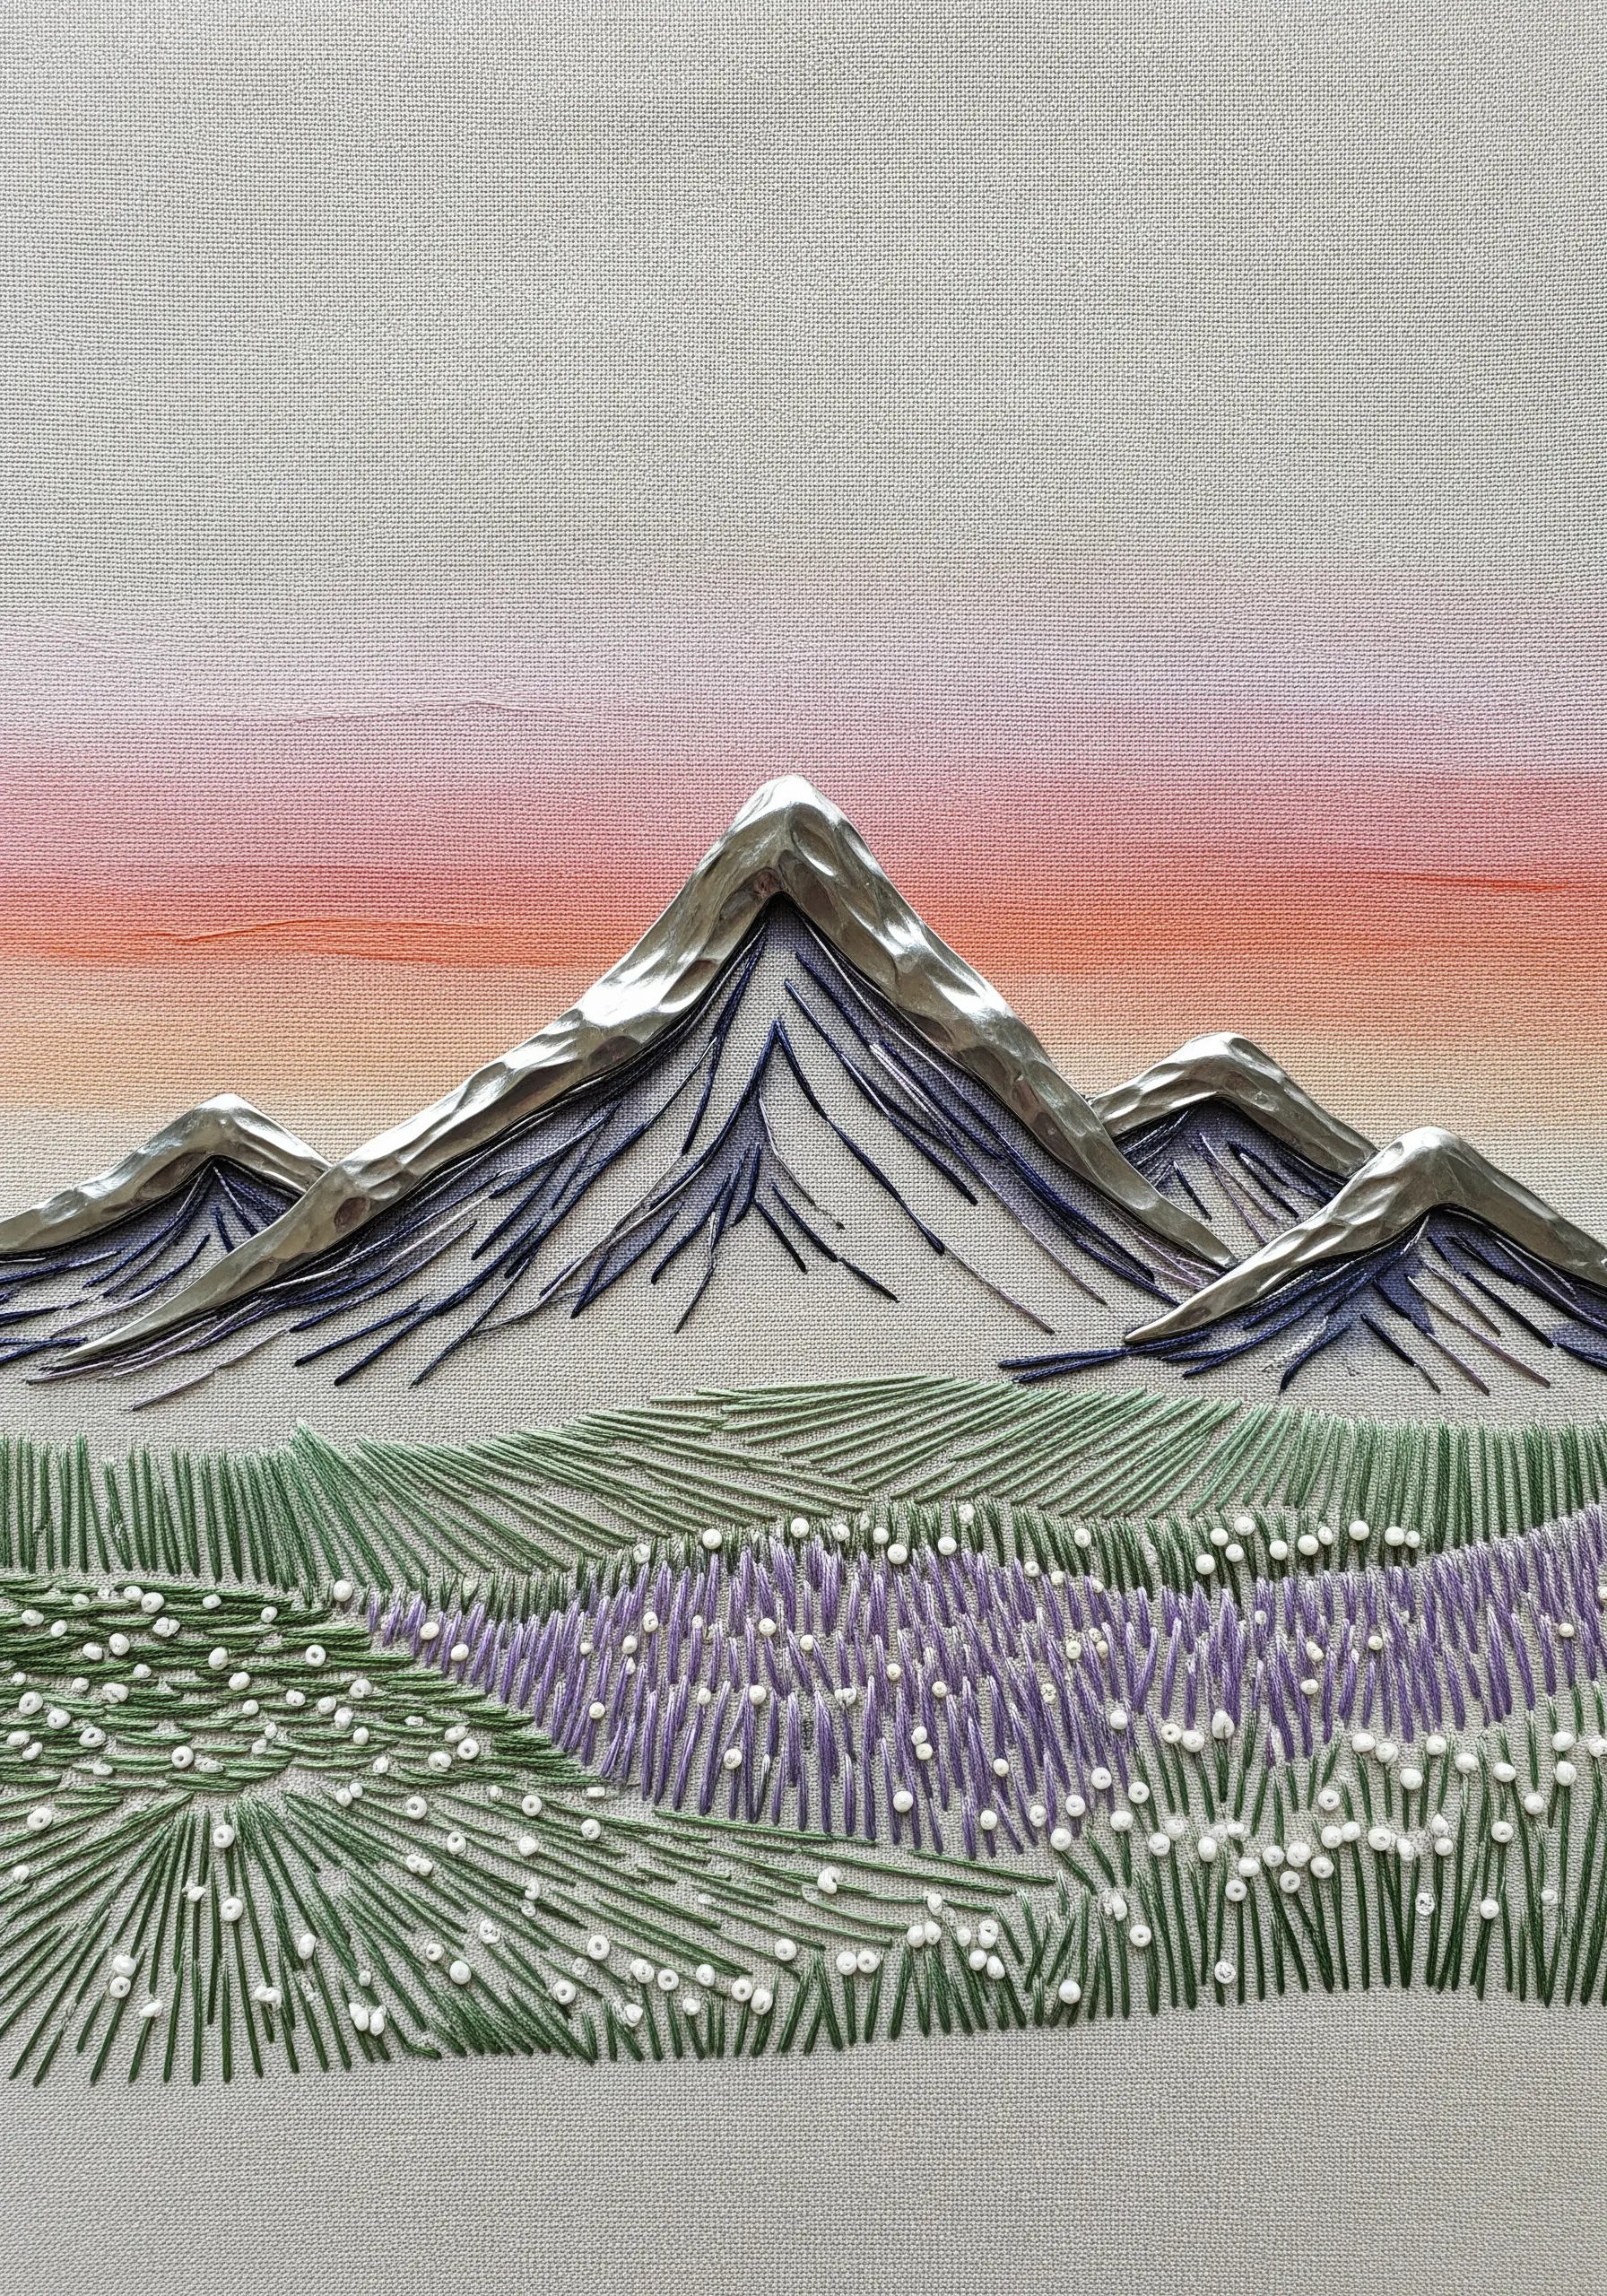
To create the effect of sunlit, snowy mountain peaks, use metallic faux leather instead of metallic thread for a bolder statement.
First, paint a soft gradient sky with fabric paints and stitch the mountain slopes with long-and-short stitch.
Cut small pieces of silver faux leather to fit the peaks, attach them with fabric glue, and then stitch around the edges to secure them permanently.
This technique provides a solid, highly reflective surface that stands out against the soft texture of the thread, perfectly mimicking the sharp quality of rock and ice.
9. Craft Iridescent Wings with Cellophane and Wire
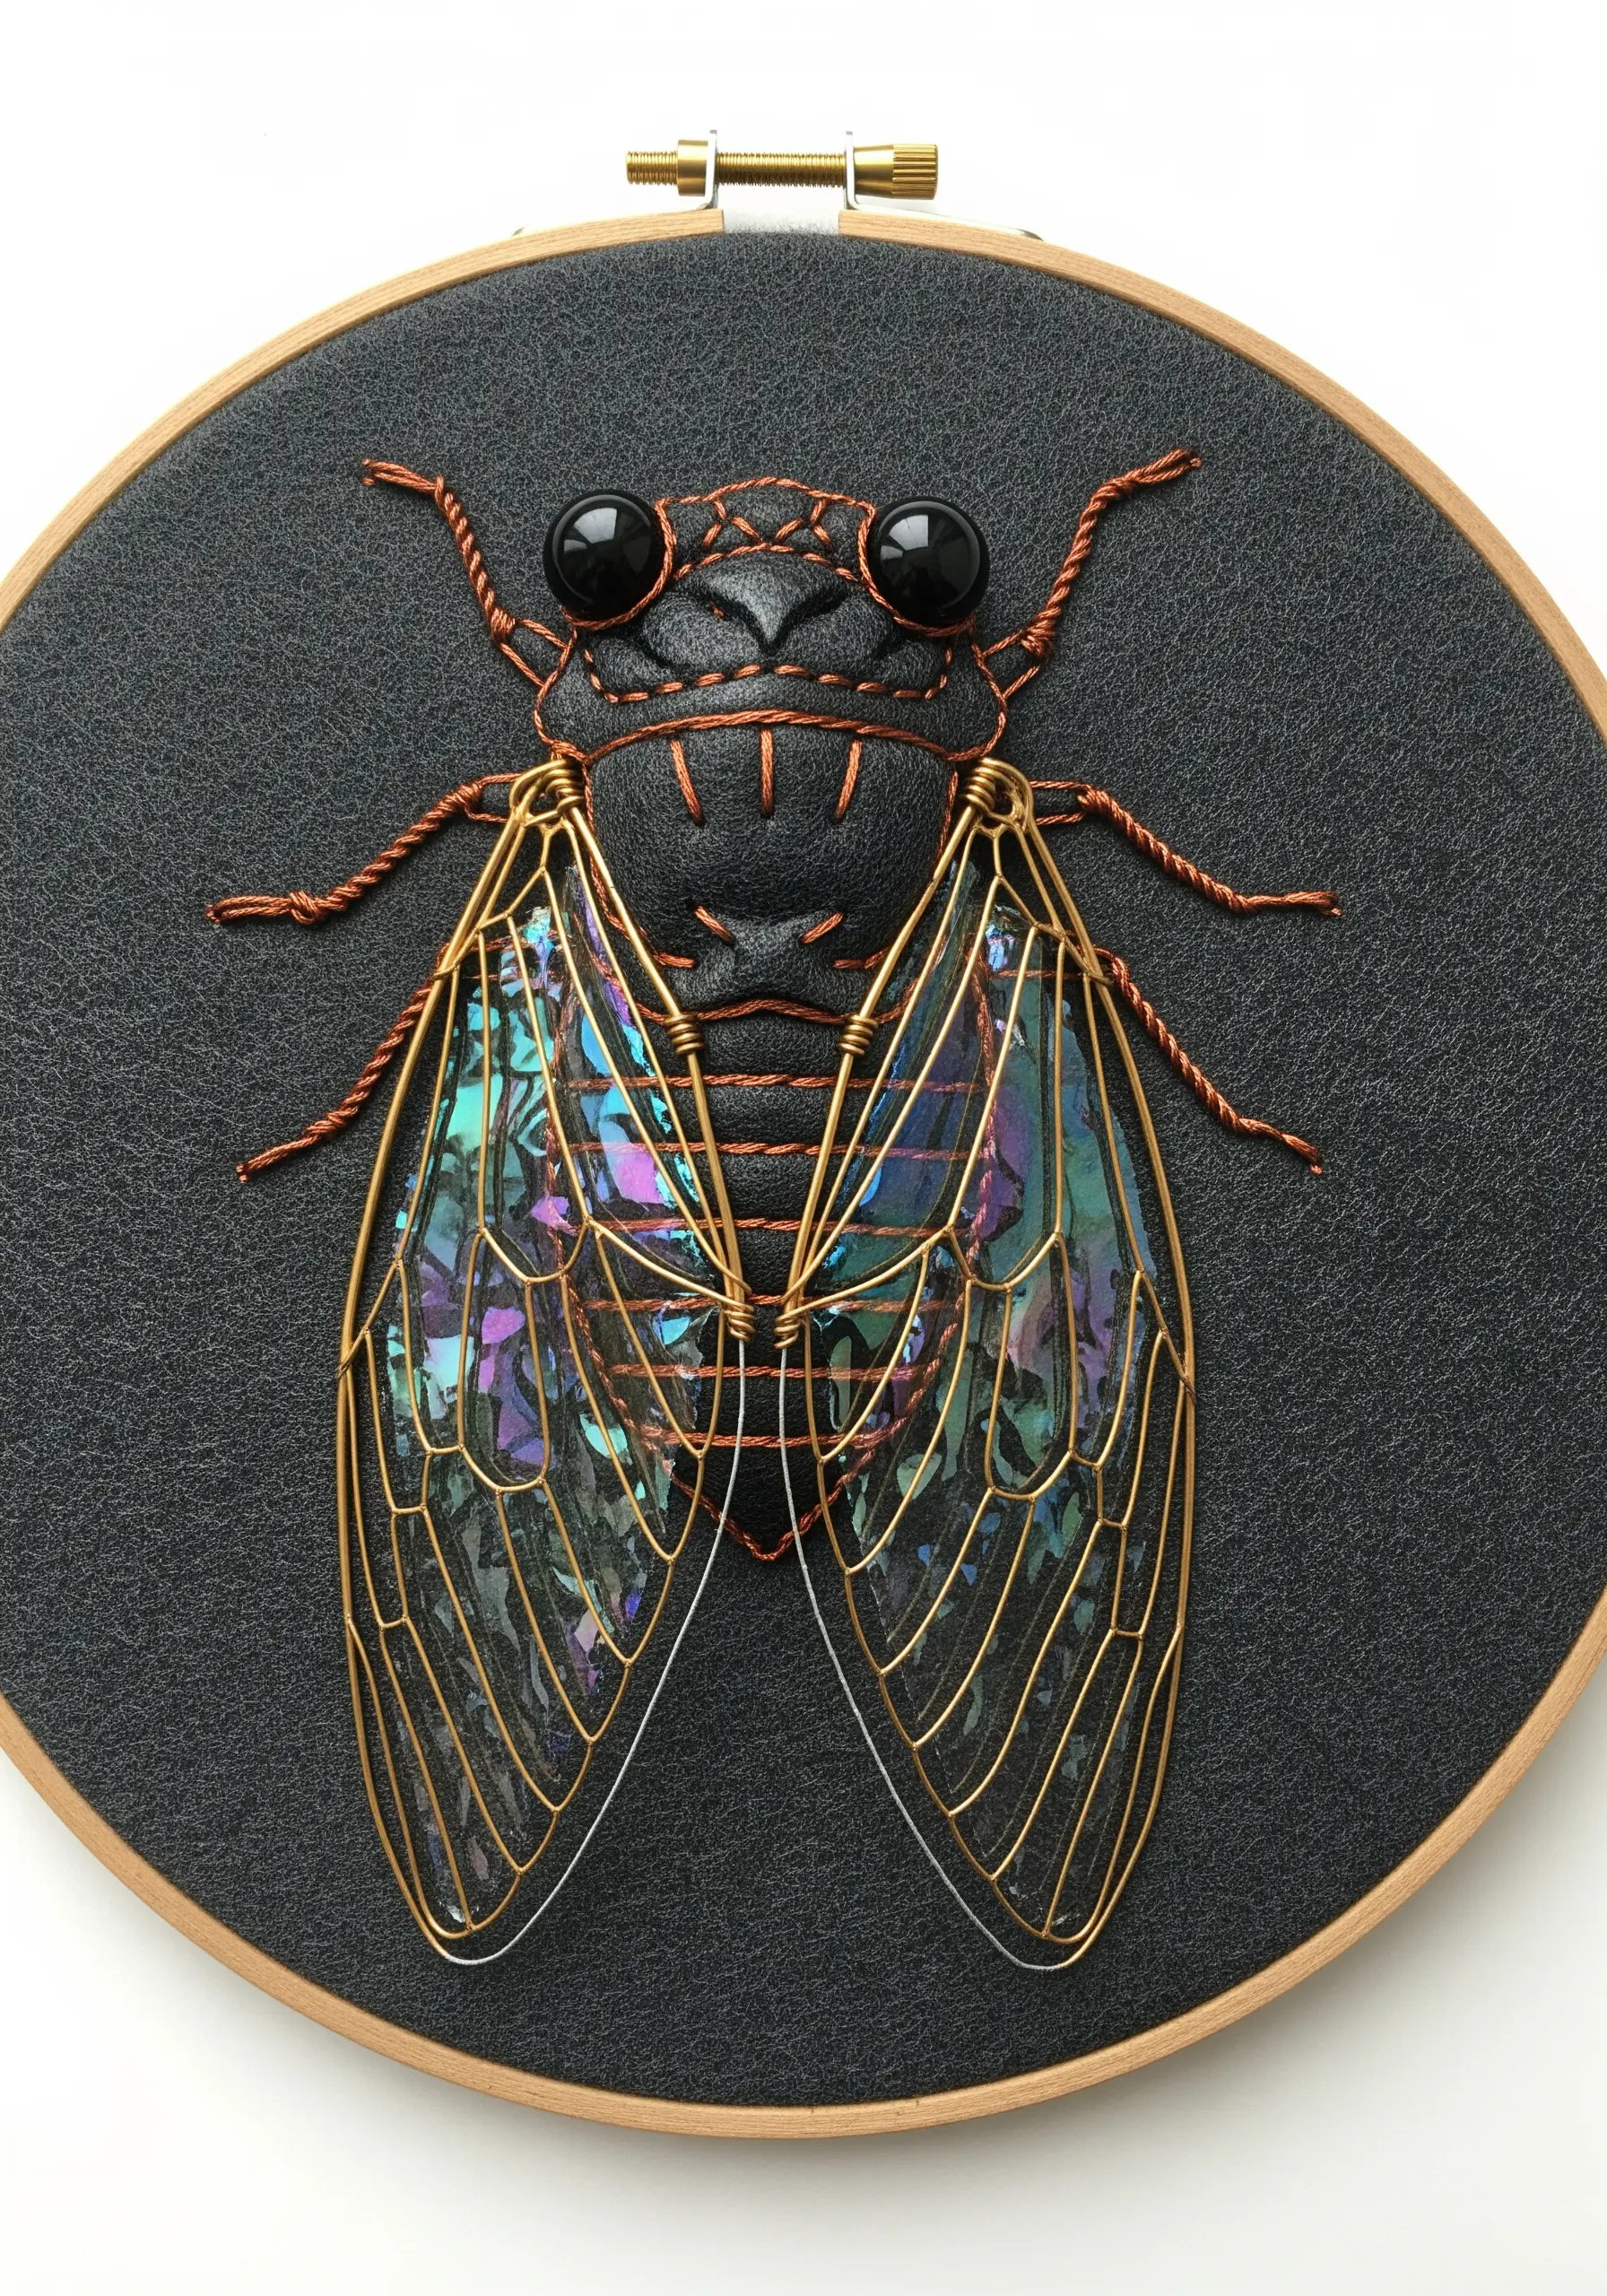
Recreate the delicate translucence of insect wings using iridescent cellophane, a material that offers unparalleled shimmer.
First, build a delicate frame for each wing with a fine-gauge wire.
Trap a piece of cellophane between two layers of water-soluble stabilizer, stitch the veins with your machine or by hand, and then wash the stabilizer away.
Mount the finished wings onto an embroidered or appliquéd body (faux leather works beautifully) for a realistic, multi-layered insect that feels truly lifelike.
10. Visualize Sound with Watercolor and Wrapped Thread
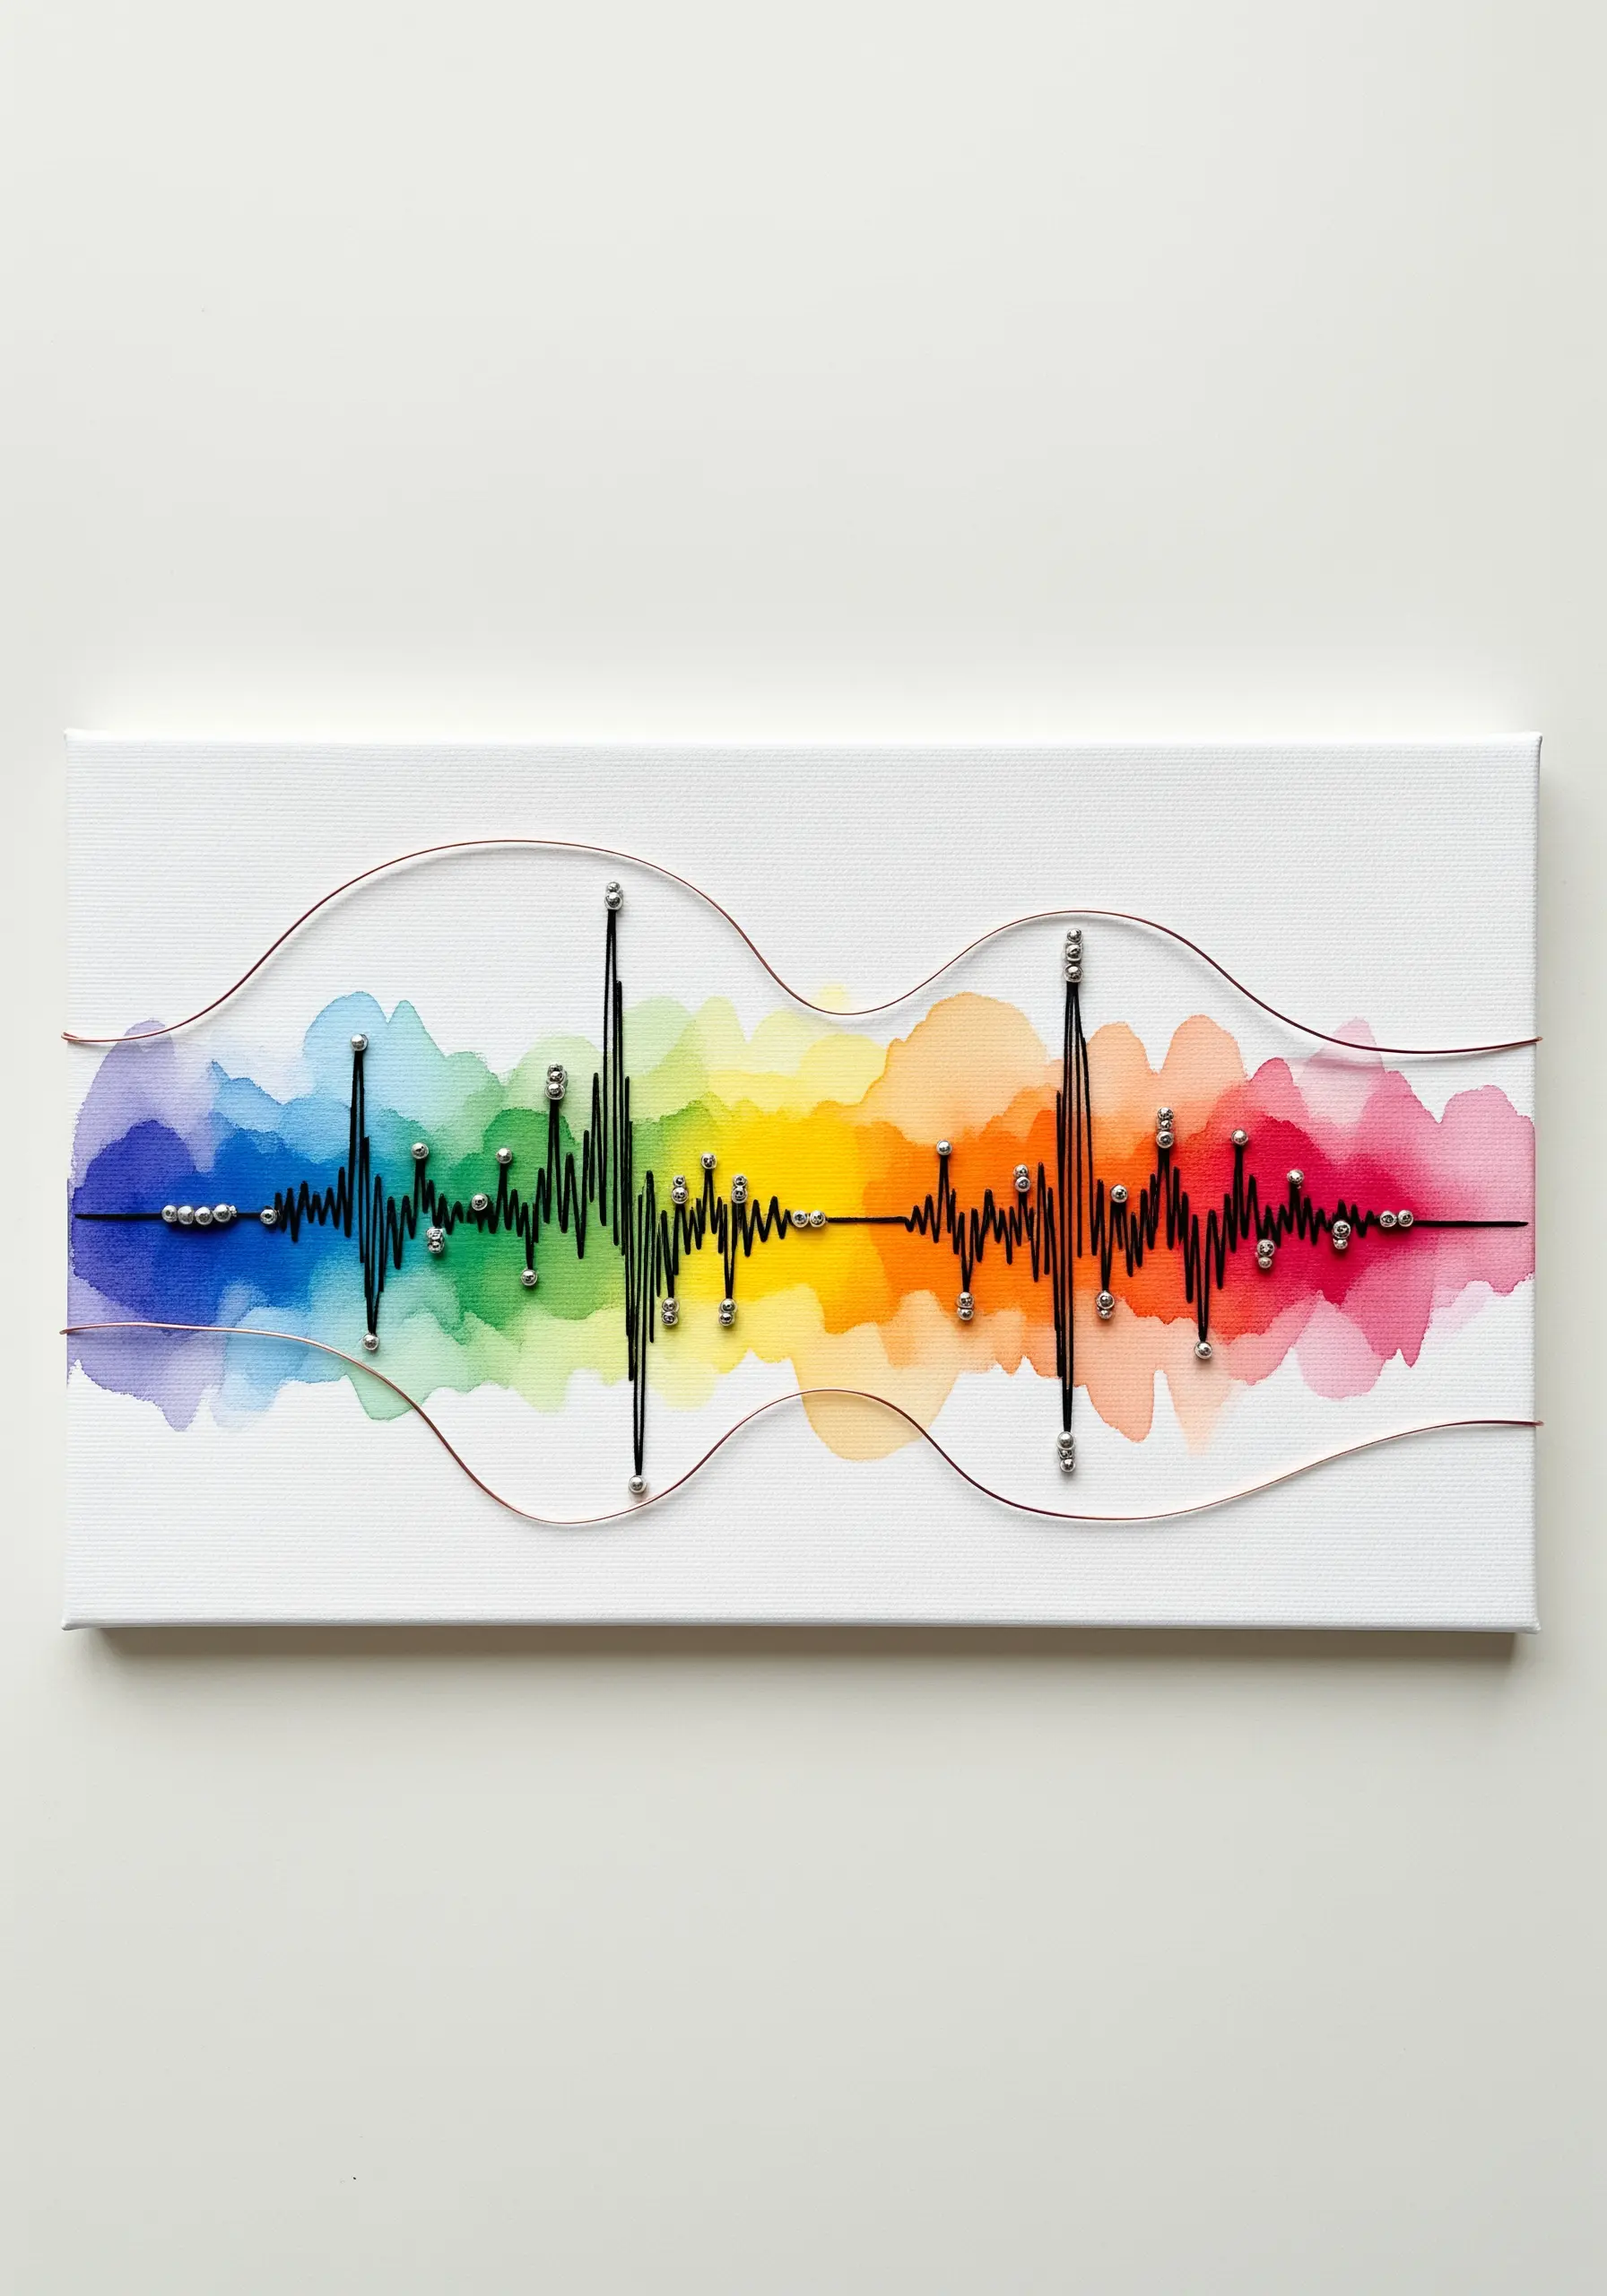
Translate a personal soundwave—like a laugh or a line from a song—into a meaningful piece of art.
Transfer the soundwave’s outline to your canvas and fill the shape with a wash of watercolor, letting the colors blend to represent the sound’s emotional tone.
Insert small nails or pins at the peaks and valleys, then wrap black thread or thin wire between them to create the sharp, precise waveform.
Frame the design with a softly curved copper wire to unify the composition, turning it into a modern take on string art maps.
11. Create Abstract Cellular Patterns with Pins and Beads
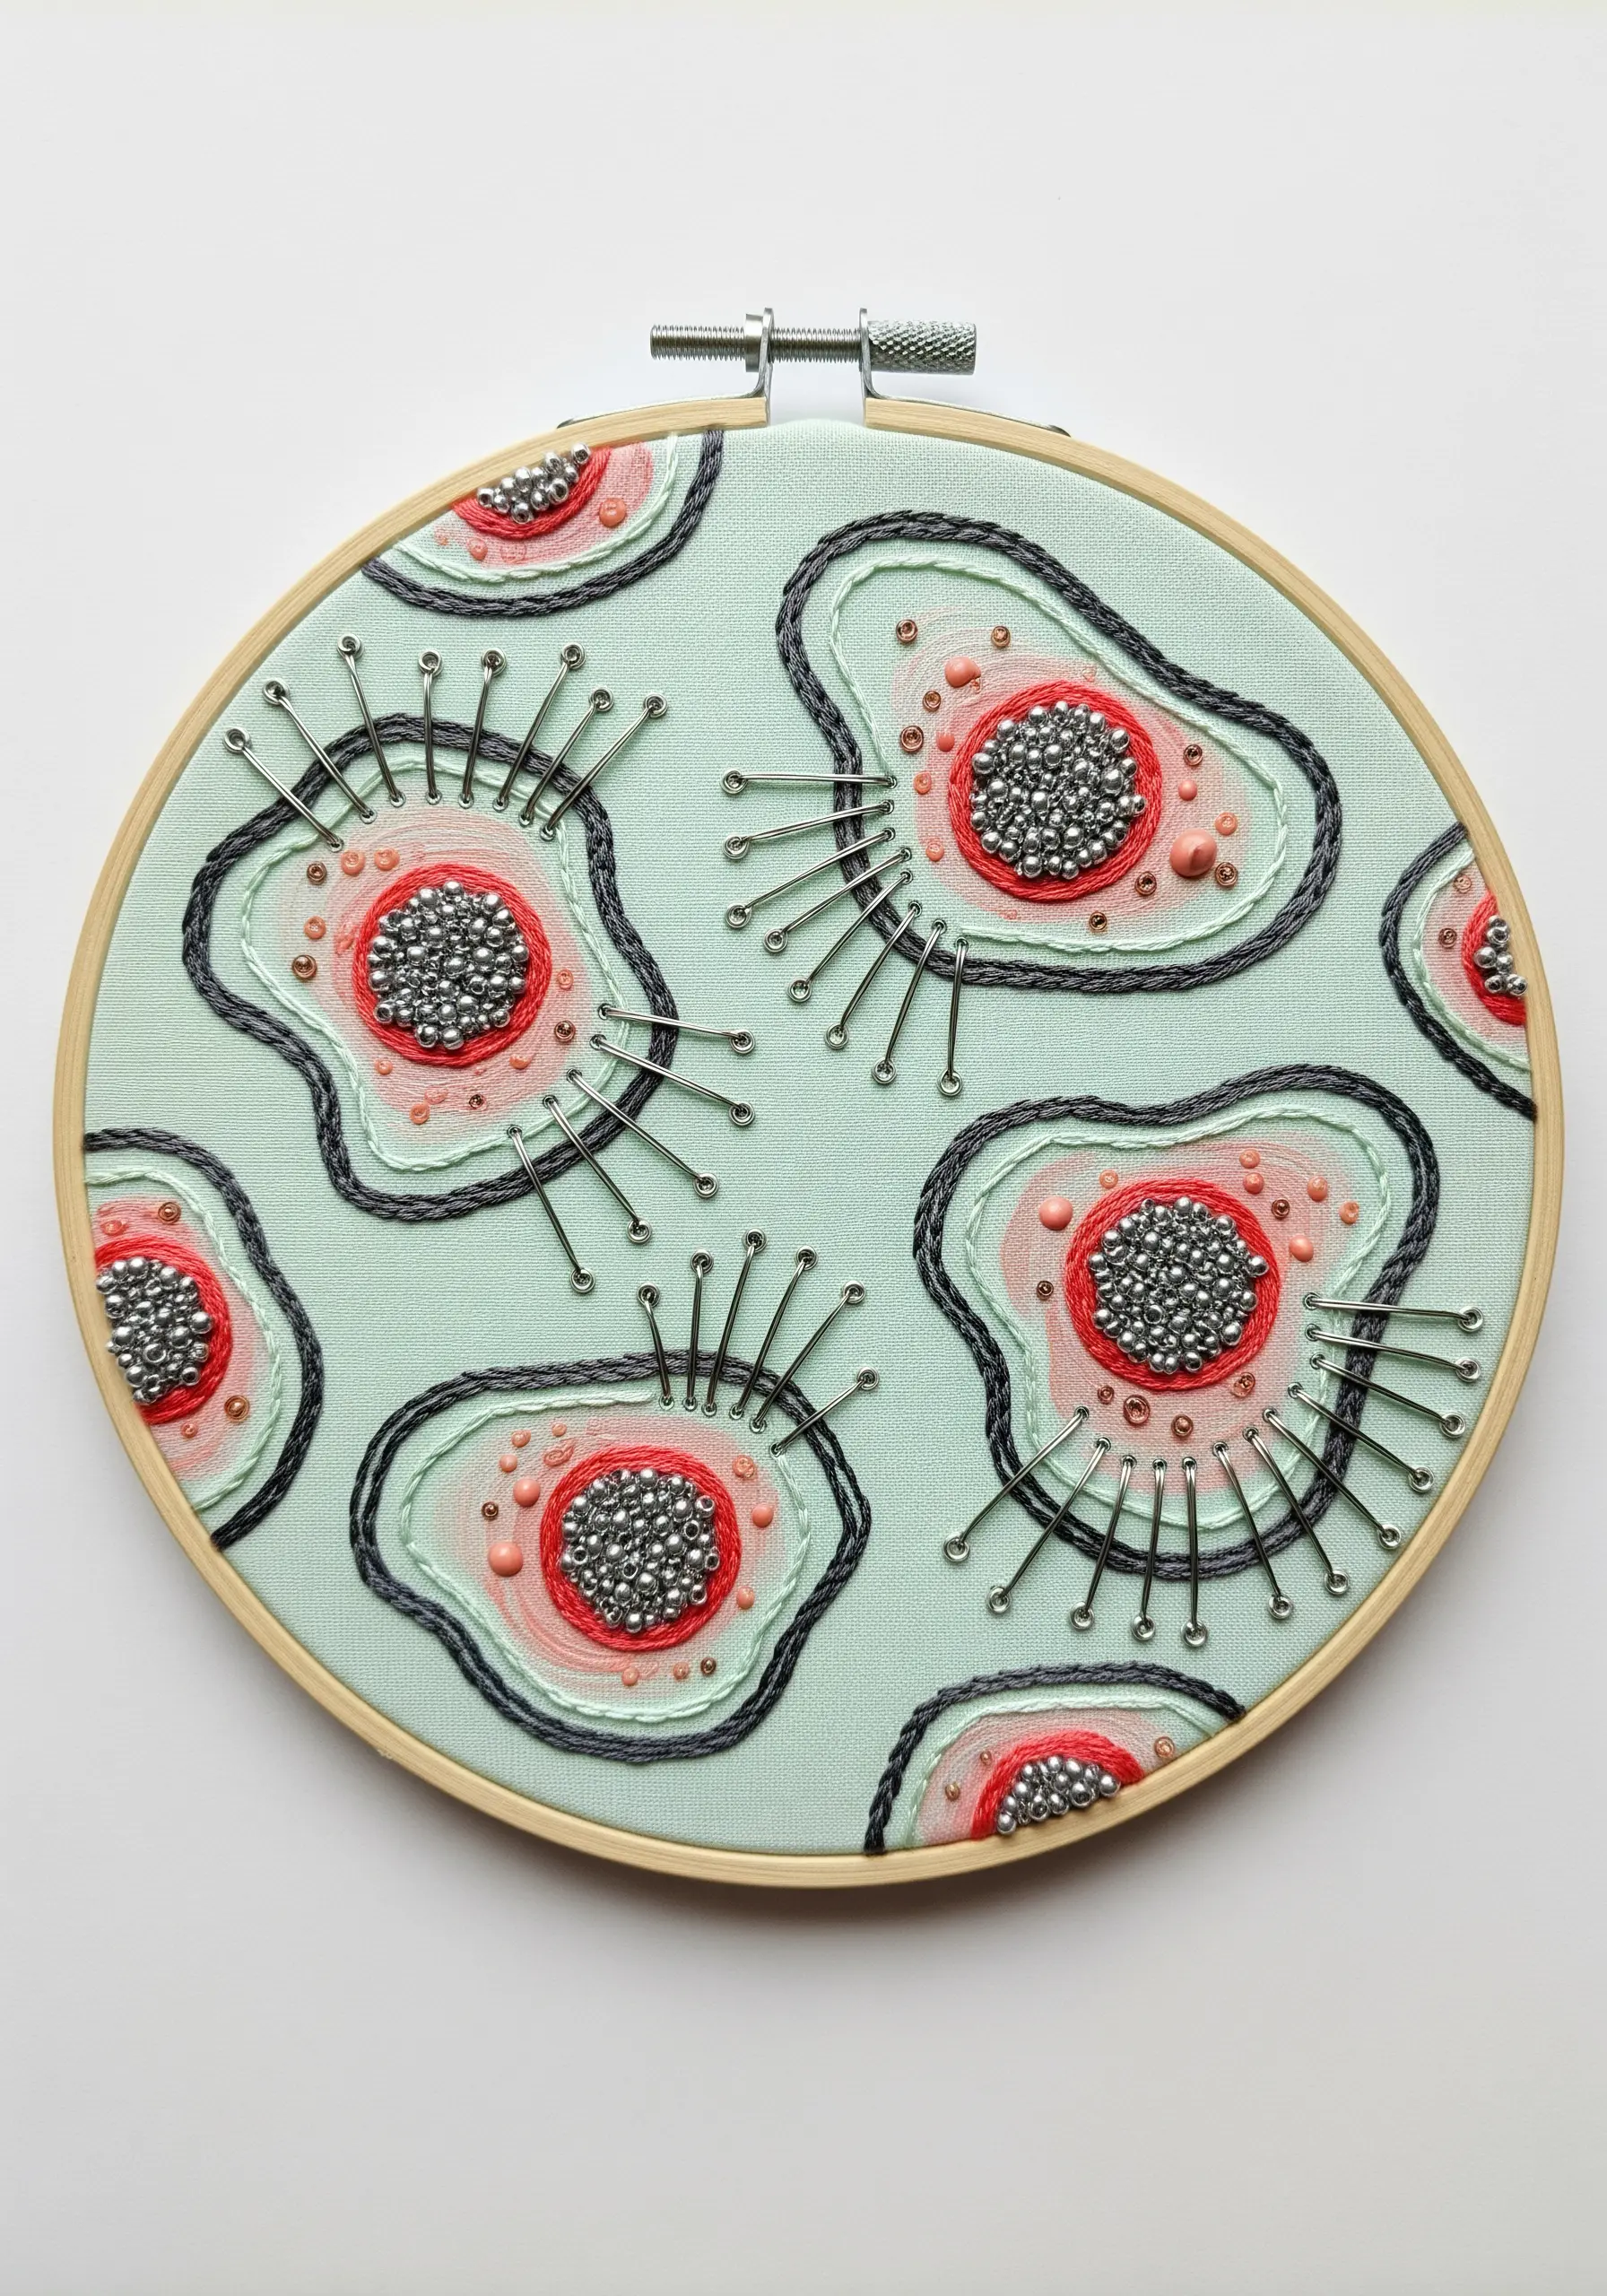
Give your embroidery a scientific, graphic feel by incorporating unconventional hardware for unexpected texture.
Outline your abstract cell shapes with a dark, heavy thread using a whipped backstitch or chain stitch.
Fill the center of each ‘cell’ with a dense cluster of metallic seed beads to create a weighted, textured nucleus.
For a radiating, spiky effect, insert steel dressmaker’s pins directly through the fabric, creating a three-dimensional fringe that adds a sharp, industrial edge to the design.
12. Emulate Kintsugi with Gold Leaf and Couched Thread
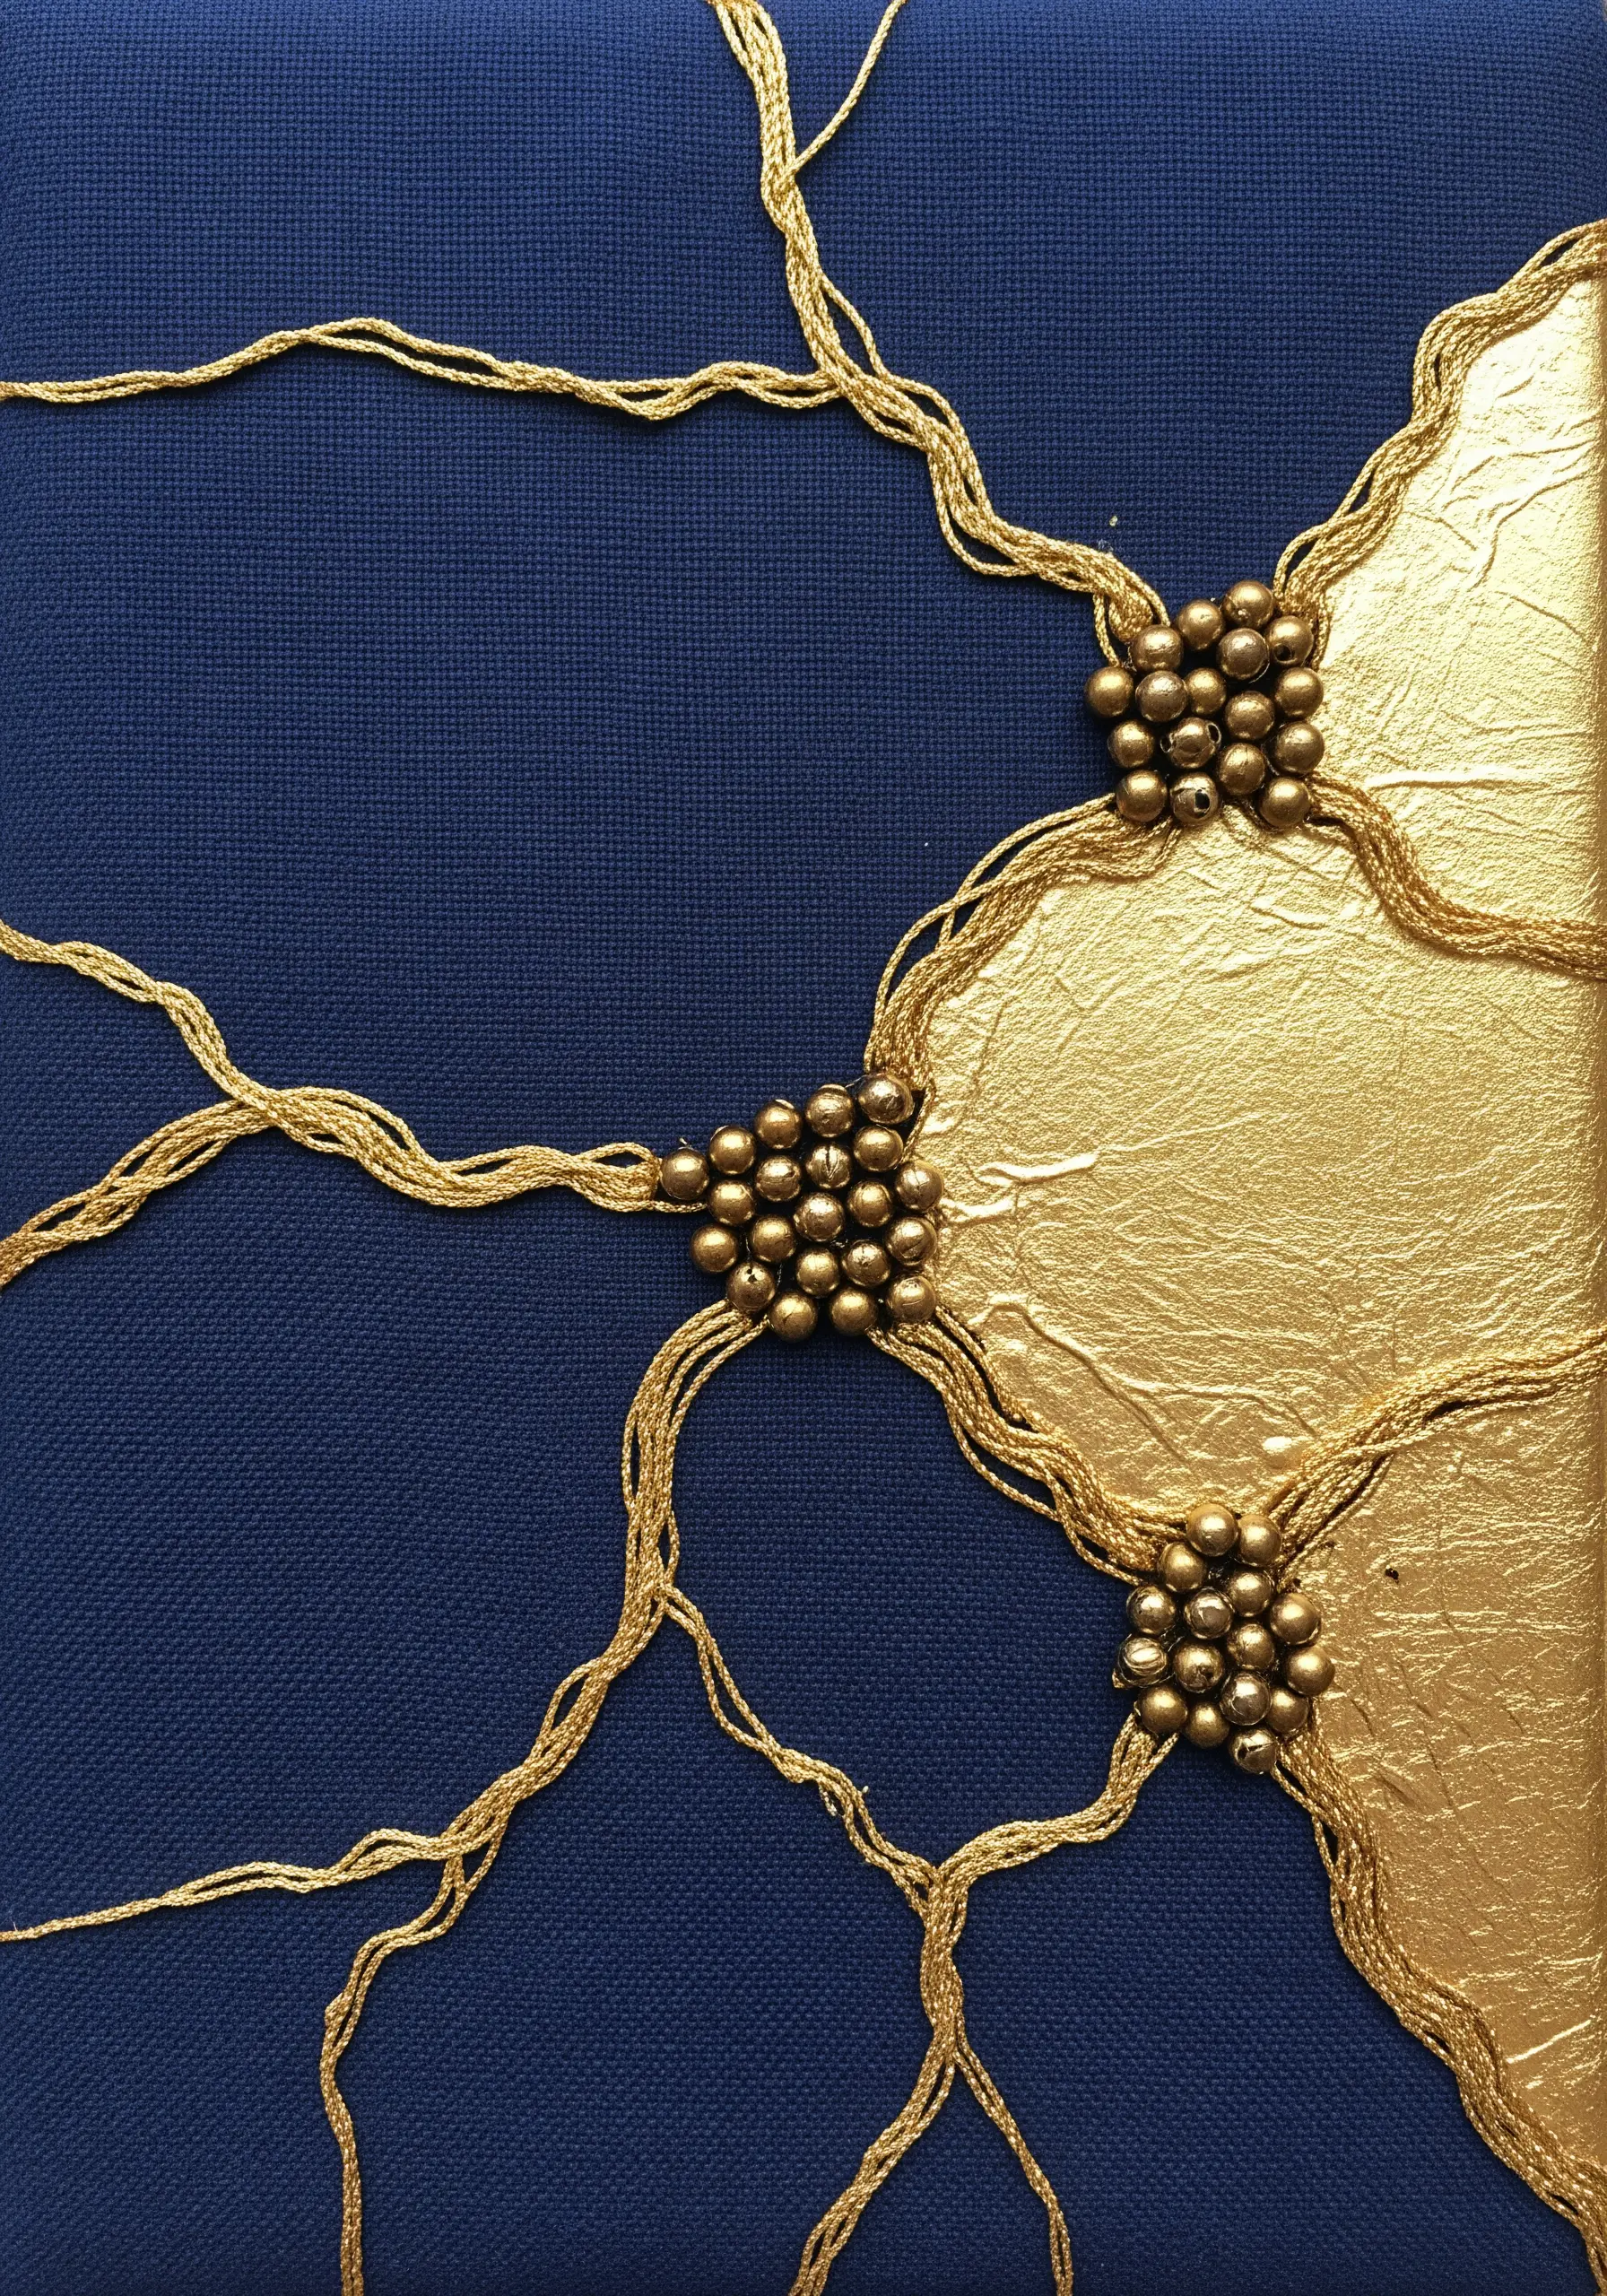
Channel the Japanese art of Kintsugi—mending broken pottery with gold—by combining gold leaf with textural thread on fabric.
Apply gold leaf sheets to a section of your canvas using an adhesive size designed for textiles.
Once set, create ‘cracks’ and branching lines with thick, couched threads that appear to hold the golden piece together.
Cluster metallic beads where the threads converge to add weight and dimension, turning the composition into a powerful piece of framed embroidery.
13. Design a Solar System with Varied Textures
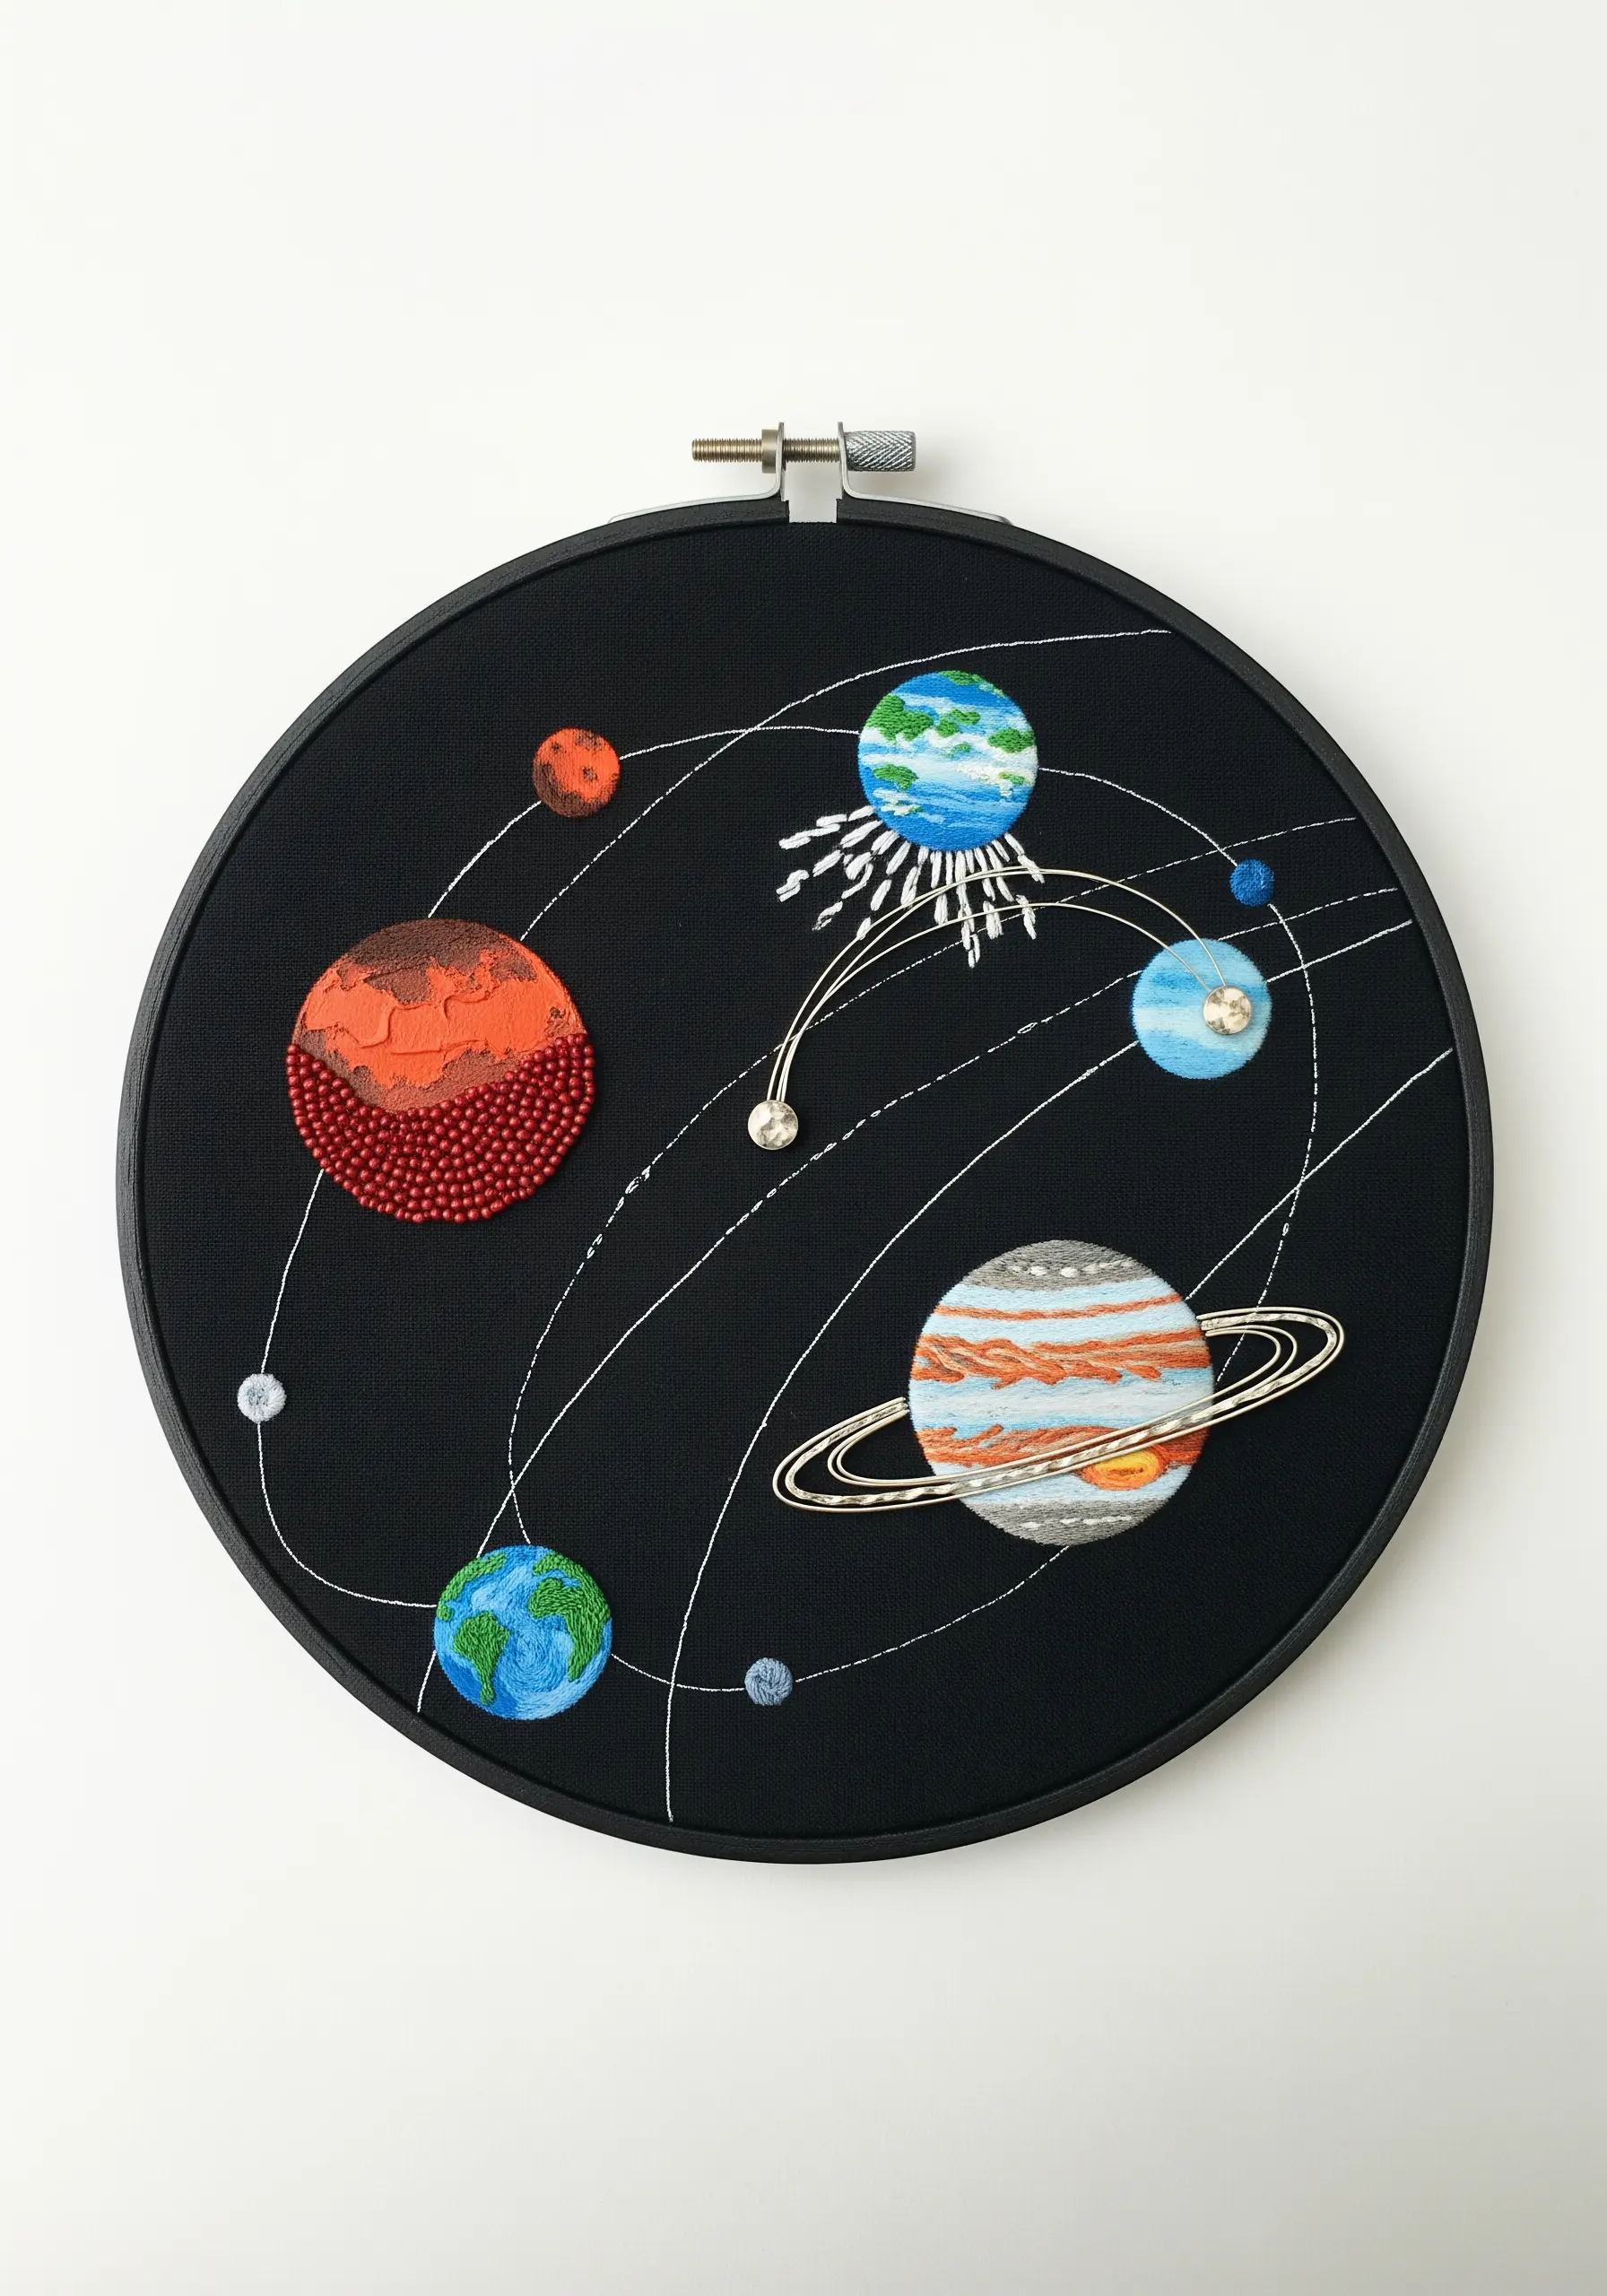
Bring the planets to life by assigning a unique texture to each one.
Use long-and-short stitch for Earth’s swirling continents and oceans, and cover Mars entirely in dense red and orange seed beads for a rocky surface.
For Saturn’s rings, carefully shape and couch a thin, flexible wire to create a perfect oval that appears to float around the planet.
This mix of flat stitching, raised beading, and sculptural wire makes your celestial scene feel dynamic, expansive, and thoughtfully designed.
14. Craft Delicate Dandelion Seeds with Beaded Tips
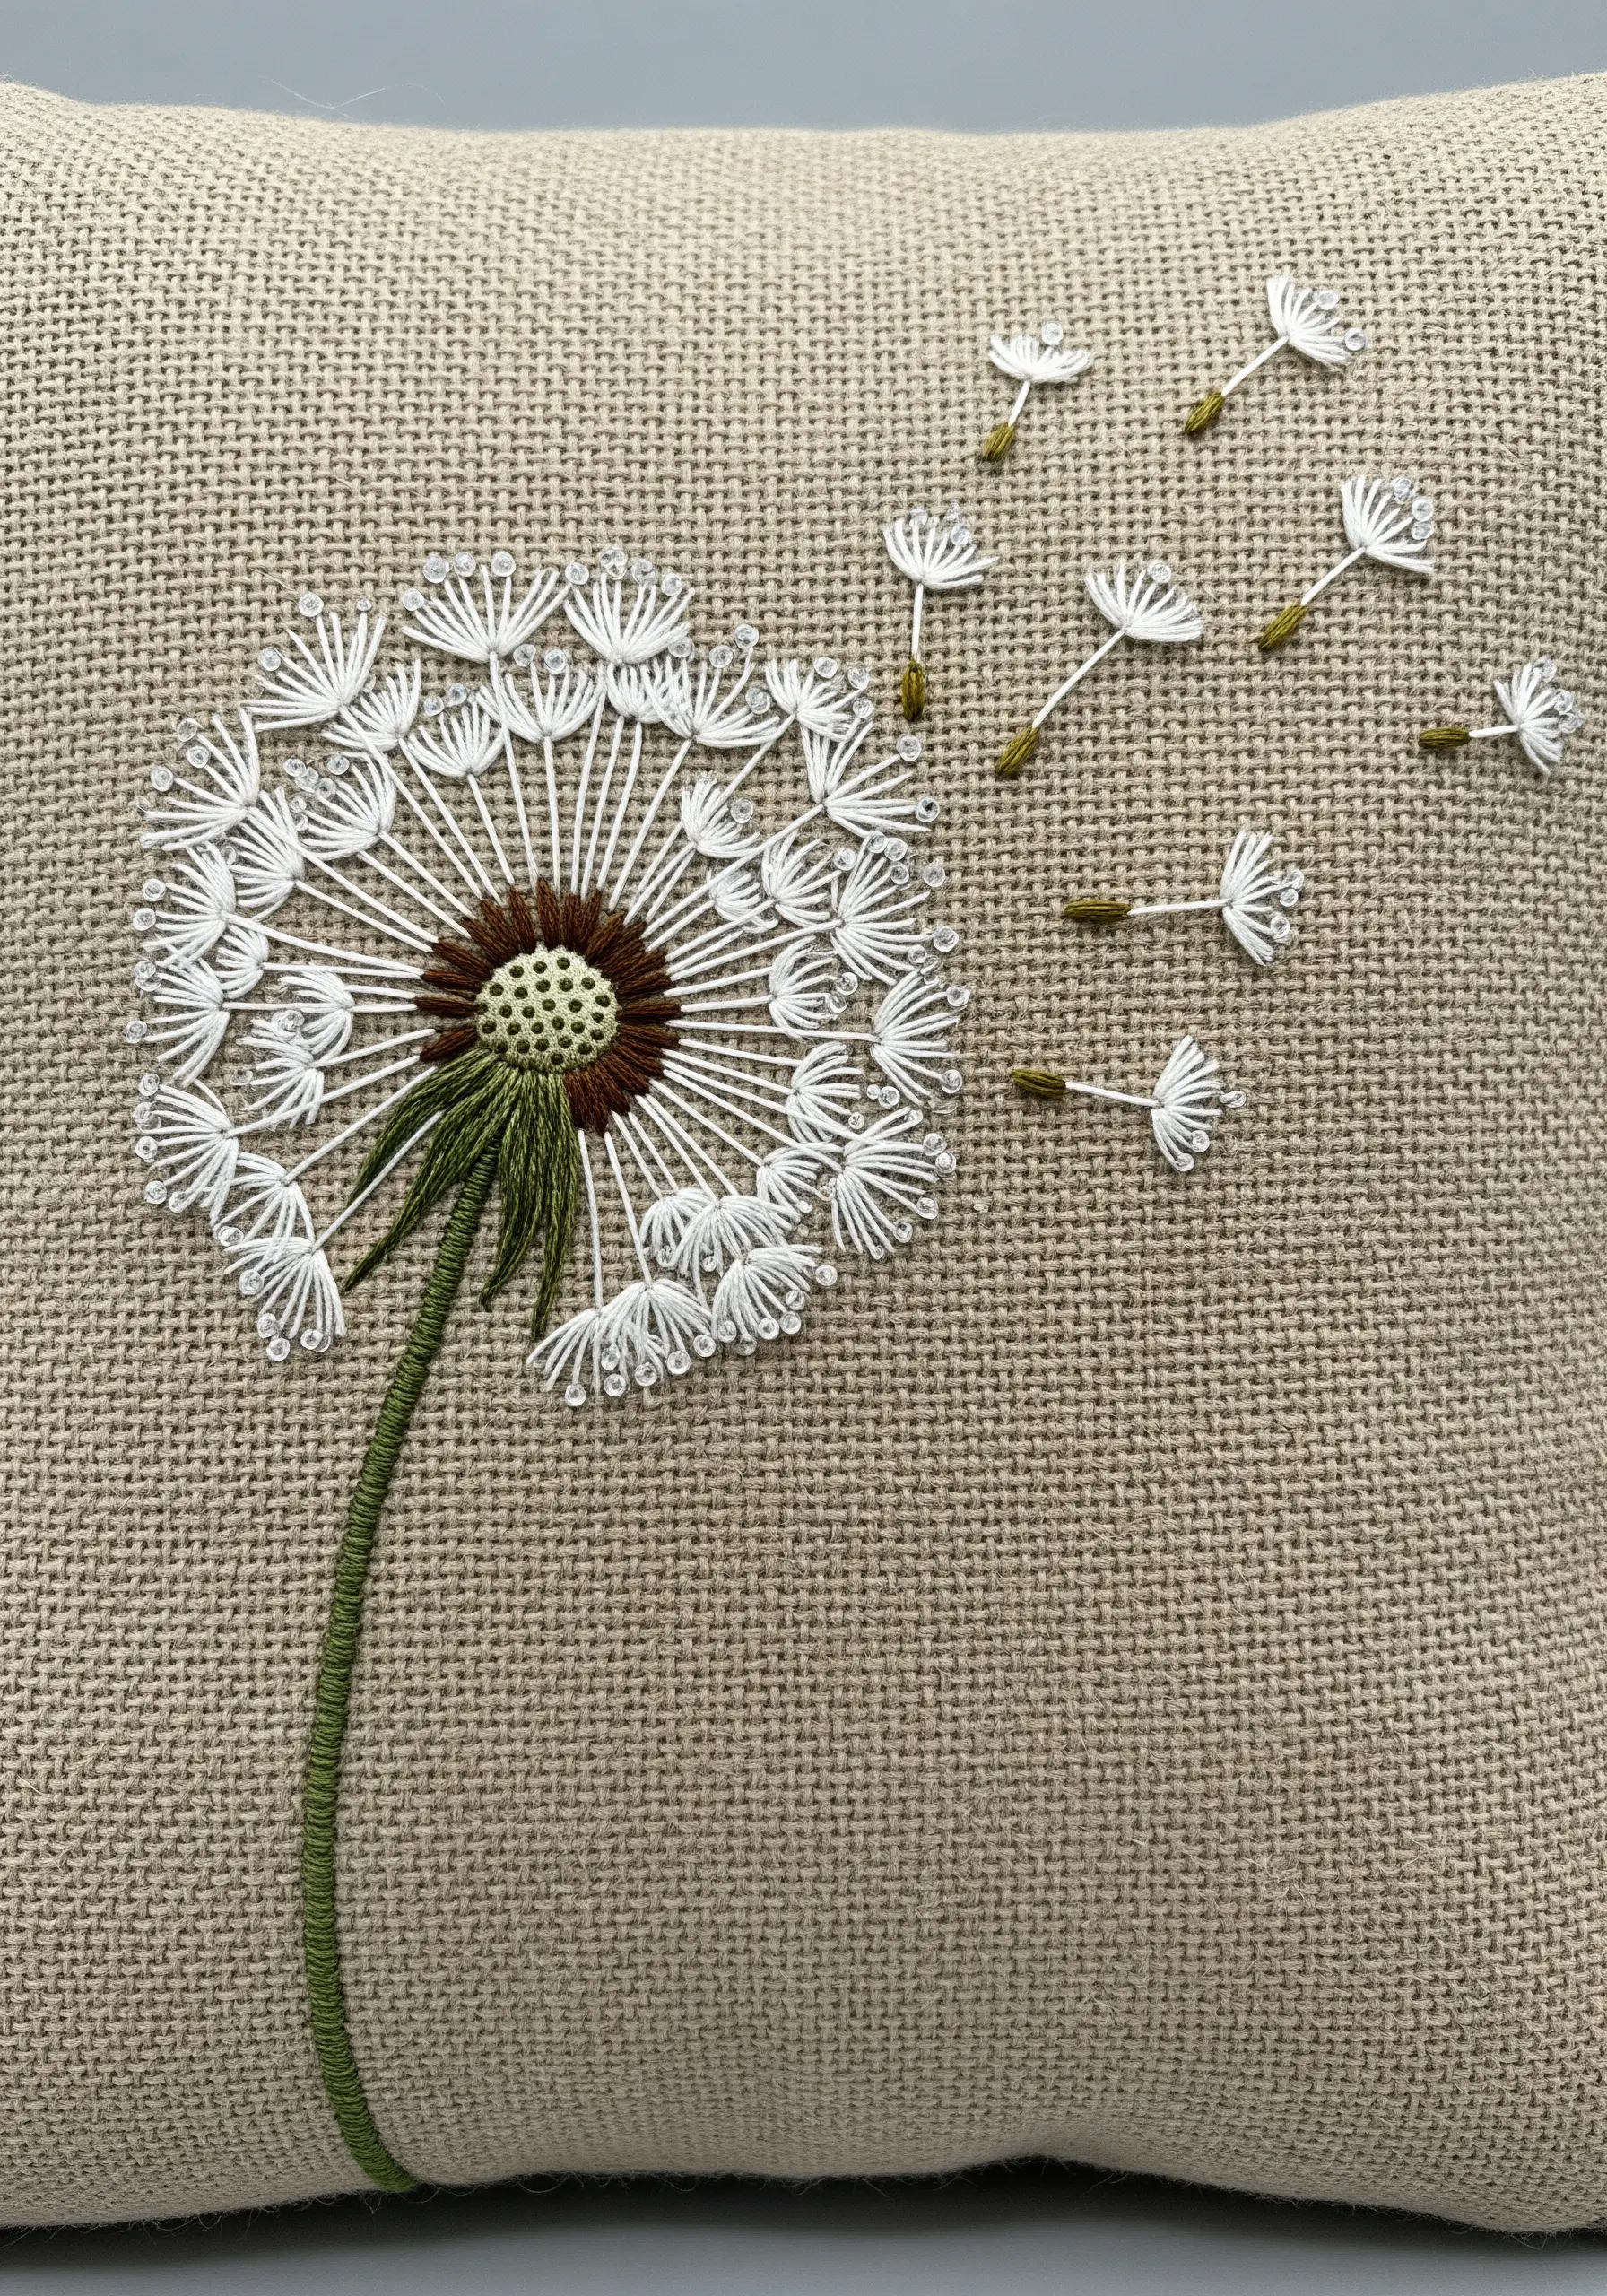
To capture the airy lightness of a dandelion on a rustic fabric like burlap, focus on delicate details.
Use a fine white thread for the radial lines of the seed head, worked in a simple straight stitch.
Form the fluffy parachutes with detached chain stitches (lazy daisies).
The key to making them sparkle is to anchor a single, tiny clear or white seed bead at the tip of each stitch. This catches the light beautifully and gives the impression of delicate, floating movement.
15. Illuminate a Cityscape with Pointillist Paint Dots
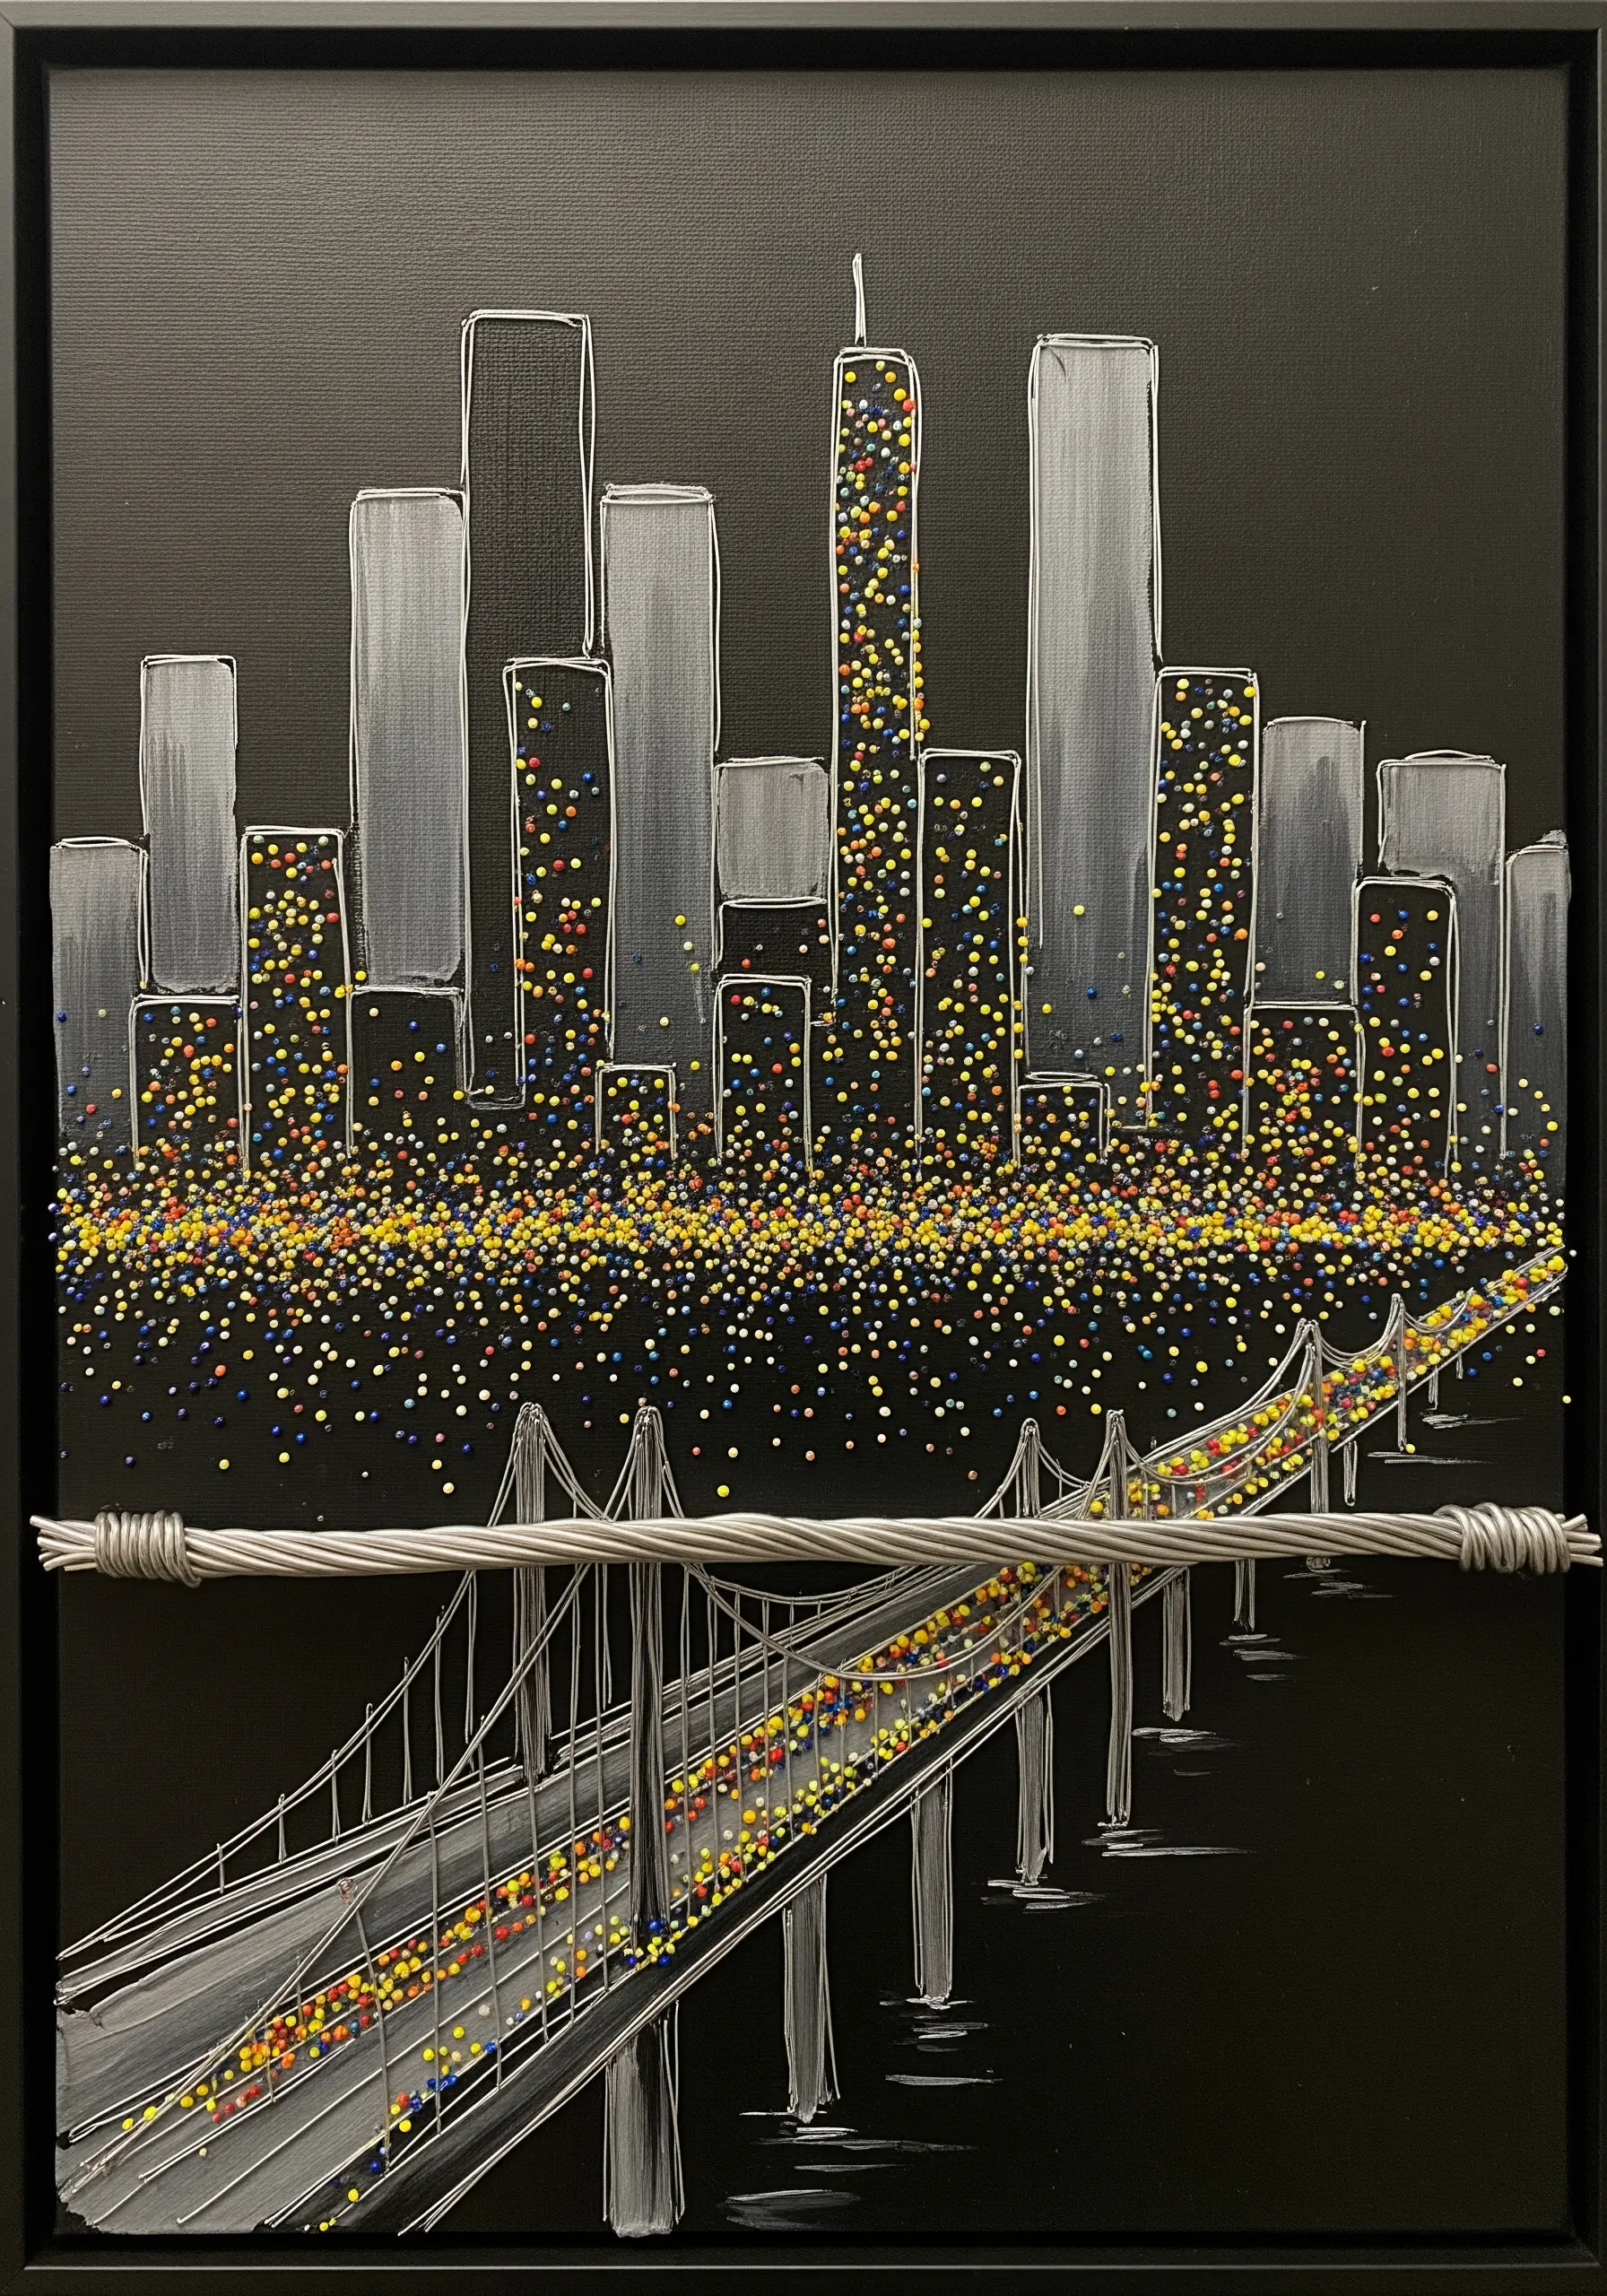
Create the effect of a bustling city at night with a pointillist-inspired painting technique.
Start by painting a monochrome skyline onto black canvas with white and grey acrylics for an architectural base.
Instead of stitching countless French knots for the lights, use tiny dots of brightly colored fabric paint or puff paint.
This method is faster and creates a vibrant, jewel-like texture. Add a bold, structural element like a twisted wire bridge in the foreground to create dramatic depth.
16. Combine Impasto Paint and Beads on Denim
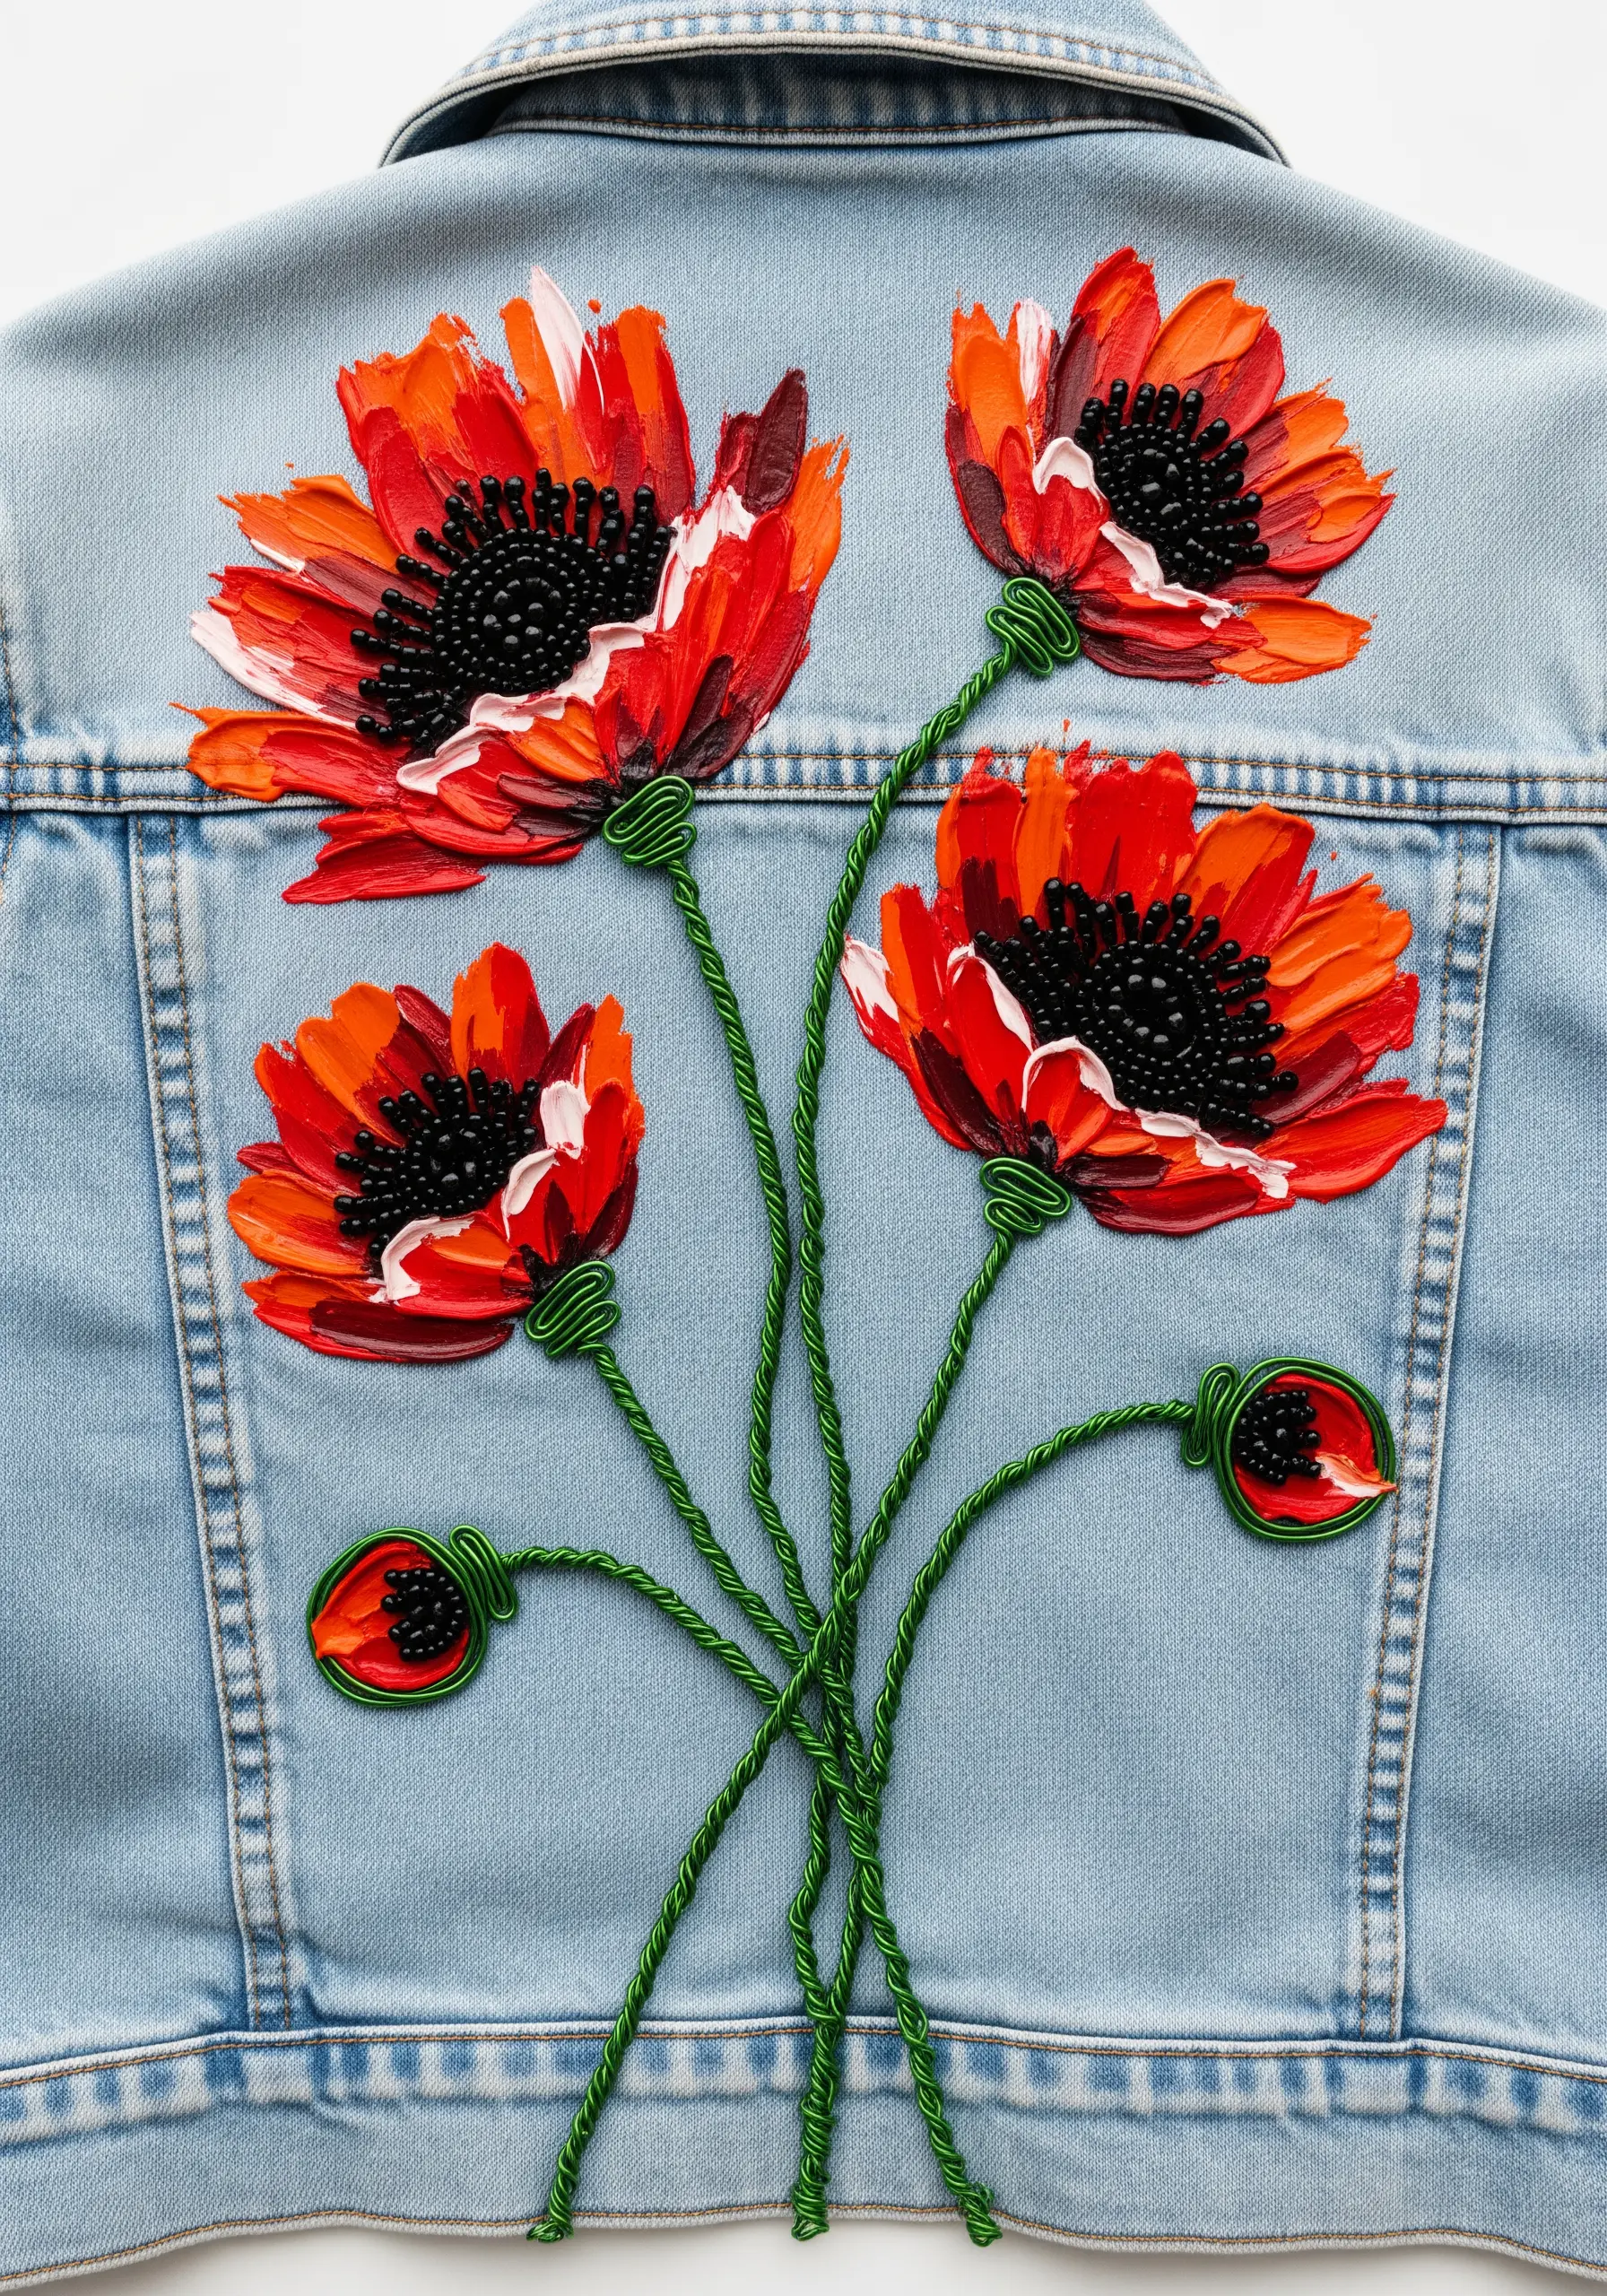
Give your floral embellishments a bold, painterly feel by applying thick acrylic paint with a palette knife directly onto a sturdy fabric like denim.
This impasto technique creates incredible dimension and visible texture for the petals.
Once the paint is completely dry, fill the flower centers with densely packed black seed beads to create a rich, caviar-bead texture.
Finish with stems made from thread-wrapped green wire, which provides a clean line and can be shaped into graceful, natural curves.
17. Curate a Cohesive Abstract Hoop Art Series
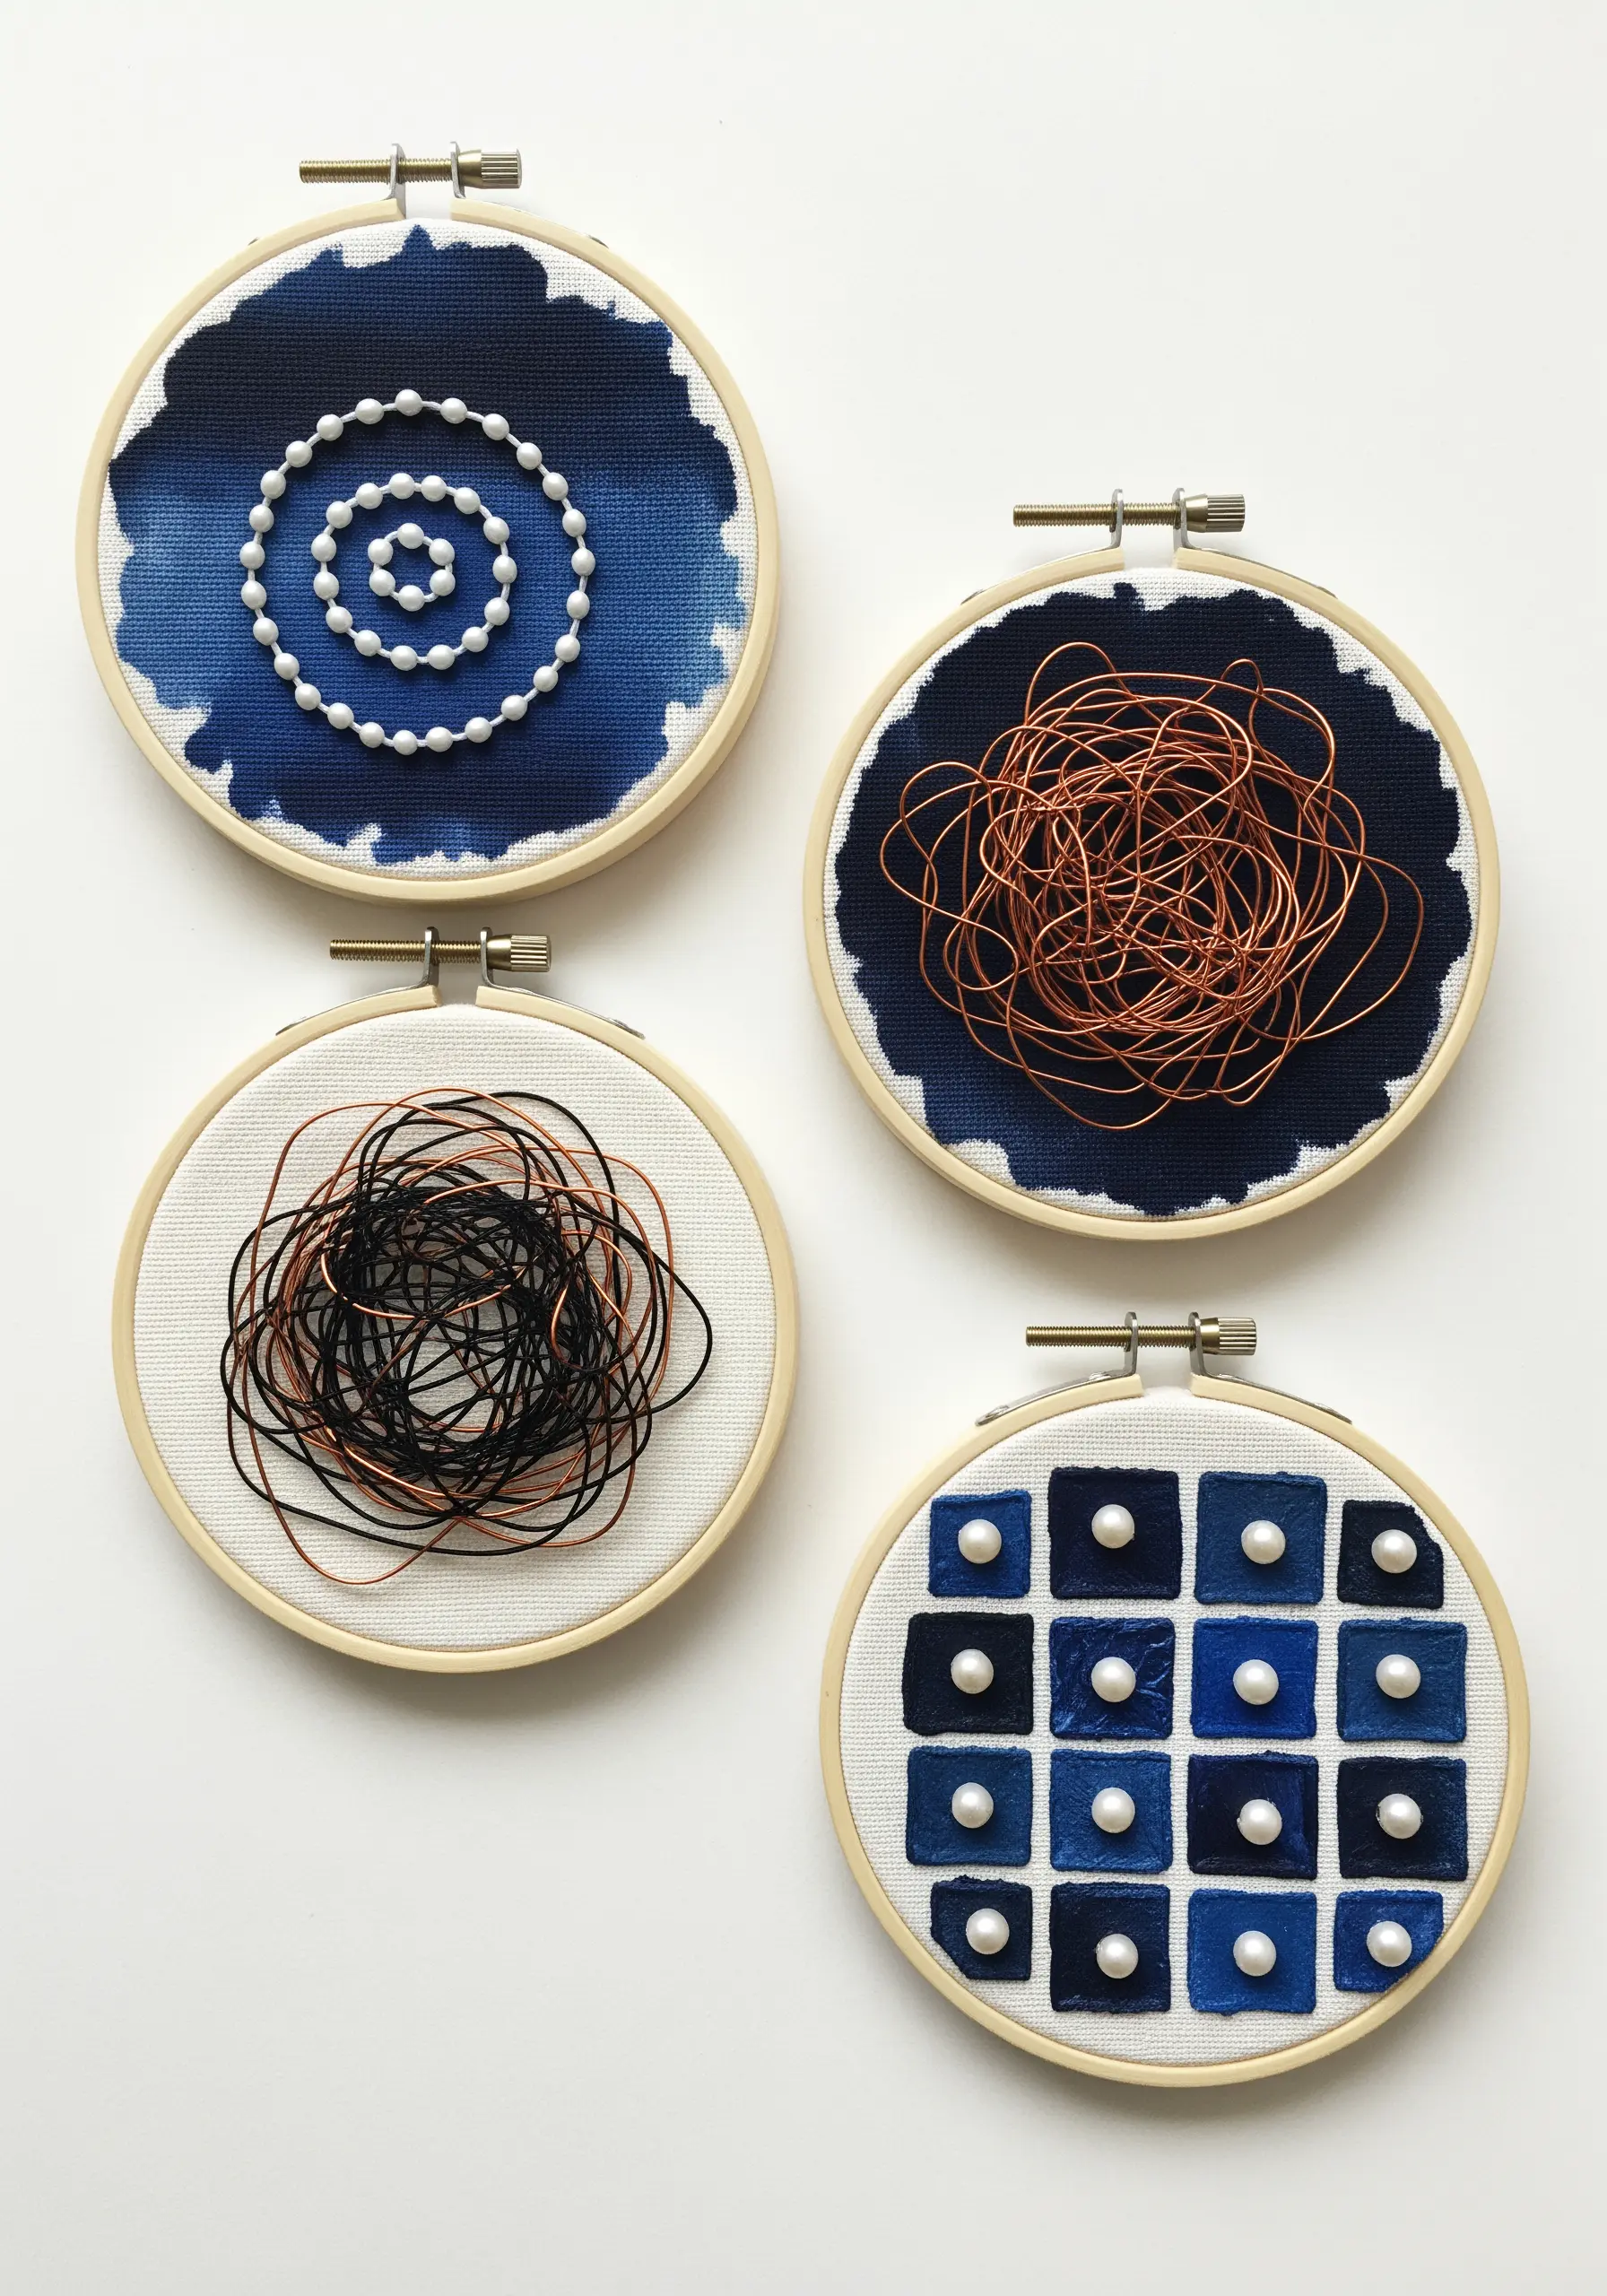
To design a unified collection of minimal DIY embroidery pieces, work with a limited palette and a repeating set of materials.
Begin by dip-dyeing your fabric with a single color, like indigo, to create an organic, cohesive base.
Then, explore different compositions within each hoop: a perfect spiral of pearl beads, a chaotic nest of copper wire, or a neat grid of painted squares accented with beads.
Using the same elements in different arrangements ensures the finished set looks intentional and thoughtfully curated when displayed together.
18. Build a Realistic Geode with Crystals and Stone Chips
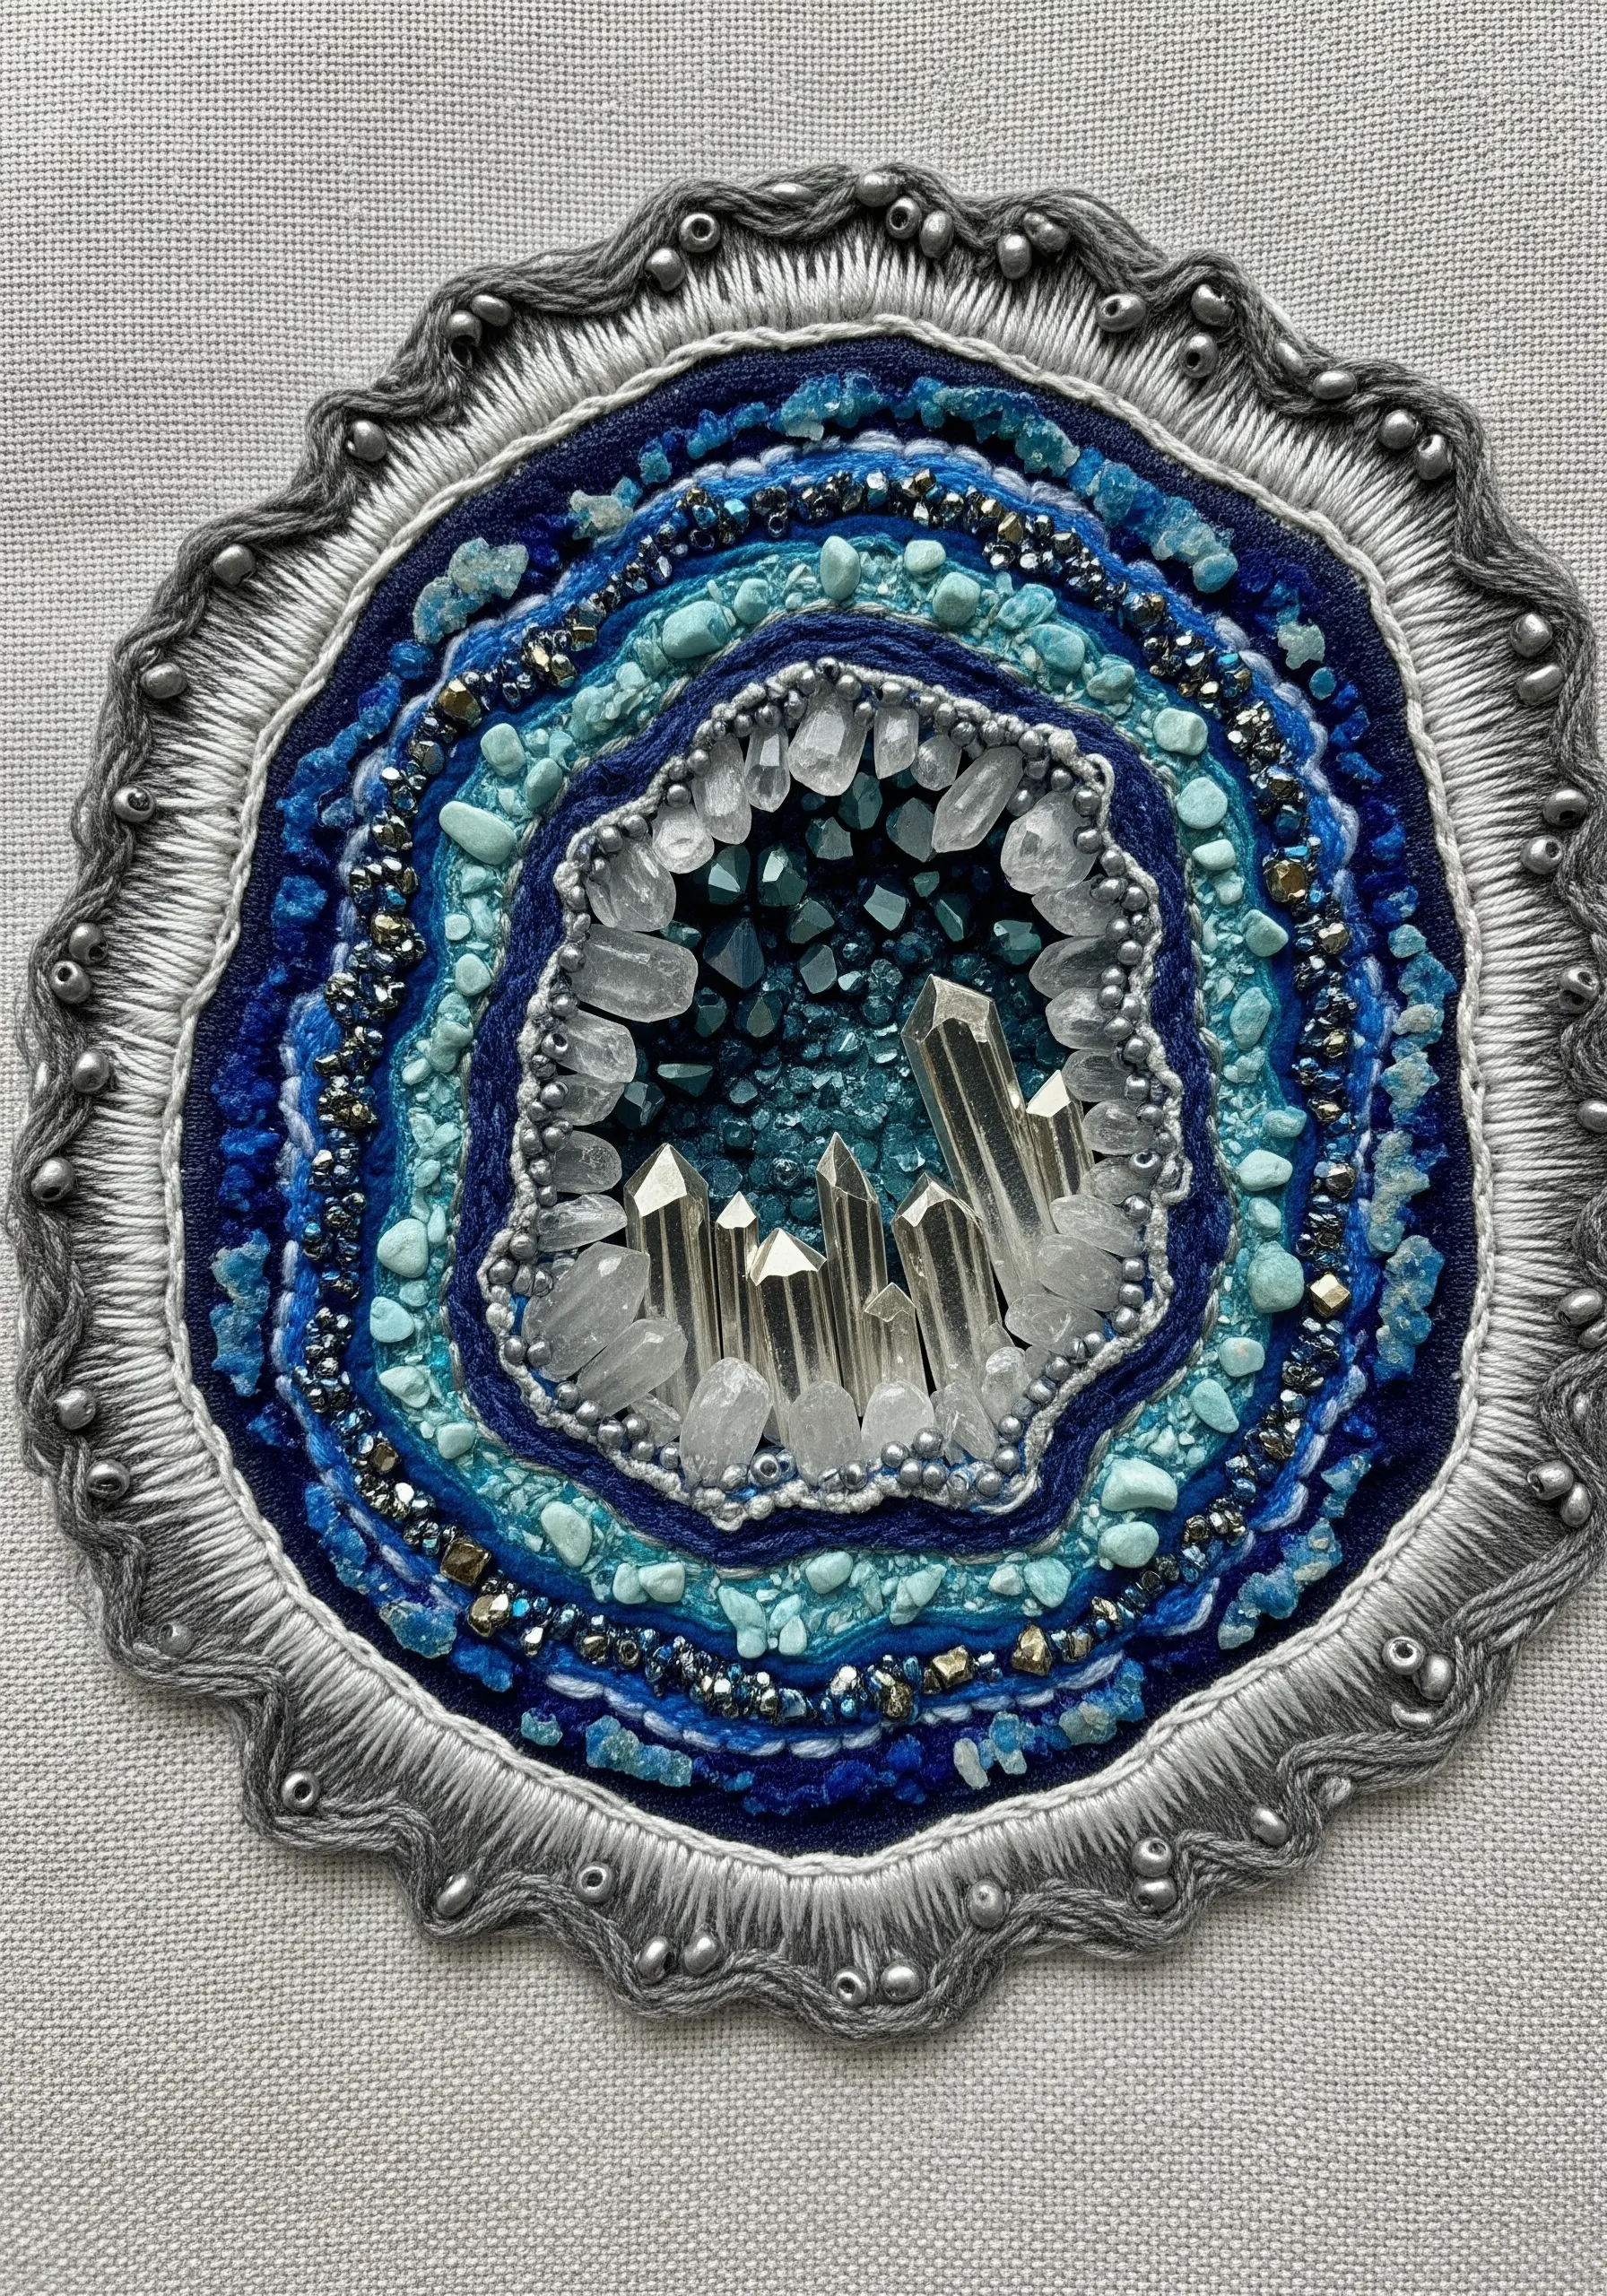
For a truly convincing geode, move beyond thread and incorporate authentic materials.
Stitch concentric rings of color using satin stitch and French knots to build up the outer layers.
In the center, apply a strong fabric glue (like E6000) and embed small quartz points and crushed stone chips, which you can find at most craft stores.
Fill any remaining gaps with seed beads and metallic thread to blend the crystals seamlessly into your stitchwork for a piece with unmatched sparkle and texture.
19. Paint Whimsical Mushrooms with Wire-Wrapped Stems
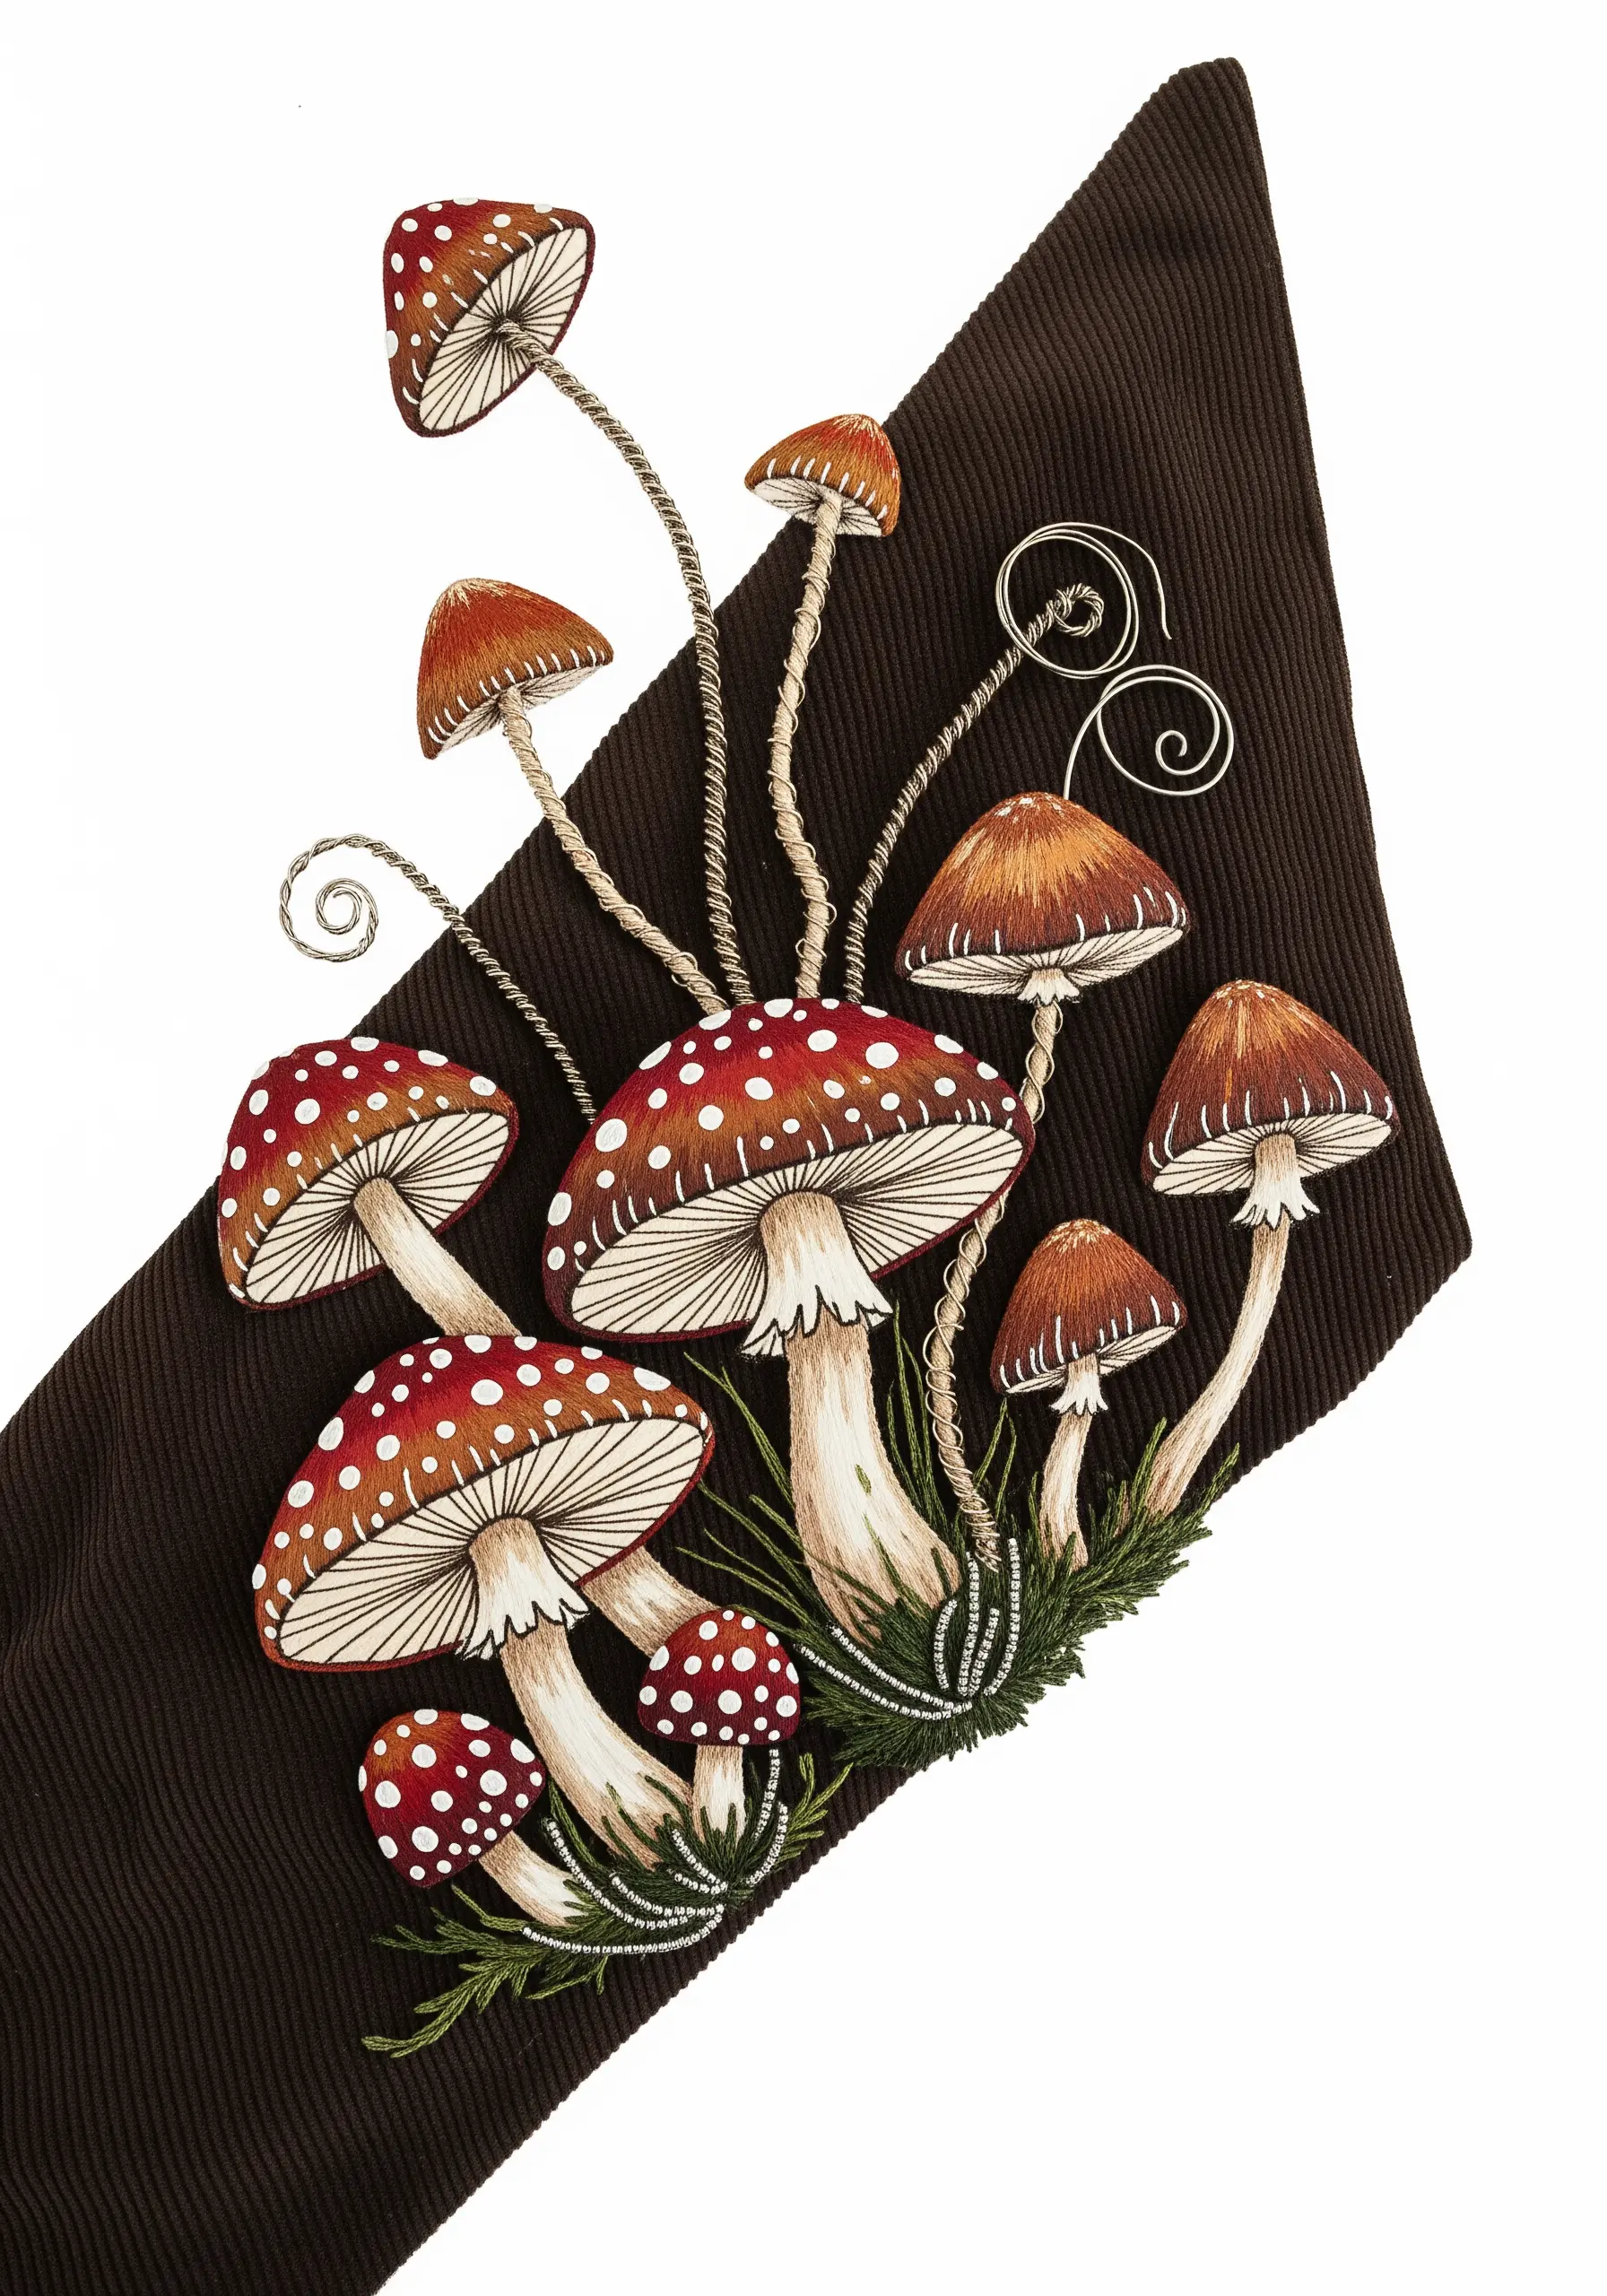
Elevate charming mushroom forest floor embroidery projects by combining painting and sculpture.
First, stitch the gills with fine straight stitches.
Then, use acrylic paint for the caps and their signature spots—it’s much faster and creates a cleaner finish than using satin stitch or French knots.
For the stems, wrap embroidery floss around a flexible wire. This allows you to bend them into beautifully natural curves and even add playful spirals for an extra touch of forest magic.


