

A single word, a meaningful date, or a simple initial holds a unique power. It transforms an everyday object into something personal, a quiet story told in thread. But it’s easy to feel that your own stitched lettering never looks quite as polished or intentional as you’d hoped.
The difference between amateur and professional-looking embroidery isn’t about complexity; it’s about control and thoughtful choices. It’s knowing which stitch will create the smoothest curve, how many strands of thread to use for a crisp finish, and how to work with your fabric, not against it.
Here, you won’t find complicated patterns. Instead, you’ll discover the core techniques that elevate simple lettering into small acts of artistry. Consider this your guide to making your mark with confidence, precision, and personal style, one stitch at a time.
1. The Secret to Fluid Cursive Stitches
To achieve a seamless, ink-like flow for script on a crisp fabric like cotton poplin, choose your stitch and thread with intention.
Opt for a whipped backstitch—first, create a standard backstitch outline, then weave a second thread through the stitches without piercing the fabric.
This technique smooths the jagged edges a simple backstitch can leave on curves, creating one continuous, elegant line.
Use only one or two strands of six-strand floss to maintain delicacy, ensuring the word feels like a whisper, not a shout.
2. Mastering Clean Lines for Modern Numerals
When embroidering sans-serif numbers or letters on textured fabric like linen or canvas, precision is paramount.
Use a basic backstitch, but focus on keeping each stitch length perfectly uniform—this is what gives the final result a clean, almost digital look.
For a medium-weight canvas, two strands of floss provide enough definition without becoming bulky.
Always use a stabilizer on the back, even for small designs, to prevent the fabric’s weave from pulling your straight lines out of shape.
3. Layering Botanicals Over a Satin Stitch Base
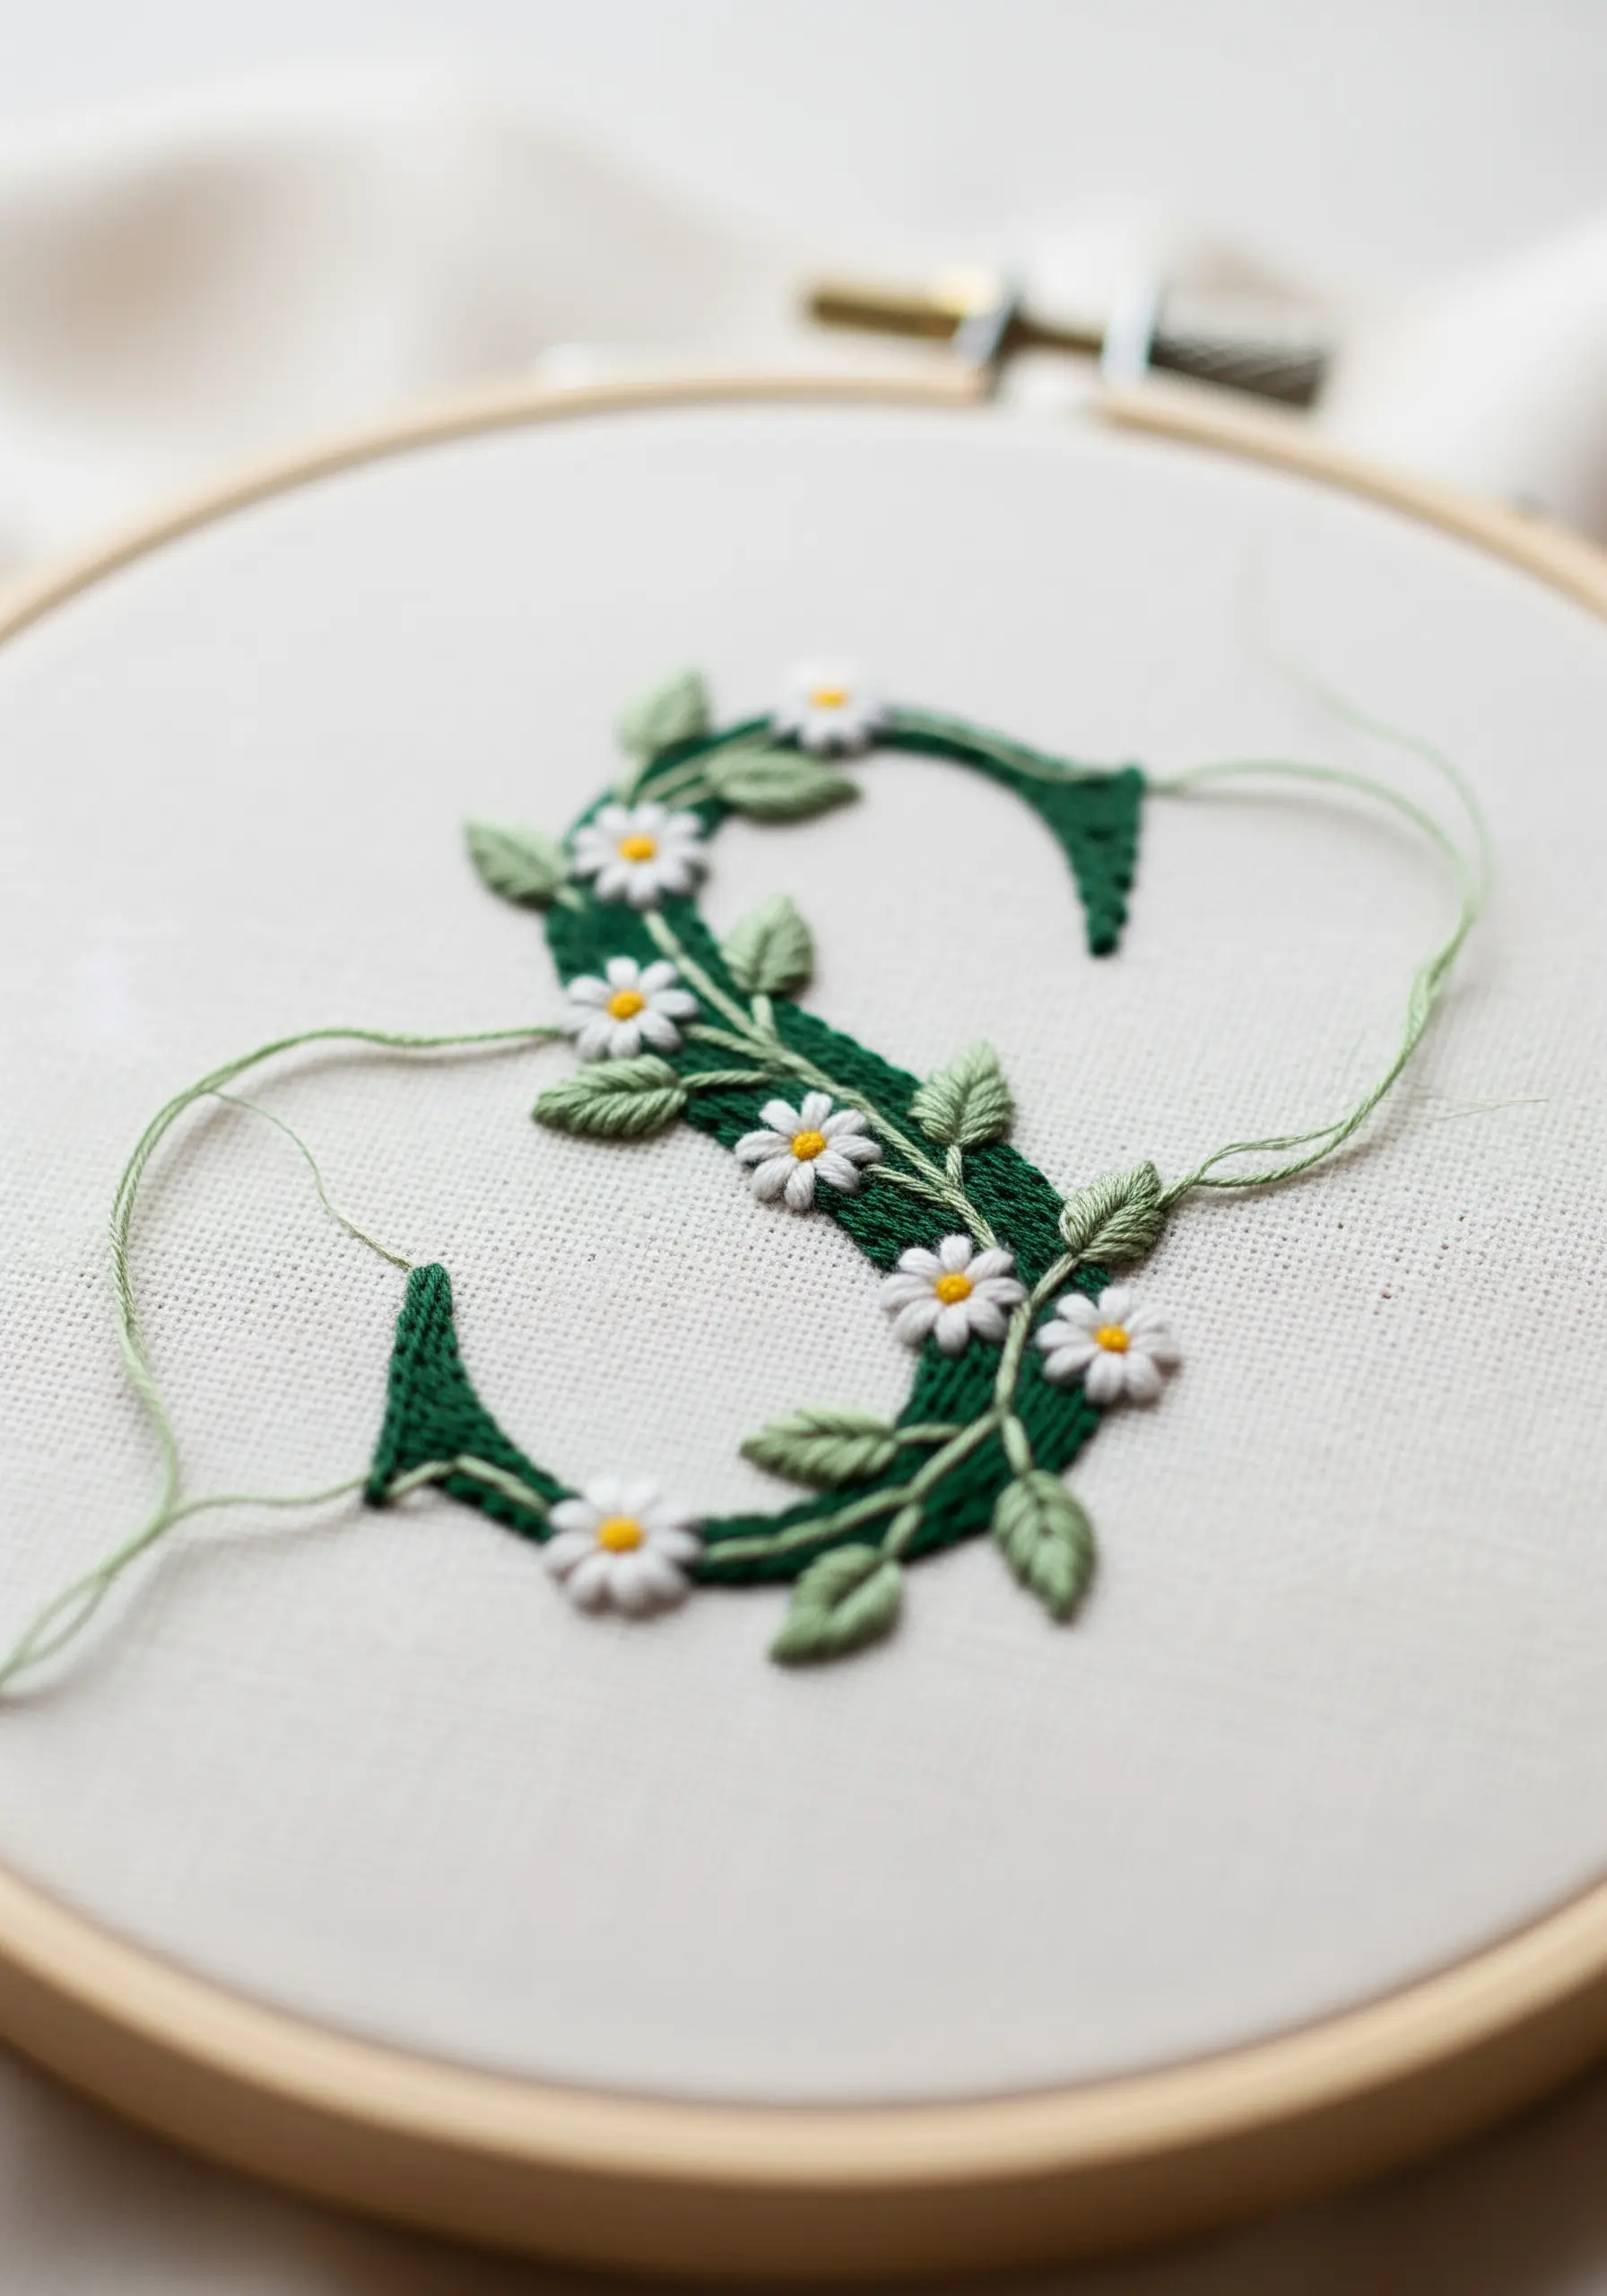
Combine textures by building a design in layers to add dimension without overwhelming the composition.
First, create your letterform with a smooth, dense satin stitch in a rich color like forest green.
Then, using a finer thread (just one or two strands), scatter tiny lazy daisy stitches and French knots over the top to form delicate flowers and leaves.
This layering technique creates a beautiful contrast between the flat, graphic letter and the three-dimensional cottagecore floral elements.
4. Creating Raised Monograms with Padded Satin Stitch

For a monogram that looks and feels exceptionally luxurious, use a padded satin stitch to give it a raised, three-dimensional profile.
Begin by creating a foundation within your letter’s outline using small, straight seed stitches or a second, smaller satin stitch layer.
Then, stitch your final satin stitch layer over this padding, working in the opposite direction.
The underlying stitches push the top layer up, creating a satisfyingly plump letterform that catches the light and adds a professional, heirloom quality to linens.
5. Executing Bold Satin Stitch on Denim
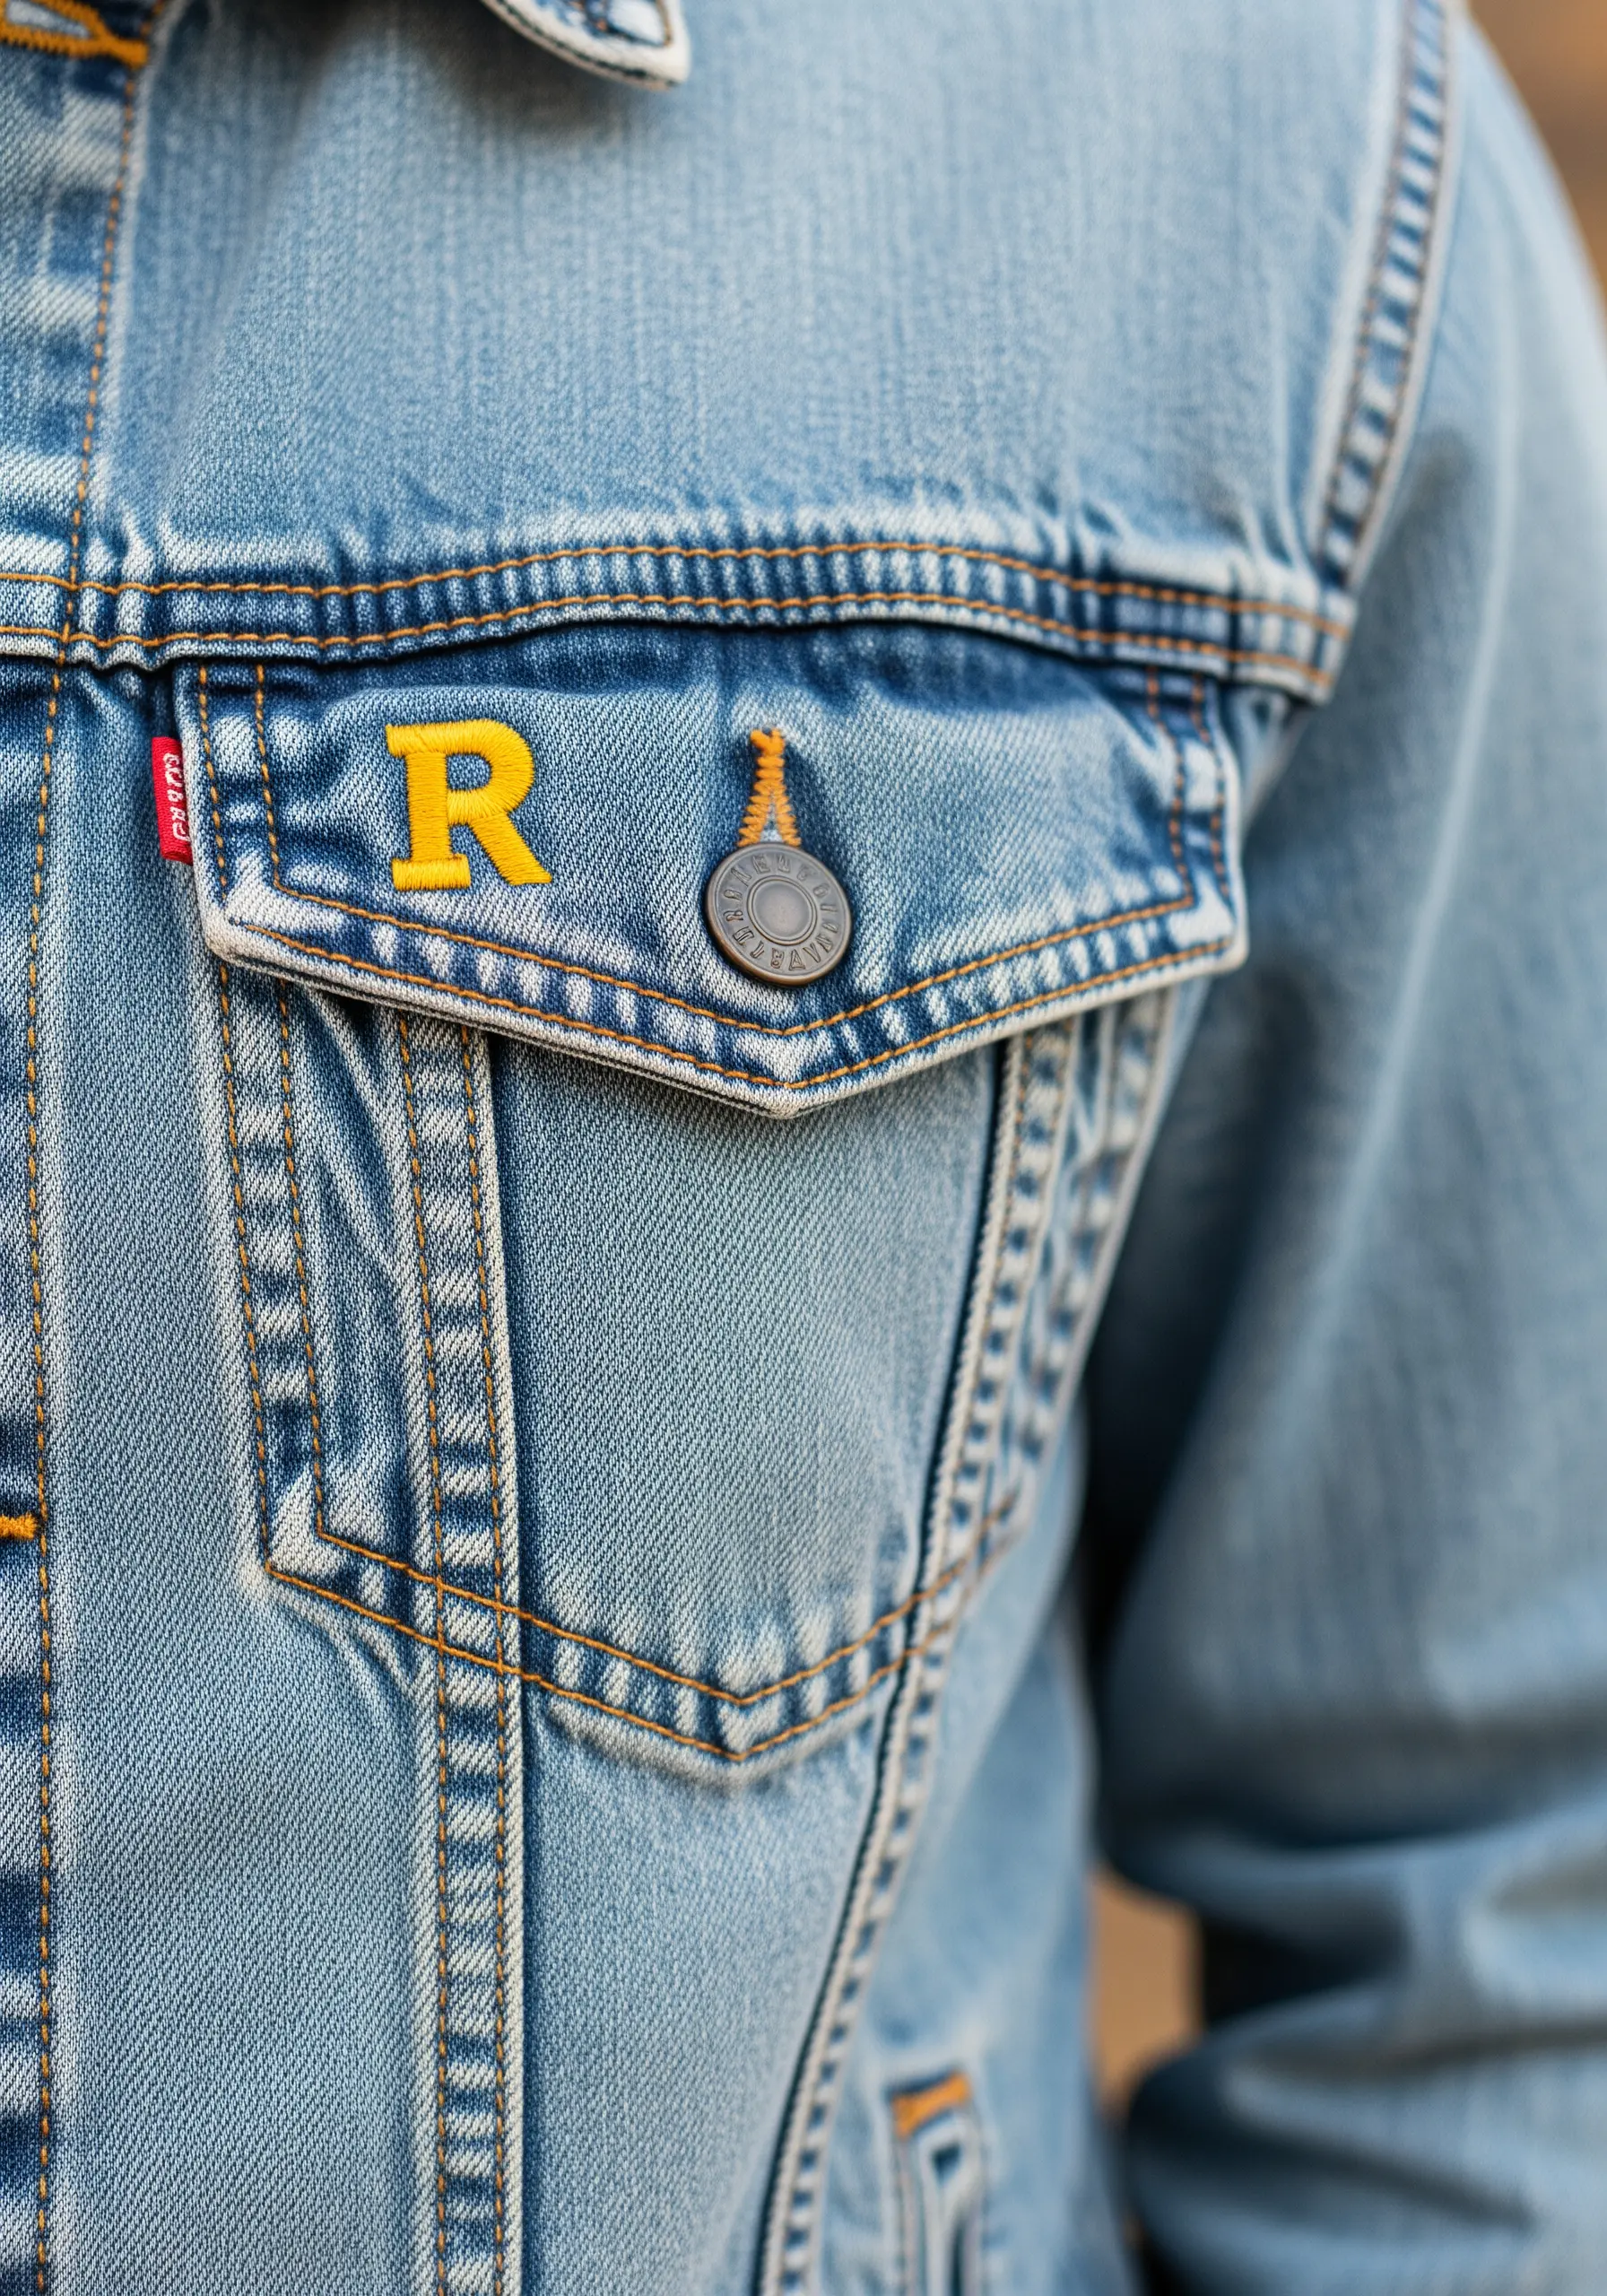
Stitching on heavy, unforgiving fabric like denim requires a few adjustments for a clean, professional finish.
Always use an iron-on stabilizer on the inside of the jacket to prevent the stretchy fabric from puckering under the tension of your fill stitches.
For bold, graphic letters, use all six strands of cotton floss or switch to a thicker thread like Perle cotton no. 5 for excellent coverage and a slight sheen.
Keep your satin stitches short and uniform to ensure the edges of the letter stay crisp and defined against the denim’s texture, turning old clothes into art.
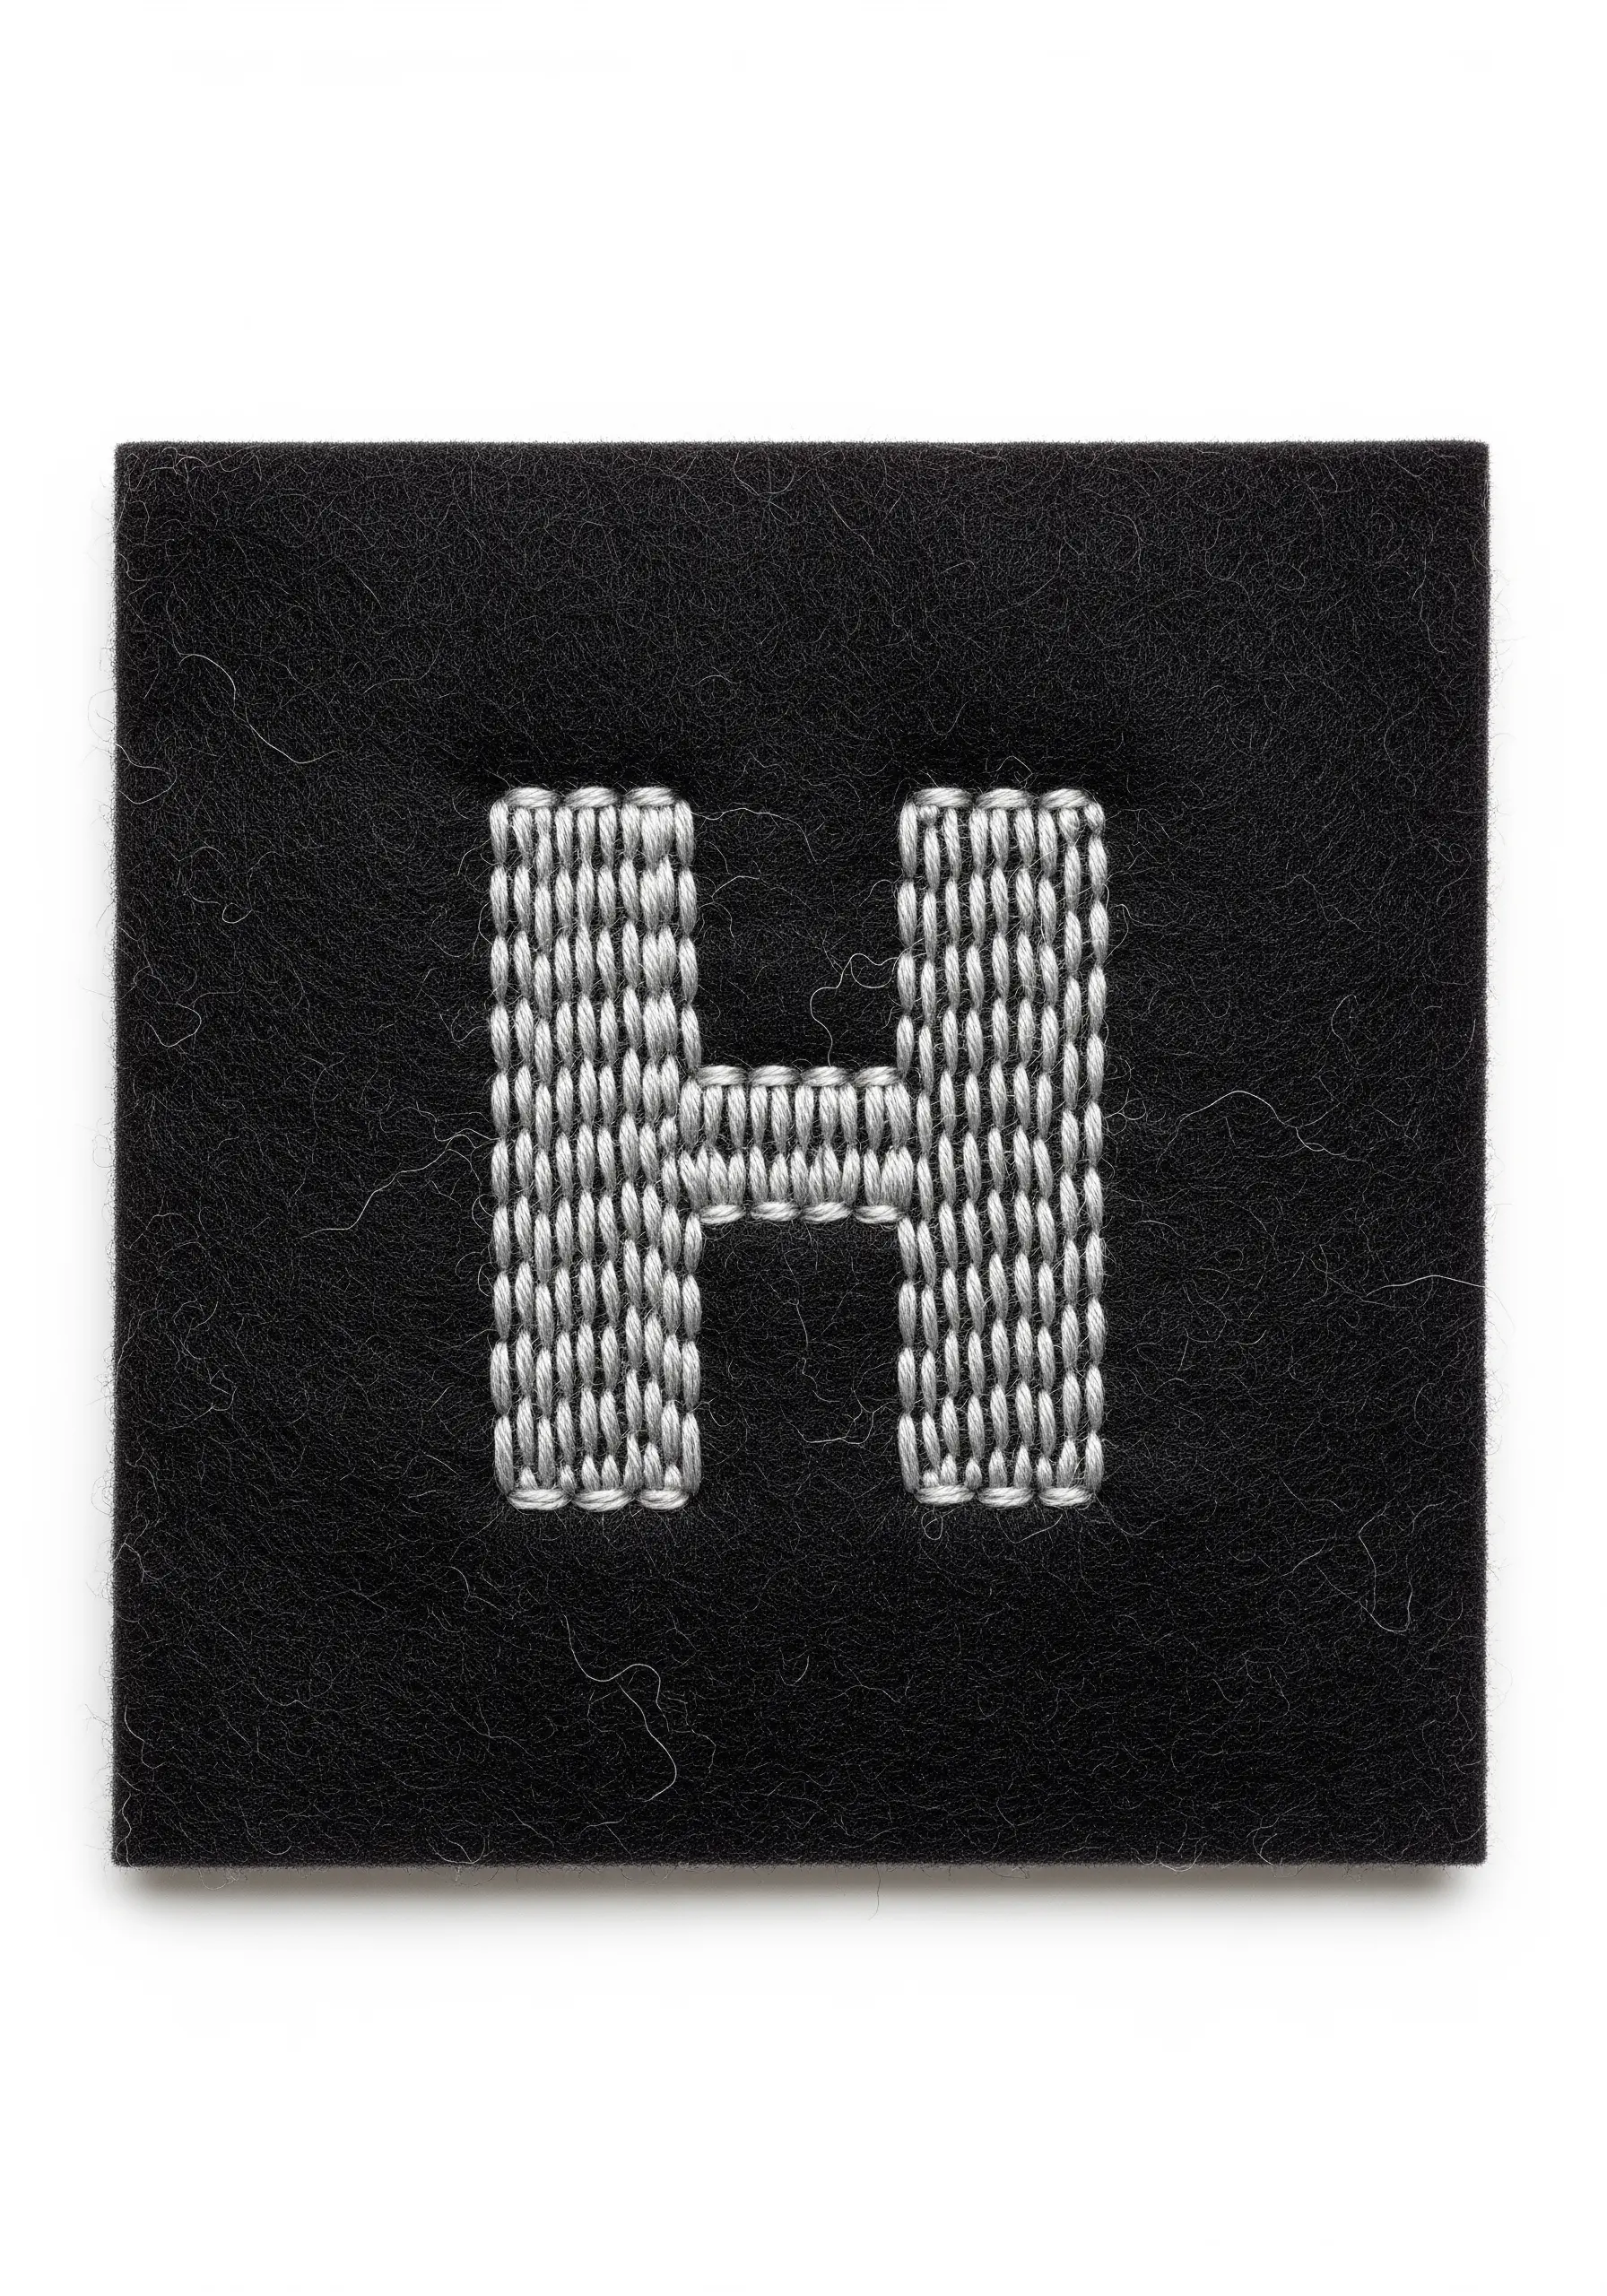
6. Using Couching to Create Textured, Rope-Like Letters
When you want lettering with significant texture and presence, couching is an ideal technique.
Lay down a thick cord, yarn, or a bundle of embroidery floss along your letter’s shape, and then use a second, finer thread to tack it down with small, perpendicular stitches.
This method allows you to add bold, rope-like dimension that a standard stitch can’t achieve.
It works exceptionally well on non-woven fabrics like felt, which provide a stable, non-fraying base for the stitches.
7. Pairing Stem Stitch with Grid-Weave Fabrics
While Aida cloth is designed for cross-stitch, you can create a compelling modern look by using surface embroidery stitches on its gridded texture.
A stem stitch works beautifully, creating a solid, rope-like line that contrasts with the geometric holes of the fabric.
The key is to ignore the grid and focus on making your stitches smooth and consistent, as if you were working on plain-weave linen.
This unexpected pairing of stitch and fabric results in a piece that feels both handcrafted and contemporary.
8. Achieving Graphic Depth with Parallel Line Work
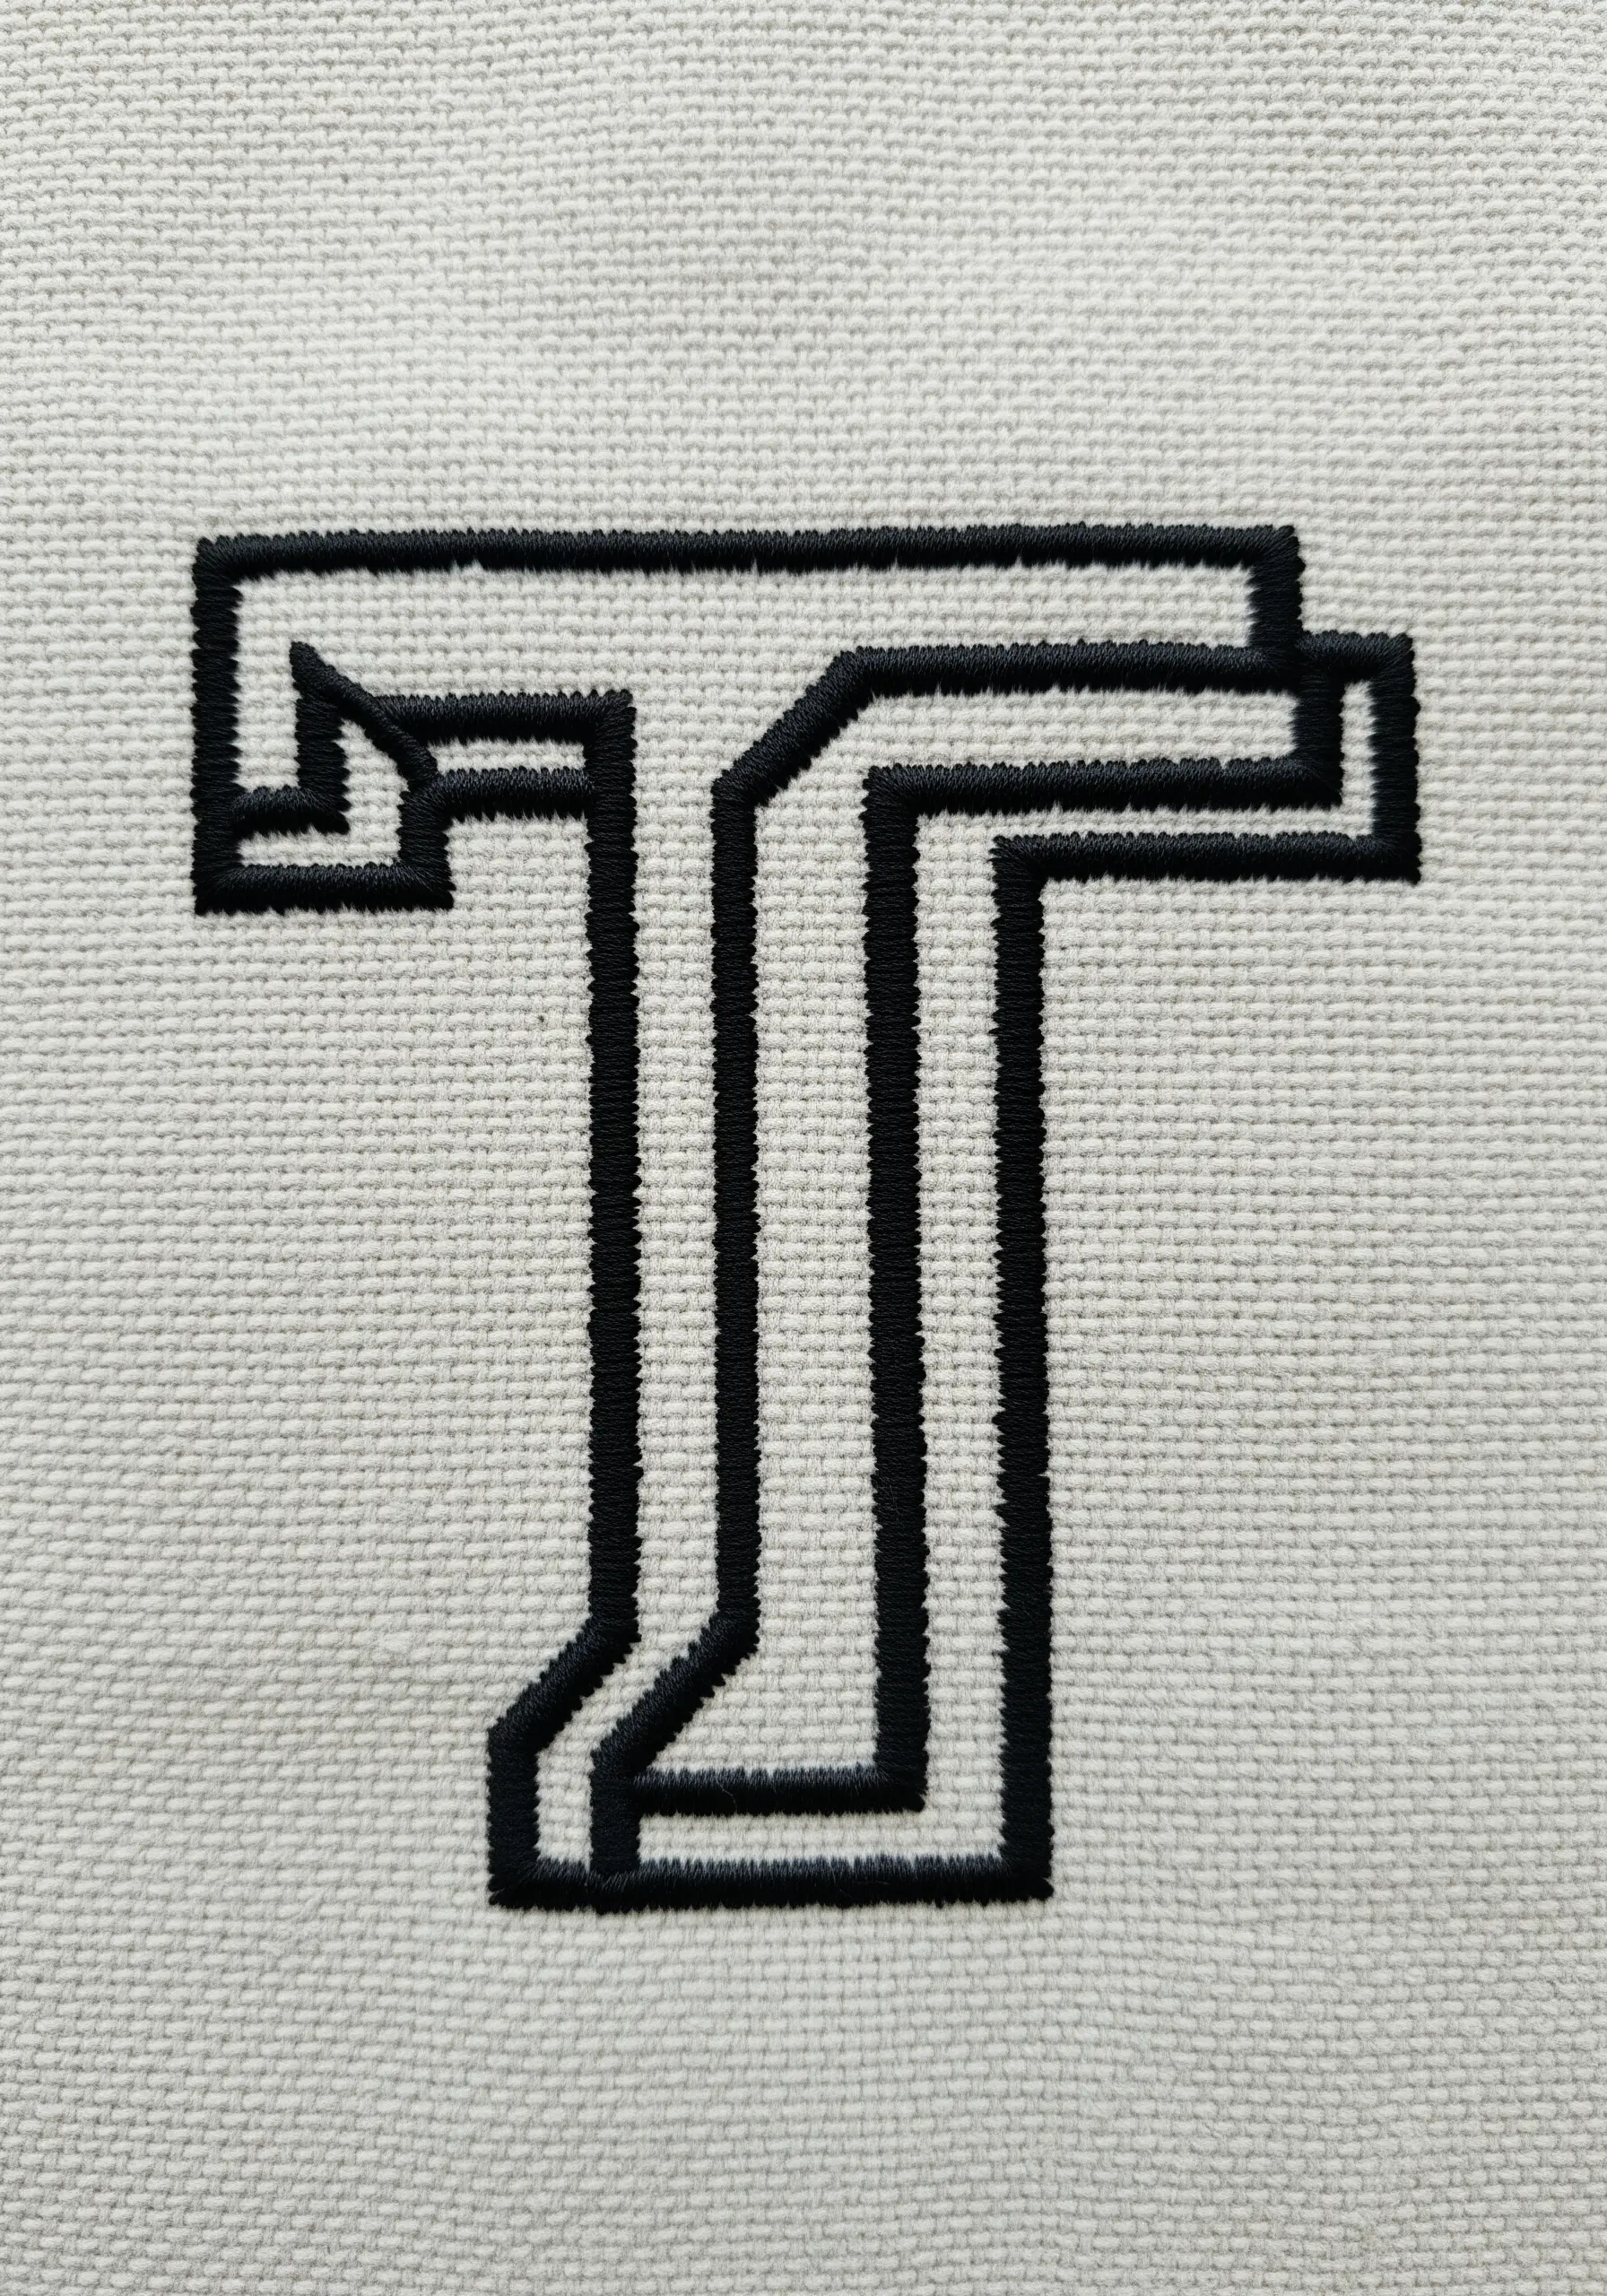
Create a striking, architectural letter by using negative space and precise stitch direction.
Instead of a solid fill, render the letter with a series of clean, parallel backstitches or satin stitches that create an inline or shadow effect.
To ensure perfect alignment, draw your guidelines with a water-soluble pen before you begin.
This technique transforms a simple initial into a piece of modern graphic design, relying on precision and structure rather than color or complexity.
9. The Art of Angling Satin Stitches for Perfect Curves
The secret to a flawless satin-stitched cursive letter lies in the angle of your stitches.
Instead of keeping them strictly vertical, you must pivot them slightly as you move around a curve, like the spokes of a wheel.
For a tight curve, begin your stitches in the center and work outwards toward each end—this helps you maintain the shape’s integrity.
Using only two or three strands of floss will allow the stitches to blend more seamlessly, creating a smooth, liquid-like surface.
10. Building Dimensional Letters with a French Knot Fill
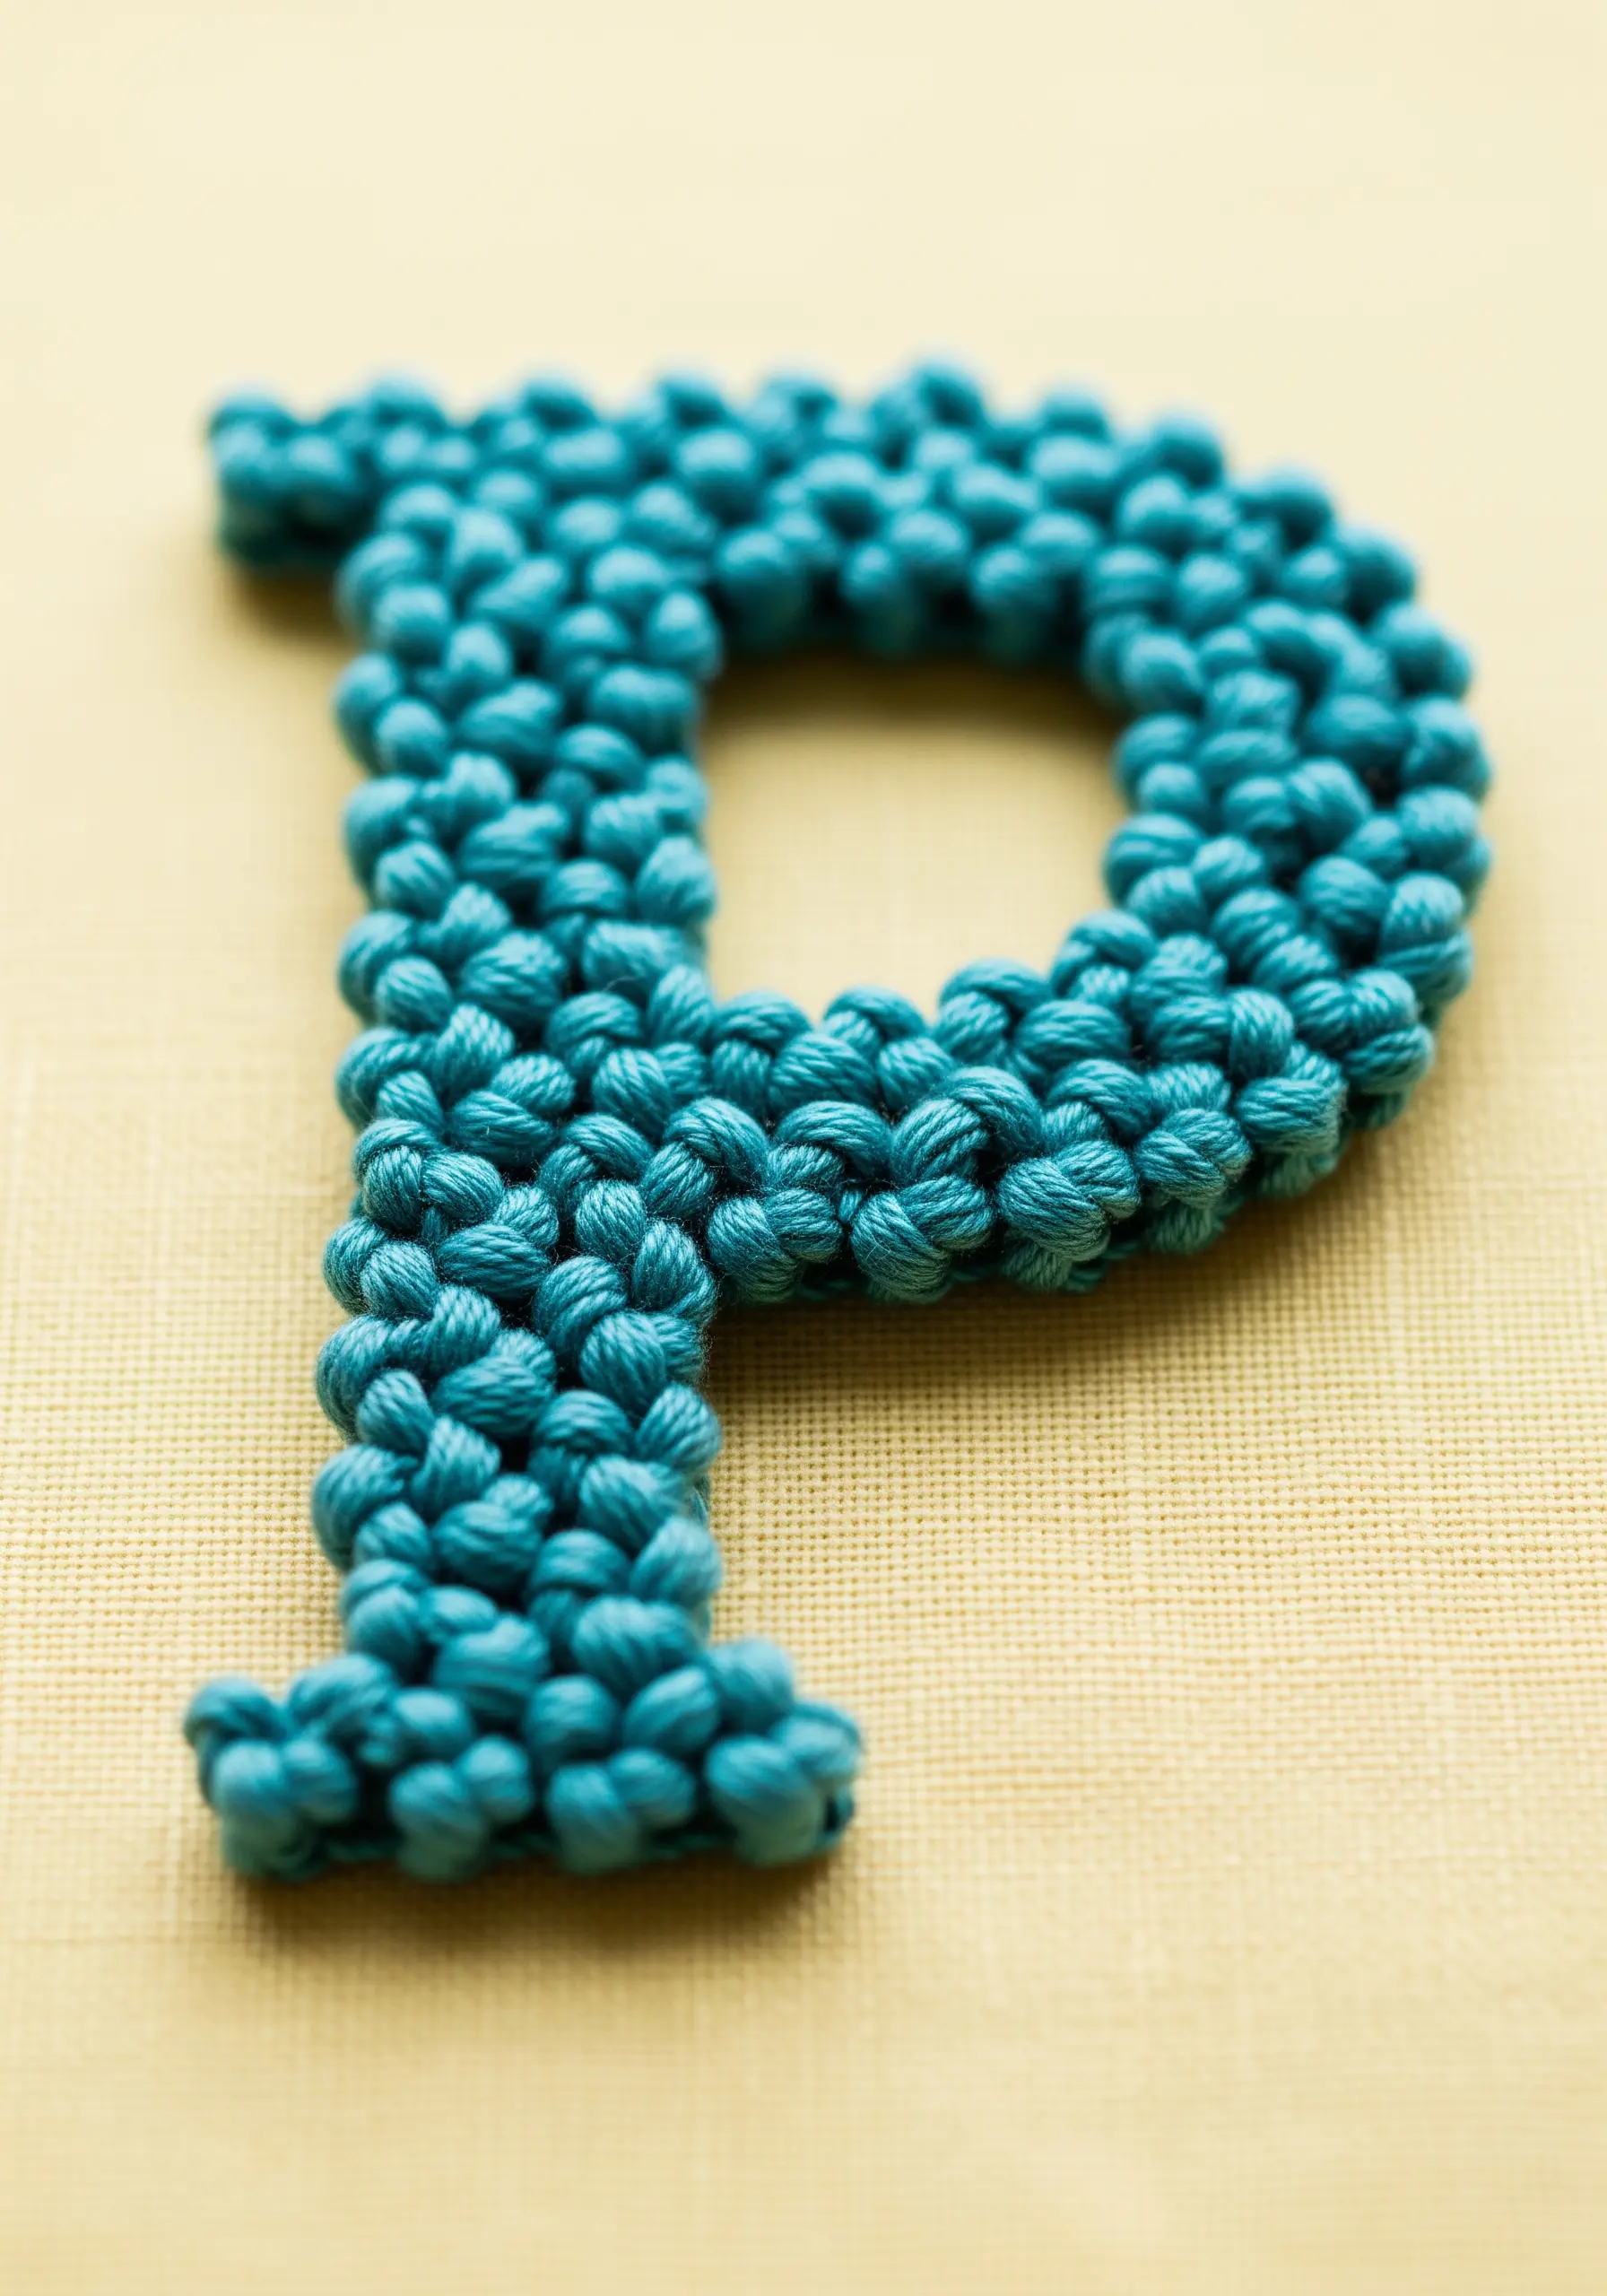
For lettering that invites touch, use French knots as a fill stitch to create a dense, bobbled texture.
First, trace a clear outline of your letter onto the fabric. Then, fill the shape with tightly packed French knots, ensuring you vary their placement to avoid rows.
For a consistent texture, wrap the thread around your needle the same number of times for each knot—once for a delicate feel, twice for a more pronounced bump.
This technique is perfect for adding a playful, tactile dimension to hoop art or pillows, resulting in high-texture fabric collage embroidery projects.
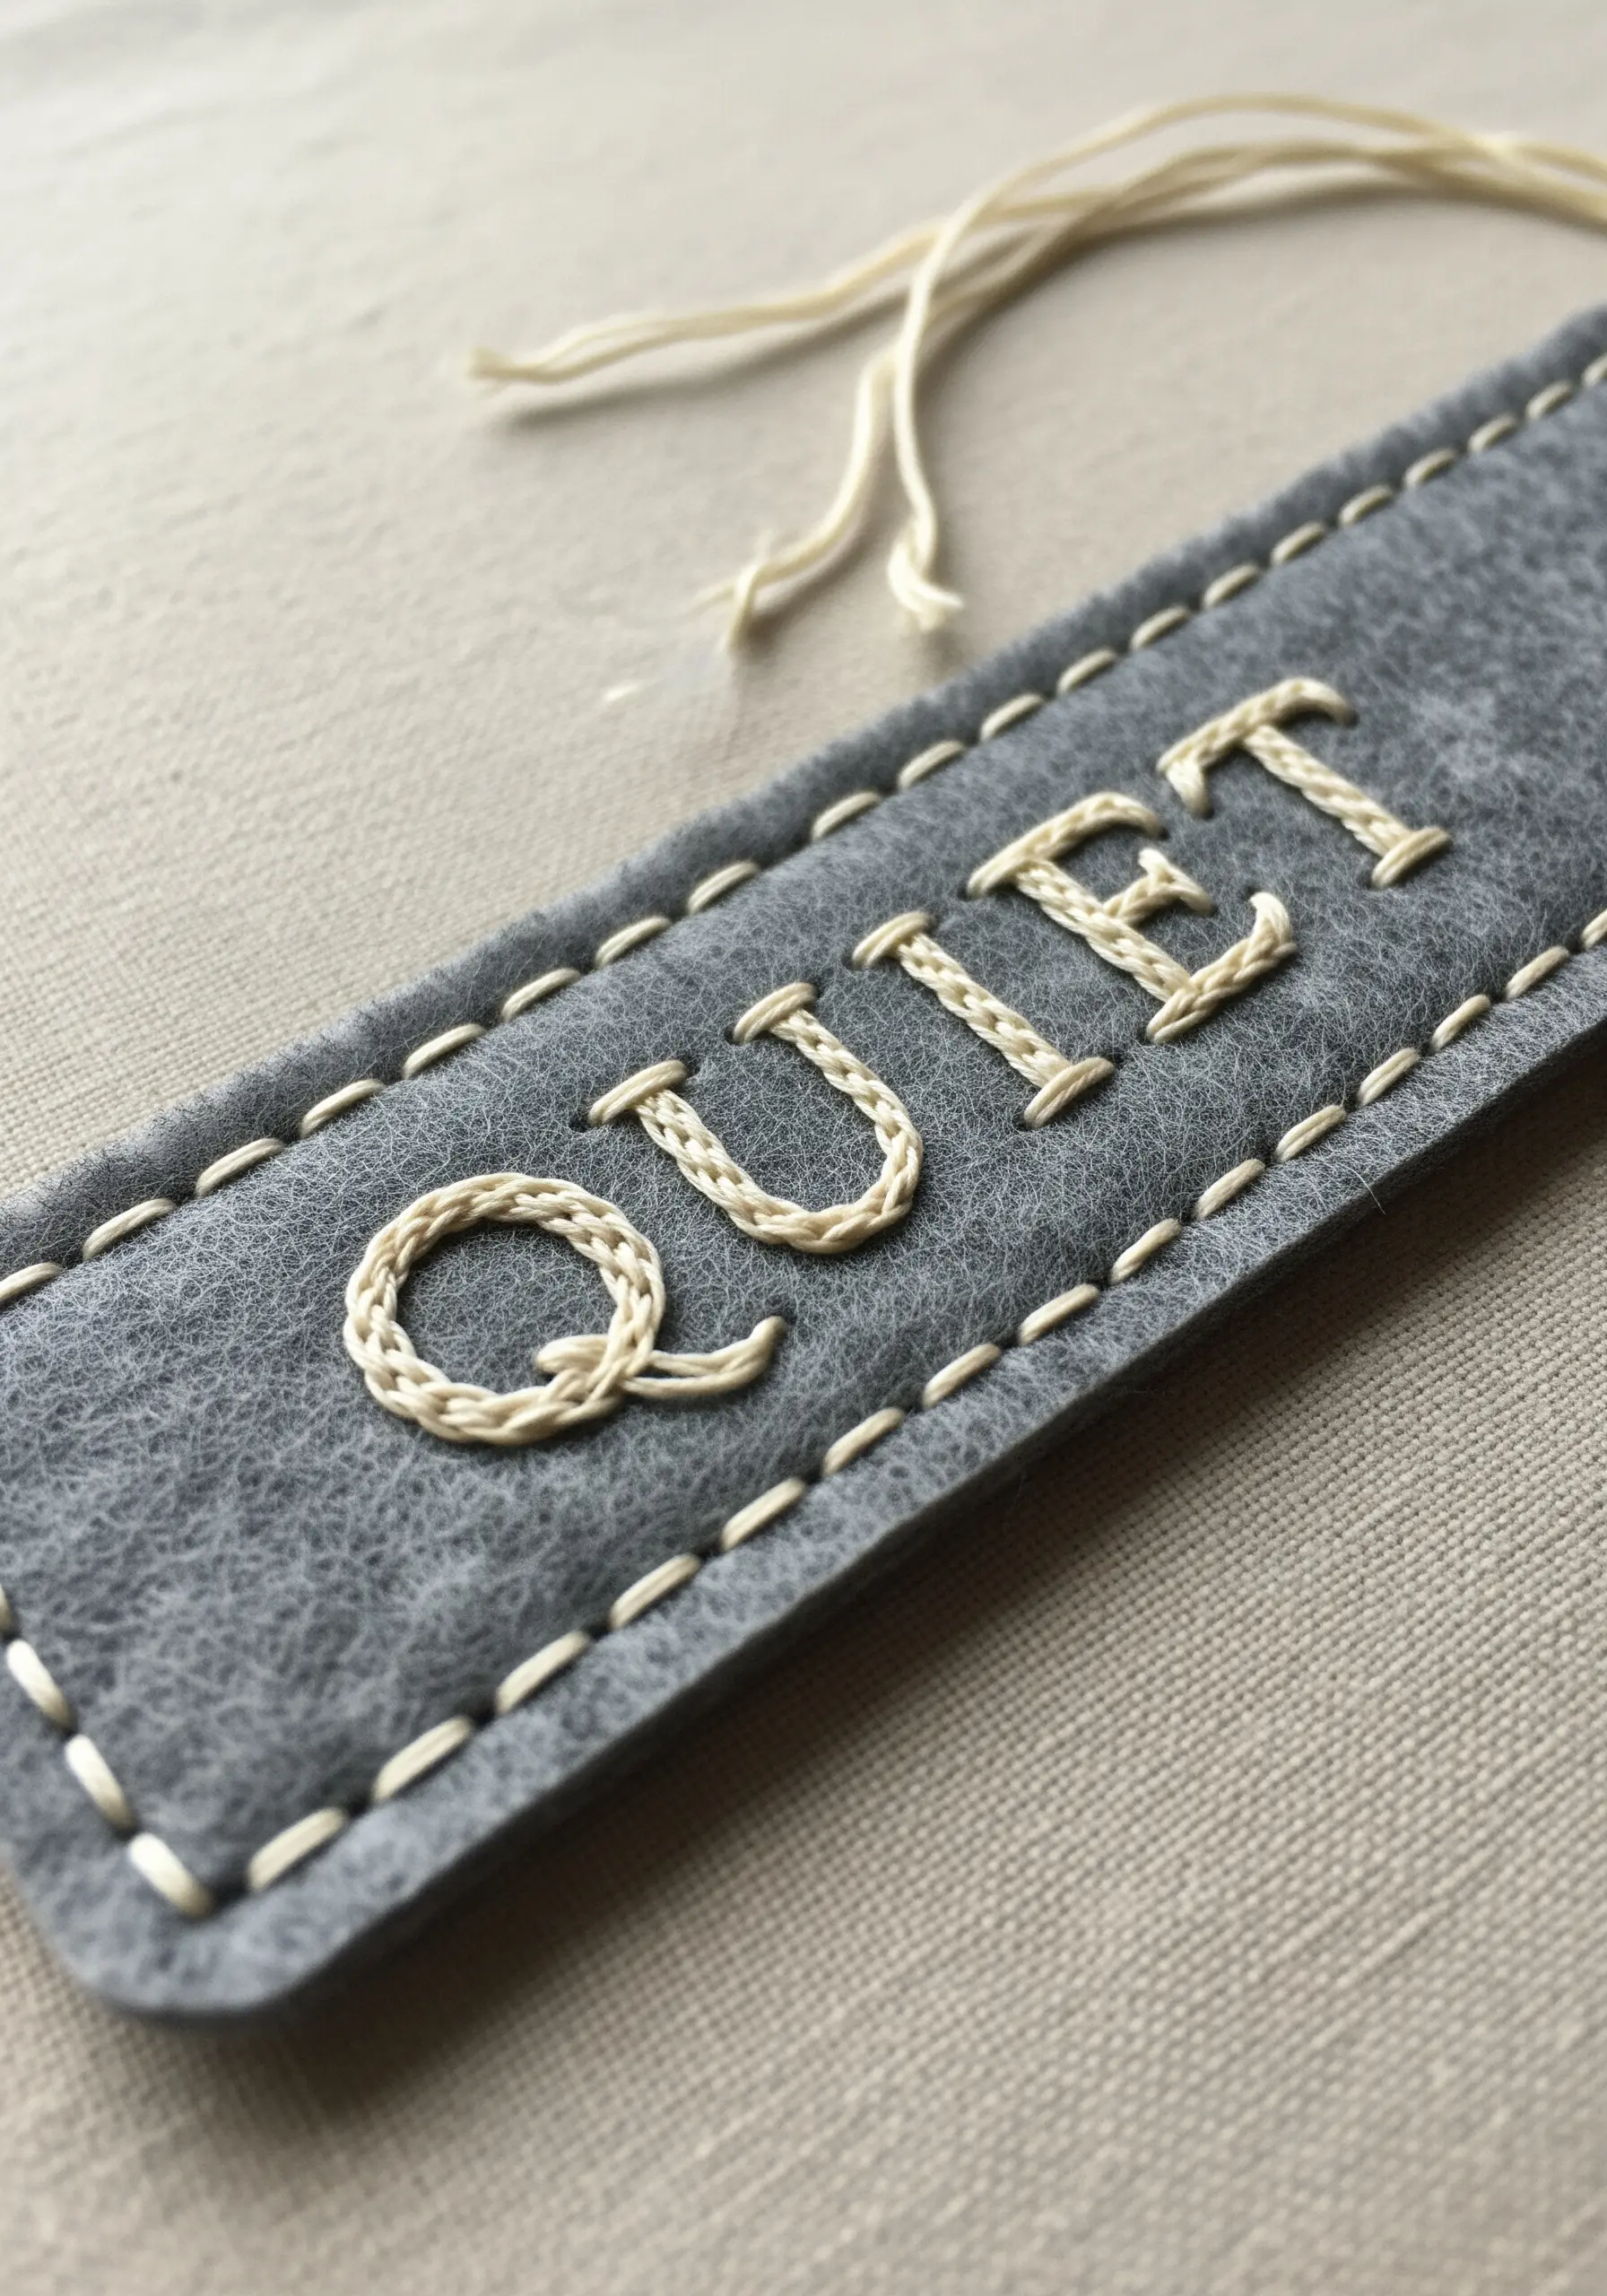
11. Executing Crisp Block Letters on Narrow Surfaces

Embroidering on a narrow, high-use area like a tote bag strap requires durability and precision.
Choose a simple, bold font and use a split stitch to outline each letter first. This creates a stable, raised edge to guide your fill stitches.
Fill the letters with vertical satin stitches, working in small sections to prevent the long stitches from snagging or loosening over time.
An olive green thread on natural canvas offers a classic, utilitarian aesthetic that elevates everyday botanical stitch ideas.
12. Weaving Threads for a Lustrous, Graphic Initial
Create a stunning woven texture by combining straight stitches with a weaving technique.
First, lay down a series of long, parallel straight stitches to form the foundation of your letter’s shape. These are your ‘warp’ threads.
Then, using a blunt tapestry needle, weave a second thread over and under the foundation stitches without piercing the fabric. This is your ‘weft’.
Using a high-sheen or metallic thread against a matte, dark fabric like black felt creates a dramatic interplay of light and texture.
13. Adding a Wrapped Bar for Typographic Contrast
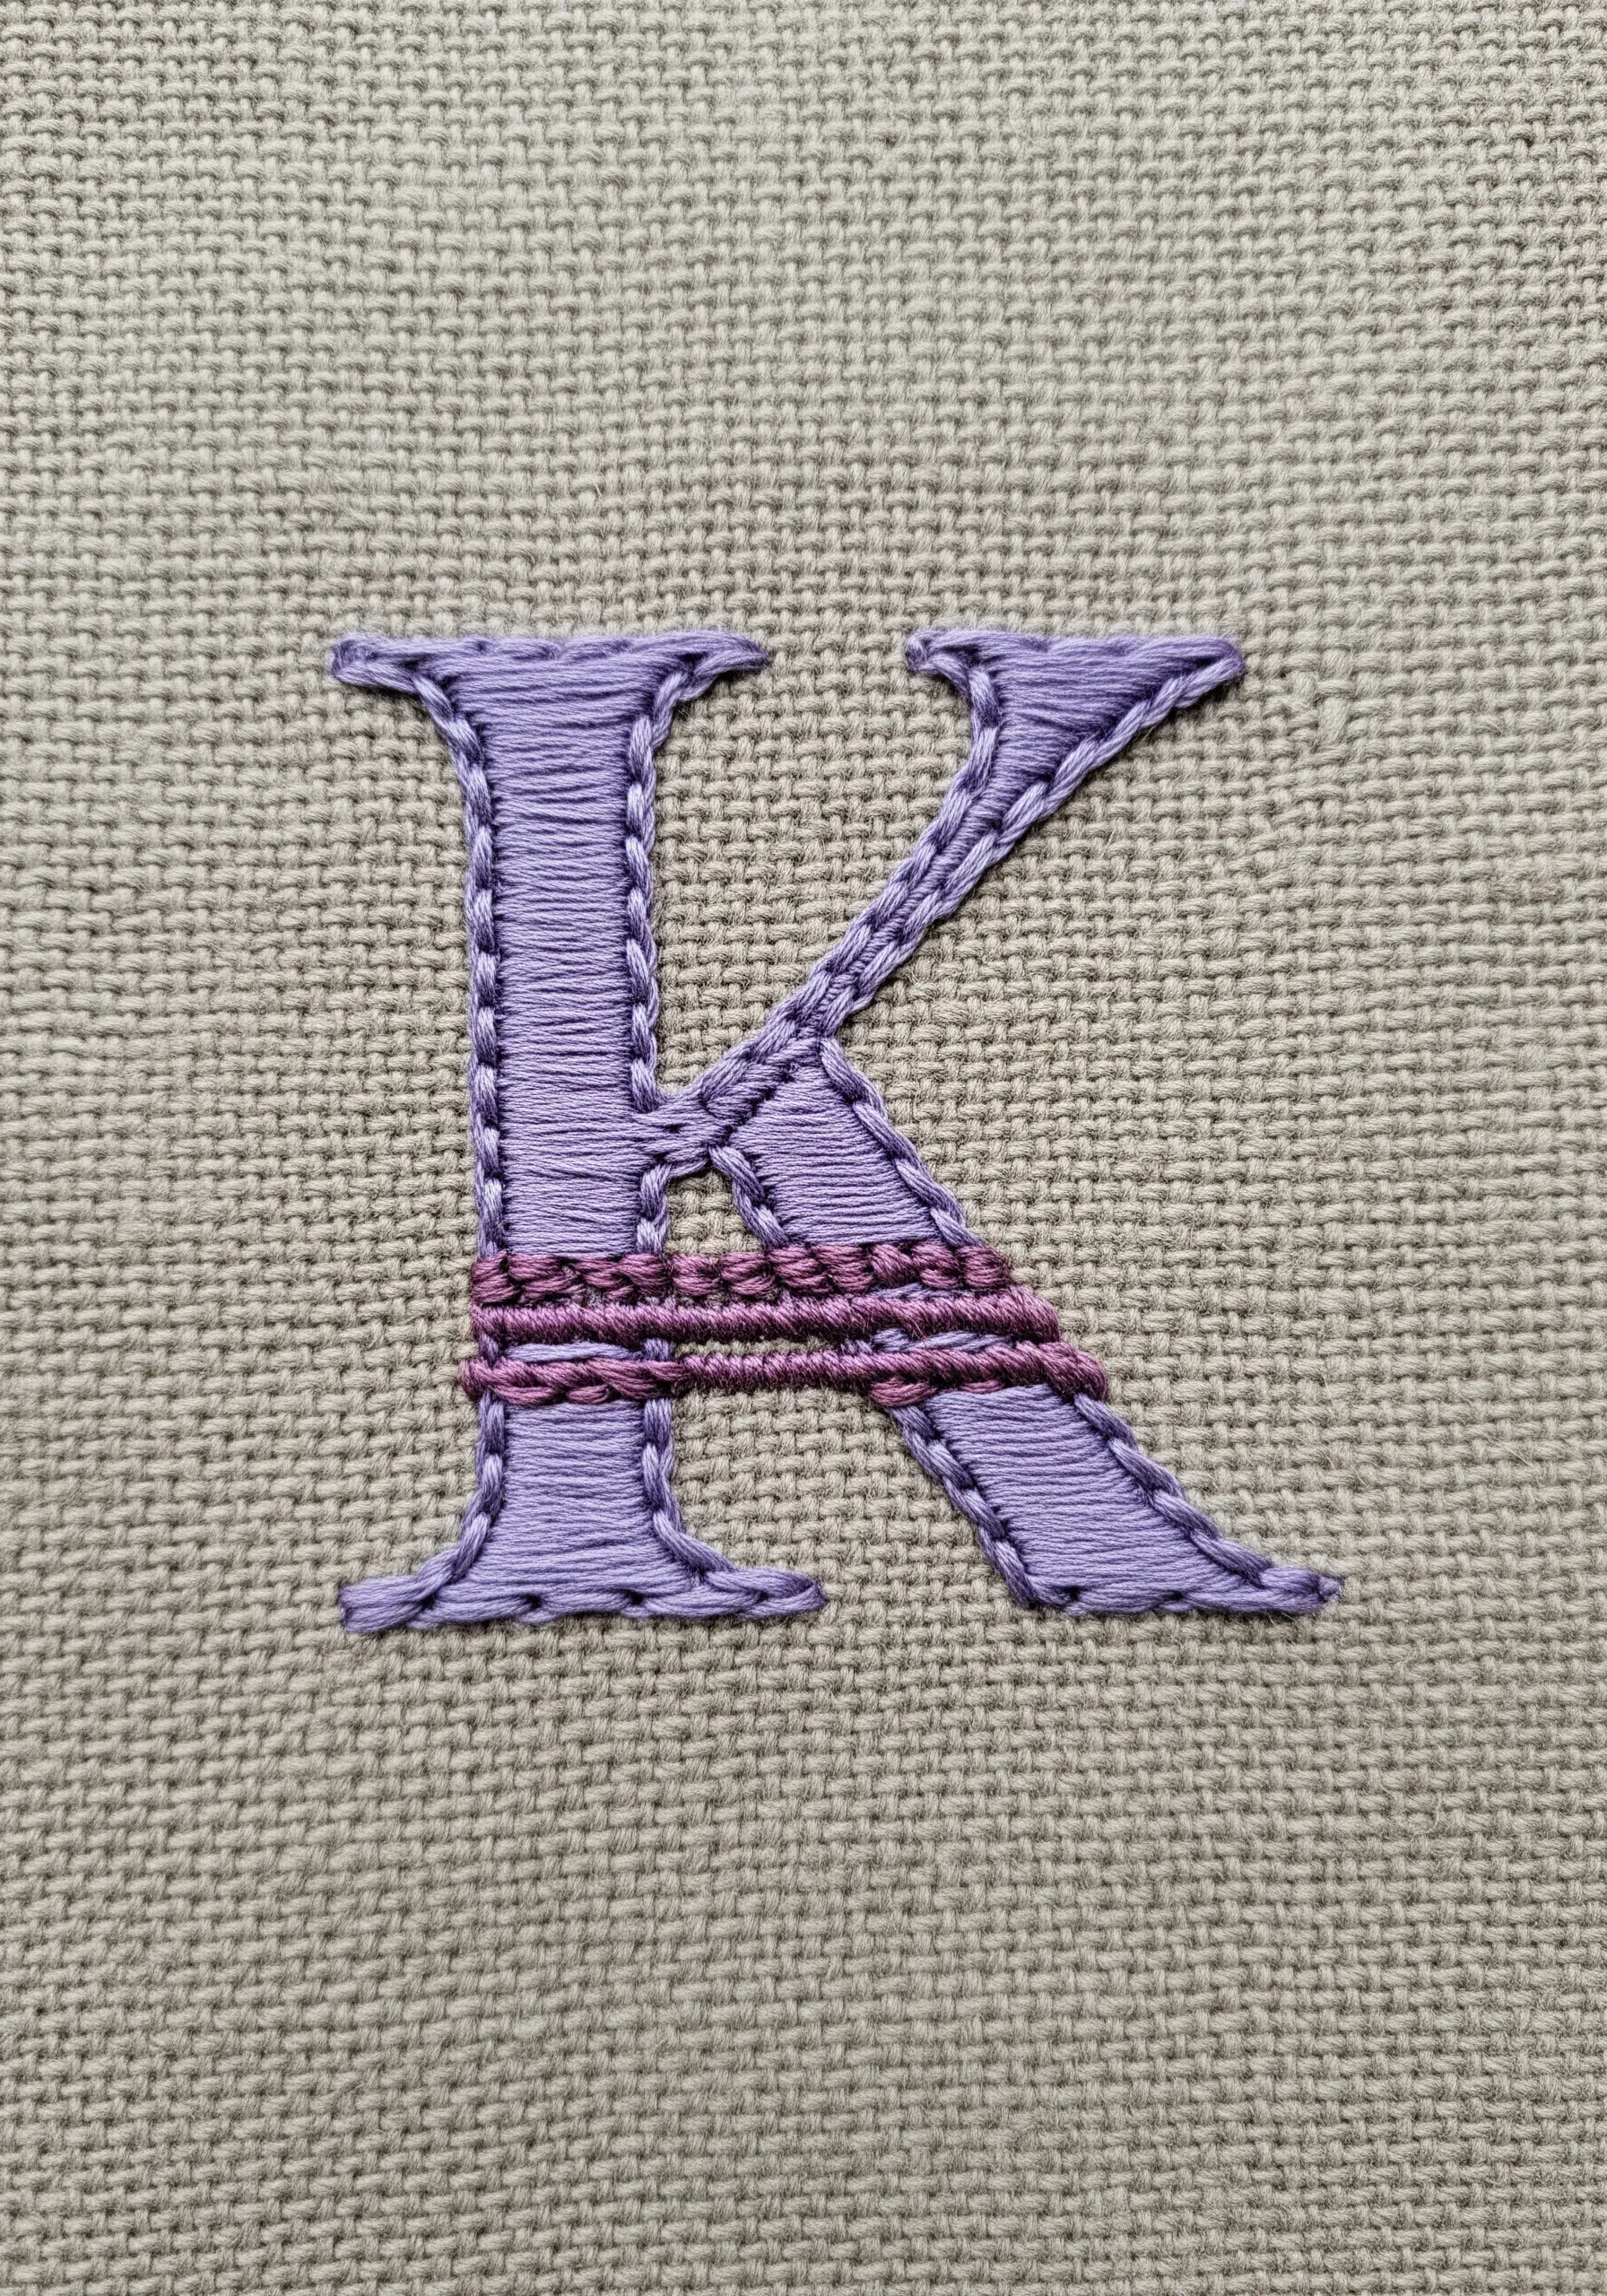
Introduce a focal point to a satin-stitched initial by adding a wrapped or woven element.
After completing the main letter in a solid fill, take a contrasting color and a blunt tapestry needle.
Carefully wrap the thread around a section of the letter—like the crossbar of this ‘K’—without piercing the initial stitches or the fabric below.
This simple addition breaks up the solid color, adding a layer of detail and graphic interest that feels both modern and thoughtful.
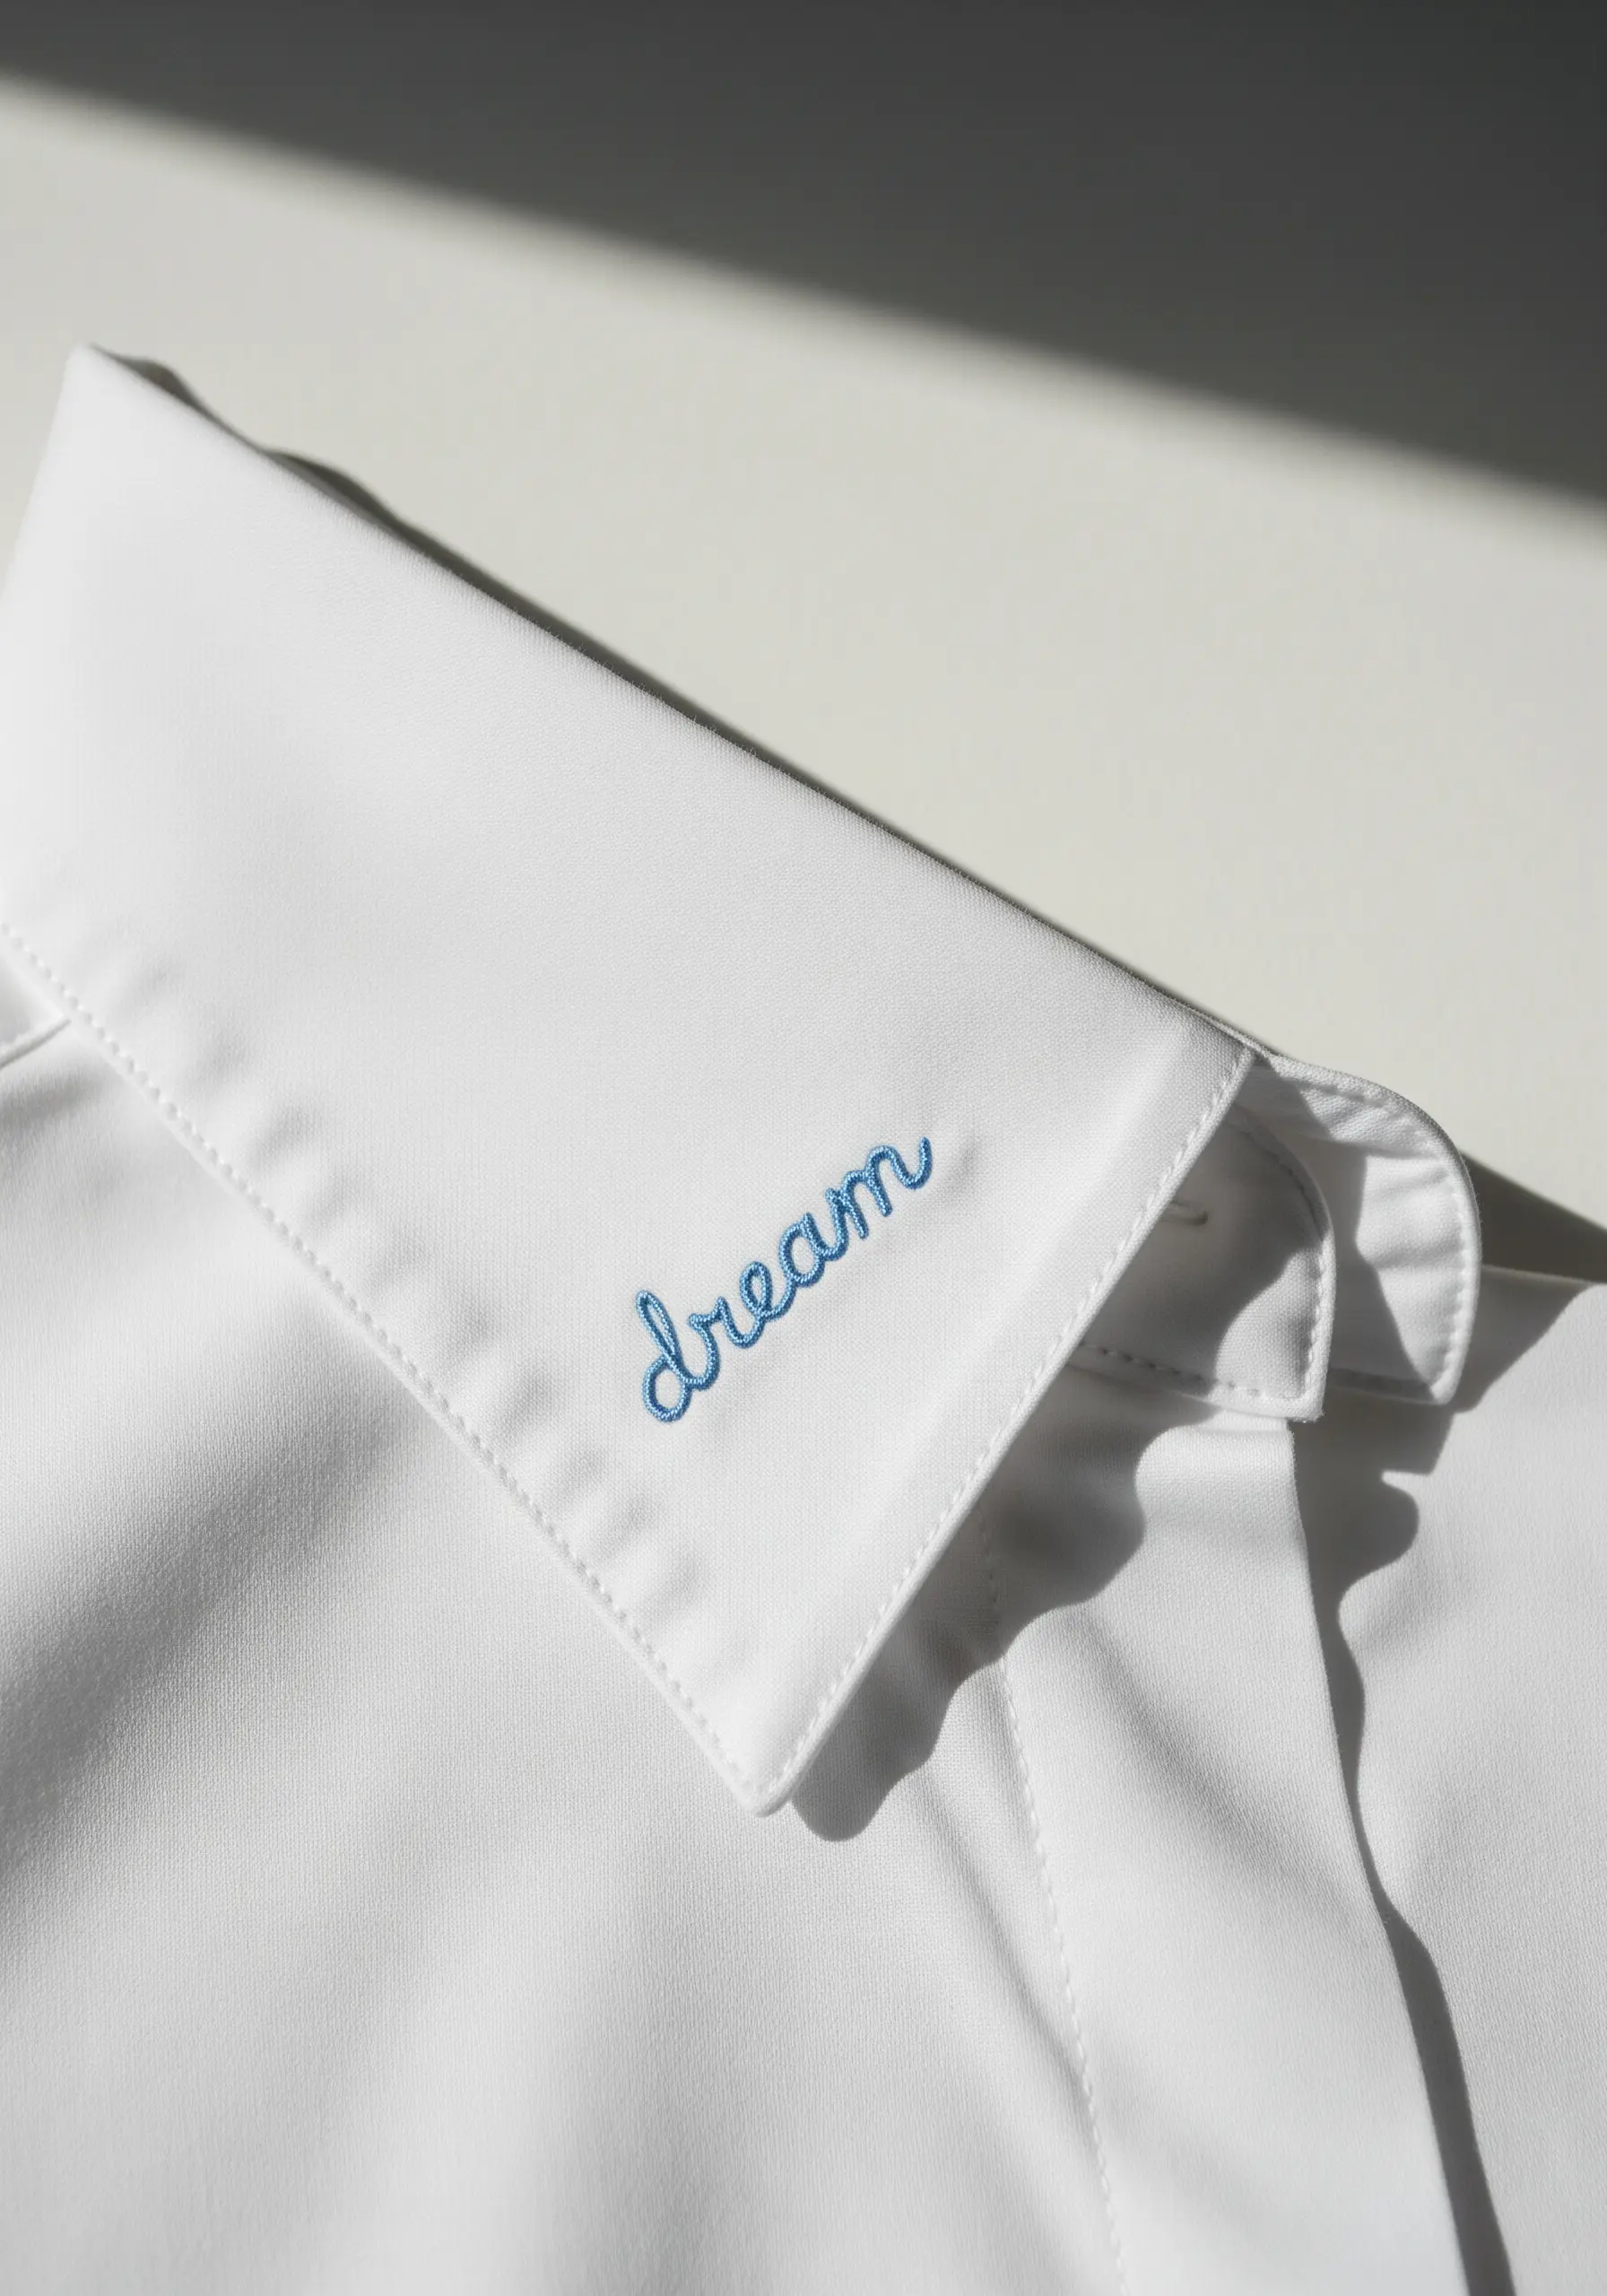
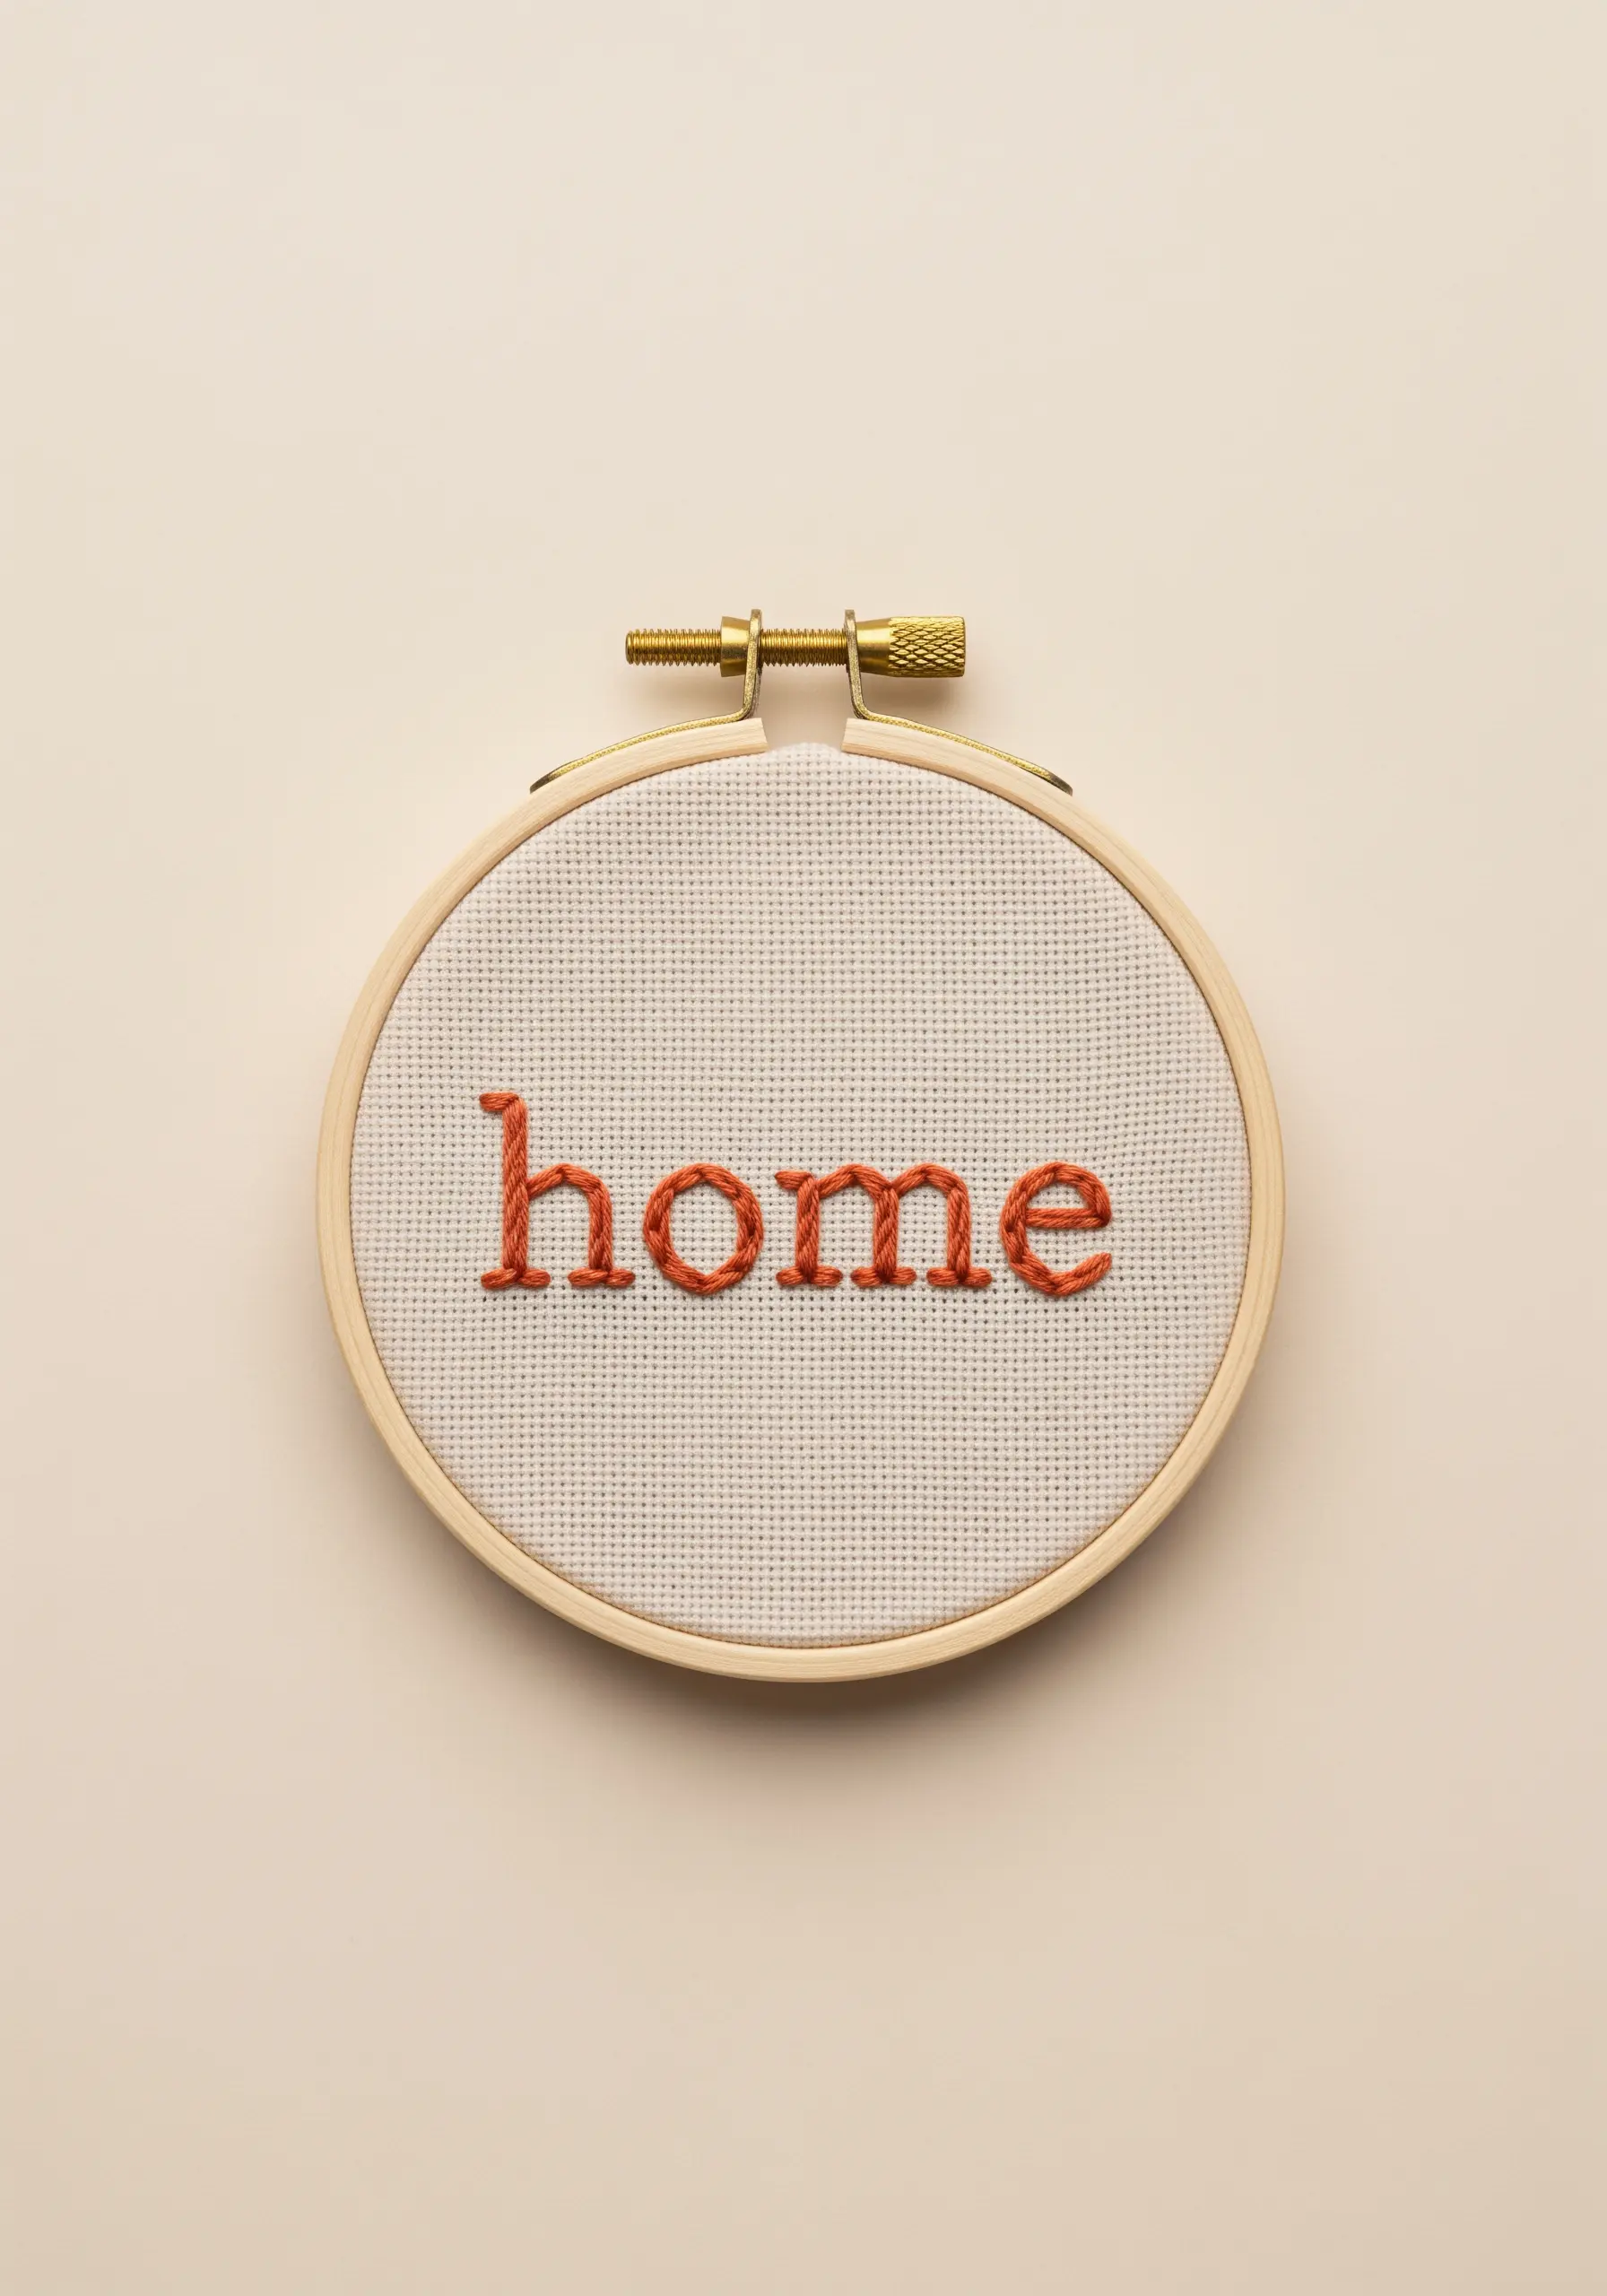
14. Embracing Understated Script on Textured Apparel
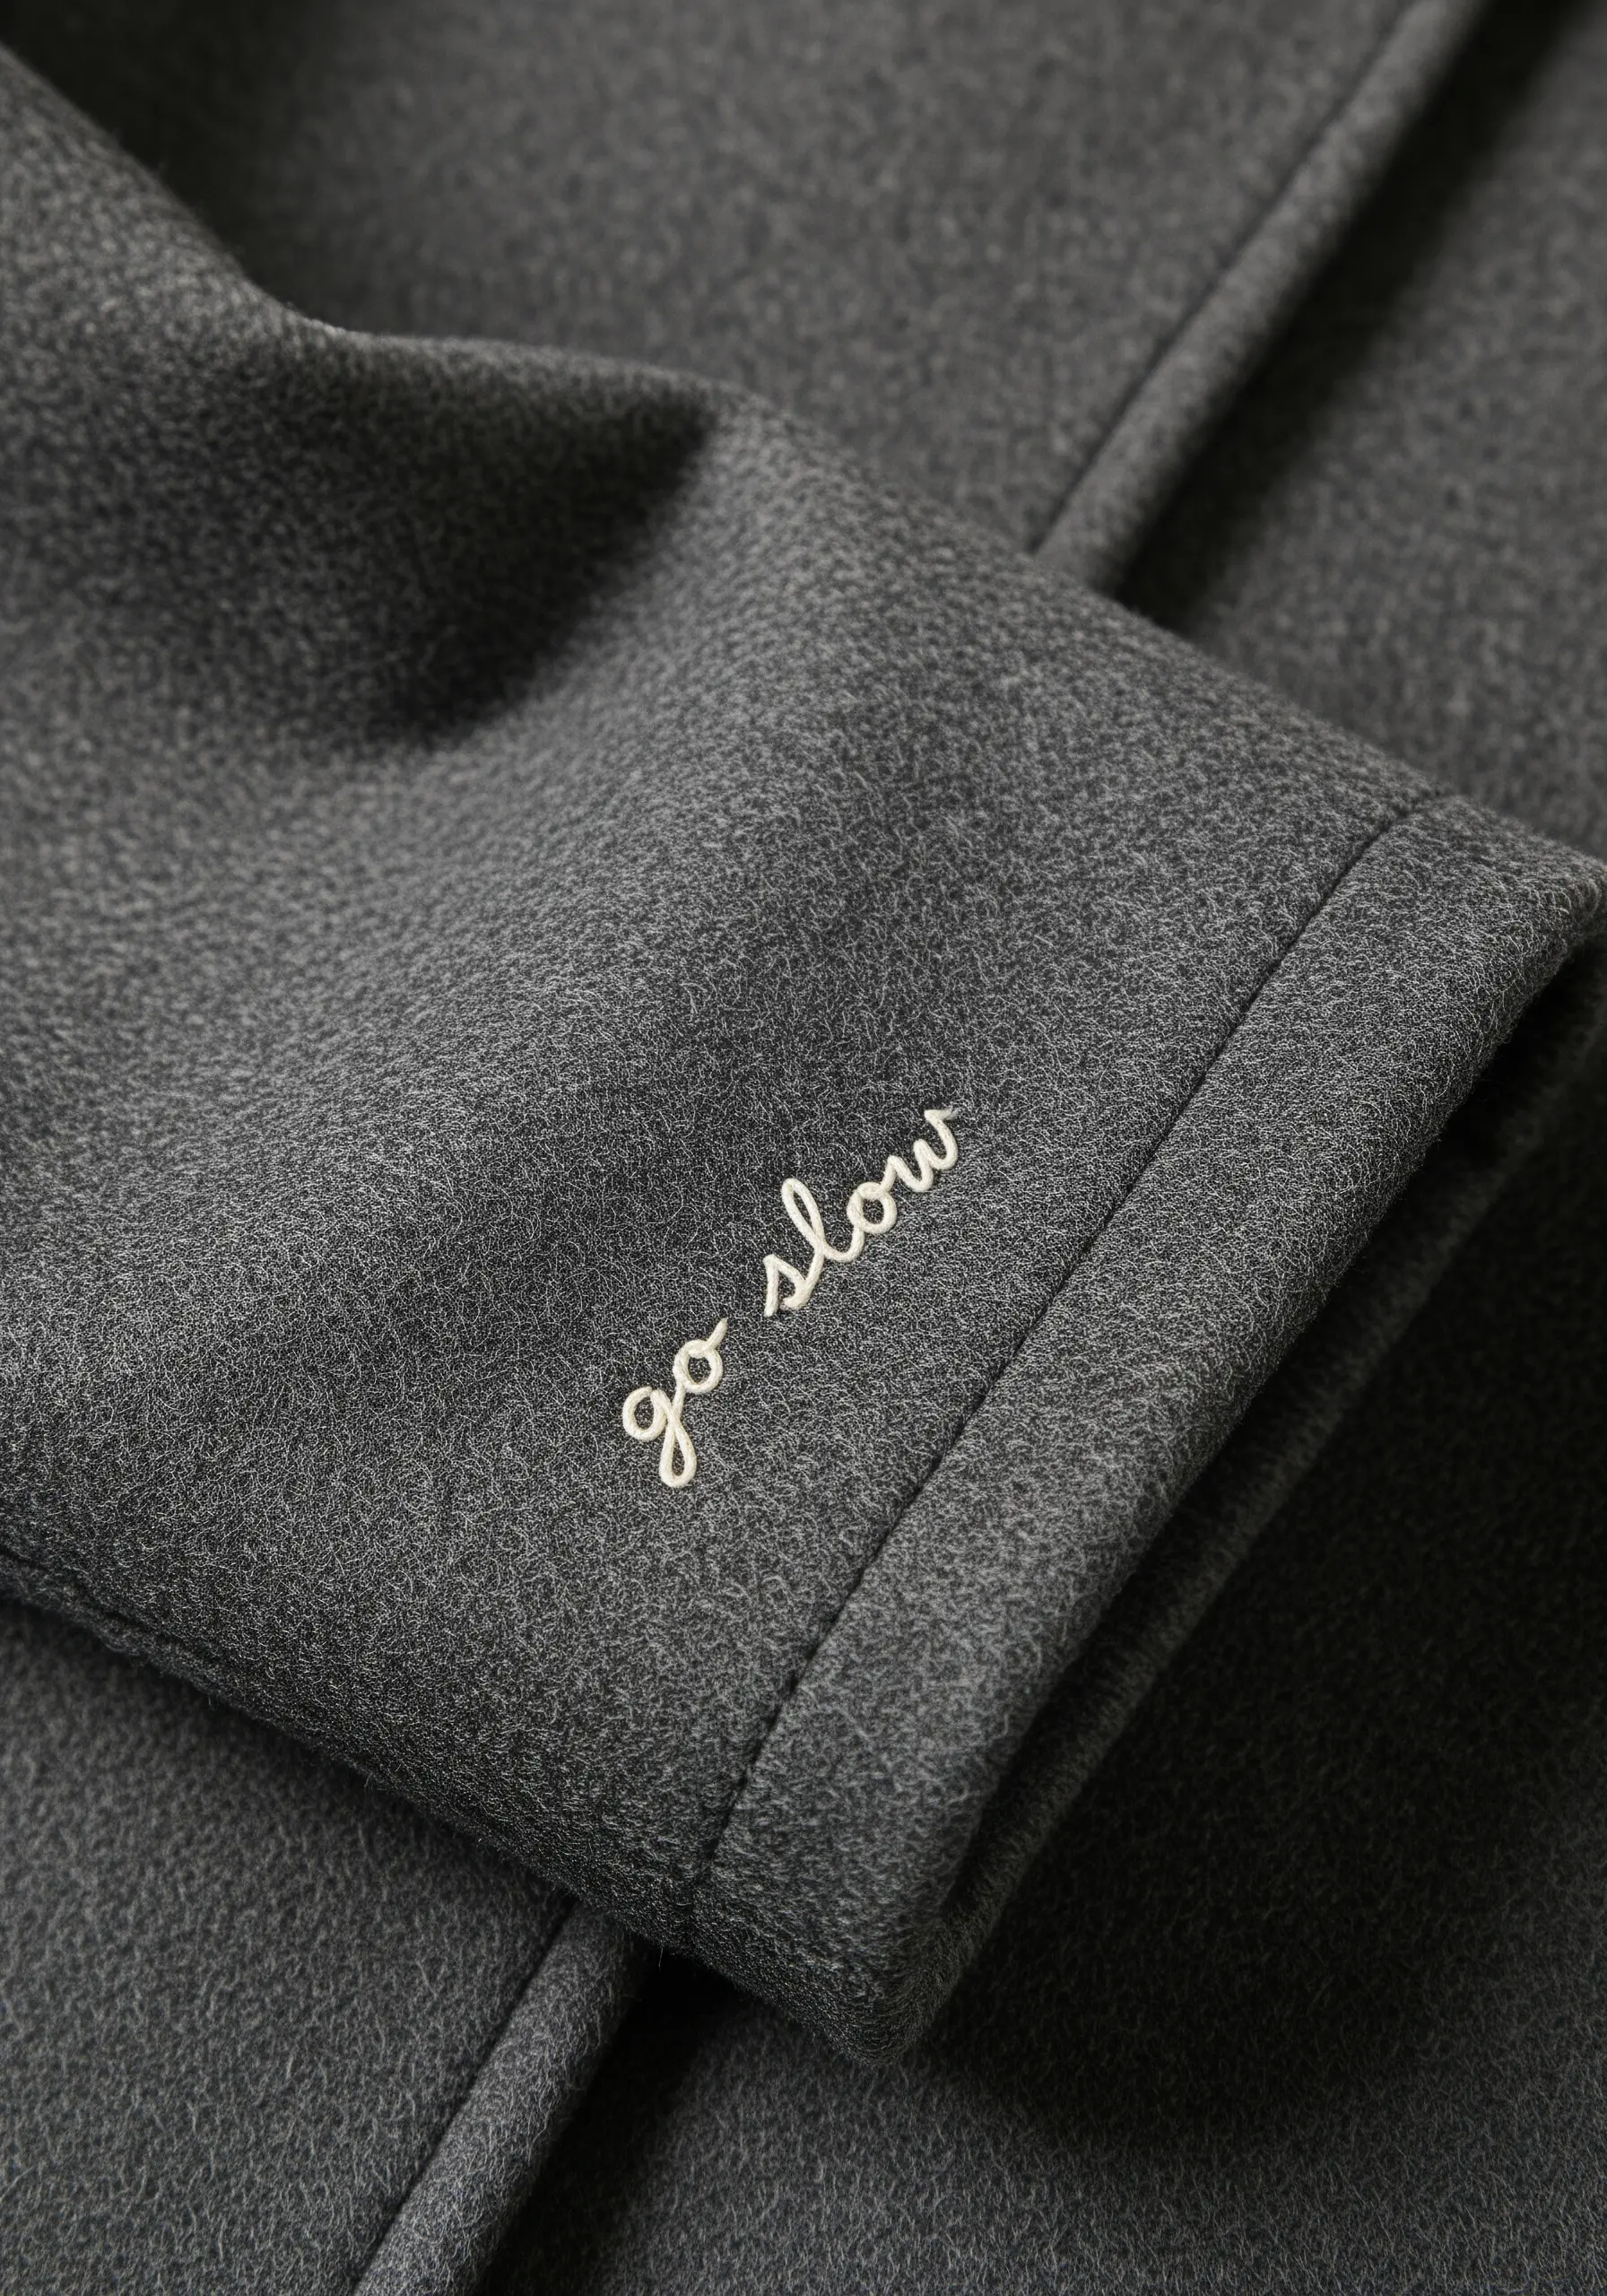
A tiny, personal message stitched on a cuff or collar gains its power from subtlety.
When working on a thick, textured material like a wool-blend coat, use a single strand of floss in a contrasting color like off-white.
A very small, neat backstitch will create the look of delicate handwriting. The key is consistency in stitch length.
This approach ensures the embroidery becomes an integrated part of the garment—a quiet detail rather than a loud declaration.
15. Swapping a Letter for a Textural Motif
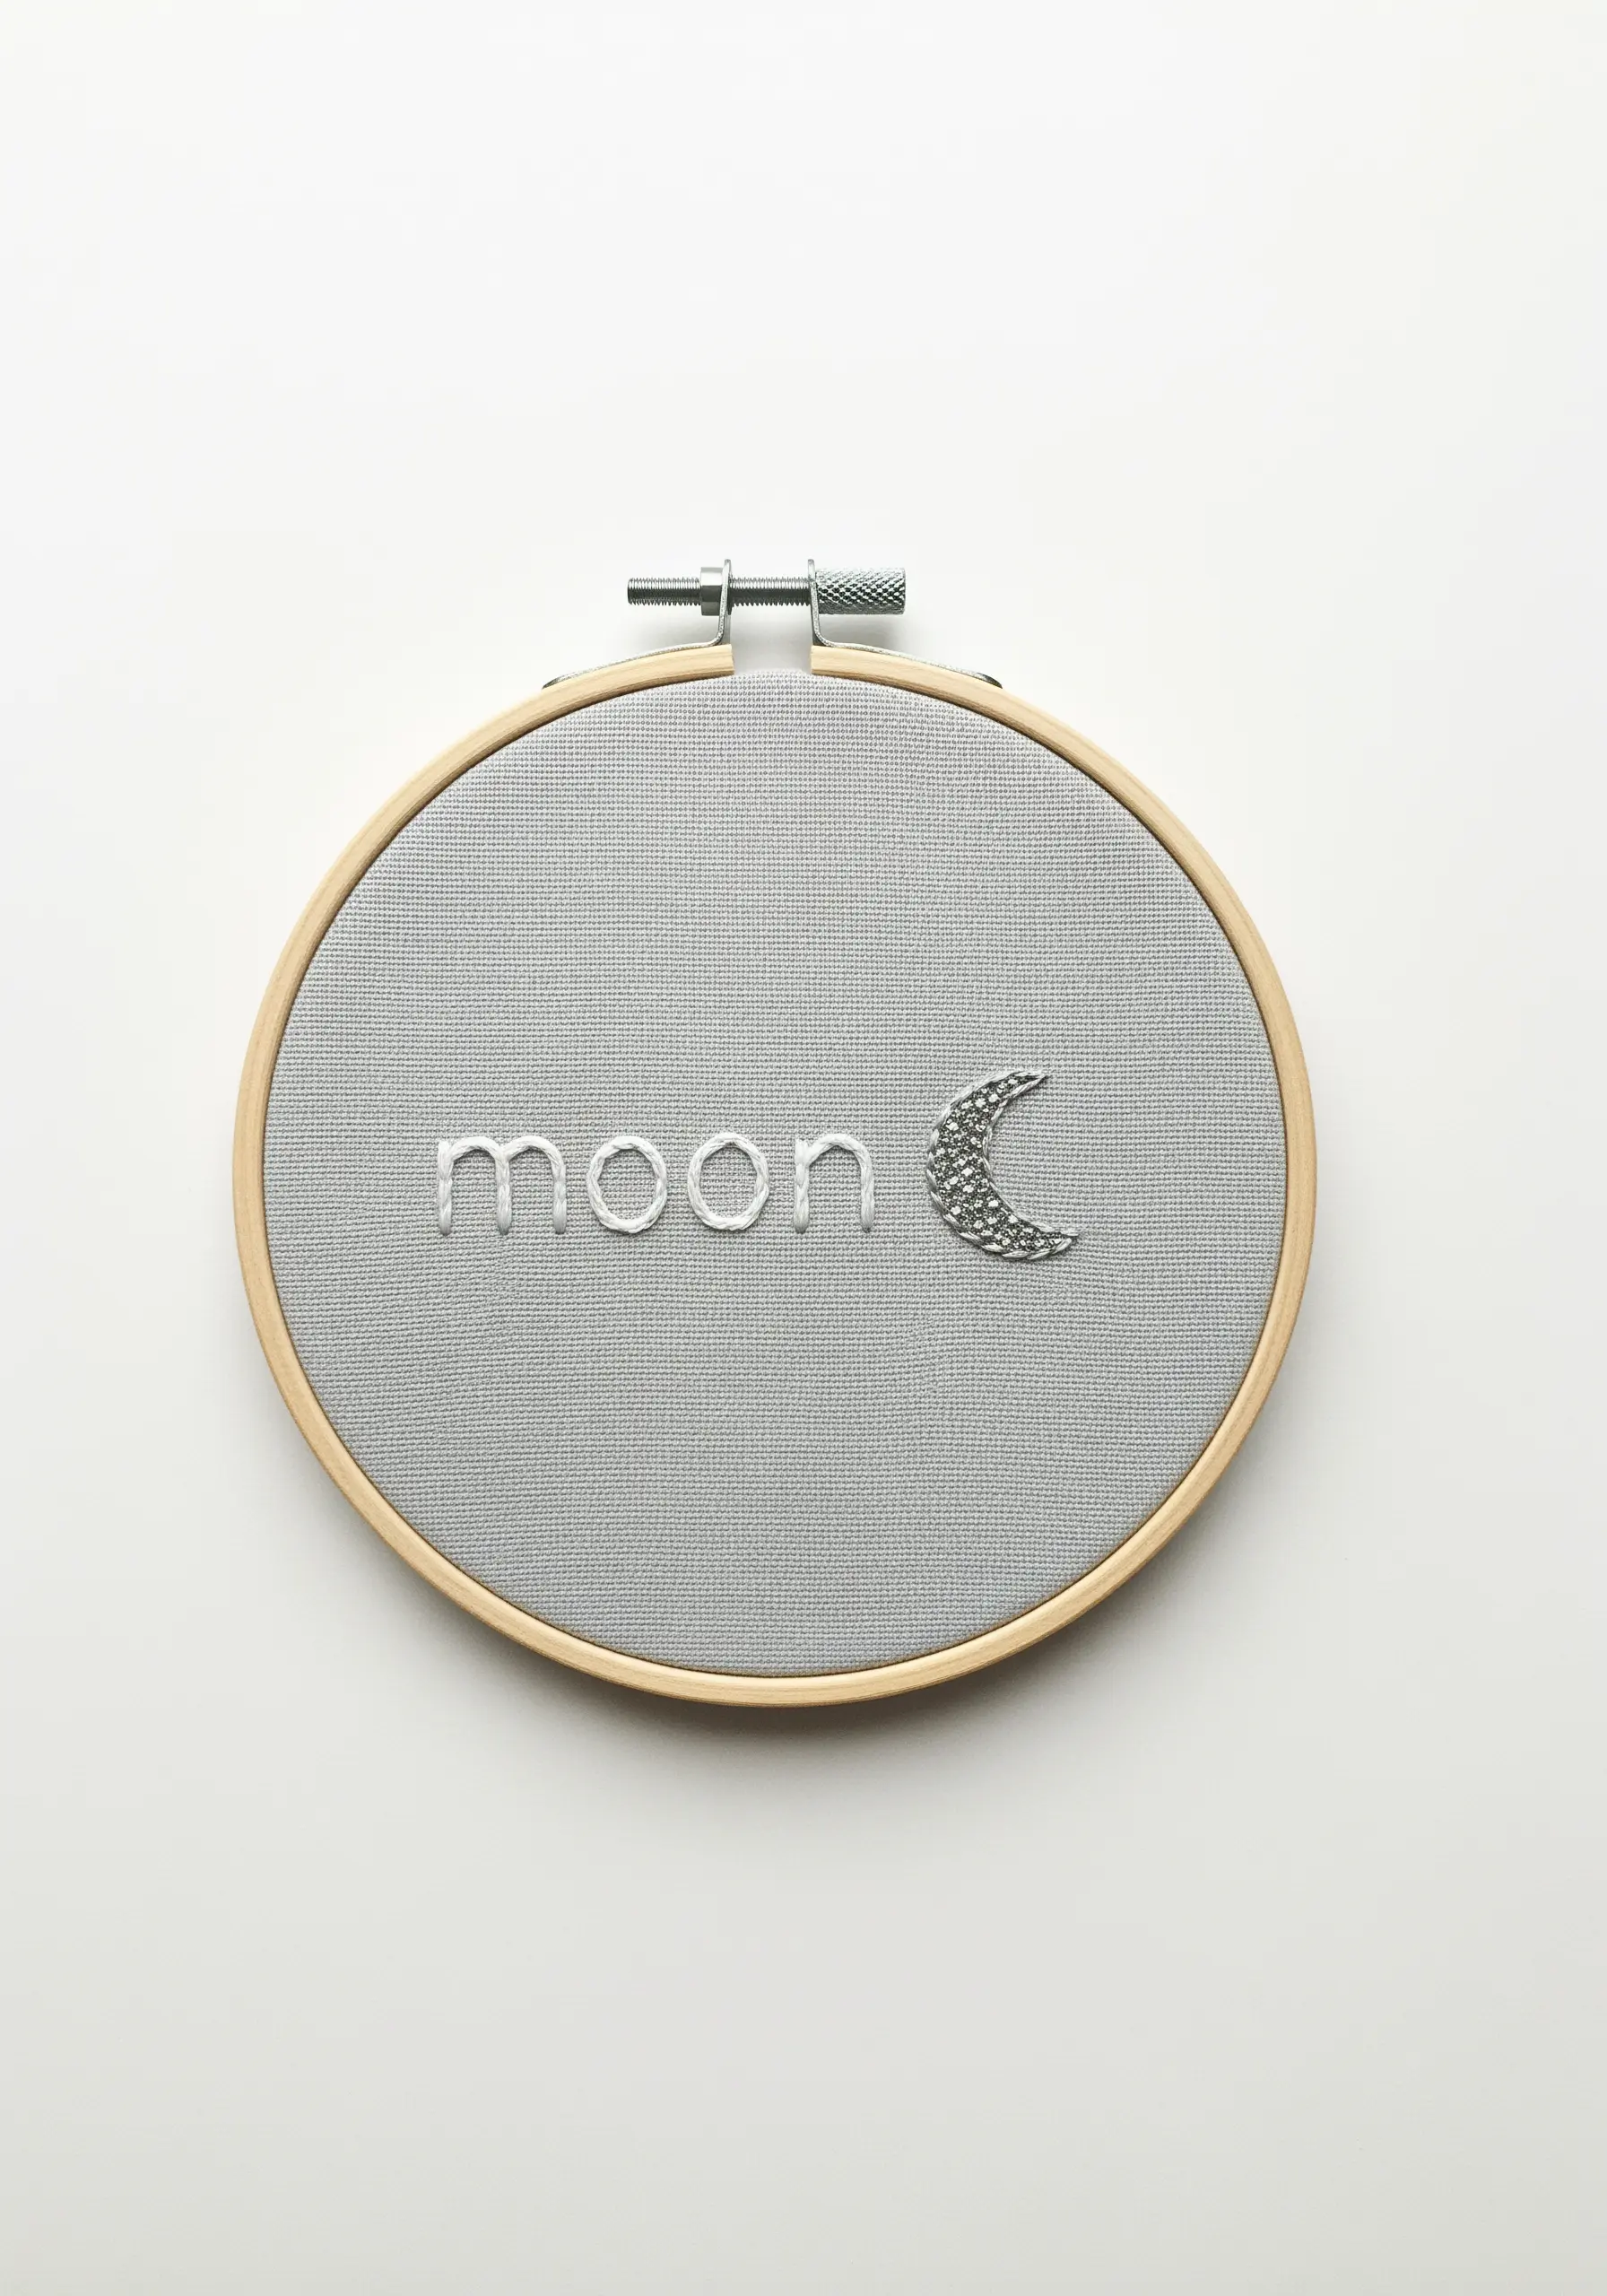
Elevate a simple word by transforming one of its letters into a tiny, illustrative element.
Here, the ‘o’s in ‘moon’ are stitched in a clean, open backstitch, directing all the attention to the final letter.
The ‘c’ is reimagined as a crescent moon, densely filled with silver French knots that provide texture and a subtle shimmer.
This conceptual approach adds a layer of wit and visual interest, turning a word into a miniature piece of art, perfect for minimal sky moon designs.
16. A Guide to Stitching Crisp Letters on Leather
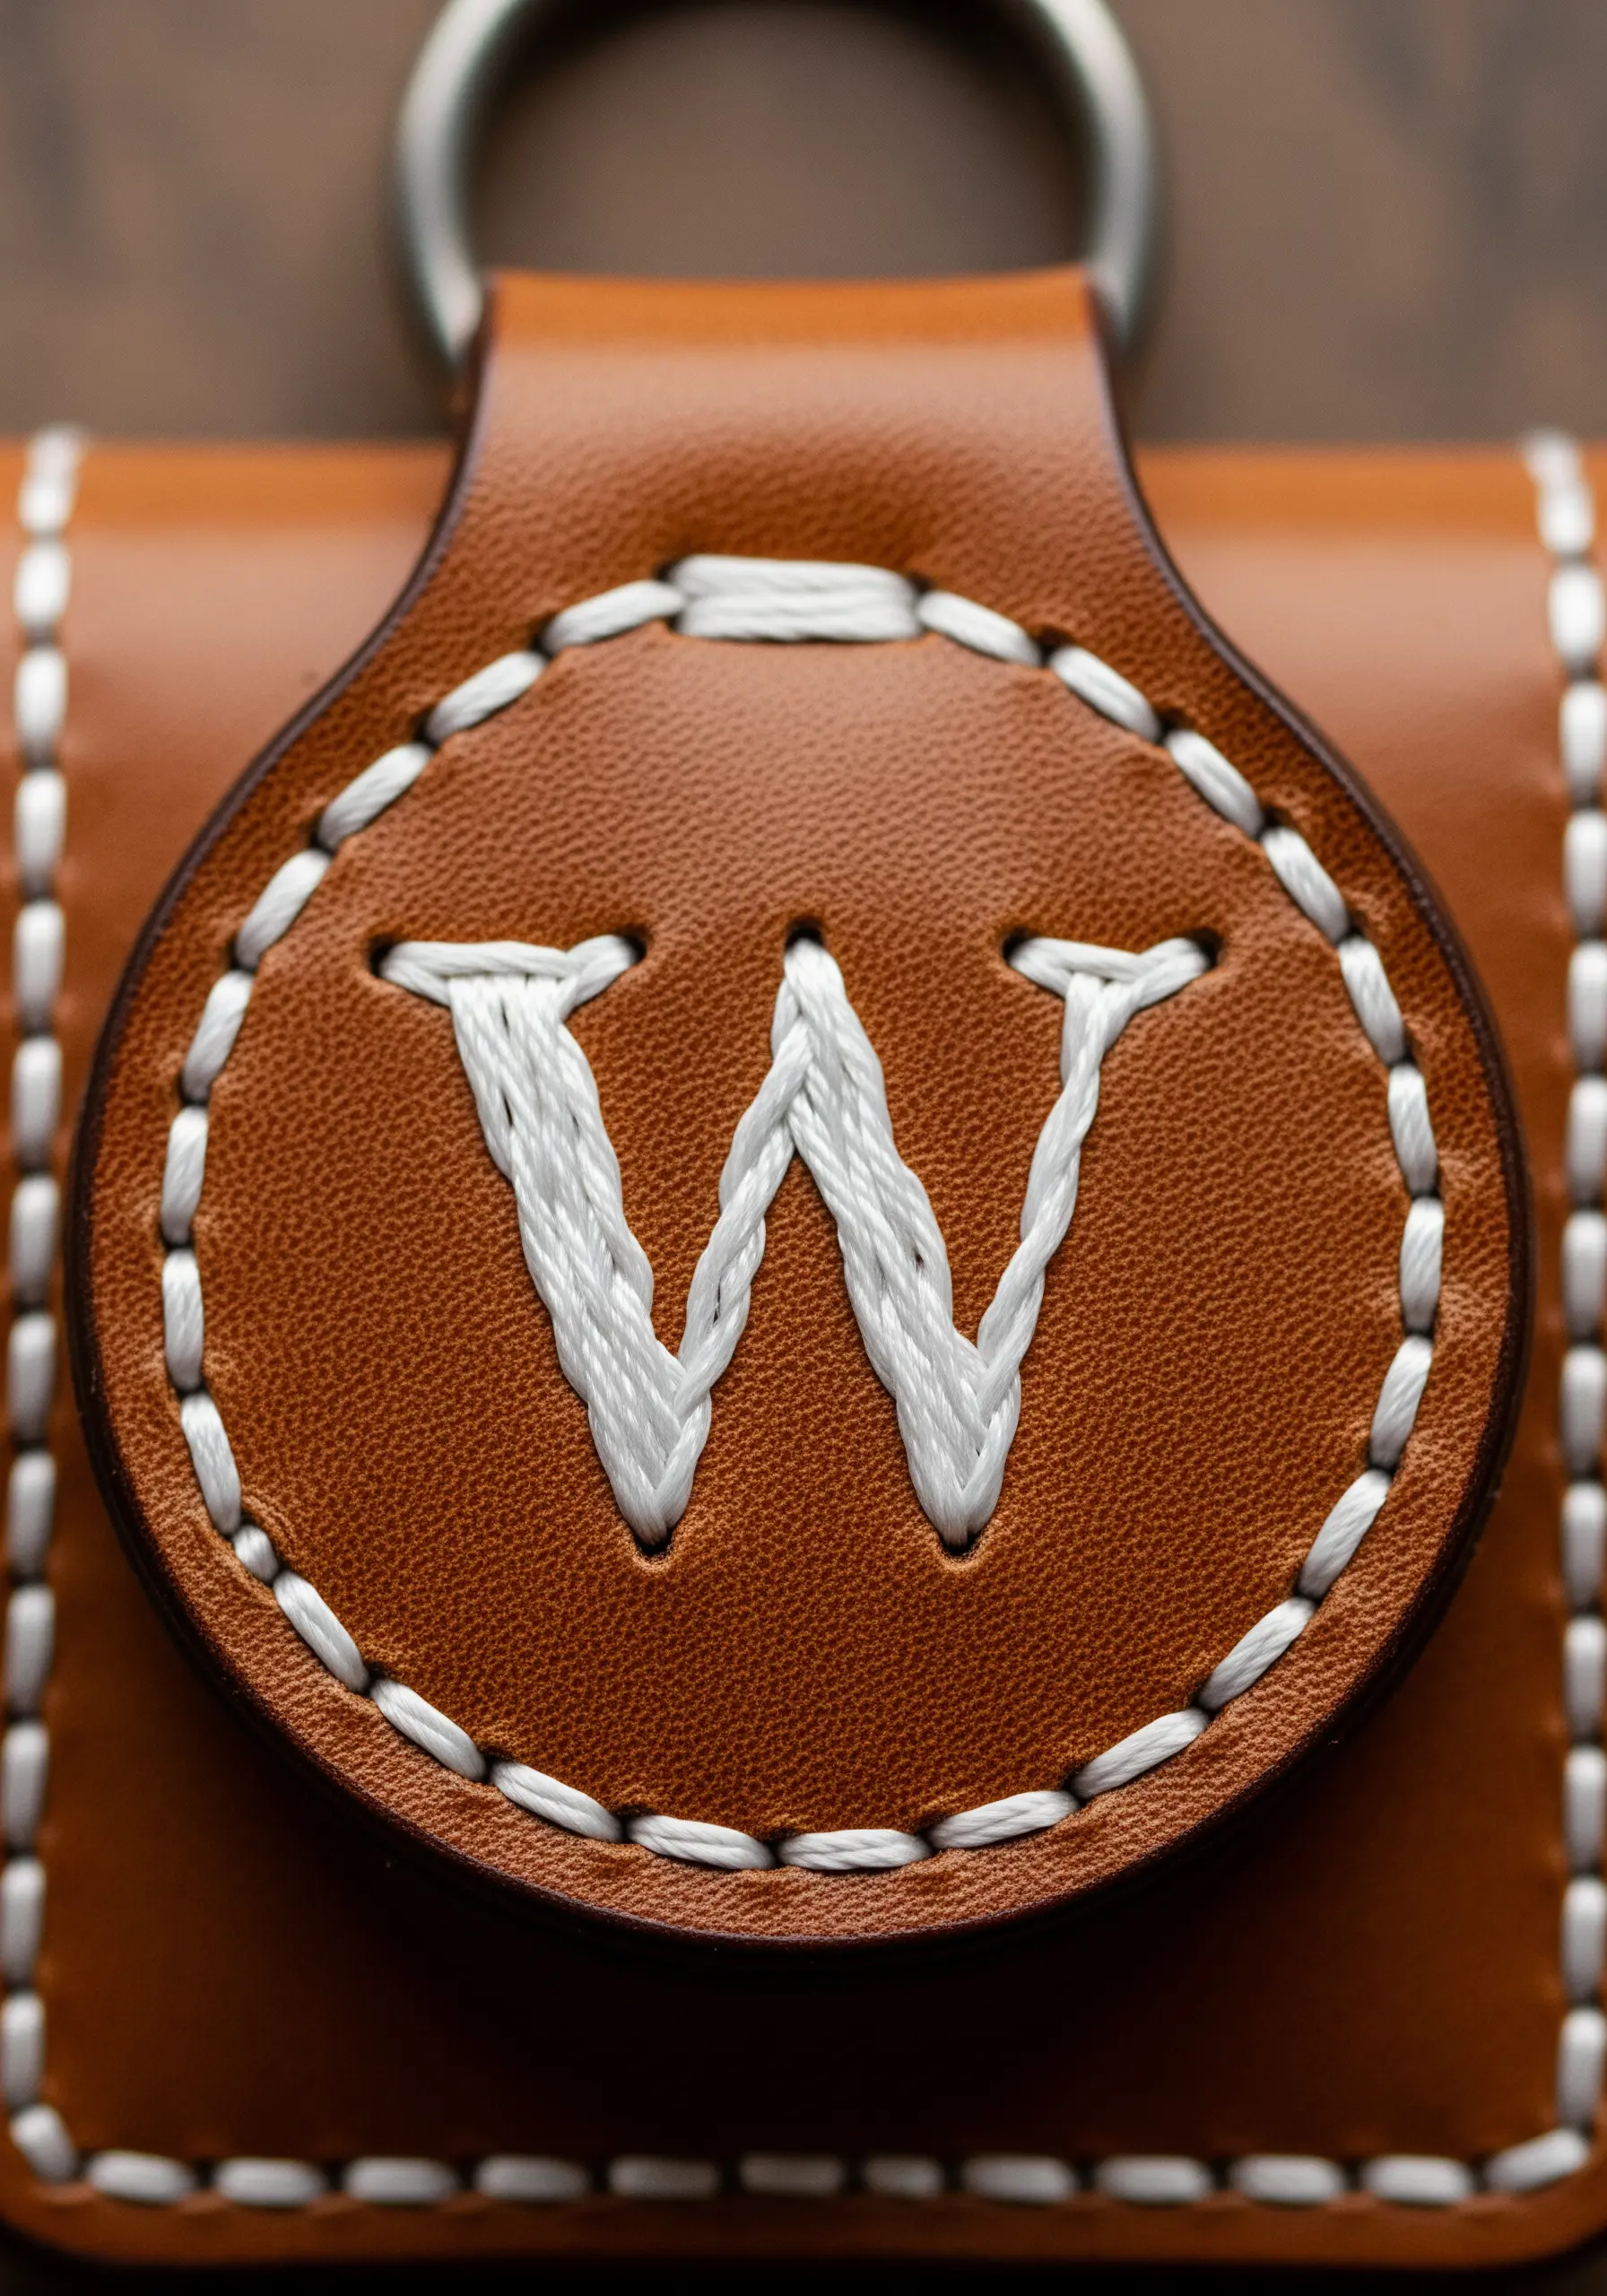
Unlike fabric, leather does not self-heal, so every puncture is permanent. The key to success is preparation.
First, trace your letter onto the leather and use a sharp awl or a sturdy needle to pre-punch every entry and exit point for your thread.
Use a durable, waxed thread and a blunt tapestry needle, which will find the pre-made holes easily without creating new ones.
A simple backstitch or satin stitch, pulled taut but not too tight, will result in a clean, professional finish that is impossible to achieve otherwise.
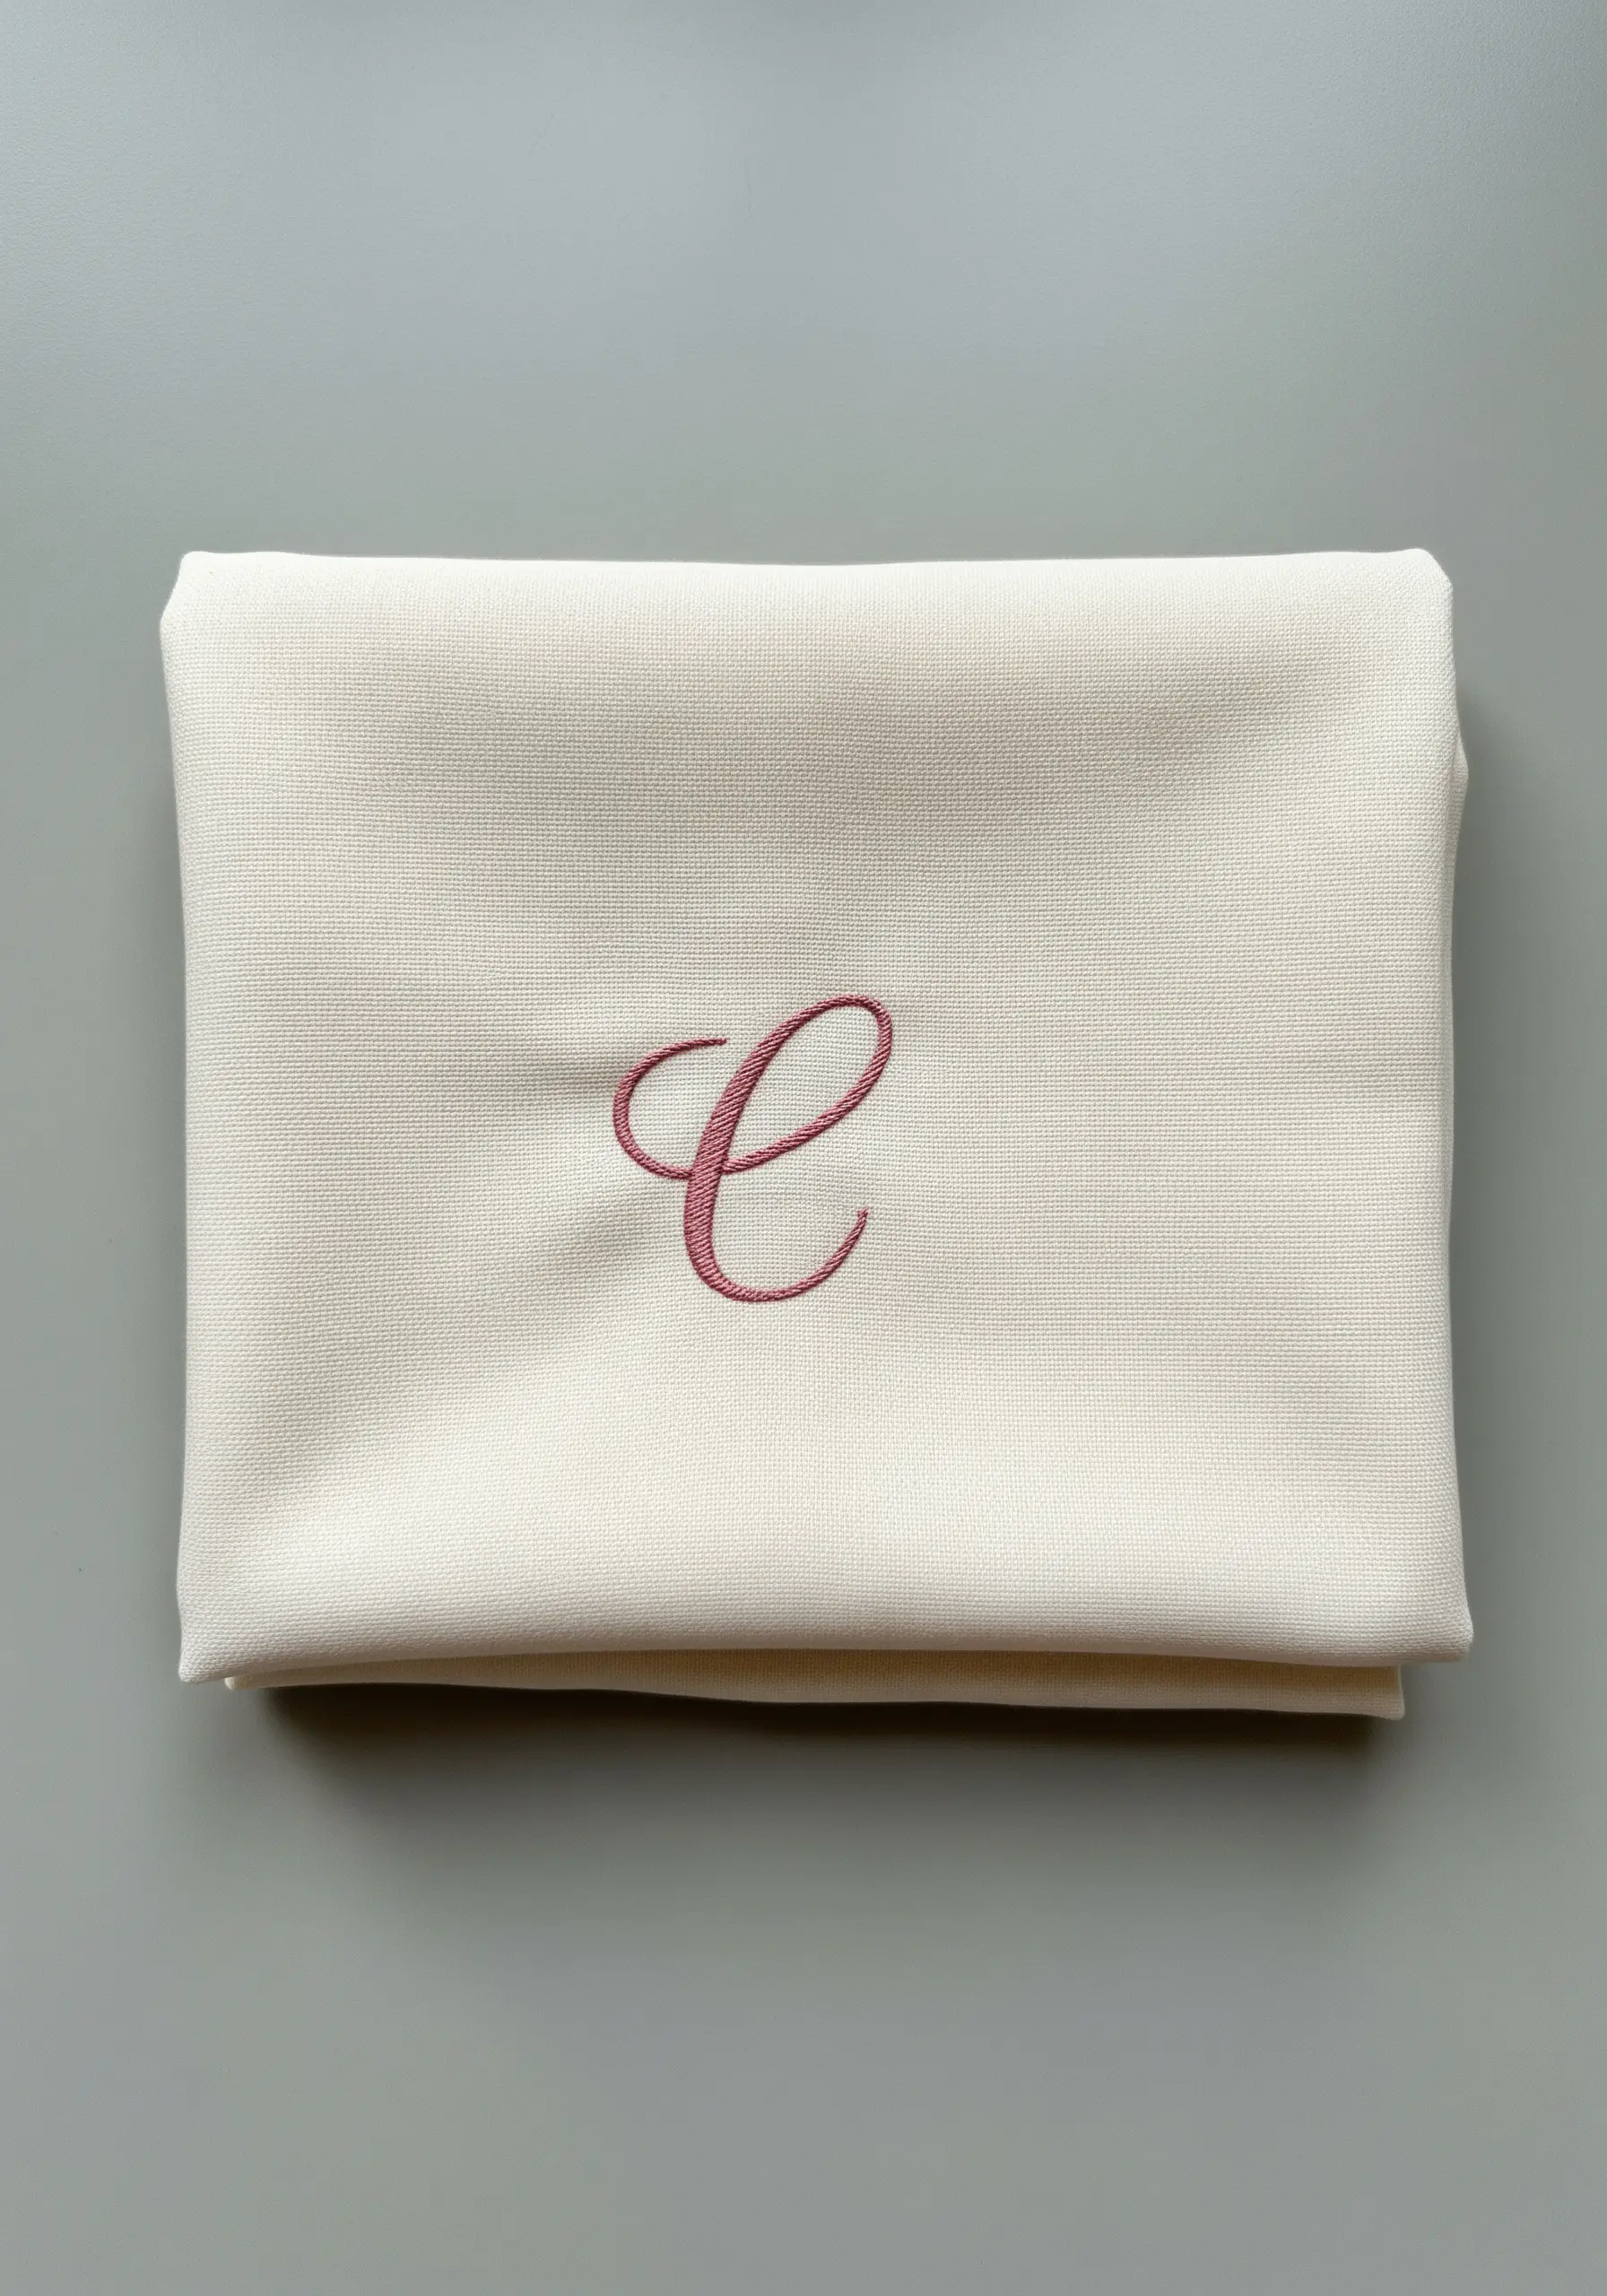
17. The Subtlety of Tone-on-Tone Lettering
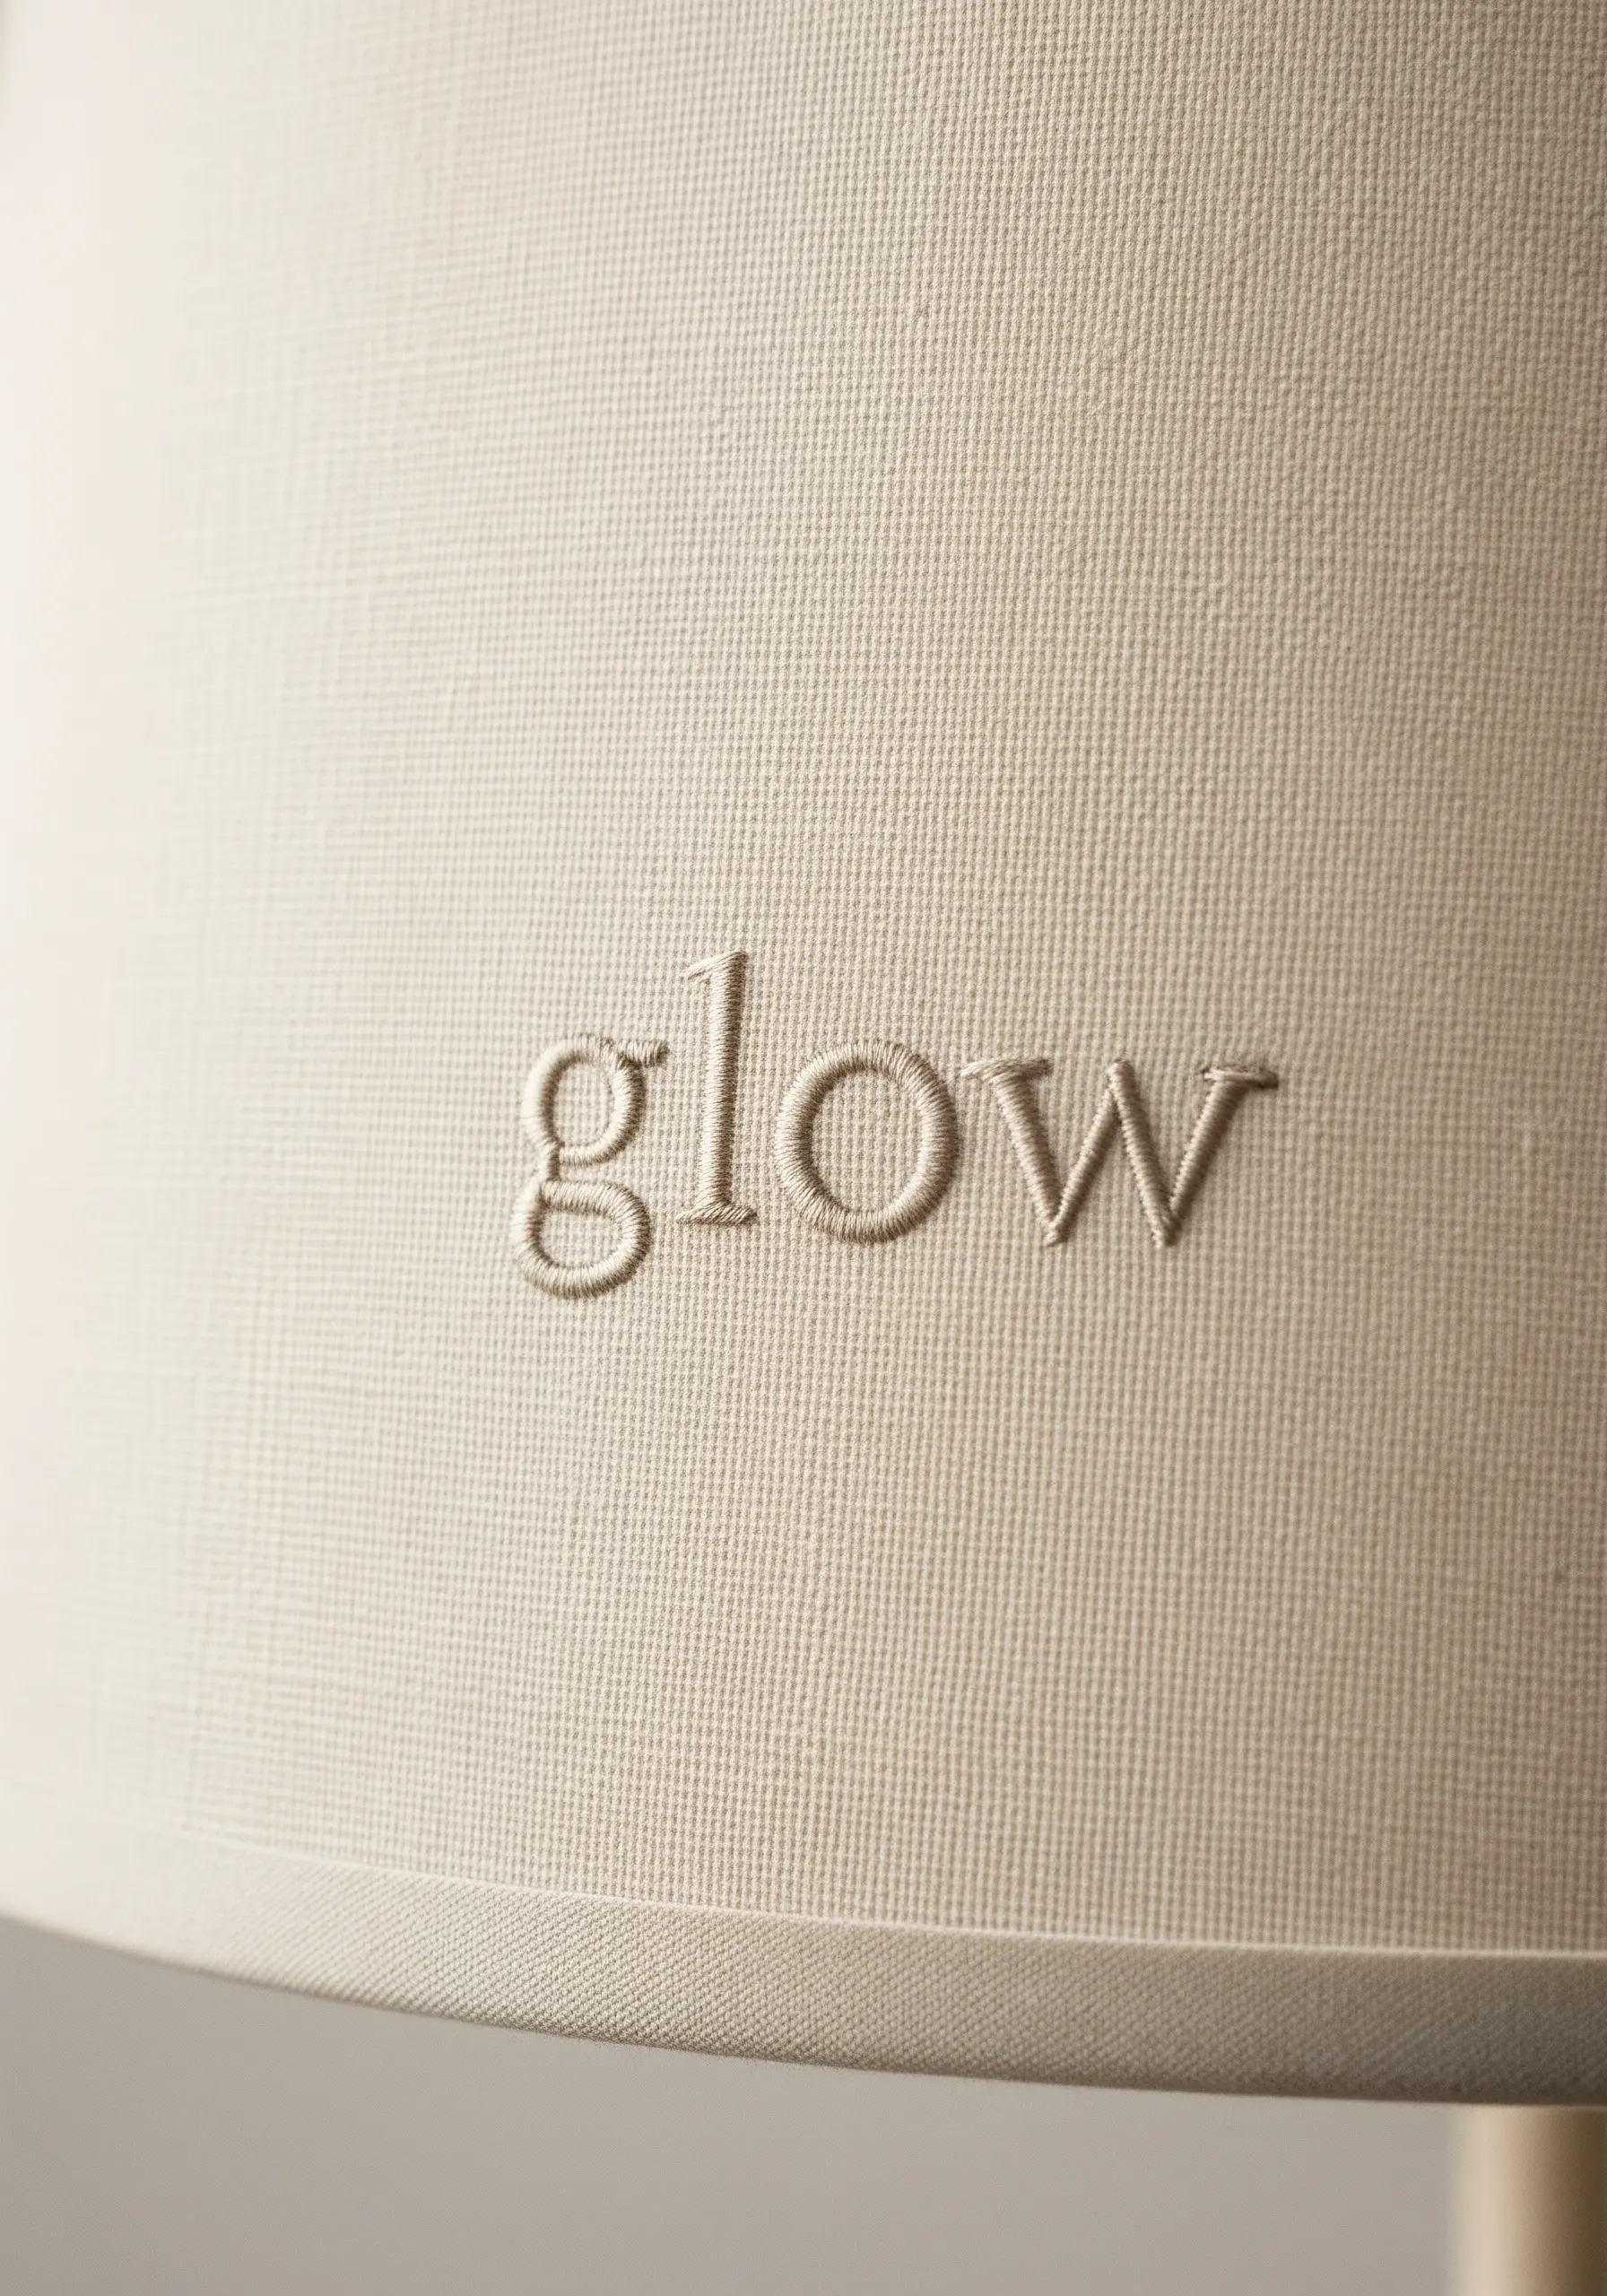
Create an effect of quiet luxury by using an embroidery thread that is only a few shades lighter or darker than your base fabric.
This tone-on-tone technique relies on texture and the play of light and shadow, rather than color contrast, to make the lettering visible.
A simple, clean backstitch or stem stitch is all that is needed to create a sophisticated, embossed look.
It’s a perfect method for adding a personal touch to home decor items like lampshades or cushions when you want the result to feel elegant and seamlessly integrated, and it’s one of the best embroidery decor ideas.
18. Stitching Letters as Celestial Constellations
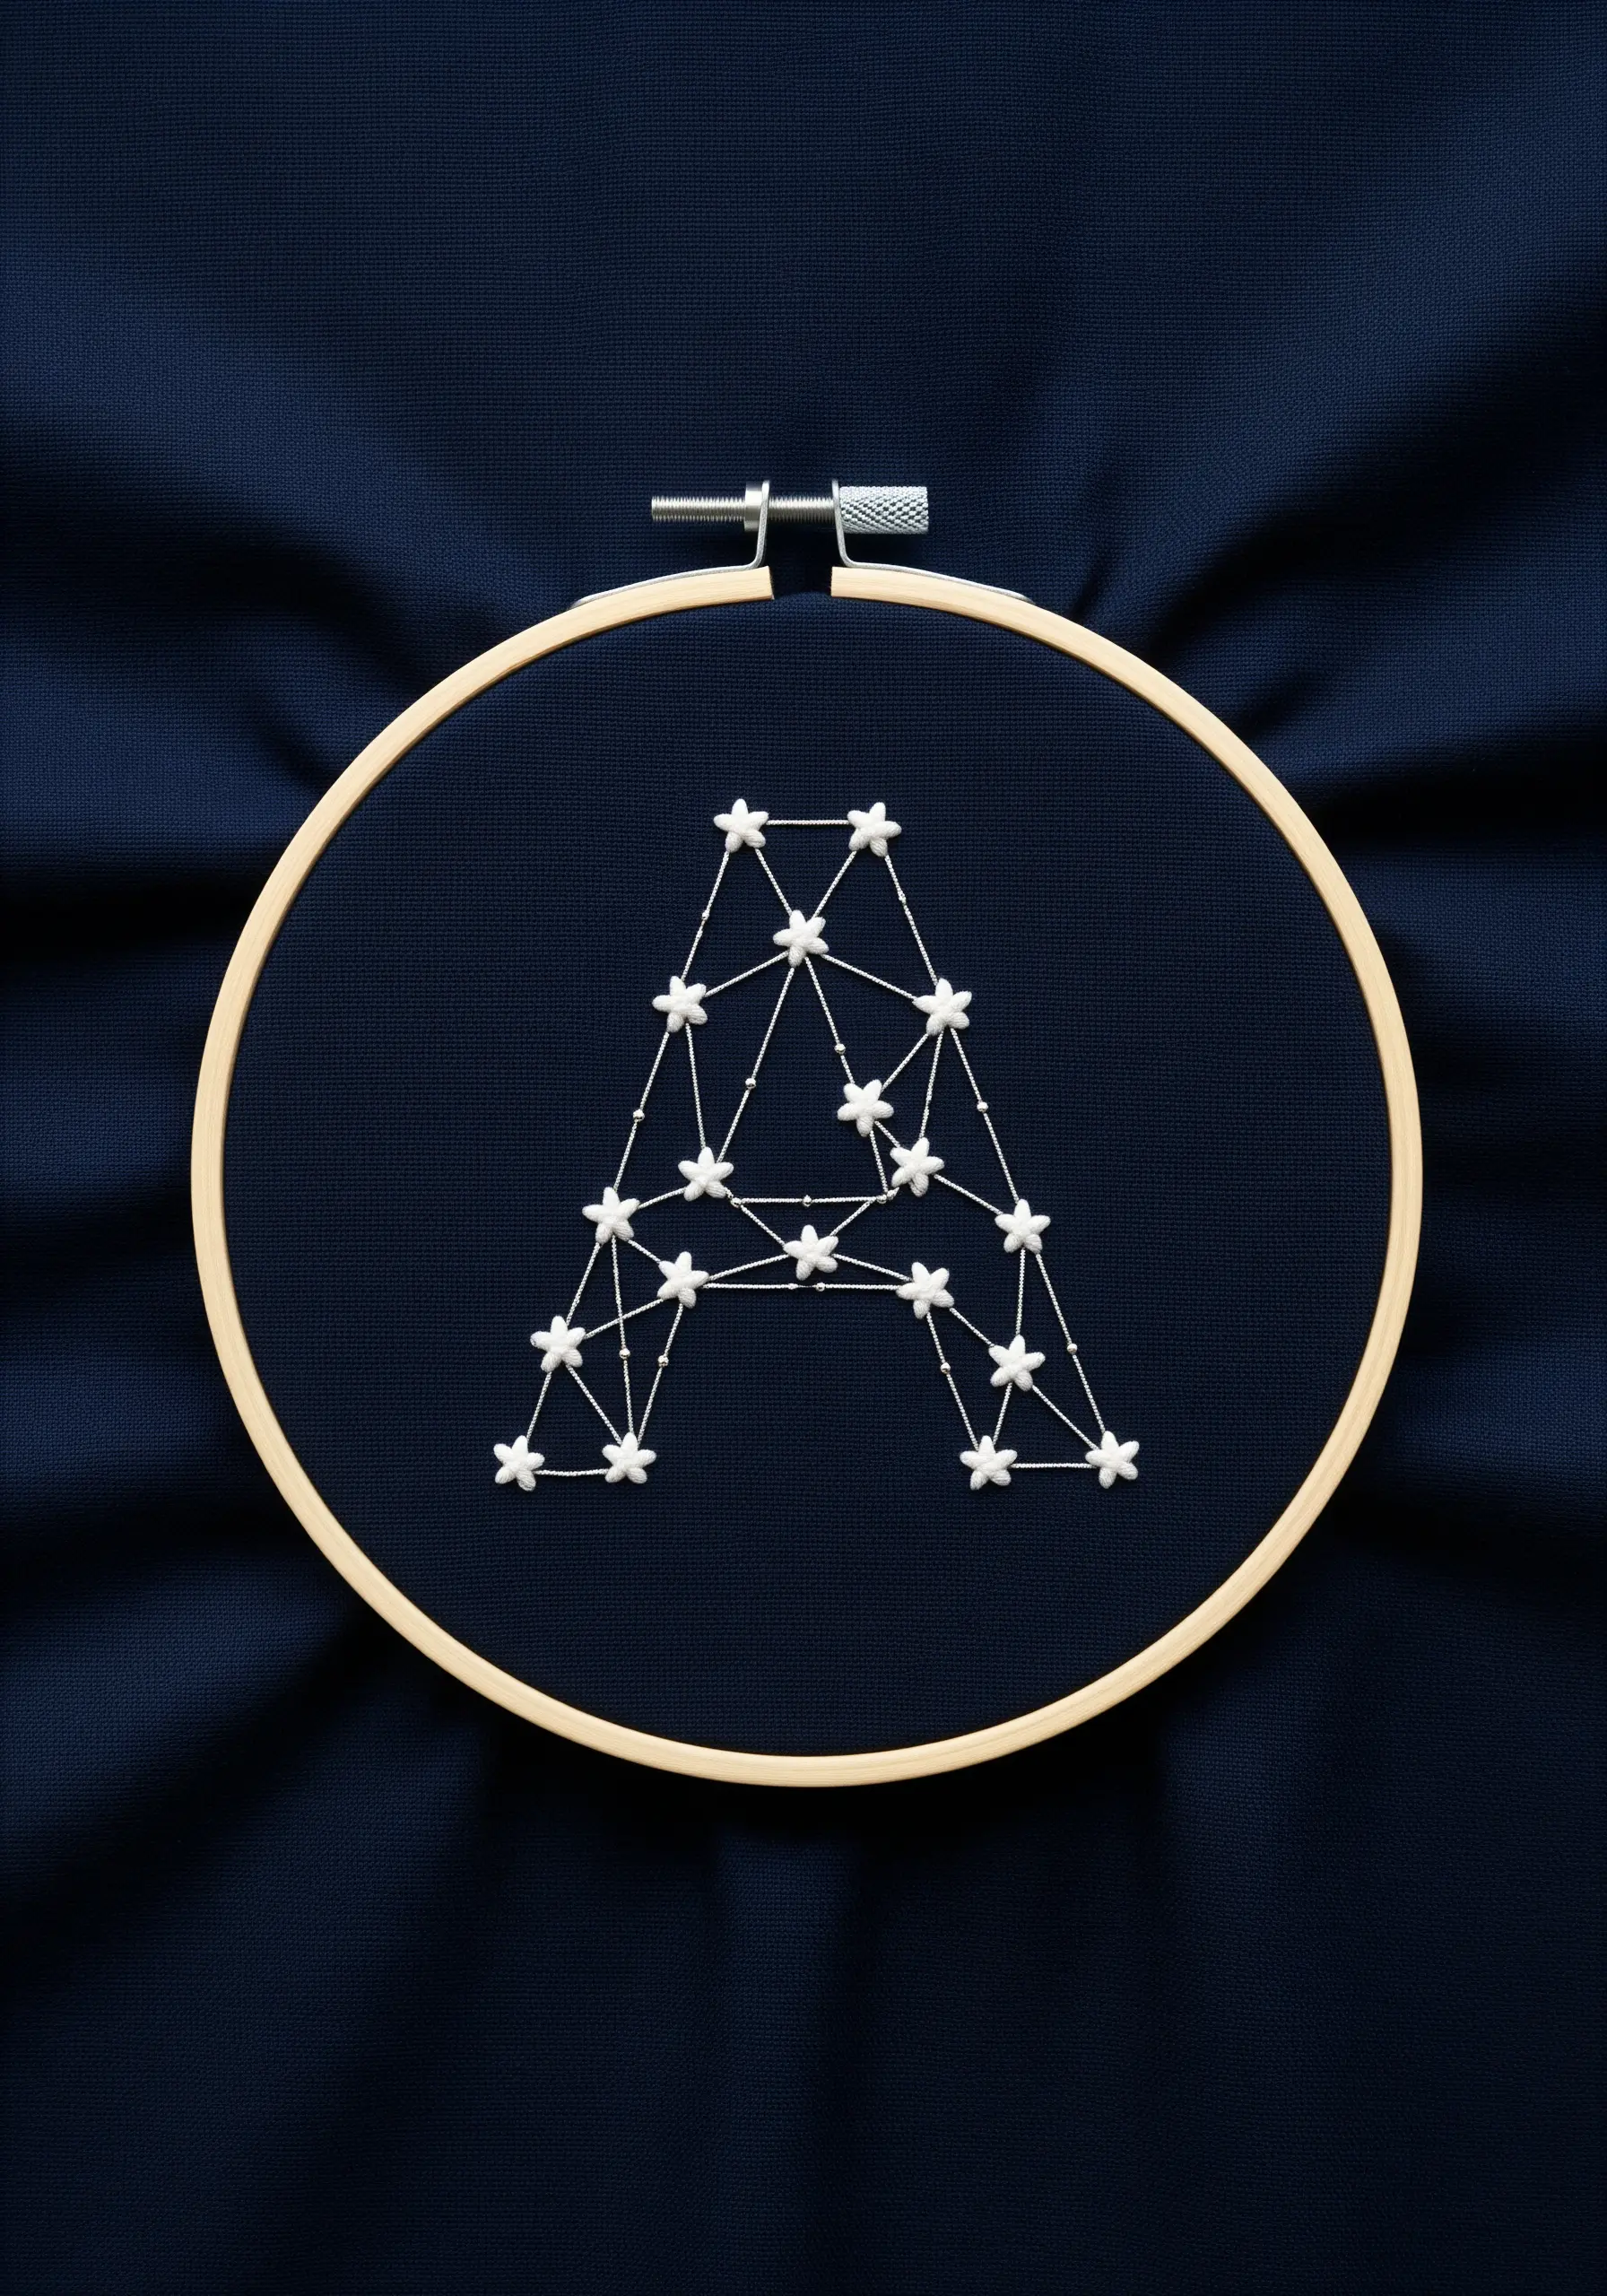
Transform a simple monogram into a piece of celestial art by treating it as a constellation.
Use a removable fabric marker to plot points along the shape of your letter. At each point, create a ‘star’ using a small French knot or a tiny star stitch.
Once your stars are in place, use a single strand of a lighter thread to connect them with straight stitches, revealing the letterform.
Stitching on a dark, high-contrast fabric like navy blue cotton enhances the night-sky effect, making the design truly shine.
19. Creating Delicate Stitched Monograms on Paper
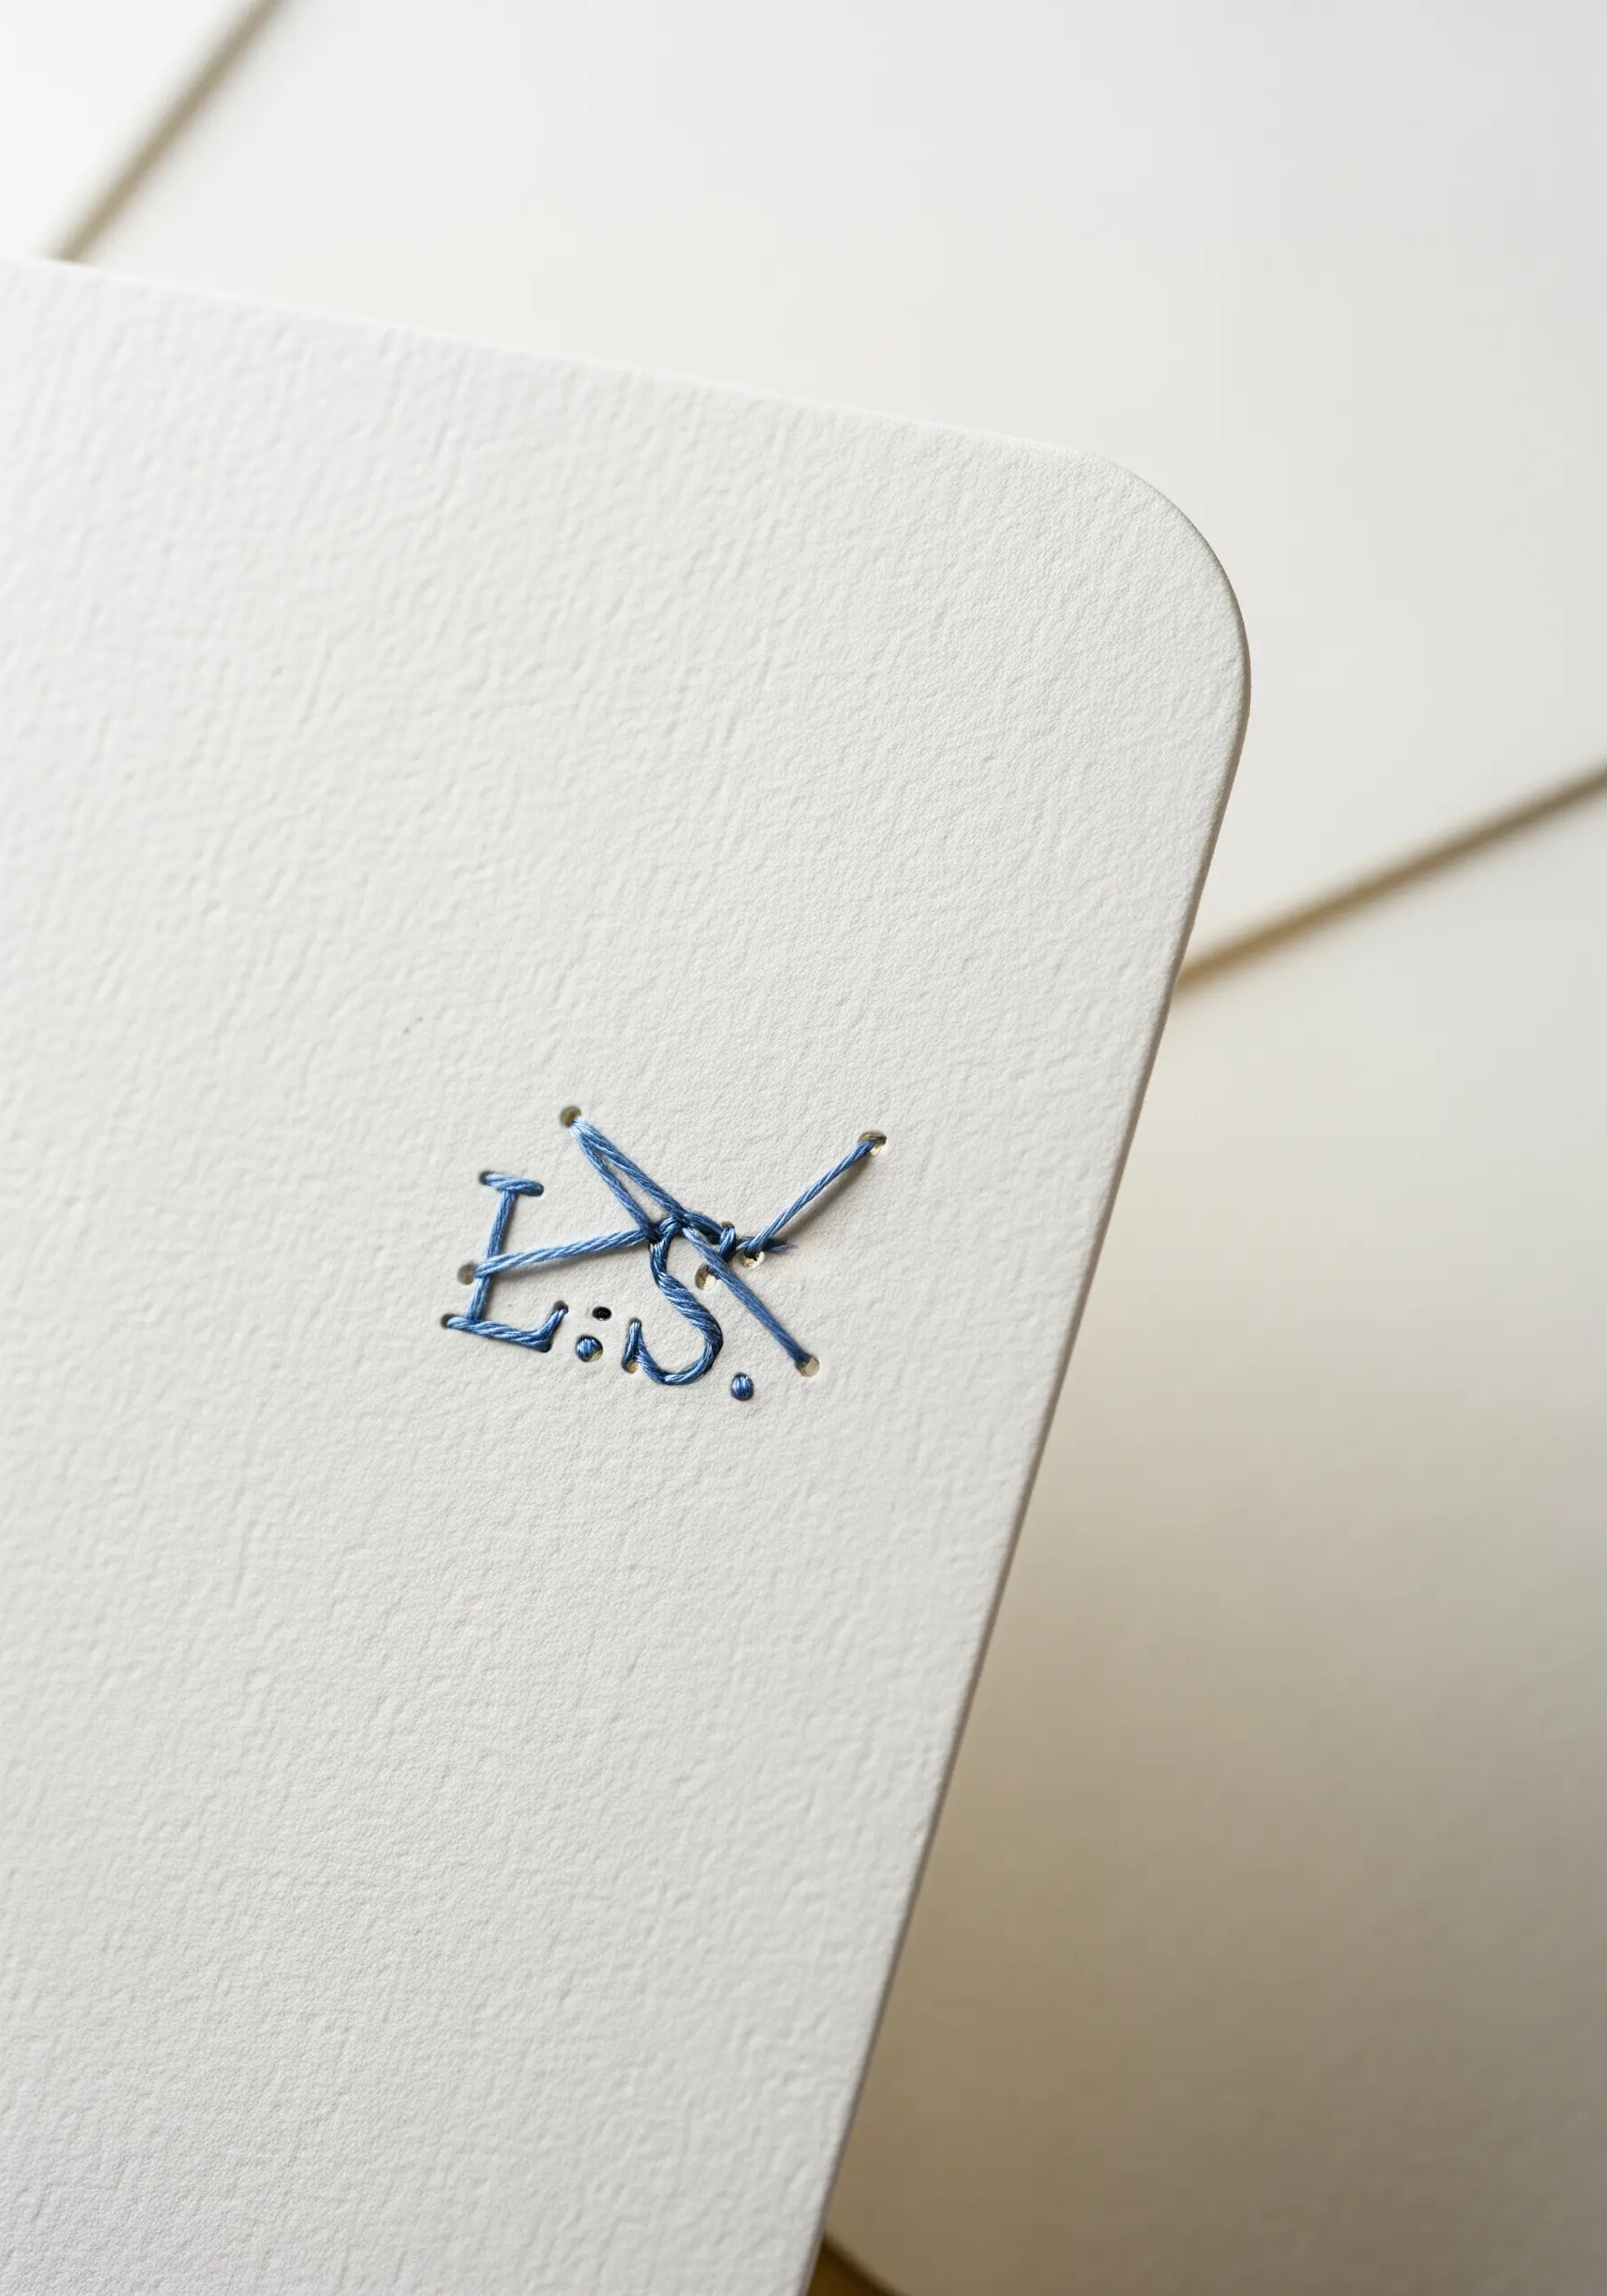
Stitching on paper offers a unique, graphic quality that’s perfect for personalizing stationery, gift tags, or art prints.
As with leather, you must pre-pierce all your holes. Use a pin held in a pin vise for control, placing holes at regular intervals along your design.
Use a fine needle and only one or two strands of floss, and be careful not to pull your stitches too tight, as this can tear the paper.
This method beautifully marries the worlds of paper craft and embroidery, perfect for creative collage art ideas.


