Have you ever looked at a finished collage and felt it was missing a certain warmth, a final layer of intention? Paper is wonderful for color and shape, but thread offers what paper cannot: line, texture, and a distinctly human touch.
Think of your needle as a drawing tool and your floss as a fine ink. With it, you can trace a delicate path across a map, add the glint of light in a paper window, or create a tactile surface that begs to be touched. This is not about complex, time-consuming embroidery; it’s about making thoughtful, deliberate marks that elevate your entire composition.
In the ideas that follow, you will discover how a few simple stitches can add movement, create focus, and tell a story. You’ll learn to see thread not as mere decoration, but as a fundamental element of your artistic language, allowing you to create mixed-media art that feels both polished and deeply personal.
1. Add Textural Accents with French Knots
Integrate small, tactile details into your paper collage by scattering clusters of French knots.
Use a single strand of floss for delicate knots or three strands for more pronounced, pebbly textures that invite touch.
Position these knots asymmetrically to create organic movement and draw the eye across the composition.
The contrast between the flat paper and the raised stitches adds a subtle, sophisticated depth that elevates the entire piece.
2. Stitch Constellations with Metallic Thread

Transform a celestial-themed collage by using metallic thread to connect points, forming constellations.
First, gently pierce the paper with your needle at each star point to ensure clean entry and exit holes, preventing tearing.
Use a fine, single strand of silver or gold metallic thread for a delicate, shimmering line that catches the light.
Add tiny seed beads or single French knots at the vertices to represent stars, giving your celestial map a three-dimensional quality.
3. Create Tension with a Single Graphic Line
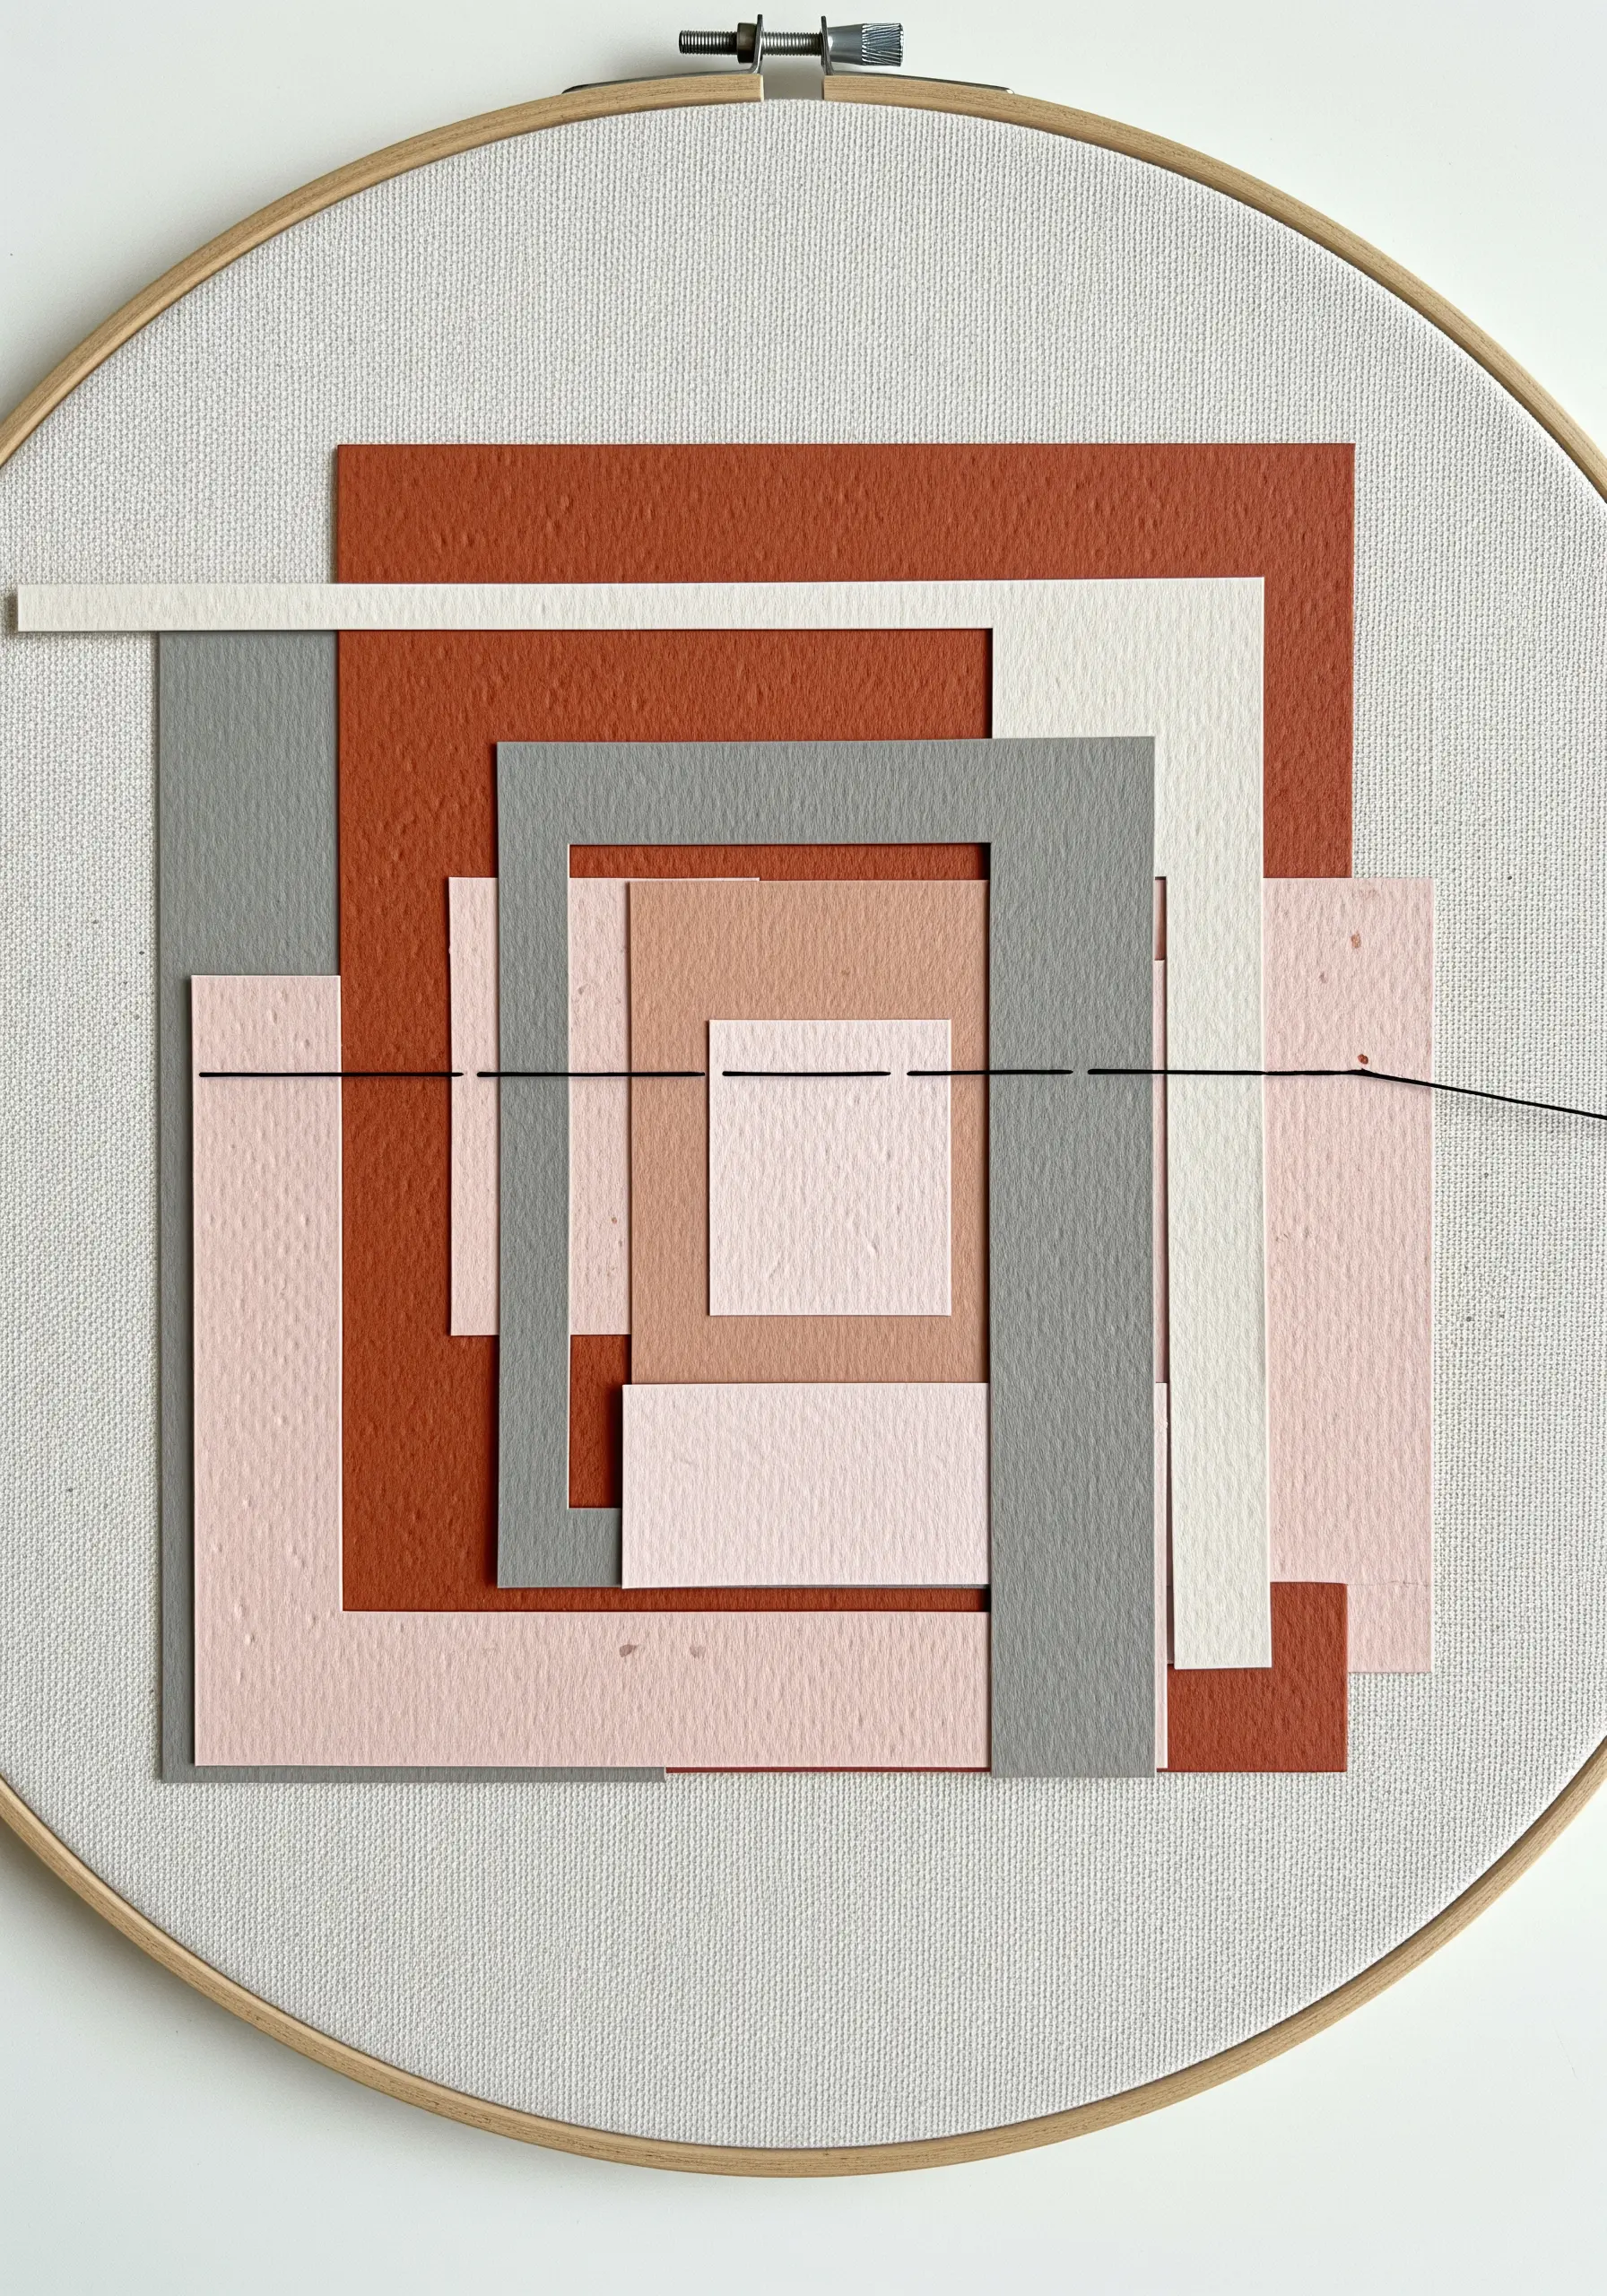
Interrupt a geometric paper arrangement with a single, taut line of contrasting thread.
This technique introduces a sharp, linear element that slices through the composition, creating dynamic visual tension.
Use a thick, dark thread, like a Perle 5 cotton, to give the line weight and presence against the softer paper tones.
Ensure the thread is pulled tight enough to be perfectly straight but not so tight that it buckles the paper or fabric beneath.
4. Emulate Natural Motion with Whipped Stitches
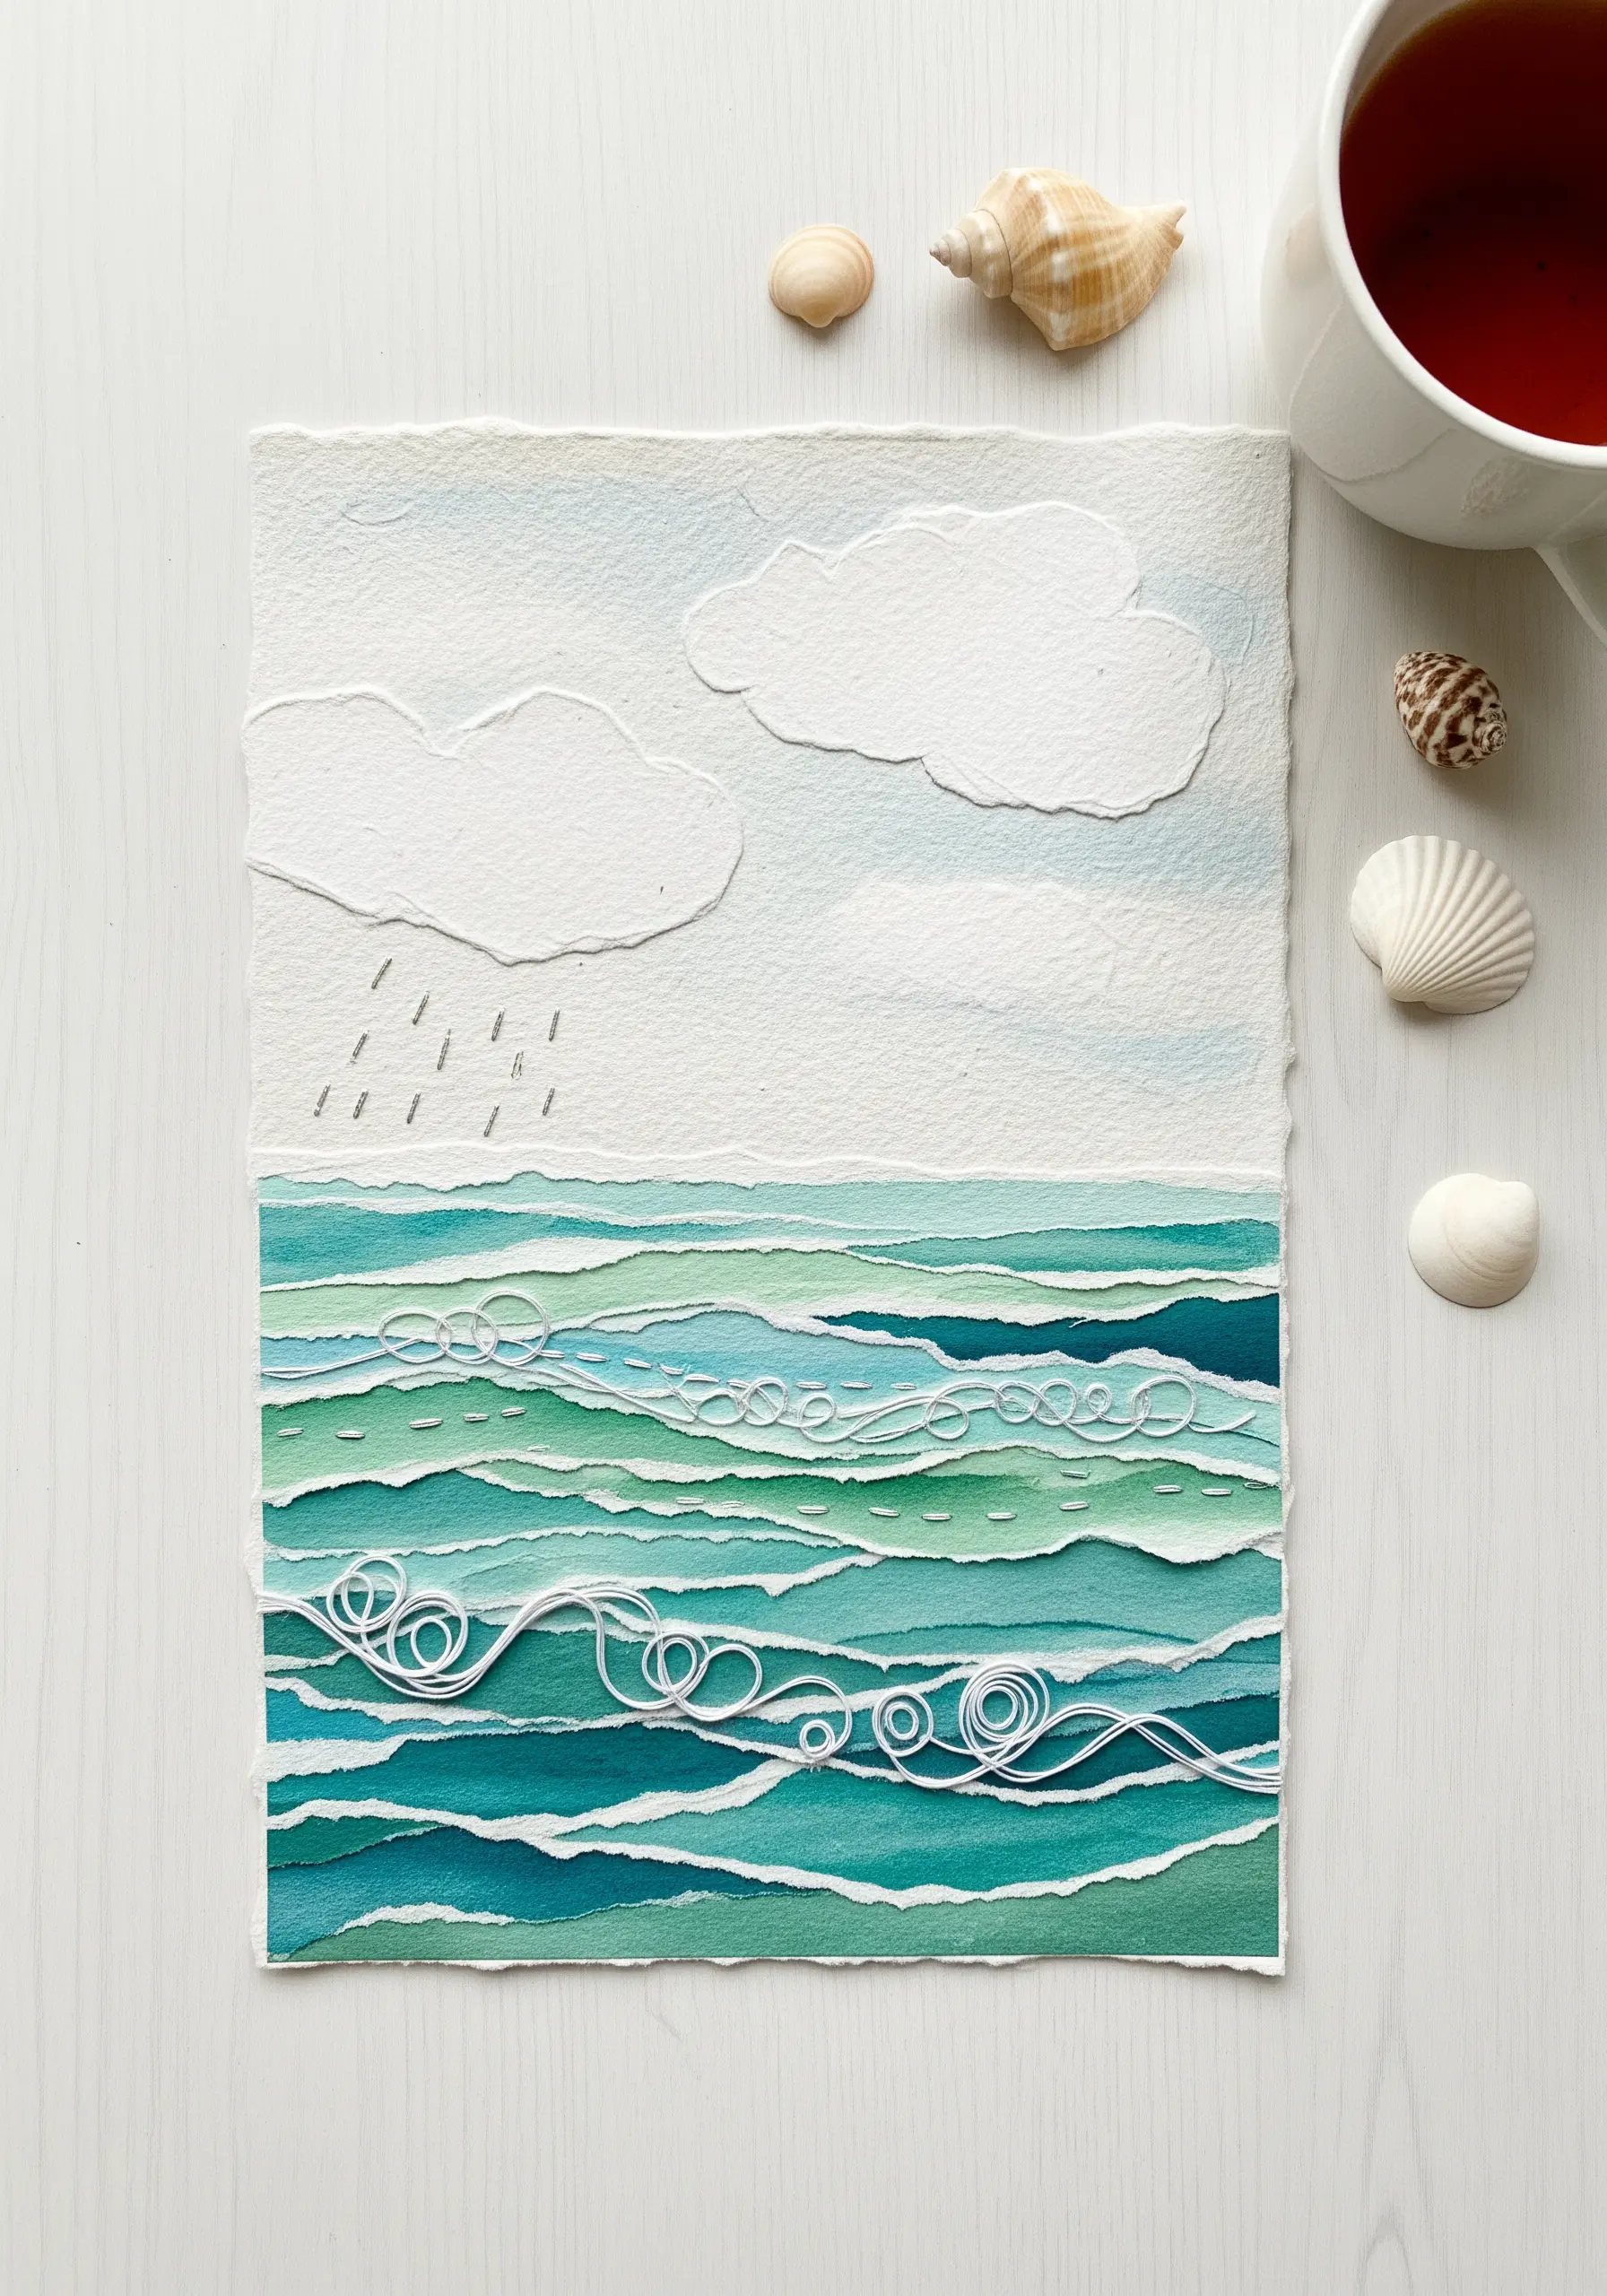
Capture the movement of water or wind by stitching swirling lines over torn paper layers.
Use a whipped backstitch or stem stitch in a contrasting color, like white on teal, to create smooth, uninterrupted curves that mimic seafoam.
Allow your stitches to cross over the torn edges of the paper, physically and visually unifying the different layers of your collage.
A variegated thread can enhance this effect, adding subtle color shifts that mirror the changing tones of water.
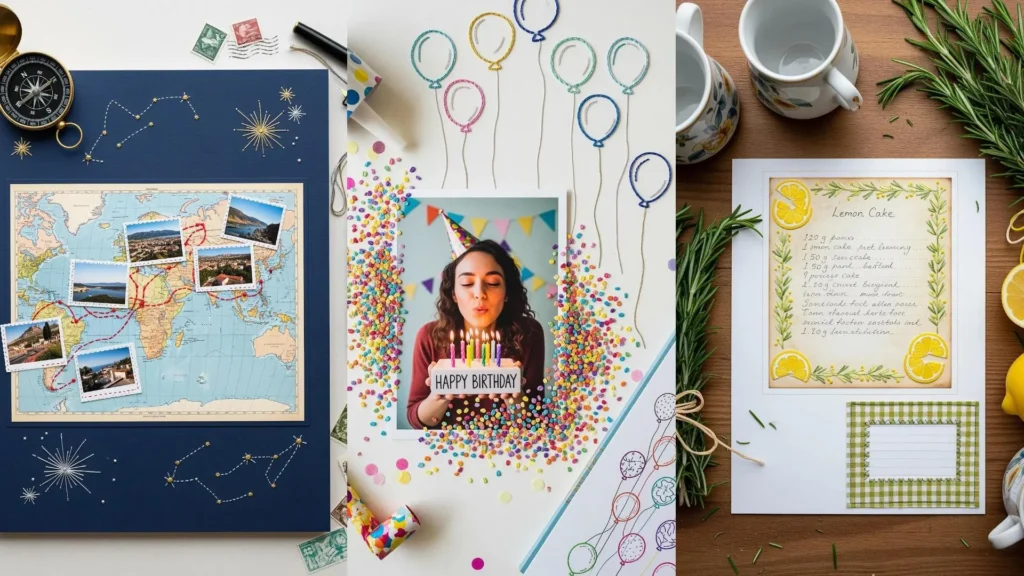
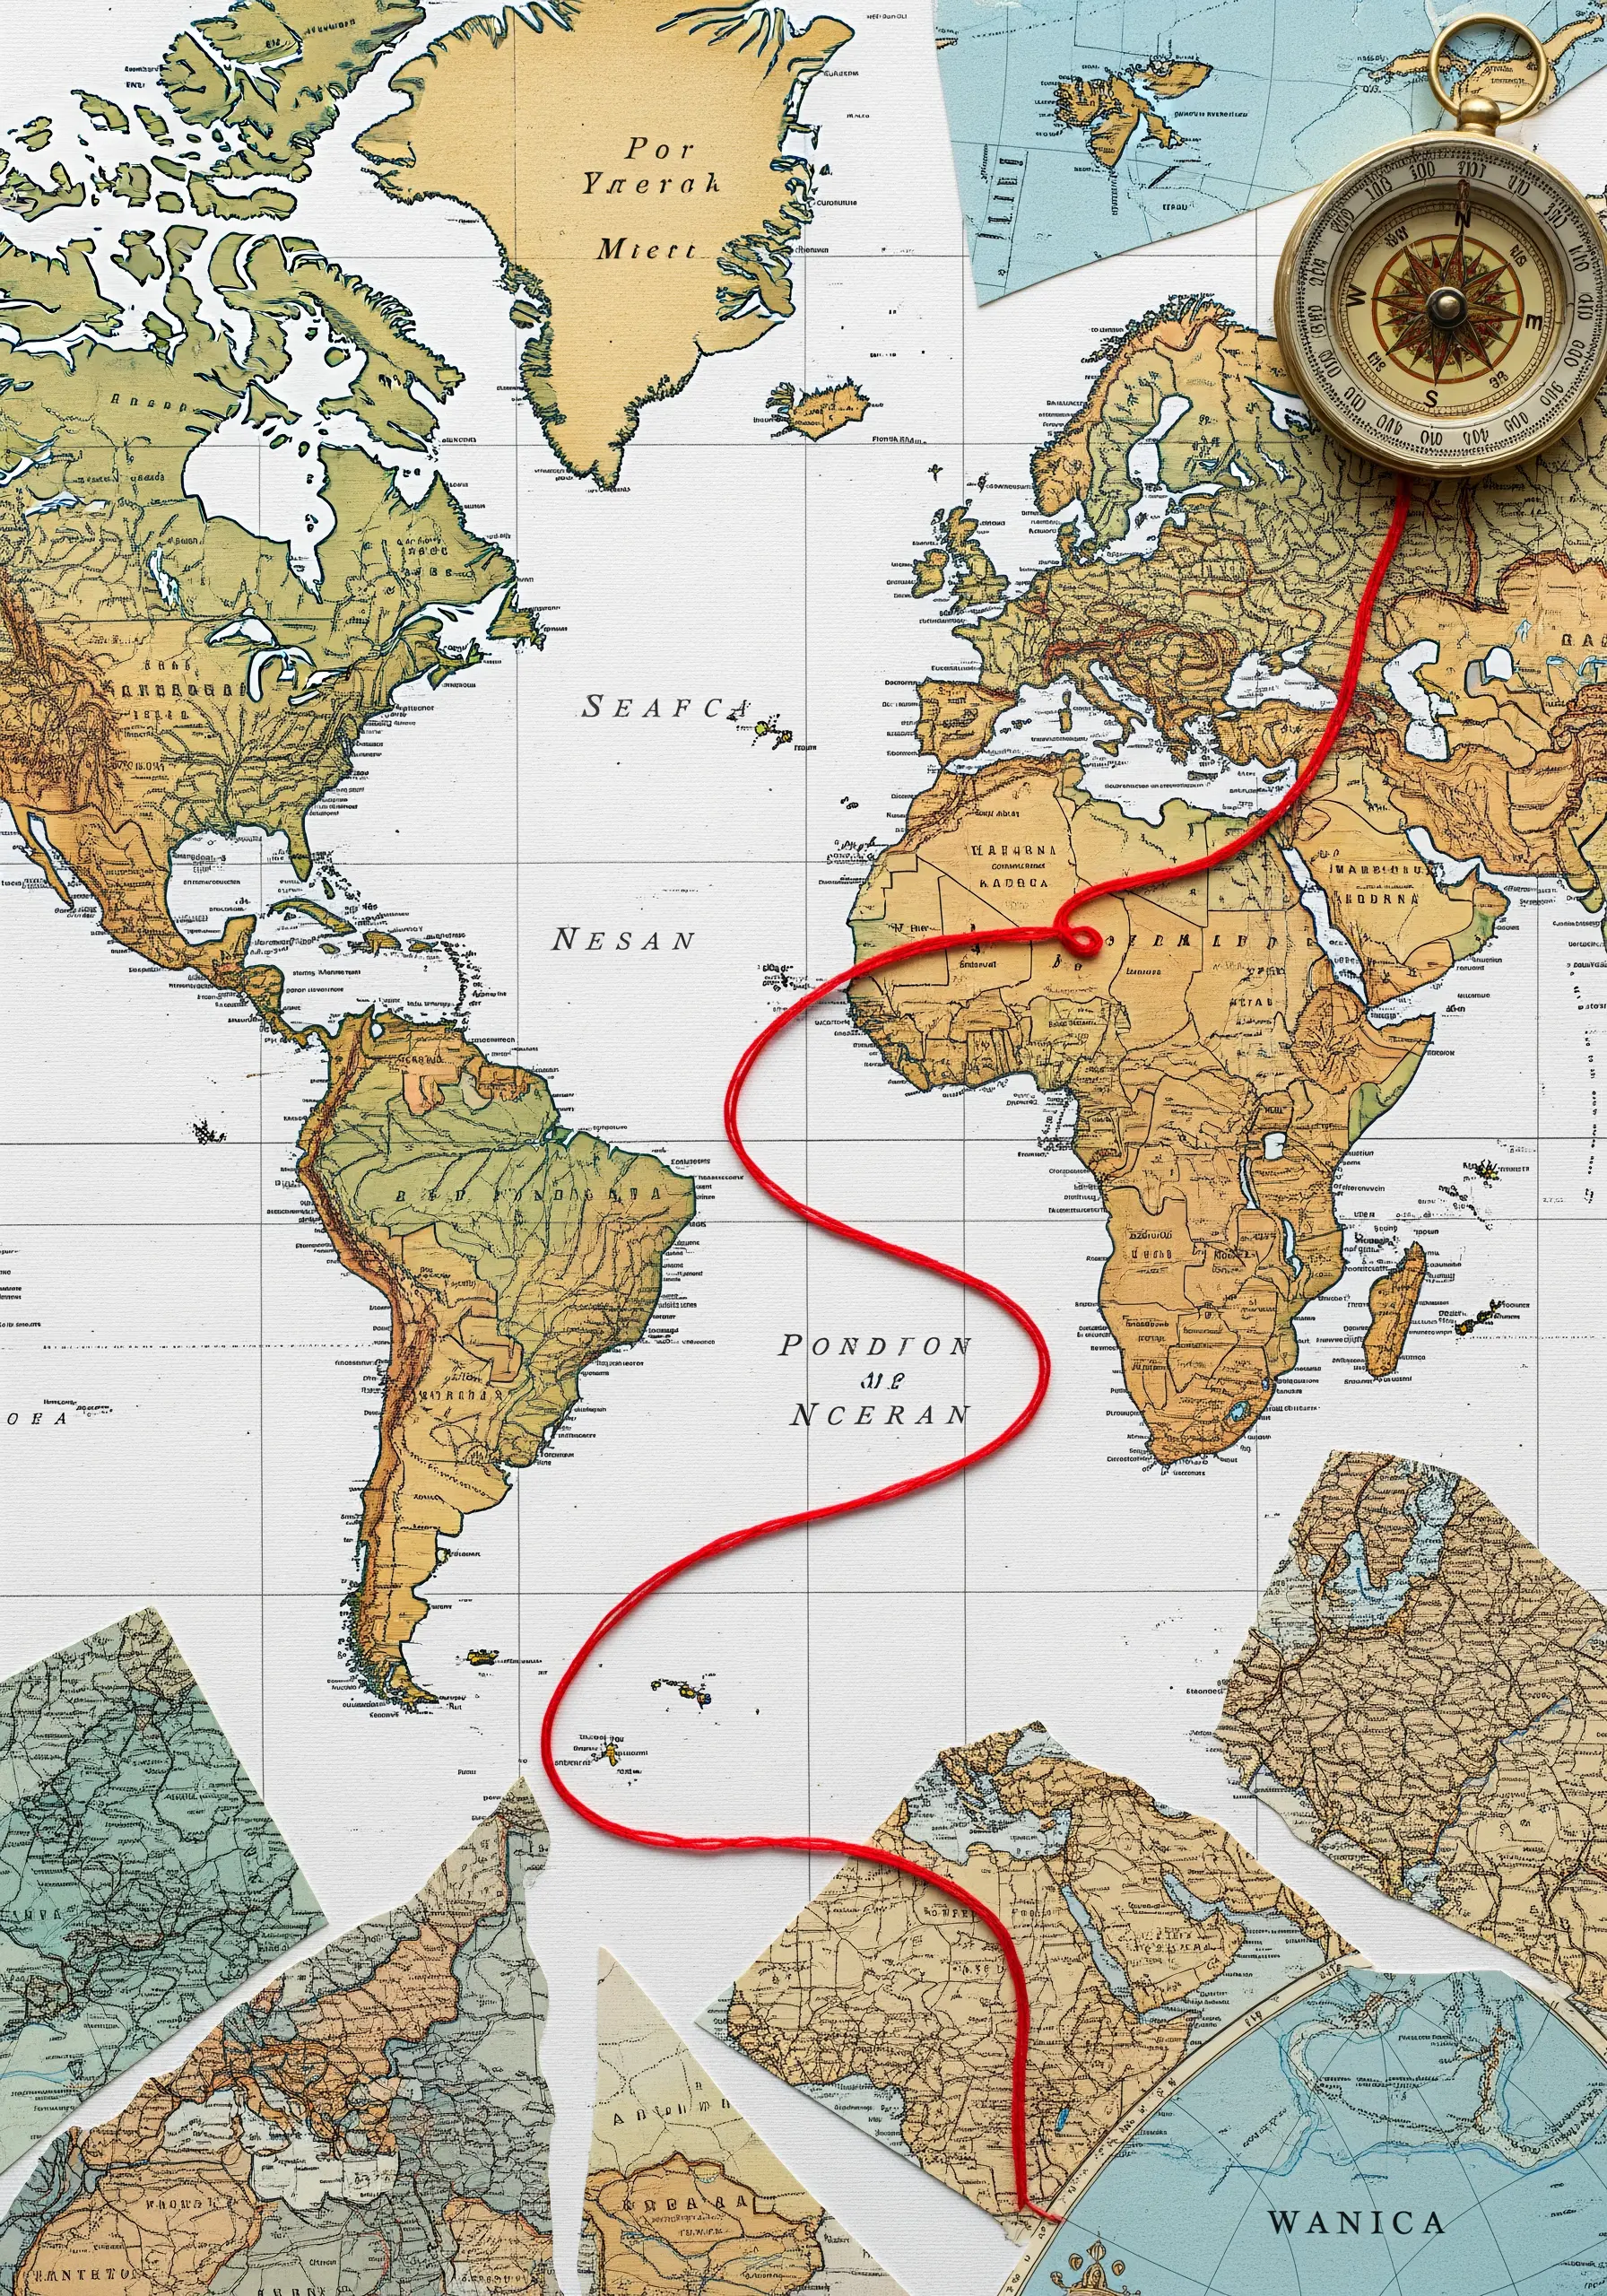
5. Trace a Narrative with a Simple Backstitch
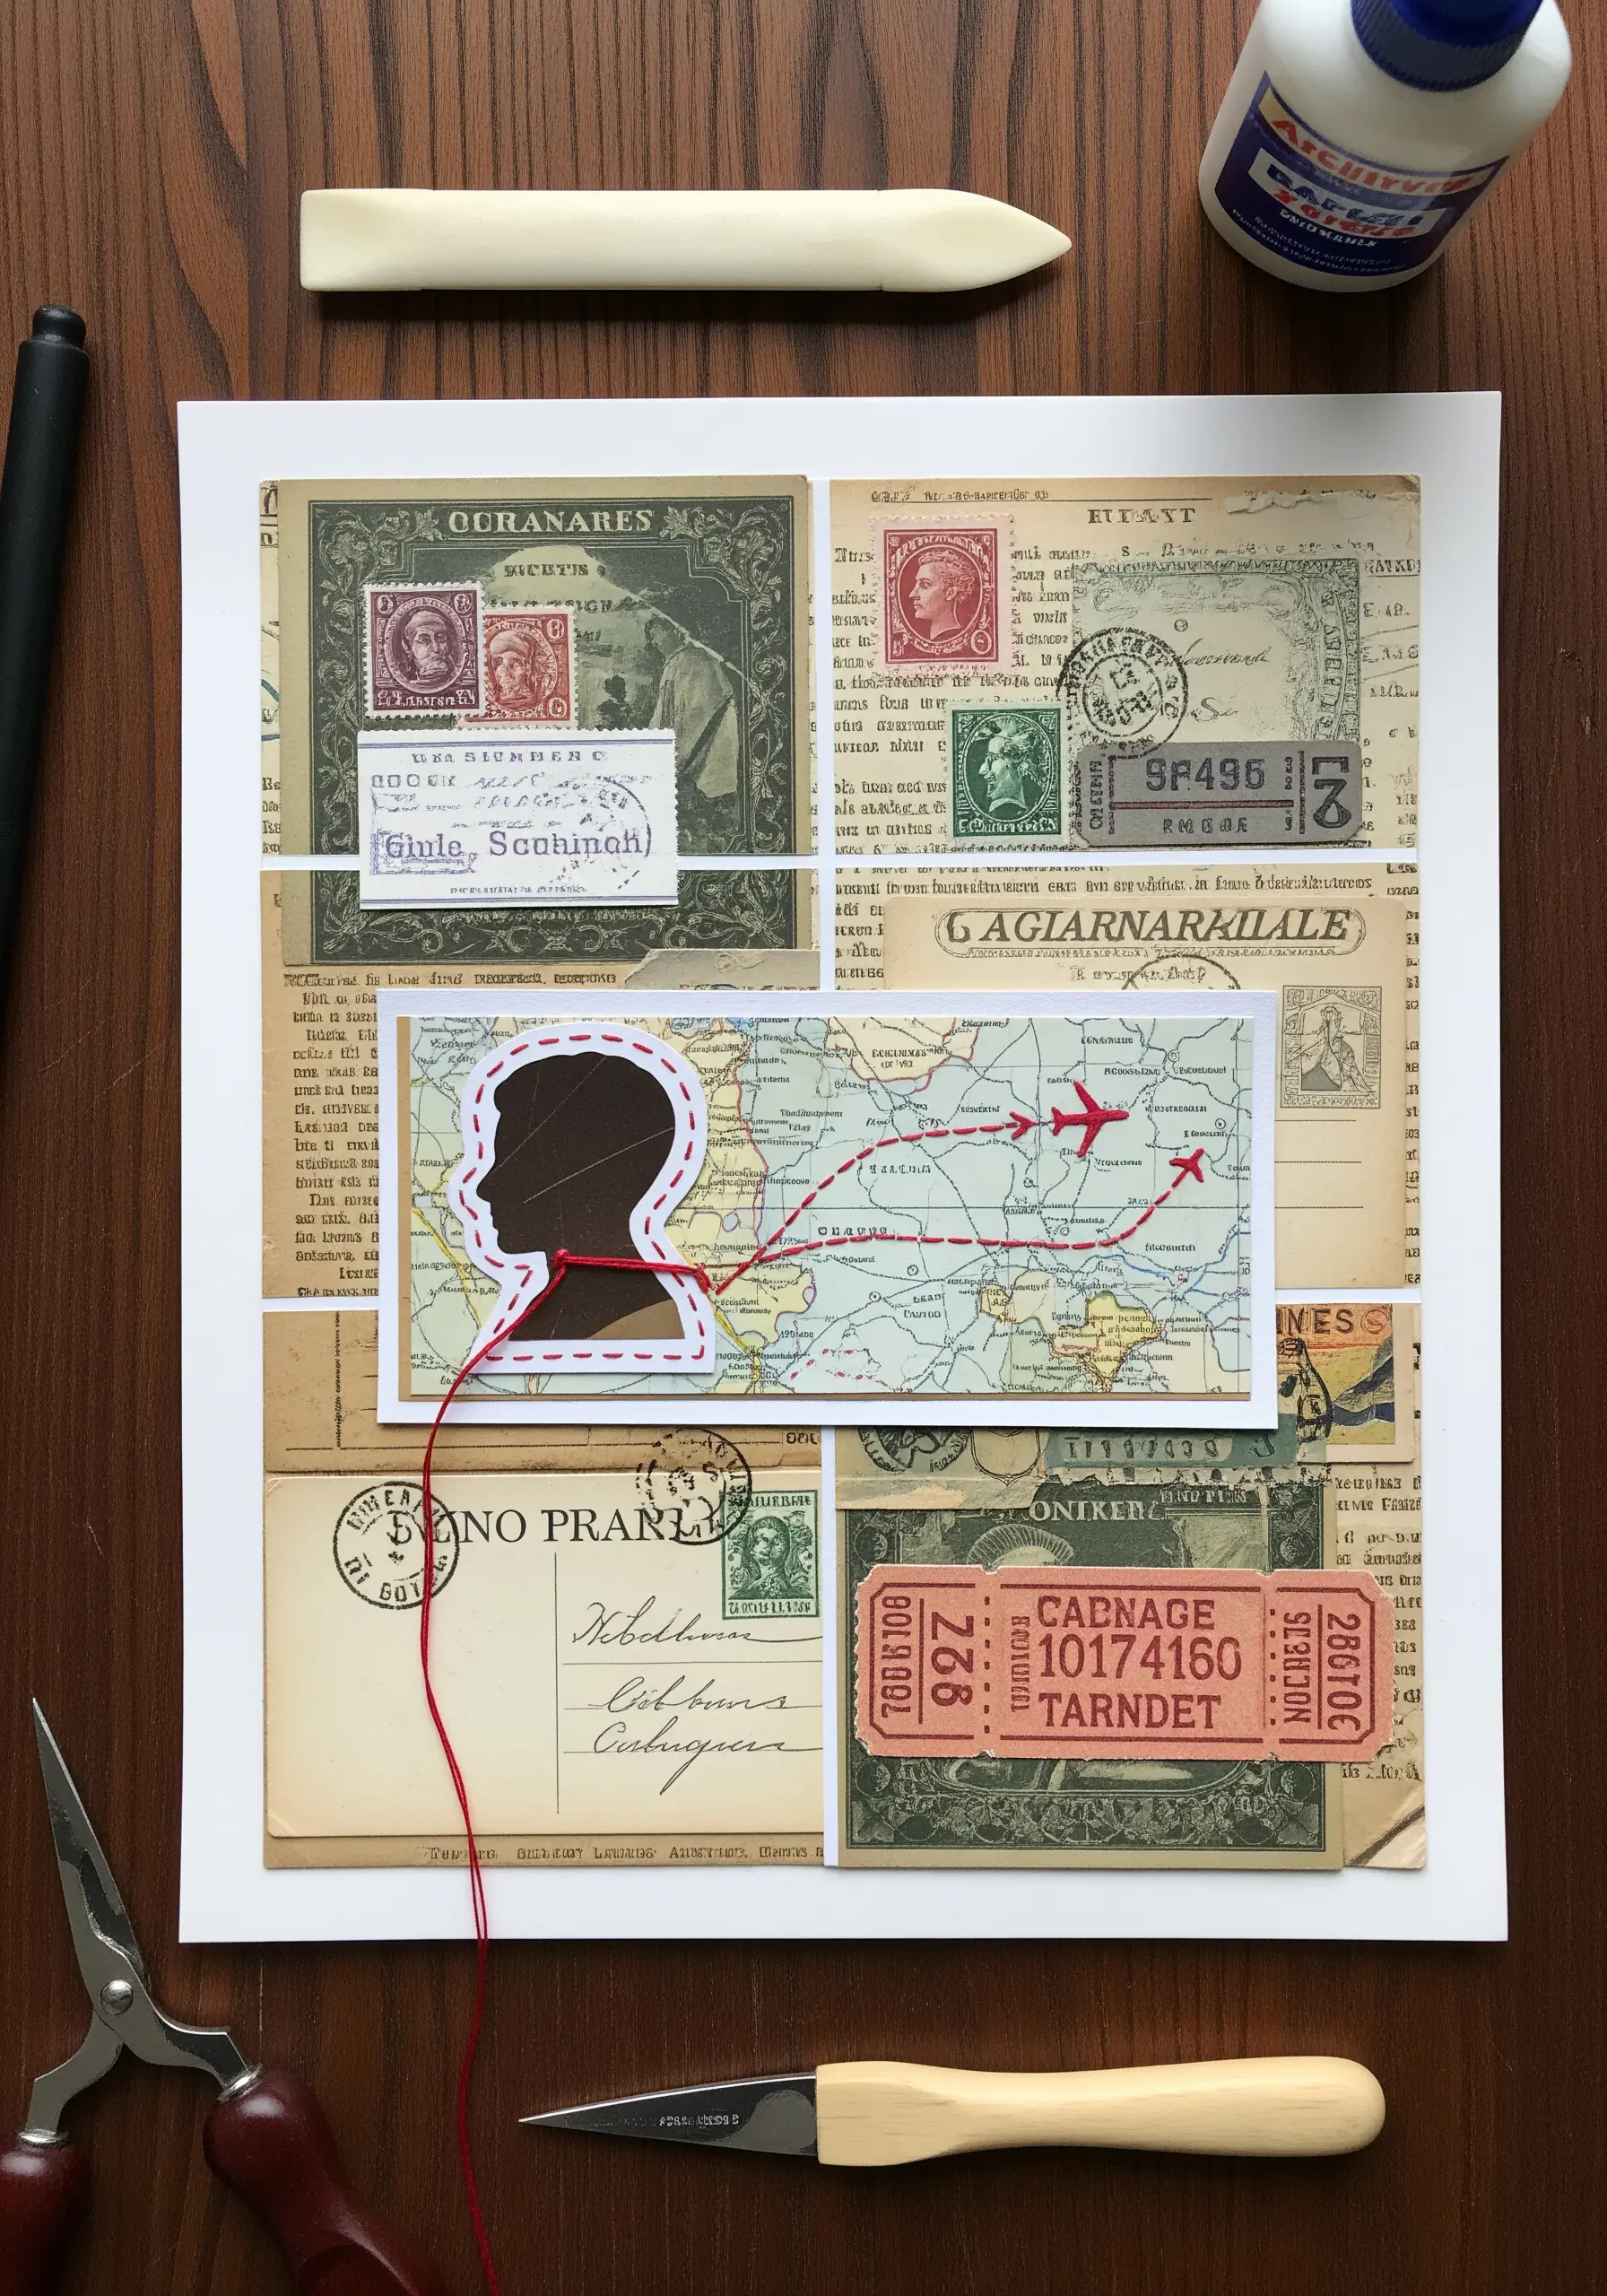
Use a single line of thread to tell a story across your collage, connecting different elements like a traveler’s path on a map.
A simple backstitch using two or three strands of floss is perfect for creating a clean, easy-to-follow line.
Choose a bold color, such as red, to ensure the stitched path stands out as the primary narrative element in your design.
This technique turns your collage from a static collection of ephemera into a dynamic piece about tracing a journey.
6. Unify a Composition with Graphic Cross Stitches
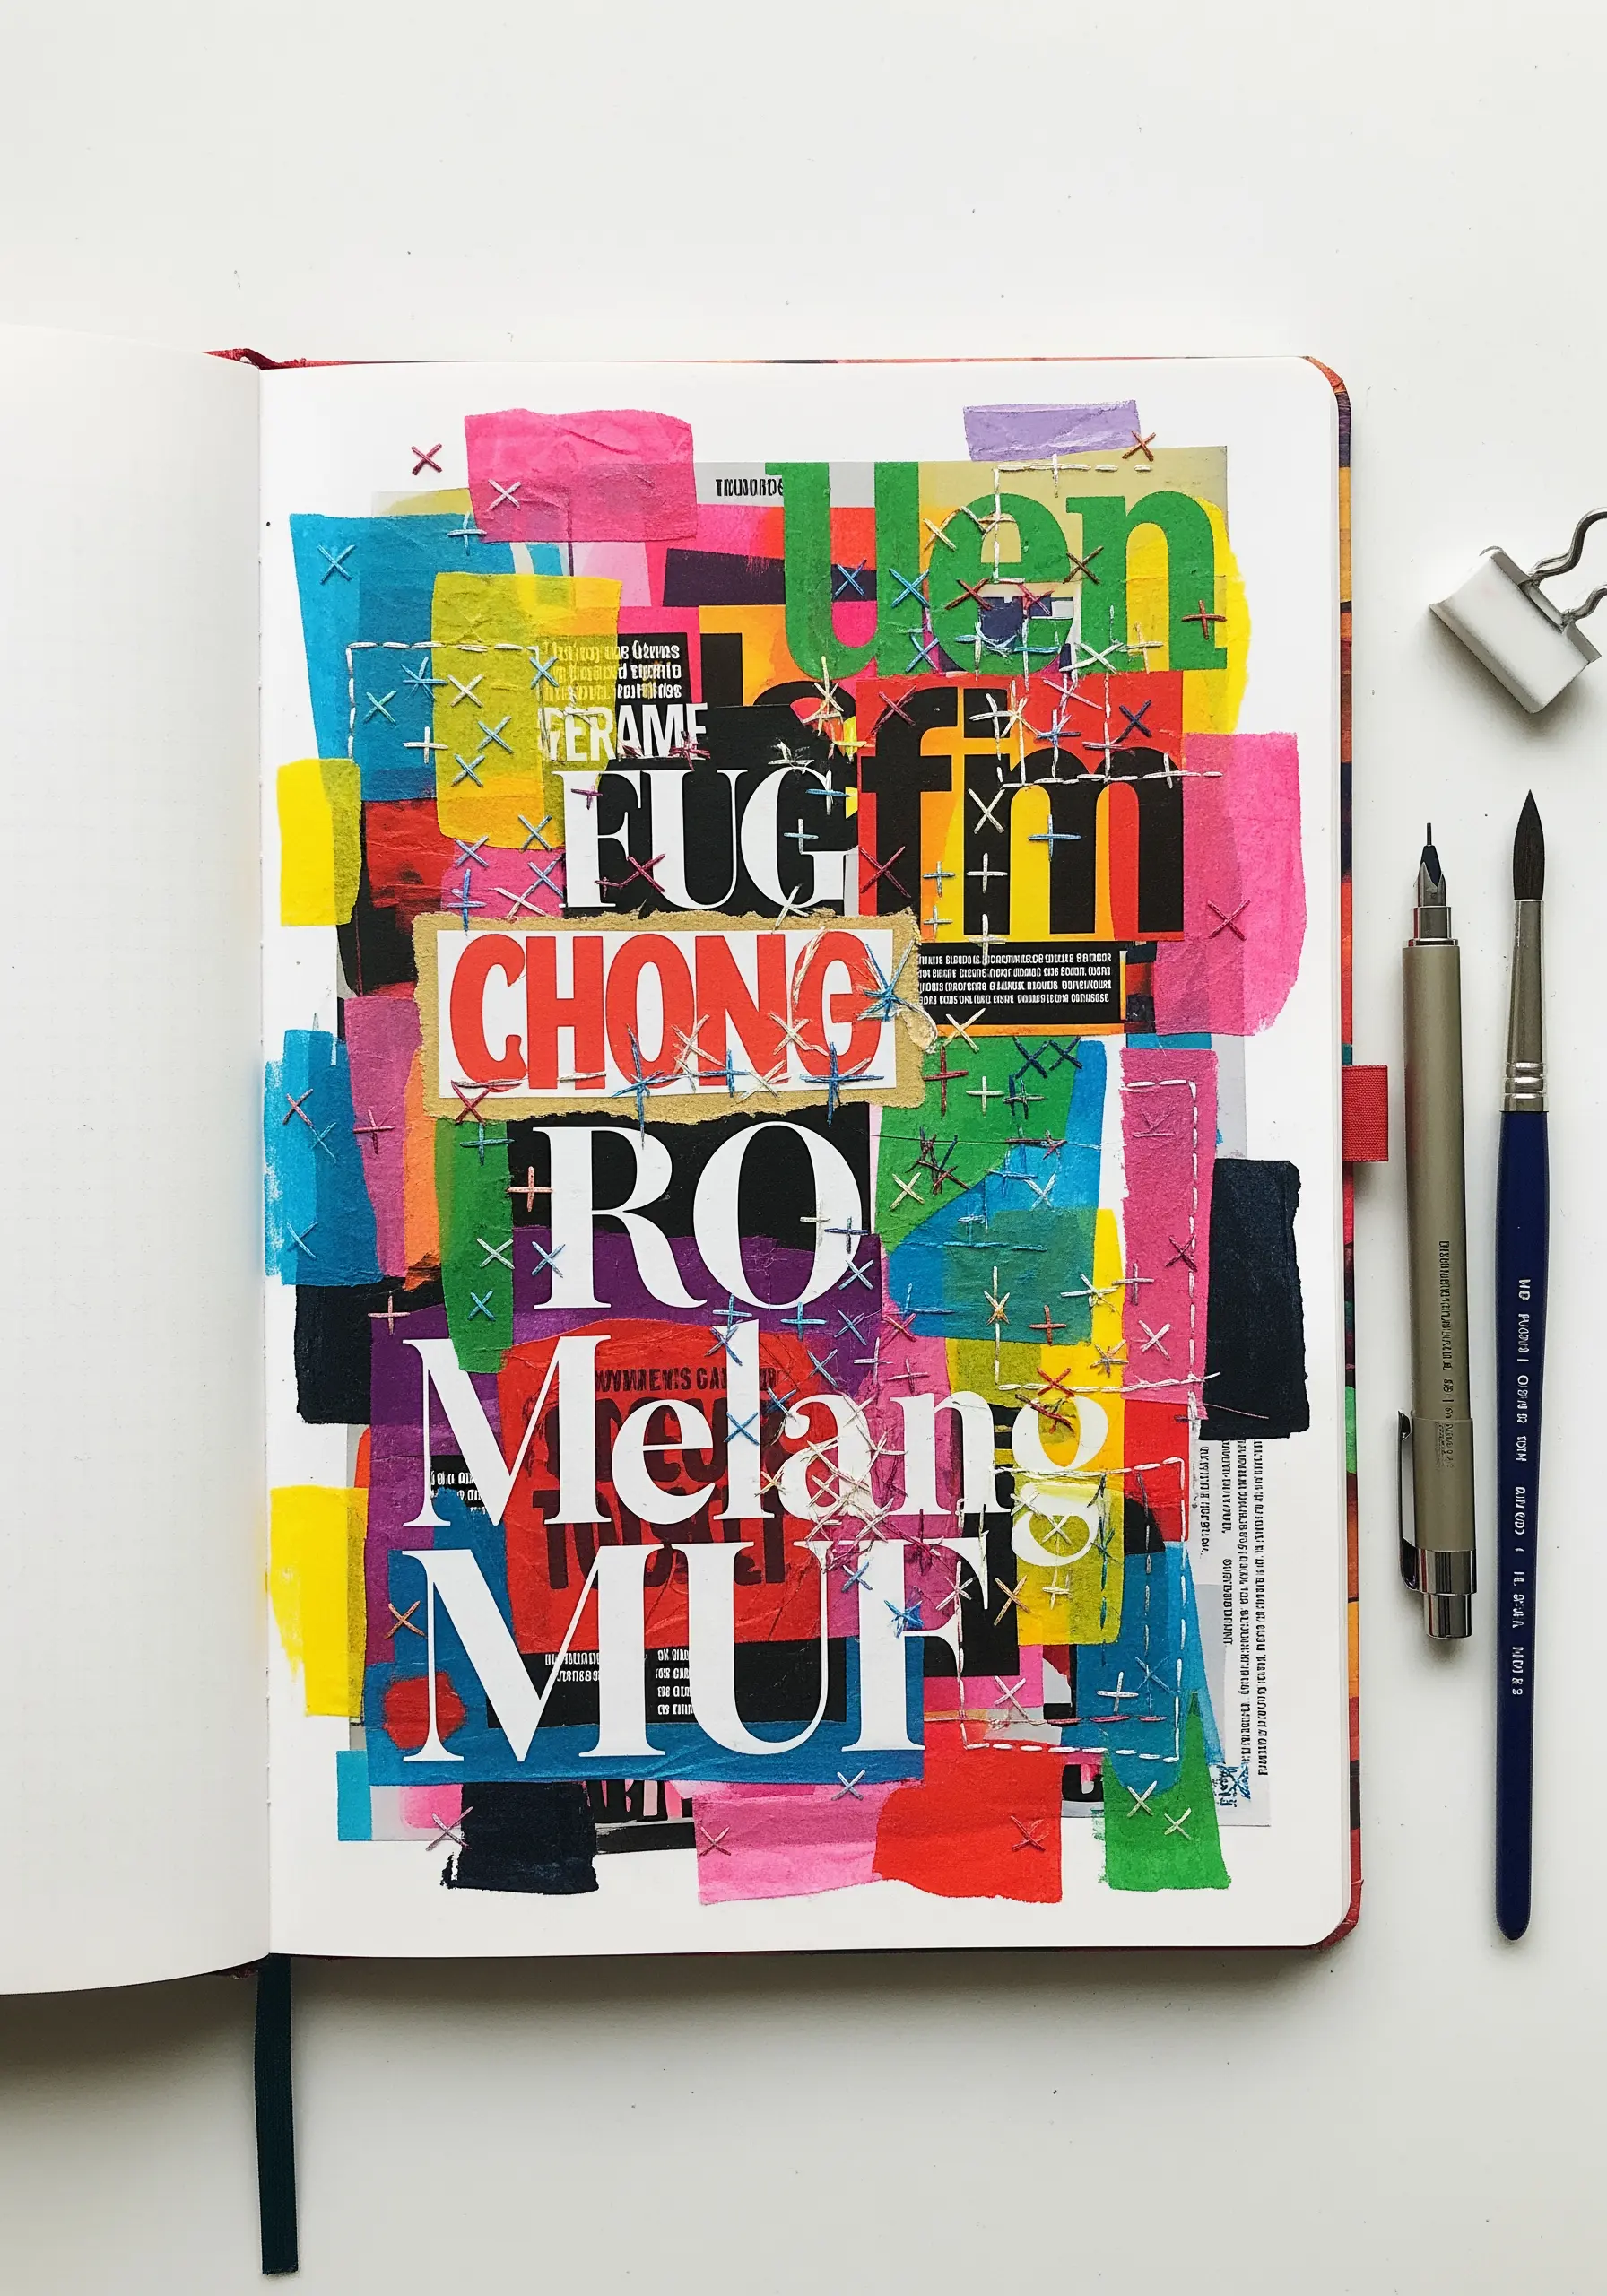
Use large, bold cross stitches to tack down and visually unify a chaotic collage of paper and typography.
This approach adds a raw, graphic texture that feels both decorative and structural, as if the stitches are staples holding the piece together.
Use a thick, high-contrast thread, like a white Perle cotton on a colorful background, to make the stitches a prominent design element.
Vary the placement and angle of your stitches to enhance the energetic, deconstructed feel of the artwork.
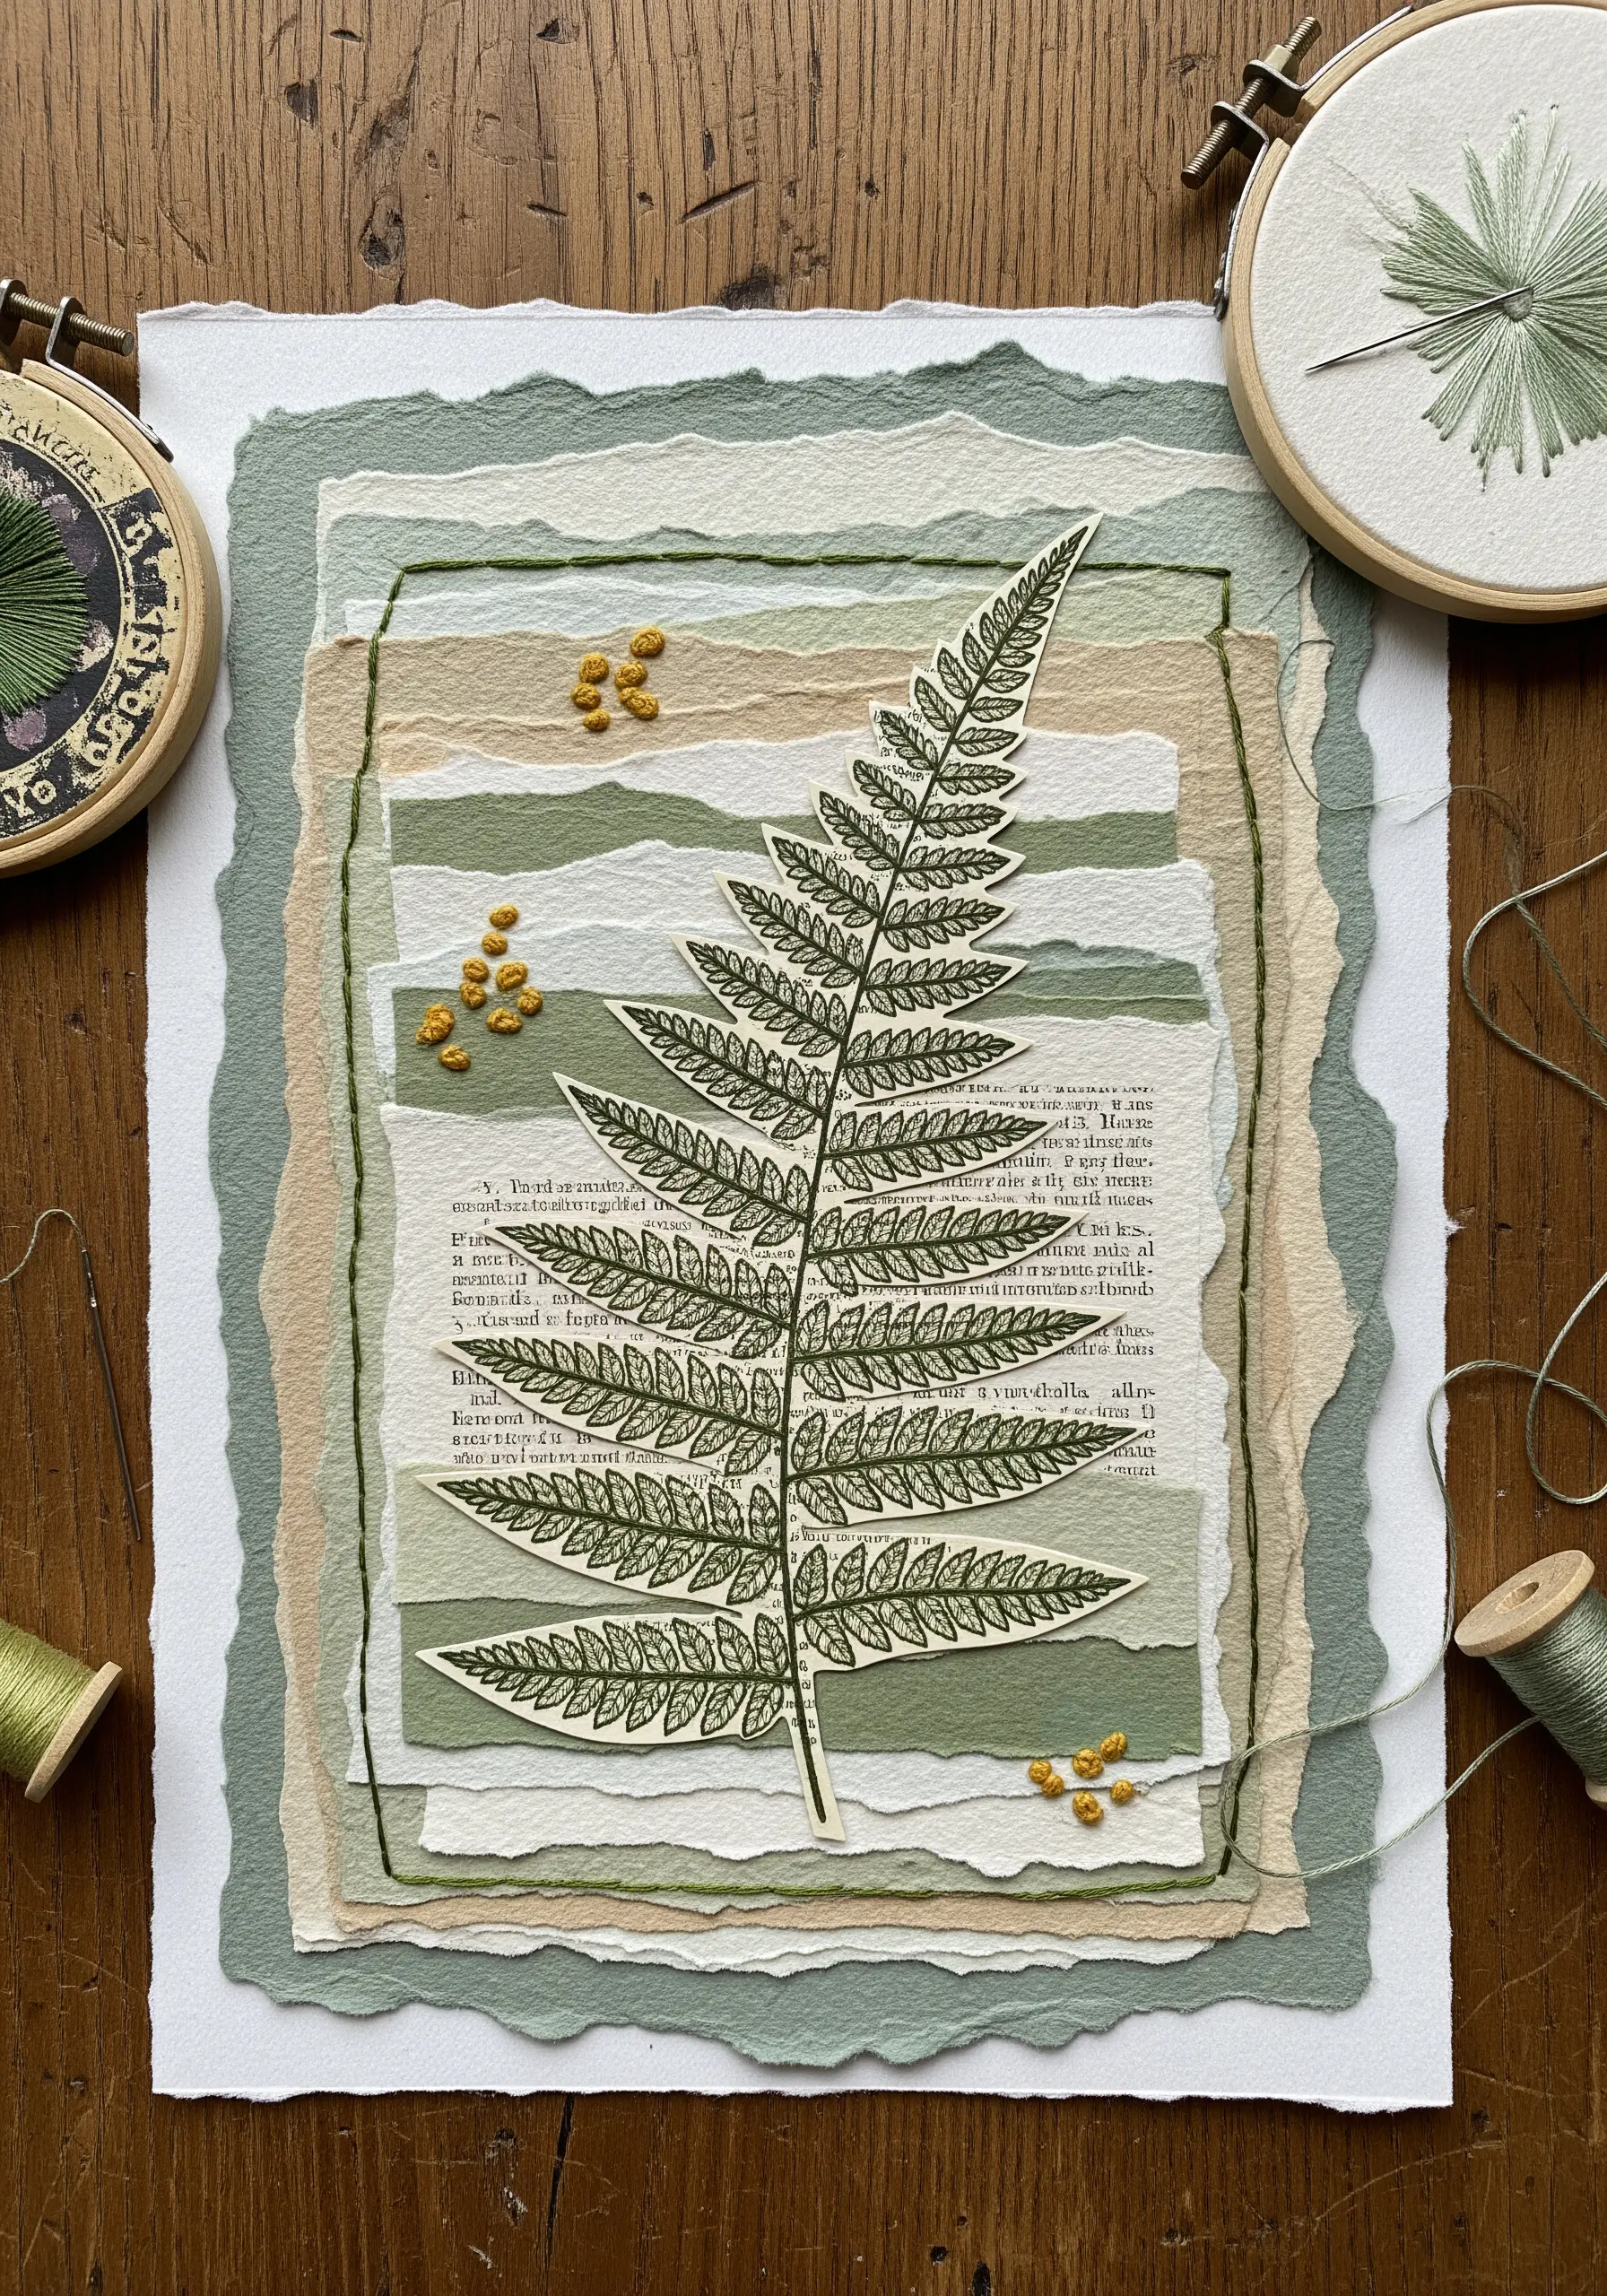
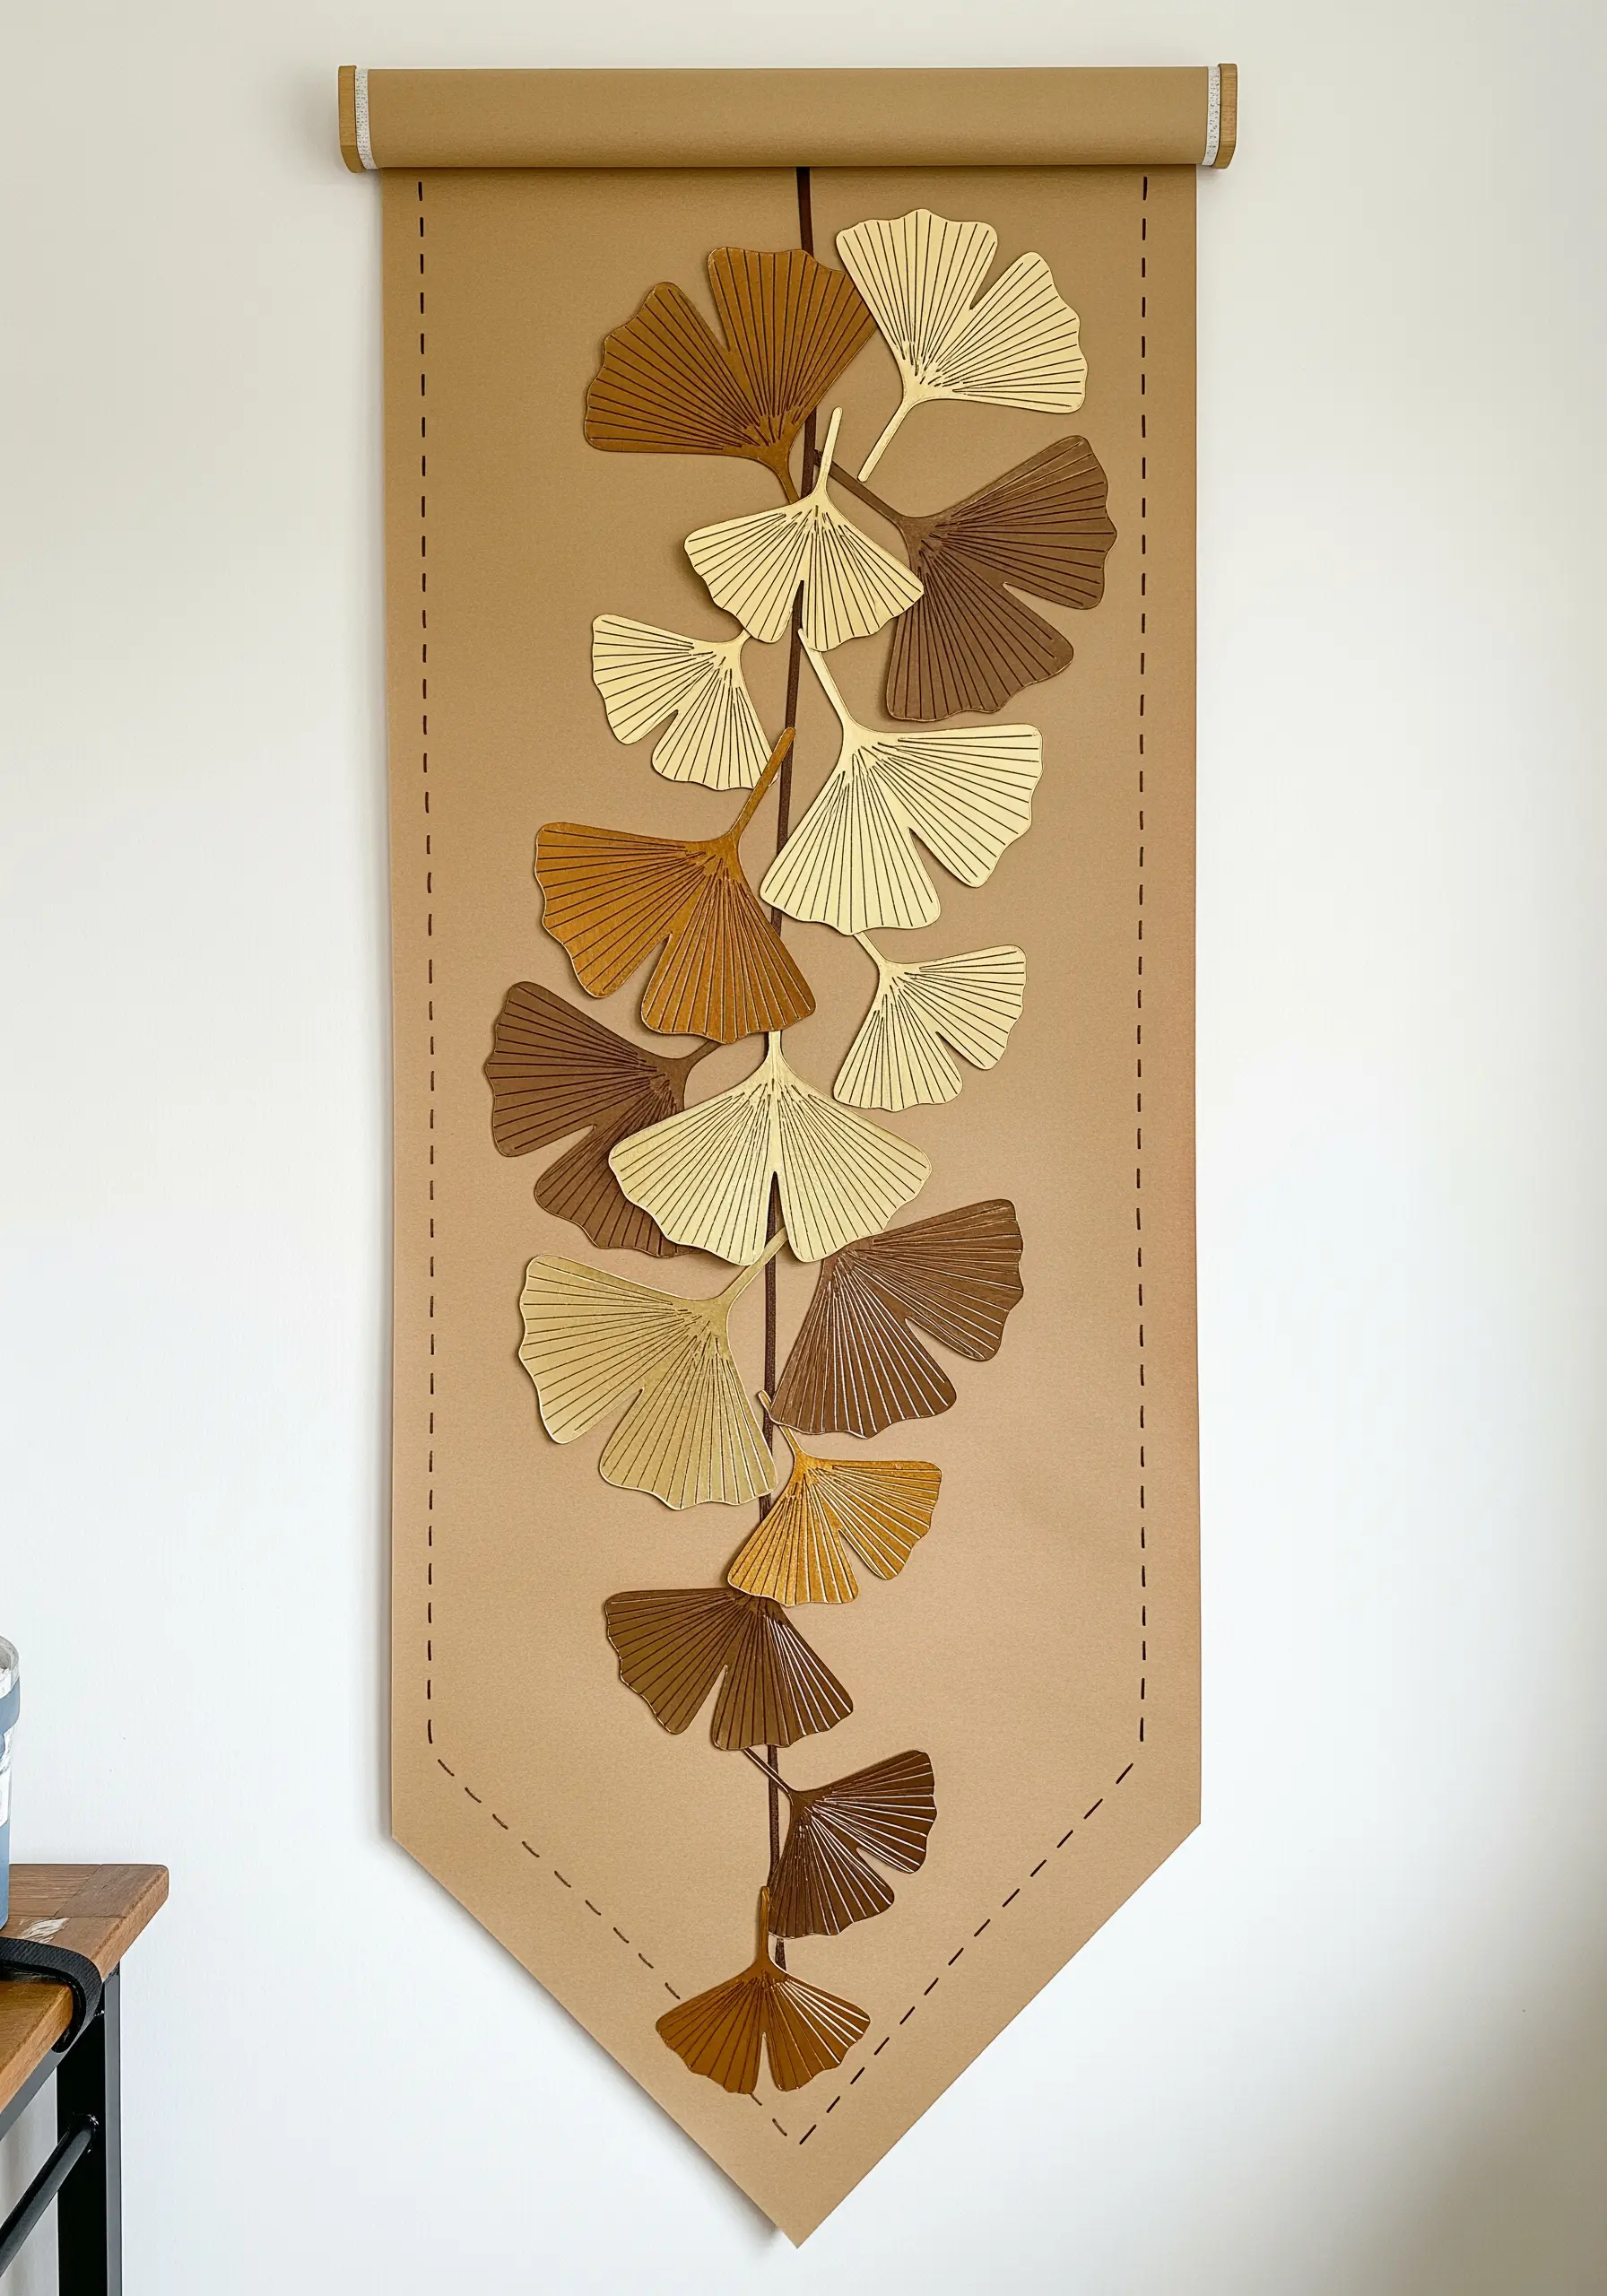
7. Add Detail and Connection with Running Stitches

Enhance paper cutouts by adding fine details, like the veins of a leaf, with a simple running stitch.
This adds a delicate, hand-drawn quality that complements the clean edges of the paper shapes.
To create a triptych, use a single long thread stretched between the panels to connect them, creating a sense of continuity and shared space.
The subtle bow in the final leaf’s stem adds a touch of softness and character to the otherwise precise composition.
8. Couch Yarn for a Bold, Tactile Pathway
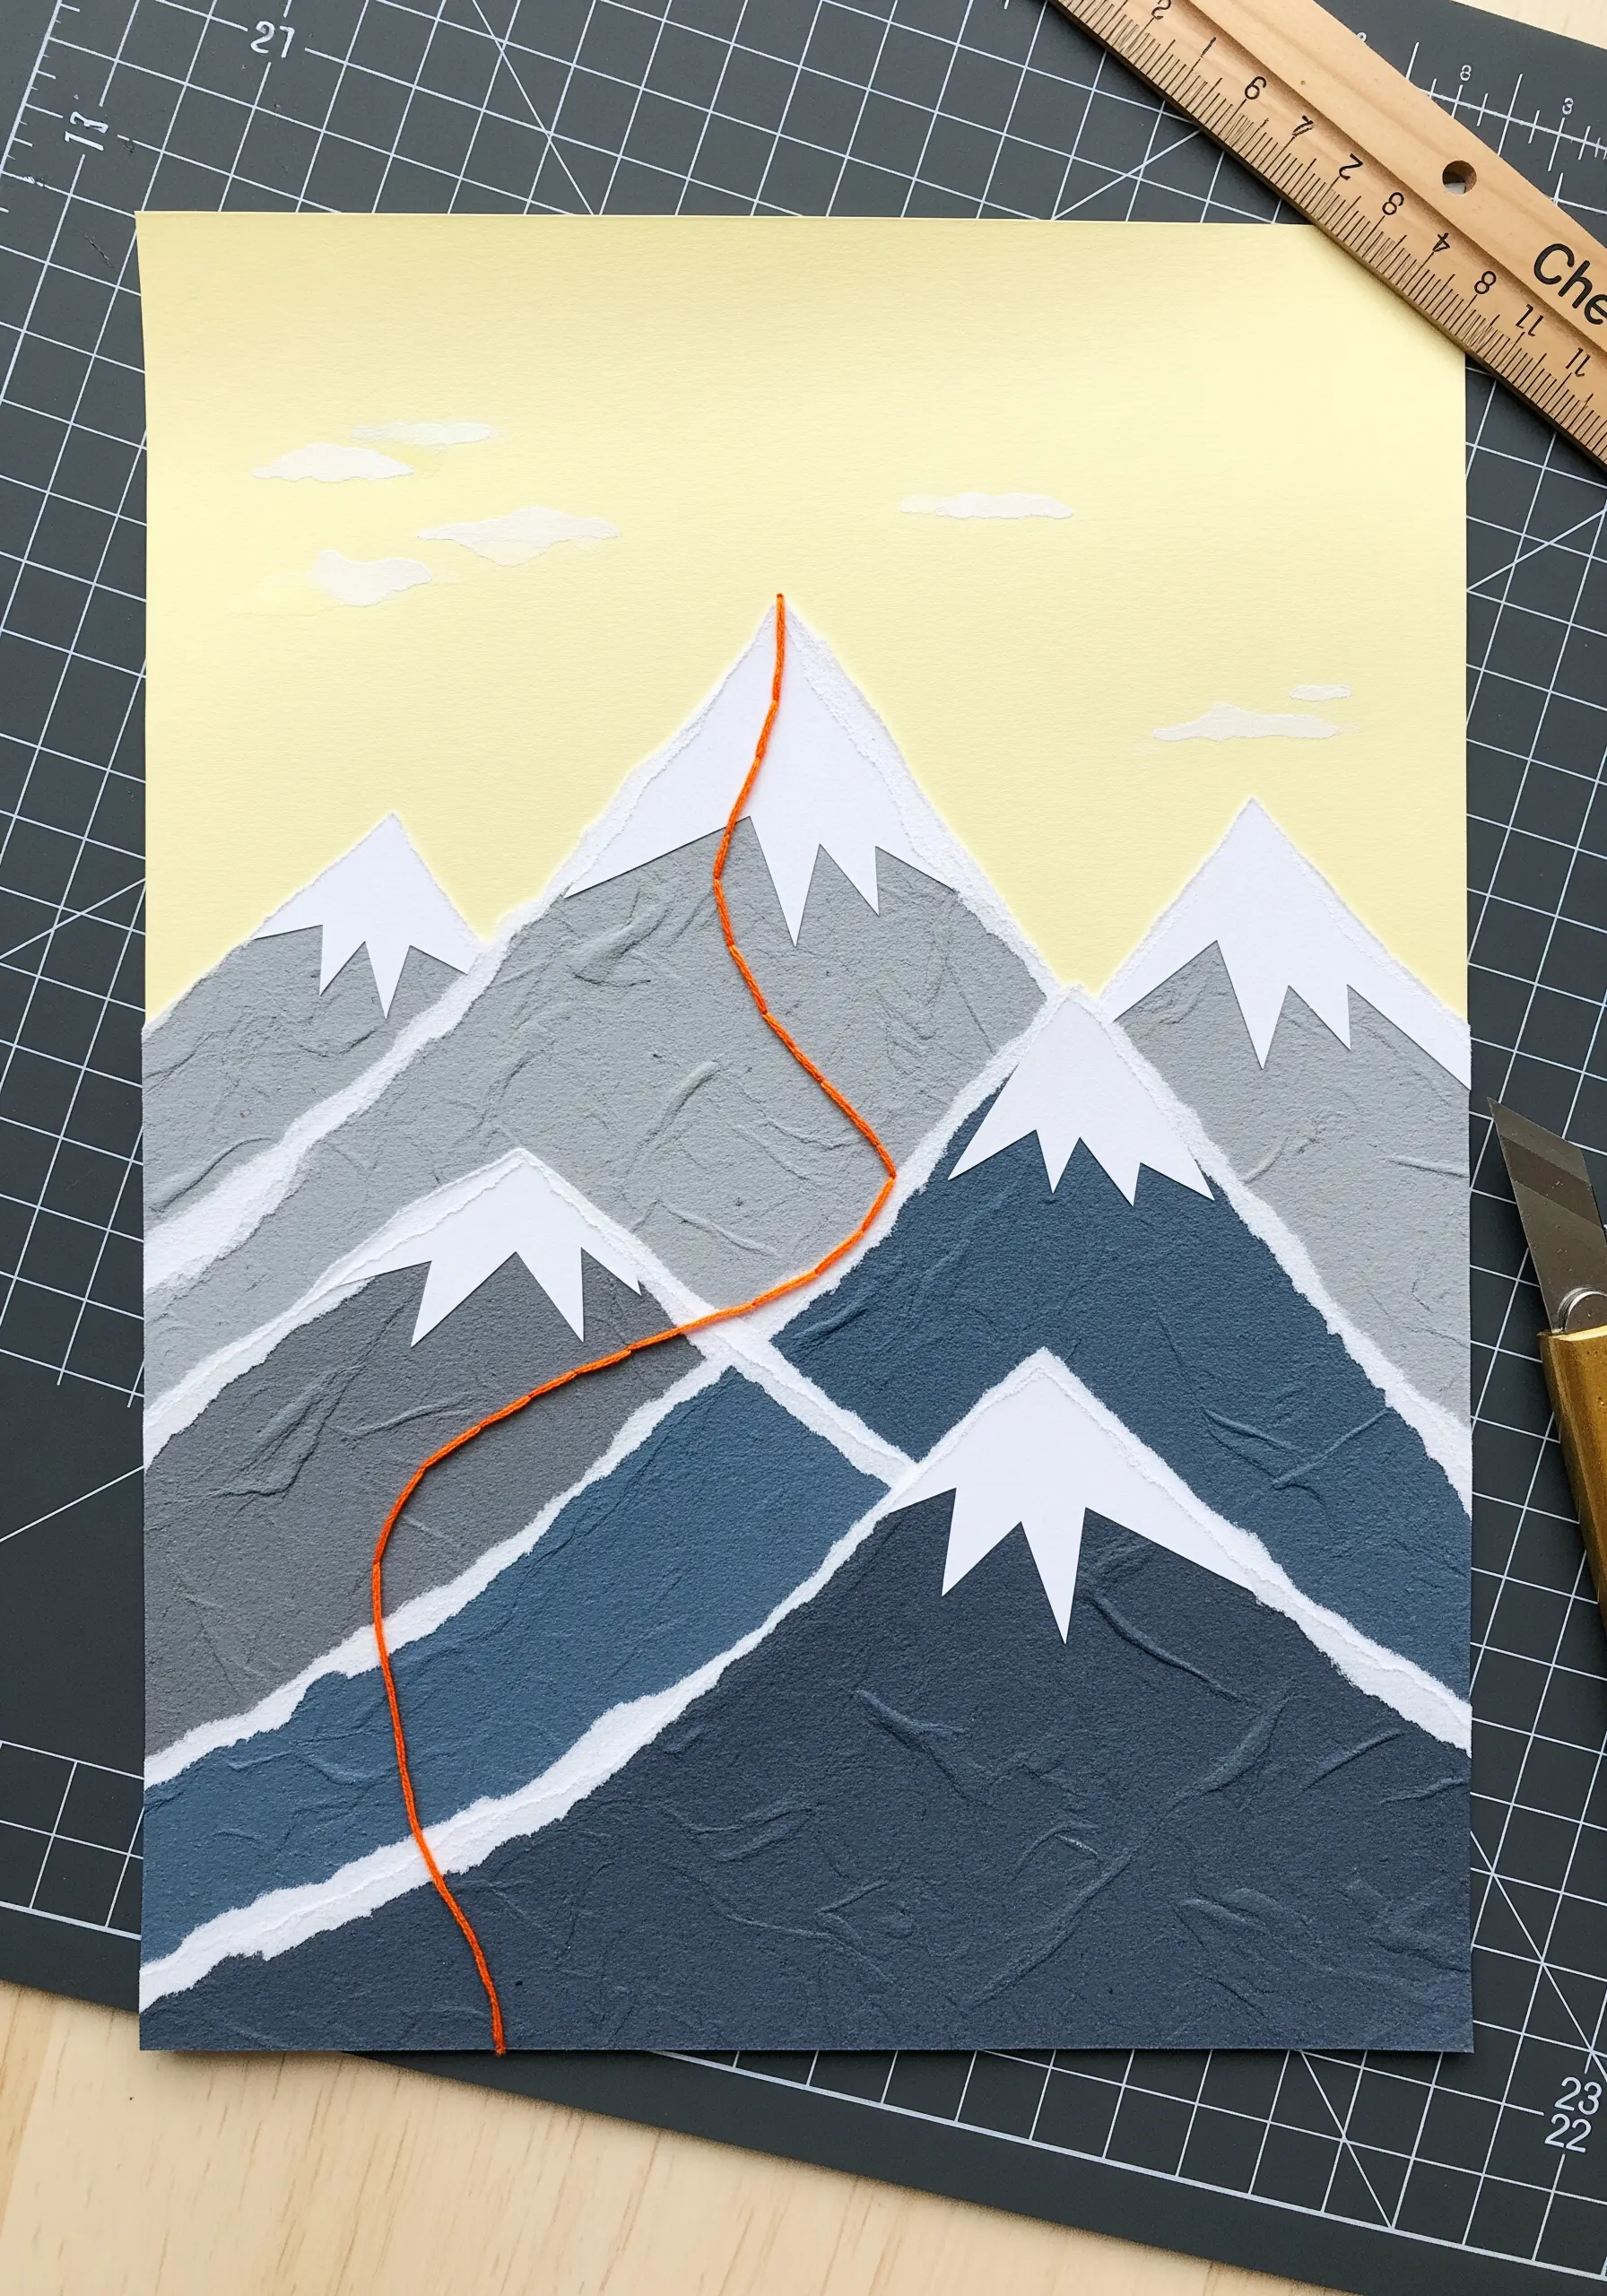
Create a prominent, raised line in your collage by couching a thick thread or yarn onto the surface.
This technique involves laying your main thread (the yarn) on the paper and using a second, finer thread to tack it down with small, perpendicular stitches.
Couching allows you to create fluid curves and bold lines without repeatedly piercing and potentially weakening the paper.
Choose a vibrant, contrasting yarn to represent a path or river, making it the undeniable focal point of your mountain landscape.
9. Suggest Texture with Fanned Straight Stitches
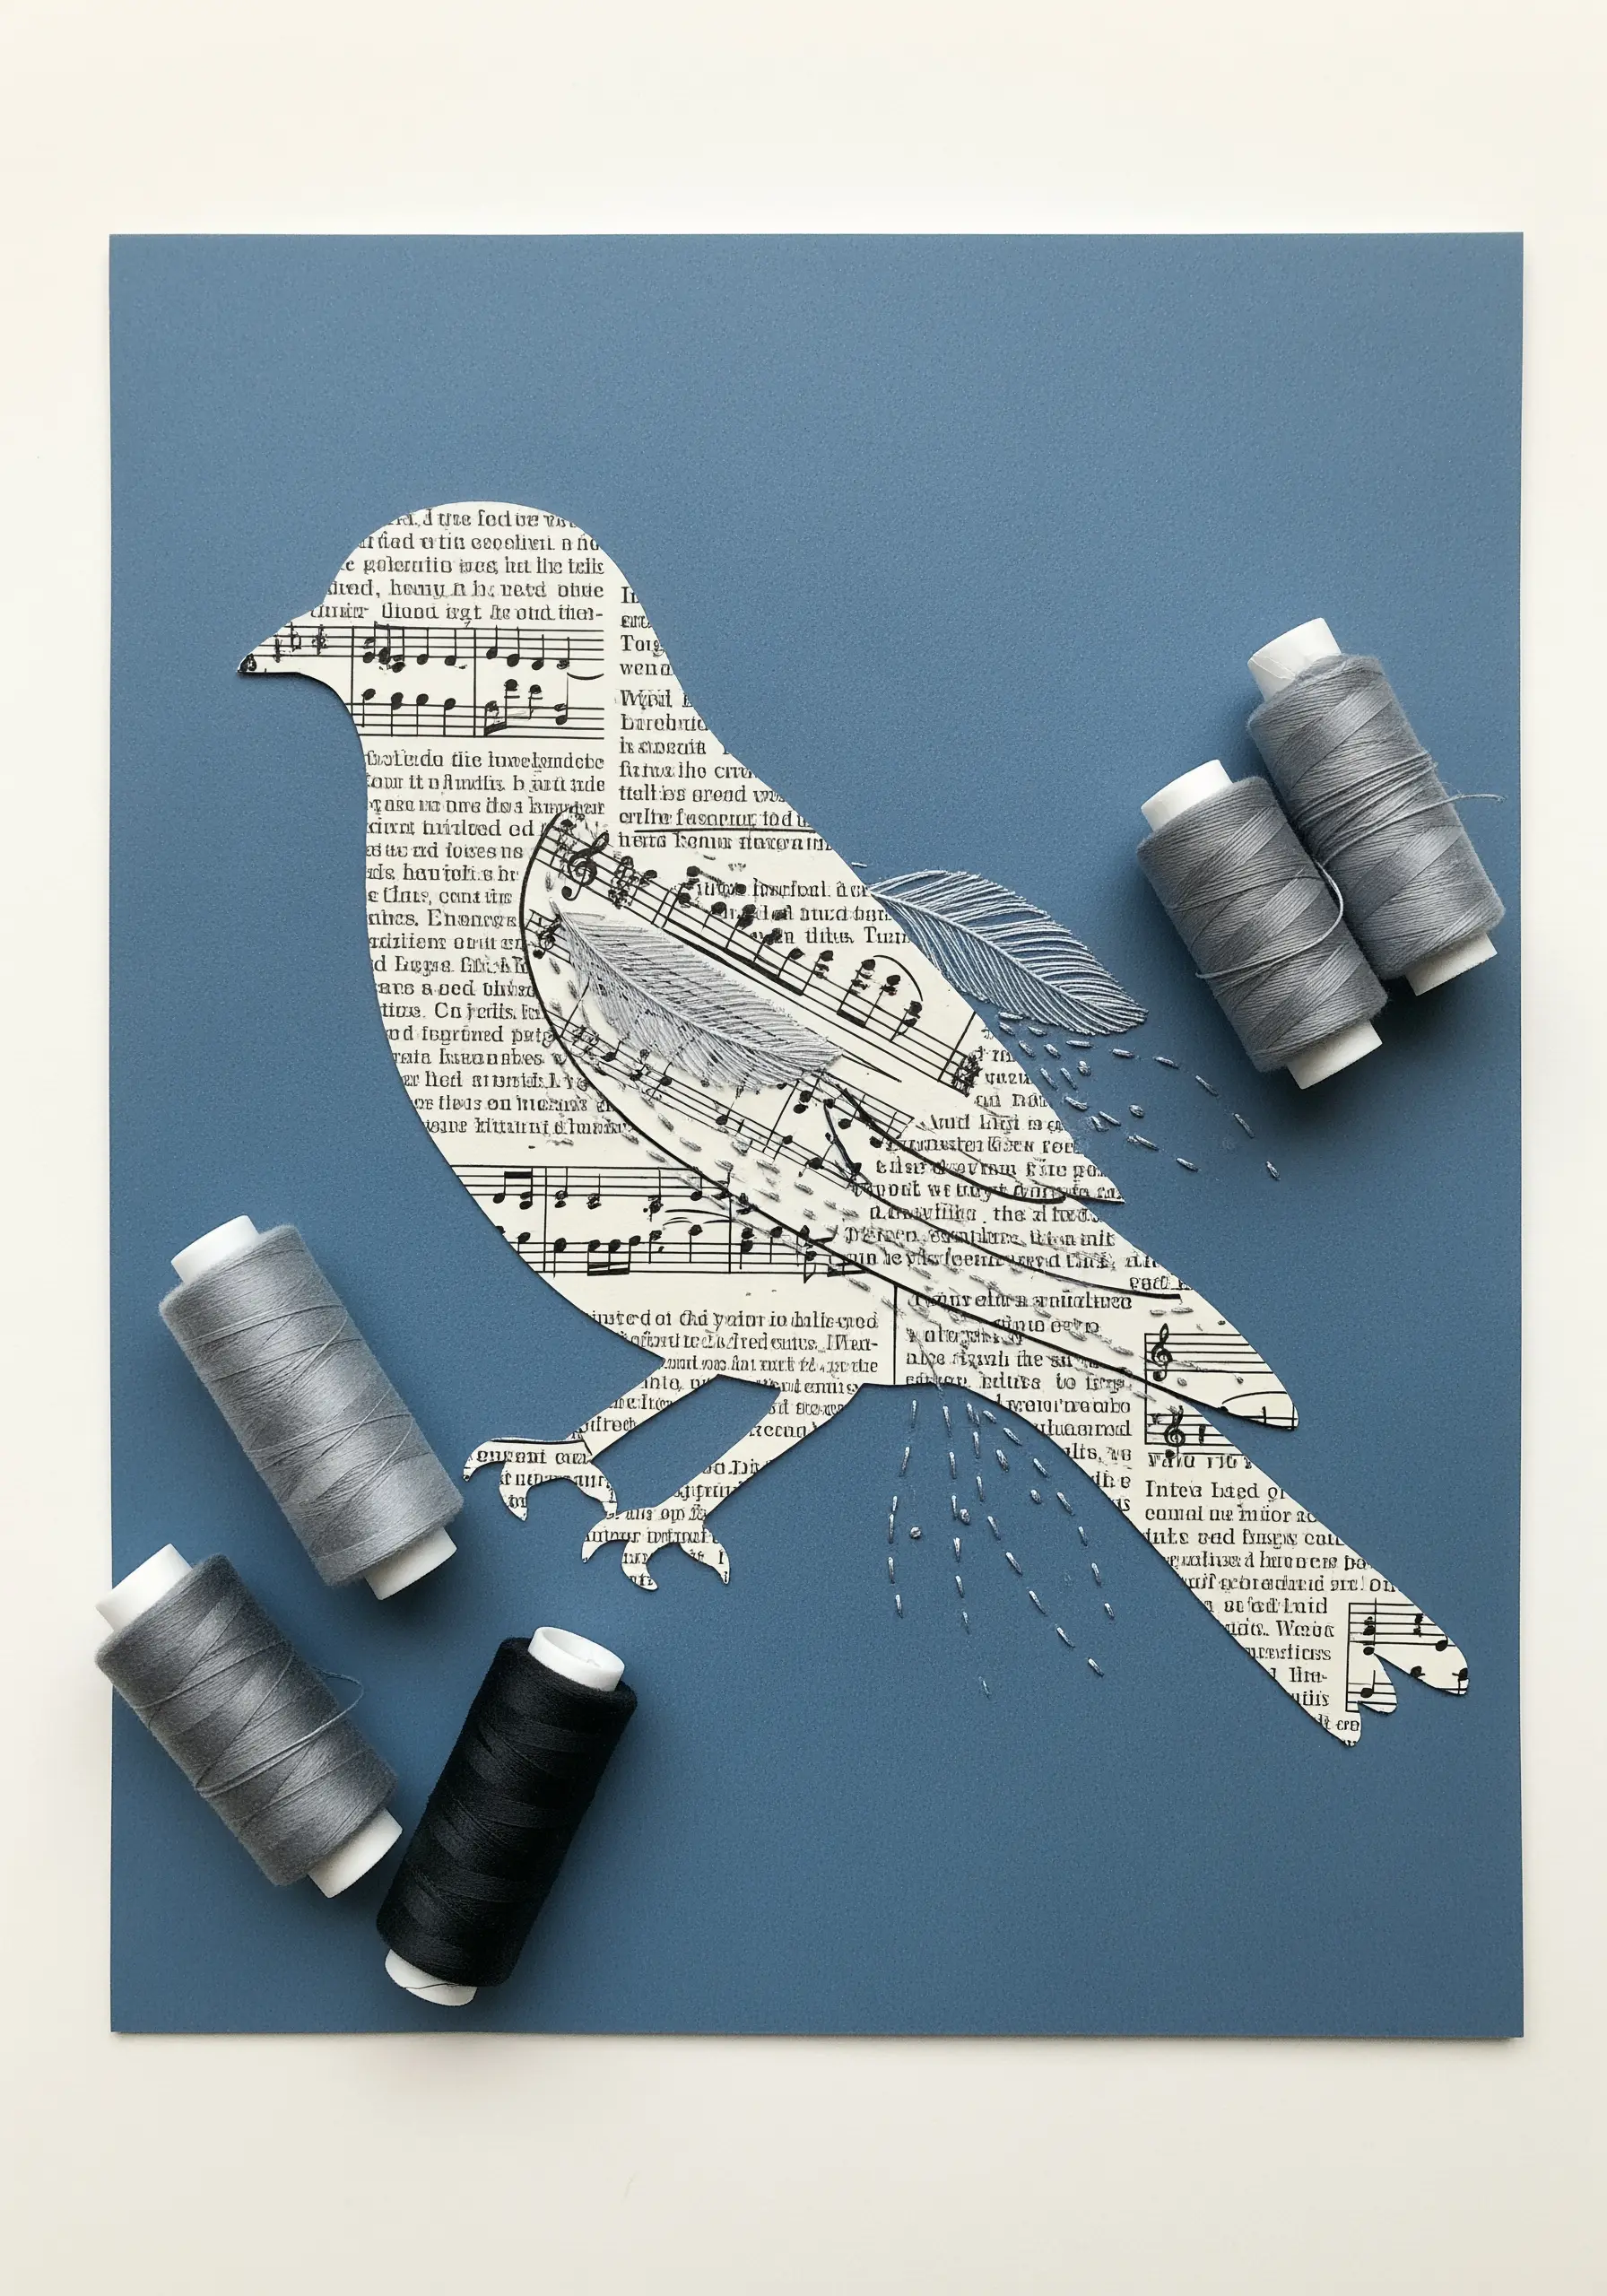
Use embroidery to add details that are merely suggested, rather than fully rendered, for a minimalist effect.
Create the impression of tail feathers on this bird silhouette by using a series of straight stitches fanned out from a single point.
Vary the length and angle of each stitch to create a sense of organic movement and lightness.
Using a thread that matches the paper’s color palette keeps the detail subtle, blending texture and form seamlessly.
10. Define Intersections with Decorative Stitching
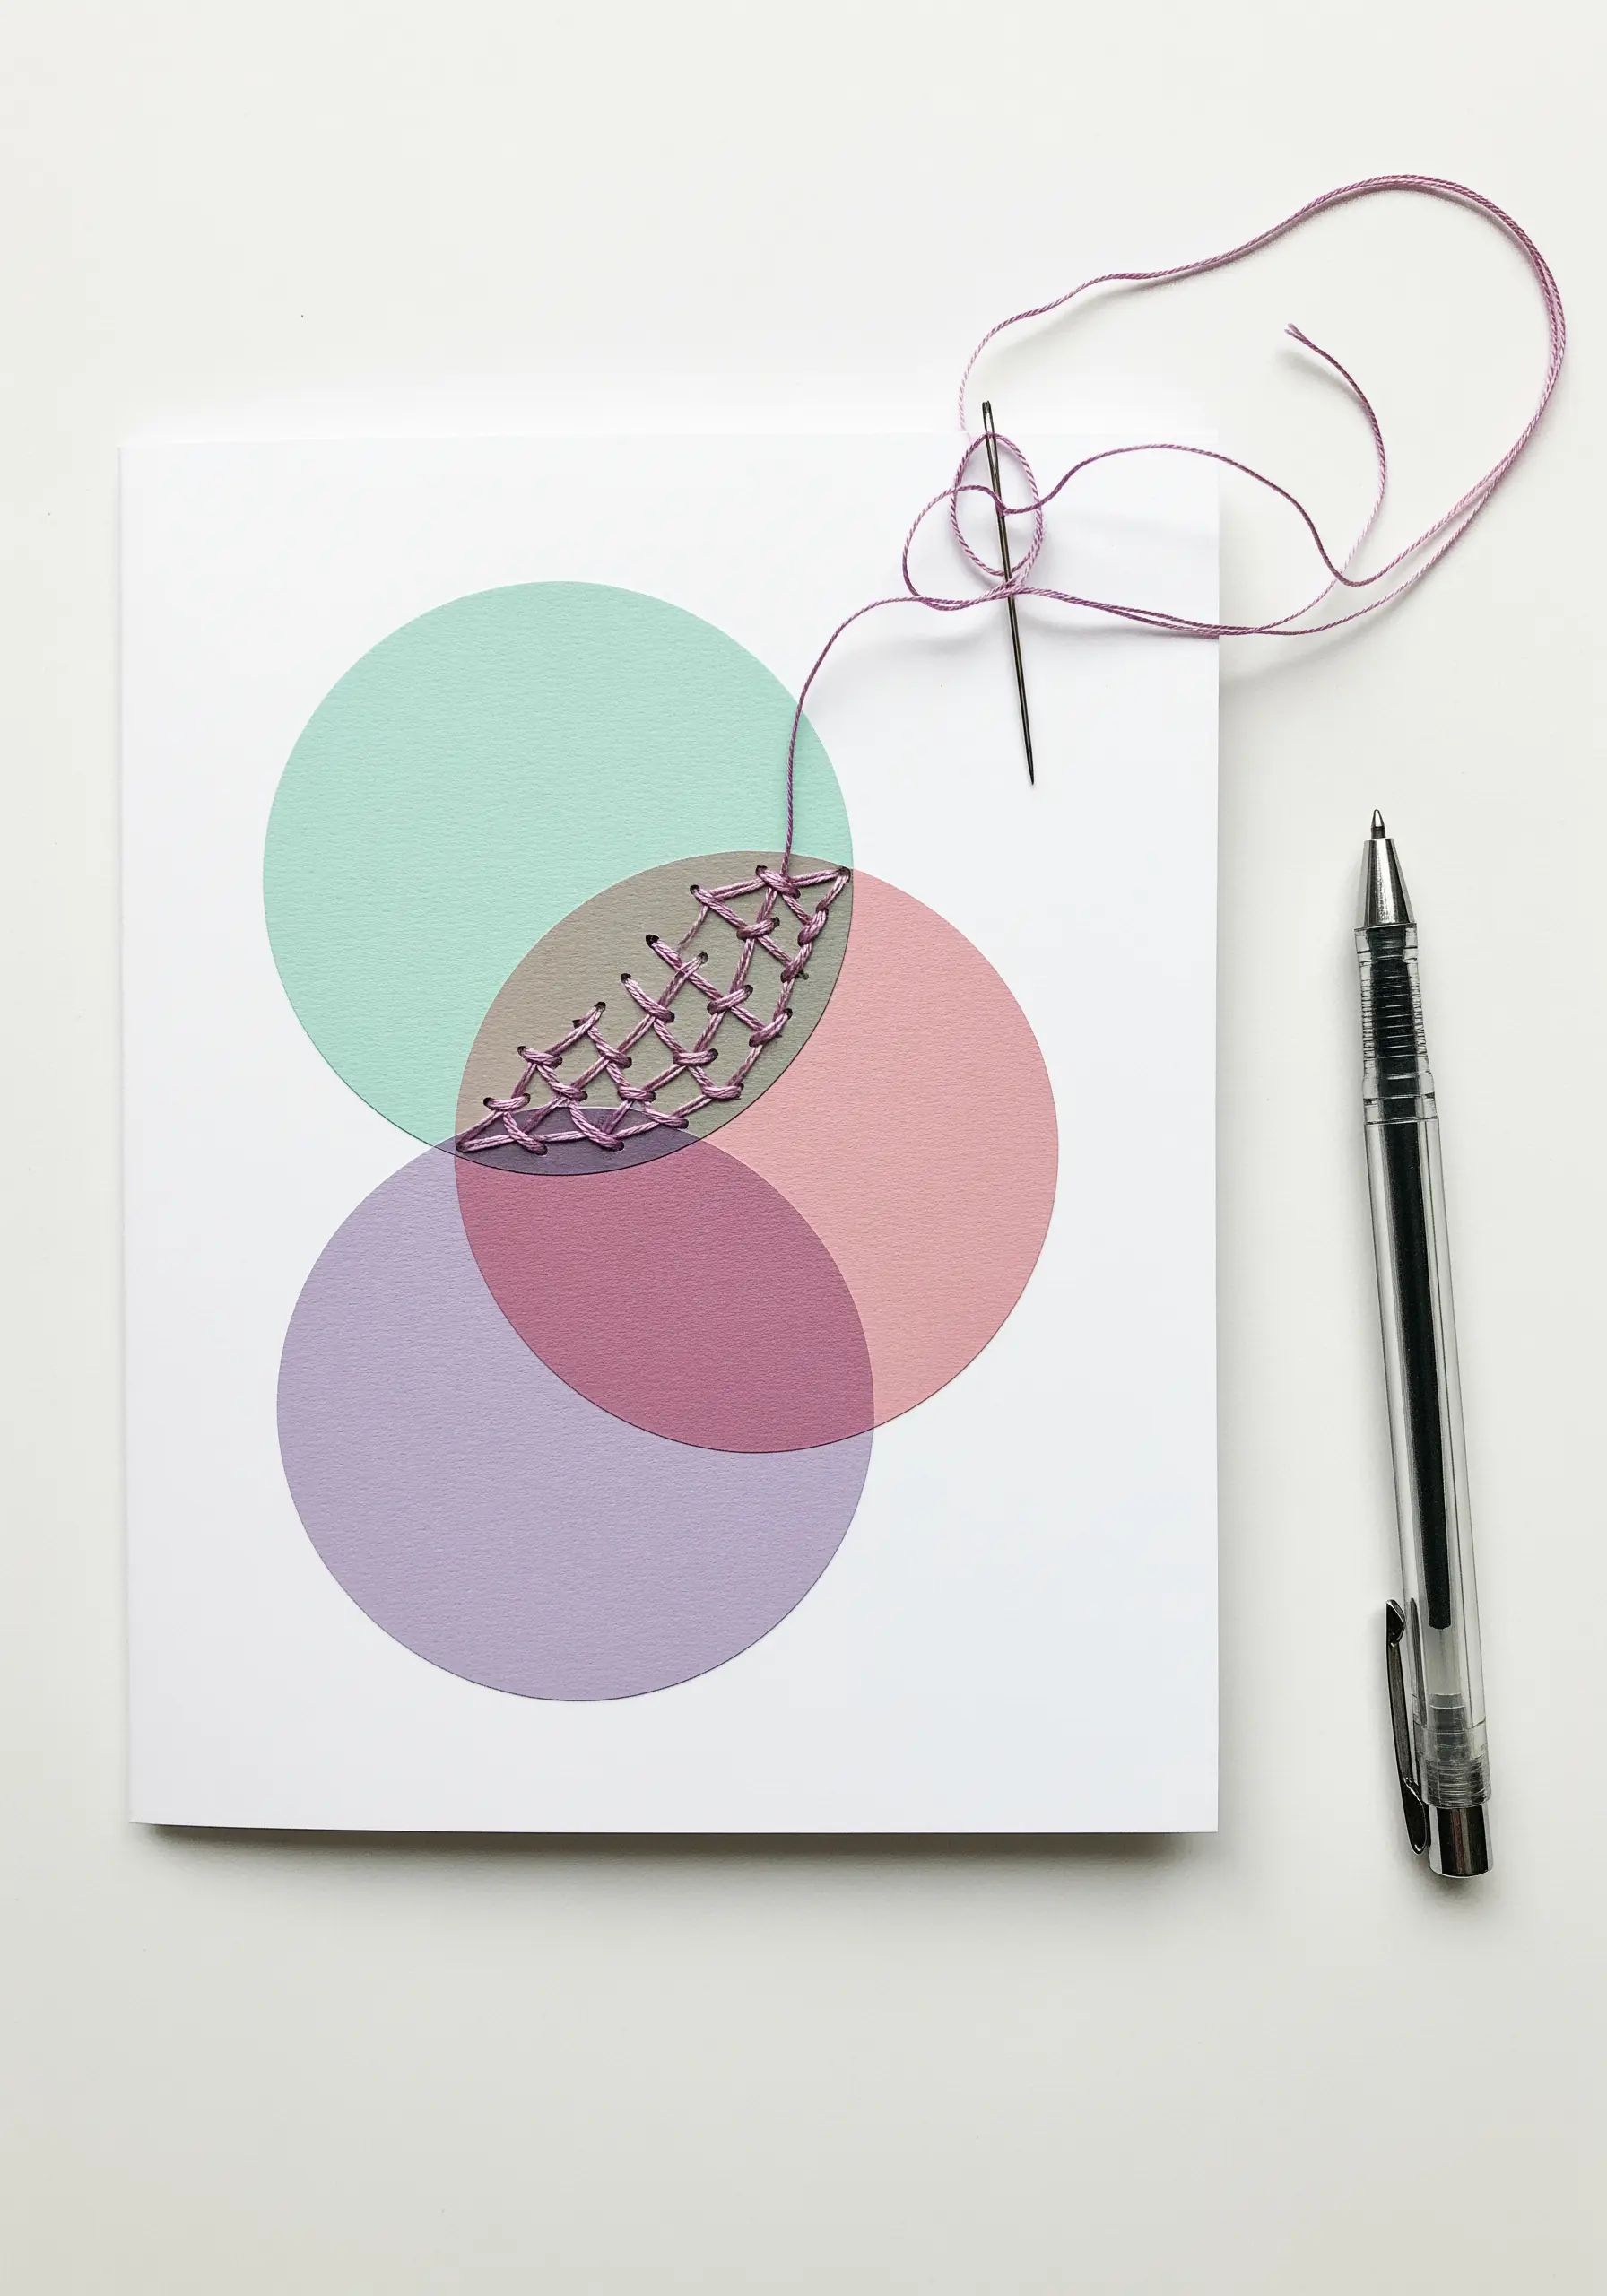
Visually emphasize the overlapping area in a design, like a Venn diagram, by filling it with a decorative stitch.
A textured stitch, such as a raised fishbone or woven stitch, creates a tactile focal point that draws immediate attention.
This technique transforms a simple graphic concept into a piece of mixed-media art where thread represents connection and synthesis.
Choose a thread color that harmonizes with the intersecting paper colors to create a cohesive, blended new shade.
11. Layer Stitches with Translucent Vellum
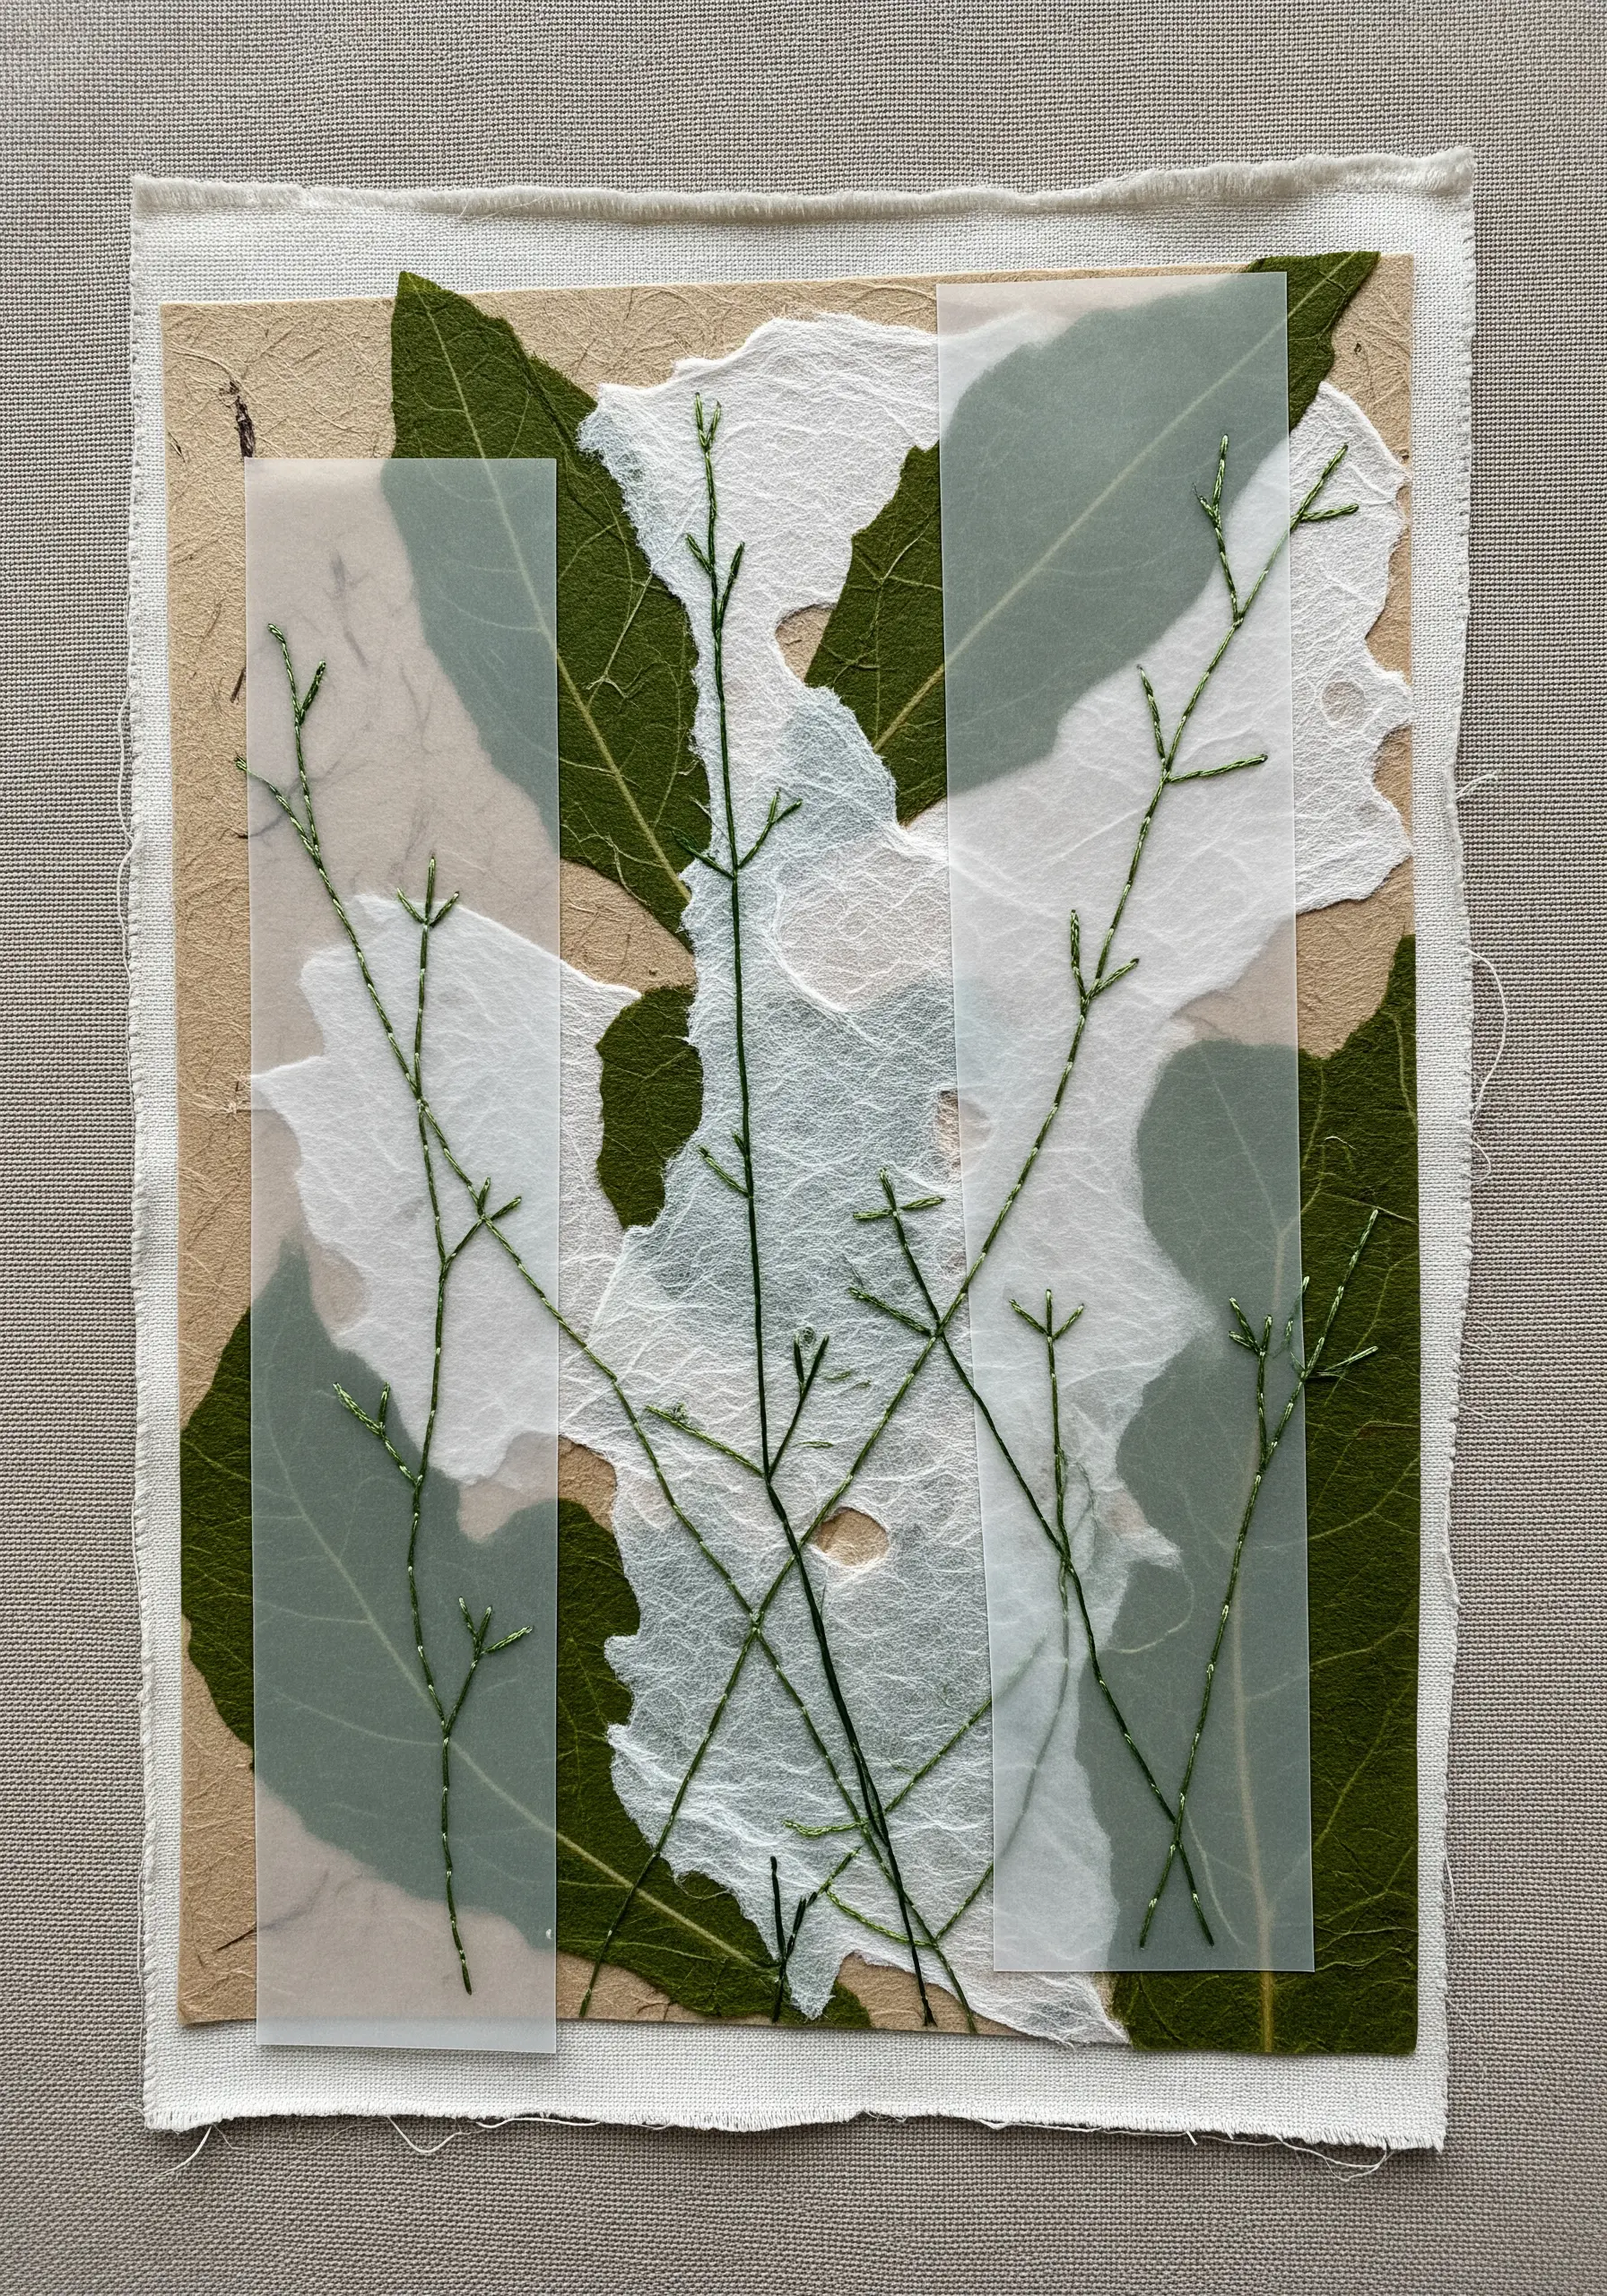
Create a sense of atmospheric depth by layering stitched elements with semi-transparent paper like vellum.
Embroider fine botanical line art directly onto your fabric or paper base, then overlay it with strips or shapes of vellum.
The vellum softens the stitches beneath, creating a misty, layered effect that adds intrigue and complexity to the composition.
You can also stitch directly onto the vellum itself, but be sure to use a fine needle and avoid dense stitching to prevent tearing.
12. Radiate Energy with Metallic Straight Stitches
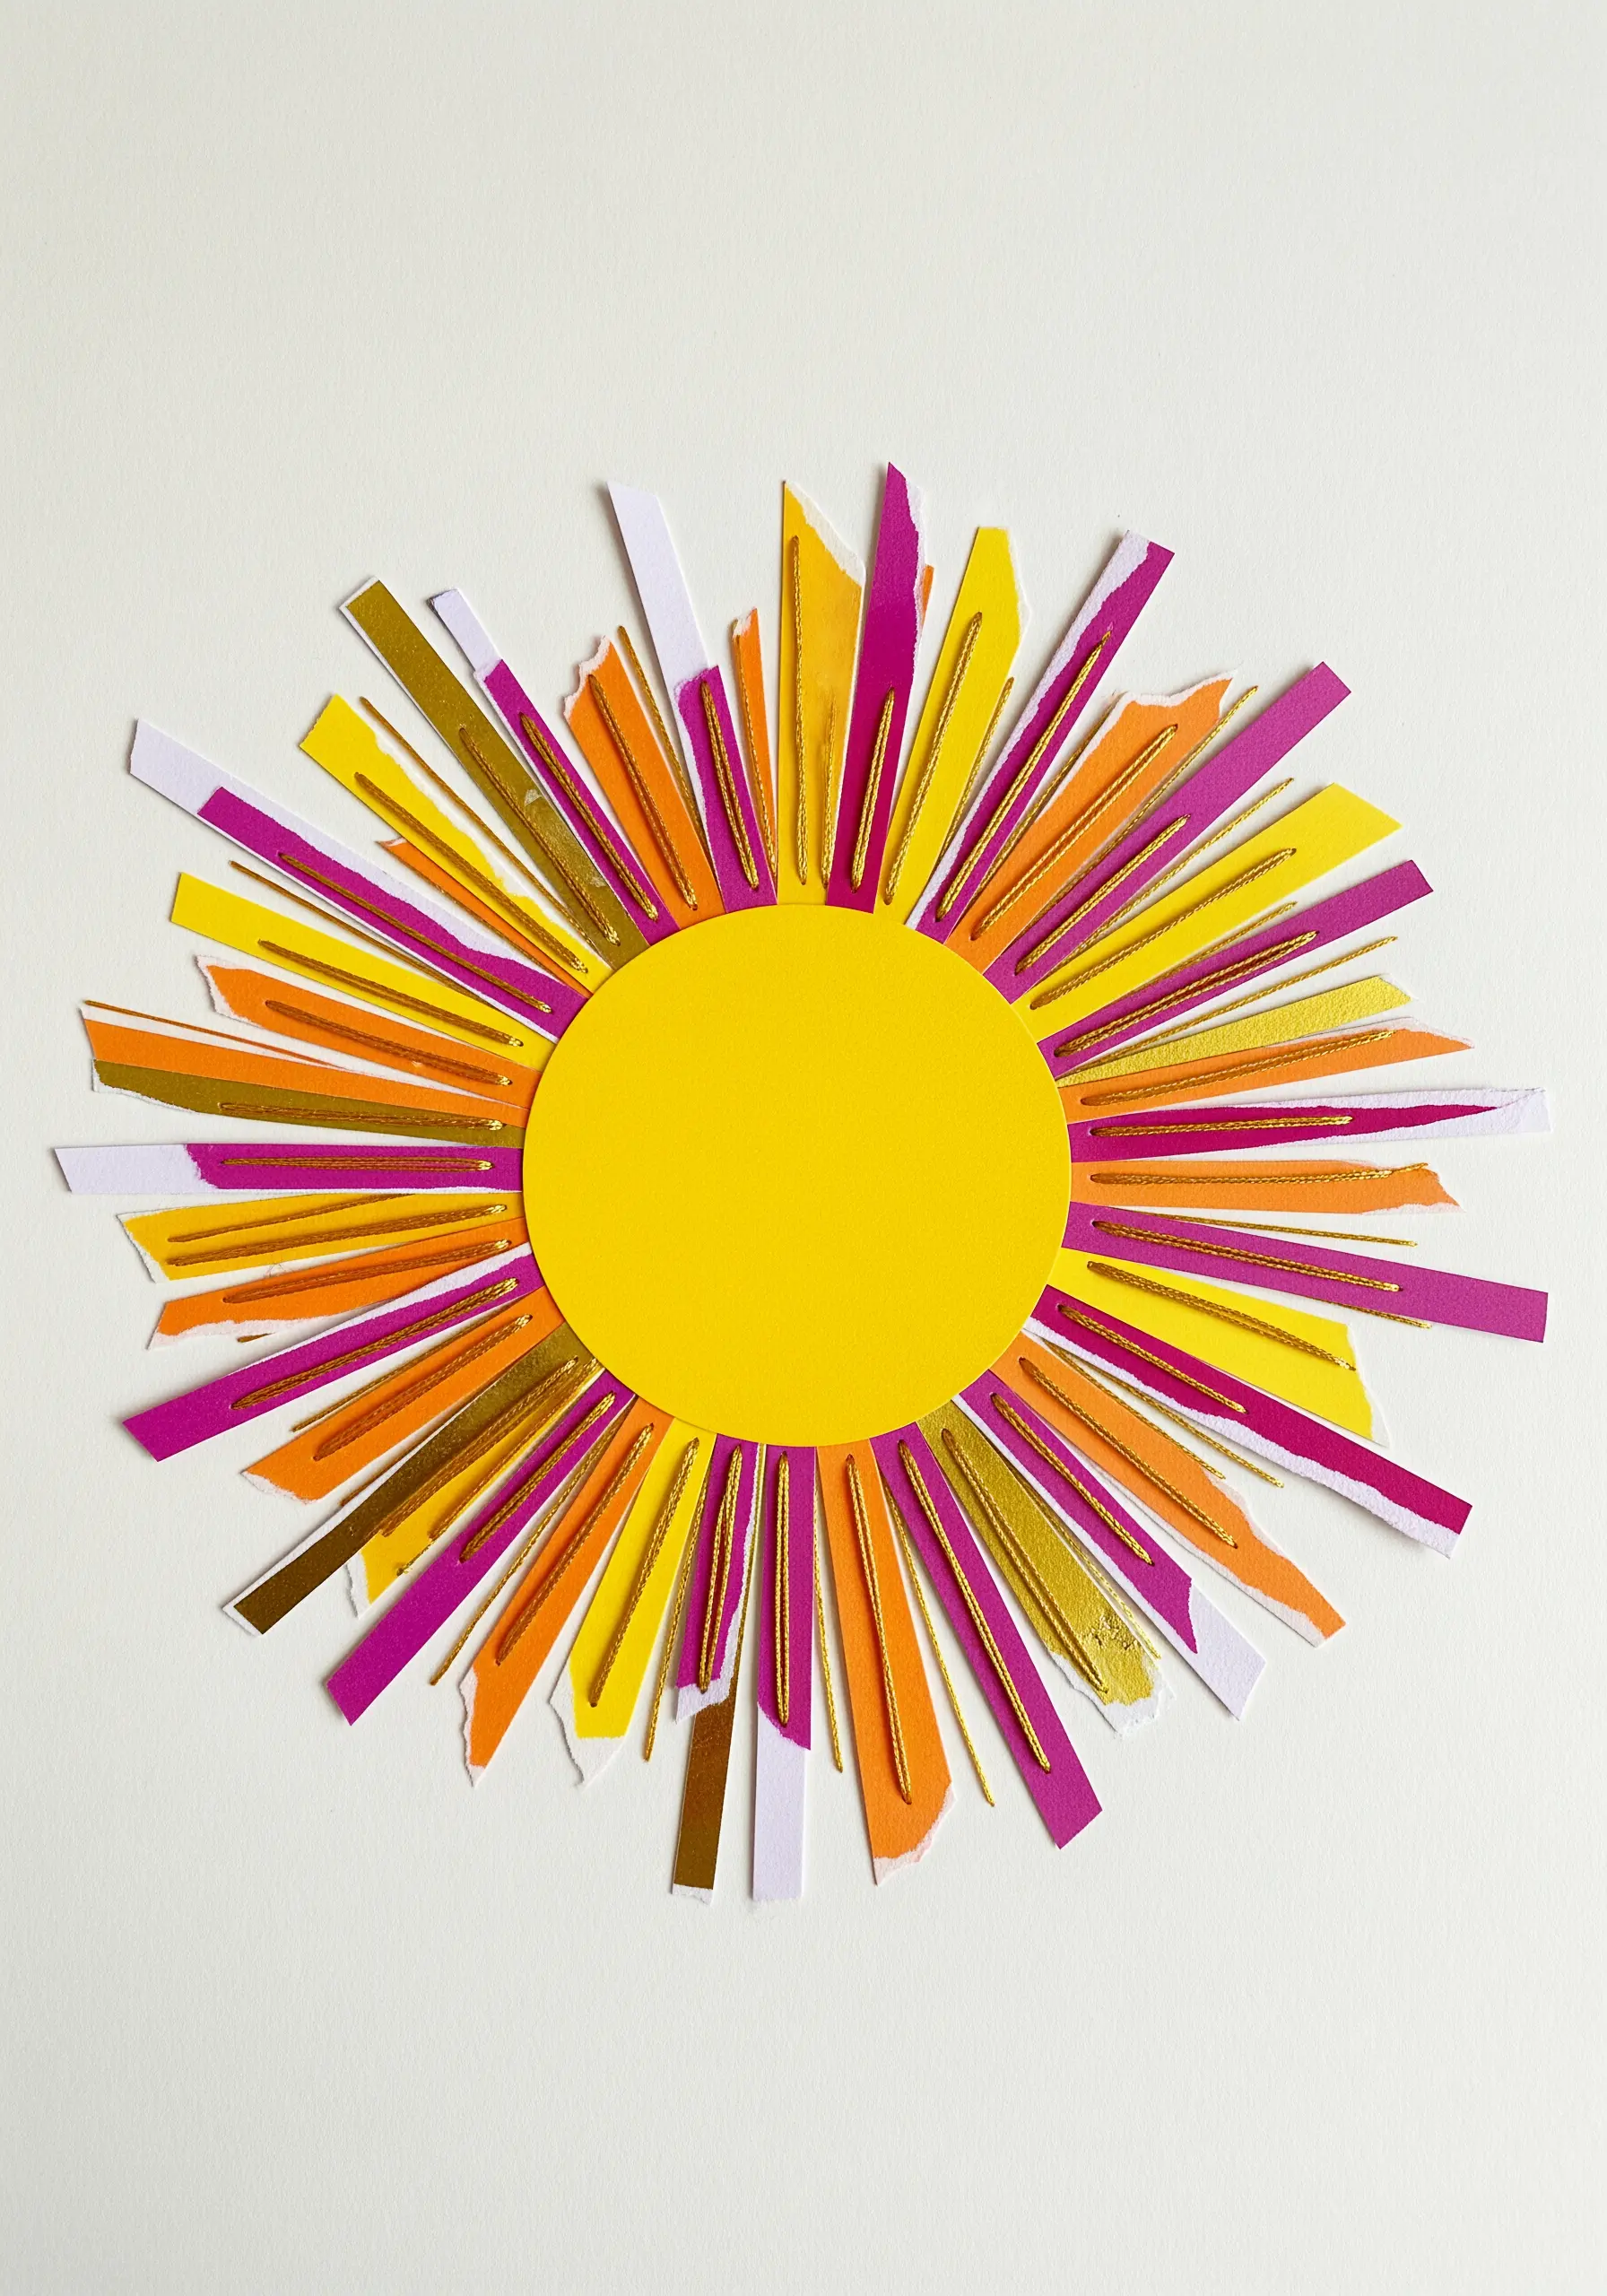
Add a burst of energy and light to your paper collage by stitching radiant lines with metallic floss.
Use long, straight stitches fanning out from a central point to create a dynamic sunburst effect.
For a clean finish, stitch your rays onto the background paper first, then glue the central paper circle on top to hide the messy backs of the stitches.
Mixing metallic gold with matte, colorful paper strips creates a compelling contrast in both texture and sheen.
13. Complete a Motif with a Single Thread
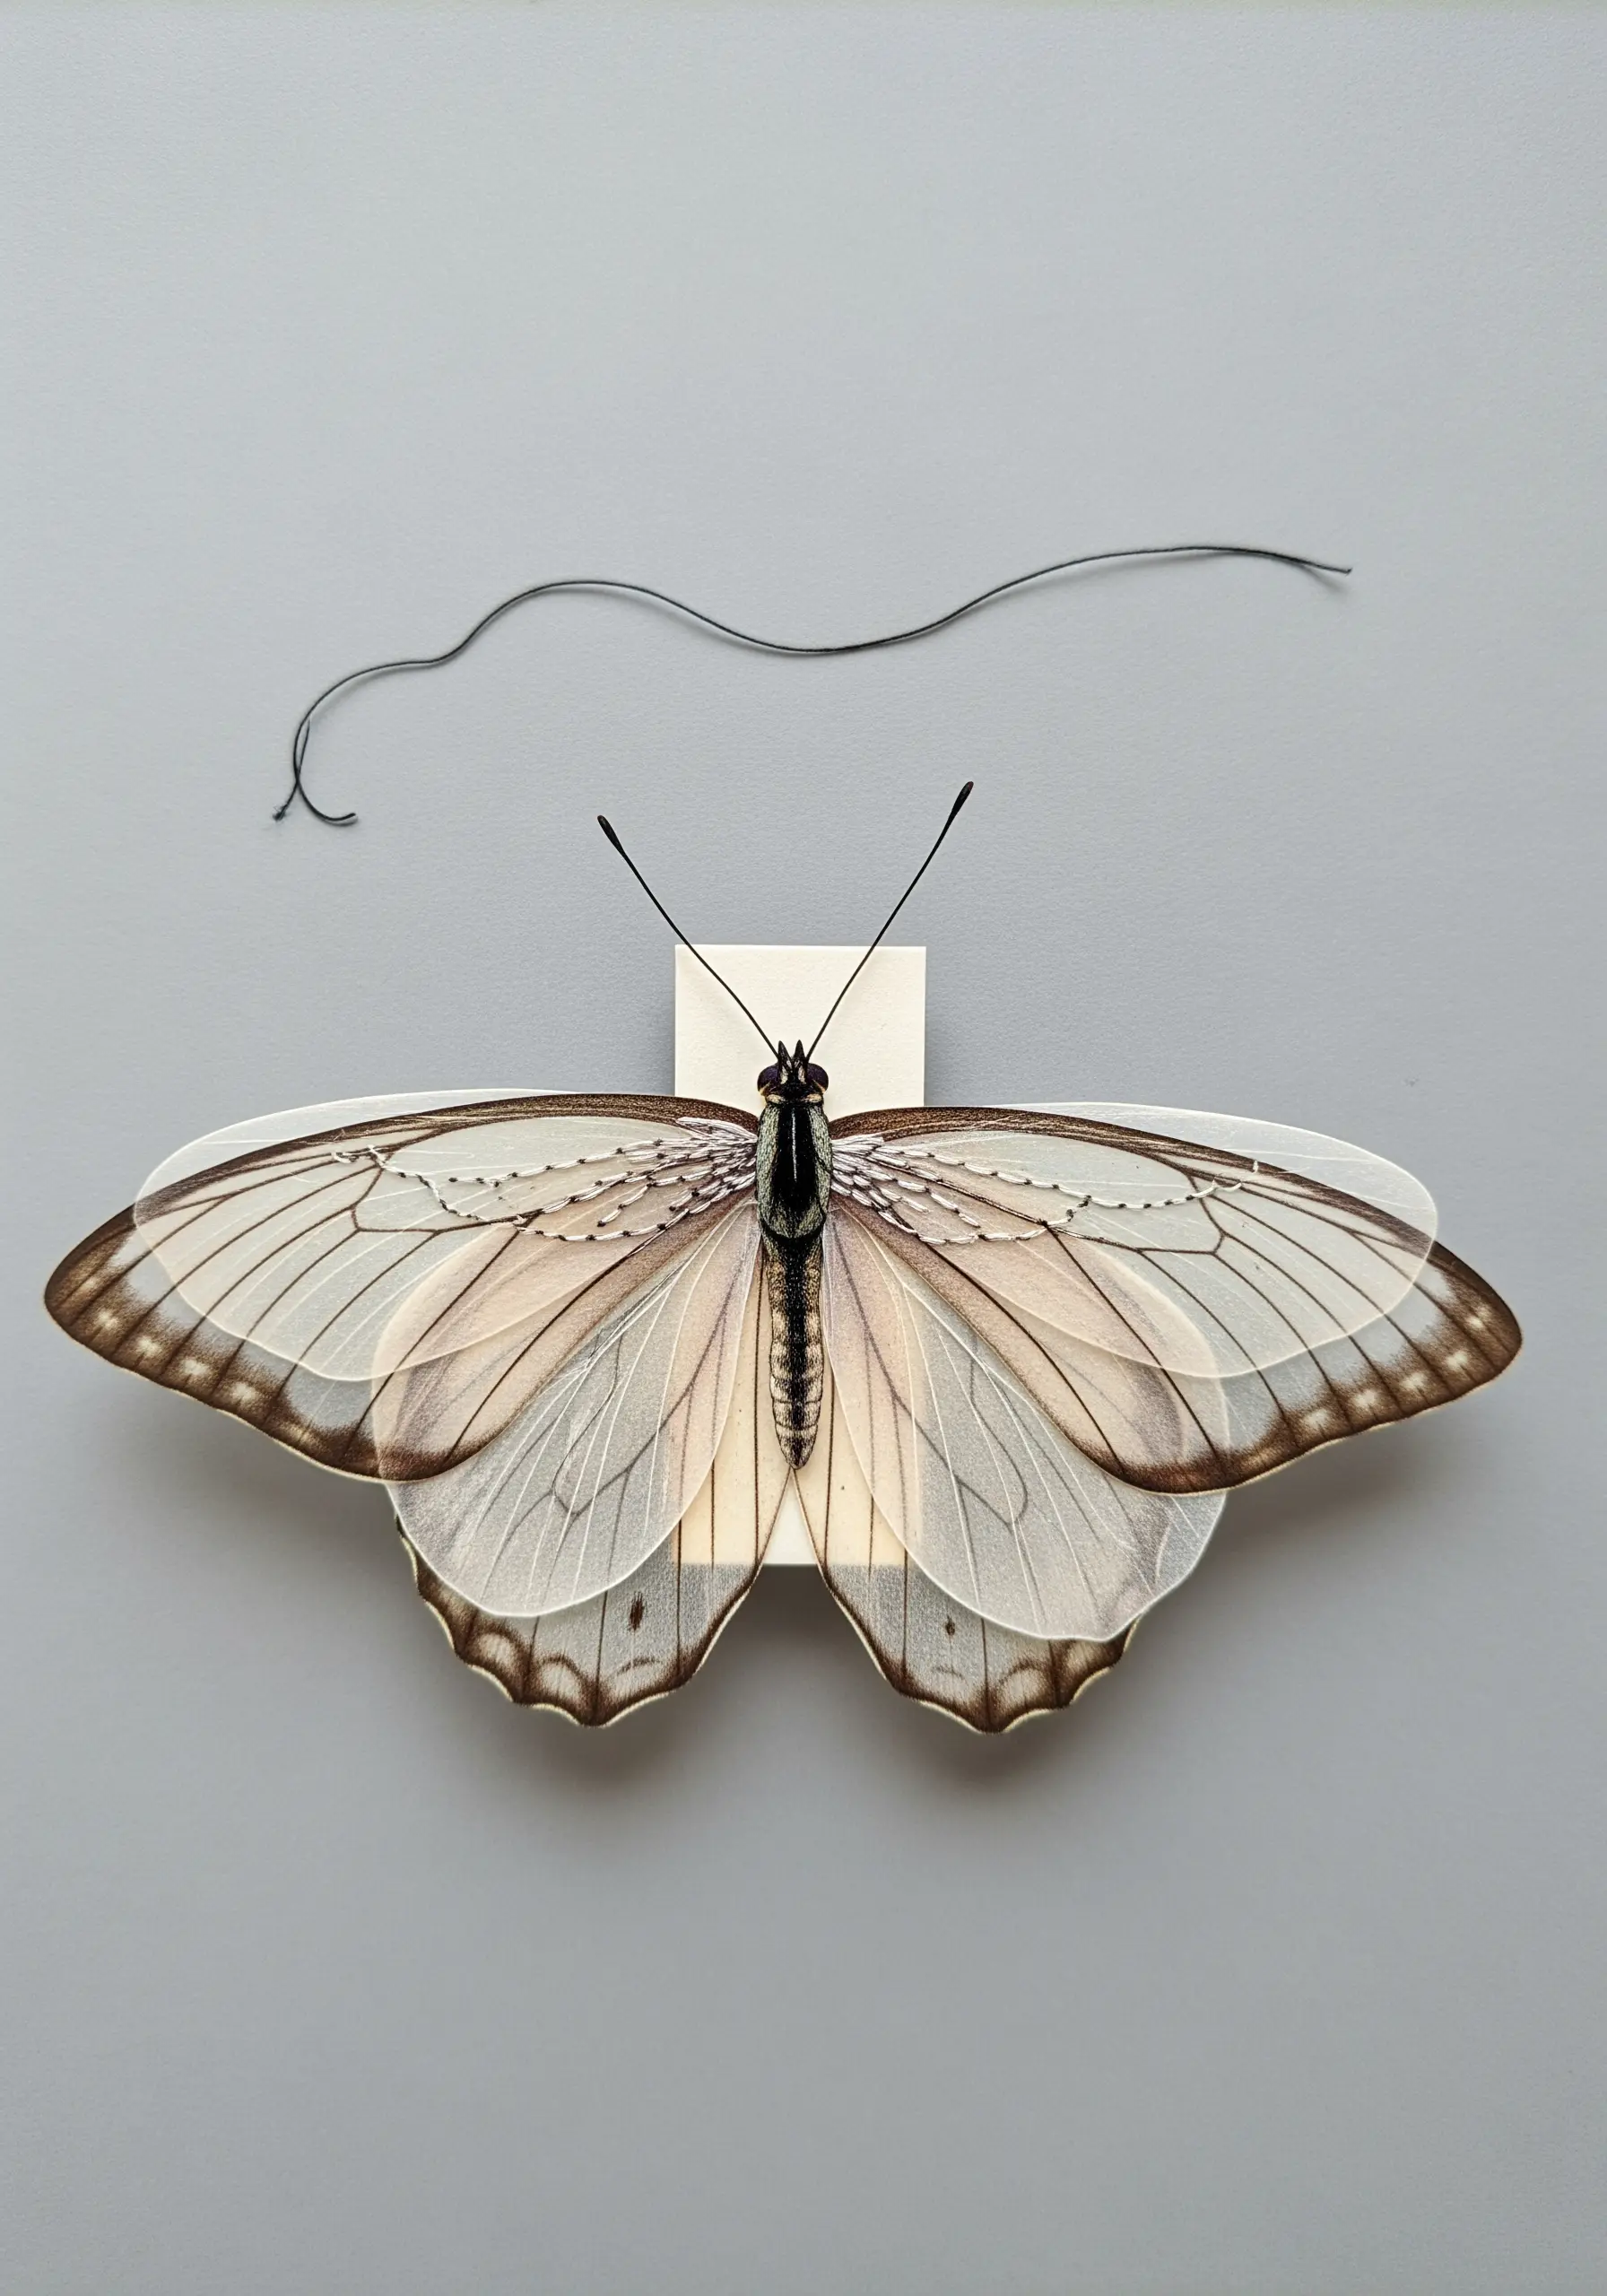
Demonstrate the power of minimalism by using a single, carefully placed thread to complete a paper illustration.
Here, a stiff, dark thread is used to create the butterfly’s antennae, providing the final detail that brings the entire piece to life.
Secure the thread on the back with a small piece of acid-free tape to avoid the bulk of a knot.
This technique shows that embroidery doesn’t have to be complex; sometimes, the most impactful detail is also the simplest.
14. Illuminate a Scene with Seed Stitches
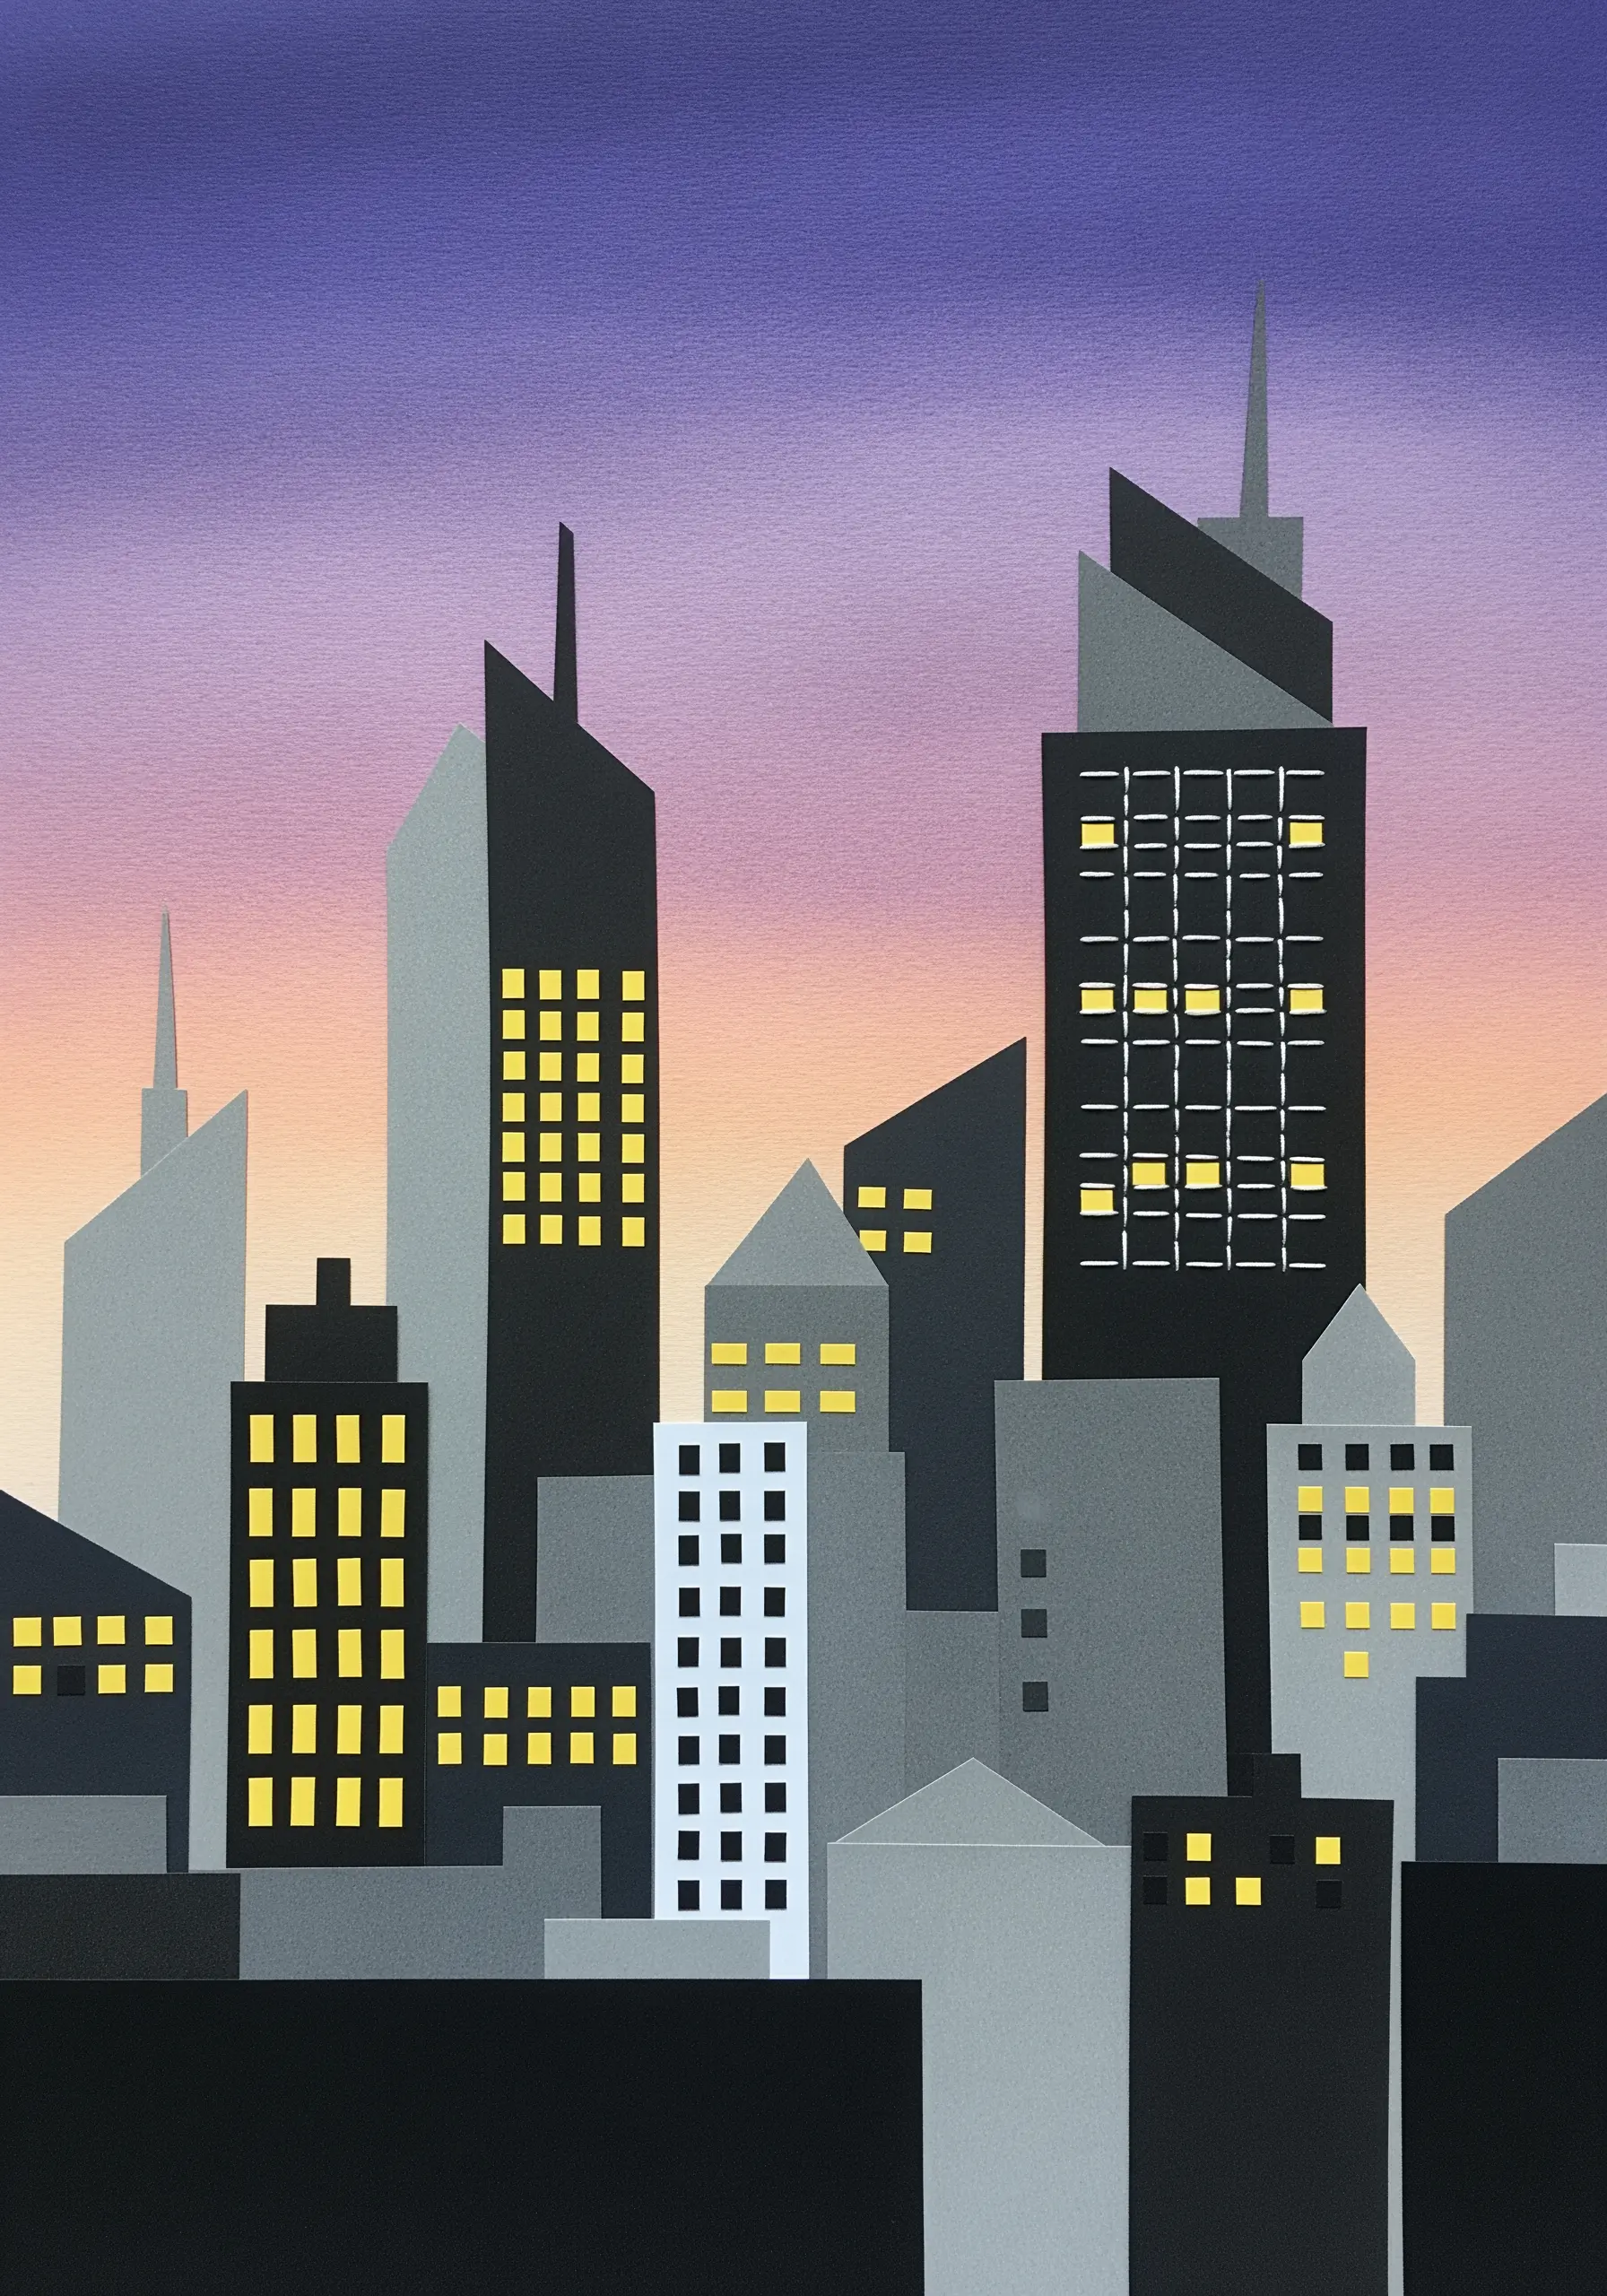
Use small, simple stitches to represent light in an otherwise static paper composition.
Place tiny horizontal straight stitches or seed stitches in the windows of a paper cityscape to create the illusion of illuminated rooms.
Use a bright, high-contrast thread, like yellow on grey paper, to make the ‘lights’ pop.
This technique adds a layer of narrative and life to the scene, suggesting activity within the silent architectural forms.
15. Frame Elements with a Classic Border Stitch
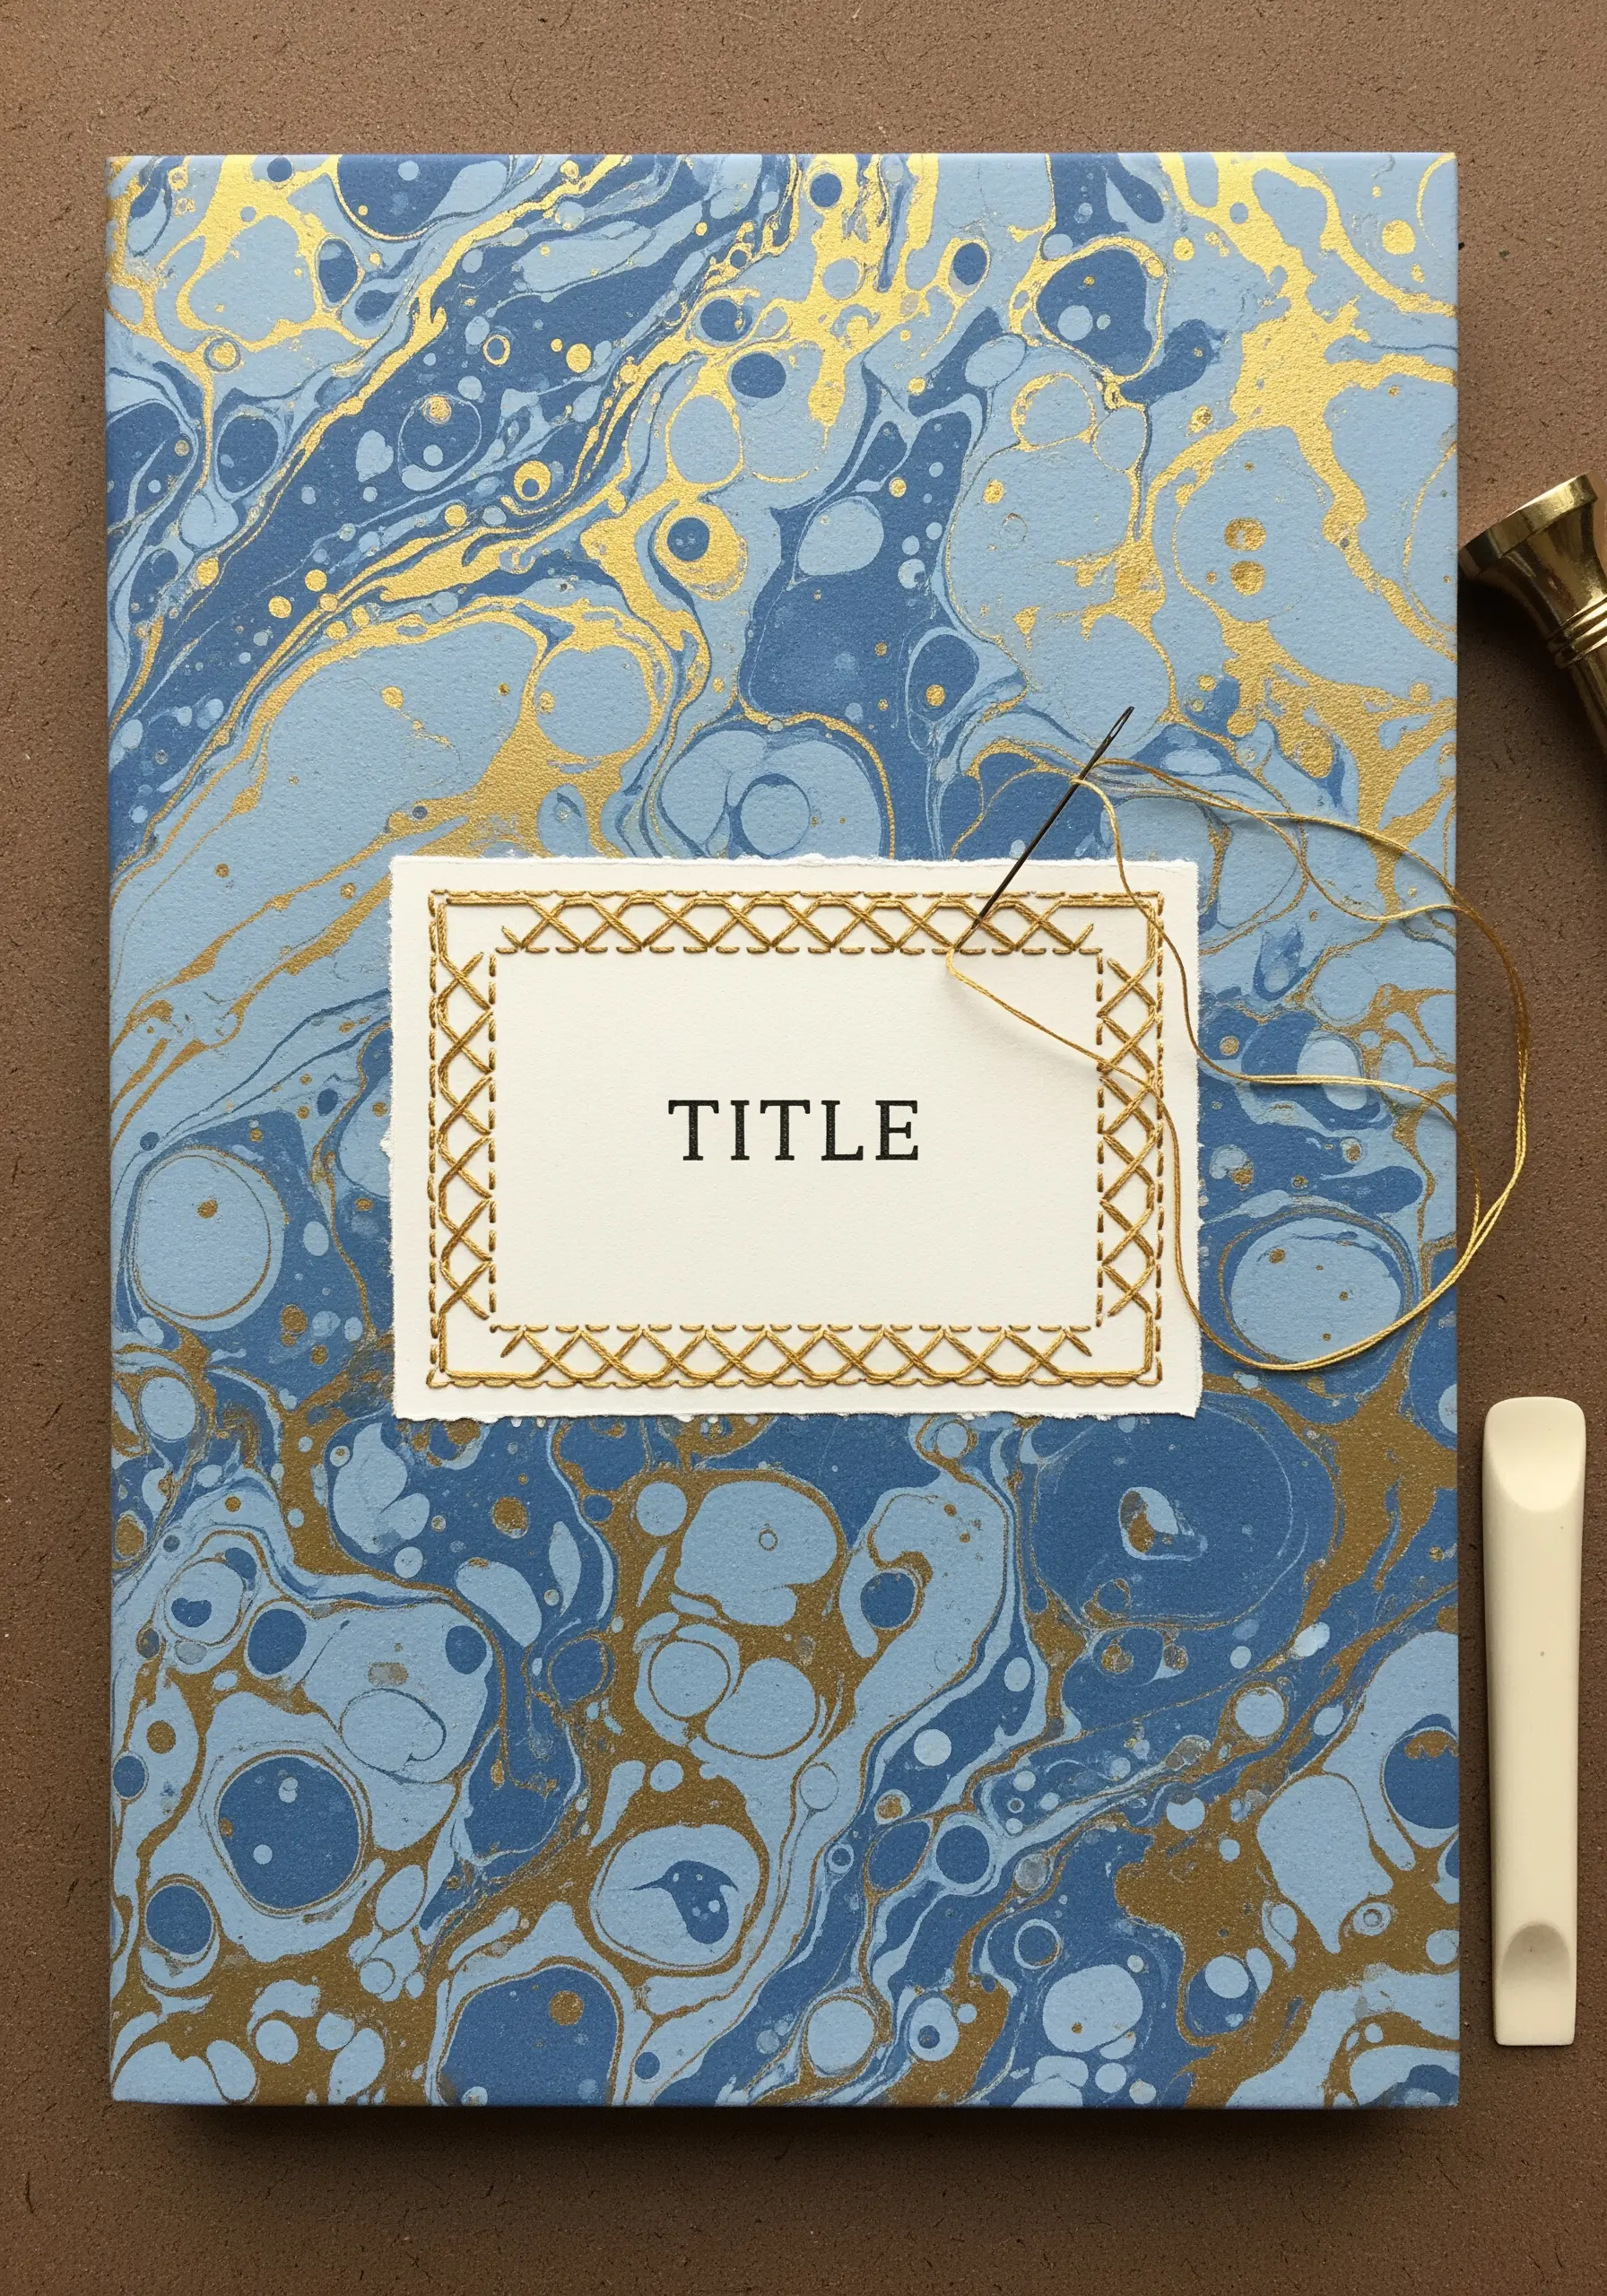
Elevate a simple paper label or central motif by framing it with a decorative border stitch.
A chevron stitch, herringbone stitch, or even a simple cross stitch border adds a touch of classic elegance and draws attention to the focal point.
Use a metallic or silk thread to give the border a luxurious finish that contrasts beautifully with the matte paper.
Pre-pierce your holes along the border to ensure your stitches are evenly spaced and perfectly aligned for a professional look.
16. Secure Delicate Objects with Couching Stitches
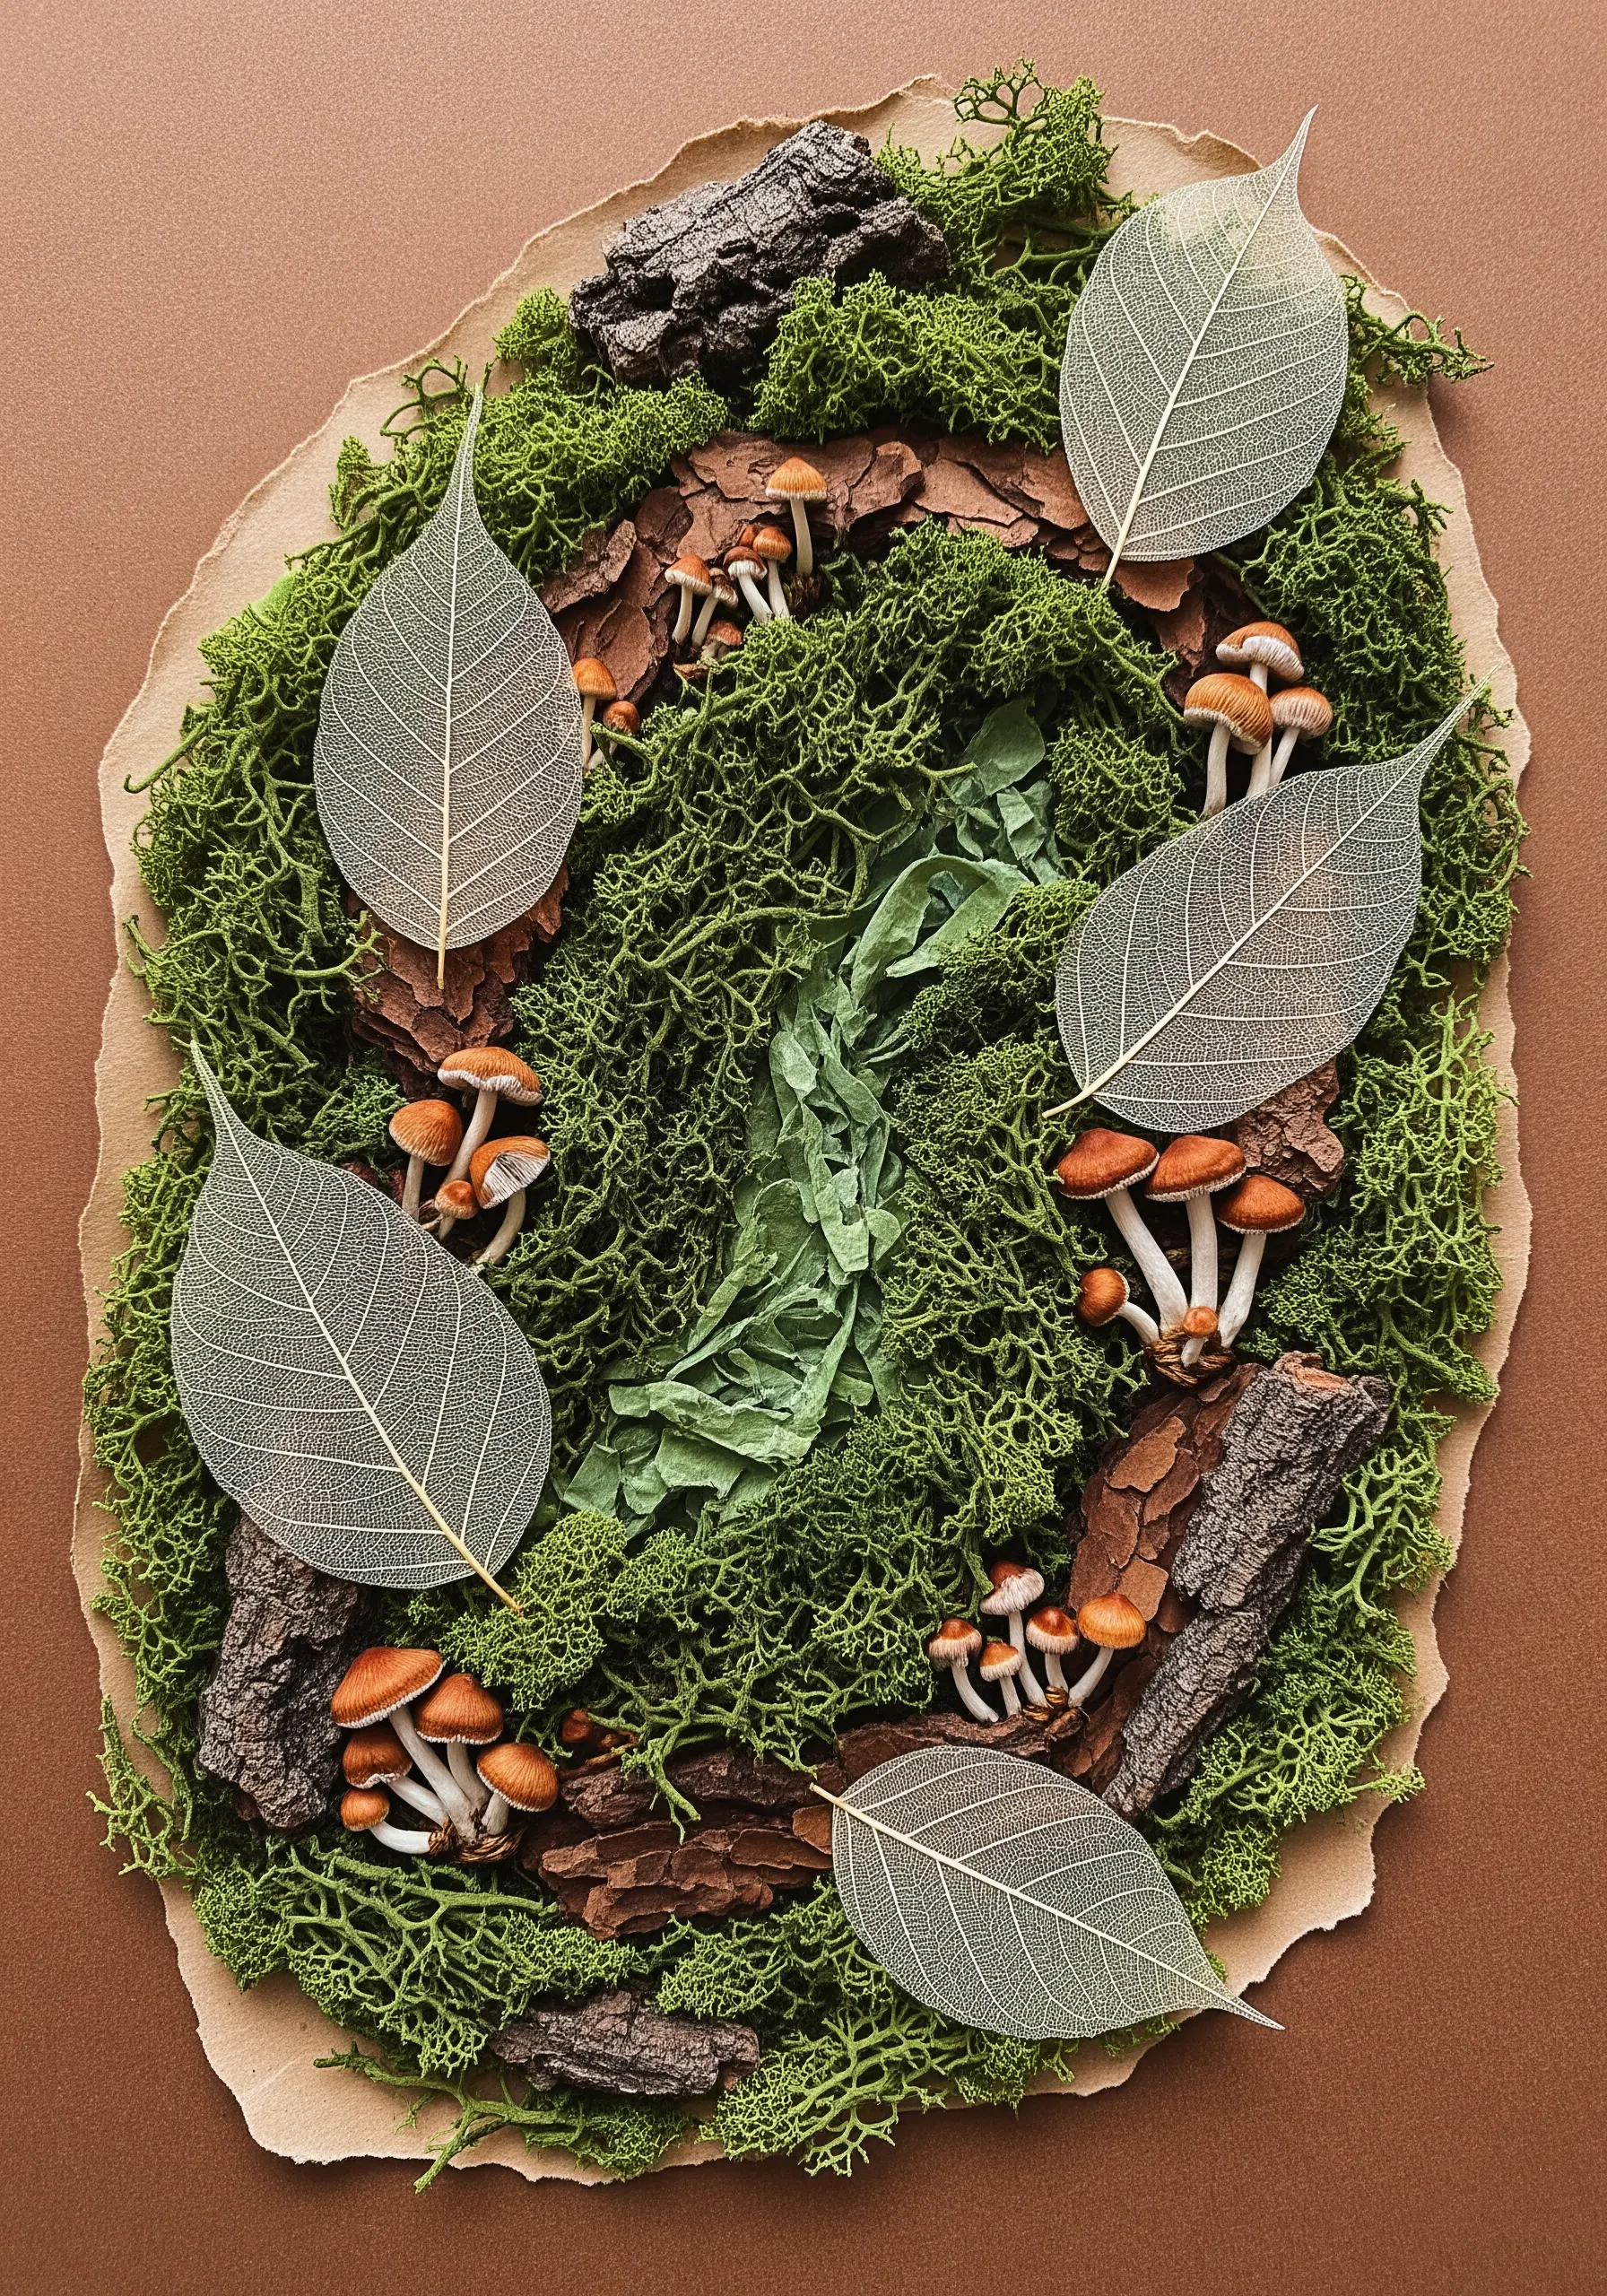
Integrate fragile, natural elements like skeleton leaves or dried botanicals into your collage by securing them with tiny couching stitches.
Use a single strand of thread in a matching color to create nearly invisible stitches that hold the object in place without damaging it.
This allows you to add incredible texture and realism to your work while ensuring the delicate pieces are protected.
This subtle technique is perfect for creating high-texture fabric collage embroidery projects that blend natural and man-made materials.
17. Define Structure with Utilitarian Stitches

Use thread not just for decoration, but to serve as a structural and visual element in your design.
In this hot air balloon, twine is used for the ropes, tied with small knots and bows that become part of the charm.
This approach gives the piece a delightful, handcrafted feel, where the materials serve a functional and aesthetic role.
This is a wonderful technique for cartoon-style embroidery ideas, adding a playful, three-dimensional quality.
18. Create a Secondary Grid with Linear Stitches
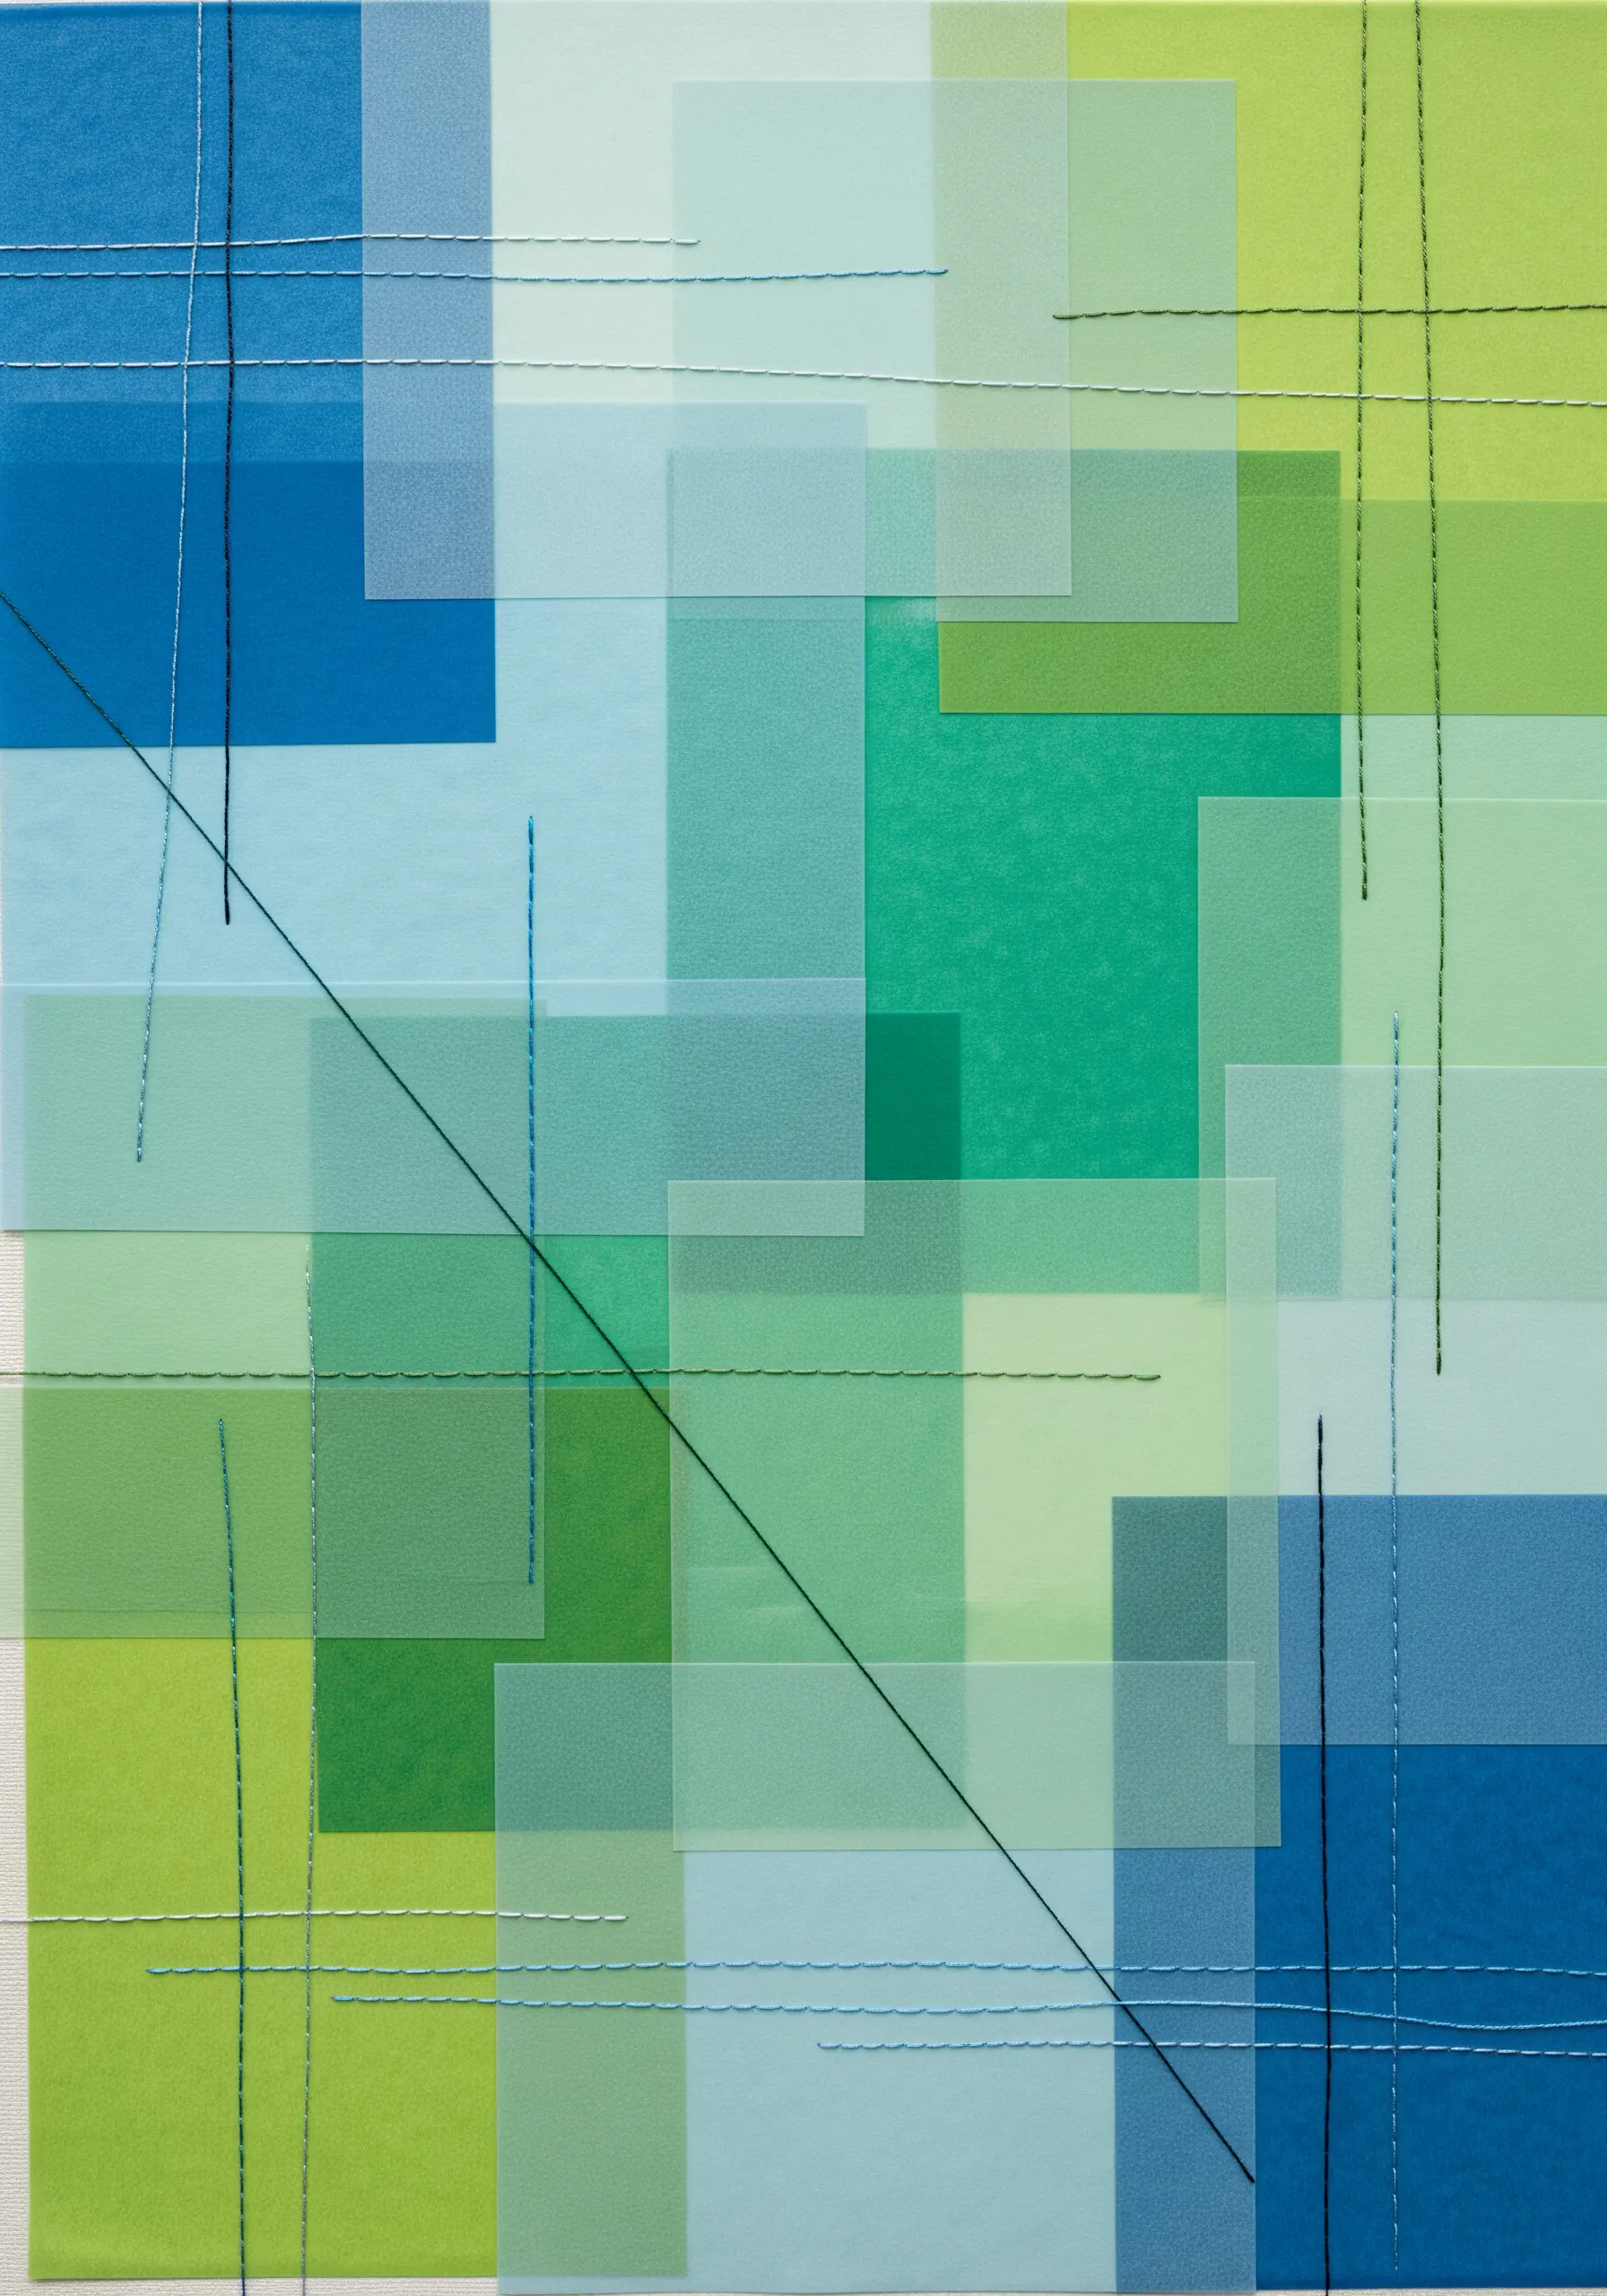
Overlay your paper collage with a grid of stitched lines to add another layer of geometric complexity and visual interest.
Use a simple running stitch or backstitch, varying the thread colors and weights to create different line qualities.
The interaction between the stitched lines and the translucent paper layers below creates new color blends and intriguing visual effects.
This technique is a sophisticated way to unify a composition and guide the viewer’s eye across the artwork.
19. Illustrate the Intangible with Thread
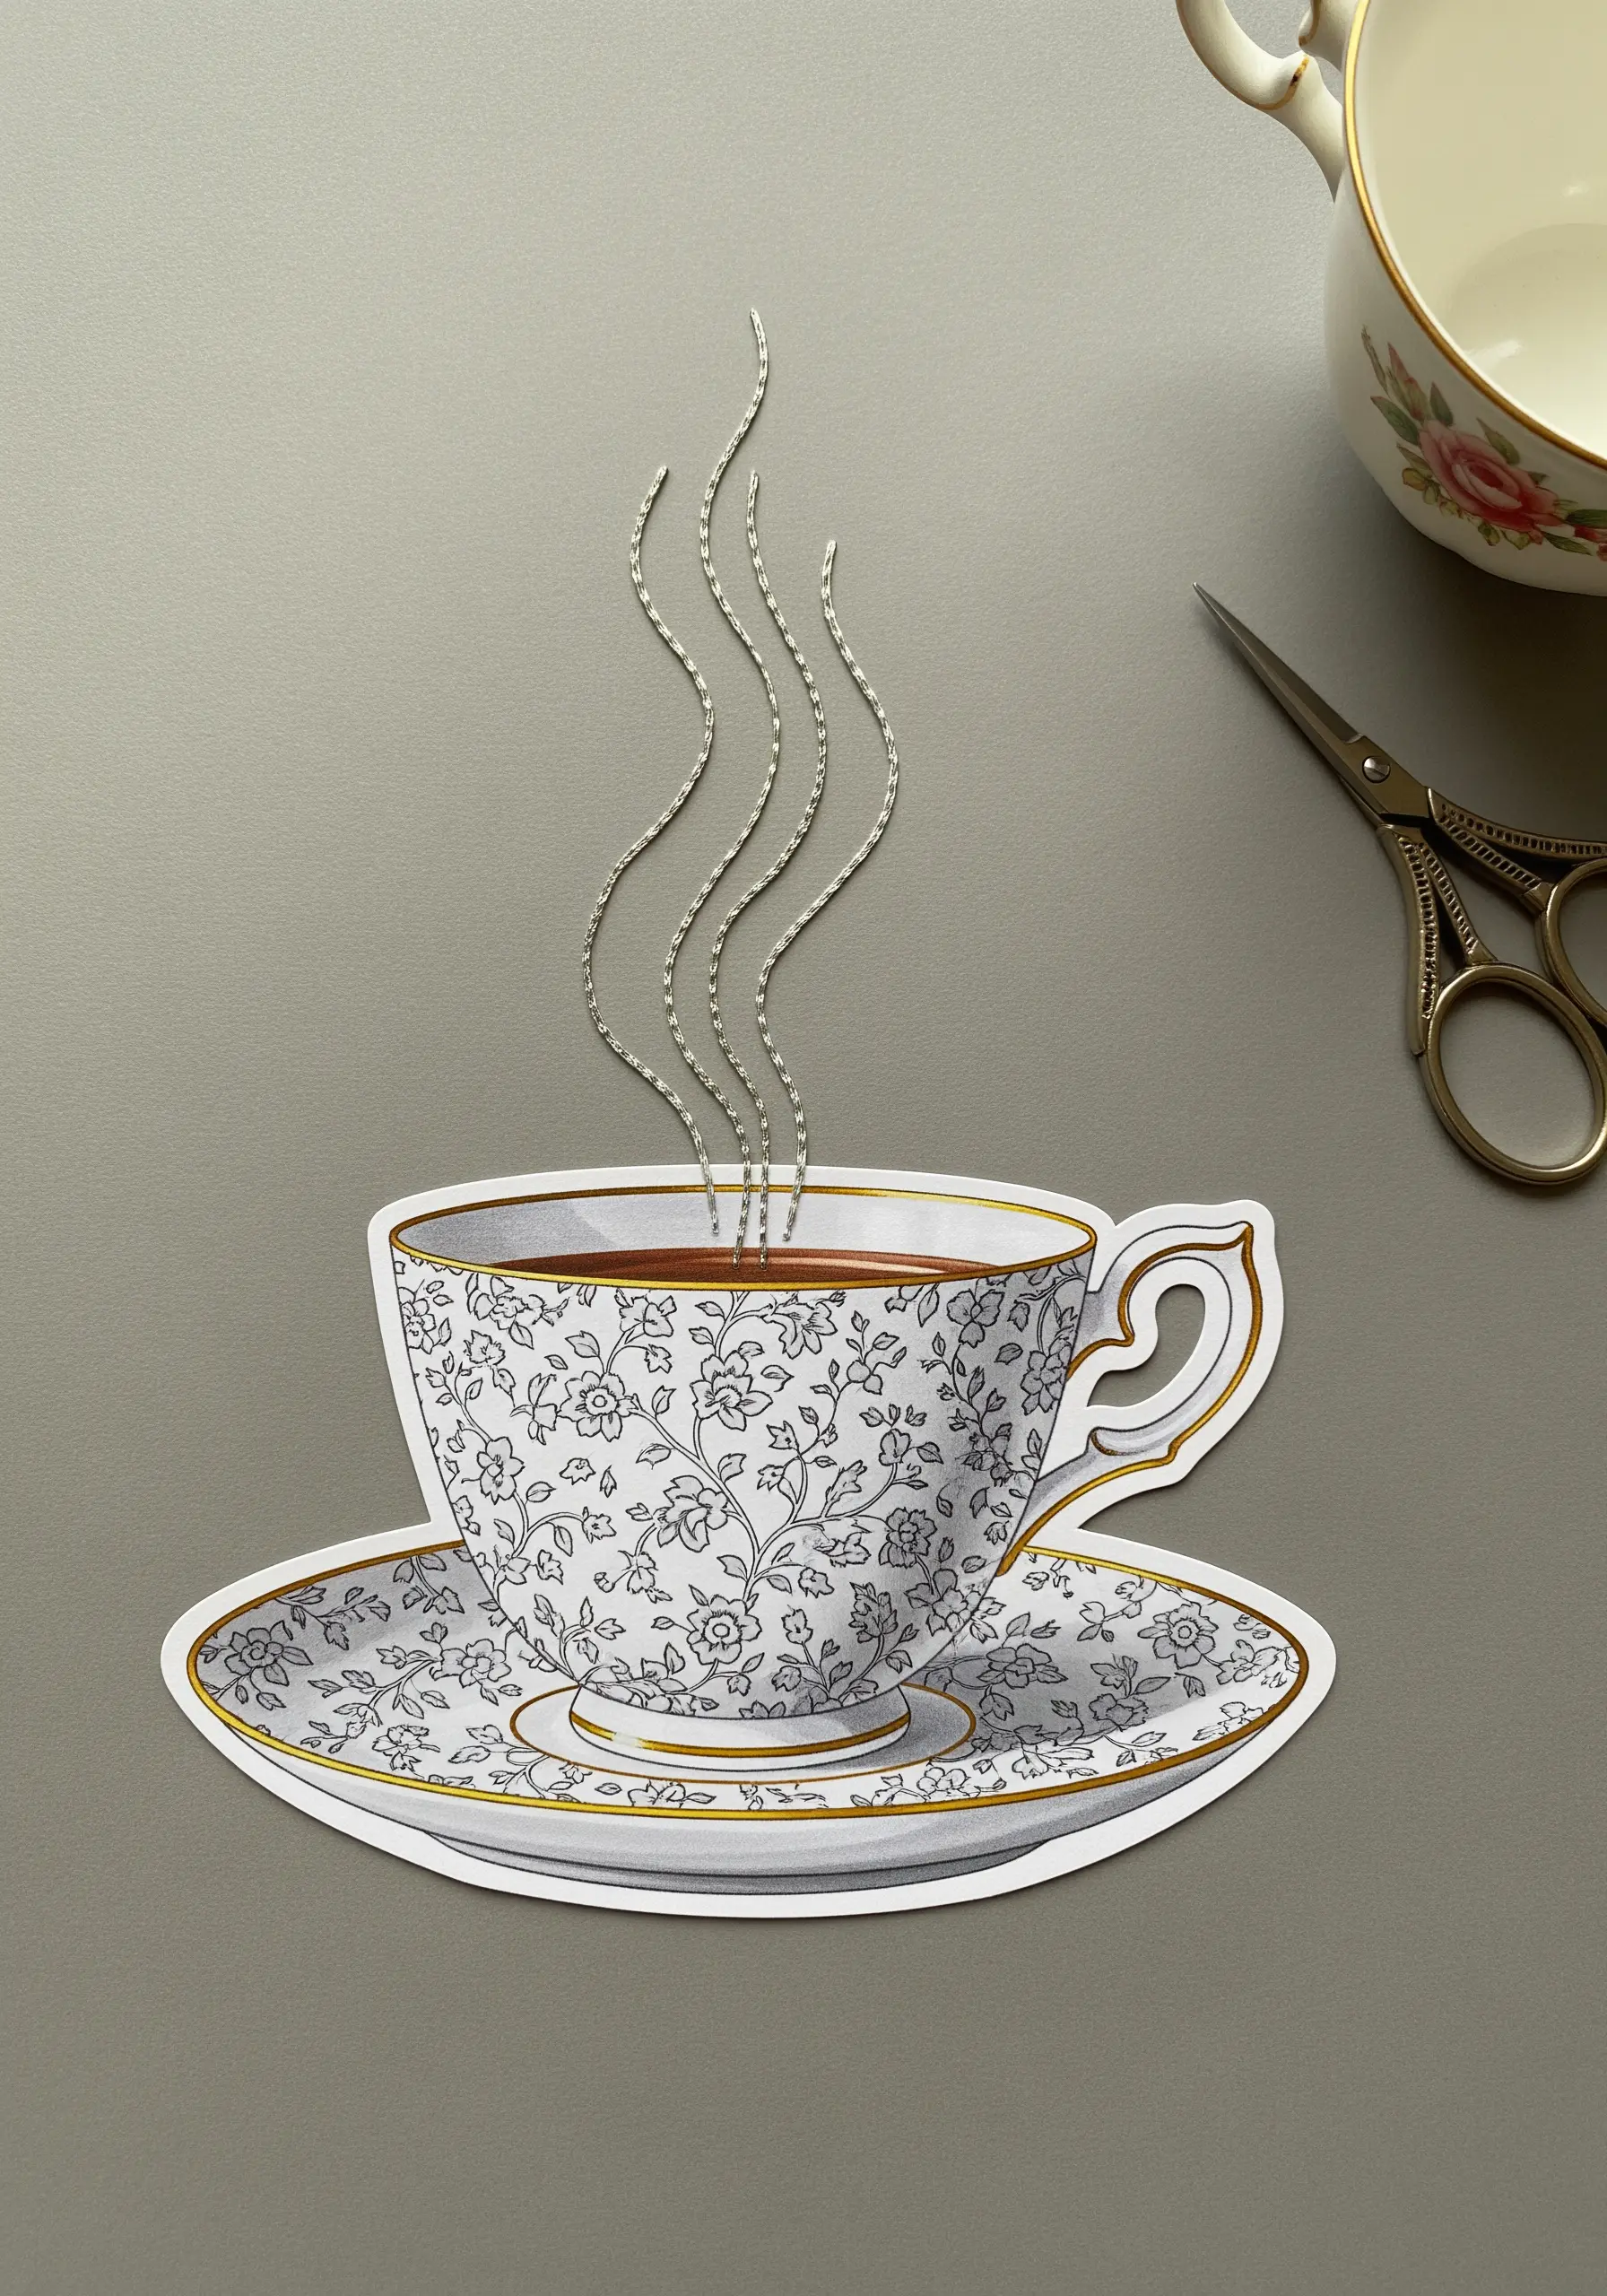
Use thread to represent ephemeral elements like smoke, steam, or scent, adding a touch of magic to your collage.
A wavy stem stitch or whipped backstitch worked in a fine, silky thread perfectly captures the delicate, flowing nature of steam rising from a teacup.
Metallic thread can add a subtle shimmer, enhancing the ethereal quality of the stitched lines.
This technique brings a static image to life, engaging more of the viewer’s senses through visual suggestion.
20. Add Graphic Texture with Simple Marks
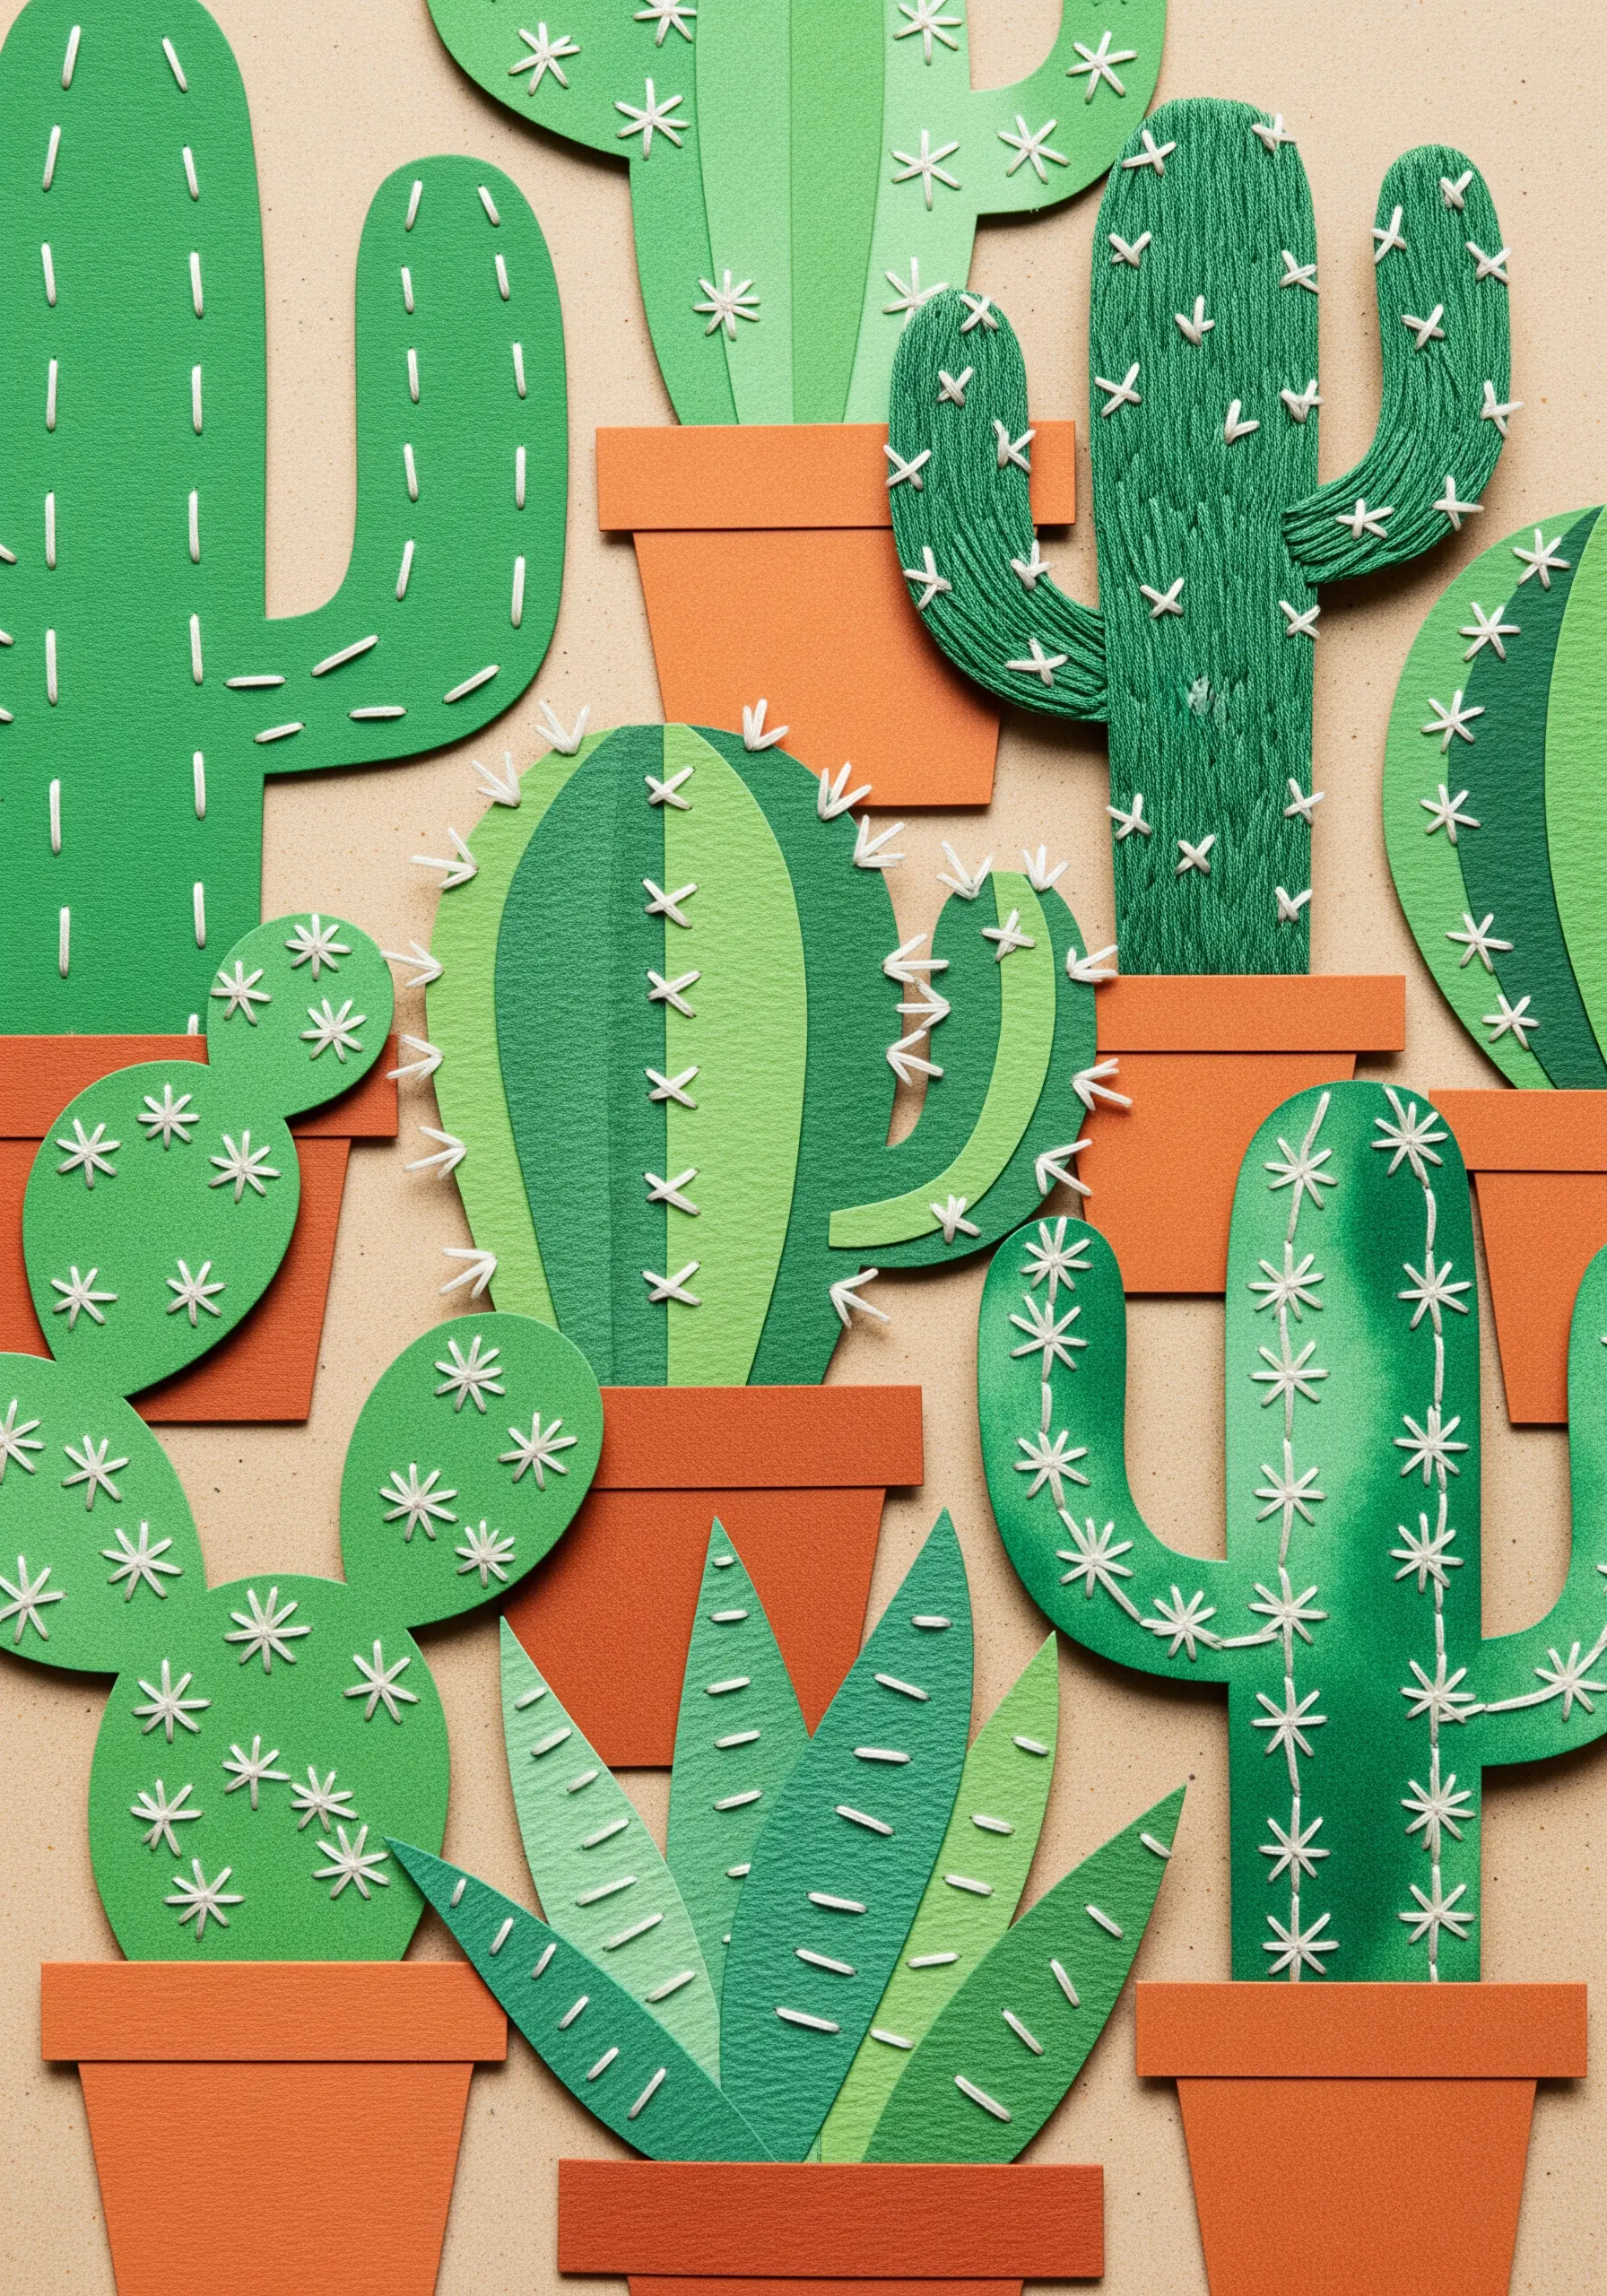
Use simple, repetitive stitches to create patterns and textures on your paper cutouts.
Represent cactus spines with small straight stitches, seed stitches, or cross stitches, using a thick, contrasting thread to make them pop.
This graphic approach adds a playful, stylized character to your work, blending illustration with textile art.
The stitches don’t just decorate the paper; they become an integral part of the illustration itself.
21. Redefine Form with Contour Line Stitching
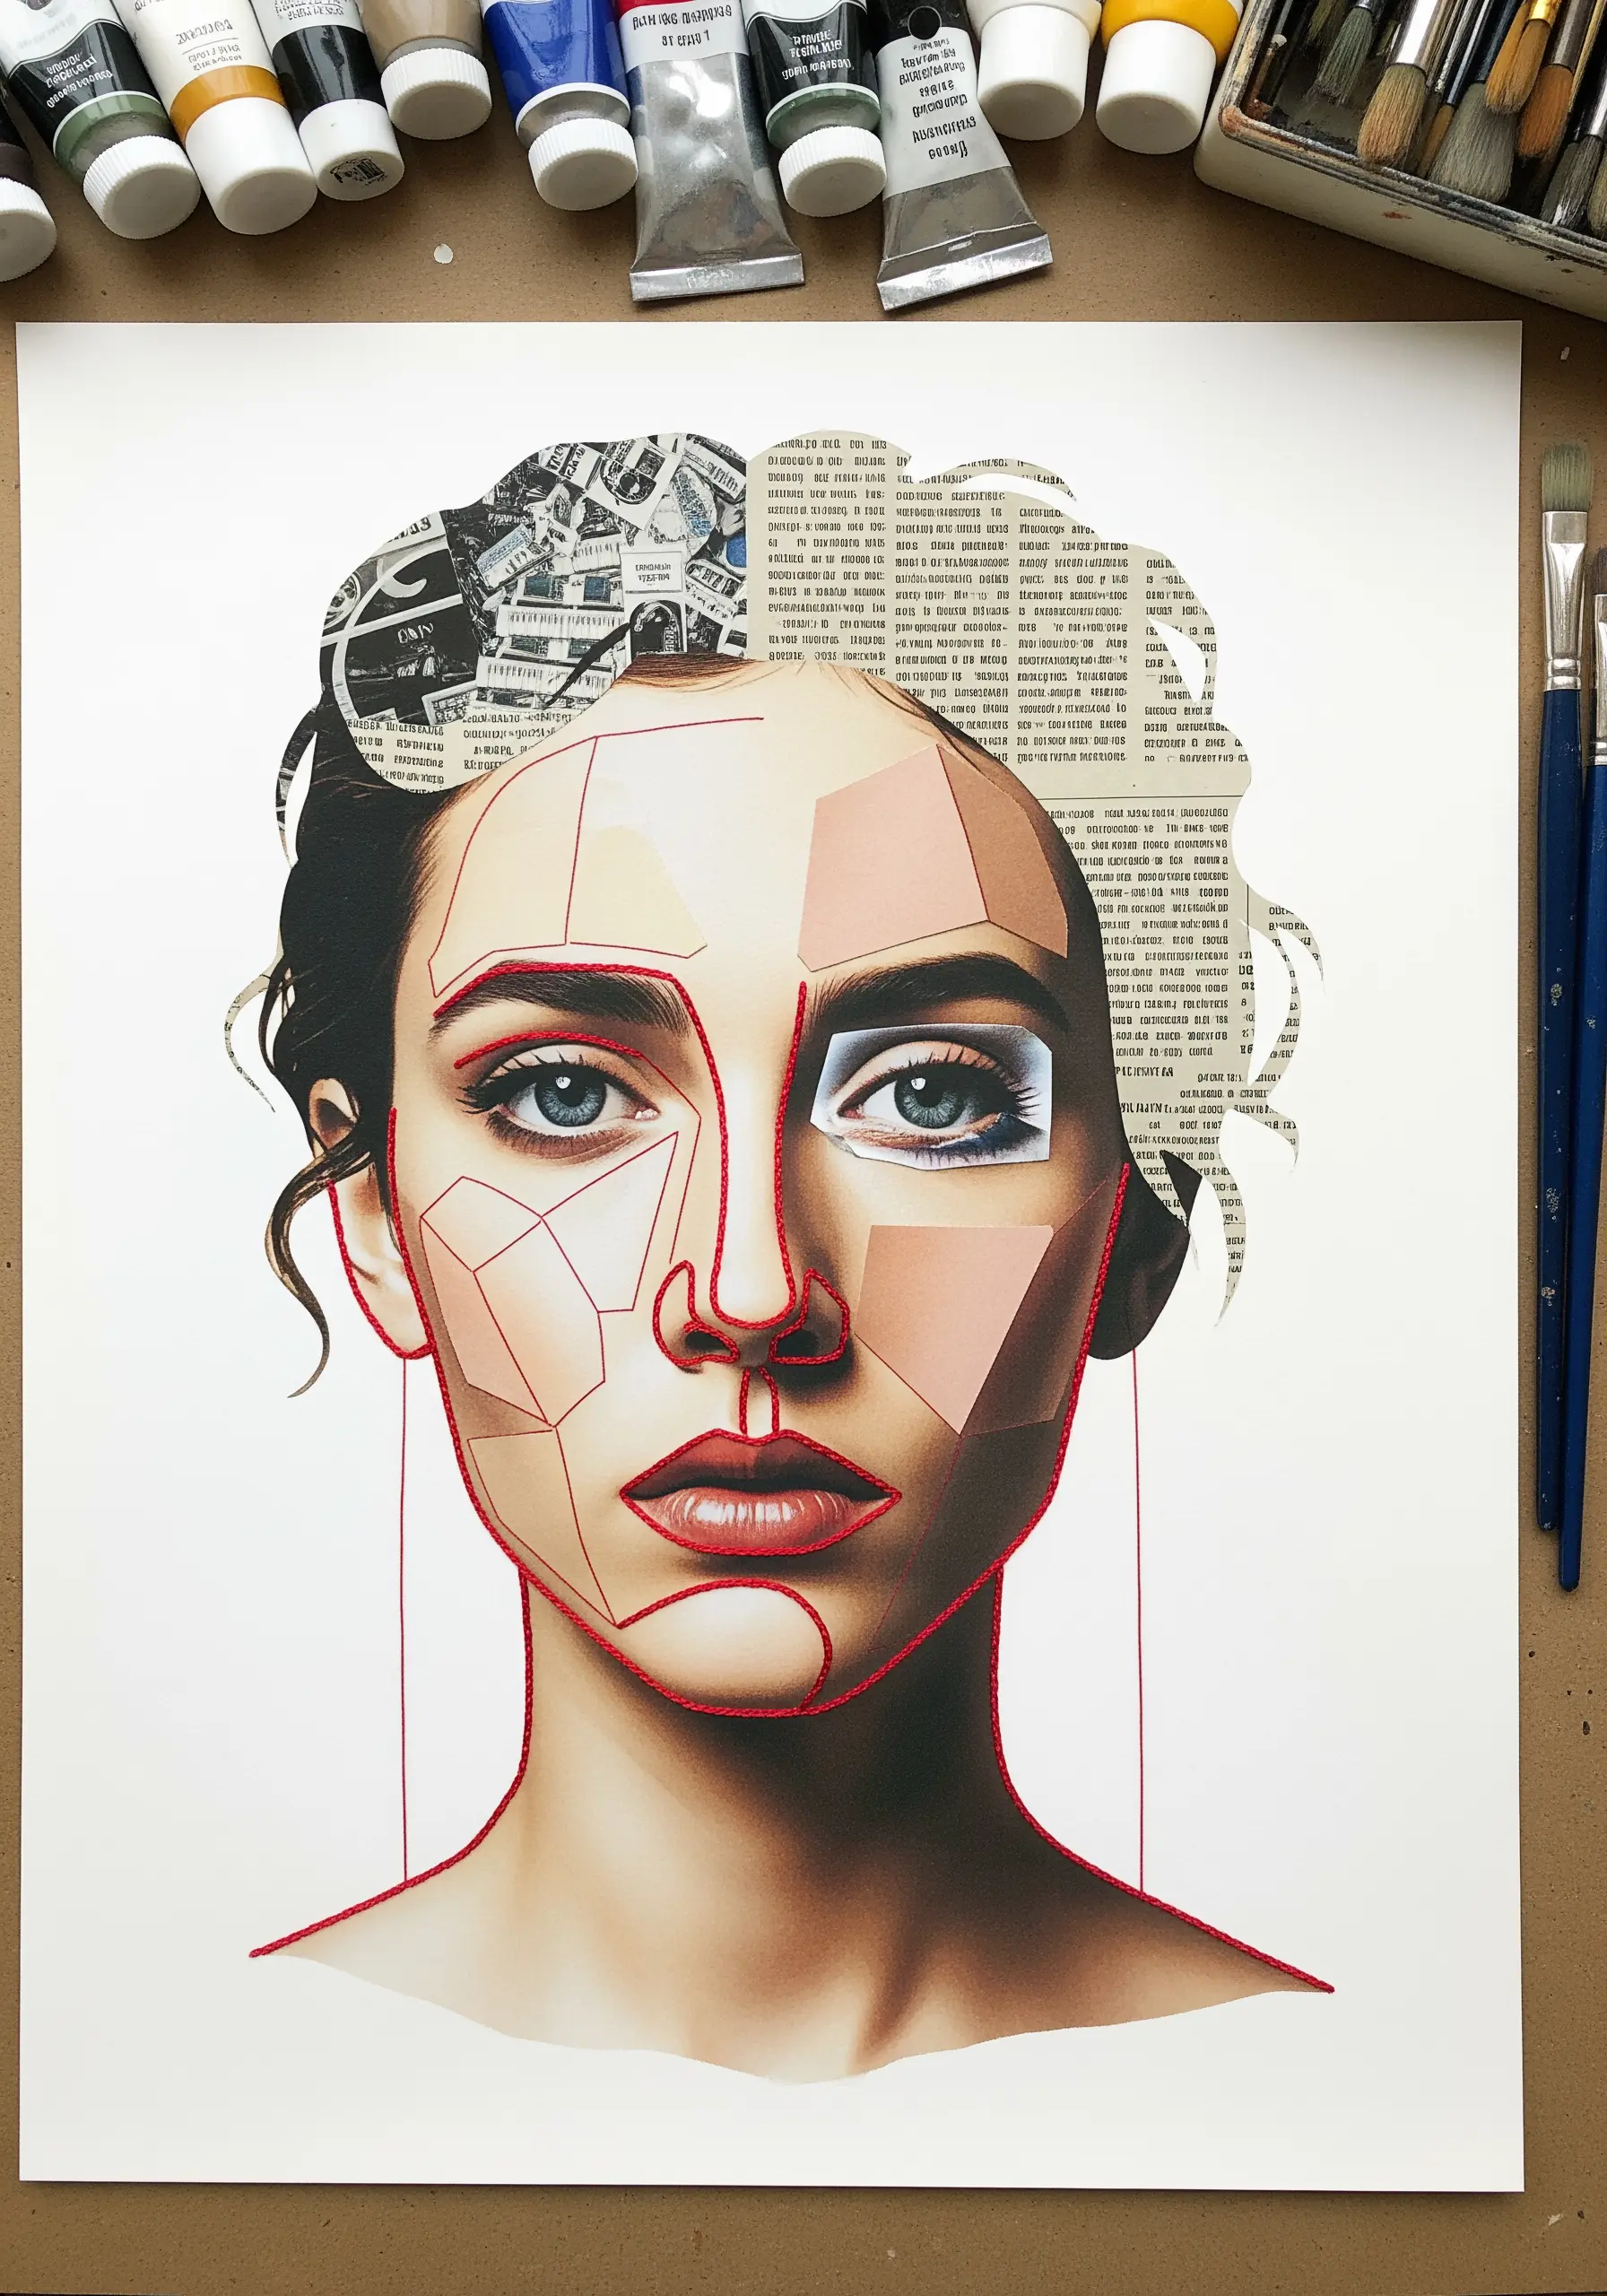
Stitch directly onto a portrait or image to superimpose a new layer of interpretation and form.
Use a single, continuous line of backstitch or stem stitch to create an abstract or geometric contour map over the original features.
A bold, contrasting thread color, like red, ensures the stitched line becomes a dominant feature of the artwork.
This powerful technique merges collage and drawing, using thread as your pencil to deconstruct and redefine the image beneath.
22. Create Tactile Rain with Hanging Threads
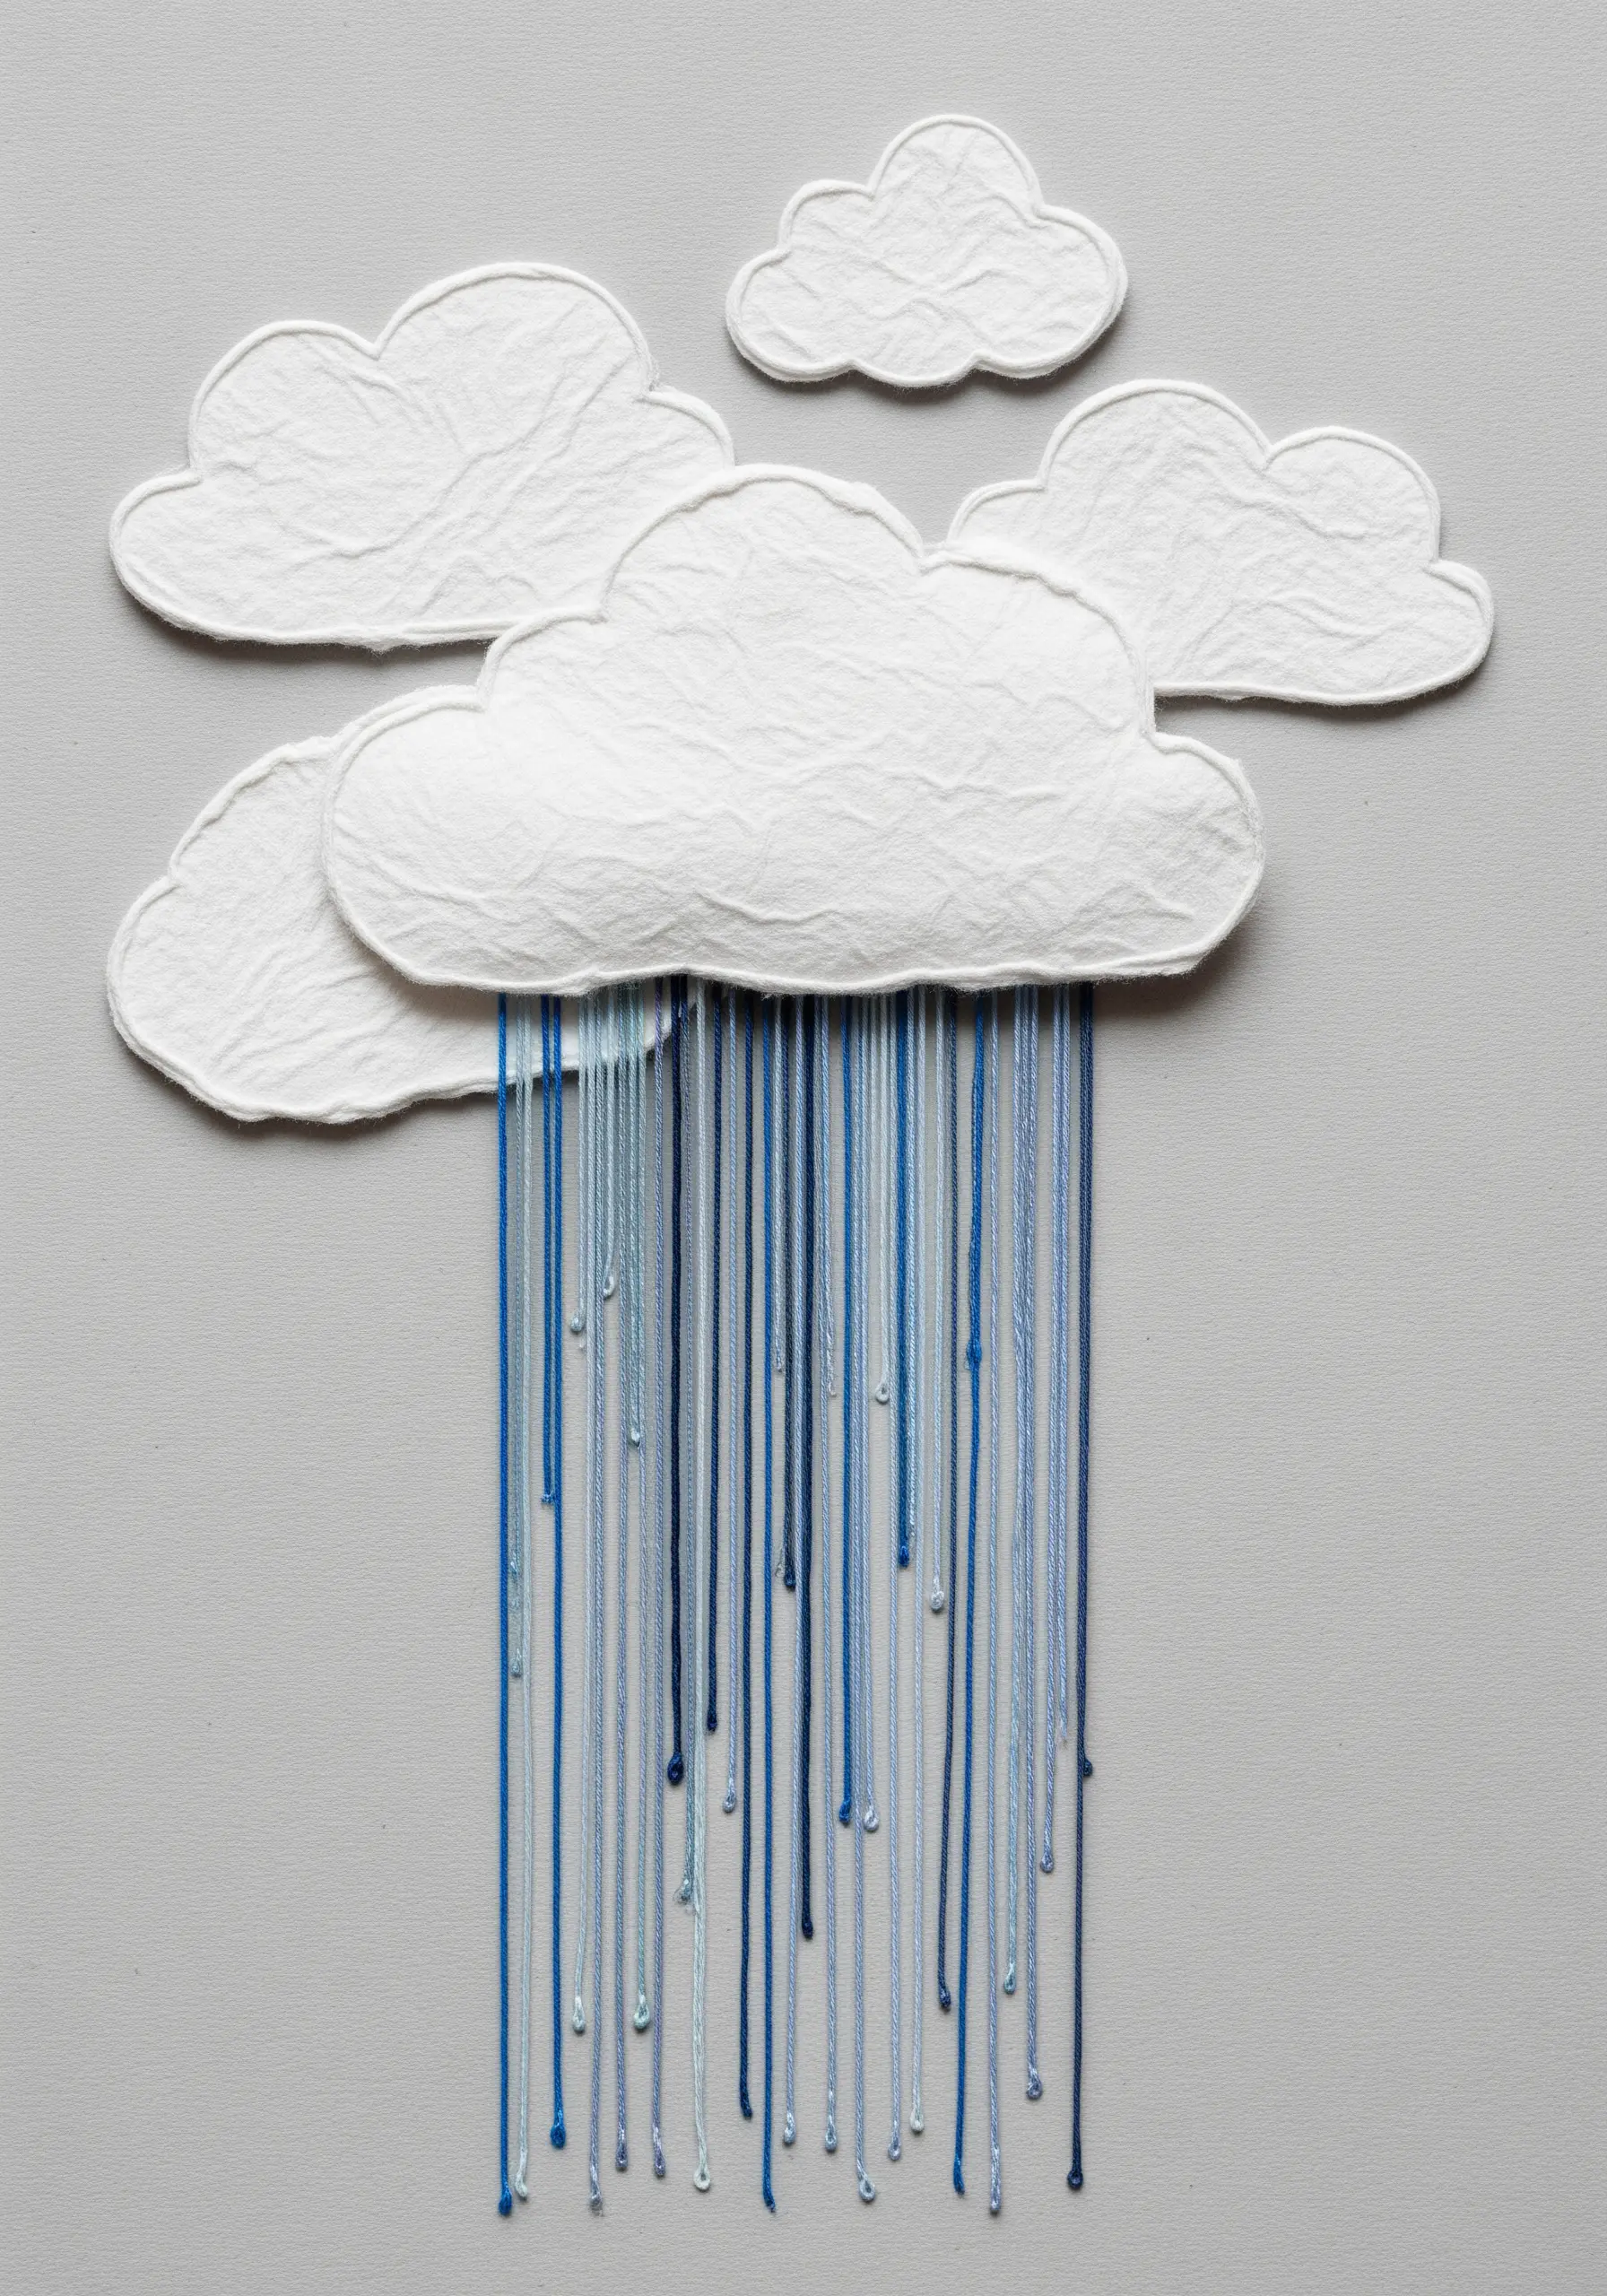
Let your threads break free from the surface to create a three-dimensional, tactile effect.
To create rain, anchor various shades of blue thread at the bottom of a paper cloud and let them hang loose.
Add a French knot or a simple overhand knot at the end of each strand to give it a bit of weight and represent a droplet.
Varying the lengths of the threads creates a natural, dynamic sense of movement, turning a flat image into a small-scale installation.
23. Form a Cohesive Spine with a Central Stitch Line
Connect a series of related paper elements by stitching them together along a central axis to create a garland or wall hanging.
A simple running stitch or backstitch is all you need to form a ‘spine’ that unites the individual pieces into a single, flowing composition.
This technique is perfect for creating yarn wall art projects and other large-scale decorative pieces from smaller paper components.
The stitching is both functional, holding the art together, and decorative, providing a continuous visual line.
24. Build Rhythm with Concentric Stitch Patterns
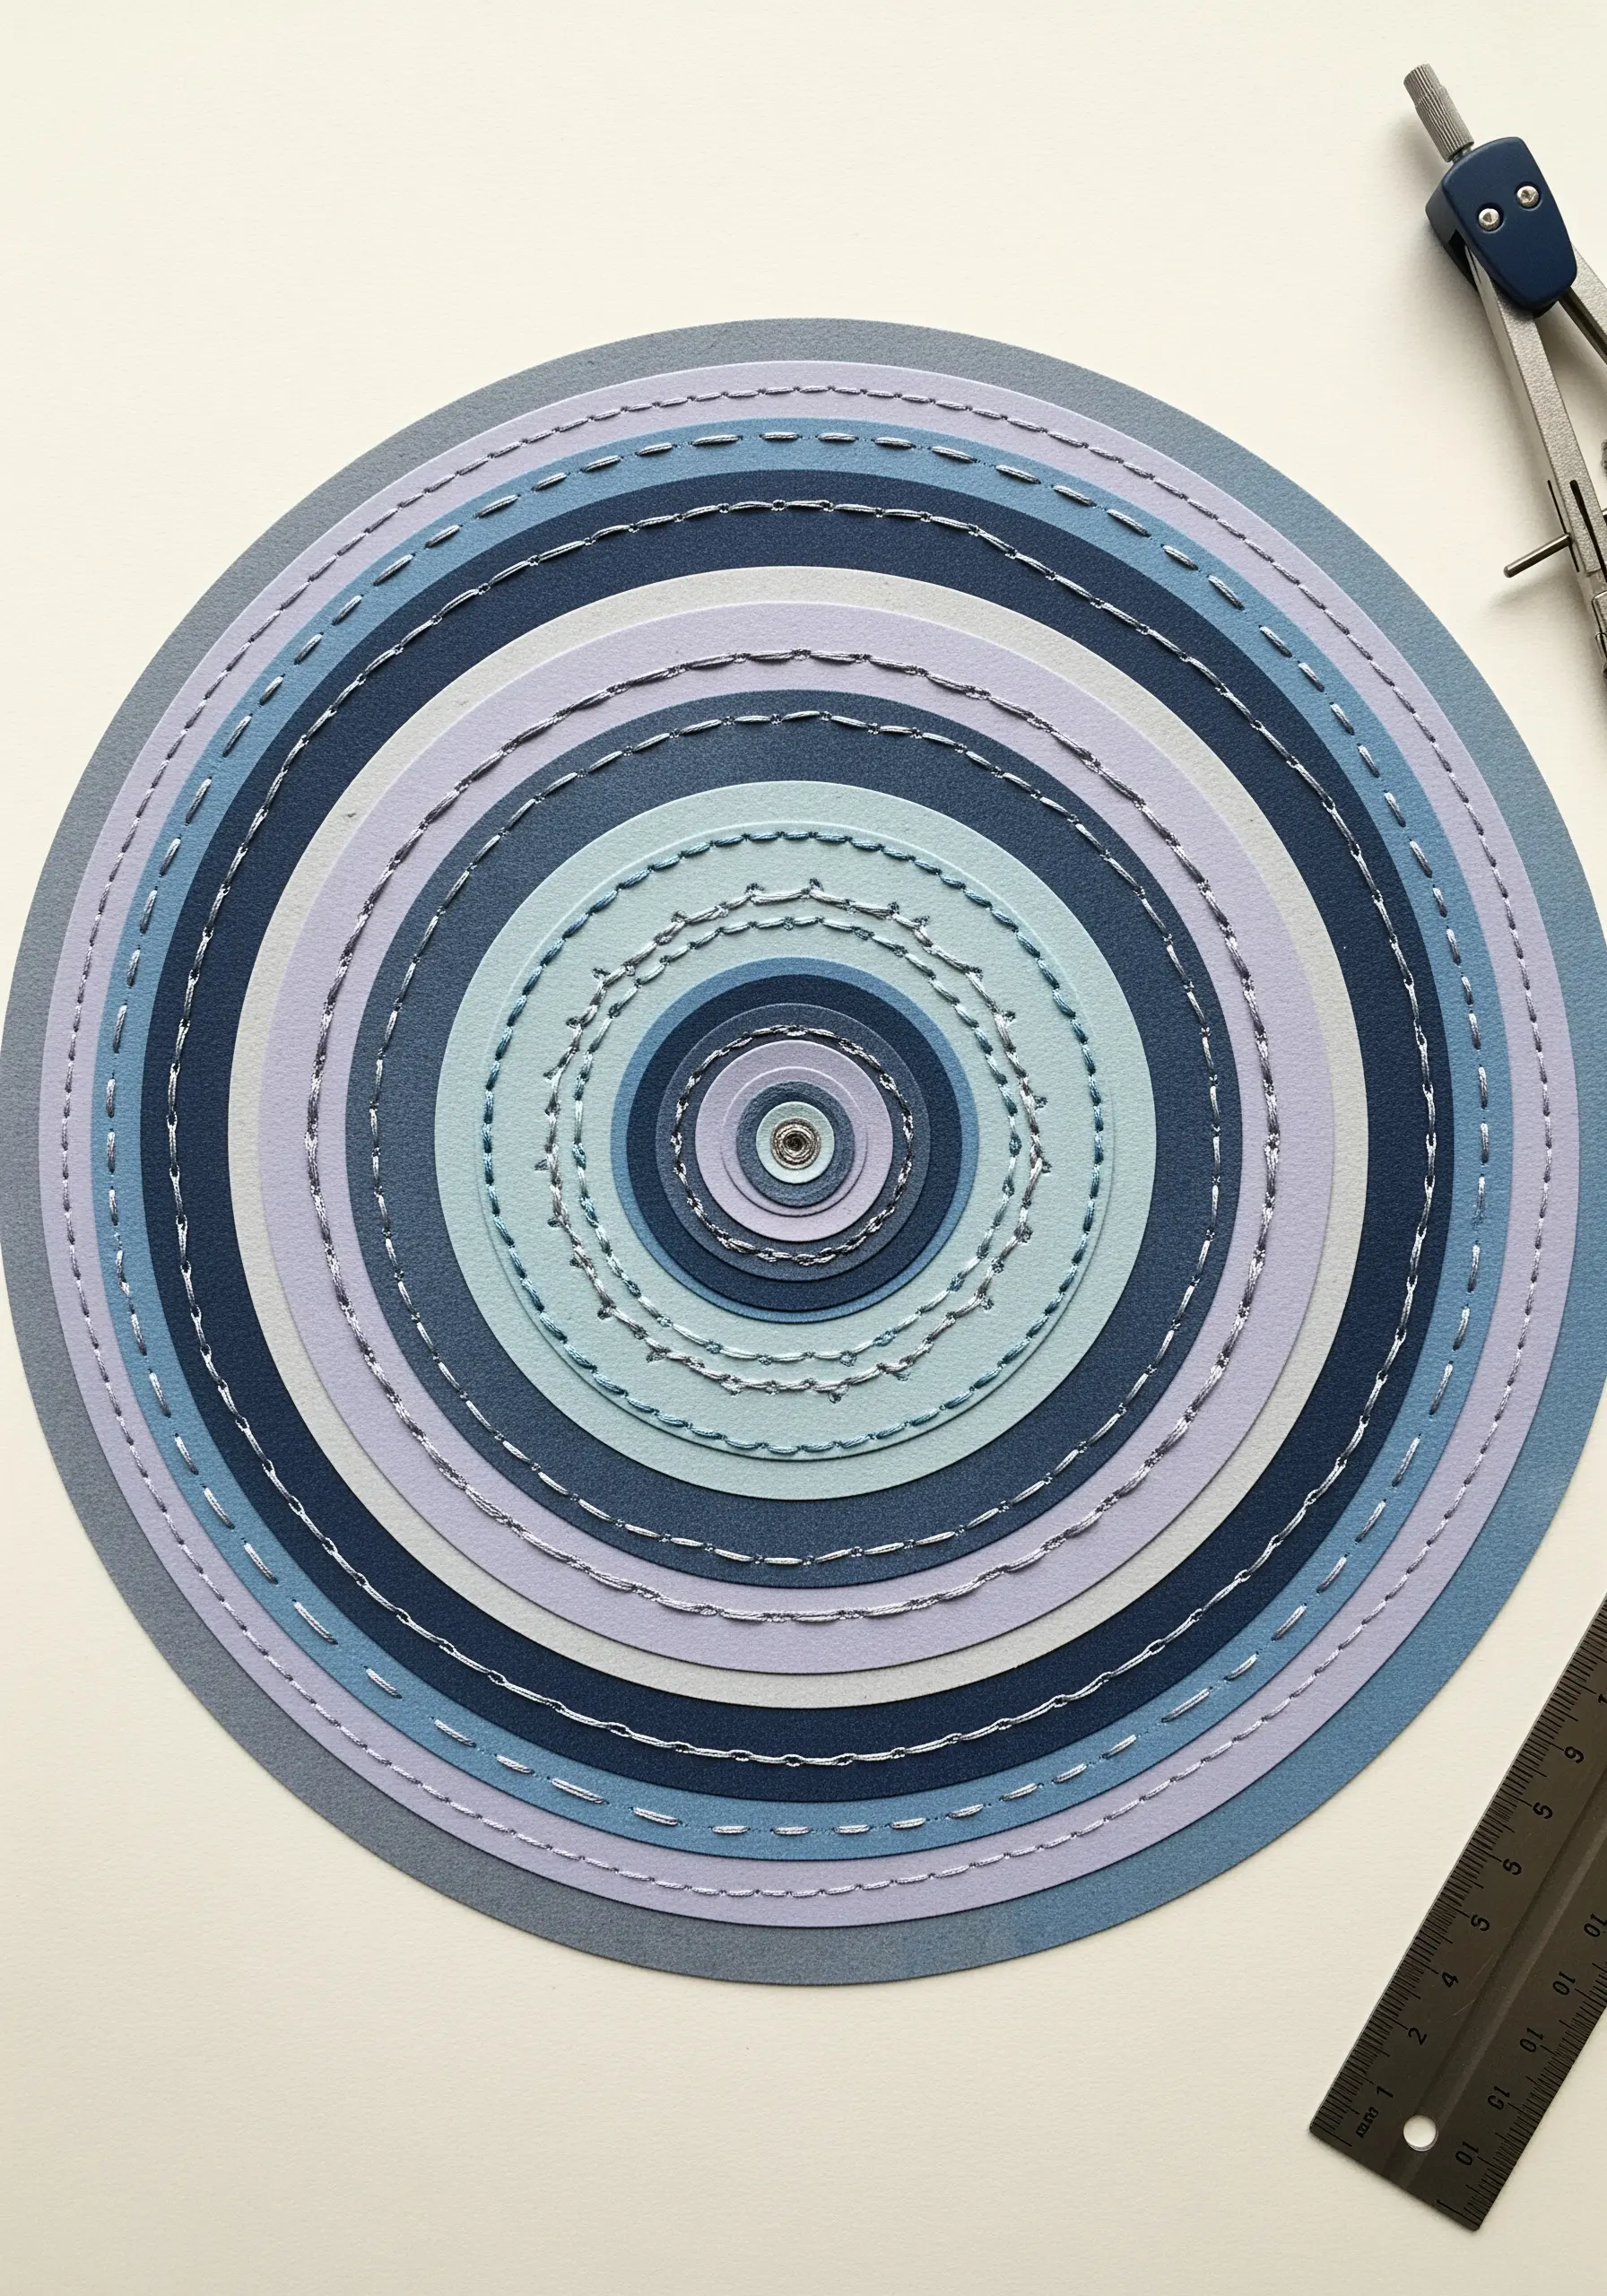
Create a mesmerizing focal point by stitching different patterns within concentric rings of paper.
Assign a unique stitch to each colored ring—running stitch, seed stitch, chain stitch, cross stitch—to build textural interest as you move toward the center.
Using a consistent thread color, like silver, across all rings ensures the focus remains on the texture of the stitches, not the color.
This meditative process allows you to explore how different stitches interact and create a dynamic, rhythmic effect.
25. Map a Journey with Bold, Couched Cord
Make a powerful statement on a map or travel-themed collage by couching a thick cord to trace a significant route.
Couching allows the cord to sit entirely on the surface, creating a prominent, three-dimensional line that commands attention.
Choose a vibrant, contrasting cord color to symbolize the energy and importance of the journey.
This technique is far more impactful than a simple backstitch for creating a bold path that you can see and feel.
26. Form Dense Clusters with Beaded French Knots
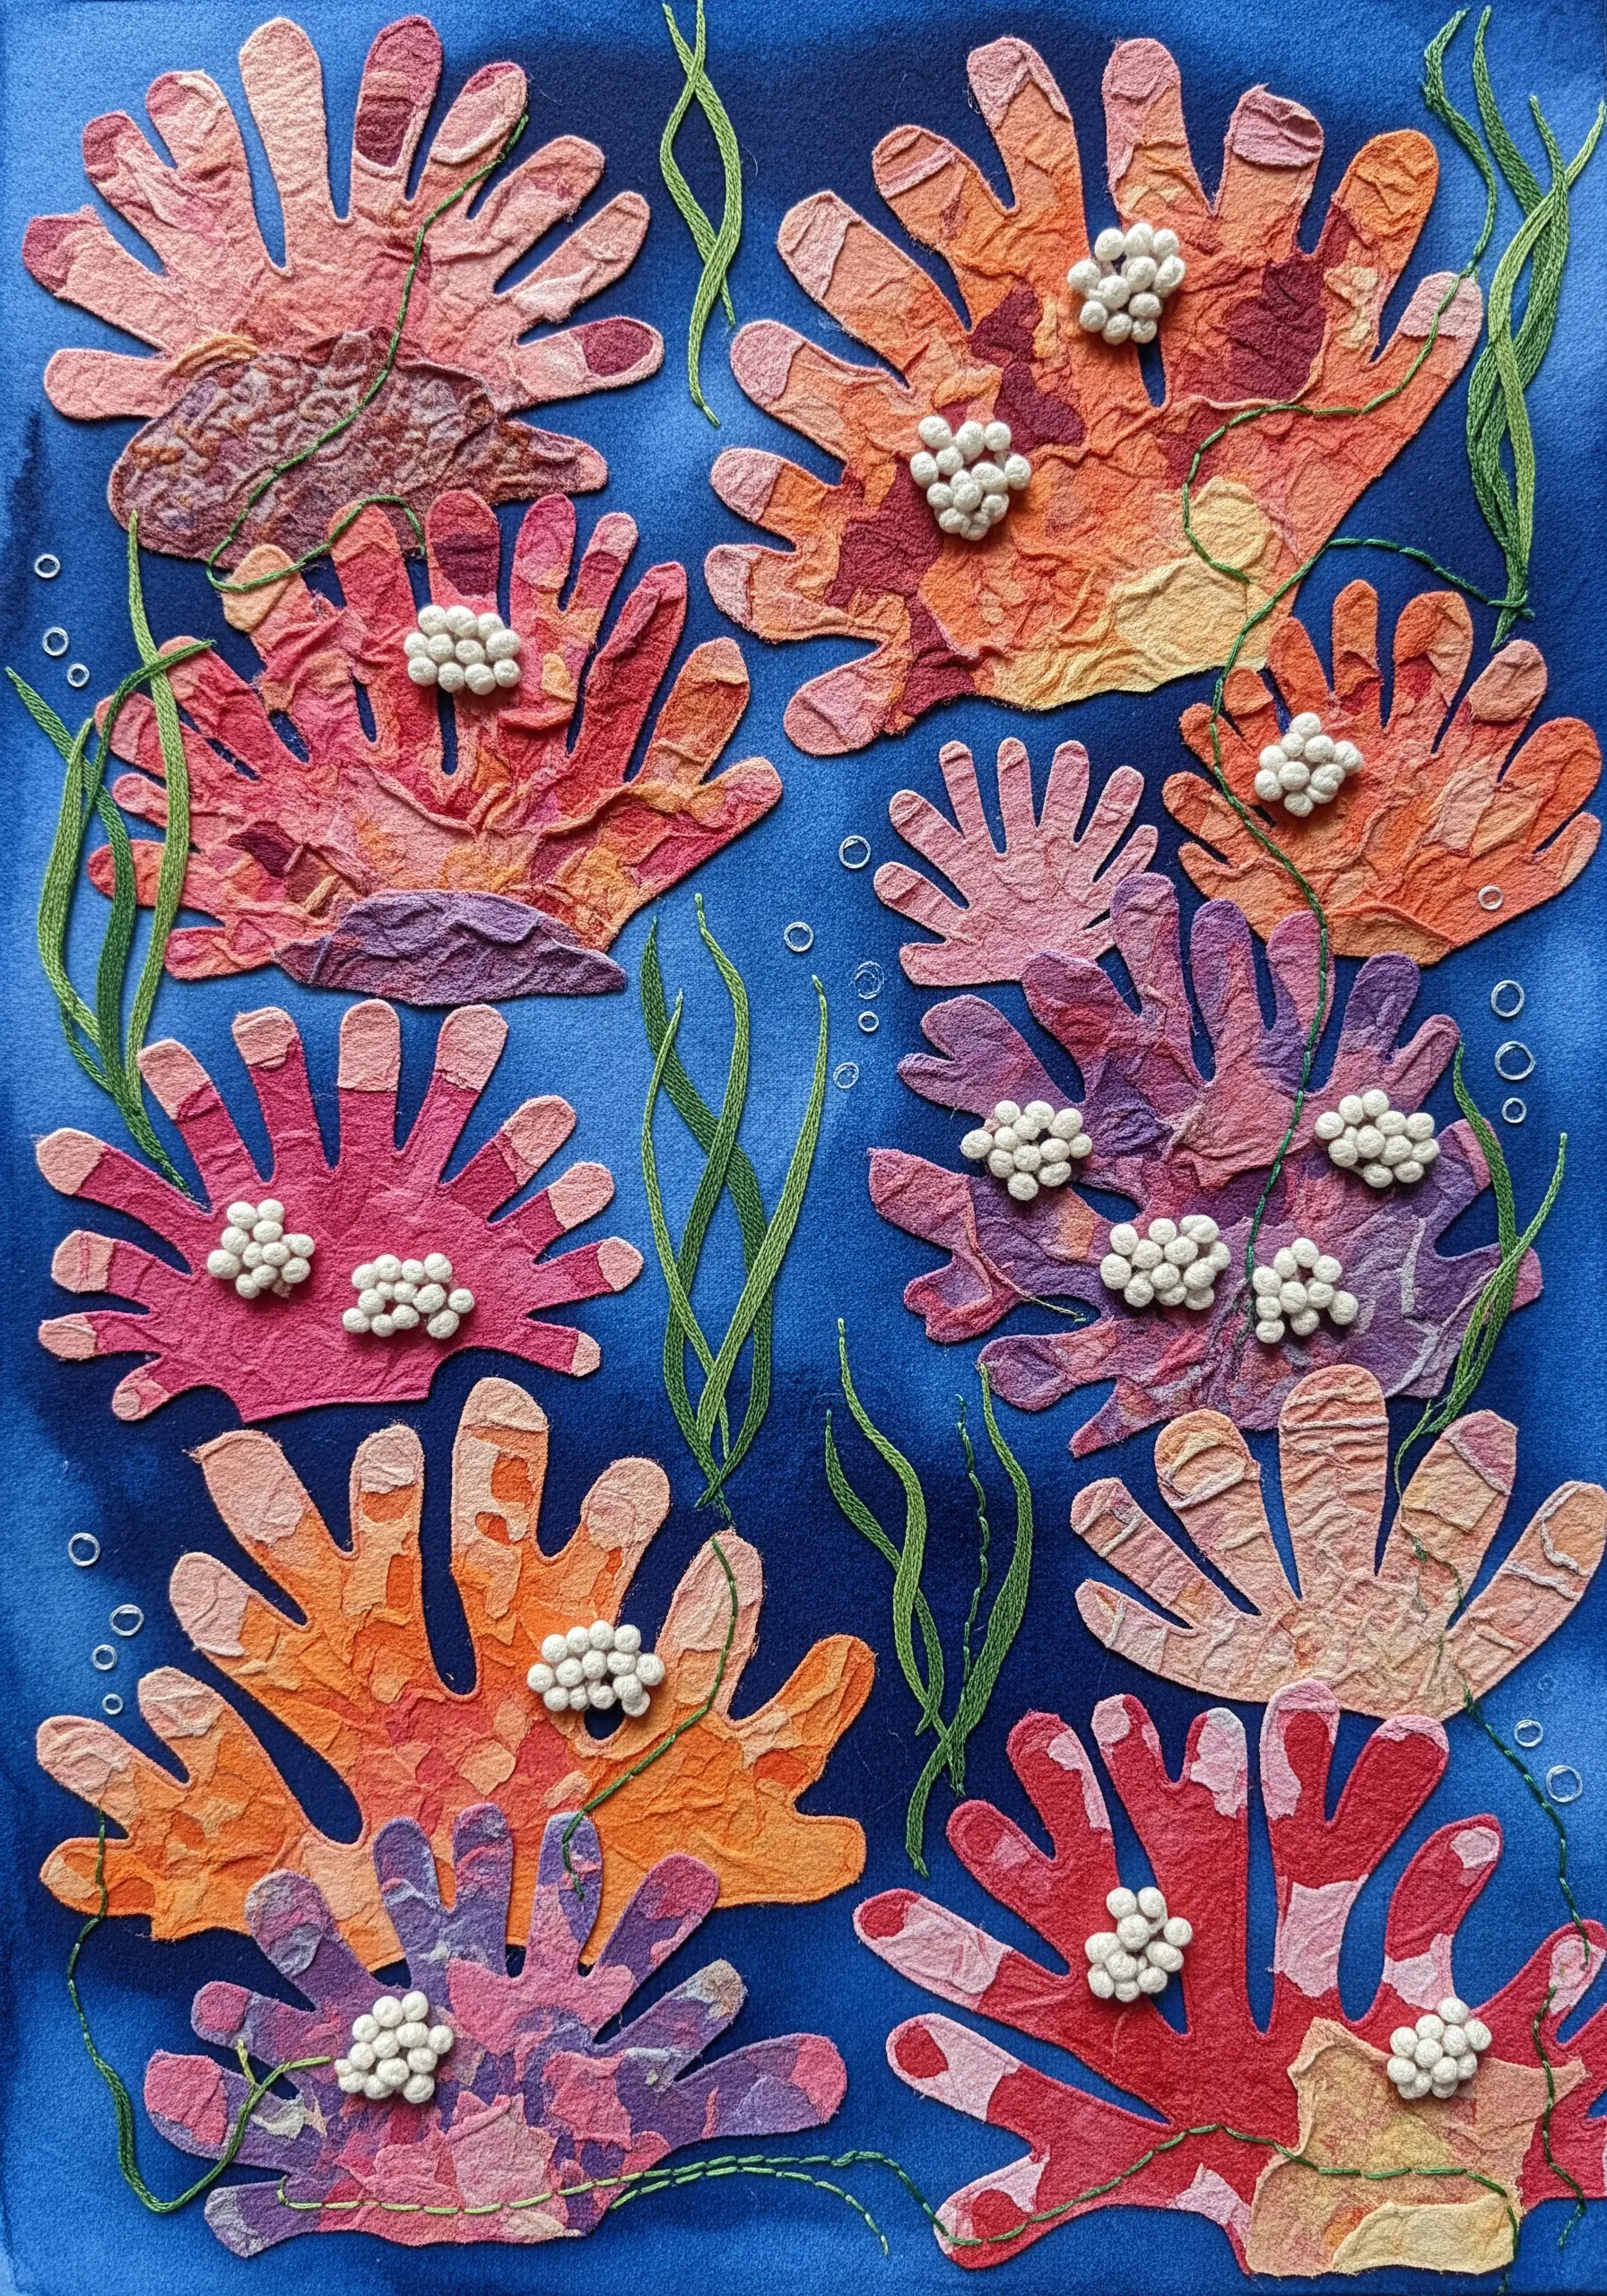
Mimic the dense, clustered textures found in nature by combining French knots with beads.
After creating a French knot, bring your needle back through the center and add a small seed bead for a touch of dimension and shine.
Group these beaded knots closely together on your paper coral shapes to create a rich, tactile surface that replicates the look of coral polyps.
This is an excellent way to add heavy, dimensional texture that contrasts with the flat, painted background.
27. Imply Connection with a Mending Stitch

Use a series of uniform straight stitches to bridge the gap between two torn pieces of paper.
This technique, inspired by Japanese sashiko mending, creates a sense of purposeful repair and connection.
The precision of the evenly spaced stitches contrasts beautifully with the raw, organic nature of the torn paper edge.
Use a bold, contrasting thread color to highlight the ‘mend’ and turn it into the central feature of your minimalist composition.