

Have you ever finished an embroidery project and felt that, while perfectly fine, it was missing something? A certain spark or polish that would transform it from a nice craft into a piece of personal art?
That next level isn’t about mastering hundreds of complex stitches. It’s about intention. It’s in the way you choose to angle a satin stitch to catch the light, the decision to use a single strand of floss for a delicate line, or the way you compose your motifs to tell a quiet story on the fabric.
Think of these ideas not as a set of rules, but as a series of invitations. Invitations to see texture as a language, to use color with confidence, and to transform a simple piece of cloth into a wall hanging that feels uniquely, beautifully yours. Your bedroom is your most personal space—let’s fill it with art that reflects you.
1. Create a Minimalist Landscape with Contour Stitching
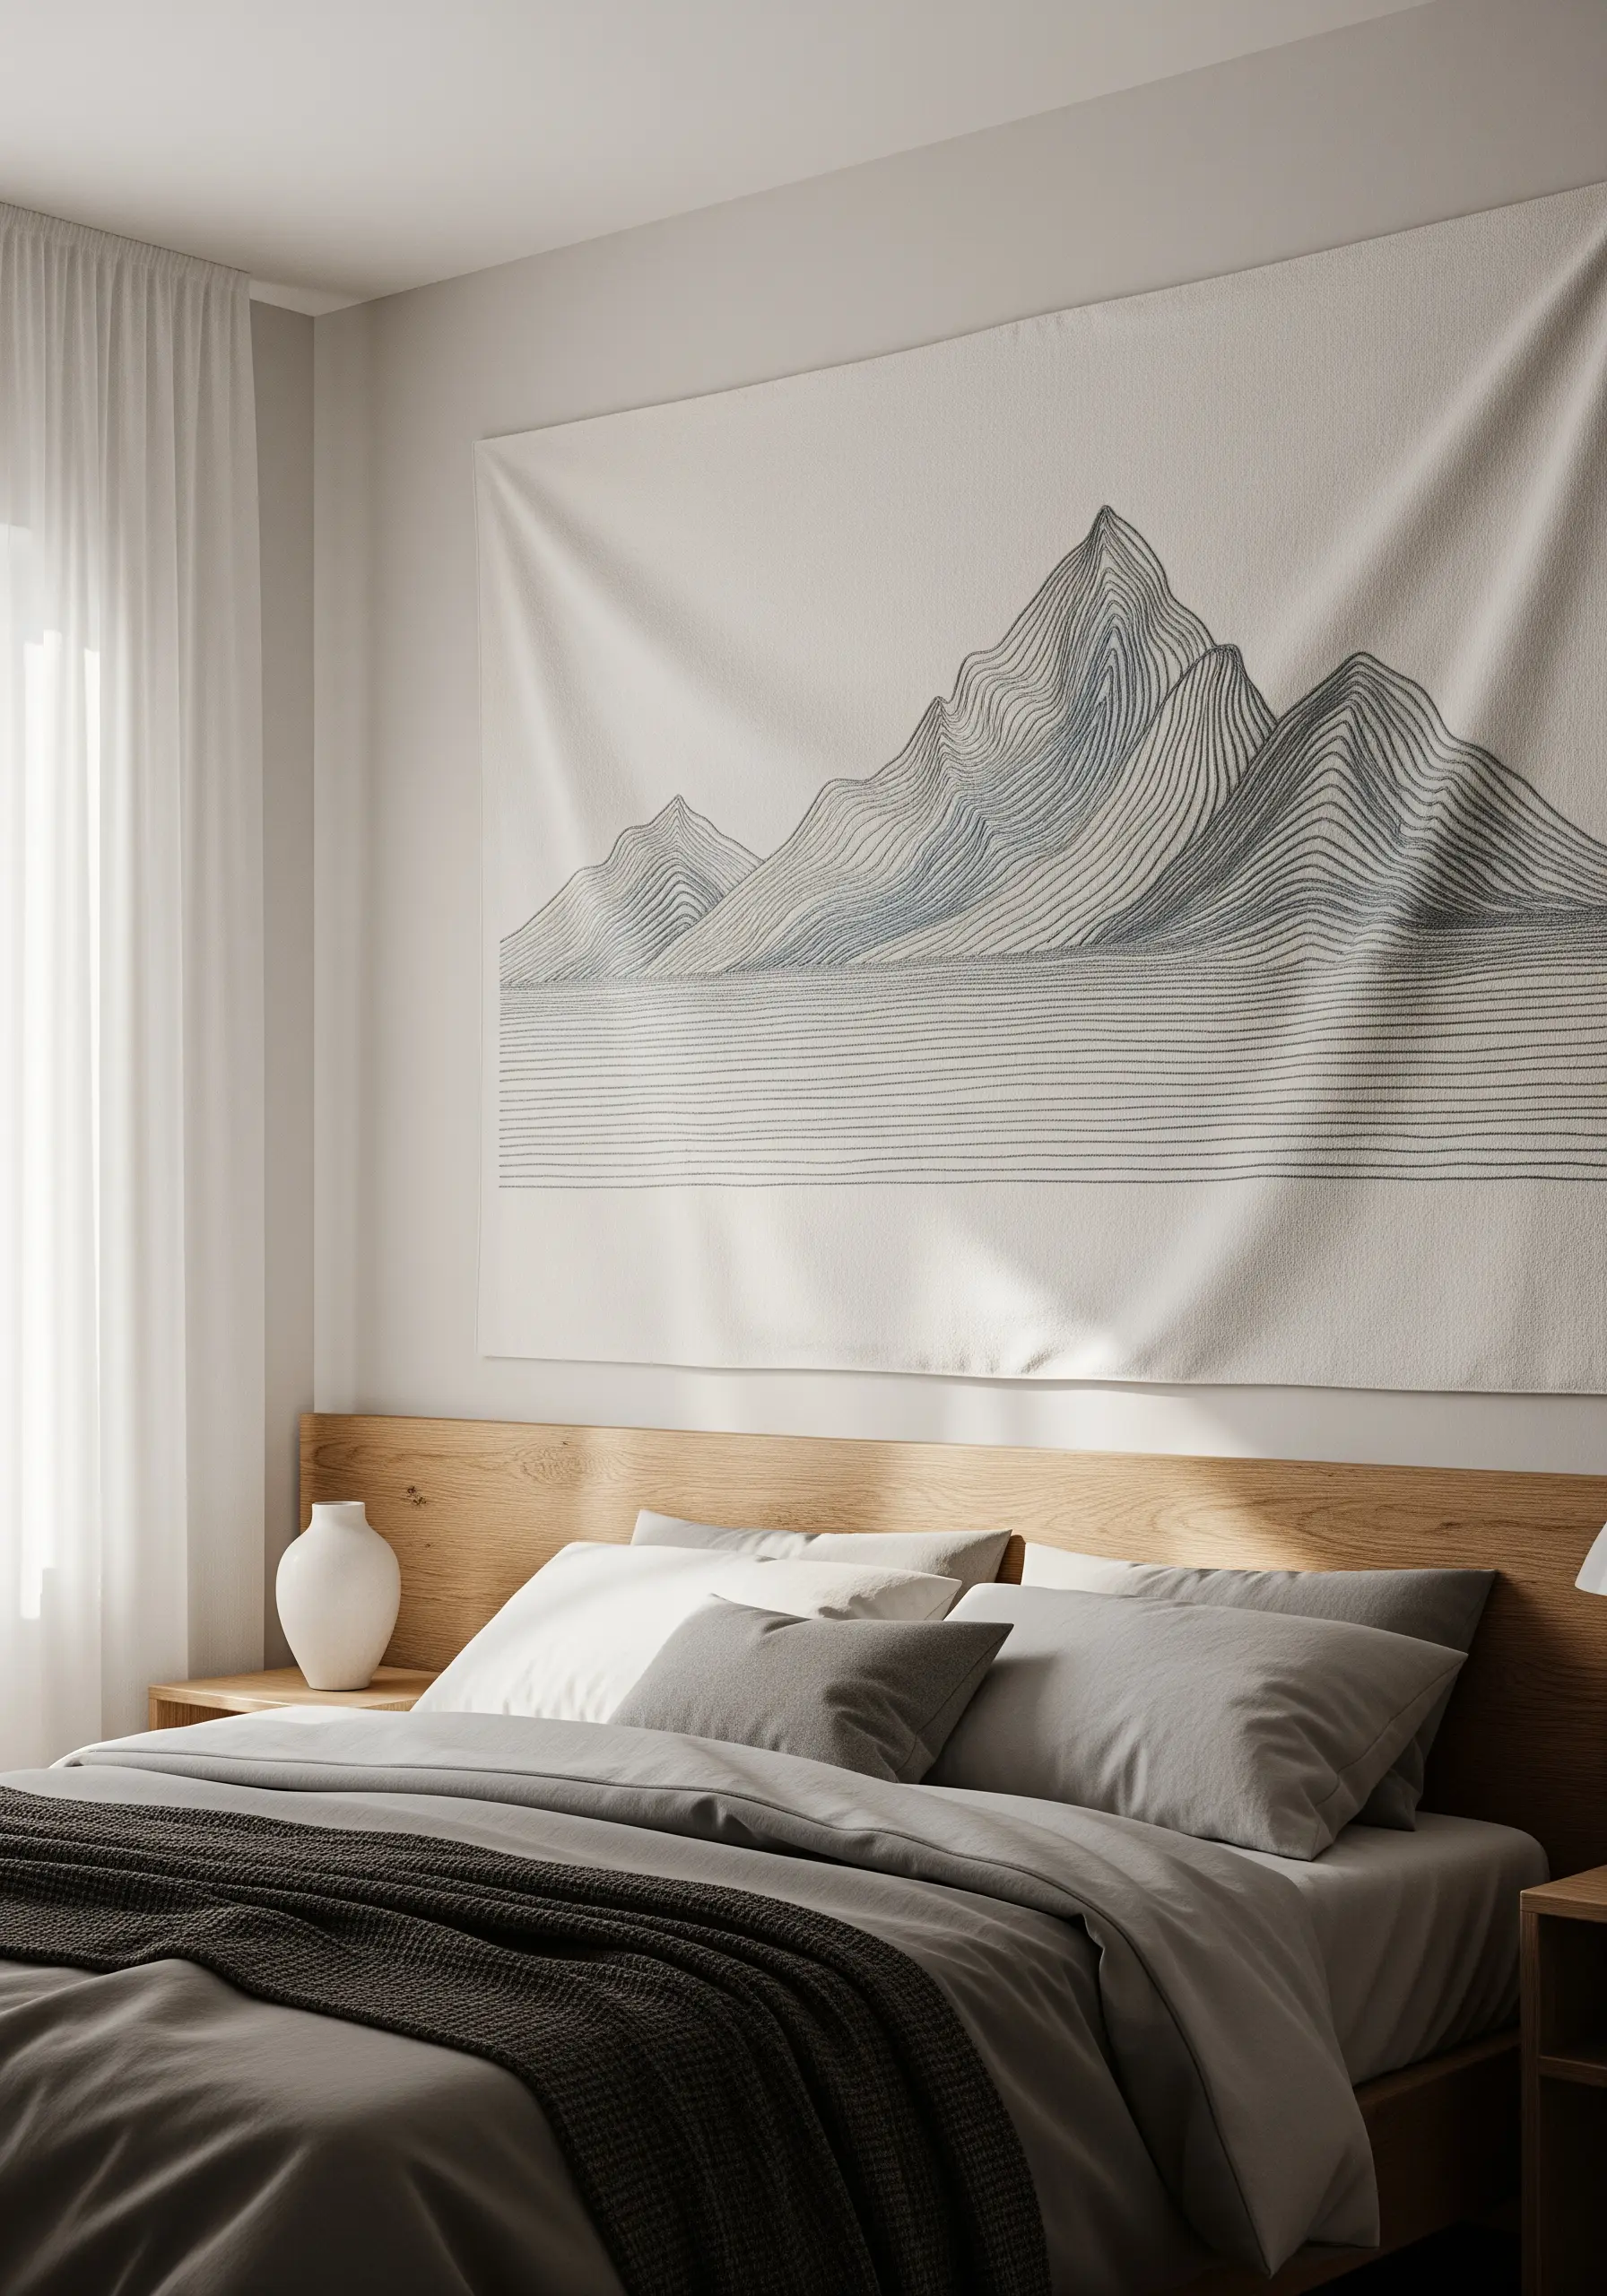
To create a large-scale, graphic landscape, think in terms of contour lines rather than solid fills.
Use a simple running stitch or backstitch with a consistent length to build the shapes of the mountains, letting the parallel lines create a sense of form and shadow.
Vary the density of your lines—placing them closer together in areas of shadow—to create depth without changing your thread color.
For a piece this large, choose a sturdy, even-weave fabric like cotton canvas or heavyweight linen that can support the tension of the stitches without puckering.
2. Master Dynamic Foliage with Directional Satin Stitch
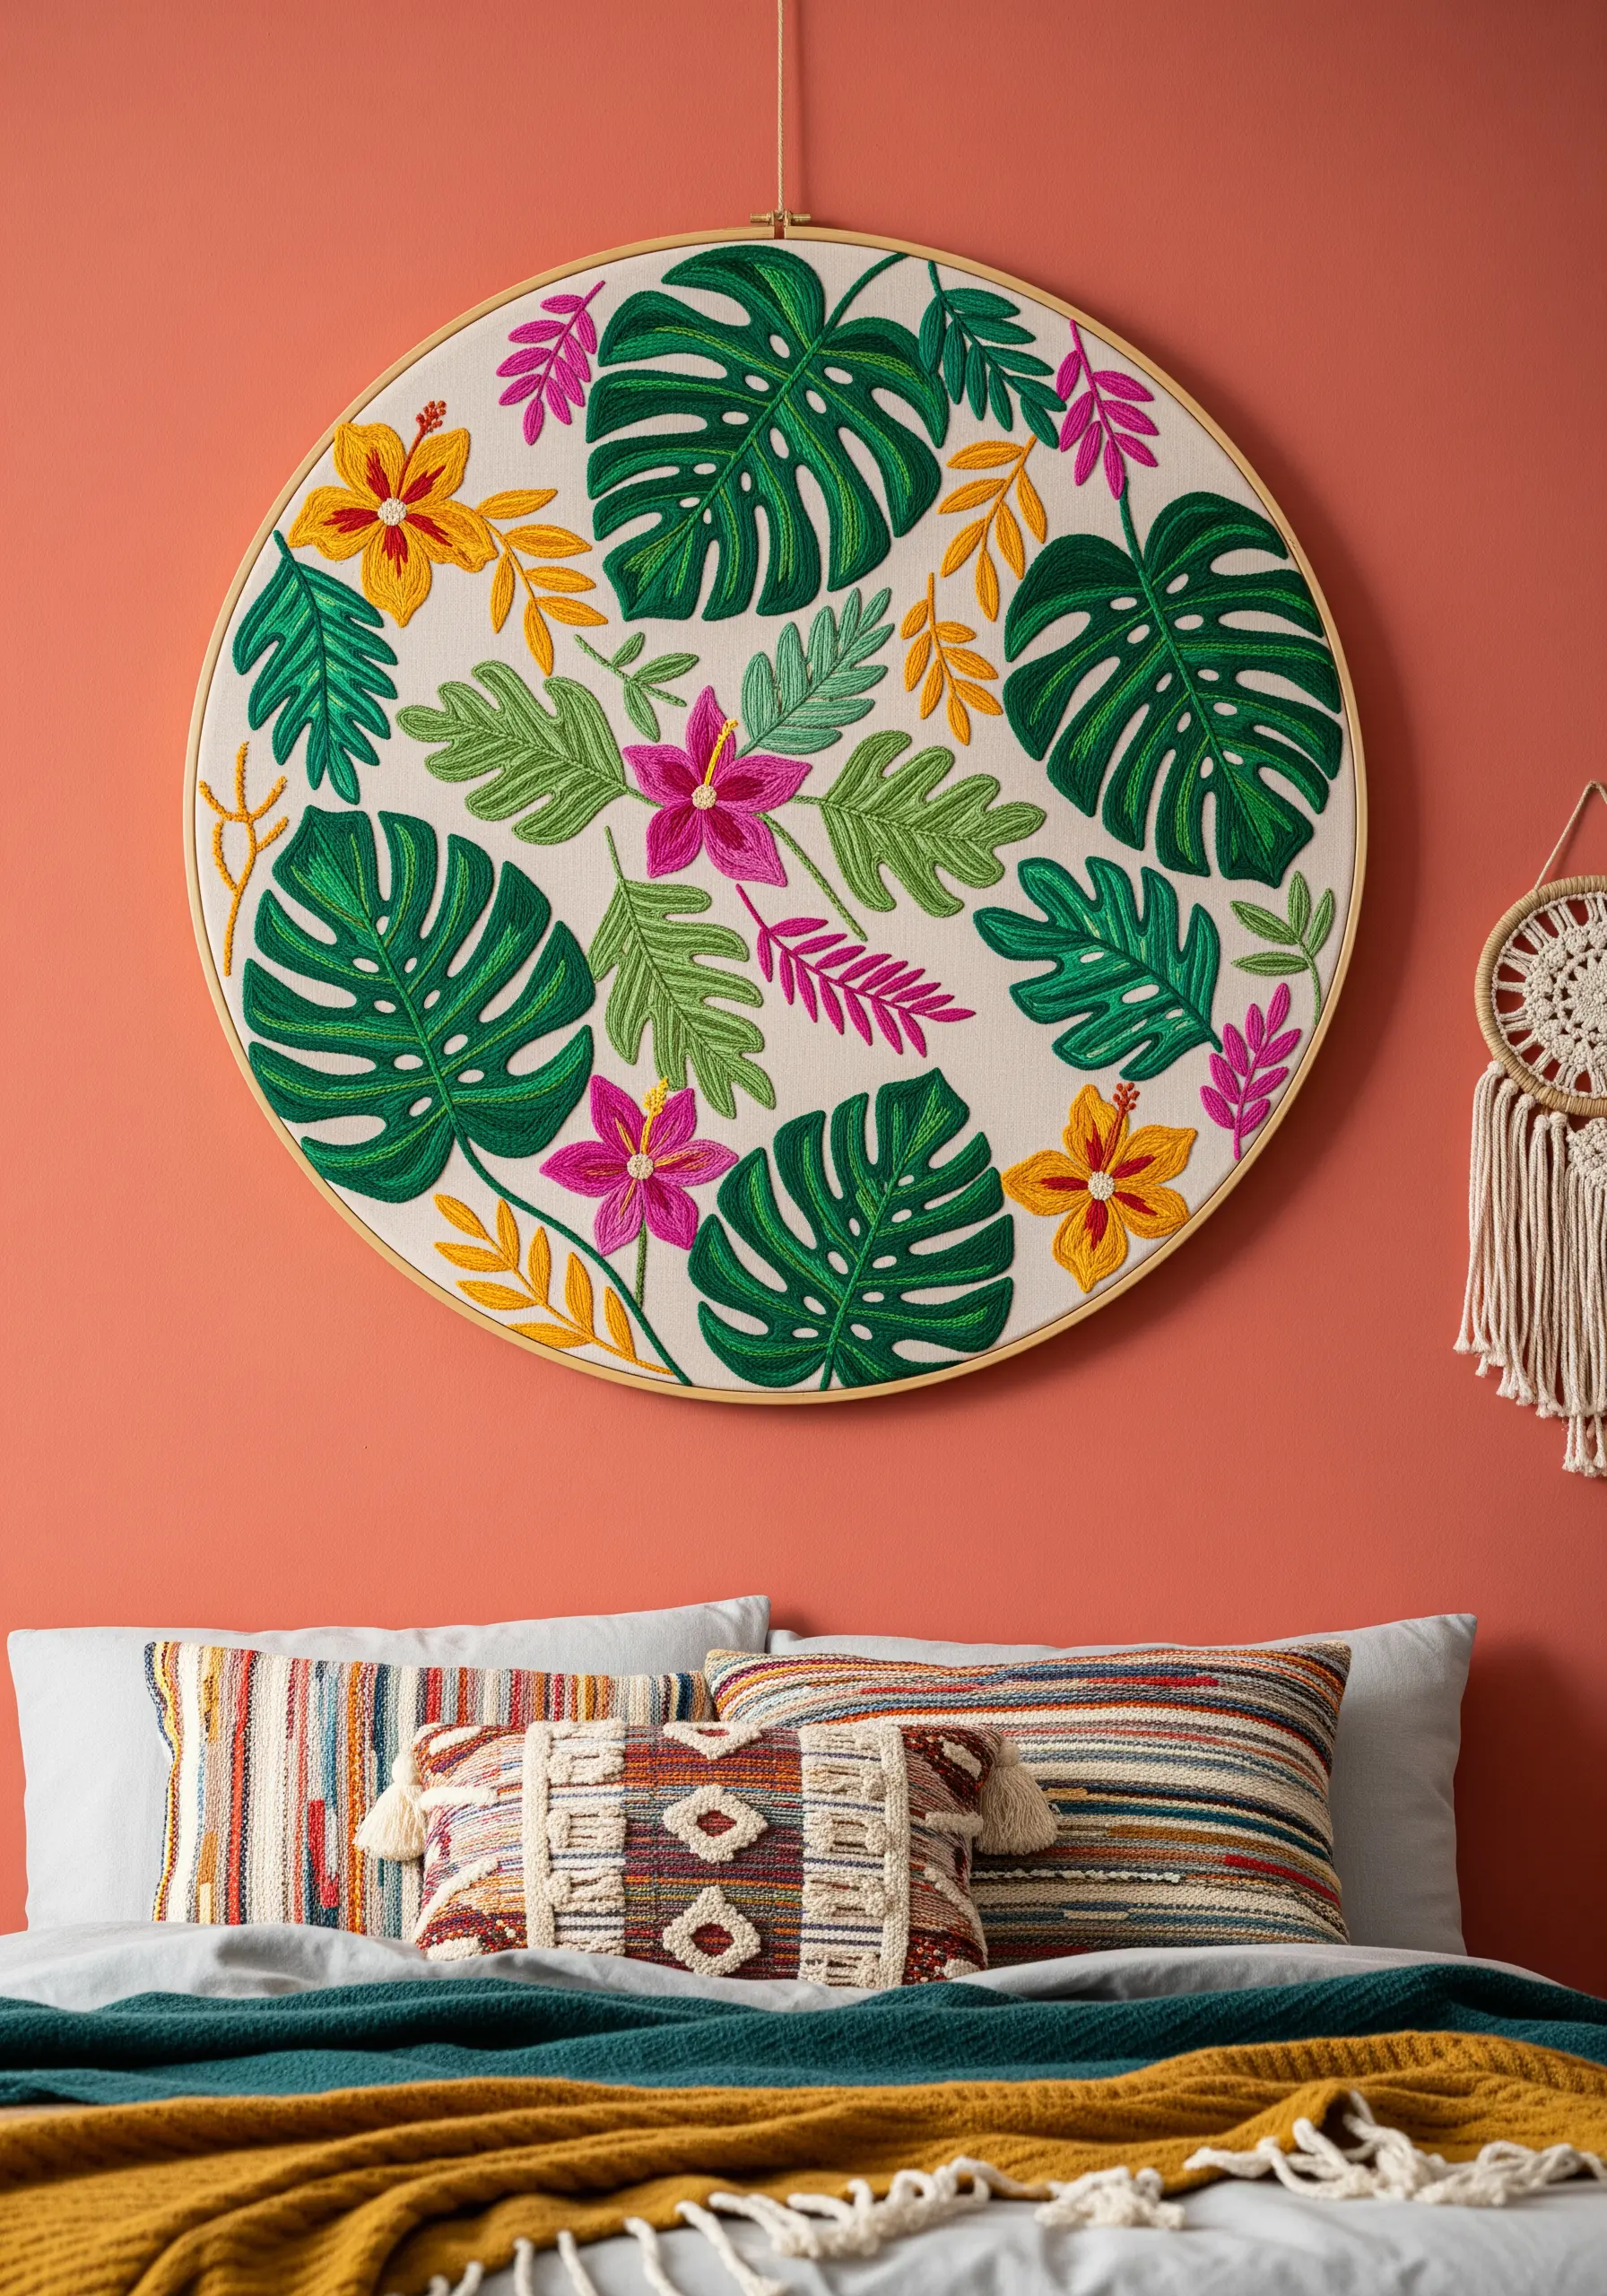
Bring botanical motifs to life by angling your satin stitches to follow the natural growth patterns of the leaves and petals.
For crisp, defined edges on shapes like these monstera leaves, first outline the area with a split stitch; this creates a slightly raised barrier for your satin stitches to rest against.
Introduce subtle realism by using two closely related shades of green within a single leaf, blending them with long-and-short stitches to mimic light and shadow.
The success of such a vibrant piece lies in balancing the busy pattern with a neutral, uncluttered background fabric, allowing the tropical colors to stand out.
3. Achieve Metallic Luster with Couching and Straight Stitches
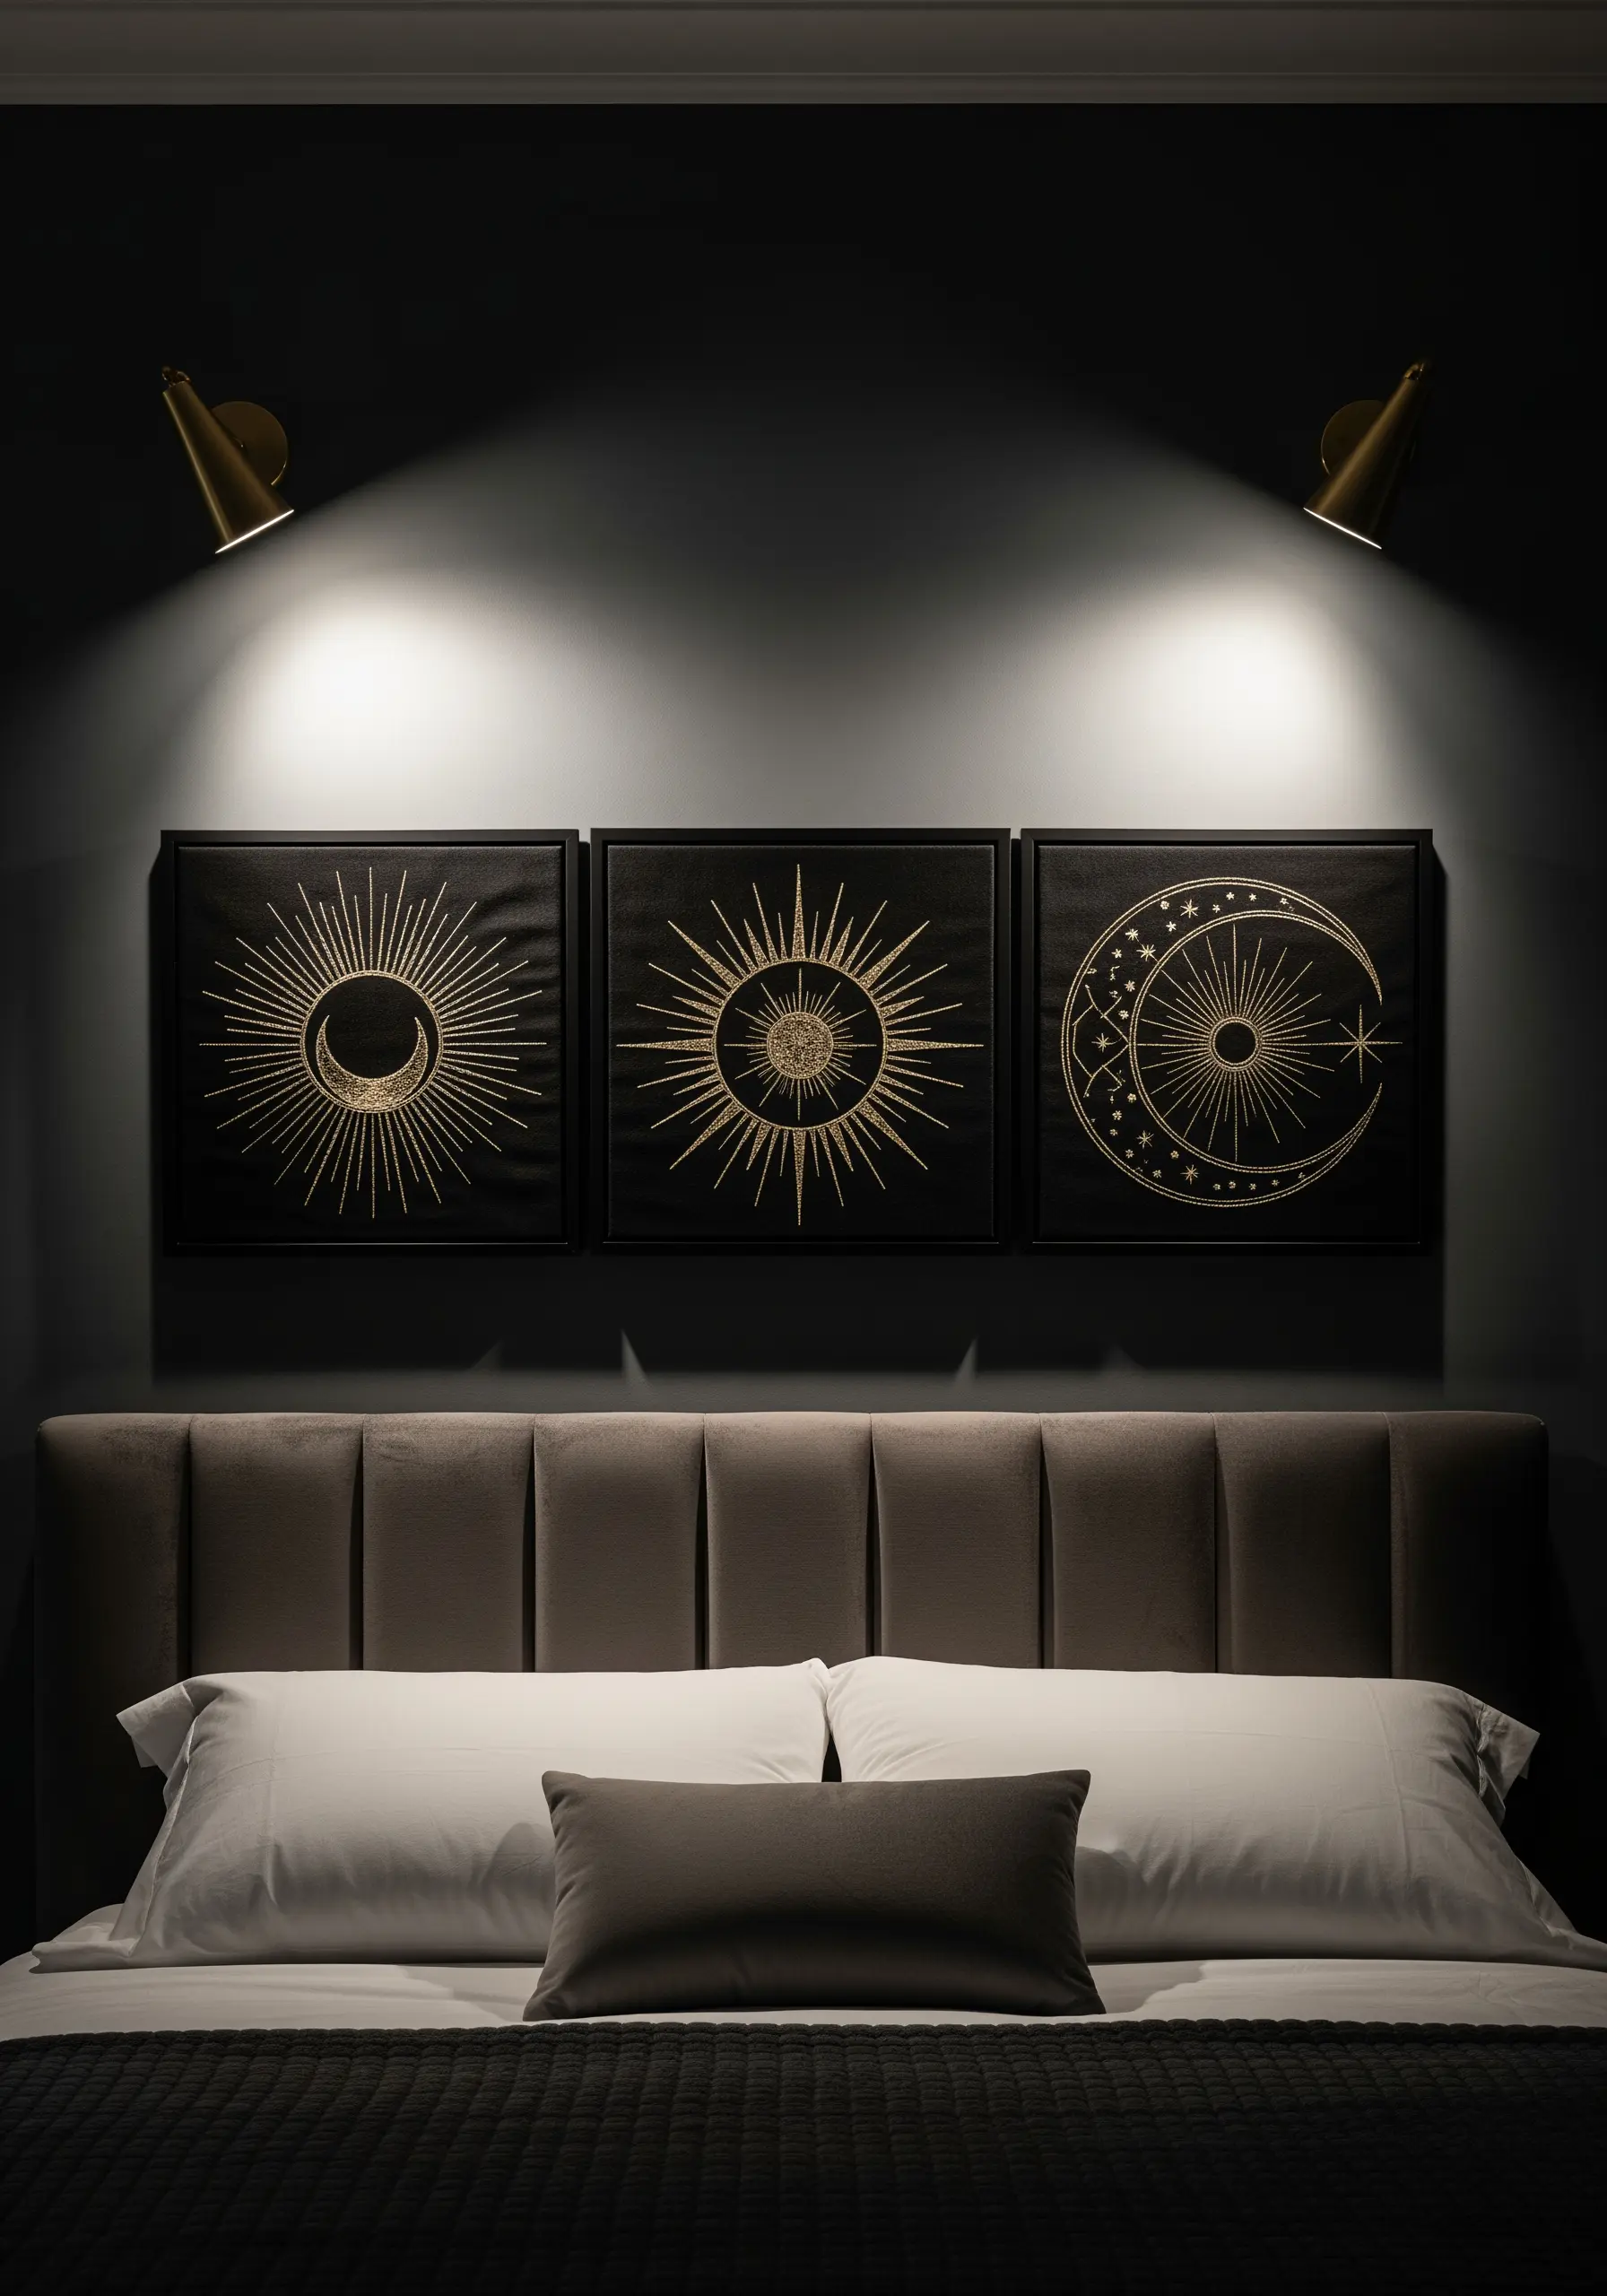
When working with metallic threads that tend to snag or unravel, couching is your most valuable technique.
Lay your metallic thread on the surface of the fabric and use a second, finer thread (in a matching color) to tack it down with tiny, perpendicular stitches.
This method preserves the metallic thread’s smooth shine and gives you perfect control over sharp lines and curves.
For the radiating sun rays, use single straight stitches pulled taut, ensuring they all originate from the same central point for a clean, explosive effect against dark fabric.
4. Use Negative Space to Create a Sense of Movement
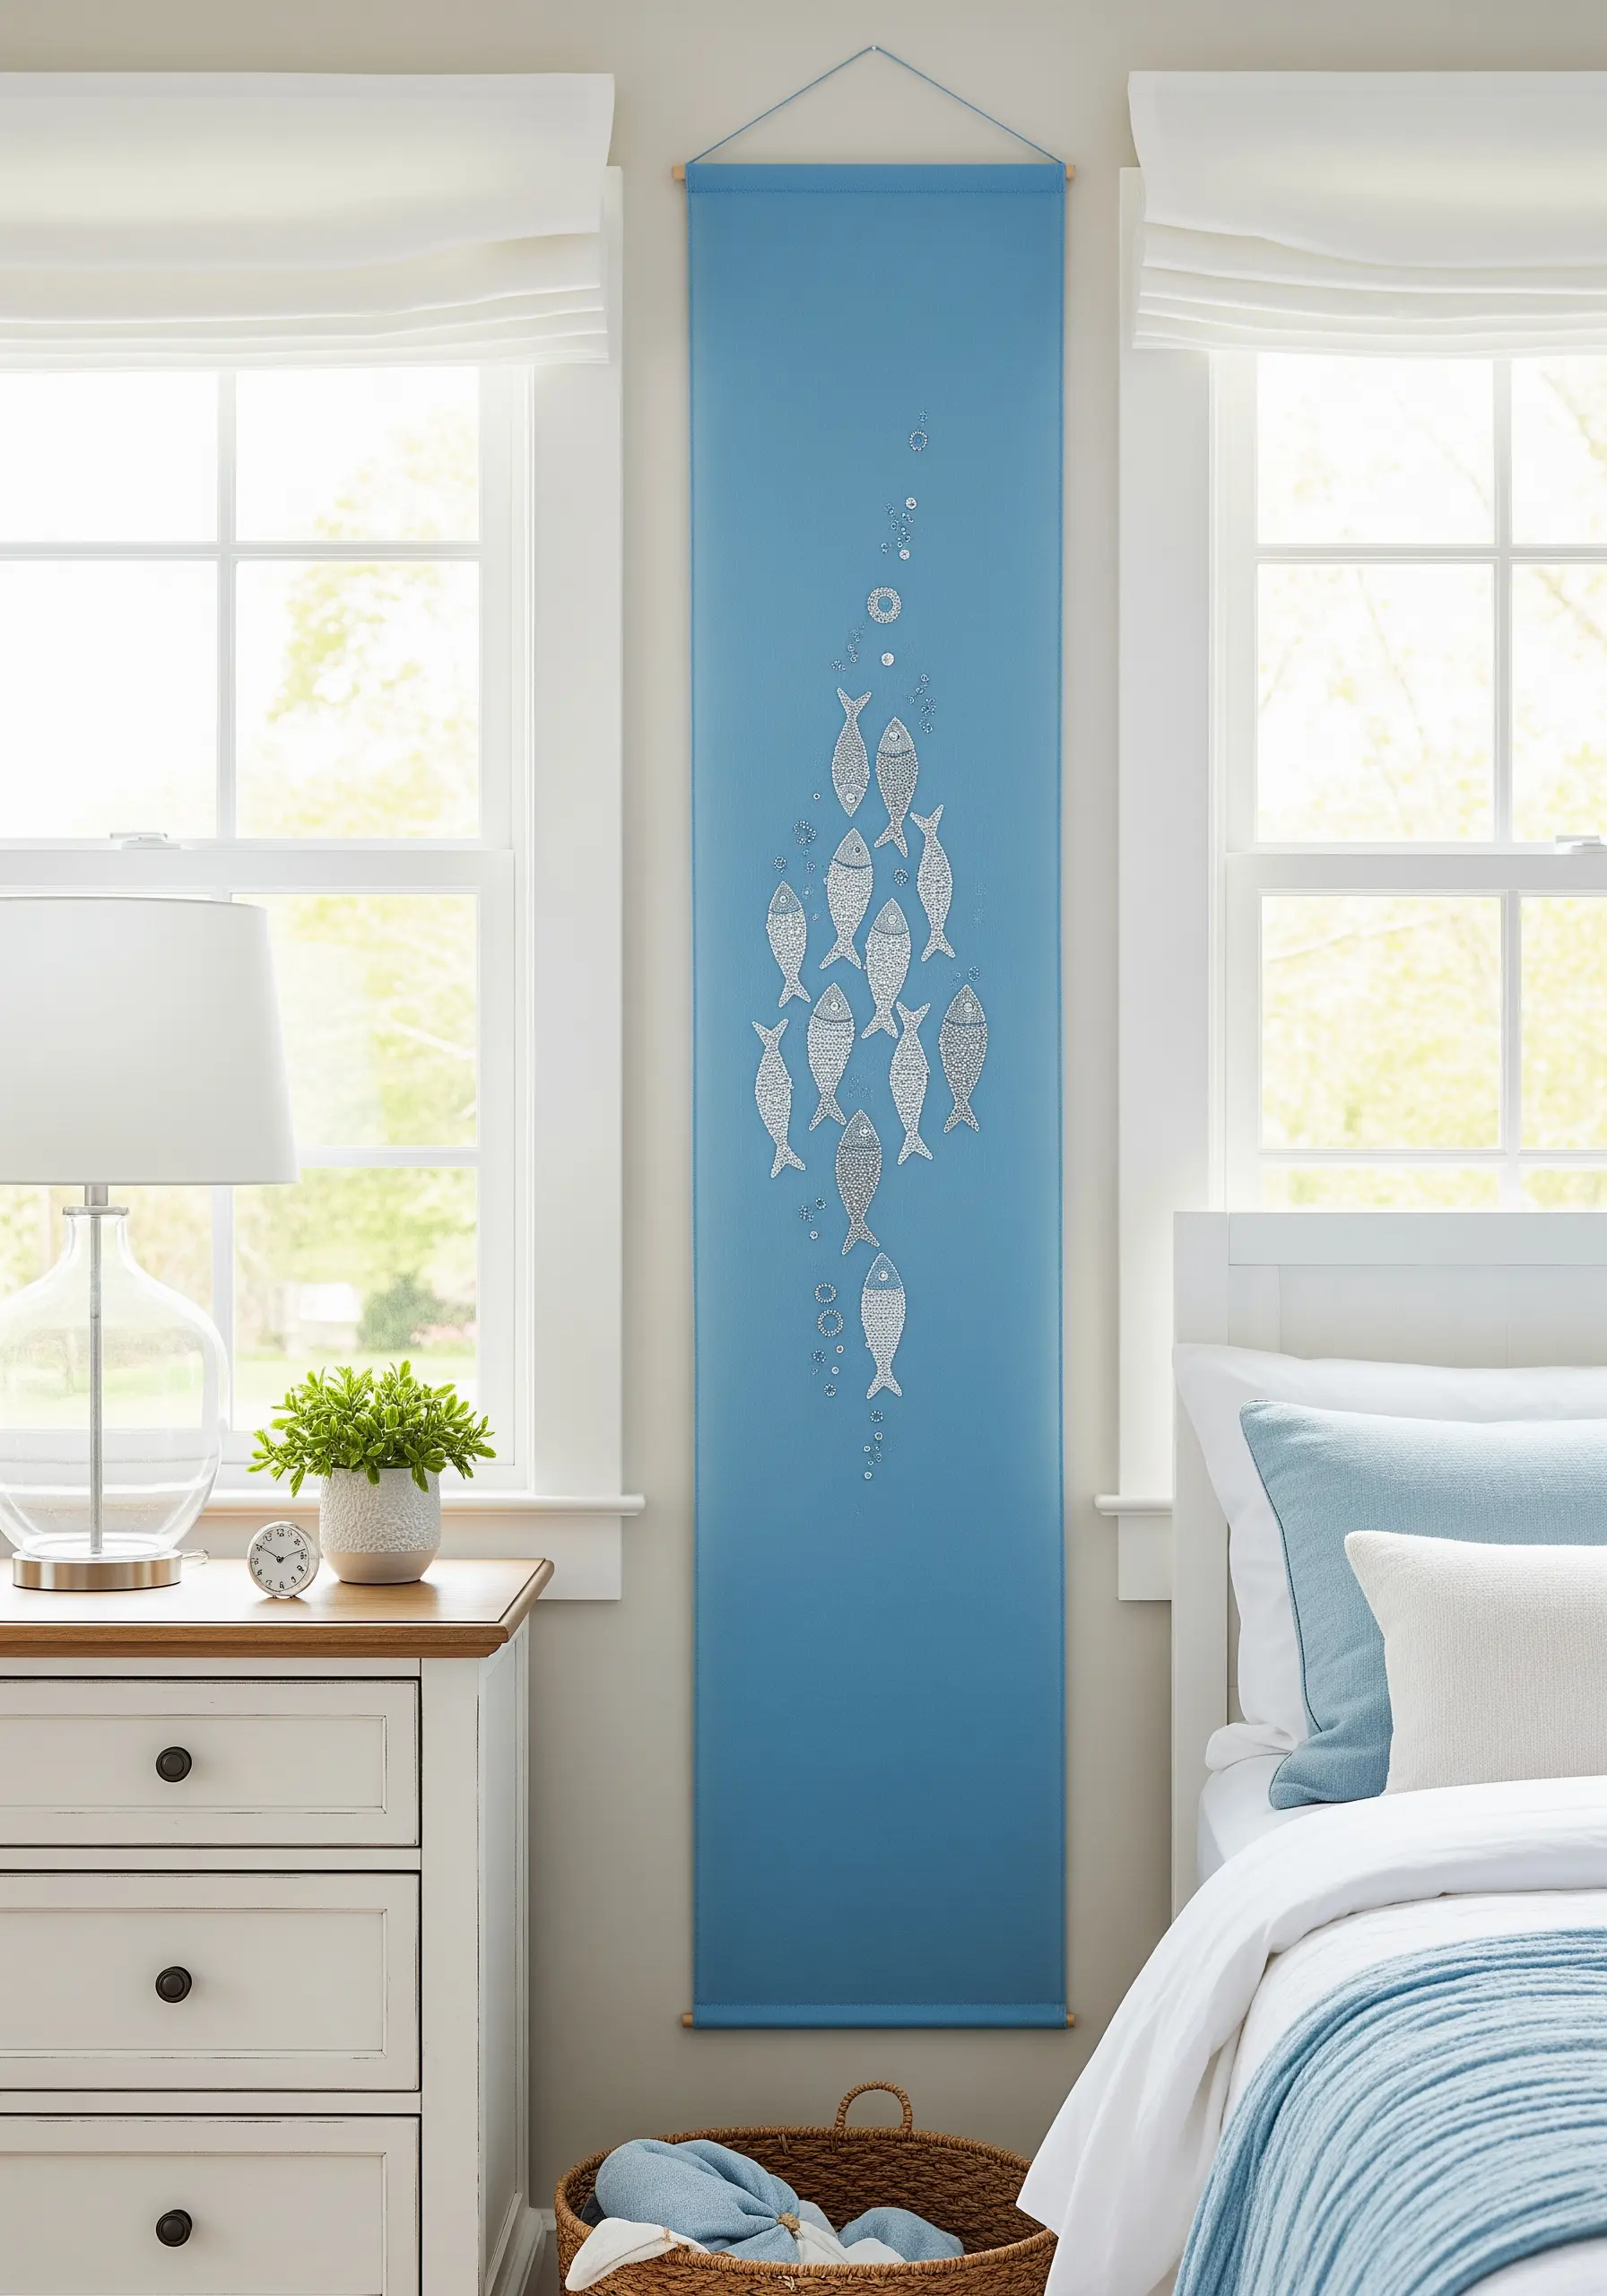
The impact of this design comes from its composition, not the complexity of its stitches.
By arranging a cluster of simple motifs in an upward sweep, you create a powerful sense of direction and motion within the empty space.
Choose a simple outline stitch, like a whipped backstitch in a contrasting silver or white thread, to make each fish clearly defined against the blue background.
Add a trail of tiny French knots or seed stitches as bubbles to enhance the aquatic illusion and guide the viewer’s eye through the scene.
5. Build Opulent Texture on Velvet with Layered Stitches
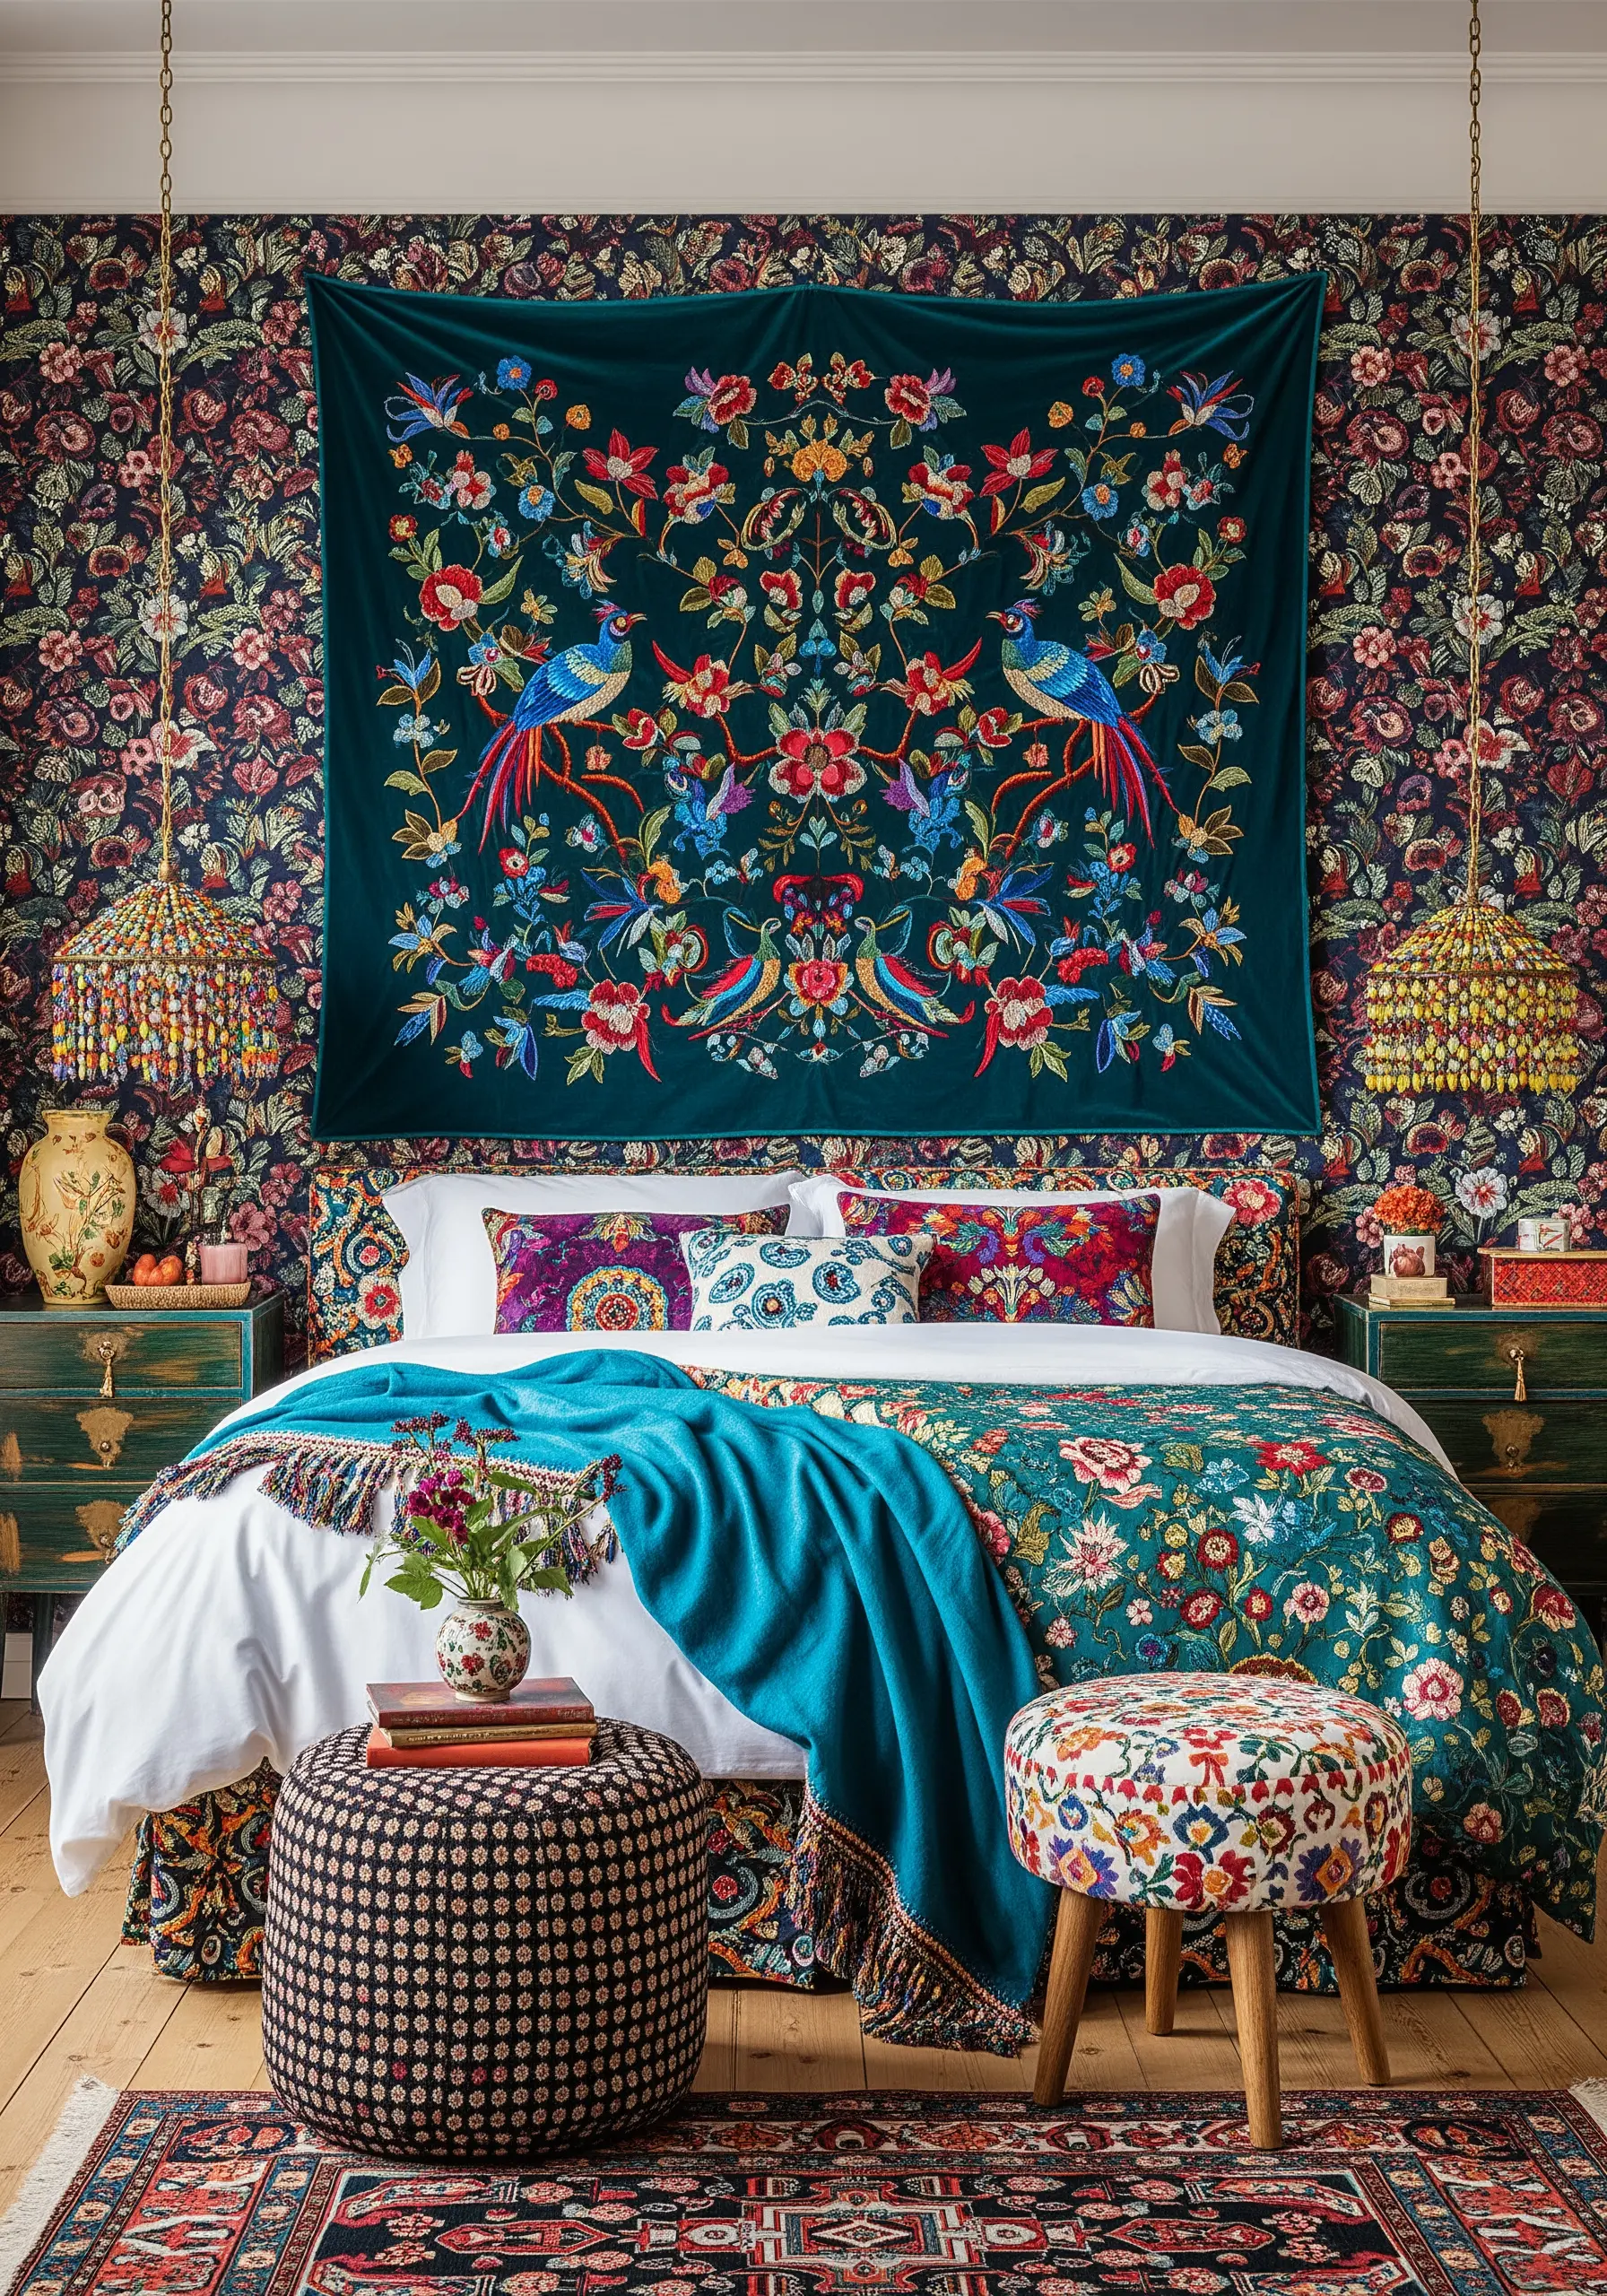
Stitching on a fabric with a deep pile like velvet requires a stabilizer on the back to prevent distortion and provide support.
Create a foundation for your design with solid fills of satin stitch for larger areas like petals and bird wings.
Then, build dimension by layering details on top: use French knots for texture, stem stitch for fine veins, and single straight stitches for feather details.
This layering technique creates a rich, tactile surface that catches the light differently, making the jewel-toned threads appear even more luxurious against the matte velvet.
6. Capture a Wildflower Meadow with Varied Stitch Textures

To create a delicate, natural-looking meadow, resist the urge to make every flower perfect or identical.
Combine a vocabulary of simple stitches: detached chain stitches for daisy petals, French knots for fluffy flower centers, and straight stitches for blades of grass.
Vary the height and thickness of the stems using a simple stem stitch with one, two, or three strands of floss.
This mix of textures is what gives the composition its organic, lifelike quality, turning it into a beautiful handmade embroidery touch. Leaving the edges of the linen raw adds to the rustic, unfussy charm.
7. Translate a Sketch into Thread with Free-Motion Embroidery
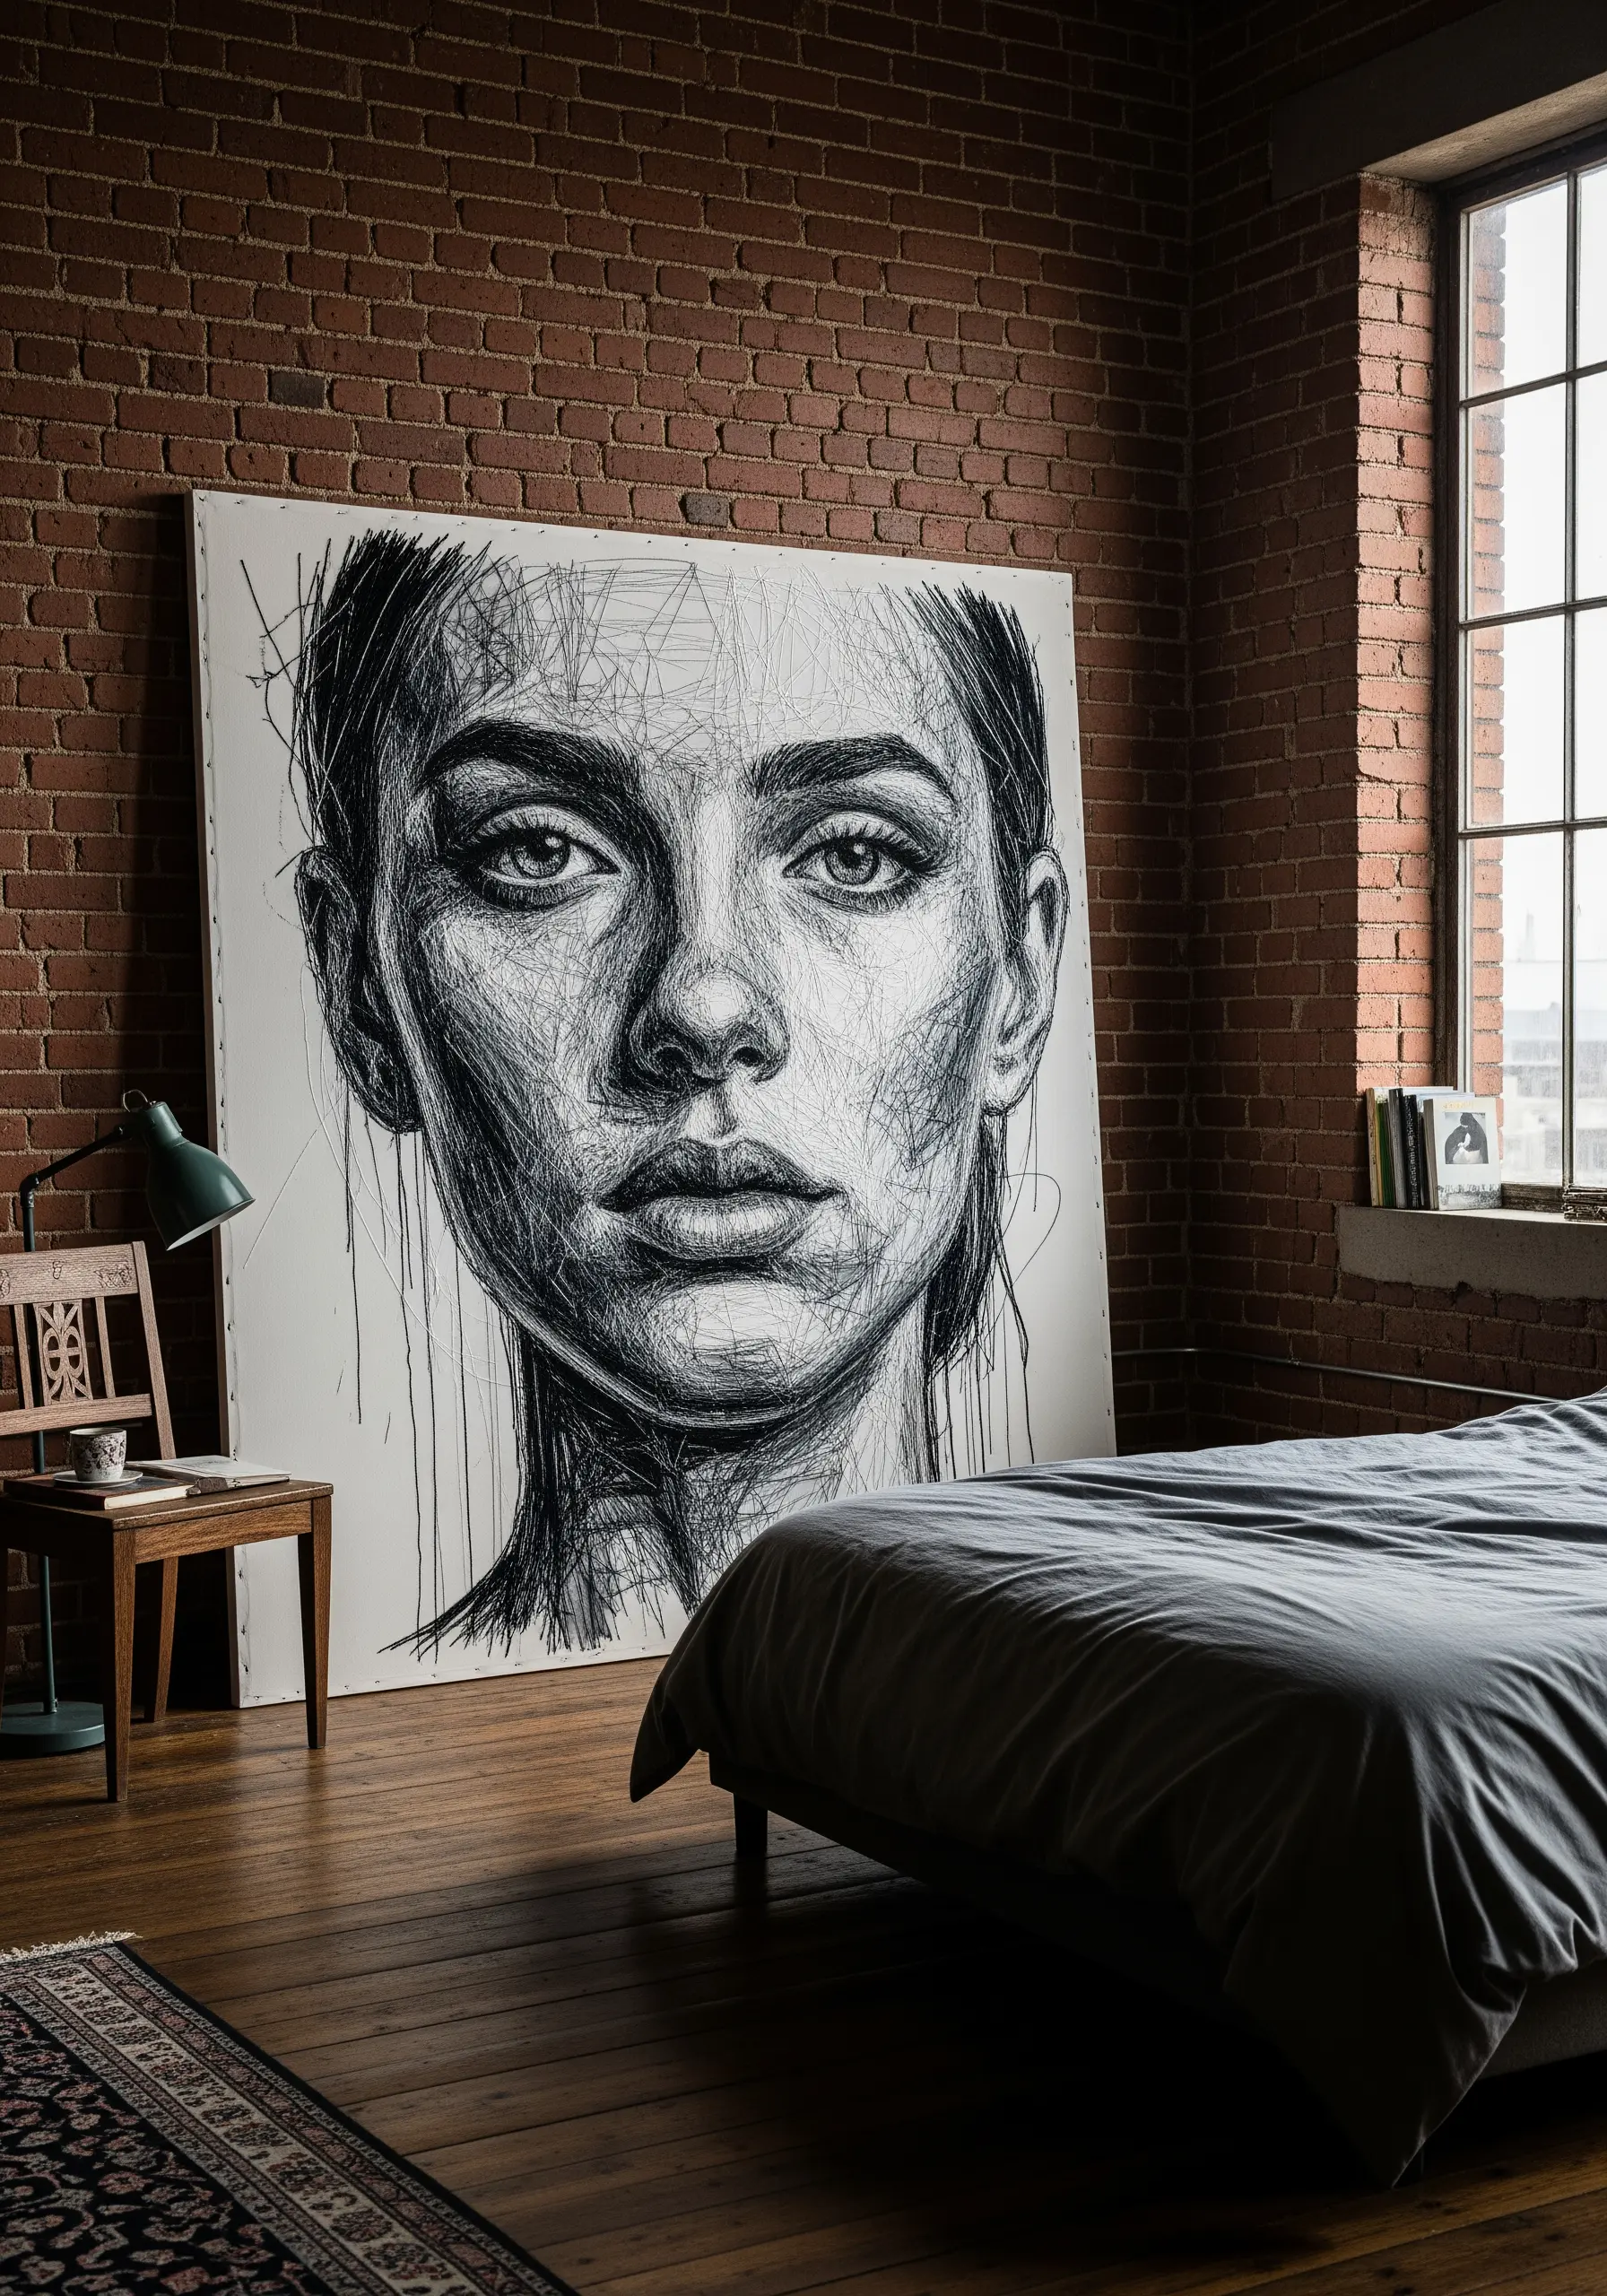
This powerfully expressive, cross-hatched portrait is best achieved using a sewing machine set up for free-motion embroidery.
By dropping the feed dogs and using a darning foot, you can move the fabric freely under the needle, essentially drawing with thread.
Build up tones and shadows by layering stitches in multiple directions, just as you would with a charcoal pencil.
To replicate this by hand, use long, overlapping straight stitches with a single strand of black floss, allowing the lines to build into a controlled chaos that creates depth and emotion.
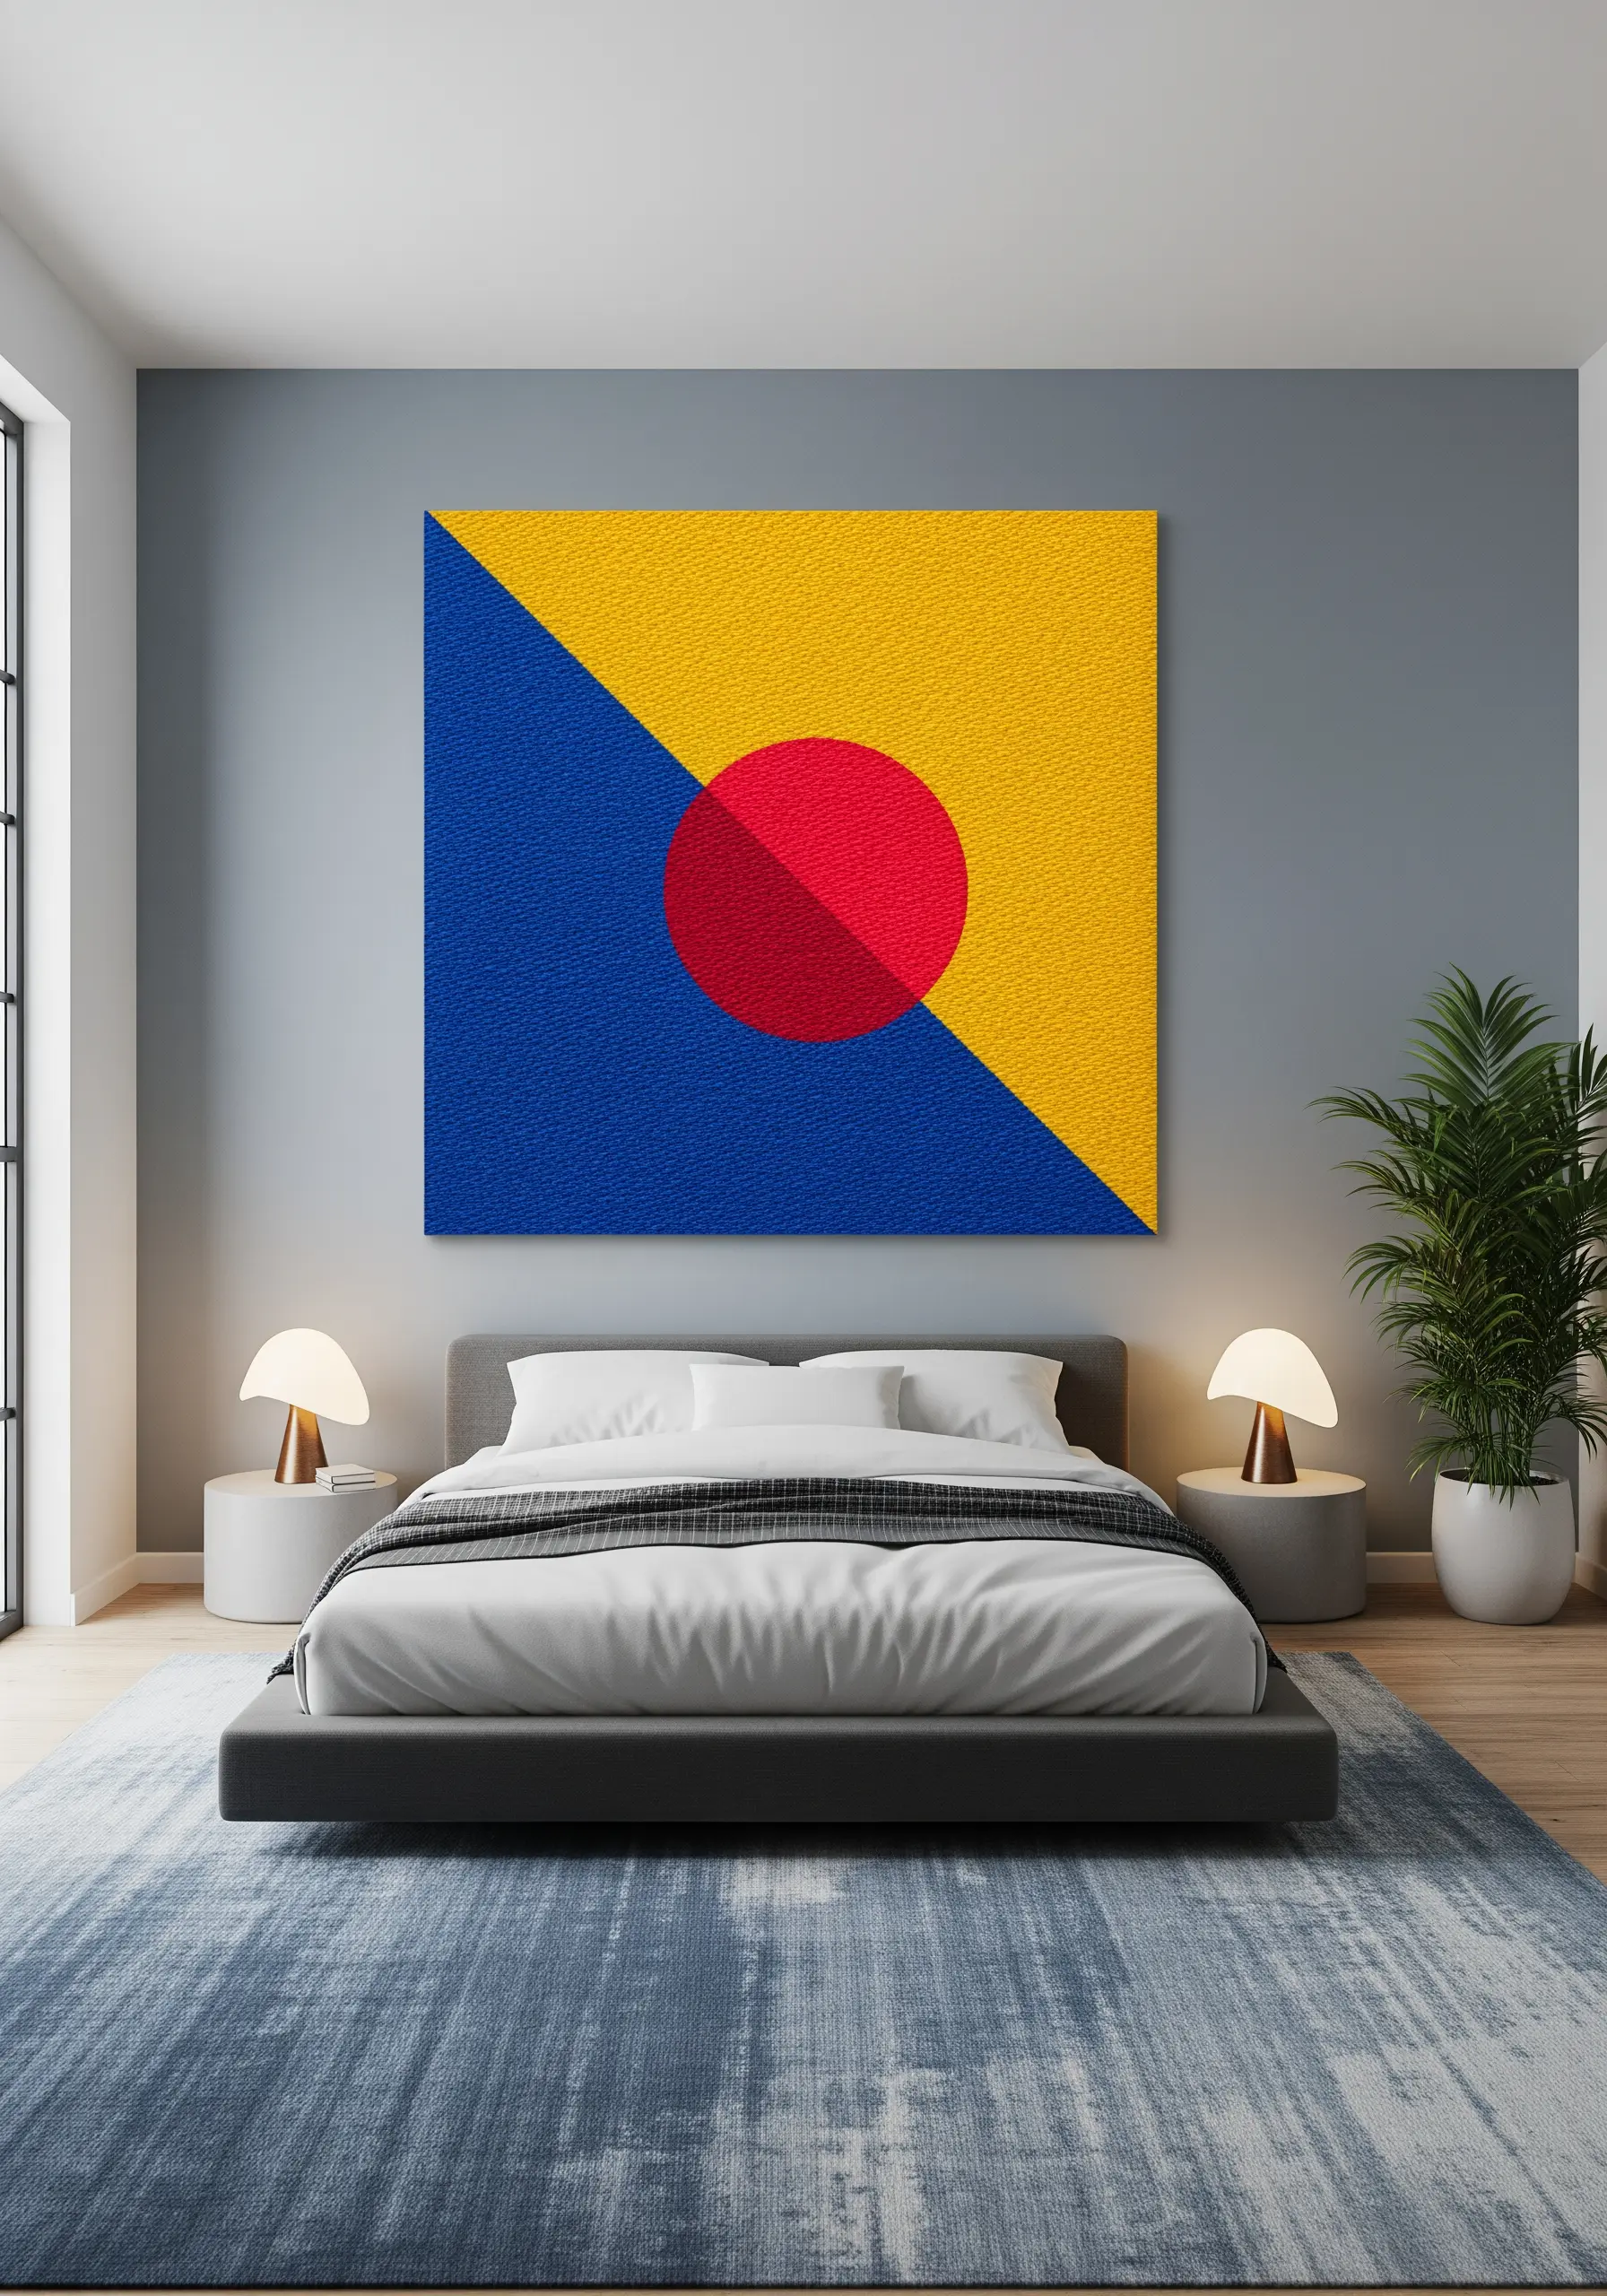
8. Explore Abstract Color Play with Satin Stitch Blocks
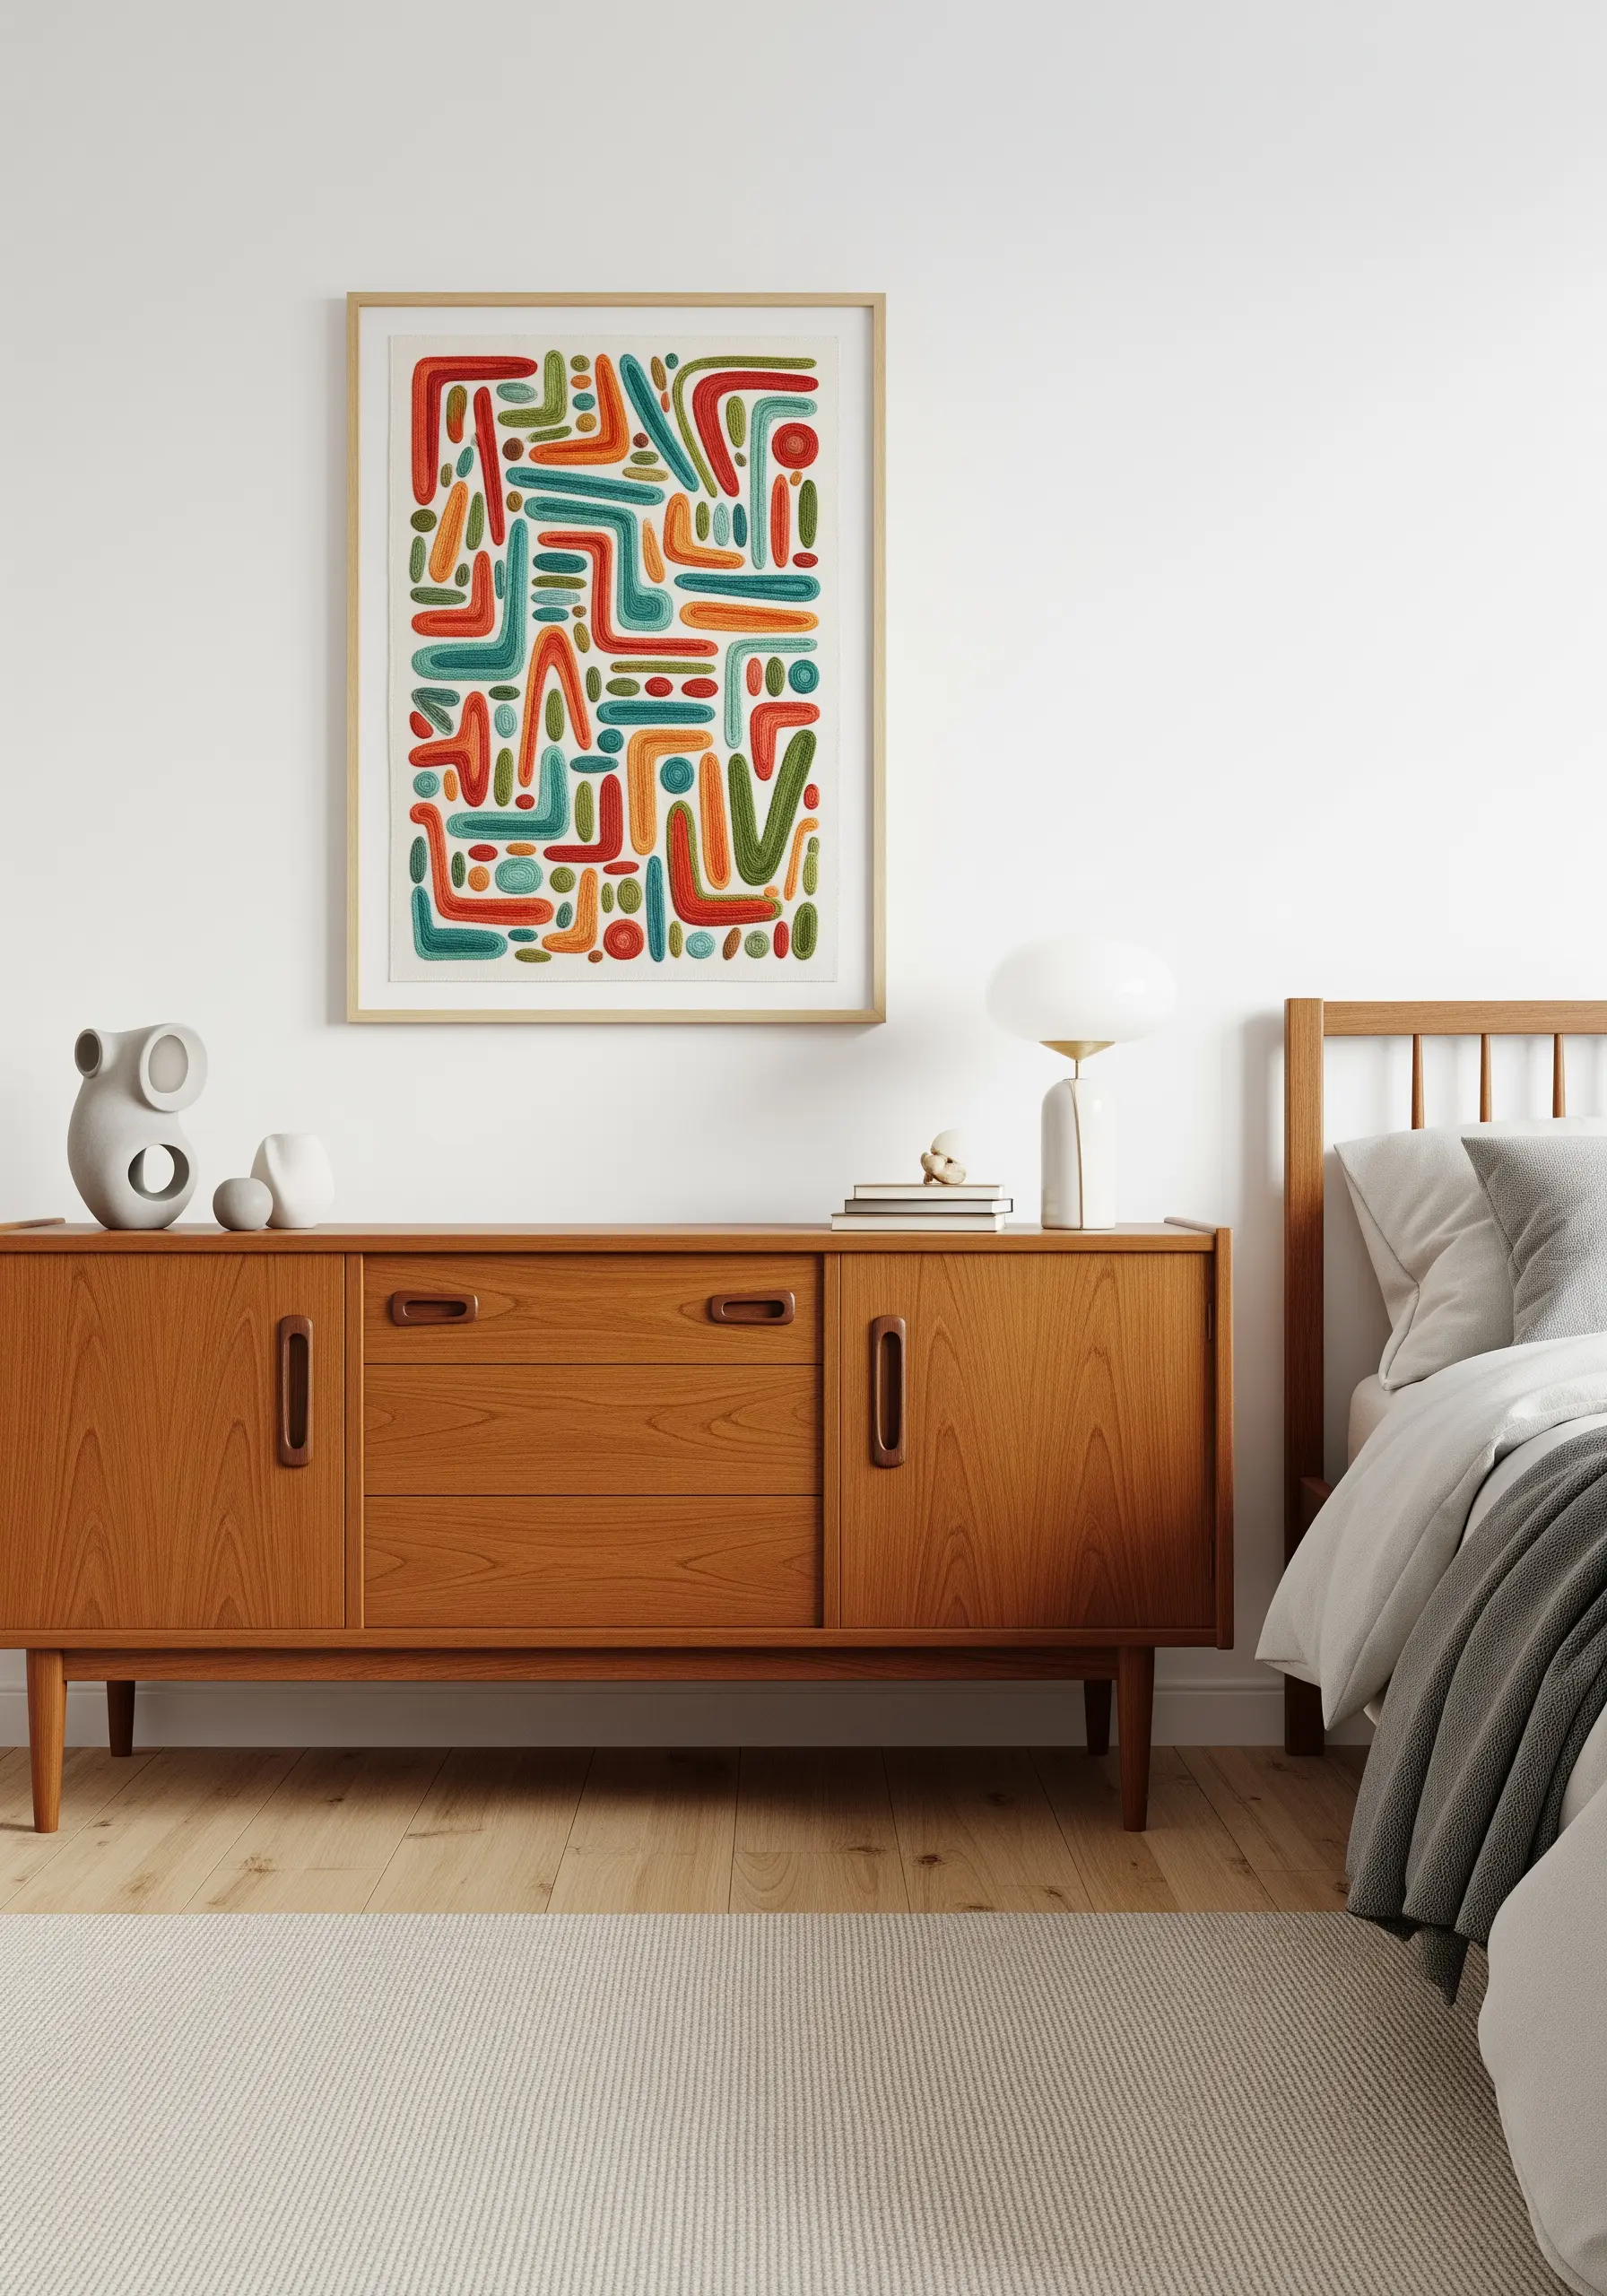
Transform your fabric into a canvas for graphic art by filling bold, abstract shapes with dense satin stitch.
To achieve those perfectly clean edges, outline each shape with a split stitch or backstitch before you begin filling it in. This creates a stable border that prevents your satin stitches from pulling unevenly.
The visual energy comes from the interplay of unexpected color pairings and the smooth, uniform texture of the stitches.
This approach elevates embroidery from craft to a form of modern, abstract design.
9. Create 3D Landscapes with High-Texture Stitches and Yarn
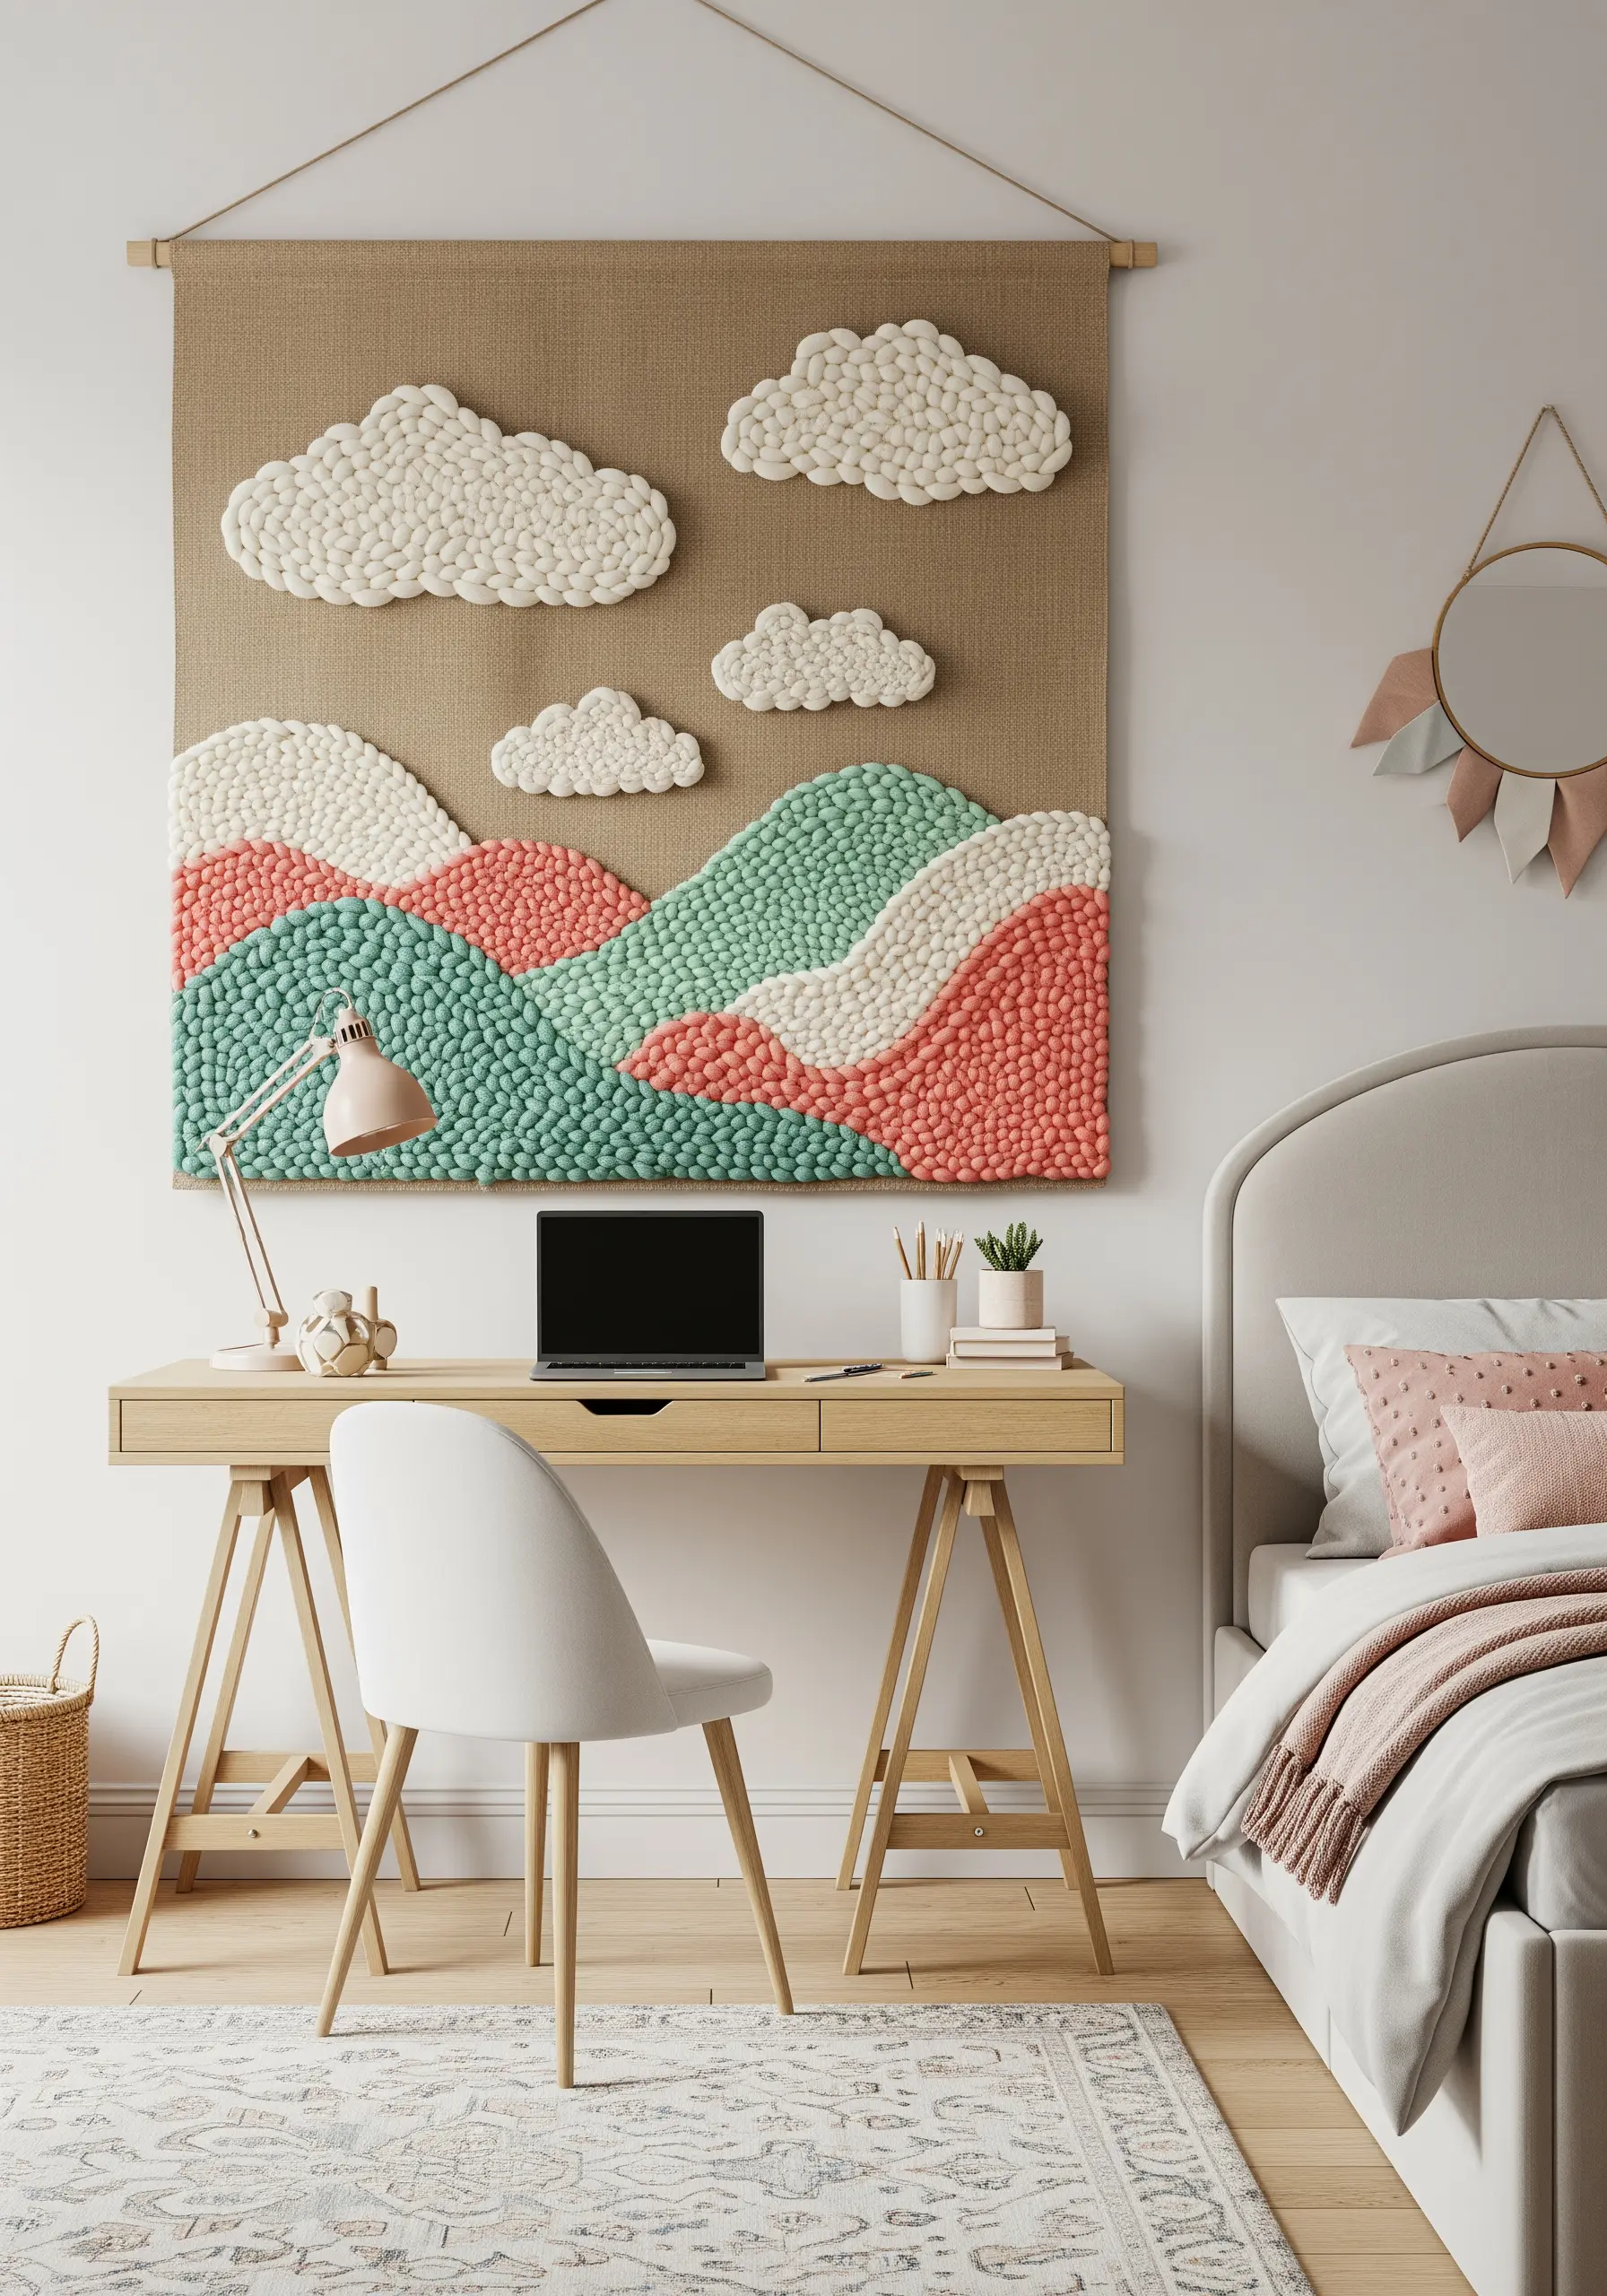
To give your wall art a sculptural, tactile quality, move beyond standard floss and incorporate chunky yarn.
The plush hills and clouds in this piece can be created with punch needle embroidery or a dense field of French knots using thick wool.
This high-pile technique adds physical depth that makes the landscape pop.
Contrast these textured elements with a flat, neutral background fabric like burlap or heavy canvas to emphasize the dimensional quality of your yarn wall art.
10. Master Expressive Simplicity with a Single Line
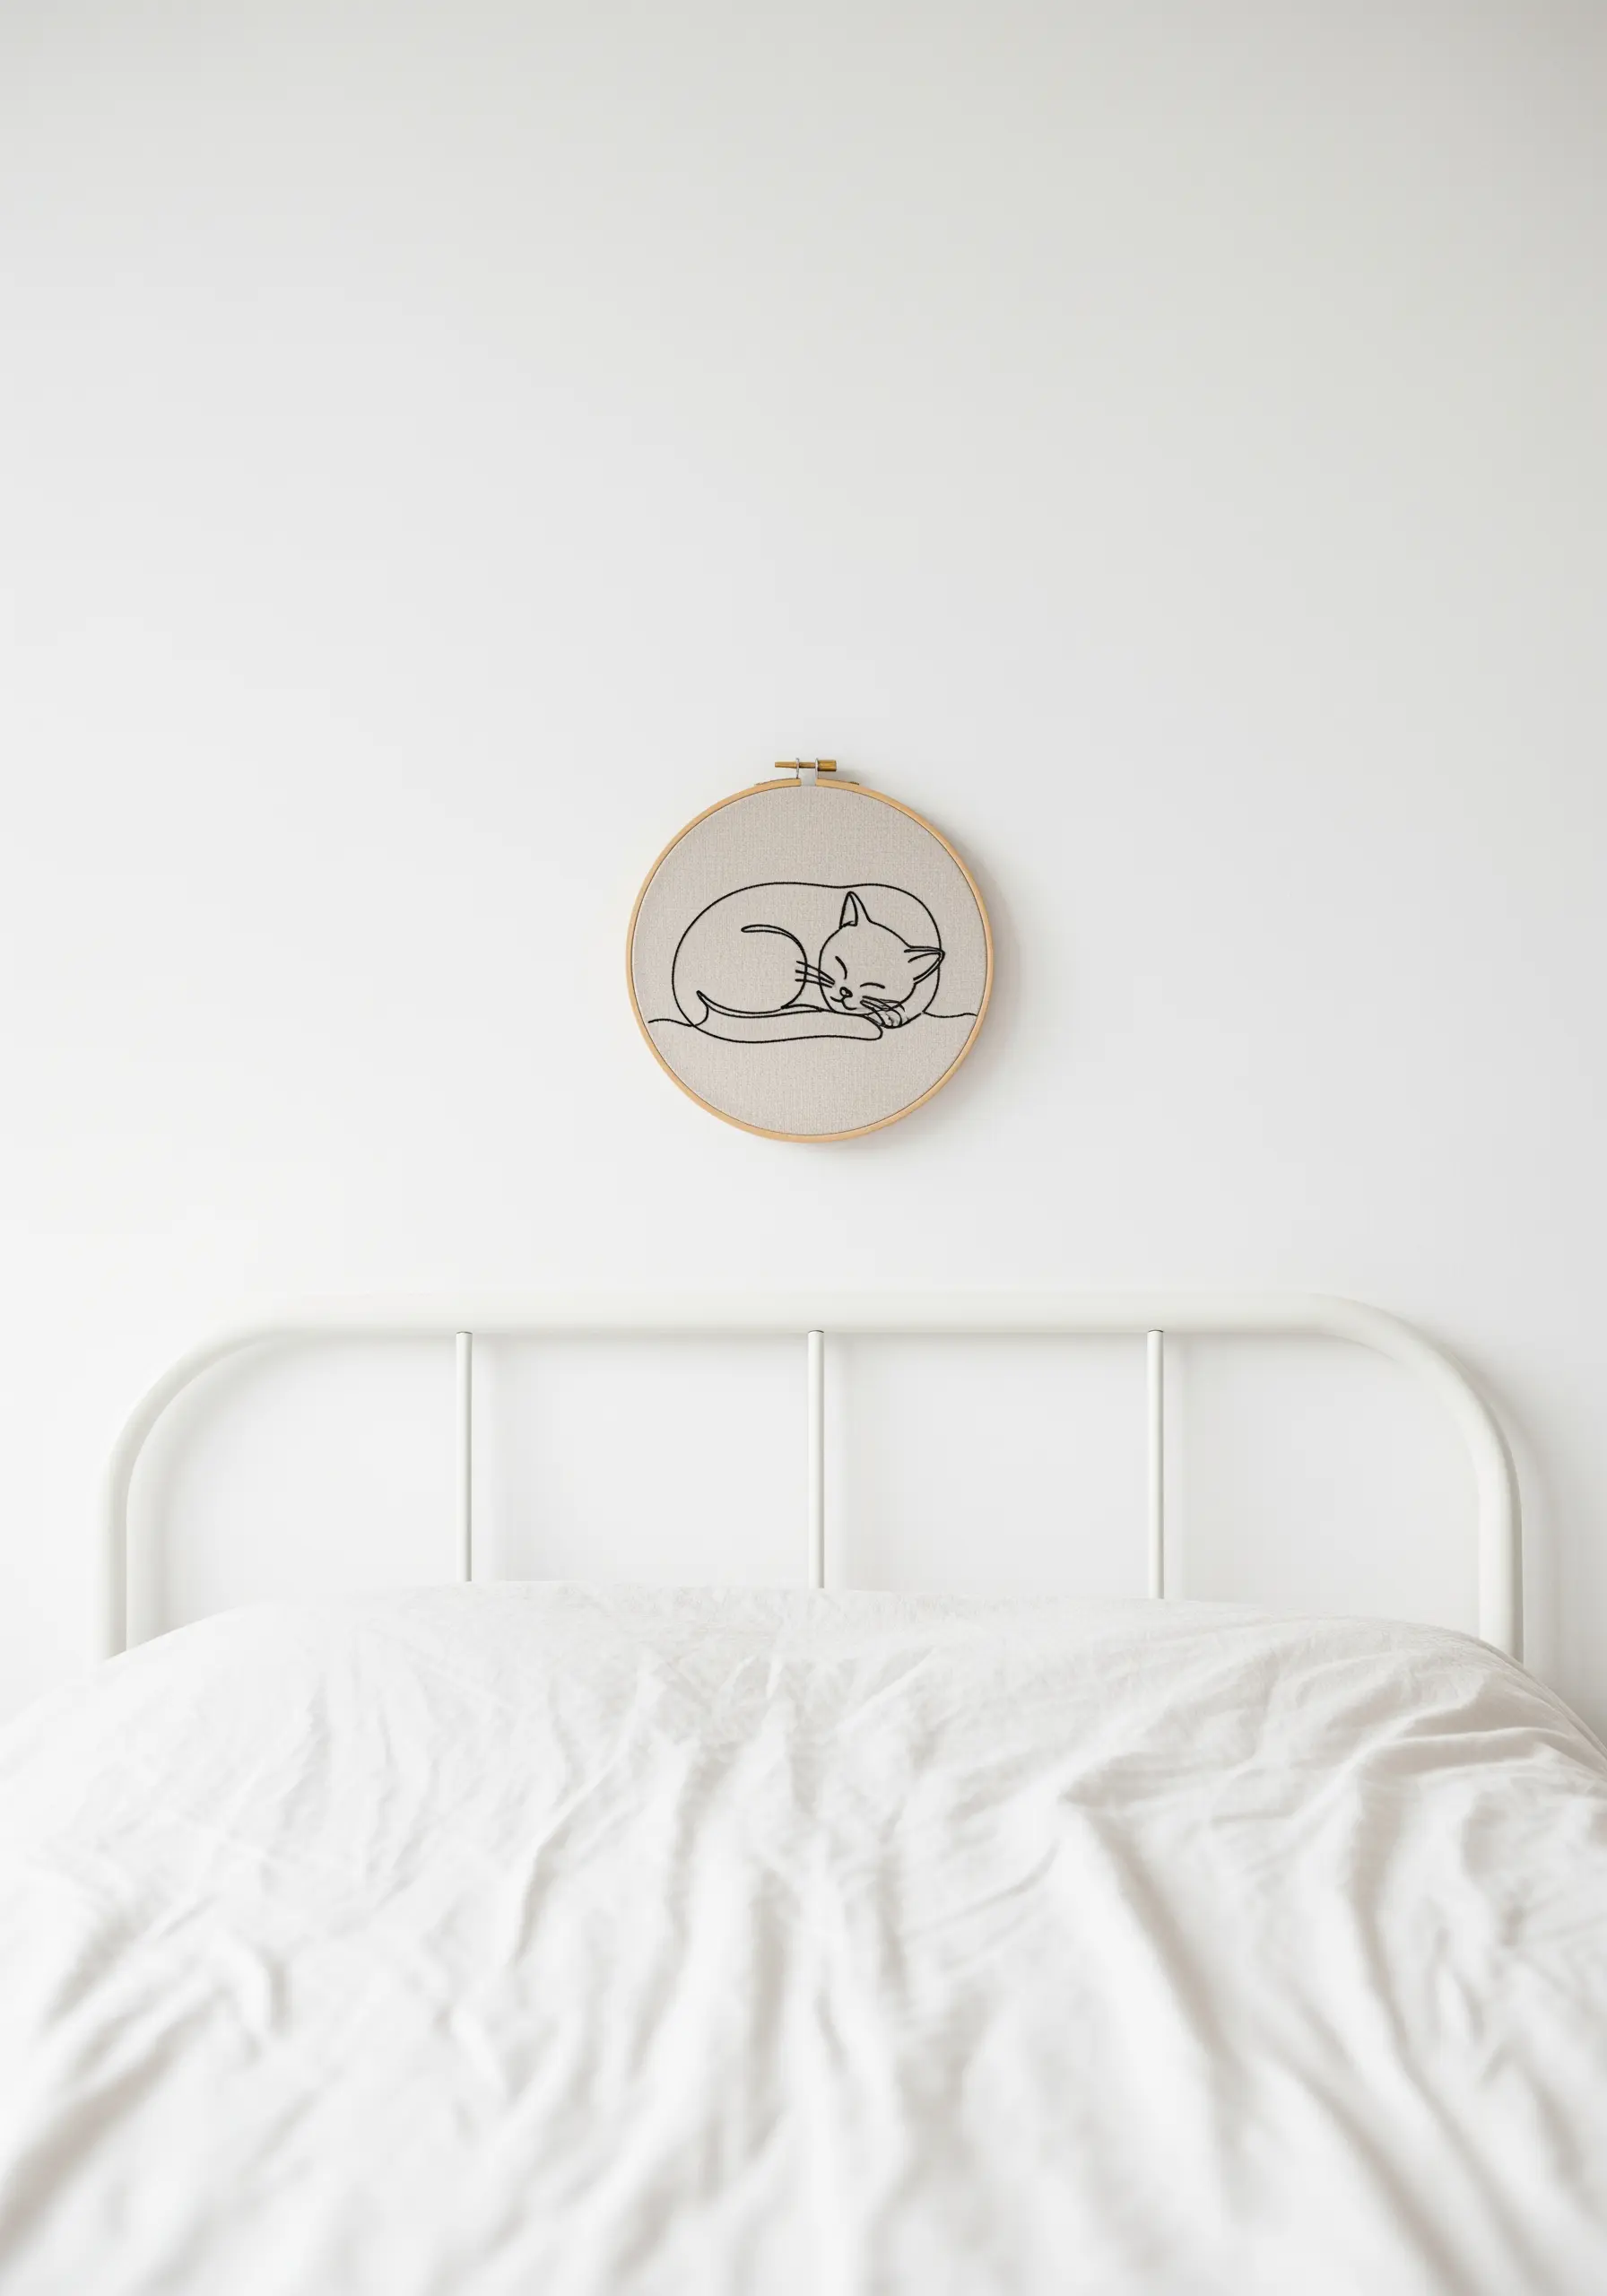
The quiet elegance of a line-art design depends on the quality of the line itself.
Use a whipped backstitch or a stem stitch to create a smooth, solid line that has the fluidity of an ink drawing.
Working with three strands of six-strand floss provides enough weight for the line to be visible without appearing heavy or clumsy.
The true skill lies in maintaining consistent stitch length, especially around curves, to create a piece of minimal embroidery that feels effortless and intentional.
11. Give Lettering Dimension with Padded Satin Stitch
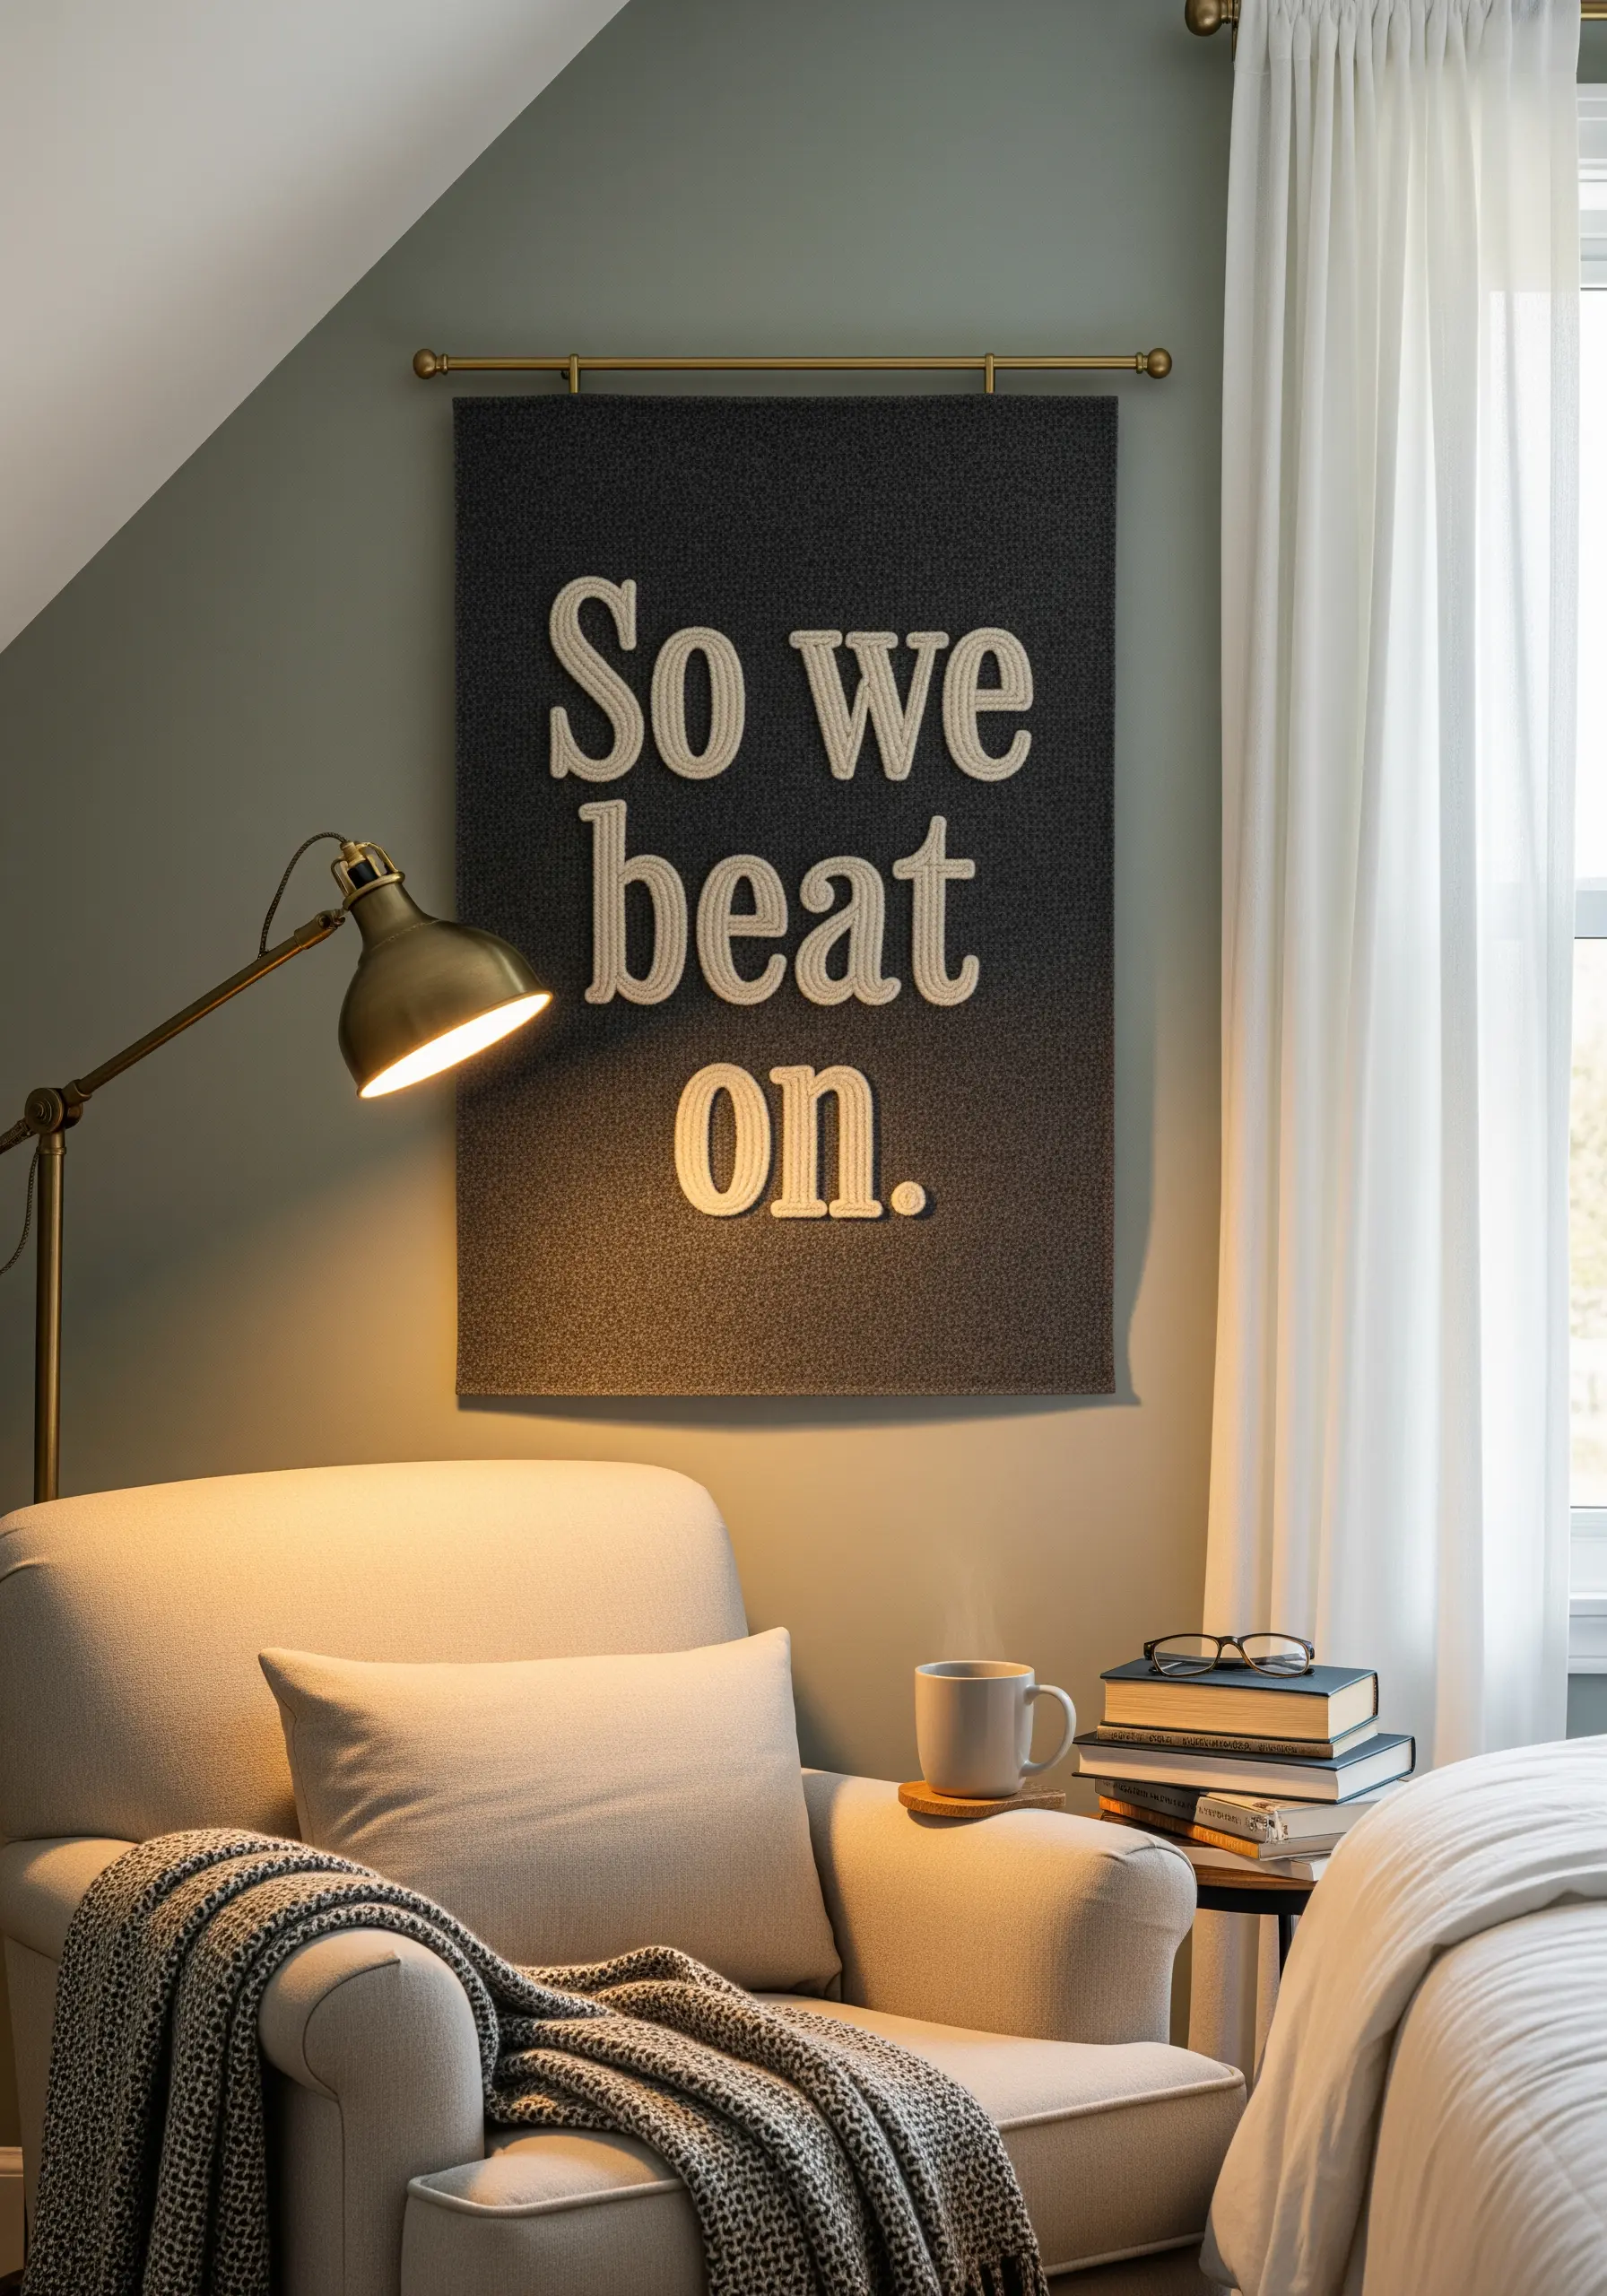
To make embroidered text stand out, use a padded satin stitch to create a raised, three-dimensional effect.
First, stitch a foundation within the shape of each letter using seed stitches, or even tack down a layer of felt cut to shape.
Then, work your final satin stitch layer over this padding, orienting your stitches perpendicular to the foundational layer for maximum loft.
This technique physically lifts the letters from the fabric, creating shadows and highlights that give your embroidered quote a sculptural presence.
12. Create Lunar Textures with Delicate Thread Painting

Capturing the moon’s cratered surface is an exercise in subtle shading and texture.
Use the long-and-short stitch technique, working with just a single strand of floss to allow for seamless blending between multiple shades of grey, silver, and off-white.
Stitch in small, swirling patterns to mimic the texture of craters and maria, rather than straight, uniform lines.
For the surrounding moon phases, a clean, crisp satin stitch provides a graphic counterpoint to the detailed, painterly realism of the central moon.
13. Embrace Folk Art Charm with Bold Shapes and Primary Colors
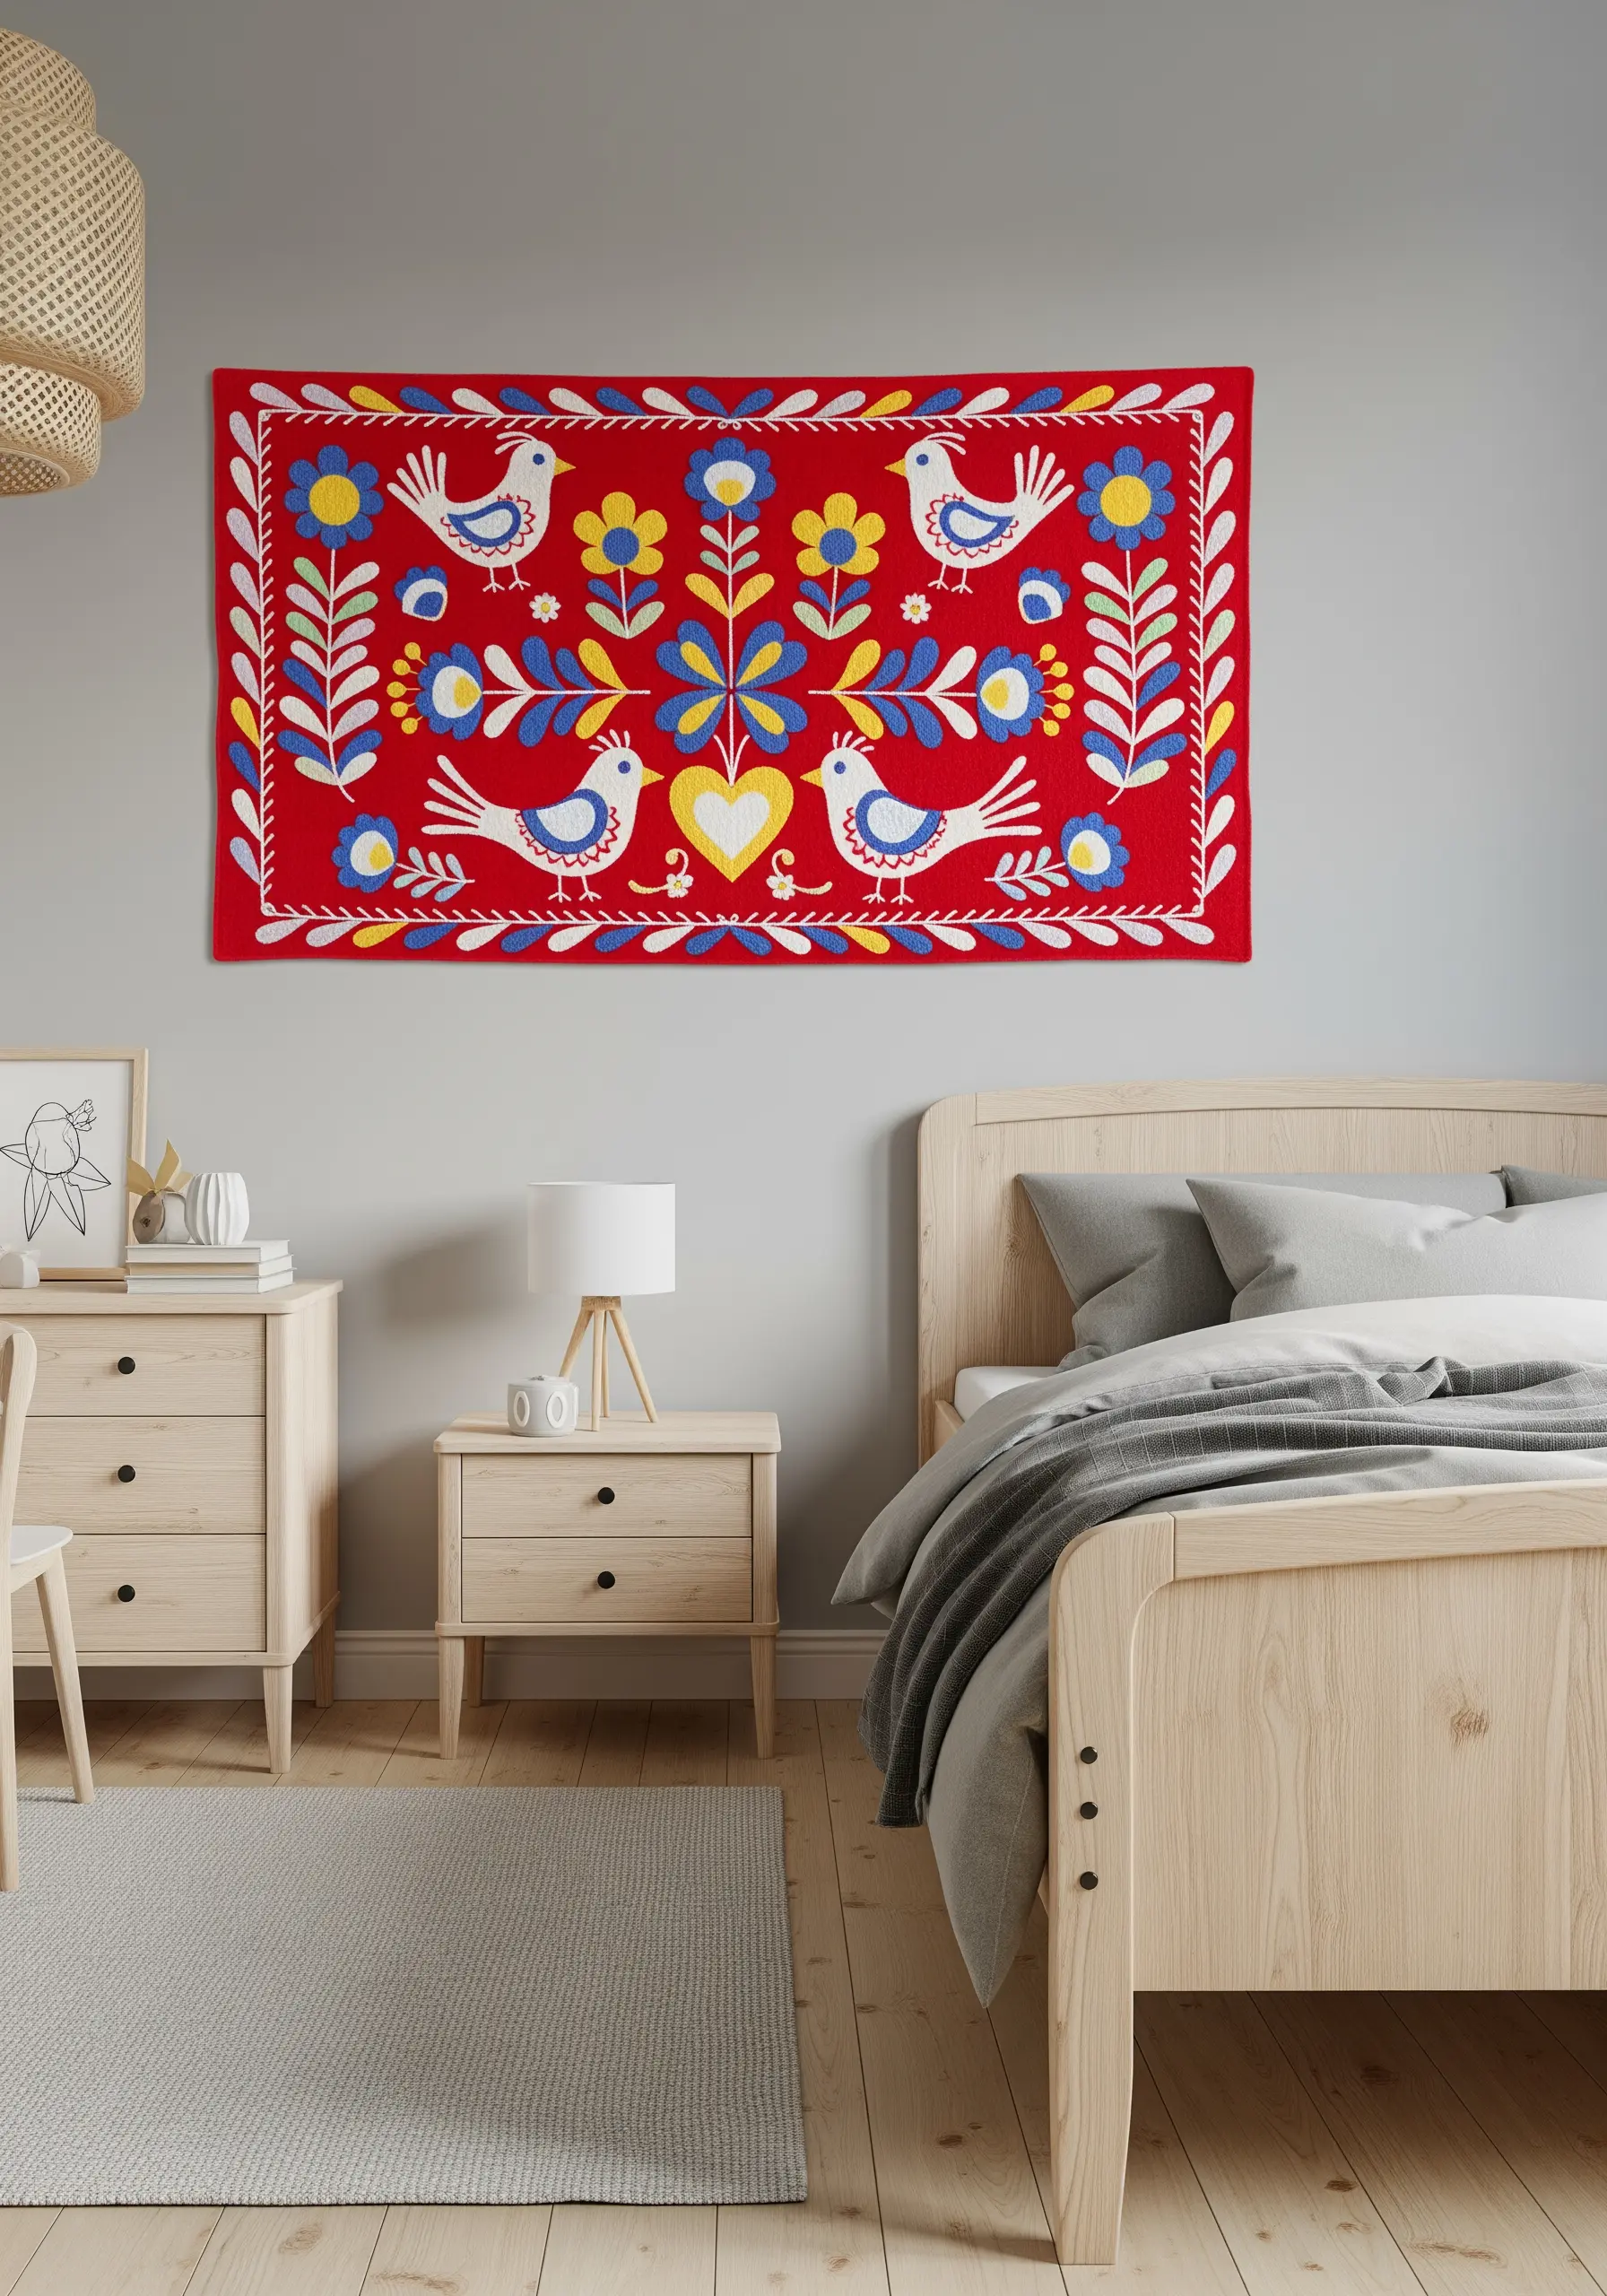
Folk art embroidery celebrates pattern, symmetry, and a joyfully direct use of color.
Define your simple, graphic motifs—like these birds and flowers—with a bold outline stitch in a high-contrast color, such as black or dark blue.
Fill the shapes with a dense satin stitch or even a simple darning stitch to create solid blocks of vibrant, flat color.
The appeal lies in the rhythm and repetition of the design, creating a piece that feels both classic and full of life.
14. Combine Scientific Detail with Artistic Expression
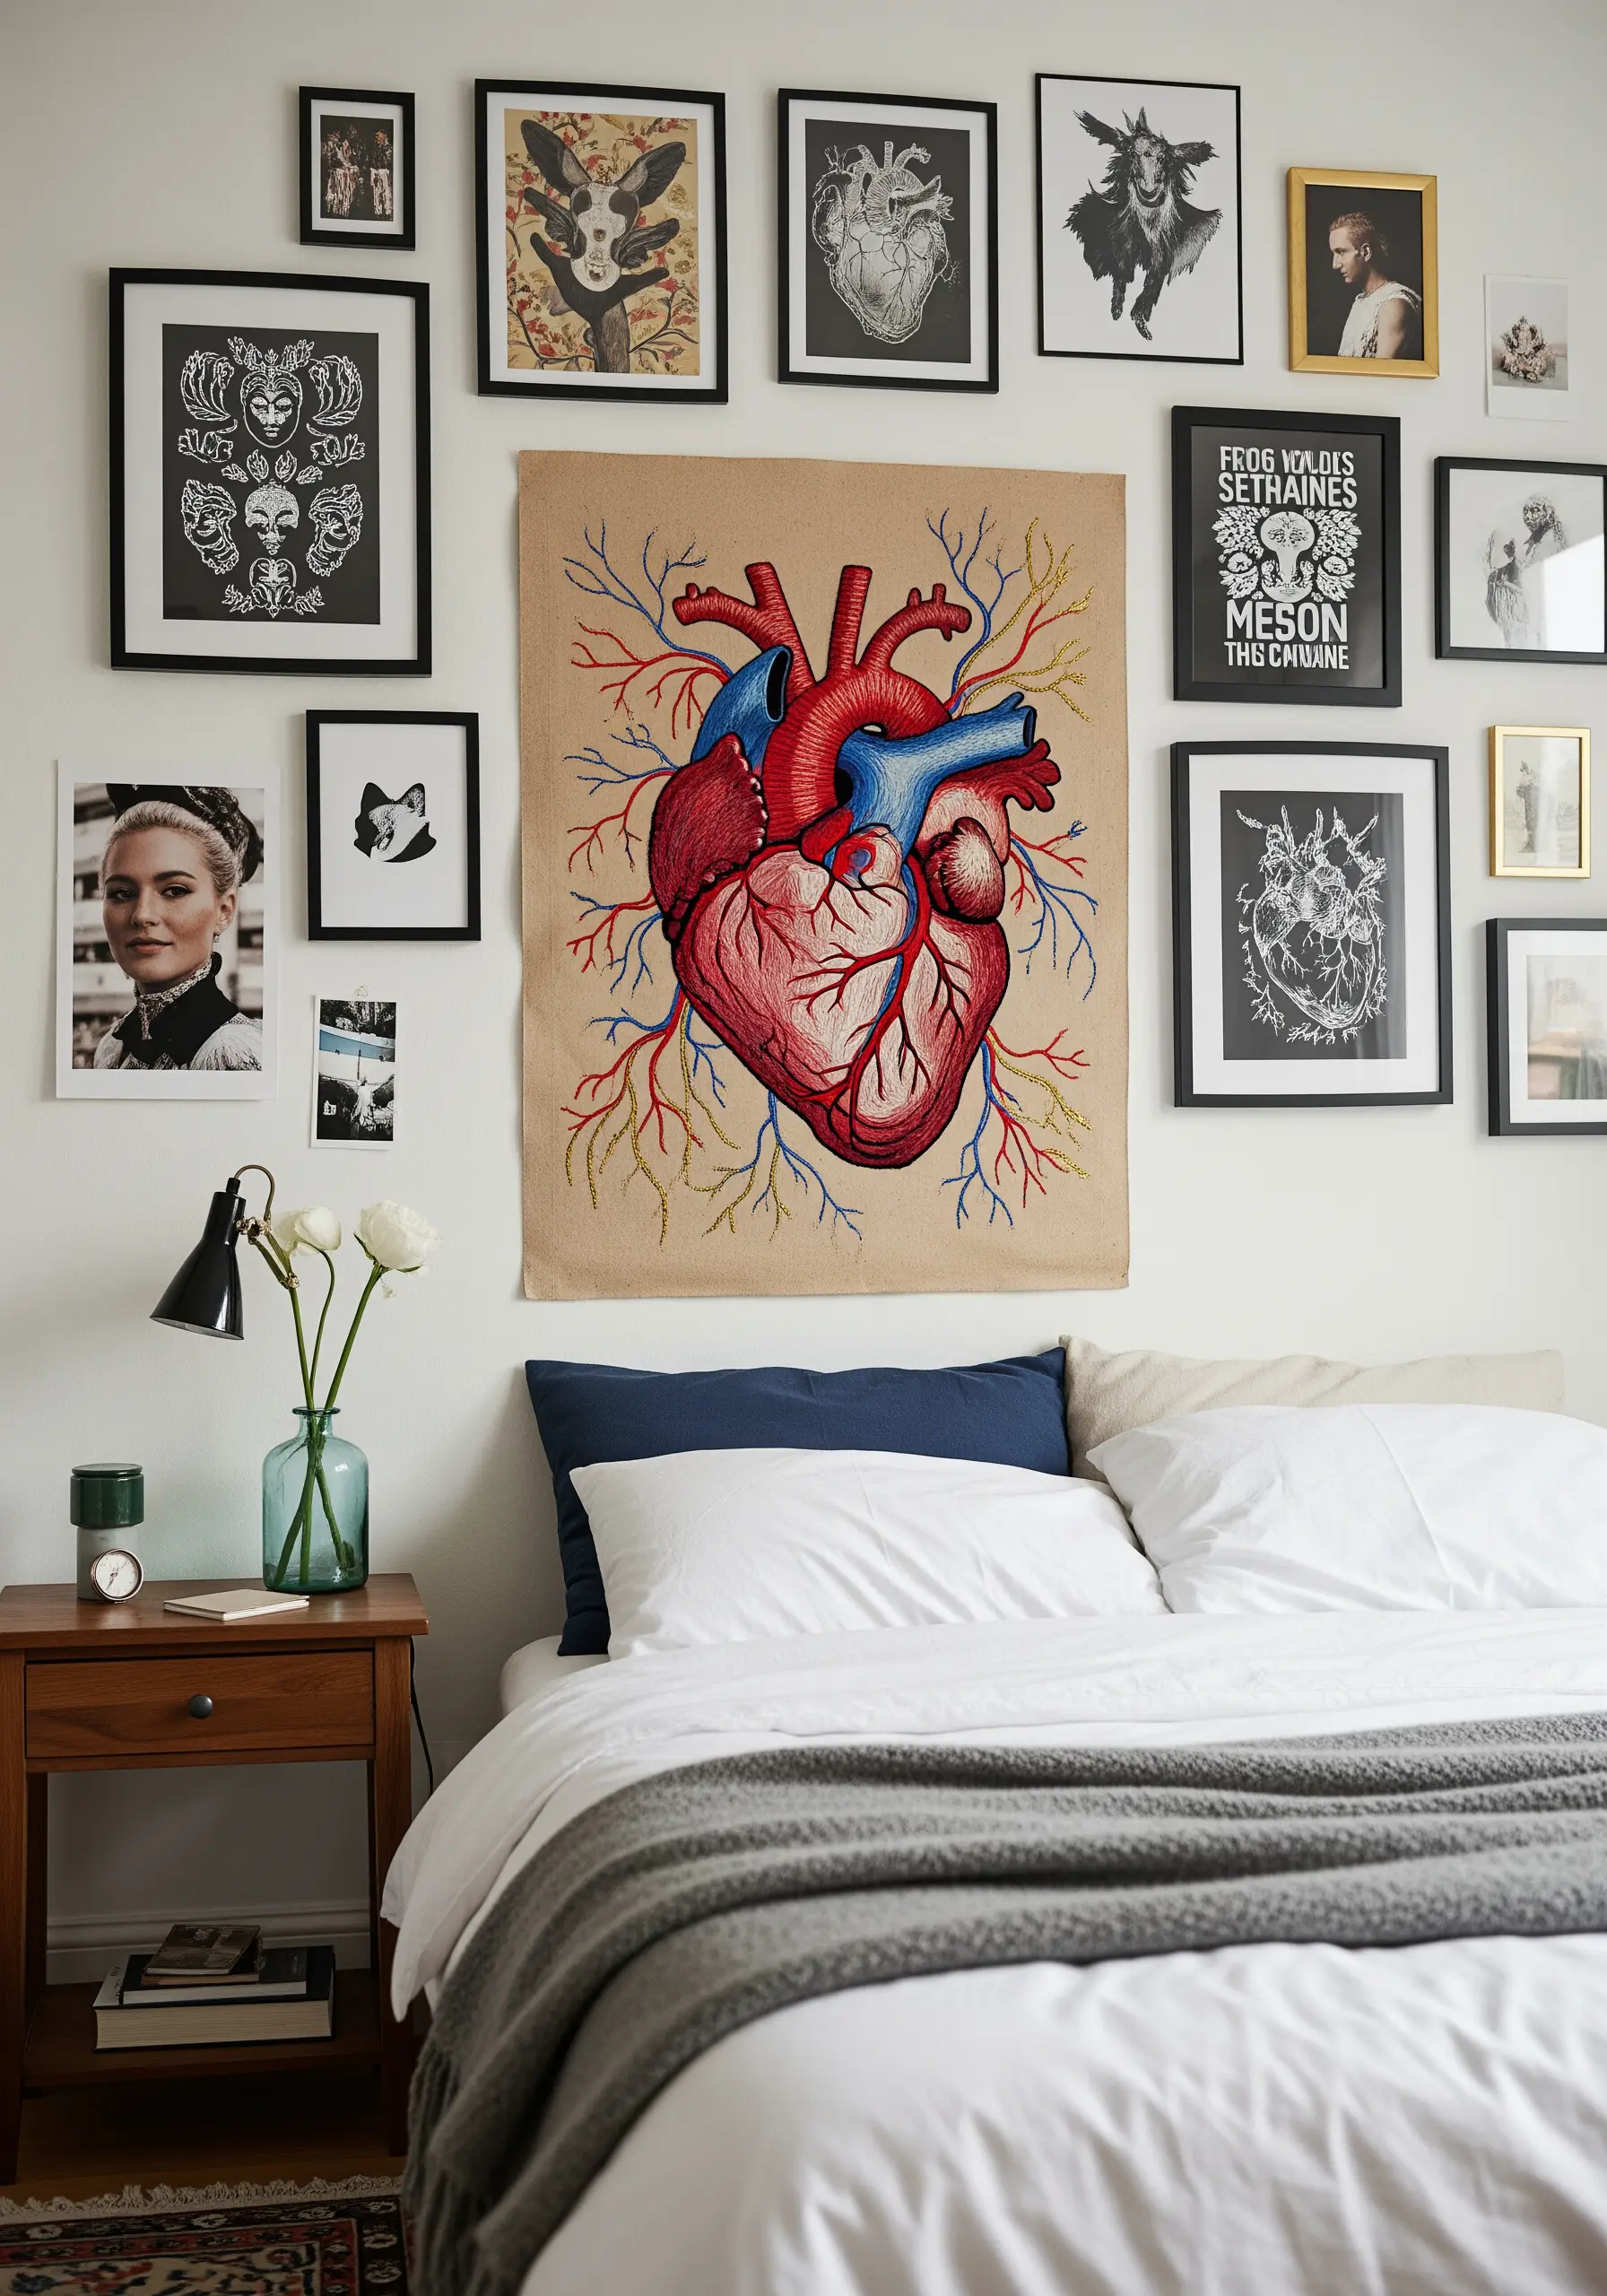
When embroidering an anatomical illustration, your choice of stitch directly impacts the final look.
Use a very fine stem stitch or whipped backstitch with a single strand of floss for the delicate arteries and veins to create clean, precise lines reminiscent of an ink drawing.
For the larger muscular areas of the heart, use long-and-short stitch to blend shades of red and pink, suggesting form and volume.
The tension between the clinical subject matter and the warm, tactile nature of embroidery is what makes a piece like this so compelling.
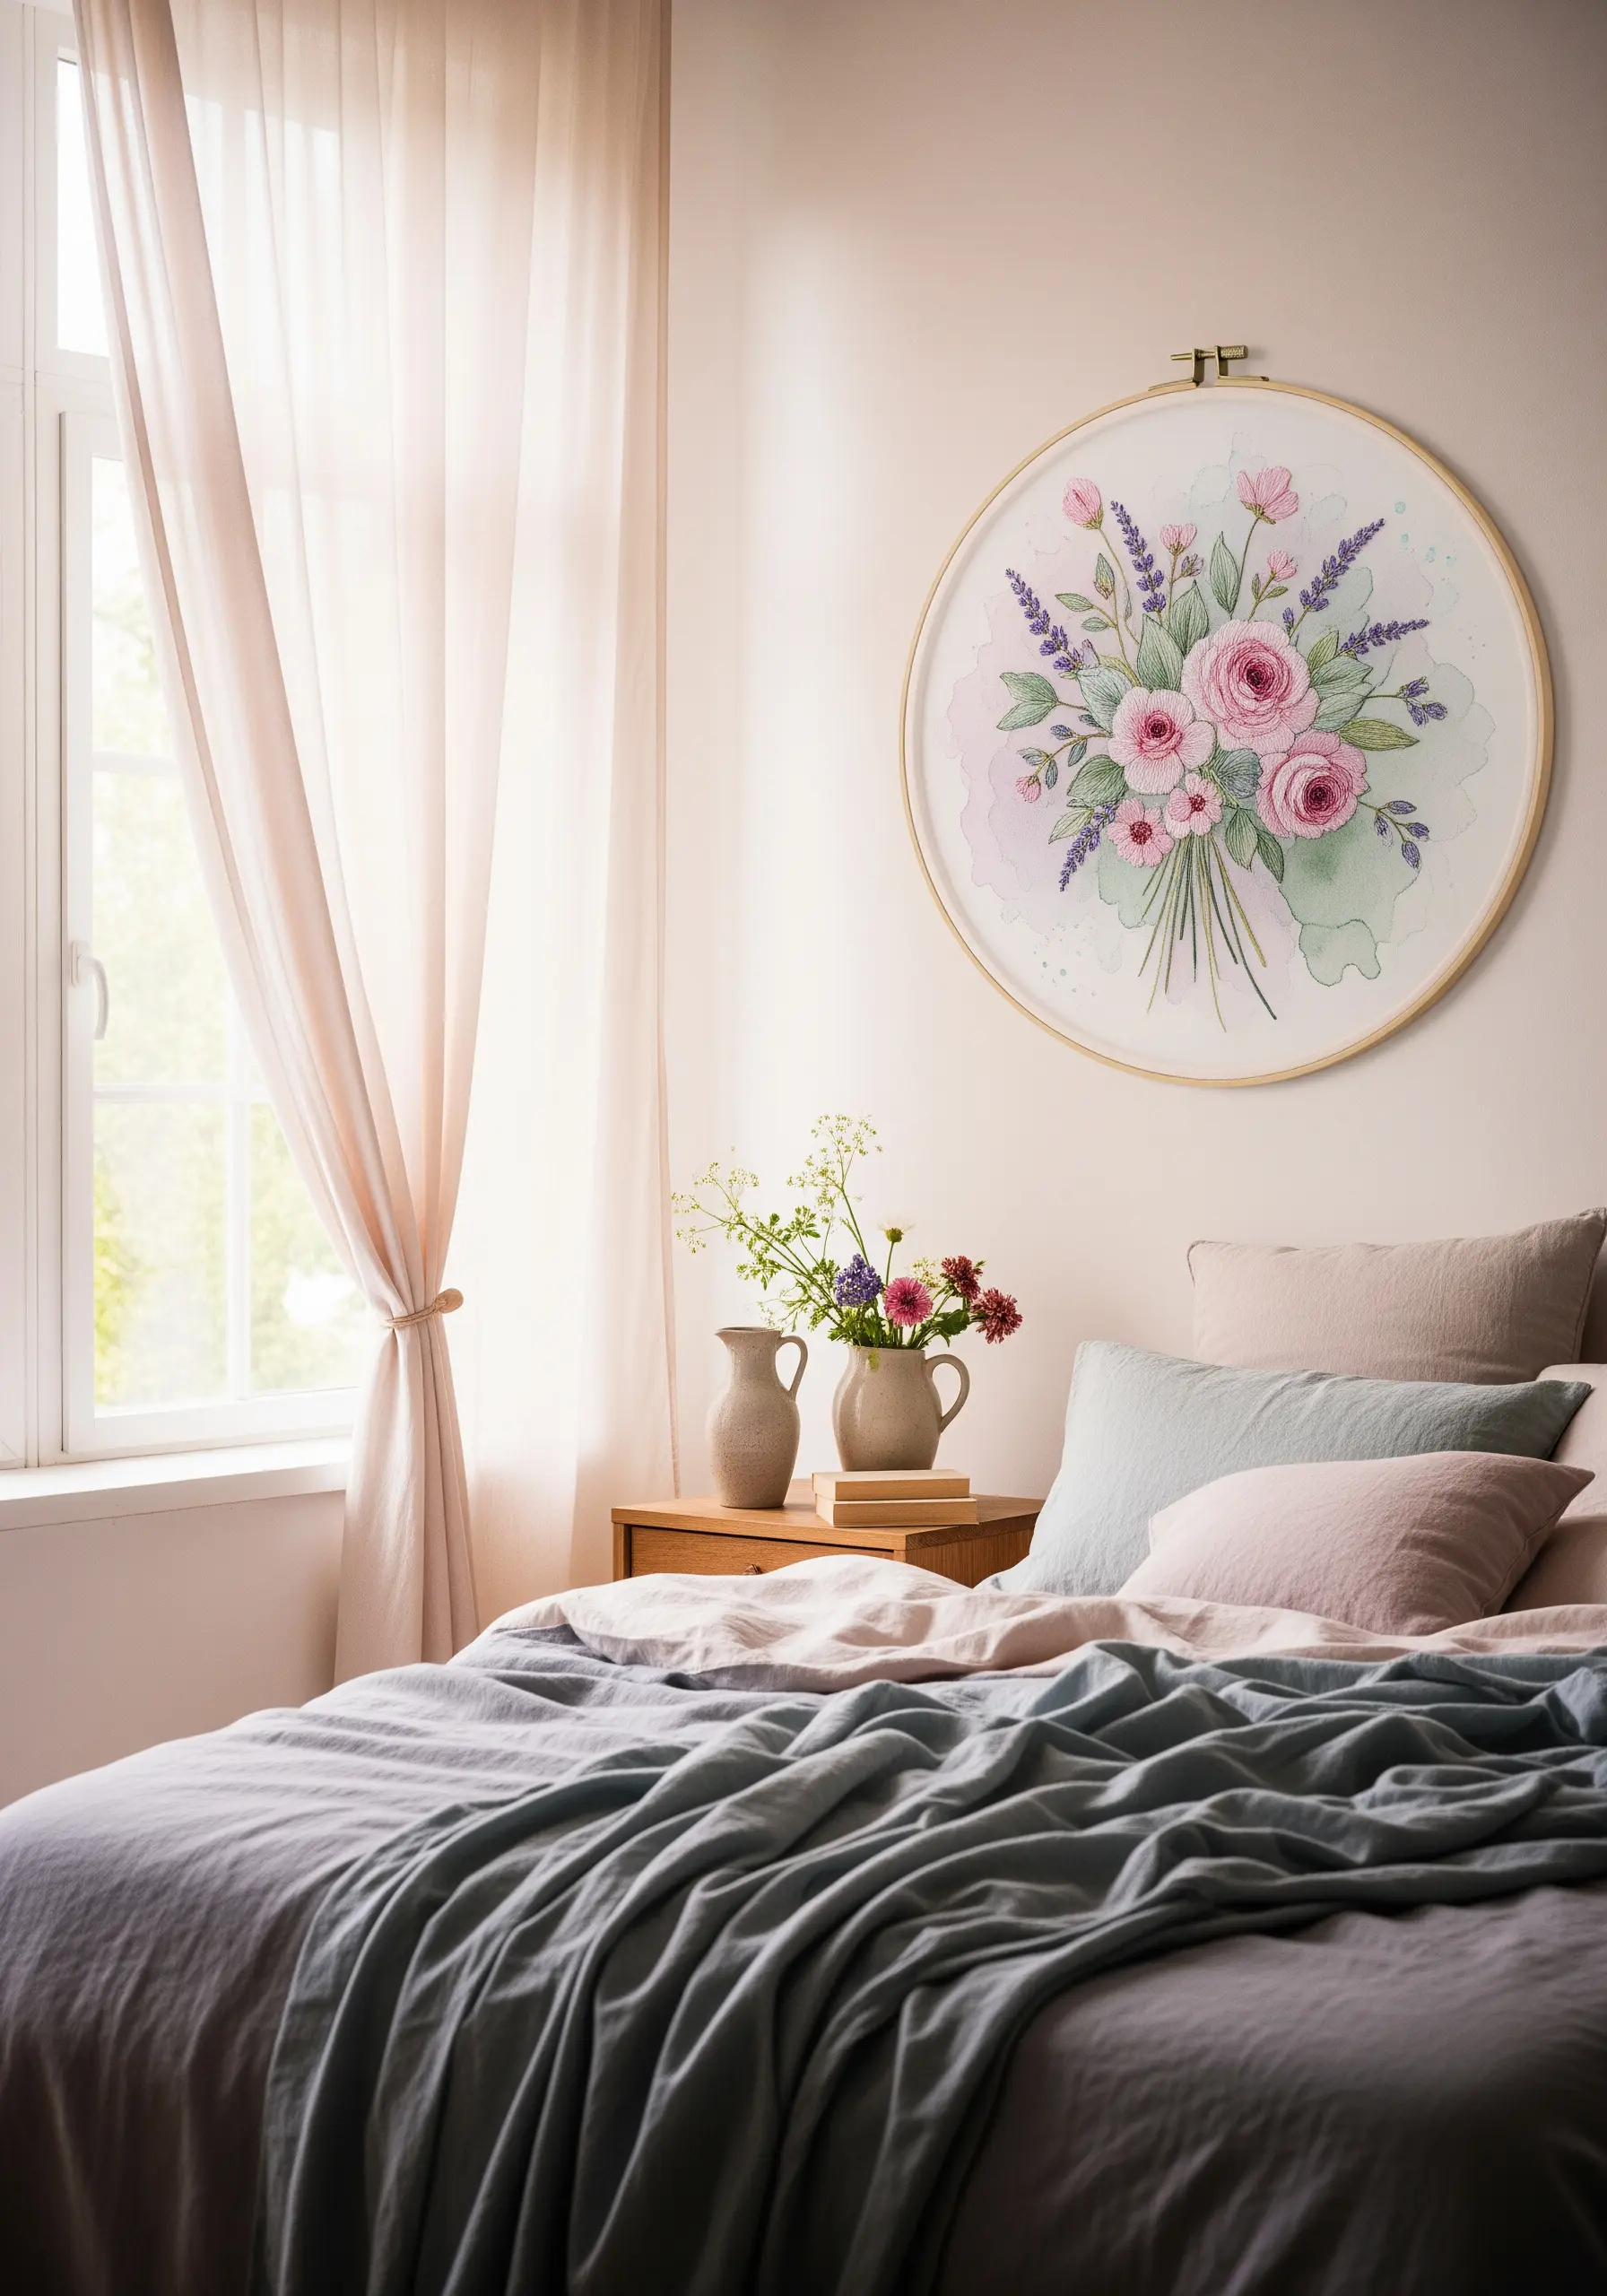
15. Create Delicate Blossoms on a Dramatic Black Background
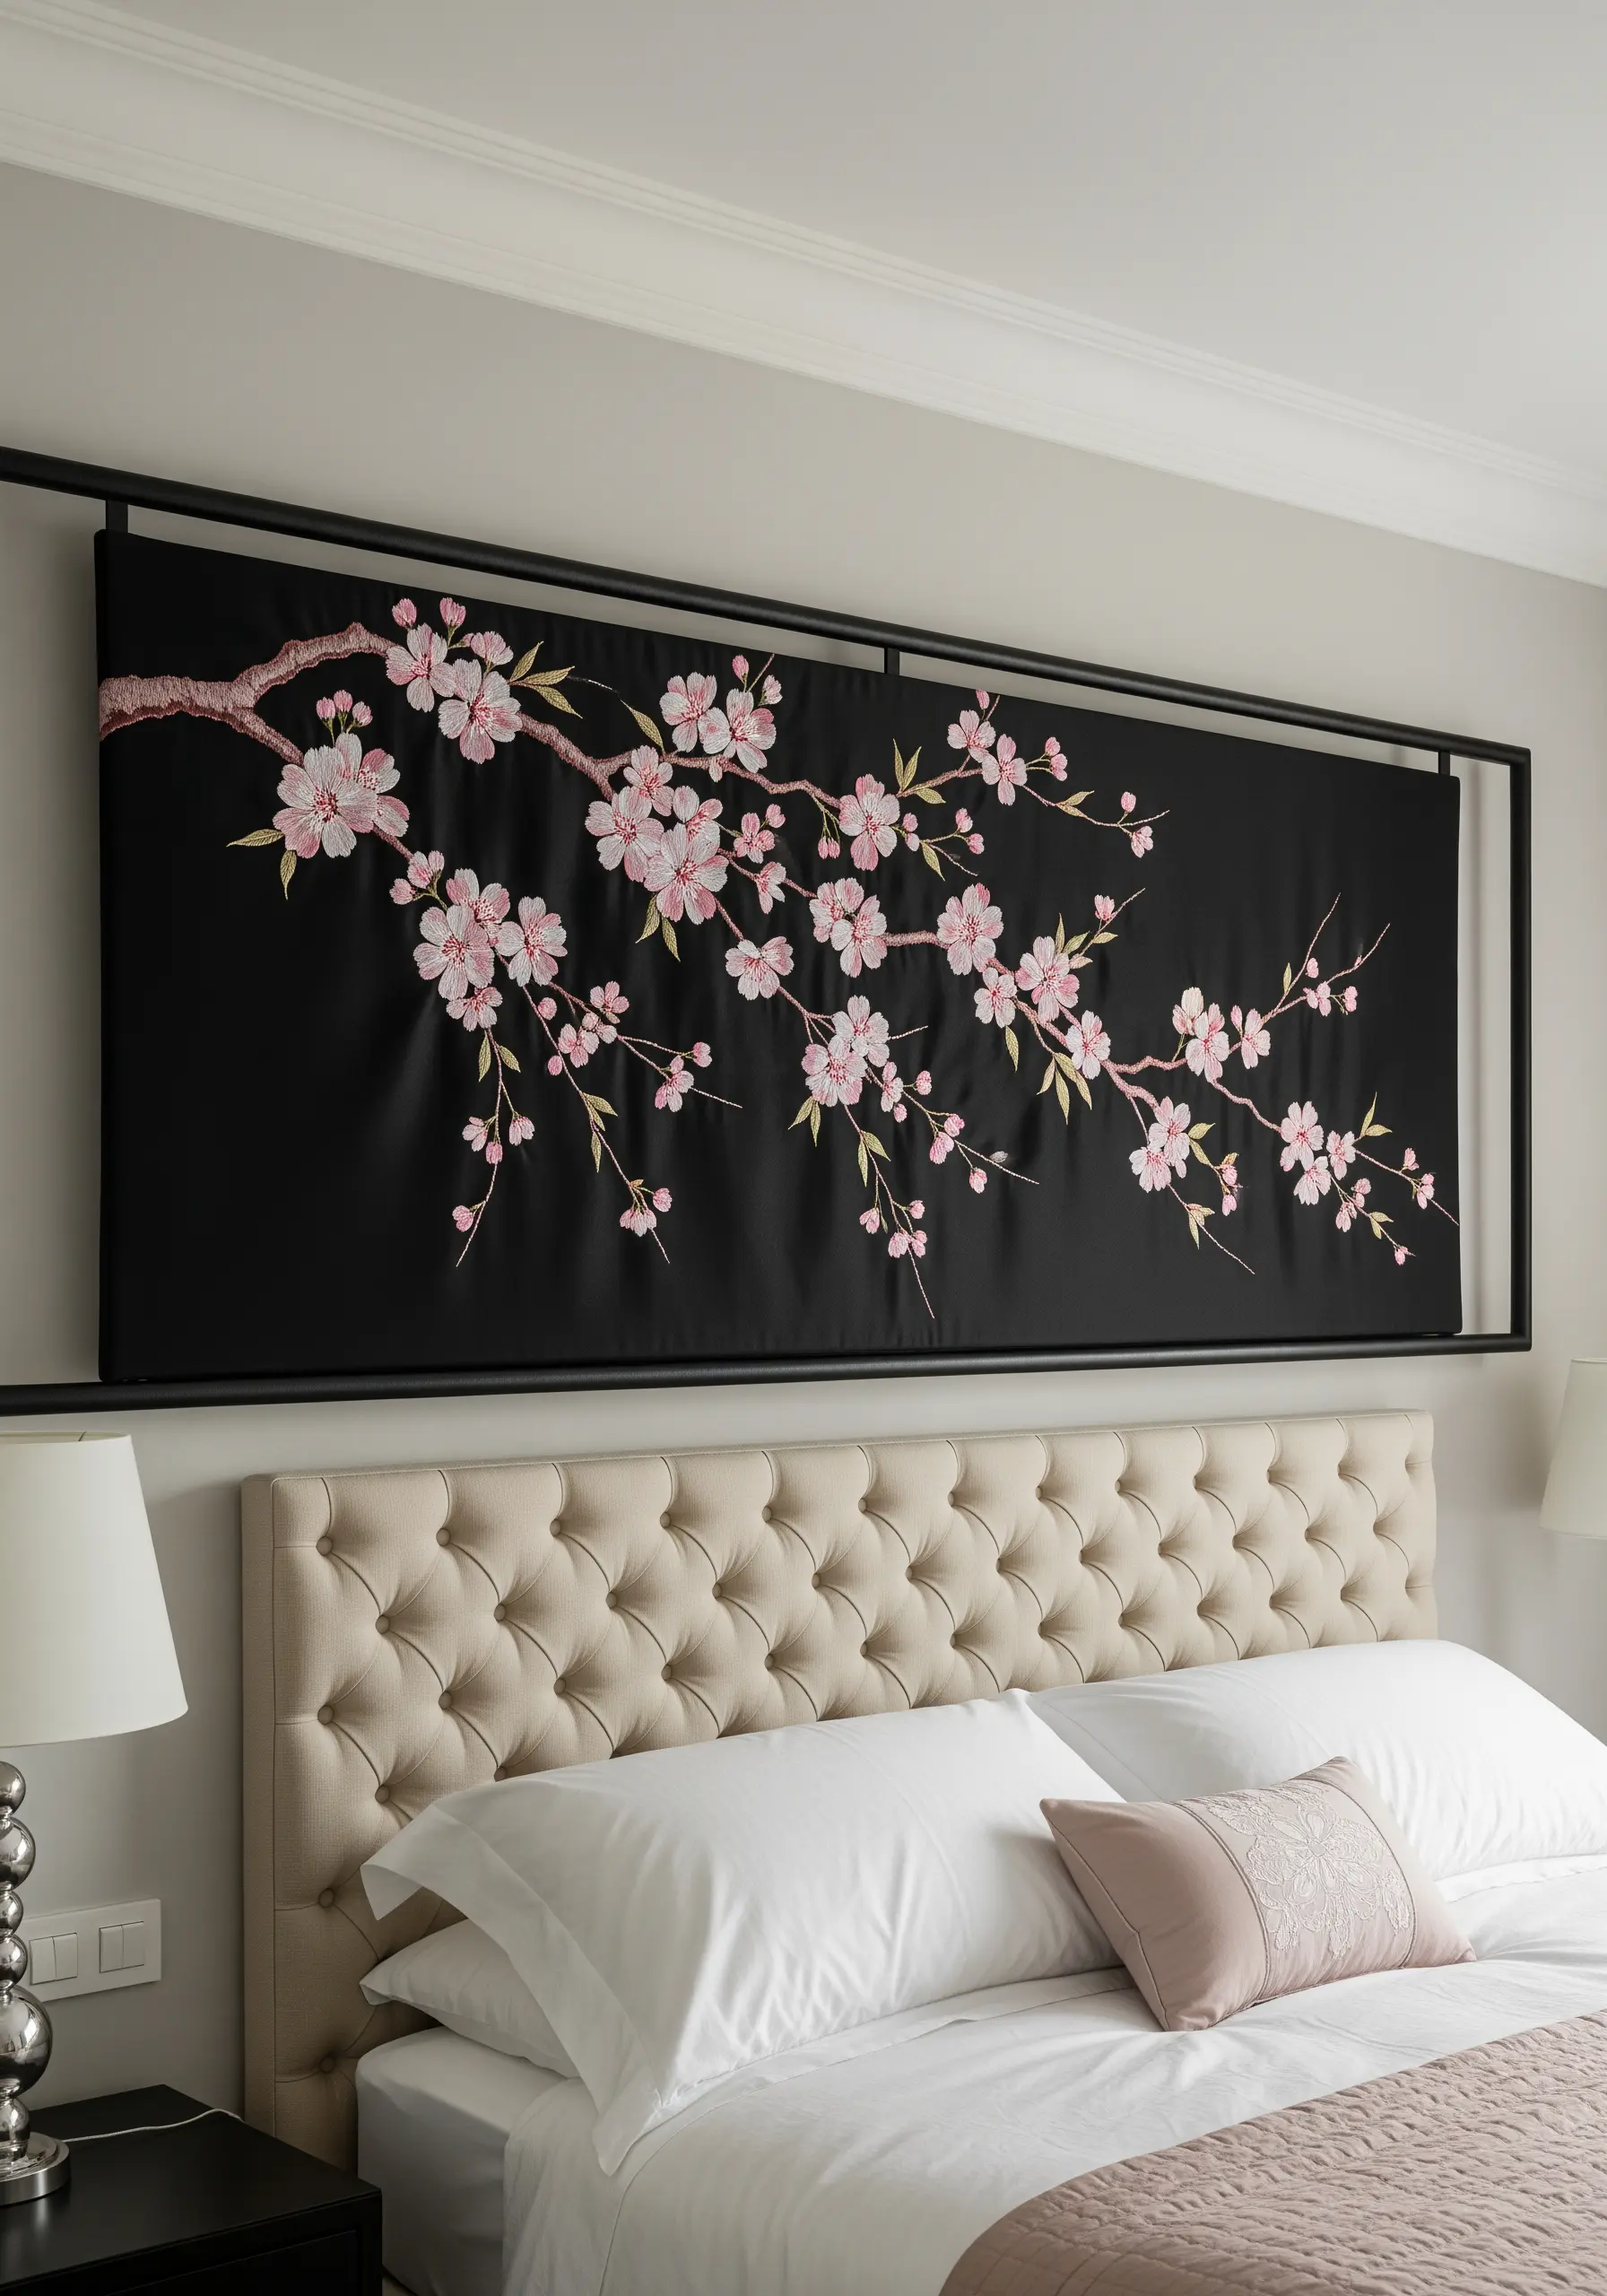
Let your thread be the only source of light by stitching on a black or very dark fabric.
This high-contrast background makes even the most delicate pastel colors appear incredibly vibrant.
For the cherry blossom petals, use a fishbone stitch. This creates a central line and angled stitches that perfectly mimic the way petals overlap and curve.
Add a cluster of tiny French knots at the center of each blossom for realism, and use a thin, slightly irregular stem stitch for the branches to give them an organic feel.
16. Achieve a Painterly Texture with Dense Seed Stitching
To create a surface that looks more like a painting than embroidery, fill large color blocks with thousands of tiny, random seed stitches.
Unlike the sheen of satin stitch, this technique creates a matte, uniform texture that absorbs light, allowing the colors to feel deep and saturated.
Meticulously fill each color block, ensuring the stitches are packed tightly together for an opaque finish.
This pointillist approach unifies disparate colors and transforms thread into a medium for creating stunning abstract art.
17. Combine Embroidery with Macrame for a Layered Boho Look
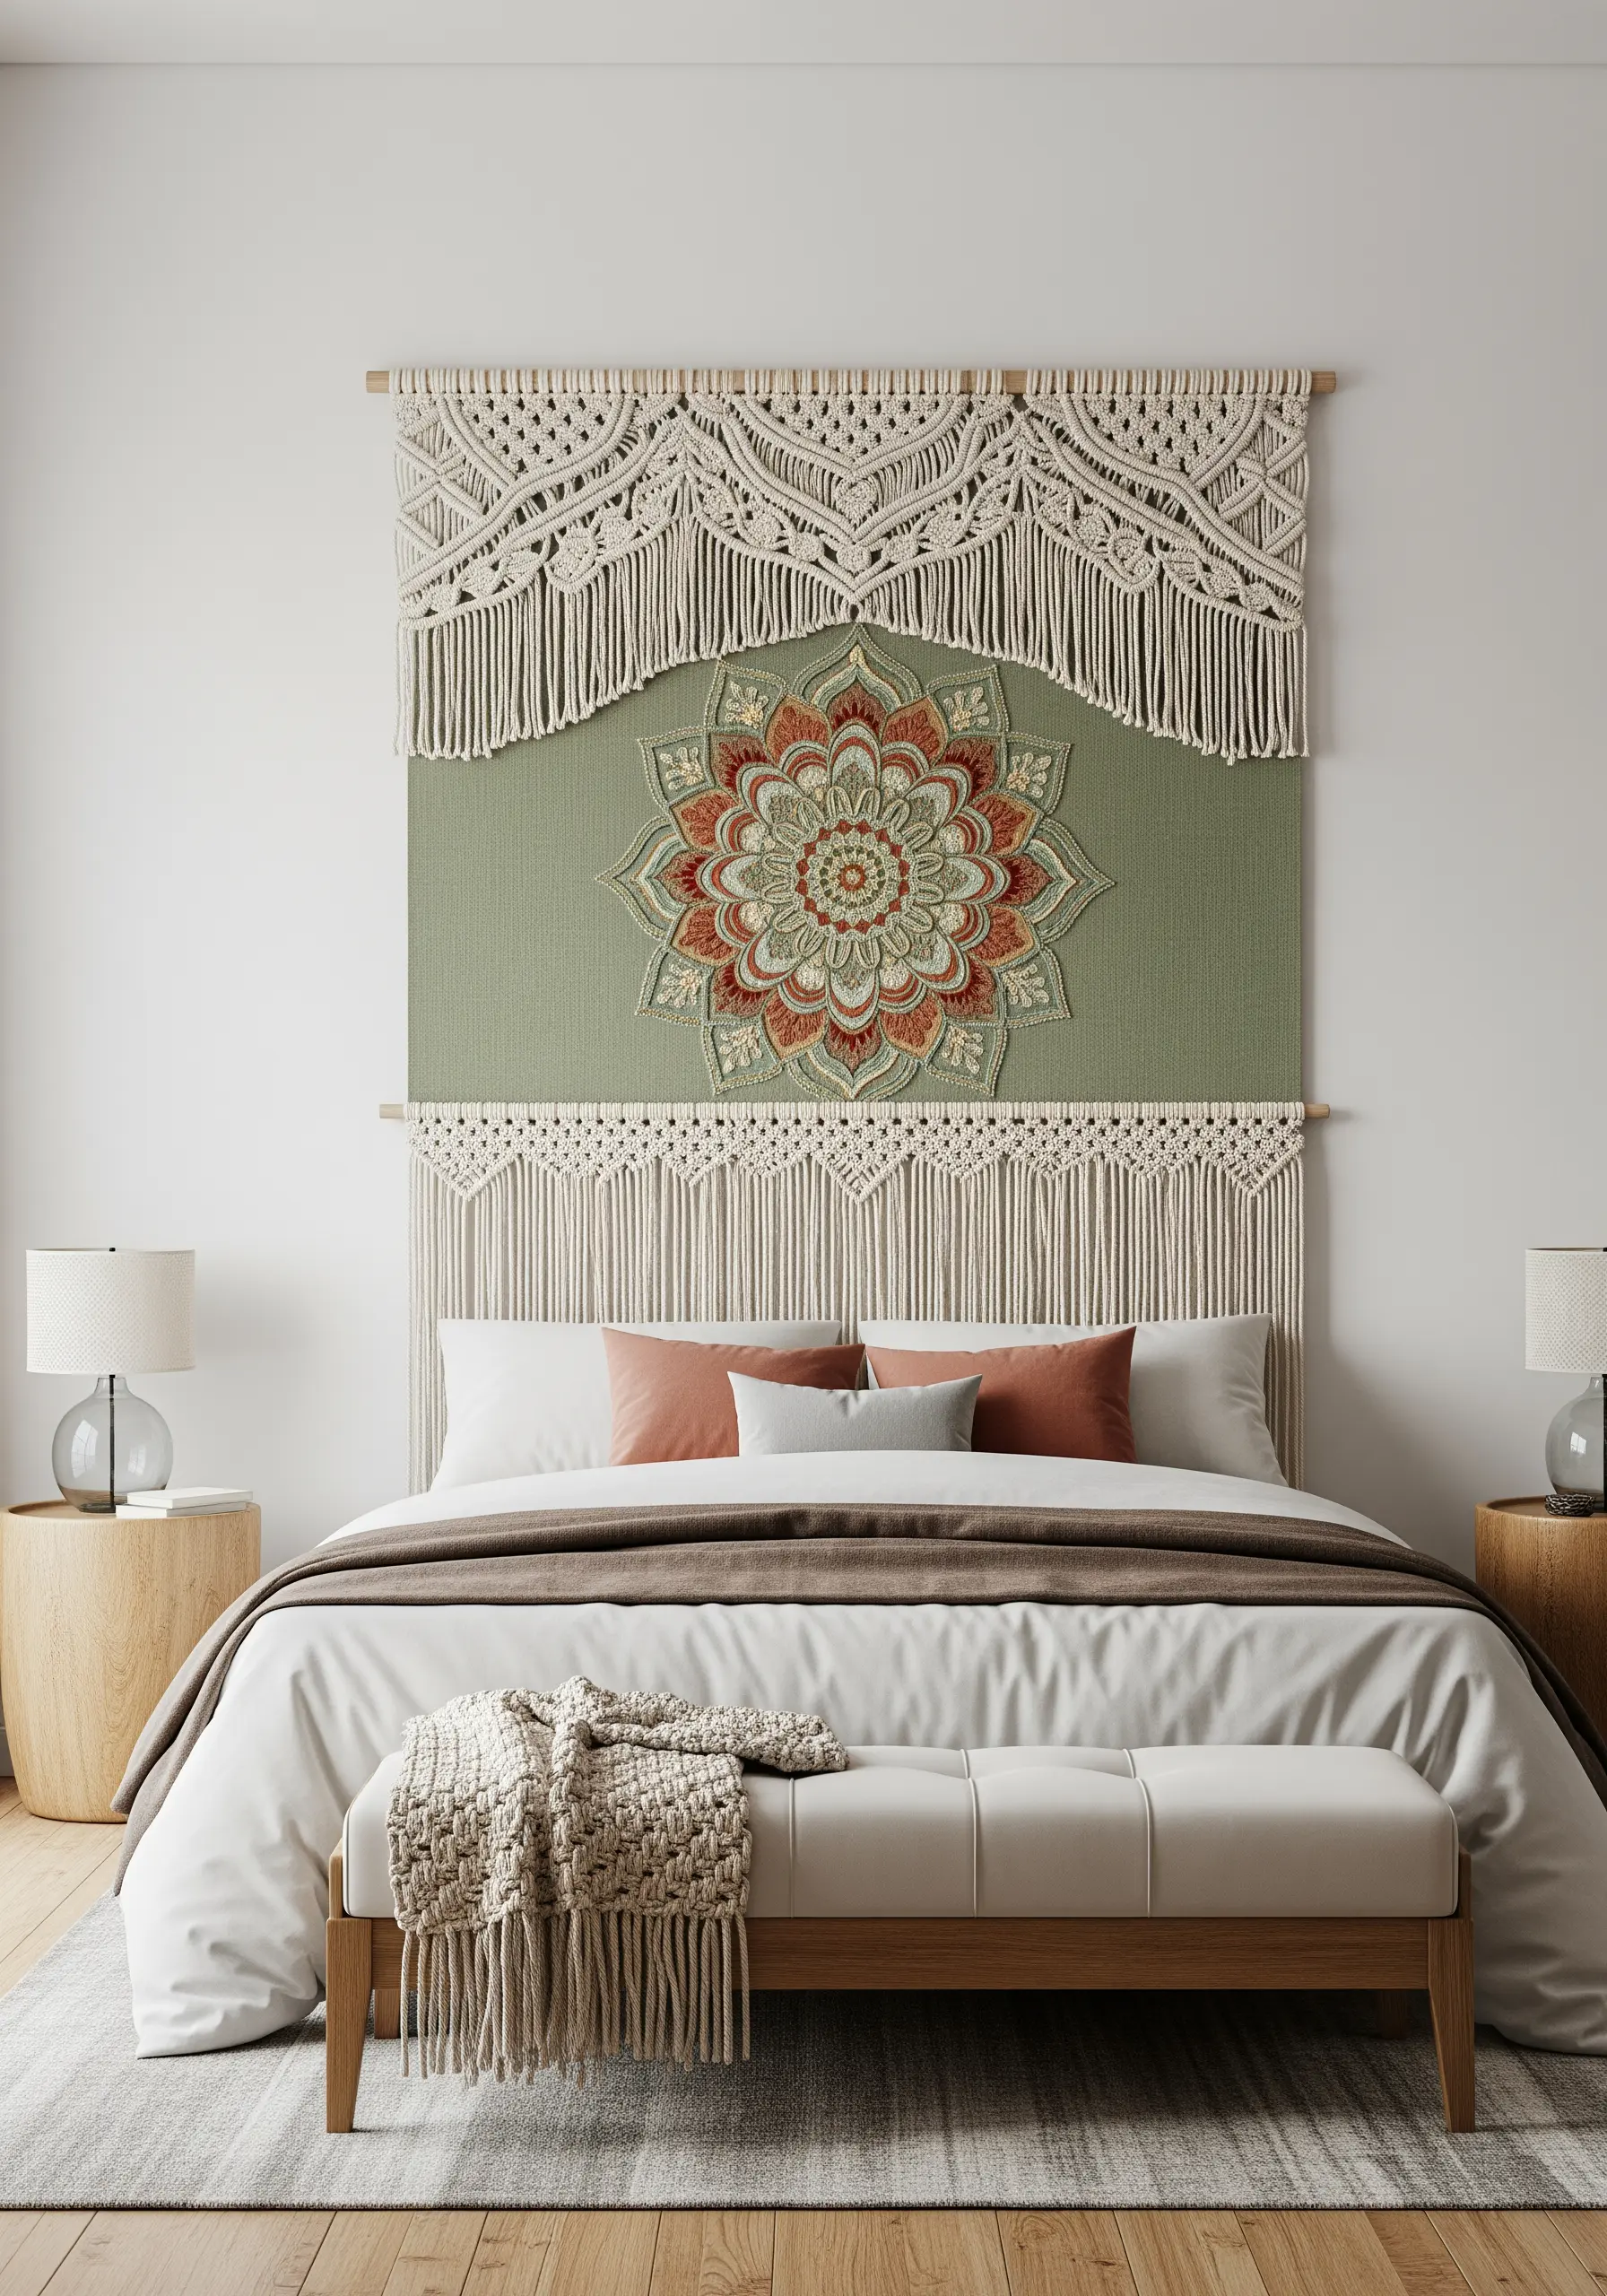
Elevate your embroidery by framing it with another fiber art for a truly impressive statement piece.
Complete your embroidered design on a central fabric panel first. Then, mount the panel onto wooden dowels at the top and bottom.
Use these dowels as the anchor for adding macrame details, creating a layered, textural frame that enhances the central design.
This fusion of techniques is perfect for creating ambitious boho embroidery patterns that act as a focal point in any room.
18. Explore Texture and Shadow with Monochrome Embroidery
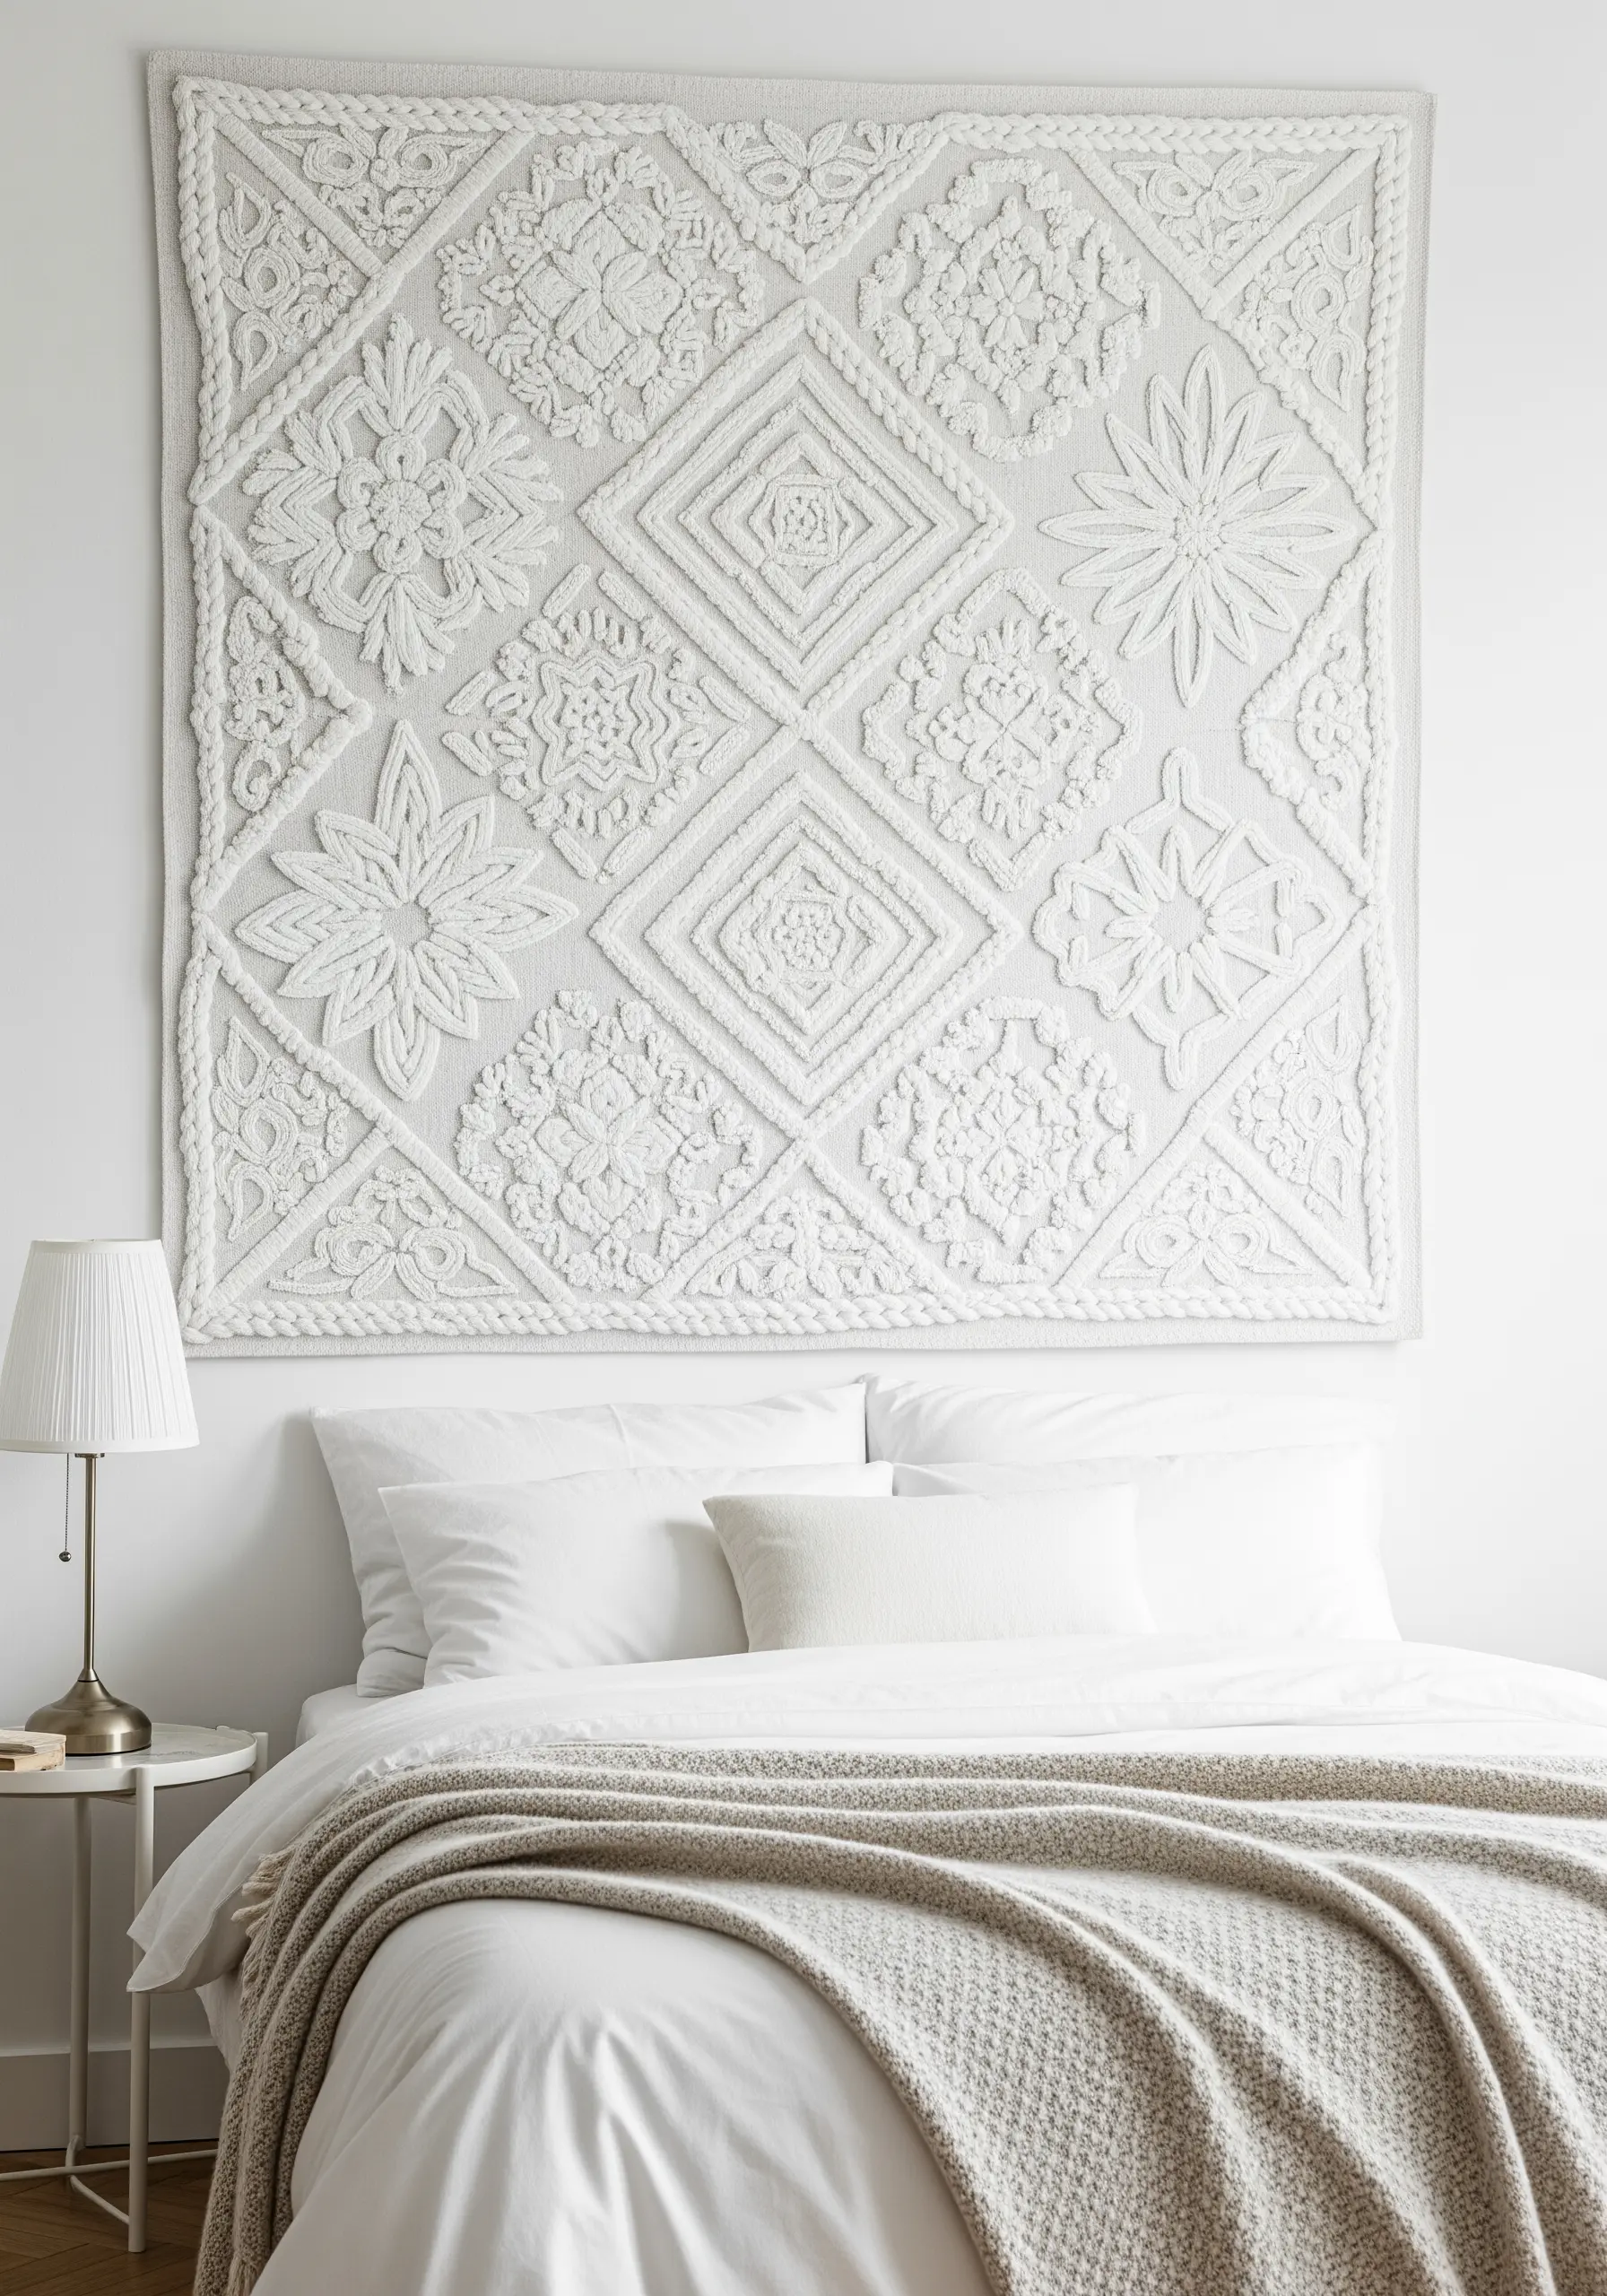
A white-on-white palette shifts the focus entirely from color to texture, light, and shadow.
Create your design by combining a variety of highly textural, dimensional stitches: chunky bullion knots, woven wheel stitches, padded satin stitch, and dense clusters of French knots.
Use different weights of thread, from single-strand floss to thick pearl cotton or even fine yarn, to introduce another layer of tactile variation.
The pattern reveals itself in the way light plays across the different surfaces, creating an exceptionally elegant and sophisticated piece.
19. Personalize Your Space with a Stitched Travel Map
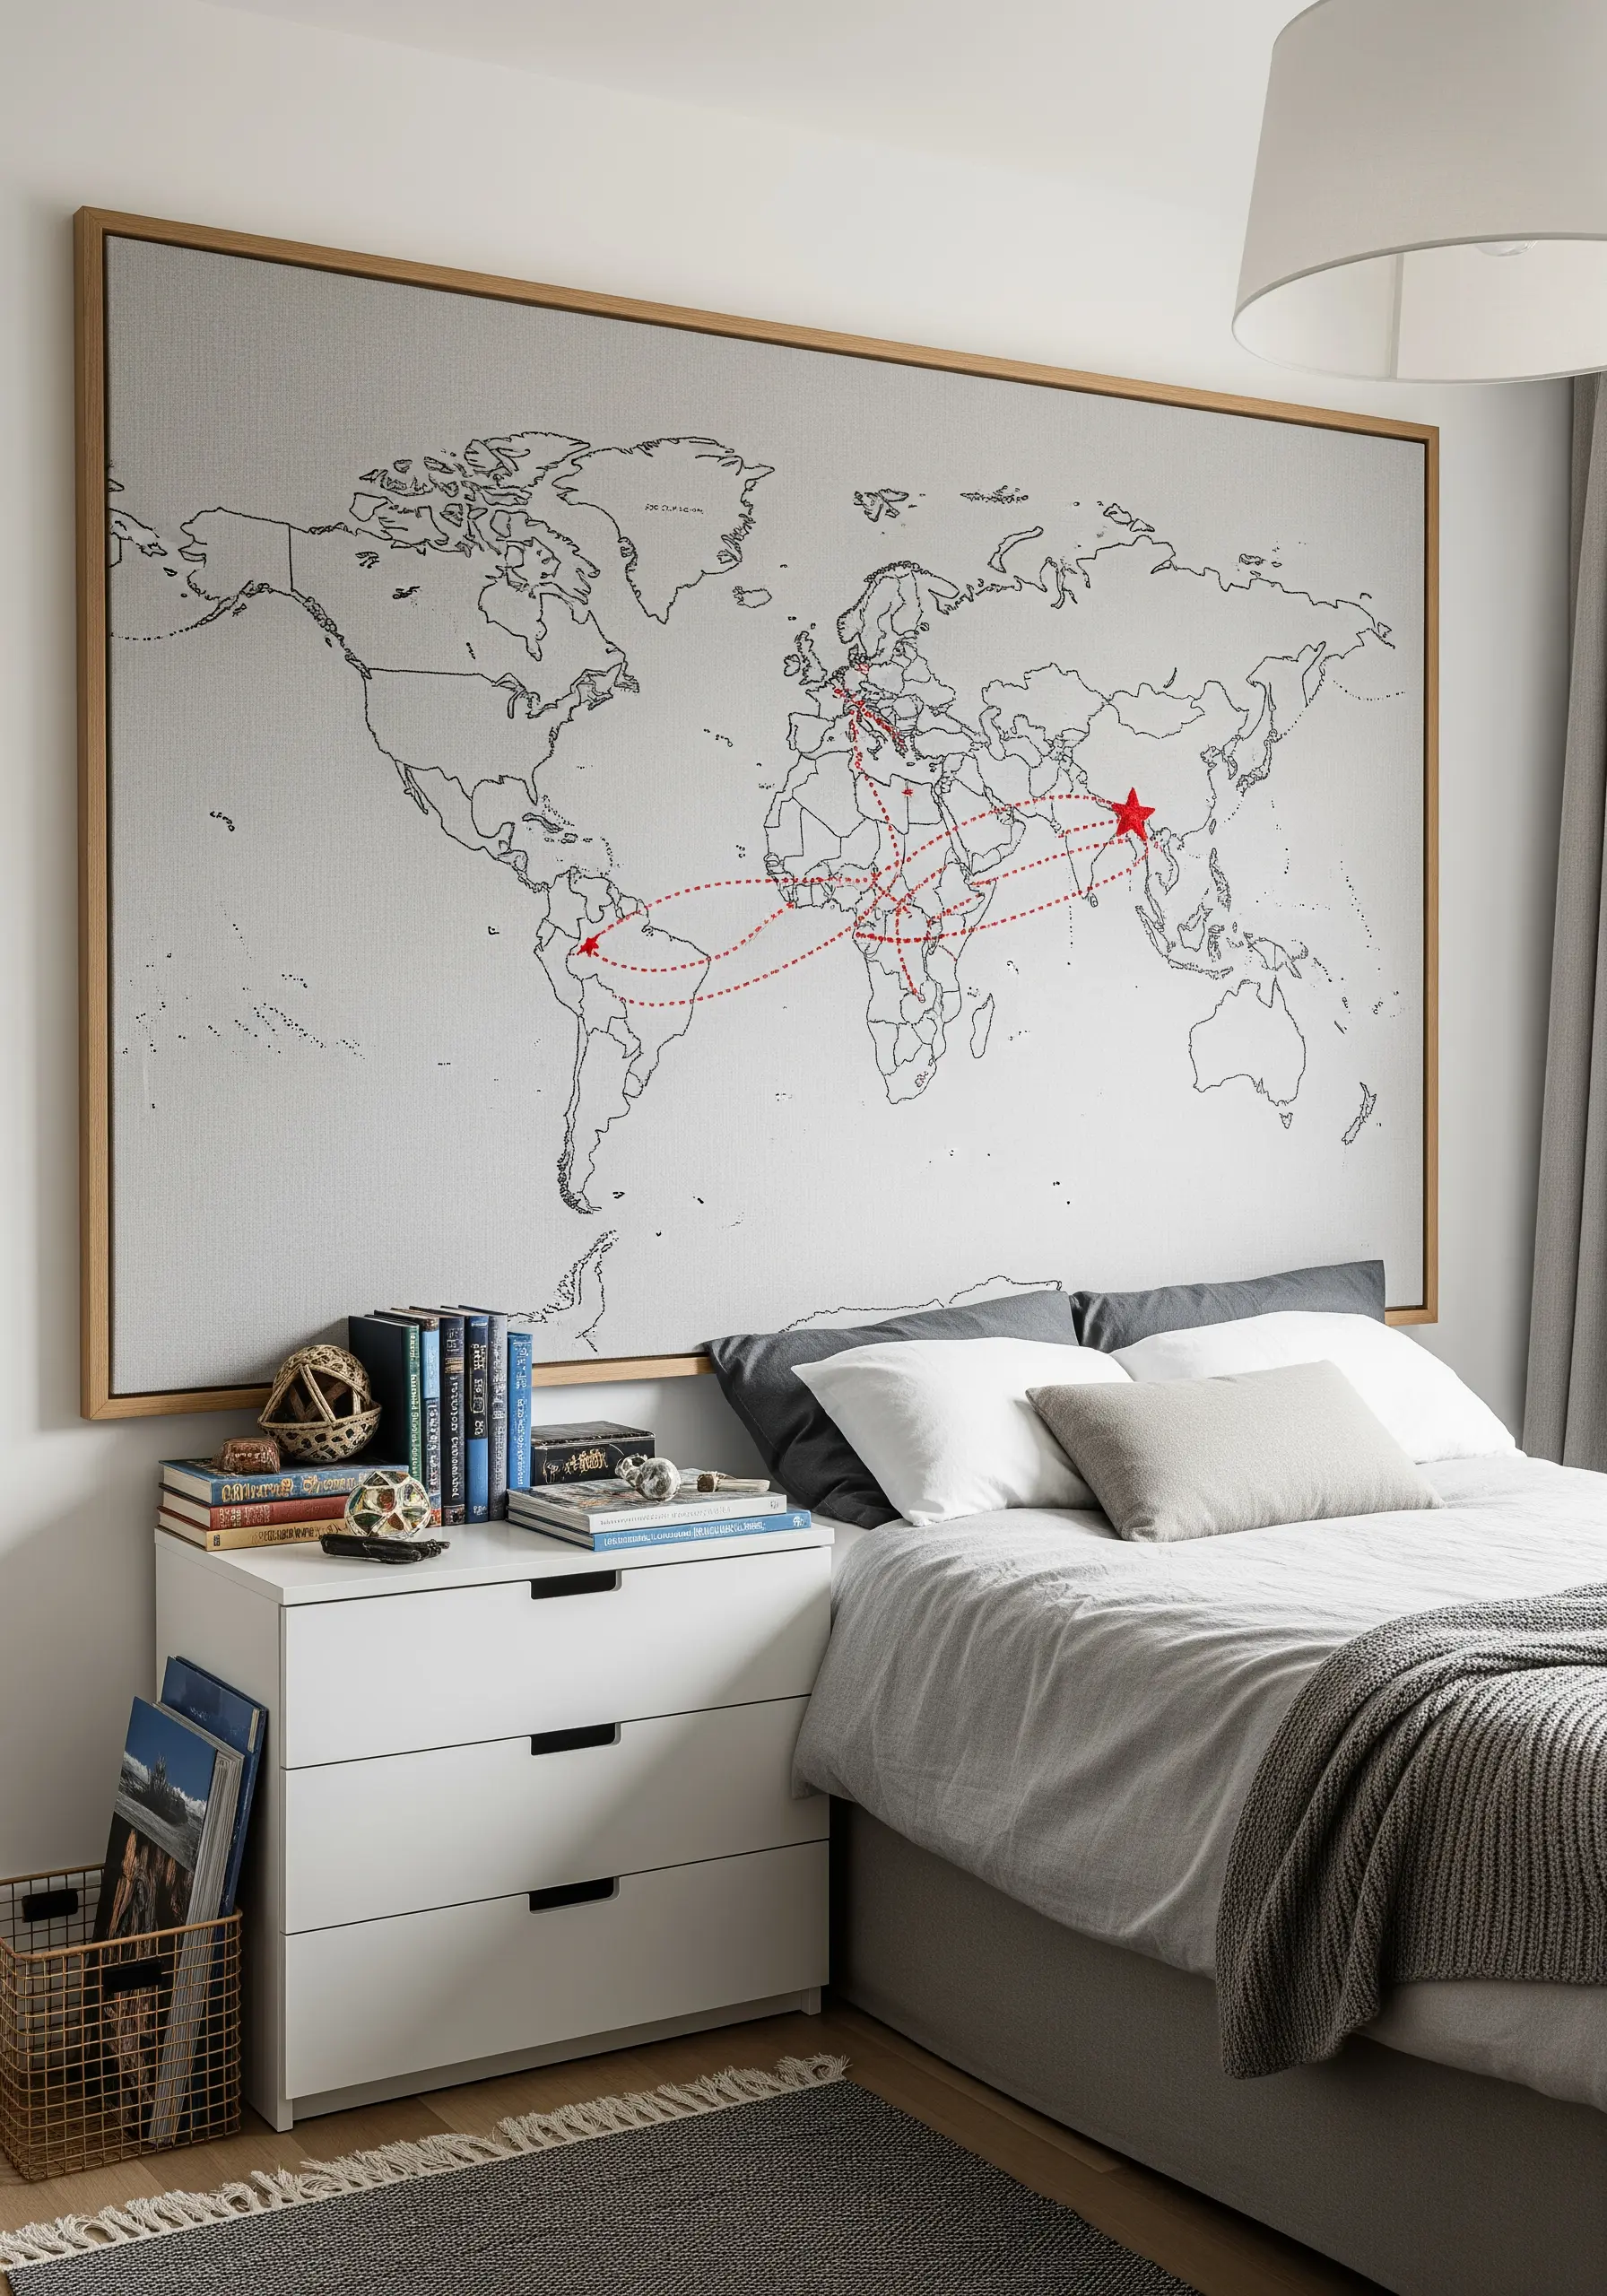
Turn a simple map into a dynamic, personal narrative of your life’s journeys.
Begin with a fabric panel printed with a world map, or transfer a design onto a large piece of canvas.
Use a simple backstitch in a neutral color like black or grey to neatly outline the continents.
Then, select a vibrant, contrasting color to stitch the paths of your travels, adding dates or initials if you wish. This is one of the most meaningful ways to create personalized embroidery for your home.
20. Blend Stitches and Paint for a Soft Watercolor Effect
For an ethereal, painterly style, integrate watercolor directly into your embroidery process.
Lightly paint your design onto your fabric with watercolors or fabric paints, allowing the colors to bleed softly into one another.
Once the paint is completely dry, use minimal embroidery to add definition and detail. A simple backstitch outline and a few scattered seed stitches or French knots are all you need.
The thread enhances the painted base without overpowering it, resulting in beautiful watercolor-style embroidery patterns with a dreamy quality.
21. Capture an Urban Landscape with Graphic Line Art
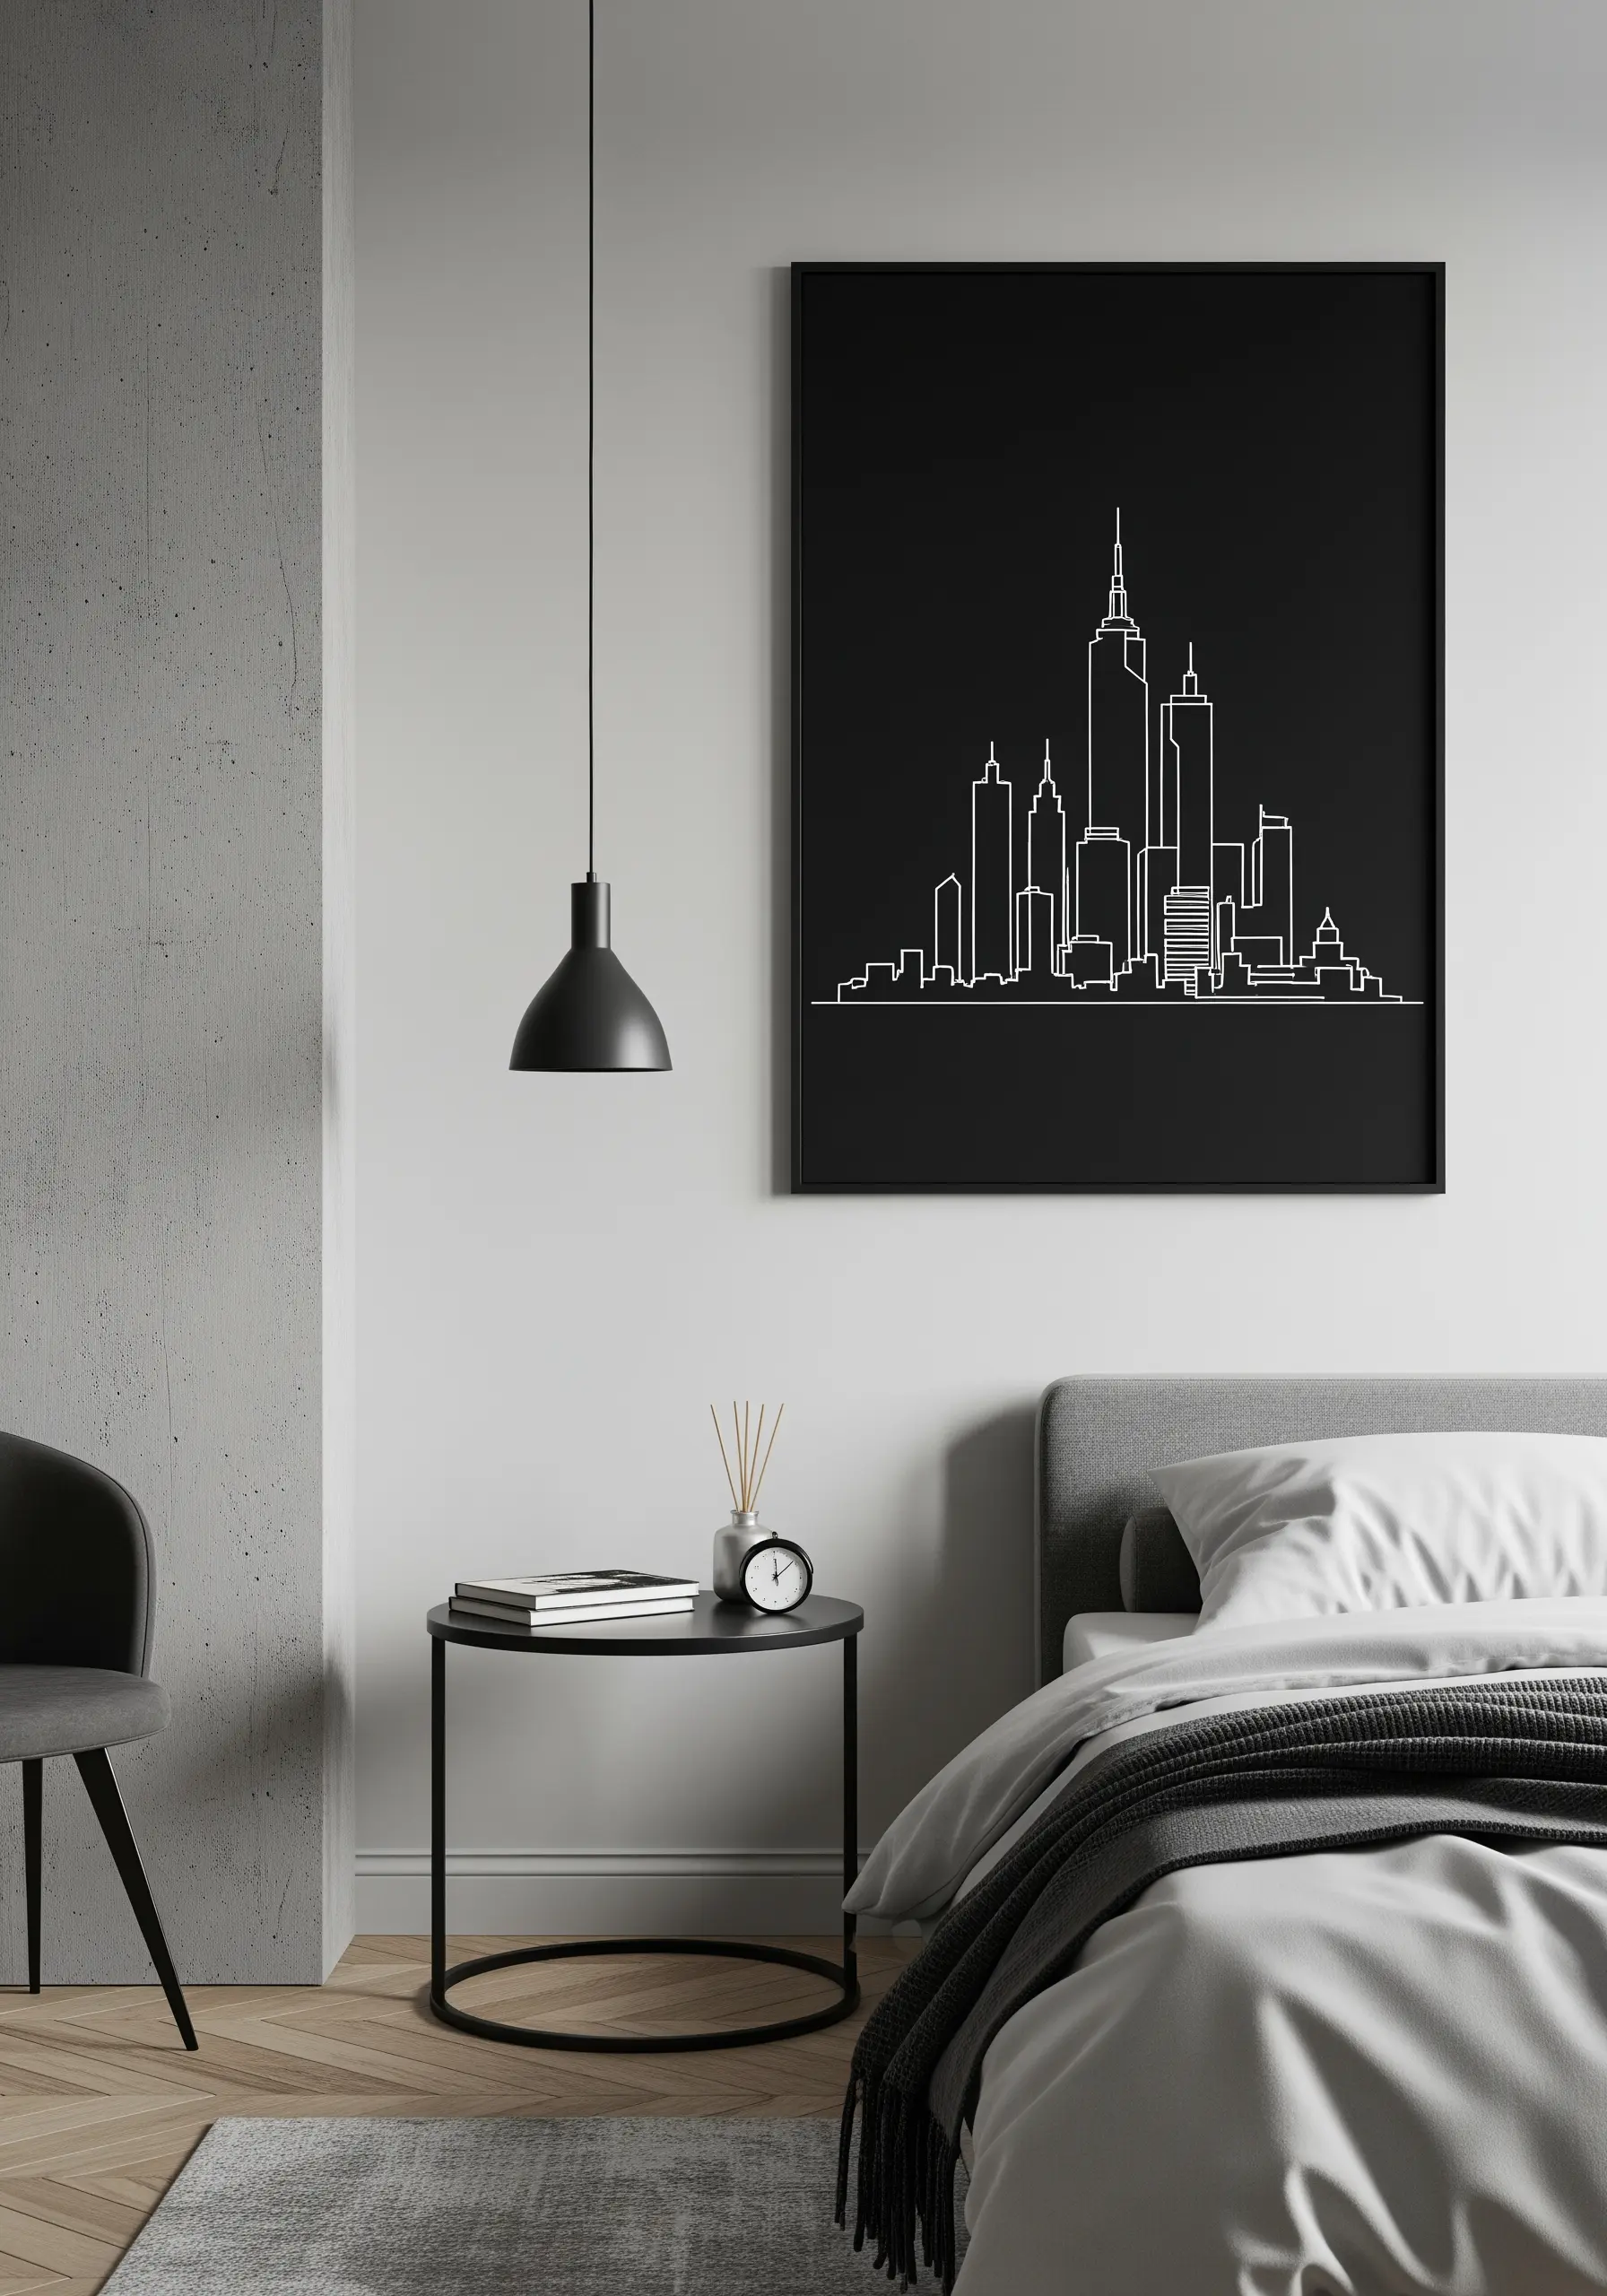
Create a sophisticated, modern piece by reducing a complex city skyline to its most essential lines.
The key to this minimalist style is a clean, unwavering line. Use a whipped backstitch or a stem stitch with three strands of floss to achieve a line that is both solid and smooth.
Choose a high-contrast palette, like white on black, to emphasize the graphic nature of the design.
Focus on capturing the iconic silhouettes rather than minute details, allowing this minimalist stitch design to make a bold statement through its simplicity.


