

Your tote bag is more than just a utility item; it’s a blank canvas waiting for a story. You have the skills, the threads, and the desire to create something beautiful, but perhaps you’re looking for that next step—a way to transform your stitching into something that feels truly intentional and chic.
The answer lies in the quiet confidence of minimalism. Line art embroidery isn’t about simplicity for its own sake; it’s about precision and the power of a single, well-placed stitch. It’s where every curve and angle carries weight, capturing a gesture, an object, or a mood with elegant restraint, turning your everyday items into wearable art.
Here, you will find more than just patterns. You will discover the techniques that create those impossibly smooth lines, the thread choices that make a design glow on dark fabric, and the subtle textural details that elevate a simple sketch into a tactile masterpiece. Prepare to see your tote bag not just as something you carry, but as something that expresses your unique, refined style.
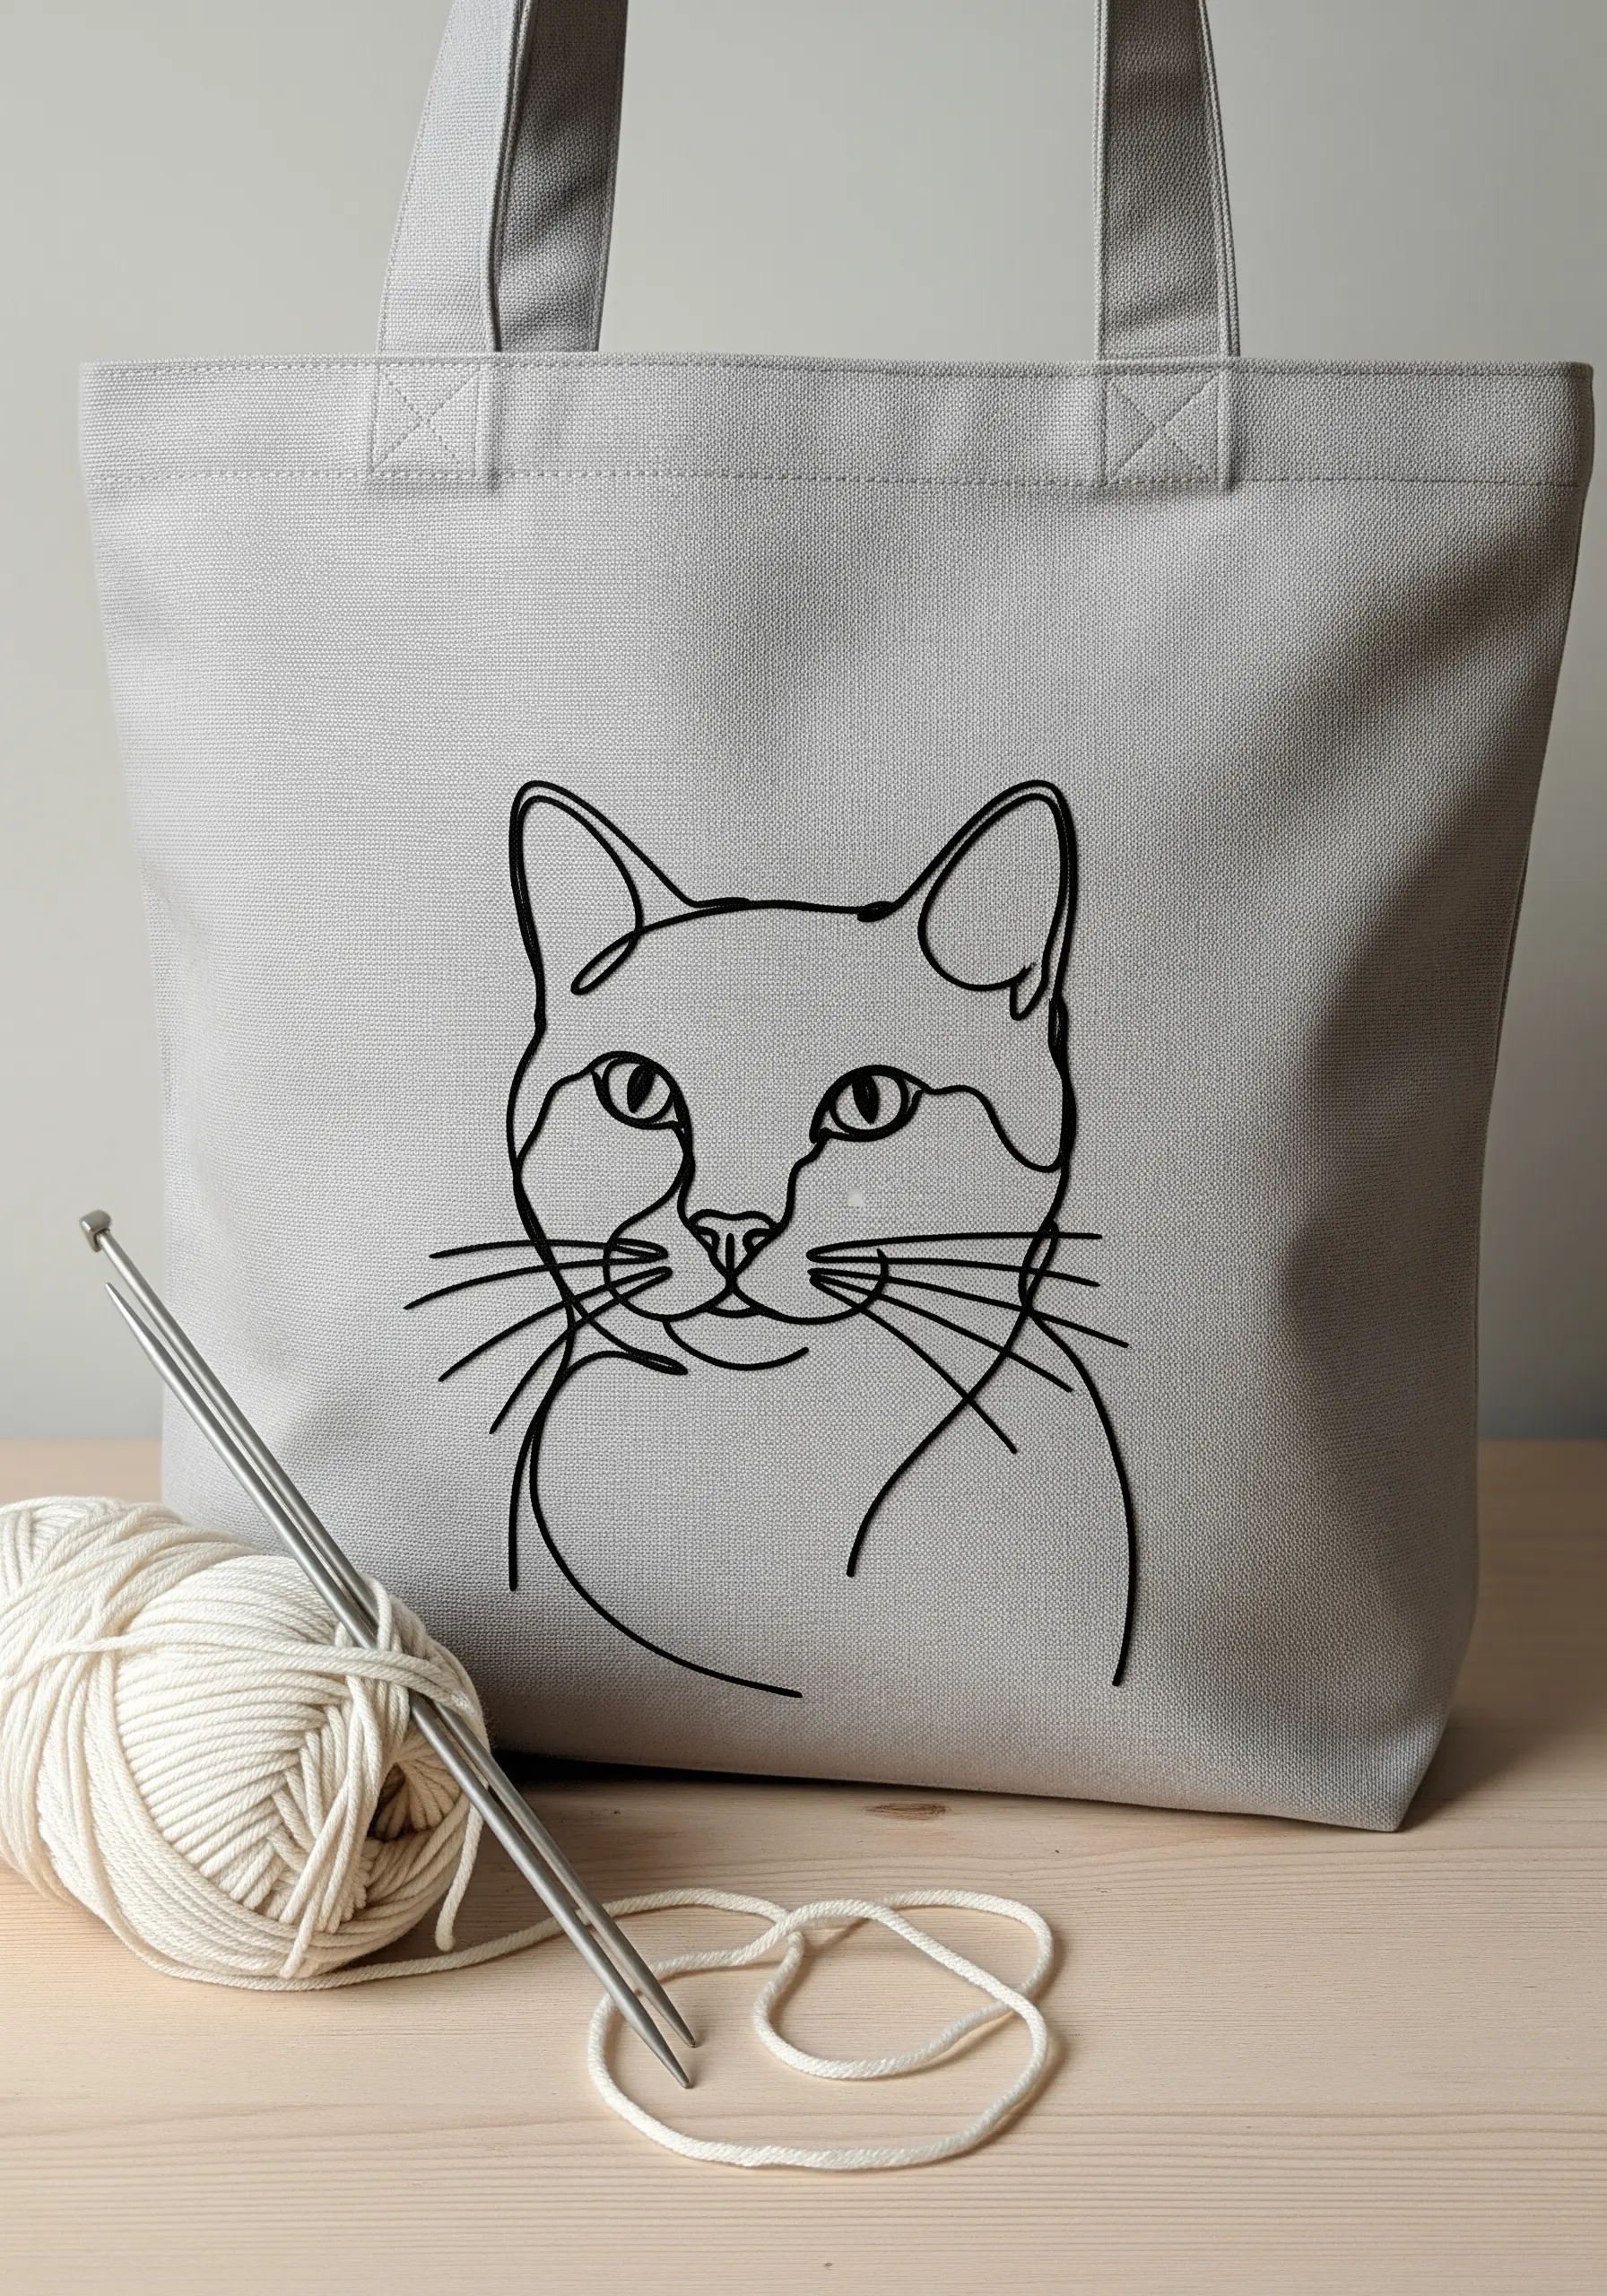
1. The Unbroken Line Portrait
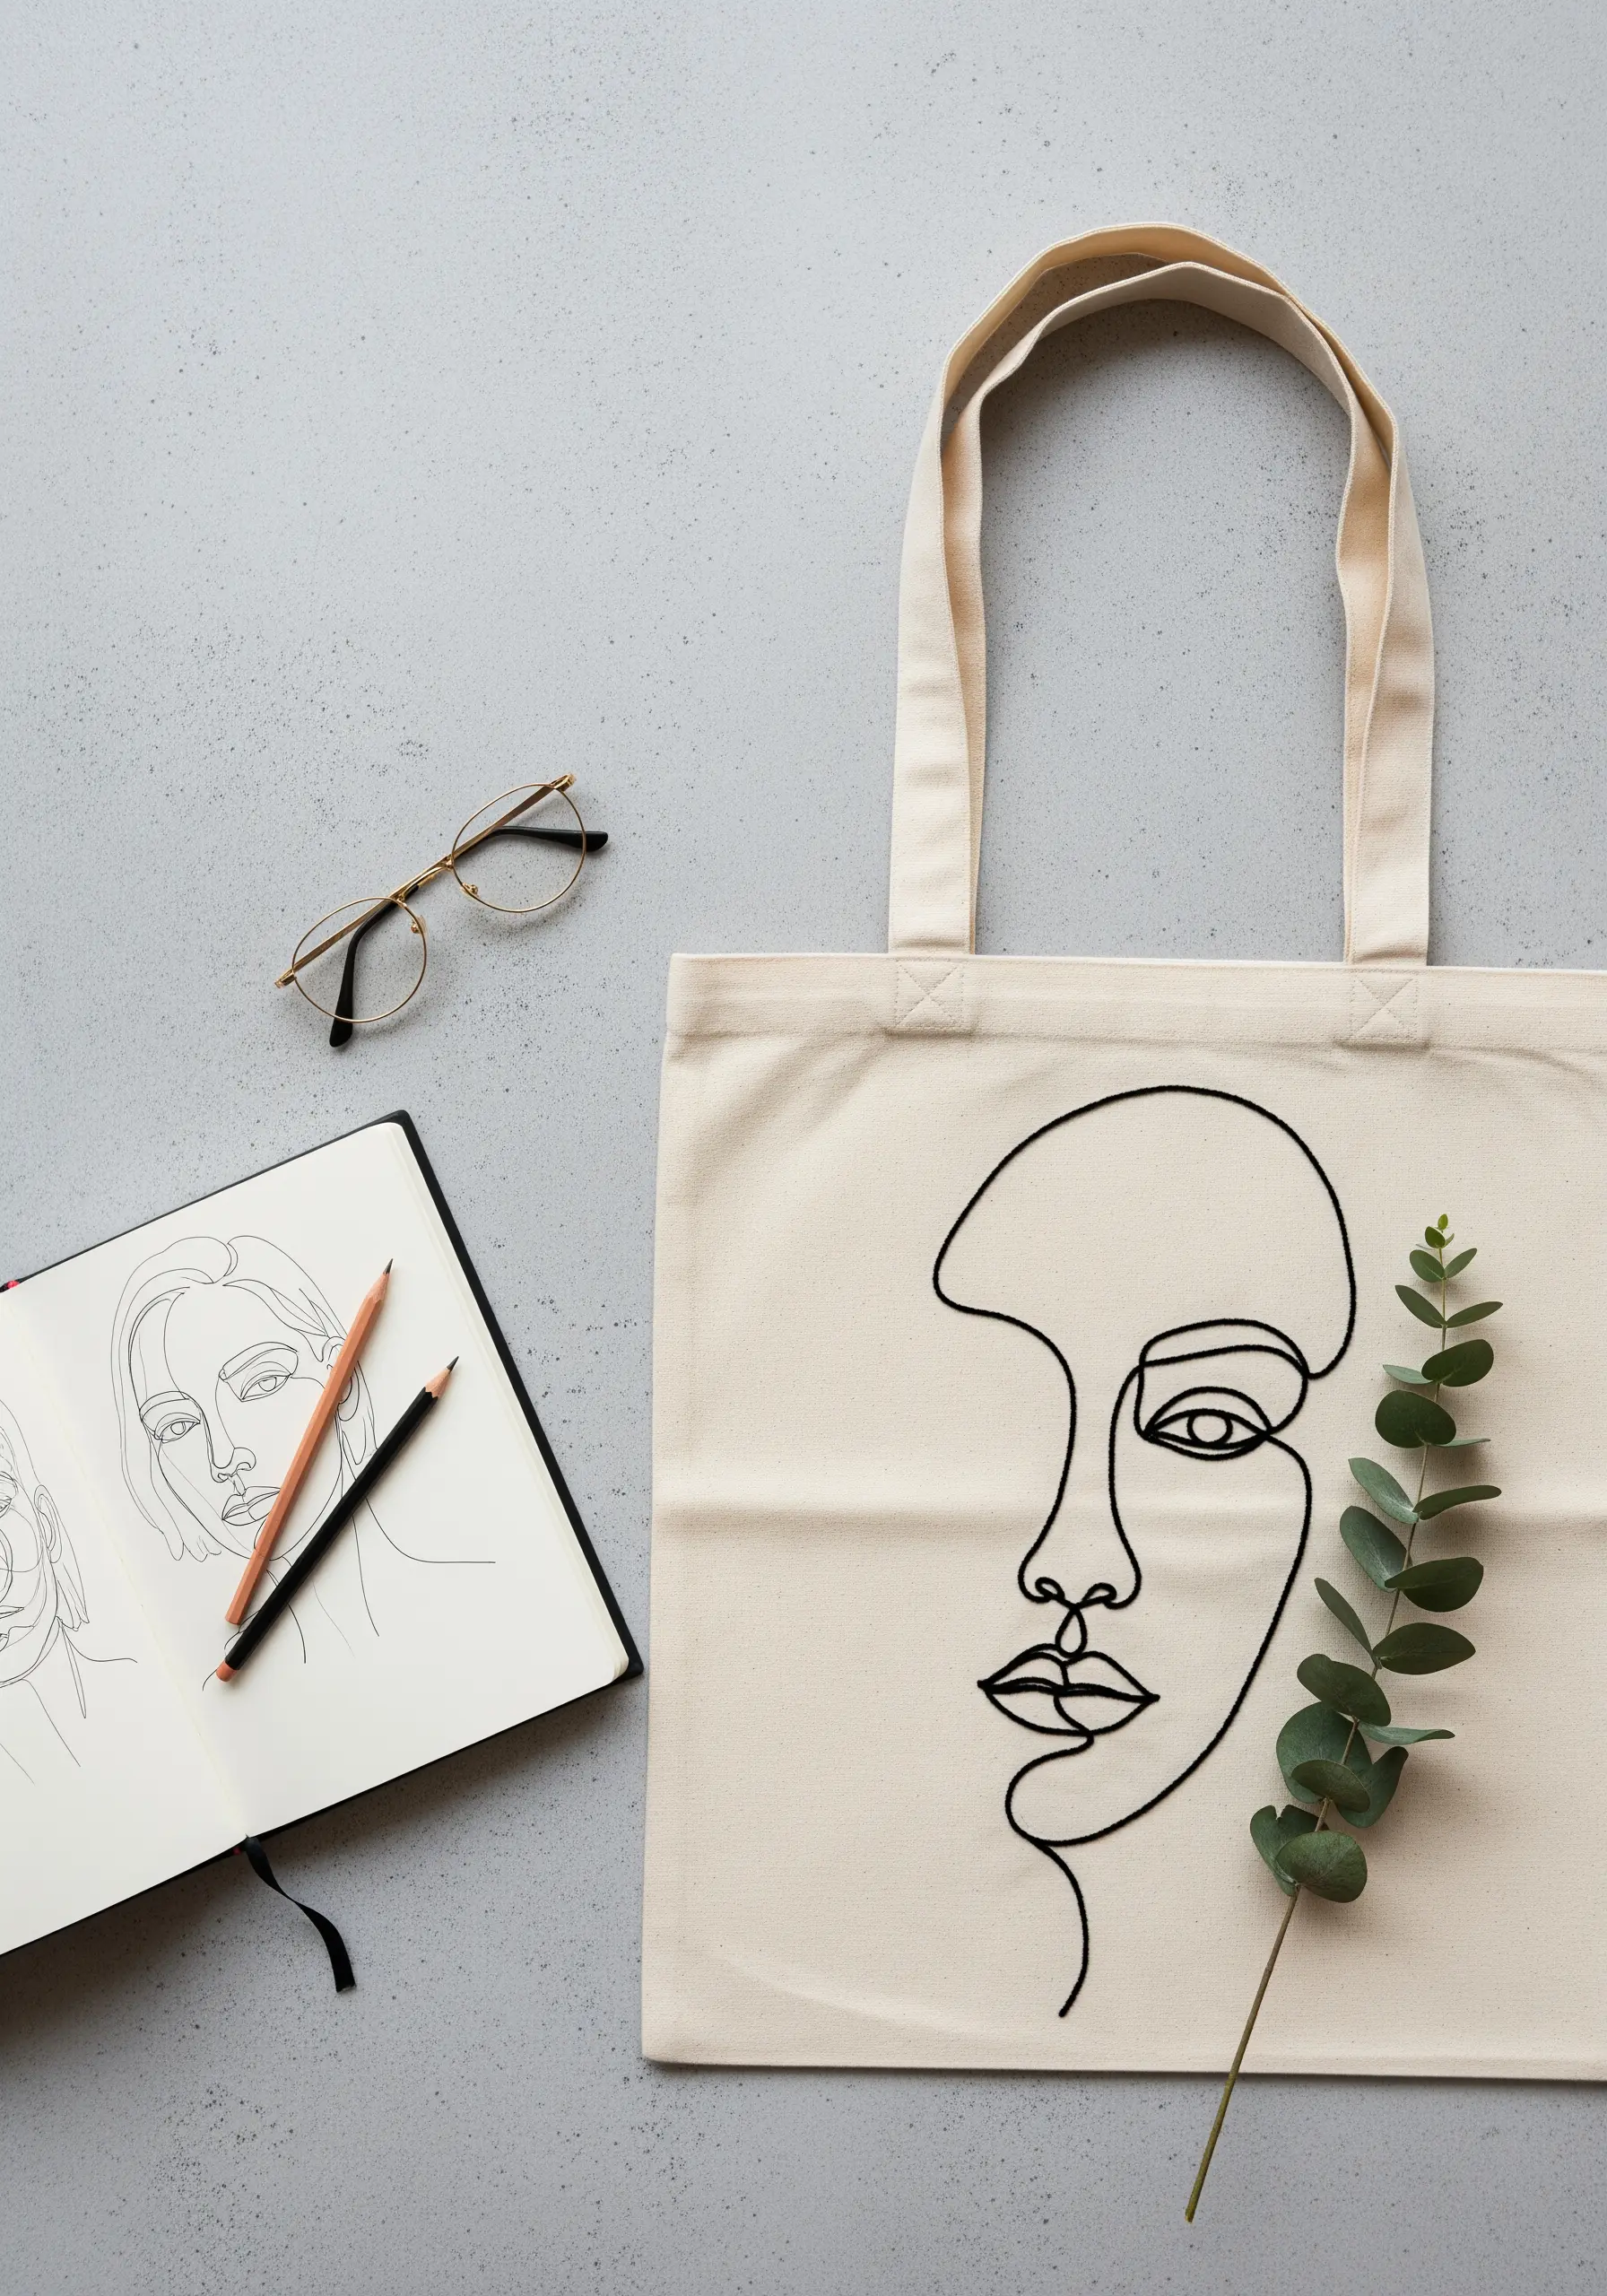
To achieve the fluid, continuous feel of a line drawing, use a whipped backstitch.
This technique smooths out the segmented look of a standard backstitch by wrapping a second thread around the line, creating a solid, raised cord that mimics an ink pen.
For sharp corners, like those defining the nose and eyes, decrease your stitch length to ensure crisp angles rather than soft curves.
Using a bold, high-contrast thread—like black on natural canvas—allows these single-line face profiles to make a strong graphic statement.
2. Luminous Botanicals on a Dark Canvas
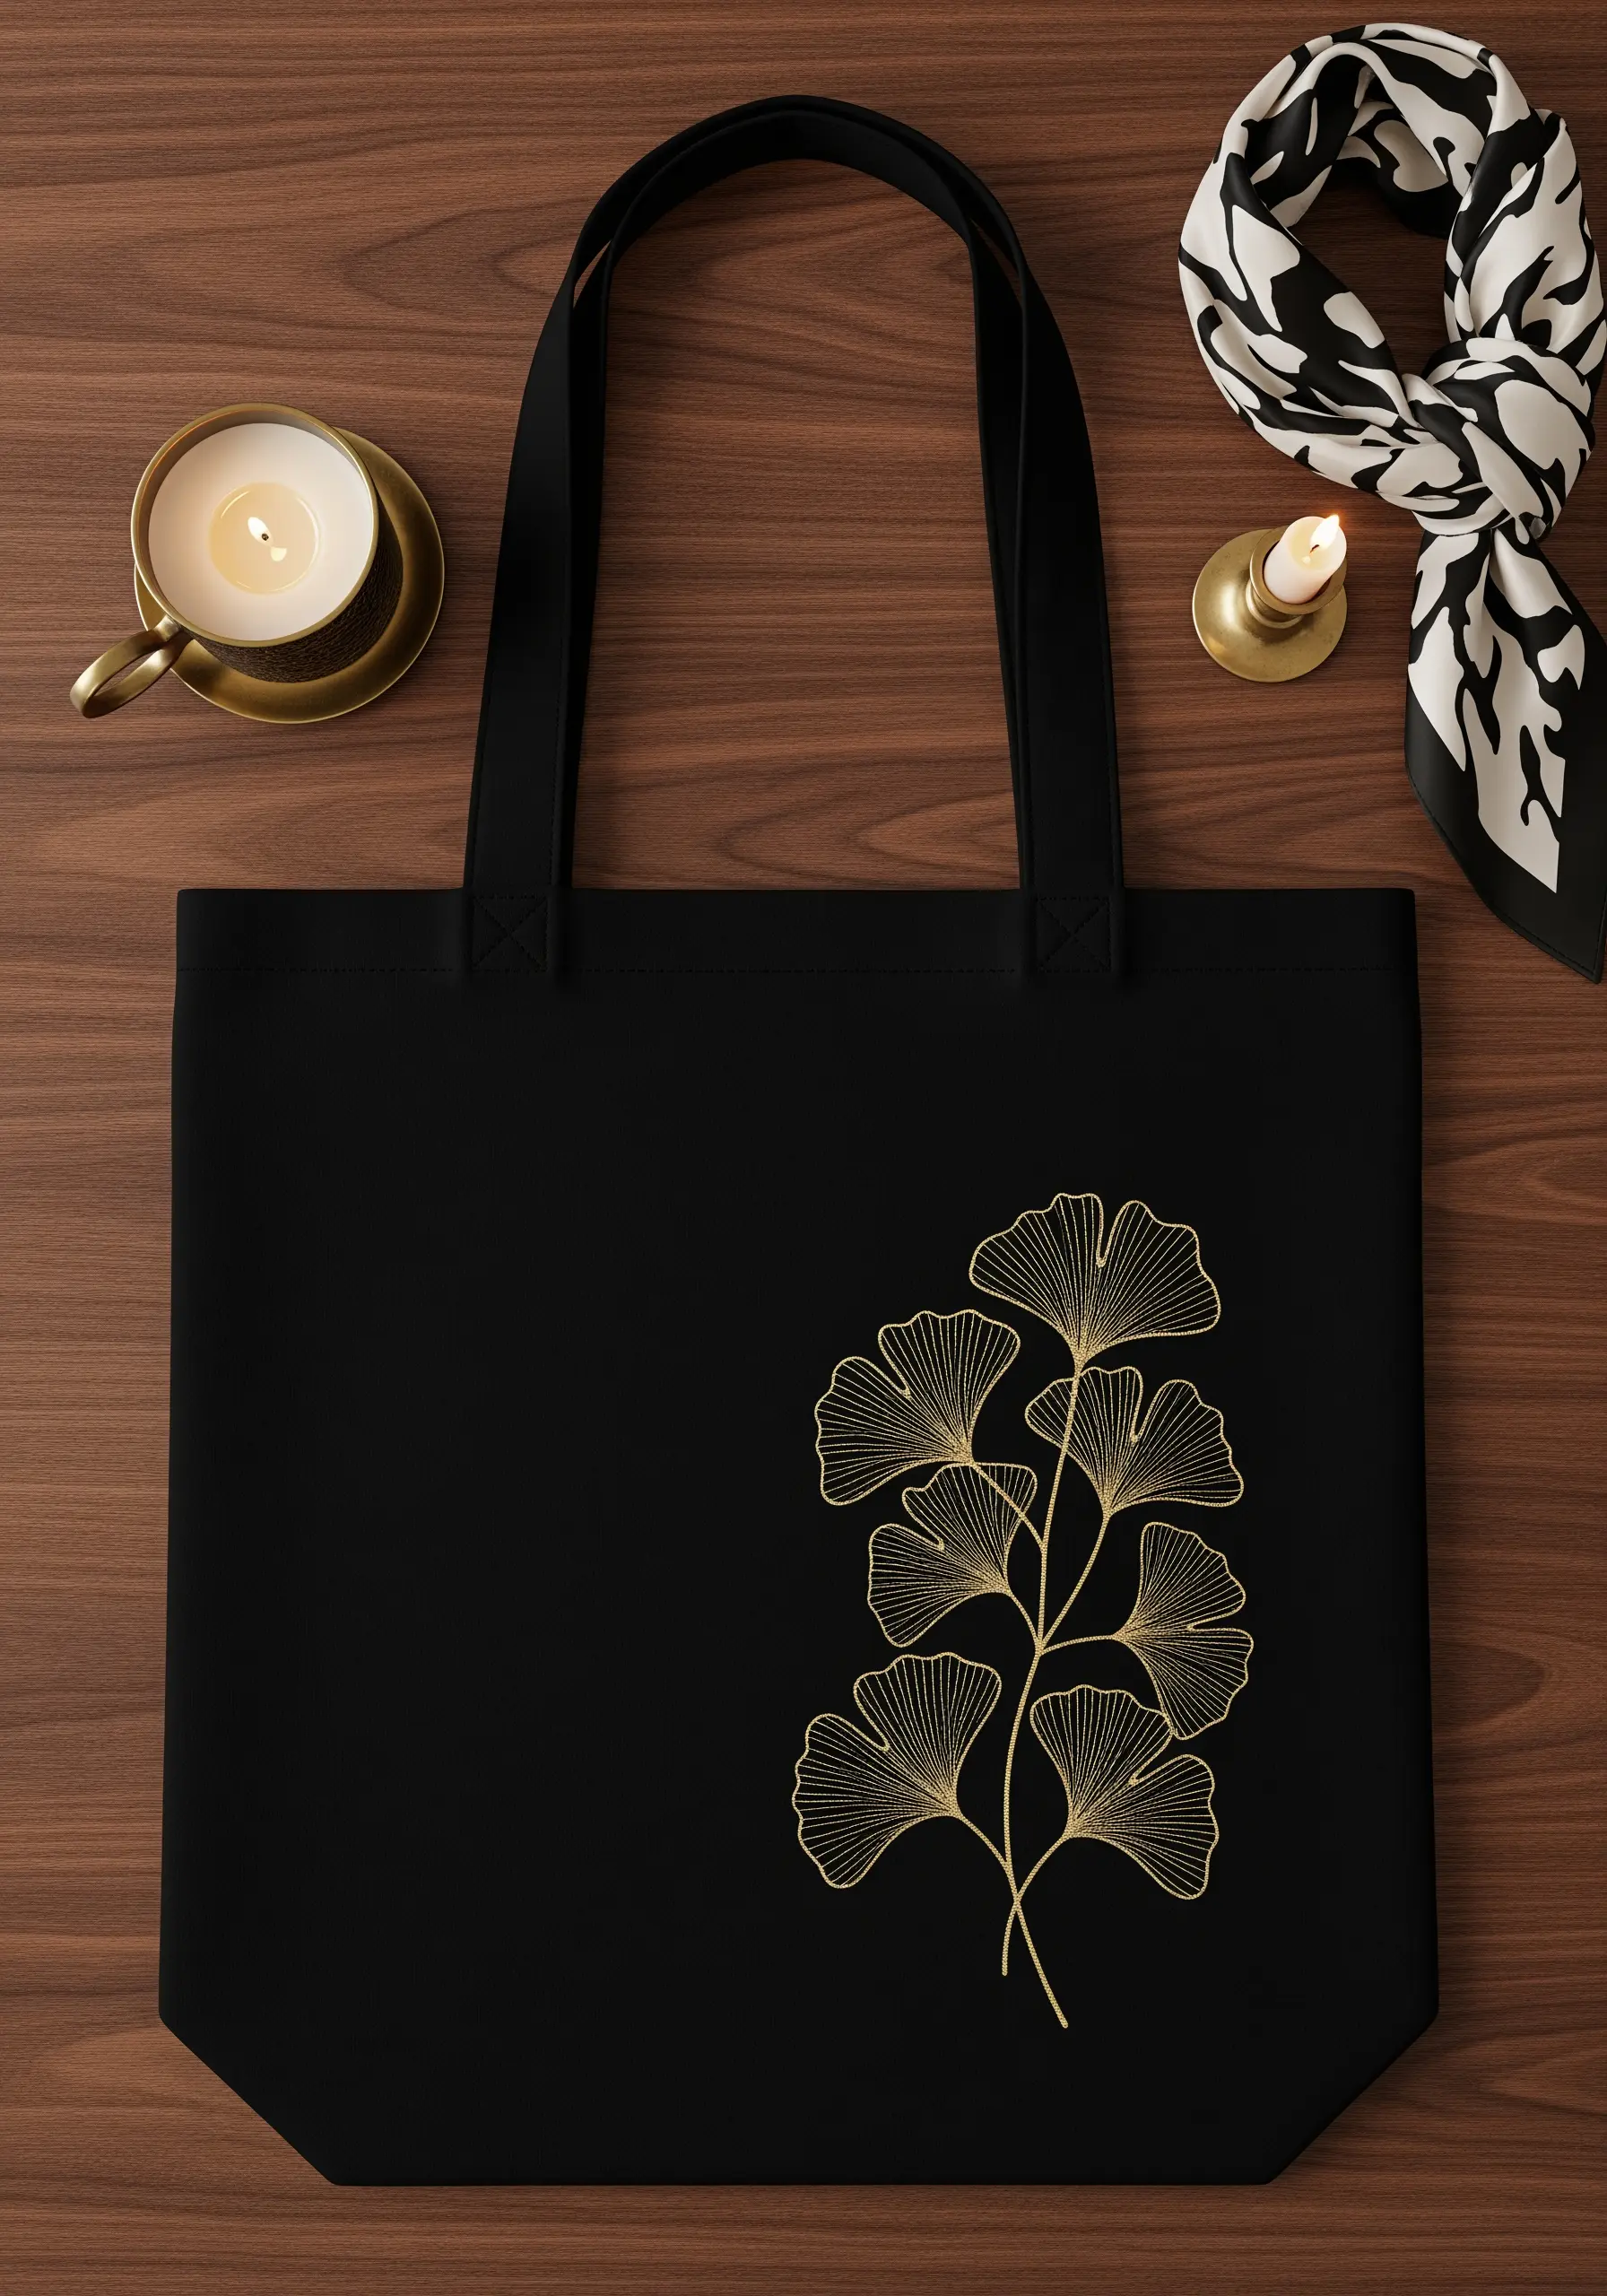
Make delicate botanicals glow on dark fabric by choosing a thread with a high sheen, such as a rayon floss or a fine metallic thread.
The light-reflecting quality creates a striking contrast that matte cotton floss cannot achieve.
Use a stem stitch for the central branch to give it a rounded, three-dimensional form, and switch to a single strand of thread for the delicate veins inside the leaves.
This subtle shift in thread weight creates visual depth and makes your botanical line art embroidery patterns appear more refined.
3. Celestial Motifs with Subtle Texture
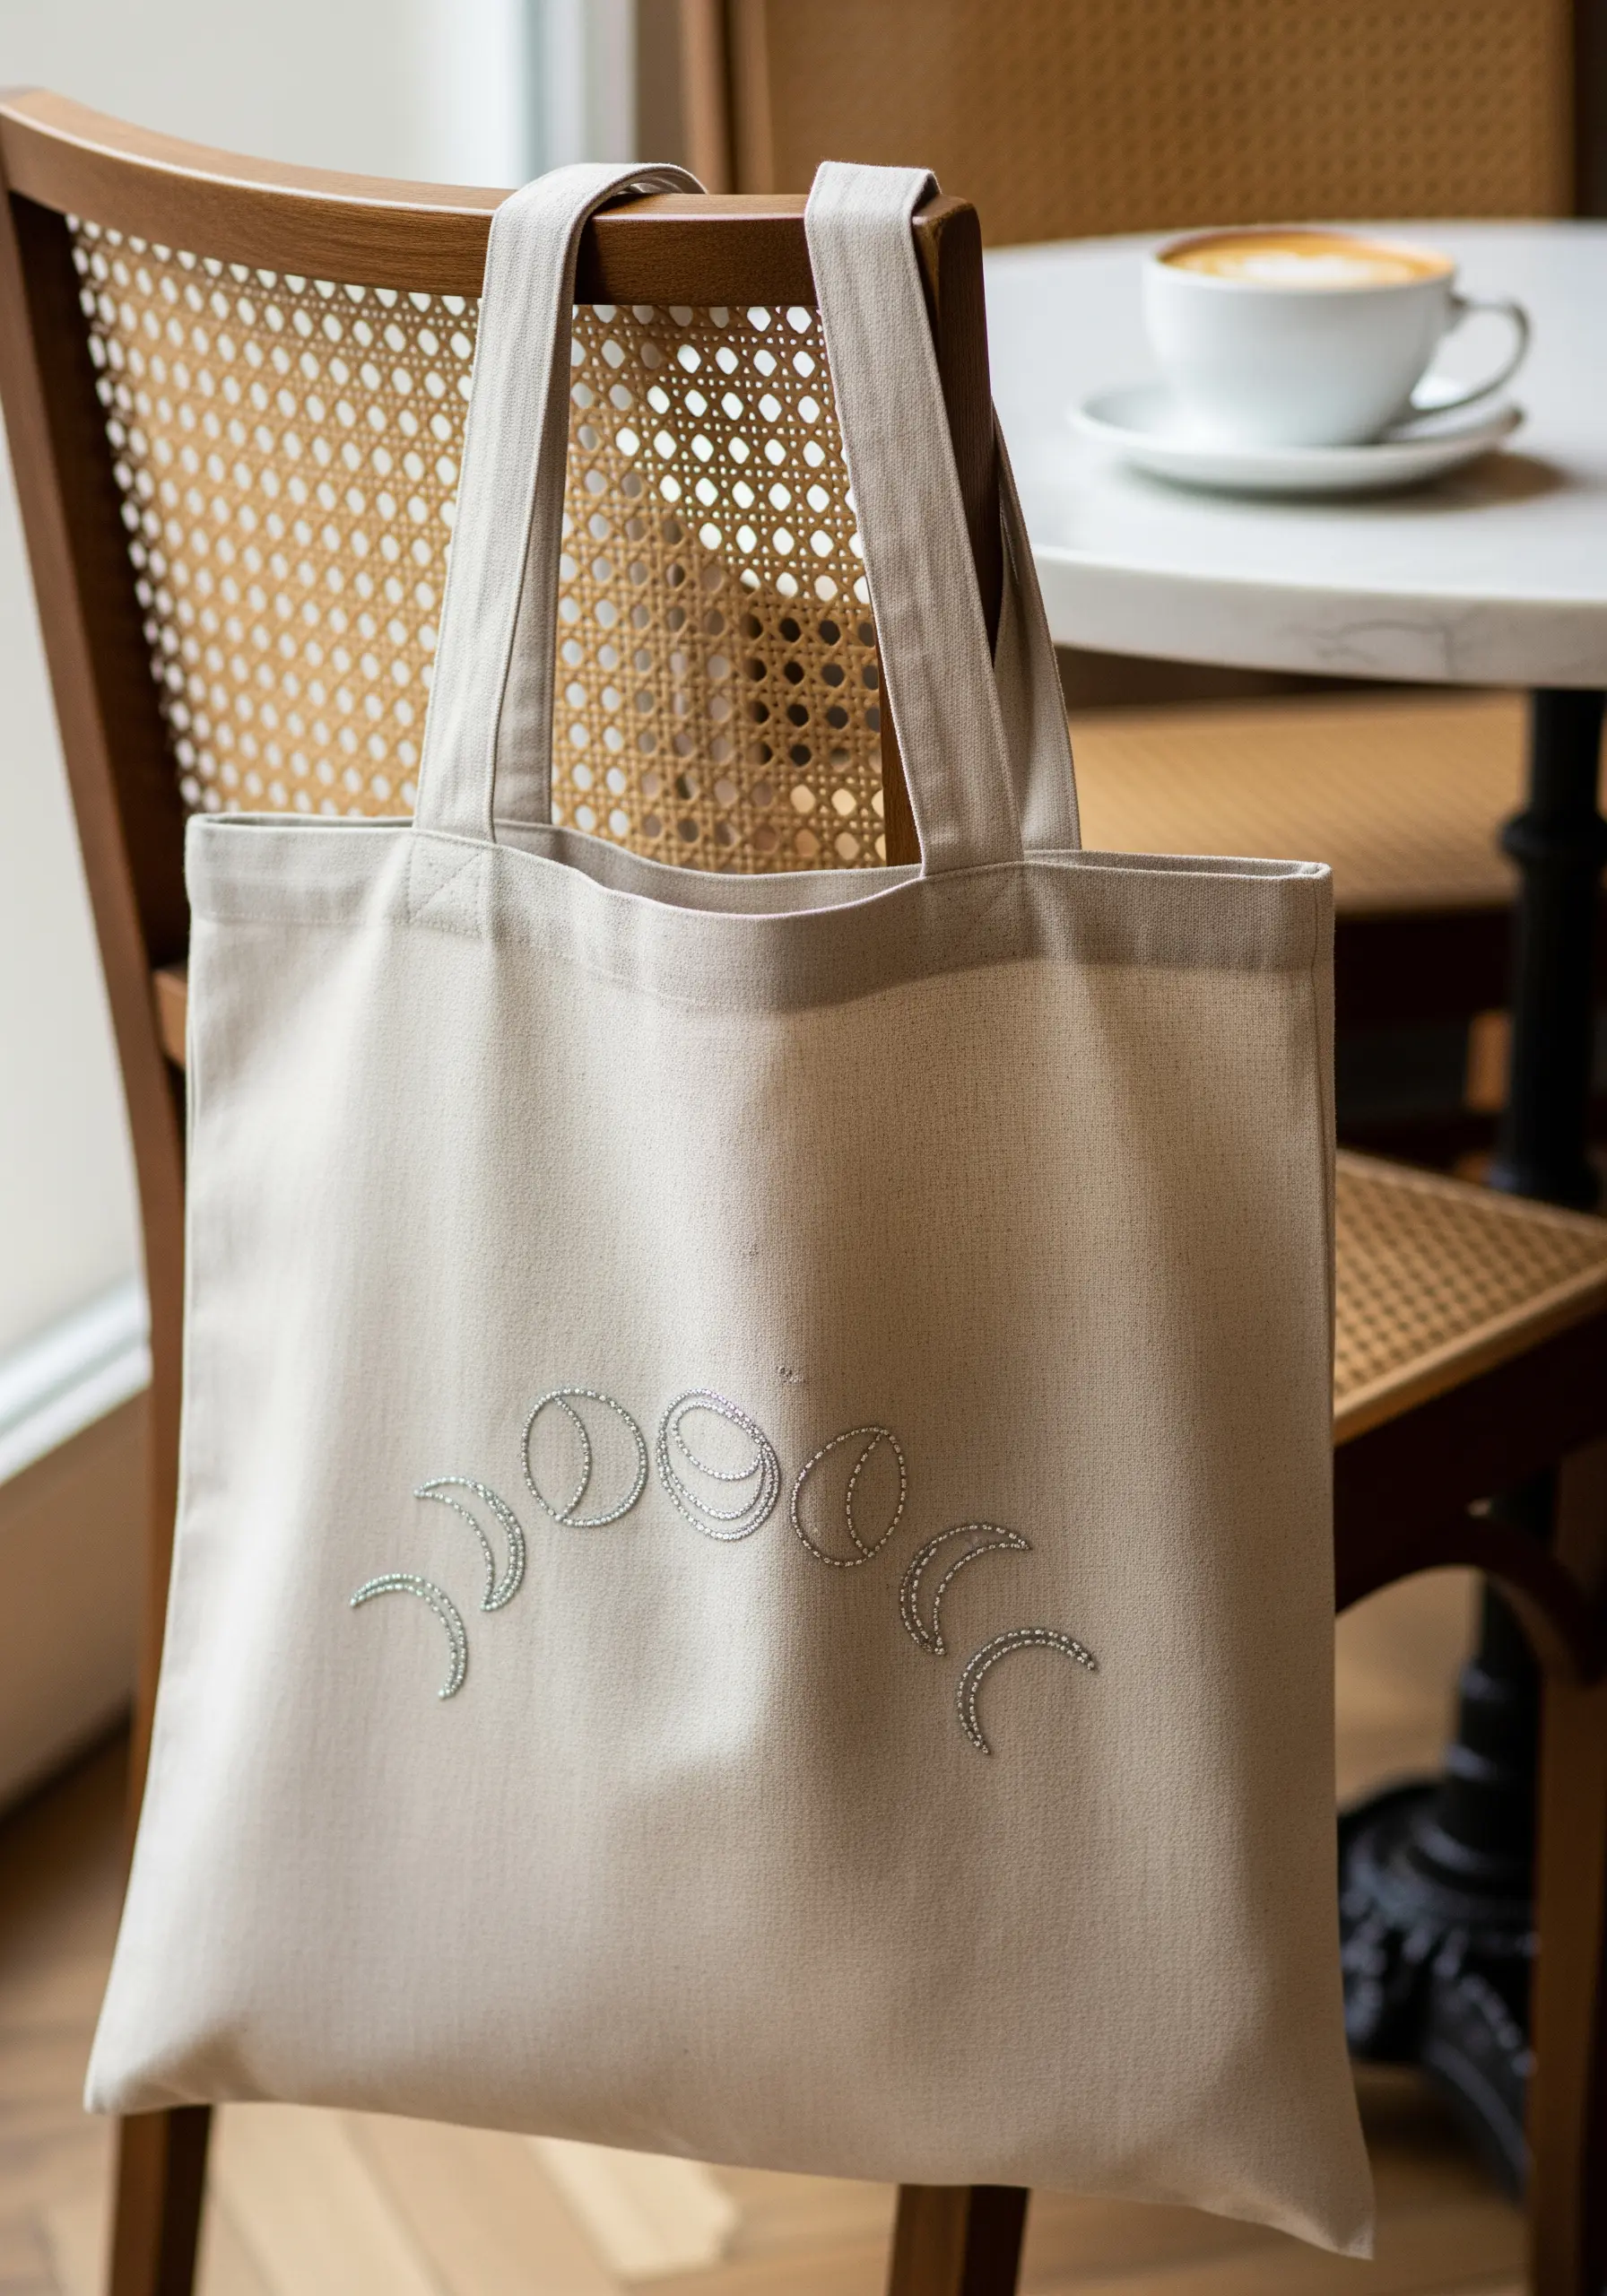
Elevate a simple moon phase pattern by incorporating textural fill stitches instead of a flat satin stitch.
For the crescent moons, use a dense seed stitch to create a stippled texture that subtly mimics the lunar surface.
For the fuller moons, a circular satin stitch worked from the outside in will produce a soft, radial sheen.
Using a single color, like a soft silver-grey on a neutral tote, keeps the focus on the textural play, making these minimal sky moon designs feel both modern and ethereal.
4. Architectural Elegance in a Single Hue
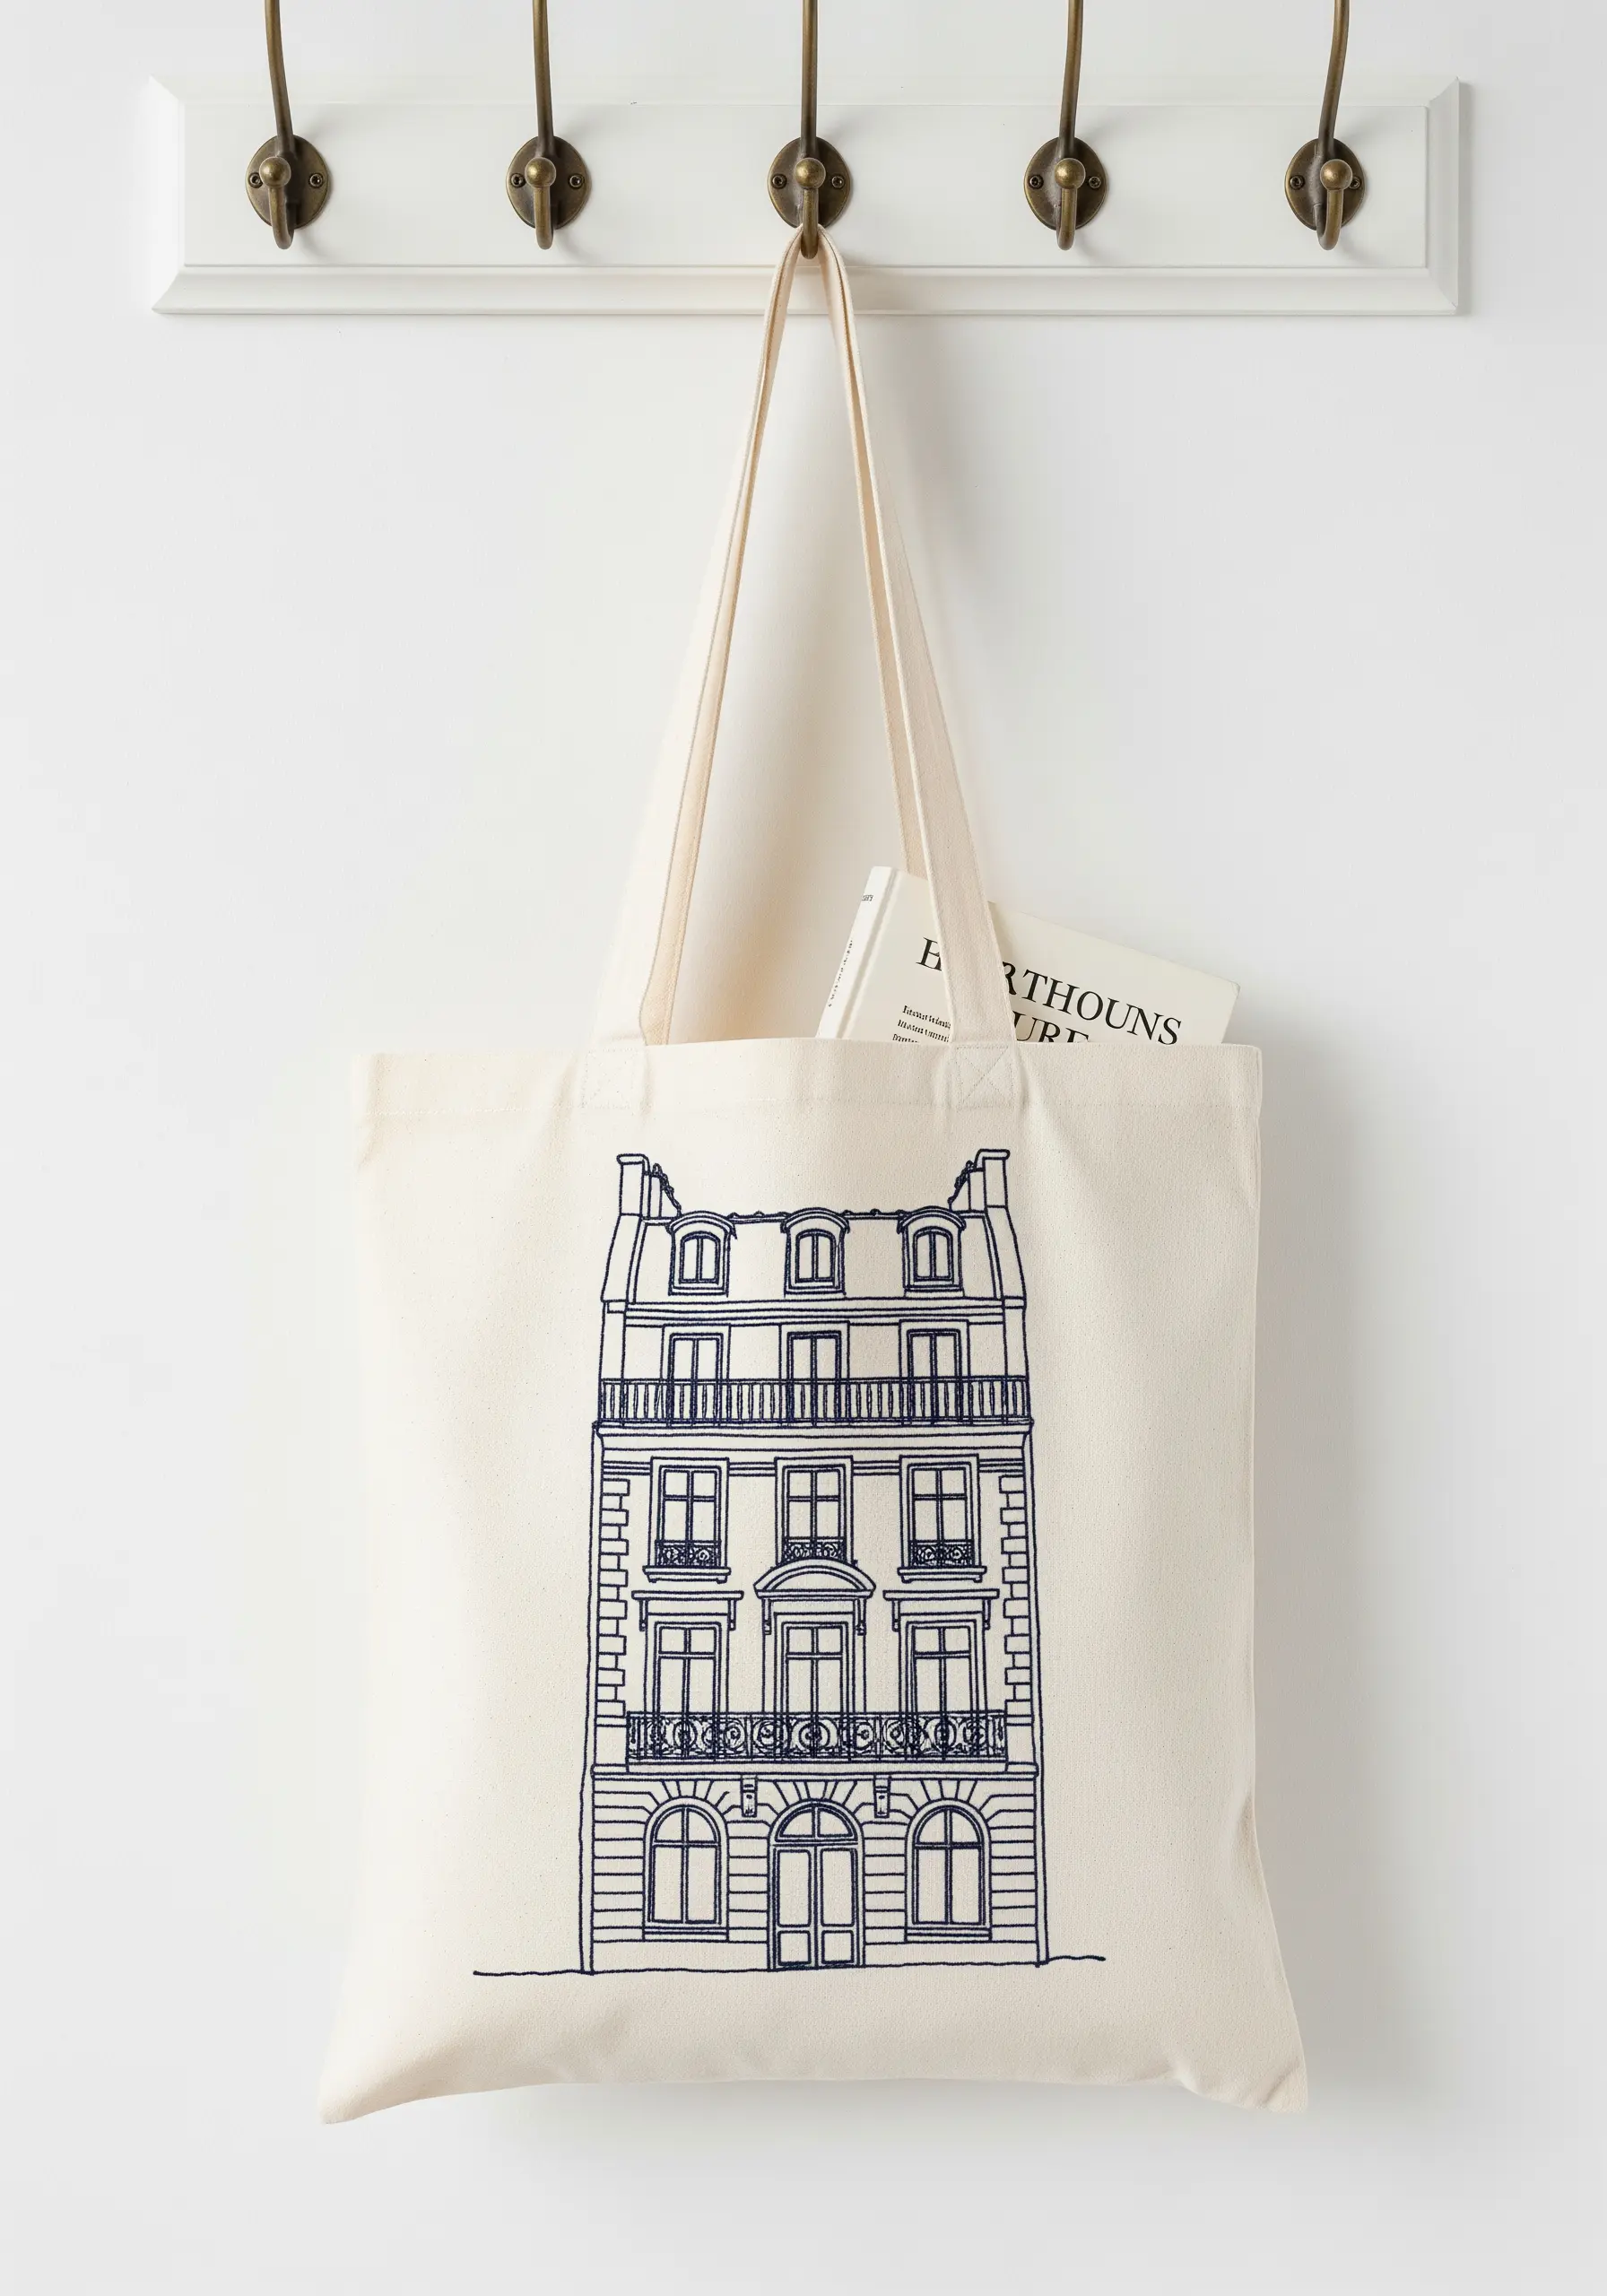
When stitching detailed architectural designs, clarity is key.
Use a thin, crisp thread like a pearl cotton in size 8 or 12 to ensure every windowpane and balcony rail is sharply defined.
A split stitch is ideal here; it creates a finer, less rustic line than a backstitch, which is perfect for capturing the precision of man-made structures.
Sticking to one color, such as navy on cream, gives the design a classic, blueprint-like aesthetic that feels sophisticated and intentional, much like in architectural string art designs.
5. Expressive Gestures with a Pop of Color
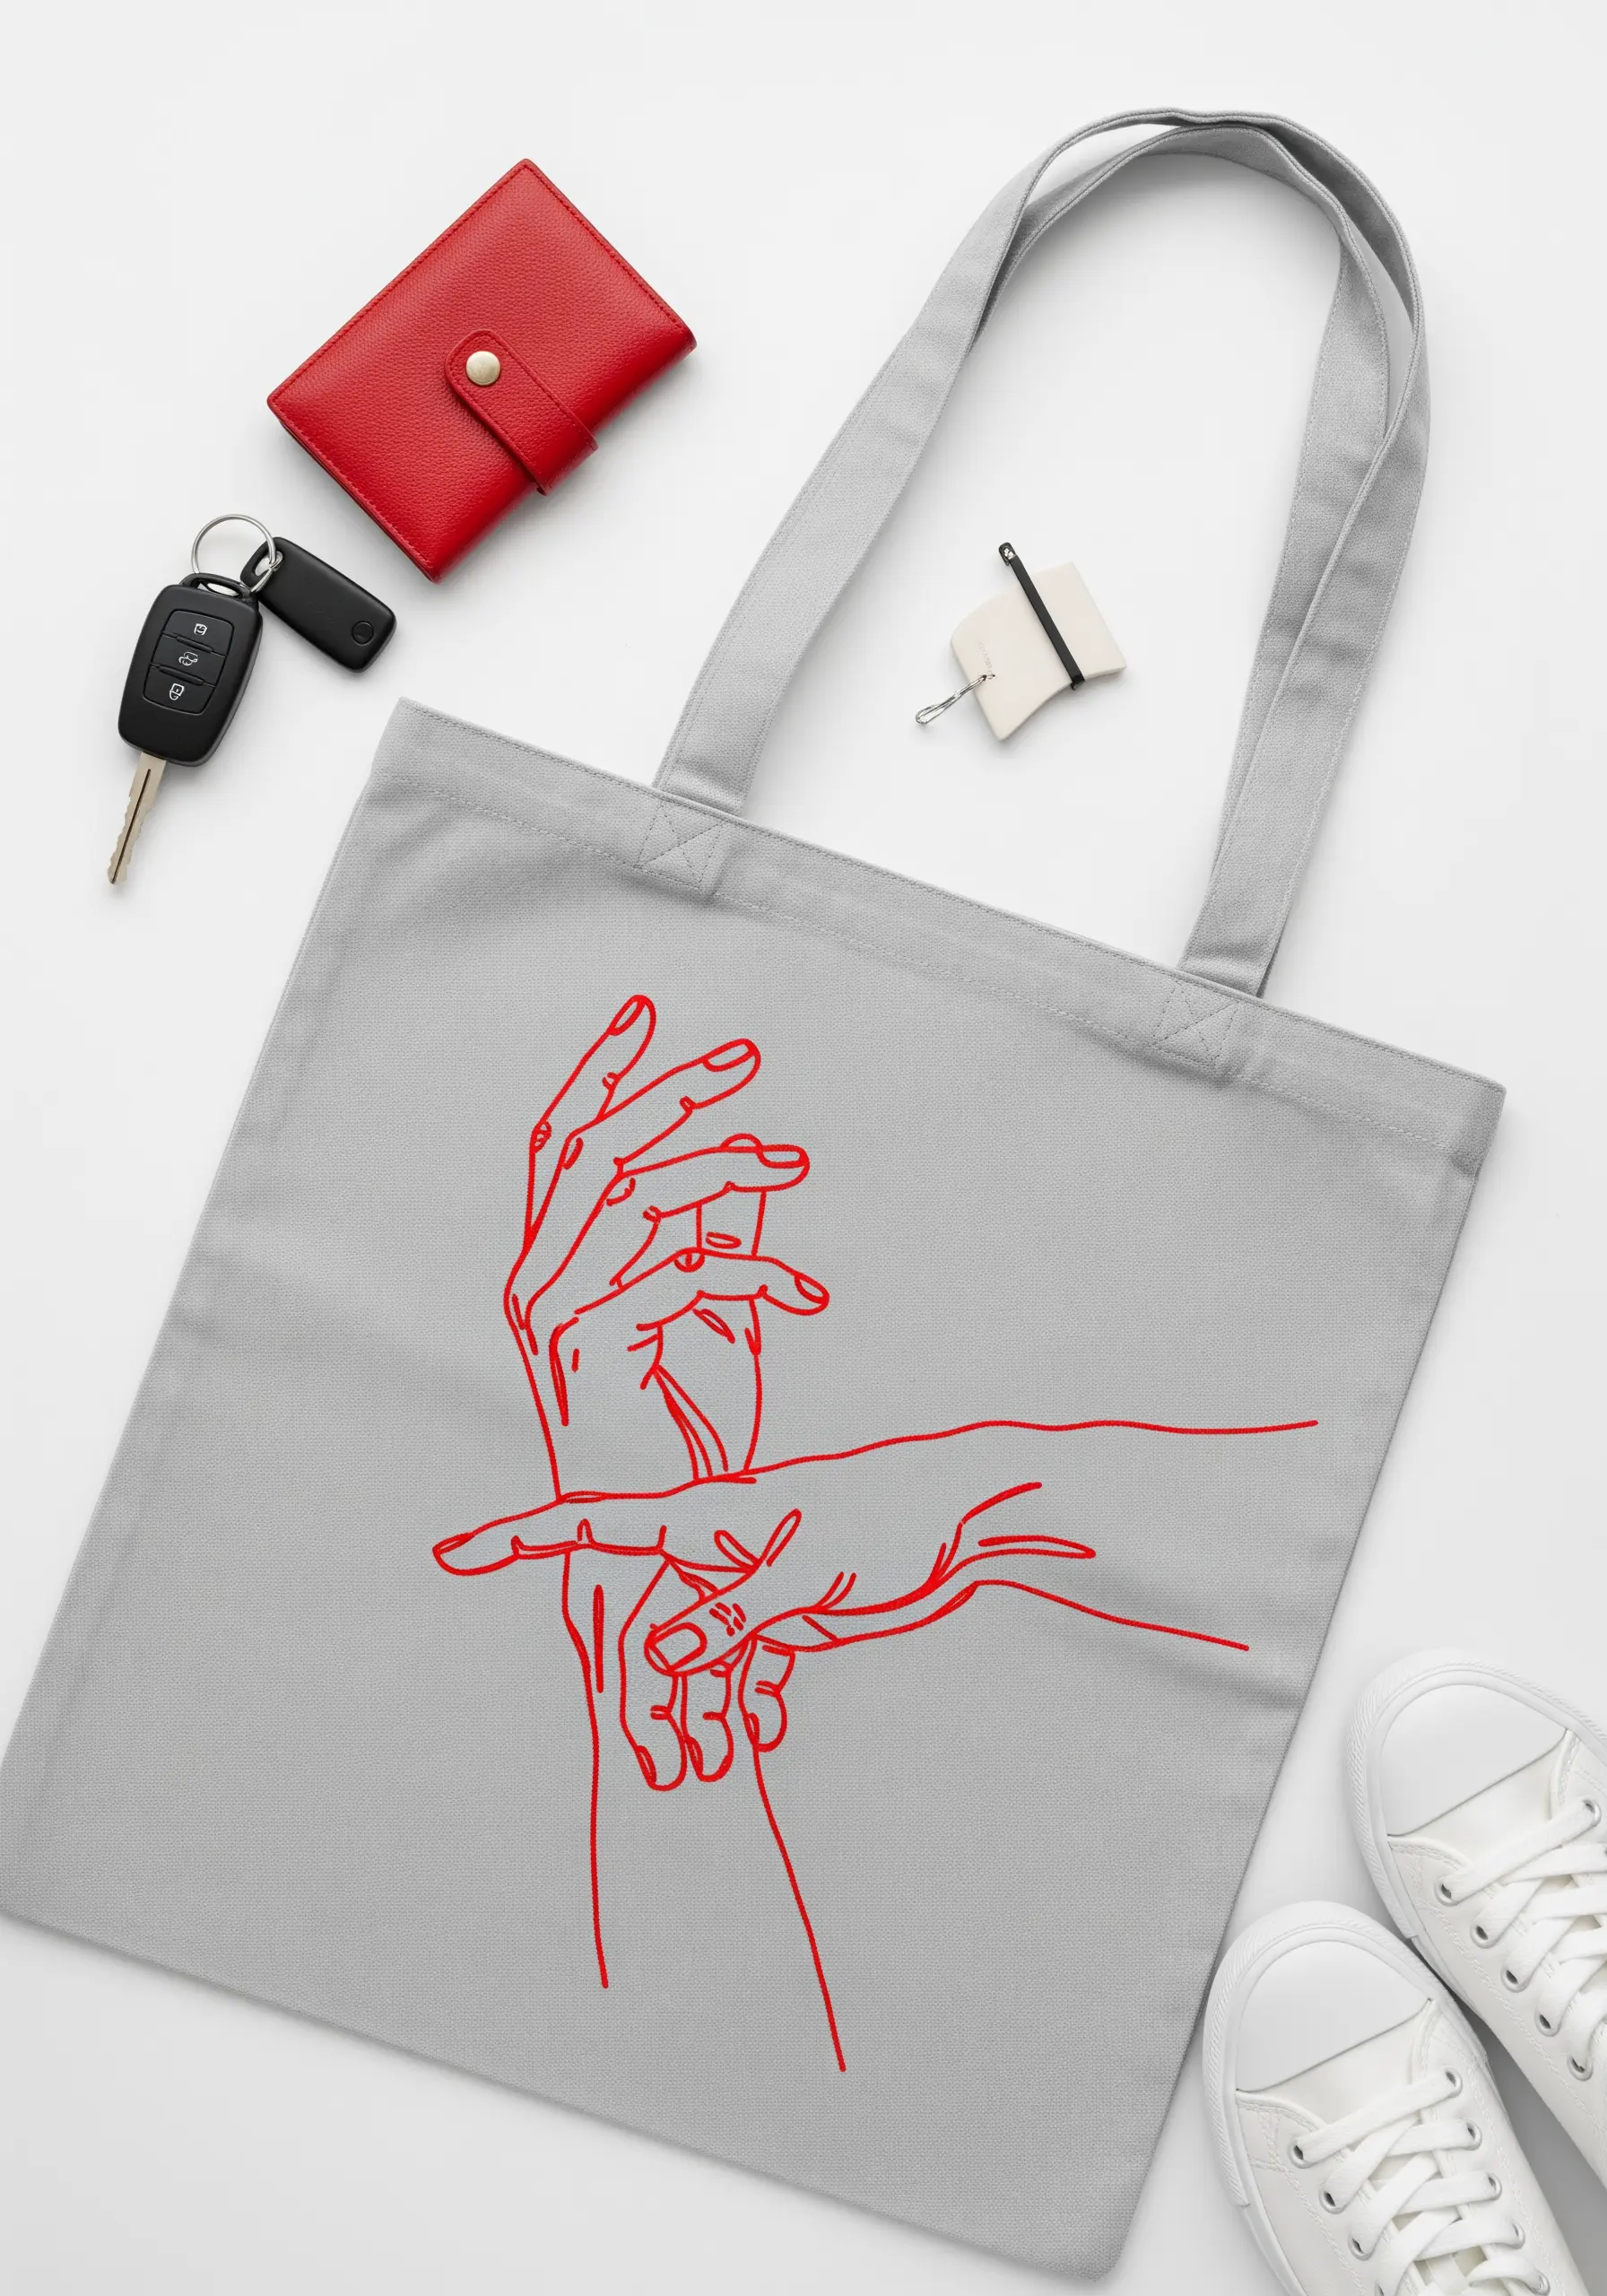
Capture the delicate energy of interlaced hands by using a single, bold color against a neutral background.
A vibrant red on grey canvas instantly draws the eye and gives the design an emotional weight.
To maintain the fluidity of the lines, use a stem stitch, which creates a smooth, rope-like curve that is perfect for outlining organic shapes.
Pay close attention to where the lines overlap, ensuring your stitches tuck cleanly behind one another to create a clear sense of depth, much like in emotional nursery decor.
6. Geometric Animals with Crisp Definition
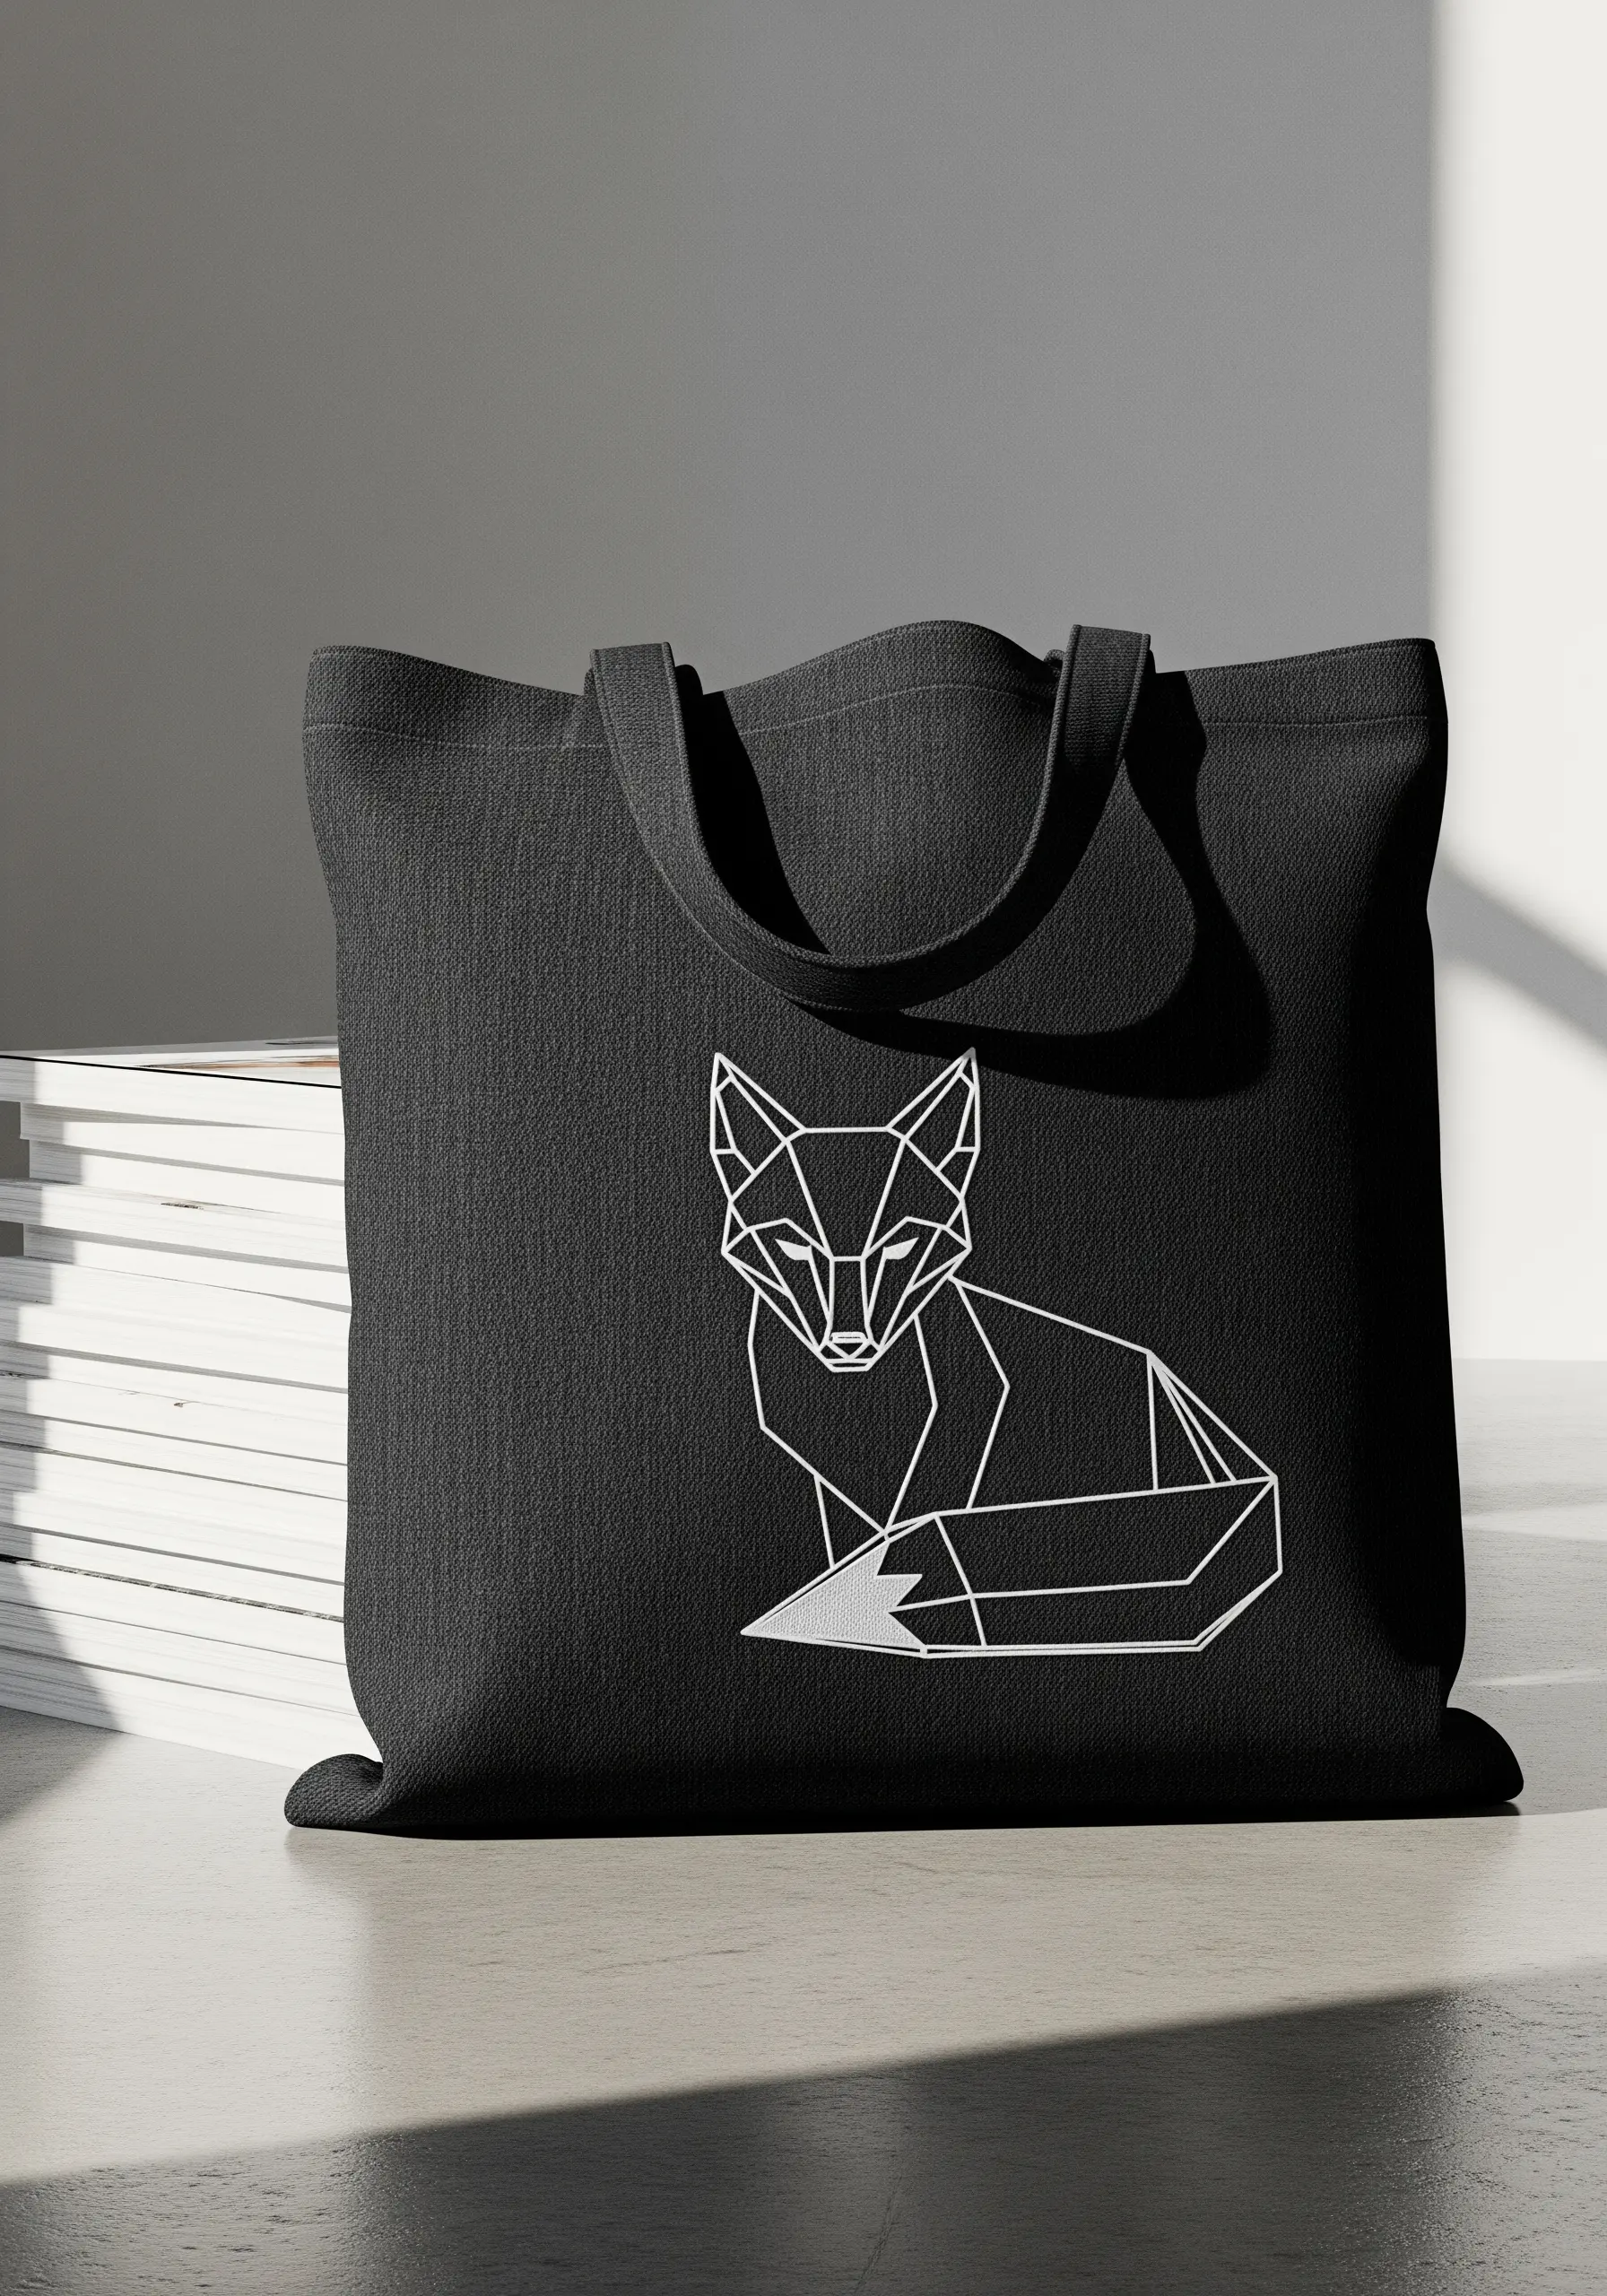
The power of a geometric design lies in its sharp angles and clean lines.
To achieve this, use a backstitch and shorten your stitch length dramatically as you approach a corner. This prevents the thread from rounding the angle and keeps the points sharp.
A high-contrast color scheme, like white on black, emphasizes the crisp geometry.
For the solid-filled tail, use a satin stitch but outline it first with a split stitch; this creates a raised, sharp edge for your satin stitches to nestle against, resulting in a perfectly clean shape, much like you would find in realistic animal & insect embroidery patterns that demand precision.
7. The Art of the Single, Continuous Line
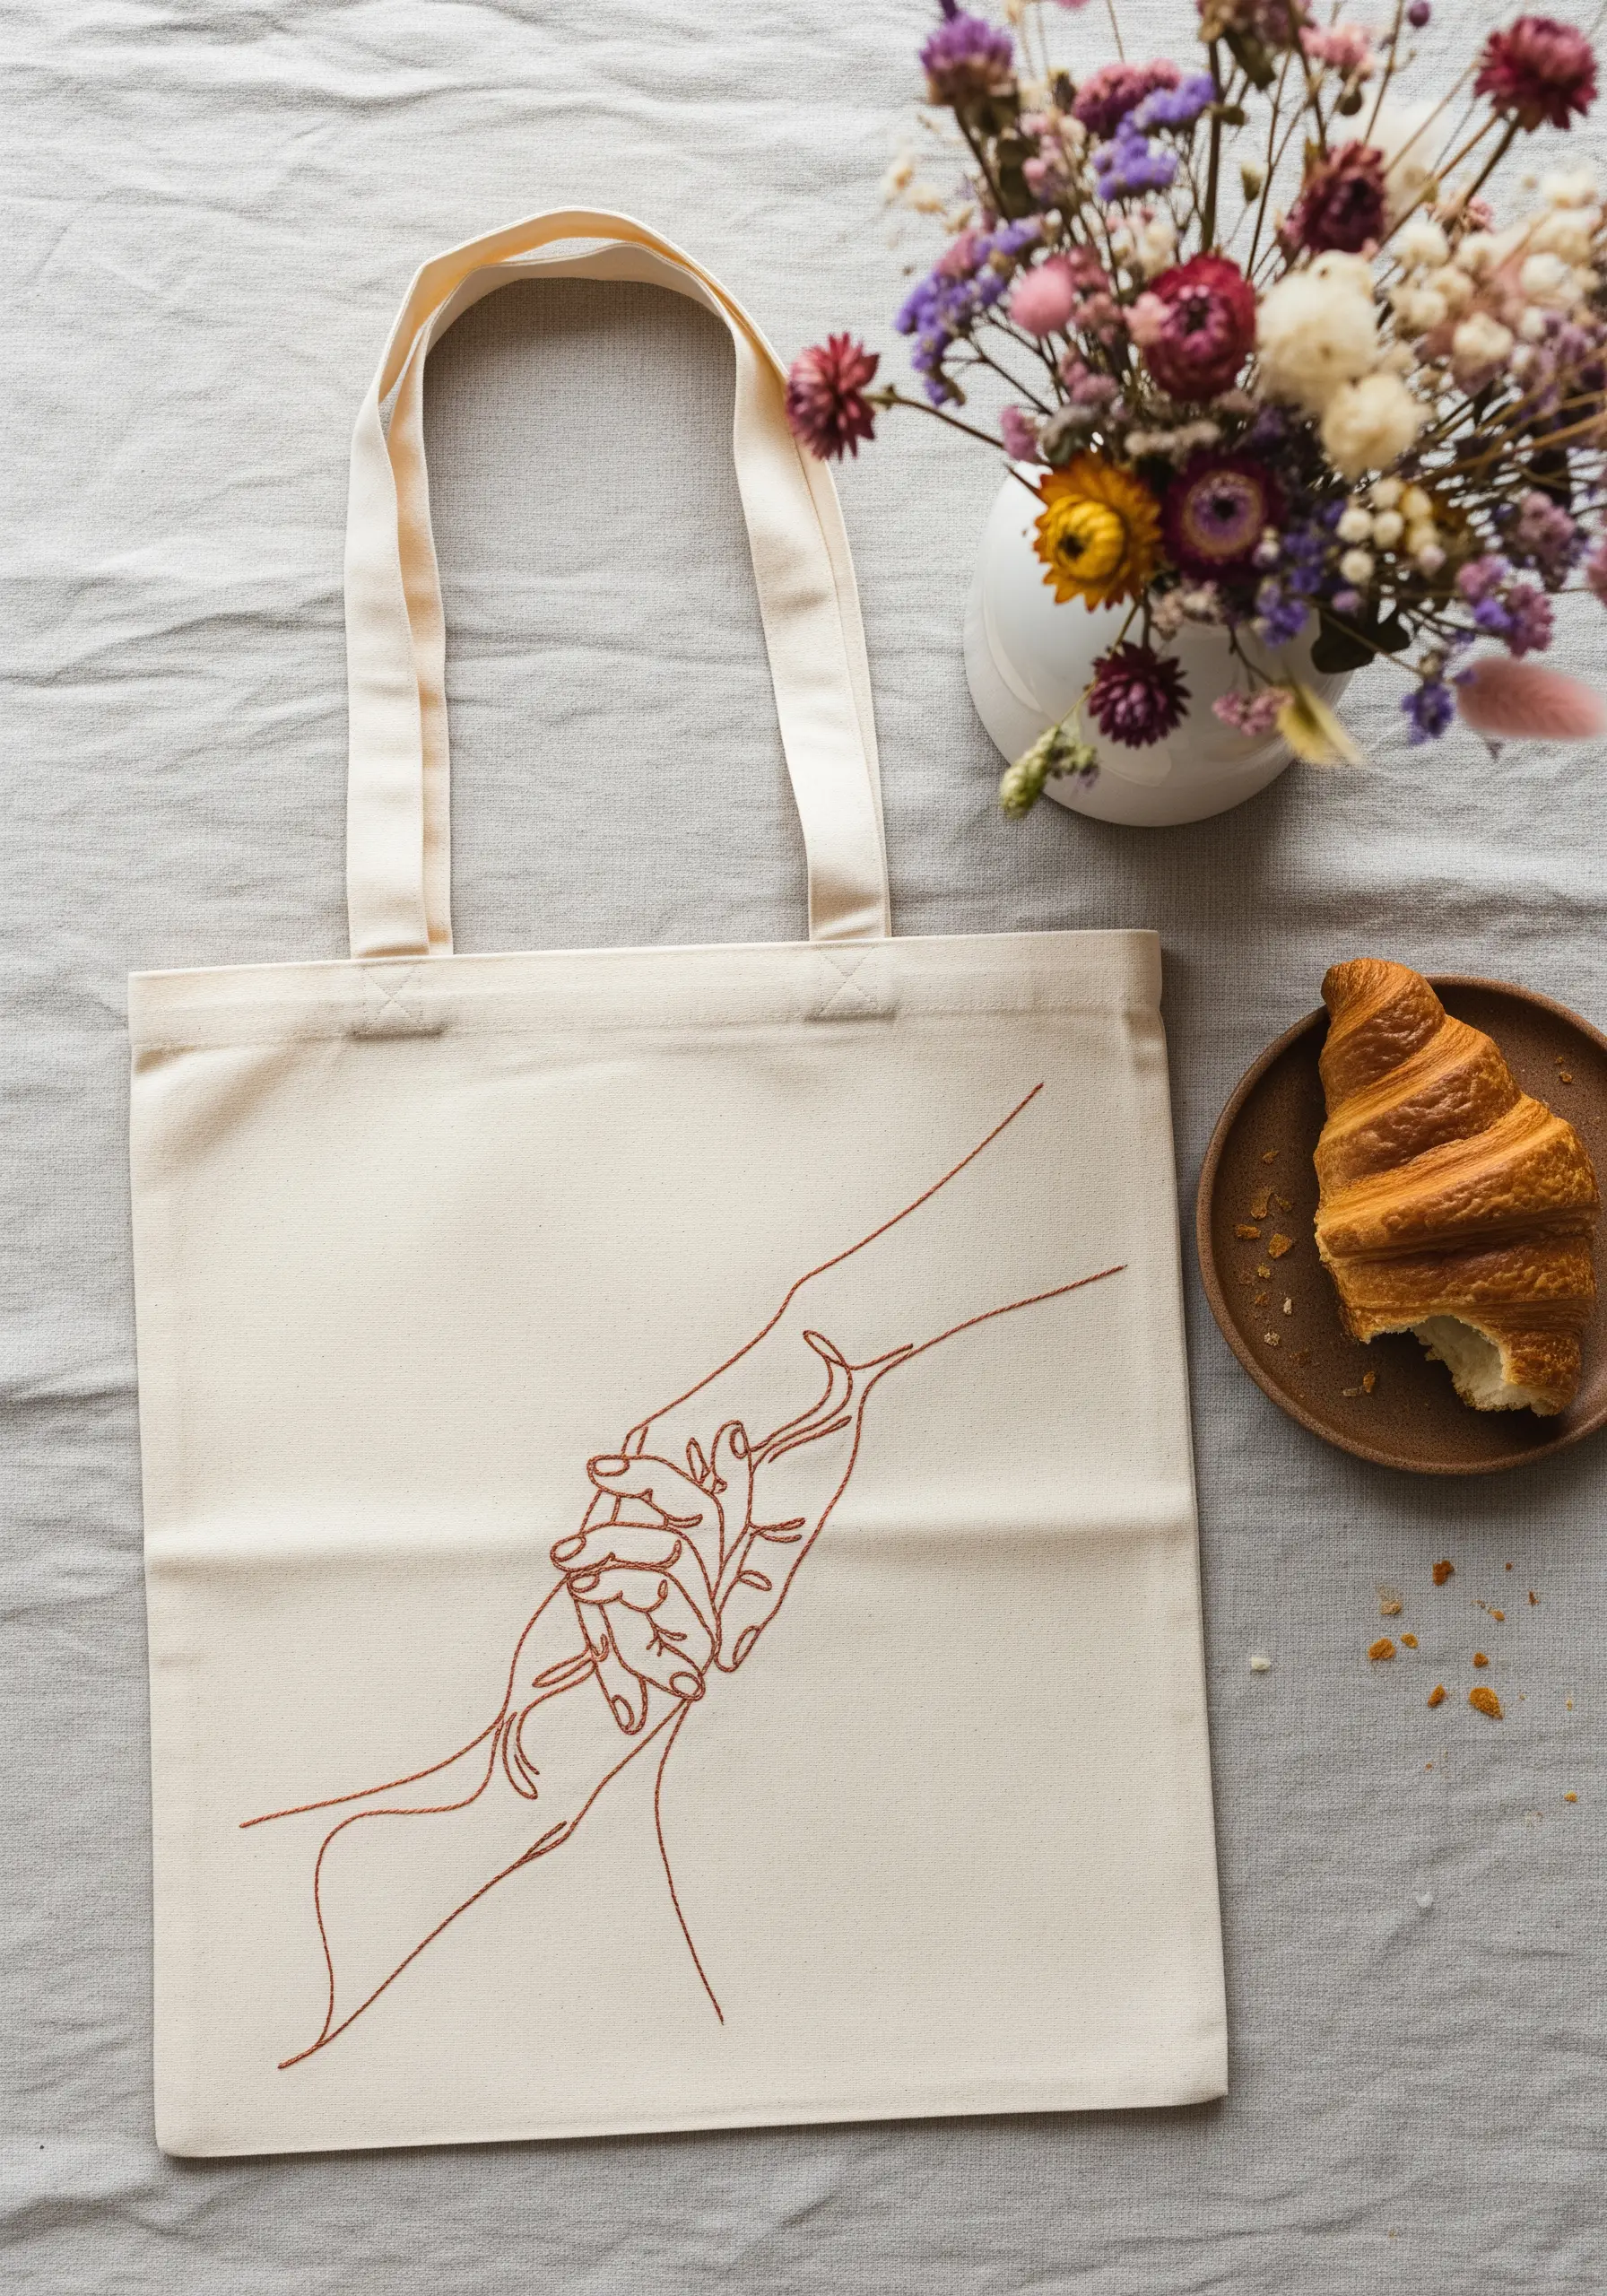
For designs that appear to be drawn in one single stroke, tension is paramount.
Use a good quality stabilizer on the back of your fabric to prevent the tote bag from puckering, especially around curves.
A whipped backstitch or a stem stitch will give you the smoothest possible line.
Choose a warm, earthy tone like terracotta or brown on a natural canvas to give the design a soft, intimate feel, perfect for minimal pet-themed line art or human connection motifs.
8. Minimalist Landscapes with Graded Lines
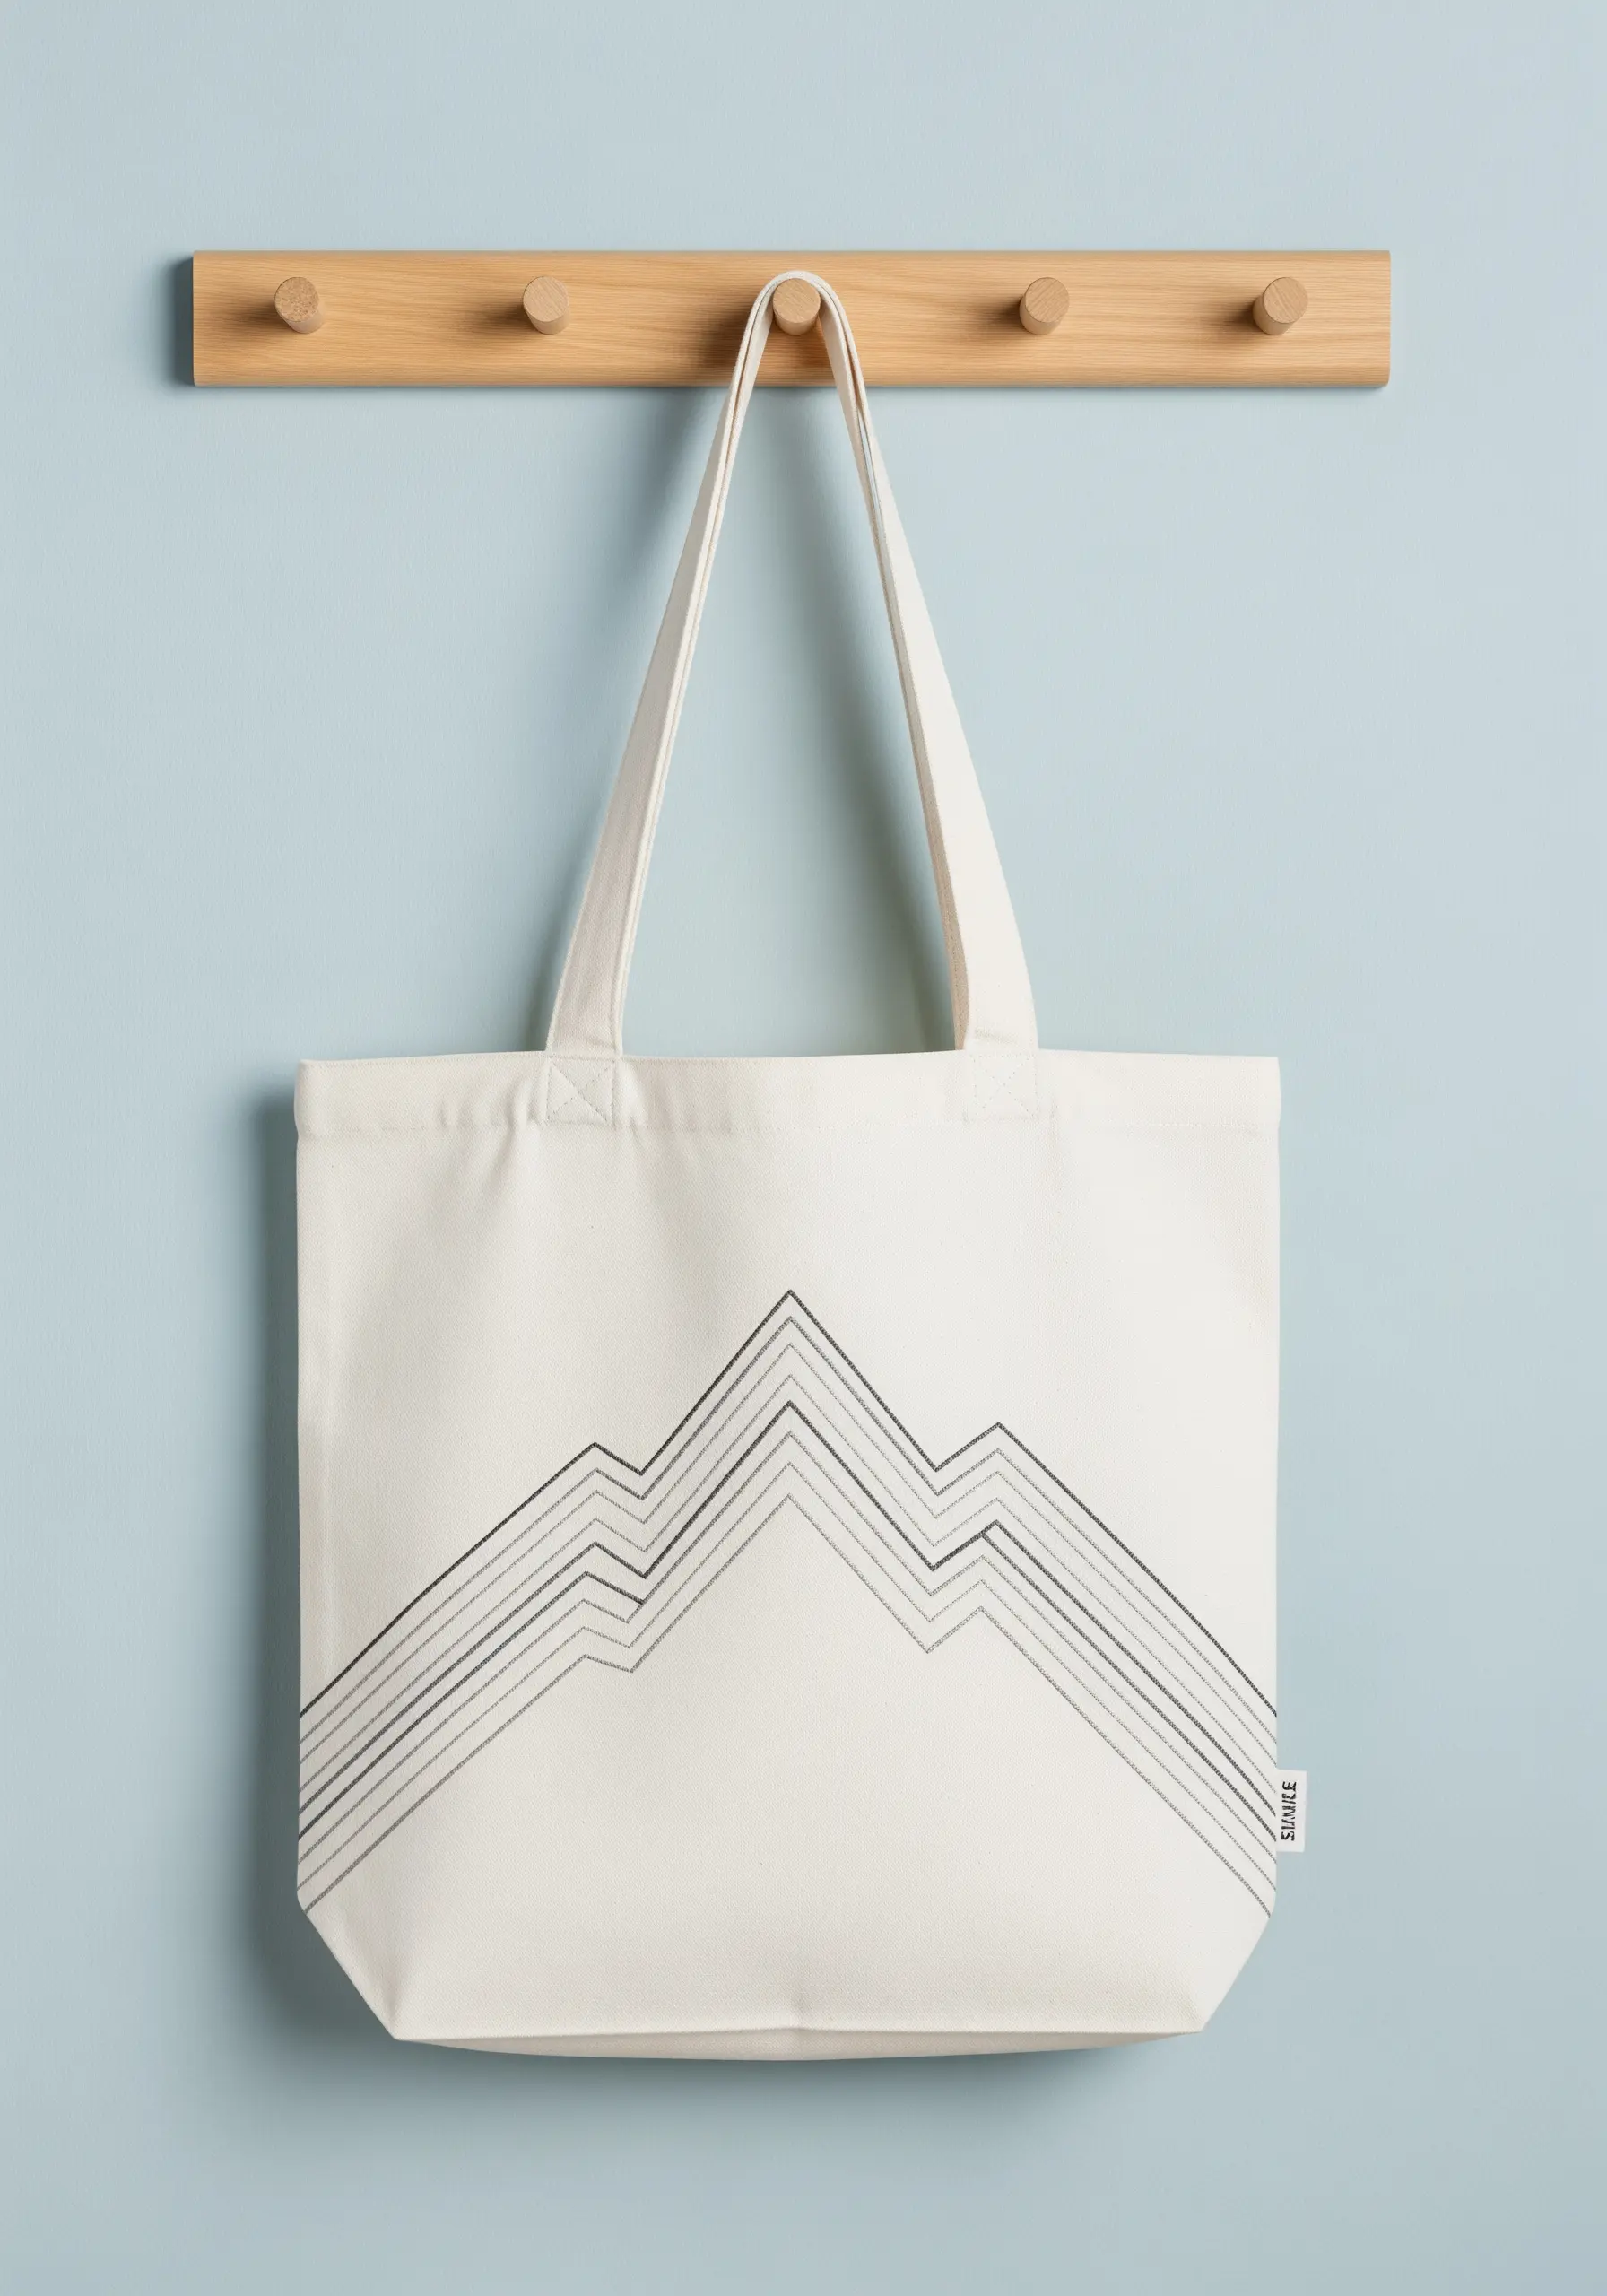
Create a sense of atmospheric perspective in a minimalist landscape by varying the weight of your thread.
Use three strands of floss for the foremost mountain peak, two for the middle, and a single strand for the most distant line.
This subtle shift in thickness creates an illusion of depth and distance without adding any complexity to the stitch itself—a simple backstitch will suffice.
The gradient effect makes simple landscape scenes feel more dynamic and thoughtfully composed.
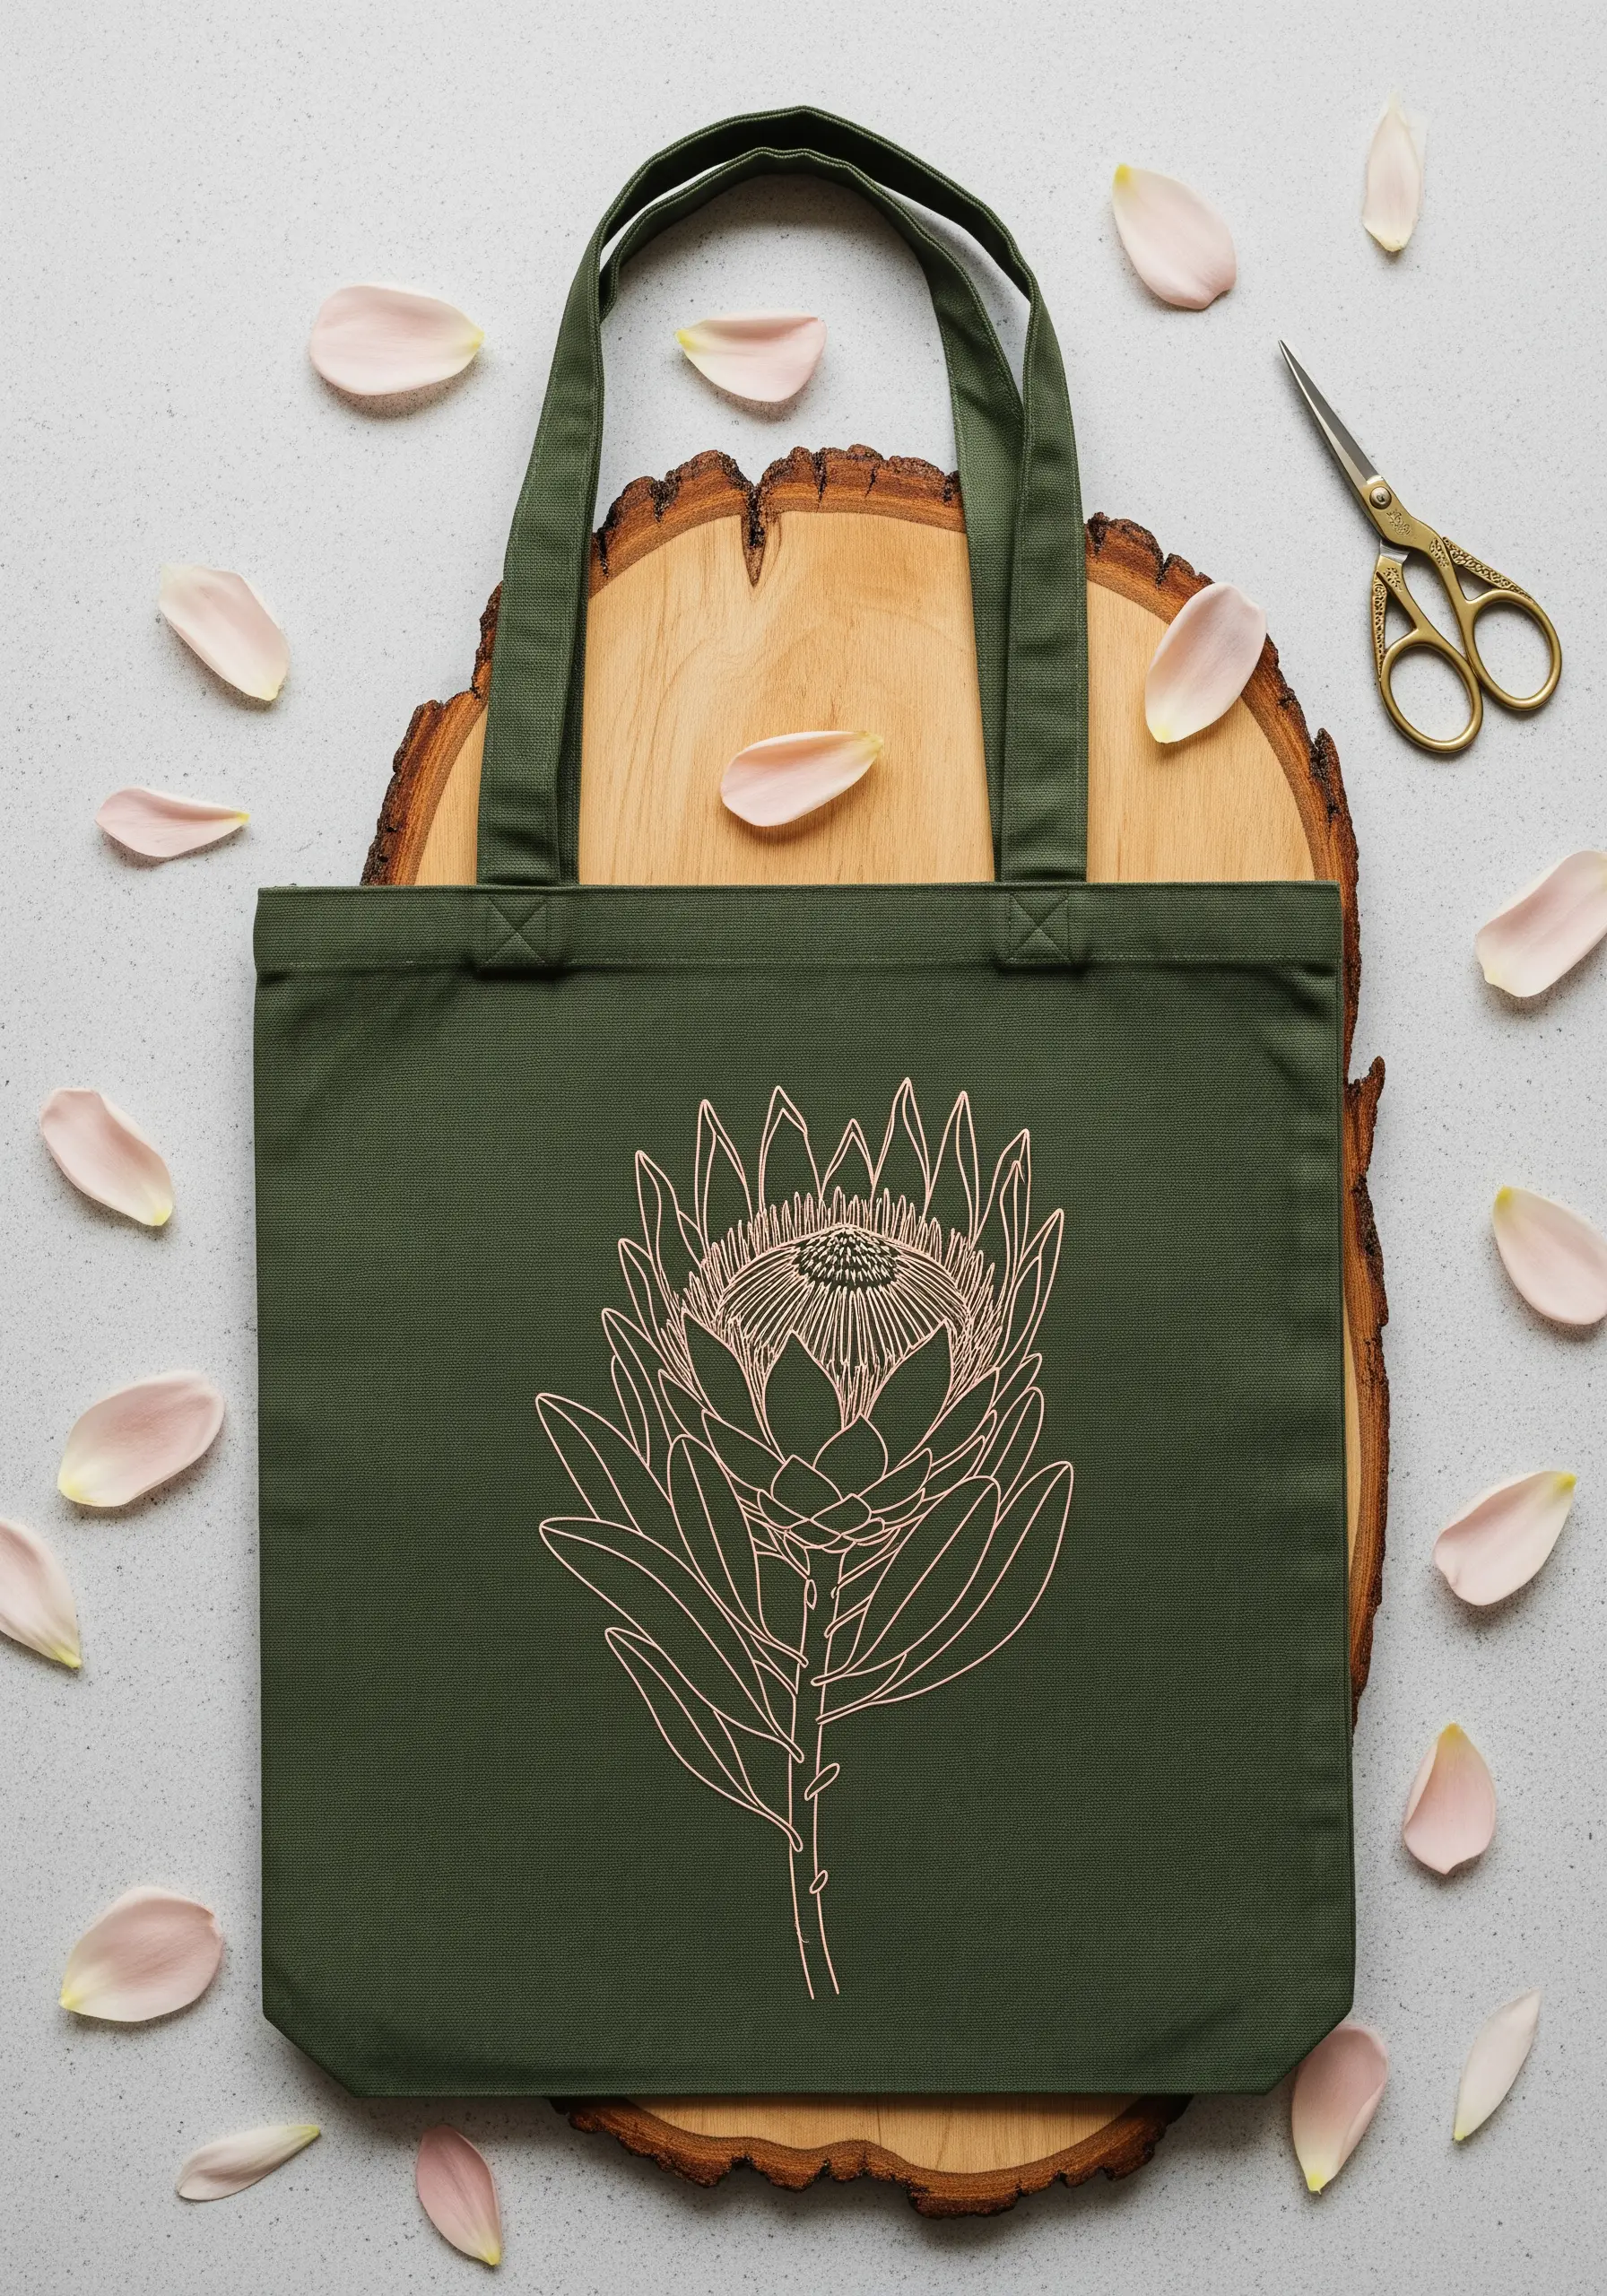
9. Botanical Illustrations with Open Work
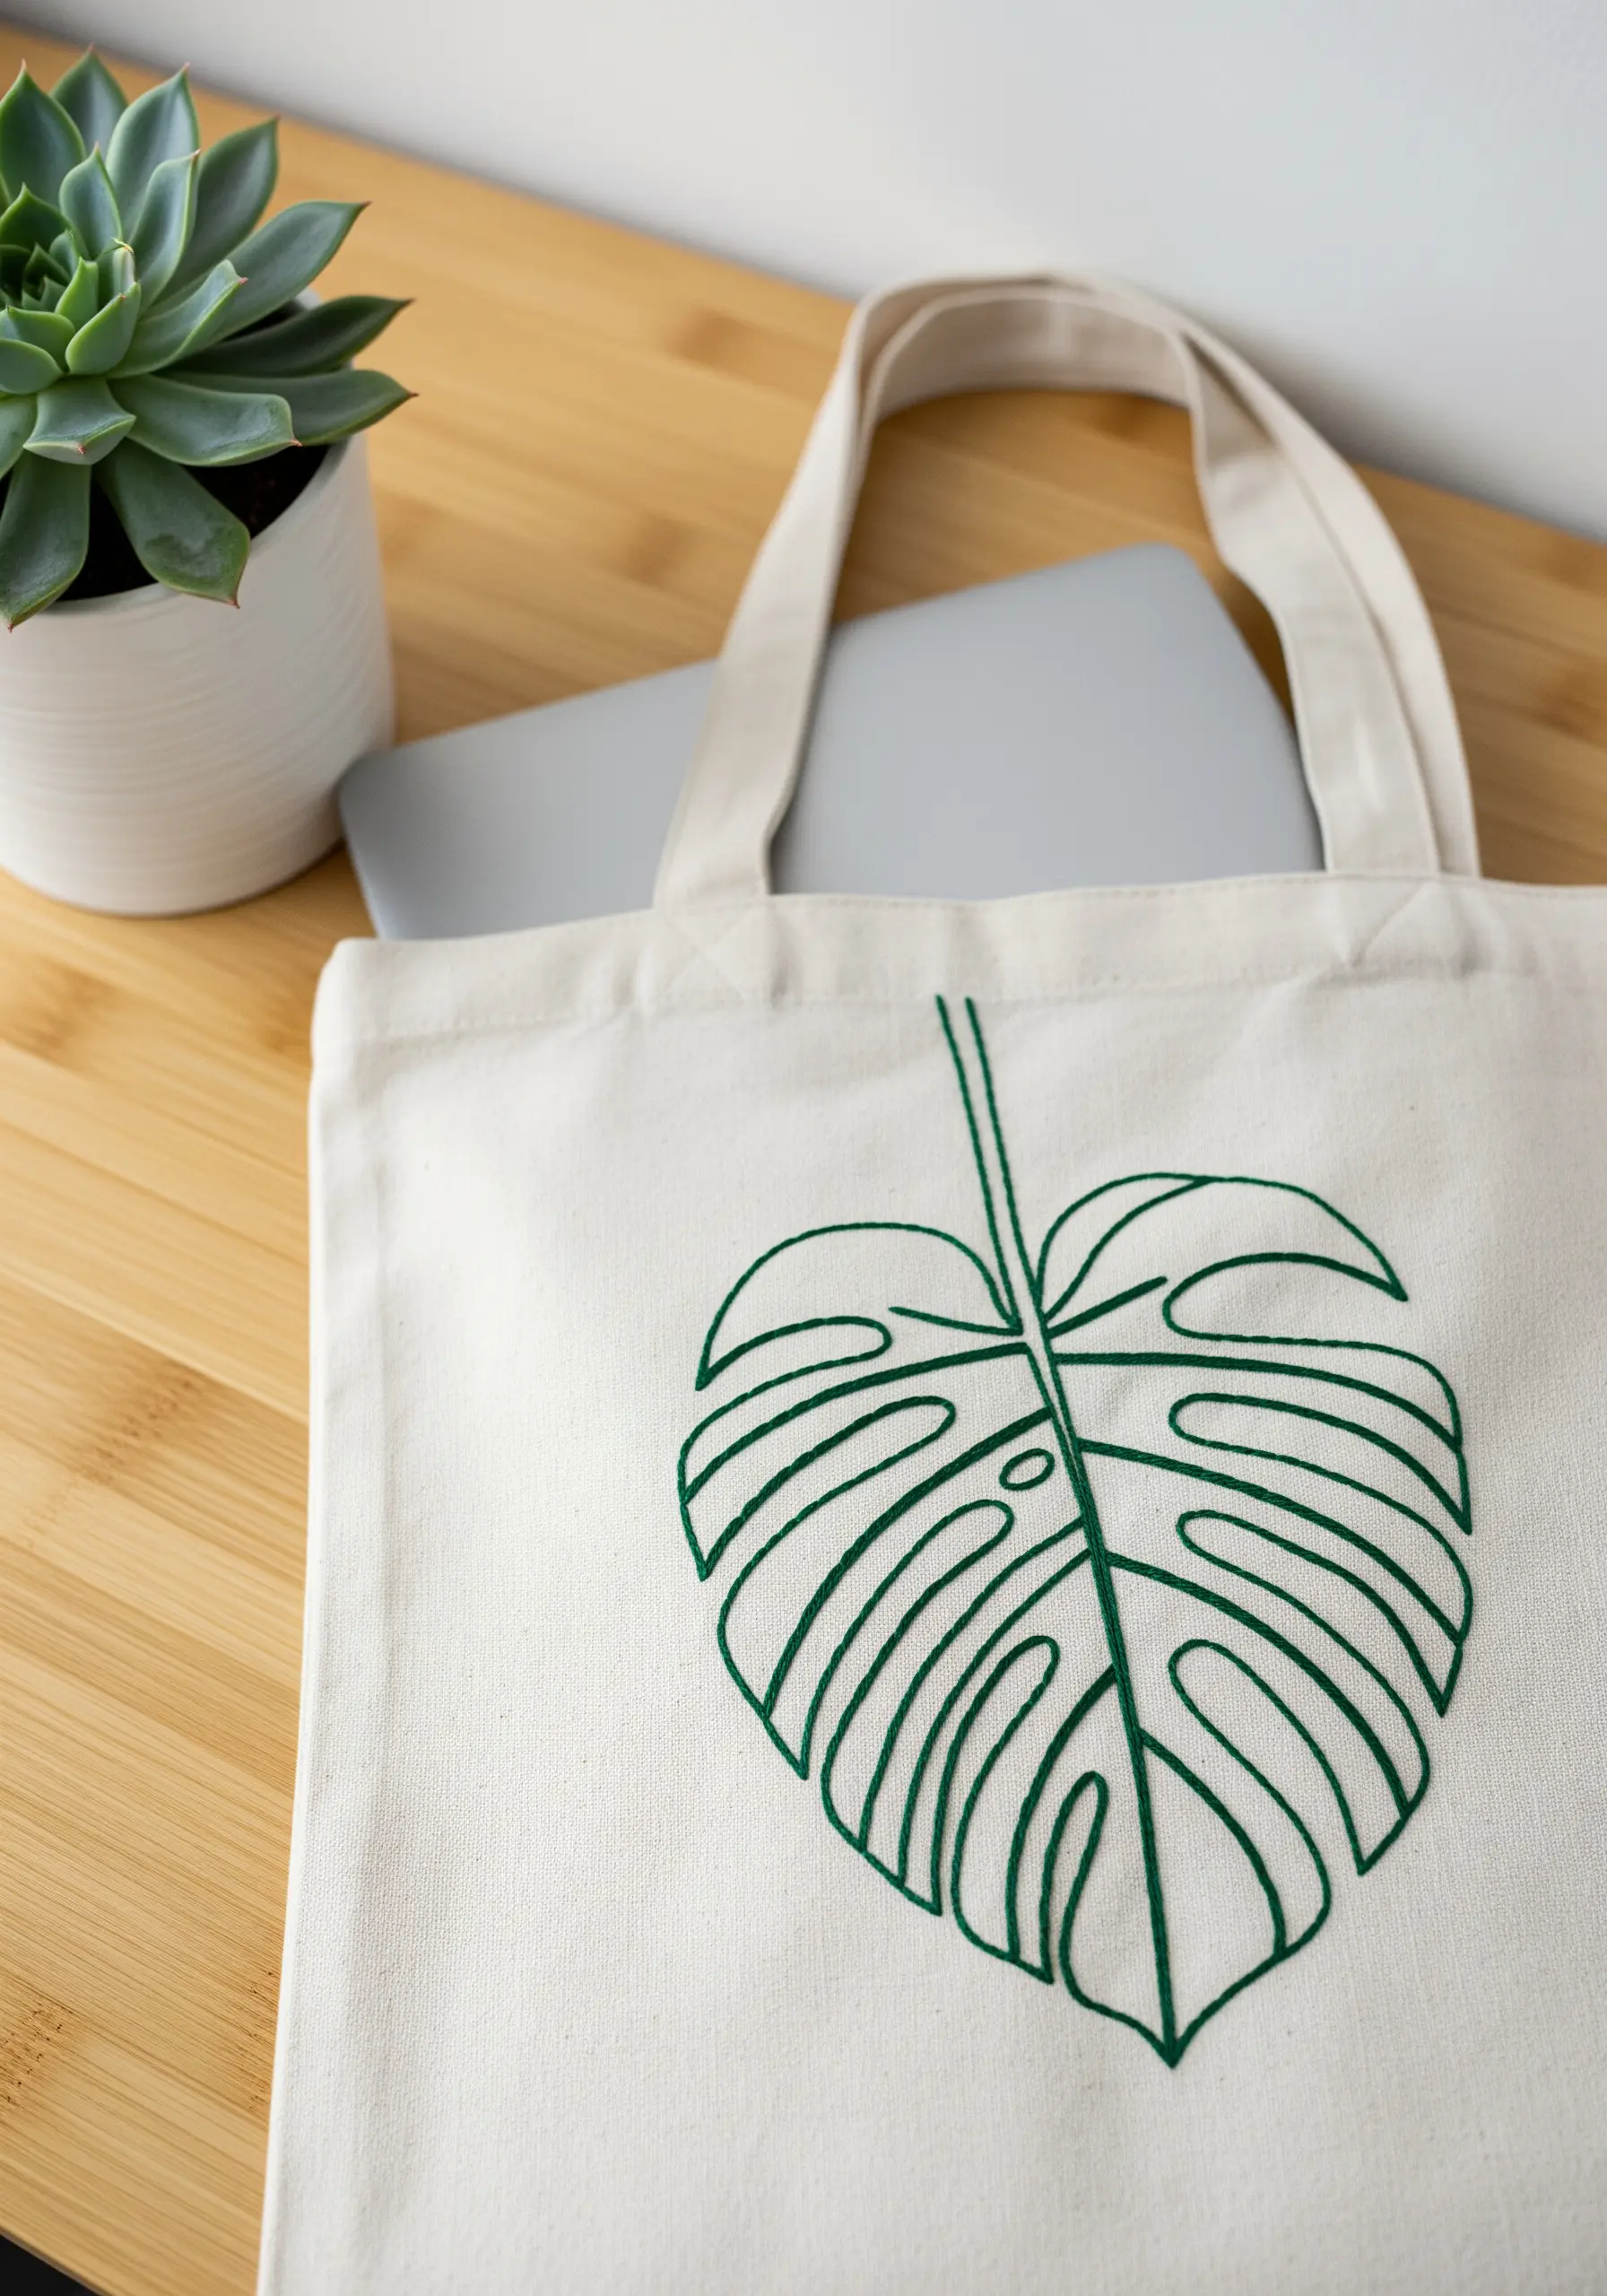
When outlining a complex botanical like a Monstera leaf, resist the urge to fill it in.
The beauty of this style lies in the negative space, which allows the mind to complete the shape.
Use a consistent backstitch with three strands of floss for a bold, graphic outline that stands out against the canvas.
This technique turns your tote bag into a piece of modern botanical art and is a great way to practice your curves on leaf embroidery stitches.
10. Elegant Lettering with a Single Stroke
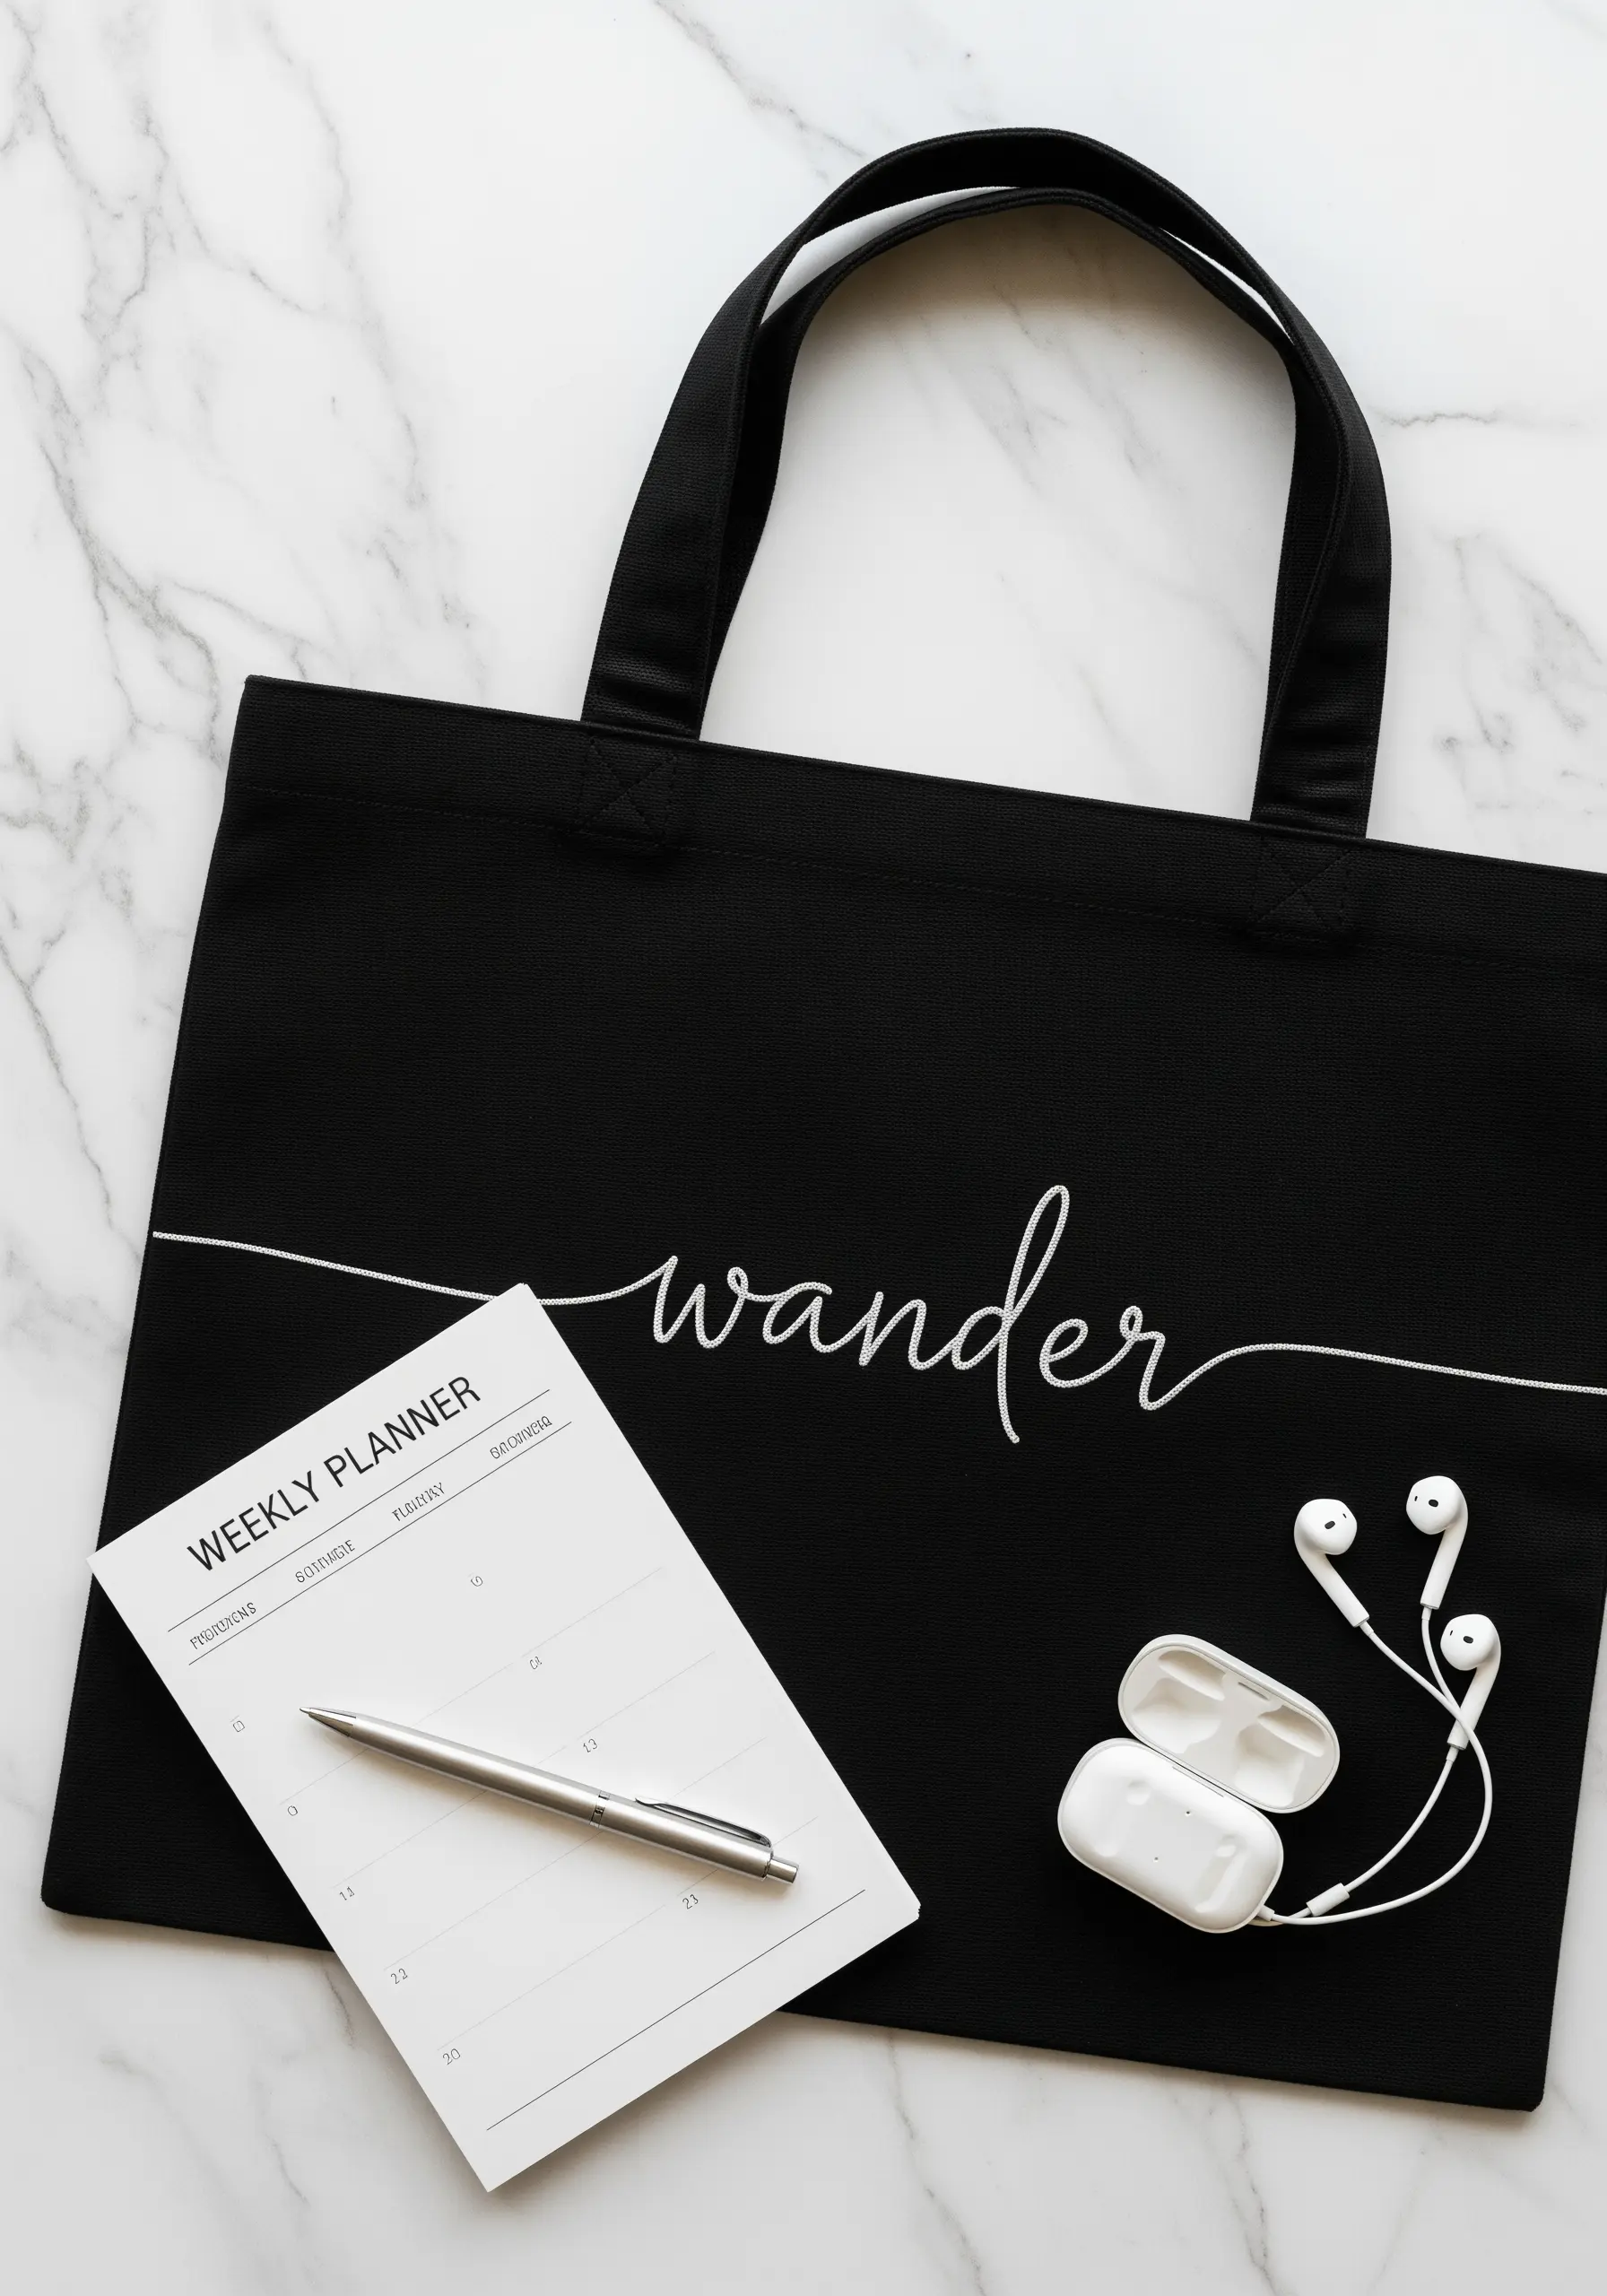
To achieve the look of effortless, flowing script, your stitch choice must be impeccable.
A whipped backstitch is perfect for this, as it eliminates the tiny gaps of a standard backstitch and creates one smooth, continuous line.
Stitch the horizontal guide lines first using a single strand of floss and a simple running stitch.
This provides a subtle anchor for the bolder, more expressive script, making it look polished and balanced, perfect for travel & adventure symbols.
11. Technical Illustrations with Precision
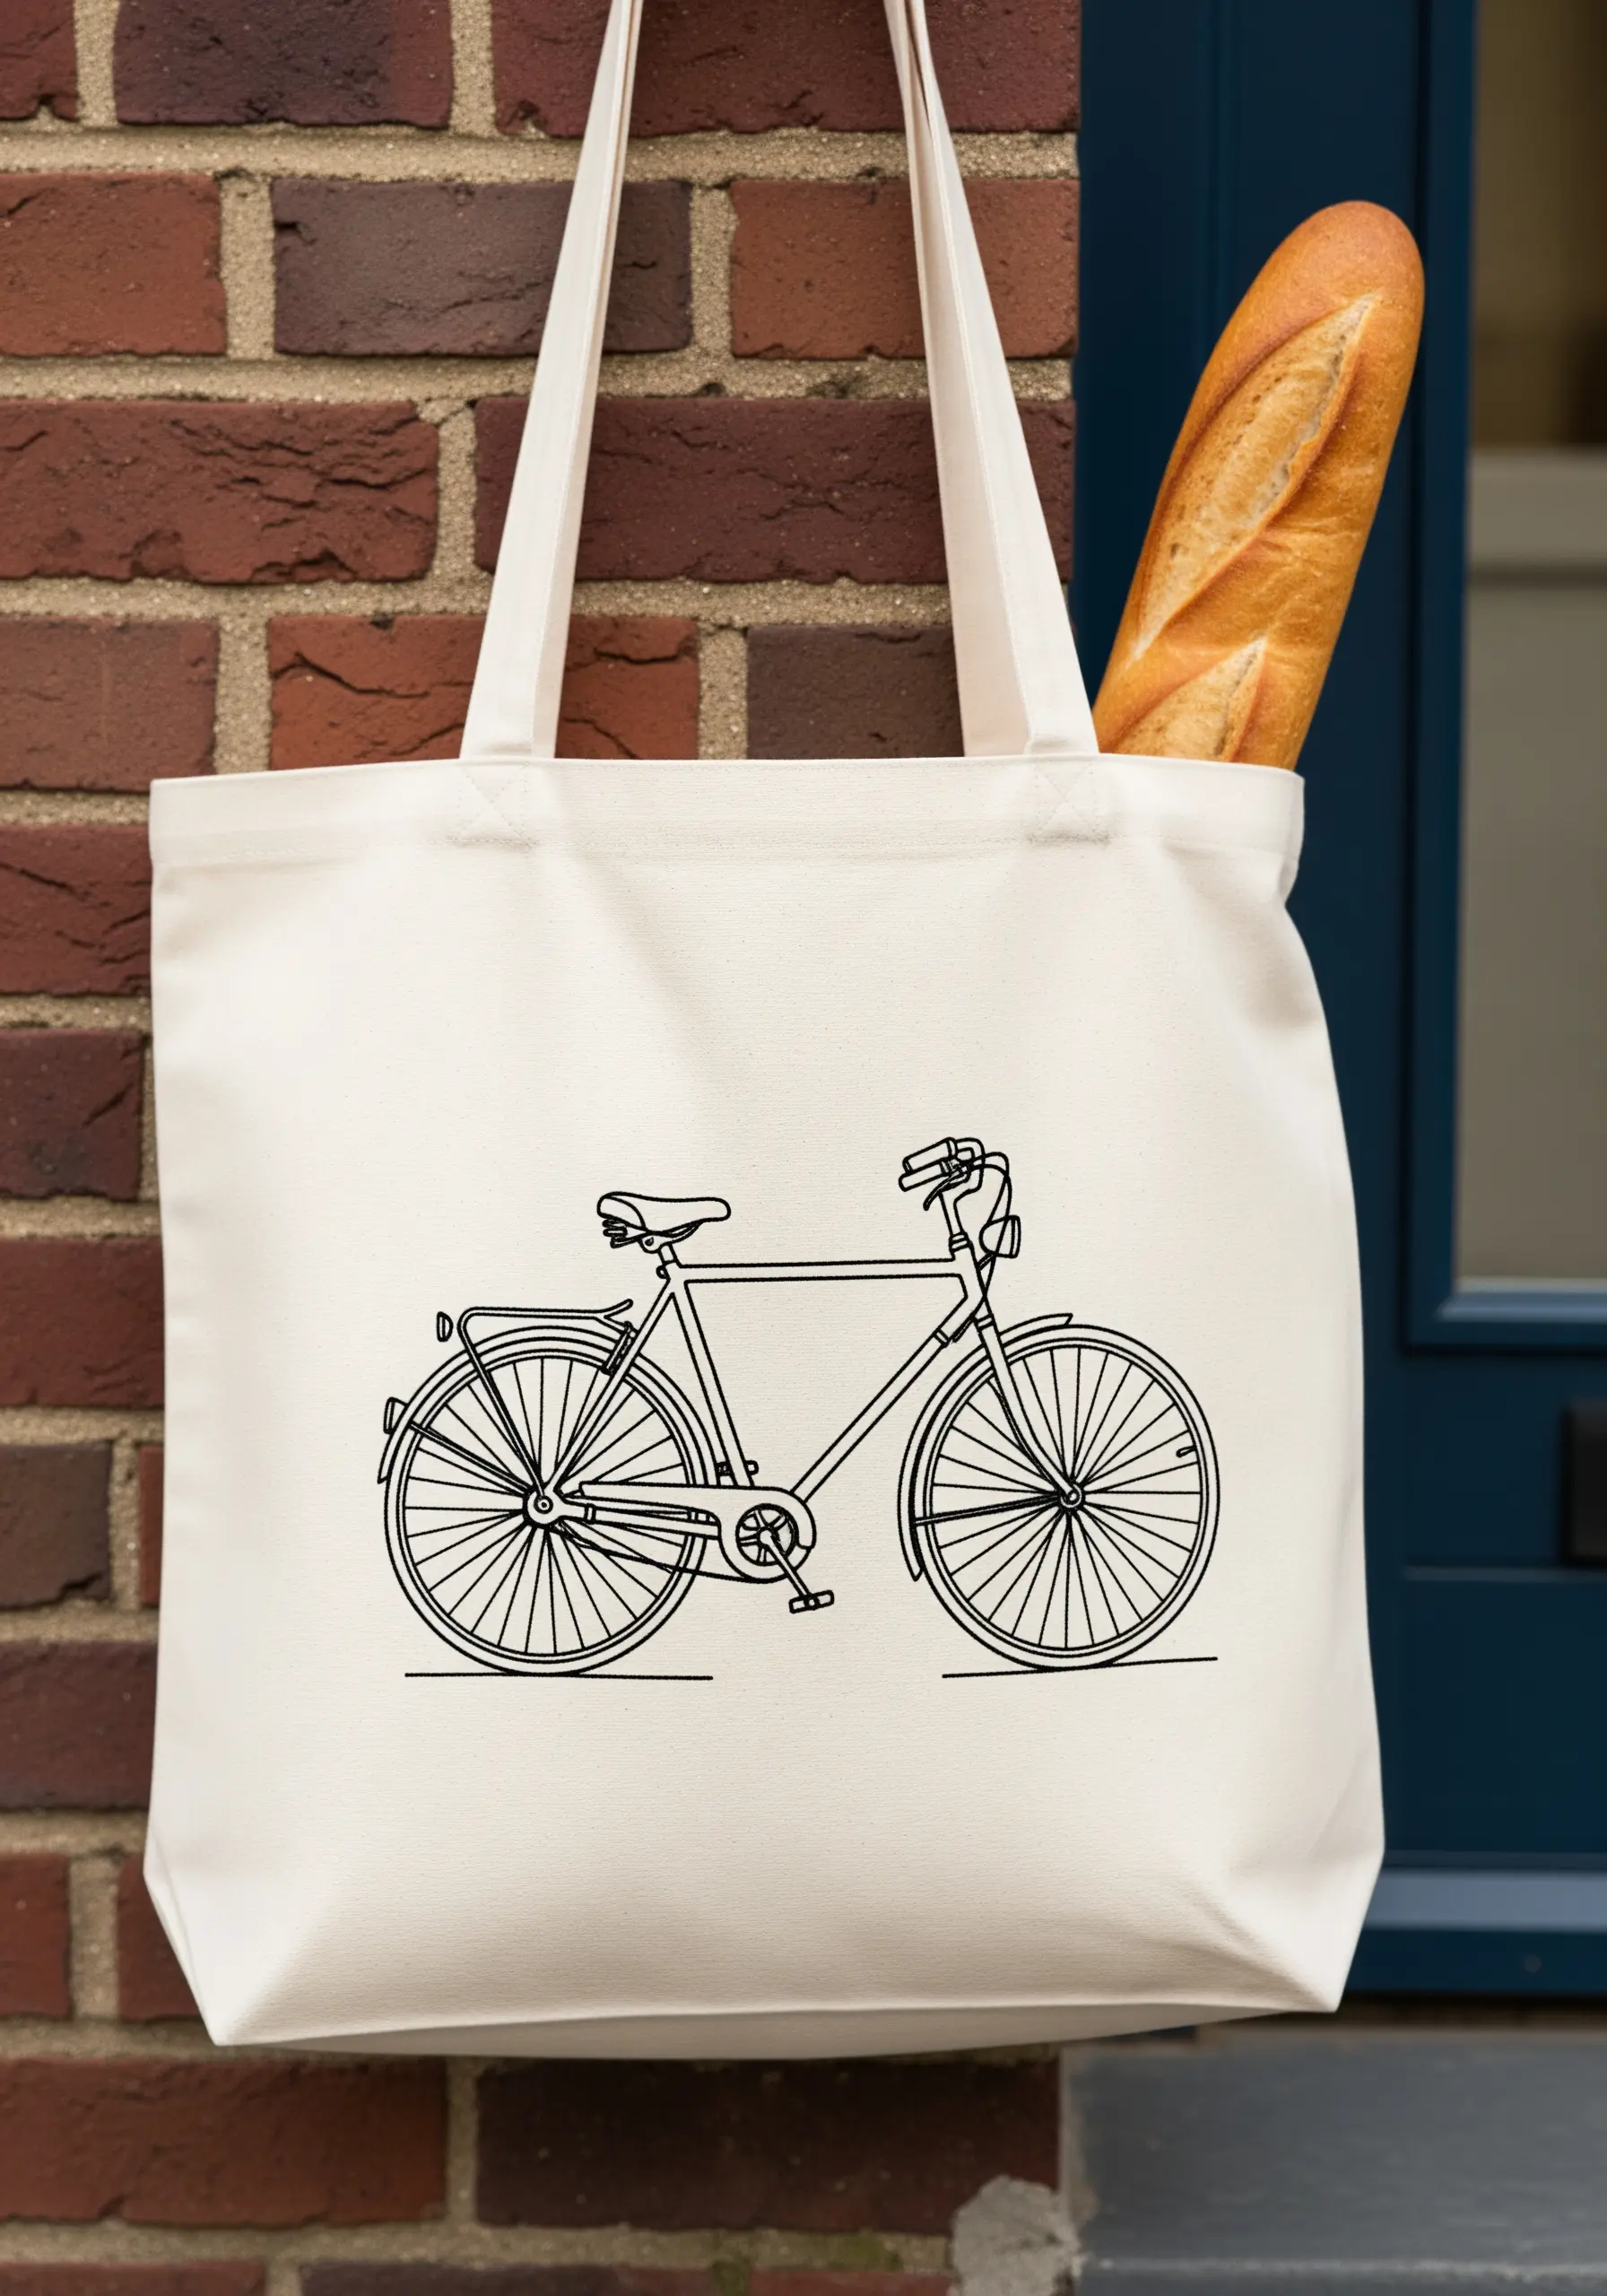
For designs with intricate mechanical details like a bicycle, a split stitch is your best ally.
It creates a sharp, fine line that allows for a high level of detail without becoming bulky.
Use only two strands of embroidery floss to keep the spokes and gears looking delicate and precise.
Before you begin, trace your pattern with a heat-erasable pen to ensure perfect placement and proportion, turning your tote into a piece of detailed line art.
12. Geometric Mandalas with Radiating Lines
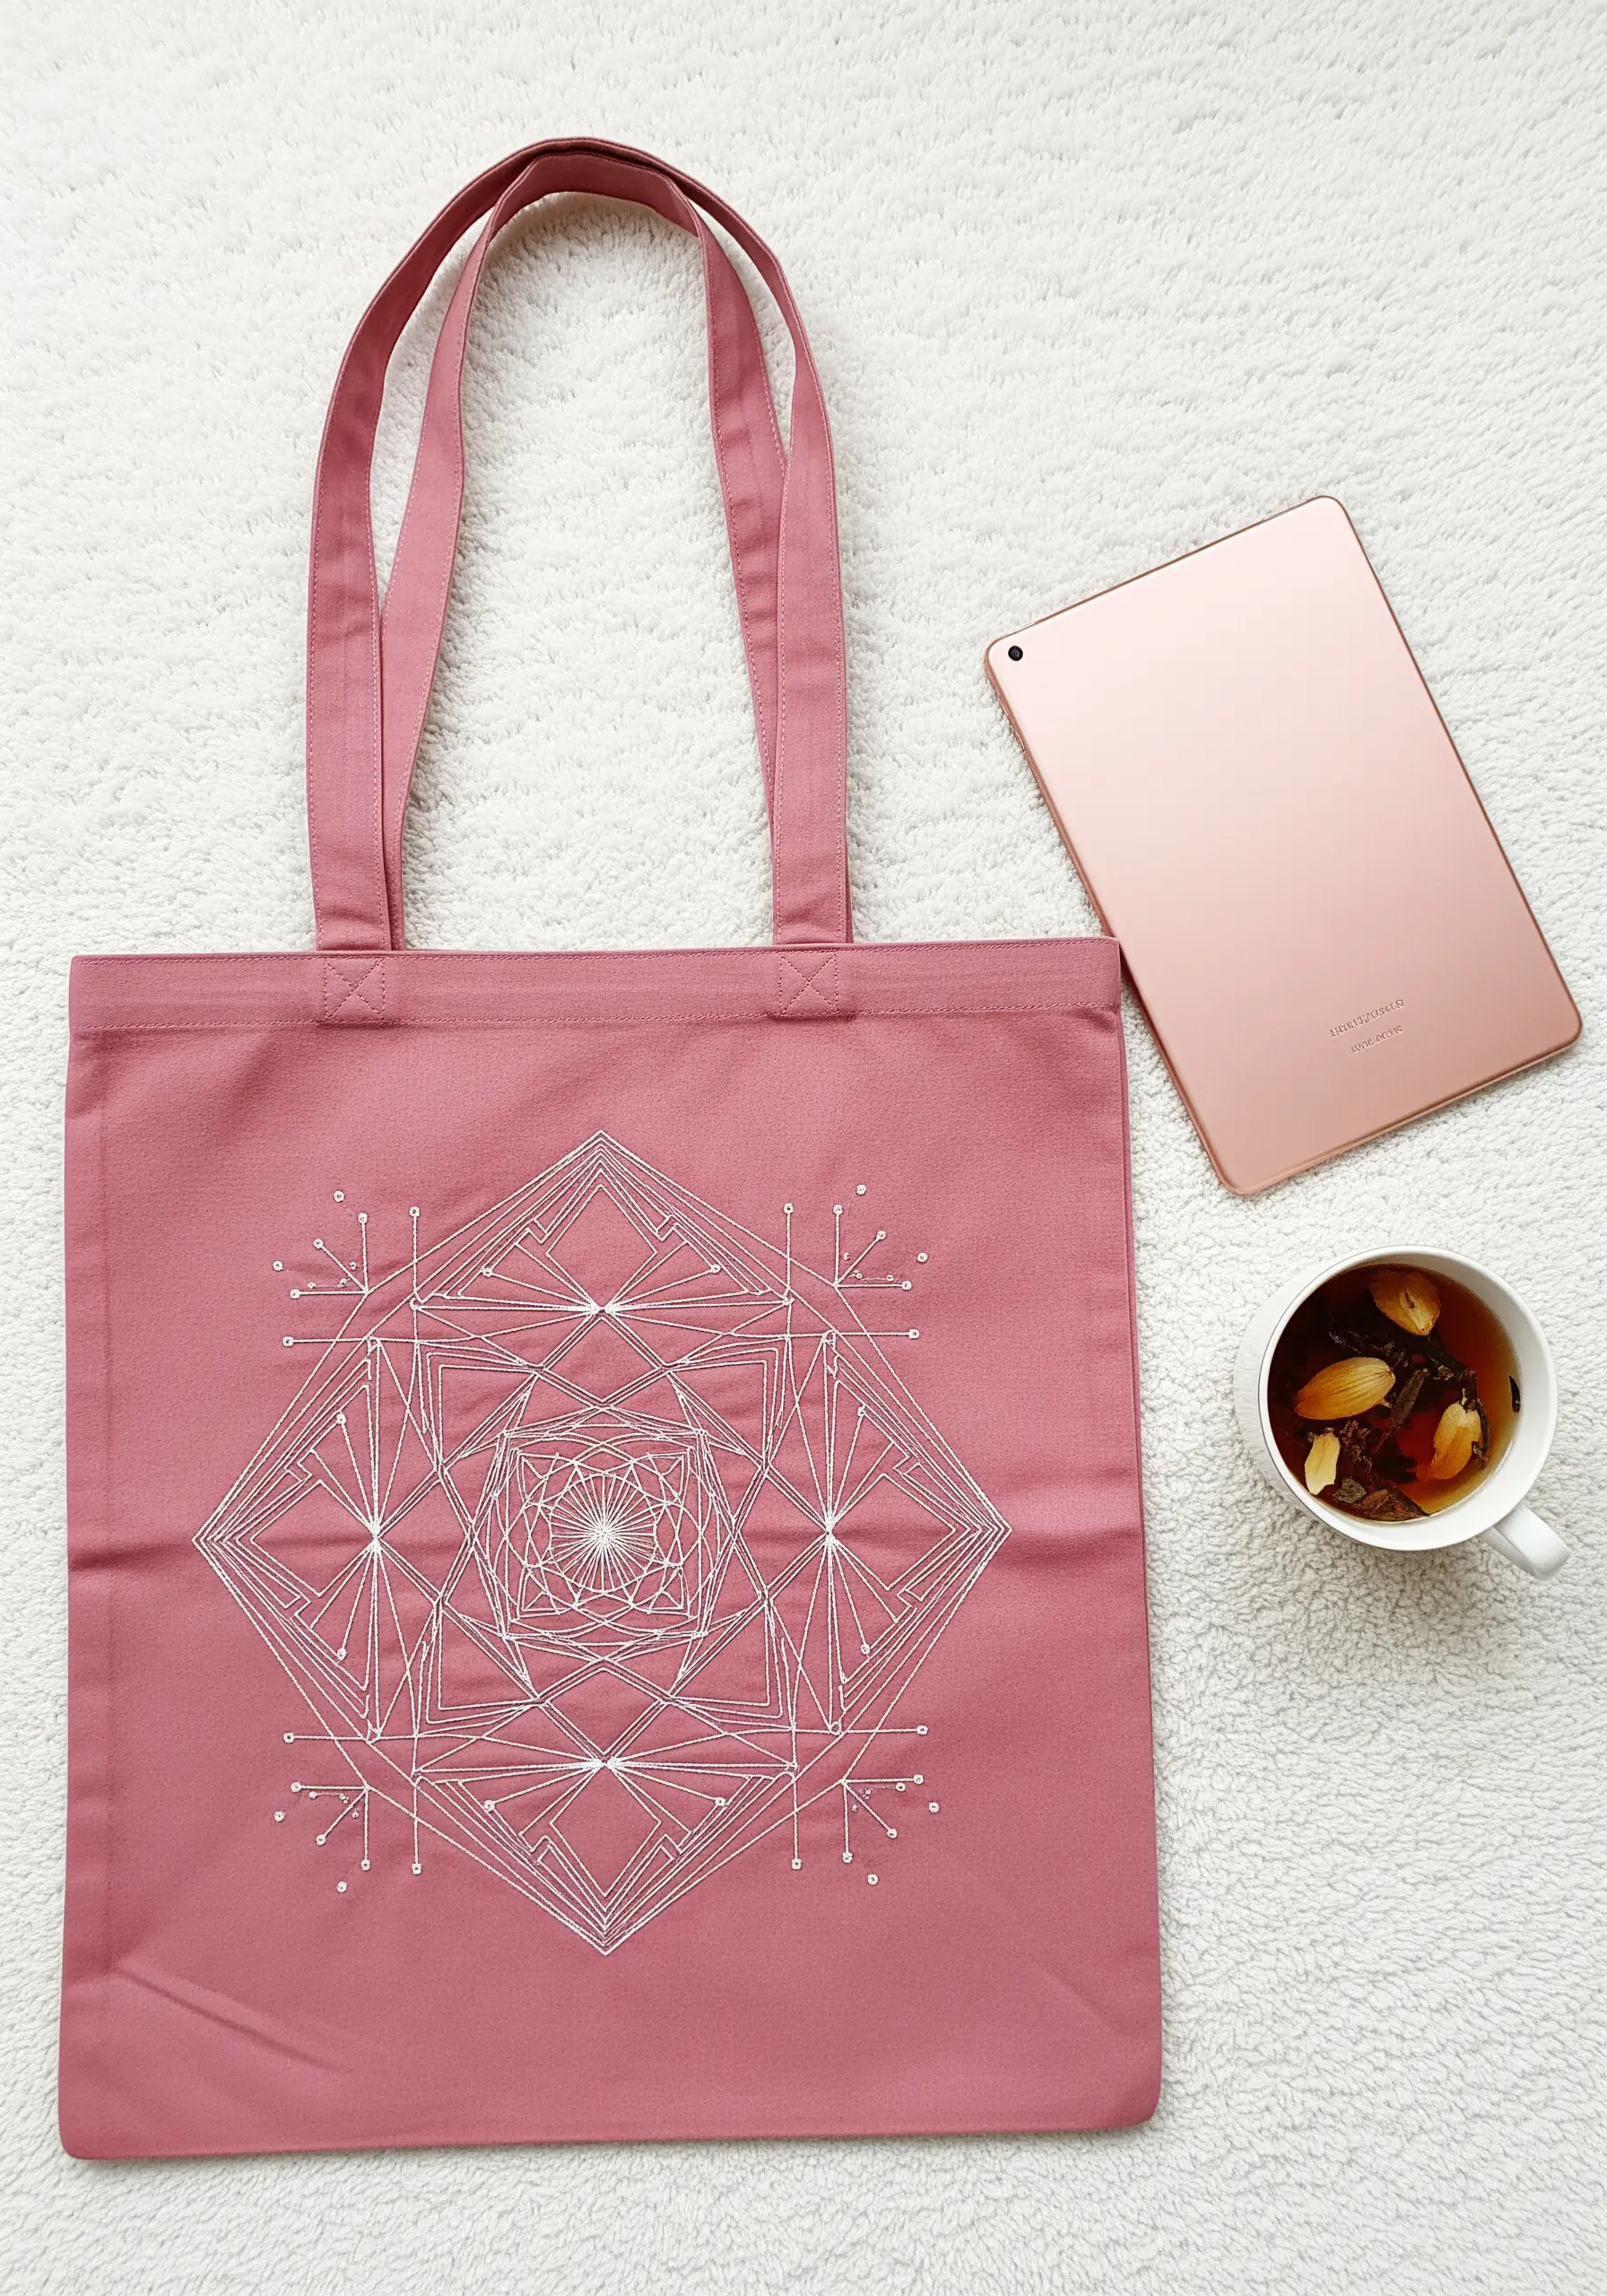
The success of a geometric mandala depends on perfect symmetry and tension.
Always use a water-soluble or heat-erasable grid pattern to guide your stitches, ensuring your radiating lines are perfectly spaced.
To prevent the fabric from puckering in the center where the stitches are densest, use a sturdy stabilizer on the back.
A fine, strong thread like pearl cotton in a light, contrasting color will make the intricate geometry pop against the colored fabric of these embroidered mandala wall art designs.
13. Capturing Personality in Animal Portraits
In a minimalist animal portrait, the eyes and whiskers carry all the personality.
For the main outline, a simple backstitch works well, but for the eyes, switch to a tiny satin stitch to create a solid, reflective point that brings the sketch to life.
Use a single strand of floss for the whiskers, extending them past the main outline with a single long stitch to create a delicate, wispy effect.
This combination of stitches adds a subtle realism to otherwise simple fox & deer embroidery patterns.
14. Delicate Florals with Monochromatic Harmony
Achieve a soft, elegant look by pairing a pastel thread with a muted, earthy fabric, like this blush pink on olive green.
This low-contrast color harmony feels sophisticated and modern.
Use a stem stitch for the outlines of the petals and stem; its rope-like texture adds a subtle dimension that elevates the design beyond a simple backstitch.
The result is a design that feels integrated with the fabric, rather than sitting on top of it, creating a beautiful monochrome floral embroidery effect.
15. Bold Pop Art with Dimensional Outlines
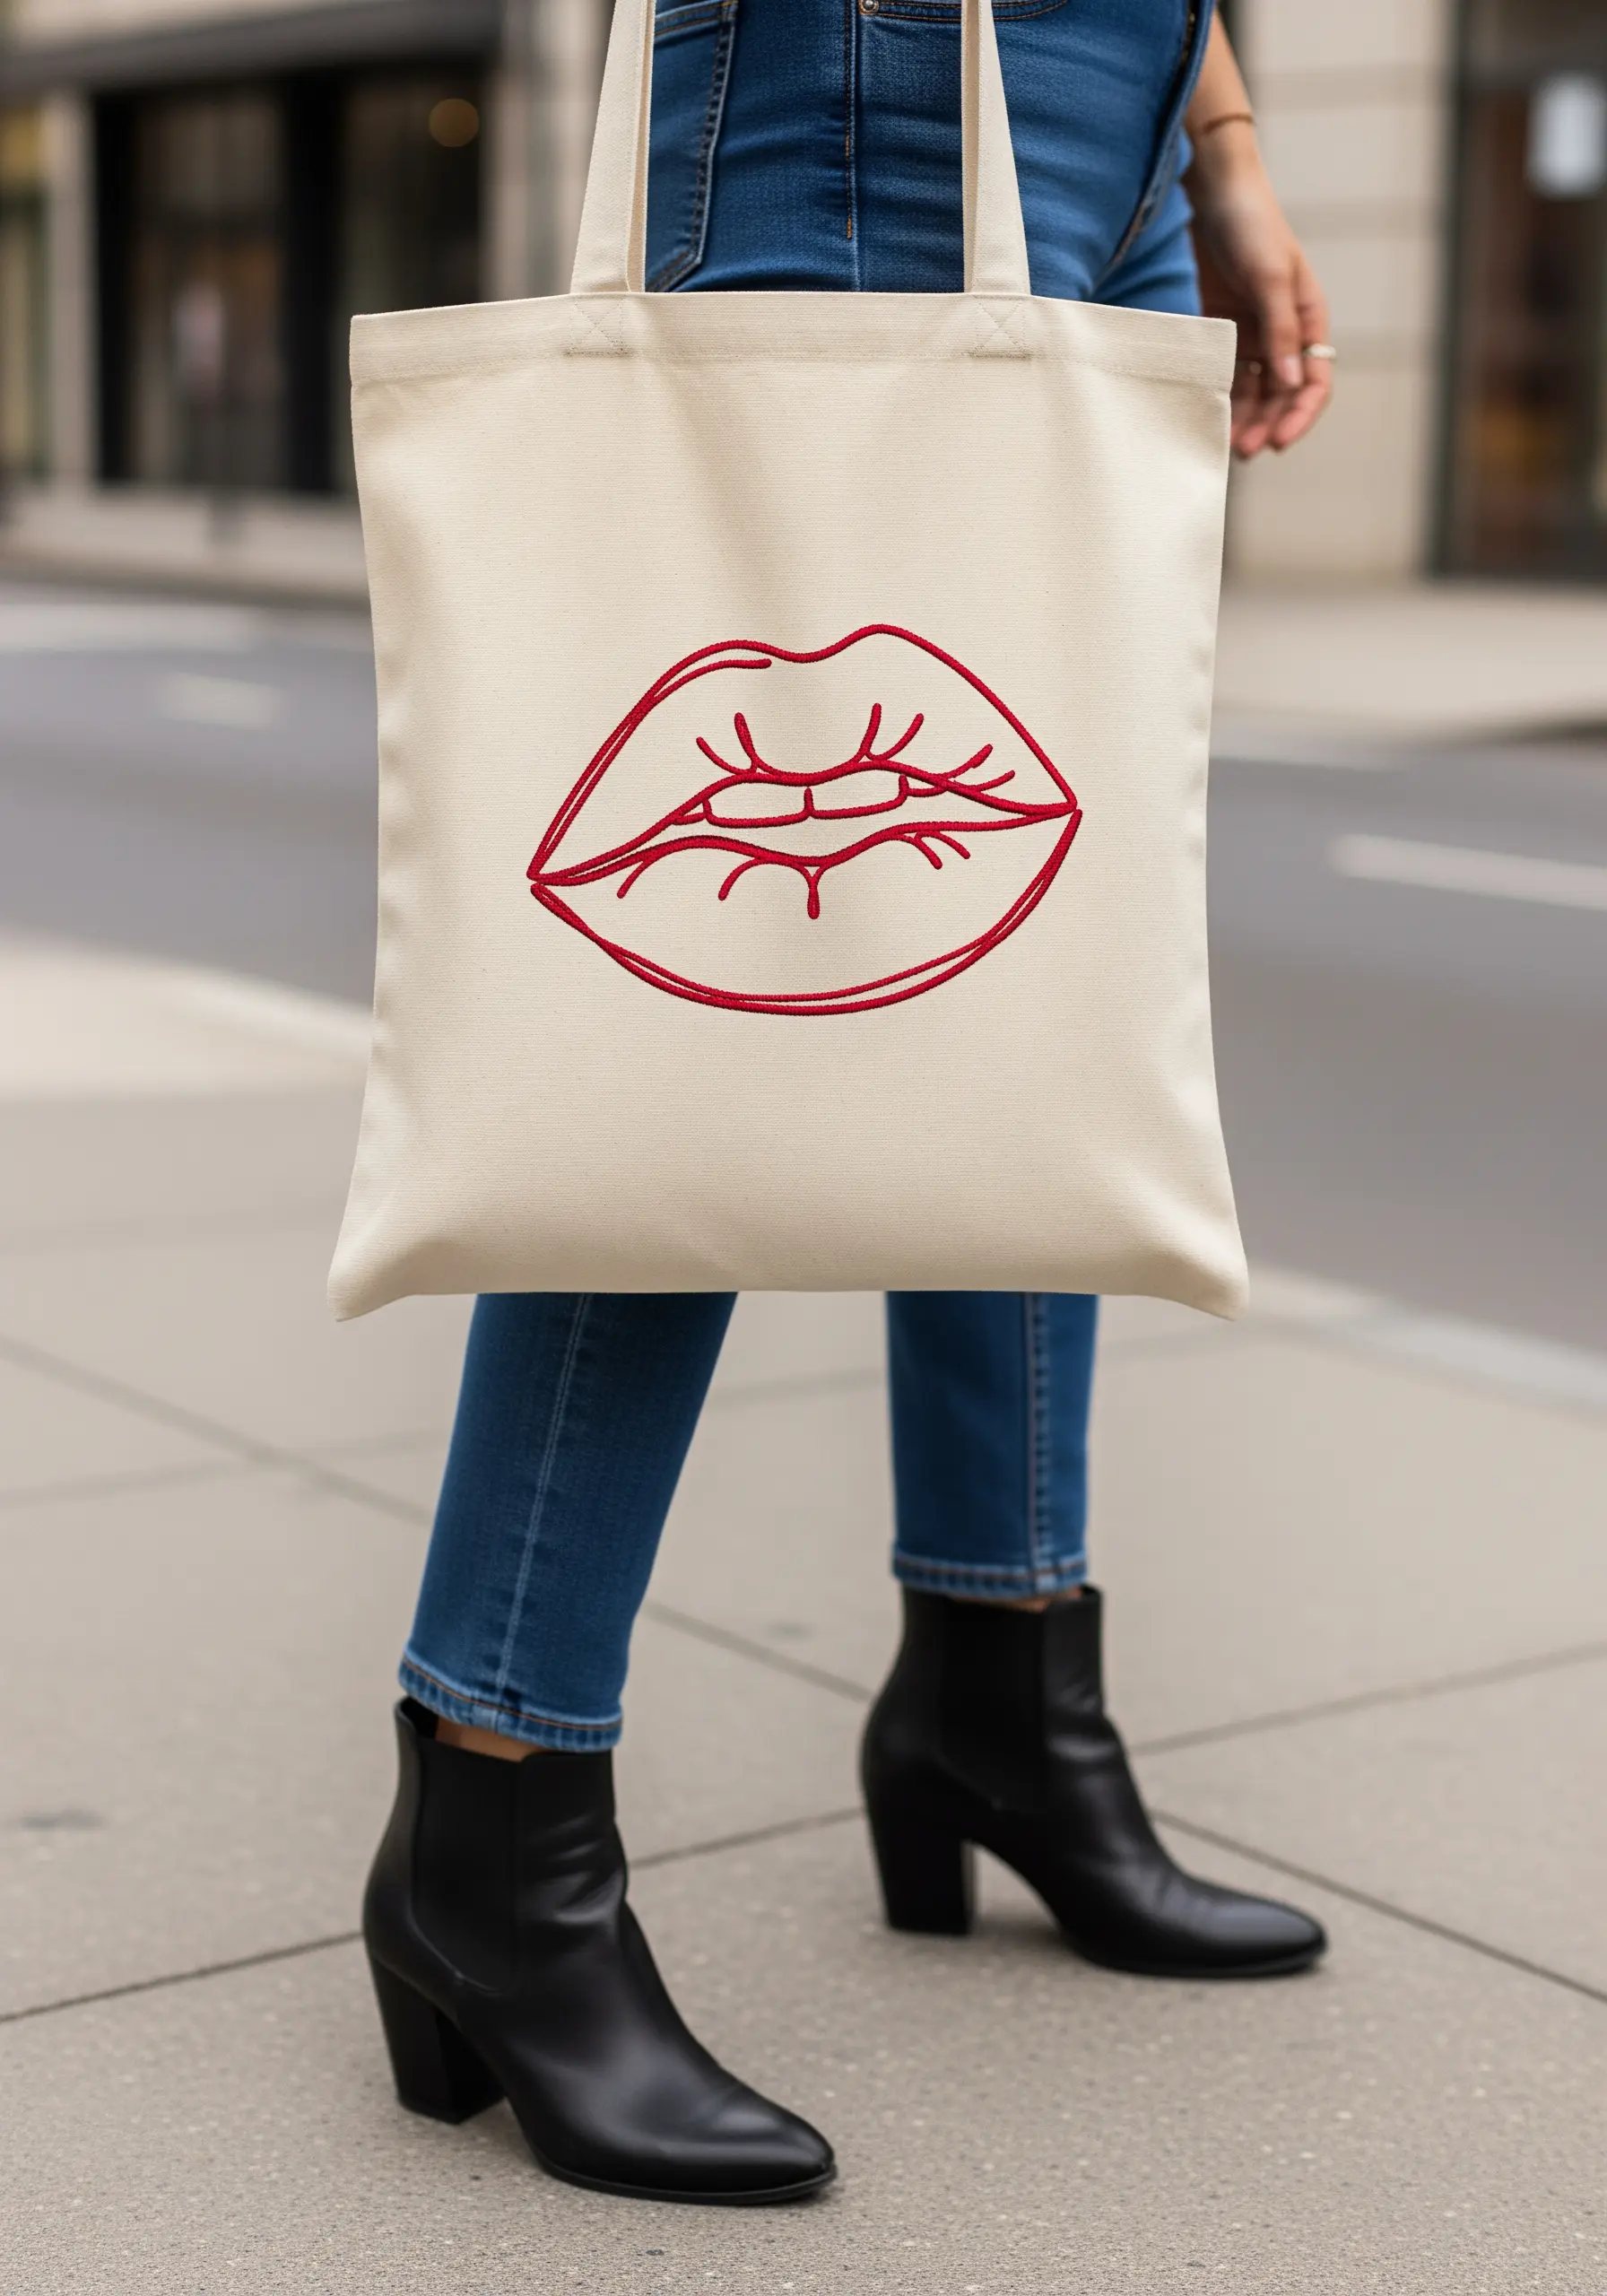
To make a graphic motif like these lips truly pop, give the outline a raised, dimensional quality.
First, stitch the entire outline using a simple backstitch. Then, go over that line with a satin stitch, using the backstitch as a padded foundation.
This technique, called a padded satin stitch, creates a bold, rounded edge that catches the light and makes the design feel more substantial and tactile, like in abstract floral embroidery hoops.
16. Abstract Motion with Parallel Lines
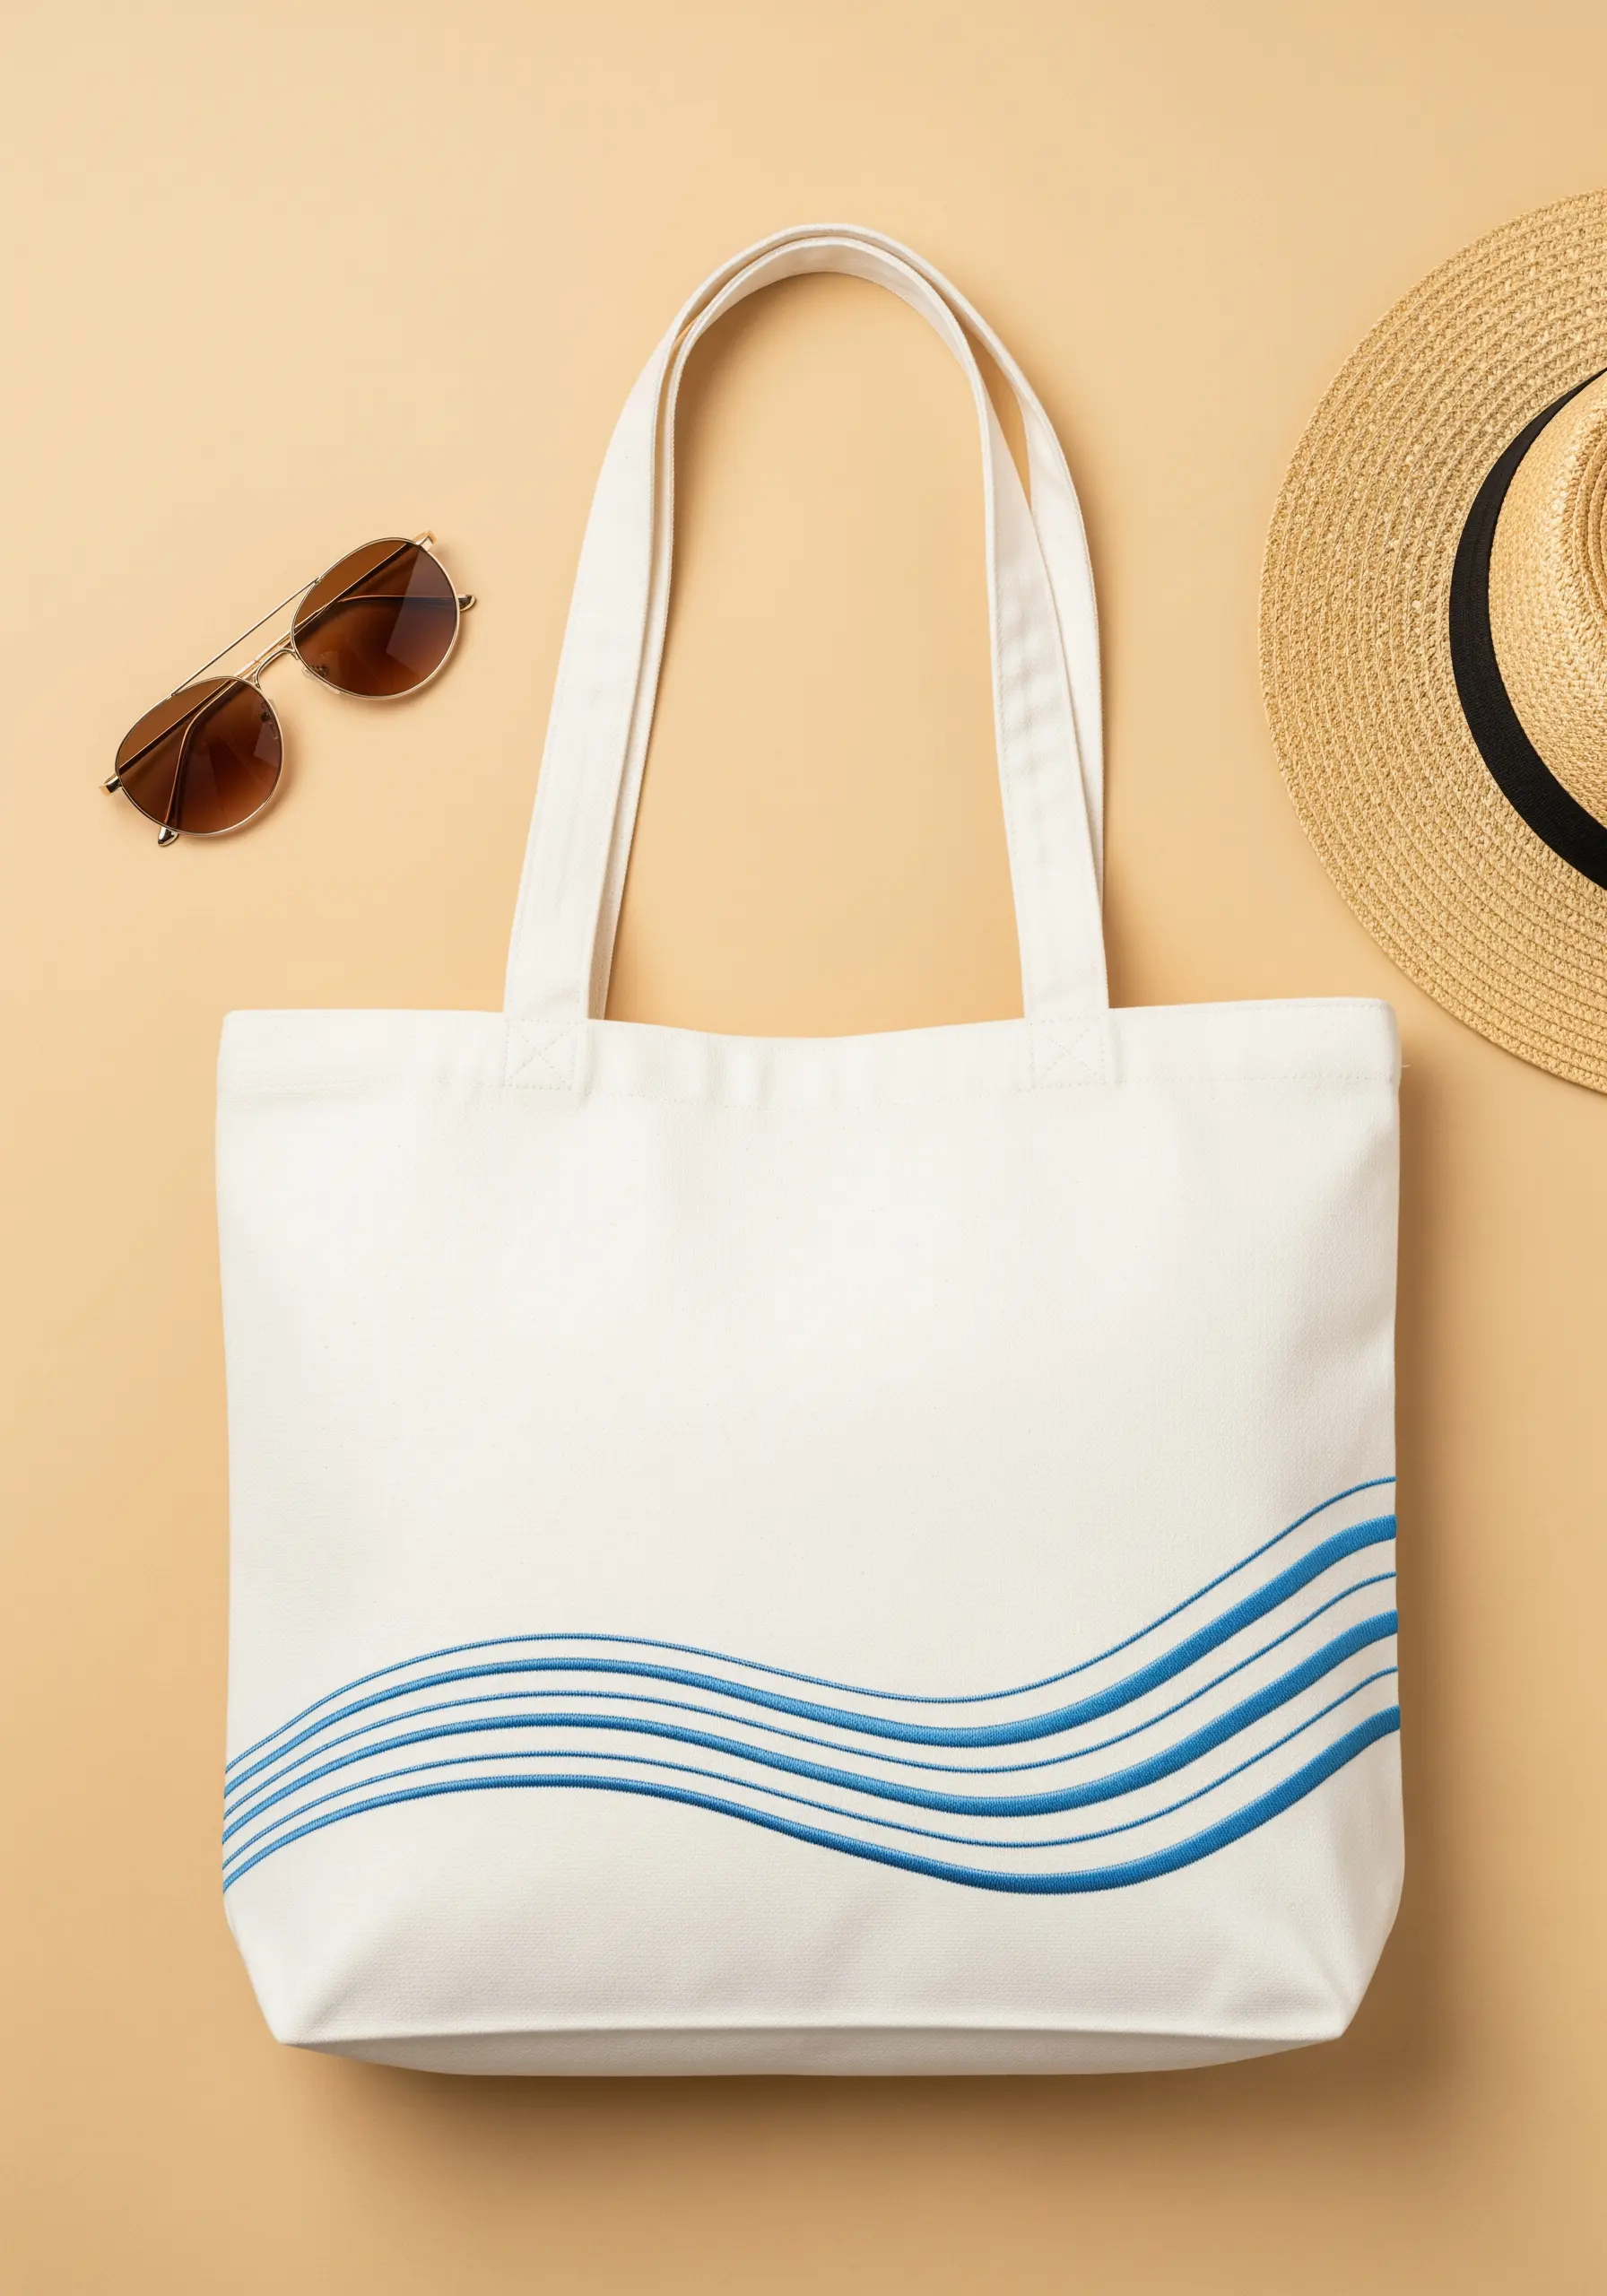
To create a sense of flowing movement with parallel lines, consistent spacing is everything.
Use a ruler and a removable fabric marker to draw your guidelines before you start stitching.
For the smoothest possible curves, use a stem stitch or a split stitch, as they are more adaptable to gradual bends than a backstitch.
Varying the number of strands for different lines can also add a subtle sense of depth to these abstract thread waves & swirls.
17. The Whispering Texture of a Feather
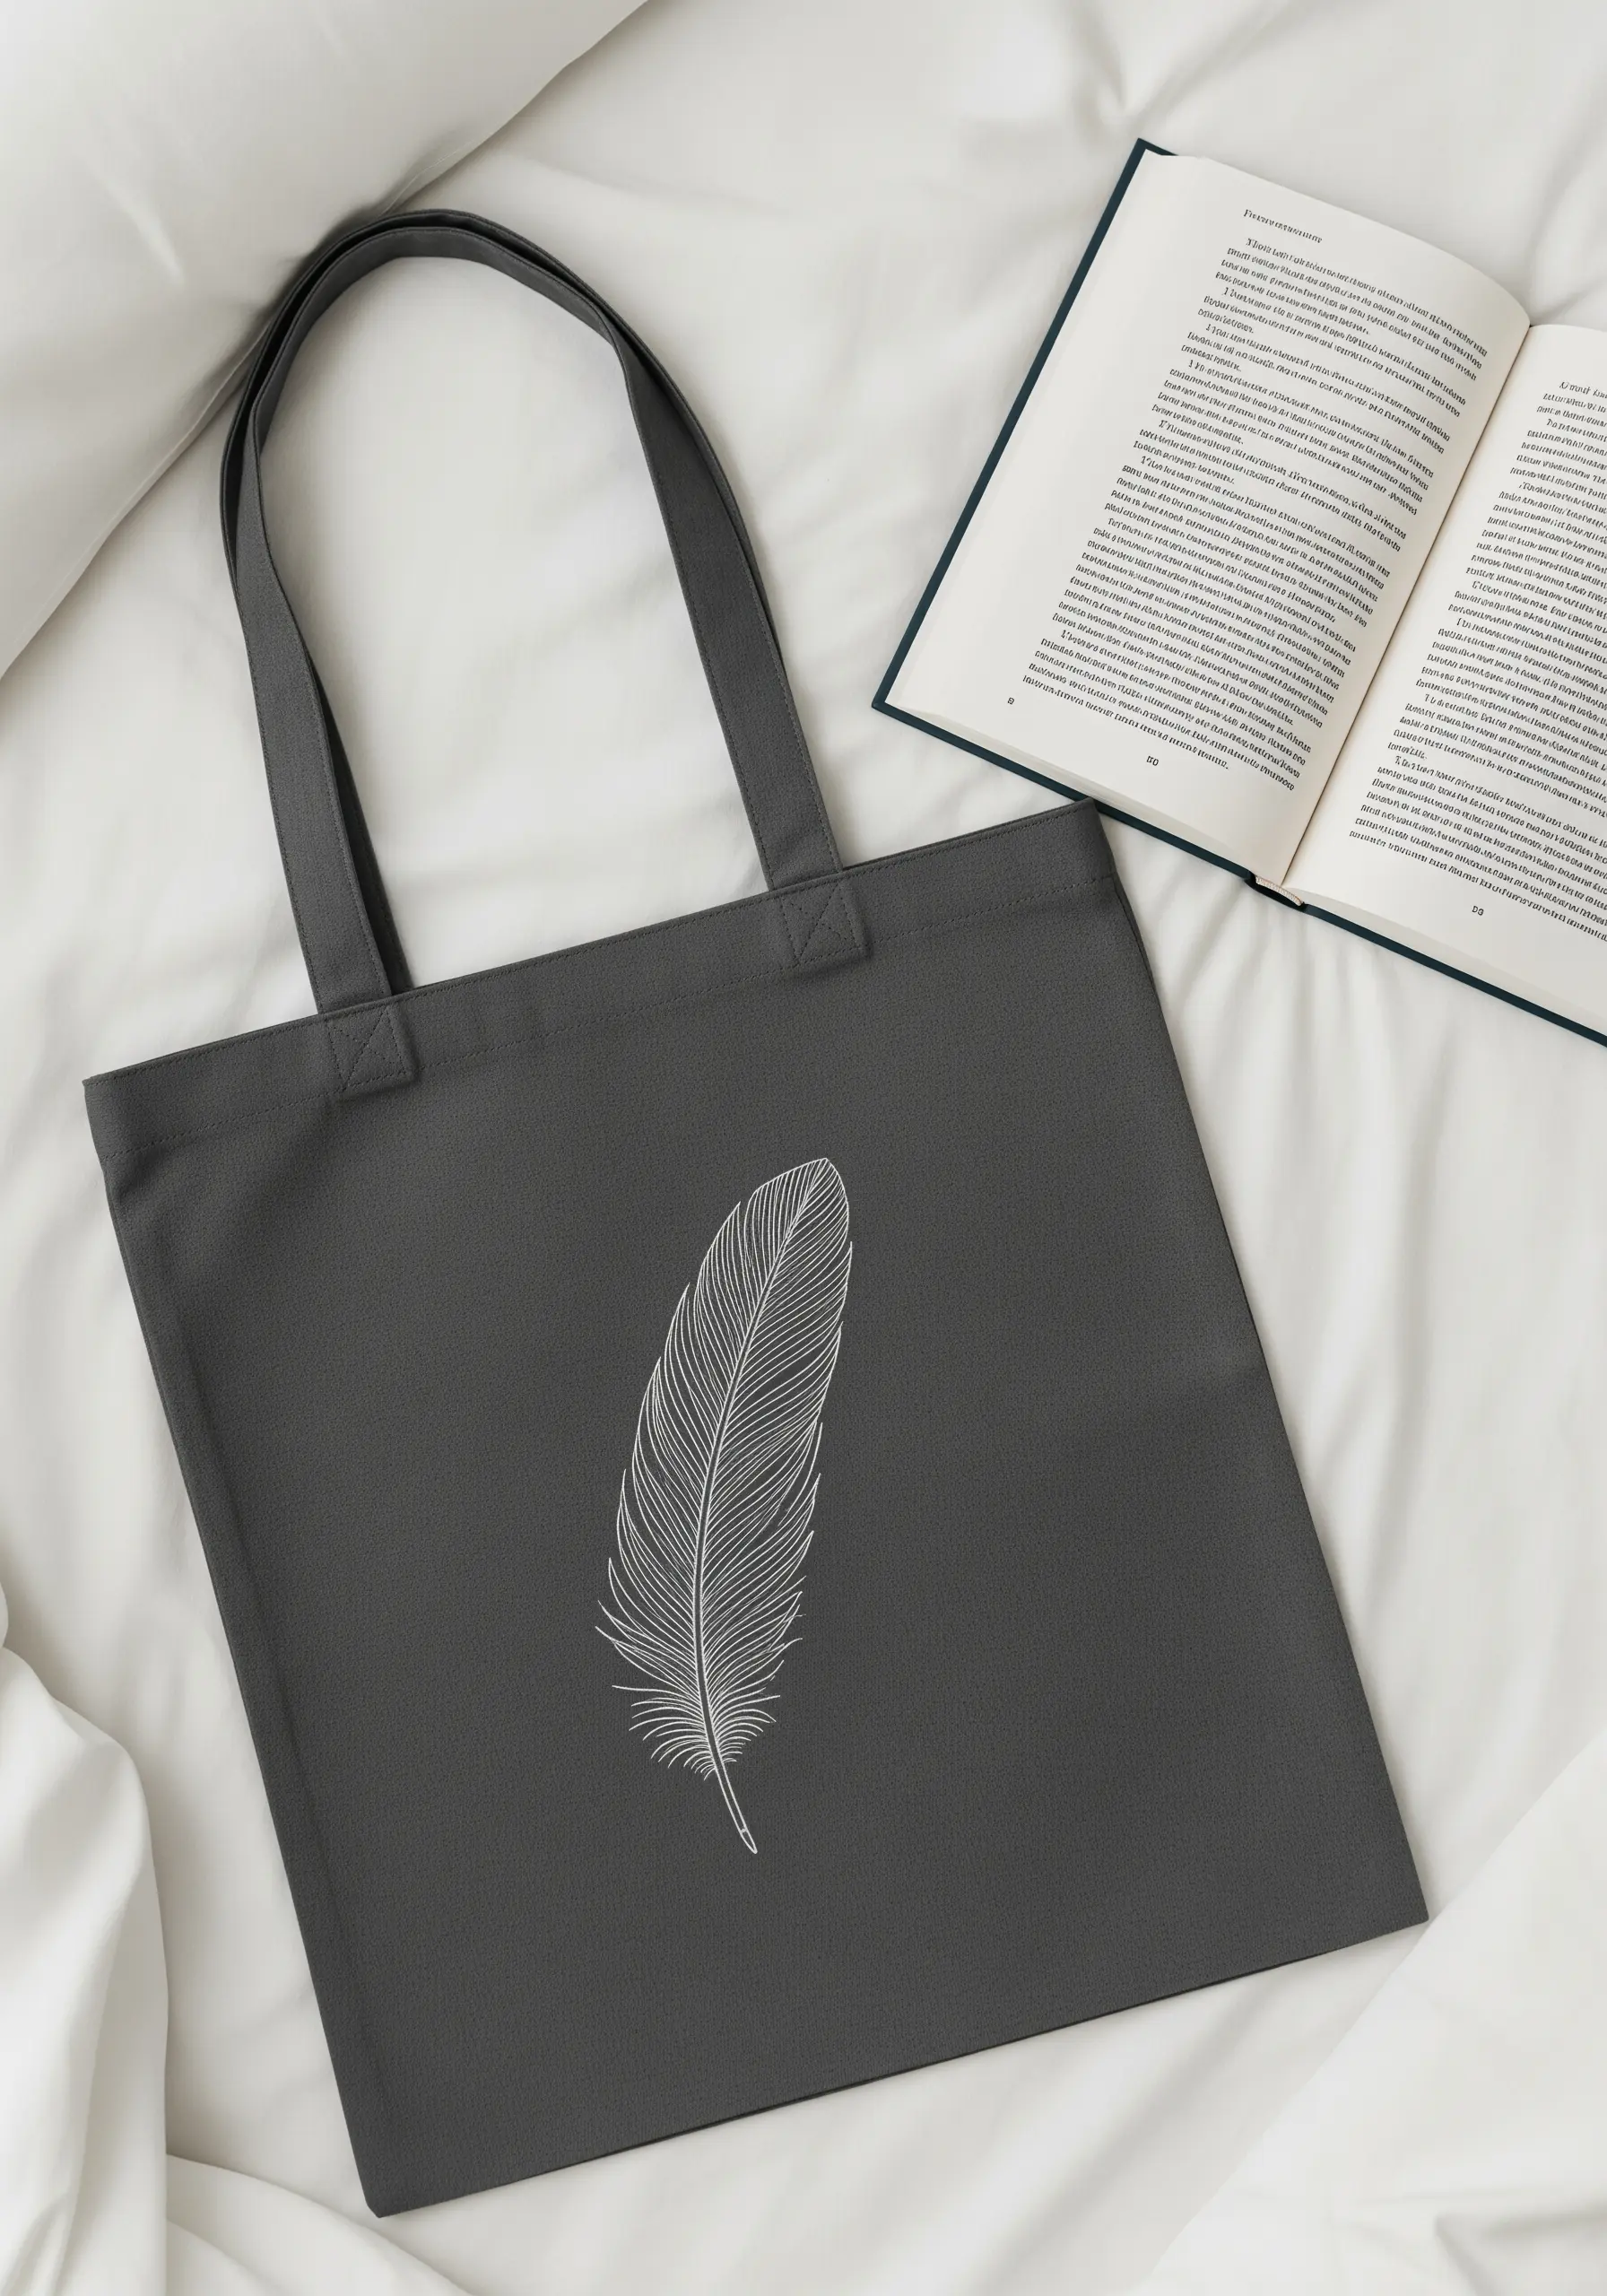
Capture the ethereal quality of a feather by focusing on stitch direction and thread weight.
Use a stem stitch for the central shaft to give it a solid, rounded form.
For the delicate barbs, stitch outward from the shaft at a slight angle using a single strand of floss and a simple straight stitch.
This creates a light, airy texture that feels true to the object and showcases one of the best nature texture embroidery hacks.
18. Abstract Compositions with Mixed Stitches
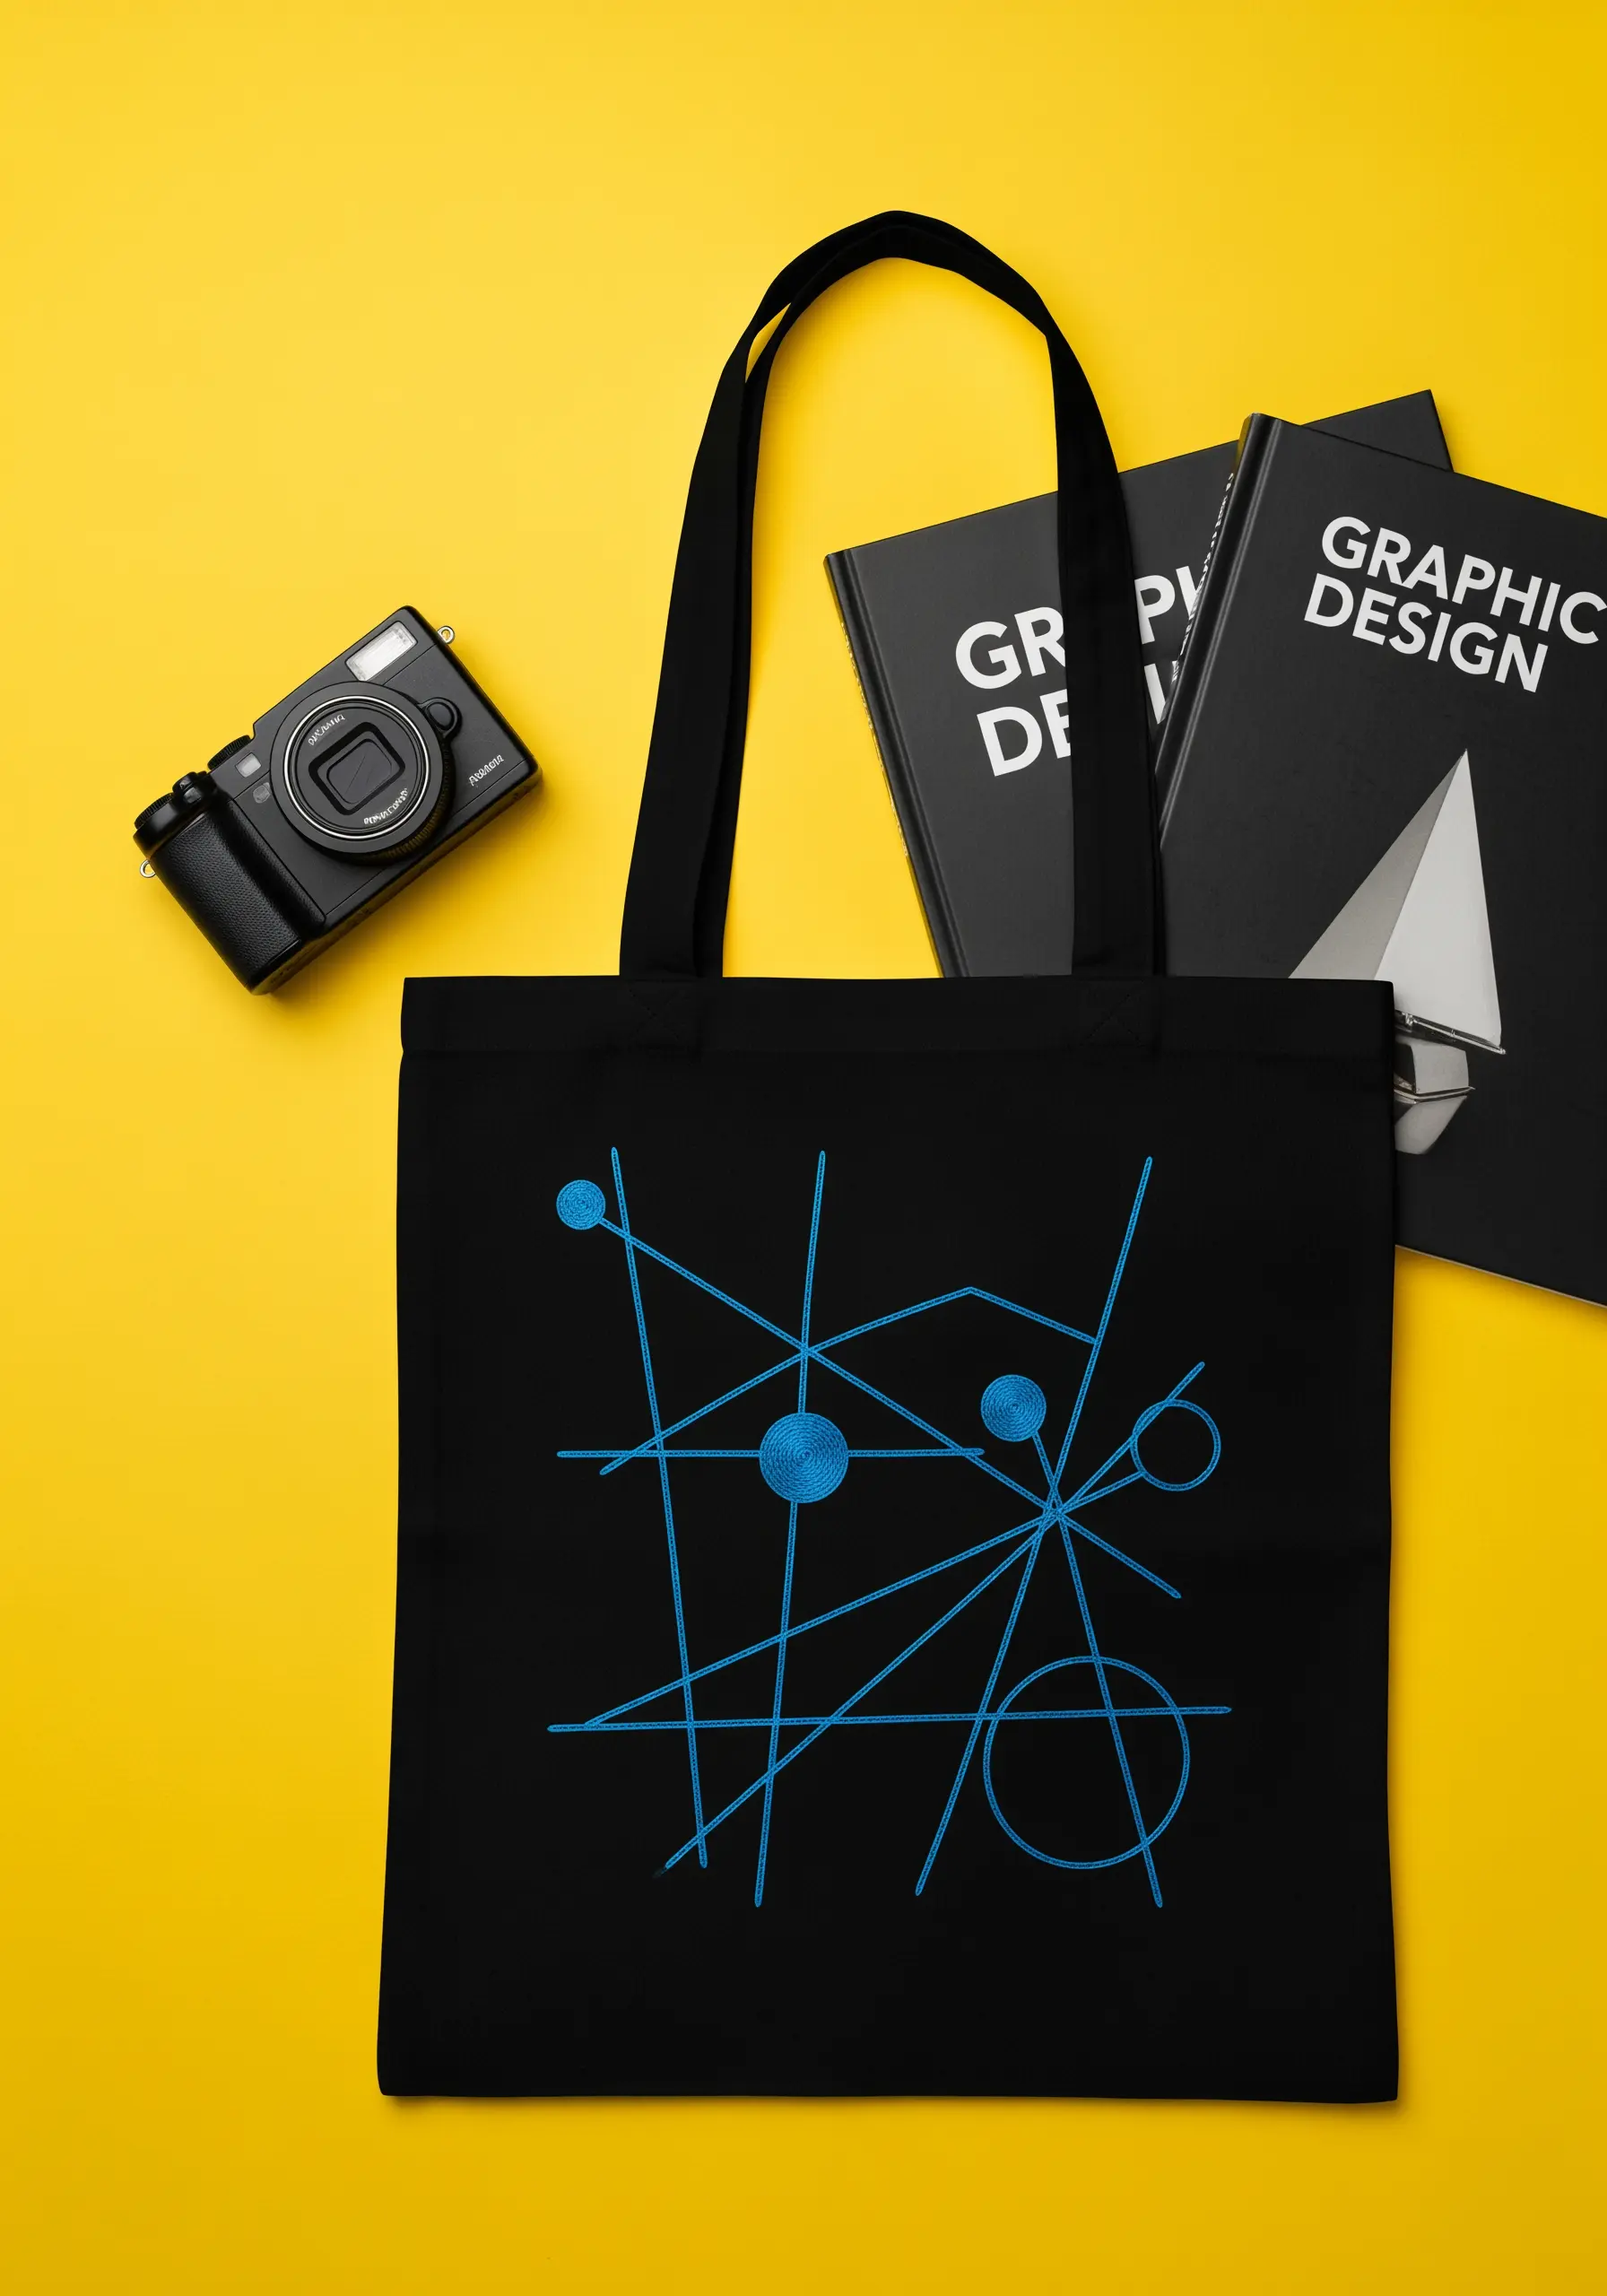
Create visual interest in an abstract design by combining linear stitches with filled shapes.
Use a crisp backstitch for the straight lines to create a strong graphic grid.
For the circular elements, switch to a satin stitch to provide a solid, smooth contrast to the open linework.
This interplay between line and shape gives the composition a dynamic, layered feel that feels intentional and balanced, much like modern modern grid & dot stitch concepts.
19. Cozy Motifs with Soft Outlines
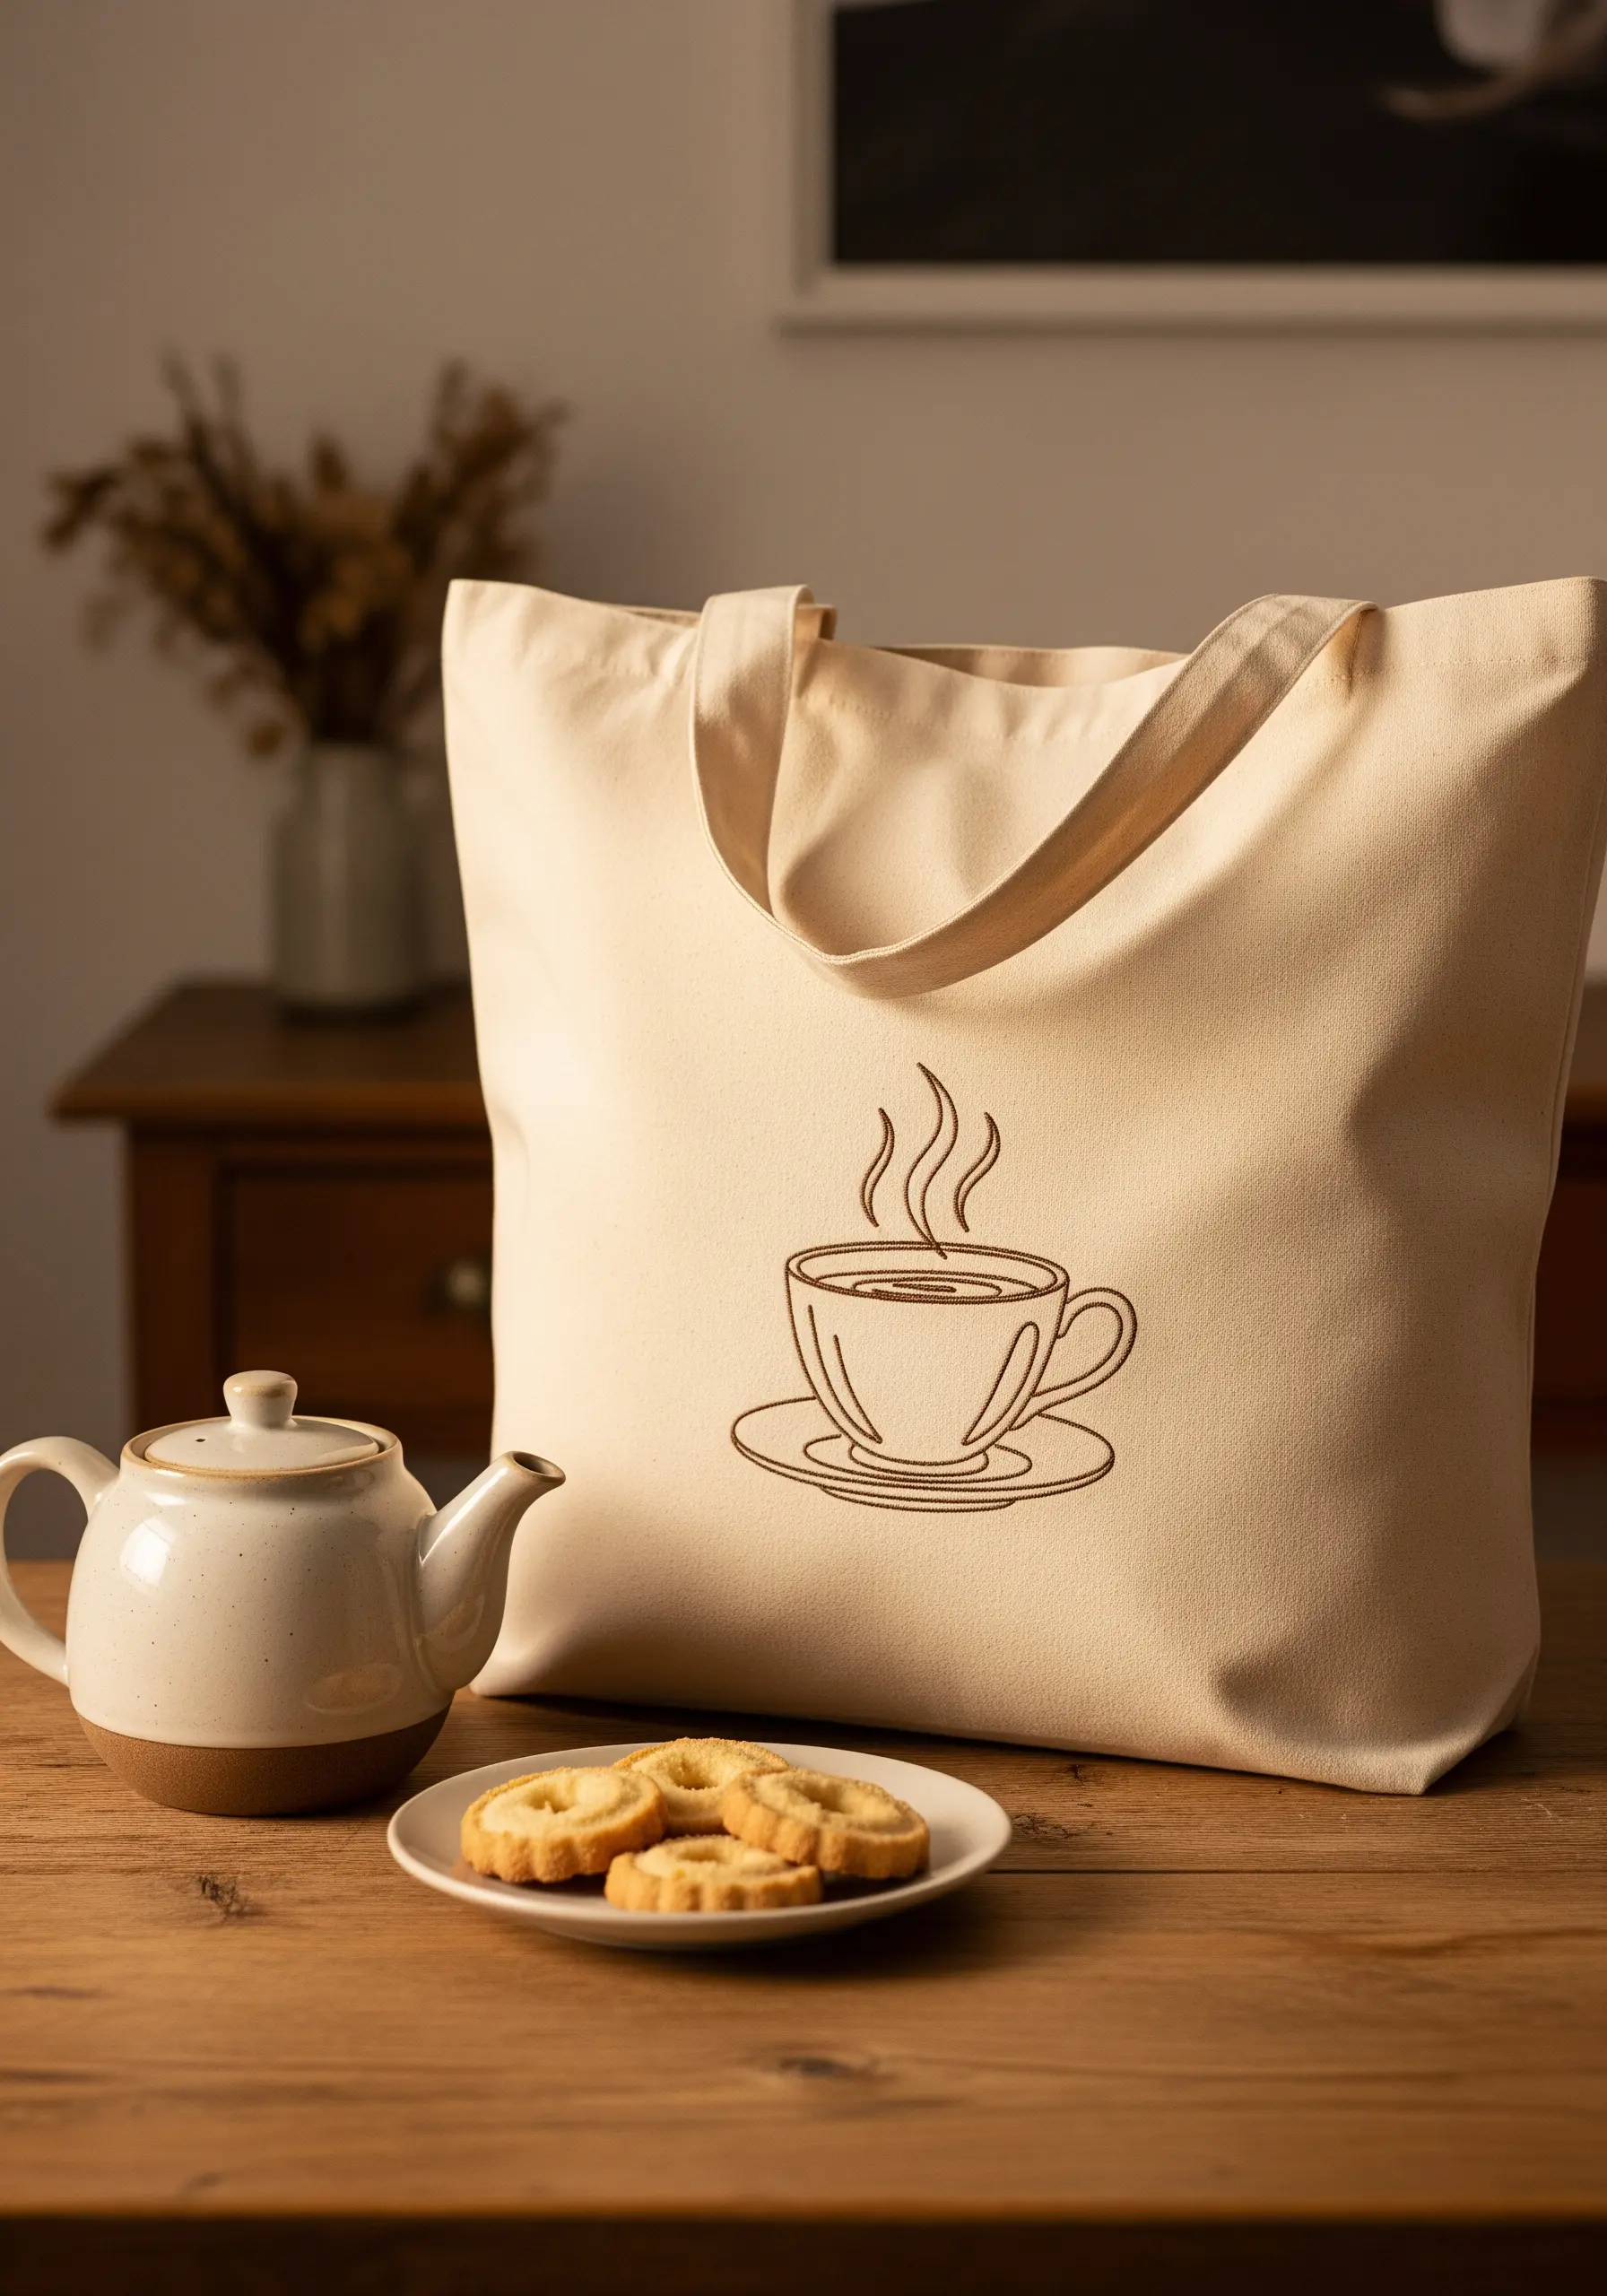
To give a simple motif like a coffee cup a soft, inviting feel, opt for a split stitch instead of a backstitch.
The split stitch creates a finer, chain-like texture that feels less rigid and more like a gentle sketch.
Using a warm brown thread on a cream canvas enhances this cozy aesthetic.
For the delicate steam lines, use just one or two strands of floss to make them appear light and ethereal, a key detail in minimal food & coffee motifs.
20. Graphic Fruit with Crosshatch Detail
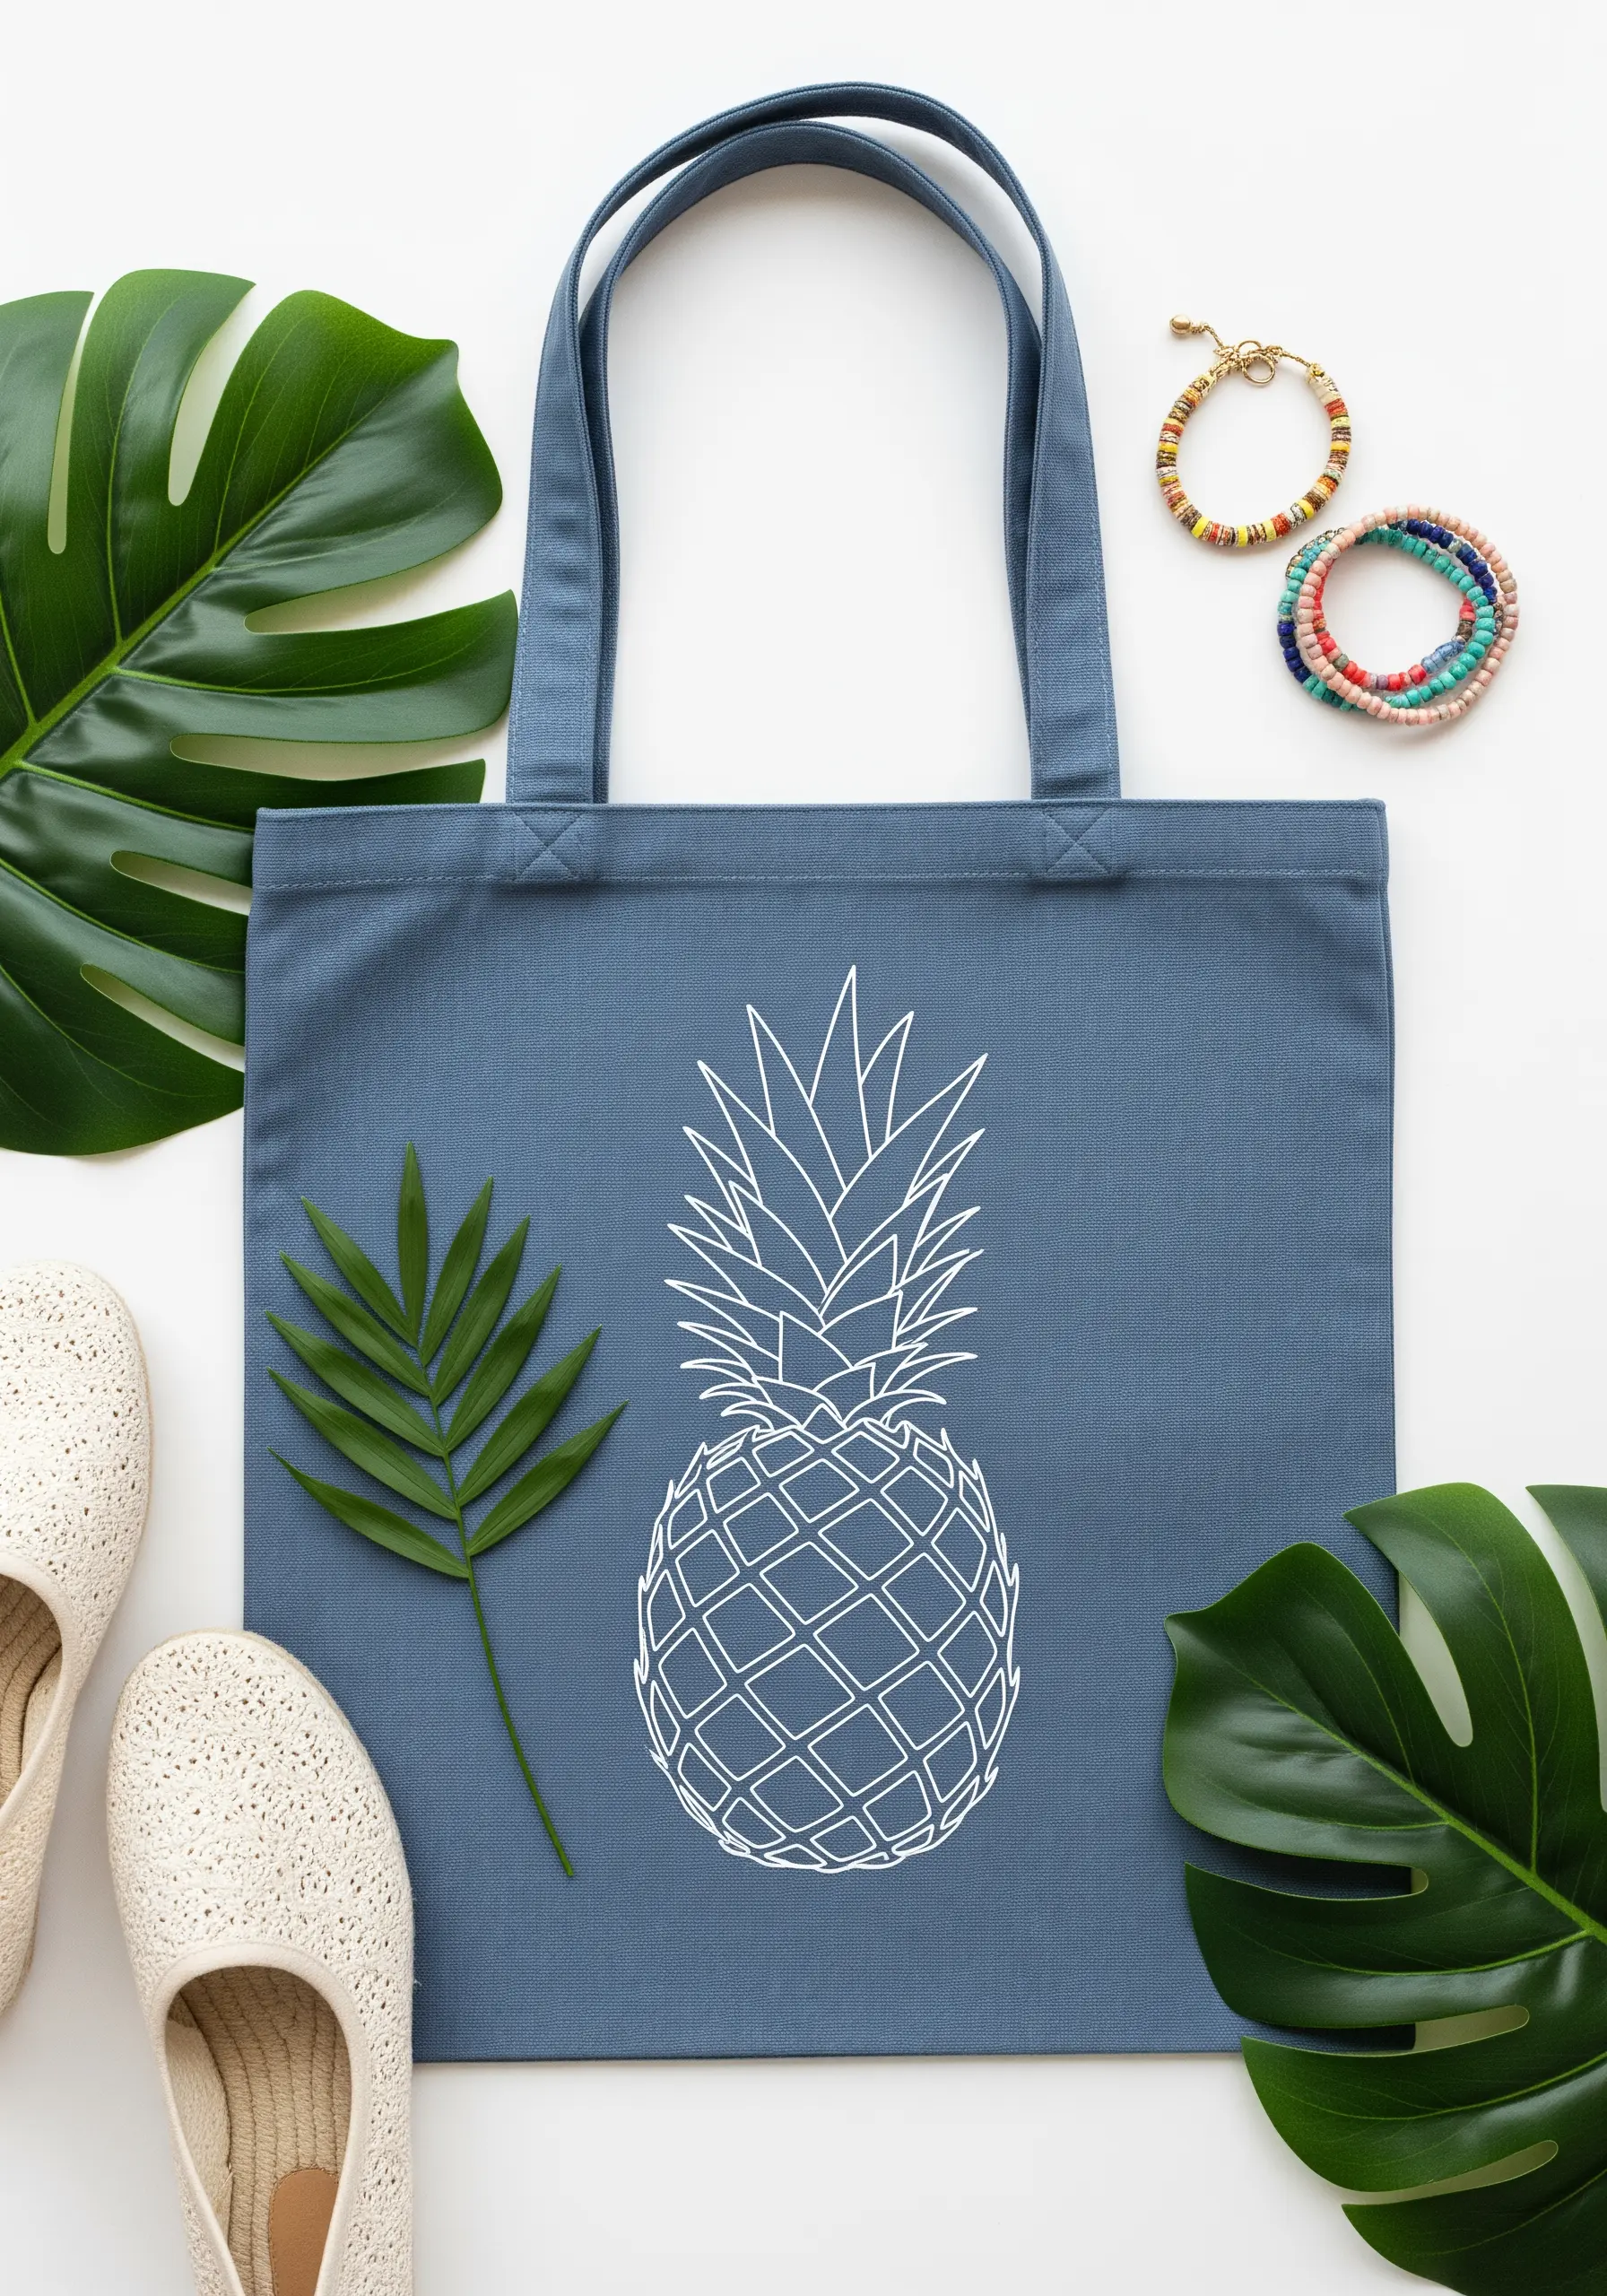
For a bold, graphic look, use a thick thread—like all six strands of cotton floss—for the main outline of the pineapple.
This creates a strong silhouette that stands out against the fabric.
For the crosshatch texture on the fruit’s body, switch to a finer two-strand thread and use simple straight stitches.
This contrast in line weight adds dimension and detail without overcomplicating the design, making it perfect for tropical leaf & flower combinations.
21. Expressive Details with Varying Line Weight
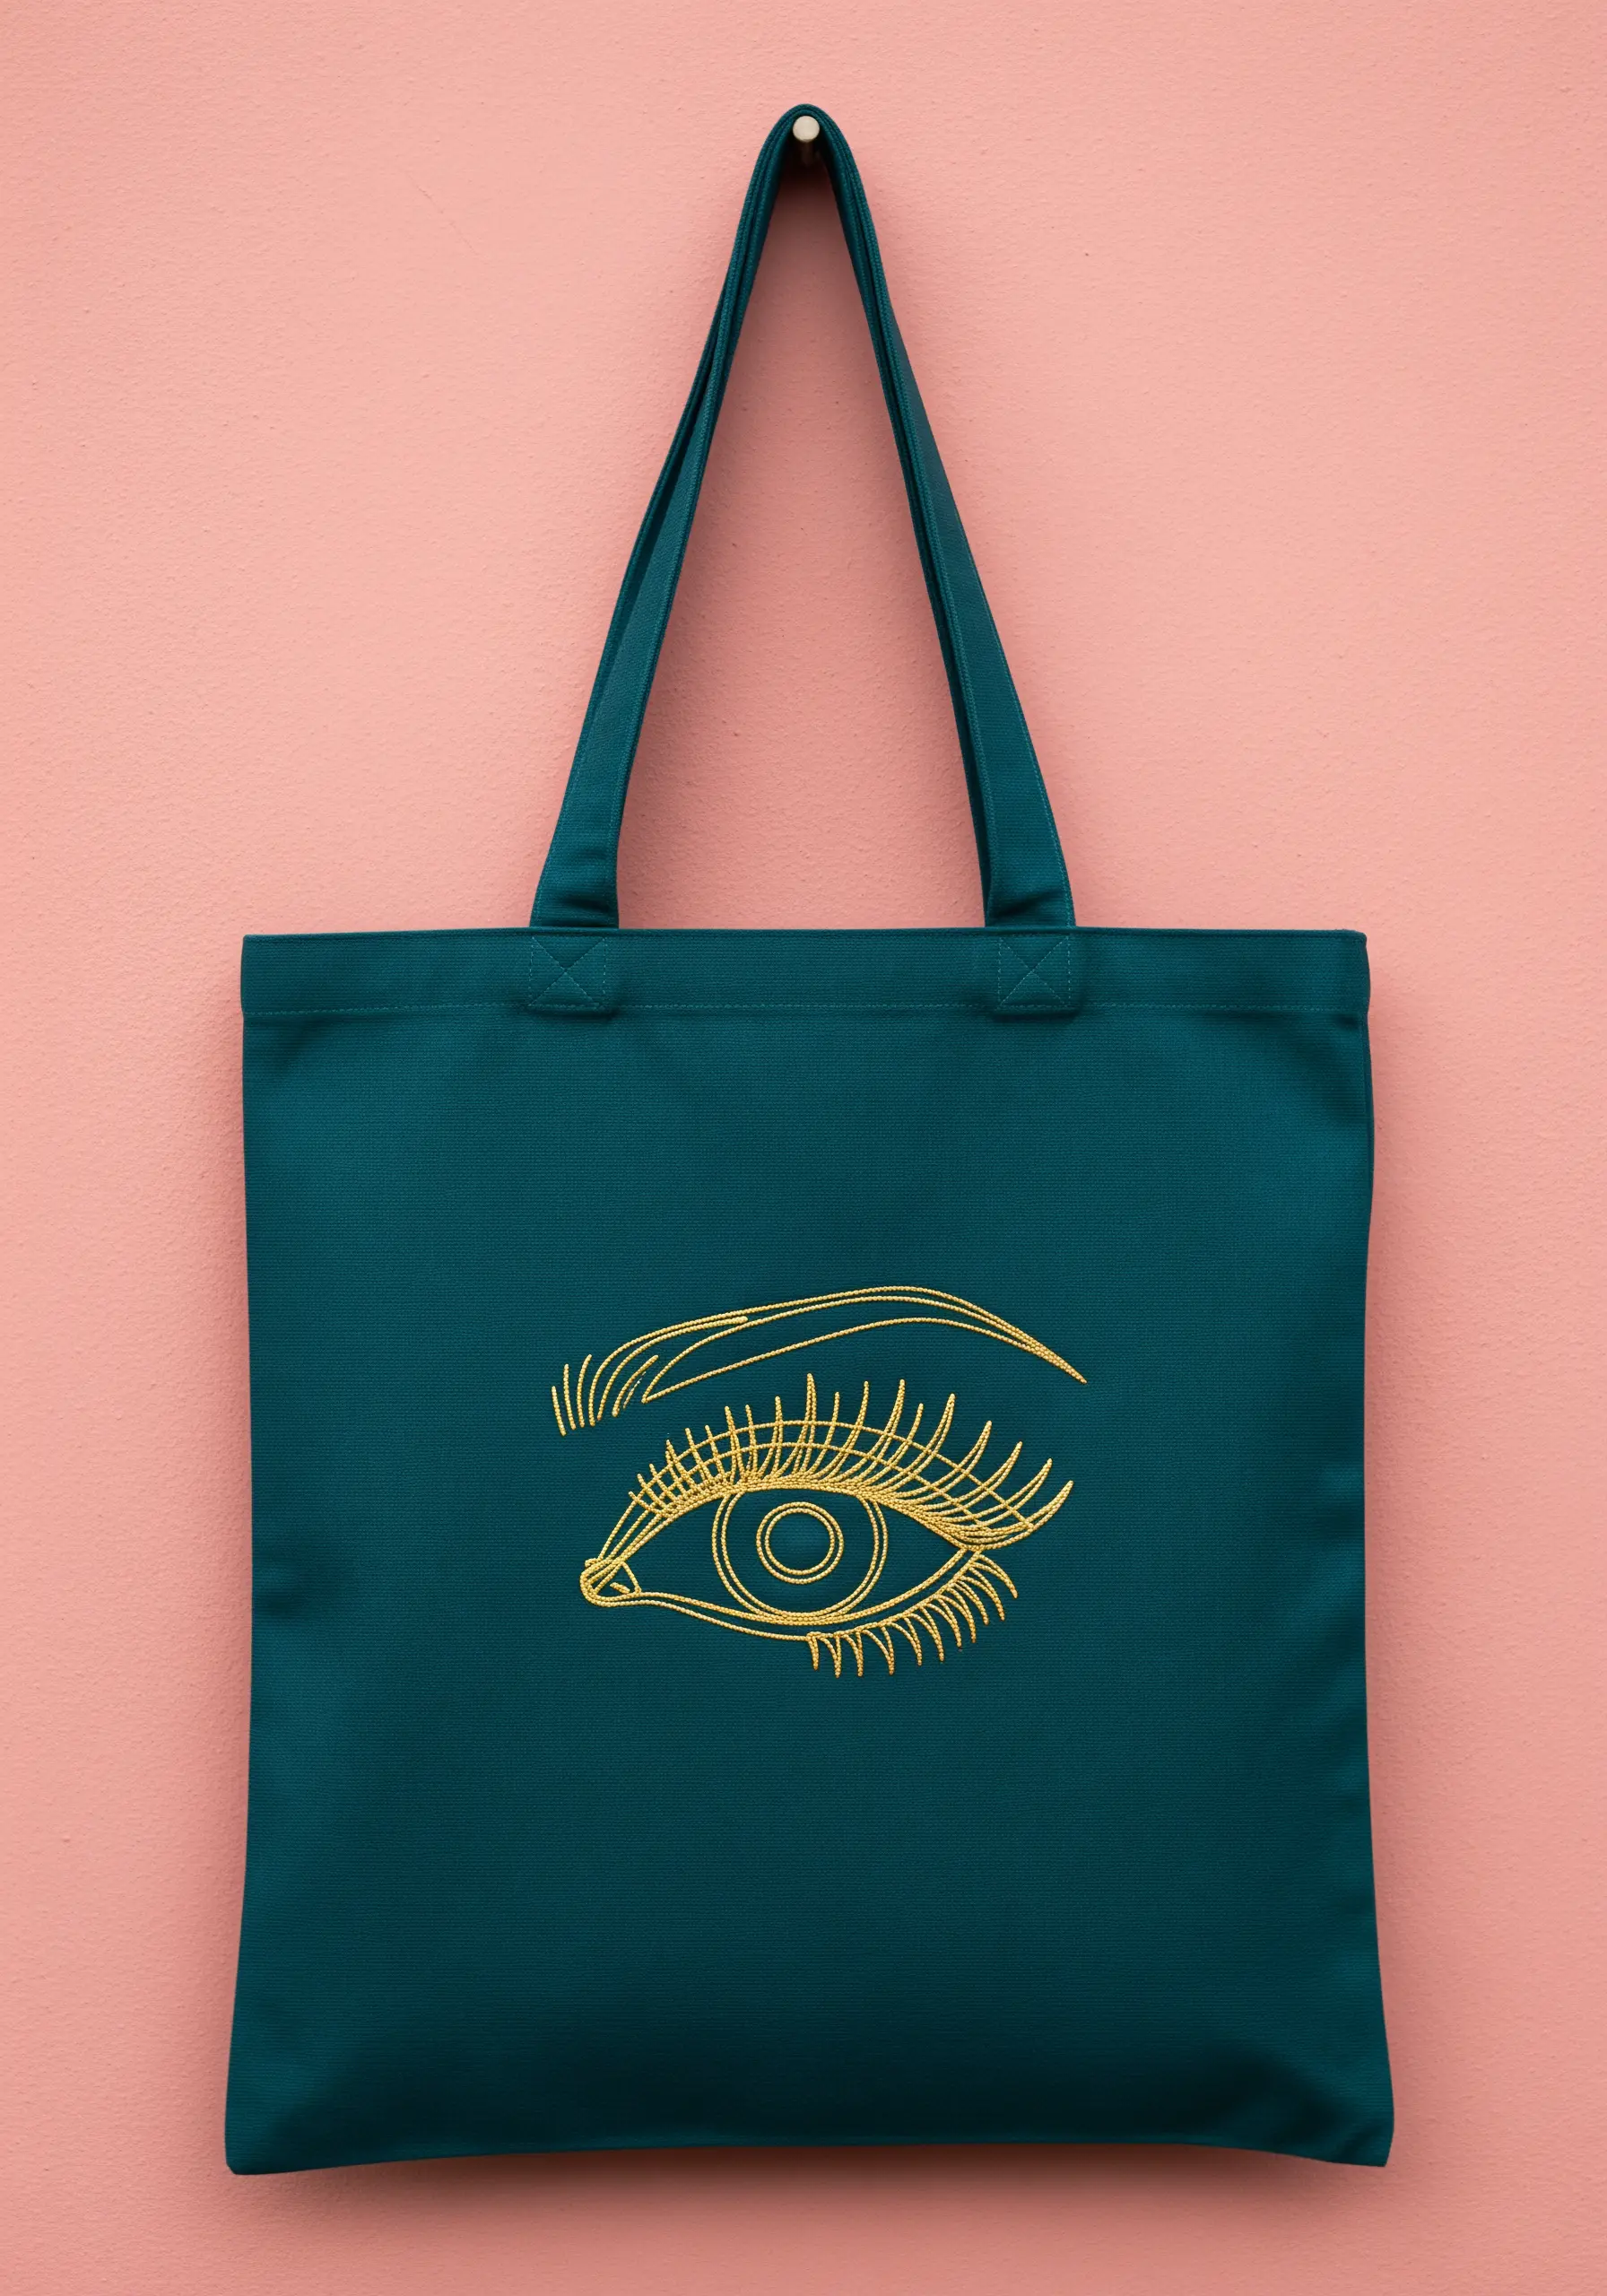
Bring a line art eye to life by strategically varying your line weight.
Use a thicker stitch, like a stem stitch with three strands of floss, for the main lash lines and the outline of the iris to give them prominence.
For the finer details, like the individual eyelashes and the eyebrow hairs, switch to a single strand and use delicate straight stitches.
This technique mimics the pressure of a pen, adding depth and expressiveness to otherwise minimal embroidery patterns that look harder than they are.


