

Sometimes, the desire to create something beautiful feels just out of reach. You have the skills, the threads, and the ideas, but making your work feel truly polished and intentional can be the hardest part. It’s not about learning a dozen complex new stitches, but about learning to see the small adjustments that make a world of difference.
Your coffee table is more than just a surface; it’s a canvas for your life. It’s where you rest your morning coffee, stack your favorite books, and gather with people you love. Adding a simple, handmade touch to this space is a quiet way of saying, ‘I was here, and I made this beautiful.’
These ideas are designed to be more than just projects; they are invitations to refine your technique. Notice how a change in stitch direction can mimic light, how a padded satin stitch can add dimension, or how a simple running stitch can become a bold graphic statement. Let’s create something this week that makes you proud every time you see it.
1. Render Citrus Pulp with Directional Satin Stitch
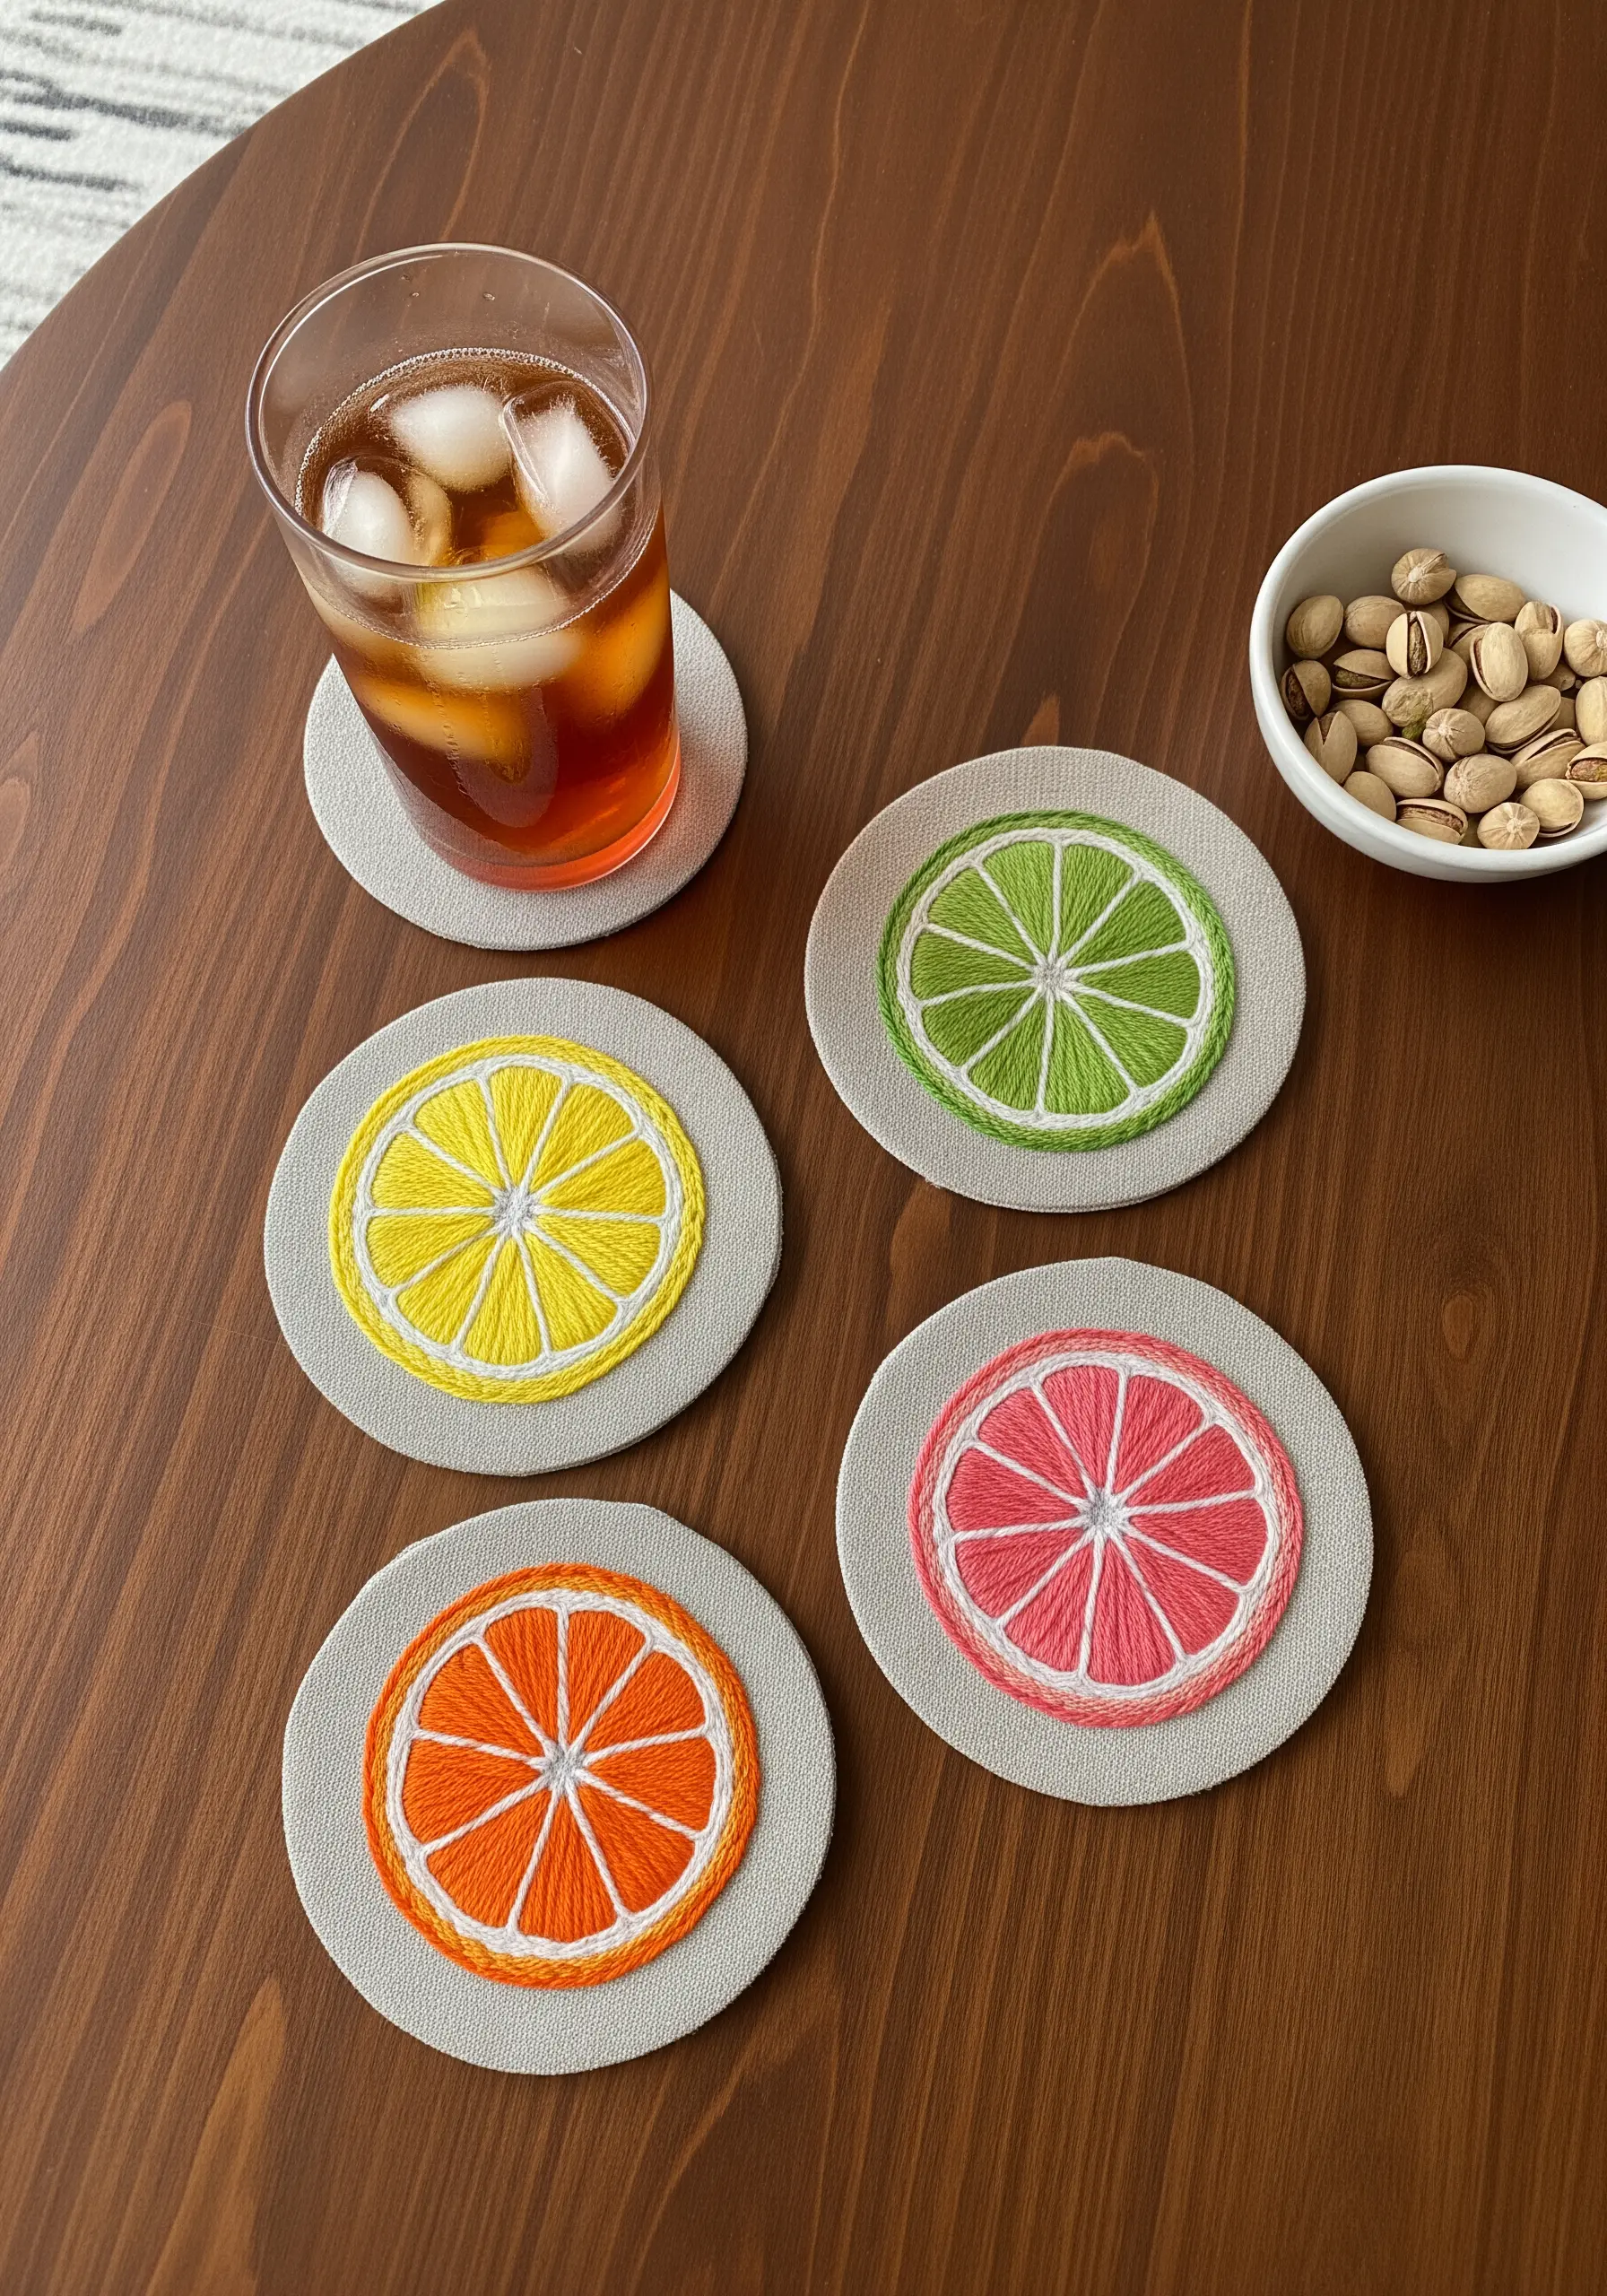
To capture the juicy texture of citrus slices, fill each segment with satin stitches angled toward the center.
This simple directional change creates the illusion of light and texture, making the fruit look more realistic.
Outline the entire slice and each segment with a tight, two-strand backstitch in a slightly darker or lighter shade to define the shapes and add a clean, graphic finish.
Use a crisp linen or cotton canvas for coasters; its tight weave prevents stitch distortion and holds up well to use.
2. Fill Geometric Shapes with Tactile Seed Stitch

Instead of a flat satin stitch, fill bold geometric shapes with a dense pattern of tiny seed stitches (or rice stitches).
This technique introduces a subtle, sophisticated texture that invites touch and adds dimension to the otherwise simple design.
Use a thick, six-strand cotton floss for the fill to create a raised effect that contrasts beautifully against the flat weave of a placemat or table runner.
This approach elevates minimal embroidery patterns into something with more substance and presence.
3. Create Dynamic Contrast with Punch Needle and Line Art
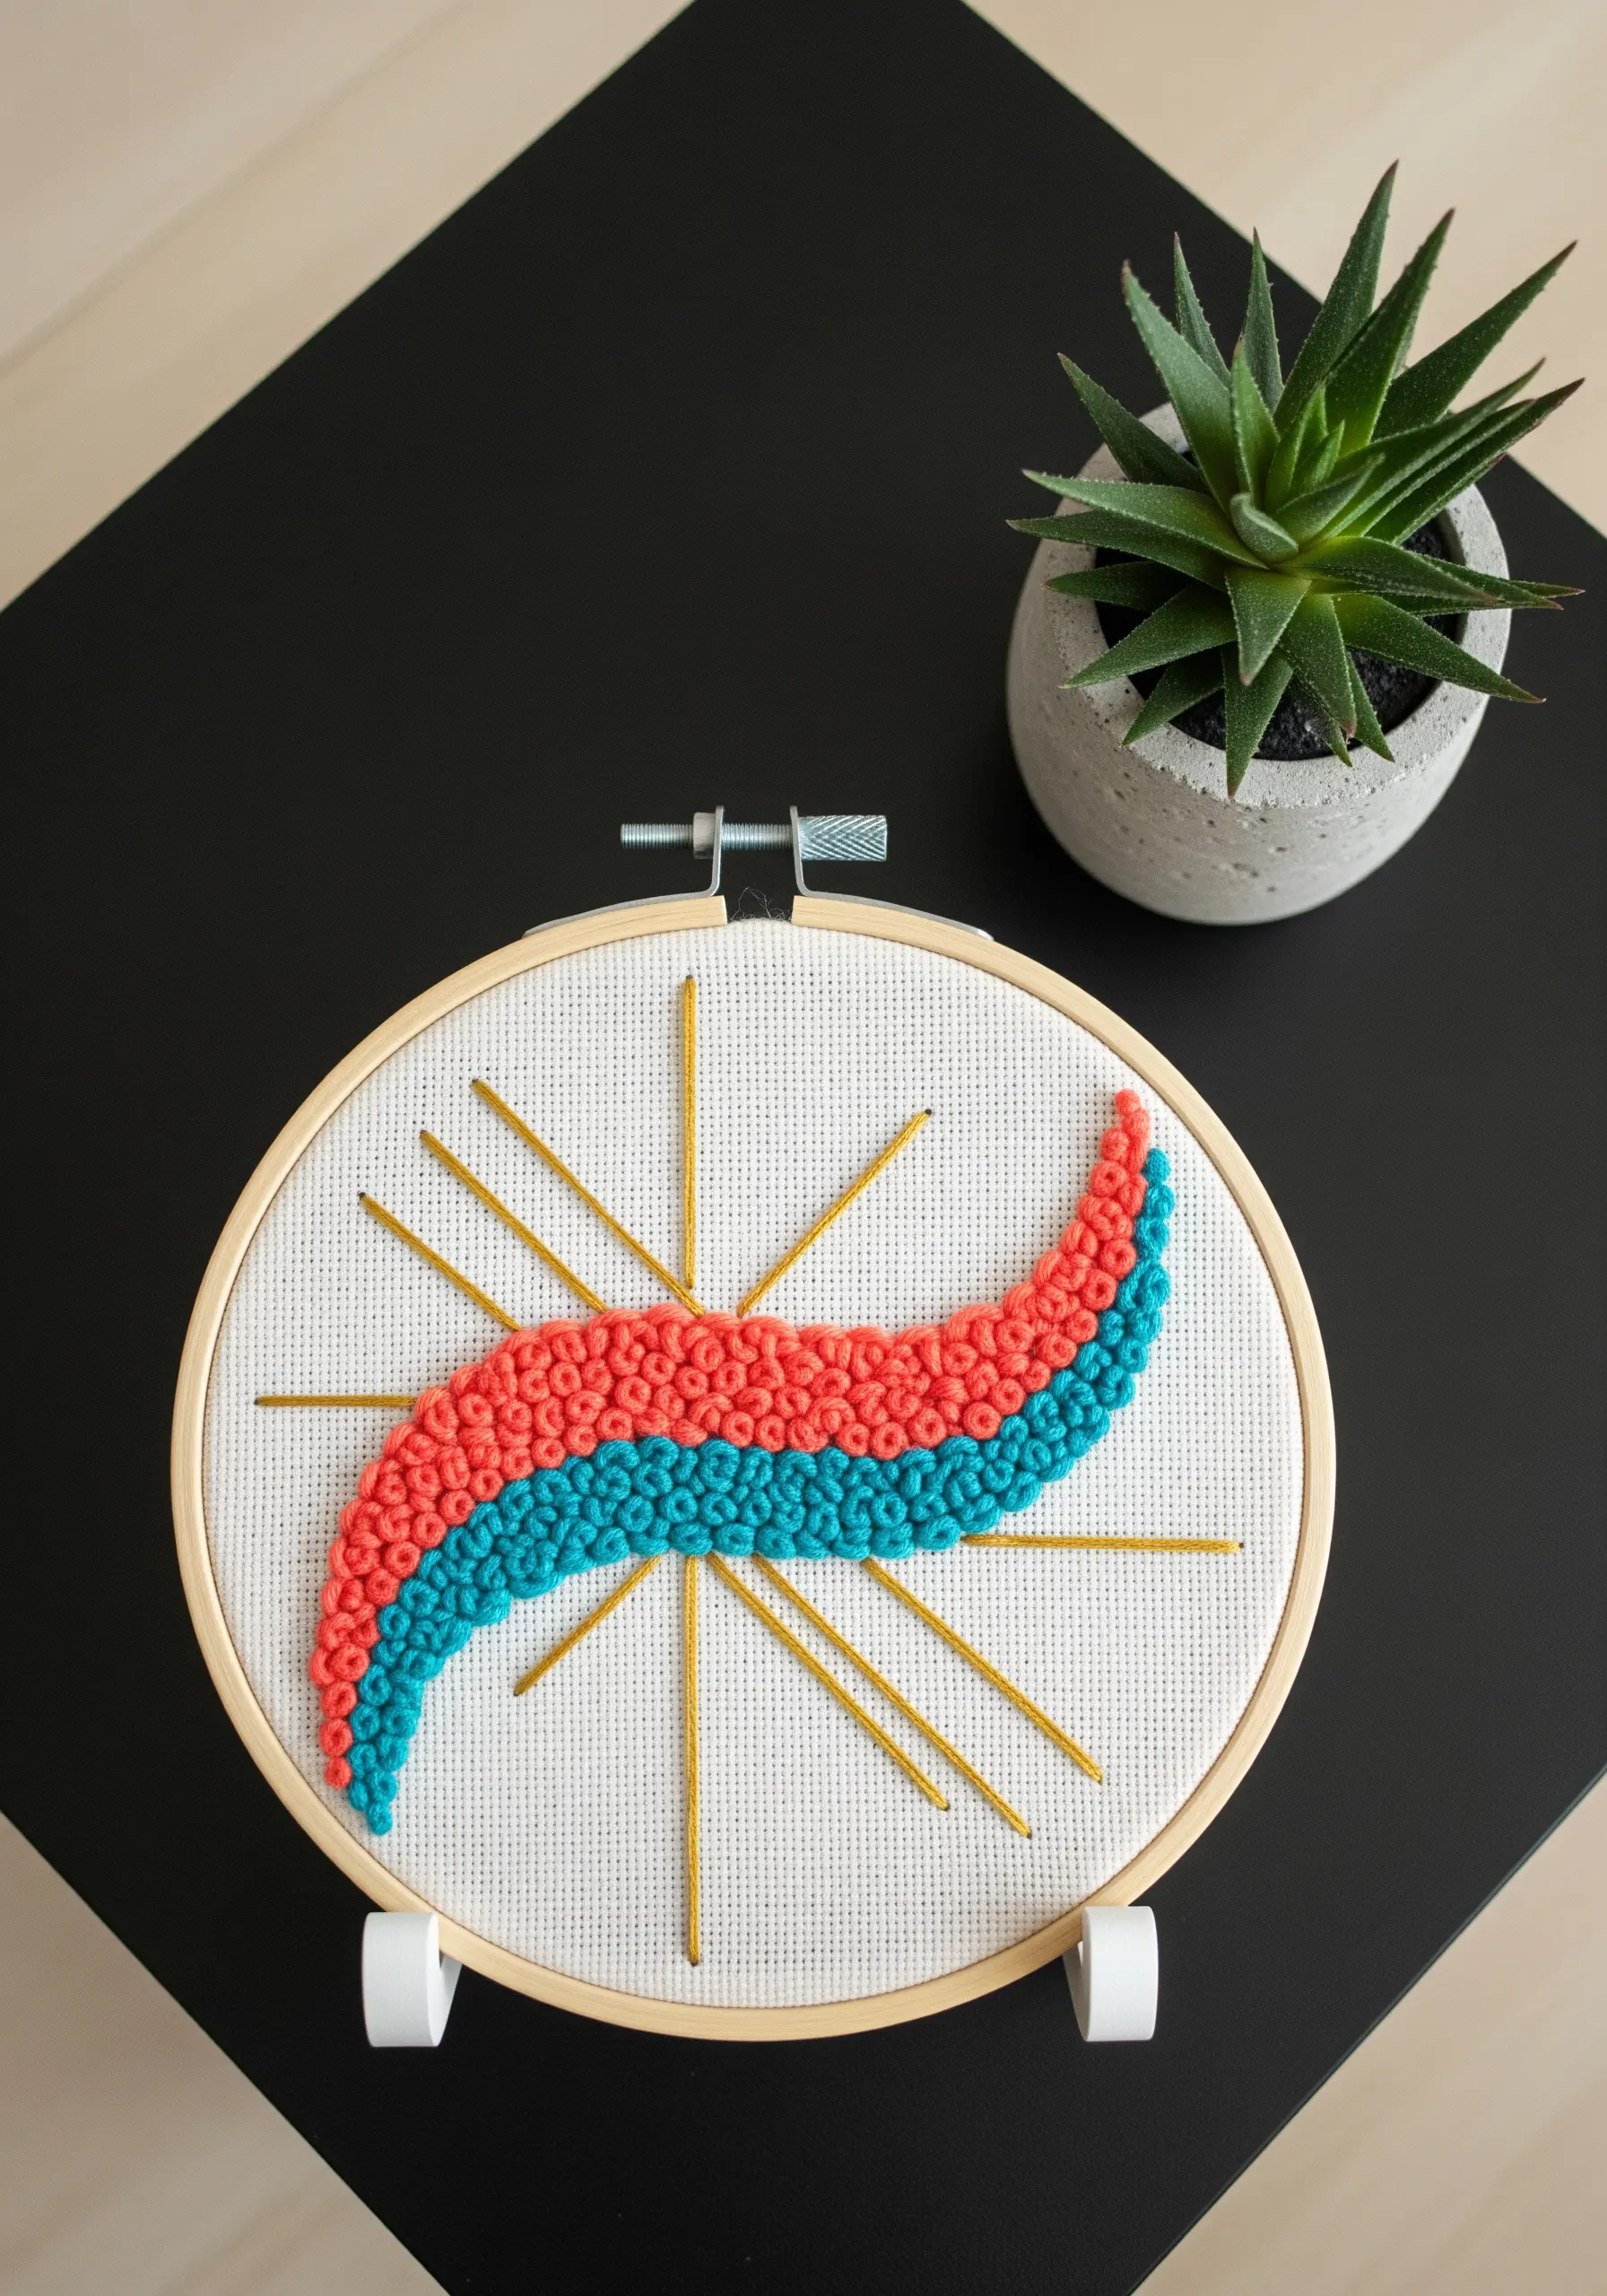
Combine the plush, high-pile texture of punch needle with the delicate sharpness of straight stitches for a truly modern look.
Use a chunky yarn for the punch needle portion to create a bold, sculptural shape.
Then, pierce the background with long, taut straight stitches using a fine, contrasting thread, like a metallic gold or a simple black cotton floss.
This juxtaposition of textures—soft and sharp, thick and thin—is what gives the piece its contemporary artistic energy.
4. Scatter a Meadow of Randomly Placed Daisies

To create a natural, ‘scattered’ look on a tray liner or napkin, avoid perfect symmetry and spacing.
Embroider tiny daisies using detached chain stitches for petals and a single French knot for the center.
Vary the angle of the stems and the direction the flowers face, and occasionally cluster two or three together.
This thoughtful imperfection makes the design feel organic and alive, as if wildflowers are genuinely growing across the fabric.
5. Illuminate a Design with Metallic and Padded Satin Stitch

Elevate a simple book cover with the magic of celestial motifs.
For the crescent moon, first lay down a base of split stitches within the shape, then cover it with satin stitches going in the opposite direction.
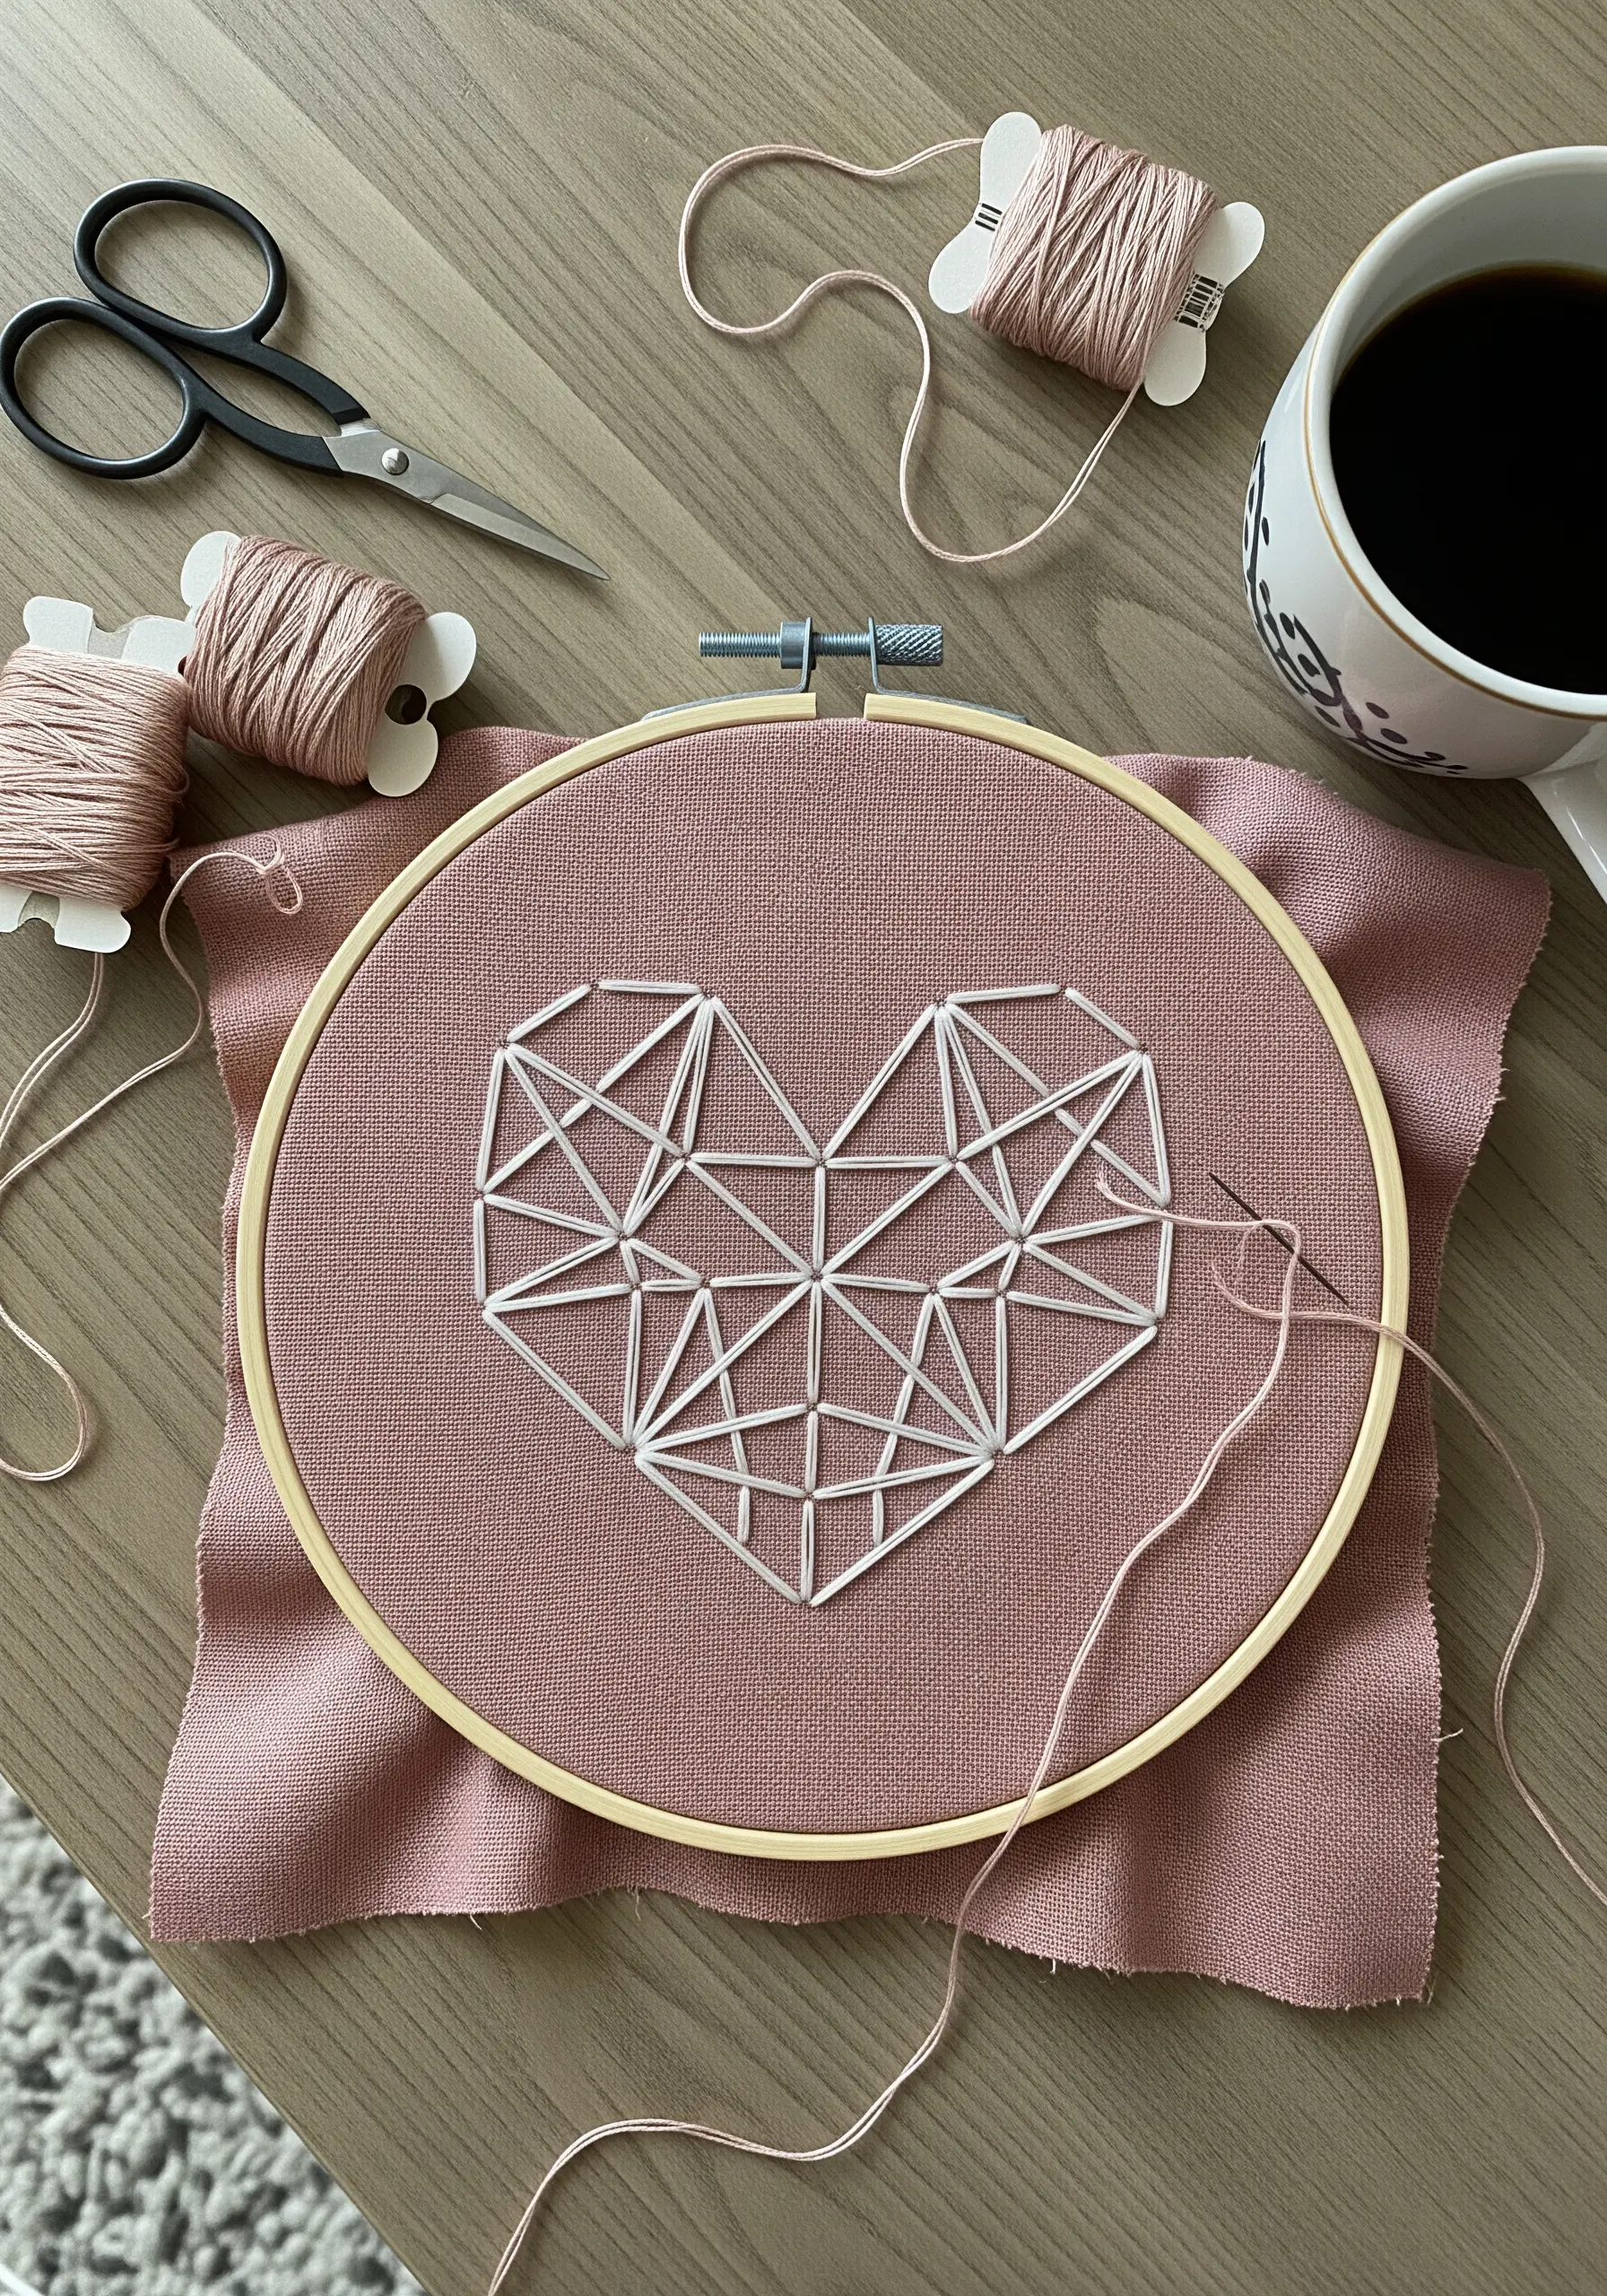
This padding technique gives the moon a raised, three-dimensional quality that catches the light beautifully.
Use a fine metallic thread for the stars and connecting lines; it adds a delicate sparkle against a dark fabric background, turning a simple object into a keepsake.
6. Make a Bold Statement with Negative Space
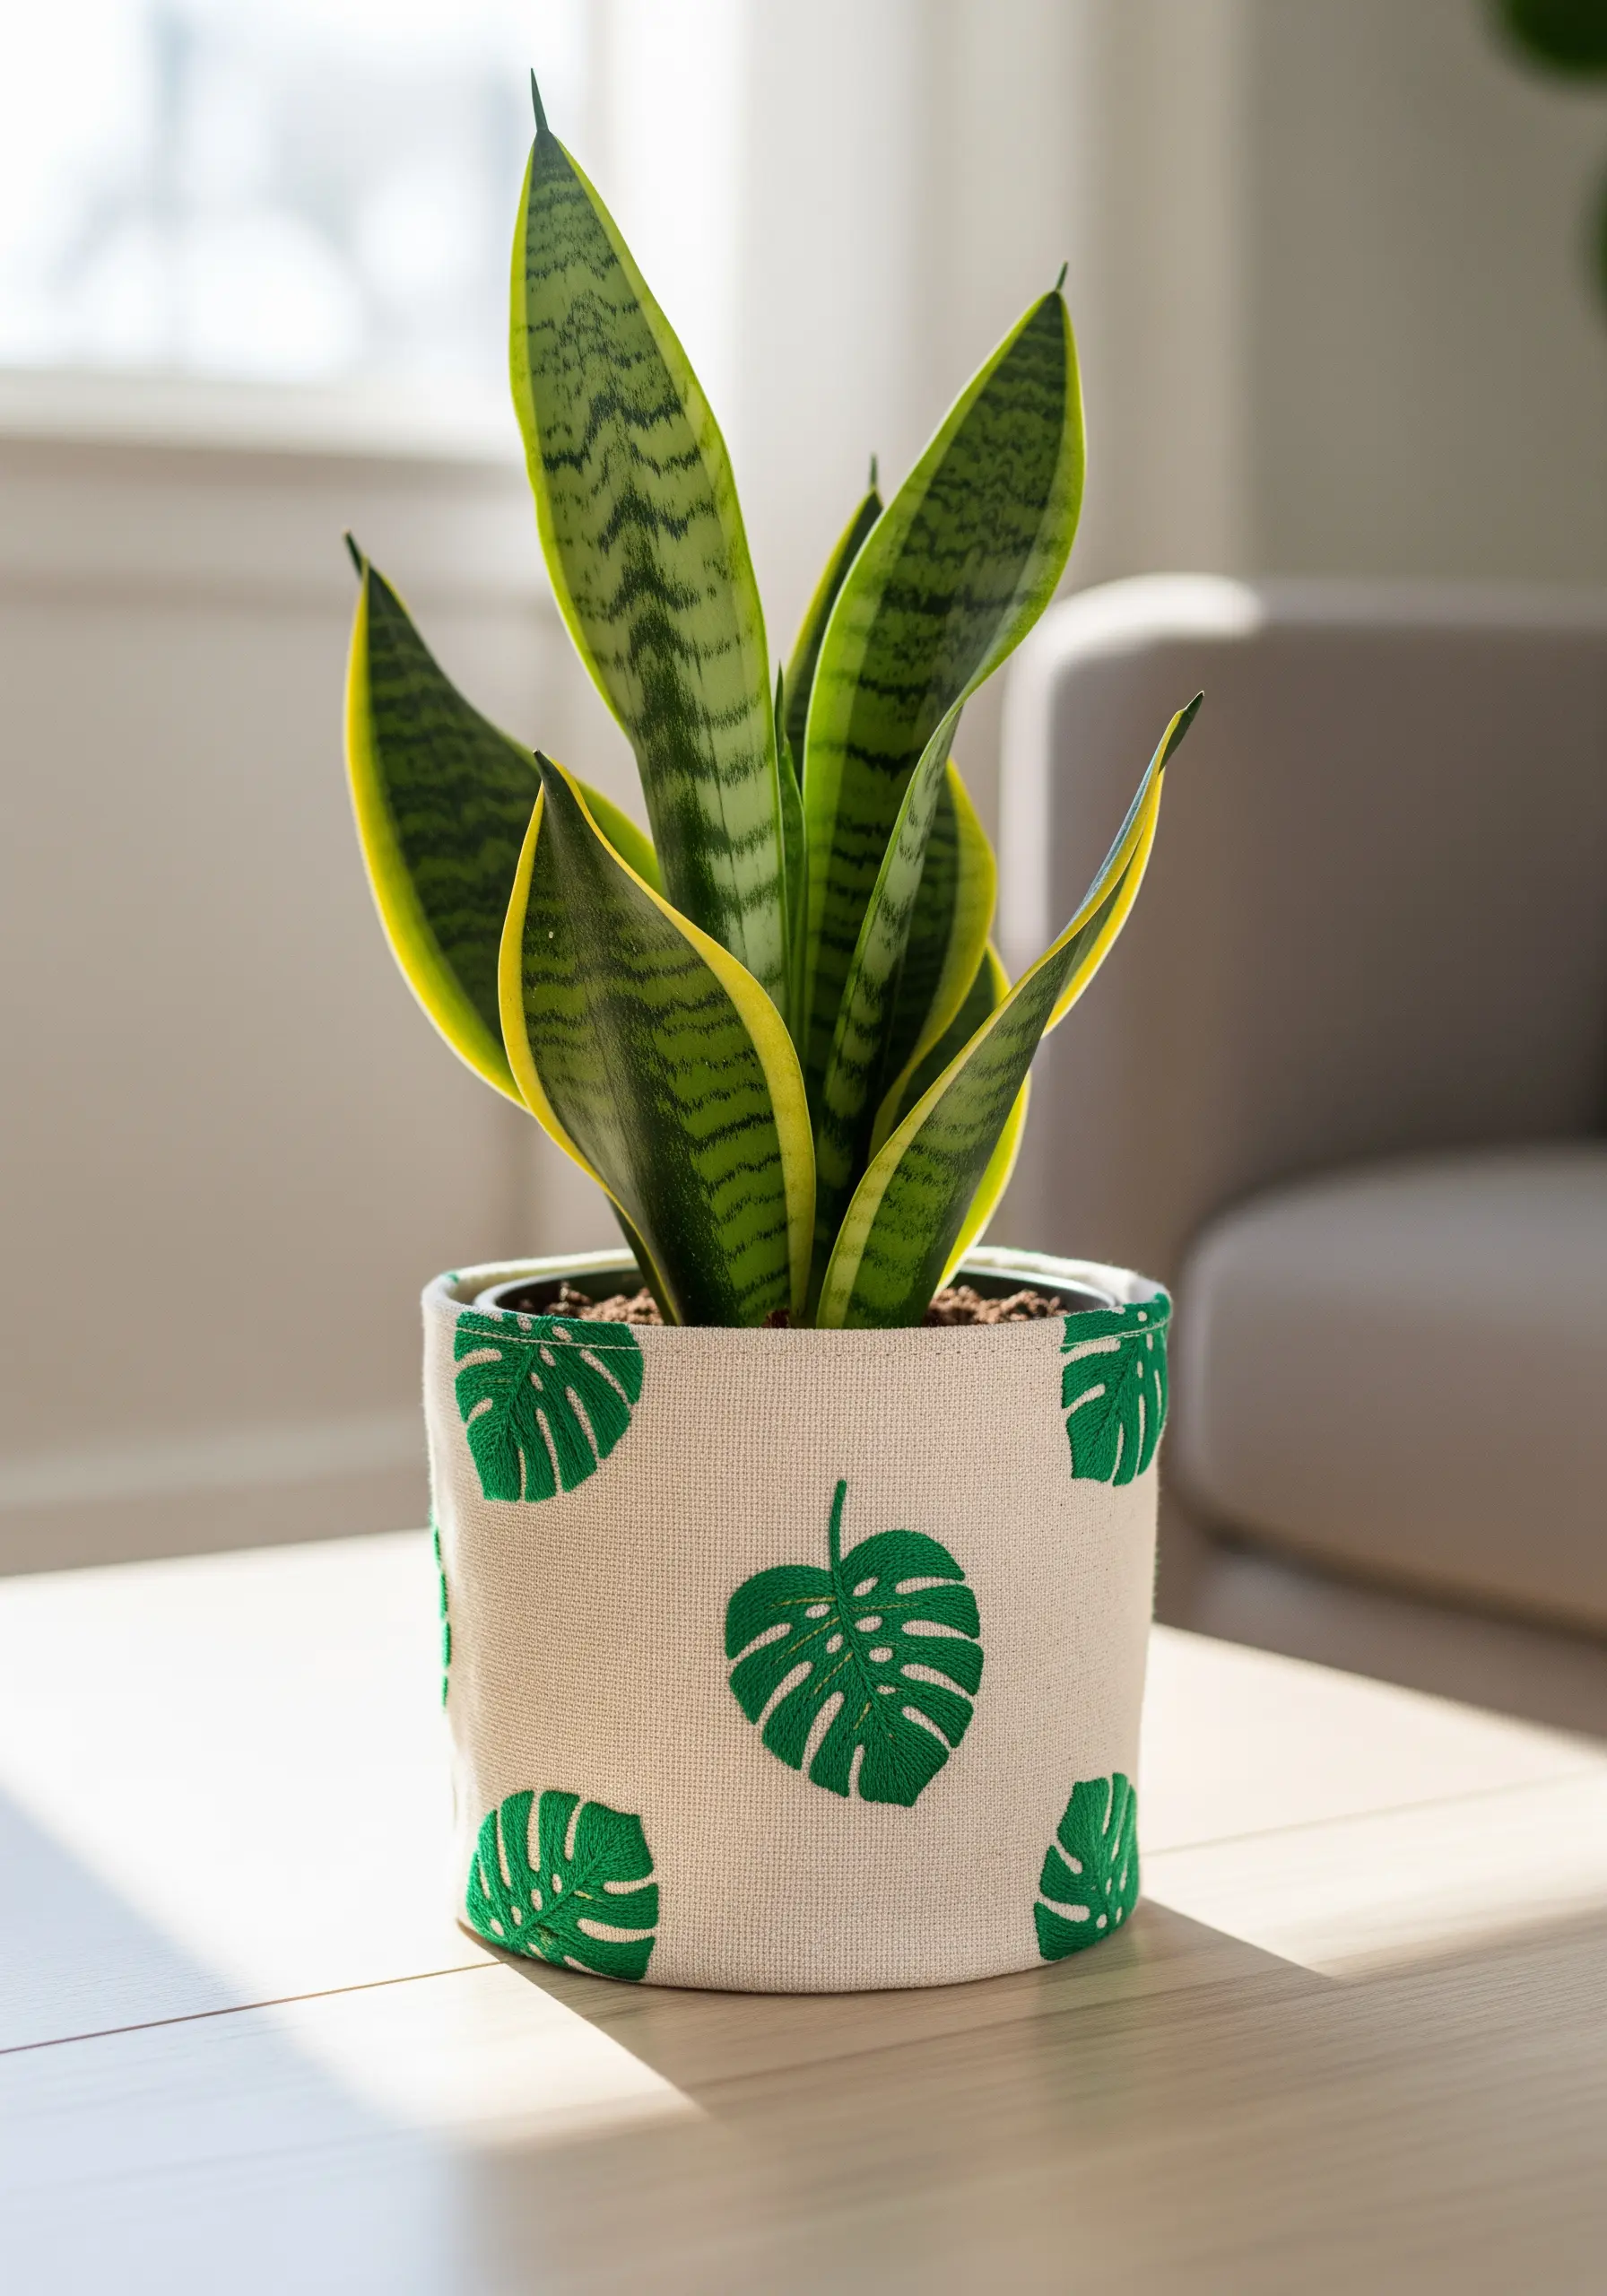
For this graphic monstera leaf pot cover, the impact comes from the clean, bold shapes and the un-stitched fabric that defines them.
Trace your leaf pattern and fill it entirely with a dense, smooth satin stitch, ensuring your stitches lie flat and parallel.
The contrast between the vibrant, solid green thread and the neutral linen background makes the design pop.
This is a perfect example of how leaf and plant embroidery ideas can feel modern and graphic rather than fussy.
7. Create a Sunburst with Variegated Thread
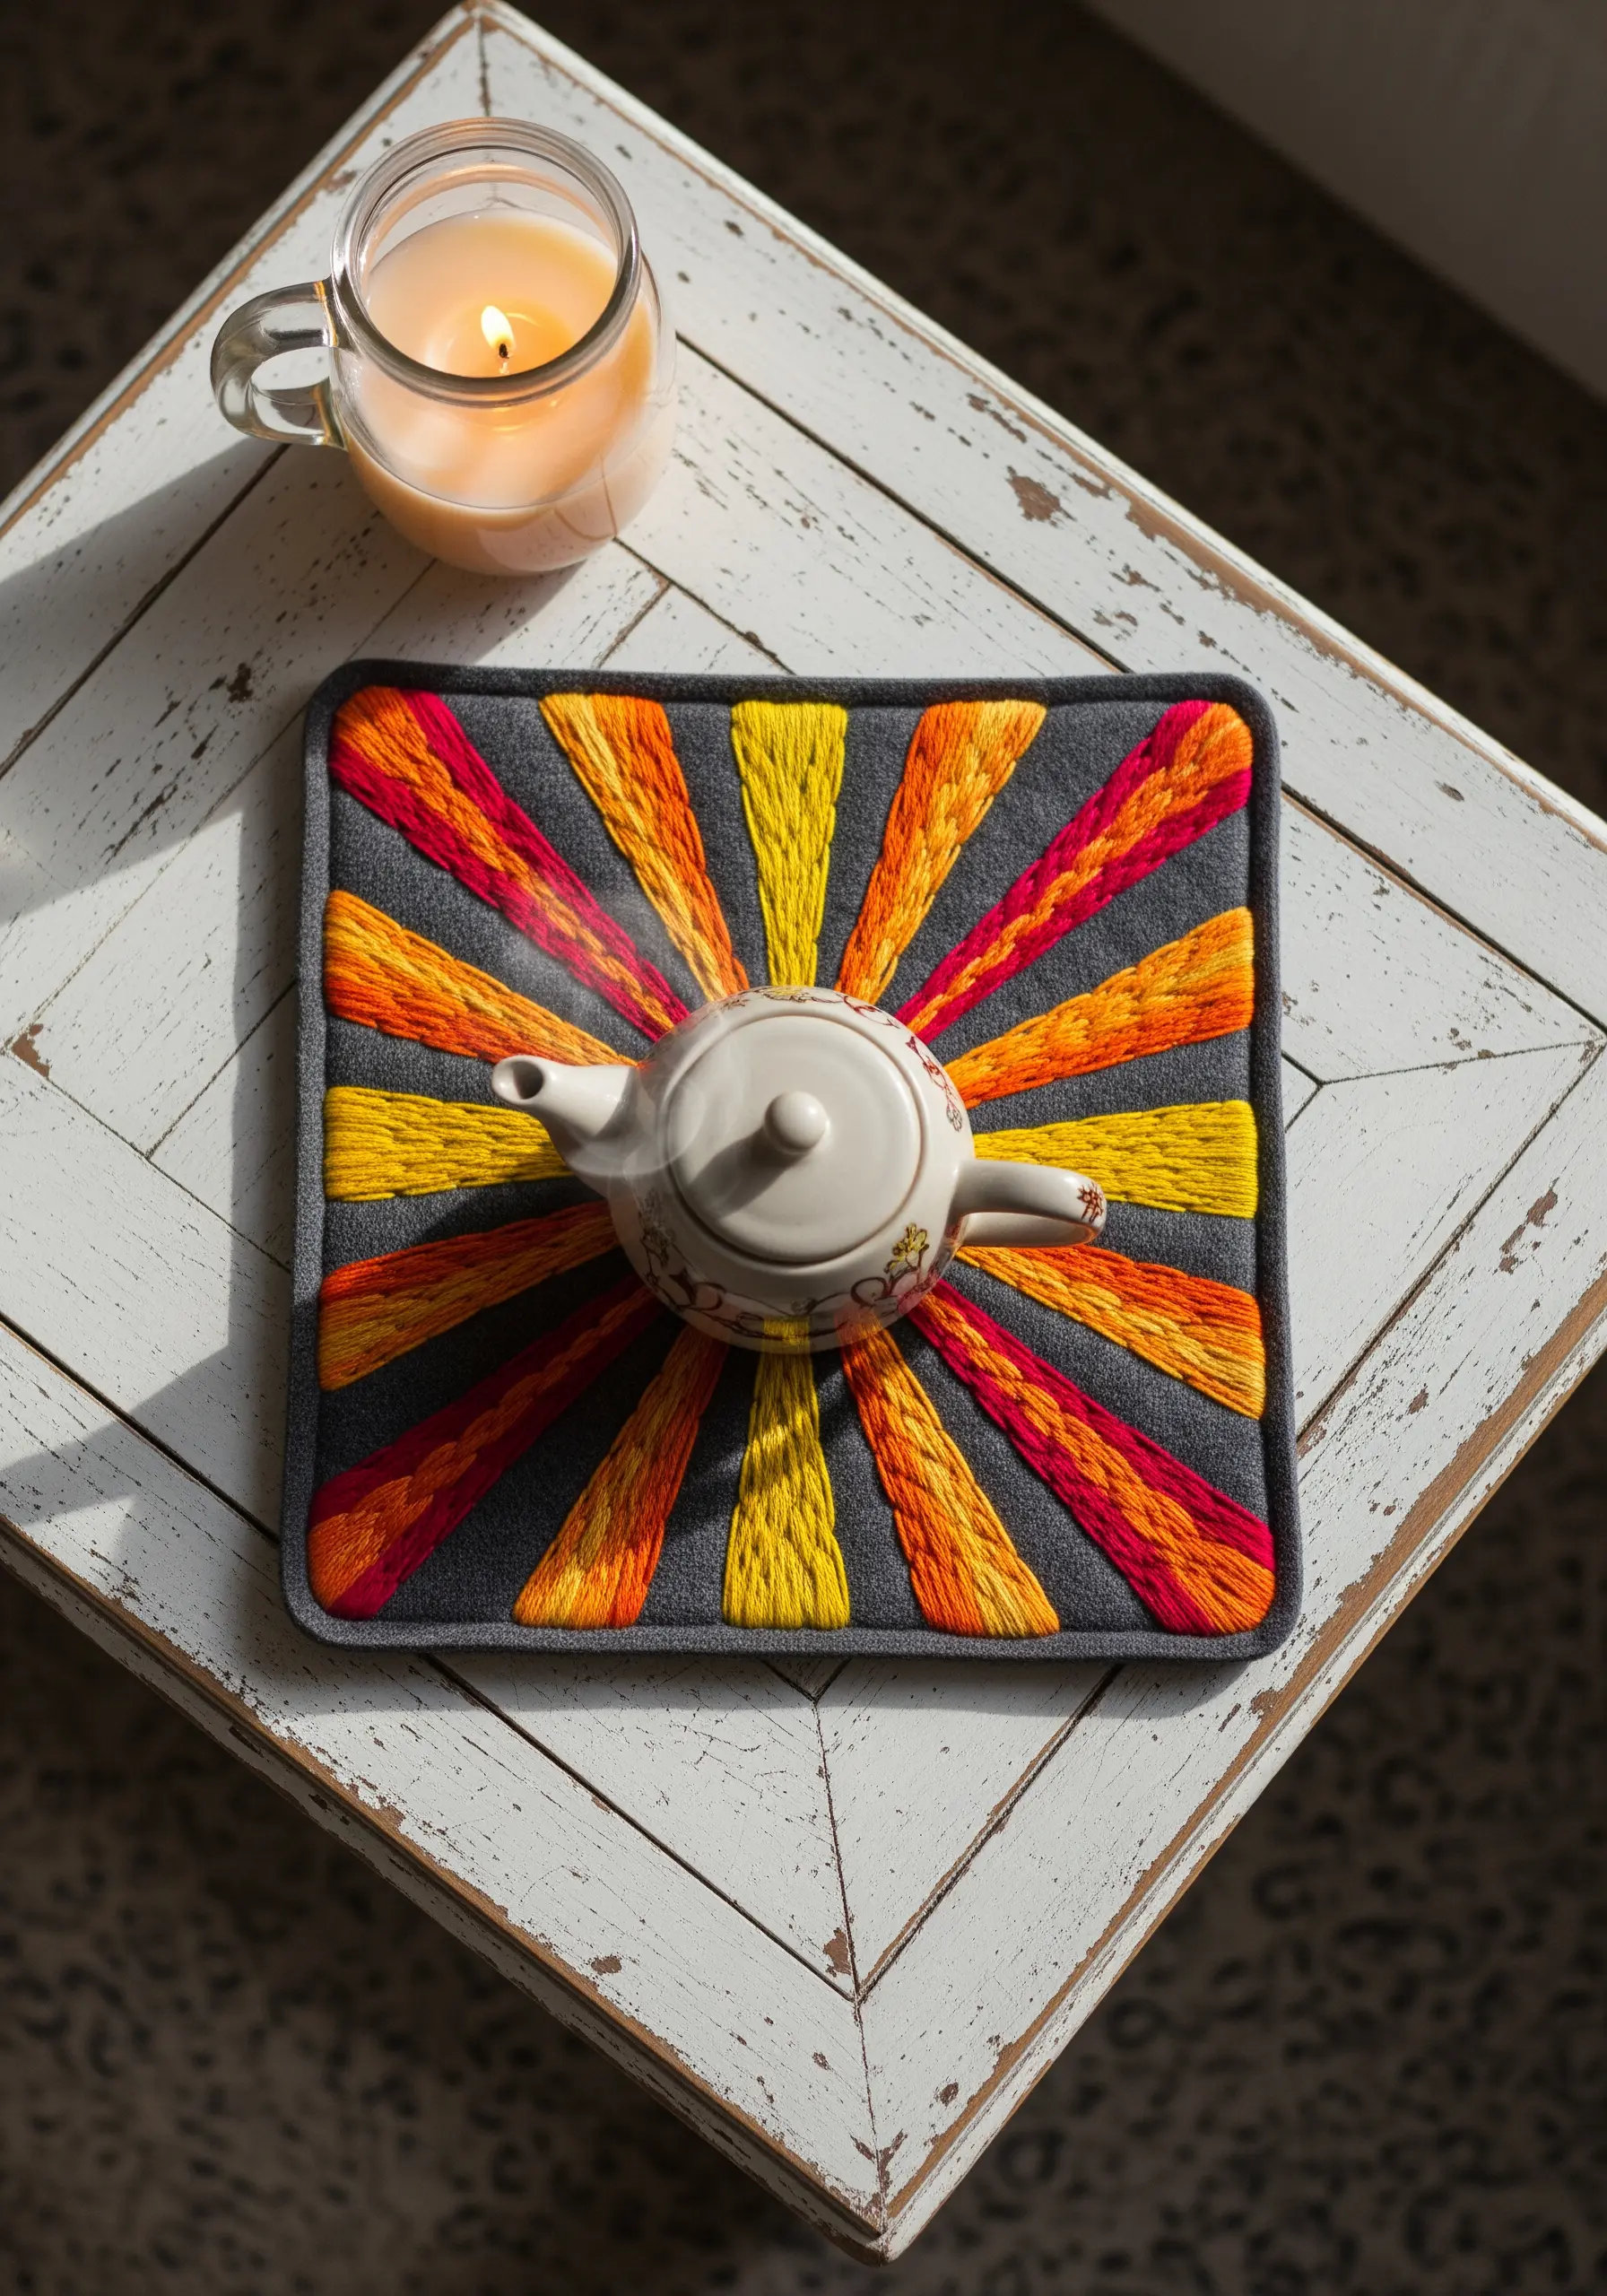
To achieve a dynamic, sun-ray effect on a trivet or mat, use variegated embroidery floss in warm tones like yellow, orange, and red.
As you make your long satin stitches, the thread’s color will shift naturally, creating a subtle gradient without you having to change threads.
This adds depth and a sense of movement to the design, making it feel more vibrant and energetic.
Alternate the variegated sections with a solid color to create even more contrast and visual rhythm.
8. Achieve Art Deco Precision with Backstitch

The elegance of an Art Deco fan pattern lies in its clean, precise lines and perfect curves.
To achieve this look on a functional item like a remote caddy, use a simple two-strand backstitch.
Its strength is its consistency, creating a solid, unbroken line that defines the geometric shapes with graphic clarity.
Choose a high-contrast color palette, like cream on black, to emphasize the linework and honor the classic Art Deco aesthetic.
9. Build Lavender’s Texture with Knots and Loops

Capture the delicate texture of a lavender sprig using a smart combination of simple stitches.
Use tiny French knots for the individual buds, clustering them tightly at the top and spacing them out as you move down the stalk.
Create the leaves with single, elongated detached chain stitches (lazy daisies).
This mix of knotted and looped stitches gives the lavender a realistic, three-dimensional form, making these delicate lavender stitch ideas perfect for fragrant sachets.
10. Add Realism with Thread Painting

To bring a bee motif to life on a linen napkin, move beyond simple outlines and use thread painting (long-and-short stitch).
Blend shades of yellow, black, and even a touch of orange to create the soft, fuzzy texture of the bee’s body.
For the delicate wings, use a single strand of light gray or translucent thread and outline them with tiny backstitches.
This level of detail transforms a simple insect into a tiny work of art, making it one of the most compelling realistic animal and insect embroidery patterns you can try.
11. Craft Elegant Lettering with Padded Satin Stitch

For a monogram on a ring dish or other soft surface, a padded satin stitch creates a luxurious, raised effect.
First, outline the letter with a split stitch. Then, fill the inside of the letter with small seed stitches or another layer of split stitch.
Finally, cover the entire shape with smooth satin stitches laid perpendicular to the padding stitches.
This technique gives the monogram a beautiful, professional contour that feels both classic and deeply personal.
12. Embrace Bold Color Blocking with Chain Stitch Outlines

Create a vibrant, retro floral pattern on a tissue box cover by thinking in blocks of color.
Fill the petals with a smooth satin stitch, then outline each shape with a contrasting chain stitch.
The chain stitch outline contains the satin stitch, giving it a clean, sharp edge, and adds another layer of texture and definition.
This technique is perfect for creating bold, graphic designs that feel playful and confident.
13. Define Geometric Patterns with High-Contrast Running Stitch
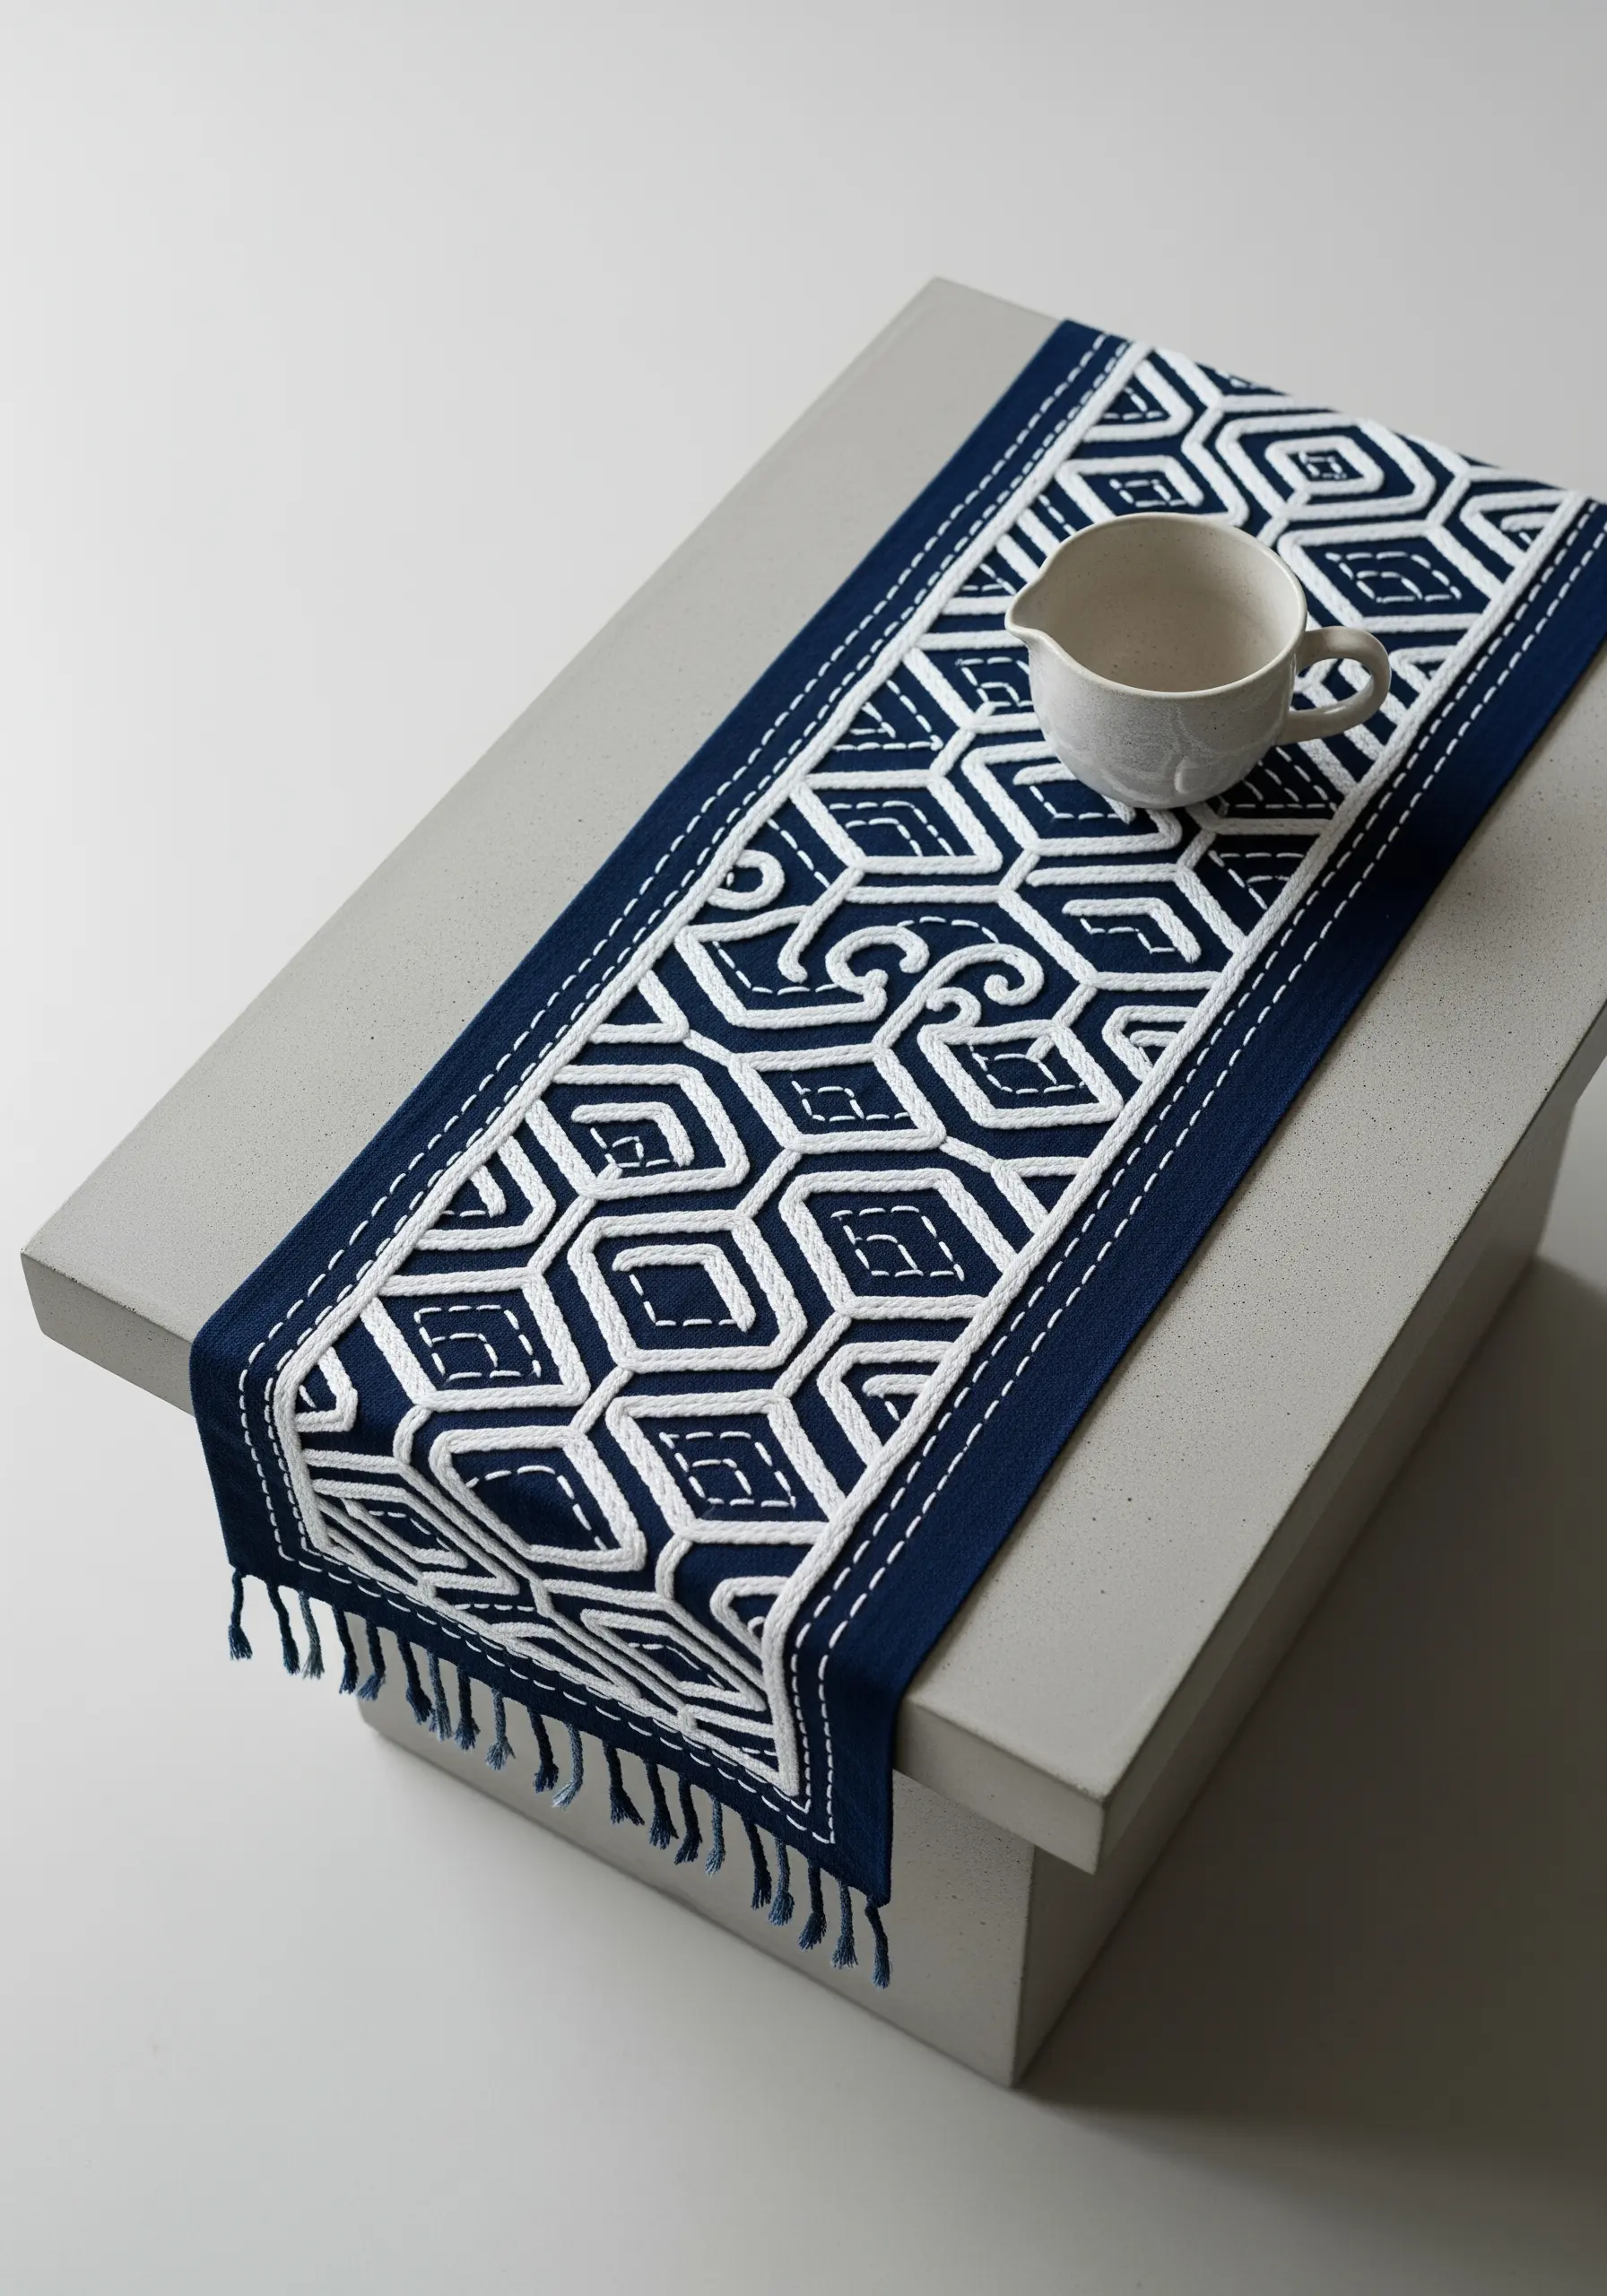
You can create an incredibly intricate-looking table runner with one of the simplest stitches: the running stitch.
The key is to use a thick, high-contrast thread, like a bright white perle cotton on a dark navy fabric.
The thickness of the thread gives the stitches presence, turning a simple dashed line into a bold design element.
This is one of the easiest ways to make simple embroidery designs that make your old linen look brand-new and strikingly modern.
14. Stitch a Message with an Ombré Gradient
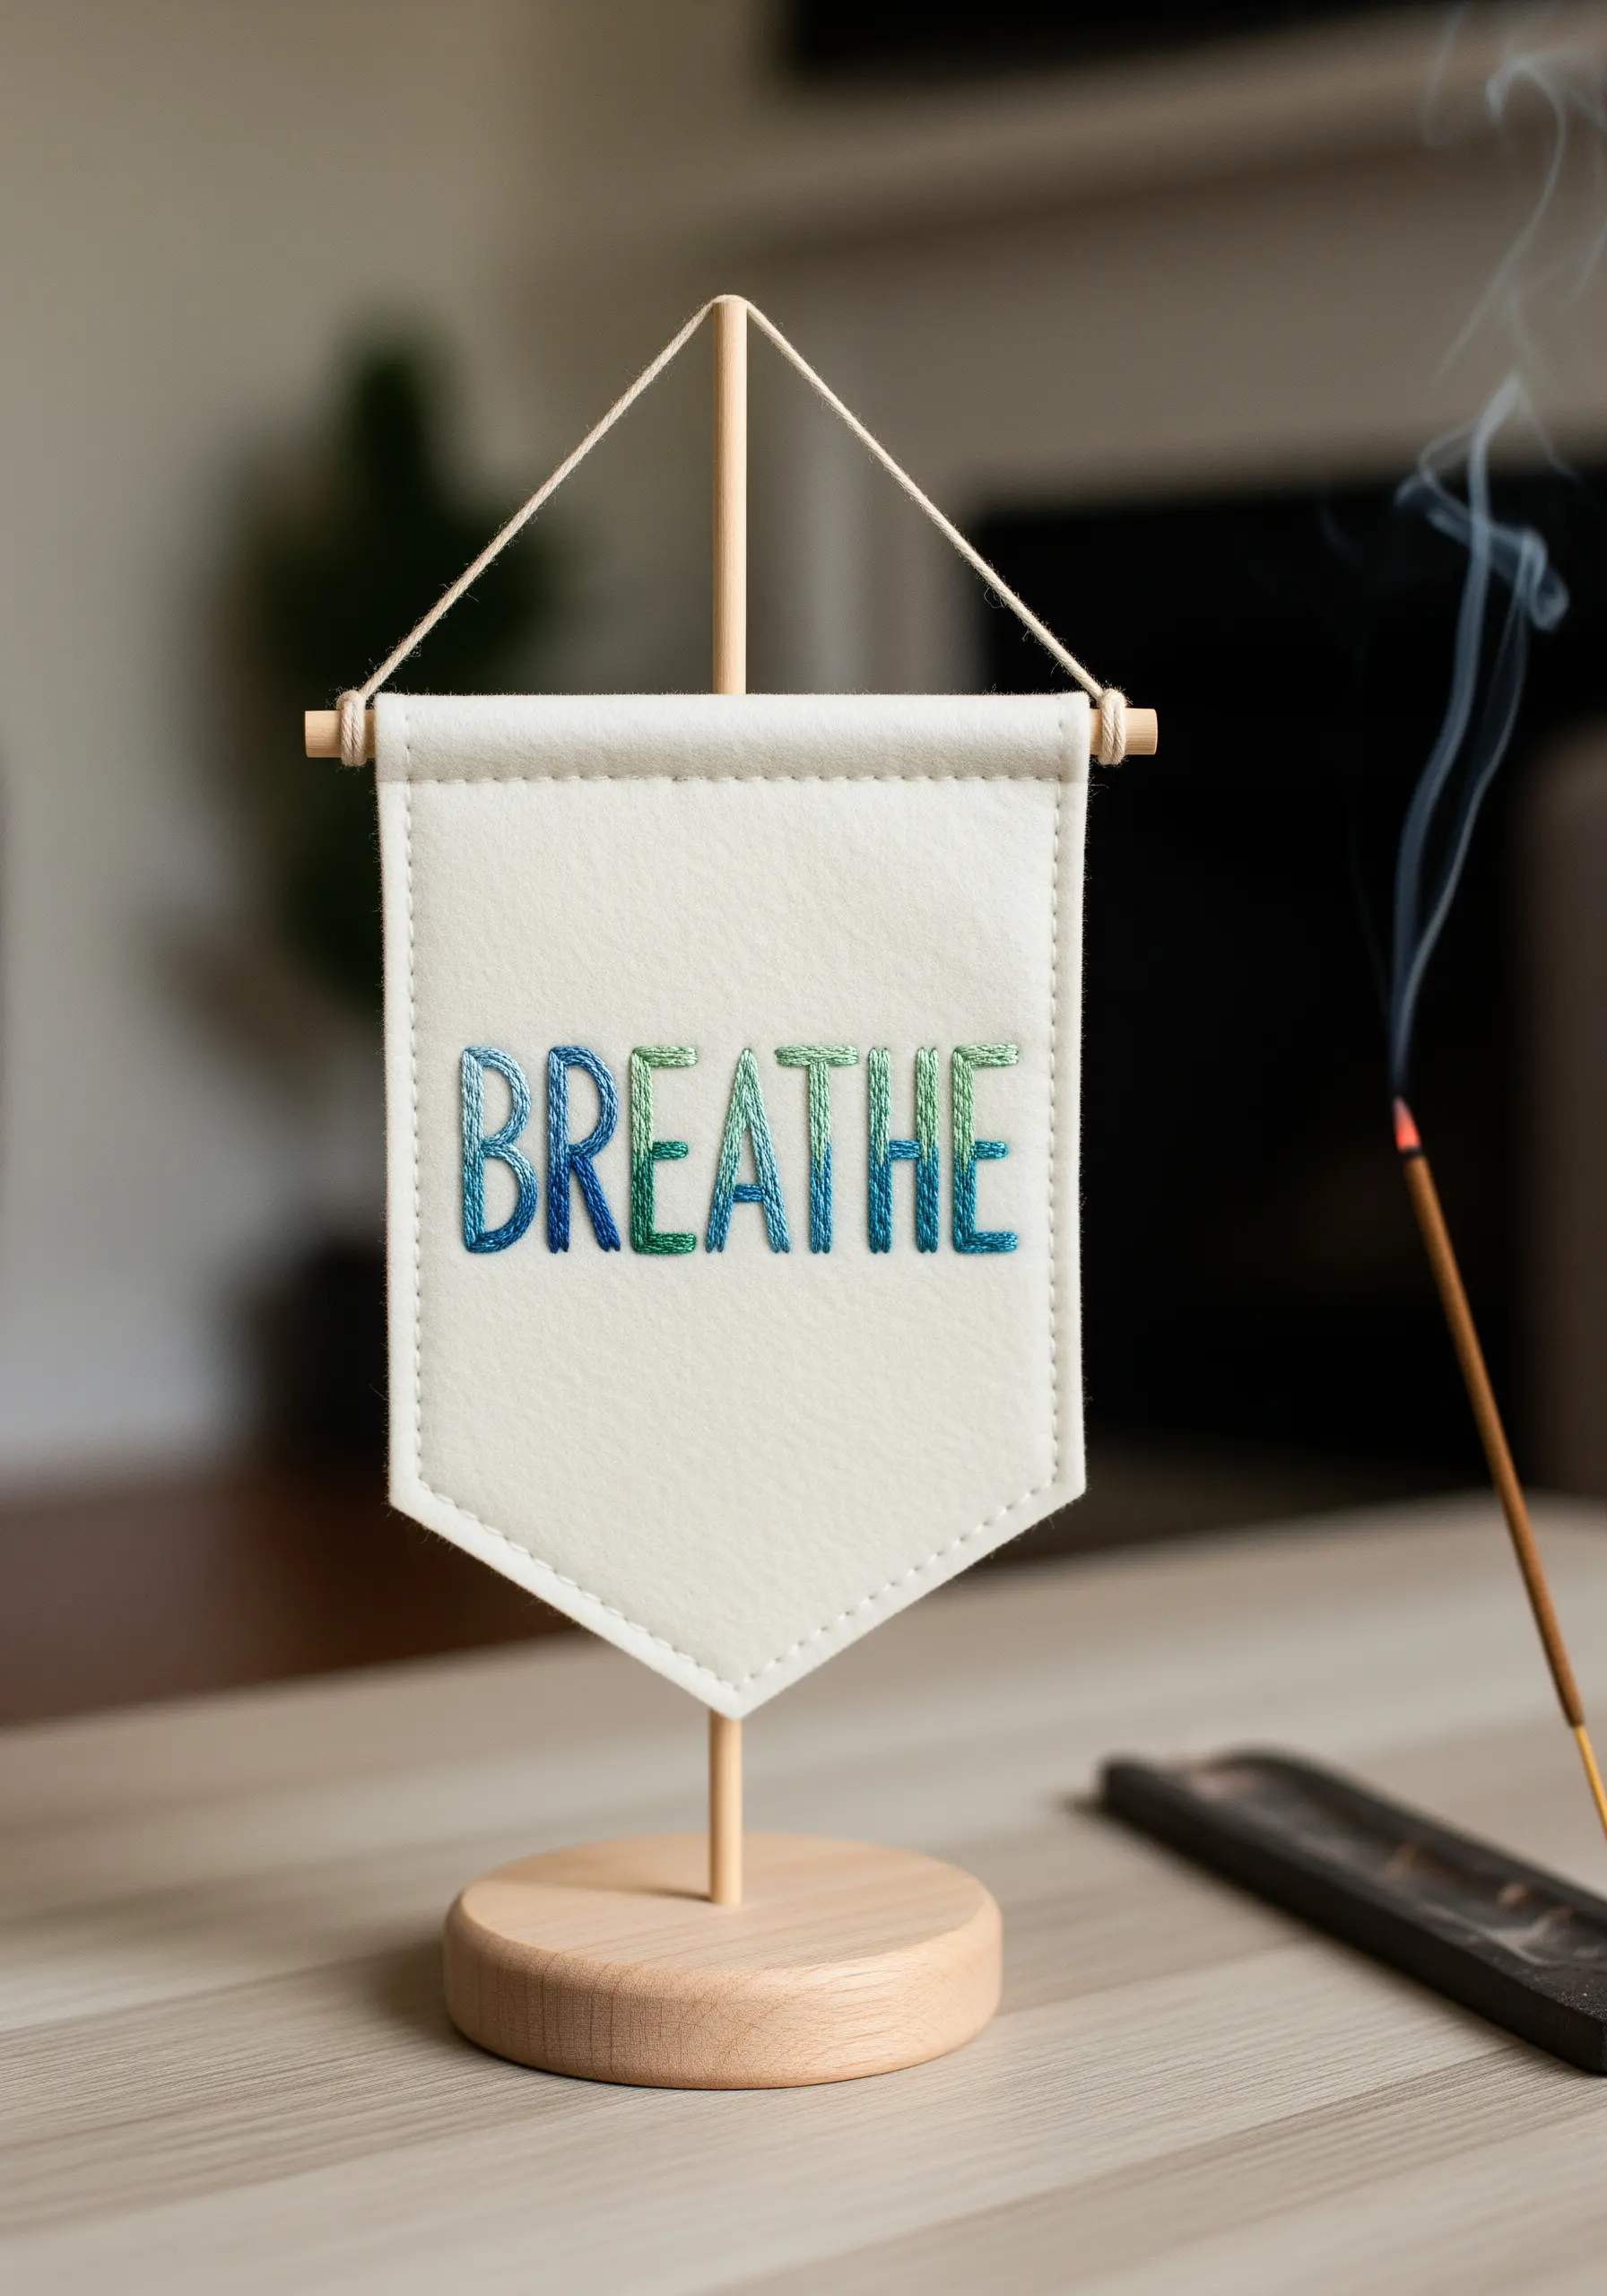
To give embroidered text a sense of flow and visual interest, fill the letters with a color gradient.
Choose three or four shades of the same color family, from dark to light.
Fill the first part of each letter with the darkest shade using a vertical satin stitch, then switch to the next shade, and so on.
This simple ombré effect turns a single word on a mini banner into a calming, meditative focal point.
15. Add Dimension to Motifs with Shading

To make these mushrooms on a glasses case look rounded and realistic, use long-and-short stitch to blend colors.
On the caps, use at least three shades of red or brown, placing the darkest shade on the bottom edge and blending up to the lightest at the top.
This mimics how light would naturally hit the object, instantly giving it form and dimension.
A few scattered French knots in white add the final touch of texture, transforming them into charming realistic mushroom forest floor embroidery projects.
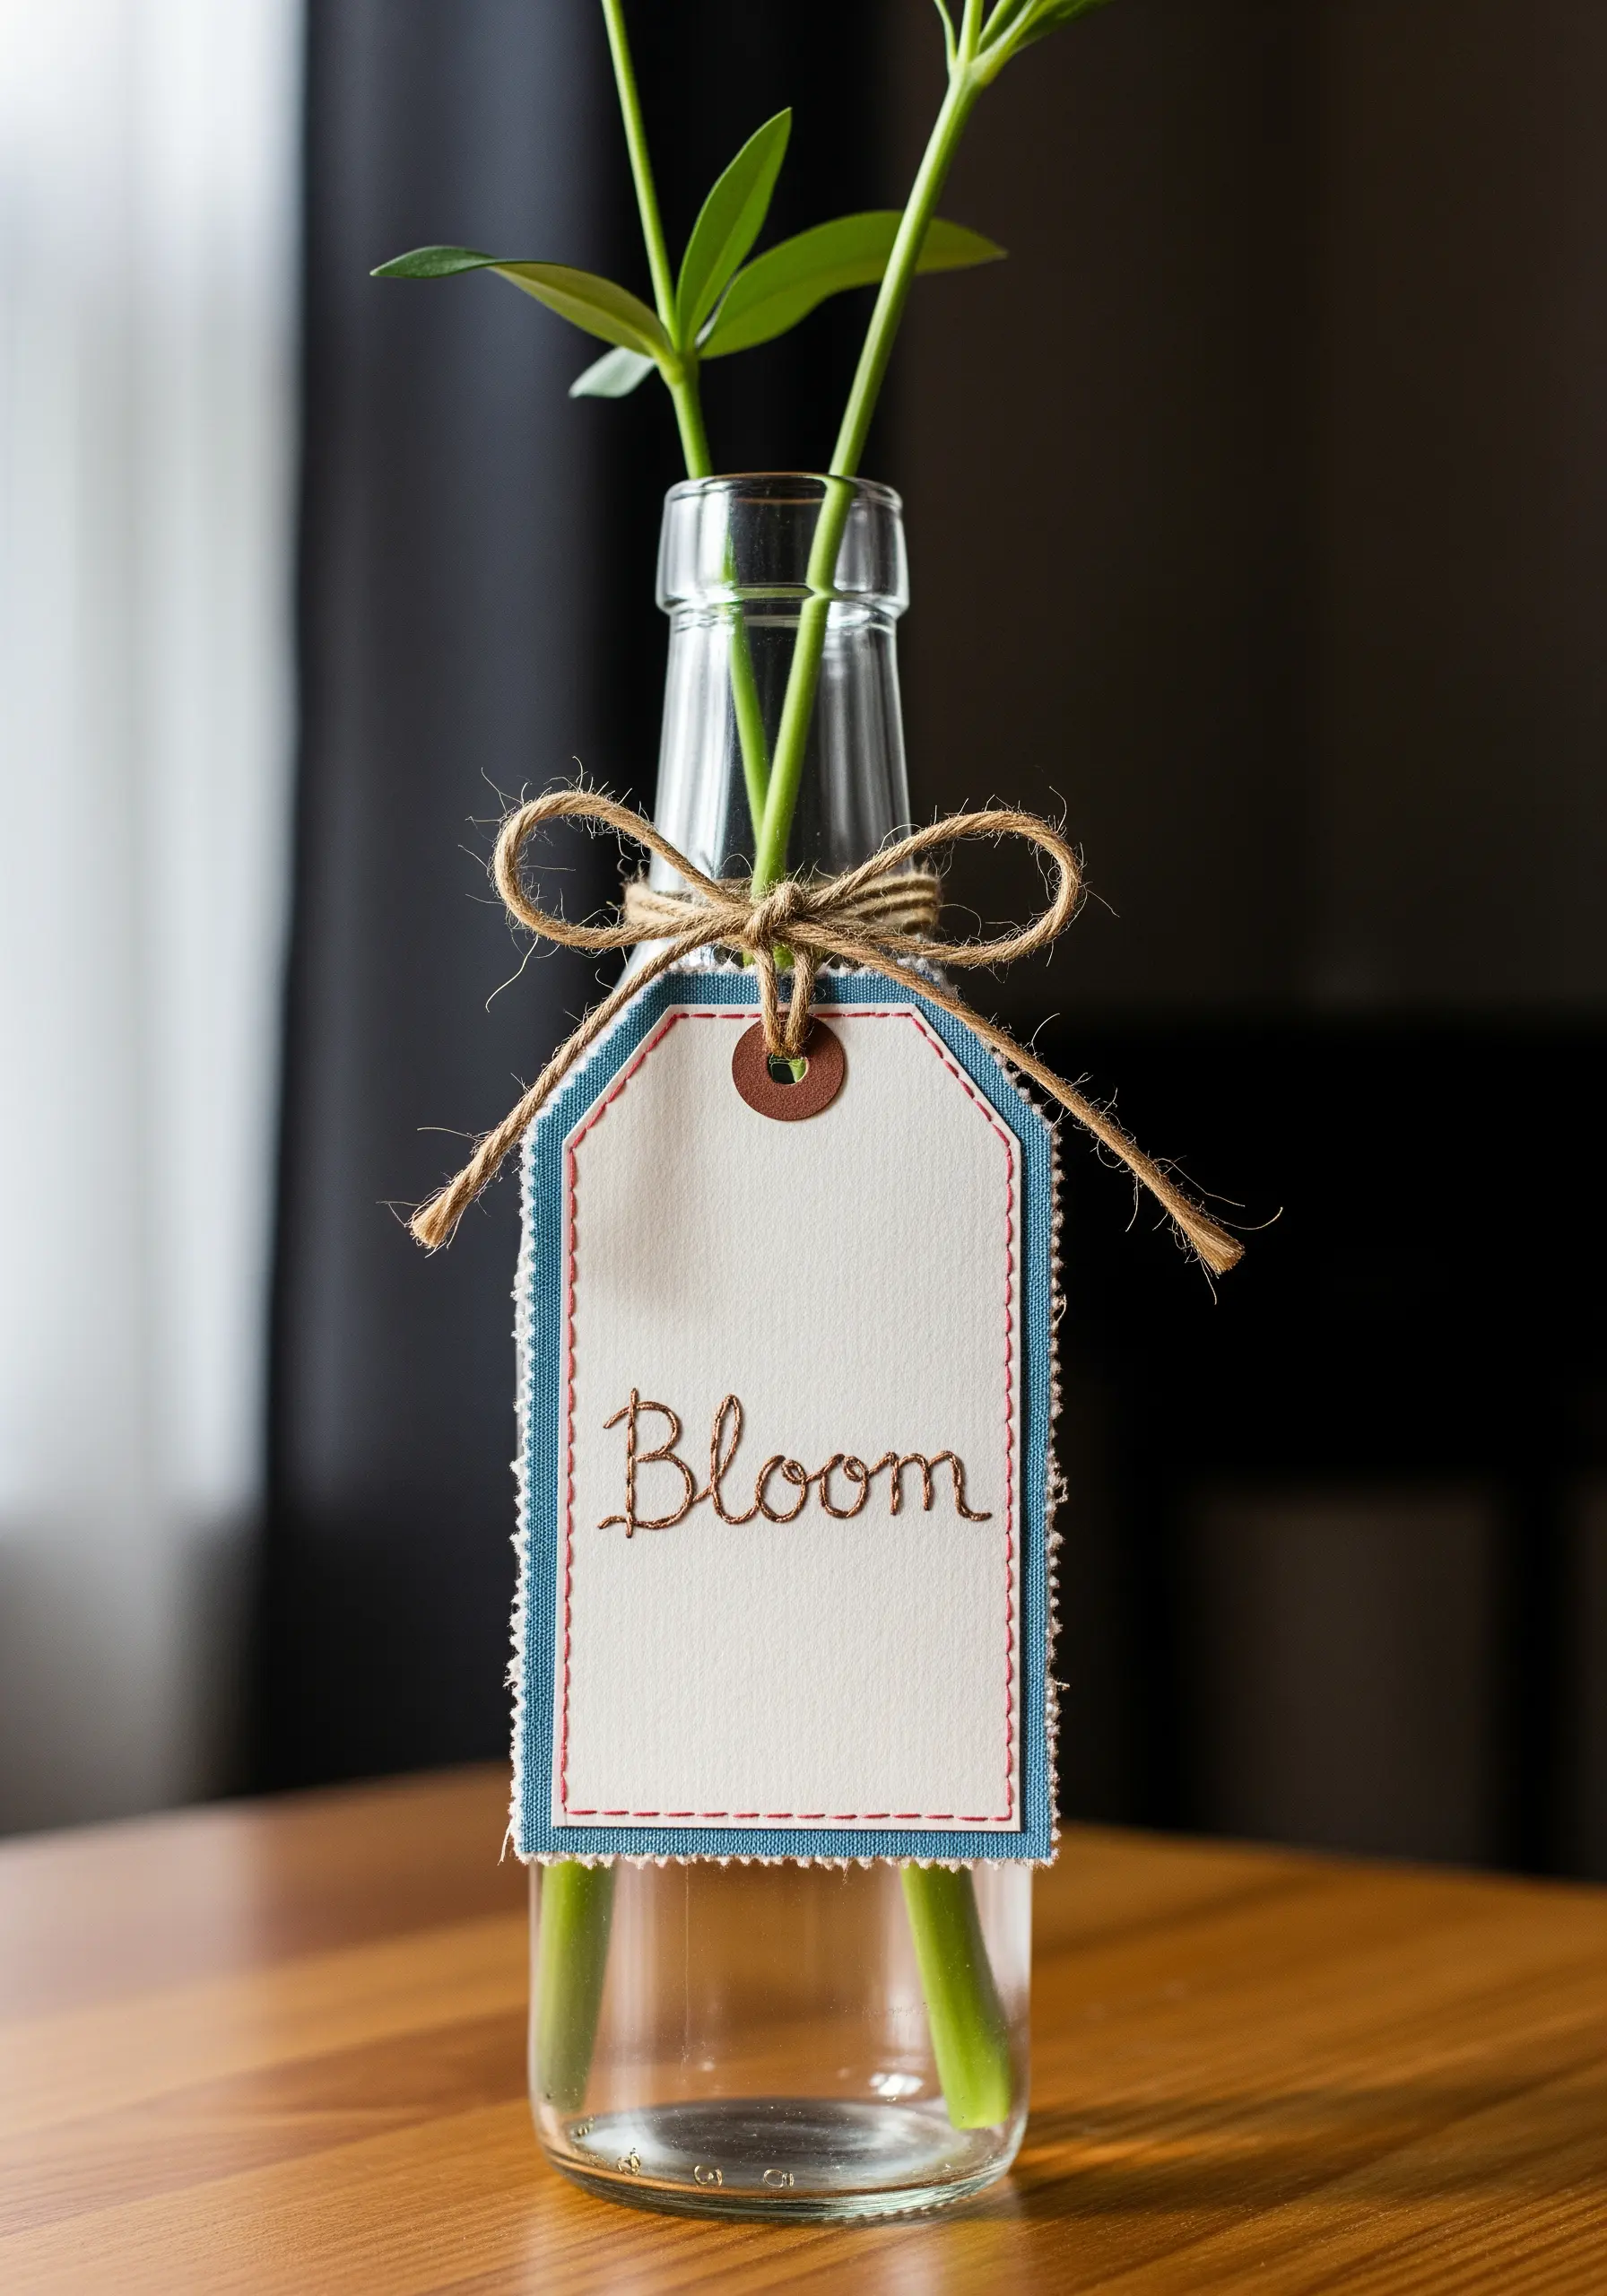
16. Elevate a Simple Vase with a Tonal Vine Wrap
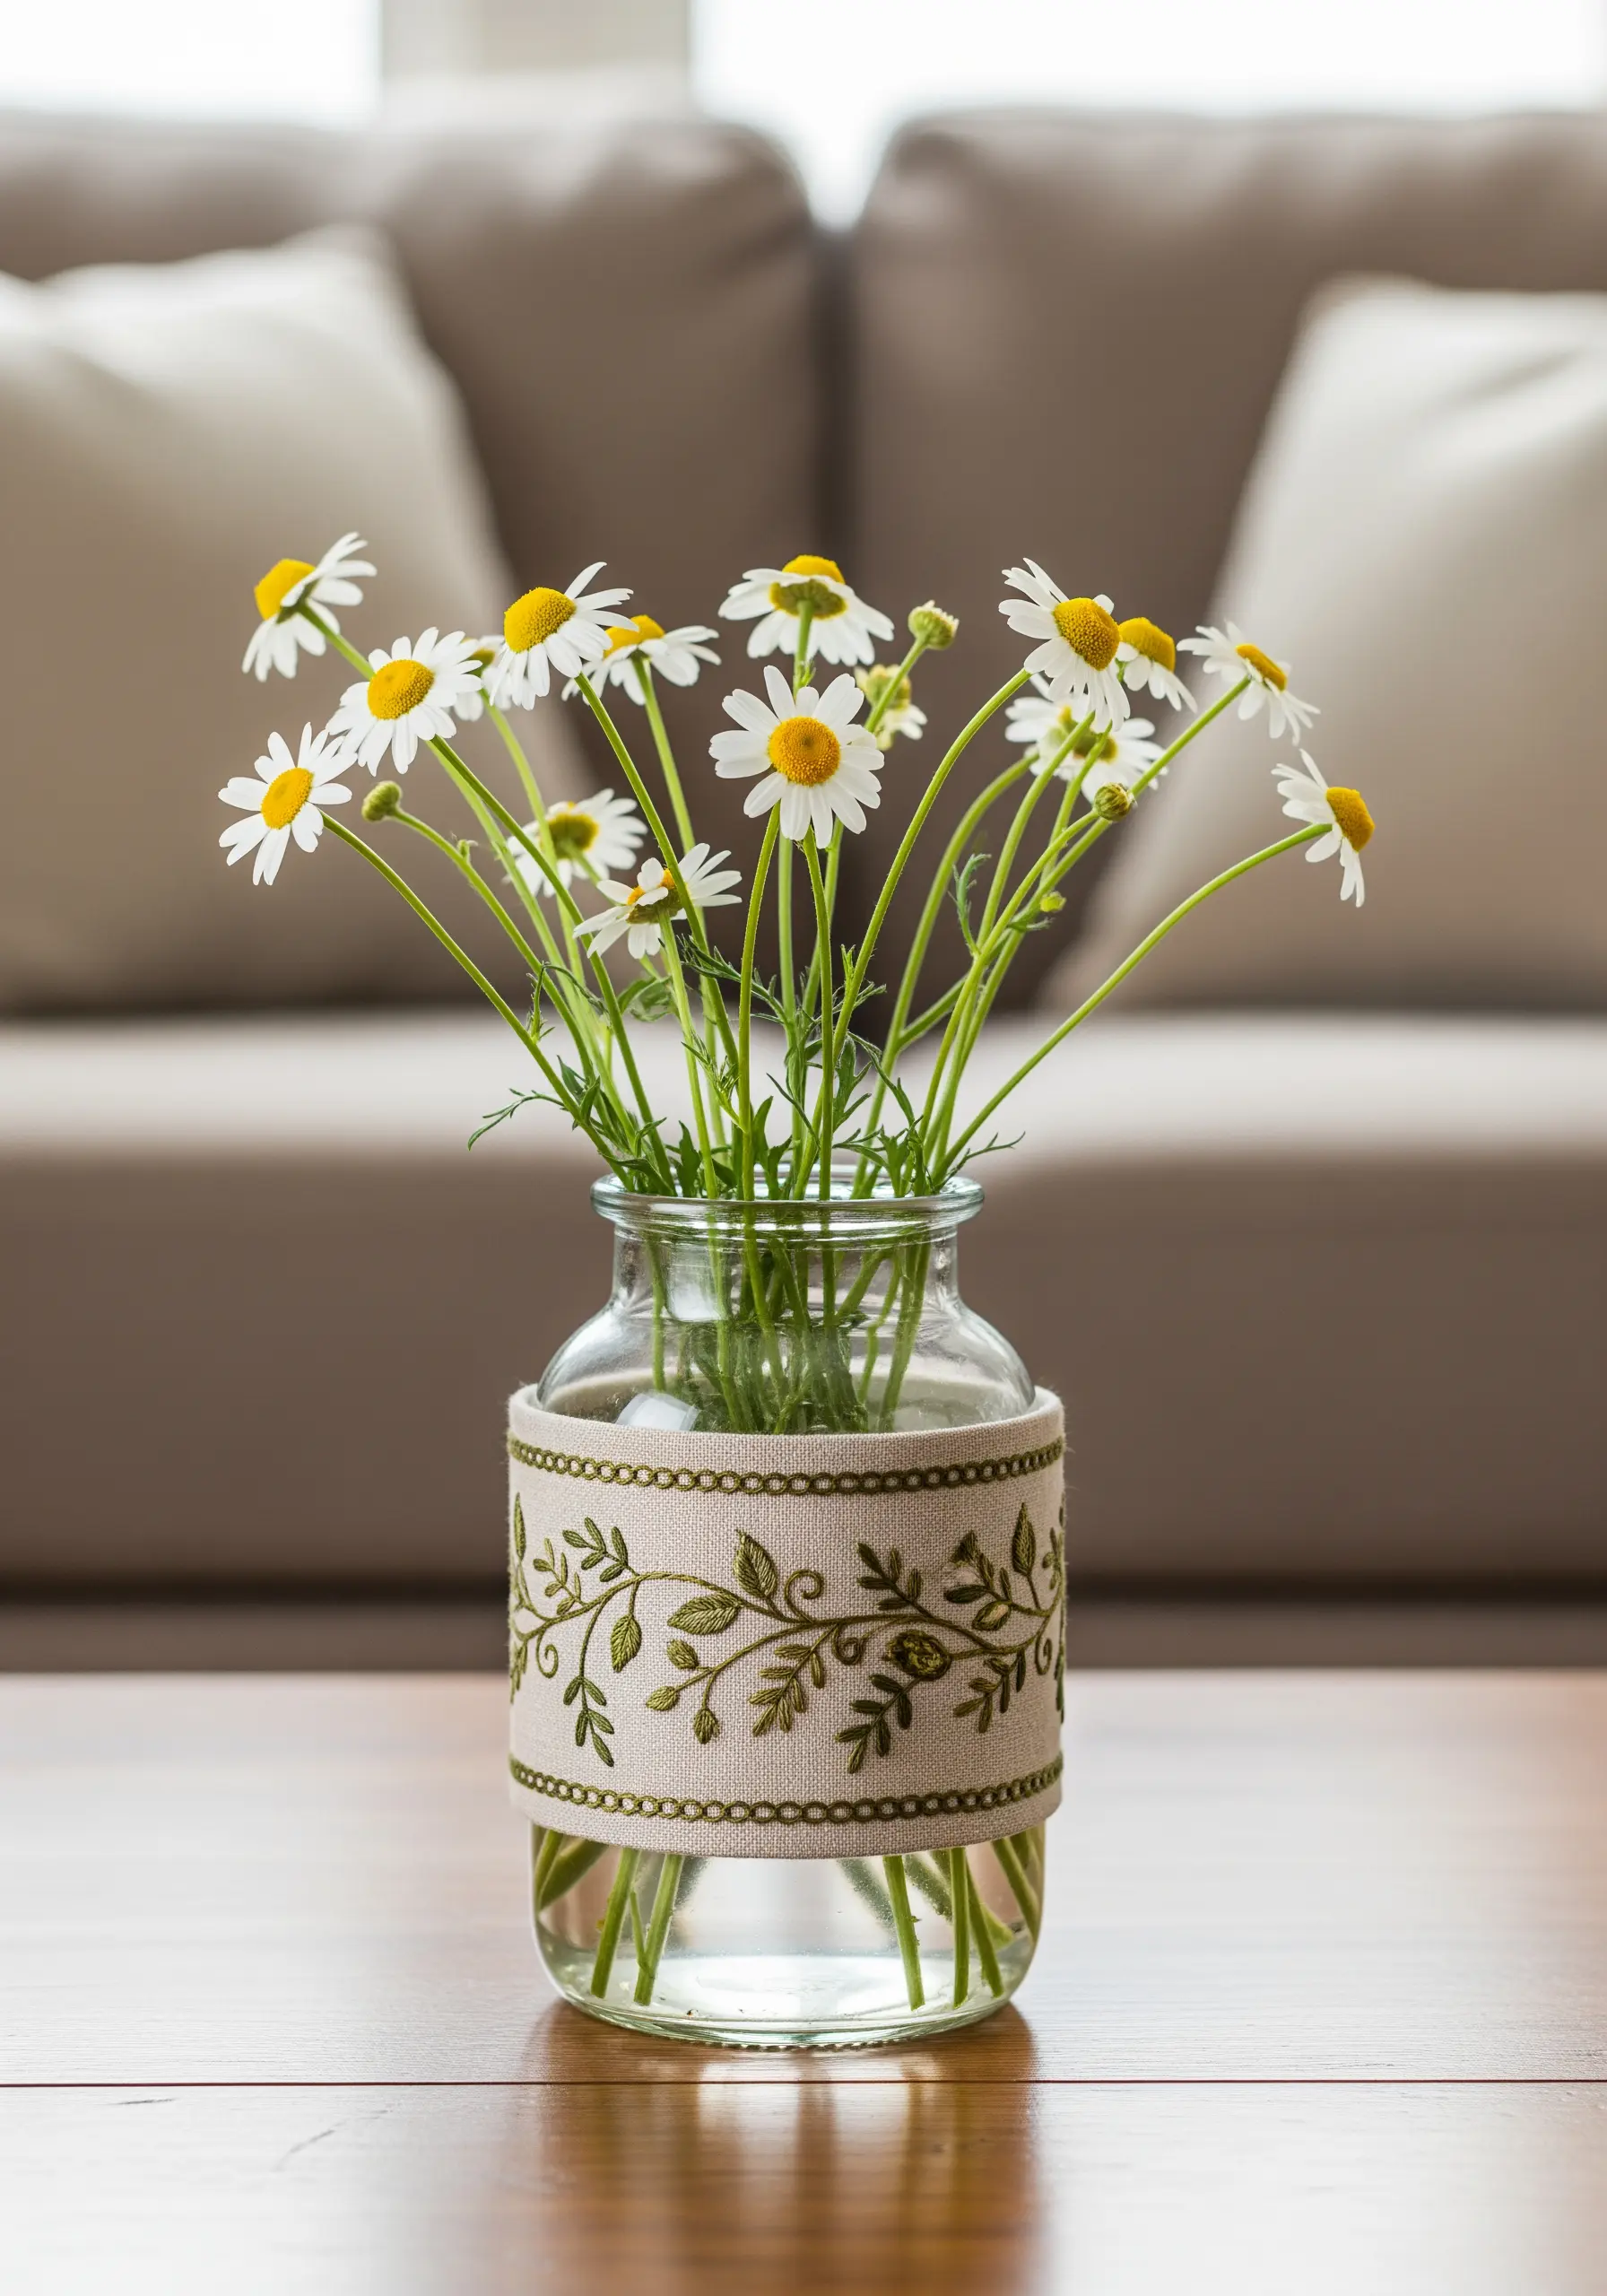
Transform a plain glass jar or vase with a simple embroidered fabric band.
For a sophisticated, understated look, use a thread color that is only a few shades different from your fabric, such as an olive green on a natural linen.
Stitch a delicate, meandering vine using stem stitch for the branches and lazy daisy stitches for the leaves.
This tonal approach adds texture and handmade elegance without overwhelming the simplicity of the flowers it will hold.
17. Stitch a Continuous Line Pattern for Modern Energy

For a modern catch-all tray, an interlocking geometric pattern stitched as a single, continuous line adds a sense of rhythm and energy.
Use a simple backstitch to maintain a clean, consistent line weight.
Choose a bright, high-contrast thread color like yellow on gray to make the pattern the hero of the piece.
Stitching on a pre-made object is easy if you use a sharp needle and work slowly to keep your tension even.
18. Turn Everyday Objects into Art with Micro-Embroidery
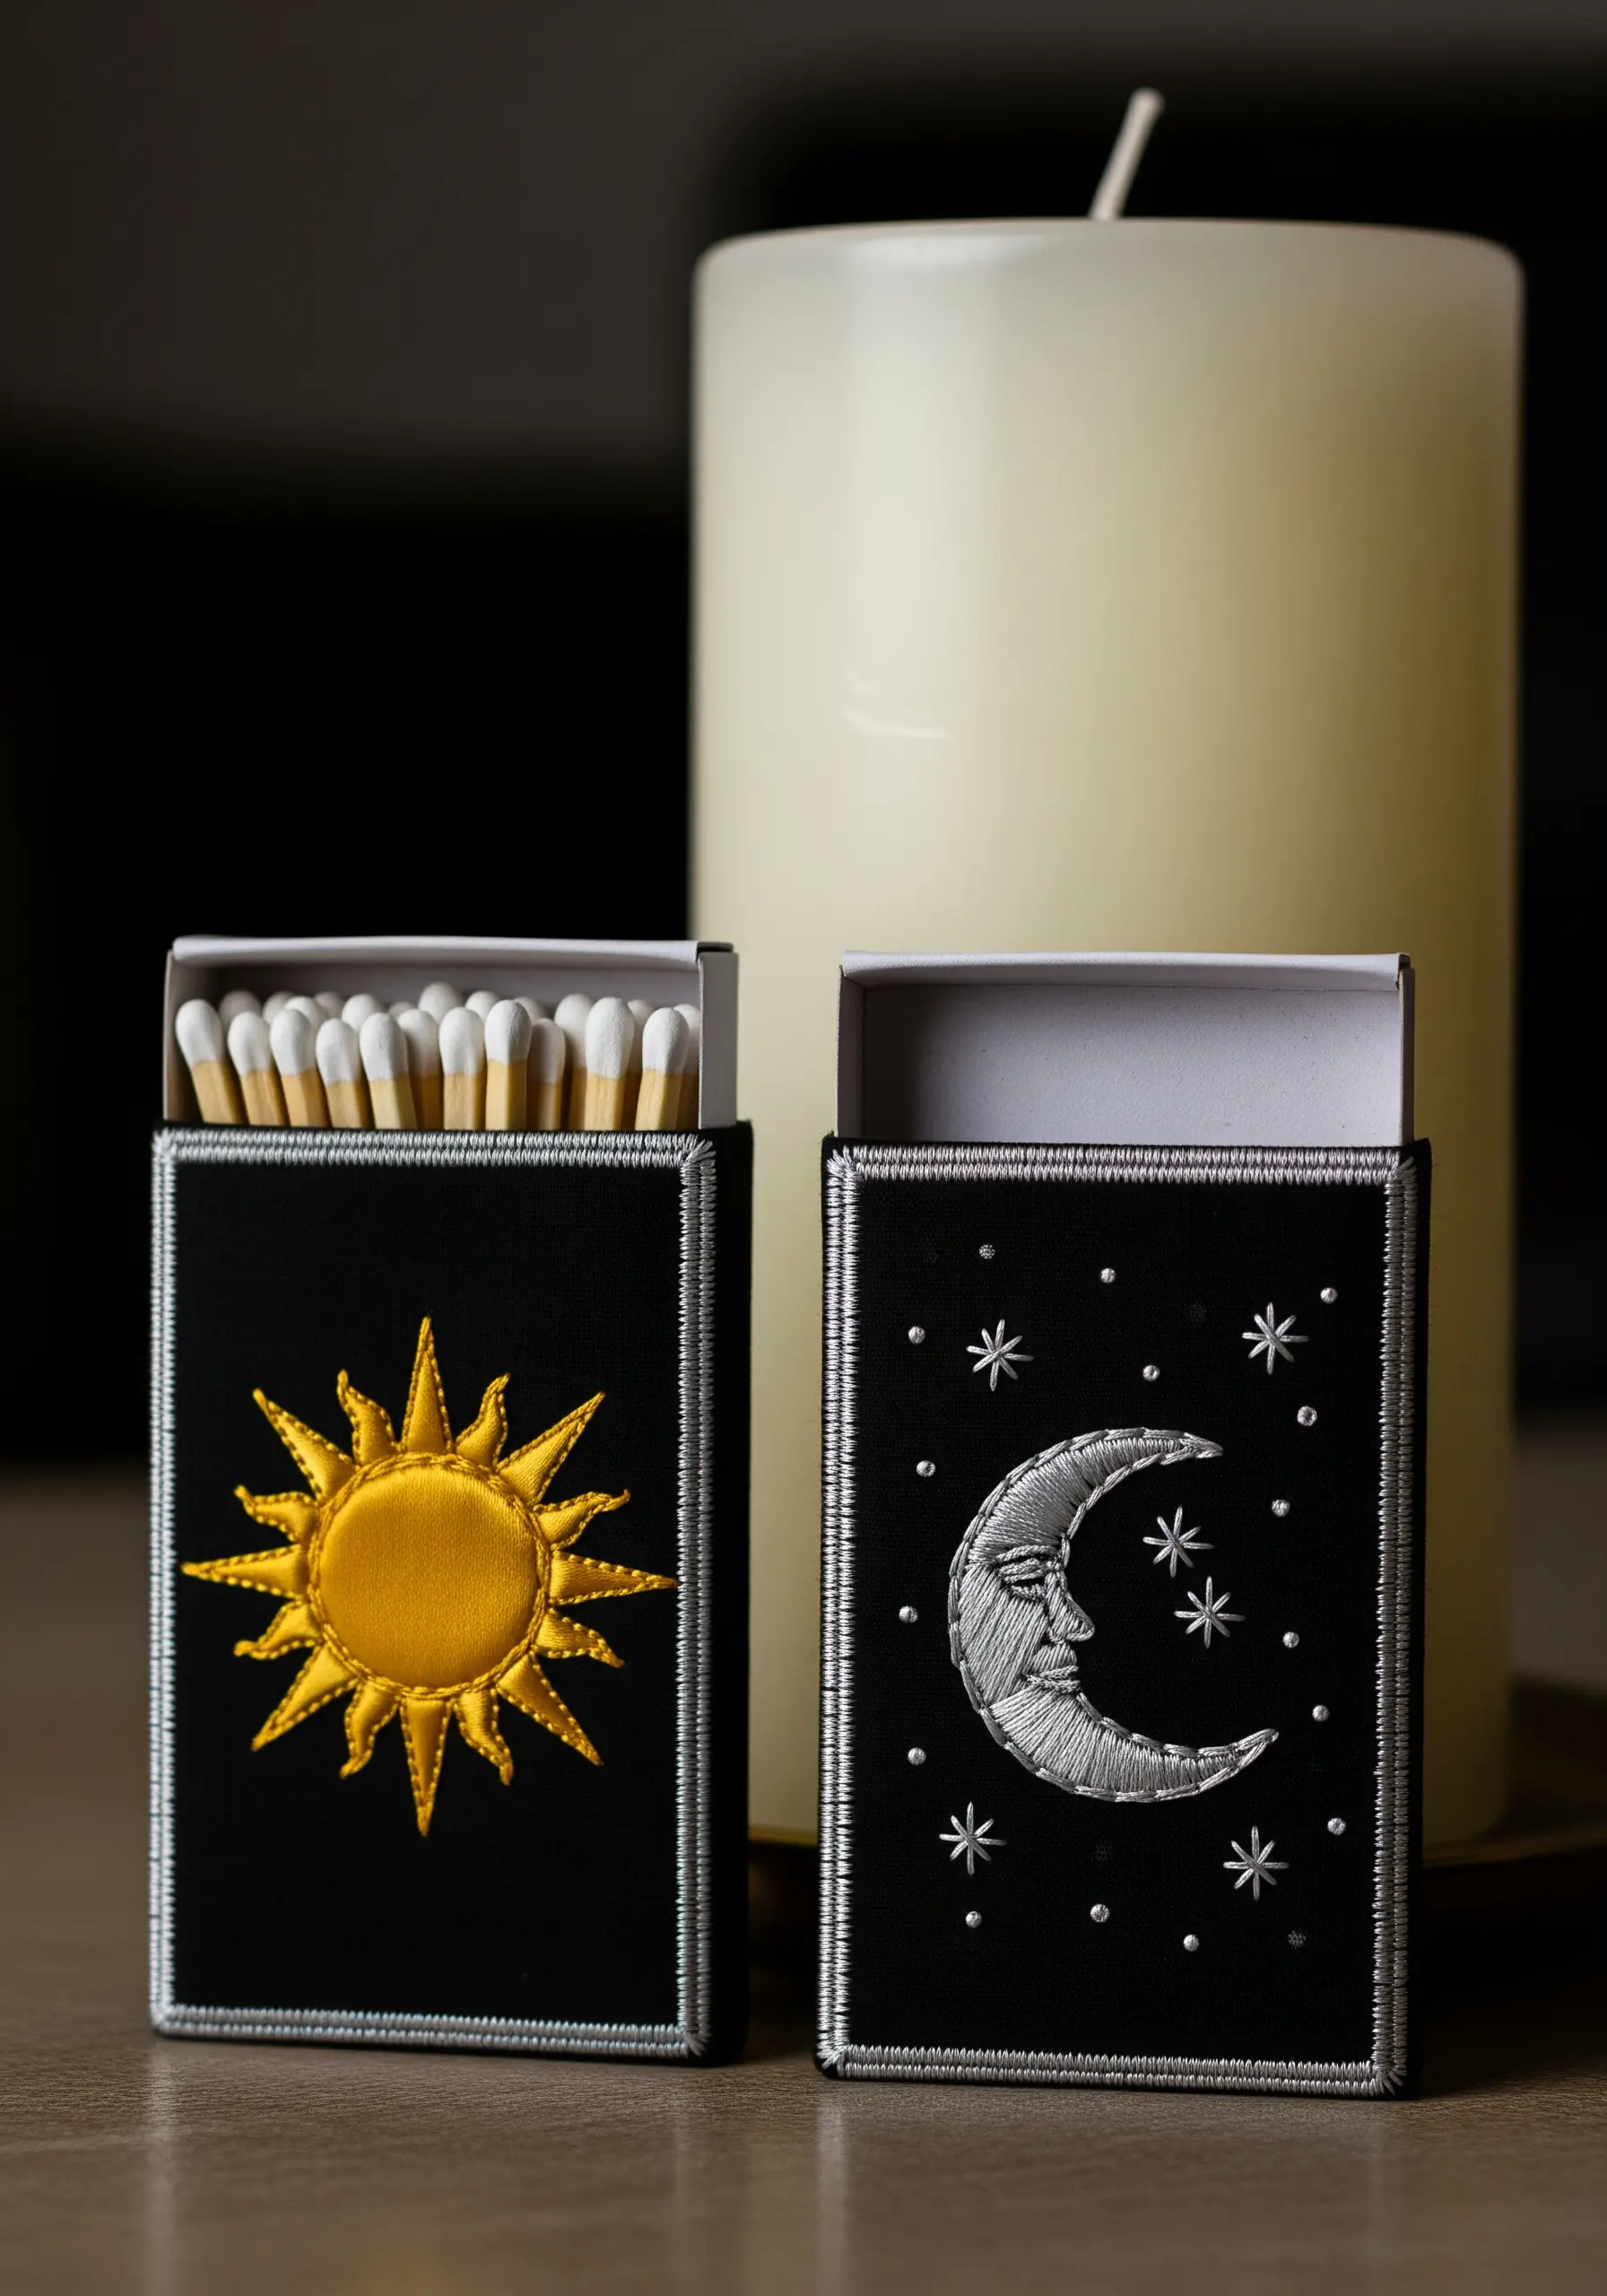
Elevate a simple matchbox by embroidering a decorative sleeve for it.
On a small scale, every stitch counts, so focus on executing a perfect padded satin stitch for the main celestial motifs.
Use a single strand of metallic silver or gold thread for tiny details like stars or rays of light to add a touch of magic.
Finishing the edges with a neat blanket stitch gives these tiny handmade decor ideas a polished, professional look.
19. Use Directional Stitches to Depict a Landscape

Capture the essence of a mountain range on a felt pennant by using the direction of your stitches to create form.
Fill the mountain peaks with satin stitches angled to mimic the natural slopes and crevices.
Use a darker thread for the rock faces and a bright white or light gray for the snowy caps, letting the stitch direction alone define the shapes.
This simple technique from our collection of string art nature trails turns a basic outline into a miniature landscape.
20. Create Graphic Power with Symbolic Line Work
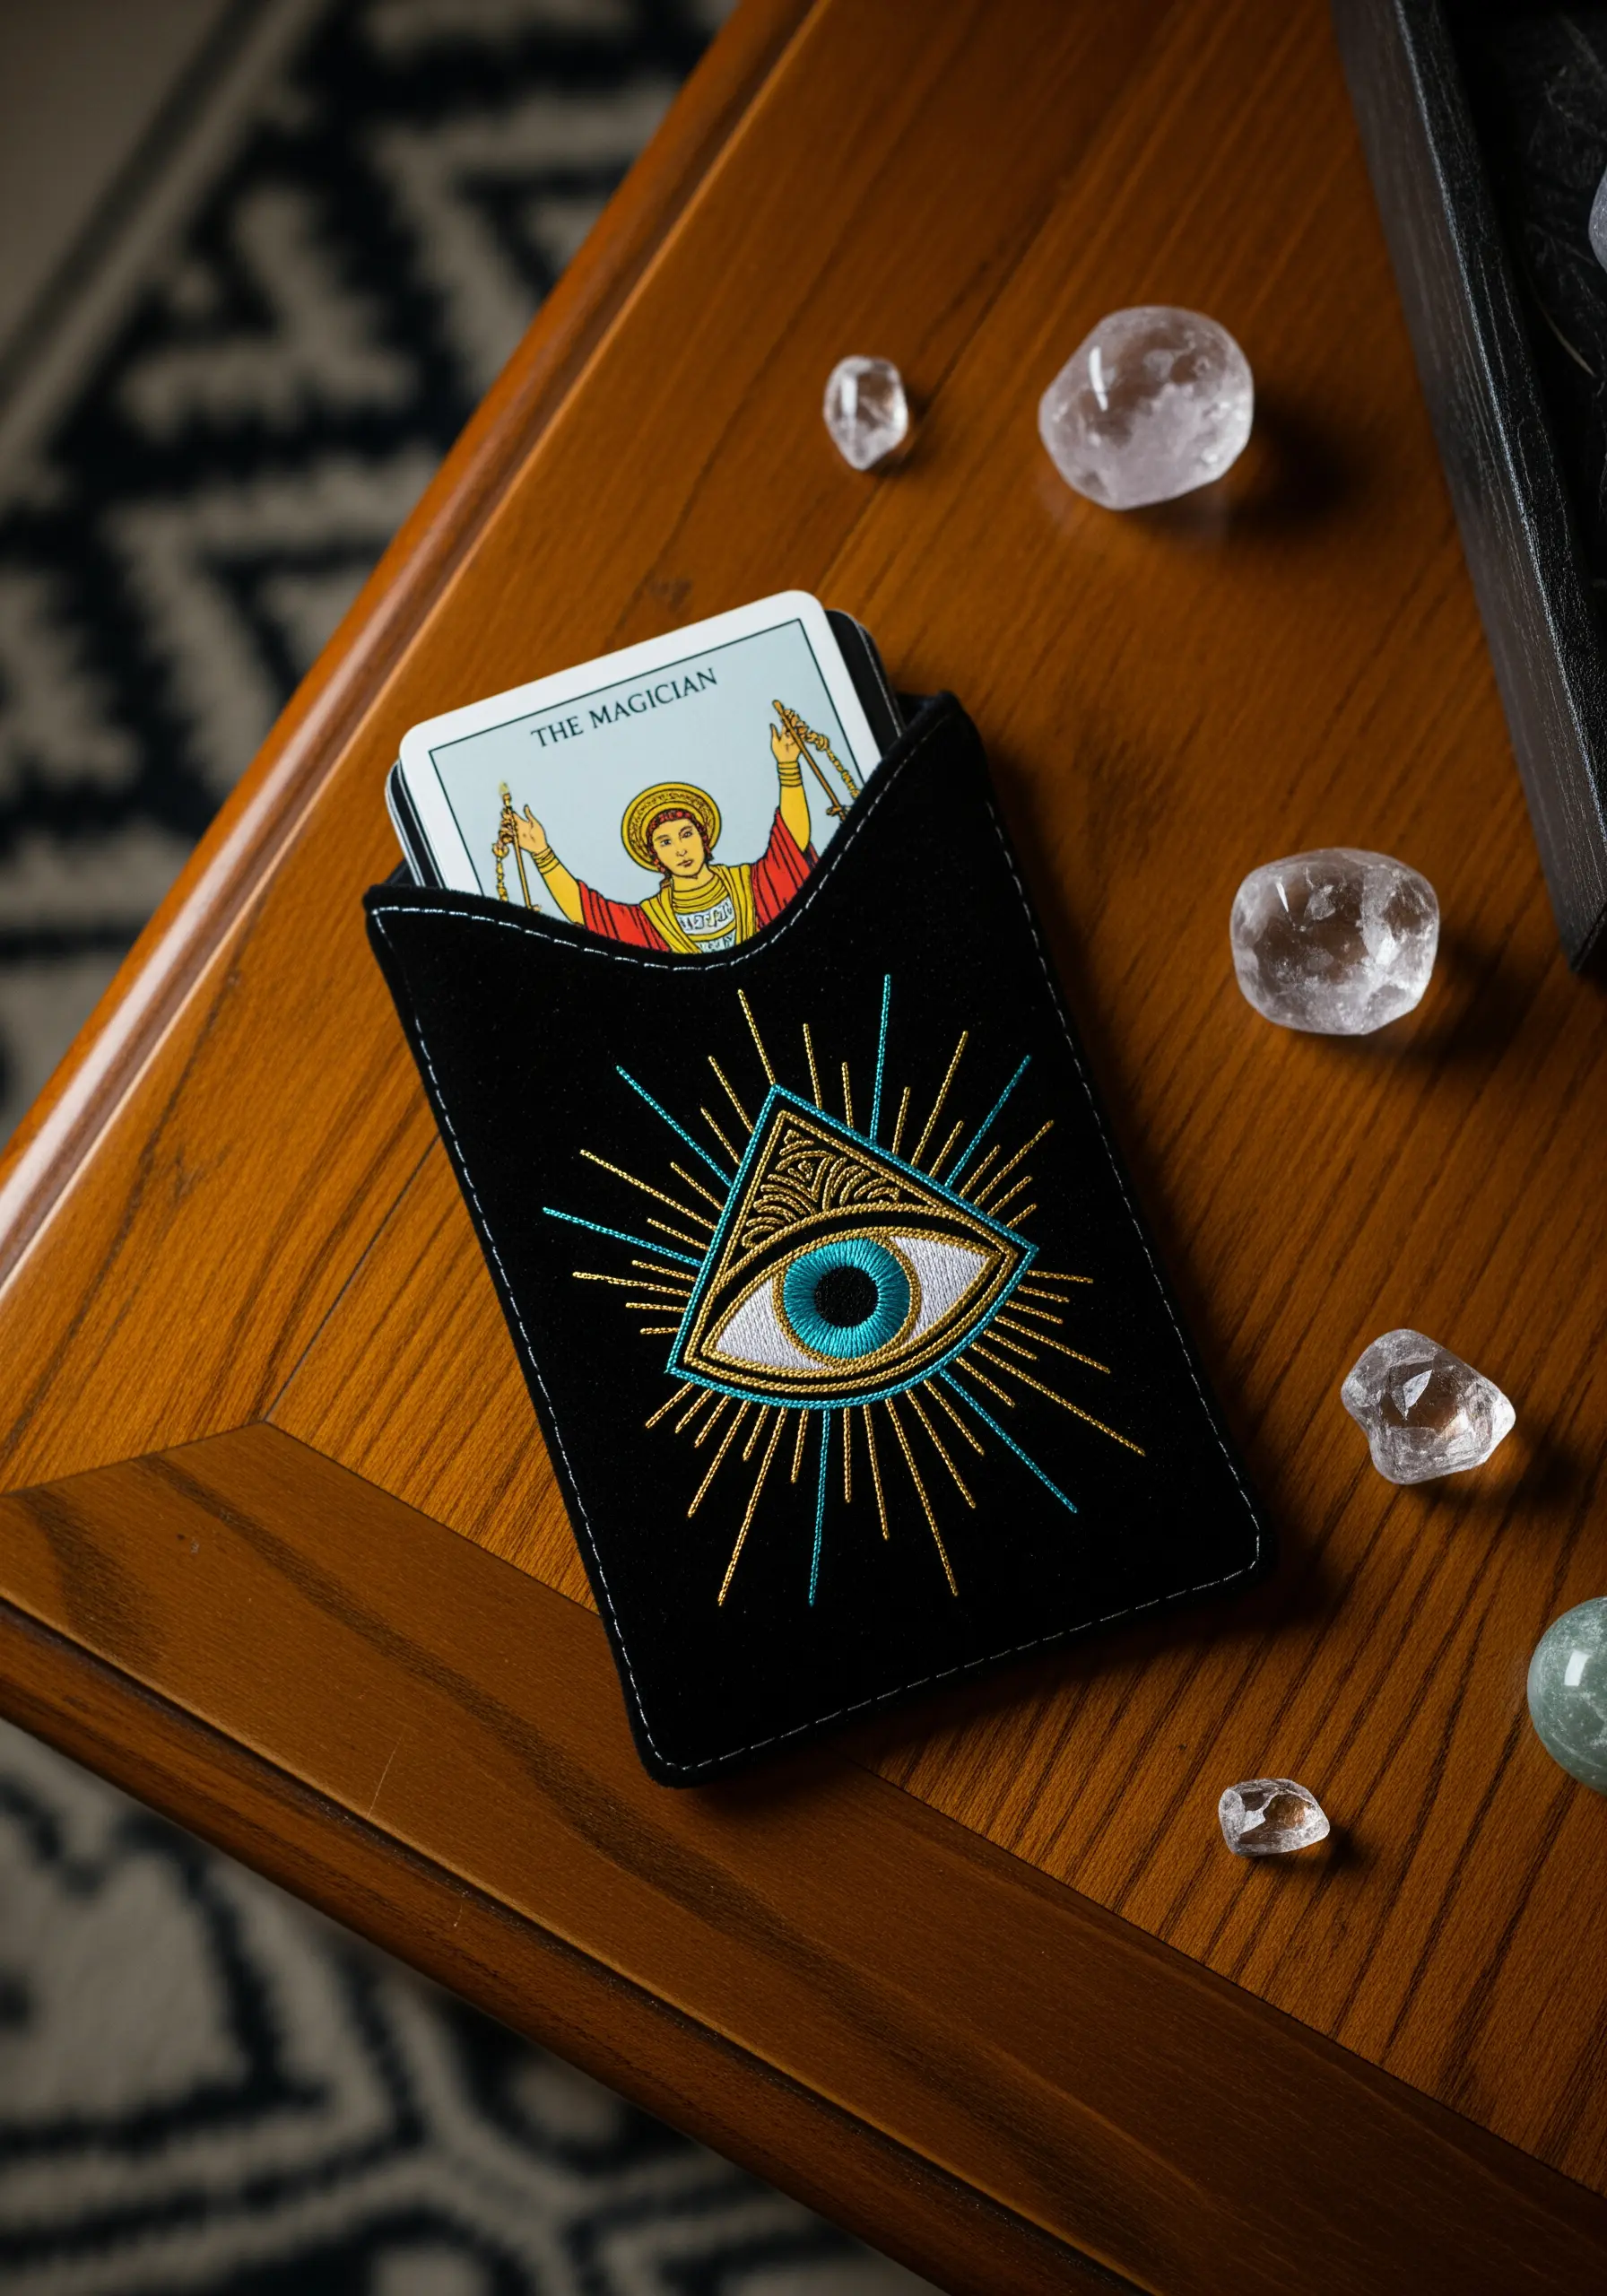
For a powerful symbolic design like this all-seeing eye, combine different stitches to create visual hierarchy.
Use a smooth satin stitch for the central eye to make it the focal point.
Frame it with radiating straight stitches in metallic thread to represent rays of light, ensuring they are pulled taut for maximum sharpness.
Finally, outline the entire motif with a clean backstitch. This combination of fill, line, and outline gives the design its crisp, graphic impact.
21. Add Sculptural Dimension with Knotted Yarn

Move your embroidery into the third dimension by incorporating thick yarn or rope directly onto your fabric.
Create coaster-sized wagon wheels or sailor’s knots and attach them to a pillow cover using a technique called couching—tacking the yarn down with small, discreet stitches in a matching thread.
This method adds incredible sculptural texture and creates a cozy, tactile piece that is both visually and physically inviting, showcasing gorgeous mixed-fiber textures.
22. Embroider on Non-Traditional Materials

Take your stitching beyond fabric by embroidering on faux leather to create a stylish cord keeper.
Use a sharp, sturdy needle (a leather needle works best) to cleanly pierce the material without tearing it.
A simple series of parallel running stitches or backstitches in contrasting colors is all you need to add a pop of personality.
The smooth surface of the faux leather makes the texture of the thread stand out beautifully.
23. Combine Paper and Thread for a Delicate Finish
Create a charming, layered gift tag by stitching directly onto sturdy cardstock.
To avoid tearing the paper, gently pre-pierce your stitching holes along your design line with a needle or awl before you begin sewing.
Use a simple backstitch for the lettering and a blanket stitch around the edge to attach the paper to a fabric backing.
This mixed-media approach offers a unique way to apply your skills beyond traditional textiles, perfect for paper art and embroidery ideas.
24. Frame a Central Motif with Patchwork
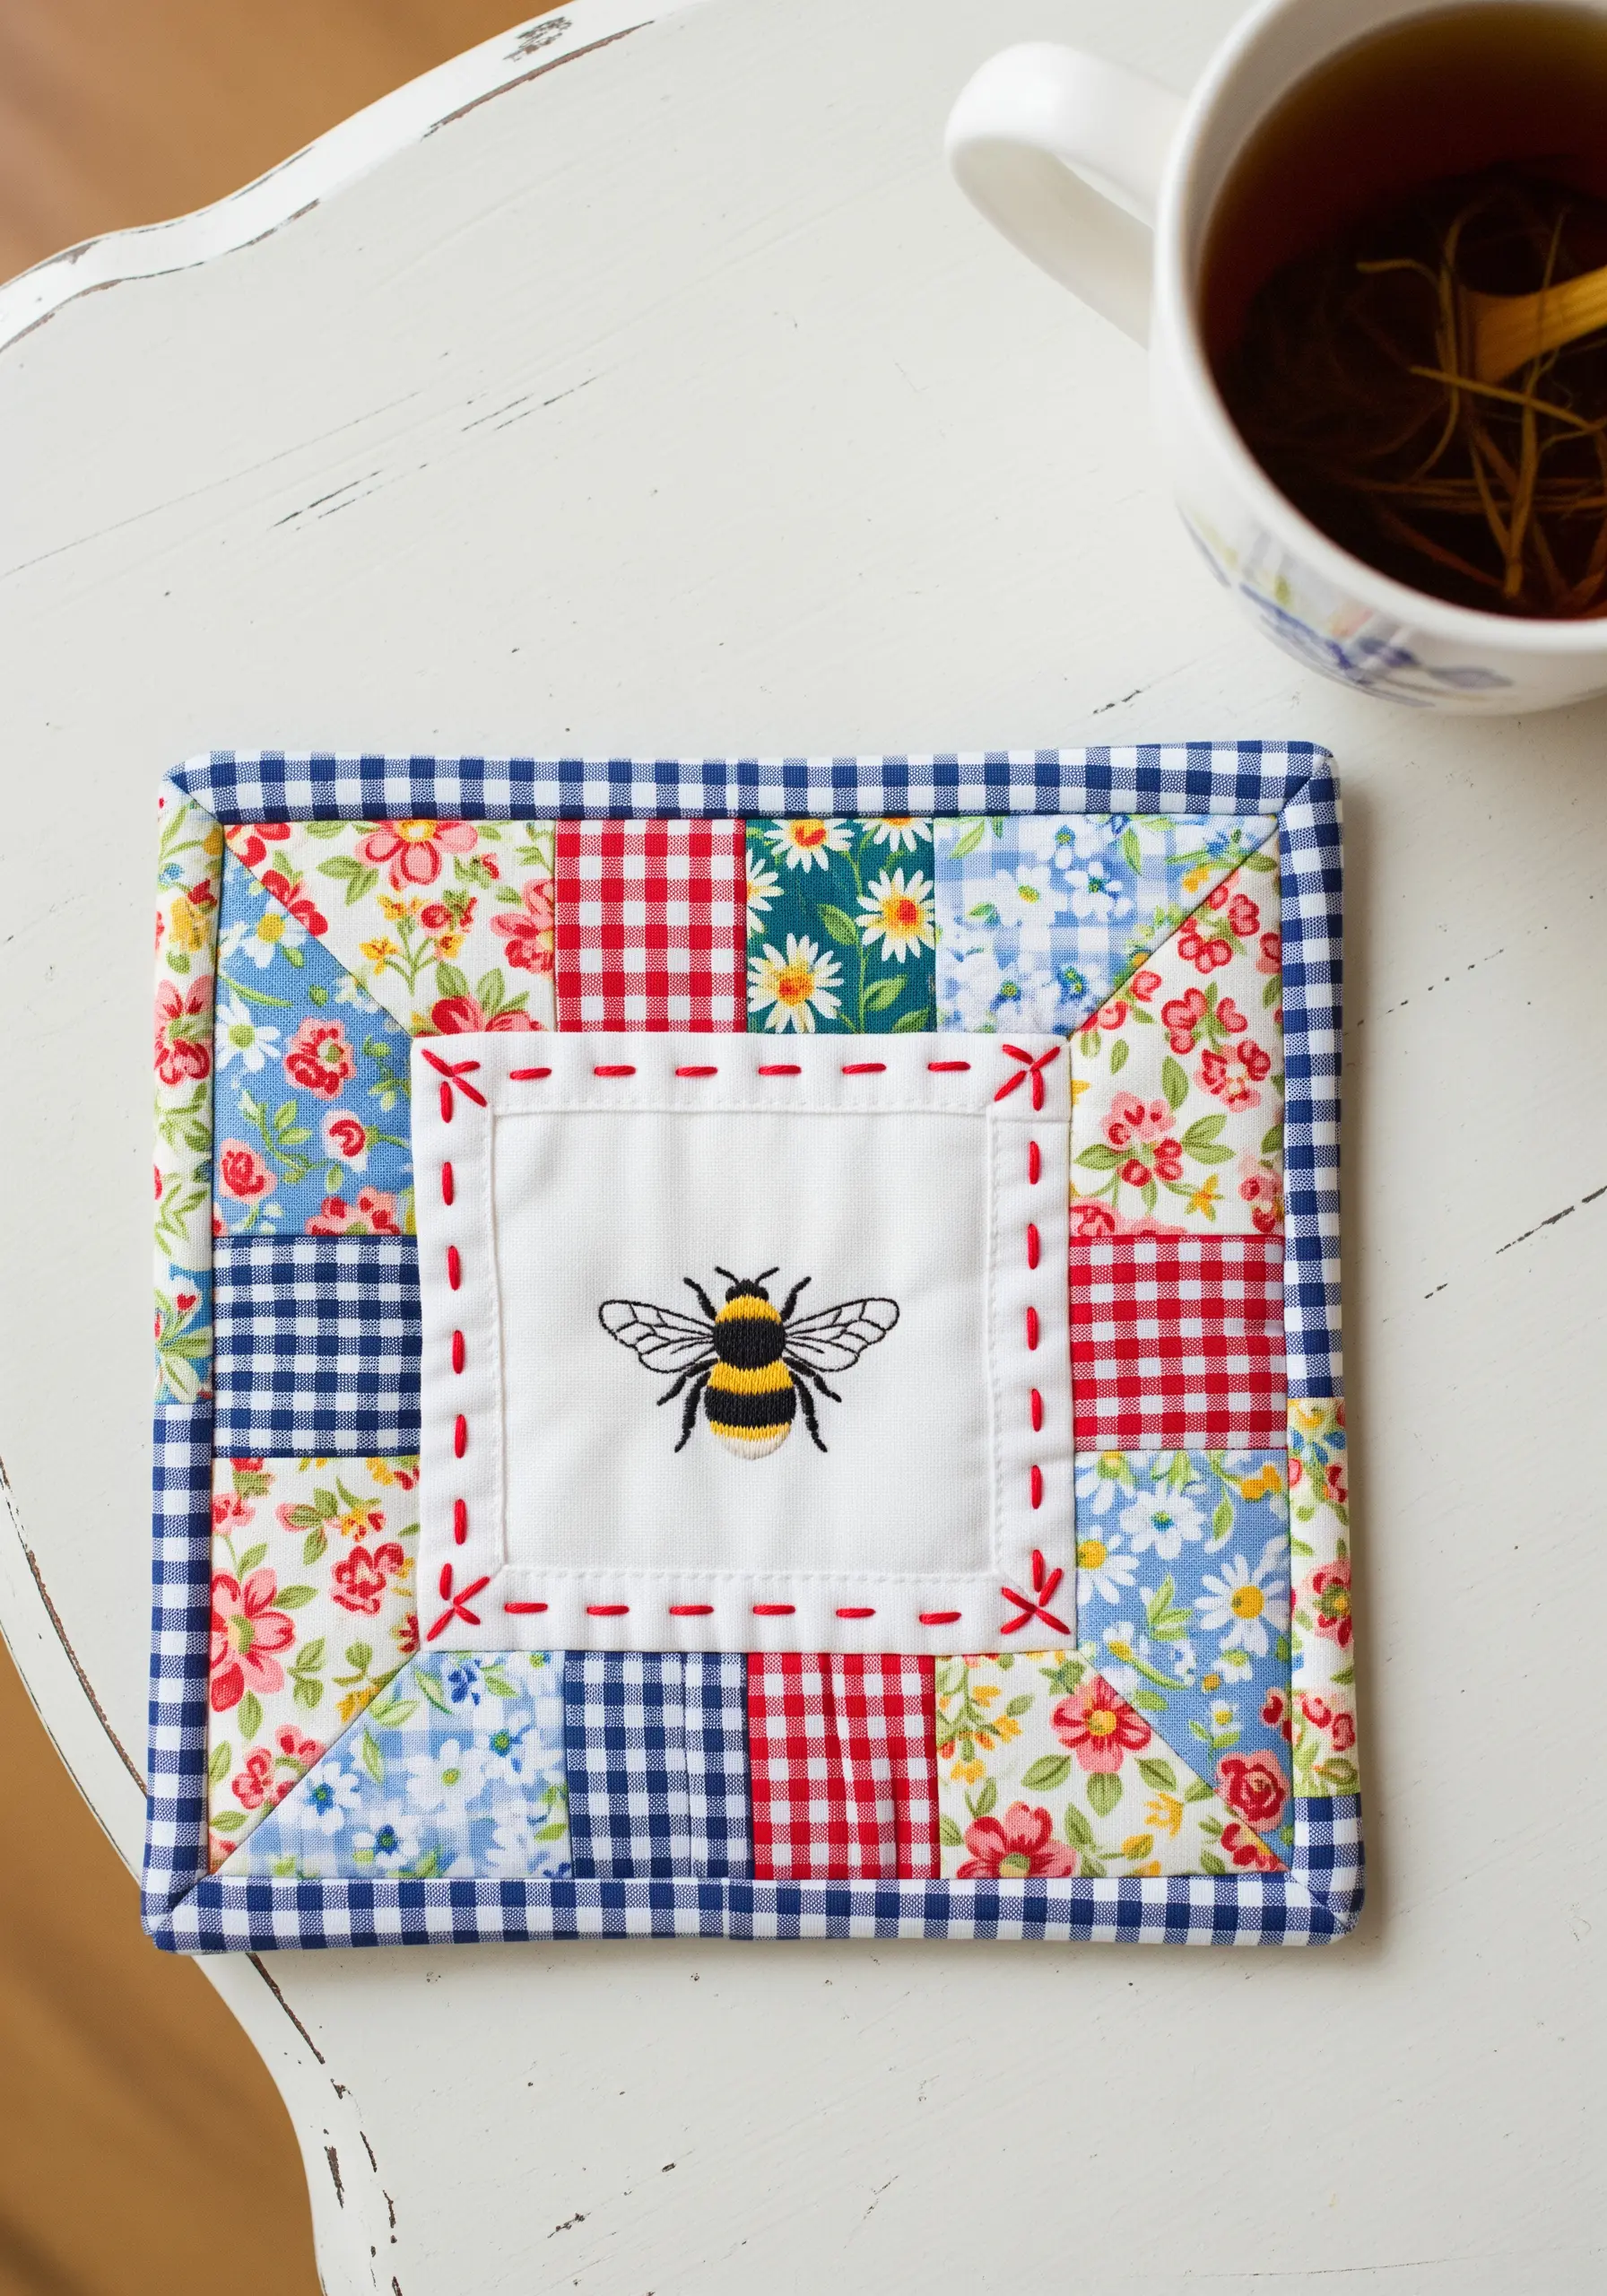
Let your embroidery be the star of a larger piece by framing it with complementary fabrics.
Stitch your central design—like this detailed bee—on a solid piece of fabric, leaving ample space around it.
Then, build a patchwork or quilted border around it to create a functional mug rug.
This method allows you to incorporate your detailed stitch work into larger projects without having to embroider the entire surface.
25. Stitch on Felt for Effortless Edges
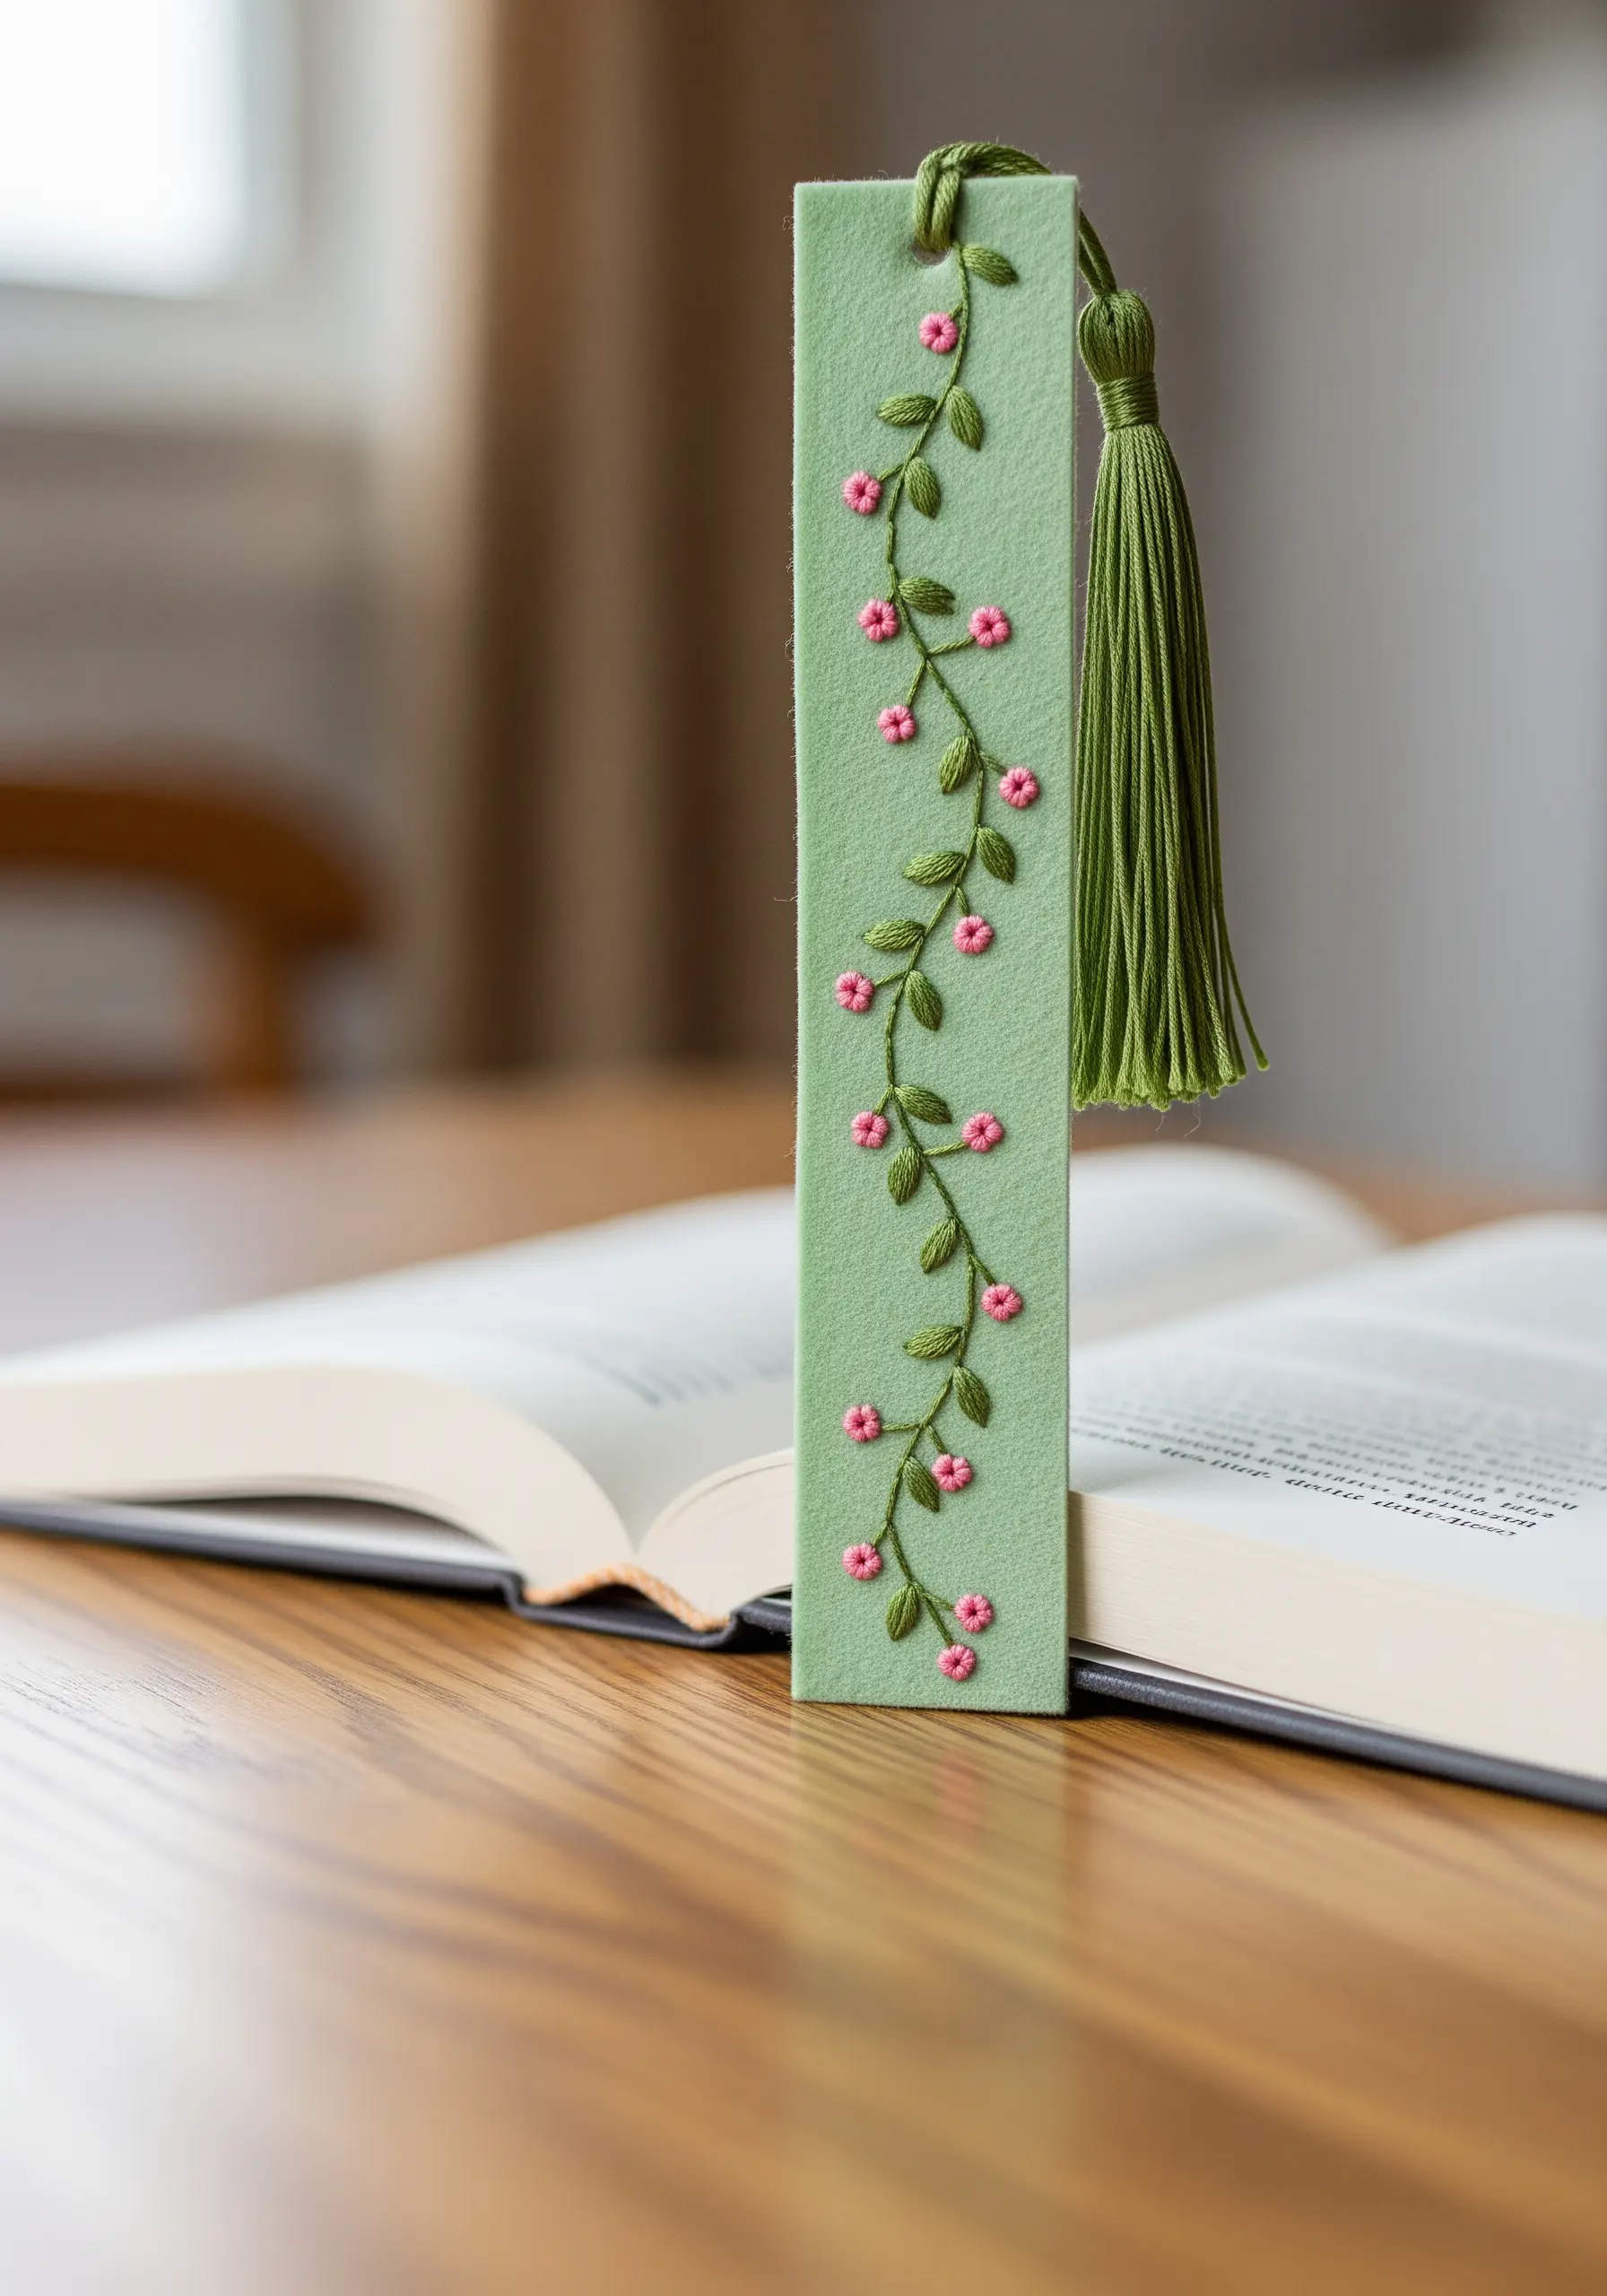
Felt is an ideal material for small projects like bookmarks because it’s sturdy and doesn’t fray, eliminating the need for hemming.
Its soft, matted surface provides excellent grip for your thread, making simple stitches like stem stitch, French knots, and lazy daisy stitches look crisp and defined.
Finish your bookmark by making a tassel from the same embroidery floss used in your design for a perfectly coordinated, professional look.
26. Explore Geometric String Art with Straight Stitches
You can create a complex, faceted design using only straight stitches.
Begin by drawing or printing a geometric pattern onto your fabric.
Instead of filling the shapes, simply connect the points of the design with long, taut straight stitches in a high-contrast thread.
The overlapping lines build a sense of depth and structure, resulting in a modern, architectural piece that feels like retro string art patterns with a contemporary twist.
27. Tackle Large-Scale Projects with Variegated Thread

Embroidering a large surface like an ottoman can feel daunting, but variegated thread is a powerful ally.
By using a floss that shifts through multiple colors, you can fill large sections of a mandala pattern while creating a beautiful, flowing gradient effect.
This technique adds incredible depth and complexity without the tedious work of constantly changing colors, making embroidered mandala wall art designs and furniture feel more achievable.
28. Give Insects Iridescence with Metallic Thread

To capture the shimmering, iridescent quality of insect wings and bodies, incorporate metallic or satin floss into your work.
Use a thread conditioner or a shorter length of thread to prevent tangling, as metallics can be tricky.
Lay down flat satin stitches on the beetle’s body to create a smooth, reflective surface.
For dragonfly wings, use an open fill stitch like a fly stitch to suggest translucence. These tiny embroidery details are what make your work truly captivating.
29. Create a Gradient with Thread Blending
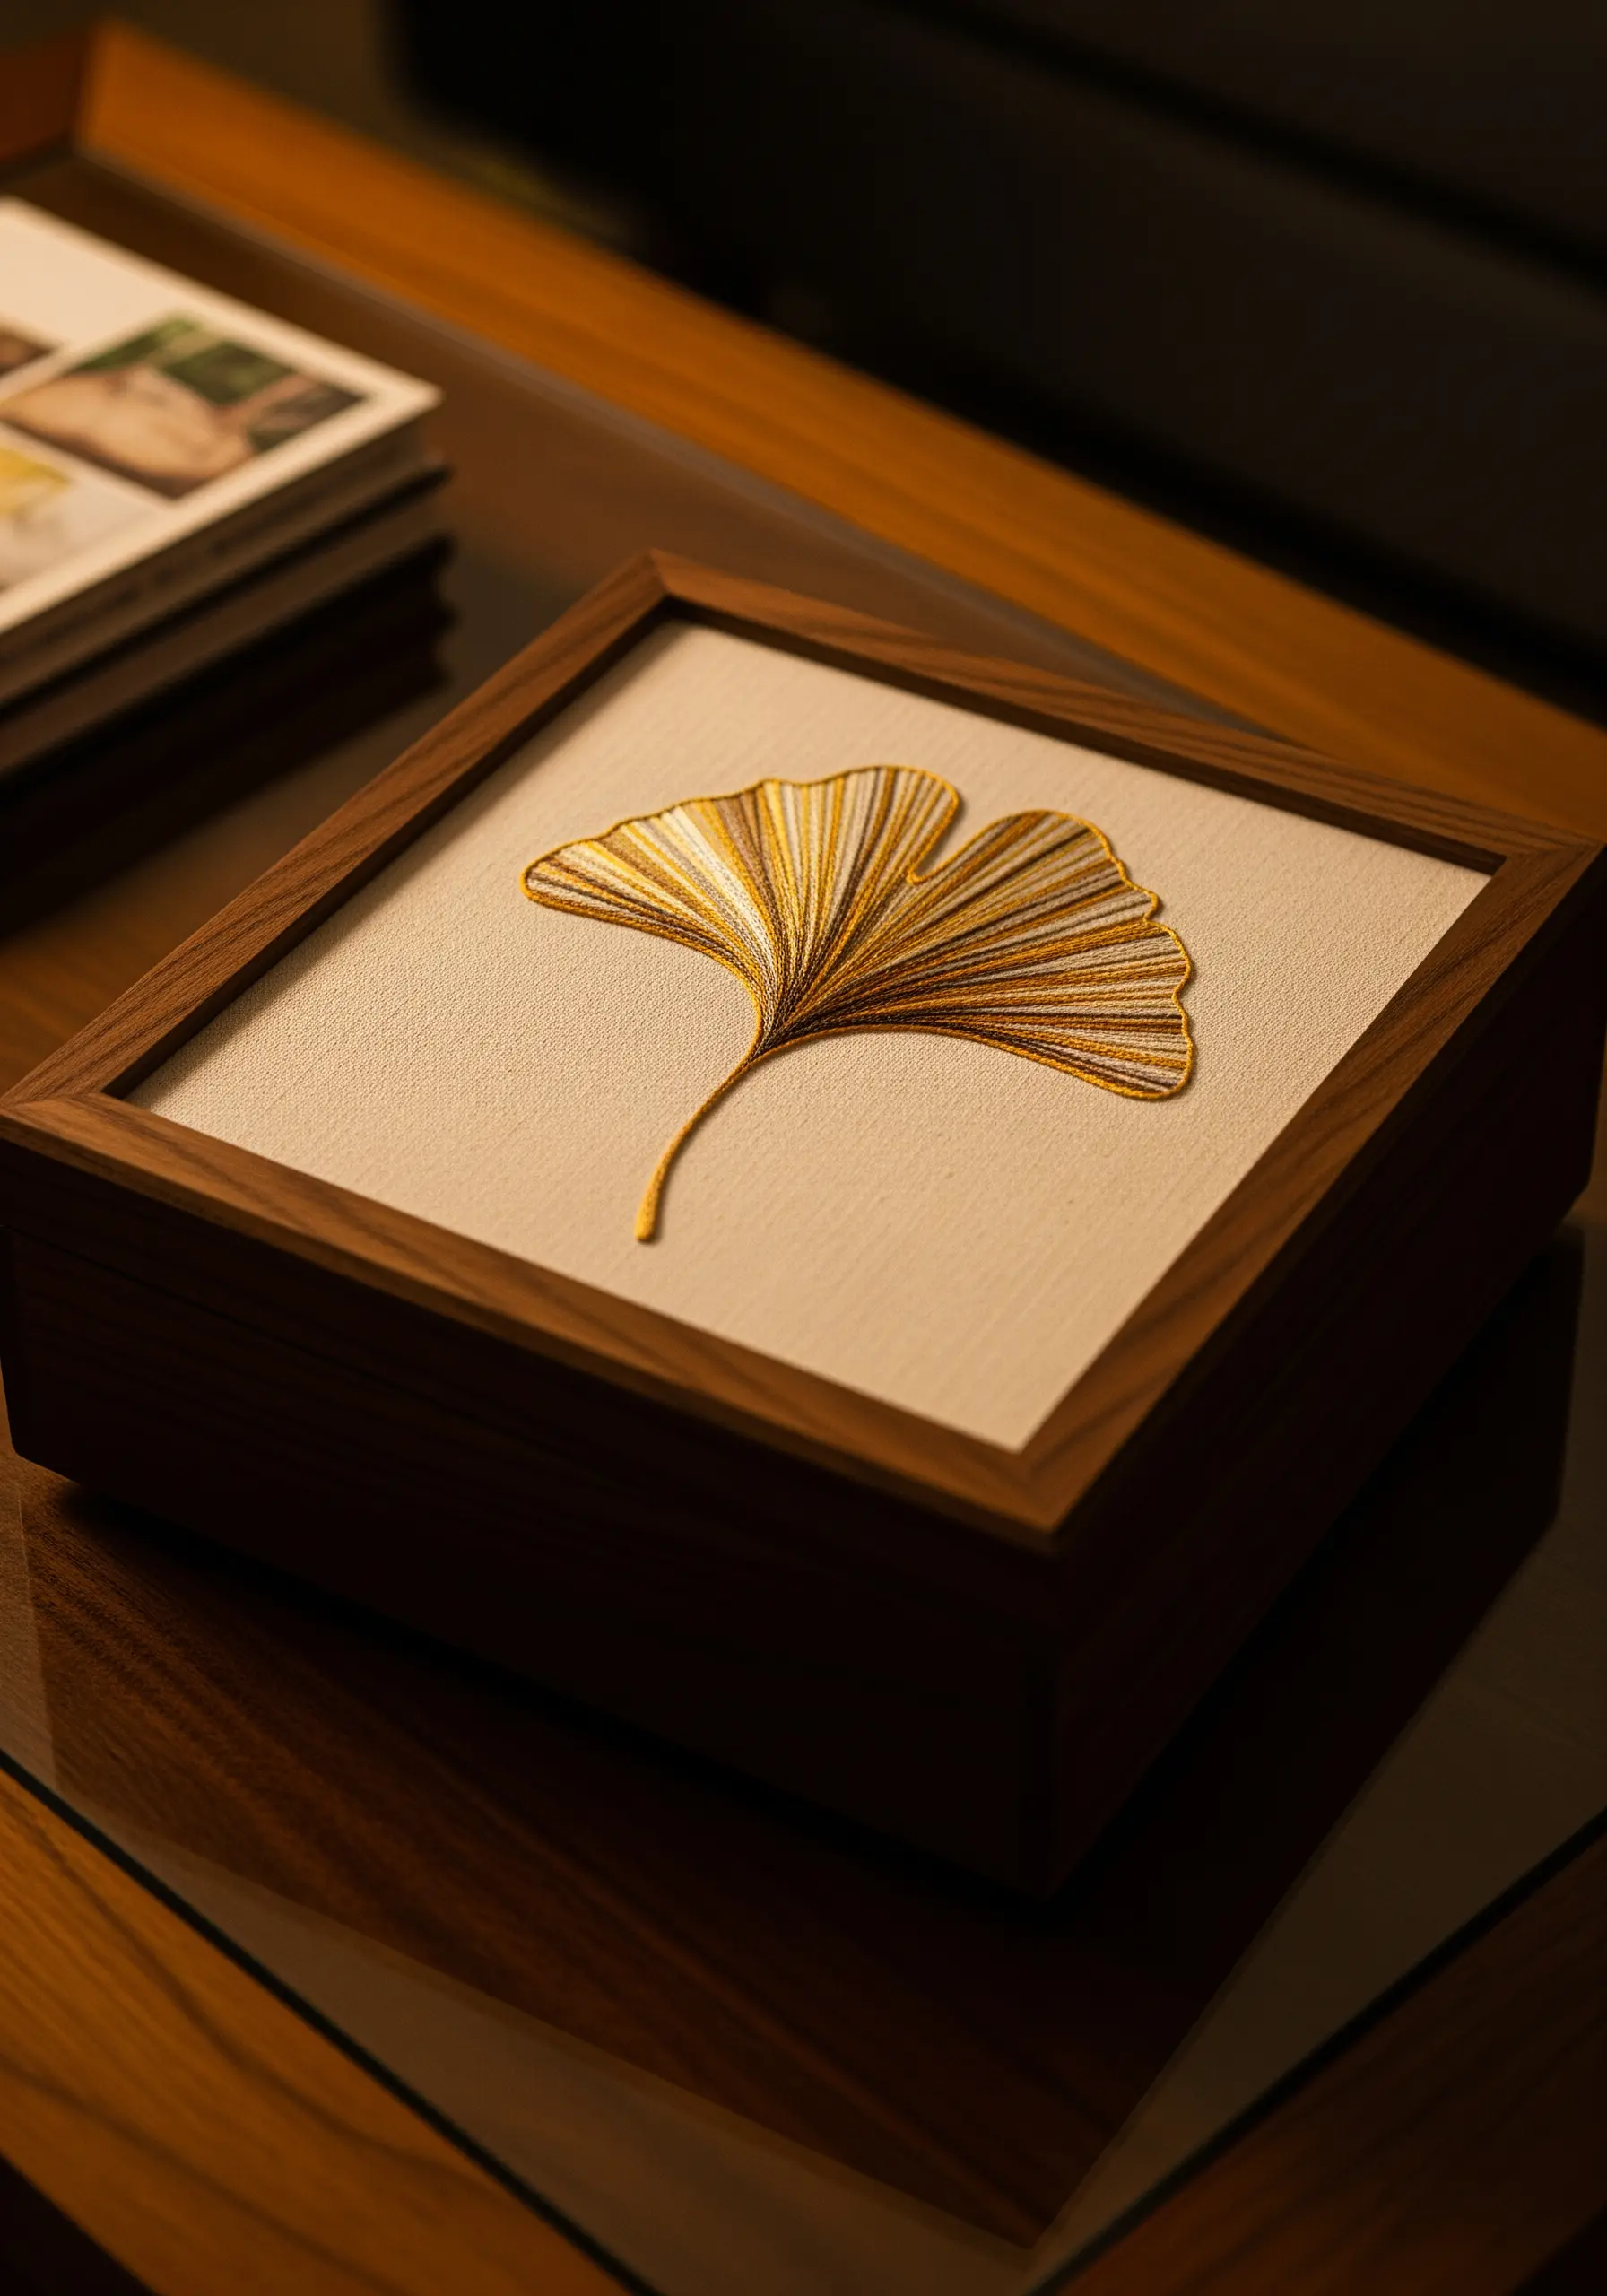
For this elegant ginkgo leaf, create a seamless gradient from gold to brown by blending your threads.
Start stitching the radiating lines from the center with three strands of gold floss in your needle. After a few stitches, swap one gold strand for a brown one. Continue, gradually swapping all strands until you are stitching with pure brown.
This technique produces a subtle, painterly effect that is far more sophisticated than simple color blocking, perfect for framed embroidery ideas that feel like art.


