

There’s a unique satisfaction in the precise, methodical process of embroidery, but sometimes you might find yourself wanting to create something with a bolder, more graphic impact. This is where the logic of 1970s string art can completely revitalize your approach to stitching.
Instead of thinking about filling shapes with dense satin stitch, I want you to start thinking in lines—in tension, angles, and the elegant curves that emerge from perfectly straight stitches. This isn’t about learning a different craft; it’s about adopting a new mindset for your needle and thread.
By translating the principles of string art to fabric and floss, you can create stunning, retro-inspired pieces that feel both nostalgic and incredibly modern. You’ll learn to use thread to define form, create optical illusions, and build texture with nothing more than the humble straight stitch. It’s a method that rewards precision and planning, allowing you to produce art that is clean, confident, and deeply intentional.
1. Build Depth With Layered Sections
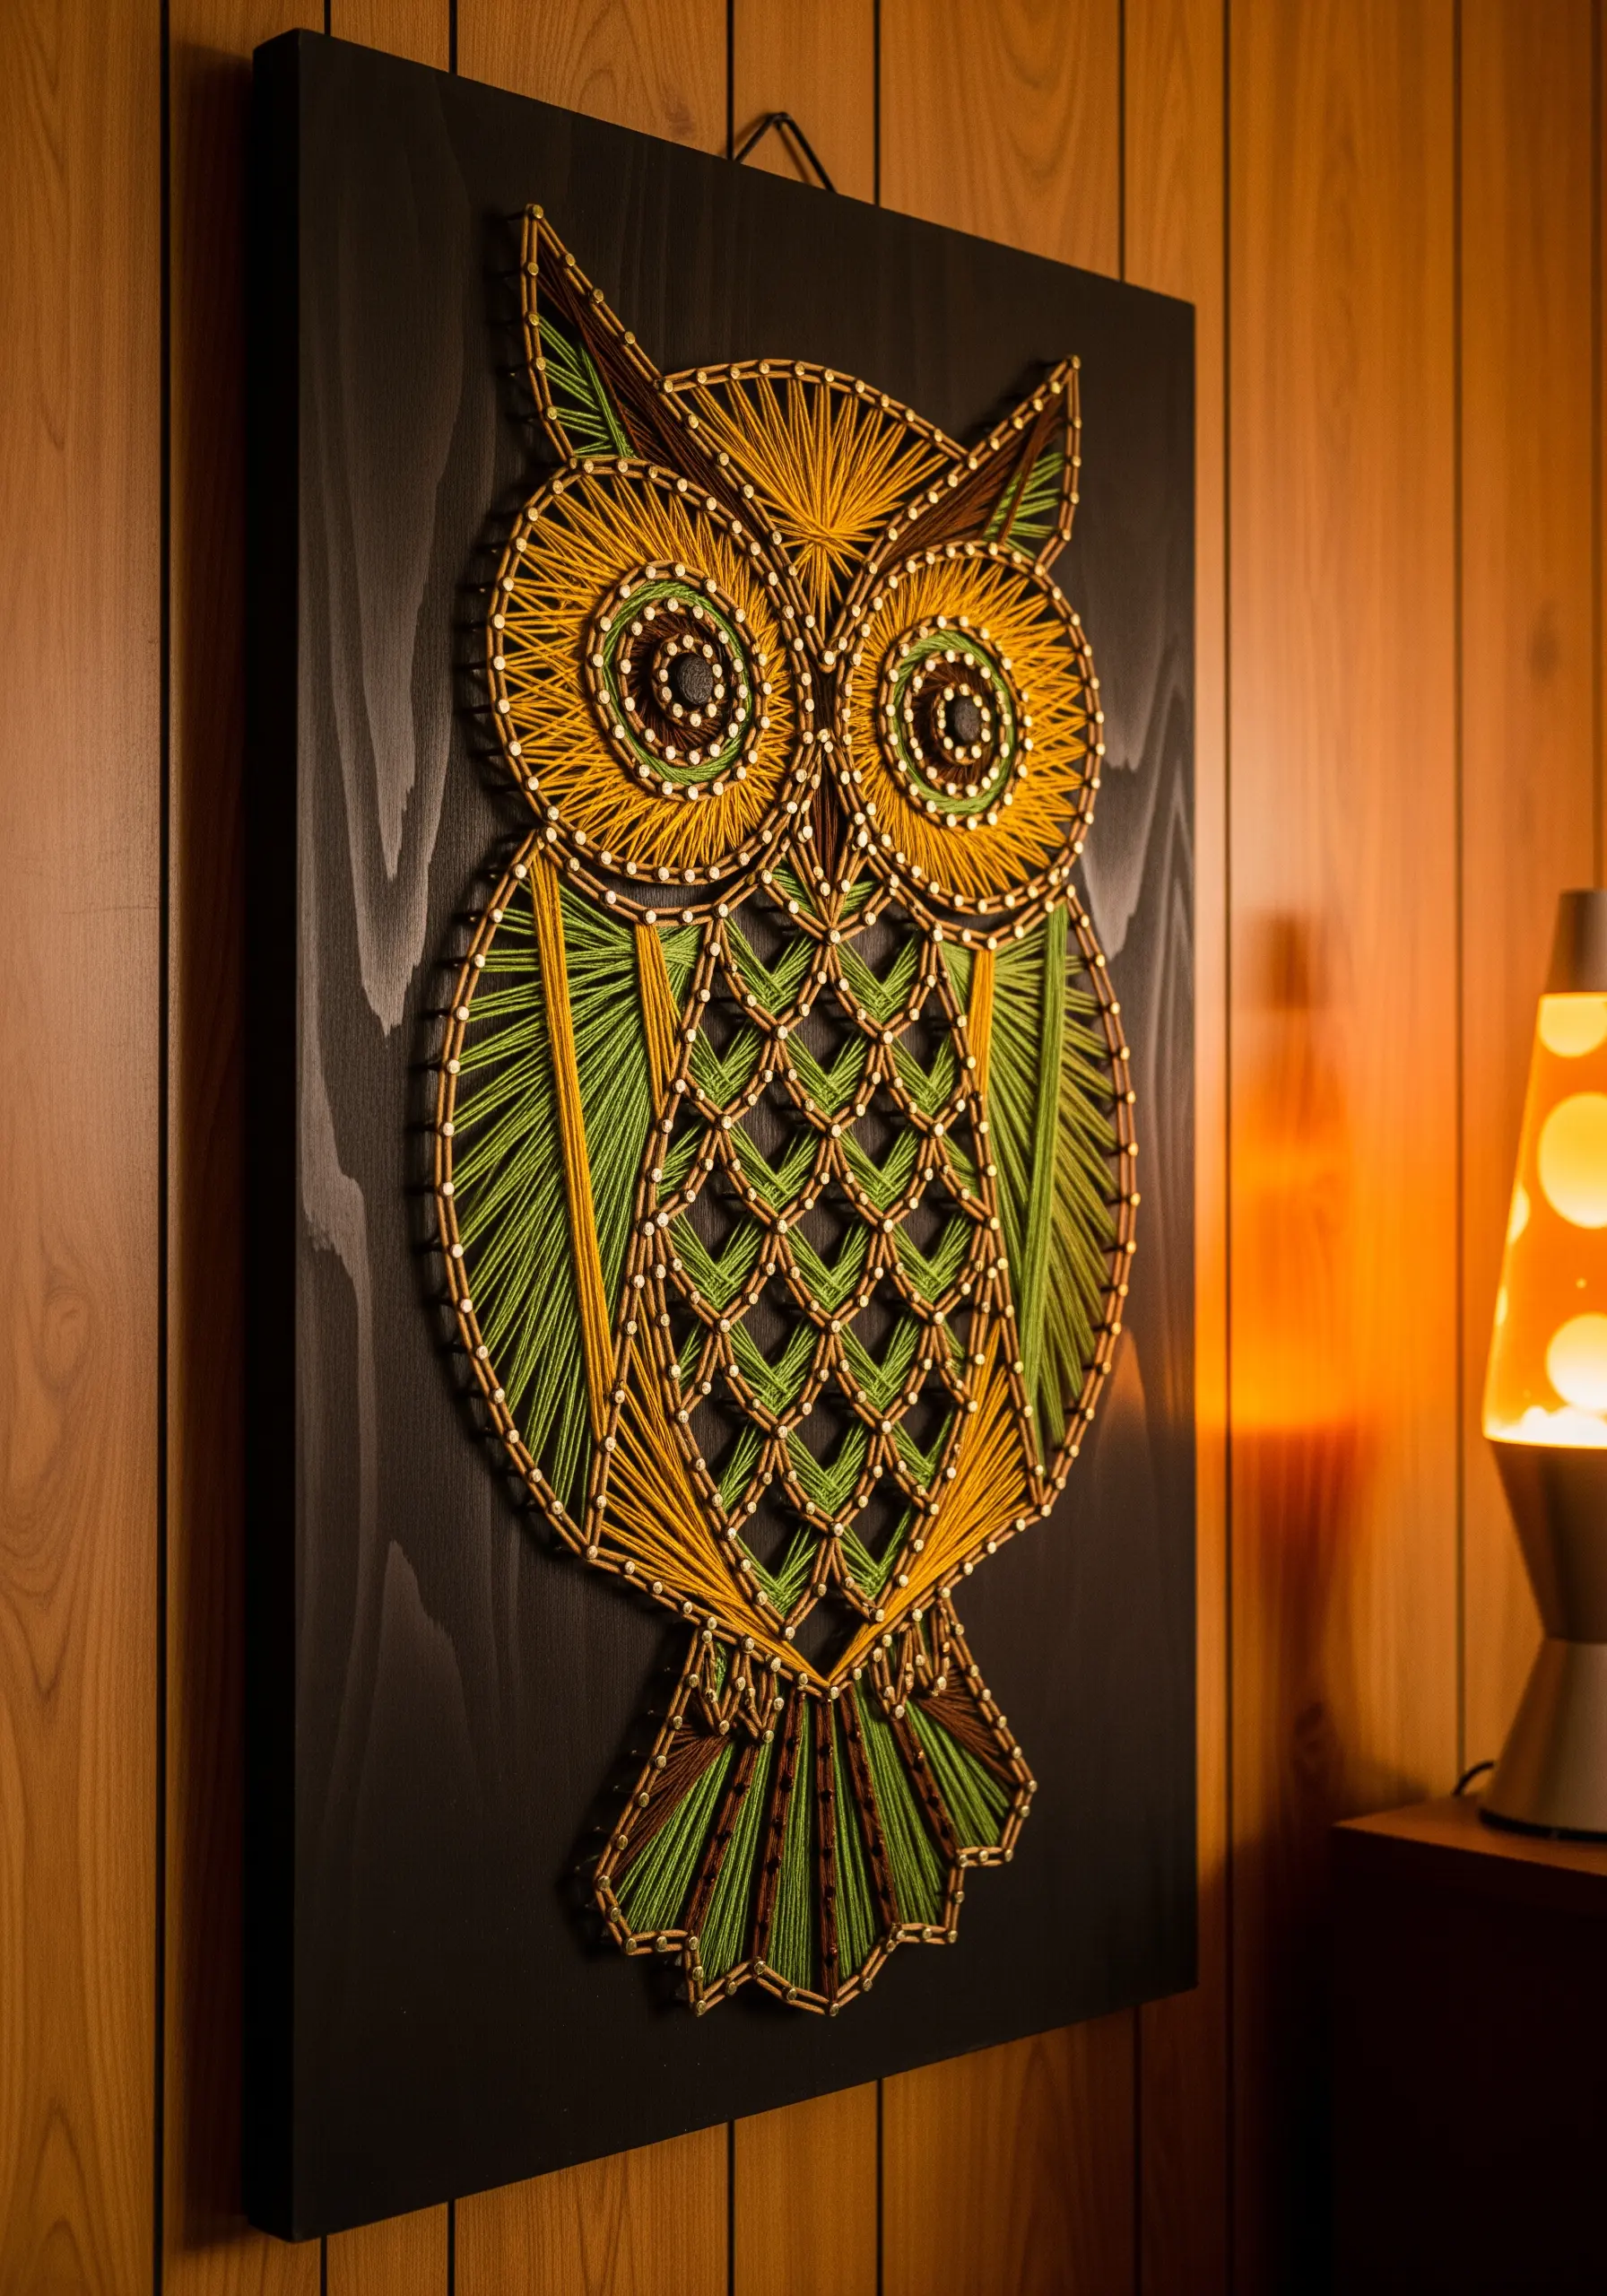
Create a sense of dimension in animal motifs by stitching in layers, not just filling a single outline.
First, complete the outer form with your darkest outline color.
Then, work inward, filling smaller sections like the eyes and chest feathers with distinct patterns and colors.
This method breaks the design into manageable parts and gives the final piece a rich, textured quality that a simple fill can’t achieve.
The contrast between the dense, radiating stitches in the eyes and the geometric V-shapes of the chest creates visual hierarchy.
2. Create a Radiant Gradient Mandala
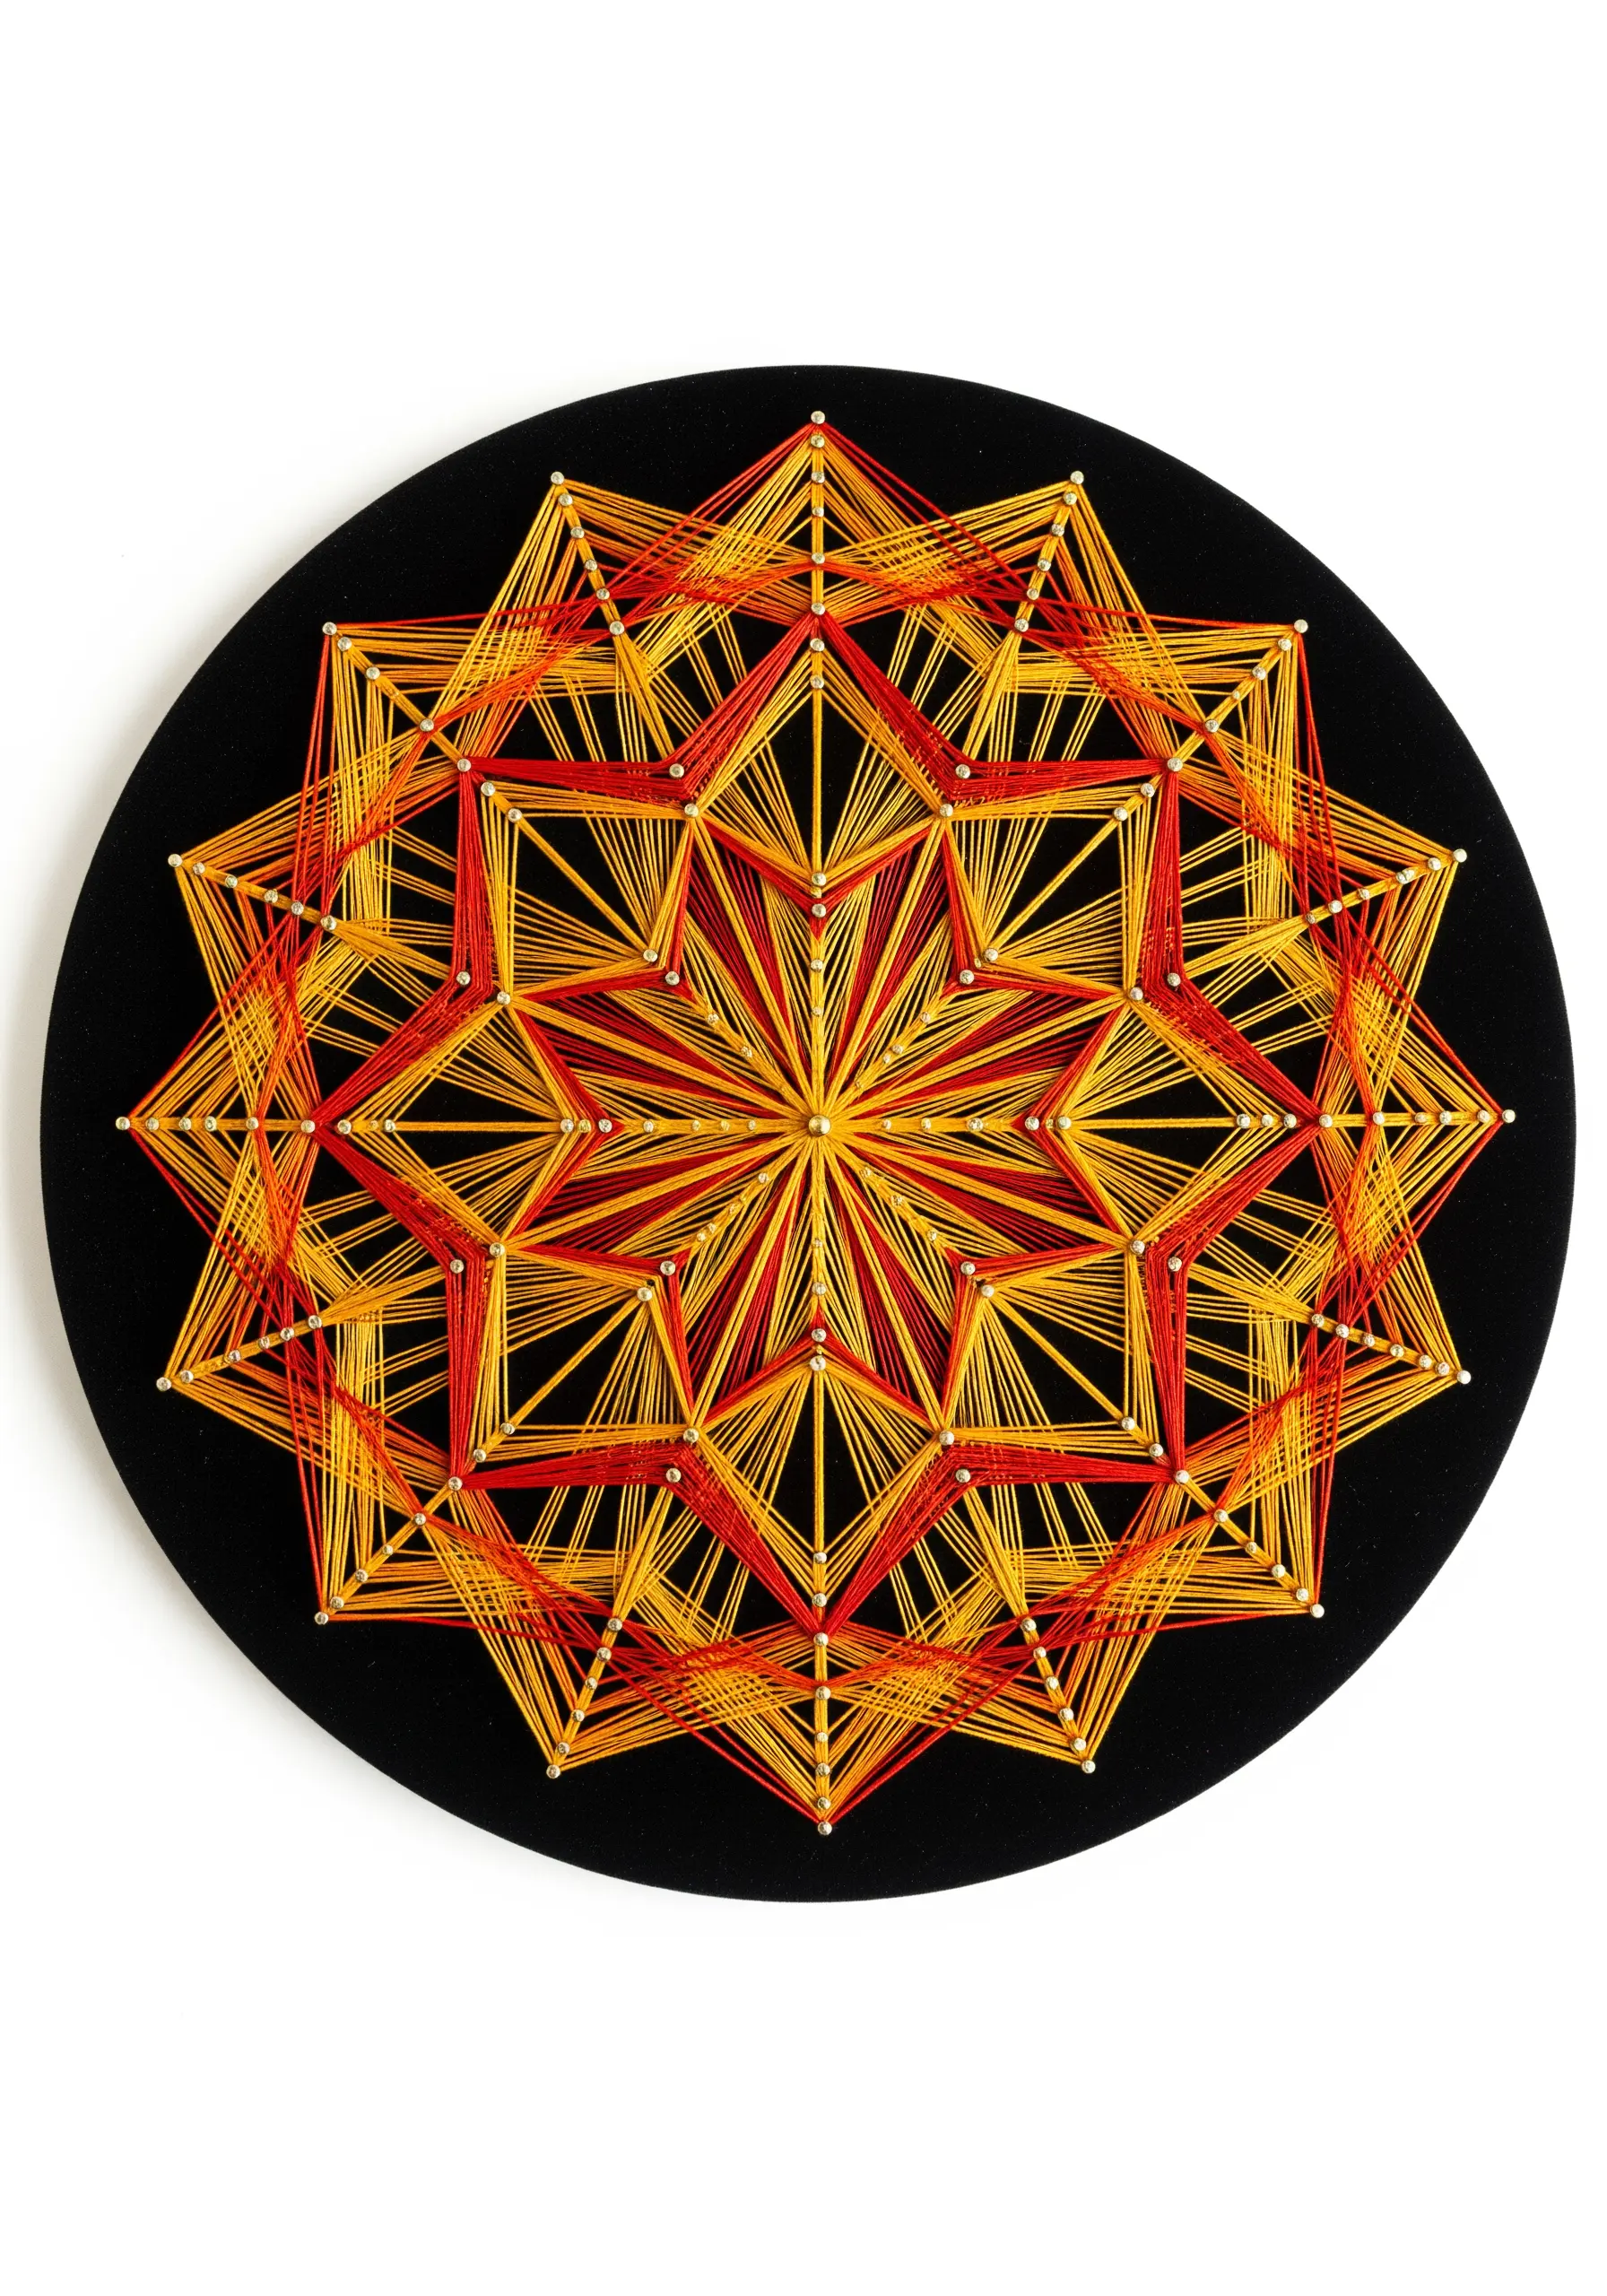
Turn a simple star or geometric shape into a captivating mandala by using an analogous color palette—shades that sit next to each other on the color wheel, like red, orange, and yellow.
Begin with your lightest color at the center, stitching the smallest interior star shape.
Work your way outward, switching to a progressively darker thread for each new layer of points.
This technique produces a seamless ombre effect that draws the eye inward, transforming a basic shape into a dynamic focal point.
Explore these floral mandala embroidery ideas for more symmetrical inspiration.
3. Combine Satin Stitch with Radiating Lines
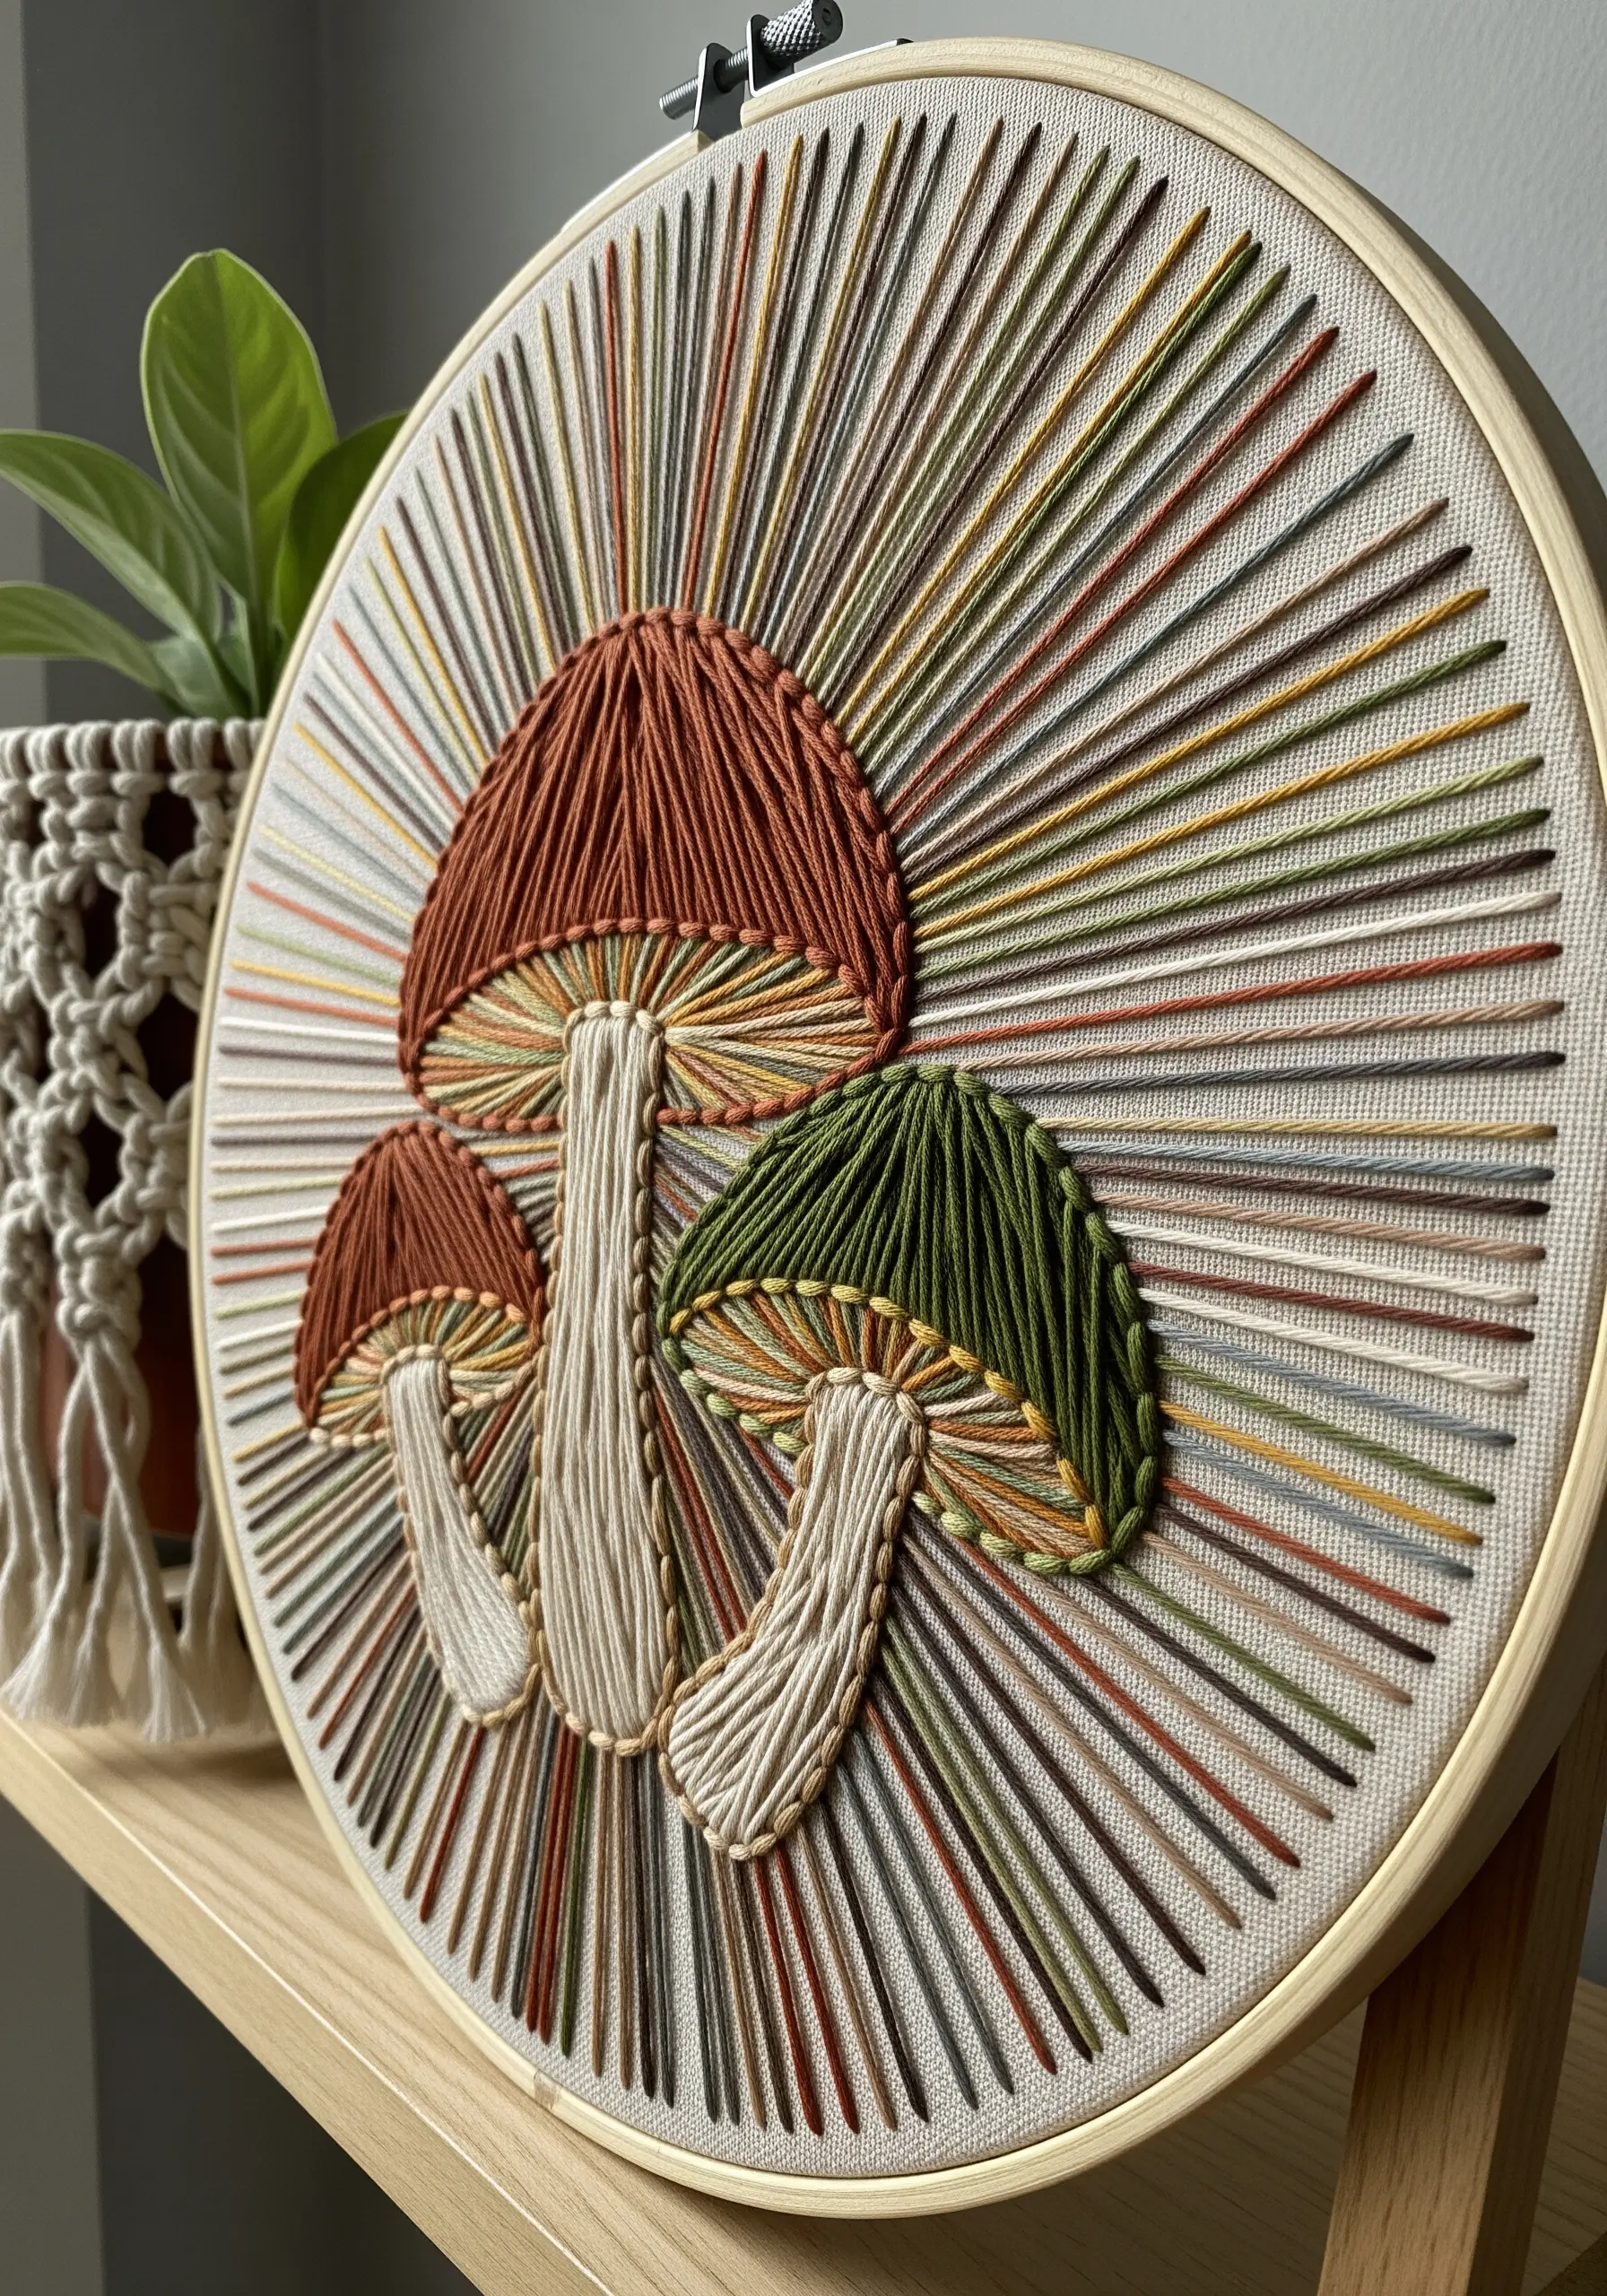
Give your motifs a modern retro look by blending solid satin stitch with a string art-inspired background.
First, fill your main subjects—like these mushroom caps and stems—with dense, smooth satin stitches for a solid, opaque finish.
Then, create the background by stitching long, straight lines that radiate from a central point behind the mushrooms to the edge of the hoop.
Using a variegated thread for the background adds subtle color shifts that mimic a ’70s palette, while the textural contrast makes your central motif pop.
4. Design a Cohesive Triptych Wall Display
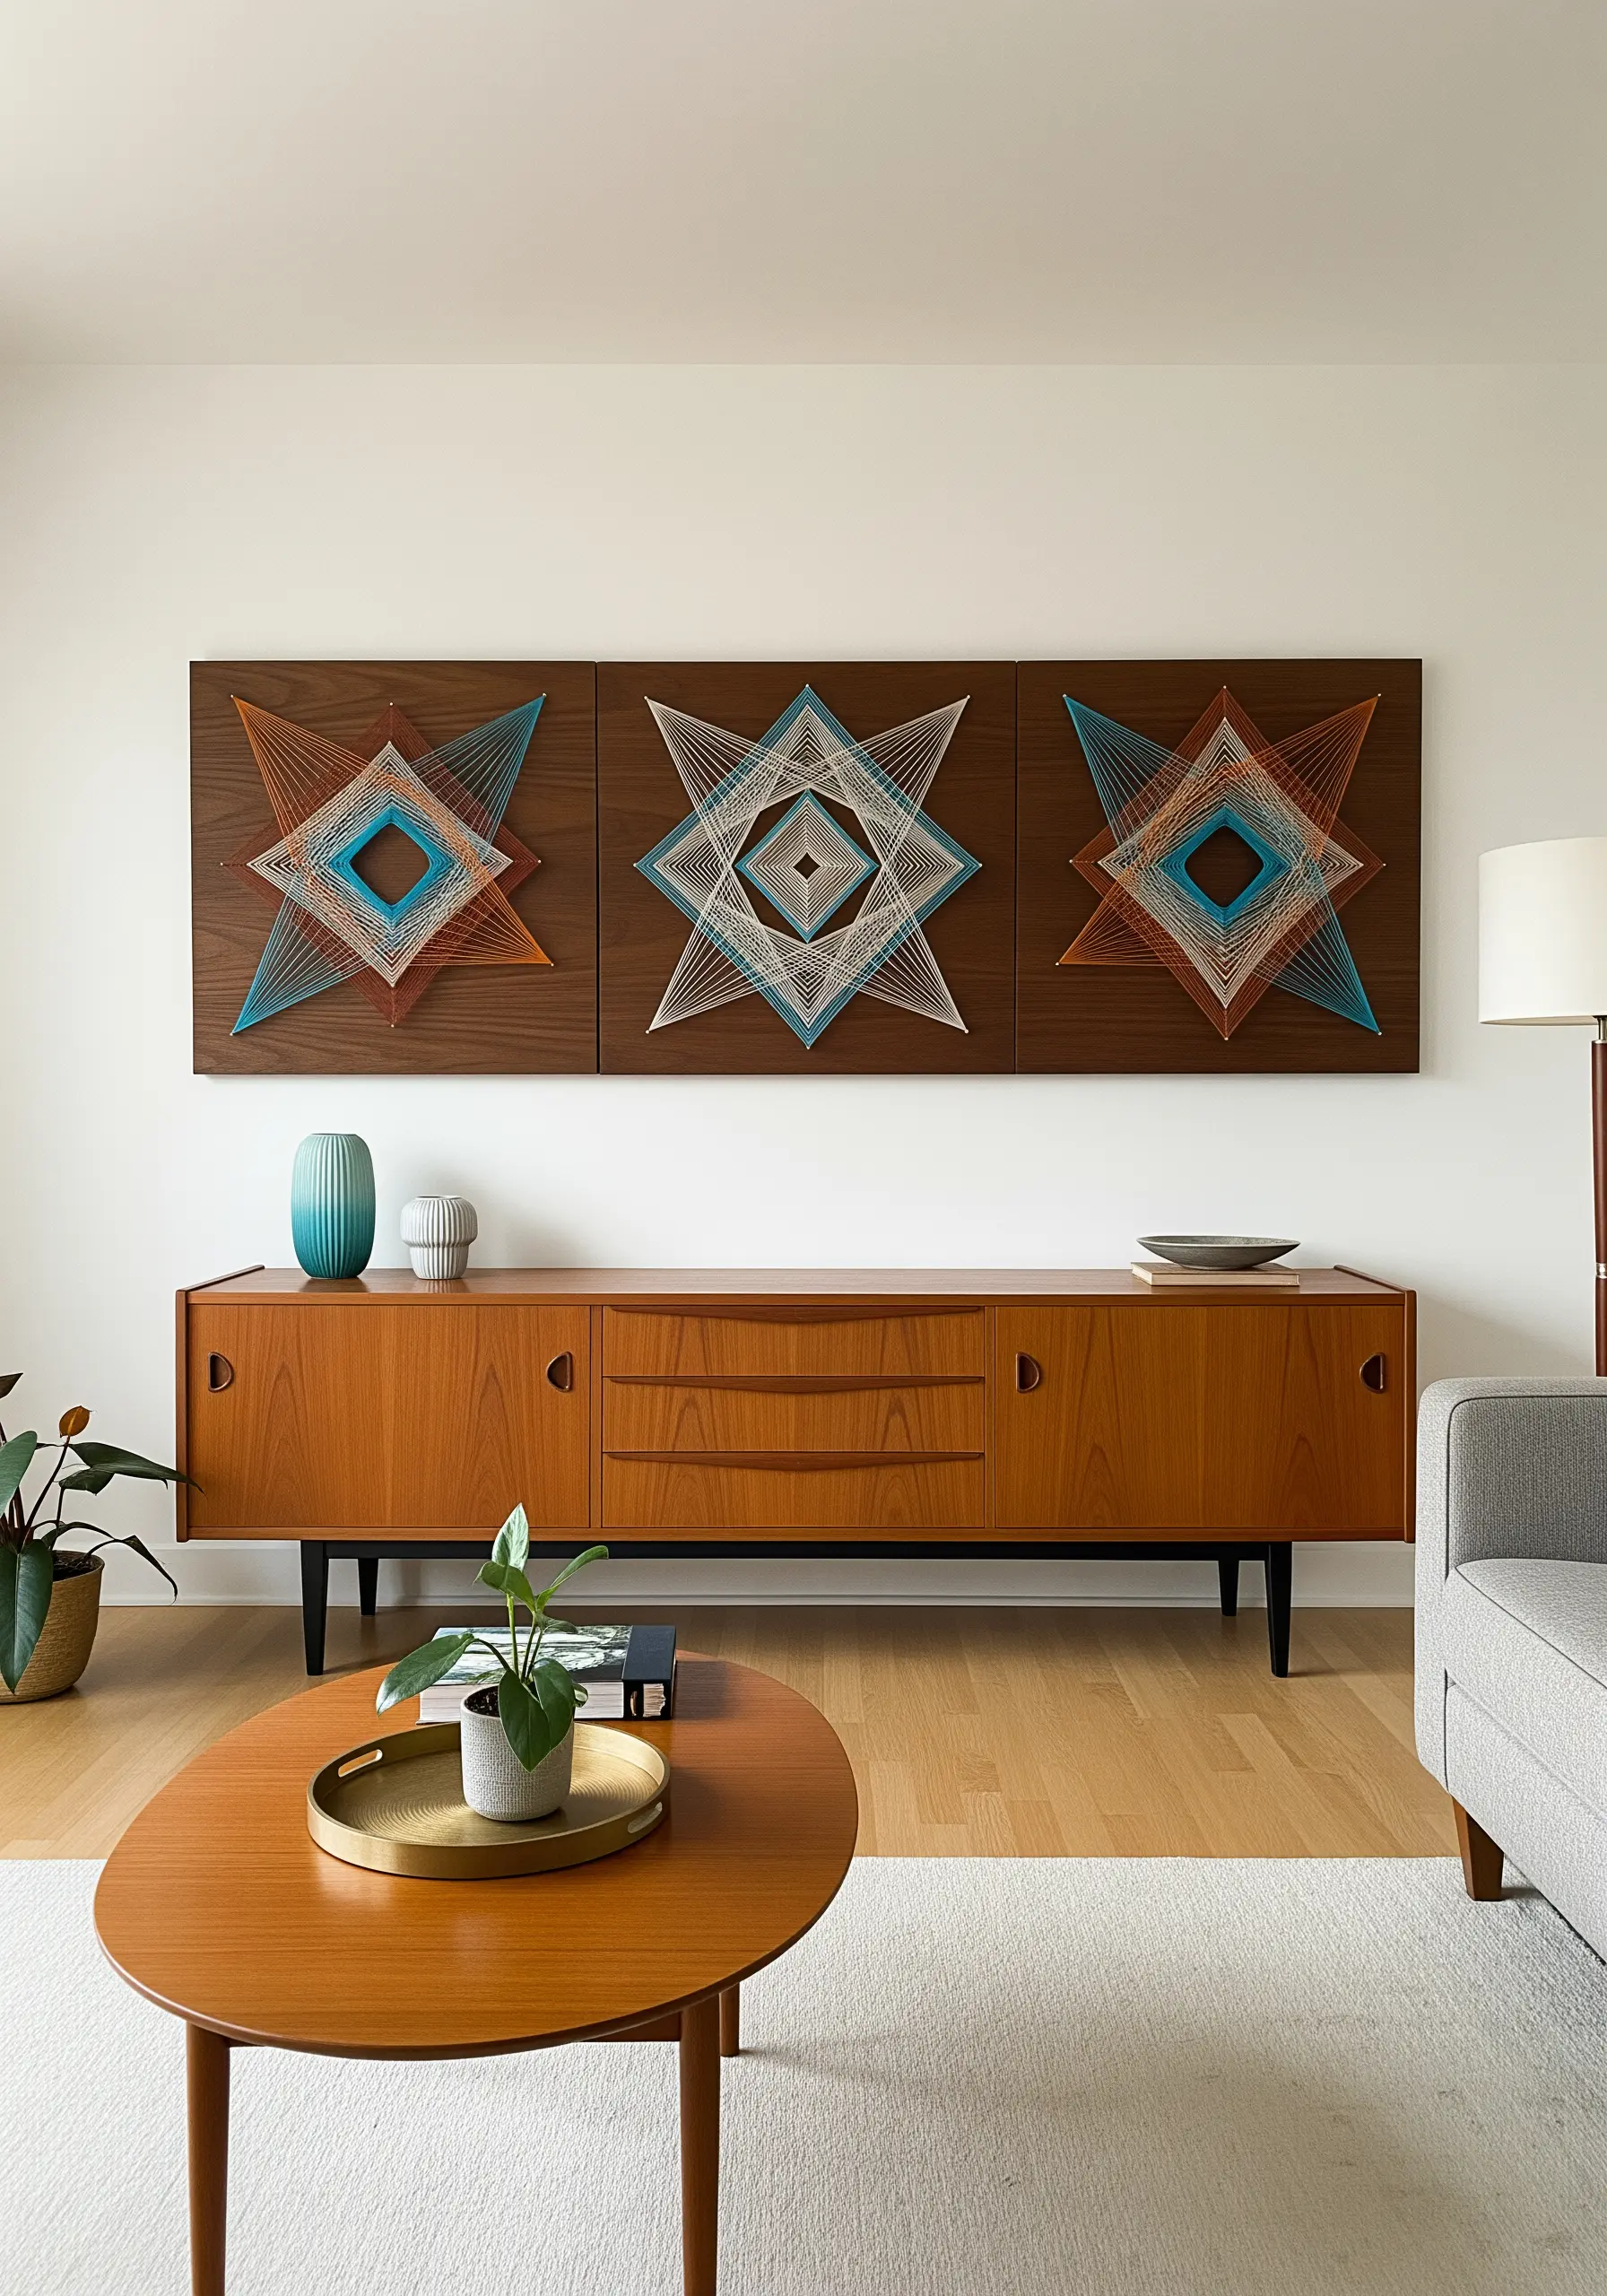
Elevate your string art from a single piece to a sophisticated collection by creating a triptych.
Design three panels that share a common element, such as the outer square frame and color palette, but vary the interior geometric pattern.
This creates rhythm and interest while ensuring the pieces work together as a unified whole.
Mounting them on stained wood panels that match your furniture, as shown here, integrates the artwork seamlessly into your room’s decor.
Discover more stunning framed embroidery pieces to complete your space.
5. Work from Background to Foreground
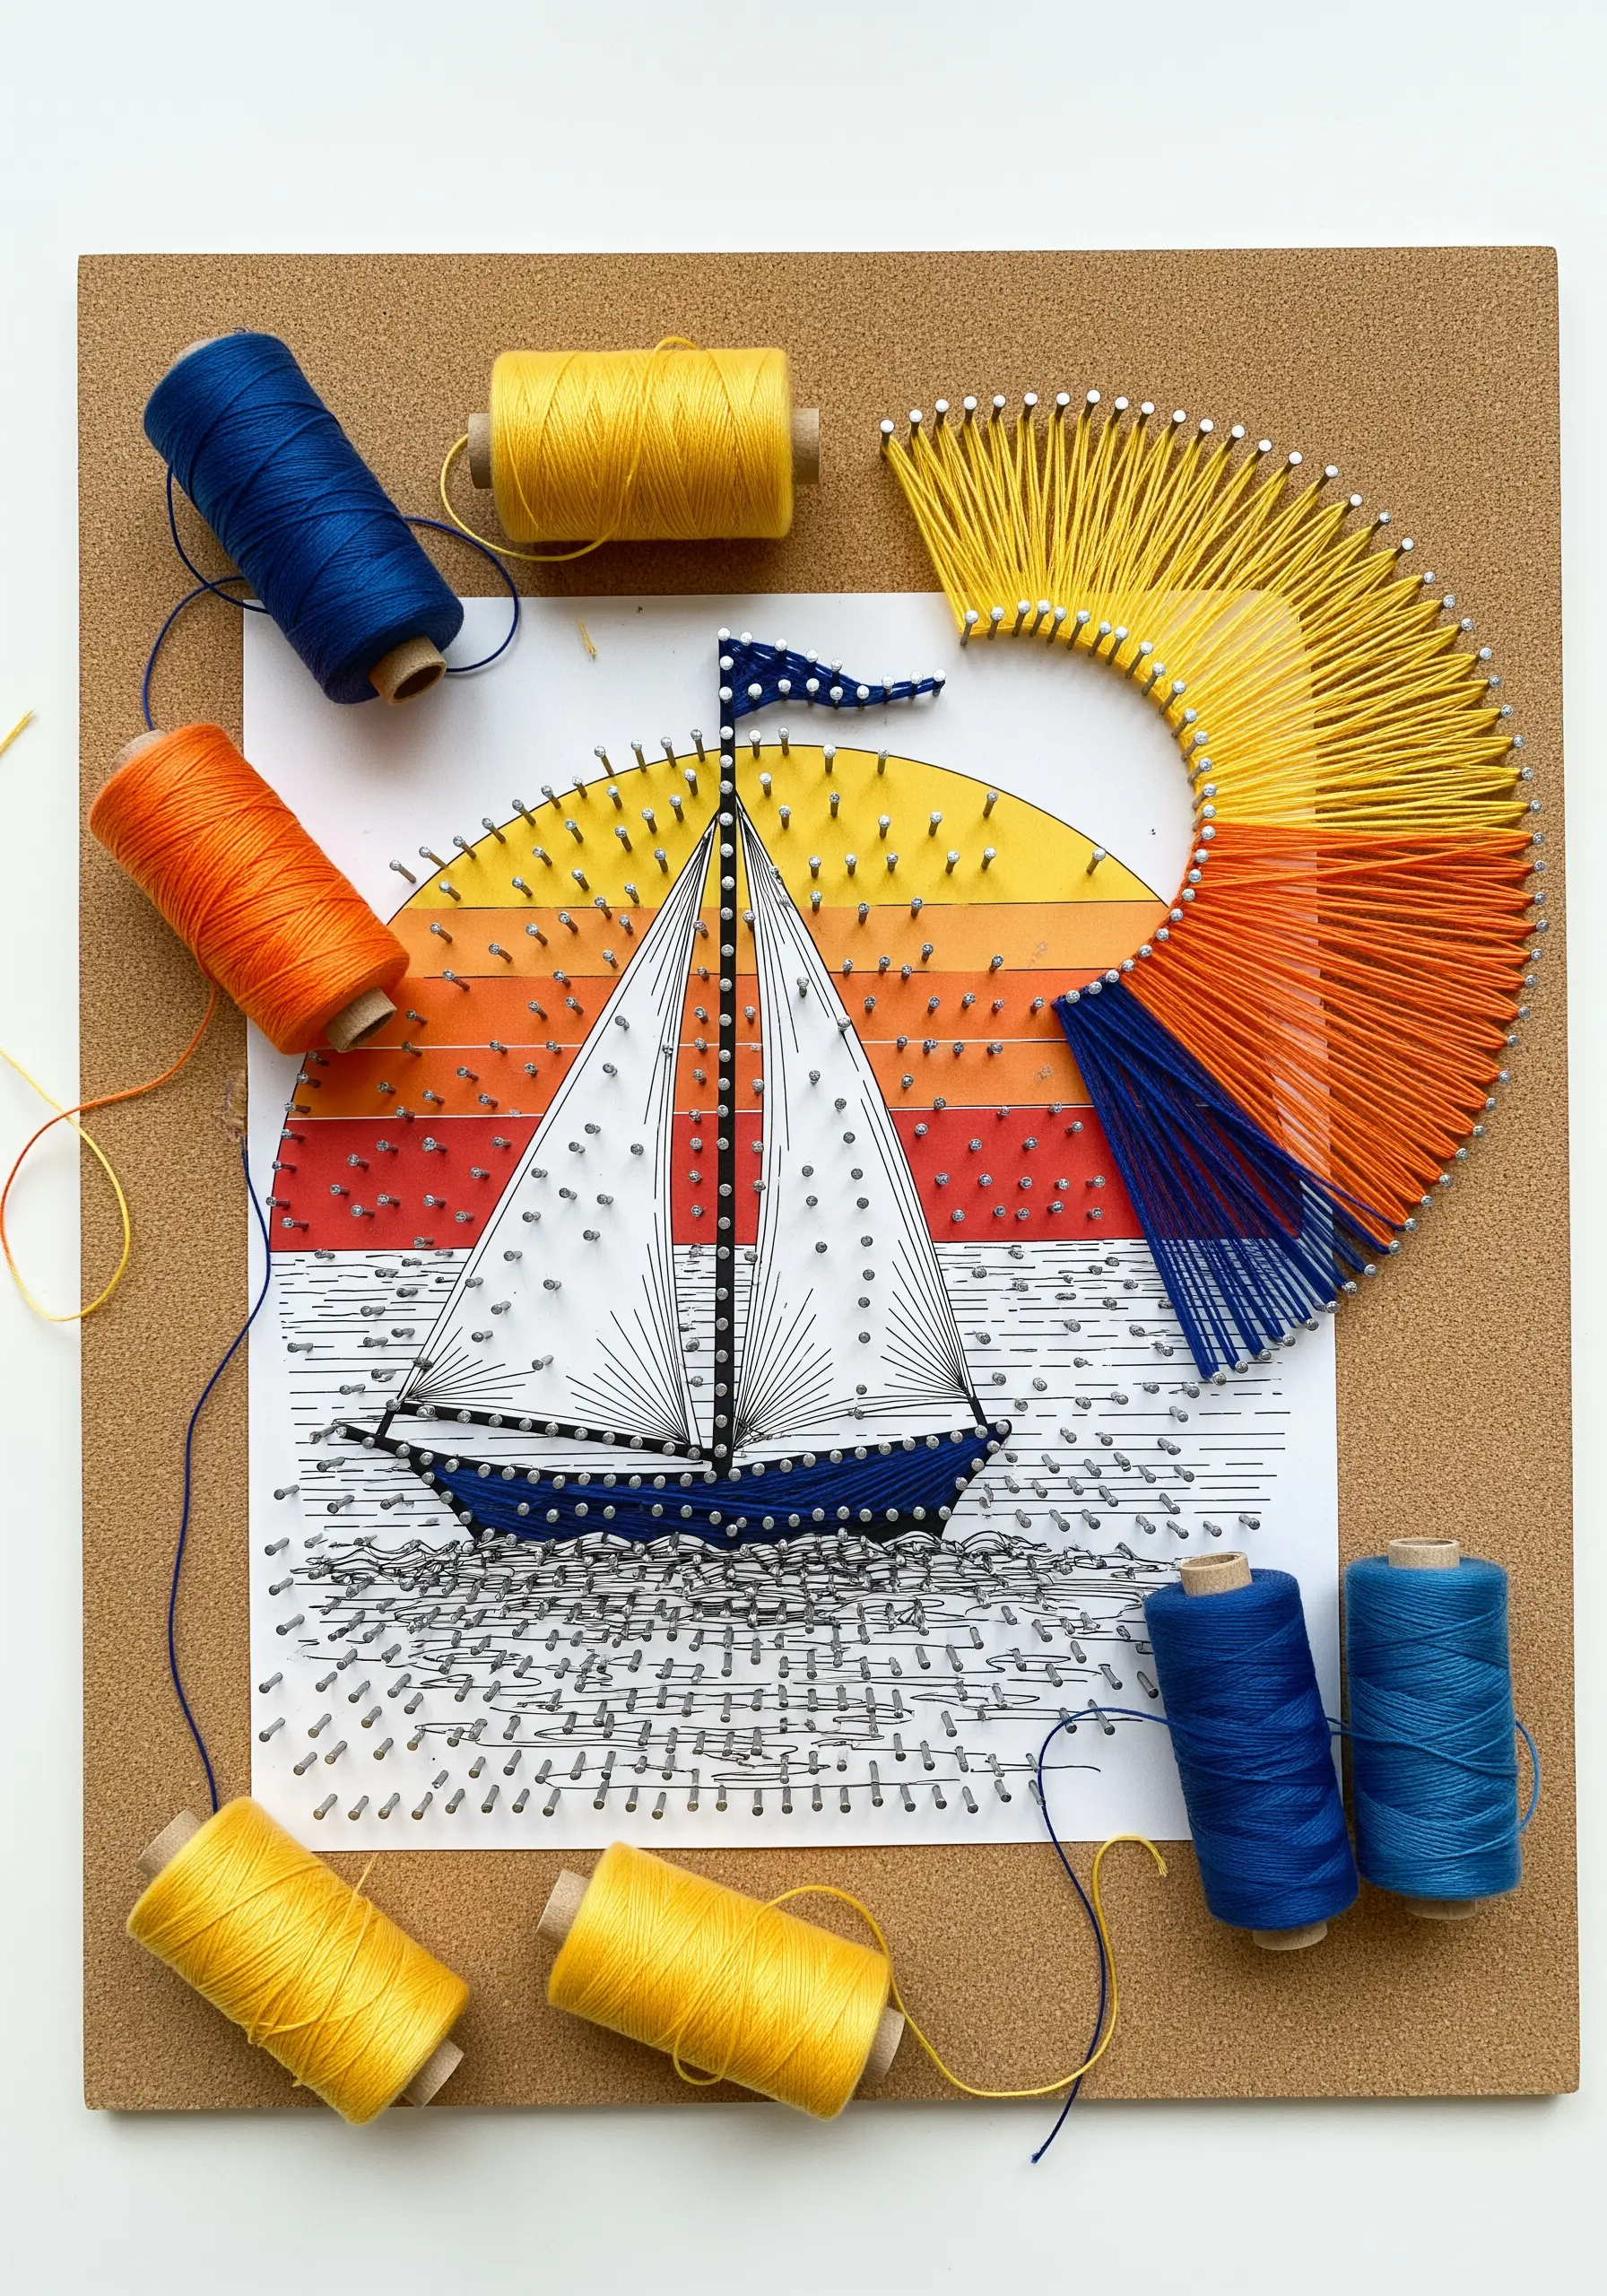
When creating a scene with overlapping elements, always stitch the rearmost layer first to ensure clean, sharp lines.
For a sunset design, map out your entire pattern but begin by stitching the radiating sun and its reflection in the water.
Once the background is complete, you can stitch the sailboat on top.
This approach prevents background threads from showing through your main subject and makes the final composition look intentional and professionally planned.
6. Layer Geometric Shapes for Optical Depth
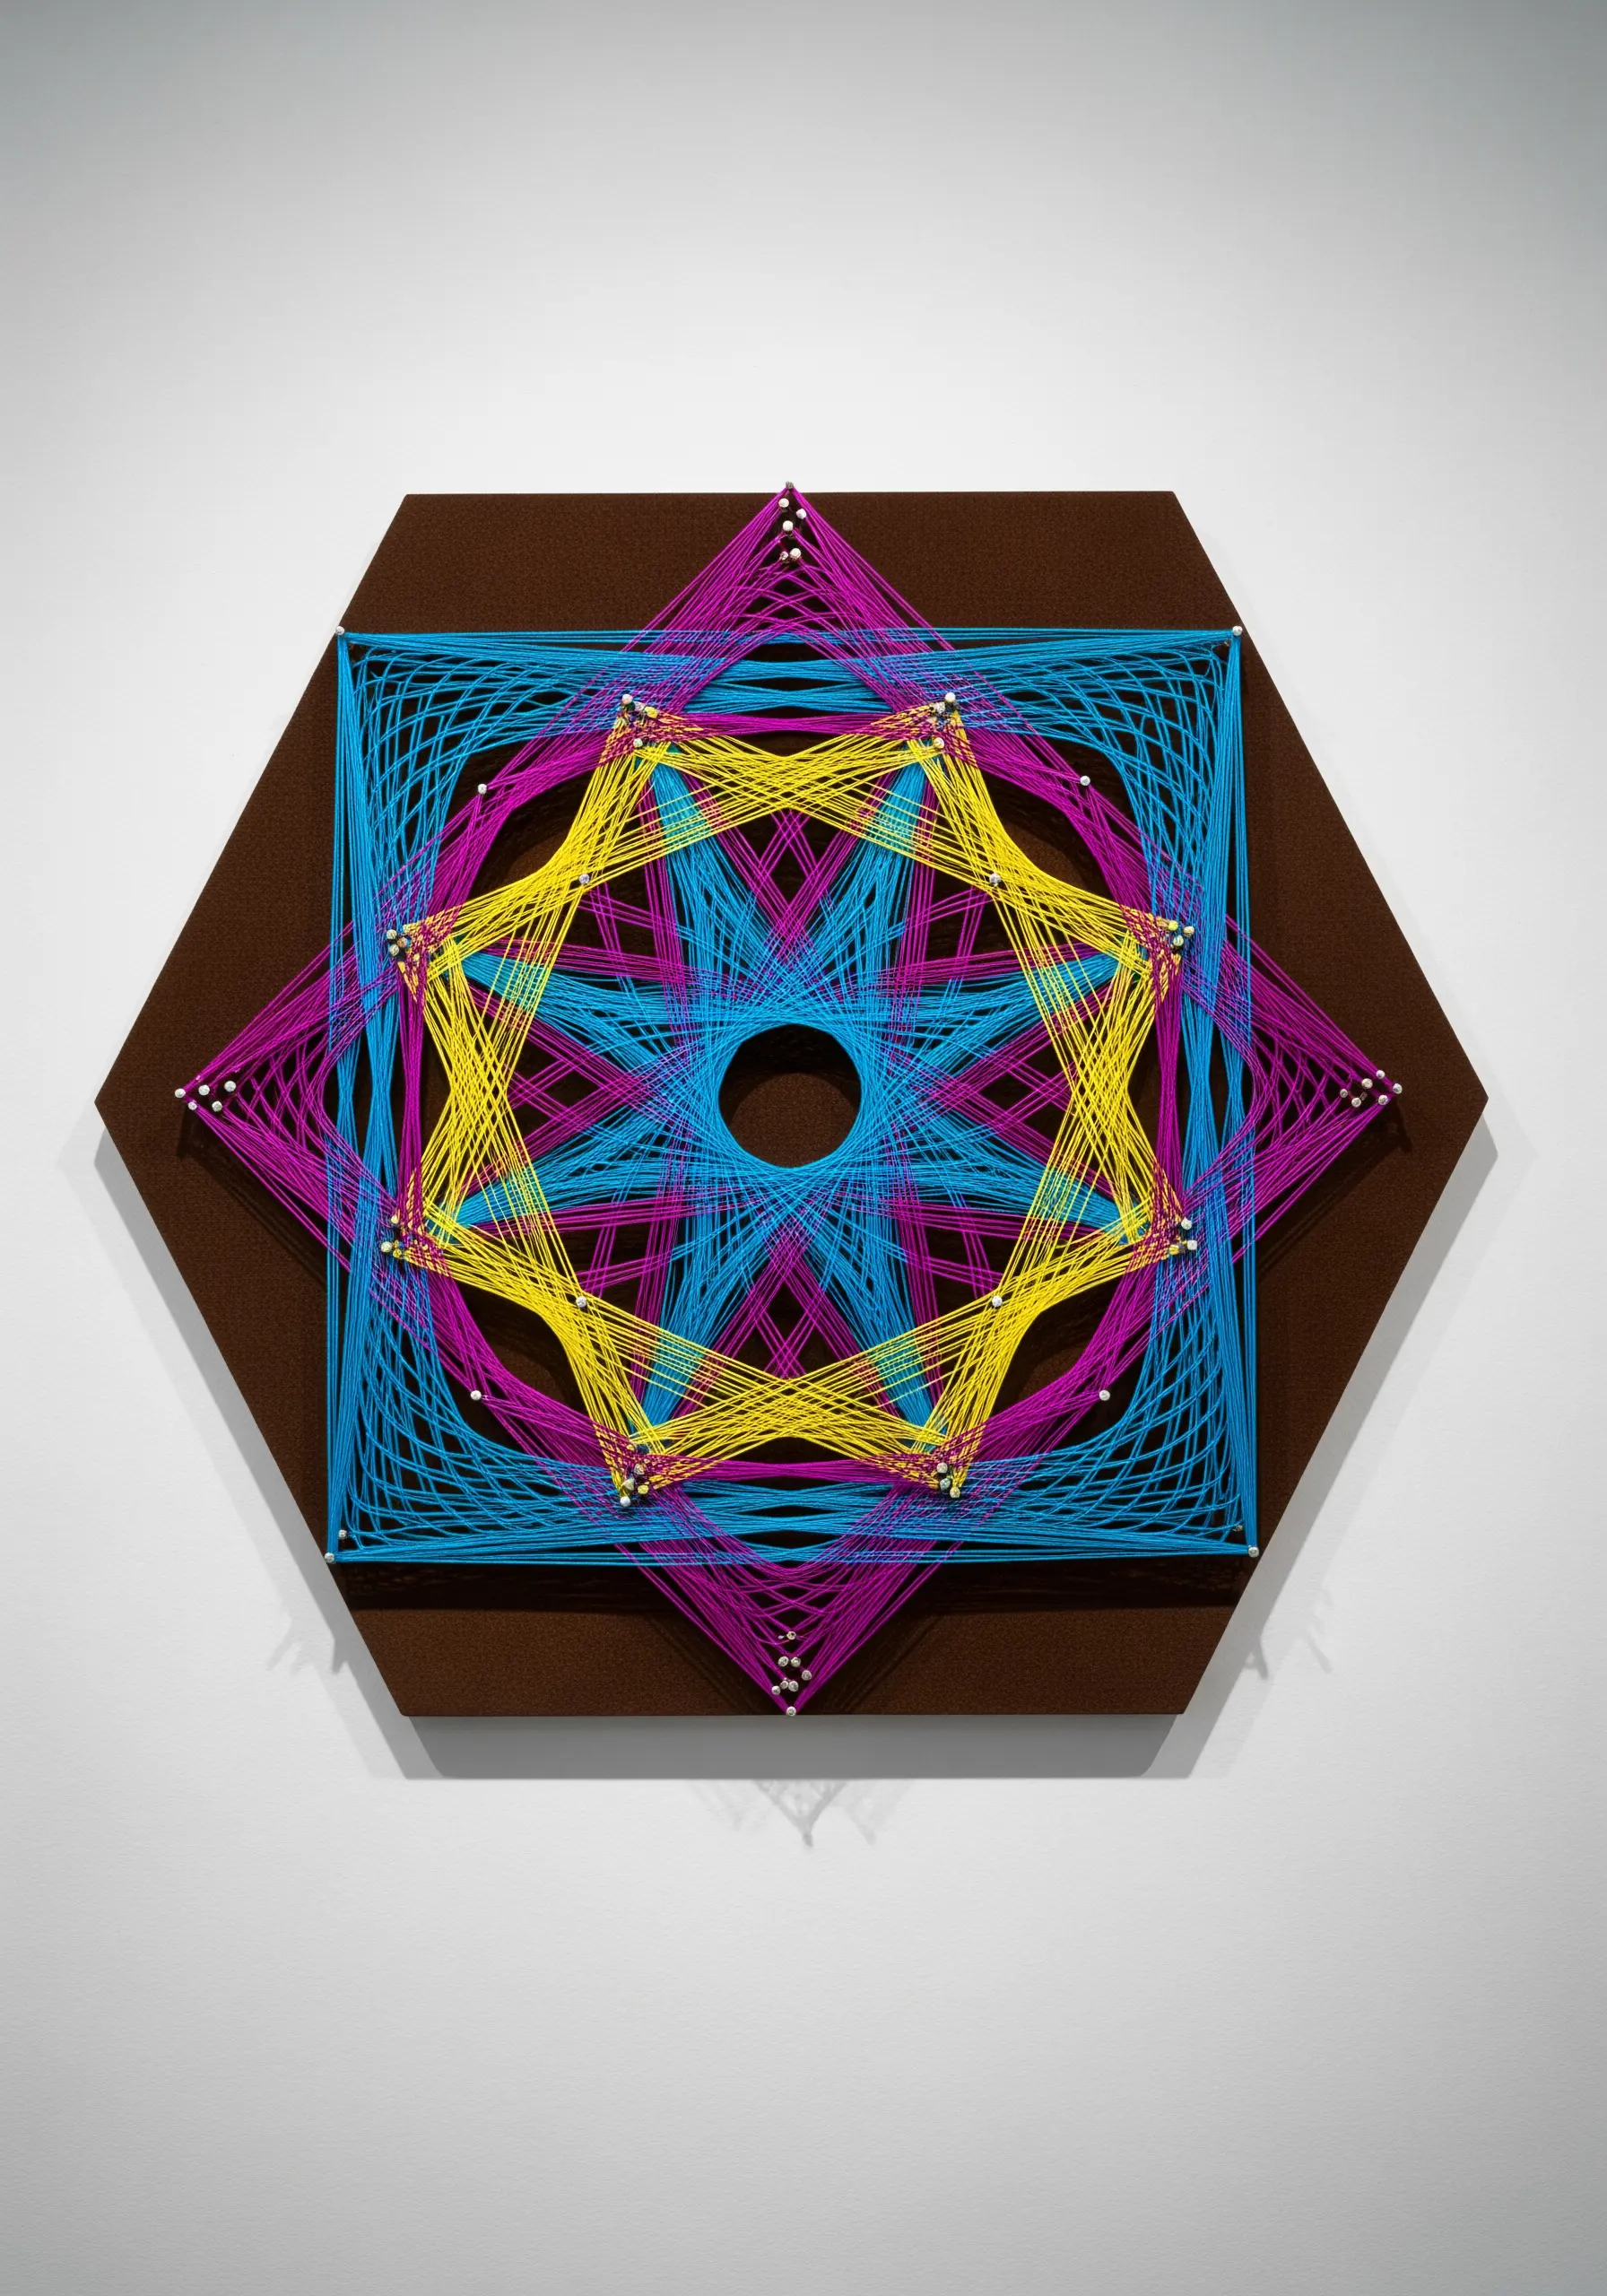
Create the illusion of three-dimensional space by layering simple geometric shapes in contrasting colors.
Start by creating the largest shape, such as the outer cyan square.
Next, stitch the overlapping magenta star, followed by the vibrant yellow star on top.
The way the lines intersect creates new, smaller shapes and a sense of depth that feels complex but is achieved with basic forms.
Explore more yarn wall art projects inspired by geometric patterns for striking decor.
7. Create Abstract Motion with Thread
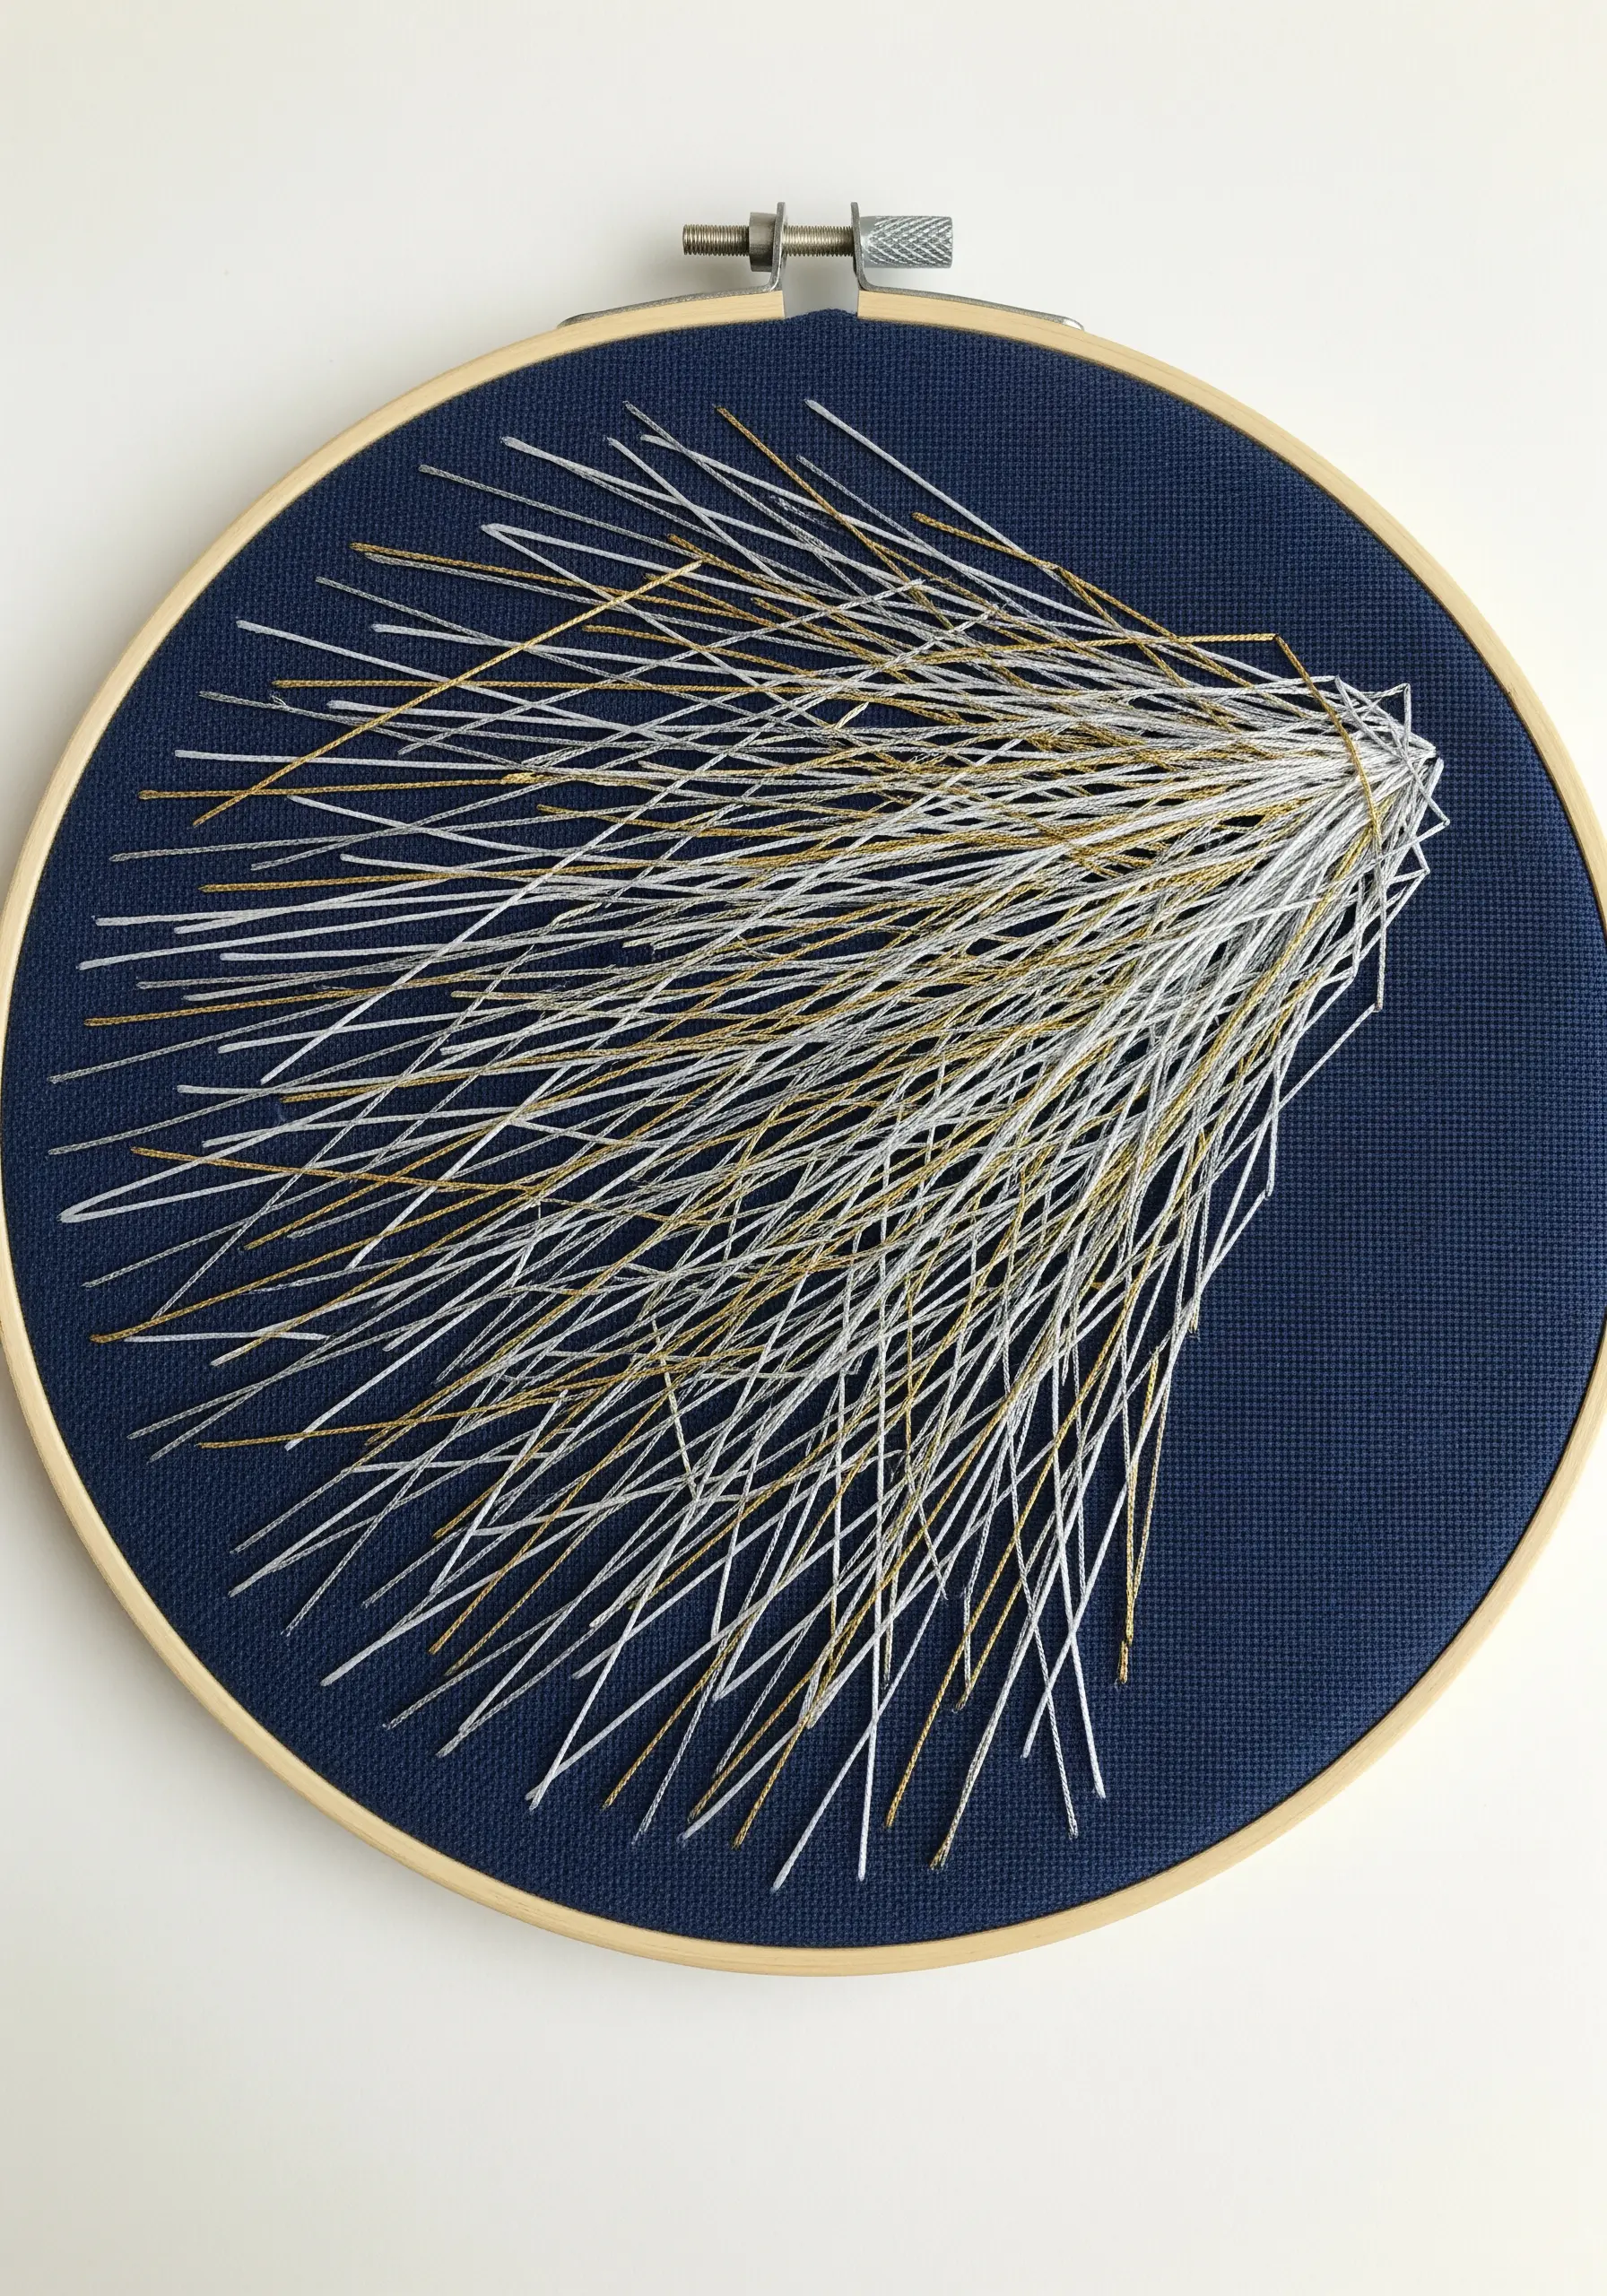
You don’t need a defined shape to create a compelling piece; focus on movement instead.
To achieve this abstract burst, anchor your stitches at a single point on one side of the hoop and radiate them outwards to multiple, scattered points on the other.
Vary the length and angle of each stitch to build a dynamic, energetic composition.
Interspersing metallic gold thread among the matte white floss adds a subtle shimmer that catches the light and enhances the sense of motion.
8. Define Your Subject with Negative Space
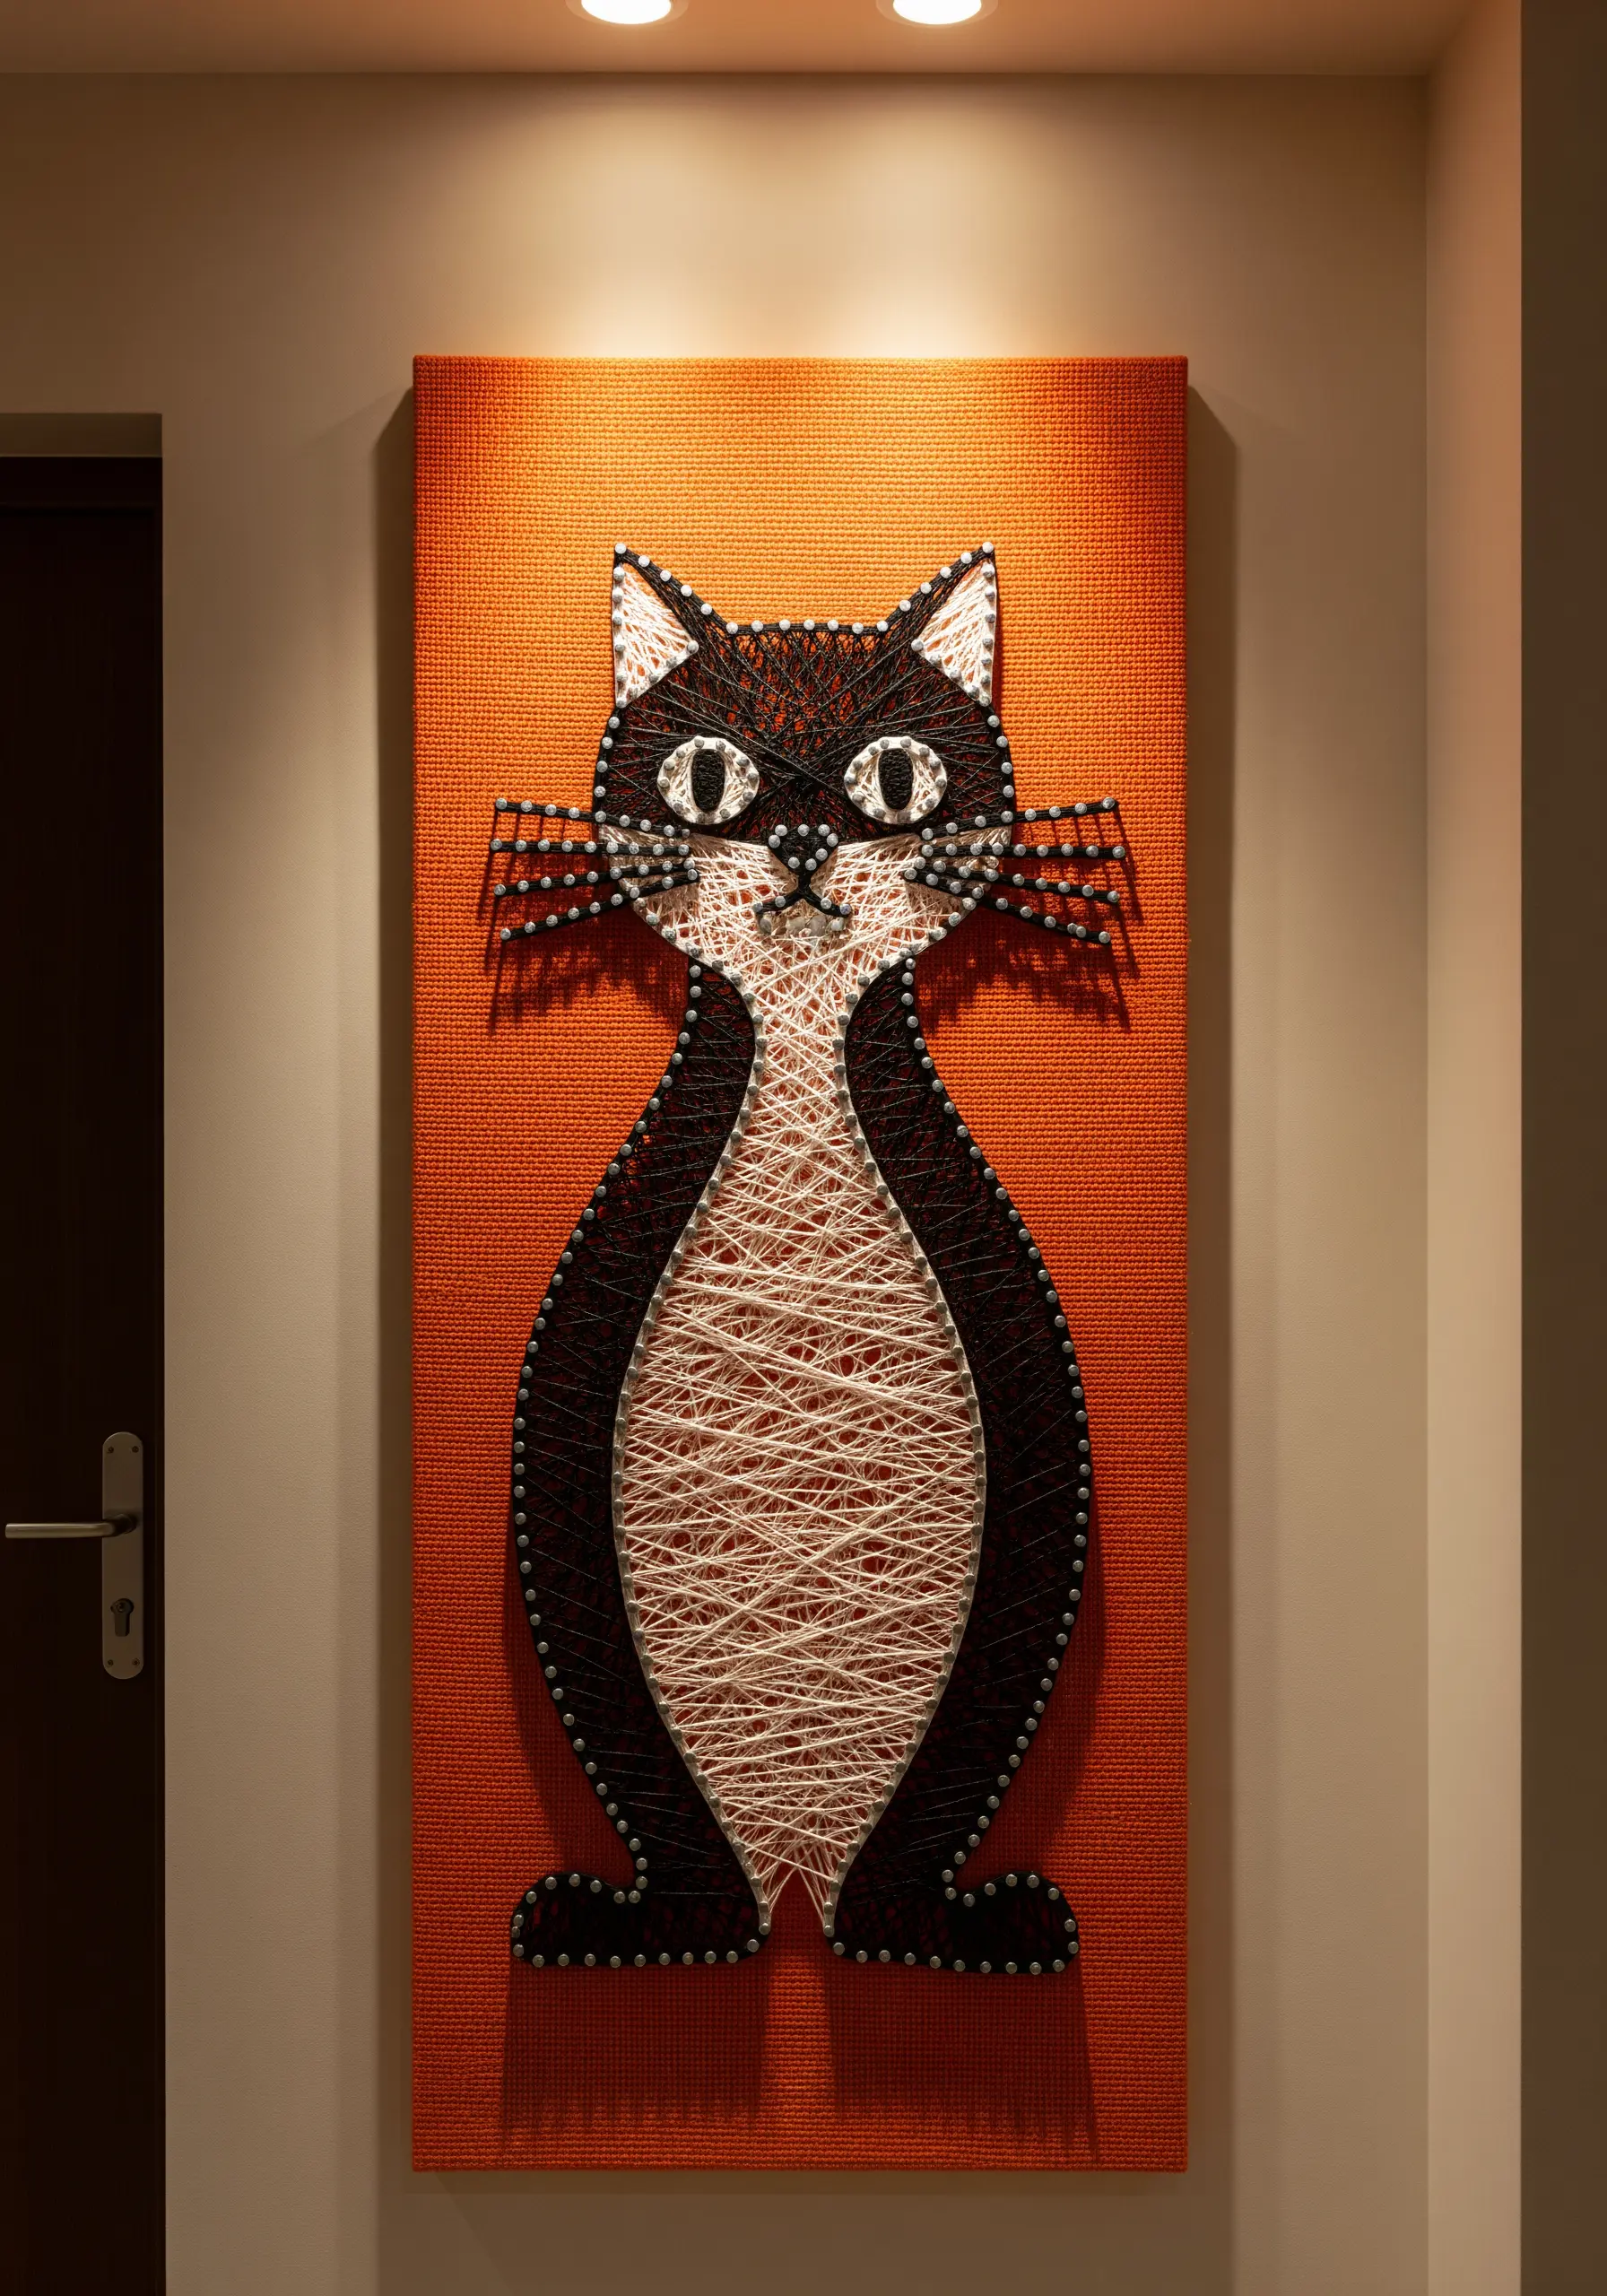
In string art, the space you *don’t* fill is just as important as the space you do.
For this charming cat, the character is defined by the bold black outline and the negative space of the orange background fabric.
Only the belly is filled with white thread, drawing the eye and creating a clear focal point.
This technique allows you to create graphic, high-contrast images that feel both playful and sophisticated.
9. Stitch a Landscape with Color-Blocked Layers
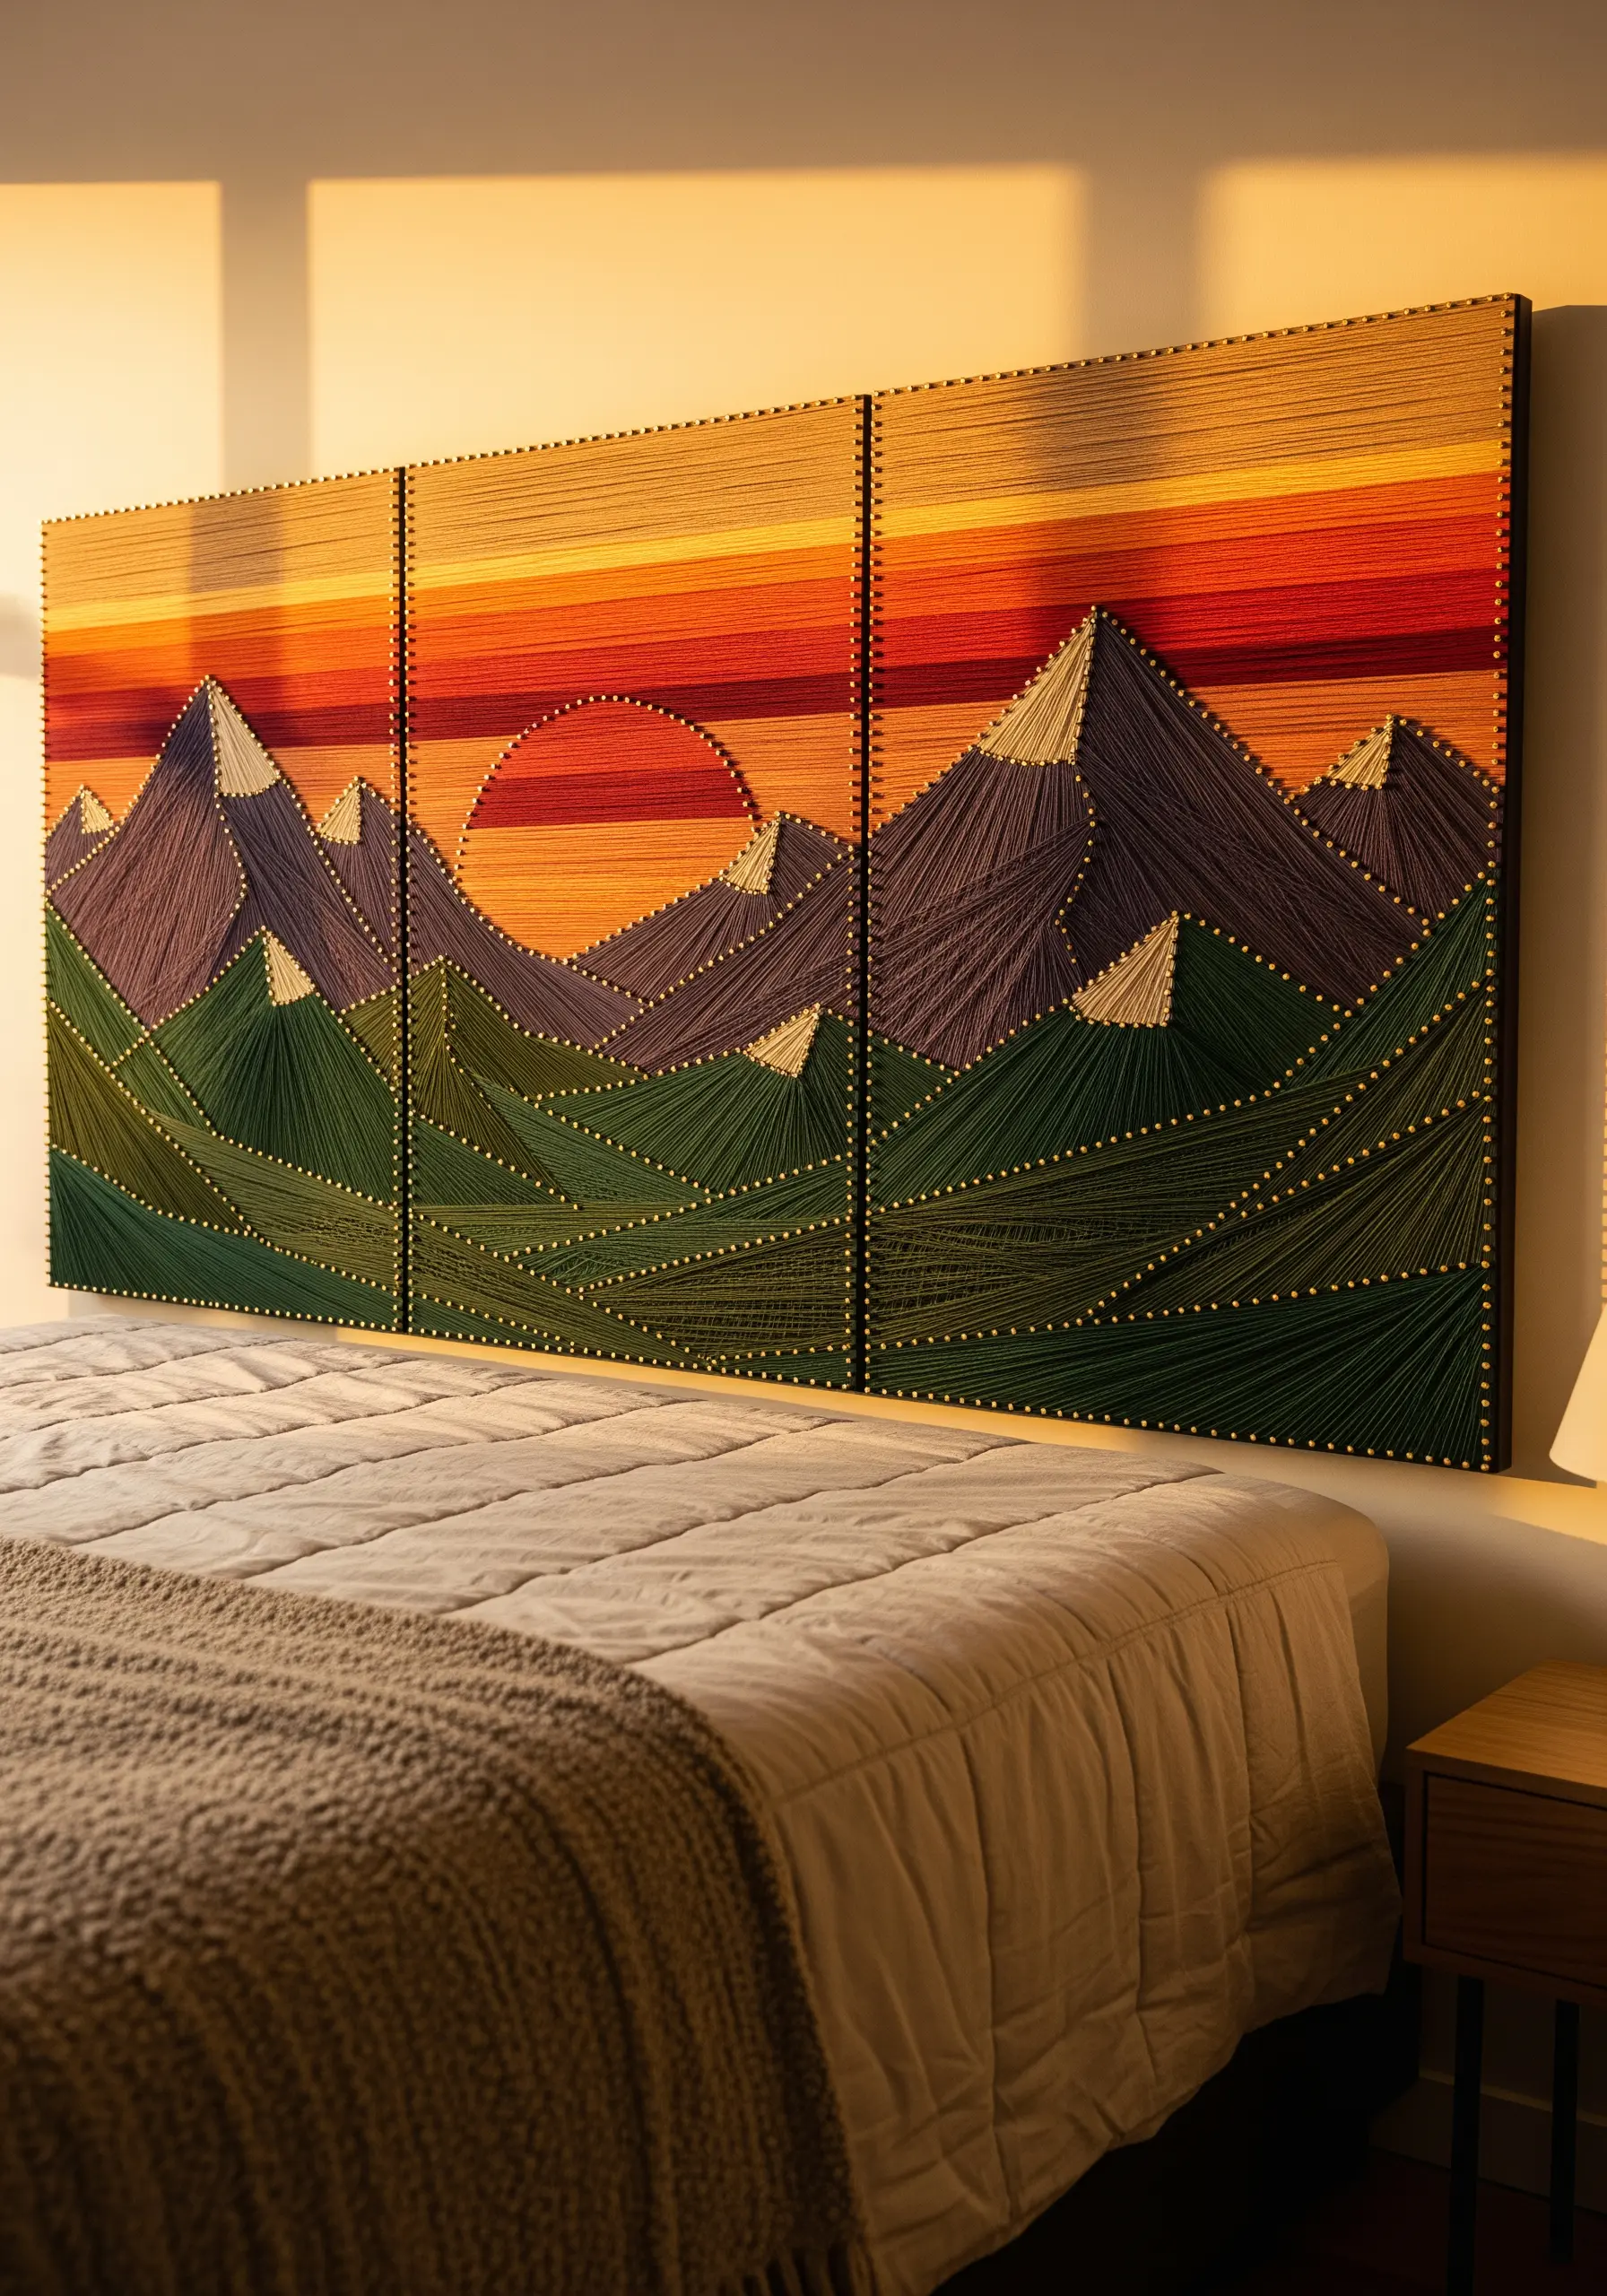
Translate a landscape into a geometric masterpiece by simplifying it into color-blocked sections.
Divide your scene into distinct areas: the sky, the distant mountains, and the foreground hills.
Fill each section with long straight stitches, using a different color for each to define its shape and distance.
A gradient of warm tones for the sunset sky adds a classic retro feel, while the angular lines of the mountains provide a strong graphic structure.
These types of framed embroidery ideas that pair perfectly with rustic interiors add a handmade touch to any room.
10. Complement Thread with a Tactile Fabric
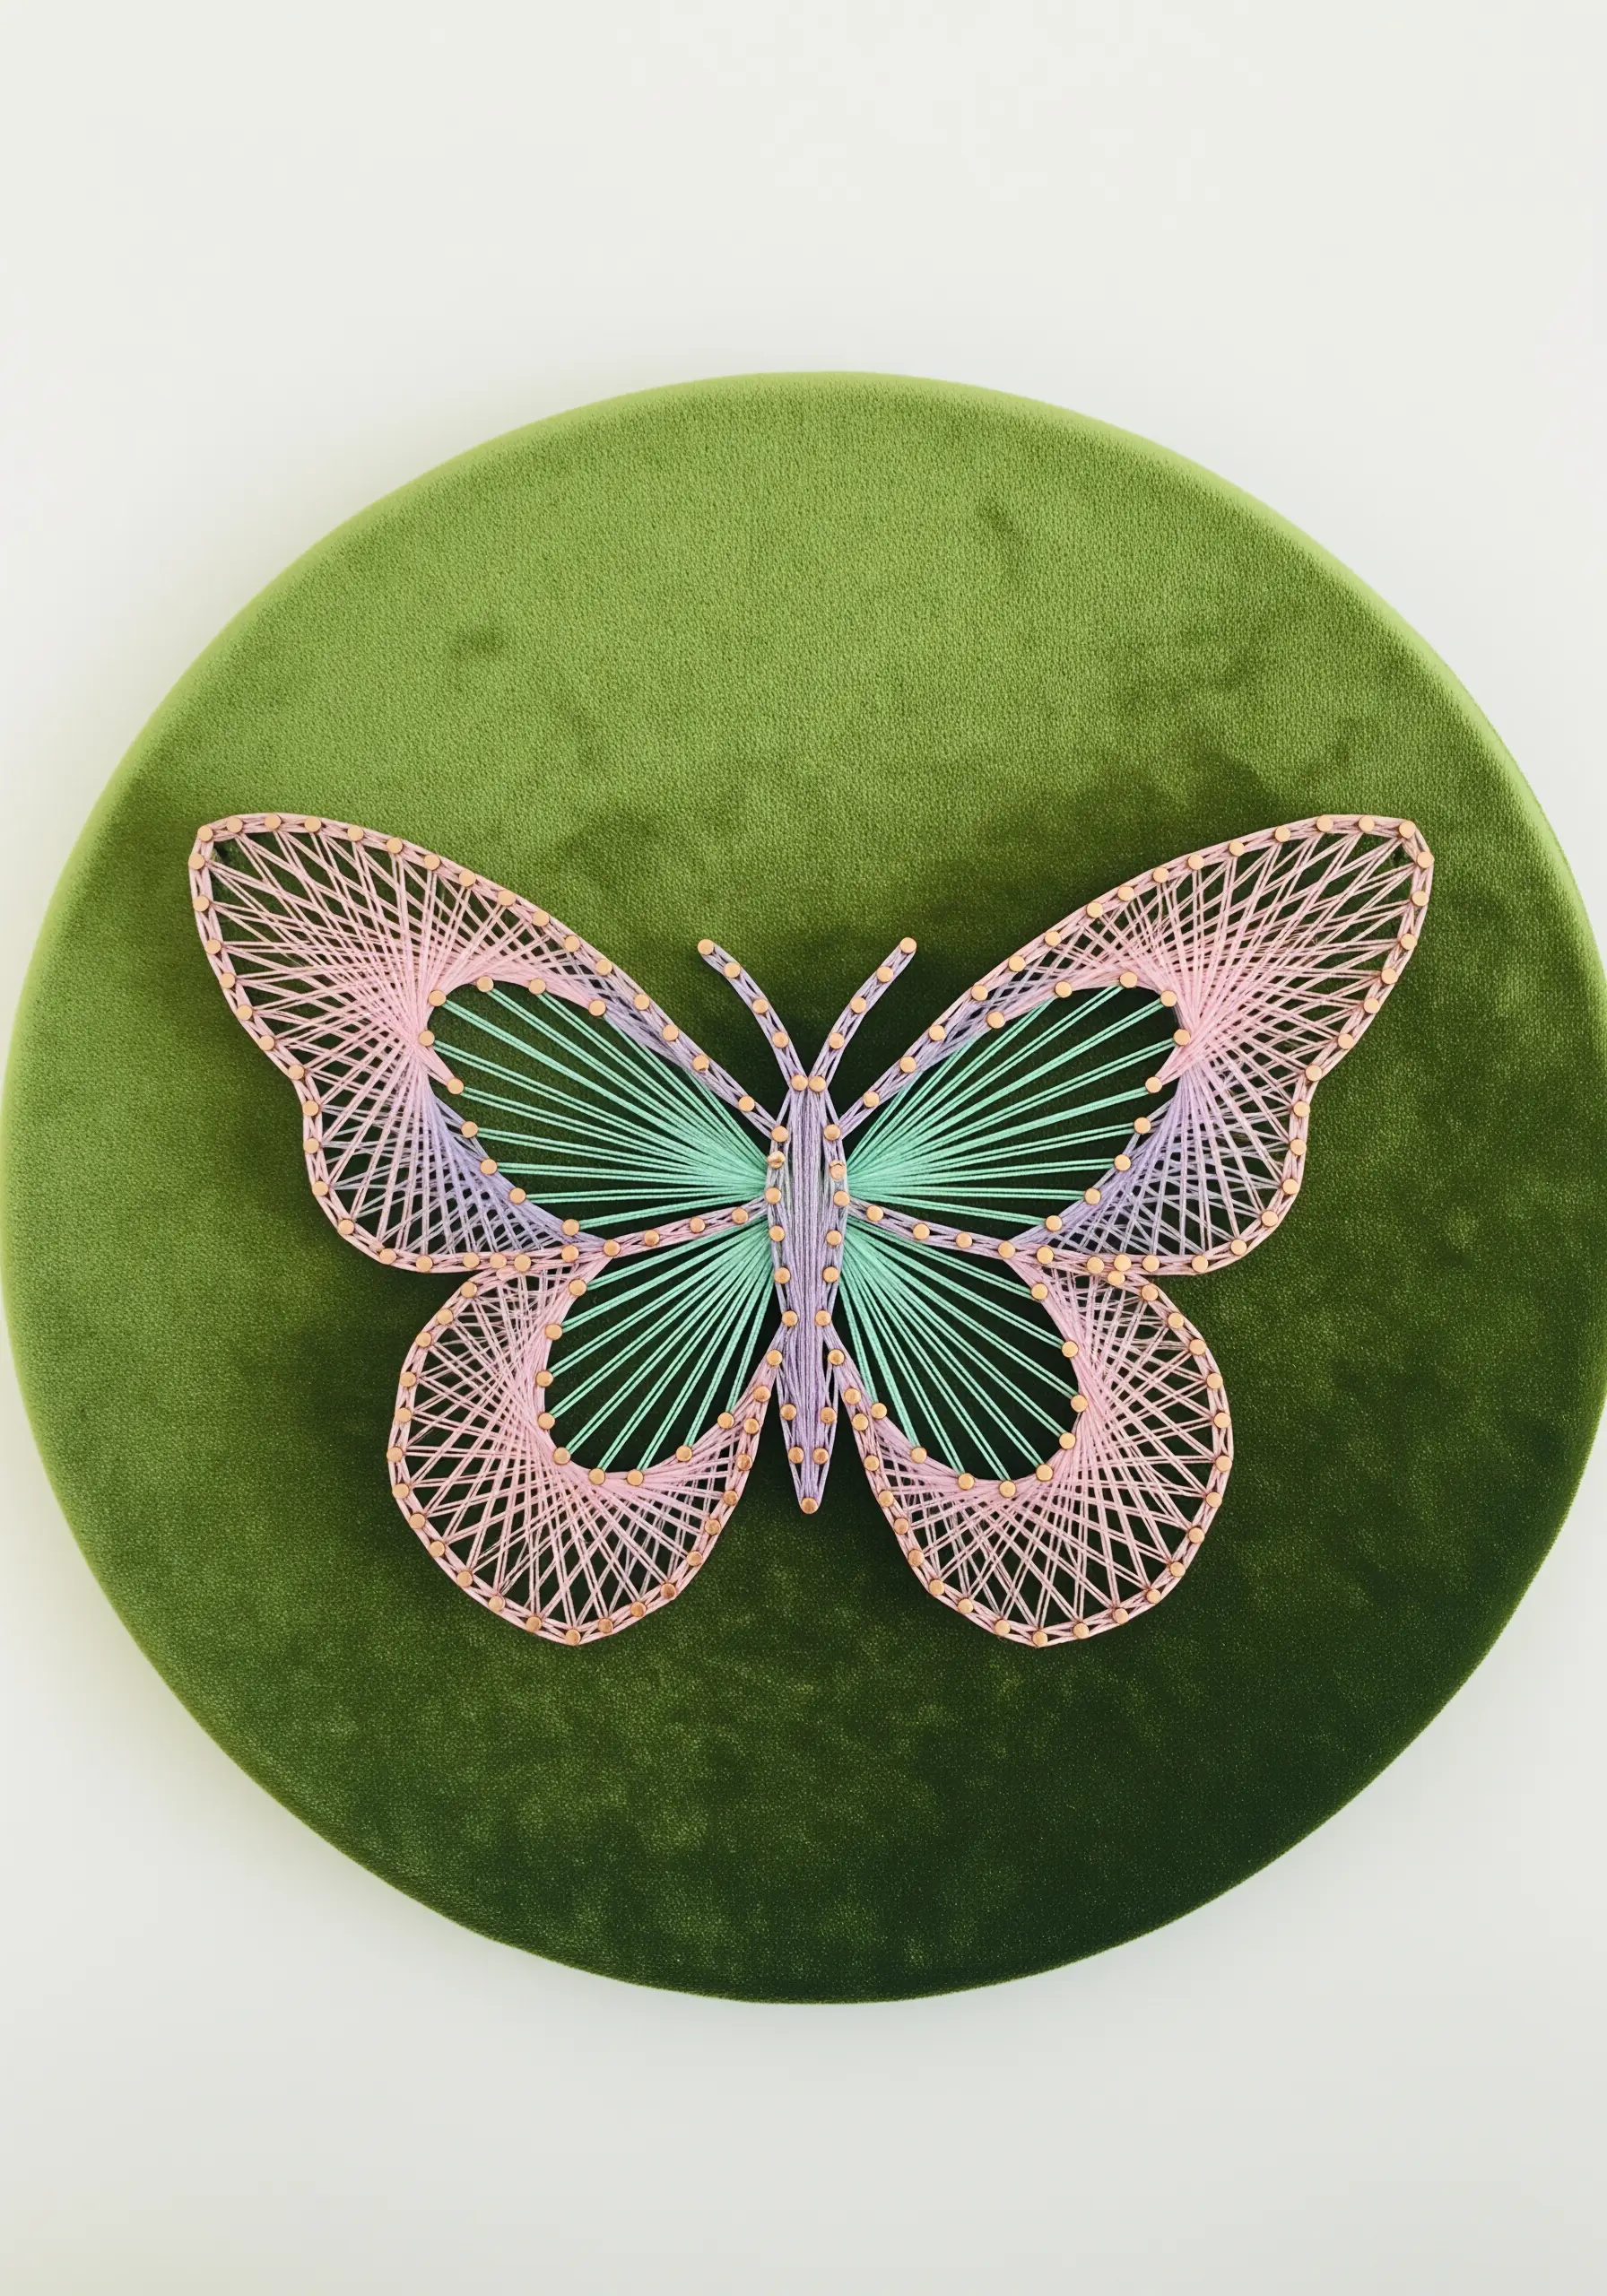
The surface you stitch on fundamentally changes the character of your finished work.
Instead of standard cotton or linen, try using a fabric with a distinct texture, like this plush olive green velvet.
The soft, light-absorbing quality of the velvet creates a dramatic contrast with the smooth, slightly glossy embroidery floss.
This pairing makes the delicate pink and mint threads of the butterfly appear to float above the surface, elevating the entire piece.
11. Mimic Textures with Varied Stitching Patterns

Use different stitching techniques within a single object to represent varied surface textures.
For the planet, alternate dense, overlapping layers of gold and white thread to create a swirling, gaseous effect.
For the rings, use clean, parallel lines of silver and white thread to suggest a faster, smoother motion.
This thoughtful variation in pattern adds a layer of realism and sophistication, making the piece more engaging to look at.
12. Form Curved Petals with Straight Stitches
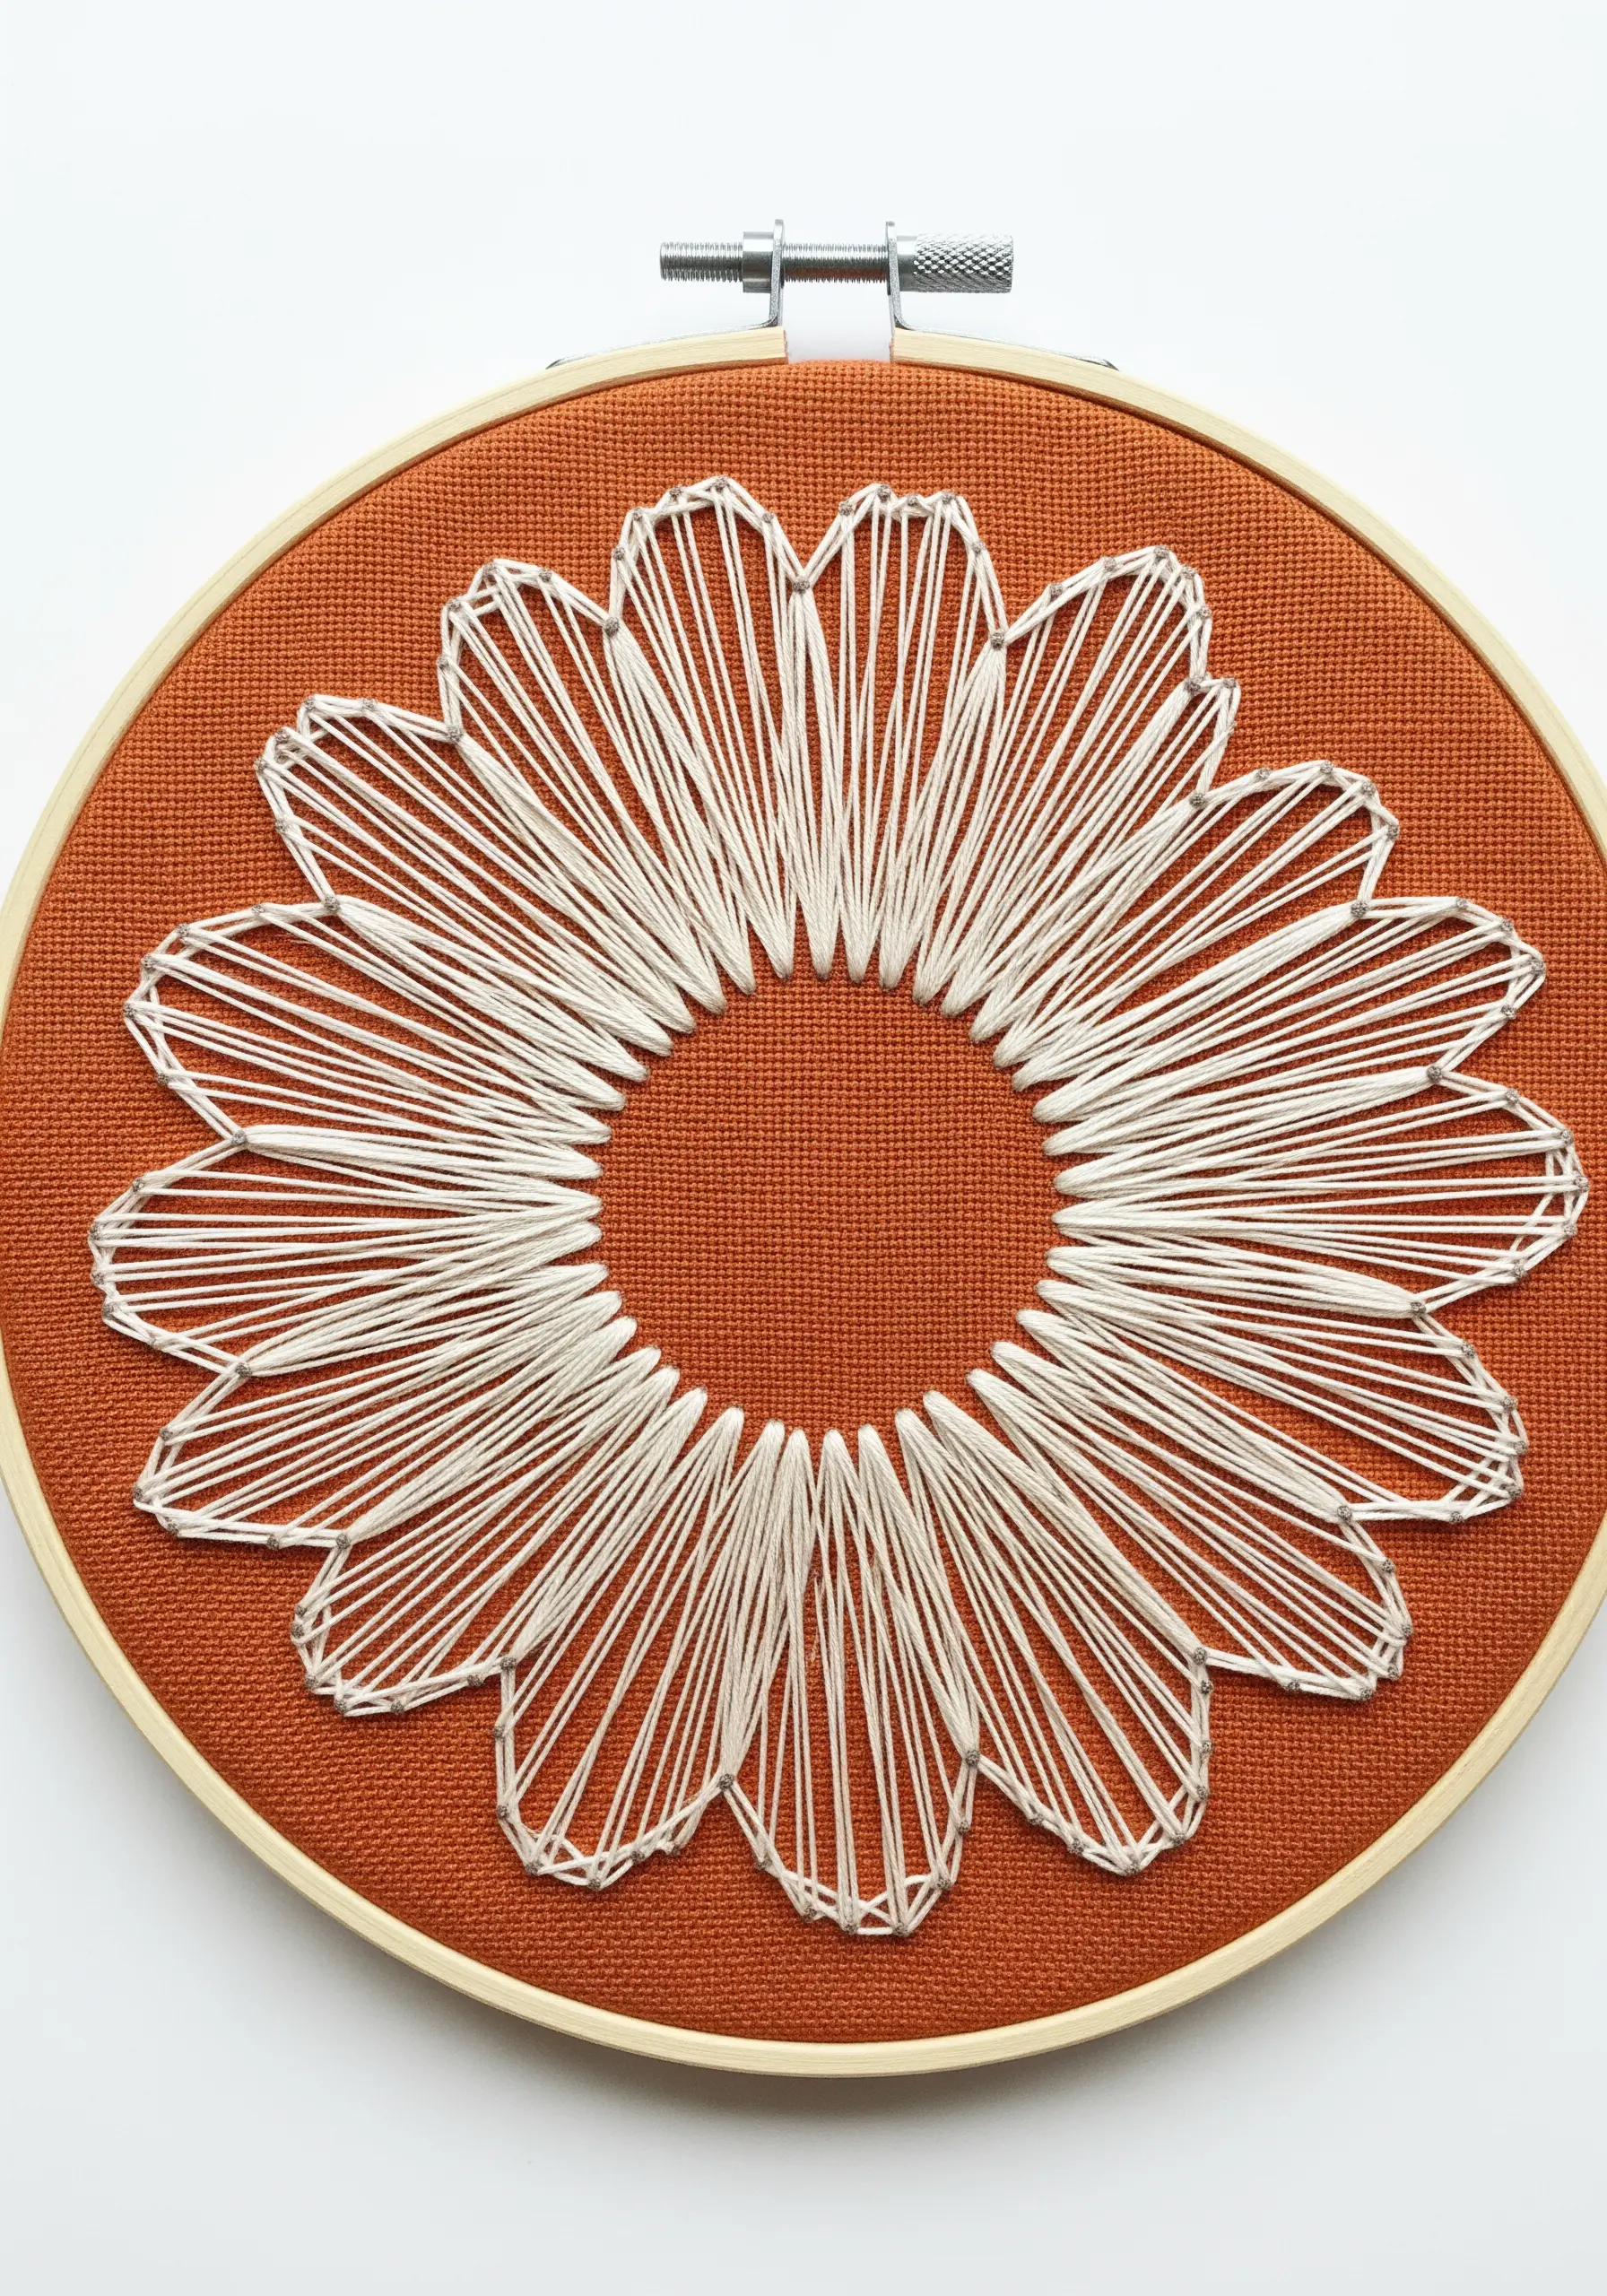
The magic of string art is creating the illusion of curves using only straight lines.
To form these daisy petals, place your anchor points in two concentric circles—one small inner circle and one larger, scalloped outer circle.
Stretch your thread between corresponding points on the inner and outer rings.
As the threads cross and layer, they form a parabolic curve, resulting in beautifully shaped petals without a single curved stitch.
13. Explore Complexity with a Monochrome Palette

Limit your palette to black and white to focus entirely on pattern, line, and density.
Without color to distract the eye, the intricate details of your intersecting threads become the main event.
Build complexity by layering multiple geometric motifs—like circles, squares, and stars—on top of one another.
The interplay of black and white threads creates mesmerizing optical effects and a sense of depth that is purely structural.
14. Mix Fill Patterns for a Playful Finish
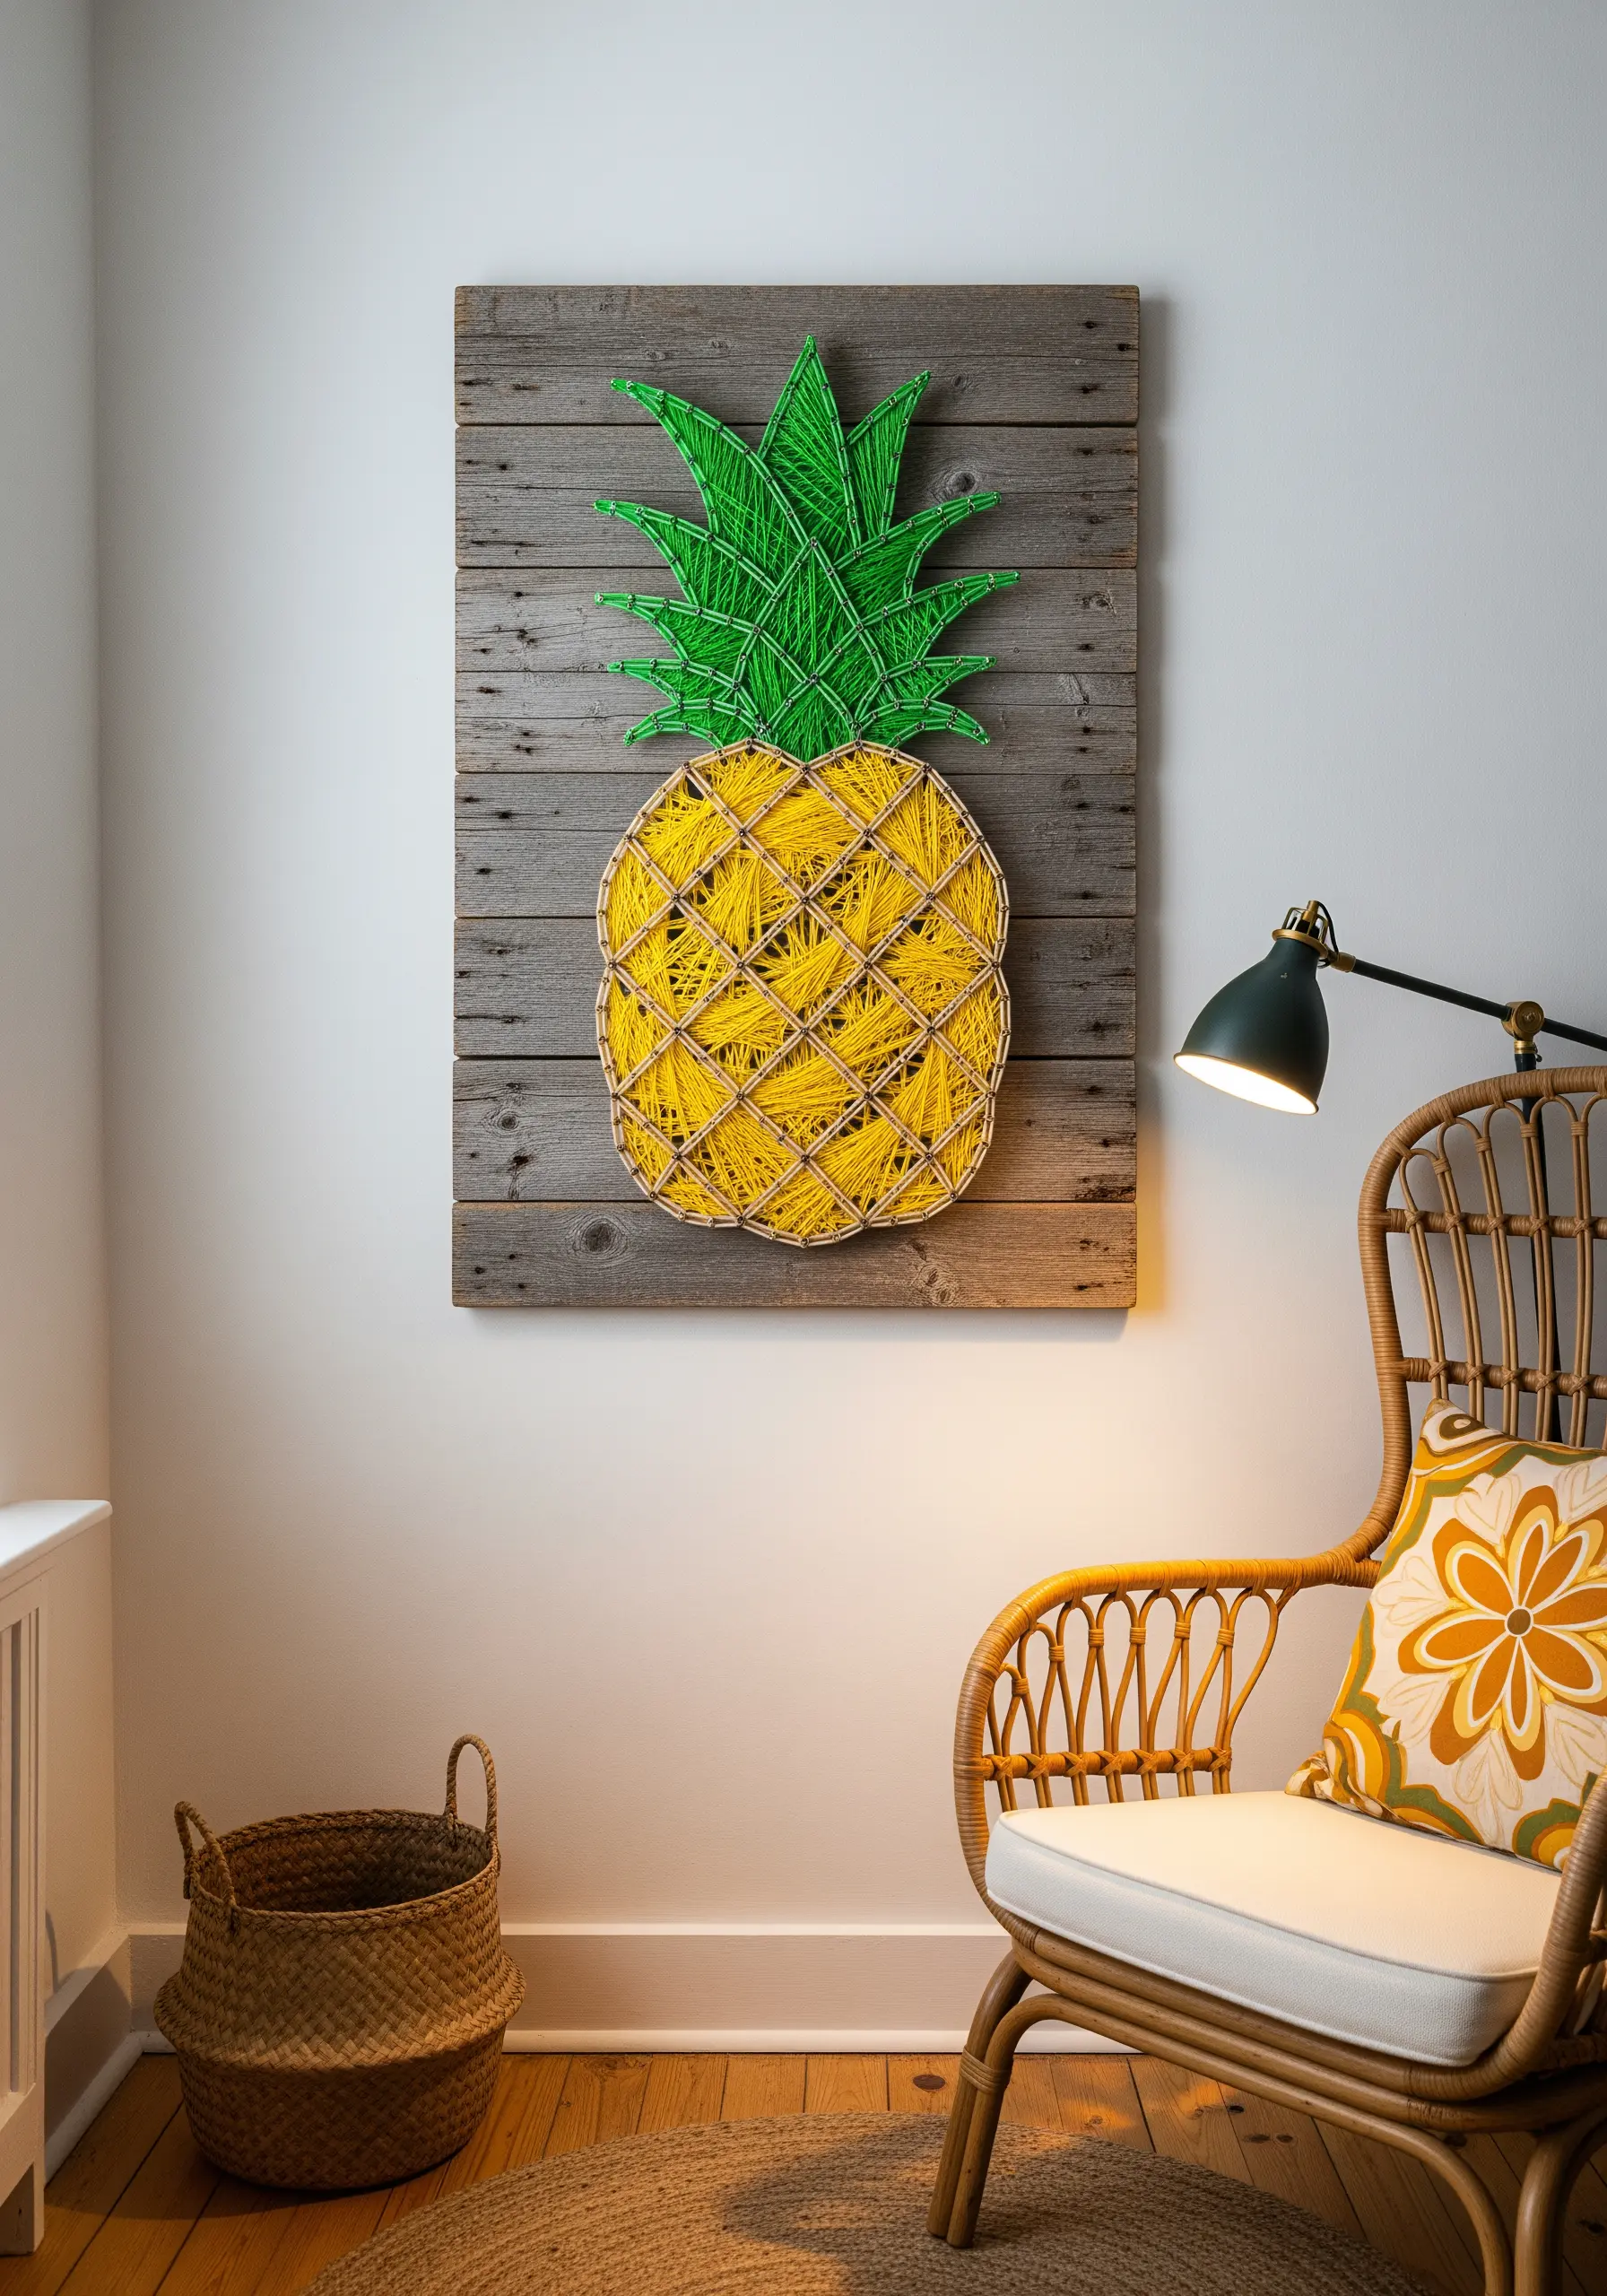
Give your design more personality by using different fill patterns for different sections.
For the pineapple’s body, use a loose, open crosshatch pattern that allows the rustic wood background to show through.
For the leaves, switch to a dense, radiating fan pattern to create a solid block of green.
This contrast not only mimics the actual texture of a pineapple but also makes the final piece more visually dynamic and fun.
15. Introduce Bold Texture with Chenille Yarn
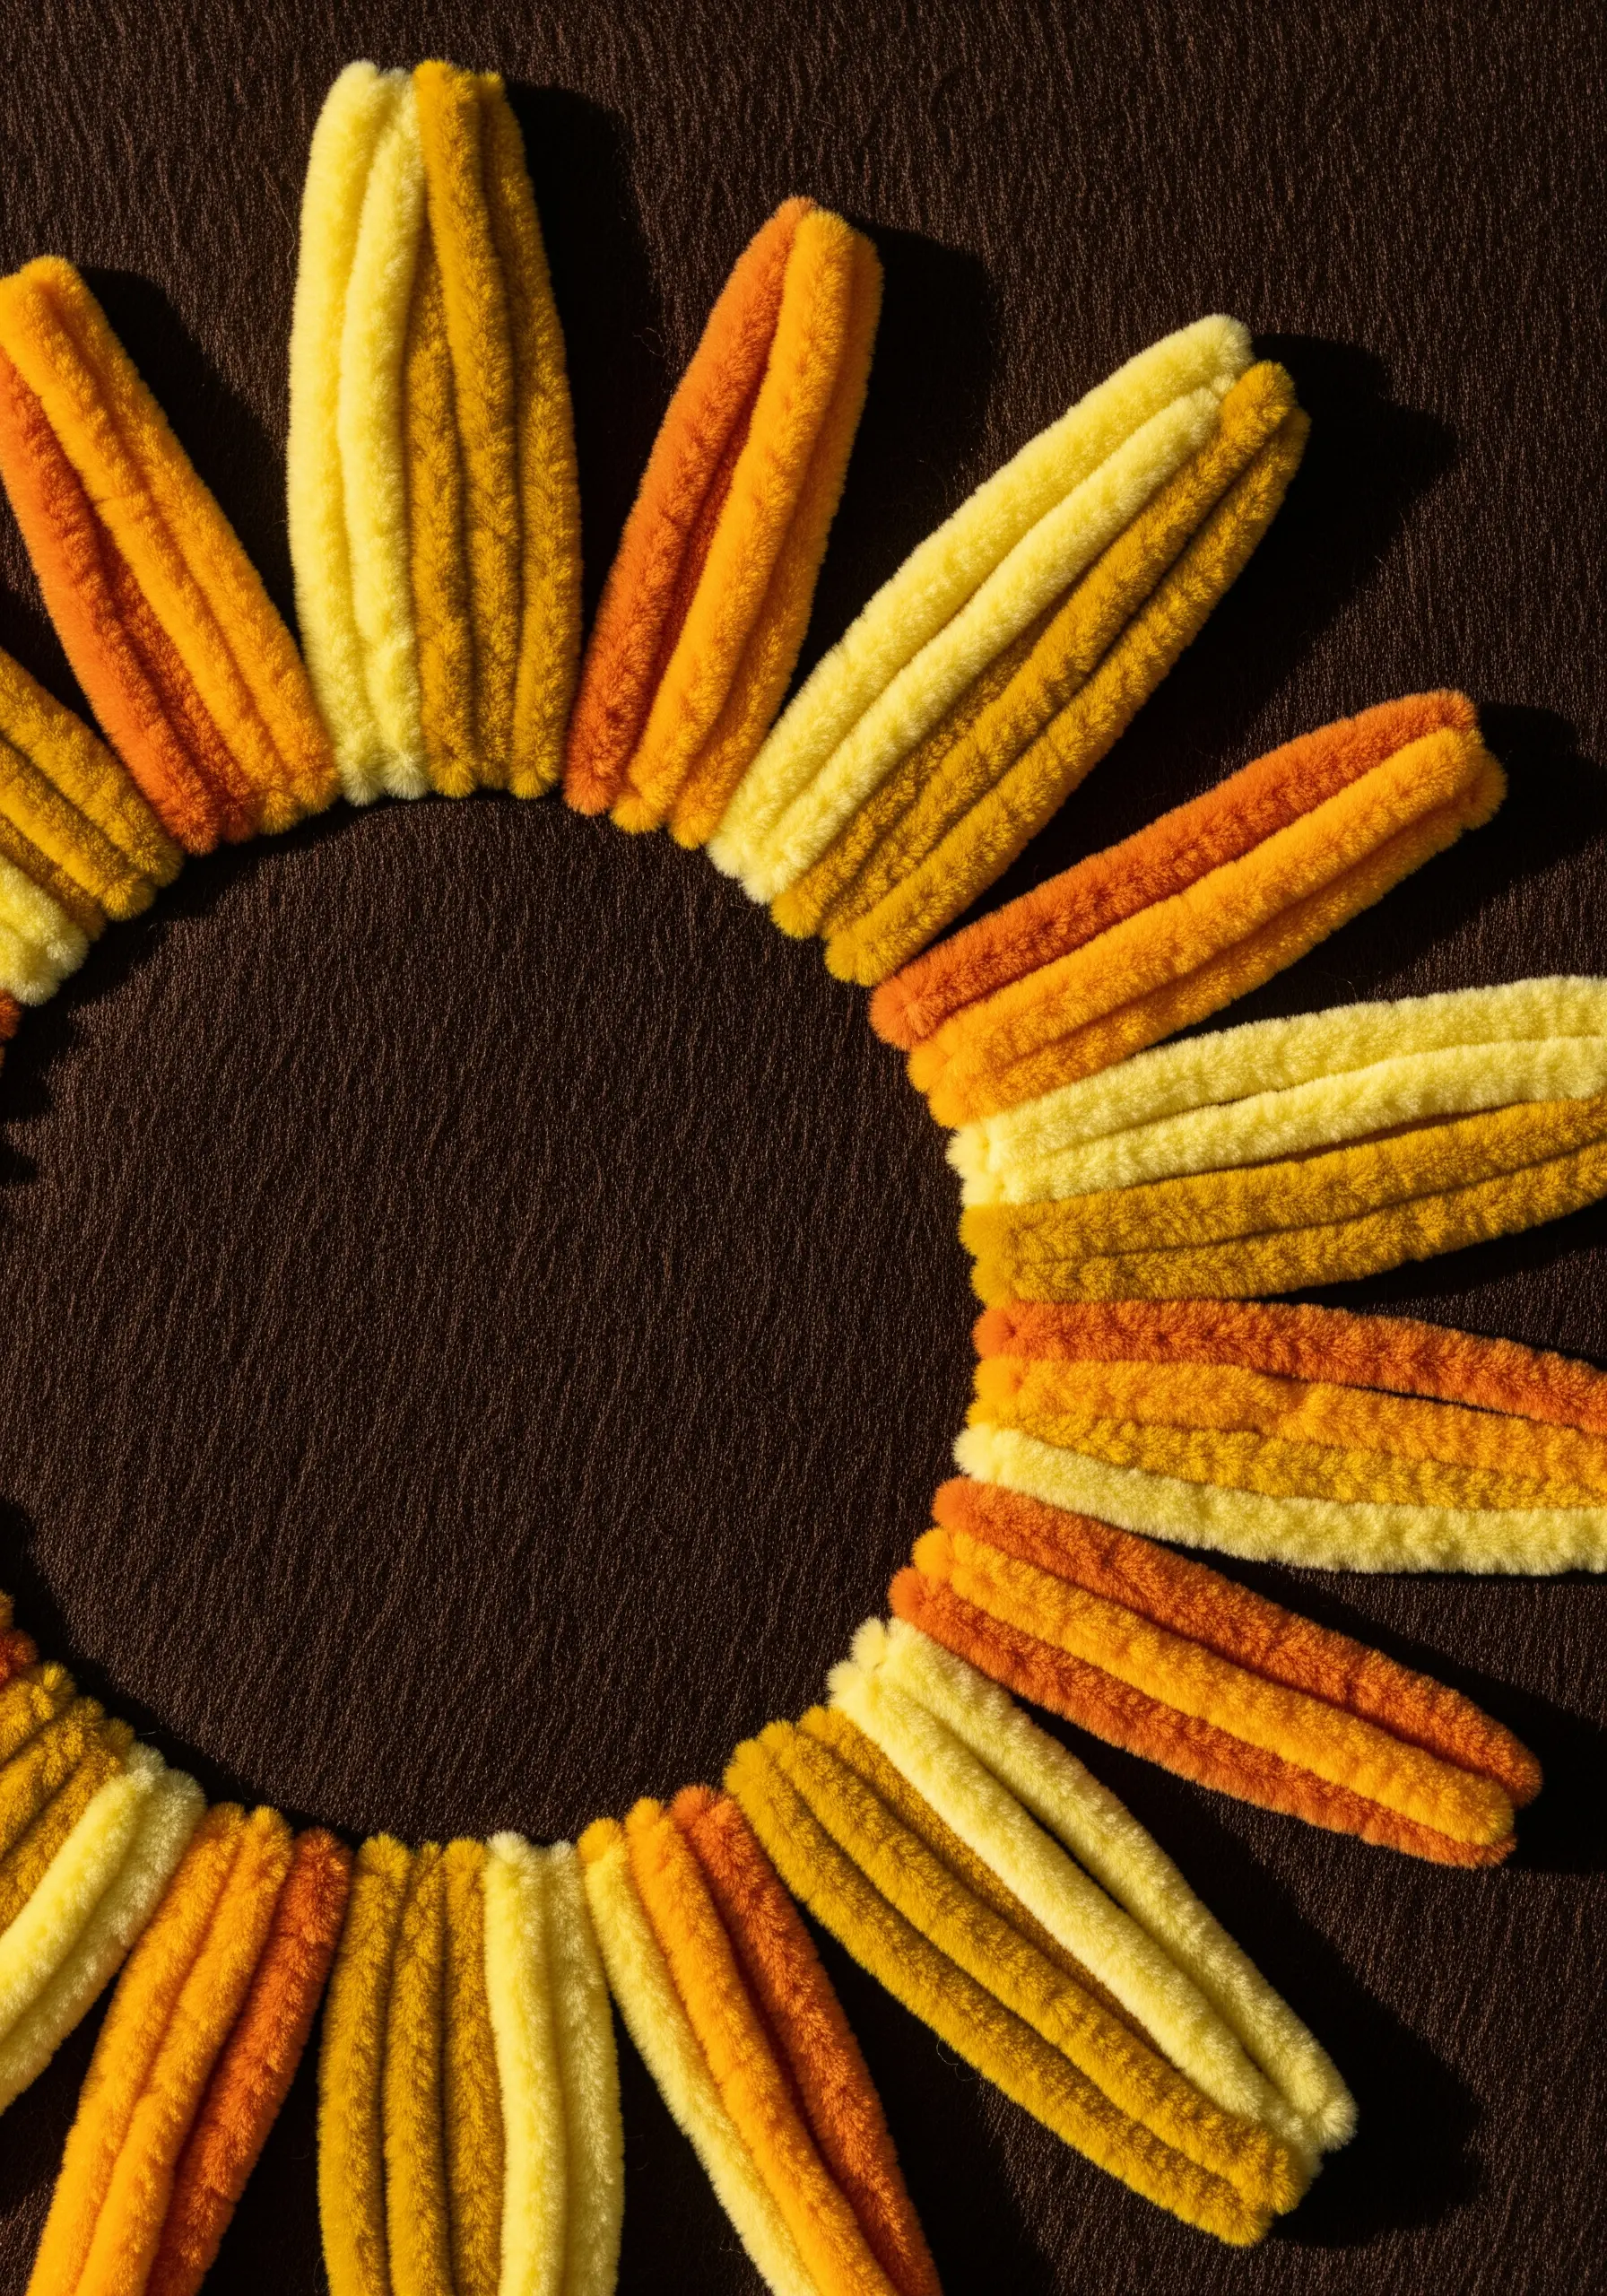
Evoke the plush textures of the ’70s by swapping standard embroidery floss for a chunky, soft yarn like chenille.
Instead of stitching through the fabric, lay the chenille yarn on the surface and secure it with small, invisible couching stitches made with a matching regular thread.
This technique allows you to create bold, highly tactile shapes with soft, rounded edges that feel cozy and nostalgic.
It’s an excellent way to add high-texture fabric collage embroidery projects to your repertoire.
16. Create an Illusion of Overlapping Forms
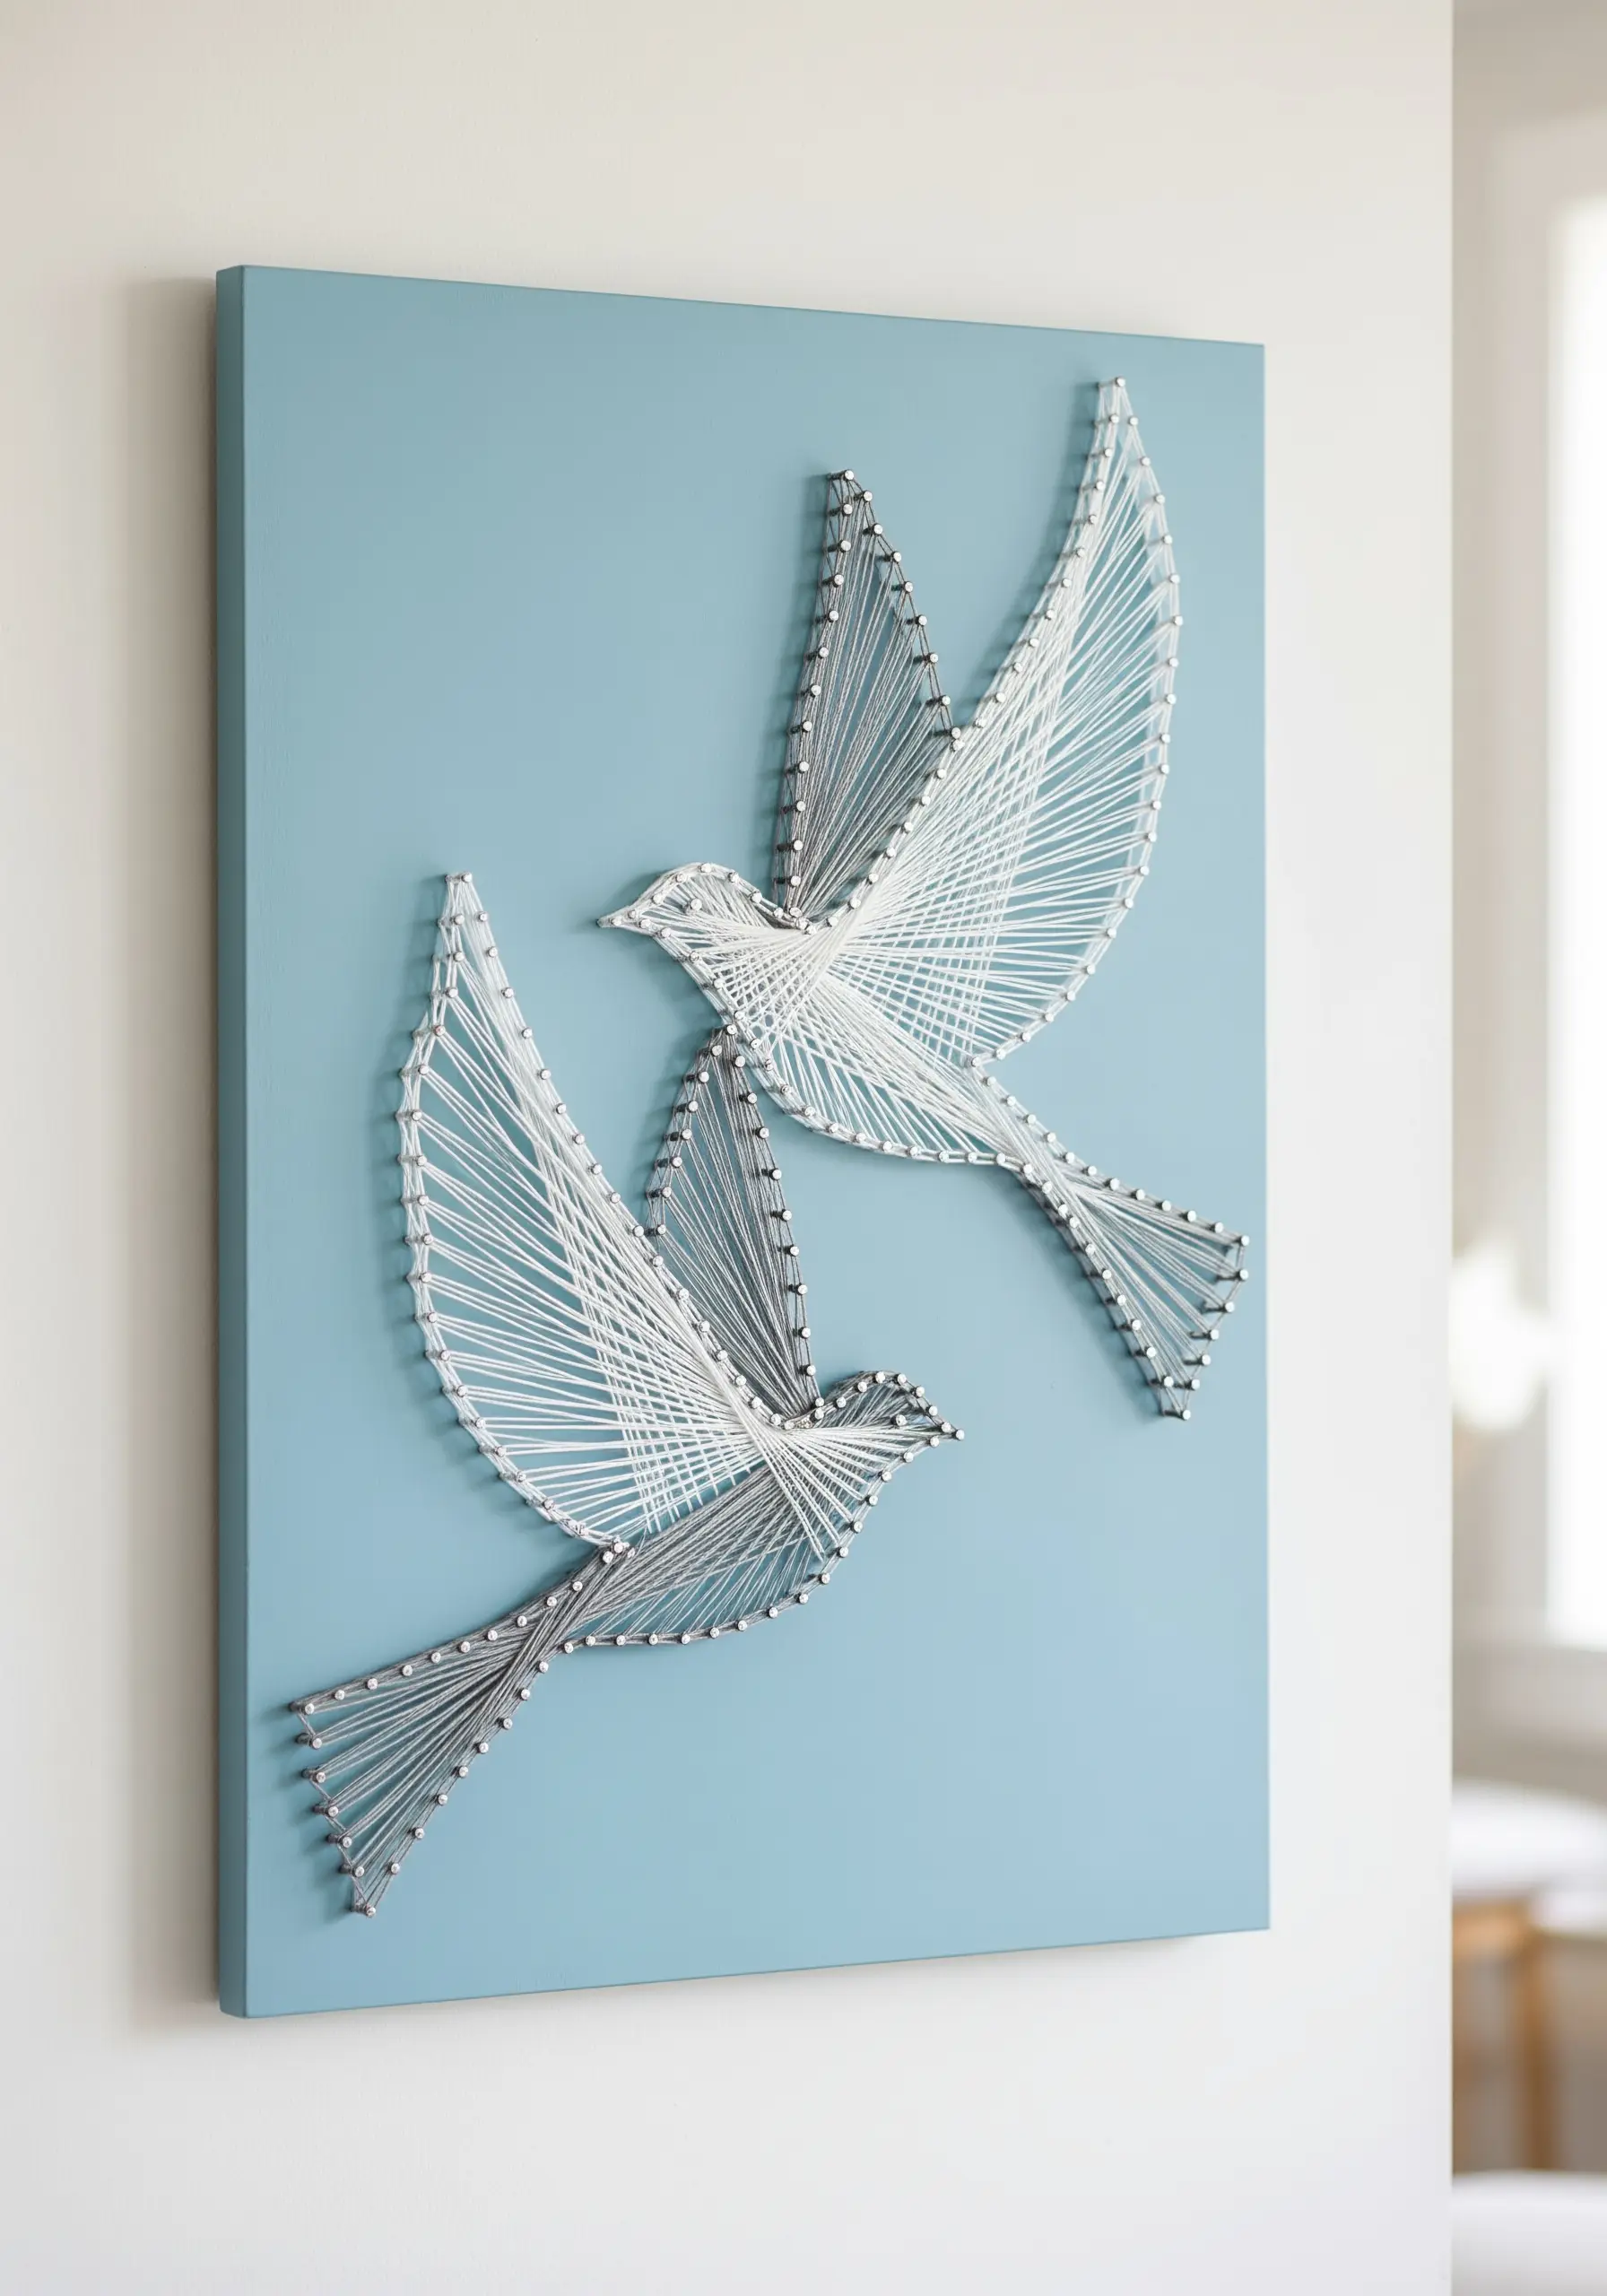
Suggest transparency and movement by allowing the lines of one object to visibly cross over another.
First, complete the full outline of the bird in the background, including the wing.
Then, stitch the second bird on top, letting its wing threads stretch over the body of the first.
This simple layering technique creates a graceful sense of depth and interaction between the two figures, making the composition feel more alive.
17. Achieve Perfect Curves with Precise Anchors
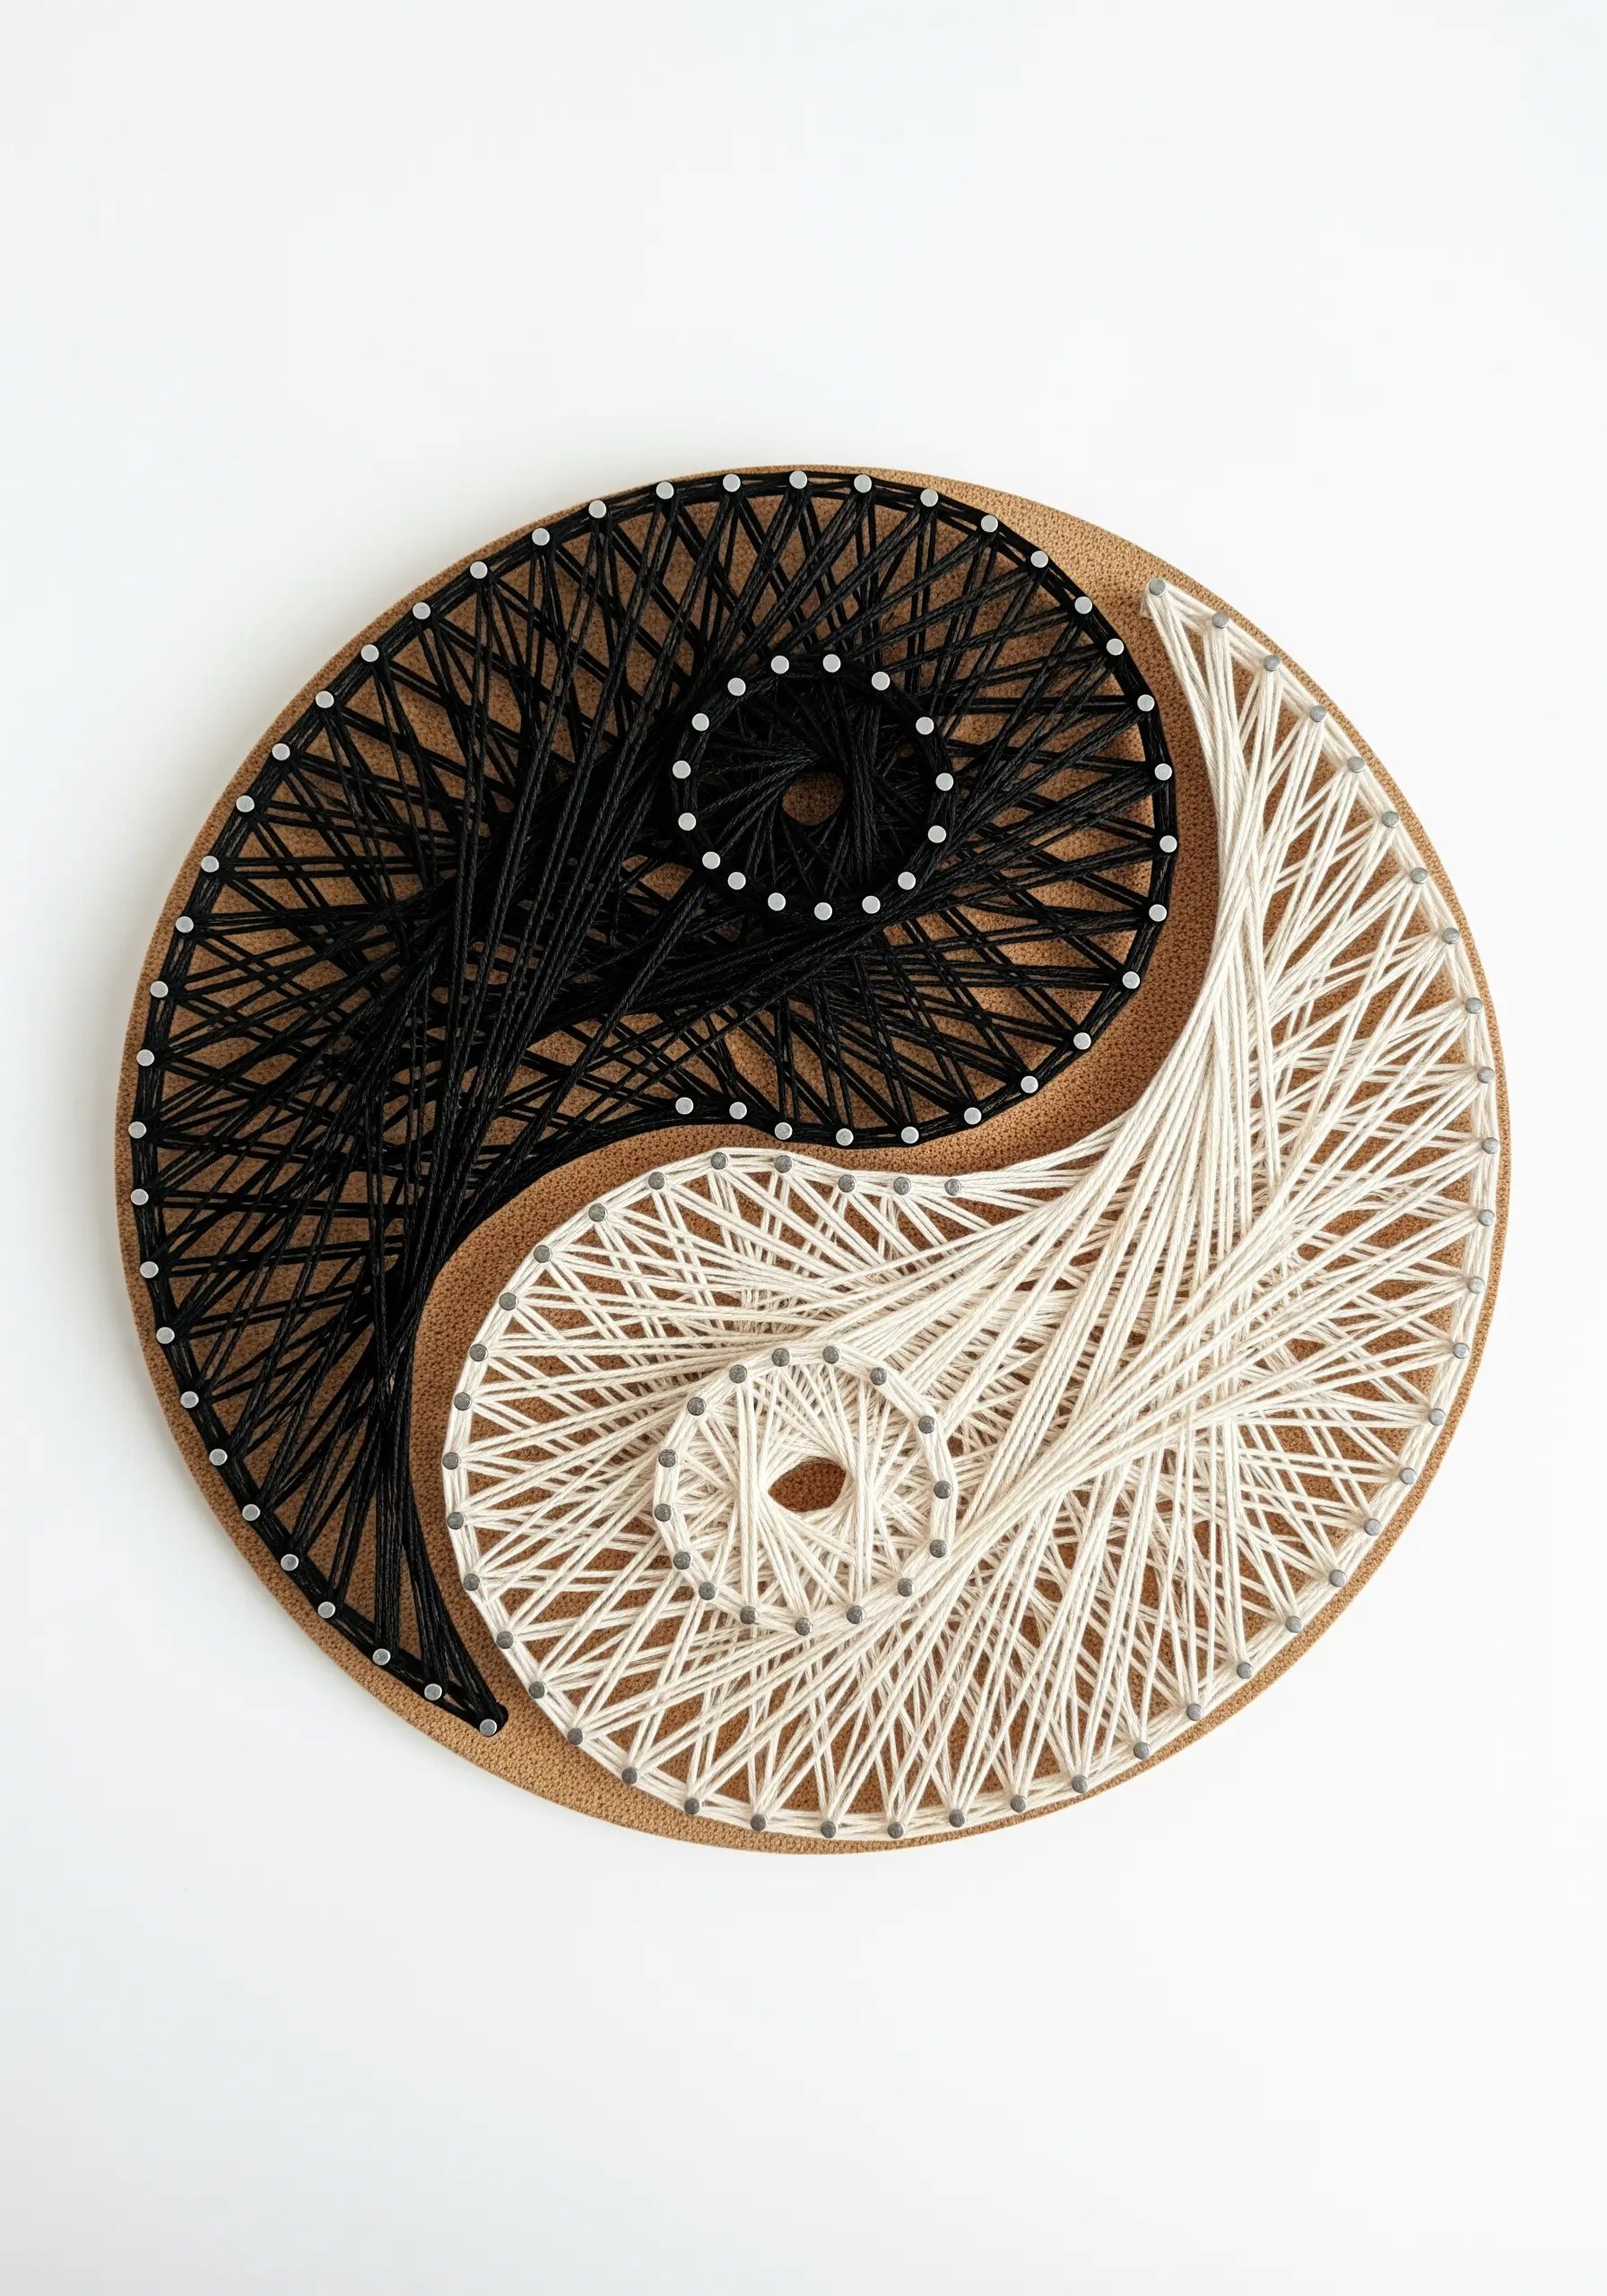
The key to a smooth, flowing curve in string art lies in the precise placement of your anchor points (or stitches, if on fabric).
To create the iconic yin-yang symbol, carefully mark out the S-curve and the outer circle.
Place your anchor points at close, regular intervals along these marked lines.
As you stretch the thread across the shape, the cumulative effect of these slight angles will form a perfect, graceful curve that appears to be drawn in a single stroke.
18. Use Randomized Stitches for a Textured Fill
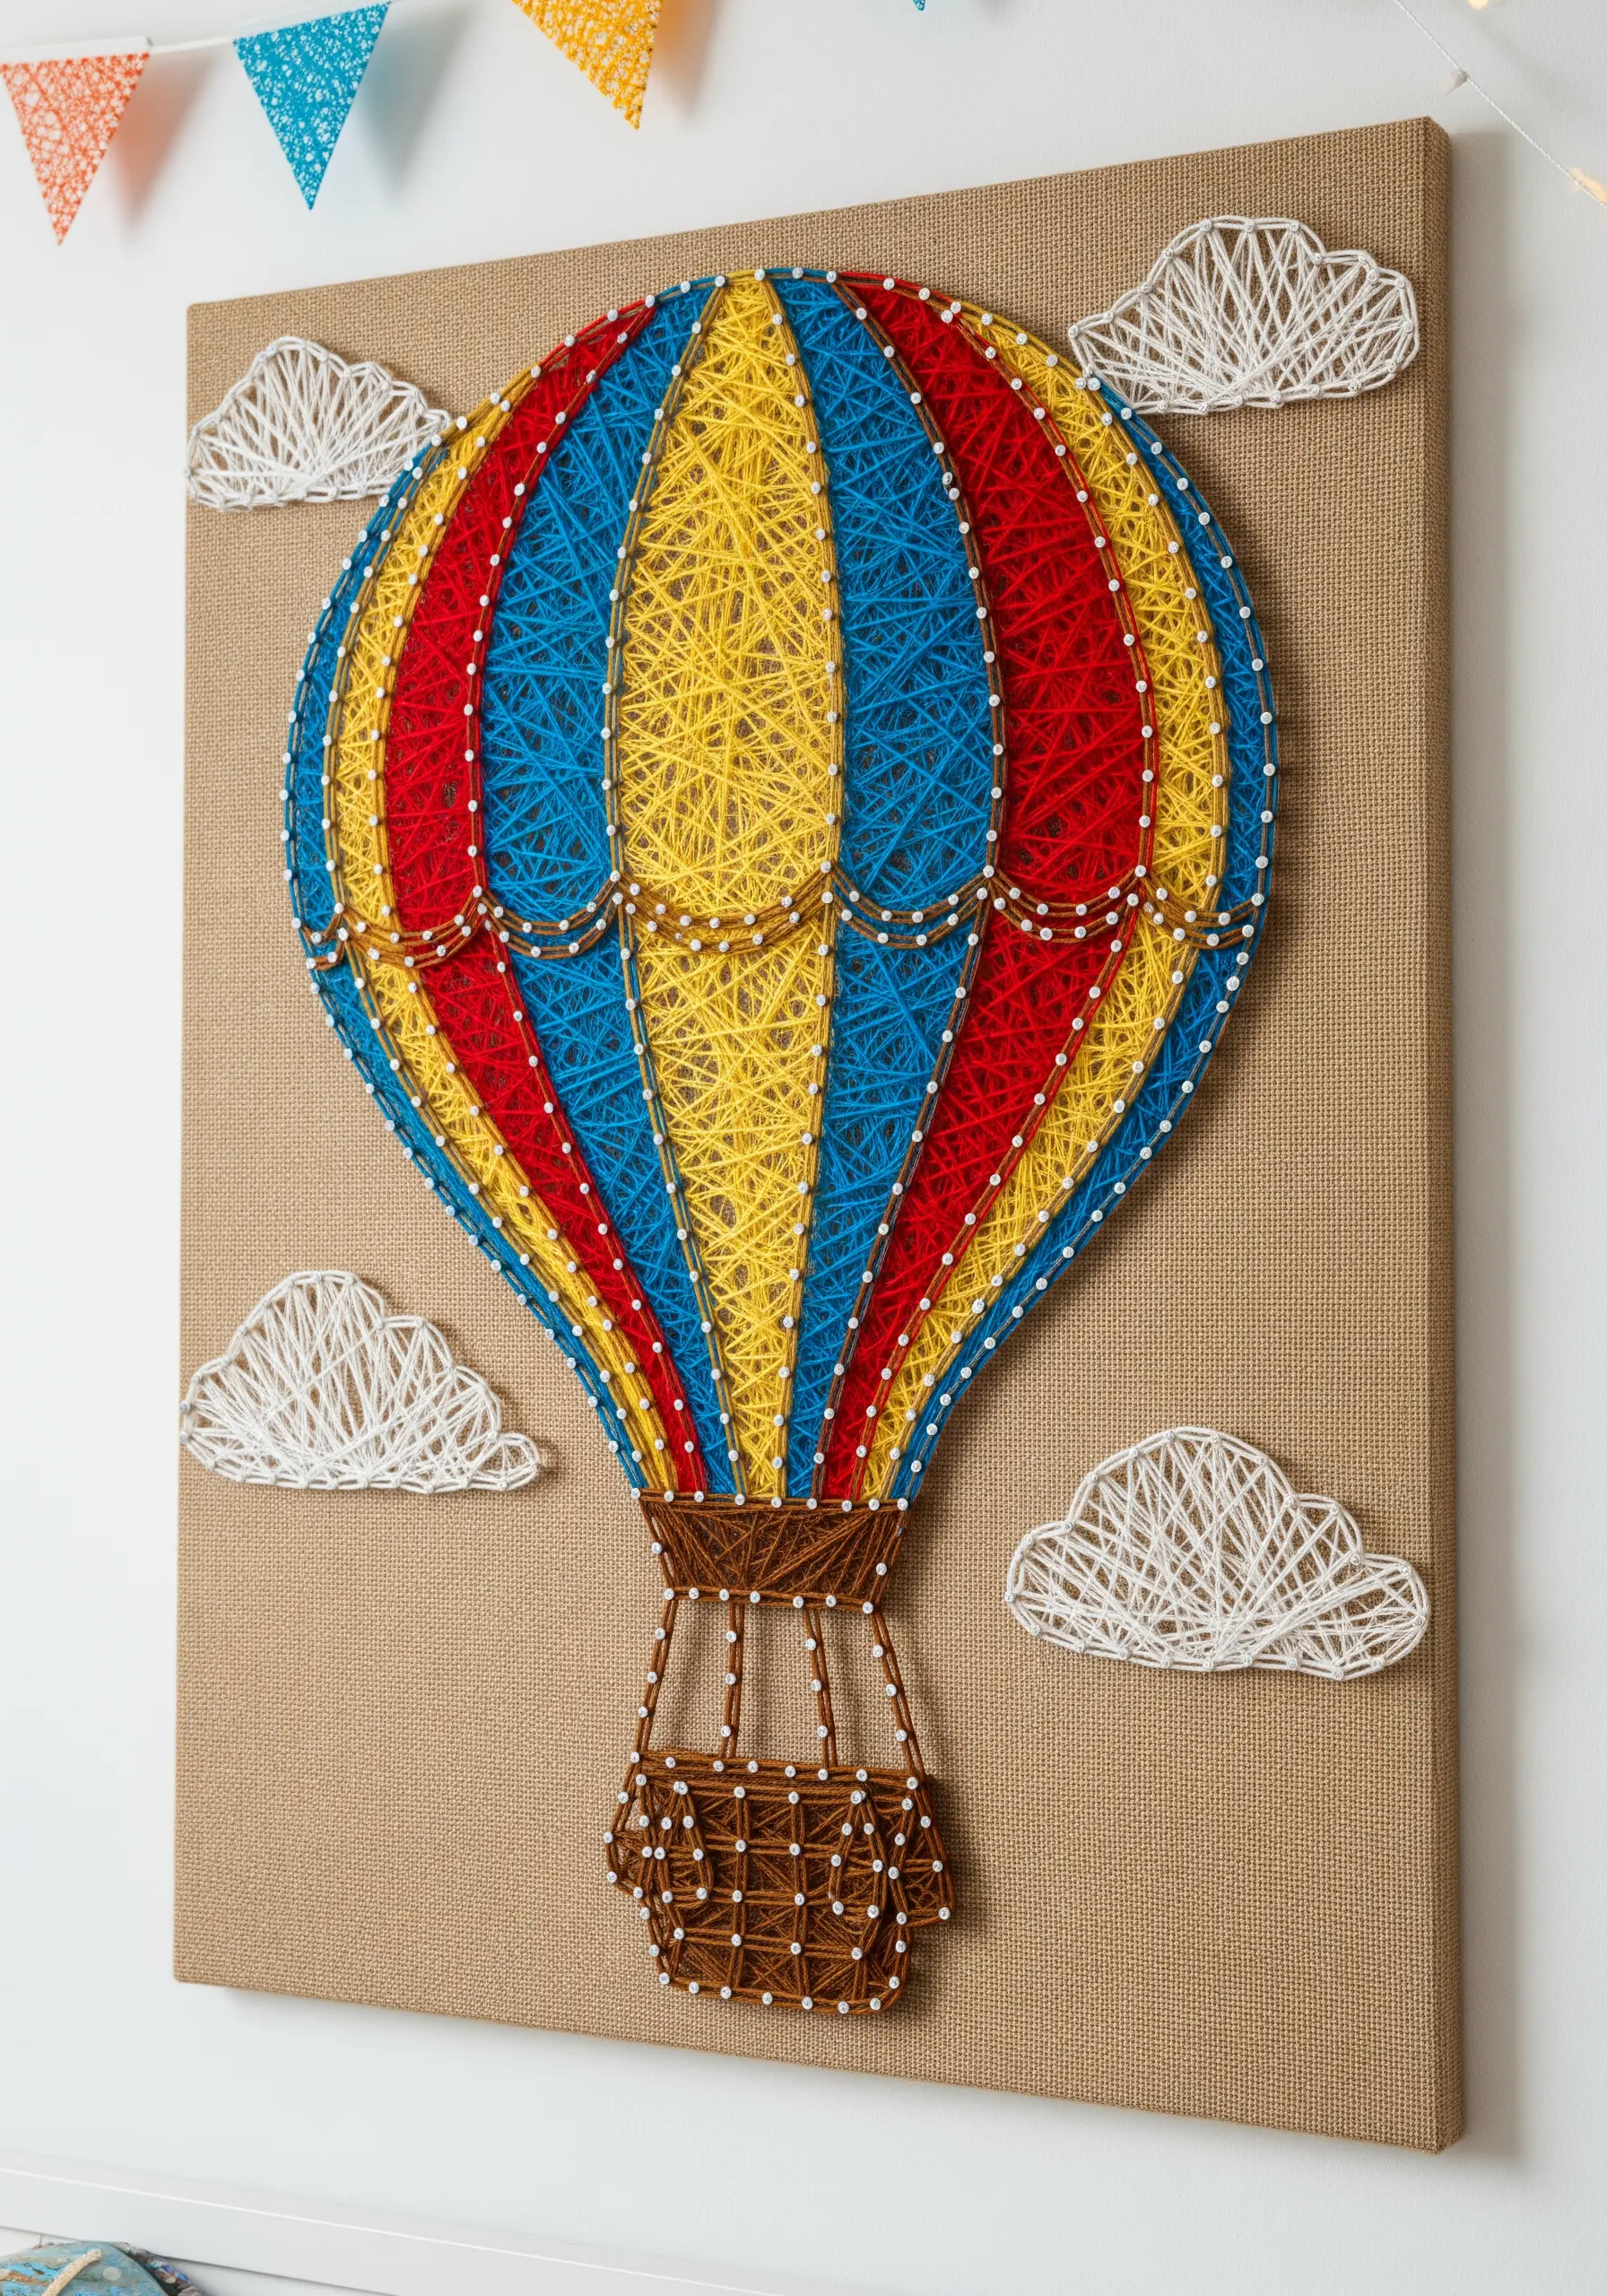
For large areas like the panels of this hot air balloon, you don’t need to wrap thread in a uniform pattern.
Instead, create a rich, woven texture by crisscrossing your thread randomly between the anchor points outlining each section.
Continue layering the thread until you achieve your desired opacity.
This method is not only faster than a precise pattern but also adds a playful, almost fabric-like quality to the filled areas.
19. Capture Fluid Motion with an Ombre Palette
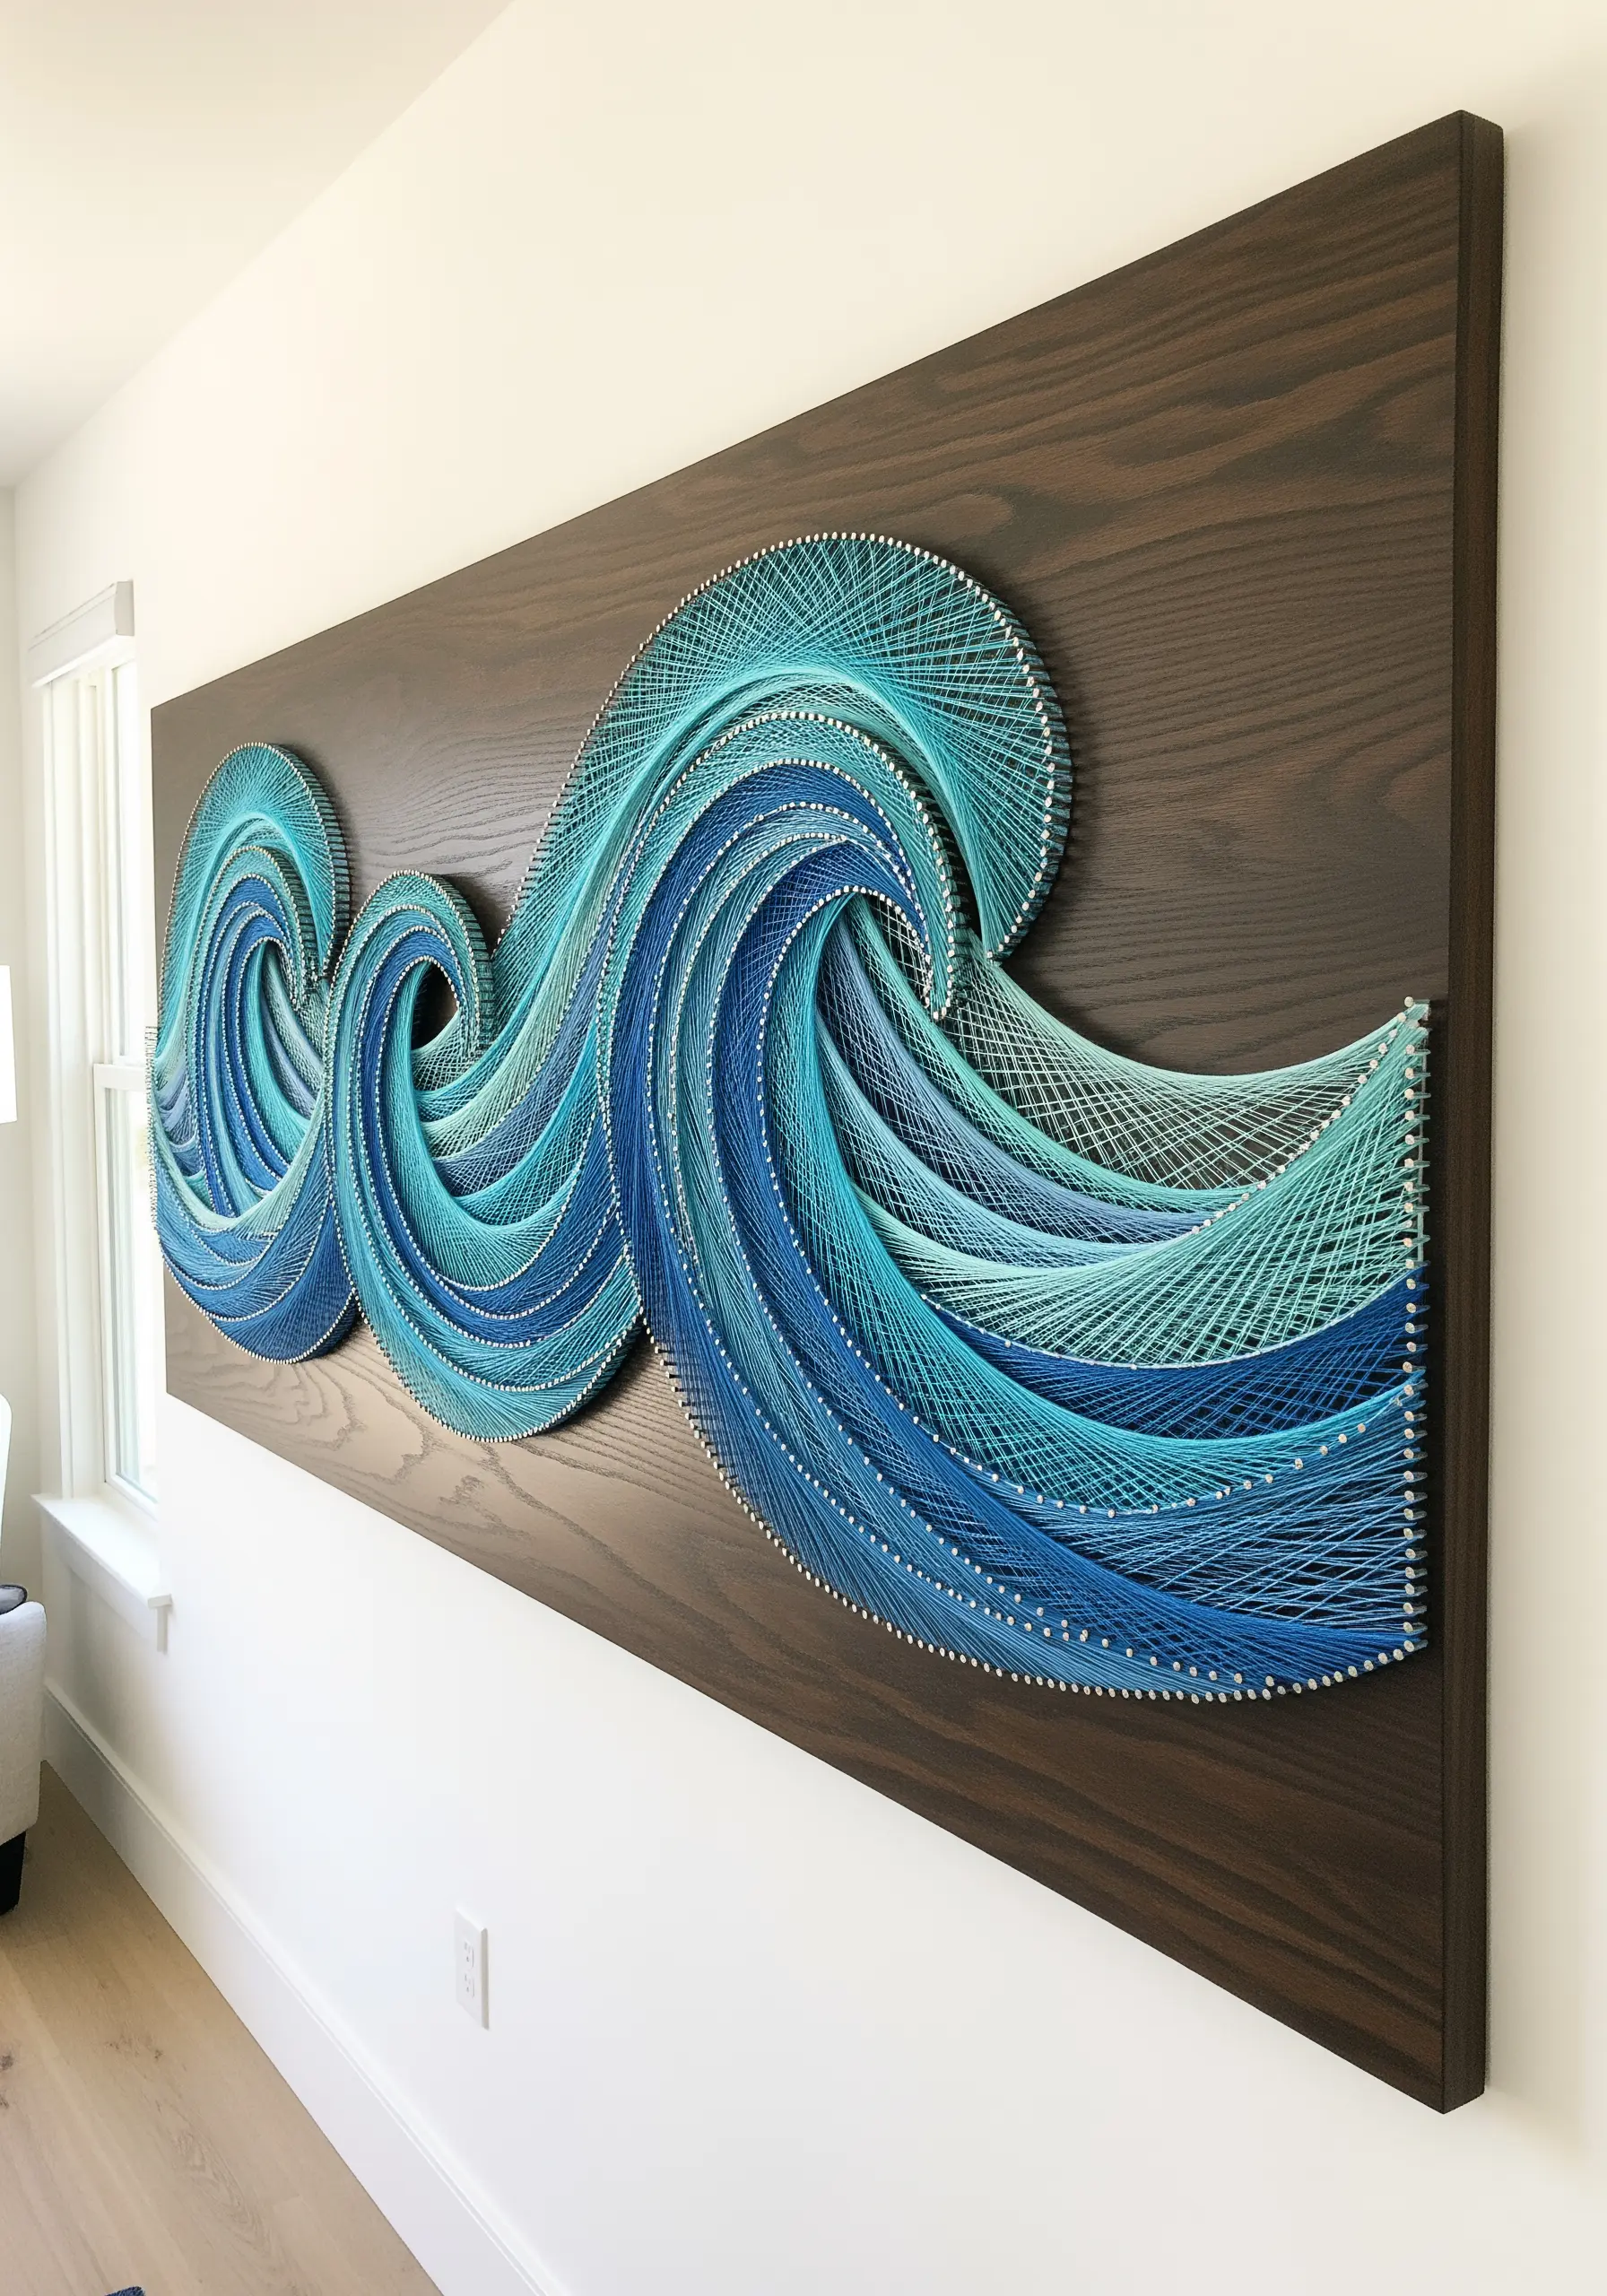
To give your string art a sense of natural movement, as in these ocean waves, a gradient color palette is essential.
Use at least three to five shades of the same color, moving from darkest at the base of the wave to lightest at the crest.
This gradual shift in color mimics the way light hits water, creating a realistic sense of depth, form, and fluidity that a single color could never achieve.
20. Weave and Loop for Three-Dimensional Lines

Move beyond simple straight stitches by incorporating weaving and looping techniques for a sculptural effect.
To create this spider web, use a stiff, metallic cord instead of soft floss.
After creating the radiating spokes, weave the circular threads over and under them.
Form the outer loops by wrapping the cord around each anchor point before moving to the next, creating a structure that has real, physical dimension.
21. Embroider Bold Lettering with a Rainbow Fill
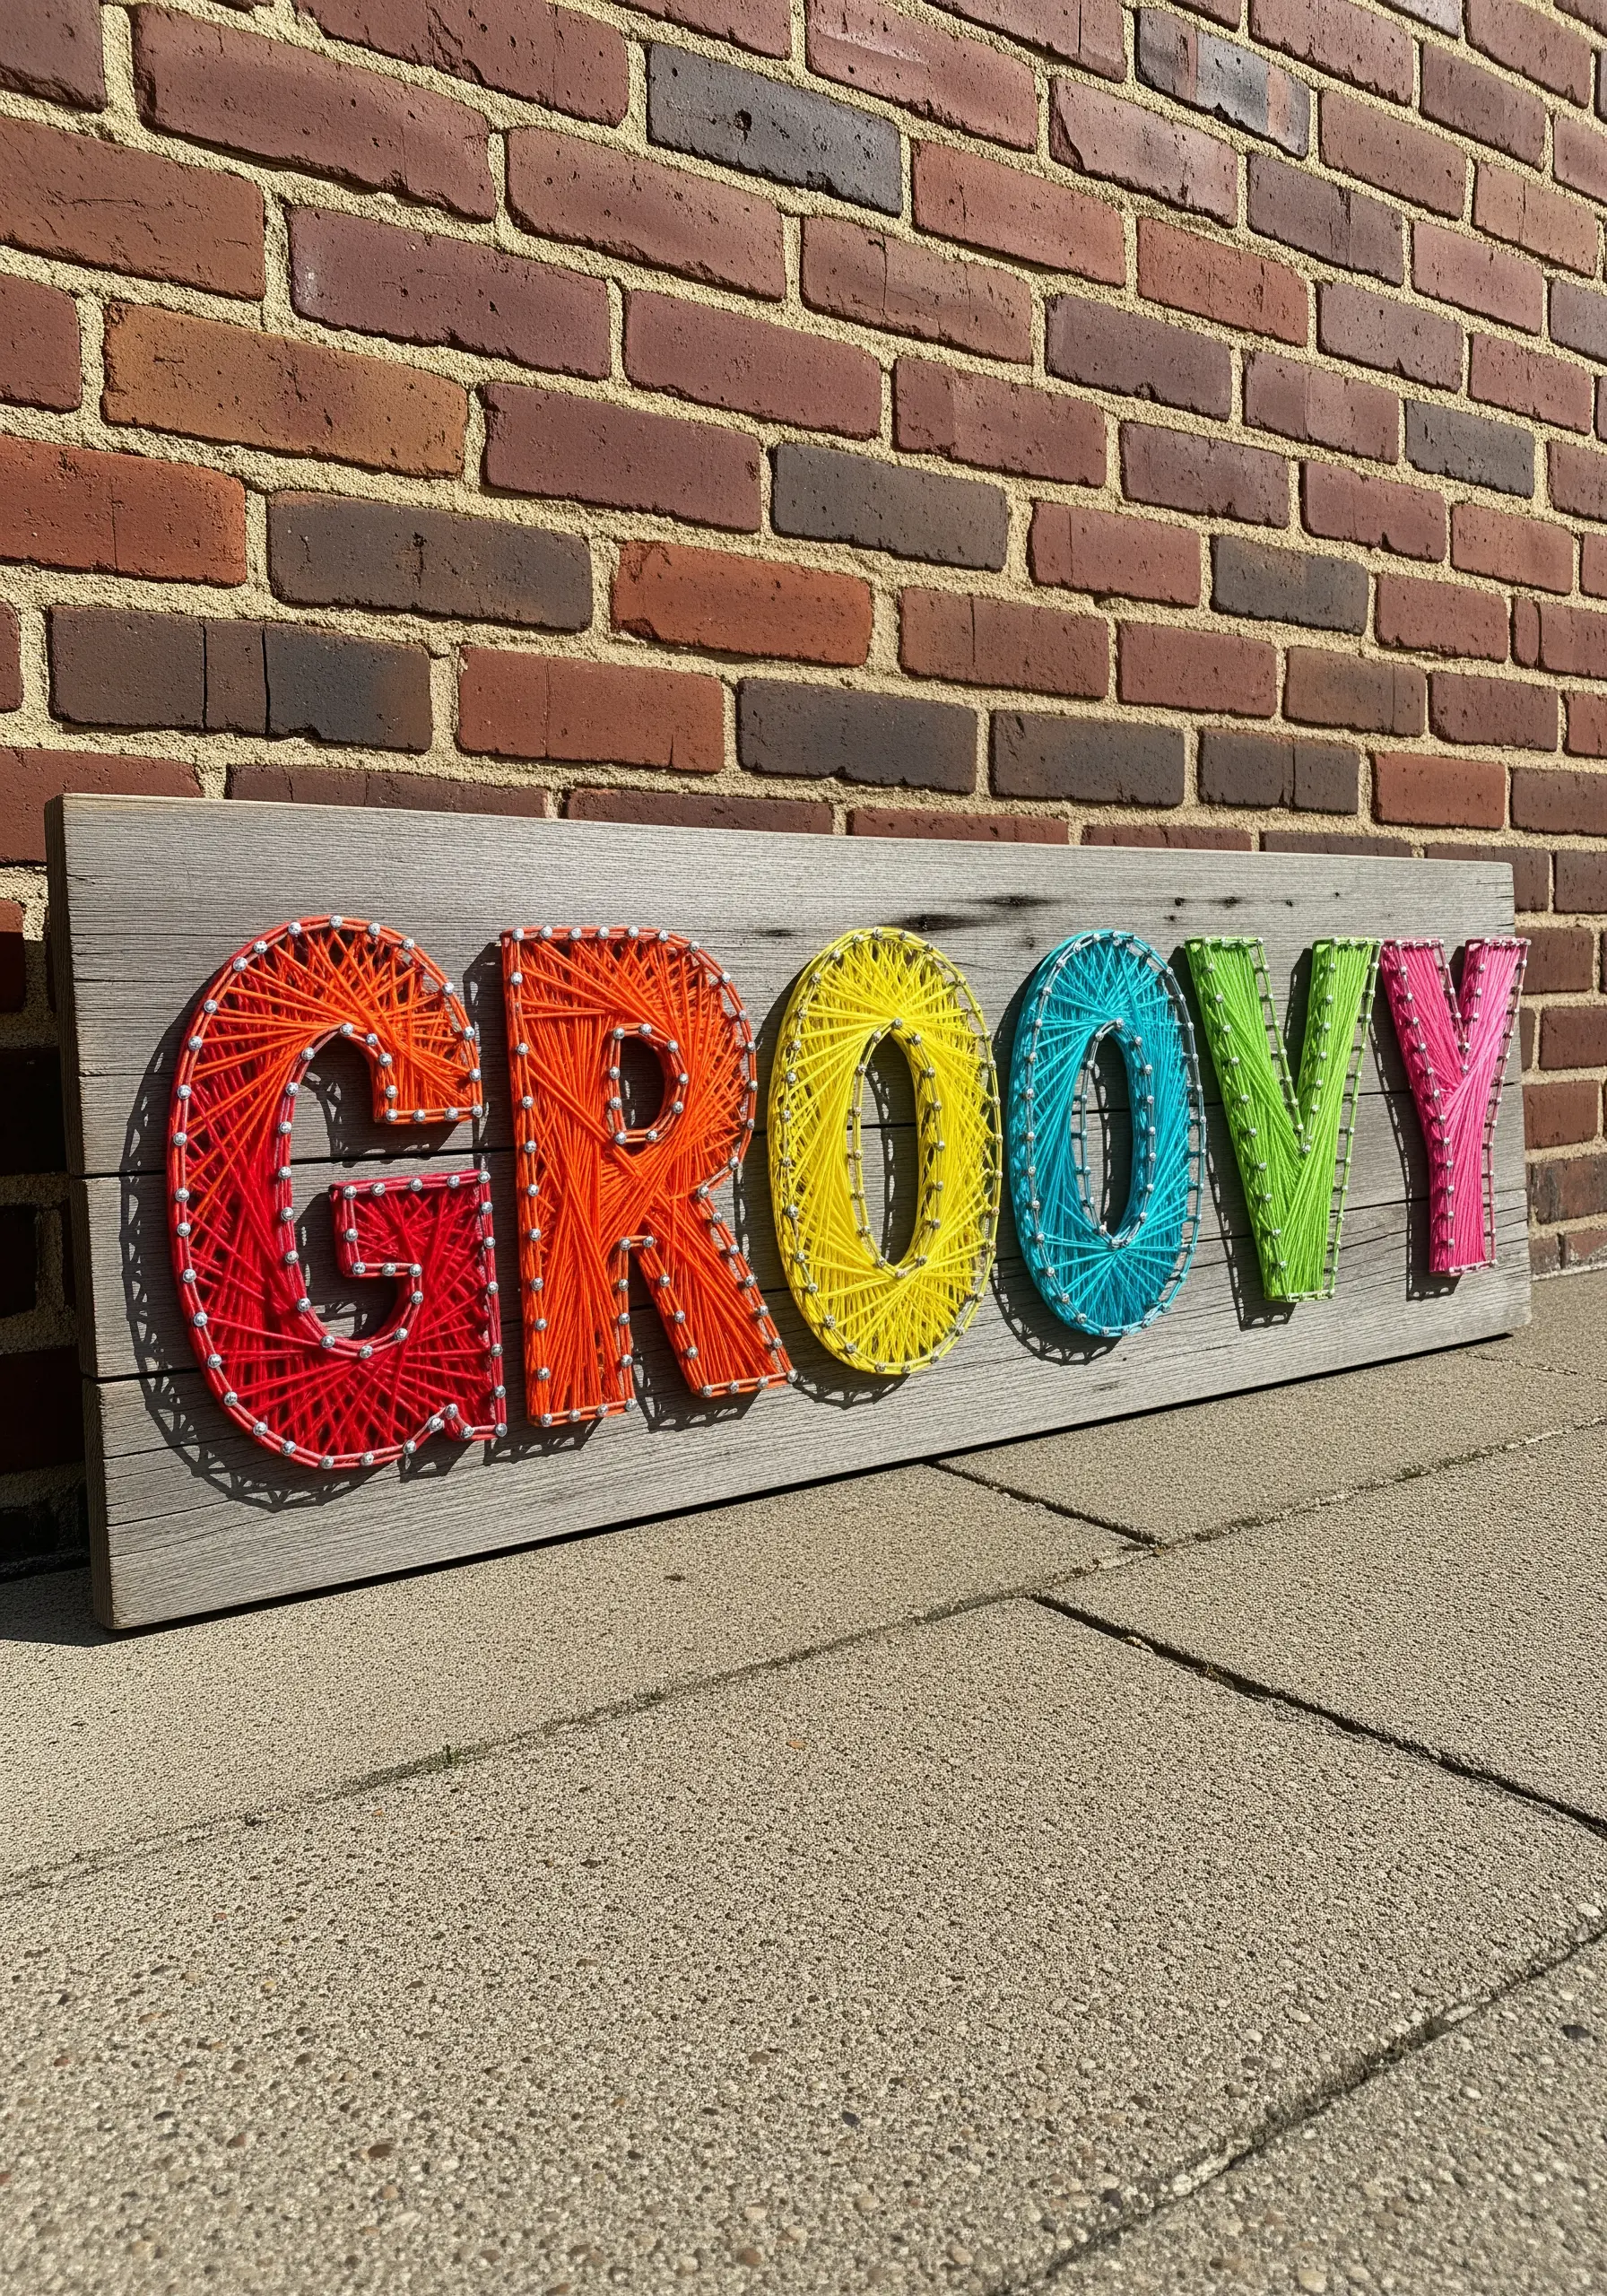
Make a statement by translating the string art technique to typography.
First, create a strong outline for each letter using backstitch or stem stitch to define the shape clearly.
Then, fill each letter with dense, long straight stitches in a vibrant color.
Arranging the colors in rainbow order gives the design a cheerful, cohesive, and unapologetically retro vibe.
These contemporary rainbow blend stitches can add a pop of color to any project.
22. Create Visual Separation with Stitch Direction
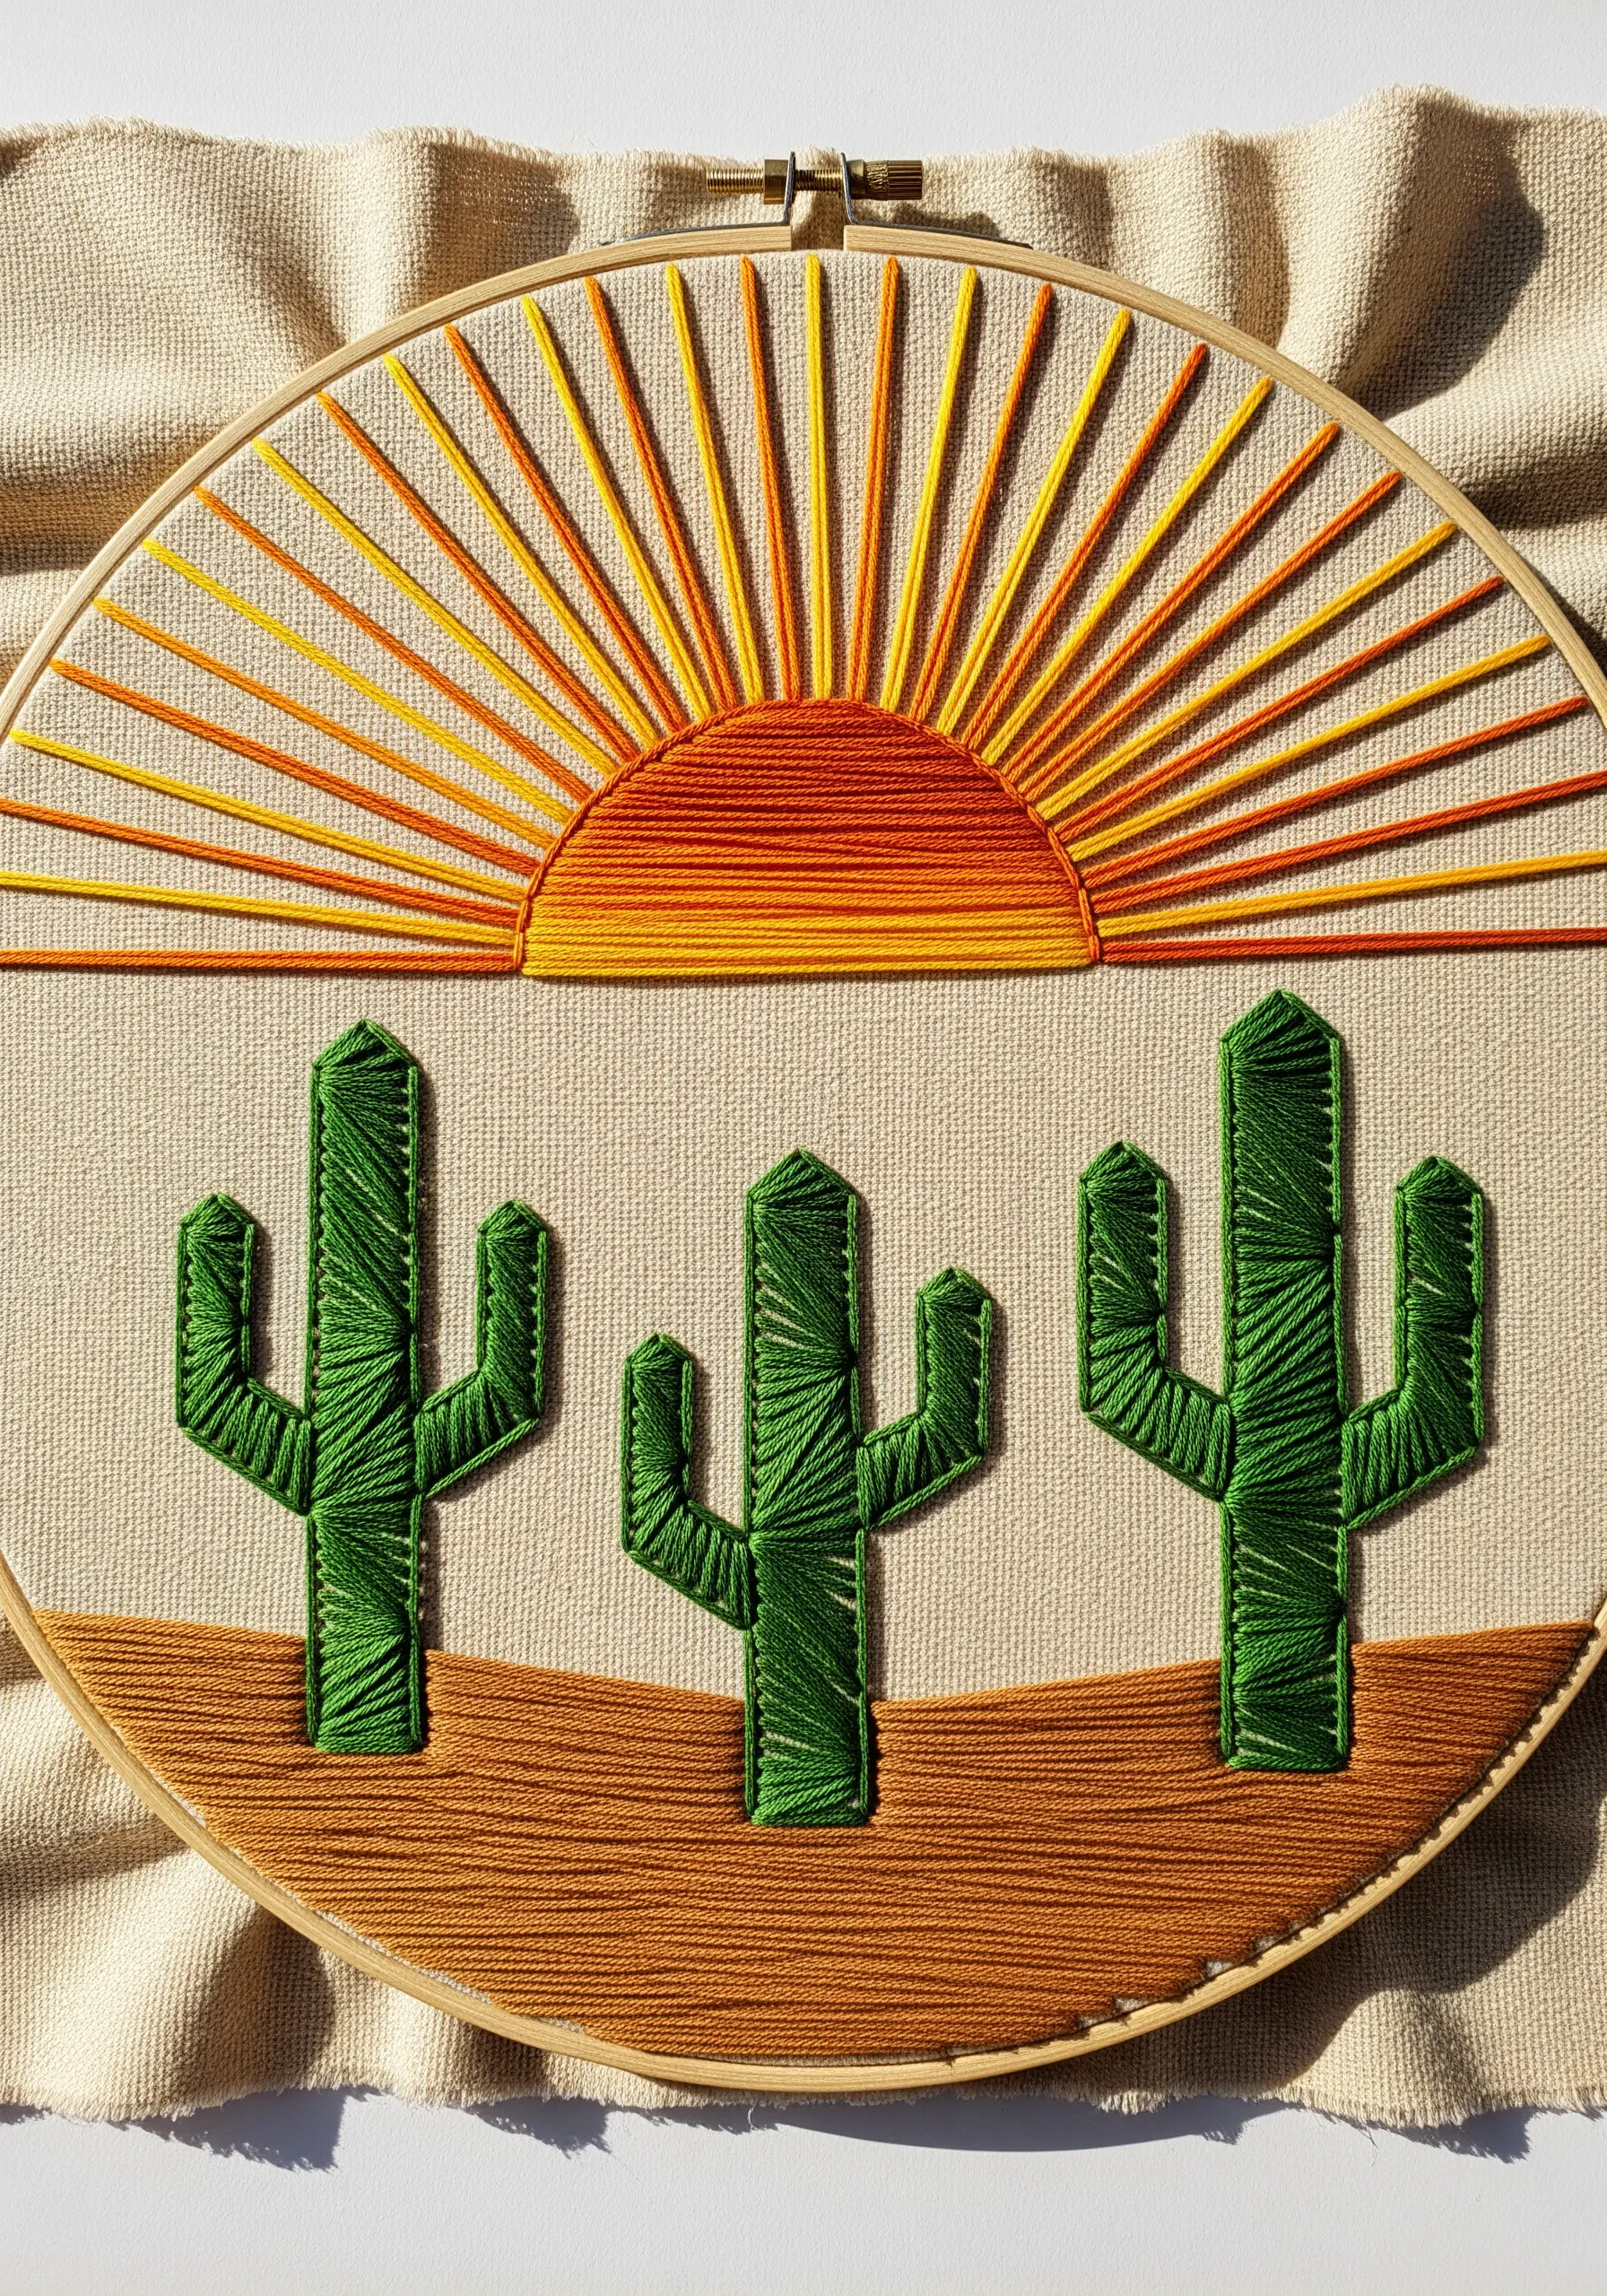
Use the direction of your stitches to define different elements in a landscape and create a sense of perspective.
In this desert scene, the ground is filled with horizontal satin stitches, suggesting a flat, expansive plane.
The cacti are filled with vertical satin stitches, emphasizing their height and making them stand out as foreground elements.
Finally, the sun’s rays radiate outwards, creating a clear focal point in the sky.
23. Build Complexity by Rotating a Single Shape
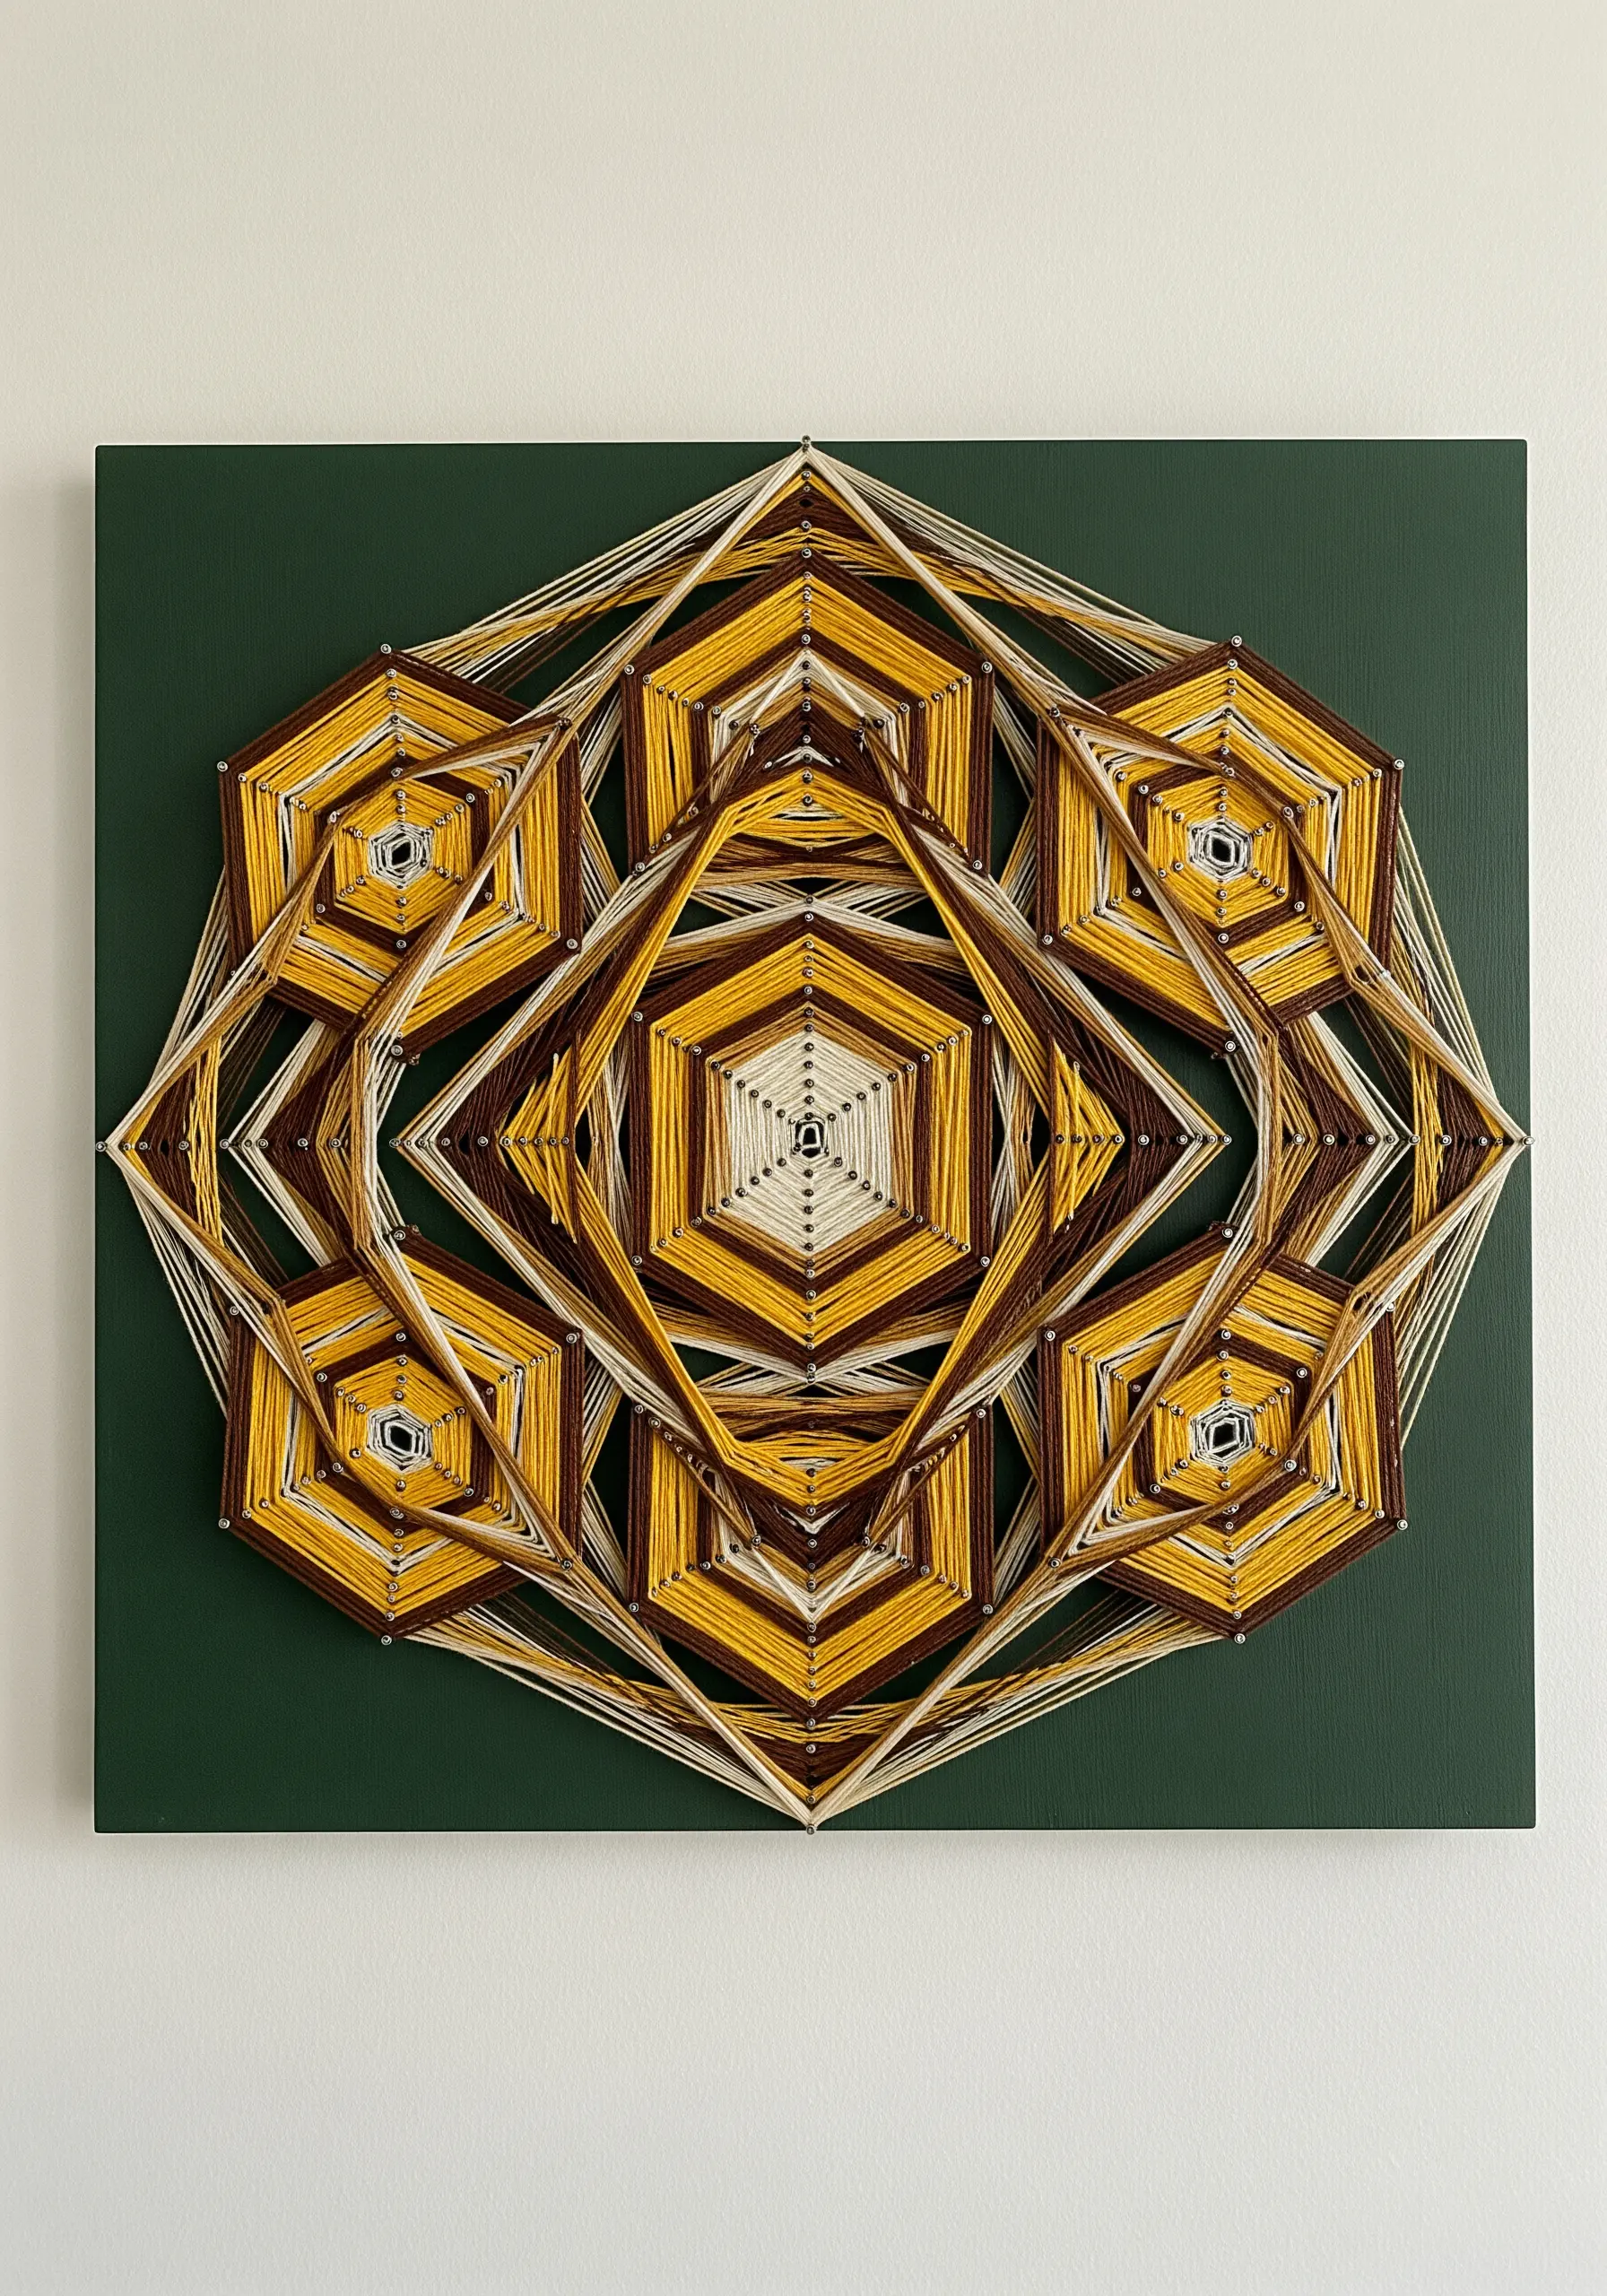
You can generate an incredibly intricate pattern from the simplest of shapes through rotation and layering.
This design is built from one core shape—likely a hexagon or square—that is repeated and rotated around a central axis.
By using a limited, earthy palette of brown, yellow, and cream, the focus remains on the mesmerizing geometric structure created by the overlapping lines.
24. Apply String Art to Unconventional Canvases
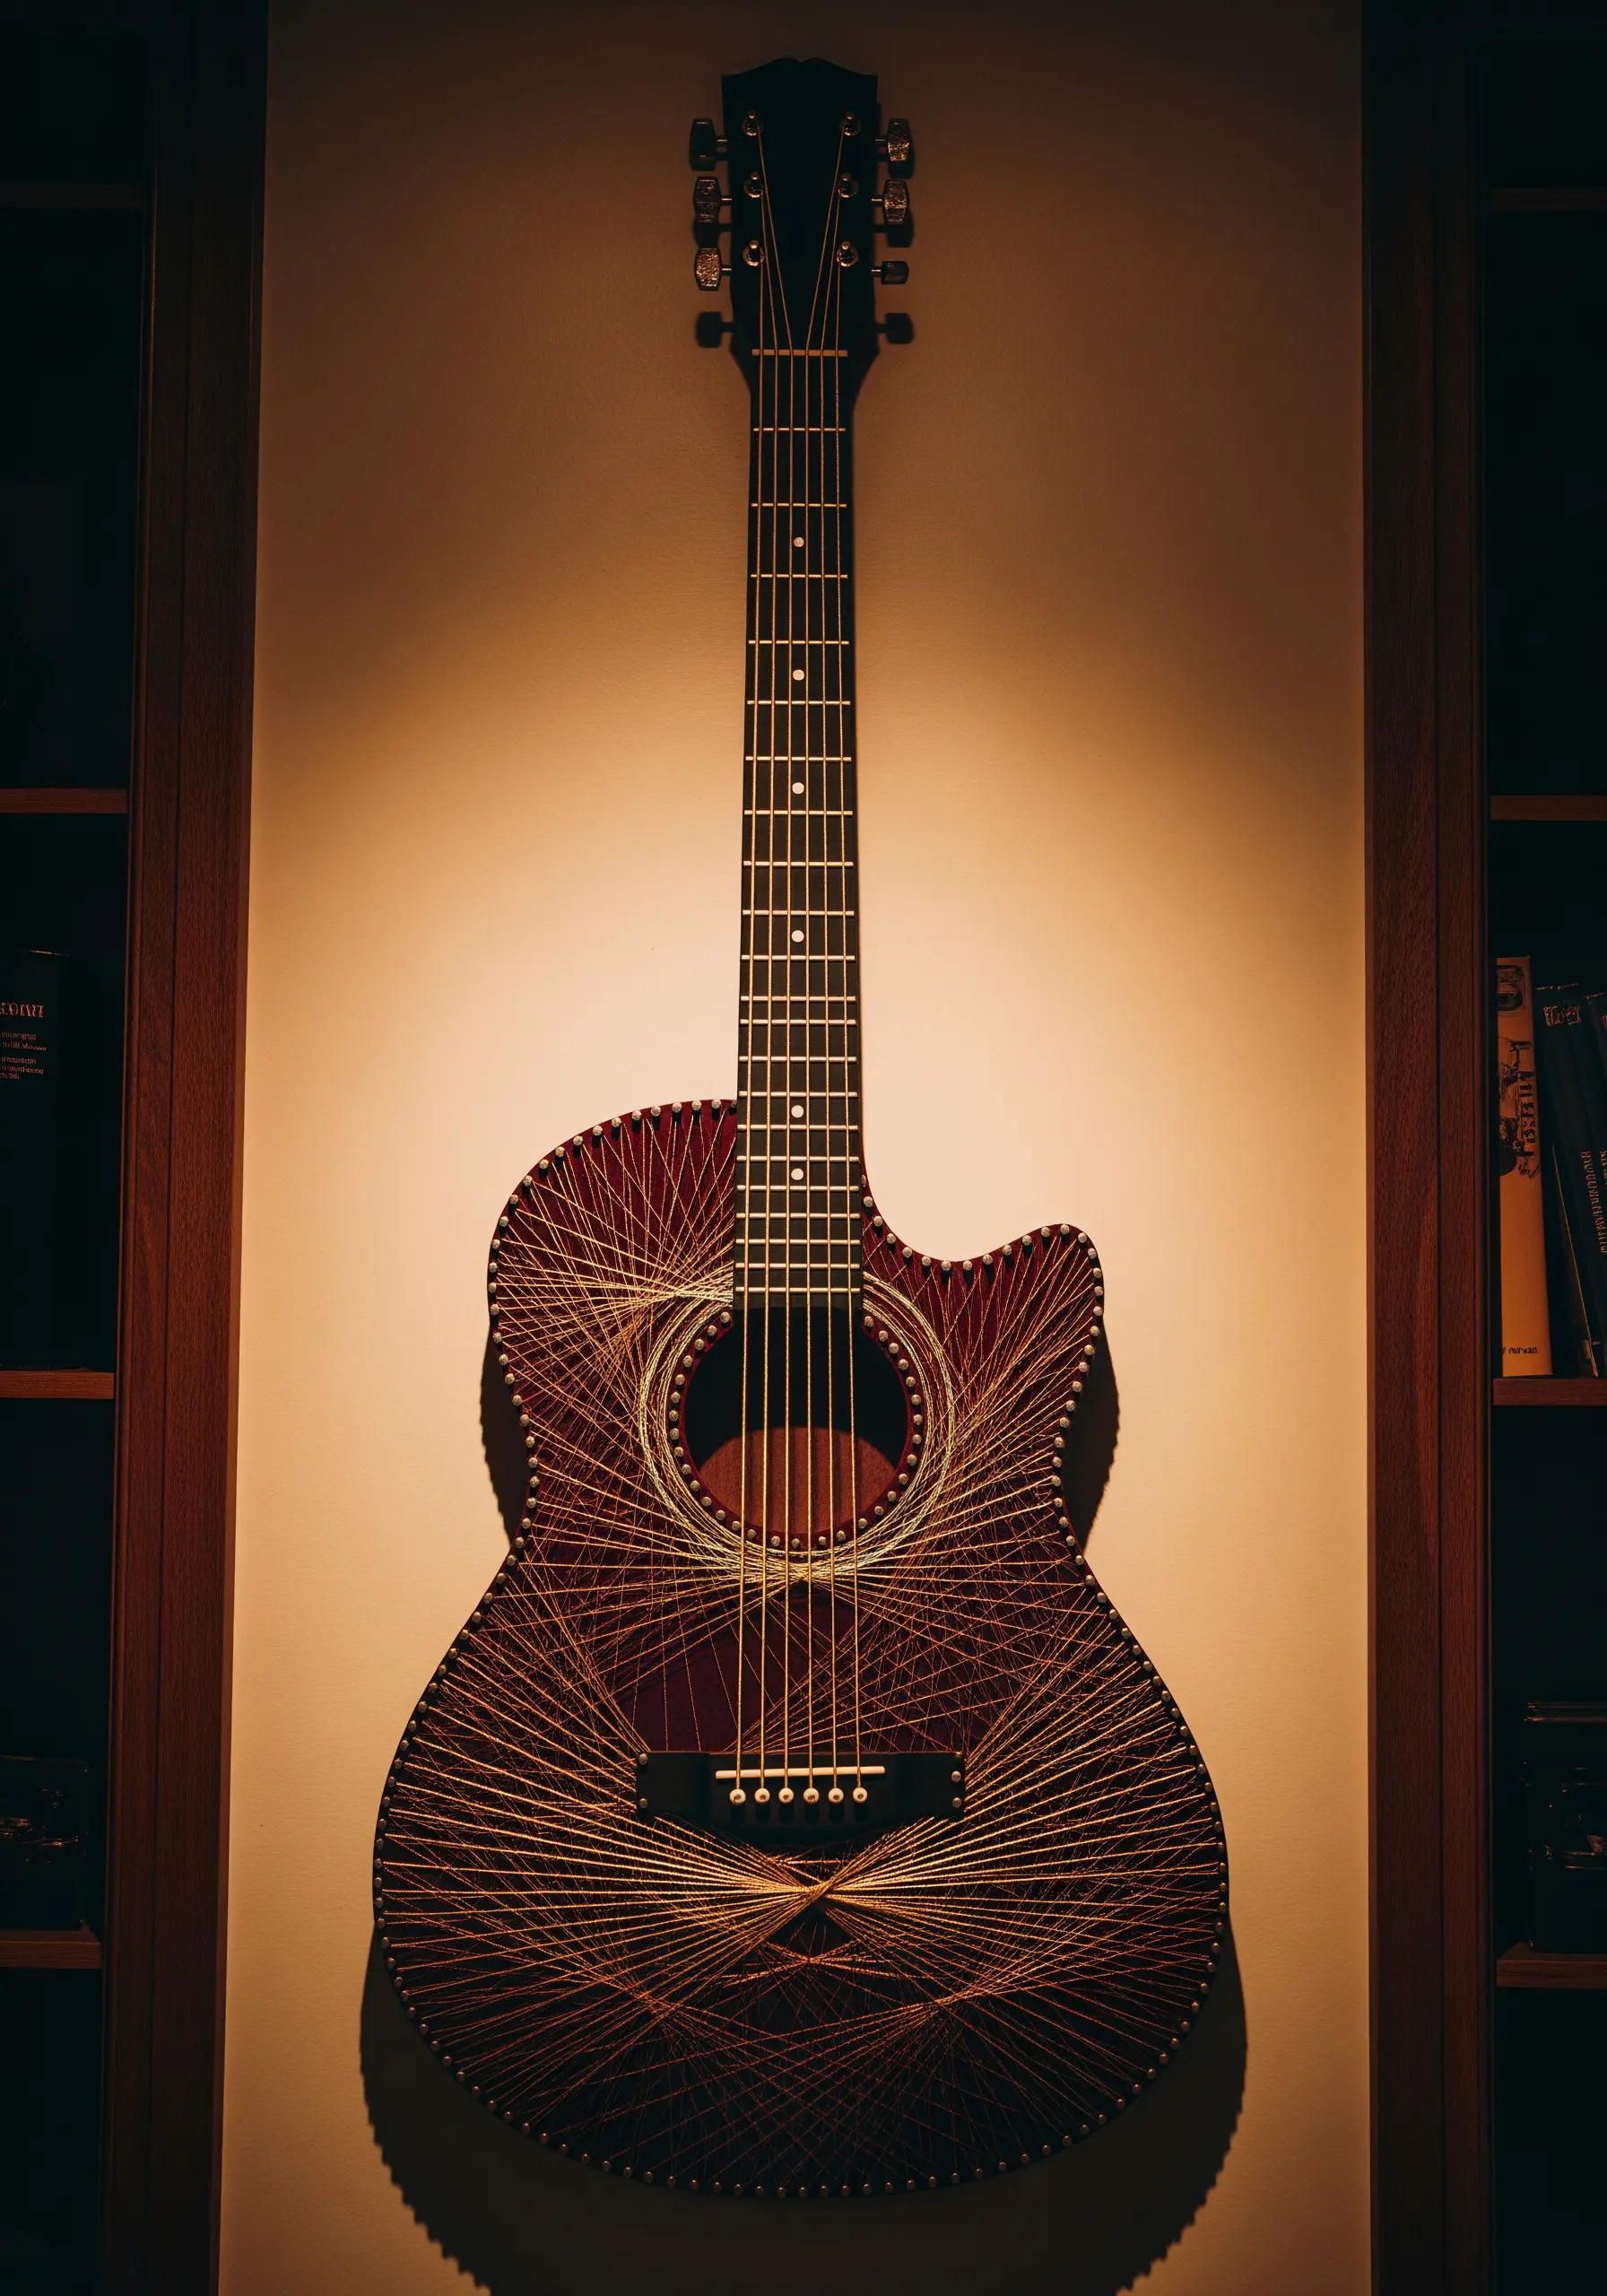
Think beyond the board or hoop and use an unexpected object as the canvas for your string art.
An old instrument, like this guitar, provides a unique shape and personal meaning.
Carefully place your nails or anchor points to follow the object’s natural curves, using the existing form to guide your design.
This transforms a decorative craft into a deeply personal piece of sculptural art.
25. Combine Braids and Straight Stitches for Texture
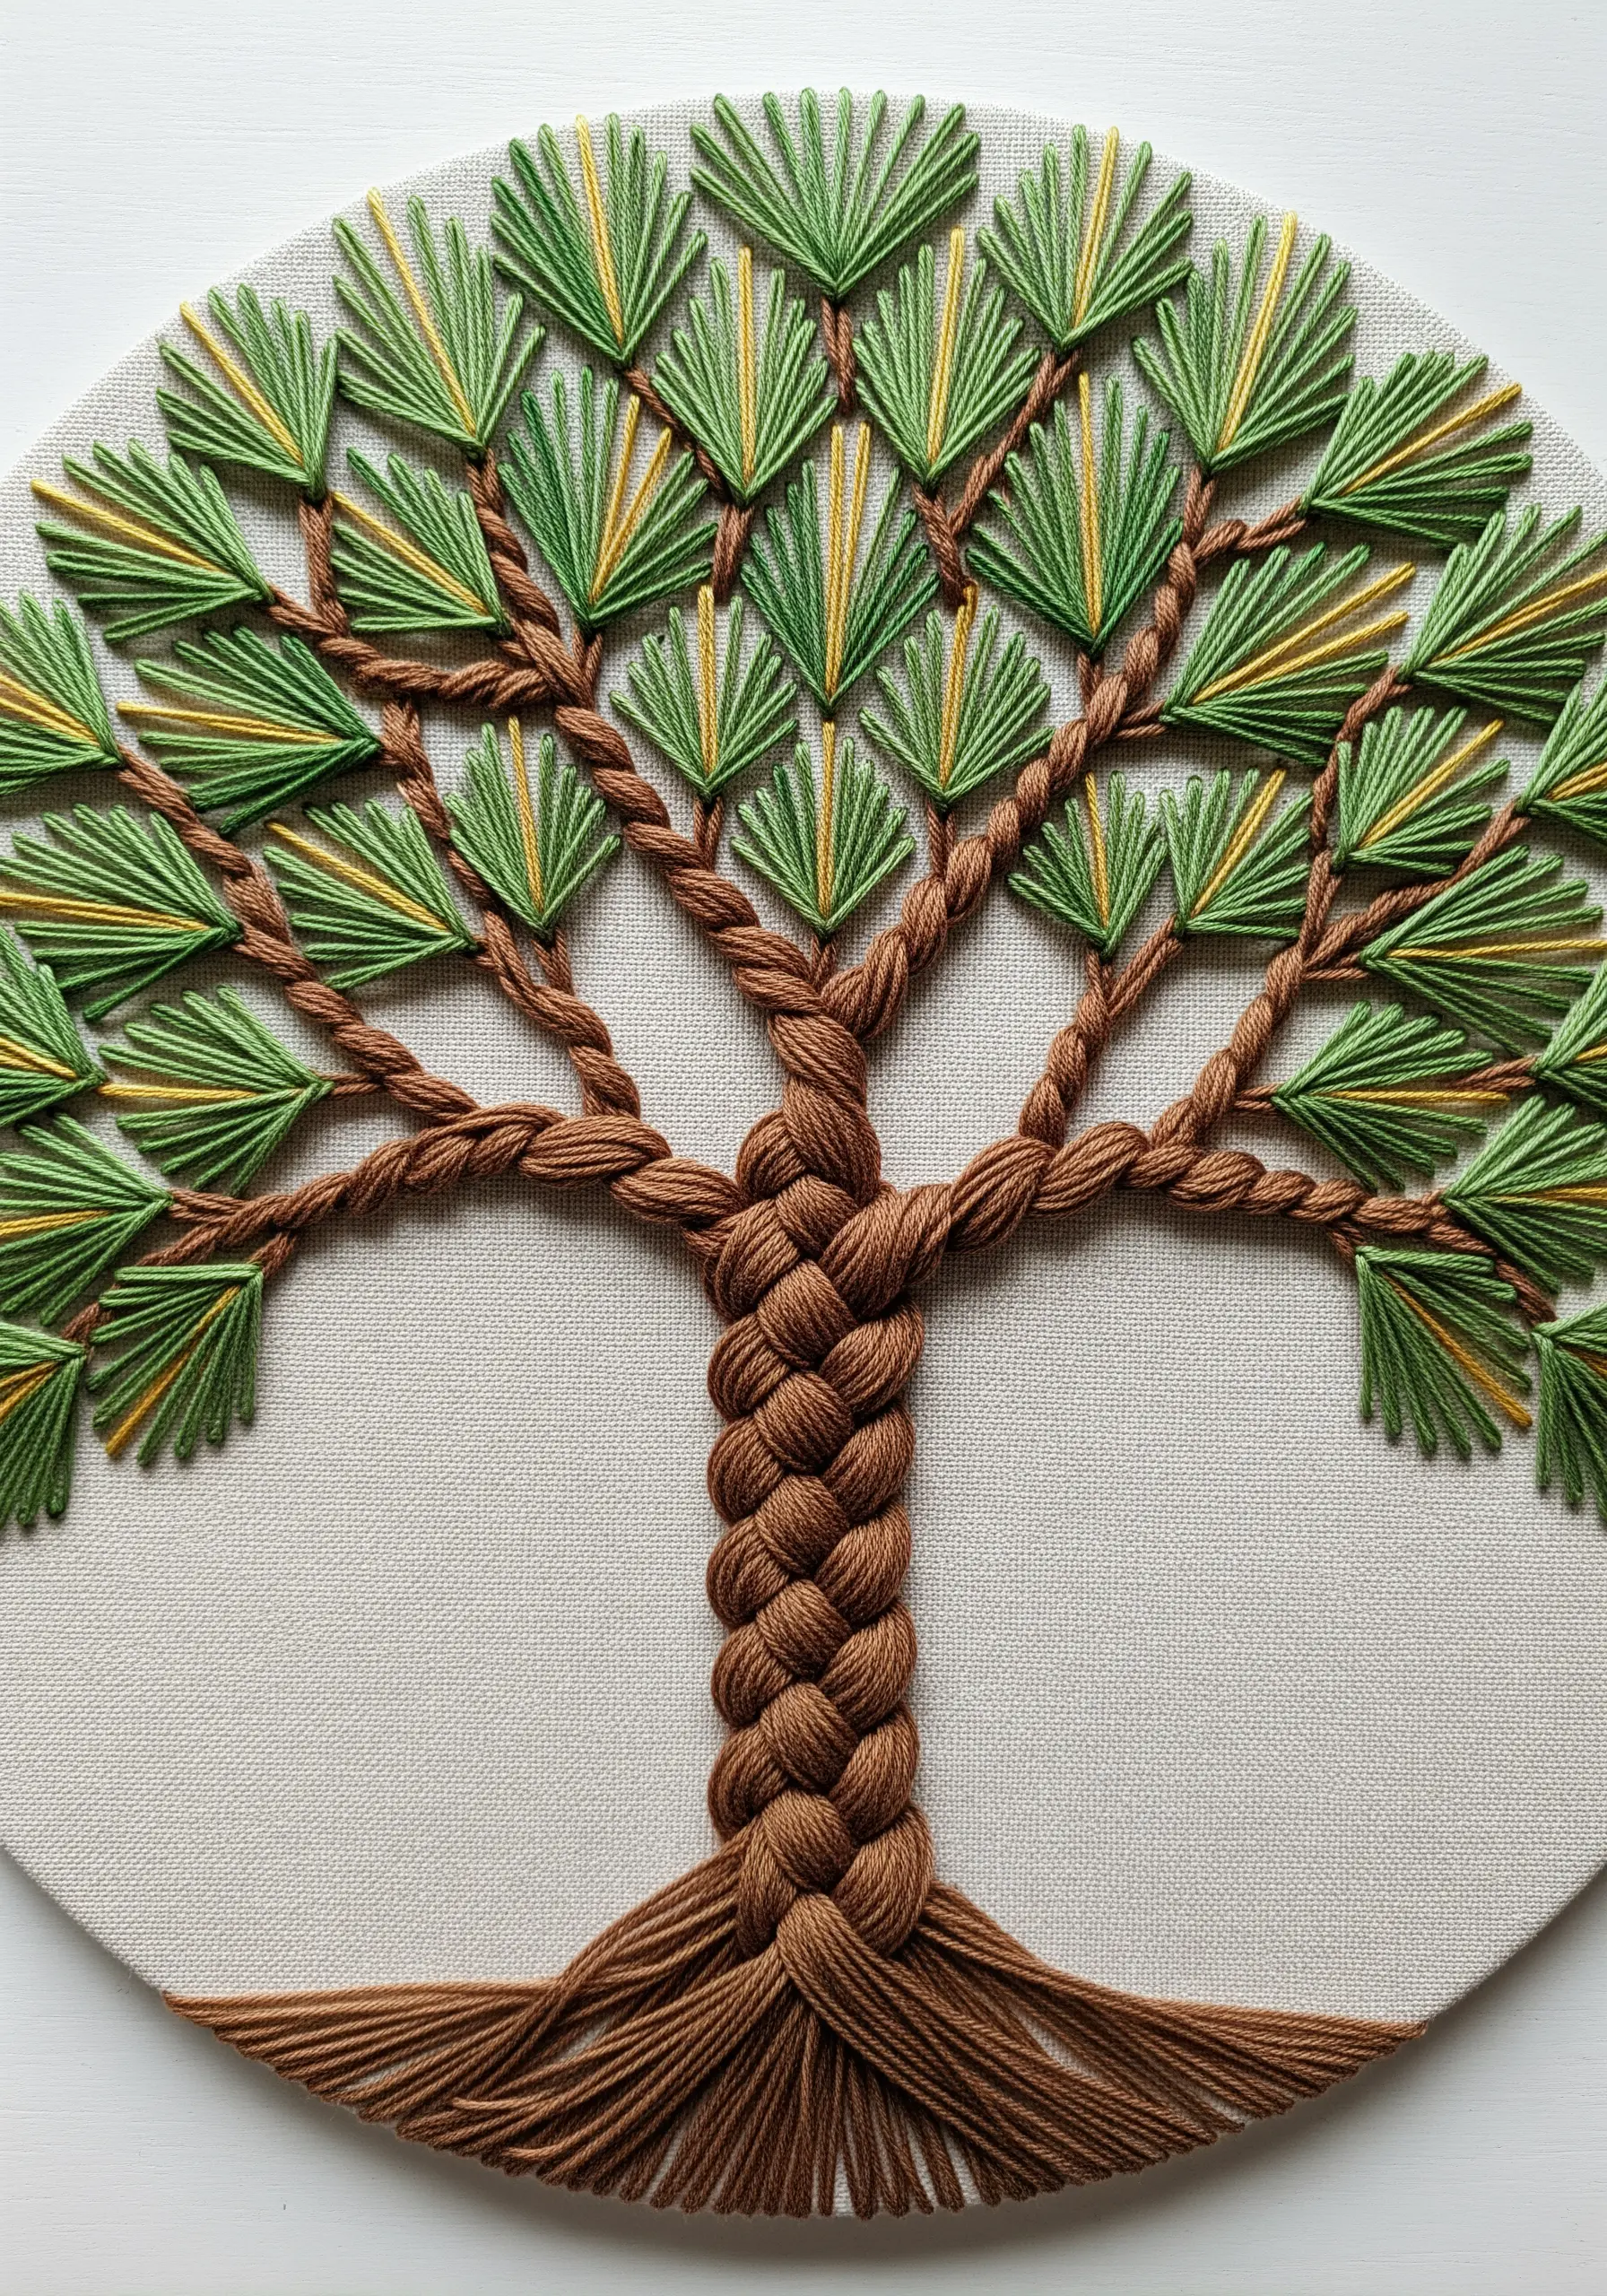
Add rich, dimensional texture to your work by combining different thread techniques in one piece.
Create a thick, sturdy tree trunk by braiding multiple strands of embroidery floss together before couching them onto your fabric.
Contrast this heavy element with delicate, light leaves made from simple, fanned-out straight stitches.
This mix of textures makes the tree feel more organic and visually interesting.
26. Use Contrast to Create a Graphic Animal Portrait
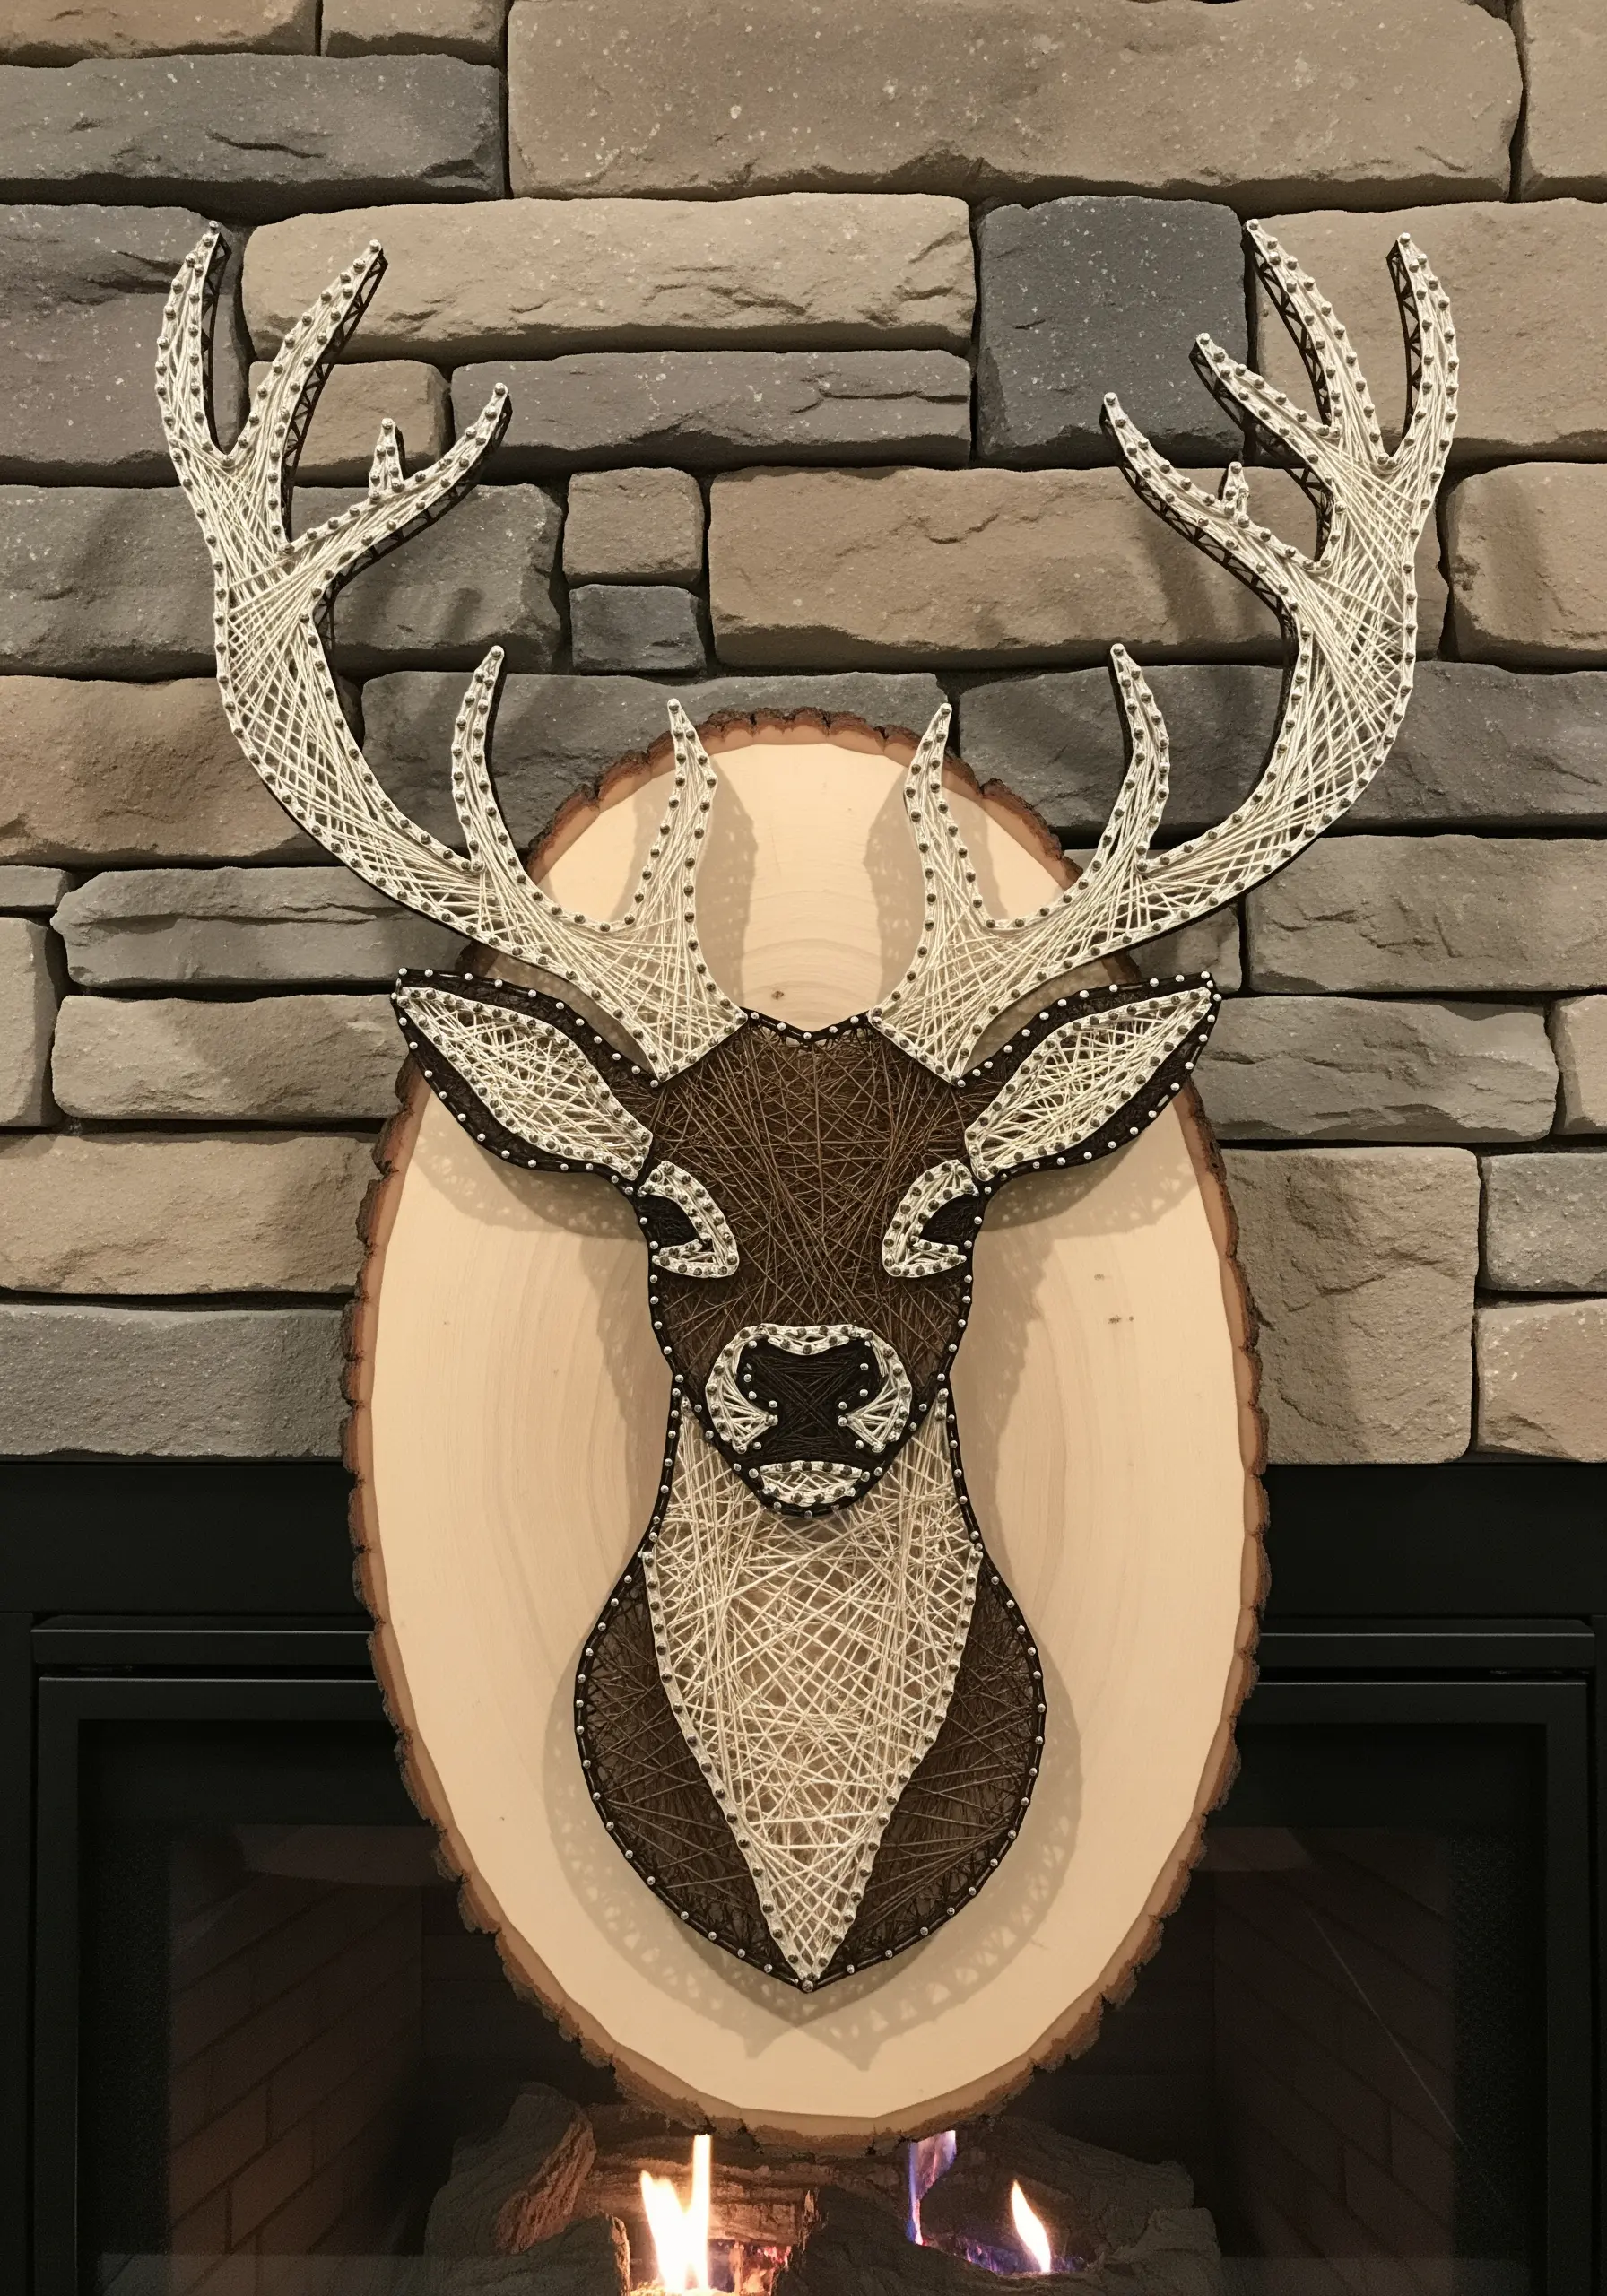
For a striking, modern-rustic look, design your motif with high contrast in mind.
Combine a densely filled-in area (the brown face) with sparsely filled or outlined sections (the white accents and antlers).
This technique creates a powerful graphic quality that simplifies the animal’s form while retaining its essential character.
Mounting the finished piece on a natural wood slice enhances the connection to nature and is perfect for animal-themed pillow stitching ideas for nursery and playroom decor too.
27. Make Hardware a Central Design Element
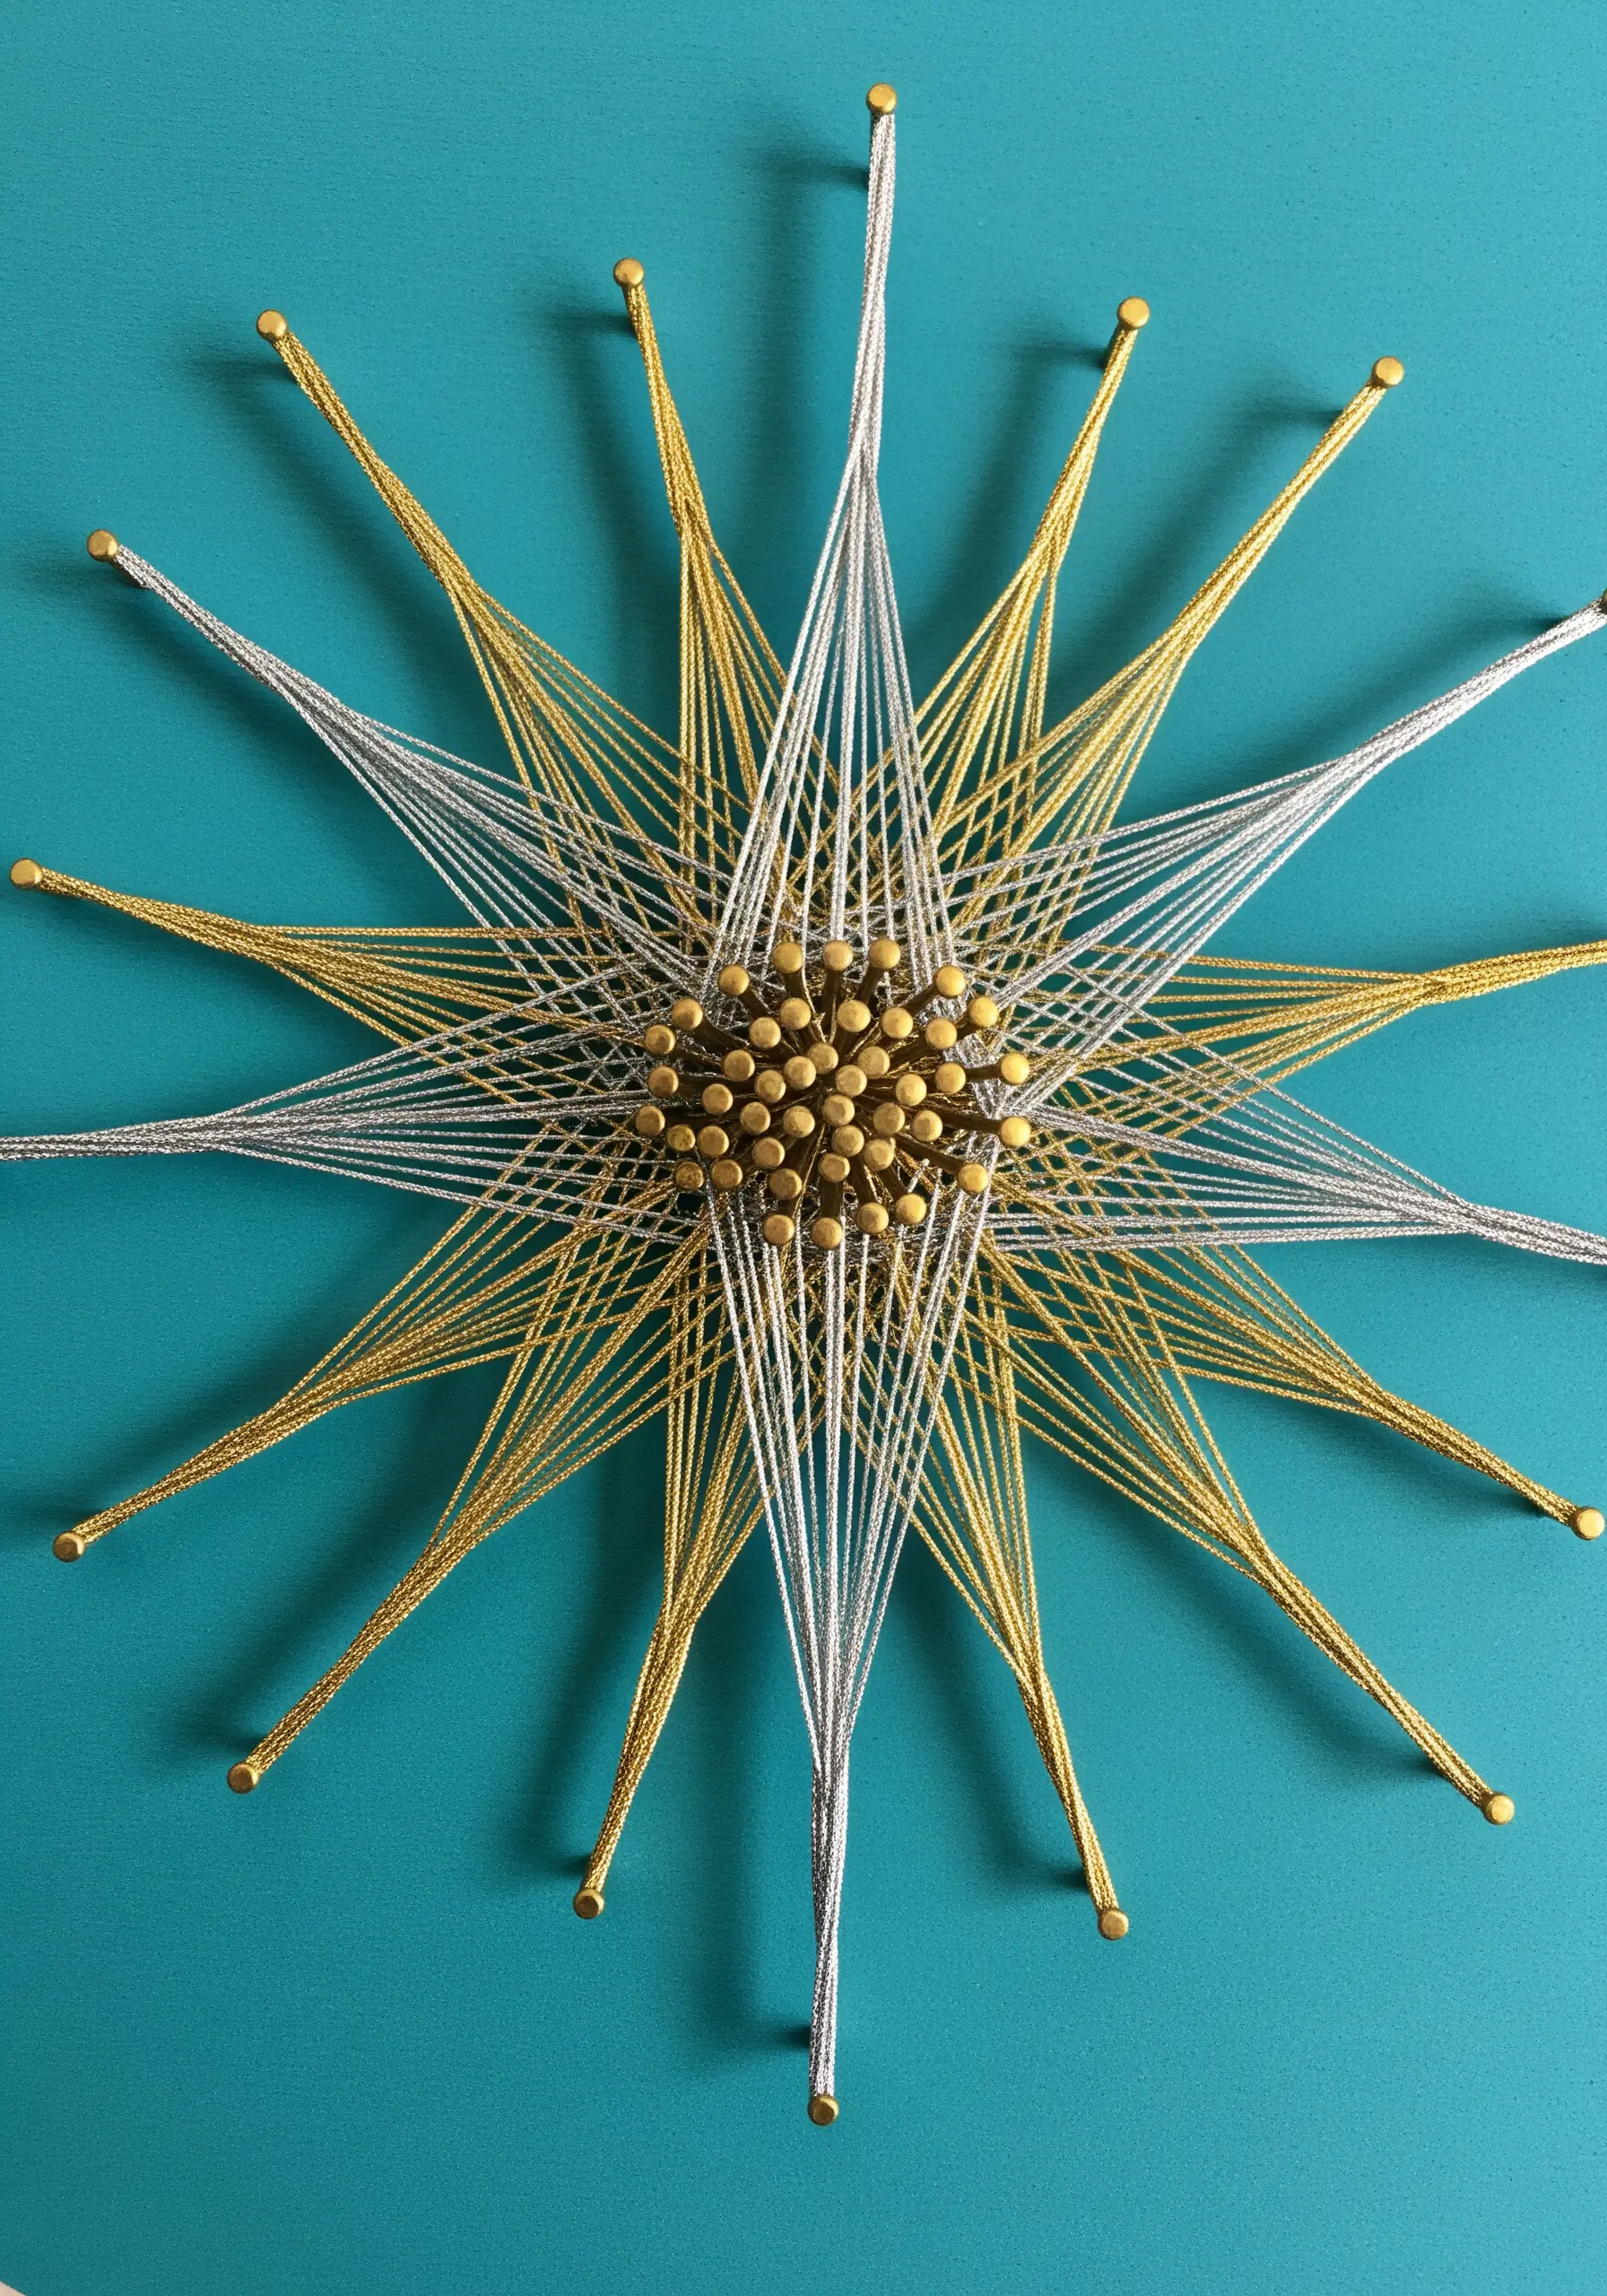
Don’t just hide your anchor points—celebrate them.
In this starburst design, the cluster of brass upholstery tacks at the center becomes a decorative element in its own right.
The metallic shine of the tacks complements the gold and silver threads, creating a cohesive and luxurious finish.
This approach turns a functional necessity into an integral part of the artwork’s aesthetic.
28. Frame Your Design with a Thematic Outline
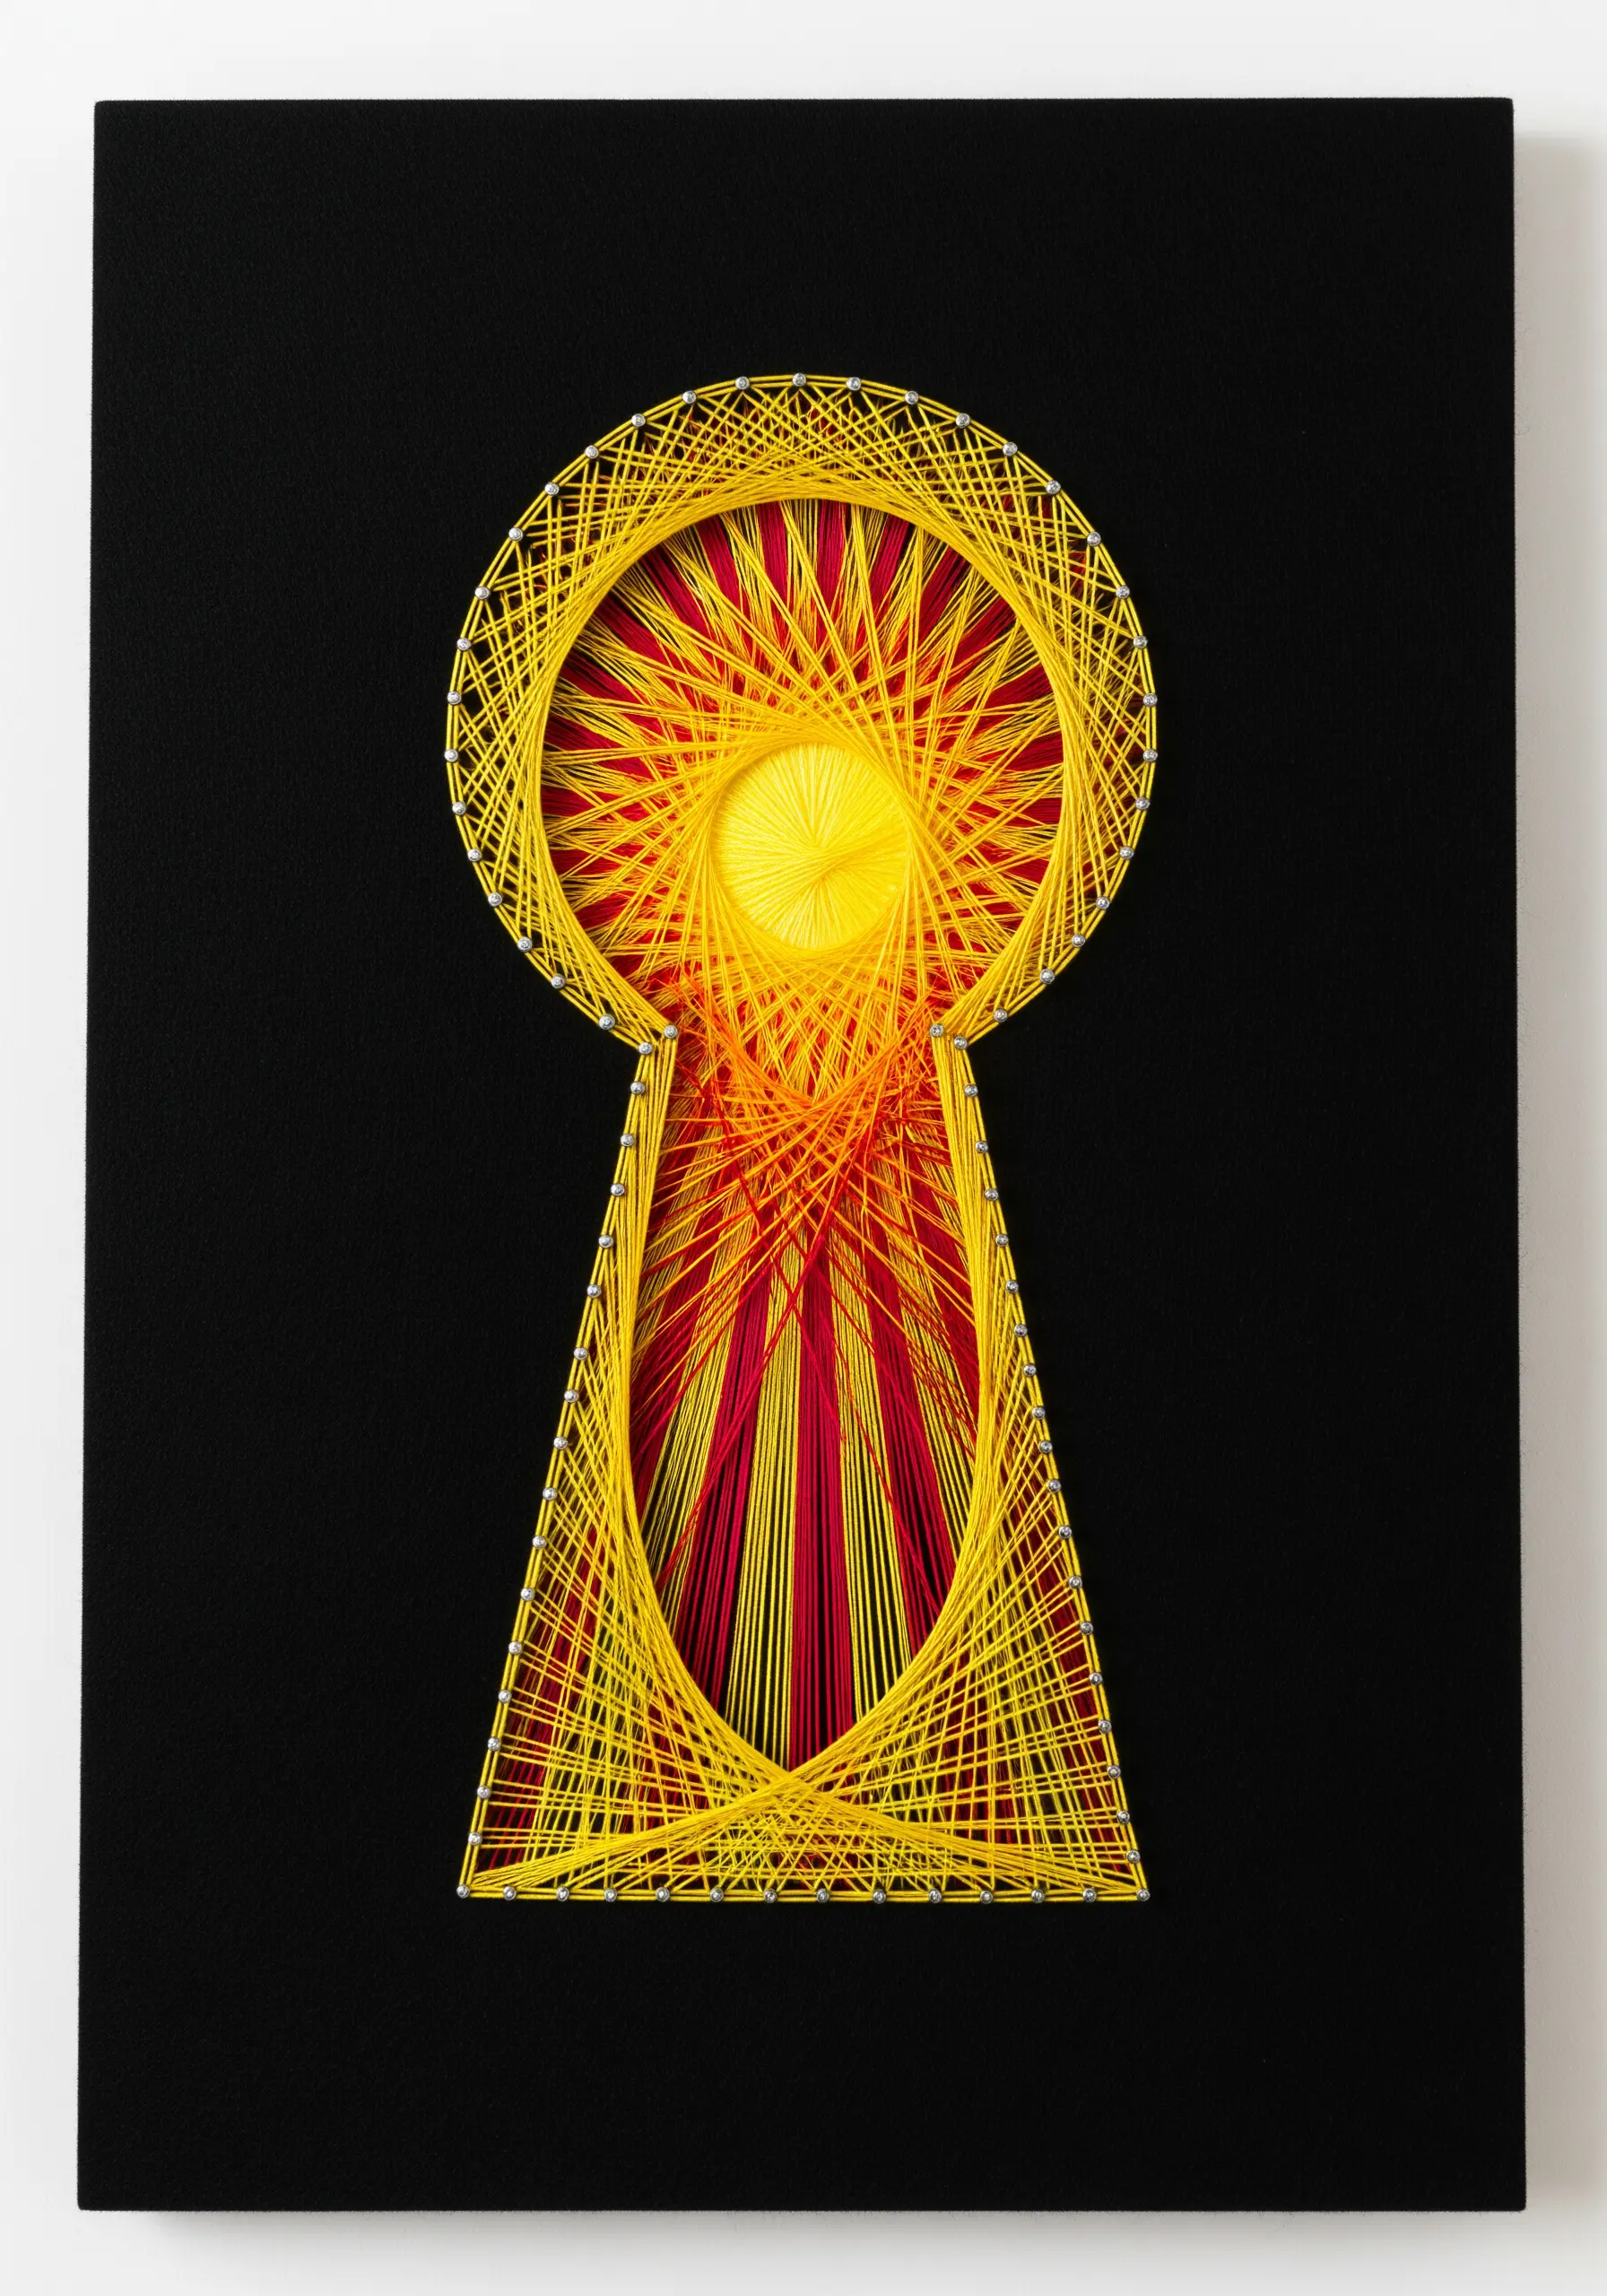
Use the outline of your piece to add another layer of narrative and meaning.
Instead of a standard square or circle, this radiating sunburst is contained within the shape of a keyhole.
This clever framing transforms a simple geometric pattern into a conceptual piece, suggesting themes of discovery, secrets, or opportunity.
It encourages the viewer to see the vibrant interior as something to be unlocked.
29. Create a Sampler of Geometric Techniques
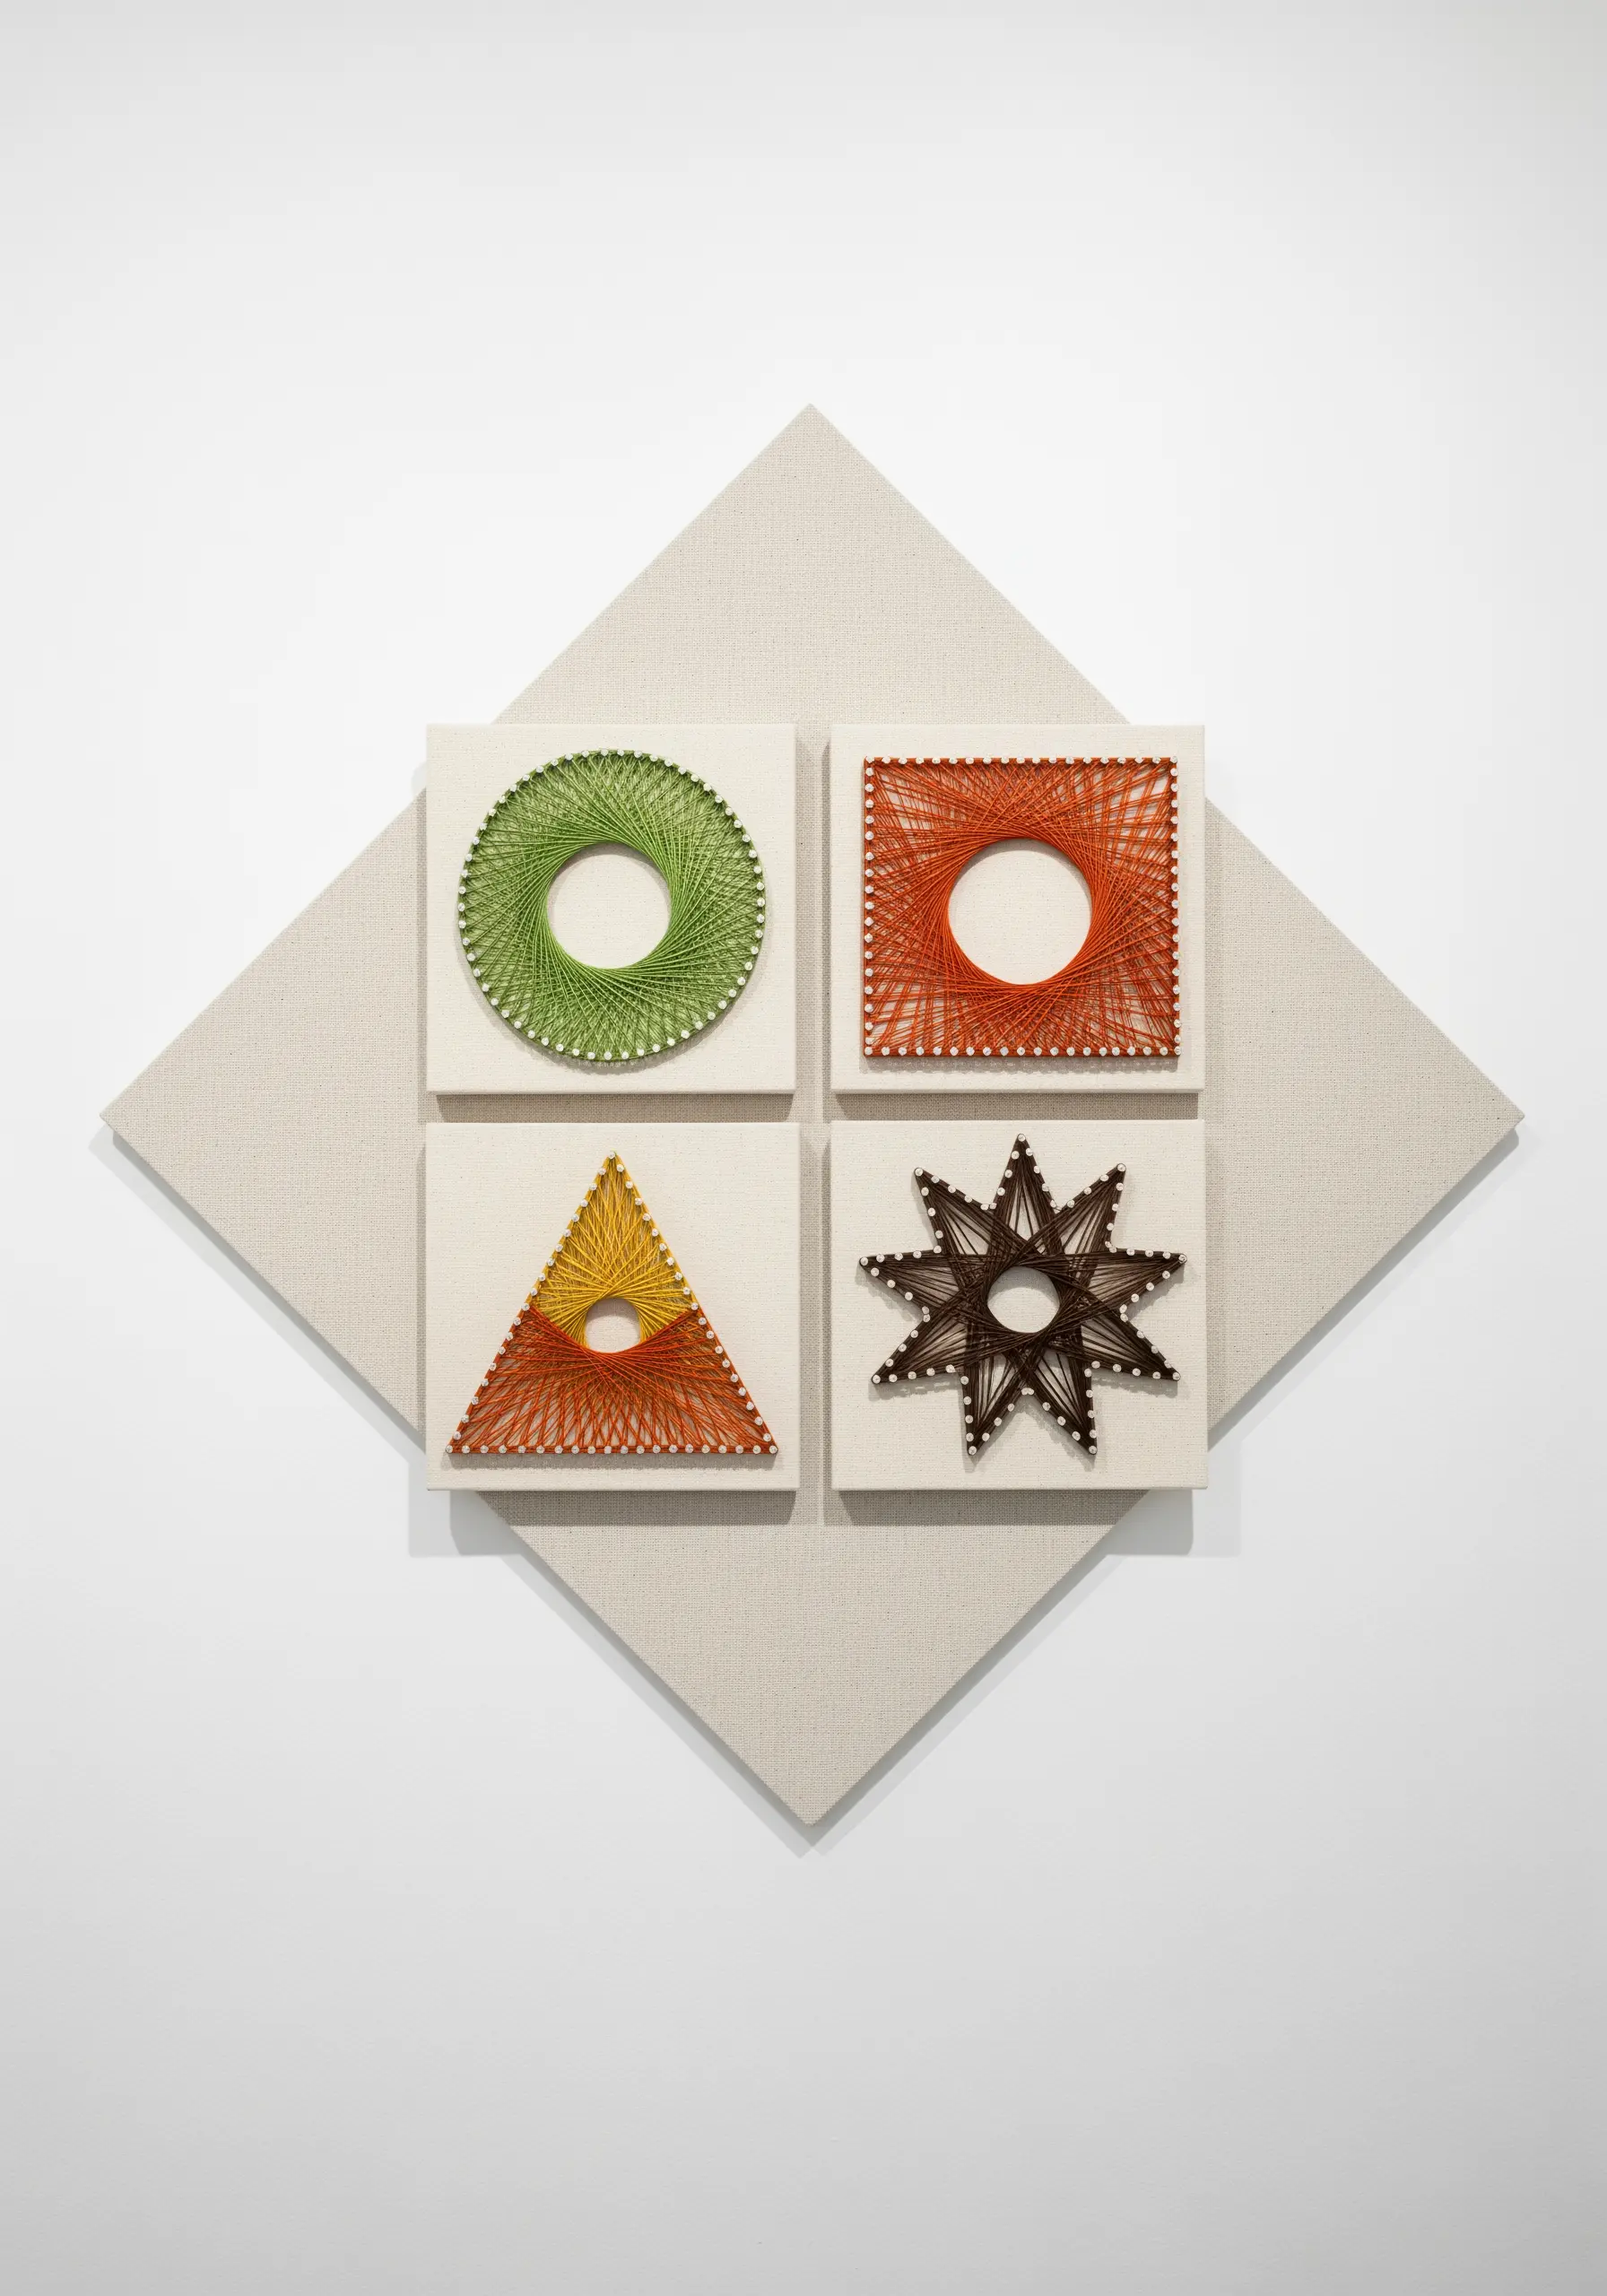
Practice and showcase different string art effects by creating a sampler with multiple small panels.
Dedicate each panel to a different geometric shape—a circle, square, triangle, or star.
Experiment with how you stretch the threads in each one to create different patterns and textures.
This is an excellent way to master the fundamentals and discover which techniques you enjoy most, similar to creating nature-themed embroidery samplers to practice real plant shapes.
30. Suggest Form with Open, Airy Stitches
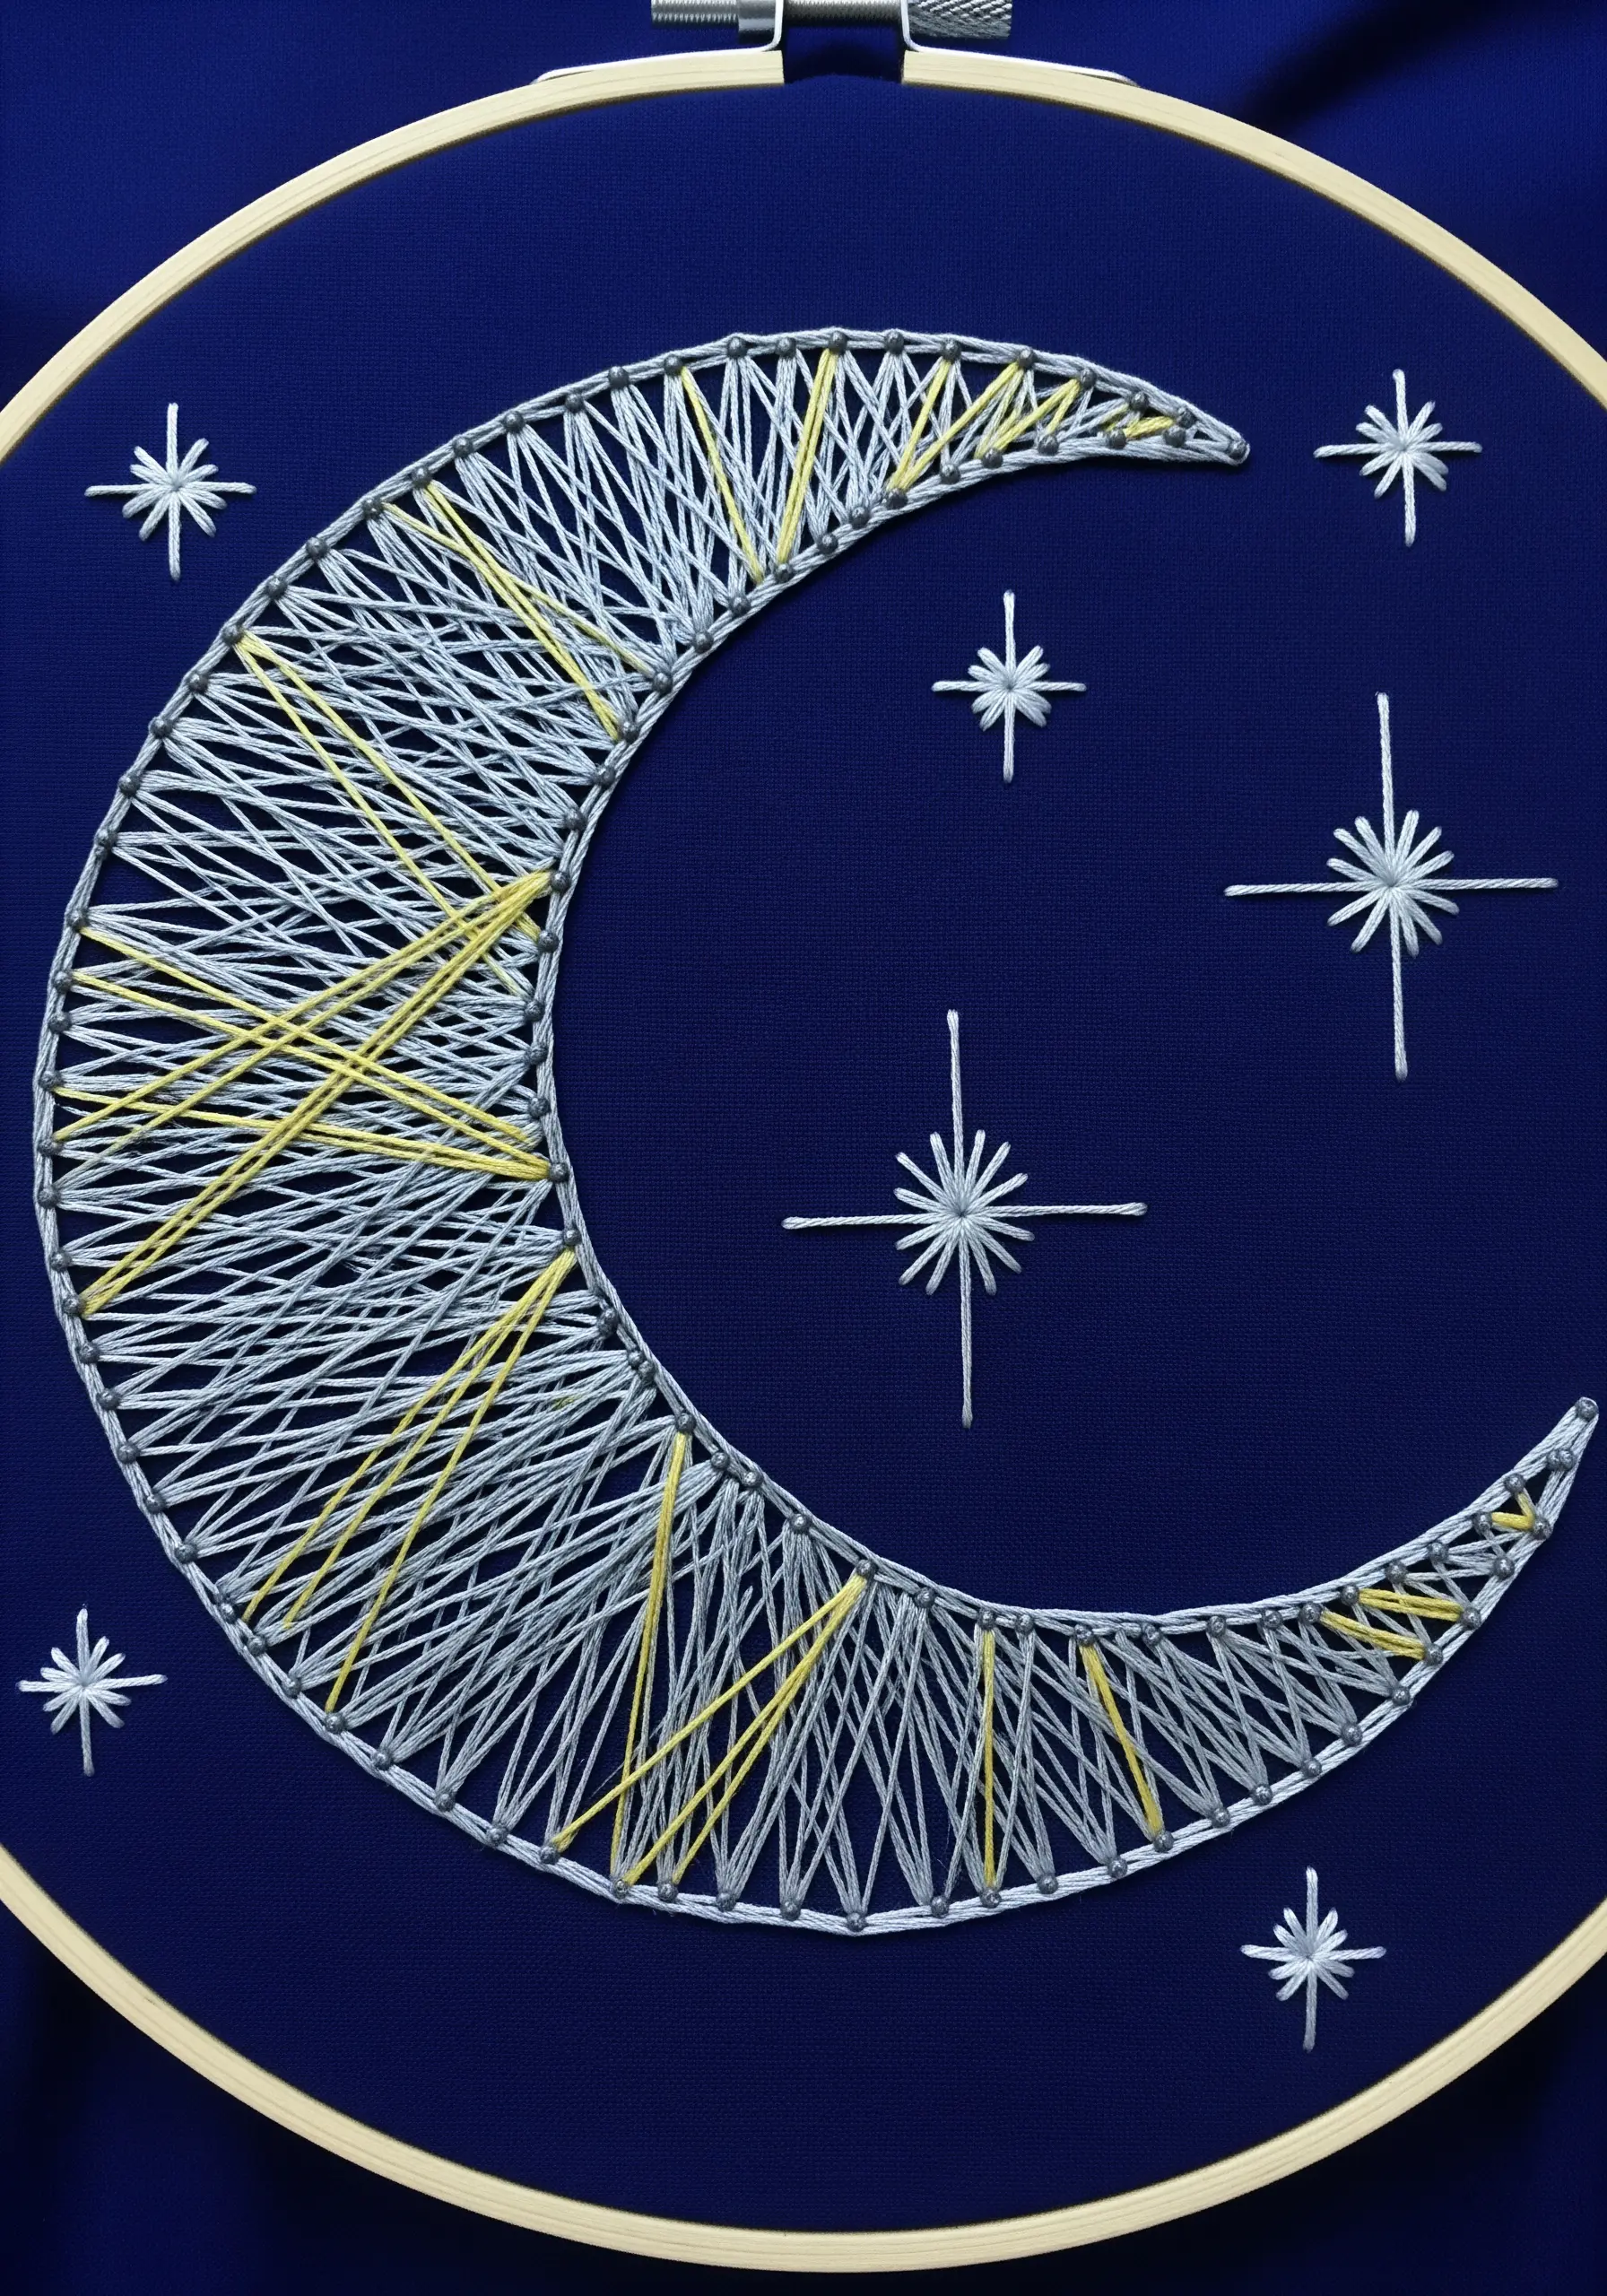
You don’t always need to fill a shape completely to define it.
For a delicate, ethereal effect, use a more open, random crisscross of stitches to suggest the shape of the moon.
This technique allows the dark background fabric to show through, giving the motif a light, translucent quality.
A few intersecting lines of a contrasting color, like the yellow here, can add a touch of warmth and visual interest without adding weight.
31. Add Embellishments for a Luxurious Finish
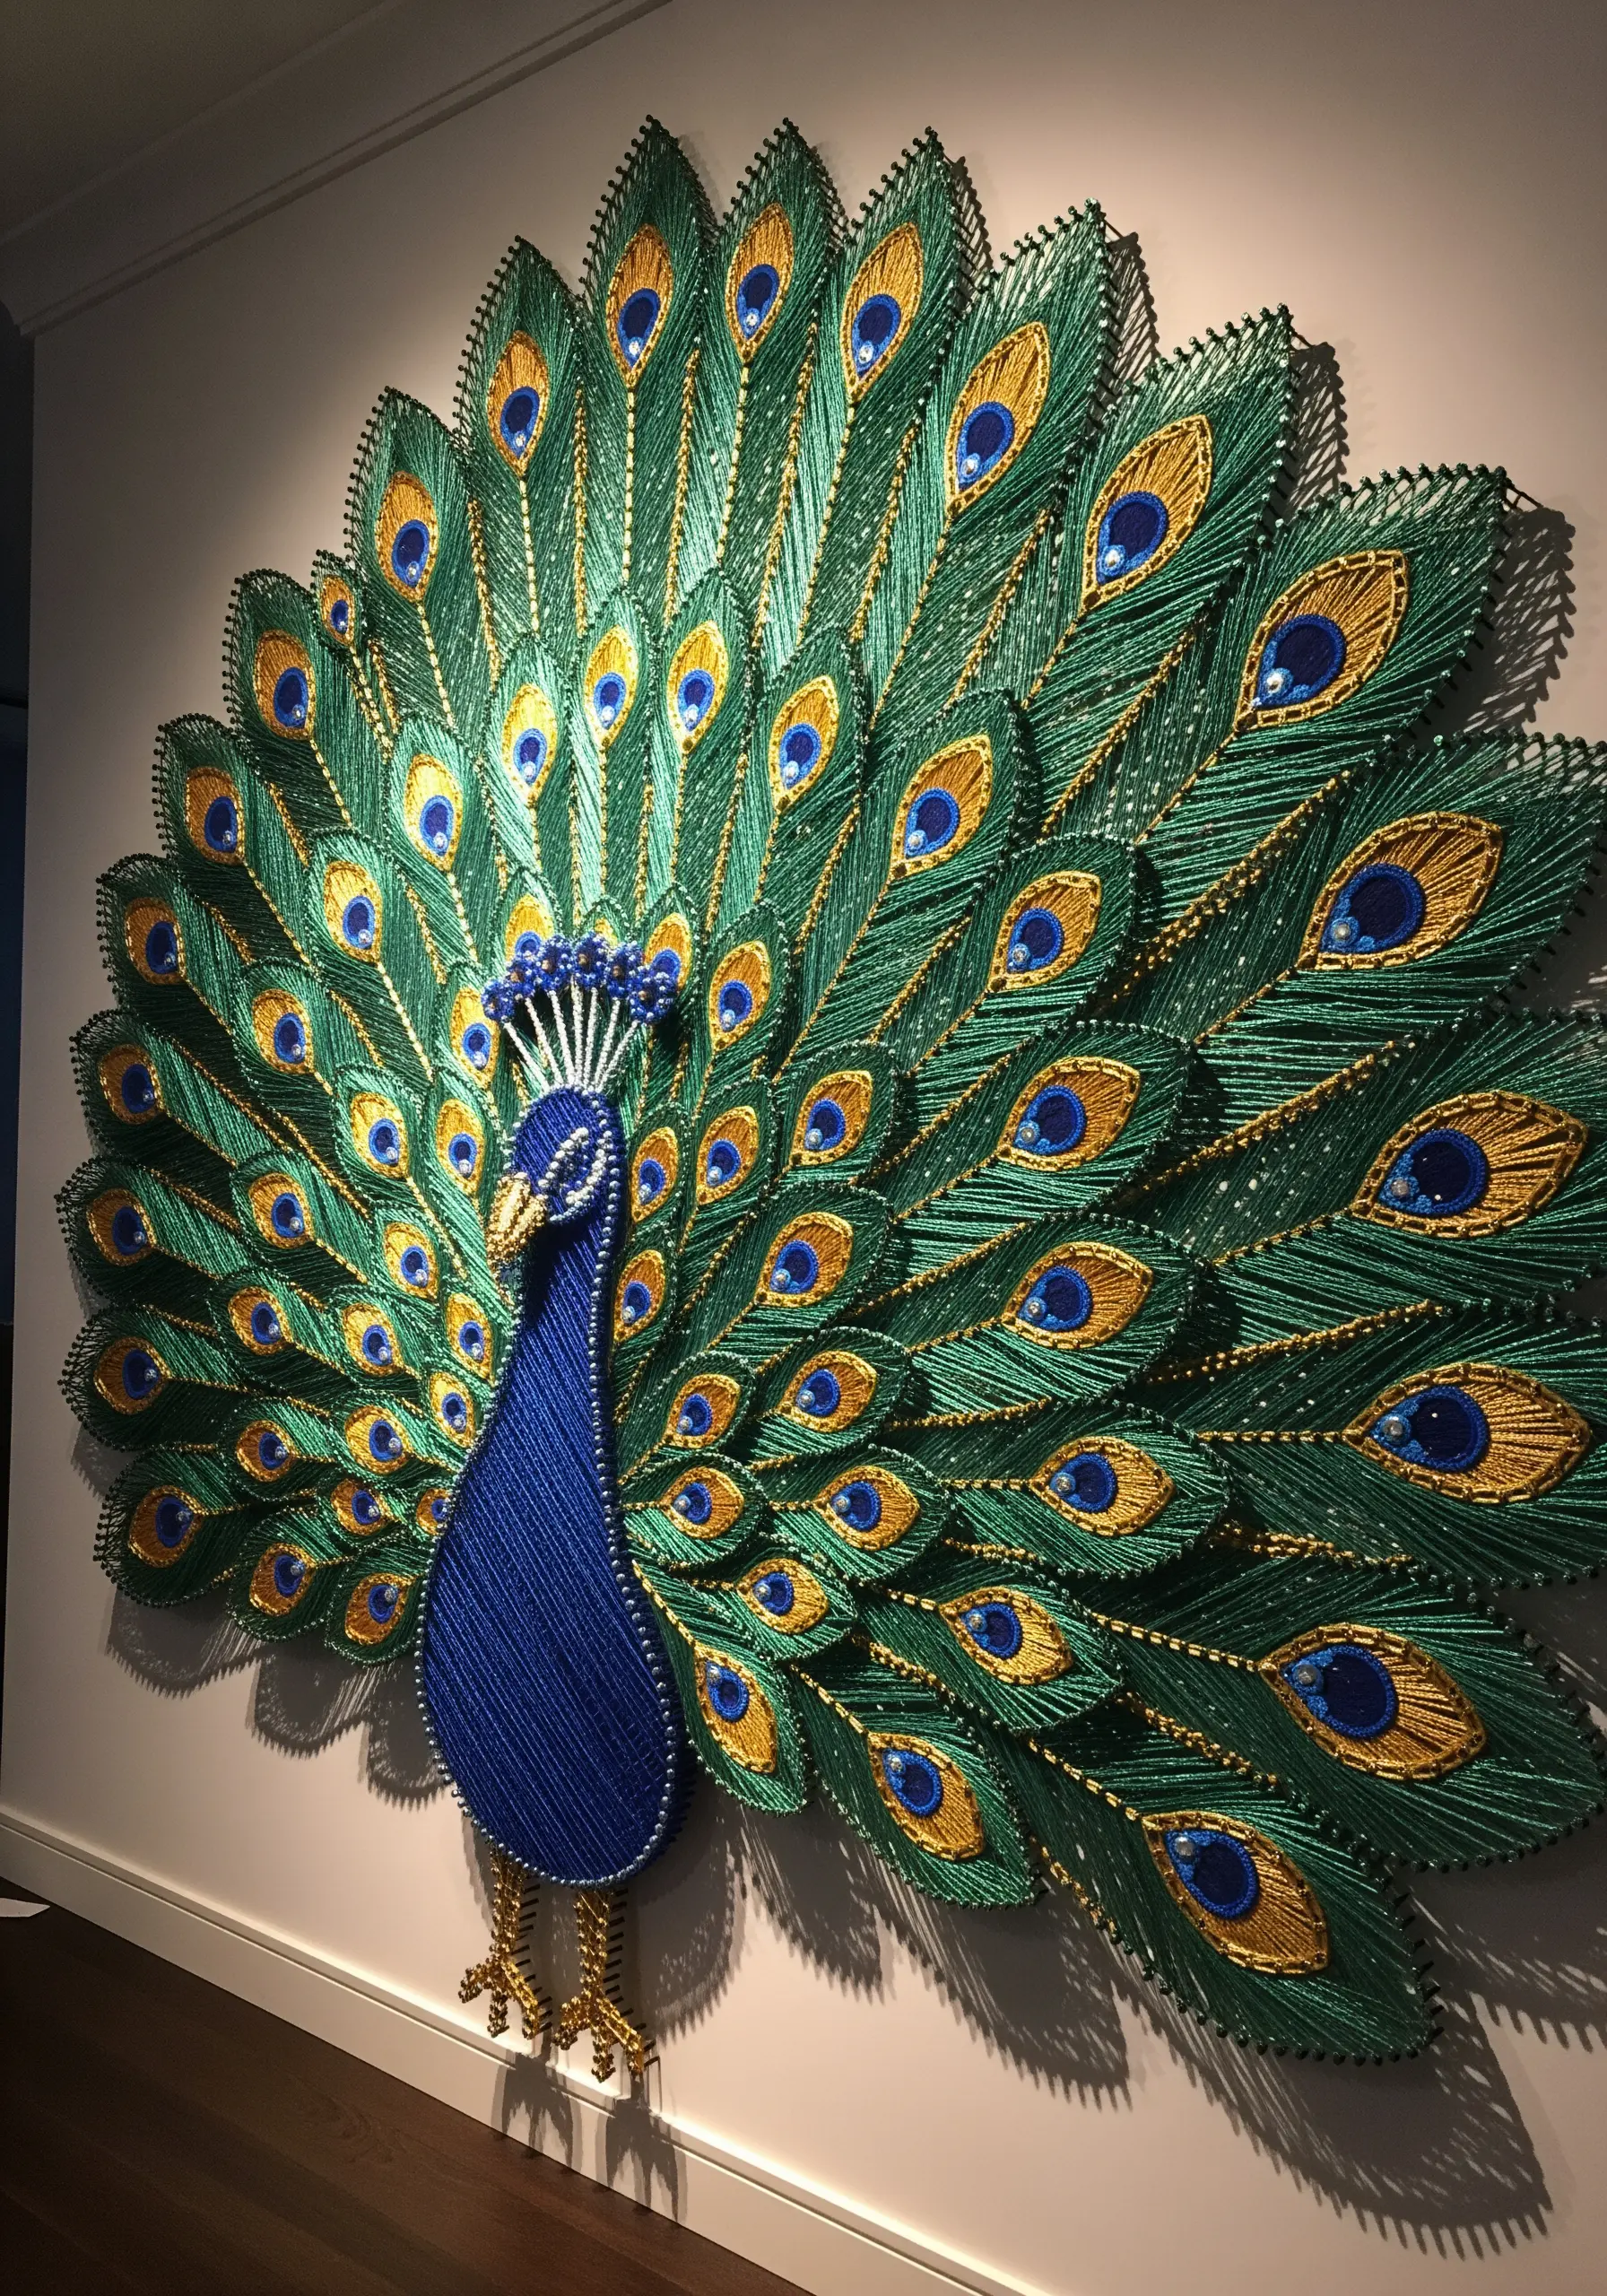
For a truly spectacular piece, combine your string art with other craft materials.
On this peacock, the eyes of the feathers are created not with thread, but with inset metallic paper or beads that catch the light.
Outlining each feather with a heavy gold cord using a couching stitch adds definition and a touch of opulence.
These mixed-media additions elevate the piece from a simple thread drawing to a rich, multi-textured showpiece.
32. Create an Optical Rhythm with Concentric Circles
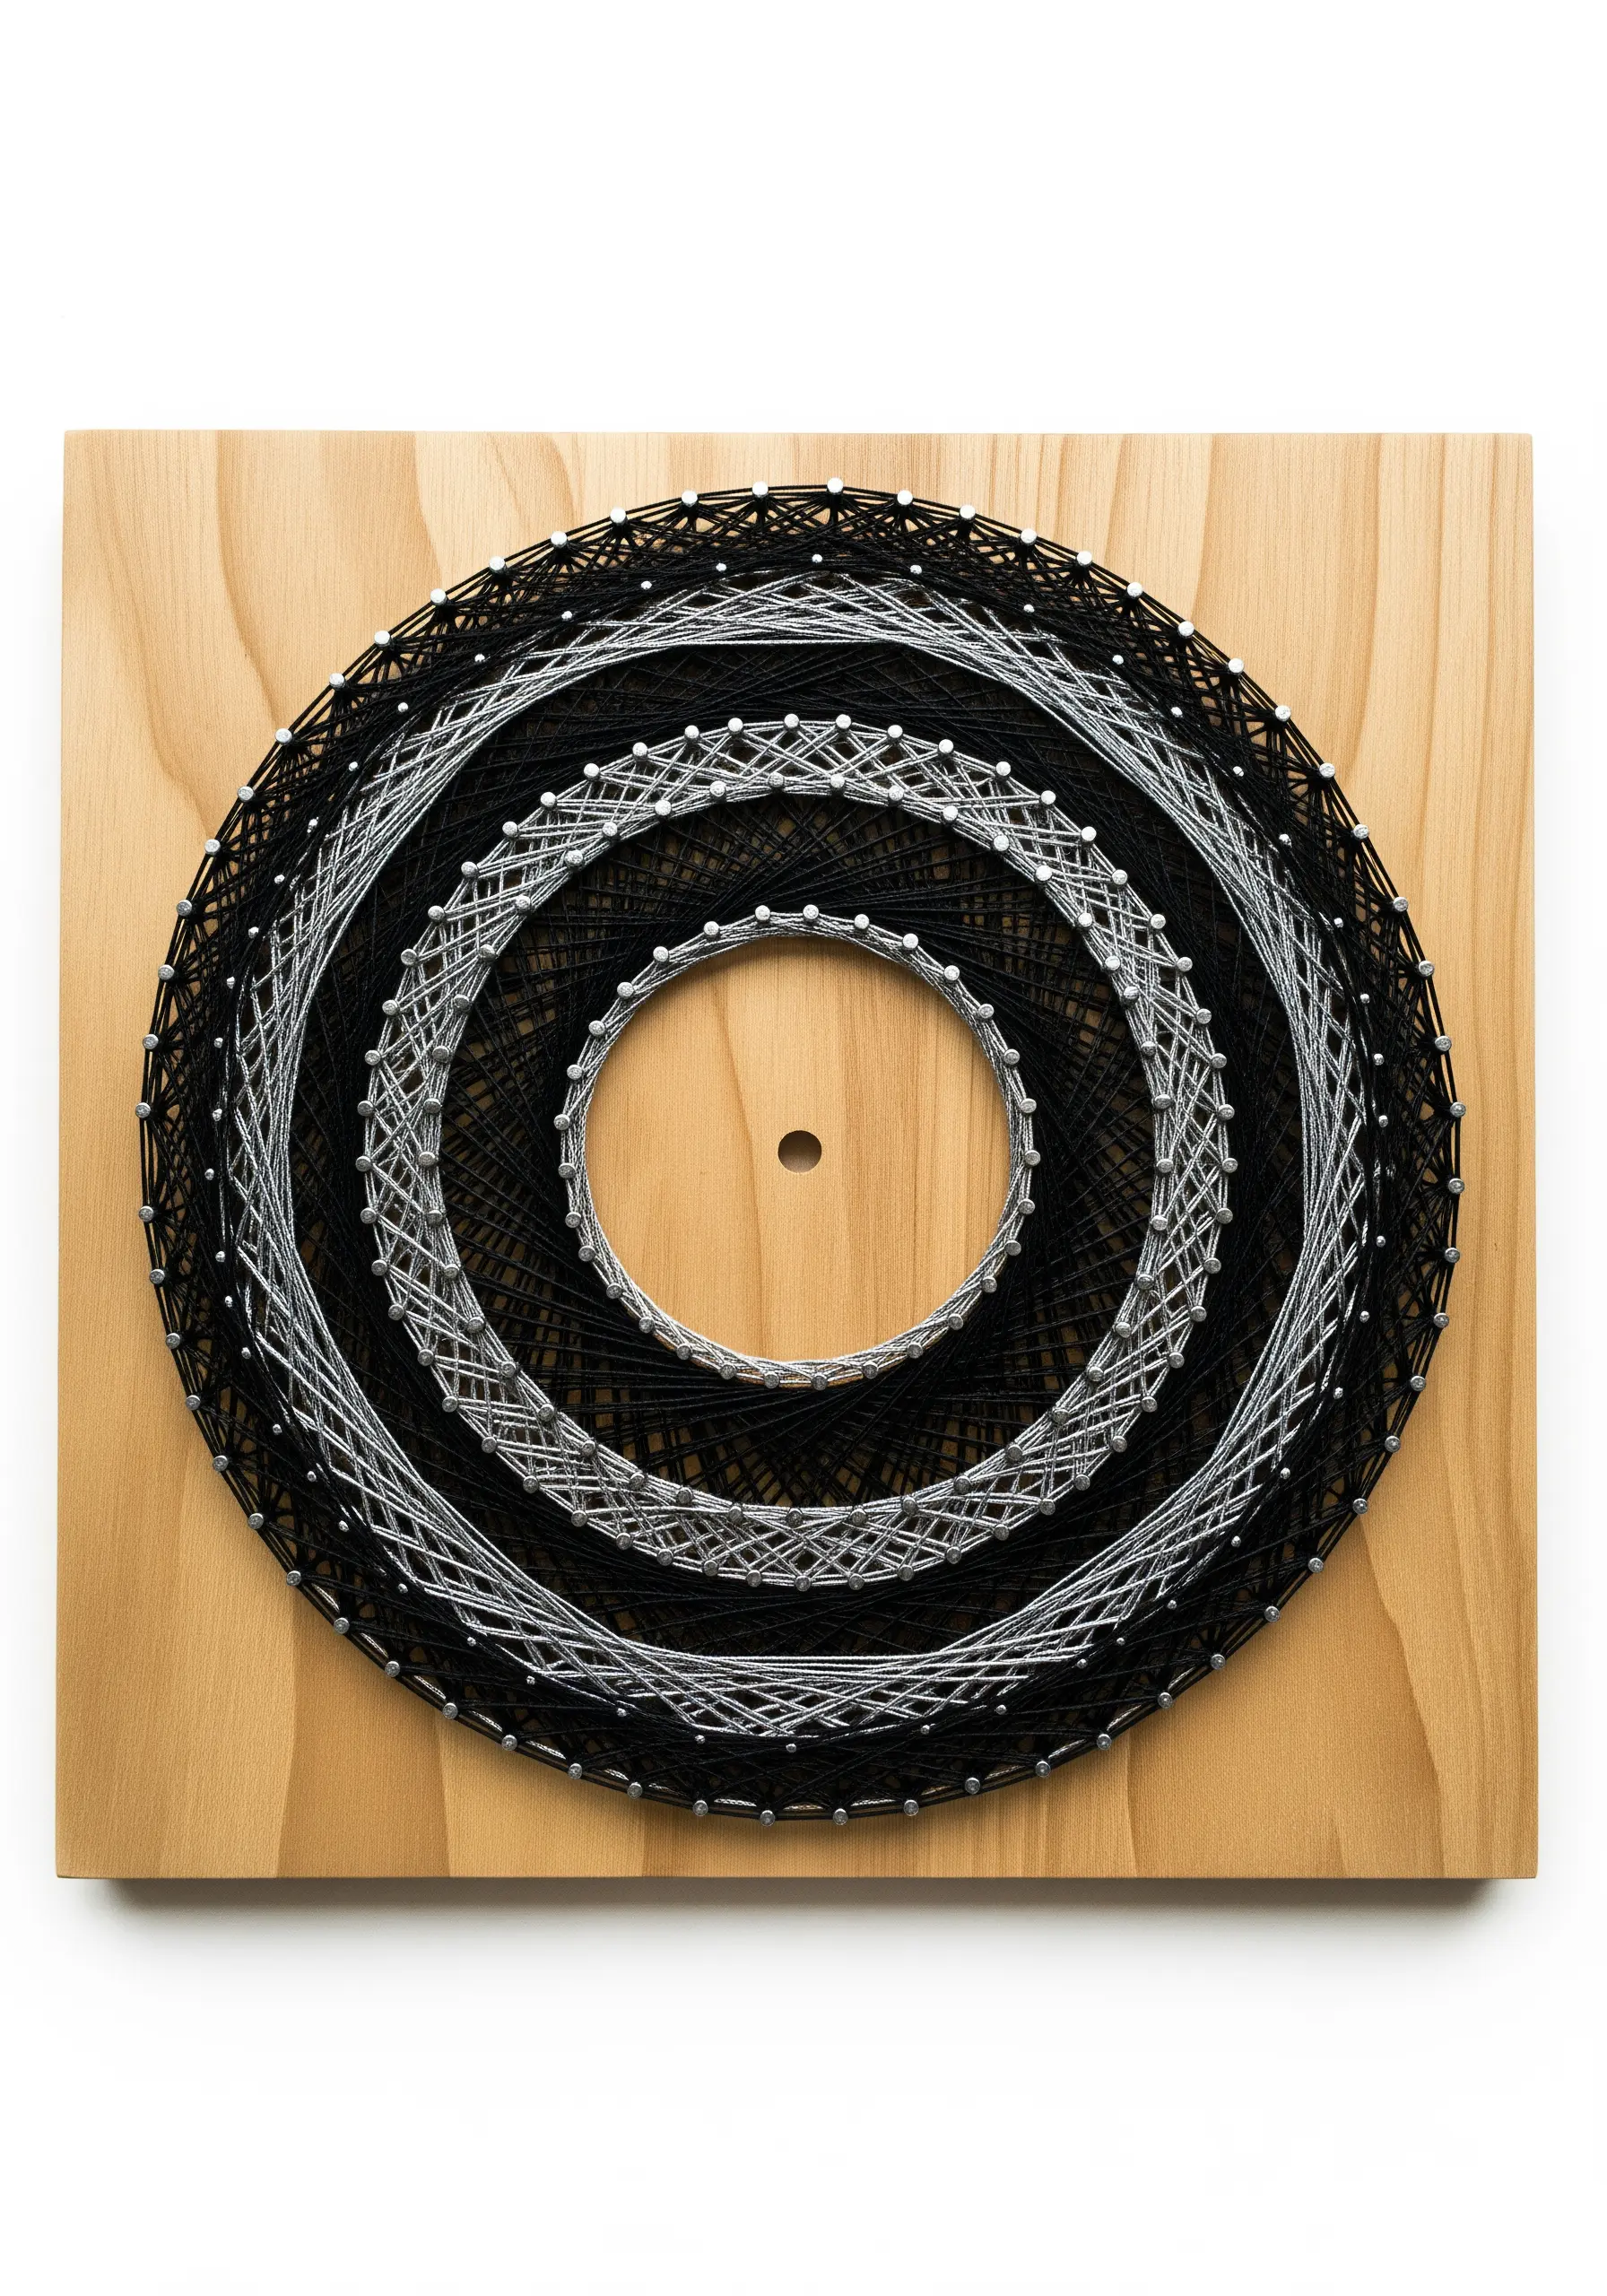
Play with optical effects by arranging your threads in concentric circles and alternating colors.
The pattern in each ring is simple, but the repetition and the shift from black to white and back again create a visual vibration.
This design pulls the viewer’s eye toward the center, making it a powerful and hypnotic composition that works beautifully on a square canvas.
33. Combine String Art with Appliqué Details
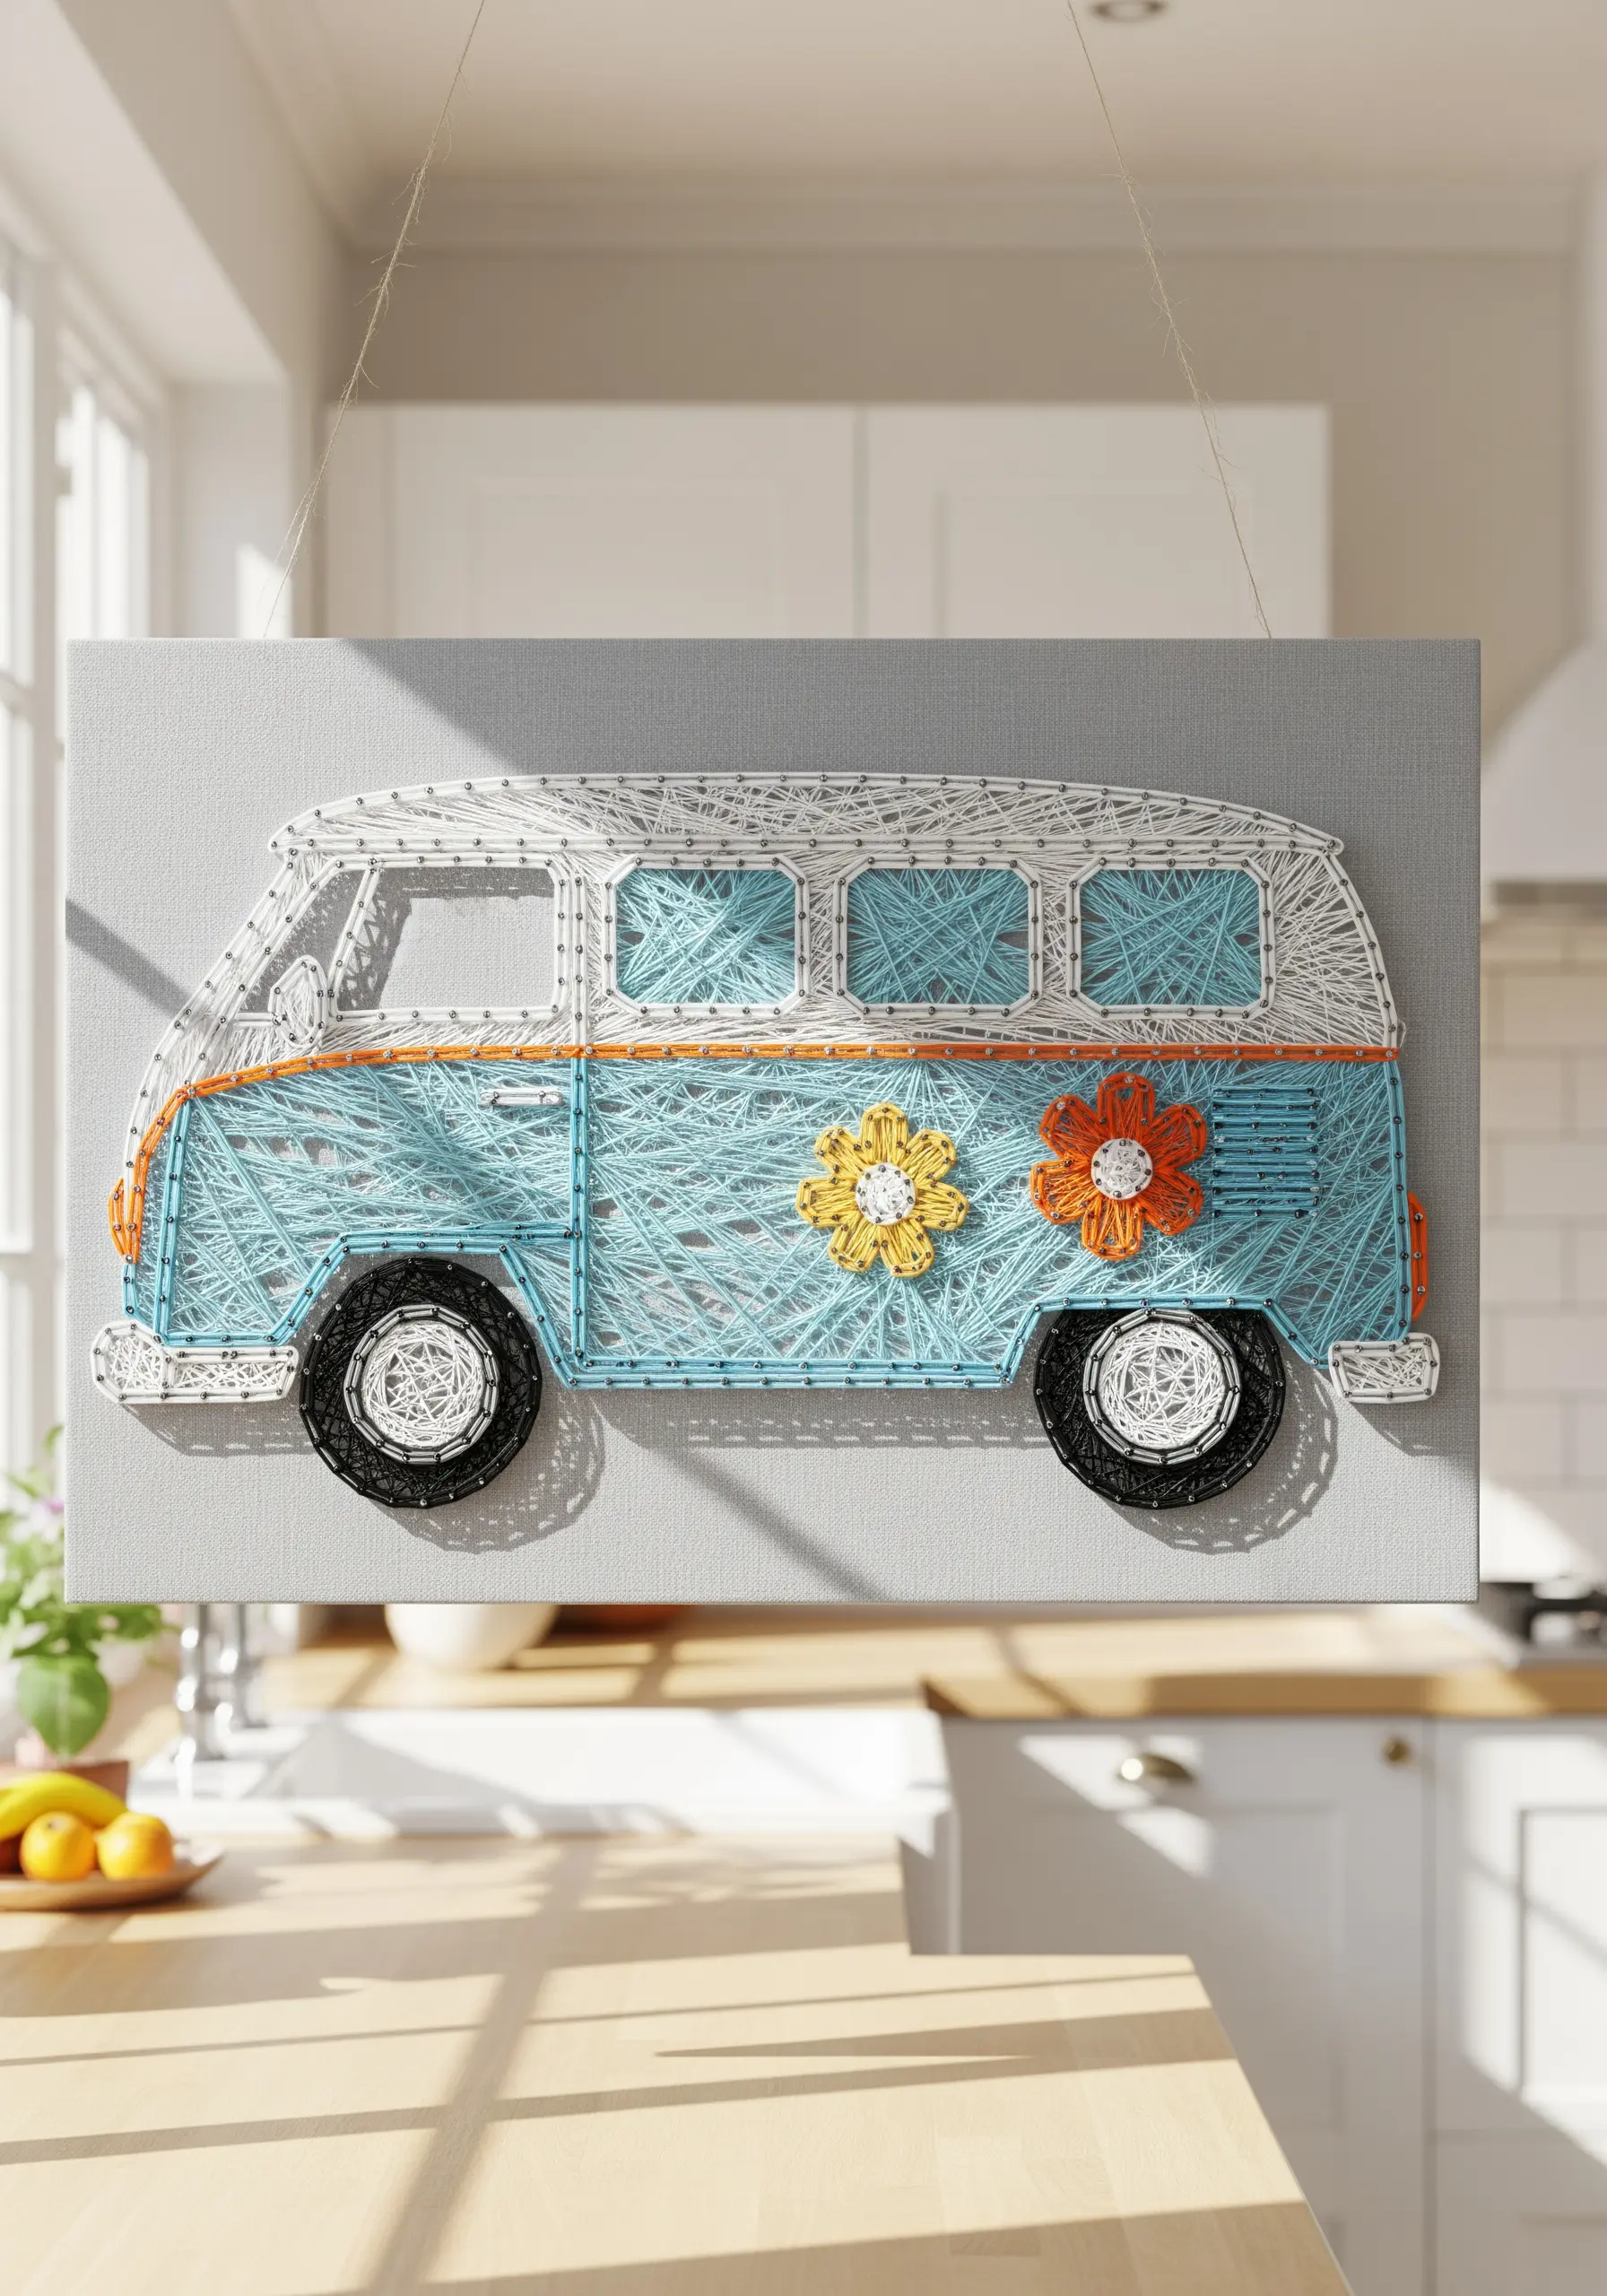
Add charming details and a pop of texture to your string art by incorporating small, separately stitched appliqués.
First, create the main body of the van using the classic string art technique to fill the windows and panels.
Then, stitch small, cheerful flowers on a separate piece of fabric, cut them out, and attach them to the surface.
This playful combination of techniques adds a delightful, handmade quality that feels quintessentially ’70s and is reminiscent of cartoon-style embroidery ideas for kids’ wear that feel playful & happy.
34. Achieve Maximum Impact with High-Contrast Botanicals

For a clean, contemporary take on botanical art, simplify your design to its essential lines.
Choose a single, vibrant color of thread and stitch your leaf motifs onto a solid black background.
This high-contrast combination eliminates all distractions, forcing the eye to focus on the elegant shapes and intricate vein patterns of the leaves.
This approach transforms a natural subject into a bold, graphic statement, perfect for anyone who loves botanical line art embroidery patterns.


