

Your tote bag is more than just a utility item; it’s a canvas waiting for your creative touch. If you’ve been looking for a way to move beyond simple patterns and make your embroidery feel more intentional and polished, this is the perfect place to start.
Unlike a delicate piece of clothing or a formal wall hanging, a tote bag is wonderfully practical and forgiving. It invites experimentation. It’s a low-pressure project where you can practice bold colors, new textures, and ambitious compositions that you’ll get to see and use every day.
Here, we’ll move beyond just suggesting motifs. We will explore specific techniques—from thread painting and textural stitches to color theory and composition—that will transform your work. You’ll learn not just what to stitch, but how to make it look refined, modern, and uniquely yours.
1. Render Pomegranates with Photorealistic Detail
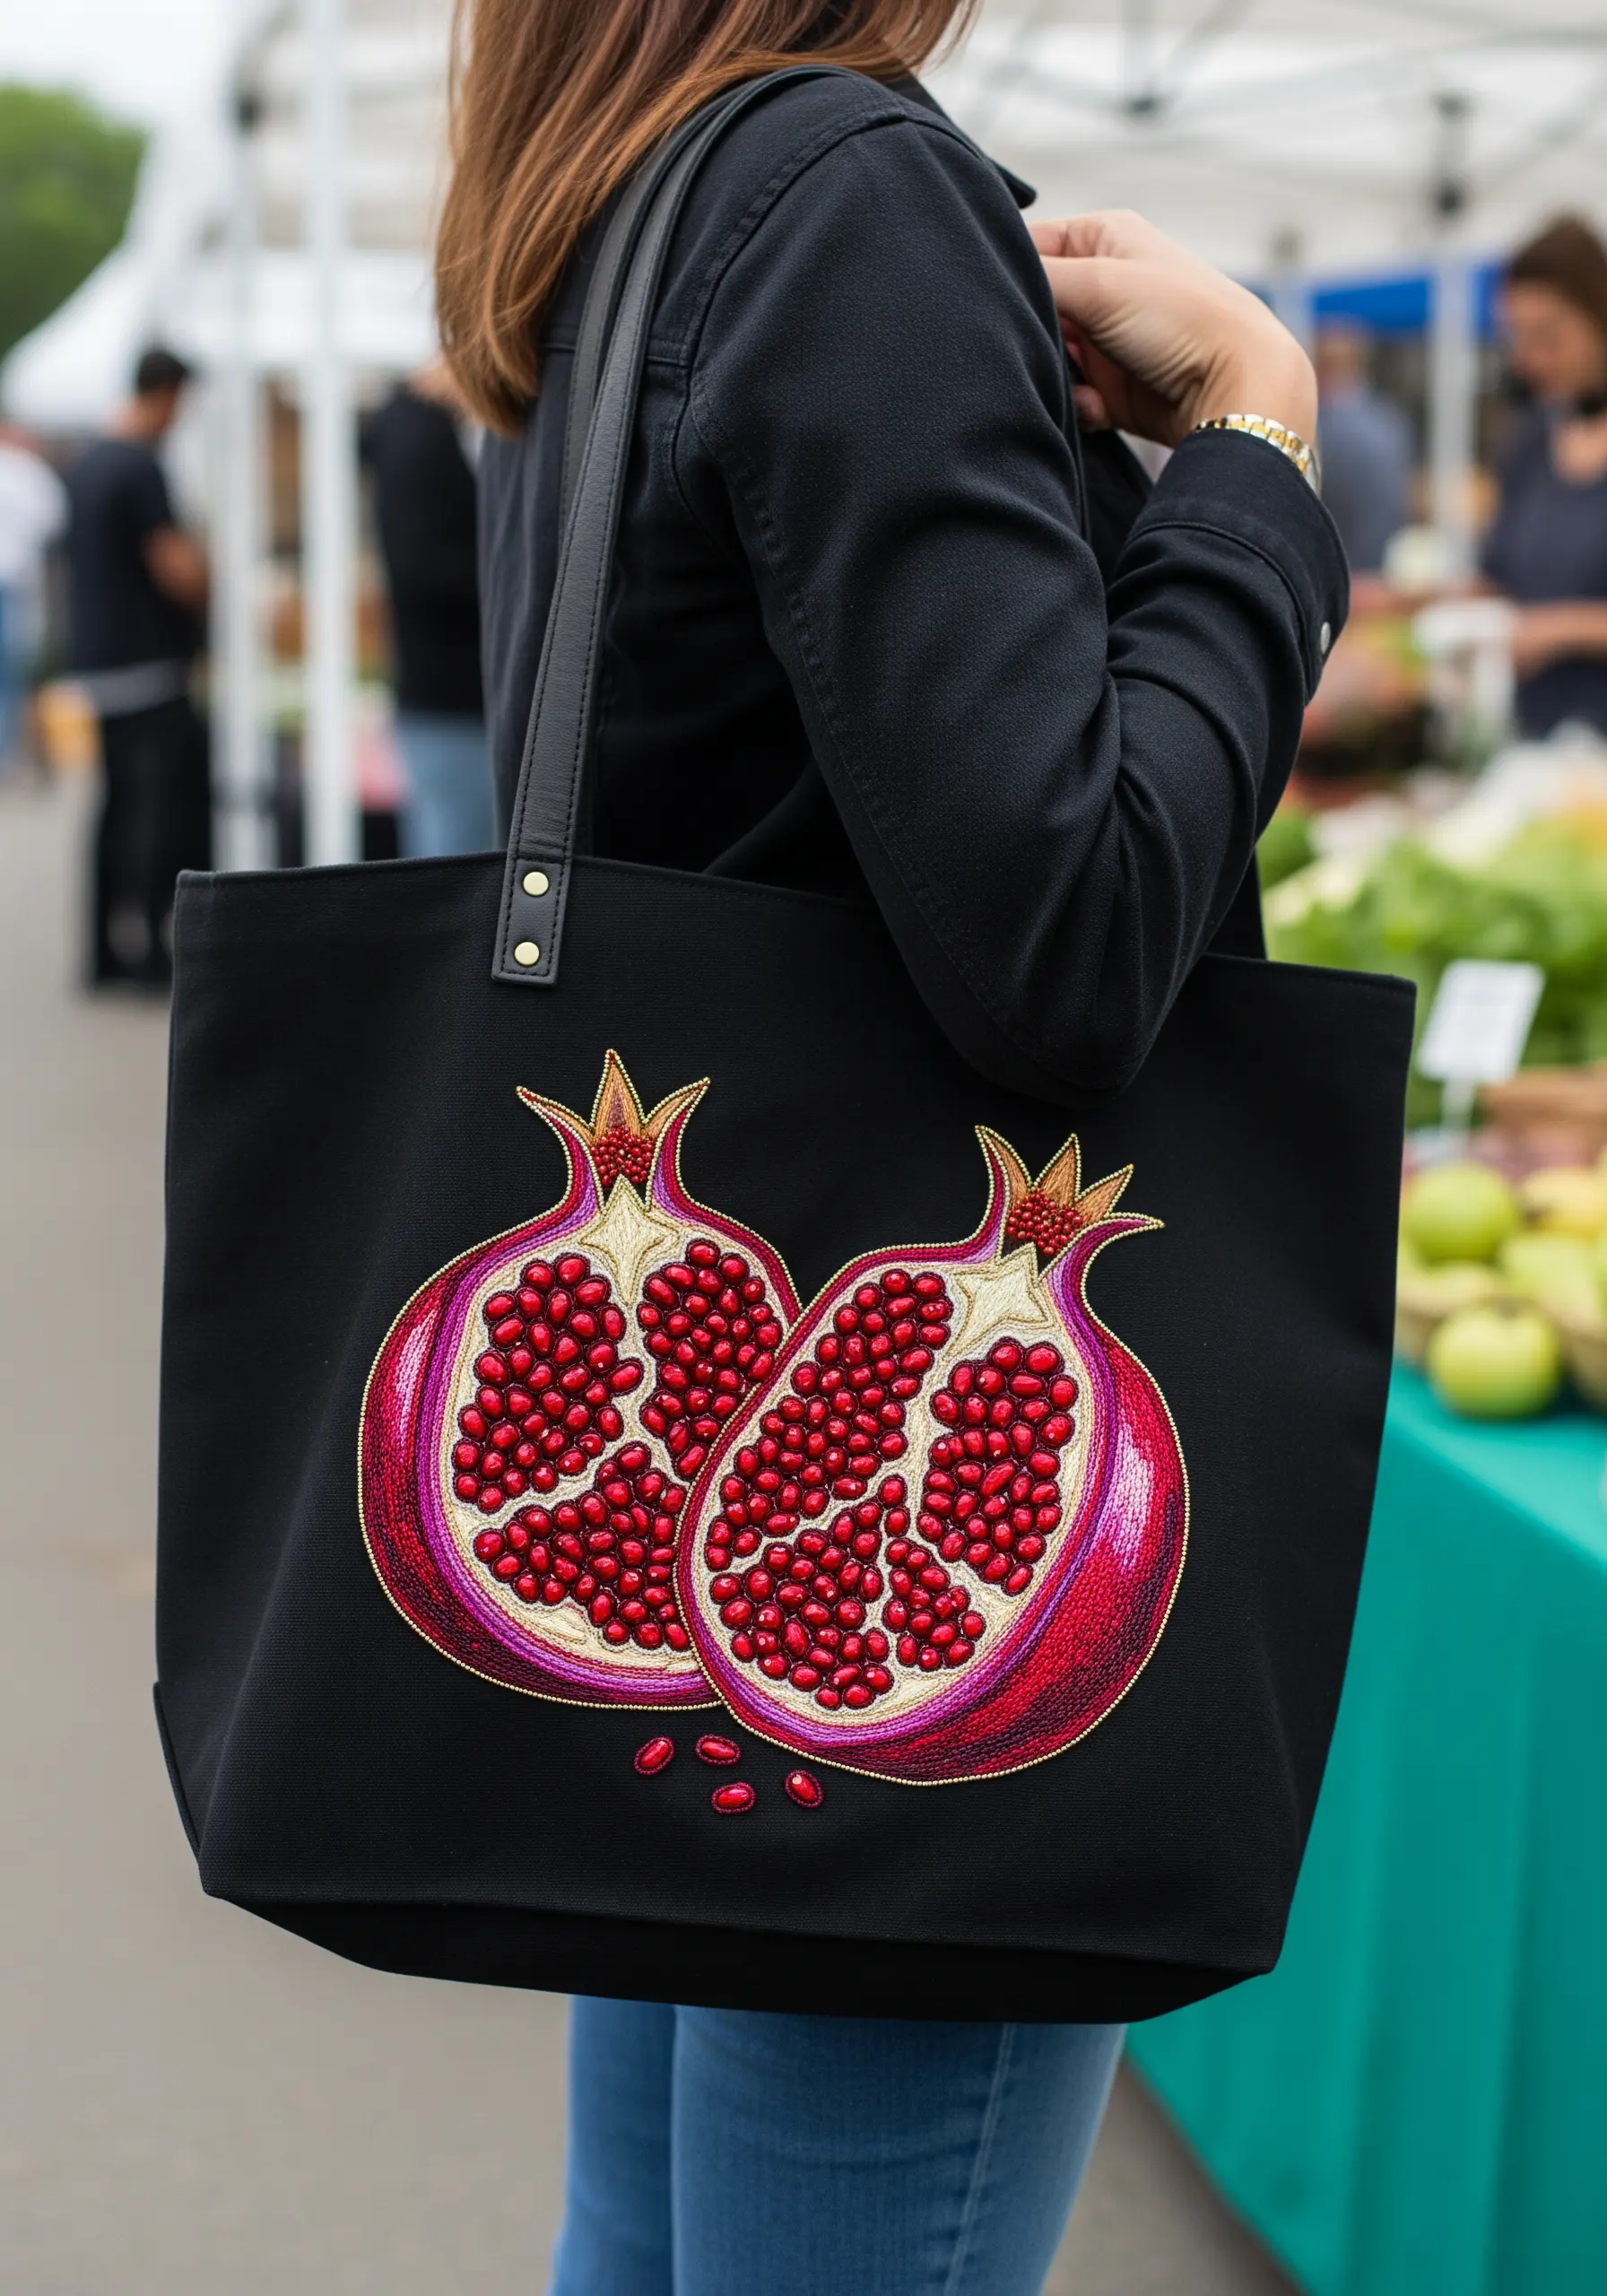
Create a sense of ripeness and depth by filling the pomegranate seeds with tightly packed French knots in varying shades of red and magenta.
For the pith, use a light pink or cream thread in a short satin stitch, ensuring your stitches follow the natural curve of the fruit’s segments.
Outline the entire fruit and the crown with a fine metallic gold thread using a couching stitch for a clean, luxurious edge that contrasts beautifully against the dark canvas.
This technique turns a simple fruit motif into a rich, textural study that feels both classic and contemporary.
2. Master Color Blocking with Dense Fill Stitches

Achieve a flat, woven-like texture by filling geometric shapes with a dense brick stitch or long-and-short stitch.
Unlike satin stitch, these interlocking stitches prevent gaping and buckling on large areas, making them ideal for a heavily used tote bag.
Choose a bold, primary-inspired color palette and let the textures do the talking.
This method transforms simple blocks of color into a tactile piece of geometric abstract thread patterns that feels intentional and modern.
3. Create an Art Deco Effect with Metallics and Line Work
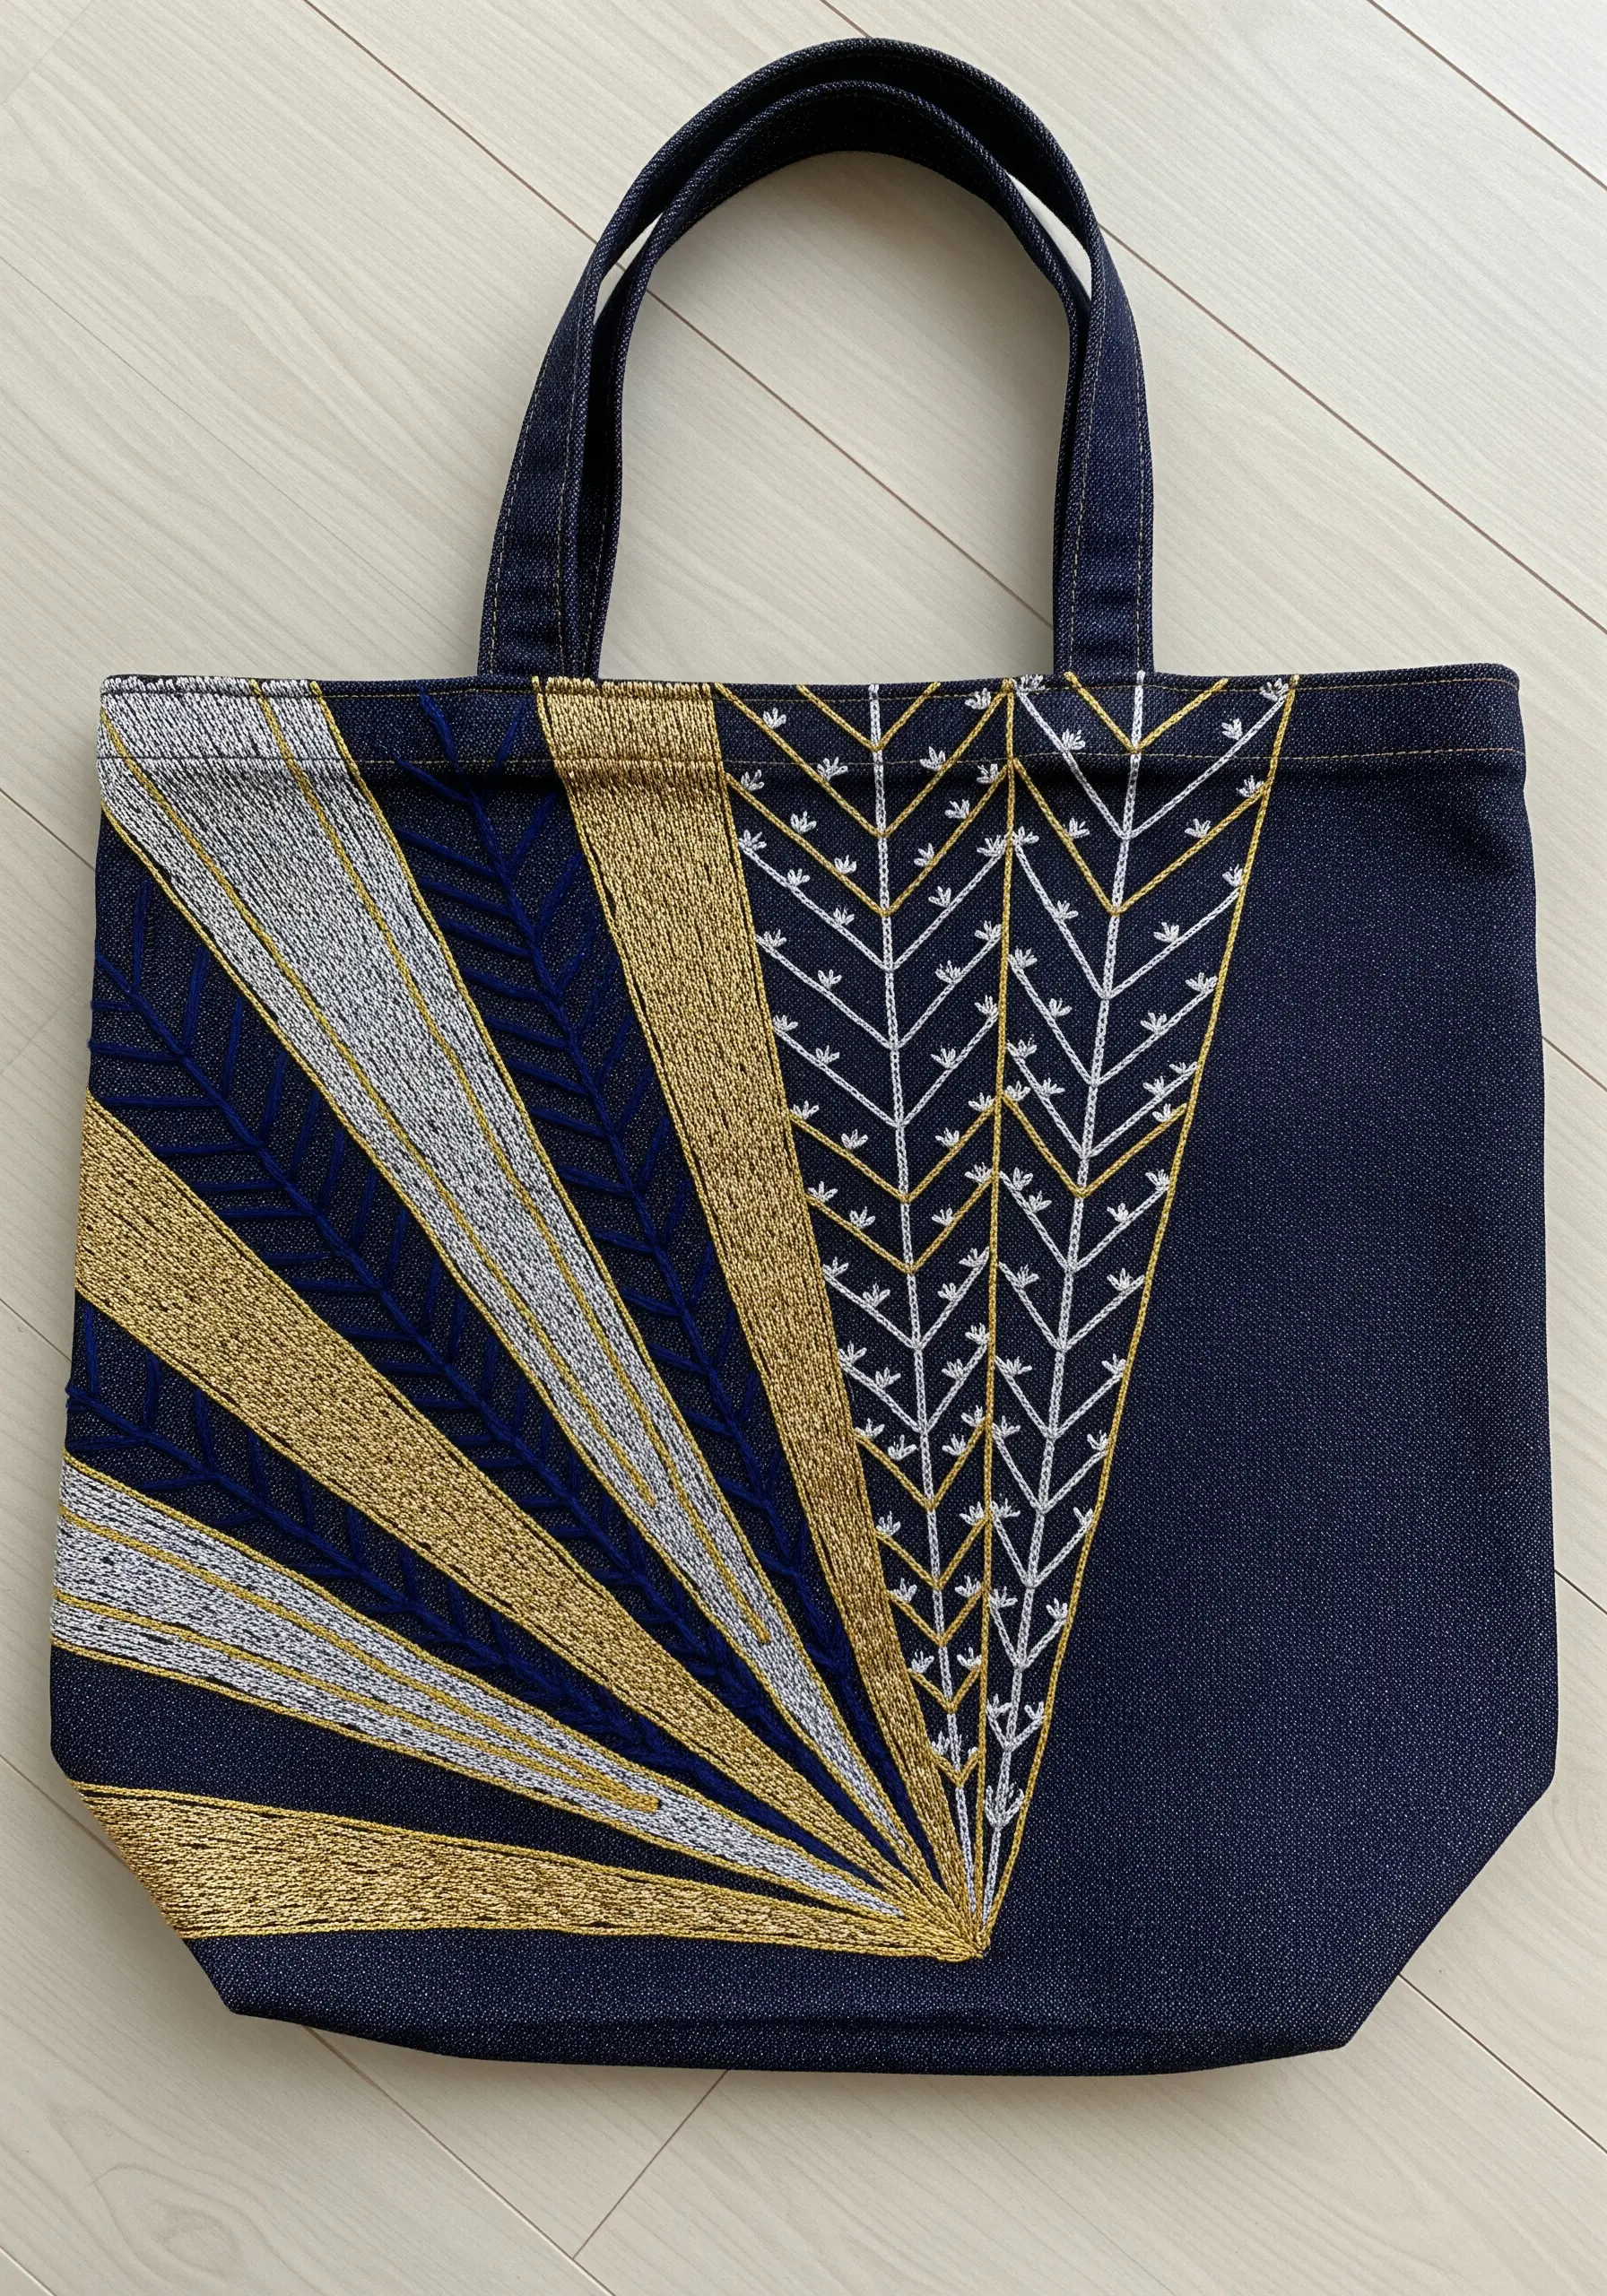
Combine bold satin stitch rays with delicate backstitched patterns to achieve a striking Art Deco-inspired sunburst.
Alternate between matte and metallic threads in shades of gold, silver, and navy to create visual rhythm and catch the light from different angles.
Pay close attention to stitch direction; ensuring the satin stitch rays emanate from a central point enhances the illusion of light.
This is a perfect example of how combining simple stitches in a structured pattern can result in a sophisticated, graphic design.
4. Embrace Sculptural Texture with Chunky Yarn Couching
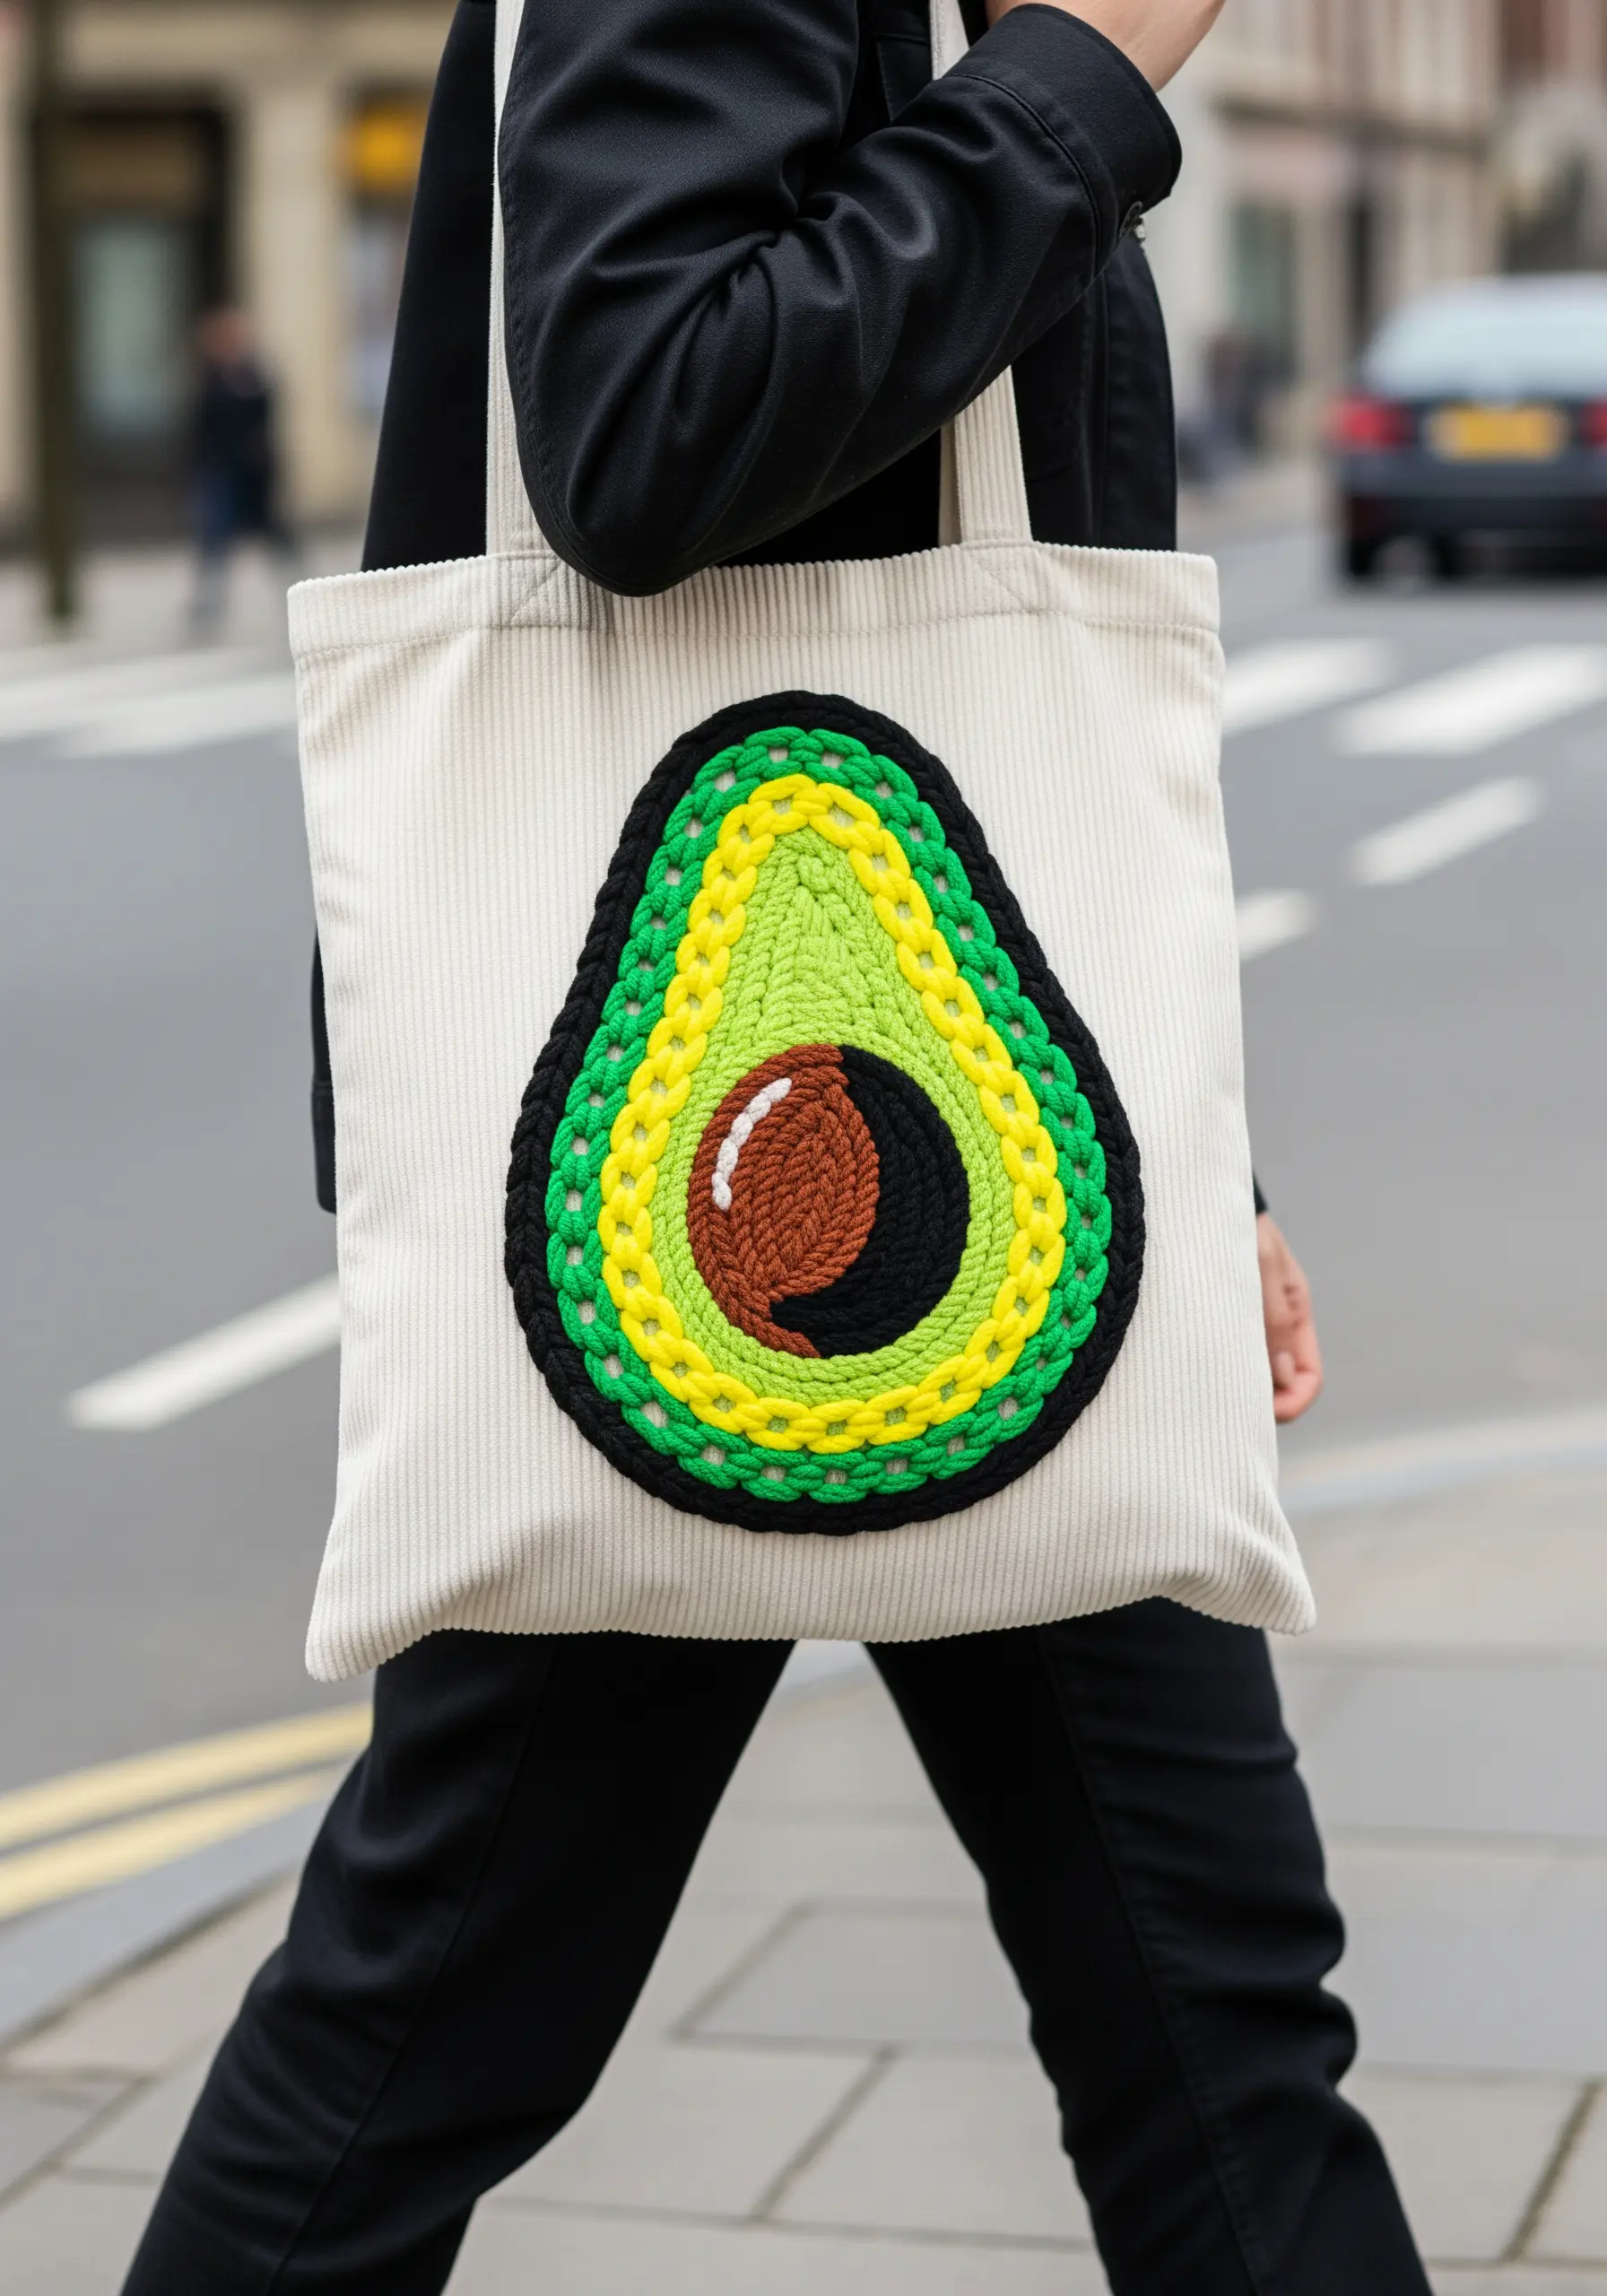
Move beyond standard floss by using thick yarn or cording to create bold, dimensional outlines.
Lay the chunky fiber along your design line and secure it with small, evenly spaced stitches in a matching or contrasting thin thread—a technique called couching.
This method adds dramatic texture and a playful, graphic quality that makes a simple motif like an avocado pop.
Fill the inner sections with a simple satin stitch to create a smooth contrast against the heavily textured outlines.
5. Paint a Cosmic Scene with Blended Threads

To create the swirling galaxy inside the iris, use the long-and-short stitch technique with single strands of thread.
Blend shades of purple, blue, teal, and pink seamlessly, treating your needle like a paintbrush to avoid harsh lines.
For the delicate eyelashes, use single, tapered straight stitches, varying their length and angle to look more natural.
A few strategically placed white French knots will mimic distant stars, completing this mesmerizing thread-painted masterpiece.
6. Design Graphic Typography with Patterned Fills

Elevate simple lettering by turning each character into a canvas for pattern play.
Instead of a solid fill, use basic stitches to create visual interest: horizontal satin stitches for stripes, or a grid of straight stitches for a checkerboard effect.
Outline each letter with a dark, crisp split stitch to ensure the text is readable and the internal patterns are cleanly contained.
This technique adds a layer of design sophistication that makes your message stand out.
7. Stitch an Explosive Sunrise with Dynamic Lines
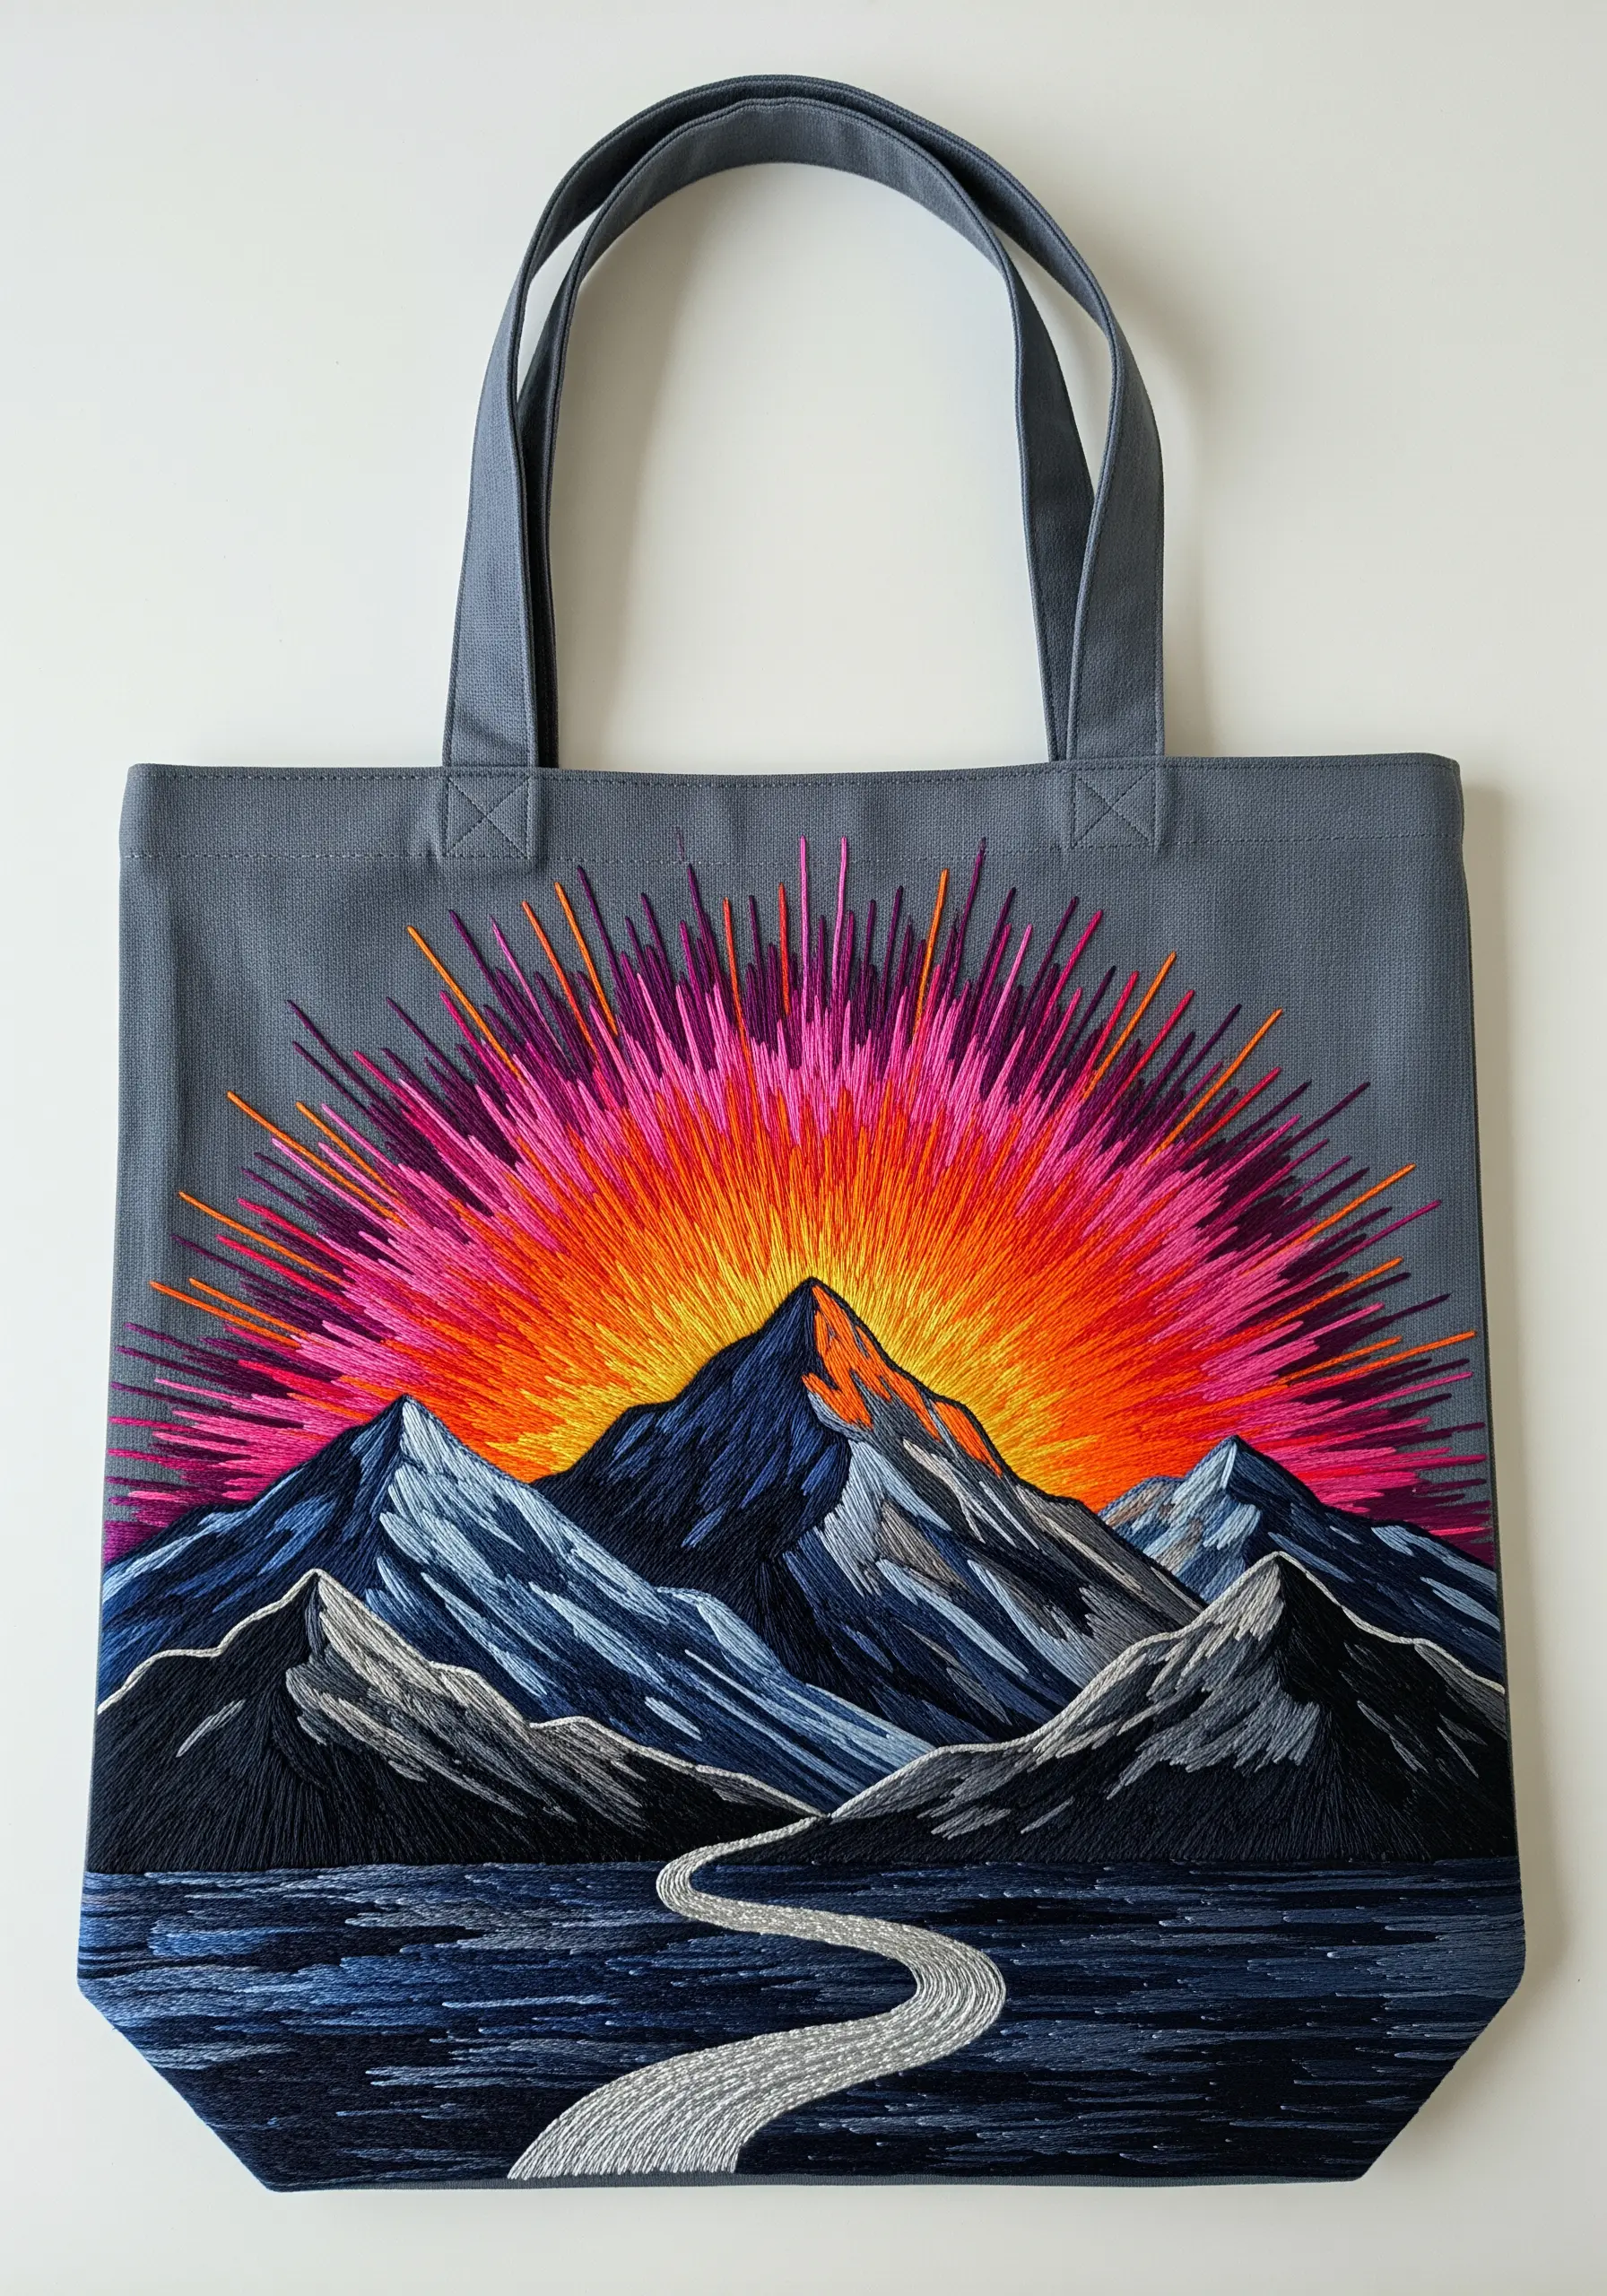
Capture the energy of a sunrise by using long, radiating straight stitches in a vibrant gradient from yellow to magenta.
Vary the length and density of your stitches to create a dynamic, explosive effect rather than a perfect circle.
Contrast this energetic sky with grounded, directional satin stitches for the mountains, following their natural planes and shadows.
This composition creates a powerful sense of movement and makes the entire scene feel alive.
8. Master the Elegance of Single-Line Art

To achieve a flawless, continuous line for a minimalist portrait, use a whipped backstitch or a stem stitch.
These stitches create a smooth, rope-like line that is far more stable and clean than a simple backstitch, which can look disjointed on curves.
Use a 4 or 6-strand floss to give the line substantial weight against the plain canvas.
The success of this design lies entirely in the confidence and consistency of that single line.
9. Map the Stars with Mixed Textures and Metallics
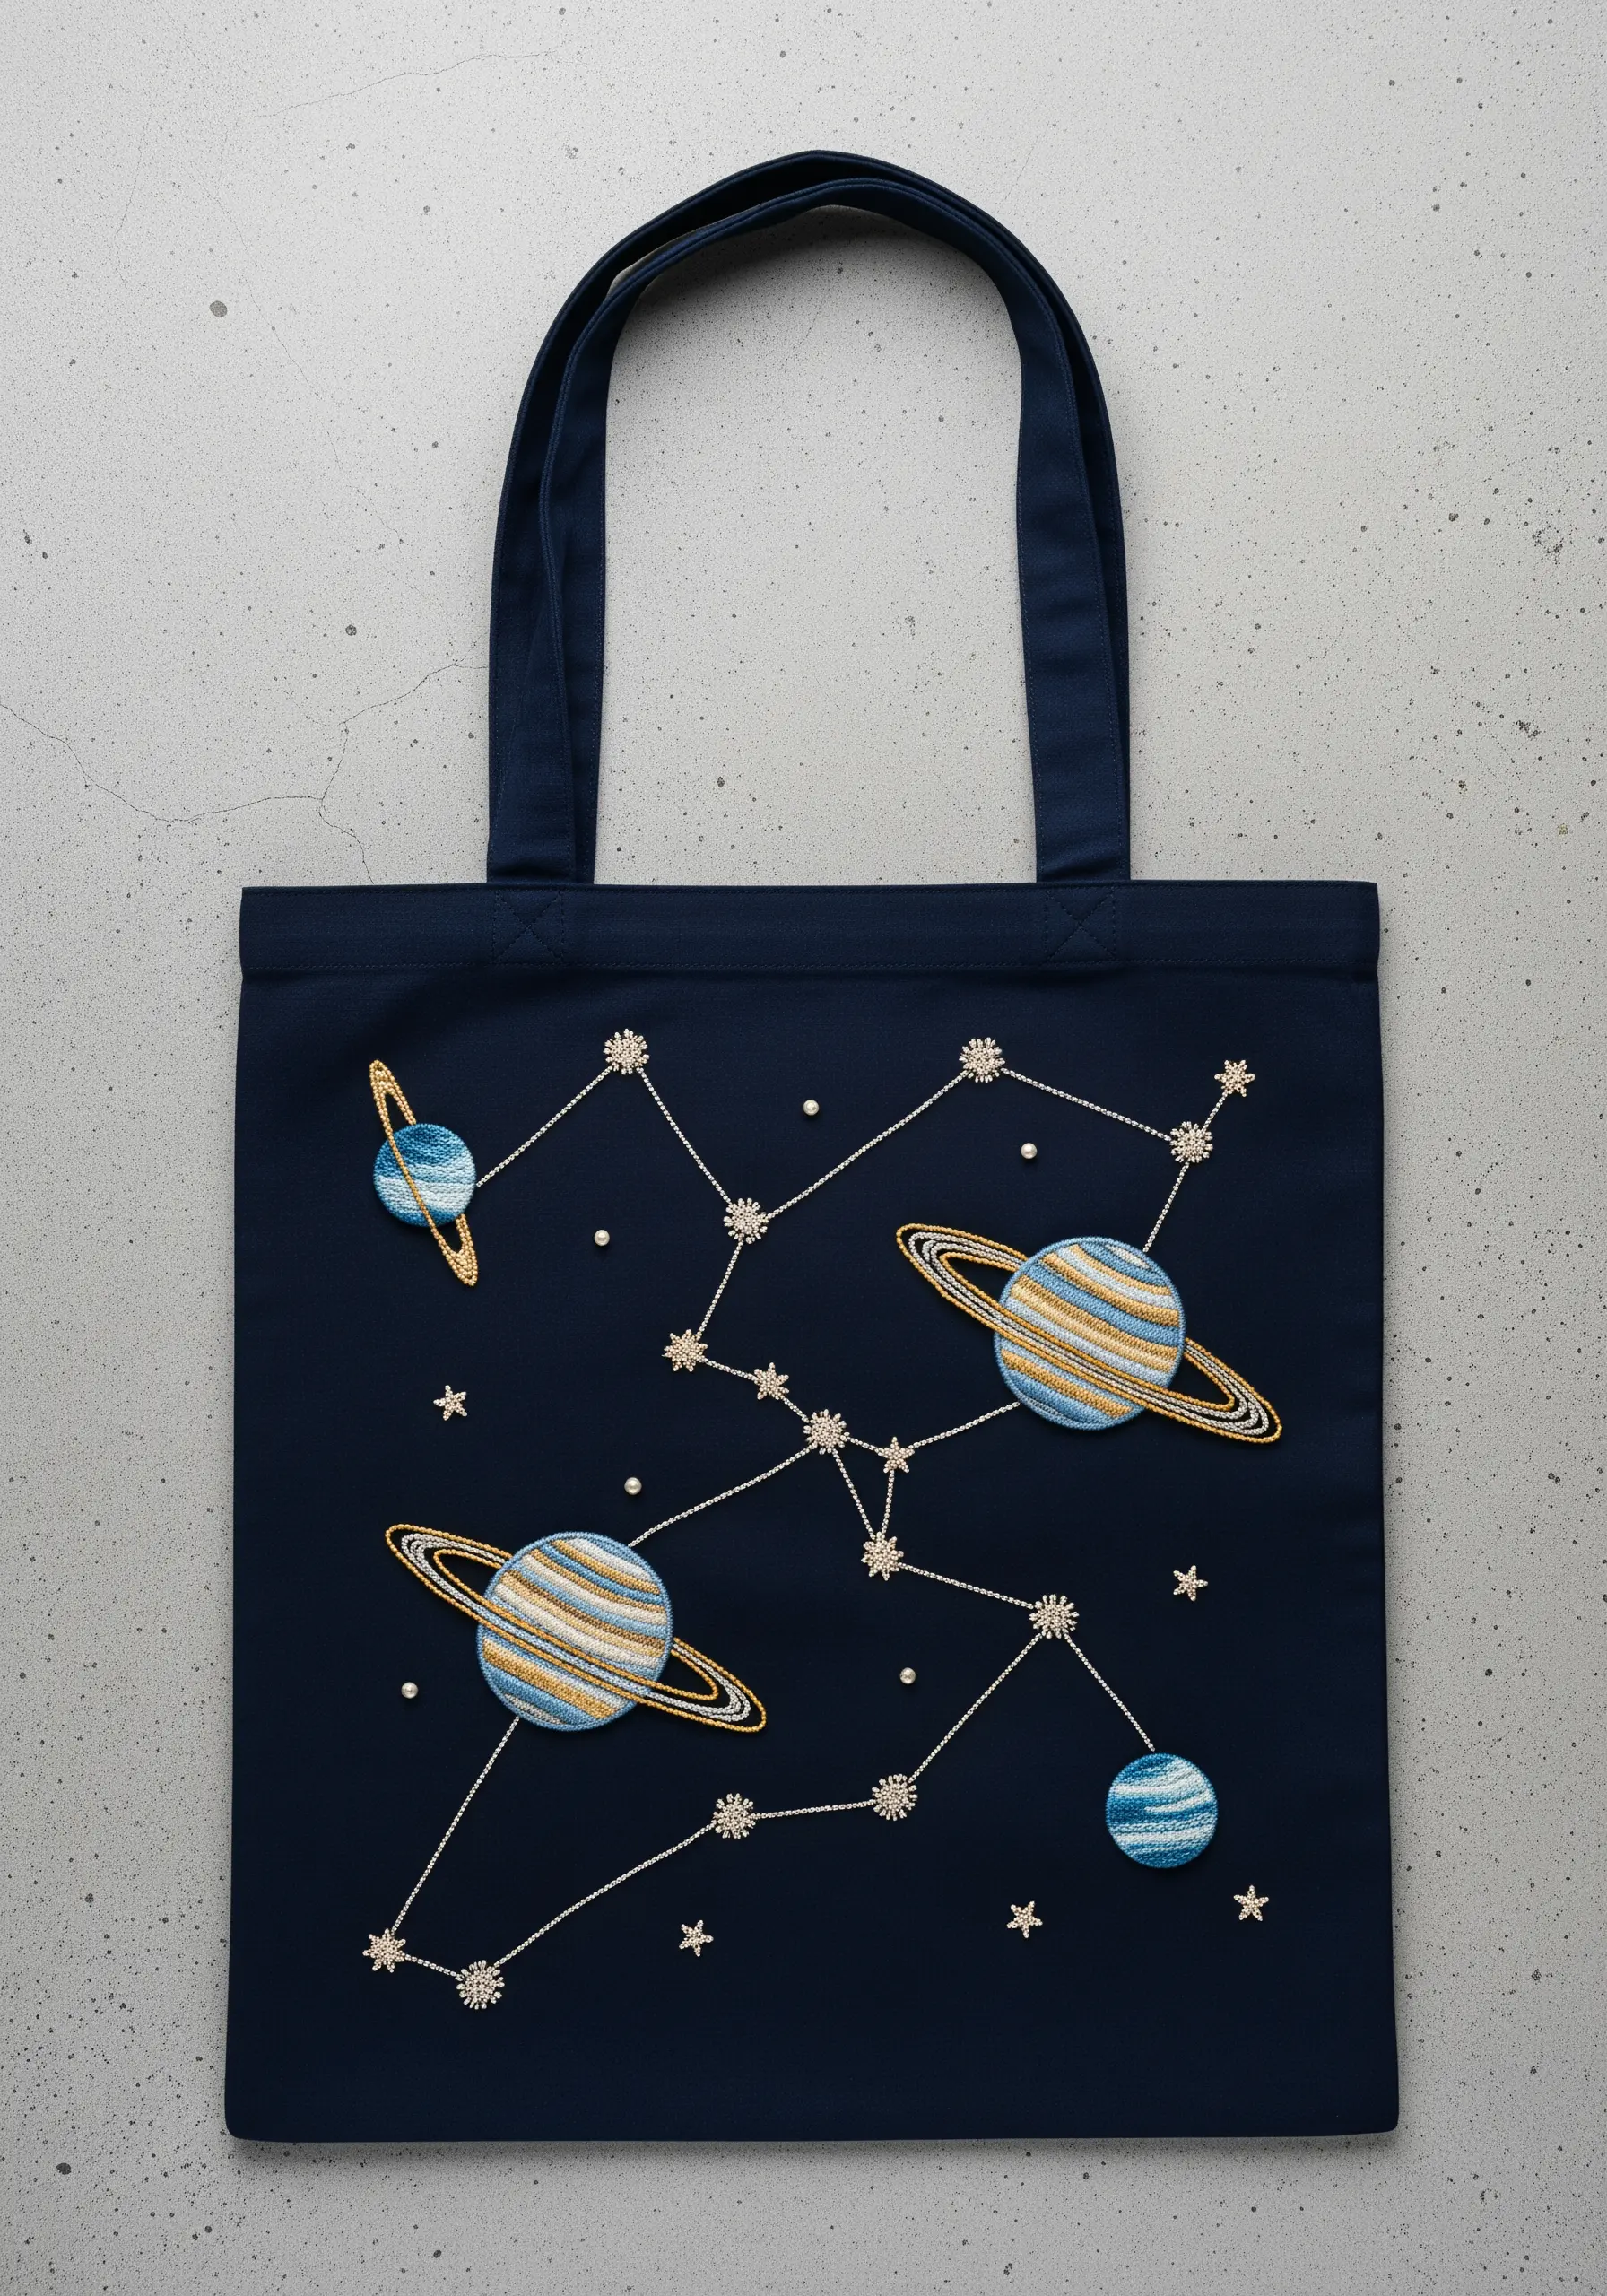
Create a celestial scene by combining different stitch textures for each element.
Use a smooth satin stitch for the planets, alternating colors to suggest rings and atmospheric layers.
Connect them with delicate, thin backstitches in a shimmering gold or silver metallic thread to form constellations.
Finally, scatter tiny starburst stitches or French knots to fill the negative space, giving your design a sense of cosmic depth.
10. Build a Symmetrical Mandala with Gradient Color

The key to a stunning mandala is perfect symmetry and a captivating color flow.
Work from the center outwards, completing one section at a time and then mirroring it on the opposite side to maintain balance.
Use a cool-to-warm color gradient—like the transition from blue to purple here—to create a visual rhythm that draws the eye across the design.
A simple fishbone stitch for the leaves adds texture without overwhelming the intricate pattern.
11. Channel Pop Art with Unconventional Colors

Recreate a powerful animal portrait in a vibrant, pop-art style by swapping natural tones for a psychedelic palette.
Use bold blocks of color—like fuchsia, turquoise, and orange—and contain them with strong, black outlines made with a split stitch.
Focus on creating sharp, graphic divisions between colors rather than smooth blending.
This approach transforms a realistic image into a confident, modern statement piece that feels fearless and energetic.
12. Create a Woodland Scene on Textured Fabric
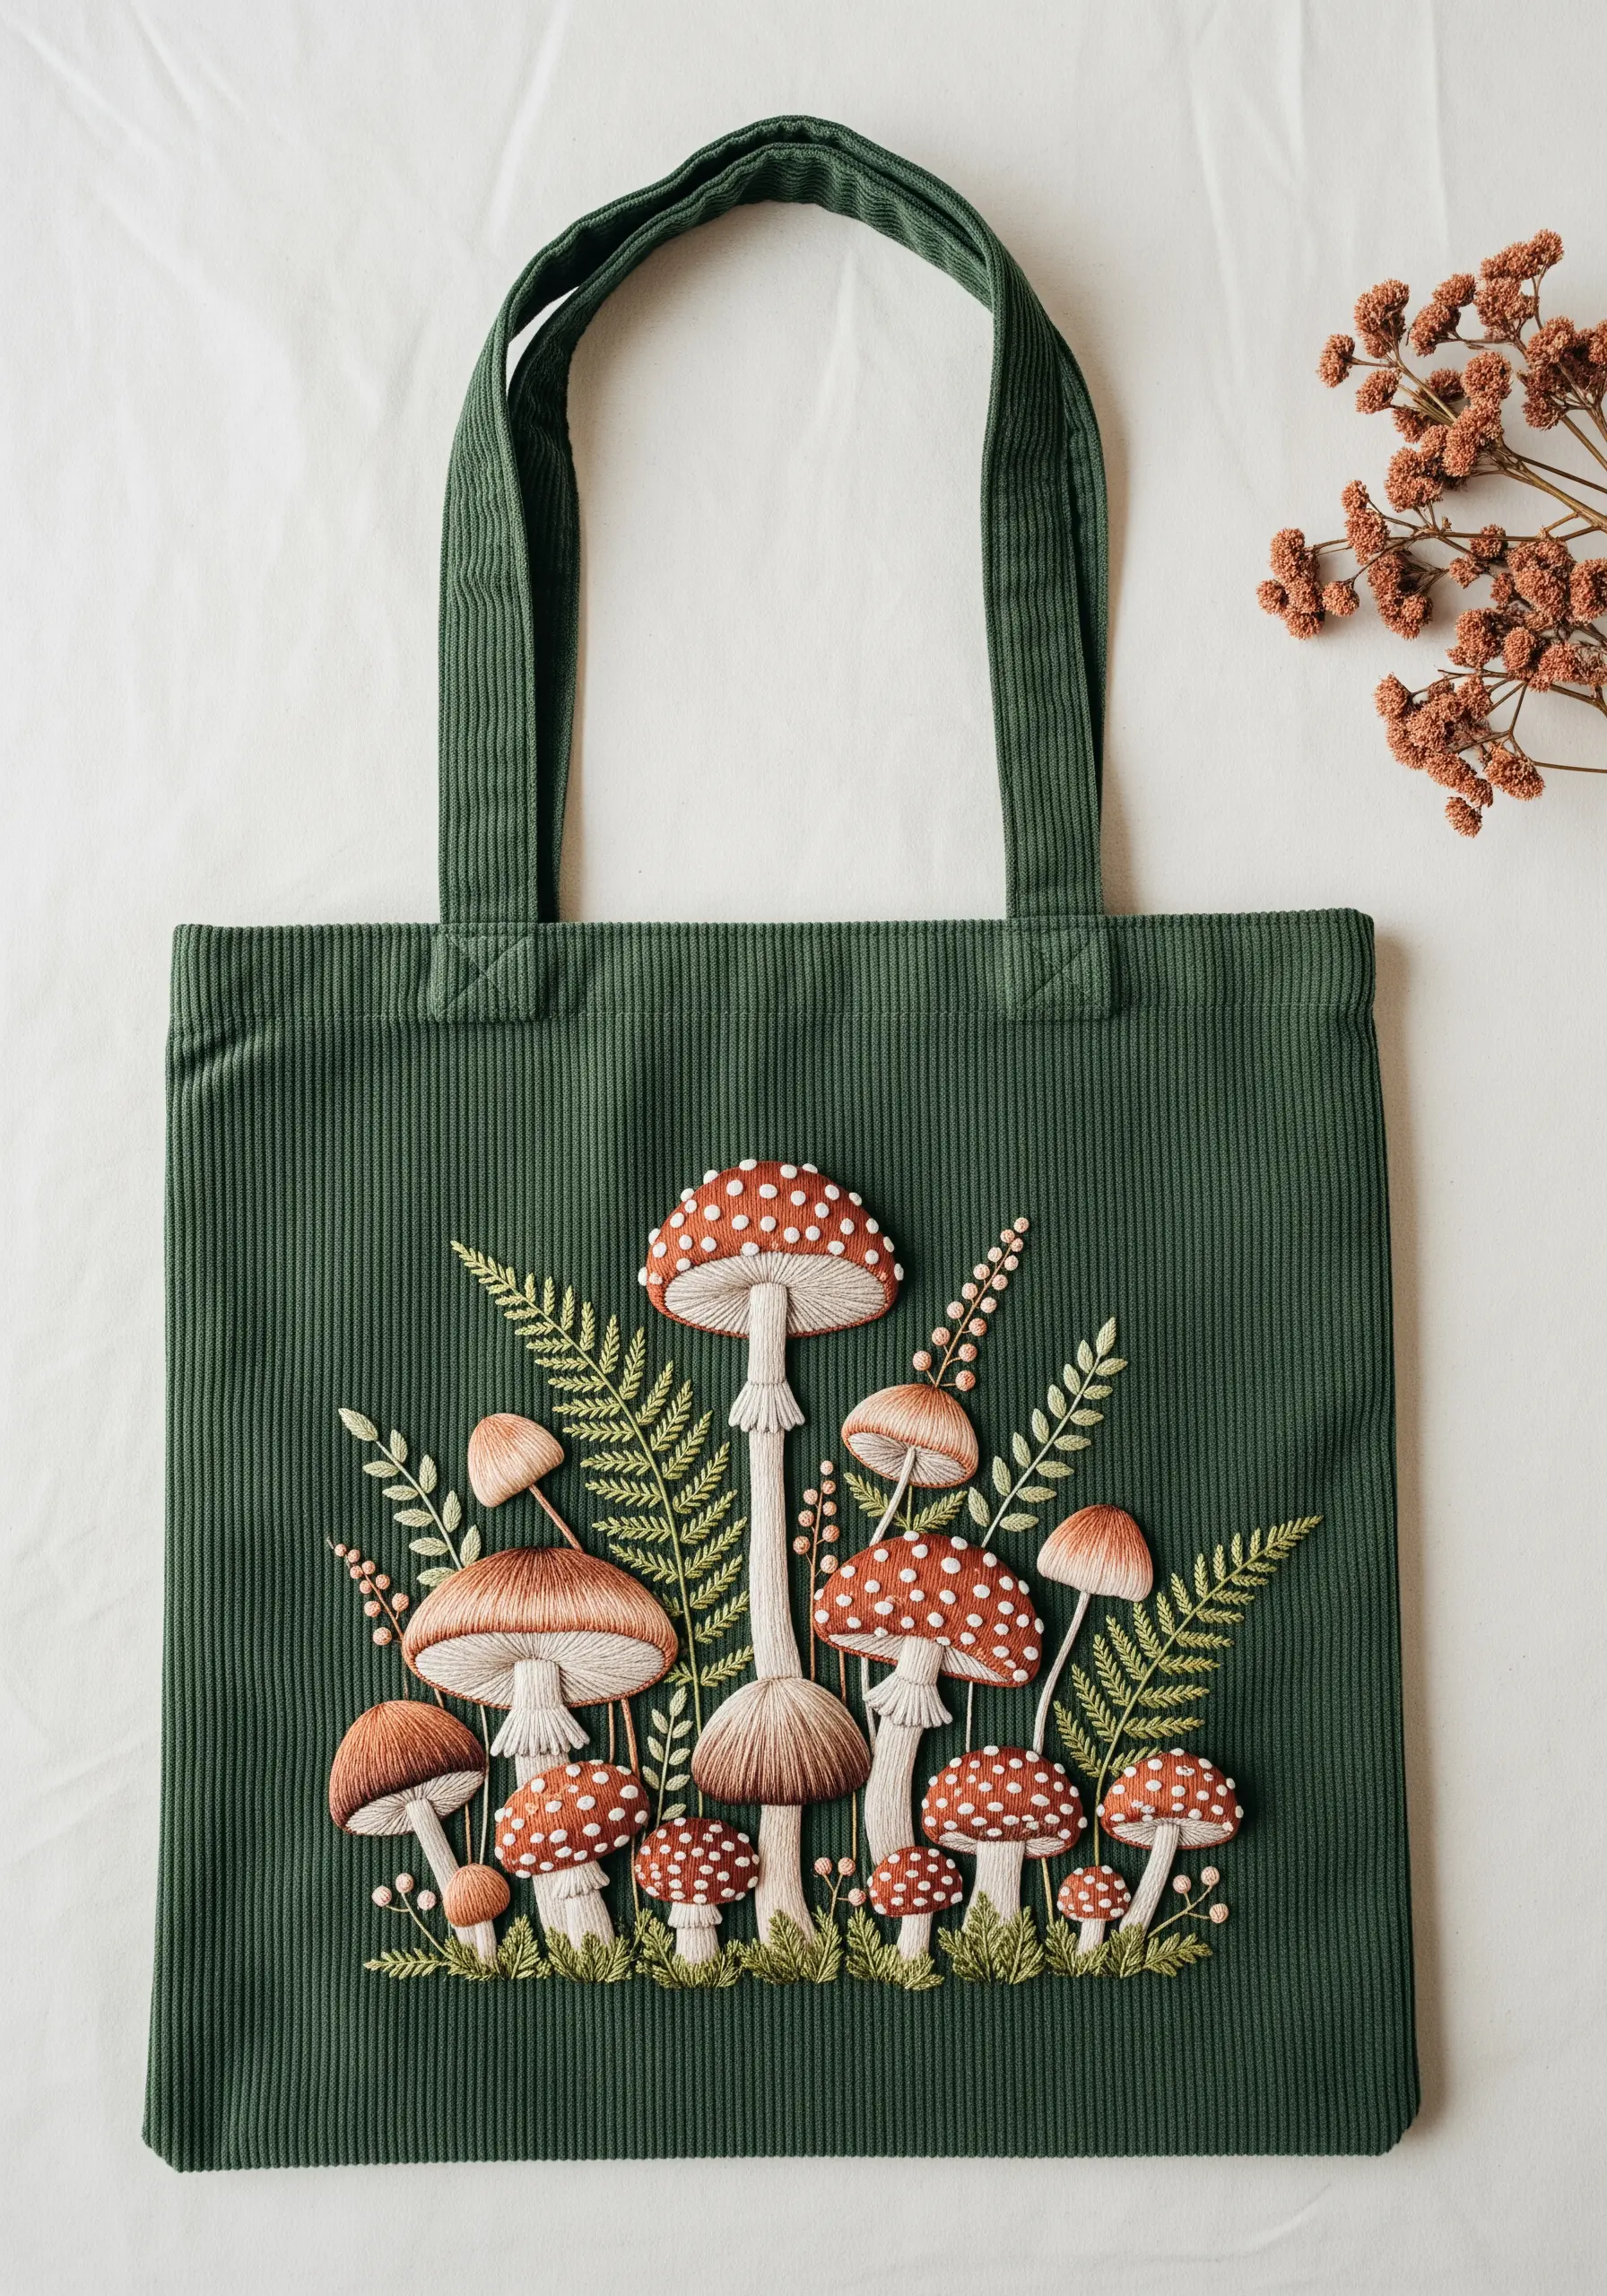
Let the fabric of your tote bag contribute to the overall aesthetic.
Stitching a delicate botanical scene onto corduroy, as seen here, adds an instant layer of rustic, woodland texture.
Use long-and-short stitch to shade the mushroom caps for realism, and add delicate fern accents with a simple stem stitch.
The combination of soft embroidery and the ribbed texture of the fabric creates a cohesive, forest-floor botanical look.
13. Emulate Mosaic Tiles with Padded Satin Stitch
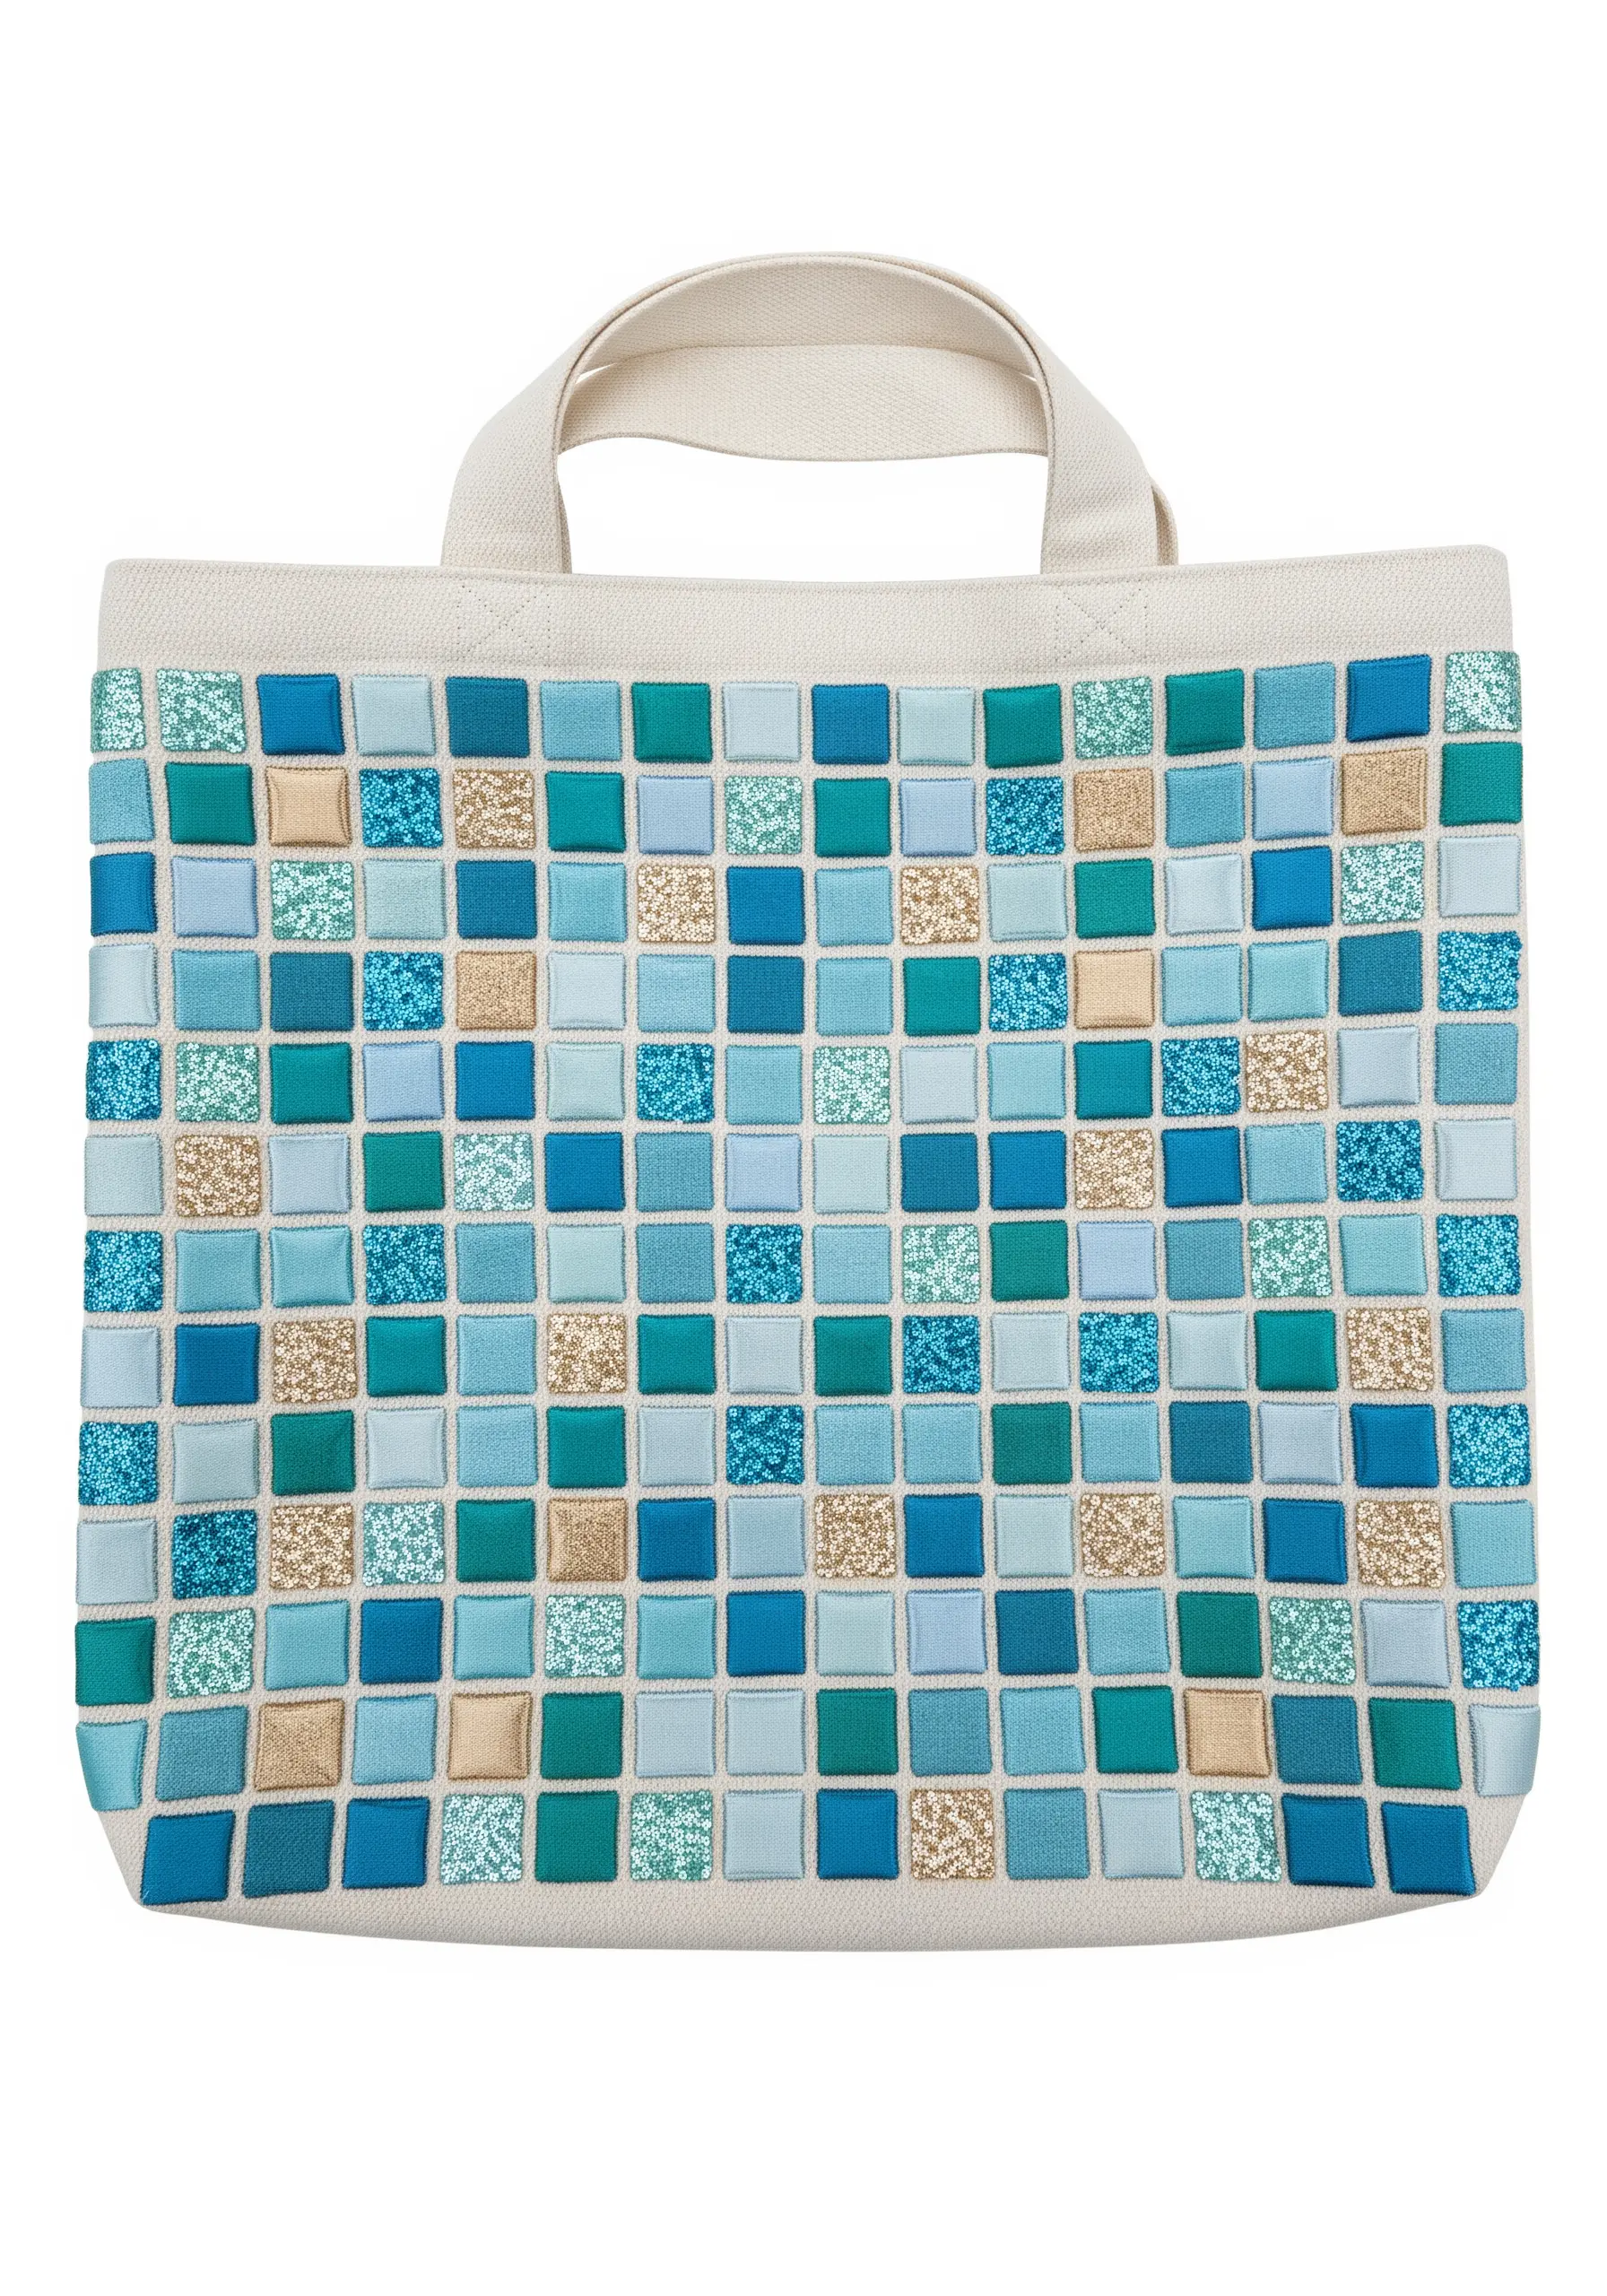
Give your design a three-dimensional, tiled effect by using padded satin stitch.
First, fill each square with small underlying seed stitches, then cover them with a smooth satin stitch in your final color.
This padding raises the squares from the surface, making them look like individual tiles.
Alternate between matte cotton floss and glittery metallic threads to mimic the look of classic glass and stone mosaics.
14. Craft an Optical Illusion with Precision Stitching
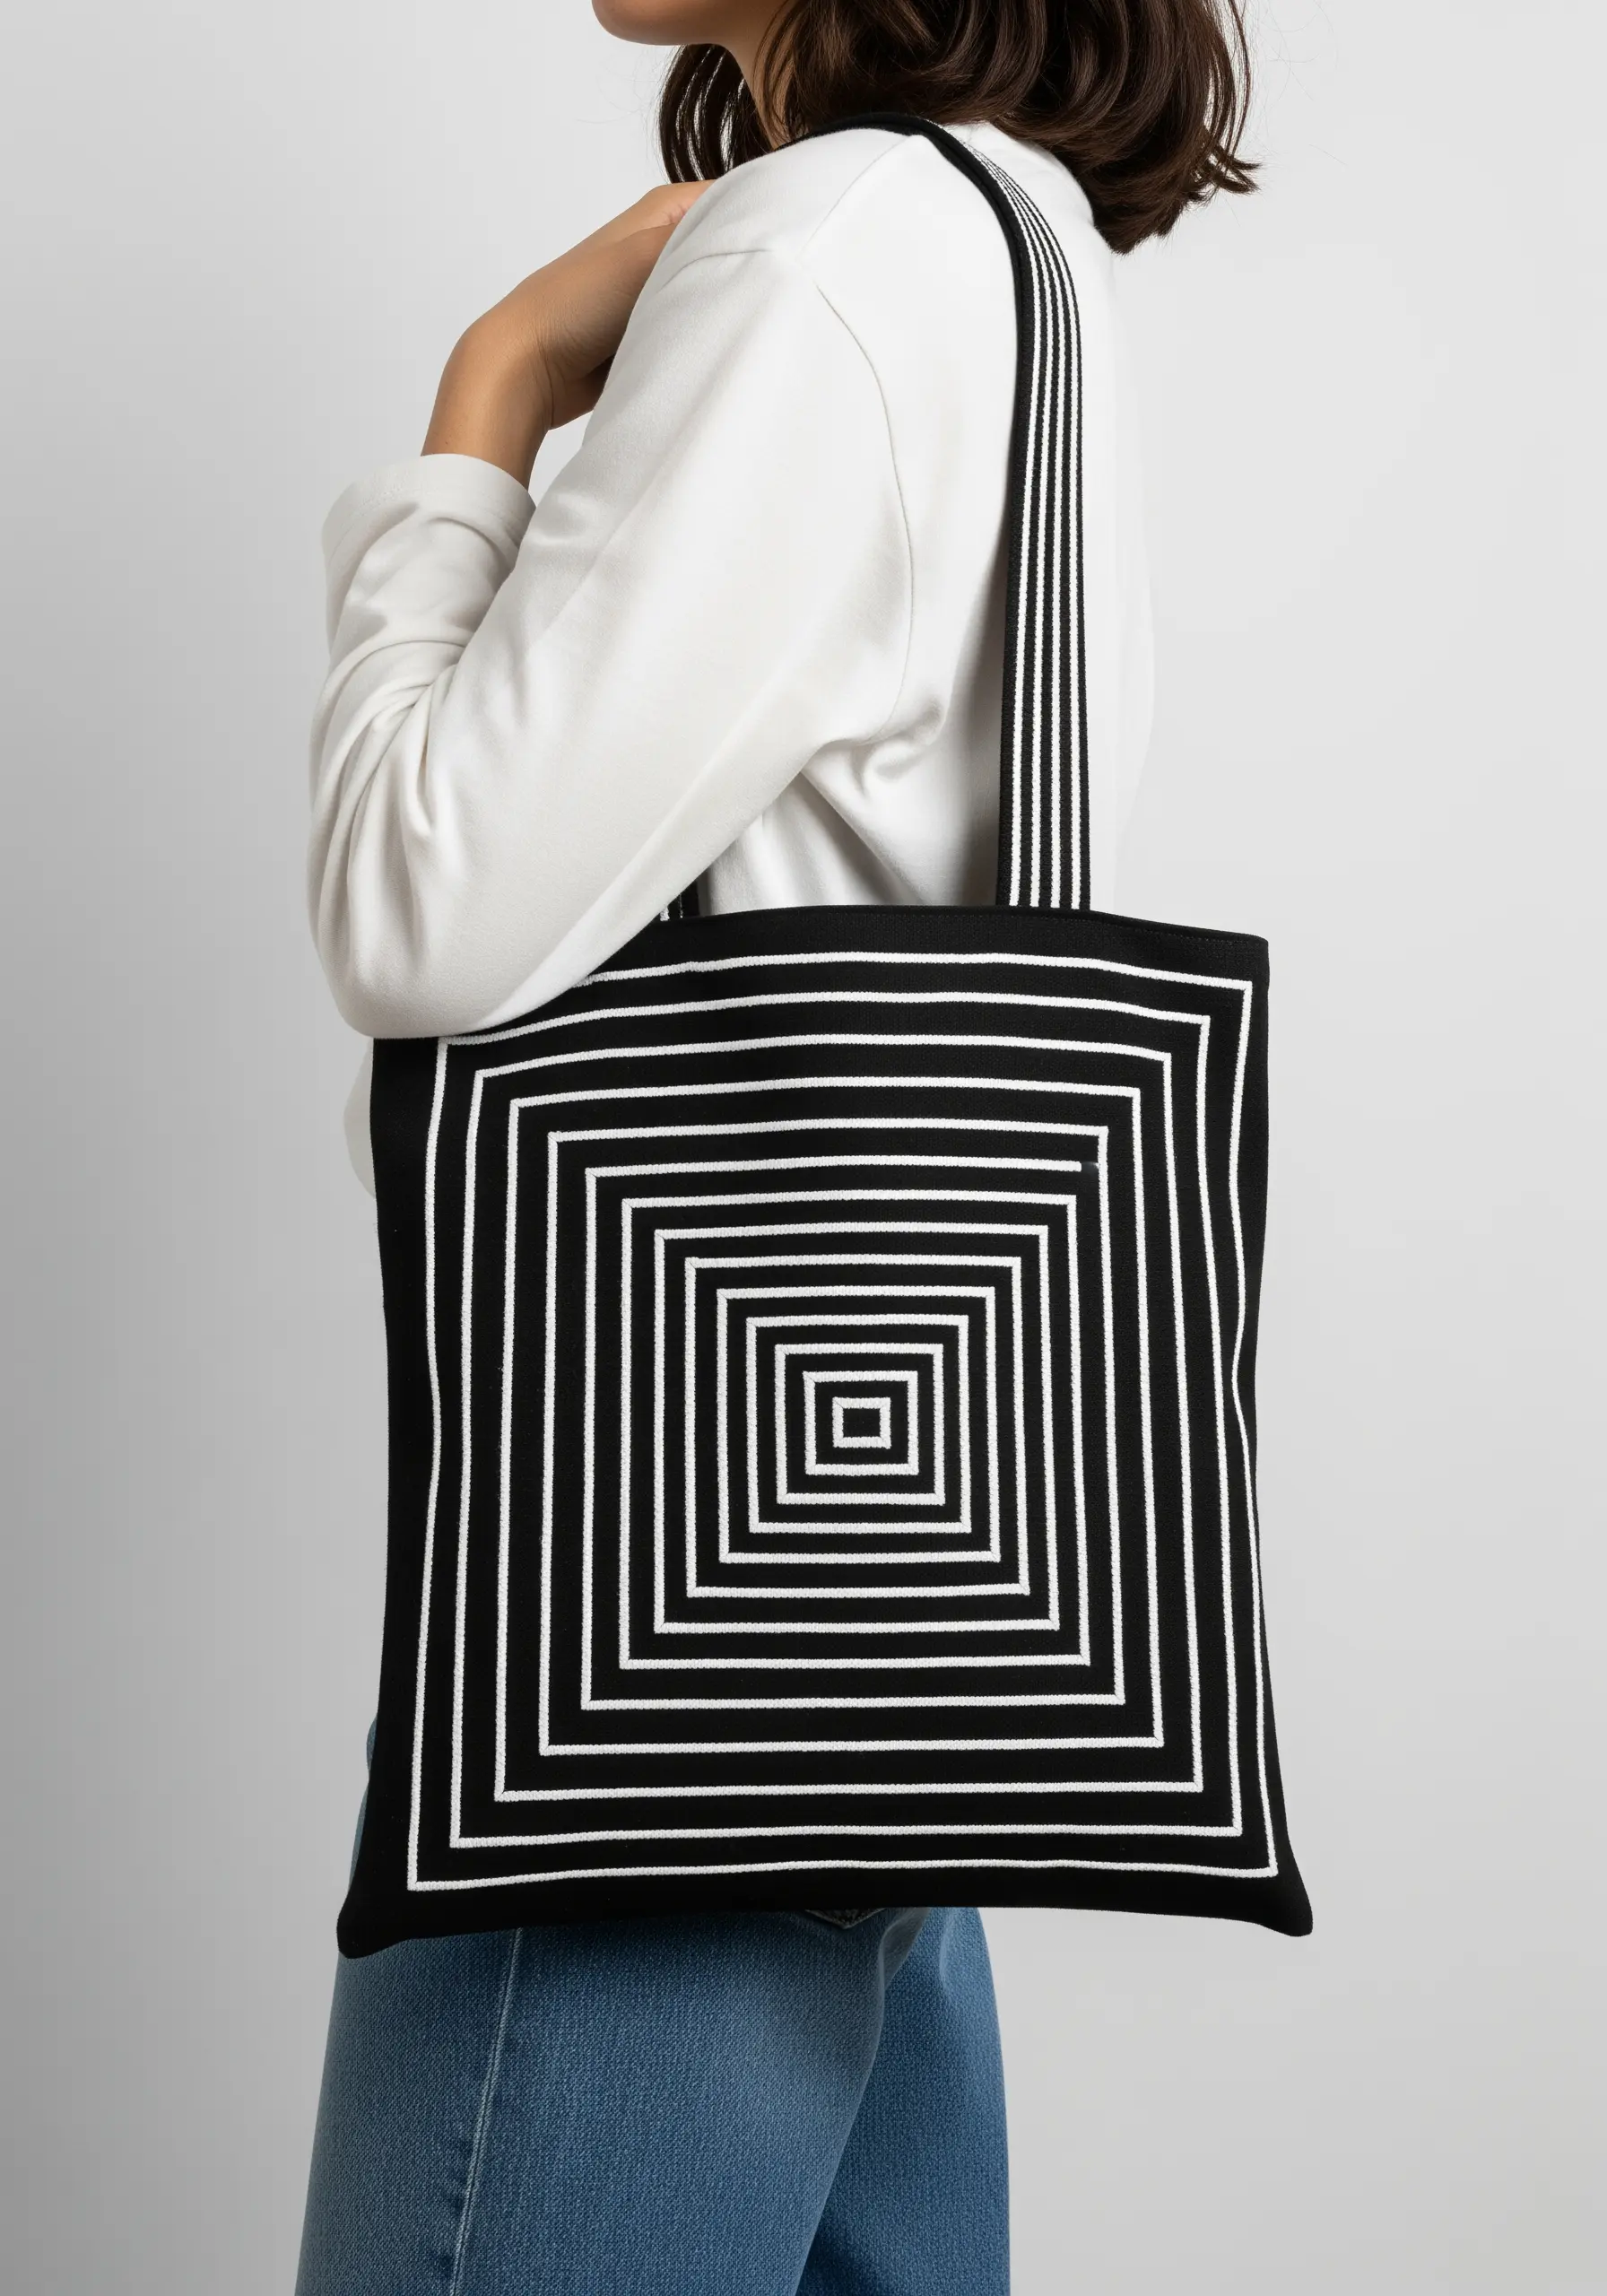
This mesmerizing design relies on perfect uniformity and precision, not complex stitches.
Use a simple, clean backstitch or stem stitch to create the concentric squares.
To ensure your lines are perfectly straight and evenly spaced, use a water-soluble marker and a ruler to draw your grid before you begin stitching.
The high-contrast white thread on a black bag amplifies the hypnotic, optical effect.
15. Define Form with Outlined Fish Scales
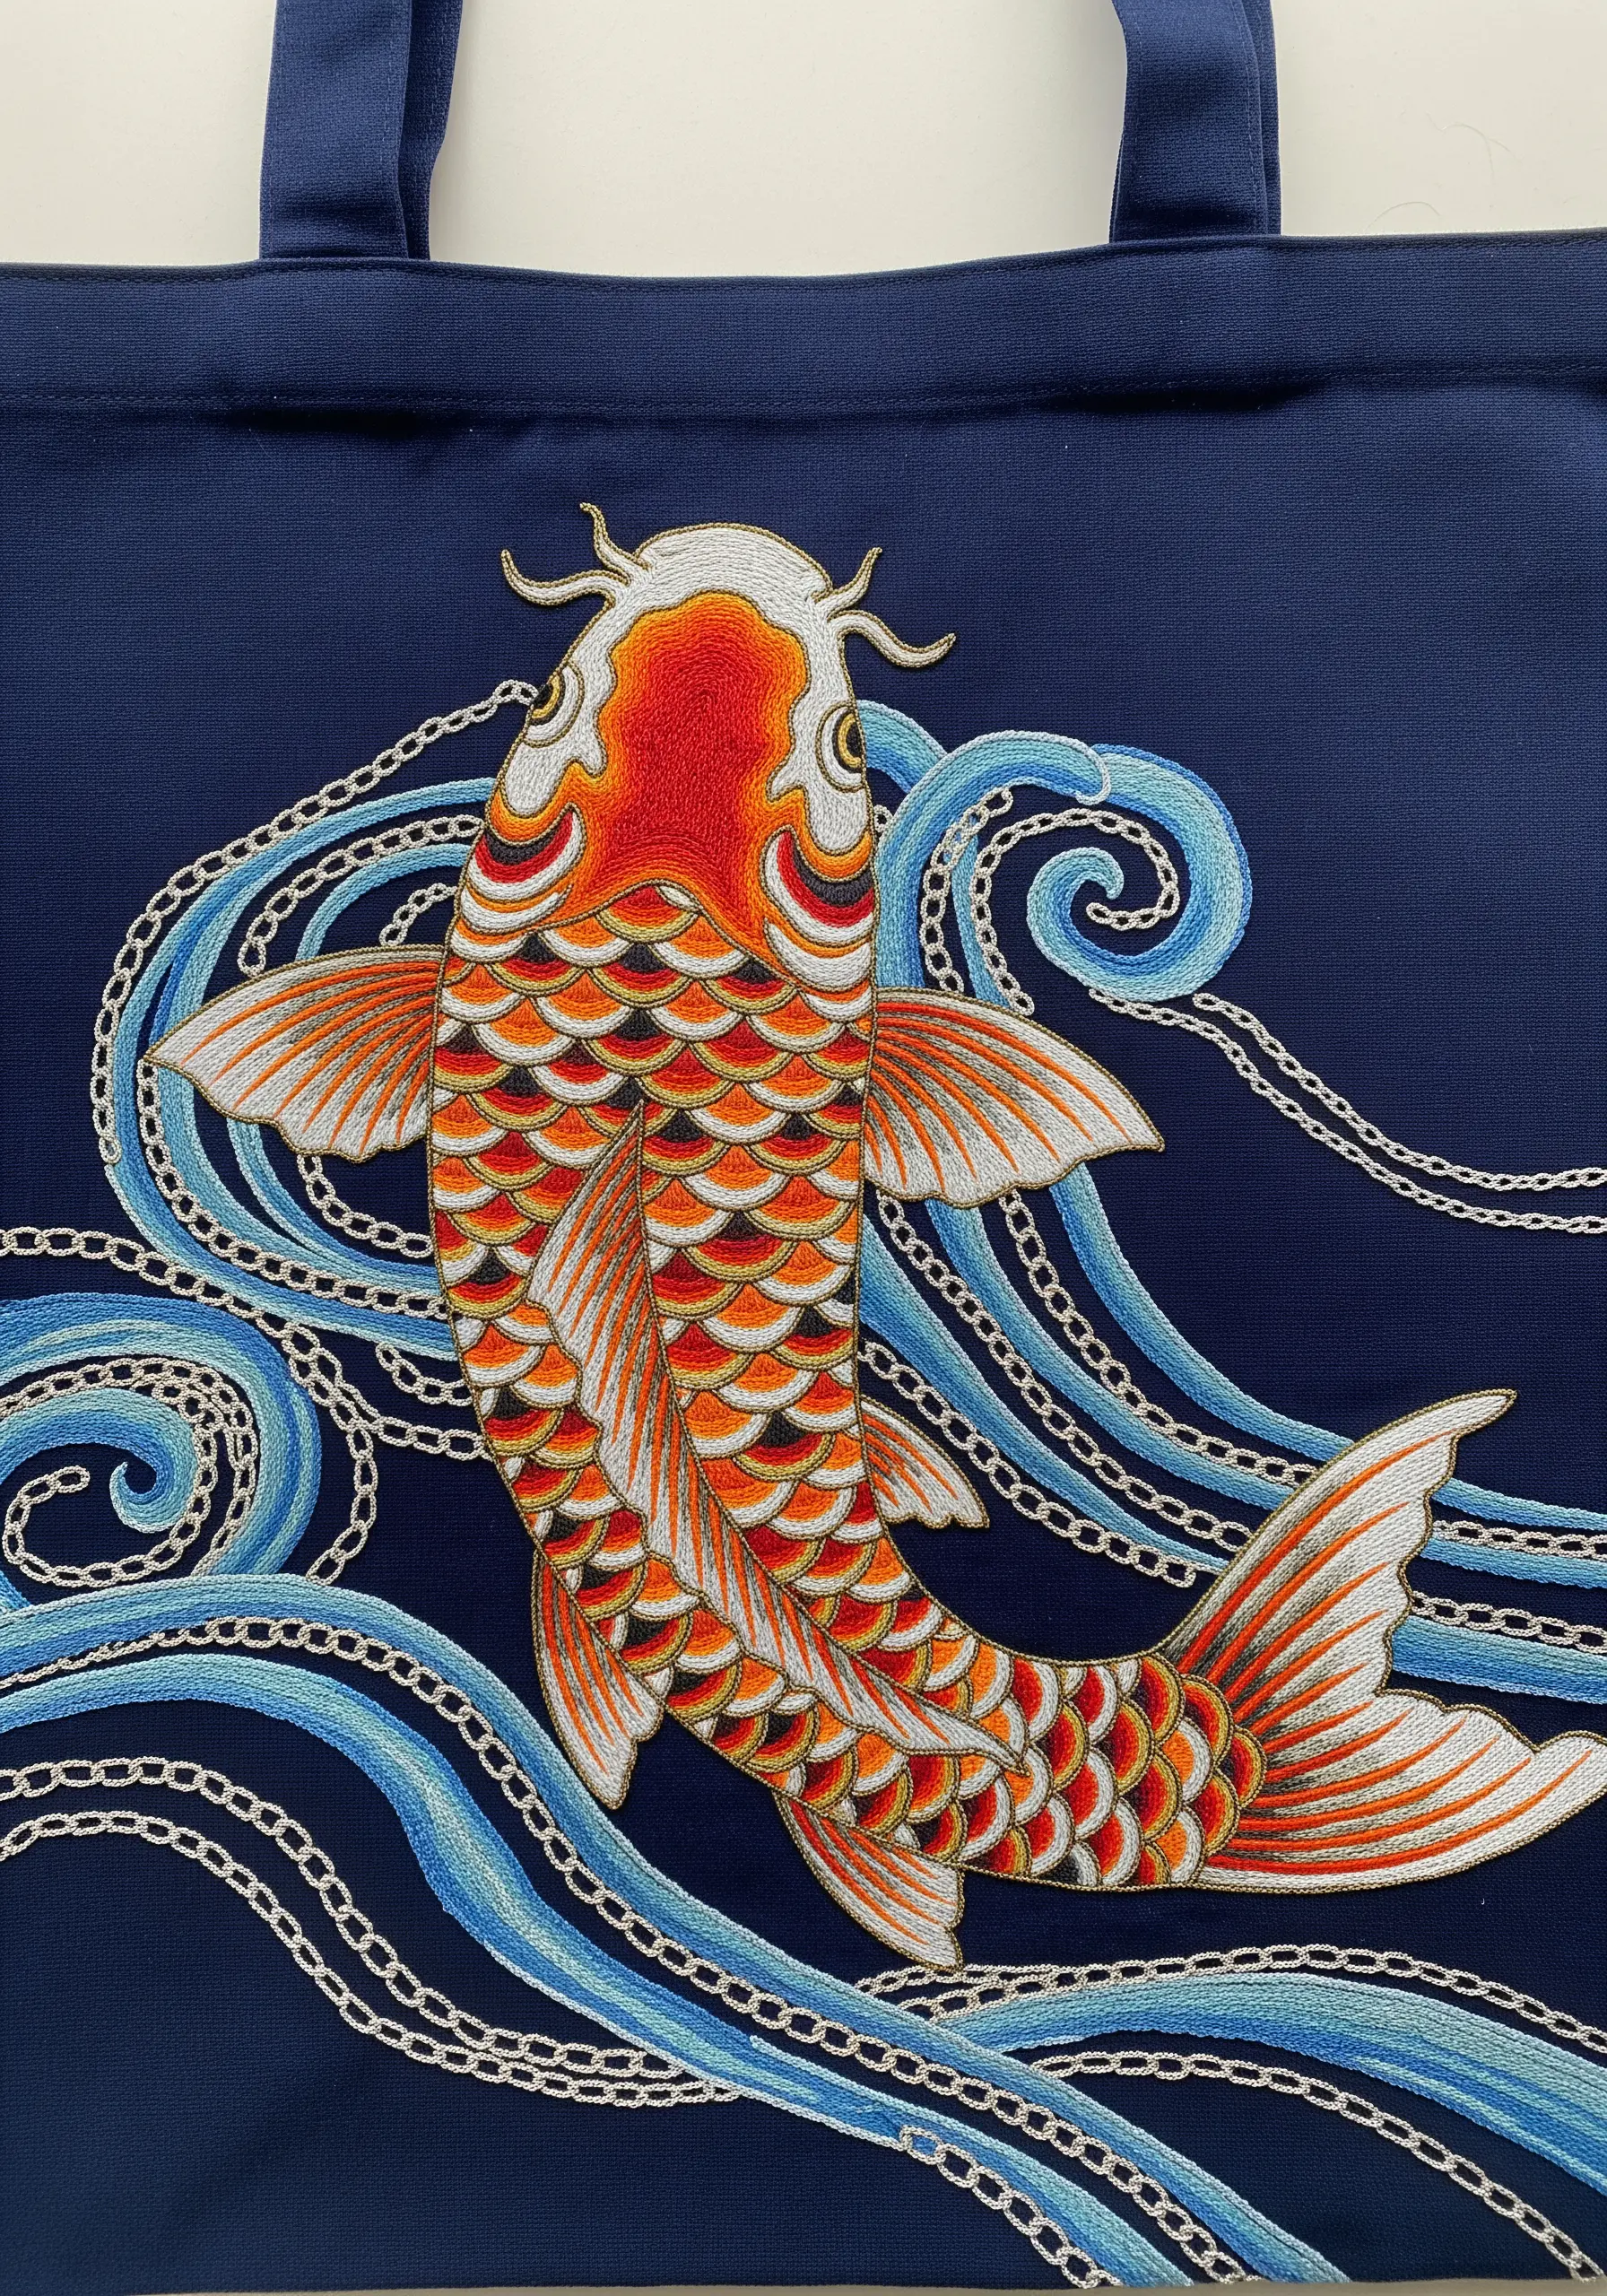
To create the intricate scales of a koi fish, use an overlapping scallop stitch or small, curved satin stitches.
The crucial step is to outline each individual scale with a darker, contrasting thread using a single backstitch line.
This technique defines each shape, preventing the colors from blending into a muddle and giving the fish a clean, illustrative quality.
For the water, use a looping chain stitch to create a sense of fluid movement.
16. Add an Unexpected Twist with Applied Textiles

Challenge the boundaries of embroidery by incorporating other fiber arts.
Here, a swath of chunky, hand-knitted fabric is appliquéd directly onto the tote bag, creating a dramatic textural contrast.
Secure the knitted piece with strong, invisible stitches from behind, or make the stitches a visible part of the design with a contrasting thread.
This mixed-media approach is bold, unconventional, and adds incredible sculptural depth.
17. Design a Cheerful All-Over Citrus Pattern
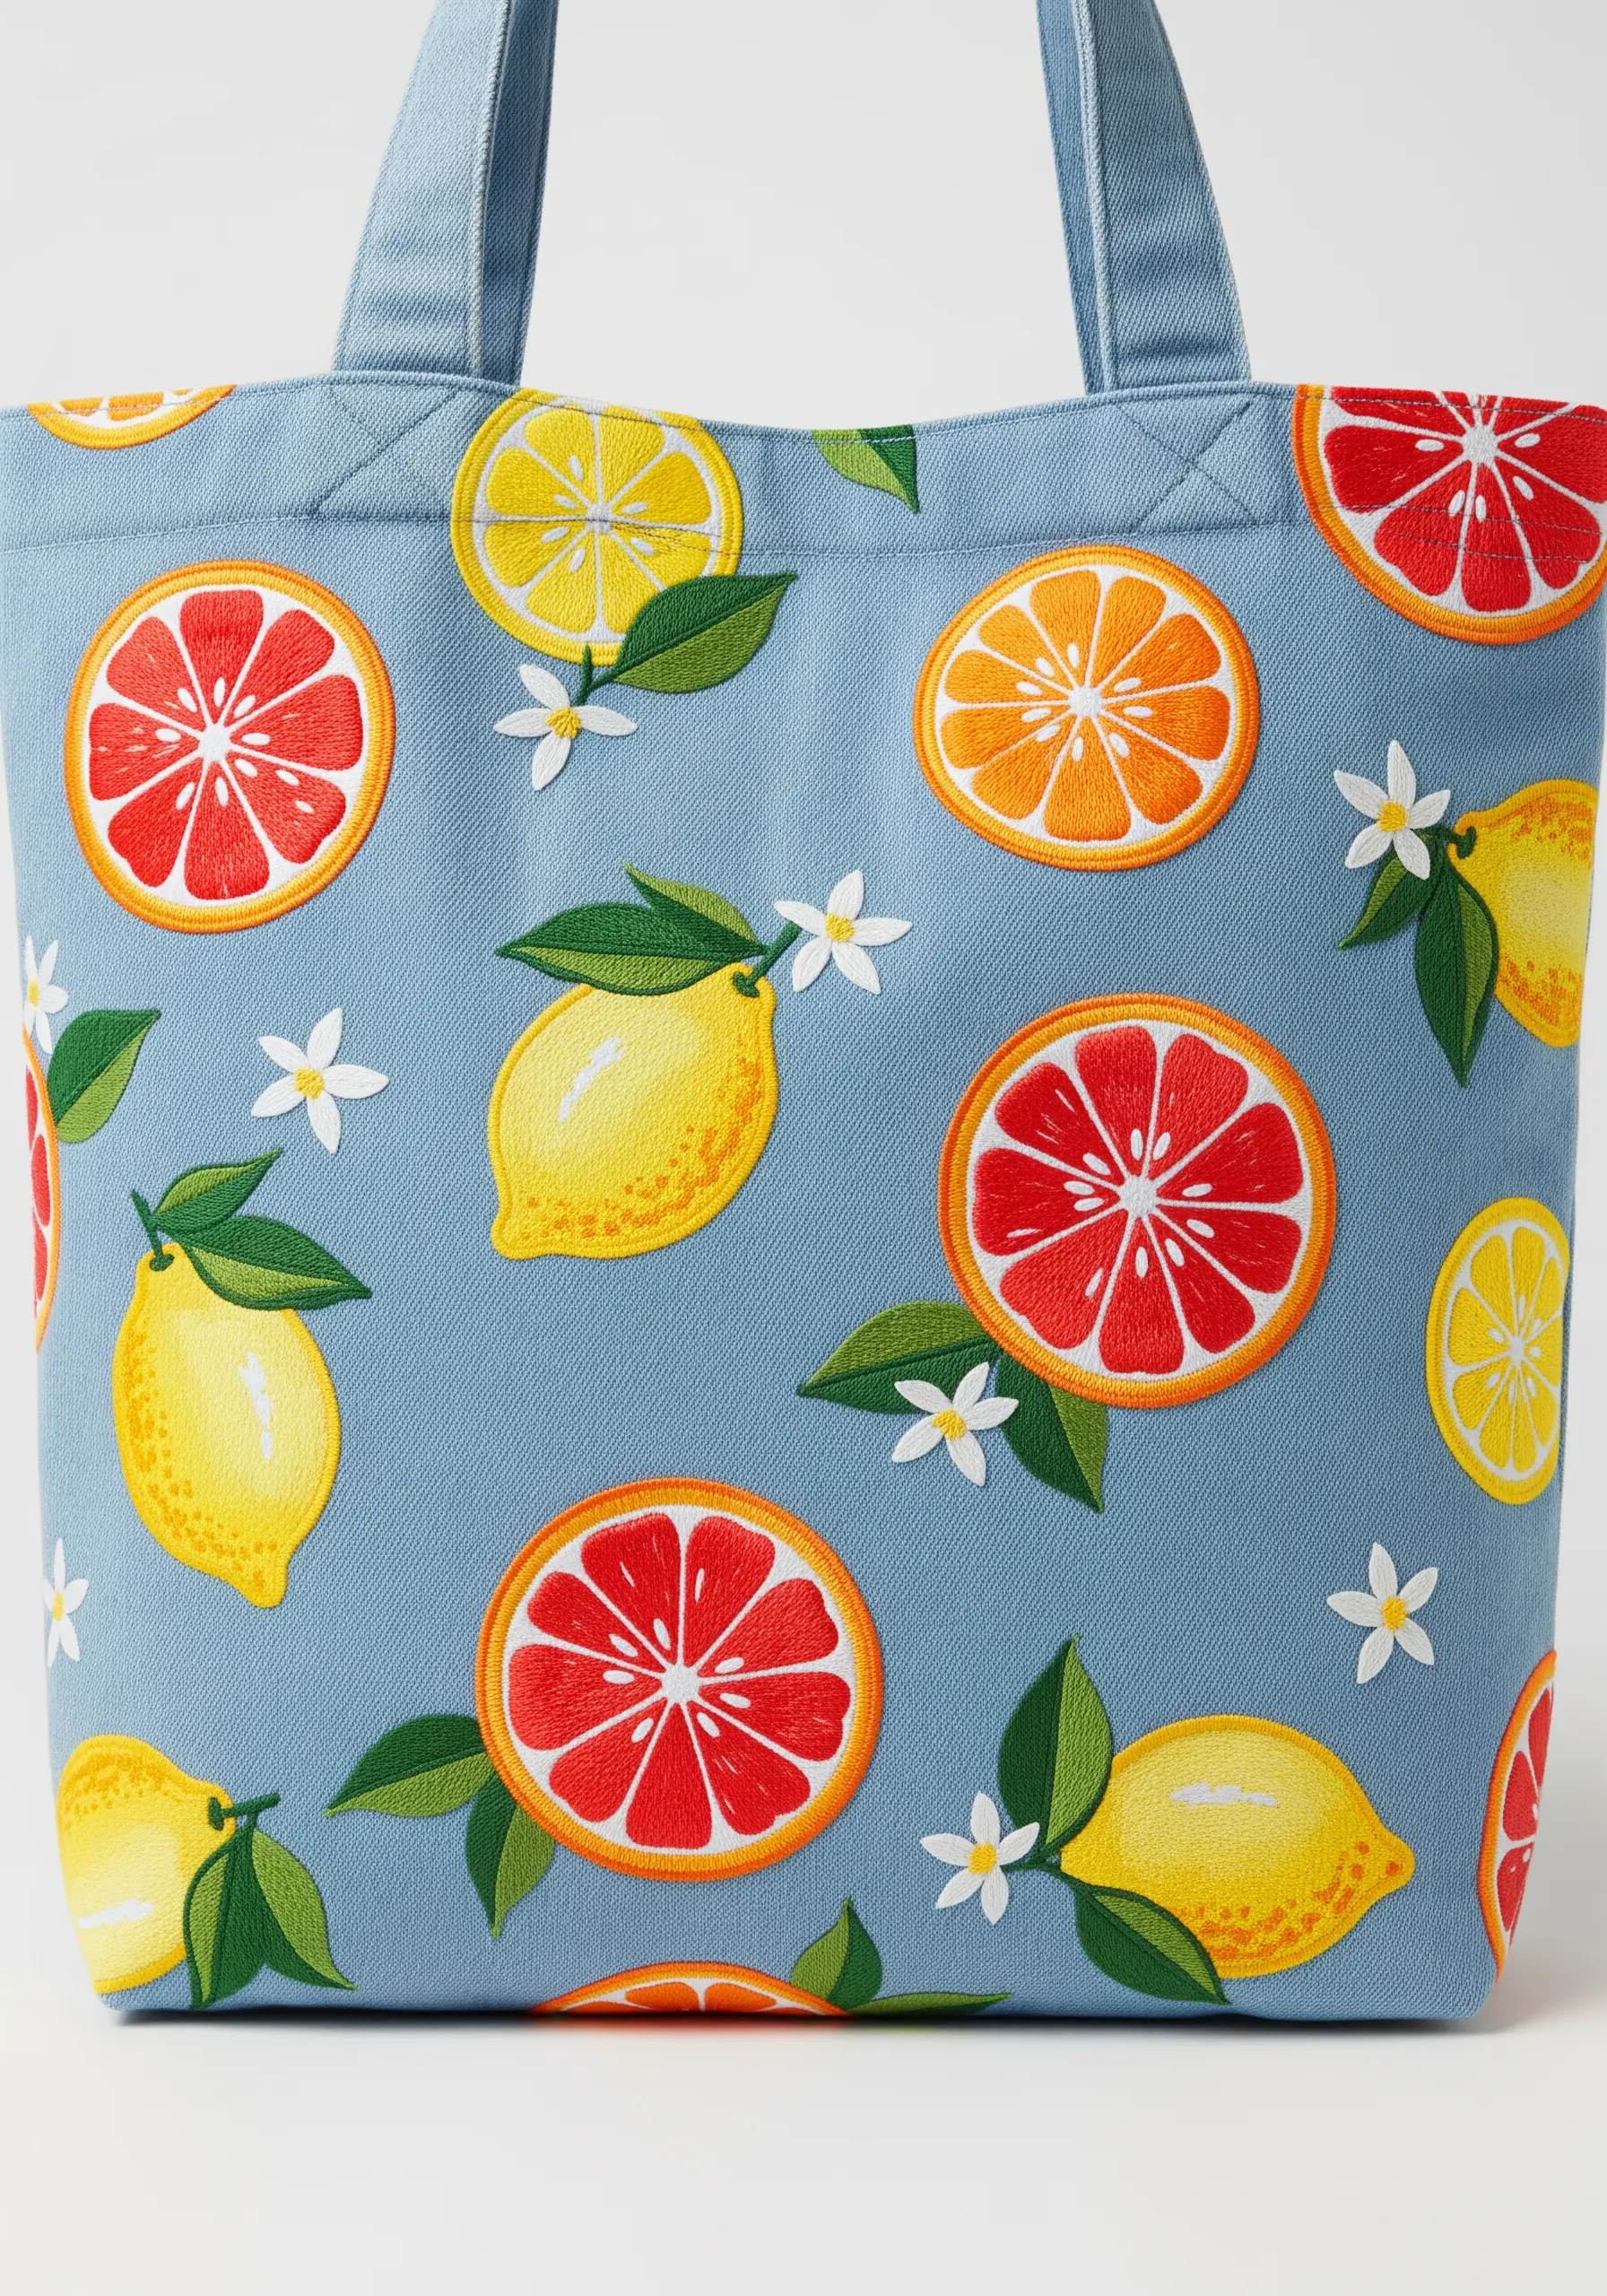
Create a vibrant, scattered pattern that feels balanced by varying the size and type of your motifs.
Combine whole lemons with sliced oranges and grapefruits, and fill the negative space with tiny floral motifs and leaves.
Use a smooth, radial satin stitch for the fruit segments and a crisp split stitch for the outlines to maintain a clean, graphic look.
The playful repetition makes this tote feel joyful and perfect for a trip to the farmers market.
18. Capture Iridescence with Silk Floss and Beads
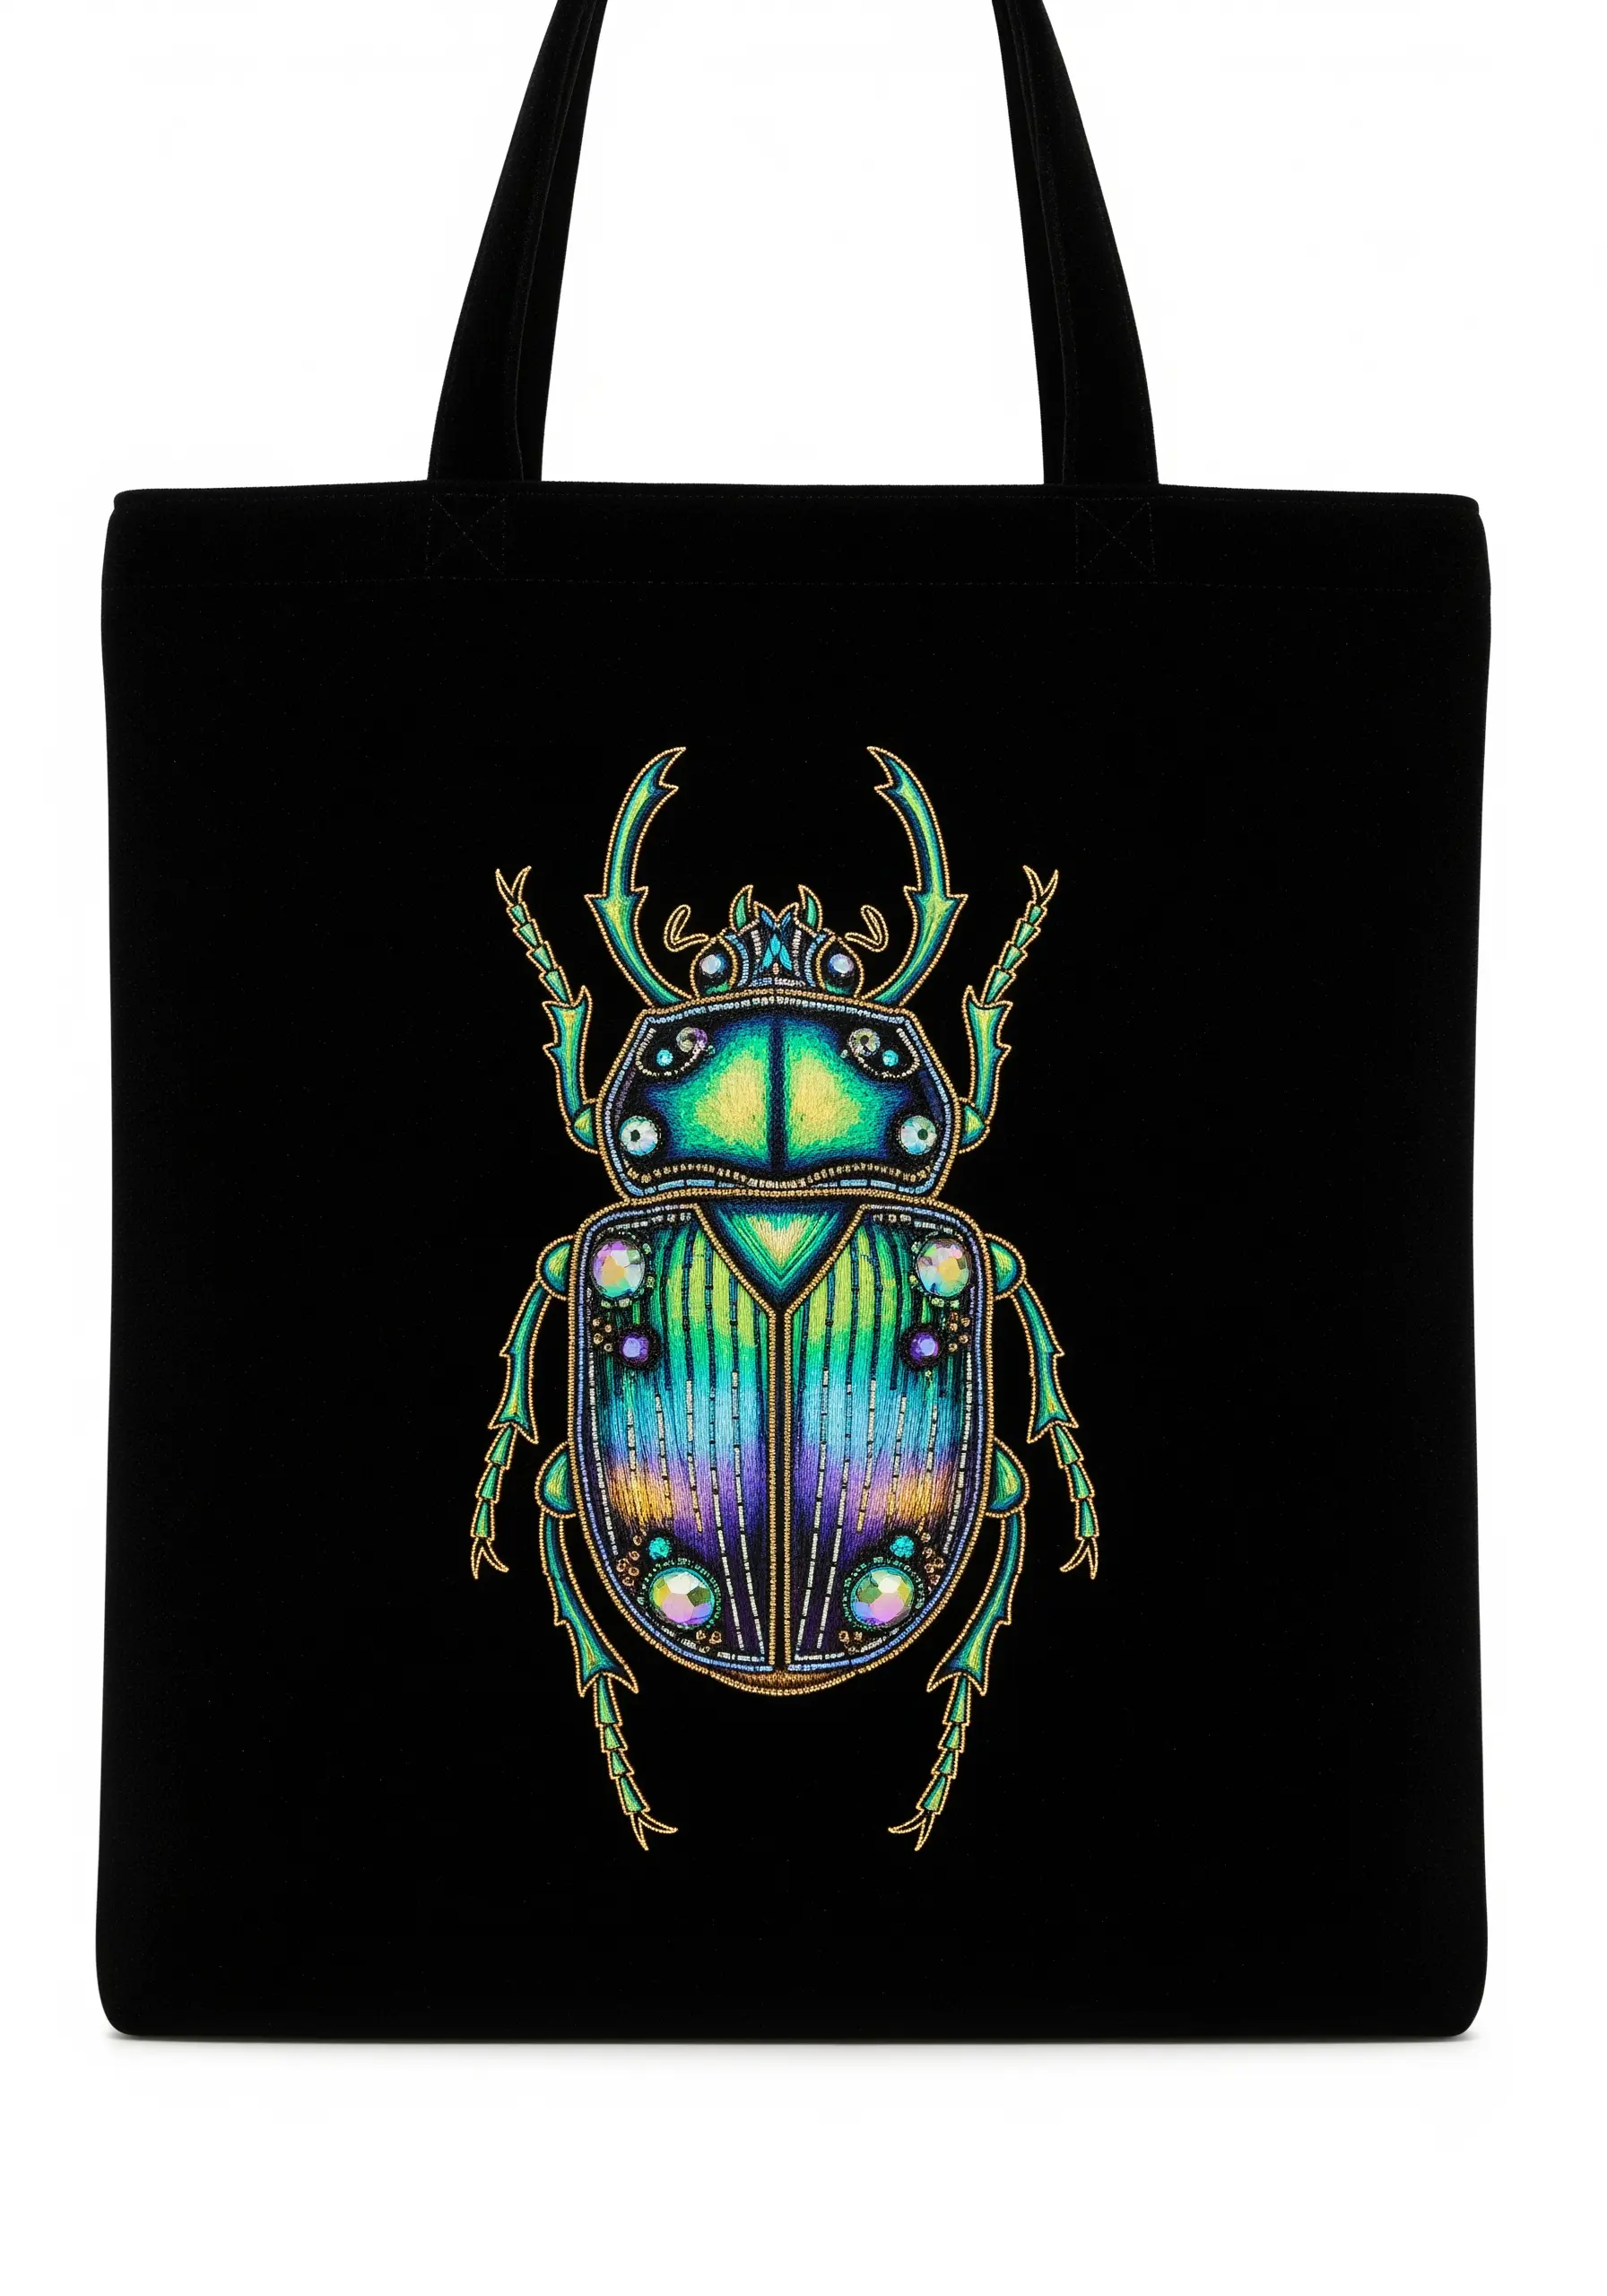
To mimic the shimmering exoskeleton of a beetle, thread painting with a single strand of silk floss is unmatched.
Silk thread has a natural luster that catches the light far better than cotton.
Blend shades of blue, green, and purple using long-and-short stitches that follow the contour of the beetle’s shell.
Enhance the effect by adding tiny, iridescent seed beads along the edges to create highlights and texture.
19. Stitch a Modern Terrazzo Pattern
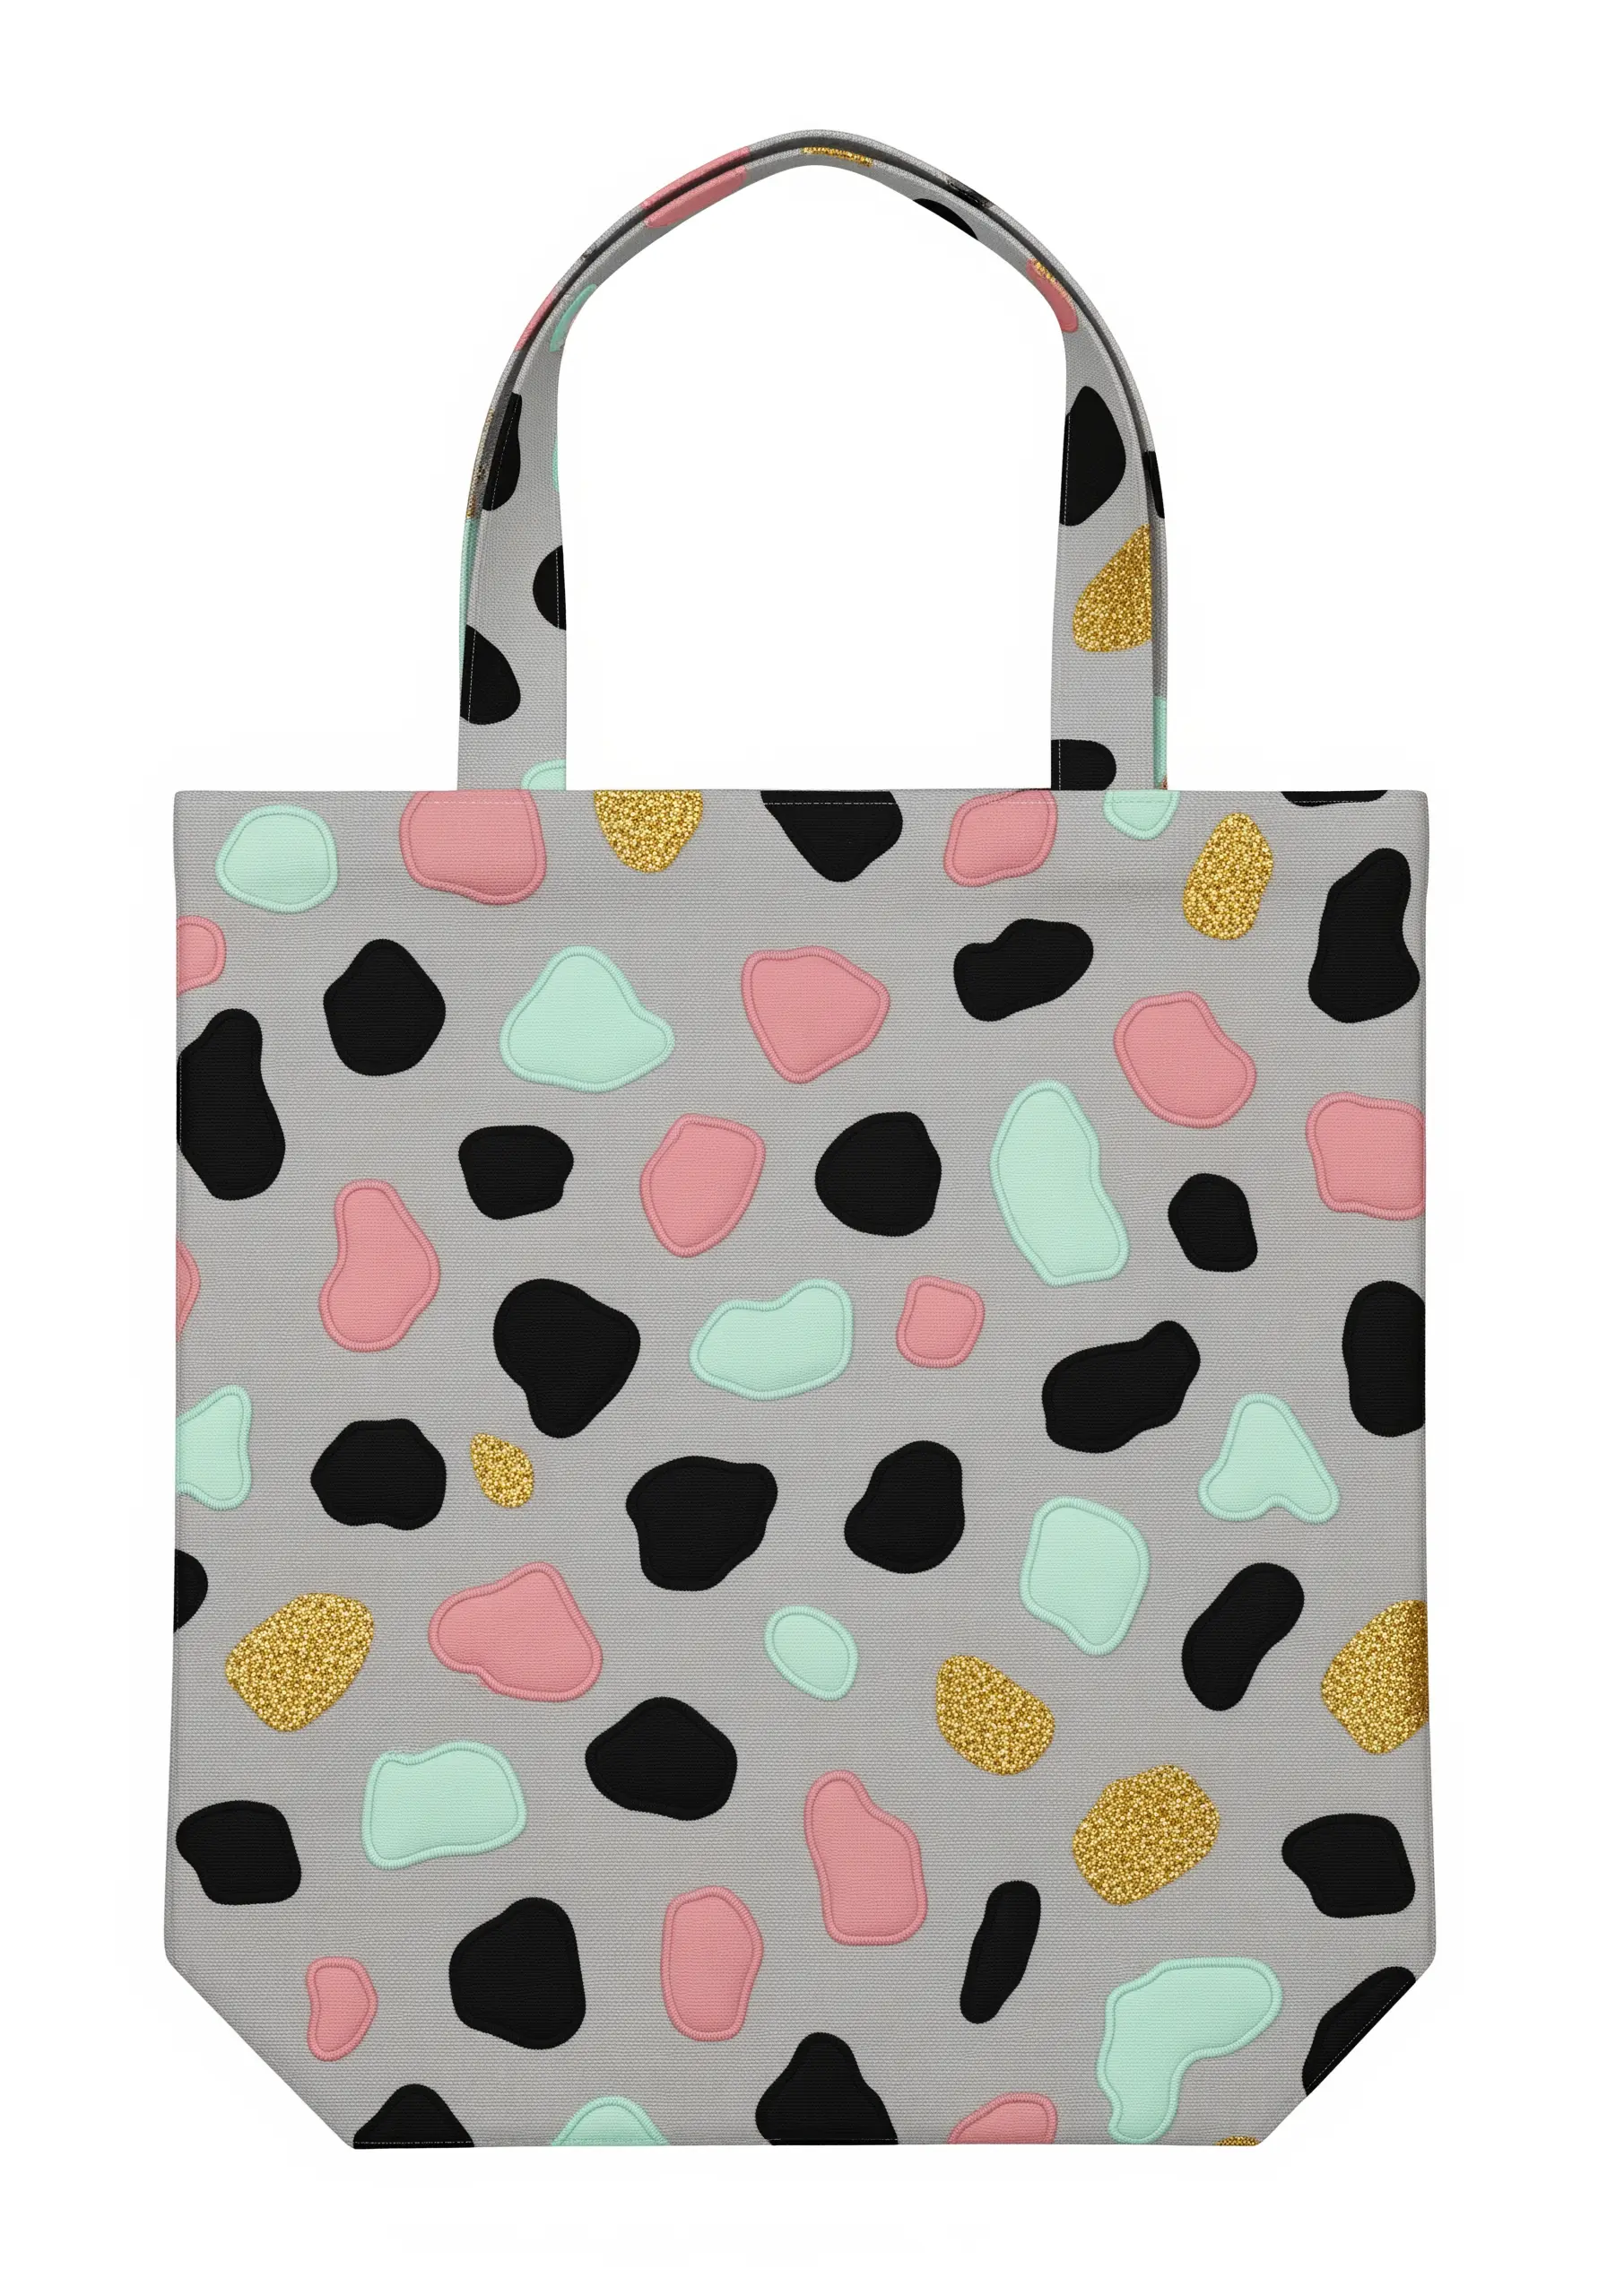
Achieve a chic, modern terrazzo look with randomly placed, organic shapes.
Use a dense satin stitch to fill each shape, making sure to vary the direction of your stitches from one shape to the next to create subtle texture.
Incorporate a few shapes filled with a metallic gold thread to add a touch of unexpected luxury.
This design is wonderfully forgiving—imperfect shapes and random placement are key to its effortless style.
20. Achieve Maximum Impact with Minimalist Lines
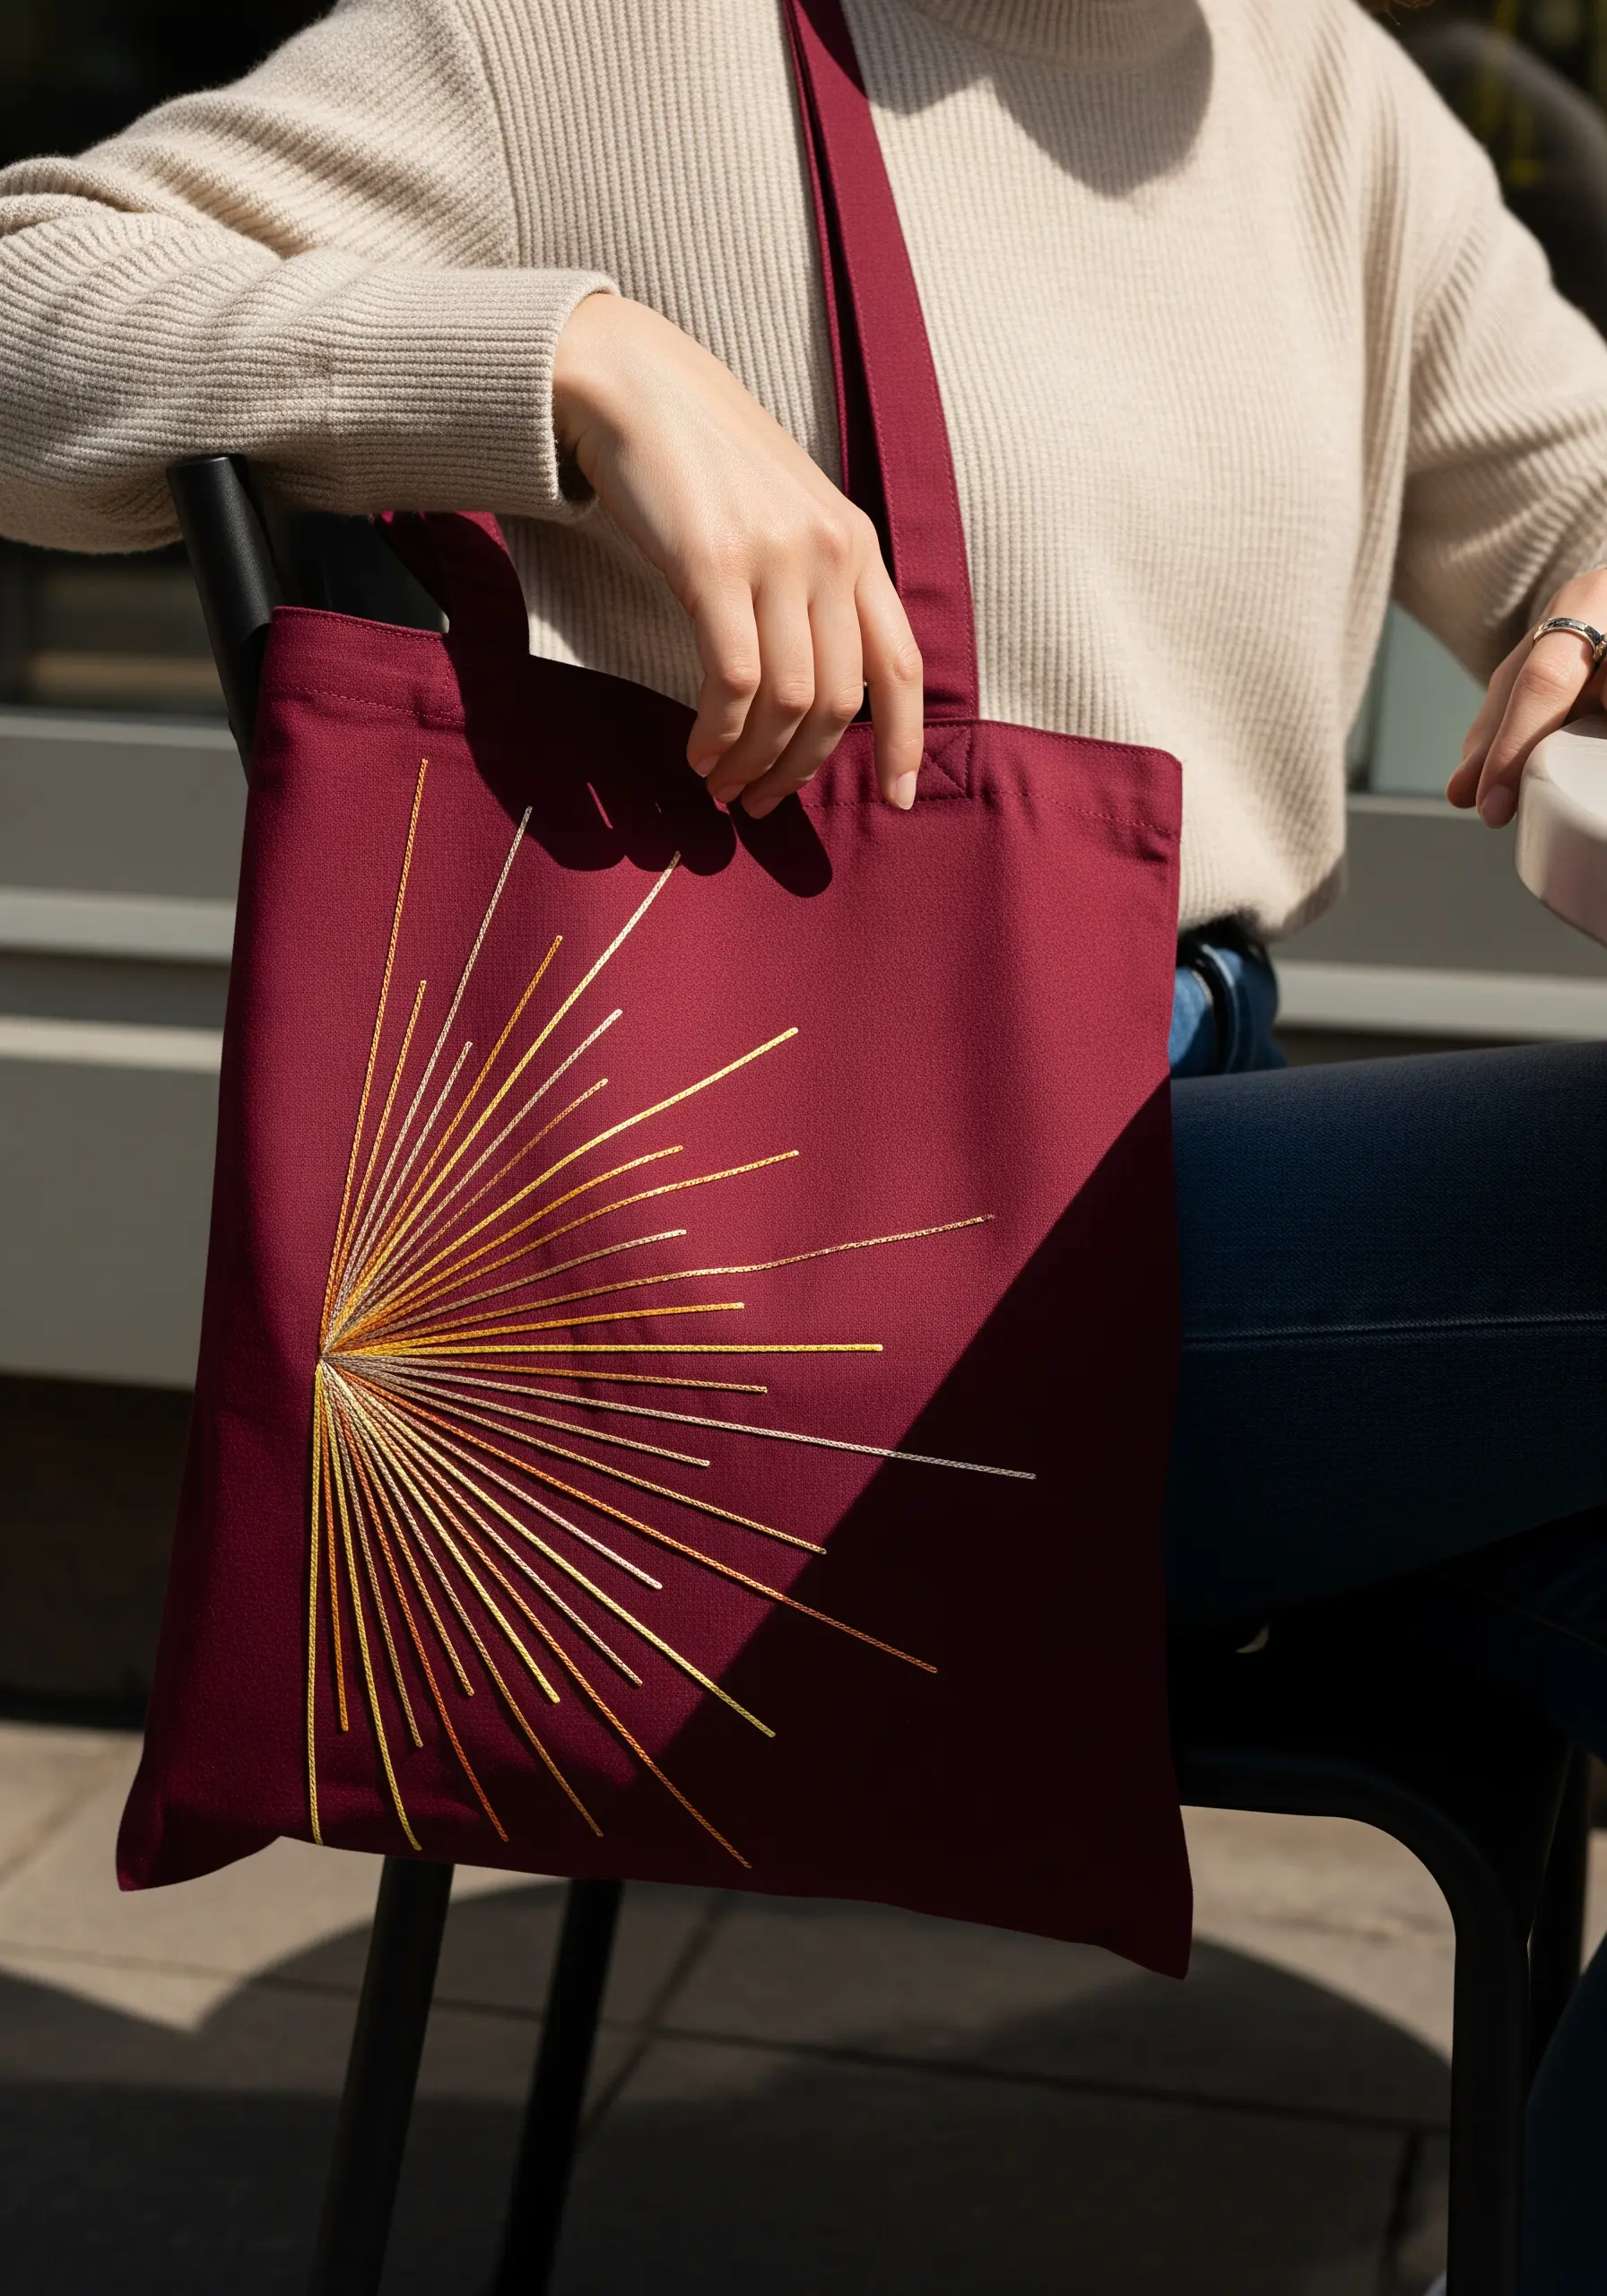
This elegant design demonstrates that you don’t need complex stitches for a dramatic result.
Create a radiant sunburst using only straight stitches originating from a single corner point.
Use a shimmering metallic thread against a rich, dark fabric like this burgundy canvas for maximum contrast and visual impact.
The key is precision: mark your start and end points before stitching to ensure every line is perfectly straight and taut.
21. Construct a 3D Floral Headdress
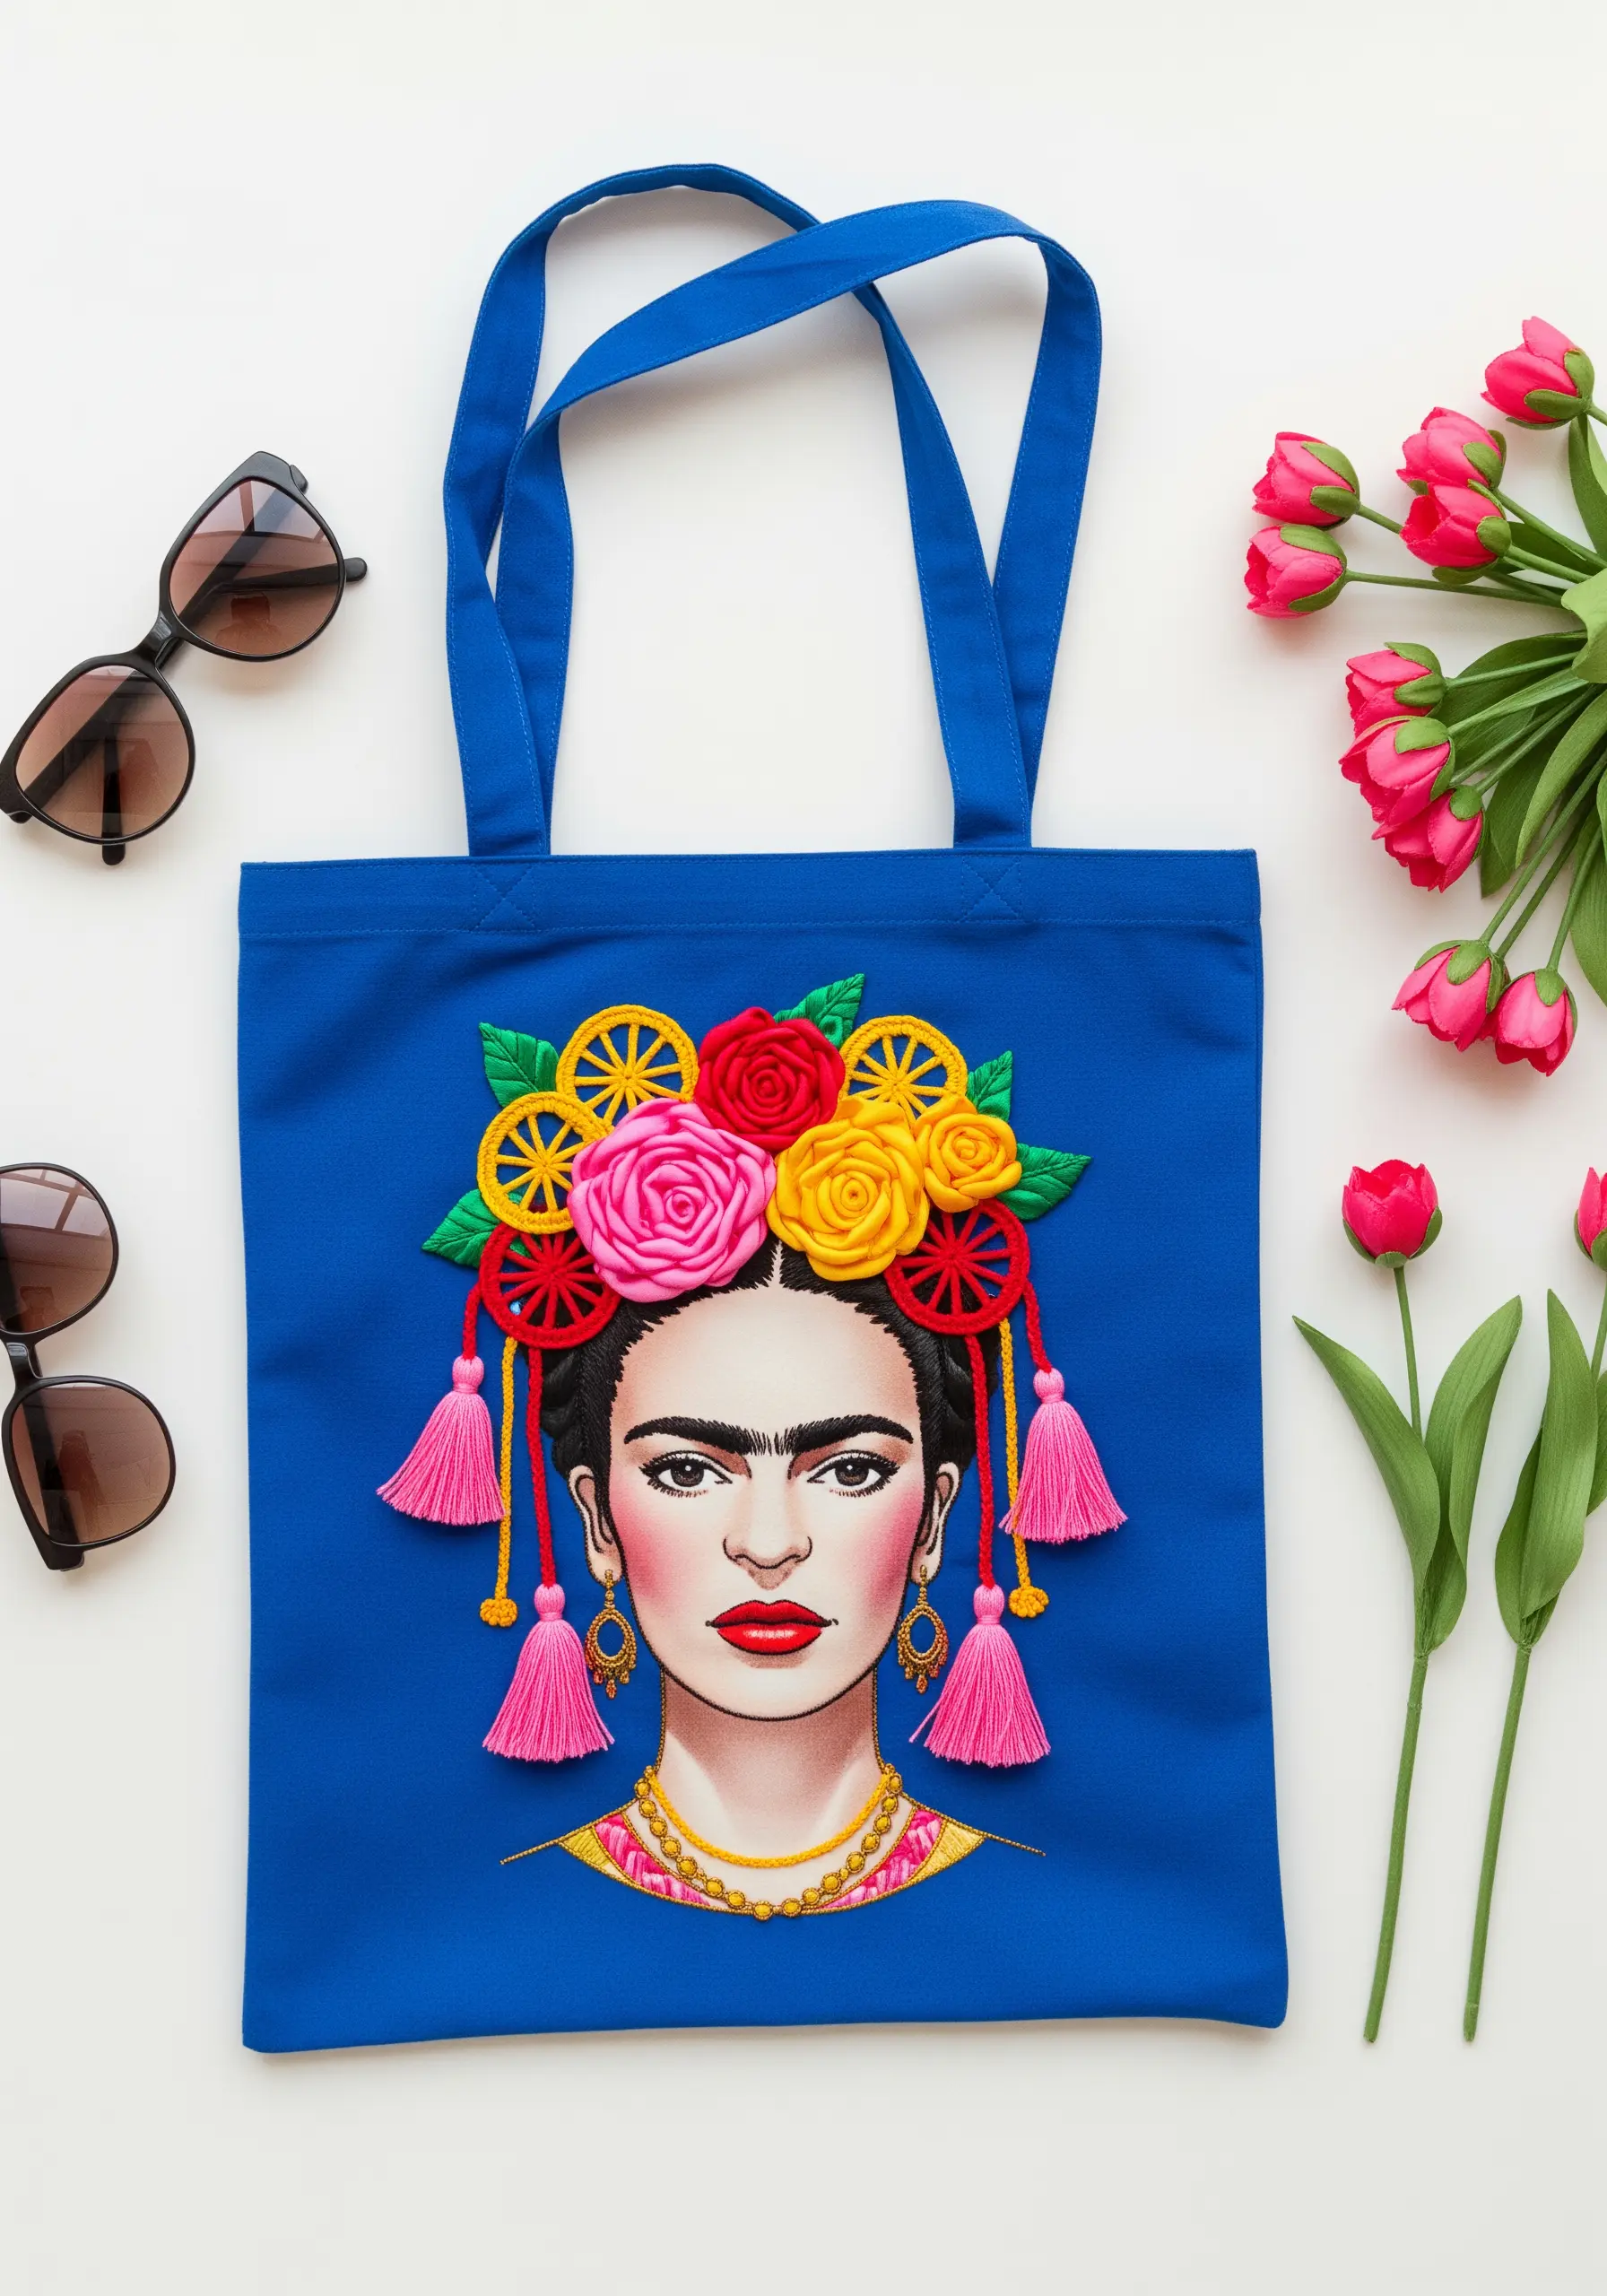
Take your portrait embroidery to the next level by incorporating three-dimensional elements.
For the flowers in Frida Kahlo’s hair, use woven wheel stitches (or spider web roses) to create raised, circular blooms that stand off the fabric.
Create miniature tassels from embroidery floss and attach them as earrings and hair decorations for added movement and texture.
These dimensional details turn a flat portrait into a stunning, tactile work of art.
22. Personalize Your Tote with an Embroidered Map
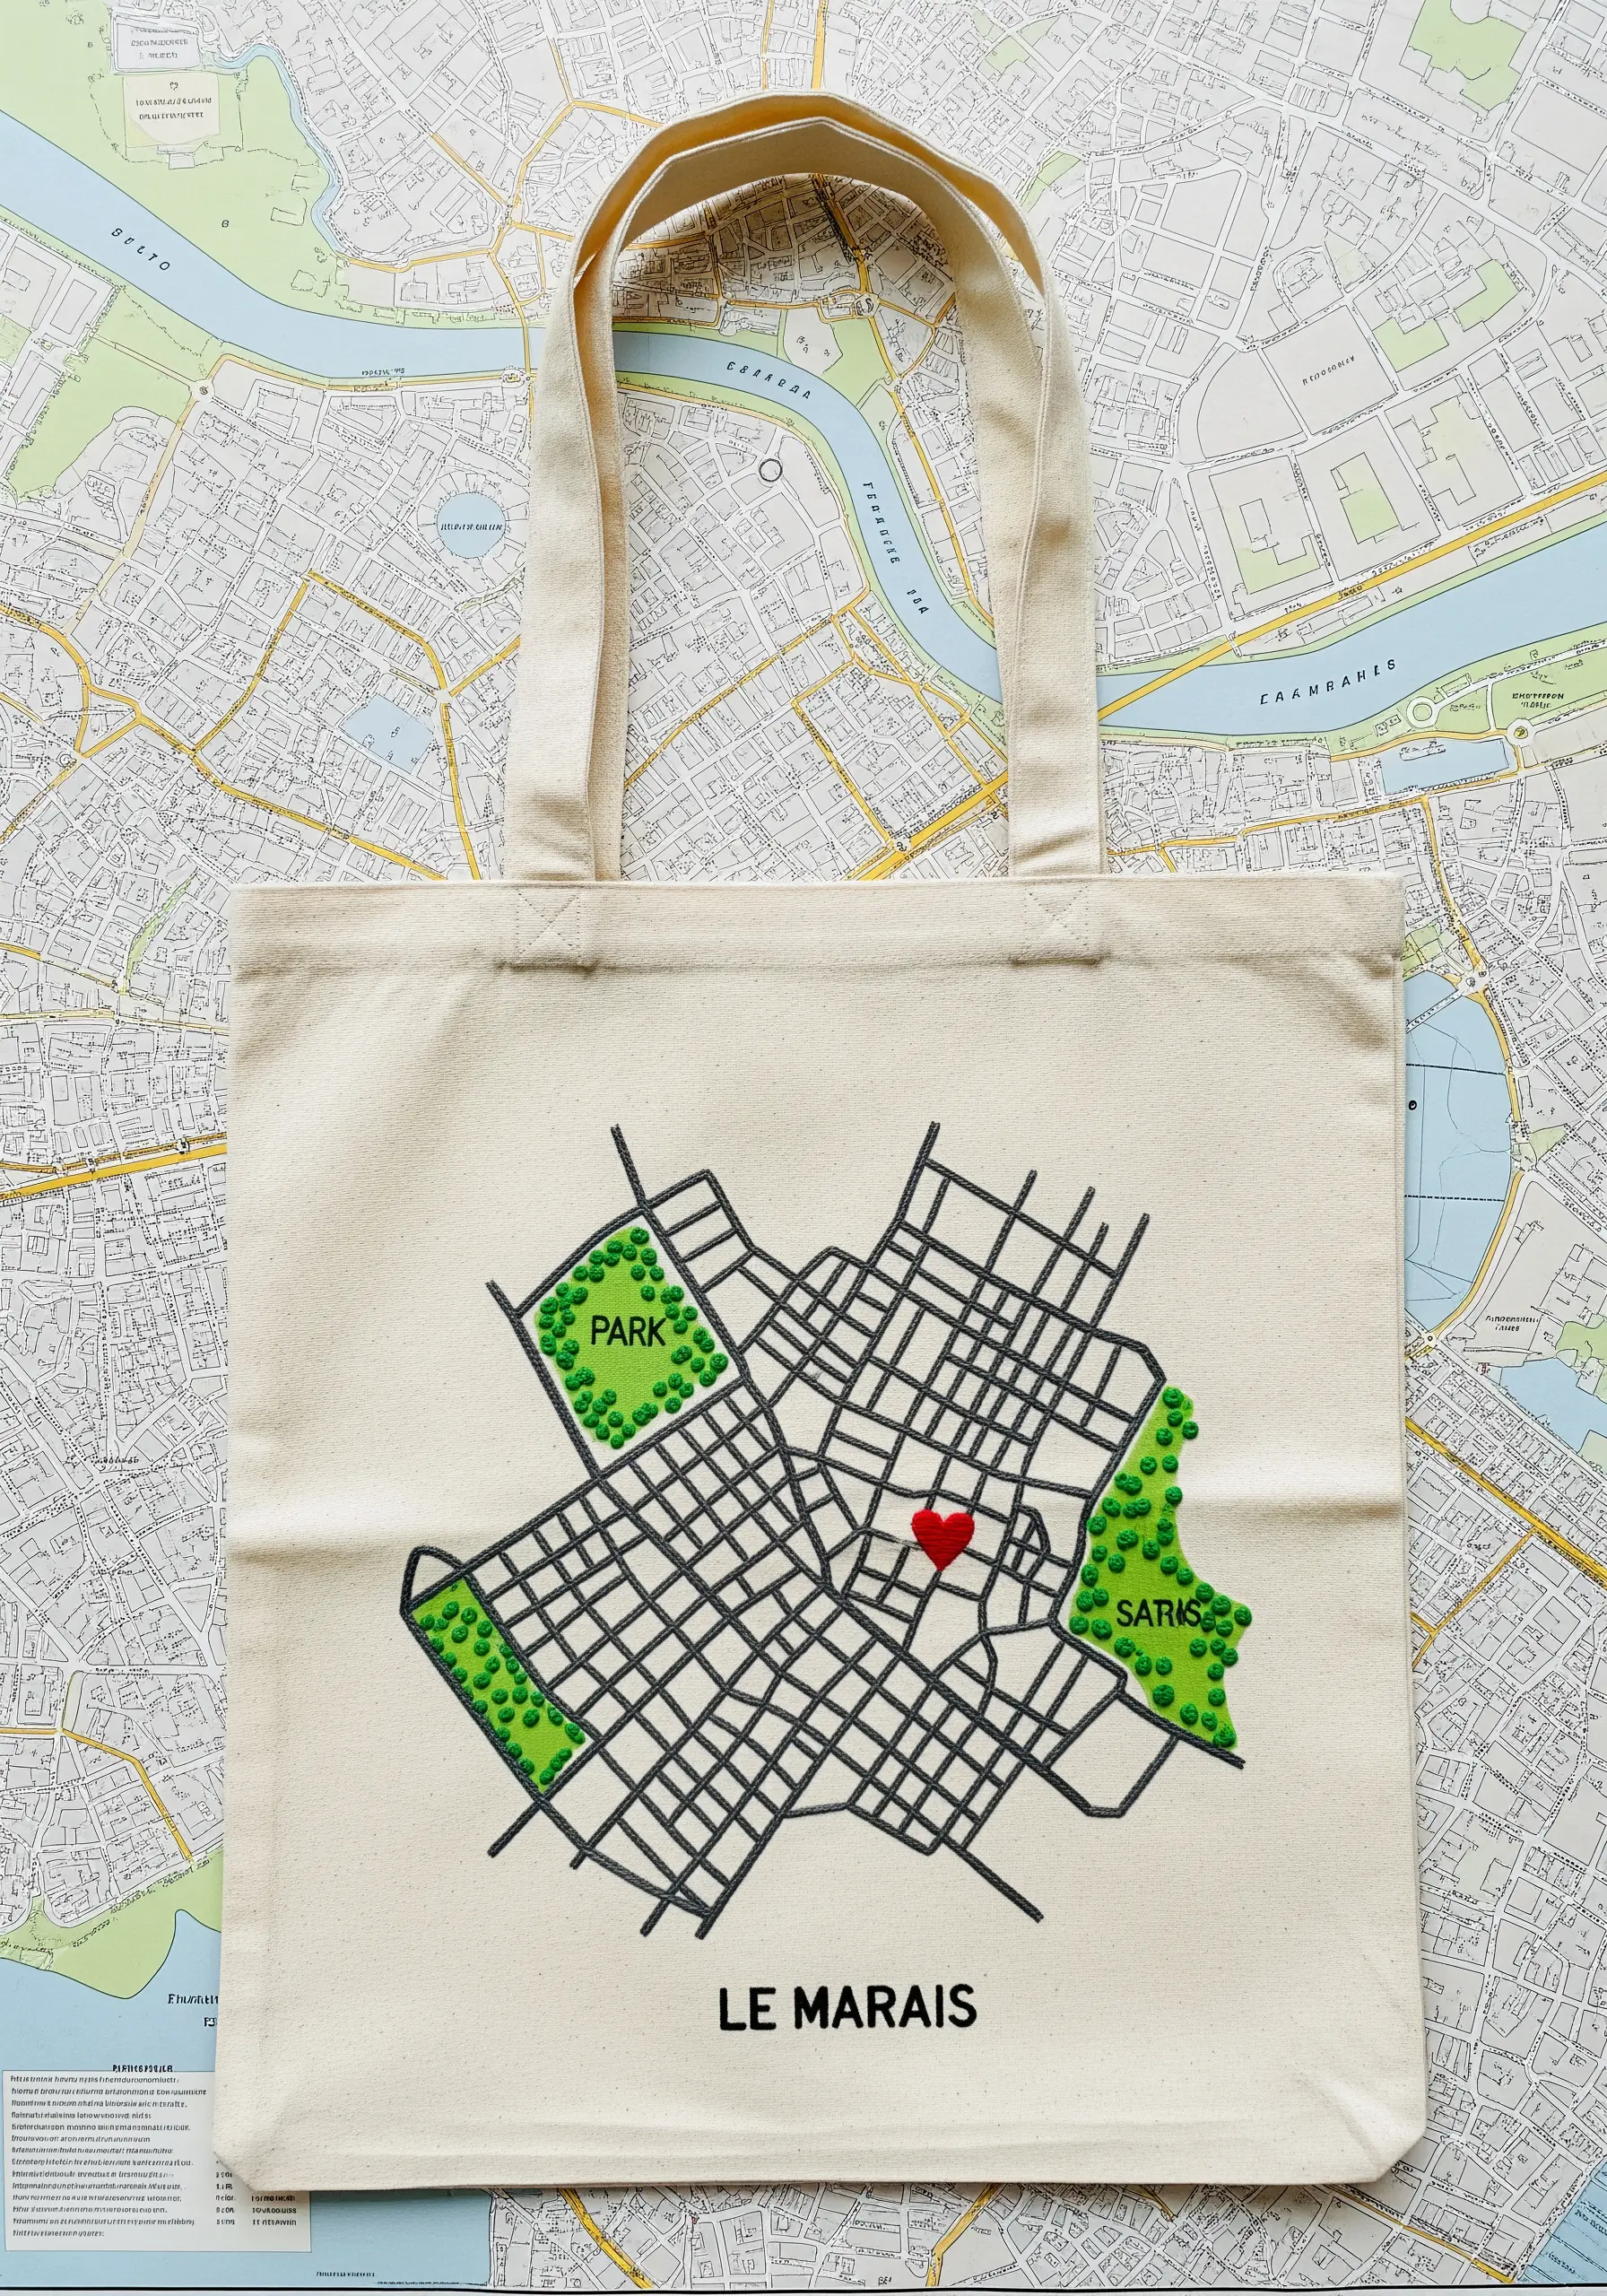
Commemorate a favorite neighborhood, a special trip, or your hometown by embroidering a simplified map.
Use a basic backstitch in a dark, high-contrast thread to trace the grid of streets.
Highlight significant locations—like a park or a specific address—with blocks of green satin stitch or a single red heart.
This is one of the most personal and creative personalized tote bag embroidery designs you can create, turning your bag into a meaningful story.
23. Weave a Textural Leopard Print
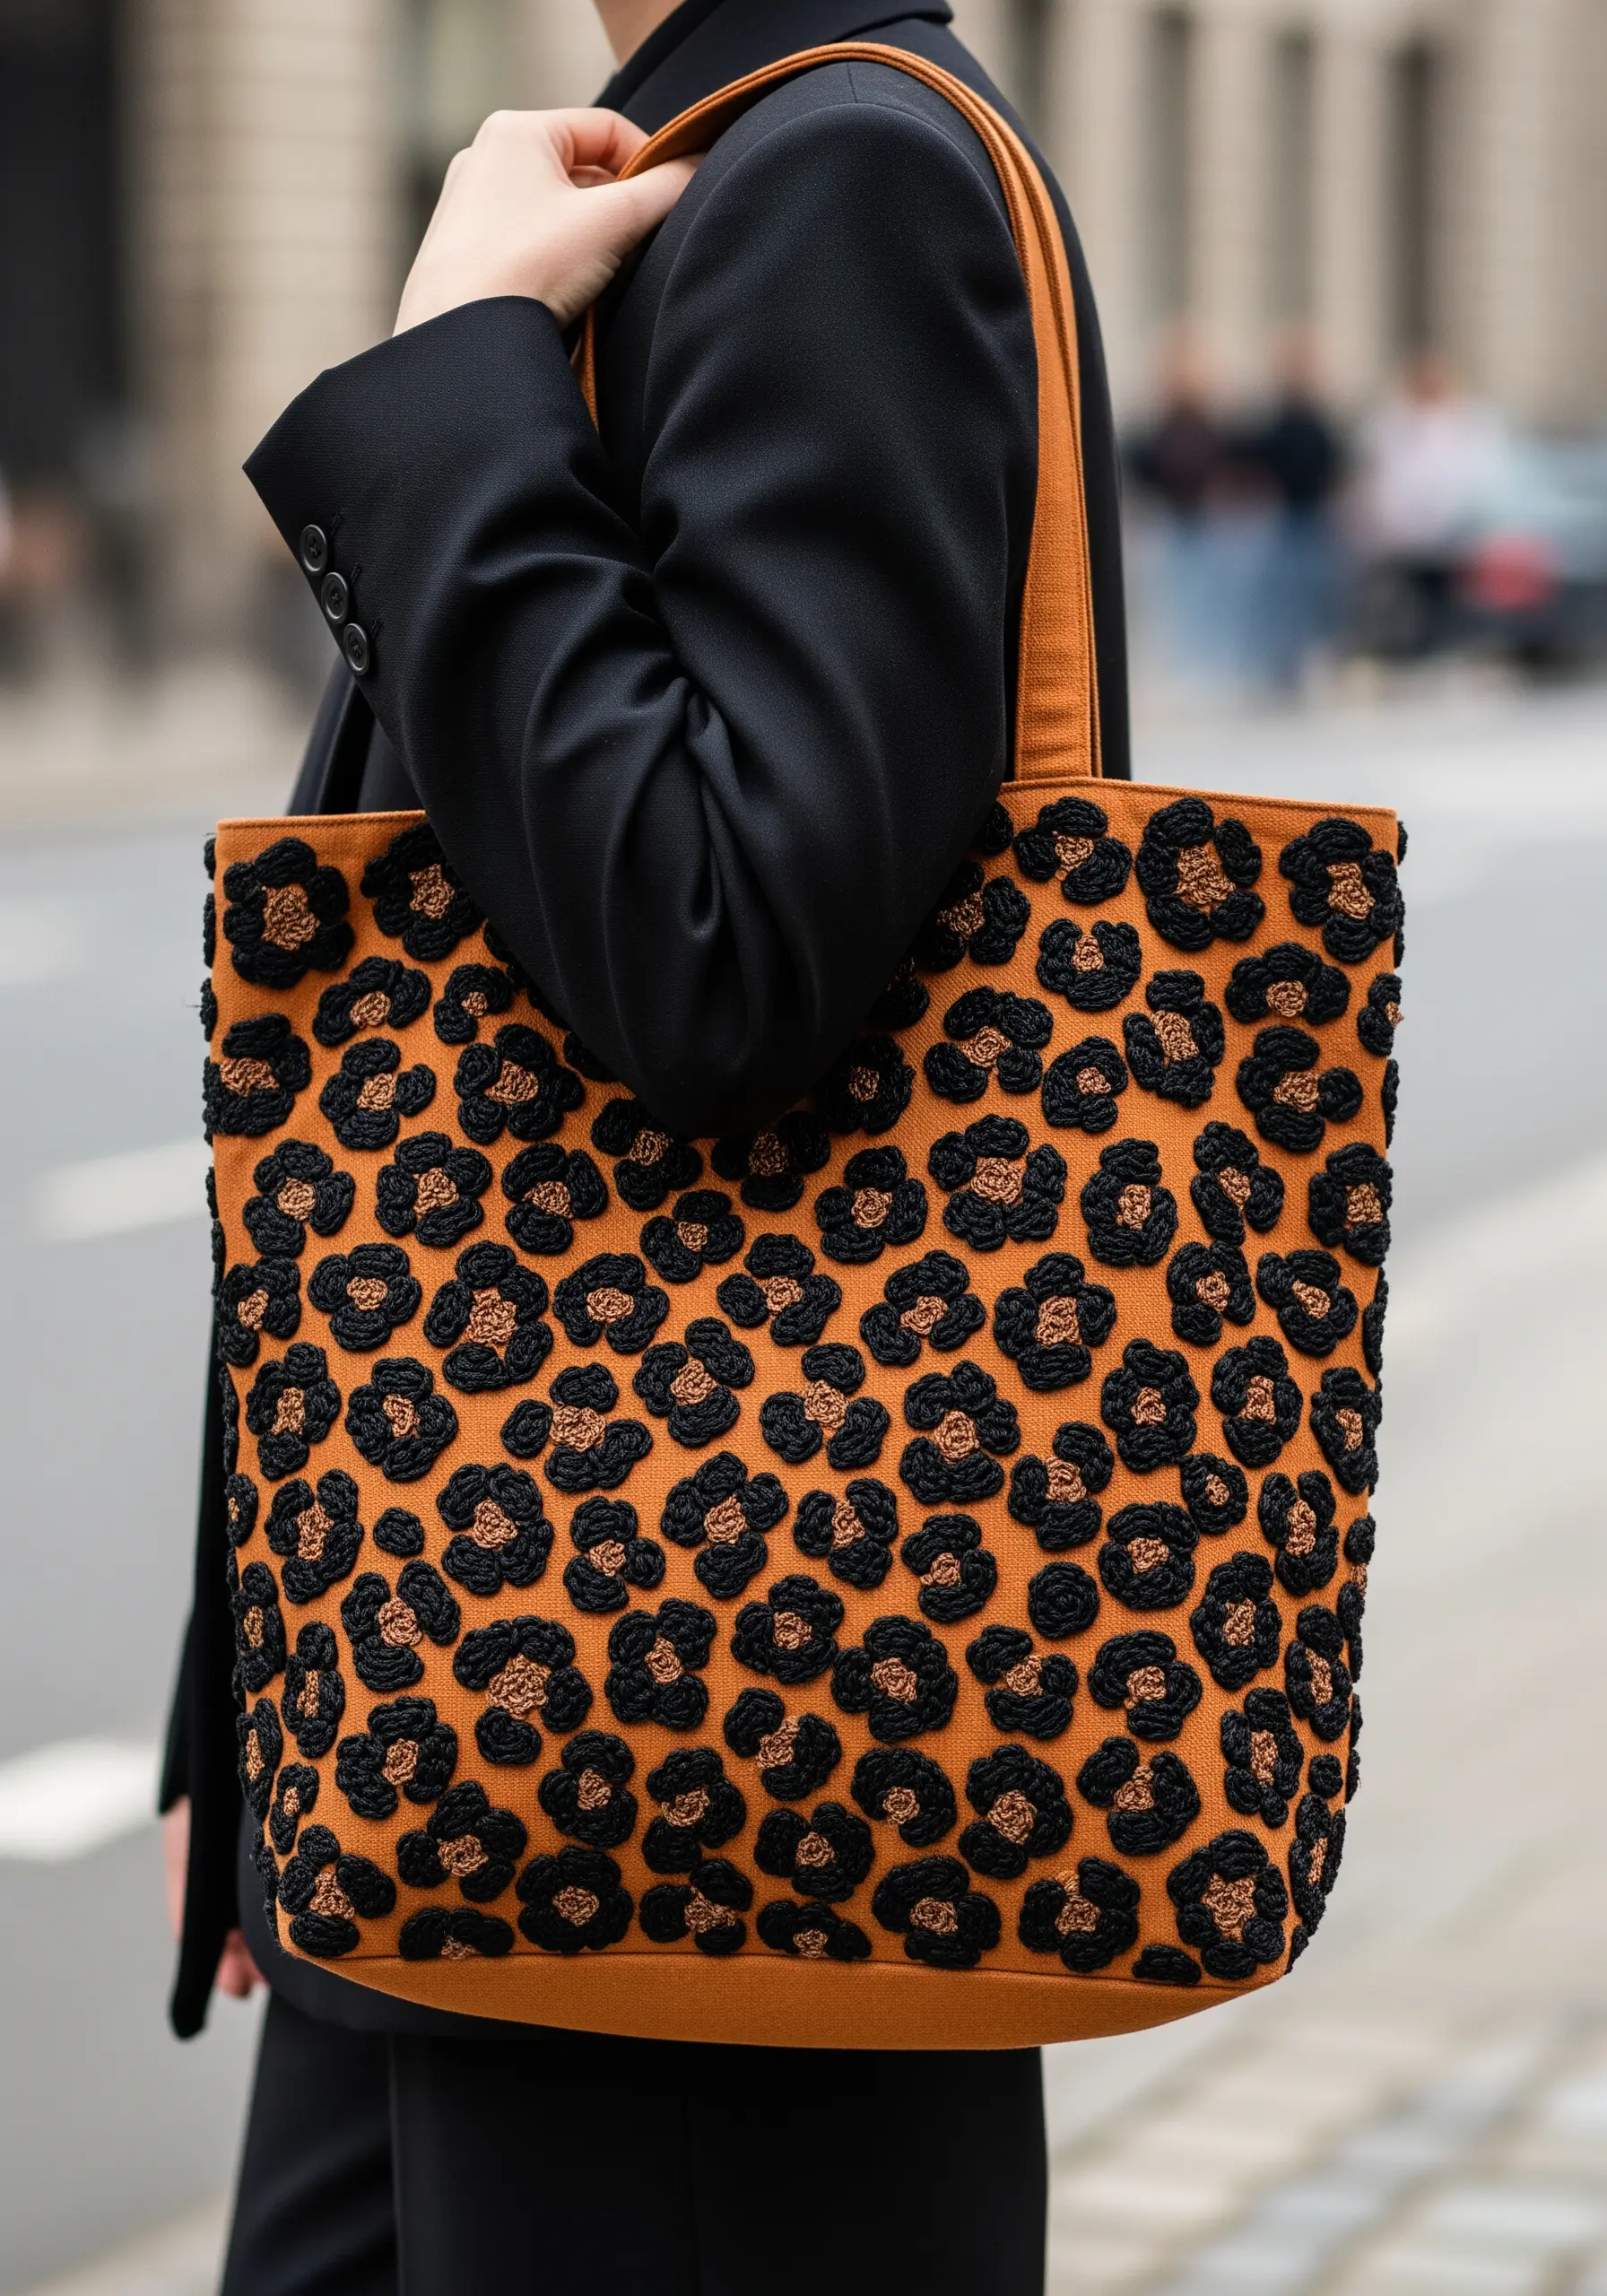
Instead of just stitching the colors of a leopard print, focus on creating its texture.
Use a highly textural stitch like the French knot or turkey work for the black spots, making them raised and velvety to the touch.
Fill in the surrounding area with a flatter stitch, like a satin stitch, in a classic tan or brown.
This contrast between flat and raised textures is what makes the pattern feel so dynamic and luxurious.
24. Illustrate Delicate Herbs with Varied Stitches
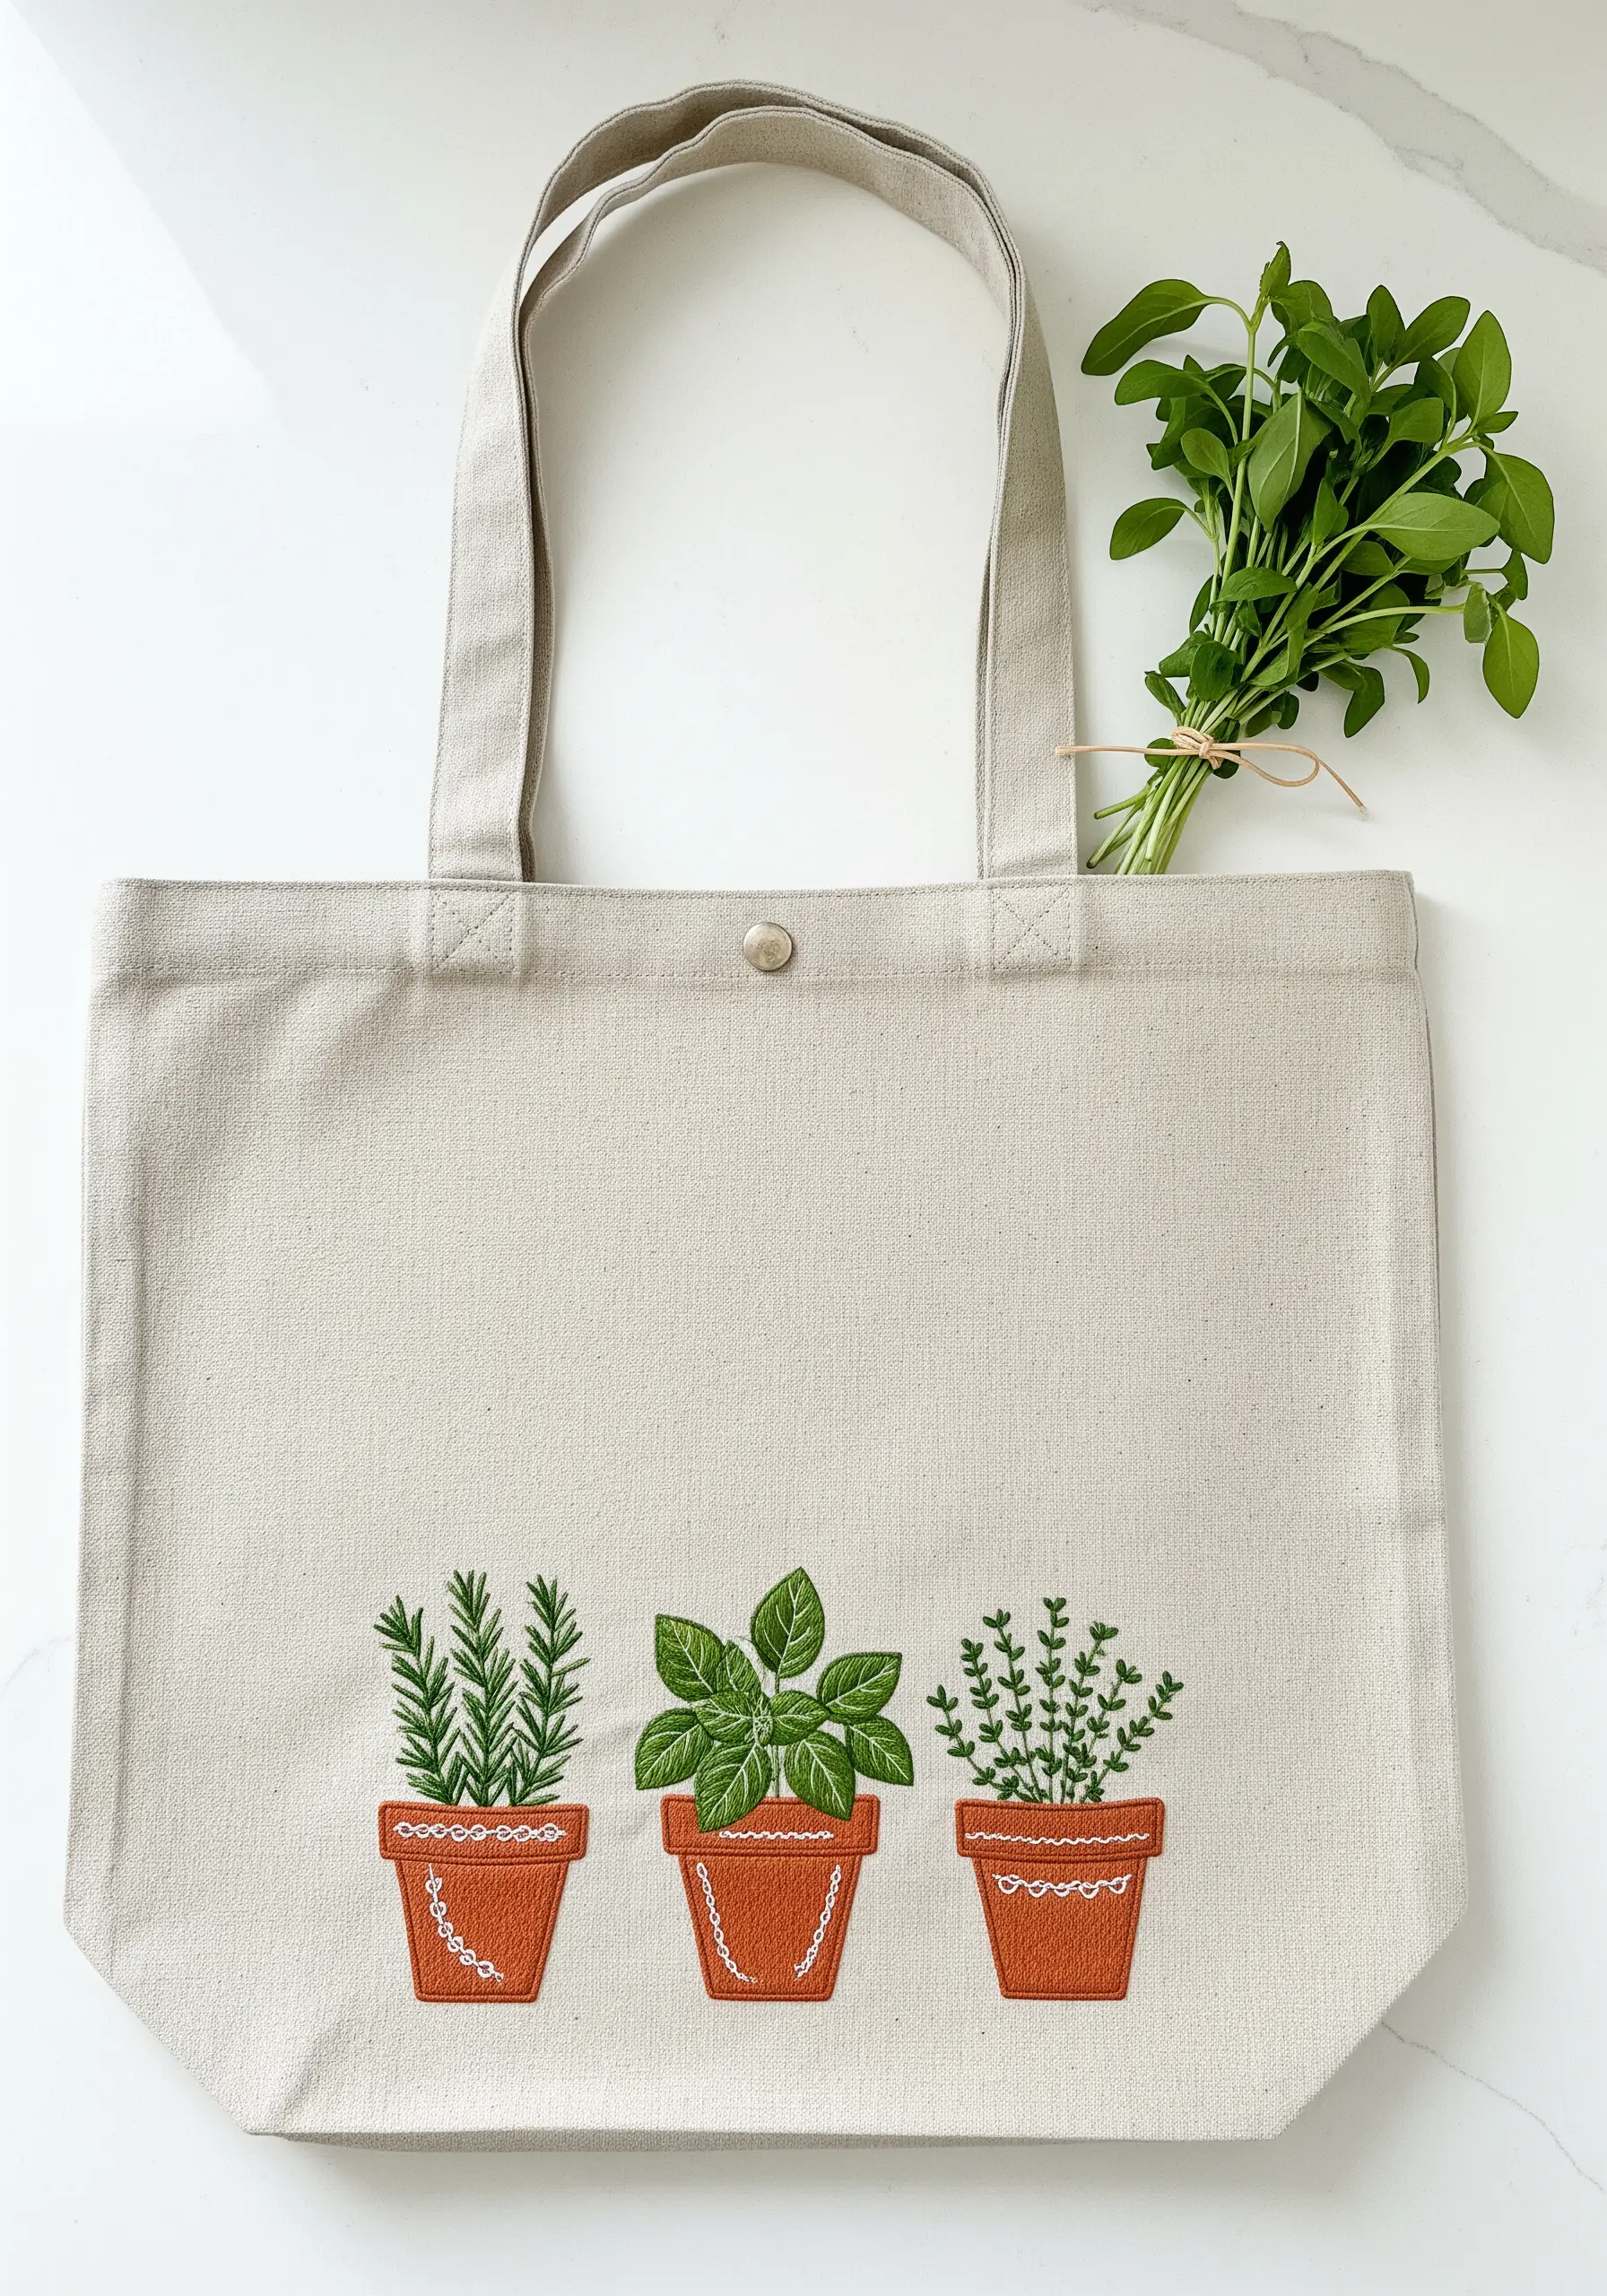
Suggest the unique foliage of different herbs by assigning a specific stitch to each one.
Use straight stitches fanning out from a central stem for rosemary’s needles.
Create basil’s broad leaves with detached chain stitches (lazy daisies), and use tiny French knots for thyme.
This thoughtful approach makes your minimal botanical patterns more recognizable and visually interesting.
25. Create a Retro Vibe with Couching and Bold Color

Capture a 70s floral aesthetic by outlining your shapes with thick yarn using the couching technique.
This creates the bold, graphic lines characteristic of retro illustrations.
Fill the shapes with a dense, smooth satin stitch in a nostalgic color palette of orange, yellow, and brown.
Stitching on a brown corduroy bag completes the vintage-inspired look, adding another layer of period-appropriate texture.
26. Add Regal Detail with Metallic Thread Scales

For mythical creatures like dragons, using metallic thread can instantly elevate the design from simple to extraordinary.
Embroider the dragon’s scales using a simple satin stitch, but alternate between a bold red and a shimmering gold thread.
Use the gold exclusively for the outlines, underbelly, and horns to create a sense of richness and importance.
The high contrast against the black bag makes the metallic details appear to glow.
27. Paint an Impressionistic Landscape with Thread
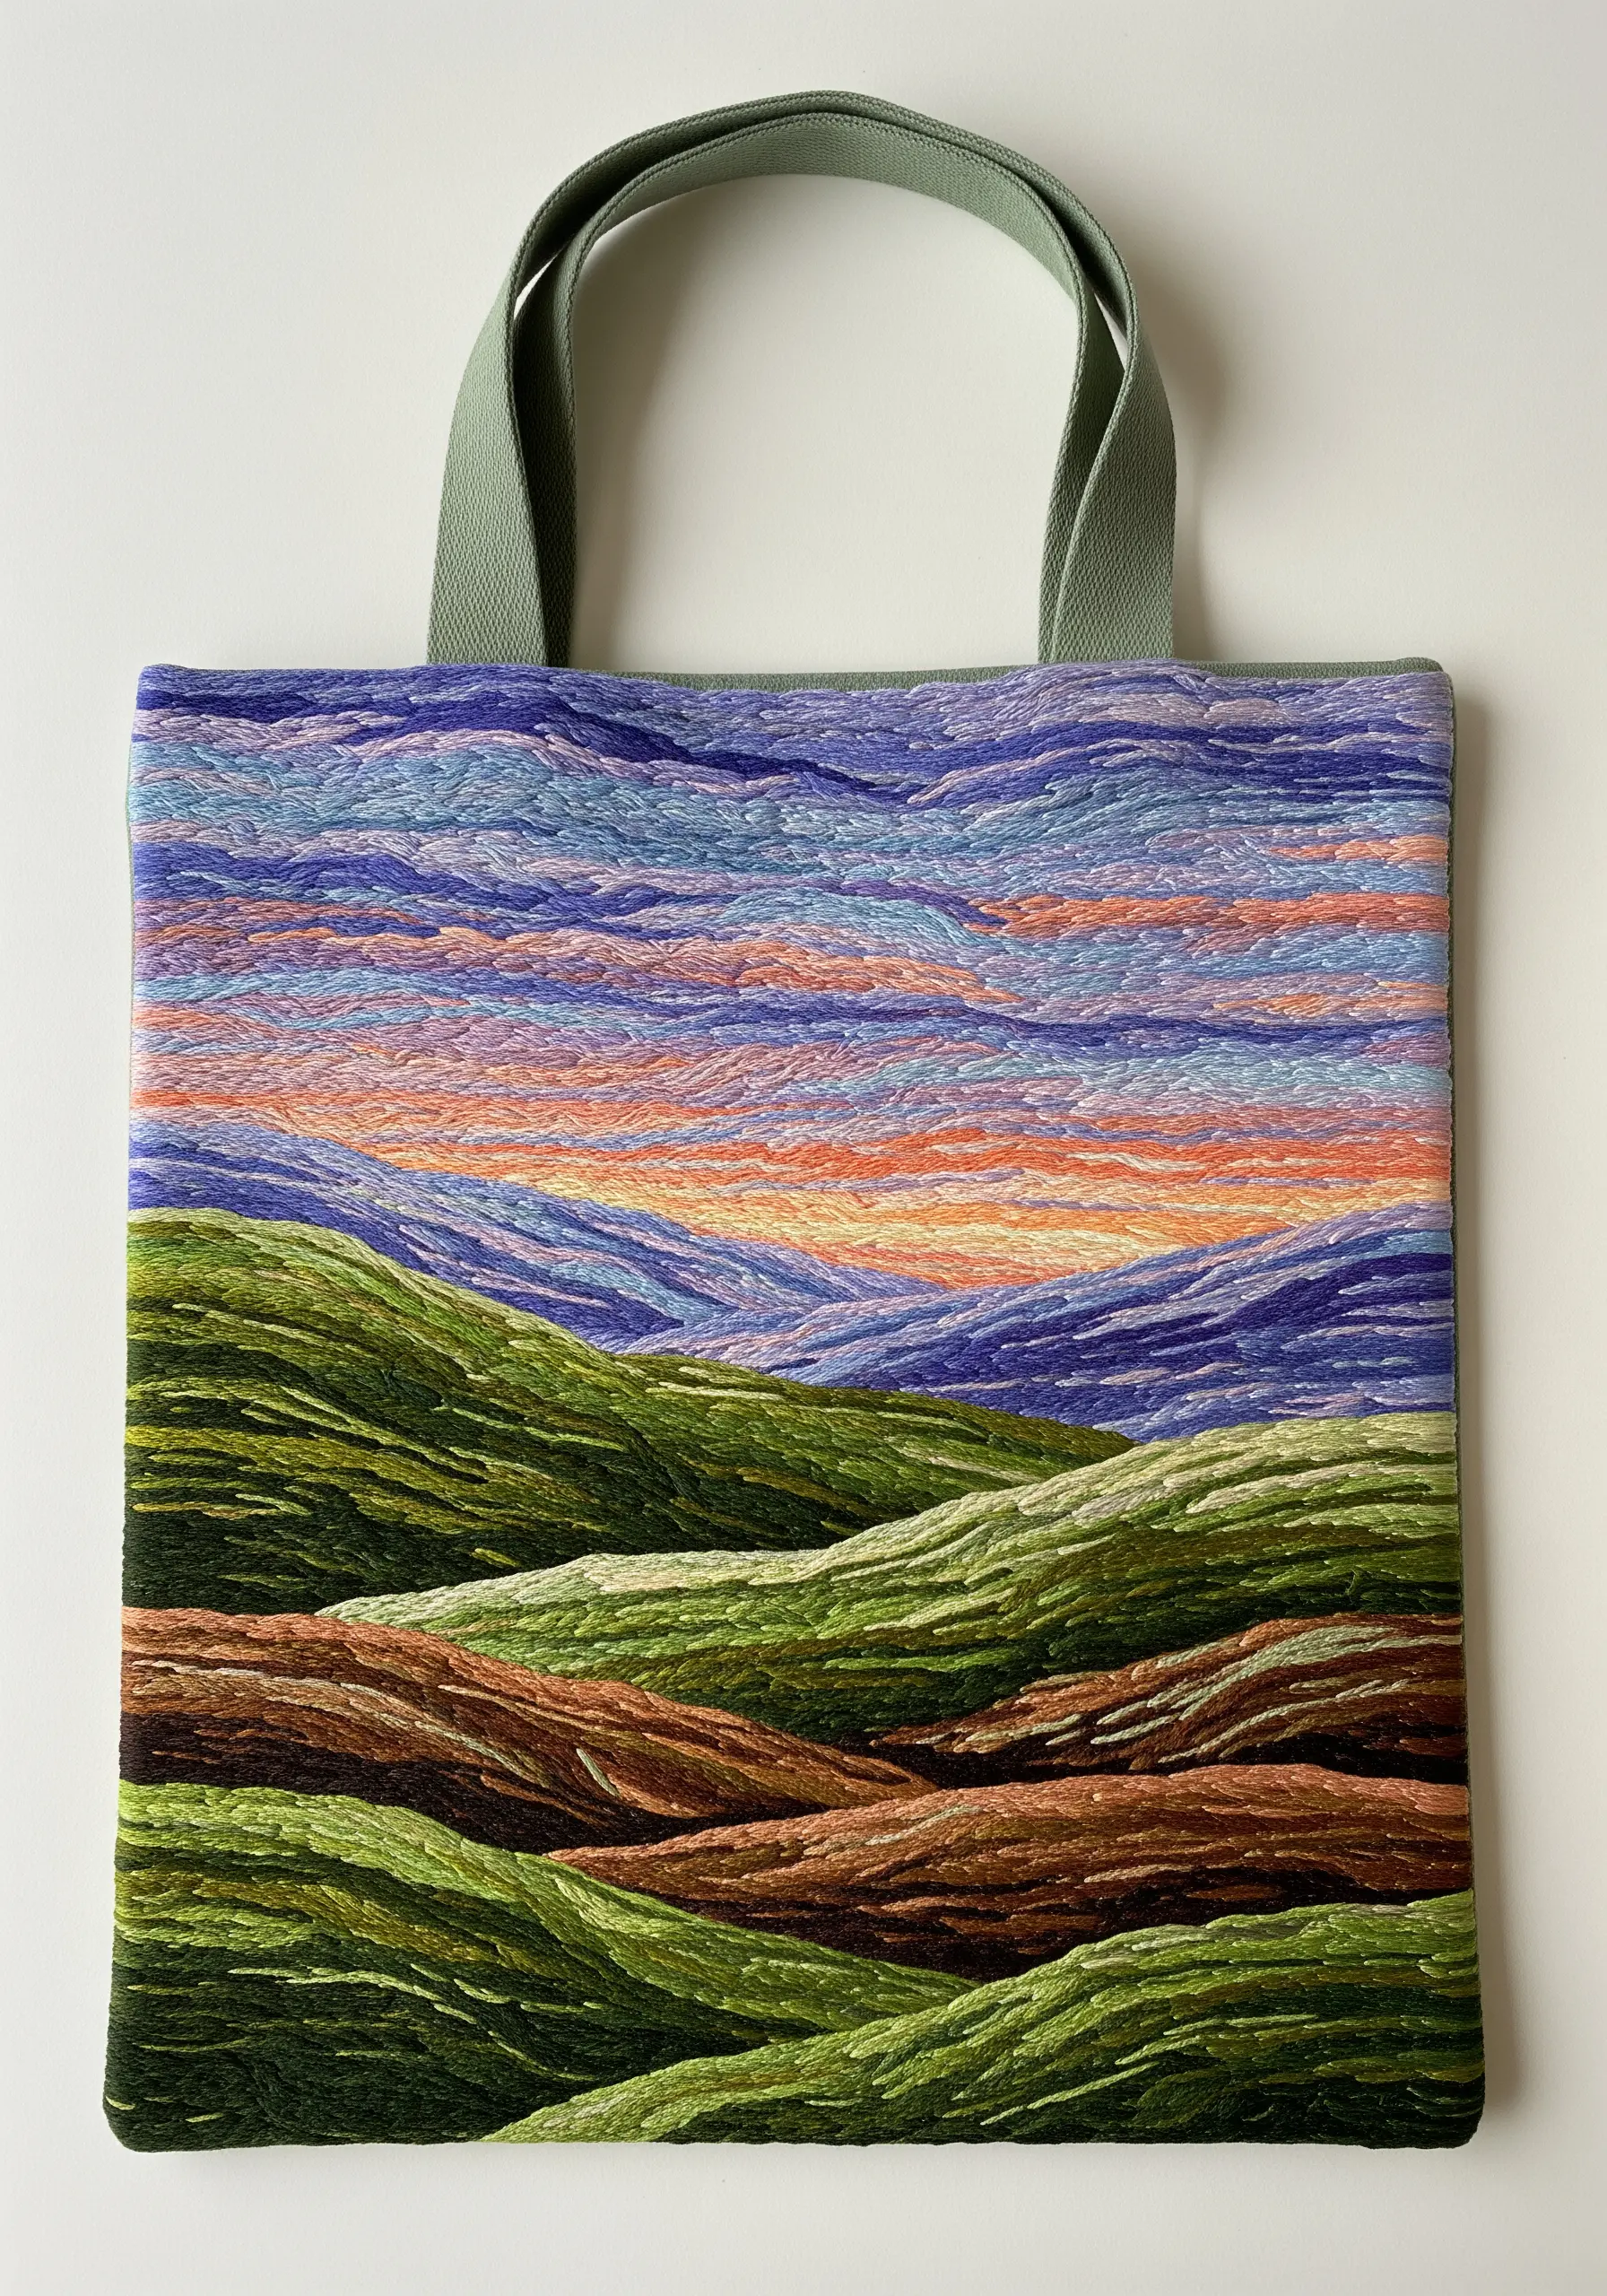
Forget precise lines and perfect fills; an impressionistic landscape is all about color and movement.
Use short, dab-like satin stitches, placing different colors next to each other to create a blended, painterly effect.
Vary the direction of your stitches to follow the rolling contours of the hills and the horizontal flow of the sky.
This technique, known as abstract thread painting, creates a piece that feels expressive and full of emotion.
28. Achieve Realism with Shading and Highlights
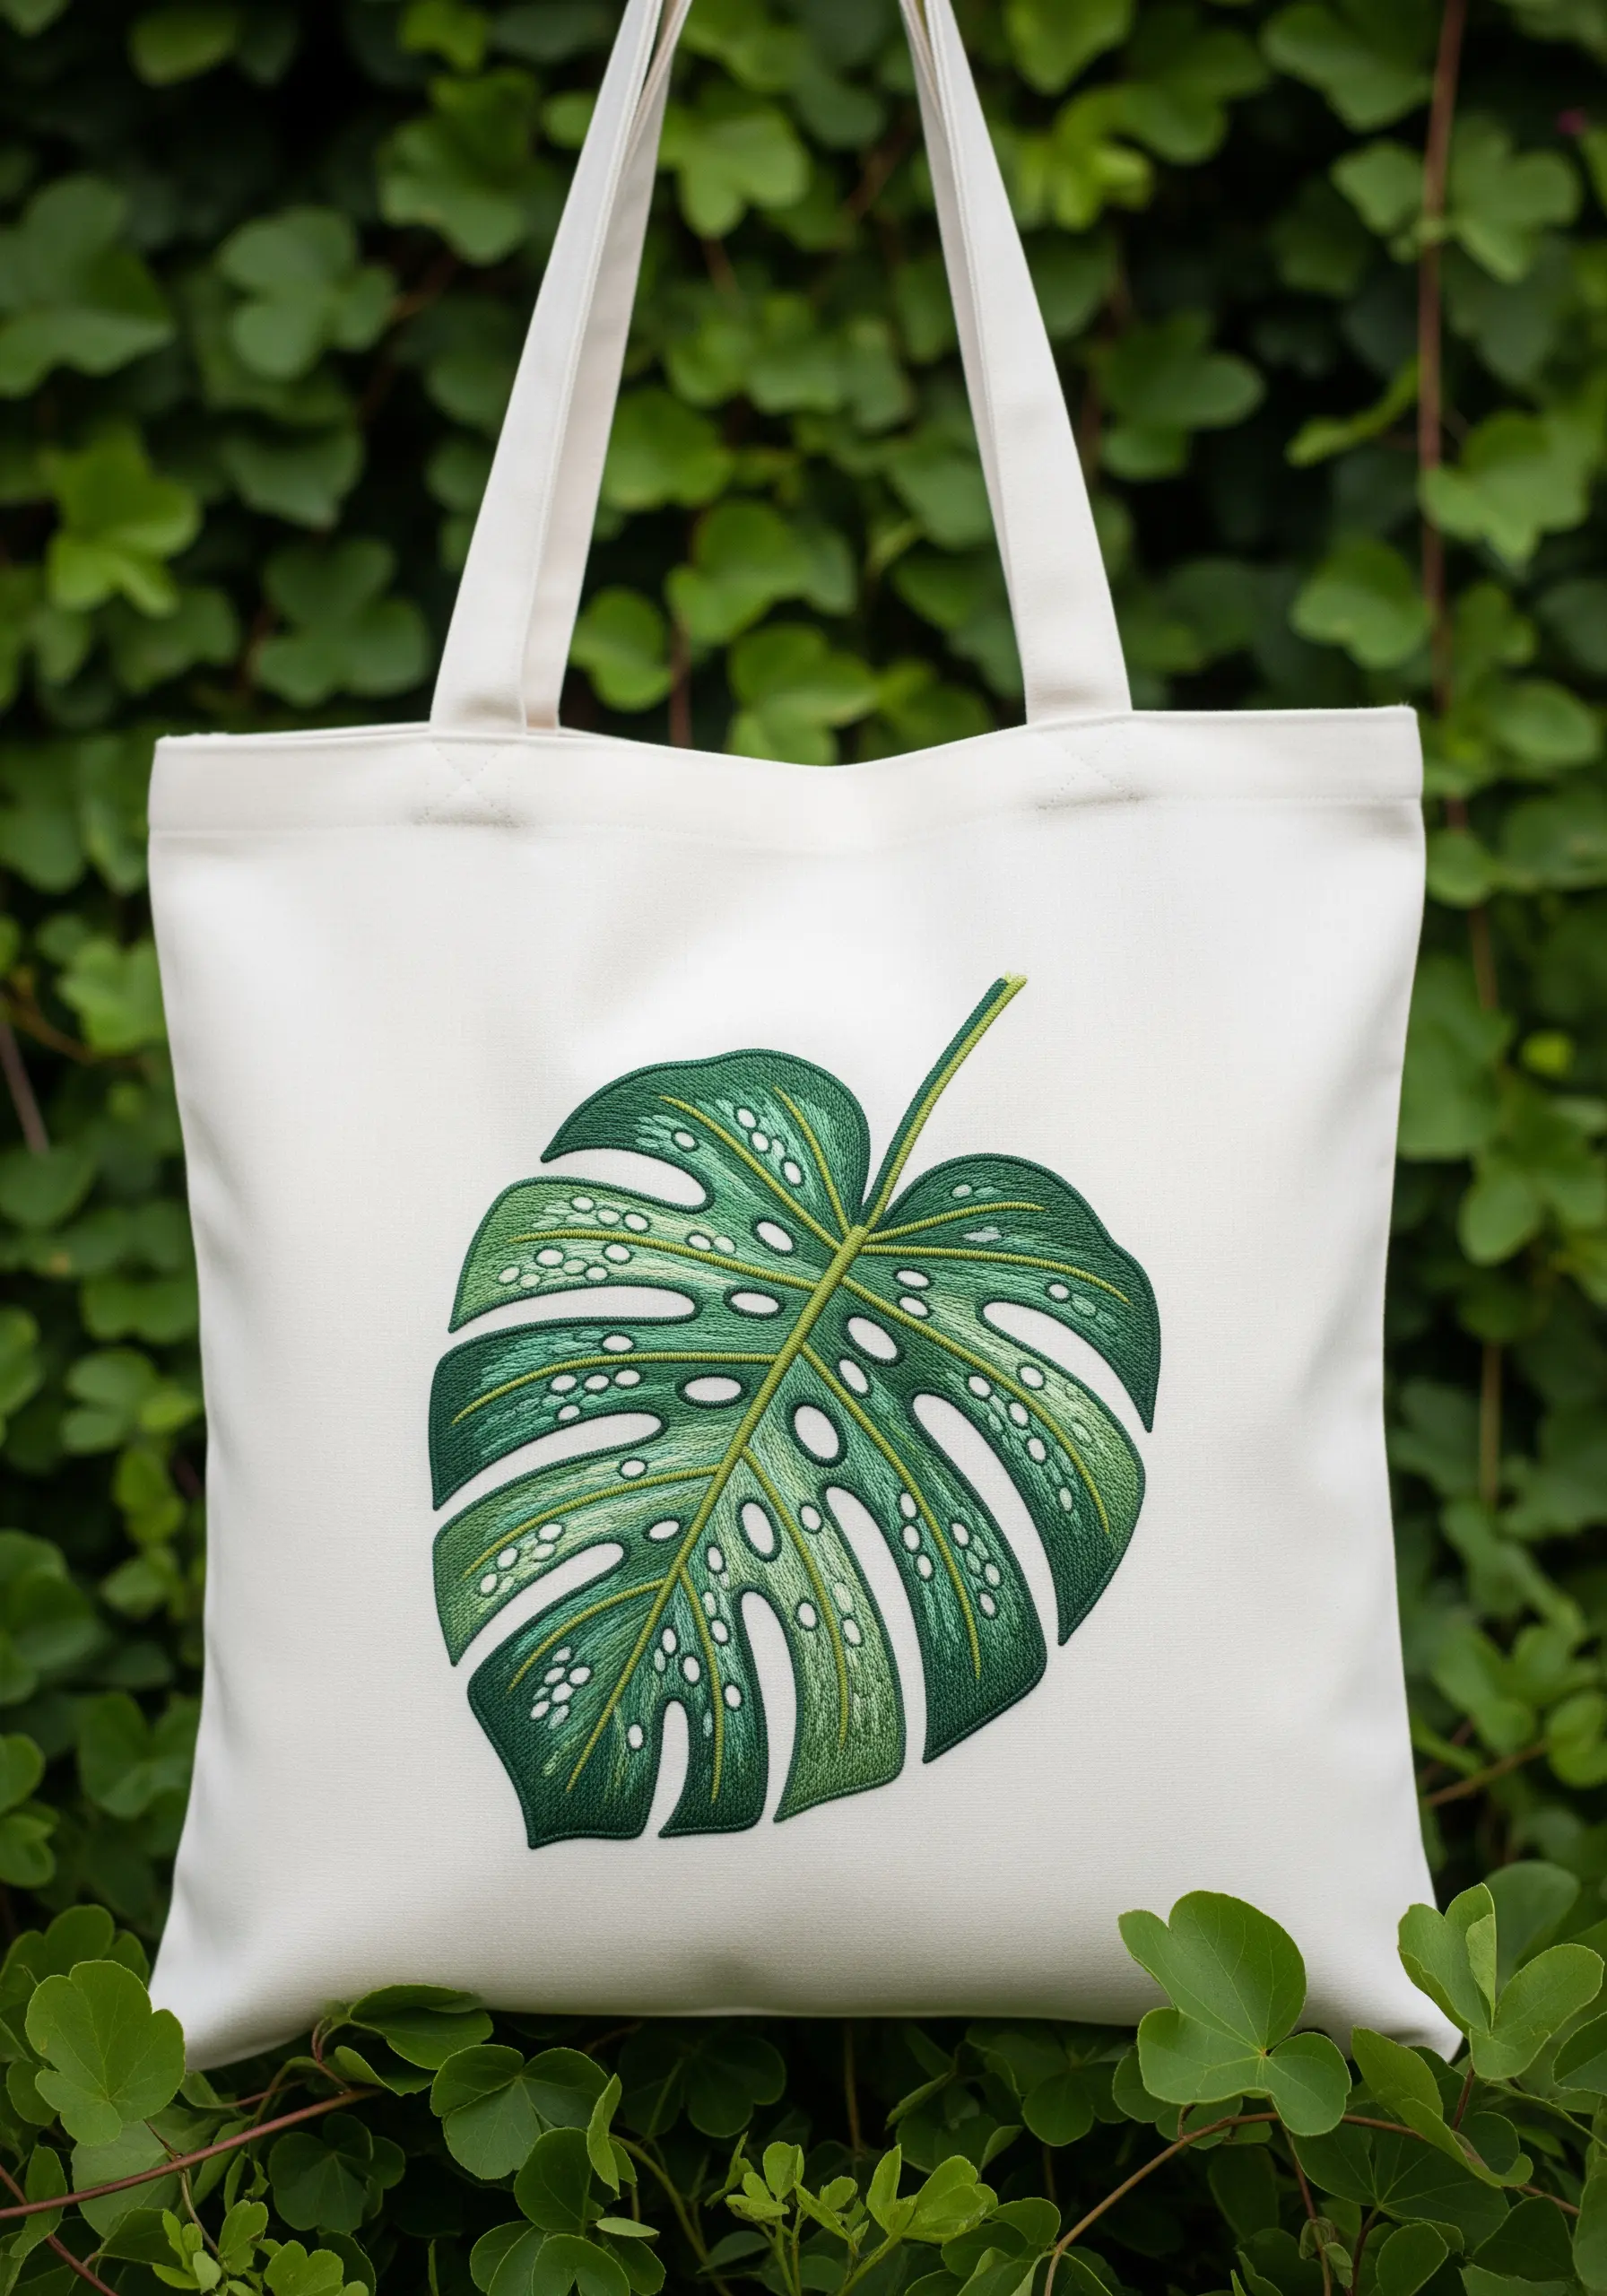
To make a botanical element like this monstera leaf look realistic, shading is essential.
Use at least three or four shades of green, moving from darkest to lightest, and blend them with the long-and-short stitch.
Follow the natural direction of the leaf’s veins with your stitches to enhance its form.
Add tiny water droplets using a few stitches of white and light gray to create highlights, giving the leaf a fresh, dewy appearance.
29. Stitch Charming Illustrations on Natural Jute

For a rustic, farm-to-table aesthetic, a jute or burlap tote provides the perfect textured canvas.
Embrace a simple, illustrative style with bold black outlines using a stem stitch.
Fill the shapes with a clean satin stitch, allowing the coarse texture of the bag to show through slightly.
This pairing of simple, charming characters with an earthy fabric creates a cohesive and playful look.
30. Design an Elegant Tone-on-Tone Monogram

For an understated and sophisticated look, try a tone-on-tone color palette.
Embroider a design using threads that are only a few shades lighter or darker than the fabric itself.
Here, shades of gray and white on a gray bag create a subtle, elegant effect where texture is more prominent than color.
This technique is perfect for creating a personalized item that feels high-end and timeless.
31. Capture Architectural Details with Linear Stitches

Recreate the beauty of a building’s facade by focusing on clean, linear stitches.
Use a simple backstitch or straight stitch to outline windows, railings, and brickwork.
Employ a light gray for the building and a dark navy or black for the outlines and shadows to create a sense of depth and dimension.
This type of architectural embroidery transforms your tote into a piece of wearable art inspired by your favorite city.
32. Curate a Cabinet of Curiosities

Design a visually engaging composition by scattering a collection of small, unrelated but thematically linked motifs.
A peacock feather, a nautilus shell, a vintage key—each object allows you to practice a different technique.
Use long-and-short stitch for the feather’s gradient, satin stitch for the shell’s stripes, and metallic thread for the key.
This approach turns your tote into a miniature collection of embroidered treasures.
33. Create Cosmic Energy with Ribbons and Beads

Introduce new textures into your work by using silk ribbons alongside traditional floss.
Create the wider bands of color in this cosmic swirl with a simple ribbon stitch, which provides more coverage and a unique sheen.
Fill the remaining space with straight stitches in floss and add a dense scattering of silver beads and starburst stitches.
This mixed-media technique creates a dynamic, swirling galaxy that is rich in texture and dimension.


