
Sometimes you pick up a needle and thread with a clear vision, and other times, you simply want to make something beautiful, something that brings a little piece of the outside world in. That quiet connection is the heart of embroidery, but it can be frustrating when the piece in your hands doesn’t quite match the one in your head.
You don’t need more complicated patterns or a drawer full of expensive supplies to elevate your work. The most profound shifts come from small, intentional changes in technique: the direction of a stitch, the choice of fabric, the way you blend two shades of green, or how you decide to frame your finished piece.
Think of these ideas not as rules, but as invitations to look closer. Each one is a way to translate the texture of a leaf, the gradient of a petal, or the delicate structure of a stem into thread. This is how you capture the quiet, persistent energy of a garden and bring it into your own space, stitch by intentional stitch.
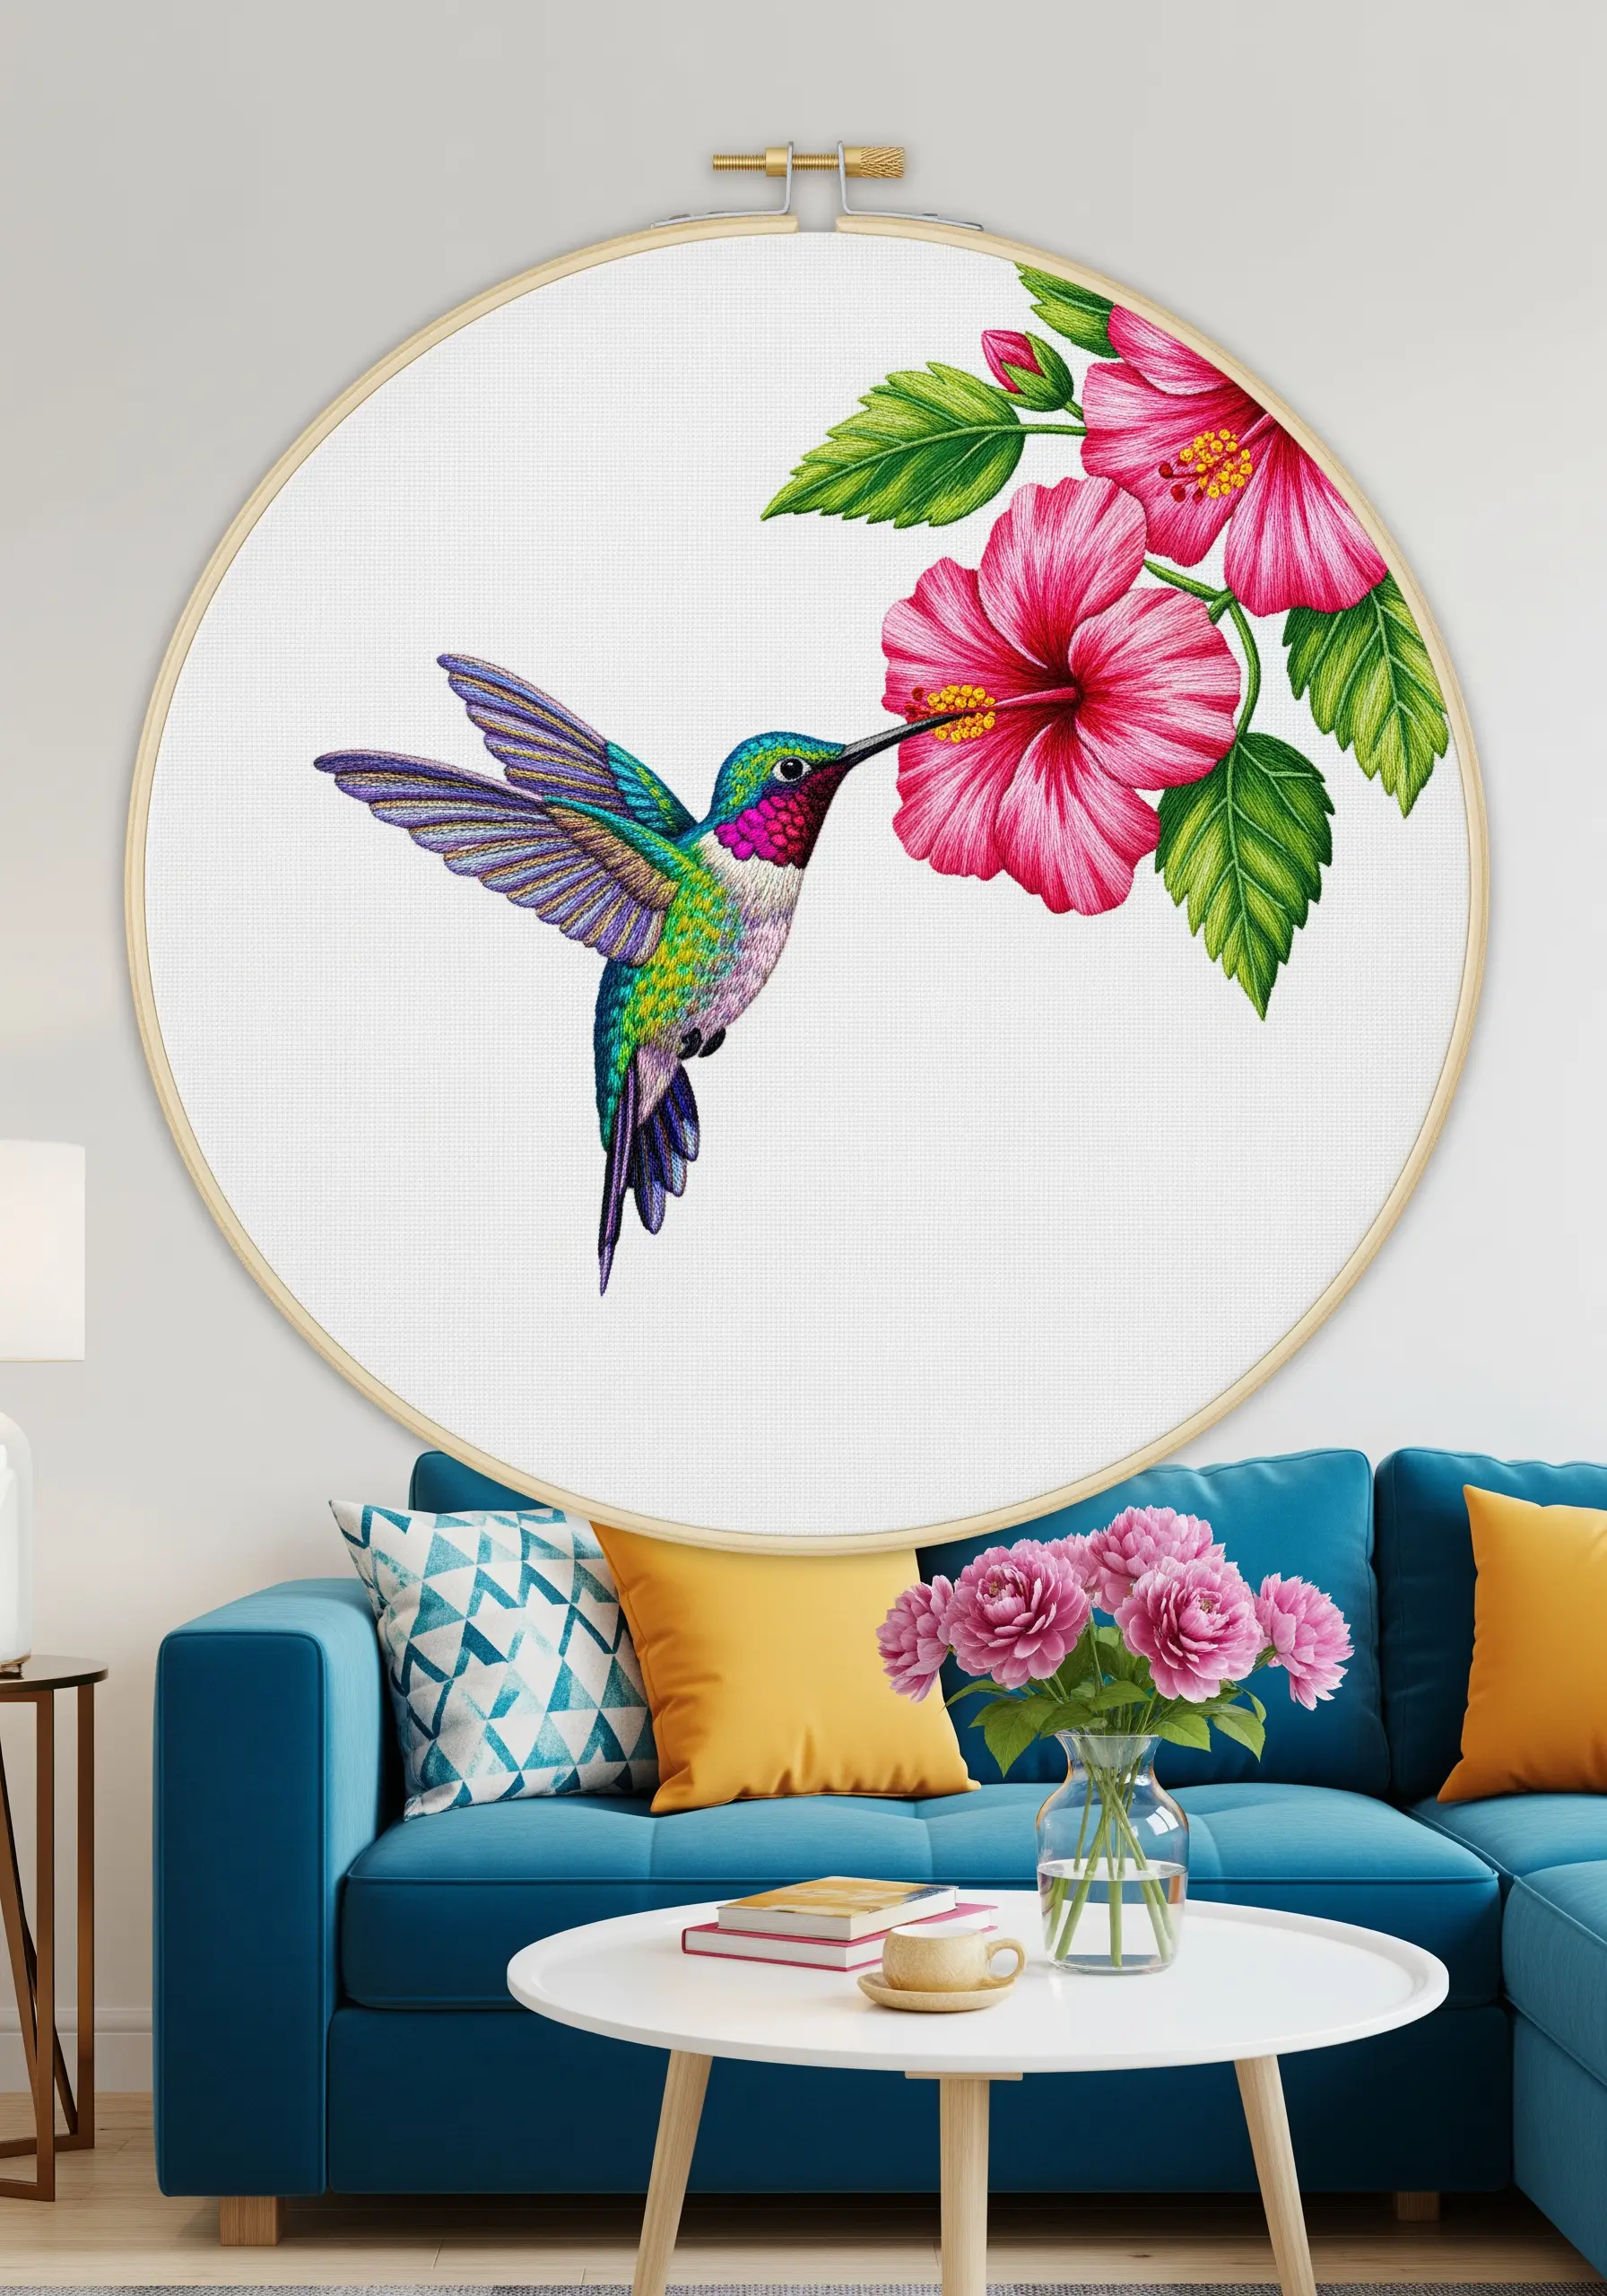
1. Master Photorealistic Leaf Shading at Scale

To achieve this dramatic realism, use a long-and-short stitch, also known as thread painting.
Work with at least four shades of green—from a deep forest green for the shadows to a bright lime for the highlights along the veins.
Direct your stitches to follow the natural curve of the leaf sections; this directional stitching is what creates the illusion of light and form.
Don’t be afraid to work on a larger scale. Using oversized hoop wall displays transforms a simple motif into a commanding piece of art that can anchor an entire room.
2. Create a Cohesive Botanical Gallery Wall

The power of this display lies in its restraint and consistency.
Choose a neutral, textured fabric like linen or unbleached cotton for all pieces to create a unified canvas.
Use a single color of thread—in this case, black—and maintain the same number of strands (two or three works well) for every motif.
The key isn’t complex stitching but thoughtful curation. By grouping these simple line-art botanicals, you create a gallery wall that feels intentional, modern, and serene.
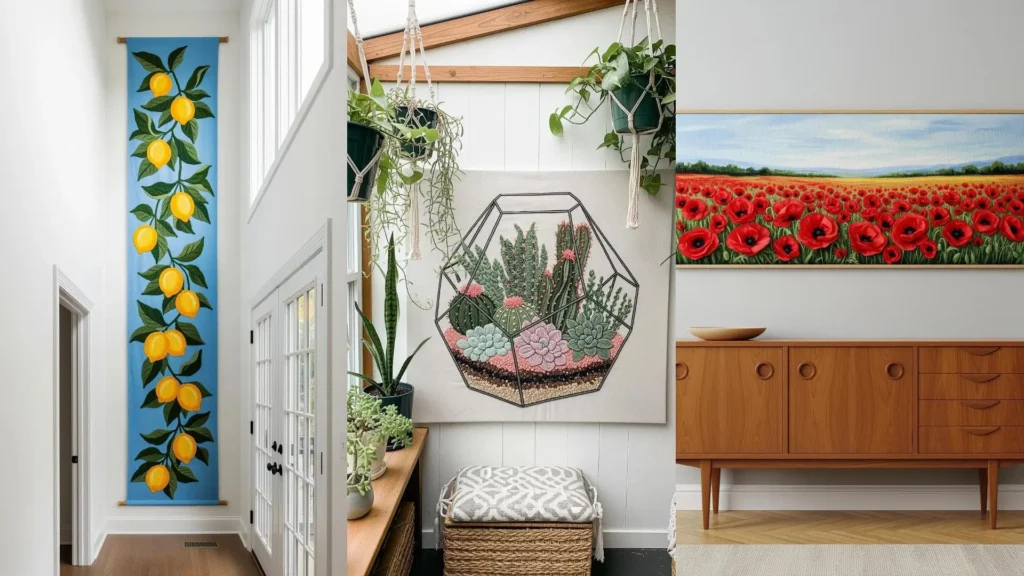
3. Design a Cascading Vertical Tapestry

Break free from the hoop by designing for a vertical format, which draws the eye downward and creates a sense of elegant movement.
For the wisteria blossoms, use clusters of French knots or detached chain stitches, blending several shades of lilac and purple to give them dimension.
Finish your piece by sewing channels at the top and bottom for dowel rods; this gives it a clean, professional hang without a frame.
This is one of the best rent-friendly embroidery wall tapestry ideas for adding a large-scale feature to a space like a home office.
4. Stitch a Wildflower Triptych with Varied Textures

Create a continuous landscape effect by spreading a single scene across three separate hoops.
To give your meadow depth and interest, vary the stitch textures—use lazy daisy stitches for petals, dense French knots for flower centers, and simple straight stitches for wispy grasses.
Arrange the hoops so the horizon line connects, which tricks the eye into seeing one unified piece of art.
These curated compositions make for beautiful bedroom embroidery accents that feel both handmade and high-end.
5. Curate a Kitchen Herbarium in Miniature Hoops

Select a theme relevant to the room, such as culinary herbs for a kitchen, to make your art feel connected to the space.
Work with a single strand of floss for delicate stems and outlines, using stitches like the fishbone stitch to create realistic leaf patterns.
The choice of black hoops adds a modern, graphic contrast to the organic motifs, making them stand out against a clean white backsplash.
Tiny hoop embroidery projects like these are perfect for filling small, awkward wall spaces with personality.
6. Use Metallic Threads for Dramatic Contrast

Stitching on black or dark-colored fabric is the fastest way to make your colors appear more vibrant and dramatic.
Incorporate gold or copper metallic thread for key elements like fruit or outlines; this adds a touch of luxury and catches the light beautifully.
To create the twisted texture on the tree trunk and roots, use a whipped backstitch or a heavy chain stitch.
The shimmer from abstract metallic thread projects against a dark background creates a formal, opulent feel perfect for a dining room.
7. Build a Terrarium with Tactile Stitch Layers

The goal here is to differentiate each plant with a unique texture, just as they appear in nature.
Use bullion knots or turkey work for fuzzy cacti, raised stem stitch bands for the segmented succulents, and tightly packed French knots for the soil and gravel layers.
A bold, clean backstitch for the geometric container provides a sharp frame that contains the organic chaos within.
This approach helps you capture nature’s textures in a way that is both visually and tactilely engaging.
8. Isolate a Single Bloom for Maximum Impact

Sometimes, the most powerful statement comes from a single, perfectly executed subject.
By placing one dramatic flower against a dark, empty background, you create an undeniable focal point that commands attention.
Use directional satin stitch with multiple shades of off-white and pale yellow to give the petals a luminous, almost glowing quality.
This high-contrast approach borrows from the power of monochrome thread embroidery ideas, where simplicity and focus create elegance.
9. Explore Abstract Botanicals with Thick Yarn

Move beyond standard floss and embrace the bold texture of chunky yarn to create graphic, modern art.
Use couching—a technique where you lay down thick yarn and tack it in place with a thinner thread—to create the fluid green shapes.
For the circular flower forms, try a punch needle or stitch tight coils of yarn for a highly textural, three-dimensional effect.
These gorgeous mixed-fiber textures transform simple shapes into a vibrant, tactile composition.
10. Add a Touch of Calm with Simple Lavender Stitches
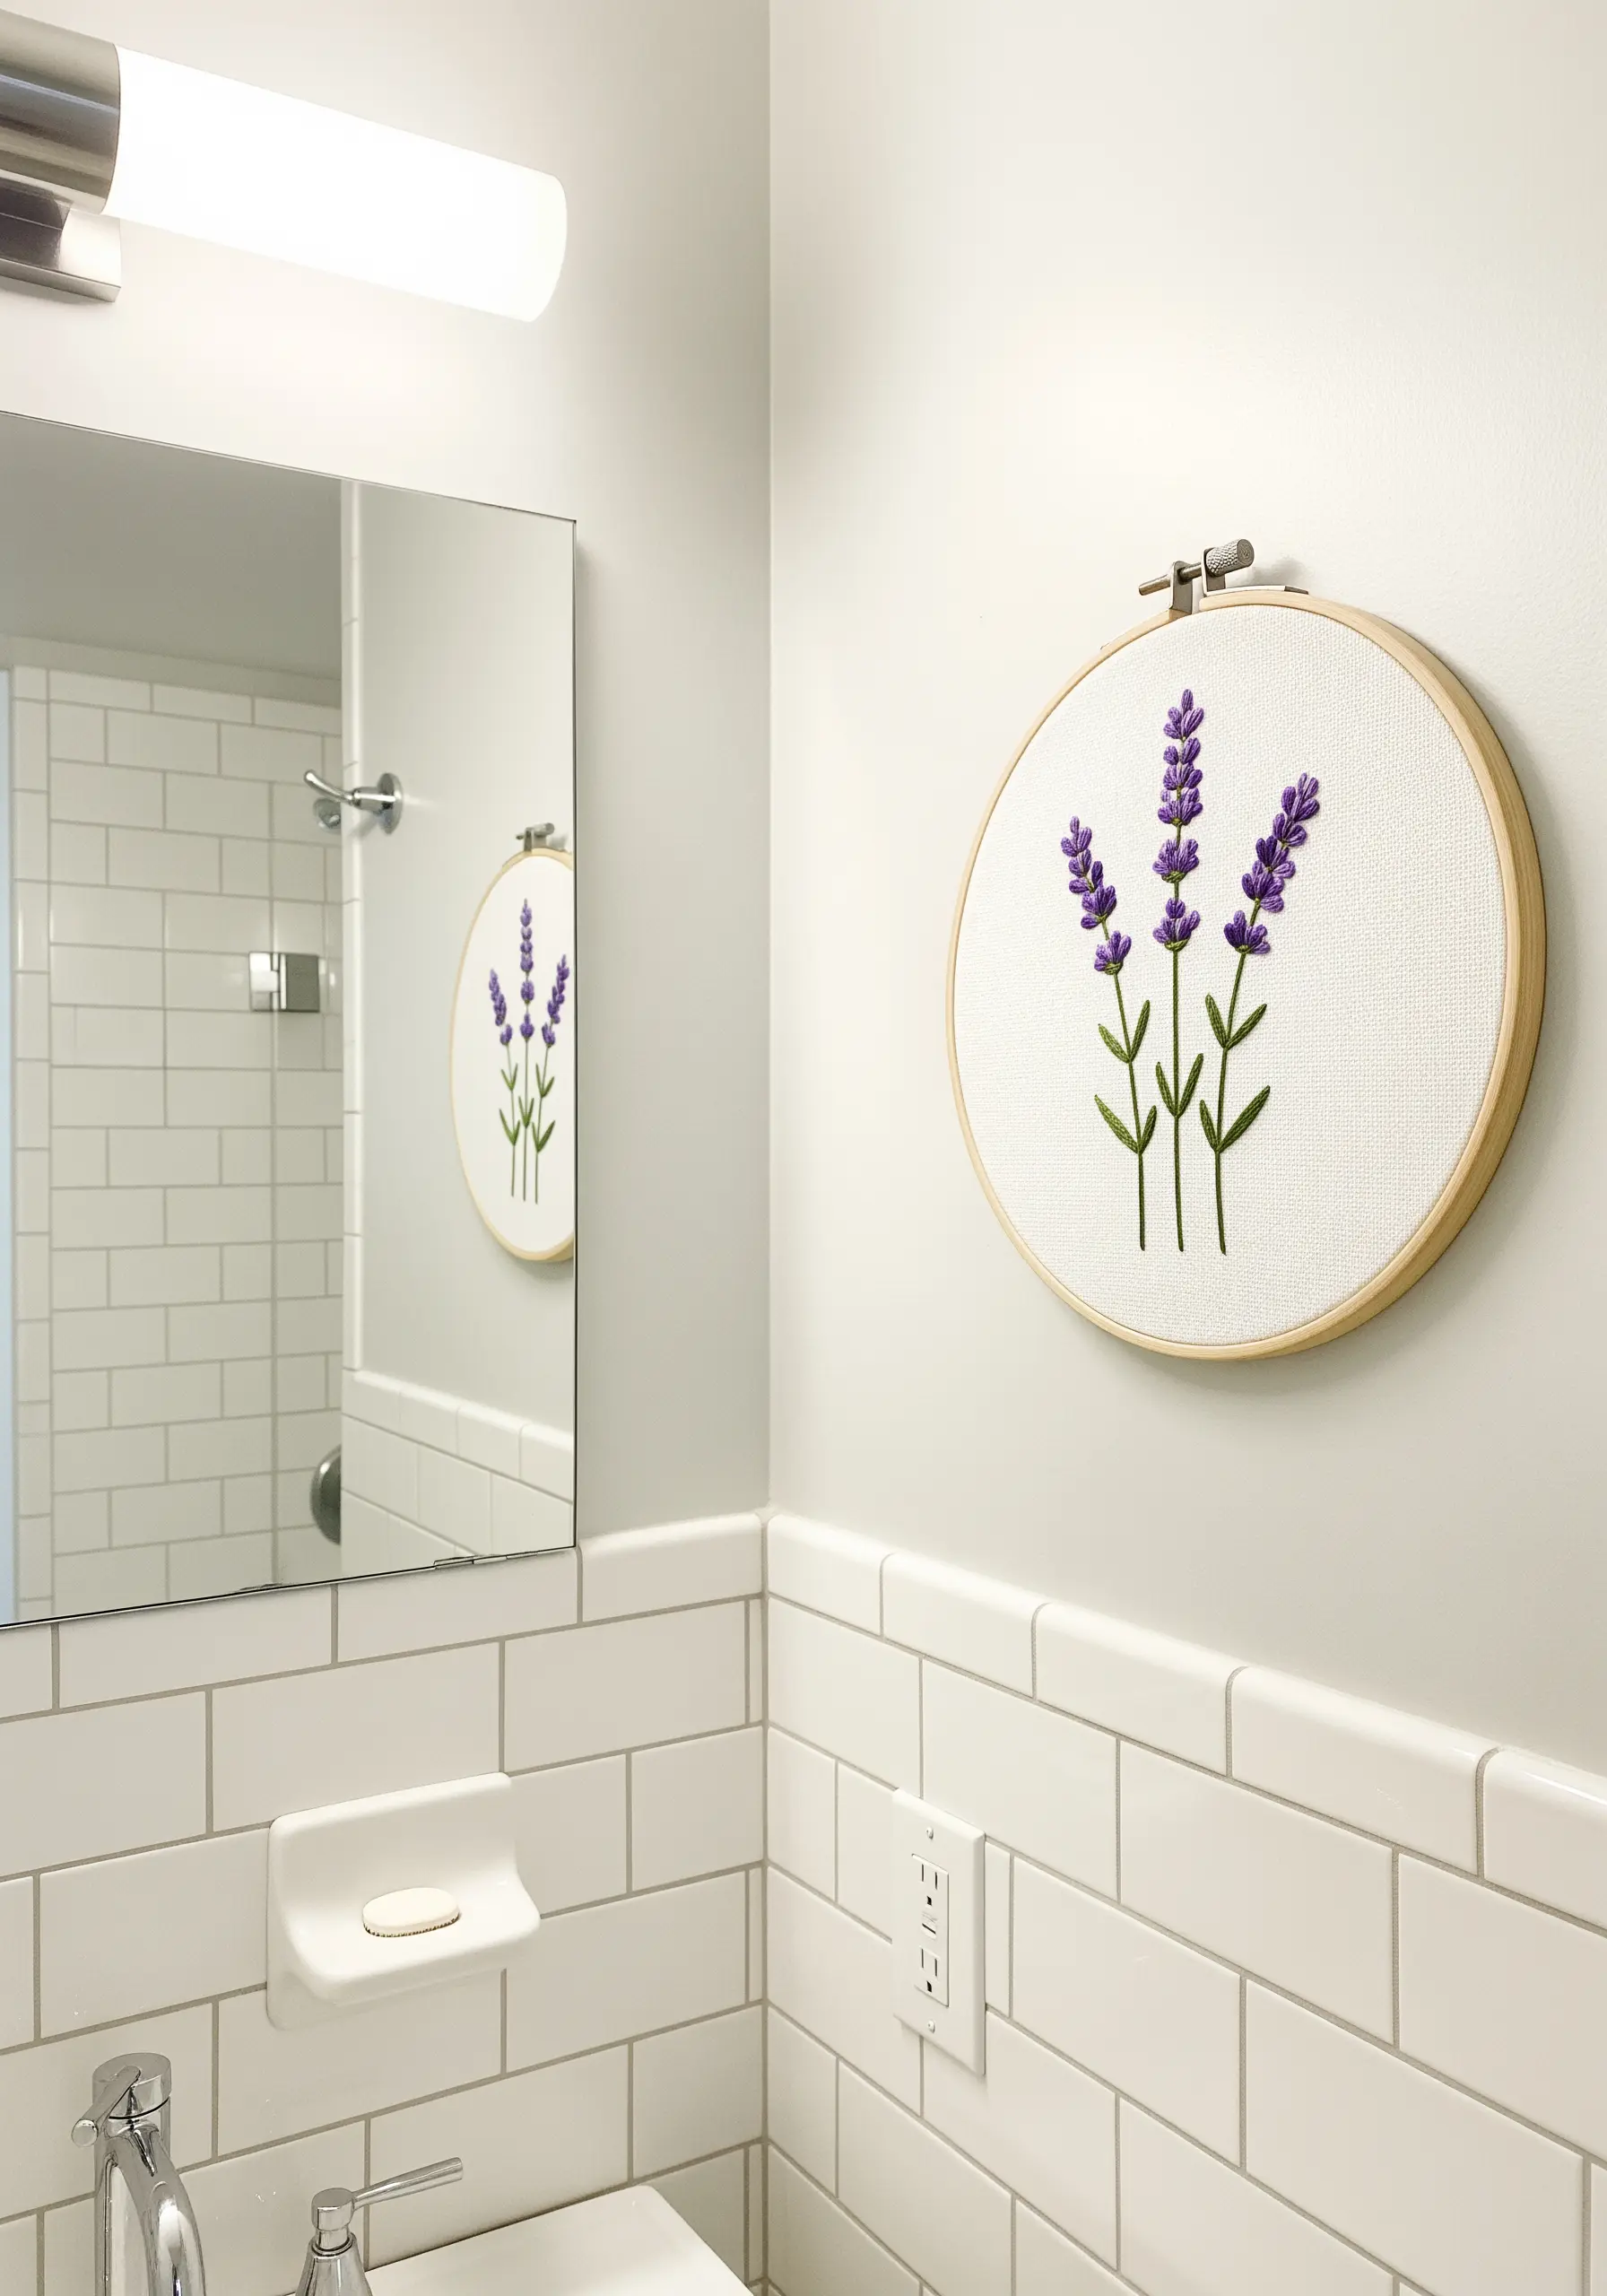
You don’t need a complex design to make an impact, especially in a small or functional space like a bathroom.
Form the lavender buds with simple lazy daisy stitches, varying their placement for a natural look.
A clean stem stitch using two or three strands of green floss is all you need for the stalks.
These delicate lavender stitch ideas prove that minimalist designs often bring the most serenity.
11. Create a Playful 3D Mushroom Scene

To give your mushroom caps that charming, puffy appearance, use a padded satin stitch.
First, create a base of underlying straight stitches or tack down a small piece of felt in the desired shape.
Then, cover this padding with satin stitches, working from one side to the other. The extra height makes the elements pop off the fabric.
This technique is perfect for realistic mushroom forest floor embroidery projects meant for a child’s room, adding a whimsical, storybook quality.
12. Stitch on Tulle for a Delicate, Floating Effect

Embroidering on a sheer fabric like organza or tulle creates a magical illusion where your botanicals appear to float in the hoop.
Always use a stabilizer (like a water-soluble film) behind the sheer fabric while you stitch; this prevents puckering and provides support. It dissolves away in water when you’re done.
Keep your stitches delicate: tiny French knots and single lazy daisy stitches work best for airy flowers like Queen Anne’s lace.
This is one of the most elegant modern thread art techniques for creating ethereal, light-filled pieces.
13. Embrace Maximalism with a Dense Garden Scene

Create a truly immersive piece by filling the entire canvas with rich color and texture, leaving very little background visible.
Use a wide variety of stitches to differentiate the flora: bullion knots for classic roses, woven wheel stitches for round blossoms, and French knots for tiny filler flowers.
This dense, layered approach to stitching creates a feeling of lush abundance.
Framed embroidery ideas like this, with their painterly quality, become heirlooms.
14. Recreate a Zen Garden with Sculptural Textures

This style moves beyond illustration and into sculptural relief, focusing entirely on texture.
Create the mossy texture by covering areas with thousands of tightly packed French knots, using several shades of green to add depth.
For the smooth, flowing lines of raked sand, couch a thicker cord or yarn onto the fabric surface.
These are the kind of embroidery projects inspired by textures you’d find on a nature walk, translated into a meditative art piece.
15. Curate an Autumnal Leaf Collection
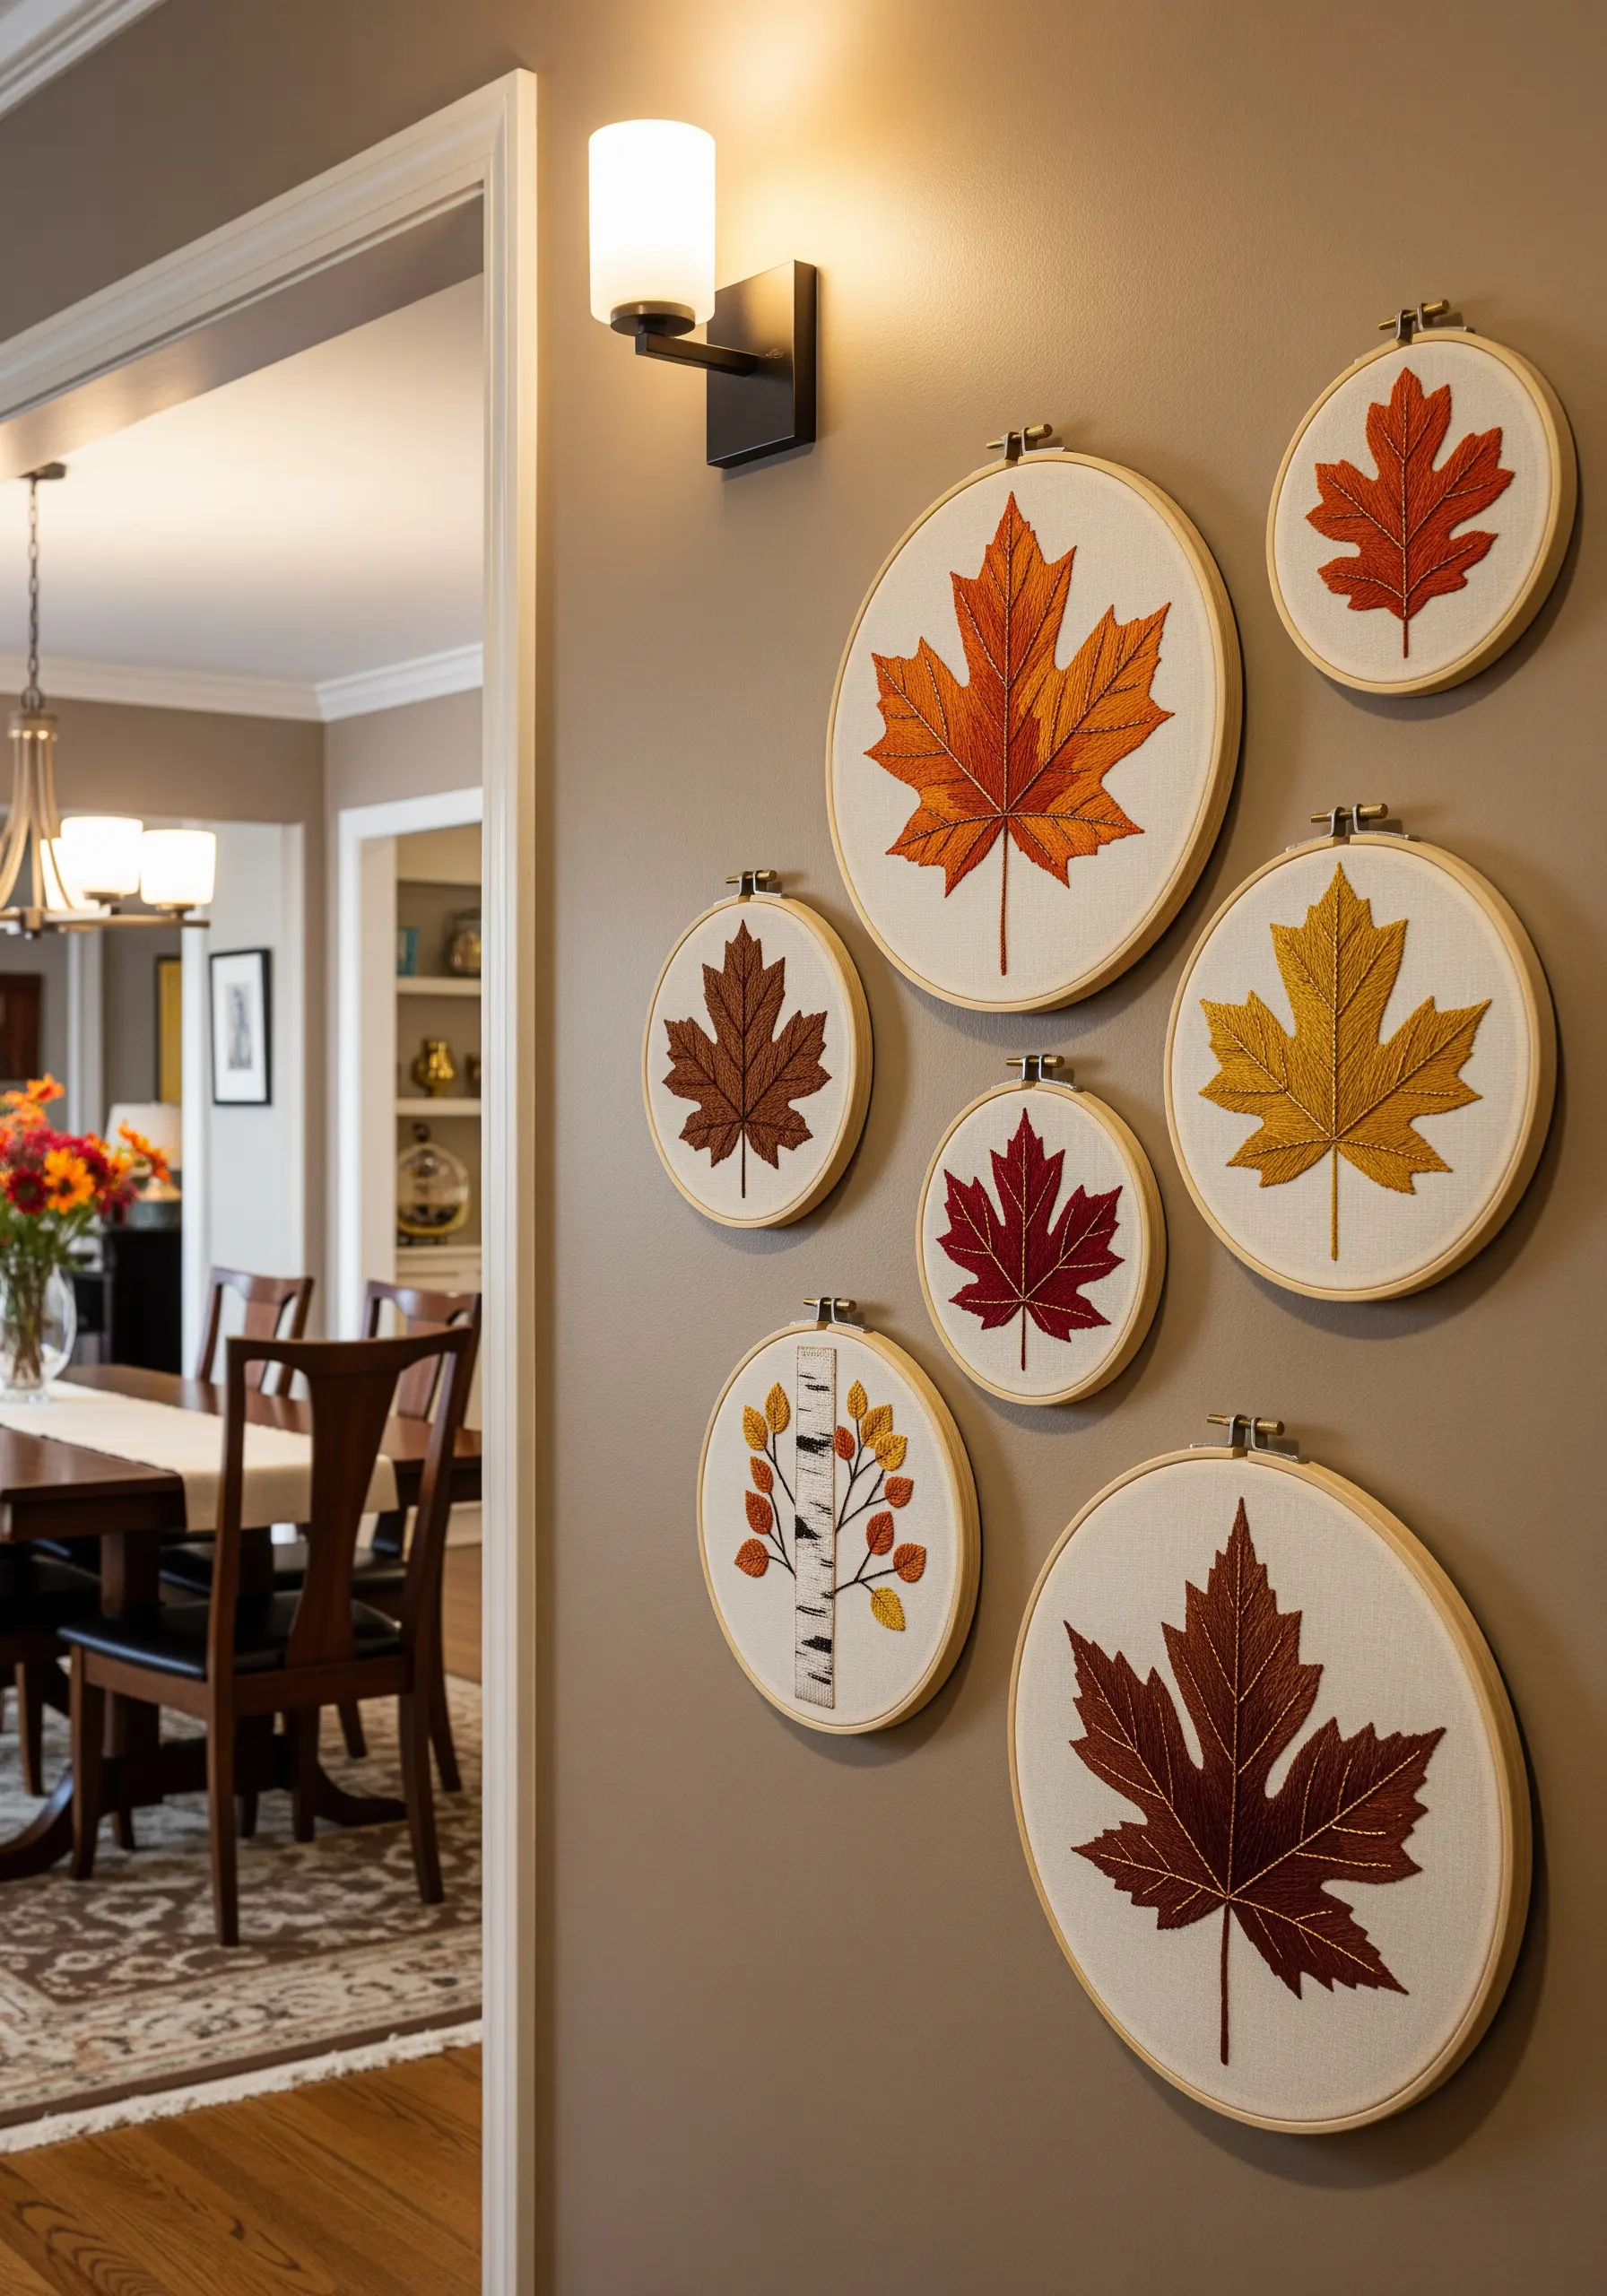
Tell a seasonal story by creating a collection of hoops that share a unified theme and color palette.
To achieve the beautiful gradient effect in the leaves, use the long-and-short stitch to blend warm autumn colors seamlessly.
Varying the hoop sizes and their placement on the wall creates a more dynamic and organic composition than a simple grid.
Earth-tone patterns like these bring a warm, cozy energy to any entryway or living space.
16. Frame Minimalist Cacti with Graphic Color Blocks

This modern, graphic style relies on the interplay between clean lines and solid fields of color.
Use a crisp split stitch or backstitch for the black outlines to ensure they are sharp and uniform.
Fill the shapes with a dense, neat satin stitch, making sure all your stitches lie parallel for a smooth, cohesive finish.
Minimalist embroidery decor ideas feel even more polished when displayed in simple, matching frames.
17. Make a Statement with a High-Contrast Lemon Vine

One of the most effective design principles is high contrast; the vibrant yellow and deep green pop beautifully against the bright blue background.
When filling the lemons with satin stitch, use a single, consistent direction for your stitches to create a smooth, light-catching sheen.
The repeating vertical pattern makes this a perfect design for a tall, narrow space like a hallway or entryway.
The result is one of those stunning embroidered wall hangings that feels both cheerful and sophisticated.
18. Stitch a Landscape with Atmospheric Perspective
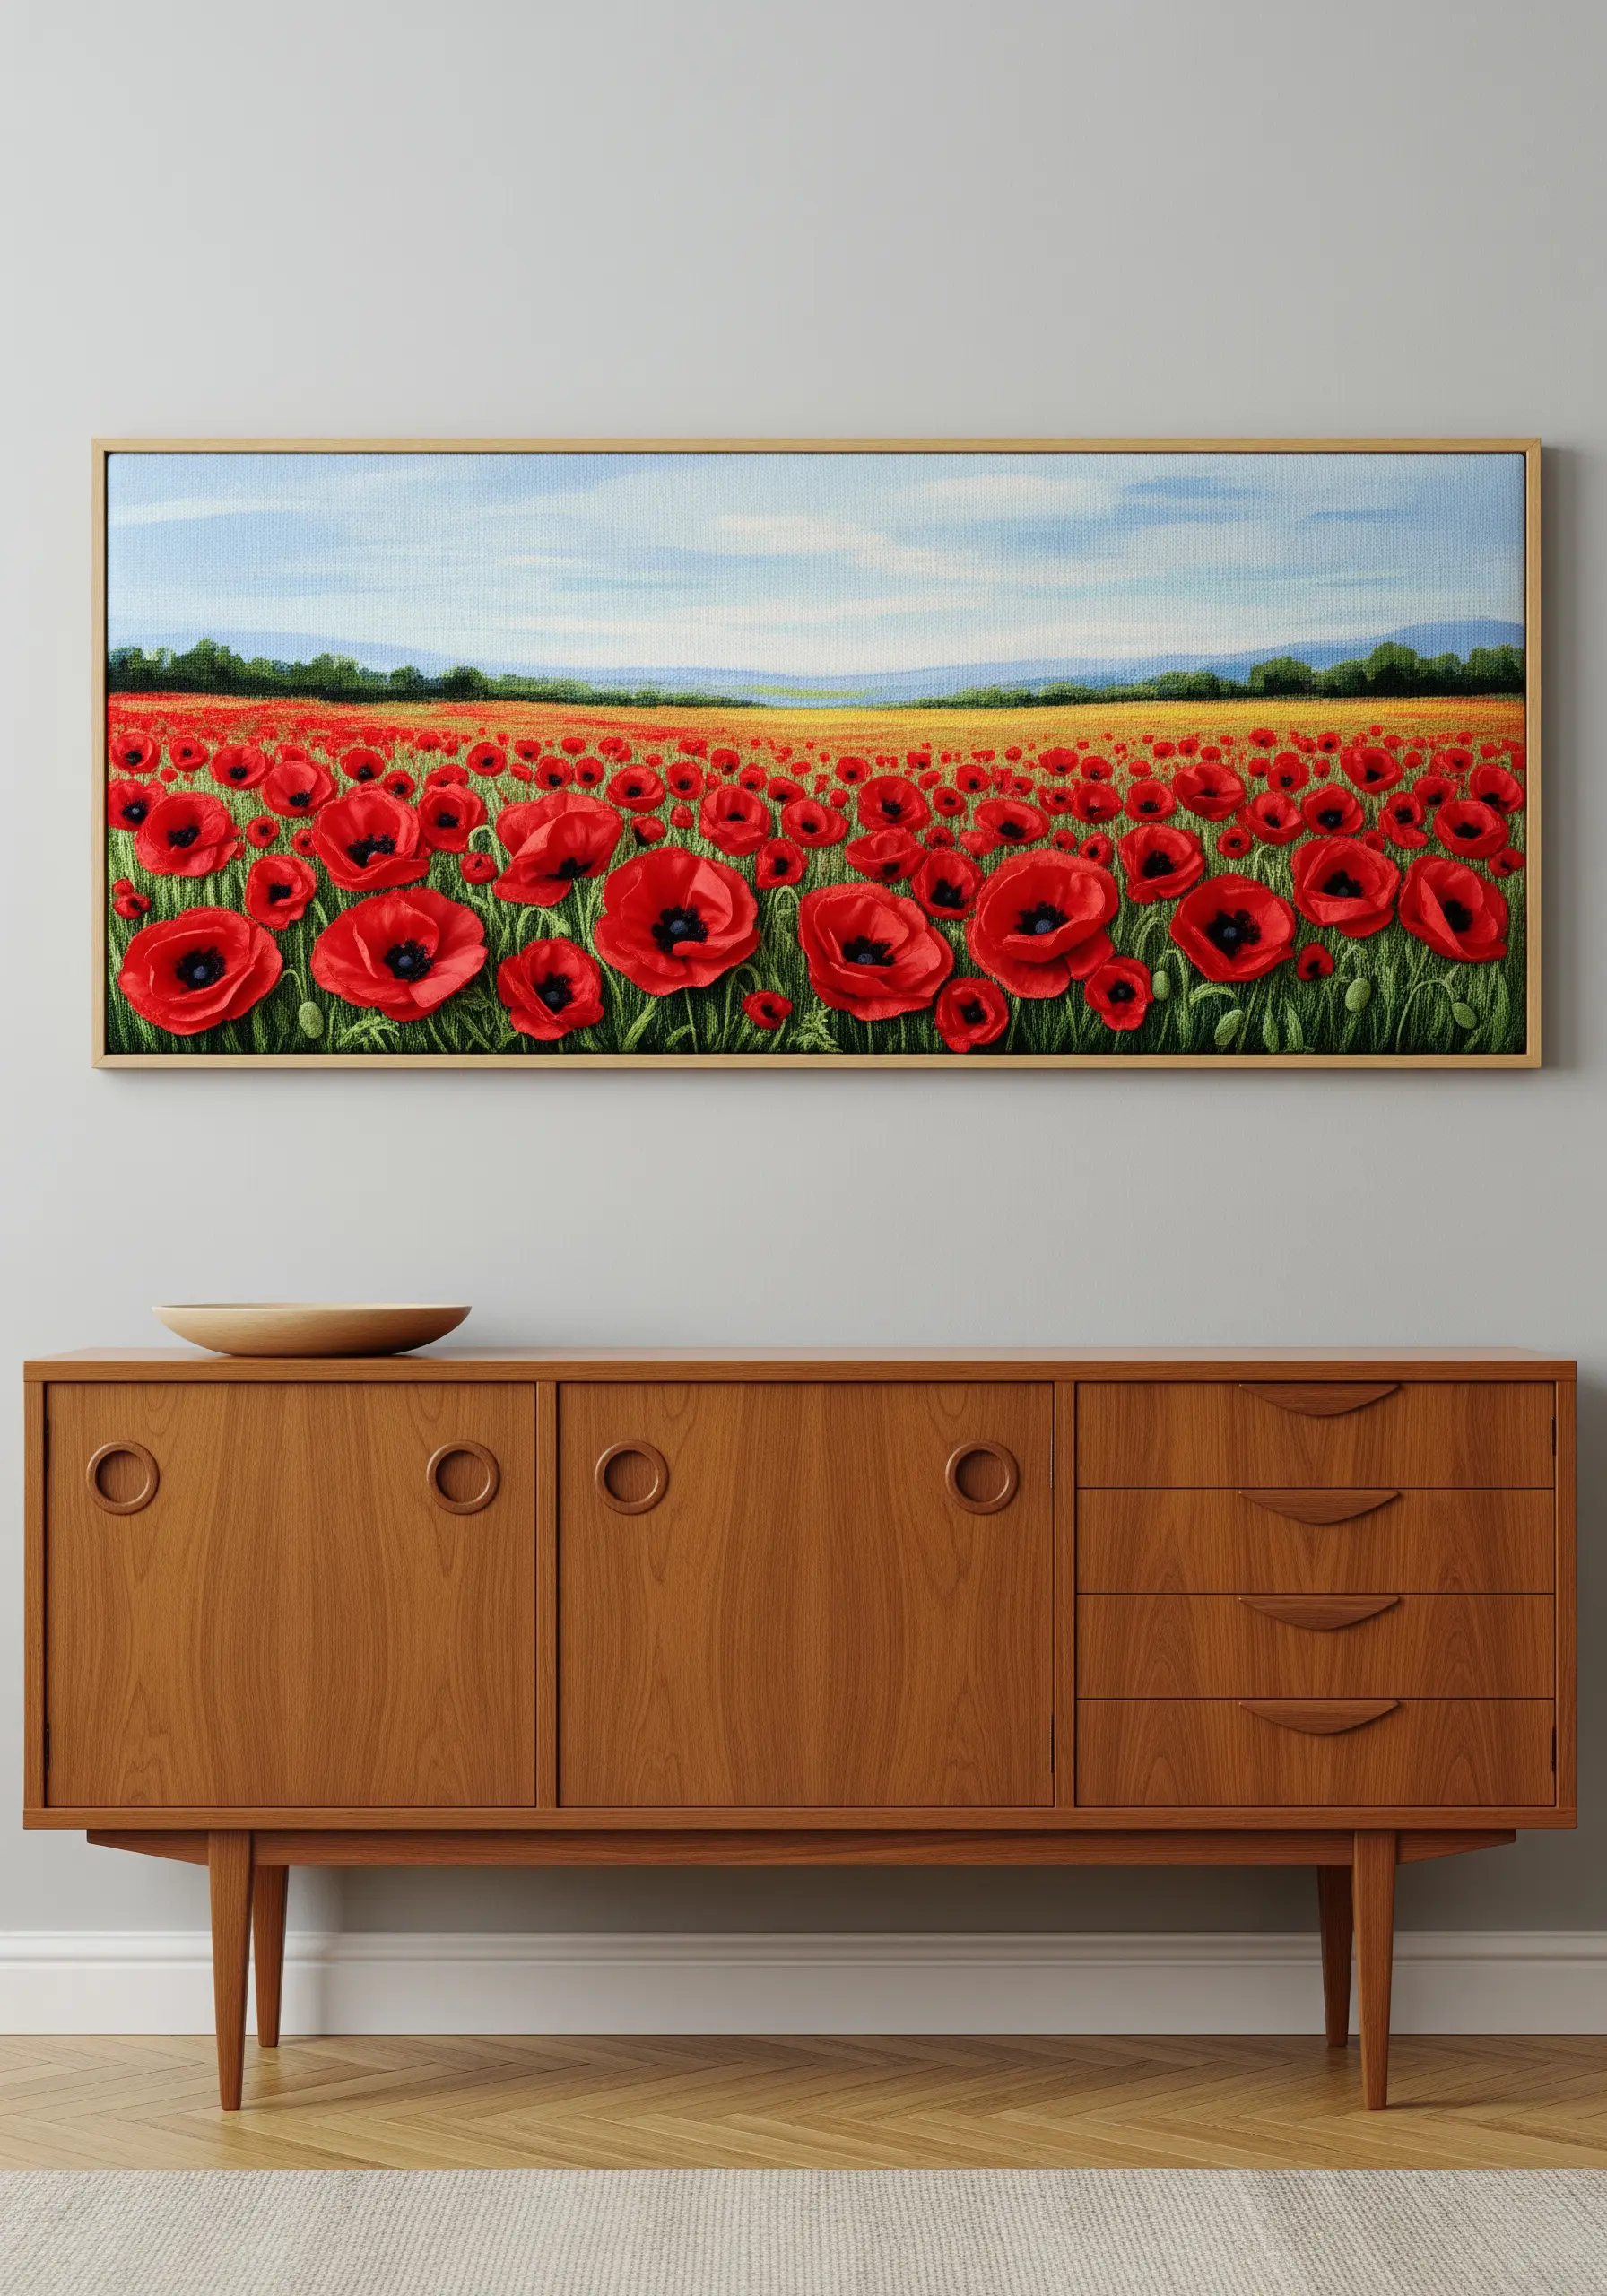
To create the illusion of depth in a landscape, you need to trick the eye.
Stitch the poppies in the foreground larger, with more detail and using bolder, more saturated reds.
As you move toward the horizon line, make your flowers progressively smaller, less detailed, and use slightly duller or lighter shades of red.
This technique mimics how we perceive distance in real life and is essential for creating successful watercolor-style embroidery patterns.
19. Replicate a Botanical Blueprint with White on Indigo

This scientific illustration style is all about precision and clarity, making it a striking piece of art.
Choose a dark, high-contrast fabric like navy blue or indigo linen.
Use only a single strand of white or off-white thread to achieve the fine, sharp lines required for the diagram and lettering.
A meticulous backstitch or split stitch is essential for this technique. These two-color embroidery ideas prove that you don’t need a full palette to create something complex and beautiful.
20. Capture Iridescence with Strategic Color Blending
To mimic the shimmering, multi-tonal feathers of a hummingbird, you’ll need to blend colors seamlessly.
Work with a single strand of thread at a time, using short and long stitches that feather into one another.
Place stitches of different colors—purples, greens, teals, and yellows—next to and overlapping each other to create the iridescent effect.
This approach mirrors the techniques behind beautiful gradient color floral embroidery ideas, turning your thread into paint.
21. Use Negative Space to Define Your Structure

Instead of stitching the trellis itself, this design cleverly uses the un-stitched background fabric to create its form.
You simply stitch the ivy vines and leaves as if they are growing on an invisible structure, allowing the viewer’s eye to fill in the gaps.
For the vines, a whipped backstitch or chain stitch provides a nice, rounded texture that stands out against the flat leaves.
Exploring fern & foliage stitch variations helps to make the leaves look more natural and less uniform.
22. Go Monumental with Large-Scale Line Art

This piece demonstrates the incredible impact of taking a simple, delicate subject and rendering it at a massive scale.
For line work this large, standard six-strand floss may not be enough. Consider using a thicker thread, like pearl cotton or even a fine yarn, to give the lines the necessary weight and presence.
The key is maintaining the delicacy of the dandelion seeds, even at scale, which creates a beautiful tension between the subject and its size.
Working this large turns simple stitching into impressive embroidery on canvas wall pieces.
23. Stitch a Story with a Layered Garden Patch

Create a charming narrative scene by thinking in layers, just like a real garden.
First, stitch the elements in the background, like the soil and the carrots. Then, add the elements in the front, like the radishes and cabbages, slightly overlapping the layers behind them to create depth.
Use a variety of stitches for texture: turkey work for fluffy carrot tops, satin stitch for smooth radishes, and French knots for the texture of the lettuce heads.
This approach can turn simple embroidery patterns that make statement wall art into a piece with depth and story.
24. Create a Botanical Study Triptych
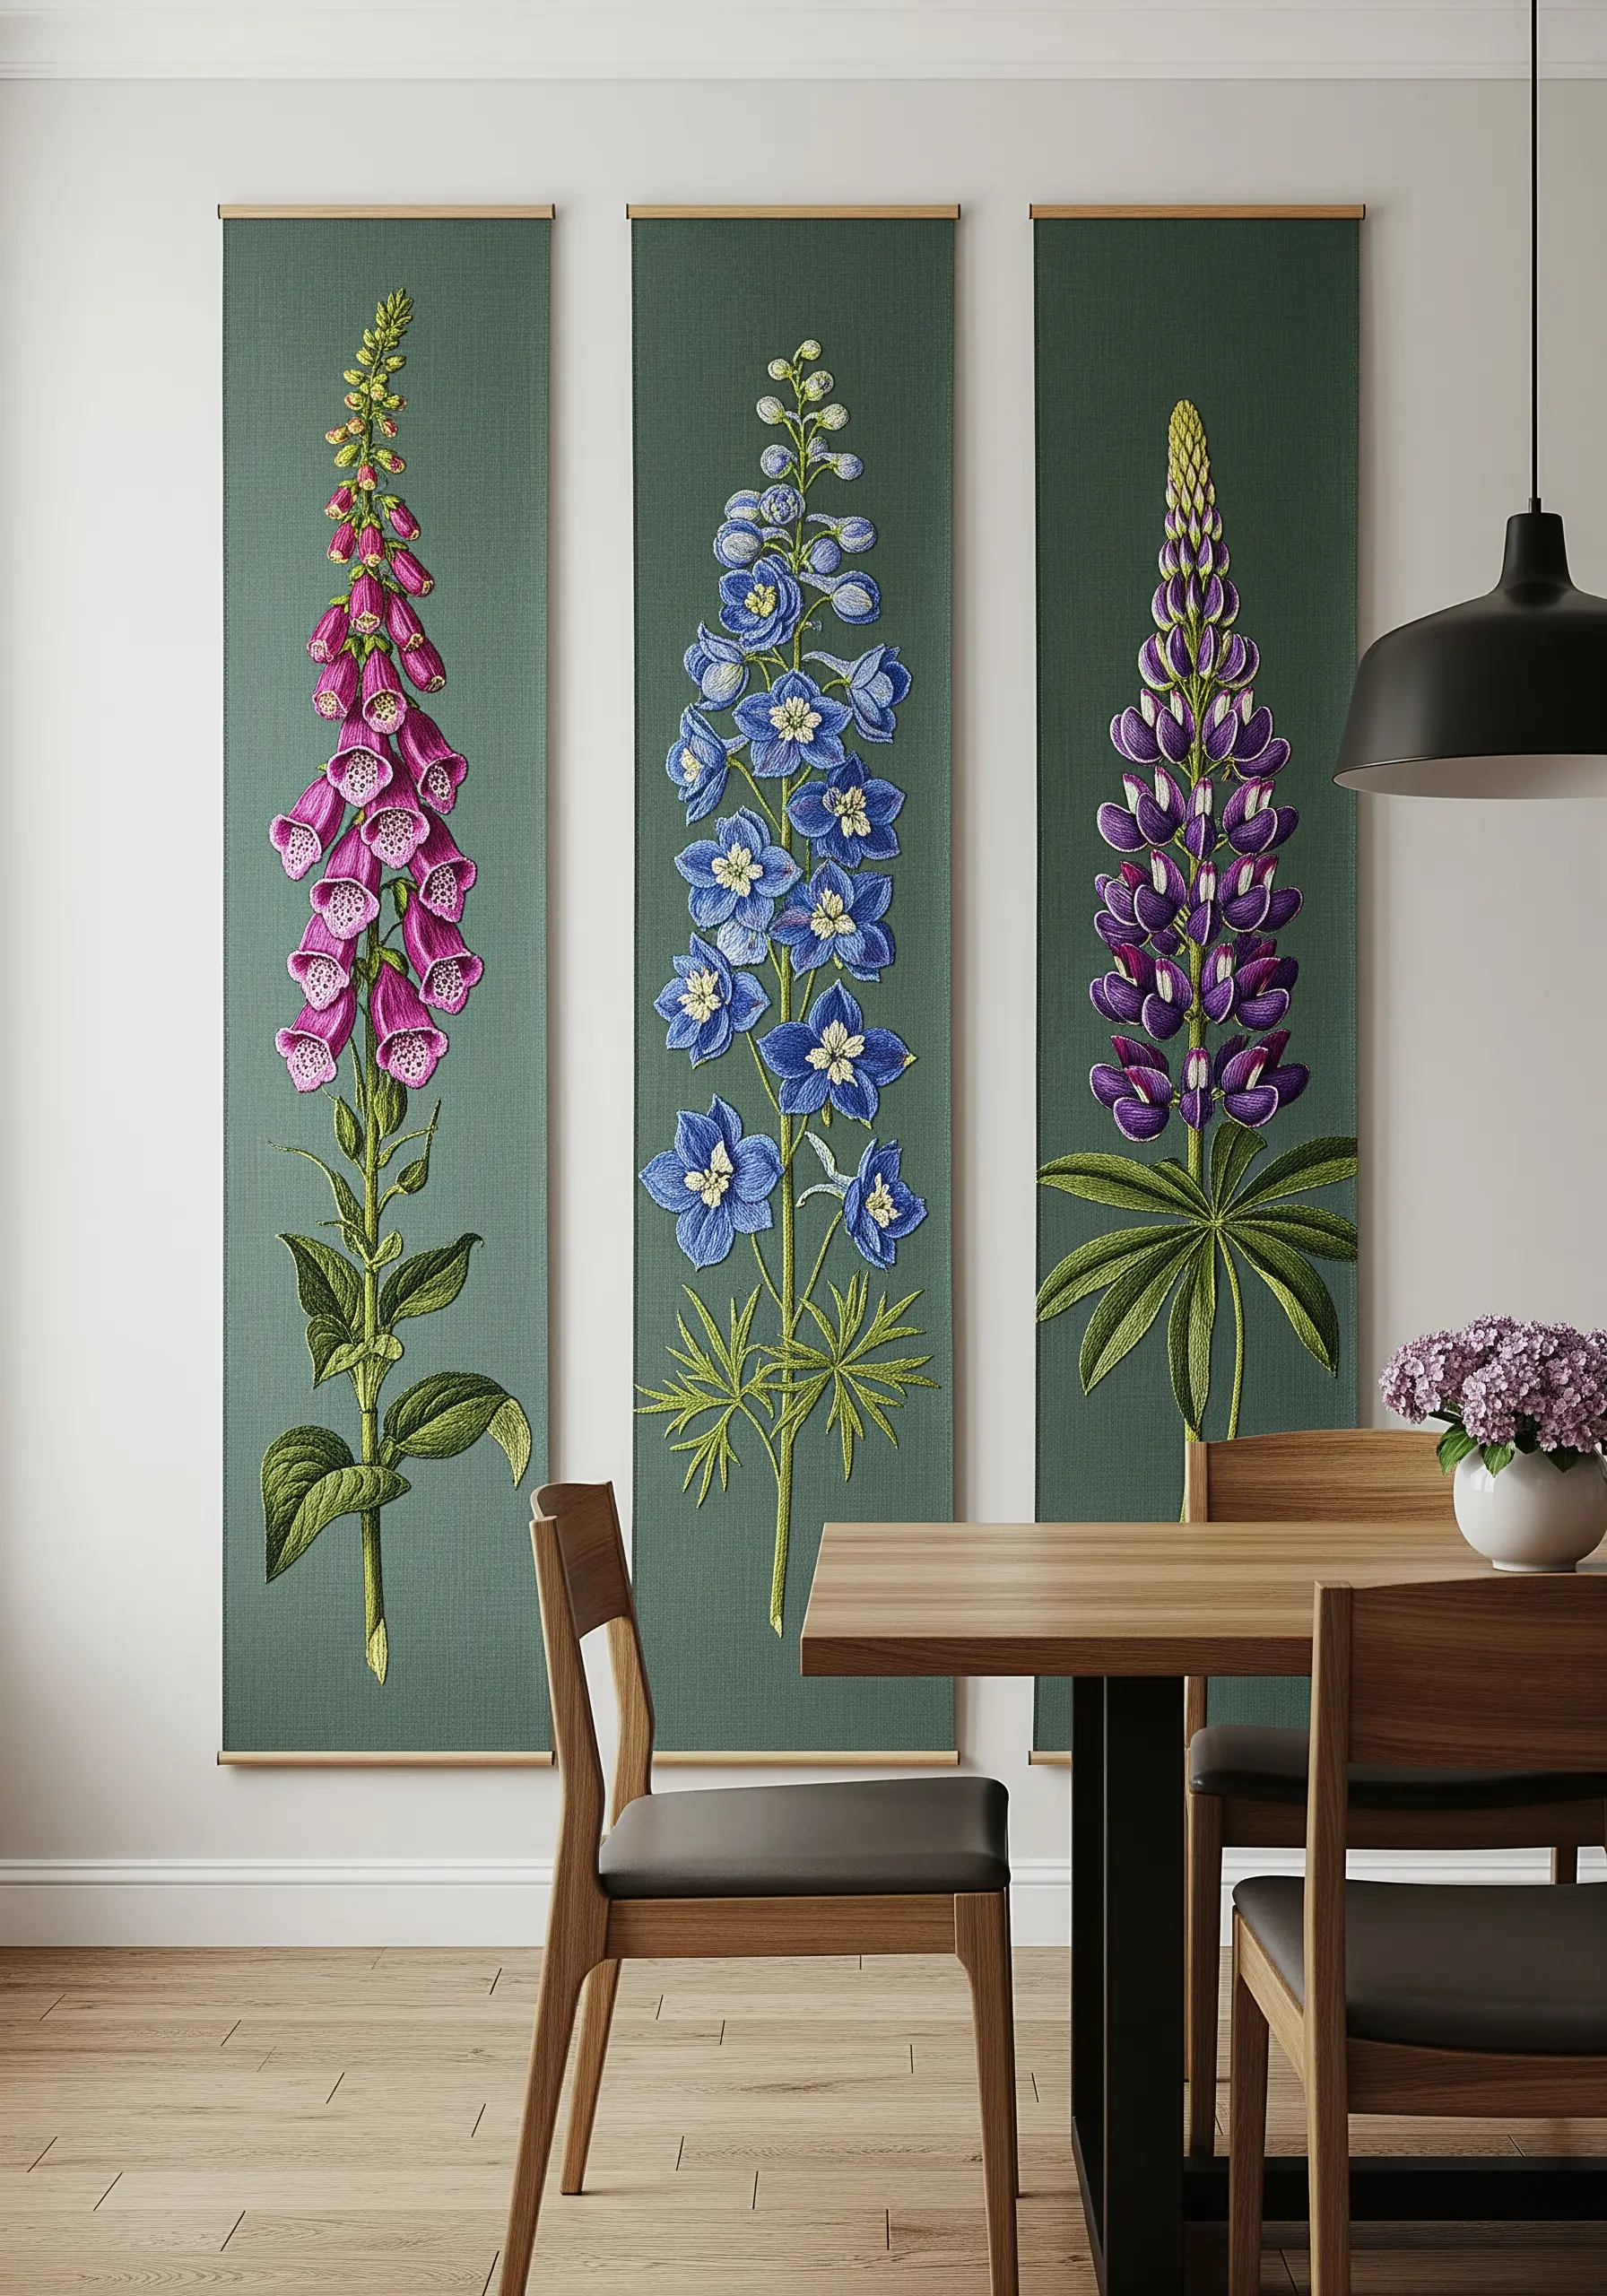
Isolating individual plant specimens on matching vertical panels gives your work the sophisticated feel of a classic botanical illustration.
Choose a unifying background fabric and color palette to ensure the three panels read as a cohesive set.
This format allows you to concentrate on the unique details and structure of each flower, celebrating their individual forms.
Even when rendered realistically, this focused approach echoes the clean aesthetic of abstract botanical silhouettes, where form is paramount.
25. Animate Your Florals with Busy Bees

Adding insects or animals to a botanical scene instantly injects life, movement, and a sense of narrative.
To make the bees stand out, use a padded satin stitch for their fuzzy bodies, which will raise them slightly from the fabric surface.
For the wings, use a few delicate straight stitches in a light gray or off-white single strand to suggest transparency and motion.
Butterfly garden embroidery ideas follow the same principle: adding fauna brings the flora to life.
26. Use Directional Stitching to Sculpt a Ginkgo Leaf
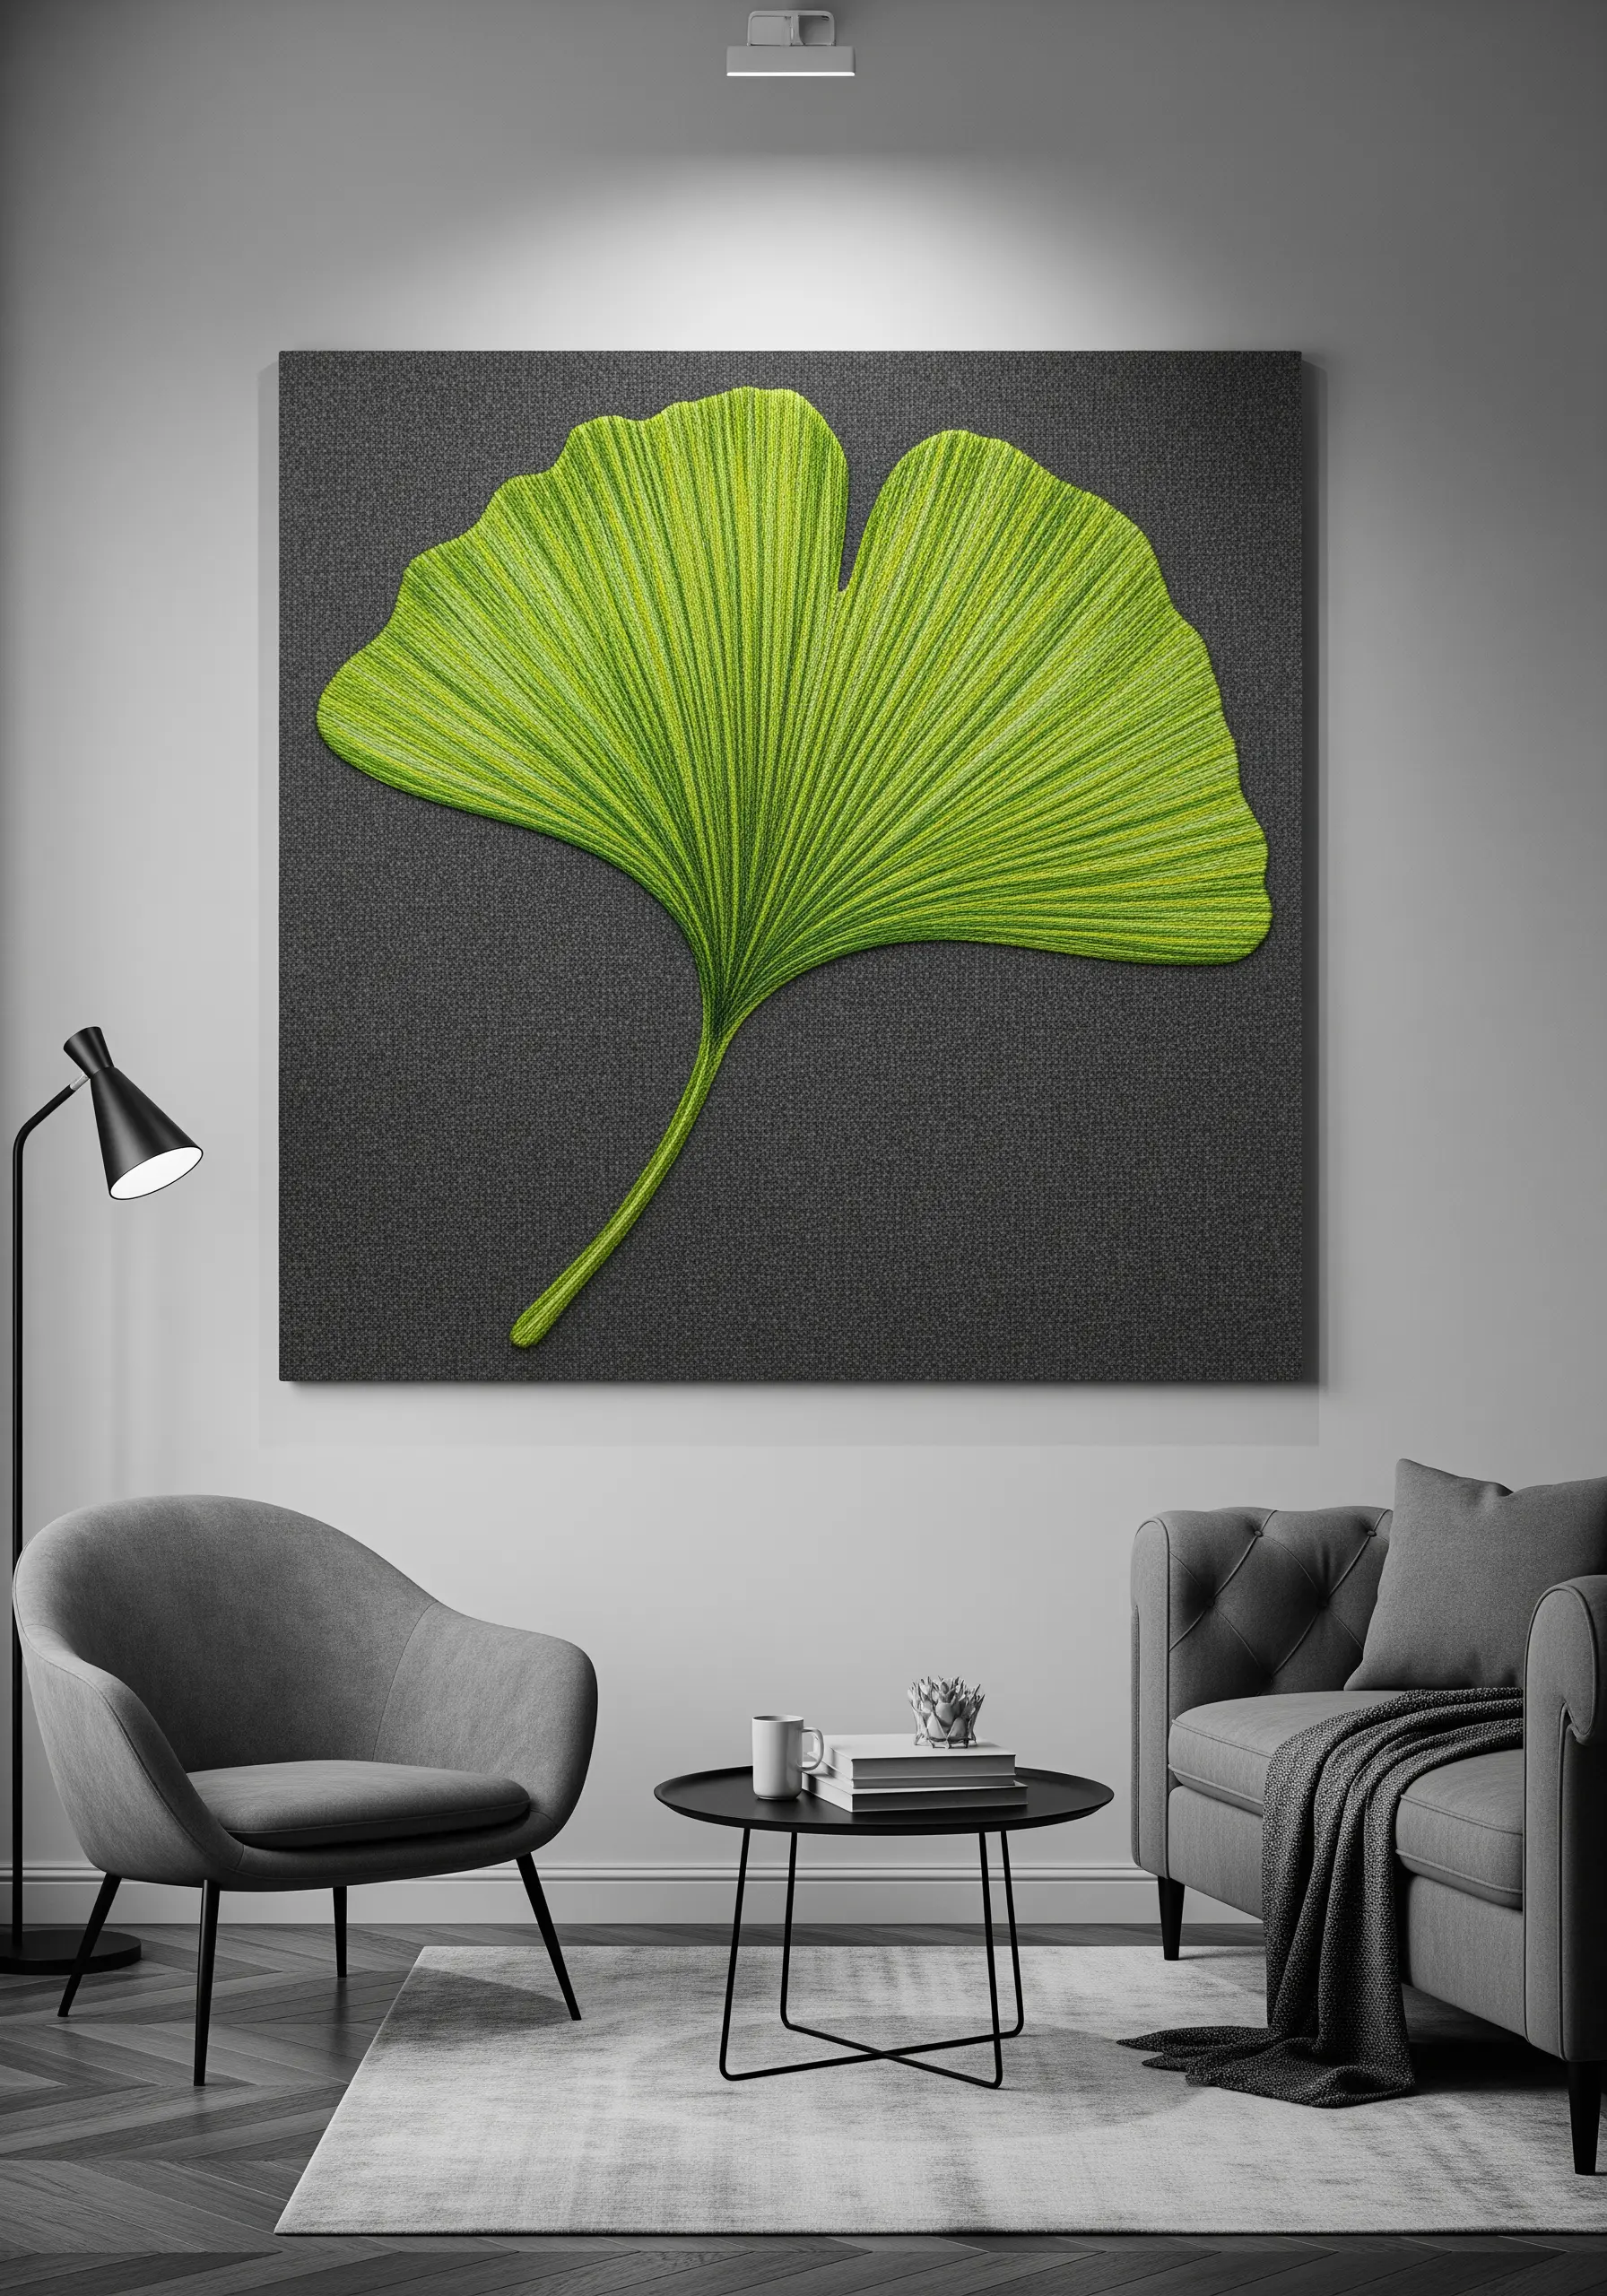
The realism in this piece is achieved almost entirely through the direction of the stitches.
Use long straight stitches or a narrow satin stitch, all radiating from the central point where the stem meets the leaf.
By following the natural, fan-like pattern of the ginkgo’s veins, your stitches will create the form and texture of the leaf organically.
This is a core technique for many hand-embroidery leaf patterns, using thread direction to create form.
27. Combine Embroidery with Macrame for a Boho Touch

Elevate a simple embroidered panel by incorporating another fiber art, like macrame, for a beautifully textured, mixed-media piece.
Stitch your botanical design on the lower two-thirds of your fabric, leaving the top third plain.
You can then attach this fabric to a dowel and add a separate macrame piece above it, creating a single, cohesive wall hanging.
Boho embroidery patterns often benefit from this kind of textural mixing, which adds warmth and character.


