

A cushion is more than a comfortable object; it’s a canvas for the stories you want to tell in your home. With just a needle and thread, you can transform a simple piece of fabric into a small world of rustic charm, filled with the textures of a country garden or a quiet woodland.
But achieving that effortless, handmade look requires intention. It’s found in the specific way you layer a stem stitch to suggest distance, the choice to use a thicker wool thread for a cozy, tactile roof, or the decision to leave negative space to let a delicate motif breathe.
Here, you’ll find not just ideas, but the techniques behind them. Learn how to master texture, blend color with purpose, and compose scenes that feel both personal and polished. Let’s turn your cushions into cherished pieces of cottagecore art, one thoughtful stitch at a time.
1. Layer a Wildflower Meadow with Varied Stitches

To prevent your meadow from looking flat, create visual depth by varying your stitch types and thread weights.
Use single-strand backstitches for delicate stems and three strands for thicker stalks in the foreground.
Combine lazy daisy stitches for simple petals, French knots for textured flower centers like dandelions, and satin stitch for bolder blooms like cornflowers.
This mix mimics the natural chaos of a field and draws the eye across the cushion, making the scene feel alive and dynamic.
Explore wildflower thread palettes to ensure your color choices feel harmonious and authentic.
2. Master Realistic Texture with Directional Stitching
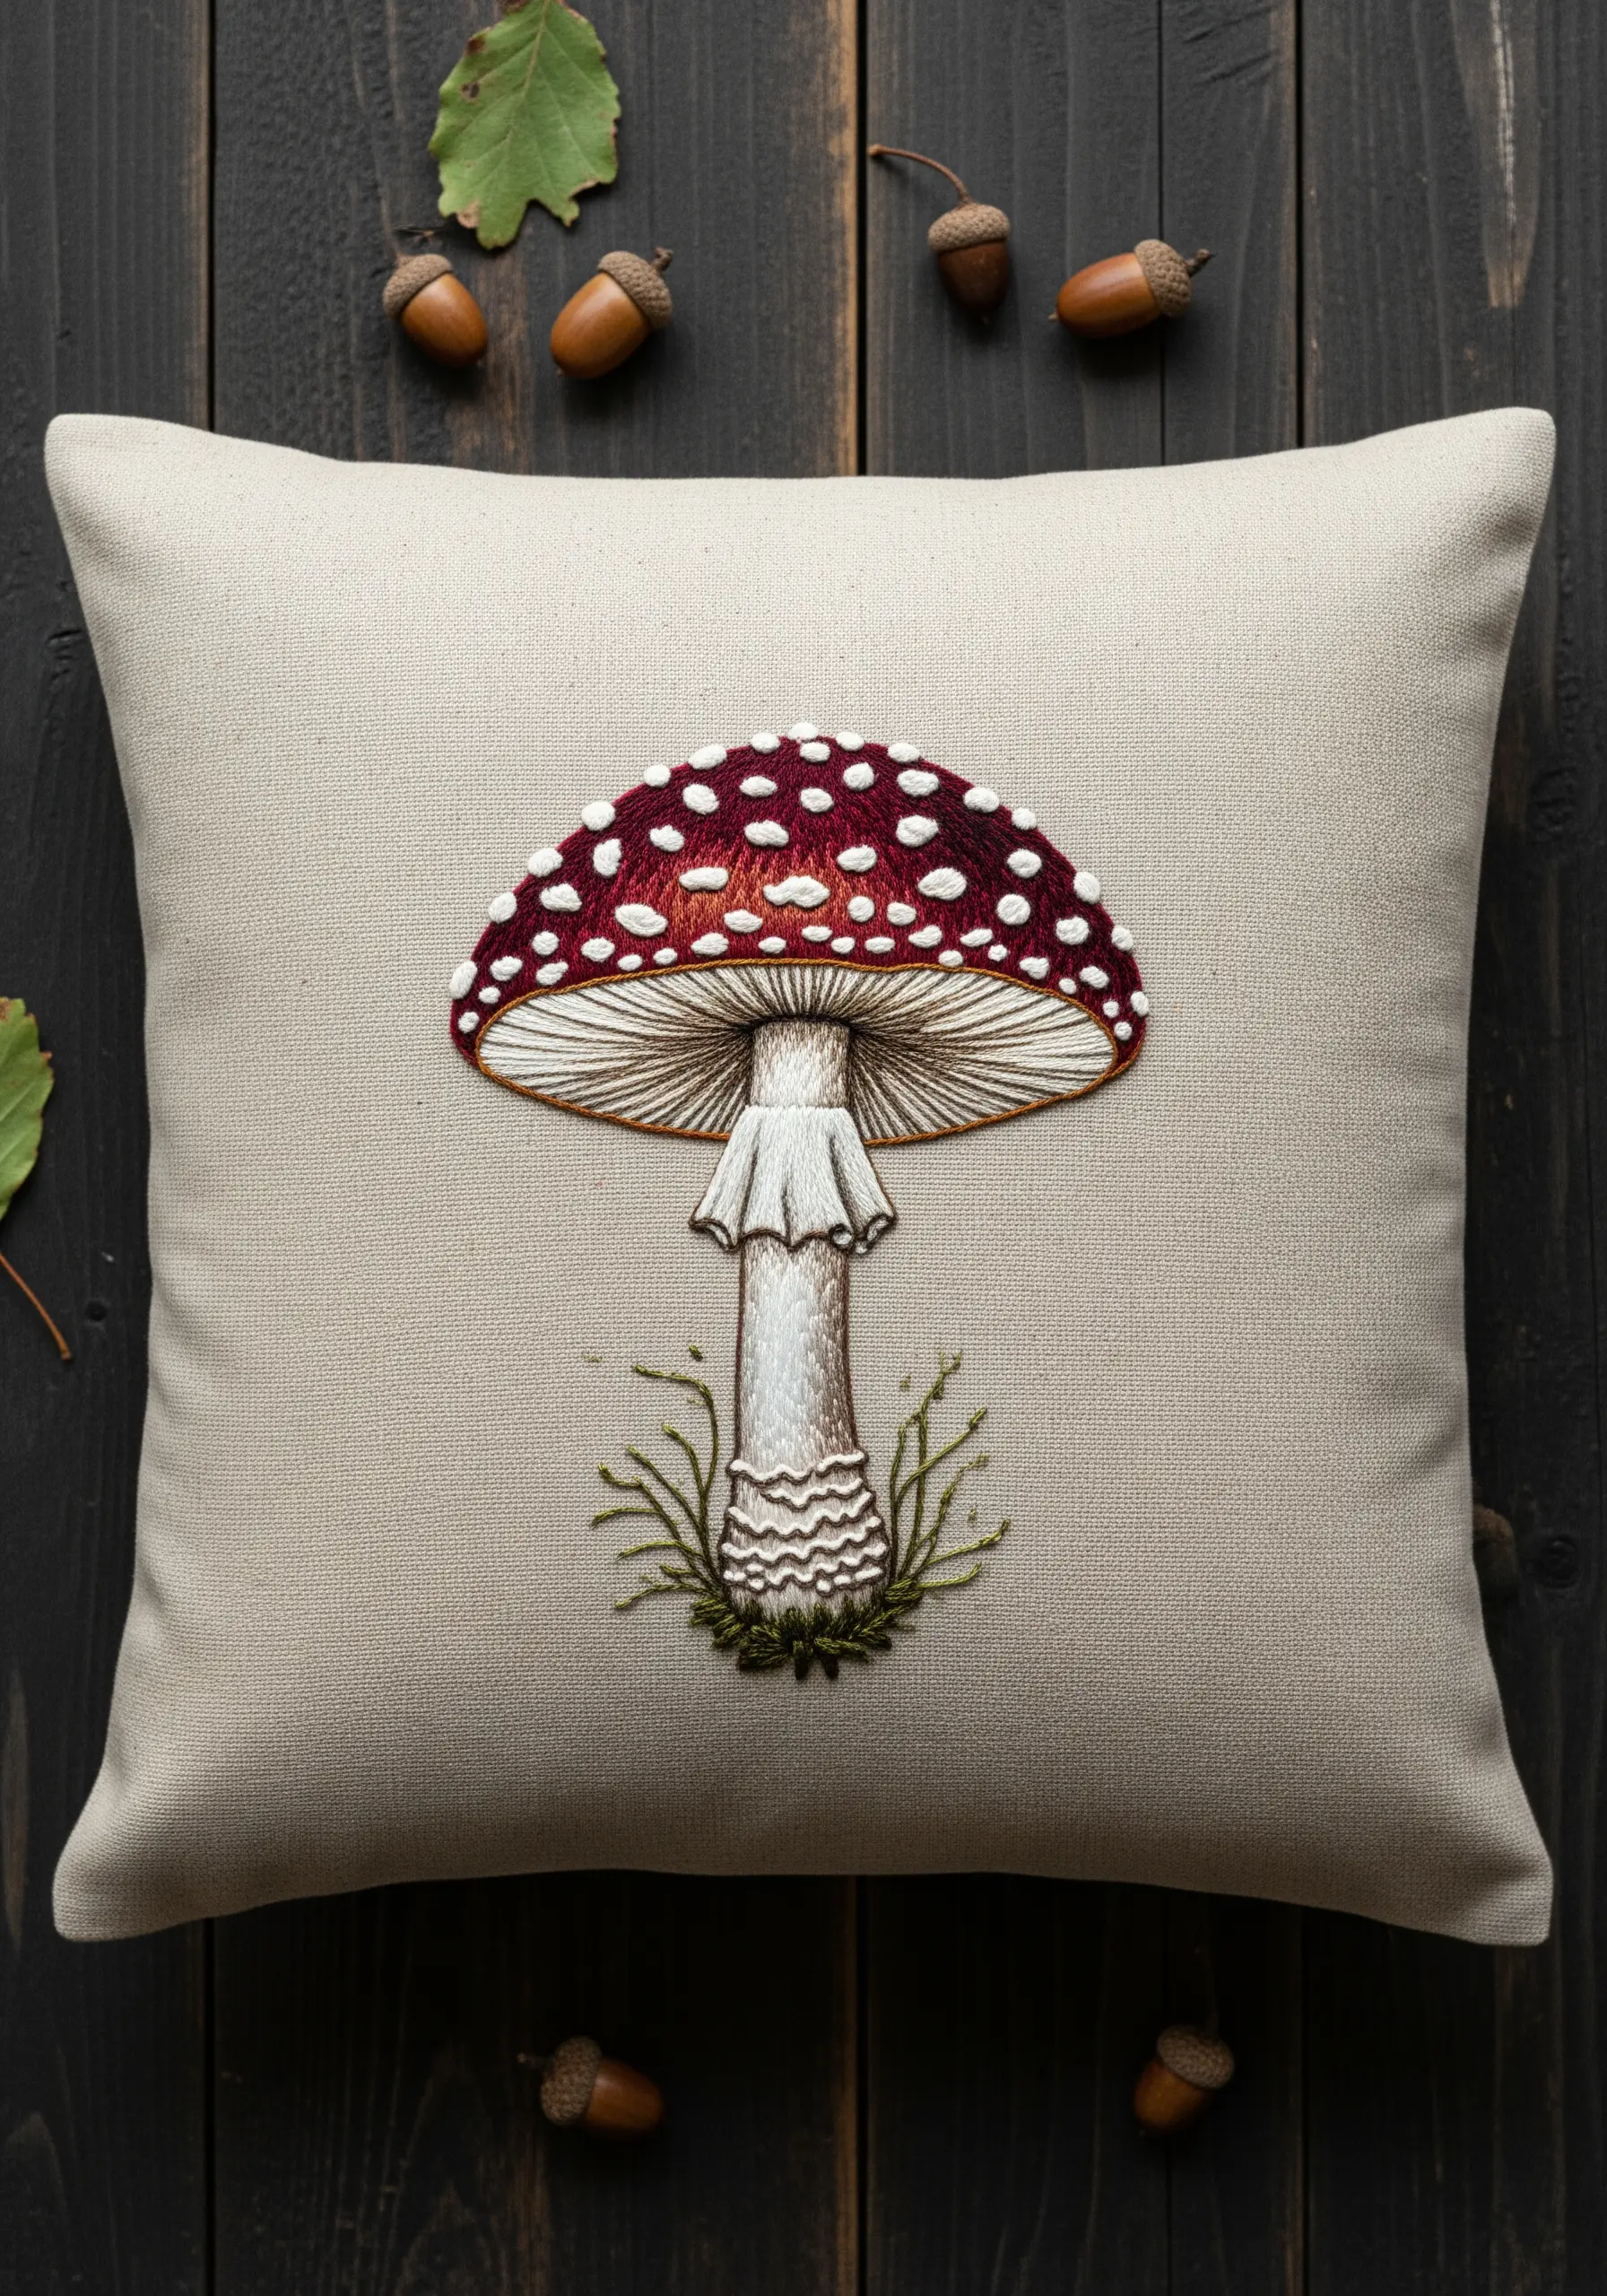
For a motif like a mushroom, the direction of your stitches is everything.
Use a long-and-short stitch for the cap, ensuring your stitches follow its natural curve to create a smooth, rounded appearance.
For the gills underneath, switch to single-strand straight stitches radiating from the stem outward; this subtle detail creates the illusion of delicate, paper-thin fins.
Finish with raised French knots for the white spots, giving them a tactile, three-dimensional quality that contrasts beautifully with the smooth cap.
These forest floor botanical stitch ideas can add even more realism to your work.
3. Create Graphic Pop with Padded Appliqué

To make your bee bodies stand out with a raised, plush effect, use padded satin stitch.
First, fill the body shapes with a base layer of small seed stitches or felt, then cover them with dense, smooth satin stitches.
This technique, called stumpwork, lifts the motif off the fabric for a professional, high-impact look.
For the translucent wings, use an open fill like detached chain stitches in a single white or grey thread to mimic delicate membranes without adding bulk.
4. Build a Scene with Architectural Texture

Recreate the charm of a thatched roof by using layered straight stitches with a matte, six-strand floss or even fine wool thread.
Stitch in slightly varied directions and overlap your layers to build up a thick, straw-like texture that feels authentic.
Contrast this heavy texture with simple, single-thread outlines for background elements like the trellis.
This creates a clear focal point on the cottage, preventing the detailed scene from becoming visually overwhelming.
5. Stitch Whimsical Movement with Whipped Backstitch
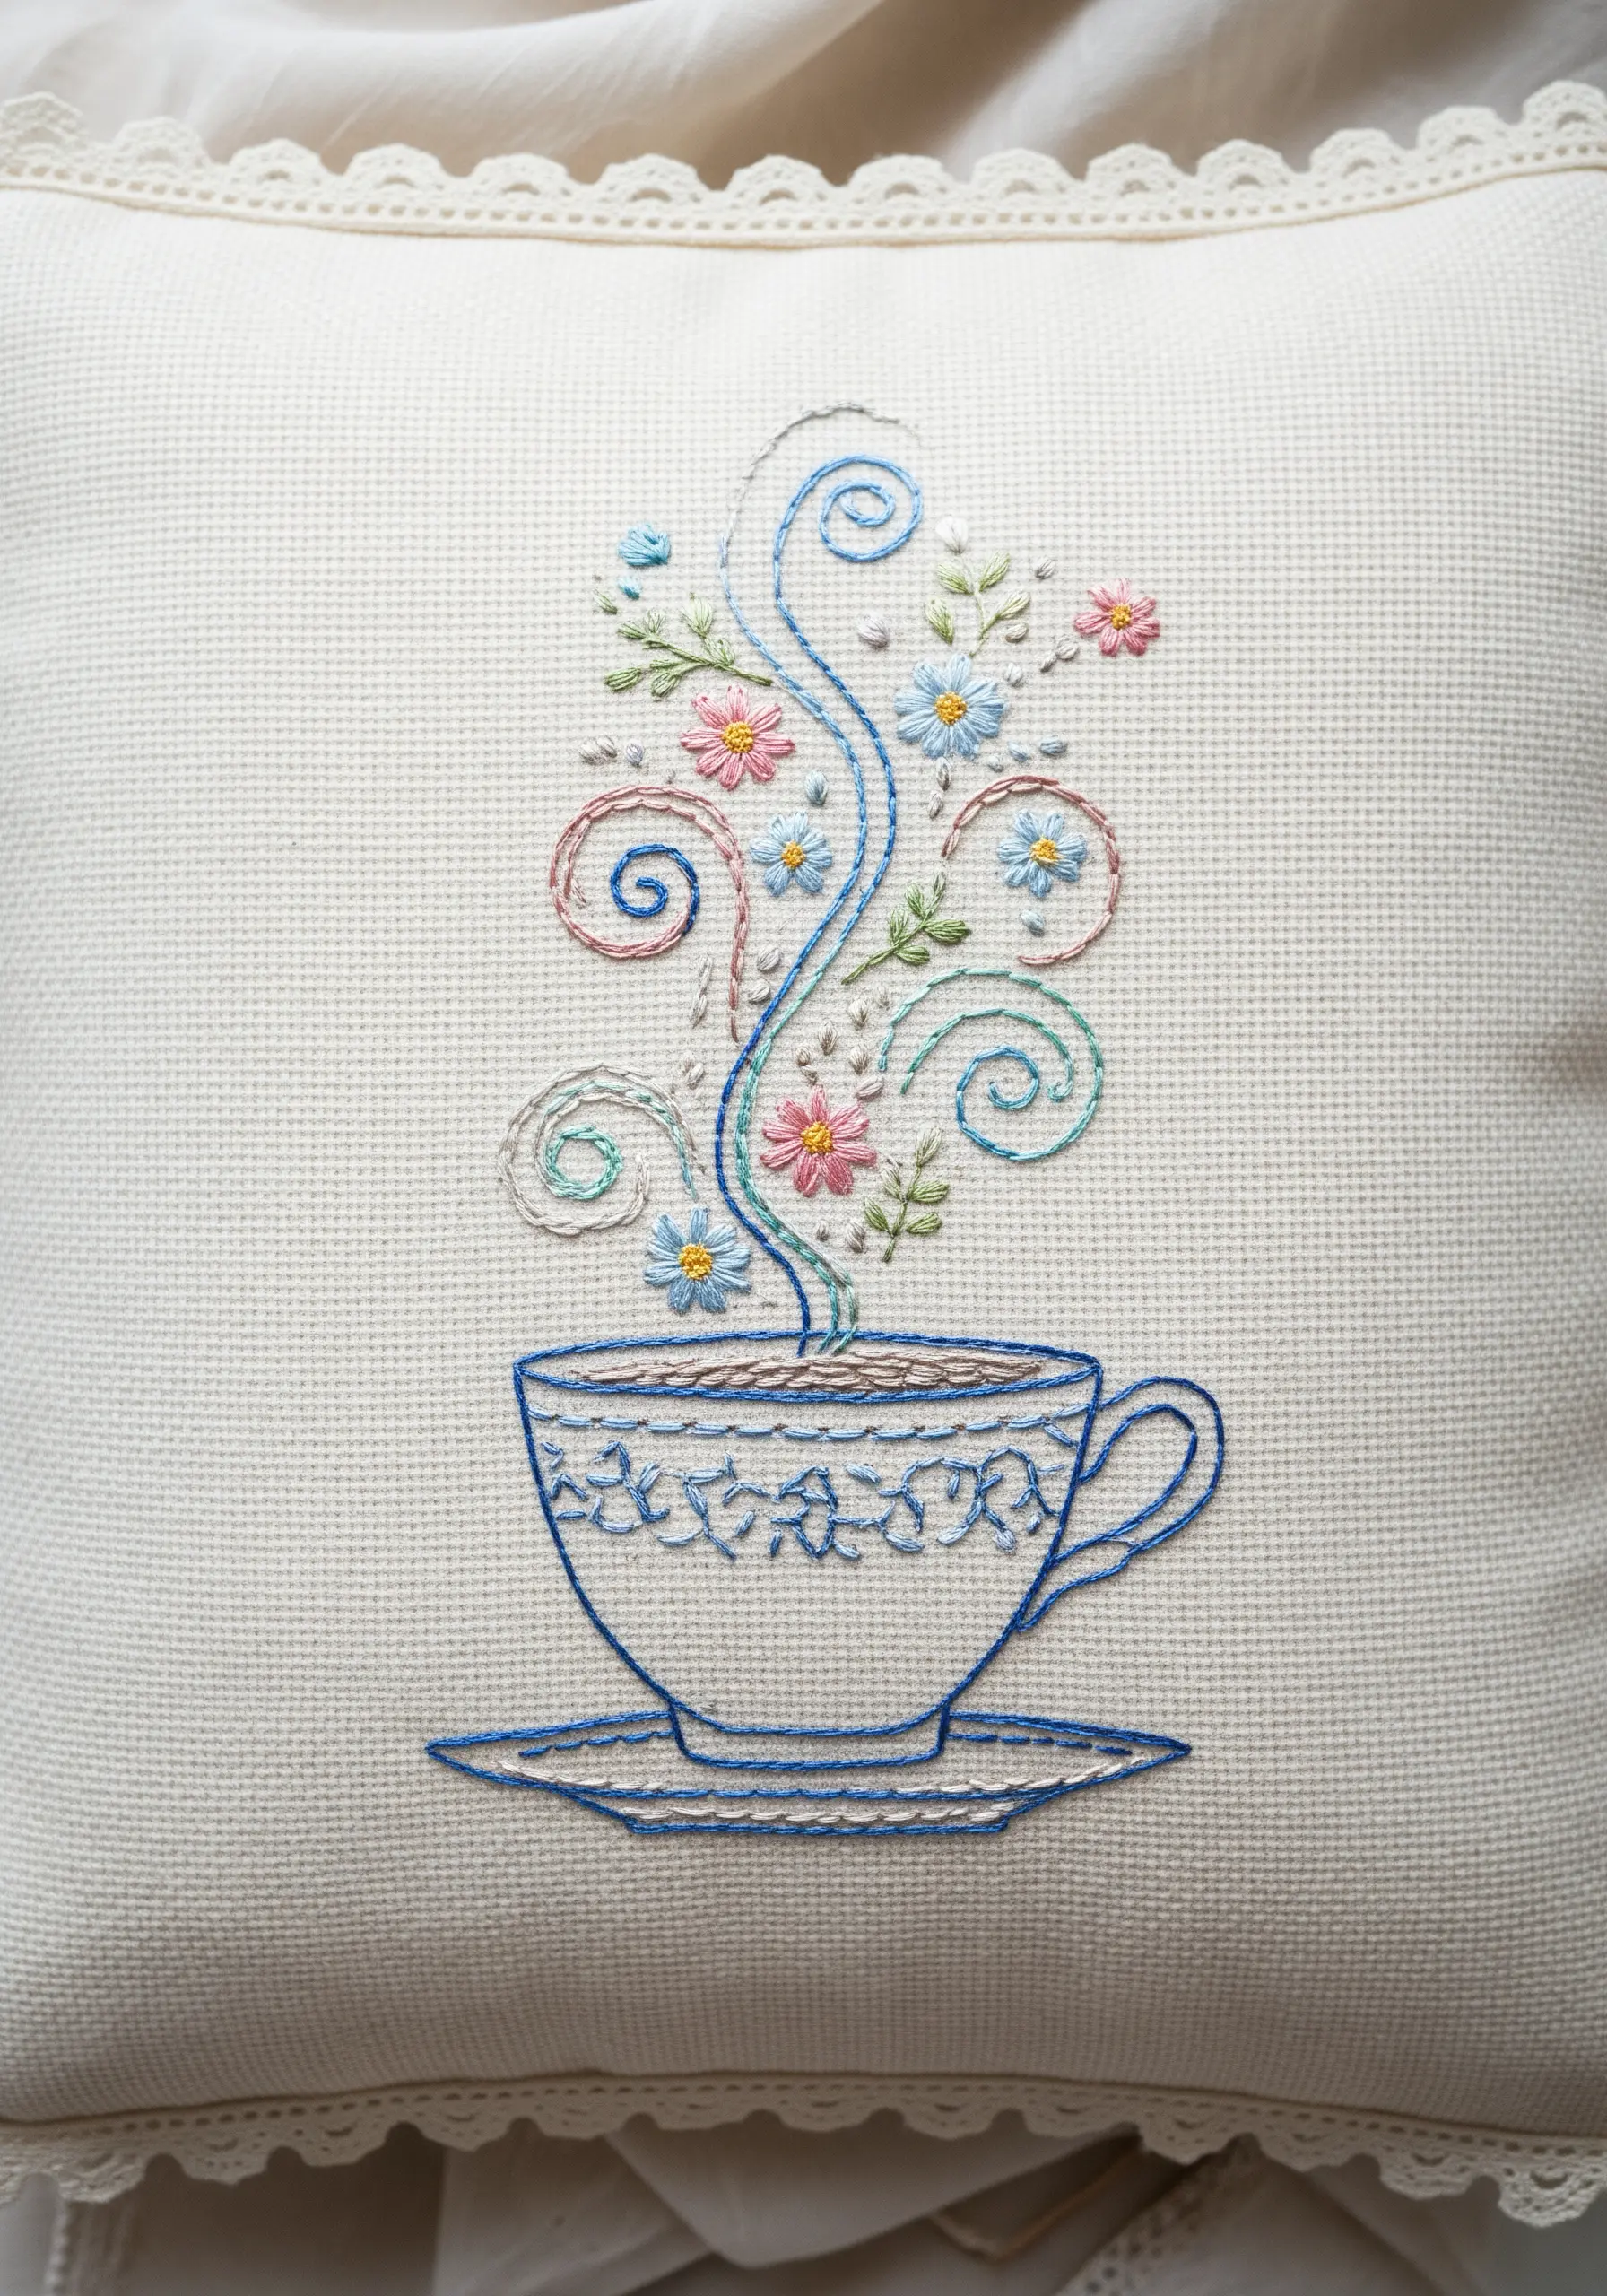
To give flowing lines like steam a smooth, uninterrupted curve, use a whipped backstitch.
First, create your line with a standard backstitch, then whip a second thread around each stitch without piercing the fabric.
This technique smooths out the jagged edges of a regular backstitch, resulting in a clean, fluid line perfect for elegant swirls and curls.
It also adds a subtle thickness that makes the outline feel more substantial and intentional.
6. Frame Your Design with a Delicate Botanical Wreath

A wreath offers a beautiful way to frame negative space or a central monogram.
To keep it from looking stiff, vary the stitches used for the foliage: fishbone stitch for broad leaves, detached chain stitches for buds, and simple straight stitches for sprigs of rosemary.
For lavender blossoms, use a cluster of French knots or short satin stitches angled upwards along the stem.
This combination of textures creates a wreath that feels organic and hand-drawn, not rigid and uniform. Explore other lavender-inspired embroidery designs for more ideas.
7. Achieve a Clean Fill with Seed Stitch Shading

When filling small shapes like strawberries, a dense satin stitch can sometimes look too heavy.
Instead, try a filled seed stitch for the red body, using tiny, randomly placed straight stitches to build up color gradually.
This creates a stippled texture that catches the light beautifully and feels softer than a solid block of satin stitch.
For the yellow seeds, add tiny French knots on top of the red fill for a final layer of dimension.
8. Capture Fur Texture on Corduroy Fabric

Embroidering on a textured fabric like corduroy can enhance your design if you work with the fabric’s grain, not against it.
For the fox’s fur, use long-and-short stitches that flow in the direction the fur would naturally lie—outward from the face and down the tail.
Use a mix of two or three closely related shades of orange and brown to create depth and realism.
The corduroy’s ridges will add another layer of texture, making the fur feel exceptionally plush and lifelike. This technique helps beginners capture fur texture like pros.
9. Ground Your Bouquet with a Transparent Jar Effect

To make a glass jar look transparent, avoid filling it in completely.
Use a simple backstitch for the outline of the jar, then add a few curved lines in a slightly lighter shade to suggest light reflecting off the glass.
Allow the stems of the flowers to show through clearly, which reinforces the illusion of transparency.
This minimalist approach ensures the focus remains on the vibrant bouquet while making the glass effect convincing.
10. Combine Typography and Florals with Appliqué
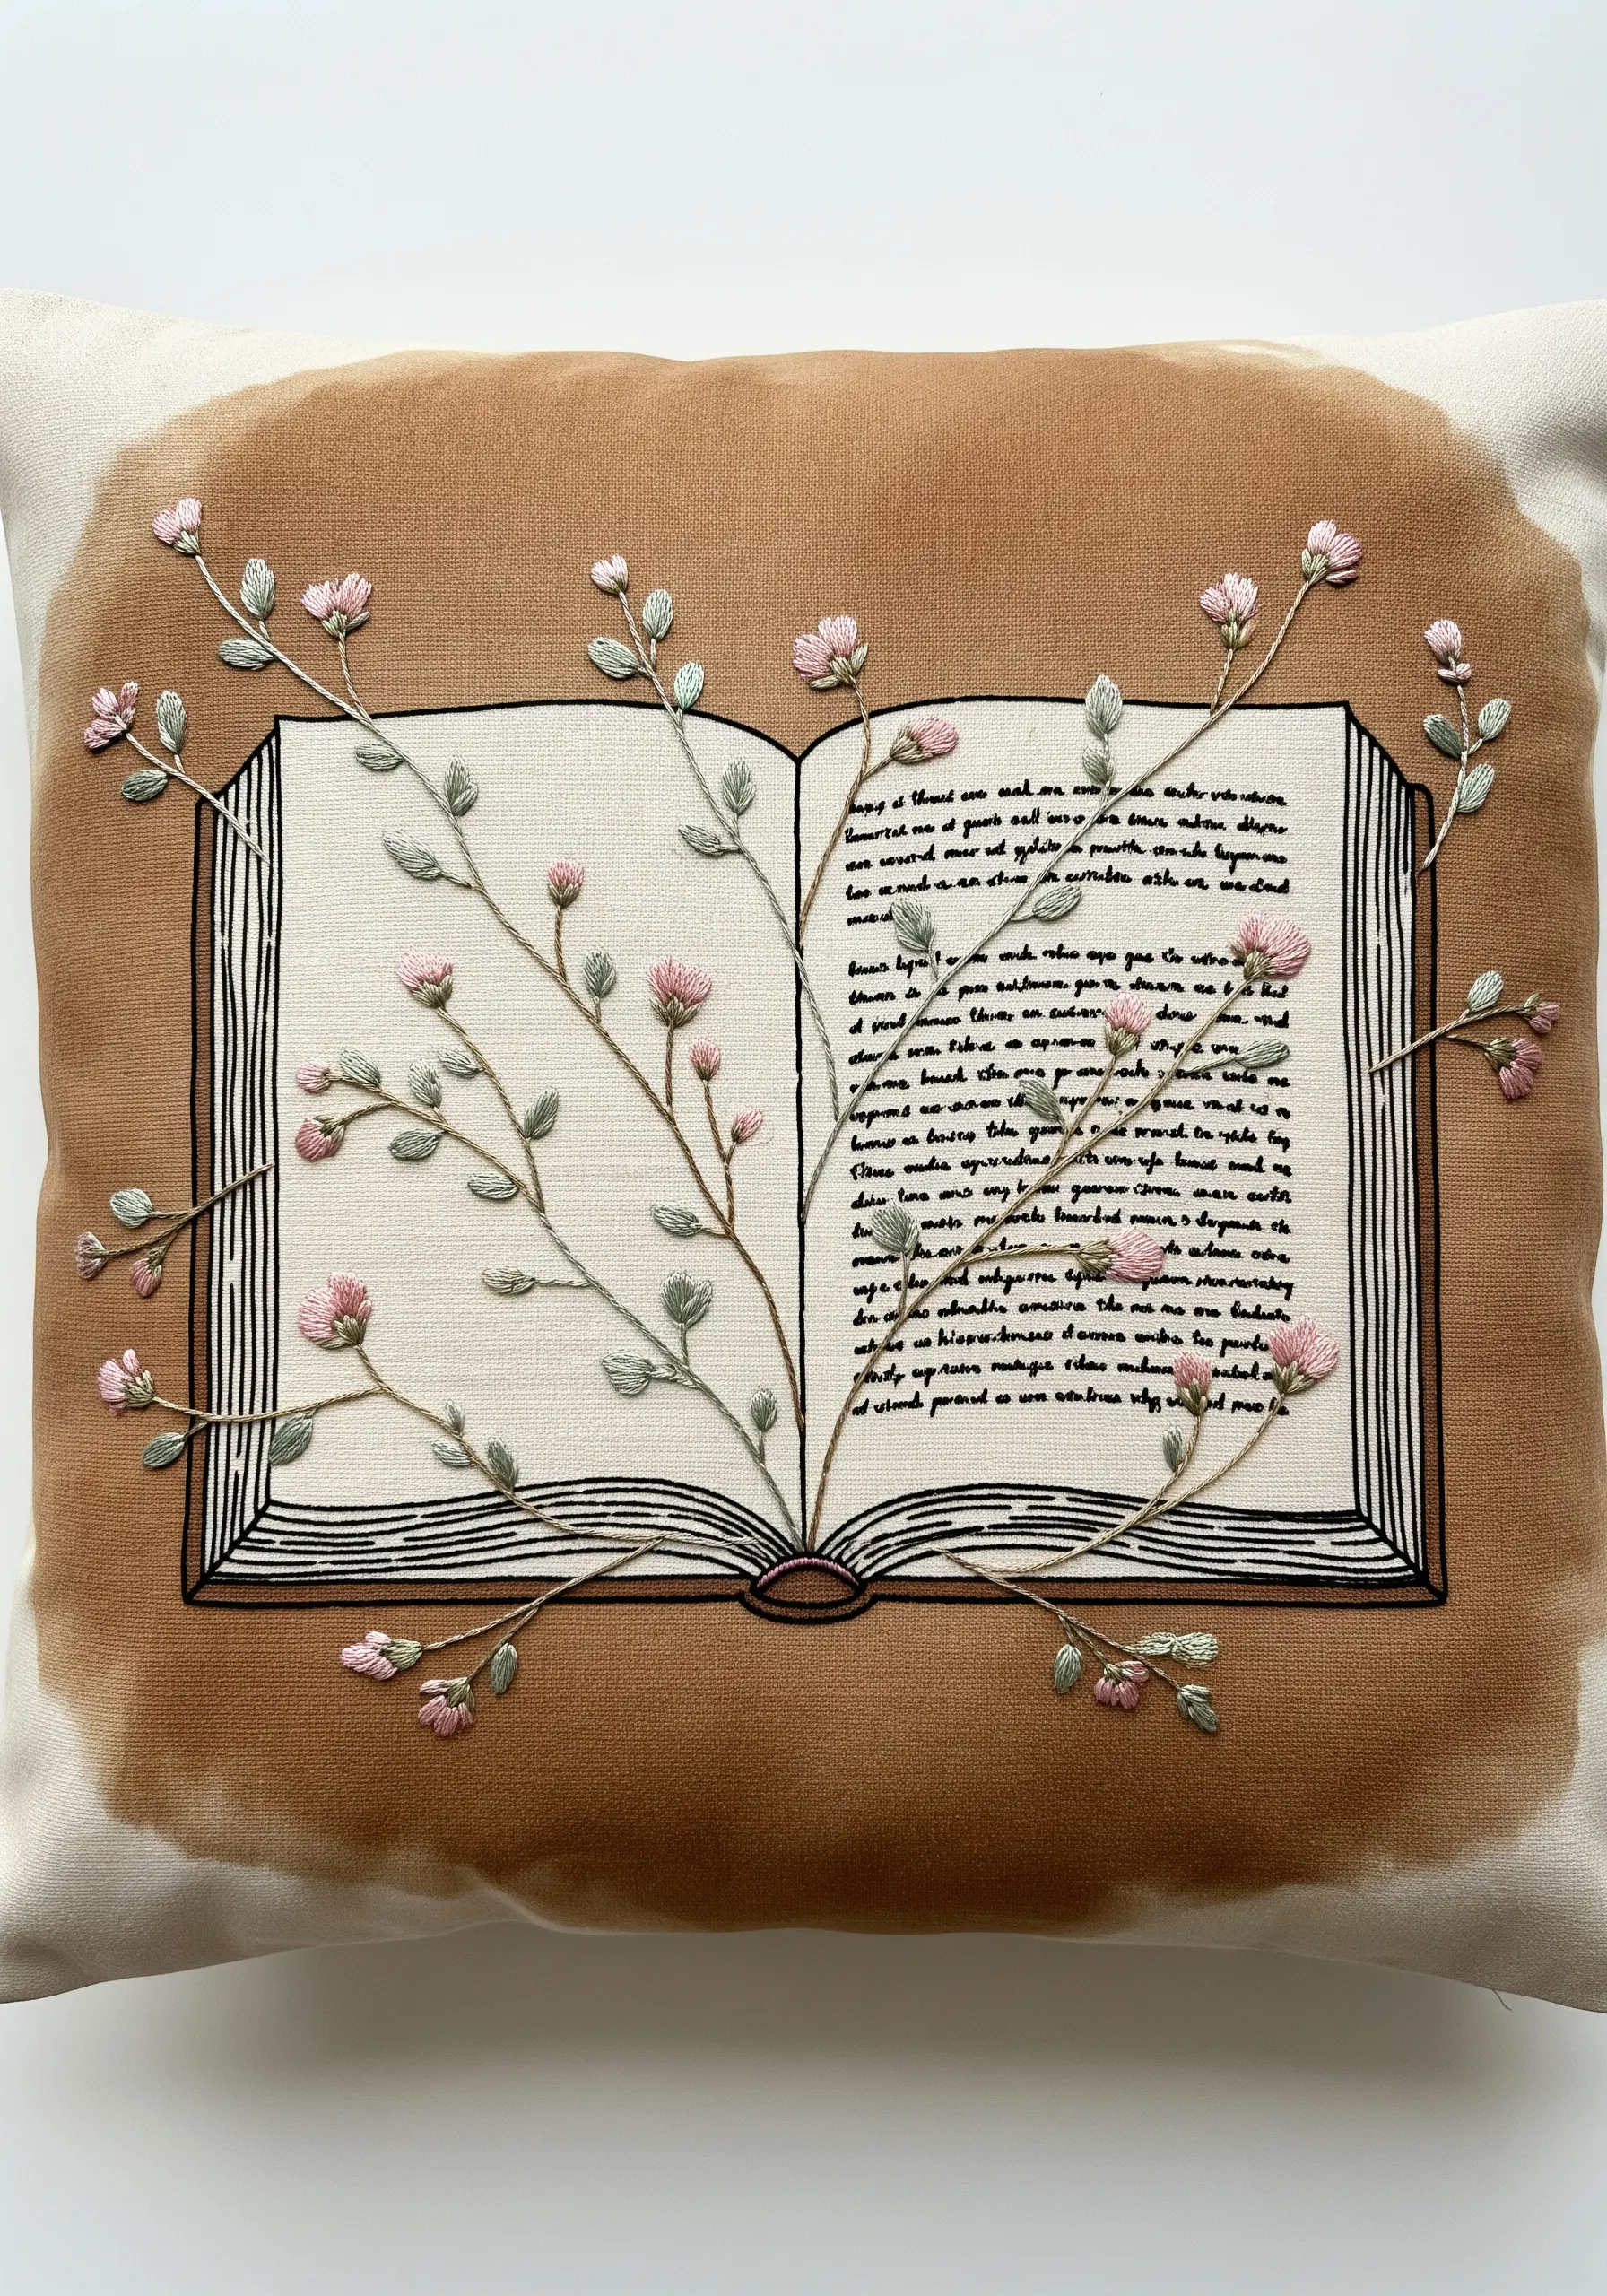
Stitching tiny, legible text can be challenging. Instead, apply a piece of pre-printed fabric for the book’s pages and secure it with a neat backstitch outline.
This mixed-media approach guarantees crisp, readable text and provides a perfect canvas for your embroidery.
Stitch your floral elements directly over the appliqué, allowing vines and blossoms to grow out from the pages.
This creates a beautiful narrative effect where the story literally comes to life from the book.
11. Create a Dynamic Pattern with a Clustered Motif

An all-over pattern adds a designer touch to a simple cushion. To keep it looking sophisticated, not chaotic, vary the size and orientation of your motifs.
Cluster smaller mushrooms near larger ones and slightly rotate each one so they don’t appear like a rigid grid.
Stick to a unified color palette—here, earthy reds, browns, and creams—to tie the entire composition together.
This approach transforms a simple repeating element into a rich, immersive woodland scene. You can also explore other nature-inspired texture patterns.
12. Blend Realistic Shading with Whimsical Color

Create a striking contrast by pairing a realistically shaded object with a burst of vibrant, stylized florals.
For the watering can, use four or five shades of grey thread and a directional satin stitch to mimic metallic shine and shadows.
Then, stitch the flowers pouring out using bright, non-realistic colors in simple stitches like lazy daisy and French knots.
This juxtaposition between realism and playful imagination makes the entire piece feel magical and unexpected.
13. Achieve Symmetry with Thread Painting

For symmetrical designs like a moth, precision is key. Lightly trace your design onto the fabric, marking clear sections for each color.
Use the long-and-short stitch, also known as thread painting, to blend the colors seamlessly within each wing panel.
To maintain symmetry, complete one section on the left wing, then immediately mirror it on the right wing before moving on.
This method prevents subtle shifts in stitch direction or density that can occur if you complete one entire side first.
14. Define Shapes on Patterned Fabric with Outlines

Embroidering on patterned fabric like gingham can be tricky, as the design can get lost.
To ensure your motifs are clearly visible, first outline them with a dark, contrasting backstitch or split stitch.
Then, fill the shape with satin stitches that run parallel to the outline, which creates a clean, graphic look.
The dark outline acts as a visual barrier, separating your embroidery from the background pattern and making it pop.
15. Add Subtle Luxury with Metallic Accents

Incorporate a touch of metallic thread to elevate a simple design.
Instead of using it for large filled areas, which can be difficult to work with, use it for fine details like the sun’s rays or delicate vine outlines.
A couching stitch works wonders with metallic floss: lay the metallic thread on the surface and use a second, thinner thread to tack it down with small, evenly spaced stitches.
This technique prevents the metallic thread from snagging or unraveling while adding a sophisticated shimmer.
16. Create Charm with Miniature Appliqué Details

For tiny, detailed objects like the clothing on the line, traditional embroidery can be difficult.
Instead, use small pieces of patterned fabric as appliqué. Cut out the shapes, treat the edges with a fray-stopping liquid, and attach them with tiny, nearly invisible stitches.
You can then add miniature embroidered details, like the trim on the dress or the pattern on the socks, directly onto the appliqué pieces before attaching them.
This gives you crisp shapes and intricate patterns on a delightfully small scale.
17. Build Dimensional Texture on Burlap
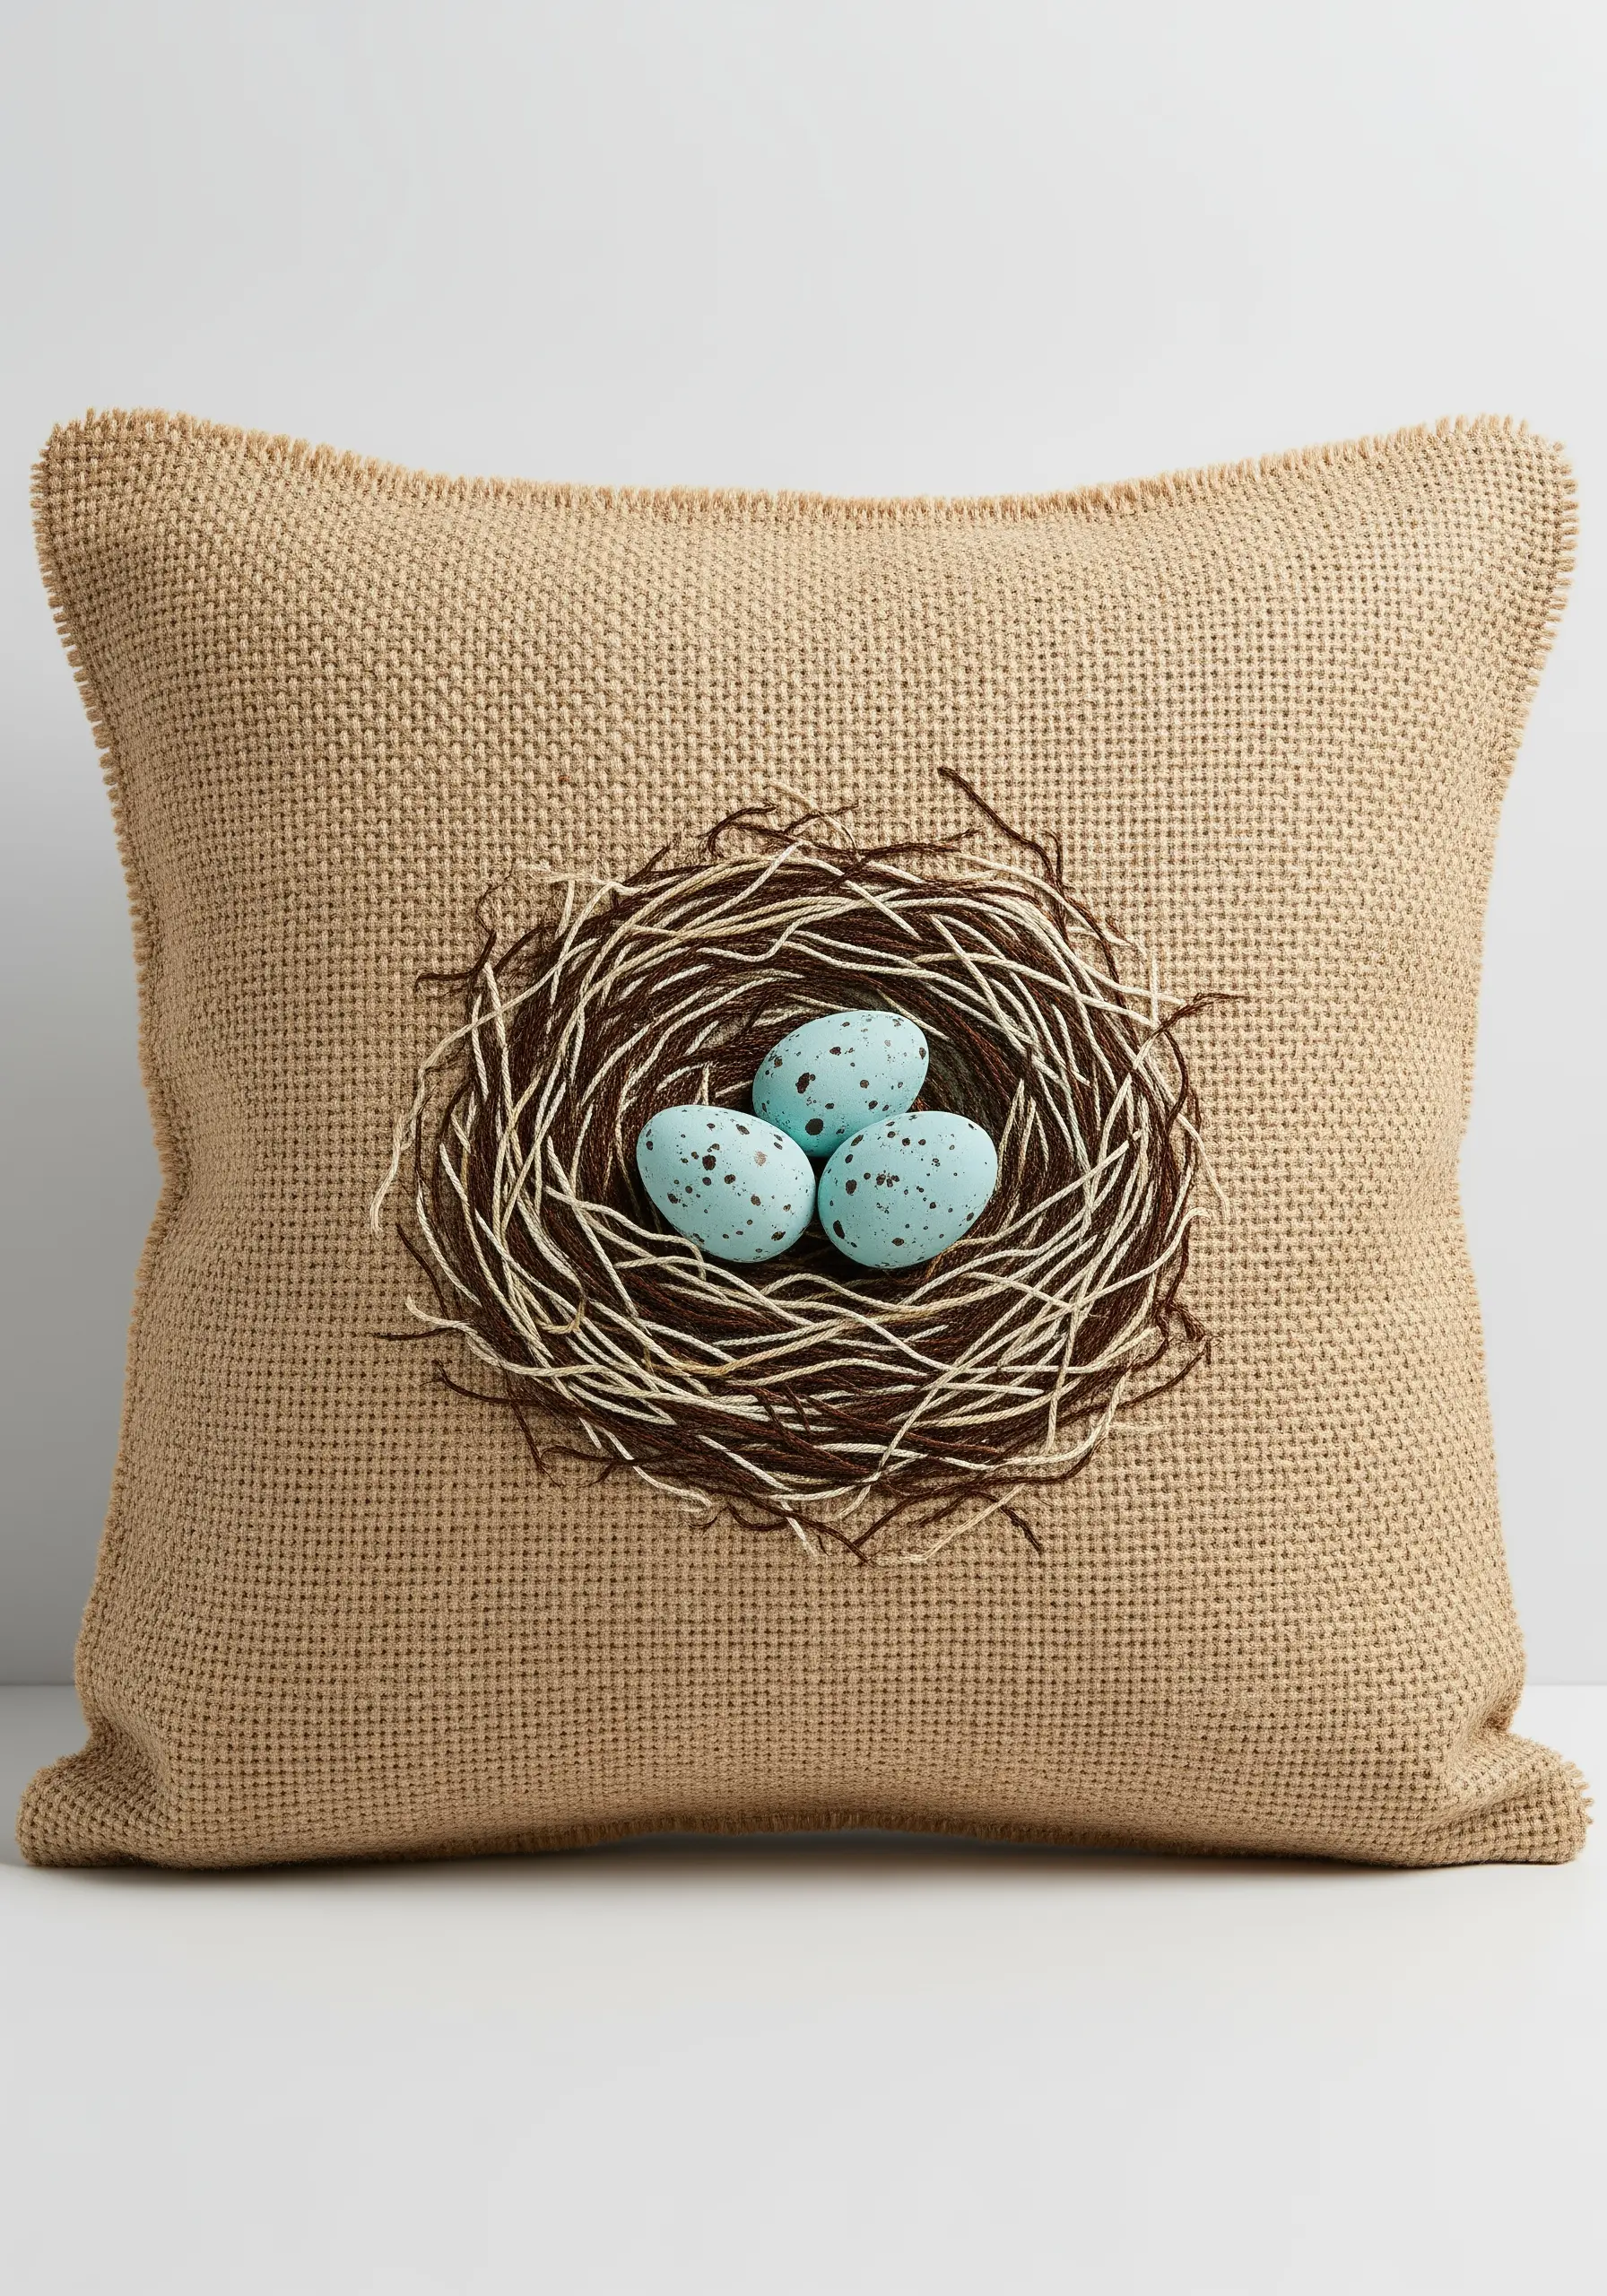
The open weave of burlap is perfect for creating rustic, highly textured pieces like a bird’s nest.
Use a mix of threads—thick wool yarn, matte cotton floss, and even fine jute twine—to mimic natural materials.
Don’t aim for neat stitches. Instead, use long, overlapping, and chaotic straight stitches and couching to build up a tangled, three-dimensional form.
The burlap’s rough texture complements the nest perfectly, grounding the design in a rustic aesthetic.


