
Your cozy nook is more than just a corner of a room; it’s a space that should feel entirely your own. With a needle and thread, you have the power to infuse every detail with warmth, texture, and personal meaning.
Forget complicated patterns or expensive supplies. The most impactful changes often come from small, intentional details—a perfectly executed stitch on a linen coaster, a pop of sculptural yarn on a planter, or a minimalist motif that turns a functional object into a quiet piece of art.
Here, you’ll find ideas designed not just to be made, but to be lived with. Each project is an invitation to slow down, focus on your craft, and create something that makes your favorite small space feel even more like home.
1. Create Woodland Depth with Layered Stitches

Build a rich, dimensional scene by combining distinct stitch textures for each element.
Use a padded satin stitch for the mushroom caps to give them a rounded, plump feel, and fill the underside with straight stitches in a contrasting color for realistic gills.
For the delicate fern leaves, a simple fishbone stitch provides the perfect shape and texture, creating a lush backdrop.
Finally, add tiny French knots and seed stitches around the base to mimic moss and forest floor debris, grounding your composition in natural detail.
This layering of textures—smooth, feathery, and knotted—is what makes your piece feel alive and professionally finished.
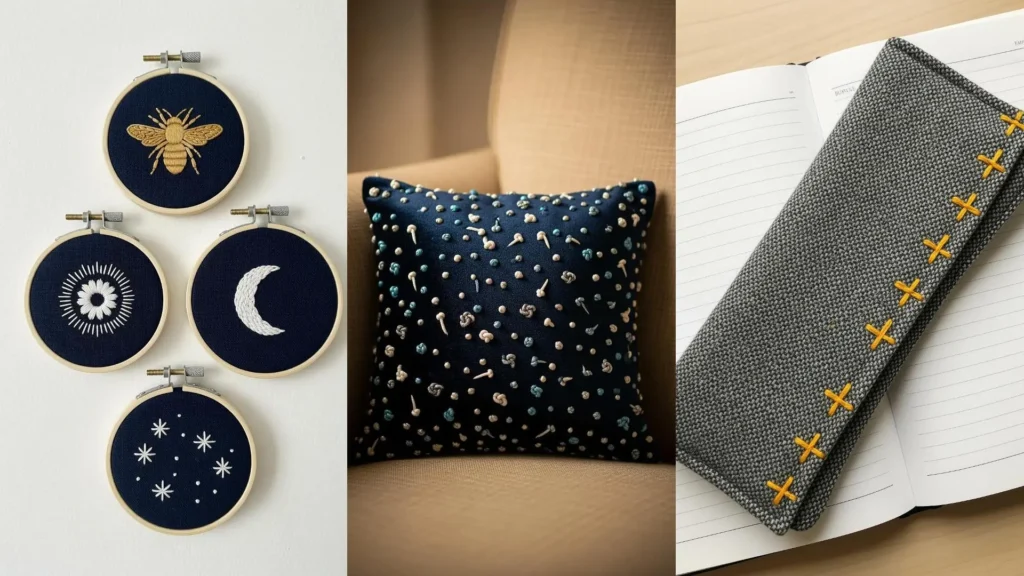
2. Stitch Geometric Patterns on Felt Coasters
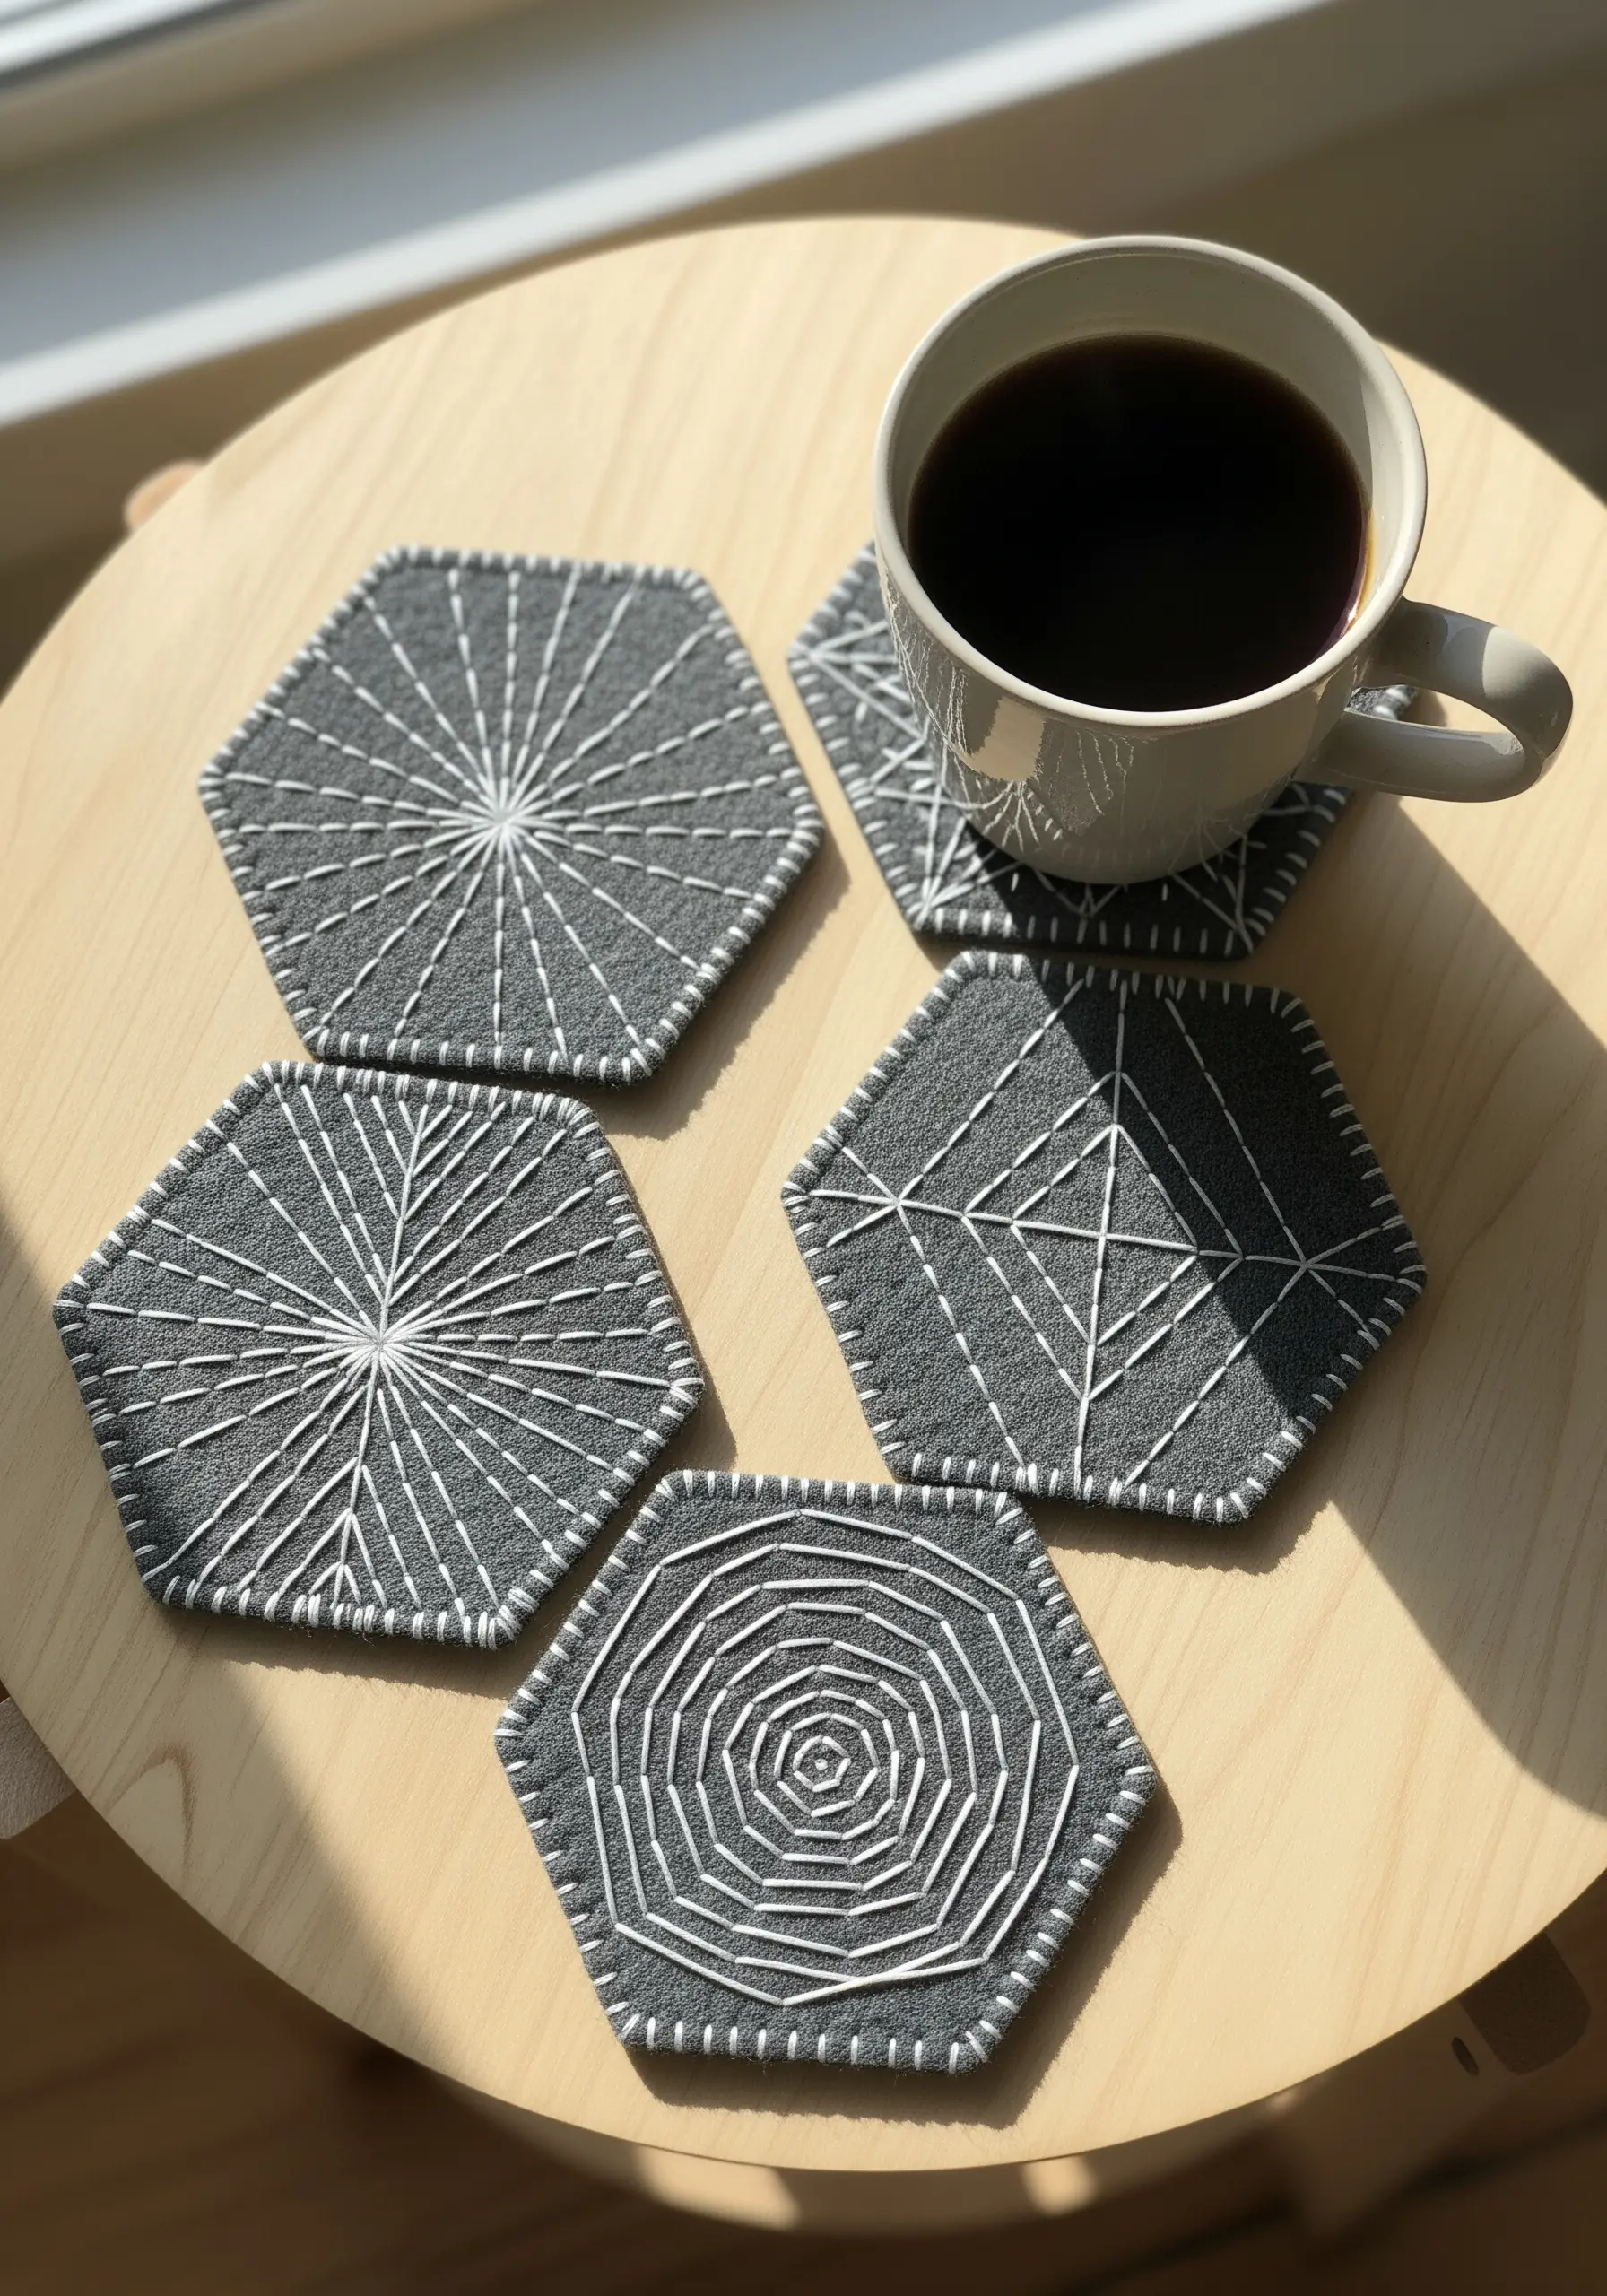
Transform simple felt hexagons into modern, functional art with geometric stitching.
Use a disappearing ink pen to mark precise anchor points along the edges of the coaster before you begin.
Work with a single, long strand of high-contrast thread (like white on charcoal) and pull each stitch taut to create sharp, clean lines.
This technique mimics the precision of string art but with the soft, tactile quality of textiles, making it perfect for geometric embroidered wall decor ideas.
Finish the edges with a neat blanket stitch for a durable and polished look that prevents fraying.
3. Elevate Lettering with a Whipped Backstitch
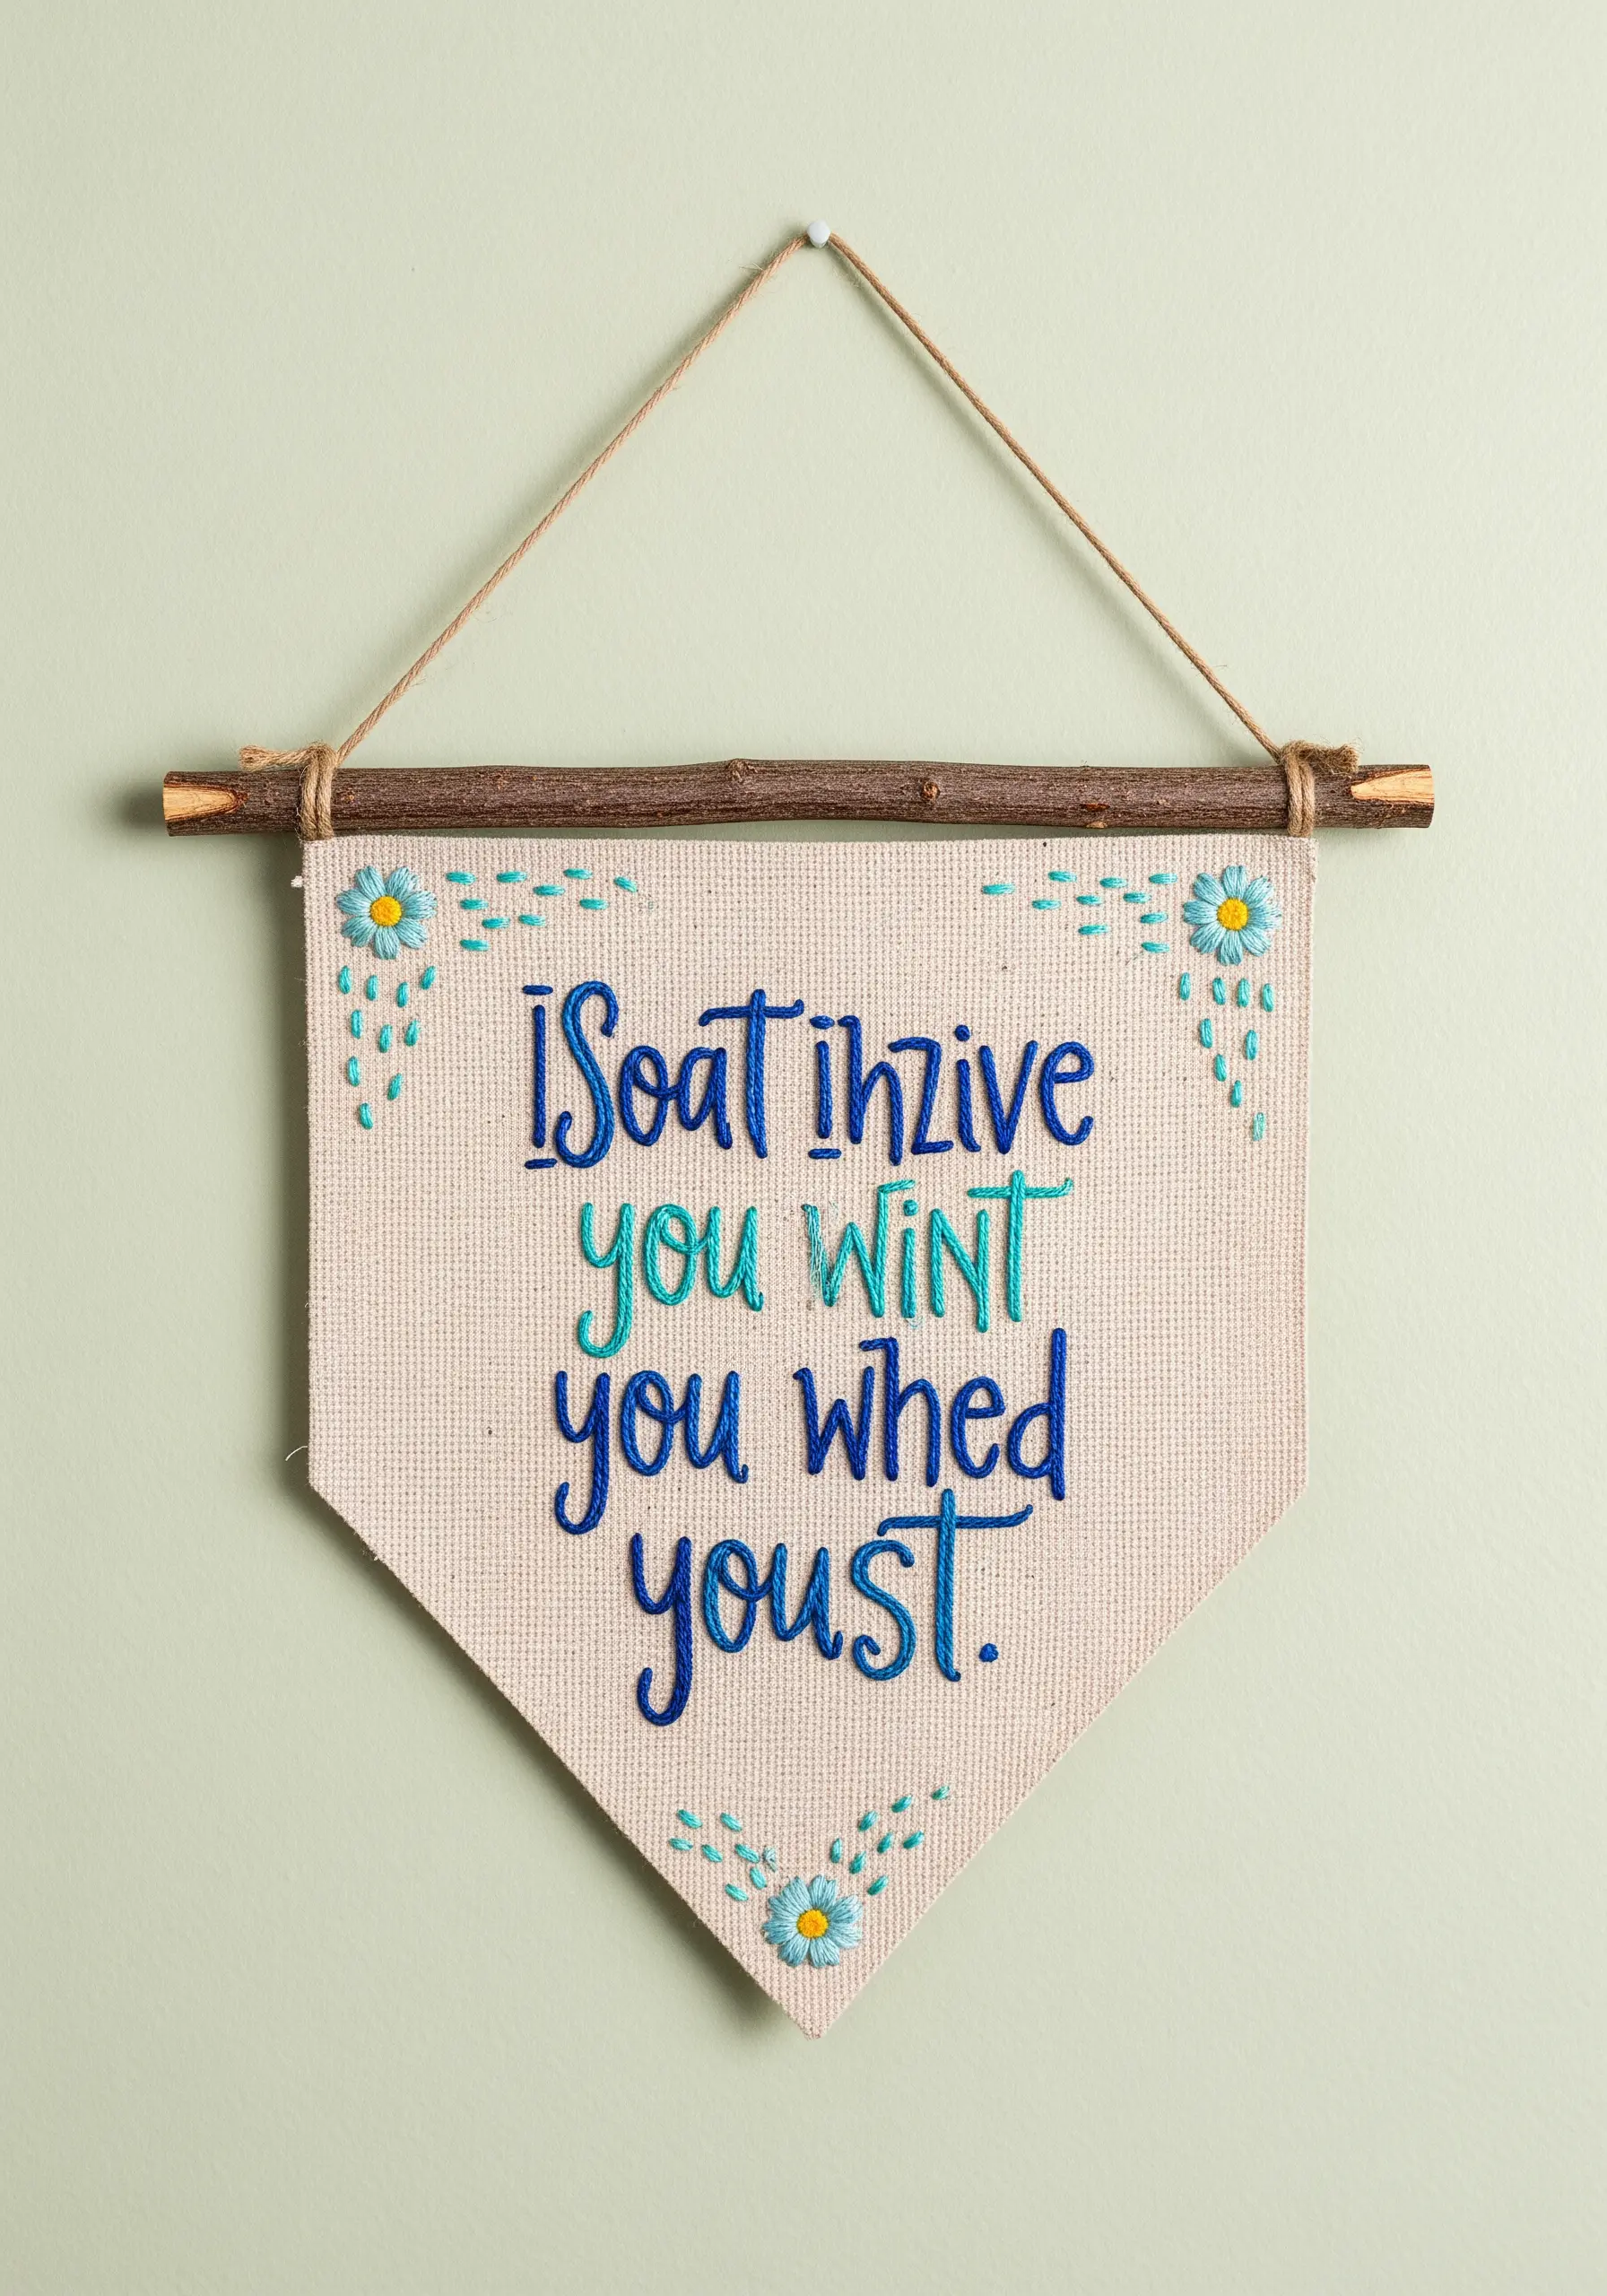
Give your embroidered quotes a bold, dimensional quality by upgrading from a standard backstitch.
First, lay down your letters using a basic backstitch as a foundation.
Next, take a second thread (either the same color or a contrasting one) and whip it around each backstitch without piercing the fabric.
This simple technique creates a smooth, rope-like line that makes your typography stand out with a clean, raised texture.
It works beautifully for quotes on wall banners, adding a professional touch that feels both playful and polished.
4. Embroider on Leather for a Refined Finish
Stitching on faux leather or thick felt creates exceptionally durable and elegant small goods, like this corner bookmark.
To ensure clean stitches without damaging the material, use a sharp needle to pre-punch your holes along the design line before threading.
A simple backstitch with just two strands of floss is all you need; the contrast between the delicate thread and the sturdy material provides the aesthetic impact.
This method is perfect for crafting DIY cozy embroidery bookmarks that make reading magical and other small, tactile gifts.
5. Add Sculptural Texture with Yarn on Burlap
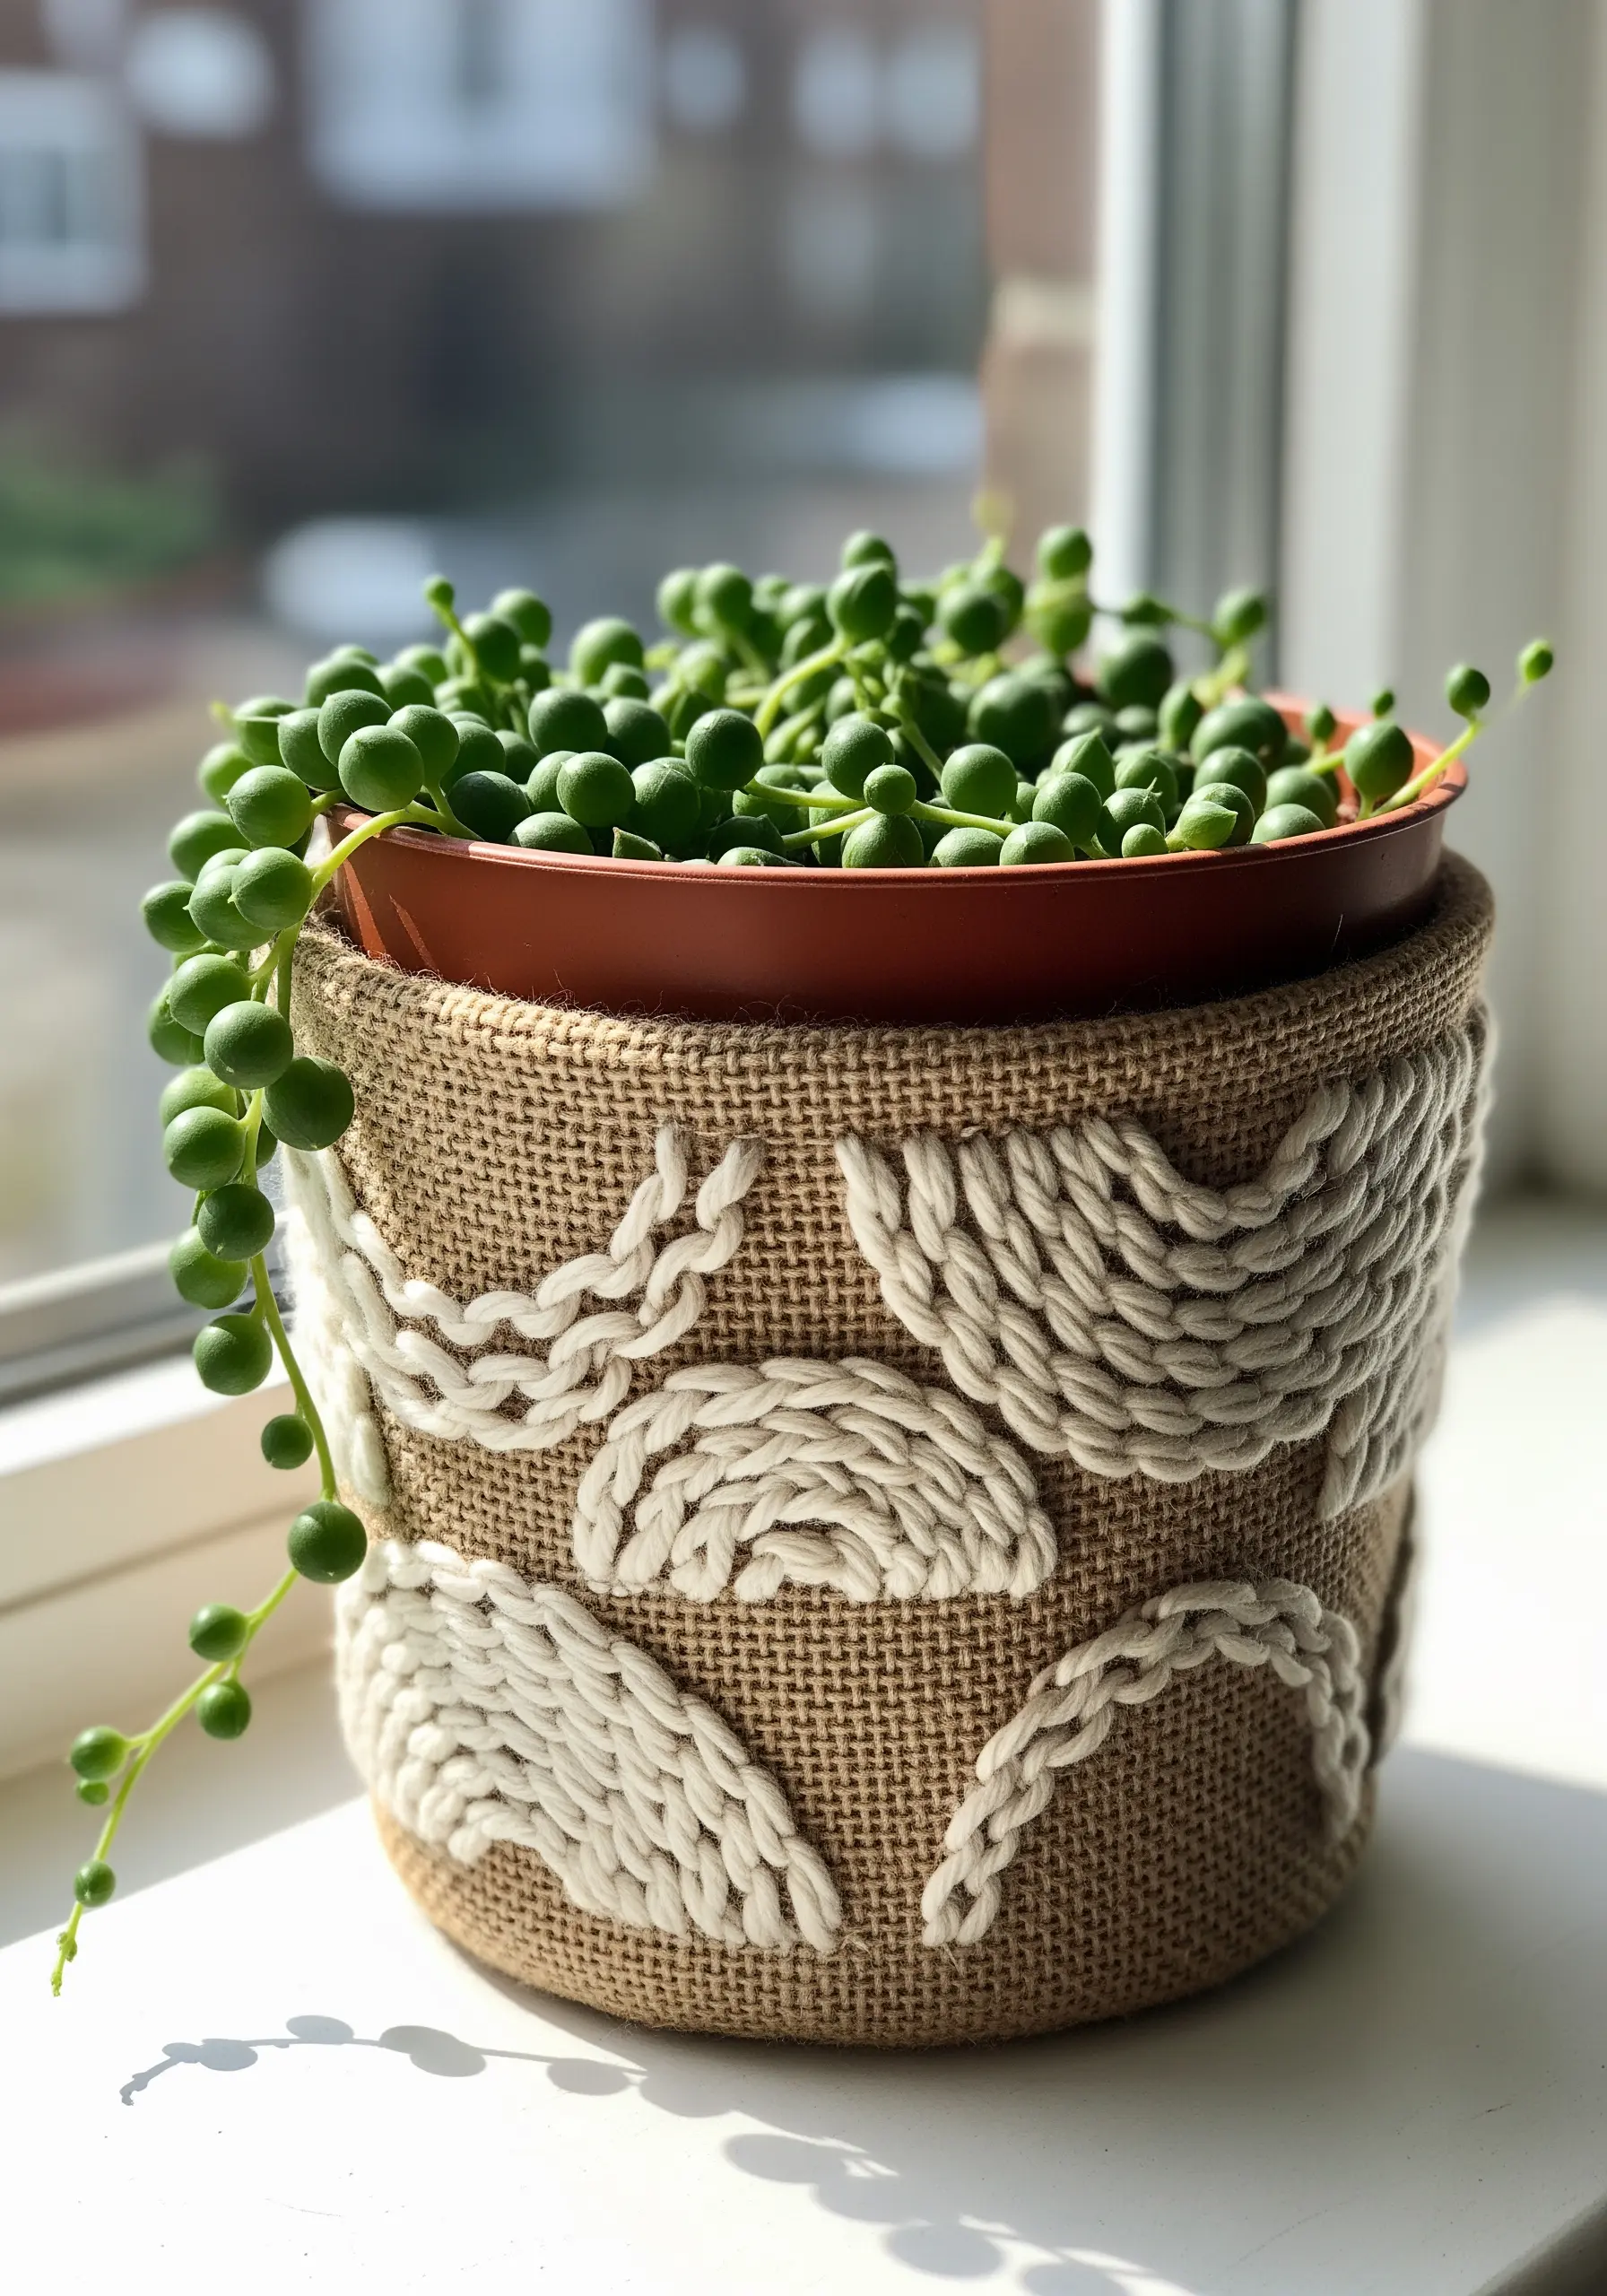
Move beyond floss to create bold, three-dimensional designs using chunky yarn.
Choose a loose-weave fabric like burlap, which easily accommodates a large needle and thick fibers.
Use a couching stitch—laying the yarn on the surface and tacking it down with a thinner thread—or a punch needle to create raised, loopy textures.
This technique is perfect for adding abstract, organic shapes to functional items like planter covers or baskets, turning them into unique fiber art pieces.
6. Master Realistic Lavender with Ribbon Stitch

For florals that feel soft and three-dimensional, switch from floss to silk ribbon.
Use a simple ribbon stitch for the lavender buds, allowing the ribbon to twist slightly as you pull it through the fabric to create naturally varied petal shapes.
Keep the stitches dense at the top of the stalk and sparse toward the bottom for a realistic taper.
For the stems, a thin green ribbon or a few strands of embroidery floss in a stem stitch will provide a delicate contrast to the plush lavender blooms.
7. Combine Appliqué and Stitching for Playful Designs

Create charming characters by layering simple appliqué shapes with minimal embroidery details.
Cut the blush cheeks from felt and secure them with a few tiny, coordinating stitches or fabric glue.
Use a dark, six-strand floss for the eyes and mouth, employing simple French knots and a curved backstitch to bring the face to life.
This combination of soft fabric shapes and sharp stitched lines adds depth and personality, turning a simple placemat or trivet into a delightful piece of functional art.
8. Frame Appliqué with Beaded Starbursts

Elevate a simple felt appliqué by framing it with dimensional stitches and beadwork.
After securing your central moon shape, use a metallic gold thread to stitch stars with radiating straight stitches.
Vary the size of the stars and the number of points for a dynamic, celestial feel.
Intersperse the stitched stars with tiny gold and pearl beads, securing each with a single stitch. This mix of matte felt, metallic thread, and shimmering beads creates a rich, multi-layered texture that catches the light beautifully.
9. Design a Minimalist Threaded Pinboard
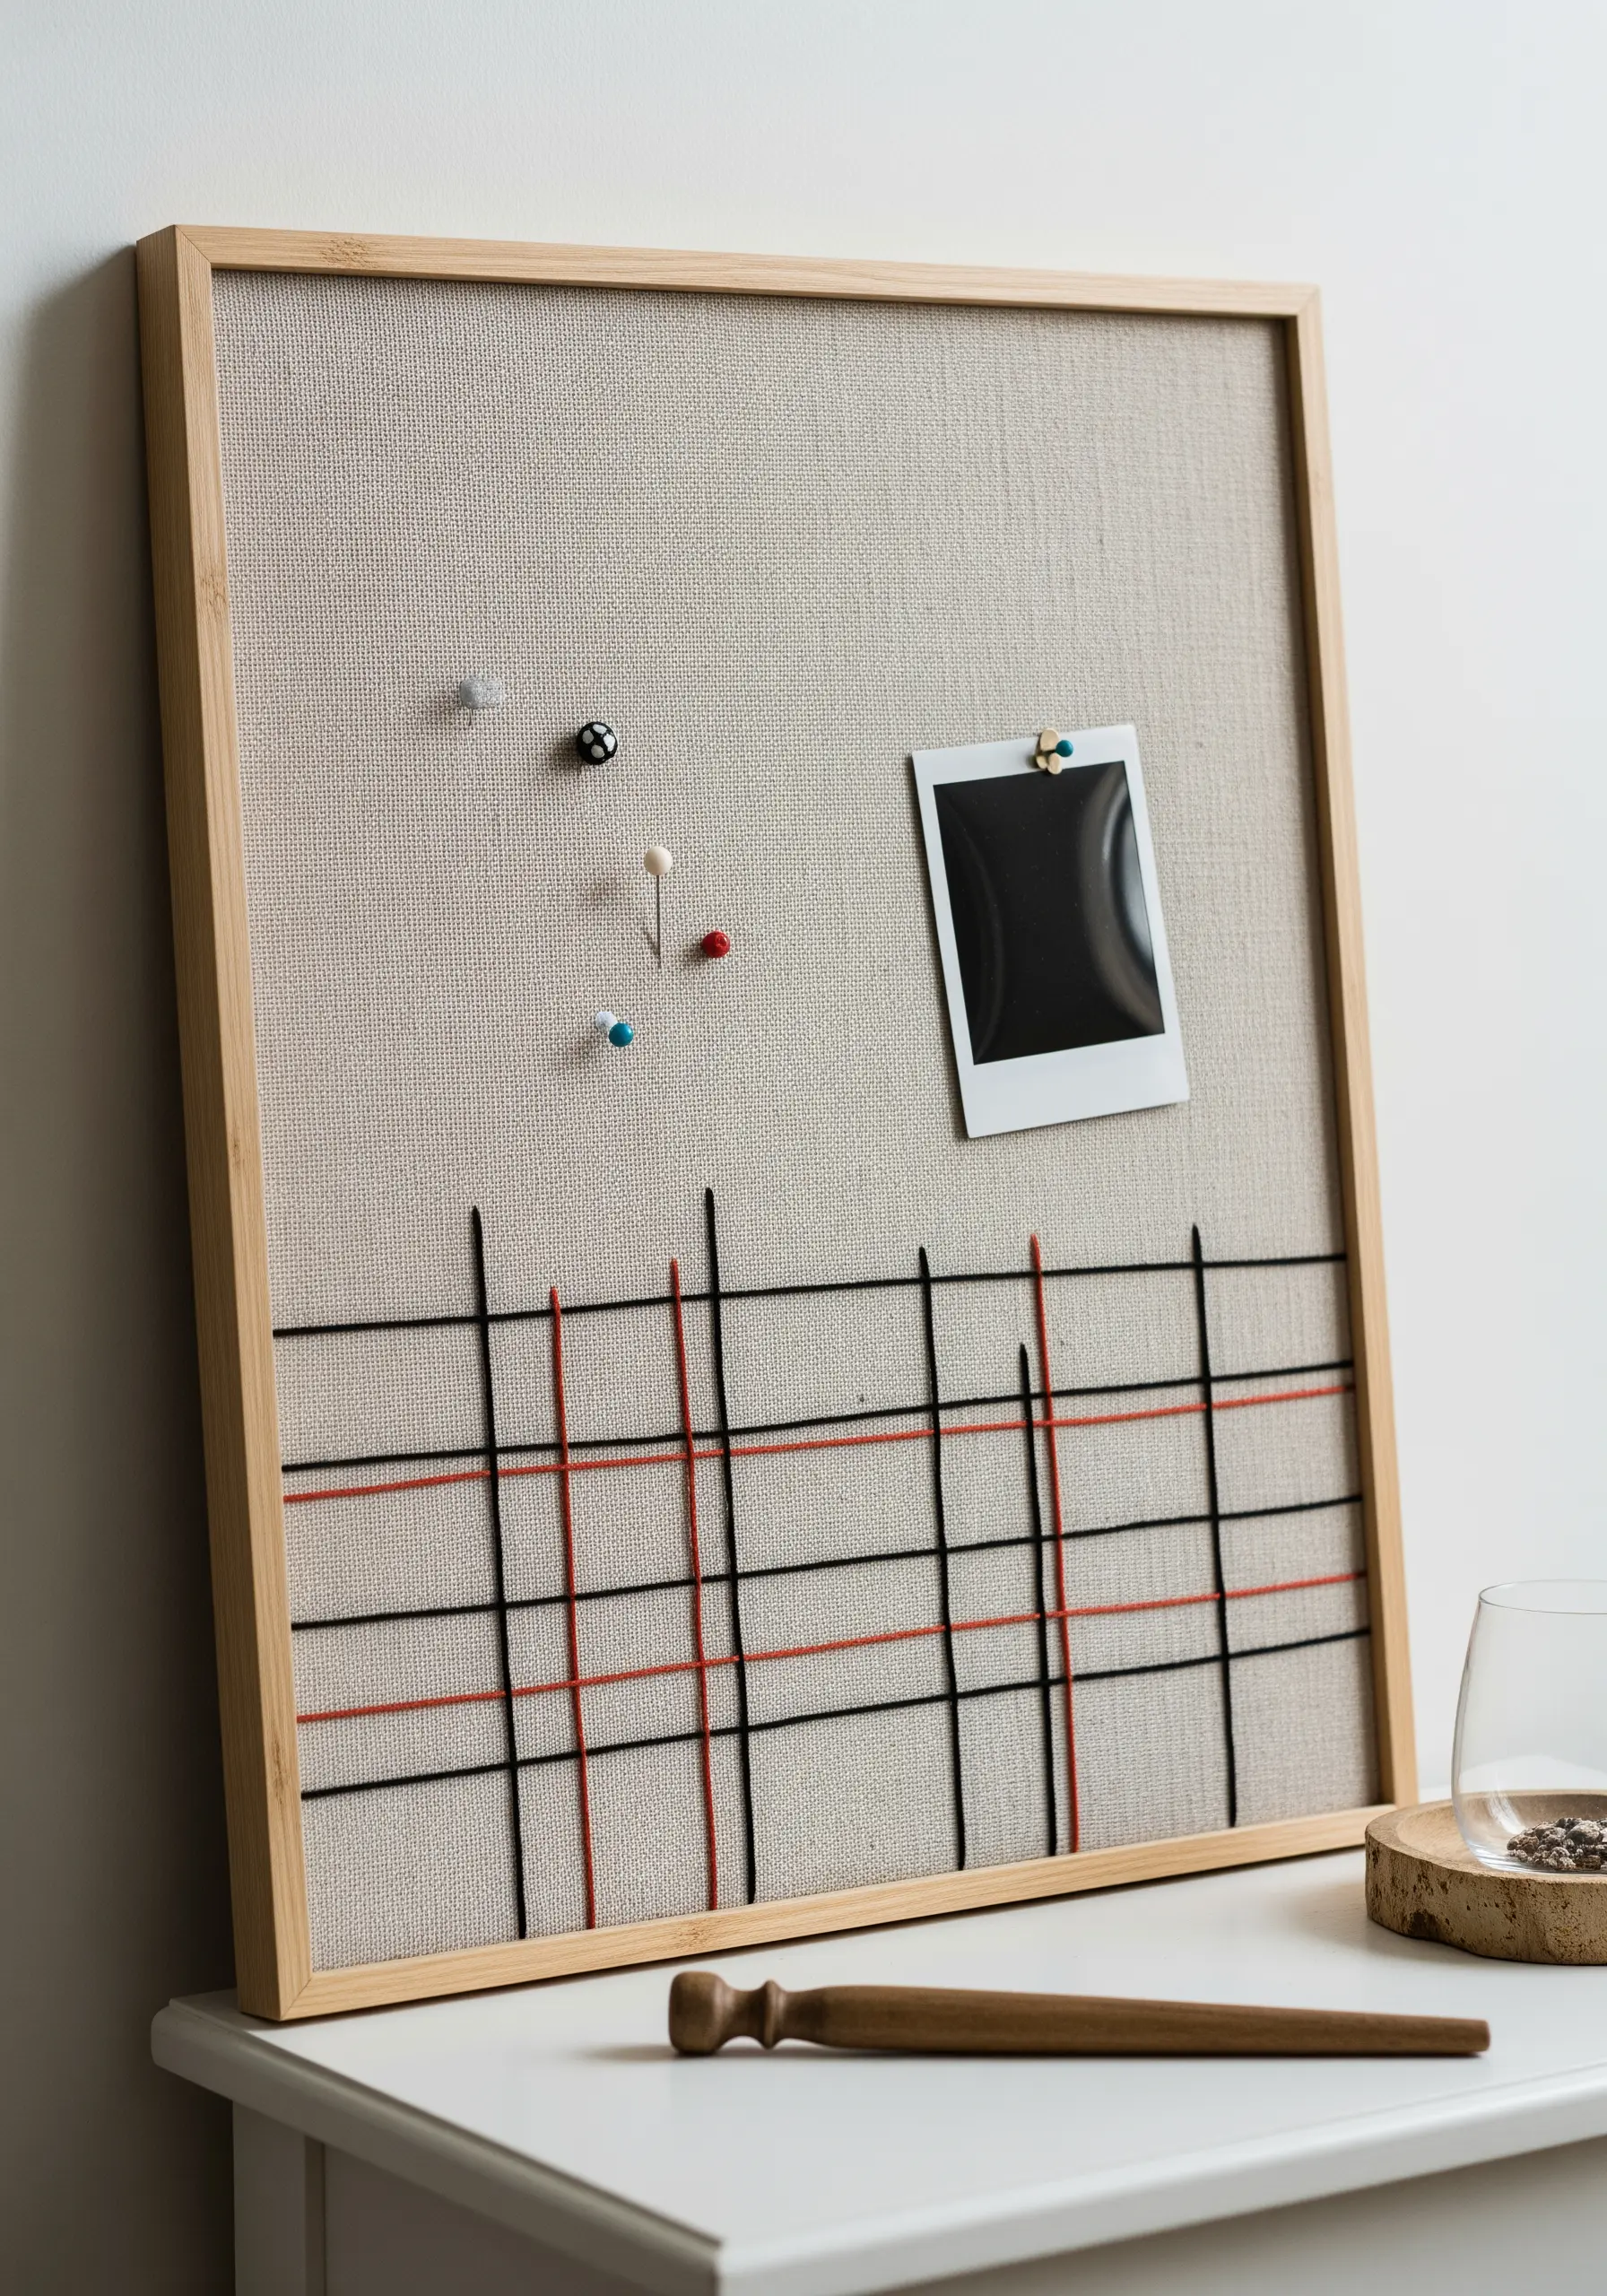
Create a functional and modern organizer by stretching fabric over a corkboard and adding a simple threaded grid.
Choose a neutral, textured fabric like linen or canvas for a sophisticated base.
Use a sturdy thread or fine cord in contrasting colors, wrapping it around the frame to create clean, intersecting lines.
This technique turns a standard pinboard into a piece of minimalist wall art, perfect for holding notes and photos without visual clutter. It’s one of the easiest tiny embroidery DIY projects for a clean, modern home look.
10. Add a Playful Border to Kitchen Linens

Brighten up plain tea towels with a simple, repeating botanical border.
Use satin stitch for the vegetables and detached chain stitches (lazy daisies) for the leaves to create clean, graphic shapes.
To ensure your satin stitches are smooth and even, outline each shape with a split stitch first. This raised edge acts as a guide and prevents the fill stitches from looking uneven.
Stitching only along the bottom edge makes the design practical for a towel that will be folded over an oven handle.
11. Decorate Storage Baskets with Felt Appliqué

Personalize fabric storage bins with no-fray felt appliqué for a durable and charming nursery decoration.
Cut out simple animal and grass shapes from different colors of felt.
Instead of intricate embroidery, use a simple running stitch or backstitch around the edges of each piece with a contrasting thread.
This technique is fast, forgiving, and adds a lovely handmade touch that is sturdy enough for a child’s room or playroom storage.
12. Create Tactile Patterns with French Knots
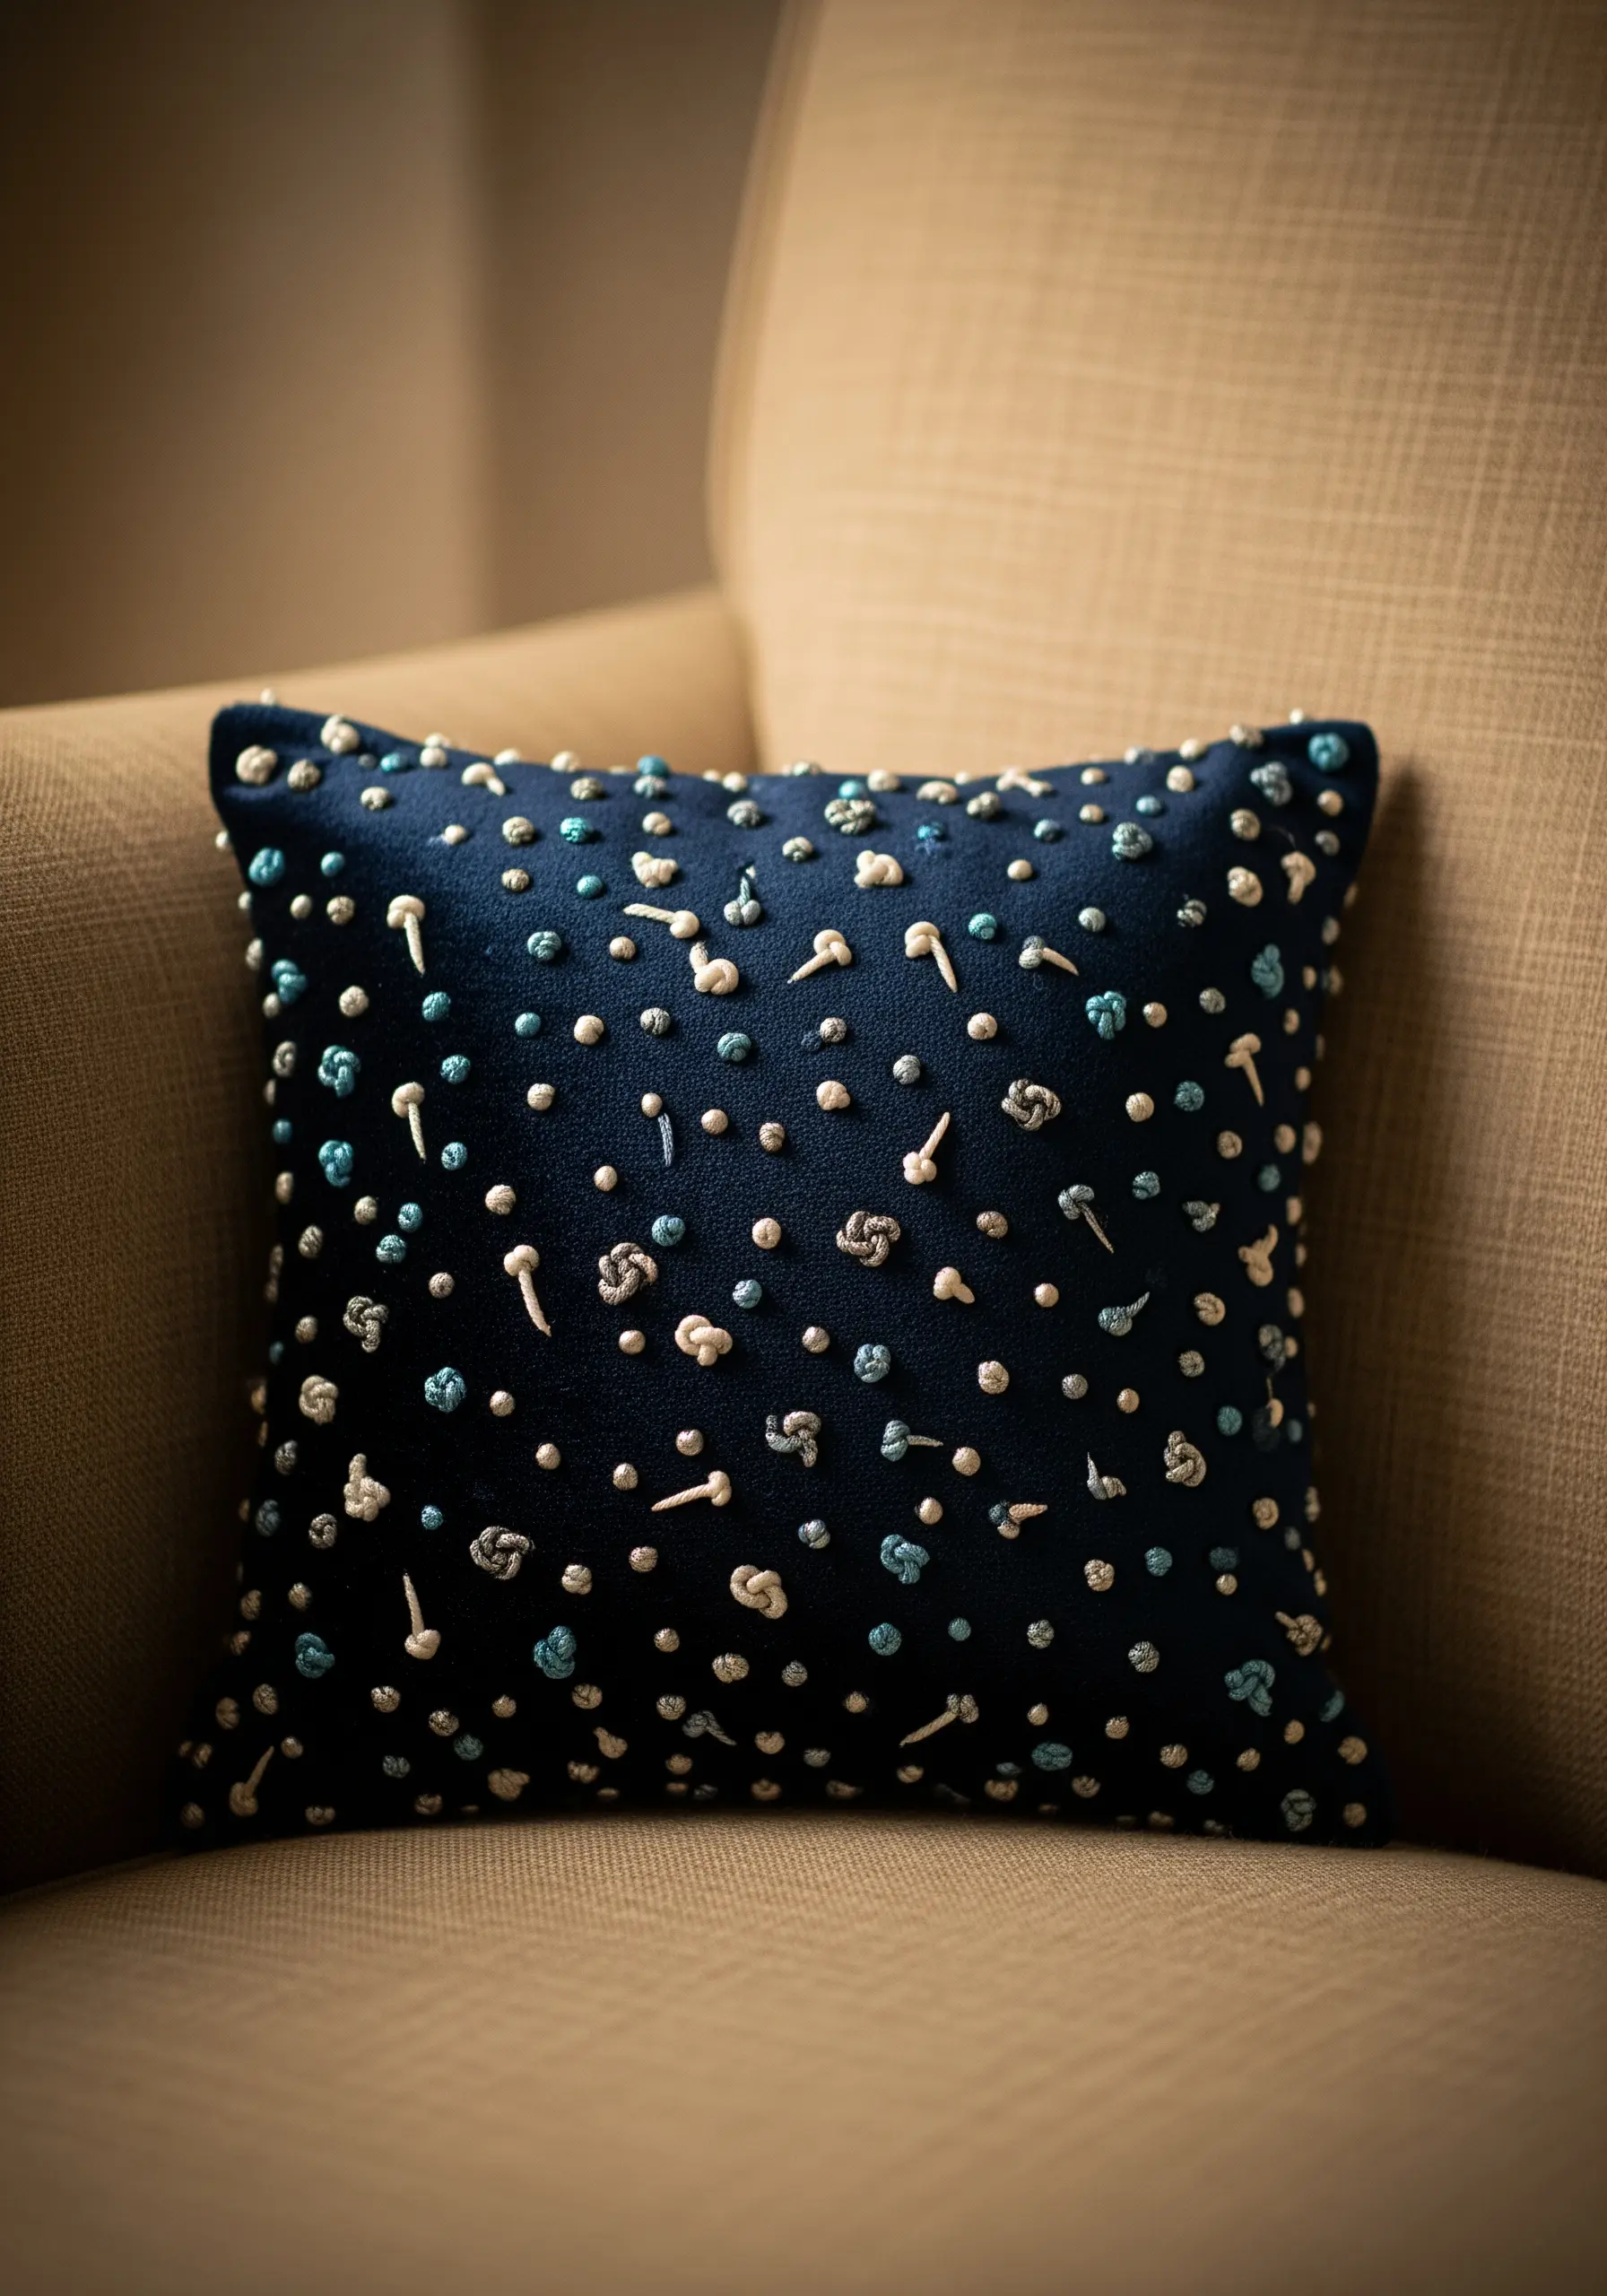
Design a highly textured surface using only French knots and their variations.
Vary the knot size by changing the number of times you wrap the thread around the needle (once for small dots, twice or three times for larger ones).
For even more texture, create bullion knots—which are elongated—and Pekinese knots for a looped, braided effect.
Arranging them in a scattered pattern on a dark, plush fabric like velvet creates a stunning visual and tactile contrast, turning a simple pillow into a statement piece.
13. Embroider a Lampshade for a Custom Glow

Turn a plain lampshade into a piece of art that interacts with light.
Choose a simple, open design, like these botanical outlines, and use a basic backstitch or stem stitch.
Work with a light-colored thread on a light-colored fabric shade to ensure the design is visible both when the lamp is on and off.
When lit, the stitched pattern will cast delicate, artistic shadows on the wall, adding a layer of unexpected magic to your room’s ambiance.
14. Craft a Felt Garland with Simple Stitches
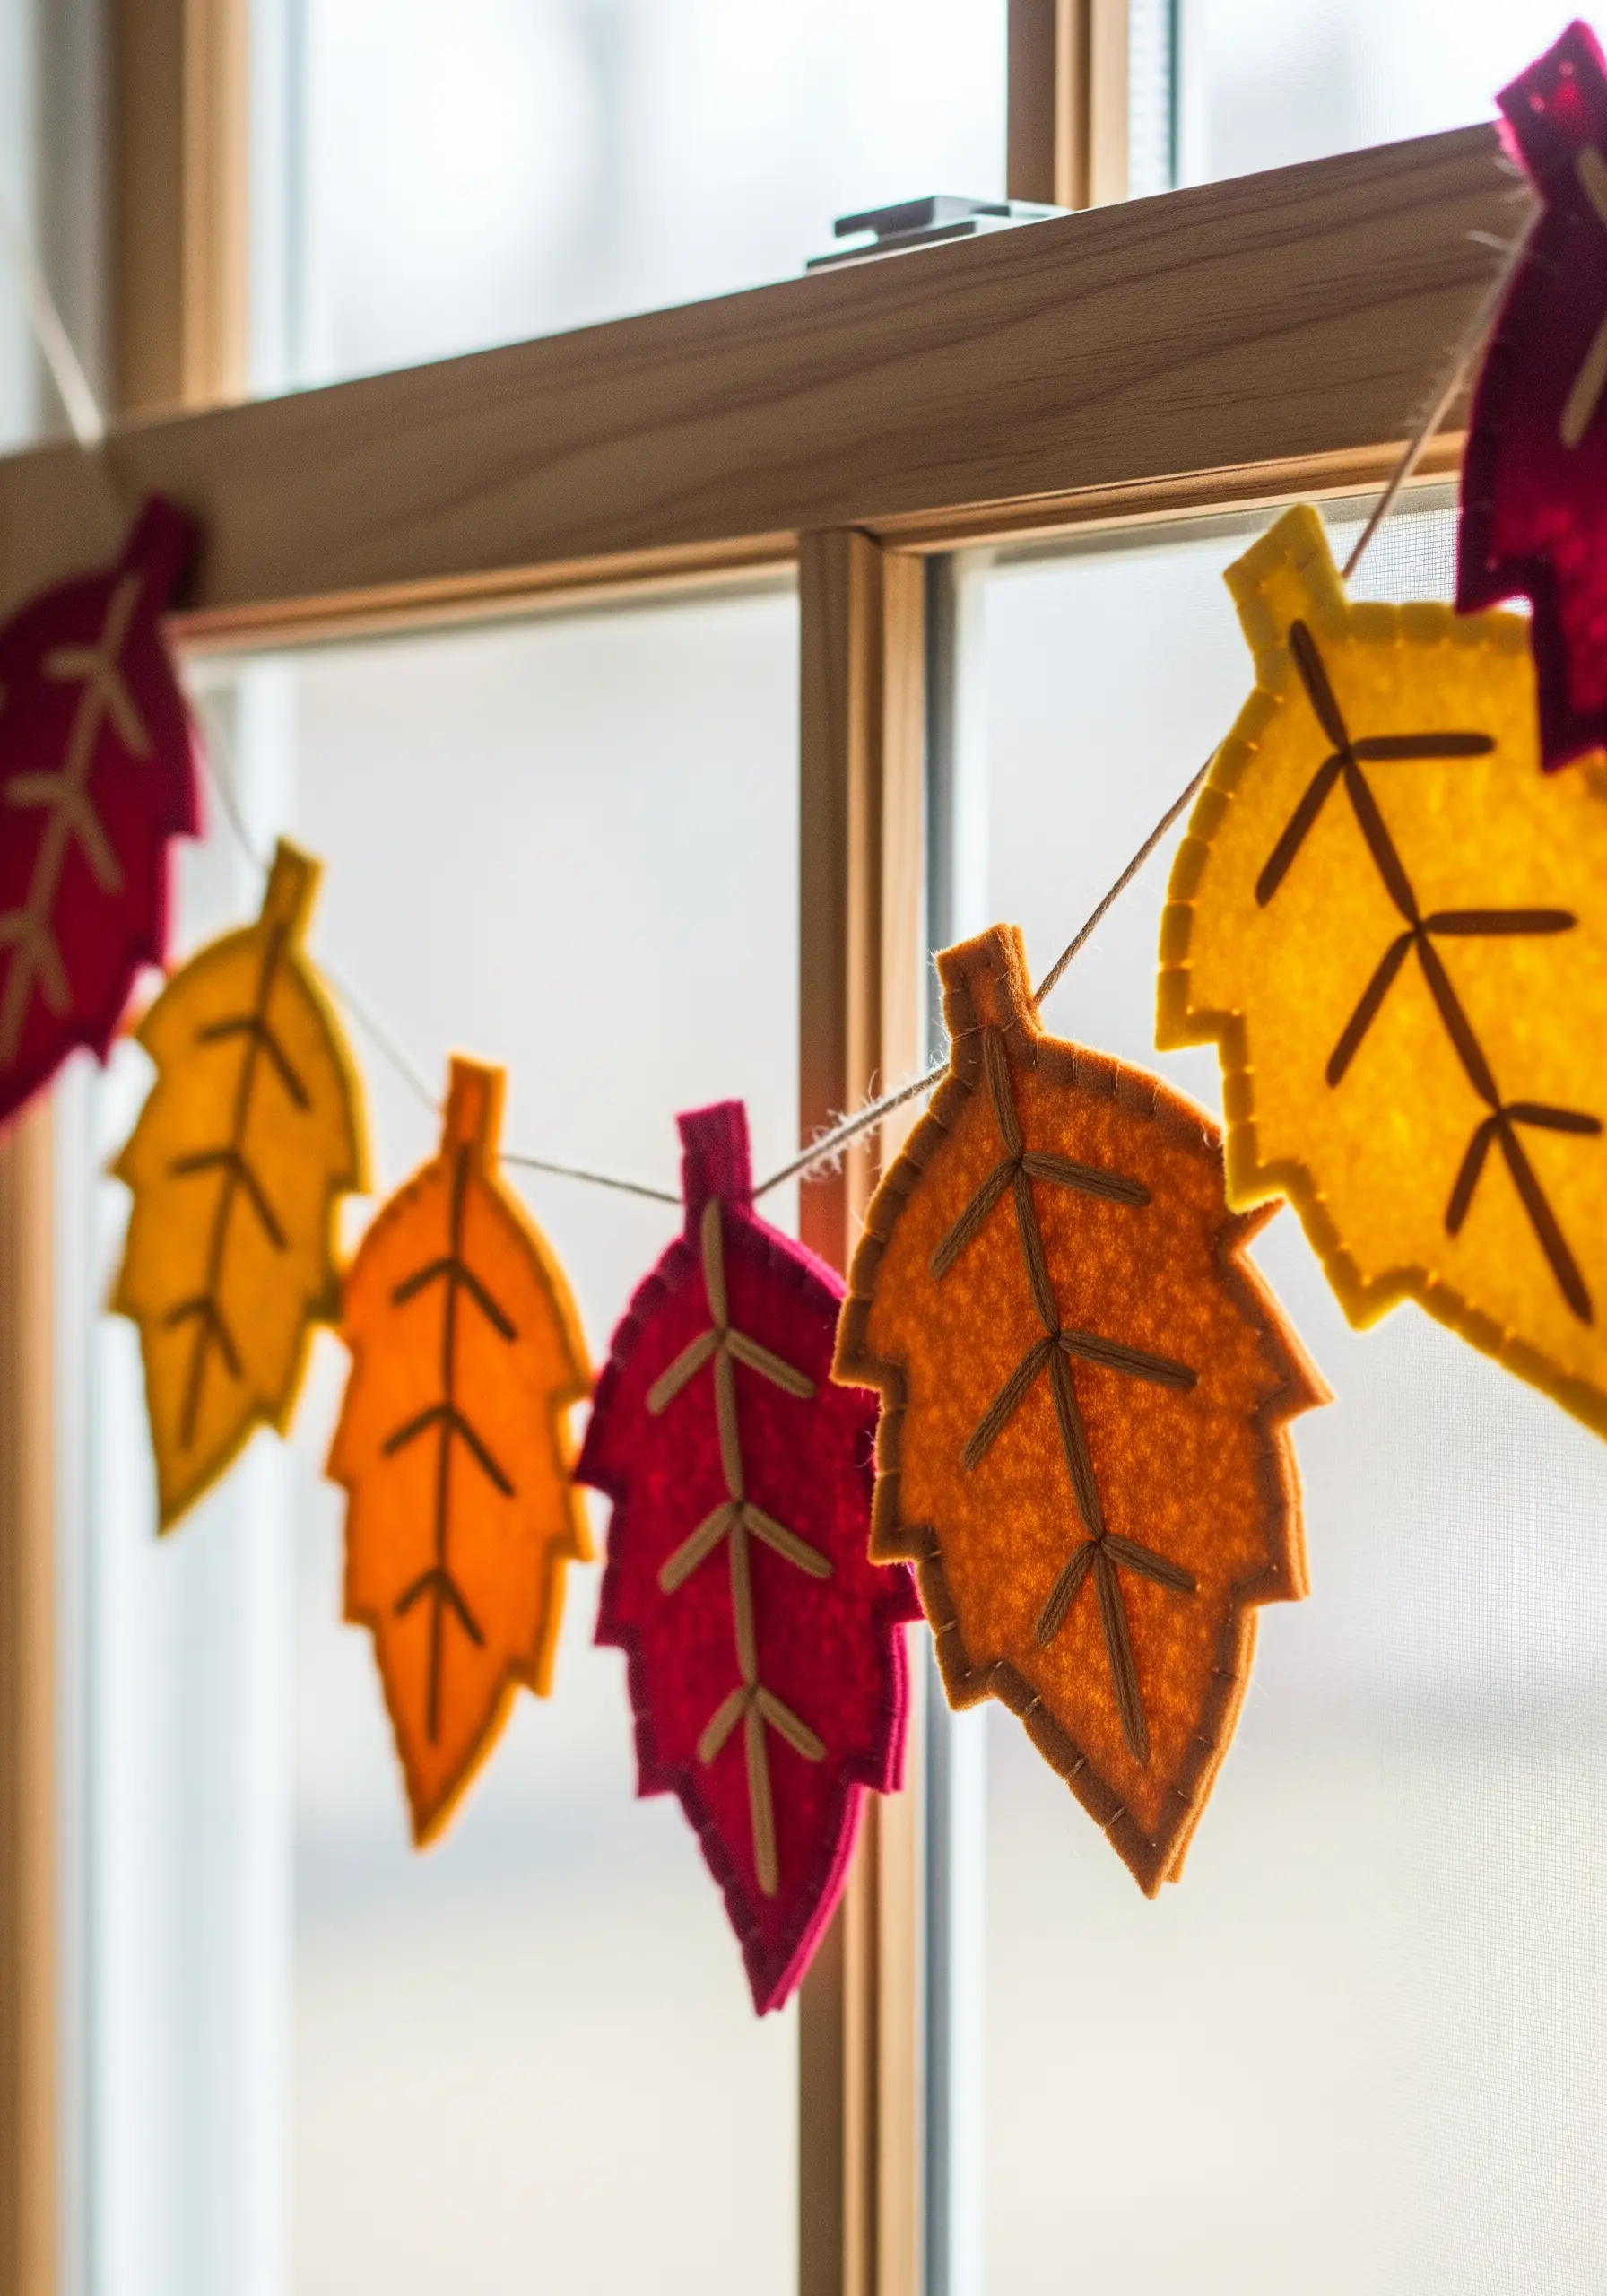
Make a festive, reusable garland using layered felt and basic stitches.
Cut two identical leaf shapes for each piece of the garland and sandwich a string or twine between them.
Use a contrasting color of floss and a simple backstitch to add vein details while simultaneously sewing the two sides together.
This technique is quick, requires no complex finishing, and results in a sturdy, double-sided garland perfect for seasonal decor.
15. Wrap a Jar with a Geometric Canvas Band
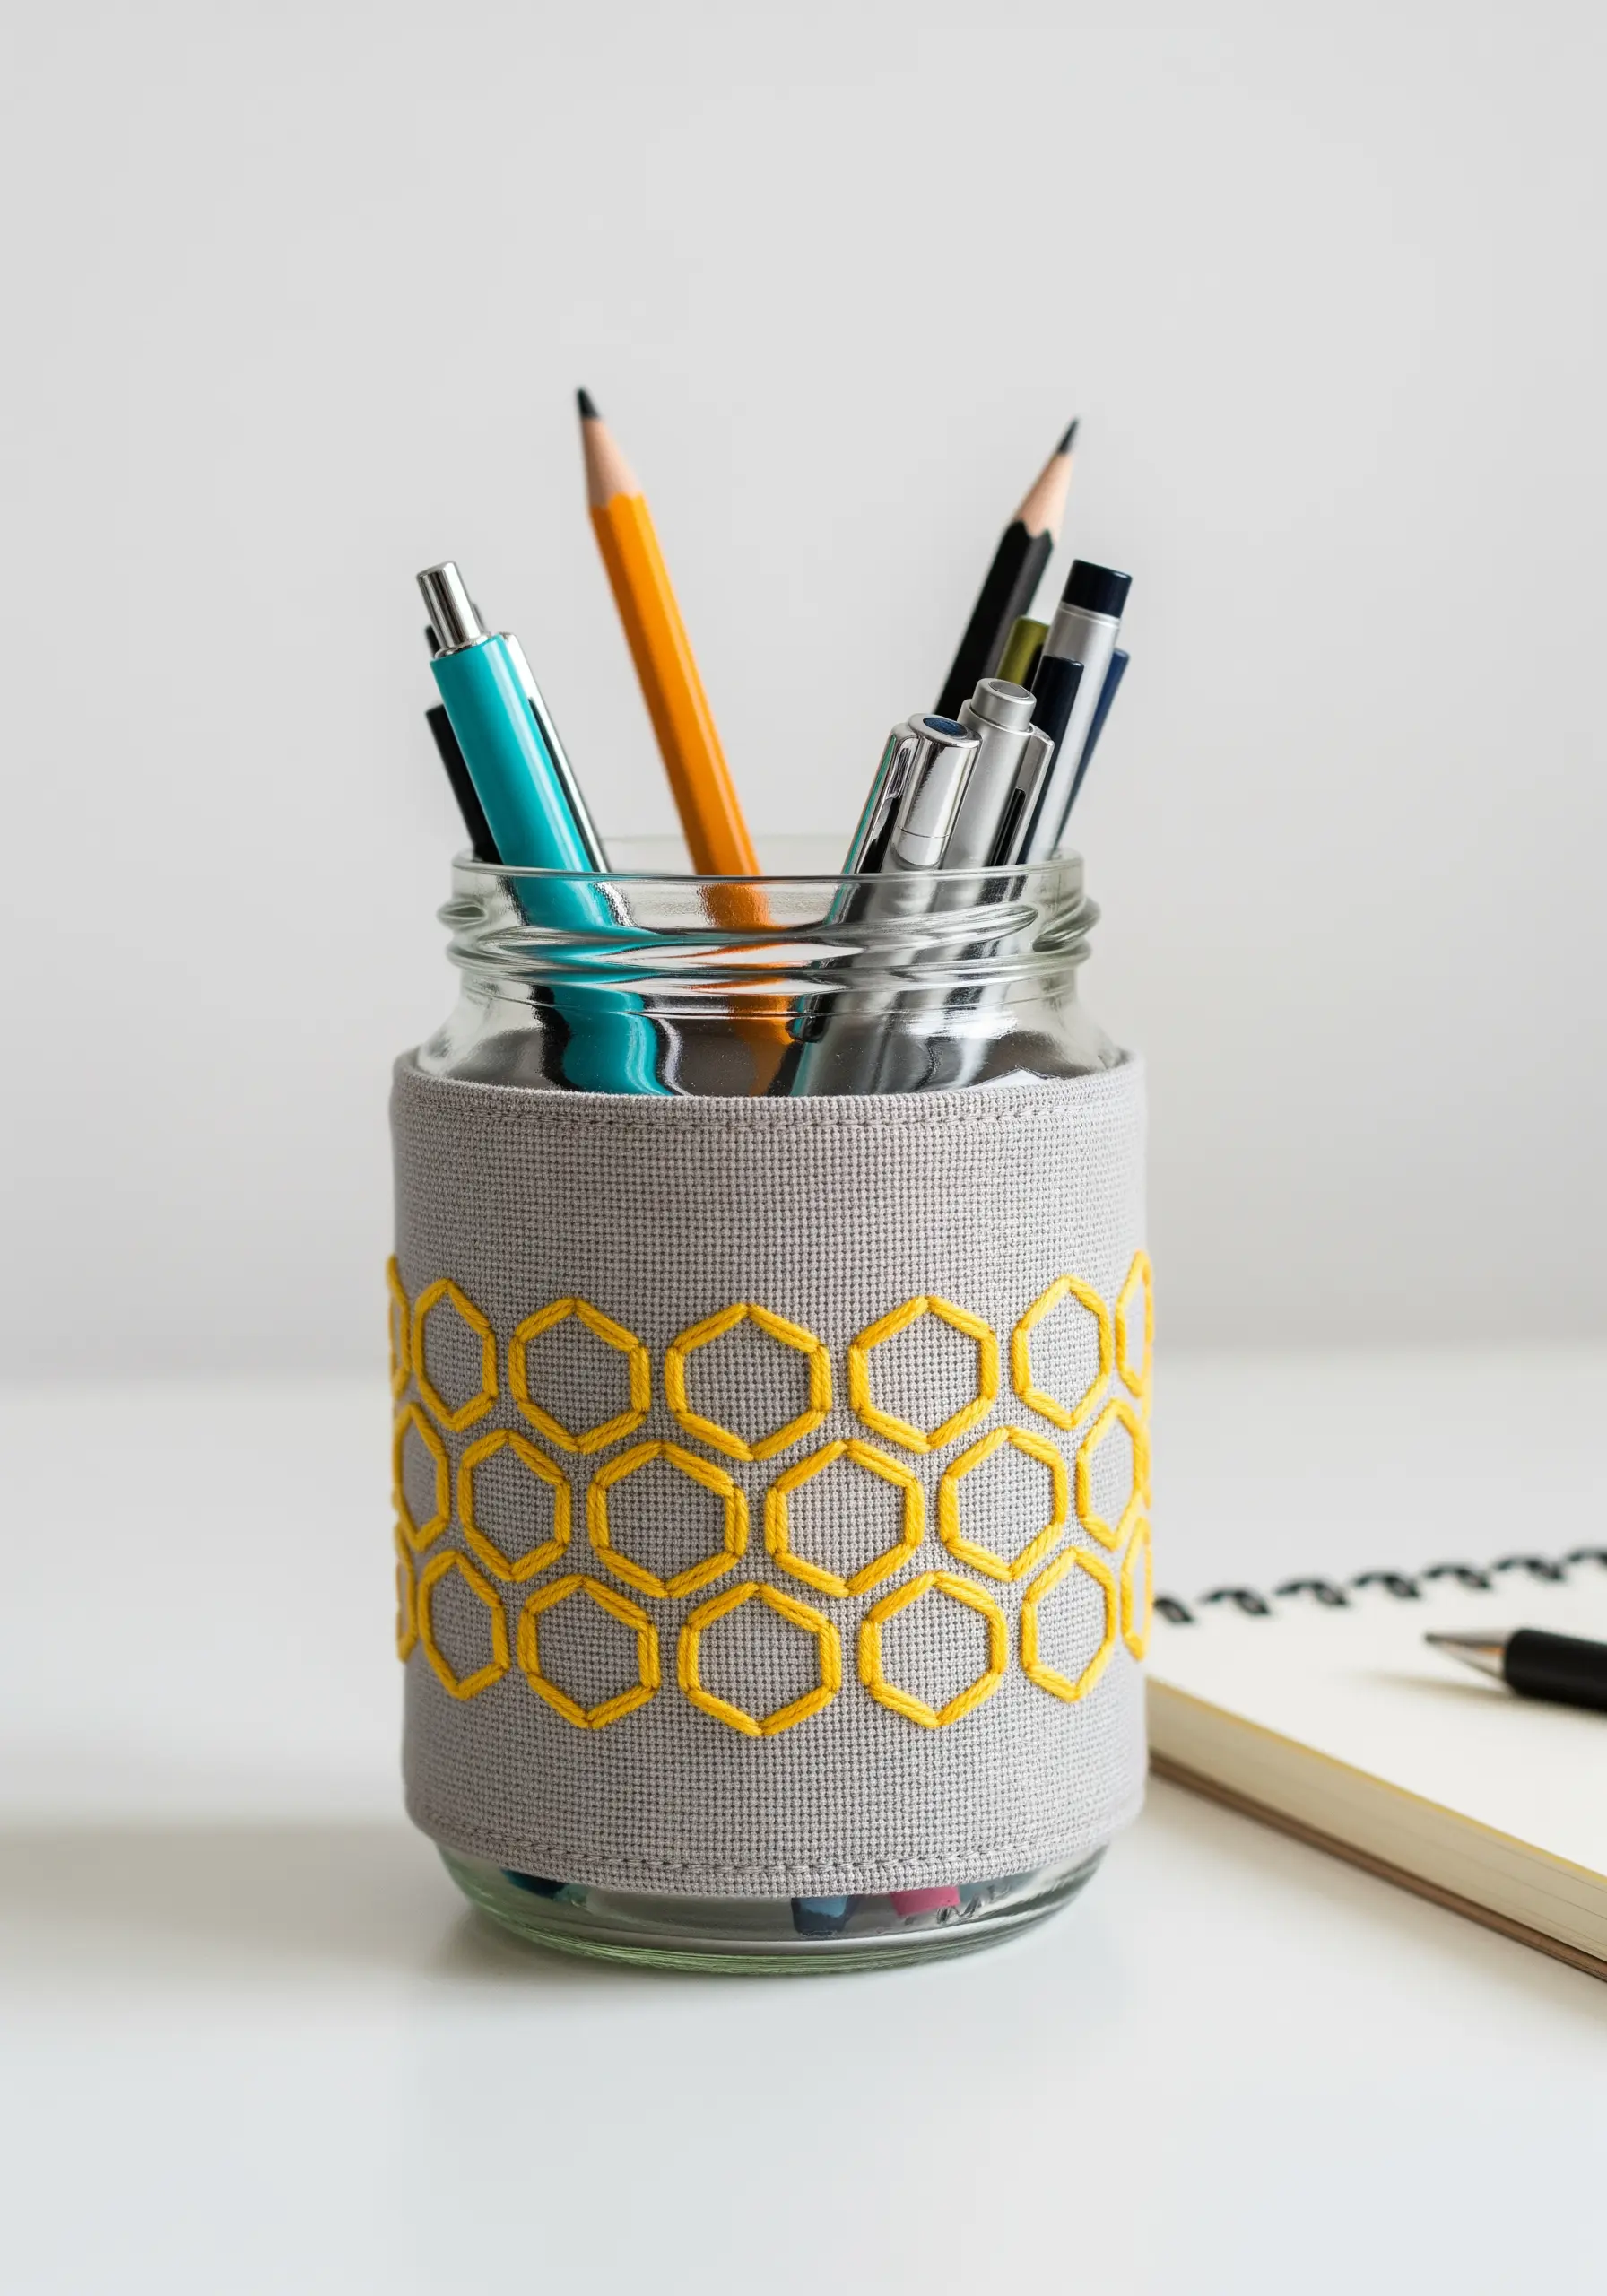
Upcycle a glass jar into a stylish pencil holder with an embroidered Aida cloth wrap.
Aida cloth’s natural grid makes it ideal for geometric patterns like this honeycomb design, which you can create using only straight stitches.
Stitch your pattern on a flat piece of fabric first, then wrap it around the jar and secure the seam at the back with a few hidden stitches.
This project is a perfect way to practice even stitching and create a functional, modern desk accessory.
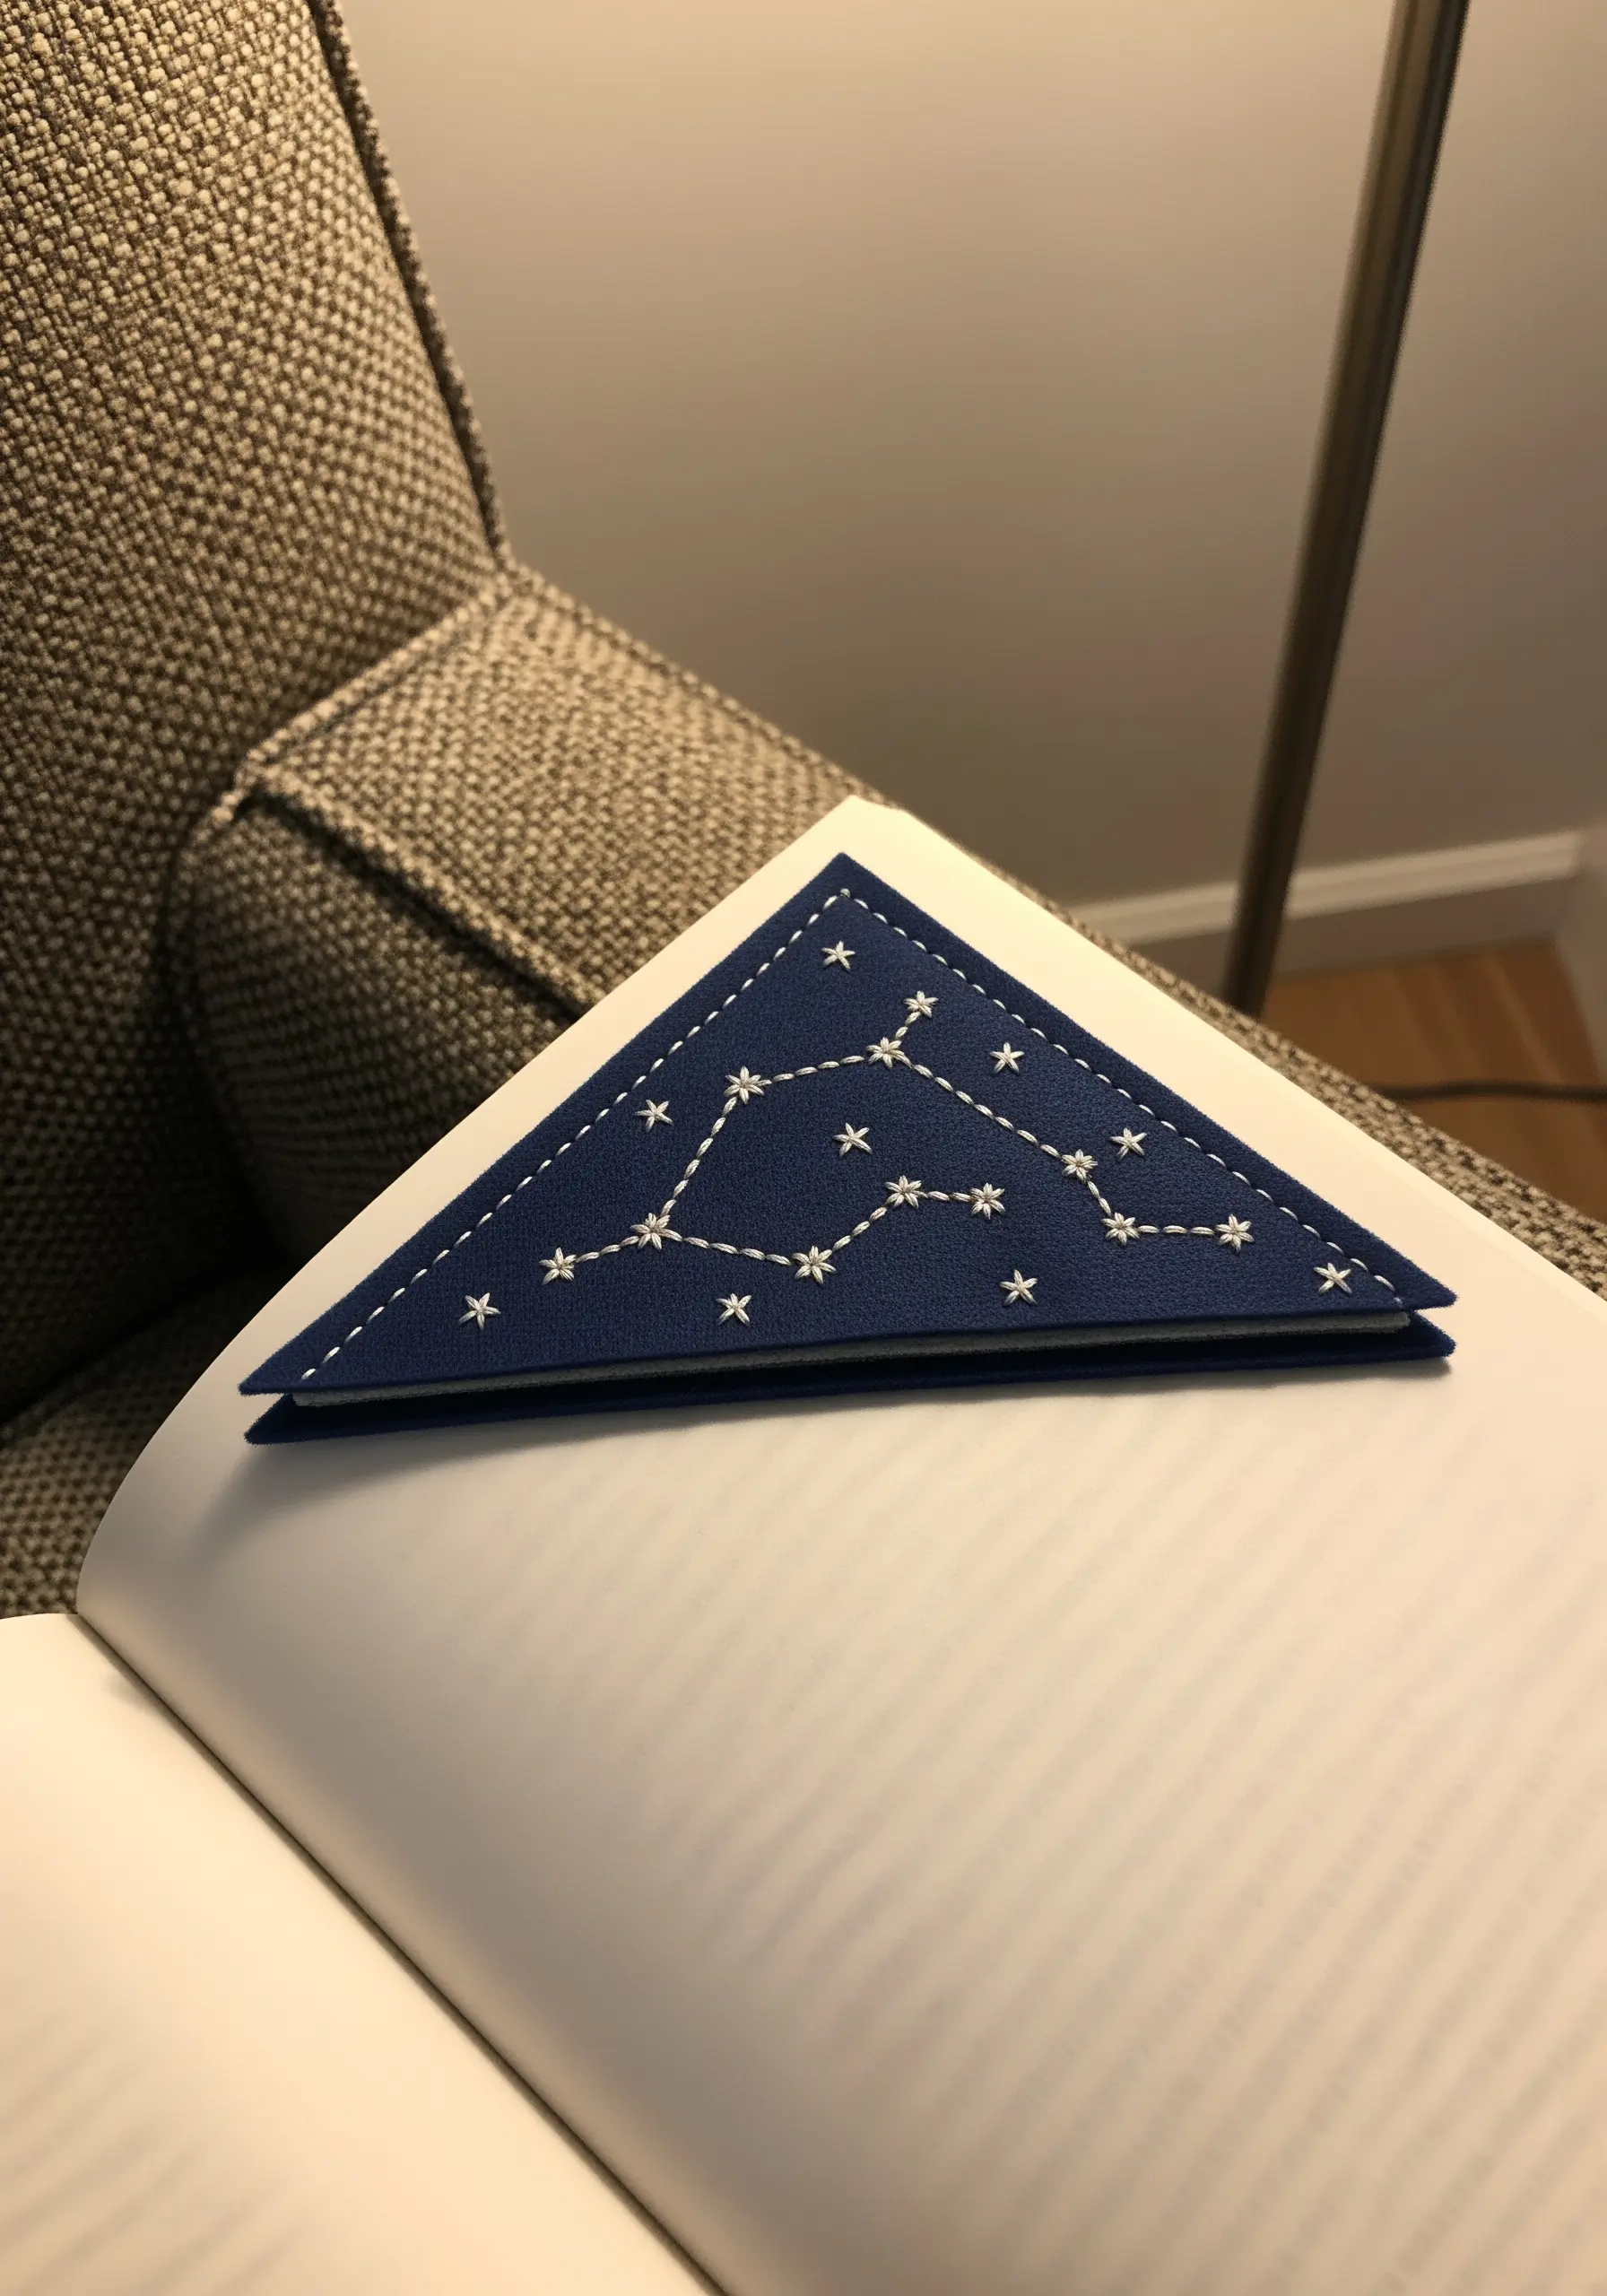
16. Achieve Delicate Detail on a Journal Cover
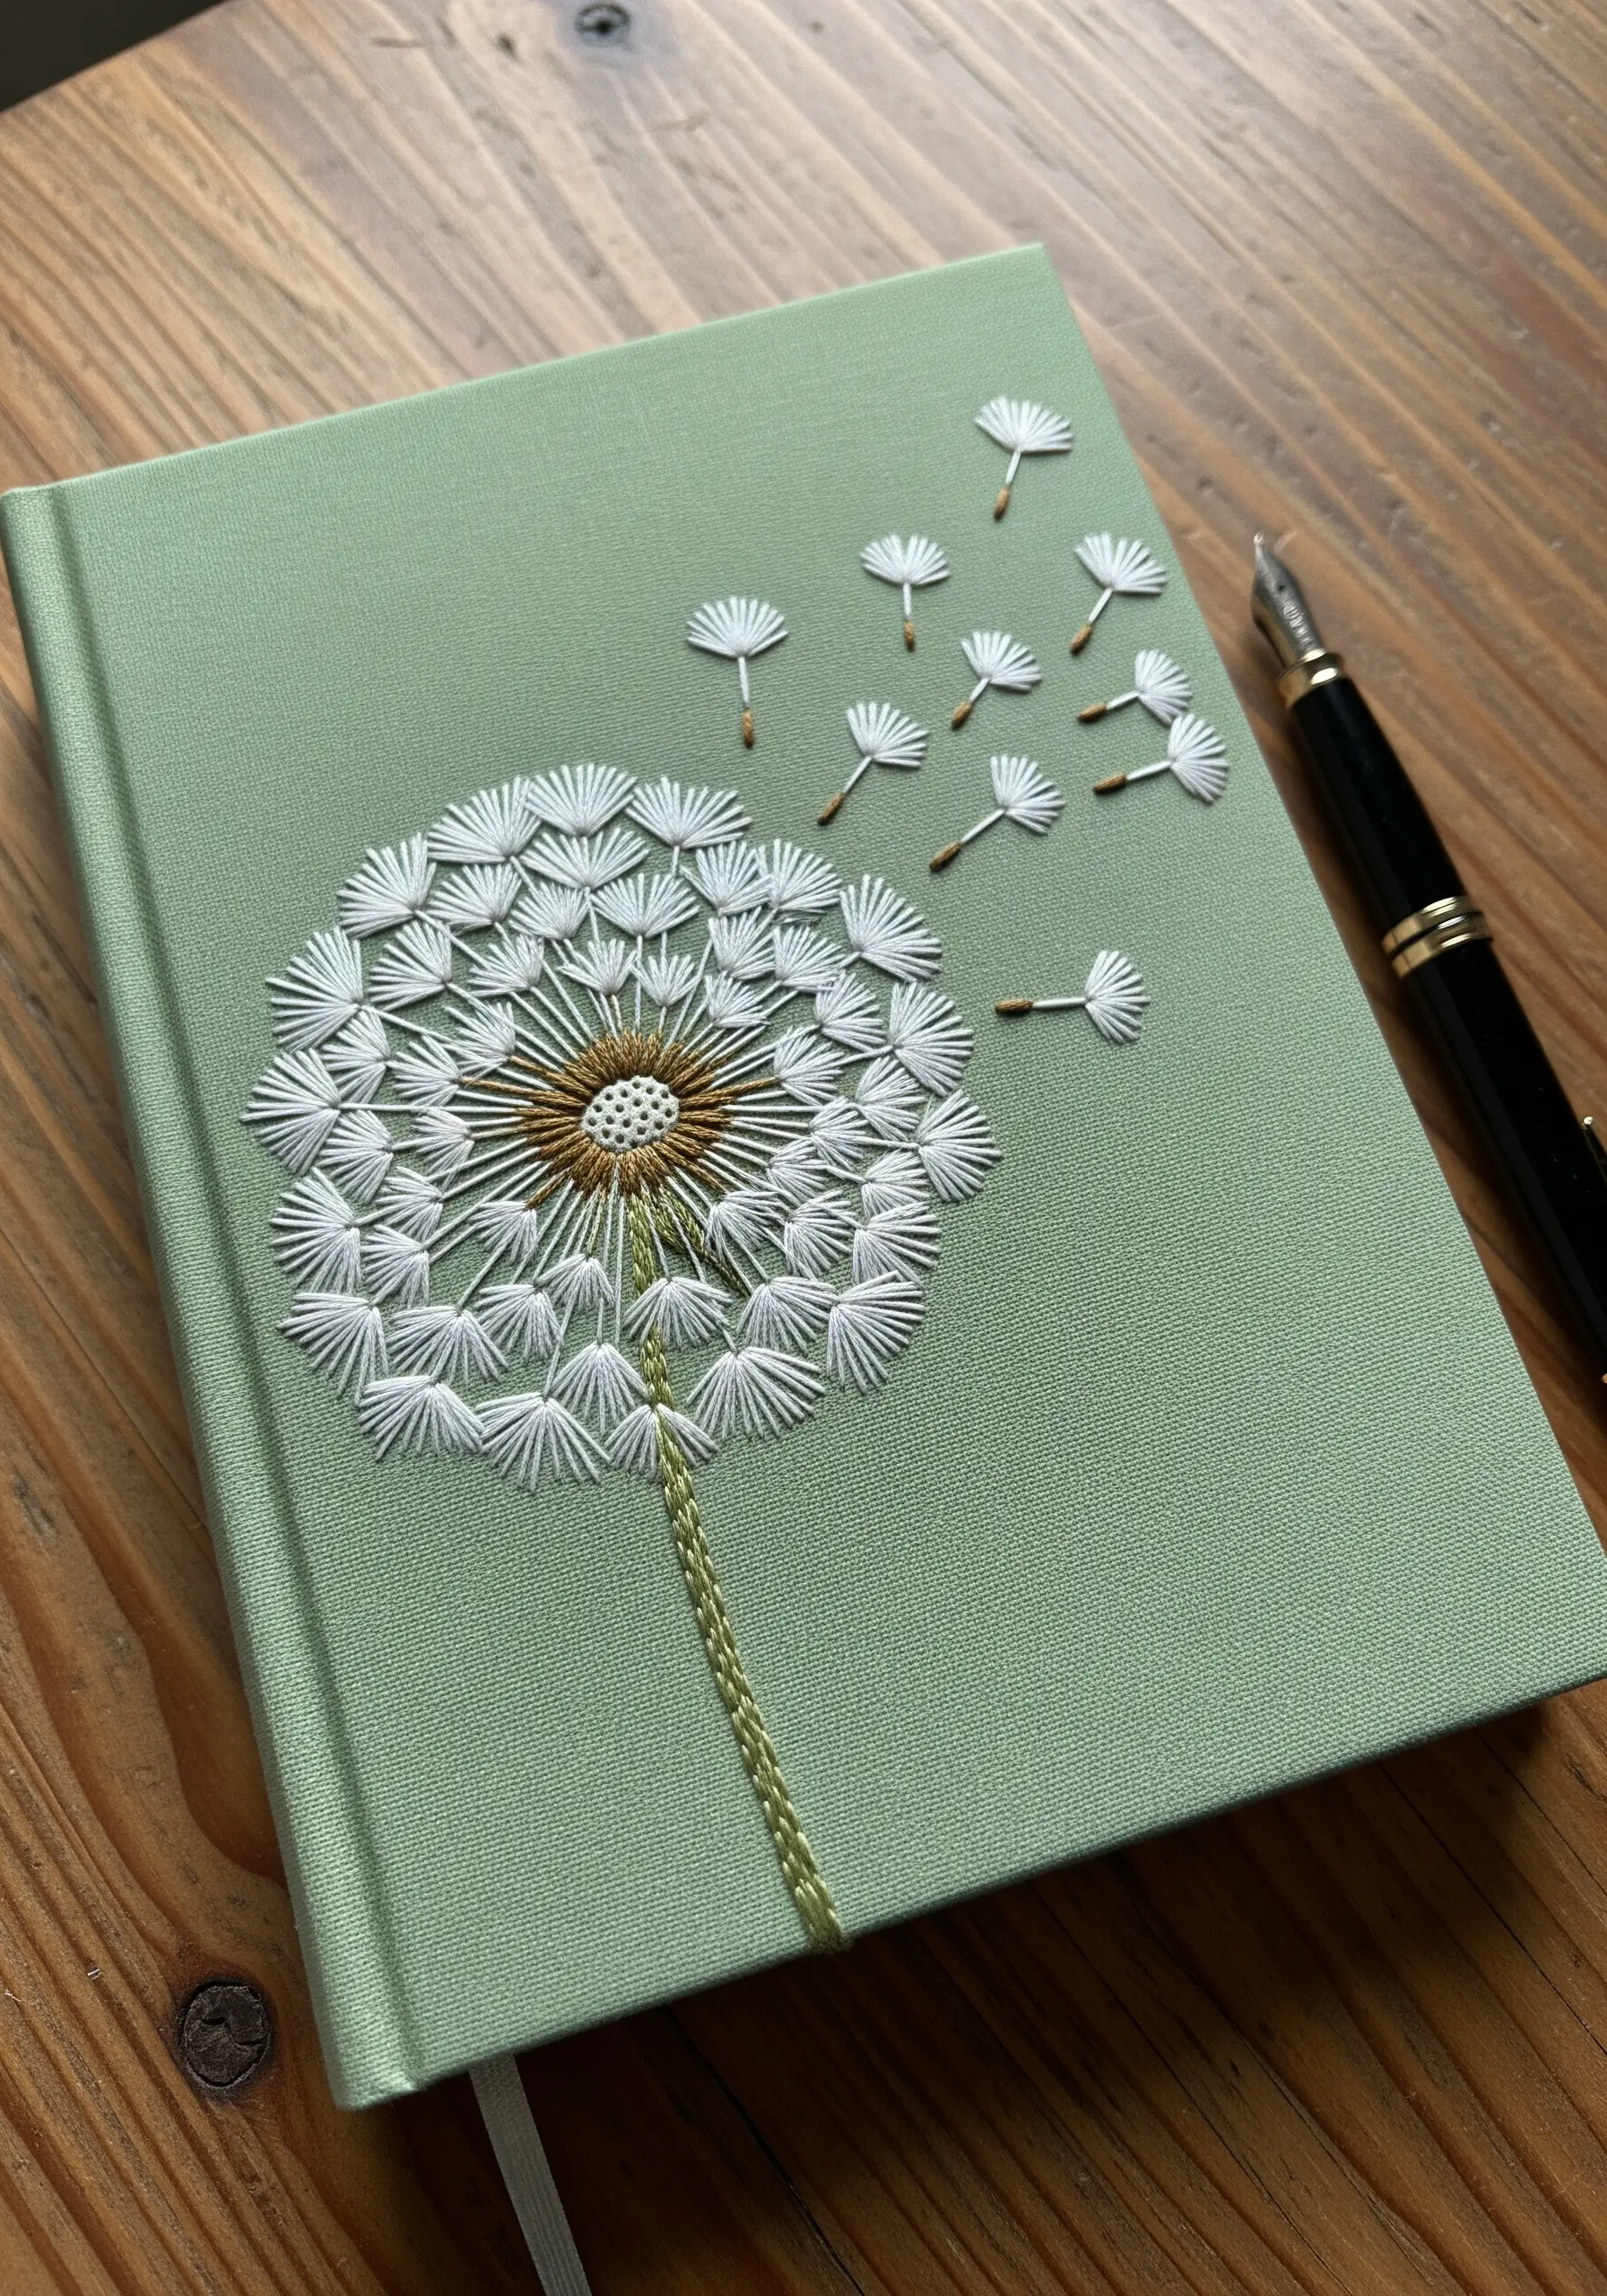
Embroidering directly onto a fabric-bound journal creates a beautifully integrated and personal object.
For the dandelion seeds, use a detached chain stitch for the parachute and a single straight stitch for the stem—this creates a light, airy effect.
The center of the dandelion can be filled with a dense cluster of French knots in a complementary color for textural contrast.
Use a sharp, fine needle to pierce the cover cleanly, and secure your threads well on the inside cover (you can hide them with an iron-on patch or decorative paper).
17. Add Functional Art to Your Entryway
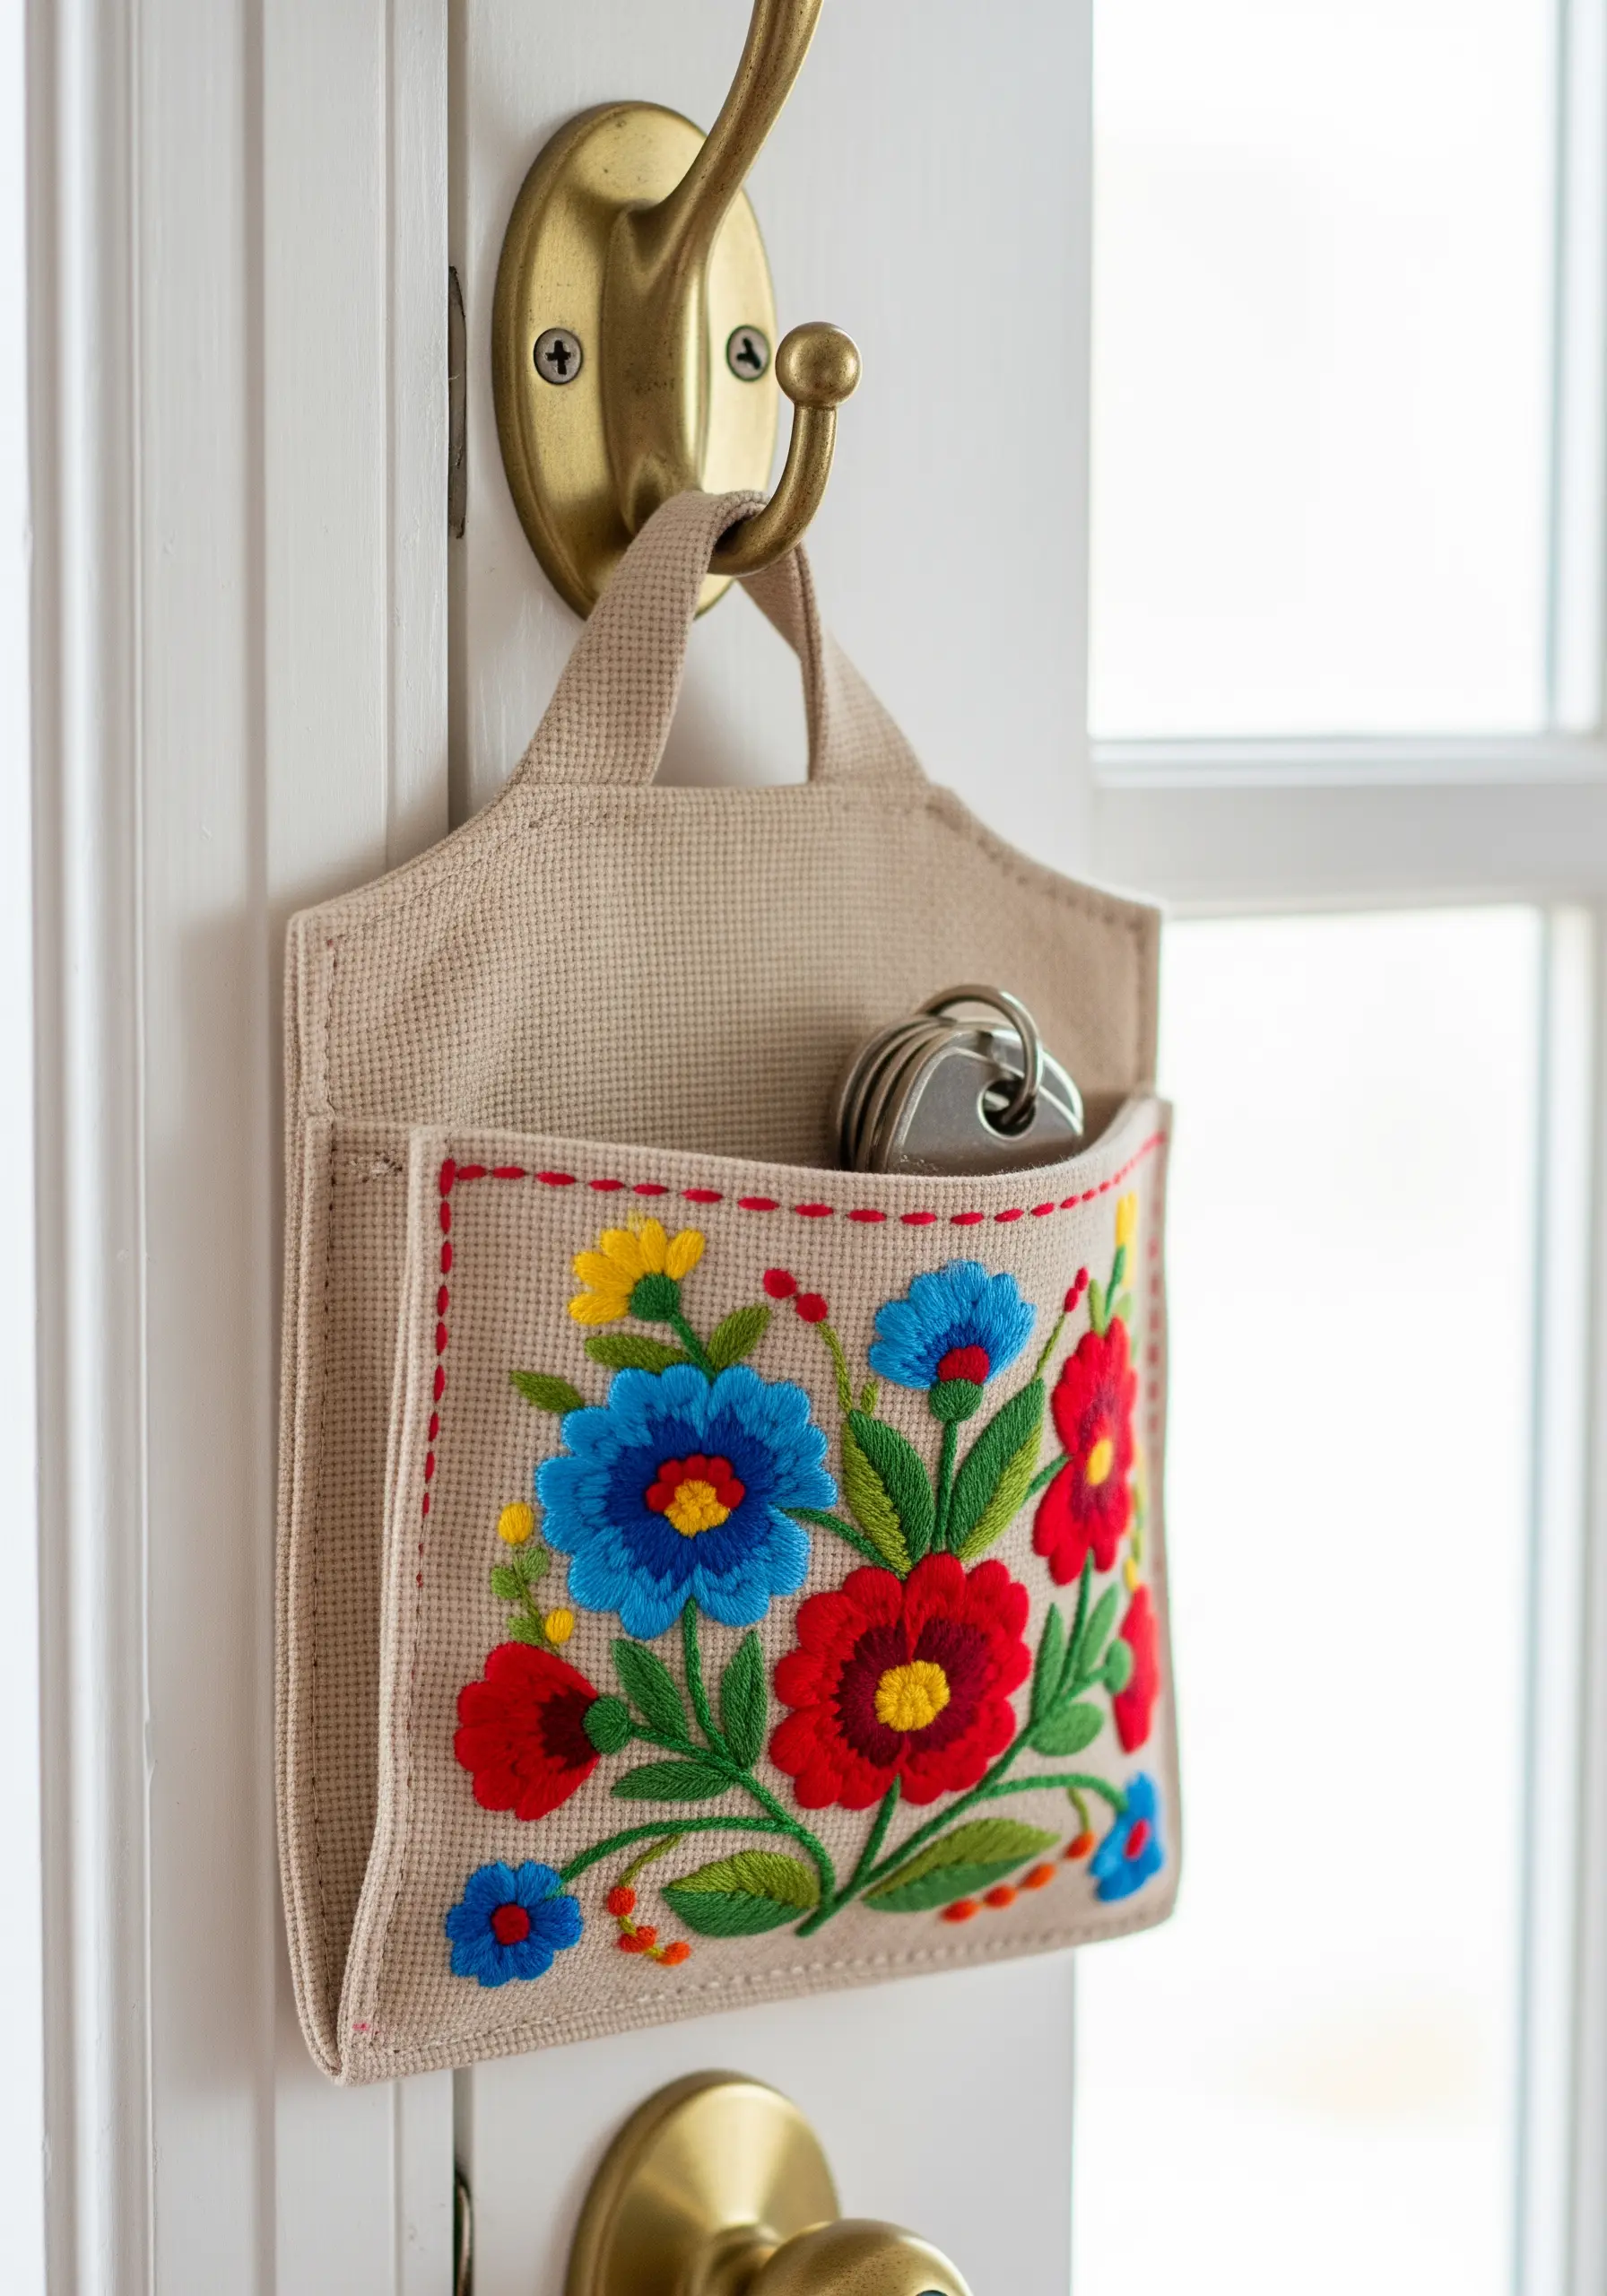
Combine utility and beauty by embroidering a small hanging pocket for keys or mail.
Choose a sturdy base fabric like canvas or linen that can support a little weight.
Fill the floral motifs with a dense satin stitch for bold, vibrant color blocks. This technique ensures the design is eye-catching and durable.
Reinforce the pocket’s top edge with a neat backstitch in a contrasting color to add a final decorative touch and increase its strength.
18. Paint a Landscape with Thread
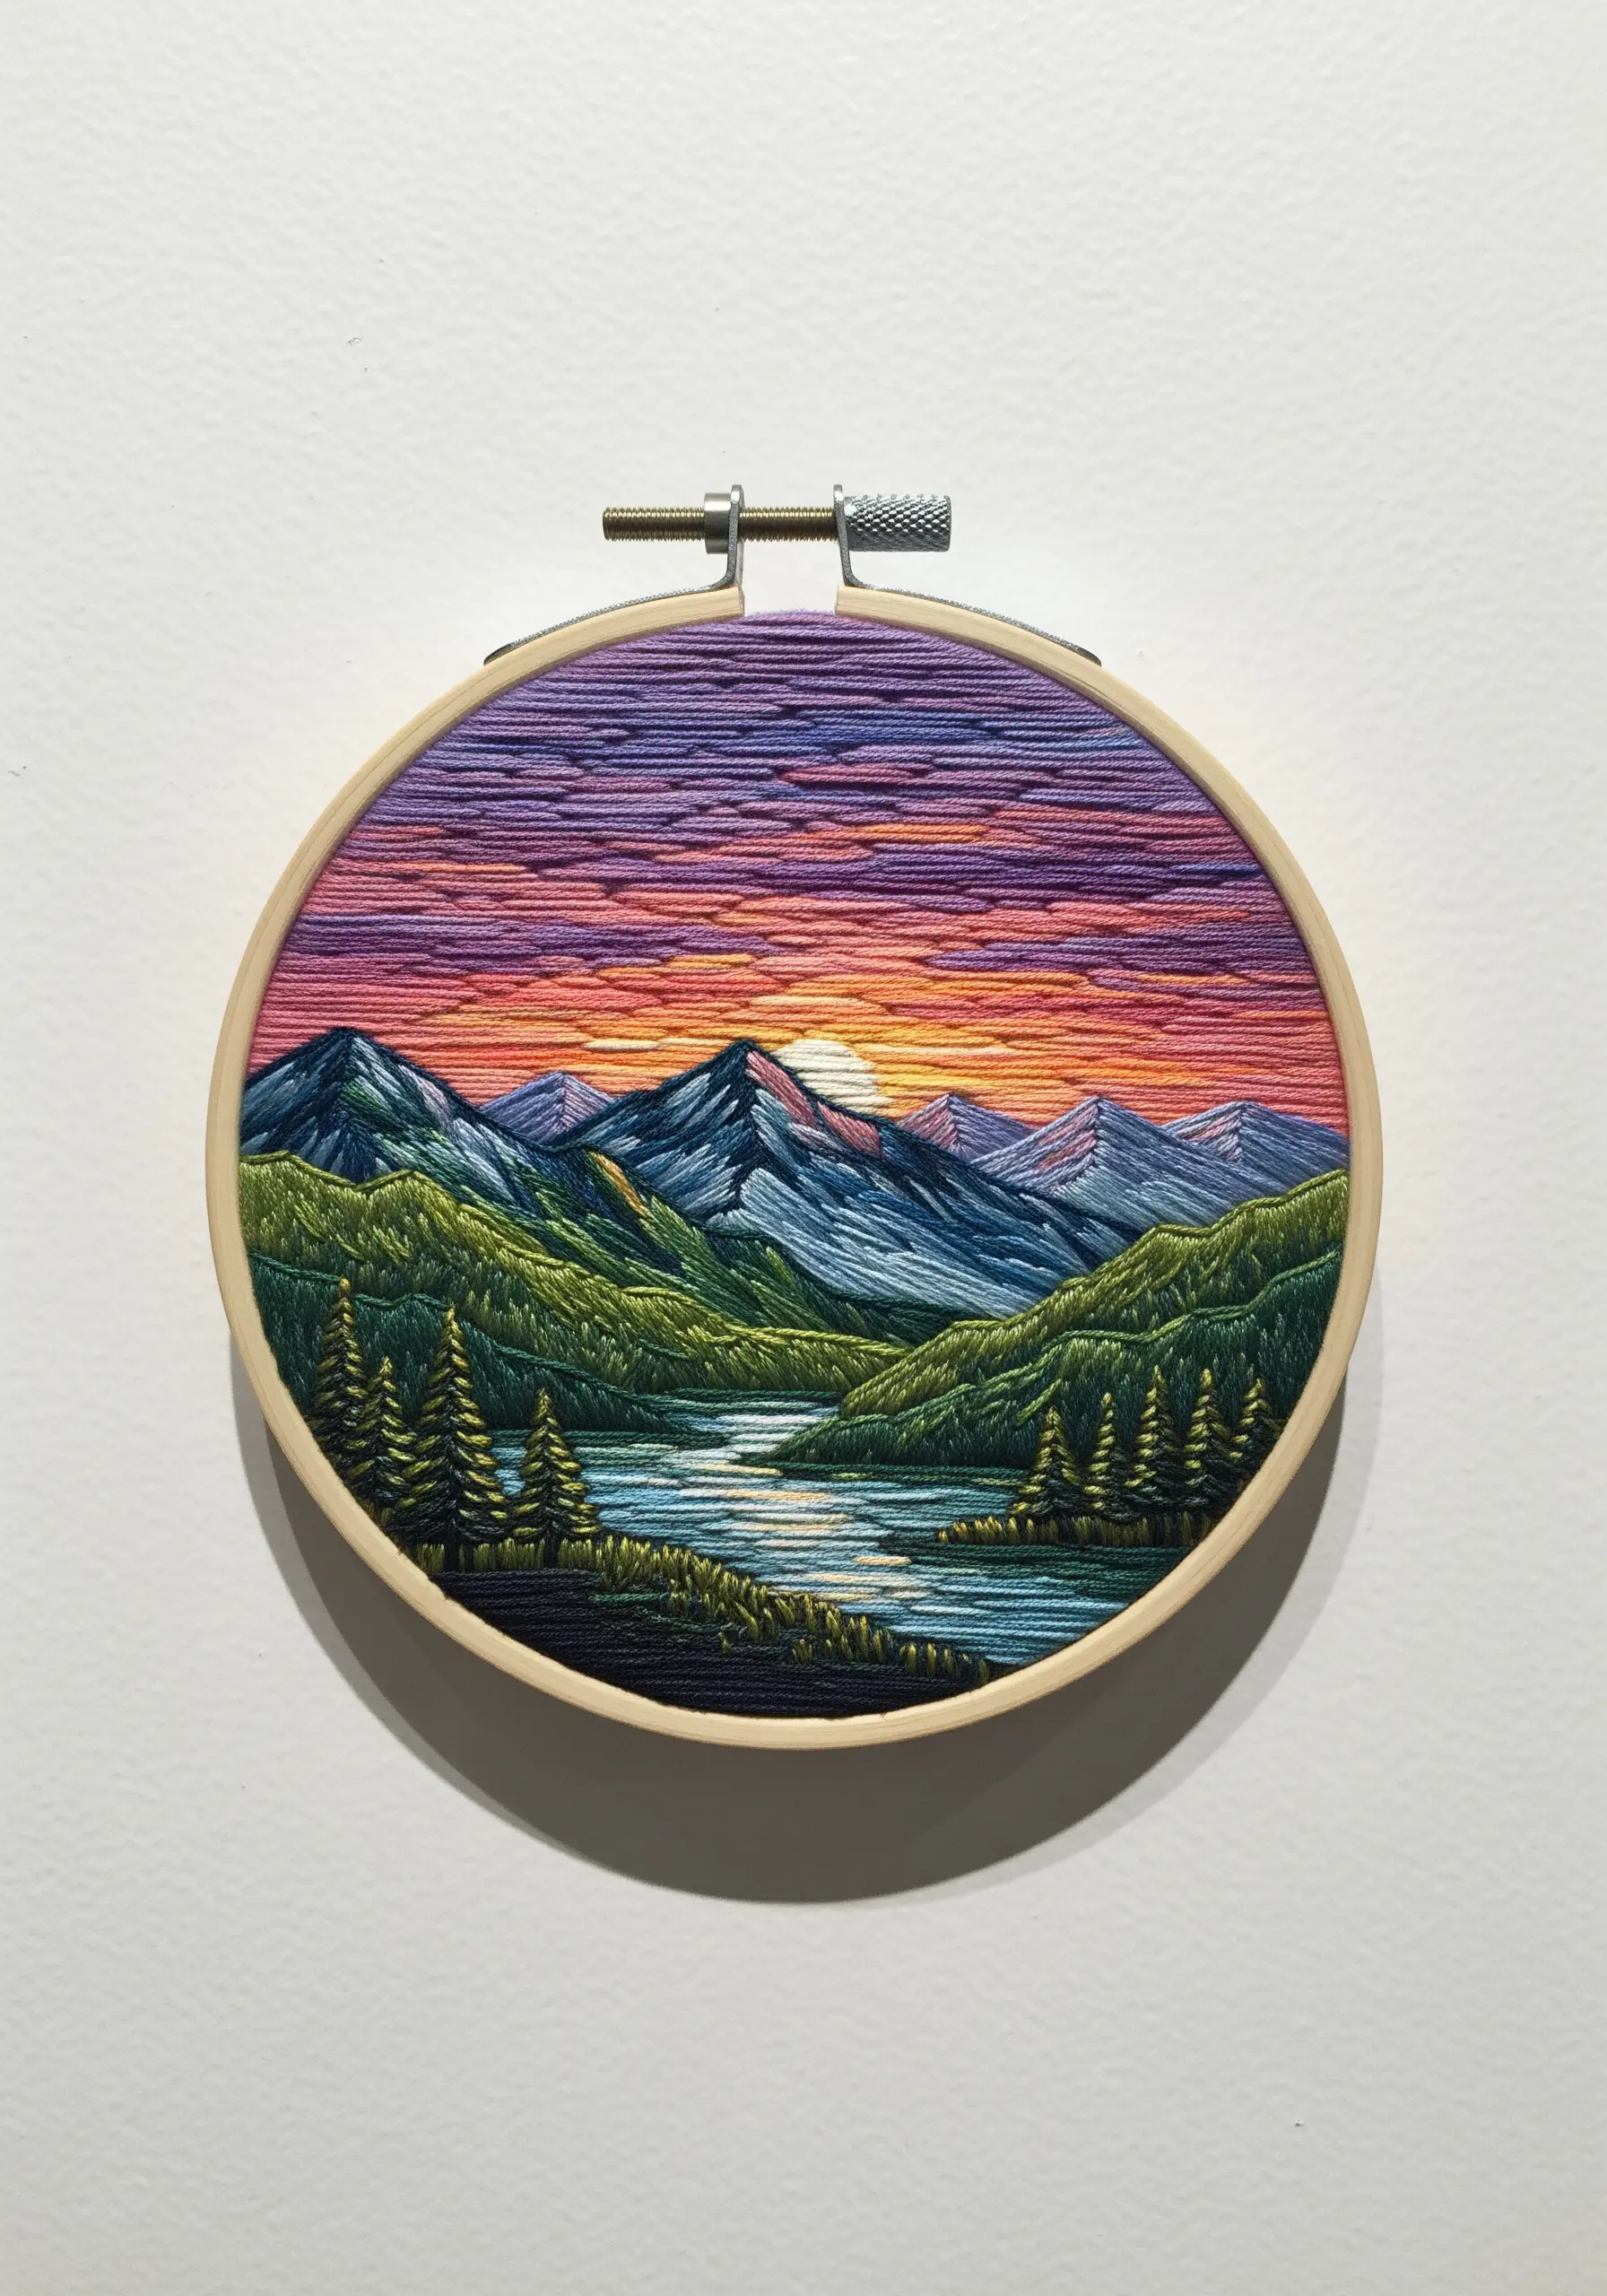
Create a stunning, painterly landscape using the thread painting technique.
Fill large areas like the sky and water with long, horizontal satin stitches, using several similar shades of thread to create a subtle gradient effect.
For the mountains and trees, use directional long-and-short stitches to mimic natural contours and textures. This adds a sense of depth and realism.
The key is to use a single strand of floss, which allows for seamless blending and gives your work the delicate quality of a watercolor painting.
19. Organize Your Pantry with Stitched Labels
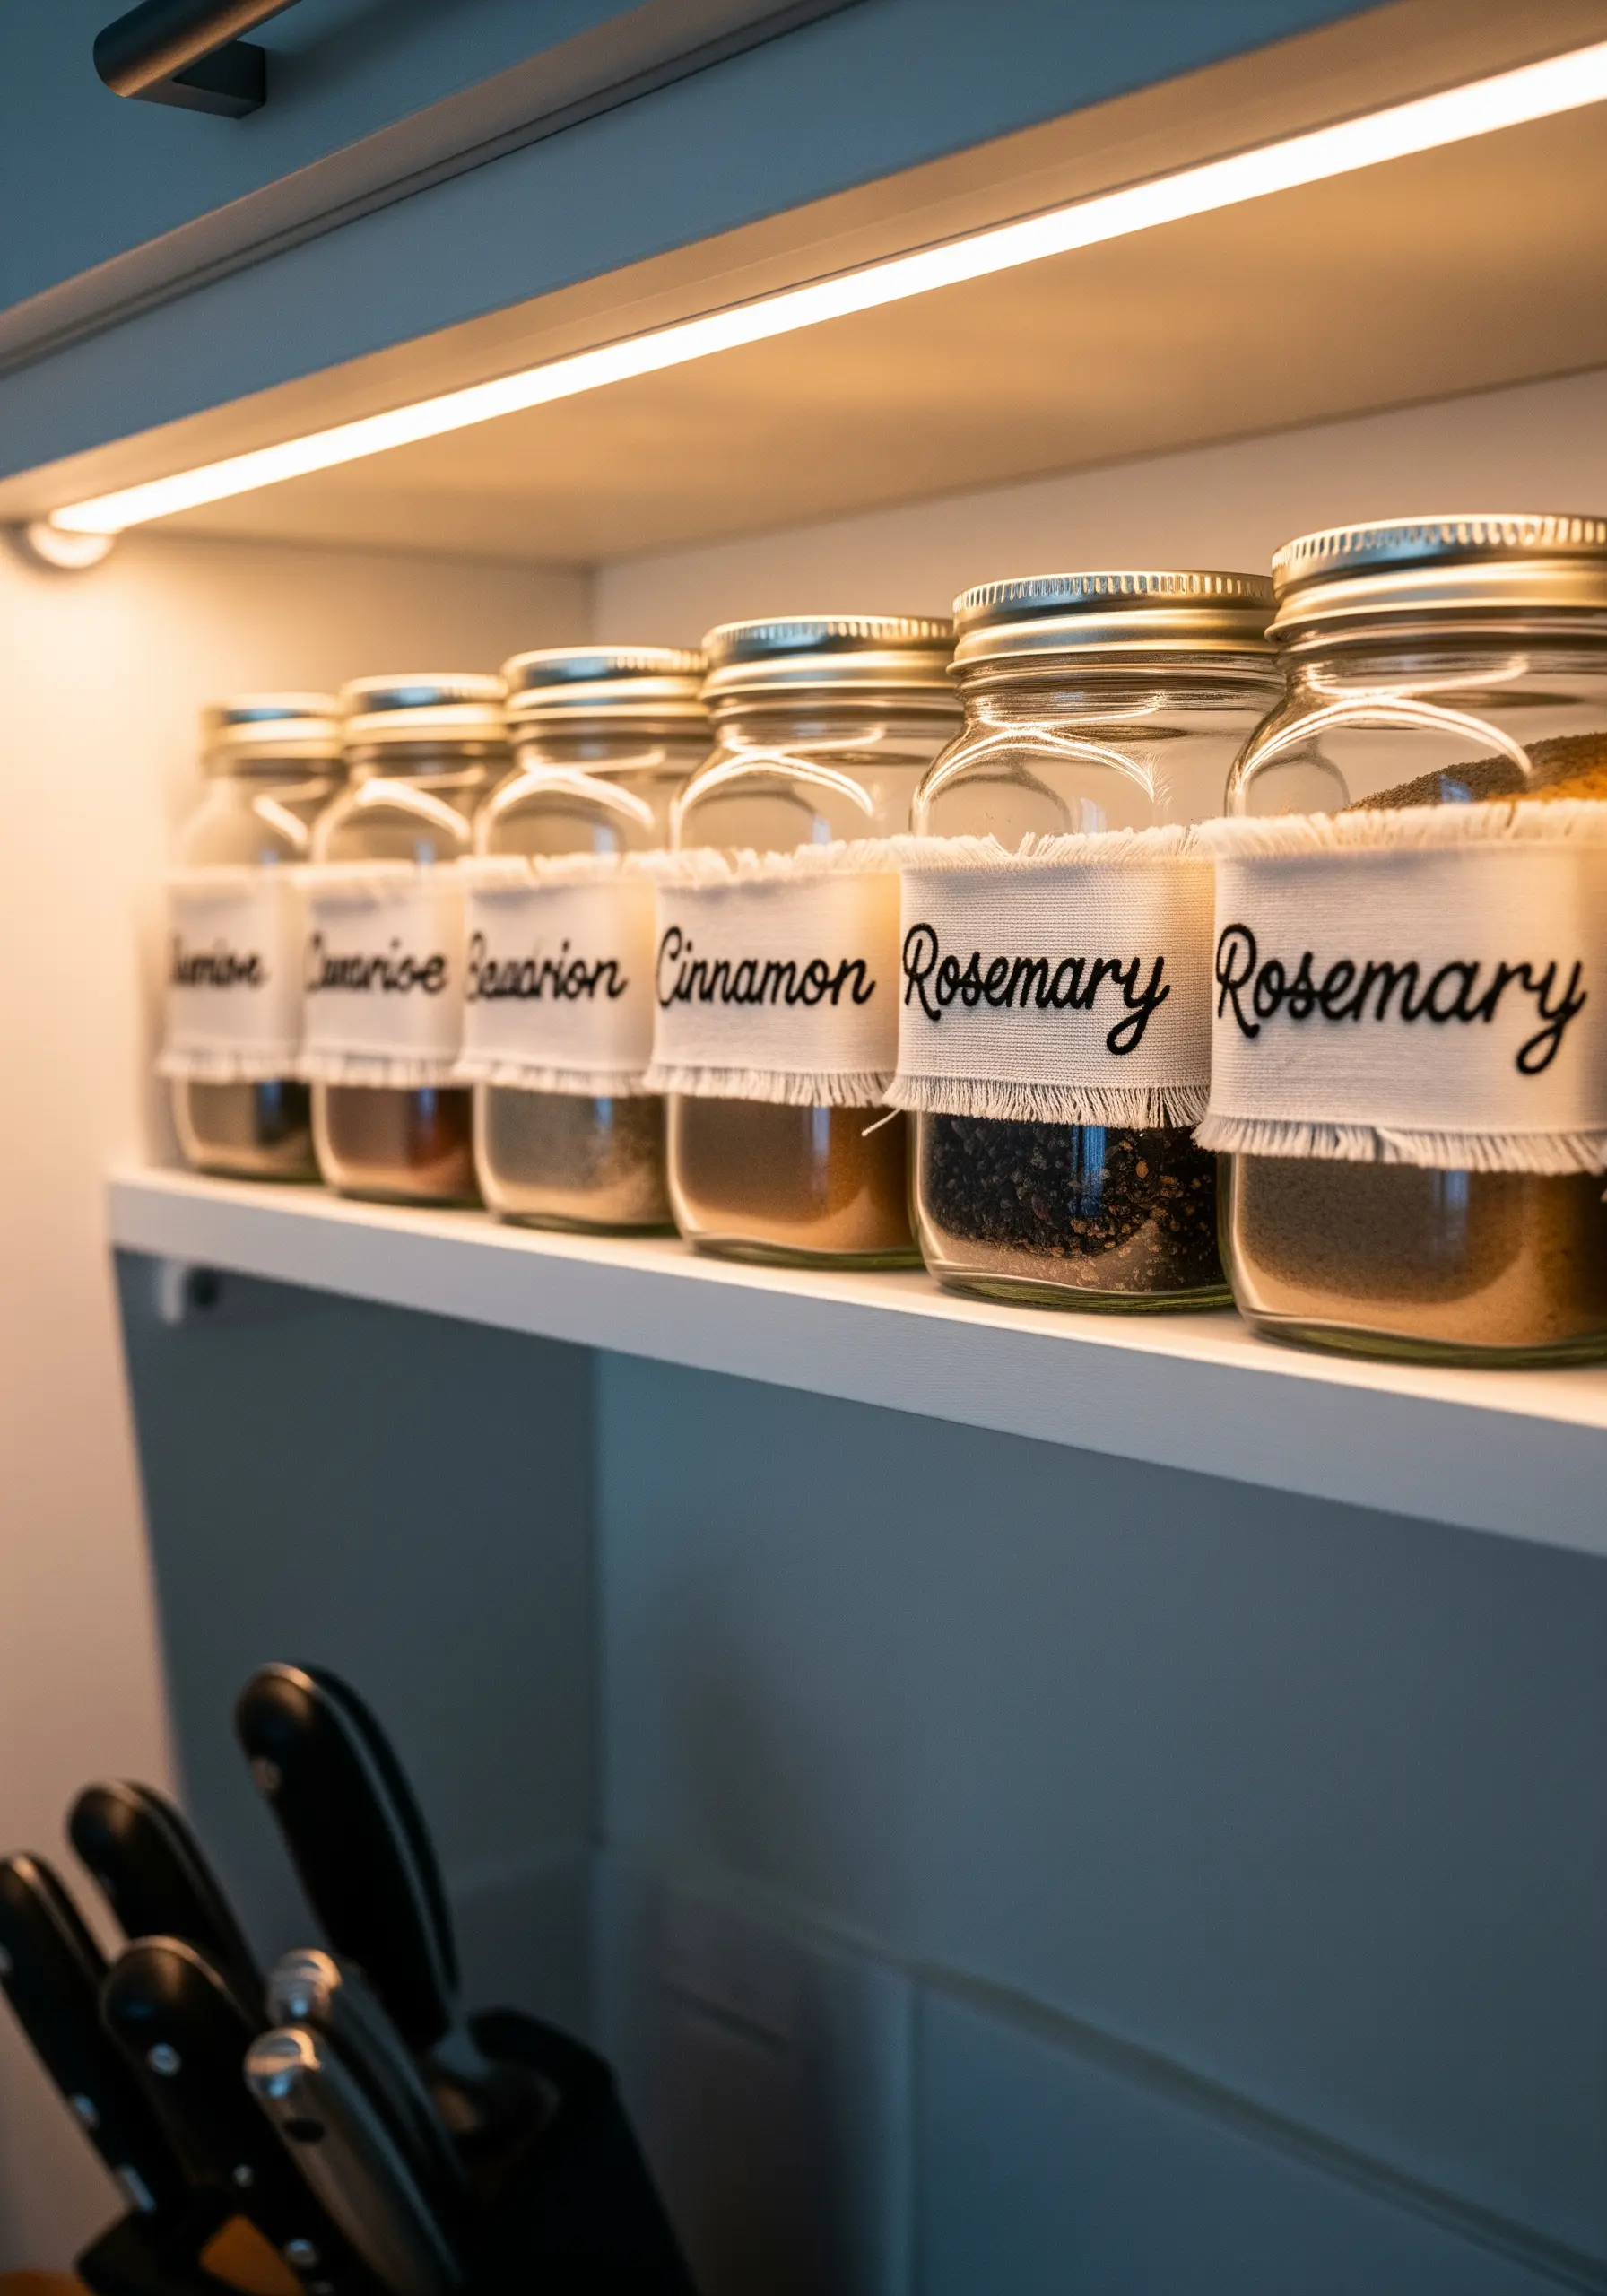
Create charming, rustic labels for your spice jars with a small strip of fabric and a simple stitch.
Use a single strand of dark floss on a light-colored, loosely woven fabric like linen or cotton gauze.
Embroider the names using a simple backstitch, keeping the letters loose and script-like for a handwritten feel.
Fray the top and bottom edges of the fabric strip before tying it around the jar to enhance the soft, rustic aesthetic.
20. Create a Delicate Bookmark with Tiny Florals
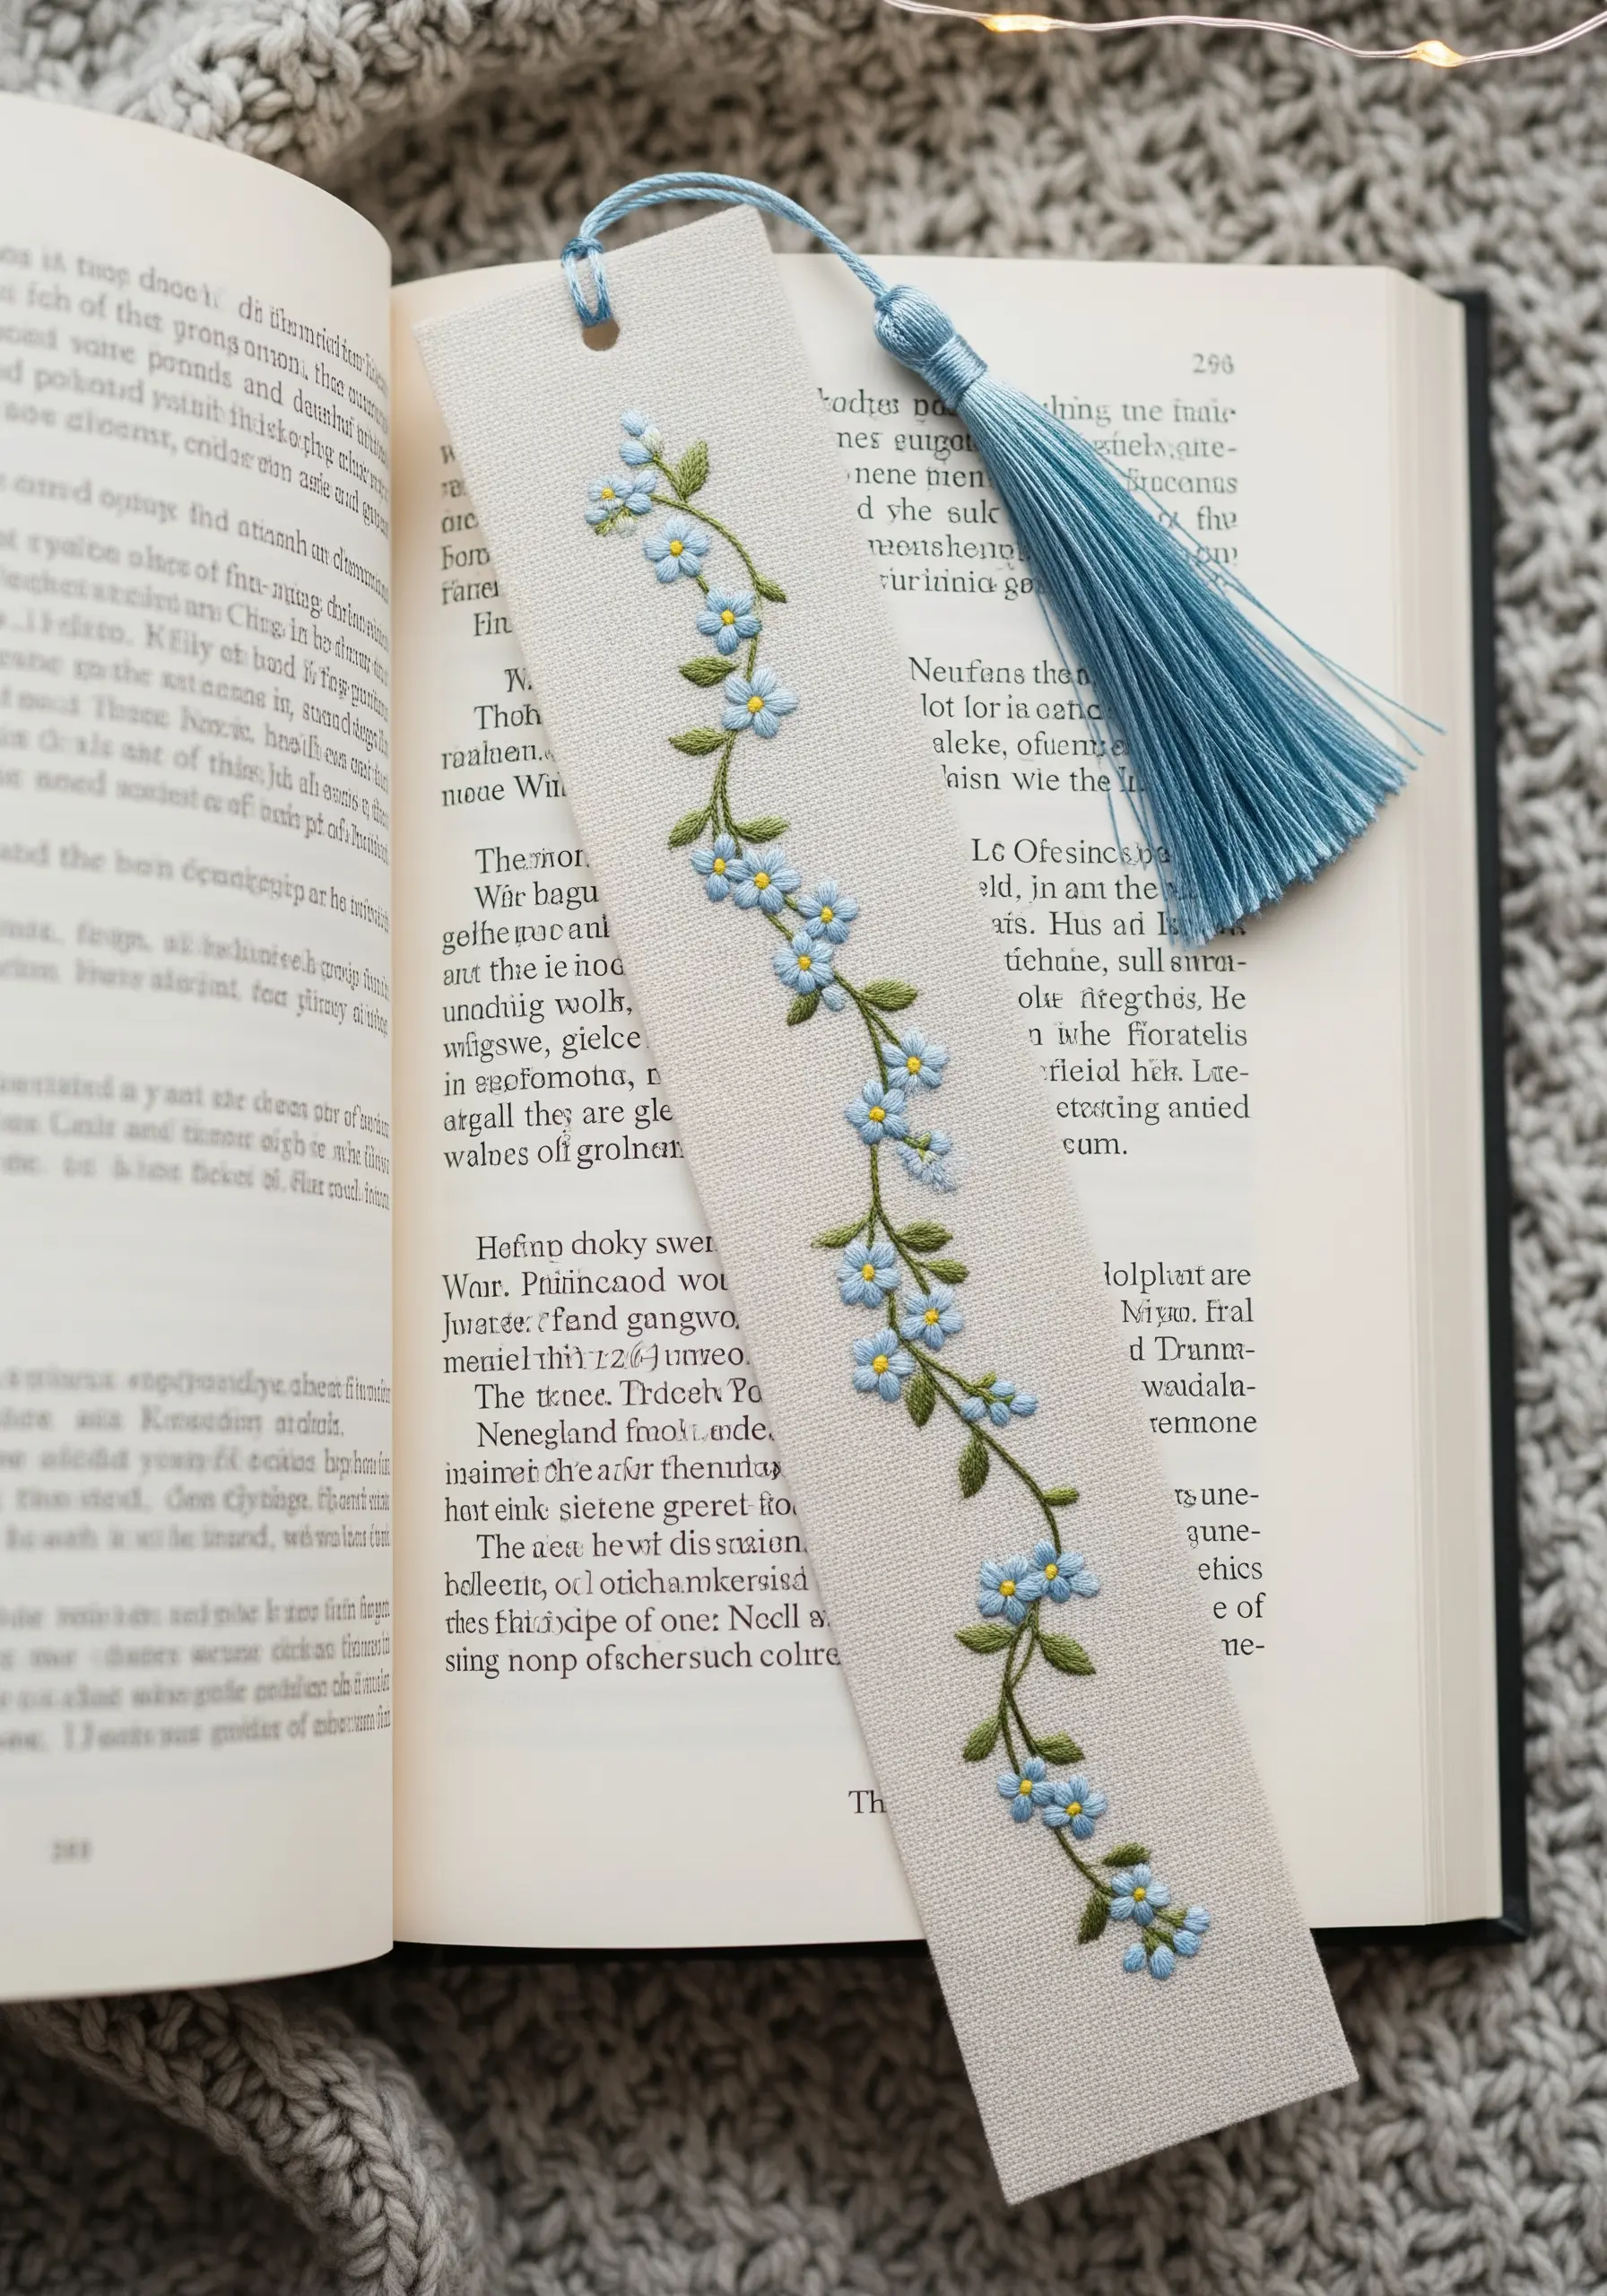
Stitch a trailing vine of forget-me-nots for a bookmark that is as beautiful as it is functional.
Use light blue detached chain stitches for the petals and a single yellow French knot for the center of each flower.
Connect the blossoms with a delicate, curving stem stitch in green. This creates a sense of gentle movement down the length of the bookmark.
Choose a high-quality linen or even-weave fabric and back it with felt or fusible interfacing for stability and a clean finish.
21. Design a House Portrait with Fabric Collage
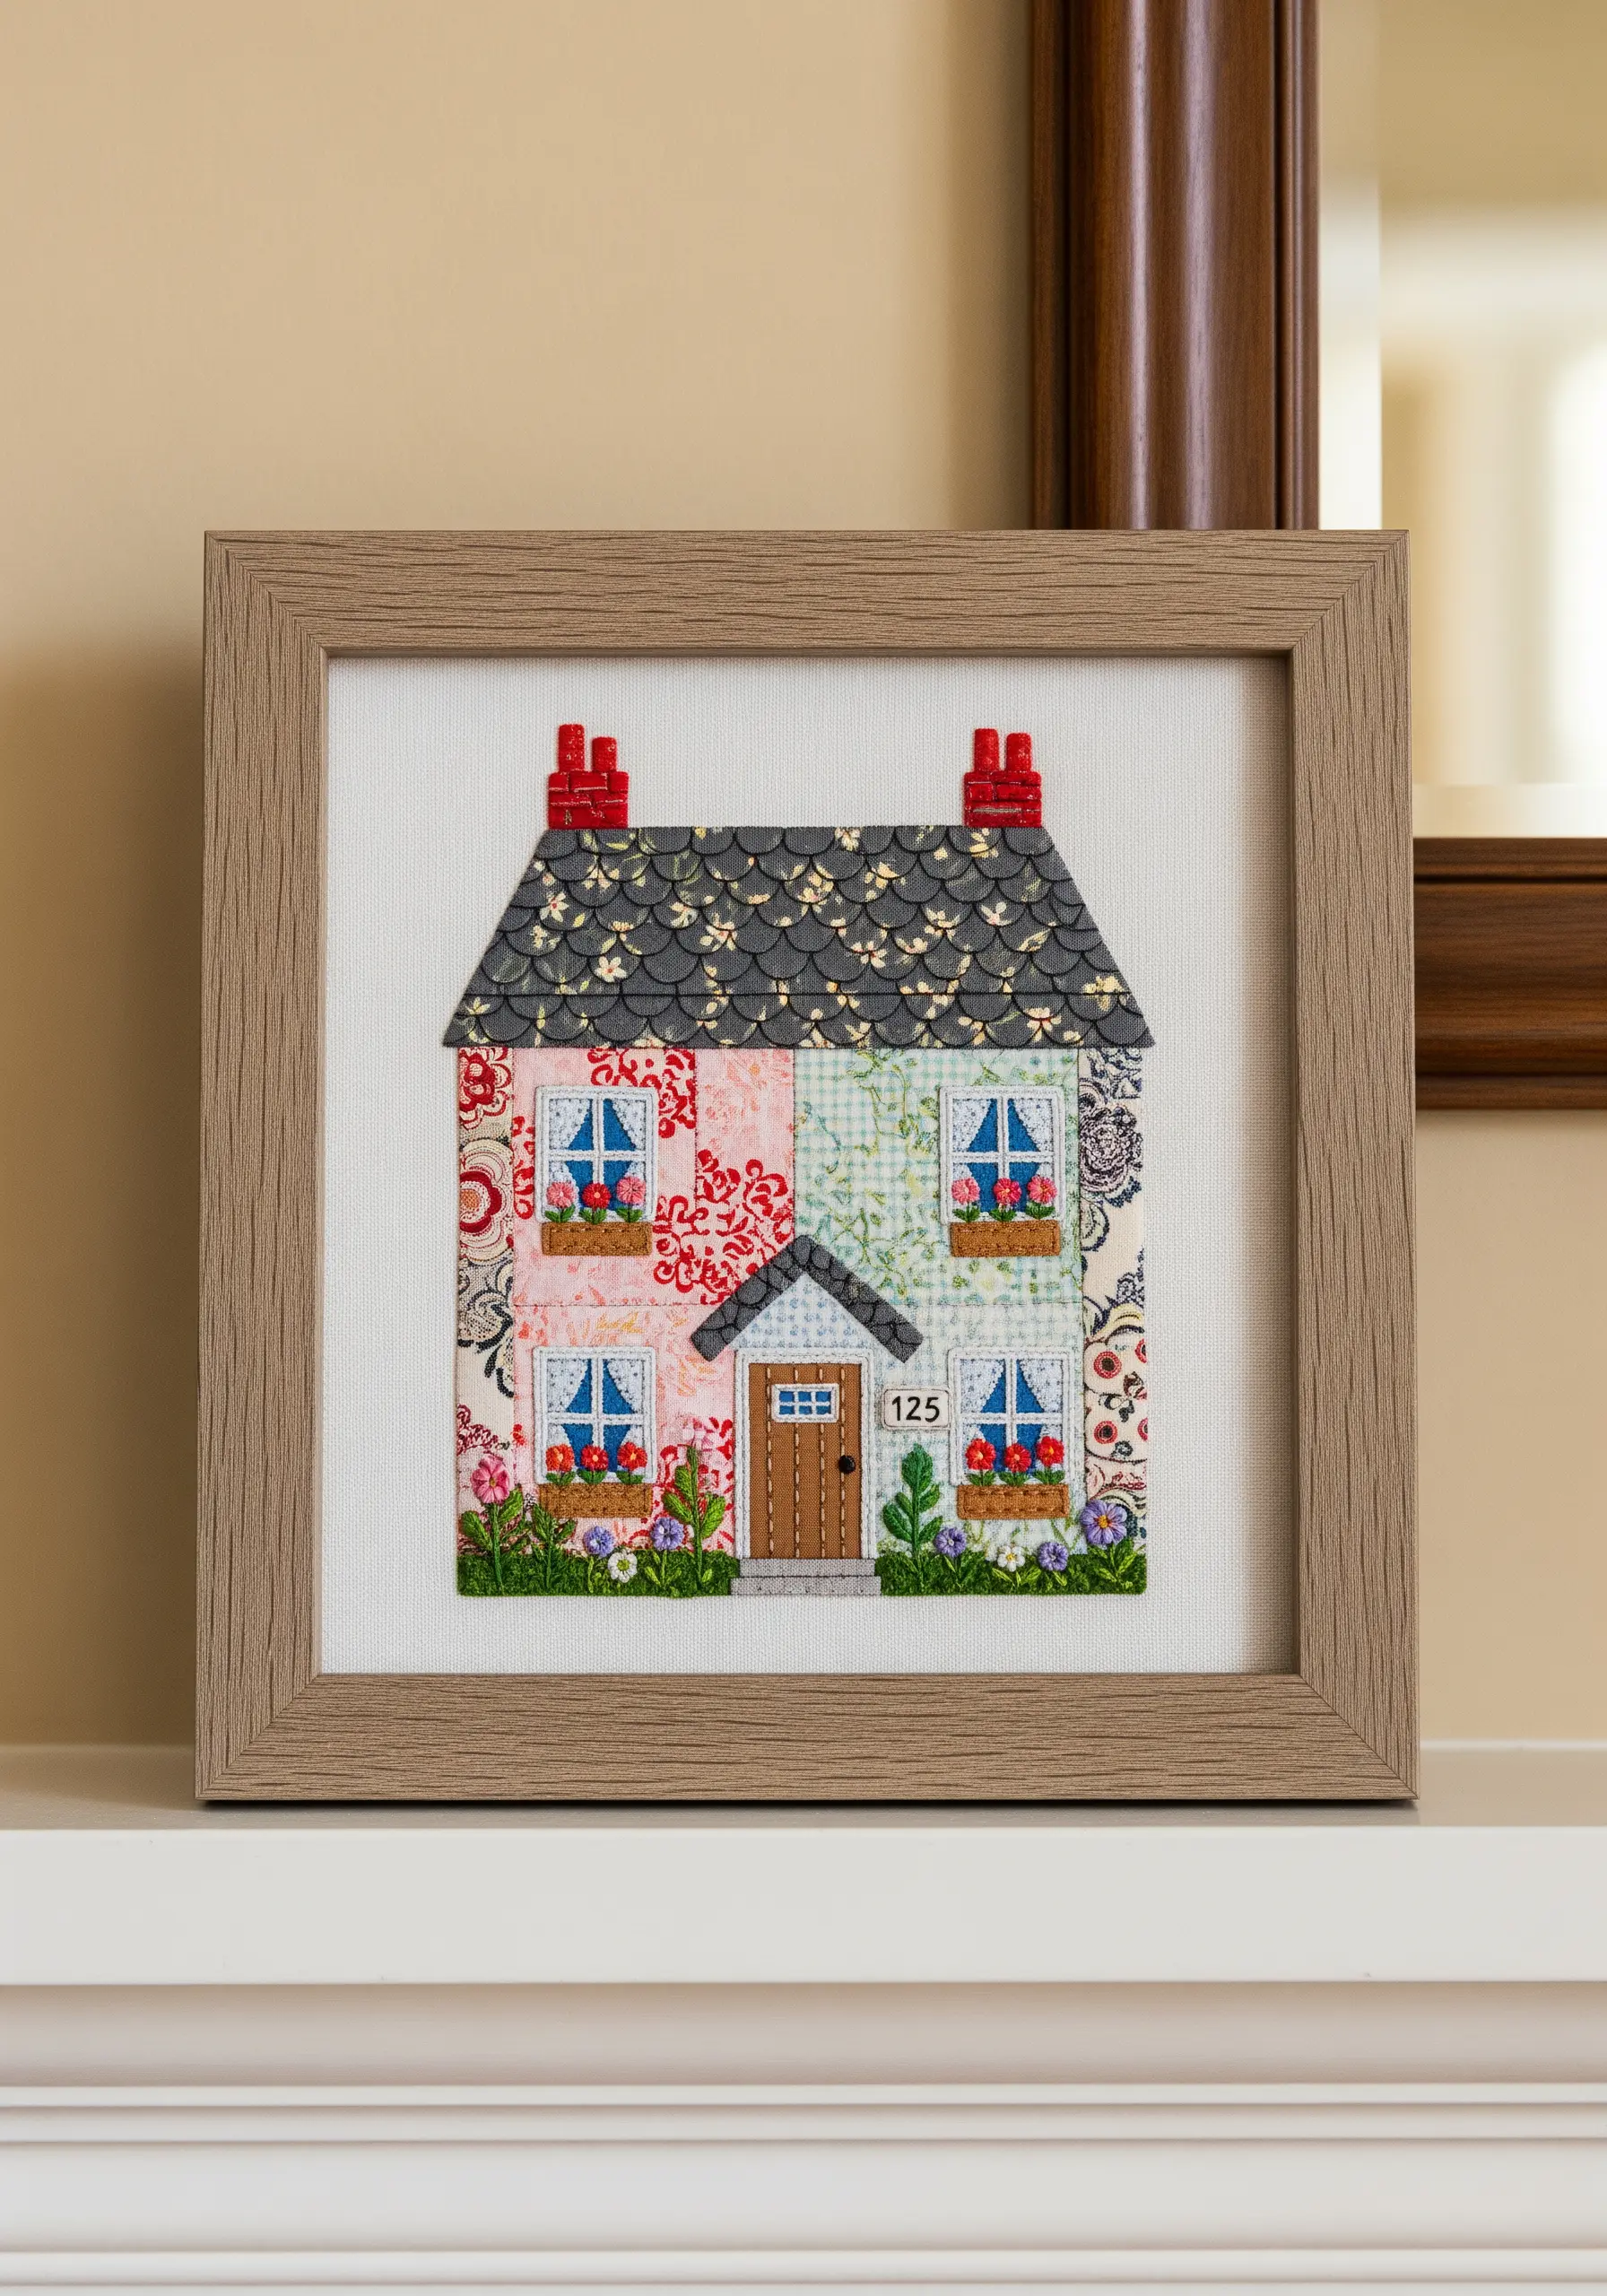
Combine fabric appliqué and embroidery to create a charming, personalized house portrait.
Use patterned fabric scraps for the walls and roof to add texture and visual interest without complex stitching.
Secure the fabric pieces with an iron-on adhesive, then add embroidered details like window frames, flowers, and the house number using simple backstitches and French knots.
This mixed-media technique allows you to build a detailed scene with personality and depth, making it a perfect housewarming gift.
22. Stitch a Simple and Stylish Cord Organizer
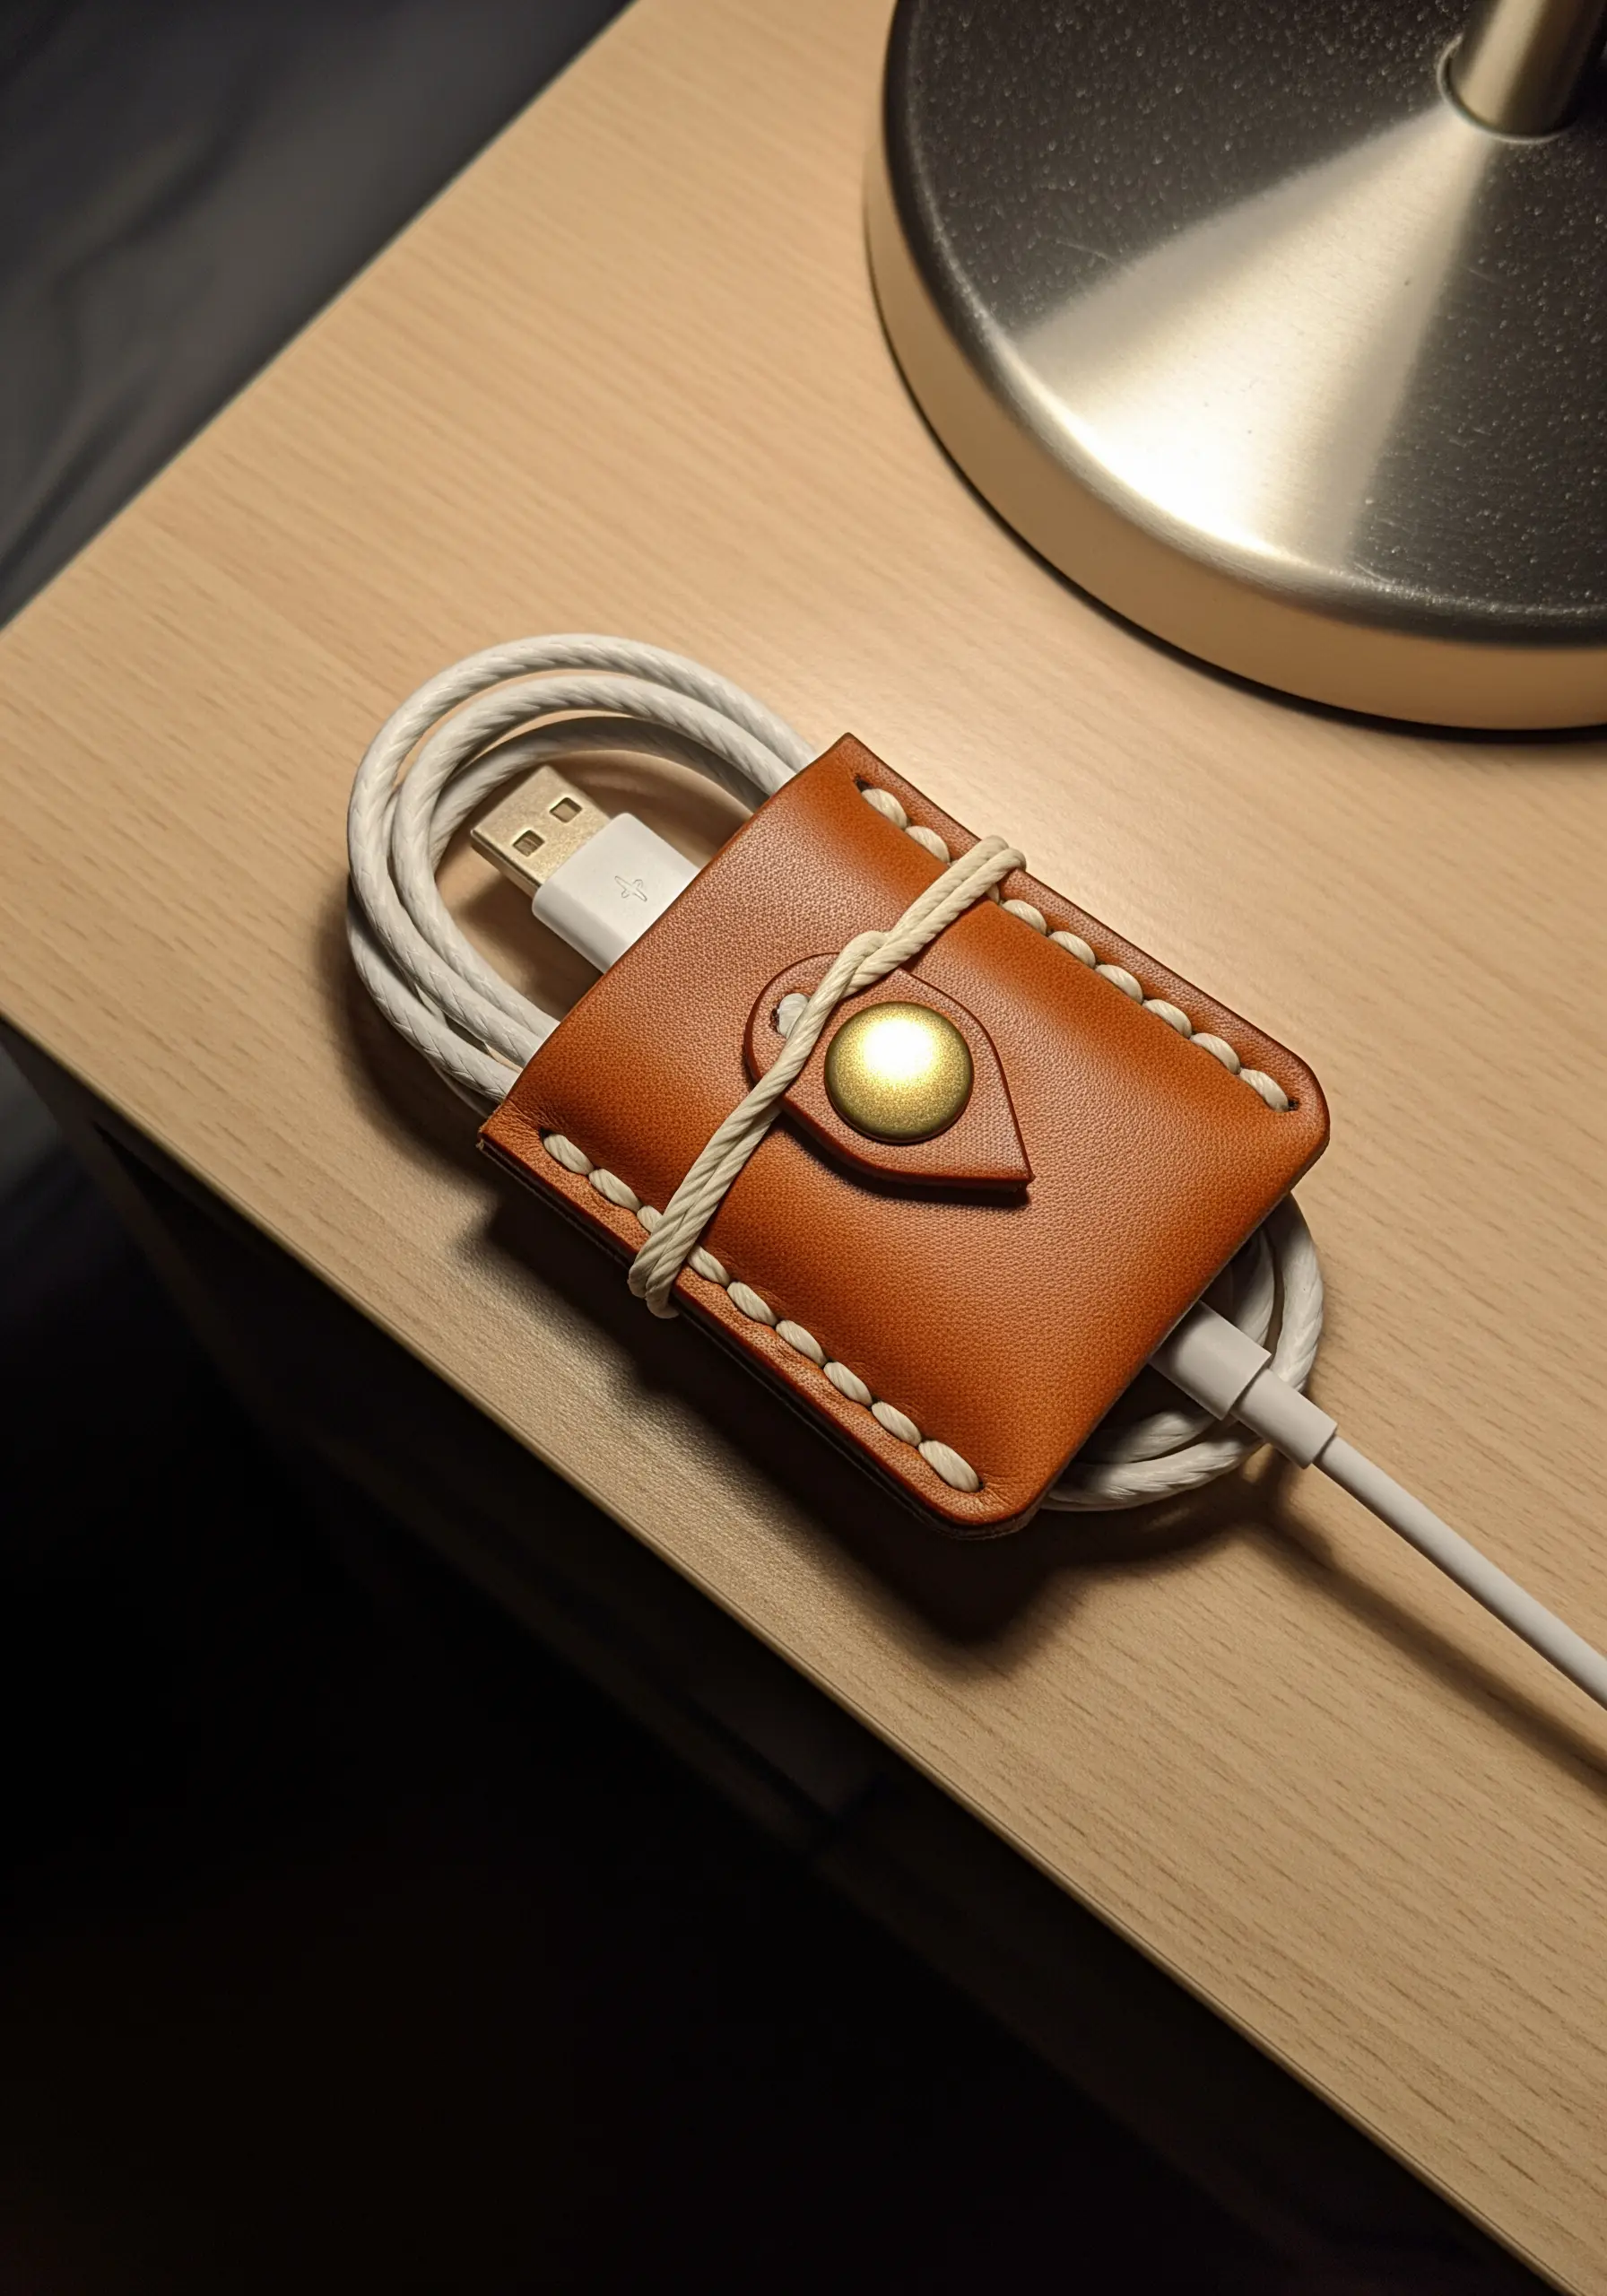
Craft a functional and handsome cord keeper using a small piece of faux leather and a basic saddle stitch.
Cut the leather to size, fold, and use a stitching awl to punch holes for your thread.
Use a thick, contrasting thread (like ivory on tan) and a saddle stitch—using two needles—for maximum durability and a classic, handcrafted look.
This quick project is an excellent introduction to leatherwork and results in a polished, practical item to keep your desk or bag tidy.
23. Add an Elegant Monogram to a Ring Dish

Turn a simple ceramic dish into a personalized jewelry holder with a padded satin stitch monogram.
First, create a padded base for your letter using small, underlying satin stitches or seed stitches. This will give your final monogram a raised, three-dimensional effect.
Next, cover the padding with smooth, even satin stitches using a lustrous thread like silk or metallic floss.
Mount the finished embroidery over a layer of batting inside the dish for a soft, luxurious surface to protect your rings.
24. Craft a 3D Felt Fox Ornament
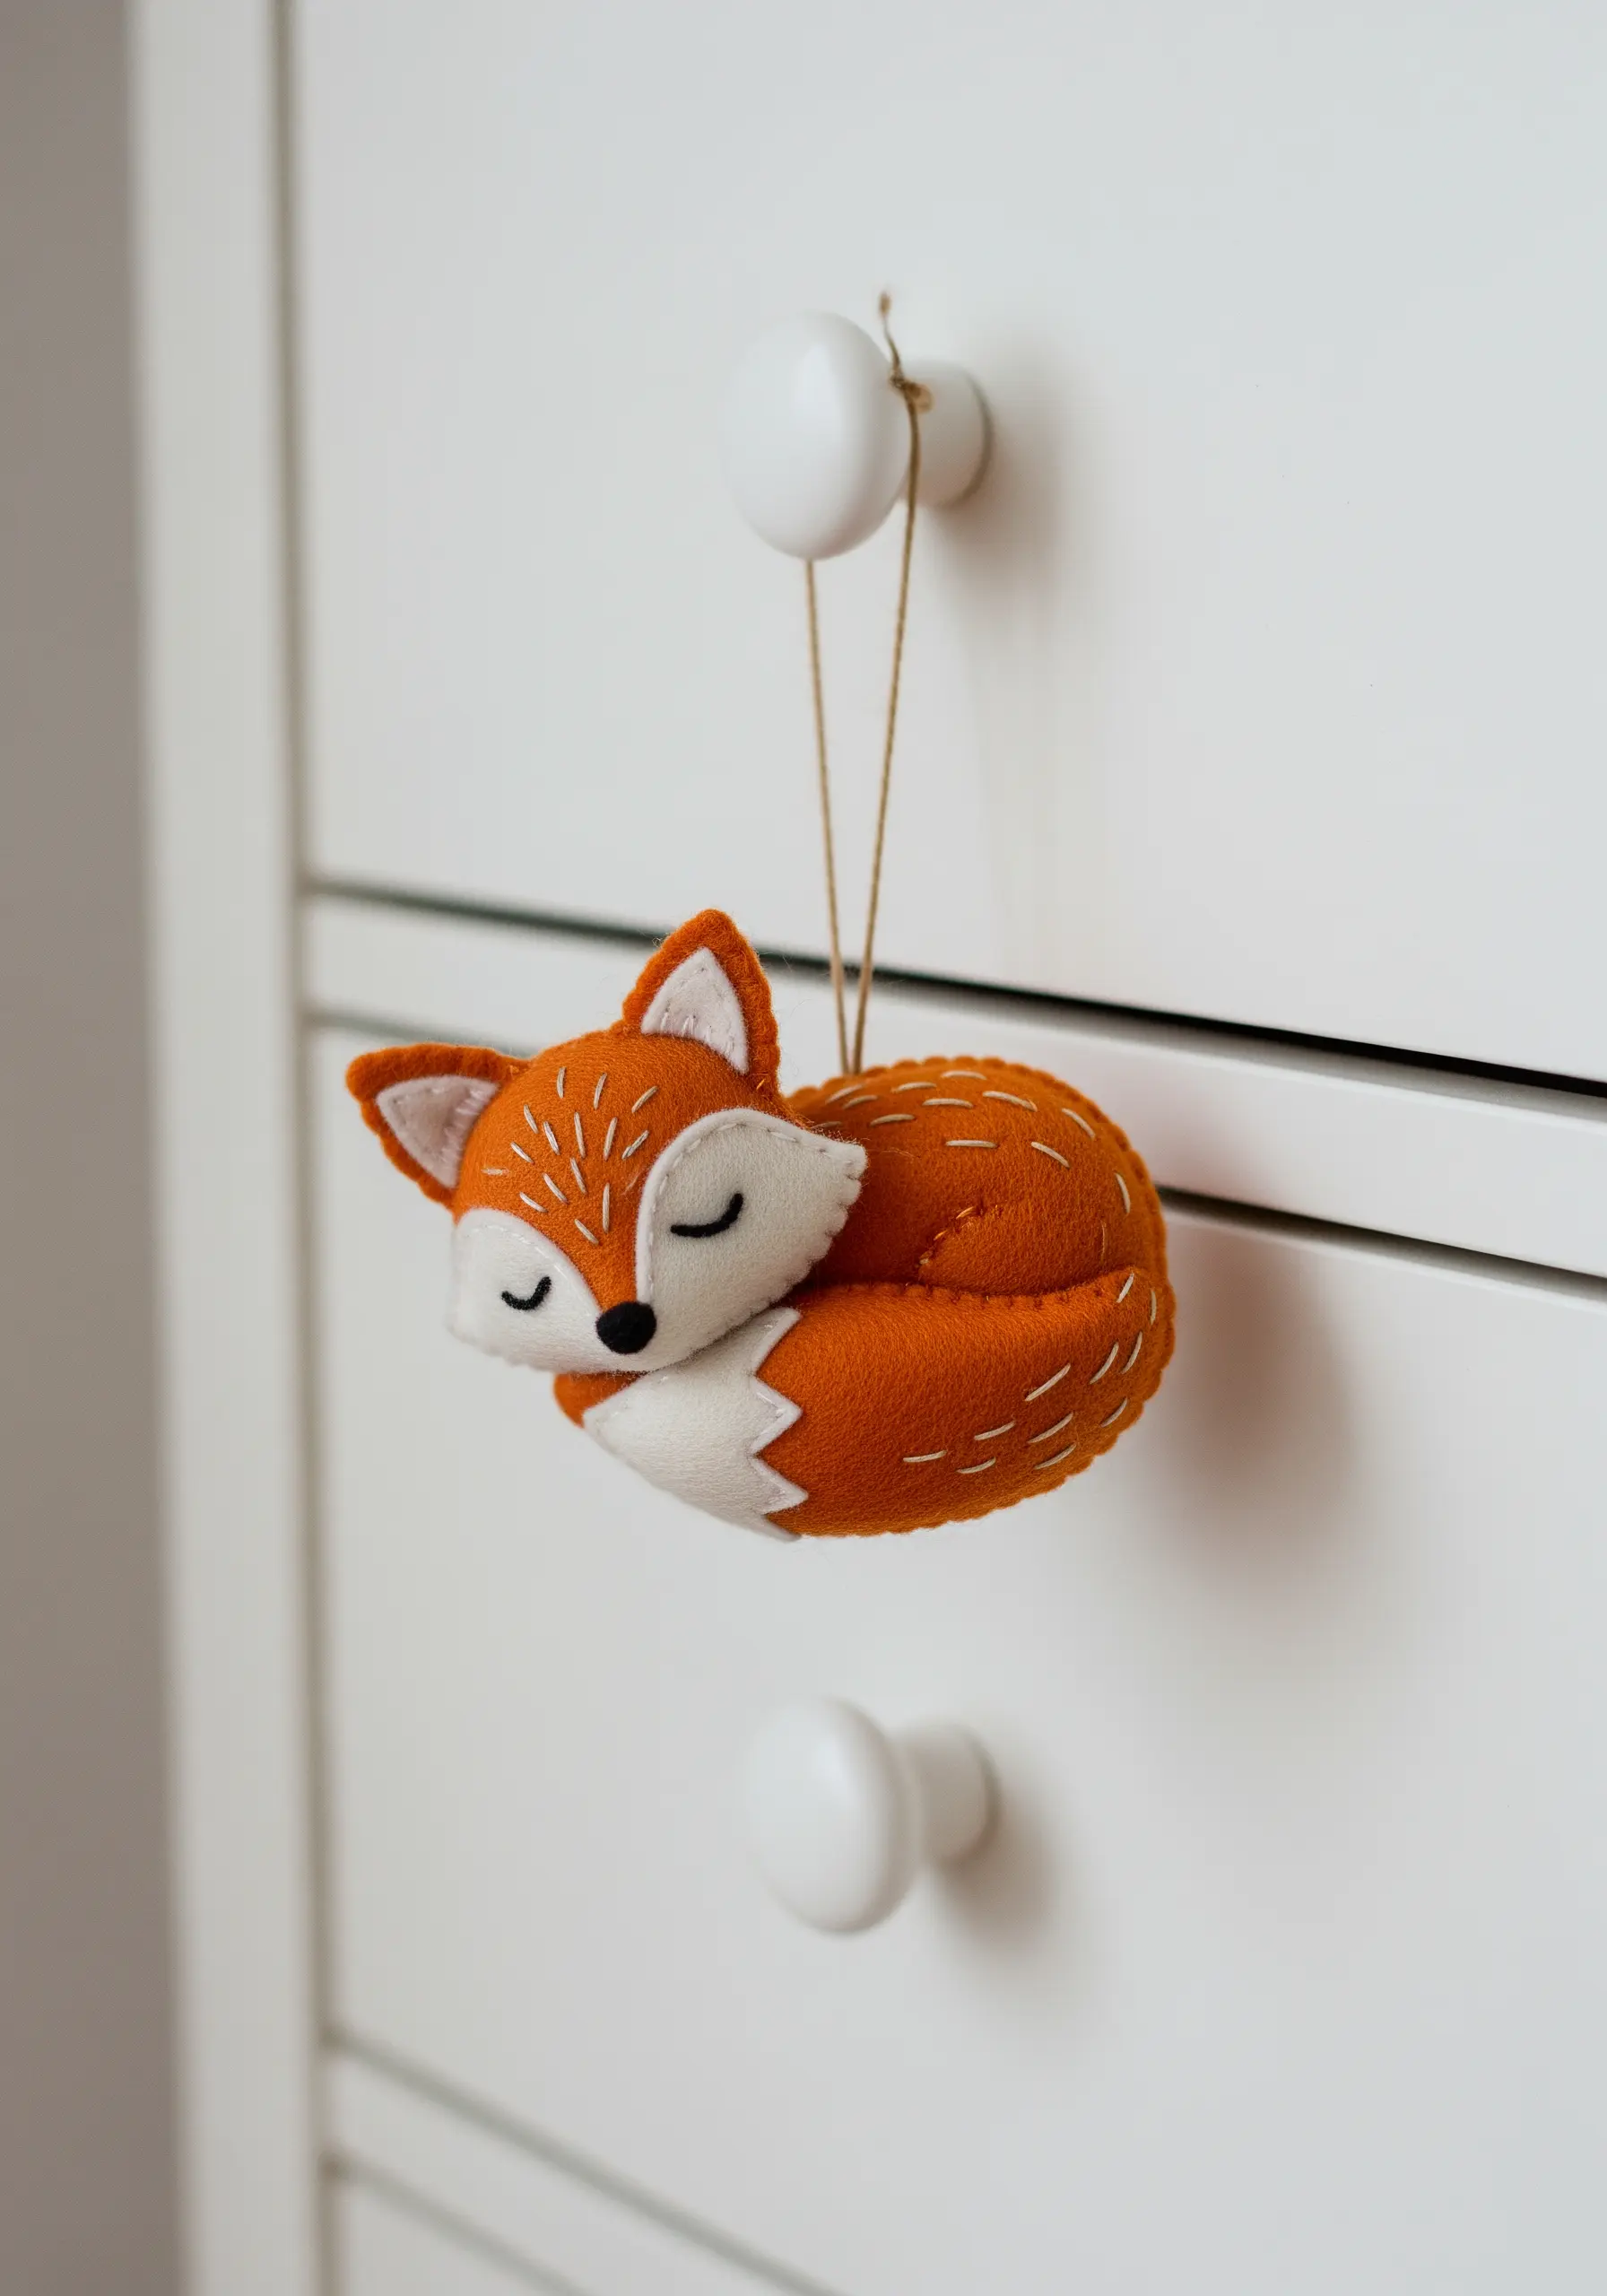
Create a charming, three-dimensional ornament by stitching together layered felt pieces.
Cut your fox pattern pieces from colored felt and use a simple running stitch or blanket stitch with a contrasting thread to join them.
Add minimal embroidered details, like sleepy eyes and a nose, with a few carefully placed stitches before stuffing.
Lightly stuff the fox with poly-fil before stitching it completely closed to give it a soft, sculptural shape perfect for hanging on a drawer knob or as a holiday ornament.
25. Embellish a Glasses Case with Accent Stitches
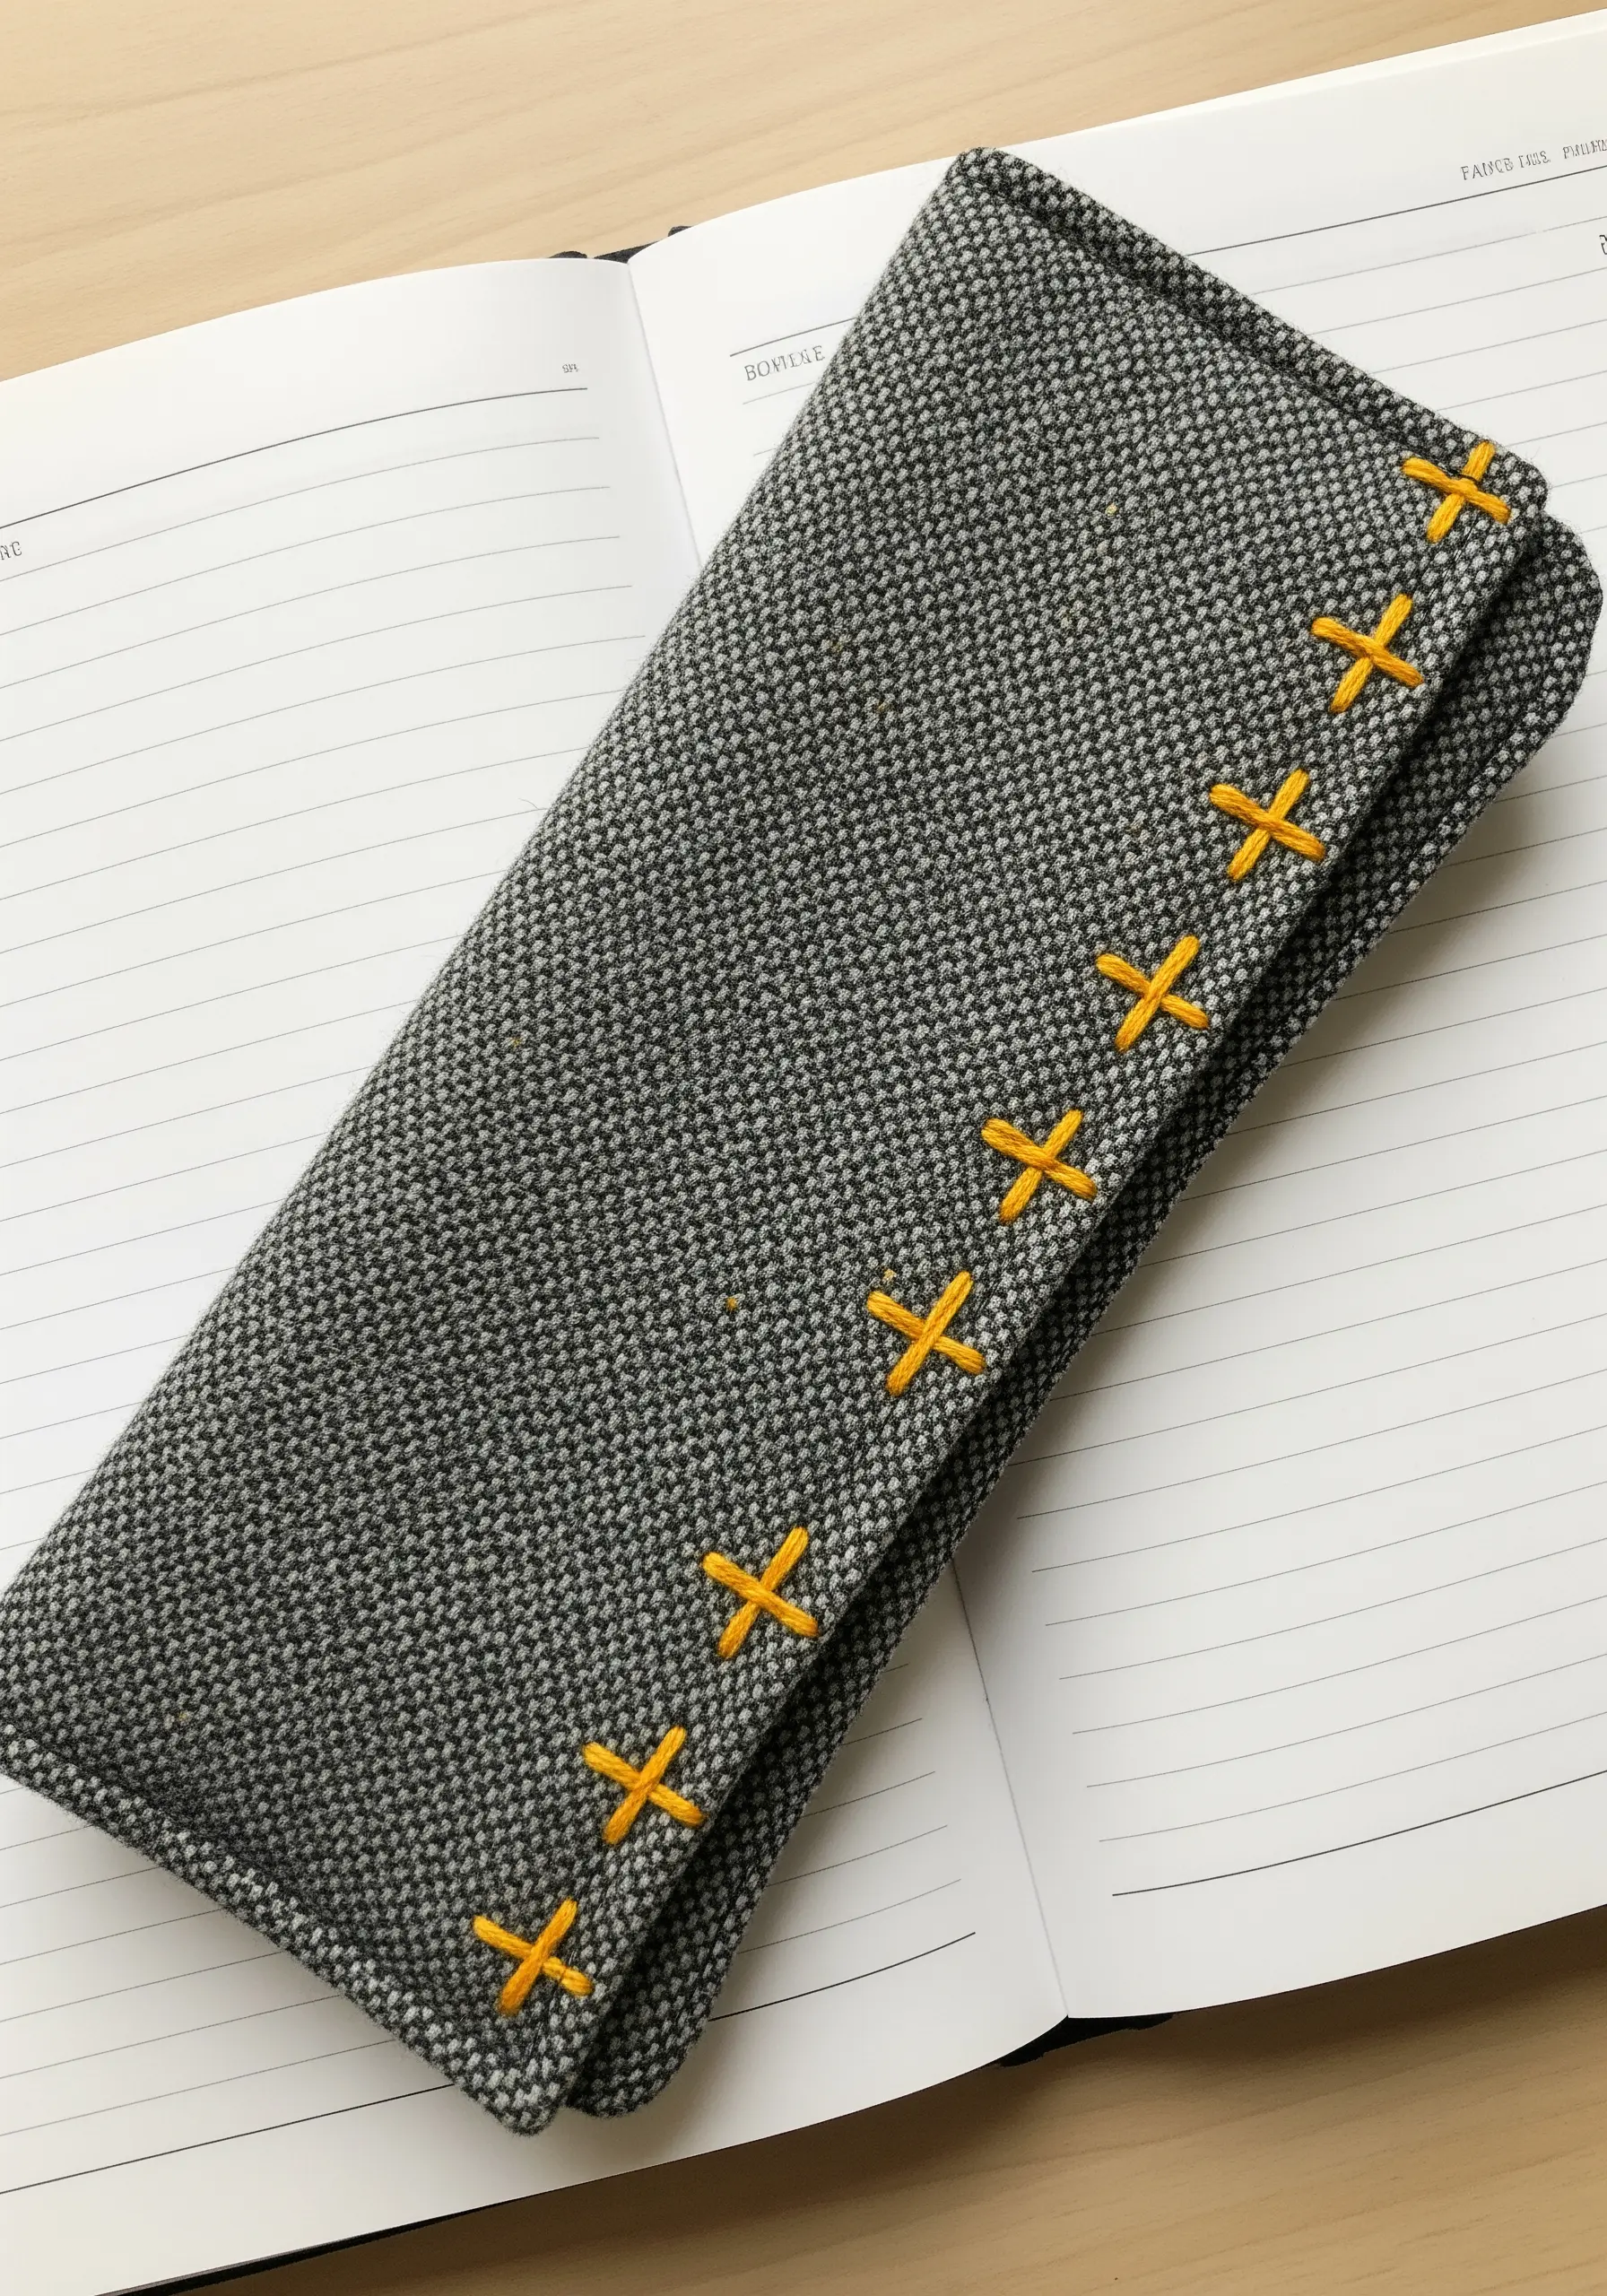
Add a touch of modern, minimal detail to a simple fabric pouch with a contrasting cross-stitch.
Using a thick, brightly colored thread like this yellow perle cotton creates a bold statement against a neutral, textured fabric like tweed.
Space the cross-stitches evenly along the seam or opening for a clean, graphic accent.
This technique is a perfect way to add a pop of personality and a handcrafted feel to a functional item without requiring a complex pattern.
26. Create Sculptural Monograms with Macrame Knots
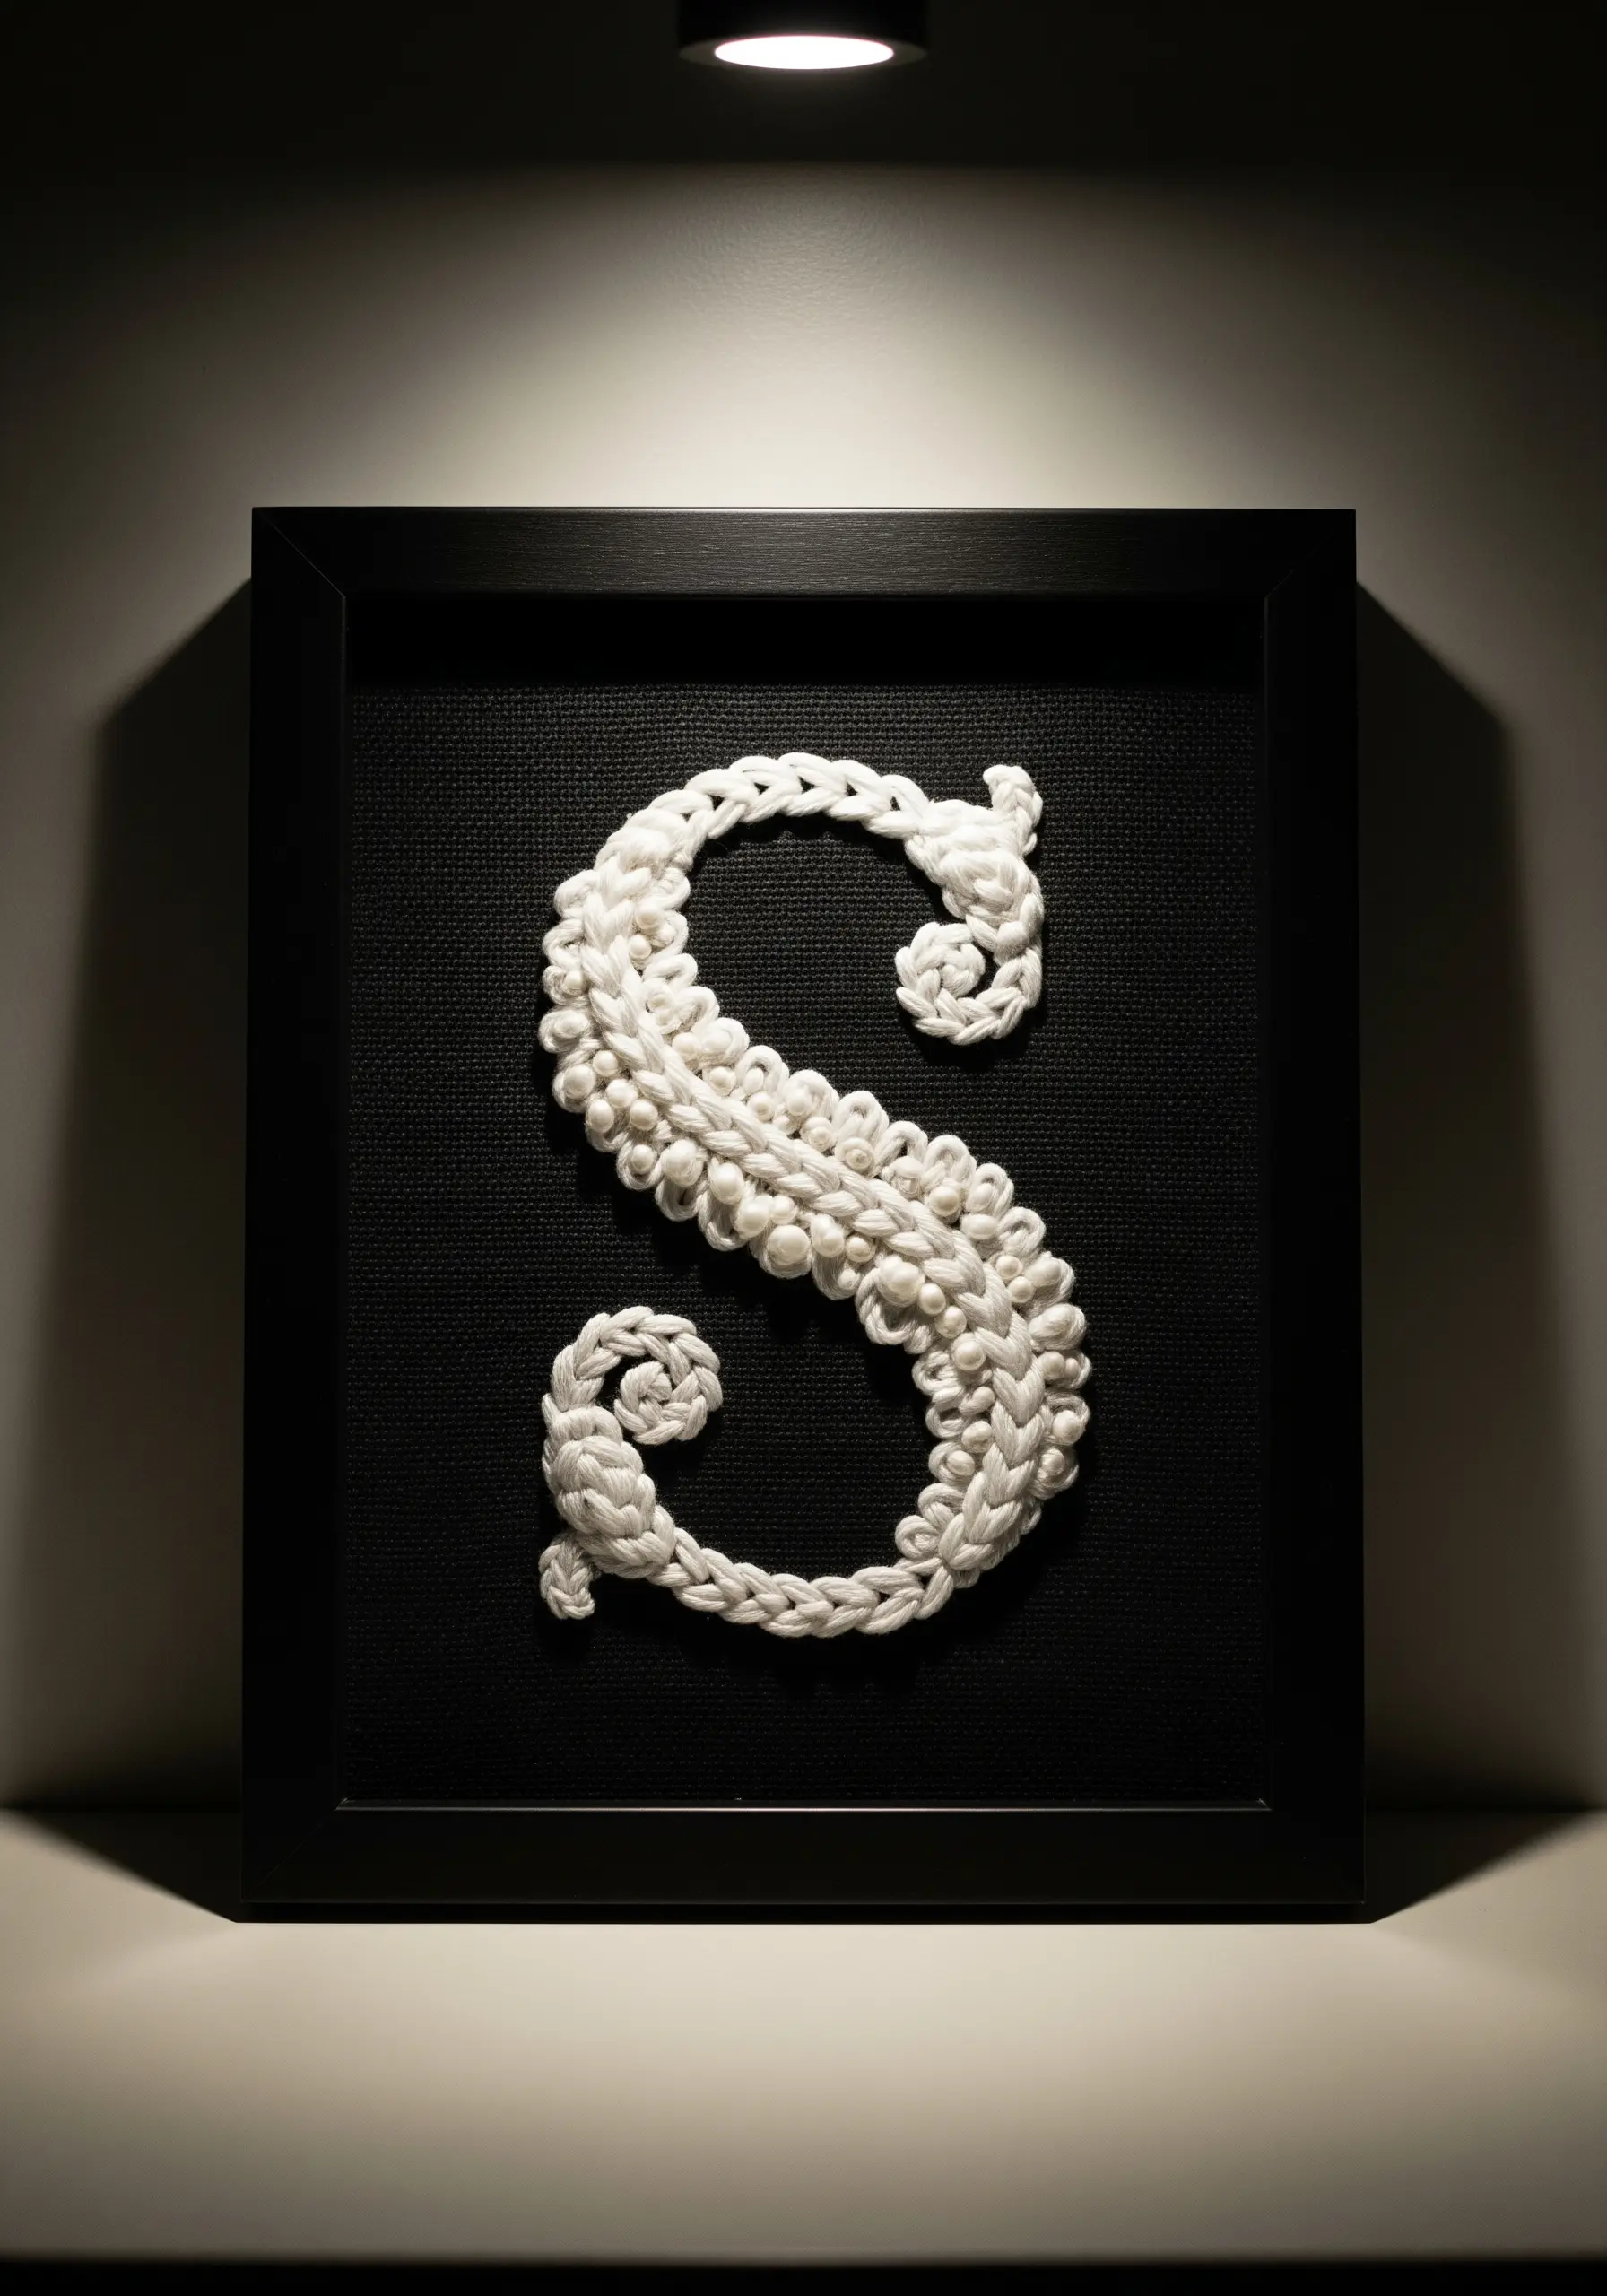
For a truly three-dimensional initial, use macrame or knotting techniques on a fabric-covered canvas.
Use a thick cotton cord and a series of basic knots, like the square knot or double half hitch, to form the letter’s shape.
Stitch the knotted cord securely onto a dark, contrasting background fabric like black Aida cloth. This high contrast makes the white cord pop, emphasizing its sculptural form.
This is a stunning way to create statement textured embroidery techniques for 3D wall decor that pops.
27. Master Fuzzy Texture with the Turkey Stitch

Replicate the fuzzy texture of a bumblebee by using the turkey stitch, also known as the ghiordes knot.
Create loops of thread on the surface of your fabric, securing each one with a small tacking stitch.
Once an area is filled with loops, carefully snip them open with sharp scissors and fluff them with your needle to create a soft, fuzzy pile.
Combine this with smooth satin-stitched areas and delicate blackwork for the wings to create a piece with incredible realism and varied textures.
28. Sew a Patchwork Advent or Memory Calendar
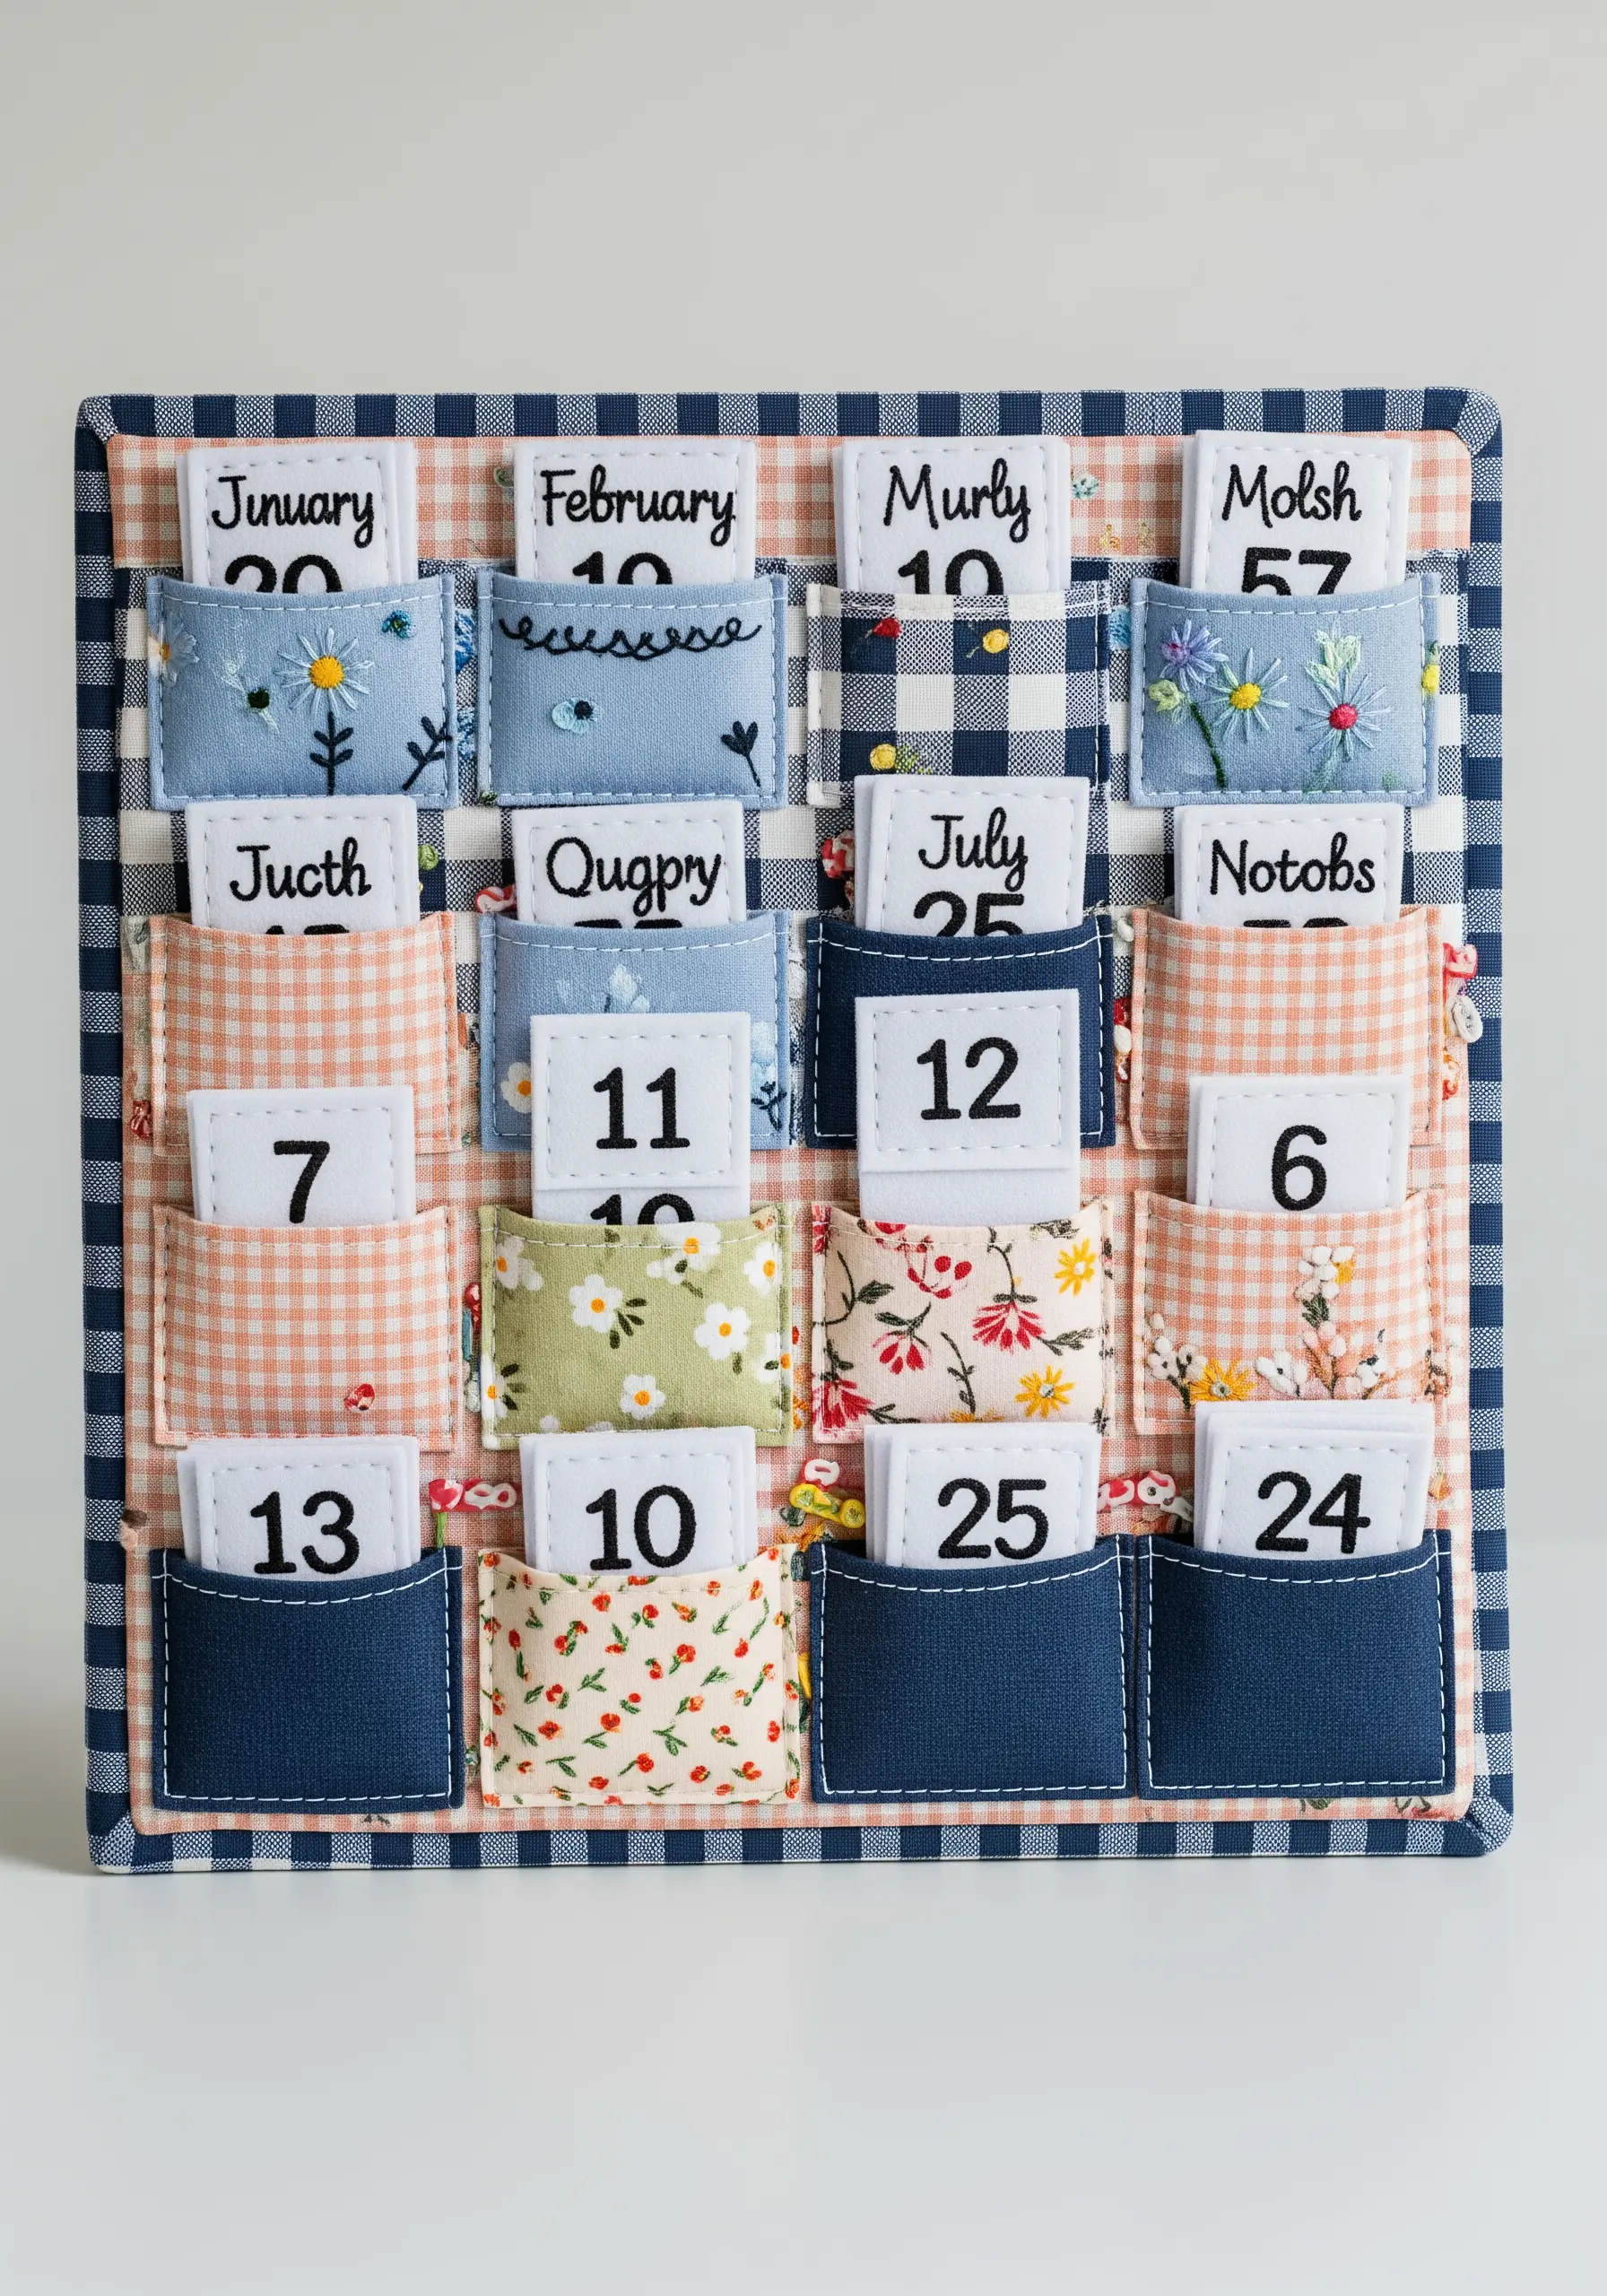
Combine simple patchwork, appliqué, and embroidery to create a reusable calendar with charming interactive pockets.
Use a variety of patterned fabric scraps for the pockets to create a whimsical, cottage-core aesthetic.
Add small, simple embroidery motifs—like lazy-daisy flowers or stars—to a few of the pockets for a touch of handmade detail.
This project is perfect for using up leftover fabric and can be adapted as a birthday countdown, chore chart, or advent calendar.
29. Add Subtle Embroidery to a Quilted Wall Hanging

Enhance a traditional quilt block with delicate, hand-stitched details.
After piecing your quilt top, add small embroidered elements like flowers or stars in the center block using a contrasting thread.
This subtle addition draws the eye to the center of the design and adds a layer of intricate, personal detail that complements the geometric patchwork.
It’s a beautiful way to merge the precision of quilting with the delicate artistry of hand embroidery.
30. Frame a Decorative Tray with a Floral Wreath

Turn an embroidery hoop into a beautiful and functional decorative tray.
Stitch a daisy wreath using white detached chain stitches for the petals and dense yellow French knots for the centers. This creates a cheerful, textured border.
Once finished, place the embroidery (still in its hoop) into a round wooden tray with a lip. You can place a piece of clear acrylic on top for a usable surface or simply display it as is.
31. Explore Abstract Art with Punch Needle
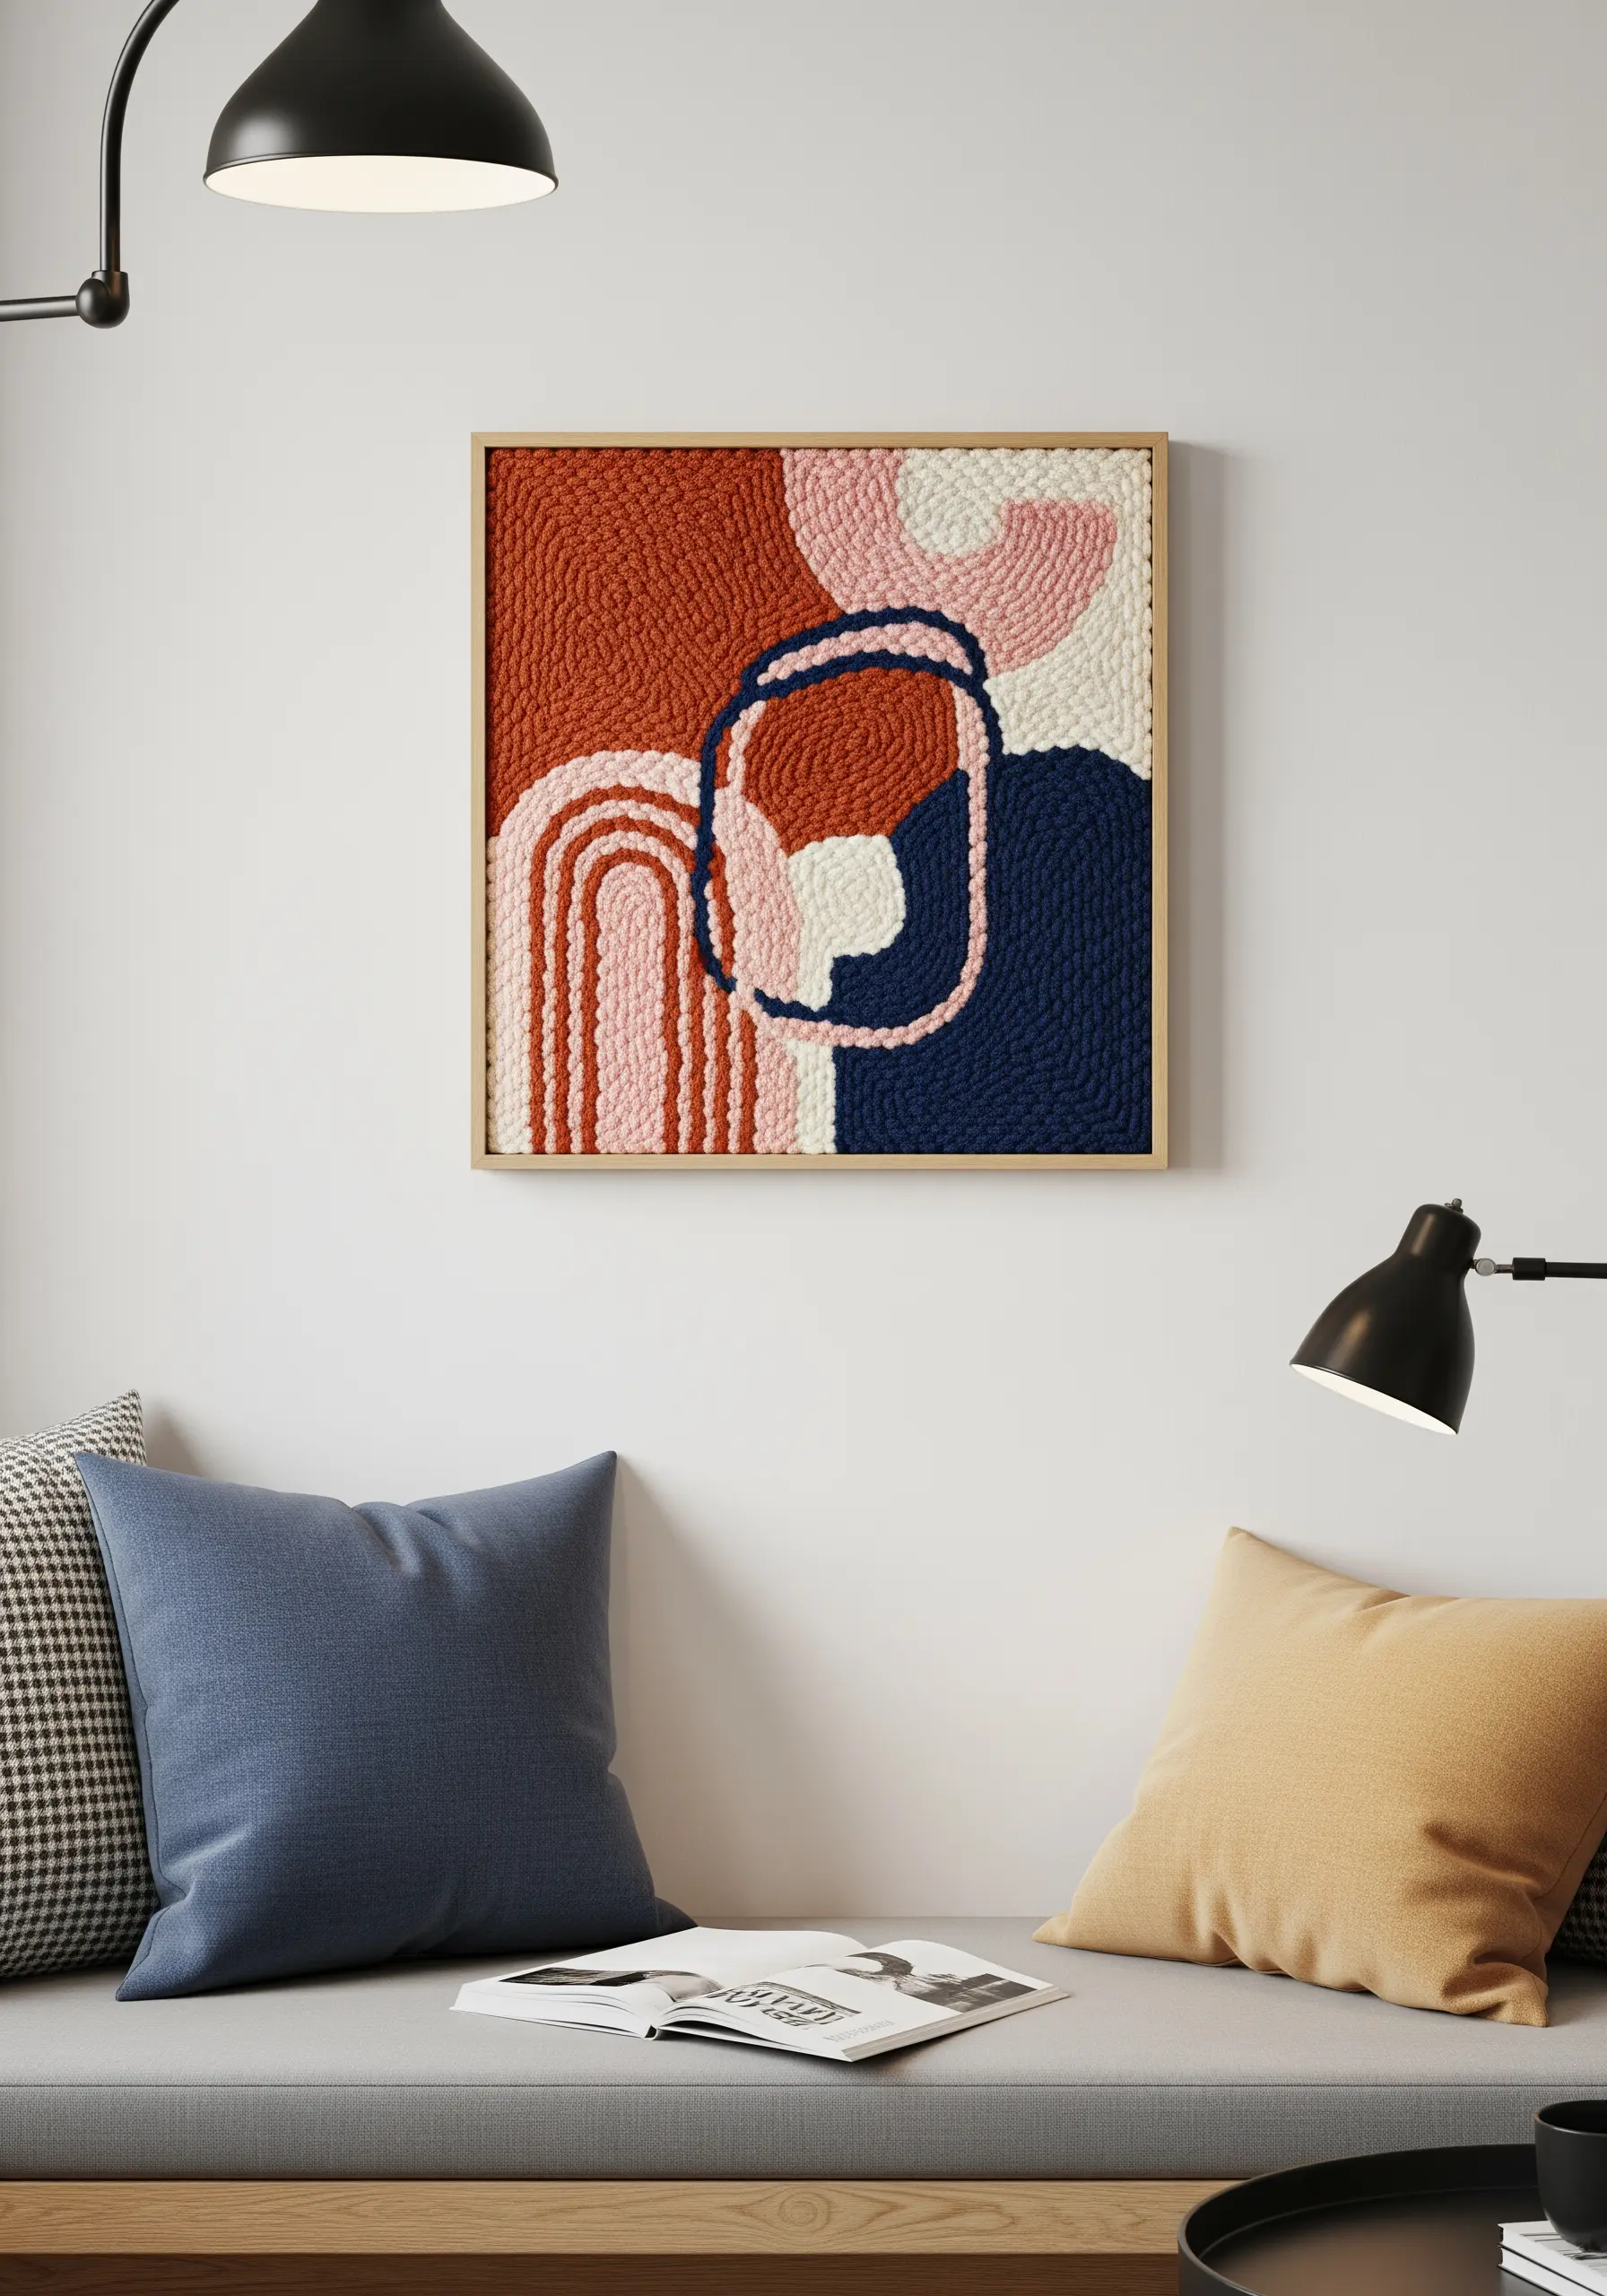
Create bold, abstract wall art with the satisfying and quick technique of punch needle embroidery.
Use a variety of yarn textures and colors to fill in blocks of an abstract design. The loops created by the punch needle give the piece a plush, rug-like texture.
Play with loop height by adjusting your needle settings to create subtle variations in depth and dimension across the piece.
This method is perfect for creating large, impactful modern yarn wall art designs that will wow your guests with a contemporary feel.
32. Stitch a Minimalist Memento Pennant

Capture a memory of a favorite place with a clean, modern embroidered pennant.
Use a simple backstitch with a dark, high-contrast thread to create a crisp outline of a landmark or landscape.
Pair the icon with a bold, sans-serif font for the location name to maintain a modern, graphic aesthetic.
This minimalist approach turns a travel souvenir into a stylish piece of decor that fits seamlessly into a gallery wall or on a corkboard of memories.
33. Embellish a Light Switch Cover with Fabric and Knots
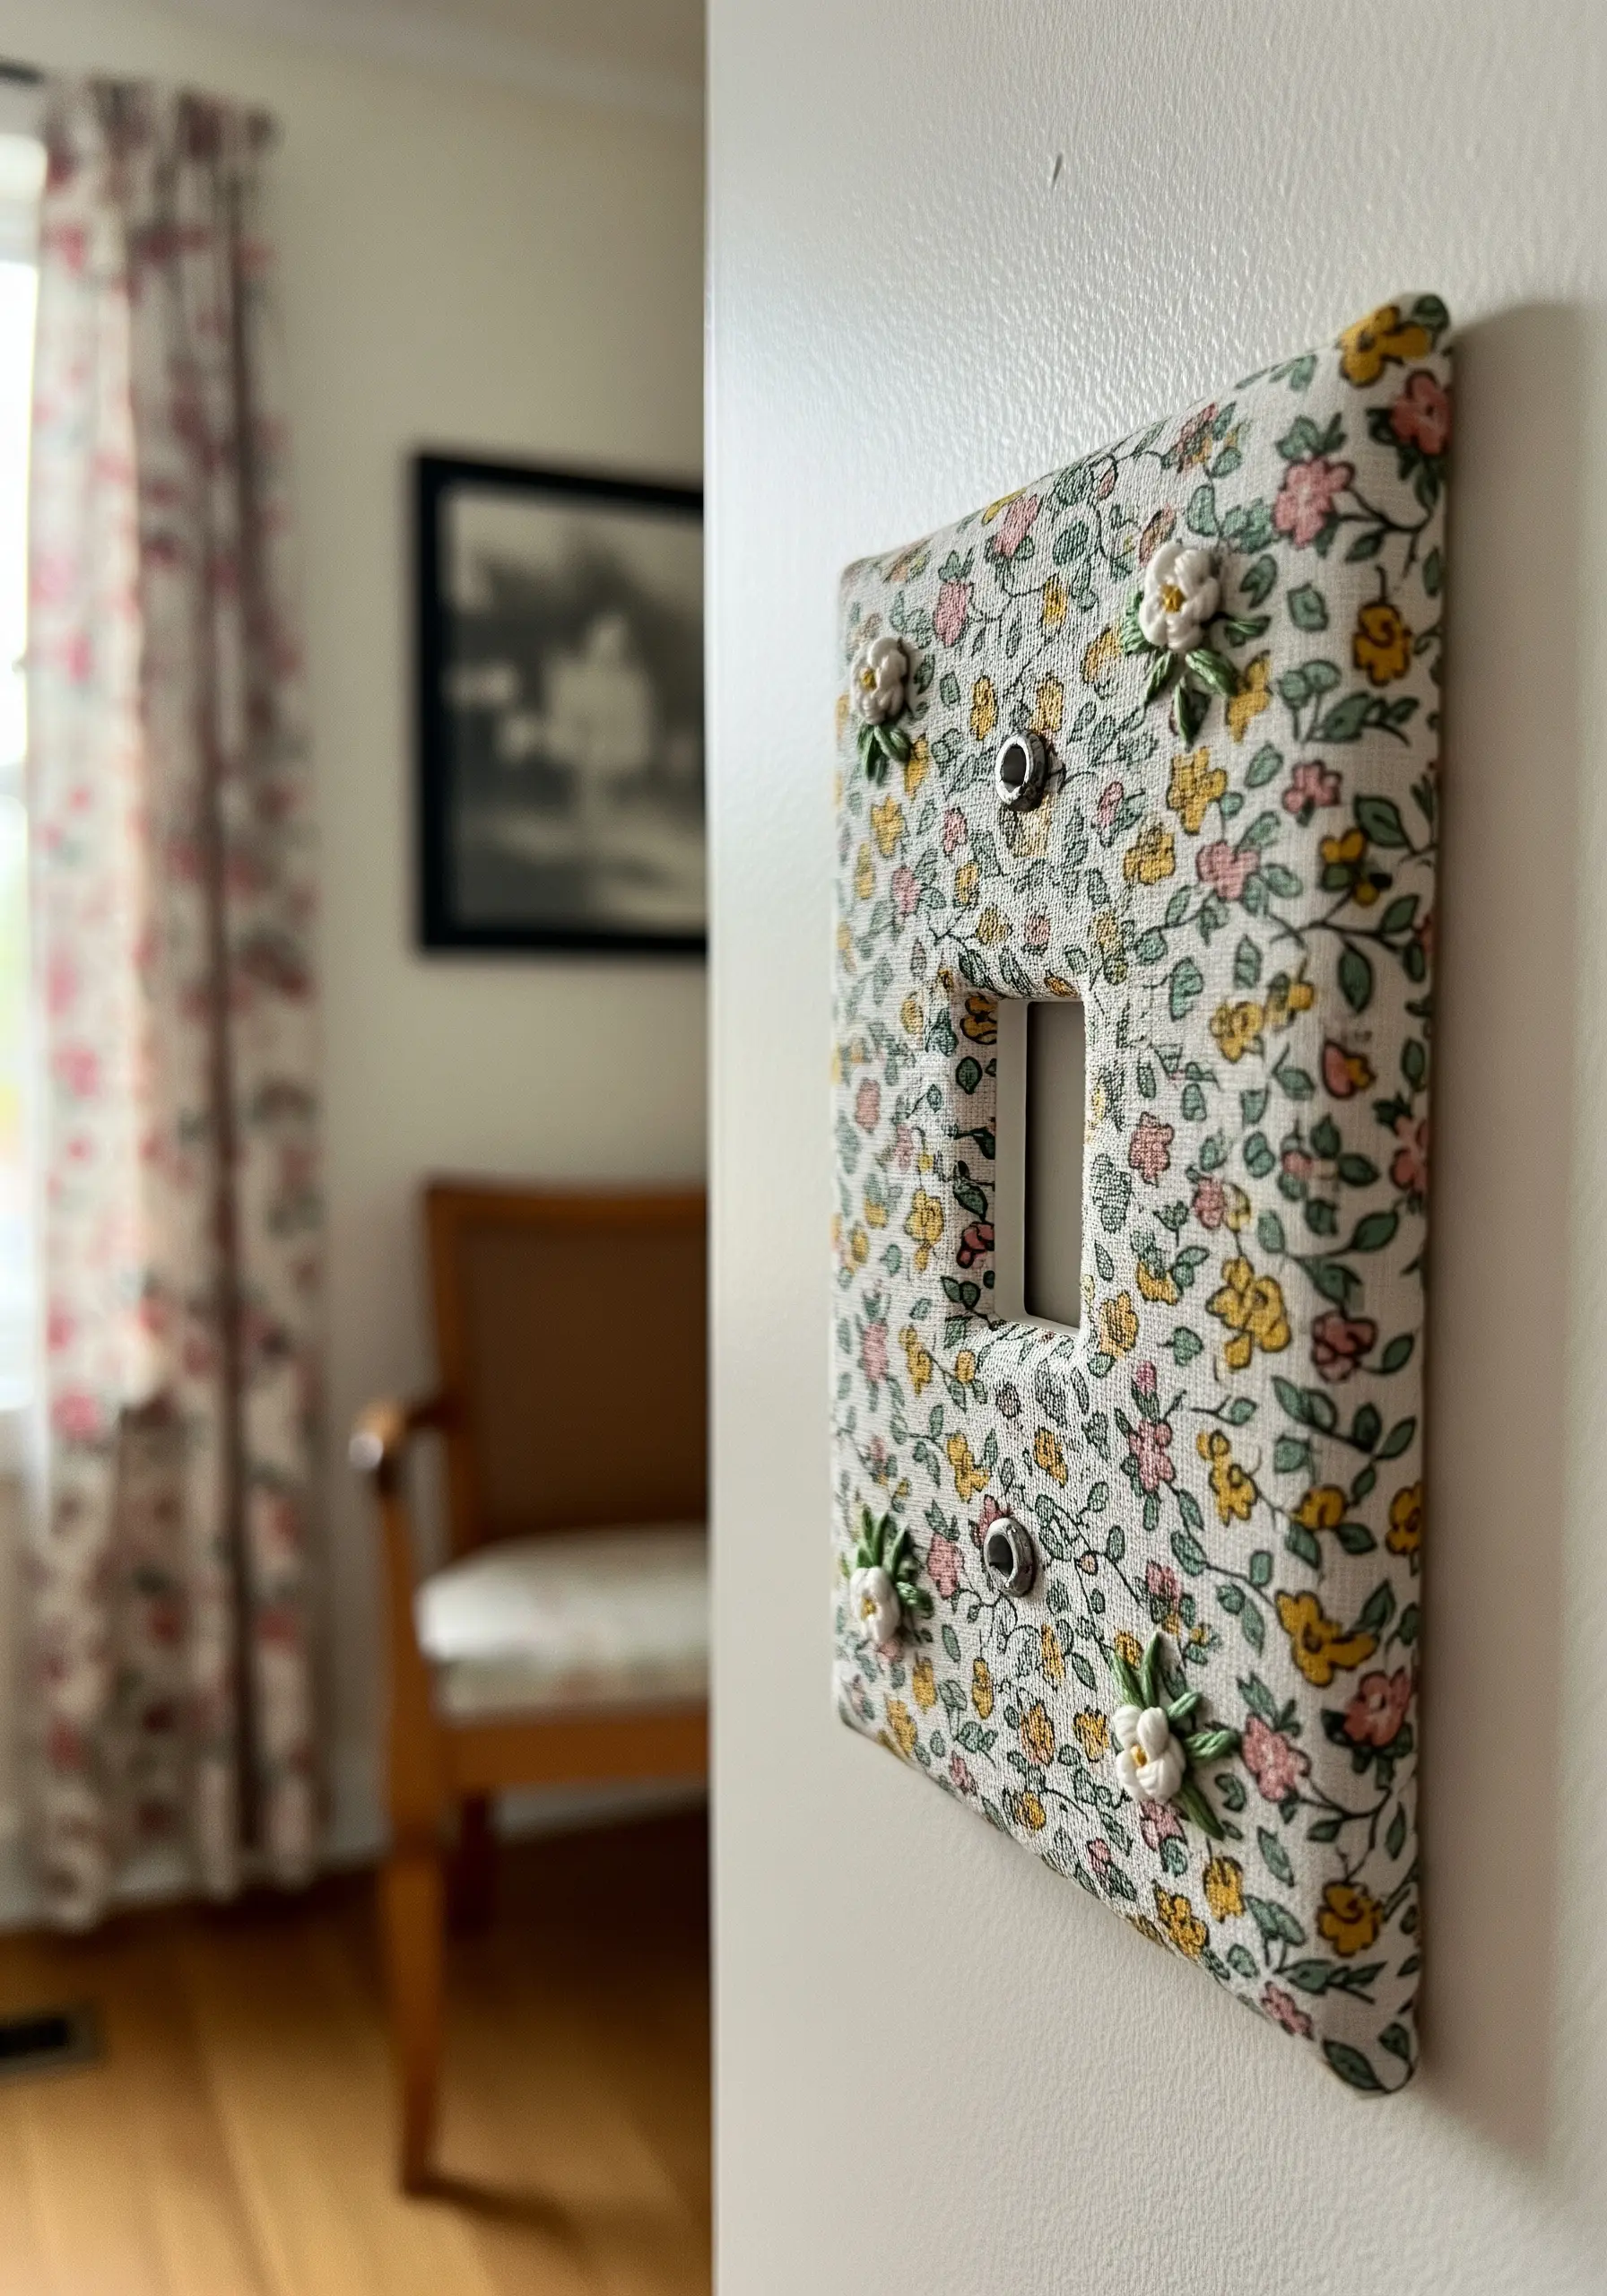
Elevate a mundane household fixture by covering it with floral fabric and adding tiny embroidered details.
Wrap a standard plastic light switch plate with a fabric scrap, securing it at the back with craft glue.
Add dimension by stitching tiny French knots or seed beads over some of the printed flowers on the fabric.
This subtle, textural detail catches the light and turns a simple utility item into a cohesive part of your room’s decor.
34. Curate a Mini Hoop Gallery Wall
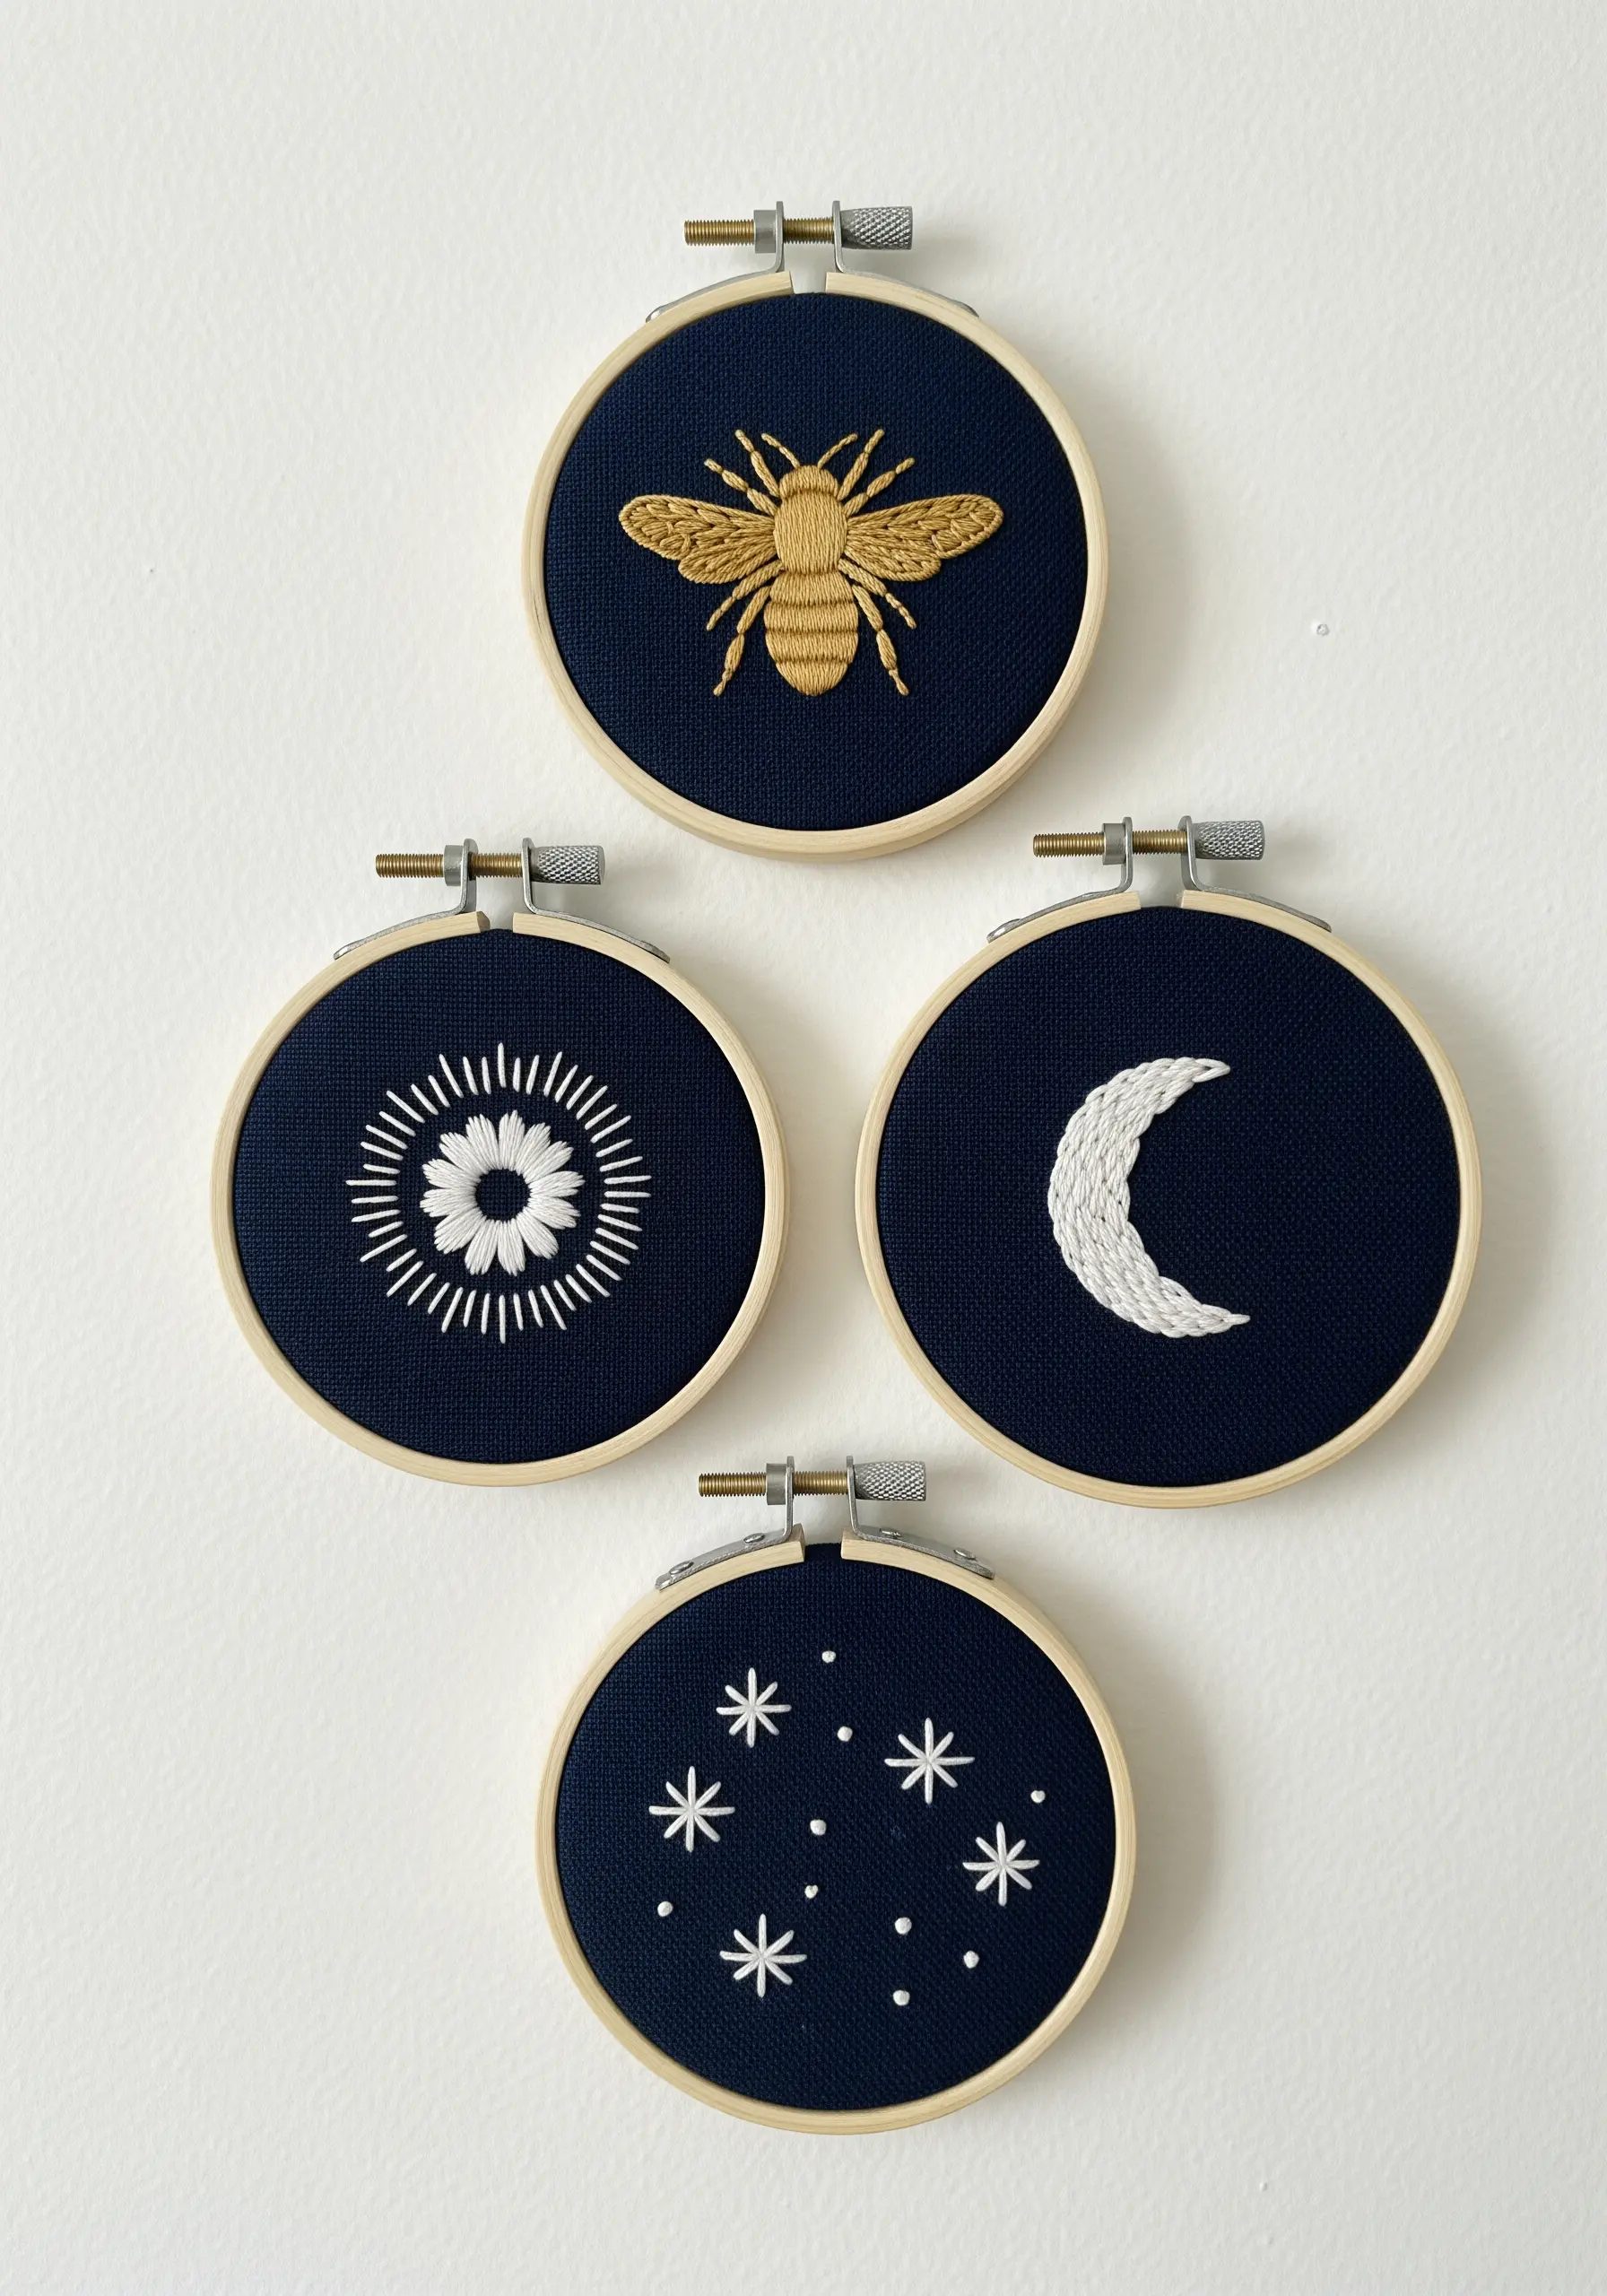
Create a sophisticated and cohesive display using a collection of small, themed embroidery hoops.
Stick to a strict color palette—like navy, white, and gold—to unify the different designs.
Embroider simple, iconic motifs on each hoop. The key to this look is using negative space effectively; don’t overcrowd the fabric.
Arranging these hooped wall collage layouts in a tight cluster creates a single, impactful piece of art that is perfect for small walls or cozy nooks.
35. Add a Minimalist Touch to a Fabric Doorstop
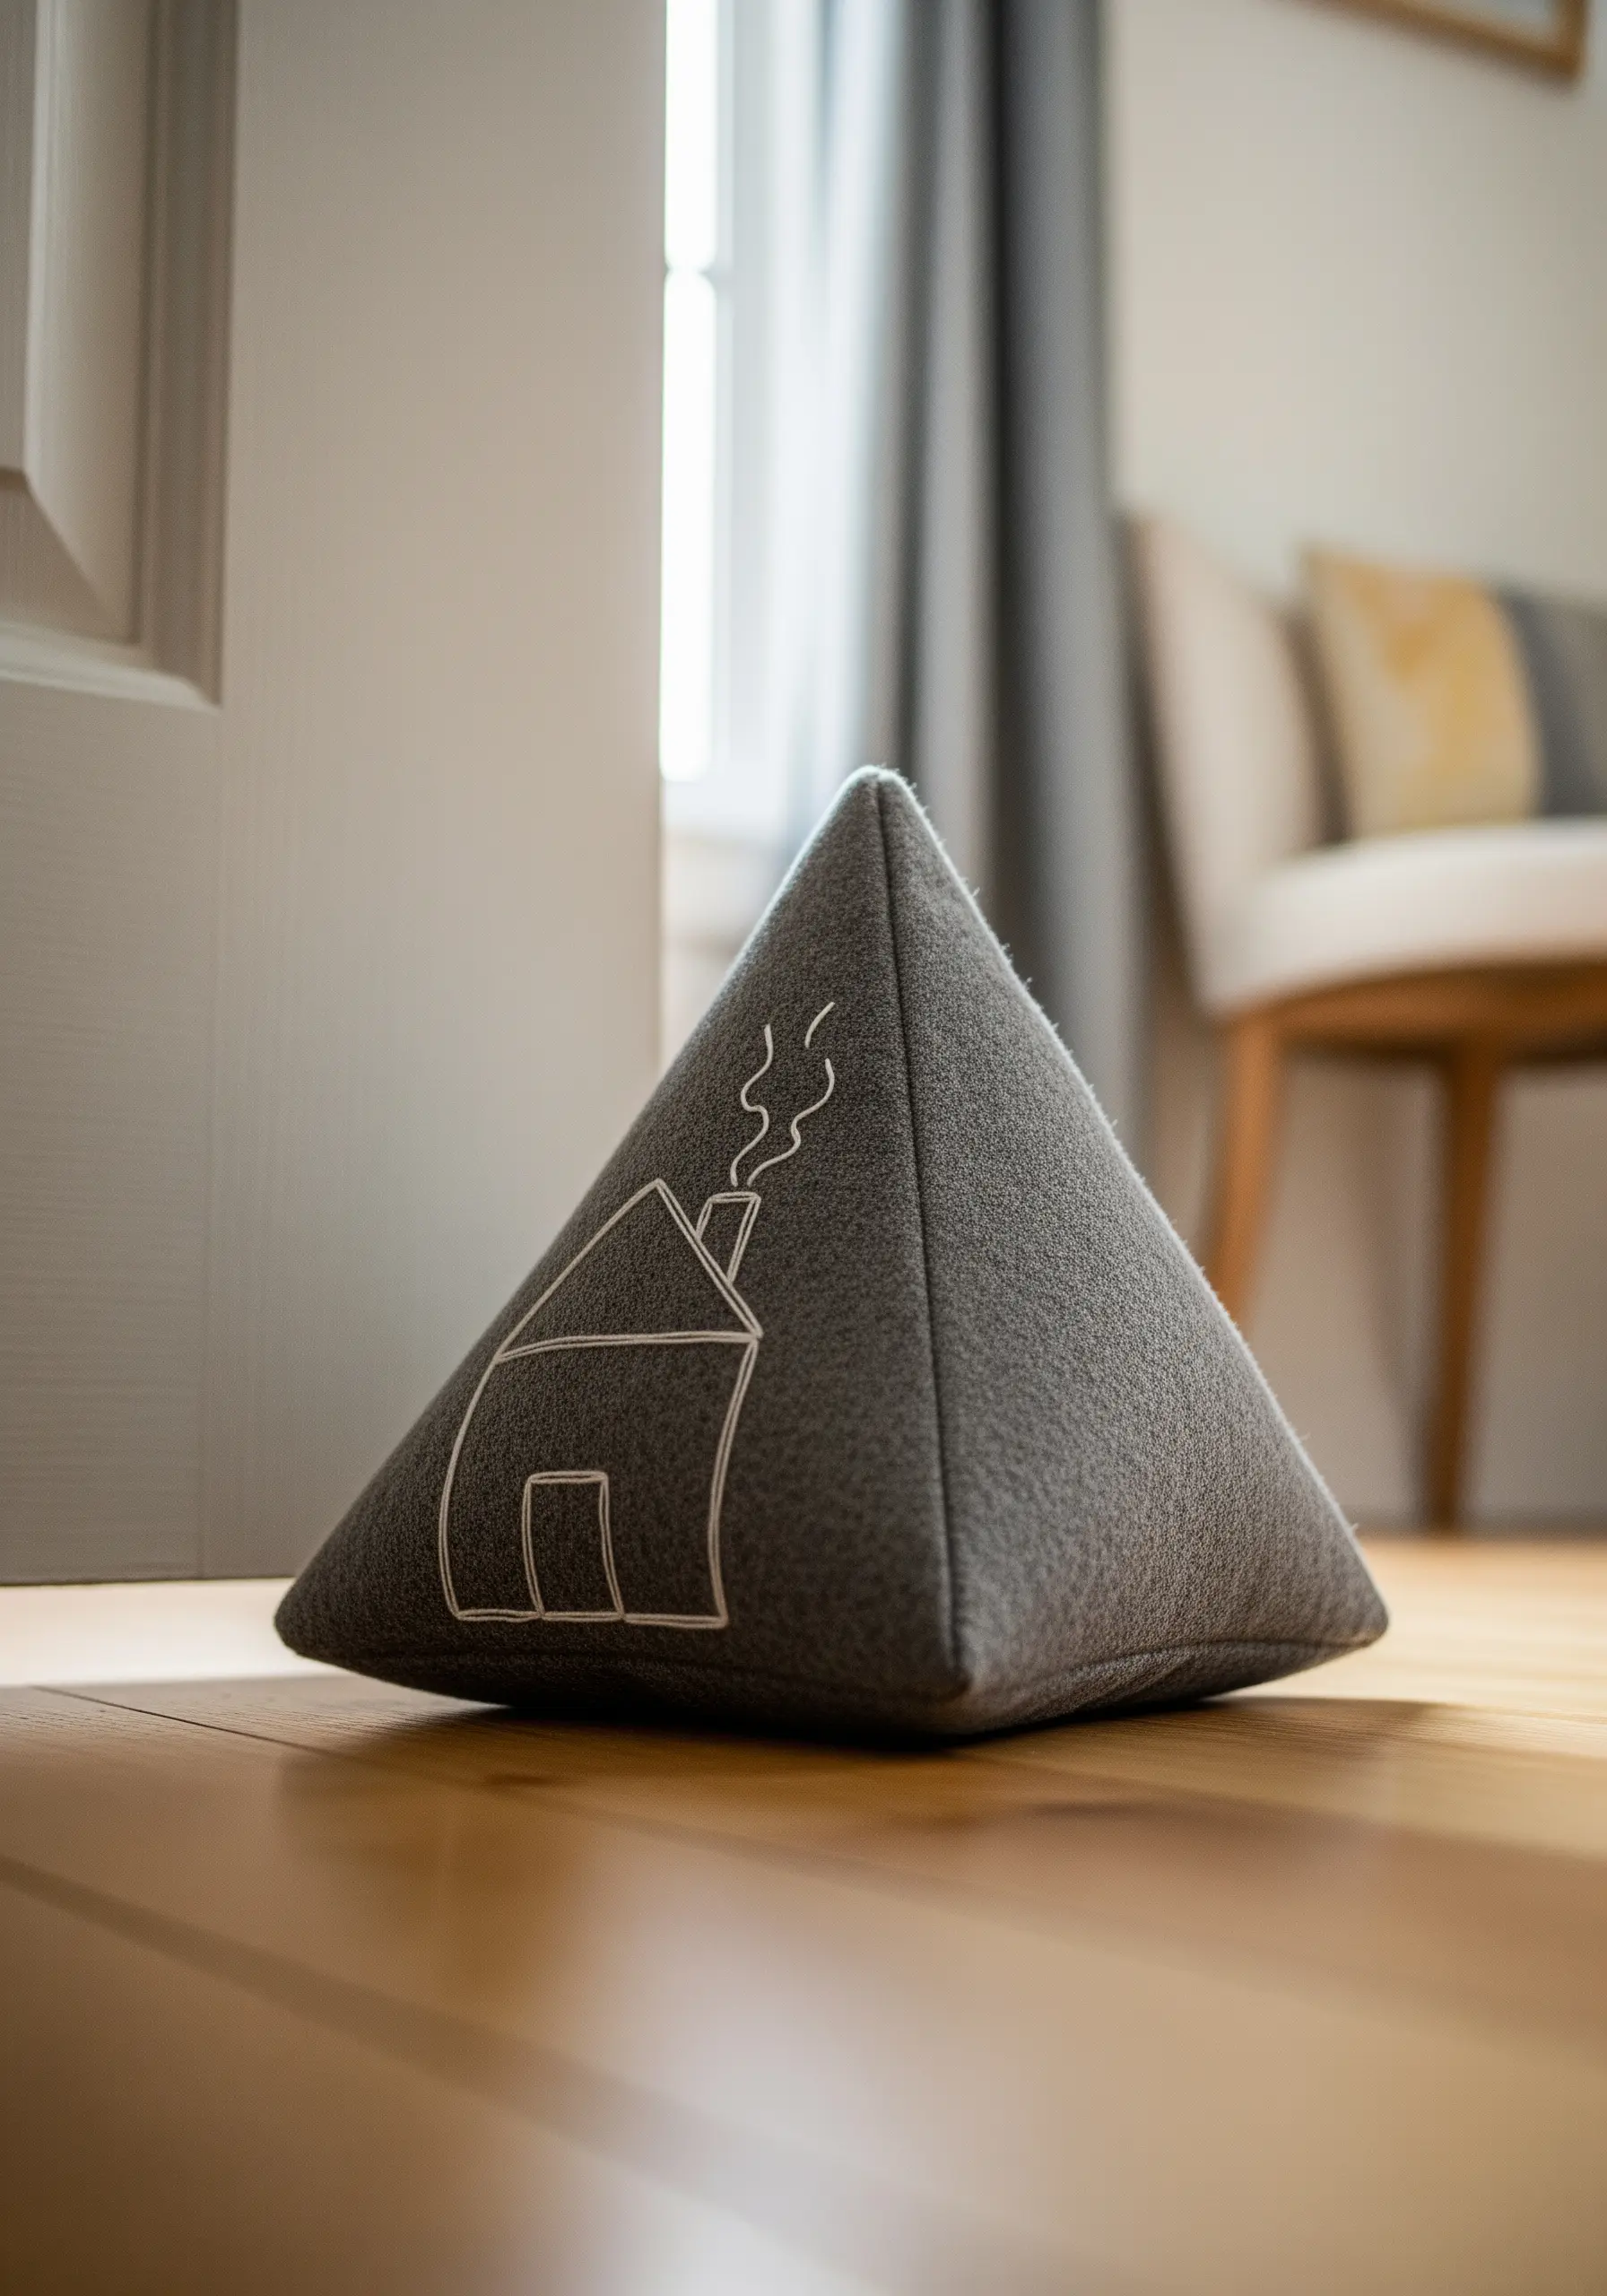
Transform a simple, functional object like a doorstop with a single, elegant line-art motif.
Construct a pyramid or cube shape from a heavy, durable fabric like felt or canvas, and fill it with sand or rice for weight.
Before sewing the final seam, use a simple backstitch with a contrasting thread to add a clean, whimsical design.
This minimalist embroidery adds a touch of personality and charm, proving that even the most practical items in your home can be beautiful.


