

You have the threads, the paper, the fabric scraps. But how do you combine them into something that feels less like a craft project and more like a story? It starts by rethinking the role of your stitches.
Instead of just filling in shapes, let your thread become a line that connects, a texture that defines, or a structure that builds. Paper isn’t just a background; it’s a layer, a character in your composition. When you see these materials as partners, your work gains an immediate and intentional depth.
In the ideas that follow, you won’t find complex instructions. Instead, you’ll find new ways of seeing—how a simple backstitch can map a memory, how layered paper can frame a feeling, and how your needle can be a tool for creating not just patterns, but narratives. Let’s begin.
1. Stitch a Narrative Path on Paper
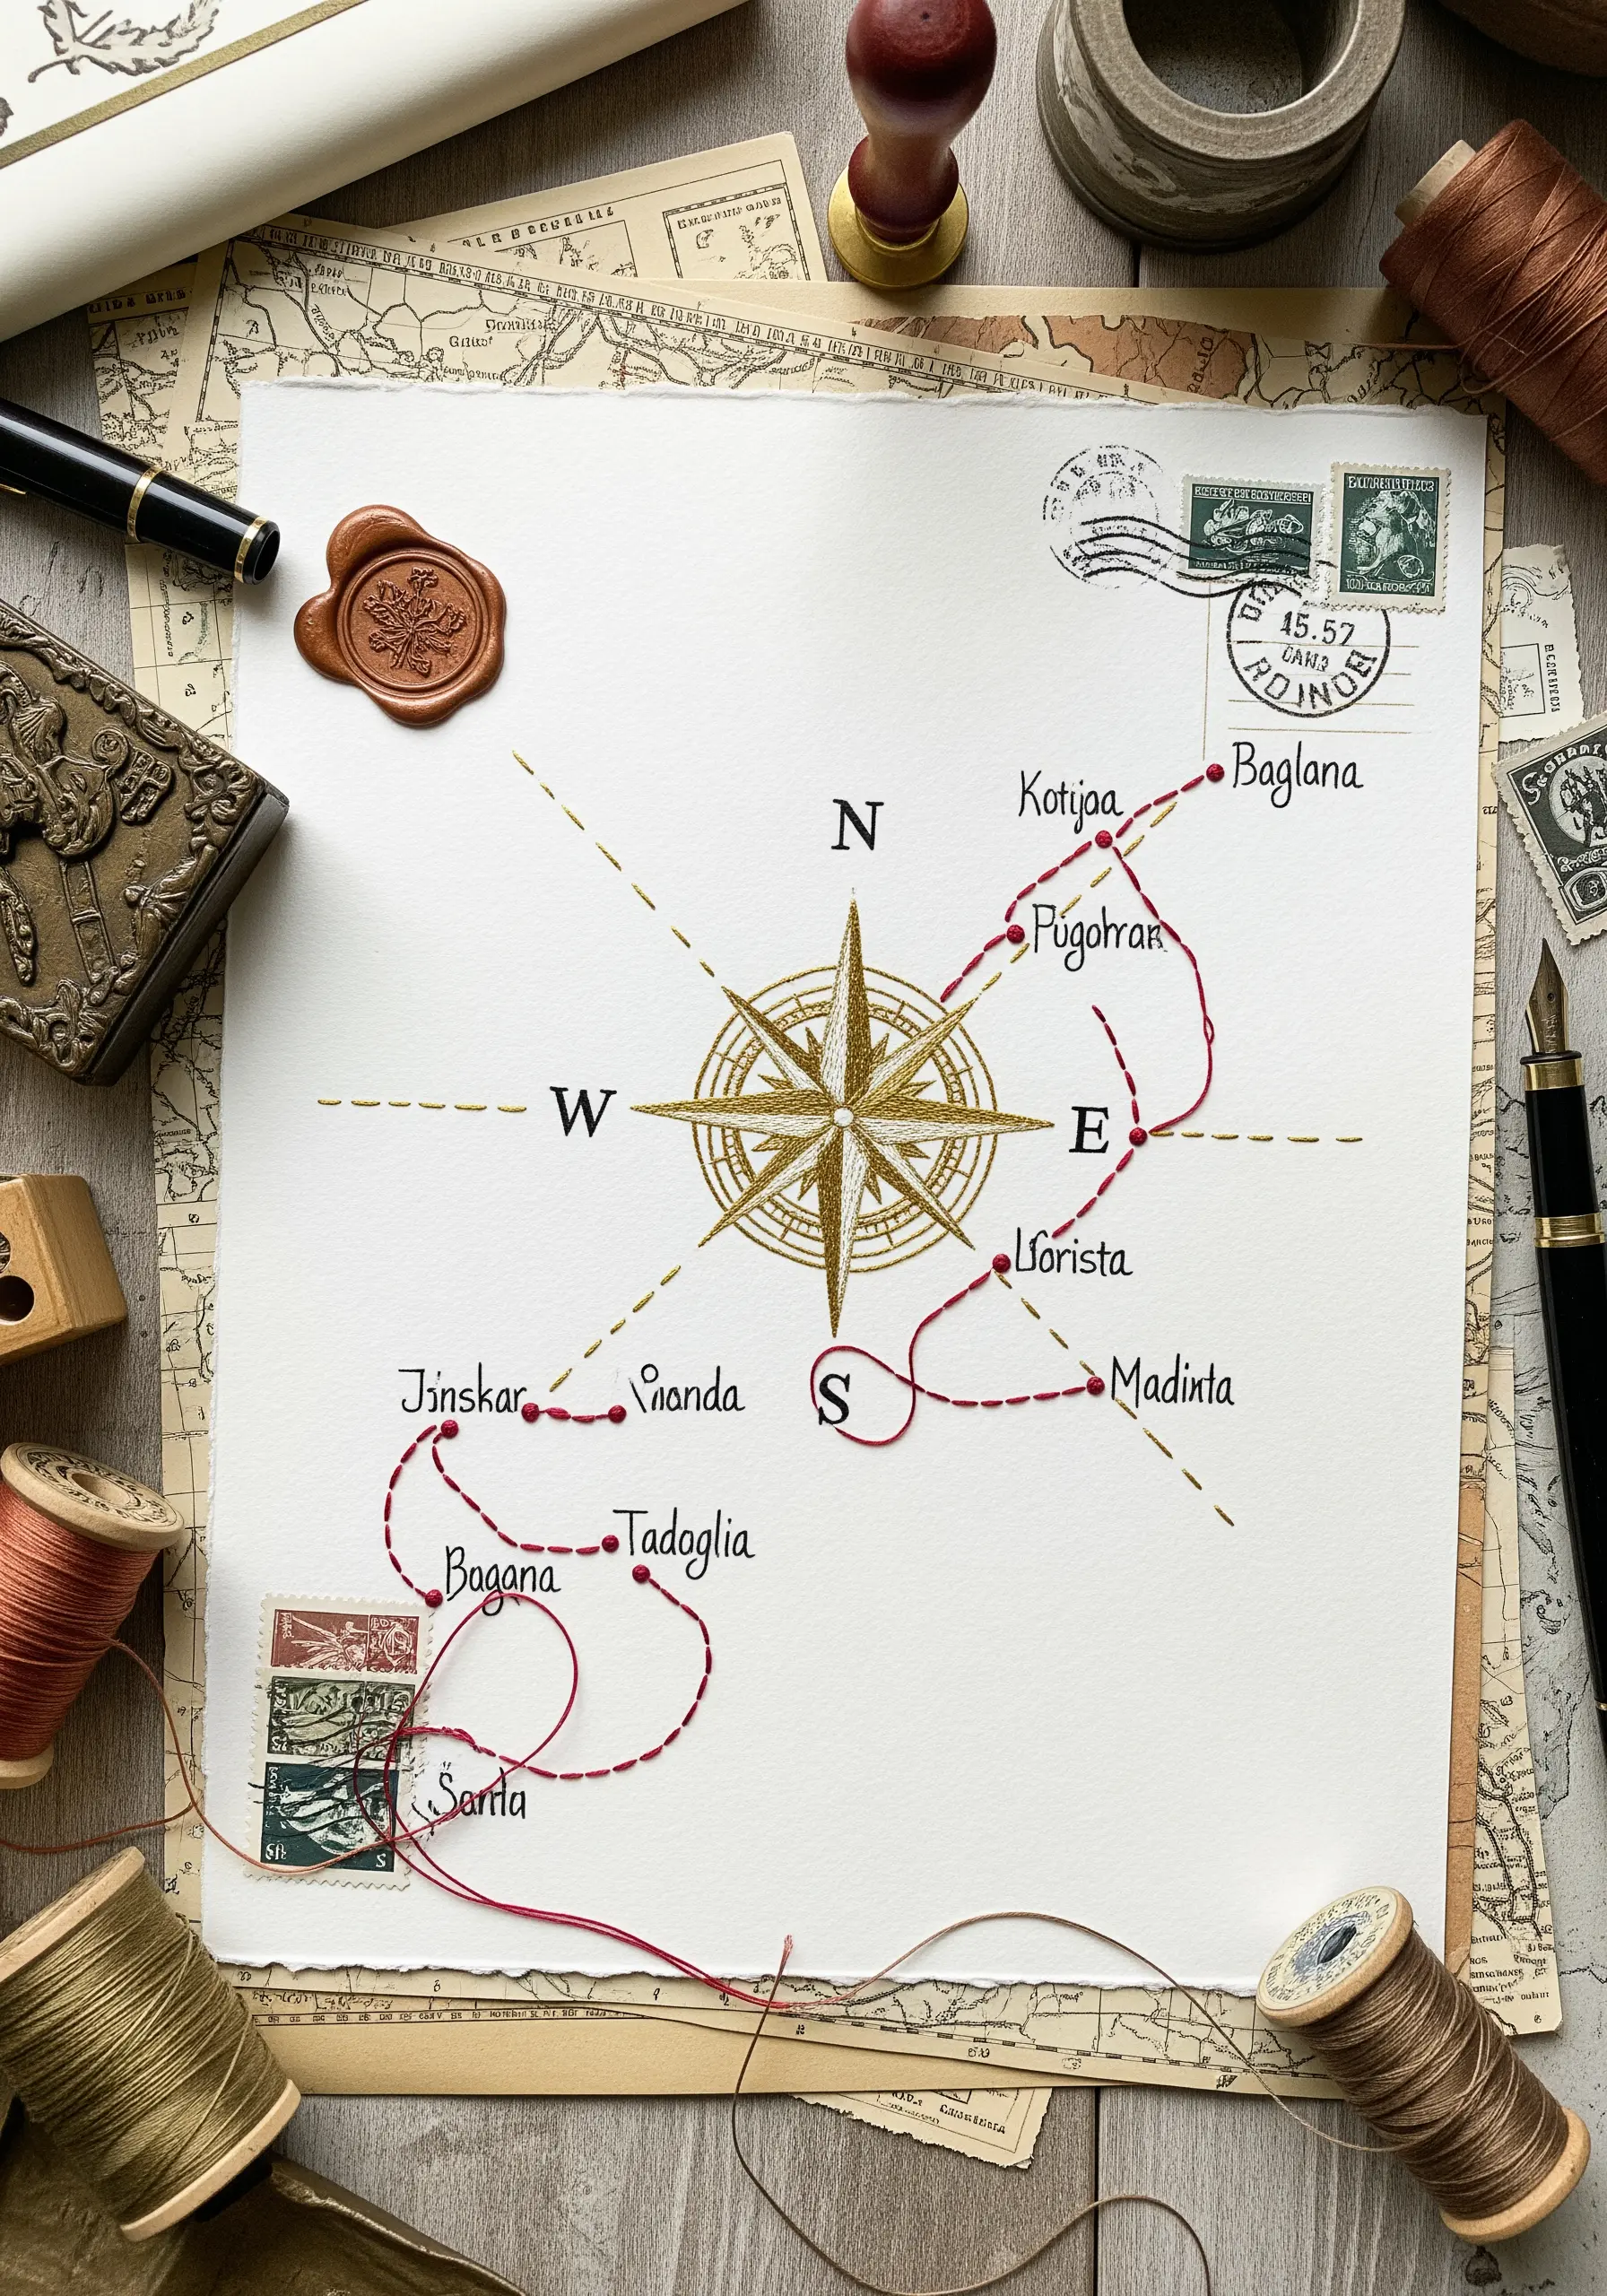
Transform a simple map or drawing into a personal story by stitching the journey directly onto heavy cardstock or watercolor paper.
First, gently pierce the paper along your intended path with a fine needle or awl; this prevents tearing when you pull the thread through.
Use a simple backstitch with two strands of cotton floss to create a clean, intentional line that mimics ink but adds tactile depth.
Varying the stitch length can give the path a more organic, hand-drawn quality, making your final piece feel both rustic and refined.
These paper art projects that transform ordinary stitches become meaningful keepsakes, mapping memories rather than just locations.
2. Layer Pressed Botanicals with Thread
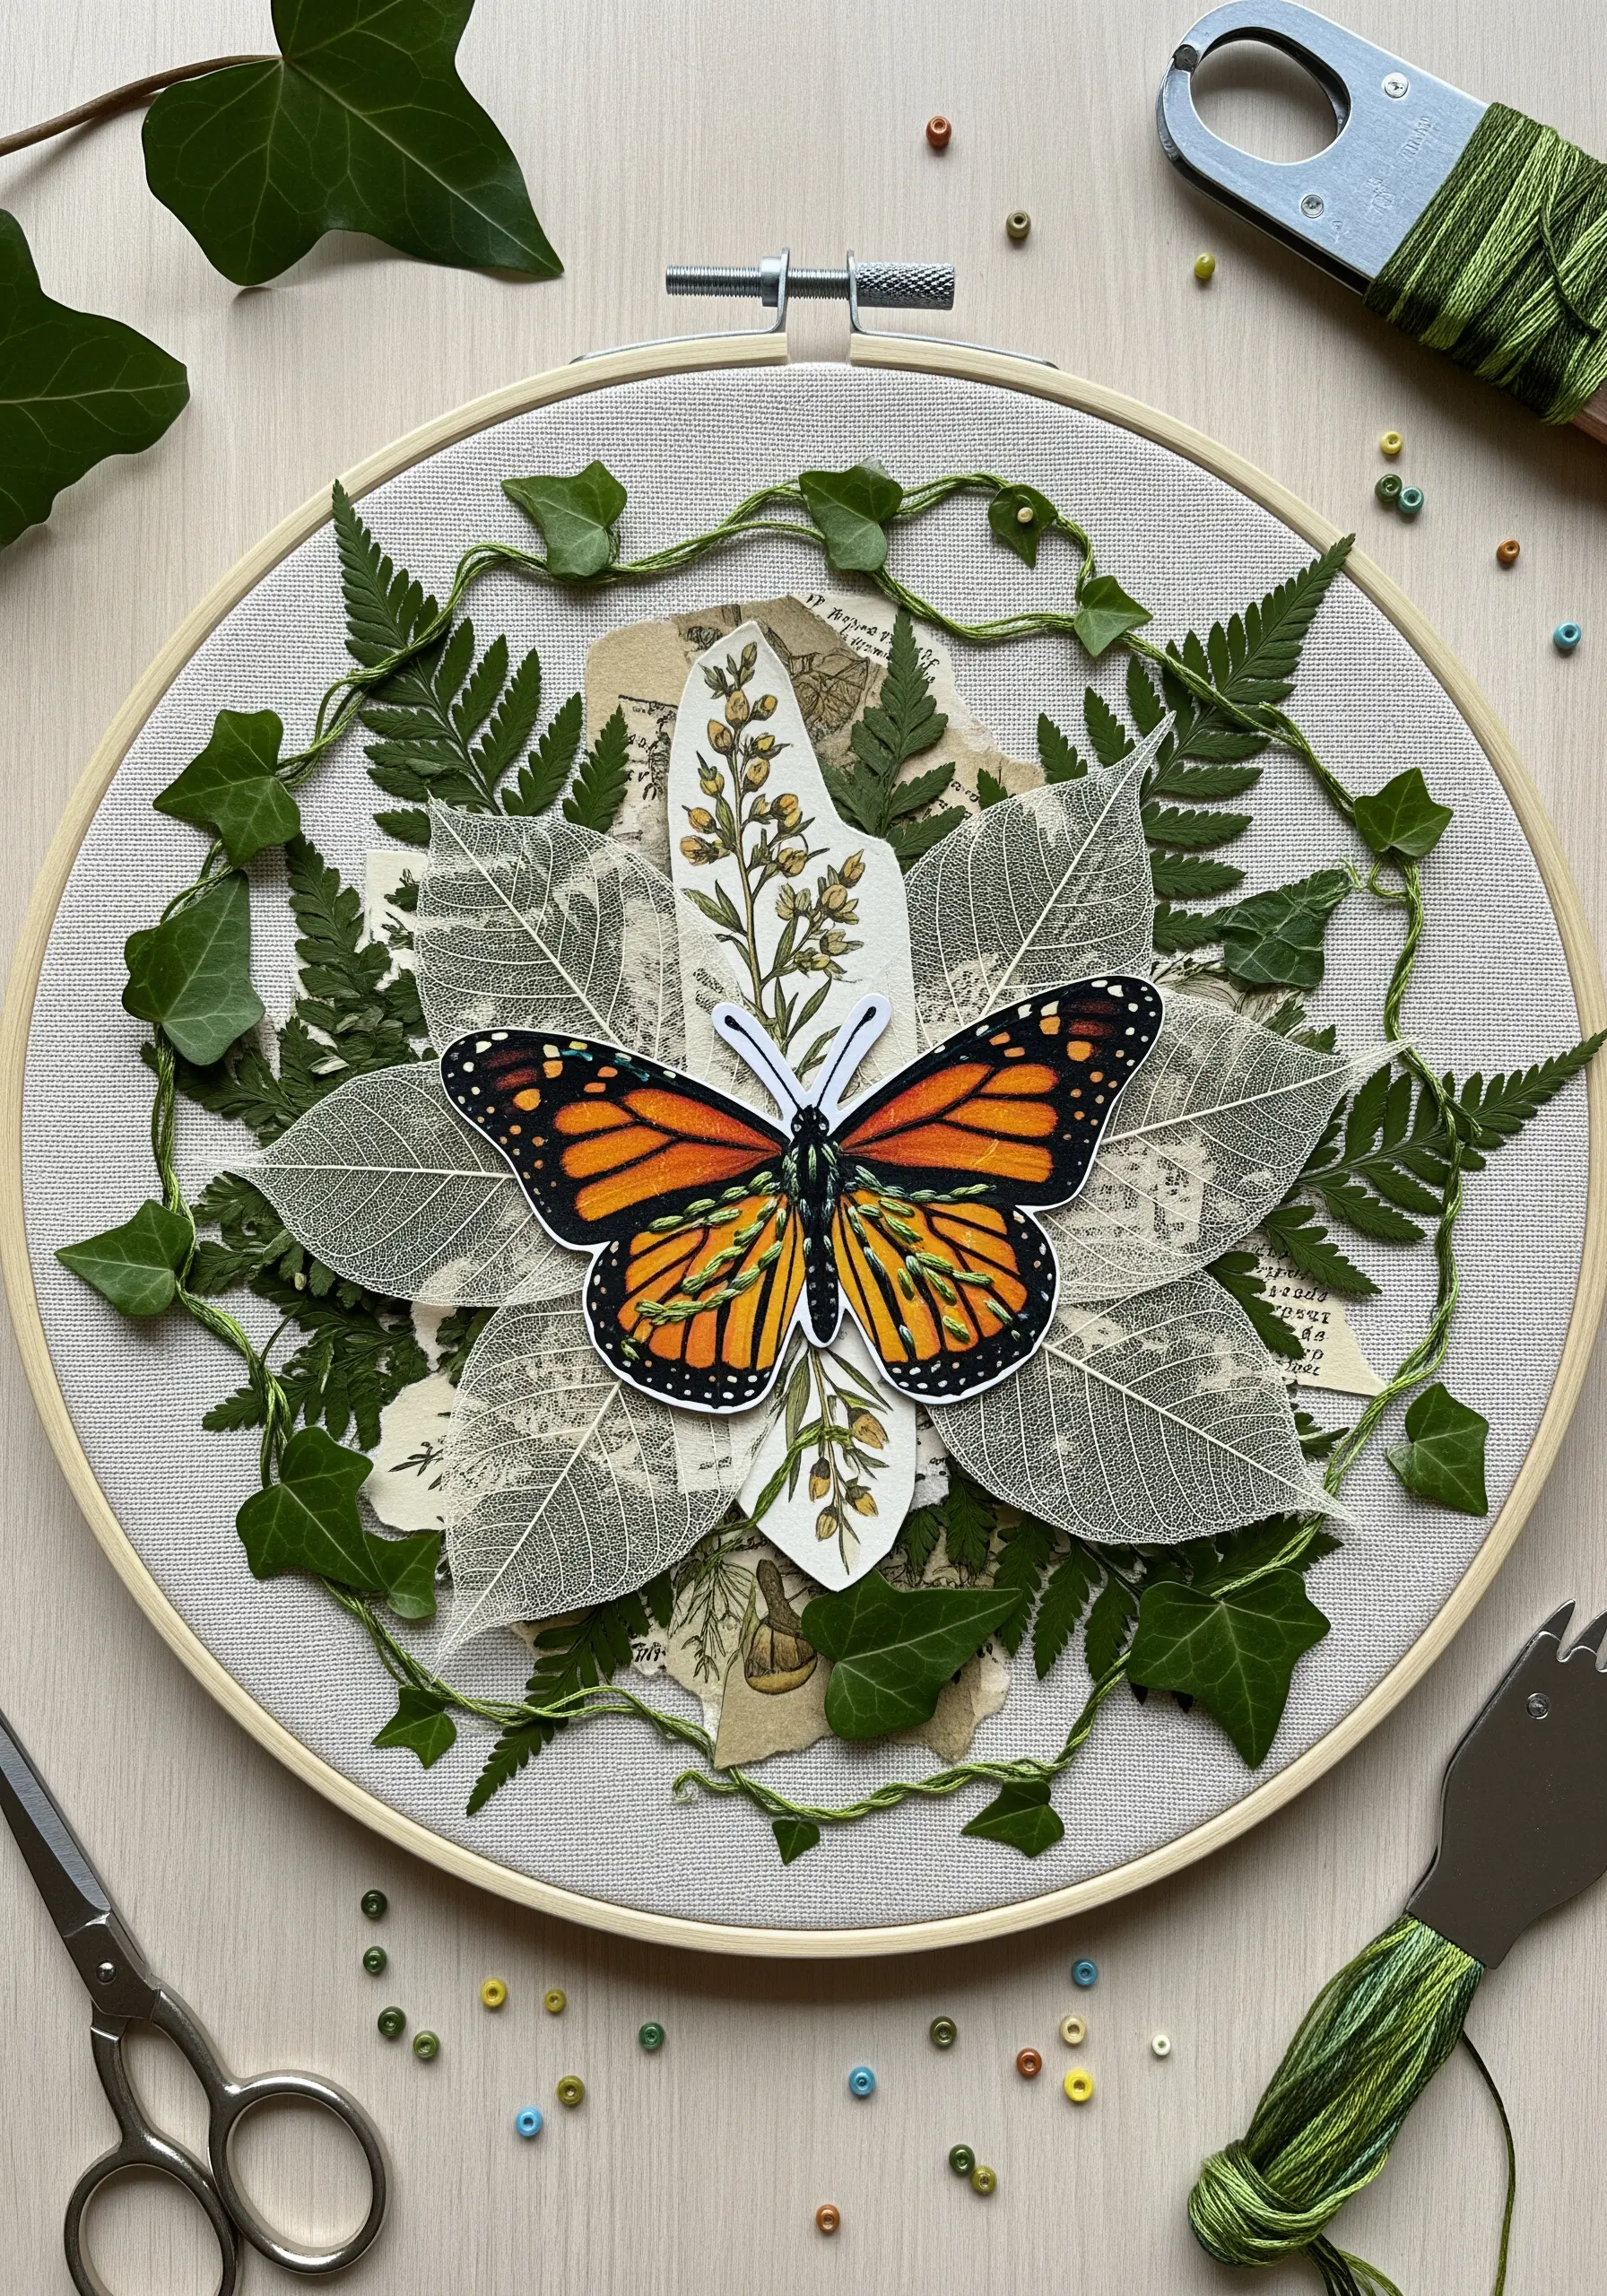
Create a delicate, multi-layered composition by combining pressed leaves, paper cutouts, and embroidery.
Use fragile elements like skeleton leaves as a translucent mid-layer between your fabric and paper motifs.
Secure them with tiny, strategically placed couching stitches—using a single strand of thread to tack down the delicate stems—preserving their form without causing damage.
This technique builds visual depth, allowing you to create pressed flower embroidery ideas where thread and nature are in perfect harmony.
The contrast between the crisp paper butterfly and the fragile leaves adds a beautiful tension to the piece.
3. Construct Architectural Forms with Thread
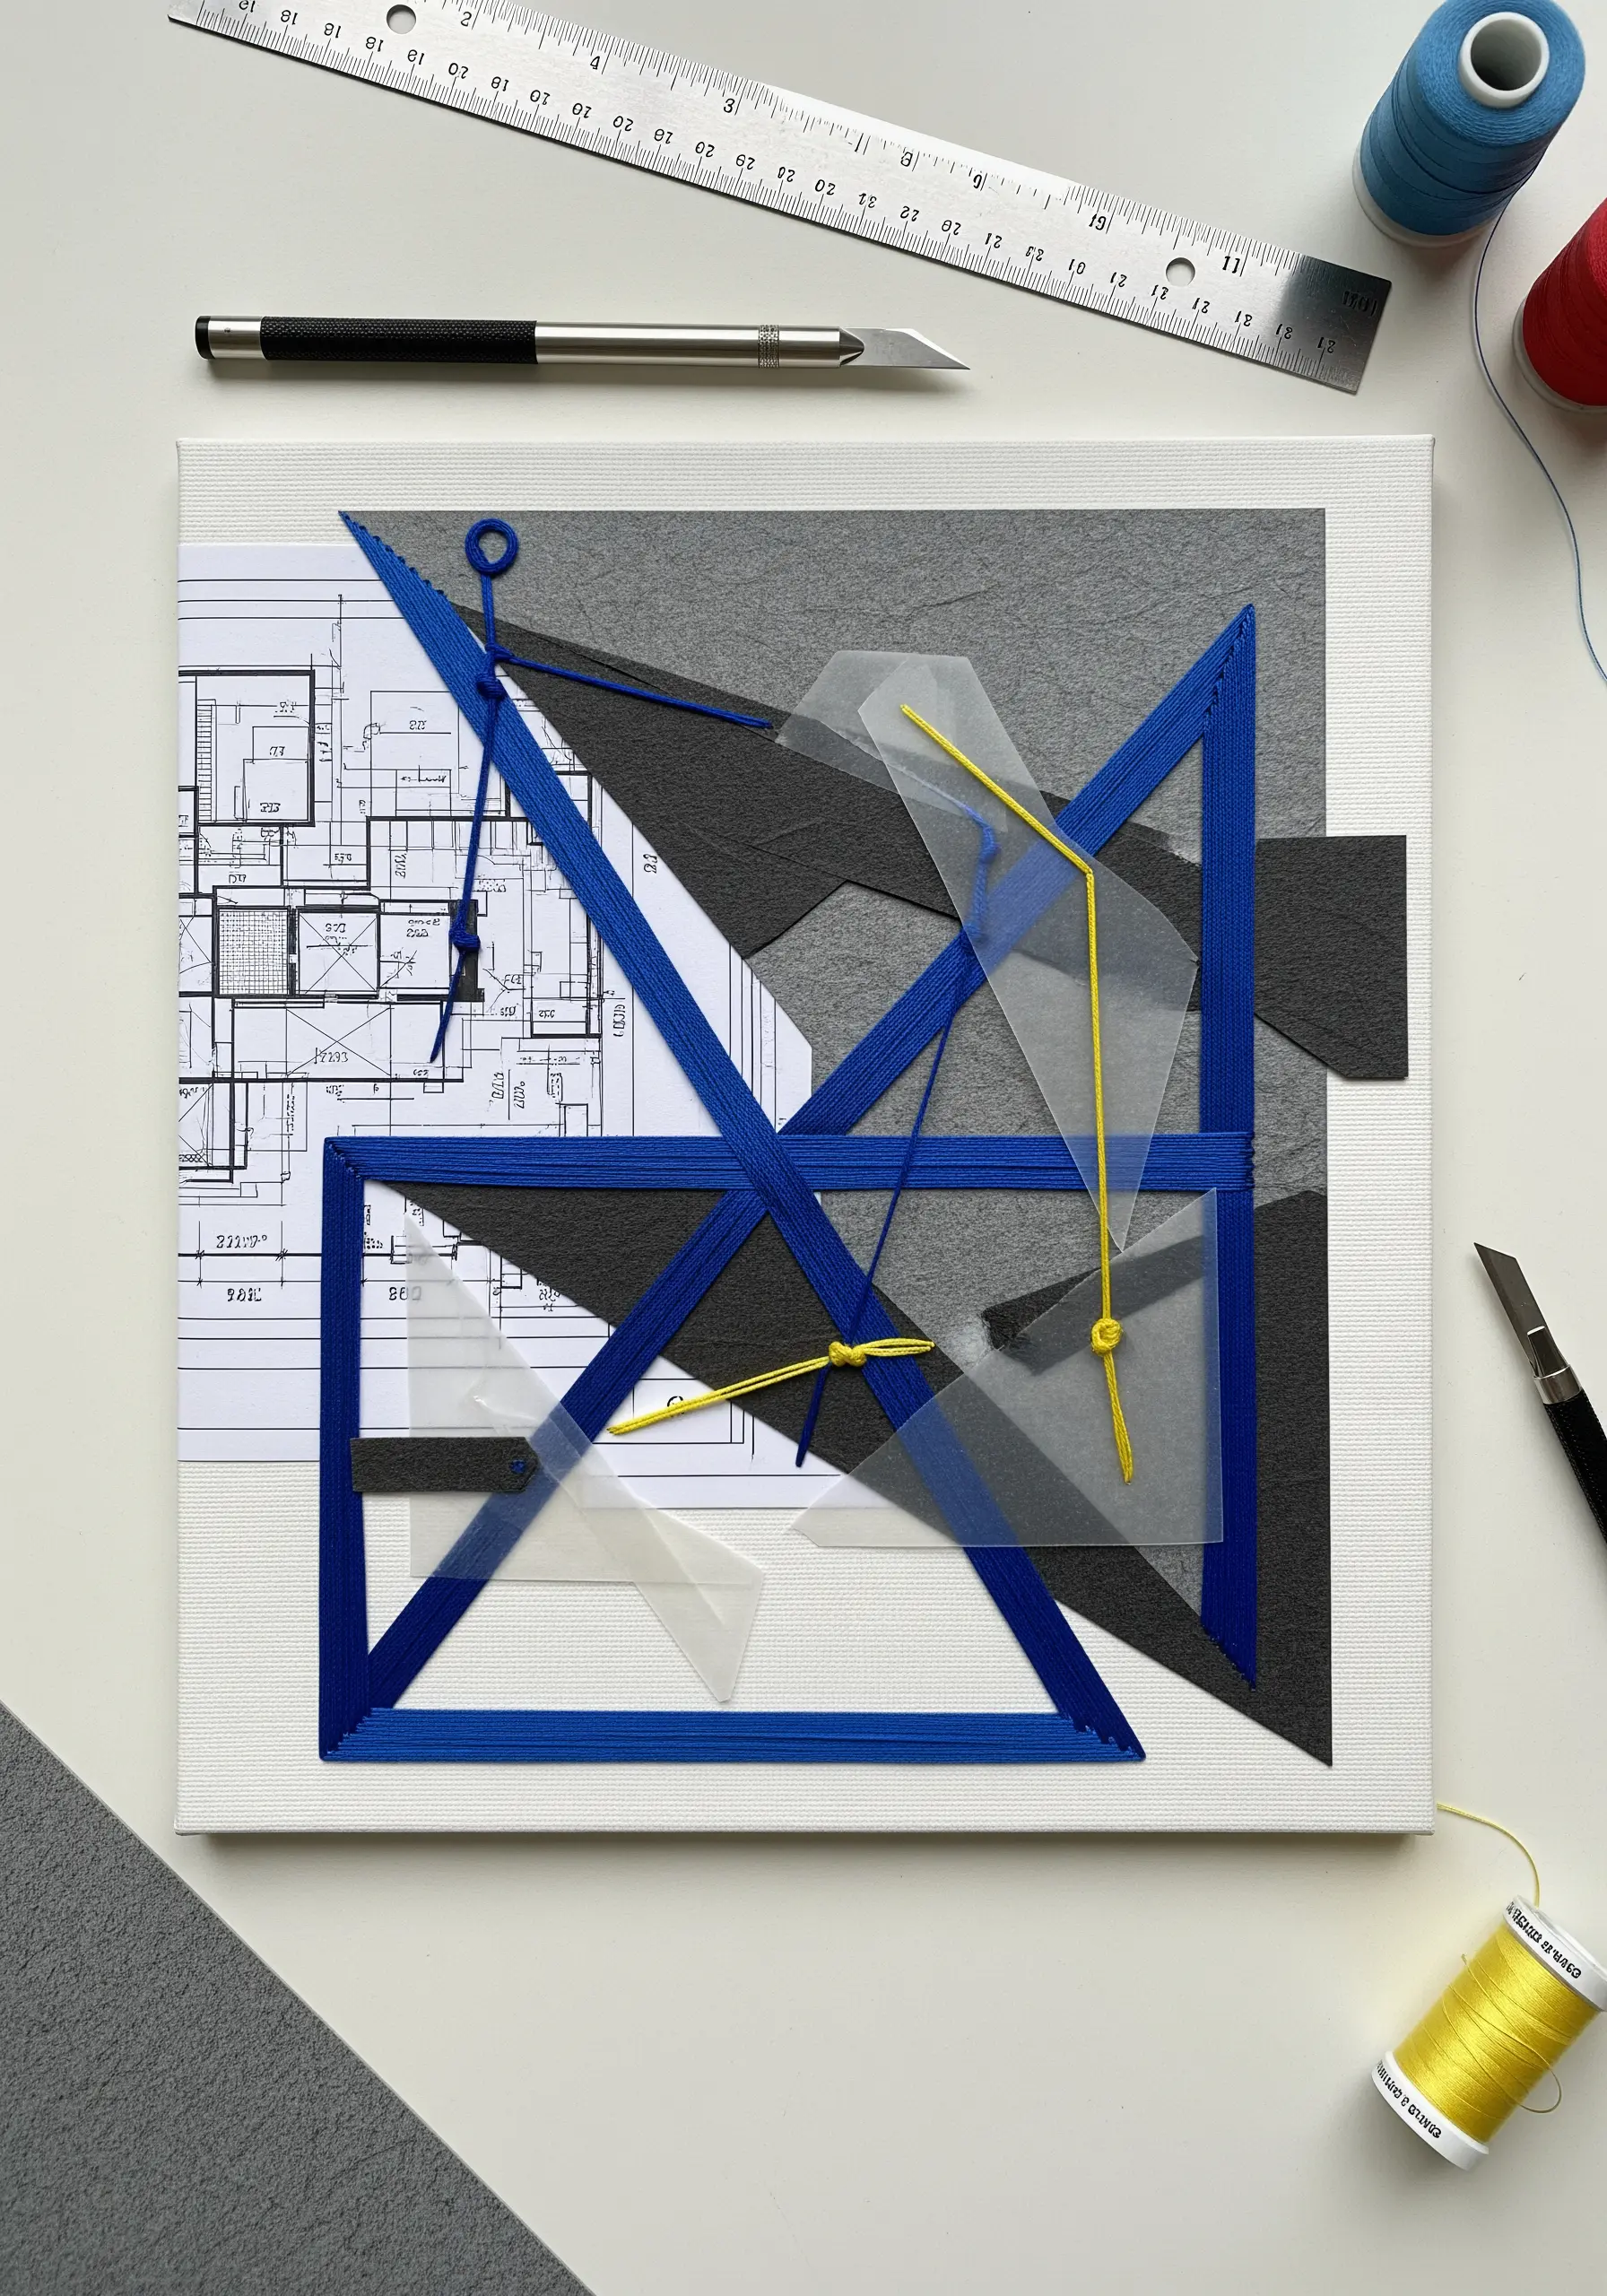
Move beyond the needle and use thread as a sculptural line to build bold, geometric compositions on canvas.
Begin by layering paper shapes—like architectural blueprints or textured cardstock—to create a dynamic background.
Instead of stitching through the canvas, wrap thread around pins or small nails placed at key intersections to create tension and form clean, sharp angles.
This method allows you to explore geometric abstract thread patterns without piercing your base, preserving the integrity of the paper collage beneath.
A single, contrasting color, like the bright yellow here, draws the eye and connects disparate elements.
4. Craft a Celestial Scene with Appliqué
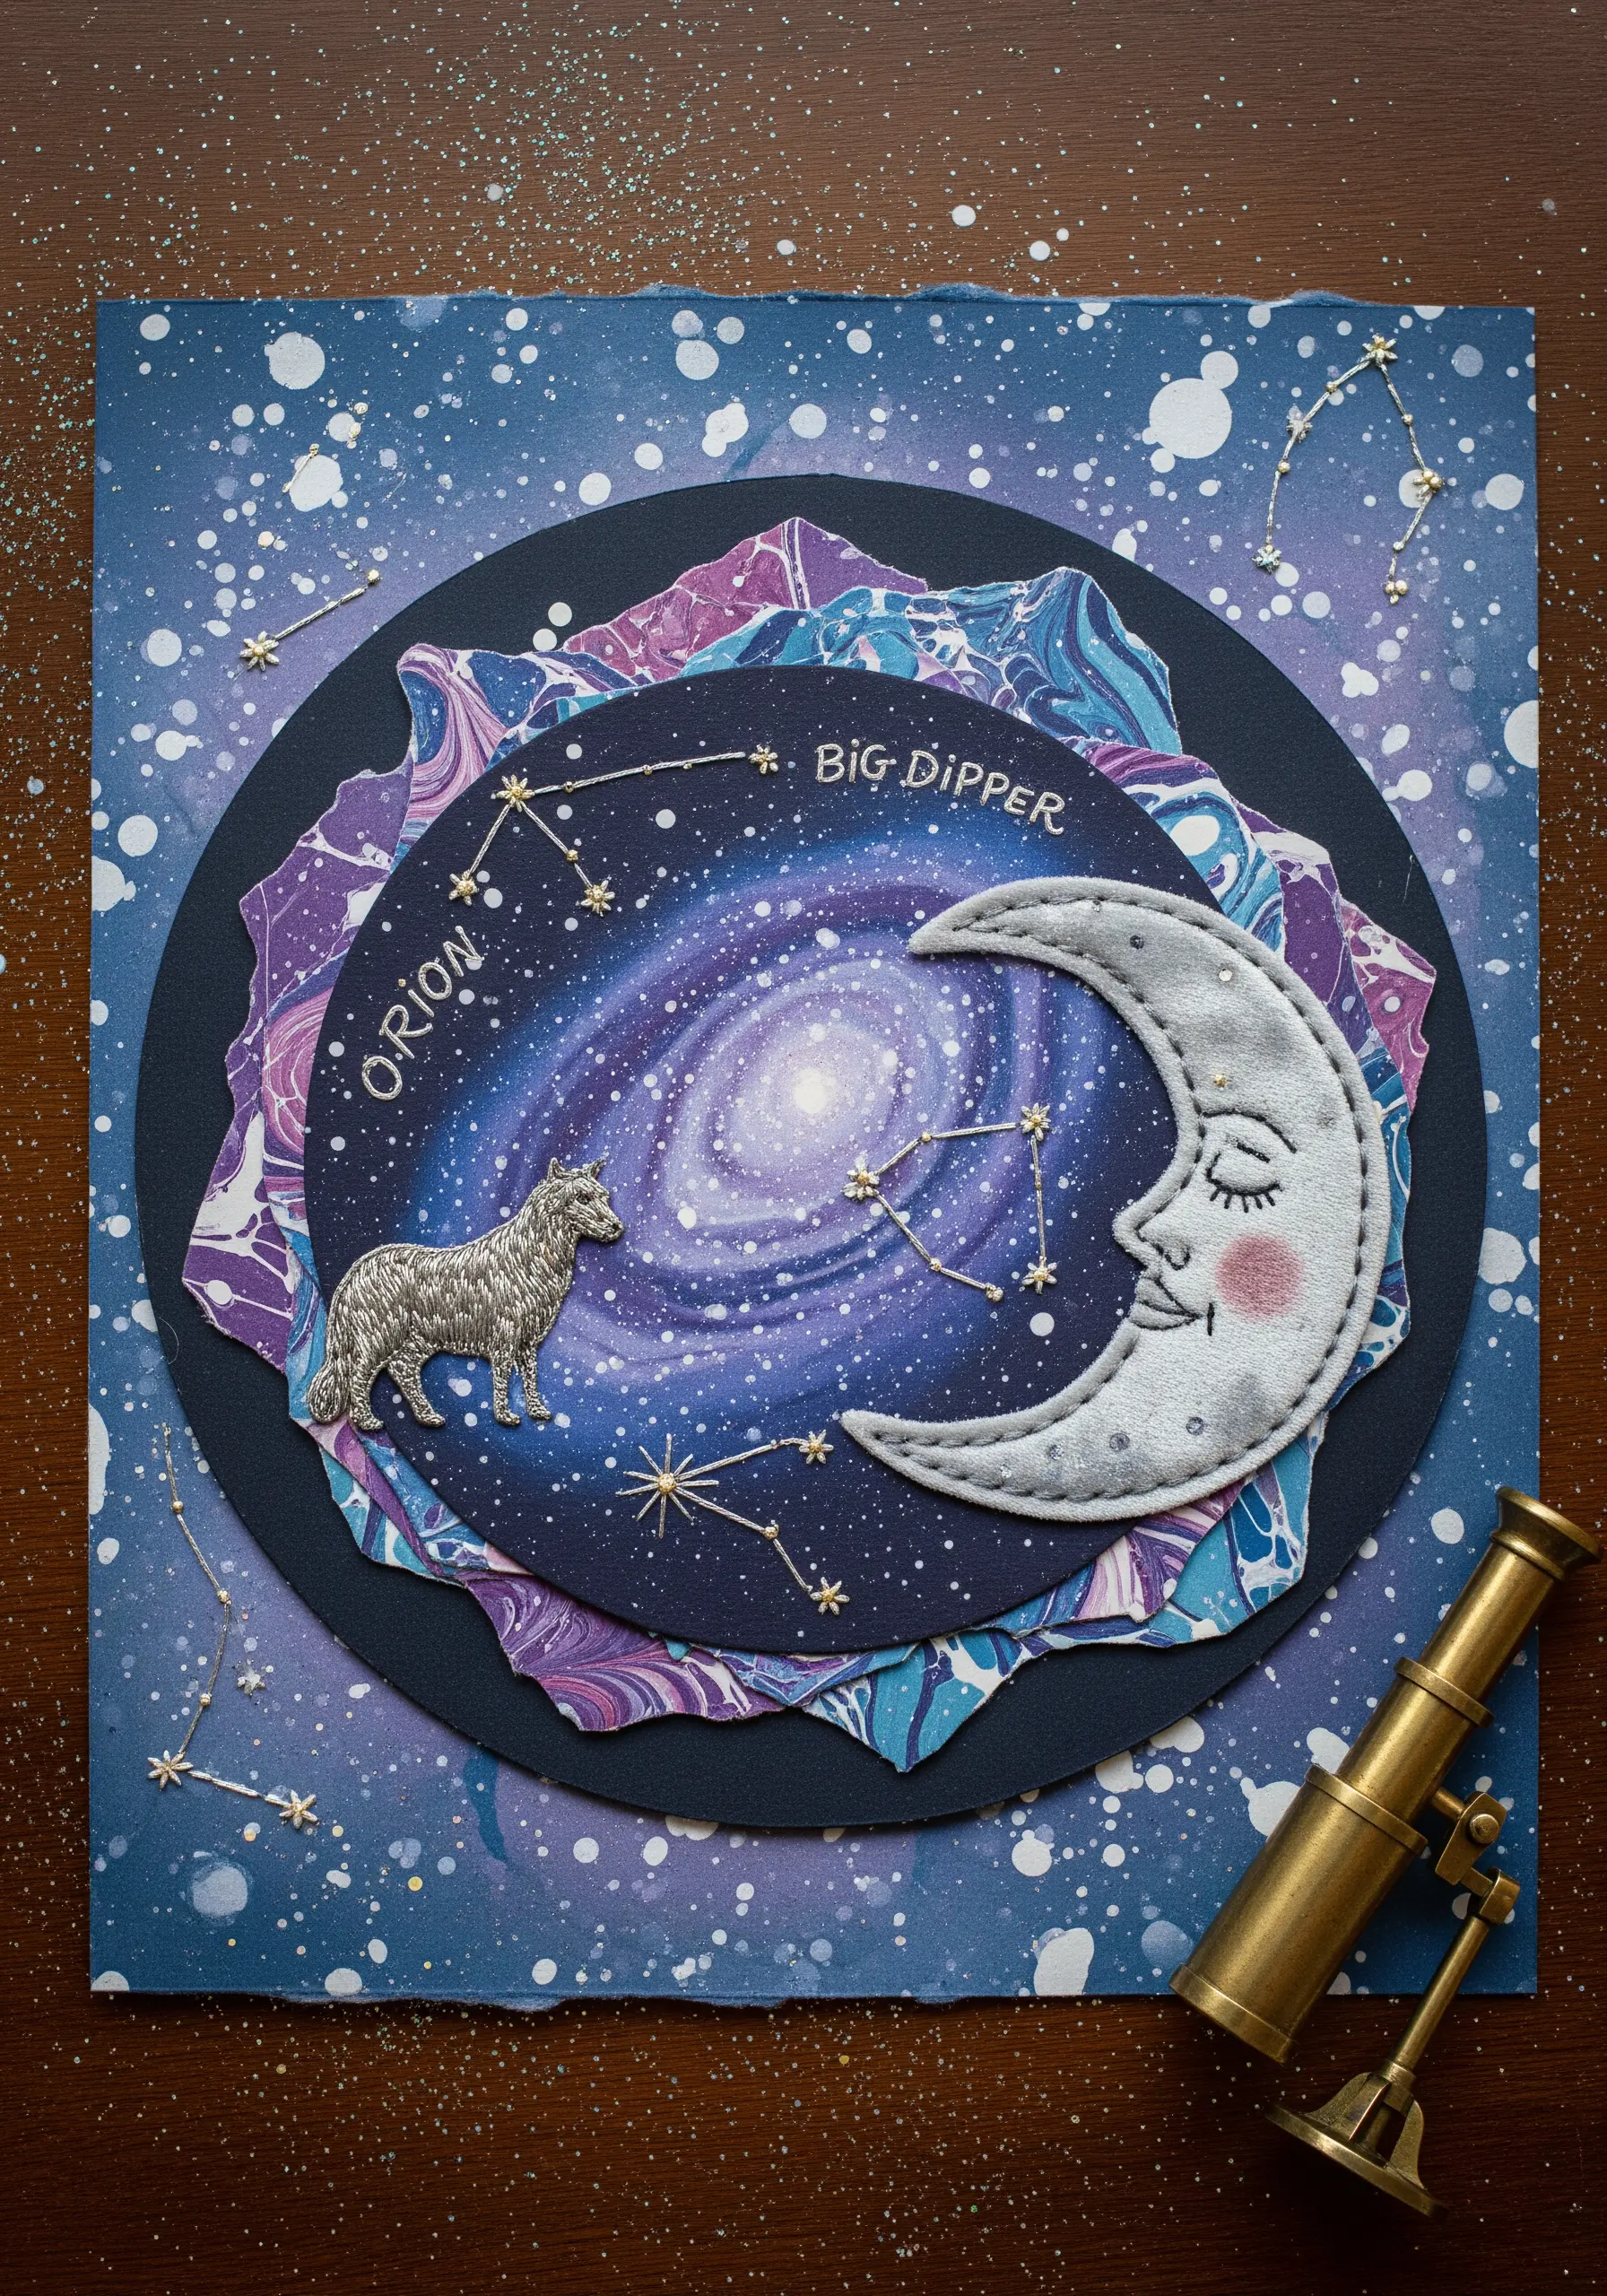
Build a celestial narrative by layering marbled paper and stitched appliqués to create a sense of cosmic depth.
Embroider your central motifs, like the moon and constellations, on separate pieces of felt or sturdy fabric first.
For a subtle 3D effect, add a thin layer of batting behind the appliqué before cutting it out and stitching it to your paper background.
Use metallic thread for the constellation lines; its reflective quality catches the light beautifully against the matte paper, mimicking distant stars.
5. Integrate Stitched Motifs into Journals
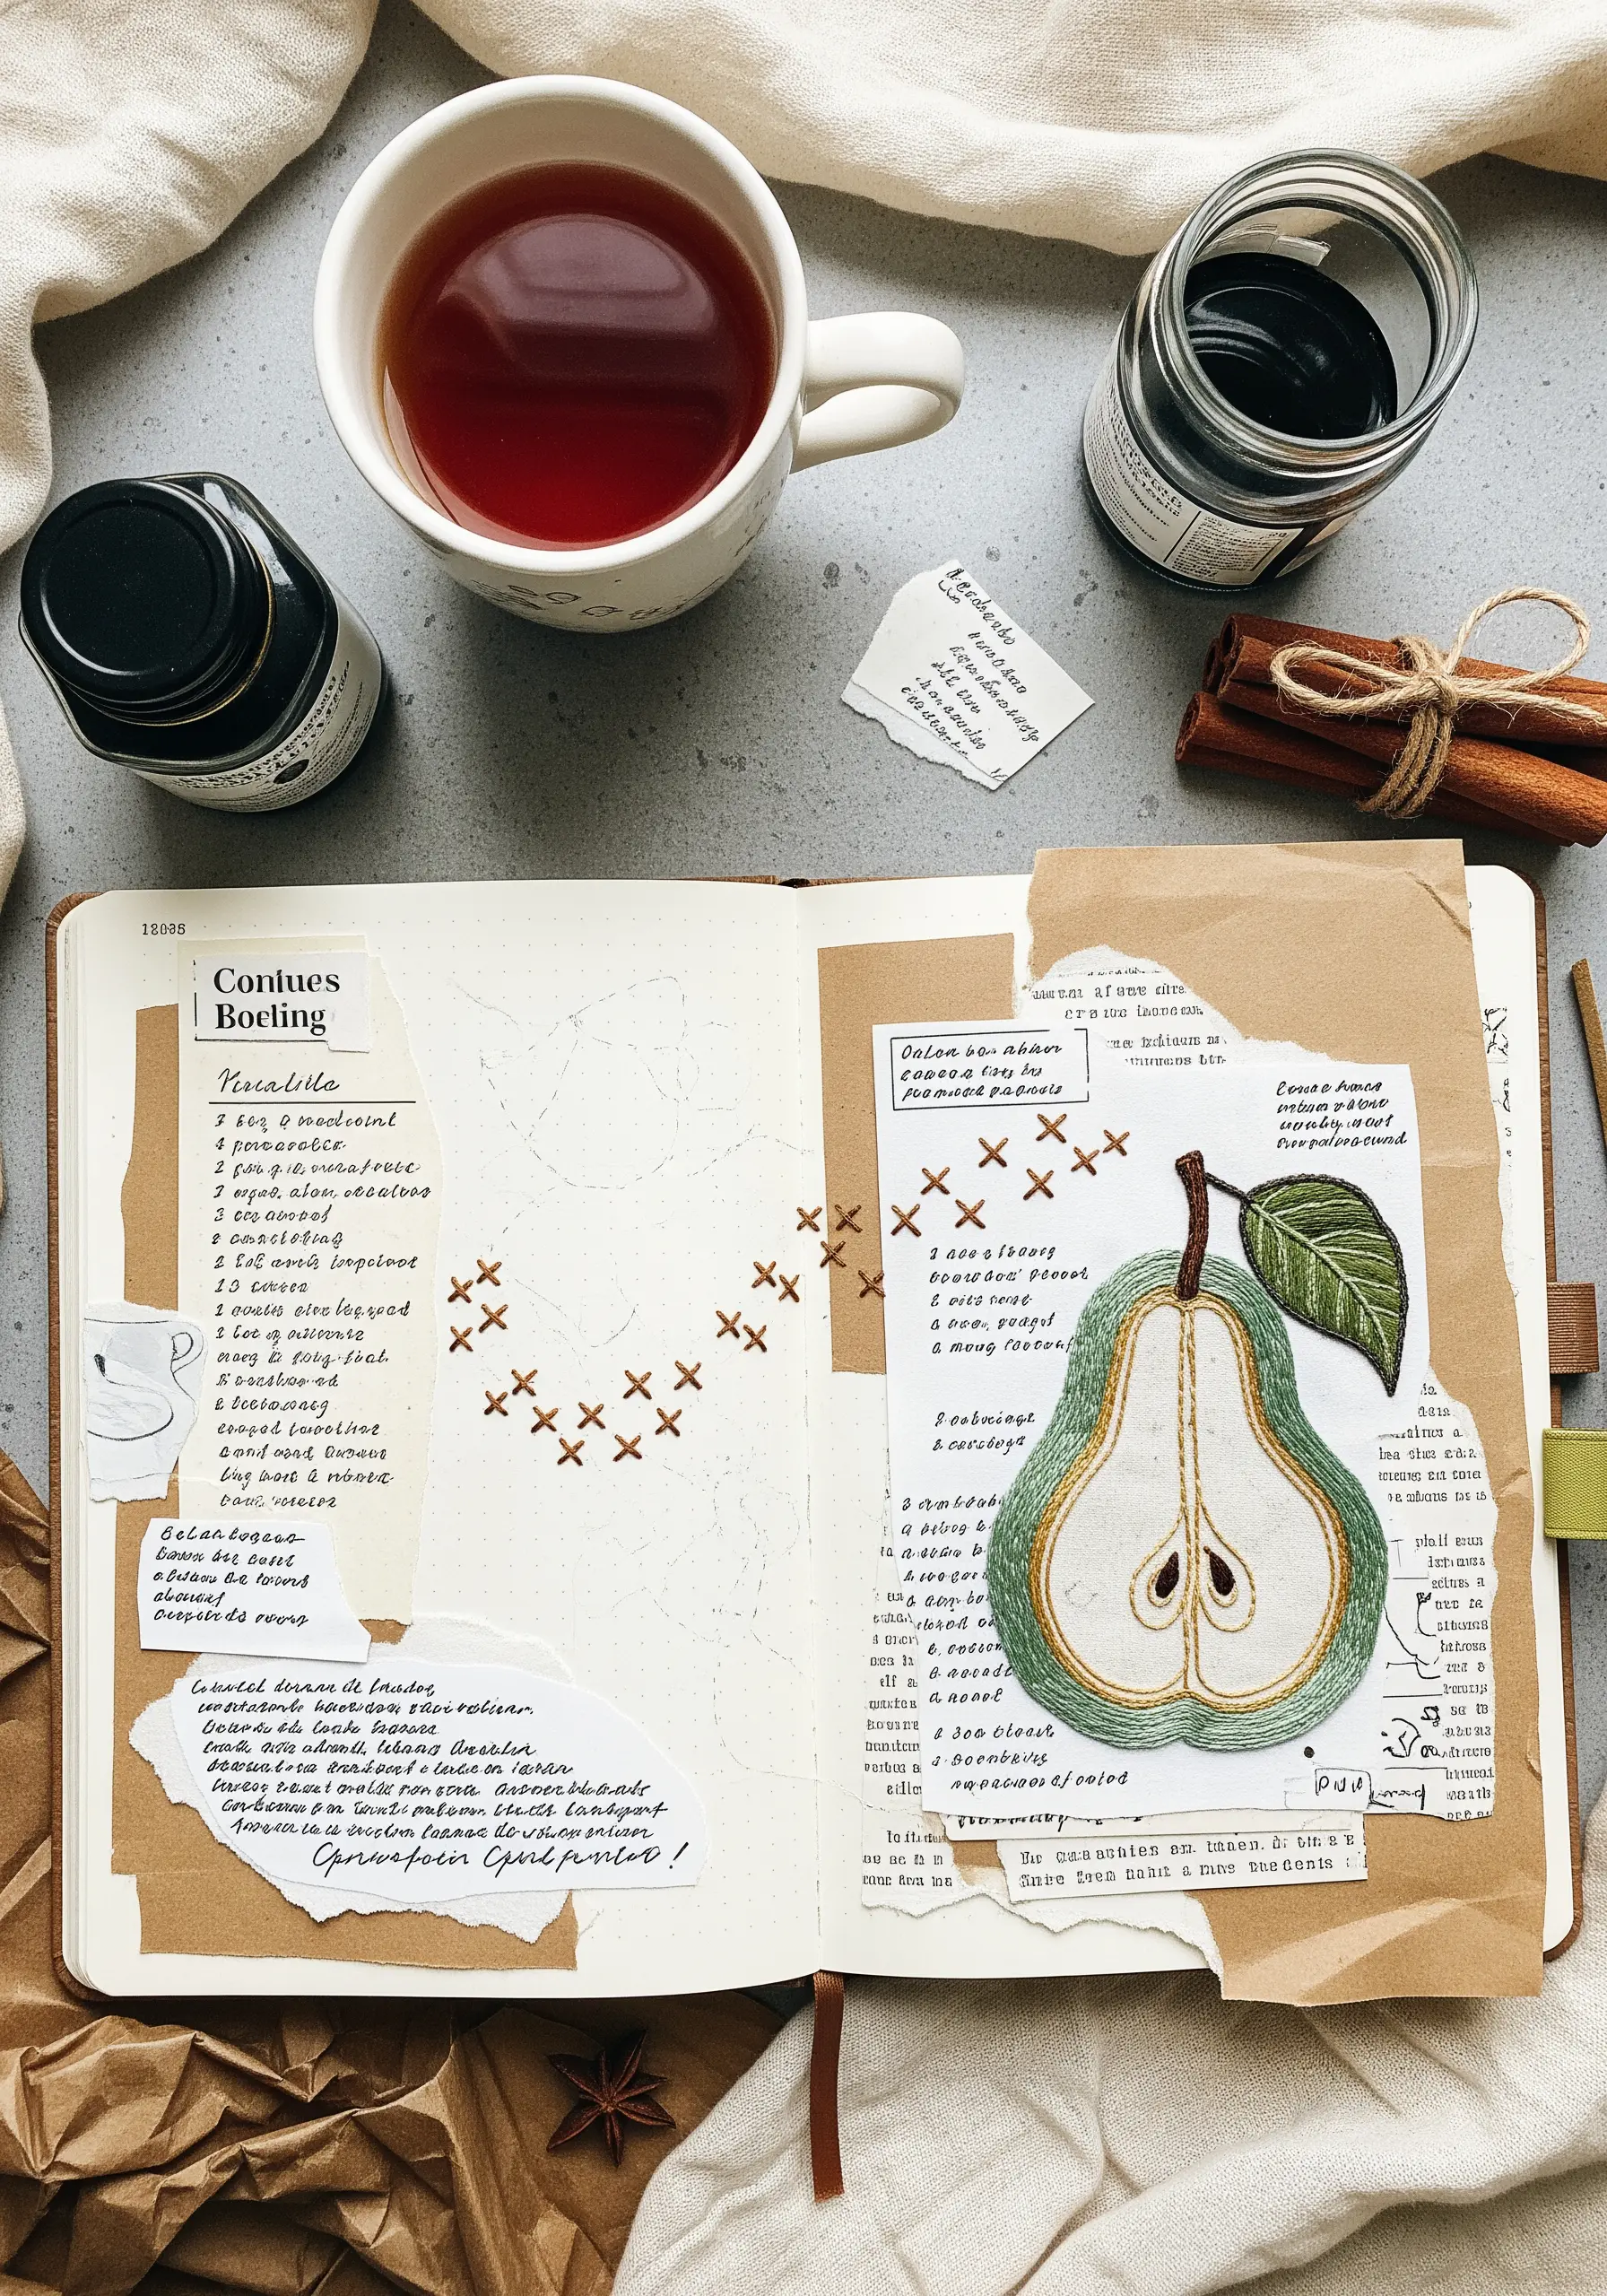
Elevate your journaling or scrapbooking by adding a tactile, embroidered element directly onto the page.
To avoid puckering the paper, stitch your motif on a lightweight piece of fabric, such as calico or linen.
Carefully trim the fabric, leaving a small, frayed edge for a soft, rustic look, and affix it to the journal page with acid-free fabric glue.
This technique allows you to incorporate detailed embroidery without compromising the integrity of the pages, offering quick stitch inspirations to beautify your notebooks and journals.
A few small, cross-stitched accents on the paper itself can beautifully tie the collage together.
6. Frame Florals with Layered Paper
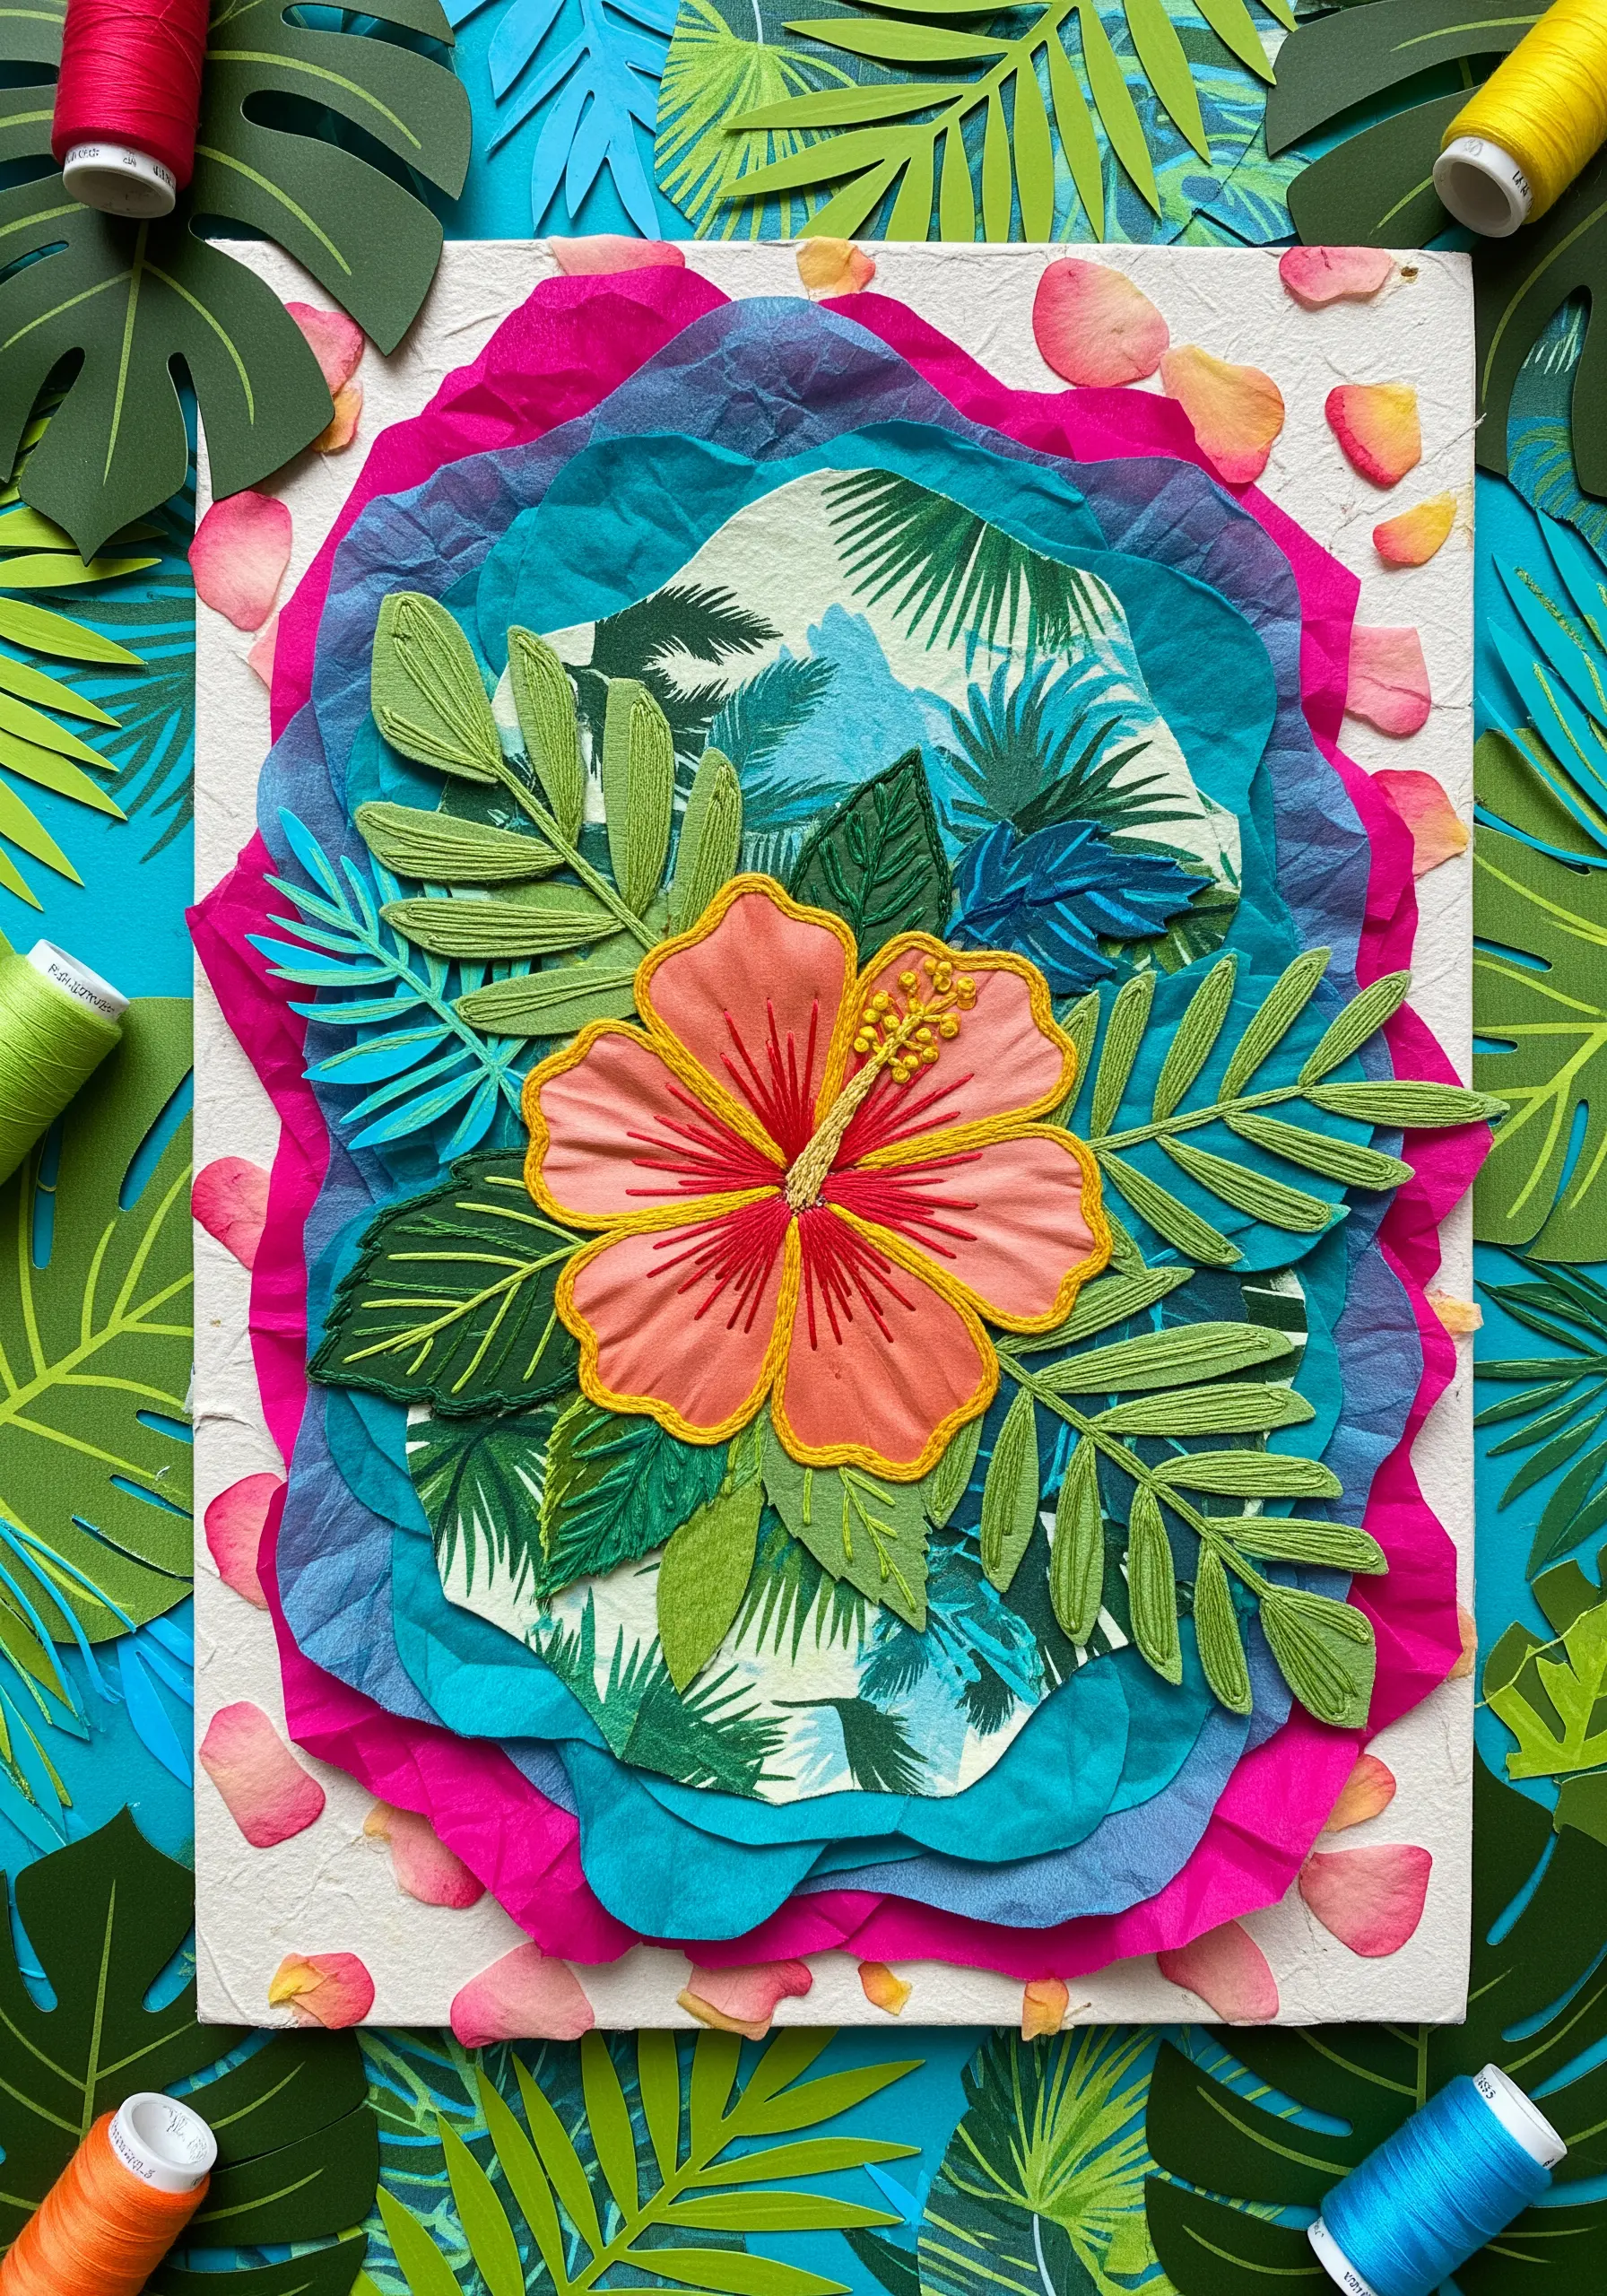
Create a vibrant, tropical composition by using torn tissue and cardstock to frame a central embroidered motif.
The raw, feathered edges of torn paper provide an organic contrast to the precise, dense satin stitch of the hibiscus flower.
Layering different shades of the same color family—from deep teal to light blue—creates a beautiful gradient effect that makes the central flower pop.
By stitching the flower on a separate piece of fabric and applying it to the collage, you ensure your stitches remain tight and polished without distorting the paper base.
7. Document Heritage with a Stitched Family Tree
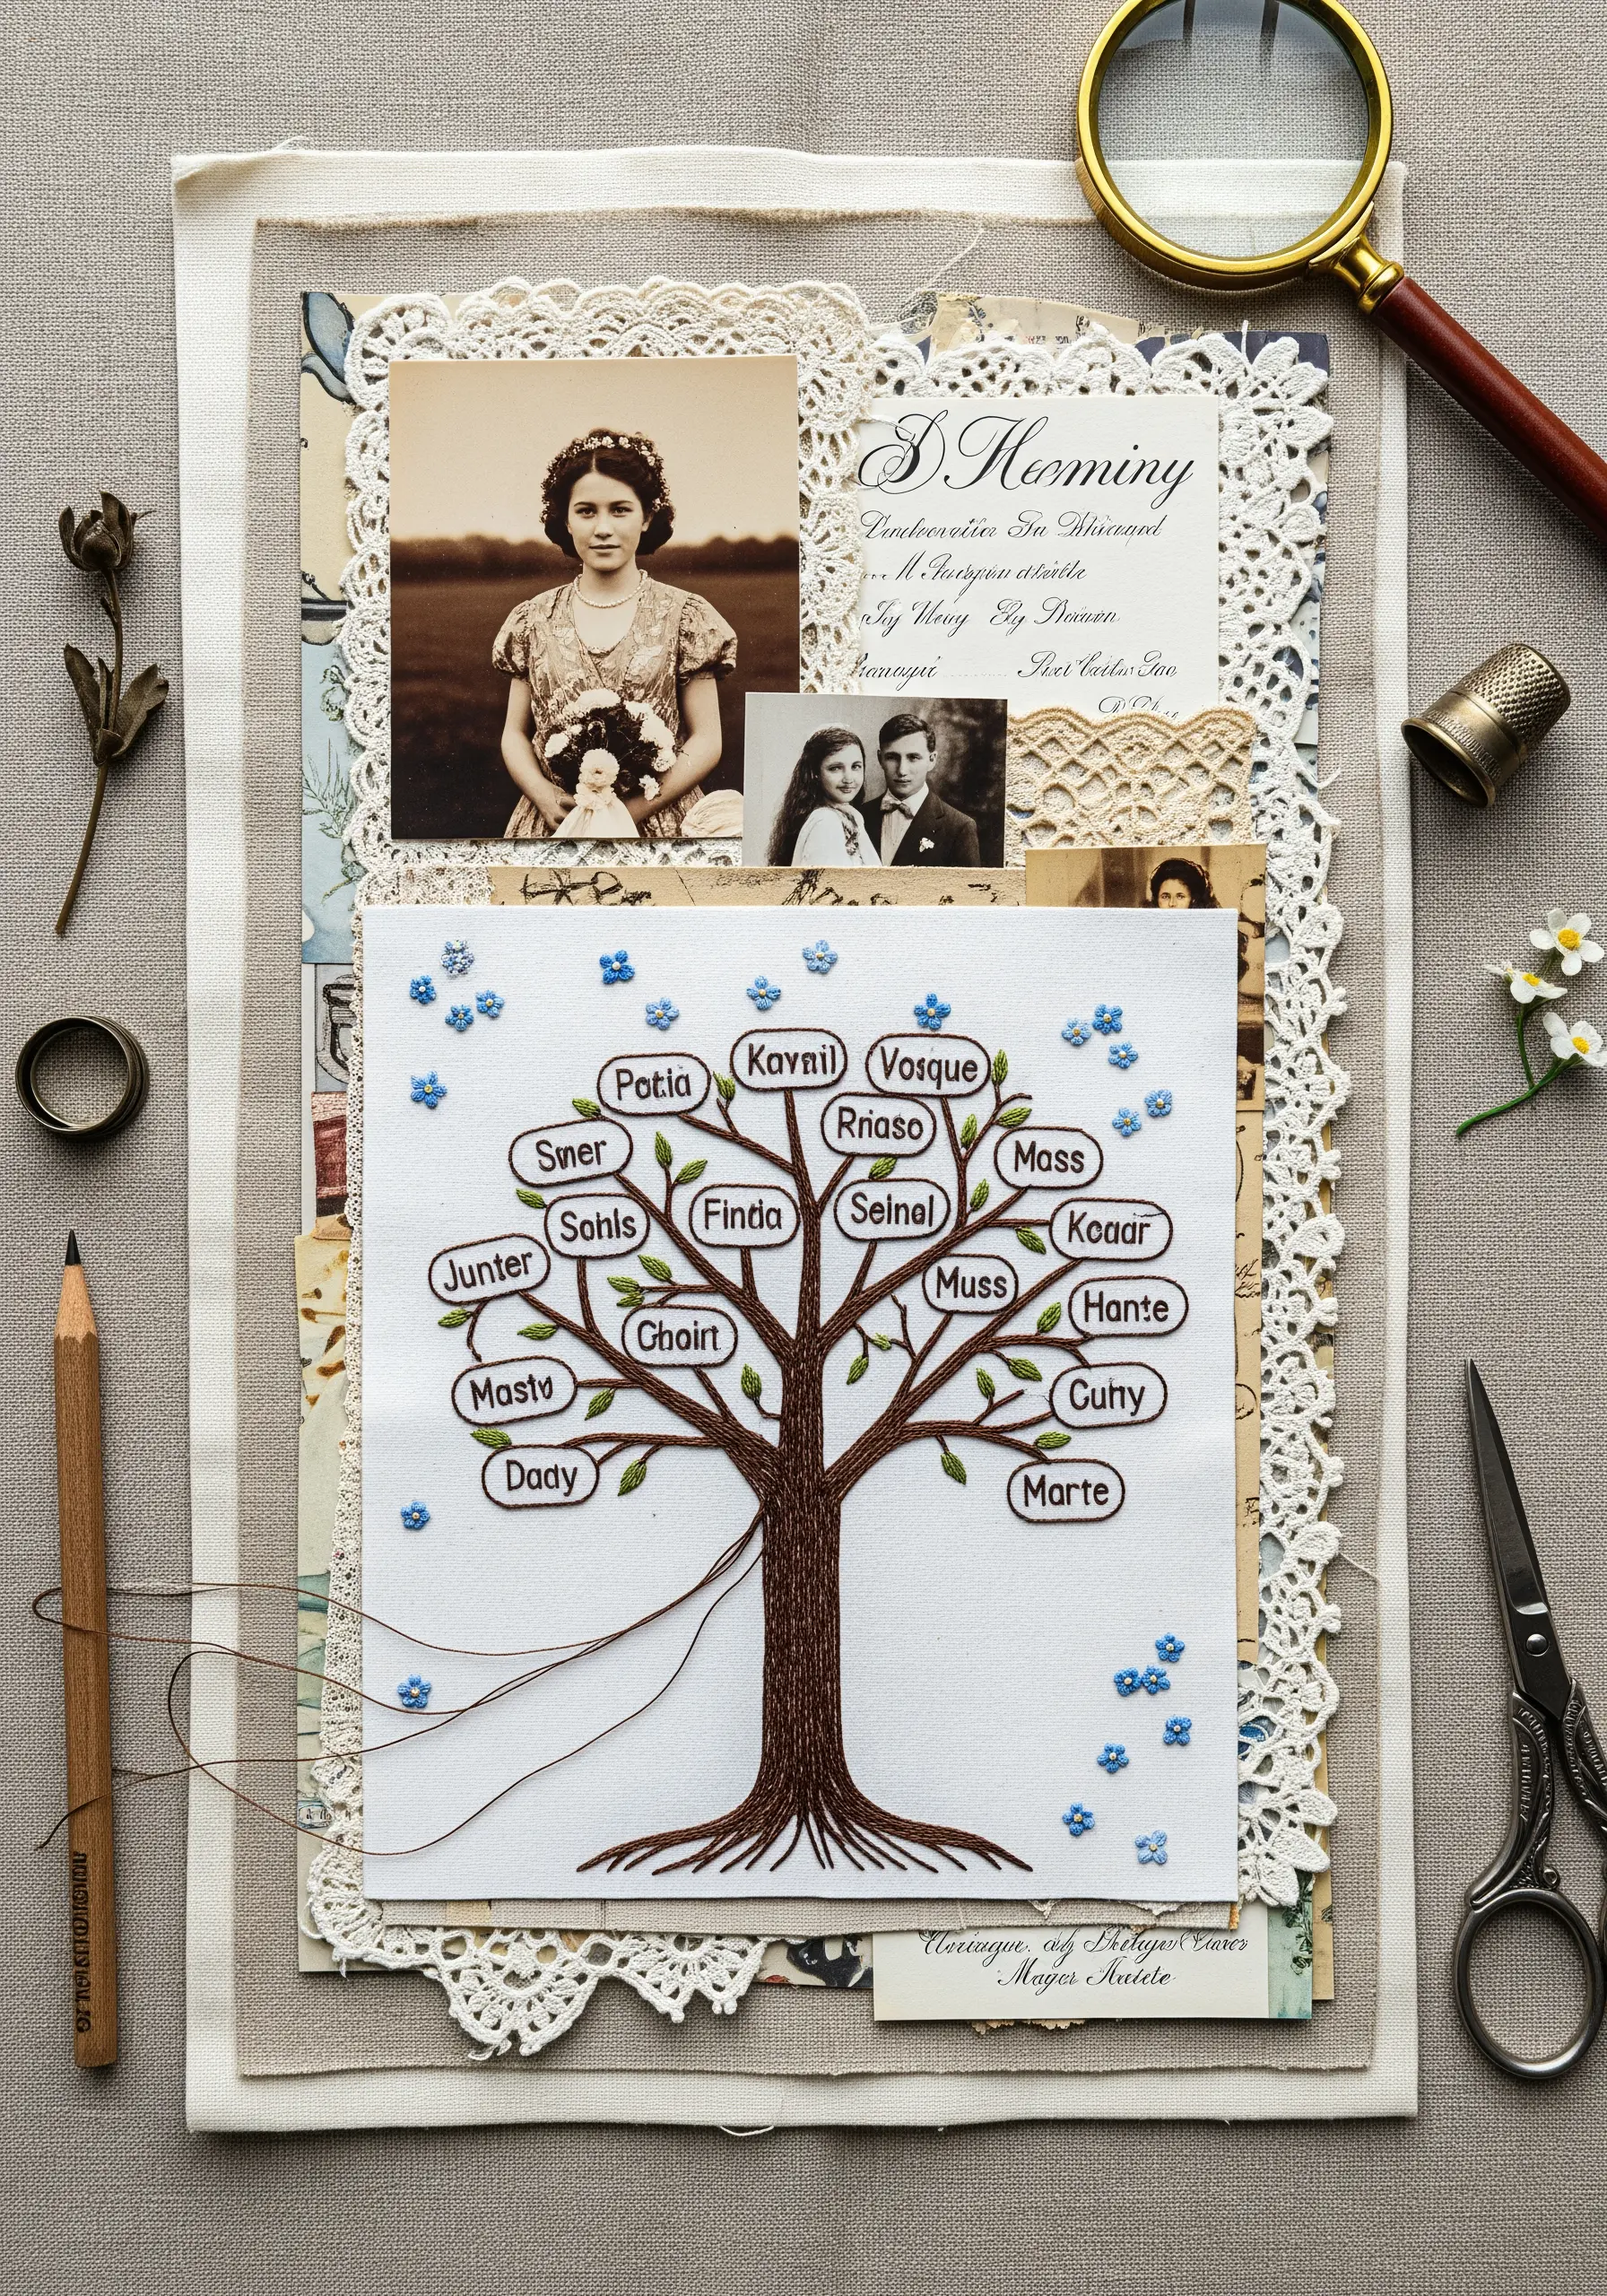
Combine vintage photographs, elegant paper, and delicate embroidery to create a deeply personal family tree.
Use a fine backstitch or stem stitch for the names and branches to ensure every detail is crisp and legible.
Scatter tiny French knots or colonial knots like blossoms around the tree; this adds a subtle texture and a touch of color without overwhelming the composition.
Mount the final piece on a neutral linen backing to honor the vintage aesthetic and provide a stable foundation for the layered paper and photos.
8. Capture Coastal Textures in Mixed Media
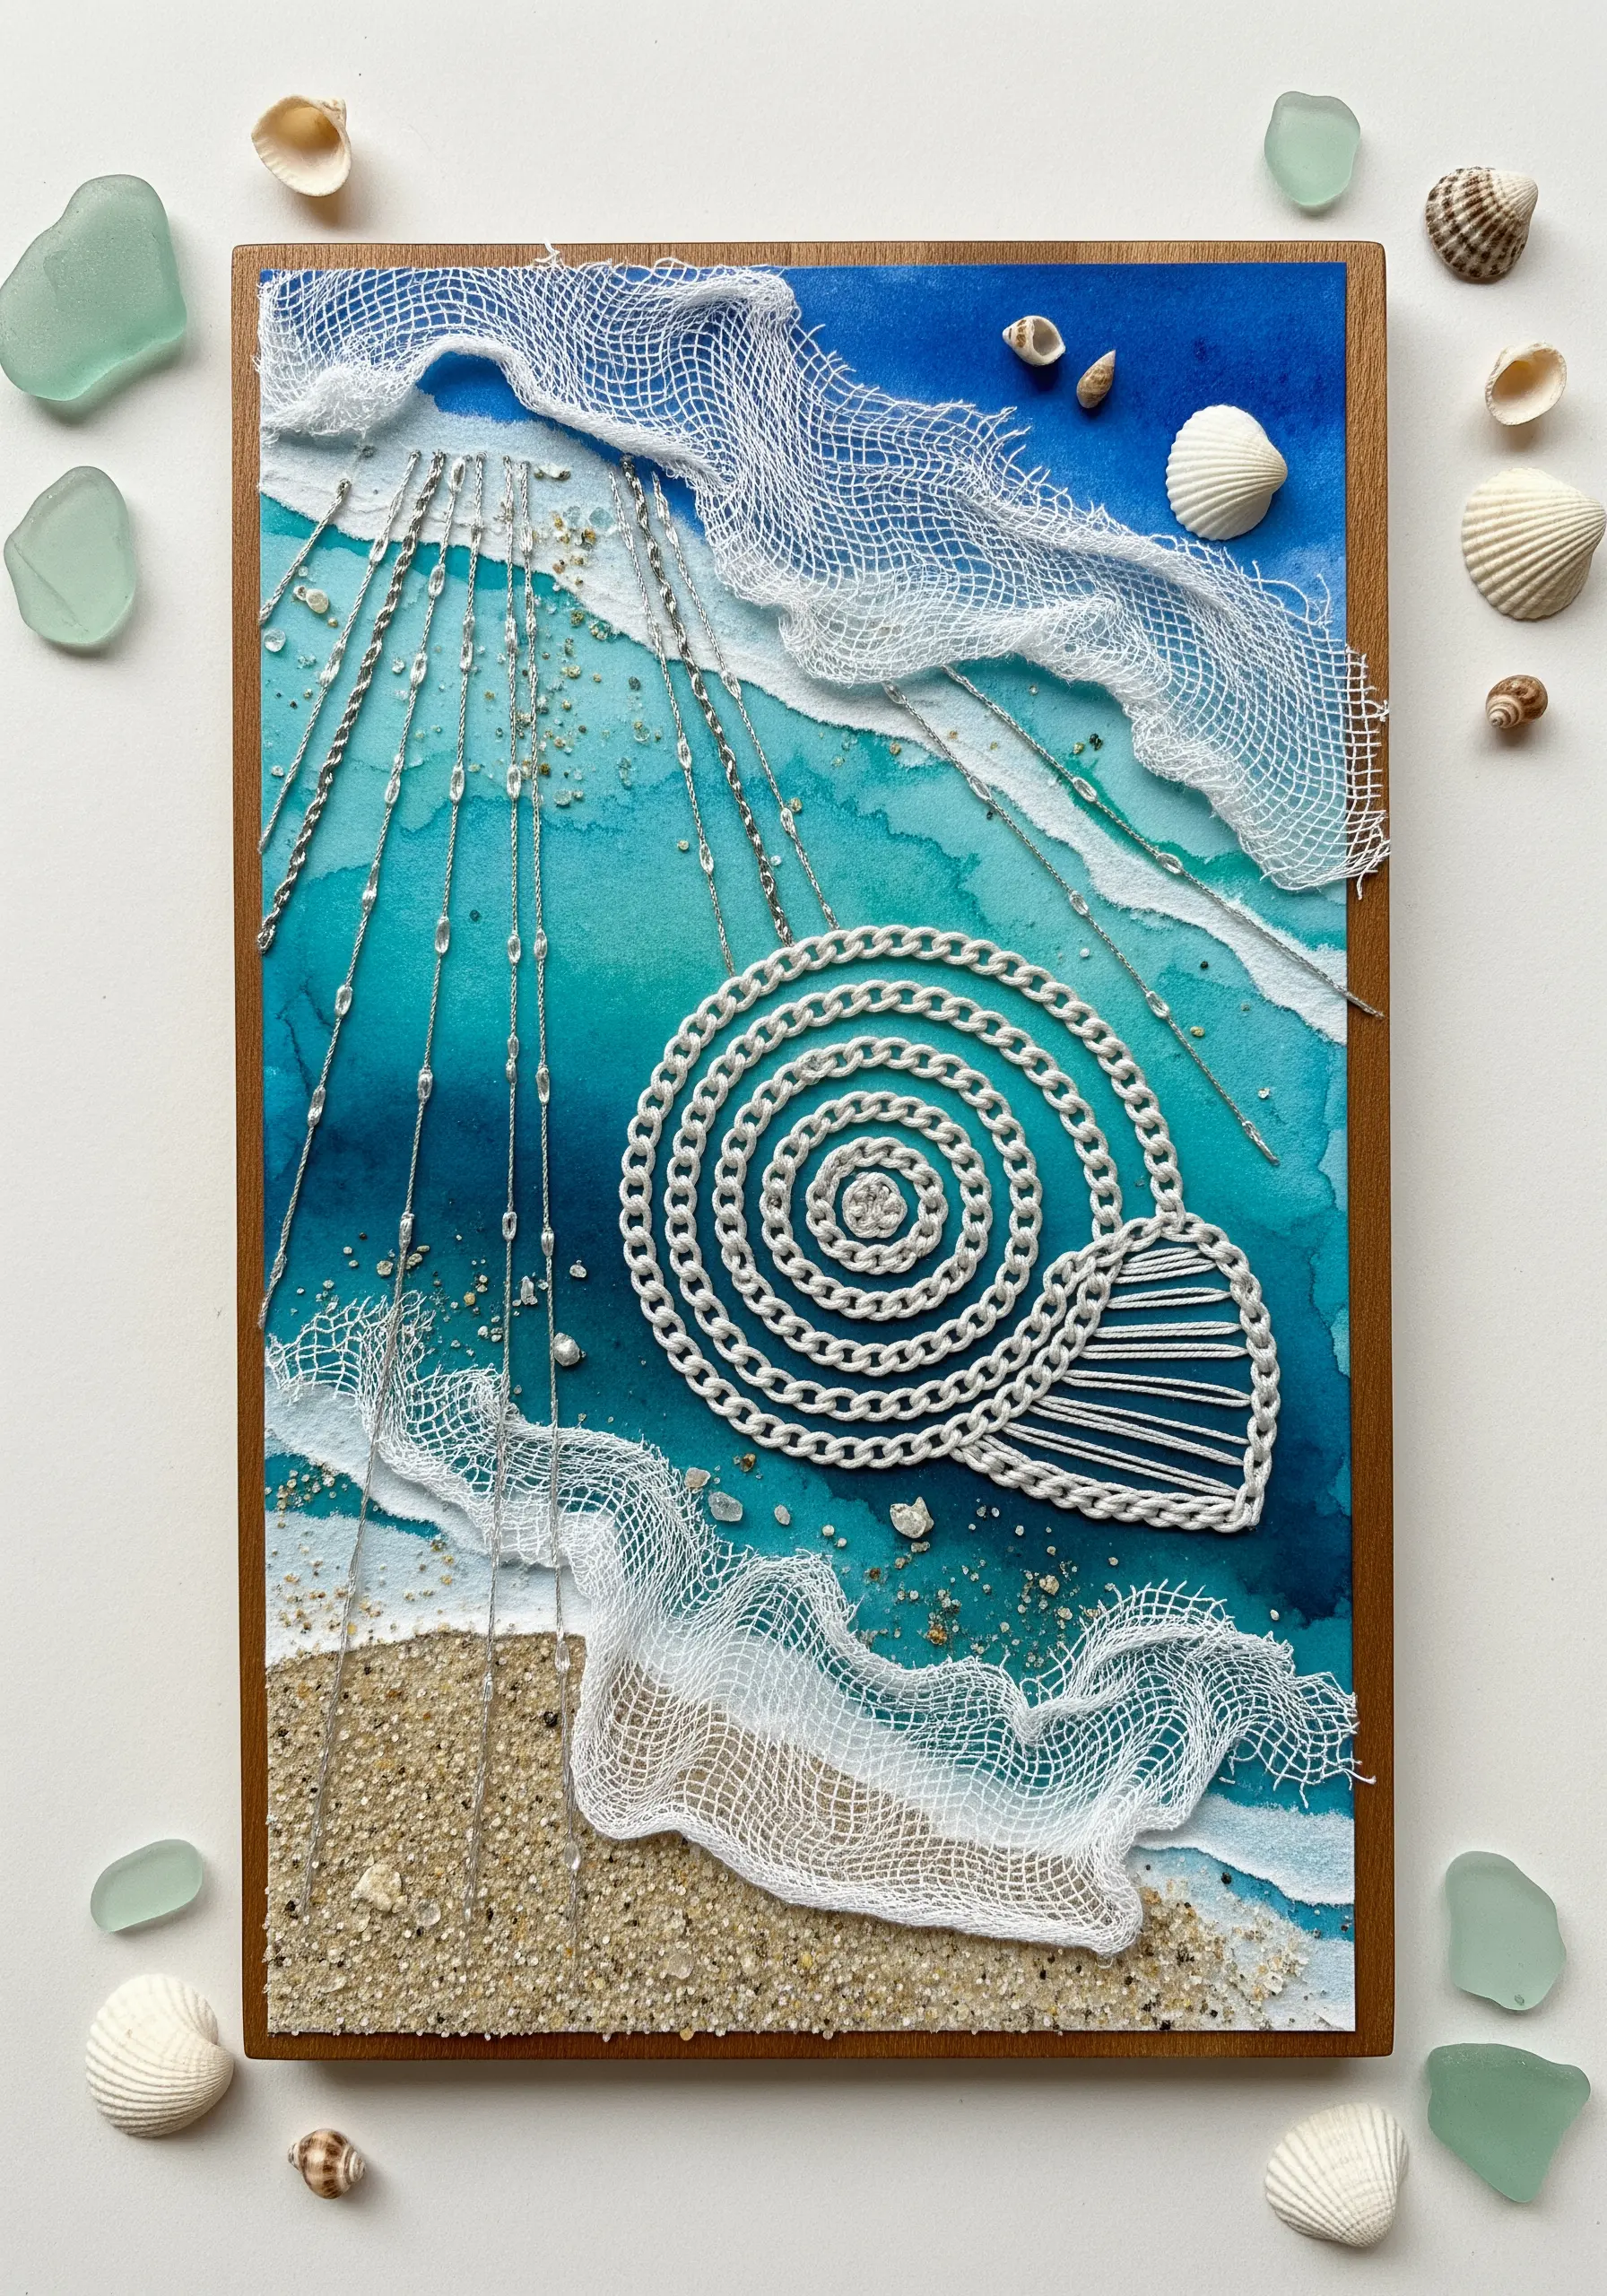
Evoke the feeling of the seaside by combining watercolor, sand, and dimensional stitching techniques.
Paint your background first, then add a layer of fine sand using a clear PVA glue to create a realistic shoreline.
Create the shell outline by couching a thick cord or multiple strands of thread; this technique provides a strong, raised edge that stands out against the flat background.
Drape fine netting or cheesecloth to mimic seafoam, securing it with a few invisible stitches. These coastal vibe embroidery projects are all about capturing a mood through texture.
9. Define Silhouettes with Punctured Paper Stitching
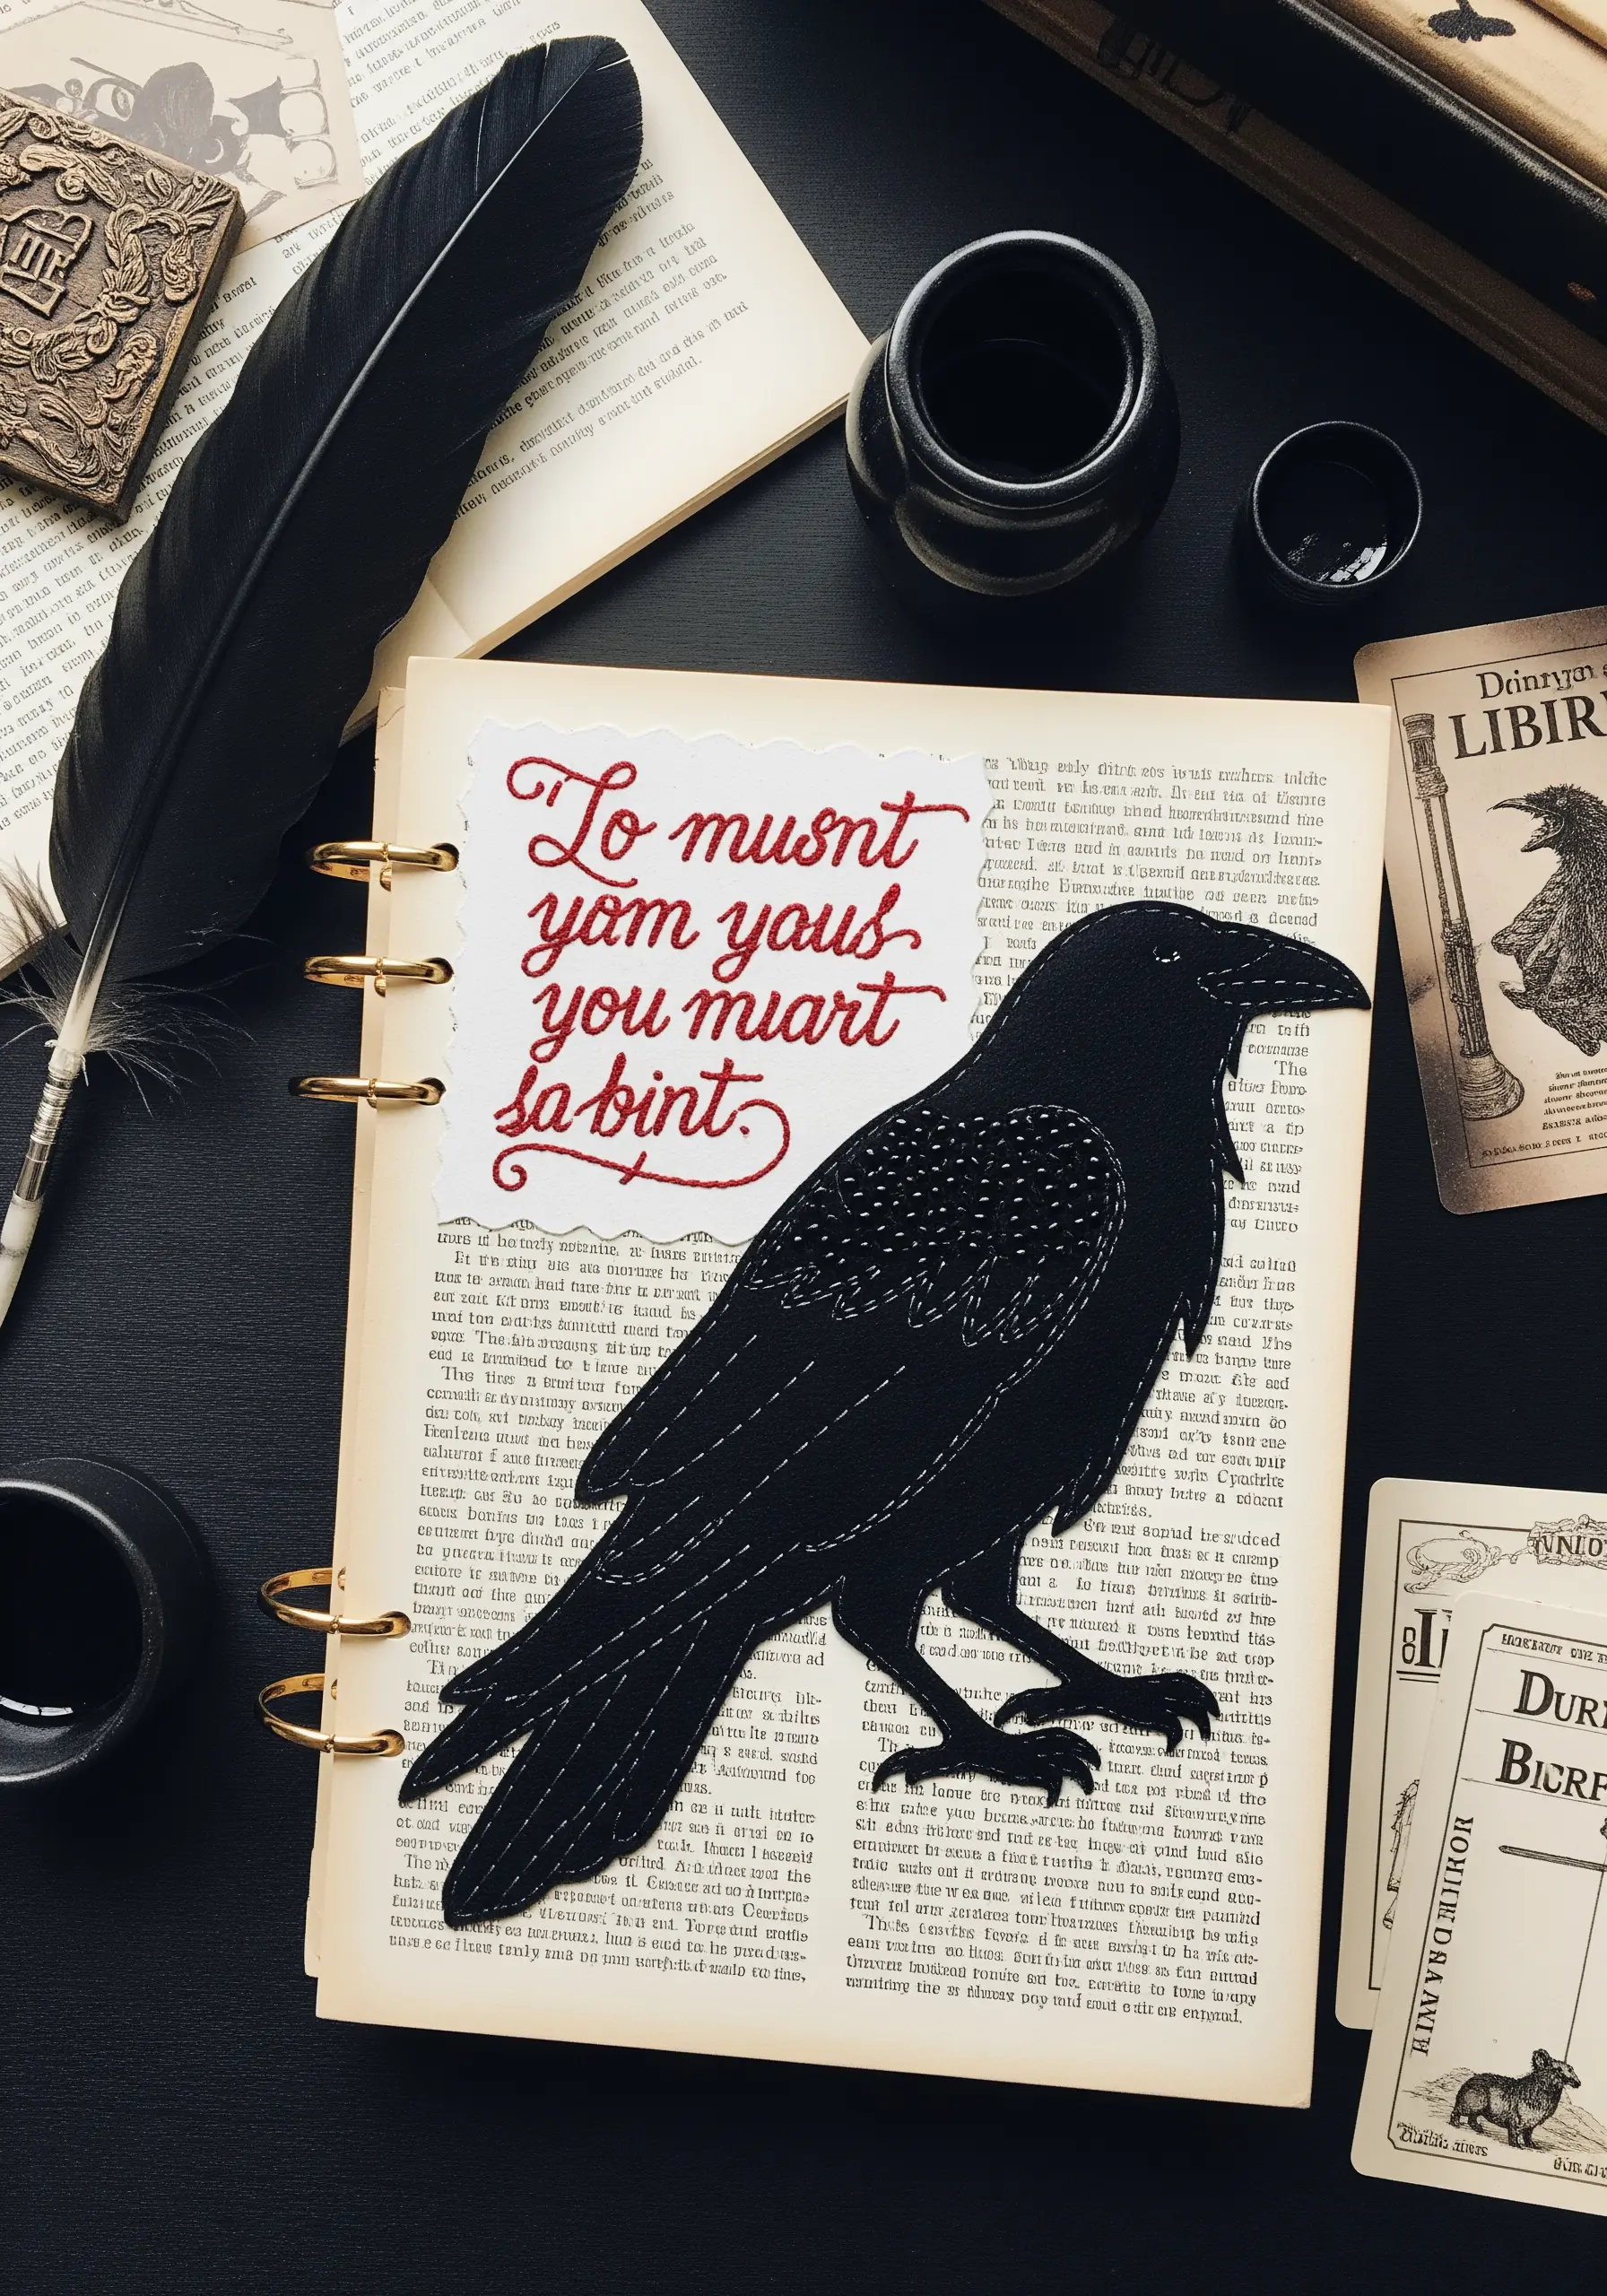
Add a graphic, hand-stitched detail to a paper cutout to give it definition and character.
To stitch on paper without tearing it, use an awl or a large-gauge needle to pre-punch your holes evenly along the edge of the silhouette.
A simple running stitch in a contrasting thread color is all you need to create a powerful visual outline.
This method is perfect for adding a touch of craft to minimalist designs, blending the clean lines of paper art with the warmth of embroidery.
10. Combine Outline Stitches with Natural Elements
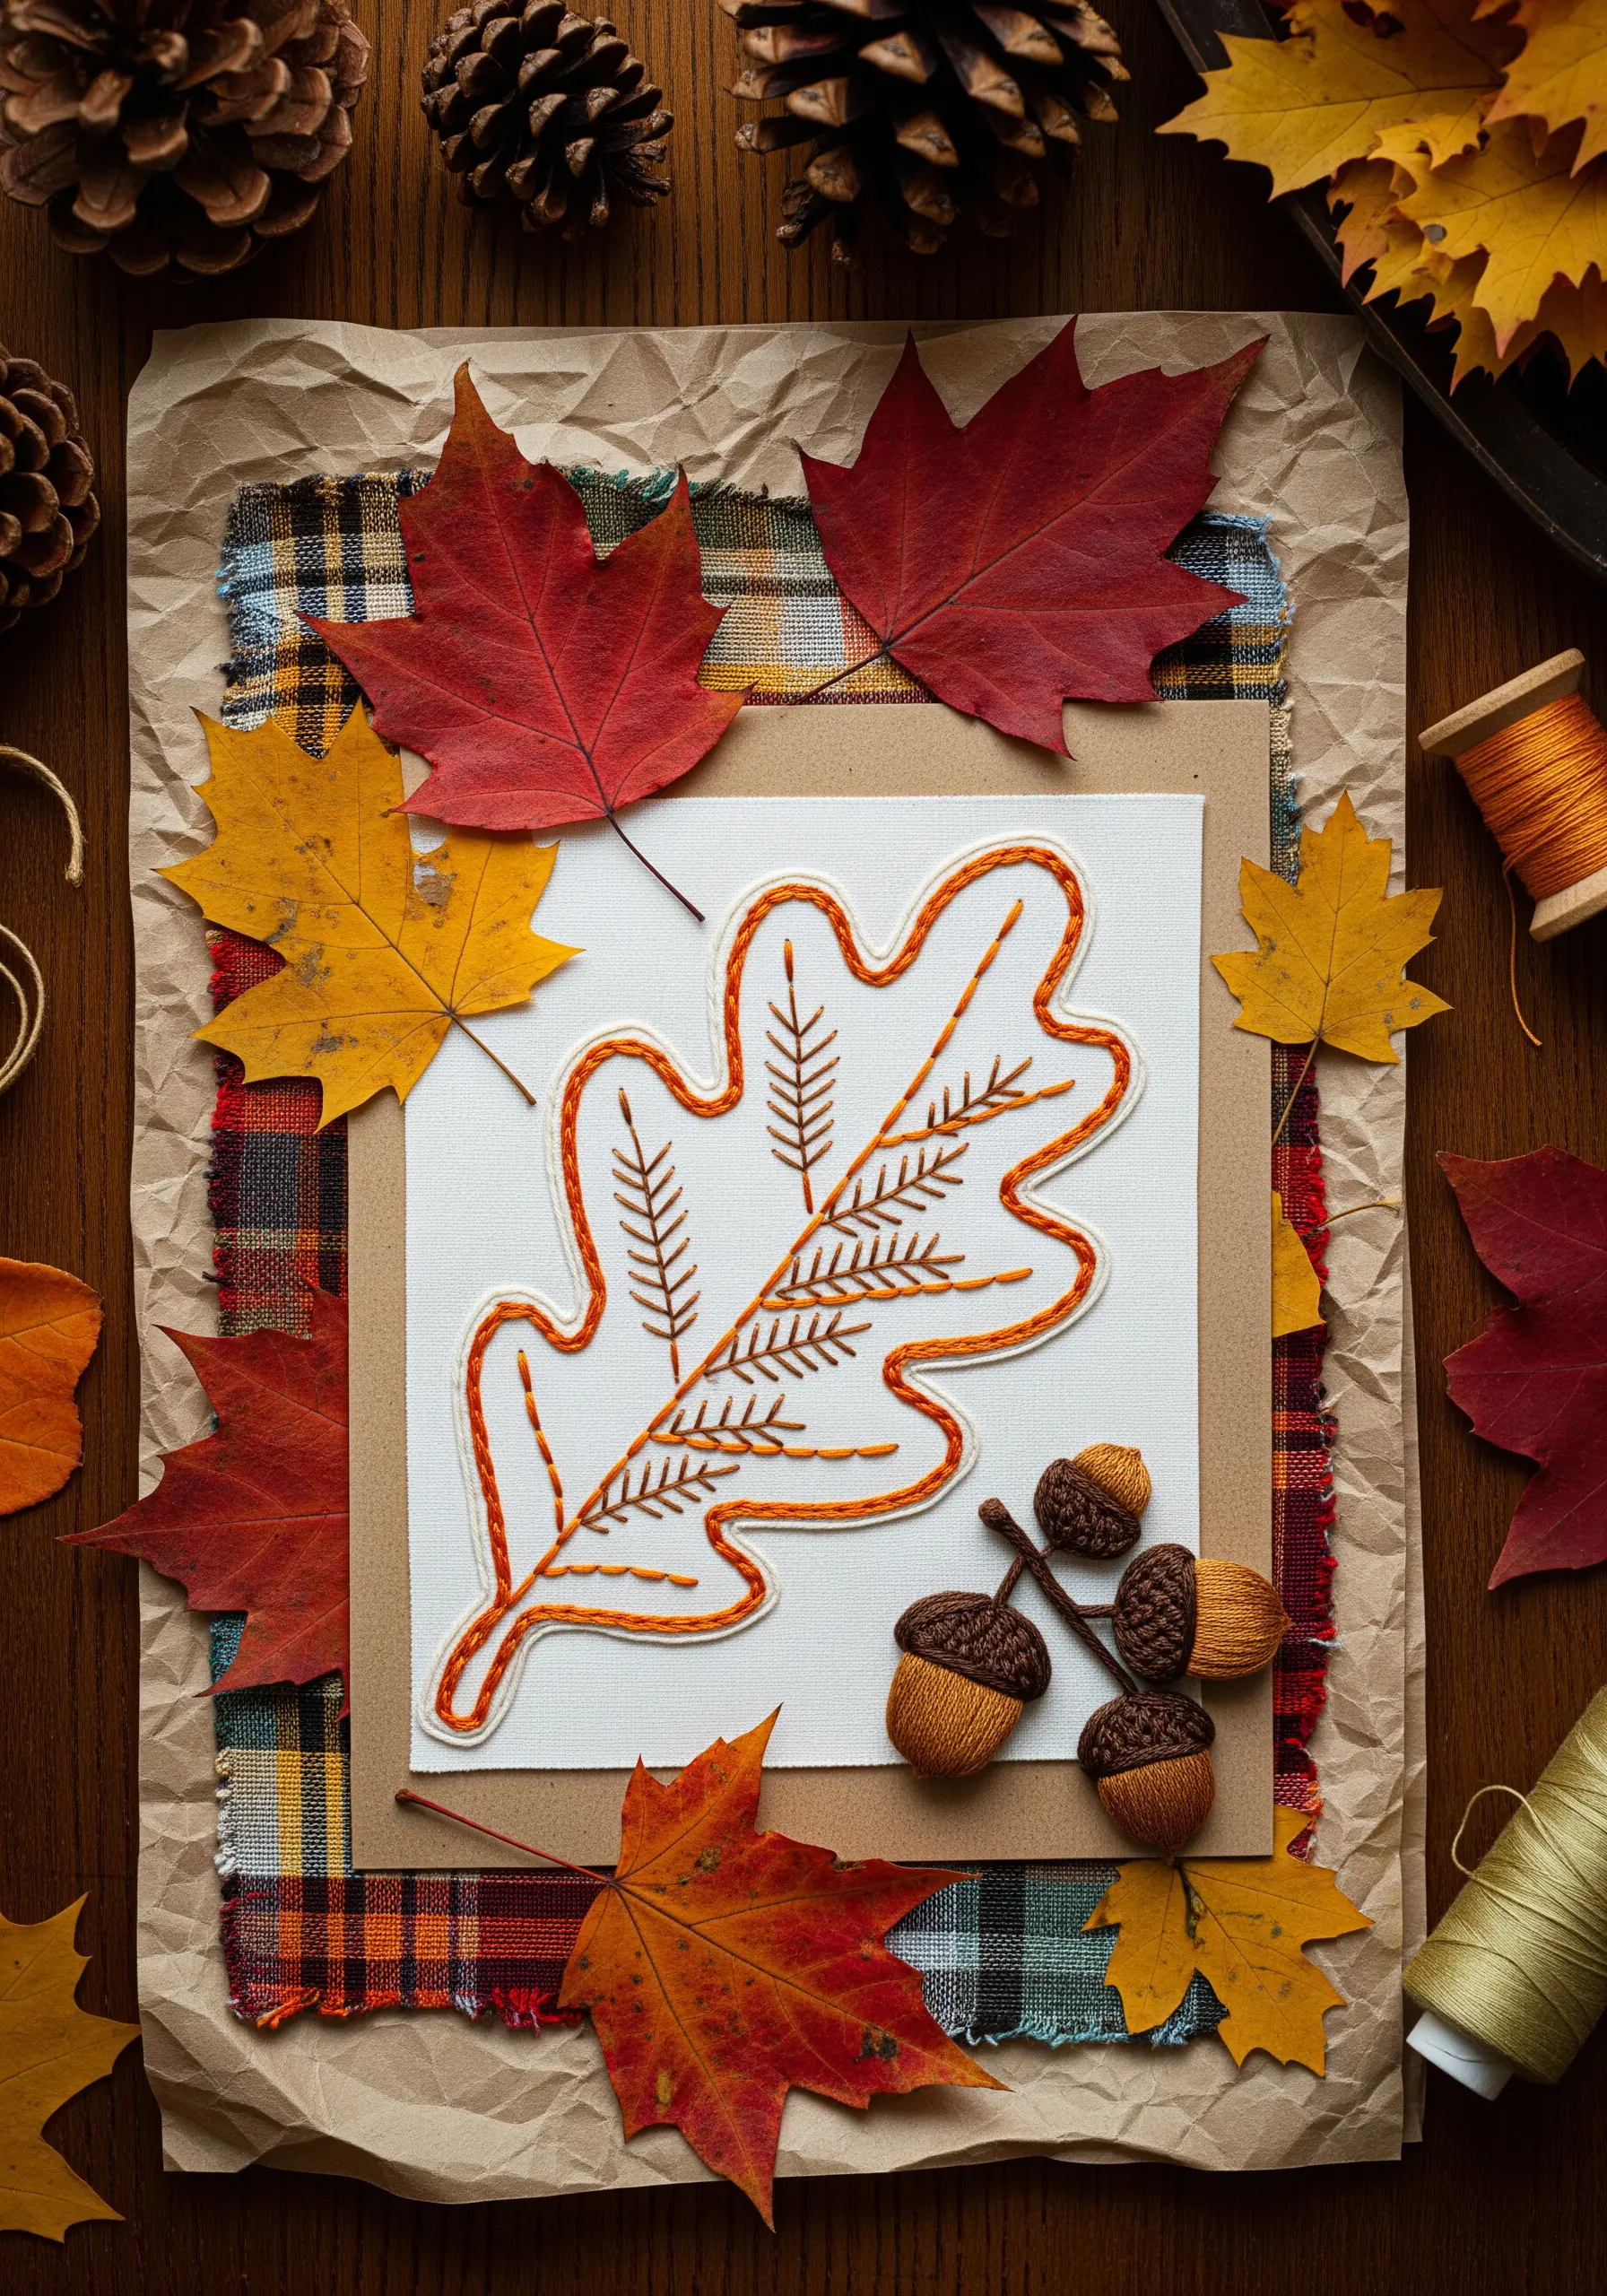
Create an autumnal ode by pairing clean embroidery with real pressed leaves and dimensional accents.
Use a chain stitch or a heavy stem stitch for the leaf’s outline; this gives it a bold, defined presence.
Fill in the delicate interior veins with simple straight stitches using a finer thread, creating a beautiful contrast in line weight.
Incorporate small, three-dimensional elements like felted acorns to ground the piece and add a playful, textural touch that enhances the natural theme.
11. Create Tension with a Single Threaded Line
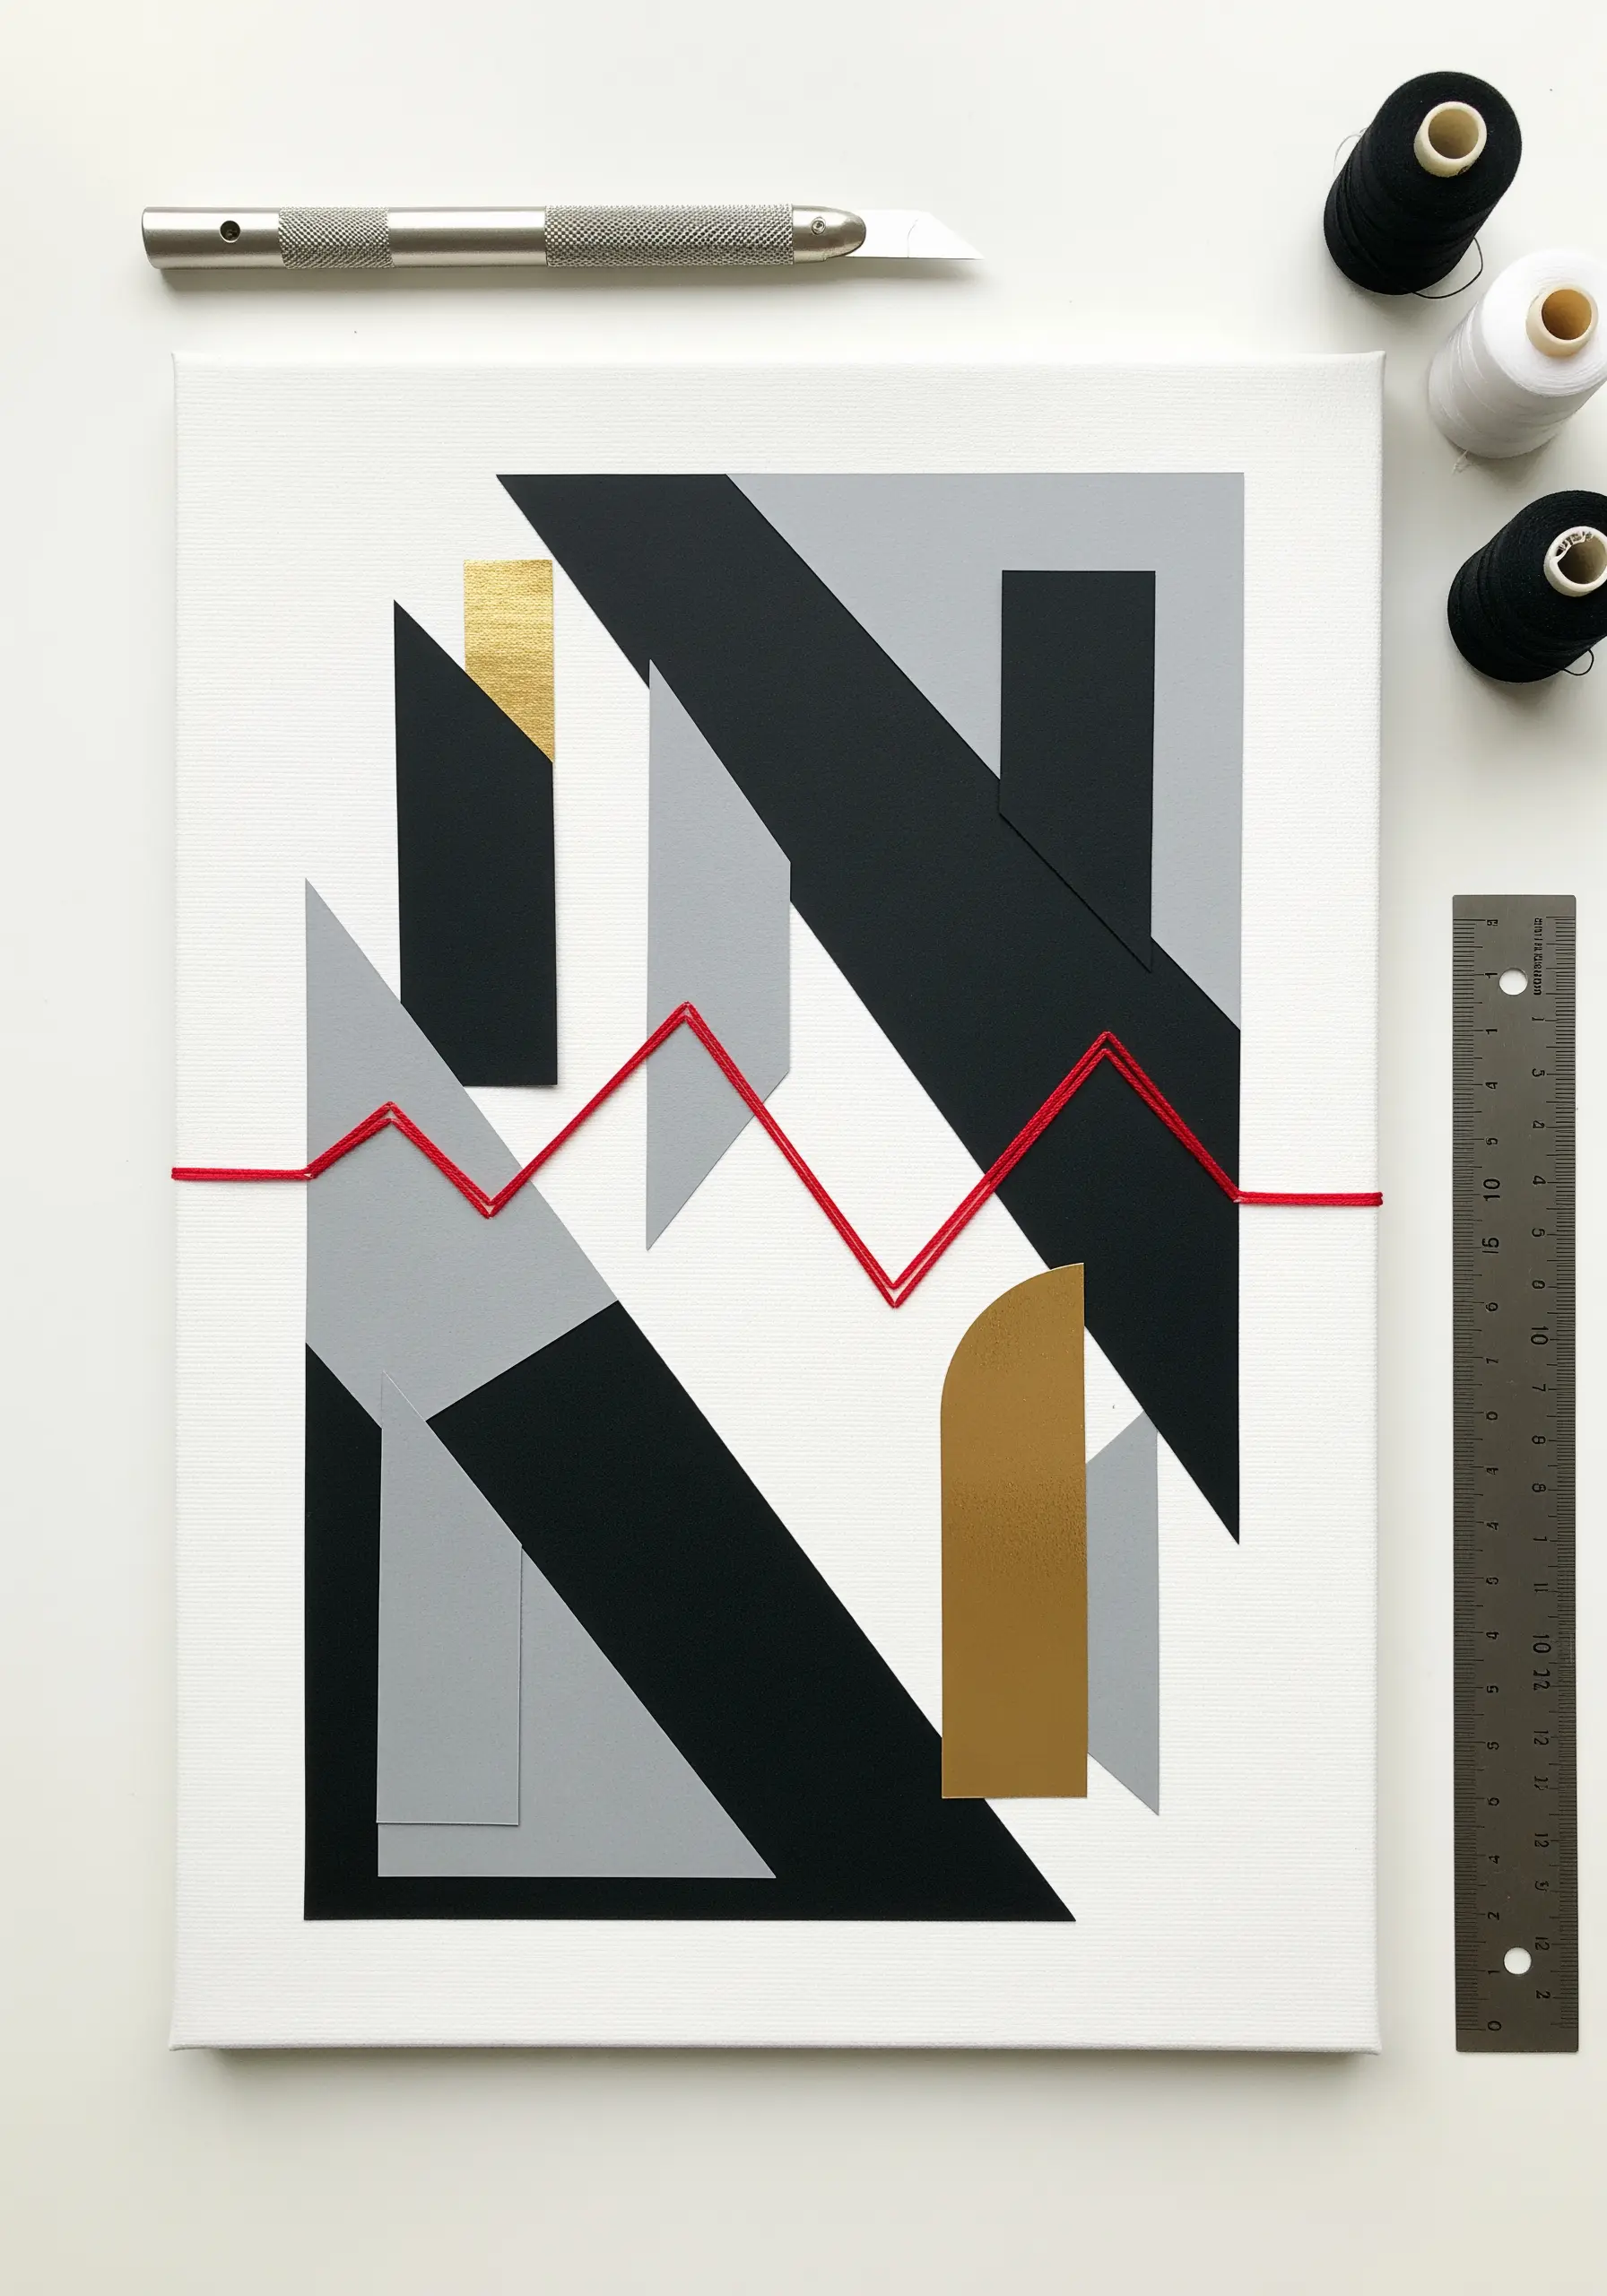
Use a single, bold thread to connect and energize a minimalist paper collage.
Arrange geometric shapes of cardstock on a stretched canvas, playing with positive and negative space.
Instead of stitching, wrap a vibrant thread around the entire canvas, creating a taut, graphic line that cuts across the composition.
This technique introduces color and movement with minimal effort, proving that embroidery-inspired art can be both structural and strikingly simple.
12. Build a Miniature World in a Shadow Box
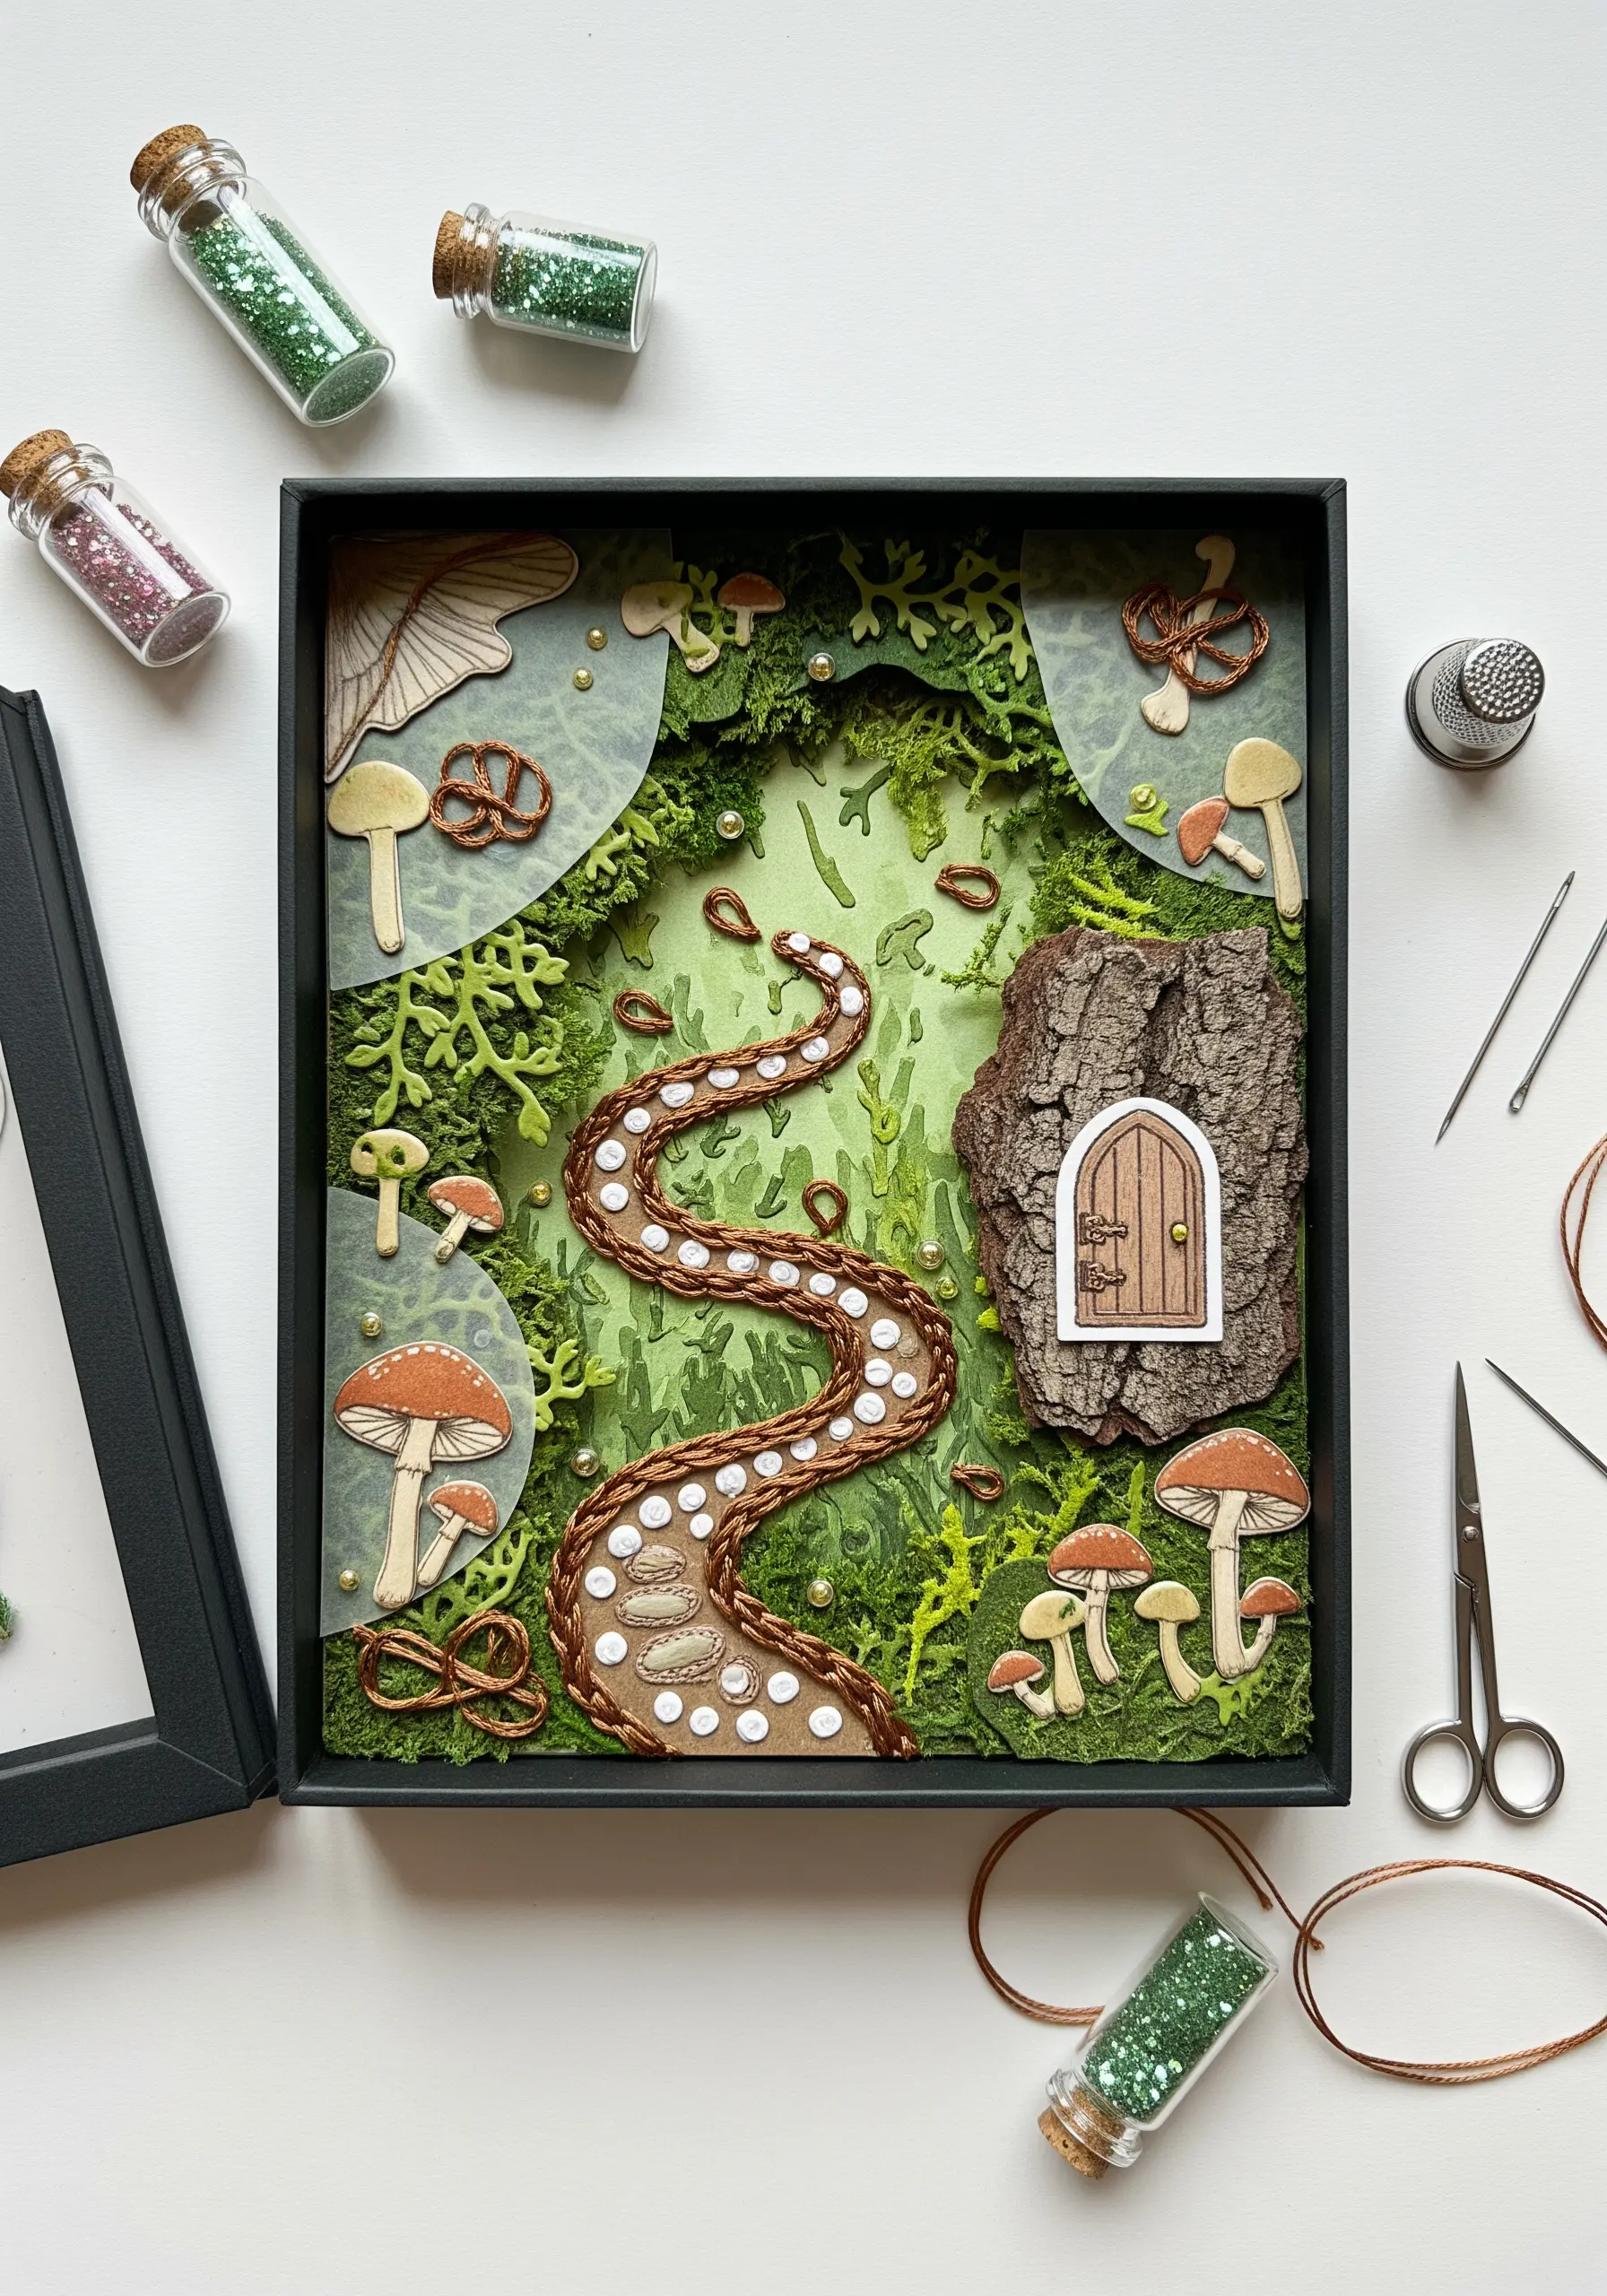
Construct an enchanting diorama by layering paper and adding embroidered textures for a magical, three-dimensional effect.
Create depth by cutting and layering several sheets of cardstock, using foam spacers between each layer.
Embroider details like the winding path directly onto the paper layers before assembling the box. A couched stitch with a thick, textured yarn works perfectly for this.
Add tiny embellishments like seed beads or glitter to catch the light and complete your whimsical scene.
13. Add Subtle Realism with Thread Details

Use fine thread to add delicate, realistic details that unify a paper collage.
In this cityscape, simple long stitches made with a silvery-grey thread perfectly replicate the look of urban power lines.
Stitch directly through the paper silhouette layer and the painted canvas behind it to secure all elements together.
This technique demonstrates how even the most minimal stitching can add a crucial layer of detail, transforming a collection of shapes into a cohesive and believable scene.
14. Weave a Textured Heart with Raised Stitches
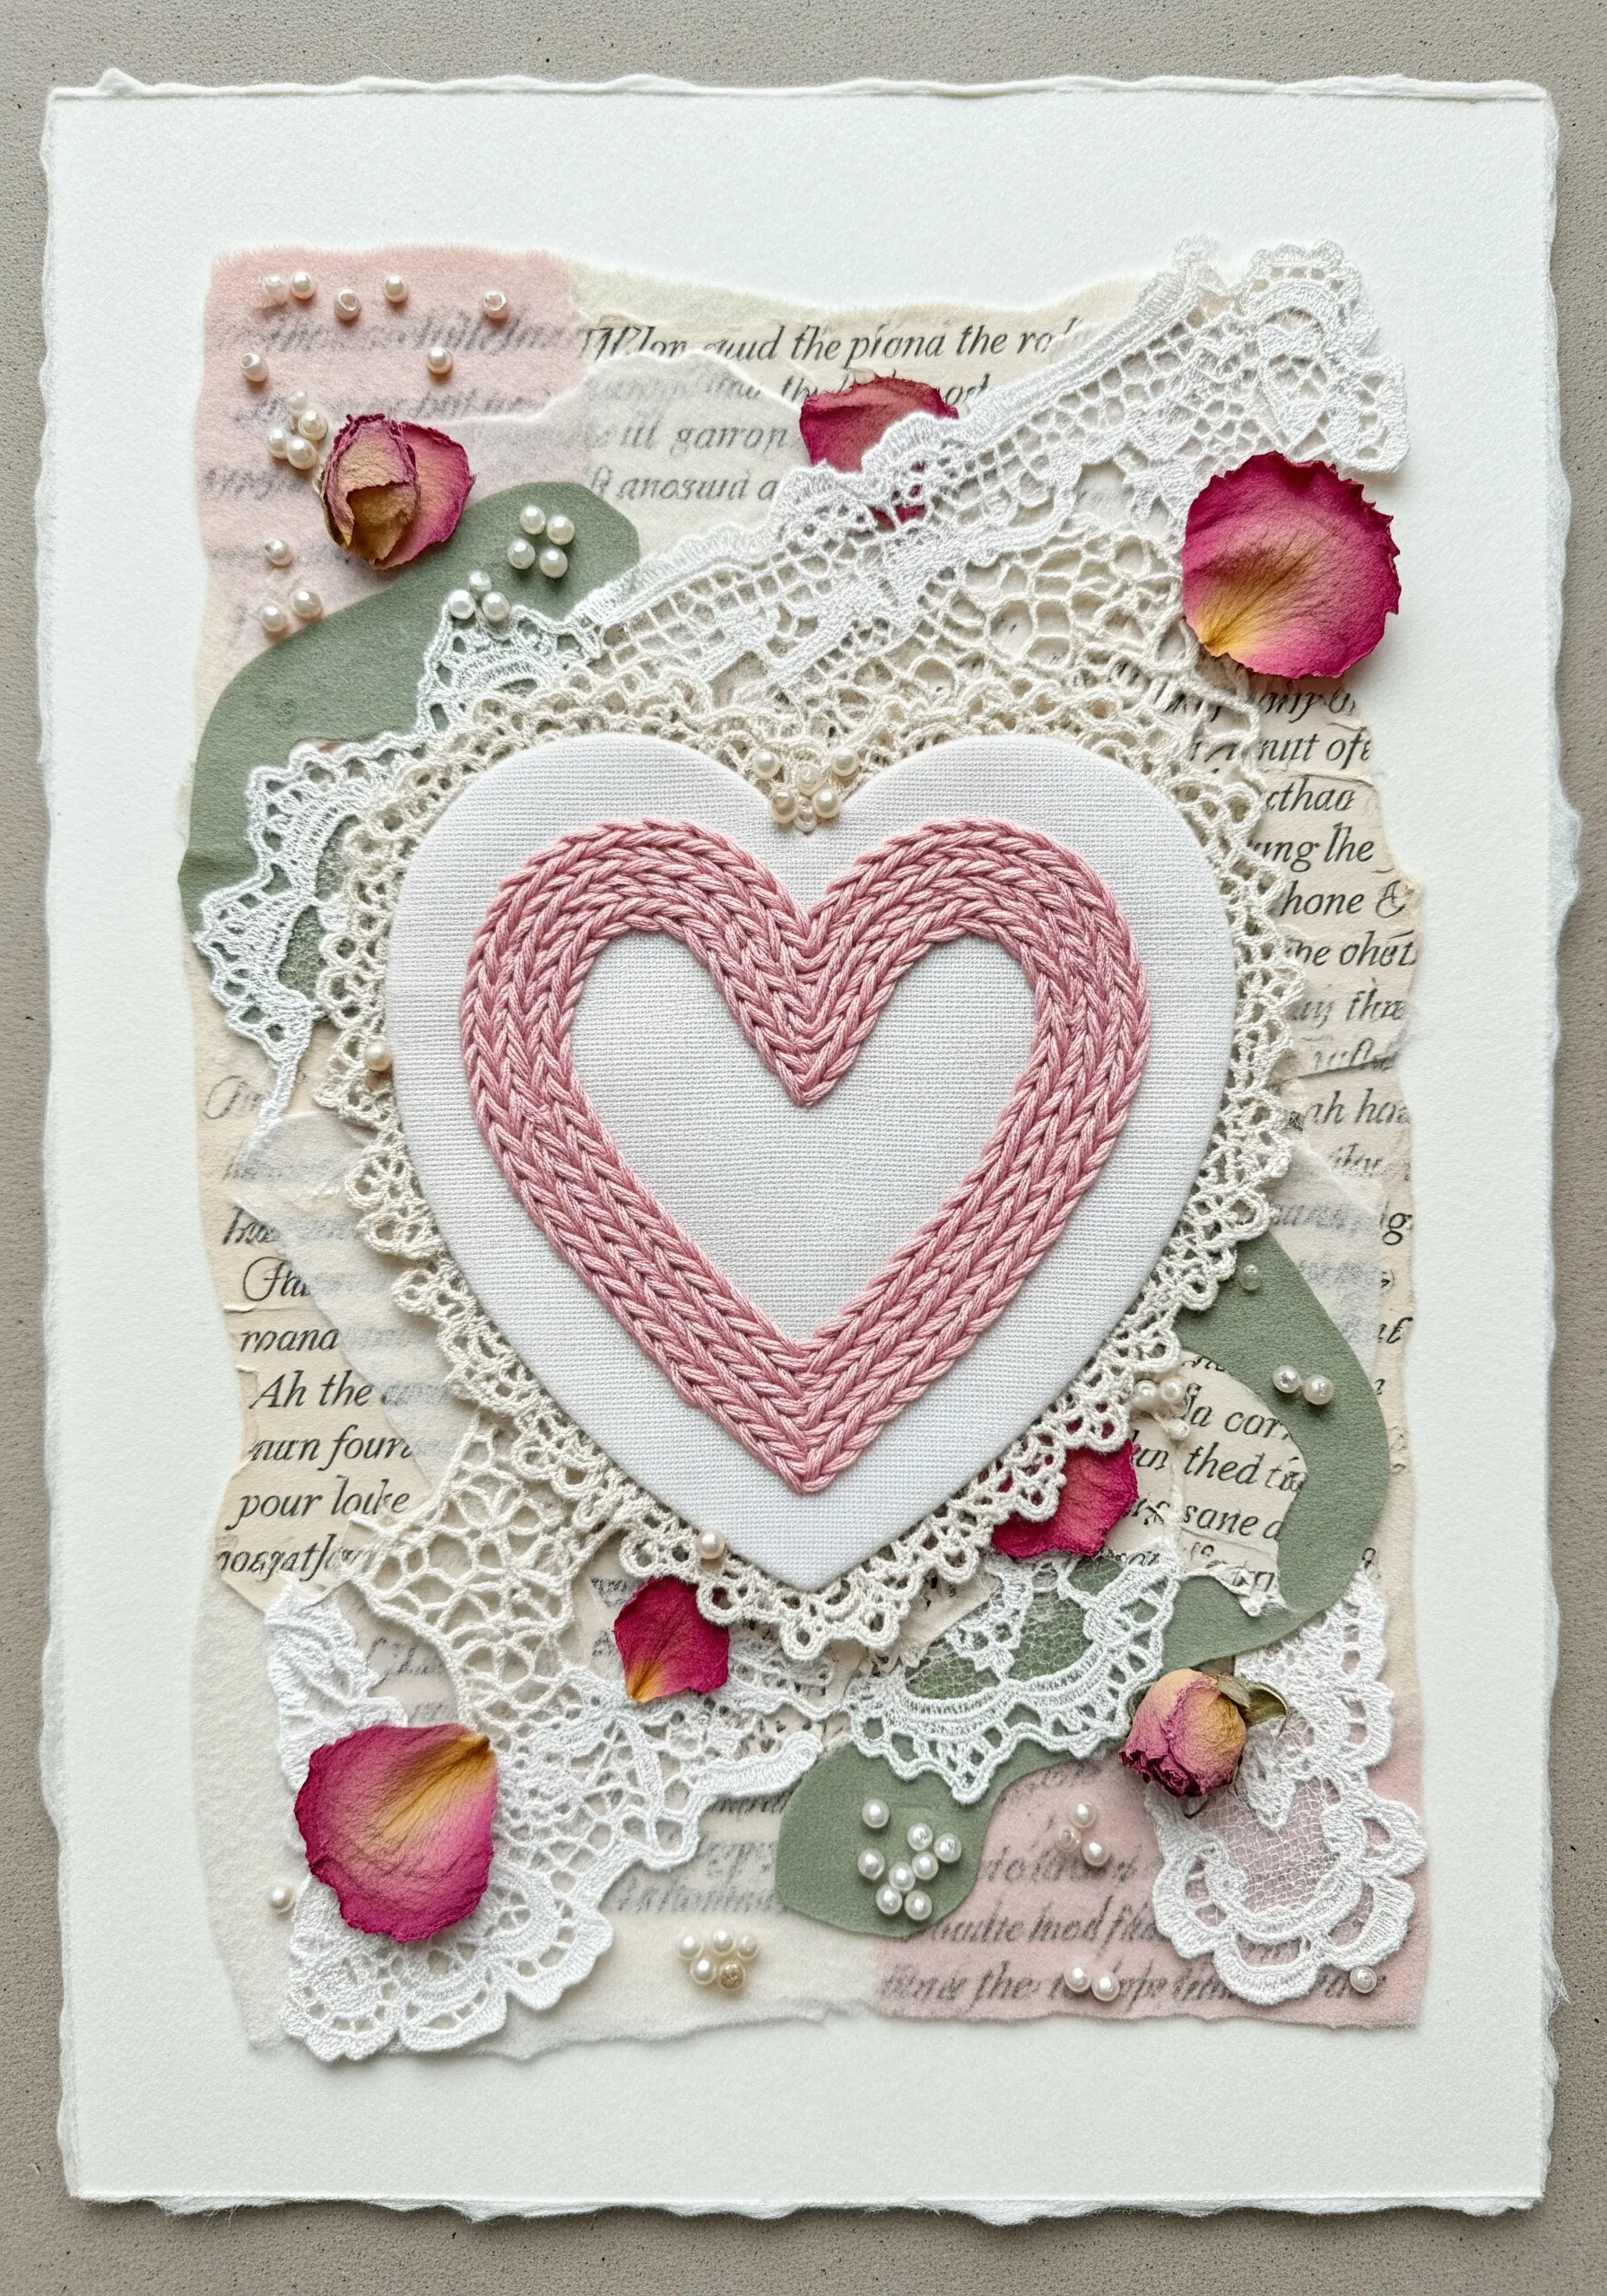
Turn a simple shape into a tactile centerpiece by using a highly textured, braided stitch.
A raised chain stitch or Palestrina knot, worked in tight, concentric rows, creates a beautiful woven effect that invites touch.
Stitch the heart on a separate piece of sturdy fabric, then cut it out and appliqué it onto a layered background of vintage lace, torn book pages, and dried petals.
This layering of soft, romantic materials makes for beautiful scrap fabric collage embroidery ideas that feel both nostalgic and new.
15. Embellish Paper Collage with Beaded Stitches
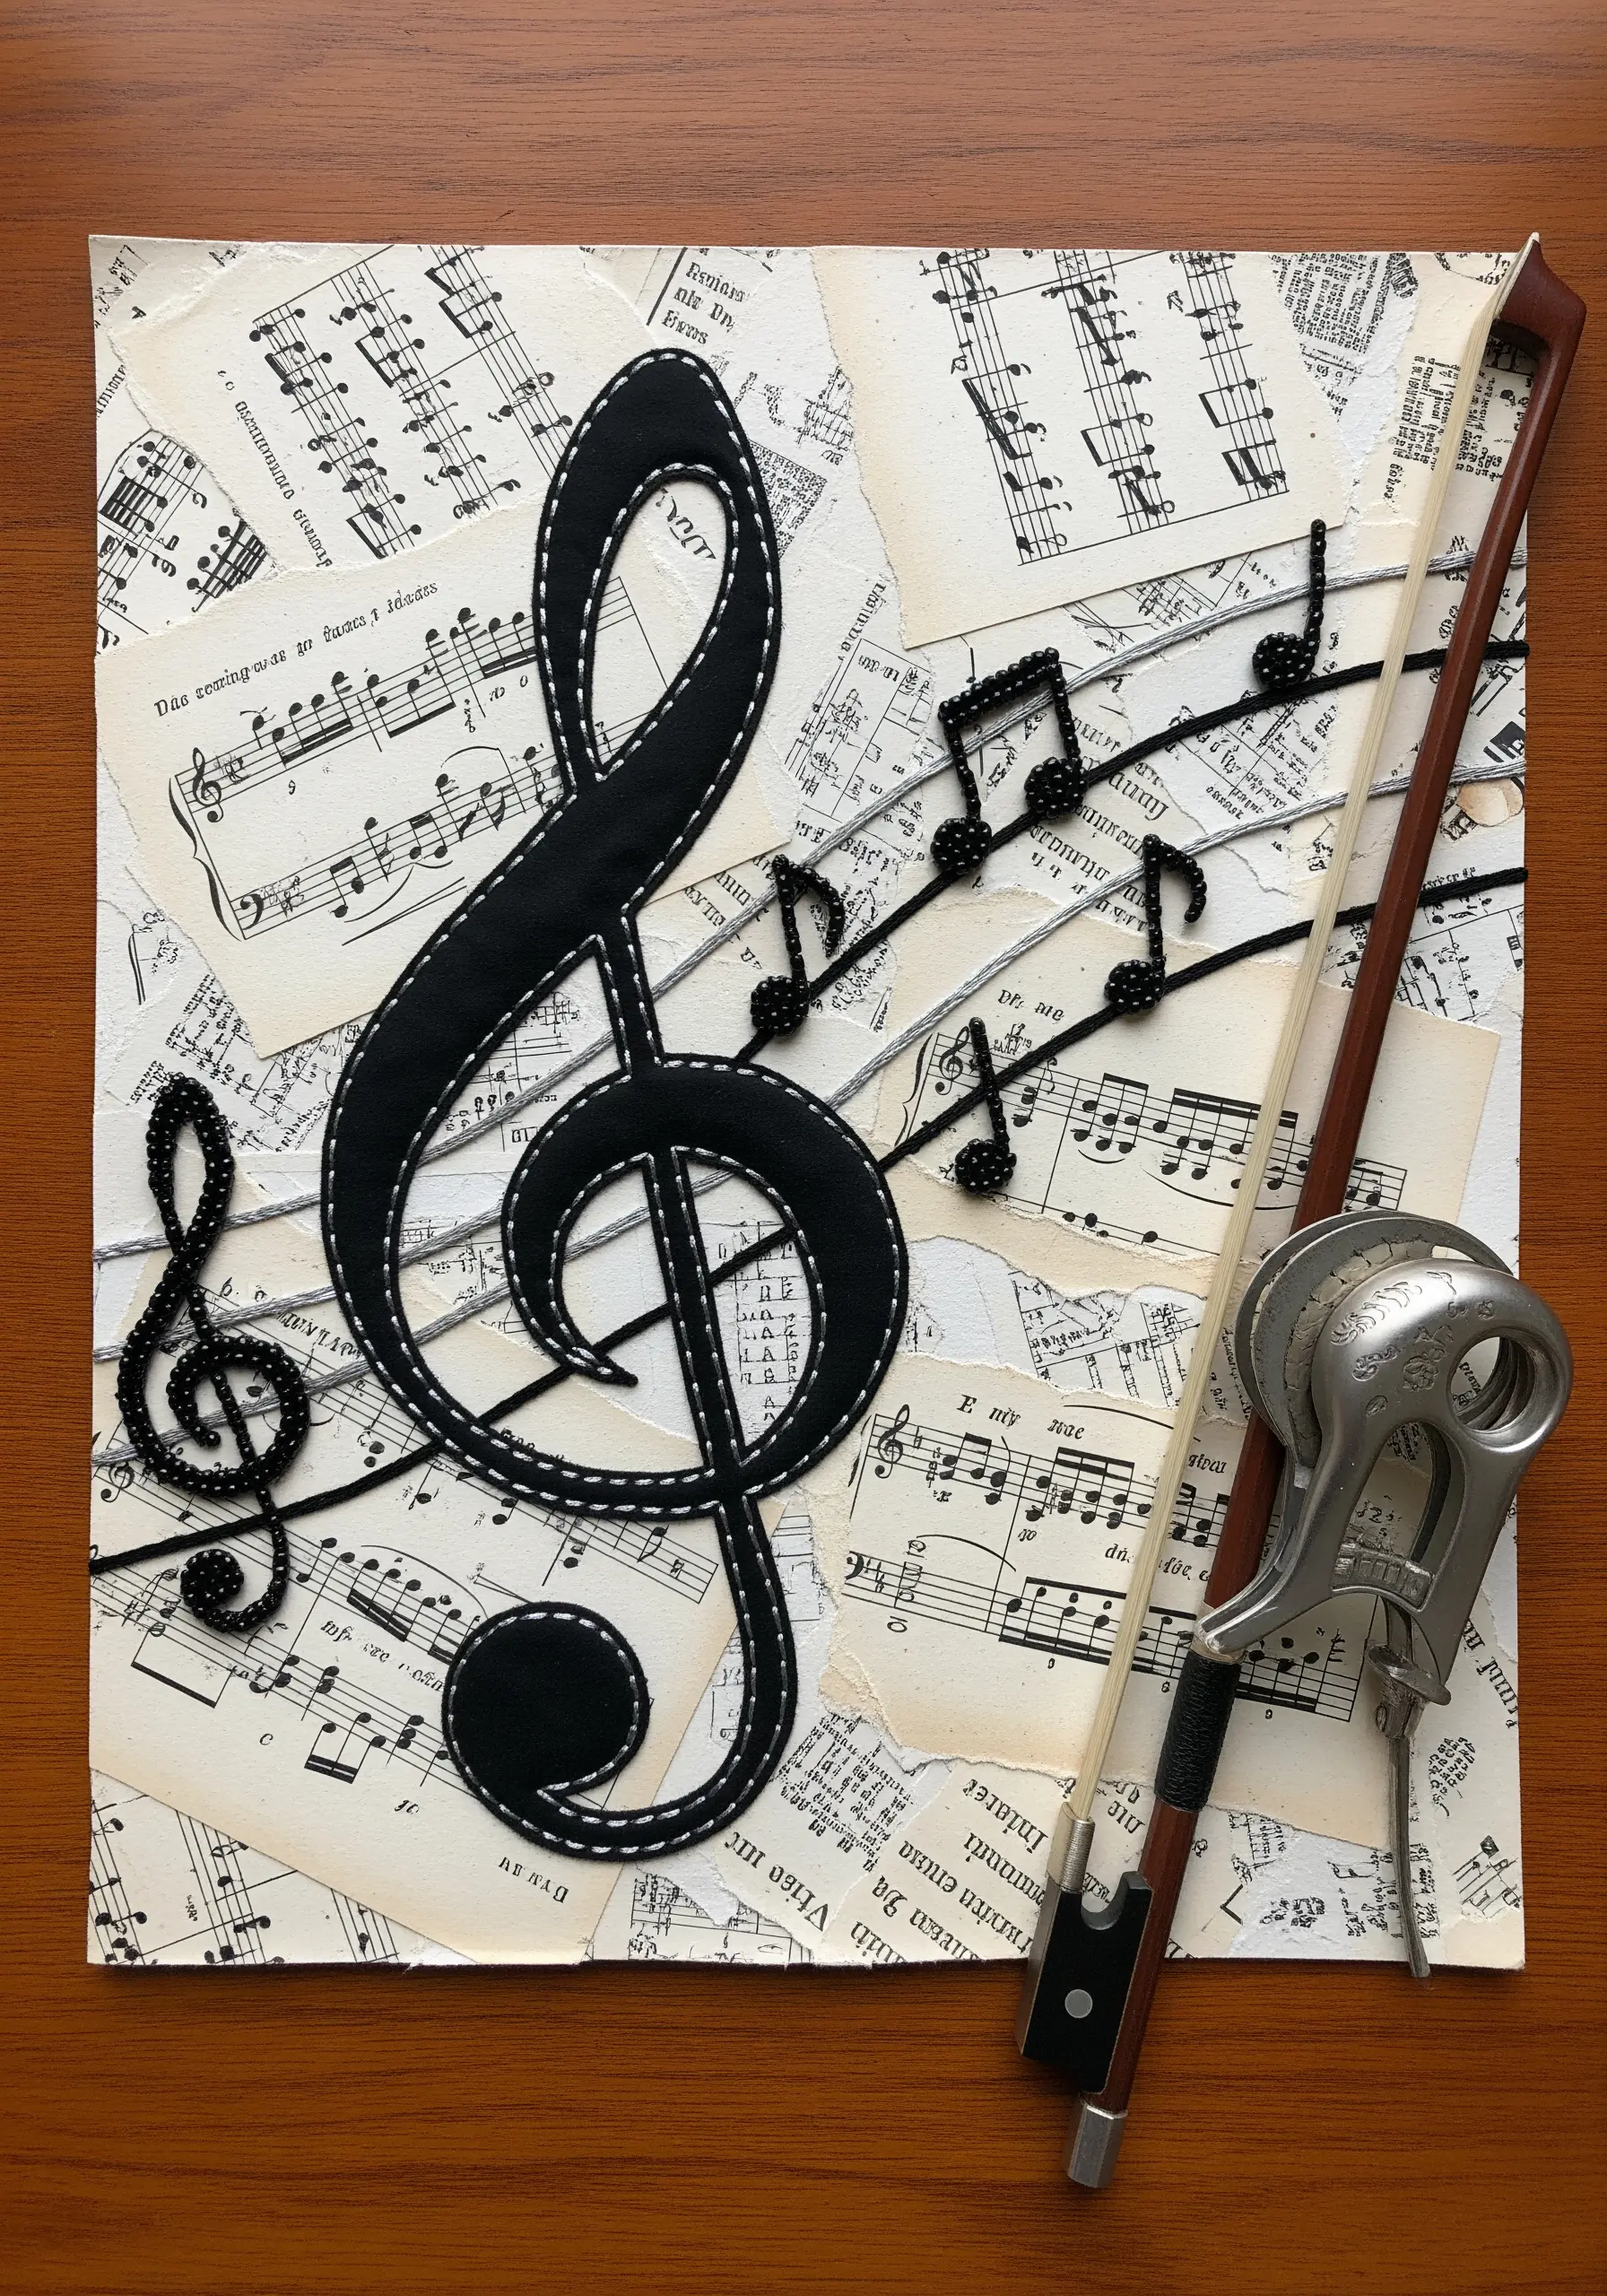
Add a touch of sparkle and dimension to your work by incorporating beads into your stitched appliqués.
Create your motifs, like these musical notes, from felt or stiff fabric and stitch them onto your paper collage background.
Instead of using thread alone, secure small seed beads along the lines of your design.
This technique adds a subtle shimmer and a raised texture that catches the light, making the elements stand out against the flat sheet music.
16. Animate Paper Cutouts with Simple Stitches
Give life and definition to simple paper cutouts with a few well-placed embroidery stitches.
Use a basic backstitch in a contrasting color to outline shapes and add details like leaf veins.
The stitches add a layer of texture that transforms the flat paper into something more dynamic and handmade.
This approach is perfect for scrapbook-style compositions, blending the worlds of paper craft and textile art with charming results.
17. Sculpt with Thread on a Fashion Illustration
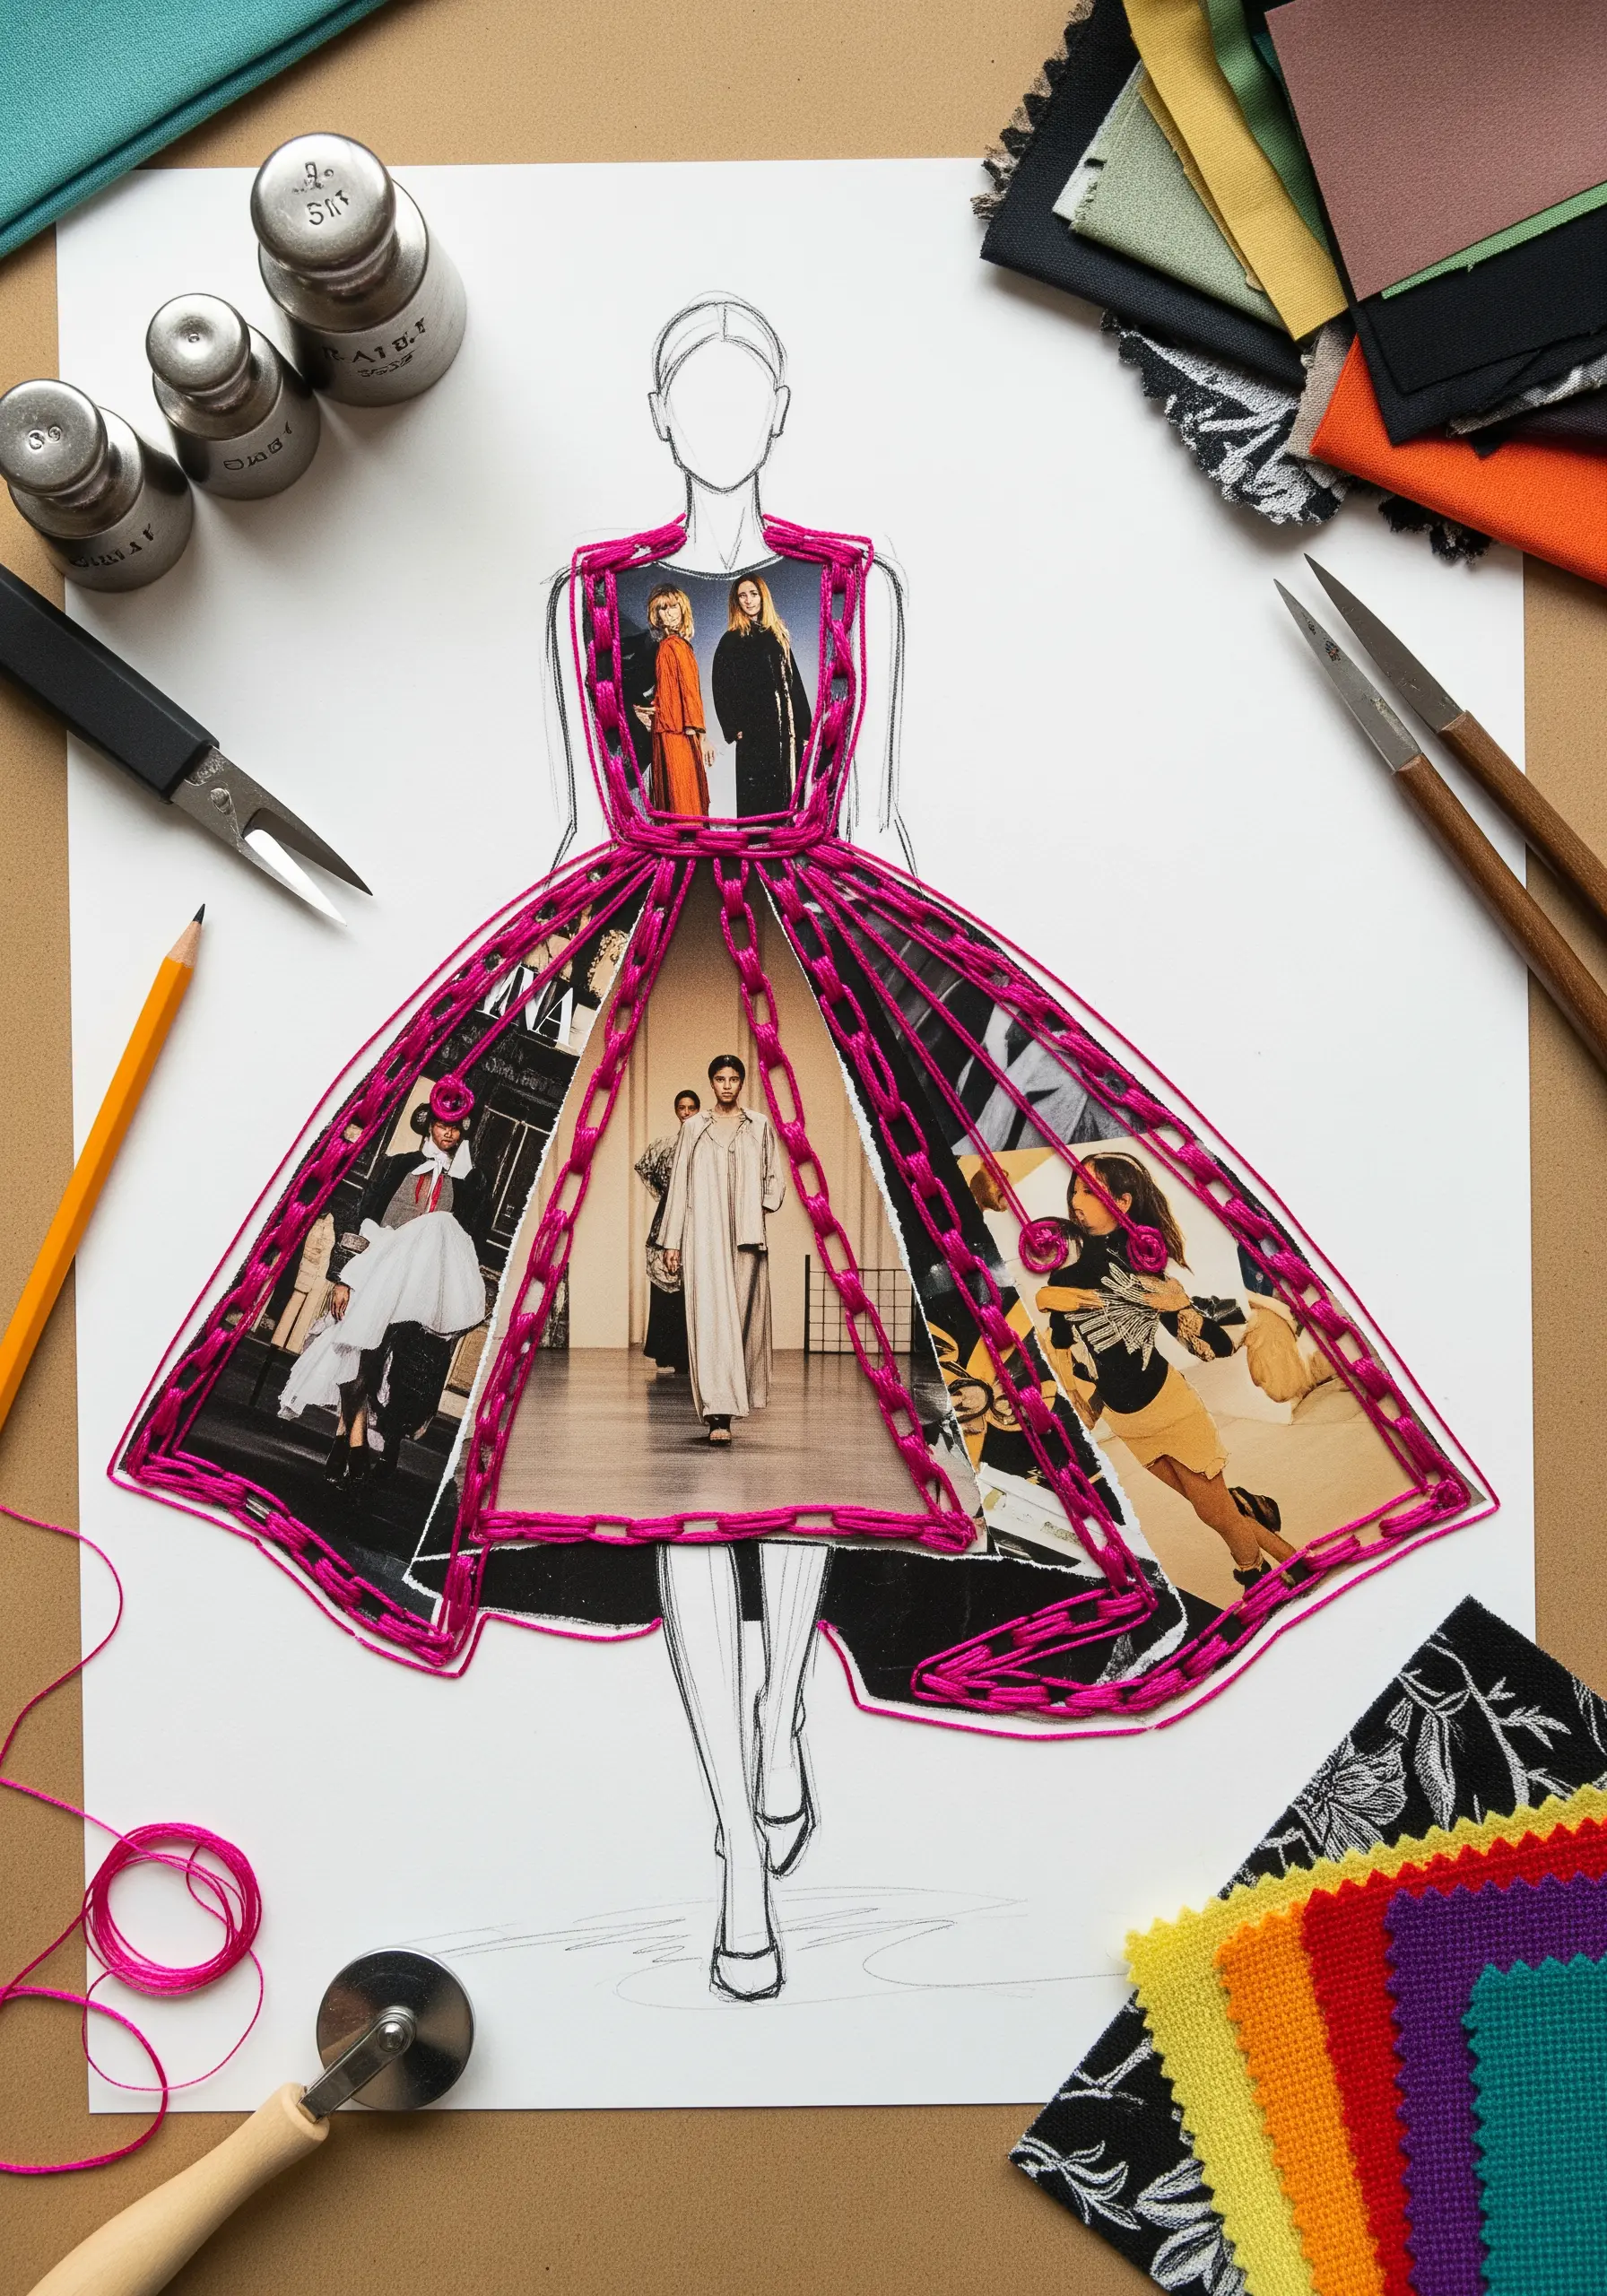
Transform a two-dimensional fashion sketch into a structural piece of art by using thread to build form.
Cut out sections of the illustration where you want to create a three-dimensional effect.
Use long, straight stitches to span the empty spaces, creating a ‘cage’ or framework that suggests the volume of the garment.
This innovative technique merges illustration with fiber art, allowing thread to become a key architectural element of the design.
18. Recreate Zen Textures with Natural Fibers
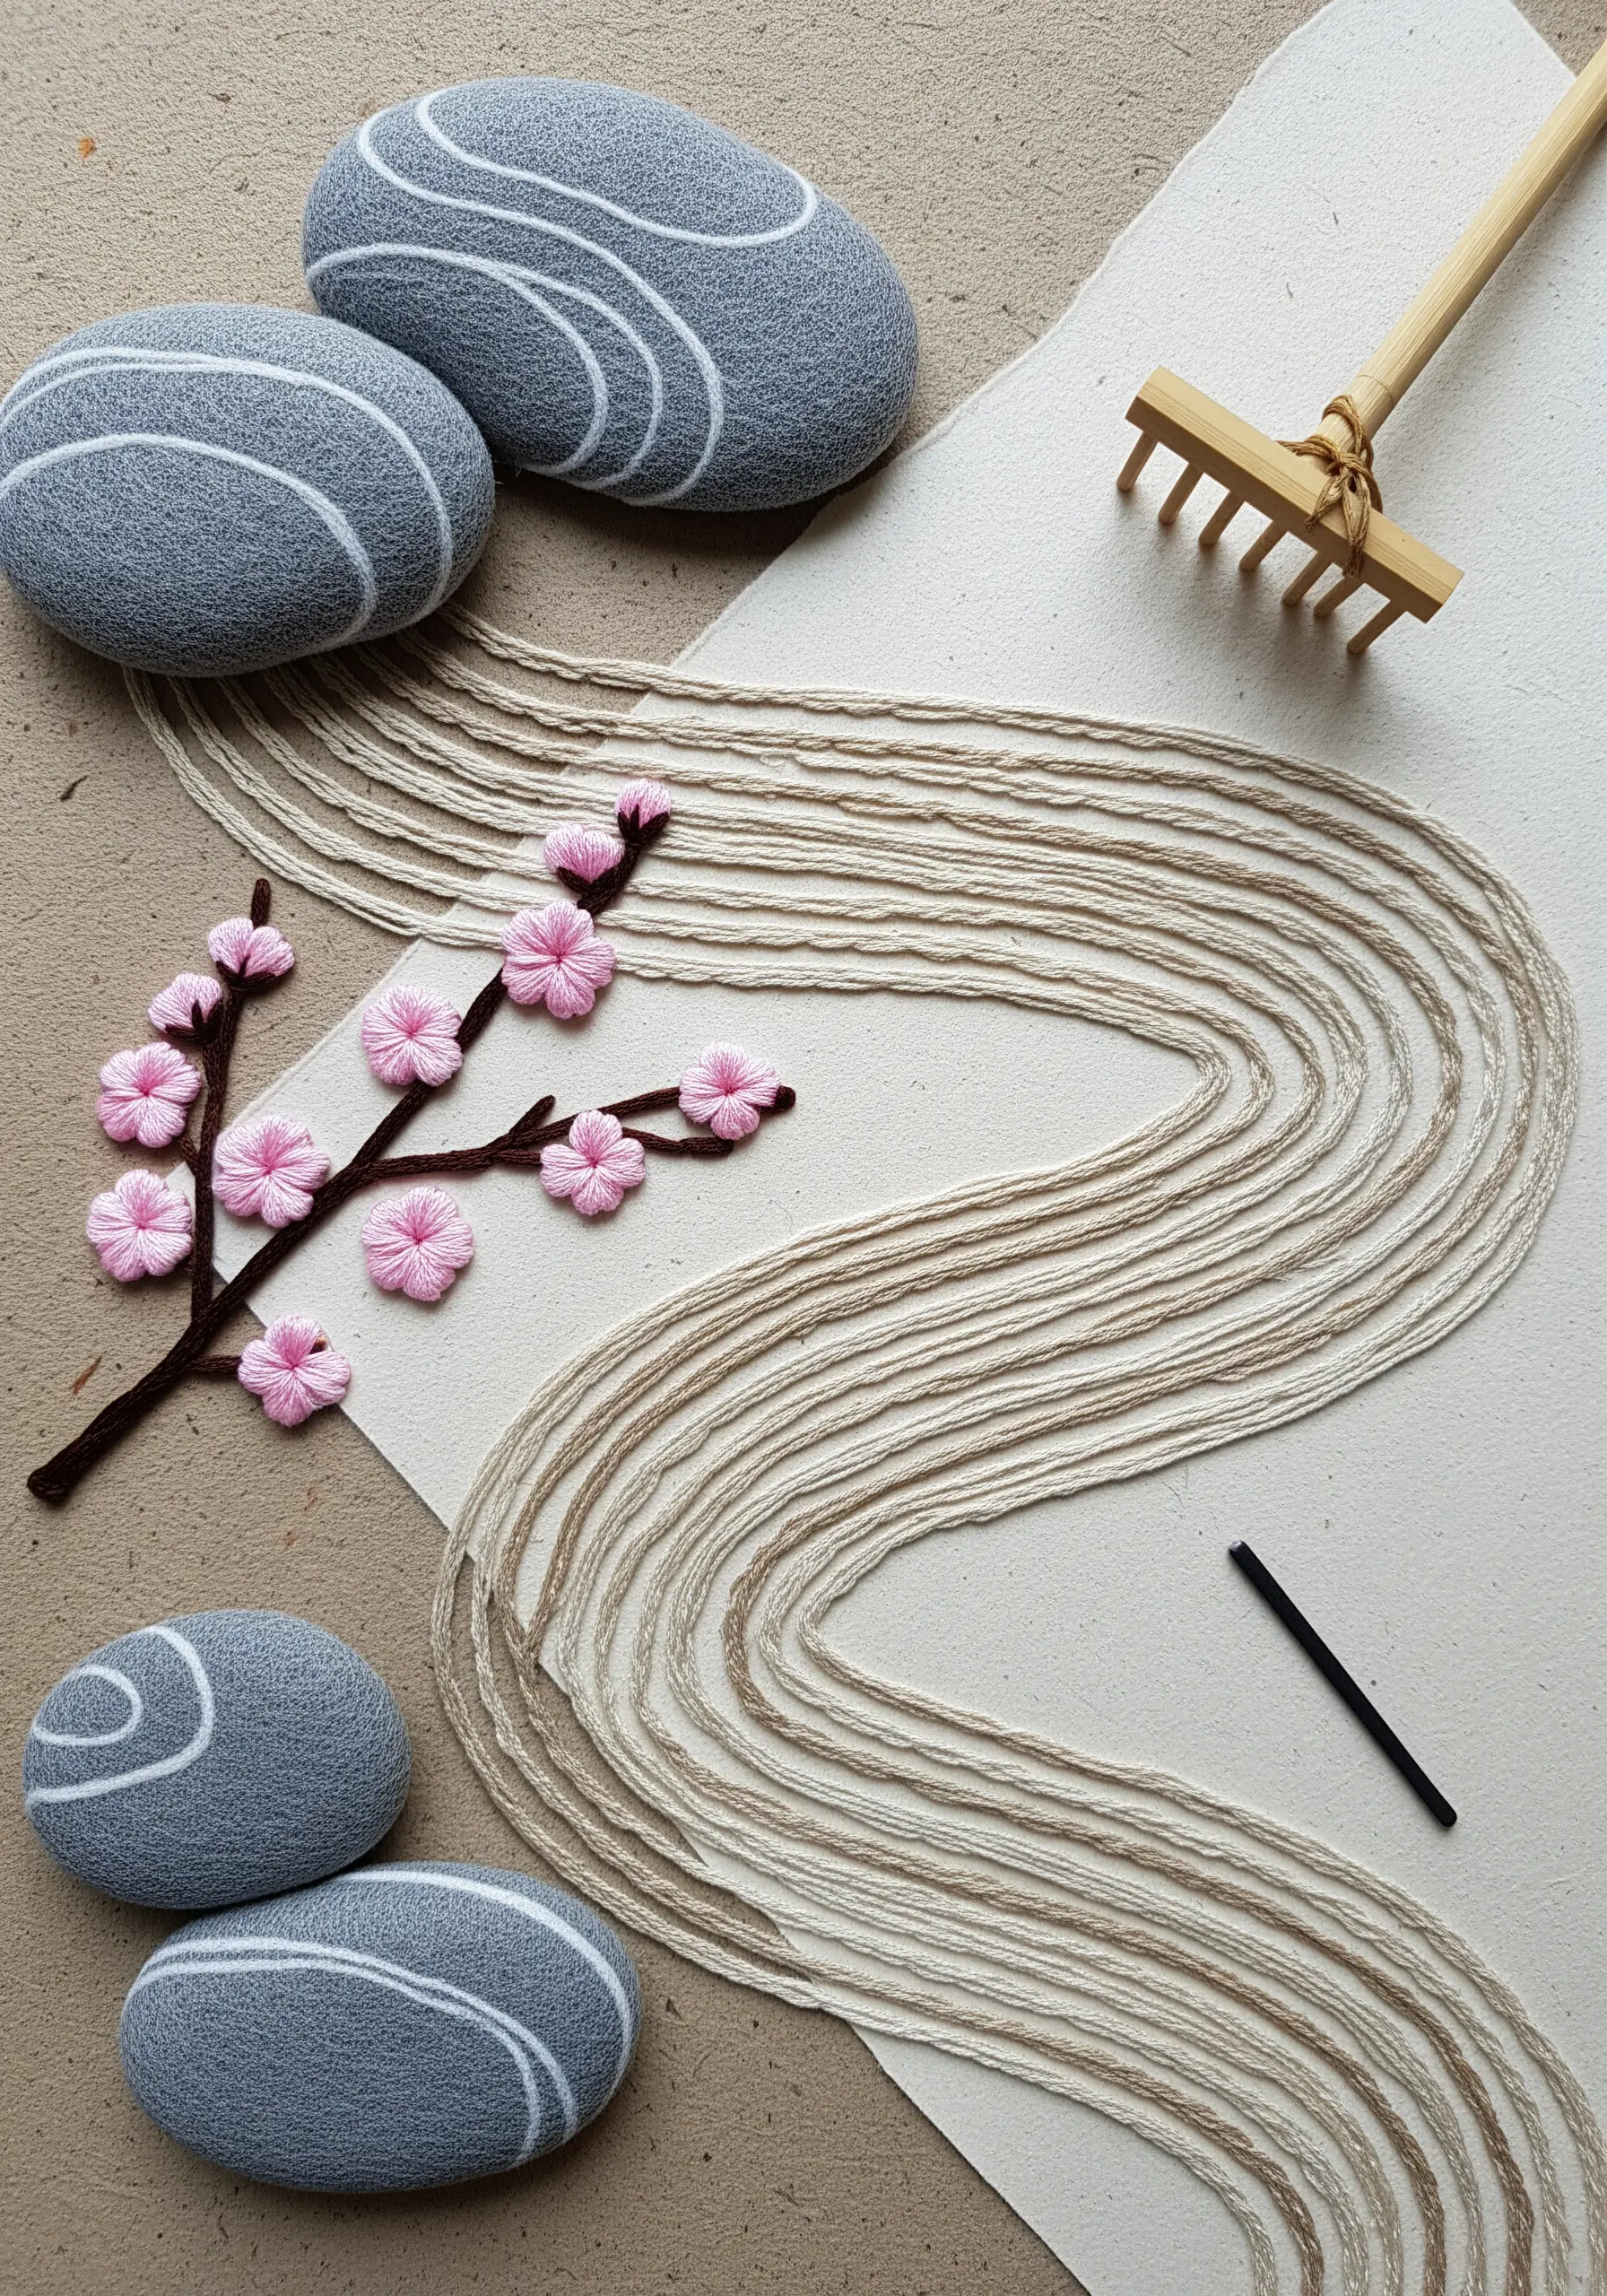
Evoke the tranquility of a Japanese Zen garden by using natural fibers and simple, repetitive stitches.
Lay down strands of jute or thick twine in flowing lines to mimic the patterns of raked sand, and secure them using a couching stitch with a finer, matching thread.
For the blossoms, create small, delicate wagon wheel stitches in a soft, contrasting color.
The combination of rough, linear textures with soft, clustered stitches creates a balanced and meditative composition, perfect for Japanese zen inspired embroidery designs.
19. Integrate Collage and Stitch in Portraiture
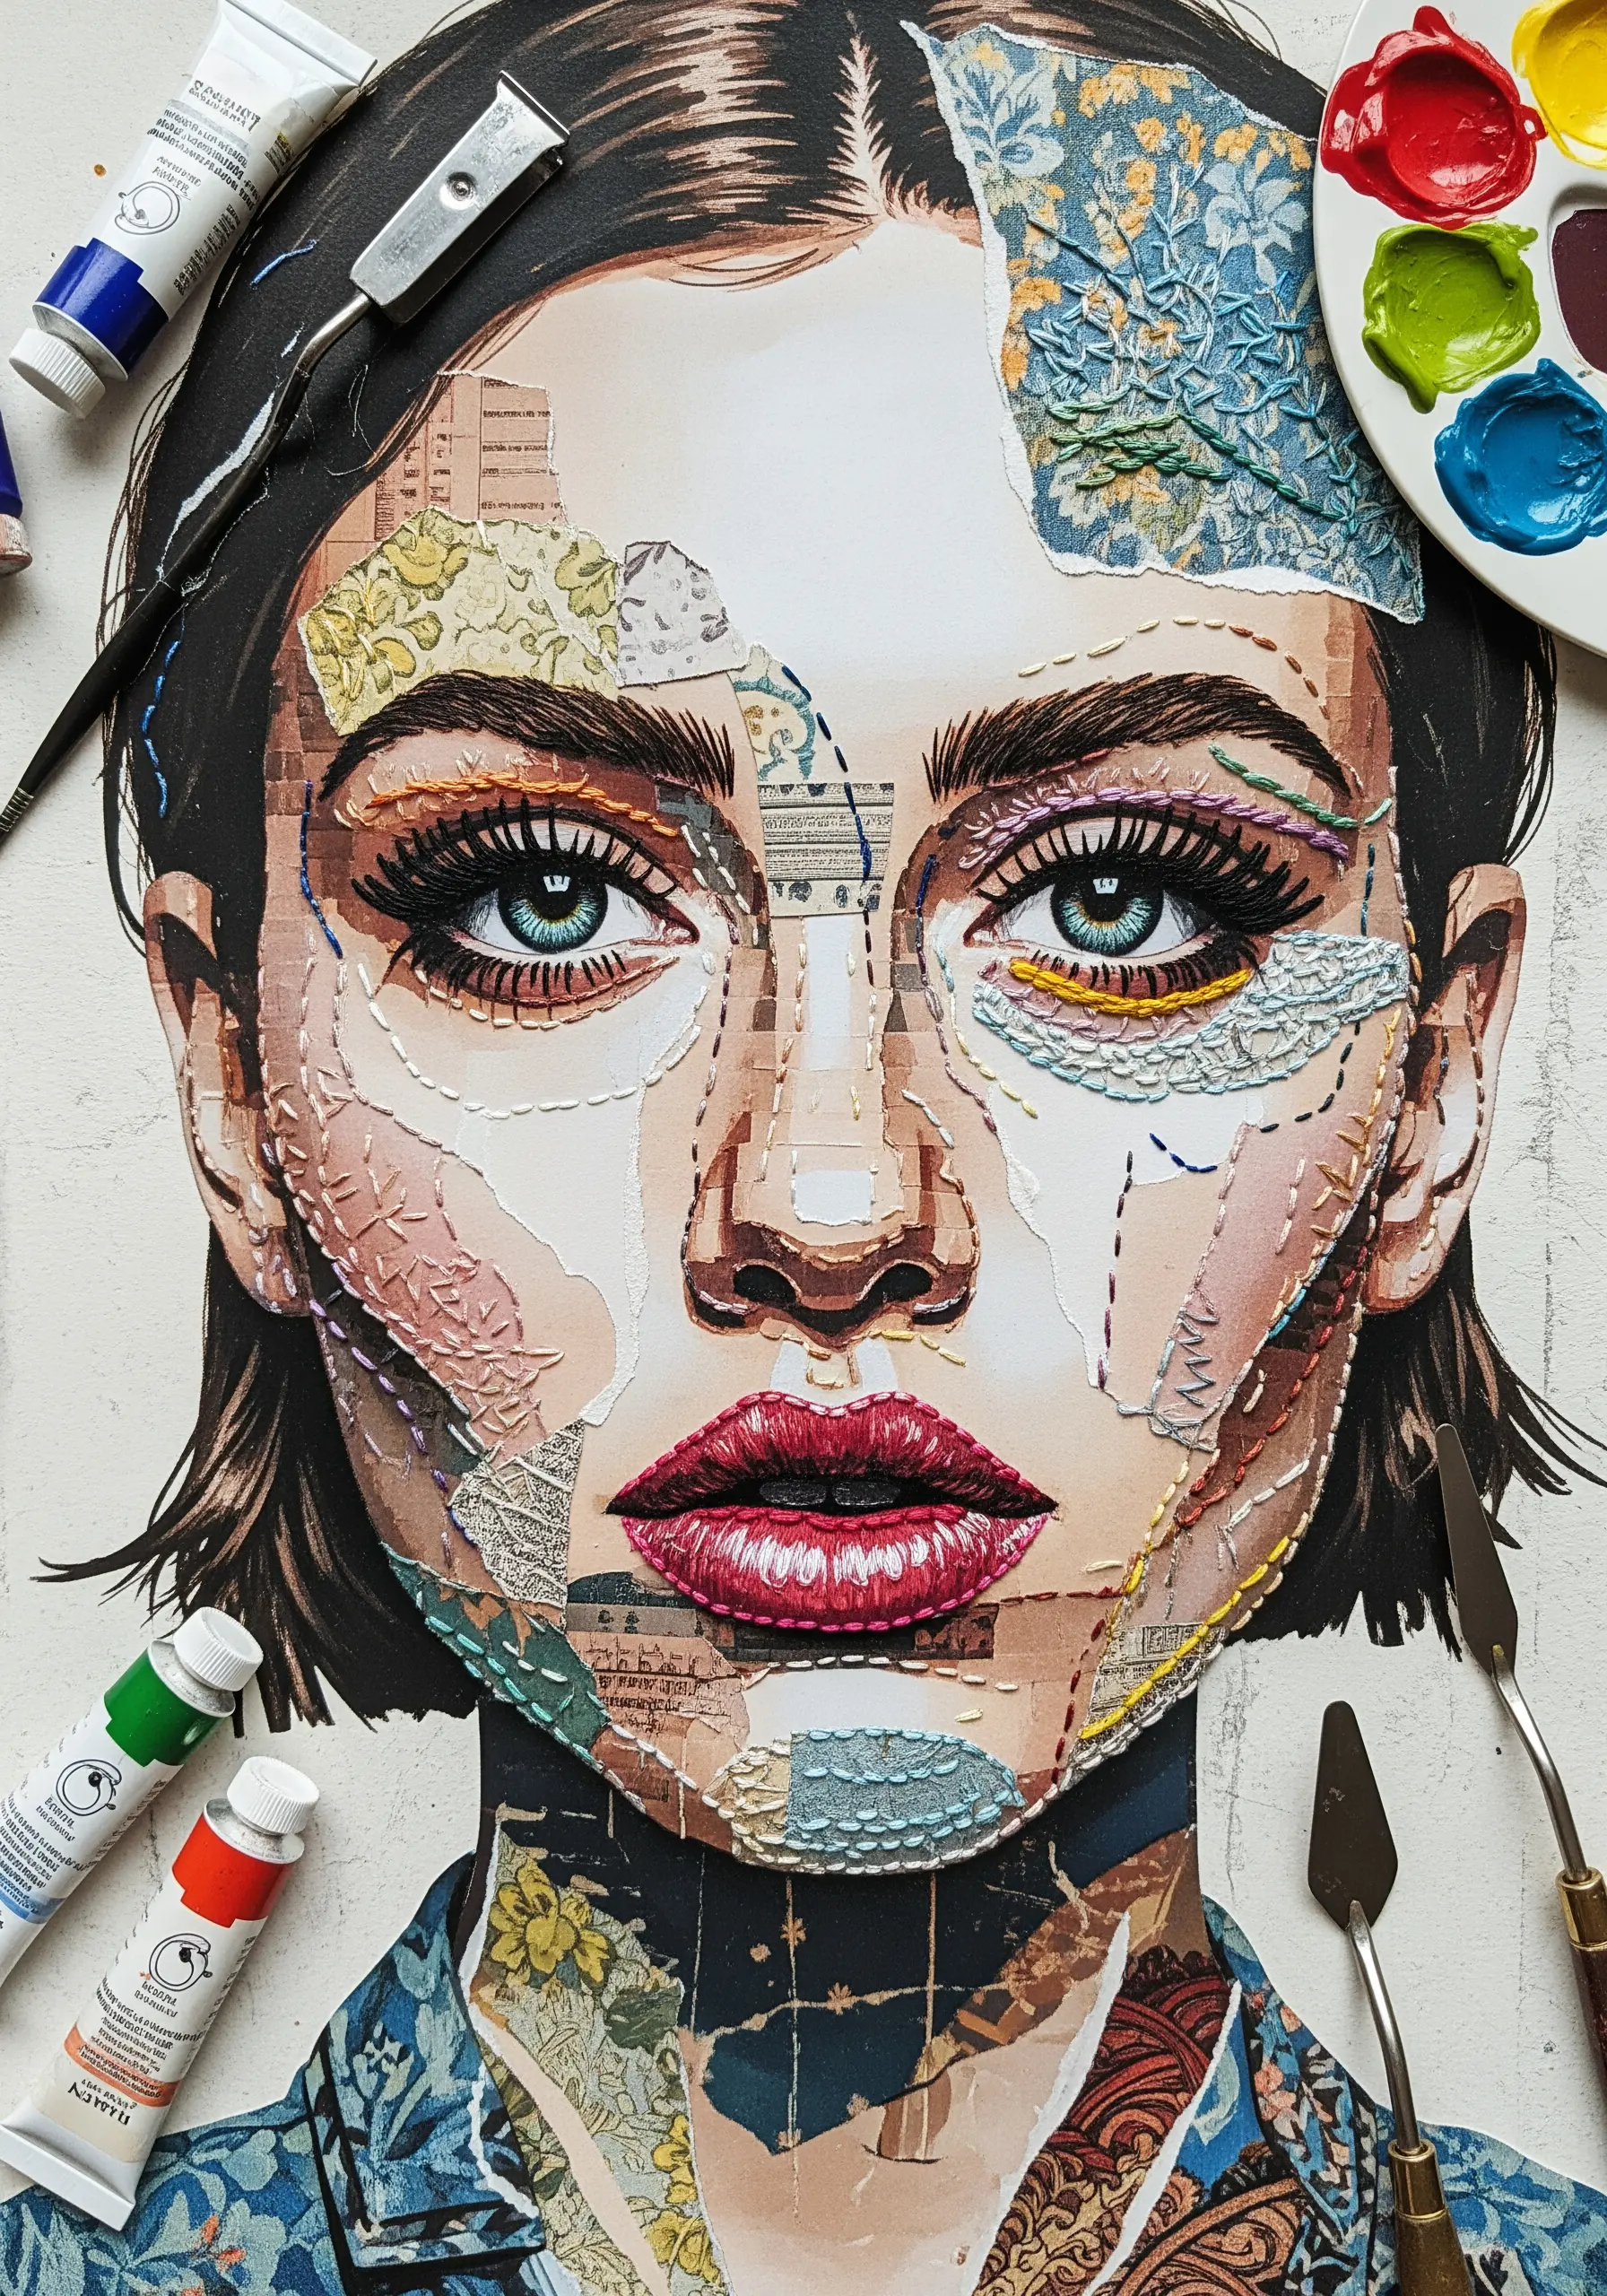
Use embroidery to seamlessly blend disparate paper elements into a cohesive and expressive portrait.
After collaging your base with fragments of text, patterns, and images, use tiny seed stitches and short straight stitches to add texture and shading.
These stitches act like cross-hatching, unifying the different paper surfaces and adding a layer of hand-drawn detail.
This technique shows how to add tiny embroidery stitches to collage art, transforming it into a deeply layered and emotive piece.
Focus the stitching around key features like the eyes and cheekbones to enhance the portrait’s structure and intensity.
20. Construct 3D Elements with Dimensional Stitches
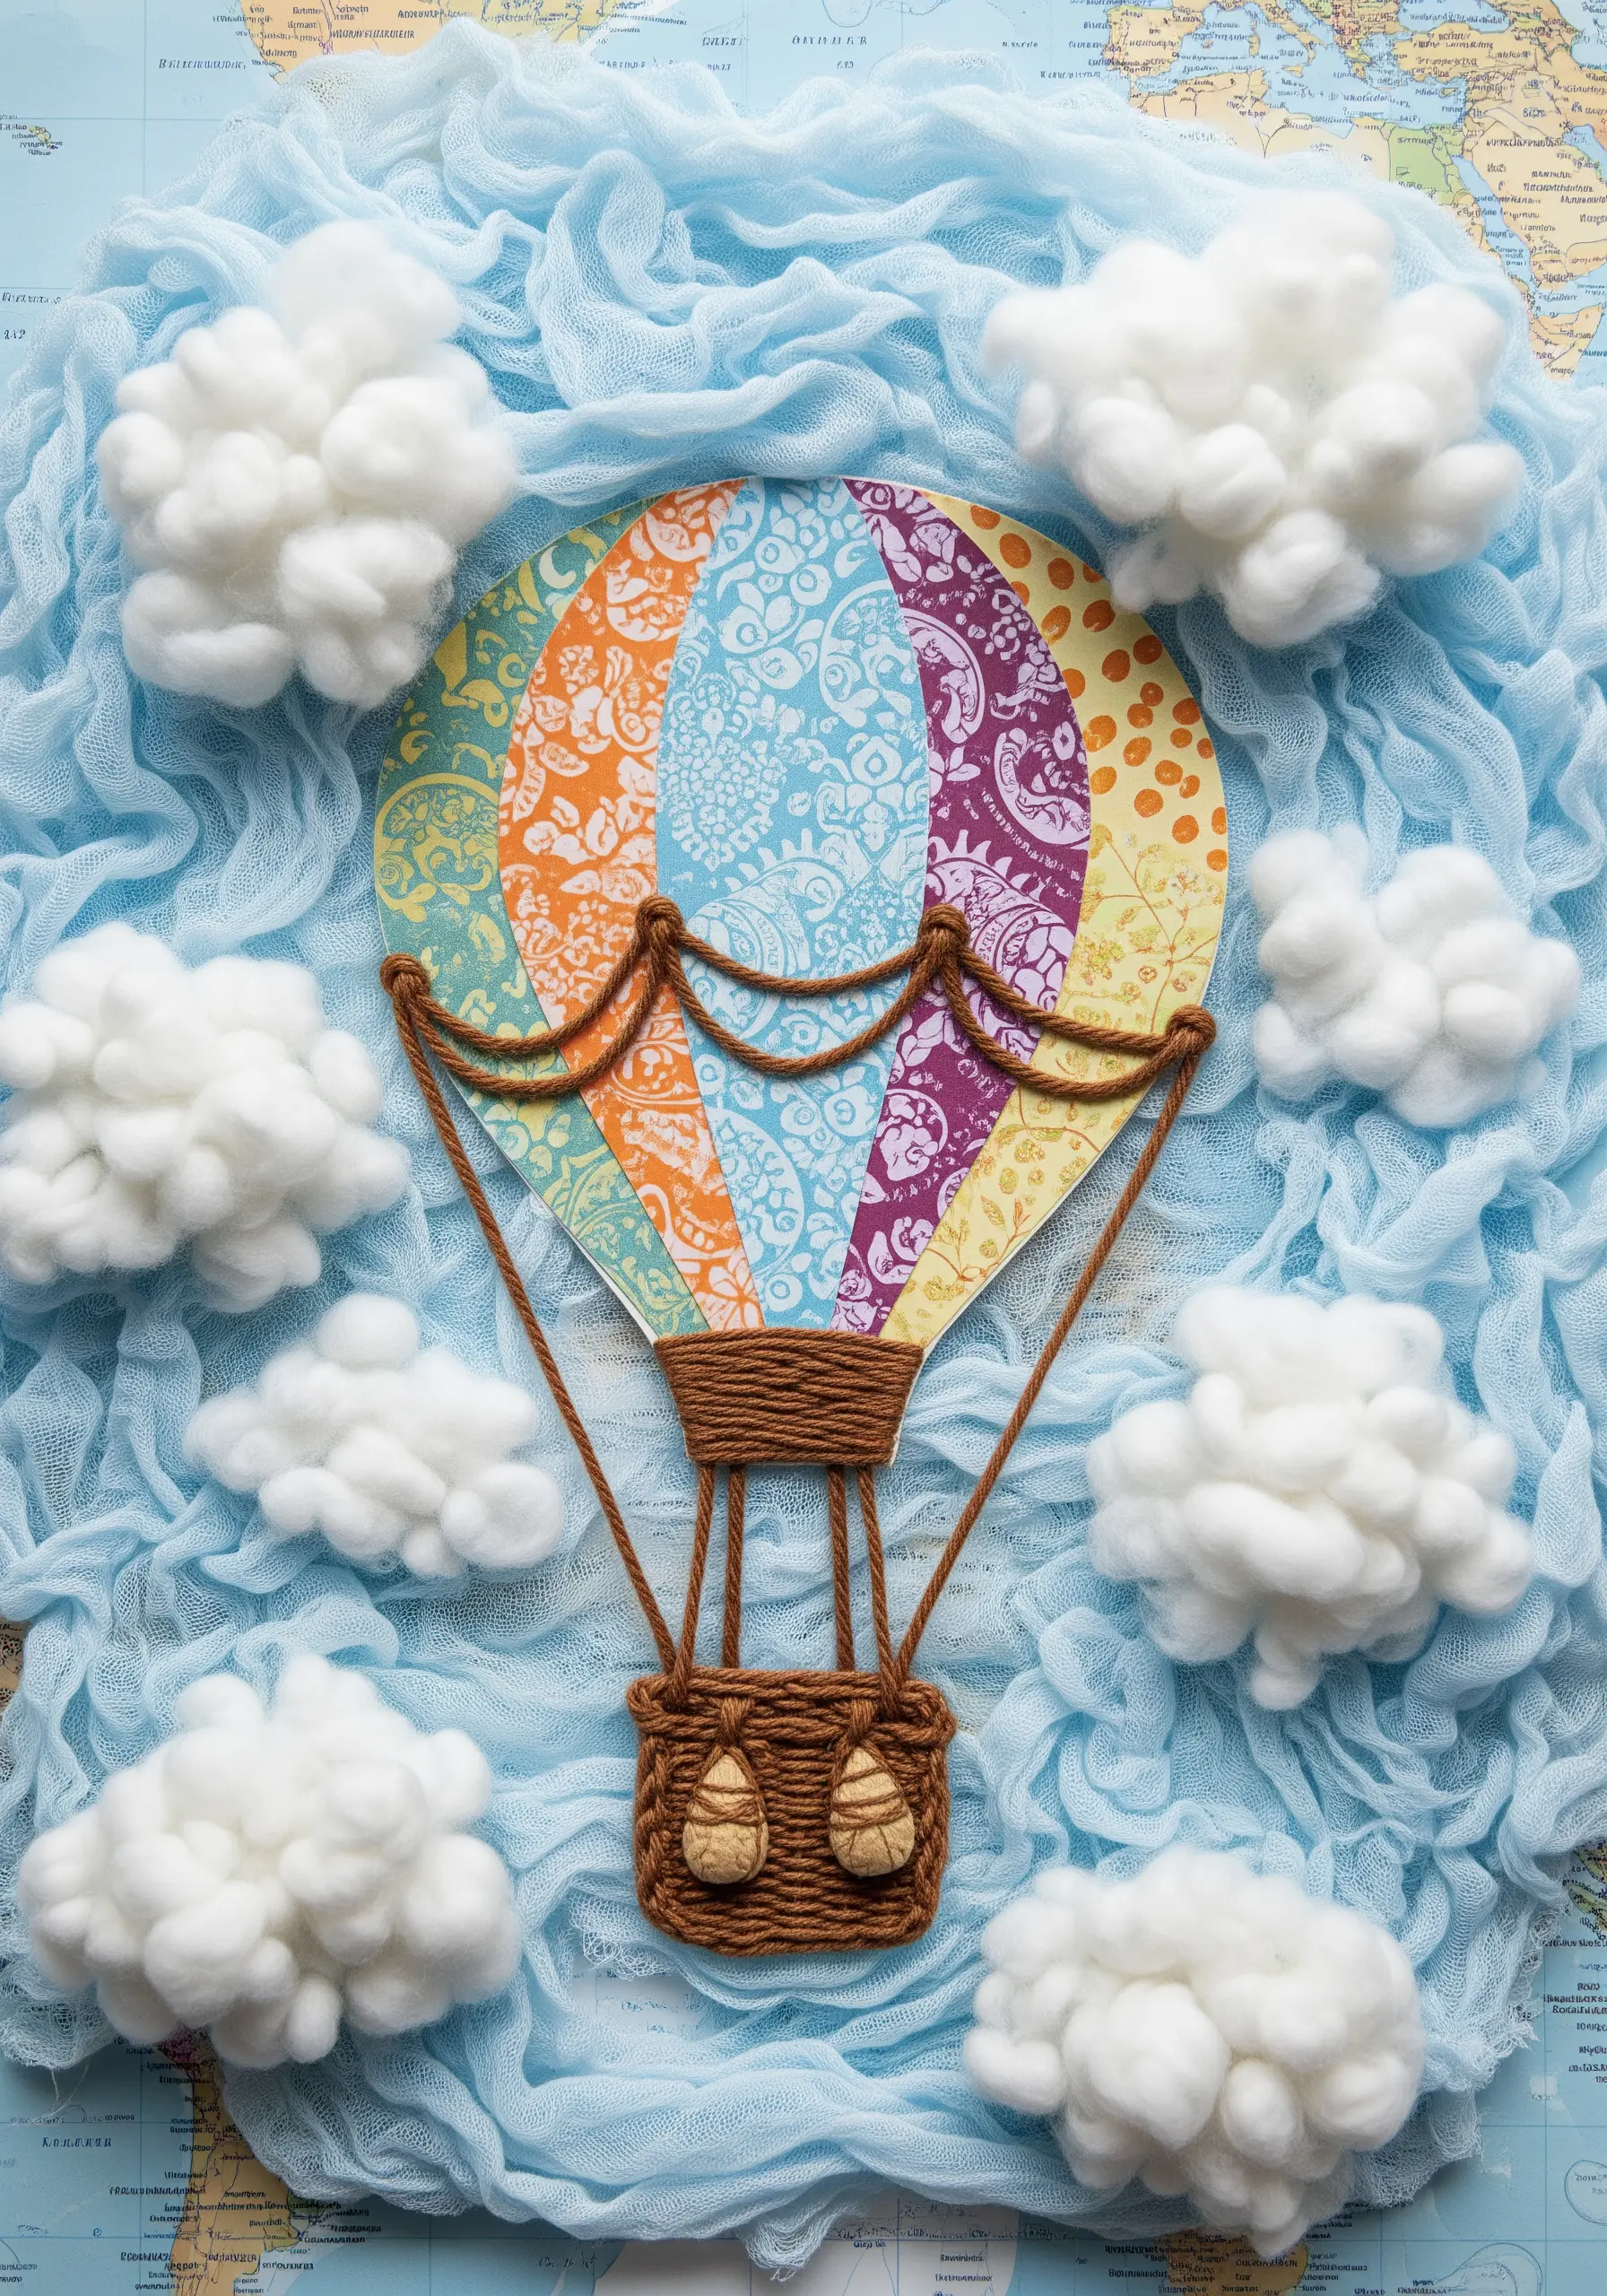
Give your collage a playful, tactile quality by incorporating three-dimensional embroidered elements.
For the hot air balloon’s basket, use a basketweave stitch or a padded satin stitch worked over a small piece of felt to create a raised, textured effect.
This technique makes the object feel tangible, providing a wonderful contrast to the flat, patterned paper of the balloon itself.
Needle-felted wool roving is perfect for creating soft, fluffy clouds that complete the whimsical, airy scene.
21. Paint with Knots for Photorealistic Texture
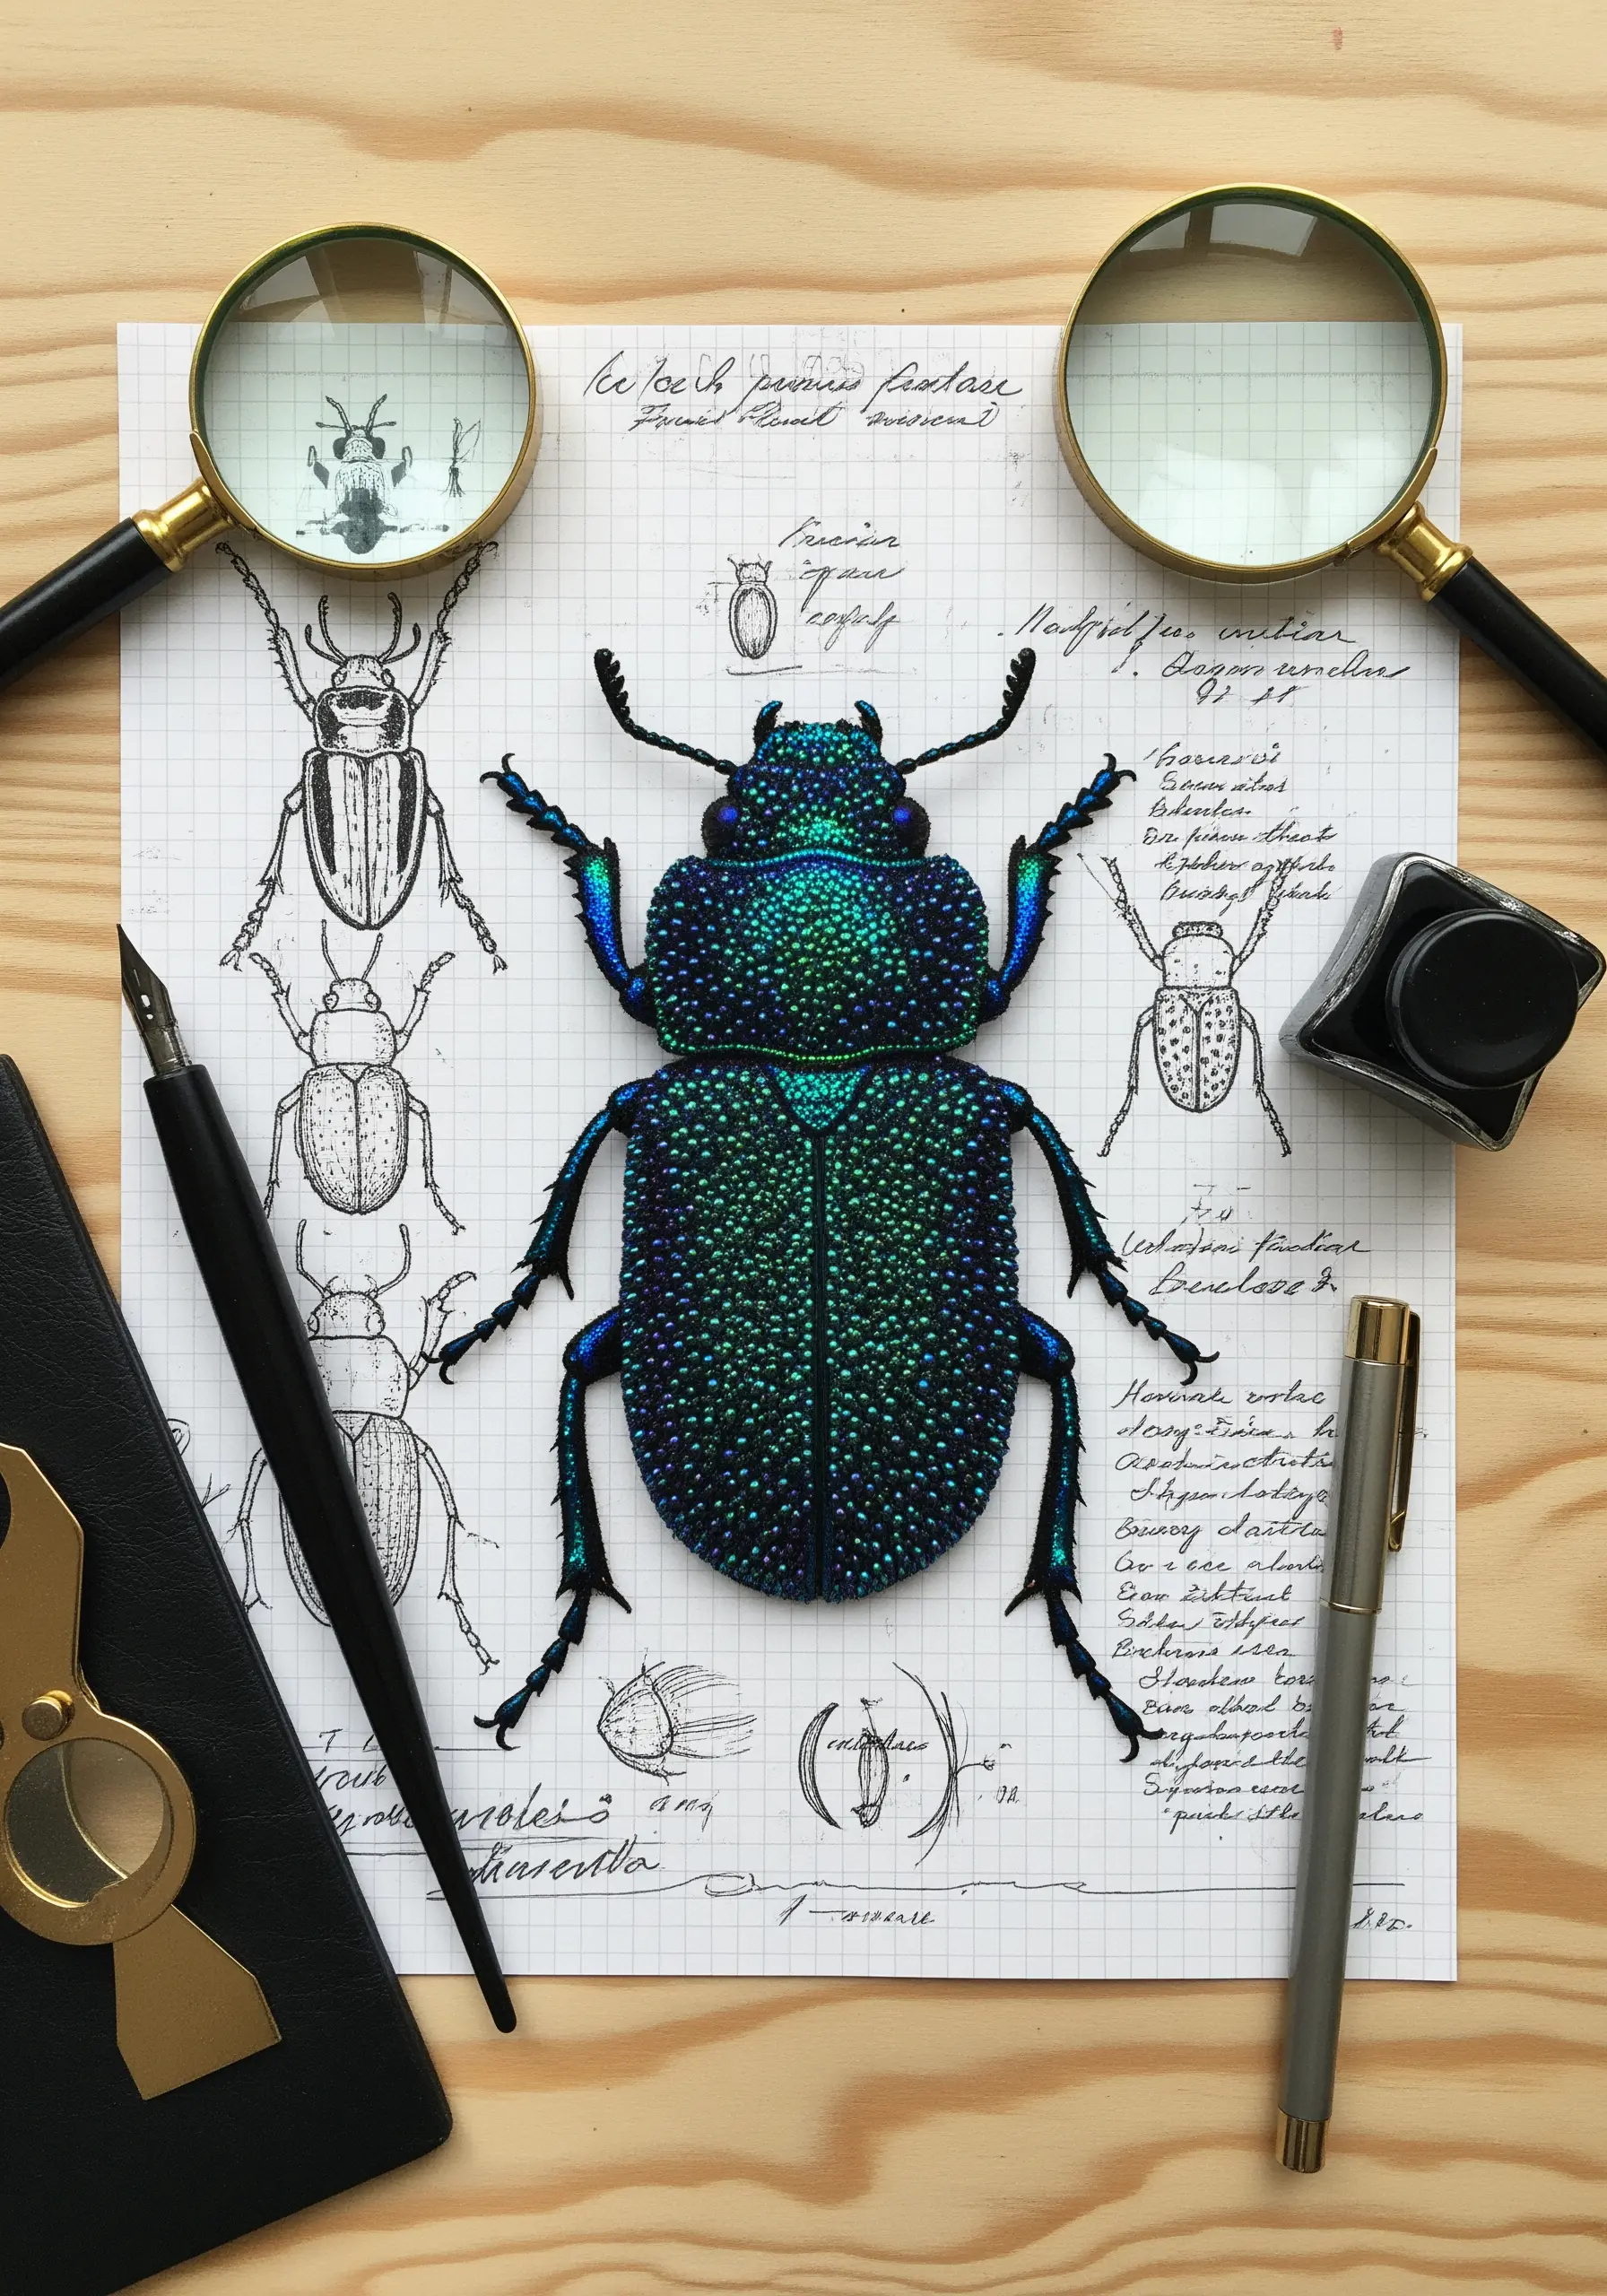
Achieve incredible depth and an iridescent, textured surface by using French knots as a form of pointillism.
Fill the entire body of your subject with thousands of tightly packed French knots, using different shades of thread to create highlights and shadows.
For a shimmering, beetle-shell effect, blend several strands of metallic and silk floss in your needle at once.
This meticulous technique transforms simple knots into a rich, painterly surface, perfect for rendering subjects that demand intricate texture and detail.


