

Have you ever looked at a finished piece and felt that, despite your best efforts, something was missing? A spark of texture, a whisper of dimension, a final touch that pulls it all together. The solution might not be a more complex design, but a more thoughtful stitch.
This is where we move beyond simply filling space with thread. We begin to think about how a single line of backstitch can feel like an ink drawing, how a cluster of French knots can mimic sea foam, or how tone-on-tone stitching can create elegance through shadow and light alone.
By combining the tactile world of thread with the layered possibilities of collage, you open up a universe of expression. You’re not just decorating paper; you are collaborating with it. You’re adding depth, emotion, and a quiet, handmade signature that is unmistakably yours.
Let’s explore how the tiniest stitches can make the biggest impact, turning your collage art from something you made into something you truly brought to life.
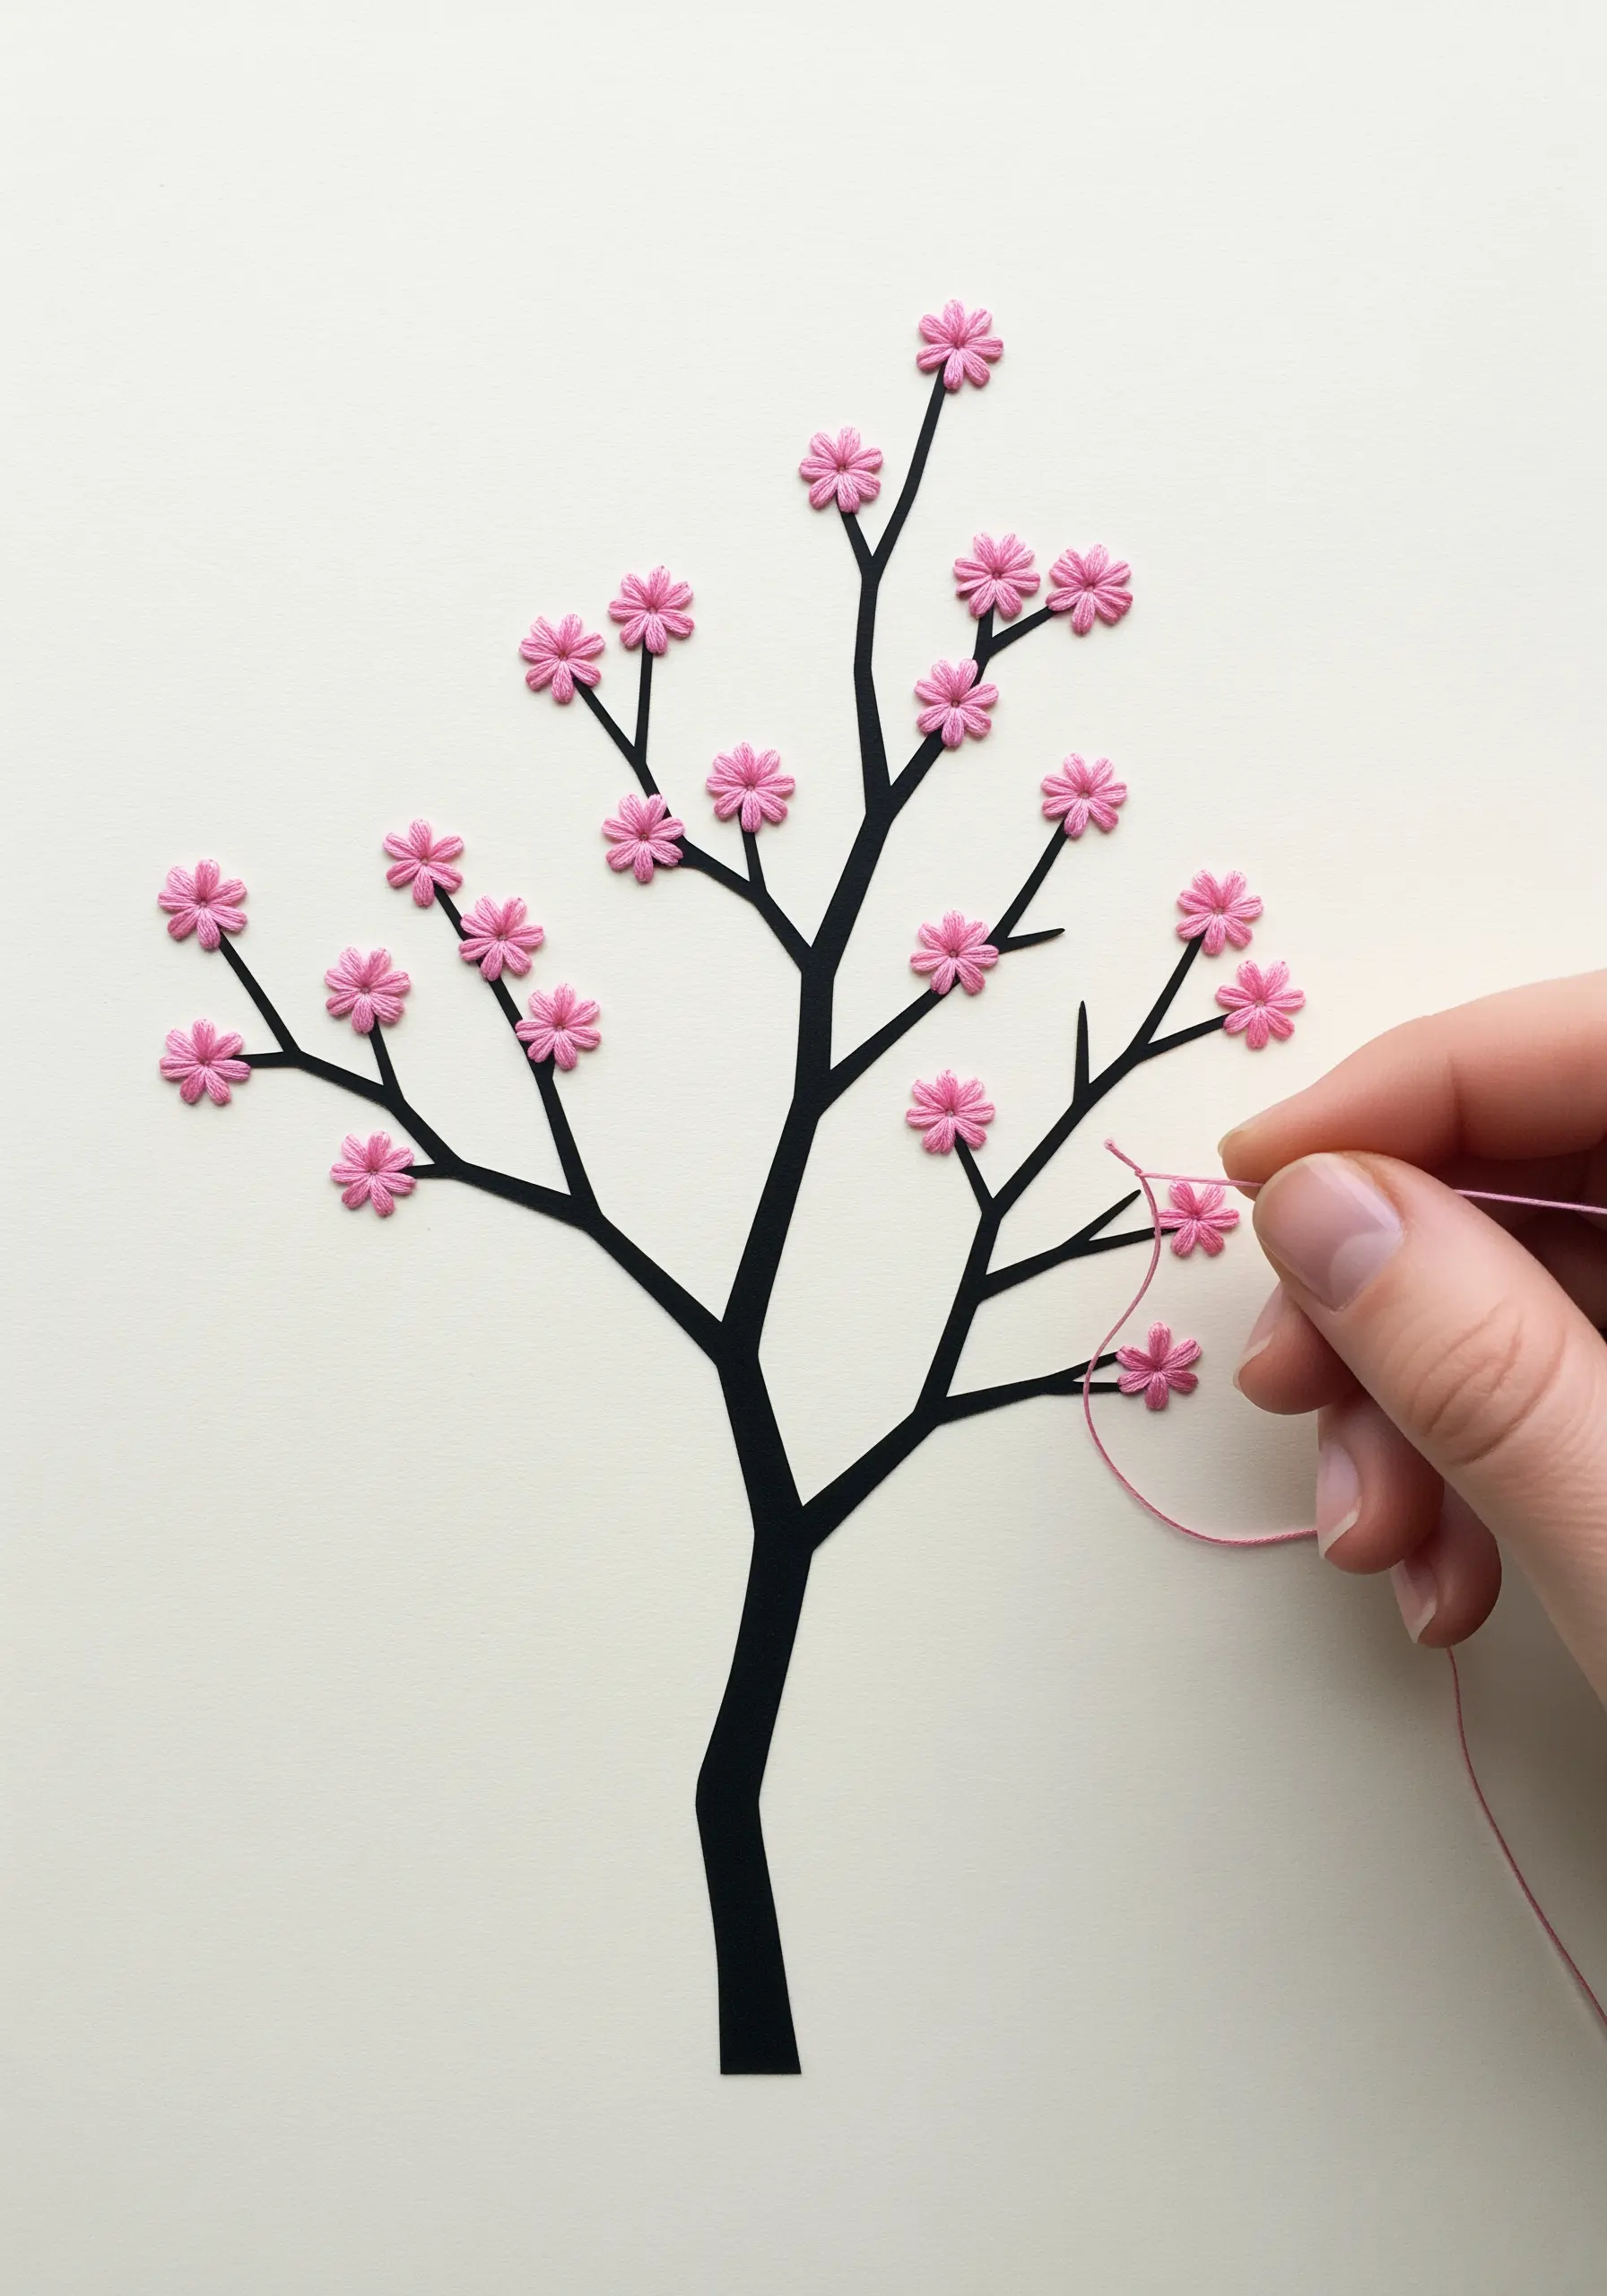
1. Add Celestial Sheen with Metallic Threads
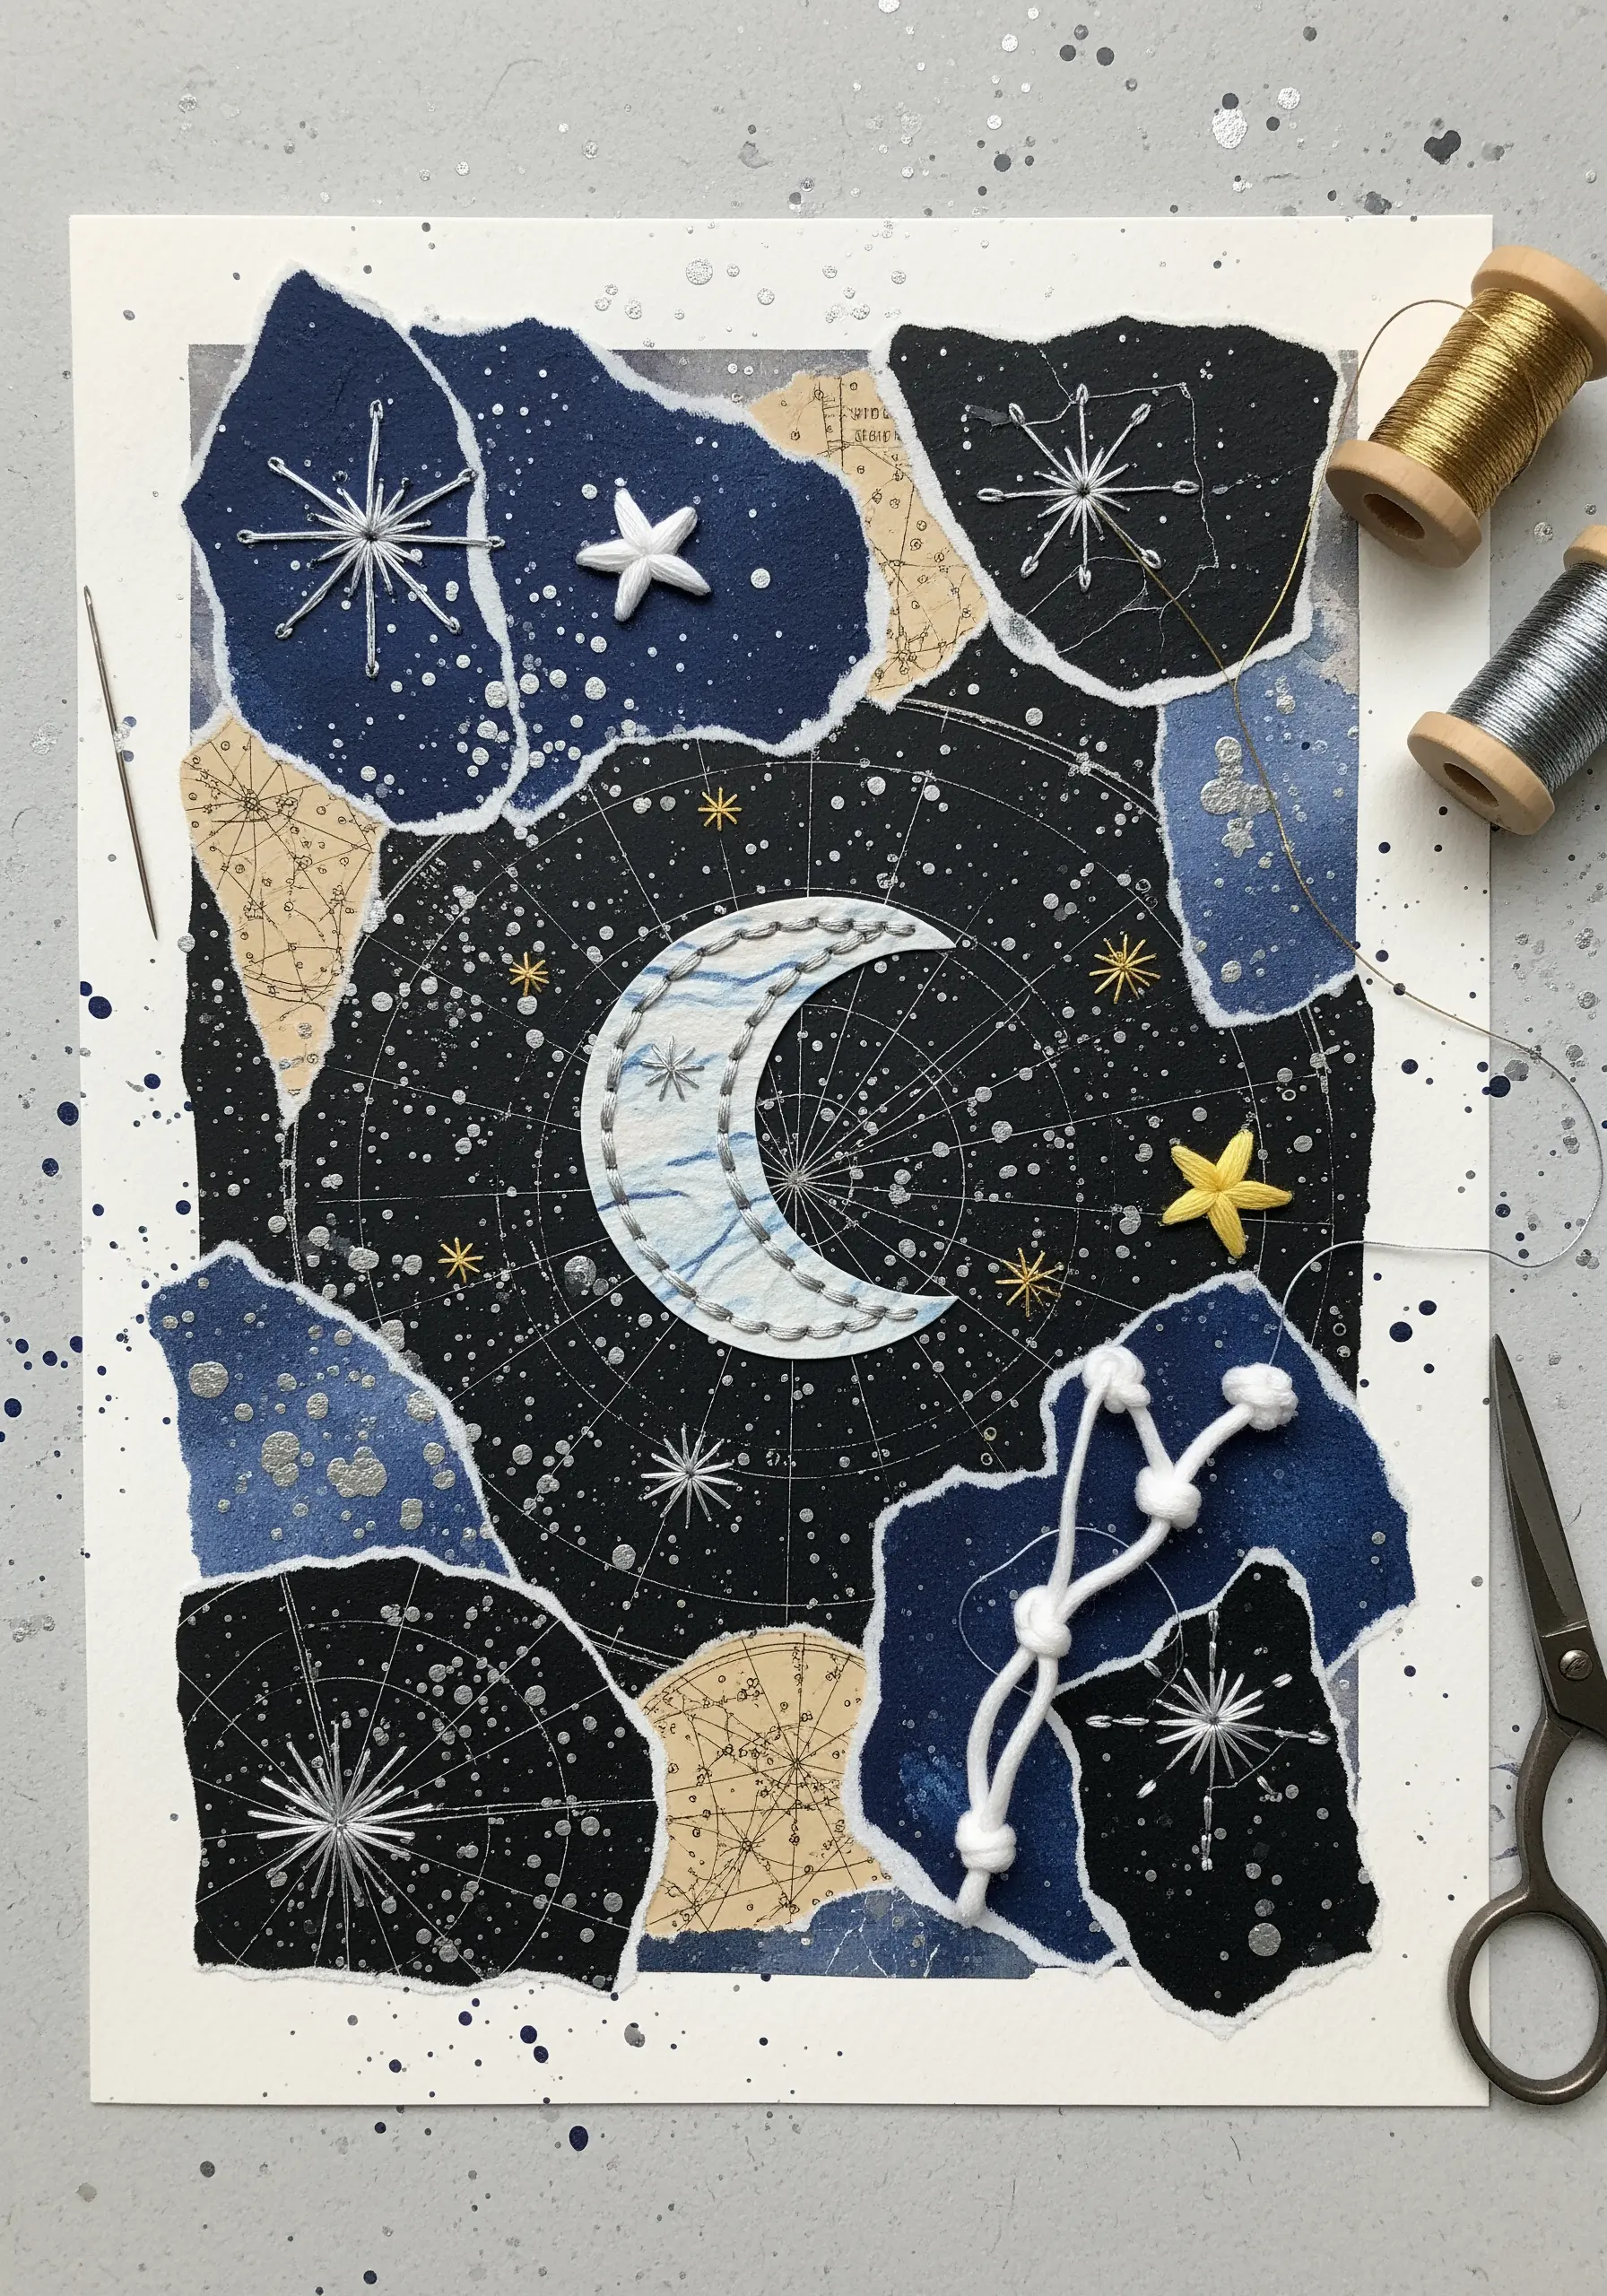
Transform a simple paper collage by introducing gold and silver metallic threads directly onto the paper surface.
Use a sharp, fine needle to pre-pierce your holes, preventing tearing and ensuring clean entry points for the thread.
For radiant starbursts, work a series of straight stitches from a central point outward, varying their length to create a dynamic shimmer.
This technique adds a layer of light and luxury, catching the eye and giving the flat paper a tactile, dimensional quality that paint alone cannot achieve.
To outline larger shapes like the moon, a simple backstitch provides a clean, defining line that contrasts beautifully with the glamorous, light-reflecting thread.
2. Frame Pressed Botanicals with a Simple Running Stitch
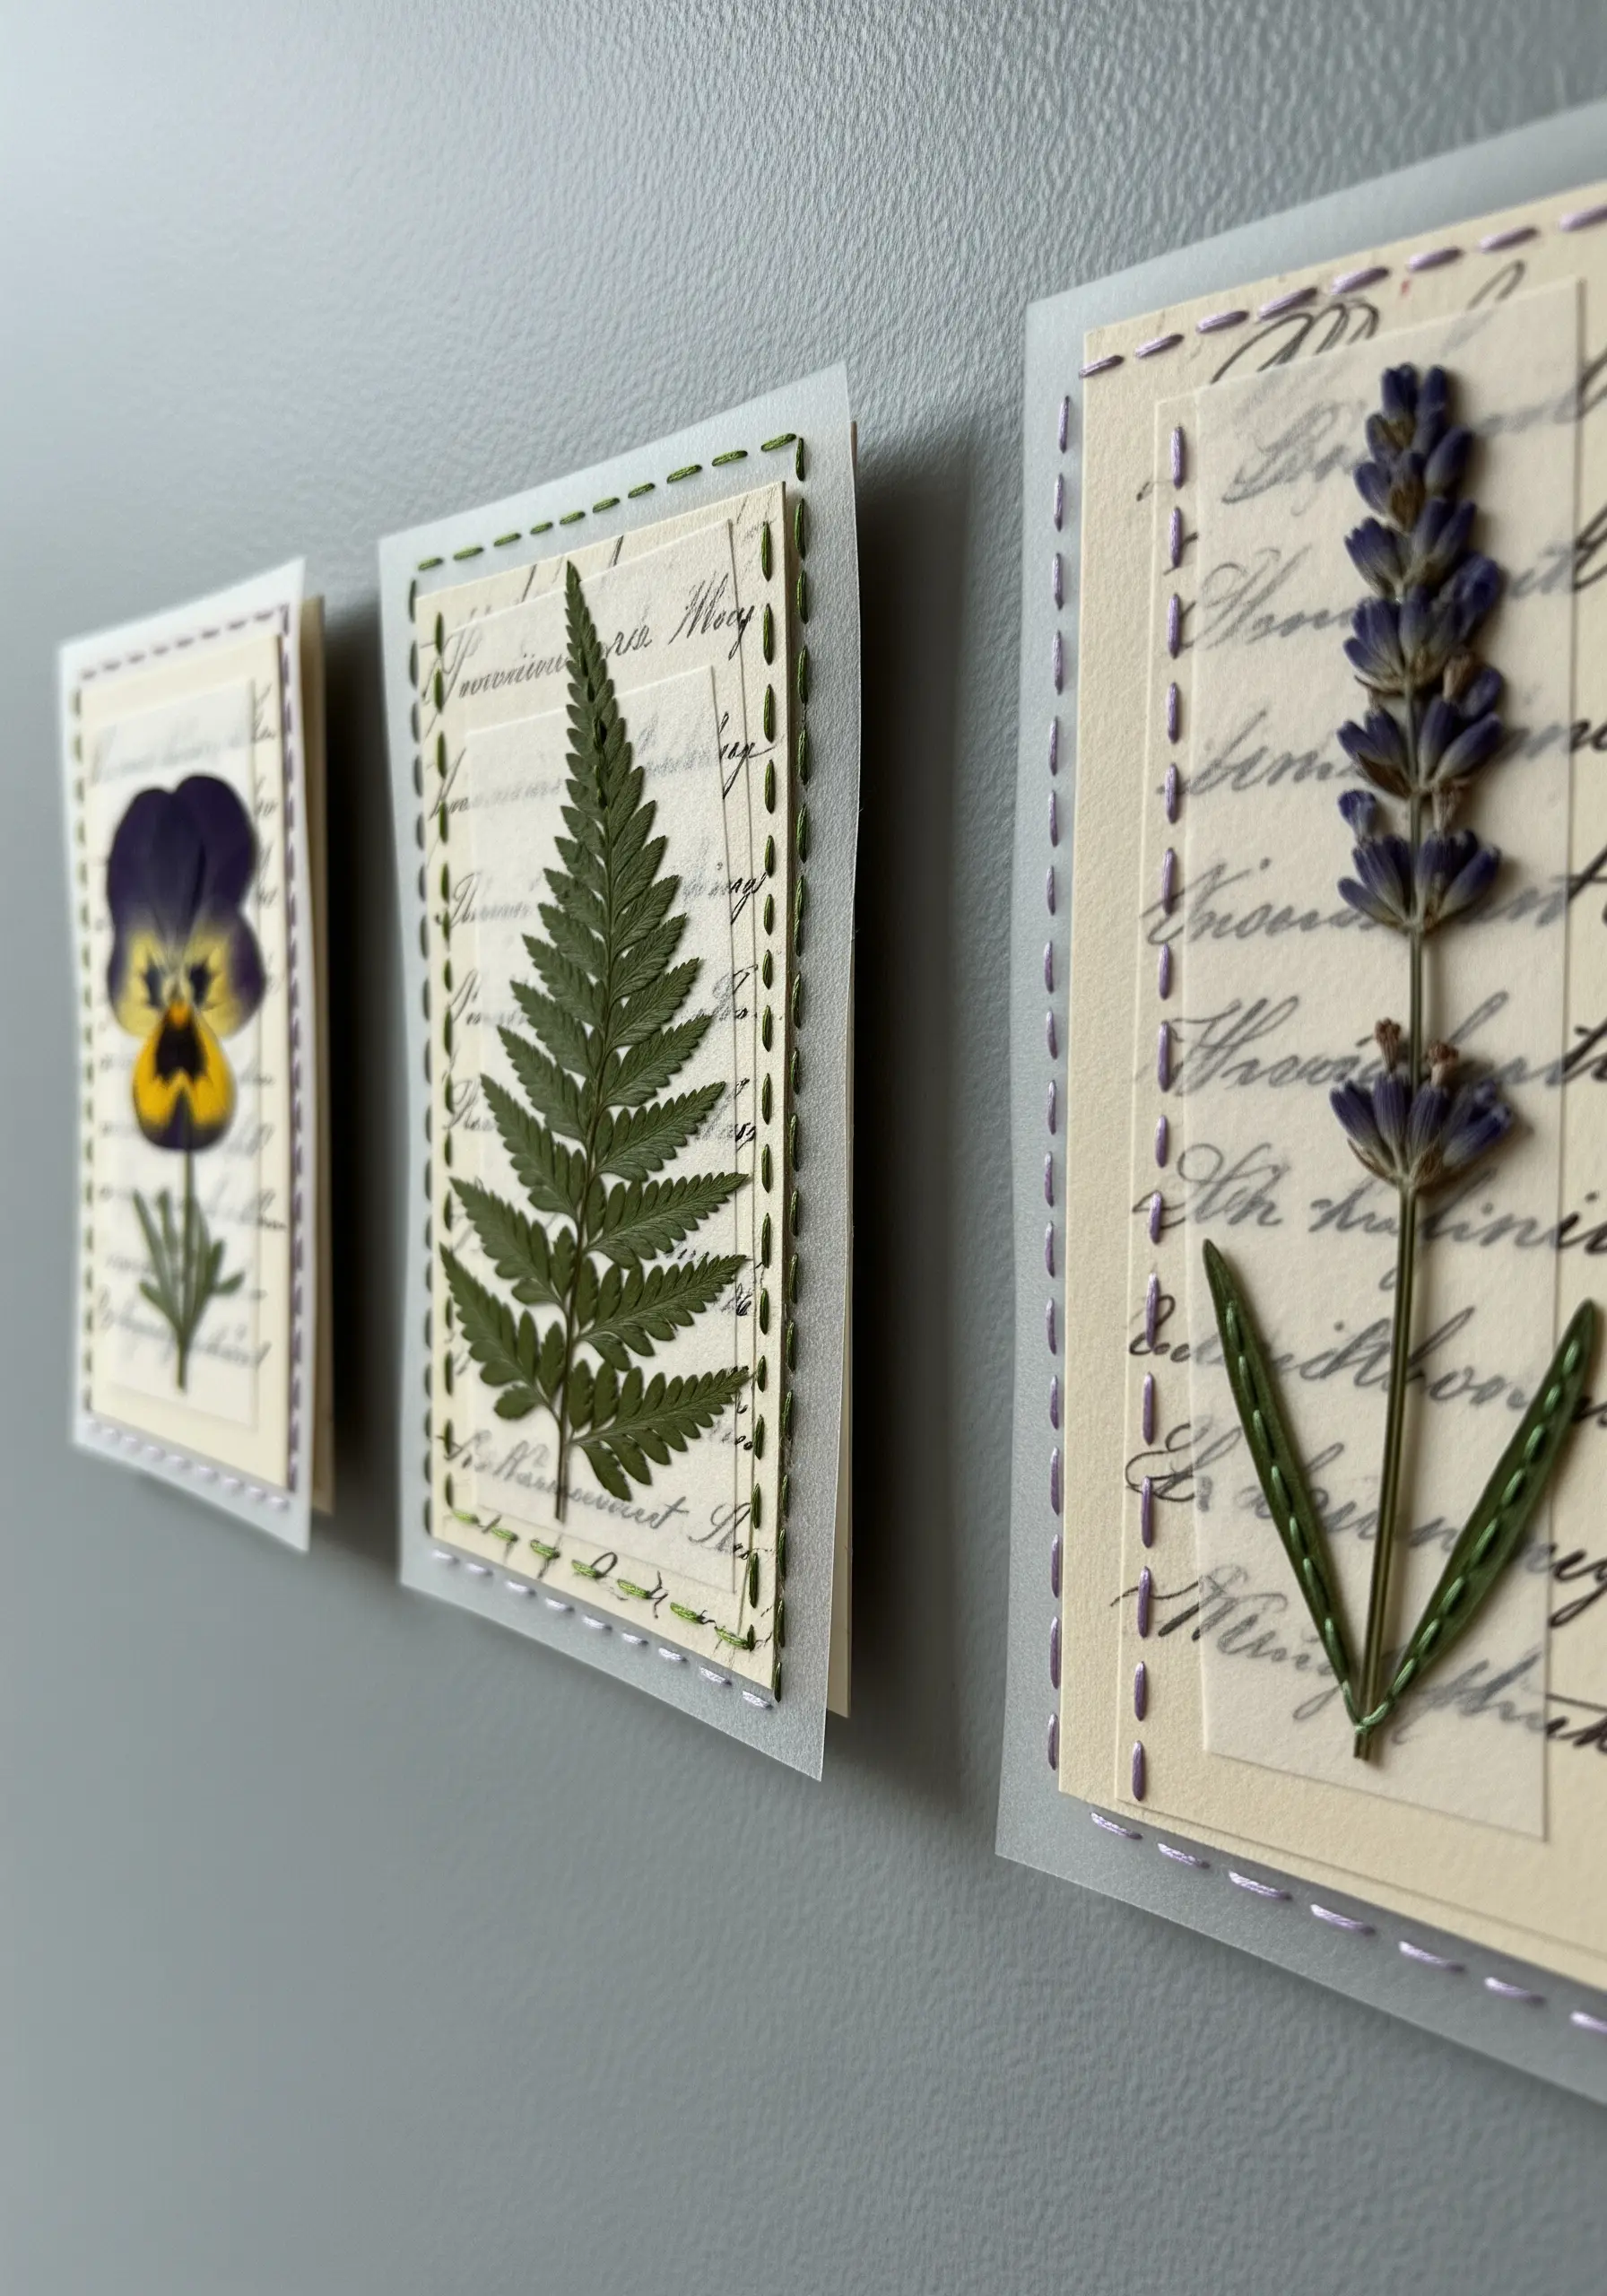
Elevate pressed flowers and leaves by adding a hand-stitched border to the paper layers they are mounted on.
A simple running stitch, worked in a contrasting or complementary color, creates a delicate frame that feels both rustic and refined.
This method doesn’t just decorate; it visually secures the botanical element, drawing the eye inward and integrating the natural specimen with its paper background.
Maintain even spacing between your stitches for a polished look, or vary it slightly for a more organic, handmade feel.
It’s a quiet detail that transforms a simple keepsake into a finished piece of art, perfect for displaying your garden treasures.
3. Create Contrast with Dense Textural Stitches
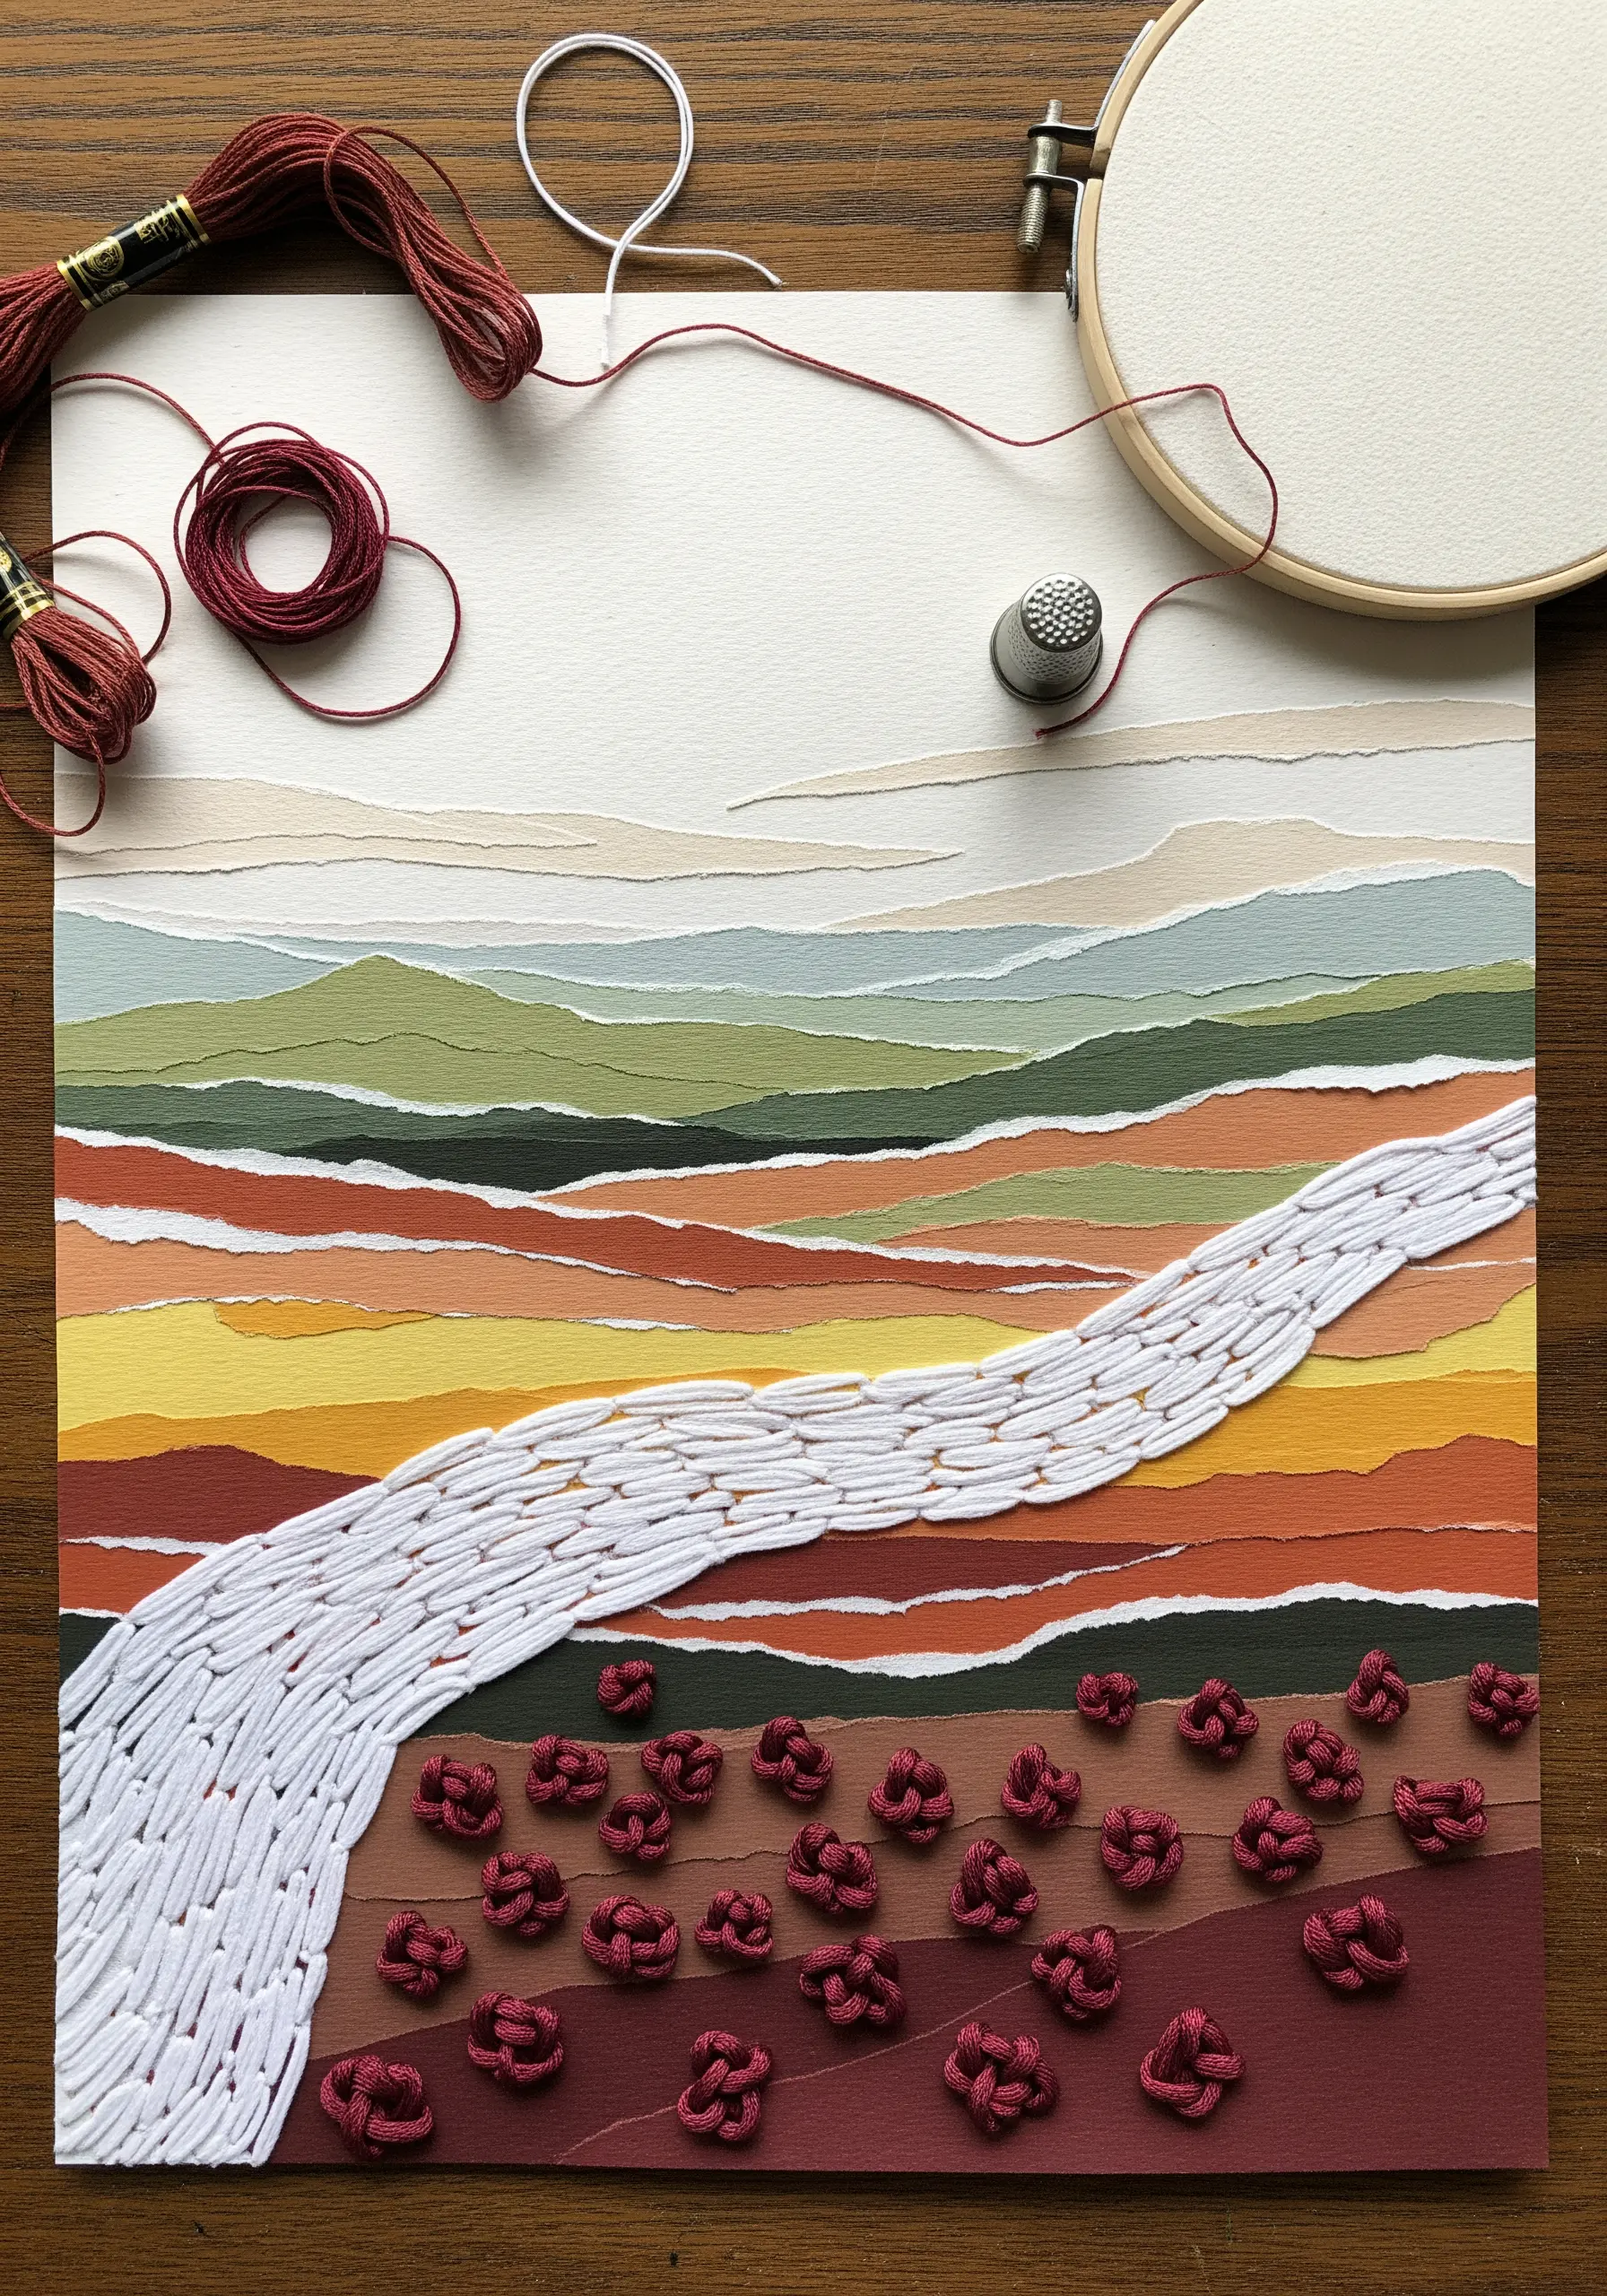
Give your paper landscape collages dramatic depth by pairing smooth paper with highly textural embroidery stitches.
Use a dense, slightly irregular satin stitch to fill a shape like a river, laying the threads closely to create a solid, woven appearance that contrasts with the torn paper edges.
In the foreground, use chunky French or colonial knots to represent flowers or stones, adding a sculptural element that literally pops off the page.
This juxtaposition of flat color and raised thread transforms the piece from a simple collage into a tactile exploration of a landscape’s textures.
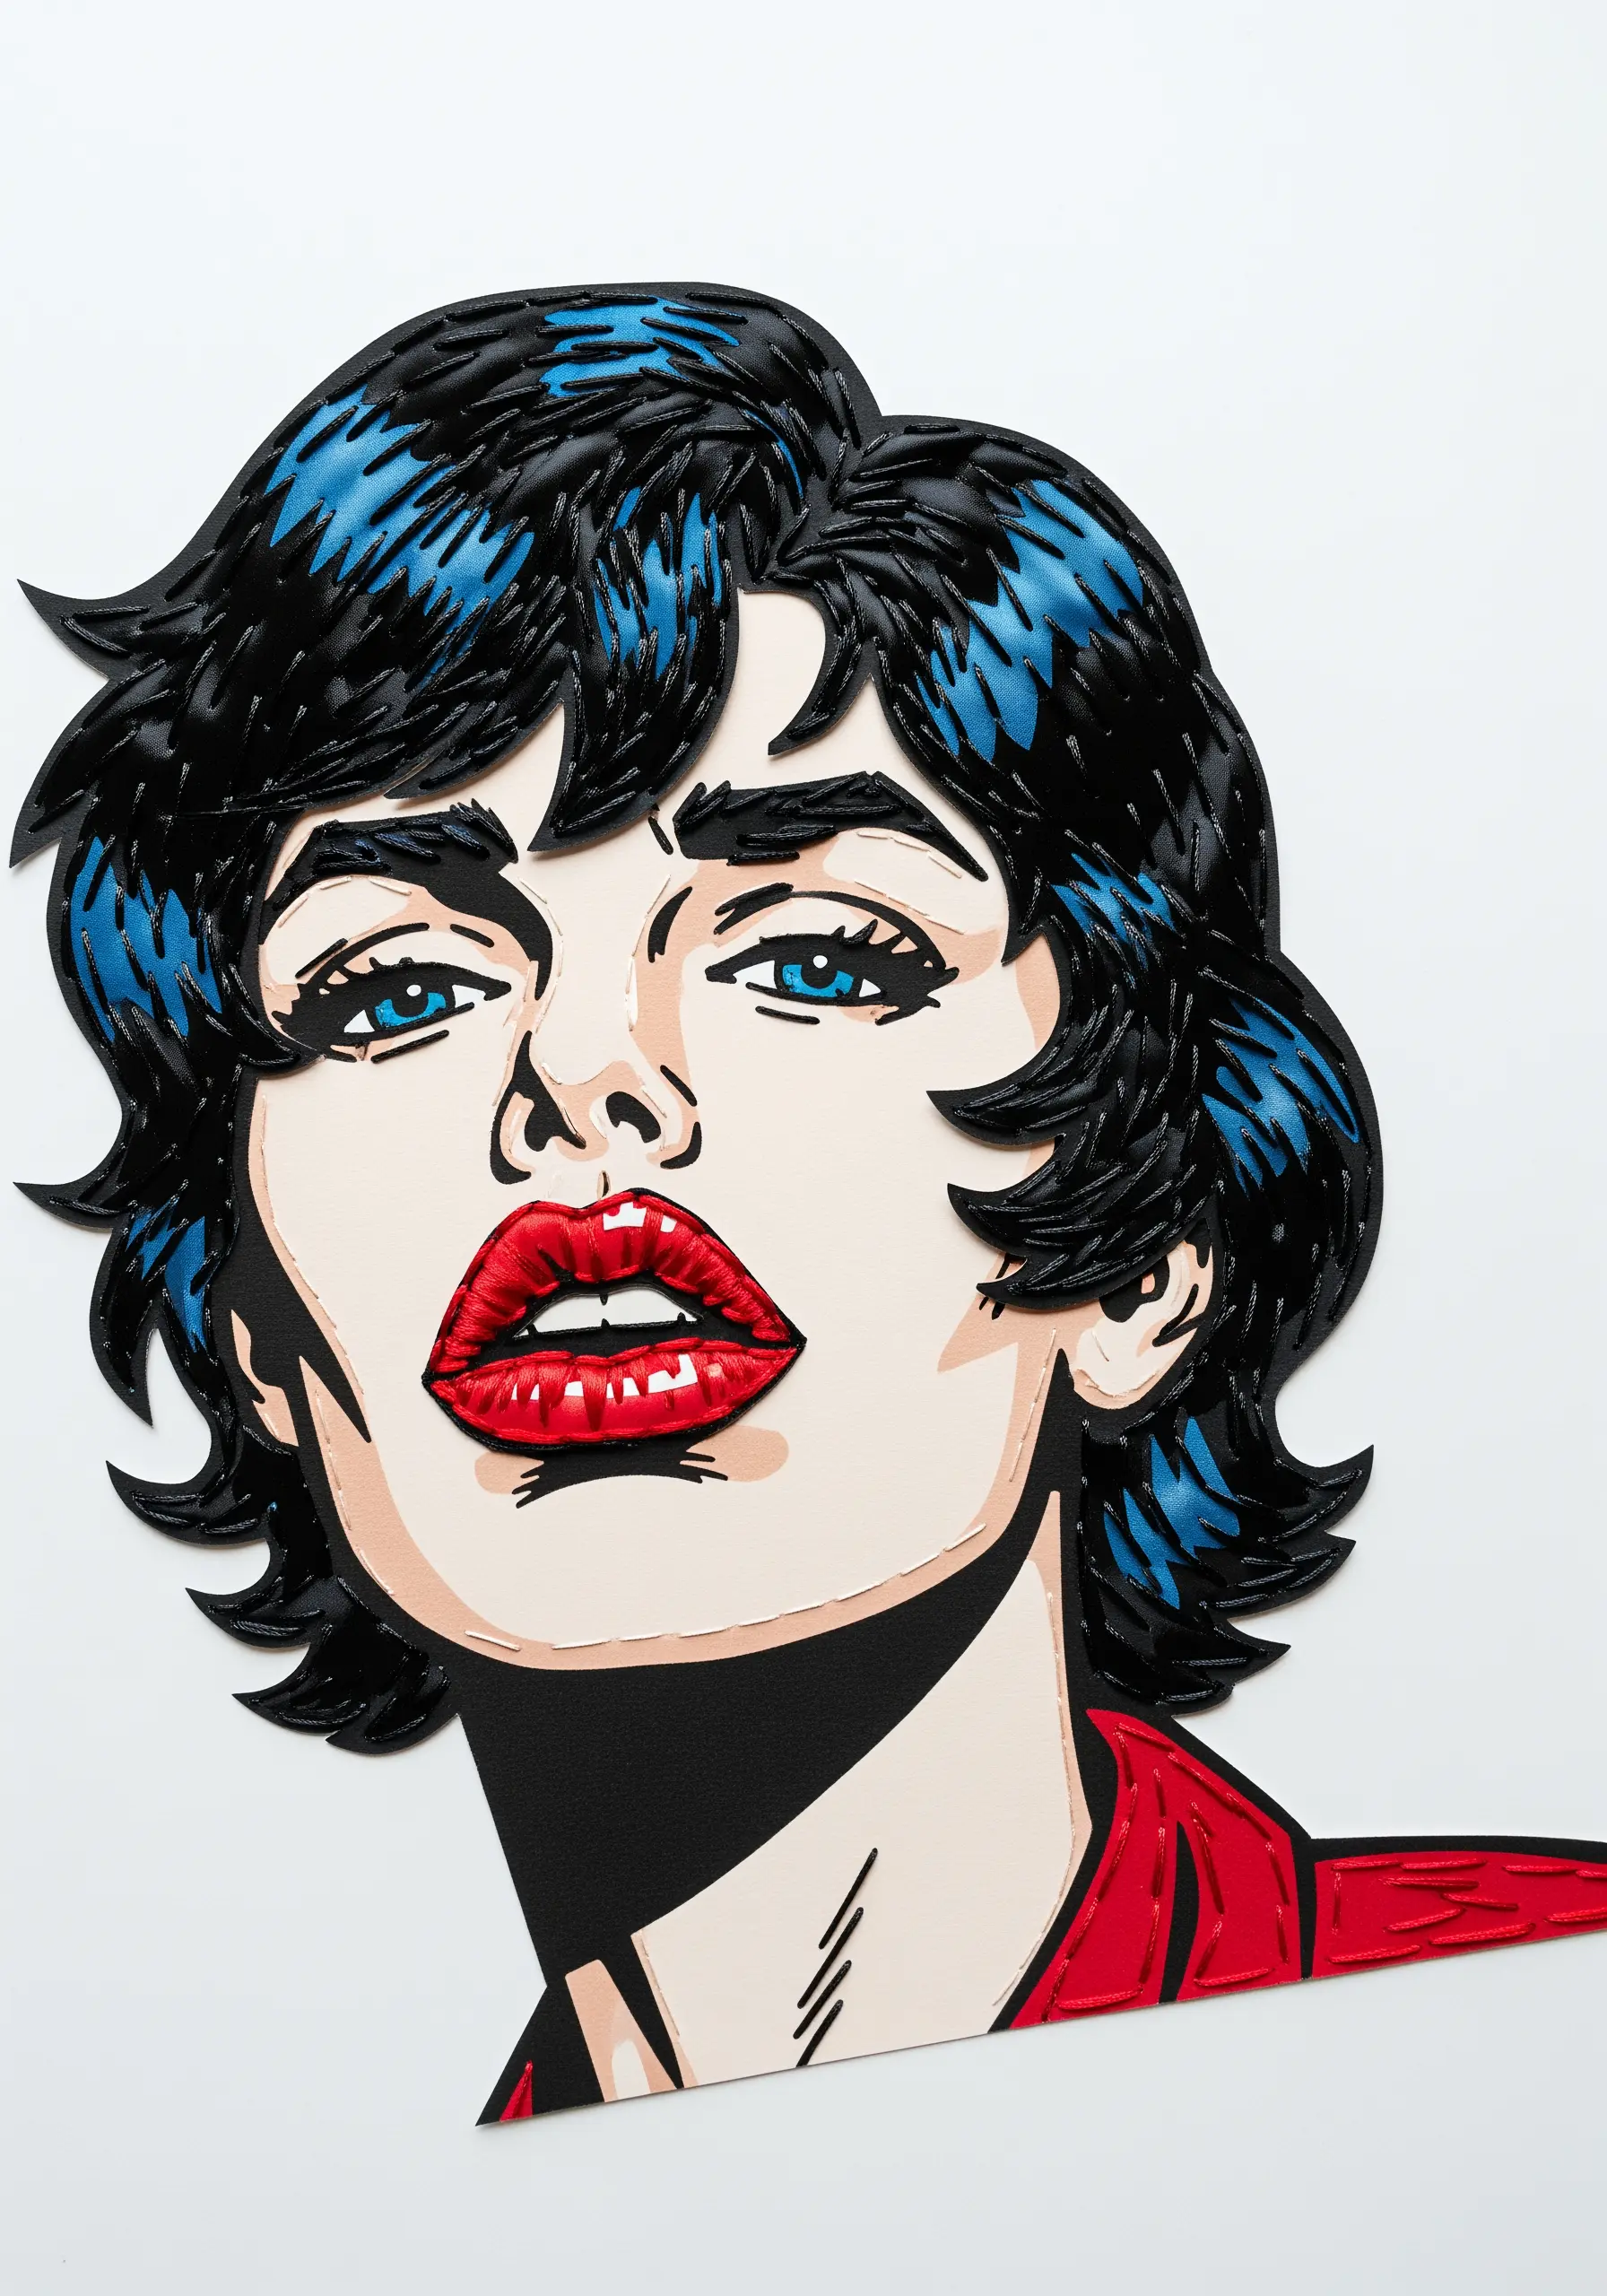
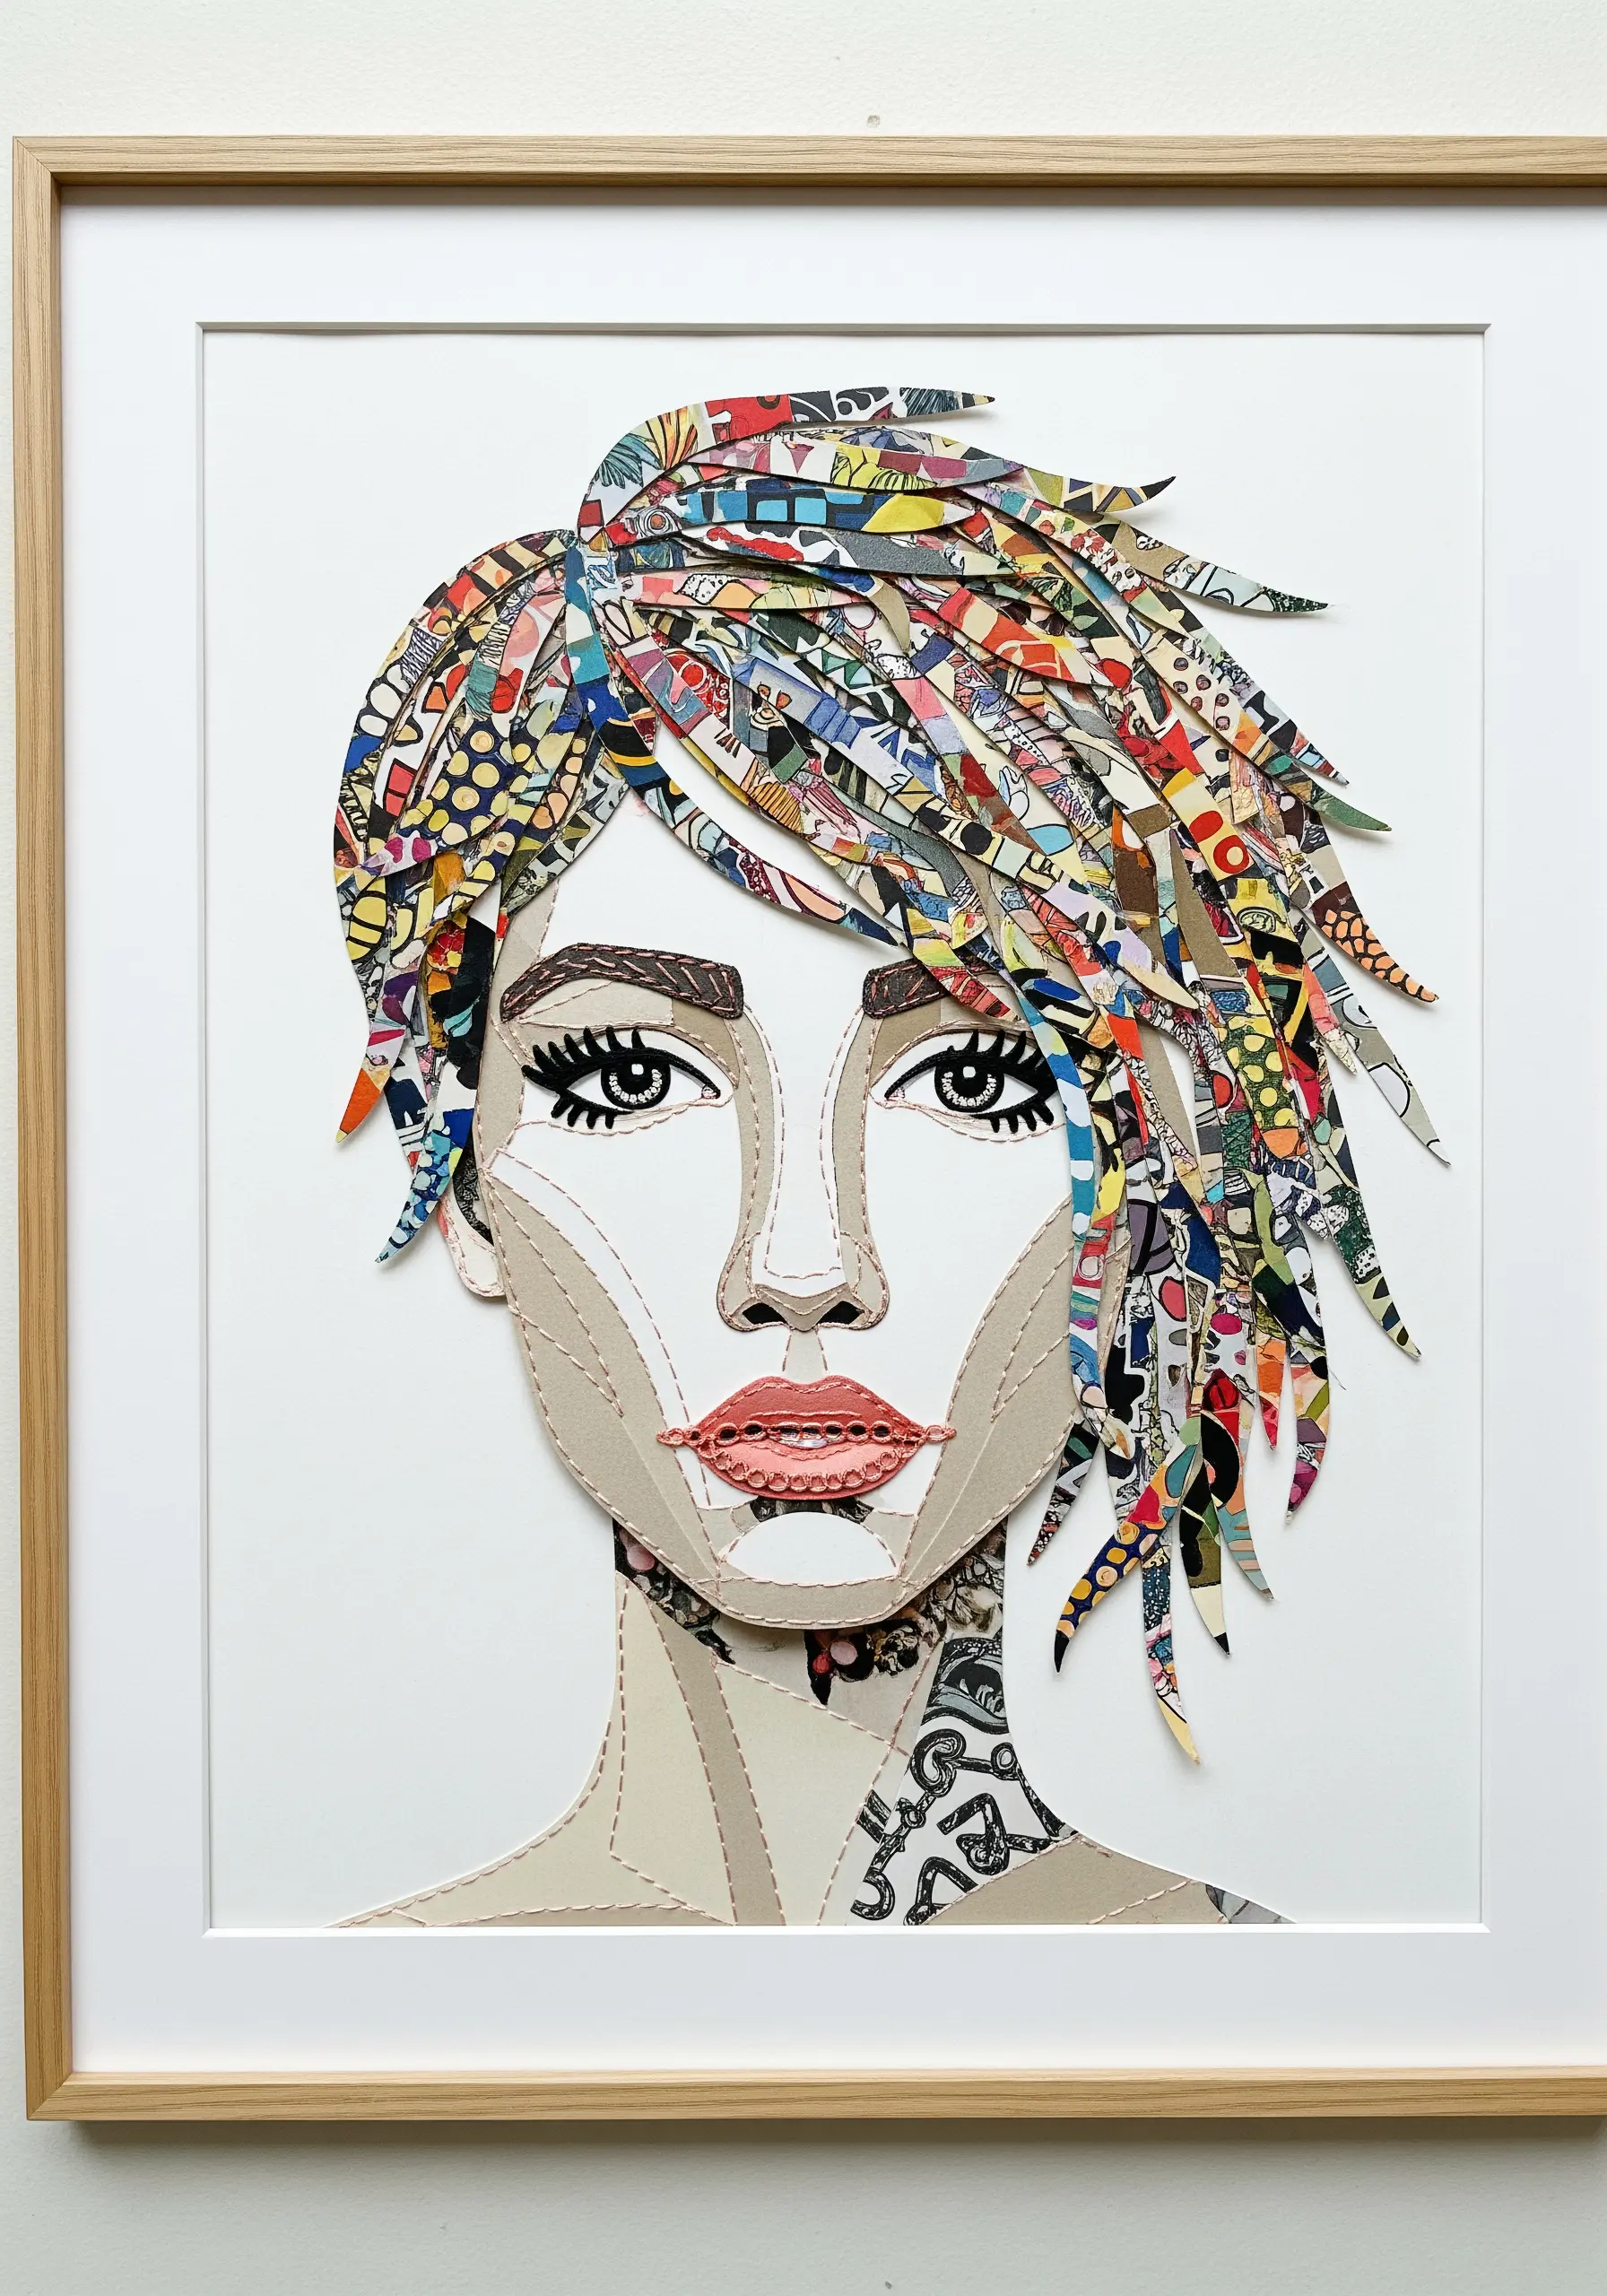
4. Define Illustrations with Bold Line Art Stitching
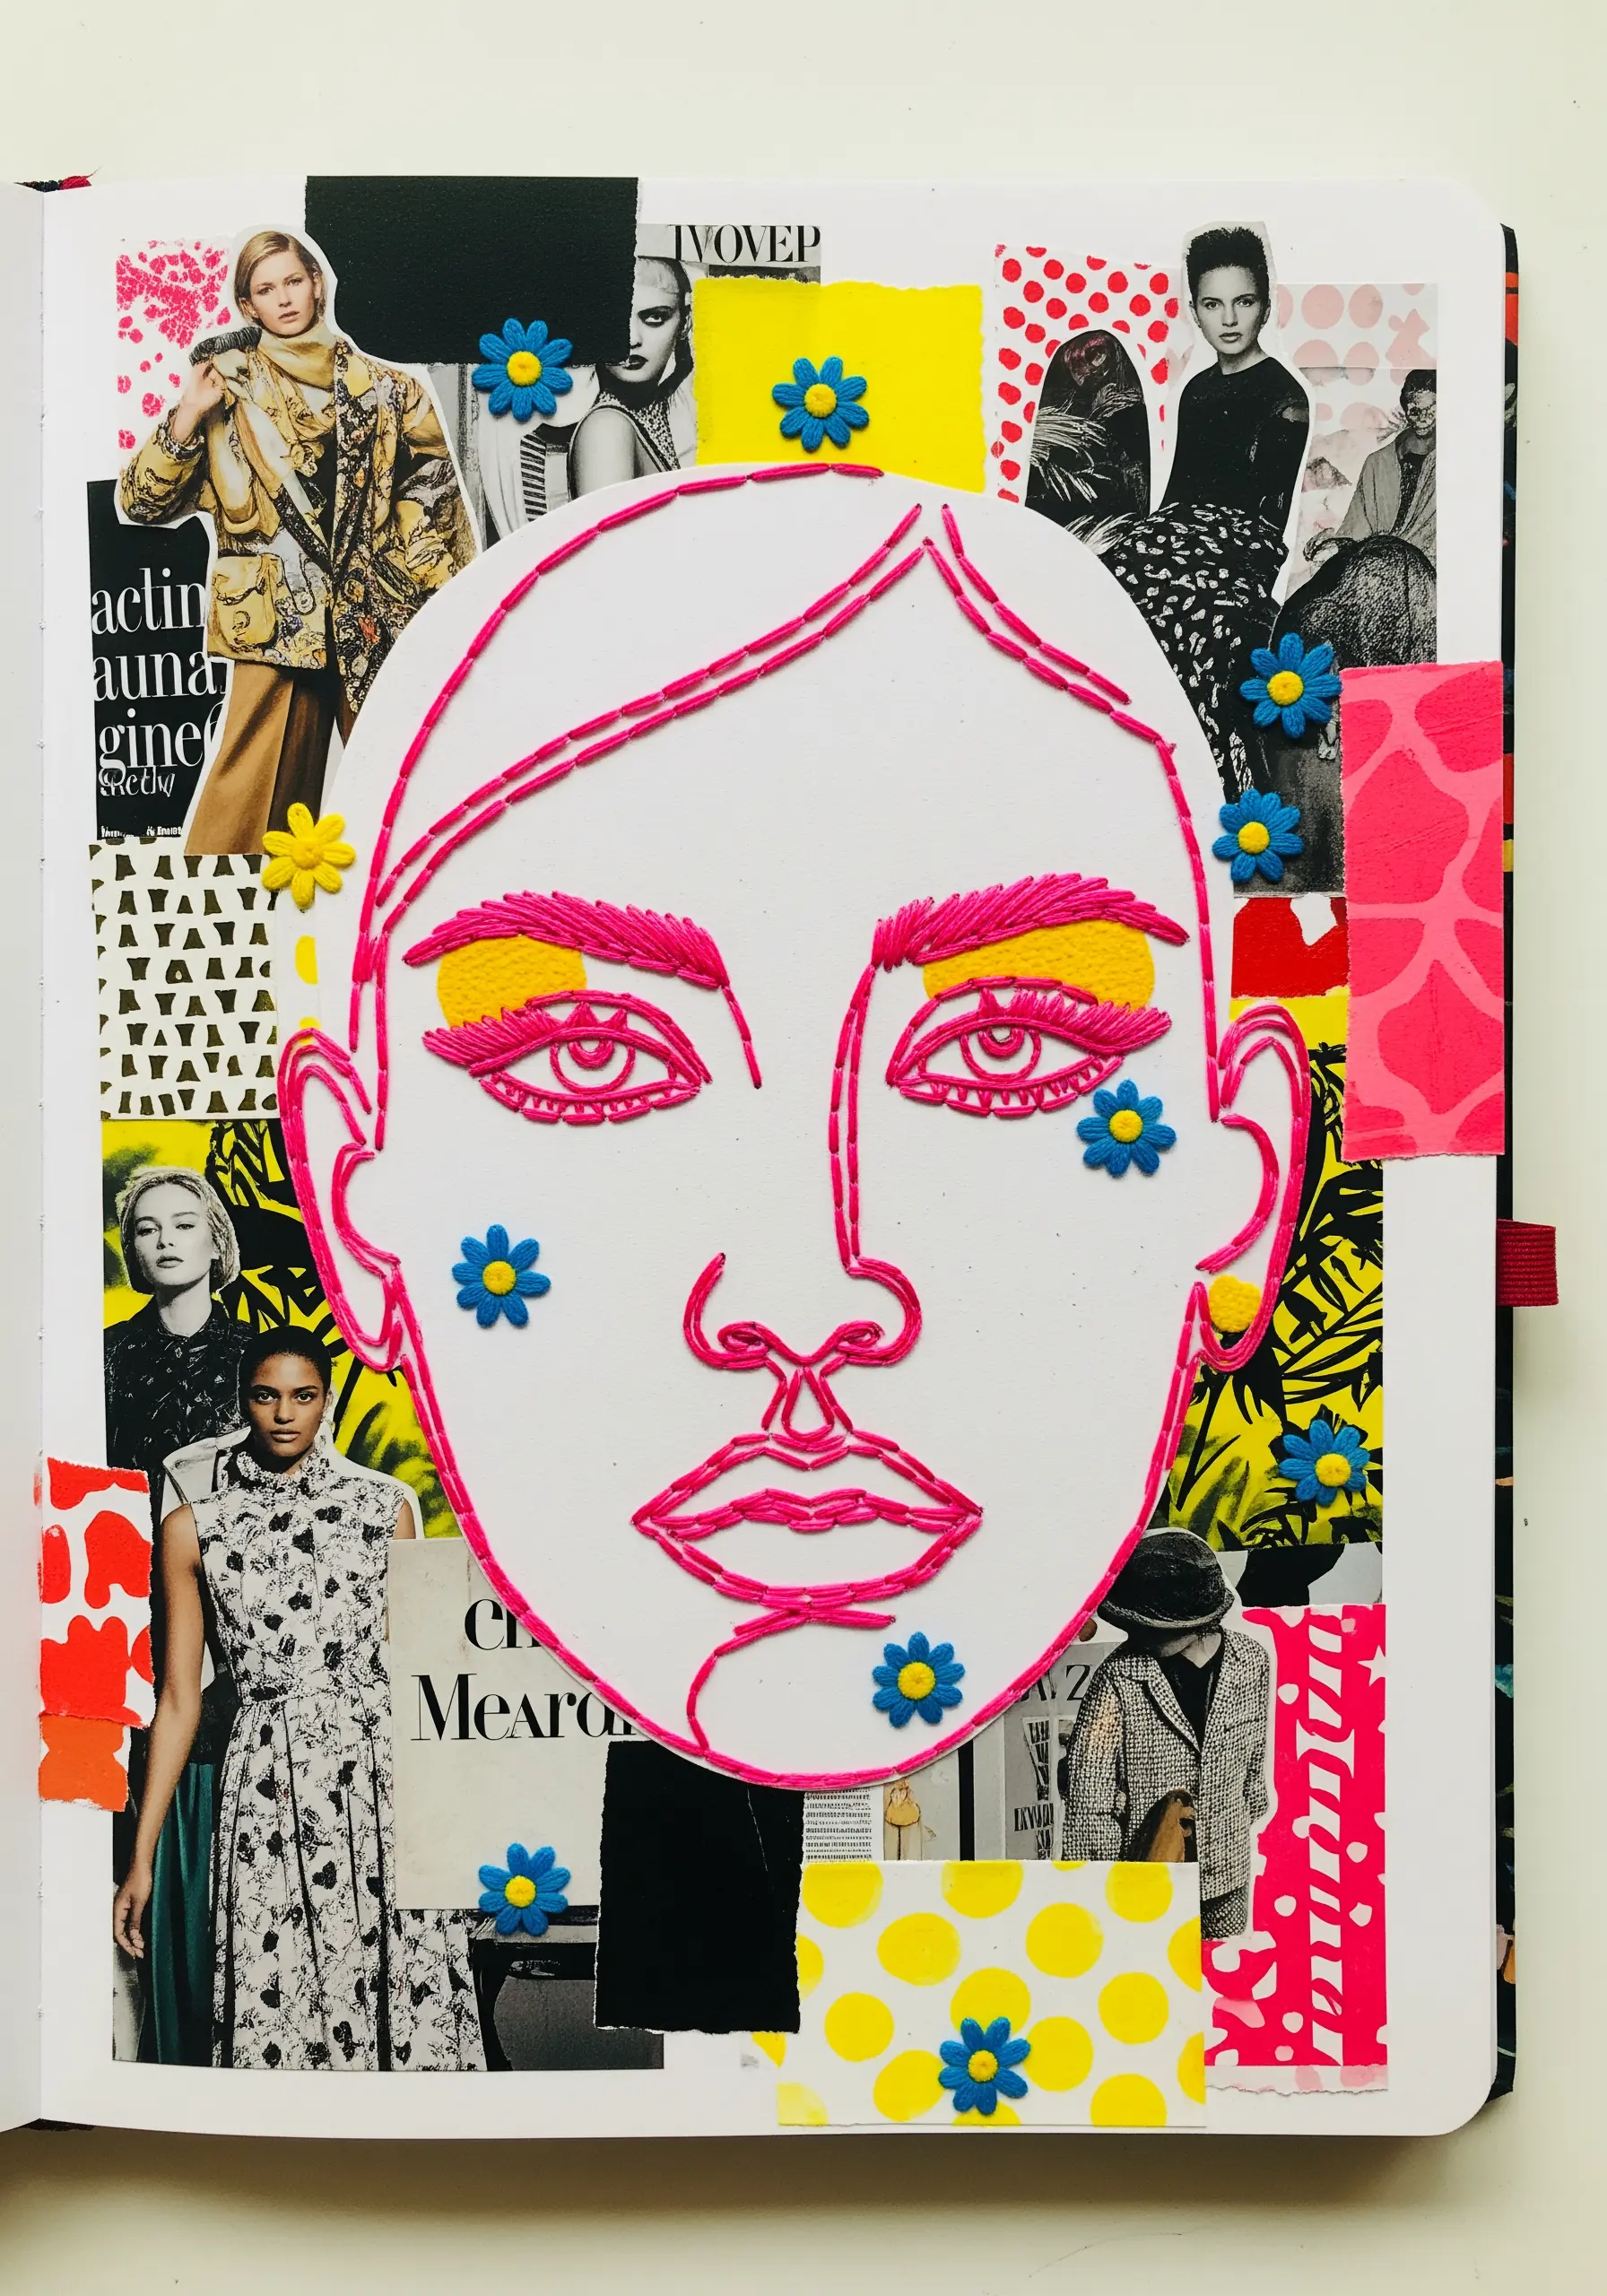
When adding embroidery to a fashion or pop art collage, use a clean backstitch to create sharp, graphic outlines.
A single, bold color—like this vibrant pink—acts like an artist’s ink, unifying the central illustration against a busy, collaged background.
Fill in small areas like eyeshadow or lips with a tight satin stitch, which adds a block of solid color and texture that makes the features pop.
This technique elevates a simple paper cutout, giving it the intentionality and finish of a fully realized illustration, much like embroidering your favorite modern culture symbols.
5. Use Single Threads as Graphic Dividers
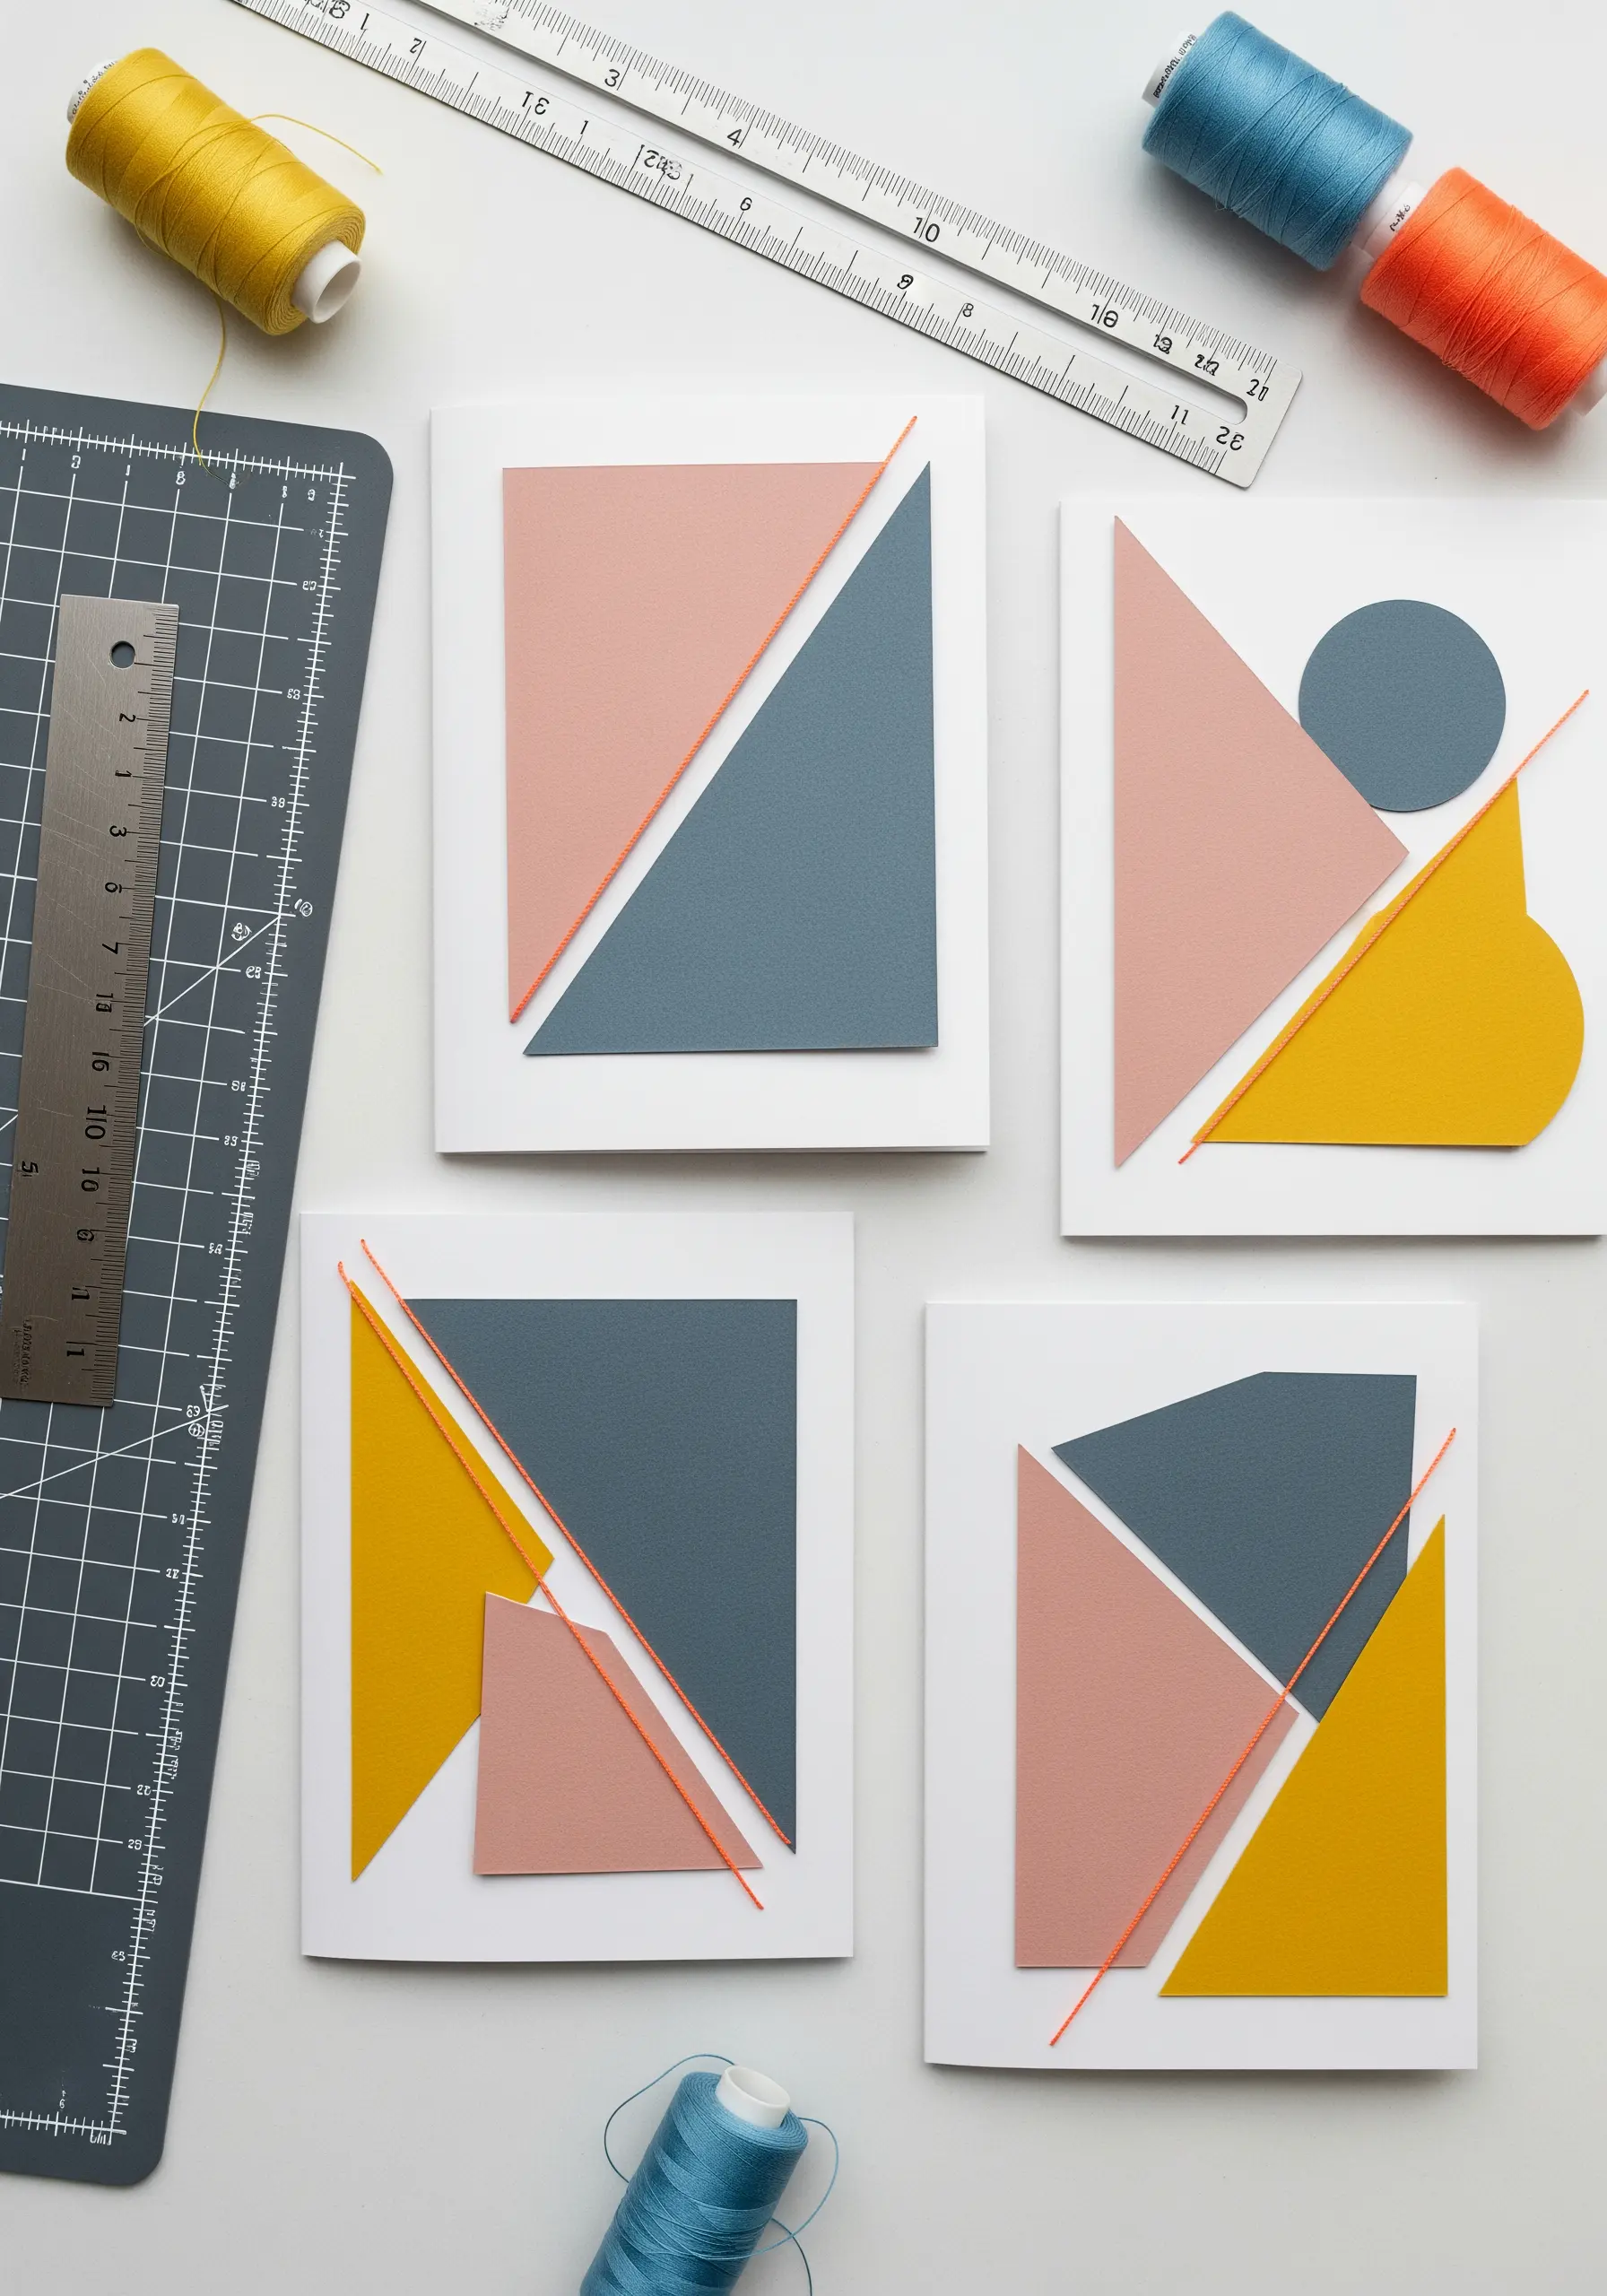
In minimalist compositions, a single strand of thread can become a powerful design element.
Stretch a taut line of thread across your geometric paper collage to act as a visual divider or an accent line.
Secure the thread on the back of the cardstock with a small piece of tape or a knot to maintain clean, sharp tension across the front.
This approach adds a delicate, three-dimensional line that photography or printing cannot replicate, introducing subtle shadow and texture.
It’s a sophisticated way to add an unexpected material to abstract geometric patterns, making the final piece feel more architectural and considered.
6. Embody Sea Foam with Clustered French Knots
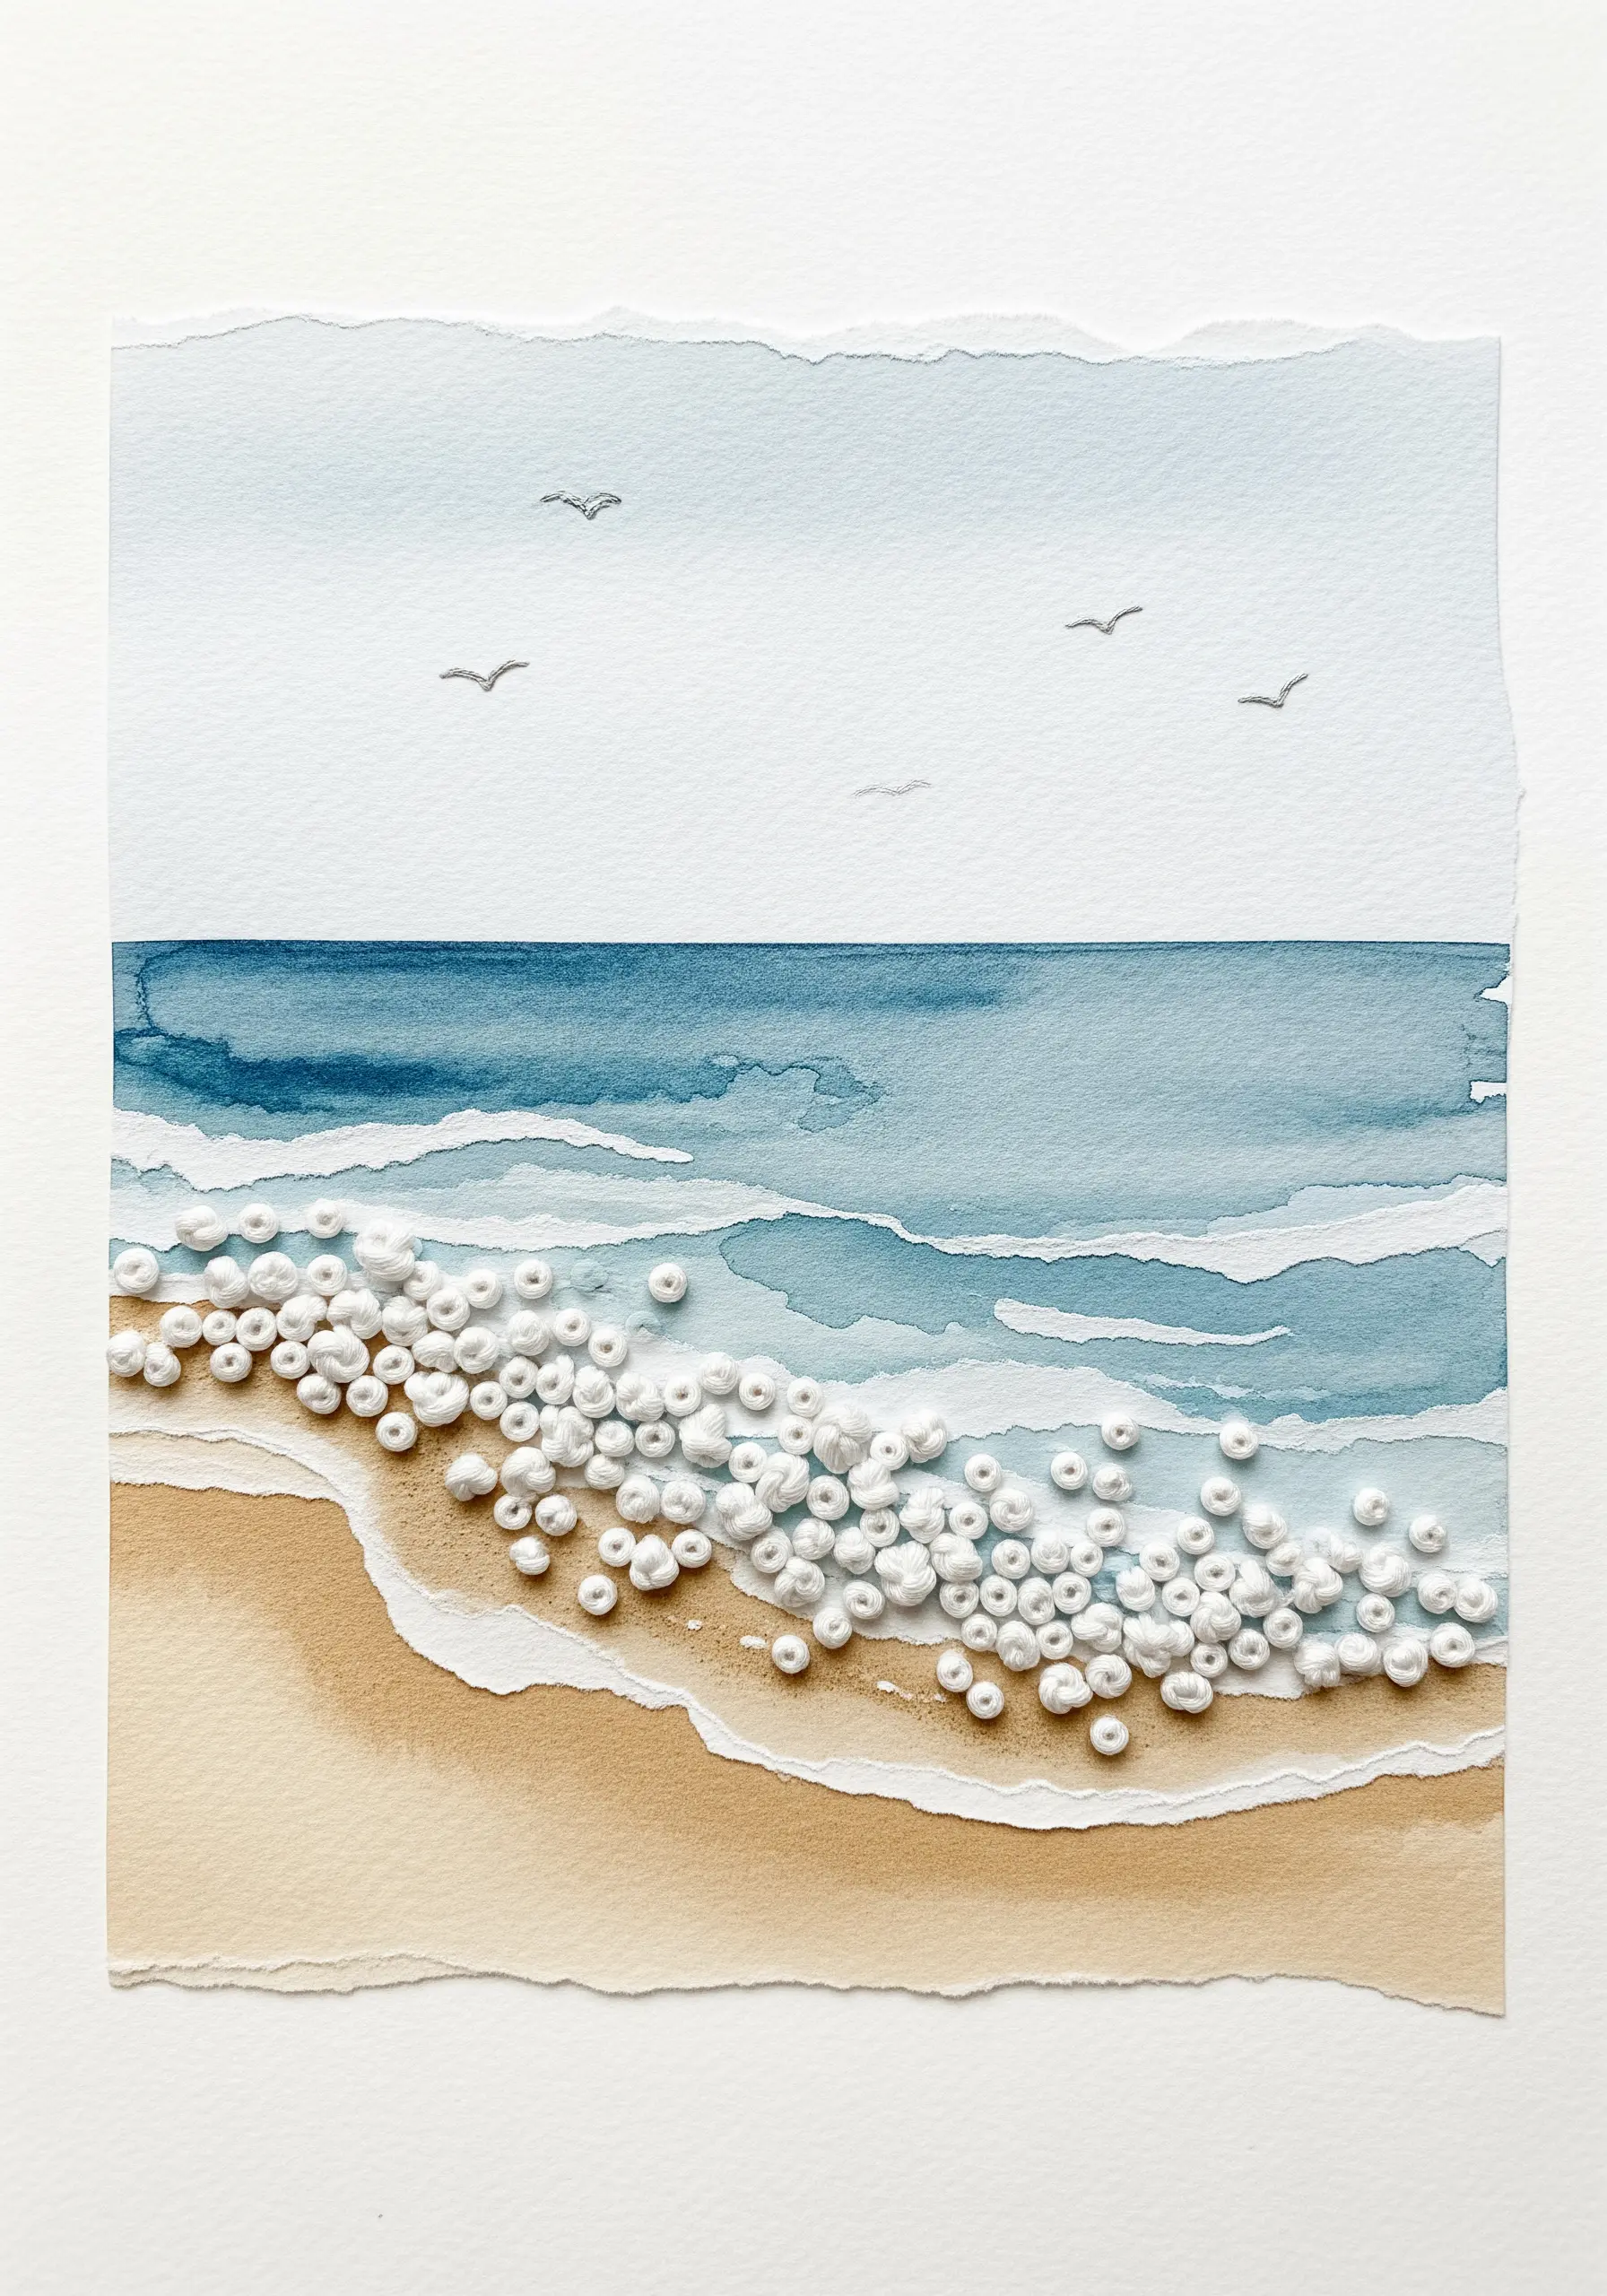
To capture the effervescent texture of sea foam against a watercolor shore, use dense clusters of French knots.
Vary the size and tightness of your knots to mimic the natural irregularity of bubbles and foam.
Use a soft, high-sheen white or off-white thread to catch the light, enhancing the wet, glistening effect of the waves.
Concentrate the knots along the water’s edge and scatter them more sparsely as they recede onto the sand for a realistic look.
This technique adds a beautiful, tactile dimension that transforms a flat painting into a multi-sensory coastal scene.
7. Add Feather Texture with Tiny Seed Stitches
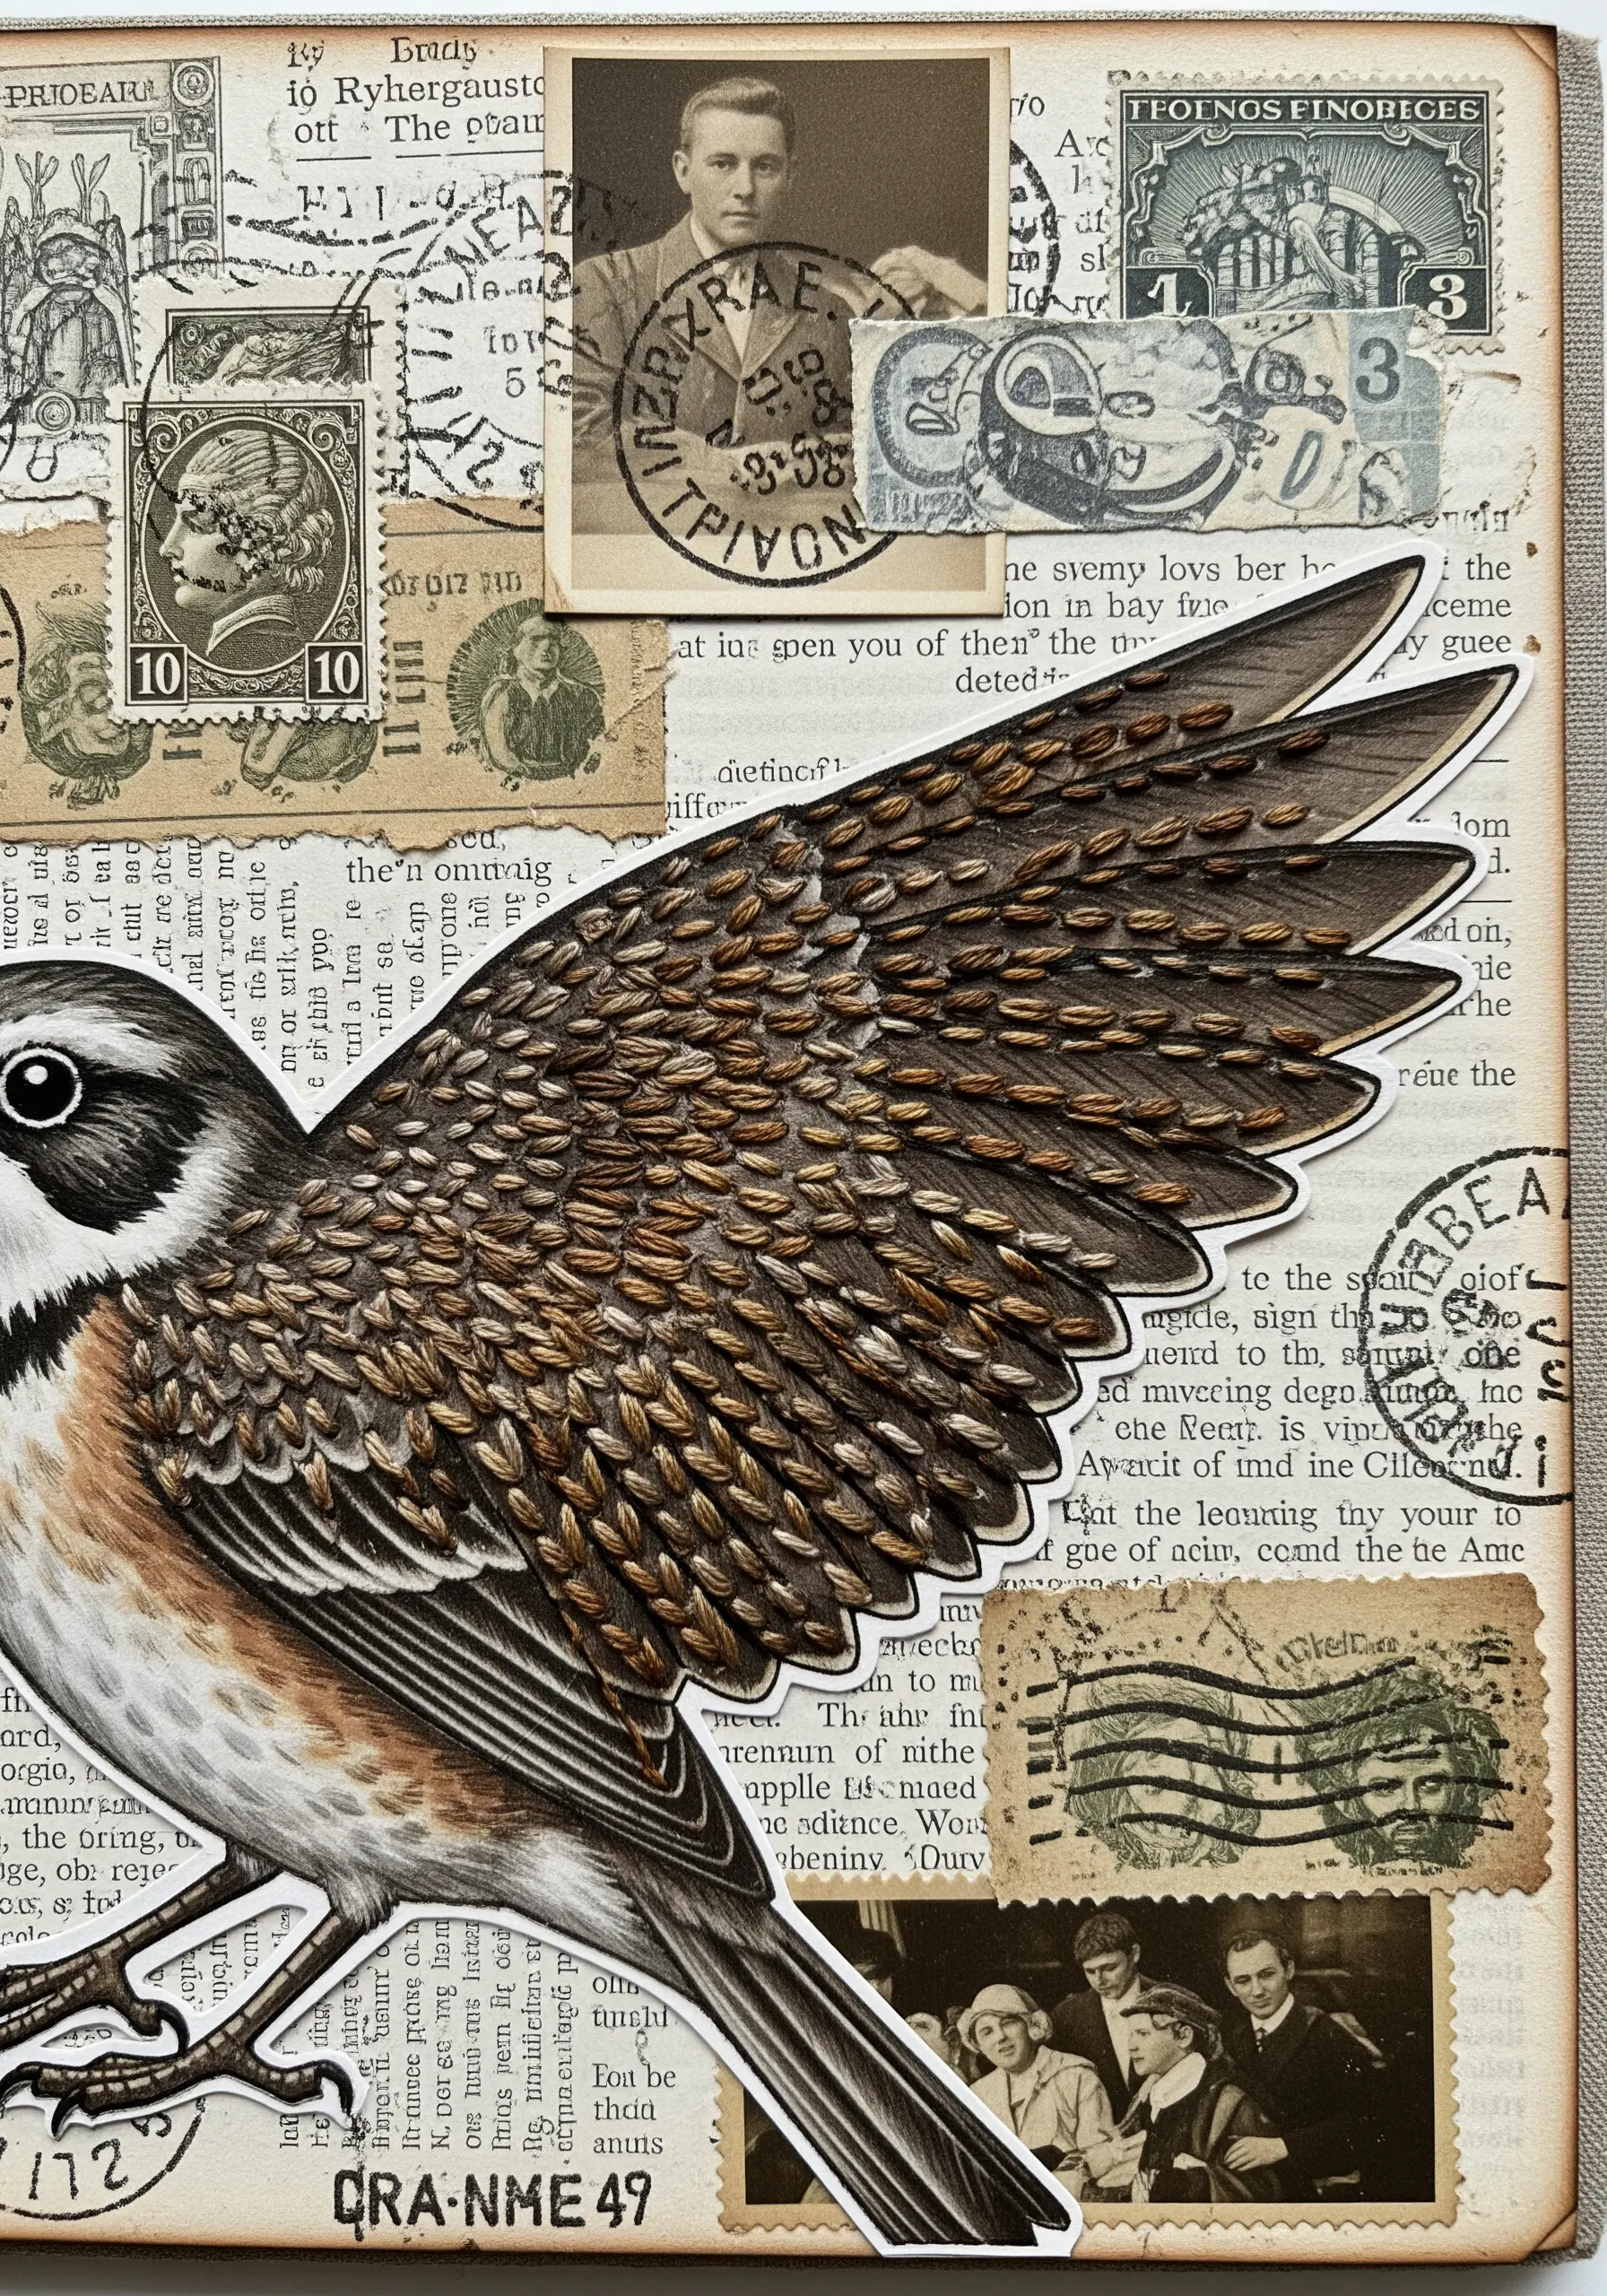
Bring a printed illustration to life by overlaying it with tiny, well-placed stitches that mimic natural textures.
On a bird’s wing, use scattered seed stitches (small, individual straight stitches) in various shades of brown and gold to simulate the texture and shimmer of feathers.
Follow the direction of the printed feather barbs for a realistic effect, concentrating stitches in darker areas to enhance shading.
This subtle addition gives the flat image a surprising depth and tactile quality, making the artwork feel layered and dynamic, as if the bird could truly come alive.
8. Highlight Architecture with Contrasting Outlines
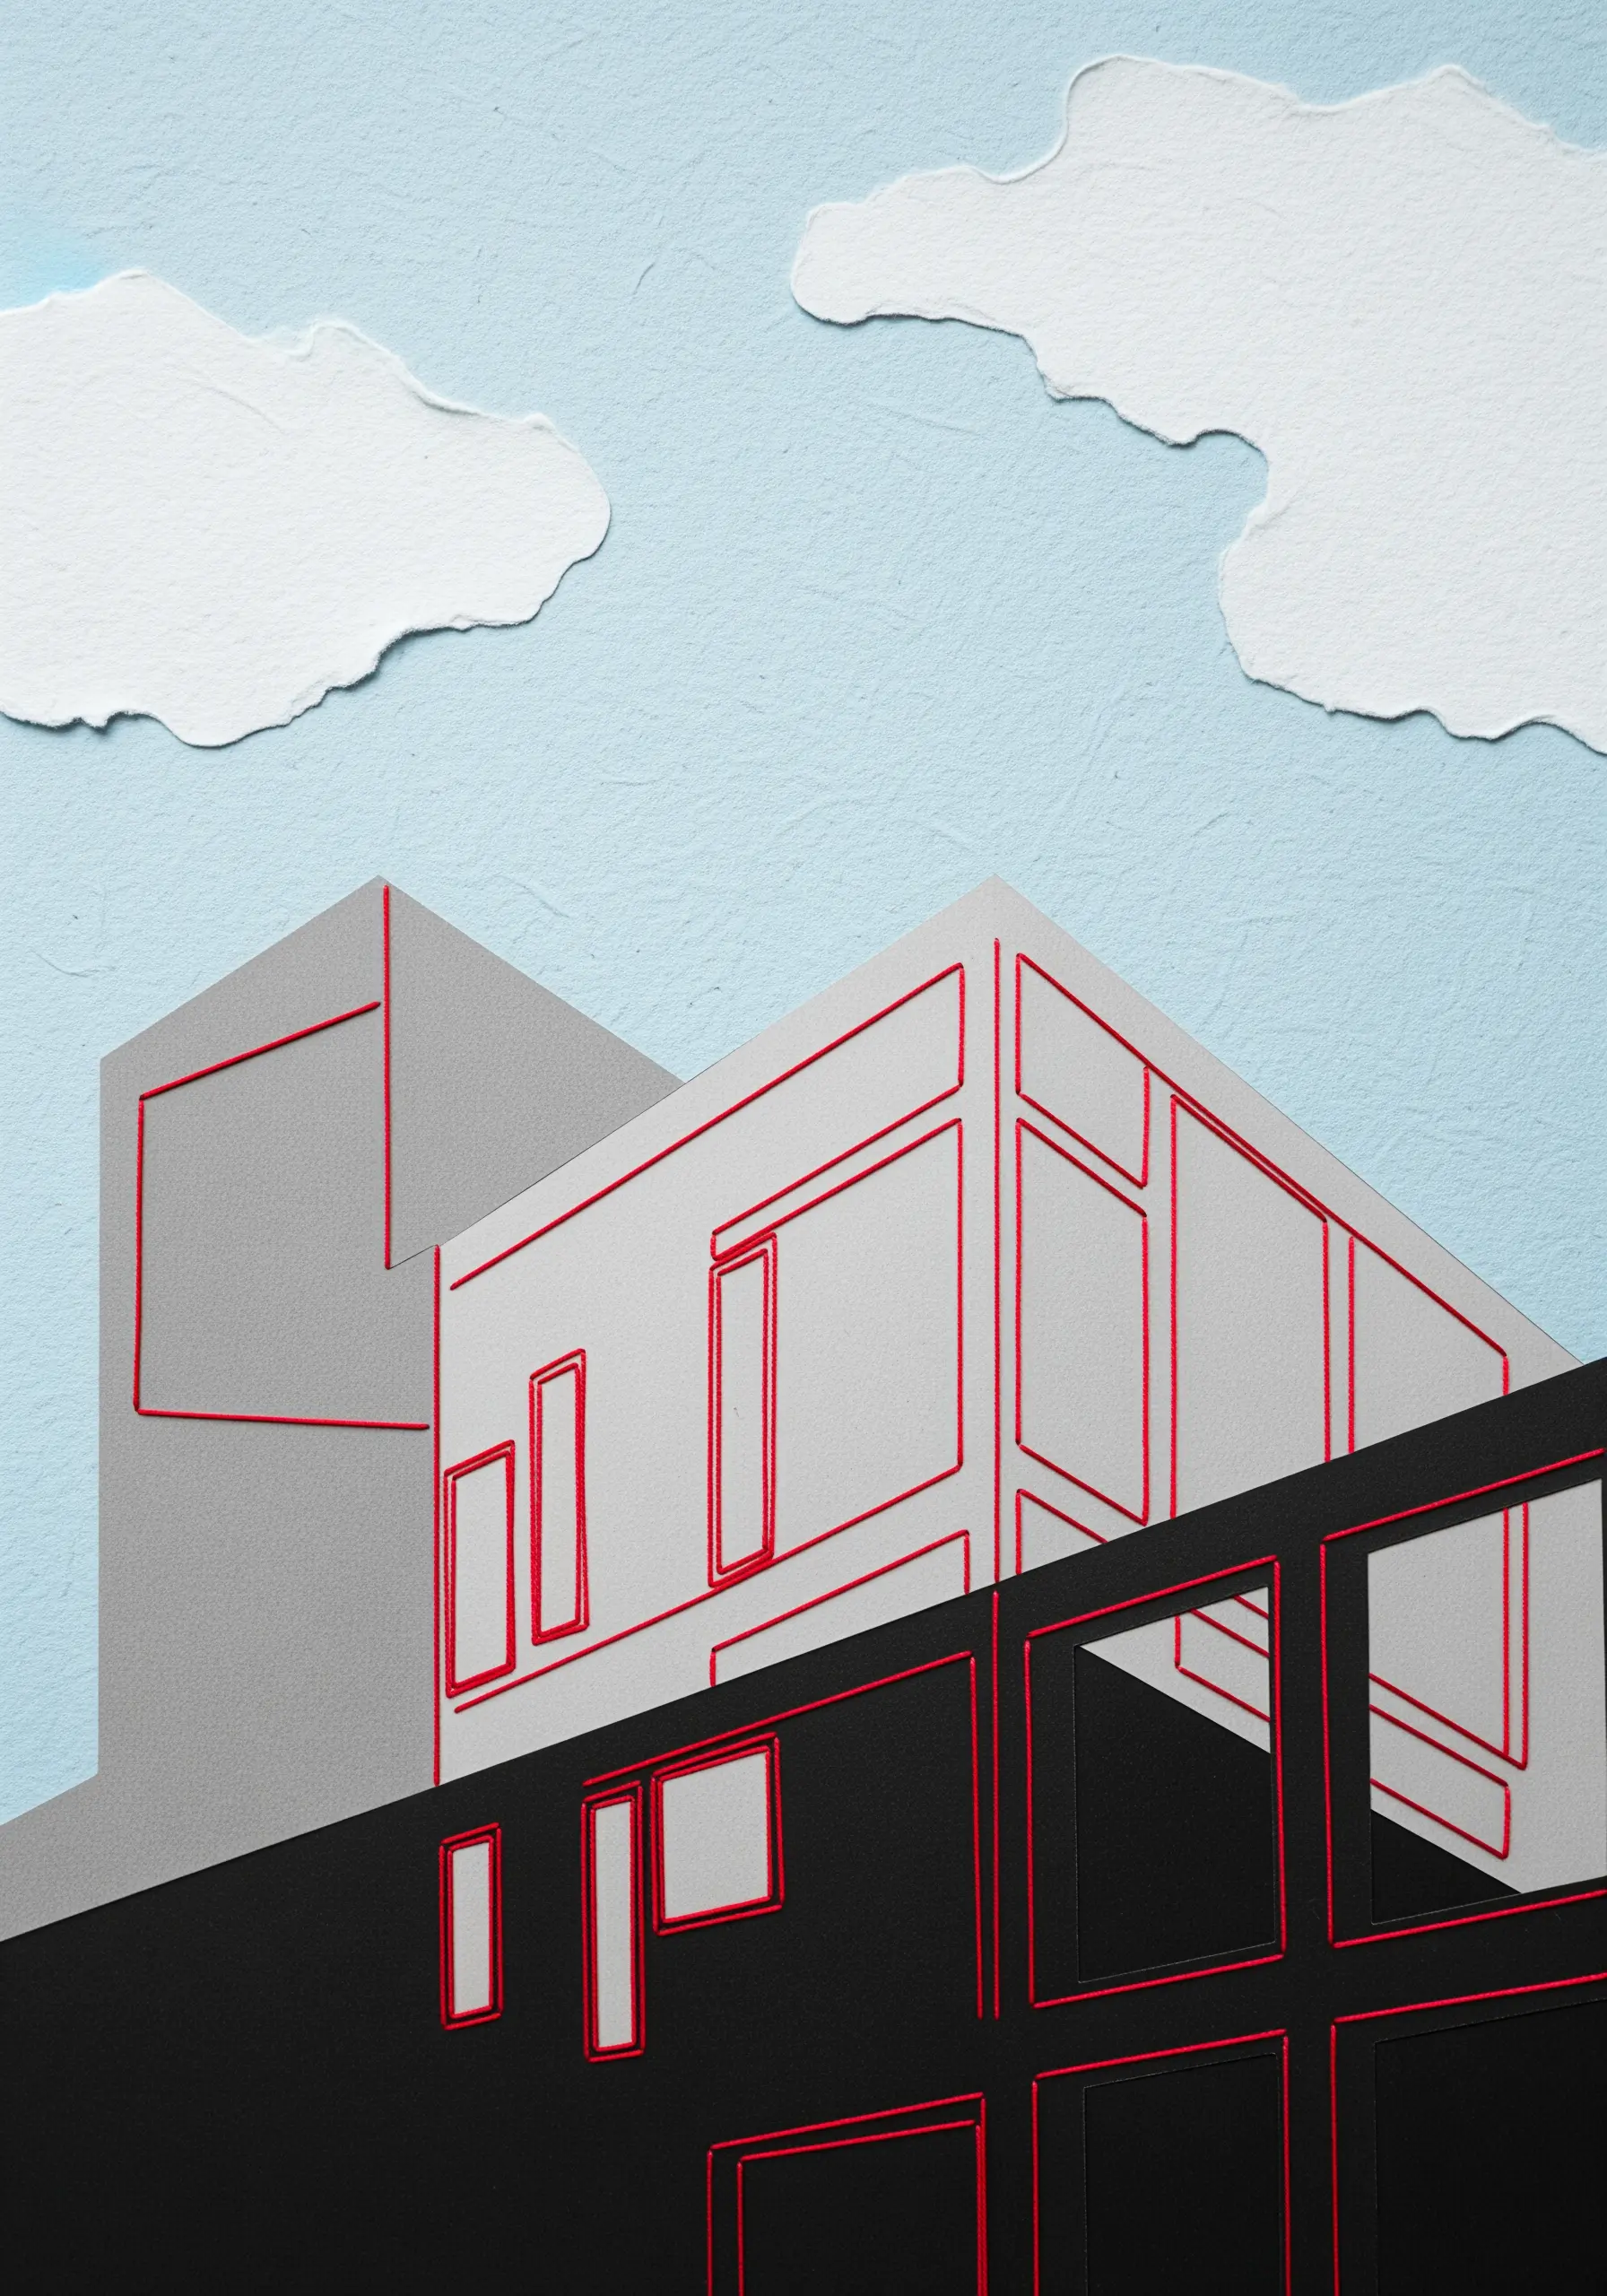
Use a single, striking color of thread to trace architectural details on a monochromatic paper collage.
A vibrant red backstitch against grey and black paper creates a blueprint-like effect, highlighting windows, doors, and structural lines with graphic precision.
This technique turns the thread into a drawing tool, adding a layer of information and visual interest that defines form and space.
It’s an incredibly effective way to add a pop of color and a sense of deliberate design to otherwise minimalist compositions, transforming your space into a peaceful retreat.
9. Unify a Collage with Radial Stitches
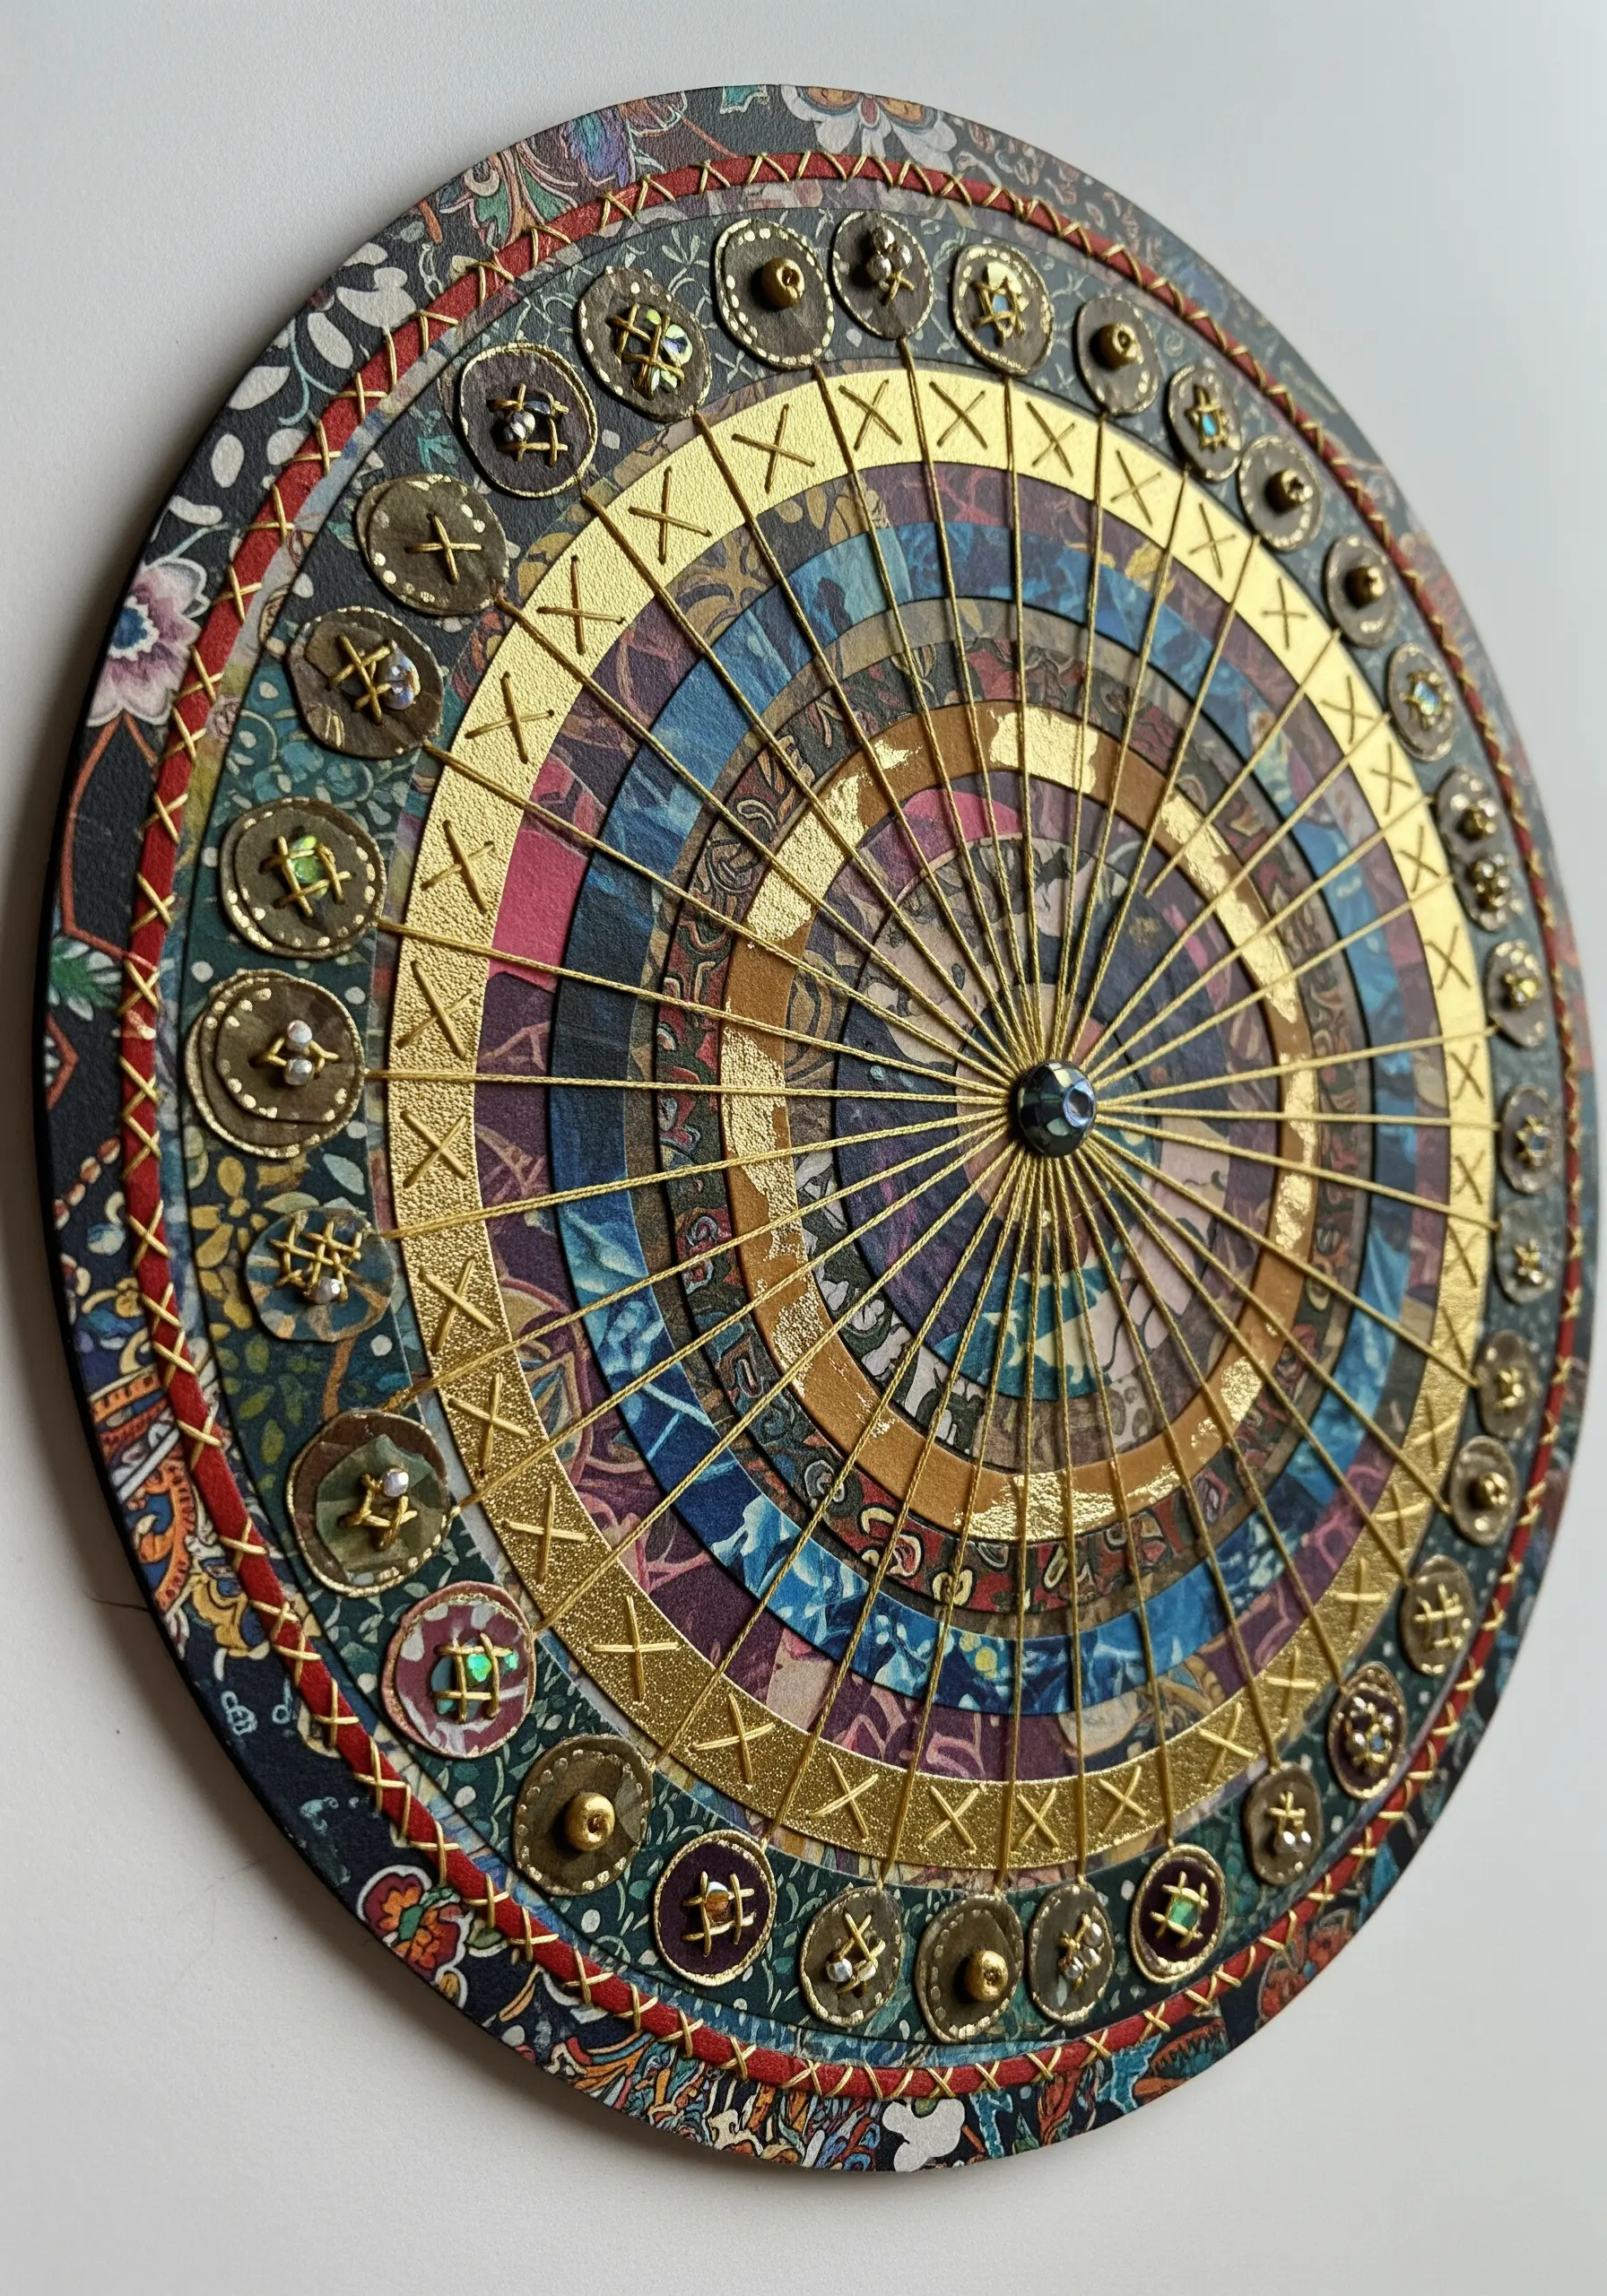
When working with a busy, multi-patterned collage, use embroidery to create a unifying structure.
Stitch long, straight spokes of metallic gold thread radiating from a central point to create a focal point and organize the visual chaos.
This technique imposes order and geometry onto the piece, guiding the viewer’s eye and tying all the disparate elements together.
Adding small embellishments like beads or sequins at intersecting points can further enhance the design’s cohesion and add a touch of luxury.
It’s a perfect way to add structure to complex meditative mandala designs.
10. Add a Focal Point with Simple Stitched Motifs
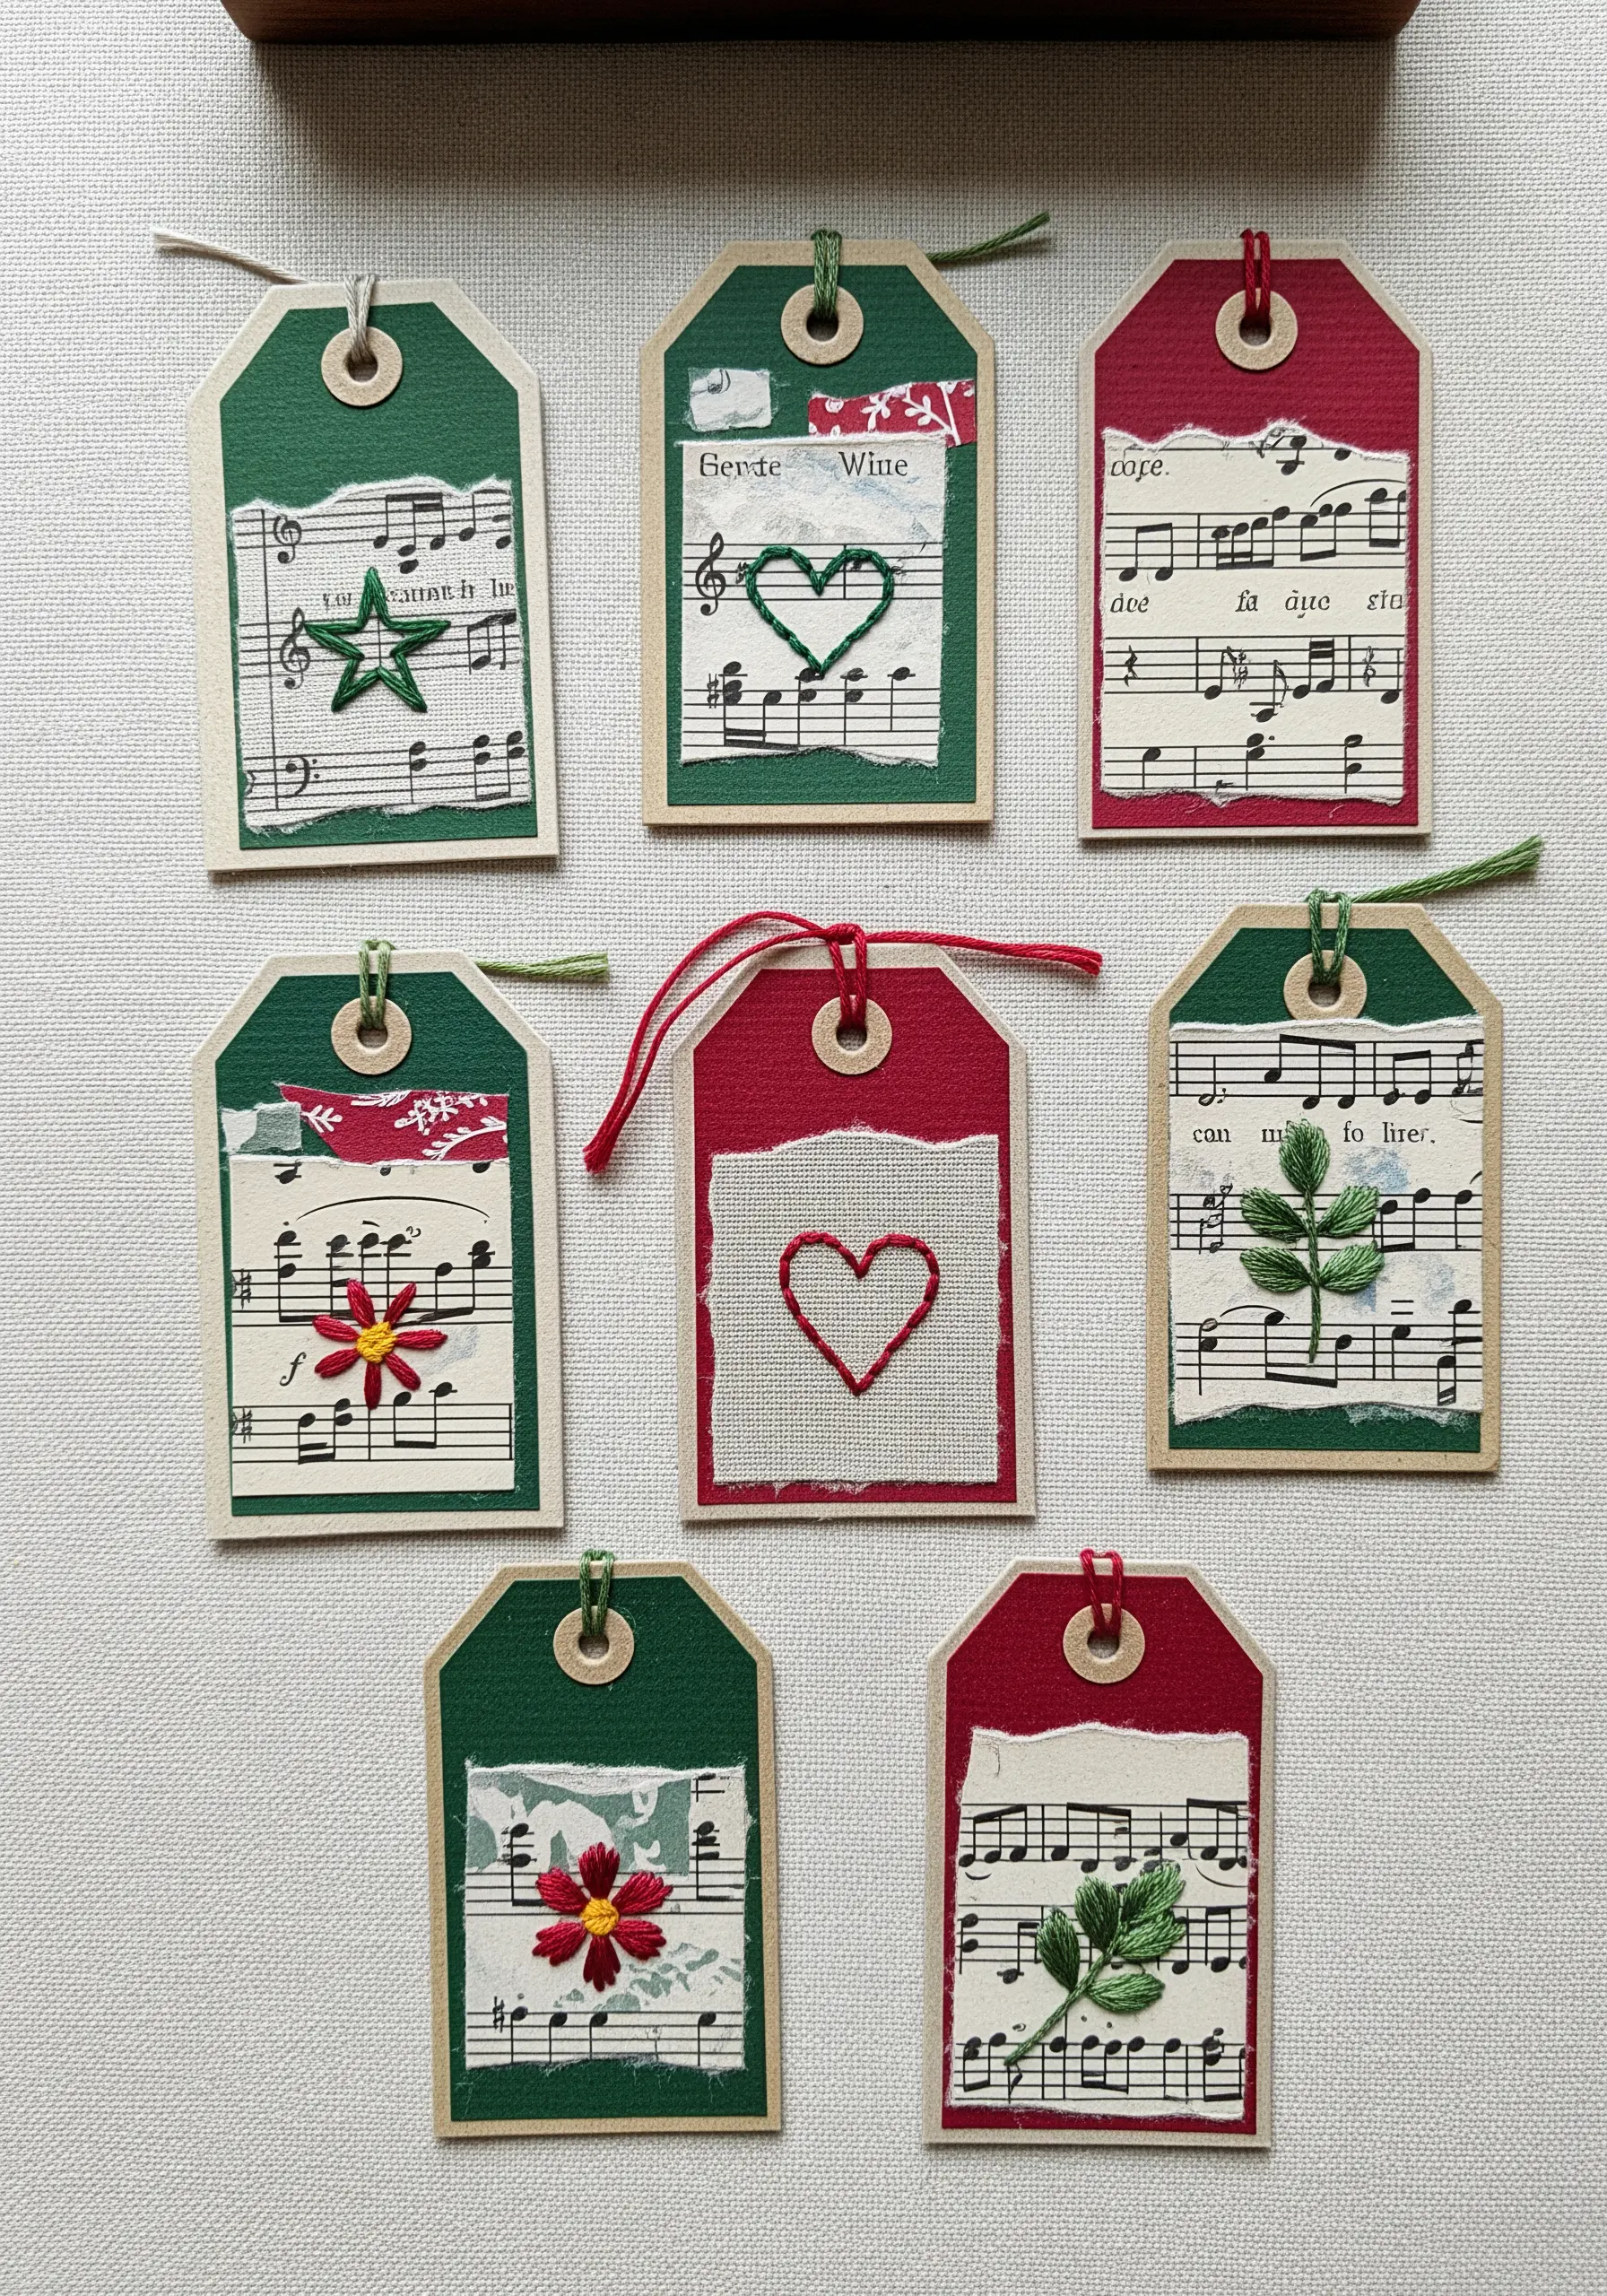
Elevate simple paper crafts like gift tags by adding a single, beautifully stitched motif.
Choose a simple shape—a heart, a star, a leaf—and stitch it directly onto a small piece of fabric or textured paper before layering it onto your tag.
Use a basic outline stitch like a backstitch for clean lines, or fill the shape with satin stitch for a bolder impact.
This thoughtful detail turns a disposable item into a tiny piece of art and is one of the easiest ways to add a personal touch to gifts.
11. Explore Texture with Tone-on-Tone Stitching
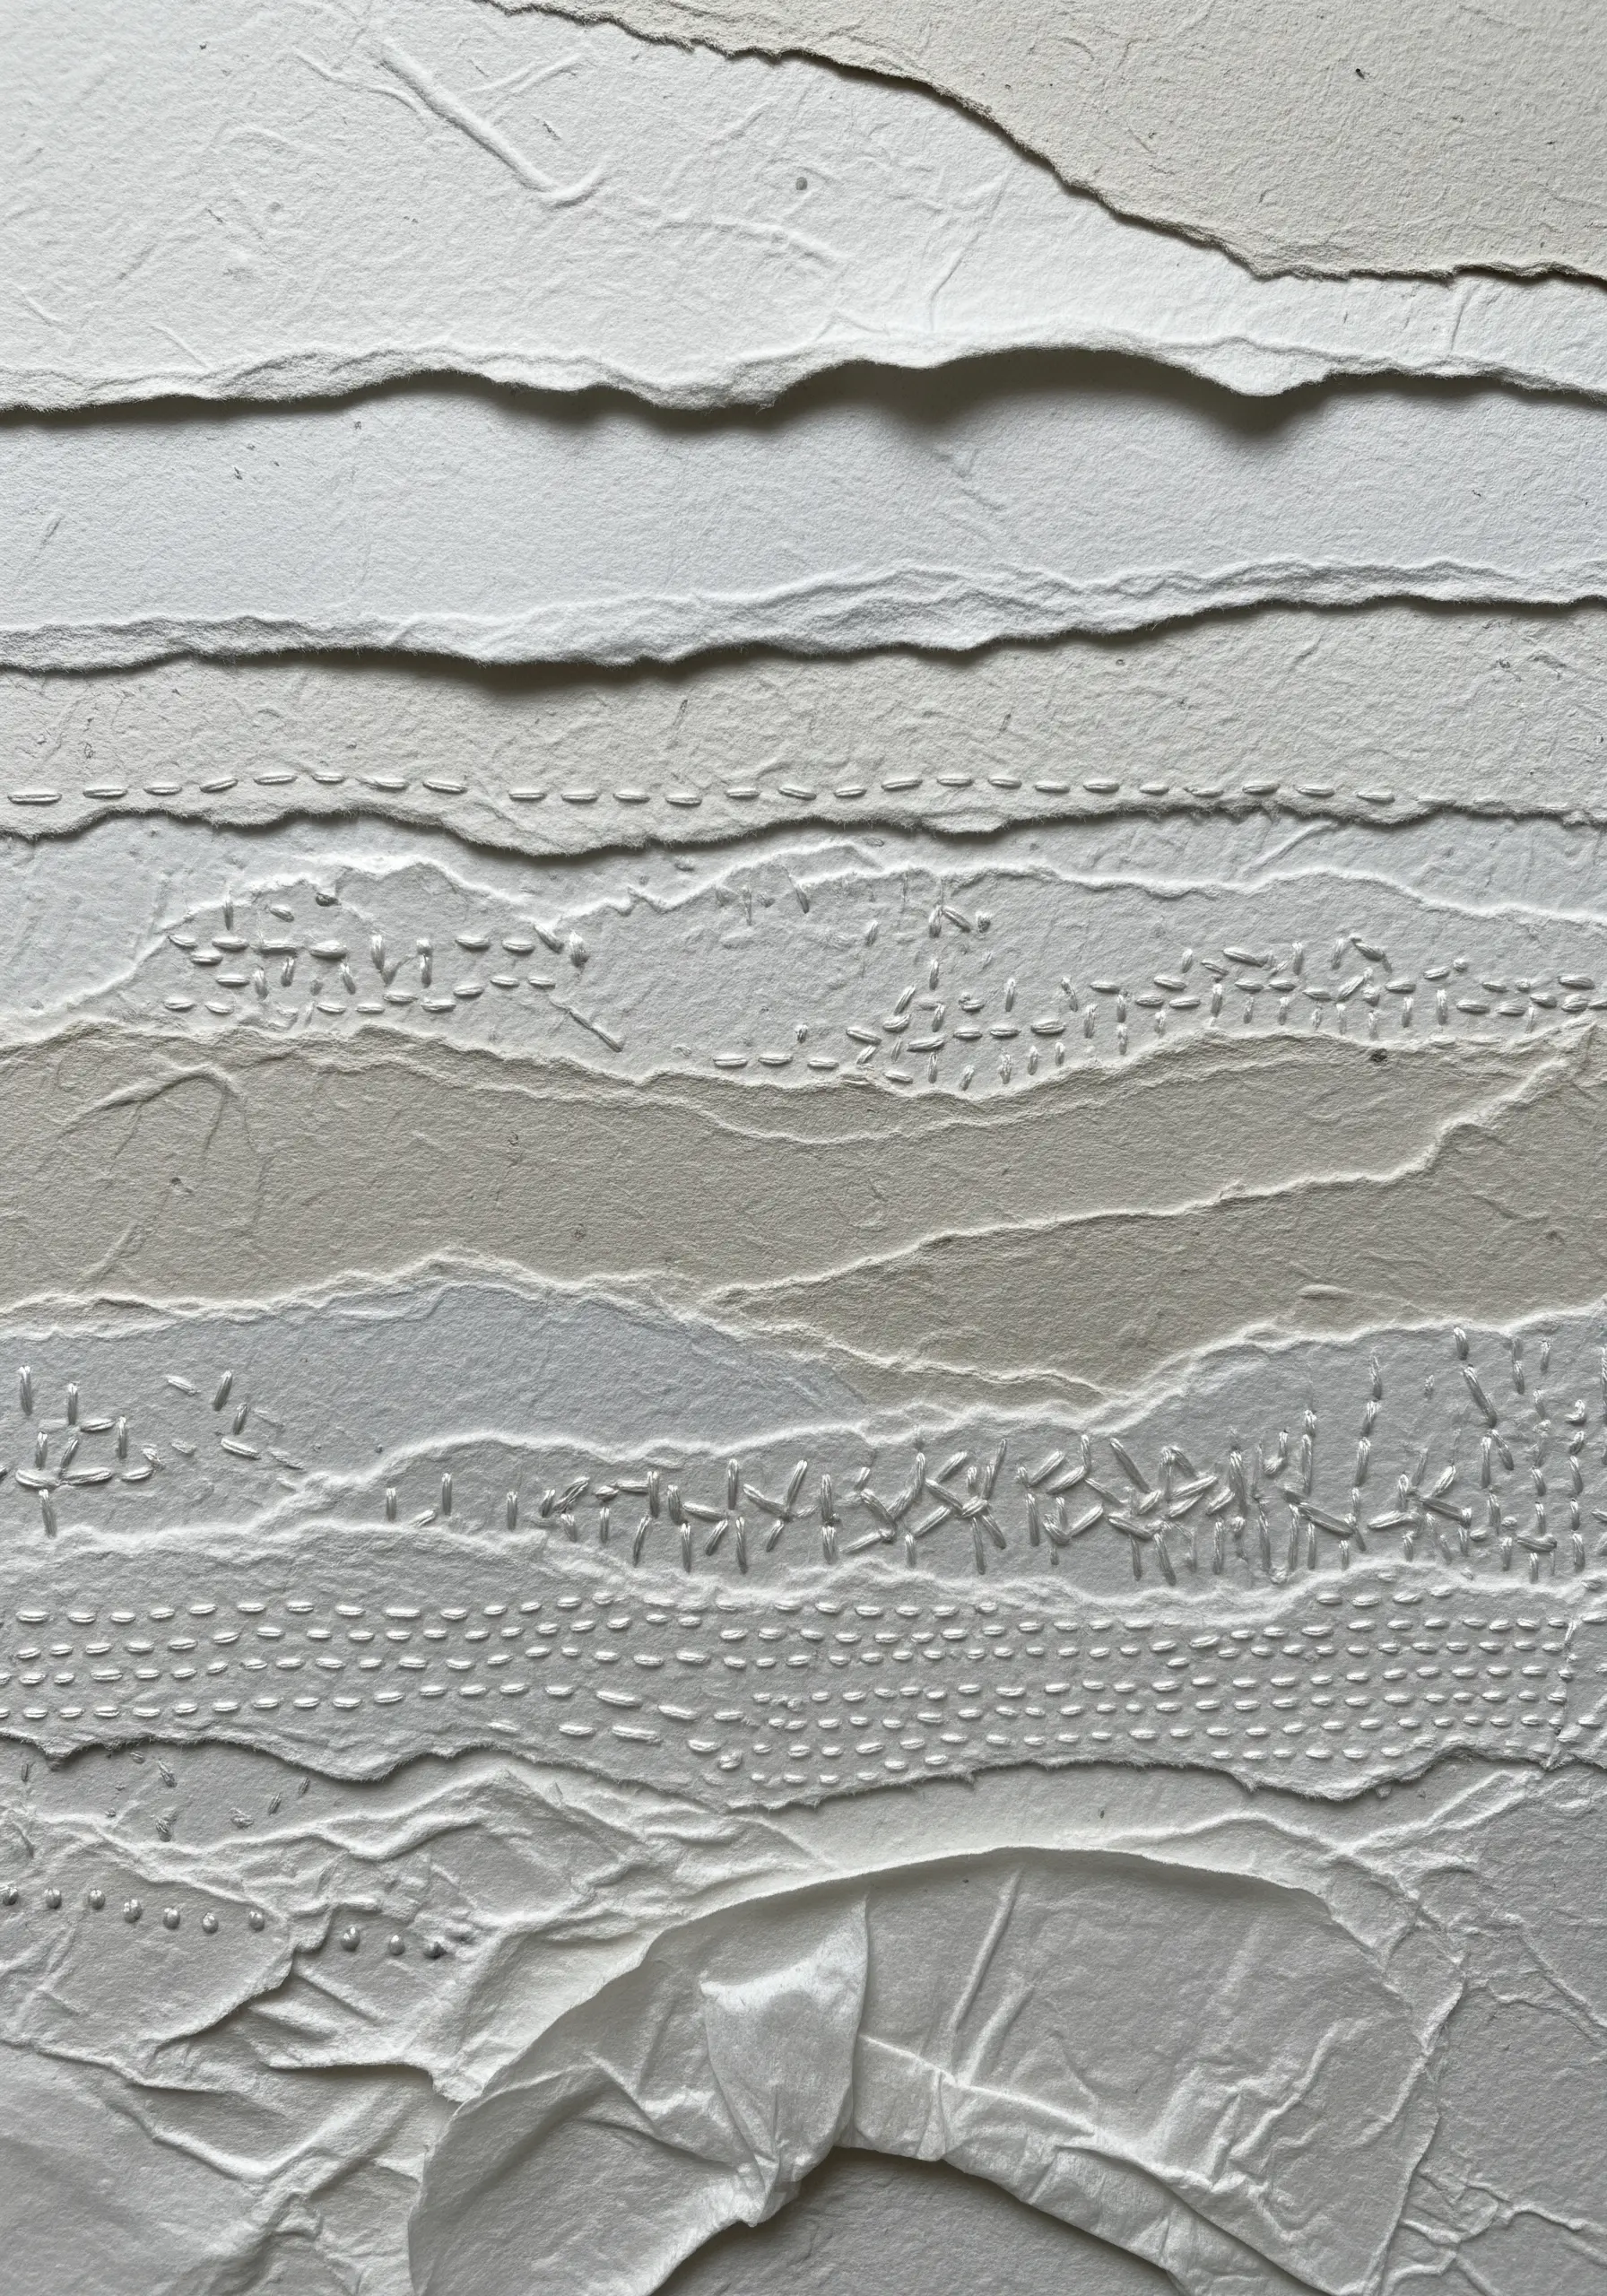
Create a sophisticated, subtle composition by stitching onto paper with thread of the exact same color.
Focus entirely on texture by varying your stitches—from simple running stitches and seed stitches to small French knots and cross stitches.
The magic of this technique lies in how the light catches the raised threads, creating shadows and highlights that reveal the pattern.
This is a perfect exercise in restraint and elegance, proving that you don’t need color to make a powerful visual statement with ultra-subtle, high-end finishes.
12. Integrate 3D Fiber Elements into a Flat Collage
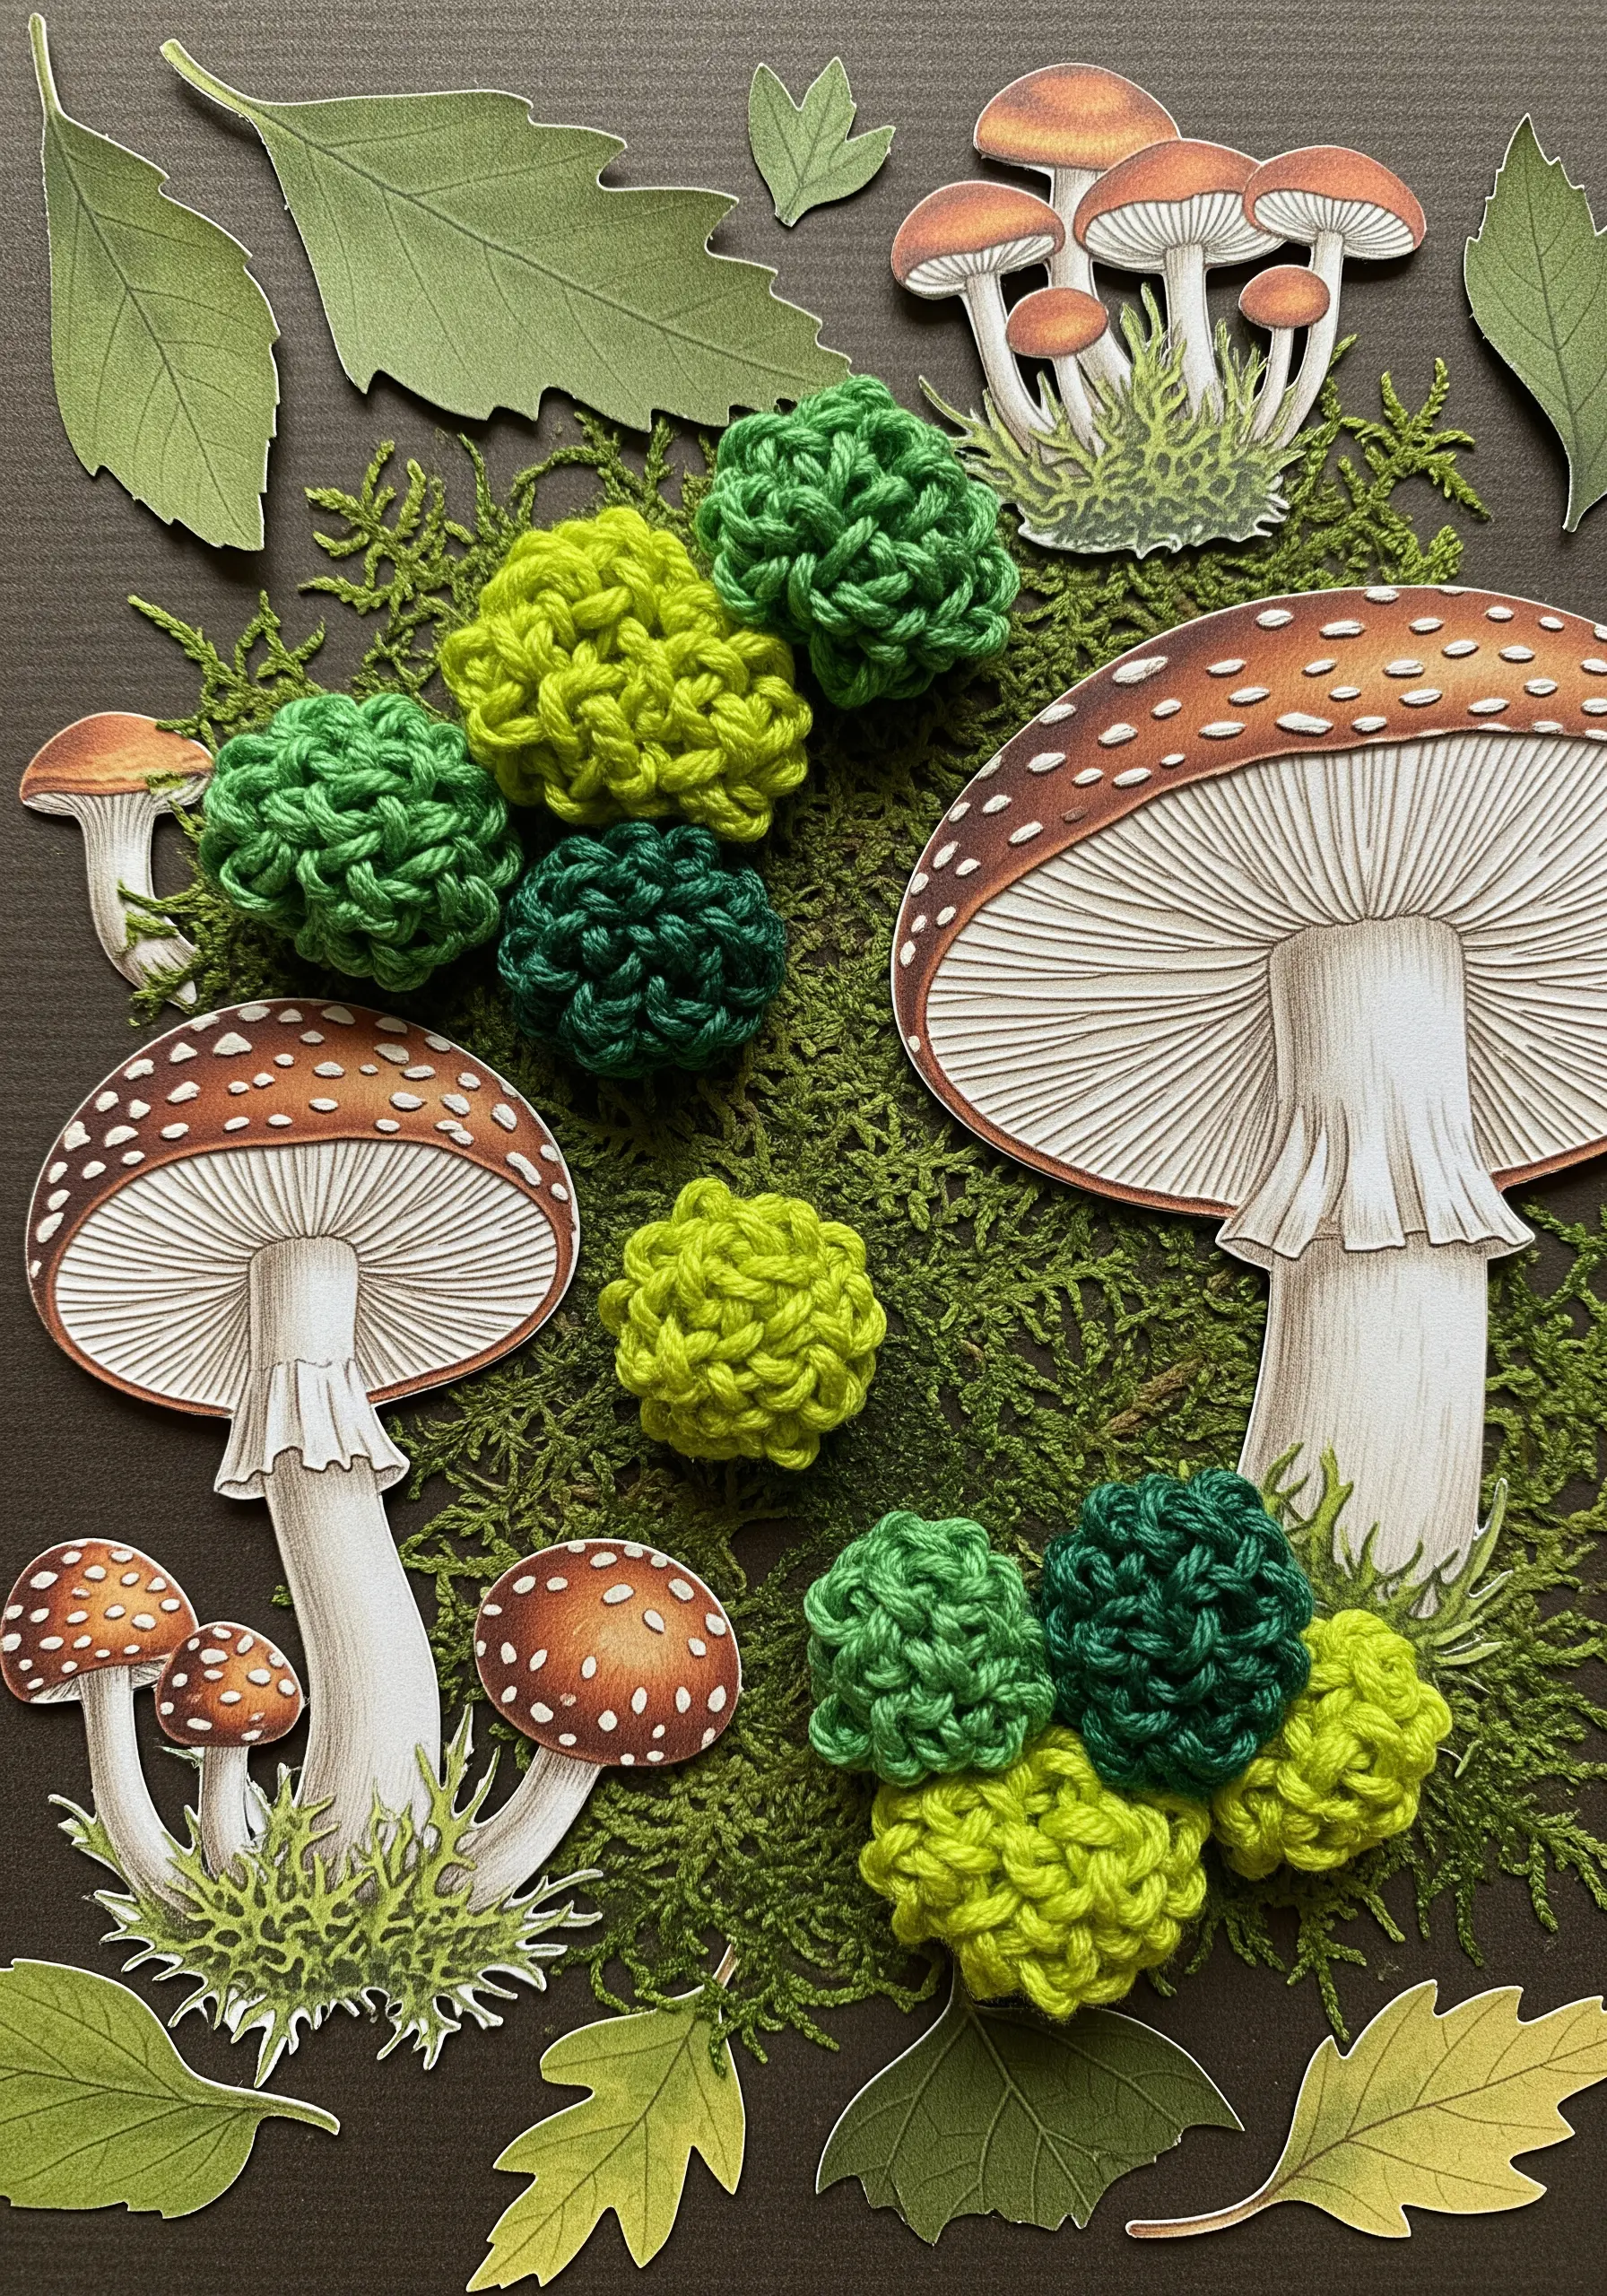
Move beyond thread and incorporate dimensional fiber elements, like these crocheted moss balls, into your collage art.
Create these small, textured pieces separately using yarn, then securely stitch or glue them onto your paper background.
This mixed-media approach adds surprising depth and tactility, bridging the gap between two-dimensional and three-dimensional art.
It’s particularly effective for nature scenes, allowing you to represent organic textures like moss, flowers, or fungi in a highly realistic and engaging way, just like in other forest-floor-inspired botanical art.
13. Sculpt with Directional Satin Stitch
Use the direction of your satin stitches to create a sense of movement, shape, and light in your embroidered illustrations.
When filling in an area like hair, angle your stitches to follow its natural flow and shine, creating highlights and shadows with thread.
Keep your stitches tight and uniform to achieve a smooth, almost glossy finish that mimics the look of graphic novel ink.
This meticulous approach transforms simple thread into a sculptural tool, allowing you to add depth and personality to hand-stitched portraits on paper.
14. Illustrate Light with Stitches
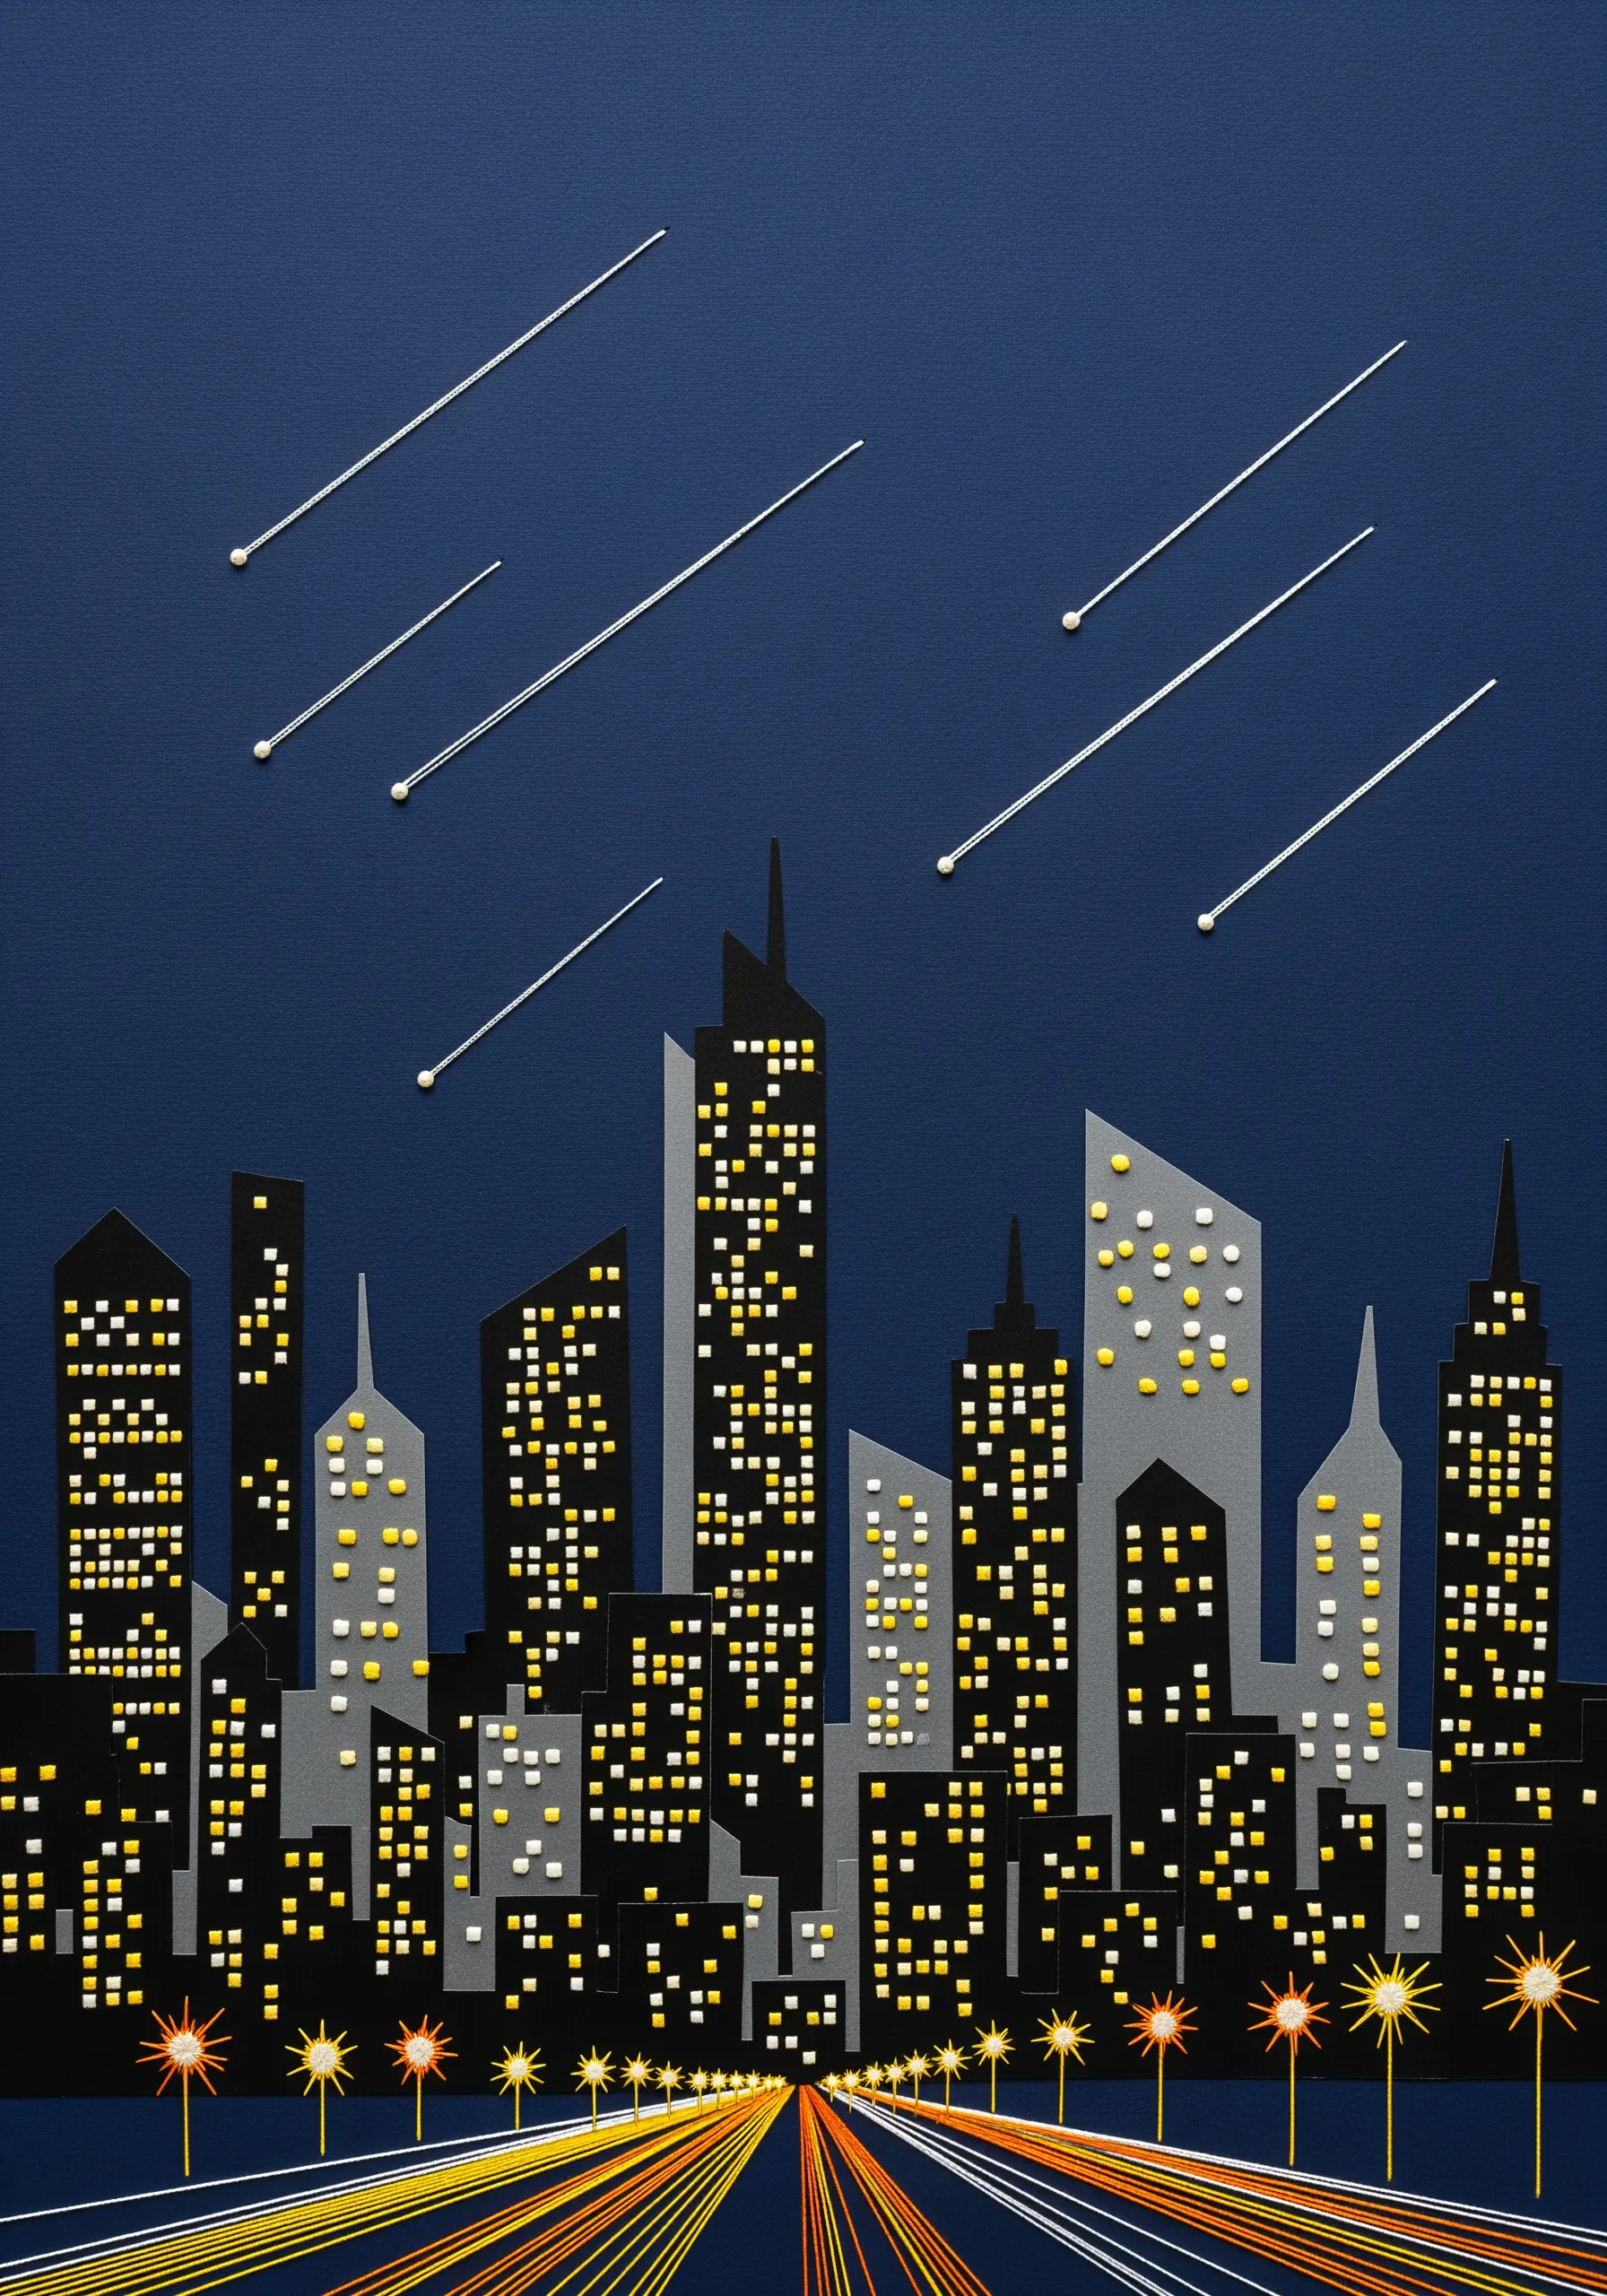
In a night-sky or cityscape collage, use embroidery to represent sources of light in a way that paper cannot.
Use tiny French knots in yellow and white for distant city lights, creating a twinkling, textured effect against the dark paper.
For shooting stars or light trails, use single, long straight stitches, perhaps with a metallic thread to add a subtle glint.
This technique allows you to add energy and dynamism to a static scene, turning simple lines into mesmerizing art.
15. Frame and Unify with a Stitched Border
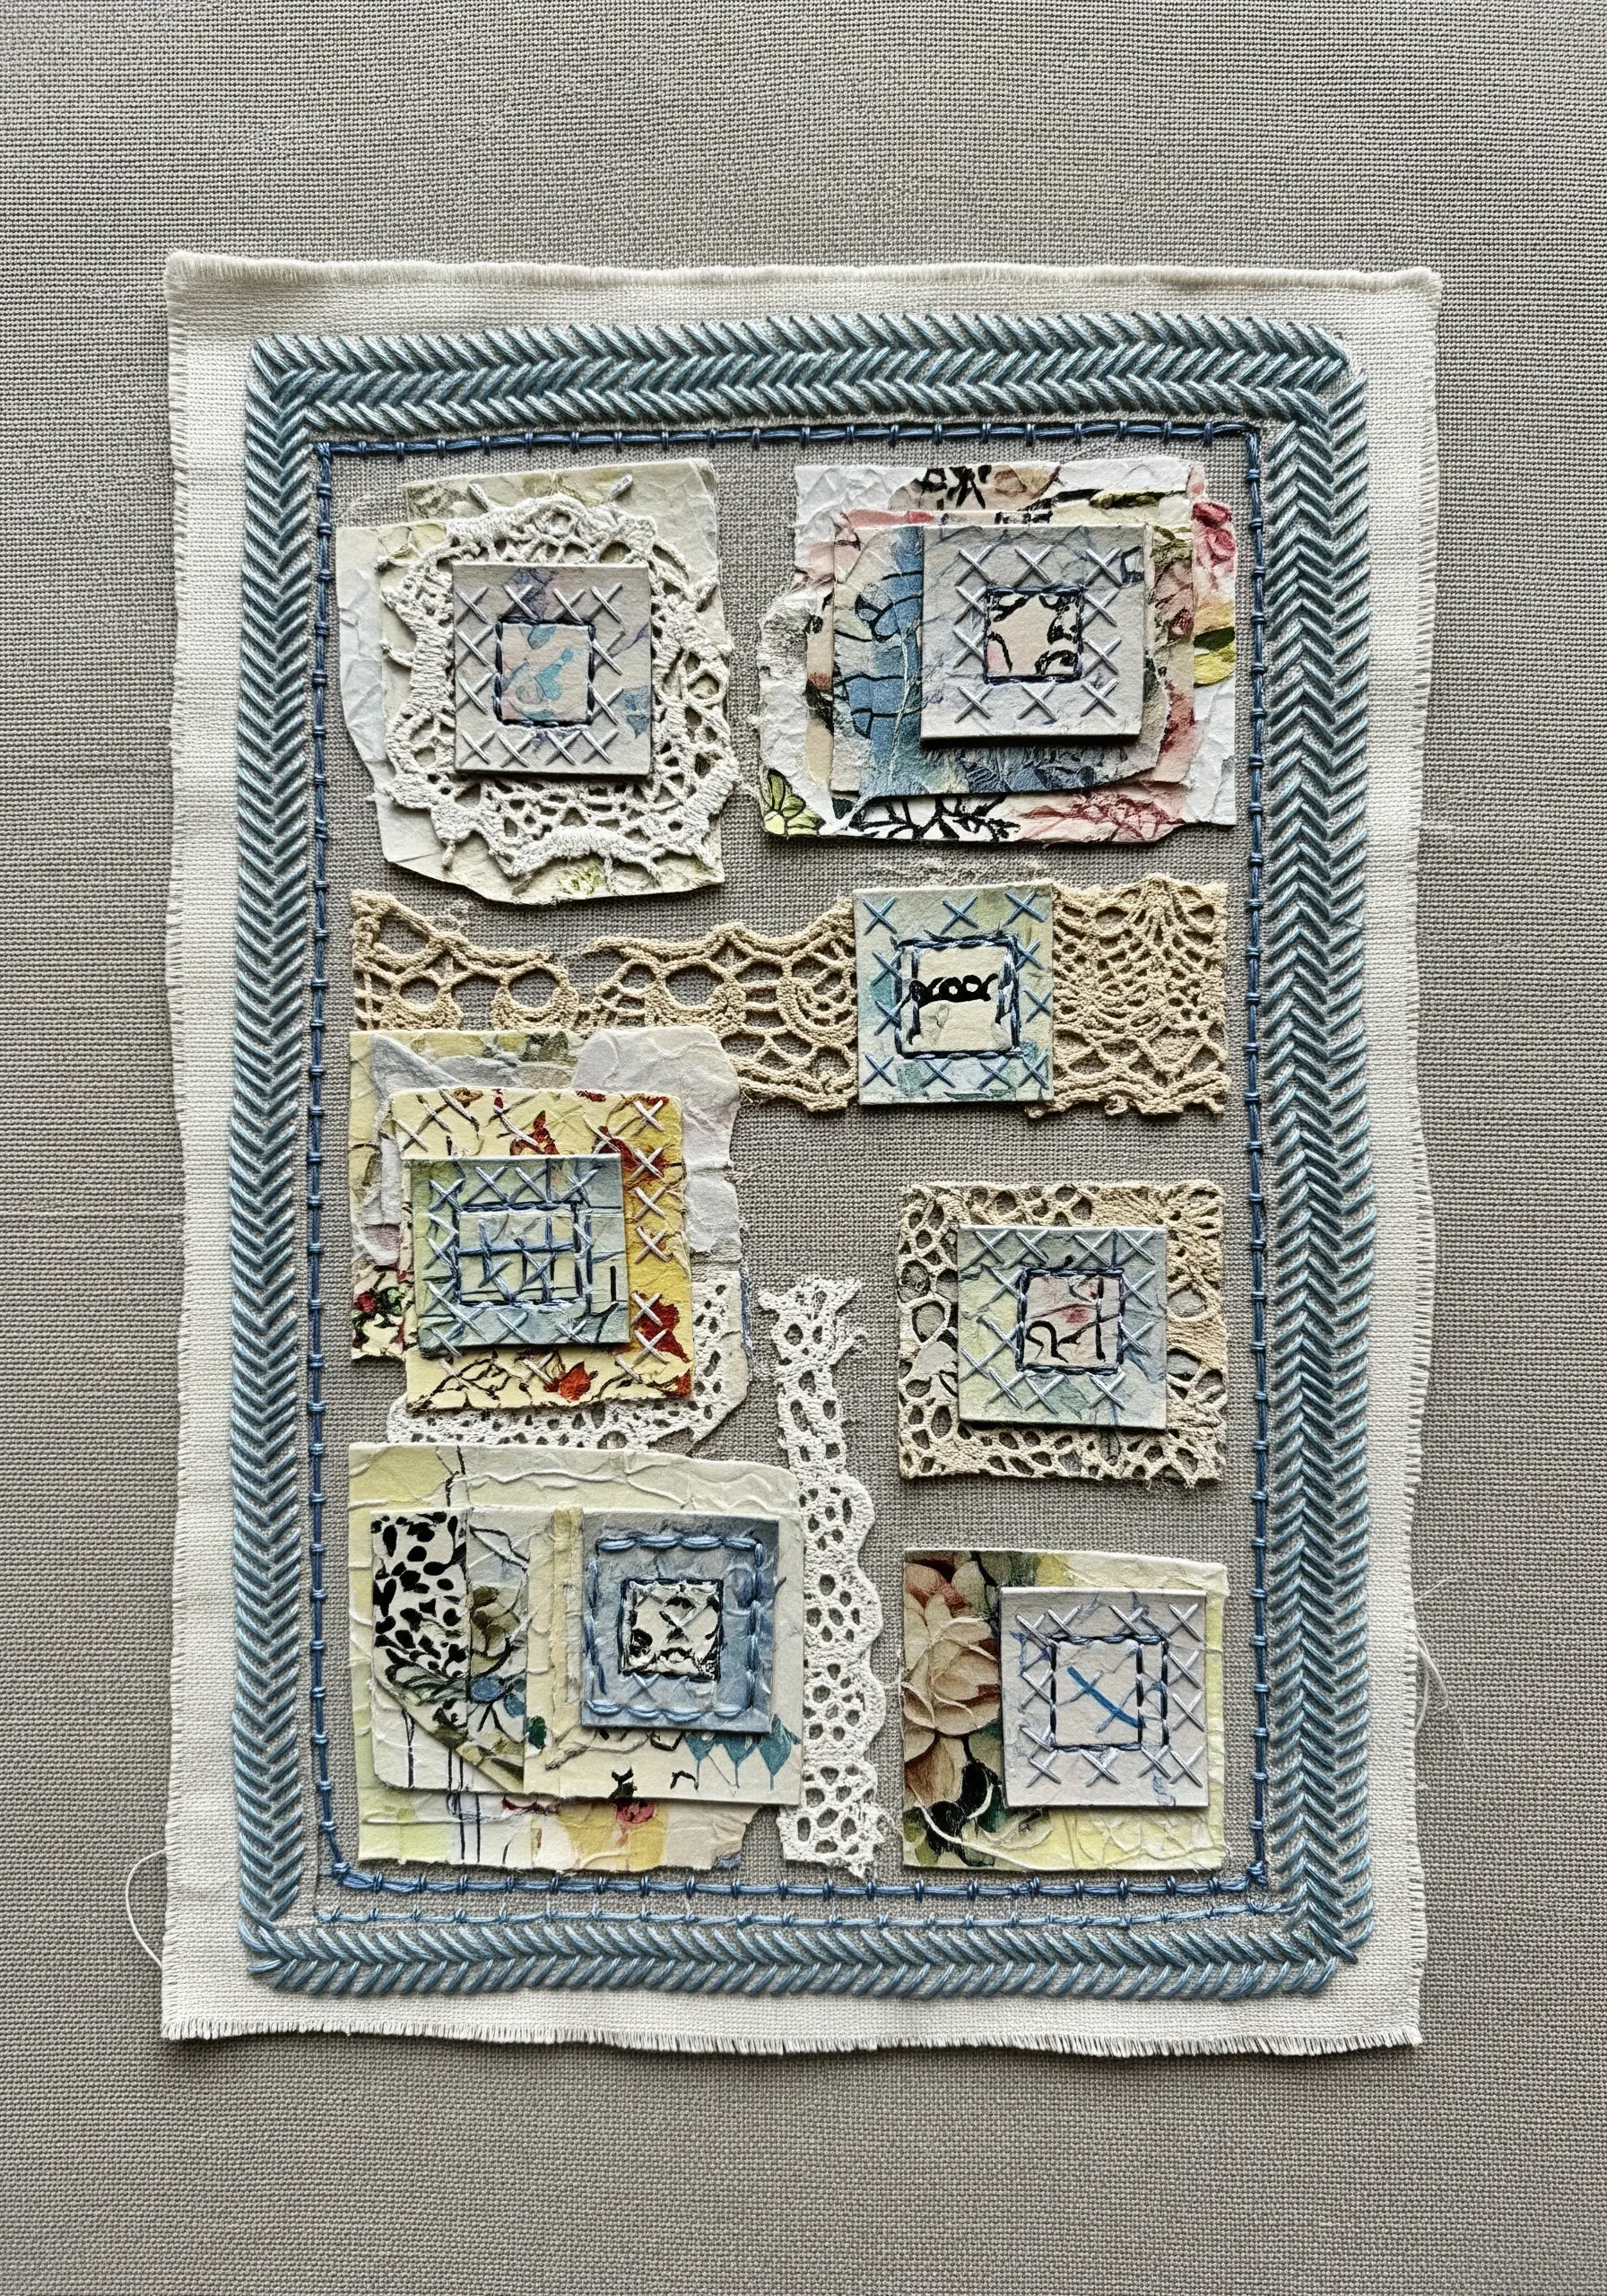
When your collage is made of many small, disparate pieces of fabric and paper, a stitched border can be the element that pulls everything together.
A bold herringbone or blanket stitch worked around the perimeter creates a defined frame, giving the scattered composition a sense of intention and completeness.
Use a contrasting thread color to make the frame a distinct design element in itself.
This is an excellent finishing technique for scrap fabric collages, transforming a collection of remnants into a cohesive work of art.
16. Couch Heavier Yarns for Bold, Textural Lines
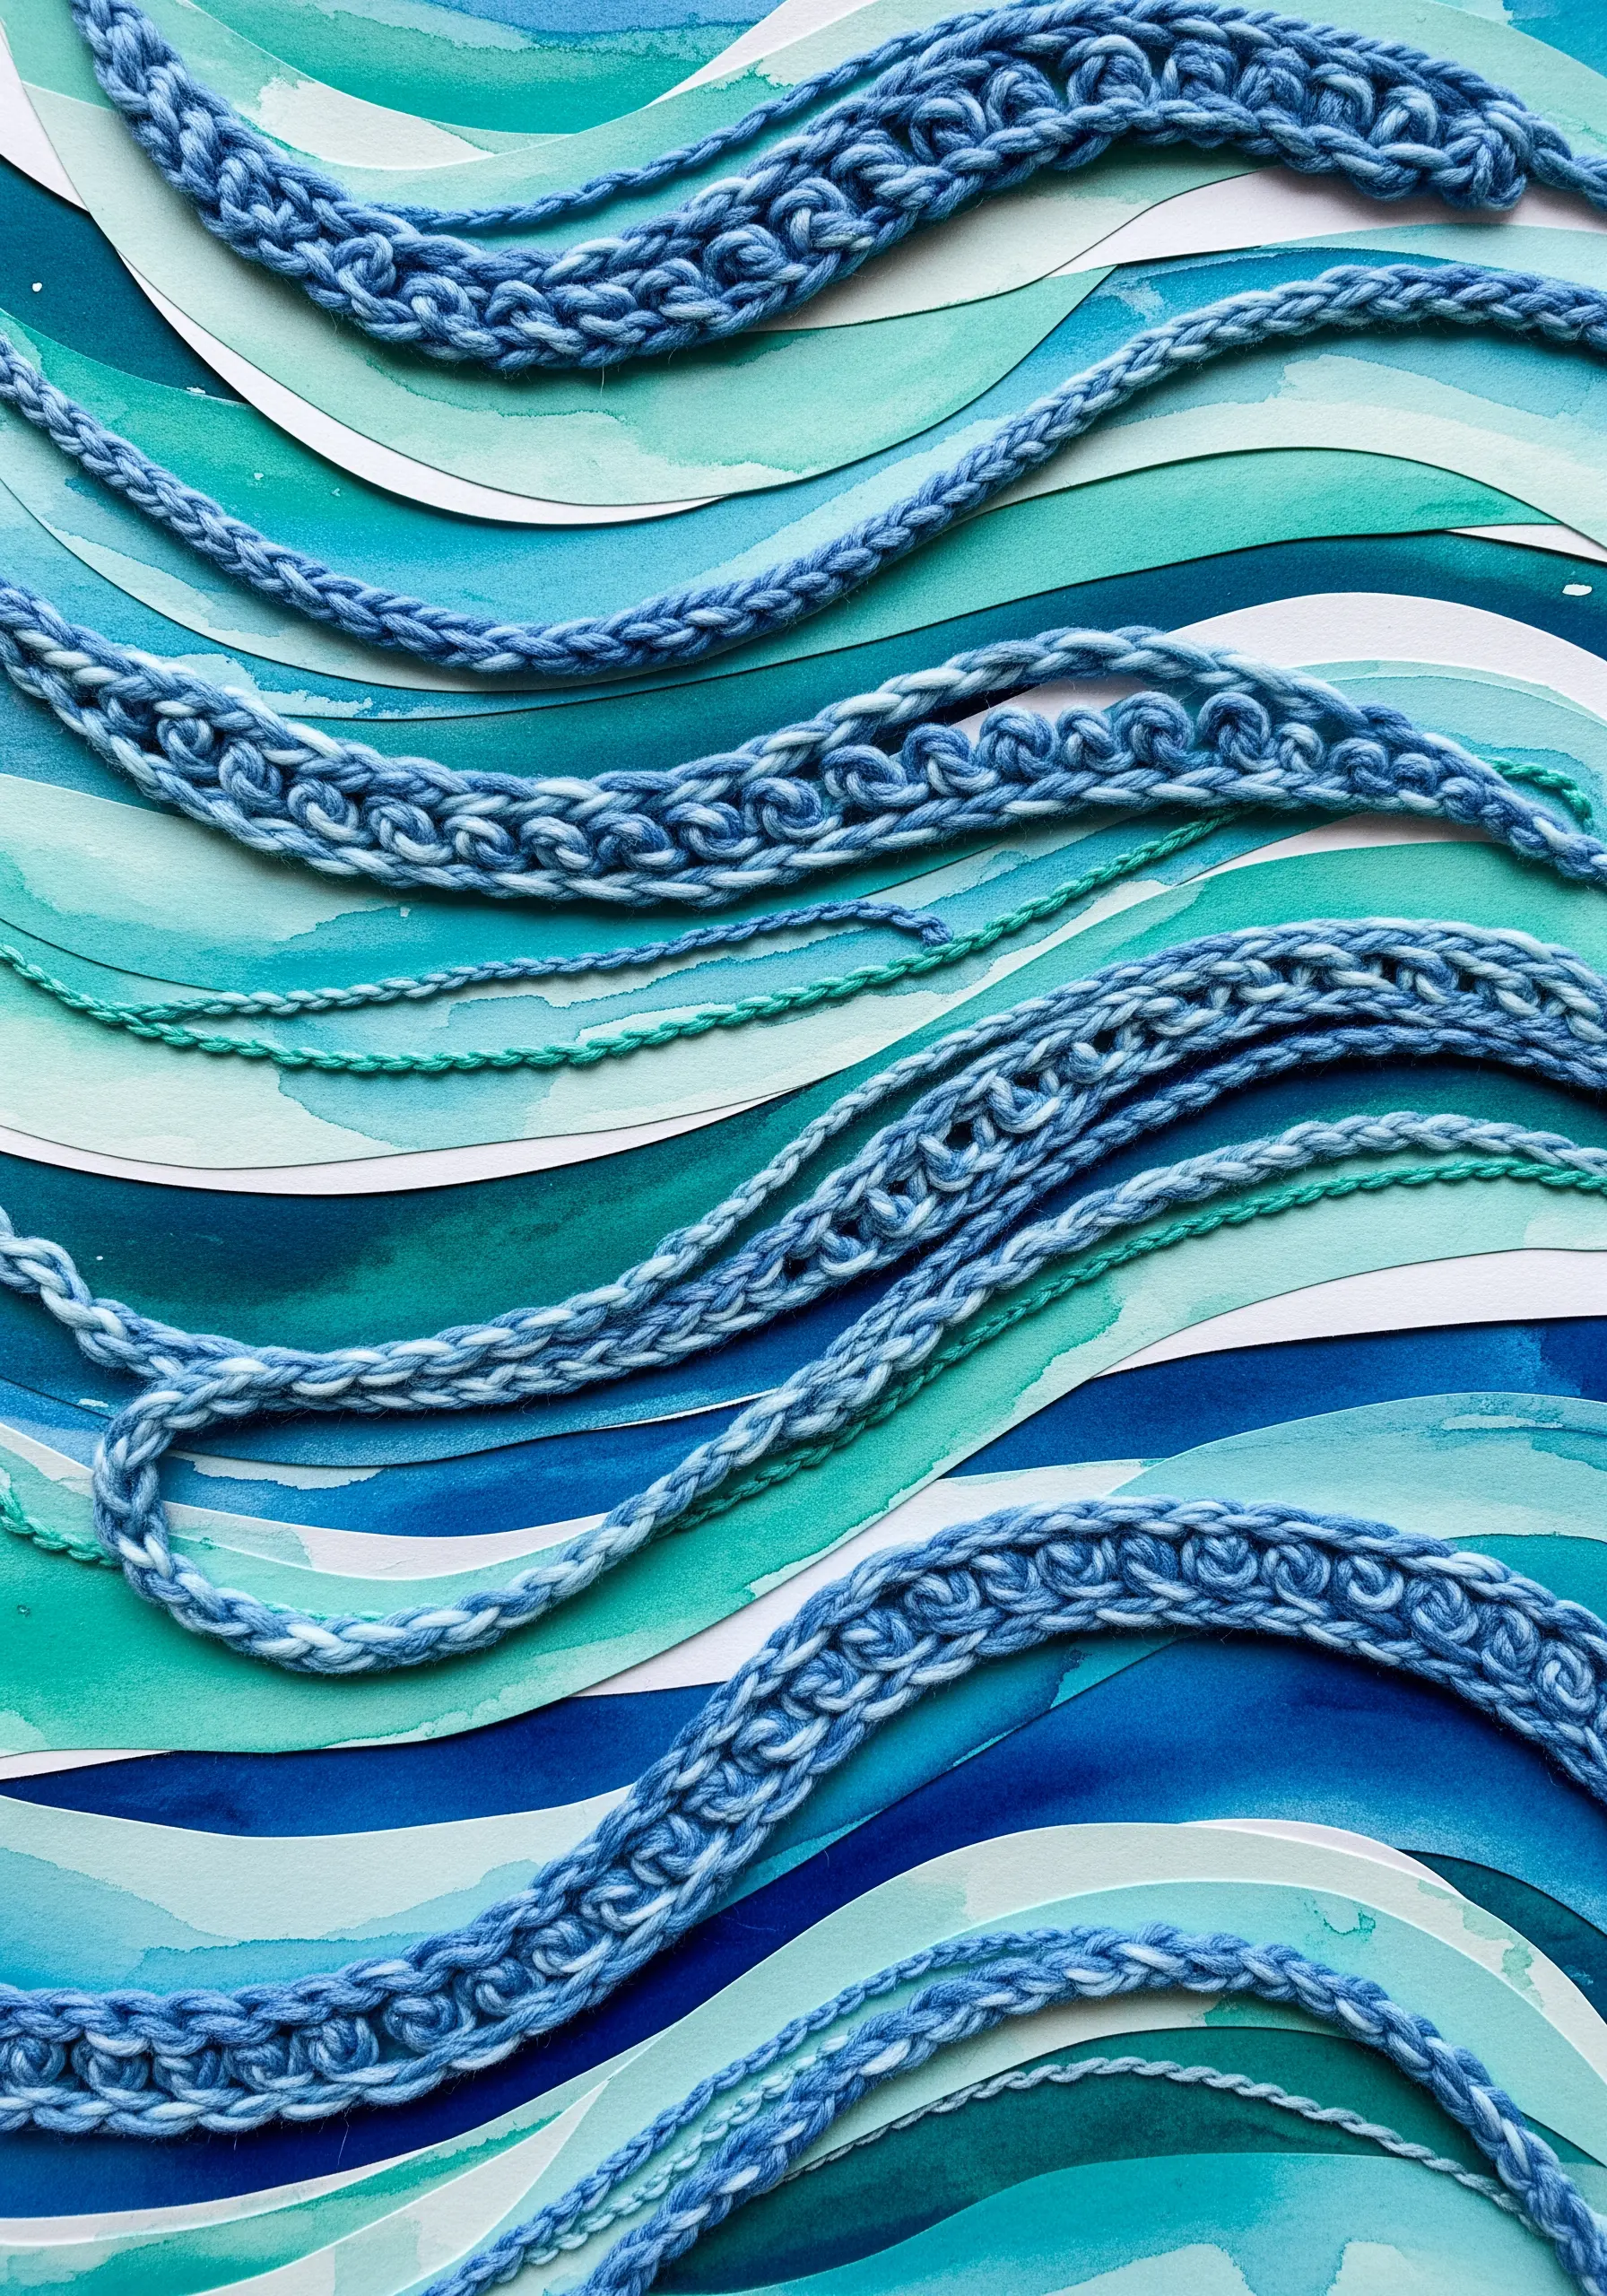
If you want to create thick, expressive lines on your collage, turn to the couching technique.
Lay a thick piece of yarn, a hand-crocheted chain, or even a thin rope onto your paper surface in the desired shape.
Then, using a standard, thinner embroidery thread, make small, evenly spaced tacking stitches over the yarn to hold it in place.
This allows you to add bold, dimensional lines that would be impossible with regular stitching, perfect for creating dramatic waves or other powerful graphic elements in ocean-inspired art.
17. Define Facial Planes with Subtle Stitching
Even on a complex paper collage portrait, a few carefully placed stitches can enhance the structure and definition of the face.
Use a single strand of thread in a neutral or slightly darker tone than the paper to add subtle contour lines along the jaw, nose, or cheekbones.
A simple backstitch or split stitch will provide a clean line without overwhelming the intricate paper details.
This technique acts like a penciled sketch over the collage, adding a layer of artistry and grounding the features, much like in minimal portrait line art.
18. Stitch Directly onto Natural Elements
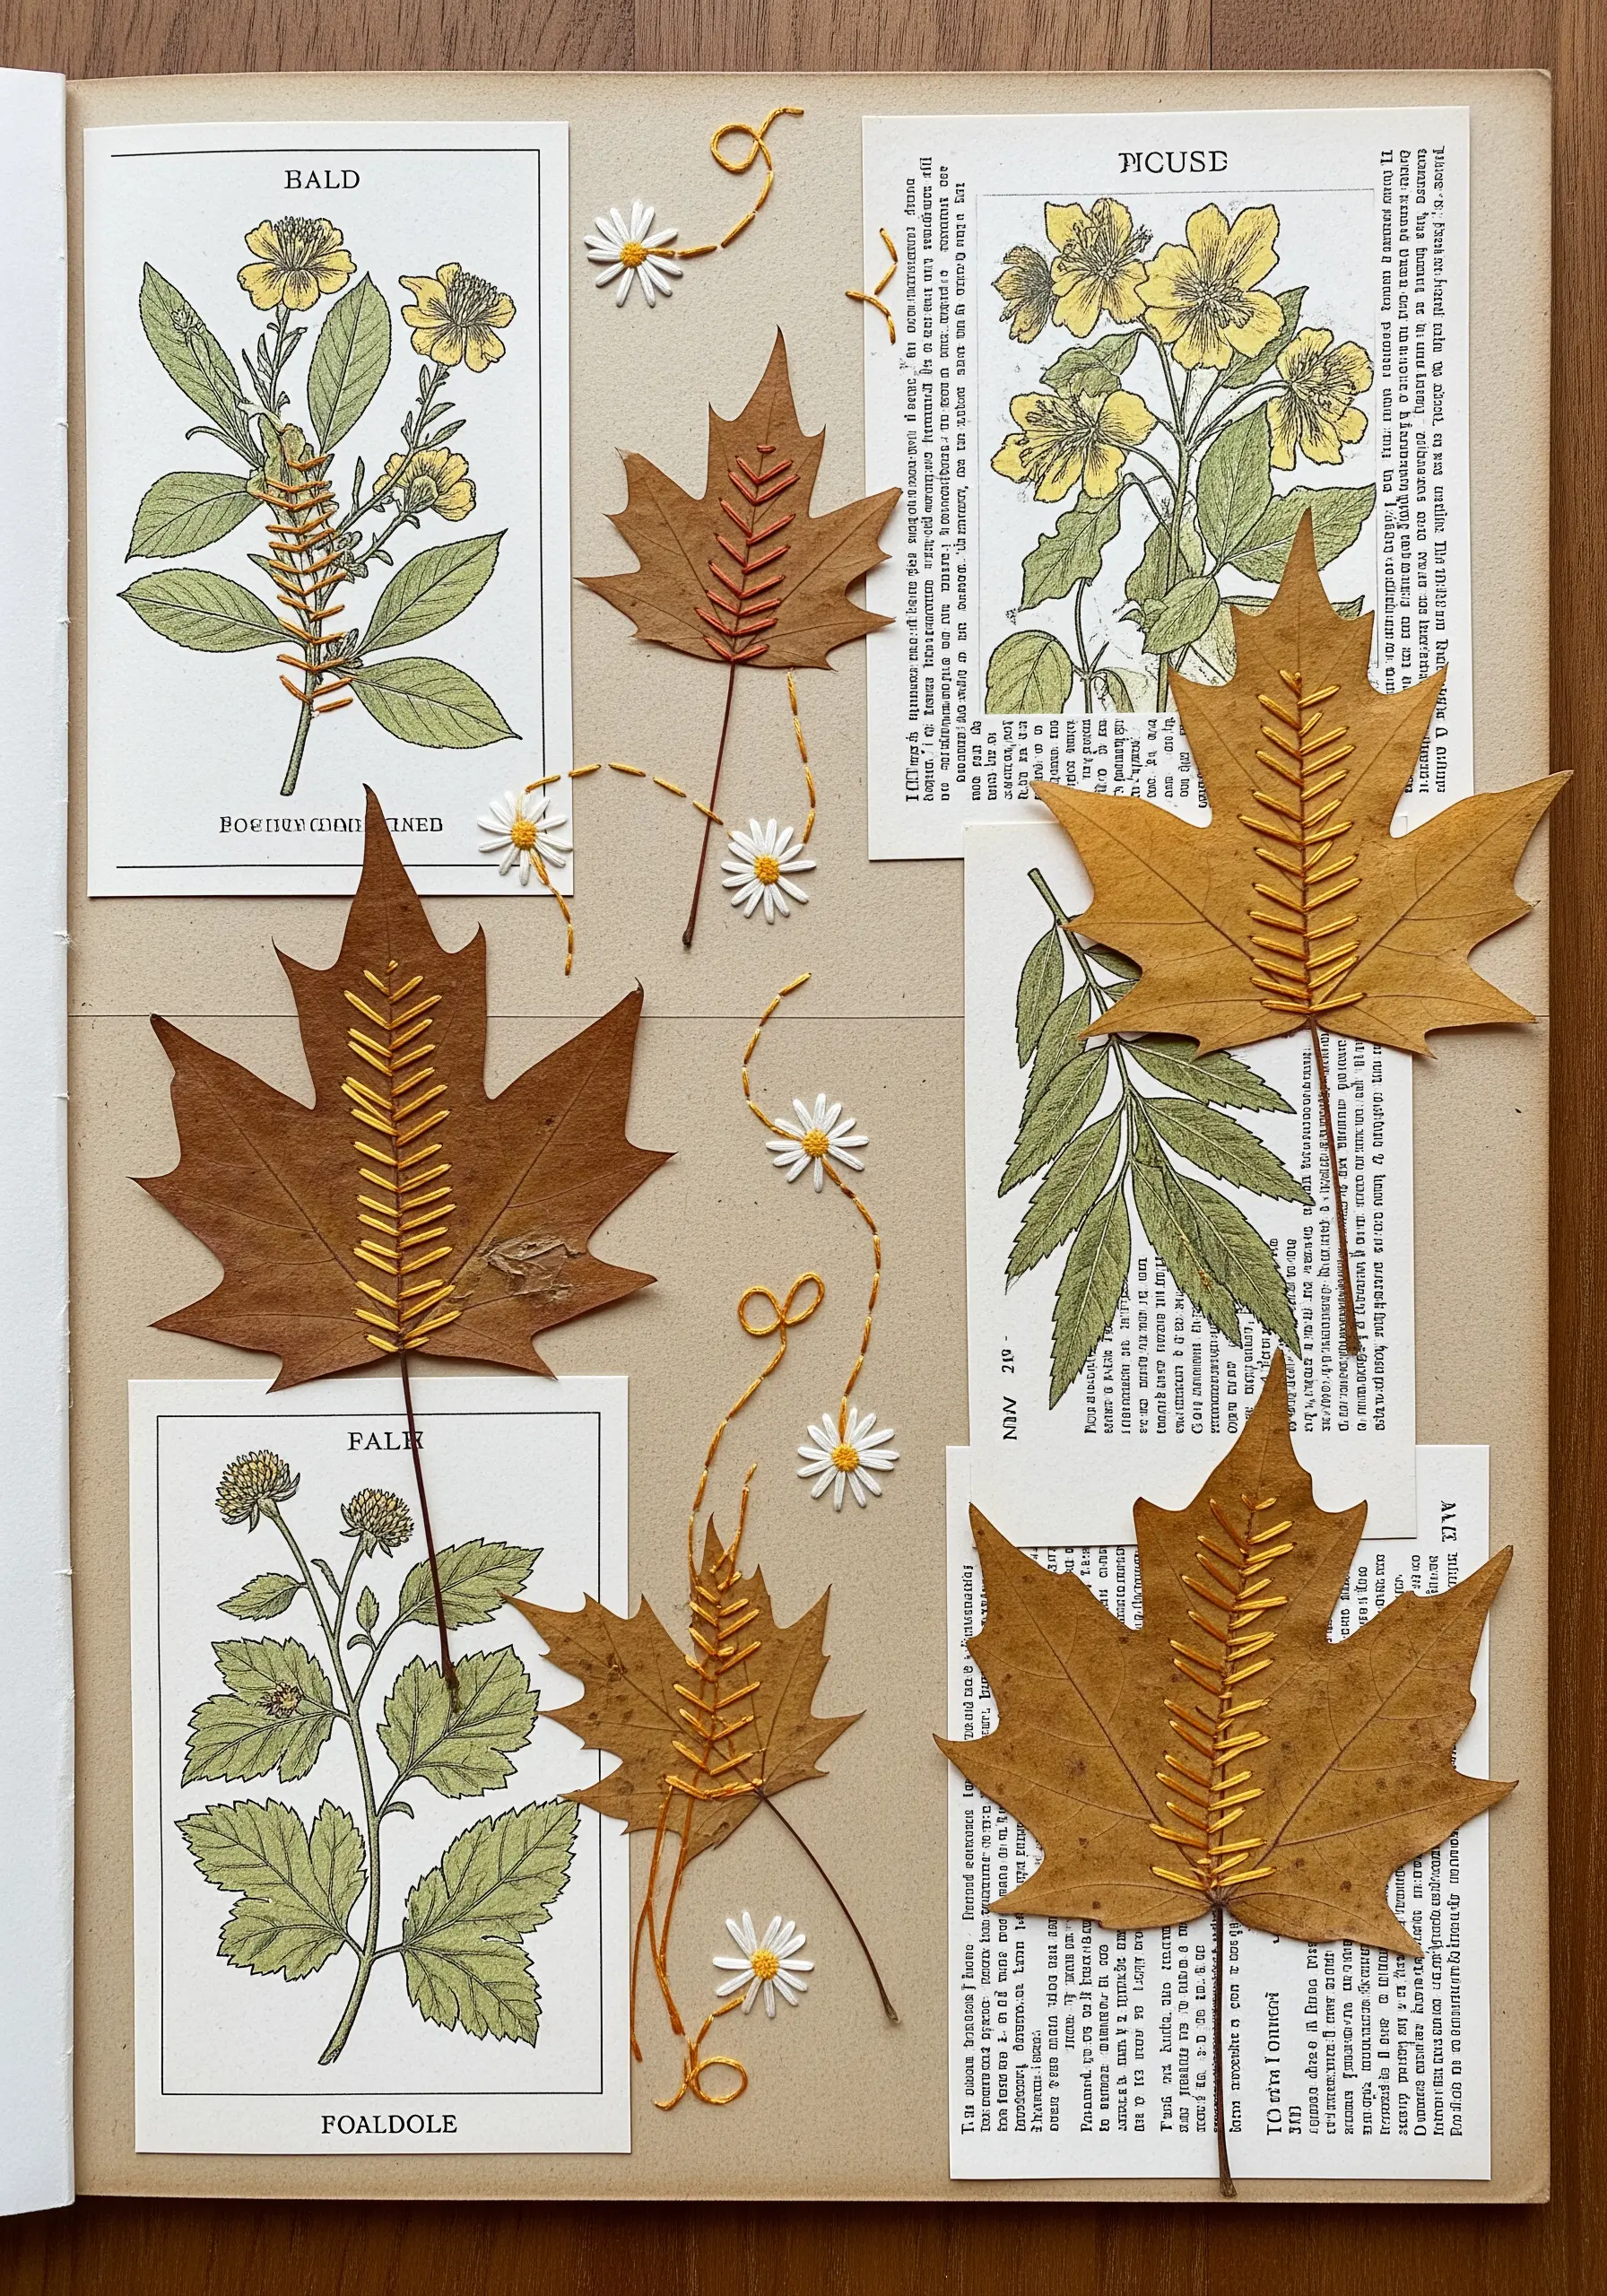
Take your collage art a step further by embroidering directly onto found natural objects like pressed autumn leaves.
Use a fine, sharp needle to gently pierce the leaf without cracking it. A simple running stitch or backstitch along the central vein adds a surprising and beautiful detail.
Varying the thread color, perhaps using a gradient thread, can mimic the natural color changes in the leaf.
This method creates a delicate interplay between natural texture and handmade craft, allowing you to highlight the intricate details of leaf veins.
19. Create Ethereal Layers with Stitched Vellum
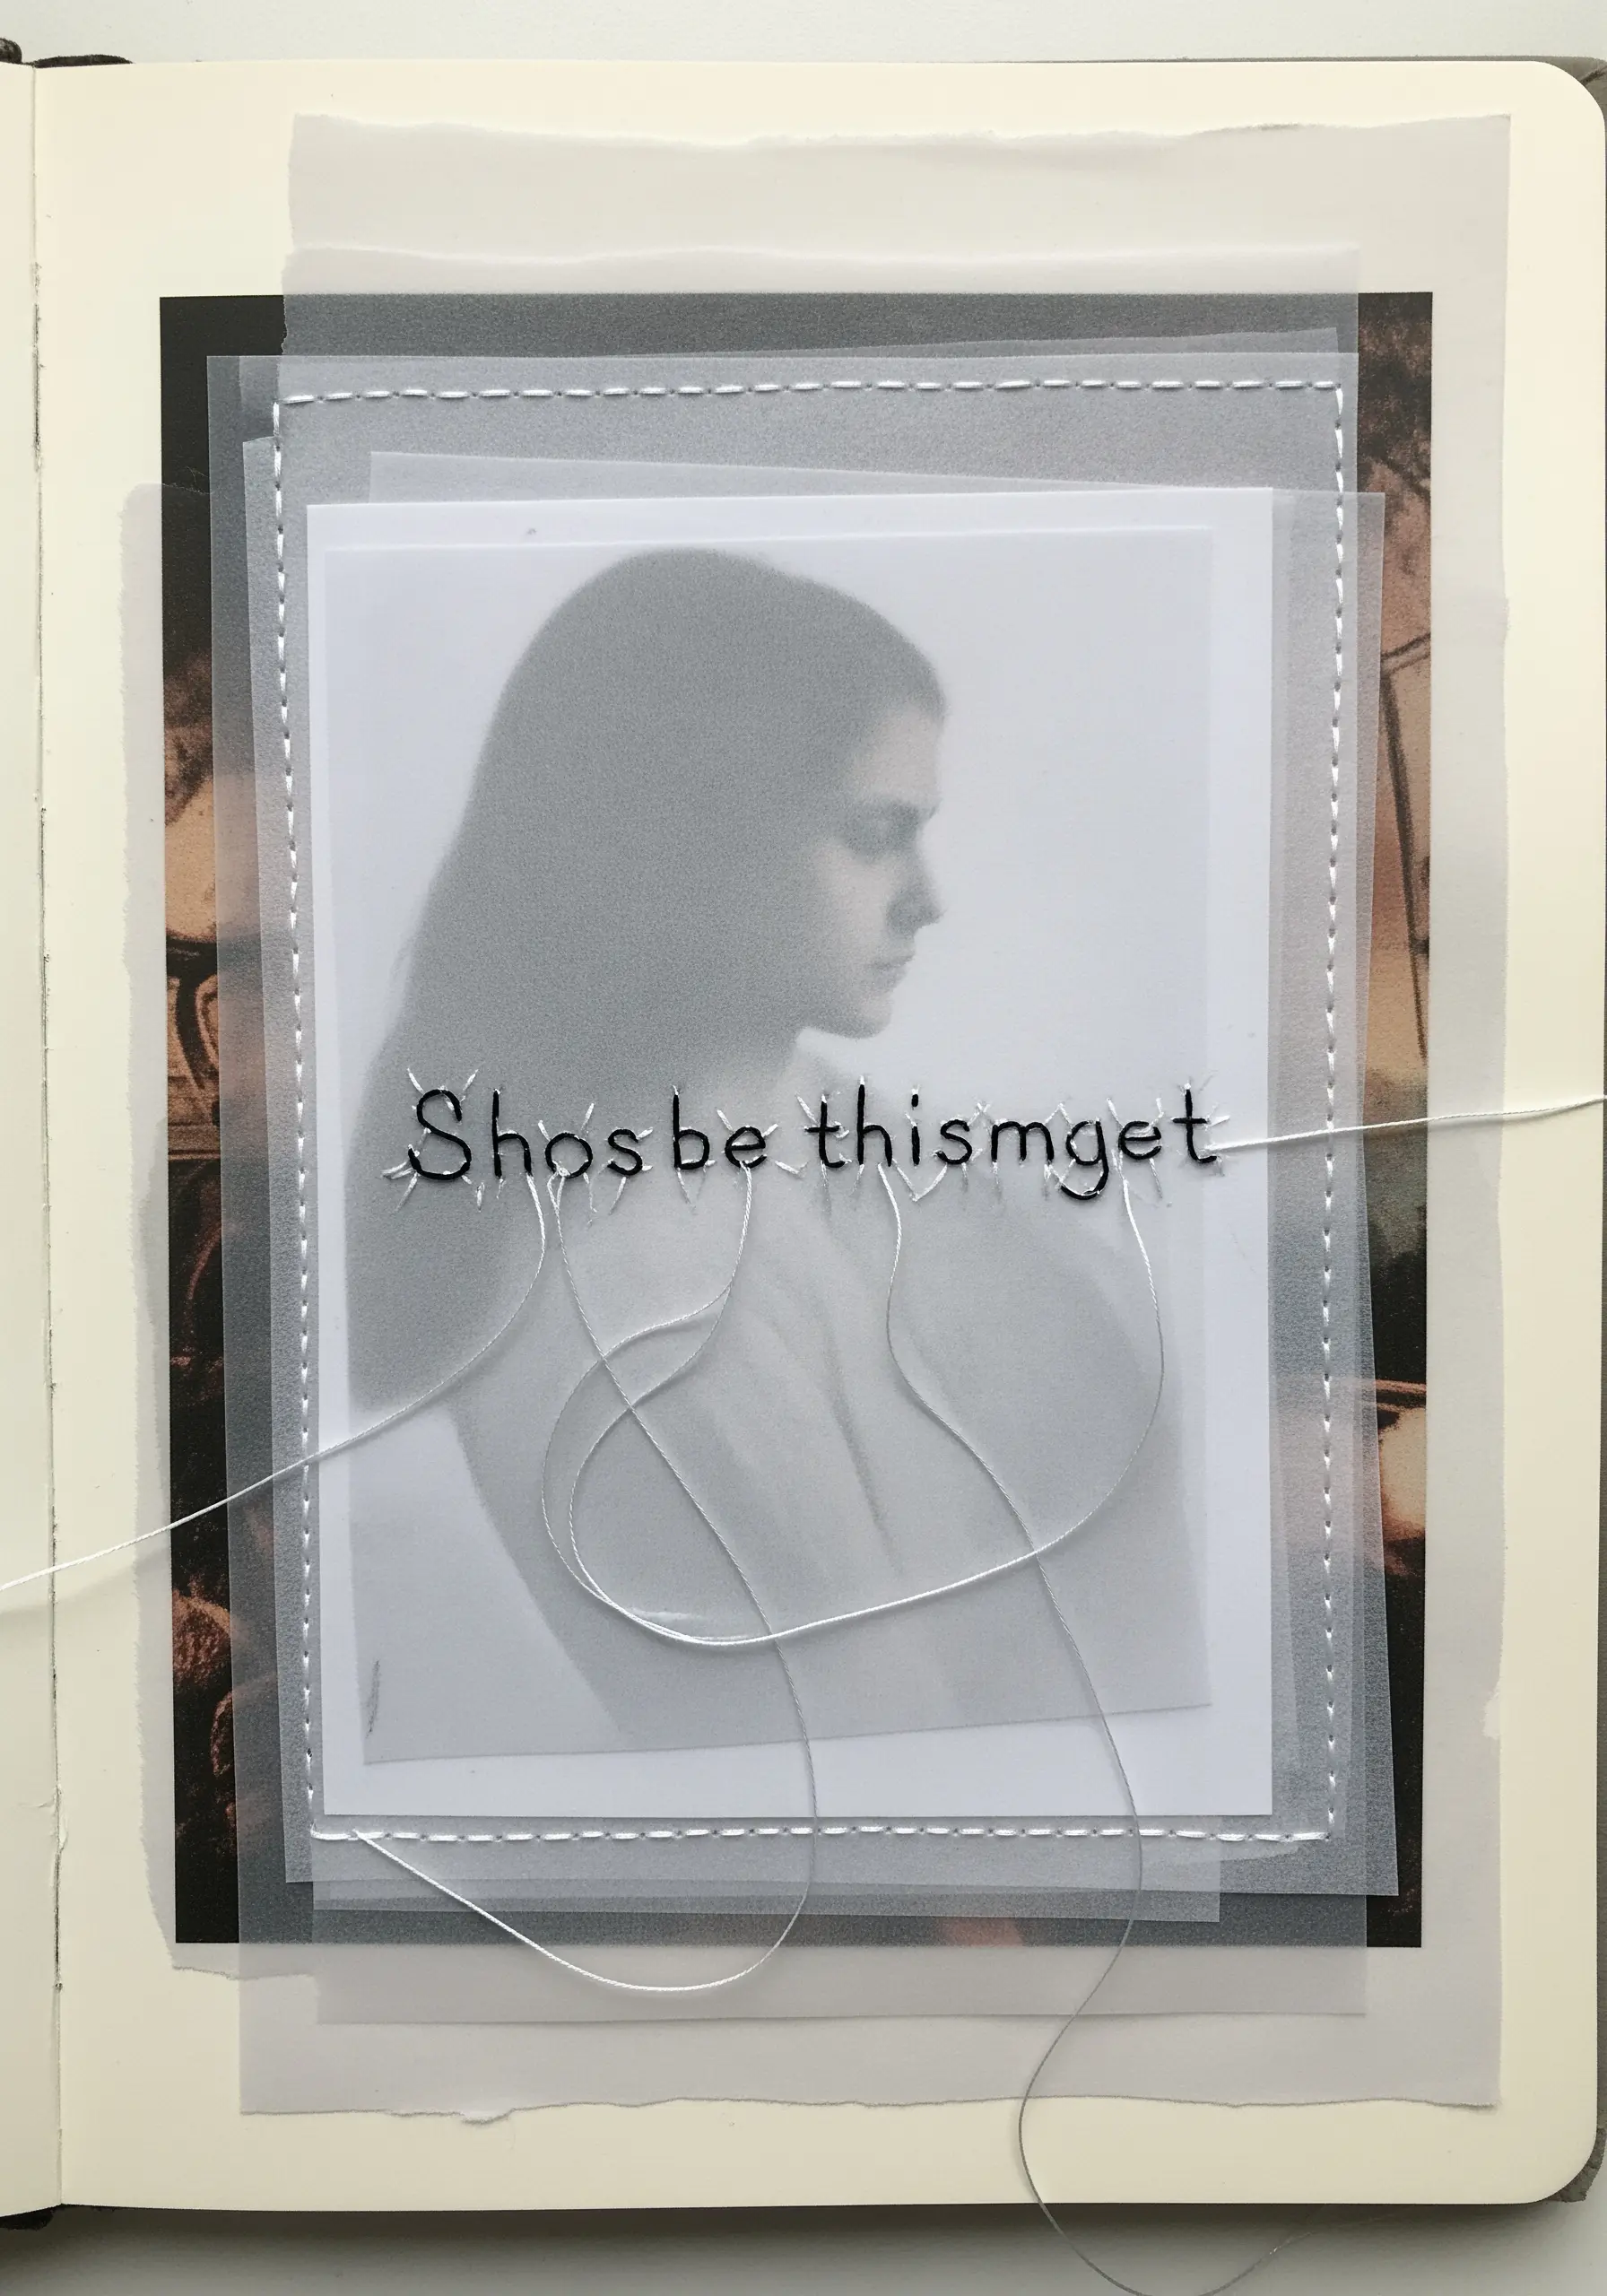
Incorporate translucent papers like vellum or tracing paper into your collage for a soft, layered, and dreamlike effect.
Stitch through these delicate layers to secure them and add textual or decorative elements. A simple backstitch for lettering or a running stitch for borders works beautifully.
The thread will appear slightly diffused through the semi-opaque paper, adding to the ethereal quality.
This is a wonderful way to partially obscure and reveal parts of your collage, creating mystery and depth, especially in projects using sheer materials.
20. Build Textured Flower Centers with Knots
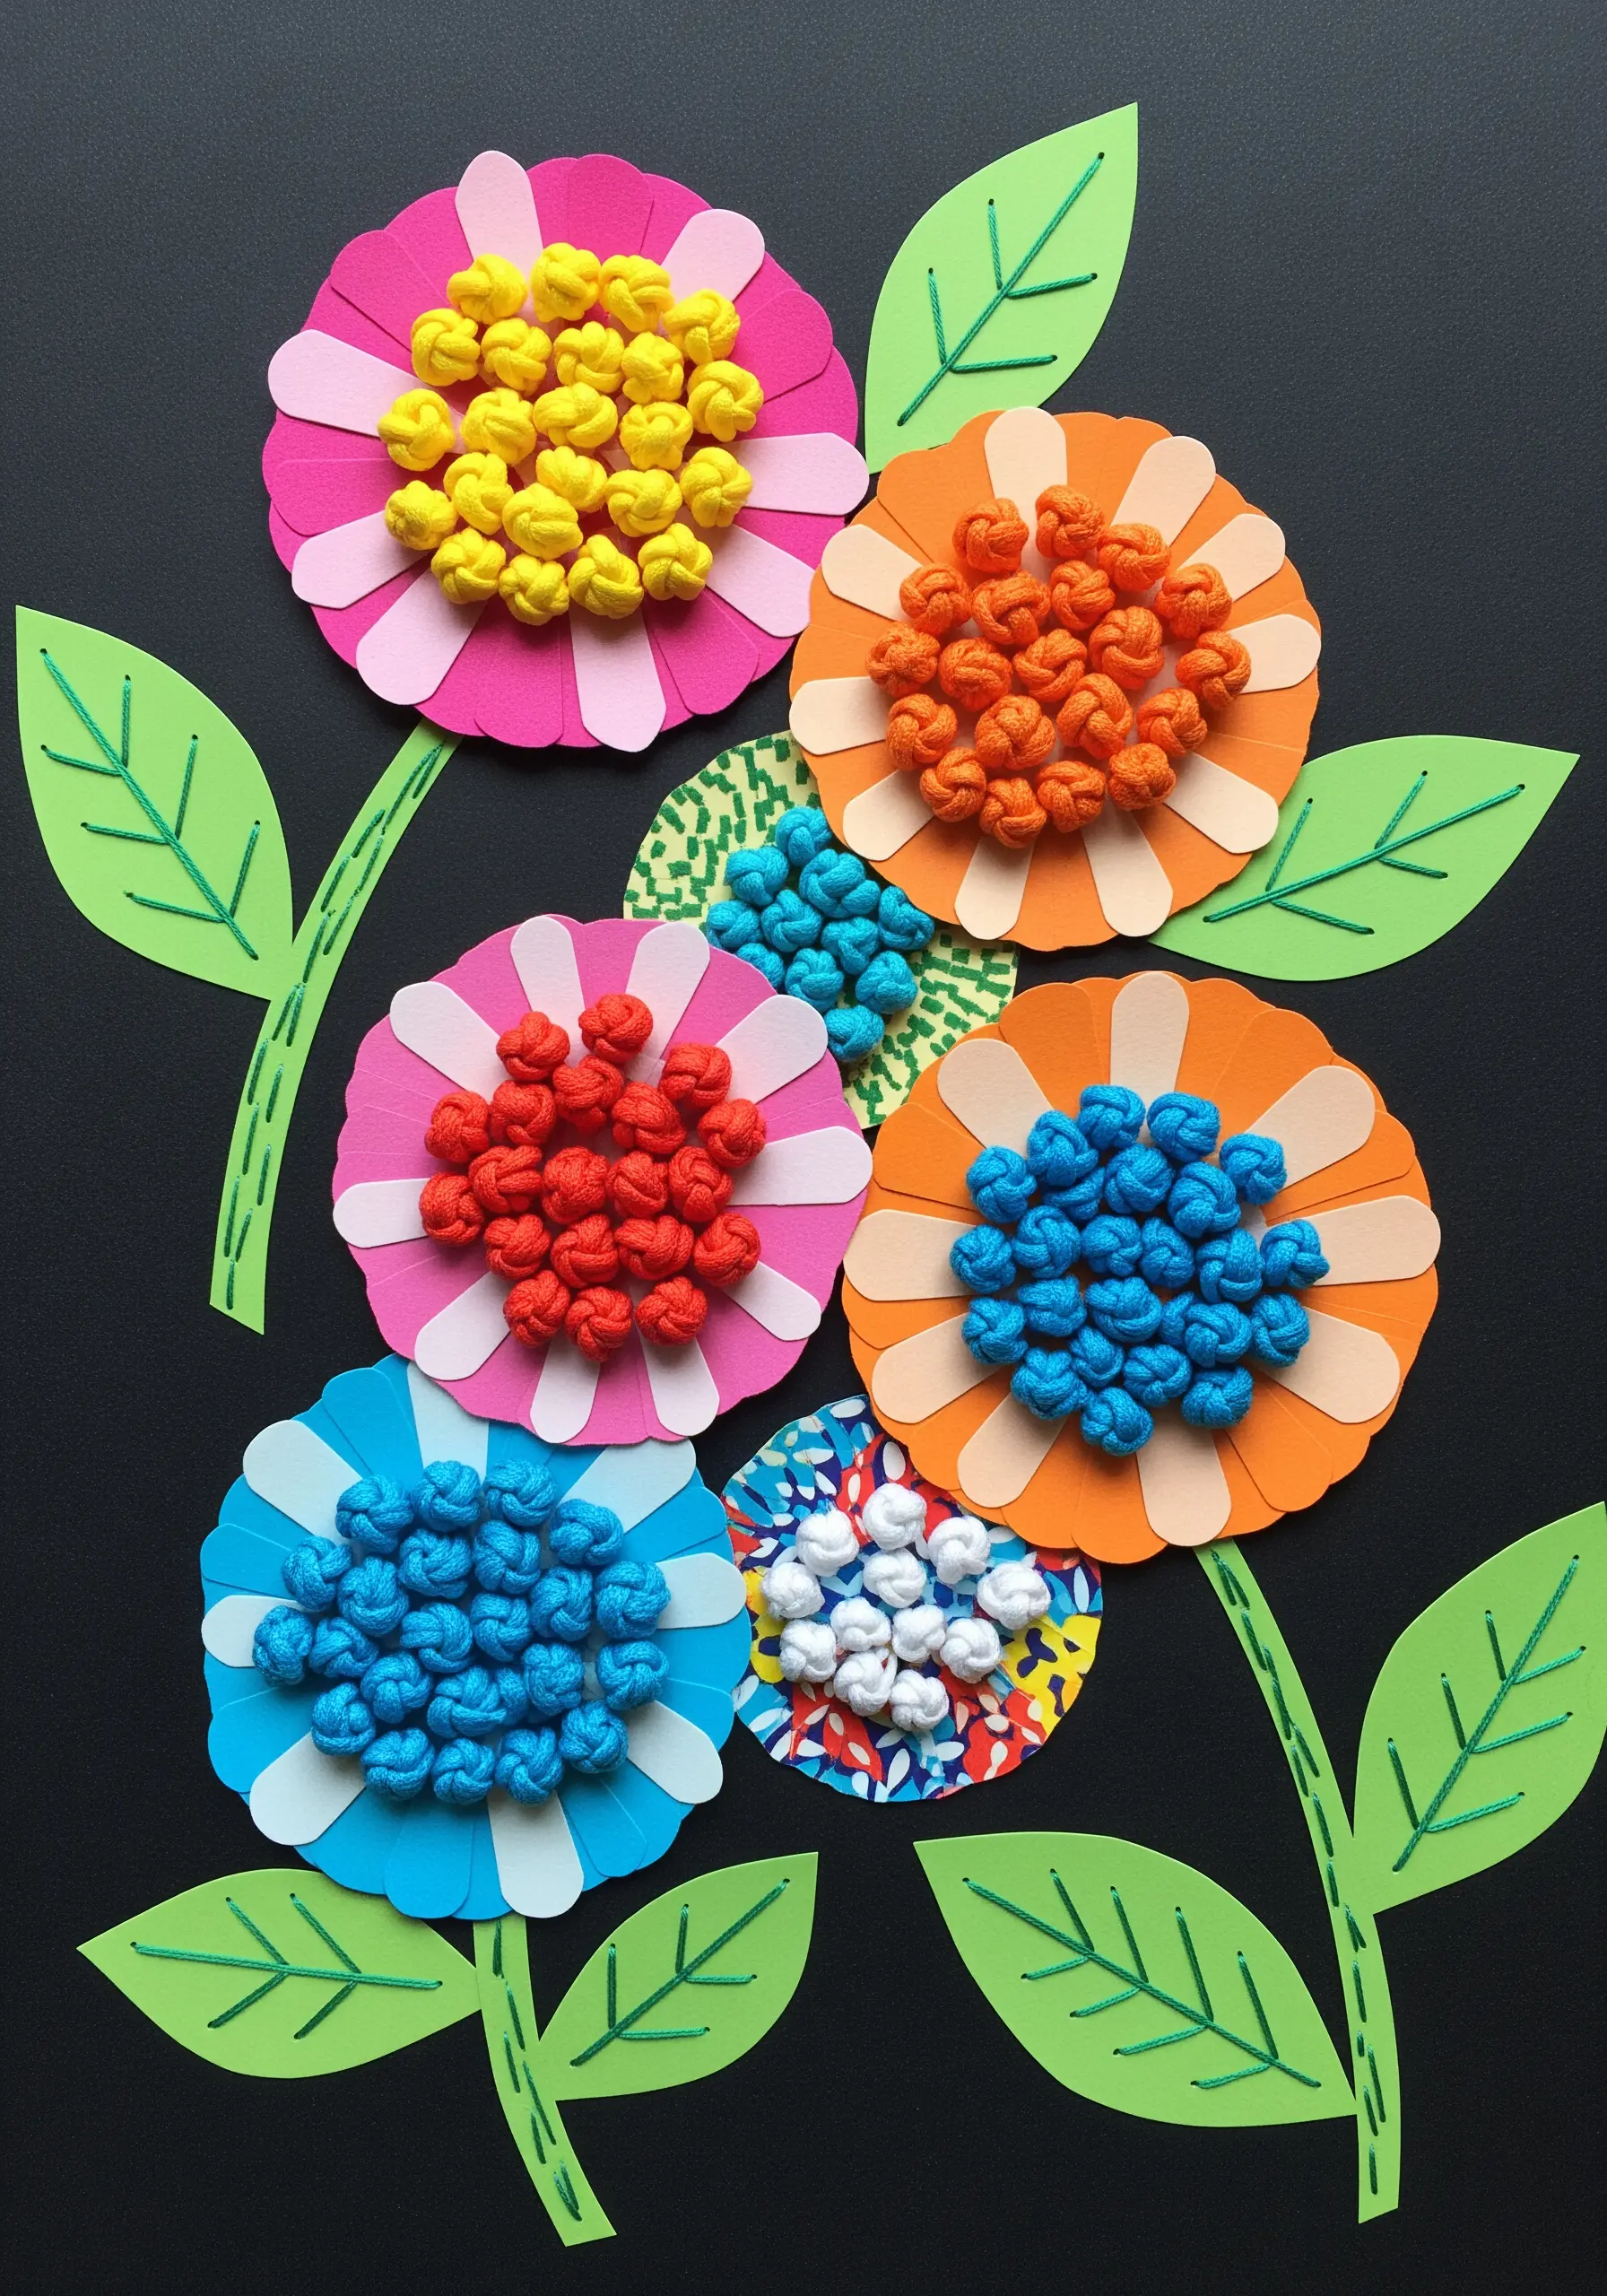
Give your paper flowers a vibrant, three-dimensional center by filling them with a dense cluster of knots.
Colonial knots or French knots are perfect for this, as they create tight, nubby textures that resemble pollen or tiny petals.
Use a bold, contrasting color to make the centers pop against the paper petals.
By packing the knots closely together, you create a solid, tactile area that draws the eye and adds a playful, sculptural quality to your floral collage, much like the process of creating full, plush petals.
21. Secure and Decorate Edges with Blanket Stitch
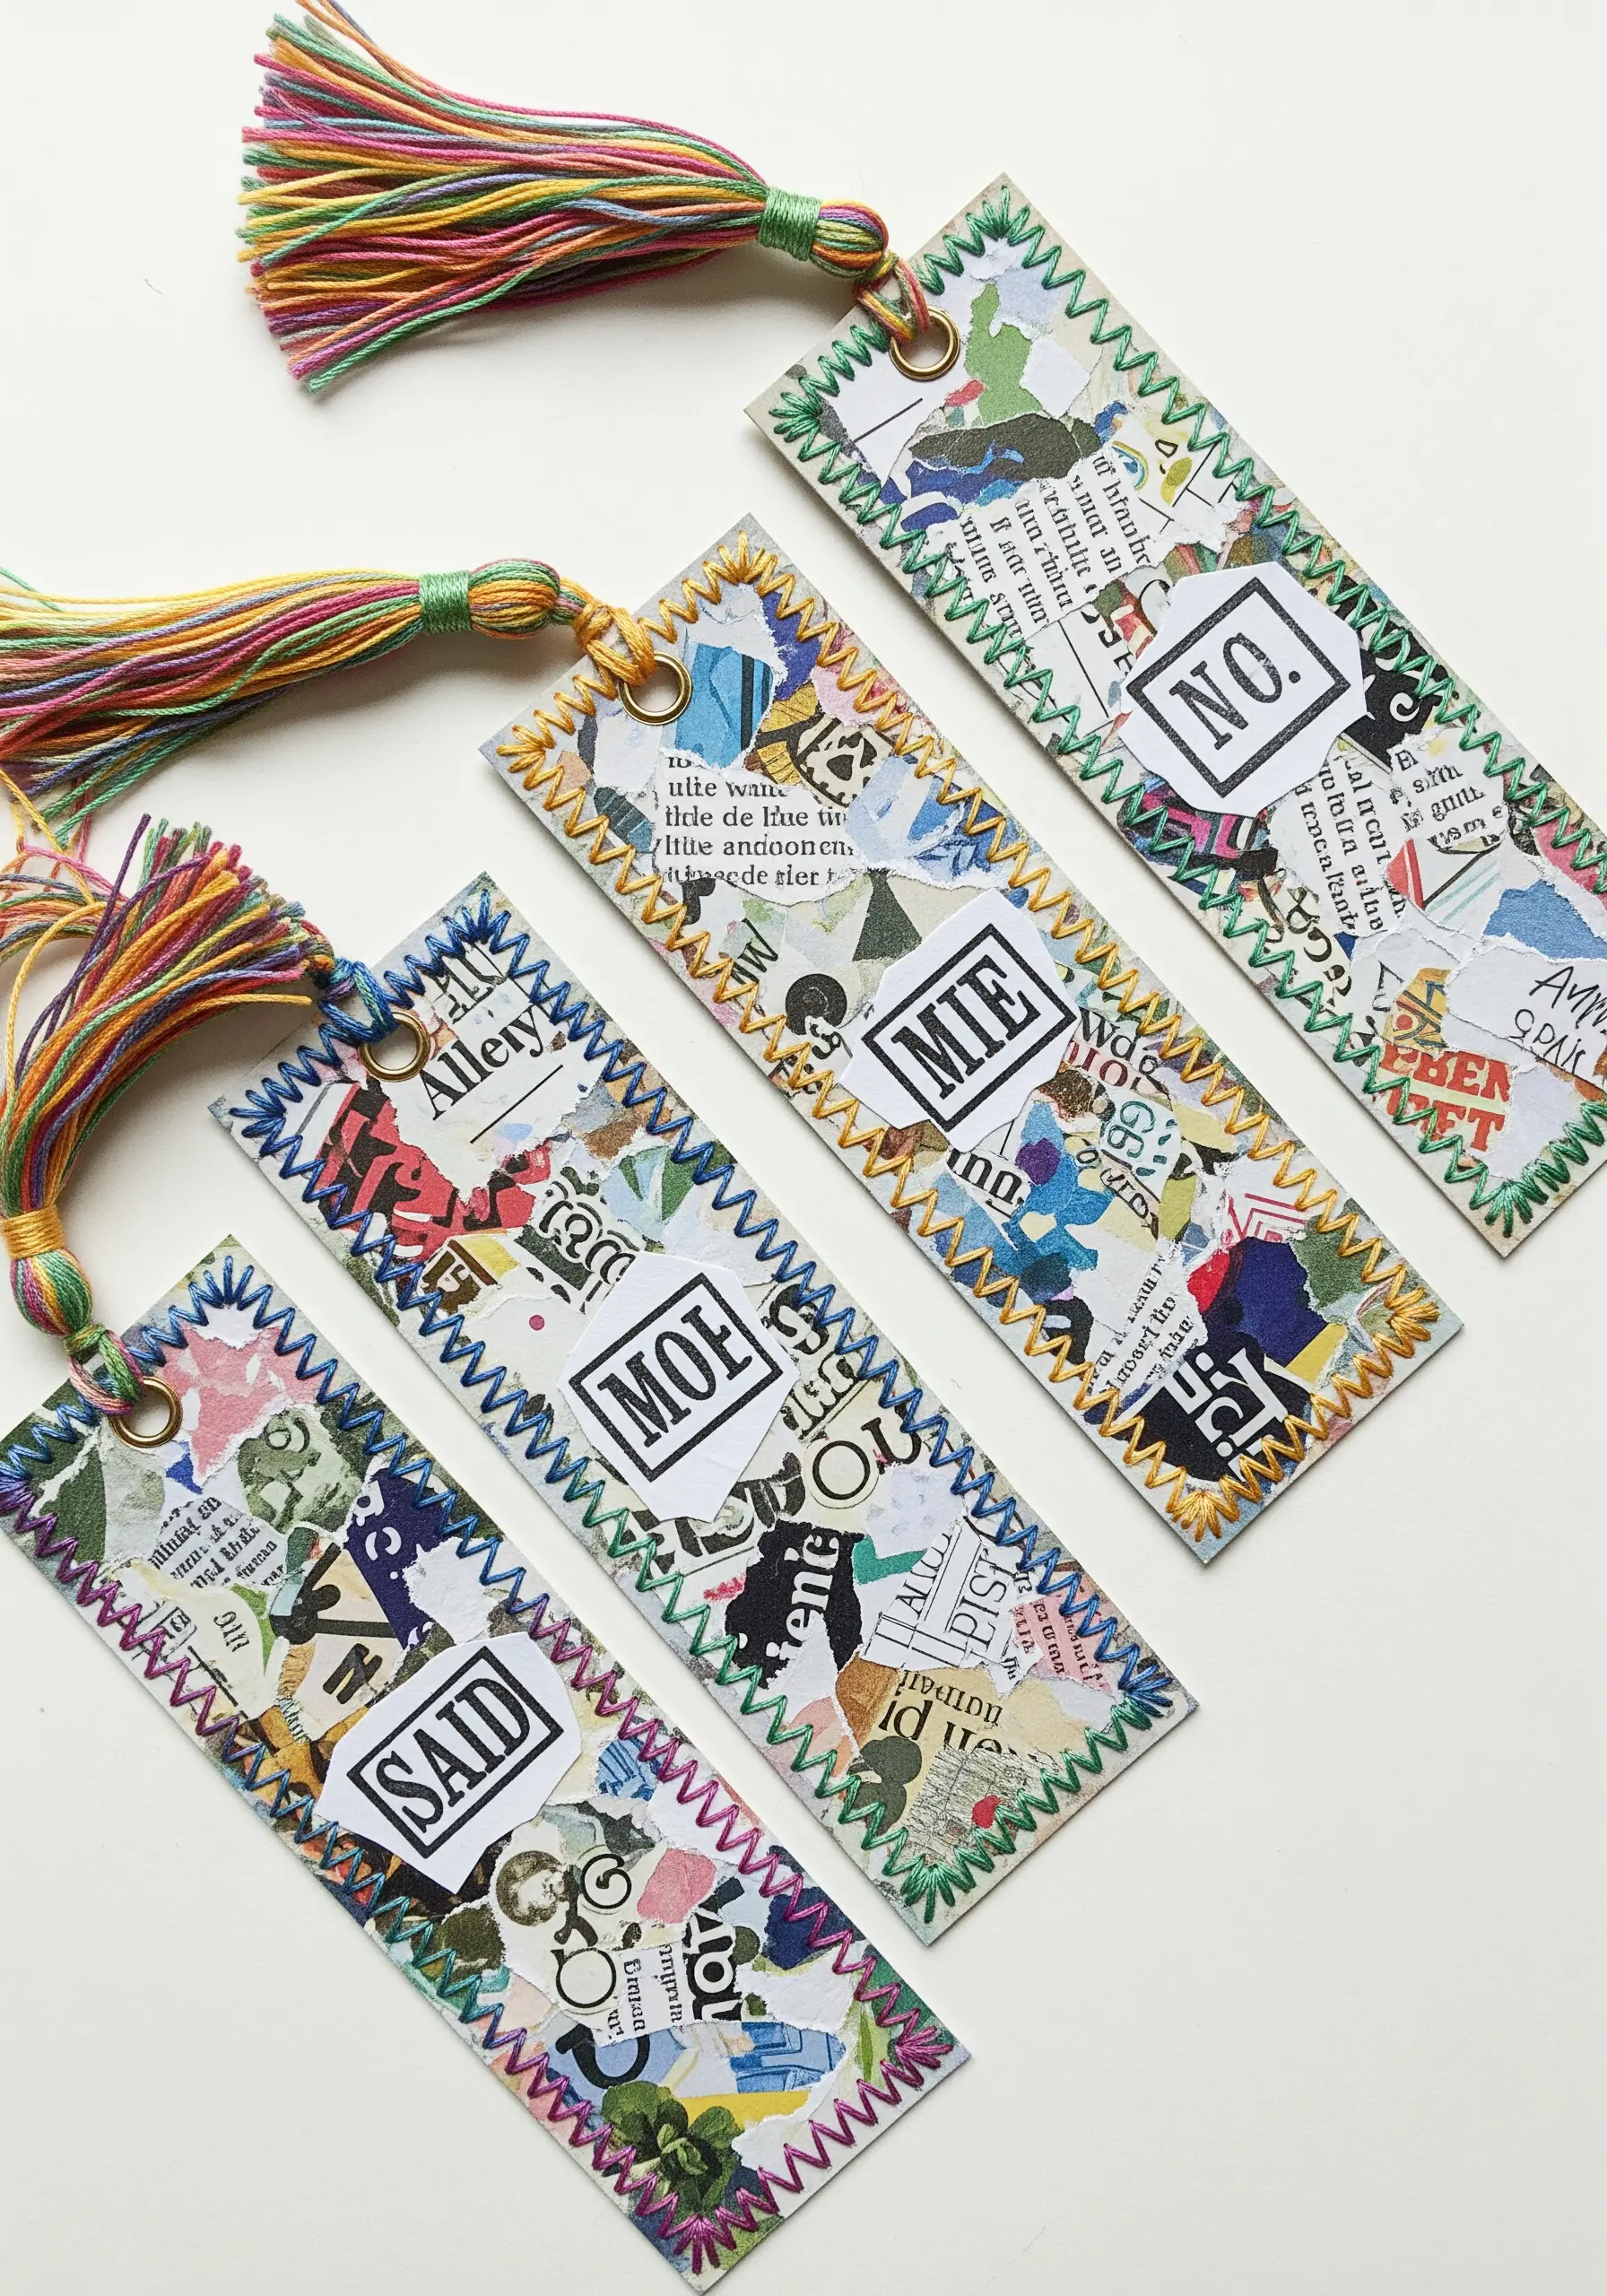
When creating layered paper crafts like bookmarks, use a blanket stitch around the edges for a dual purpose: it’s both decorative and functional.
The stitch neatly binds the layers of paper together, preventing them from peeling apart with use.
A colorful variegated thread adds a playful and polished finish, framing the central collage and making the entire piece feel more durable and intentional.
This is a classic finishing technique borrowed from textile arts that works wonderfully on sturdy paper or cardstock, making for perfectly cozy and magical bookmarks.
22. Embellish with Couching and Beading
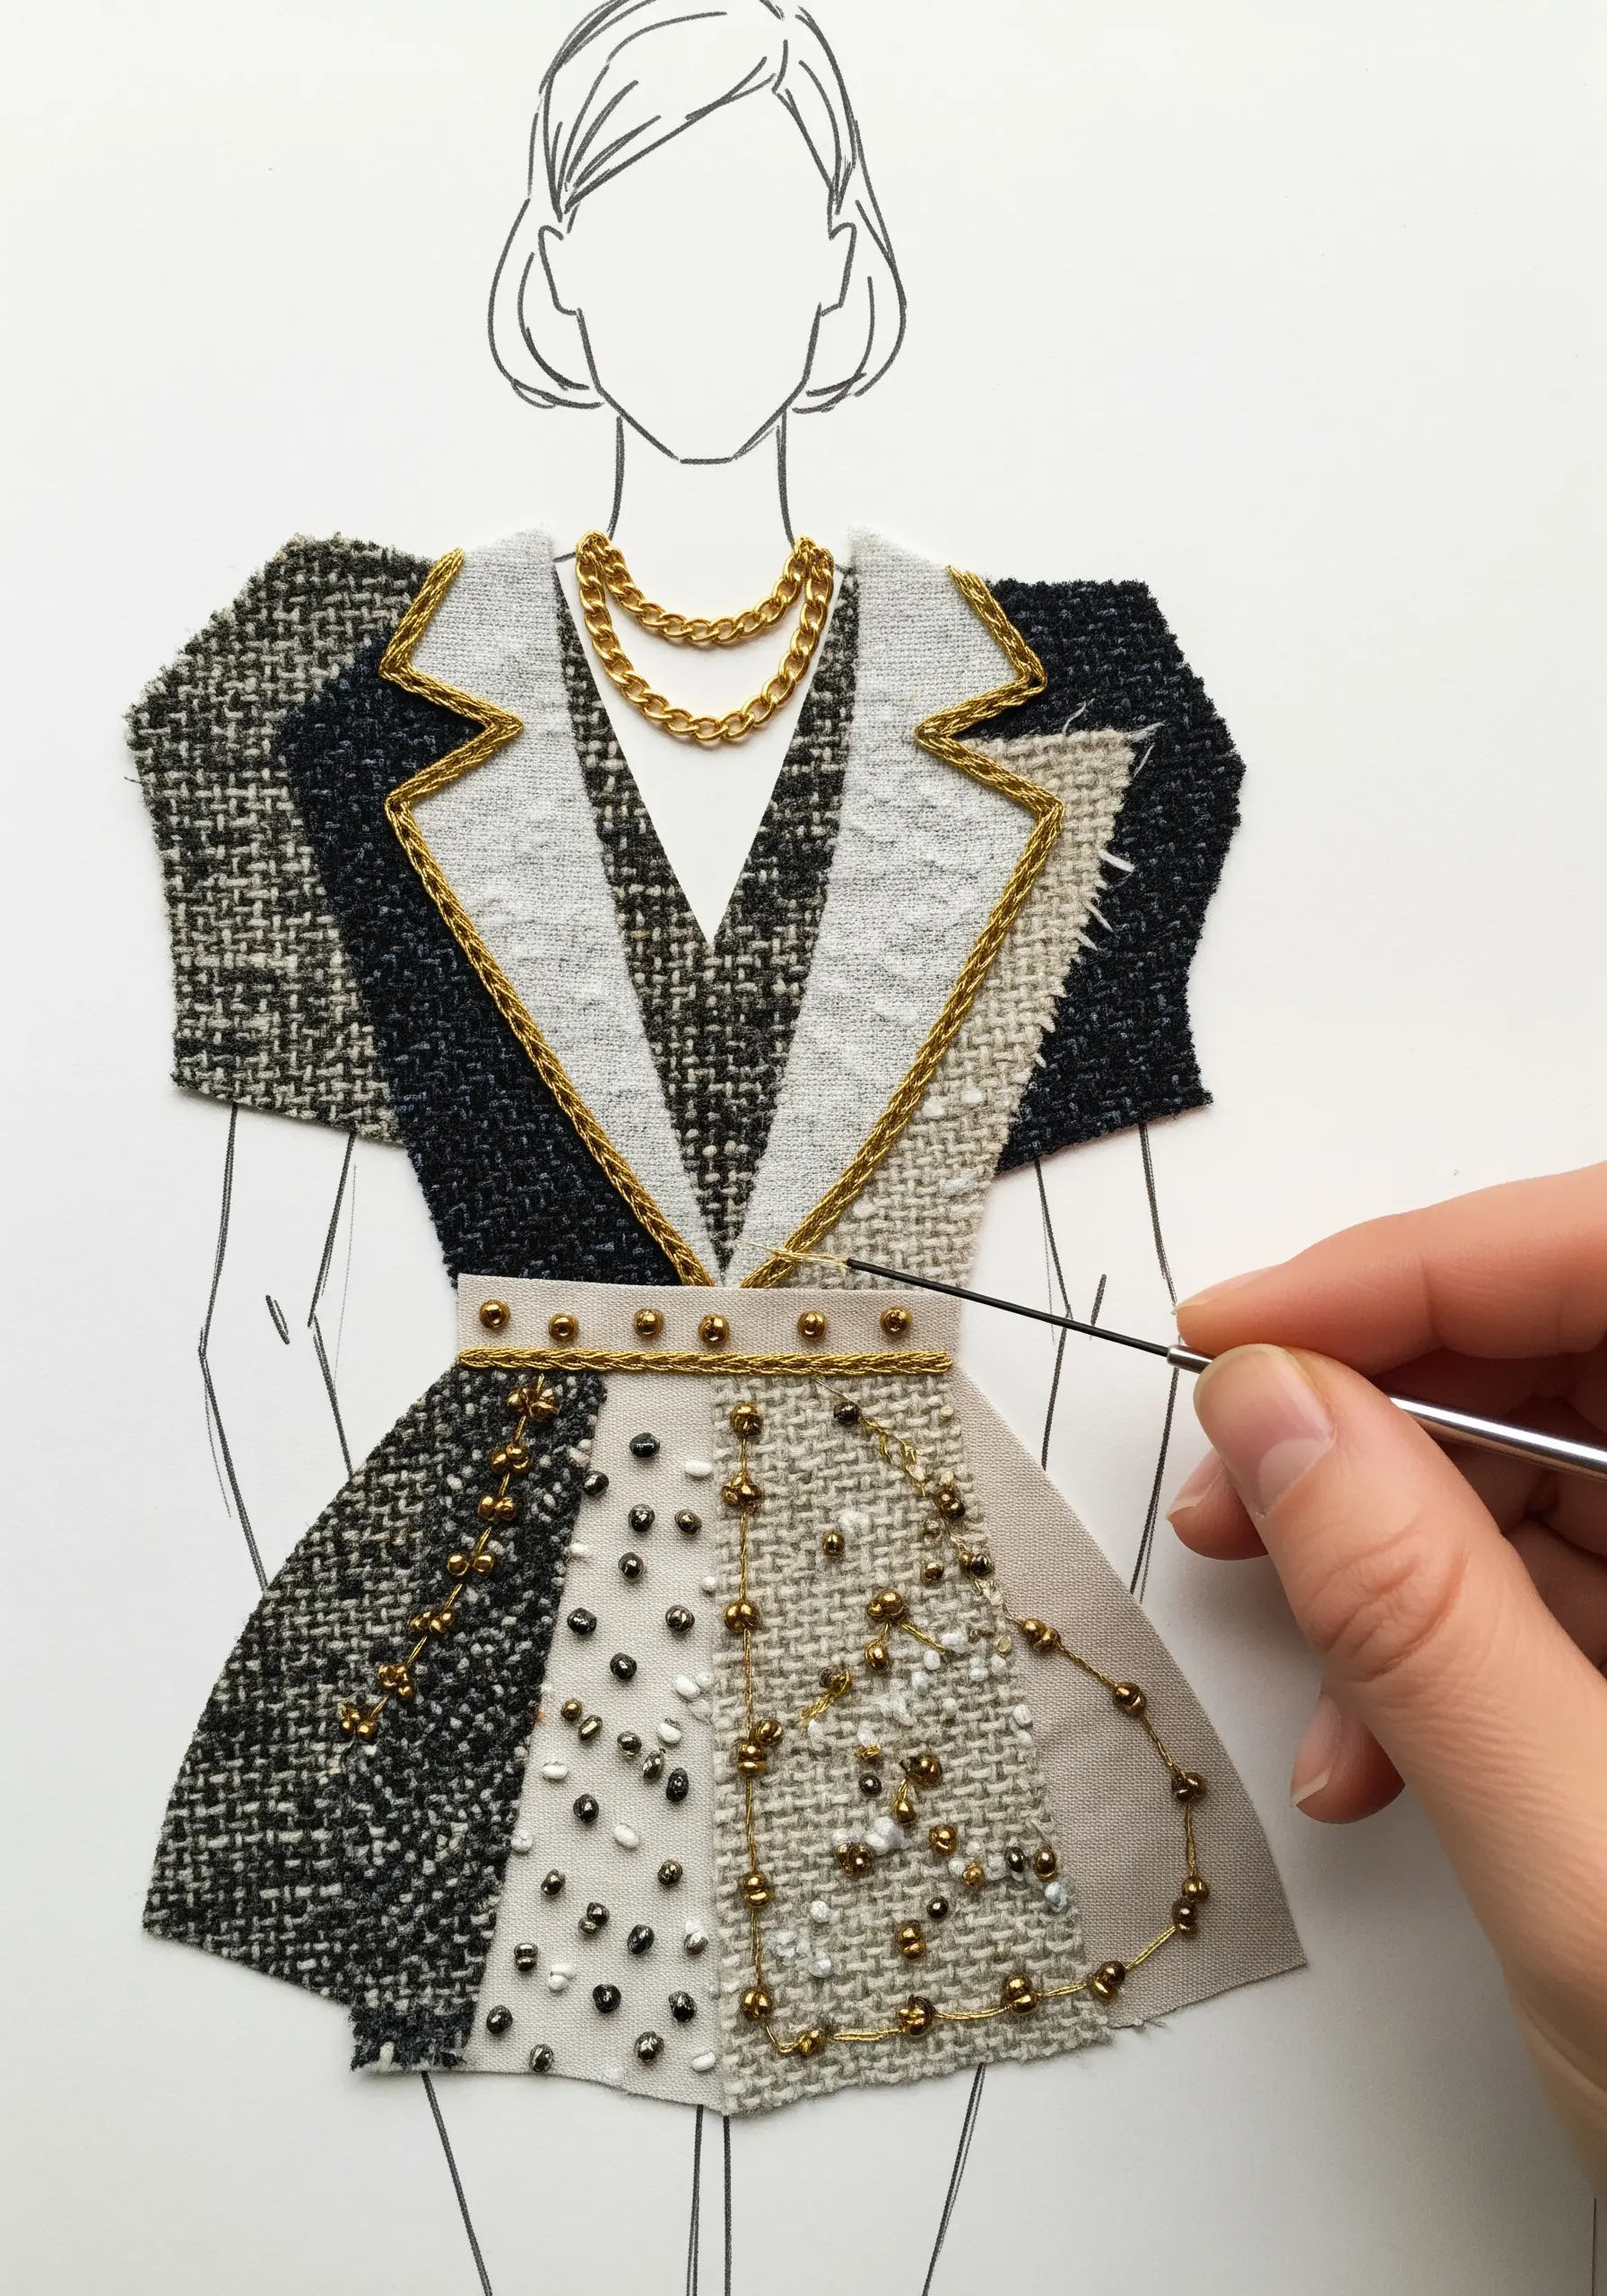
For a touch of haute couture on your fashion illustration collages, combine couching with delicate beading.
Couch a thick metallic cord or chainette thread along lapels or waistlines to create a bold, luxurious outline. Use a matching, finer thread for the small tacking stitches so they become invisible.
Then, scatter tiny seed beads across fabric areas, securing each one with a small stitch, to mimic the texture of tweed or embellished textiles.
This mixed-media approach adds unparalleled texture and shine, transforming a simple sketch into a high-fashion piece, ideal for glamorous dinner-party-ready designs.
23. Map Journeys with a Crisp Backstitch
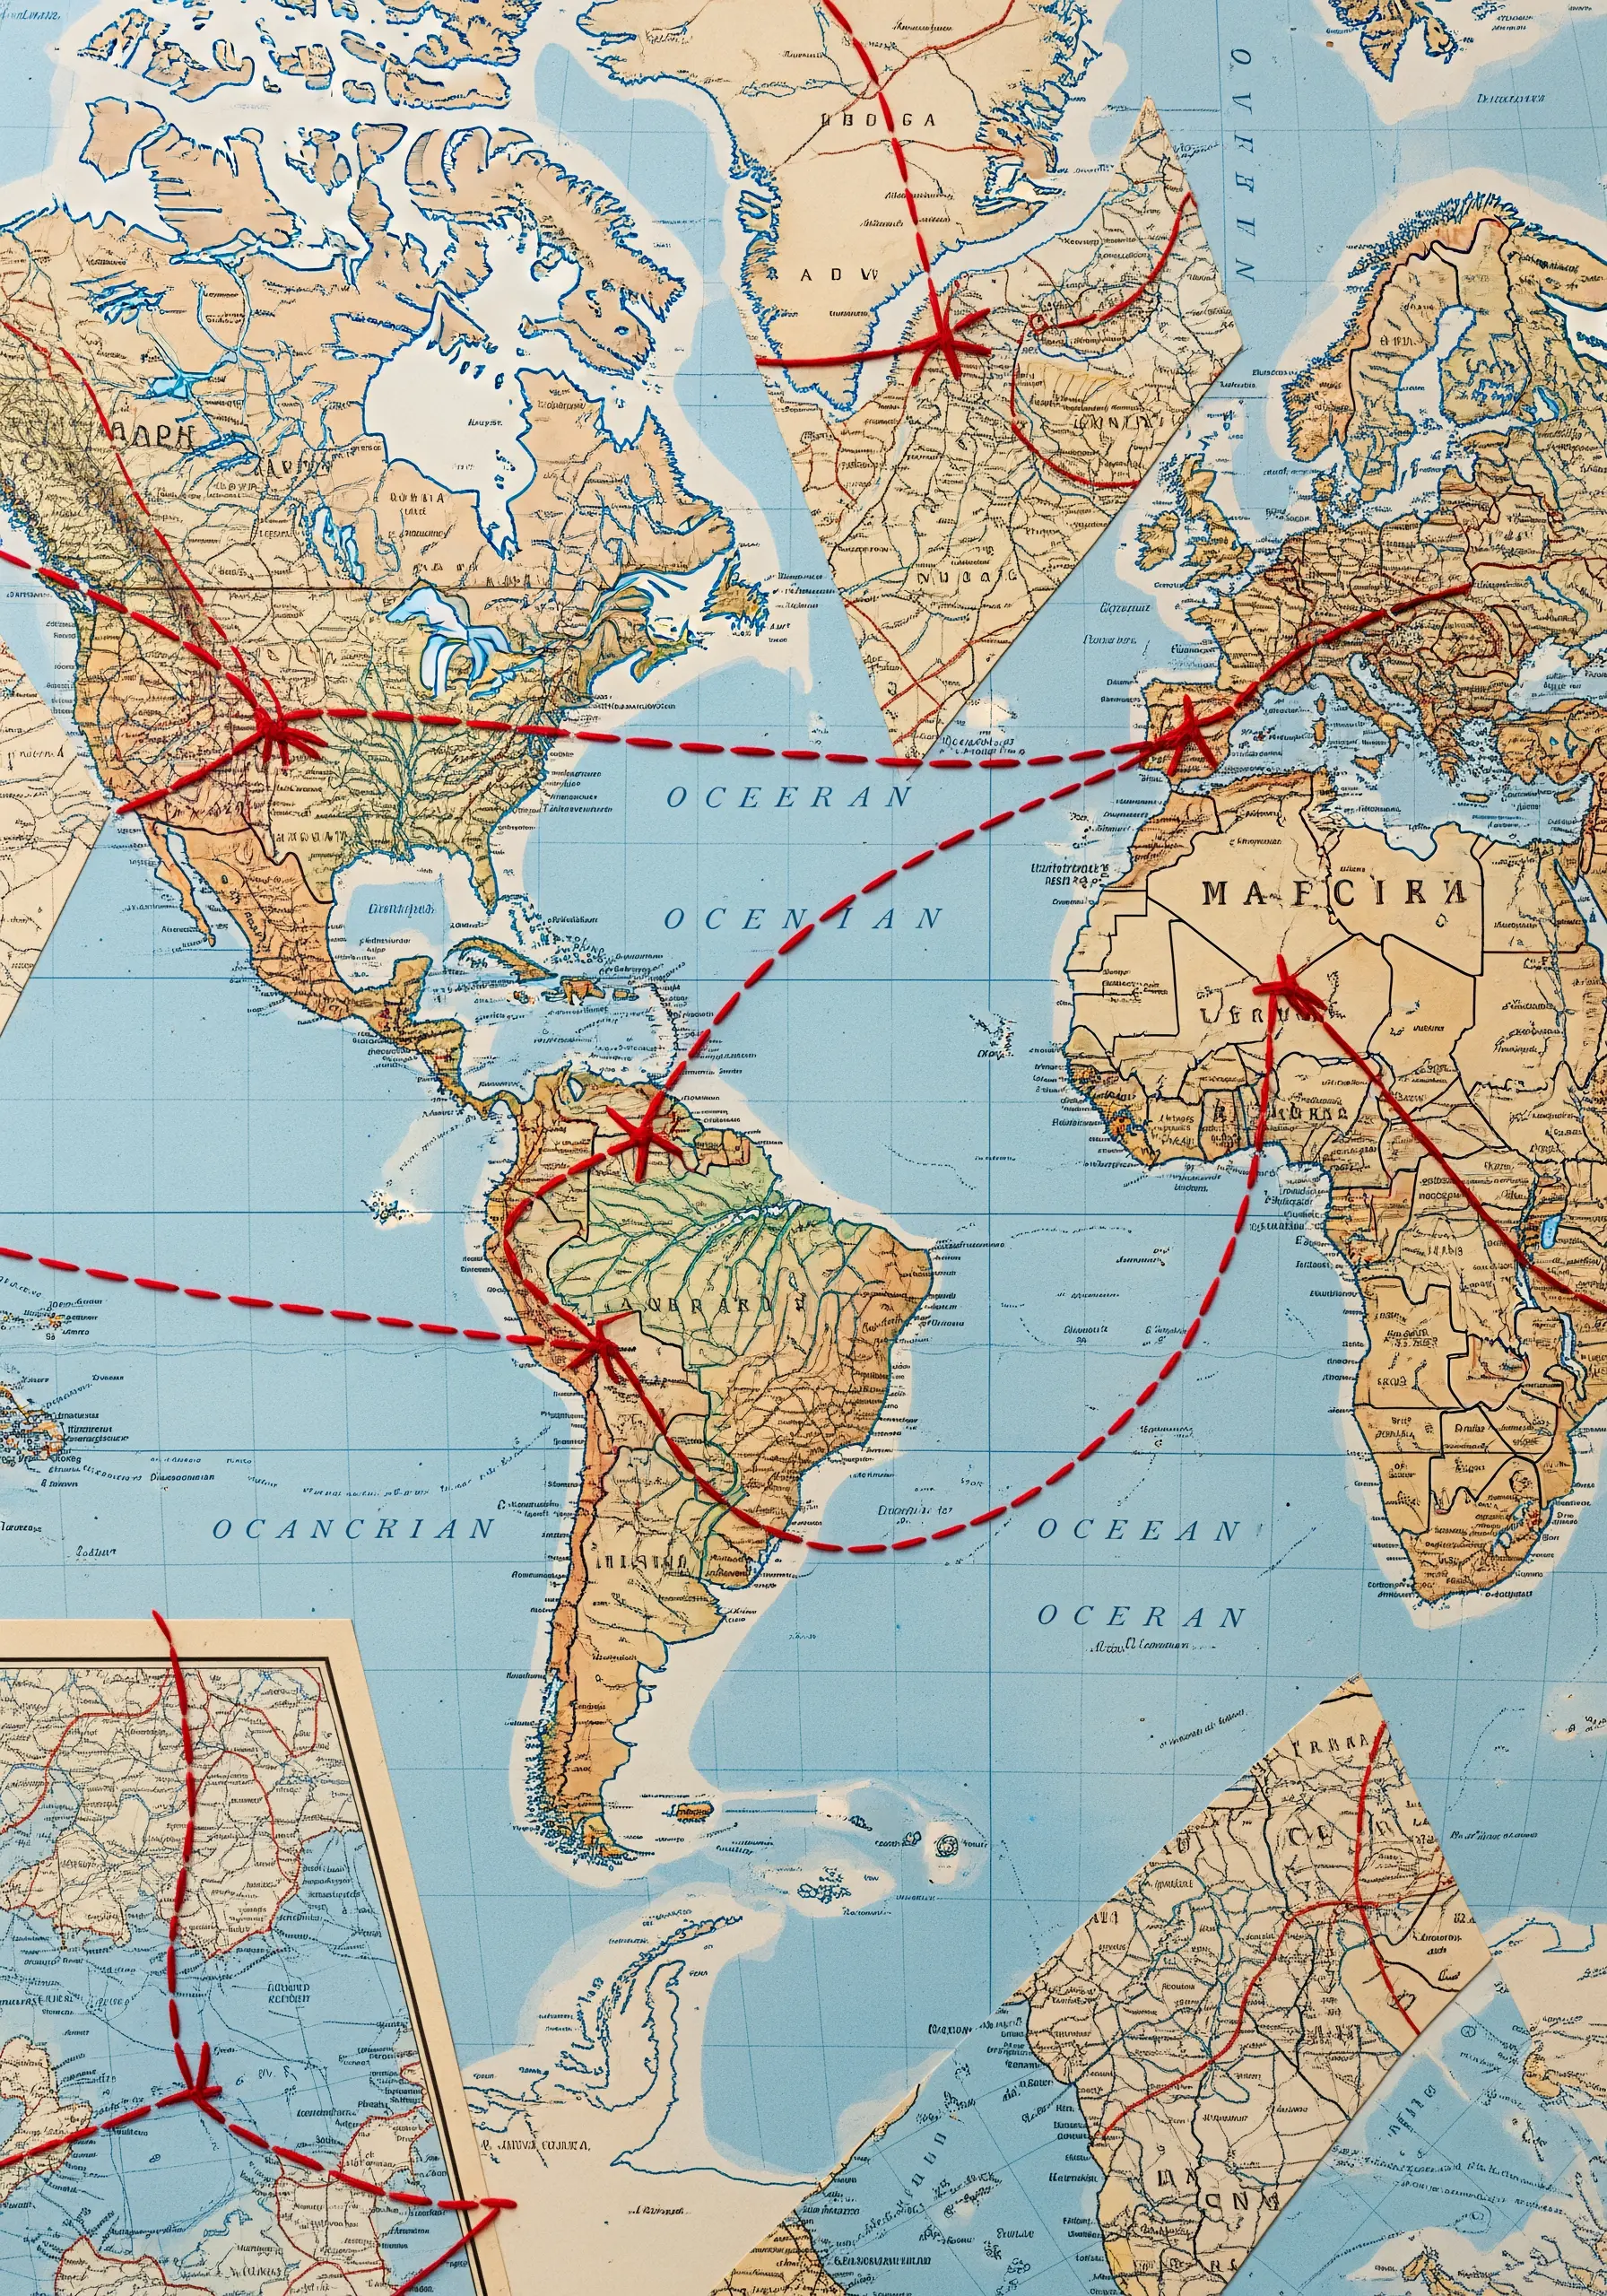
Personalize a map collage by stitching the lines of your travels, past or future.
Use a crisp backstitch or stem stitch in a bold, contrasting color like red to create clear, readable lines that stand out against the map’s details.
Add a tiny star stitch or French knot at each destination point to mark cities or significant locations.
This technique turns a generic map into a deeply personal story, a visual record of your life’s journeys, and is a beautiful way to document travel-themed ideas.
24. Add Whimsy with Stitched Sprinkles

Bring your paper food collages to life with the delightful texture of embroidered details.
Use tiny, scattered straight stitches in a rainbow of colors to create the look of sprinkles on a paper cupcake or donut.
For fillings in macarons or cakes, use a row of small, uniform French knots in a contrasting color like white.
These simple stitches add a playful, three-dimensional element that makes the treats look almost good enough to eat, perfect for charming kitchen decor.
25. Create Cut-Out Motifs with Dense Stitching
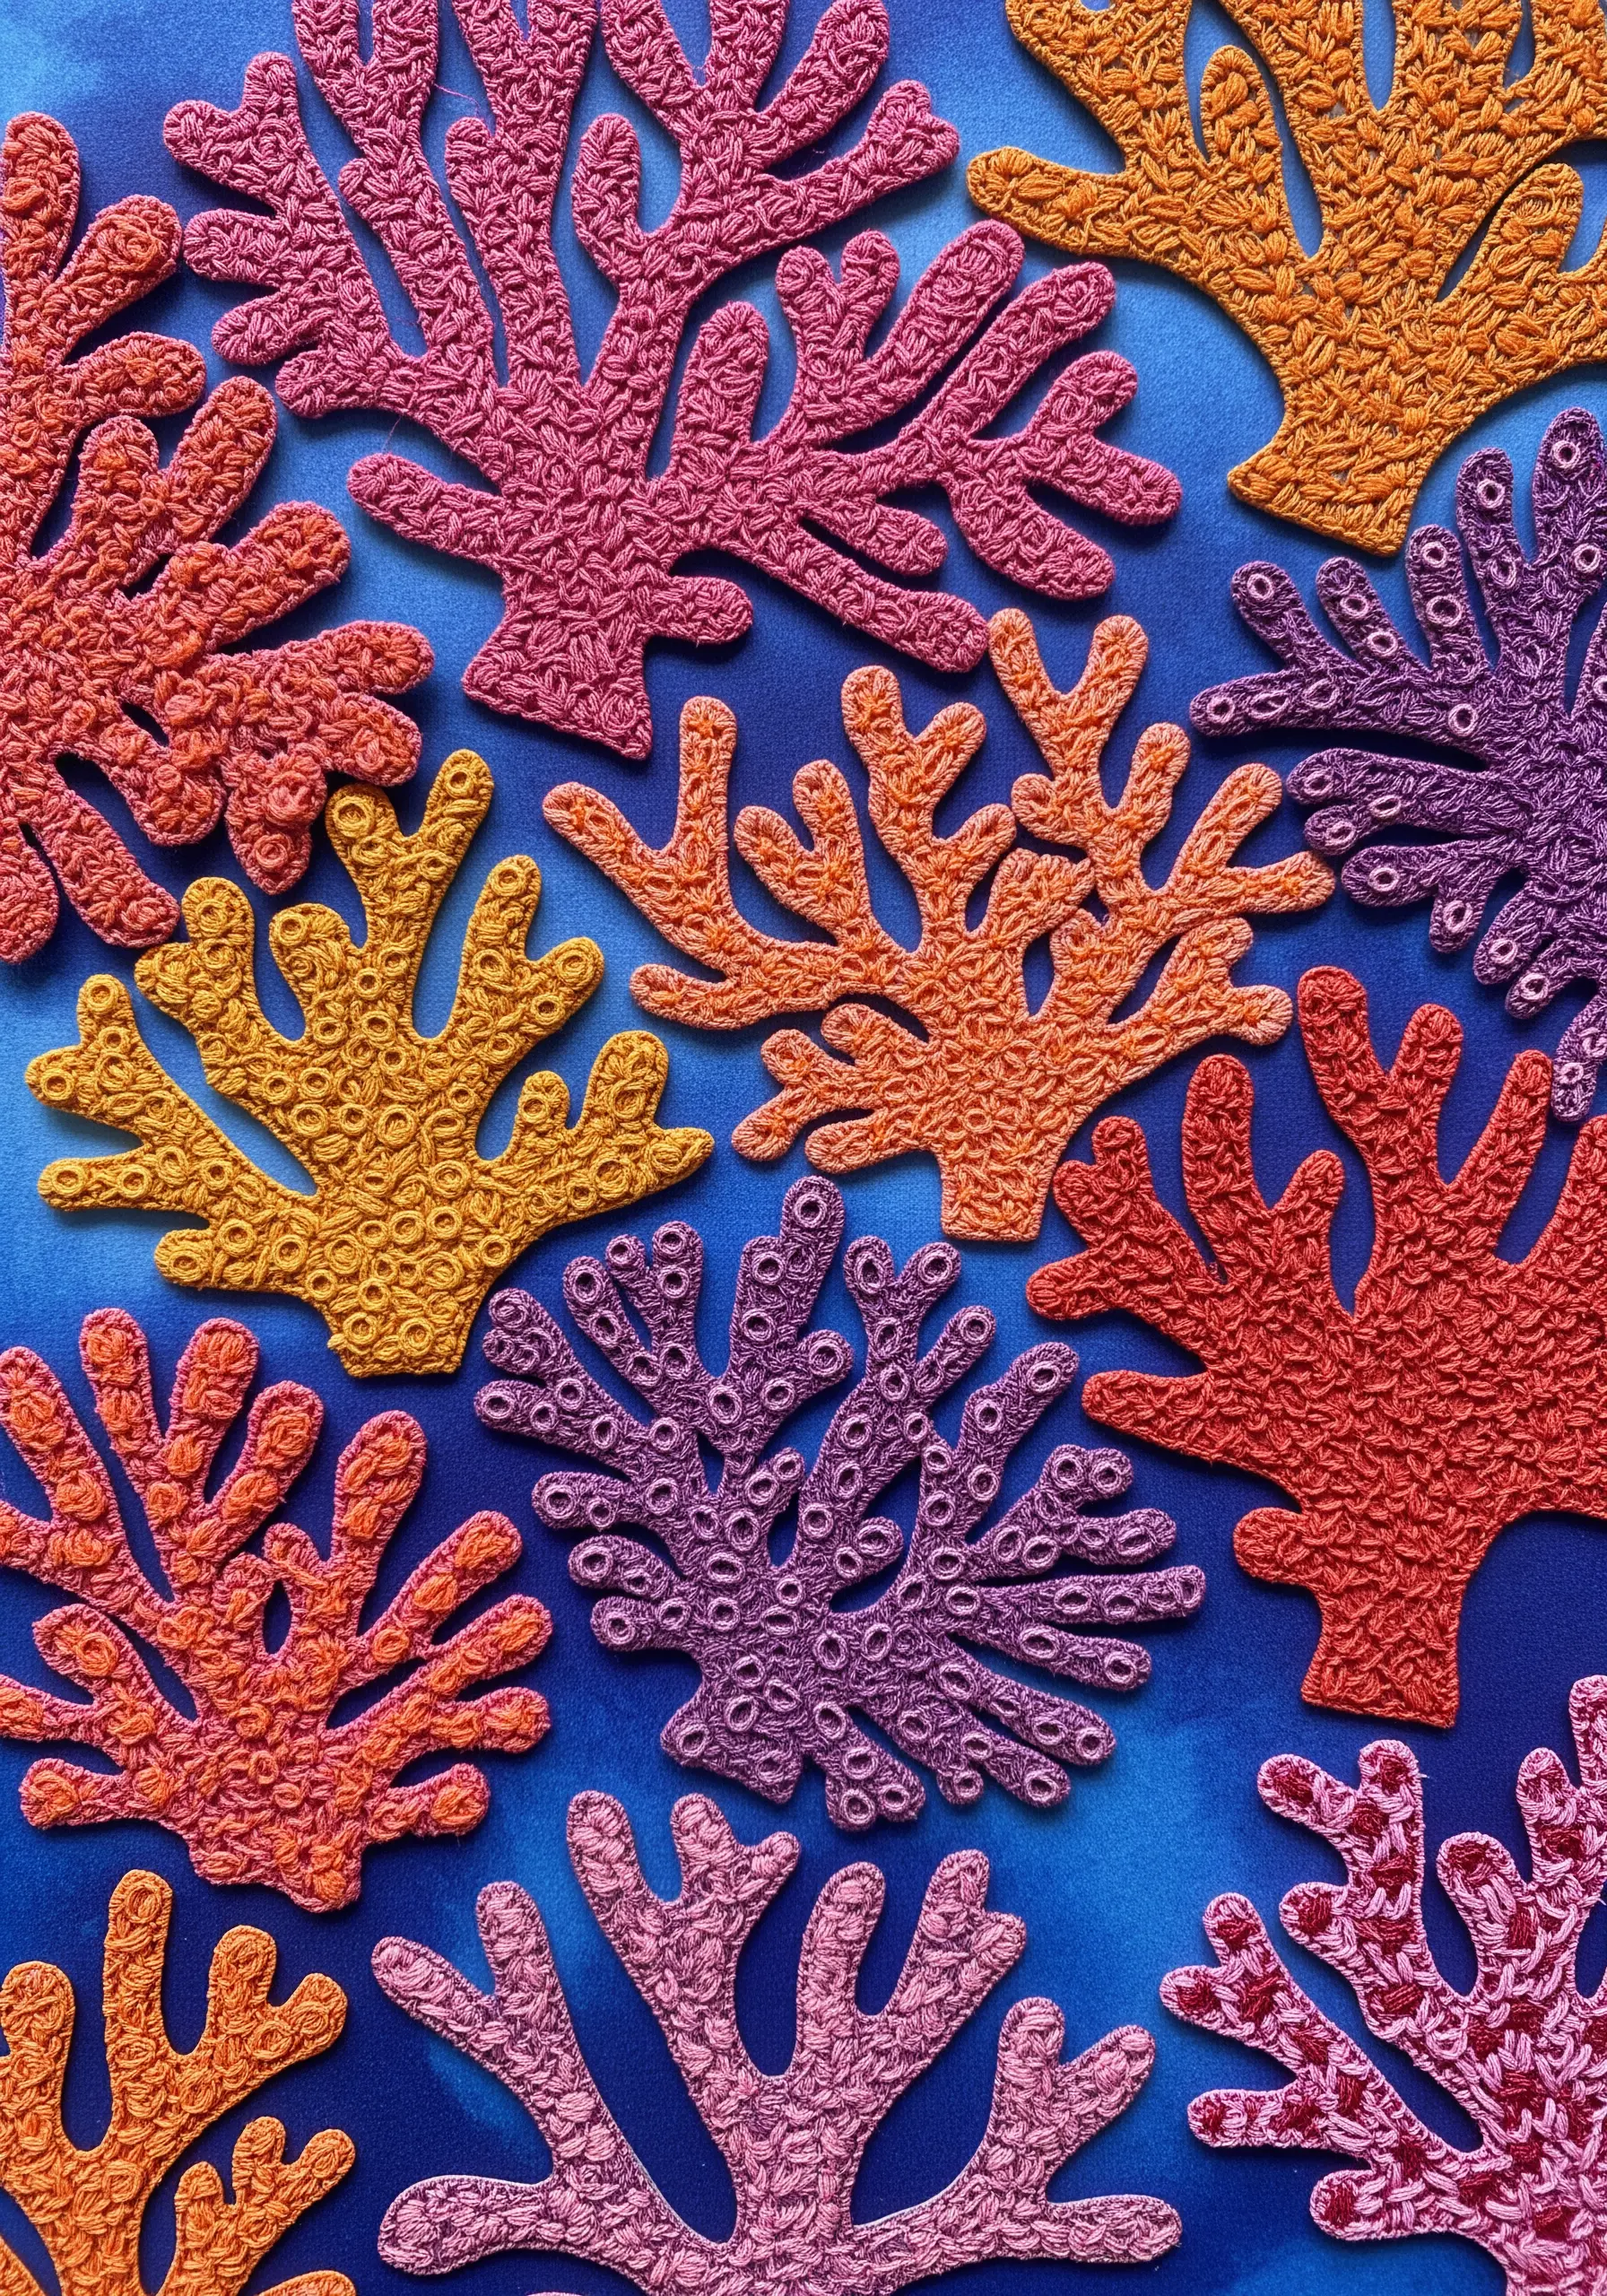
Instead of stitching onto your collage, stitch onto a separate piece of fabric and then incorporate it into your work.
Completely fill a shape, like these coral branches, with dense satin stitch and French knots on a piece of stabilizer-backed fabric.
Once complete, carefully cut out the embroidered shape from the fabric and apply it to your paper or painted background.
This technique gives you a perfectly finished, raised appliqué with incredible texture, allowing you to build complex layers and explore organic textures in your art.
26. Craft Delicate Blooms with Woven Wheel Stitches
For perfect, dimensional blossoms on your paper art, the woven wheel stitch (or spider web stitch) is an ideal choice.
Start by creating a small star of straight stitches (an odd number is crucial, usually 5 or 7) as your spokes.
Then, weave your working thread over and under these spokes in a circle until the shape is filled, creating a beautiful, rose-like flower.
These stitches sit neatly on top of the paper, adding a pop of texture and color, and are a great way to fill your compositions with tiny floral motifs.
27. Connect Disparate Elements with Thread Webs
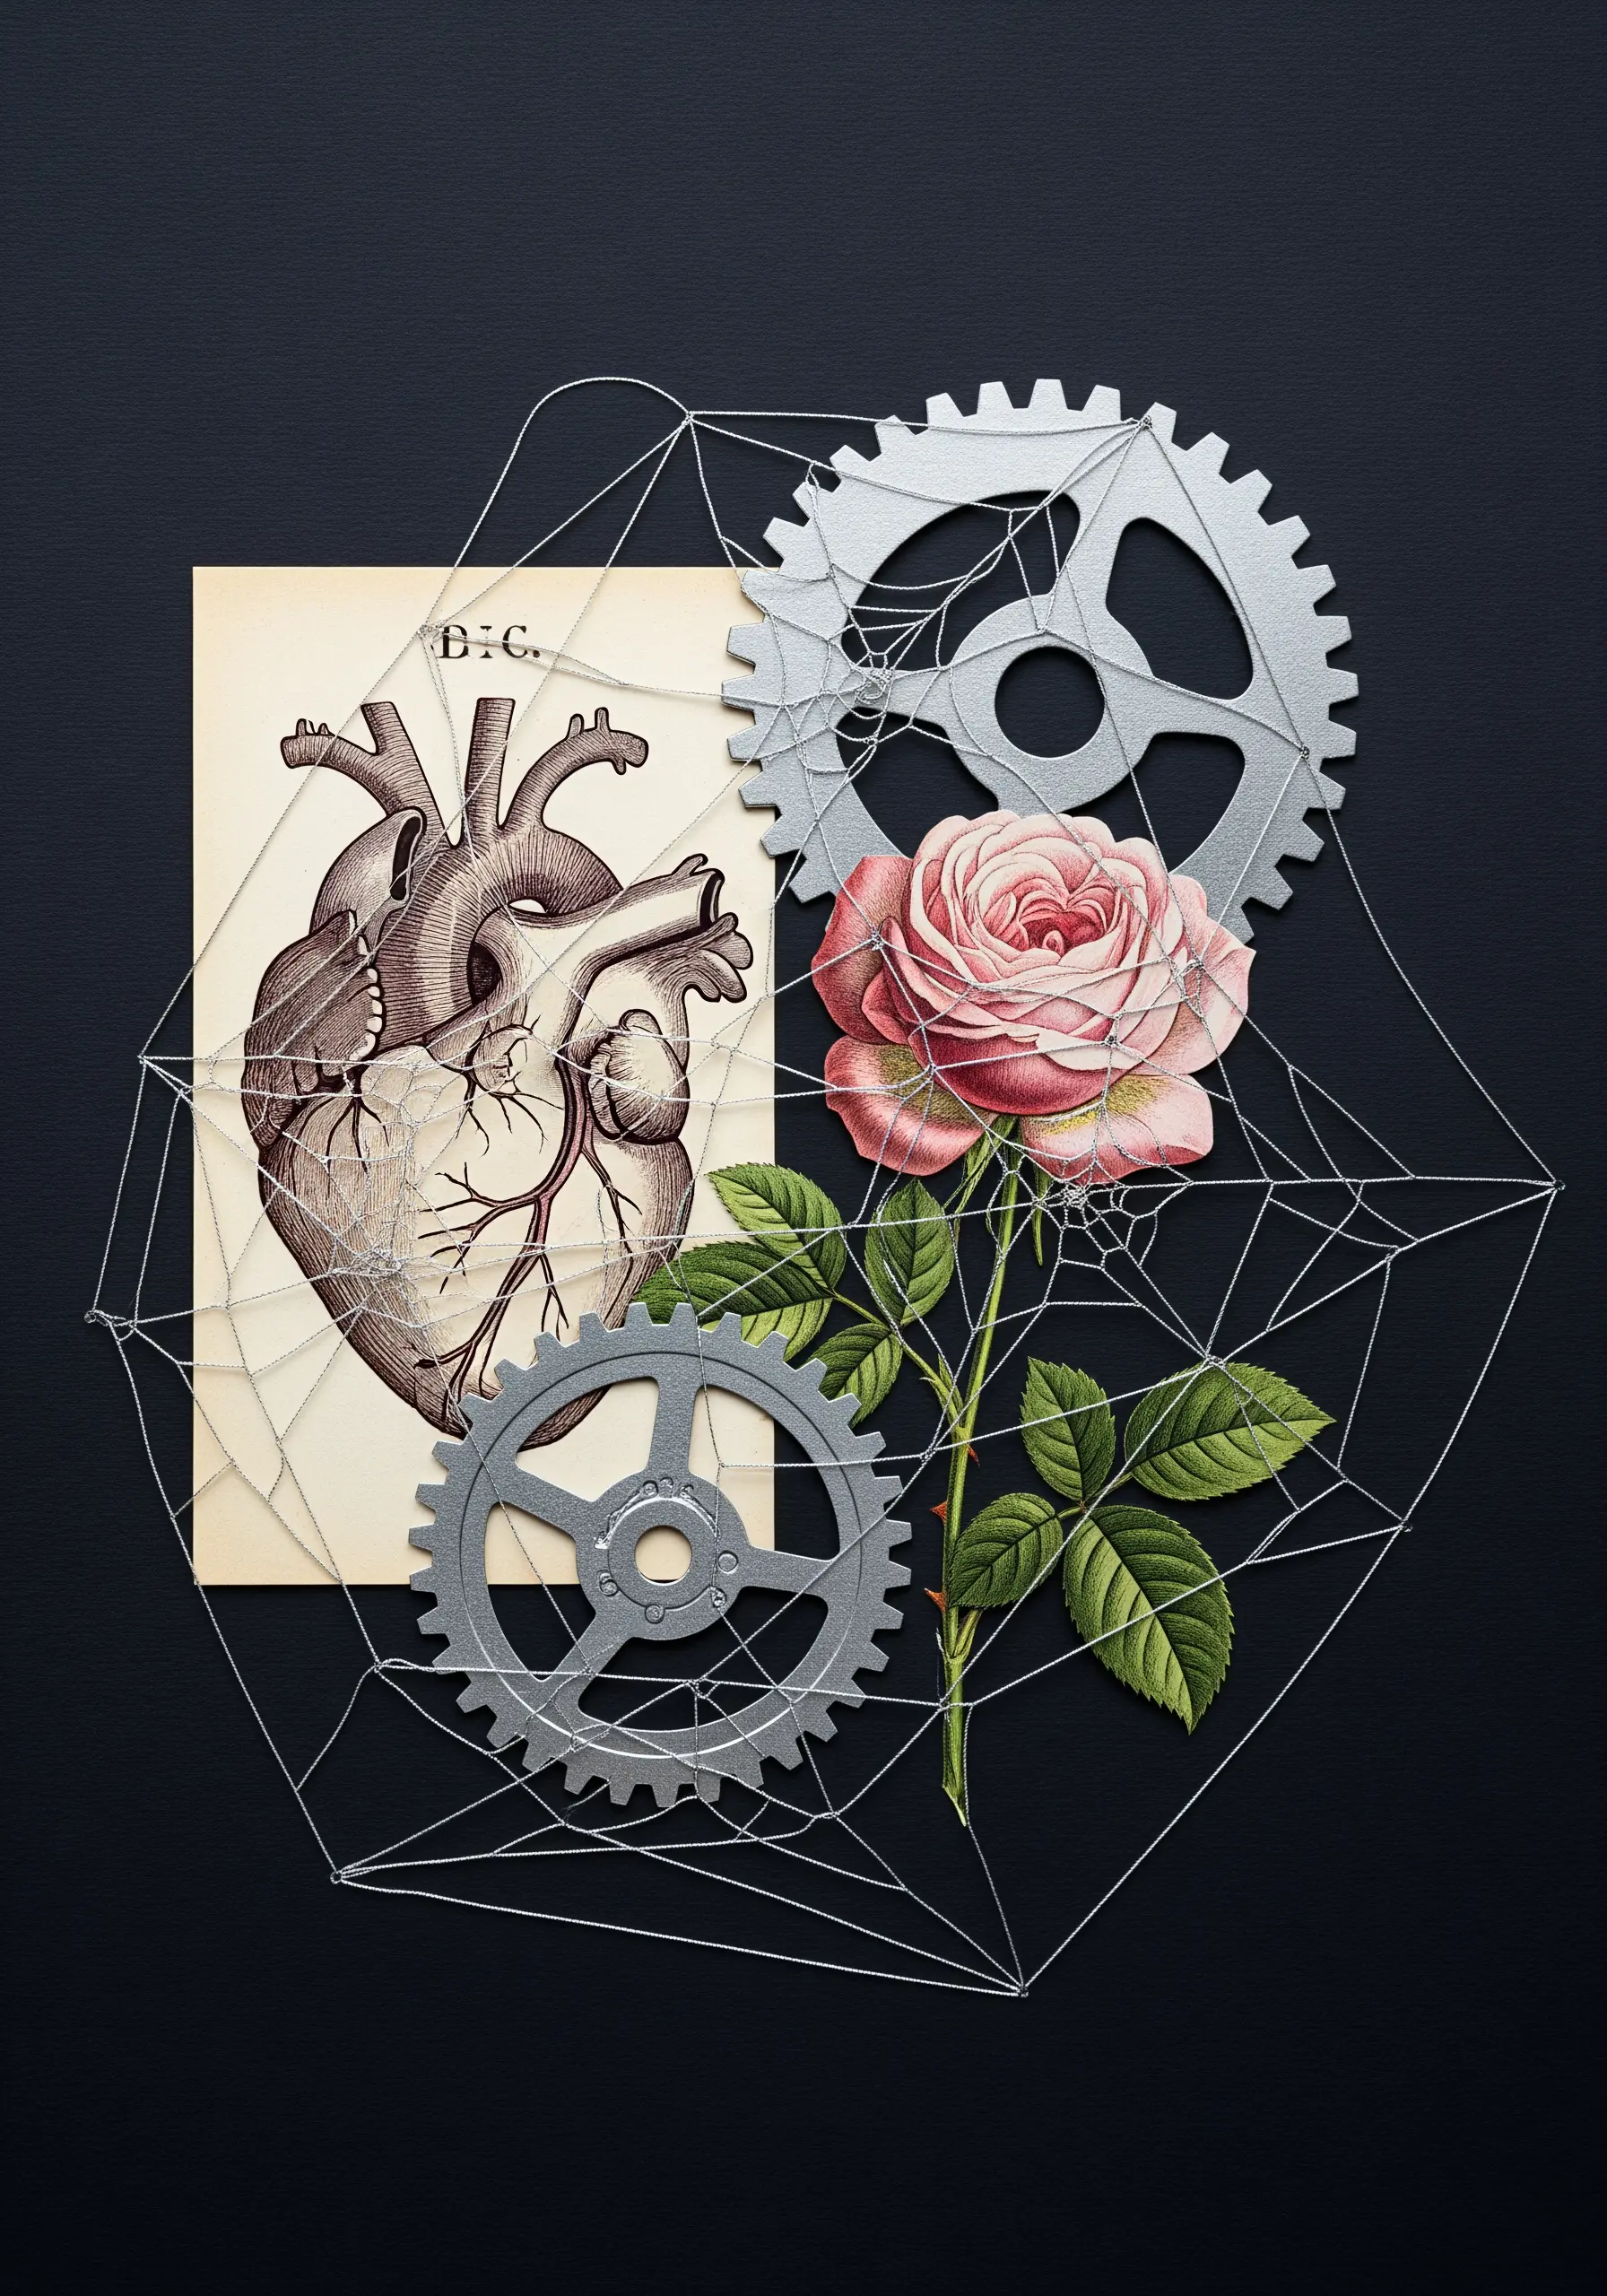
Use thread to create a visual and conceptual link between unrelated objects in your collage.
Stretch single strands of a fine, strong thread between anchor points on different elements—a heart, a rose, a gear—to form a geometric web.
This technique physically and metaphorically connects the pieces, suggesting relationships, tension, or a shared system.
It transforms the thread from a mere decorative element into a narrative tool, adding a layer of intellectual and emotional complexity to your abstract designs.
28. Convey Energy with Dynamic Satin Stitch
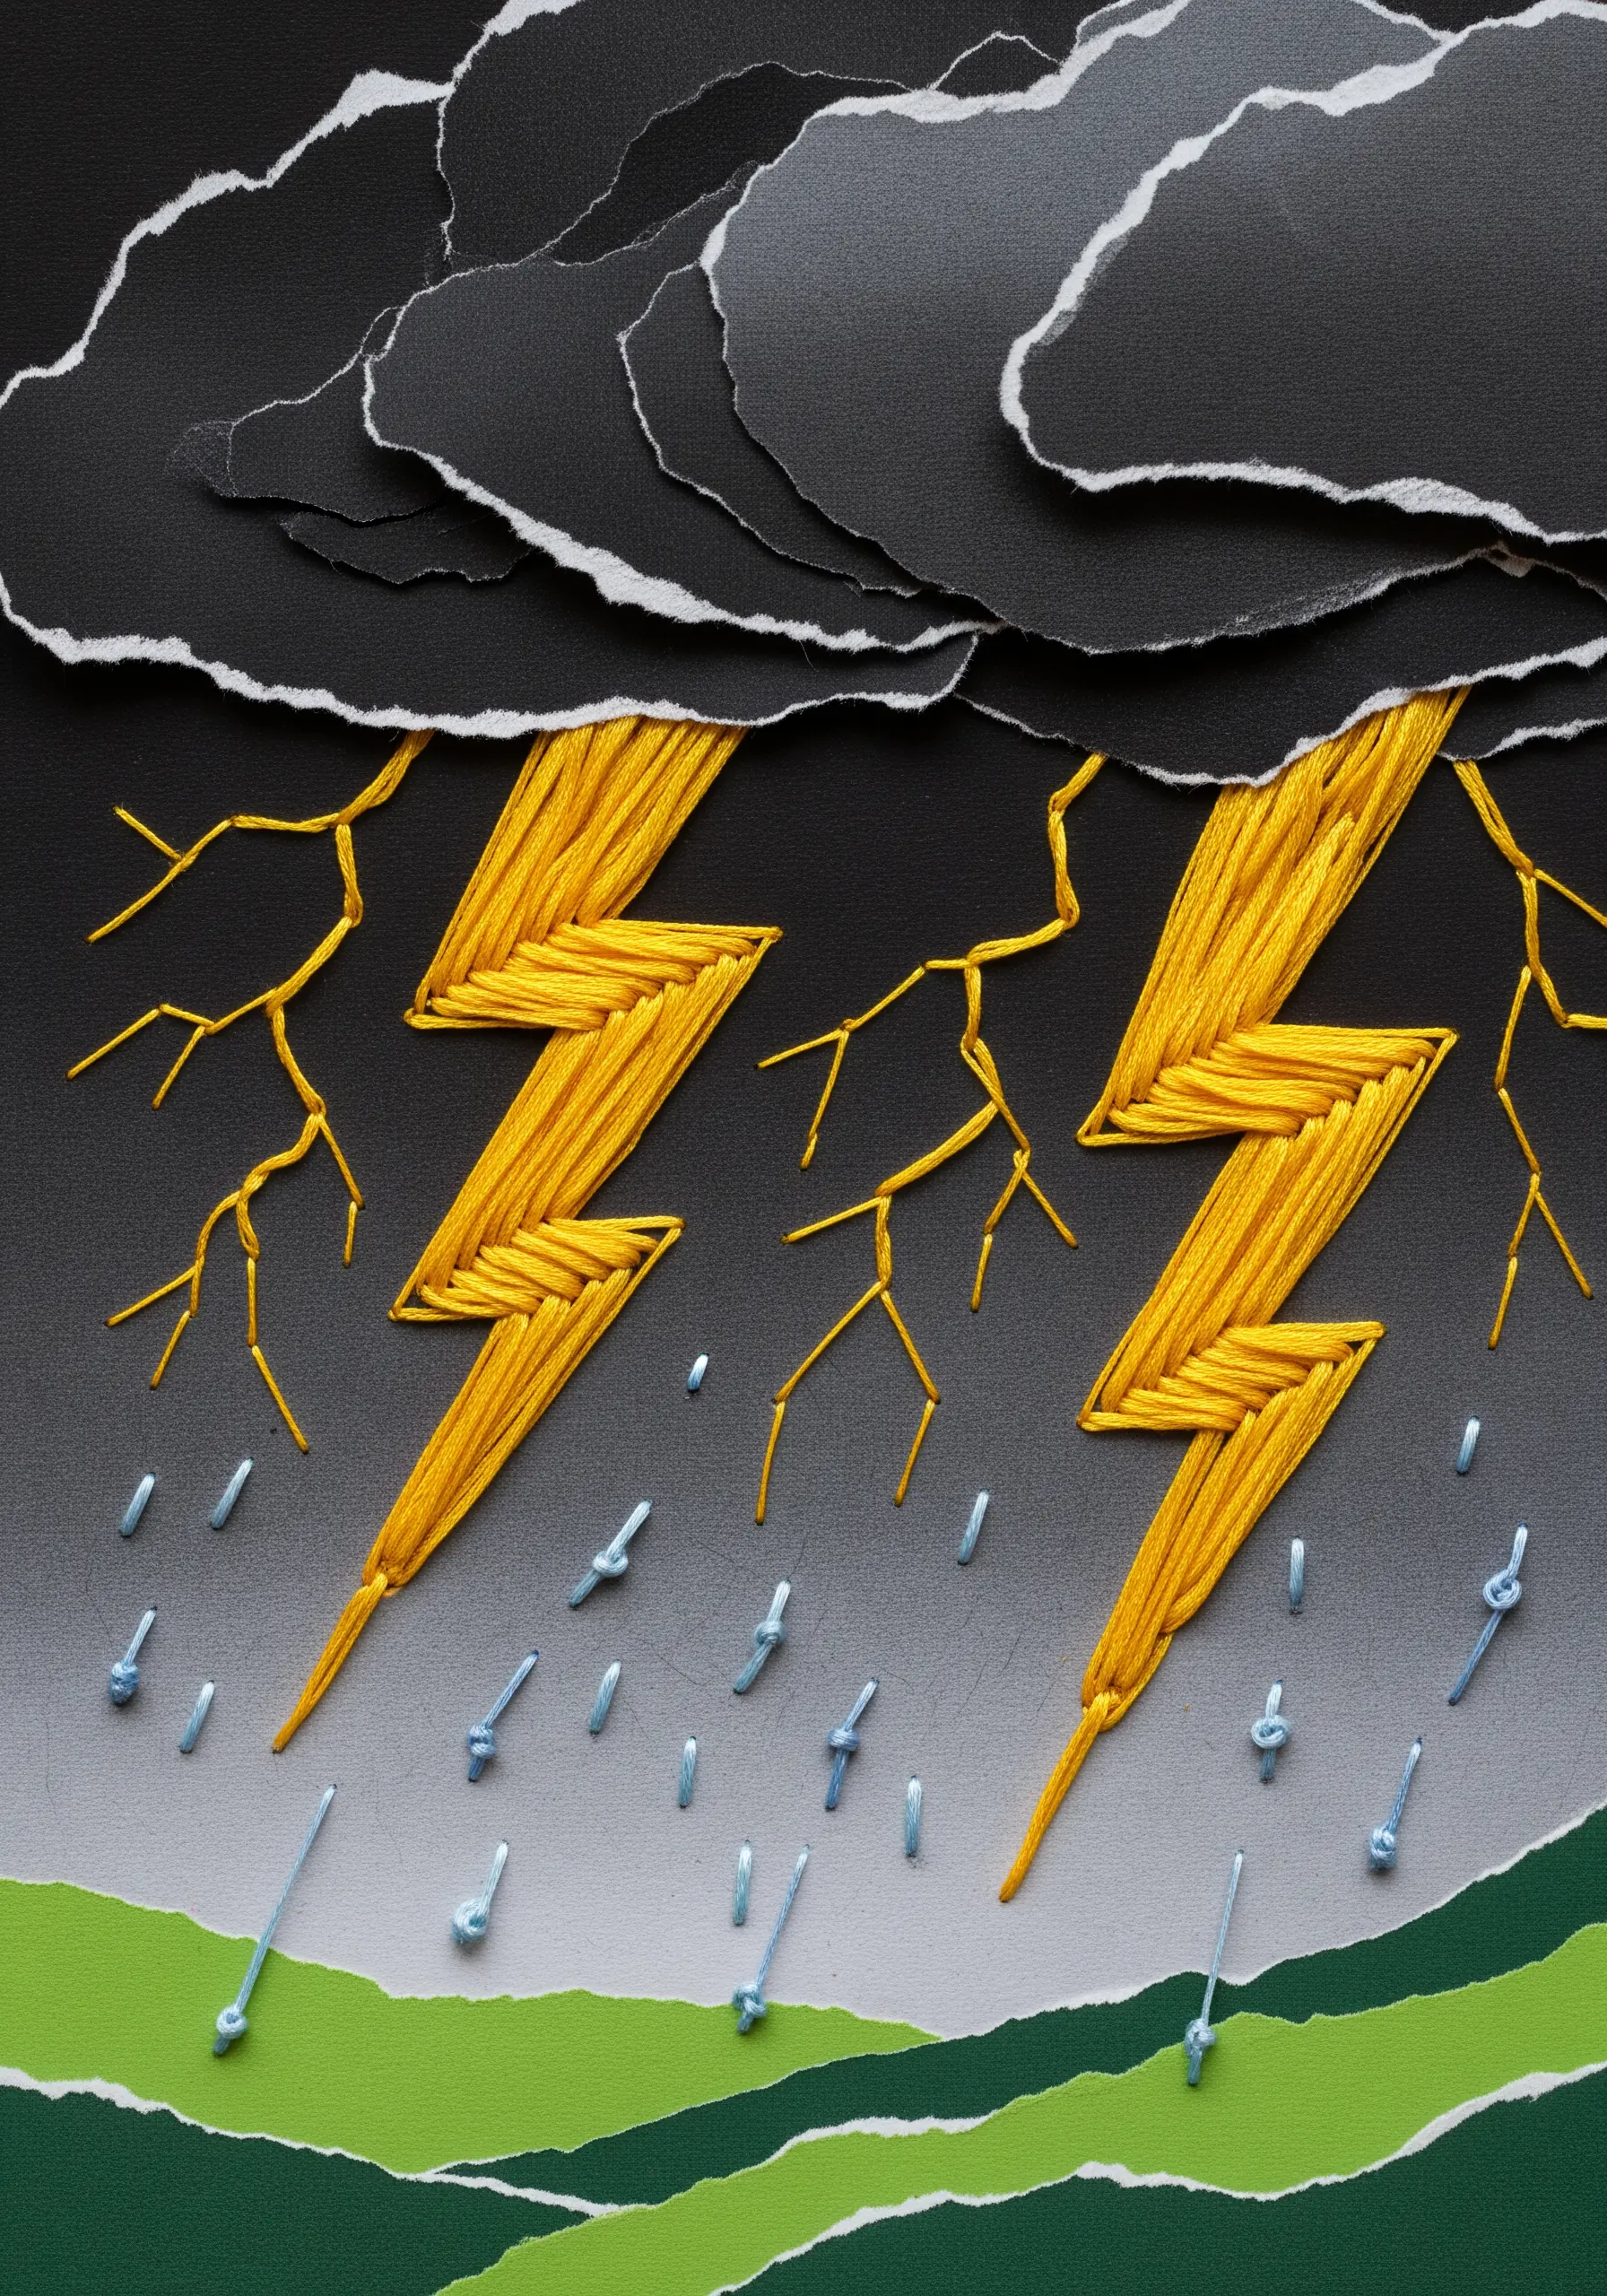
Capture the raw energy of a storm by using bold, directional satin stitch for lightning bolts.
The tight, parallel stitches create a solid, vibrant shape that feels powerful and electric against the dark, torn paper clouds.
For the smaller, branching electrical tendrils, switch to a delicate split stitch or single straight stitches to convey their chaotic, searching paths.
This contrast in stitch weight and style makes the composition dynamic and is a powerful way to represent abstract nature motifs like storms and waves.
29. Draw Graphic Lines with Thread
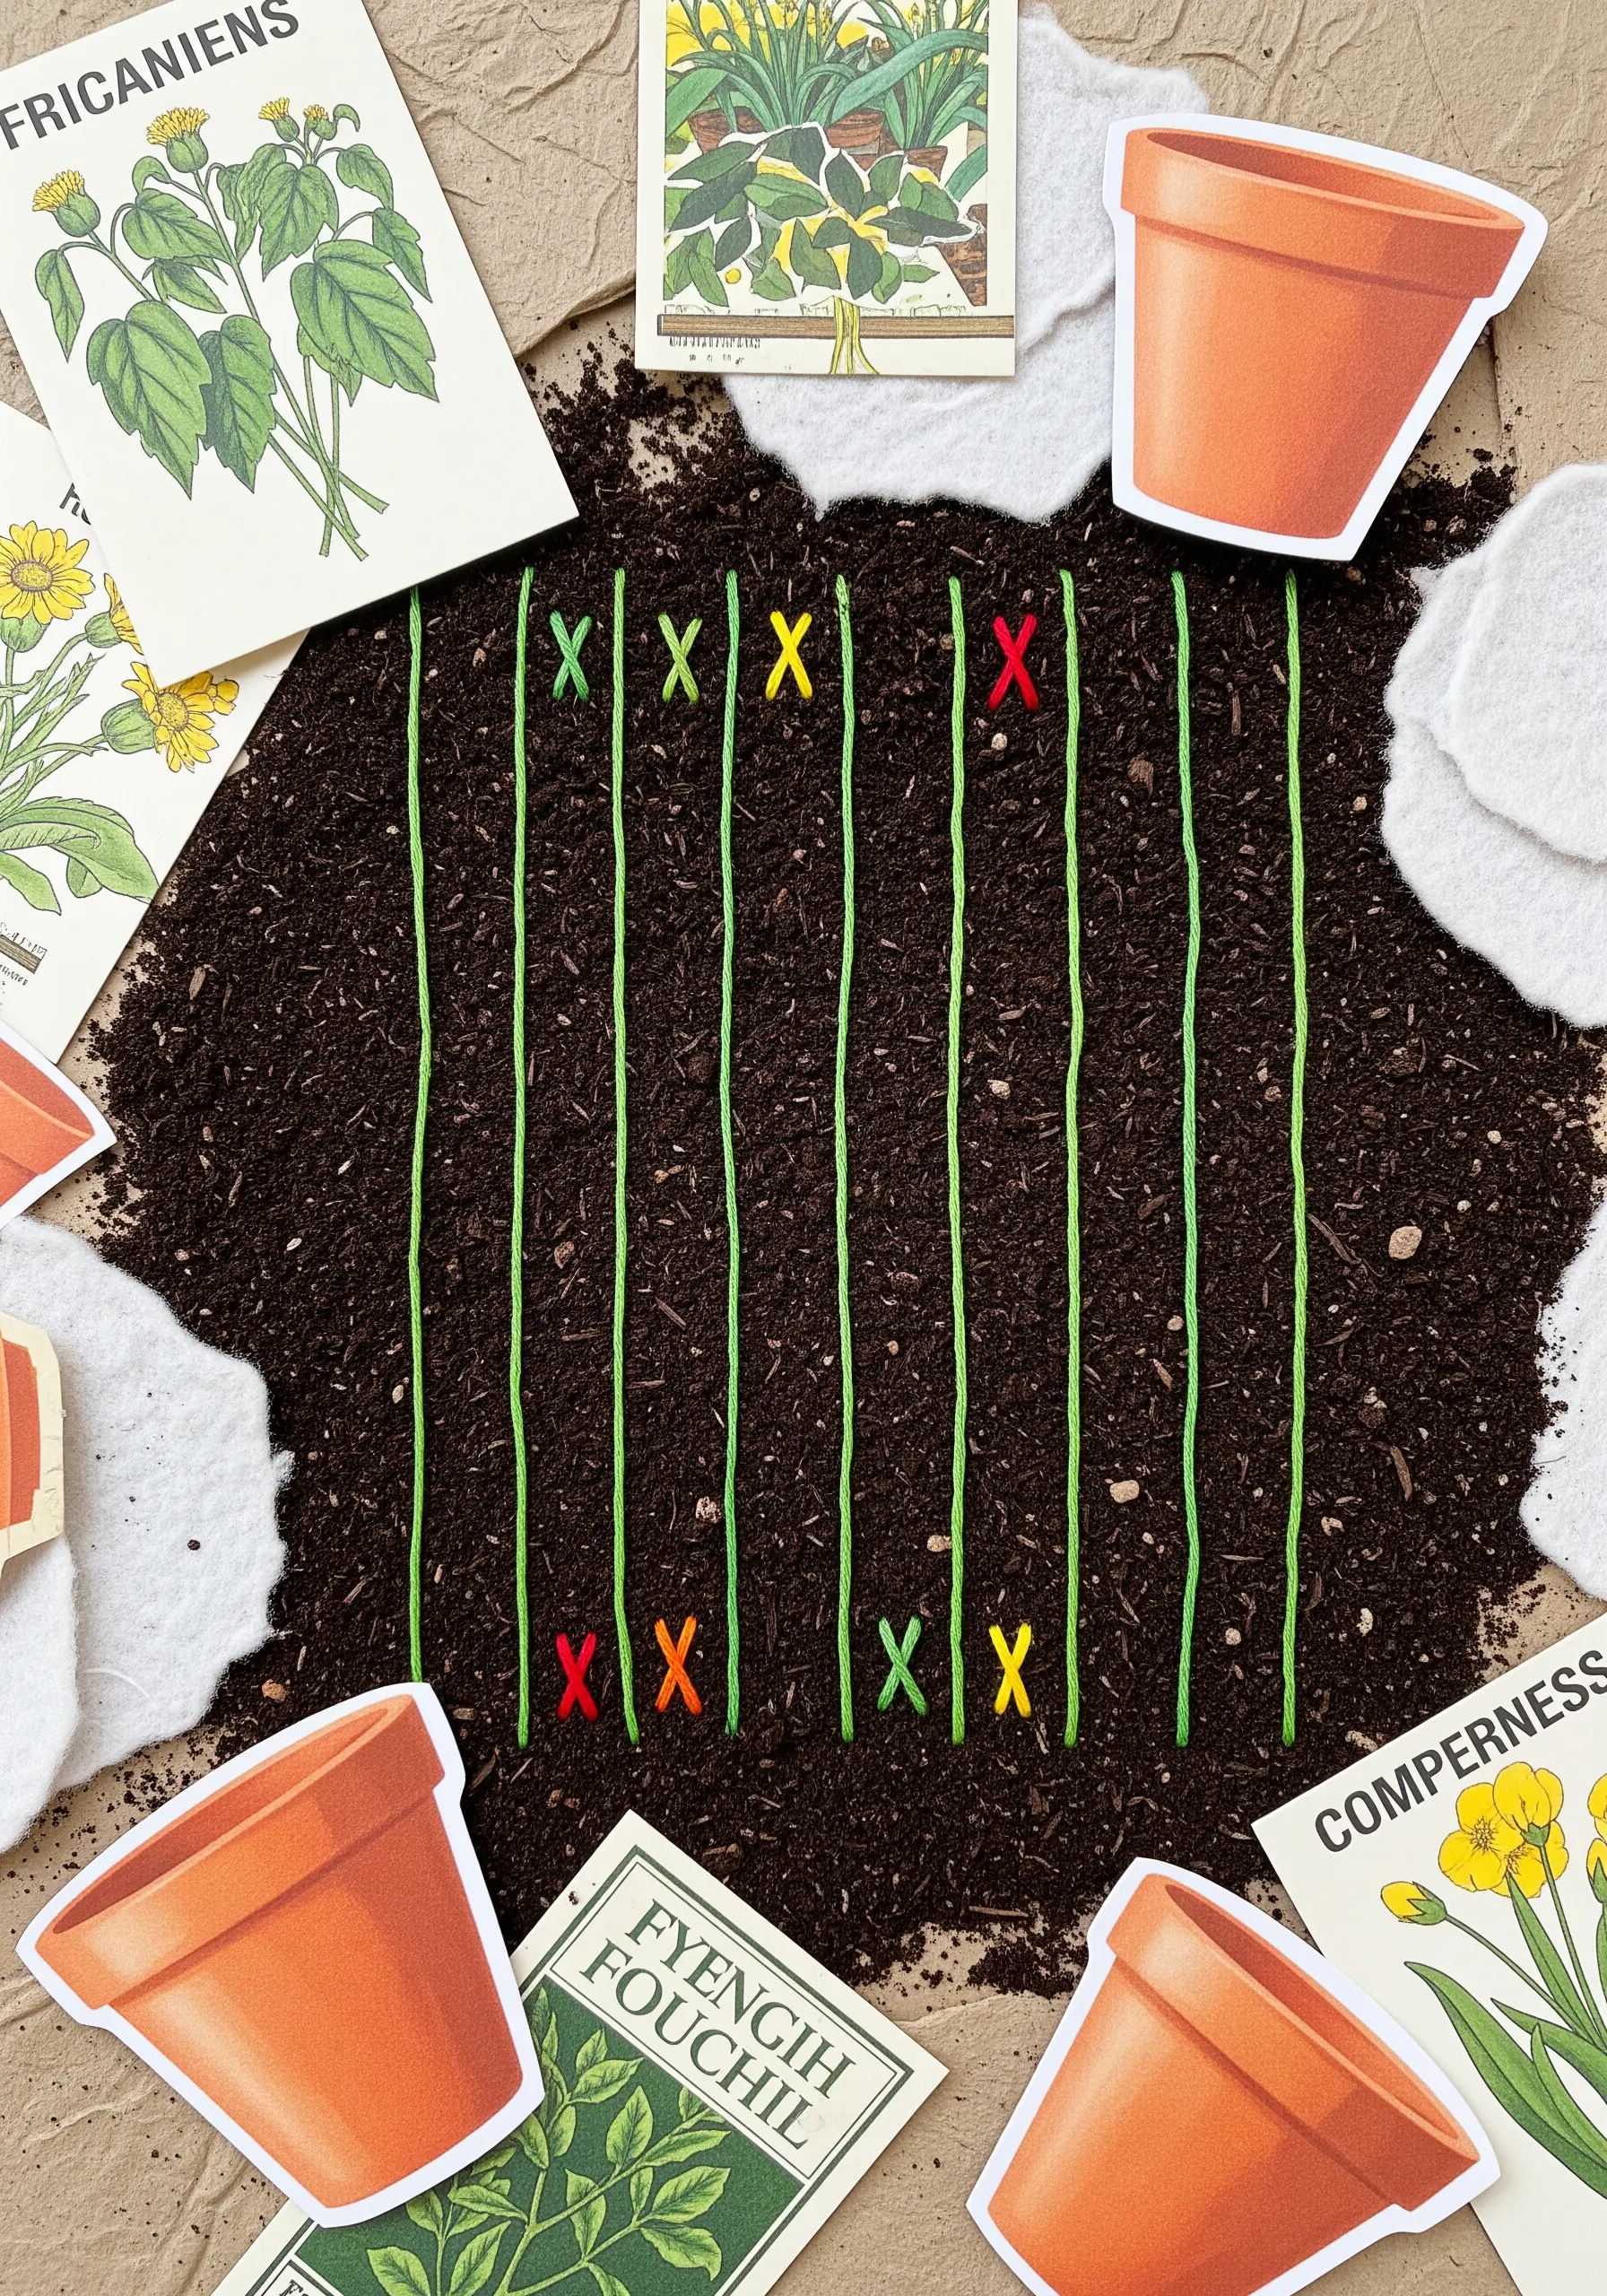
In a conceptual or illustrative collage, use thread as a precise drawing tool.
Long, perfectly straight stitches can create clean garden rows, architectural lines, or graph axes with a texture and presence that a pen cannot match.
Use small cross stitches or French knots as markers or data points within your design.
This technique is perfect for adding a layer of schematic detail or infographic style to your artwork, allowing you to combine organic collage elements with clean, linear structure, like you might when you transfer authentic shapes from nature.
30. Create Whimsical Details with Rolled Roses
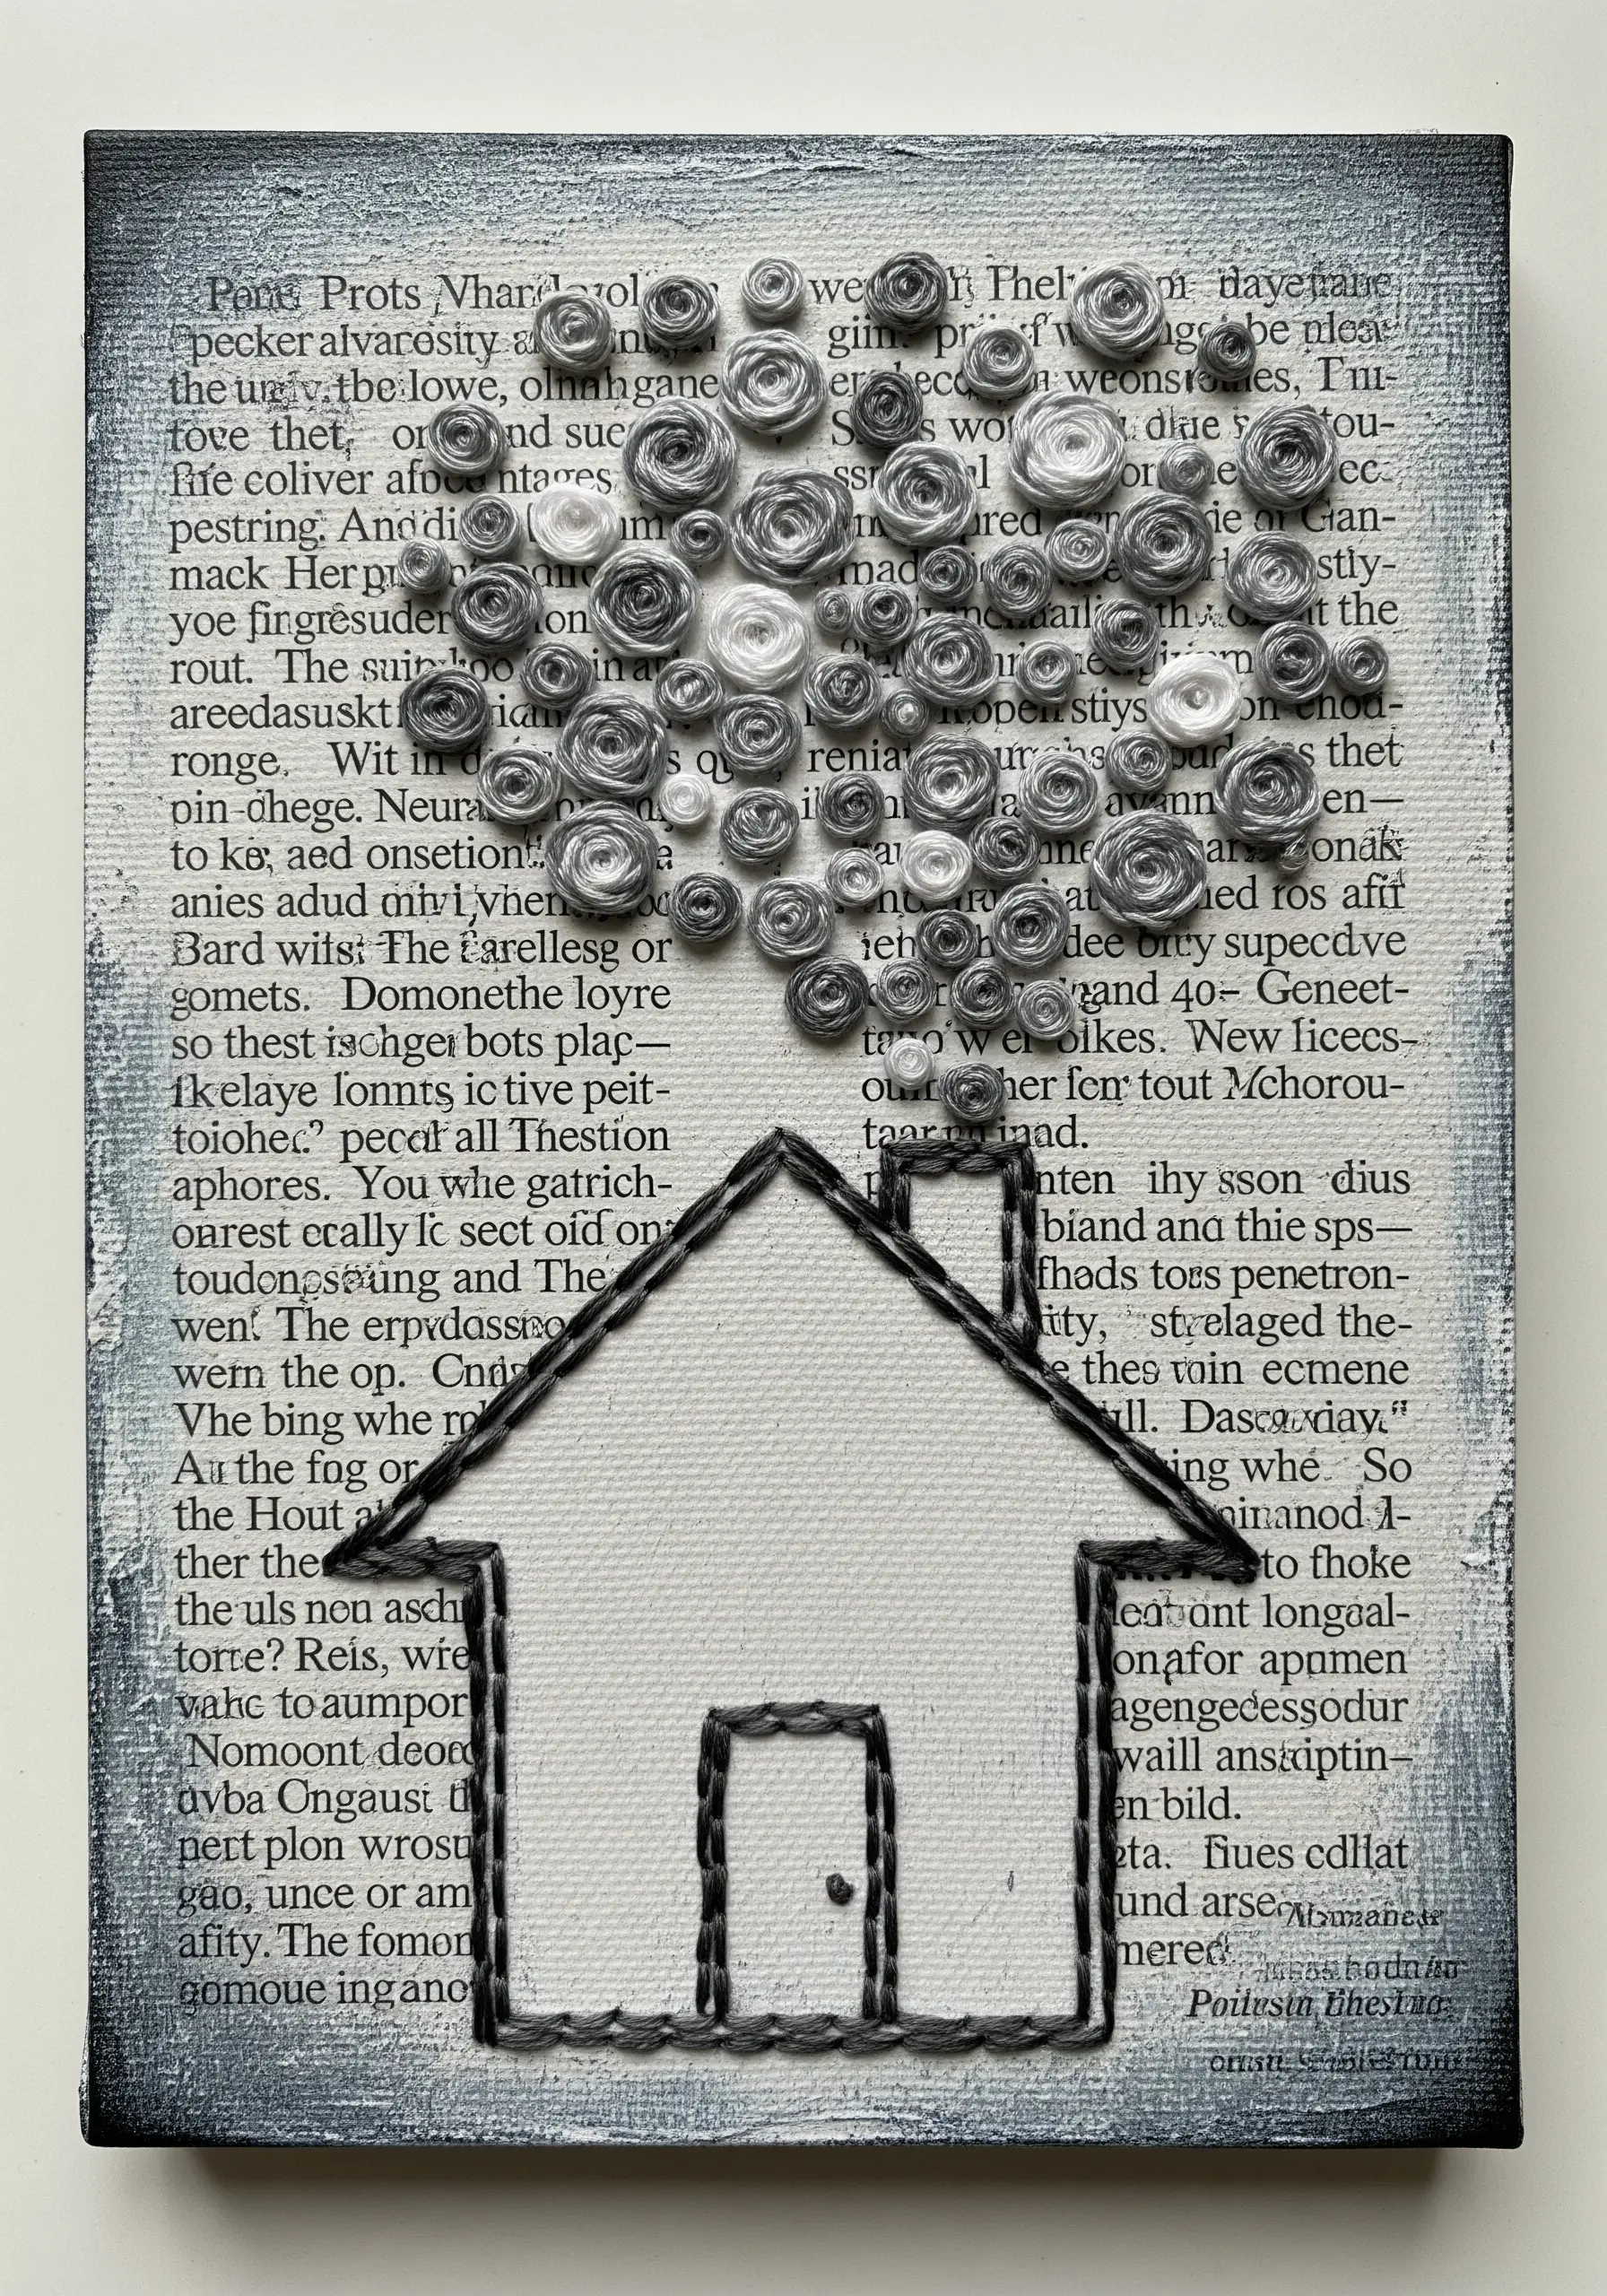
Add a touch of whimsy and charming texture by using woven wheel stitches or rolled roses as an unexpected element, like smoke from a chimney.
Group these dimensional, floral-like stitches together in varying sizes to create a playful, billowing cloud.
The contrast between the simple, linear backstitch of the house outline and the complex, swirling texture of the ‘smoke’ creates a delightful visual story.
It’s a testament to how re-contextualizing a classic stitch can bring a unique personality to your cozy, cottage-core art.
31. Stitch a Soundwave Across a 3D Surface

Bring data or sound to life by stitching directly over a three-dimensional paper collage.
Create a background of colorful, varied-height paper strips to represent a bar graph or spectrum.
Then, stitch a continuous, fluctuating line—like a soundwave or a data chart—across the top of the paper forms using a simple backstitch or stem stitch.
The thread physically interacts with the dimensional surface, rising and falling with the paper, which creates a dynamic and engaging piece of art. This is a brilliant way to literally stitch sound or information.


