

There’s a special kind of magic in transforming a simple blanket into something deeply personal. It’s not just about adding a decorative touch; it’s about infusing an everyday object with intention, texture, and a story only you can tell.
But perhaps you feel your stitching could be more refined, or you’re unsure how to translate an idea onto a challenging fabric like chunky knit or plush velvet. The secret isn’t in mastering hundreds of complex stitches, but in making thoughtful choices about the ones you already know.
Together, we’ll explore how adjusting thread weight can create dimension, how changing stitch direction can mimic nature, and how the right stabilizer can give you flawless results on any textile. You have the skill; now, let’s refine your technique and turn that cozy throw into a true work of art.
1. Render a Painterly Scene on Chunky Knits

Embroidering on a high-pile or chunky knit blanket requires a stabilizer to prevent your stitches from disappearing into the texture.
Apply a water-soluble topping film over your design area; this creates a smooth surface for your needle and dissolves away with water when you’re finished.
Use long and short stitch to fill the foxes and trees, varying the stitch direction to mimic the flow of fur or the angle of branches.
For such a thick base, use all six strands of floss or even a finer tapestry wool to ensure your design has presence and doesn’t look sparse.
2. Map the Night Sky with Metallic Threads
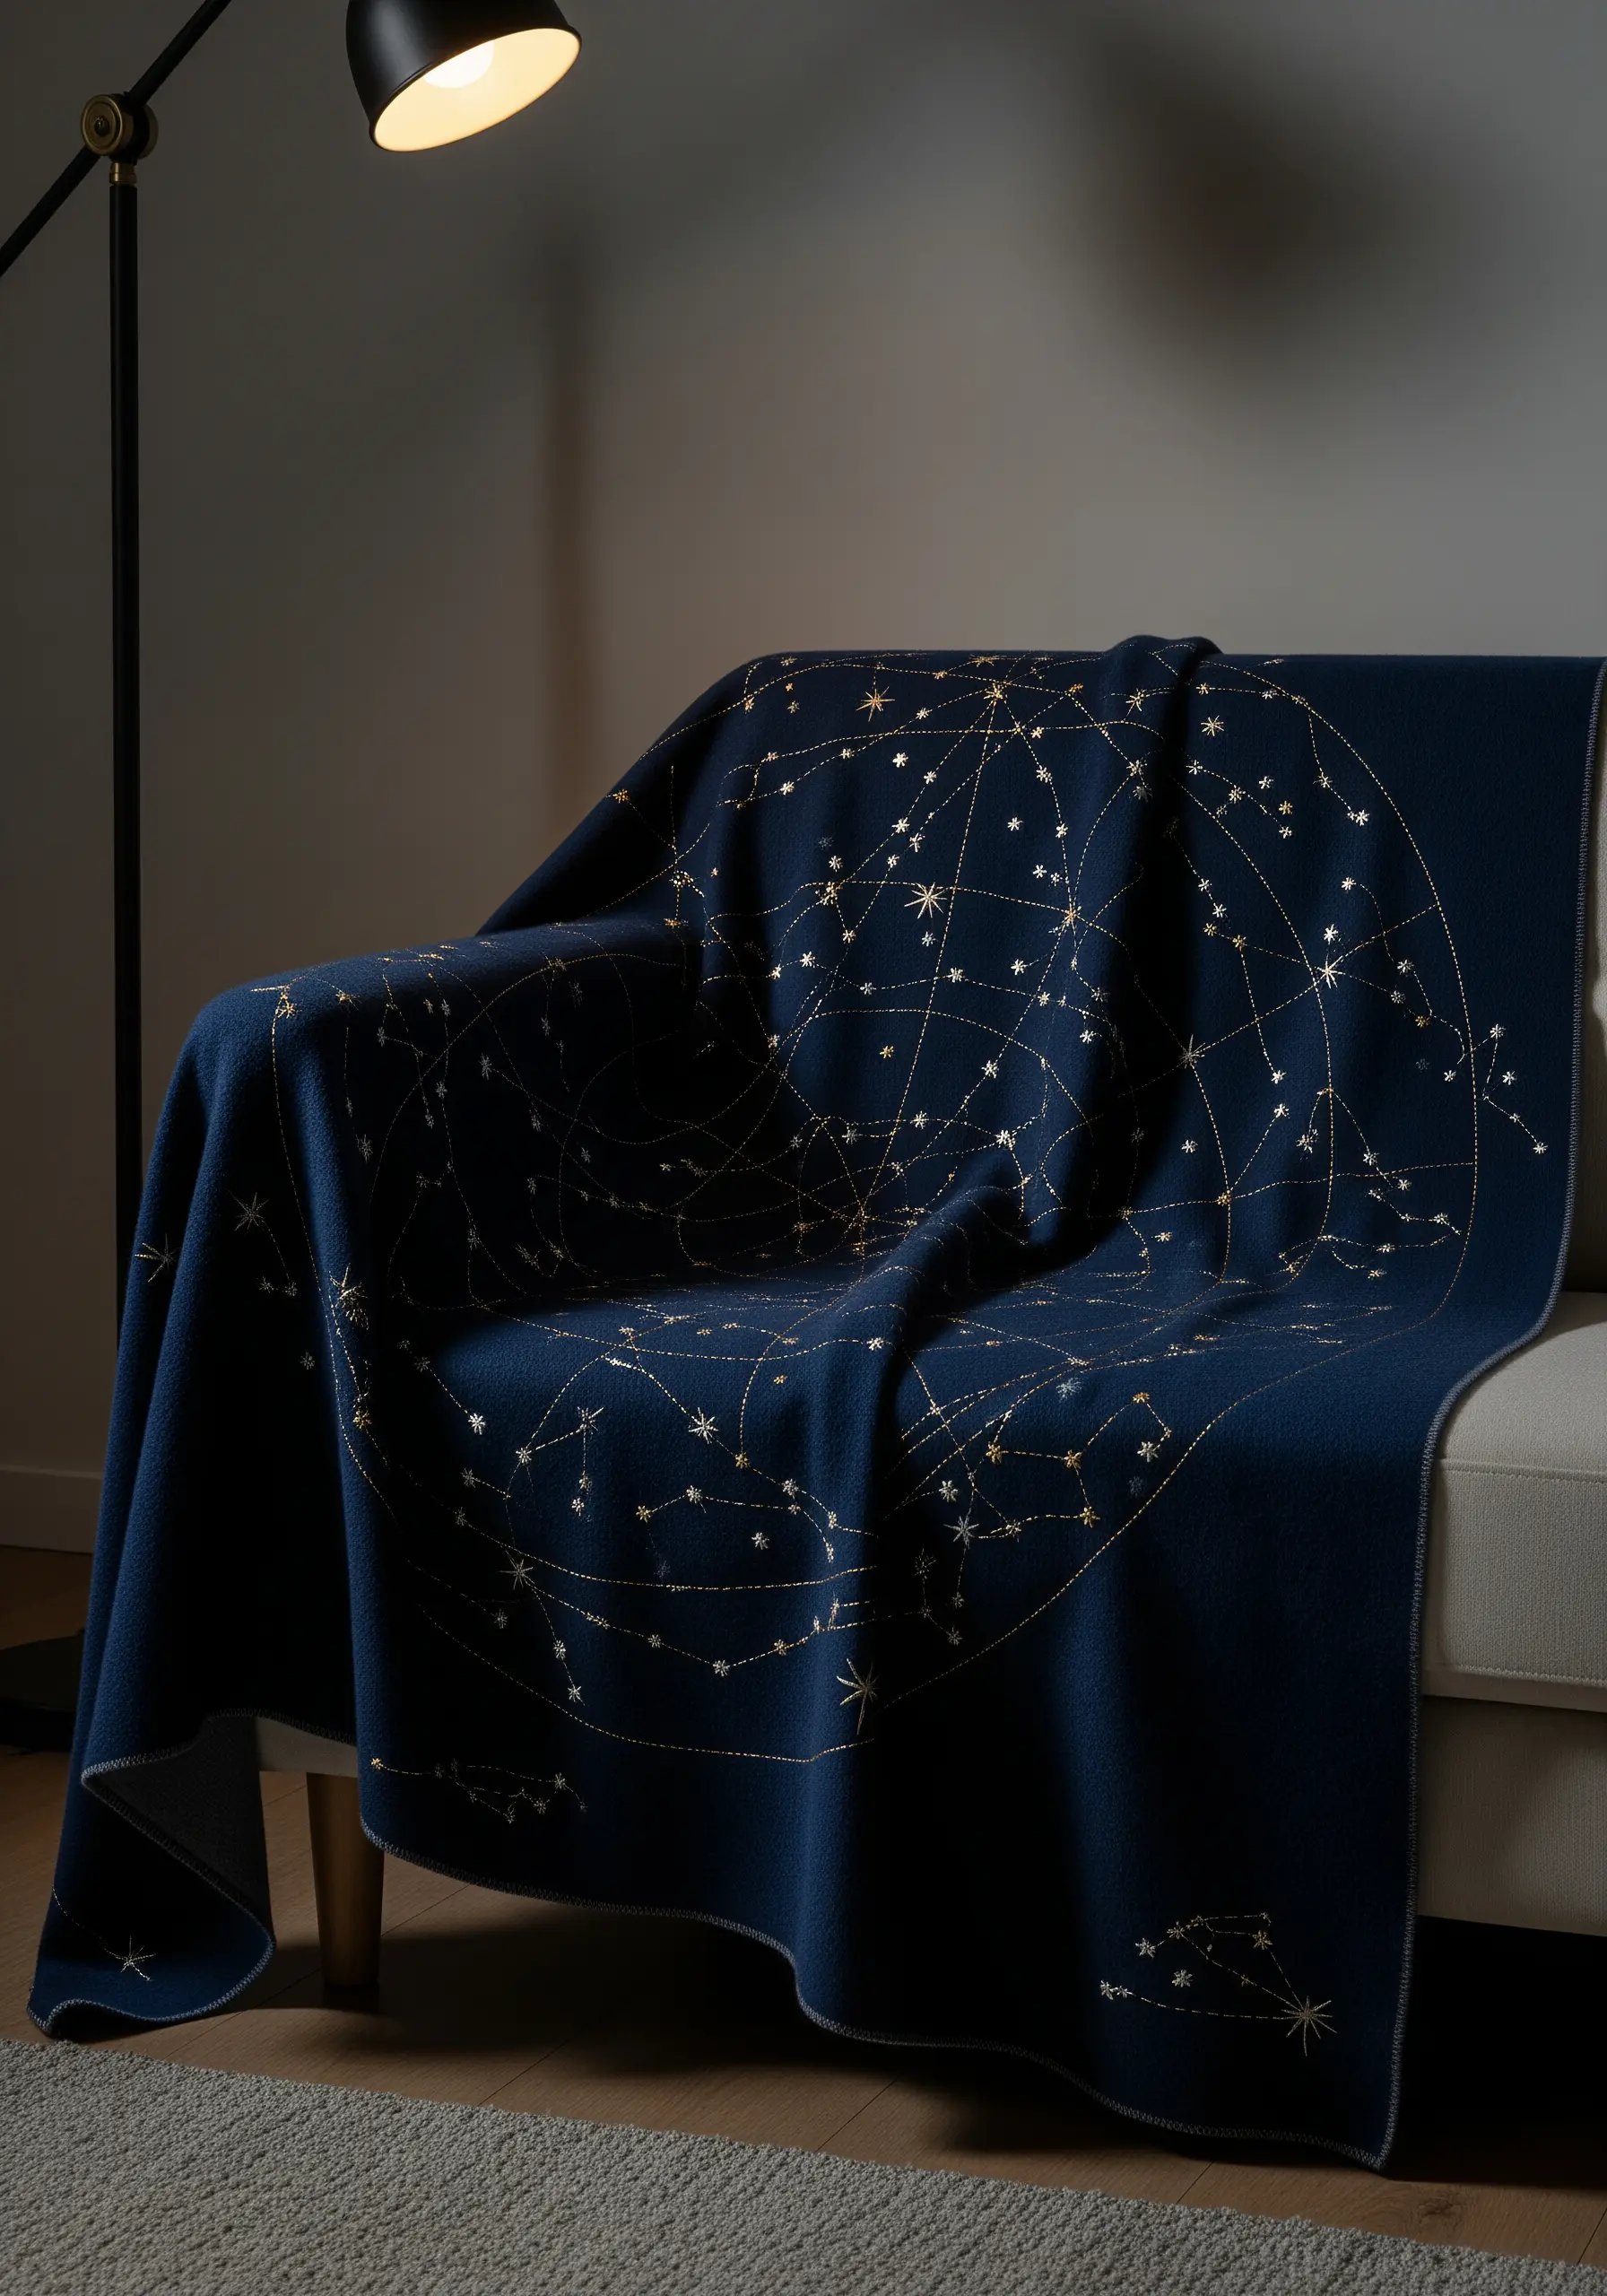
To create a delicate constellation map on a dark wool or cashmere throw, choose a fine, single-strand metallic thread for a subtle shimmer.
Work with shorter lengths of thread (no more than 12-14 inches) to minimize tangling and fraying, which metallic fibers are prone to.
Use a simple backstitch for the connecting lines and tiny, single-wrap French knots or seed stitches for the stars to maintain a minimalist aesthetic.
A blanket stitch finish on the edge, as seen here, provides a clean, professional frame for your celestial artwork.
3. Create Bold Monograms with Textured Stitches
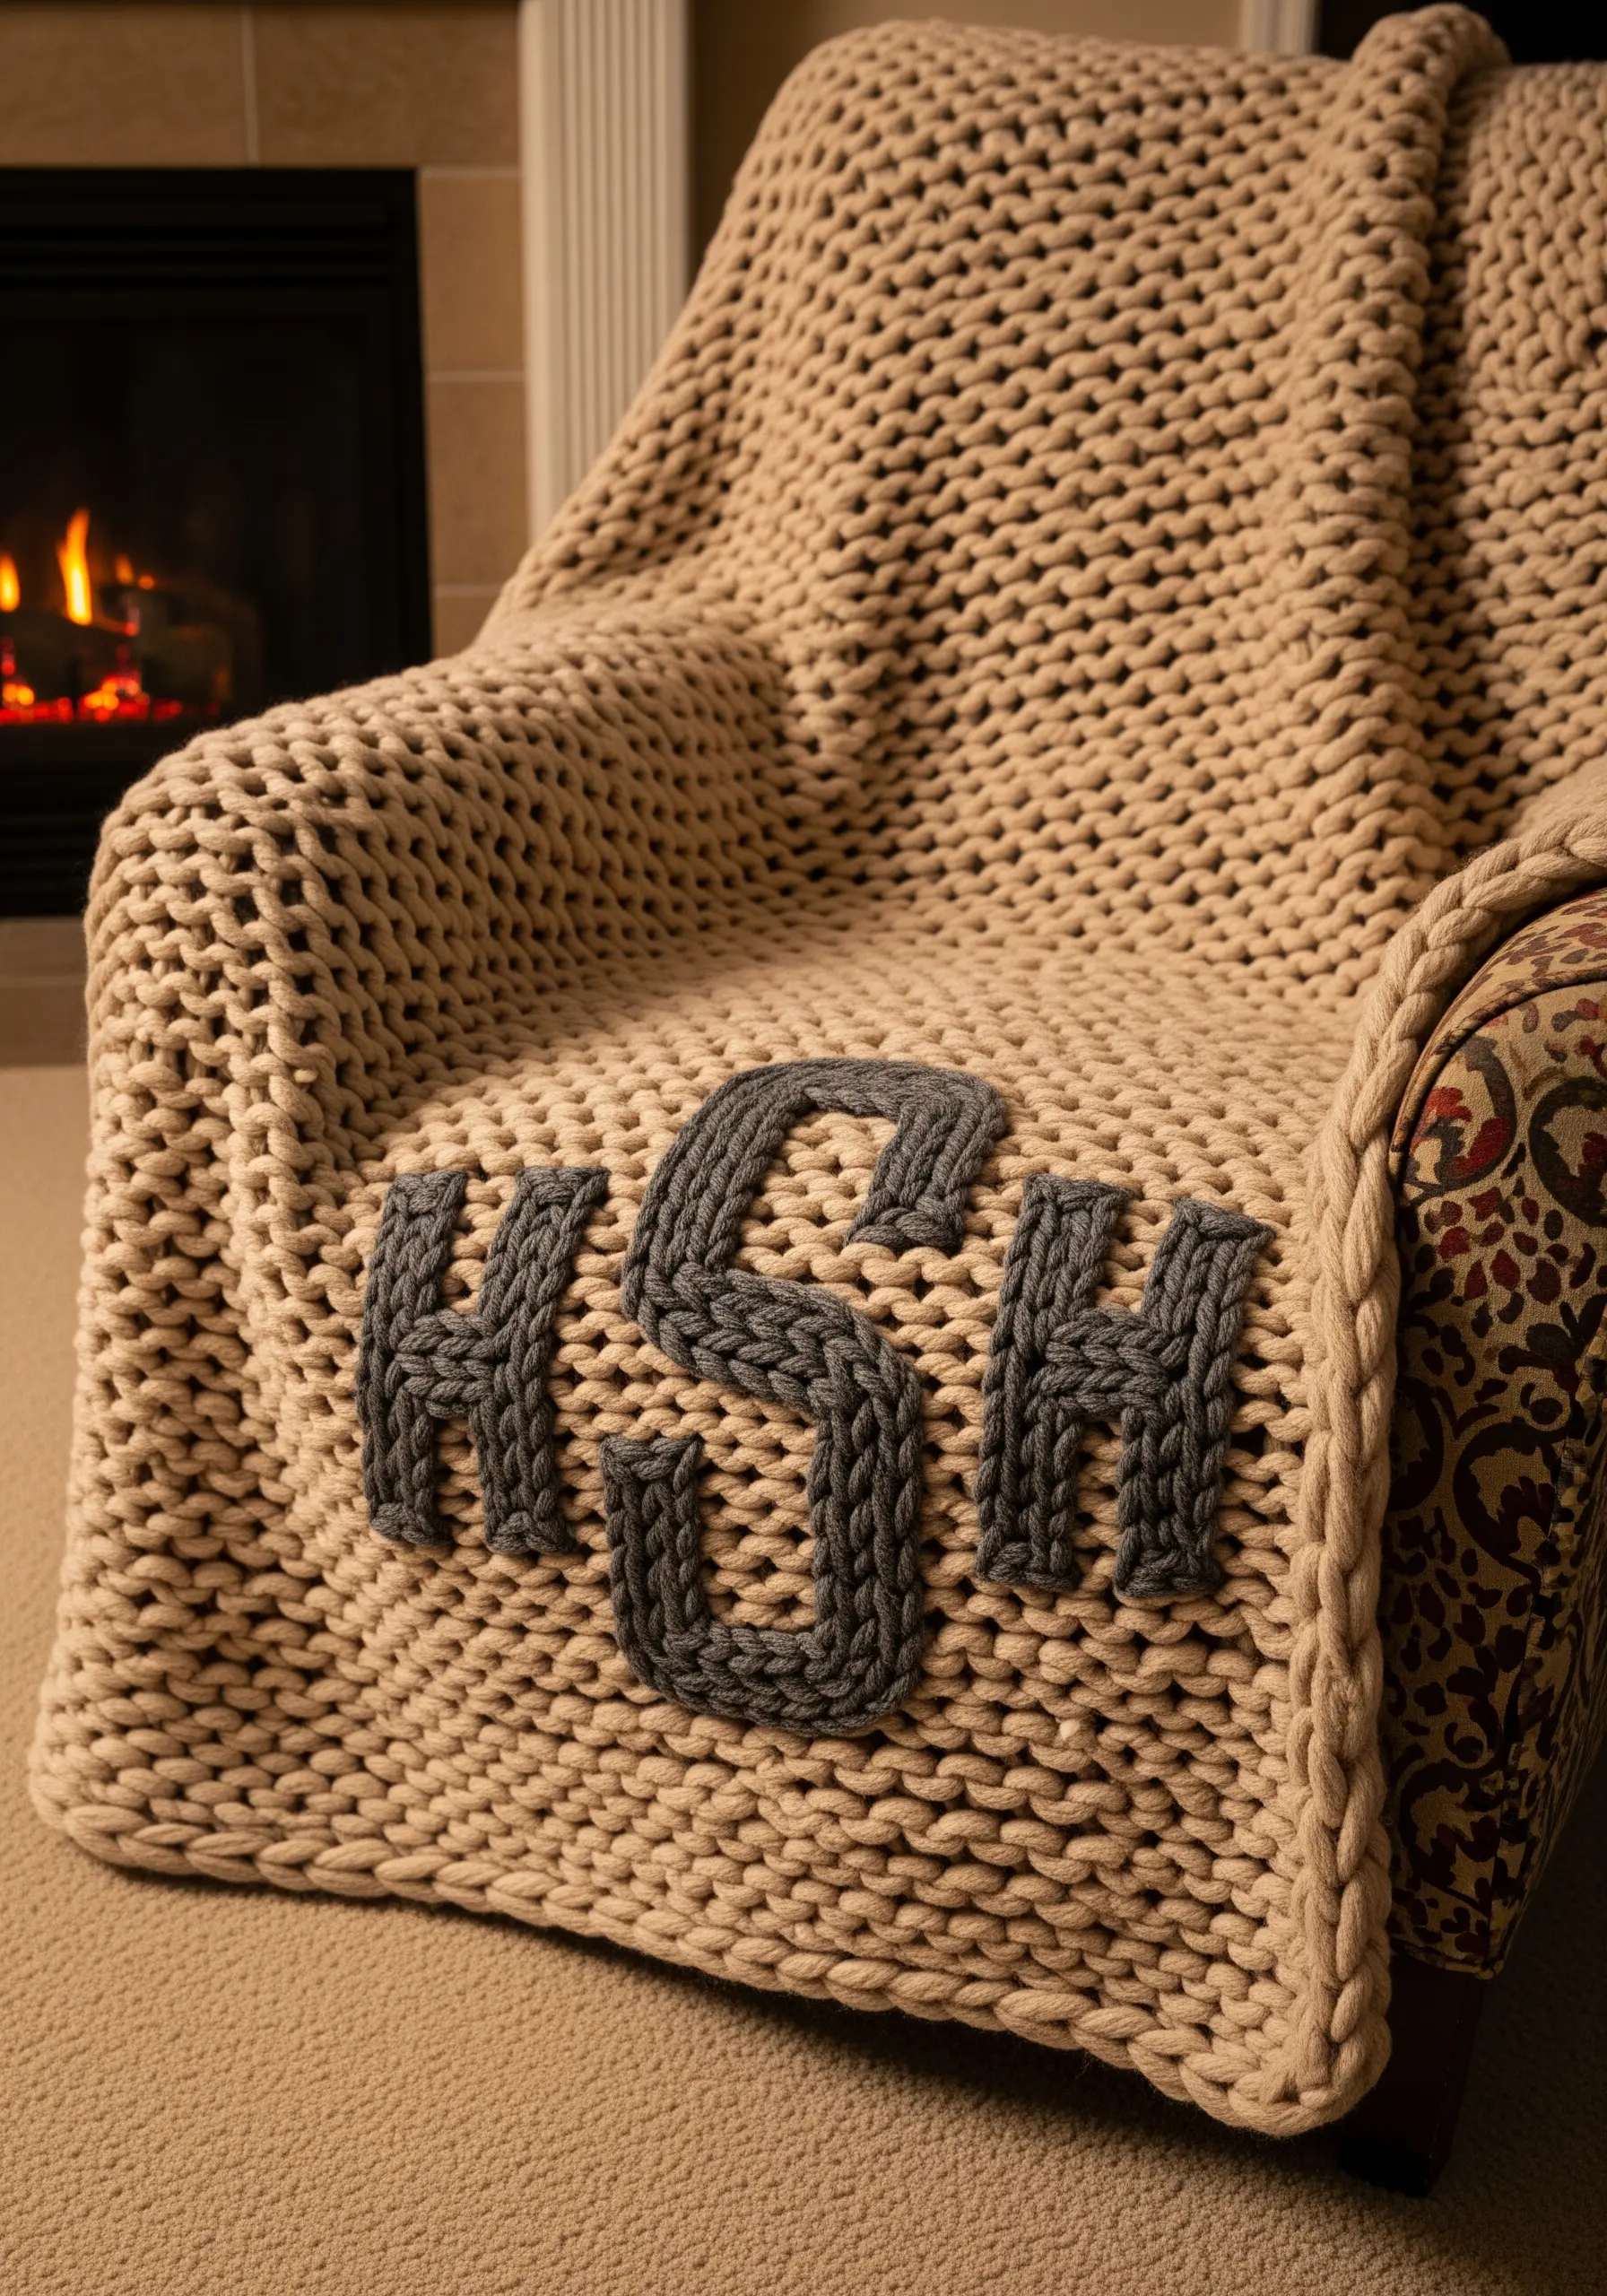
For a monogram on a heavily textured knit, traditional satin stitch won’t provide enough coverage or structure.
Instead, create the letters using a raised chain stitch worked in a thicker yarn, like DK or worsted weight wool.
This technique creates a braided texture that complements the blanket’s knit structure while remaining distinct and legible.
To ensure perfect shaping, trace your letters onto a tear-away stabilizer and stitch directly through it before gently removing the excess.
4. Stitch a Serene Mandala on Soft Jersey

When embroidering on a stretchy fabric like jersey fleece, a permanent cut-away stabilizer on the back is essential to prevent puckering and distortion.
Use a simple backstitch or stem stitch for the outlines to achieve clean, defined lines that honor the design’s symmetry.
Choose a limited palette of three to four harmonious colors to maintain the calming, meditative quality of floral mandala embroidery ideas.
Keep your thread tension consistent and slightly looser than you would on woven fabric to accommodate the material’s natural stretch.
5. Define Geometry with Dimensional Couching

Achieve bold, graphic lines on a textured blanket by using couching, a technique where you lay a thick cord or yarn on the surface and tack it down with a thinner thread.
This method adds dimension and texture without pulling or distorting the base fabric, making it ideal for large-scale geometric patterns.
Play with contrast by using a different color for your tacking stitches, creating a subtle dotted line effect over the main cord.
The result is a highly tactile design that feels both modern and rooted in traditional textile art.
6. Weave Celestial Motifs with Punch Needle
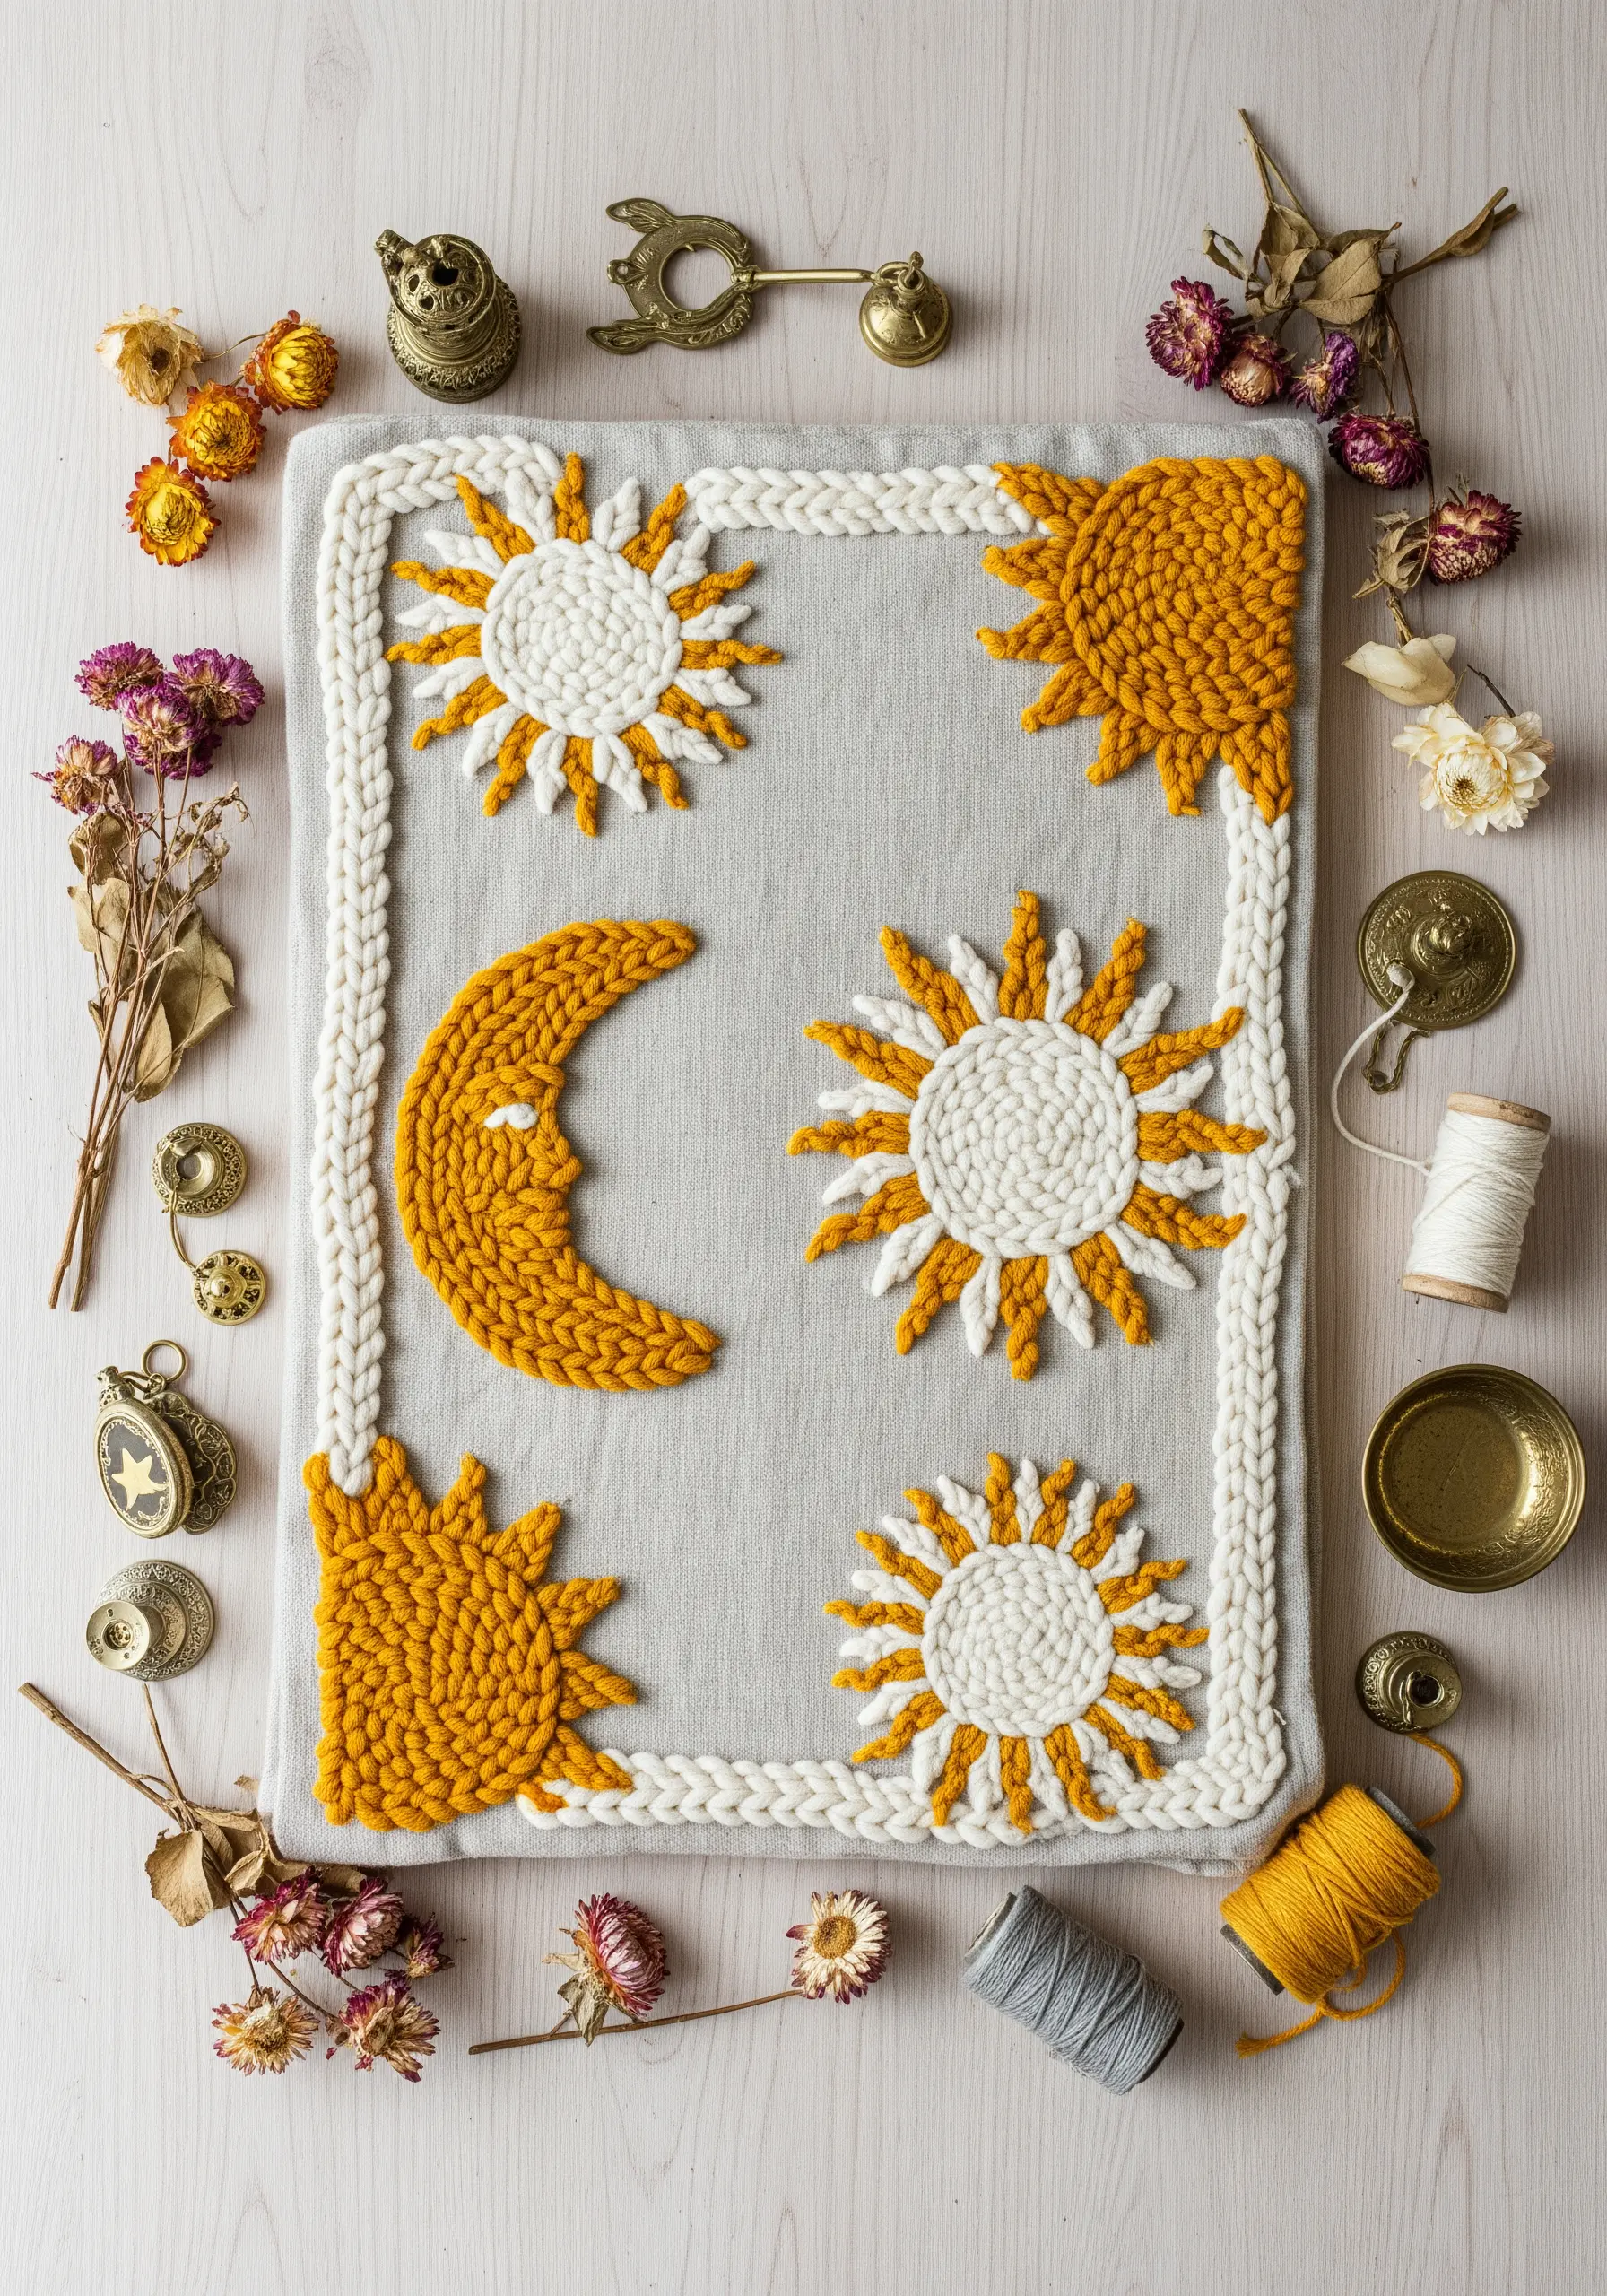
For a plush, high-texture effect, use a punch needle with chunky yarn to create raised sun and moon motifs.
This technique is faster than traditional embroidery for filling large areas and results in dense, carpet-like loops that are incredibly tactile.
Work from the back of the fabric to create loops on the front, adjusting your needle’s loop height for varied texture.
Frame your collection of motifs with a simple, hand-braided border using the same yarn to create a cohesive wall hanging or decorative mat.
7. Add a Touch of Frost with Metallic Snowflakes

Embellish a plush fleece blanket with sparkling snowflakes using a silver or icy blue metallic thread.
To prevent the delicate thread from snagging on the fleece, use a larger-eyed needle, like a chenille needle, which creates a cleaner path through the fabric.
A simple backstitch for the main snowflake arms and tiny straight stitches for the intricate details will keep the design looking crisp and delicate.
Cluster the snowflakes near a corner for an asymmetrical composition that feels more organic and less like a repeating pattern.
8. Frame a Landscape on a Plaid Throw
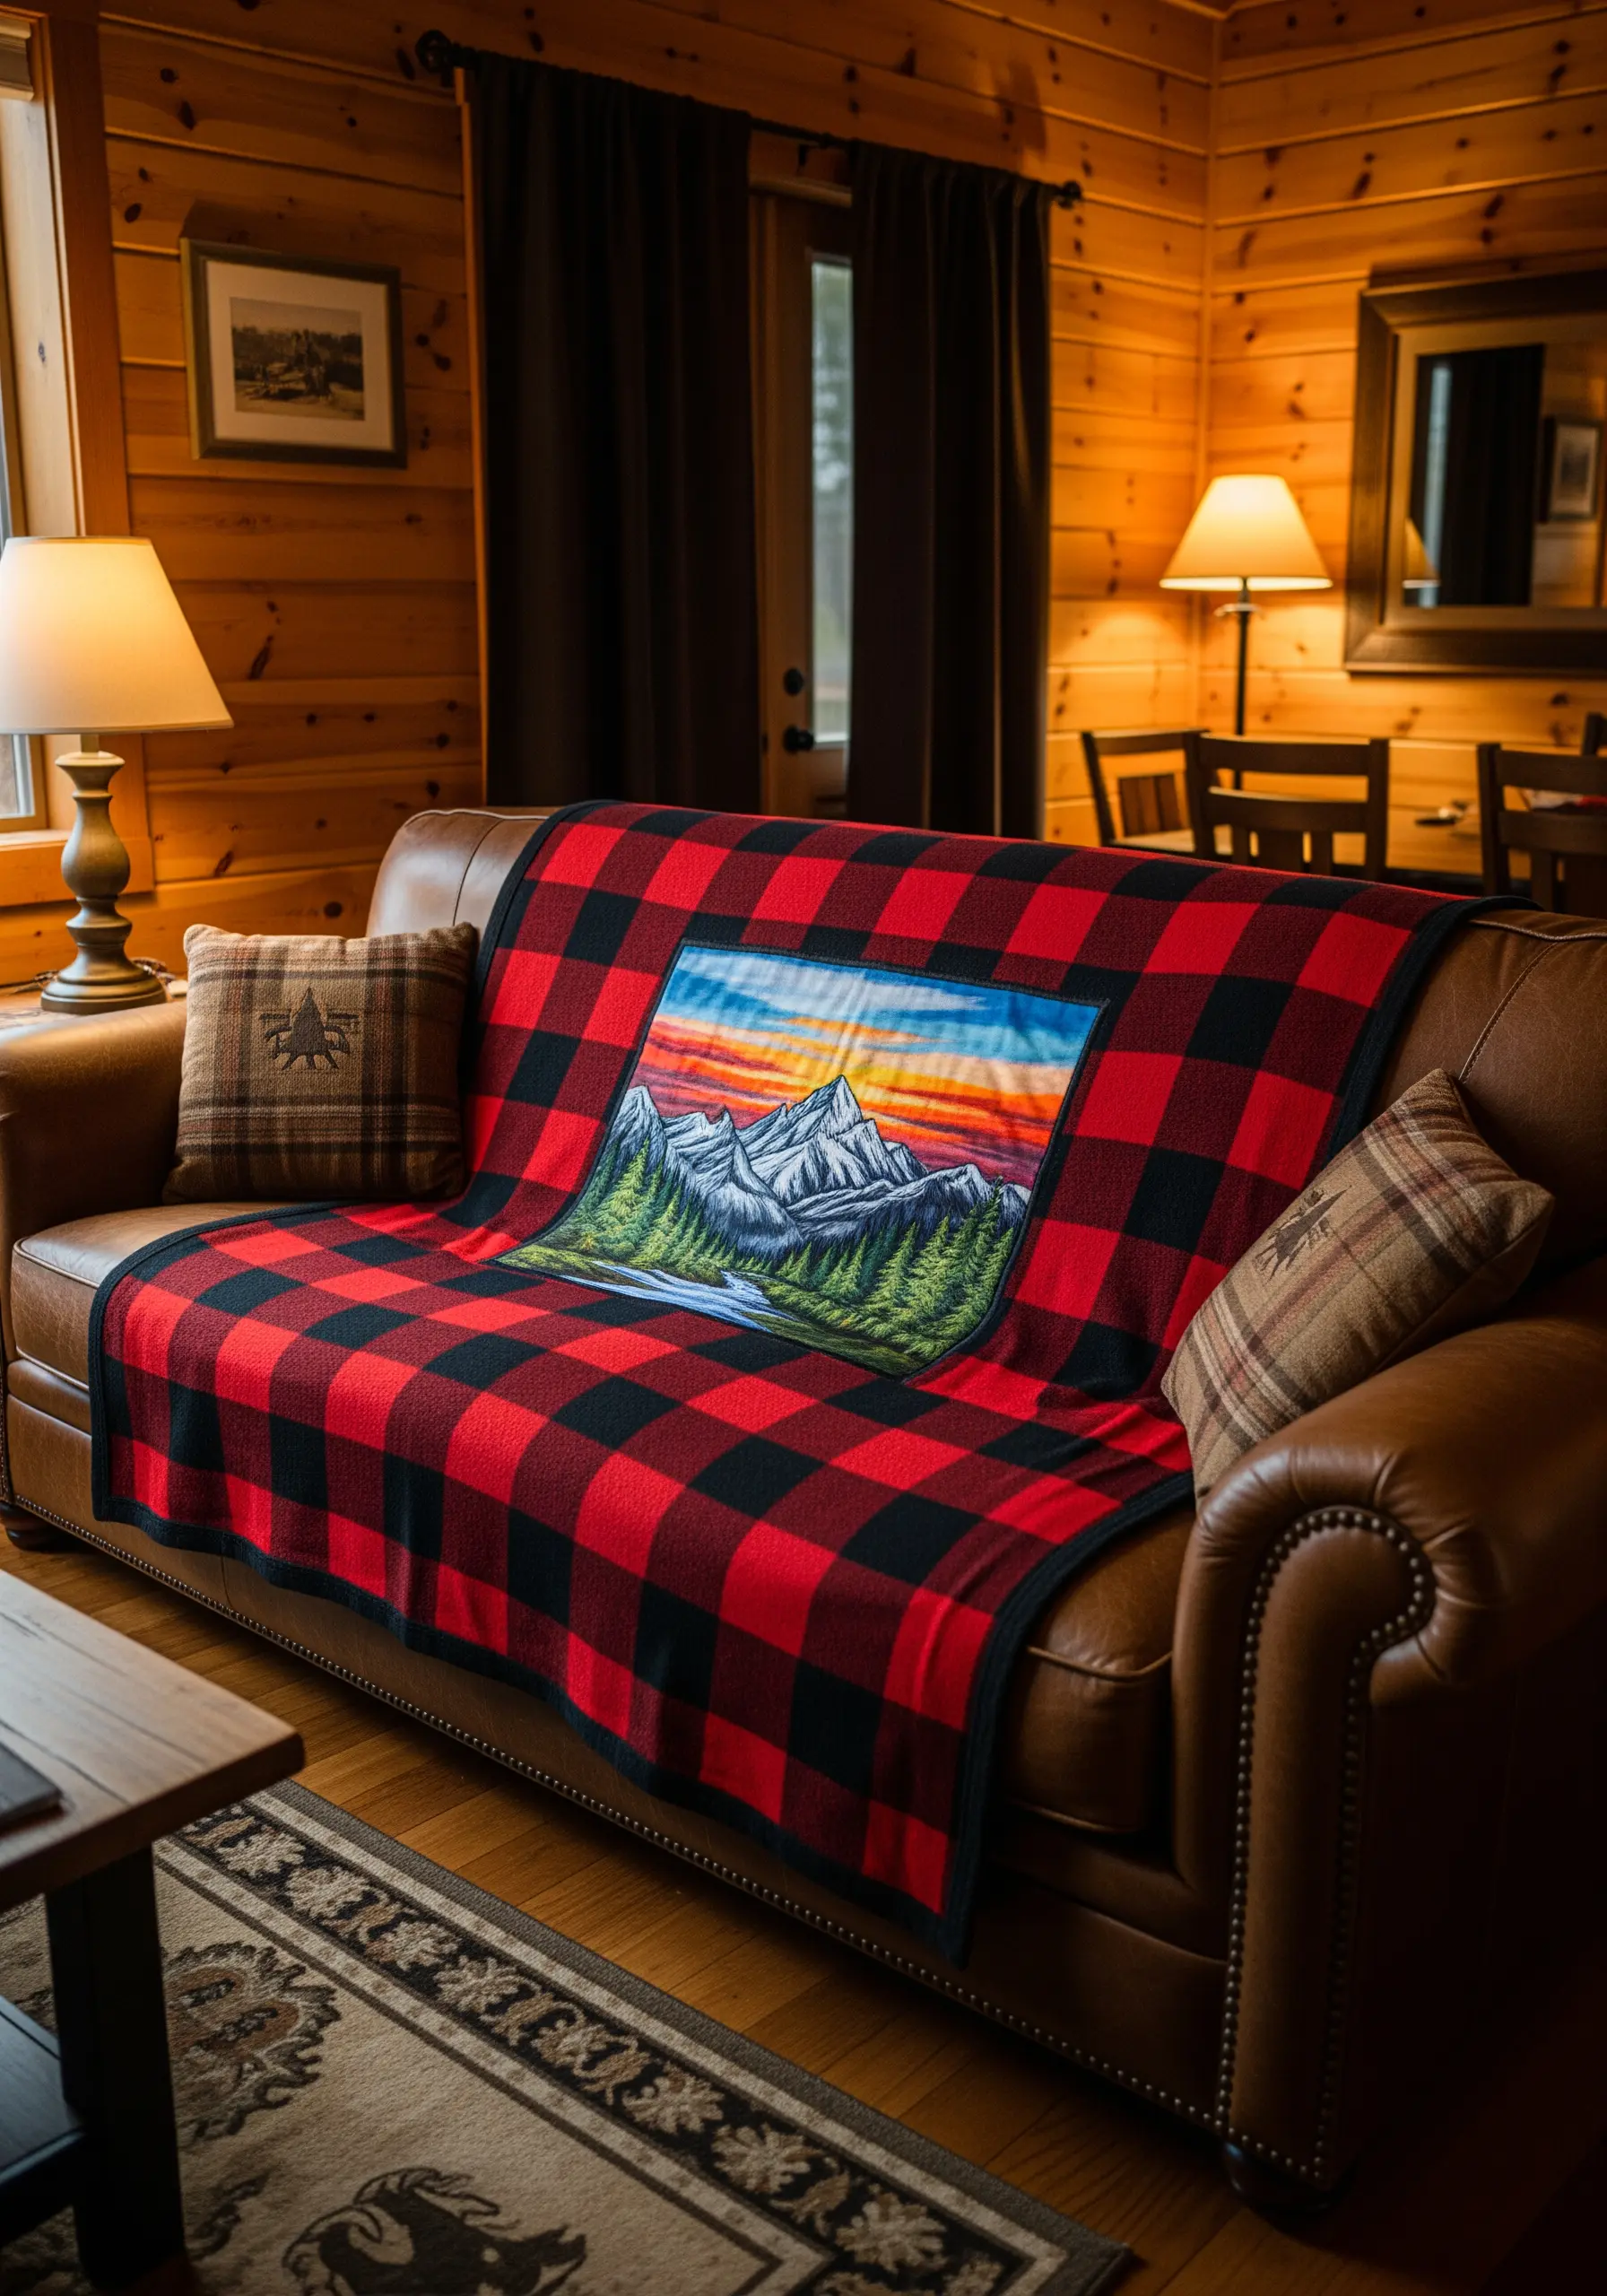
Integrate a fully embroidered panel into a classic plaid blanket for a stunning focal point.
Stitch your landscape scene on a separate piece of sturdy fabric, like linen or cotton canvas, which can handle dense satin stitching without puckering.
Use long and short stitch to create smooth color gradients in the sky and mountains, giving the scene a painterly quality.
Once complete, carefully appliqué the embroidered panel onto the blanket, finishing the edges with a tight satin stitch border for a seamless look.
9. Scatter Botanical Sketches Across a Blanket
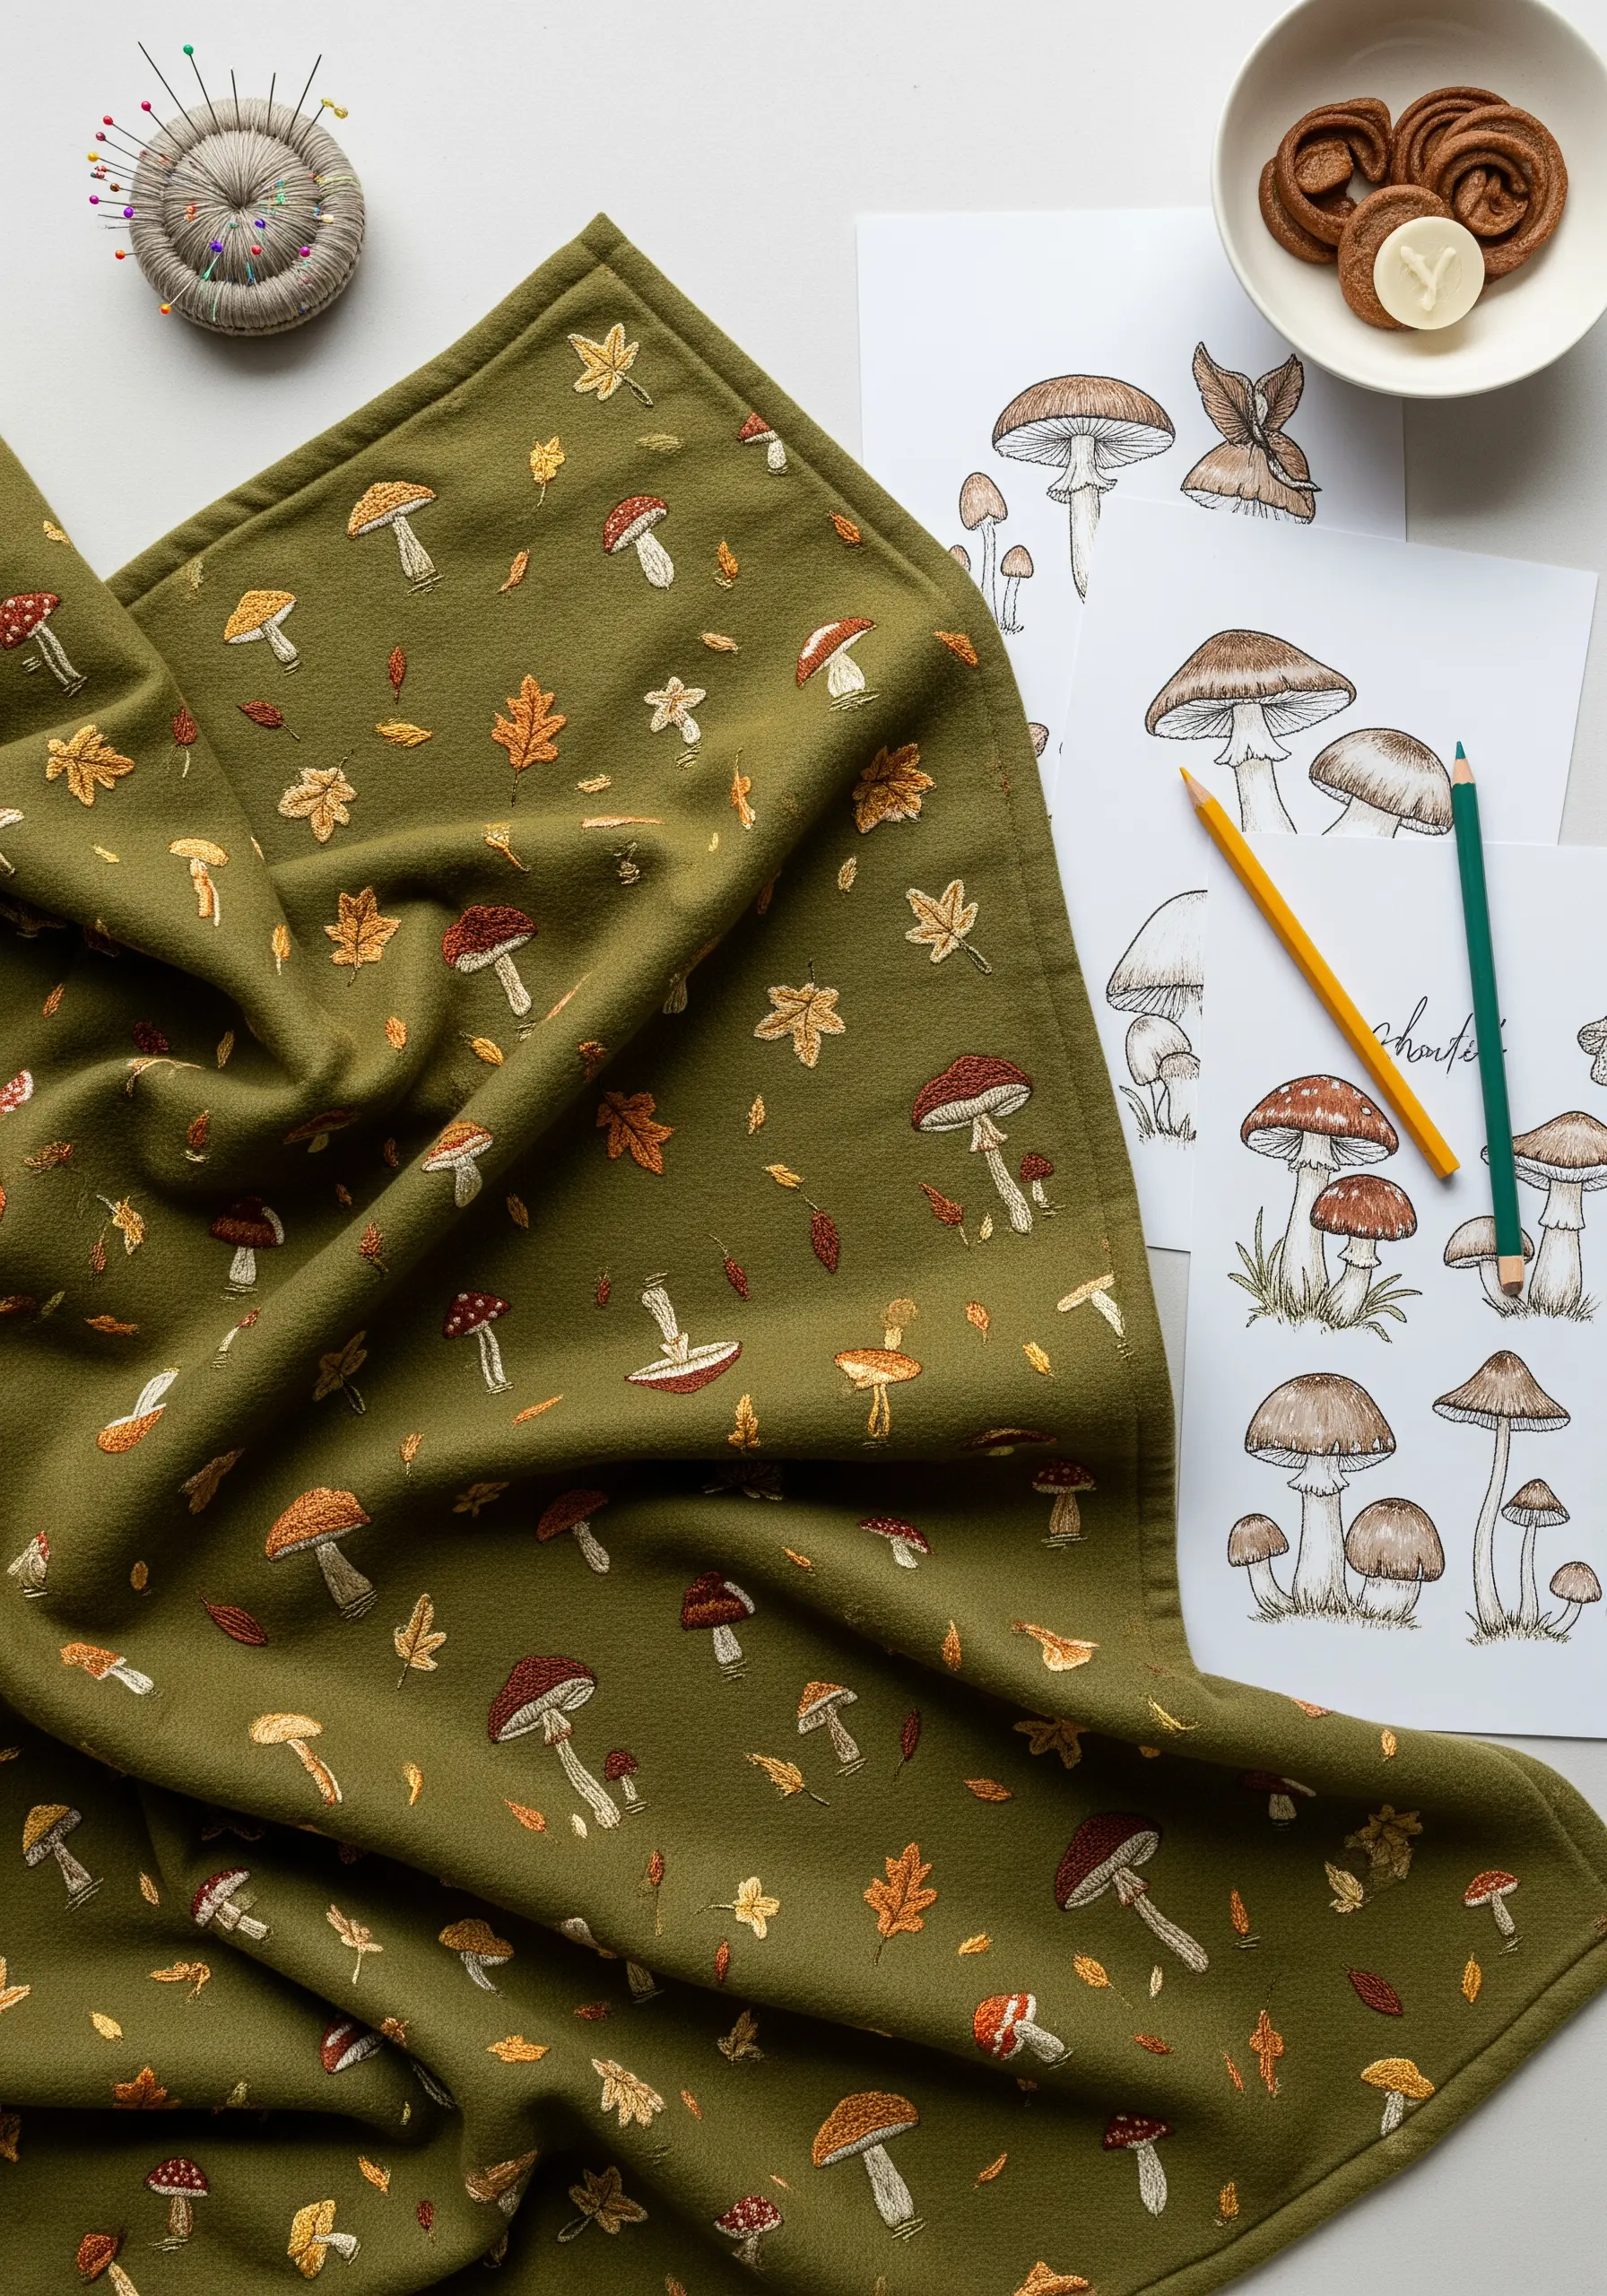
Create a charming, all-over pattern by scattering small, hand-embroidered botanical motifs across a fleece or flannel throw.
Keep the stitches simple—satin stitch for mushroom caps, stem stitch for stems, and single straight stitches for leaf veins—to maintain a delicate, illustrative feel.
Use a limited, earthy color palette to ensure the scattered design feels cohesive rather than chaotic.
Vary the orientation and spacing of each motif to give the blanket a natural, ‘forest floor’ appearance that invites closer inspection.
10. Create an Opulent Border with Peacock Feathers

For a design with intricate color changes, like these peacock feathers, organize your floss beforehand and work in small sections to map out the gradients.
Use a single strand of metallic gold thread to outline the ‘eye’ of each feather, adding a touch of shimmer that catches the light.
The feather barbs are created with dense satin stitches angled outward from the central shaft, giving them a realistic, fanned appearance.
This kind of dense, corner-focused design adds a luxurious weight to the blanket, making it drape beautifully.
11. Capture Delicate Movement with Dandelion Seeds
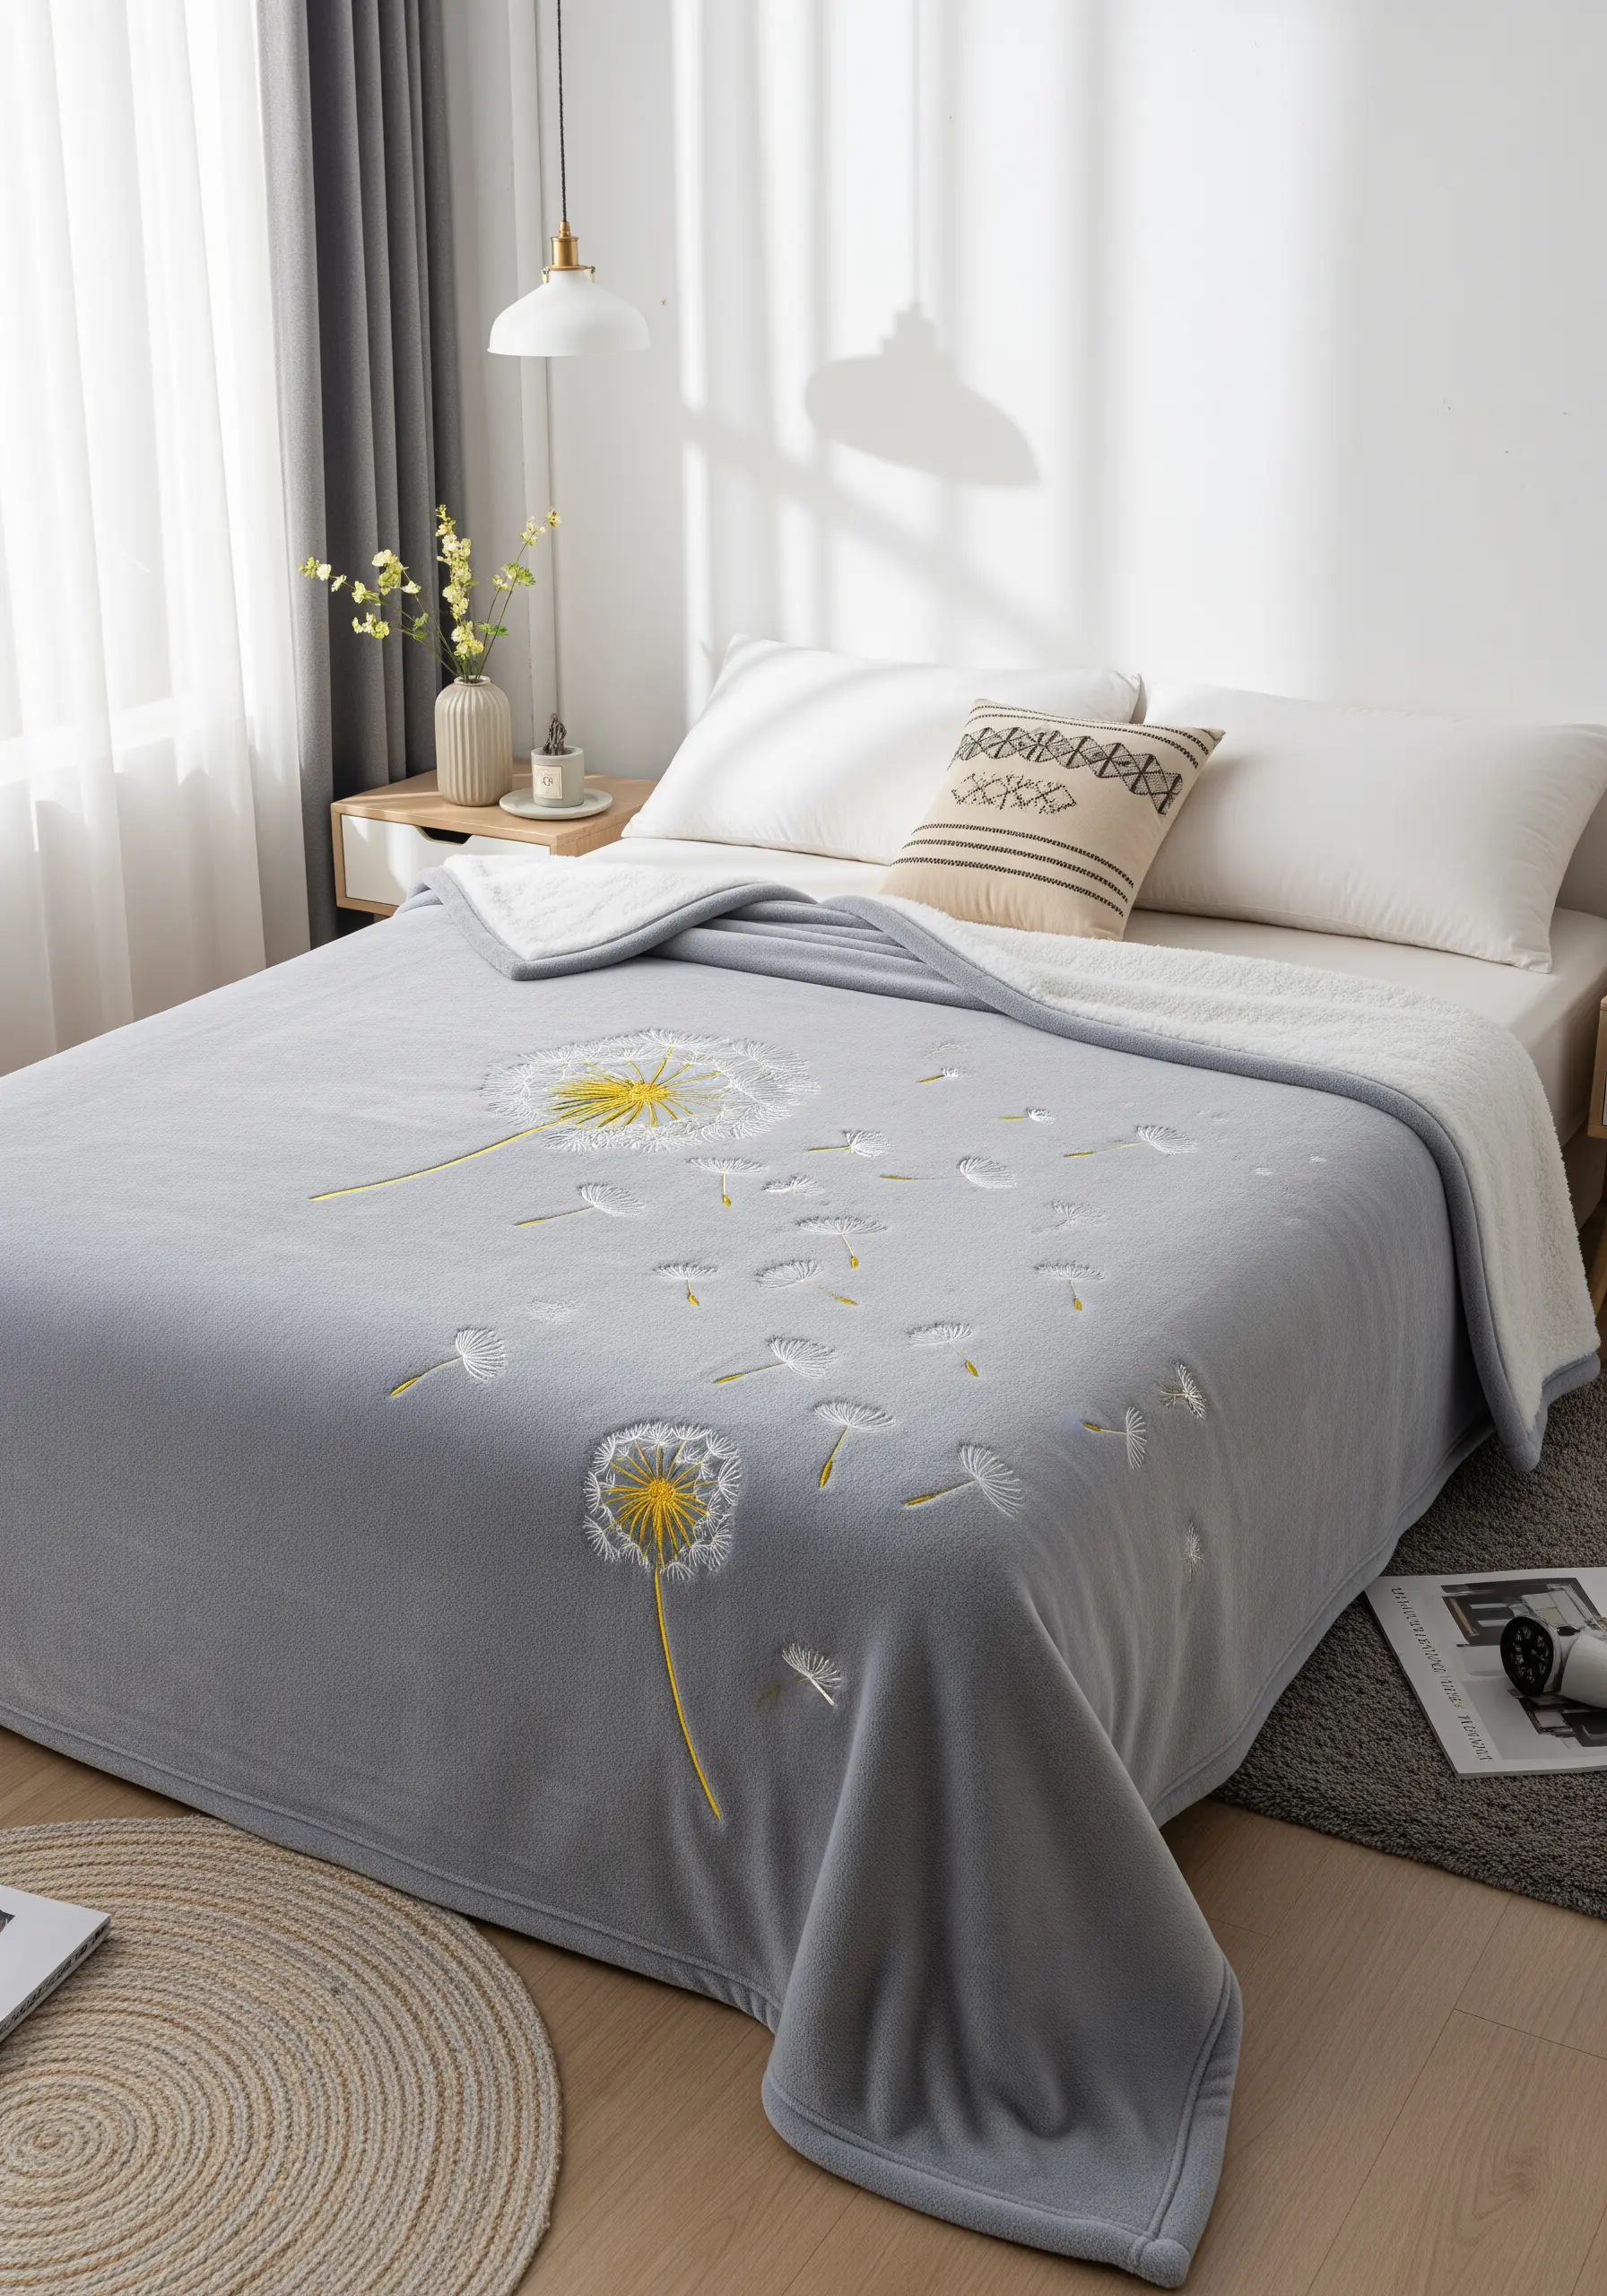
Suggest the feeling of wind and movement by embroidering dandelion seeds floating across the surface of a soft blanket.
Use a fine, single strand of white floss for the parachute-like pappus, created with detached chain stitches or single straight stitches fanning from a central point.
A touch of yellow satin stitch for the flower head and green stem stitch for the stalk anchors the design.
The sparse, asymmetrical placement is key to the design’s success, creating a sense of lightness and motion.
12. Build a Sunflower with Textured Weaving
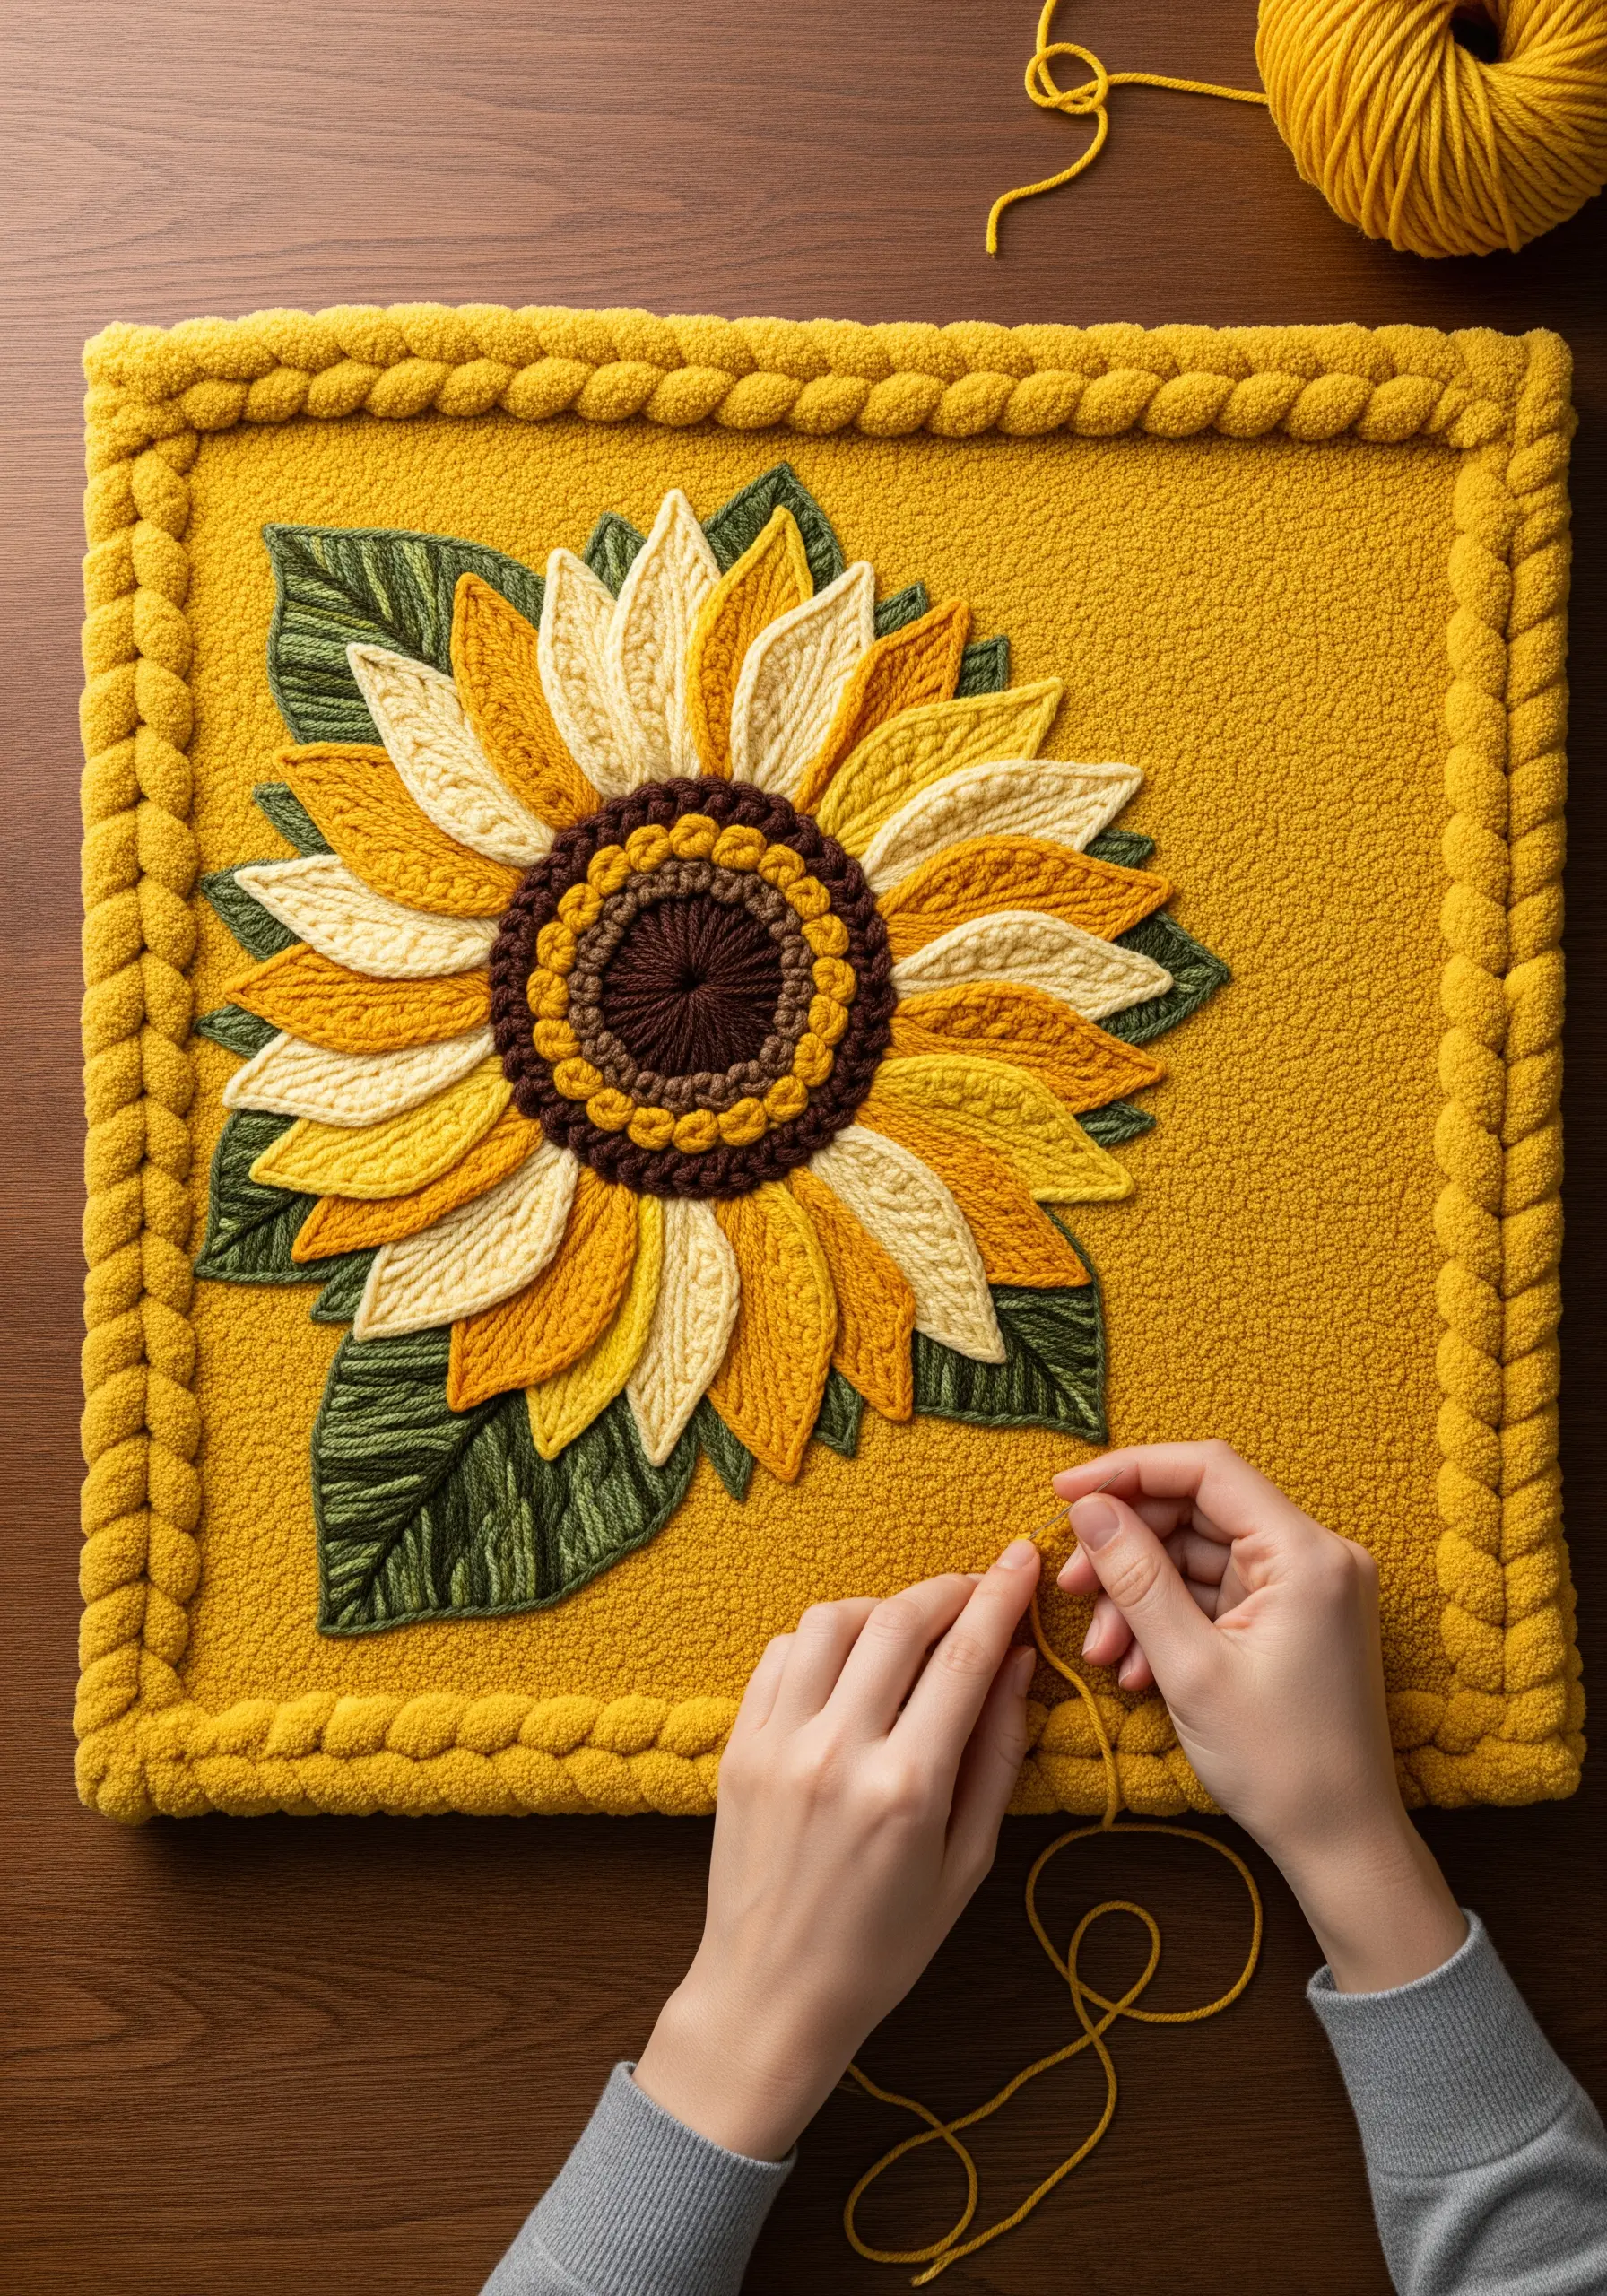
Combine embroidery with weaving techniques to create a sunflower with incredible dimension and texture.
Create the petals using a base of straight stitch ‘spokes’ and then weaving your yarn over and under them, a technique known as needle weaving.
For the flower’s center, use a dense cluster of French knots in varying shades of brown to mimic the texture of seeds.
This highly tactile approach turns a simple floral motif into a captivating piece of high-texture fabric collage.
13. Define Modern Portraits with Continuous Line Art
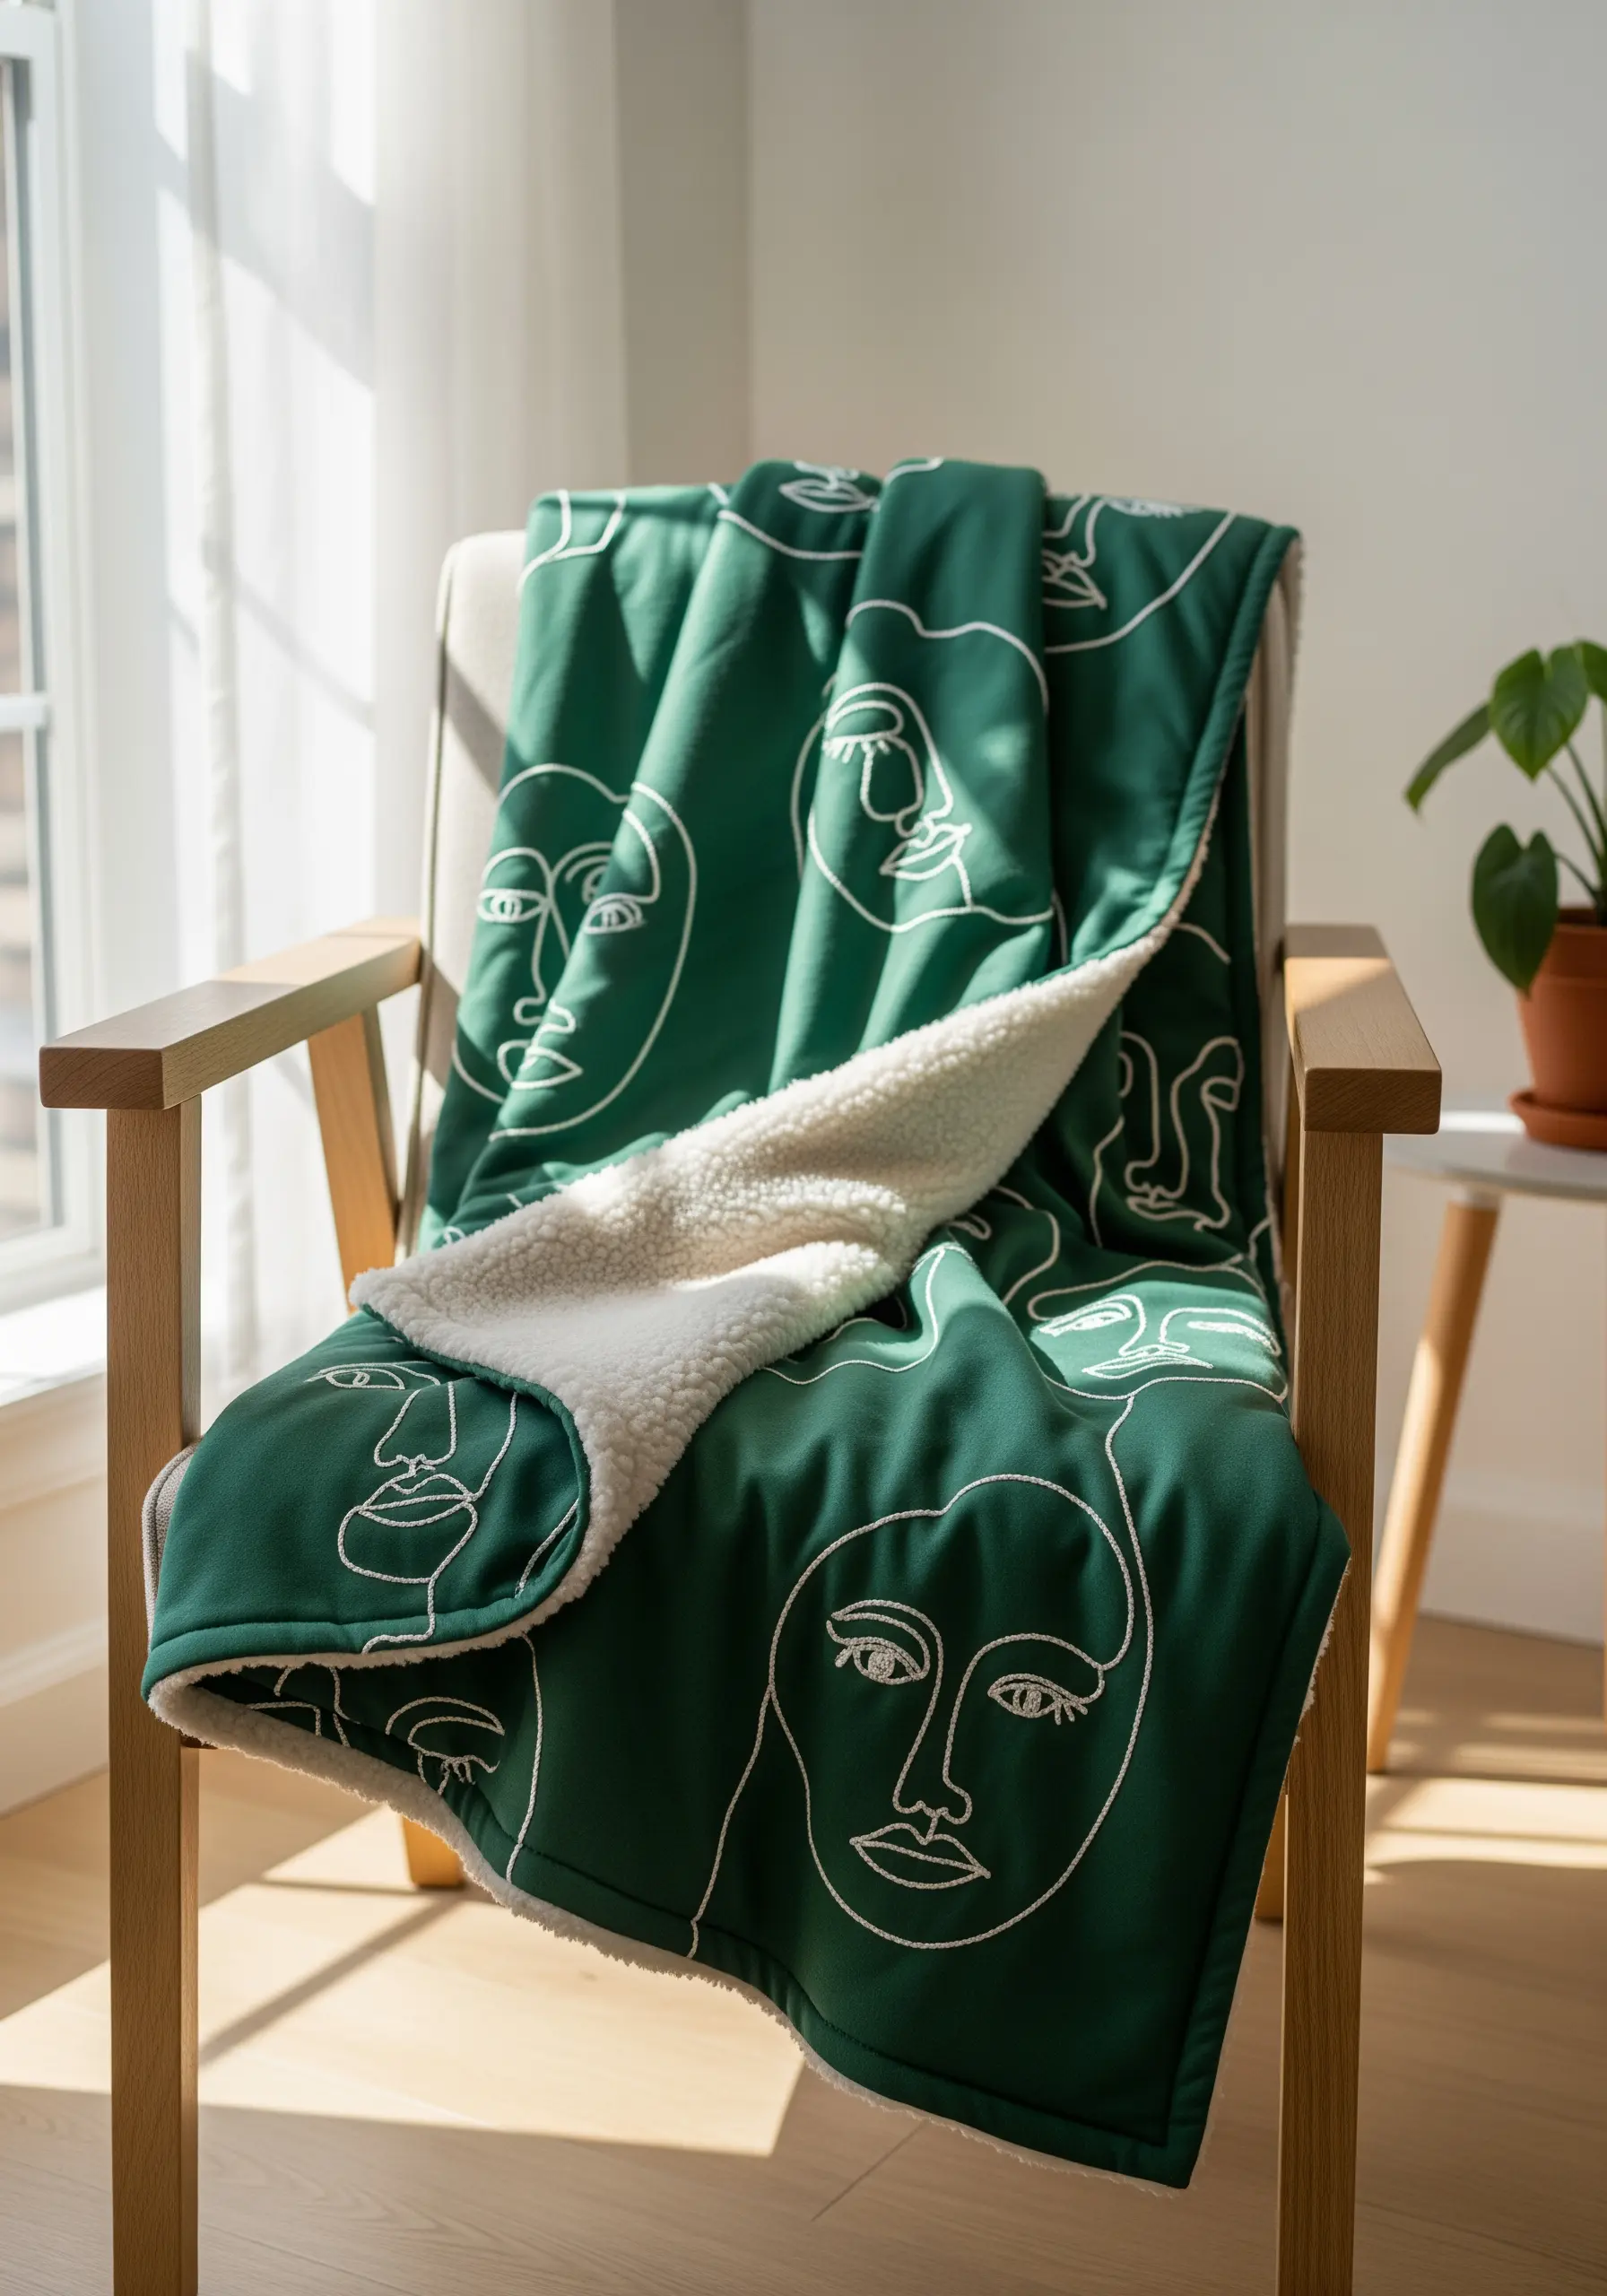
Emulate the elegance of a continuous line drawing by using a single, unbroken stitch to create abstract faces.
A whipped backstitch is perfect for this, as it creates a smooth, raised line with no visible gaps between stitches.
Trace your design onto a water-soluble stabilizer to ensure the lines flow exactly as intended, capturing the essence of the sketch.
The high contrast of white thread on a dark green background makes these line art motifs feel bold, graphic, and effortlessly modern.
14. Create a Coastal Collection with Appliqué
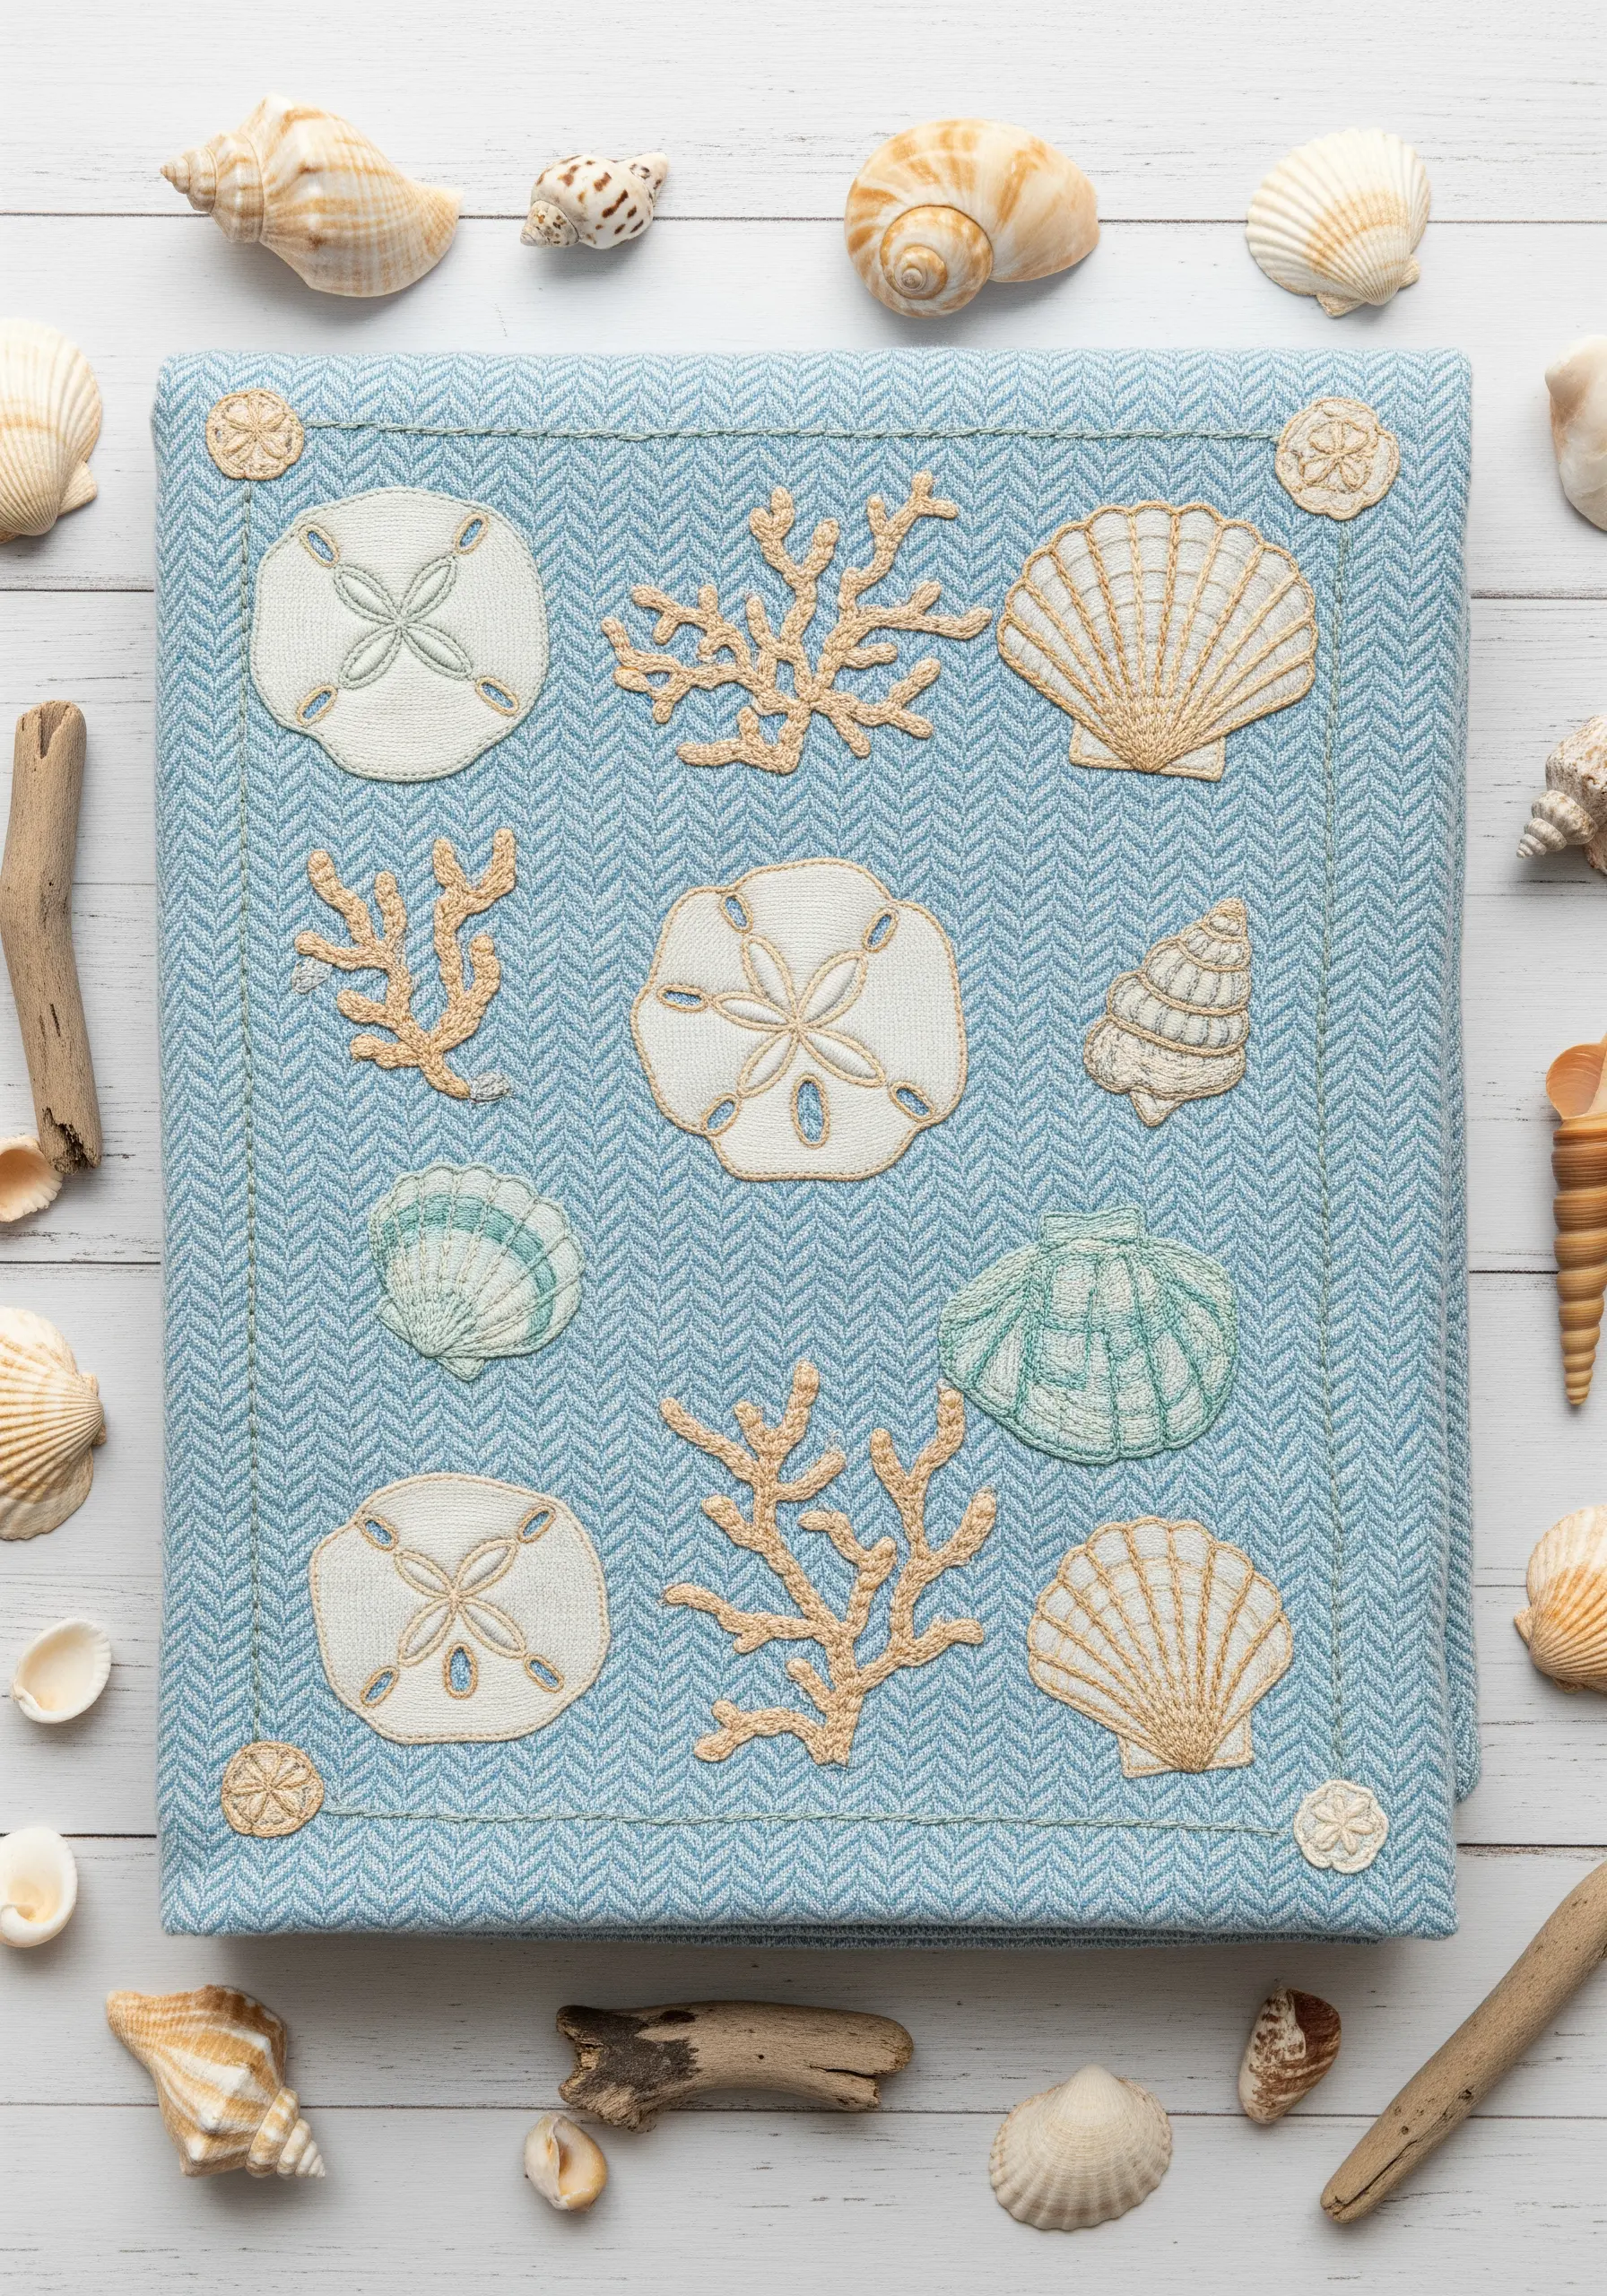
Combine appliqué with embroidery to create clean, graphic coastal motifs on a textured fabric like this herringbone weave.
Cut your shell and sand dollar shapes from a contrasting fabric (like felt or linen), fuse them in place, and then secure the edges with a neat blanket stitch.
Add fine details, like the lines on the shells, using a simple backstitch directly on top of the appliqué pieces.
This layered technique adds subtle dimension and allows you to achieve crisp shapes that would be difficult with fill stitches alone.
15. Go Bold and Playful with Felt Appliqué
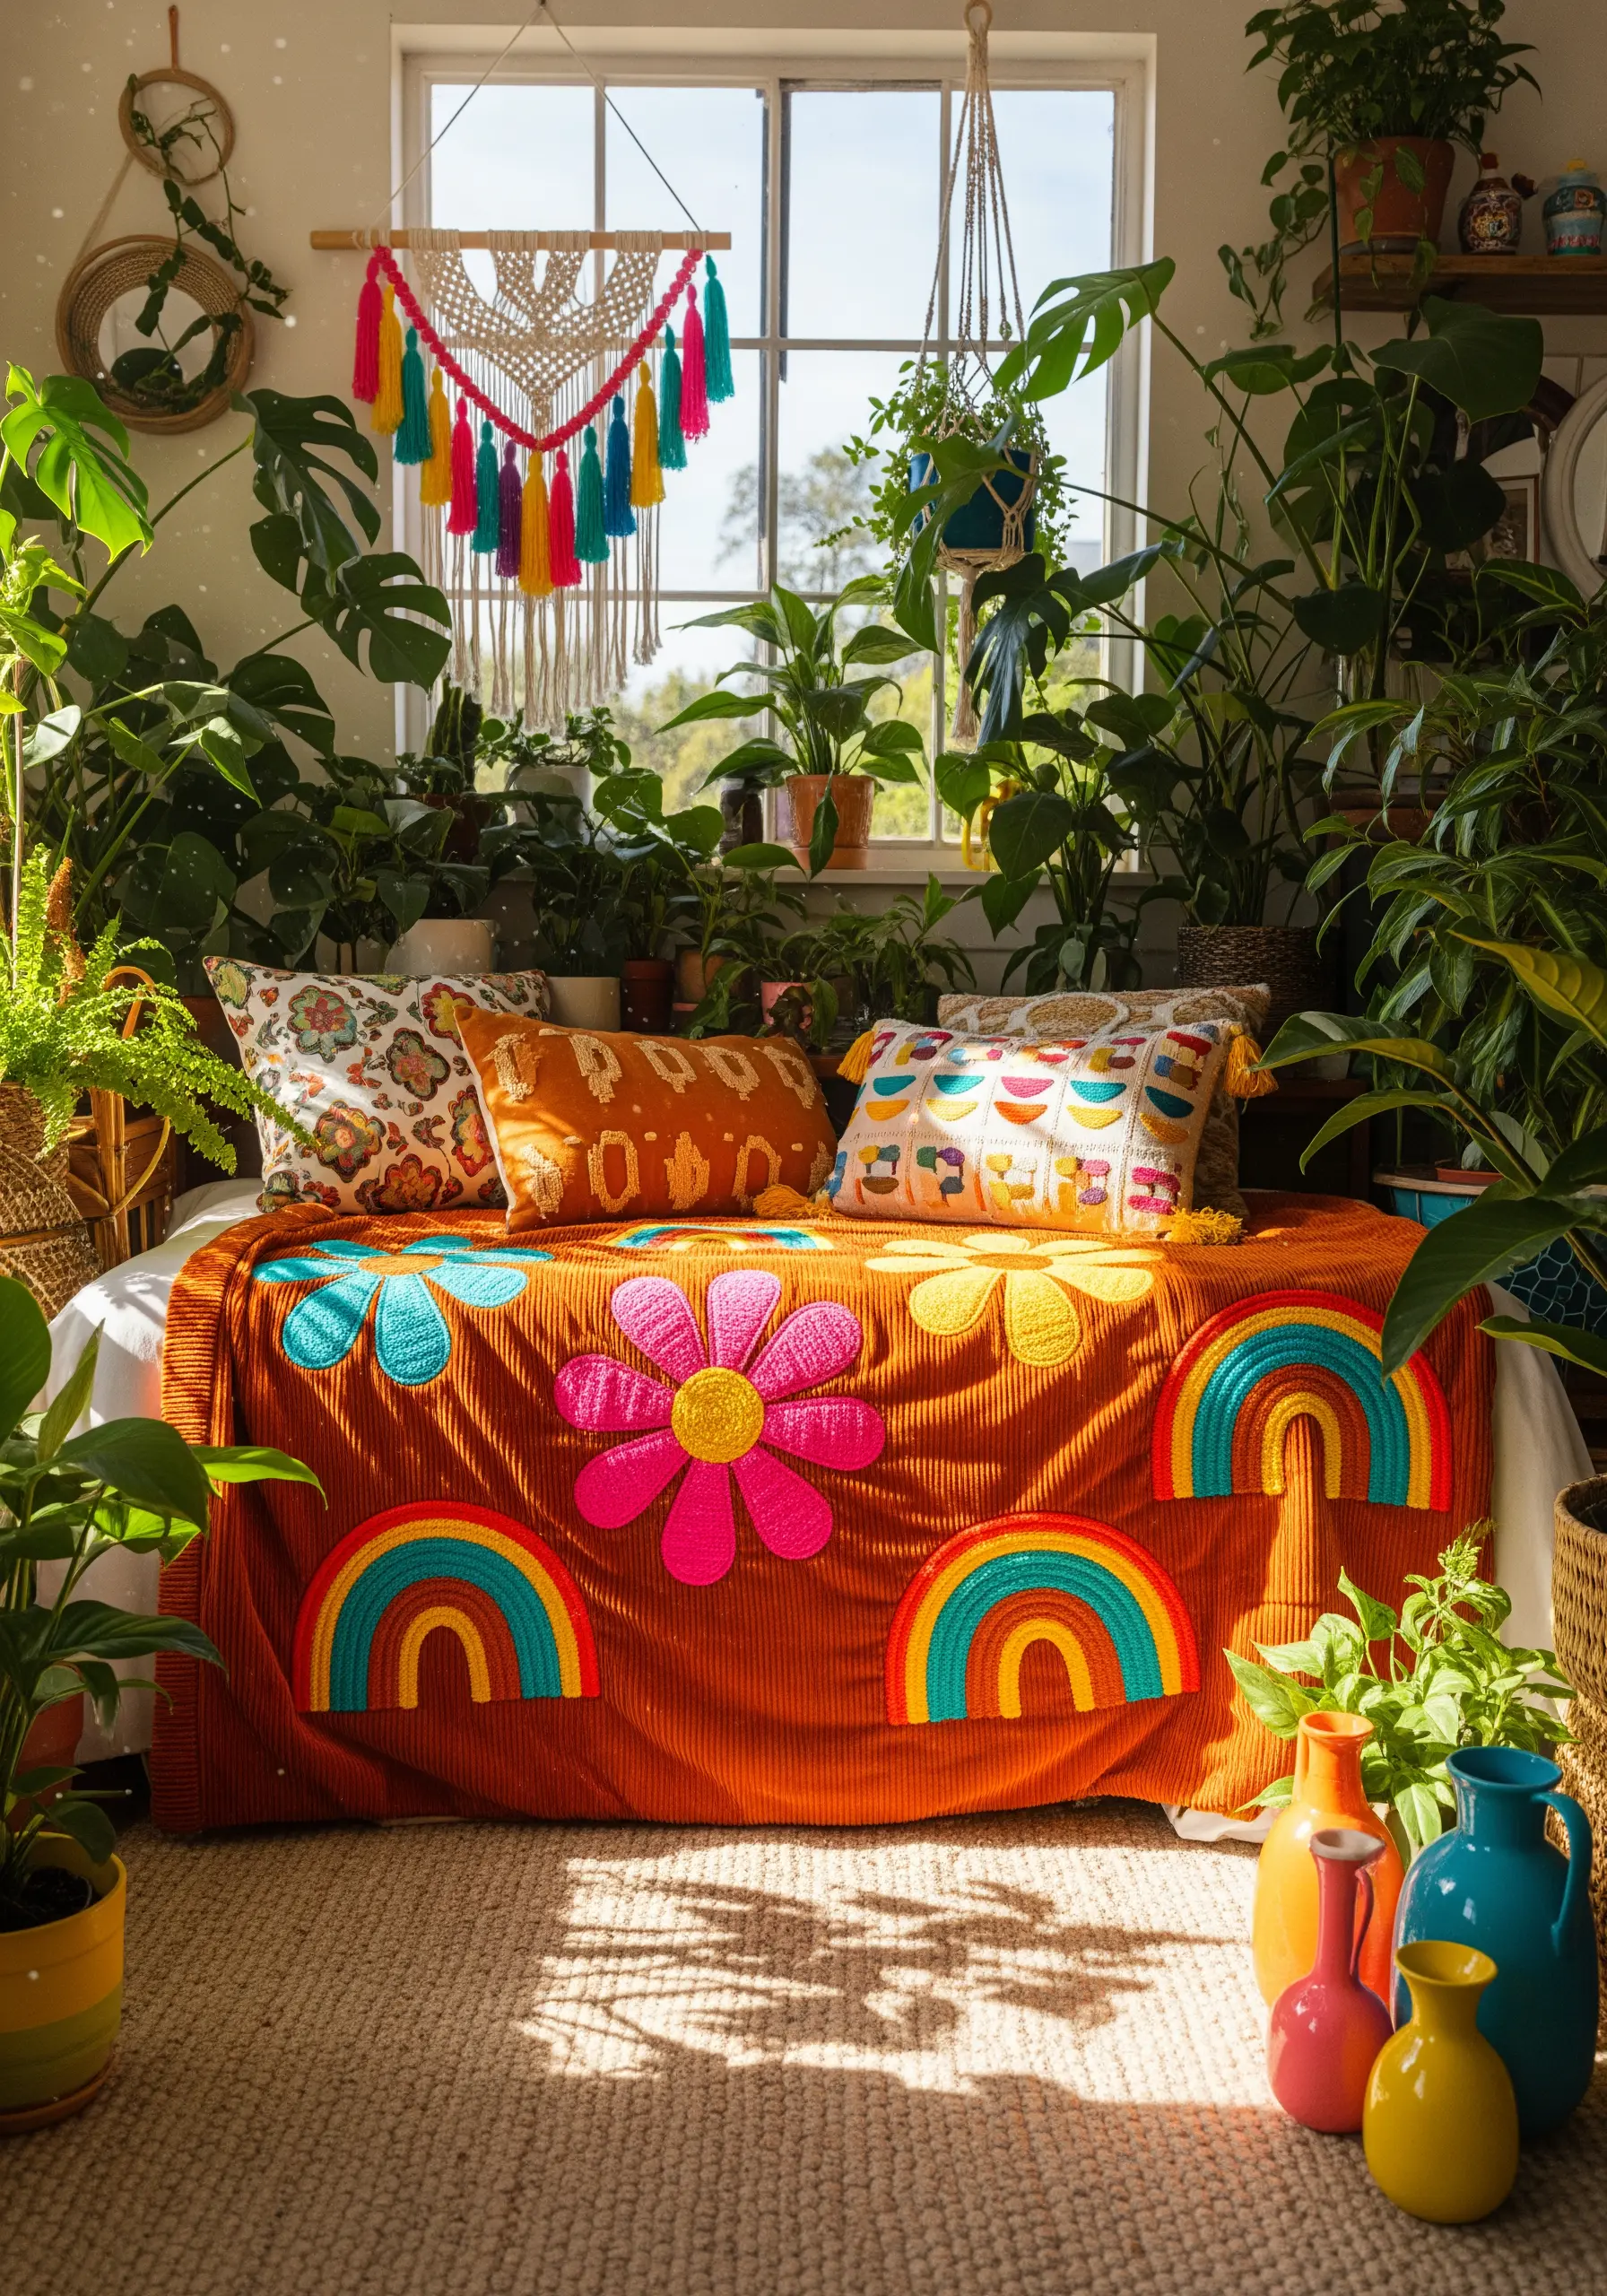
For large-scale, colorful designs on a textured fabric like corduroy, felt appliqué is the perfect solution.
Cut your shapes from brightly colored felt and secure them with a contrasting blanket stitch around the edges. This not only attaches the pieces but also adds a charming, handmade detail.
This method allows you to create huge, graphic rainbows and flowers quickly, resulting in a playful, high-impact design that’s incredibly durable.
The combination of soft felt and ribbed corduroy creates a rich, tactile experience perfect for a child’s room or a bohemian space.
16. Add Refined Detail with a Woven Border
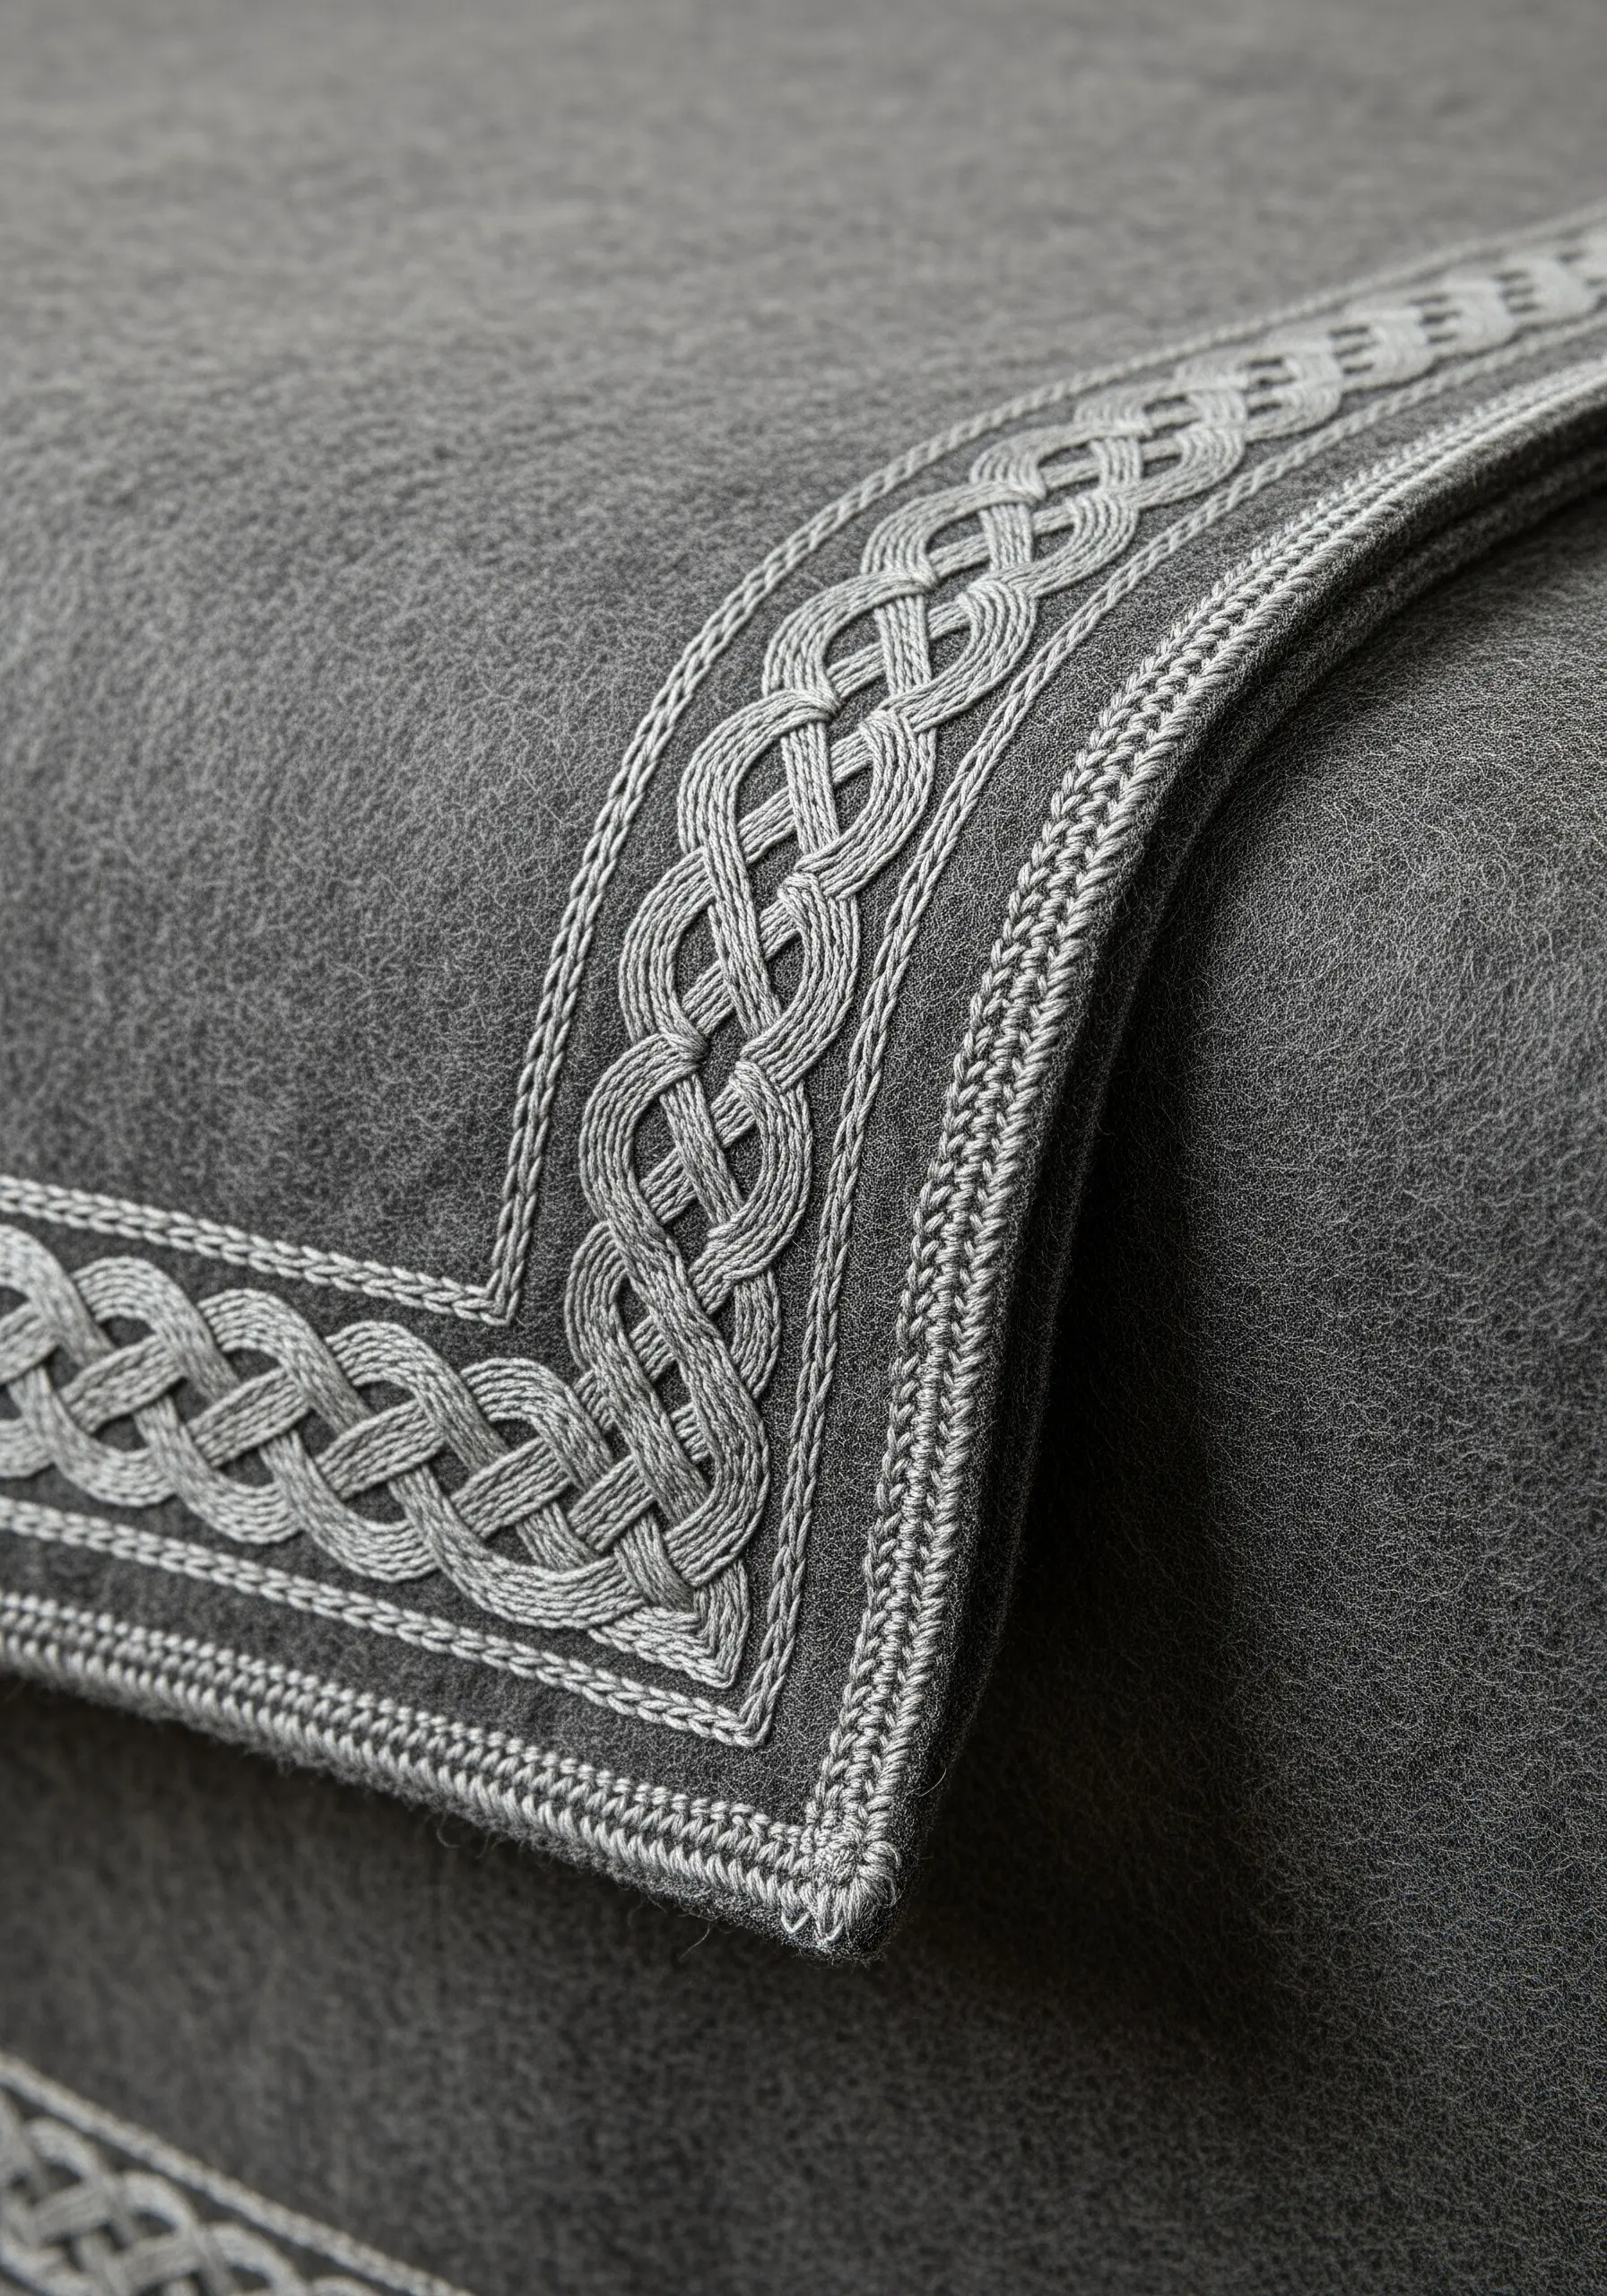
Elevate a simple felted wool blanket with a sophisticated border that mimics the look of woven trim.
Create this interlaced effect using a threaded herringbone stitch, where you first lay down a row of herringbone stitches and then weave a second thread through them without piercing the fabric.
Use a thread color with a slight sheen, like a silk or satin floss, to create a subtle contrast against the matte wool.
Outlining the entire border with a neat backstitch provides a crisp edge and contains the design beautifully.
17. Create a Sampler Quilt with Sashiko Stitching
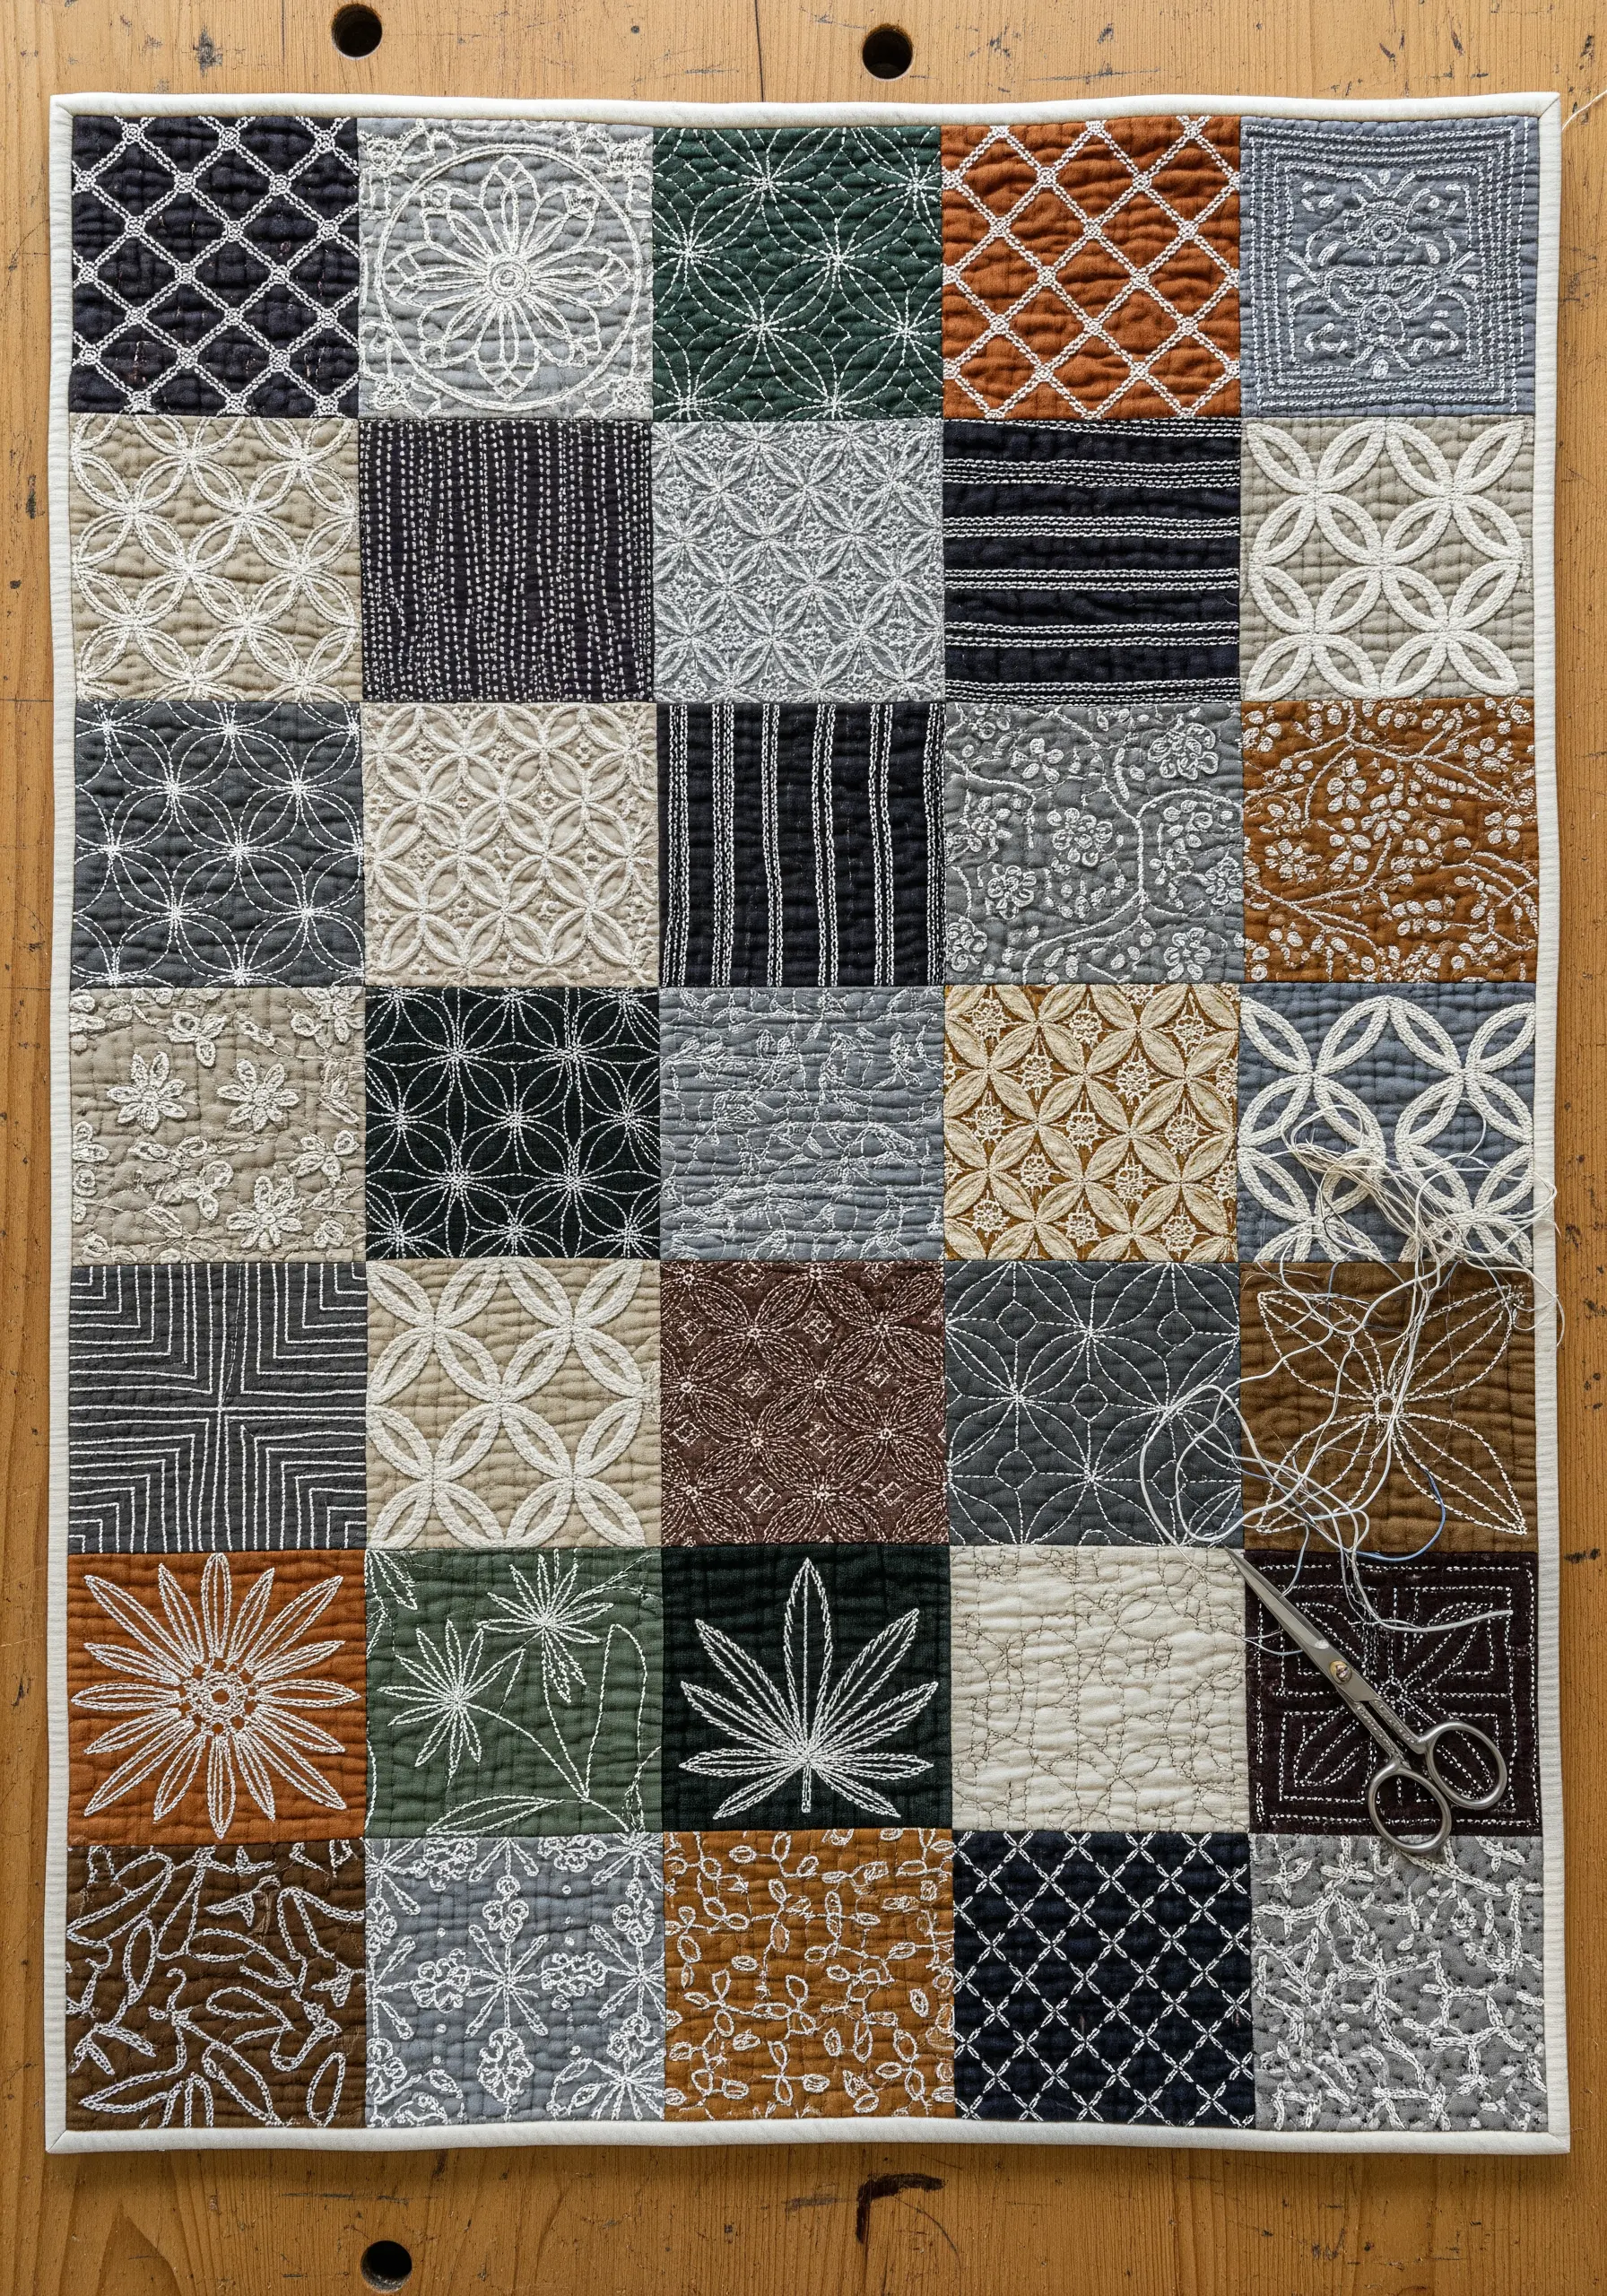
Explore the meditative art of Sashiko by creating a sampler quilt of different traditional patterns.
Each square showcases a unique geometric design created entirely with a simple running stitch. The magic is in the precision and rhythm of your stitching.
Use a thick, non-divisible Sashiko thread and a long Sashiko needle for the best results, as they are designed to move smoothly through multiple layers of fabric.
Focus on keeping your stitch length and the gaps between them consistent to achieve the clean, graphic look that defines this Japanese embroidery style.
18. Embellish Velvet with Classic Botanical Motifs

Embroidering on velvet requires a gentle touch to avoid crushing the pile. Always use a hoop, but don’t overtighten it, and consider wrapping the inner ring with twill tape for extra grip.
A classic holly motif is perfect for a luxurious velvet throw. Use a padded satin stitch for the berries to give them a rounded, three-dimensional appearance.
For the leaves, a combination of satin stitch and split stitch adds texture and defines the veins.
The way the sheen of the thread contrasts with the deep, matte texture of the velvet creates a look of timeless holiday elegance.
19. Capture Flight with Minimalist Line Art
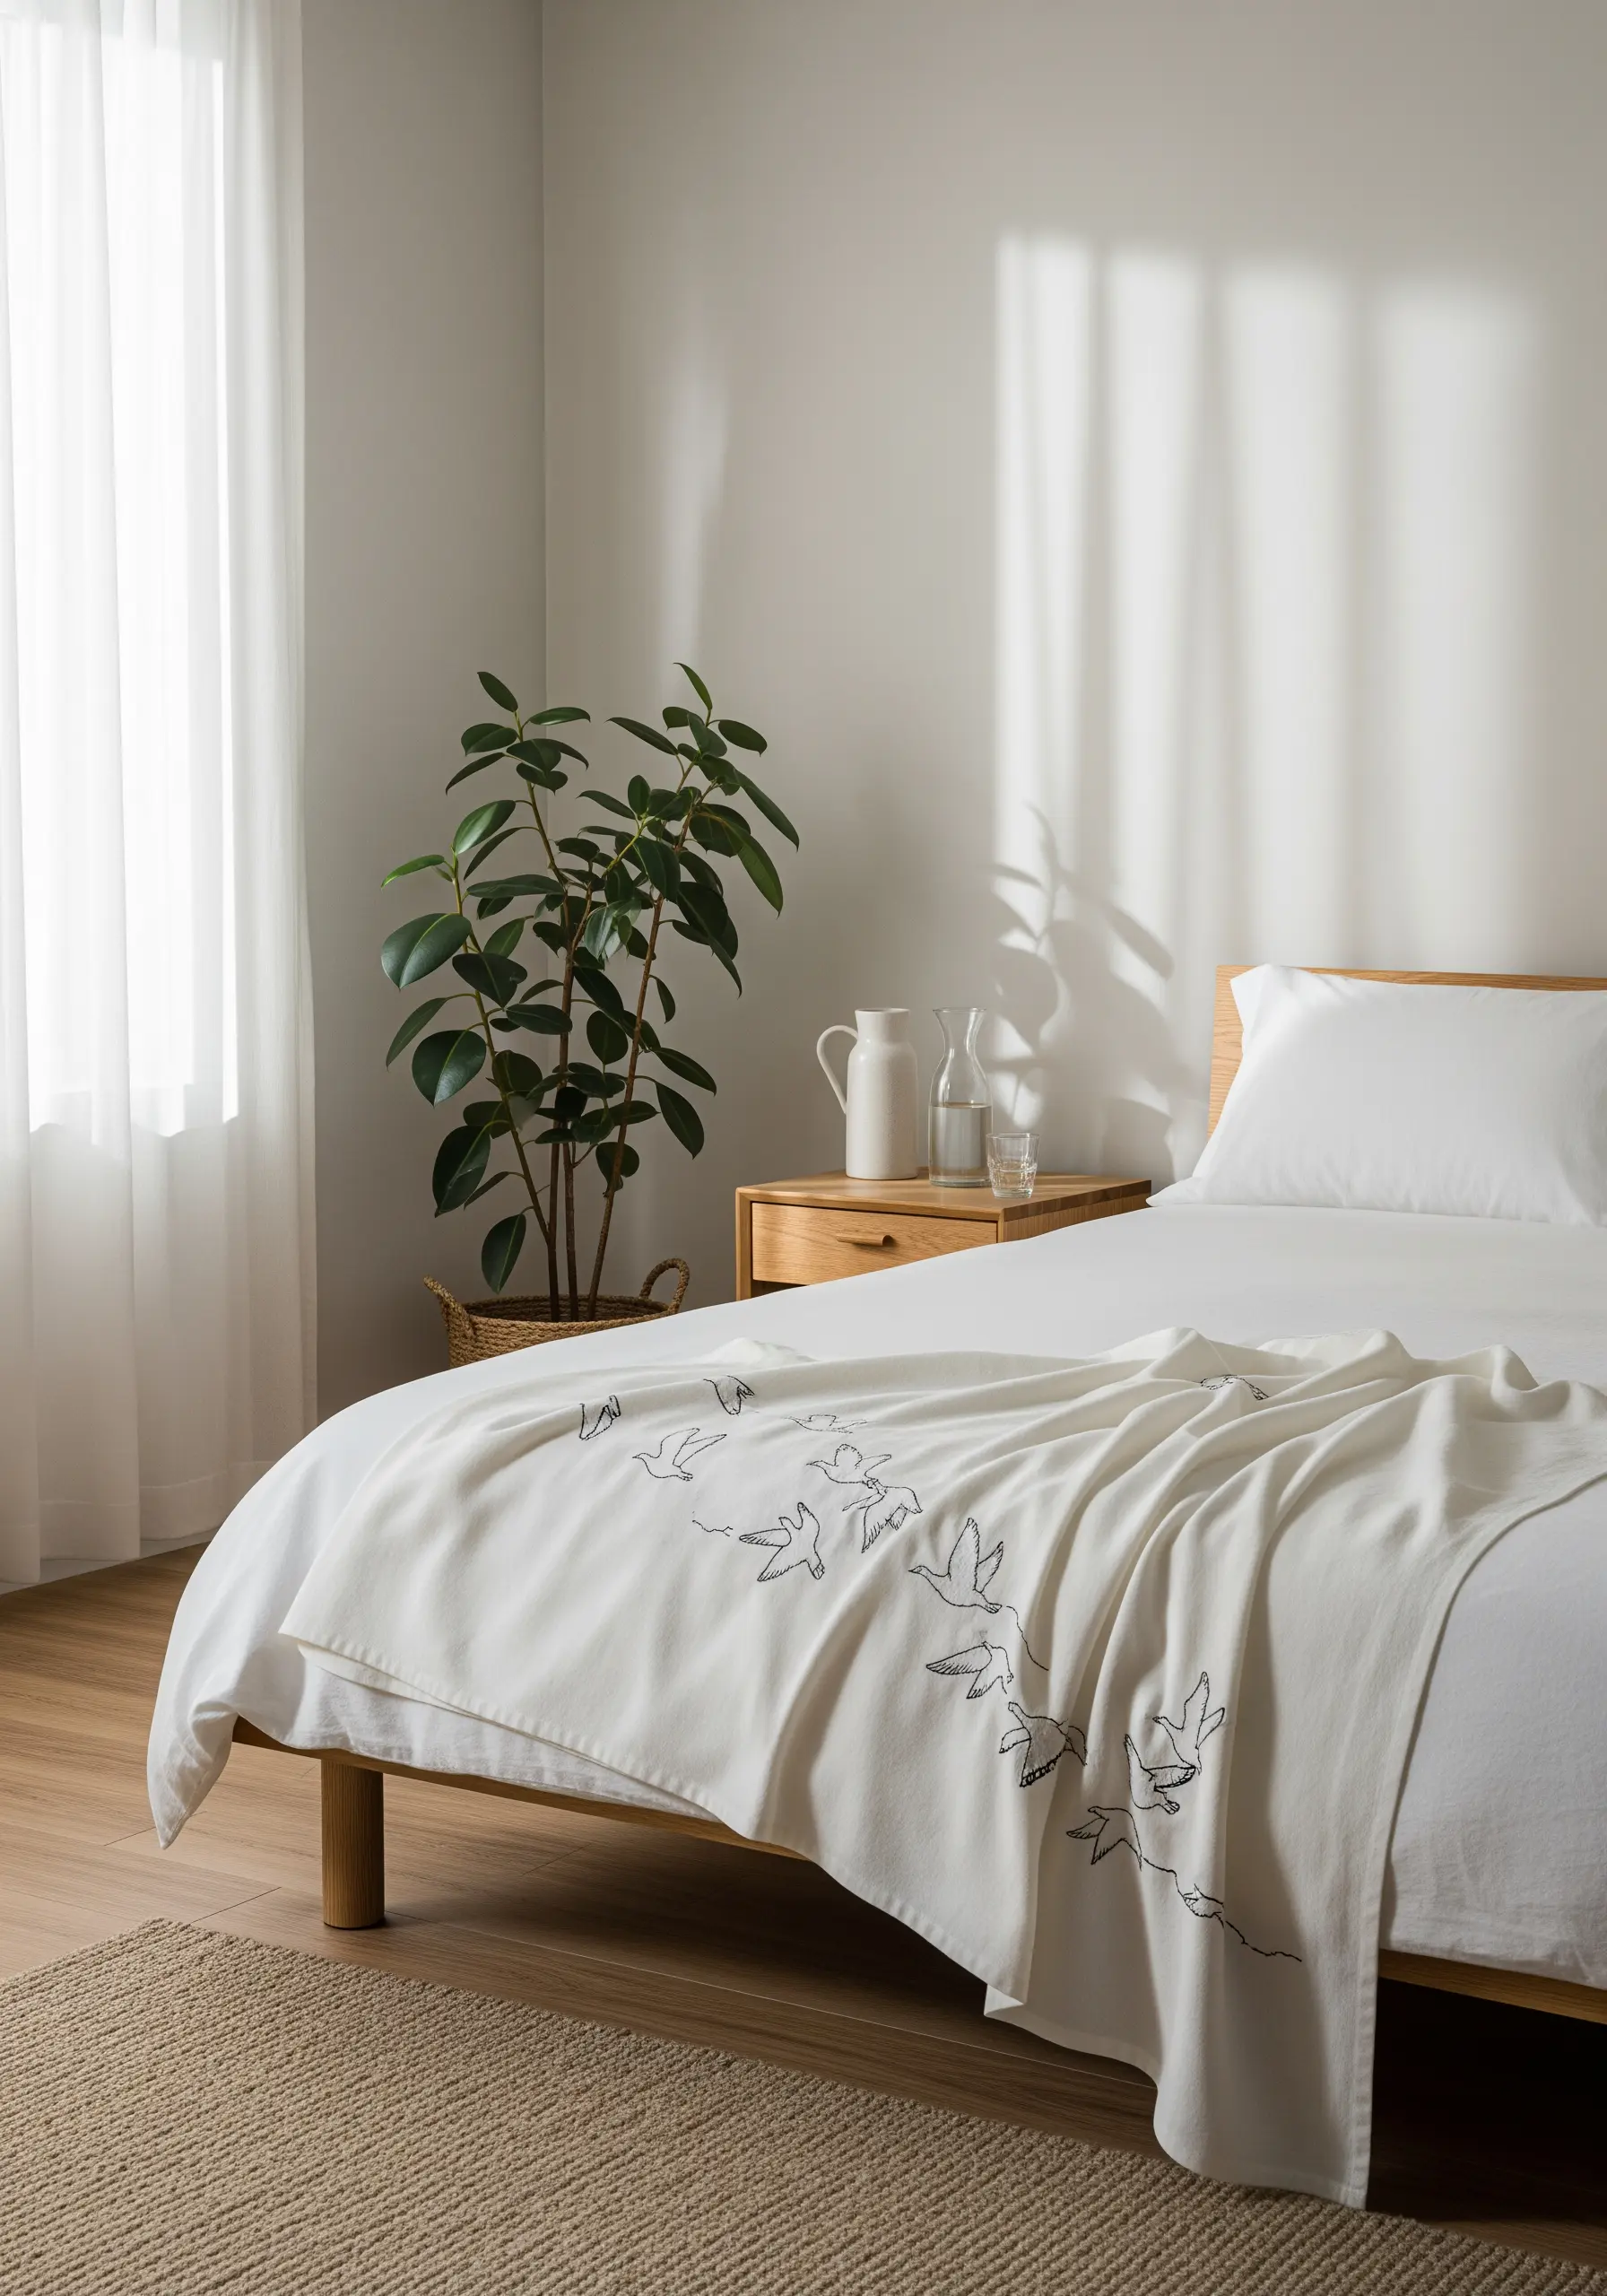
Create a sense of gentle movement across a lightweight throw with a scattered pattern of line-art birds.
Use a simple backstitch or stem stitch in a contrasting dark thread to keep the focus on the clean, calligraphic shapes of the birds.
By leaving most of the shapes as outlines, you create a design that feels airy and light, perfectly suited to a fine-gauge knit or cotton blanket.
Arrange the birds in a flowing, upward sweep from one corner to draw the eye and enhance the feeling of motion.
20. Personalize a Baby Blanket with Pastel Tones
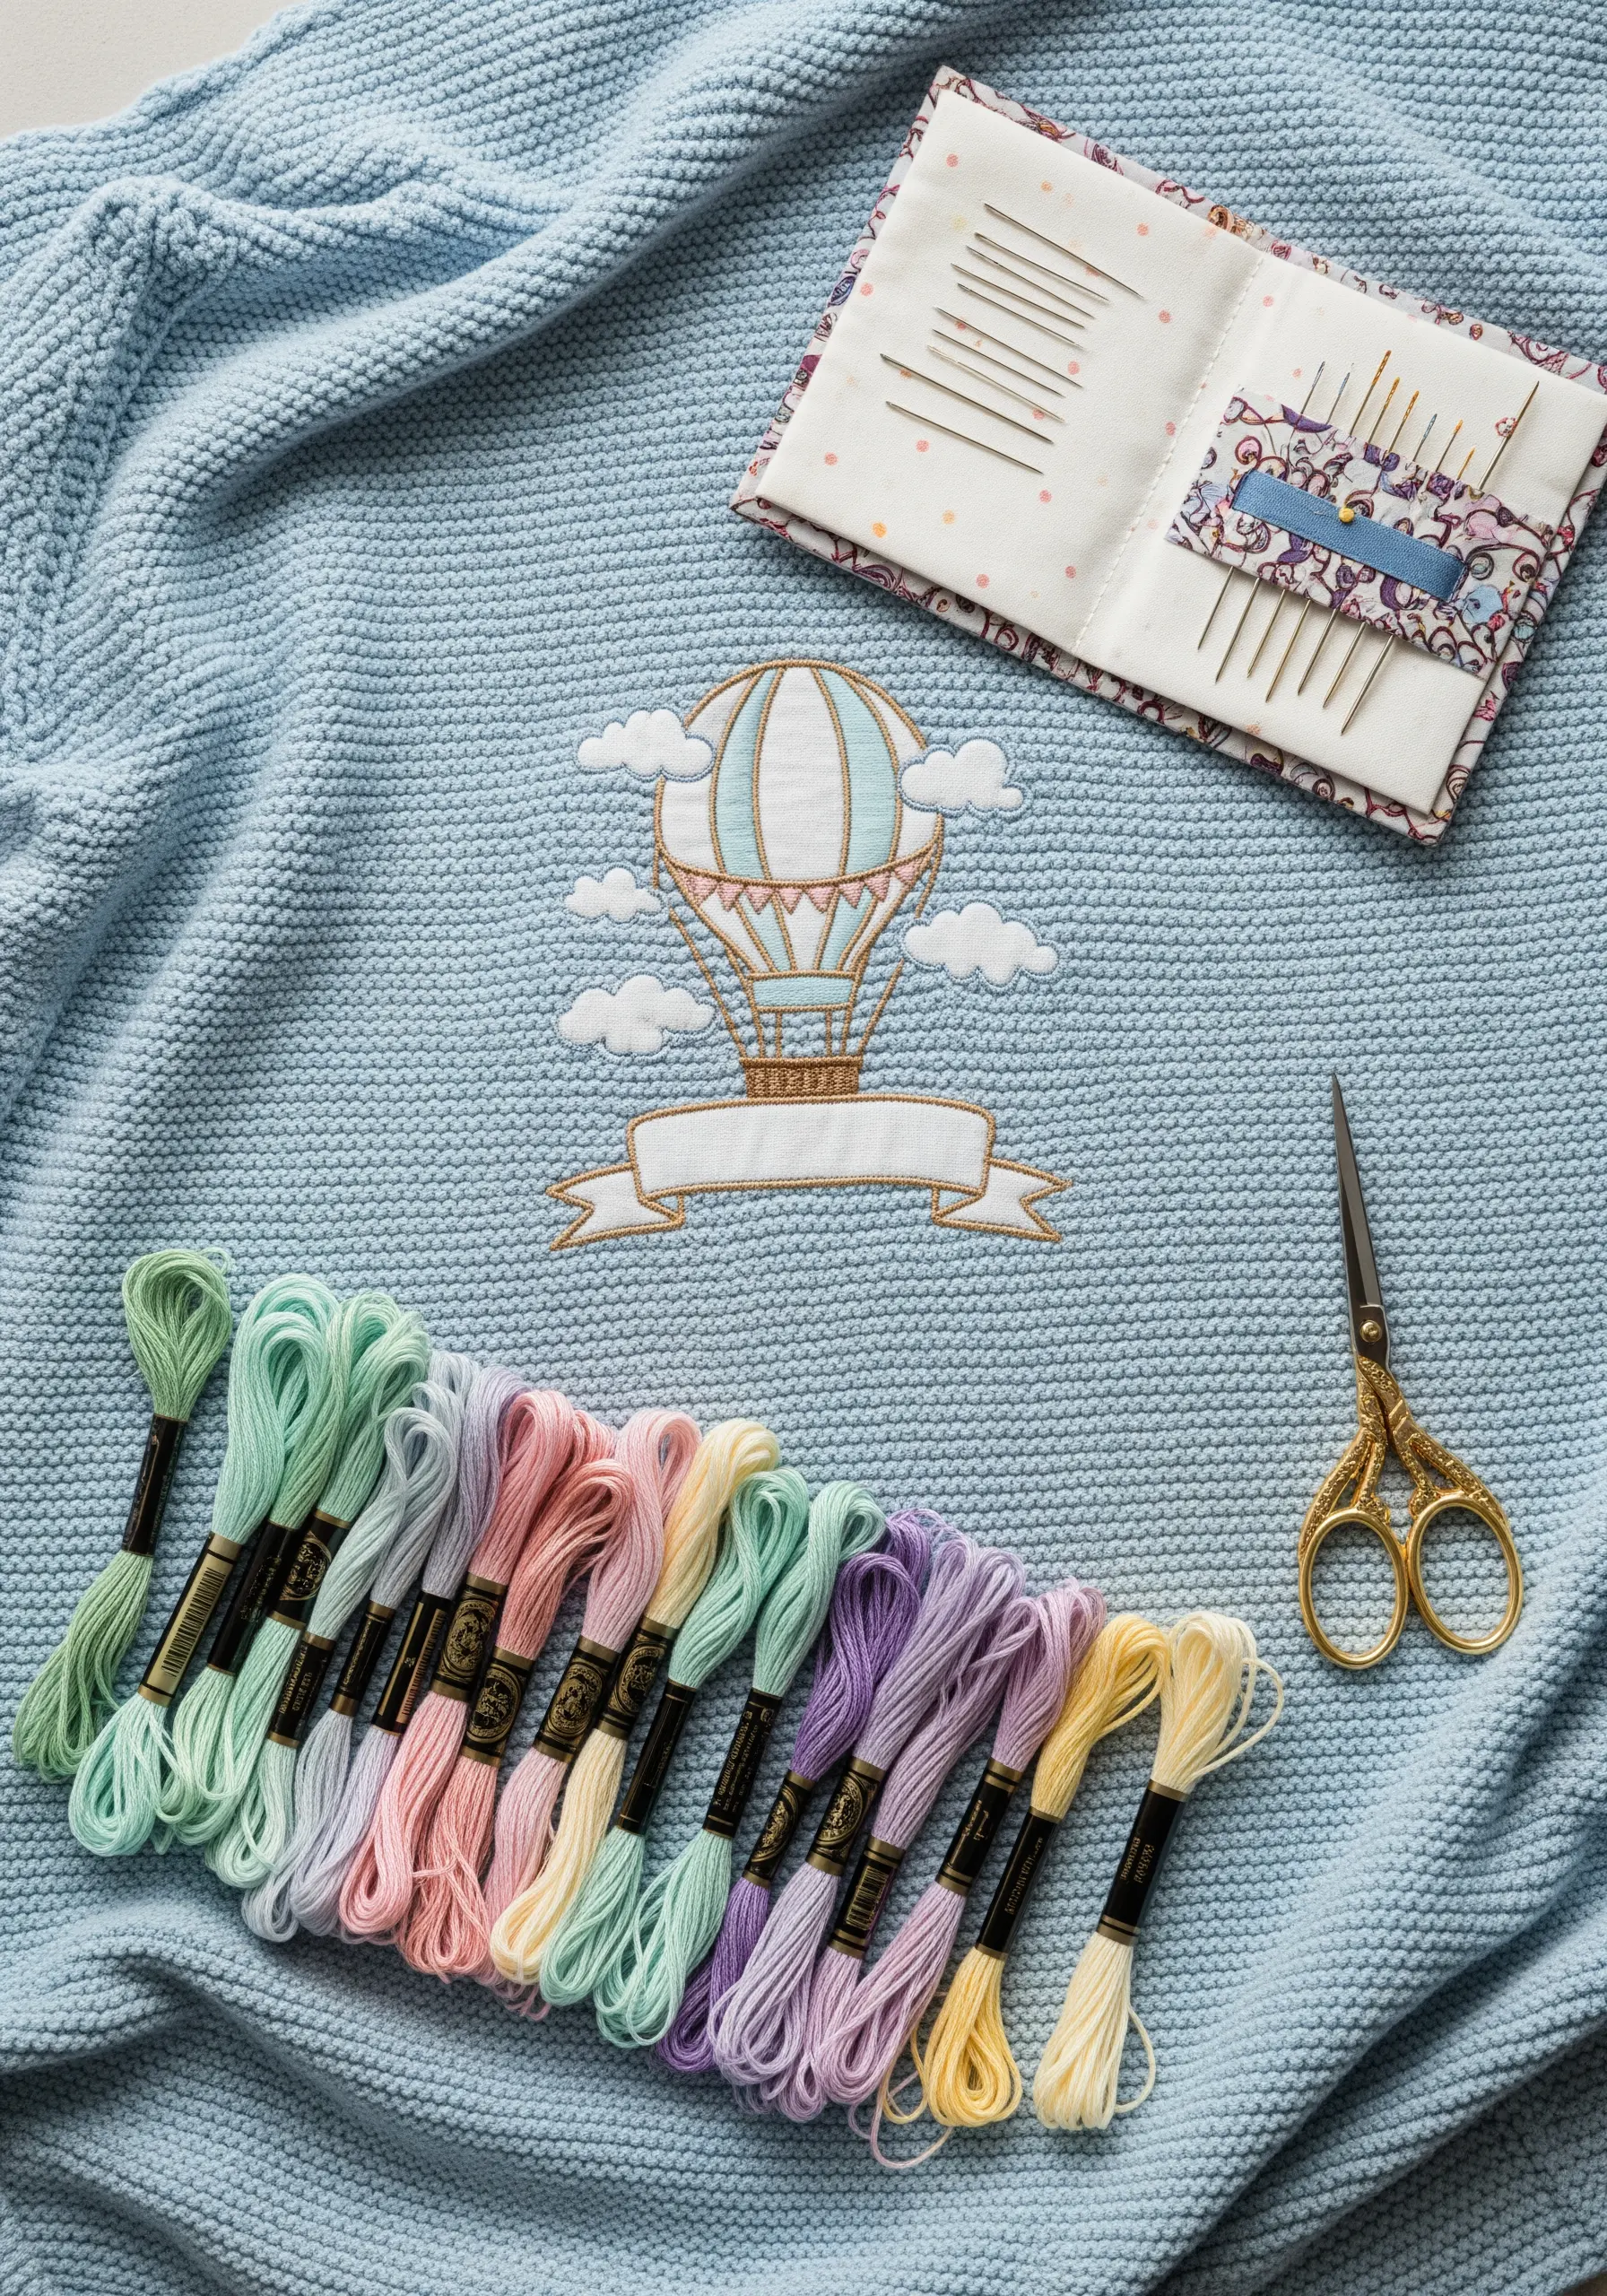
For a soft, knit baby blanket, a tear-away stabilizer is your best friend. It supports the stitches during embroidery and is easily removed afterward, keeping the blanket soft against the skin.
Choose a gentle, pastel color palette and use a clean satin stitch for filling in larger areas like the hot air balloon stripes.
Outline your motifs with a darker shade using a backstitch to give them crisp definition and prevent the soft colors from blending into the background.
Adding a blank banner at the bottom provides the perfect spot to personalize the blanket with a name or date using small backstitch letters.
21. Sculpt Abstract Forms with Braided Yarn
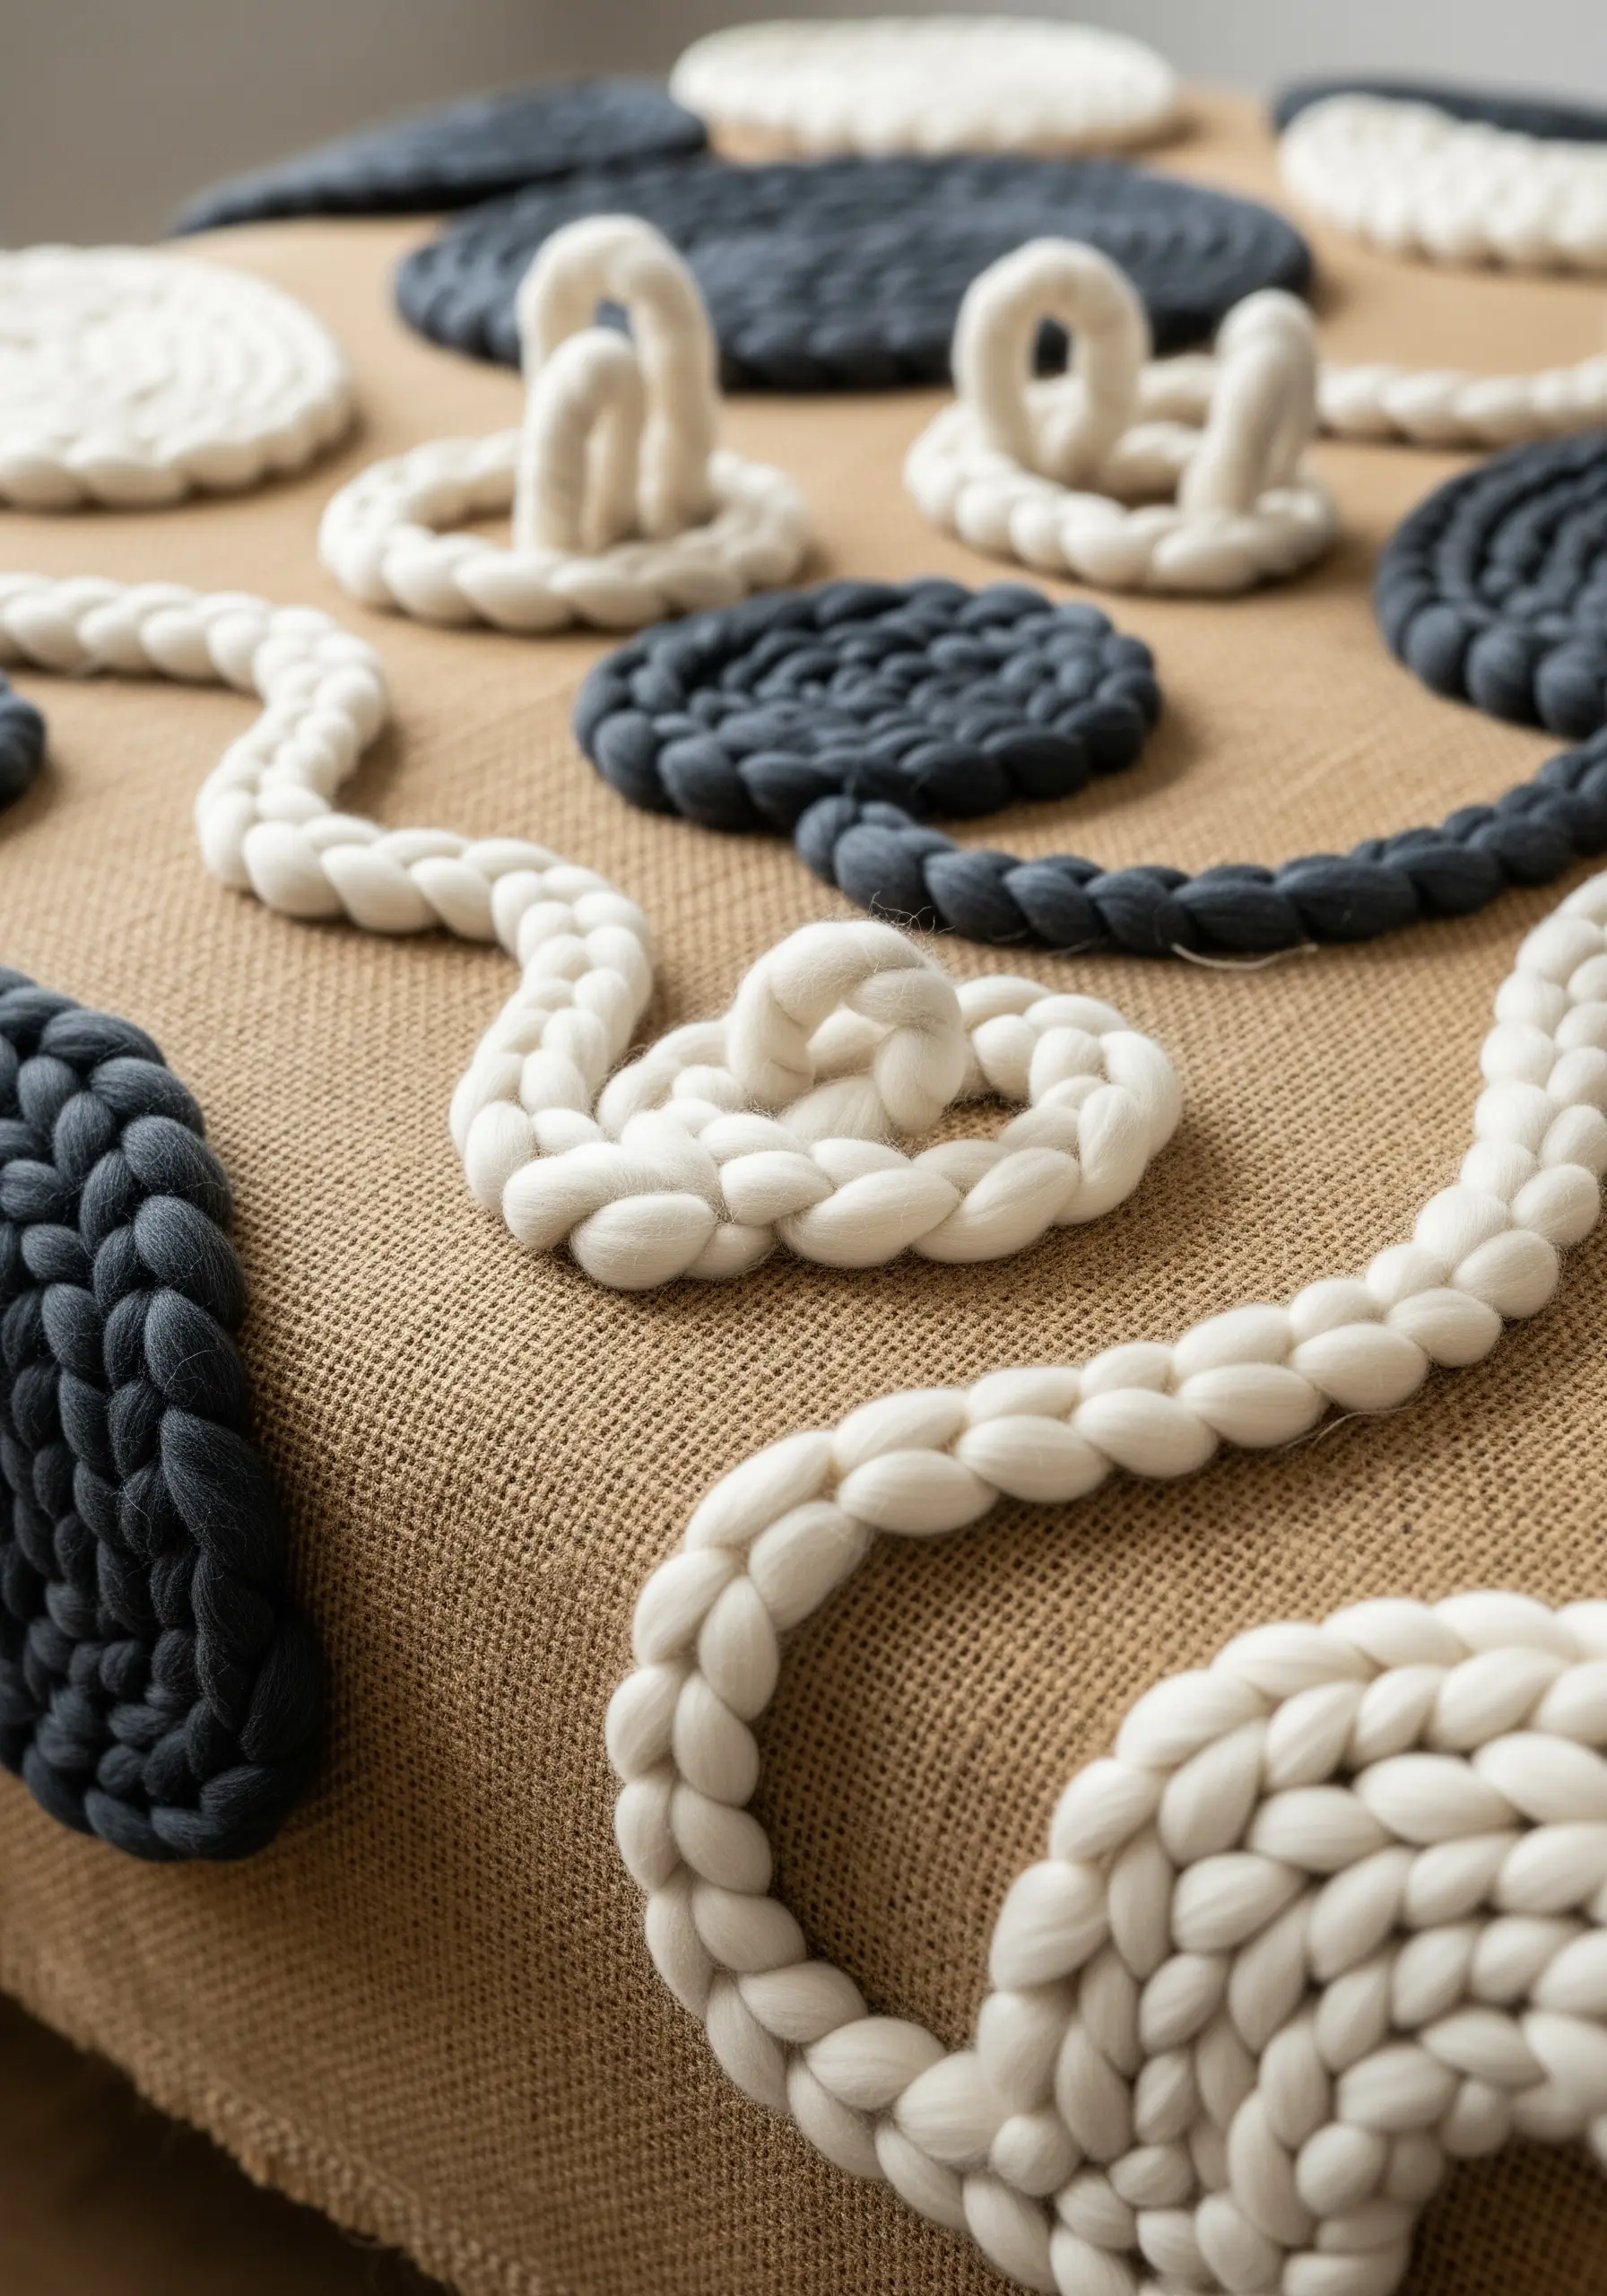
Move beyond the needle and thread by using thick, pre-braided yarn to create highly sculptural, abstract shapes on a sturdy canvas like burlap.
Arrange the braided cord into your desired forms—loops, knots, and coils—and then hand-tack them in place from behind using a strong, invisible thread.
This technique, known as couching on a grand scale, focuses purely on form and texture, creating a piece of yarn wall art that is as much sculpture as it is embroidery.
The contrast between the soft, voluminous braid and the flat, rustic burlap creates a compelling tactile and visual tension.
22. Add Zest to Waffle Weave with Fill Stitches

The grid-like texture of a waffle-weave blanket can be challenging, but it also acts as a natural guide for your stitches.
Use a dense satin stitch to fill in the lemon motifs, allowing the stitches to sink slightly into the fabric’s recesses. This creates a beautifully integrated, almost quilted look.
Choose a perle cotton thread instead of stranded floss; its indivisible, high-twist structure is less likely to snag on the textured weave and provides a lovely sheen.
Outline the leaves and lemons with a backstitch after filling them to give the shapes a clean, defined edge against the textured background.
23. Create Art Deco Glamour with Goldwork

Achieve the unmistakable luxury of an Art Deco design by using goldwork techniques on a plush, jewel-toned fabric like velvet or satin.
This fan motif is created using couched passing thread, where you lay down strands of fine metallic thread and tack them in place with a thinner, matching sewing thread.
The key to the clean, radiating lines is precise spacing and tension. Mark your guidelines first with a removable fabric pen to ensure perfect symmetry.
This technique adds shimmer and a slightly raised texture without adding bulk, preserving the elegant drape of the fabric.
24. Build a Snowy Village Scene on Cable Knit
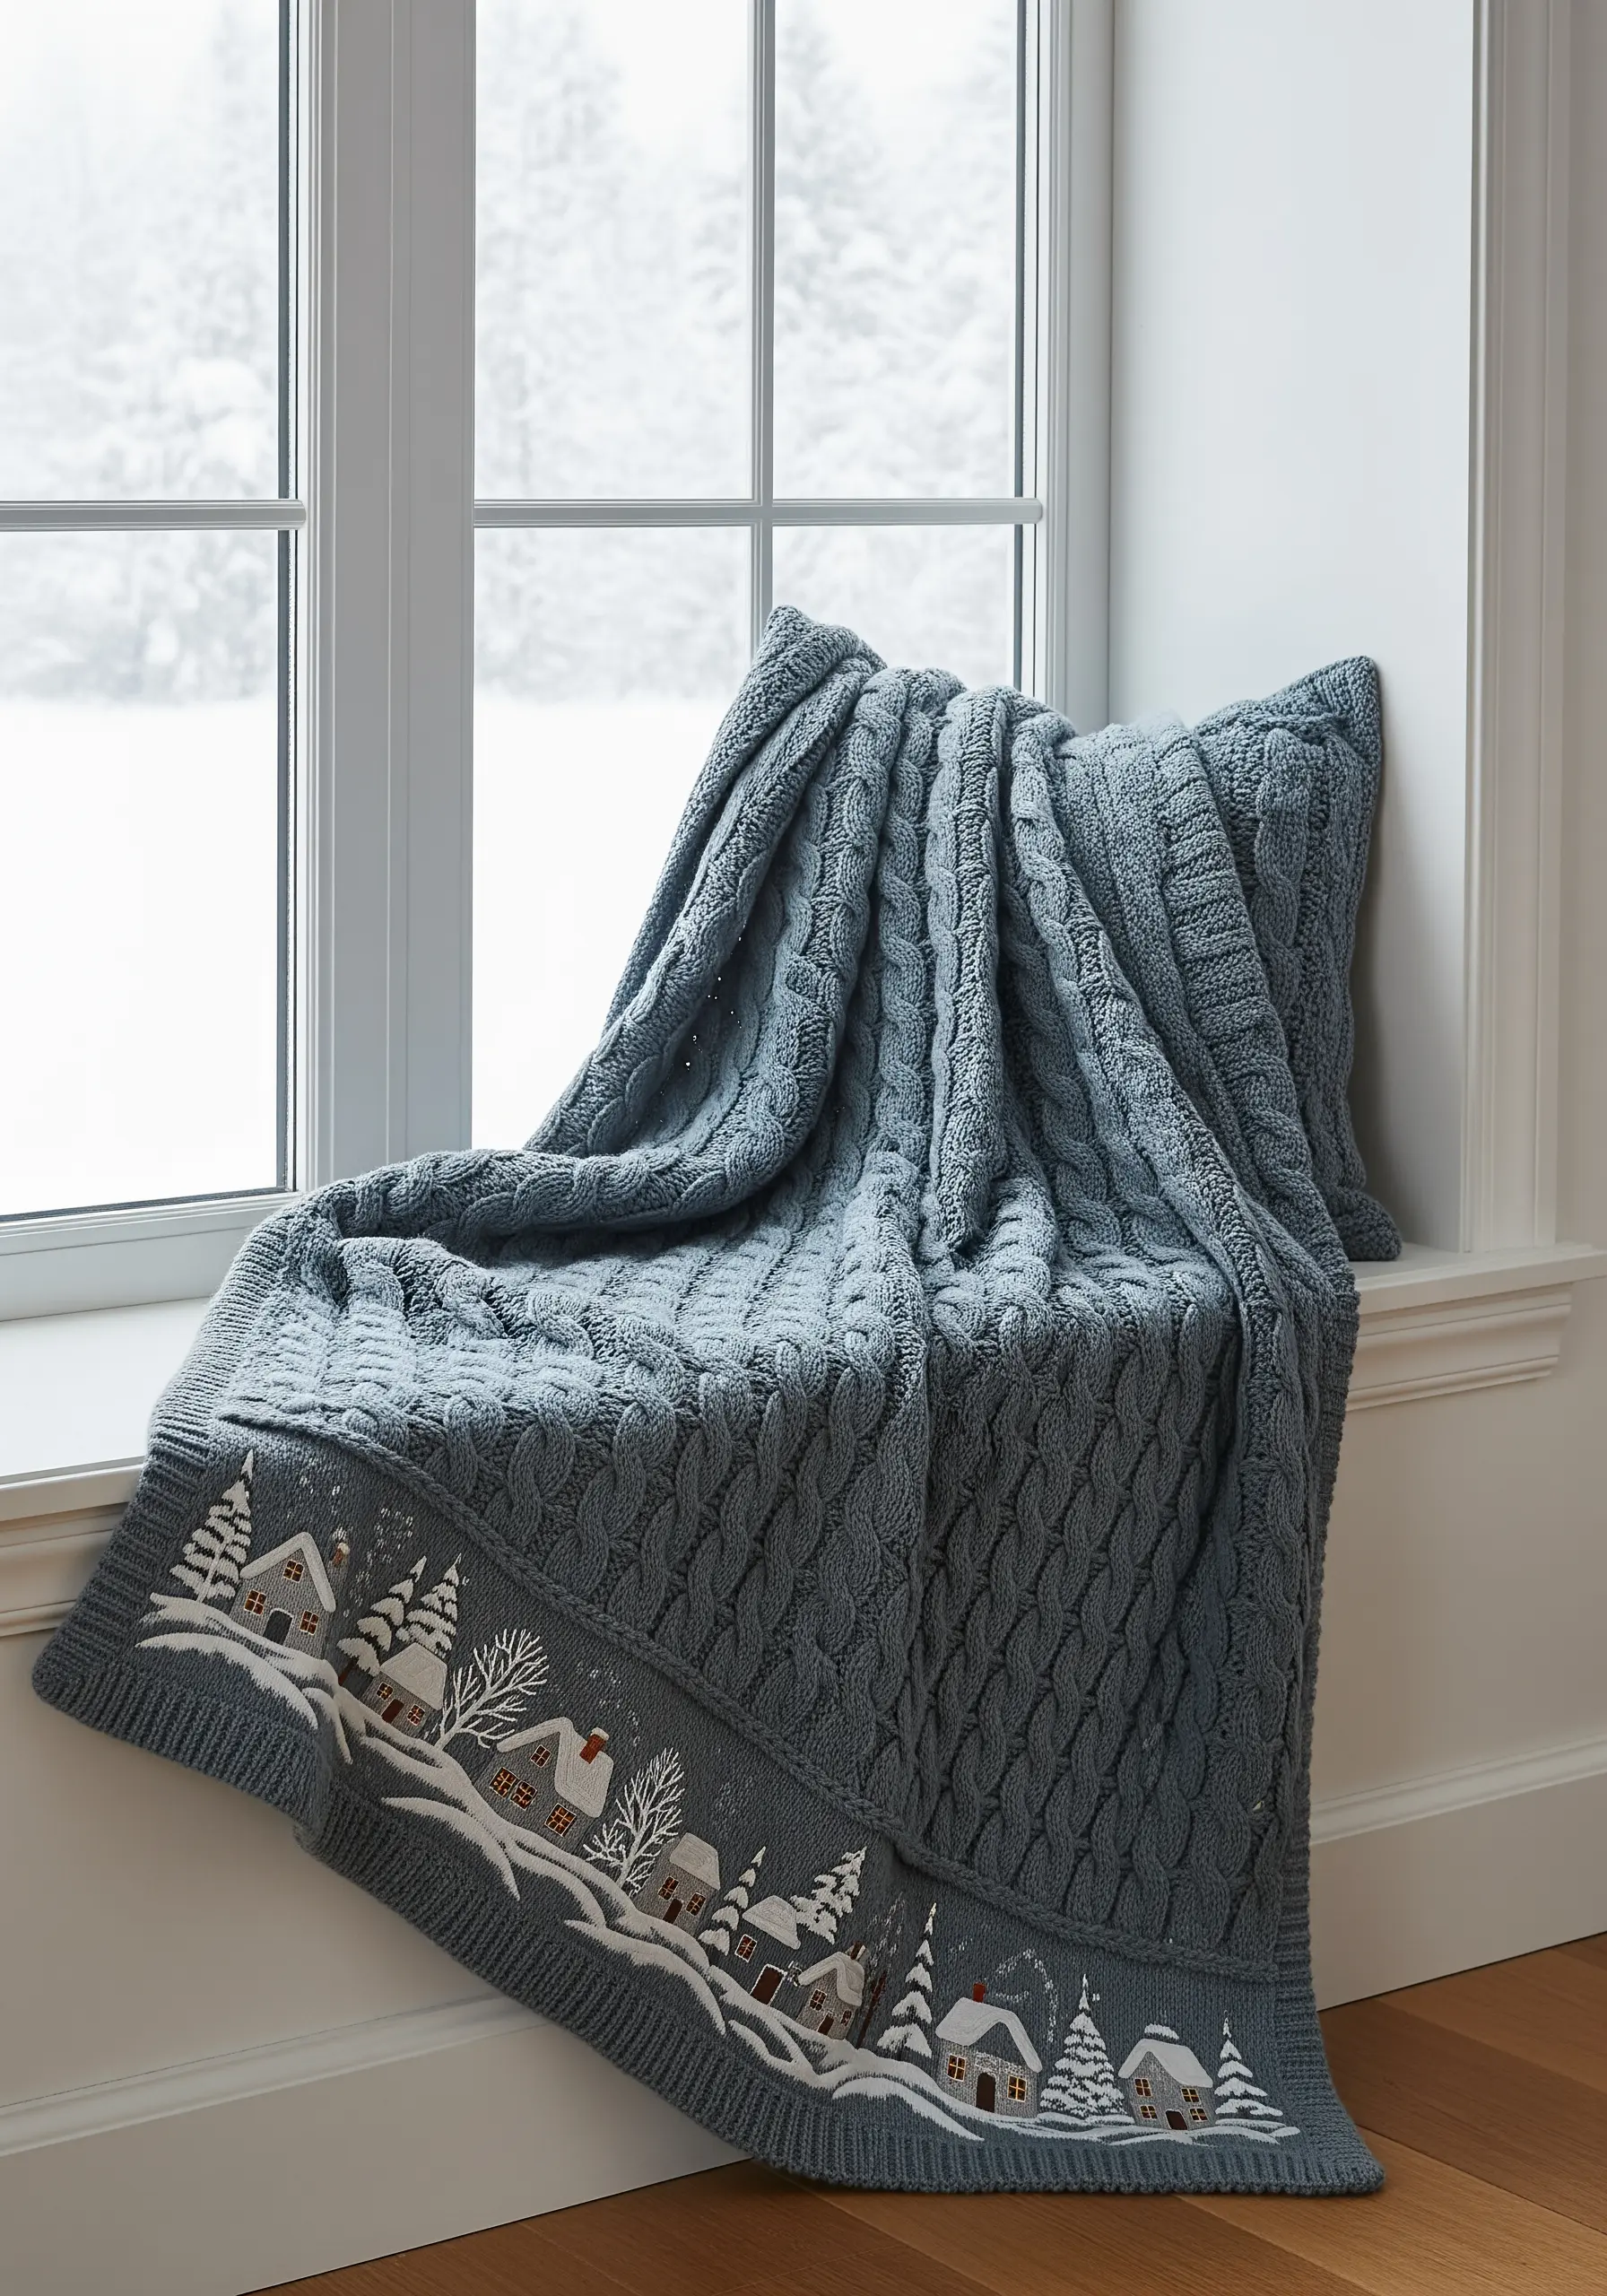
Embellish a cable knit throw by creating a narrative scene along its border. The existing texture of the knit provides a perfect ‘snowy ground’ for your design.
Use simple stitches to build your winter village: satin stitch for the houses, French knots for snow on the rooftops, and seed stitch for falling snow.
For the delicate trees, use a fly stitch for the boughs, which gives them a light, feathery appearance against the chunky knit.
Stitching with wool yarn instead of cotton floss will better complement the texture of the blanket and create a more cohesive final piece.
25. Plant a Lavender Field with Knots and Stems
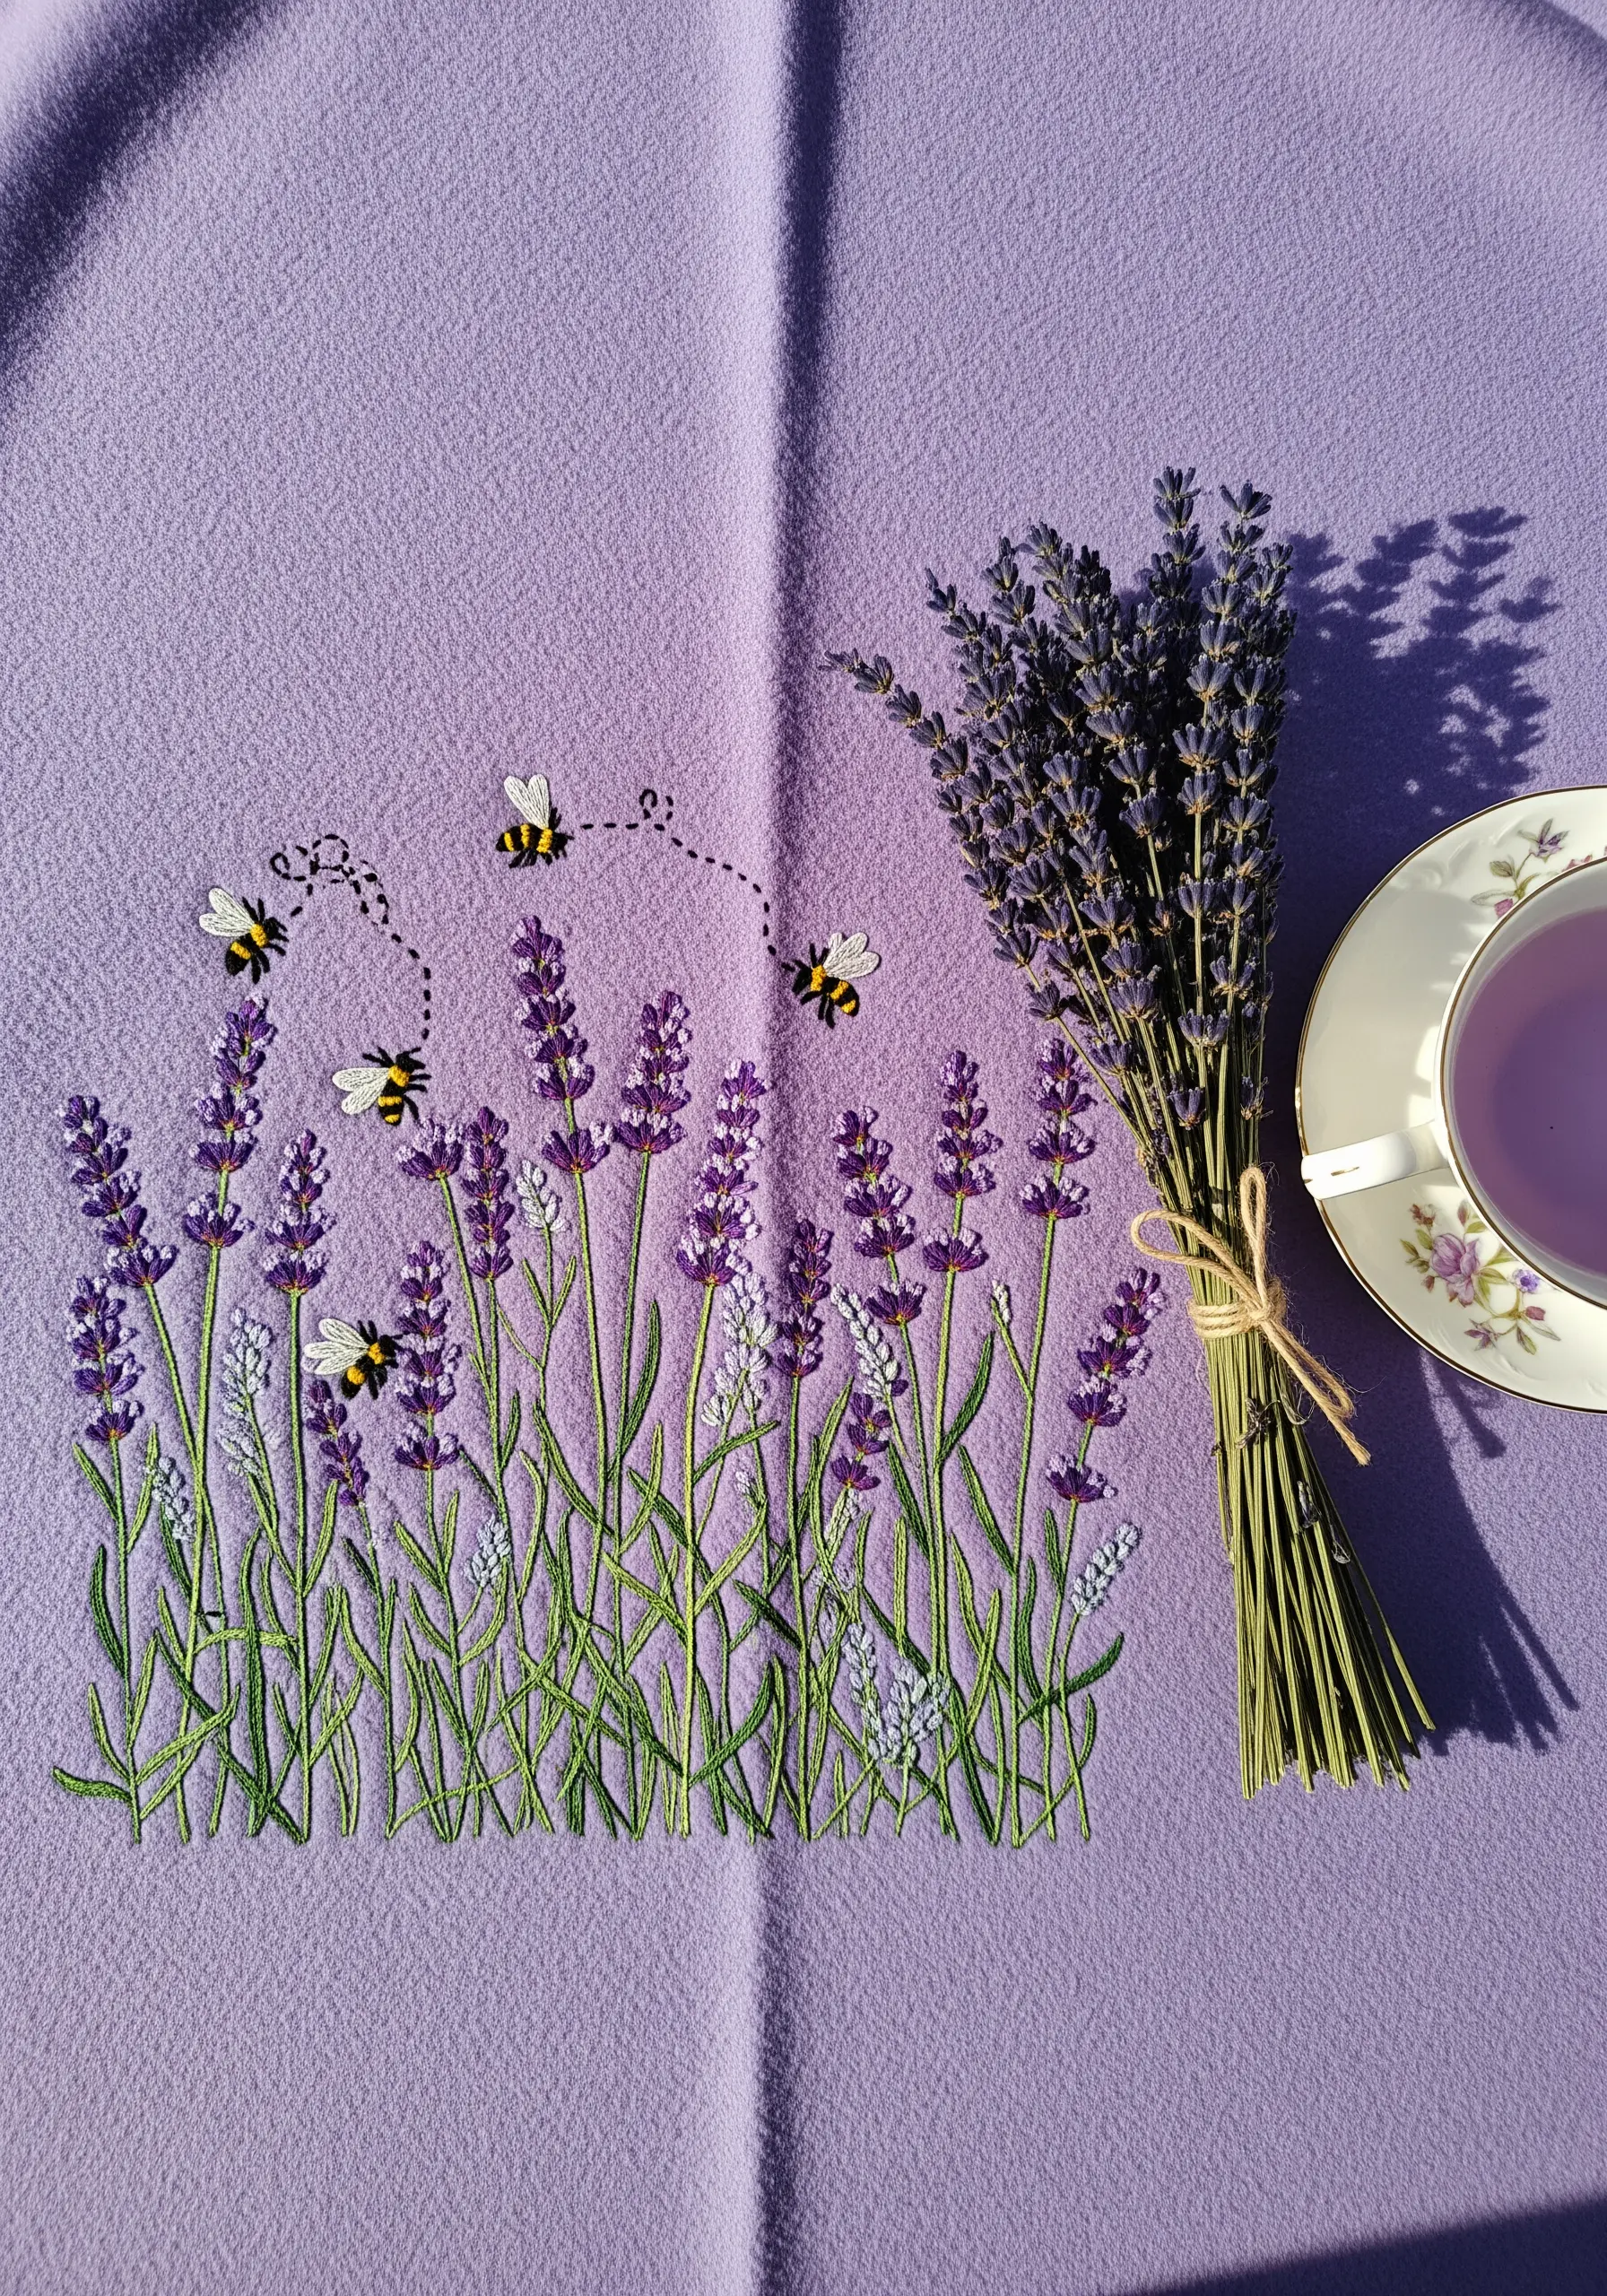
Create a realistic field of lavender by combining just two simple stitches in varying densities.
Use stem stitch or outline stitch for the green stalks, varying their height and angle slightly to create a natural, unregimented look.
For the lavender blossoms, use clusters of French knots in shades of purple, lilac, and even white. Placing them tightly at the top of the stem and more sparsely lower down mimics the shape of the flower.
The little bees are a charming addition, made with simple satin stitch bodies and detached chain stitch wings.
26. Embroider a Favorite Quote with Precision
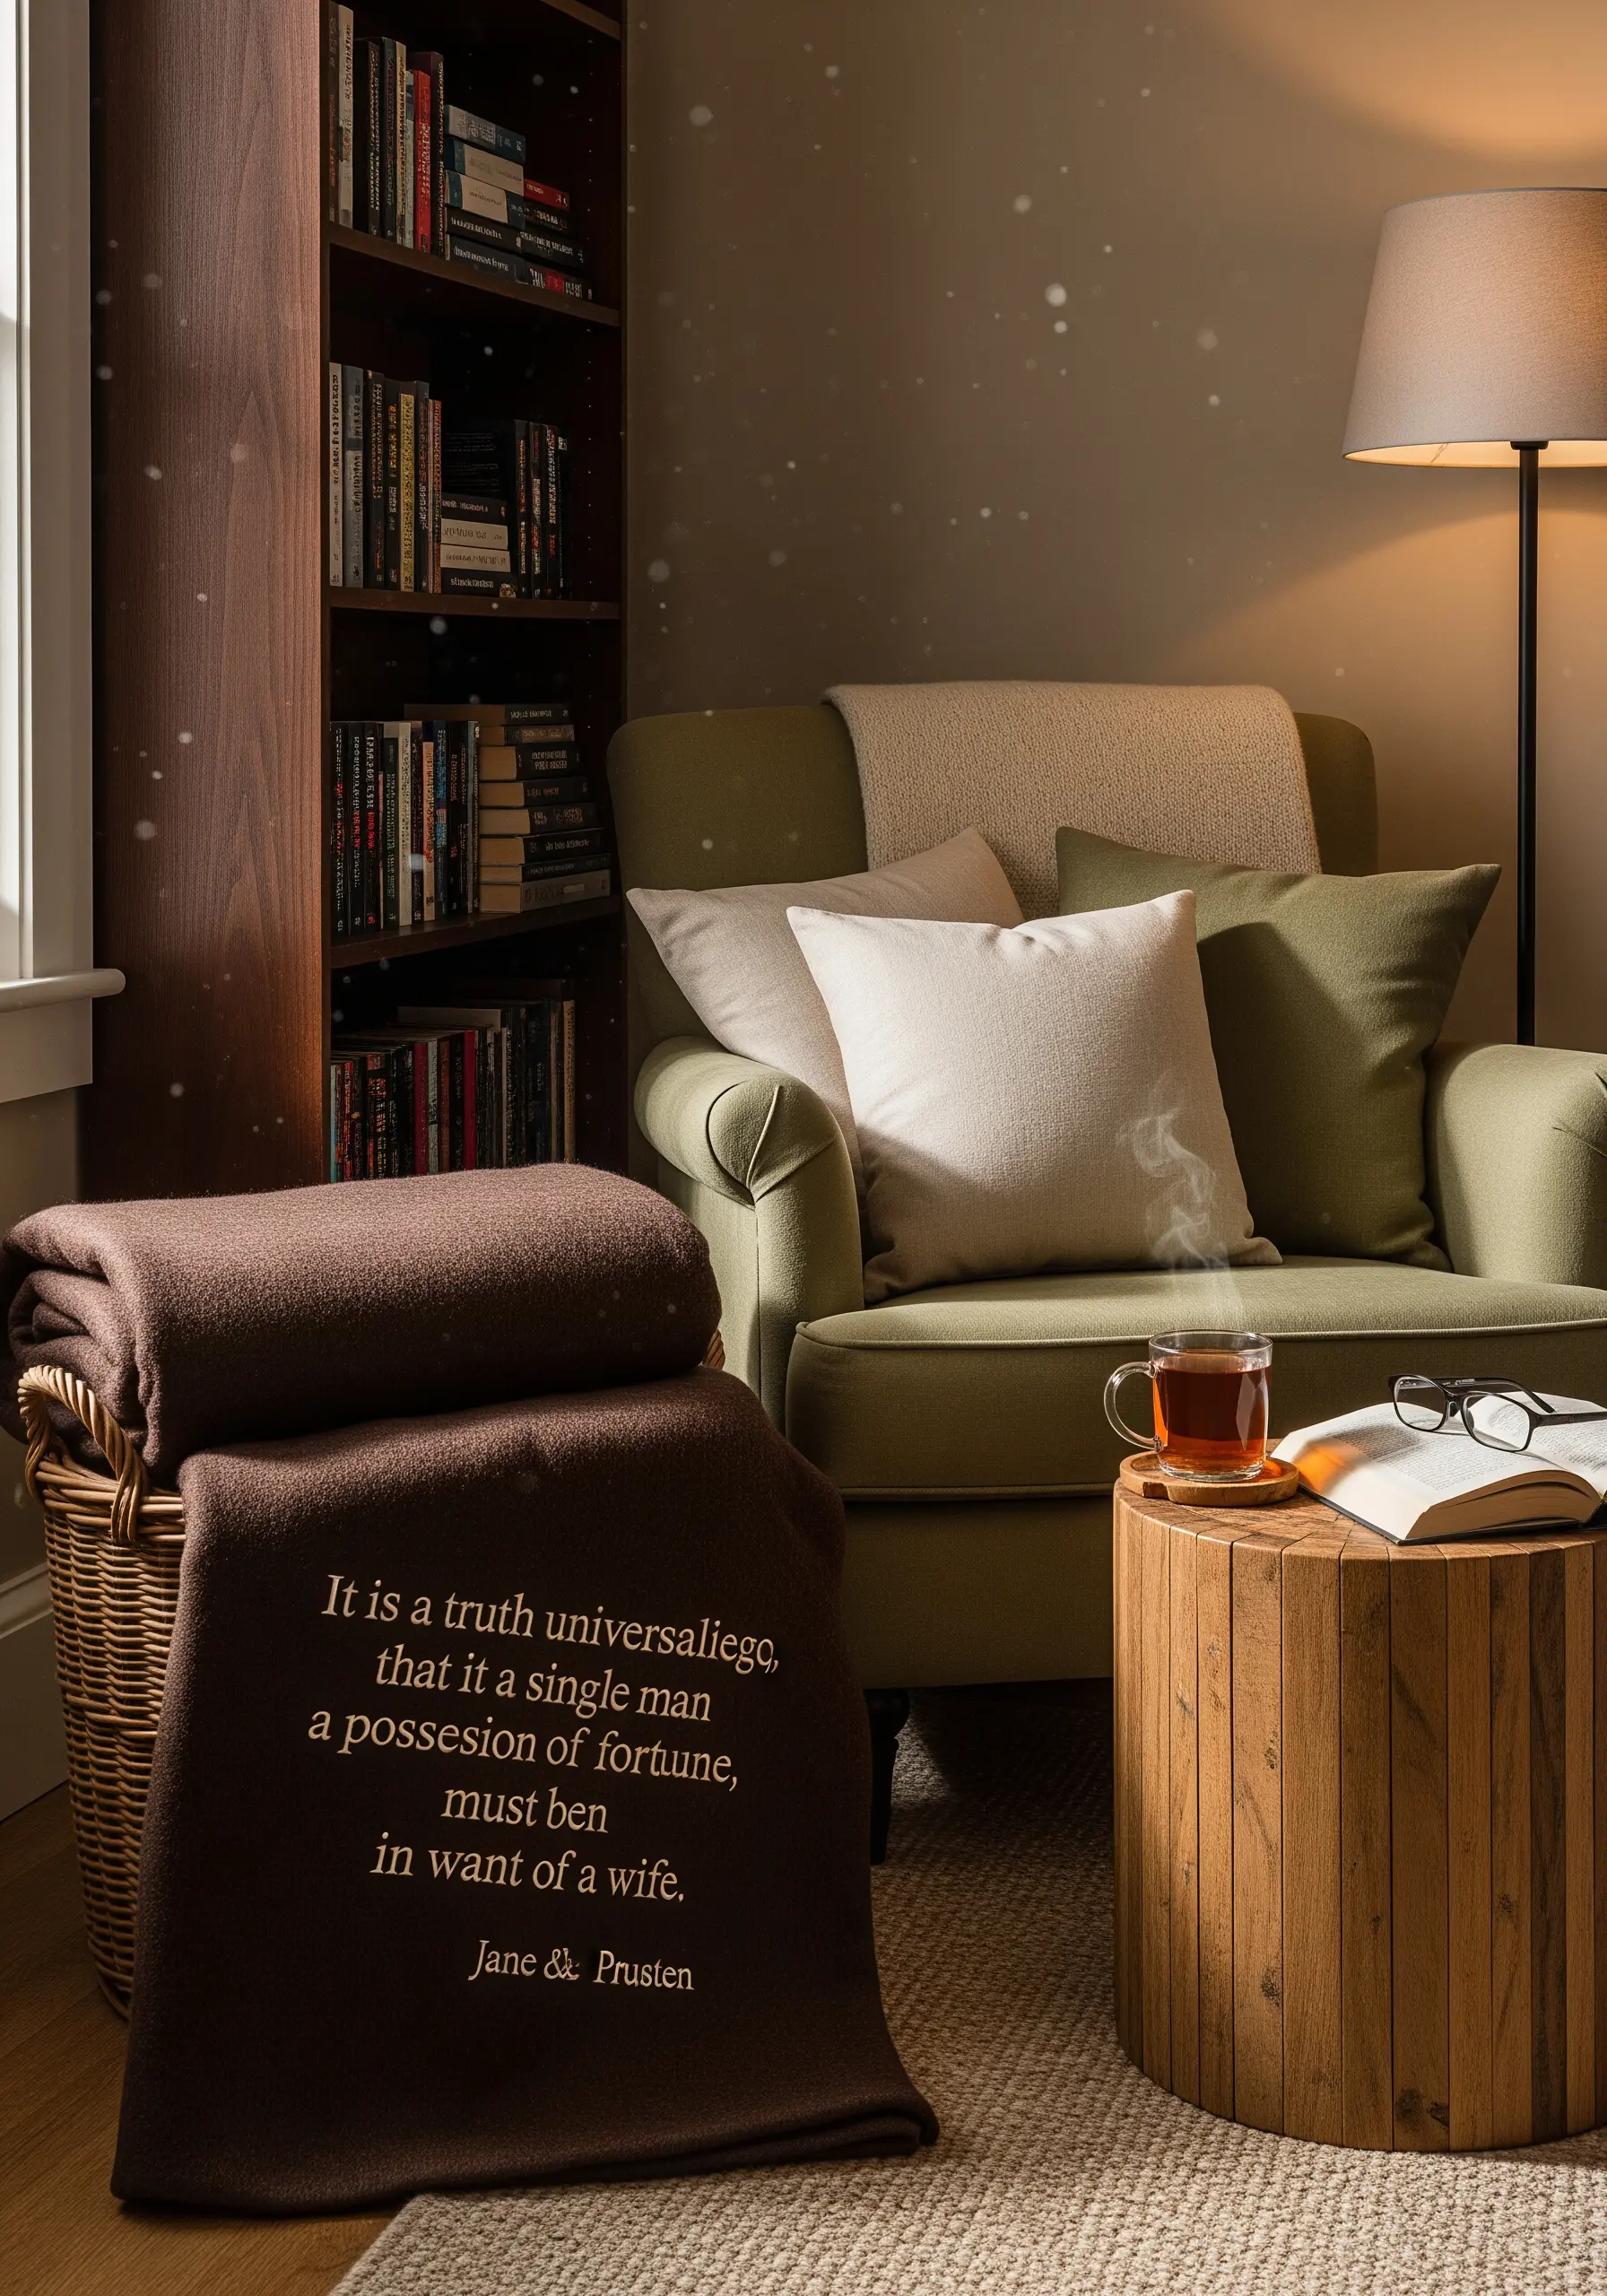
When embroidering text, clarity is paramount. Choose a simple, clean font and transfer it to your fabric using a water-soluble stabilizer for perfect letterforms.
Use a two-strand backstitch for a fine, crisp line that is ideal for serif or script fonts. For a bolder, sans-serif look, a stem stitch works beautifully.
Stitch slowly and focus on making each stitch the exact same length, especially around curves, to ensure the text is smooth and legible.
This technique transforms a simple wool blanket into a deeply personal keepsake or a thoughtful, literary gift.
27. Add Texture and History with Boro Stitching

Create a richly textured blanket from old denim using the Japanese techniques of Boro (patching) and Sashiko (stitching).
Layer patches of denim in varying shades and textures, then stitch them together with dense, decorative rows of running stitch in a high-contrast thread.
Vary the direction and pattern of your stitching in each patch—some can be straight lines, others concentric squares or intersecting grids.
This is more than just mending; it’s a way of telling a story through fabric, where every stitch adds strength, character, and history to the final piece.
28. Create Playful Shapes with Raised Chain Stitch
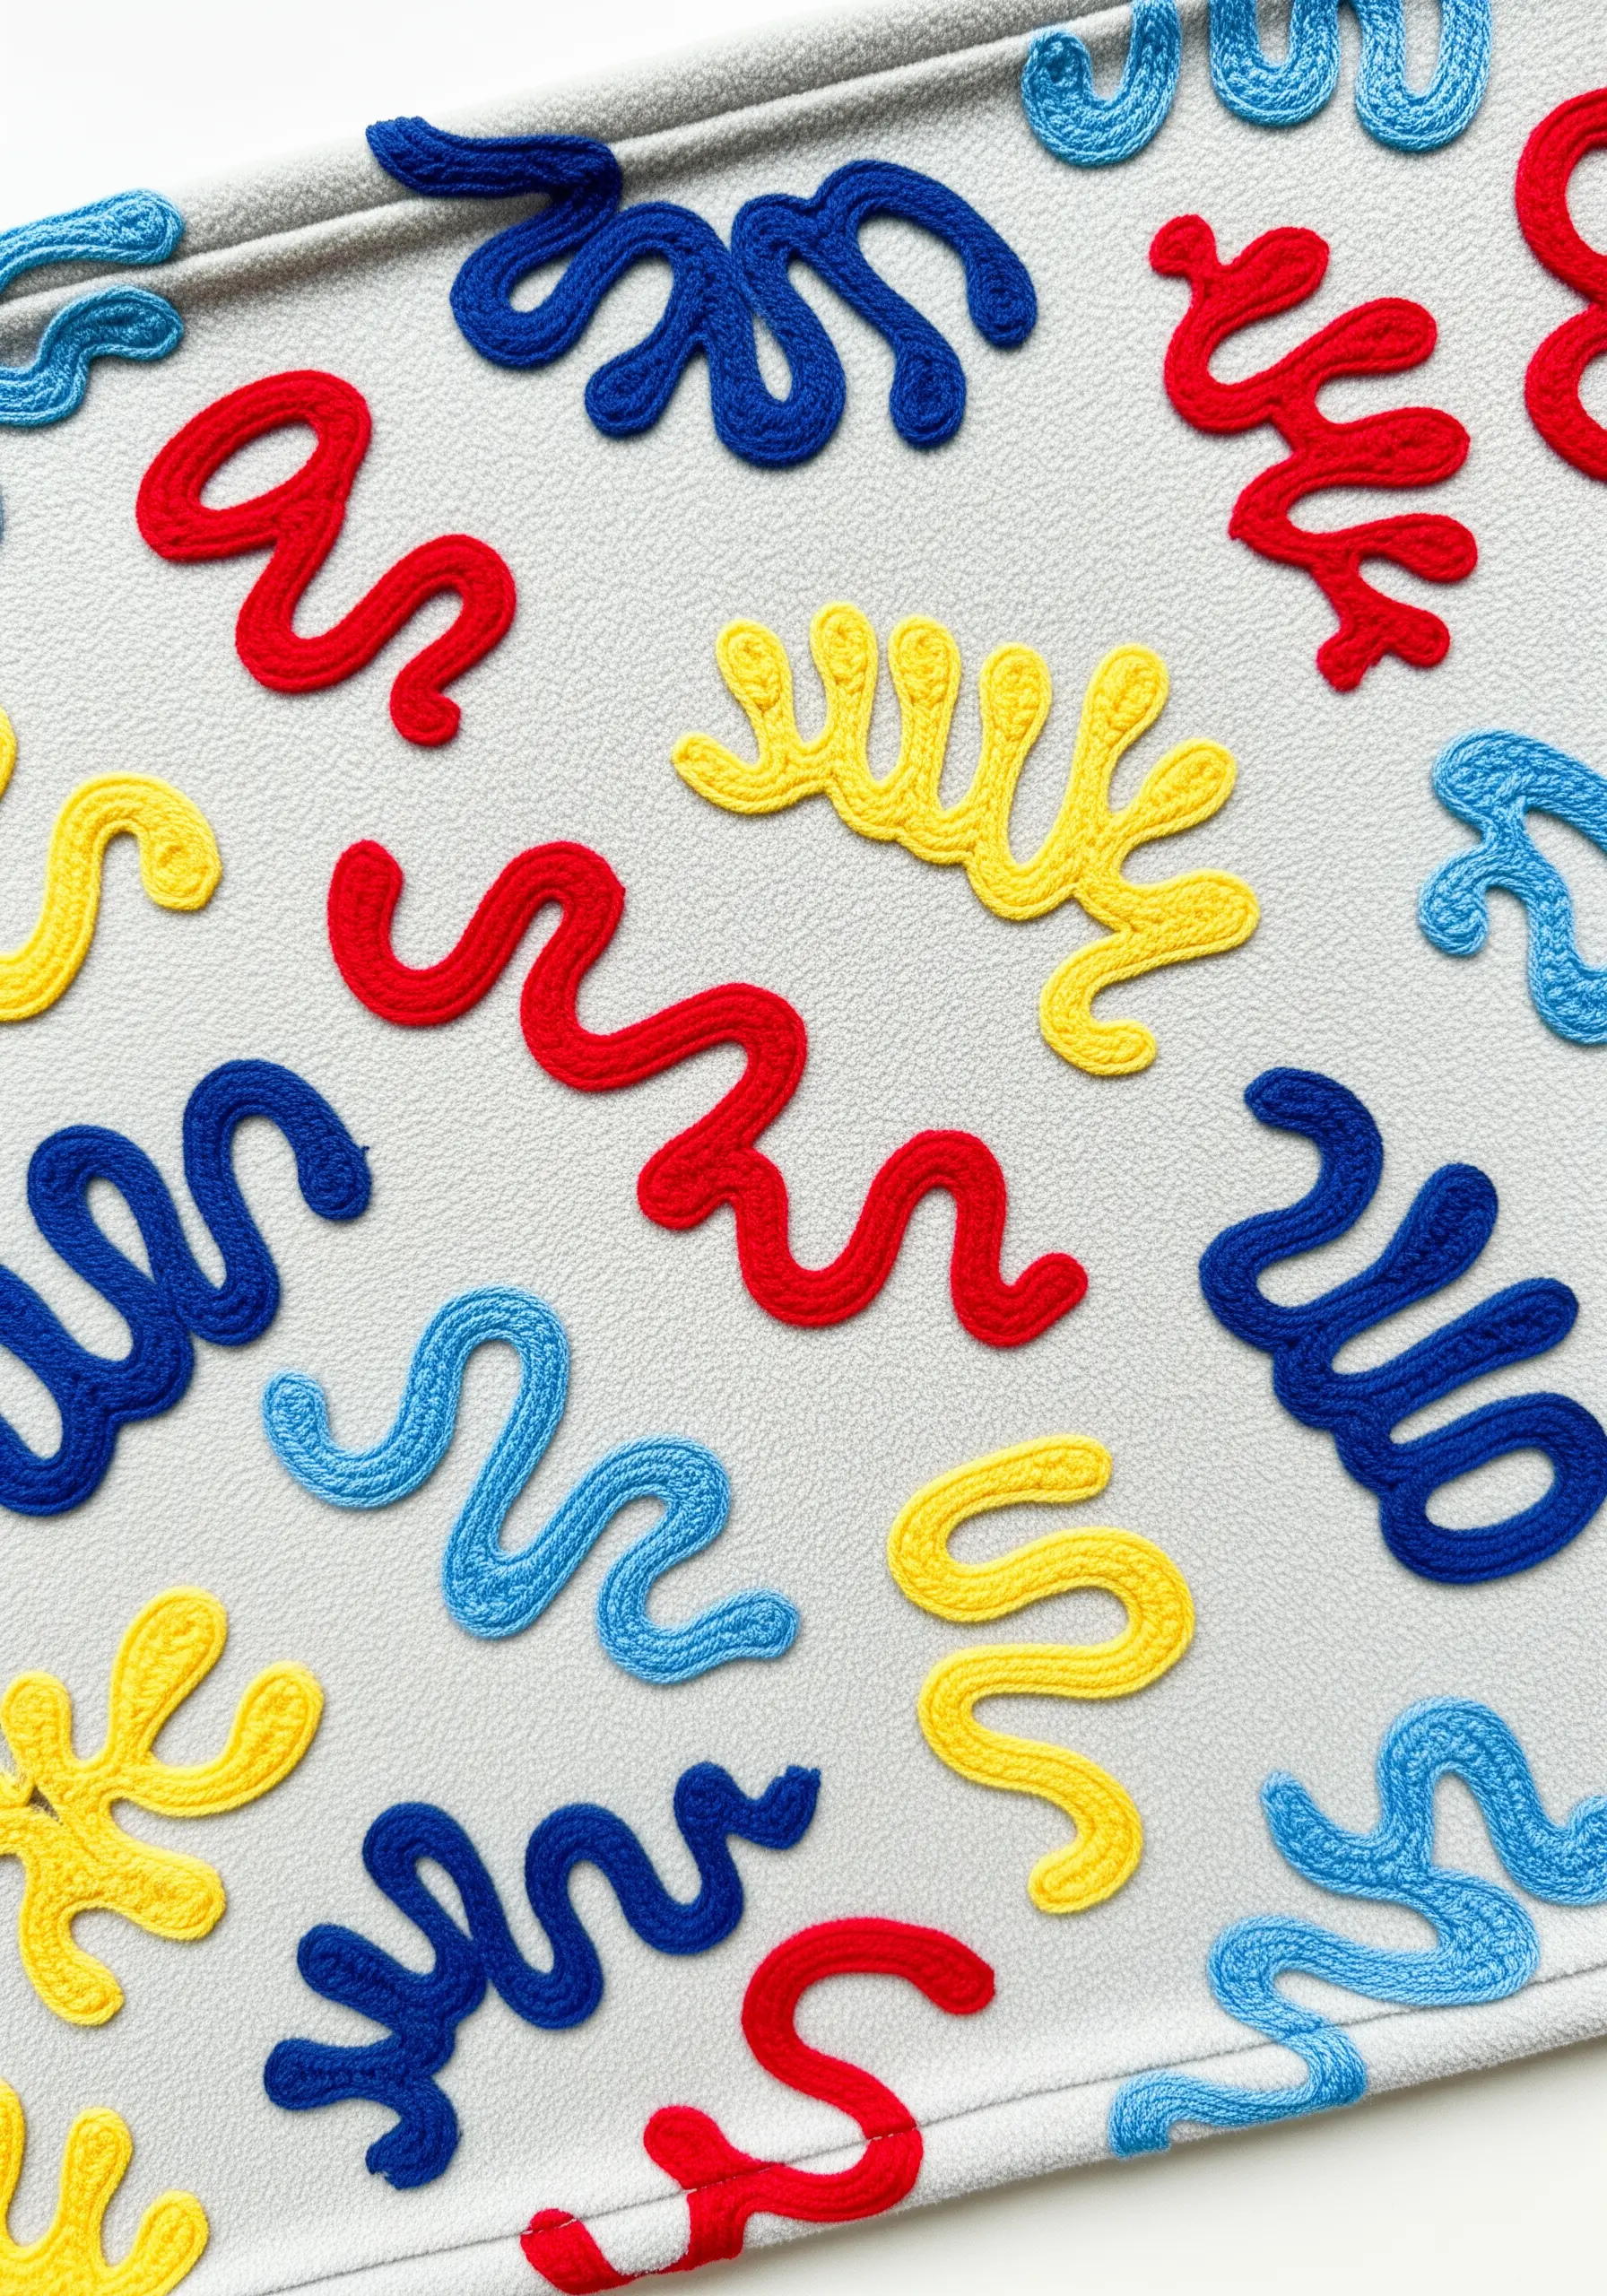
For a bold, graphic, and highly tactile effect, use a raised chain stitch to create these abstract, worm-like shapes.
This stitch, also known as a detached chain stitch ridge, creates a three-dimensional, corded line that sits on top of the fabric.
Use a thick, vibrant thread like perle cotton or tapestry wool to maximize the texture and make the primary colors pop against the neutral background.
This is a perfect technique for cartoon-style embroidery ideas, as it’s durable, fun to touch, and visually striking.
29. Frame Your Throw with a Glimmering Paisley Border
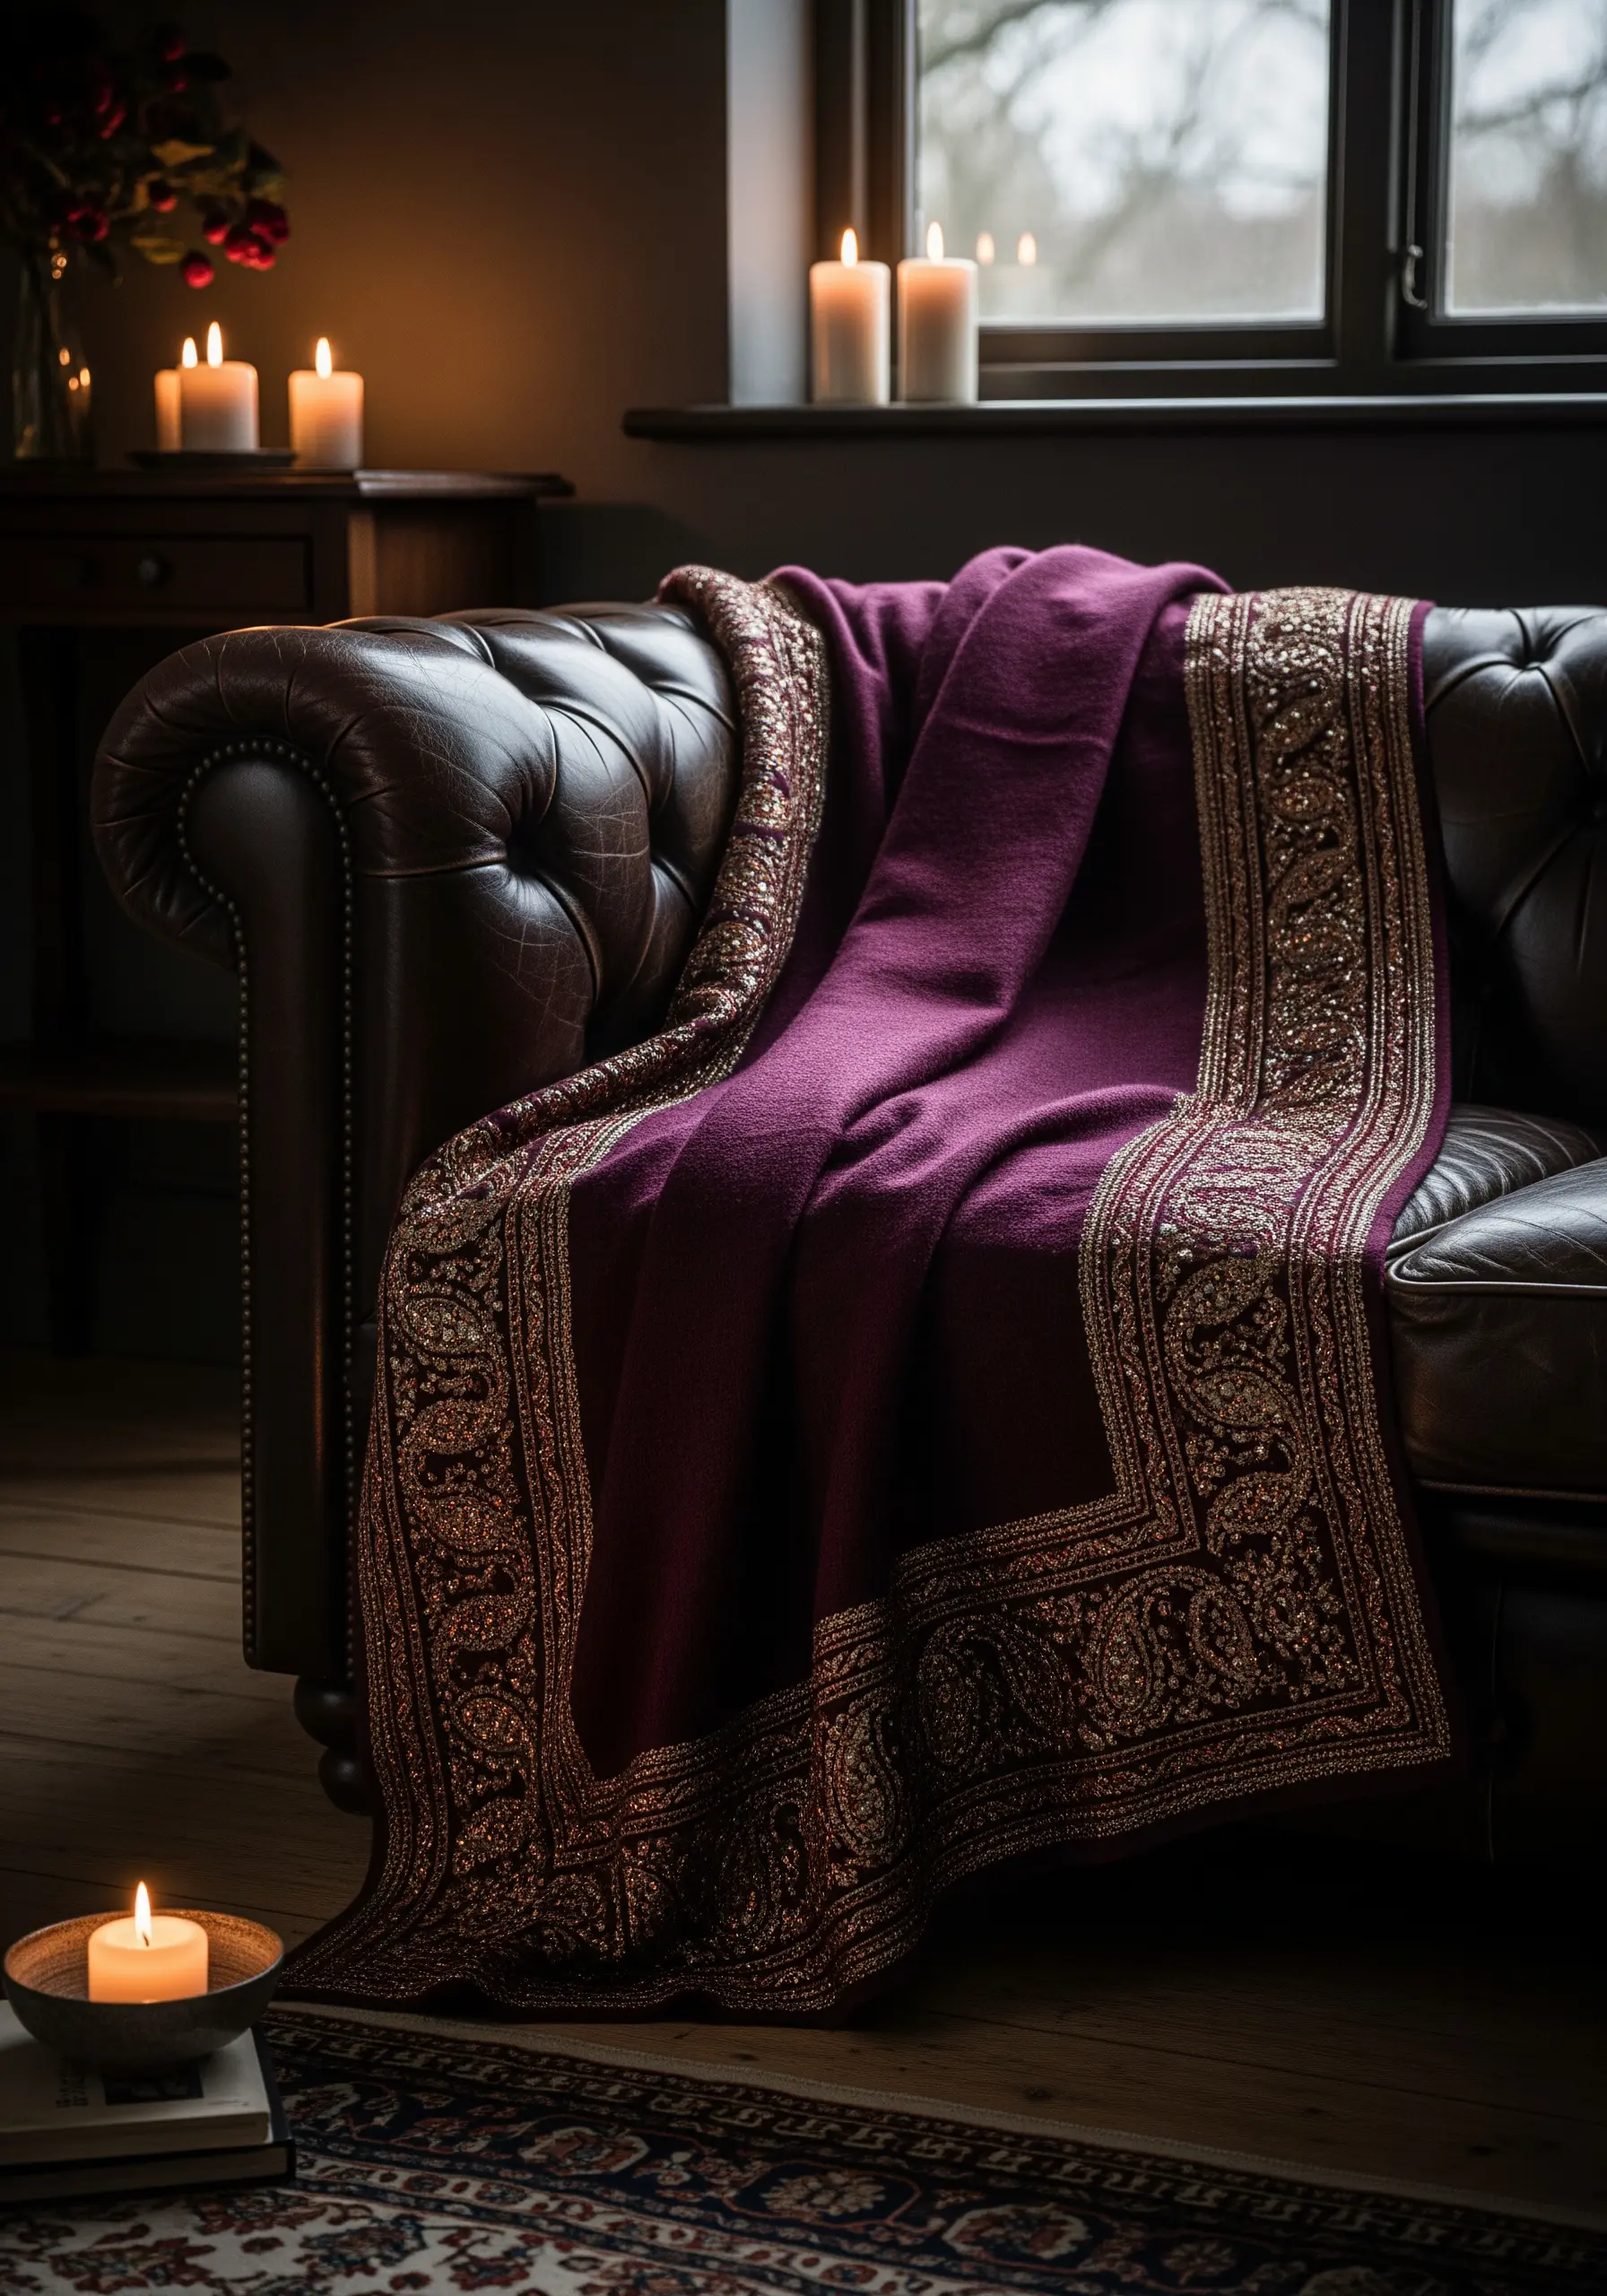
Add a touch of opulent, old-world charm to a wool throw with a wide, glittering paisley border.
Use a fine metallic thread, such as a gold or copper-colored filament, couched onto the surface to create the intricate outlines of the paisley motifs.
Fill in small areas with seed stitches or short satin stitches to add texture and density to the design without overwhelming the delicate linework.
This approach gives the impression of a heavy, woven trim while keeping the blanket soft and flexible.
30. Make a Statement with a Single, Large-Scale Motif
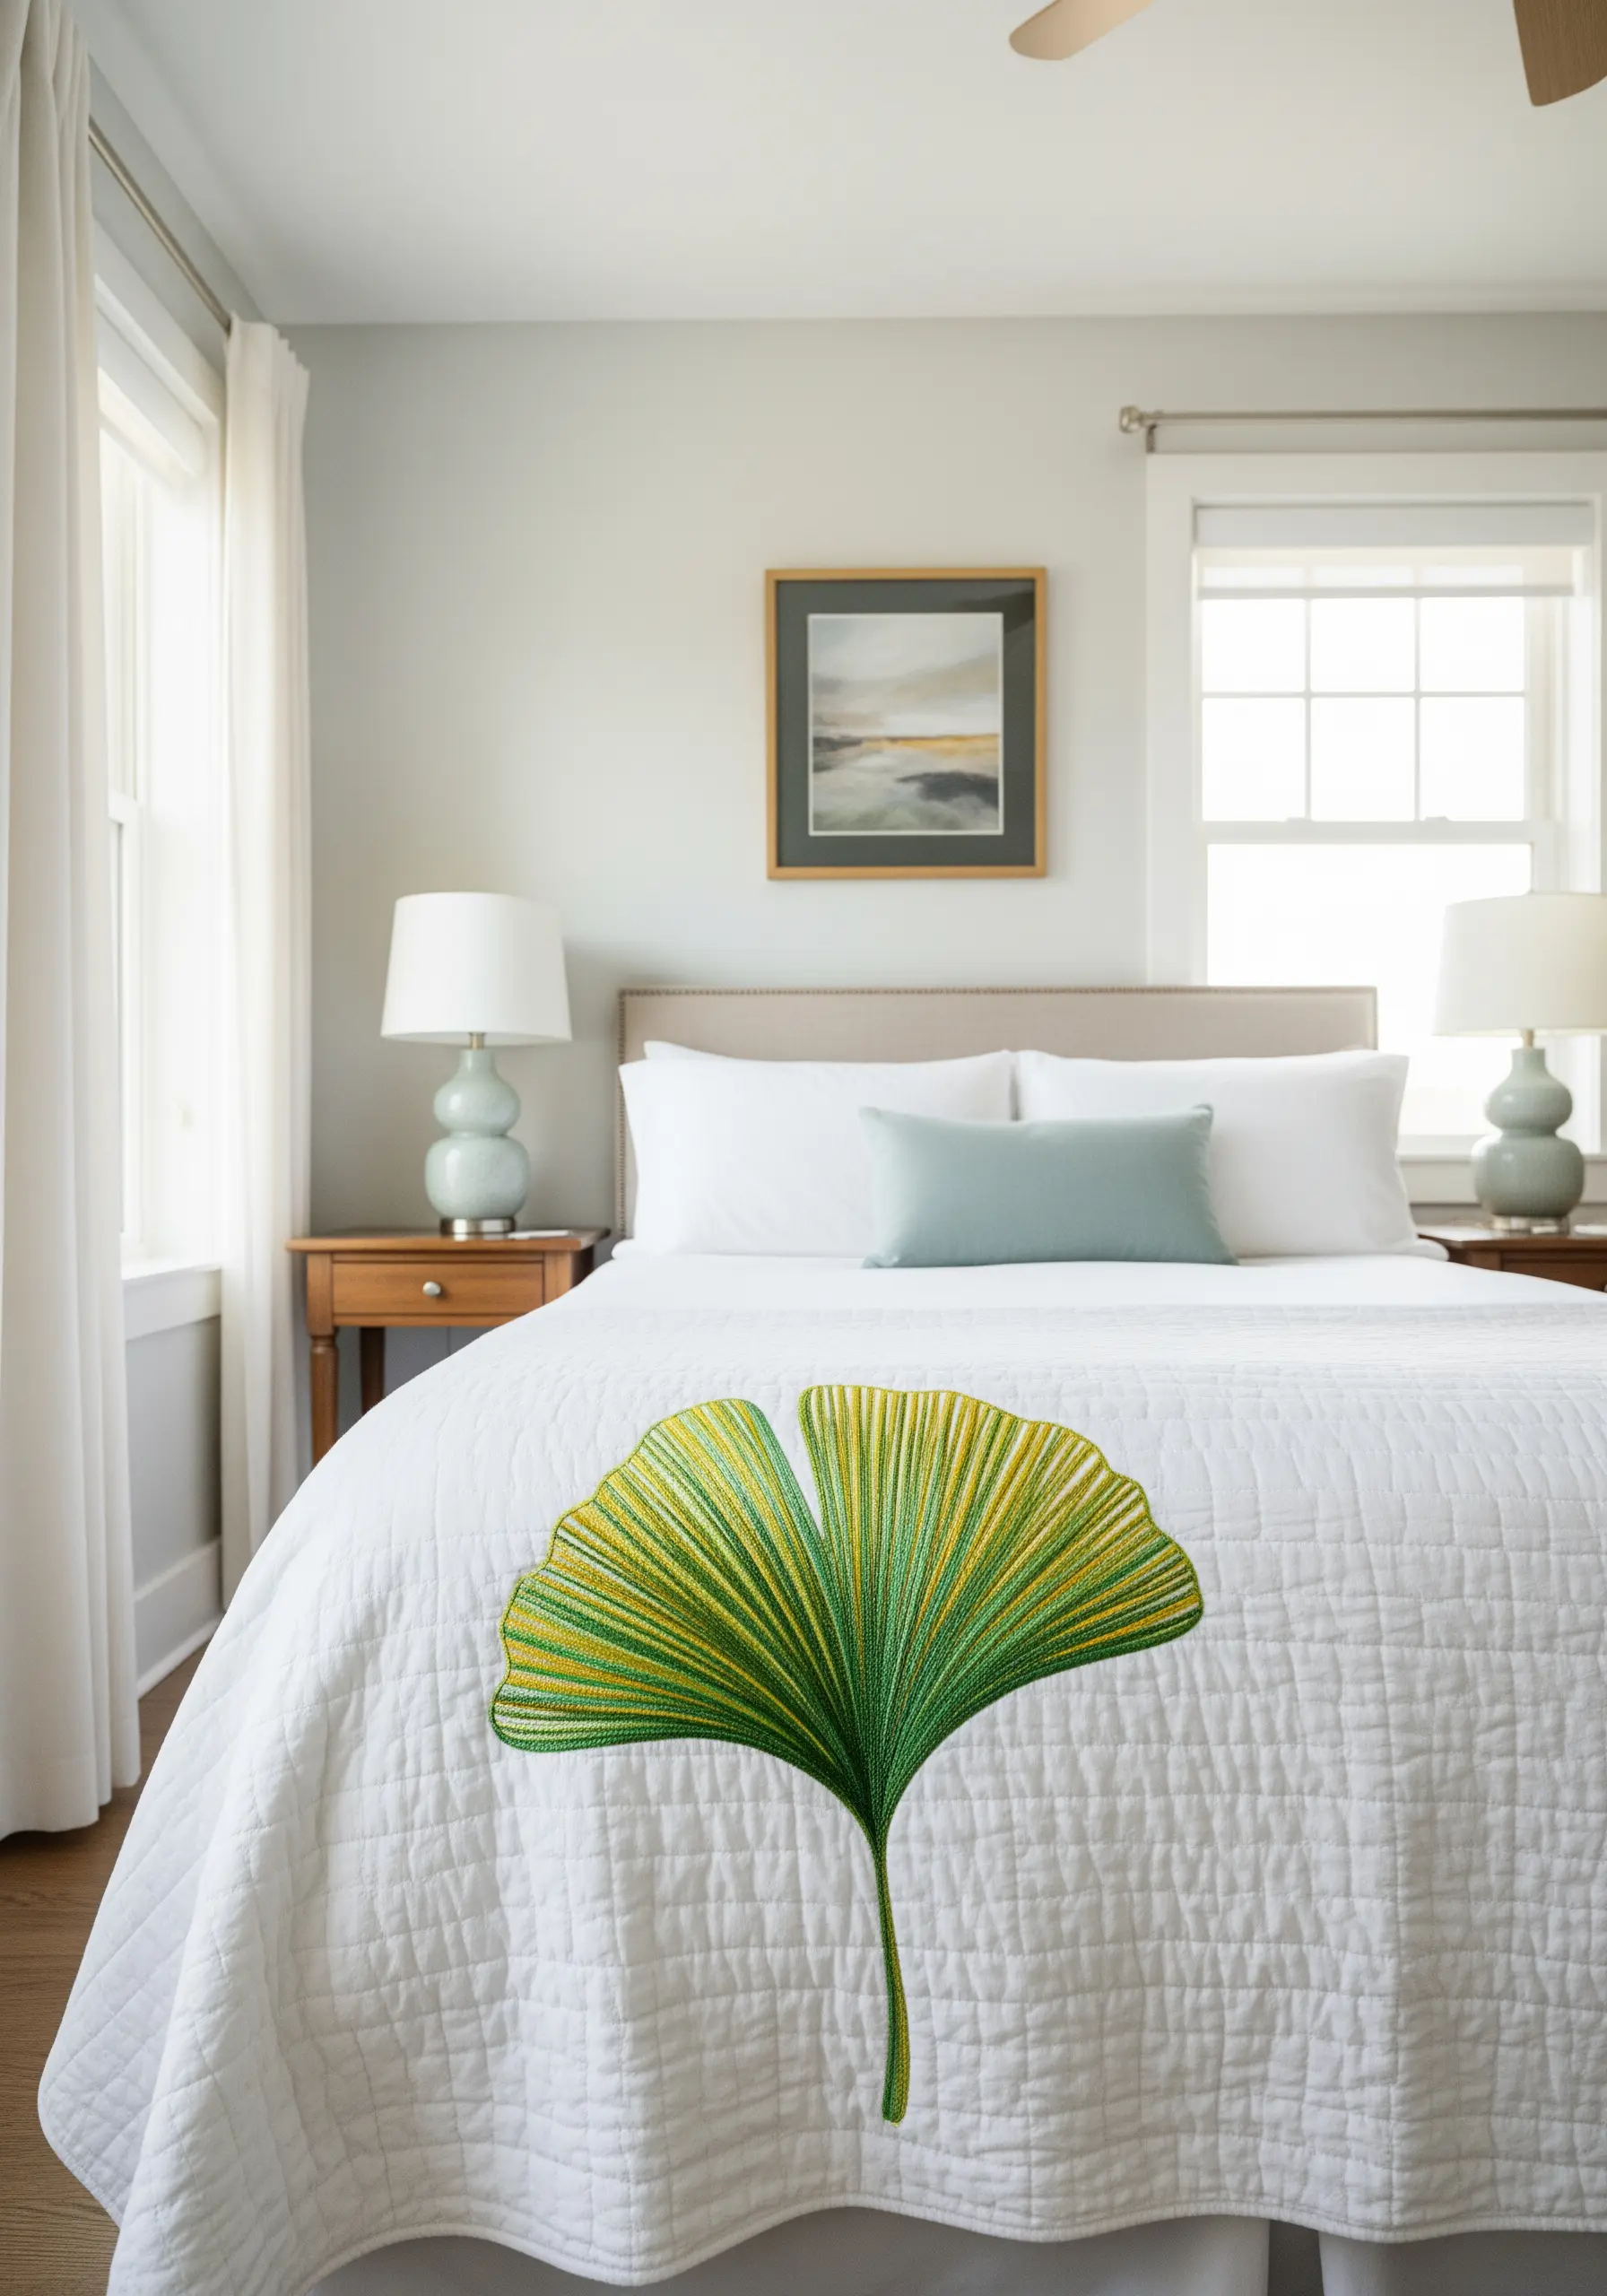
Transform a simple quilted bedspread by centering a single, oversized botanical motif on it.
The ginkgo leaf’s radiating lines are perfect for long and short stitch, allowing you to create a smooth, seamless color gradient from lime green to golden yellow.
Work in sections, following the direction of the leaf’s veins to give the design a natural sense of form and movement.
By keeping the rest of the blanket unadorned, this large-scale embroidery becomes a dramatic, artistic focal point for the entire room.


